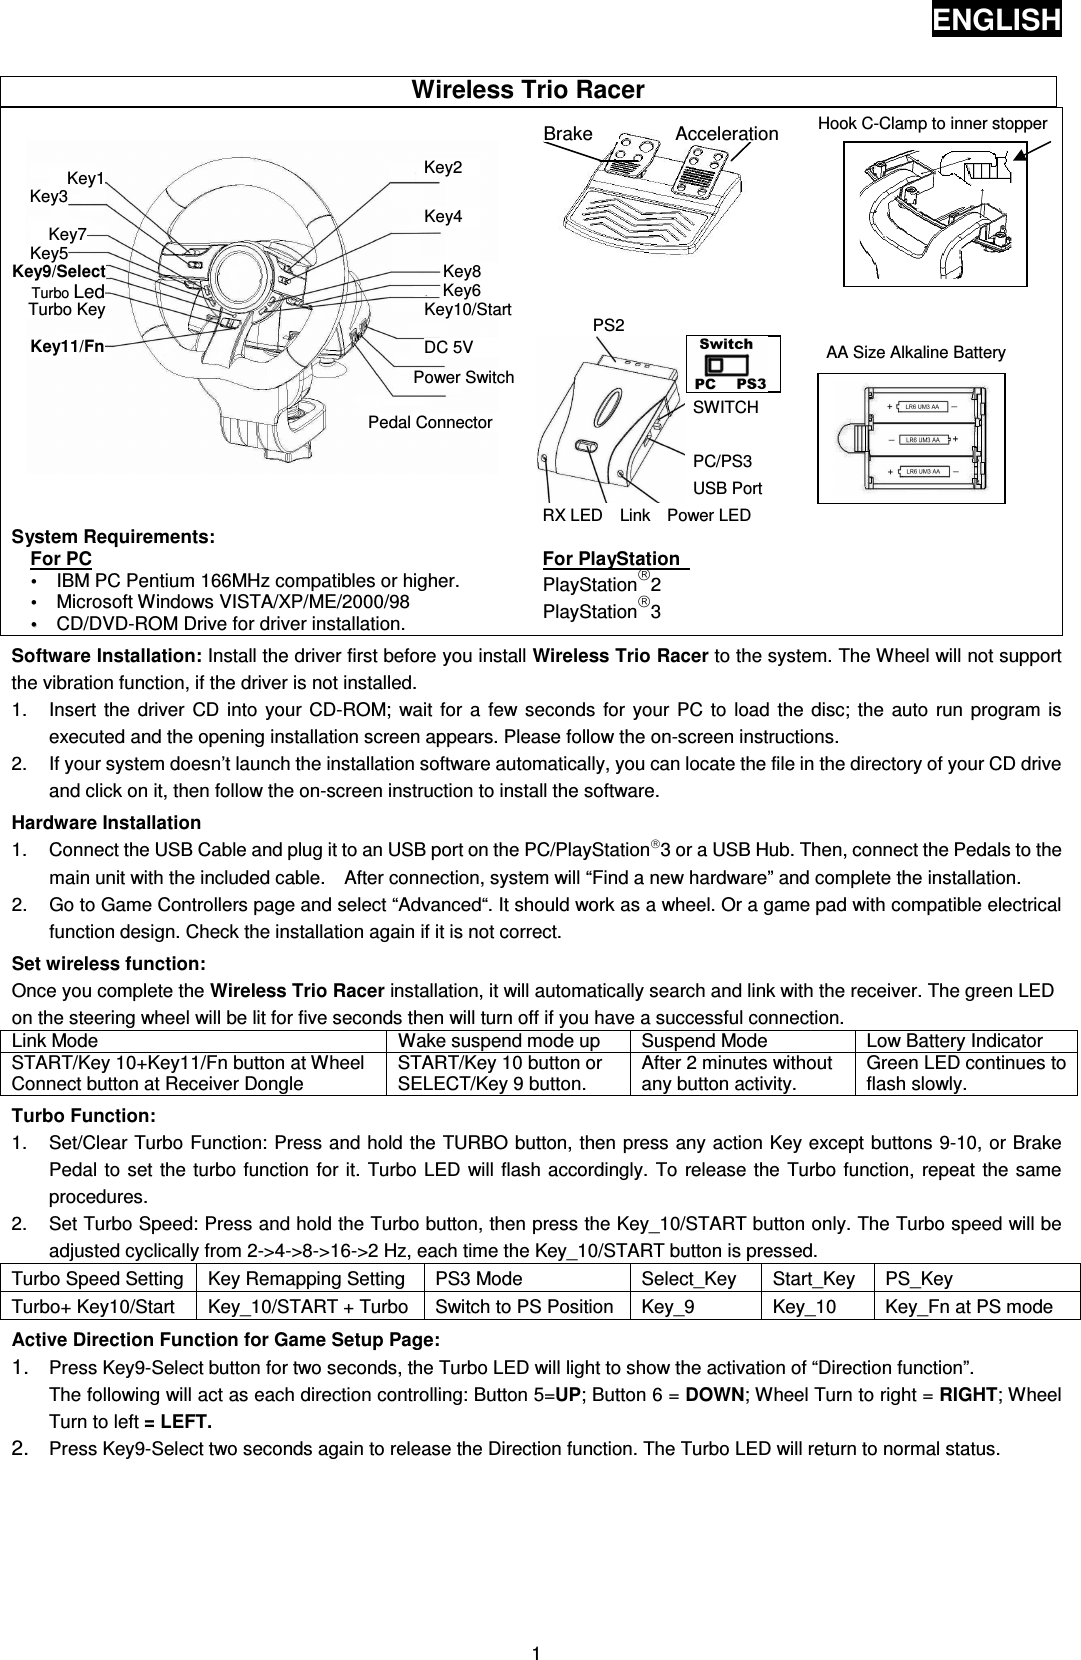
KYE SYSTEMS GG000J Wireless Trio Racer/Receiver User Manual INDEX

KYE Systems Corp Wireless Trio Racer/Receiver INDEX

UserMan

ENGLISH 1                                                                   Hook C-Clamp to inner stopper                                            PS2                                                                                       AA Size Alkaline Battery                                                           SWITCH                                                                     PC/PS3                                         USB Port RX LED    Link    Power LED System Requirements: For PC  IBM PC Pentium 166MHz compatibles or higher.  Microsoft Windows VISTA/XP/ME/2000/98   CD/DVD-ROM Drive for driver installation.   For PlayStation   PlayStation2 PlayStation3 Software Installation: Install the driver first before you install Wireless Trio Racer to the system. The Wheel will not support the vibration function, if the driver is not installed. 1.  Insert  the driver CD into your CD-ROM; wait  for a few  seconds  for your PC  to load the  disc; the  auto run program  is executed and the opening installation screen appears. Please follow the on-screen instructions. 2.  If your system doesn’t launch the installation software automatically, you can locate the file in the directory of your CD drive and click on it, then follow the on-screen instruction to install the software. Hardware Installation 1.  Connect the USB Cable and plug it to an USB port on the PC/PlayStation3 or a USB Hub. Then, connect the Pedals to the main unit with the included cable.    After connection, system will “Find a new hardware” and complete the installation. 2.  Go to Game Controllers page and select “Advanced“. It should work as a wheel. Or a game pad with compatible electrical function design. Check the installation again if it is not correct.   Set wireless function: Once you complete the Wireless Trio Racer installation, it will automatically search and link with the receiver. The green LED on the steering wheel will be lit for five seconds then will turn off if you have a successful connection. Link Mode  Wake suspend mode up  Suspend Mode  Low Battery Indicator START/Key 10+Key11/Fn button at Wheel Connect button at Receiver Dongle    START/Key 10 button or SELECT/Key 9 button.  After 2 minutes without any button activity.  Green LED continues to flash slowly. Turbo Function: 1.  Set/Clear Turbo Function: Press and hold the TURBO button, then press any action Key except buttons 9-10, or Brake Pedal to set the turbo function for it. Turbo LED will flash accordingly. To release the Turbo function, repeat the same procedures.   2.  Set Turbo Speed: Press and hold the Turbo button, then press the Key_10/START button only. The Turbo speed will be adjusted cyclically from 2->4->8->16->2 Hz, each time the Key_10/START button is pressed. Turbo Speed Setting  Key Remapping Setting PS3 Mode  Select_Key  Start_Key PS_Key Turbo+ Key10/Start  Key_10/START + Turbo Switch to PS Position  Key_9  Key_10  Key_Fn at PS mode Active Direction Function for Game Setup Page: 1.  Press Key9-Select button for two seconds, the Turbo LED will light to show the activation of “Direction function”.   The following will act as each direction controlling: Button 5=UP; Button 6 = DOWN; Wheel Turn to right = RIGHT; Wheel Turn to left = LEFT.   2.  Press Key9-Select two seconds again to release the Direction function. The Turbo LED will return to normal status. Wireless Trio Racer   Brake Acceleration  Key1 Key3 Key10/Start Key8 Power Switch Key7 Key4 Key2 Key5 Key9/Select Turbo Led Pedal Connector Turbo Key  Key6  Key11/Fn DC 5V
 FEDERAL COMMUNICATIONS COMMISSION INTERFERENCE STATEMENT This equipment has been tested and found to comply with the limits for a Class B digital device, pursuant to Part 15 of the FCC Rules. These limits are designed to provide reasonable protection against harmful interference in a residential installation. This equipment generates, uses and can radiate radio frequency energy and, if not installed and used in accordance with the instructions, may cause harmful interference to radio communications. However, there is no guarantee that interference will not occur in a particular installation. If this equipment does cause harmful interference to radio or television reception, which can be determined by turning the equipment off and on, the user is encouraged to try to correct the interference by one or more of the following measures: –  Reorient or relocate the receiving antenna. –  Increase the separation between the equipment and receiver. –  Connect the equipment into an outlet on a circuit different from that to which the receiver is connected. –  Consult the dealer or an experienced radio/TV technician for help. CAUTION: Any changes or modifications not expressly approved by the party responsible for compliance could void the user's authority to operate the equipment.  This device complies with Part 15 of the FCC Rules. Operation is subject to the following two conditions: (1) This device may not cause harmful interference and (2) This device must accept any interference received, including interference that may cause undesired operation.   RF exposure warning    This equipment must be installed and operated in accordance with provided instructions and the antenna(s) used for this transmitter must be installed  to provide a separation distance of at least 20 cm from all persons  and must not be co-located or operating in conjunction with any  other antenna or transmitter. End-users and installers must be provide  with antenna installation instructions and transmitter operating conditions  for satisfying RF exposure compliance.

Navigation menu