KYE SYSTEMS GMZJY WIRELESS MOUSE TRAVELER 9005BT(GM-110036/T) User Manual 04
KYE Systems Corp WIRELESS MOUSE TRAVELER 9005BT(GM-110036/T) 04
Users Manual
English
1
Introduction
Traveler 9005BT is designed for a PC or notebook enabled with a
Bluetooth device. It provides a convenient feature to attach your
mouse when taking your notebook to office meetings.
Hardware Installation
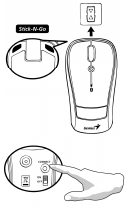
1. Install two AA batteries in the mouse.
2. Stick-N-Go: attach the ‘Click Mount’ on
your notebook in a convenient position
first, then you can attach the mouse on
your notebook as shown to avoid
dropping your mouse.
3. Make sure that you have switched on
the power switch underneath the mouse.
Software Installation
1. Make sure the mouse is connected to the computer.
2. Put the CD driver into the CD drive.
3. Choose and double click ‘Mouse Driver’ and follow the
instructions to complete the 4D/8D installation.
English
2
Factory Settings
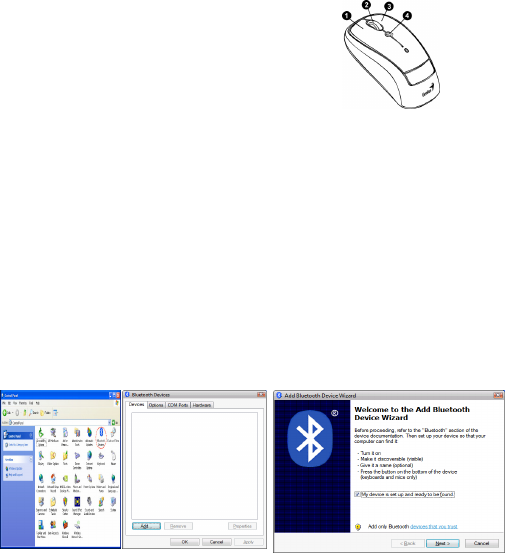
1. Left Button: Provides traditional mouse functions like click,
double click and drag.
2. Magic-Roller: Press the
“Magic-Roller” to surf the Internet and
Windows documents.
3. Right Button: Provides traditional
mouse click functions.
4. Flying Scroll: Press and hold on to the button and move the
mouse for multi-direction browsing. It provides more fun and
convenience to office users in scrolling up, down, left, right or
diagonally.
Pairing Process in Vista and Windows XP SP2
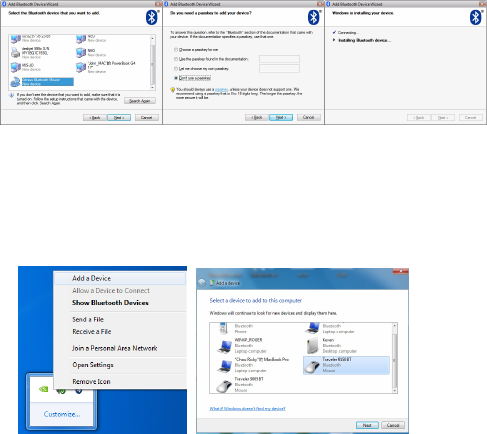
1. Open the Windows control panel, then select “Bluetooth
devices”.
2. Click “Add…..”
3. Select “My device is setup and ready to be found”, then click
“Next”.
English
3
4. Press and hold the “CONNECT” button under the mouse.
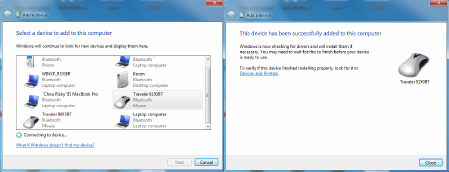
5. In “Peripherals (Keyboards, mice, joysticks)”, select Genius
Bluetooth Mouse and click “Next”.
6. Select “Don’t use a passkey” and click “Next”.
7. Windows will start to connect the Genius Bluetooth Mouse
automatically. Press the finish button after the connection
process is completed.
Pairing Process in Windows 7
1. Mouse over the Bluetooth device icon and click right button of
mouse to open function list, then select “Add a Device”.
2. Press and hold the “CONNECT” button under the mouse.
3. Select Genius Bluetooth Mouse, then click “Next”.
English
4
4. Windows will start to connect the Genius Bluetooth Mouse
automatically. Press the close button after the connection process
is completed.
Once the connection between the Genius Bluetooth Mouse and your
computer is established, the connection will be kept permanently. That
means the connection will re-establish automatically each time you
run Windows.
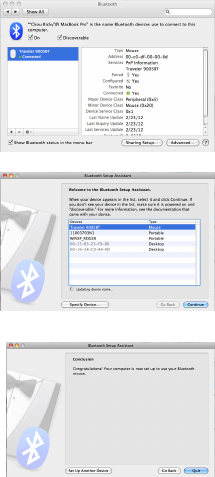
Pairing Process in Mac OS X 10.2.8 or later
1. Press and hold the “CONNECT” button under the mouse.
2. Click the Bluetooth icon on the task bar and select “Setup
Bluetooth device”.
3. Click “Continue” when the “Bluetooth Setup Assistant” appears.
4. Choose “Mouse” and press “Continue” to the next step.
5. When Bluetooth finds the “Genius Bluetooth Mouse”, press
“Continue” to the next step.
English
5
6. Click “Continue” when the “Passkey exchange with your
mouse” appears.
7. The connection is now successful and you can use your Genius
Bluetooth Mouse.
Pairing Process in Mac OS X 10.5 or later
1. Click the Bluetooth icon
on the task bar and click
plus sign to “Setup new
device”.
2. Press and hold the
“CONNECT” button
under the mouse.
3. When Bluetooth finds
the “Genius Bluetooth
Mouse”, press
“Continue” to the next
step.
4. When Mac connects the
Genius Bluetooth Mouse
completely, press “Quit”
and back to Bluetooth
setup screen.
English
6
5. The connection is now successful and you can use your Genius
Bluetooth Mouse.
Now you can use the Genius Bluetooth Mouse wirelessly with a
Bluetooth enabled Apple computer. Afterwards, the connection of the
Genius Bluetooth mouse will re-establish automatically each time
Mac OS X runs.
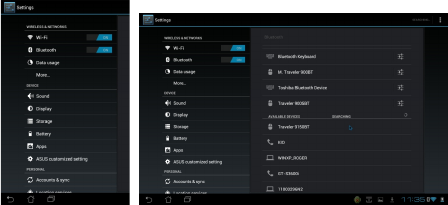
Pairing Process in Android 3.0 or later
1. Select the Bluetooth device icon.
2. Press and hold the “CONNECT” button under the mouse.
3. Android will start to connect the Genius Bluetooth Mouse
automatically. Type PIN “0000” for the Genius Bluetooth
Mouse to complete connection process.

English
7
4. The connection is now successful and you can use your Genius
Bluetooth Mouse.
Remark:
If not in use for a while, the Bluetooth Mouse will go into sleep
mode. Move or click any button on the Bluetooth Mouse to wake
it up, it takes less than three seconds for it to work again.
If not in use for 30 minutes or longer, the Bluetooth Mouse will
disconnect from your computer. Move or click any button on the
Bluetooth Mouse for reconnection, it takes about six seconds for
the mouse to start working normally.

English
8
FCC Compliance and Advisory Statement
This device complies with Part 15 of the FCC rules. Operation is subject to the
following two conditions:(1) this device may not cause harmful interference, and (2)
this device must accept any interference received, including interference that may
cause undesired operation.
This equipment has been tested and found to comply with the limits for a Class B
digital device, according to Part 15 of the FCC rules. These limits are designed to
provide reasonable protection against harmful interference in a residential installation.
This equipment generates, uses and can radiate radio frequency energy and if not
installed and used in accordance with the instructions, may cause harmful
interference to radio communications. However, there is no guarantee that
interference will not occur in a particular installation. If this equipment does cause
harmful interference to radio or television reception, which can be determined by
turning the equipment off and on, the user is encouraged to try correct the interference
by one or more of the following measures:
1.Reorient the receiving antenna.
2.Increase the separation between the equipment and receiver.
3.Connect the equipment into and outlet on a circuit different from that to which the
receiver is connected.
4.Consult the dealer or an experienced radio/TV technician for help.
Any special accessories needed for compliance must be specified in the instruction
manual.
Warning: A shielded-type power cord is required in order to meet FCC emission limits
and also to prevent interference to the nearby radio and television reception. It is
essential that only the supplied power cord be used. Use only shielded cables to
connect I/O devices to this equipment.
CAUSION: Any changes or modifications not expressly approved by the party
responsible for compliance could void your authority to operate the equipment.
IC statementThis Class B digital apparatus complies with Canadian ICES-003.Cet
appareil numérique de la classe B est conforme à la norme NMB-003 du Canada.
FCC ID: FSUGMZJY