KYOCERA Document Solutions 2HN0120 Laser Printer with RFID User Manual FS C5300DN OG ENG
KYOCERA Document Solutions Inc. Laser Printer with RFID FS C5300DN OG ENG
UserManual.wiki
>
KYOCERA Document Solutions
>
2HN0120 User Manual
>
user manual part 2
Contents
1.
user manual part 1
2.
user manual part 2
user manual part 2
Navigation menu
Upload a User Manual
Namespaces
Wiki Guide
HTML
PDF
Info
Views
User Manual
Discussion / Help
Navigation

![Maintenance 3-3• Installation GuideUnderstanding Messages Requesting Toner Container ReplacementThe printer displays messages for individual colors at two stages of toner usage. This message is automatically alternated with the other printer message (such as Ready):• When the printer becomes low on toner, for example in the cyan container, the printer displays the message Toner low C,M,Y,K as the first caution. Note the replacement is not always necessary at this stage. • If you ignore the above message and continue printing, the printer displays the message Replace toner — just before the toner is used up. The toner container must be replaced immediately. Clean the separate charger wires, etc. After the cleaning is finished, however, the message does not automatically change to Ready. To restart printing, you must press [GO] and make the printer ready.In either case, replace the toner container, see Toner Container Replacement on page 3-2.Replacing the Toner ContainerThis section explains how to replace the toner containers. When replacing the toner container of any color, always replace the waste toner box at the same time. If this box is full, the printer may be damaged or contaminated by the waste toner that may spill over the box. To replace the toner container, first make sure of the color of the toner container requiring replacement. In this example, it is assumed that you are replacing the black toner container.1Open the face-down tray (top tray). Note Do not remove the toner container from the carton until you are ready to install it in the printer.Note During toner container replacement, temporarily put storage media and computer supplies (such as floppy disks) away from around the toner container. This is to avoid damaging media by the magnetism of toner.Important You do not have to turn printer power off before starting the replacement. Any data that may be under printing process in the printer will be deleted if you turn printer power off.Face-down tray (top tray)](https://usermanual.wiki/KYOCERA-Document-Solutions/2HN0120.user-manual-part-2/User-Guide-894471-Page-8.png)
![4-4 Troubleshooting Dropouts, horizontal streaks, stray dots Clean the main charger units.For details see the LSU/Charger section in the Advanced Operation Guide.Black or white vertical streaks Check the operation panel for toner.If the Toner low C,M,Y,K message is displayed with color description, install a new toner kit for the color. To replace the toner container, see Toner Container Replacement on page 3-2.Clean the main charger units.For details see the LSU/Charger section in the Advanced Operation Guide.Refresh drum.Perform the following procedures on the operation panel and try cleaning the drum surface using the printer's built-in cleaning system.1Press [MENU].2Press U or V repeatedly until Adjust/Maintenance > appears.3Press Z. Press U or V repeatedly until >Service > appears.4Press Z. Press U or V repeatedly until >>Drum appears.5Press [OK] ([ENTER]) twice.6The message display shows Please wait. After approx. 3 minutes, the display returns to Ready.Faint or blurred printing Clean the main charger units.For details see the LSU/Charger section in the Advanced Operation Guide.Make sure the paper type setting is correct the paper being used.Conduct color calibration either by switching the printer off then on or using the printer operation panel.Try adjusting the color control settings using the printer driver.Check the operation panel. If the Toner low C,M,Y,K message is displayed with color description, install a new toner kit for the color. To replace toner, see Toner Container Replacement on page 3-2.Printed Results Corrective ActionDirection of Paper Feed](https://usermanual.wiki/KYOCERA-Document-Solutions/2HN0120.user-manual-part-2/User-Guide-894471-Page-17.png)
![Troubleshooting 4-5Refresh drum.Perform the following procedures on the operation panel and try cleaning the drum surface using the printer's built-in cleaning system.1Press [MENU].2Press U or V repeatedly until Adjust/Maintenance > appears.3Press Z. Press U or V repeatedly until >Service > appears.4Press Z. Press U or V repeatedly until >>Drum appears.5Press [OK] ([ENTER]) twice.6The message display shows Please wait. After approx. 3 minutes, the display returns to Ready.Grey background Clean the main charger units.For details see the LSU/Charger section in the Advanced Operation Guide.Conduct color calibration either by switching the printer off then on or using the printer operation panel.Dirt on the top edge or back of the paper Check the paper chute and the ramp.Pull out the paper transfer unit and check for toner on the paper ramp. Clean the paper ramp using a soft, dry, lint-free cloth. For details, see Cleaning the Paper Transfer Unit on page 3-7.Clean the main charger units.For details see the LSU/Charger section in the Advanced Operation Guide.Printed Results Corrective Action](https://usermanual.wiki/KYOCERA-Document-Solutions/2HN0120.user-manual-part-2/User-Guide-894471-Page-18.png)
![4-6 Troubleshooting Error MessagesThe following table lists errors and maintenance messages that you can be dealt with by yourself. If Call service appears, turn off the printer, disconnect the power cord, and contact your service technician.Some errors cause the alarm to sound. To stop the alarm, press [CANCEL]. Message Corrective ActionAccount errorPress GOThis message is displayed when the Job Accounting function is enabled and an attempt to specify job accounting settings or to register or delete an account fails. To return the printer to the print-ready status, press [GO].Add paper MPTrayThe paper has run out in the paper source displayed. Supply paper according to the paper source displayed (paper cassettes, MP tray, or optional paper feeders).This message is displayed alternately with messages indicating the printer status, such as, Ready, Please wait, and Processing.Call service F ###:F### represents a controller error (#=0, 1, 2, ...). Call for service. The printer does not operate when this message is displayed. Call service ####:0123456#### represents a mechanical error (#=0, 1, 2, ...). Call for service. The printer does not operate when this message is displayed. The total number of pages printed is also indicated, e.g. 0123456.Canceling dataDisplayed when data is being canceled. Cassette #not loadedThe corresponding paper cassette is not installed. Install the cassette. The cassette number can be 1 (topmost) to 4 (bottom). Change envelopeswitch positionDisplayed when the paper type does not match the Envelope Switch setting. Check wastetoner boxThis message warns following two cases. Install the new waste toner box.The waste toner box is not installed. The waste toner box is full.Clean printerPress GOPlease clean the inside of the printer. See Cleaning the Printer on page 3-7.This message will be displayed when replacing the toner container after the message Replace toner C,M,Y,K is displayed. After cleaning the inside of the printer, press [GO] and the printer will be ready for printing.Closefront coverThe front cover of the printer is open. Close the front cover. Closeleft coverThe left cover of the printer is open. Close the left cover. Closetop coverThe top cover of the printer is open. Close the printer top cover. Duplex disabledPress GOYou attempted to print with a paper size and paper type that cannot be used for duplex printing. Press [GO] to print onto one-side of the paper only.](https://usermanual.wiki/KYOCERA-Document-Solutions/2HN0120.user-manual-part-2/User-Guide-894471-Page-19.png)
![Troubleshooting 4-7Enter AccountAn account code must be entered. This message is displayed if you try to print from the operation panel (e.g. printing a status page or using the Job Retention function) when the Job Accounting function is enabled. Enter the correct account code and then press [GO] to begin printing. For more information, see Job Accounting (Job Accounting selection/setting) in section 2 Using the Operator Panel in the Advanced Operation Guide.Envelope modeDisplayed when the Envelope Switch is set to envelope mode. Error.Power off. F###Turn the power switch off and then back on again. If this message still remains, turn the power switch off, and contact your service representative or authorized service center. Error.Power off. F000The printer controller and operation panel cannot exchange data. Turn the printer off and unplug it from the mains power supply. Then contact your service representative or authorized service center. See the back page of this manual for the relevant phone numbers.Exceeded Max.outPress GOThis message is displayed when the Job Accounting function is enabled and an attempt has been made to exceed the print limit set for each account. To return the printer to the print-ready status, press [GO]. For more information, see Job Accounting (Job Accounting selection/setting) section of the Advanced Operation Guide.File not found Press GOThe specified file was not found on the hard disk, RAM disk or memory card. For more information on the hard disk, RAM disk and memory cards, see Device Common (Selecting/Setting the common device) in section 2 Using the Operator Panel in the Advanced Operation Guide. When Auto Error Clear is enabled, printing automatically begins after a set time has elapsed. For more information, see Print Settings in section 2 Using the Operator Panel in the Advanced Operation Guide.Format error Hard diskThe hard disk installed in the printer is not formatted, and therefore cannot be read or written. Format error Memory cardThe memory card inserted in the printer is not formatted, and therefore cannot be read or written. To format a memory card, follow the procedure in Using the operation panel section of the Advanced Operation Guide.Hard disk err ##Press GOA hard disk error has occurred. Look at the error code given in place of ## and refer to Storage Error Codes on page 4-10. To ignore the hard disk error, press [GO]. Illegal Account Press GOThis message is displayed when the Job Accounting function is enabled and no account is set for a transmitted print job or the specified account is not registered (the incorrect account is set). To return the printer to the print-ready status, press [GO]. For more information, see Job Accounting (Job Accounting selection/setting) section of the Advanced Operation Guide.Install MKReplace Maintenance Kit which is displayed on the message display. Replacement of the maintenance kit is necessary at every 200,000 images of printing and requires professional servicing. Contact your service technician.Job not storedPress GOPrinting using the Job Box function failed because there was insufficient space available on the hard disk or RAM disk, or because the RAM disk was disabled when the hard disk was demounted. To print an error report and return the printer to the print-ready status, press [GO].Message Corrective Action](https://usermanual.wiki/KYOCERA-Document-Solutions/2HN0120.user-manual-part-2/User-Guide-894471-Page-20.png)
![4-8 Troubleshooting KPDL error ##Press GOCurrent print processing cannot continue because of occurrence of KPDL error which is categorized by ##. To print out an error report, display > Print KPDL err(s) from the menu system, and select On. Press [GO] to resume printing. You can abandon printing by pressing [CANCEL].If Auto Error Clear is set to On, printing will be automatically resumed after a preset period of time.Load Cassette #(A4)/(PLAIN) †The paper cassette matching the paper size and paper type of the print job is empty. Load paper into the paper cassette as displayed in place of #. Press [GO] to resume printing. If you want to print from a different paper source, press U or V to display Use alternative? and you can change the source for paper feeding. After selecting a paper source and pressing [MENU], Paper Settings > appears. By pressing the U, the paper type settings menu appears. After setting the correct paper type, press [OK] ([ENTER]) and printing starts.Load MP Tray(A4)/(PLAIN) †There is no paper cassette installed in the printer that matches the paper size and paper type of the print job. Set paper in the MP tray. Press [GO] to resume printing. (Note that feeding the paper having a paper size which does not match the current paper size from the MP tray can cause paper jam.)If you want to print from a different paper source, press U or V to display Use alternative? and you can change the source for paper feeding. After selecting a paper source and pressing [MENU], Paper Settings > appears. By pressing the U, the paper type settings menu appears. After setting the correct paper type, press [OK] ([ENTER]) and printing starts.Memory overflowPress GOThe total amount of data received by the printer exceeds the printer’s internal memory. Try adding more memory. Press [GO] to resume printing. You can abandon printing by pressing [CANCEL].If Auto Error Clear is set to On, printing will be automatically resumed after a preset period of time.MemoryCard err##Press GOA memory card error has occurred. Look at the error code given in place of ## and refer to Storage Error Codes on page 4-10. To ignore the memory card error, press [GO]. No multi copiesPress GOMulti copies cannot be printed because RAM disk is disabled or the hard disk is not installed. Press [GO] to print error report. Original tonerinstalledDisplayed when the installed toner is the original Kyocera product. Paper jam###############A paper jam has occurred. The location of the paper jam is indicated in place of the #’s. For details, see Clearing Paper Jams on page 4-11. Paper loadingThe selected cassette is being prepared. Paper path error There is no paper cassette in the feeder, or the cassette is not inserted properly. After reinserting the paper cassette, you should be able to print. When two or more optional feeders are installed and the lowest one is selected, the same message will appear if any of the upper paper feeder and the printer cassette is improperly installed.Print overrunPress GOThe data transferred to the printer was too complex to print on a page. Press [GO] to resume printing. Message Corrective Action](https://usermanual.wiki/KYOCERA-Document-Solutions/2HN0120.user-manual-part-2/User-Guide-894471-Page-21.png)
![Troubleshooting 4-9RAM disk error##Press GOA RAM disk error has occurred. Look at the error code given in place of ## and refer to Storage Error Codes on page 4-10. To ignore the RAM disk error, press [GO]. Replace tonerC,M,Y,KReplace tonerClean printerTwo message items are displayed alternately. Toner has run out in the toner container(s). Replace the toner container using a new toner kit for the particular color. The printer does not operate when this message is displayed.For example, if Replace toner C,K is displayed, replace the cyan and the black toner containers.Toner lowC,M,Y,KReplace the toner container using a new toner kit. Color of the toner container that needs to be replaced is represented by C (Cyan), M (Magenta), Y (Yellow), and K (Black). Top traypaper fullThe top tray has become full (approx. 250 pages). You must remove all printed pages from the top tray. When the printer detects that the top tray is empty again, the printer will continues printing into the top tray.Unknown tonerinstalledDisplayed when the installed toner is not the original Kyocera product. Install original Kyocera toner. USB memory err##Press GOAn error has occurred in the USB memory device. To return the printer to the print-ready status, press [GO]. USB mem. removedPress GODisplayed when a USB memory device is physically removed without first selecting the correct menu option for device removal. Use alternative?Cassette 1When the cassette does not contain any paper that matches the print data (paper size and type), this message allows you to specify an alternative cassette to use instead. A paper source number is only displayed when an optional paper feeder is installed. To print from a different paper source, see Print Settings in section 2 Using the Operator Panel in the Advanced Operation Guide.Warninglow memoryThe printer’s internal memory is running low due to too many numbers of fonts and macros downloaded. Try deleting unnecessary fonts and macros. Wrong AccountDisplayed when an attempt is made to register an account in the Job Accounting menu by entering an account code that already exists. For more information, see Job Accounting (Job Accounting selection/setting) section of the Advanced Operation Guide.Wrong IDThe user ID entered for a private job, or a stored job is not correct. Check the user ID that you specified on the printer driver. Wrong PasswordThe password entered for access to the Job Accounting menu does not match the password set. Enter the correct password. For more information, see Job Accounting (Job Accounting selection/setting) in section 2 Using the Operator Panel in the Advanced Operation Guide.†. After this error has happened, page protect mode will be automatically turned on. To maintain optimum use of memory during printing, we recommend you manually turn off page protect mode.Message Corrective Action](https://usermanual.wiki/KYOCERA-Document-Solutions/2HN0120.user-manual-part-2/User-Guide-894471-Page-22.png)
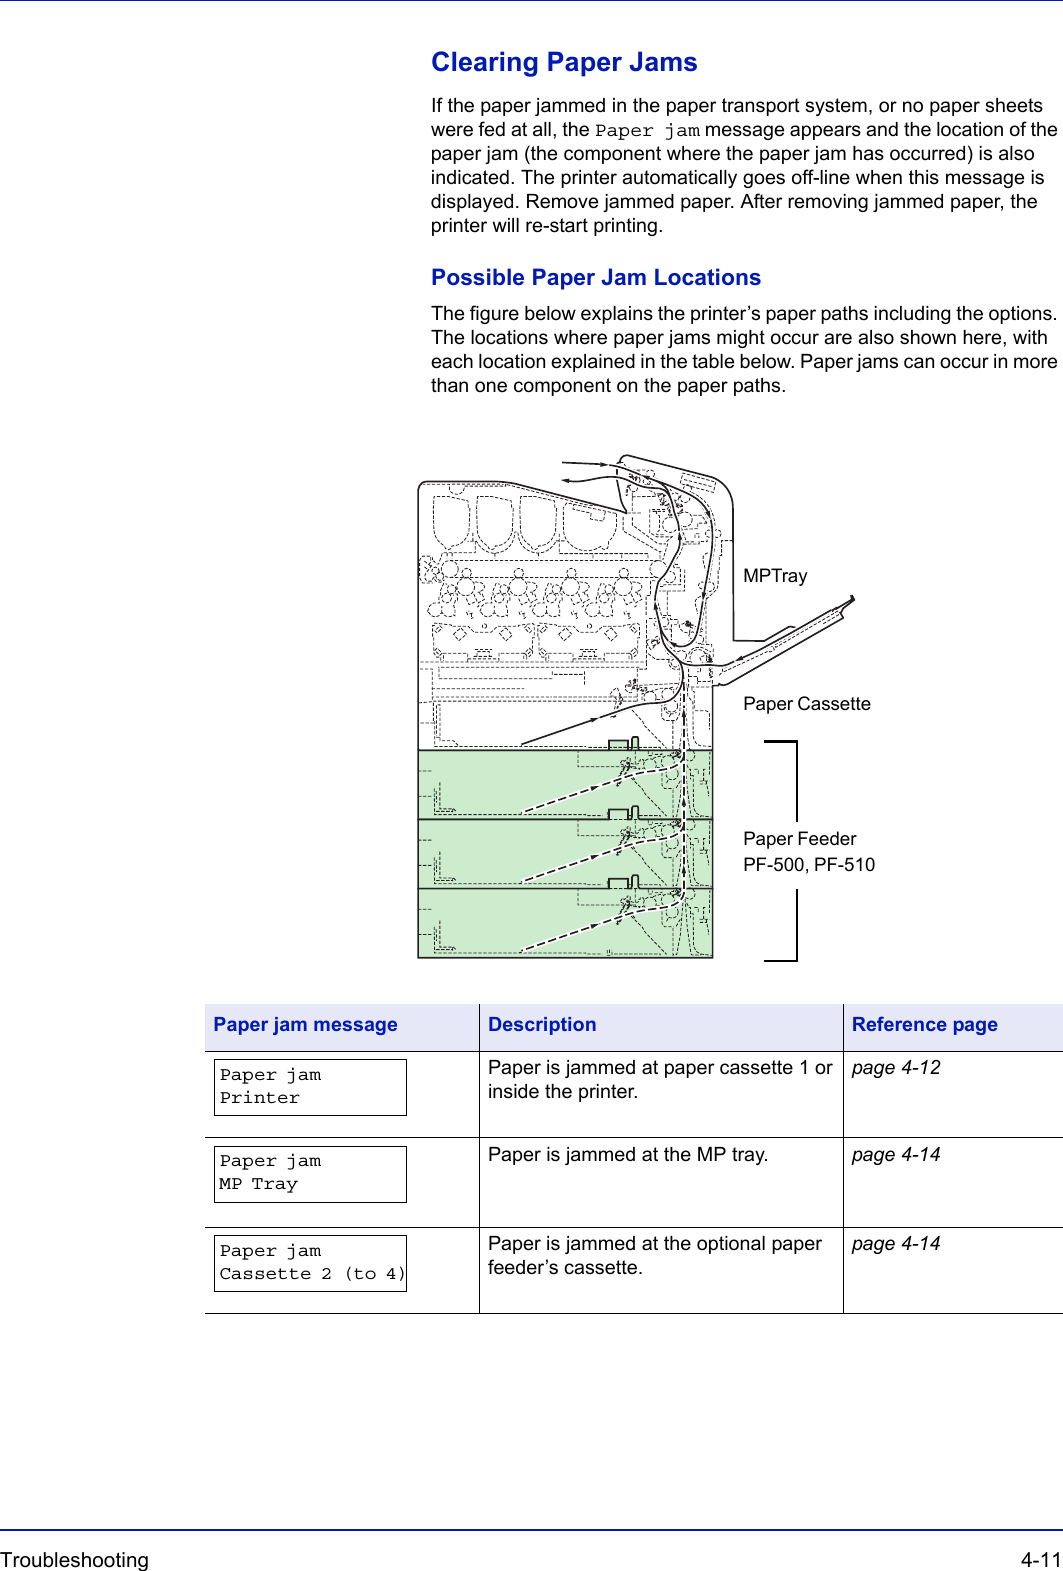
![4-12 Troubleshooting General considerations for clearing jamsBear in mind the following considerations when attempting jam removal:• If paper jams occur frequently, try using a different type of paper, replace the paper with paper from another ream, flip the paper stack over, or rotate the paper stack 180 degrees. The printer may have problems if paper jams recur after the paper was replaced.• Whether or not the jammed pages are reproduced normally after printing is resumed depends on the location of the paper jam.Utilizing Online Help MessagesOnline help messages are available in the printer’s message display to provide simple instructions for clearing jams. Press ( ) when the paper jam message has appeared. Then a help message will appear to facilitate jam clearing in the location.[Paper jam Cassette]Paper is jammed at paper cassette. 1Pull out the paper cassette and remove the jammed paper. 2If paper is jammed in the paper cassette, open and close the front cover (the paper jam error will be reset).[Paper jam Printer]Paper is jammed at the paper cassette or inside the printer. Remove the jammed paper using the procedure given below.1While pulling the green front cover release lever, pull out the front cover. CAUTION When pulling the paper, pull it gently so as not to tear it. Torn pieces of paper are difficult to remove and may be easily overlooked, deterring the jam recovery.](https://usermanual.wiki/KYOCERA-Document-Solutions/2HN0120.user-manual-part-2/User-Guide-894471-Page-25.png)
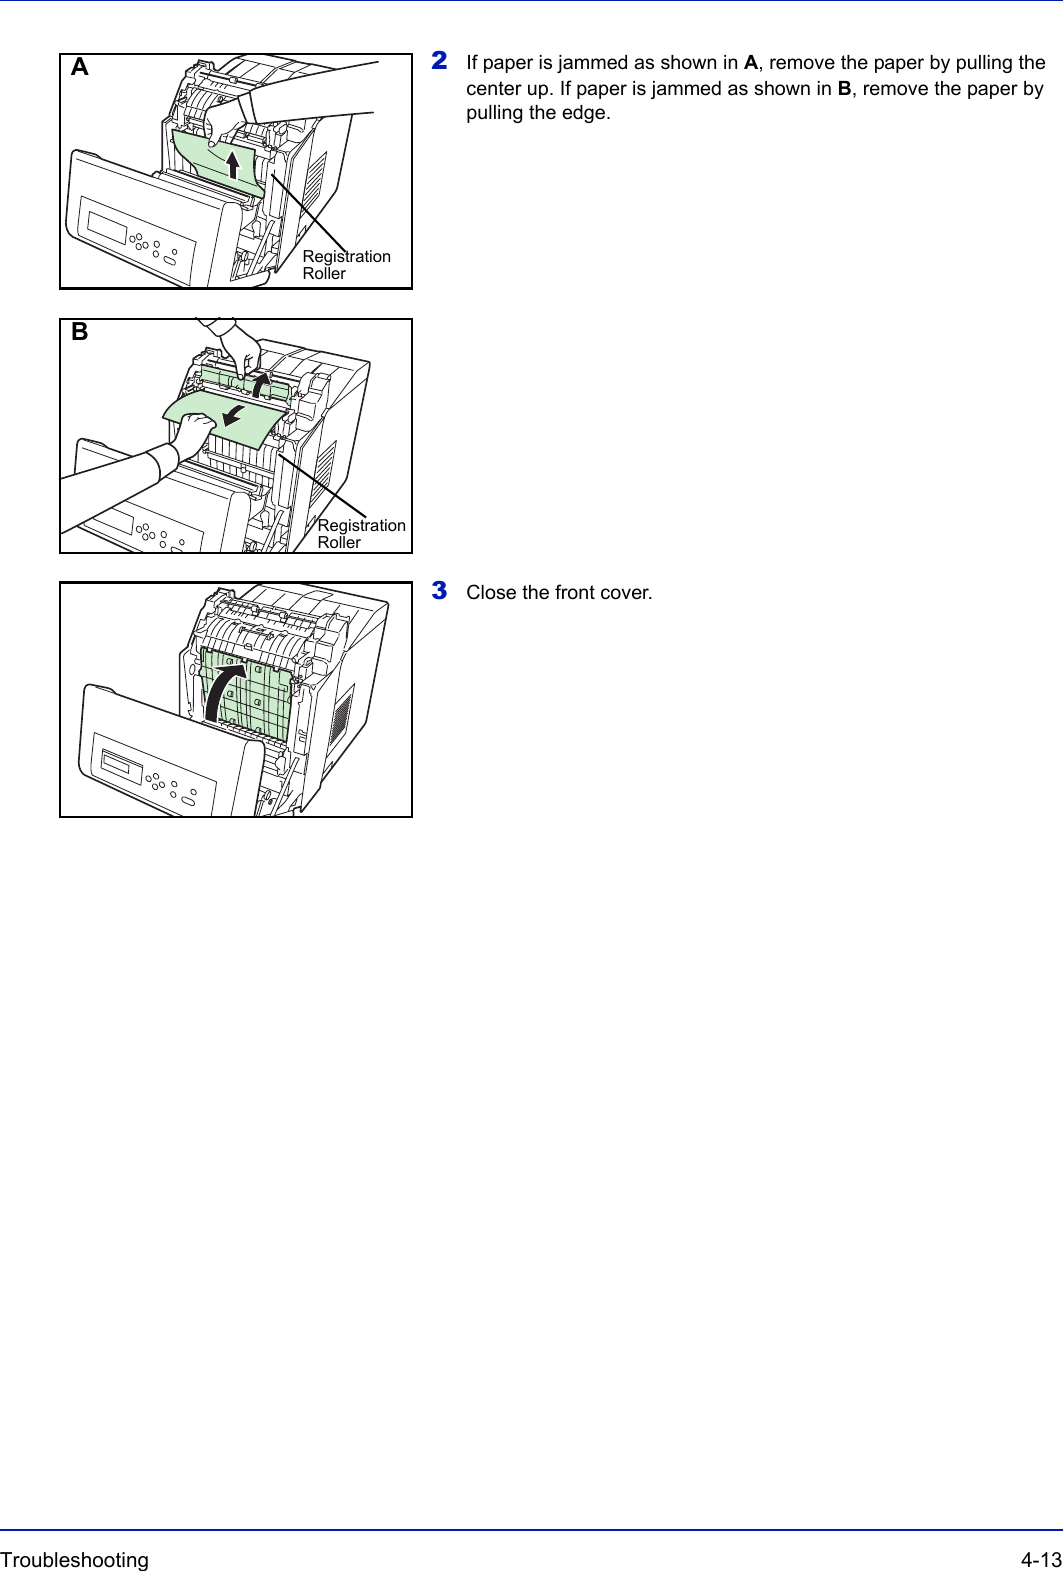
![4-14 Troubleshooting [Paper jam MP Tray]Paper is jammed at the MP tray. Remove the jammed paper using the procedure given below.1Remove the paper jammed at the MP tray. 2Open and close the front cover (the paper jam error will be reset).[Paper jam Cassette 2 (to 4)]1If the paper jams in the paper feeder, pull out the paper feeder and remove the jammed paper.](https://usermanual.wiki/KYOCERA-Document-Solutions/2HN0120.user-manual-part-2/User-Guide-894471-Page-27.png)
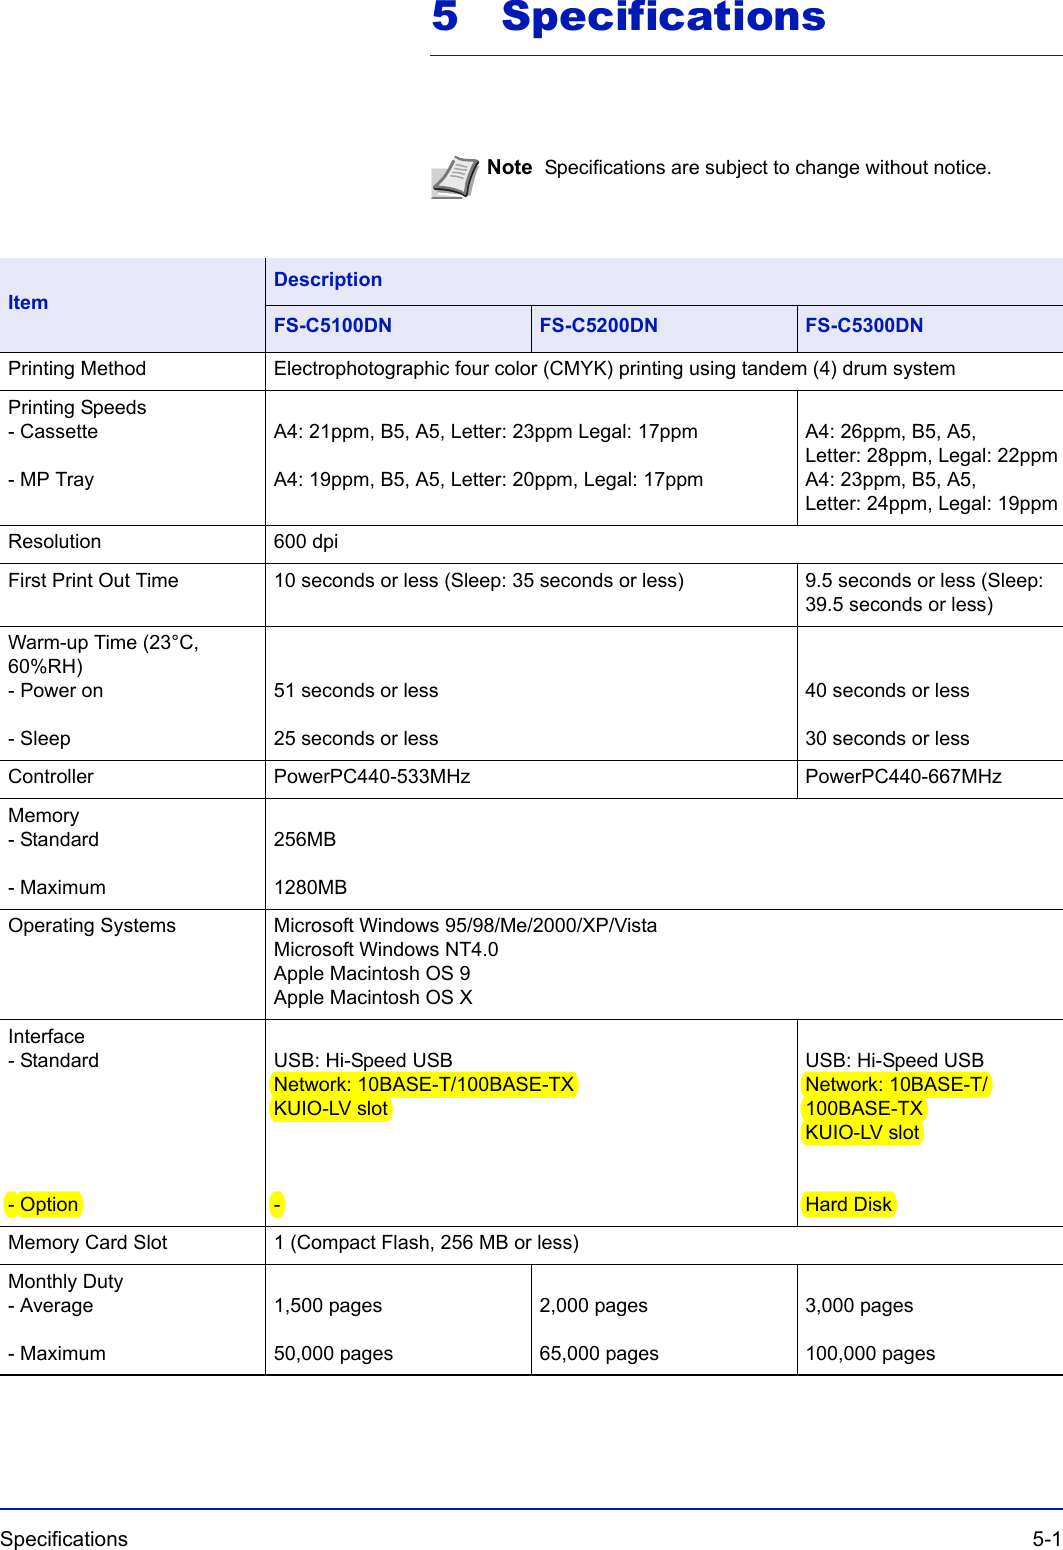
![5-2 Specifications Paper Sizes- Cassette- MP TrayA4, B5, A5, Folio, 8 1/2 × 14"(Legal), 8 1/2 × 11"(Letter), Oficio II, Executive, ISO B5, Envelope C5, 16K, and CustomA4, B5, A5, Folio, 8 1/2 × 14"(Legal), 8 1/2 × 11"(Letter), Oficio II, Statement, Executive, A6, B6, ISO B5, Env. Monarch, Envelope #10, Envelope #9, Envelope #6, Envelope DL, Envelope C5, 16K, Hagaki, Oufuku-Hagaki, Youkei 2, Youkei 4, and CustomPaper Types- Cassette- MP TrayPlain, preprinted, bond, recycled, rough, letterhead, color, prepunched, high quality, and customPlain, transparency, preprinted, labels, bond, recycled, vellum, rough, letterhead, color, prepunched, envelope, cardstock, coated, thick, high quality, and customPaper Feed Source Capacity- Cassette- MP Tray250 sheets (80g/m2)150 sheets (80g/m2)500 sheets (80g/m2)150 sheets (80g/m2)Margin 4 mm (left, right, top and bottom)Output Tray Capacity- Face-down Tray 250 sheets (80g/m2)Operation Environment- Temperature- Relative Humidity- Altitude- Illumination10 to 32.5 °C (50 to 90.5 °F)15 to 80 %2,000m (6,562 feet) maximum1,500 lux maximumPower Source 120 V, 60 Hz, max. 11.4 A (U.S.A./Canada) 220-240 V, 50 Hz/60 Hz, max. 6.1 A (European countries) Max. allowable voltage fluctuation: ±10 % Max. allowable frequency fluctuation: ±2 %Power Consumption Maximum :1060WDuring printing : 503WDuring standby: 126WDuring sleep mode : 18WOperating noise (in accordance with ISO7779 [Bystander Position, sound pressure level at the front])During printing: LpA = 52dB (A)During standby: LpA = 36dB (A)During sleep mode: immeasurably lowDimensions (W x D x H) 345 × 518 × 455mm13-5/8 × 18-1/2 × 17-9/10"345 × 518 × 480mm13-5/8 × 20-2/5 × 18-9/10"Weight Approx. 27kg (59-1/2lbs) Approx. 28kg ItemDescriptionFS-C5100DN FS-C5200DN FS-C5300DN](https://usermanual.wiki/KYOCERA-Document-Solutions/2HN0120.user-manual-part-2/User-Guide-894471-Page-29.png)