KYOCERA Document Solutions 2HN0120 Laser Printer with RFID User Manual FS C5300DN OG ENG
KYOCERA Document Solutions Inc. Laser Printer with RFID FS C5300DN OG ENG
Contents
- 1. user manual part 1
- 2. user manual part 2
user manual part 2
2-10 Printing Operation
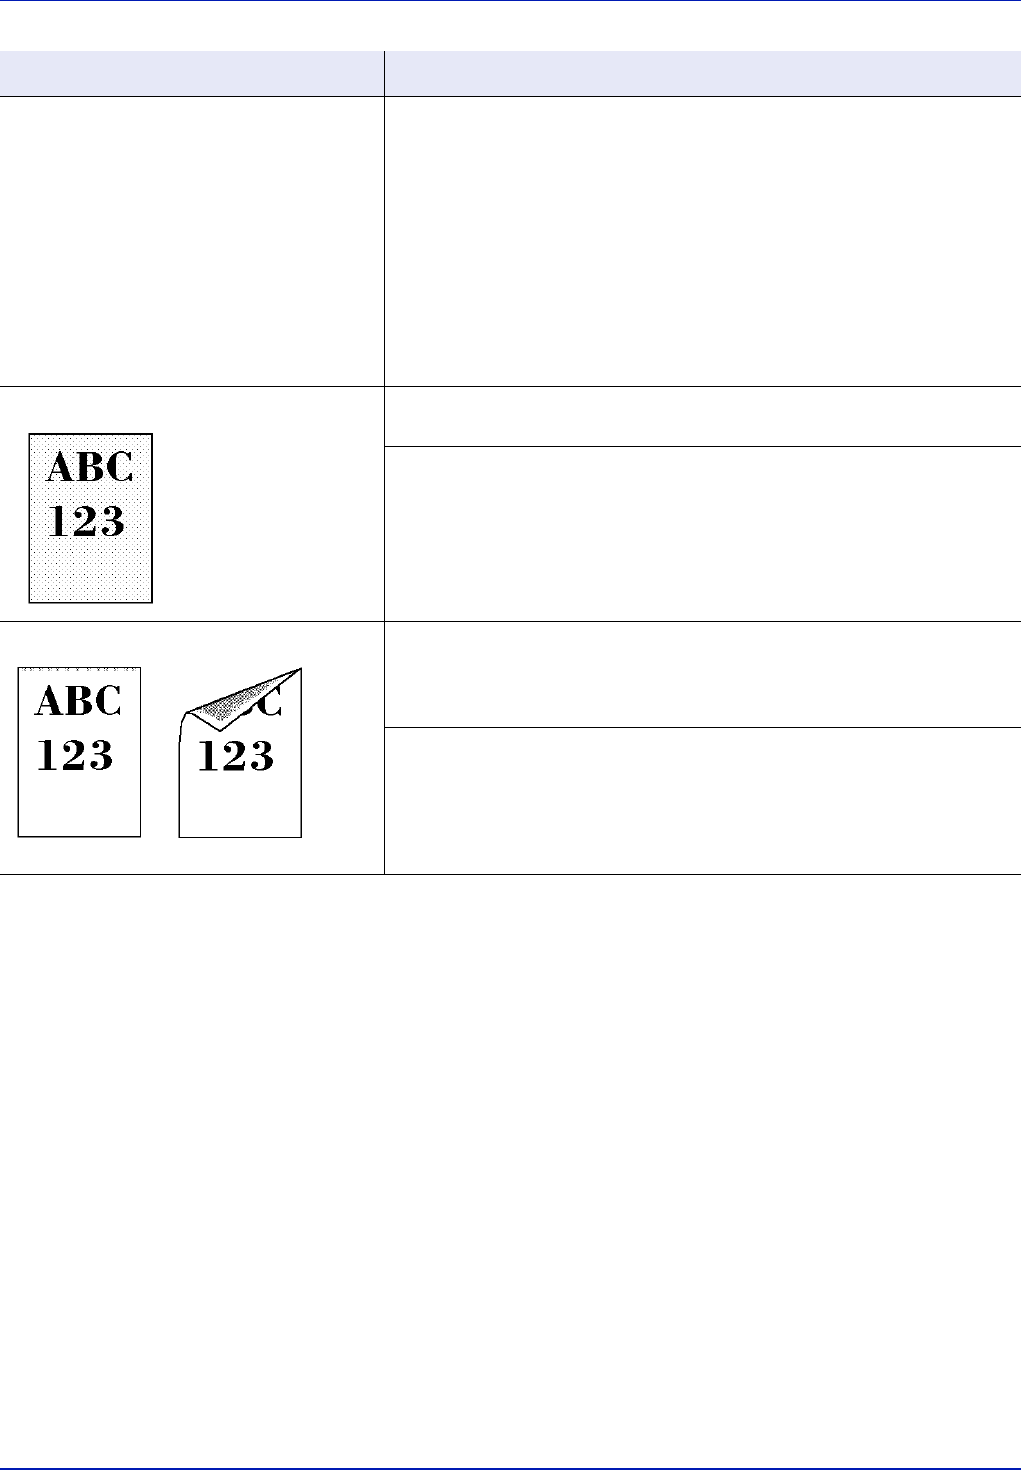
Sample of Network Status Page
Status Page
Printer
FS-C5300DN
Firmware version
Printing Operation 2-11
Loading Printer Driver
Ensure the printer is plugged in and connected to the PC before installing
the printer driver from the CD-ROM.
Installing the software in Windows
You can use either Express mode or Custom mode to install the software.
Express mode automatically detects connected printers and installs the
required software. Use Custom mode if you want to specify the printer
port and select the software to be installed.
1Turn on the computer and start up Windows.
If the Welcome to the Found New Hardware Wizard dialog box
displays, select Cancel.
2Insert the CD-ROM supplied with the printer into the optical drive of
the PC. In Windows Vista, the user account management window
appears. Click "Allow".
The installation program launches.
3Click "View License Agreement" and read the License Agreement.
Click "Agree".
4Click "Install software".
The software install wizard starts up. Click "Next".
From this point, the procedure differs depending on your version of
Windows and your connection method. Proceed to the correct
procedure for your connection type.
•Express mode (Windows Vista or Windows XP)
•Custom mode (Windows Vista, Windows XP, Windows 2000 or
Windows Server 2003)
Note In Windows Vista, Windows XP and Windows 2000, you
must be logged on with administrator privileges.
Note If the software install wizard does not launch
automatically, open the CD-ROM window in Windows
Explorer and double-click "Setup.exe".
2-12 Printing Operation
Express Mode (Windows Vista or Windows XP)
In Express mode, the installer automatically detects the printer when it is
turned on. Use Express mode for standard connection methods.
1In the installation method selection window, select Express Mode
and click "Next". The print system detection window appears and the
installer detects the connected printers. If the installer does not detect
a print system, check that the print system is connected via USB or a
network and that it is turned on. Then return to the print system
detection window.
2Select the print system to be installed and click "Next".
3You can customize the print system name in the installation settings
window. This will be the name displayed in the Printer window and in
the printer lists displayed in applications. Specify whether to share the
print system name or set the print system as an existing printer and
then click "Next".
4A window appears in which you can check the settings. Check the
settings carefully and then click "Install".
5A message appears saying that the printer has been installed
successfully. Click "Exit" to exit the printer installation wizard and
return the CD-ROM main menu.
If the device setup dialog box appears after you click "Exit", you can
specify the settings for items such as optional features installed in the
print system. You can also specify the device settings after you exit
the installation. For details, refer to "Device Settings" in the printer
driver operation manual on the CD-ROM.
This completes the printer driver installation procedure. Follow the
on-screen instructions to restart the system, if required.
Note While the information shown in Windows Vista and
Windows XP installation dialog boxes differs slightly, the
installation procedure is the same.
Note If the Found New Hardware Wizard appears, click
"Cancel". If a hardware installation warning message appear,
click "Continue".
Note If the Windows security window appears, click "Install
this driver software".
Printing Operation 2-13
Custom Mode (Windows Vista, Windows XP, Windows
2000 or Windows Server 2003)
Use Custom mode if you want to specify the printer port and select the
software to be installed.
For example, if you do not want fonts installed on your computer to be
replaced, select Custom Mode and deselect the Fonts checkbox in the
installation window.
1Select Custom Mode and click "Next". (E.g.: For Windows Vista)
2Following the instructions in the install wizard window, select the
software packages to be installed and the specify the port, etc.
For details, refer to "Custom Installation" in the printer driver
operation manual on the CD-ROM.
Installation on a Macintosh
1Turn on the printer and the Macintosh.
2Insert the included CD-ROM (Software Library) into the CD-ROM
drive.
3Double-click the CD-ROM icon.
4Double-click either OS 10.2 and Later or IS 9.x and Earlier
depending on your Mac OS version.
5Double-click Kyocera OS X Japanese x.x or Kyocera Japanese
x.x. The printer driver installation software starts up.
6Install the printer driver as directed by the instructions in the
installation software.
2-14 Printing Operation
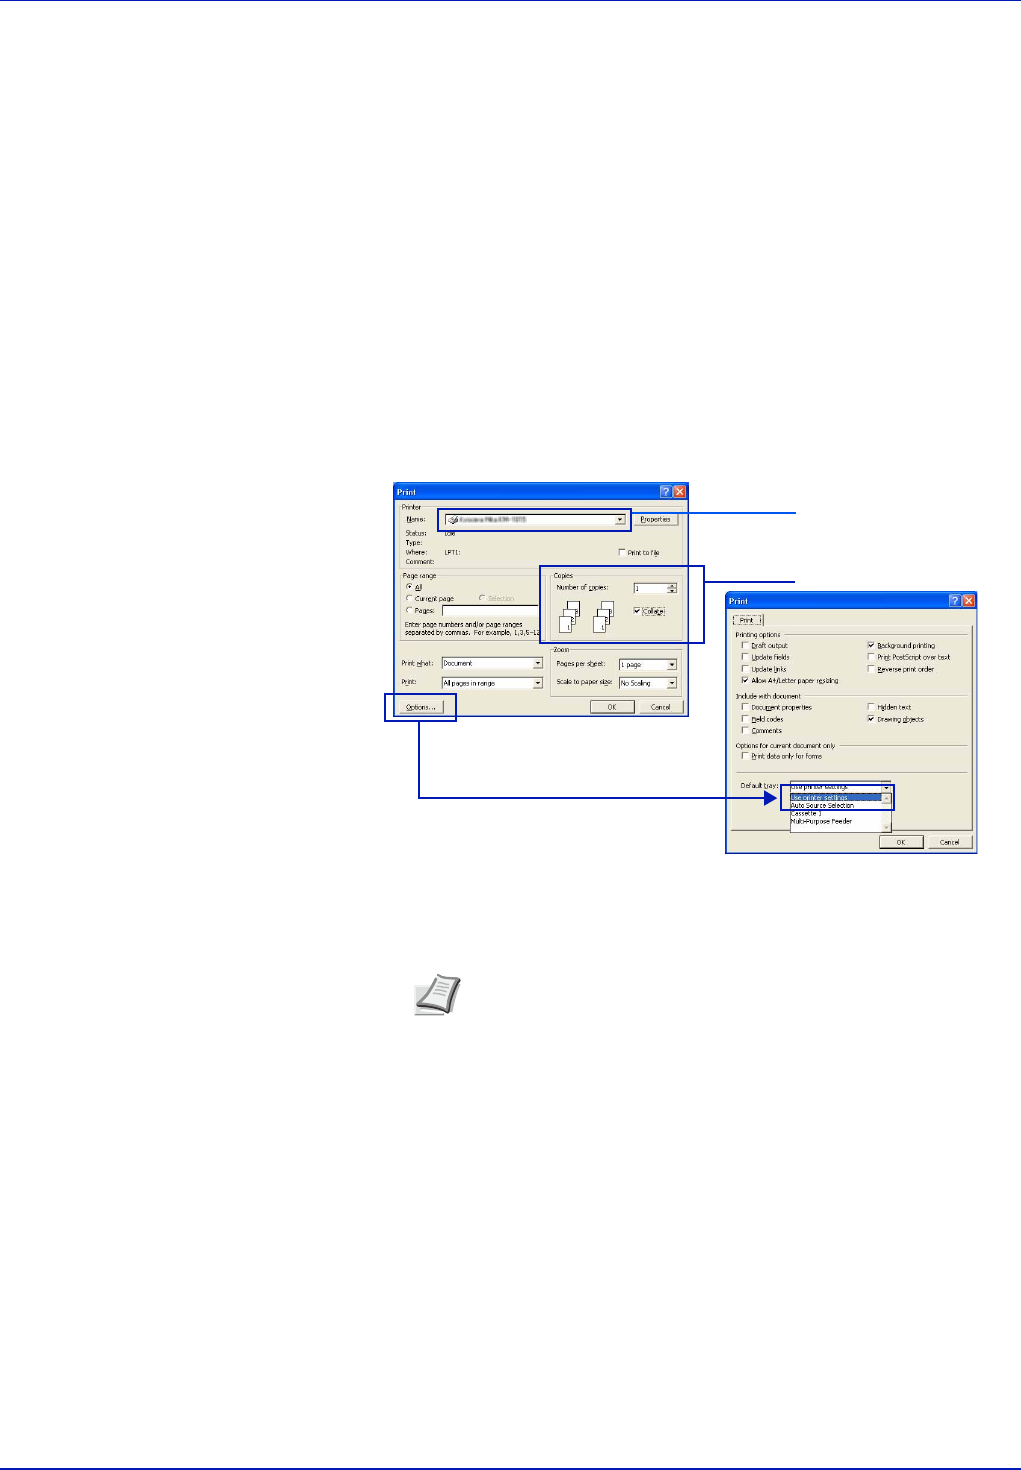
Printing from Application Software
The steps required to print a document created with an application are
explained below. You can select the printing Paper Size and Output
Destination.
1Load the paper required into the paper cassette.
2From the application File menu, select Print. The Print dialog box
displays.
3Click the drop down list of printer names. All the printers installed in
Windows are listed. Click the name of the machine.
4Use Number of copies to enter the number of prints required. Up to
999 copies can be entered.
For Microsoft Word, we recommend that you click Options and
specify Use printer settings for the Default tray.
5To start printing, click OK.
3
4
Note For information on how to use the printer driver software,
refer to the KX Printer Driver Operation Guide.

Maintenance 3-1
3 Maintenance
This chapter contains explanations on the following topics:
General Information 3-2
Toner Container Replacement 3-2
Replacing the Waste Toner Box 3-5
Cleaning the Printer 3-7

3-2 Maintenance
General Information
This chapter describes basic maintenance tasks you can perform on the
printer. You can replace the following component according to the
printer’s display:
• Toner Kits
• Waste Toner Box
Also, the following parts need periodic cleaning:
• Paper Transfer Unit
• Main Charger Units
Toner Container Replacement
Frequency of toner container replacement
The life of the toner containers depends on the amount of toner required
to accomplish your printing jobs. When 5% coverage (a typical business
document) of individual toner colors is assumed for A4 or letter size
paper:
• The black toner container lasts an average of 9,000 monochrome
pages (FS-C5100DN: 5,000 monochrome pages, FS-C5200DN:
7,000 monochrome pages).
• The cyan, magenta, and yellow toner containers last an average of
12,000 color images (FS-C5100DN: 3,500 color images, FS-
C5200DN: 5,000 color images).
You can print a status page to check how much toner remains in the toner
container. The Toner Gauge in the consumables status section on the
status page shows a progress bar for each color, which roughly
represents how much toner is left in the toner container.
Starter Toner Containers
The toner containers packed with the new printer are starter toner
containers. The black starter toner container lasts an average of 4,500
monochrome pages (FS-C5100DN: 2,500 monochrome pages, FS-
C5200DN: 3,500 monochrome pages). The cyan, magenta, and yellow
starter toner containers last an average of 6,000 color images for each
(FS-C5100DN: 1,750 color images for each, FS-C5200DN: 2,500 color
images).
Toner Kits
For best results, we recommend that you only use genuine Kyocera Parts
and Supplies.
The toner kits are supplied in 4 different colors: cyan, magenta, yellow
and black.
A new toner kit for each color contains the following items:
• Toner Container
• Cleaning cloth
• Grid cleaner for main charger cleaning
• Plastic waste bags for old toner container and old waste toner box
• Waste toner box
Maintenance 3-3
• Installation Guide
Understanding Messages Requesting Toner Container
Replacement
The printer displays messages for individual colors at two stages of toner
usage. This message is automatically alternated with the other printer
message (such as Ready):
• When the printer becomes low on toner, for example in the cyan
container, the printer displays the message Toner low C,M,Y,K as
the first caution. Note the replacement is not always necessary at this
stage.
• If you ignore the above message and continue printing, the printer
displays the message Replace toner — just before the toner is
used up. The toner container must be replaced immediately. Clean
the separate charger wires, etc. After the cleaning is finished,
however, the message does not automatically change to Ready. To
restart printing, you must press [GO] and make the printer ready.
In either case, replace the toner container, see Toner Container
Replacement on page 3-2.
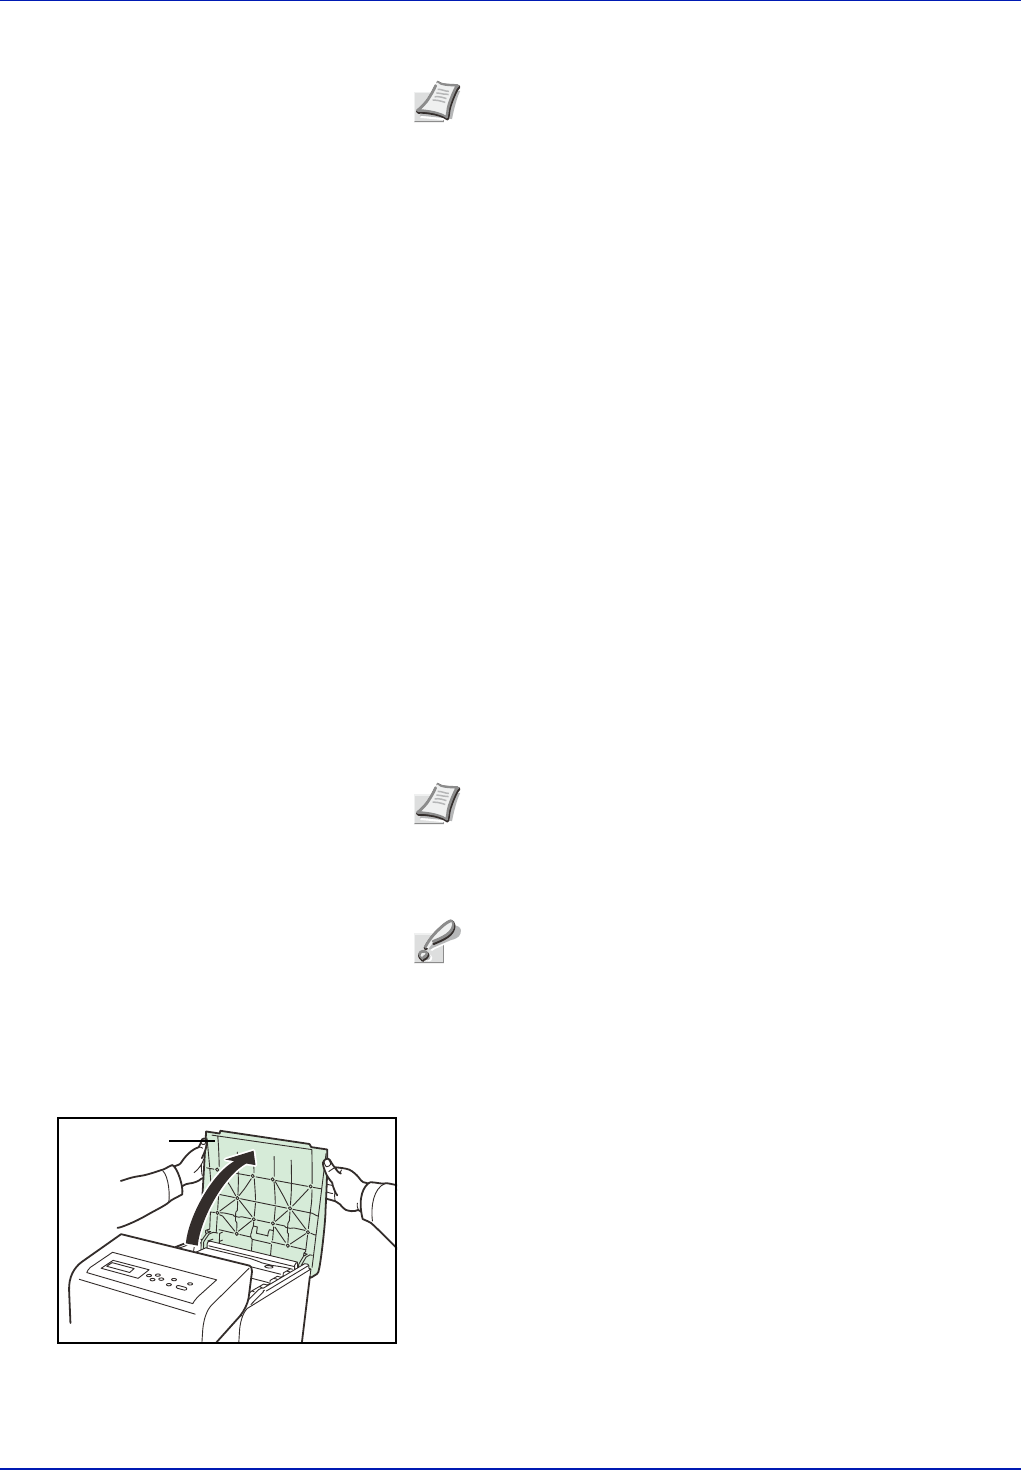
Replacing the Toner Container
This section explains how to replace the toner containers. When
replacing the toner container of any color, always replace the waste toner
box at the same time. If this box is full, the printer may be damaged or
contaminated by the waste toner that may spill over the box.
To replace the toner container, first make sure of the color of the toner
container requiring replacement. In this example, it is assumed that you
are replacing the black toner container.
1Open the face-down tray (top tray).
Note Do not remove the toner container from the carton until you
are ready to install it in the printer.
Note During toner container replacement, temporarily put
storage media and computer supplies (such as floppy disks)
away from around the toner container. This is to avoid damaging
media by the magnetism of toner.
Important You do not have to turn printer power off before
starting the replacement. Any data that may be under printing
process in the printer will be deleted if you turn printer power
off.
Face-down tray
(top tray)

3-4 Maintenance
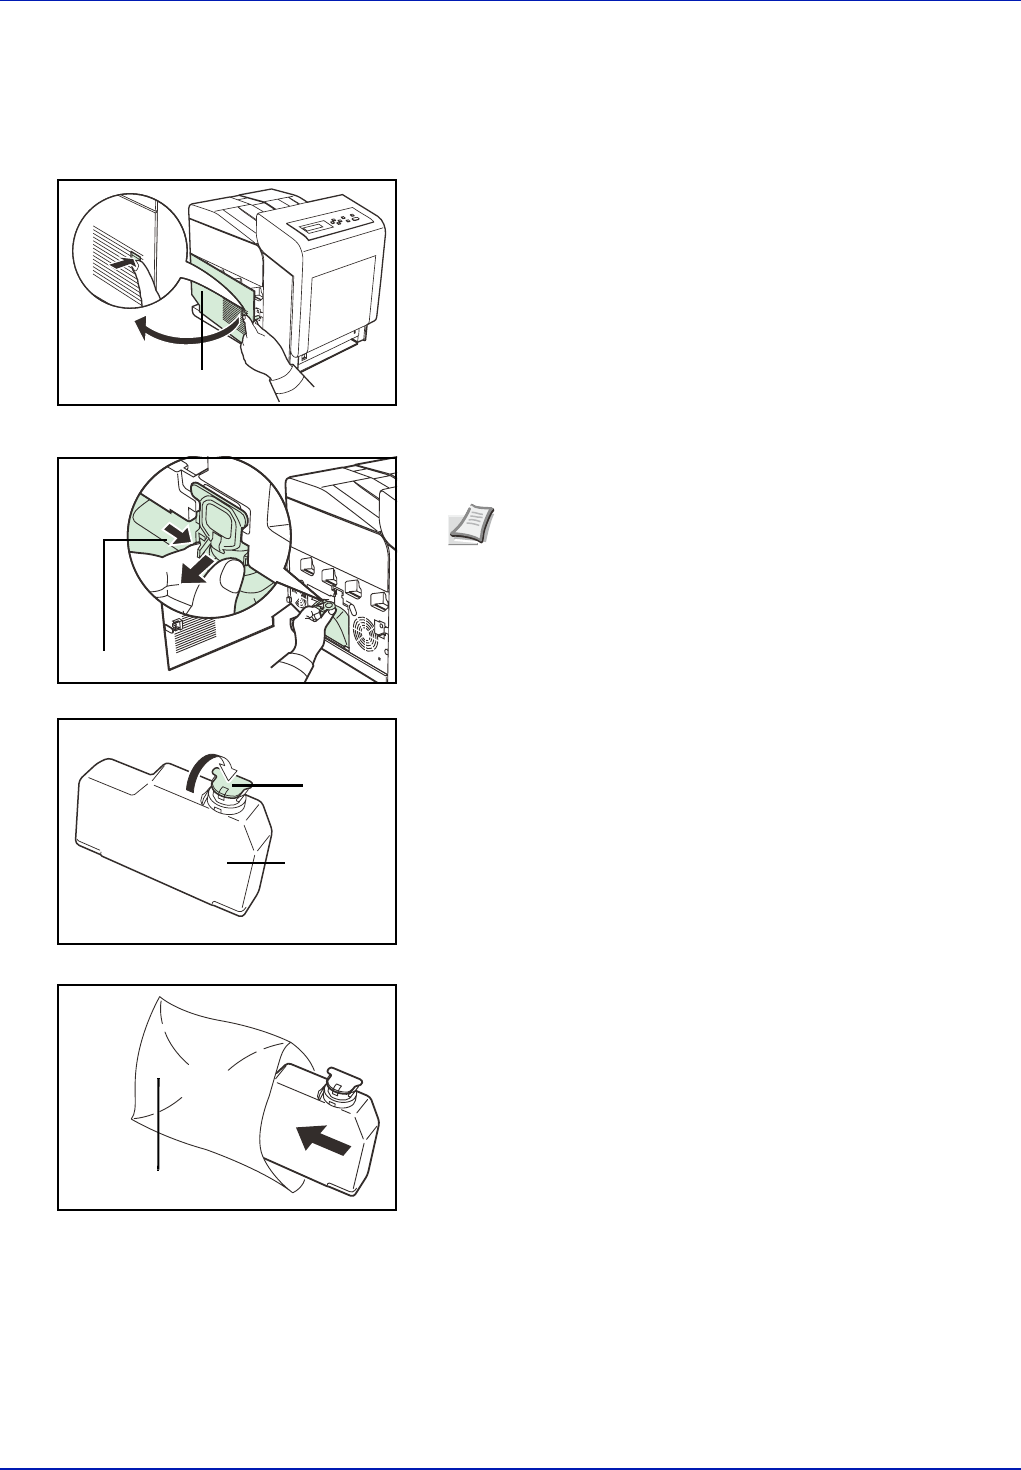
2Carefully remove the old toner container from the printer.
3Put the old toner container in the plastic bag (contained in the toner
kit) and discard it later according to the local code or regulations for
waste disposal.
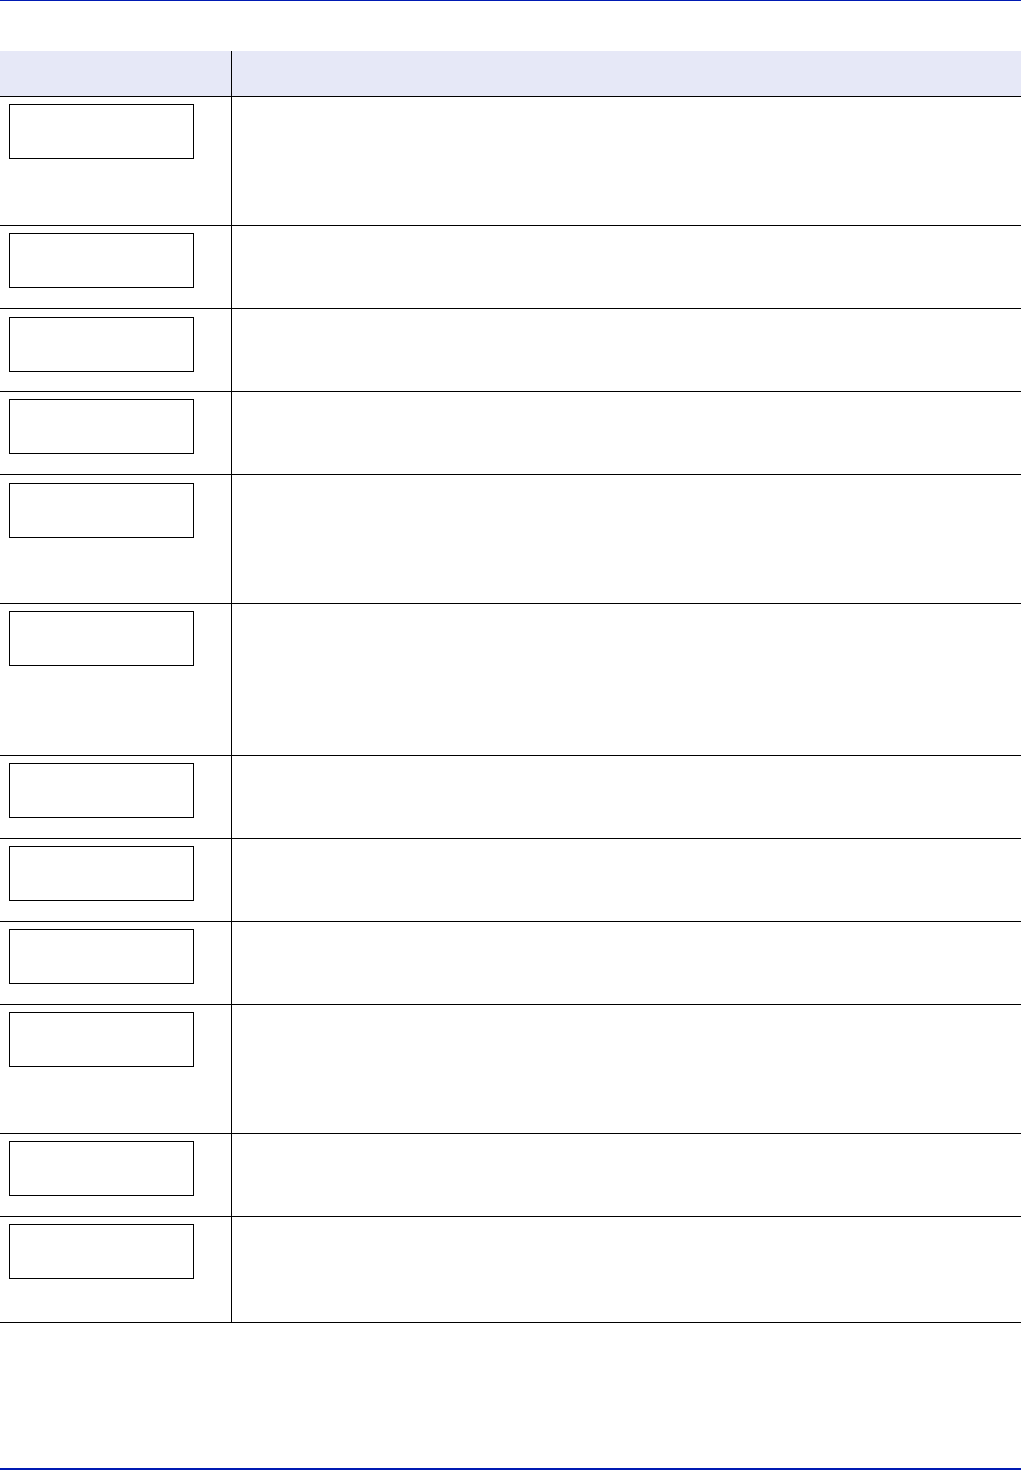
4Take the new toner container out of the toner kit.
5Shake the new toner container 5 or 6 times as shown in the figure in
order to distribute the toner evenly inside the container.
Do not press too firmly on the center of the toner container or touch
the toner feed slot.
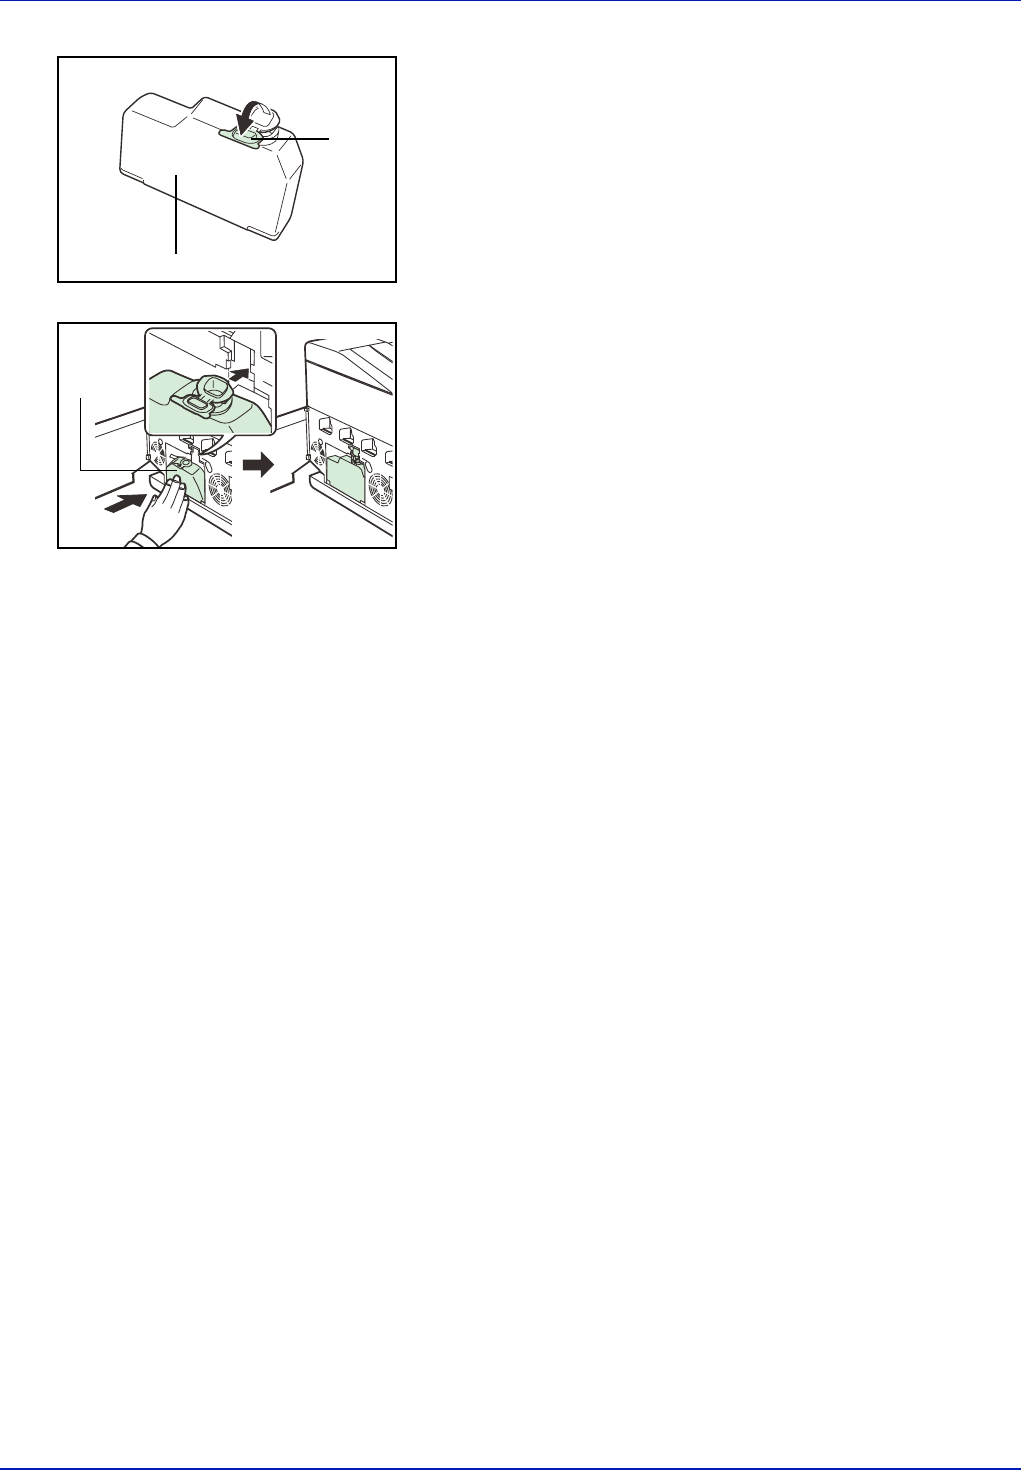
6Set the new toner container in the printer as shown in the figure
below.
7Push down on the top of the toner container to install it firmly in place.
Use the same procedure to replace the other color toner containers.
8
Close the face-down tray (top tray).
Proceed to the next section.
Note If the face-down tray (top tray) does not close, check
that the new toner container is installed correctly (in step 7).
After use, always dispose of the toner container and the
waste toner box in accordance with Federal, State and Local
rules and regulations.
Plastic Bag
Toner feed slot
Maintenance 3-5
Replacing the Waste Toner Box
Replace the waste toner box when the Check waste toner box
message is displayed. A new waste toner box is included with the toner
kit. The printer will not operate without replacing the waste toner box.
1Open the left cover.
2While holding the waste toner box, press the lock lever and then
gently remove the waste toner box.
3Close the cap to the old waste toner box after removing the box from
the printer.
4To prevent toner from spilling, put the old waste toner box in the
plastic bag (contained in the toner kit) and discard it later according
to the local code or regulations for waste disposal.
Note Remove the waste toner box as gently as possible so
as not to scatter the toner inside. Do not let the opening of the
waste toner box face downward.
Left Cover
Lock Lever
Old Waste
Toner Box
Cap
Plastic Bag
3-6 Maintenance
5Open the cap of the new waste toner box.
6Insert the new waste toner box as shown in the figure below. When
the box is set correctly, it will snap into place.
7Make sure that the waste toner box is correctly inserted and close the
left cover.
After replacing the toner containers and the waste toner box, clean the
main charger units and the paper transfer unit. For instructions, see
Cleaning the Printer on page 3-7.
Cap
New Waste Toner Box
New Waste
Toner Box
Maintenance 3-7
Cleaning the Printer
The paper transfer unit should be cleaned each time the toner container
and waste toner box are replaced.
To maintain optimum print quality, it is also recommended that the inside
of the printer be cleaned once a month as well as when the toner
container is replaced.
It should also be cleaned if streaking or lines appear on printed copies, or
if printouts appear faint or blurred.
Cleaning the Paper Transfer Unit
Print problems such as soiling of the reverse side of printed pages may
occur if the paper transfer unit becomes dirty. To clean the paper transfer
unit, you must use the cleaning cloth included in the toner kit.
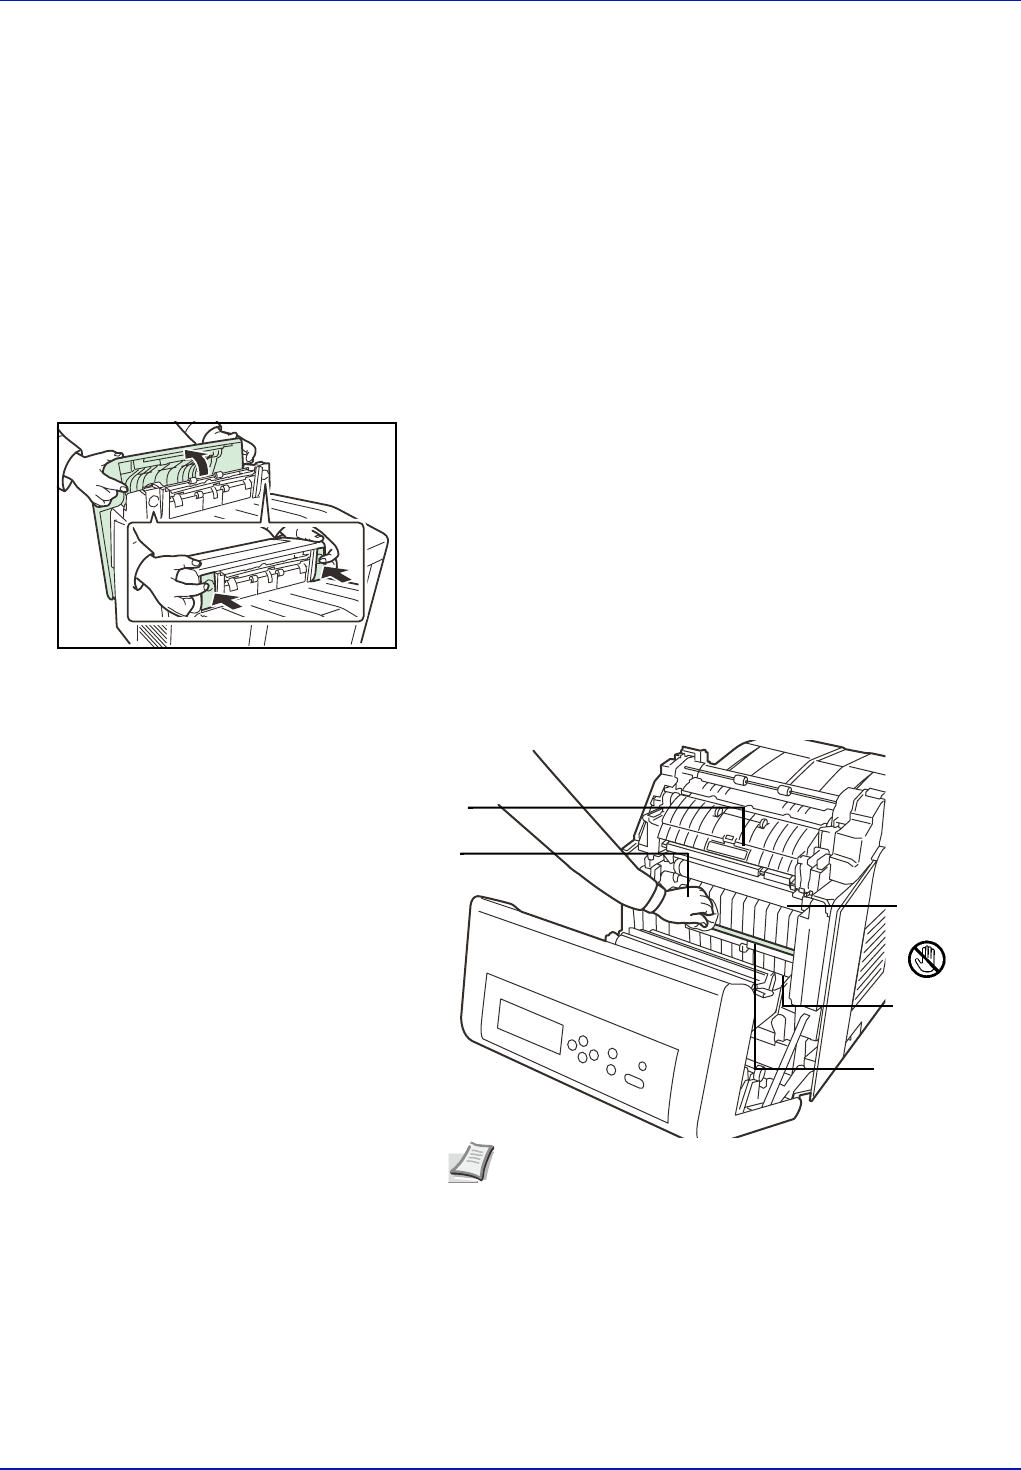
1While pulling the green front cover release lever, pull out the front
cover.
2Wipe away the paper dust on the registration roller and the paper
ramp using the wiper cloth included in the toner kit.
3Push the paper transfer unit back in completely.
Paper Ramp
Wiper Cloth
Transfer Roller
(Black)
Paper Transfer
Unit
Registration Roller
(Metal)
Note Be careful not to touch the black transfer roller during
cleaning as this may adversely affect print quality.

3-8 Maintenance

Troubleshooting 4-1
4 Troubleshooting
This chapter contains explanations on the following topics:
General Guidelines 4-2
Print Quality Problems 4-3
Error Messages 4-6
Clearing Paper Jams 4-11
If a problem cannot be corrected, contact your service
technician.
4-2 Troubleshooting
General Guidelines
The table below provides basic solutions for problems you may encounter
with the printer. We suggest you consult this table to troubleshoot the
problems before calling for service.
Tips
Printer problems may be solved easily by following the tips below. When
you have encountered a problem that following the above guidelines will
not solve, try the following:
• Turn the printer power off and wait for several seconds. Then, turn on
the printer.
• Reboot the computer which sends the print jobs to the printer.
• Obtain and use the latest version of the printer driver. The latest
versions of printer drivers and utilities are available at:
http://www.kyoceramita.com/download/.
• Make sure that the procedures for printing are correctly followed in the
application software. Consult the documentation supplied with the
application software.
• If the printer prints garbage characters or stalls when the computer is
turned on, particularly when the printer is connected to the computer
under Windows 98 via the parallel port, rename device driver file
drvwppqt.vxd. This file may be located in Windows\System\Iosubsys
or Arcada\System folder. For technical details, visit Microsoft web site
for the device driver.
Symptom Check Items Corrective Action
Print quality is not good. See Print Quality Problems on page 4-3.
Paper is jammed. See Clearing Paper Jams on page 4-11.
Nothing lights on the operation panel
even when power is turned on and the
fan makes no noise.
Check that the power cord is properly
plugged into the power outlet.
Turn off the printer’s power, plug in the
power cord securely, and try turning on
the printer’s power again.
Check that the power switch is in the
On (|) position.
Set the power switch to the On
position.
The printer prints a status page, but
does not print jobs from the computer.
Check the printer cable or the interface
cable.
Connect both ends of the printer cable
securely. Try replacing the printer cable
or the interface cable.
Check program files and application
software.
Try printing another file or using
another print command. If the problem
occurs only with a specific file or
application, check the printer driver
settings for that application.
Troubleshooting 4-3
Print Quality Problems
The tables and diagrams in the following sections define print quality
problems and the corrective action you can conduct to solve the
problems. Some solutions may require cleaning or replacing parts of the
printer.
If the suggested corrective action will not solve the problem, call for
service.
Printed Results Corrective Action
Skewed-color printout Conduct color registration using the printer operation panel.
Completely blank printout Check the toner containers.
Open the printer face-down tray (top tray) and check that the toner
containers are correctly installed in the printer. For more information on
installing the toner containers, see Toner Container Replacement on page
3-2.
Check that the application software is correctly operated.
Full single-color printout Check the charger unit.
Open the left cover and check that the charger unit is correctly installed.
4-4 Troubleshooting
Dropouts, horizontal streaks, stray dots Clean the main charger units.
For details see the LSU/Charger section in the Advanced Operation Guide.
Black or white vertical streaks Check the operation panel for toner.
If the Toner low C,M,Y,K message is displayed with color description,
install a new toner kit for the color. To replace the toner container, see
Toner Container Replacement on page 3-2.
Clean the main charger units.
For details see the LSU/Charger section in the Advanced Operation Guide.
Refresh drum.
Perform the following procedures on the operation panel and try cleaning
the drum surface using the printer's built-in cleaning system.
1Press [MENU].
2Press U or V repeatedly until Adjust/Maintenance > appears.
3Press Z. Press U or V repeatedly until >Service > appears.
4Press Z. Press U or V repeatedly until >>Drum appears.
5Press [OK] ([ENTER]) twice.
6The message display shows Please wait. After approx. 3 minutes,
the display returns to Ready.
Faint or blurred printing Clean the main charger units.
For details see the LSU/Charger section in the Advanced Operation Guide.
Make sure the paper type setting is correct the paper being used.
Conduct color calibration either by switching the printer off then on or using
the printer operation panel.
Try adjusting the color control settings using the printer driver.
Check the operation panel. If the Toner low C,M,Y,K message is
displayed with color description, install a new toner kit for the color. To
replace toner, see Toner Container Replacement on page 3-2.
Printed Results Corrective Action
Direction
of Paper
Feed
Troubleshooting 4-5
Refresh drum.
Perform the following procedures on the operation panel and try cleaning
the drum surface using the printer's built-in cleaning system.
1Press [MENU].
2Press U or V repeatedly until Adjust/Maintenance > appears.
3Press Z. Press U or V repeatedly until >Service > appears.
4Press Z. Press U or V repeatedly until >>Drum appears.
5Press [OK] ([ENTER]) twice.
6The message display shows Please wait. After approx. 3 minutes,
the display returns to Ready.
Grey background Clean the main charger units.
For details see the LSU/Charger section in the Advanced Operation Guide.
Conduct color calibration either by switching the printer off then on or using
the printer operation panel.
Dirt on the top edge or back of the paper Check the paper chute and the ramp.
Pull out the paper transfer unit and check for toner on the paper ramp.
Clean the paper ramp using a soft, dry, lint-free cloth. For details, see
Cleaning the Paper Transfer Unit on page 3-7.
Clean the main charger units.
For details see the LSU/Charger section in the Advanced Operation Guide.
Printed Results Corrective Action
4-6 Troubleshooting
Error Messages
The following table lists errors and maintenance messages that you can
be dealt with by yourself. If
Call service
appears, turn off the printer,
disconnect the power cord, and contact your service technician.
Some errors cause the alarm to sound. To stop the alarm, press
[CANCEL].
Message Corrective Action
Account error
Press GO
This message is displayed when the Job Accounting function is enabled and an attempt to
specify job accounting settings or to register or delete an account fails. To return the printer to
the print-ready status, press [GO].
Add paper MPTray
The paper has run out in the paper source displayed. Supply paper according to the paper
source displayed (paper cassettes, MP tray, or optional paper feeders).This message is
displayed alternately with messages indicating the printer status, such as, Ready, Please
wait, and Processing.
Call service
F ###:
F### represents a controller error (#=0, 1, 2, ...). Call for service. The printer does not
operate when this message is displayed.
Call service
####:0123456
#### represents a mechanical error (#=0, 1, 2, ...). Call for service. The printer does not
operate when this message is displayed. The total number of pages printed is also indicated,
e.g. 0123456.
Canceling data
Displayed when data is being canceled.
Cassette #
not loaded
The corresponding paper cassette is not installed. Install the cassette. The cassette number
can be 1 (topmost) to 4 (bottom).
Change envelope
switch position
Displayed when the paper type does not match the Envelope Switch setting.
Check waste
toner box
This message warns following two cases. Install the new waste toner box.
The waste toner box is not installed.
The waste toner box is full.
Clean printer
Press GO
Please clean the inside of the printer. See Cleaning the Printer on page 3-7.
This message will be displayed when replacing the toner container after the message
Replace toner C,M,Y,K is displayed. After cleaning the inside of the printer, press [GO]
and the printer will be ready for printing.
Close
front cover
The front cover of the printer is open. Close the front cover.
Close
left cover
The left cover of the printer is open. Close the left cover.
Close
top cover
The top cover of the printer is open. Close the printer top cover.
Duplex disabled
Press GO
You attempted to print with a paper size and paper type that cannot be used for duplex
printing. Press [GO] to print onto one-side of the paper only.
Troubleshooting 4-7
Enter Account
An account code must be entered. This message is displayed if you try to print from the
operation panel (e.g. printing a status page or using the Job Retention function) when the Job
Accounting function is enabled. Enter the correct account code and then press [GO] to begin
printing. For more information, see Job Accounting (Job Accounting selection/setting) in
section 2 Using the Operator Panel in the Advanced Operation Guide.
Envelope mode
Displayed when the Envelope Switch is set to envelope mode.
Error.Power off.
F###
Turn the power switch off and then back on again. If this message still remains, turn the
power switch off, and contact your service representative or authorized service center.
Error.Power off.
F000
The printer controller and operation panel cannot exchange data. Turn the printer off and
unplug it from the mains power supply. Then contact your service representative or
authorized service center. See the back page of this manual for the relevant phone numbers.
Exceeded Max.out
Press GO
This message is displayed when the Job Accounting function is enabled and an attempt has
been made to exceed the print limit set for each account. To return the printer to the print-
ready status, press [GO].
For more information, see Job Accounting (Job Accounting selection/setting) section of the
Advanced Operation Guide.
File not found
Press GO
The specified file was not found on the hard disk, RAM disk or memory card. For more
information on the hard disk, RAM disk and memory cards, see Device Common (Selecting/
Setting the common device) in section 2 Using the Operator Panel in the Advanced
Operation Guide. When Auto Error Clear is enabled, printing automatically begins after a set
time has elapsed. For more information, see Print Settings in section 2 Using the Operator
Panel in the Advanced Operation Guide.
Format error
Hard disk
The hard disk installed in the printer is not formatted, and therefore cannot be read or written.
Format error
Memory card
The memory card inserted in the printer is not formatted, and therefore cannot be read or
written. To format a memory card, follow the procedure in Using the operation panel section
of the Advanced Operation Guide.
Hard disk err ##
Press GO
A hard disk error has occurred. Look at the error code given in place of ## and refer to
Storage Error Codes on page 4-10. To ignore the hard disk error, press [GO].
Illegal Account
Press GO
This message is displayed when the Job Accounting function is enabled and no account is
set for a transmitted print job or the specified account is not registered (the incorrect account
is set). To return the printer to the print-ready status, press [GO].
For more information, see Job Accounting (Job Accounting selection/setting) section of the
Advanced Operation Guide.
Install MK
Replace Maintenance Kit which is displayed on the message display. Replacement of the
maintenance kit is necessary at every 200,000 images of printing and requires professional
servicing. Contact your service technician.
Job not stored
Press GO
Printing using the Job Box function failed because there was insufficient space available on
the hard disk or RAM disk, or because the RAM disk was disabled when the hard disk was
demounted. To print an error report and return the printer to the print-ready status, press
[GO].
Message Corrective Action
4-8 Troubleshooting
KPDL error ##
Press GO
Current print processing cannot continue because of occurrence of KPDL error which is
categorized by ##. To print out an error report, display > Print KPDL err(s) from the
menu system, and select On. Press [GO] to resume printing. You can abandon printing by
pressing [CANCEL].
If Auto Error Clear is set to On, printing will be automatically resumed after a preset period of
time.
Load Cassette #
(A4)/(PLAIN)
†
The paper cassette matching the paper size and paper type of the print job is empty. Load
paper into the paper cassette as displayed in place of #. Press [GO] to resume printing.
If you want to print from a different paper source, press U or V to display Use
alternative? and you can change the source for paper feeding. After selecting a paper
source and pressing [MENU], Paper Settings > appears. By pressing the U, the paper
type settings menu appears. After setting the correct paper type, press [OK] ([ENTER]) and
printing starts.
Load MP Tray
(A4)/(PLAIN)
†
There is no paper cassette installed in the printer that matches the paper size and paper type
of the print job. Set paper in the MP tray. Press [GO] to resume printing. (Note that feeding
the paper having a paper size which does not match the current paper size from the MP tray
can cause paper jam.)
If you want to print from a different paper source, press U or V to display Use
alternative? and you can change the source for paper feeding. After selecting a paper
source and pressing [MENU], Paper Settings > appears. By pressing the U, the paper
type settings menu appears. After setting the correct paper type, press [OK] ([ENTER]) and
printing starts.
Memory overflow
Press GO
The total amount of data received by the printer exceeds the printer’s internal memory.
Try adding more memory. Press [GO] to resume printing. You can abandon printing by
pressing [CANCEL].
If Auto Error Clear is set to On, printing will be automatically resumed after a preset period of
time.
MemoryCard err##
Press GO
A memory card error has occurred. Look at the error code given in place of ## and refer to
Storage Error Codes on page 4-10. To ignore the memory card error, press [GO].
No multi copies
Press GO
Multi copies cannot be printed because RAM disk is disabled or the hard disk is not installed.
Press [GO] to print error report.
Original toner
installed
Displayed when the installed toner is the original Kyocera product.
Paper jam
###############
A paper jam has occurred. The location of the paper jam is indicated in place of the #’s. For
details, see Clearing Paper Jams on page 4-11.
Paper loading
The selected cassette is being prepared.
Paper path error
There is no paper cassette in the feeder, or the cassette is not inserted properly. After
reinserting the paper cassette, you should be able to print. When two or more optional
feeders are installed and the lowest one is selected, the same message will appear if any of
the upper paper feeder and the printer cassette is improperly installed.
Print overrun
Press GO
The data transferred to the printer was too complex to print on a page. Press [GO] to resume
printing.
Message Corrective Action
Troubleshooting 4-9
RAM disk error##
Press GO
A RAM disk error has occurred. Look at the error code given in place of ## and refer to
Storage Error Codes on page 4-10. To ignore the RAM disk error, press [GO].
Replace toner
C,M,Y,K
Replace toner
Clean printer
Two message items are displayed alternately. Toner has run out in the toner container(s).
Replace the toner container using a new toner kit for the particular color. The printer does not
operate when this message is displayed.
For example, if Replace toner C,K is displayed, replace the cyan and the black toner
containers.
Toner low
C,M,Y,K
Replace the toner container using a new toner kit. Color of the toner container that needs to
be replaced is represented by C (Cyan), M (Magenta), Y (Yellow), and K (Black).
Top tray
paper full
The top tray has become full (approx. 250 pages). You must remove all printed pages from
the top tray. When the printer detects that the top tray is empty again, the printer will
continues printing into the top tray.
Unknown toner
installed
Displayed when the installed toner is not the original Kyocera product. Install original Kyocera
toner.
USB memory err##
Press GO
An error has occurred in the USB memory device. To return the printer to the print-ready
status, press [GO].
USB mem. removed
Press GO
Displayed when a USB memory device is physically removed without first selecting the
correct menu option for device removal.
Use alternative?
Cassette 1
When the cassette does not contain any paper that matches the print data (paper size and
type), this message allows you to specify an alternative cassette to use instead. A paper
source number is only displayed when an optional paper feeder is installed. To print from a
different paper source, see Print Settings in section 2 Using the Operator Panel in the
Advanced Operation Guide.
Warning
low memory
The printer’s internal memory is running low due to too many numbers of fonts and macros
downloaded. Try deleting unnecessary fonts and macros.
Wrong Account
Displayed when an attempt is made to register an account in the Job Accounting menu by
entering an account code that already exists.
For more information, see Job Accounting (Job Accounting selection/setting) section of the
Advanced Operation Guide.
Wrong ID
The user ID entered for a private job, or a stored job is not correct. Check the user ID that you
specified on the printer driver.
Wrong Password
The password entered for access to the Job Accounting menu does not match the password
set. Enter the correct password. For more information, see Job Accounting (Job Accounting
selection/setting) in section 2 Using the Operator Panel in the Advanced Operation Guide.
†. After this error has happened, page protect mode will be automatically turned on. To maintain optimum use of
memory during printing, we recommend you manually turn off page protect mode.
Message Corrective Action
4-10 Troubleshooting
Storage Error Codes
Hard Disk Errors
Memory Card Errors
RAM Disk Errors
Code Meaning
01 Hard disk format error. If this error recurs even if the power has been turned
off and then on, reformat the hard disk.
02 The disk system is not installed. Recheck the requirements for using the
system and the devices.
03 The memory card is write-protected. Check the memory card status.
04 There is no available hard disk space. Delete unnecessary files, etc., in order
to free up space.
05 The specified file does not exist in the hard disk.
06 There is no memory available to the hard disk system. Increase the available
memory.
10 Formatting is not possible because host data is being spooled on the hard
disk. Wait until the hard disk is ready, and then format.
85 VMB: Alias error. The alias setting was lost, or the virtual tray corresponding
to the alias does not exist. Set the alias again.
97 The number of permanent code jobs that can be stored reached the limit
value, and no more can be saved. Either delete some unnecessary jobs, etc.,
or increase the limit.
98 An unreadable page was found in a job (The job is damaged.).
99 A print job for the specified ID does not exist in the hard disk.
Code Meaning
01 The printer does not support the memory card inserted.
02 The memory card is not installed.
04 The memory card is full and cannot hold further data. Purge unnecessary
files or use a new memory card.
05 Specified file is not on the memory card.
06 Insufficient printer memory to support the memory card system. Expand
printer memory.
Code Meaning
01 Format error. Try turning the power off and on again.
02 RAM disk mode is Off. Turn RAM disk mode On from the operation panel.
04 No disk space. Purge unnecessary files.
05 Specified file is not on disk.
06 Insufficient printer memory to support the RAM disk system. Expand printer
memory.
Troubleshooting 4-11
Clearing Paper Jams
If the paper jammed in the paper transport system, or no paper sheets
were fed at all, the Paper jam message appears and the location of the
paper jam (the component where the paper jam has occurred) is also
indicated. The printer automatically goes off-line when this message is
displayed. Remove jammed paper. After removing jammed paper, the
printer will re-start printing.
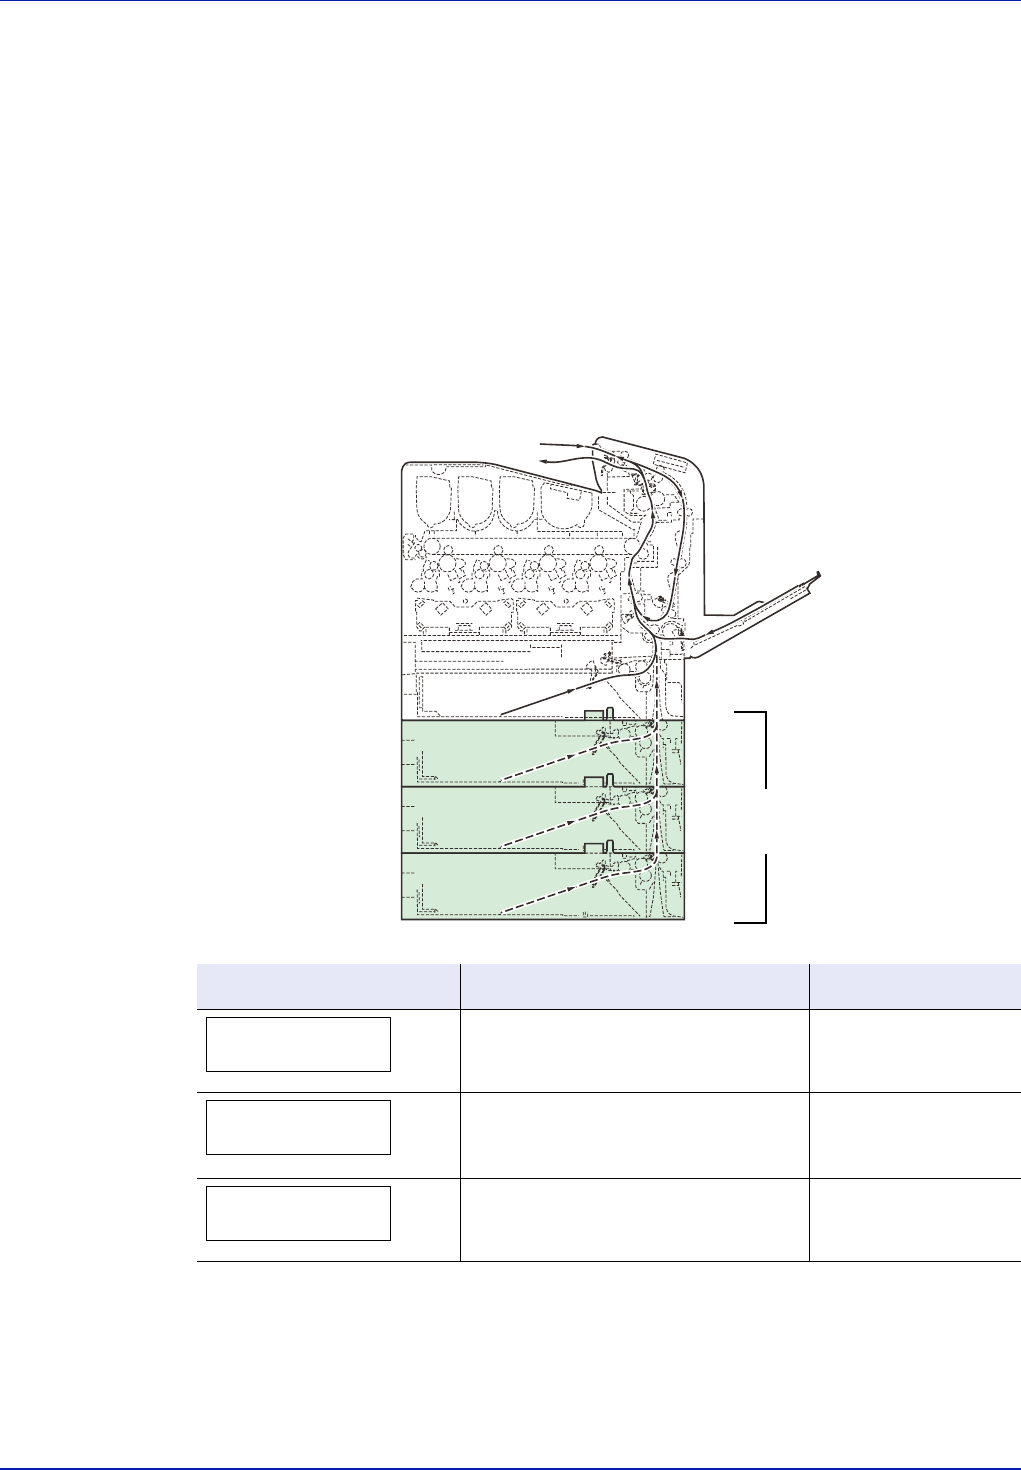
Possible Paper Jam Locations
The figure below explains the printer’s paper paths including the options.
The locations where paper jams might occur are also shown here, with
each location explained in the table below. Paper jams can occur in more
than one component on the paper paths.
Paper jam message Description Reference page
Paper jam
Printer
Paper is jammed at paper cassette 1 or
inside the printer.
page 4-12
Paper jam
MP Tray
Paper is jammed at the MP tray. page 4-14
Paper jam
Cassette 2 (to 4)
Paper is jammed at the optional paper
feeder’s cassette.
page 4-14
Paper Feeder
PF-500, PF-510
MPTray
Paper Cassette
4-12 Troubleshooting
General considerations for clearing jams
Bear in mind the following considerations when attempting jam removal:
• If paper jams occur frequently, try using a different type of paper,
replace the paper with paper from another ream, flip the paper stack
over, or rotate the paper stack 180 degrees. The printer may have
problems if paper jams recur after the paper was replaced.
• Whether or not the jammed pages are reproduced normally after
printing is resumed depends on the location of the paper jam.
Utilizing Online Help Messages
Online help messages are available in the printer’s message display to
provide simple instructions for clearing jams. Press ( ) when the paper
jam message has appeared. Then a help message will appear to facilitate
jam clearing in the location.
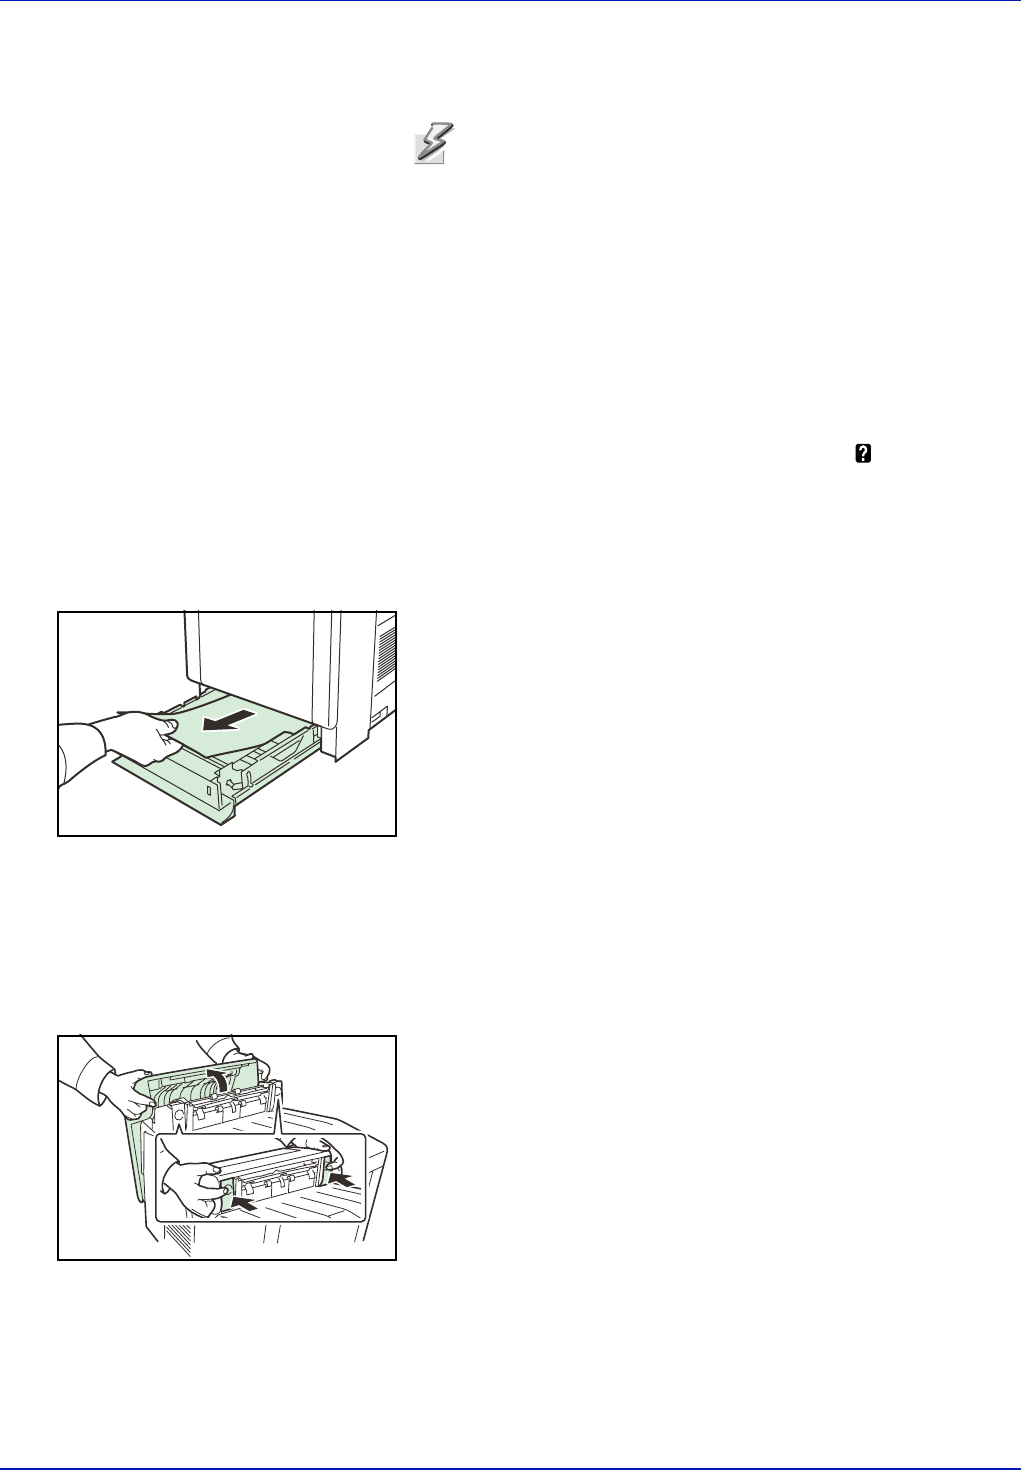
[Paper jam Cassette]
Paper is jammed at paper cassette.
1Pull out the paper cassette and remove the jammed paper.
2If paper is jammed in the paper cassette, open and close the front
cover (the paper jam error will be reset).
[Paper jam Printer]
Paper is jammed at the paper cassette or inside the printer. Remove the
jammed paper using the procedure given below.
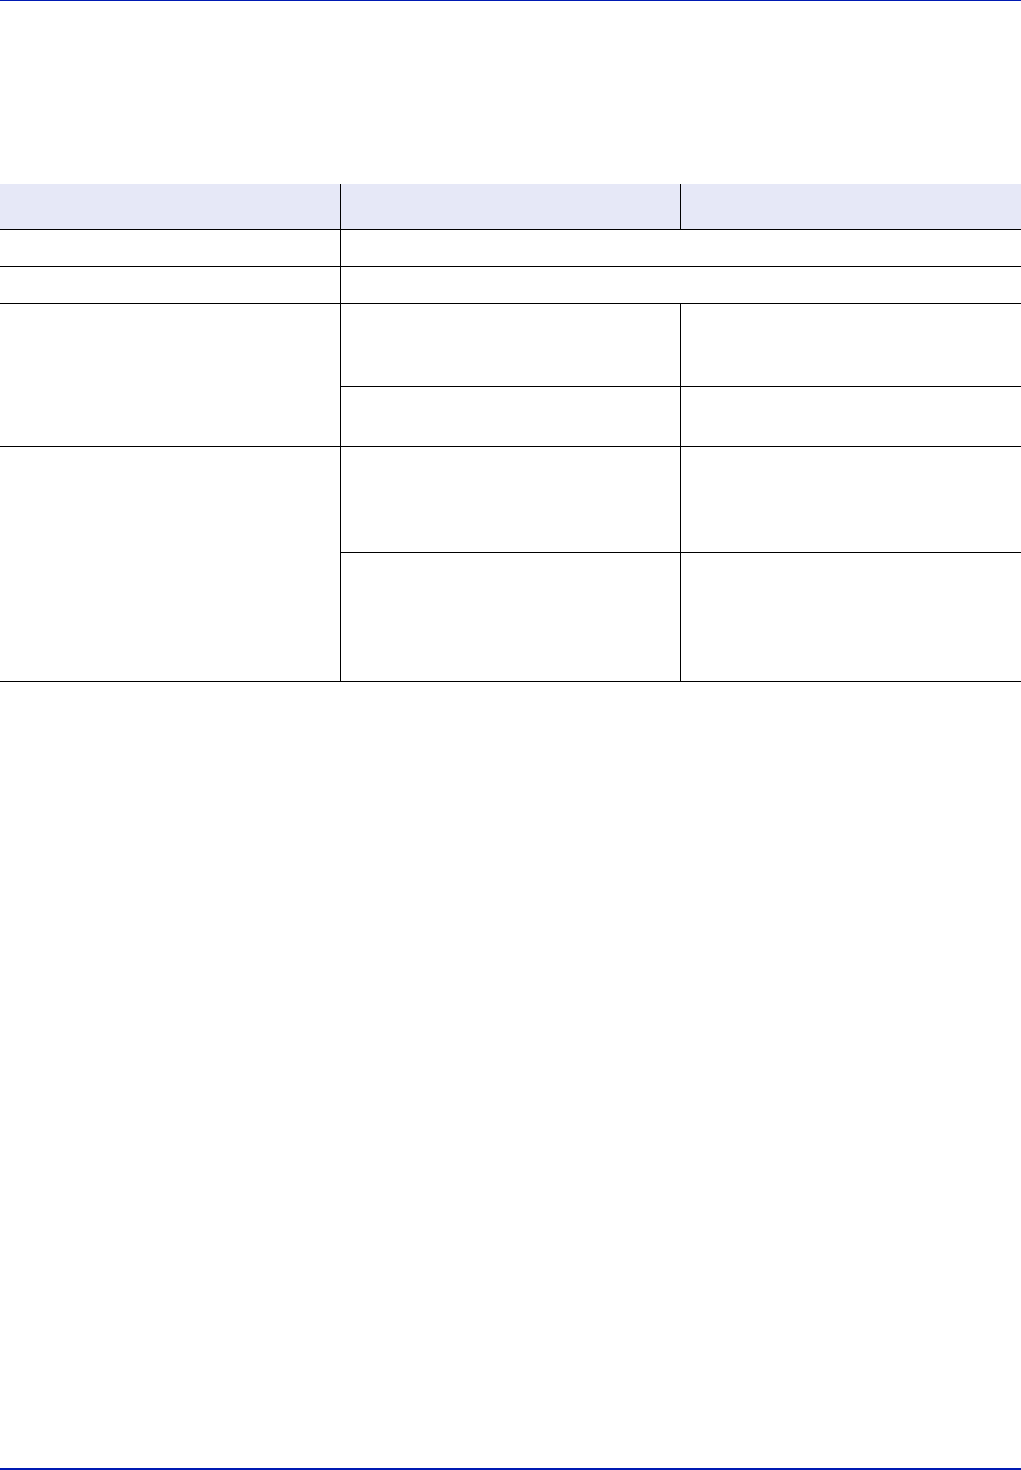
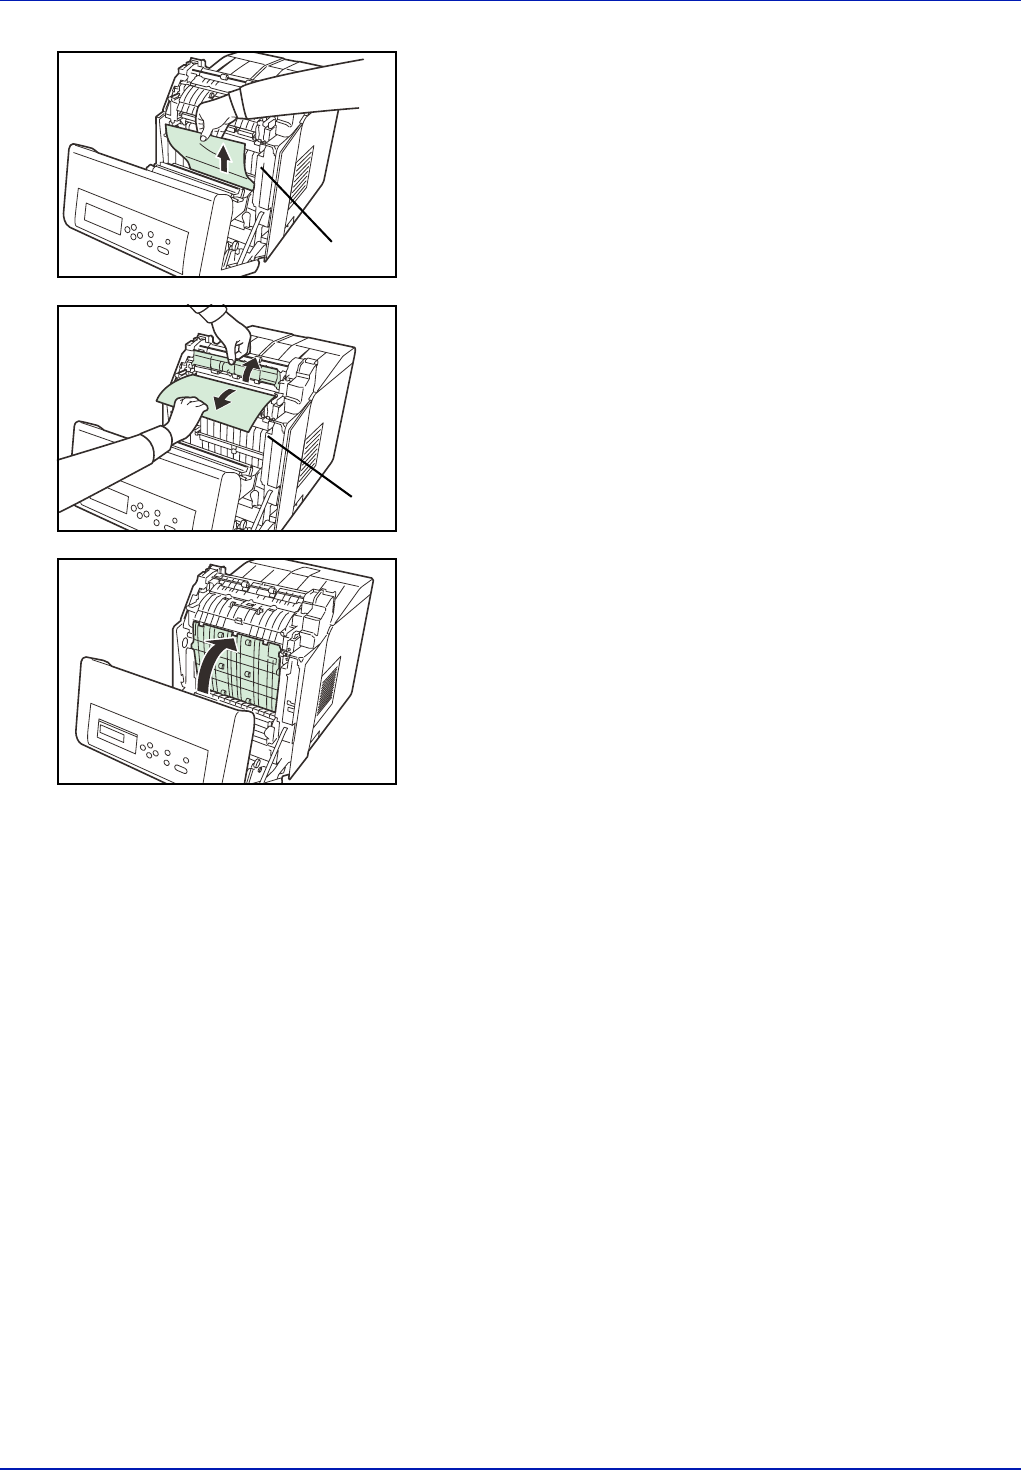
1While pulling the green front cover release lever, pull out the front
cover.
CAUTION When pulling the paper, pull it gently so as not to
tear it. Torn pieces of paper are difficult to remove and may be
easily overlooked, deterring the jam recovery.
Troubleshooting 4-13
2If paper is jammed as shown in A, remove the paper by pulling the
center up. If paper is jammed as shown in B, remove the paper by
pulling the edge.
3Close the front cover.
A
Registration
Roller
B
Registration
Roller
4-14 Troubleshooting
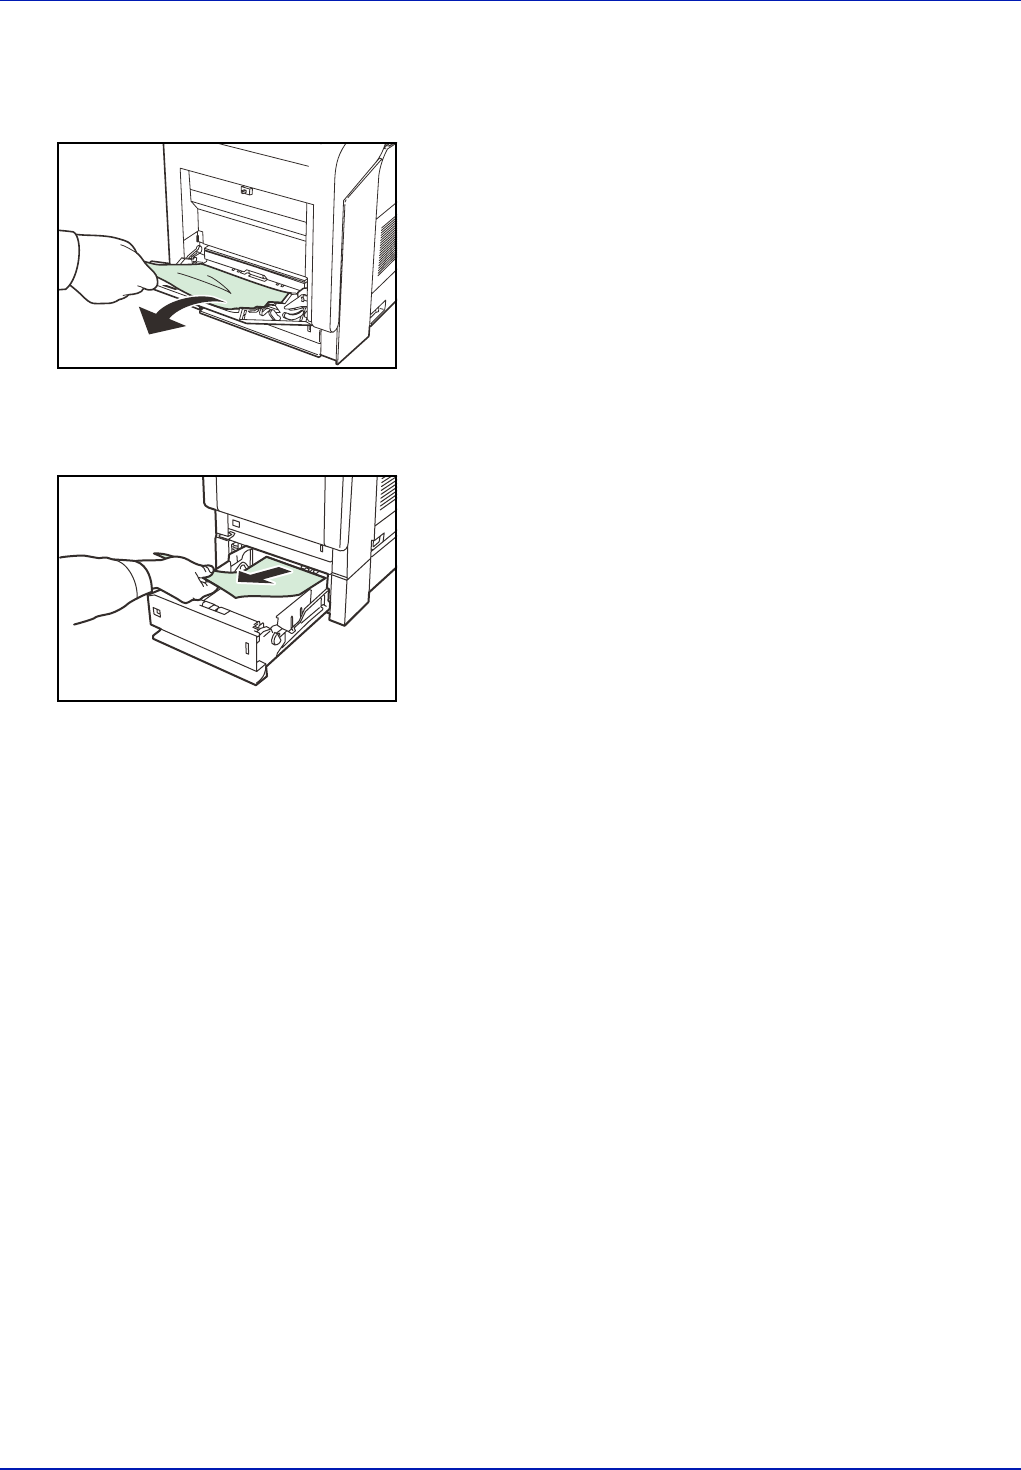
[Paper jam MP Tray]
Paper is jammed at the MP tray. Remove the jammed paper using the
procedure given below.
1Remove the paper jammed at the MP tray.
2Open and close the front cover (the paper jam error will be reset).
[Paper jam Cassette 2 (to 4)]
1If the paper jams in the paper feeder, pull out the paper feeder and
remove the jammed paper.
Specifications 5-1
5 Specifications
Note Specifications are subject to change without notice.
Item
Description
FS-C5100DN FS-C5200DN FS-C5300DN
Printing Method Electrophotographic four color (CMYK) printing using tandem (4) drum system
Printing Speeds
- Cassette
- MP Tray
A4: 21ppm, B5, A5, Letter: 23ppm Legal: 17ppm
A4: 19ppm, B5, A5, Letter: 20ppm, Legal: 17ppm
A4: 26ppm, B5, A5,
Letter: 28ppm, Legal: 22ppm
A4: 23ppm, B5, A5,
Letter: 24ppm, Legal: 19ppm
Resolution 600 dpi
First Print Out Time 10 seconds or less (Sleep: 35 seconds or less) 9.5 seconds or less (Sleep:
39.5 seconds or less)
Warm-up Time (23°C,
60%RH)
- Power on
- Sleep
51 seconds or less
25 seconds or less
40 seconds or less
30 seconds or less
Controller PowerPC440-533MHz PowerPC440-667MHz
Memory
- Standard
- Maximum
256MB
1280MB
Operating Systems Microsoft Windows 95/98/Me/2000/XP/Vista
Microsoft Windows NT4.0
Apple Macintosh OS 9
Apple Macintosh OS X
Interface
- Standard
- Option
USB: Hi-Speed USB
Network: 10BASE-T/100BASE-TX
KUIO-LV slot
-
USB: Hi-Speed USB
Network: 10BASE-T/
100BASE-TX
KUIO-LV slot
Hard Disk
Memory Card Slot 1 (Compact Flash, 256 MB or less)
Monthly Duty
- Average
- Maximum
1,500 pages
50,000 pages
2,000 pages
65,000 pages
3,000 pages
100,000 pages
5-2 Specifications
Paper Sizes
- Cassette
- MP Tray
A4, B5, A5, Folio, 8 1/2 × 14"(Legal), 8 1/2 × 11"(Letter), Oficio II, Executive, ISO B5,
Envelope C5, 16K, and Custom
A4, B5, A5, Folio, 8 1/2 × 14"(Legal), 8 1/2 × 11"(Letter), Oficio II, Statement, Executive,
A6, B6, ISO B5, Env. Monarch, Envelope #10, Envelope #9, Envelope #6, Envelope DL,
Envelope C5, 16K, Hagaki, Oufuku-Hagaki, Youkei 2, Youkei 4, and Custom
Paper Types
- Cassette
- MP Tray
Plain, preprinted, bond, recycled, rough, letterhead, color, prepunched, high quality, and
custom
Plain, transparency, preprinted, labels, bond, recycled, vellum, rough, letterhead, color,
prepunched, envelope, cardstock, coated, thick, high quality, and custom
Paper Feed Source Capacity
- Cassette
- MP Tray
250 sheets (80g/m2)
150 sheets (80g/m2)
500 sheets (80g/m2)
150 sheets (80g/m2)
Margin 4 mm (left, right, top and bottom)
Output Tray Capacity
- Face-down Tray 250 sheets (80g/m2)
Operation Environment
- Temperature
- Relative Humidity
- Altitude
- Illumination
10 to 32.5 °C (50 to 90.5 °F)
15 to 80 %
2,000m (6,562 feet) maximum
1,500 lux maximum
Power Source 120 V, 60 Hz, max. 11.4 A (U.S.A./Canada) 220-240 V, 50 Hz/60 Hz, max. 6.1 A
(European countries) Max. allowable voltage fluctuation: ±10 % Max. allowable frequency
fluctuation: ±2 %
Power Consumption Maximum :1060W
During printing : 503W
During standby: 126W
During sleep mode : 18W
Operating noise (in
accordance with ISO7779
[Bystander Position, sound
pressure level at the front])
During printing: LpA = 52dB (A)
During standby: LpA = 36dB (A)
During sleep mode: immeasurably low
Dimensions (W x D x H) 345 × 518 × 455mm
13-5/8 × 18-1/2 × 17-9/10"
345 × 518 × 480mm
13-5/8 × 20-2/5 × 18-9/10"
Weight Approx. 27kg (59-1/2lbs) Approx. 28kg
Item
Description
FS-C5100DN FS-C5200DN FS-C5300DN

A1
We recommend the use of our own brand supplies. We will not be liable for any damage caused by
the use of third party supplies in this machine.
2008

Rev. 1.0 2008.2