KYOCERA Document Solutions 2HS0108 Laser Printer with RFID User Manual
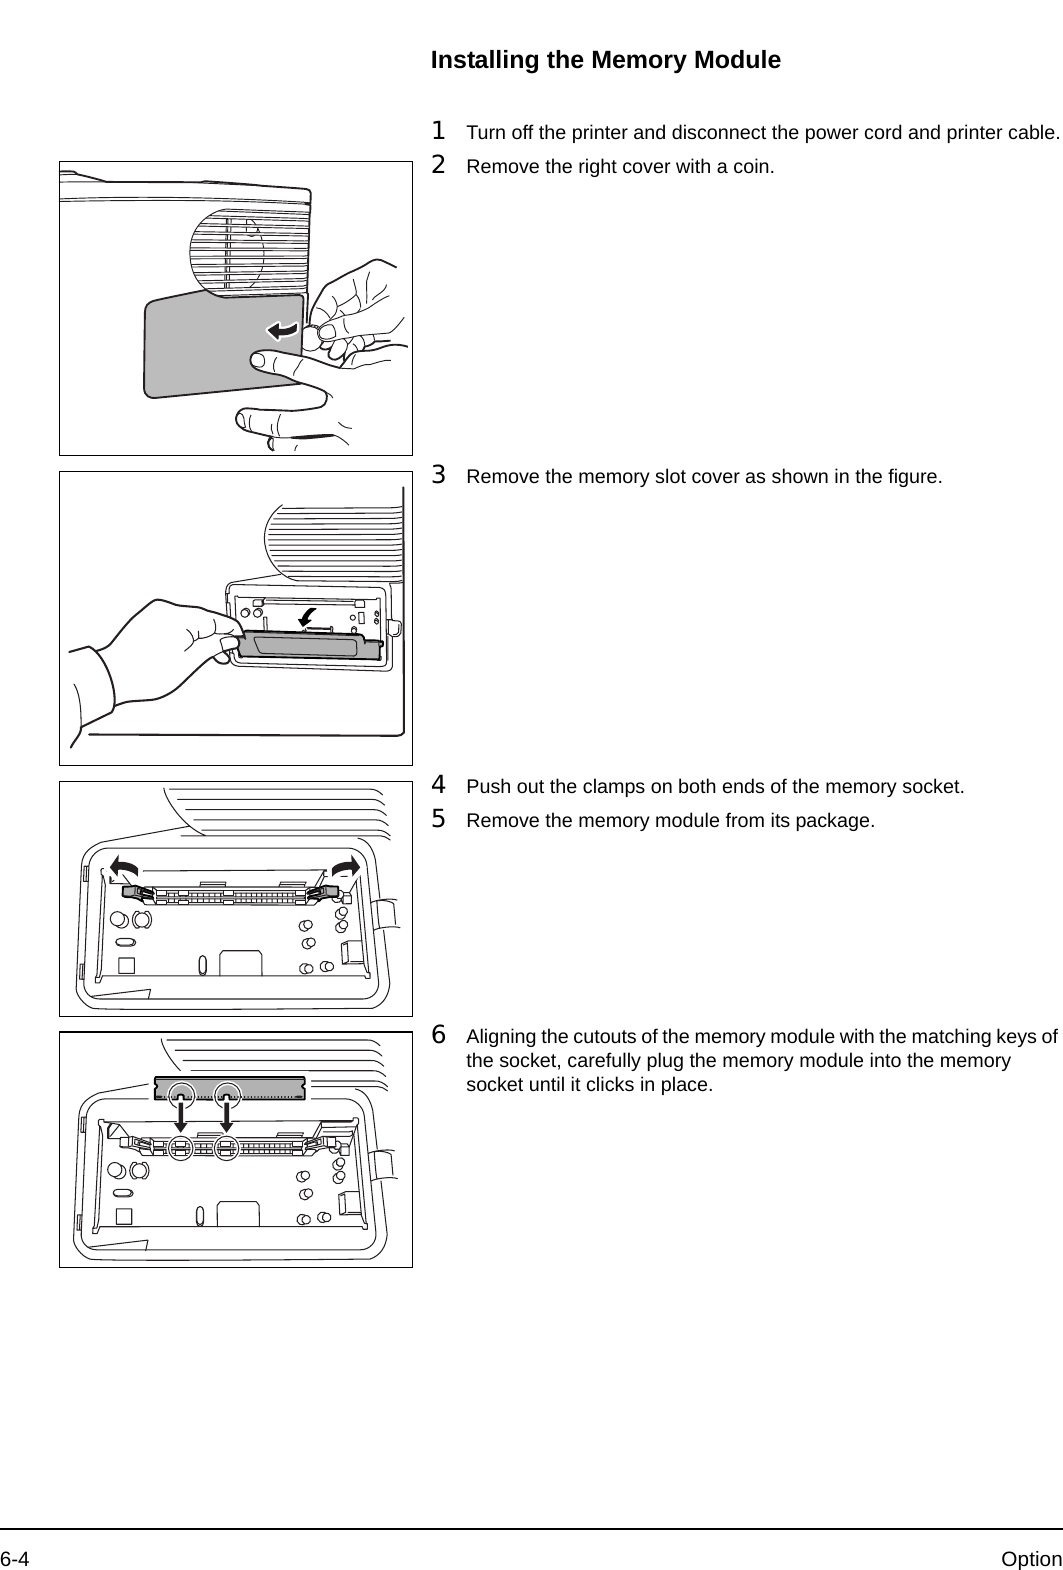
KYOCERA Document Solutions Inc. Laser Printer with RFID
UserManual.wiki
>
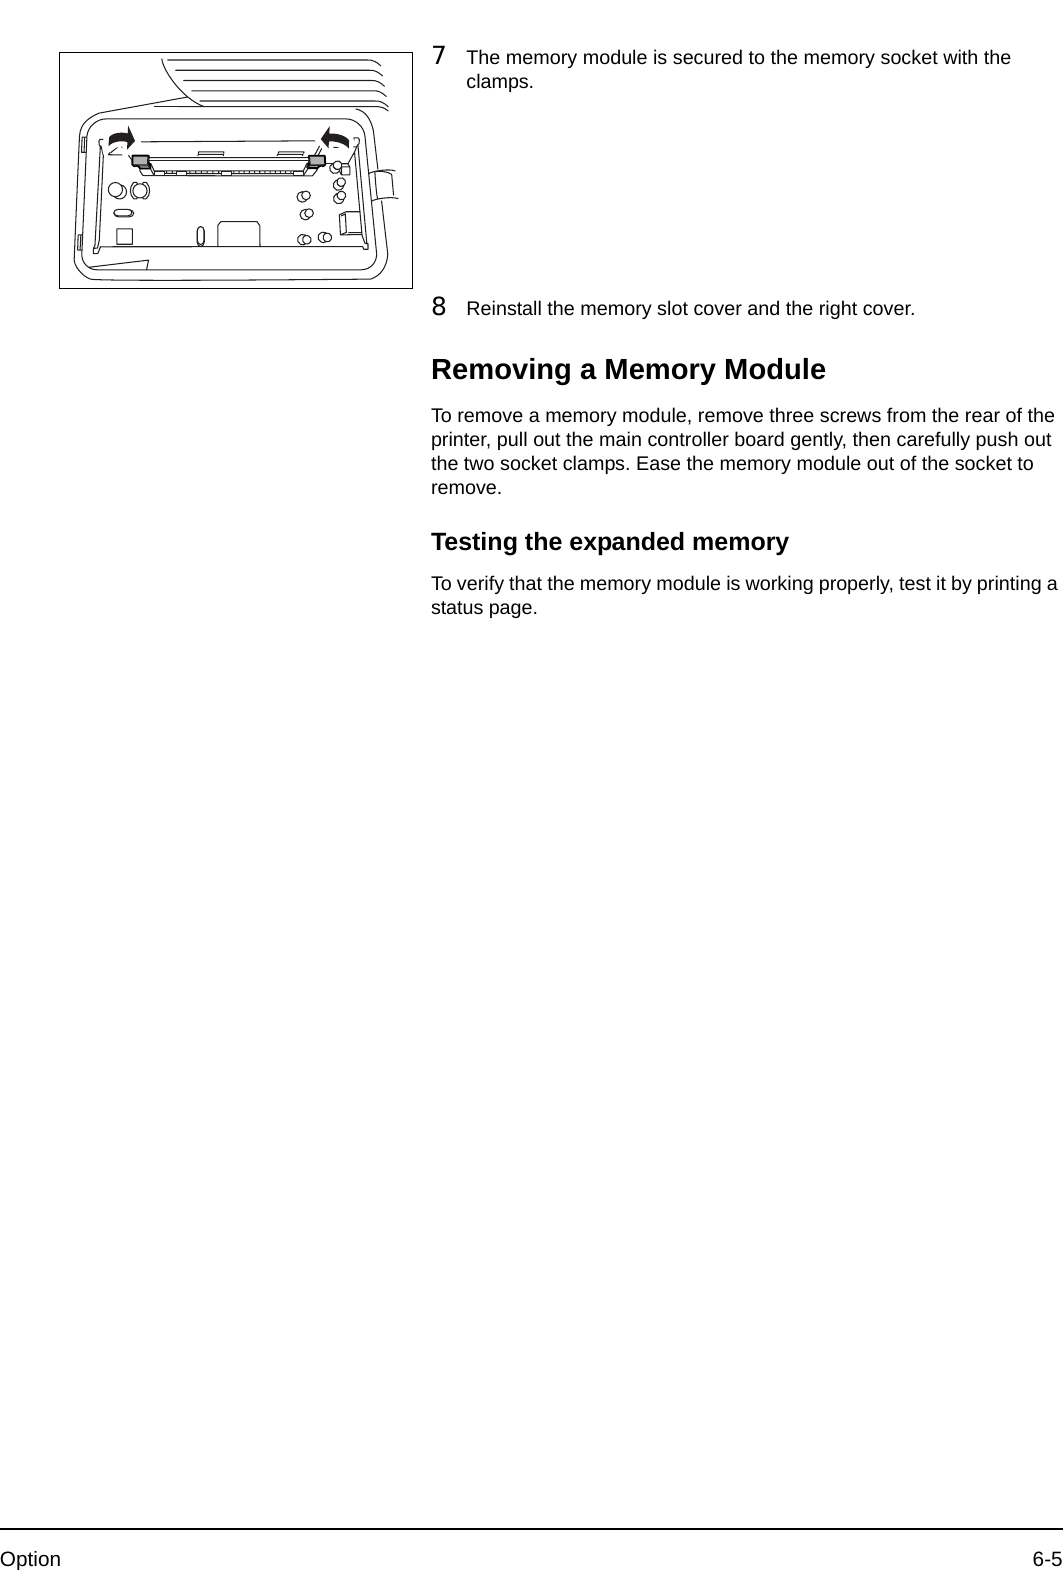
KYOCERA Document Solutions
>
2HS0108 User Manual
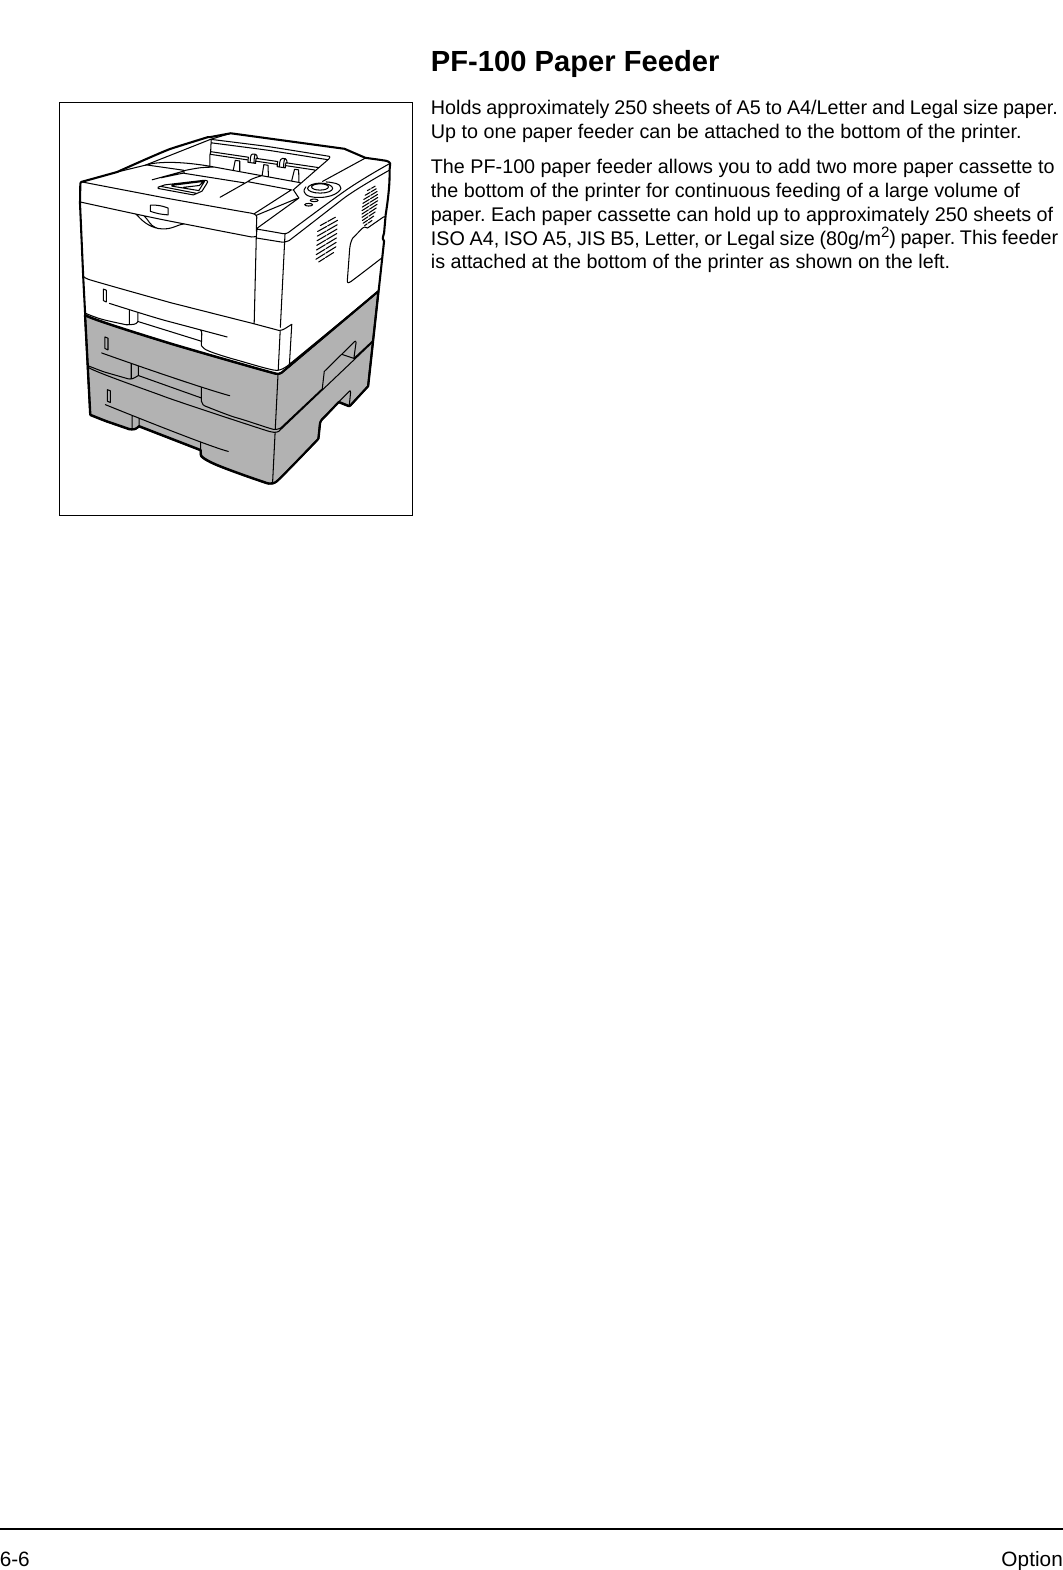
user manual
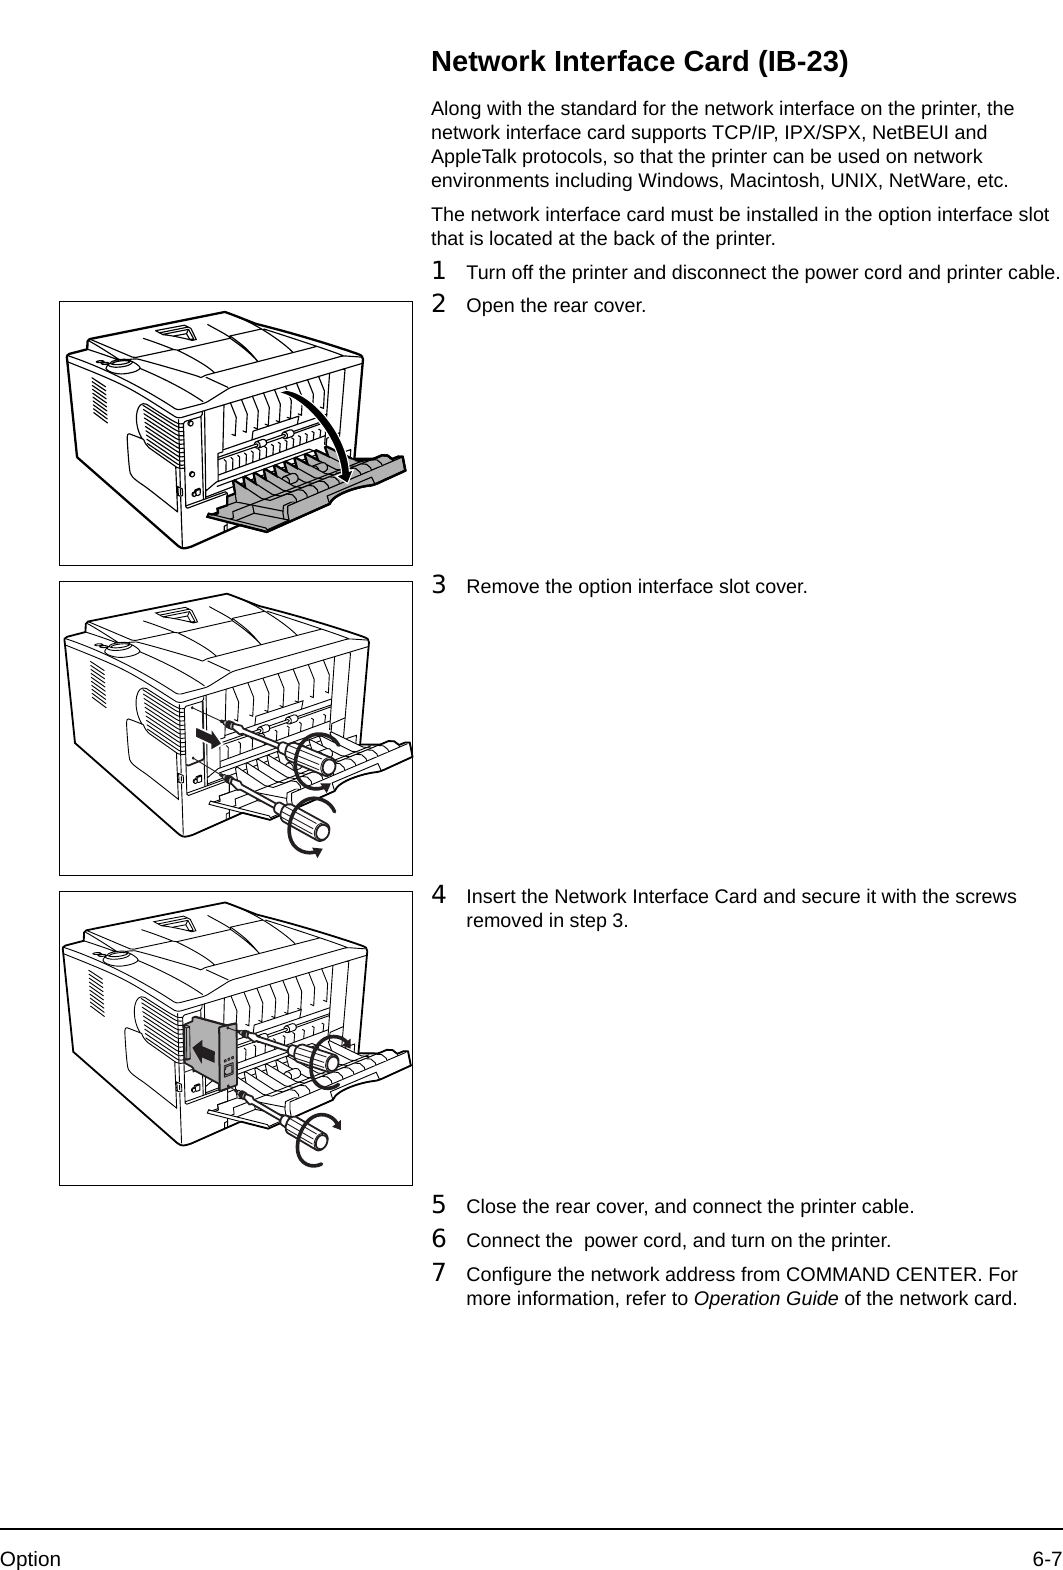
Navigation menu
Upload a User Manual
Namespaces
Wiki Guide
HTML
PDF
Info
Views
User Manual
Discussion / Help
Navigation


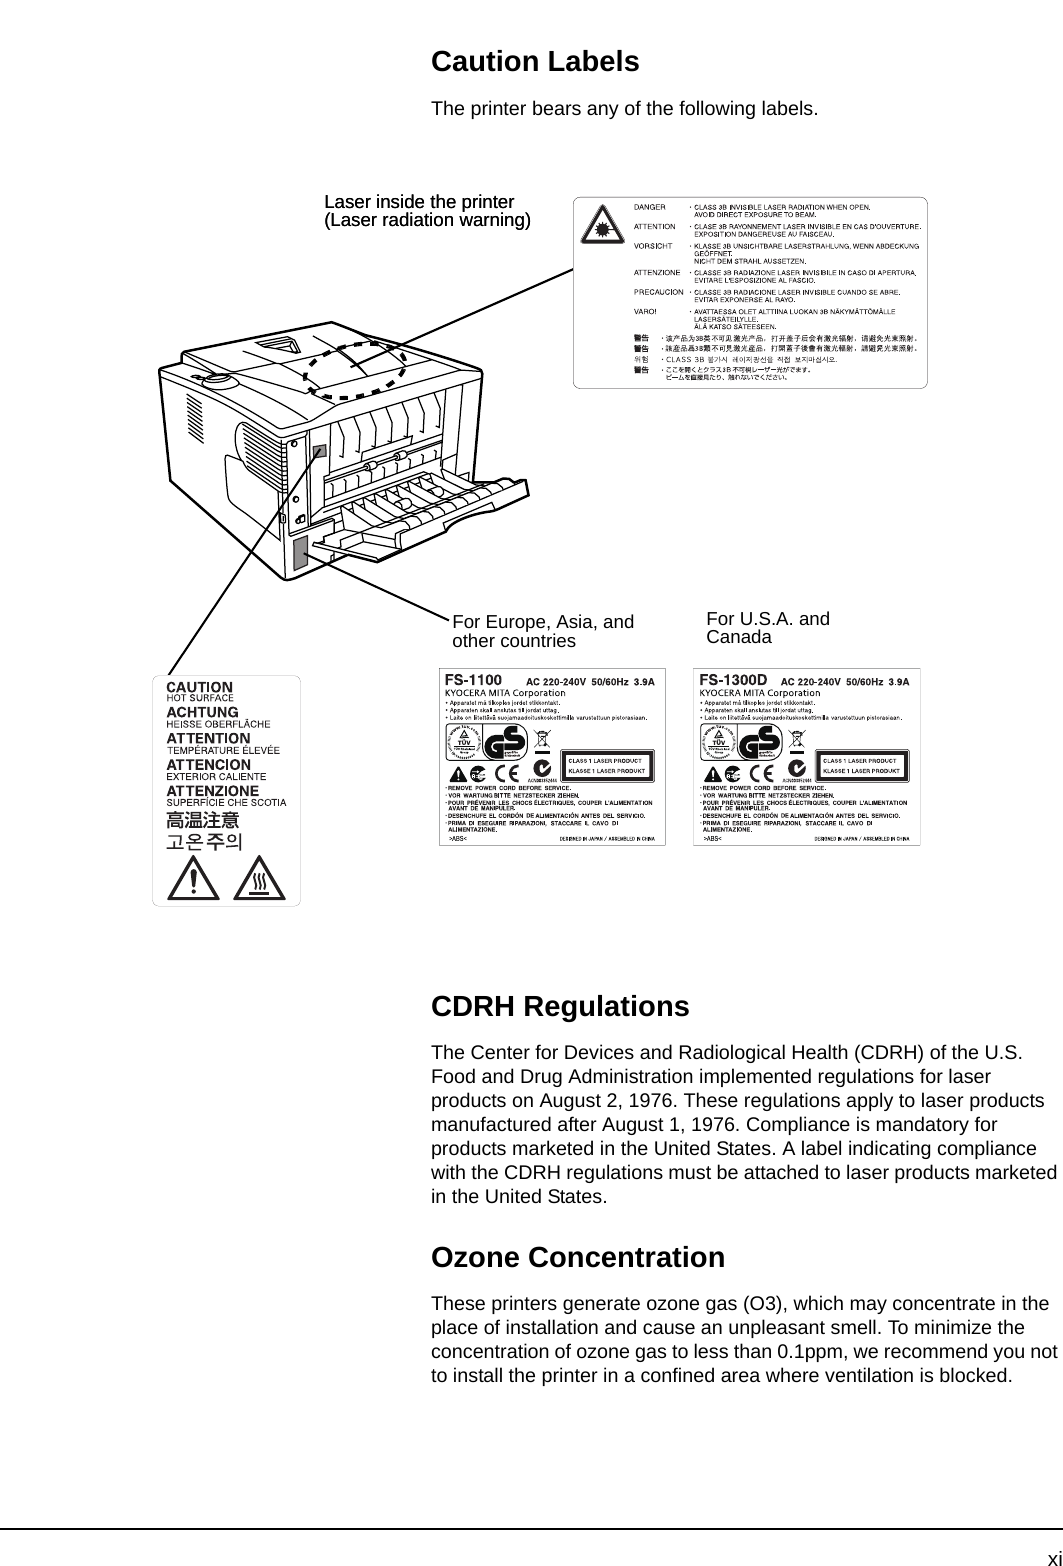
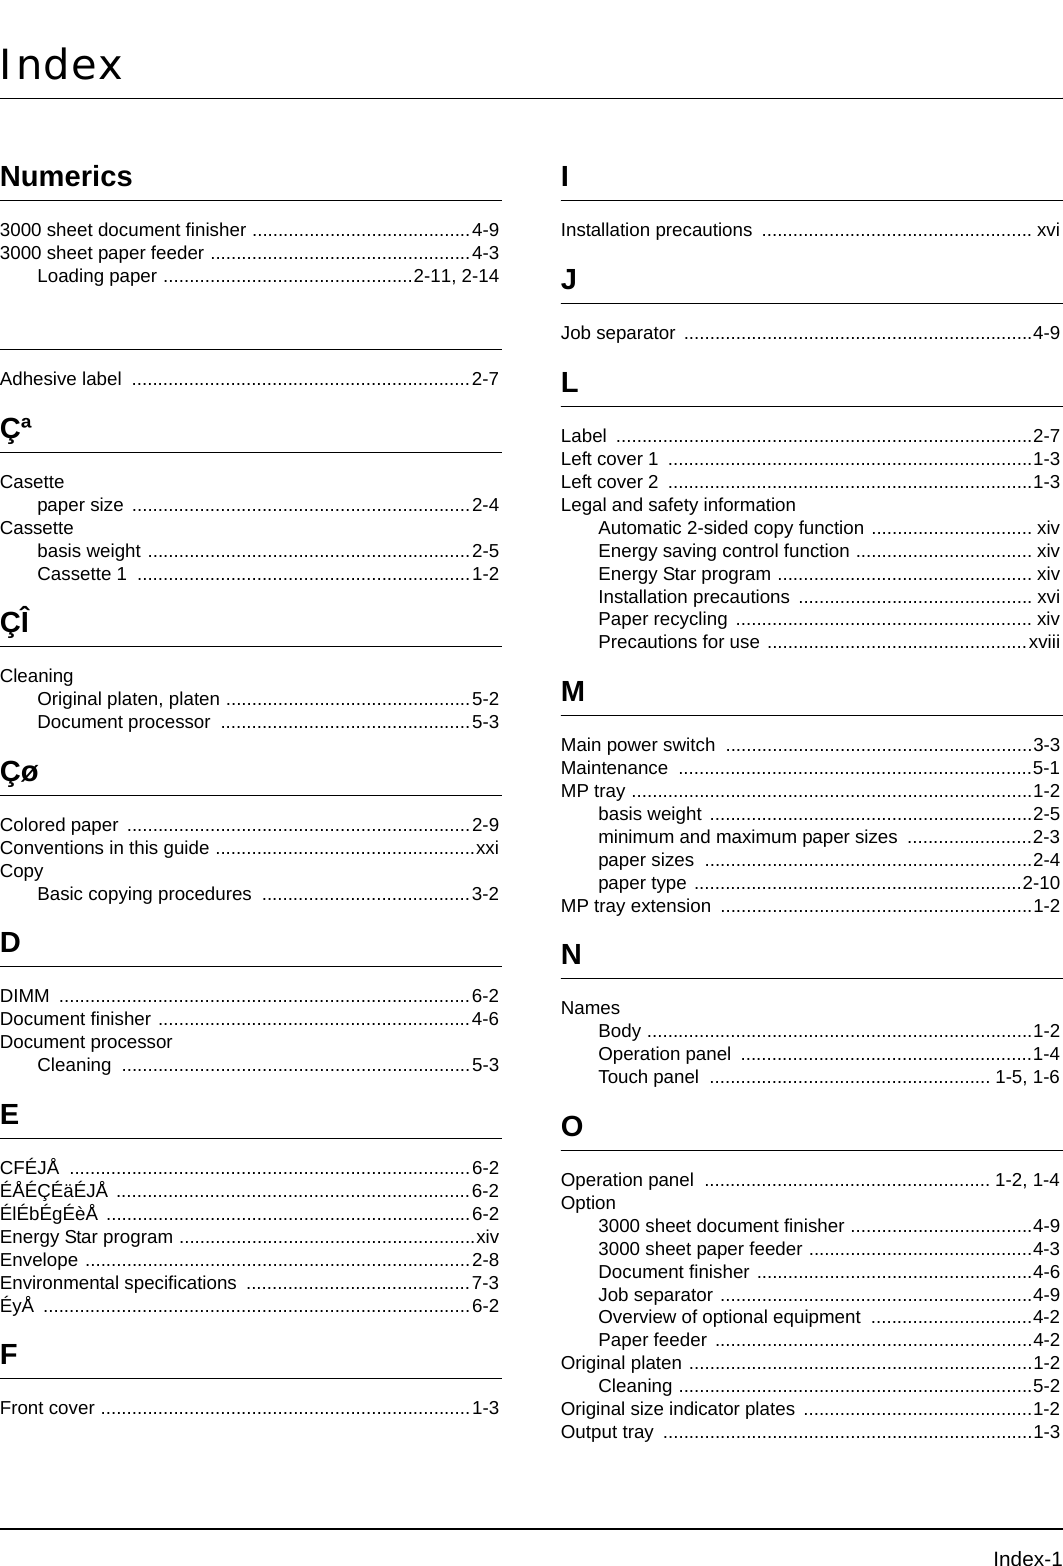
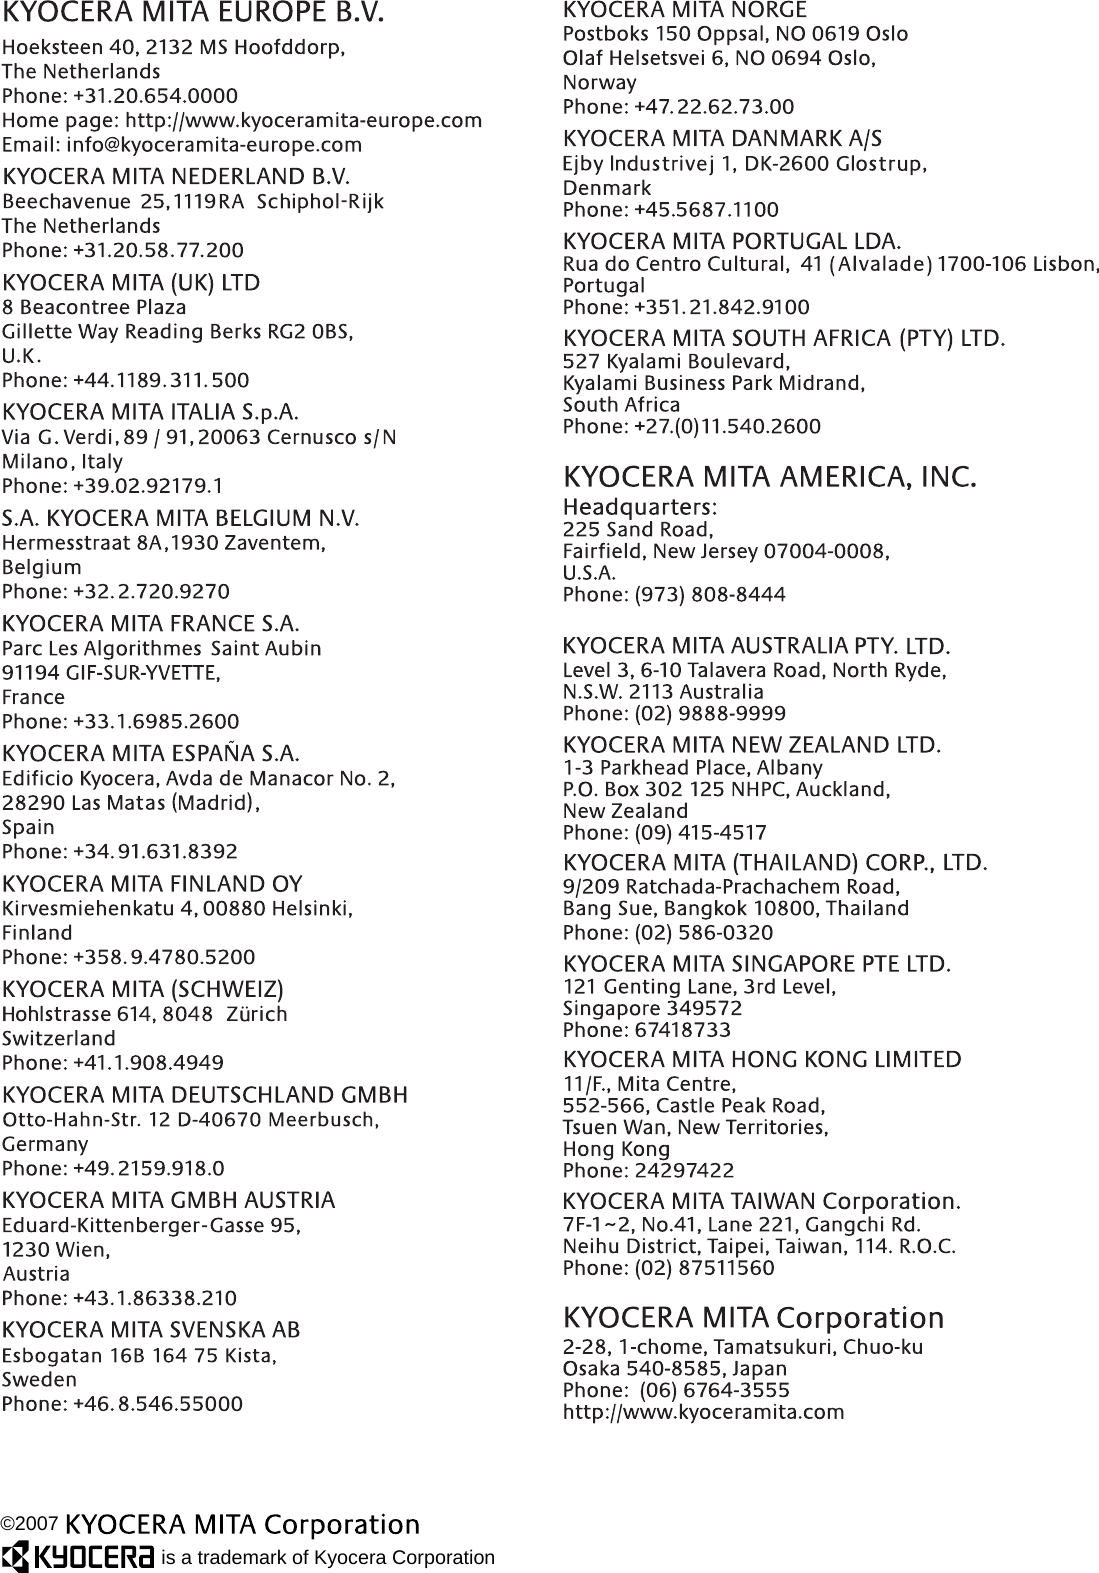
![xvSymbolsThe sections of this guide and parts of the machine marked with symbols are safety warnings meant to protect the user, other individuals and surrounding objects, and ensure correct and safe usage of the machine. The symbols and their meanings are indicated below.The following symbols indicate that the related section includes safety warnings. Specific points of attention are indicated inside the symbol.The following symbols indicate that the related section includes information on prohibited actions. Specifics of the prohibited action are indicated inside the symbol. The following symbols indicate that the related section includes information on actions which must be performed. Specifics of the required action are indicated inside the symbol.Please contact your service representative to order a replacement if the safety warnings in this Operation Guide are illegible or if the guide itself is missing. (fee required)DANGER: Indicates that serious injury or even death will very possibly result from insufficient attention to or incorrect compliance with the related points.WARNING: Indicates that serious injury or even death may result from insufficient attention to or incorrect compliance with the related points.CAUTION: Indicates that personal injury or mechanical damage may result from insufficient attention to or incorrect compliance with the related points..... [General warning].... [Warning of danger of electrical shock].... [Warning of high temperature].... [Warning of prohibited action].... [Disassembly prohibited].... [Alert of required action].... [Remove the power plug from the outlet].... [Always connect the machine to an outlet with a ground connection]](https://usermanual.wiki/KYOCERA-Document-Solutions/2HS0108/User-Guide-842394-Page-17.png)

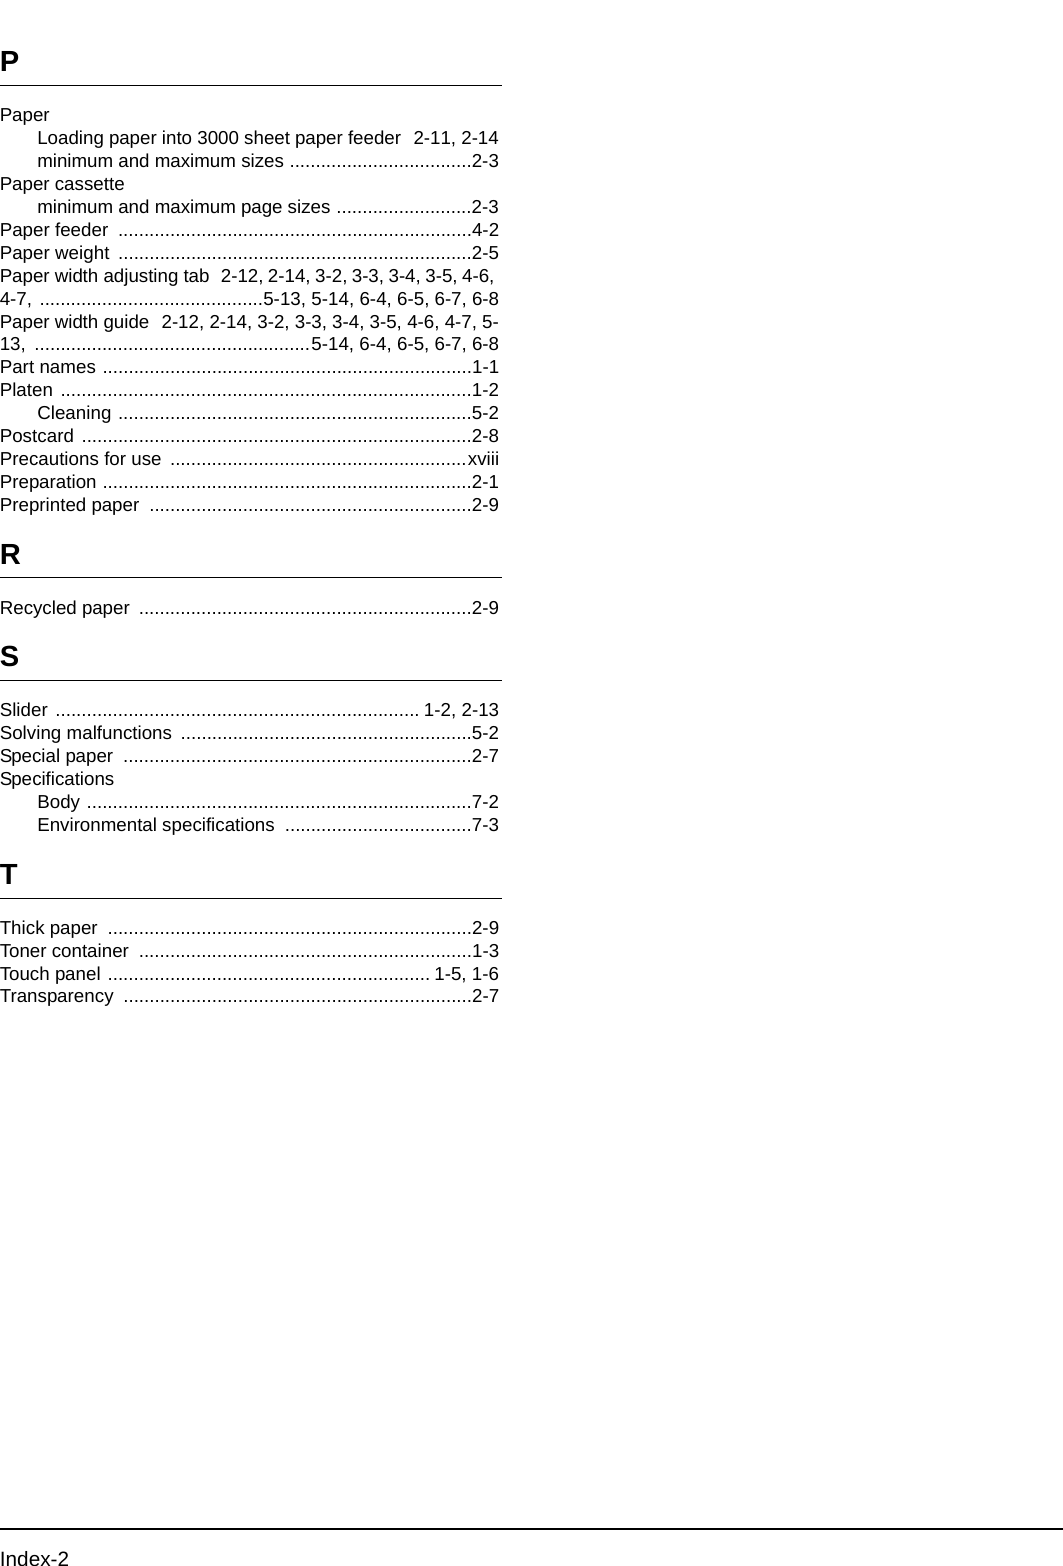
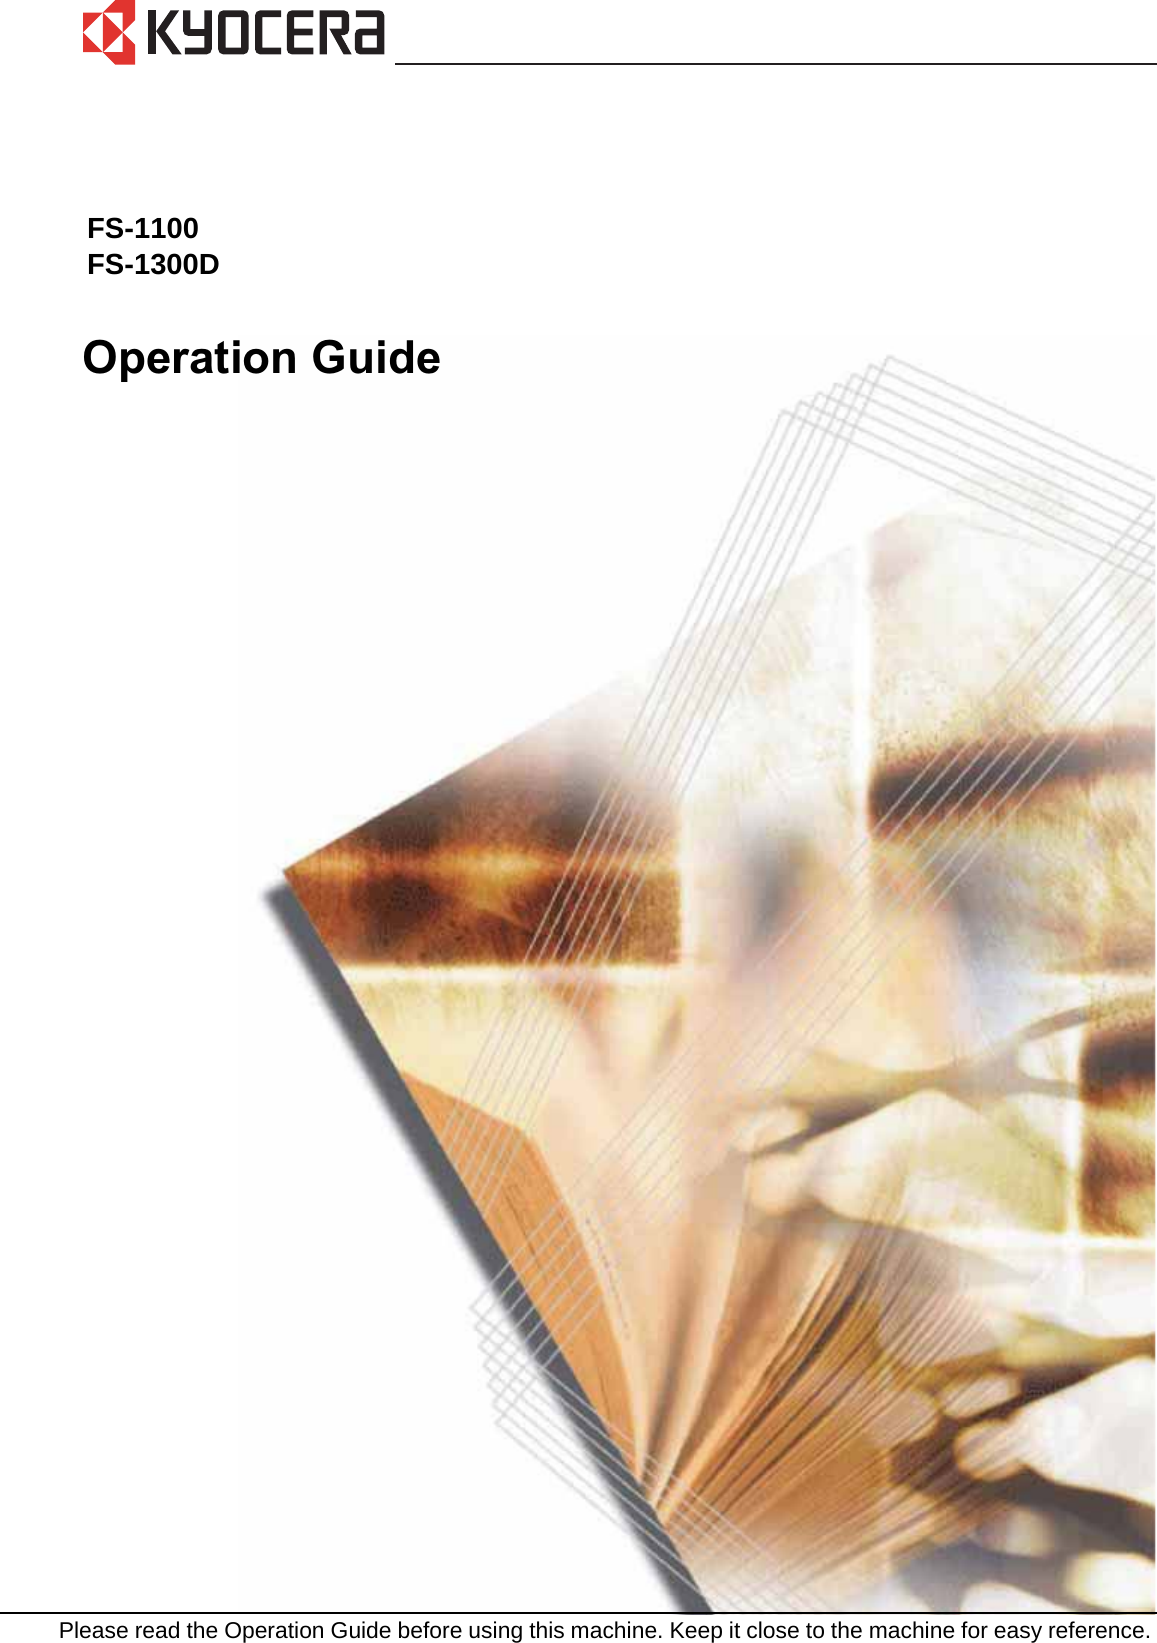
![Introduction-xxiConventions in This GuideThis manual uses the following conventions.Convention Description ExampleItalic Typeface Used to emphasize a key word, phrase or reference to additional information.Close the front cover.Refer to Toner Container Replacement on page 3-3.Bold Used to denote operation panel keys.Press [GO].To start printing, click OK.Note Used to provide additional or useful information about a function or feature.Note For information about storing the pin, refer to step 10.Important Used to provide important information. IMPORTANT Ensure paper is not folded, curled, or damaged.Caution Cautions are statements that suggest mechanical damage as a result of an action.CAUTION For safety, always unplug the power cord before cleaning the machine.Warning Used to alert users to the possibility of personal injury.WARNING High voltage is present in the charger section.](https://usermanual.wiki/KYOCERA-Document-Solutions/2HS0108/User-Guide-842394-Page-23.png)

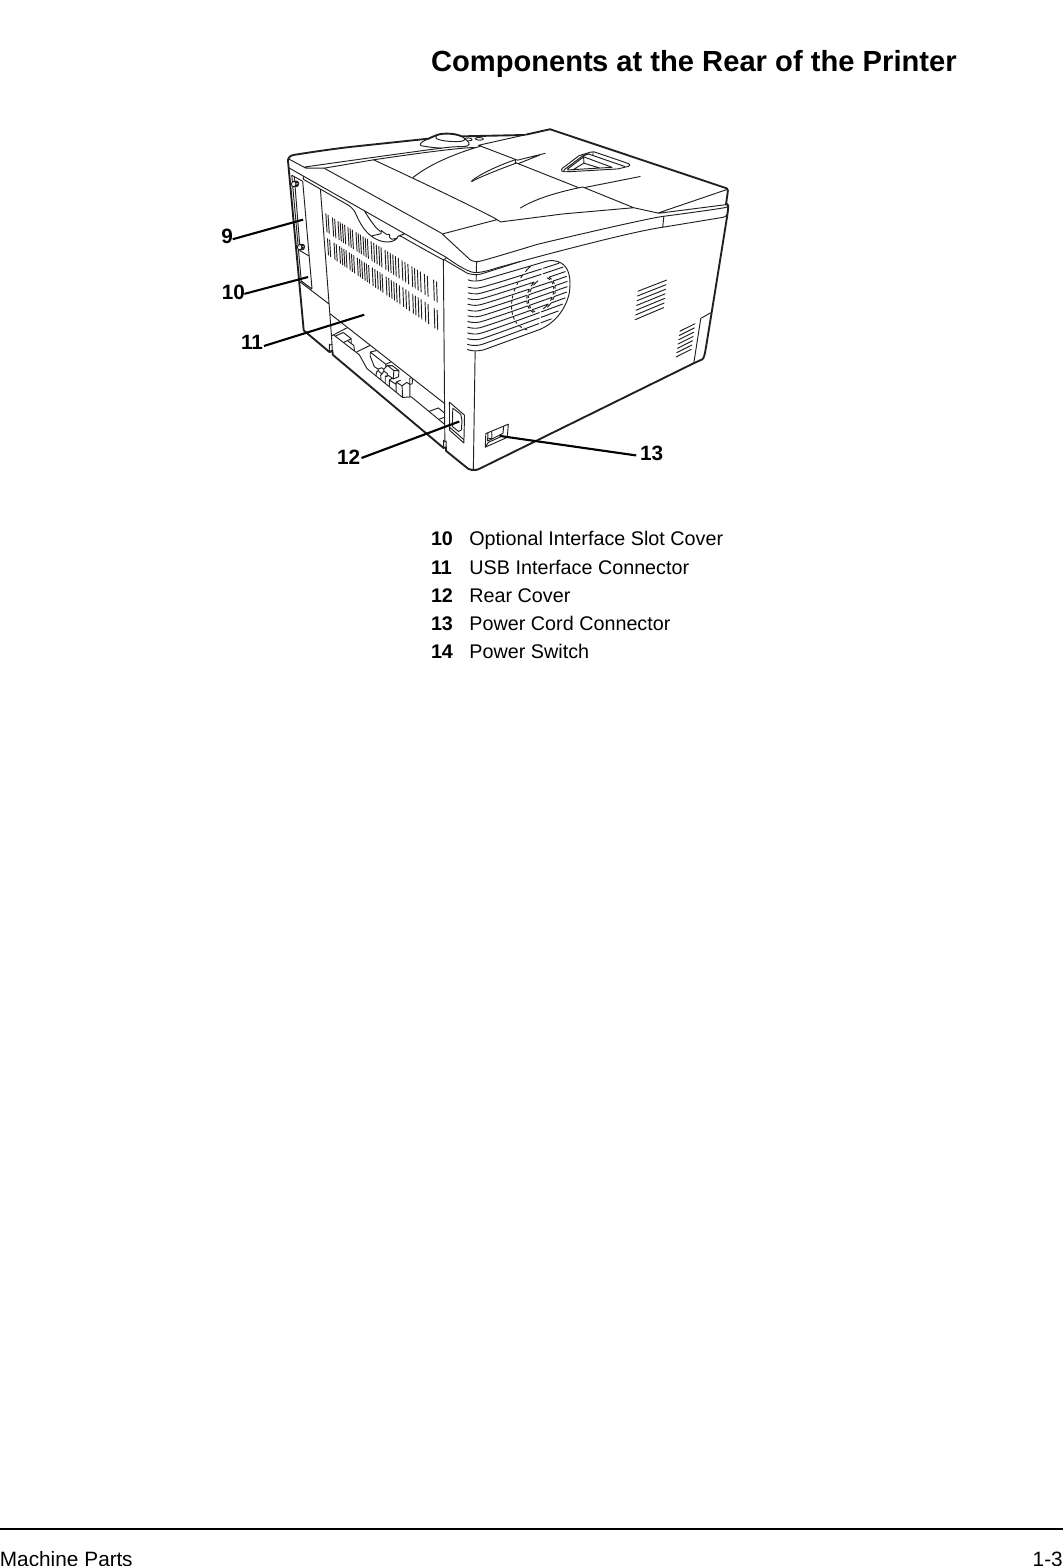
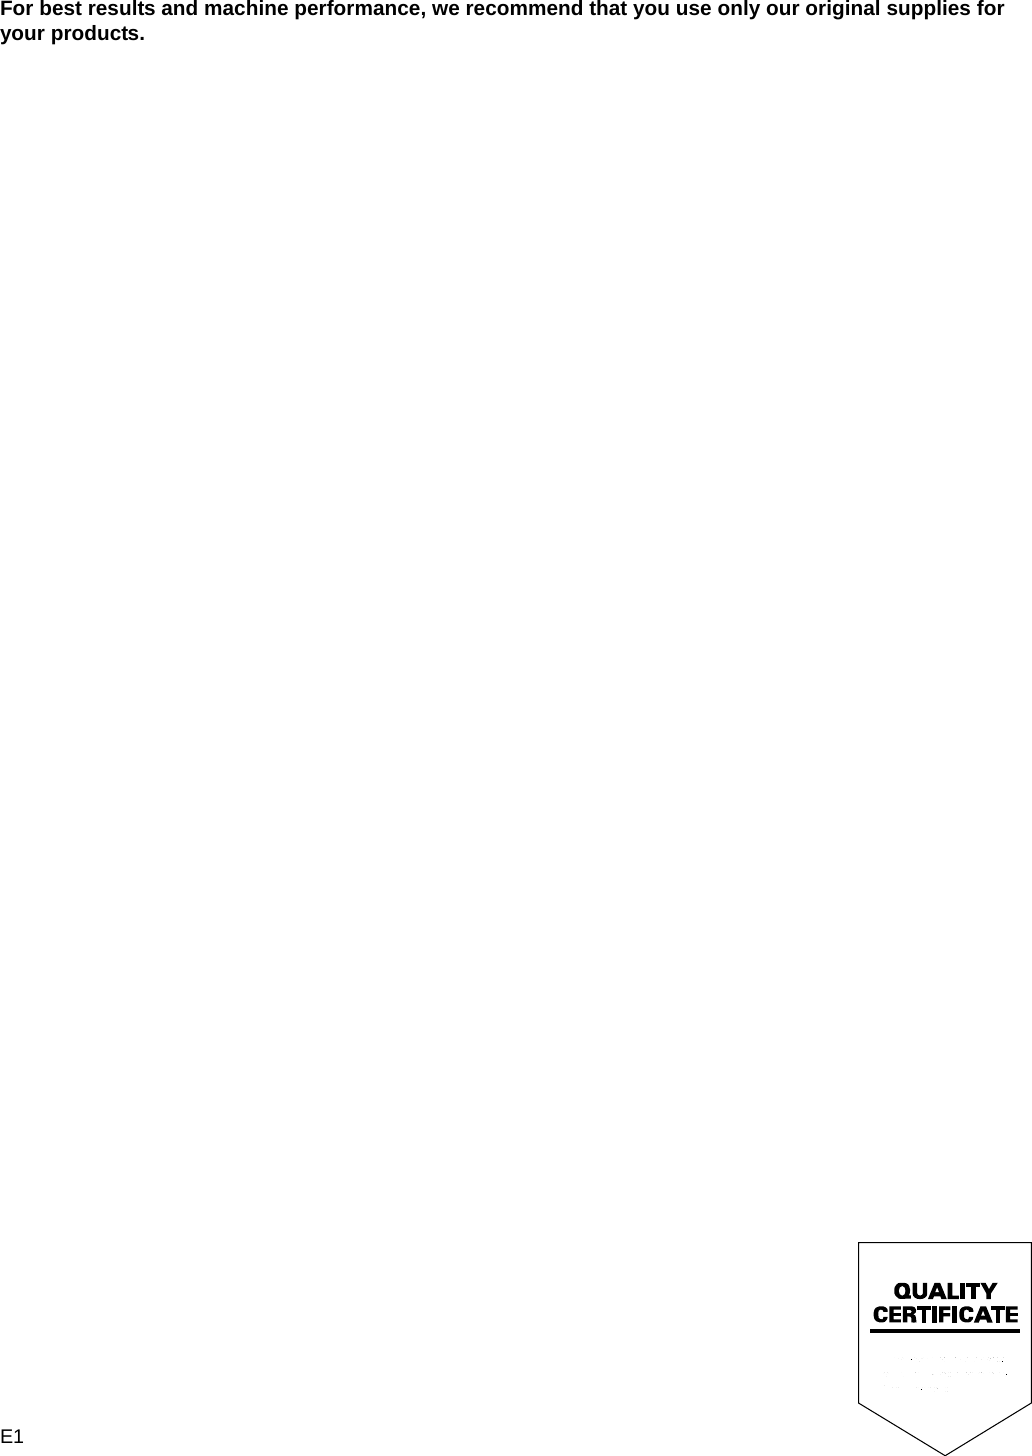
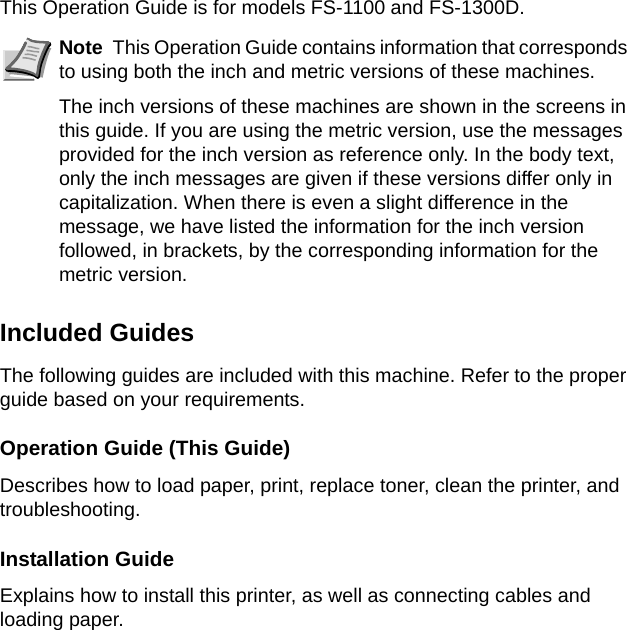
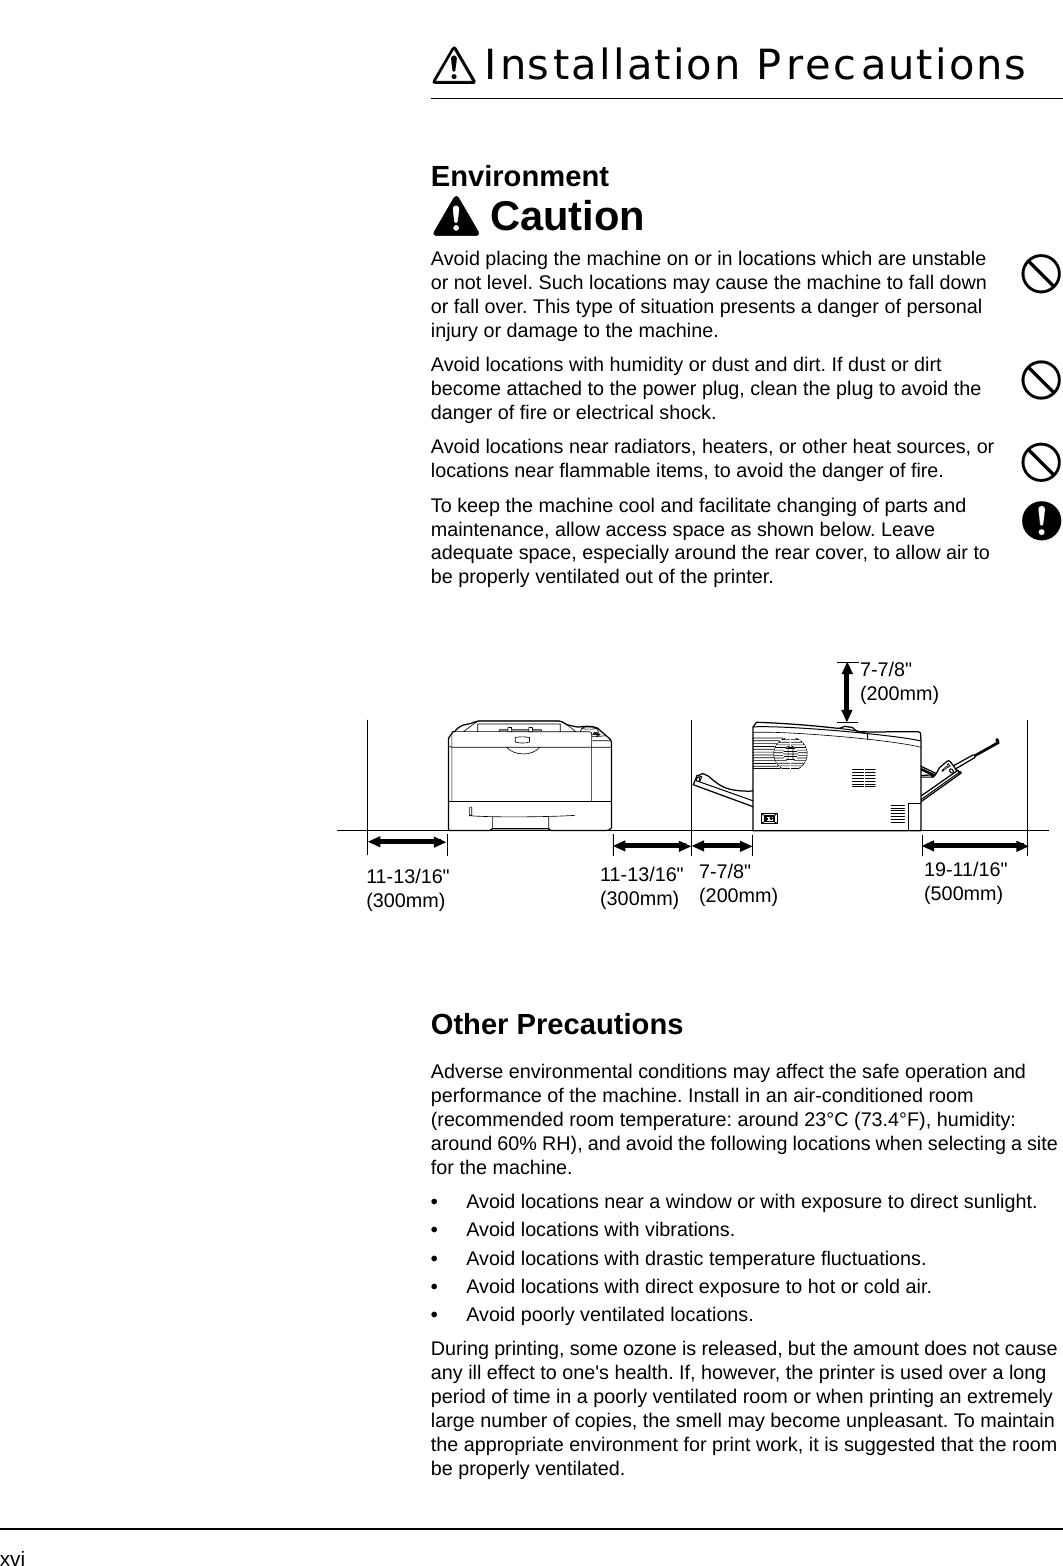
![1-4 Machine PartsOperation Panel1 Ready Indicator2 Attention Indicator3 Toner Indicator4Data Indicator5 Paper Indicator6 Jam Indicator7 [Cancel] Key8 [GO] Key21345678](https://usermanual.wiki/KYOCERA-Document-Solutions/2HS0108/User-Guide-842394-Page-28.png)
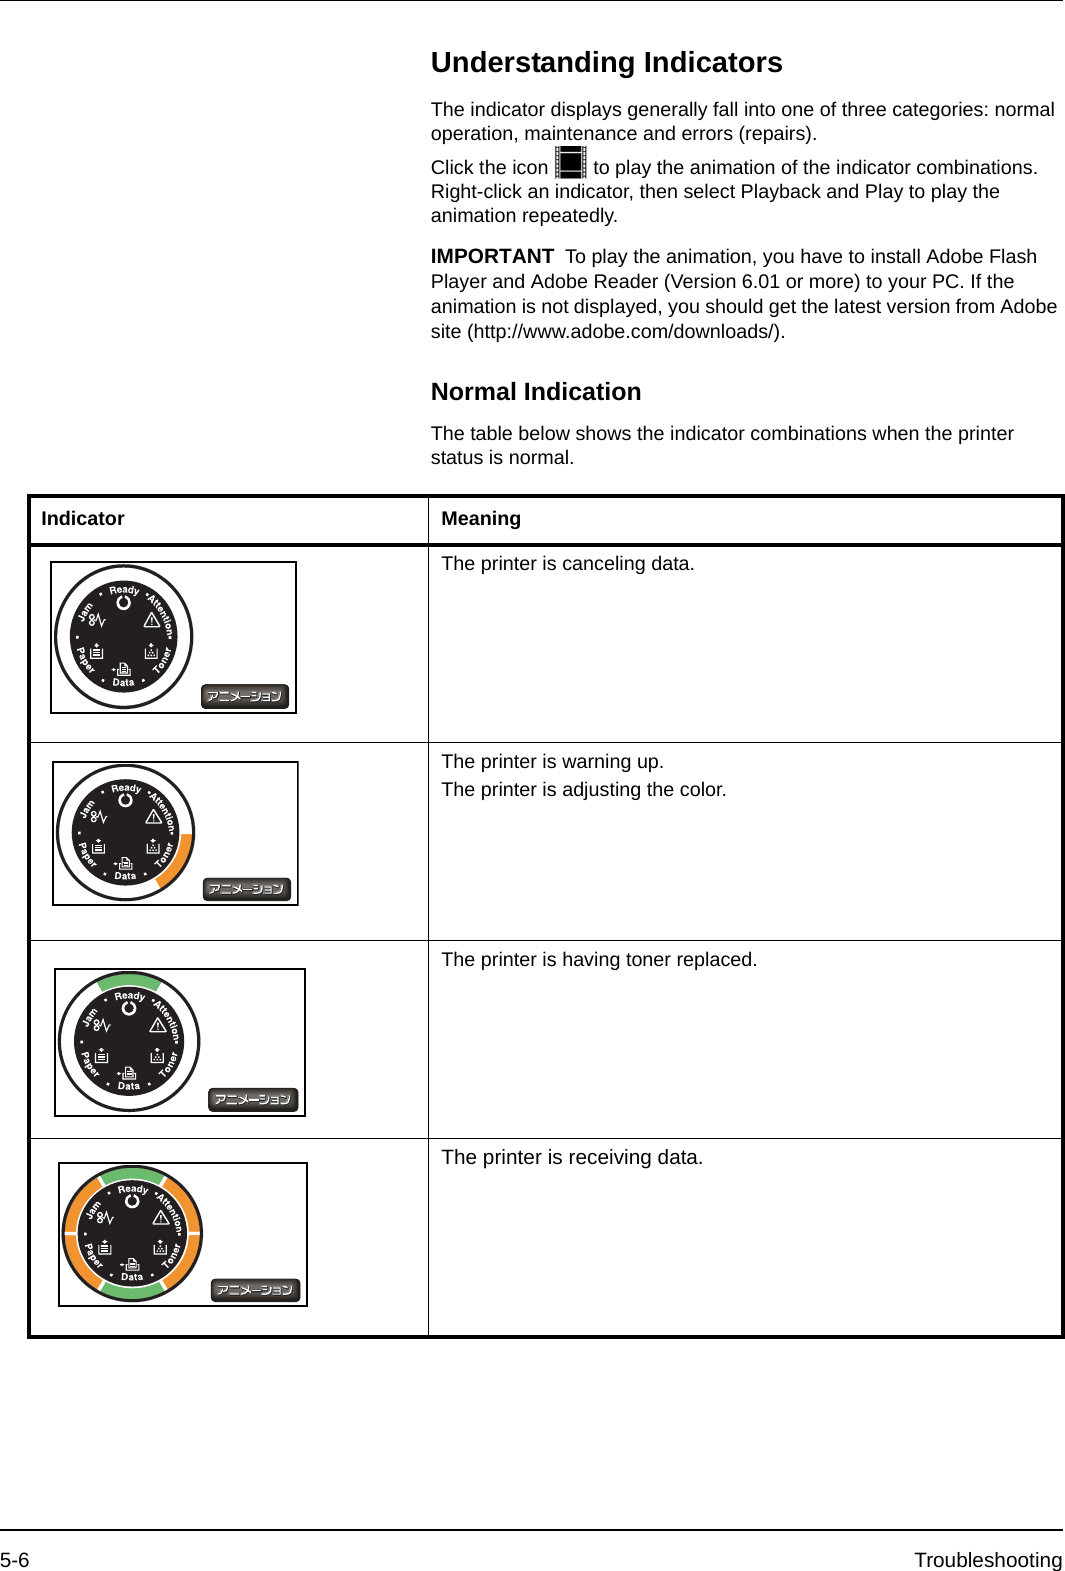
![Machine Parts 1-5IndicatorsThere are six indicators located on the top right of the printer. The indicators are used to identify the status of the printer at any time. To identify the printer status, check the indicators on the printer and then refer to the table below.Indicator Status MeaningReady (Green) Lit Indicates online status (printing is possible).Fast Flashing Offline status. You cannot print, but the printer can receive data. Slow Flashing The printer is in sleep mode. Printing resumes when the [GO] is pressed.Off The printer has stopped because an error occurred.Data (Green) Lit The printer is processing data or is accessing to memory.Fast Flashing The printer is receiving data.Off The printer is not processing data.Jam (Amber) Lit A paper jam has occurred or the cassette is not inserted properly.Off The printer status is normal.Paper (Amber) Lit The paper has run out when printing.Fast Flashing The specified cassette or paper feeder has no paper at Ready status. The cassette is not inserted properly.Off The printer status is normal.Attention (Amber) Lit An error has occurred because the printer cover is open, but printing resumes when the [GO] is pressed.While an optional feeder is installed and the feeder is selected as a paper source, the paper cassette of the main unit (CASS1) is not installed correctly.Fast Flashing The warning status other than Jam, Toner, Paper, and Attention.Off The printer status is normal.Toner (Amber) Lit The printer has stopped because the toner is exhausted.Fast Flashing The toner is running low.Off The printer status is normal.Note For other combinations of the six indicators, call for service. Status Monitor (software bundled with the KX driver) will provide more detailed information about the printer status.](https://usermanual.wiki/KYOCERA-Document-Solutions/2HS0108/User-Guide-842394-Page-29.png)
![1-6 Machine PartsKeysRefer to the following table for the name and description of the basic functions of each key.Key Status Operation FunctionCancel - Press for 1 second or more Cancels the data from the PCGO At Ready Press momentarily Switches On-line/Off-linePress for 3 to 10 seconds The printer is in sleep mode. Printing resumes when the [GO] is pressed.Press for 10 seconds or more The printer has stopped because an error occurred.At Error Press momentarily The printer is processing data or is accessing to memory.Paper Empty Press momentarily The printer status is normal.](https://usermanual.wiki/KYOCERA-Document-Solutions/2HS0108/User-Guide-842394-Page-30.png)


![Connecting and Printing 3-9Configuration ToolThe Configuration Tool is a Status Monitor function that allows you to check and/or change the settings for printers not included in the KX driver. When you install the KX driver, you can choose to install the Configuration Tool as an optional function.The Configuration Tool can be used for printers connected to the PC via a USB cable. If a printer is connected via a network cable, the COMMAND CENTER starts up.For details about the Configuration Tool, refer to its help file.Accessing the Configuration ToolFollow these steps to display the Configuration Tool on the desktop.1Right-click the printer icon in the Windows taskbar.2Select "Configure the Printing System" from the menu. The Configuration Tool window appears.Exiting the Configuration ToolUse either of the methods listed below to exit the Configuration Tool.•Exit using the Close button:Click the Close button in the top-right corner of the Configuration Tool window.•Exit using the [OK] or [Cancel] button:Clicking [OK] exits the Configuration Tool after applying the modified printer settings. Clicking [Cancel] exits the Configuration Tool without applying the modified printer settings.Note The contents of the Properties dialog box will vary depending on the installed optional devices, and whether the device is connected by a network interface or a local interface.](https://usermanual.wiki/KYOCERA-Document-Solutions/2HS0108/User-Guide-842394-Page-55.png)
![Connecting and Printing 3-11Printer TabThe Printer tab allows you to set print processing parameters that are not available in the KX driver. As well as the printing density and form feed timeout, you can change the memory size used for processing raster data such as bitmap and JPEG files.Connection TabYou can use the Connection tab to set the emulation. You can also use this tab to change the buffer memory size and buffer mode used on the host for communication processing.Data TabThe Data tab fetches and lists the data used in other communication processes, such as PRESCRIBE. Select a data type and click [View] to fetch and display a list of the target data from the printer. The information displayed includes the name, type and storage location.](https://usermanual.wiki/KYOCERA-Document-Solutions/2HS0108/User-Guide-842394-Page-57.png)
![3-12 Connecting and PrintingOthers TabThe Others tab enables you to configure the printer settings shown below.Item DescriptionAuto sleep Configures the amount of time when the printer automatically enters Sleep Mode. Click [Advanced] to turn Auto sleep on or off. EcoFuser Enables or disables the EcoFuser. Select On to reduce the power consumption to a minimum by turning off the heater of the fixing unit at Sleep Mode. The default setting is On.Panel lock Locks or unlocks the operation panel. Locking the operation panel disables key operations from the panel.RAM disk Enables or disables RAM disk mode. Enabling the RAM disk allows you to use it as a temporary storage area for data such as font files or the contents of the receive buffer. You can also specify the RAM disk format by clicking [Advanced] when the RAM disk is enabled.](https://usermanual.wiki/KYOCERA-Document-Solutions/2HS0108/User-Guide-842394-Page-58.png)


![Troubleshooting 5-7The printer is receiving data.Printing resumes when the [GO] is pressed.The printer is printing the last page after waiting.Printing is possible.Offline status. You cannot print, but the printer can receive data.The printer is in sleep mode. Printing resumes when the [GO] is pressed.Indicator Meaning](https://usermanual.wiki/KYOCERA-Document-Solutions/2HS0108/User-Guide-842394-Page-77.png)
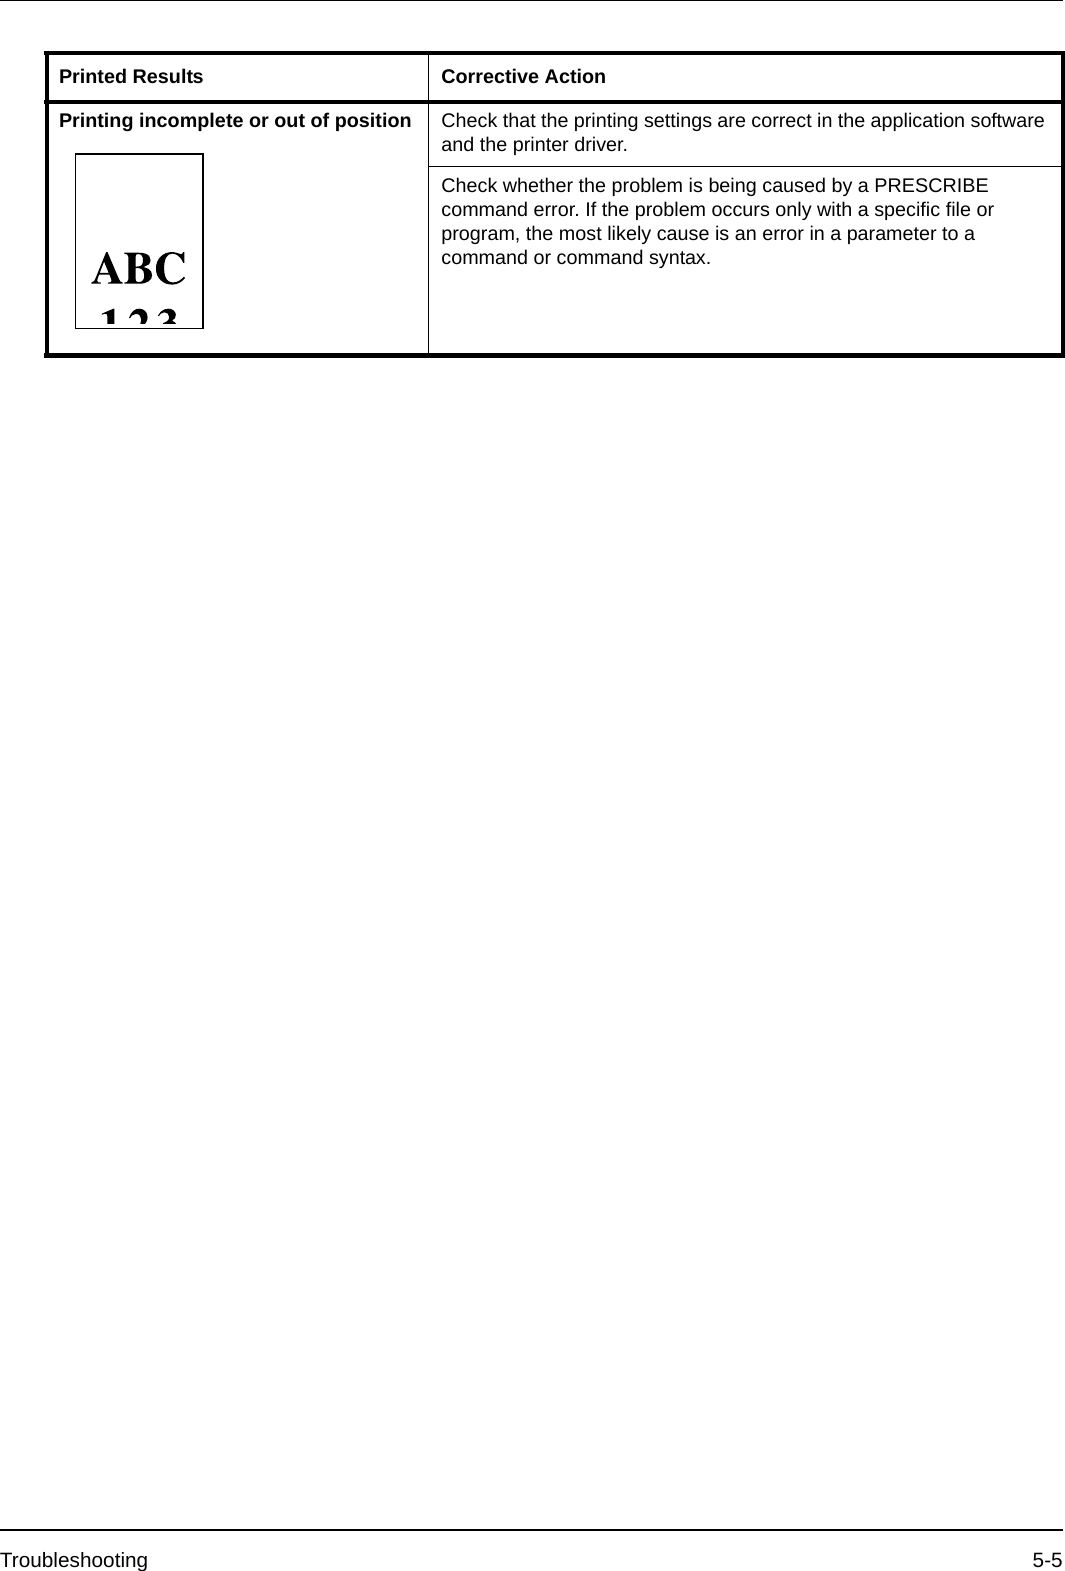
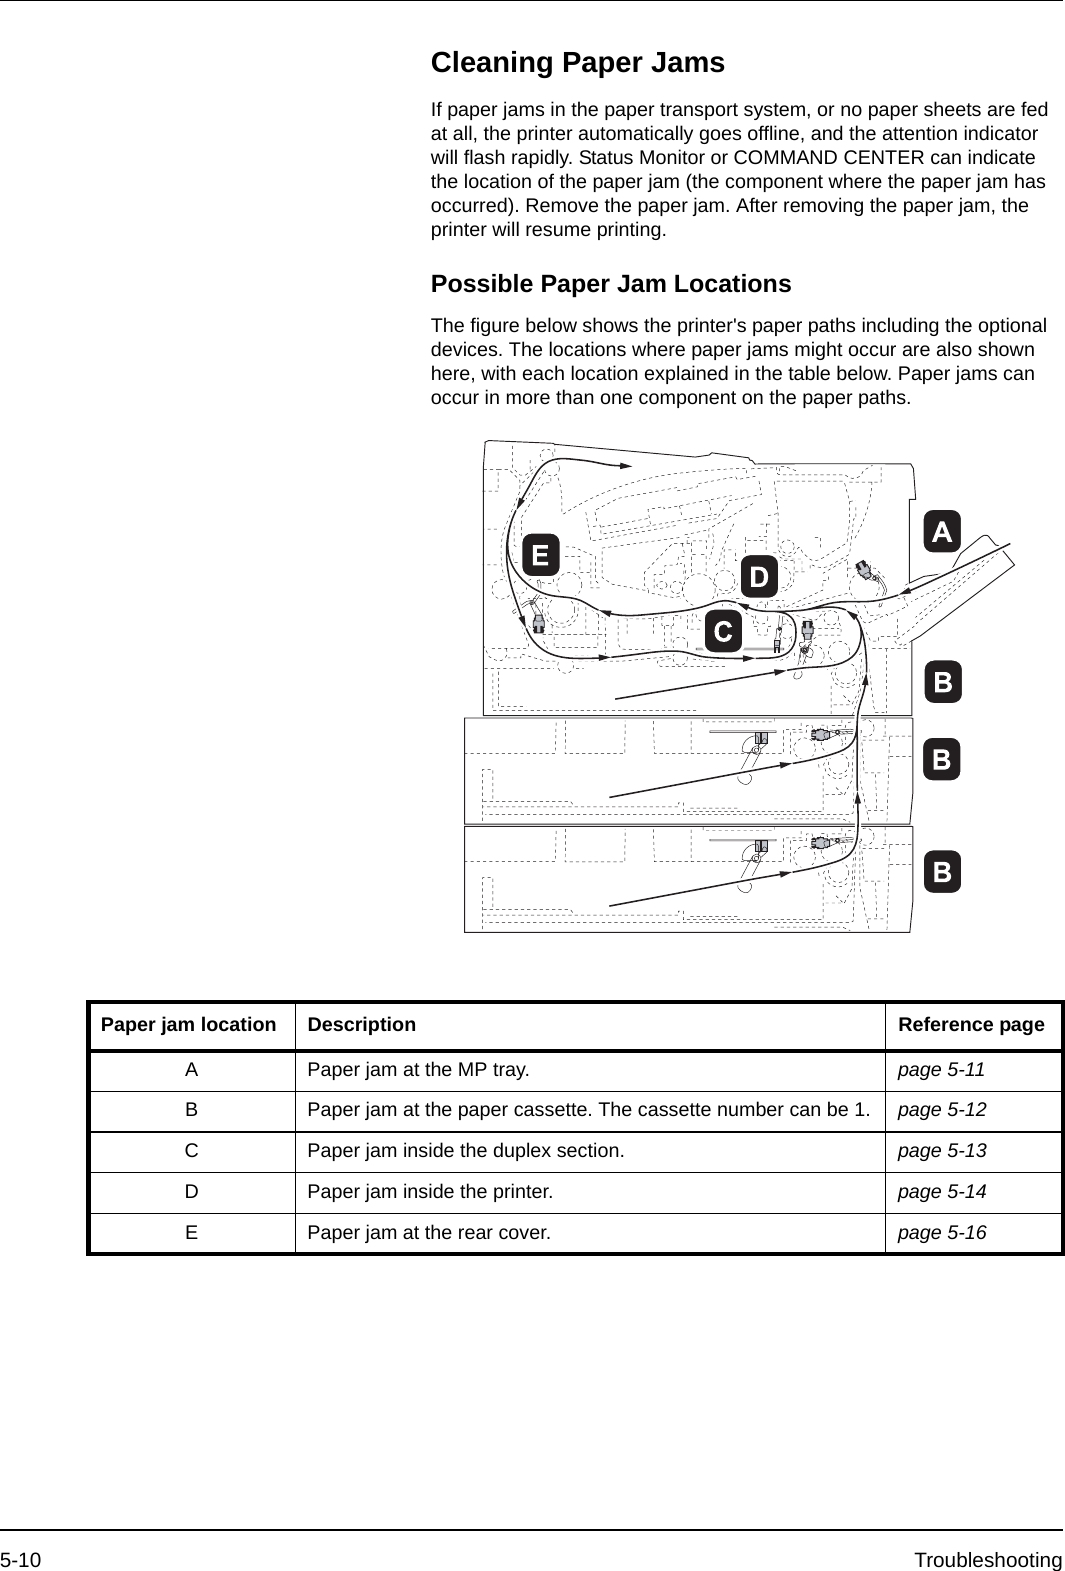
![5-8 TroubleshootingMaintenance IndicationThe table below shows the indicator combinations when user intervention is required. It is assumed that the printer is online and is processing data.Indicator Meaning RemedyThere is no paper in the cassette or MP tray. The empty paper source and required paper size are shown in Status Monitor and COMMAND CENTER.Load paper into the paper source.The cassette is not inserted properly. Insert the cassette fully into the printer.The front cover is open. Close the cover.There is no cassette in the paper feeder or the cassette is not inserted properly.Re-insert the cassette and then try printing again.The cassette does not contain the paper specified by the printer driver.Load the size and type of paper shown in Status Monitor and COMMAND CENTER into the cassette (#[1 or 2]) and then restart printing. You can change the paper source by pressing the [GO].The paper sizes do not match. If the paper size in the paper source differs from the paper size and type specified by the printer driver, you can print by supplying paper from the MP tray. Load the correct paper size and type into the MP tray and press [GO] to begin printing.If you want to supply paper from a source other than the MP tray, you can change the paper source by pressing [GO].If the paper fed from the MP tray is a different size from the specified paper size, a paper jam will occur.A paper jam occurred during printing. Open the printer cover and remove the jammed paper.](https://usermanual.wiki/KYOCERA-Document-Solutions/2HS0108/User-Guide-842394-Page-78.png)
![Troubleshooting 5-9Error IndicationIf the indicators light or flash repeatedly in manners not described above for normal or maintenance indication, a service error has probably occurred. Turn the printer off by the power switch, wait 5 seconds and then turn the printer on again. This may clear the error. Even if the error is not cleared, contact your service technician.The toner is running low. Have a new toner container ready.The toner has run out. Replace with a new toner container. After replacing the toner container, clean the inside of the printer.Unable to print with the specified resolution due to insufficient memory.Add the expansion memory to the printer.CF card is not formatted. Format the CF card.Specified file not found. Press [GO] to continue processing. Press [Cancel] to cancel processing.The current printing cannot be continued. Press [GO] to continue processing. Press [Cancel] to cancel processing.Unable to print due to insufficient memory. Install the optional extended memory in the printer. Press [GO] to continue processing. Press [Cancel] to cancel processing.Unable to print as the data is too complicated. Press [GO] to continue processing. Press [Cancel] to cancel processing.Indicator Meaning Remedy](https://usermanual.wiki/KYOCERA-Document-Solutions/2HS0108/User-Guide-842394-Page-79.png)

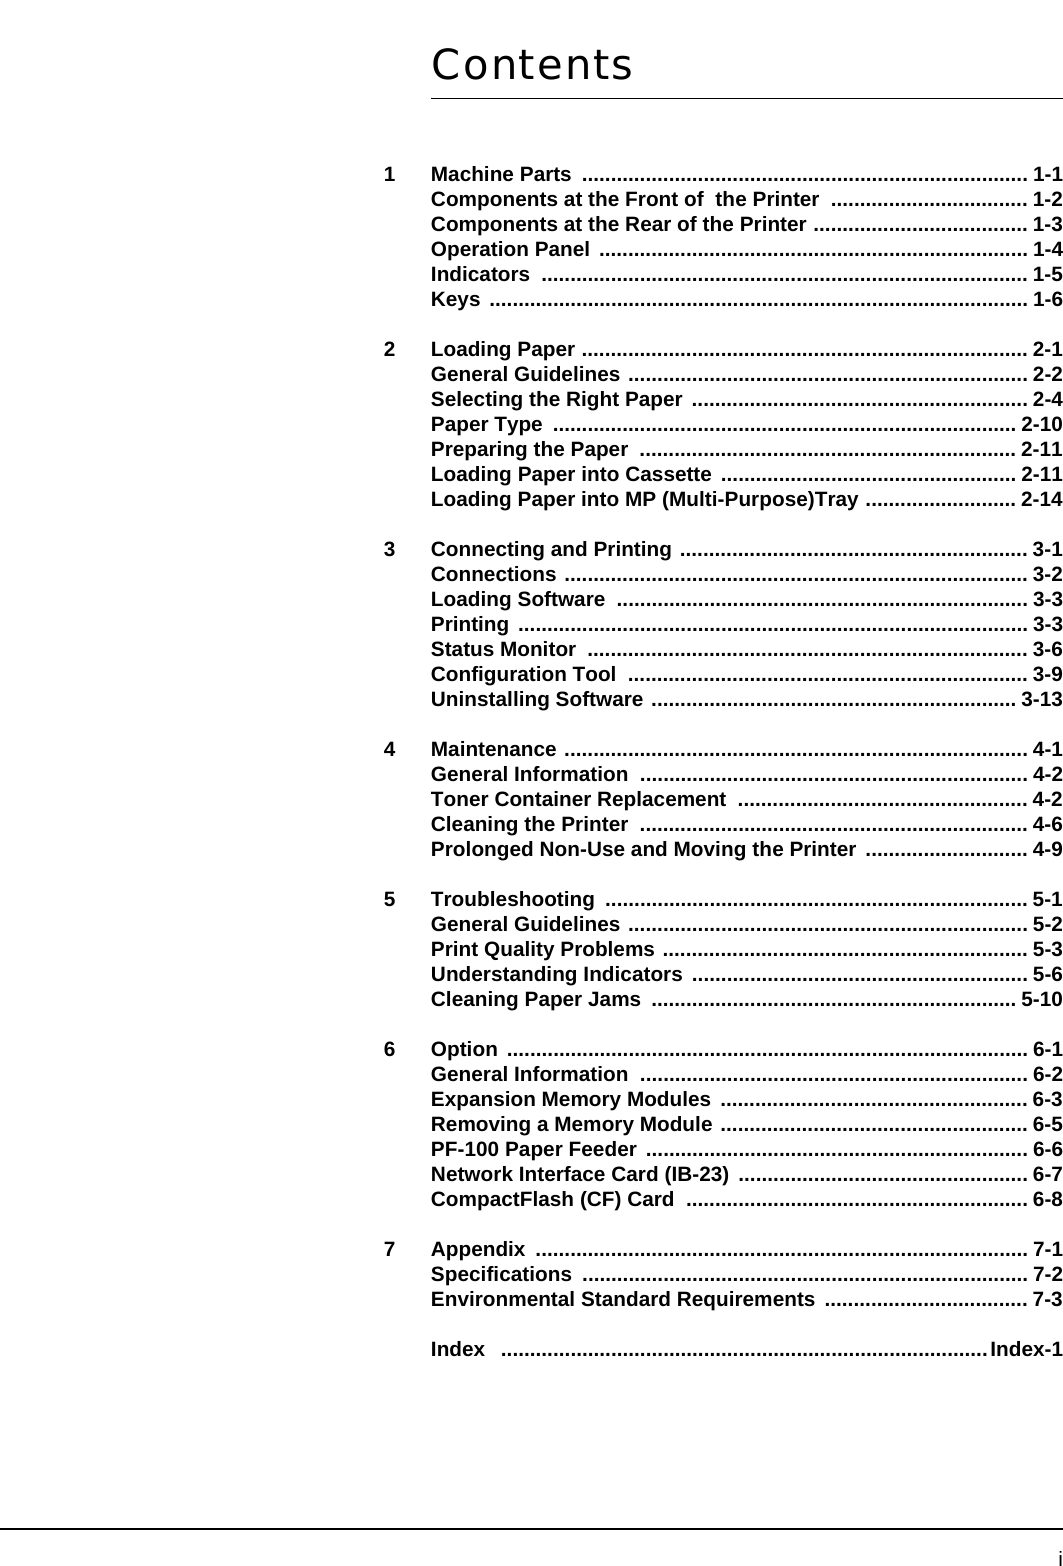
![Appendix 7-3Environmental Standard RequirementsThis machine conforms to the following environmental standard requirements.•Time for switching to Sleep mode (default): 15 minutes•Duplex Printing: Standard Equipment•Durable paper for feeding: Paper made of 100% recycled paper NOTE: Contact your Dealer or Service Representative for recommended paper types.Operating EnvironmentTemperature 10 to 32.5°C/50 to 90.5°FHumidity 15 to 80 %Altitude 2,500 m/8,202 ft maximumBrightness 1,500 lux maximumController PowerPC 405F5/360 MHzSupported OS Windows 2000 Service Pack 2 or later, Windows Me, Windows XP, Windows Server 2003, Apple Macintosh OS 9.x/OS X 10.xInterface Standard Hi-Speed USB: 1Option Network Interface Card: 1 (10BASE-T/100BASE-TX/1000BASE-T)PDL PRESCRIBEMemory Standard 32MBMaximum 544MBDimension (W x D x H) 375 × 245 × 390 mm23 13/16 × 25 3/8 × 29 5/16"Weight (without toner container) 10 kg/215.6 lbPower Source 1500 WPower Consumption 120 V AC, 60 Hz, 12.0 A/220 to 240 V AC, 50 Hz, 7.2 AOptions Expanded memory, Paper Feeder (250-sheet x 2), Network Interface Card (IB-23)Expanded memory, Paper Feeder (250-sheet x 1), Network Interface Card (IB-23)Operating noise (in accordance with ISO7779 [Bystander Position, sound pressure level at the front])During printing LpA = 53dB (A)During standby LpA = 30 dB (A)During sleep mode immeasurably lowItem DescriptionFS-1100 FS-1300D](https://usermanual.wiki/KYOCERA-Document-Solutions/2HS0108/User-Guide-842394-Page-97.png)