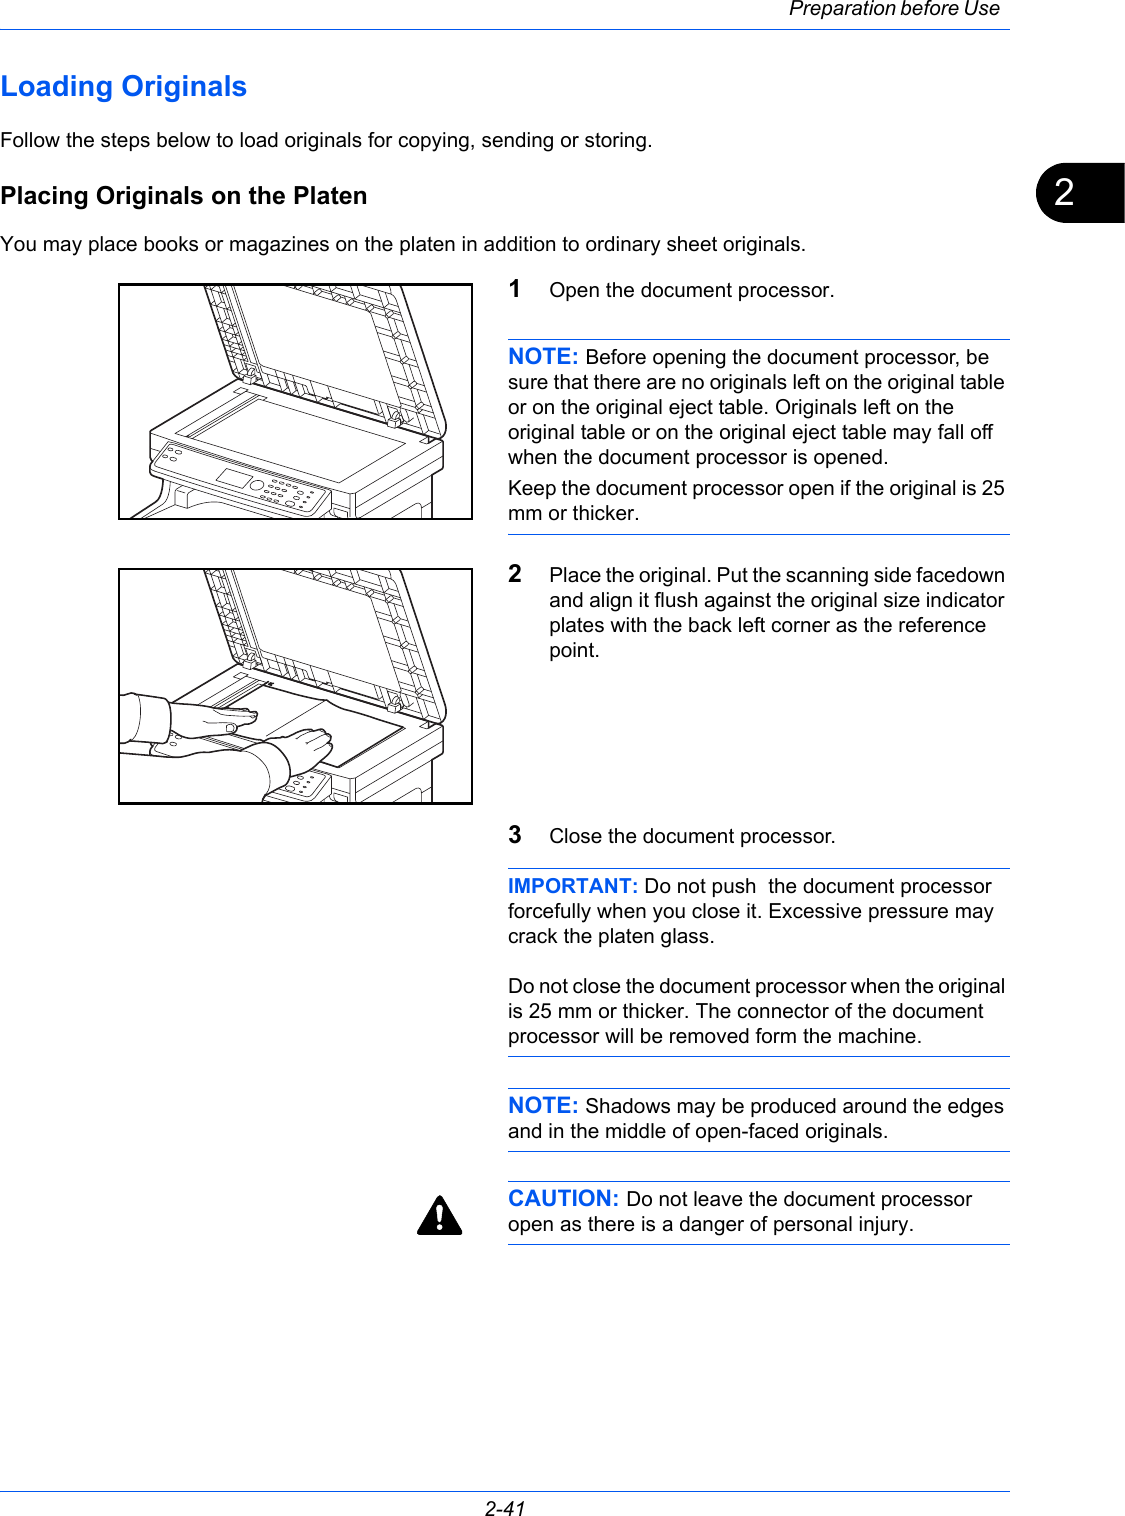
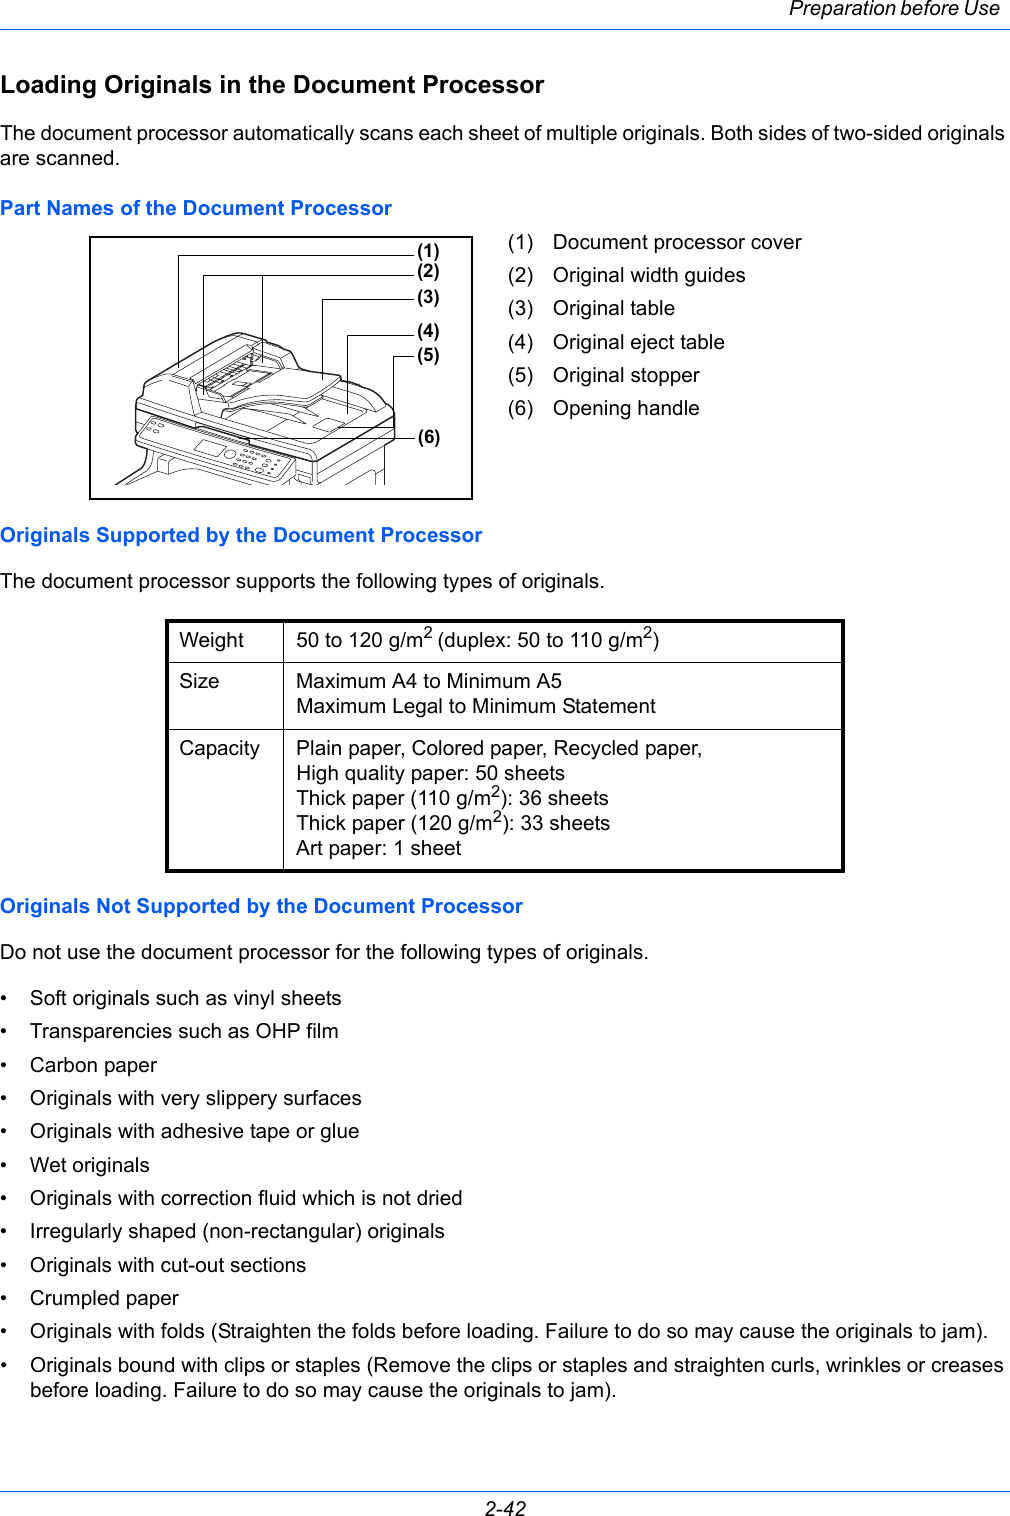
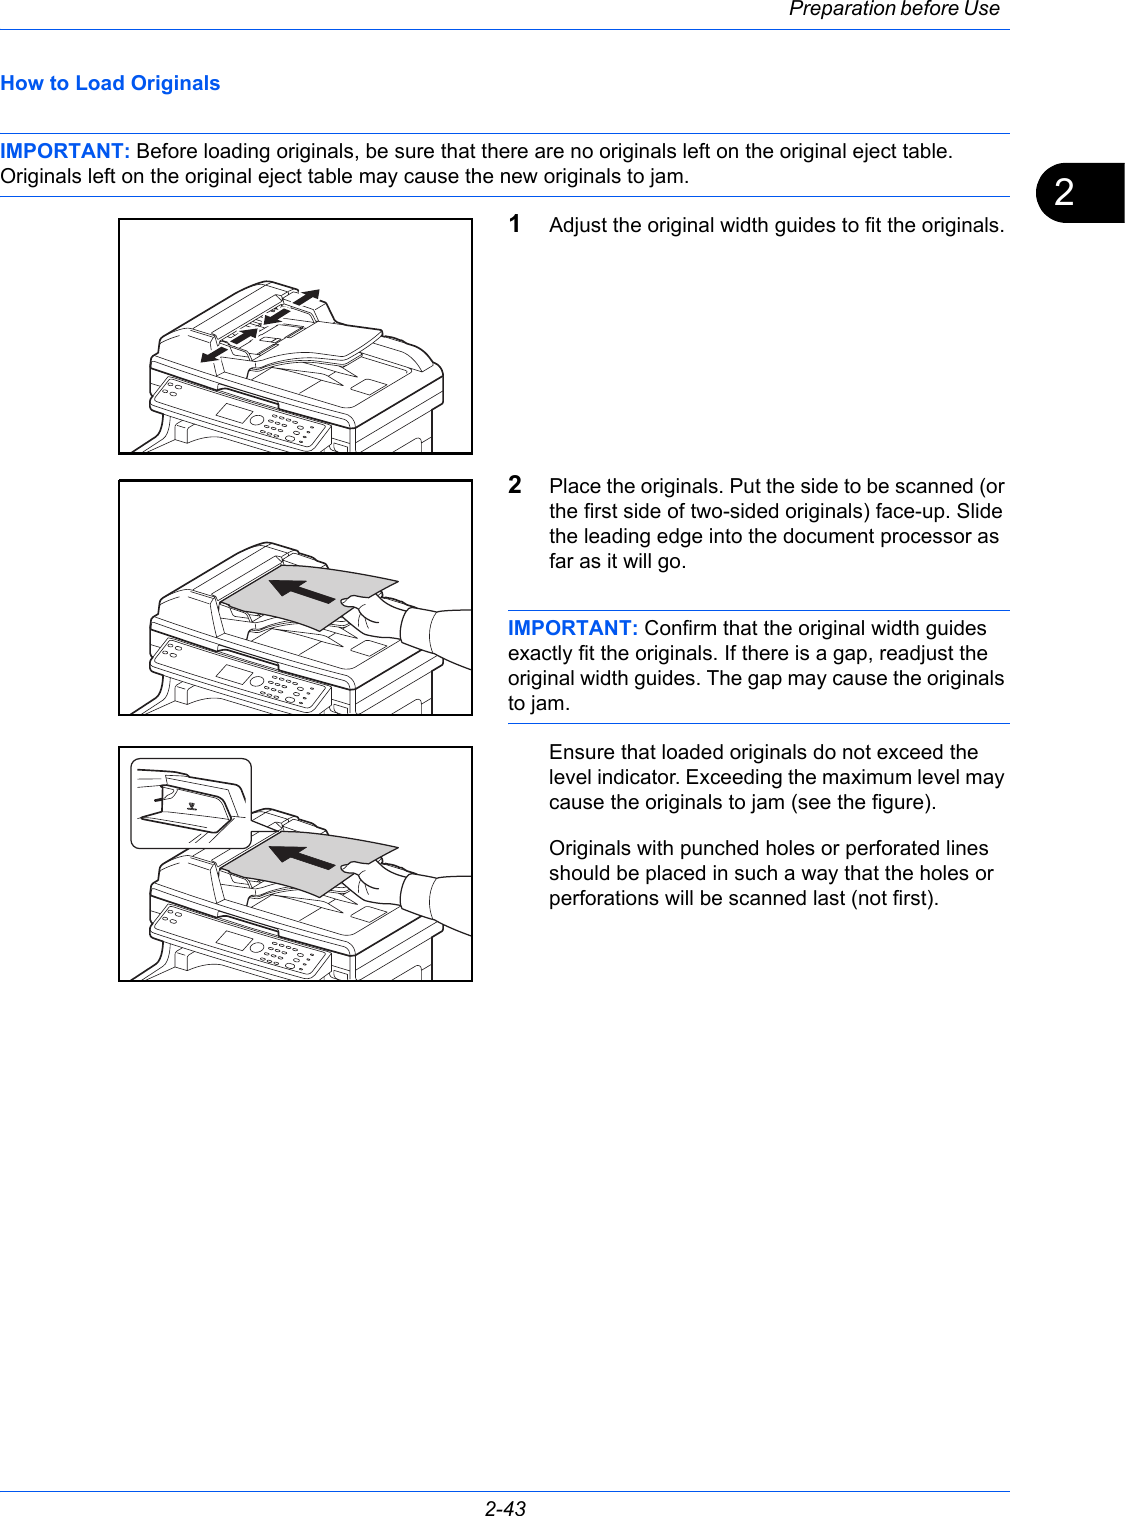
KYOCERA Document Solutions 2KV0440 A0440 User Manual FS 1028MFP FS 1128MFP
KYOCERA Document Solutions Inc. A0440 FS 1028MFP FS 1128MFP
UserManual.wiki
>
KYOCERA Document Solutions
>
2KV0440 User Manual
User Manual
Navigation menu
Upload a User Manual
Namespaces
Wiki Guide
HTML
PDF
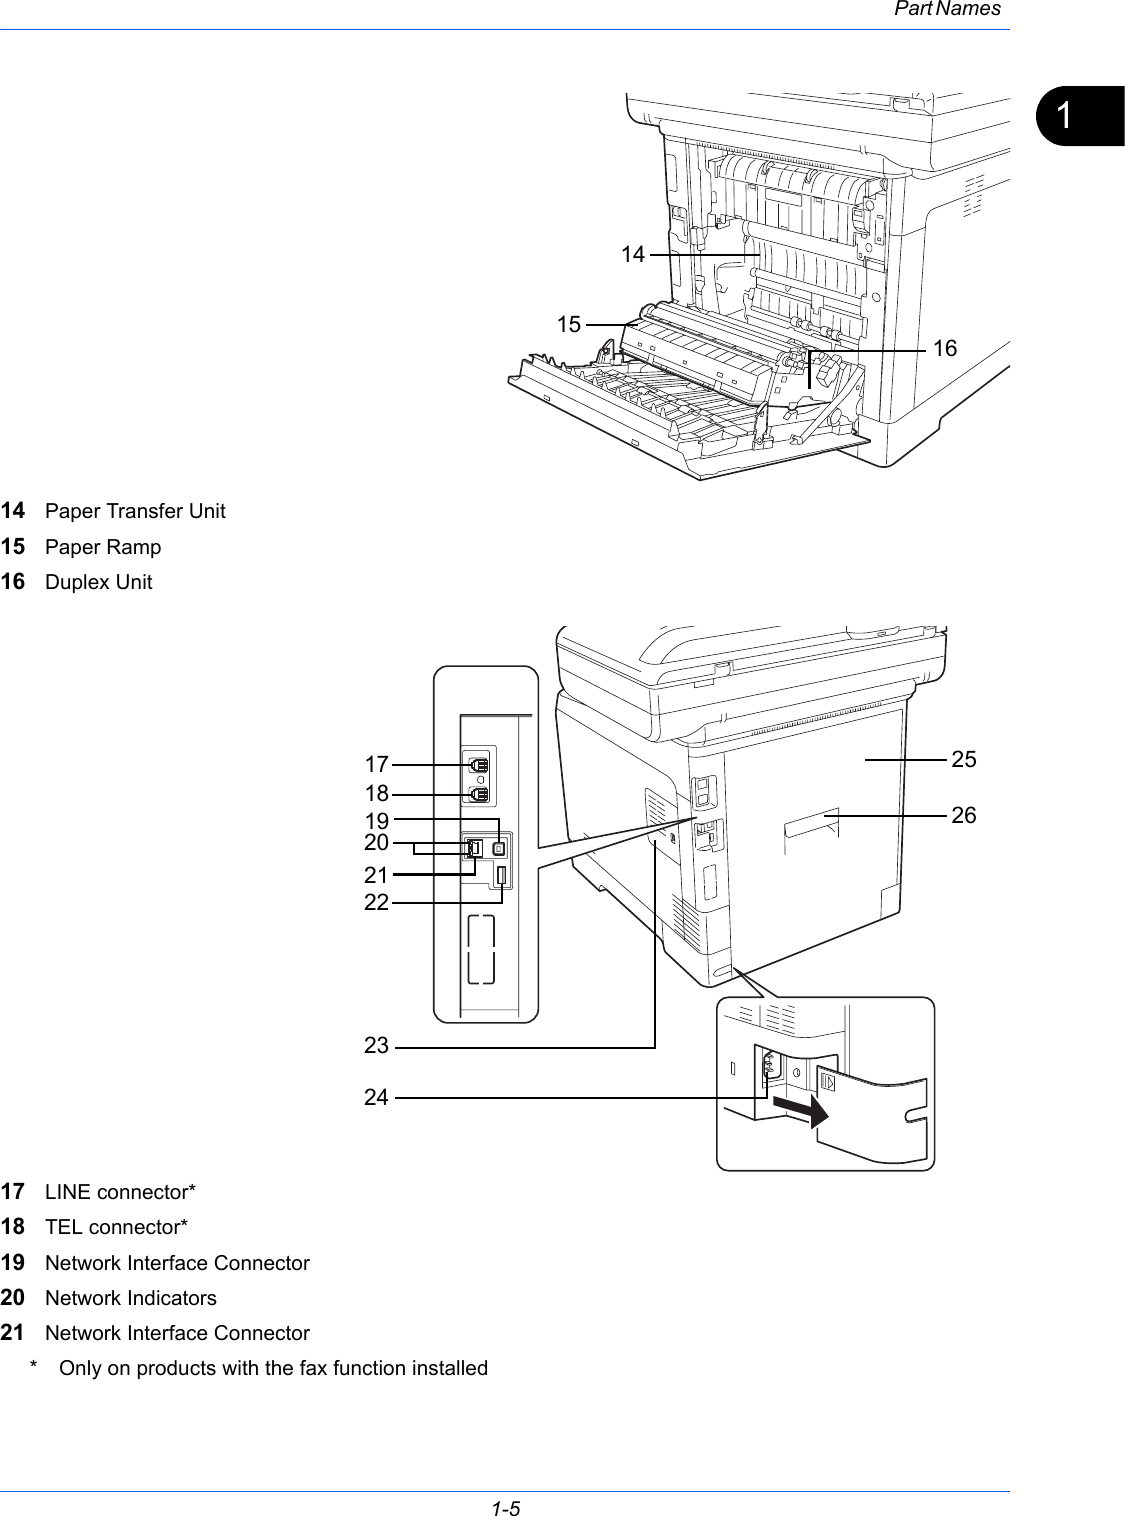
Info
Views
User Manual
Discussion / Help
Navigation
![iSafety Conventions in This GuideThe sections of this guide and parts of the machine marked with symbols are safety warnings meant to protect the user, other individuals and surrounding objects, and ensure correct and safe usage of the machine. The symbols and their meanings are indicated below.SymbolsThe U symbol indicates that the related section includes safety warnings. Specific points of attention are indicated inside the symbol.The symbol indicates that the related section includes information on prohibited actions. Specifics of the prohibited action are indicated inside the symbol.The z symbol indicates that the related section includes information on actions which must be performed. Specifics of the required action are indicated inside the symbol.Please contact your service representative to order a replacement if the safety warnings in this Operation Guide are illegible or if the guide itself is missing (fee required).NOTE: An original which resembles a bank note closely may not be copied properly in some rare cases because this machine is equipped with a counterfeiting prevention function.WARNING: Indicates that serious injury or even death may result from insufficient attention to or incorrect compliance with the related points.CAUTION: Indicates that personal injury or mechanical damage may result from insufficient attention to or incorrect compliance with the related points..... [General warning].... [Warning of danger of electrical shock].... [Warning of high temperature].... [Warning of prohibited action].... [Disassembly prohibited].... [Alert of required action].... [Remove the power plug from the outlet].... [Always connect the machine to an outlet with a ground connection]](https://usermanual.wiki/KYOCERA-Document-Solutions/2KV0440/User-Guide-1258981-Page-3.png)
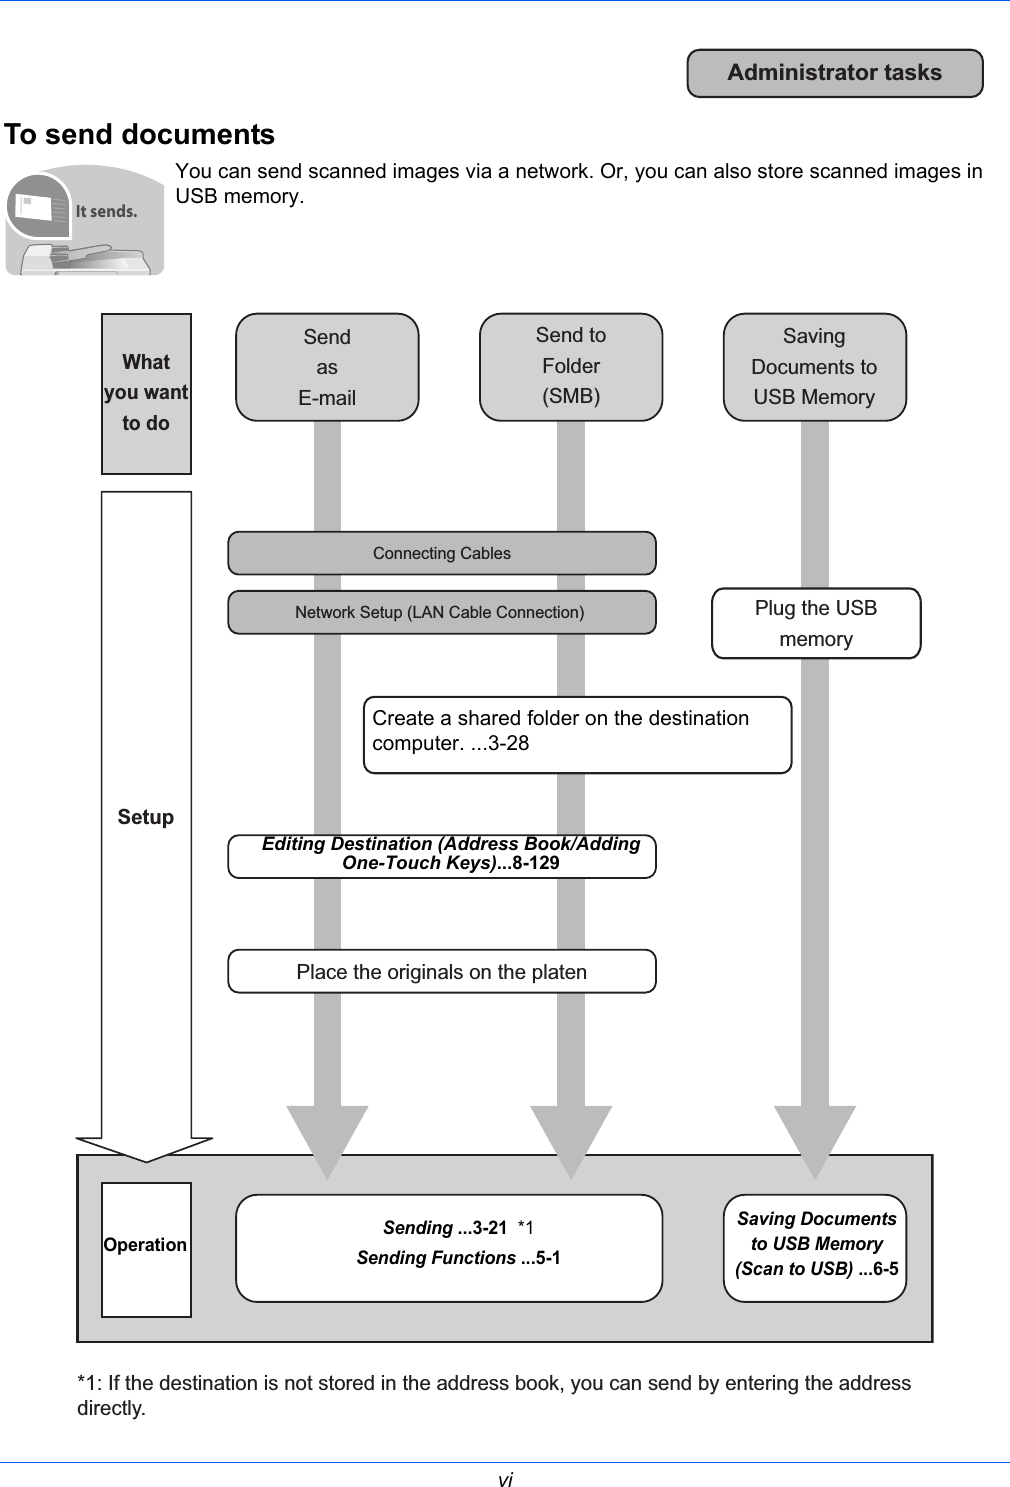
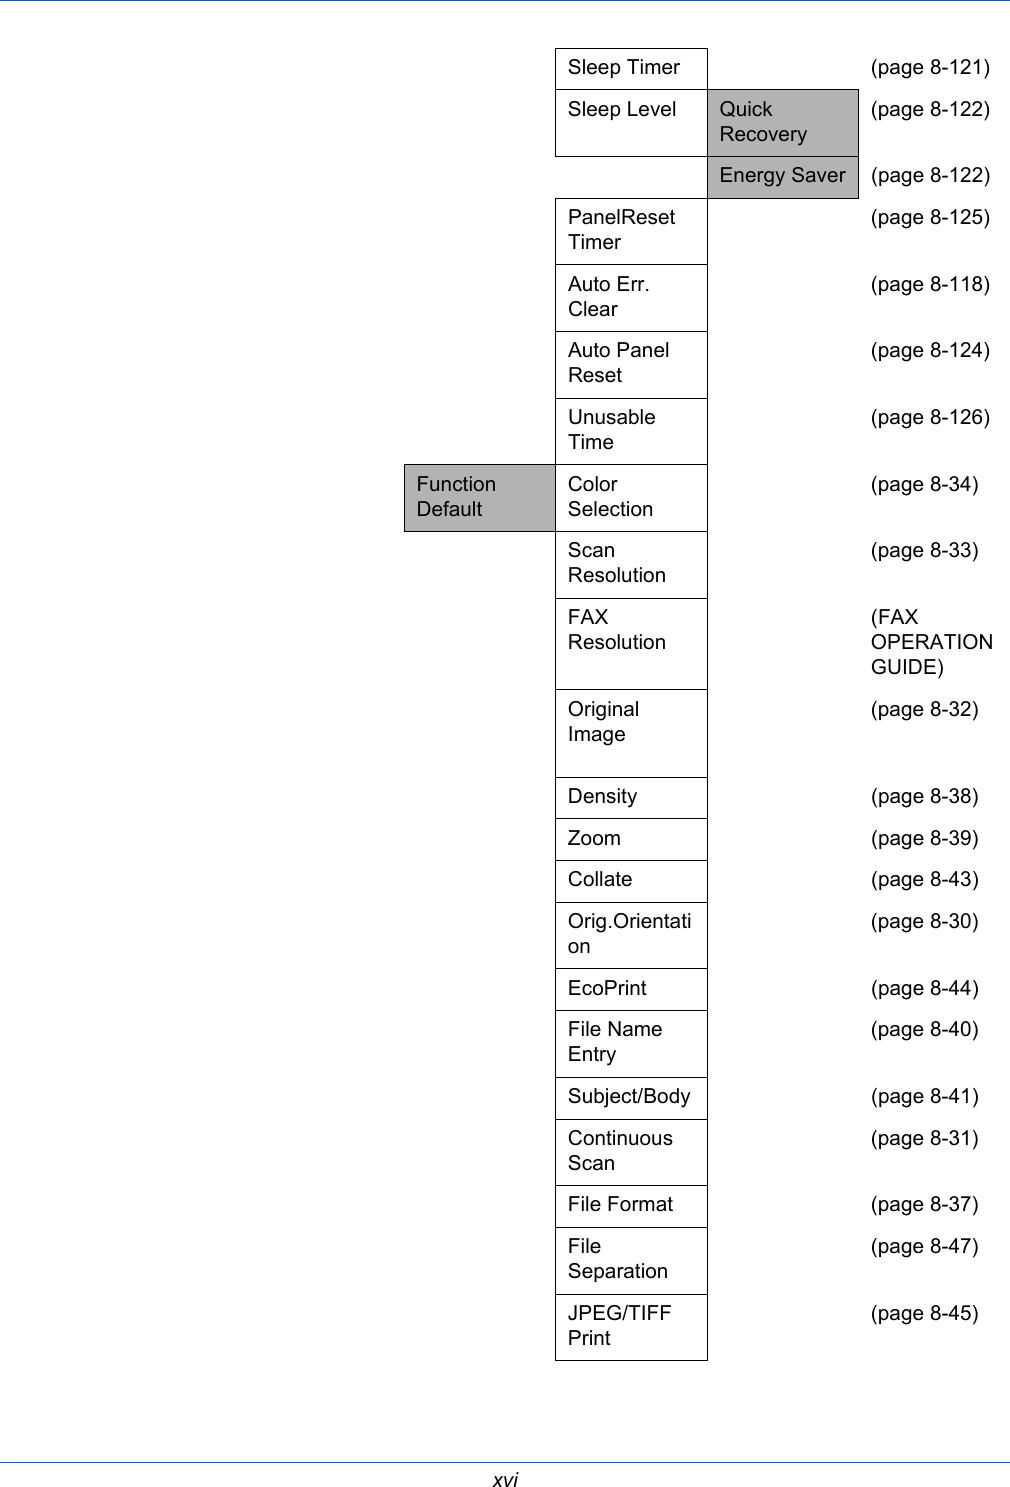
![ContentsiiContentsQuick Guide . . . . . . . . . . . . . . . . . . . . . . . . . . . . . . . . . . . . . . . . . . . . . . . . . . . . . . . . . . . . . . . . . . vMenu Map. . . . . . . . . . . . . . . . . . . . . . . . . . . . . . . . . . . . . . . . . . . . . . . . . . . . . . . . . . . . . . . . . . -viiiEnvironment . . . . . . . . . . . . . . . . . . . . . . . . . . . . . . . . . . . . . . . . . . . . . . . . . . . . . . . . . . . . . . . . . xxLaser Safety (Europe) . . . . . . . . . . . . . . . . . . . . . . . . . . . . . . . . . . . . . . . . . . . . . . . . . . . . . . . . xxiiiSAFETY OF LASER BEAM (USA) . . . . . . . . . . . . . . . . . . . . . . . . . . . . . . . . . . . . . . . . . . . . . . xxivSafety Instructions Regarding the Disconnection of Power (USA). . . . . . . . . . . . . . . . . . . . . . . xxviLegal Restriction on Copying/Scanning . . . . . . . . . . . . . . . . . . . . . . . . . . . . . . . . . . . . . . . . . . xxviiiLegal and Safety Information . . . . . . . . . . . . . . . . . . . . . . . . . . . . . . . . . . . . . . . . . . . . . . . . . . .xxix1Part NamesOperation Panel . . . . . . . . . . . . . . . . . . . . . . . . . . . . . . . . . . . . . . . . . . . . . . . . . . . . . . . . . . . . . 1-2Machine . . . . . . . . . . . . . . . . . . . . . . . . . . . . . . . . . . . . . . . . . . . . . . . . . . . . . . . . . . . . . . . . . . . 1-42 Preparation before UseCheck bundled items . . . . . . . . . . . . . . . . . . . . . . . . . . . . . . . . . . . . . . . . . . . . . . . . . . . . . . . . . 2-2Determining the Connection Method and Preparing Cables . . . . . . . . . . . . . . . . . . . . . . . . . . . 2-3Connecting Cables . . . . . . . . . . . . . . . . . . . . . . . . . . . . . . . . . . . . . . . . . . . . . . . . . . . . . . . . . . . 2-5Power On/Off . . . . . . . . . . . . . . . . . . . . . . . . . . . . . . . . . . . . . . . . . . . . . . . . . . . . . . . . . . . . . . . 2-7Sleep and Auto Sleep. . . . . . . . . . . . . . . . . . . . . . . . . . . . . . . . . . . . . . . . . . . . . . . . . . . . . . . . . 2-9Switching the Language for Display [Language] . . . . . . . . . . . . . . . . . . . . . . . . . . . . . . . . . . . 2-10Setting Date and Time . . . . . . . . . . . . . . . . . . . . . . . . . . . . . . . . . . . . . . . . . . . . . . . . . . . . . . . 2-11Network Setup (LAN Cable Connection) . . . . . . . . . . . . . . . . . . . . . . . . . . . . . . . . . . . . . . . . . 2-14Installing Software . . . . . . . . . . . . . . . . . . . . . . . . . . . . . . . . . . . . . . . . . . . . . . . . . . . . . . . . . . 2-22COMMAND CENTER (Settings for E-mail) . . . . . . . . . . . . . . . . . . . . . . . . . . . . . . . . . . . . . . . 2-23Sending E-mail . . . . . . . . . . . . . . . . . . . . . . . . . . . . . . . . . . . . . . . . . . . . . . . . . . . . . . . . . . . . . 2-24Loading Paper . . . . . . . . . . . . . . . . . . . . . . . . . . . . . . . . . . . . . . . . . . . . . . . . . . . . . . . . . . . . . 2-26Loading Originals . . . . . . . . . . . . . . . . . . . . . . . . . . . . . . . . . . . . . . . . . . . . . . . . . . . . . . . . . . . 2-41Installing Printer Driver . . . . . . . . . . . . . . . . . . . . . . . . . . . . . . . . . . . . . . . . . . . . . . . . . . . . . . . 2-443 Basic OperationLogin/Logout. . . . . . . . . . . . . . . . . . . . . . . . . . . . . . . . . . . . . . . . . . . . . . . . . . . . . . . . . . . . . . . . 3-2One-Touch Keys and Program Keys . . . . . . . . . . . . . . . . . . . . . . . . . . . . . . . . . . . . . . . . . . . . . 3-3Message Display . . . . . . . . . . . . . . . . . . . . . . . . . . . . . . . . . . . . . . . . . . . . . . . . . . . . . . . . . . . . 3-5Copying . . . . . . . . . . . . . . . . . . . . . . . . . . . . . . . . . . . . . . . . . . . . . . . . . . . . . . . . . . . . . . . . . . . 3-6Printing - Printing from Applications . . . . . . . . . . . . . . . . . . . . . . . . . . . . . . . . . . . . . . . . . . . . . 3-19Sending . . . . . . . . . . . . . . . . . . . . . . . . . . . . . . . . . . . . . . . . . . . . . . . . . . . . . . . . . . . . . . . . . . 3-21Preparation for sending a document to a PC . . . . . . . . . . . . . . . . . . . . . . . . . . . . . . . . . . . . . . 3-28Confirm Destination Screen . . . . . . . . . . . . . . . . . . . . . . . . . . . . . . . . . . . . . . . . . . . . . . . . . . . 3-37Specifying Destination . . . . . . . . . . . . . . . . . . . . . . . . . . . . . . . . . . . . . . . . . . . . . . . . . . . . . . . 3-39Scanning document data . . . . . . . . . . . . . . . . . . . . . . . . . . . . . . . . . . . . . . . . . . . . . . . . . . . . . 3-43Canceling Jobs . . . . . . . . . . . . . . . . . . . . . . . . . . . . . . . . . . . . . . . . . . . . . . . . . . . . . . . . . . . . . 3-45Checking Remaining Toner and Paper. . . . . . . . . . . . . . . . . . . . . . . . . . . . . . . . . . . . . . . . . . . 3-464 Copying FunctionsOriginal Size . . . . . . . . . . . . . . . . . . . . . . . . . . . . . . . . . . . . . . . . . . . . . . . . . . . . . . . . . . . . . . . . 4-2Paper Selection . . . . . . . . . . . . . . . . . . . . . . . . . . . . . . . . . . . . . . . . . . . . . . . . . . . . . . . . . . . . . 4-4Original Orientation. . . . . . . . . . . . . . . . . . . . . . . . . . . . . . . . . . . . . . . . . . . . . . . . . . . . . . . . . . . 4-8EcoPrint . . . . . . . . . . . . . . . . . . . . . . . . . . . . . . . . . . . . . . . . . . . . . . . . . . . . . . . . . . . . . . . . . . 4-10Combine Mode . . . . . . . . . . . . . . . . . . . . . . . . . . . . . . . . . . . . . . . . . . . . . . . . . . . . . . . . . . . . . 4-11Continuous Scan . . . . . . . . . . . . . . . . . . . . . . . . . . . . . . . . . . . . . . . . . . . . . . . . . . . . . . . . . . . 4-14](https://usermanual.wiki/KYOCERA-Document-Solutions/2KV0440/User-Guide-1258981-Page-4.png)


![xxxiiiOriginal SSLeay LicenseCopyright (C) 1995-1998 Eric Young (eay@cryptsoft.com) All rights reserved.This package is an SSL implementation written by Eric Young (eay@cryptsoft.com). The implementation was written so as to conform with Netscapes SSL.This library is free for commercial and non-commercial use as long as the following conditions are aheared to. The following conditions apply to all code found in this distribution, be it the RC4, RSA, lhash, DES, etc., code; not just the SSL code. The SSL documentation included with this distribution is covered by the same copyright terms except that the holder is Tim Hudson (tjh@cryptsoft.com).Copyright remains Eric Young’s, and as such any Copyright notices in the code are not to be removed.If this package is used in a product, Eric Young should be given attribution as the author of the parts of the library used.This can be in the form of a textual message at program startup or in documentation (online or textual) provided with the package.Redistribution and use in source and binary forms, with or without modification, are permitted provided that the following conditions are met:1Redistributions of source code must retain the copyright notice, this list of conditions and the following disclaimer.2Redistributions in binary form must reproduce the above copyright notice, this list of conditions and the following disclaimer in the documentation and/or other materials provided with the distribution.3All advertising materials mentioning features or use of this software must display the following acknowledgement: “This product includes cryptographic software written by Eric Young (eay@cryptsoft.com)”The word ‘cryptographic’ can be left out if the rouines from the library being used are not cryptographic related :-).4If you include any Windows specific code (or a derivative thereof) from the apps directory (application code) you must include an acknowledgement: “This product includes software written by Tim Hudson (tjh@cryptsoft.com)”THIS SOFTWARE IS PROVIDED BY ERIC YOUNG “AS IS” AND ANY EXPRESS OR IMPLIED WARRANTIES, INCLUDING, BUT NOT LIMITED TO, THE IMPLIED WARRANTIES OF MERCHANTABILITY AND FITNESS FOR A PARTICULAR PURPOSE ARE DISCLAIMED. IN NO EVENT SHALL THE AUTHOR OR CONTRIBUTORS BE LIABLE FOR ANY DIRECT, INDIRECT, INCIDENTAL, SPECIAL, EXEMPLARY, OR CONSEQUENTIAL DAMAGES (INCLUDING, BUT NOT LIMITED TO, PROCUREMENT OF SUBSTITUTE GOODS OR SERVICES; LOSS OF USE, DATA, OR PROFITS; OR BUSINESS INTERRUPTION) HOWEVER CAUSED AND ON ANY THEORY OF LIABILITY, WHETHER IN CONTRACT, STRICT LIABILITY, OR TORT (INCLUDING NEGLIGENCE OR OTHERWISE) ARISING IN ANY WAY OUT OF THE USE OF THIS SOFTWARE, EVEN IF ADVISED OF THE POSSIBILITY OF SUCH DAMAGE.The licence and distribution terms for any publically available version or derivative of this code cannot be changed. i.e. this code cannot simply be copied and put under another distribution licence [including the GNU Public Licence.]](https://usermanual.wiki/KYOCERA-Document-Solutions/2KV0440/User-Guide-1258981-Page-35.png)
![xxxviiConventions in This GuideThe following conventions are used depending on the nature of the description.Convention Description ExampleBold Indicates the operation panel keys or a computer screen.Press the Start key.[Regular] Indicates a selection item on the Message Display.Select [System].Italic Indicates a message displayed on the Message Display.Ready to copy is displayed.Used to emphasize a key word, phrase or references to additional information.For more information refer to Sleep and Auto Sleep on page 2-9.Note Indicates supplemental information or operations for reference.NOTE: Important Indicates items that are required or prohibited so as to avoid problems.IMPORTANT: Caution Indicates what must be observed to prevent injury or machine breakdown and how to deal with it.CAUTION:](https://usermanual.wiki/KYOCERA-Document-Solutions/2KV0440/User-Guide-1258981-Page-39.png)

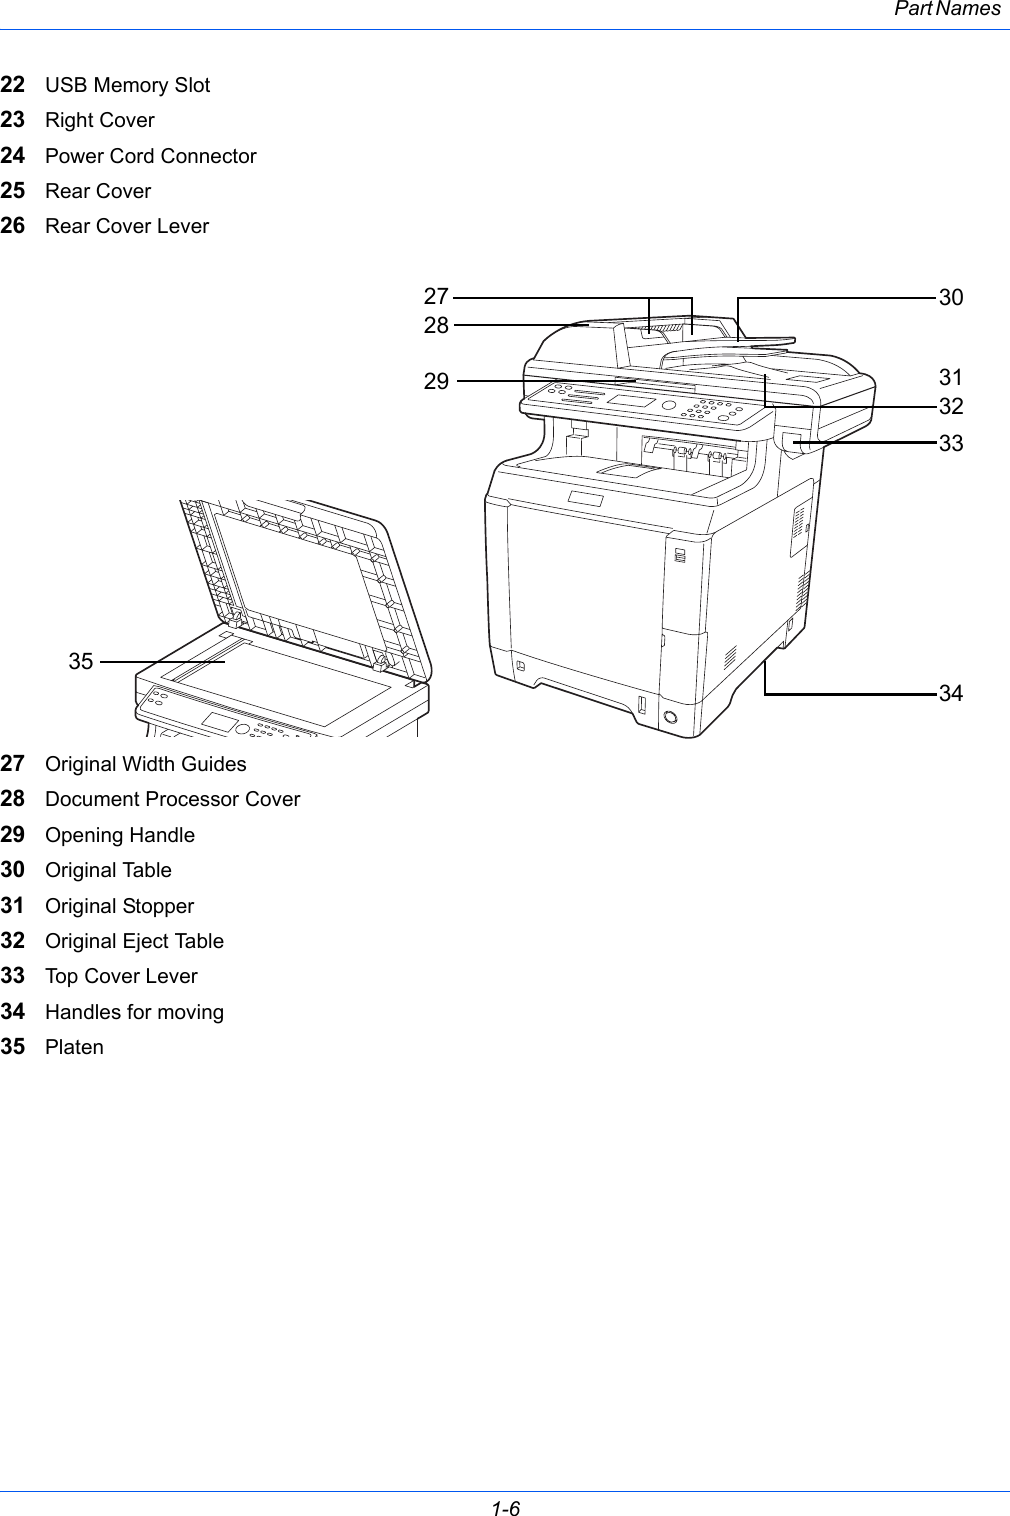
![2-12 Preparation before UseThis chapter explains the preparations before using this equipment for the first time as well as the procedures for loading papers and originals.• Check bundled items .................................................... 2-2•Determining the Connection Method and Preparing Cables...... 2-3• Connecting Cables ....................................................... 2-5• Power On/Off................................................................ 2-7• Sleep and Auto Sleep................................................... 2-9• Switching the Language for Display [Language] ........ 2-10• Setting Date and Time................................................ 2-11• Network Setup (LAN Cable Connection) .................... 2-14• Installing Software ...................................................... 2-22• COMMAND CENTER (Settings for E-mail) ................ 2-23• Sending E-mail ........................................................... 2-24• Loading Paper ............................................................ 2-26• Loading Originals........................................................ 2-41• Installing Printer Driver ............................................... 2-44](https://usermanual.wiki/KYOCERA-Document-Solutions/2KV0440/User-Guide-1258981-Page-47.png)
![Preparation before Use 2-10Switching the Language for Display [Language] Select the language displayed on the Message Display.Use the procedure below to select the language.1Press the System Menu/Counter key on the main unit operation panel.When you are performing user management and have not logged in, a login screen will appear. Then, enter the user ID and password to log in.NOTE: Refer to Character Entry Method on Appendix-7 for details on entering characters.2In the Sys. Menu/Count. menu, press the U or V key to select [Common Settings].3Press the OK key. The Common Settings menu appears.4Press the U or V key to select [Language].5Press the OK key. Language appears.6Press the U or V key to select the desired language and then press the OK key.Completed. is displayed and the screen returns to the Common Settings menu.Login User Name: L b ********************Login Password:[ Login ]Sys. Menu/Count.:a b 5 User Property*********************7 Copy [ Exit ]6 Common SettingsCommon Settings:a b *********************2 Default Screen3 Sound [ Exit ]1 LanguageLanguage:a b *********************2 Deutsch3 Français1 *English](https://usermanual.wiki/KYOCERA-Document-Solutions/2KV0440/User-Guide-1258981-Page-56.png)
![Preparation before Use 2-112Setting Date and TimeFollow the steps below to set the local date and time at the place of installation.When you send an E-mail using the transmission function, the date and time as set here will be printed in the header of the E-mail message. Set the date, time and time difference from GMT of the region where the machine is used.NOTE: Be sure to set the time difference before setting the date and time.1Turn on the main power switch.2Press the System Menu/Counter key on the main unit operation panel.When you are performing user management and have not logged in, a login screen will appear. Then, enter the user ID and password to log in.3In the Sys. Menu/Count. menu, press the U or V key to select [Common Settings].4Press the OK key. The Common Settings menu appears.5Press the U or V key to select [Date Setting].OnOffLogin User Name: L b ********************Login Password:[ Login ]Sys. Menu/Count.:a b 5 User Property*********************7 Copy [ Exit ]6 Common SettingsCommon Settings: a b *********************2 Default Screen3 Sound [ Exit ]1 Language](https://usermanual.wiki/KYOCERA-Document-Solutions/2KV0440/User-Guide-1258981-Page-57.png)
![Preparation before Use 2-126A login screen will appear. Then, enter the user ID and password to log in.7Press the OK key. The Date Setting menu appears.8Press the U or V key to select [Time Zone].9Press the OK key. Time Zone appears.10 Press the U or V key to select your region and then press the OK key.Completed. is displayed and the screen returns to the Date Setting menu.11Press the U or V key to select [Summer Time].12Press the OK key. Summer Time appears.13Press the U or V key to select [On] or [Off] and then press the OK key.Completed. is displayed and the screen returns to the Date Setting menu.Login User Name: L b ********************Login Password:[ Menu ] [ Login ]Date Setting:a b *********************2 Date Format3 Time Zone [ Exit ]1 Date/TimeTime Zone:a b *********************2 -11:00 Midway3 -10:00 Hawaii1 -12:00 InternatiDate Setting:a b 2 Date Format3 Time Zone********************* [ Exit ]4 Summer TimeSummer Time:a b *********************2 On1 *Off](https://usermanual.wiki/KYOCERA-Document-Solutions/2KV0440/User-Guide-1258981-Page-58.png)
![Preparation before Use 2-13214Press the U or V key to select [Date/Time].15Press the OK key. Date/Time appears.16Press the Y or Z key to move the cursor position, press the U or V key to enter year, month and day, and then press the OK key.17Press the Y or Z key to move the cursor position, press the U or V key to enter hours, minutes and seconds, and then press the OK key.Completed. is displayed and the screen returns to the Date Setting menu.18Press the U or V key to select [Date Format].19Press the OK key. Date Format appears.20Press the U or V key to select the desired display format and then press the OK key.Completed. is displayed and the screen returns to the Date Setting menu.Date Setting:a b *********************2 Date Format3 Time Zone [ Exit ]1 Date/TimeDate/Time:a b Year Month Day 2010 01 01(Time Zone:Tokyo )Date/Time:a b Hour Min. Second 11: 45: 50(Time Zone:Tokyo )Date Setting:a b 1 Date/Time*********************3 Time Zone [ Exit ]2 Date FormatDate Format:a b *********************2 Day/Month/Year3 Year/Month/Day1 *Month/Day/Year](https://usermanual.wiki/KYOCERA-Document-Solutions/2KV0440/User-Guide-1258981-Page-59.png)
![Preparation before Use 2-14Network Setup (LAN Cable Connection)The machine is equipped with network interface, which is compatible with network protocols such as TCP/IP (IPv4), TCP/IP (IPv6), IPX/SPX, NetBEUI, IPSec, and AppleTalk. It enables network printing on the Windows, Macintosh, UNIX, NetWare and other platforms.This section explains the TCP/IP (IPv4) Setup procedures. For other network settings, refer to Network Setup on page 8-145.•TCP/IP (IPv4) Setup (when an IP address is automatically assigned) ...2-16•TCP/IP (IPv4) Setup (by Entering IP Addresses) ...2-16TCP/IP (IPv4) Setup (when an IP address is automatically assigned)If an IP address will be automatically assigned, configure the settings below.NOTE: The [DHCP] and [Auto-IP] settings are enabled by default. Specify the settings below when Network Setup on page 8-145 have been changed from their default state.Use the procedure below to setup the TCP/IP (IPv4) setting.1Press the System Menu/Counter key on the main unit operation panel.When you are performing user management and have not logged in, a login screen will appear. Then, enter the user ID and password to log in.NOTE: Refer to Character Entry Method on Appendix-7 for details on entering characters.2In the Sys. Menu/Count. menu, press the U or V key to select [System], and then press the OK key.IMPORTANT: To make the settings, you must have logged in using a user ID with administrator privileges.The default settings of the login user name and login password are both "2600".If you have logged in using a user ID without administrator privileges, the screen will display Administrator only. and return to the standby screen.Login User Name:L b ********************Login Password:[ Login ]Sys. Menu/Count.:a b 1 Report2 Counter********************* [ Exit ]3 SystemAdministrator only.](https://usermanual.wiki/KYOCERA-Document-Solutions/2KV0440/User-Guide-1258981-Page-60.png)
![Preparation before Use 2-1523In the System menu, press the U or V key to select [Network Setting].4Press the OK key. The Network Setting menu appears.5Press the U or V key to select [TCP/IP Settings].6Press the OK key. The TCP/IP Settings menu appears.7Press the U or V key to select [TCP/IP].8Press the OK key. TCP/IP appears.9Press the U or V key to select [On] and then press the OK key.Completed. is displayed and the screen returns to the TCP/IP Settings menu.10Press the U or V key to select [IPv4 Setting].System:a b *********************2 I/F Block Set.3 Security Level[ Exit ]1 Network SettingNetwork Setting:a b *********************2 NetWare3 AppleTalk[ Exit ]1 TCP/IP SettingsTCP/IP Settings:a b *********************2 IPv4 Setting3 IPv6 Setting[ Exit ]1 TCP/IPTCP/IP: a b 1 Off*********************2 *OnTCP/IP Settings:a b 1 TCP/IP*********************3 IPv6 Setting[ Exit ]2 IPv4 Setting](https://usermanual.wiki/KYOCERA-Document-Solutions/2KV0440/User-Guide-1258981-Page-61.png)
![Preparation before Use 2-1611Press the OK key. The IPv4 Setting menu appears.12Press the U or V key to select [DHCP].13Press the OK key. DHCP appears.14Press the U or V key to select [On] and then press the OK key. Completed. is displayed and the screen returns to the IPv4 Setting menu.15Press the U or V key to select [Auto-IP].16Press the OK key. Auto-IP appears.17Press the U or V key to select [On] and then press the OK key. Completed. is displayed and the screen returns to the IPv4 Setting menu.TCP/IP (IPv4) Setup (by Entering IP Addresses)Set up TCP/IP to connect to the Windows network. Set the IP addresses, subnet masks, and gateway addresses. The default settings are "TCP/IP Protocol: On, DHCP: On, Bonjour: Off, Auto-IP: On".NOTE: Before setting an IP address, ask your network administrator if your network environment requires input of an IP address. If input is necessary, ask your network administrator to obtain an IP address for you.IPv4 Setting:a b *********************2 Bonjour3 Auto-IP[ Exit ]1 DHCPDHCP: a b 1 Off*********************2 *OnIPv4 Setting:a b 1 DHCP2 Bonjour*********************[ Exit ]3 Auto-IPAuto-IP: a b 1 Off*********************2 *On](https://usermanual.wiki/KYOCERA-Document-Solutions/2KV0440/User-Guide-1258981-Page-62.png)
![Preparation before Use 2-172Use the procedure below to setup the TCP/IP (IPv4) setting.1Press the System Menu/Counter key on the main unit operation panel.When you are performing user management and have not logged in, a login screen will appear. Then, enter the user ID and password to log in.NOTE: Refer to Character Entry Method on Appendix-7 for details on entering characters.2In the Sys. Menu/Count. menu, press the U or V key to select [System], and then press the OK key.IMPORTANT: To make the settings, you must have logged in using a user ID with administrator privileges.The default settings of the login user name and login password are both "2600".If you have logged in using a user ID without administrator privileges, the screen will display Administrator only. and return to the standby screen.3In the System menu, press the U or V key to select [Network Setting].4Press the OK key. The Network Setting menu appears.5Press the U or V key to select [TCP/IP Settings].Login User Name:L b ********************Login Password:[ Login ]Sys. Menu/Count.:a b 1 Report2 Counter********************* [ Exit ]3 SystemAdministrator only.System:a b *********************2 I/F Block Set.3 Security Level[ Exit ]1 Network SettingNetwork Setting:a b *********************2 NetWare3 AppleTalk[ Exit ]1 TCP/IP Settings](https://usermanual.wiki/KYOCERA-Document-Solutions/2KV0440/User-Guide-1258981-Page-63.png)
![Preparation before Use 2-186Press the OK key. The TCP/IP Settings menu appears.7Press the U or V key to select [TCP/IP].8Press the OK key. TCP/IP appears.9Press the U or V key to select [On] and then press the OK key.Completed. is displayed and the screen returns to the TCP/IP Settings menu.10Press the U or V key to select [IPv4 Setting].11Press the OK key. The IPv4 Setting menu appears.12Press the U or V key to select [DHCP].13Press the OK key. DHCP appears.14Press the U or V key to select [Off] and then press the OK key. TCP/IP Settings:a b *********************2 IPv4 Setting3 IPv6 Setting[ Exit ]1 TCP/IPTCP/IP: a b 1 Off*********************2 *OnTCP/IP Settings:a b 1 TCP/IP*********************3 IPv6 Setting[ Exit ]2 IPv4 SettingIPv4 Setting:a b *********************2 Bonjour3 Auto-IP[ Exit ]1 DHCPDHCP: a b 1 Off*********************2 *On](https://usermanual.wiki/KYOCERA-Document-Solutions/2KV0440/User-Guide-1258981-Page-64.png)
![Preparation before Use 2-192Completed. is displayed and the screen returns to the IPv4 Setting menu.15Press the U or V key to select [Bonjour].16Press the OK key. Bonjour appears.17Press the U or V key to select [Off] and then press the OK key. Completed. is displayed and the screen returns to the IPv4 Setting menu.18Press the U or V key to select [Auto-IP].19Press the OK key. Auto-IP appears.20Press the U or V key to select [Off] and then press the OK key. 21Press the U or V key to select [IP Address].IPv4 Setting:a b 1 DHCP*********************3 Auto-IP[ Exit ]2 BonjourBonjour:a b *********************2 On1 *OffIPv4 Setting:a b 1 DHCP2 Bonjour*********************[ Exit ]3 Auto-IPAuto-IP: a b 1 Off*********************2 *OnIPv4 Setting:a b 2 Bonjour3 Auto-IP*********************[ Exit ]4 IP Address](https://usermanual.wiki/KYOCERA-Document-Solutions/2KV0440/User-Guide-1258981-Page-65.png)
![Preparation before Use 2-2022Press the OK key. IP Address appears.23Use the arrow keys to enter the IP address. Press the Y or Z key to move the cursor position horizontally.Press the U or V key or the numeric keys to enter the IP Address. Each 3 digits can be set between 000 and 255.IMPORTANT: When the DHCP Setting (page 2-14) is [On], the current IP address is displayed and cannot be changed.When setting an IP address, set the DHCP Setting (page 2-14) to Off.24Press the OK key. Completed. is displayed and the screen returns to the IPv4 Setting menu.25 Press the U or V key to select [Subnet Mask].26 Press the OK key. Subnet Mask appears.27Use the arrow keys to enter the Subnet Mask.Press the Y or Z key to move the cursor position horizontally.Press the U or V key or the numeric keys to enter the Subnet Mask. Each 3 digits can be set between 000 and 255.IP Address:a b 123.145.167.189IP Address: b 123.145.167.189IPv4 Setting:a b 3 IP Address*********************5 Default Gateway[ Exit ]4 Subnet MaskSubnet Mask:a b 123.145.167.189](https://usermanual.wiki/KYOCERA-Document-Solutions/2KV0440/User-Guide-1258981-Page-66.png)
![Preparation before Use 2-212IMPORTANT: When the DHCP Setting (page 2-14) is [On], the current Subnet Mask is displayed and cannot be changed.When setting an Subnet Mask, set the DHCP Setting (page 2-14) to Off.28Press the OK key. Completed. is displayed and the screen returns to the IPv4 Setting menu.29 Press the U or V key to select [Default Gateway].30Press the OK key. Default Gateway appears.31Use the arrow keys to enter the Default Gateway.Press the Y or Z key to move the cursor position horizontally.Press the U or V key or the numeric keys to enter the Default Gateway. Each 3 digits can be set between 000 and 255.IMPORTANT: When the DHCP Setting (page 2-14) is [On], the current Default Gateway is displayed and cannot be changed.When setting an Default Gateway, set the DHCP Setting (page 2-14) to Off.32Press the OK key. Completed. is displayed and the screen returns to the IPv4 Setting menu.IPv4 Setting:a b 3 IP Address4 Subnet Mask*********************[ Exit ]5 Default GatewayDefault Gateway:a b 123.145.167.189](https://usermanual.wiki/KYOCERA-Document-Solutions/2KV0440/User-Guide-1258981-Page-67.png)


![Preparation before Use 2-352Specifying Paper Size and MediaThe default paper size setting for cassette, for multi purpose tray and for the optional paper feeder (cassettes 2 and 3) is [Letter], and the default media type setting is [Plain].If the paper used in the cassette will be fixed and the paper is a standard size, set the Paper Size Dial as explained in Loading Paper in the Cassettes on page 2-27, and set the paper type as explained in Specifying Paper Size and Media Type for the Cassettes on page 2-35. If the paper is a non-standard size, set the paper size and paper type as explained in Specifying Paper Size and Media Type for the Cassettes on page 2-35.To fix the type of paper to be used in multi purpose tray, specify the paper size setting. (Refer to Specifying Paper Size and Media Type for the Multi Purpose Tray on page 2-38.)Specifying Paper Size and Media Type for the CassettesTo fix the type of paper to be used in cassette or the optional paper feeder (cassettes 2 and 3), specify the paper size. Also, you use a media type other than plain paper, specify the media type setting.NOTE: If using the products equipped with the fax function, the available media types for printing received faxes are as shown below.Plain, Recycled, Bond, Color, and High Quality1Press the System Menu/Counter key on the main unit operation panel.When you are performing user management and have not logged in, a login screen will appear. Then, enter the user ID and password to log in.NOTE: Refer to Character Entry Method on Appendix-7 for details on entering characters.Selection Item Selectable Size/TypePaper Size Select from the standard sizes. Selectable paper sizes are as follows.Inch size: Letter, Legal, Statement and Oficio IIMetric size: A4, A5, A6, B5, Folio, 16K, Executive and Envelope C5Media Type Plain, Recycled, Preprinted, Bond, Color,Prepunched, Letterhead, High Quality and Custom 1~8** To change to a media type other than Plain, refer to Paper Weight on page 8-17.Login User Name:L b ********************Login Password:[ Login ]](https://usermanual.wiki/KYOCERA-Document-Solutions/2KV0440/User-Guide-1258981-Page-81.png)
![Preparation before Use 2-362In the Sys. Menu/Count. menu, press the U or V key to select [Common Settings].3Press the OK key. The Common Settings menu appears.4Press the U or V key to select [Orig./Paper Set.].5Press the OK key. The Orig./Paper Set. menu appears.6Press the U or V key to select from [Cassette 1 Set.] to [Cassette 3 Set.]. NOTE: [Cassette 2] and [Cassette 3] are shown when the optional cassettes are installed.Follow the steps below when you select the main unit cassette (Cassette 1). Operate in a similar fashion when you select an optional cassette (Cassette 2 or 3).7Press the OK key. The Cassette 1 Set. menu appears.8When the Paper Size Dial on the cassette is set to [Other], set the paper size. Press the U or V key to select [Cassette 1 Size].NOTE: When the Paper Size Dial on the cassette is set to a standard paper size, this setting does not appear. Go to step 11.Sys. Menu/Count.:a b 5 User Property*********************7 Copy [ Exit ]6 Common SettingsCommon Settings:a b *********************2 Default Screen3 Sound [ Exit ]1 LanguageOrig./Paper Set.:a b *********************2 Def. Orig. Size3 Custom PaperSize[ Exit ]1 Custom Orig.SizeCassette 1 Set.:a b *********************2 Cassette 1 Type[ Exit ]1 Cassette 1 Size](https://usermanual.wiki/KYOCERA-Document-Solutions/2KV0440/User-Guide-1258981-Page-82.png)
![Preparation before Use 2-3729Press the OK key. Cassette 1 Size appears.10Press the U or V key to select the desired paper size and then press the OK key.Completed. is displayed and the screen returns to the Cassette 1 Set. menu.11Press the U or V key to select [Cassette 1 Type].12Press the OK key. Cassette 1 Type appears.13Press the U or V key to select the desired paper type and then press the OK key.Completed. is displayed and the screen returns to the Cassette 1 Set. menu.Cassette 1 Size:a b *********************2 Legala3 Statementa1 *LetteraCassette 1 Set.:a b 1 Cassette 1 Size*********************[ Exit ]2 Cassette 1 TypeCassette 1 Type:a b *********************2 Recycled3 Preprinted1 *Plain](https://usermanual.wiki/KYOCERA-Document-Solutions/2KV0440/User-Guide-1258981-Page-83.png)
![Preparation before Use 2-38Specifying Paper Size and Media Type for the Multi Purpose TrayTo fix the type of paper to be used in the multi purpose tray, specify the paper size.When using other than a plain paper, specify the media type.NOTE: If using the products equipped with the fax function and the multi purpose tray is used to print a received FAX, the available media types are as shown below.Plain, Recycled, Bond, Color, and High Quality1Press the System Menu/Counter key on the main unit operation panel.When you are performing user management and have not logged in, a login screen will appear. Then, enter the user ID and password to log in.NOTE: Refer to Character Entry Method on Appendix-7 for details on entering characters.Item DescriptionPaper SizeStandard SizesSelect from the standard sizes. Selectable paper sizes are as follows.Inch size: Letter, Legal, Statement, Executive, and Oficio IIMetric size: A4, A5, A6, B5, B6, Folio and 16KISO B5, Envelope #10 (Commercial #10), Envelope #9 (Commercial #9), Envelope #6 (Commercial #6 3/4), Envelope Monarch, Envelope DL, Envelope C5, Hagaki, Oufuku Hagaki, Youkei 4, Youkei 2Size EntryEnter the size not included in the standard size.Selectable paper sizes are as follows.Inch sizeX (Horizontal): 5.83~14.02" (in 0.01" increments),Y (Vertical): 2.76~8.50" (in 0.01" increments) Metric sizeX (Horizontal): 148~356 mm (in 1mm increments),Y (Vertical): 70~216 mm (in 1mm increments)Media Type Selectable media types are as follows.Plain, Transparency, Vellum, Labels, Recycled, Preprinted, Bond, Cardstock, Color, Prepunched, Letterhead, Envelope, Thick, High Quality and Custom 1~8** To change to a media type other than Plain, refer to Paper Weight on page 8-17.Login User Name:L b ********************Login Password:[ Login ]](https://usermanual.wiki/KYOCERA-Document-Solutions/2KV0440/User-Guide-1258981-Page-84.png)
![Preparation before Use 2-3922In the Sys. Menu/Count. menu, press the U or V key to select [Common Settings].3Press the OK key. The Common Settings menu appears.4Press the U or V key to select [Orig./Paper Set.].5Press the OK key. The Orig./Paper Set. menu appears.6Press the U or V key to select [MP Tray Set.].7Press the OK key. The MP Tray Set. menu appears.8Press the U or V key to select [MP Tray Size].9Press the OK key. MP Tray Size appears.10Press the U or V key to select the desired paper size and then press the OK key.Sys. Menu/Count.:a b 5 User Property*********************7 Copy [ Exit ]6 Common SettingsCommon Settings:a b *********************2 Default Screen3 Sound [ Exit ]1 LanguageOrig./Paper Set.:a b *********************2 Def. Orig. Size3 Custom PaperSize[ Exit ]1 Custom Orig.SizeMP Tray Set.:a b *********************2 MP Tray Type[ Exit ]1 MP Tray SizeMP Tray Size:a b *********************2 Legala3 Statementa1 *LetteraMP Tray Size:a b *********************2 Envelope #103 Envelope #91 *ISO B5a](https://usermanual.wiki/KYOCERA-Document-Solutions/2KV0440/User-Guide-1258981-Page-85.png)
![Preparation before Use 2-40If you select [Size Entry], use the numeric keys to enter the Y (vertical) size and press the OK key, and then enter the X (horizontal) size and press the OK key.Completed. is displayed and the screen returns to the MP Tray Set. menu.11Press the U or V key to select [MP Tray Type].12Press the OK key. MP Tray Type appears.13Press the U or V key to select the desired paper type and then press the OK key.Completed. is displayed and the screen returns to the MP Tray Set. menu.Size Entry(Y): D b (5.83 - 14.02) x ***11.49*"MP Tray Set.:a b 1 MP Tray Size*********************[ Exit ]2 MP Tray TypeMP Tray Type:a b *********************2 Transparency3 Vellum1 *Plain](https://usermanual.wiki/KYOCERA-Document-Solutions/2KV0440/User-Guide-1258981-Page-86.png)