Kenmore Elite 79631462410 User Manual WASHER Manuals And Guides 1409086L
User Manual: Kenmore Elite 79631462410 79631462410 KENMORE ELITE WASHER - Manuals and Guides View the owners manual for your KENMORE ELITE WASHER #79631462410. Home:Laundry & Garment Care Parts:Kenmore Elite Parts:Kenmore Elite WASHER Manual
Open the PDF directly: View PDF ![]() .
.
Page Count: 68
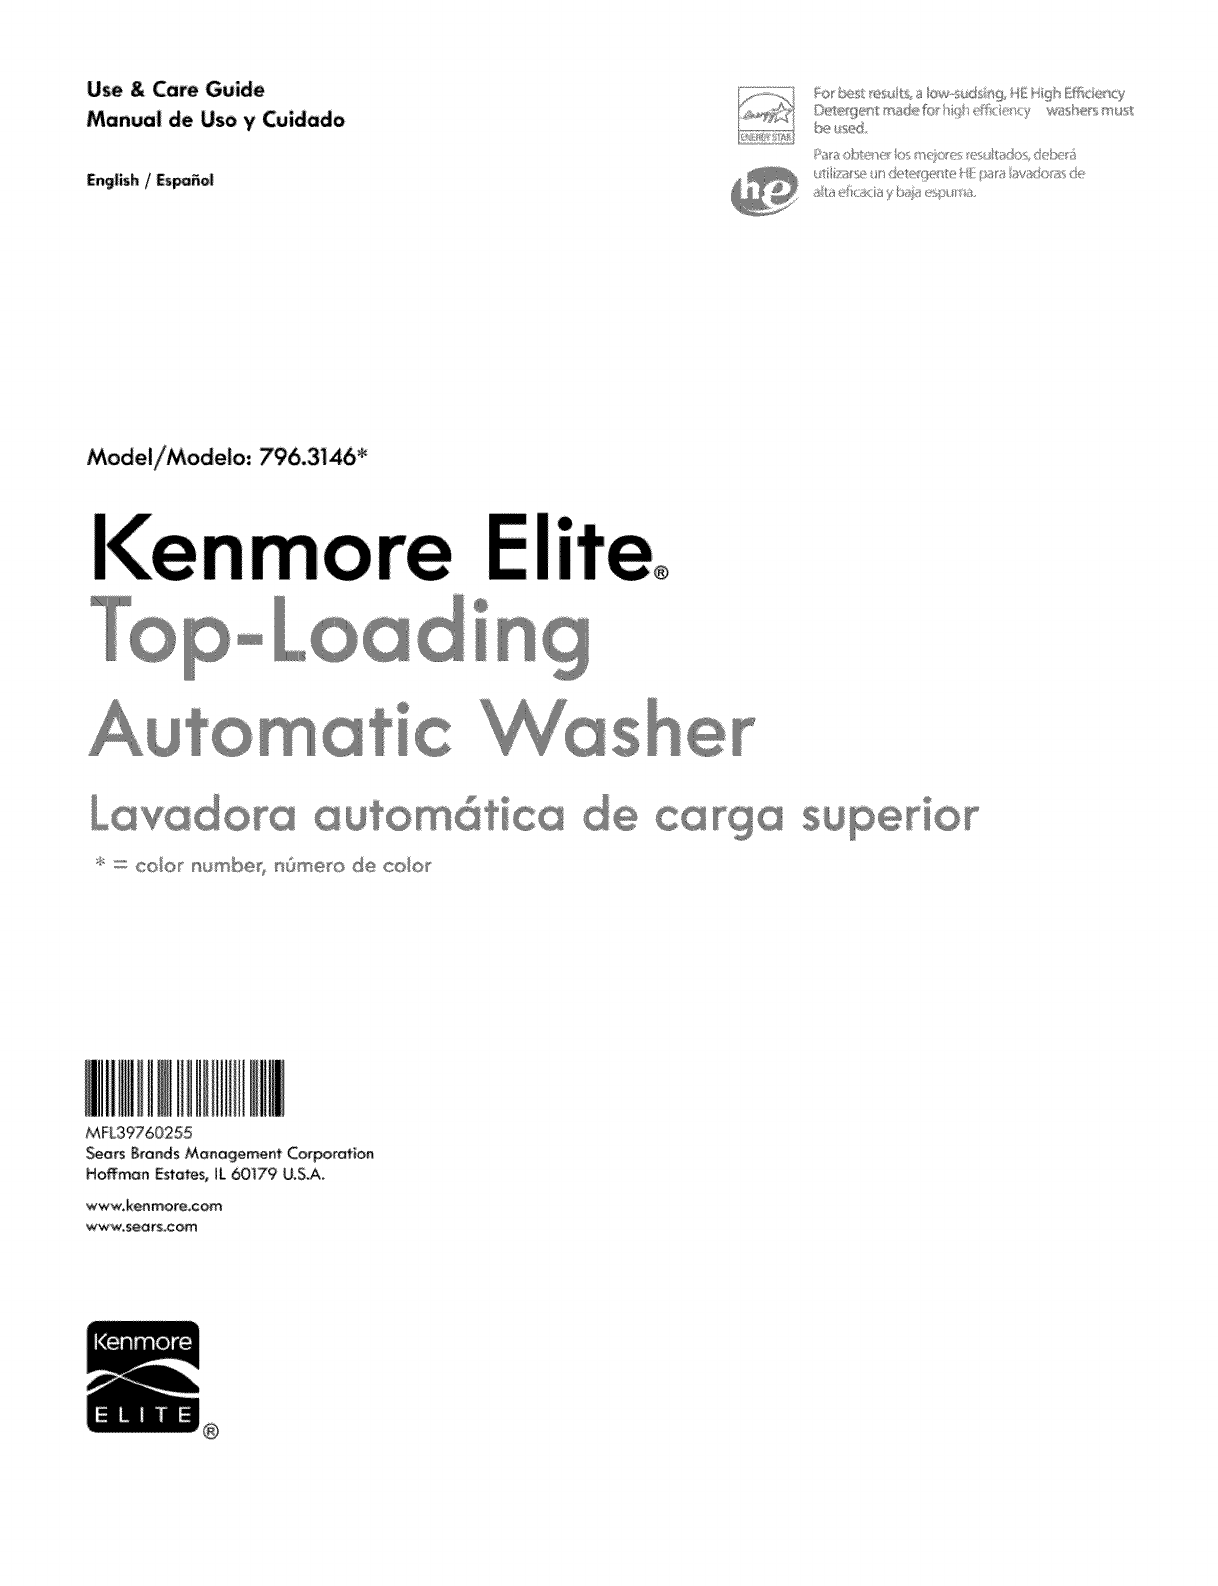
Use & Care Guide
Manual de Uso y Cuidado
English /Es_fio|
ie u _:÷d,
i_ i!']= L {i' "s!i!' -ii )U), )_5
Model/Modelo: 796.31_*
ore Elite,
@
@
®uto @tic®
' _ co,oF numbeB _@wero de ce/oy
d@ carga @
s_peFIoF
MFL39760255
Scots 8ranis Management Corporation
Hoffman Estates, IL 60179 U.S_A
www_kenmo_e,com
www.$ea_s_om
®
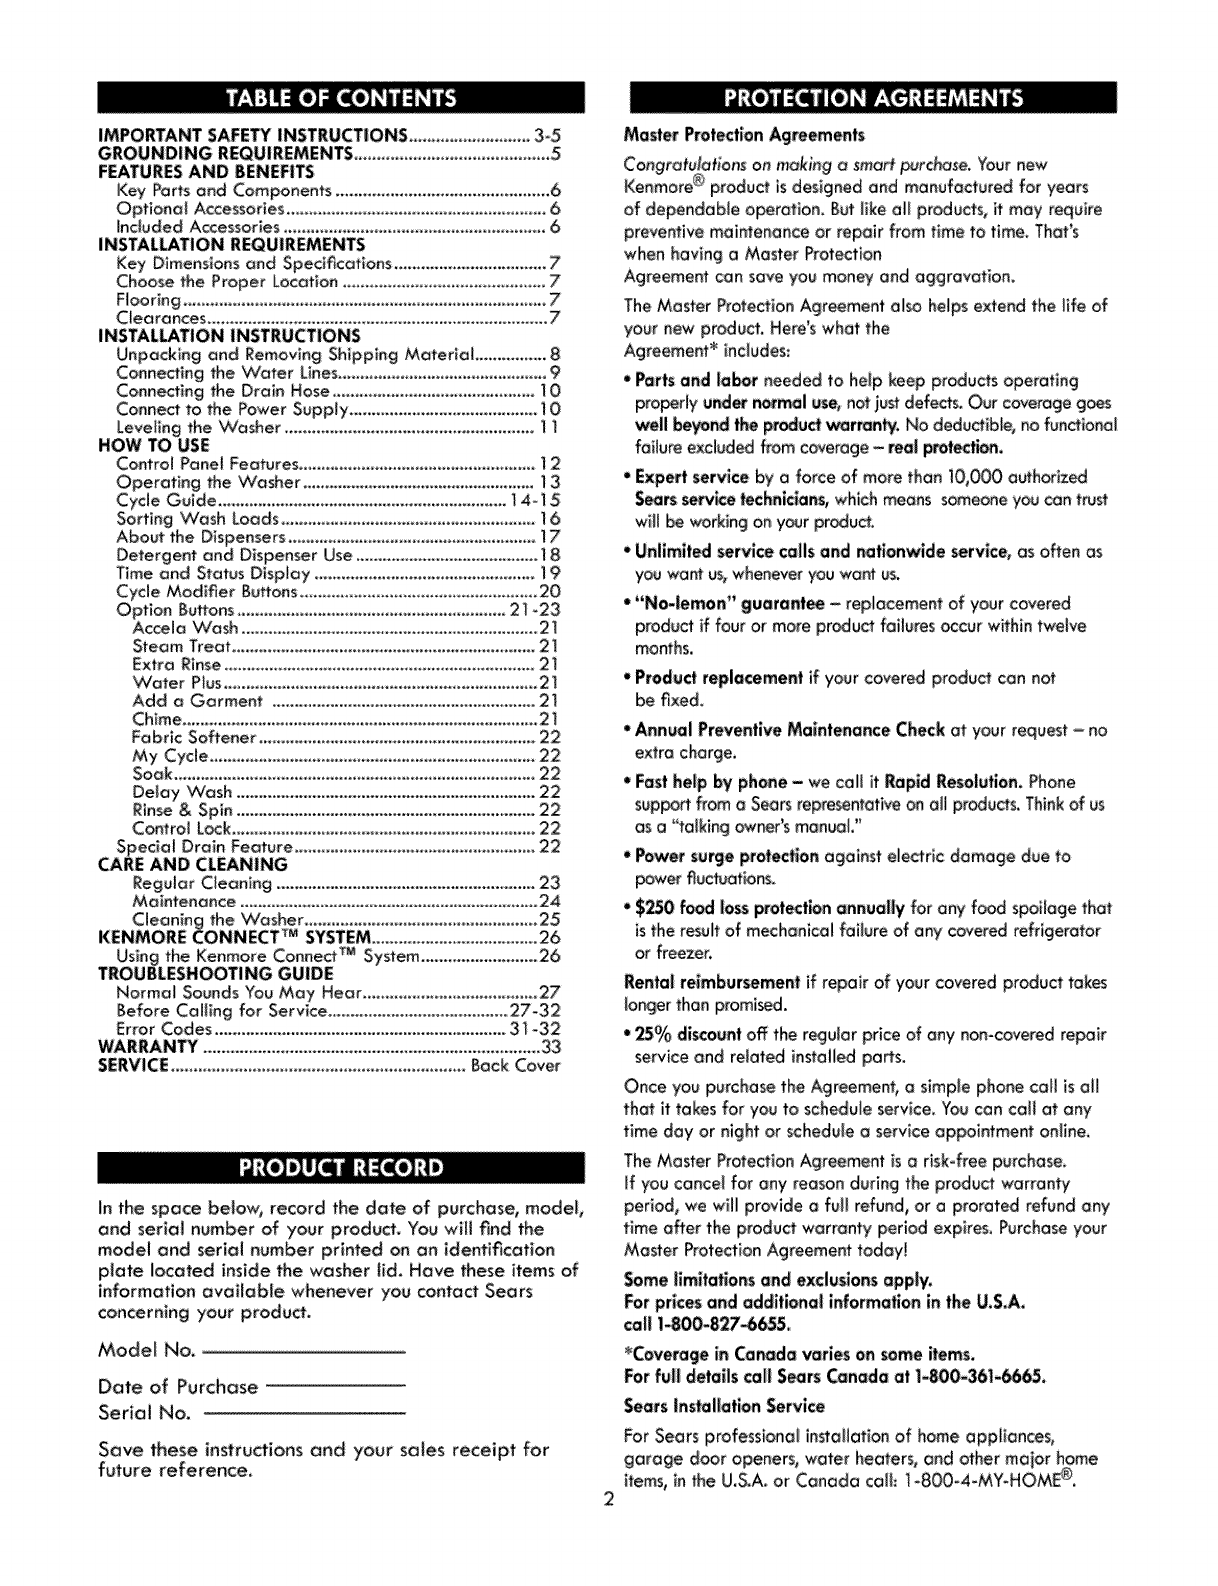
Using the Kenmore ConnectTM System ...........................26
TROUBLESHOOTING GUIDE
Normal Sounds You May Hear .........................................27
Before Calling for Service ............................................27_32
Error Codes ................................................................. 31-32
WARRANTY ............................................................................33
SERVICE ................................................................. Back Cover
In the space below, record the dote of purchase, model,
and serial number of your product. "Youwillfind the
mode_ end serial number printed on an identification
plate located inside the washer tid. Have these items of
information available whenever you contact Sears
concerning your product.
Model No.
Date of Purchase
Serial No.
Save these instructions and your sates receipt for
future reference.
Master Protection Agreements
Congratulations on making, a smart purchase, Your new
Kenmore _ product is designed and manufactured for years
of dependable operation, But _ike aH products, it may require
preventive maintenance or repair from time to time, That's
when having a Master Protection
Agreement can save you money and aggravation°
The Master Protection Agreement' also he_psextend the _ife M
your new product. Here's whm the
Agreement _ includes:
•Parts and labor needed to heip keep products operating
properllt under _rmo[ use, not _ustdefects, Our coverage g_
well beyond the productwarranty, No deducible, no fun_iona_
foffure excluded from coverage - real protection.
•l_xpert servke by aforce of more than 10,000 authc_-ized
S_rs _rvice _chnkians, which means someone you can trust
wil! be working on your product.
• Unlimited service calls and nationwide service, as often as
you want us, whenever you want us.
• "No-lemon" guarantee - replacement of your covered
prode_ ff four or more product faitures occur within twelve
months,
• Product replacement if ,your covered product can not
be fixed.
• Annual Preventive Maintenance Check at your request -no
extra charge,
• Fast help by phone - we coff it Rapid Resolution. Phone
supportfrom a Sears representative on aft products.Think:of us
aSa "talking owner's manual,"
•Power surgeprotectionagainst e_ectricdamage due to
power fluctuations,
•$_0 food lossprotectionannually for any food spo}Joge that
is the resu#of mechanicalfailure of any coveredrefrigerator
or freezer.
Rental reimbursement if repair of your covered product takes
longer than promi_d.
•25% d&count off the regular price of any non-covered re_ir
service and related installed parts,
Once you purchase the Agreement, a simple phone ca_l is aH
that it takes for you to schedule service, "Youcan coil at any
time day or night or schedule a service appointment on_ine.
The Master Protection Agreement is a risk-free purchase_
If you cancel for any' reason during the product warranty
period, we wiJlprovide a full refund, or aprorated refund any
time after the product warranty period expires, Purchase your
Master Protection Agreement today!
Some limitations and exclusions apply.
For prices and additional information in the U,S,A,
call i-800-827-6655.
_Coveragein Canada varleson some items,
Forfull details callSe_rs Canada at i-800-361-6665.
SearsInstallation Service
For Sears professiona_installation of home appliances,
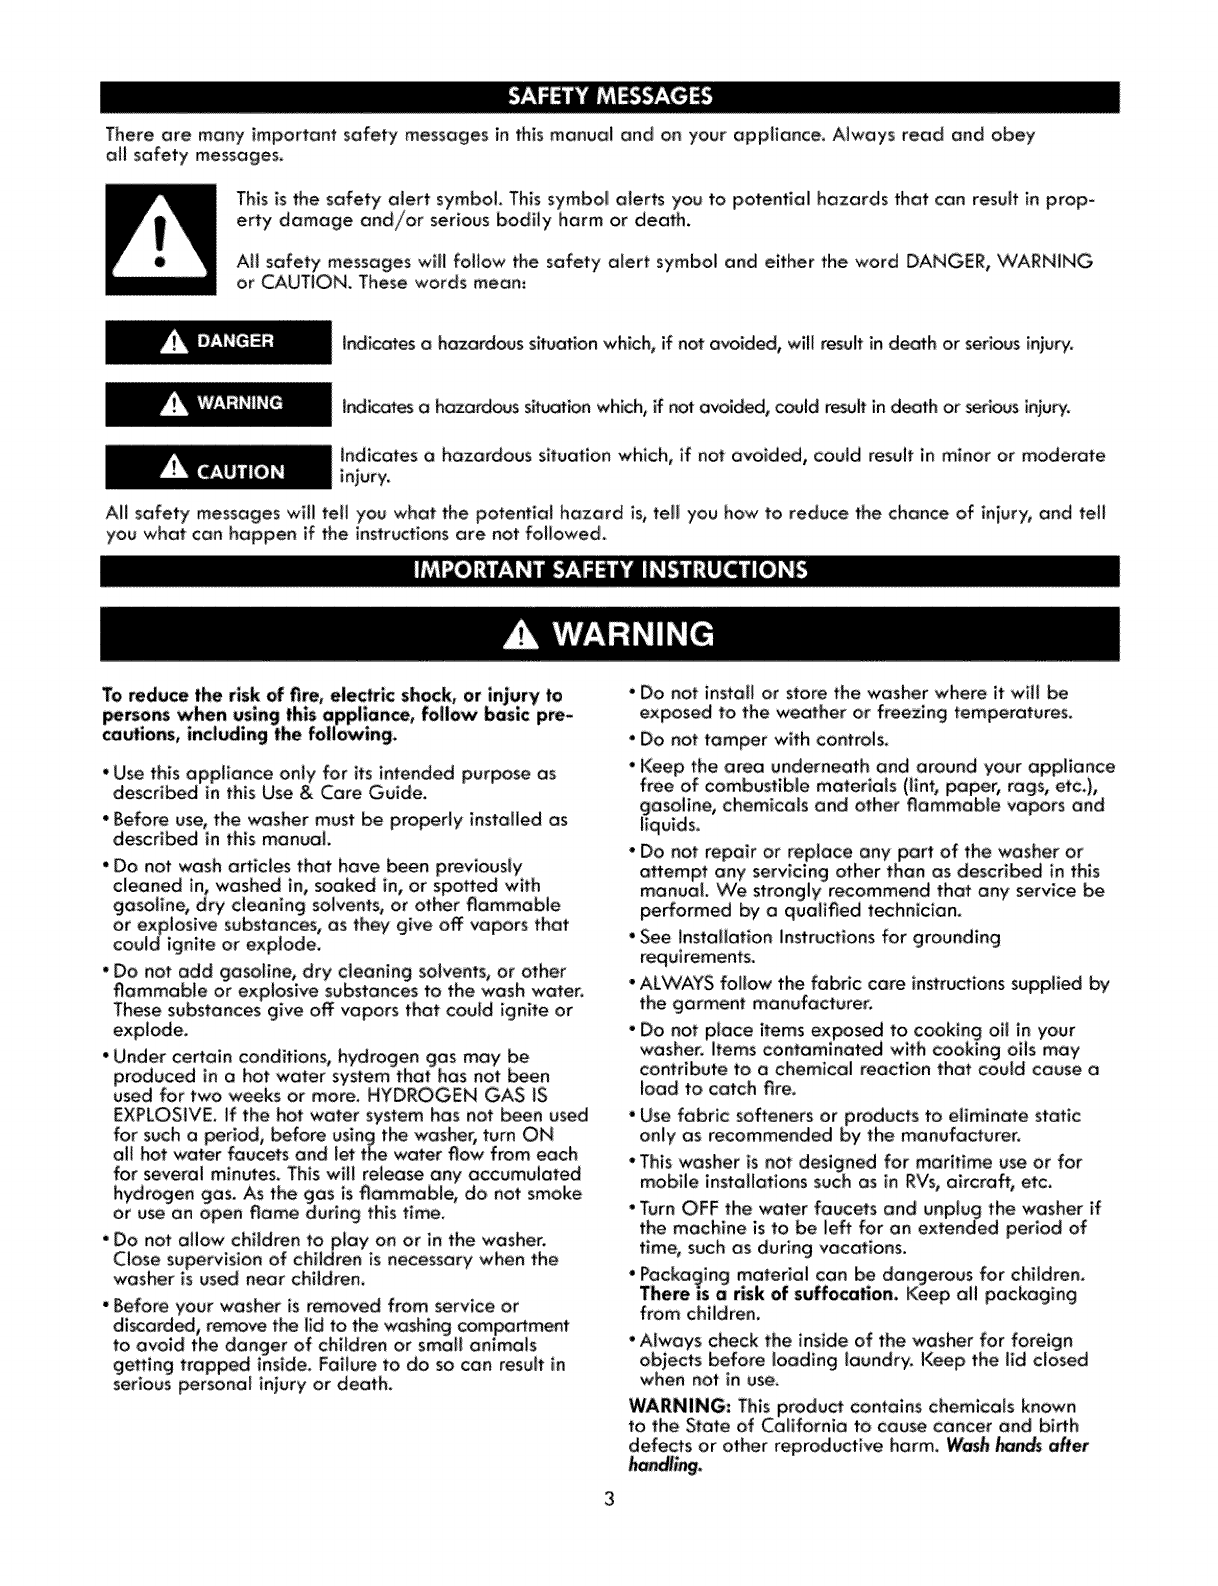
There are many important safety messages in thls manual and on: your appllance. Always read and obey
oil safety messages.
This _sthe safety alert symbol. This symbol alerts you to potentlai hazards that can result in prop_
erty damage and/or serious bodily harm or death.
All safety messages will follow the safety alert symbol and either the word DANGER, VCARNING
or CAUTION_ These words mean:
Indicates a hazardous situation which, if not avoided, will result in death or _rious injury.
Indicates a hazardous situation which, if not avoided, could _sult in death or _ric,Js ir_ury.
Indicates a hazardous situation which, if not avoided, could result in minor or moderate
injury.
All safety messages will tell you what the potential hazard is, tell you how to reduce me chance of injury, and tell
you what can happen if the instructions are not followed.
• Use this appliance only for _tsintended purpose as
described tn this Use & Care Guide.
Before use, the washer must be properly installed as
described in thls manual.
• Do not wash articles that have been previously
cleaned in:, washed in, soaked in, or spoffed w_th
gasoline, dry cleaning solvents, or other flammable
or expiosive substances, as they g_ve off vapors that
could ignite or explode.
These substances glve off vapors that could ignite or
explode.
• Under certain conditions, hydrogen gas may be
produced in a hot water system that has not _en
used for two weeks or more. HYDROGEN GAS IS
EXPLOSIVE. if the hot water system has not been used
for such a period, before using the ,washer, turn ON
all hot water faucets and let the water flow from each
for several minutes, This will release any accumulated
hydrogen gas. As the gas is flammable, do not smoke
or use an open flame during this tlme.
on or in the washer.
is necessary when the
washer is used near children.
• Before your washer is removed from service or
serious personal injury or death.
•Do not install or store the washer where it will be
exposed to the weather or freezing temperatures.
"Do not tamper with controls.
asoline, chemicals and other flammable vapors and
iqulds.
• Do not repair or replace any part of the washer or
attempt any servicing other than as descried in this
manual. We strongly recommend that any service be
performed by a qualified technician.
• See Installation Instructions for grounding
requirements.
•ALWAYS follow the fabric: core instructions supplied by
the garment manufacturer.
•Do not place items exposed to cooking oH in: your
washer; Items contamlnated with cook}ng oils may
contribute to a chemical reaction that could cause o
load to catch fire.
• Use fabrlc: softeners or products to eliminate statlc
only as recommended by the manufacturer.
• This washer is not designed for maritime use or for
mobile installations such as in RVs, aircraft, etc.
time_ such as during vacations.
• Packaging material can be dangerous for children.
There is a risk of suffocation. Keep all packaging
from children.
•Always check the inside of the washer for foreign
objects before loading laundry_ Keep the lid dosed
when not in use.
defects or other reproductive harm. Washhar_ a_er
handling.
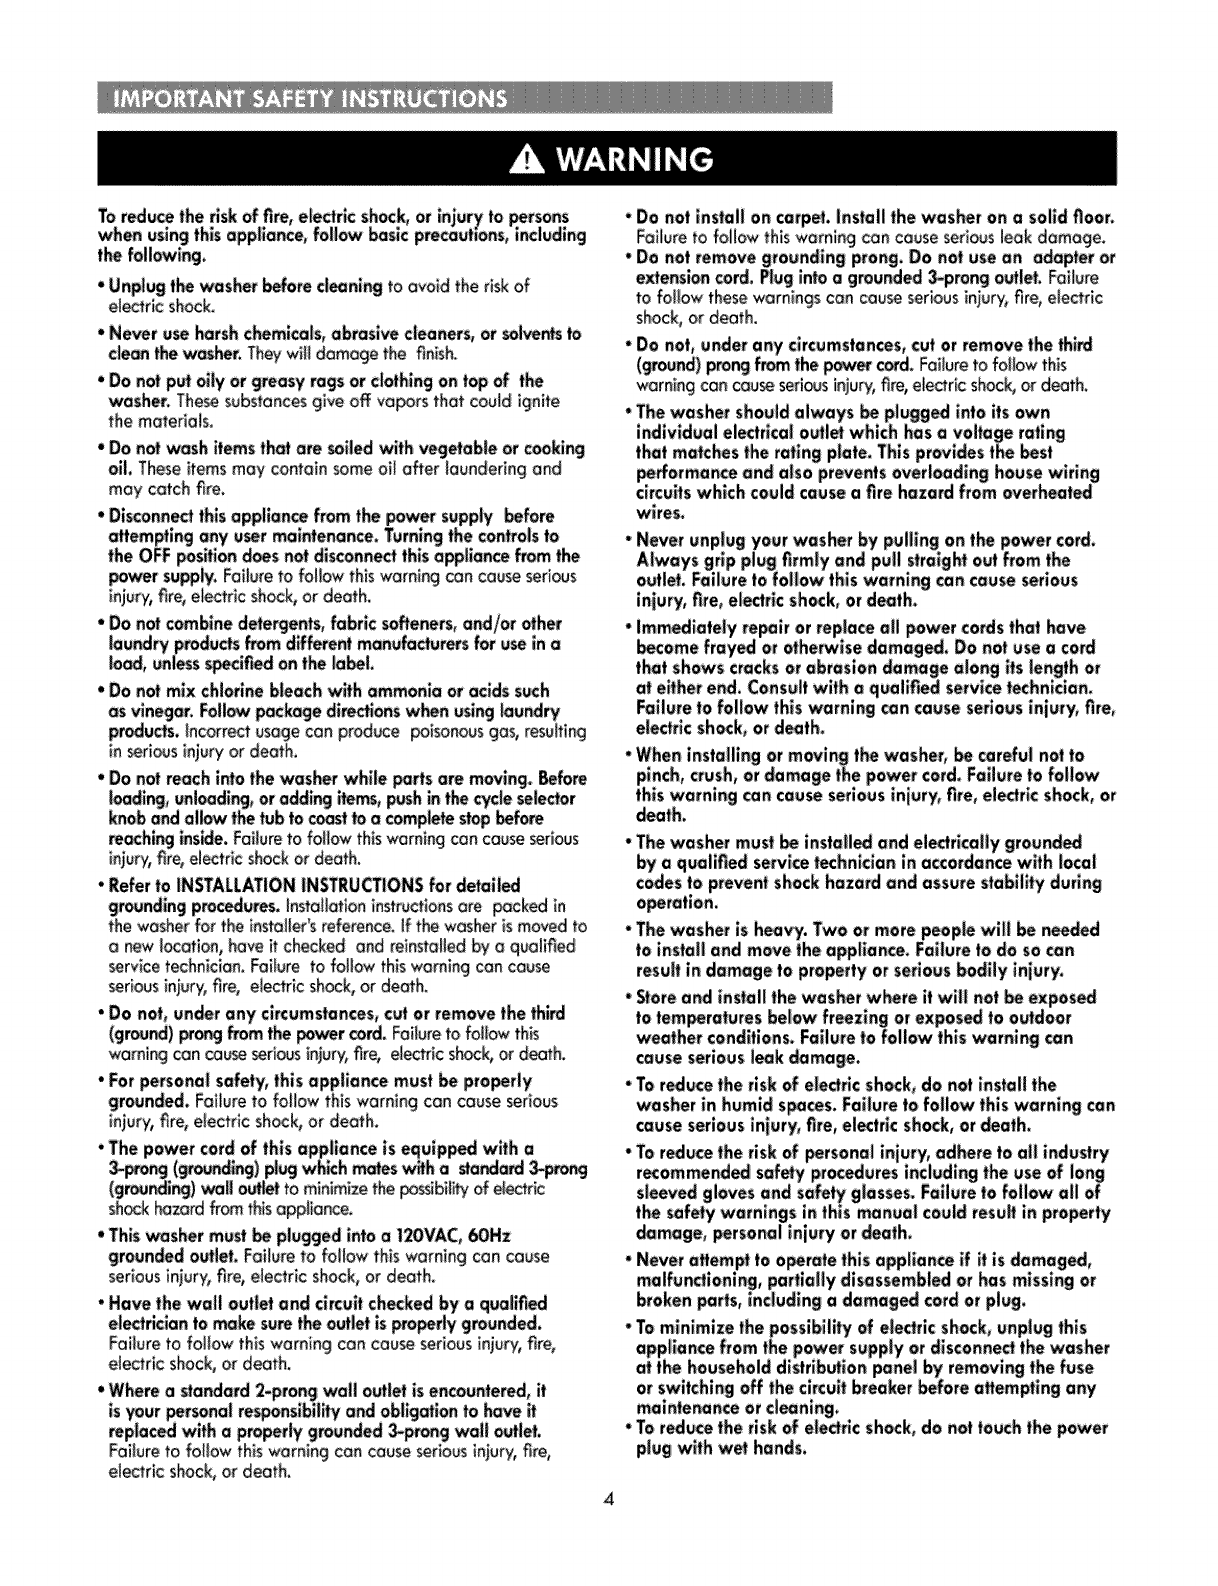
the following,
•Unplug the wasber before cl_ning to ovo_d the risk of
electricshock,
•Never usa harsh chemicals,abrasivecleaners,or solventsto
cleanthewasher.Theywfftdamagethe finish
• Do not p_ oily or greasy ragsor clothingontopof the
washer.Thesesubstancesgive off vaporsthat could ignite
the materials.
•Do not wash itemsthat are soiled-withvegetable or cooki_
oil. Theseitems may contain someoff after _aunderingand
may catch fire,
• Disconnectthisappliancefrom the power supply before
aflemptingany usor maintenance. Turningthe controlsto
the OFFposffiondoesnotdisconnectthis appffancefromtbe
pcrwersupply.Faffureto follow thiswarning can causeserious
injury,fire, electric shock,or death,
• Do nat combine detergents,fabric softeners,and/or other
laundry productsfromdiffe_nt manufacturersfor useina
load,unbss _clfied ontbe _abeL
•Do not mix chbr_ne bleachwith ammoniaor acids such
as vinegar.Foffcrwpackagedlr_ions when using lau_ry
products,Incorrectusagecan produce poisonousgas,resulting
in seriousinjury or death.
reaching aside. Failure to folbw th_swarning con cause serious
_niury, fire, electric shock or death.
•Refer to _NSTALLATION INSTRUCTIONS for detaiied
groundingprocedure,InstaHmioninstructionsore packed in
the washer for t;heinstaller's reference. If the washer is moved to
a new J_otlon,haveitchecked and reinstalledby a qualified
_rvice technlc_an. Foiture to follow th_swarning can cause
serious _njur_;fire, electric sh_k, or death.
• Do not, under any circumstances, cut or remove the third
(ground)prig fromthepower cord.FailuretofoH_ this
warningcan cause_riousin_ur_fire,eI_ricshock,ordeath.
•For personal safety_ this appliance must be pro_rly
ground_, Failuretofollowthiswarningcan causeserious
iniury,fir_electricshock_ordeath,
•The power card of this appliance is equipp_ with a
_p_g (grounding) pl_ which m_es with astanda_ _prong
(grouPie) wall outer to minimize the _sslbHi_t of e_ectric
sh_k hazardfrom thisappliance.
• This washer must be plugged into a 12OVAC, _Hz
grounded outlet.Failuretofollowthiswarningcan cause
serious iniury, fire, electric shock, or death_
• Have the wall outlet and circuit choked by a qualified
el_tHcian to make _e the outlet is pro_dy grounded.
Failureto followthiswarningcan cause seriousiniury,fire,
electricshock, or death.
• Where a standard 2-prong waft outlet is encounterS, it
Failuretofollowthiswarningcan causeseriousinjury,fire,
electric shock, or death.
• Do not install on carpet.Installthe washer on a solid floor.
Foffureto follow thiswarningcon causeseriousleak damage.
• Do not removegrounding prong. Do notuse an adapteror
extensioncord.Plugintoa grounded 3-prongoutEet.Failure
to foffow thesewarningscan cau_ seriousinjury,fir_ electric
shock,or death.
• Do not, under any circumstances,cut or removethe third
(ground)prongfromthe_er cord.Failureto follow this
warningcan causeserious_ury, fire,ele_ric shock,or death.
• Thewashershouldalways be pluggedInto itsown
individualelectrical outletwhich has a voltage rating
that matchesthe ratingplate. Thisprovidesthe best
wires.
•Never unplug your washe_by pulling on the power cord.
injury,fire, eight shock,or death.
• Immediatelyirepairor replace all power cordsthat hove
becomefrayedor othe_ise damaged. Do notuse a co_
that shows cracksorabrasion damagealong its length or
at effherend. Consultwffh aqualified servicetechnician.
Failureto follow thiswarning can causeseriousinjury,fire,
electricshock,or death.
• When_nstaff[ngor movingthe washer,be careful notto
pinch,crush,or damage the power cord.Failureto follow
thiswarning can causeseriousinjury,fire, ei_rlc shock,or
death°
codesto preventshockhazard and assurestabilityduring
resuit indamage to propertyor se6ous bodily injury.
• Storeand installthe washerwhere it wiff not be expos_
causeseriousleak damage.
• Toreducethe Hskof electricshock, do notinstallthe
washerin humid s_ces. Failureto foffowthis warning can
causeserious injury,fire, electricsh_k, or death.
sleev_ gloves and safetyglasses Failureto foflow all of
the safetywarnings in this manual could resultin proper_
damage, personalinjury or death.
broken_rts, indudlnga damag_ cordat plug.
maintenance or cleaning_
• To reduce the risk of eledric shock, do not touch the power
plug with wet hands.
•Donotallowchildrento playonorin thewasher.
Closesupervisionof childrenisnecessarywhenthe
washerisusednear cNldren. As children grow, teach
them the prope_ safe u_ of all appliances.Failure
to comply with these warnings could result in serious
personal injury.
• Destroy the carton, plastic bag, and other packing
materials after the washer is unpacked, Children
might use them for piay. Cartons covered with rugs,
bedspreads, or p_ostic sheets con become airtight
chambers, Failure to comply with these warnings could
resultinseriouspersonal injury.
•Keep laundry products out of children'sreach,To
prevent personal iniury,observe allwarnings on
product labels, Failure to comply with these warnings
could resultin seriouspersonal injury.
* Before your washer is removed from service or
discarded, remove the lid to the washing com_rtment to
avoid the danger of children or small animals getting
trapped inside.Failureto do so can resultin serious
personai injury or death,
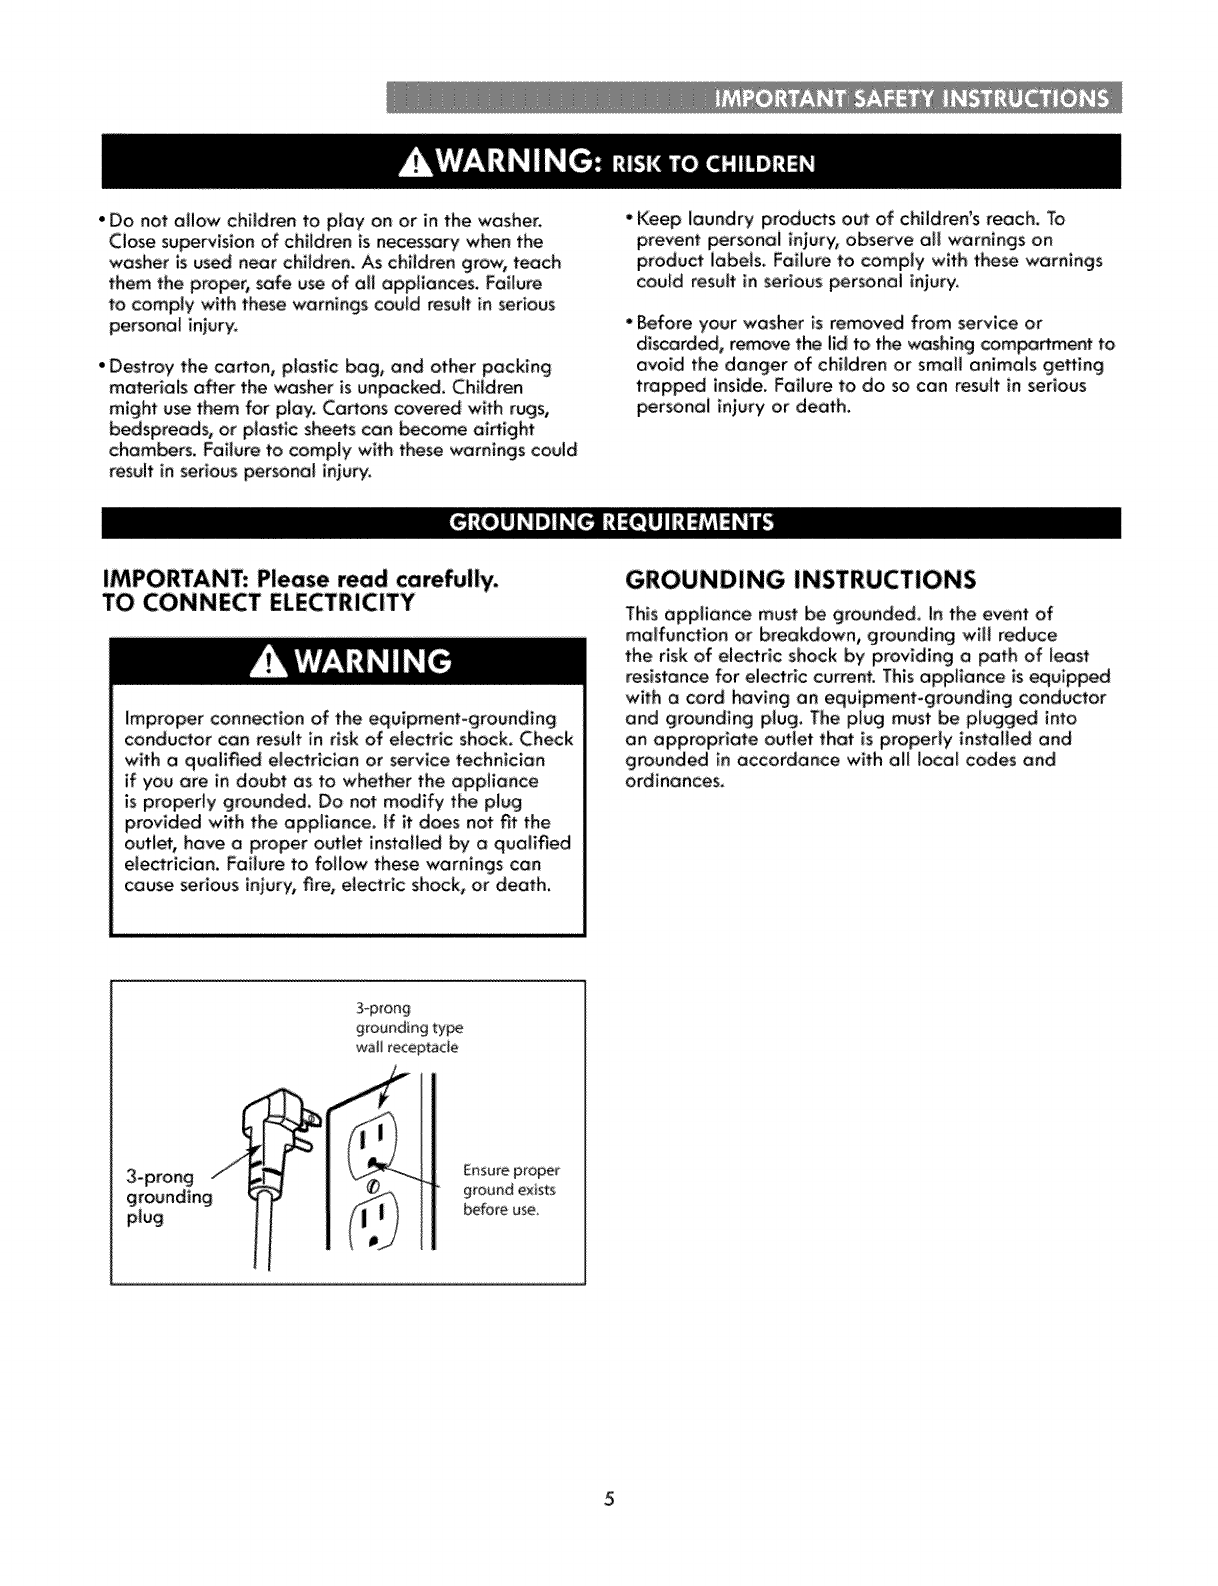
IMPORTANT: Please read carefully.
TO CONNECT ELECTRICITY
Improper connection of the equipment-groundlng
conductor can resultin riskof electricshock, Check
with aqualified electrician or service technician
if you ore in doubt as to whether the appliance
is properly grounded, Do not modify the plug
provided with the applionceo Ifitdoes not fit the
outlet, have aproper outlet installed by aqualified
eIectrlcian,Failureto follow these wamings con
cause seriousinjury,fire,electricshock, or death.
GROUNDING INSTRUCTIONS
This appliance must be grounded. In the event of
malfunction or breakdown,, grounding wiH reduce
the risk of electric shock by providing a path of least
resistance for eIectric current. This appliance is equipped
with a cord having an equipment-grounding cond_tor
and grounding plug,The p(ug must be plugged into
an appropriate outlet that is properly installed and
grounded in accordance with all local codes and
ordinances.
3-prong
grounding type
wall receptacle
grounding_
plug
Ensure proper
g_ound exists
befo_ use_
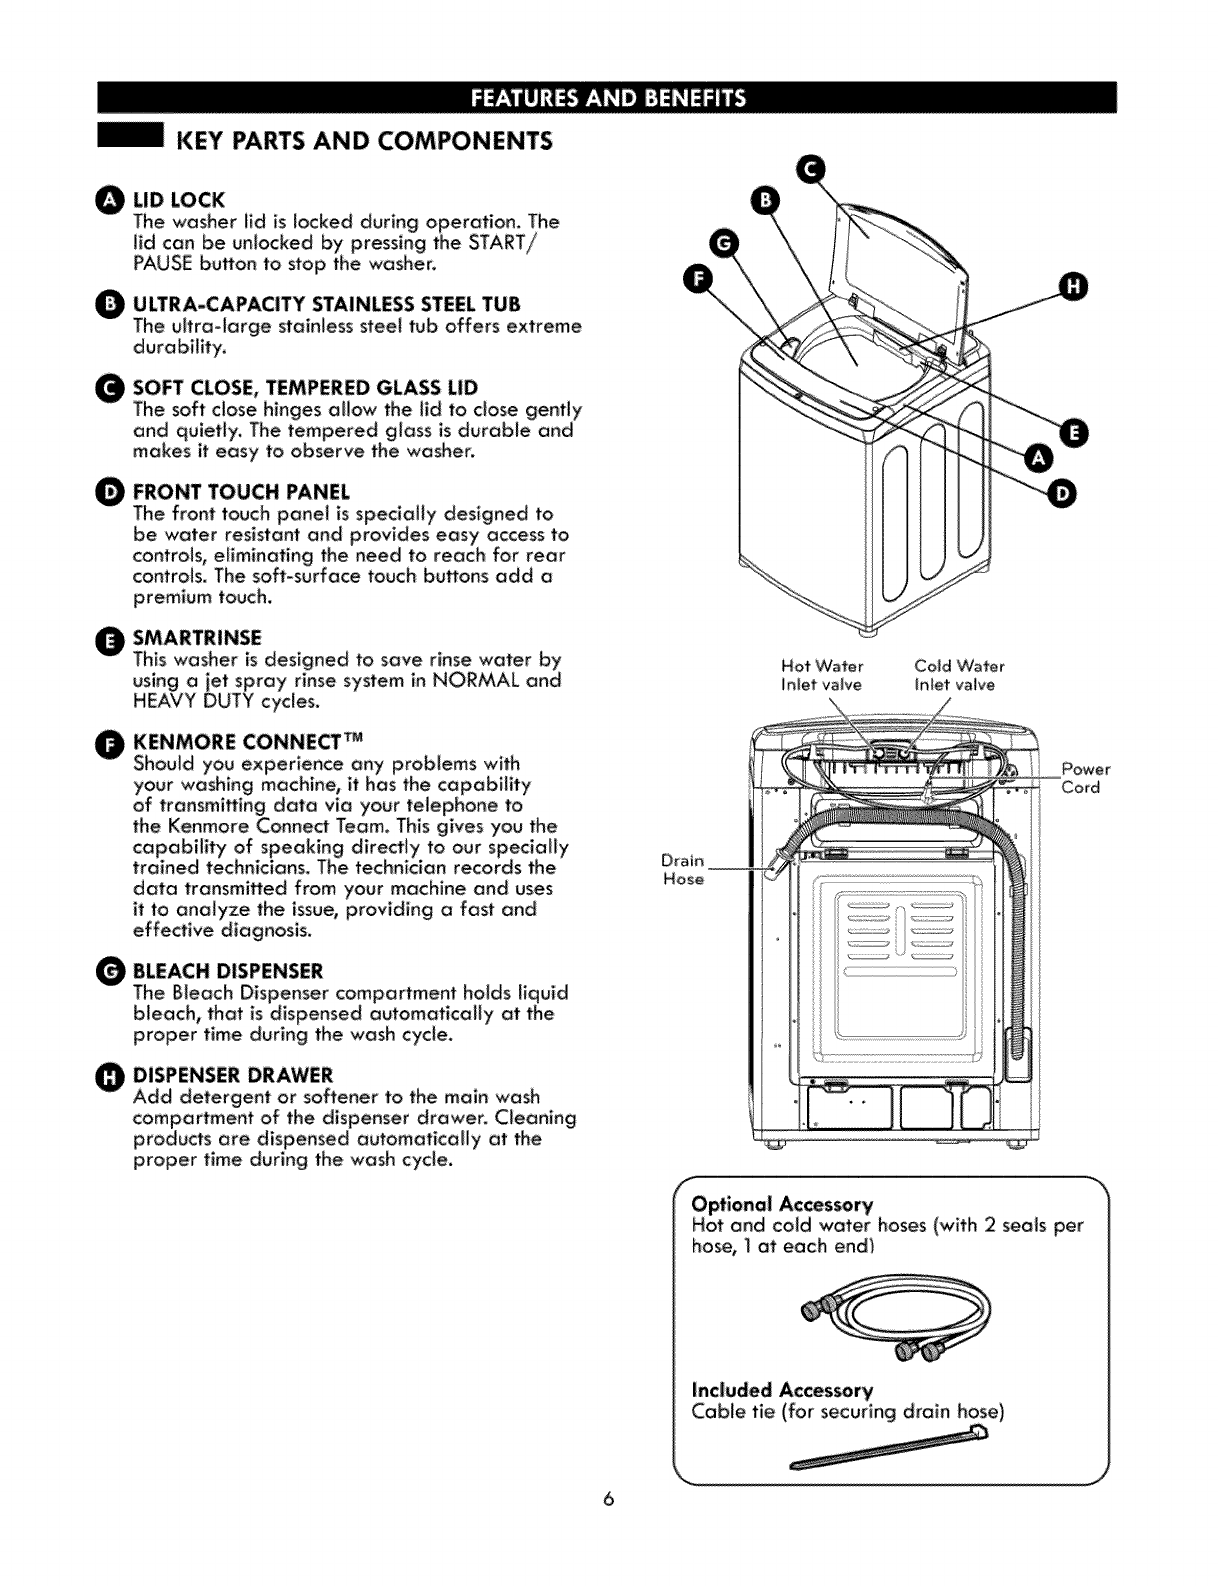
KEY PARTS AND COMPONENTS
gLID LOCK
The washer lid is locked during operation. The
lid can be unlocked by pressing the START/
PAUSE button to stop the was:her.
ULTRA-CAPACITY STAINLESS STEELTUB
The ultra-large stainless steel tub offers extreme
durability.
SOFT CLOSE, TEMPERED GLASS LID
The soft close hinges allow the lid to close gently
and quietly. The tempered gloss is durable and
makes it easy to observe the washer.
FRONT TOUCH PANEL
The front touch panel is specially designed to
be water resistant and provides easy access to
controls, eliminating the need to reach for rear
controls, The soft-surface touch buffons add a
premium touch.
SMARTRINSE
This washer is designed to save rinse water by
using a jet spray rinse system in NORMAL and
HEAVY DUTY cycles.
OKENMORE CONNECT TM
Should you experience any problems with
your washing machine_ it has the capability
of transmi_ing data via your telephone to
the Kenmore Connect Team. This gives you the
data transmitted from your machine and uses
it to analyze the issue, providing a fast and
effective diagnosis.
BLEACH DISPENSER
The Bleach Dispenser compartment holds liquid
bleach, that is dispensed automatically at the
proper time during the wash cycle,
DISPENSER DRAWER
Add detergent or softener to the main wash
compartment of the dispenser drawer. Cleaning
produ_s are dispensed automatically at the
proper time during the wash cycle.
Drain
Hose
Hot Water Cold Water
inlet valve InJet valve
Optional Accessory
Hot and cold water hoses (with 2 seals per
hose, 1at each end_
Included Accessory
Cable tie (for securing drain hose}

KEY DIMENSIONS AND SPECIFICATIONS
Top_Loading VVasher
120VAC, 60Hz
Dimensions 27"(VV} X 28 3/8"(D) X 40 3/8"(H), 55 3/8"(H with lid open)
68.6 cm (W) X 72.i cm (D) X 102.6 cm (14),140.6 cm (H {_'ith iid
Net Weight 138.2 Ibs. (62.7kg)
CHOOSE THE PROPER LOCATION
WAR N I NG
°Washerisheavy. Twoor mare peopleare requiredwhen
moving and unpackingthe washer. Faitureto do so may
resultindamage to property or seriousbodily harm.
°Storeand installthe washerwhere it wiff not be exposed
to temperatures below freezing or exposedto ou_oor
weather conditions,Failureto fol}ow this warnlngcon cause
_rious injury, fire, electric shock,or death.
• Properlyground washerto conformwith aft electric
governingcodesand ordinances.Failureto foffow this
warning con causeseriousinjury, fire, ele_ric shock,or
death,
• Toreducethe Hsk of eiectrk shock,do not install the
washer inhumid spaces.Failureto follow thiswarning can
causeseriousinjury, fire, electric shock,or death.
• Toensure proper air flow, do not blockthe large opening
onthe harlem of the washer with carpetingor other
materials.
• 0o notremovegroundprong. Donotuse an adopter or
extension_. Plugintoa grounded 3-prongoutlet,Failure
to follow this warning can causeseriousi_ury, fire, eie_ric
shock,or death.
NOTE::tnstailingthe washerin a humidspace,or installingor
storingthe washerwhere it wHIbe exposed to the weather or
freezhg ternperatures,may resultinrustor other damage that
isnot covered by the produd warranty.
PowerOut|at
•The poweroutletmust be within 60 in. (1.5m) of either side
ofthe washer,
•The applianceand outletmust be positionedso thatthepbg
is easilyaccessible,
• Do not over_oad the outlet with more than
one opplionce.
•The ouHet must be grounded in accordance with current
wiring e_e_ric codes and regulations,
• Time-delay fuse or circuit breaker is recommended.
NOTE: Itisthepersonalresponsibifftyand oMigeti_ of the
productowner tohove a properouHetin_aHed by a qualified
service technician,
€FLOORING
•To minimizenoiseandvibration,thewasherMUST be
instoUedon o solidlyconstructedfioonSeetheNOTEtoyour
right.
' AItowebJeslope under the entire washerisa maximum:1in.
difference fromside to side or from front to back.
"_nstaliing on carpeting and soft tile surfaces is
not recommended.
•Never install the washer on a platform or weakly
supported structure,
CLEARANCES
7
105cm}
1'_ 2'7' 1_
_250m (686 cm} 2 5,cm}
Toensuresufficientclearancefor ",voterlinesand airflow, allow
minimumclearancesof at least I in.(2_5cm)at _ sidesand
4in. (10 _) behind the unit. Besureto allow for wall, doeGor
floor moldlngsthat may increa_ the required clearances.
I40,6 cm}
iwith <p÷n lid
3 _/_
(9 _m
Minimum vertical space from floor to overhead
shelves, cabinets, ceilings, etc., is 56 in.
NOTE: The washer must be installed on firm flooring
to minimize vibration during the spin cycle, Concrete
flooring is best, but a wood floor is sumcient, provided
it is built to FHA #andards. The "washer should not be
installed on rugs or exposed to weather.
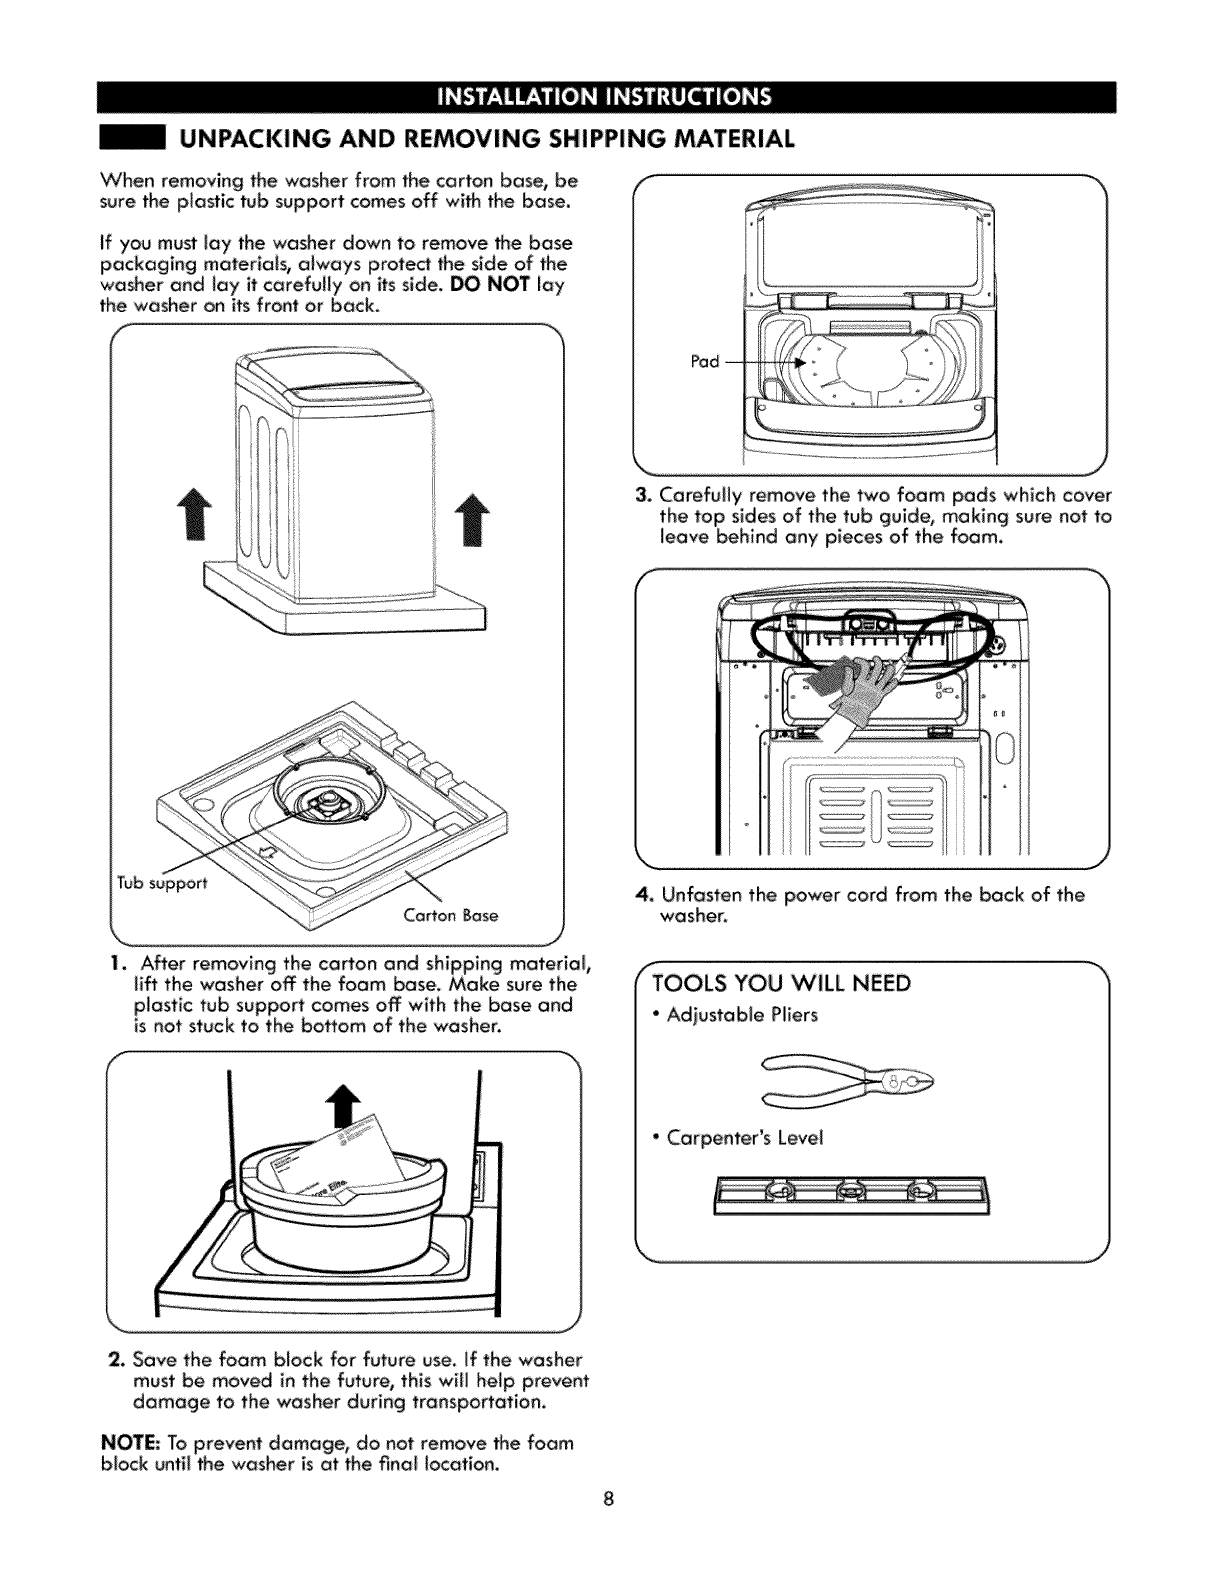
|UNPACKING AND REMOVING SHIPPING MATERIAL
When removing the washer from the carton base_ be
sure the plastic tub support comes off wi_ the base.
If you must lay the washer down to remove the base
packaging materials, always prote_ the side of the
washer and lay it carefully on its side. DO NOT _ay
the washer _ its front or back.
Tub support
Carton Base
I. After removing the carton and shipping materiai,
lift the washer off the foam base. Make sure the
plastic tub support comes off with the base and
is not stuck to the bottom of the washer.
f "x
Pad --
J
x, j
3. Caref:uliy remove the two foam pads which cover
the top sides of the tub guide, making sure not to
leave behind any pieces of the foam_
4. Unfasten the power cord from the back of the
washer.
fTOOLS YOU WILL NEED _-"
•Adjustable Pliers
,Carpenter's Level
j
2. Save the foam b_ock for future use. If the washer
must be moved in the future, this will help prevent
damage to the washer during transportation.
NOTE: To prevent damage, do not remove Re foam
btock until the washer is at the final location.
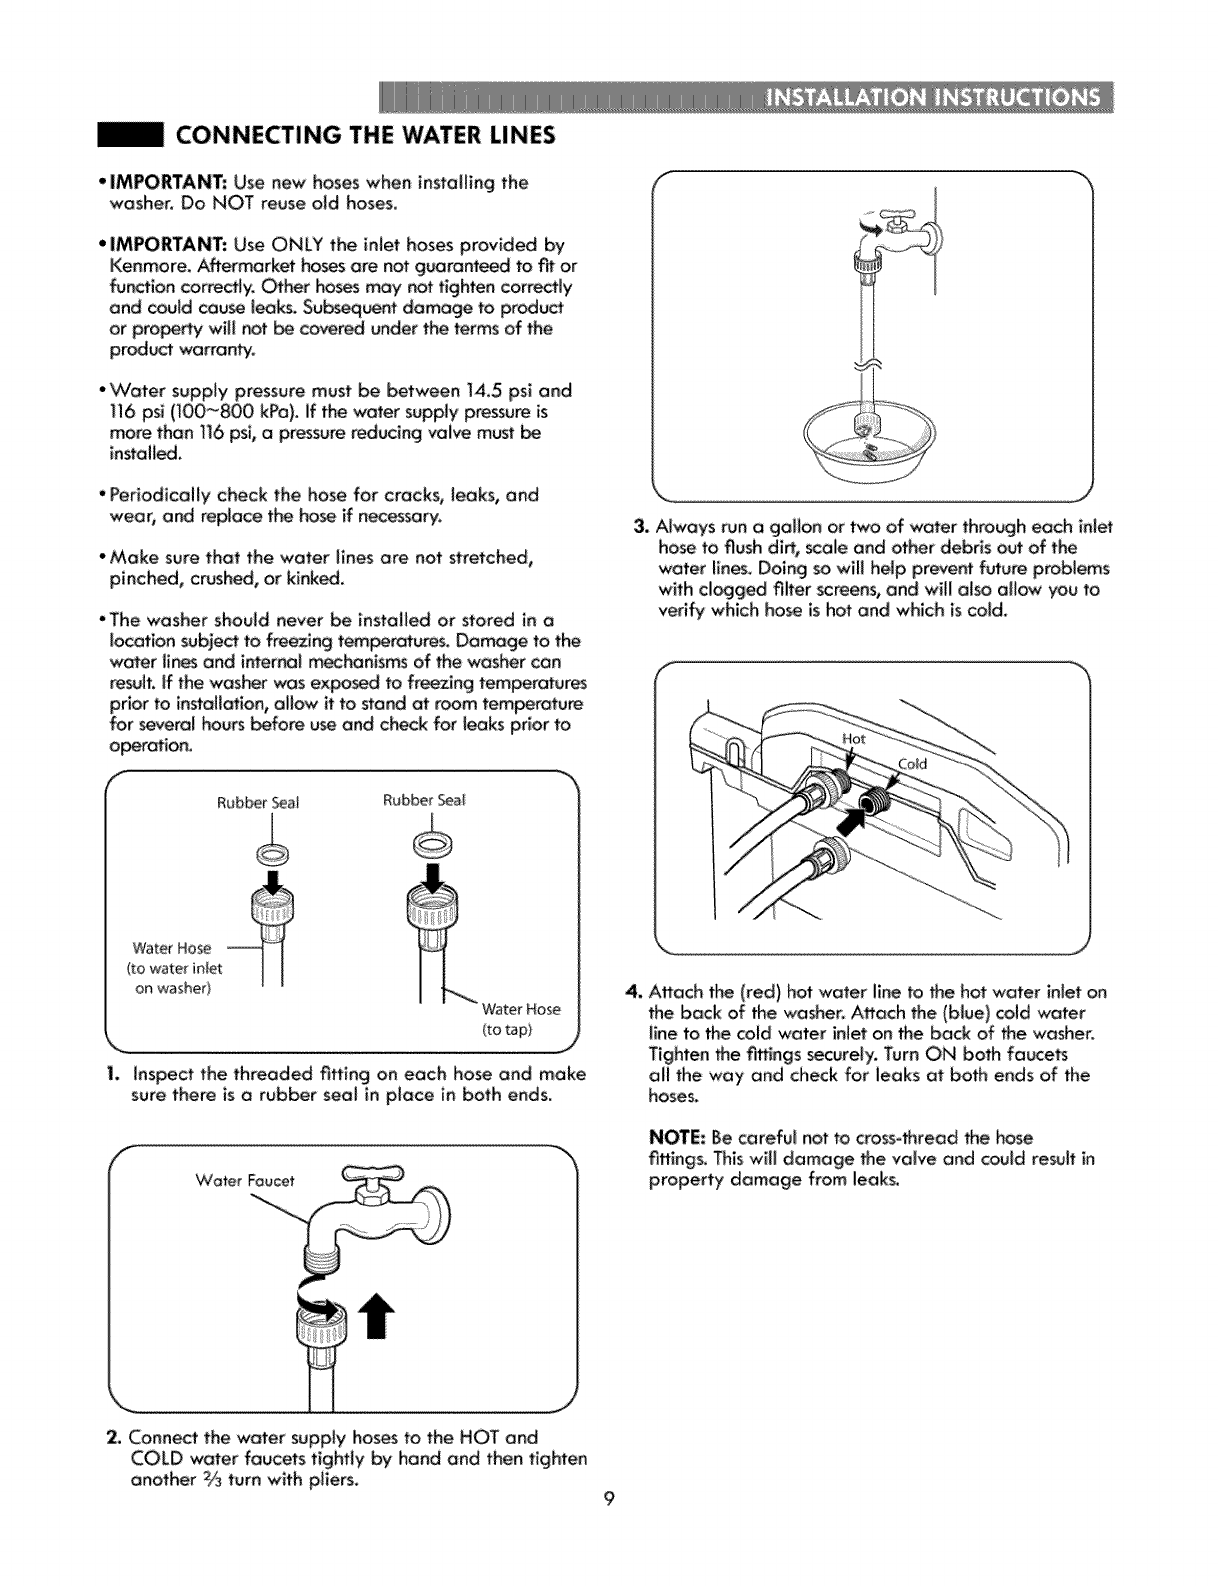
CONNECTING THE WATER LINES
•IMPORTANT: Use new hoses when installing the
-washer. Do NOT reuse old hoses.
• IMPORTANT: Use ONLY the inlet hoses provided by
Kenmore. Aflermarket hosesare not guaranteed to tit or
functbn correctly. Other ho_ may not tighten correctly
and couM cau_ looks. Subseq_nt damage to product
or proem/will not _ covered under the terms of the
product warranty.
•"vVater supply pressure must be between 14.5 psi and
116psi (100_800 kPa).if t_ water supply pressu_ is
re,ore than 116psi, a pressurereducing vaive must
installed.
•PerlodicaHy check the hose for crocks, leaks, and
wear_ and replace the hose if necessary.
• Make sure that the water Jines are not stretched,
pinched, crushed, or kinked,
•The washer should never be MstaHed or stored in a
Iocafion _bject to freeing tem_ratures_ Damage to the
water fines and internal m_hanlsms of the washer can
result, if the washer was exposed to freezing temperatu_
prior to installation, allow it to stand at room temperature
for severa_ hours before u_ and check for leaks prior to
operation.
i
Rubber Sea| Rubbe_ Seal
Wate_Hose
(to wate_inlet
on washeO
WaterHose
(to tap)
1. Inspect the threaded tiffing on each hose and make
sure there is a tuber seal in place in both ends.
f
2, Connect the water supply hoses to the HOT and
COLD w_ter faucets tightly by hand and then tighten
another 2/3 turn with pliers, 9
3. Always run a gallon or two of water thrash each inlet
hose to flush dirt, scale and other debris out of the
water lines, Doing so will help prevent future problems
with cl_ged filter screens, and wiff also allow you to
verify which hose is hot and which is cold.
4, Attach the (red) hot water line to _e hot water inlet on
the back of the washer. Attach the (blue) cold "water
line to the cold water inlet on the back of _e washer.
Tighten the _¢tings securely. Turn ON both faucets
all the way and check for leaks at bath ends of the
hoses.
NOTE: Be careful not to cross-thread fine hose
fifflngs, This will damage _e valve and could result in
property damage from leaks.
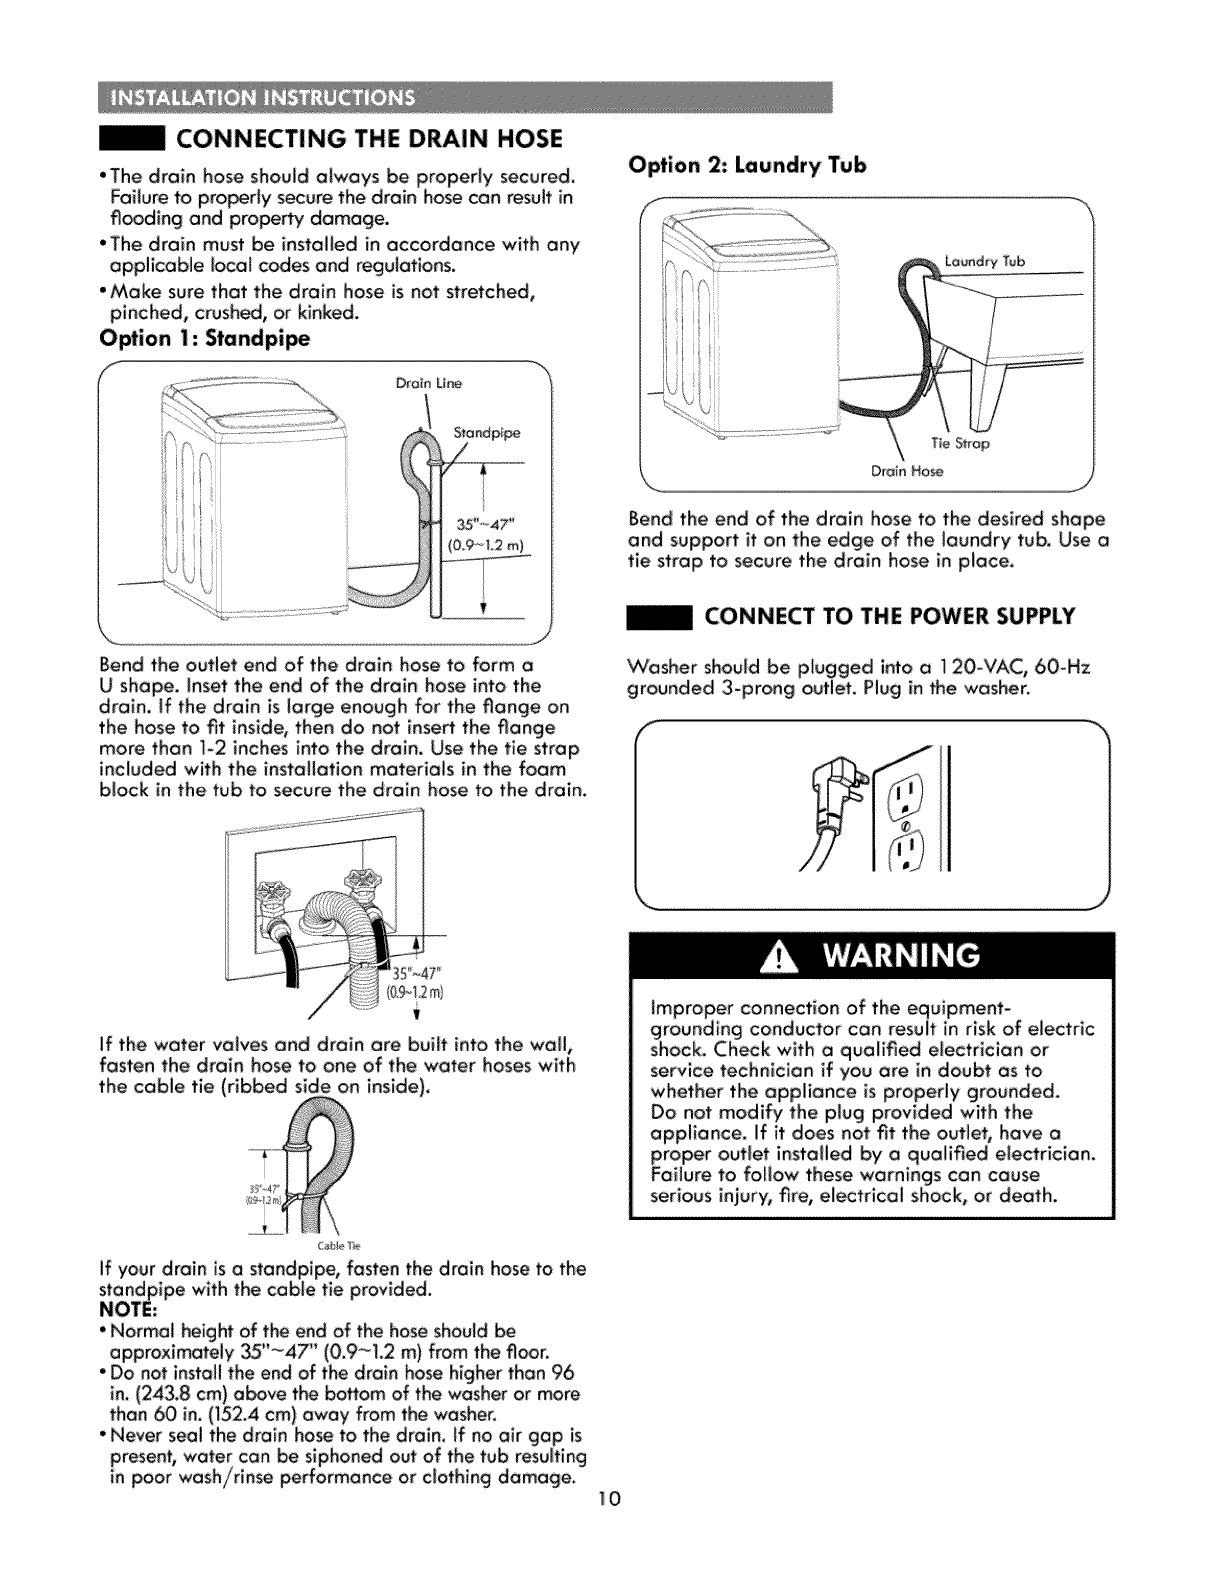
CONNECTING THE DRAIN HOSE
• The drain hose should always be properly secured.
Failure to properly s_ure the drain hose can resuff in
flooding and property damage,
• The drain must be installed in accordance with any
applicable toca_ codes and regulations.
•Make sure that the drain hose is not stretched,
pinched, crushed, or kinked.
Option 1: Standpipe
f Drain Line
Bend the outlet end of the drain hose to form a
U shape, inset the end of the drain hose into the
drain, if the drain is large enough for the flange on
the hose to fit inside, then do not inse_ the flange
more than ]-2 inches into the drain. Use the tie strap
included with the installation materials in the foam,
block in the tub to secure the drain hose to the drain.
Option 2: Laundry Tub
Bend the end of the drain hose to the desired shape
and support it on the edge of the _aundry tub. Use a
tie strap to secure the drain hose in place.
CONNECT TO THE POWER SUPPLY
Washer should be plugged into a 120-VAC, 60-Hz
grounded 3-prong outlet. Plug in the washer.
T
if the water valves and drain are buiff into the wall,
fasten the drain hose to one of the water hoses with,
the cable tie (ribbed side on inside).
shock. Check with a qualified electrician or
service technician if you are in doubt as to
appliance, if it does not fit the outleh have a
roper outlet instalied by o qualified e_ectrician.
ailure to follow these warnings can cause
serious injury, fire, electrical shock, or death.
If ,your drain is ostandpipe, fasten the drain hose to the
standpipe with the cable tie provided.
NOTE:
•Normal height of the end of the hose should be
approximately _'_47" (0.9~I.2 m) from the floor.
•Do not install the end of the drain hose higher than 96
in. (243.8 cm) above the bottom of the washer or more
than 60 in. (_52.4 cm) away from the washer.
in poor wash/rinse pedormance or c_othing damage. 10
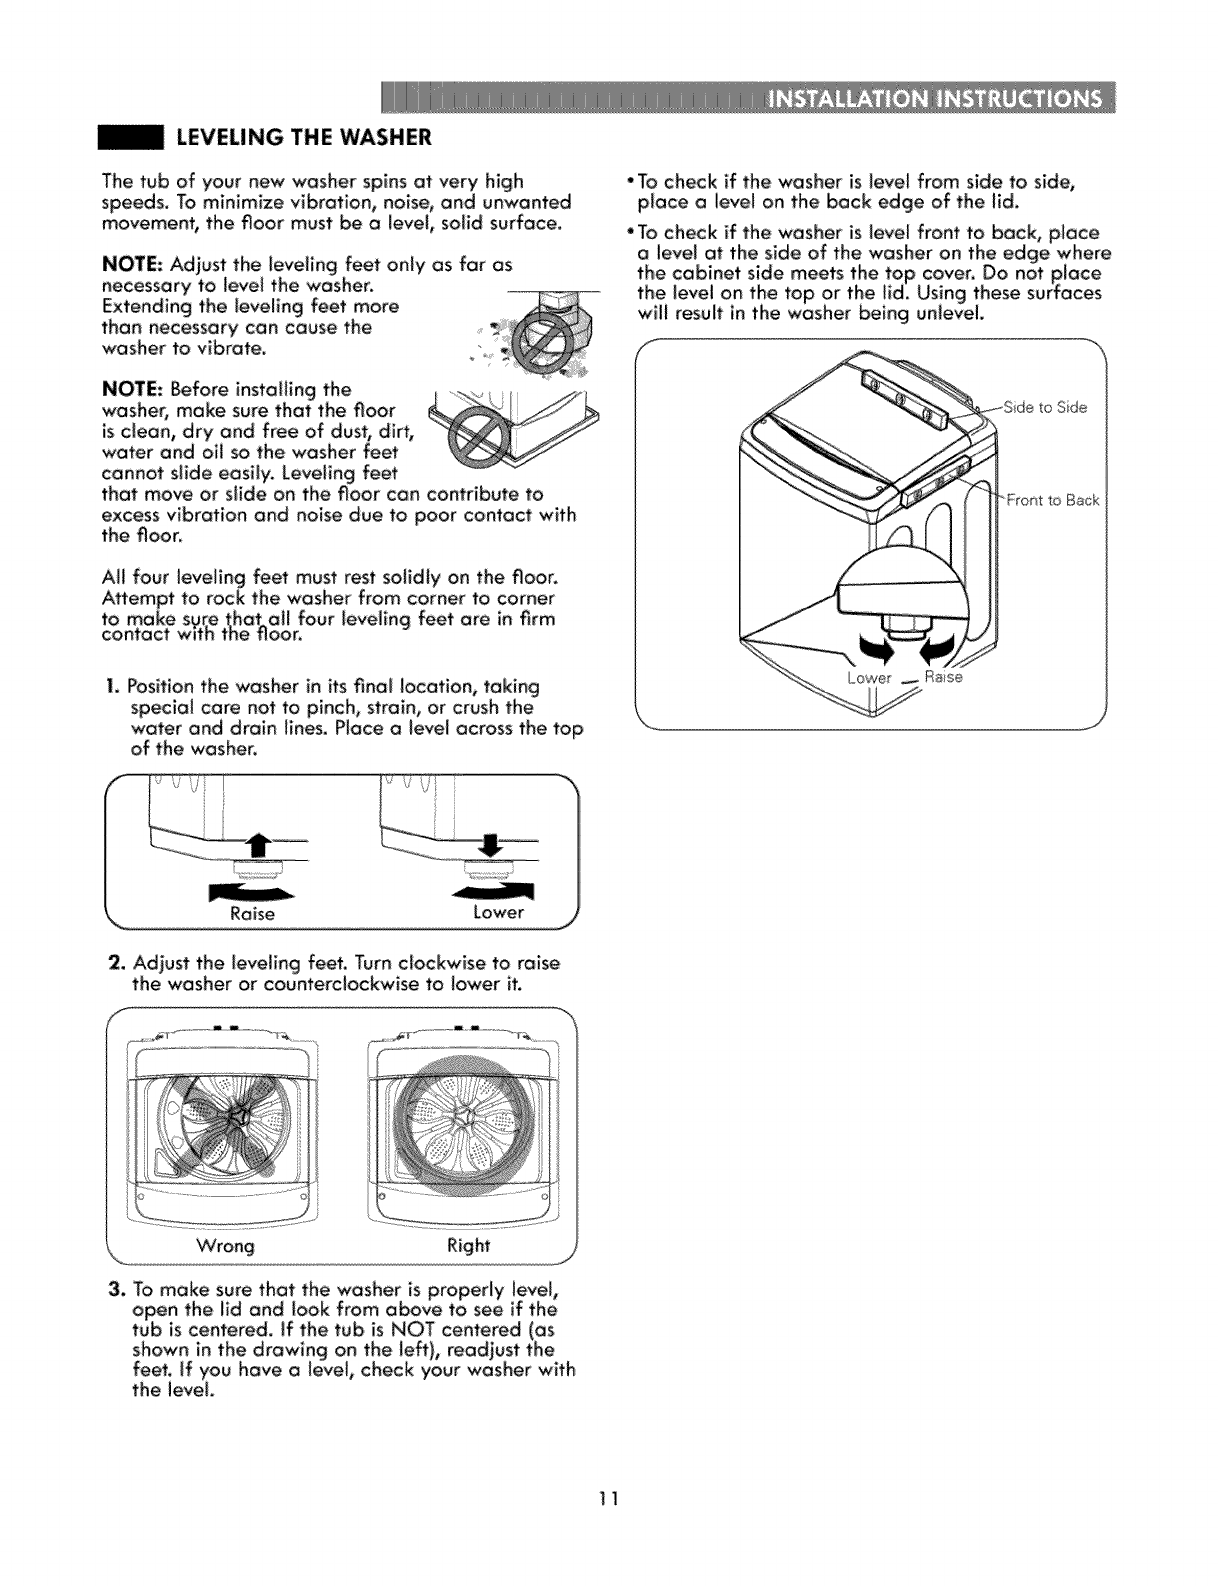
LEVELING THE WASHER
The tub of your new washer spins at very high
speeds. To minimize vibration, noise, and unwanted
movement, the floor must be o_evel, solid surface.
NOTE: Adjust the _eveHng feet only as far as
necessary to _evel the washer.
Extending the feveling feet more
than necessary can cause the
-washer to vibrate.
NOTE: Before installing the
washer, make sure that the floor
is clean, dry and free of dust, dirt,
water and oil so the washer feet
cannot slide easily. Leveling feet
that move or s_ide on the floor can contribute to
excess vibration and noise due to poor contact with
the floor,
All four leveling feet must rest solidly on the floor.
Attempt to rock the washer from corner to corner
to make sgr.ethat^all four leveling feet are in firm
contact wtth the tloor,
I. Position the washer in its final location, taking
special care not to pinch, strain, or crush the
water and drain lines. Place a level across the top
of the washer,
• To check if the washer is level from side to side,
place a level on the back edge of the lid.
f
Sde
J
2. Adjust the leveling feet, Turn clockwise to raise
the washer or counterclockwise to lower it.
f
Wrong Righf
3. To make sure that the was:her is properly level,
open: the lid and look from above to see if the
the level.
11
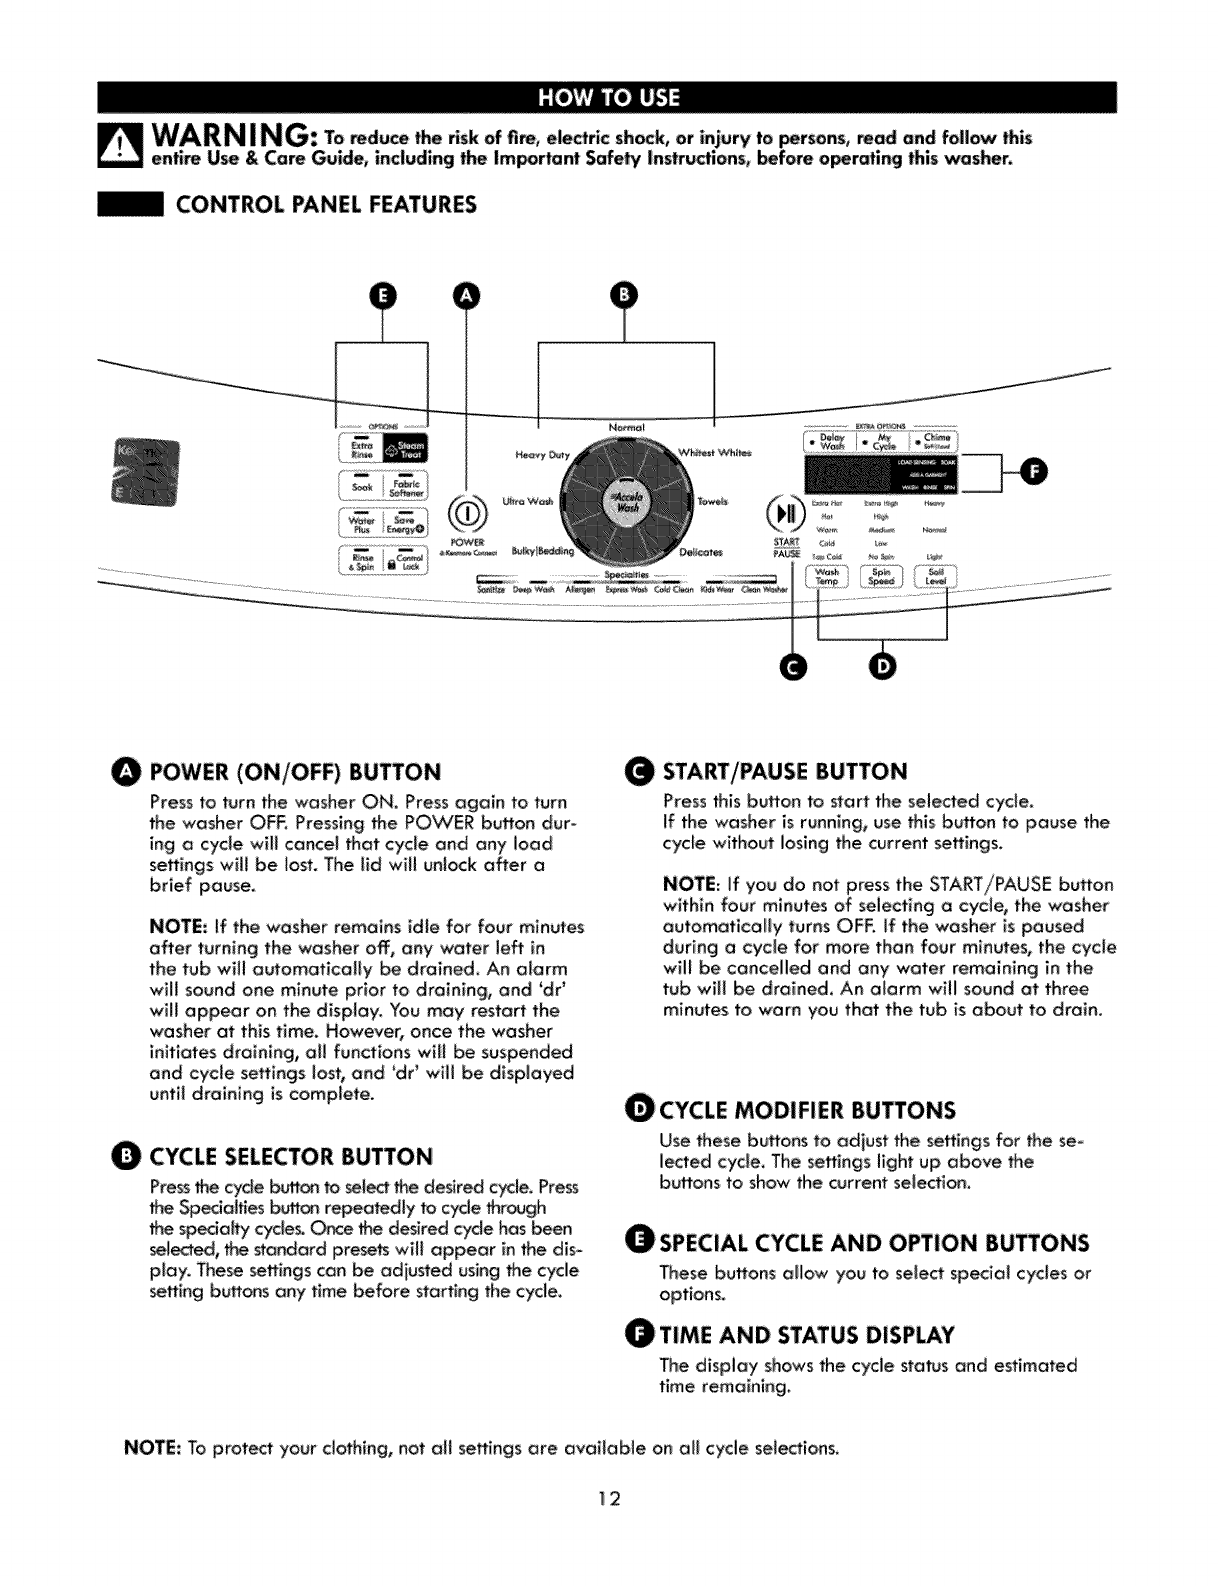
CONTROL PANEL FEATURES
O
O
POWER (ON/OFF) BUTTON
Press to turn the washer ON. Press again to turn
the washer OFF. Pressing _e POWER bu_on dur-
ing a cycle wtl cancel that cycle and any load
settings wll be lost. The ld wil unlock after a
brief pause,
NOTE: ff the washer remains idle for four minutes
offer turning the washer off, any water left in
the tub will automatlcaly _ drained. An alarm
wll sound one minute prior to draining, and 'dr _
wlJ appear on the display. You may restart the
washer at this time. However, once the washer
initiates draining, al functions wll be suspended
and cycle settings lost, and 'dr' will be displayed
until draining is complete.
CYCLE SELECTOR BUTTON
Press _e cycle button to _J_ the desired cyde. Press
•eSpecialties b_ repeatedly to cyde thigh
the specialty c_le_ Or_:e tk_ desired cycle has been
selected, the standard prese_ will appear in the dis-
play. These settings can be adjusted using the cycle
setting buttons any time before starting the cycle.
START/PAUSE BUTTON
Press this button to start the selected cycle
If the washer is running, use this button to pause the
cycle without losing the current settings.
NOTE: If you do not press the START/PAUSE button
within four minutes of seiecting a cycle, the washer
automatlcaly turns OFE if the washer is paused
during a cycle for more than four minutes, the cycle
will be cancelled and any water remaining in the
tub will be drained, An alarm will sound at three
minutes to warn you that the tub is about to drain.
_'CYCLE MODIFIER BUTTONS
Use these buffons to adjust the settings for _e se-
lected cycle, The settings light up above the
buttons to show the current selection.
ASPECIAL CYCLE AND OPTION BUTTONS
These buttons allow you to select specla_ cycles or
options.
TIME AND STATUS DISPLAY
The display shows the cycle sta_s and estimated
time remaining.
NOTE: To prot_ your clothing, not all settings are available on all! cycle selections,
1_2
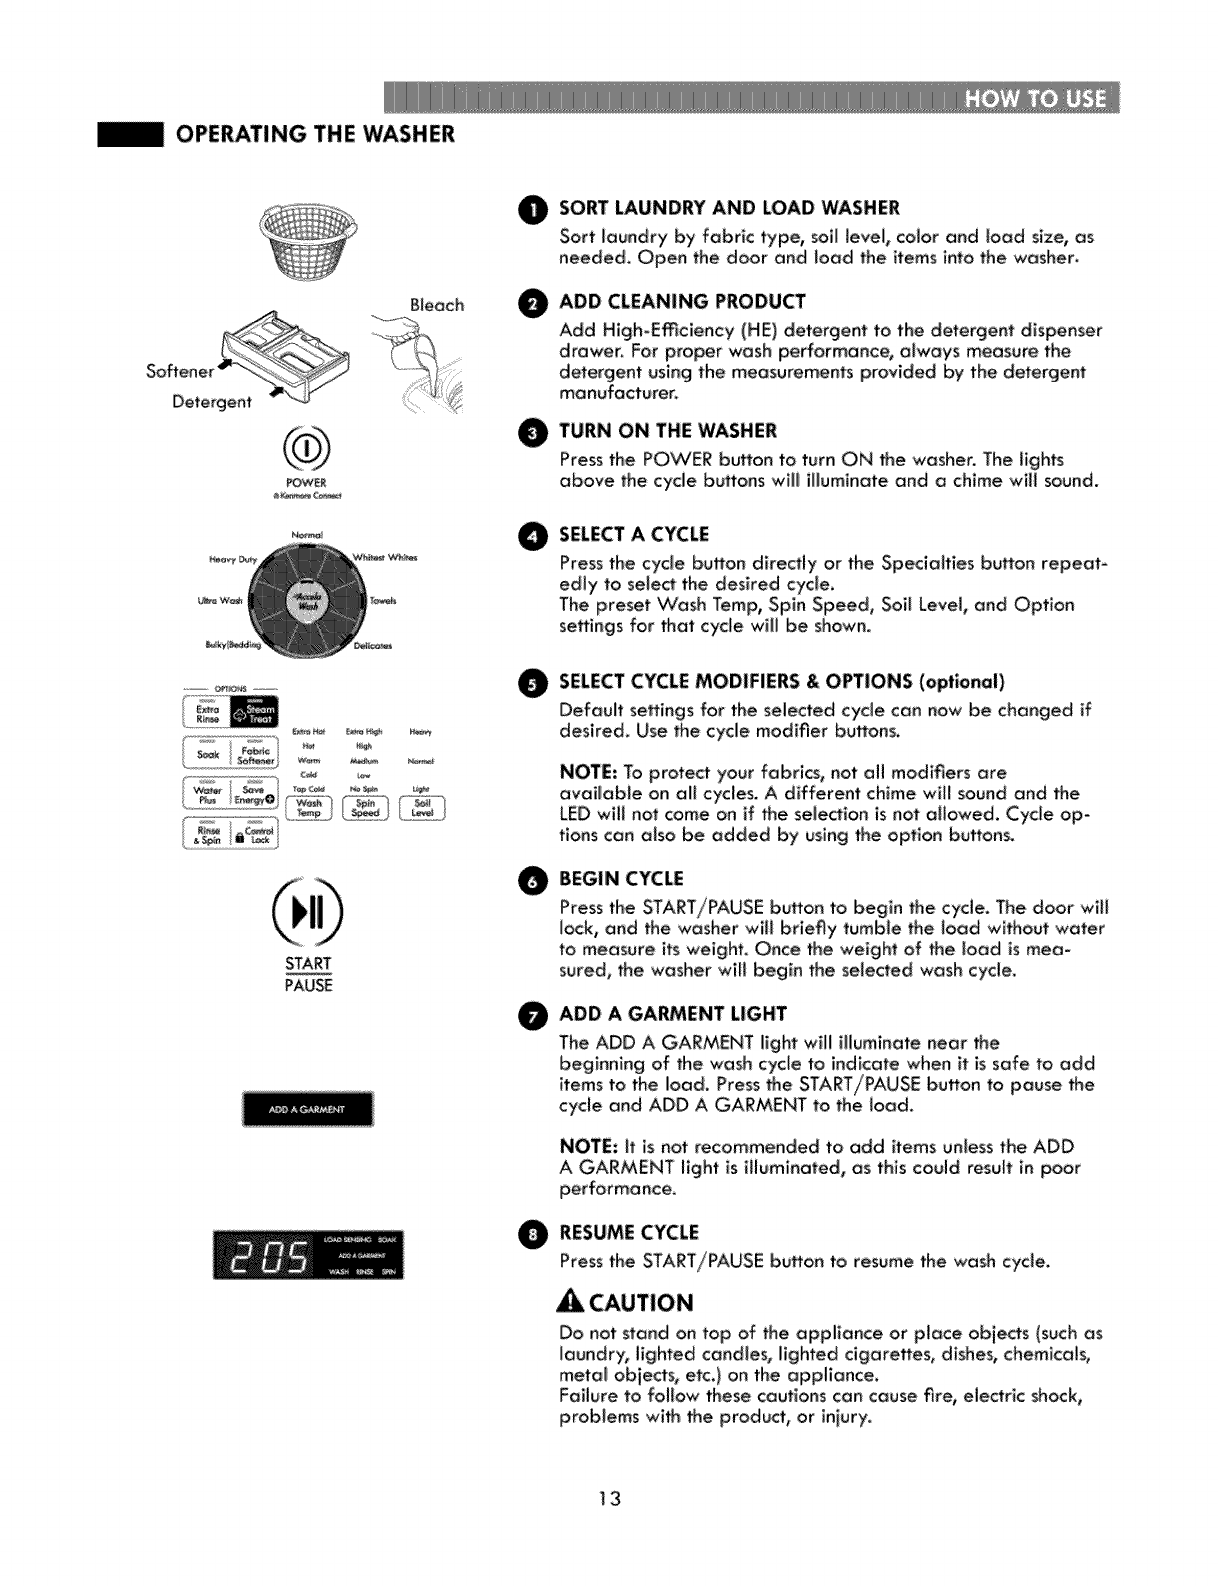
OPERATING THE WASHER
Bleach
............
So_ener
Do,o goot......
POWER
START
PAUSE
@
@
0
0
0
@
SORT LAUNDRY AND LOAD WASHER
Sort laundry by fabric type, soil level, color and _oad size, as
needed. Open the door and toad the items into the washer.
ADD CLEANING PRODUCT
Add High-Emciency (HE) detergent to the detergent dispenser
drawer. For proper wash periformance, always measure the
detergent using the measurements provided by the detergent
manufacturer,
TURN ON THE WASHER
Pressthe POVCERbu_on to turn ON the washer. The lights
above the cycle buttons will ffluminate and a chime will sound.
SELECTA CYCLE
Pressthe cycle button directly or the Specialties button repeat-
edly to select the desired cycie.
The preset Wash Temp, Spin Speed, Soil Level, and Option
settings for _at cycle wiff be shown.
SELECT CYCLE MODIFIERS & OPTIONS (optional)
Defauff settings for the selected cycle can now be changed if
desbed, Use the cycle modifier buttons.
NOTE: To protect your fabrics, not all modifiers are
available on all c:ycles, A different chime will sound and the
LED will not come on if the seJection is not affowed. Cycle op-
tions can also be added by using the option buttons.
BEGIN CYCLE
Pressthe START/PAUSE buffon to begin _e cycle. The d_r will
lack, and the washer will briefly tumble the load without water
to measure its weight. Once the weight of the load is mea-
sured, • e washer will begin the selected wash cycle.
ADD A GARMENT LIGHT
The ADD A GARMENT fight wiff iffumlnate near the
beg_nnlng of the wash cycle to indicate when ff is safe to add
items to the load. Press the START/PAUSE button to pause the
cycle and ADD A GARMENT to the load.
NOTE: It is not recommended to add items unless the ADD
A GARMENT I_ght is illuminated, as this could result _n poor
ORESUME CYCLE
Pressthe START/PAUSE button to resume the wash cycle.
Do not stand on top of the appliance or place obiects (such as
laundry, lighted candies, lighted cigarettes, dishes, chemicals,
metal objects, etc,} on the appliance.
Failure to follow these cautions can cause fire, electric shock,
problems with the product, or iniury.
13
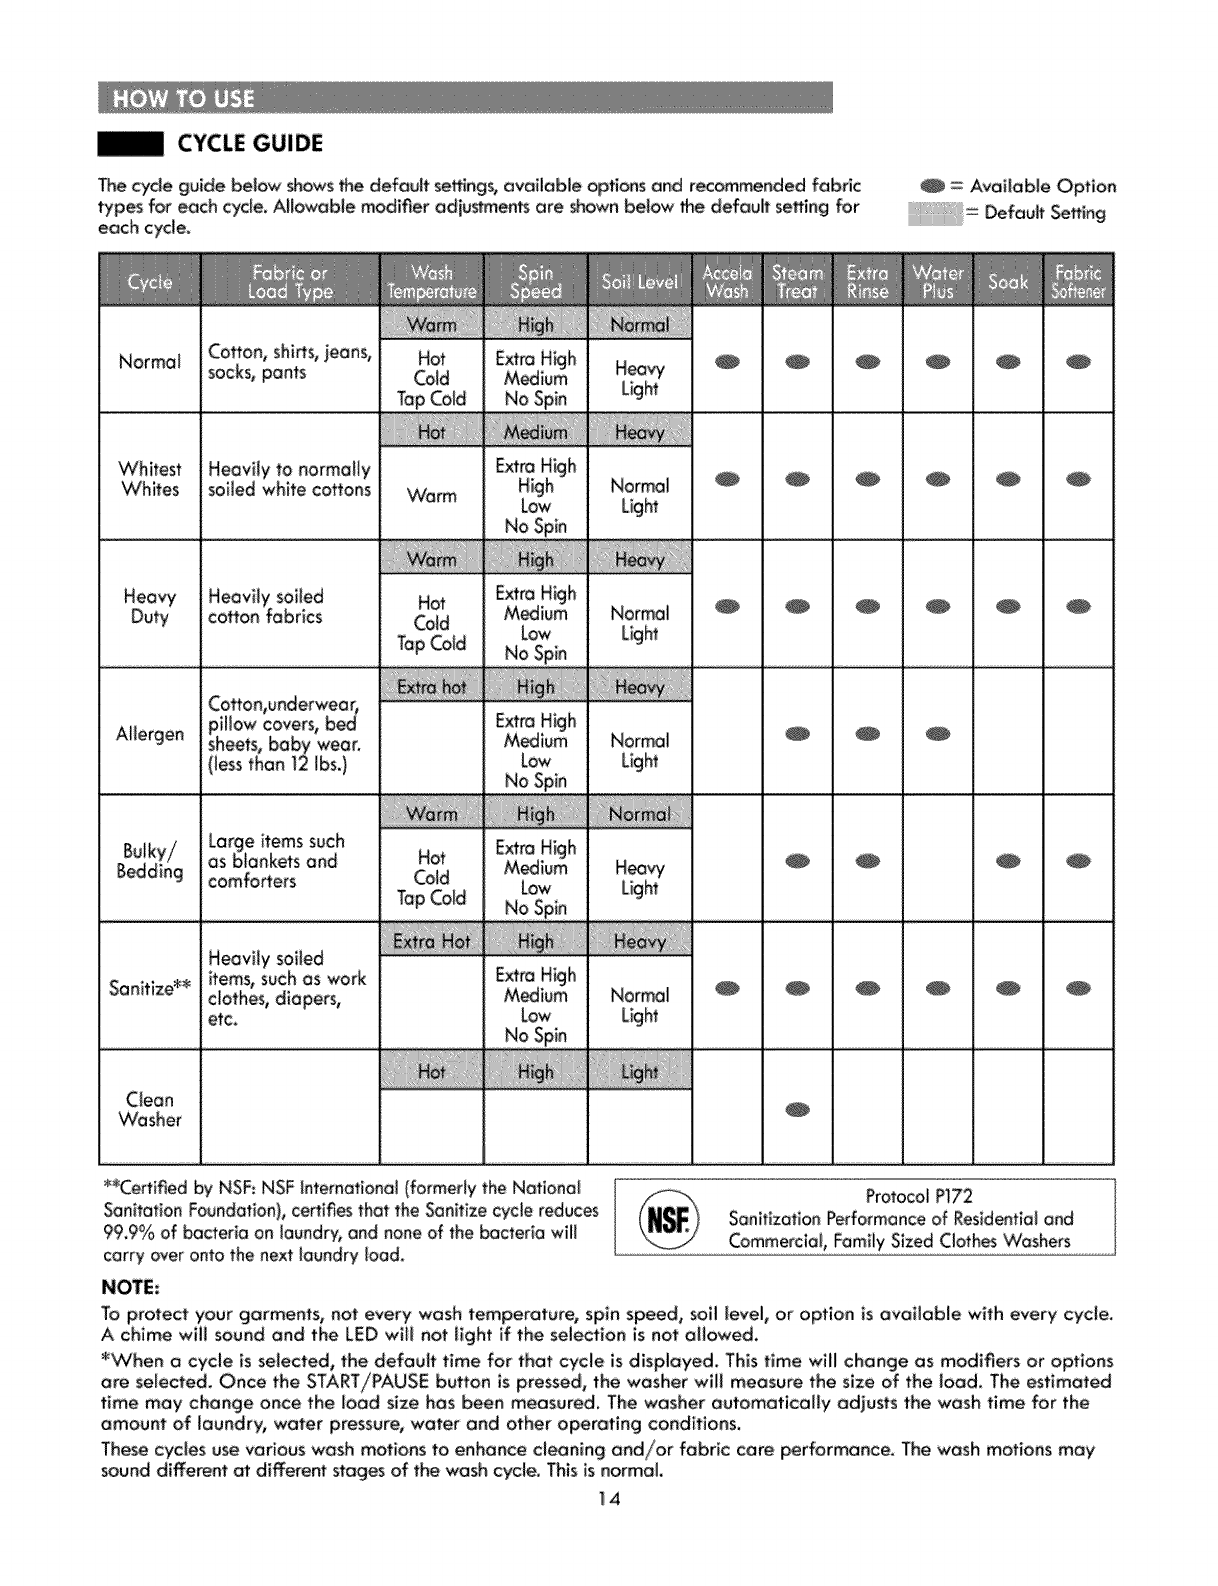
CYCLE GUIDE
The cycle guide beiow shows the defavff settings, avaiioble options and recommended fabric
types for each cycle. Allowable modifier adiustmen_ are shown below the defauff seff_ng for
each cycle.
Normat
Whitest
Whites
Heavy
Duty
Allergen
Sanitize*:_
Cotton, shins, jeans,
socks, pants
Heavily soiled
cotton fabrics
Large items such
as blankets and
caretakers
Heavily soiled
items,such as work
clothest diapers,
etc.
Warm
O_ii_Jiiiiiiii_ili!
H_
Cold
TapCold
H_
Cold
Tap Cold
Clean
Washer
Extra Hk
Mman
LOW
NoSp!n
Low
NoSp!o
Low
No Spin
E_tra Hk Ih
Low
_O _DII
i
E_tra Hk ih
Low
No Spin
H_vy
Light
Normal
Light
Normal
Light
Normal
Light
H_vy
Light
Normal
Light
IIIIIIIIHl_
O
_*Cen;fied by NSF: NSF International (formerly the Nafiona_
Sanitation Foundation}, certifies that the Sanitize cycle reduces
99.9% of _eria on laundry, and none of the bacteria will
carry over onto the next laundry toad.
NOTE:
@: Available Option
i: Defauff Se#ing
@
@
@
@
i
i
@
! .......................
@
!.
@
[
@
@
@
@
@
@
@
@
@
@
@
@
Protocol P]72
Sanifization Performance of: Res_dentia_and
Commercla_, Famffy Sized Clothes Washers
To protect your garments, not every wash temperature, spin speed_ soil level, or option is available with every cycle.
A chime will sound and the LED will not fight if the selection is not allowed.
*W'hen a cycle is selected, the default time for that cycle is displayed. This time will change as modifiers or options
ore selected. Once the START/PAUSE bufon is pressed, the washer wil! measure the size of the load. The e#_mated
time may change once the load size has been measured. The washer automatically adjusts the wash time for the
amount of laundry, water pressure, water and other operating conditions,
These cycles use various "wash motions to enhance cleaning and/or fabric care performance. The wash motions may
sound different m different stages of the wash cycle. This is normal
14
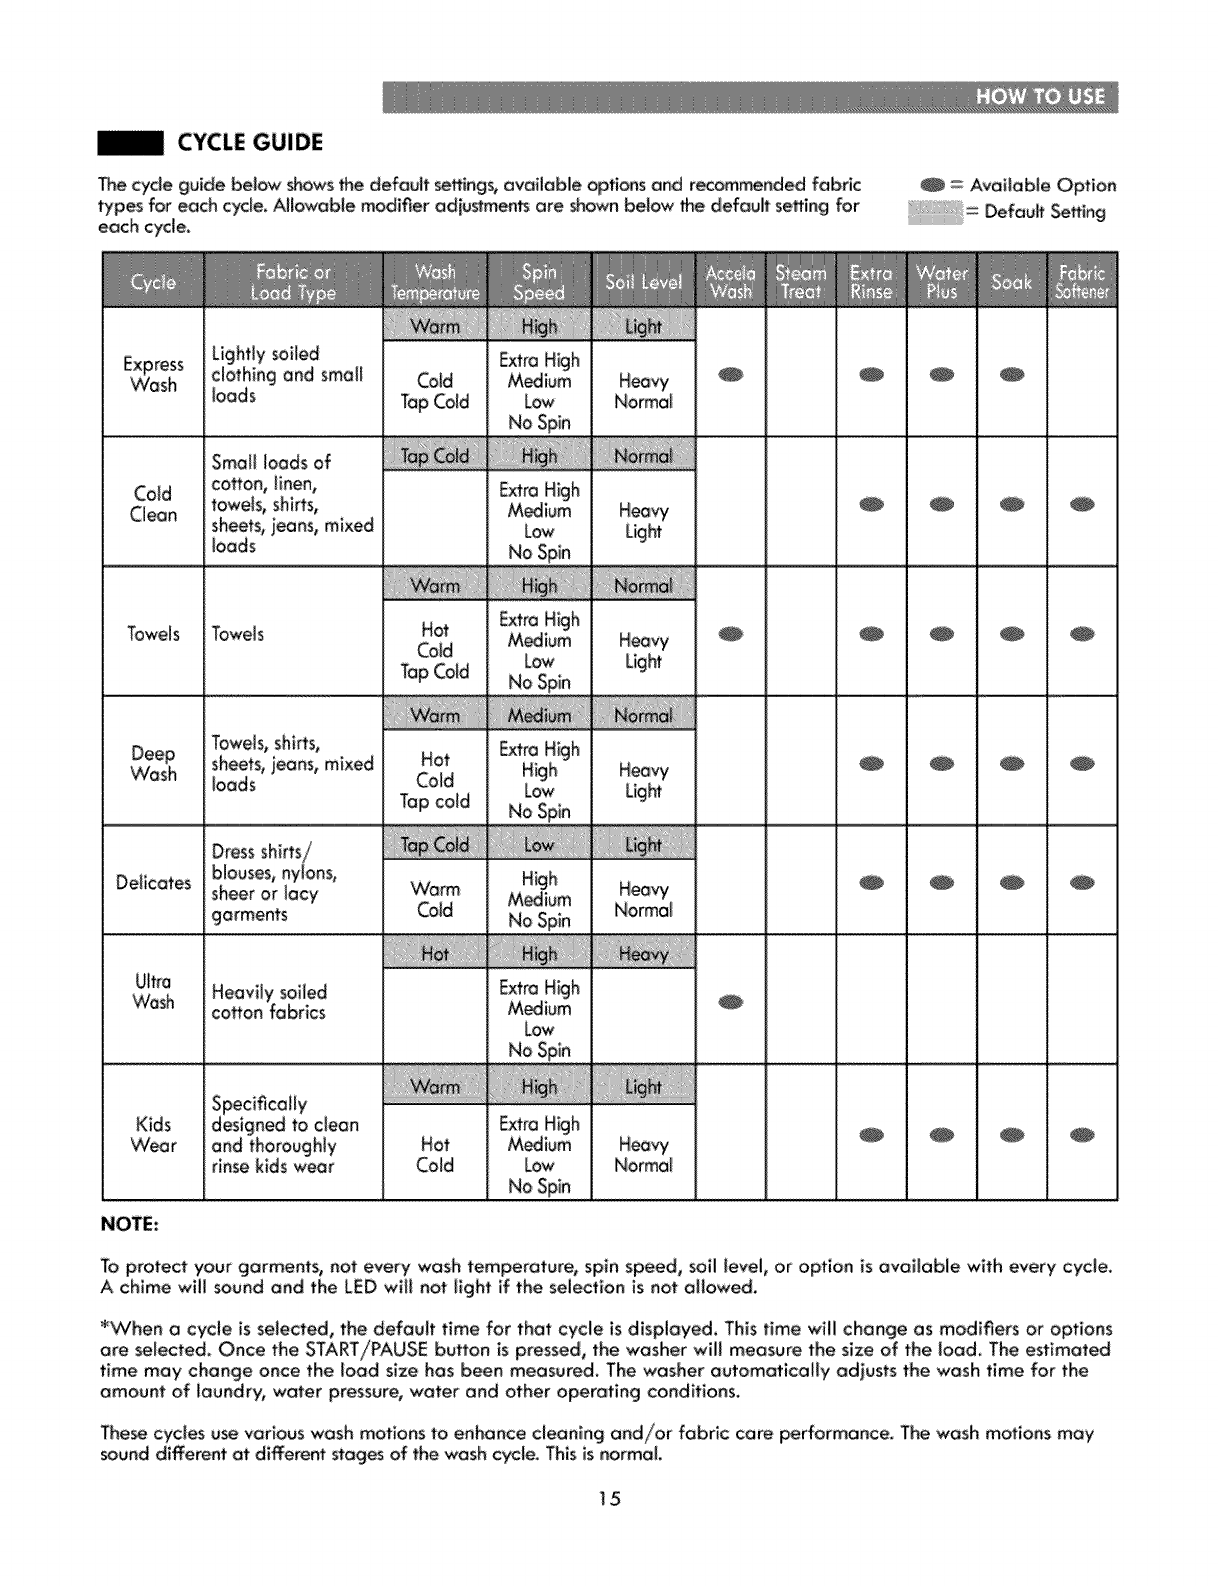
CYCLE GUIDE
The cycle guide below showsthe default settings, available options and recommended fabric
types for each cycle, AHowable modifier adiustmen_ are shown below the default setting for
each cycle.
Express
Wash
Towels
Deep
Wash
DeHcates
Ultra
Wash
Lightly soiled
clothing and small
loads
Dressshirts/
blouses, nytons0
sheer or lacy
garments
Heavily soiled
cotton fabrics
and thoroughly
rinse kids wear
H_
Cold
TapCold
Hot
Cold
TaD cold
Worm:
Cold
Hot
Cold
Kids
VVeor
Extra H_h
M_ium
Low
Extra High
Medium
Low
No Spin
Extra High
Medium
Low
NoSP!n
Extra High
High
Low
No Spin
LOW]I]
High
M_ium
NoSp!n
E_o Hklh
Low
No Spin
E_°a Hklh
_iun_
Low
No Spin
NOTE:
= Available Option
Default Se_ing
0
To protect your garments, not every wash temperature, spin speed, soll level, or option is available with every cycle.
A chime will _und and the LED will not _ight if the selection is not allowed.
_When a cycle is selected, the default time for that cycle is displayed. This time will change as modifiers or options
are selecte.d. Once the START/PAUSE button is pressed, the washer will measure the size of the load. The estimated
time may change once the load size has been measured. The washer automatically adjusts the wash time for the
amount of _aundry, water pressure, water and other operating conditions,
The_ cycles use various wash motions to enhance cleaning and/or fabric care performance, The wash motions may
sound different at different stages of the wash cycle. This is normal.
15
SORTING WASH LOADS
CAUTION
•Do not load items higher than the top edge of the tub,
Faiiureto follow thiscaution can resuJtin (eakage or
damage to fabrics.
• Use the BULKY/BEDDING cycle for buoyant or
nonabsorbent items such as piUows or comforters.
Faffure to foiiow thls caution can resu(t in )eakage.
•If possible, do not wash any water-resistant items.
If you must_ please se(ect the Bulky/Bedding cycle.
-Examples of water-proof or water-resistant items
inc(ude ce_a(n mattress pads, mattress covers, rain
gea5 camping gear, skiing appare(, outdoor gear and
s(mi(ar items.
,_. i•
Grouping _lm mr items
For me best washing results, and to red_e the posslbliity
of damage to clothing, core shou)d be taken to sort the
in poor wash performance, color transfer or discoloration,
fabric damage or linting. Fabrics should be sorted into
groups as de_ribed below.
Colors
Soft a_icIes by color. 'Wash dark clothes together in
aseparate bad from (ight colors or whites. Mixing dark
clothes with light clothes can result in dye transfer or
discoloration of the tighter cbthes.
Soil Level
,Wash heavily soiled clothing together. VVasNng lightly
soiled clothing in the same load with heavi(y soiled
ciothlng could result in poor wash performance for the
Ughfly soiled cbthing.
Fabric Type
Deilcatea_iciesshould not be mixed with heavier or
sturdier fabric types. _,/asNng deilcates in abad
wffh heavy fabrics can resu(t in damage to the more
deiicate fabrics. VCashlng heavier fabrics _n adeilcate
load can resuff in poor wash performance for the
heavier fabrics and possible damage to the delicates.
Lint Type
Some fabrics affect and bind tint to them while others
give off lint in the laundry process. Avoid mixing these
ilnt coiiectors and lint producers in the same ioo& Mixing
thesefabricswillresultin pillingand tintingon the lint
collectors. (For examp)_ lint collector - knit sweater; lint
producer - terrycbth towels.)
[/f Sort Laundry _ jl
( ( by Colors ( by SoU ( by Fabric by Lint
( De)Ico_es llm Prodvce_
( I LIgh:t$ Easy Care L(nlCoffectot
_X,,J DaAs (Light )Sturdy
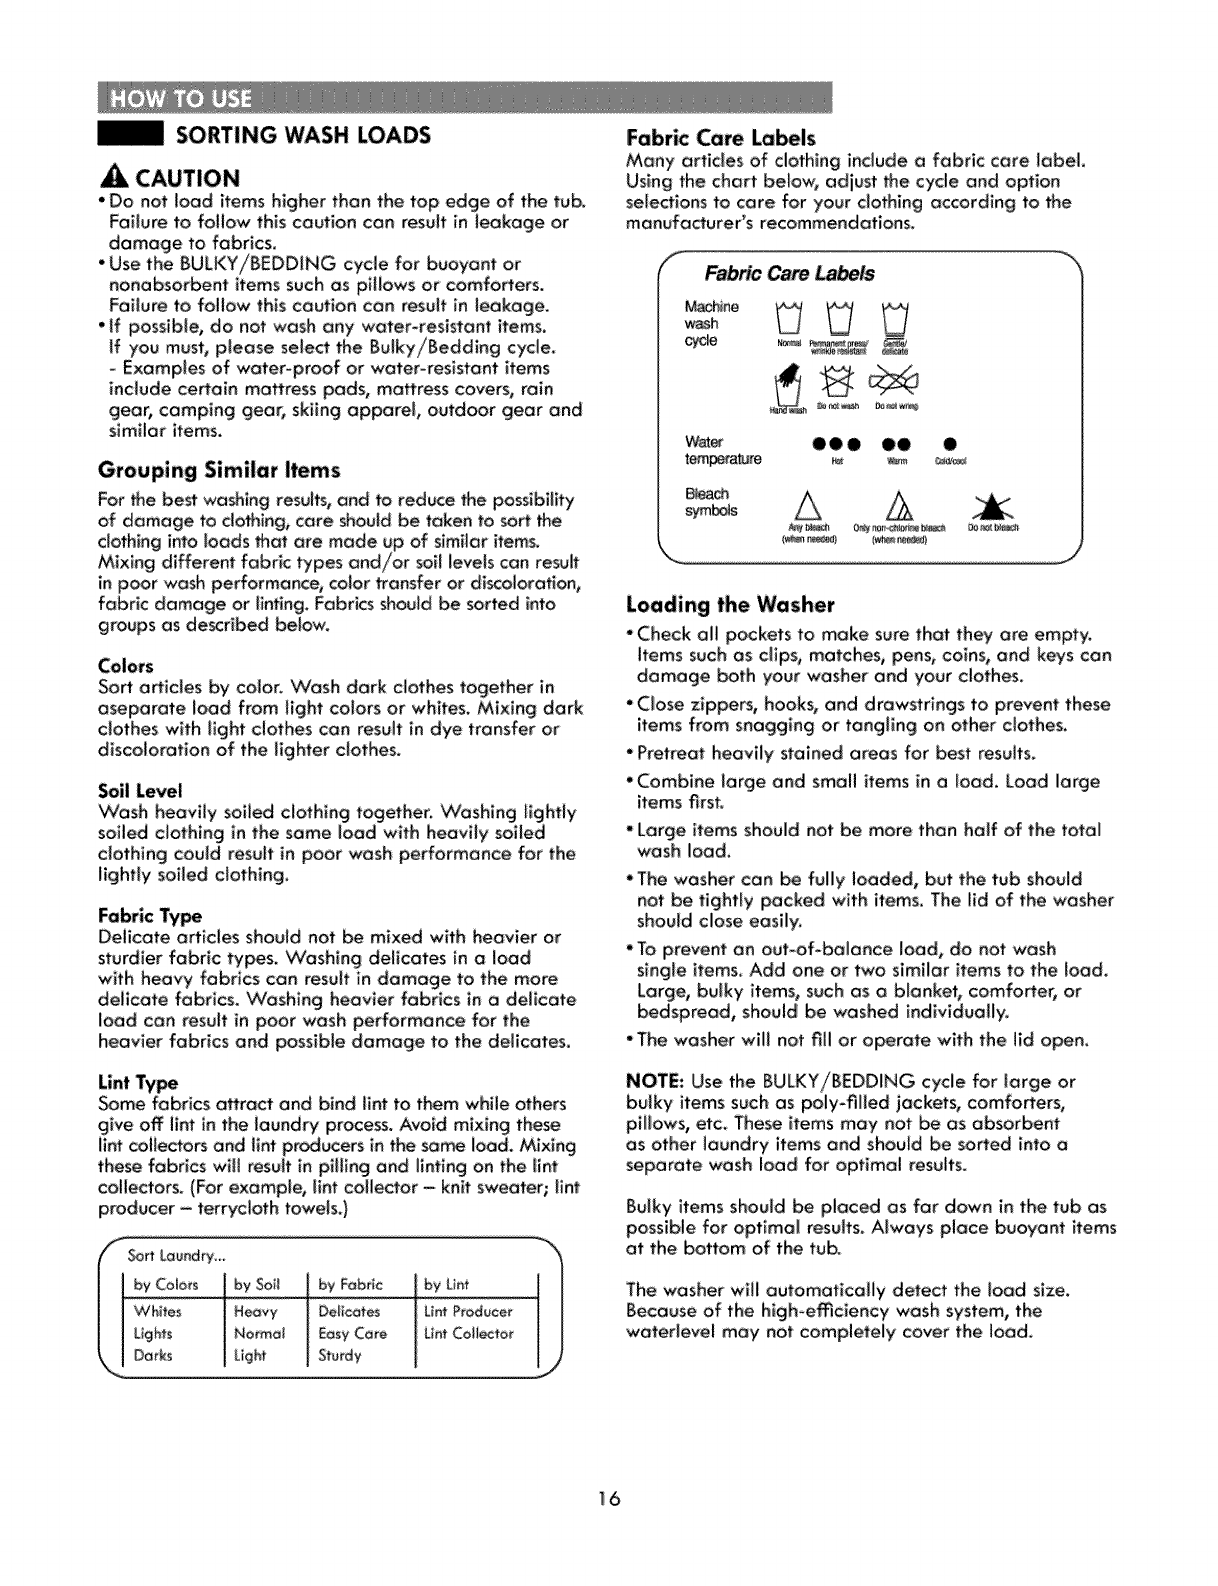
Fabric Care Labels
Many arfic(es of clothing include o fabric core label
Using the chart below, adjust the cycle and option
selections to care for your clothing according to the
manufacturer's recommendations.
FabricCam La_s
Machine
Waer O0 • O0 •
Ble_
symbols A
Loading the Washer
"Check allpockets to make sure that they are empty.
items such as dips, matches, pens, coins, and keys can
damage both your washer and your clothes.
•Close zippers, hooks, and drawstrings to prevent these
items from snagging or tangling on other c(othes.
•Pretreat heavi)y stained areas for best resu(ts.
•Combine large and smaU items in a bad, Load large
items first.
•Large items should not be more then half of the total
wash load.
•The washer can be fuUy loaded, but the tub should
not be tightly packed with items. The ffd of the washer
should cbse easliy.
•To prevent an out-of-be(once bad, do not wash
single items. Add one or two sim(Iar ffems to the bad.
Large, bulky items, such as a blanket, comfo#e5 or
bedspread, should be washed individuaUy.
"The washer wiil not fii( or operate wlth the lid open.
NOTE: Use the BULKY/BEDDING cycle for (orge or
bulky items such as poly-fiUed jackets, comforters,
pli)ows, etc_ These ffems may not be as absorbent
as other laundry items and should be so#ed into a
separate wash load for optimal results.
Bulky items should be placed as far down in the tub as
possible for optimal results. Always place buoyant items
at the bottom of the tub.
The washer will automatically detect the load size.
Because of: the Ngh-e_ciency wash system, the
waterlevel may not completely cover the load.
I_6
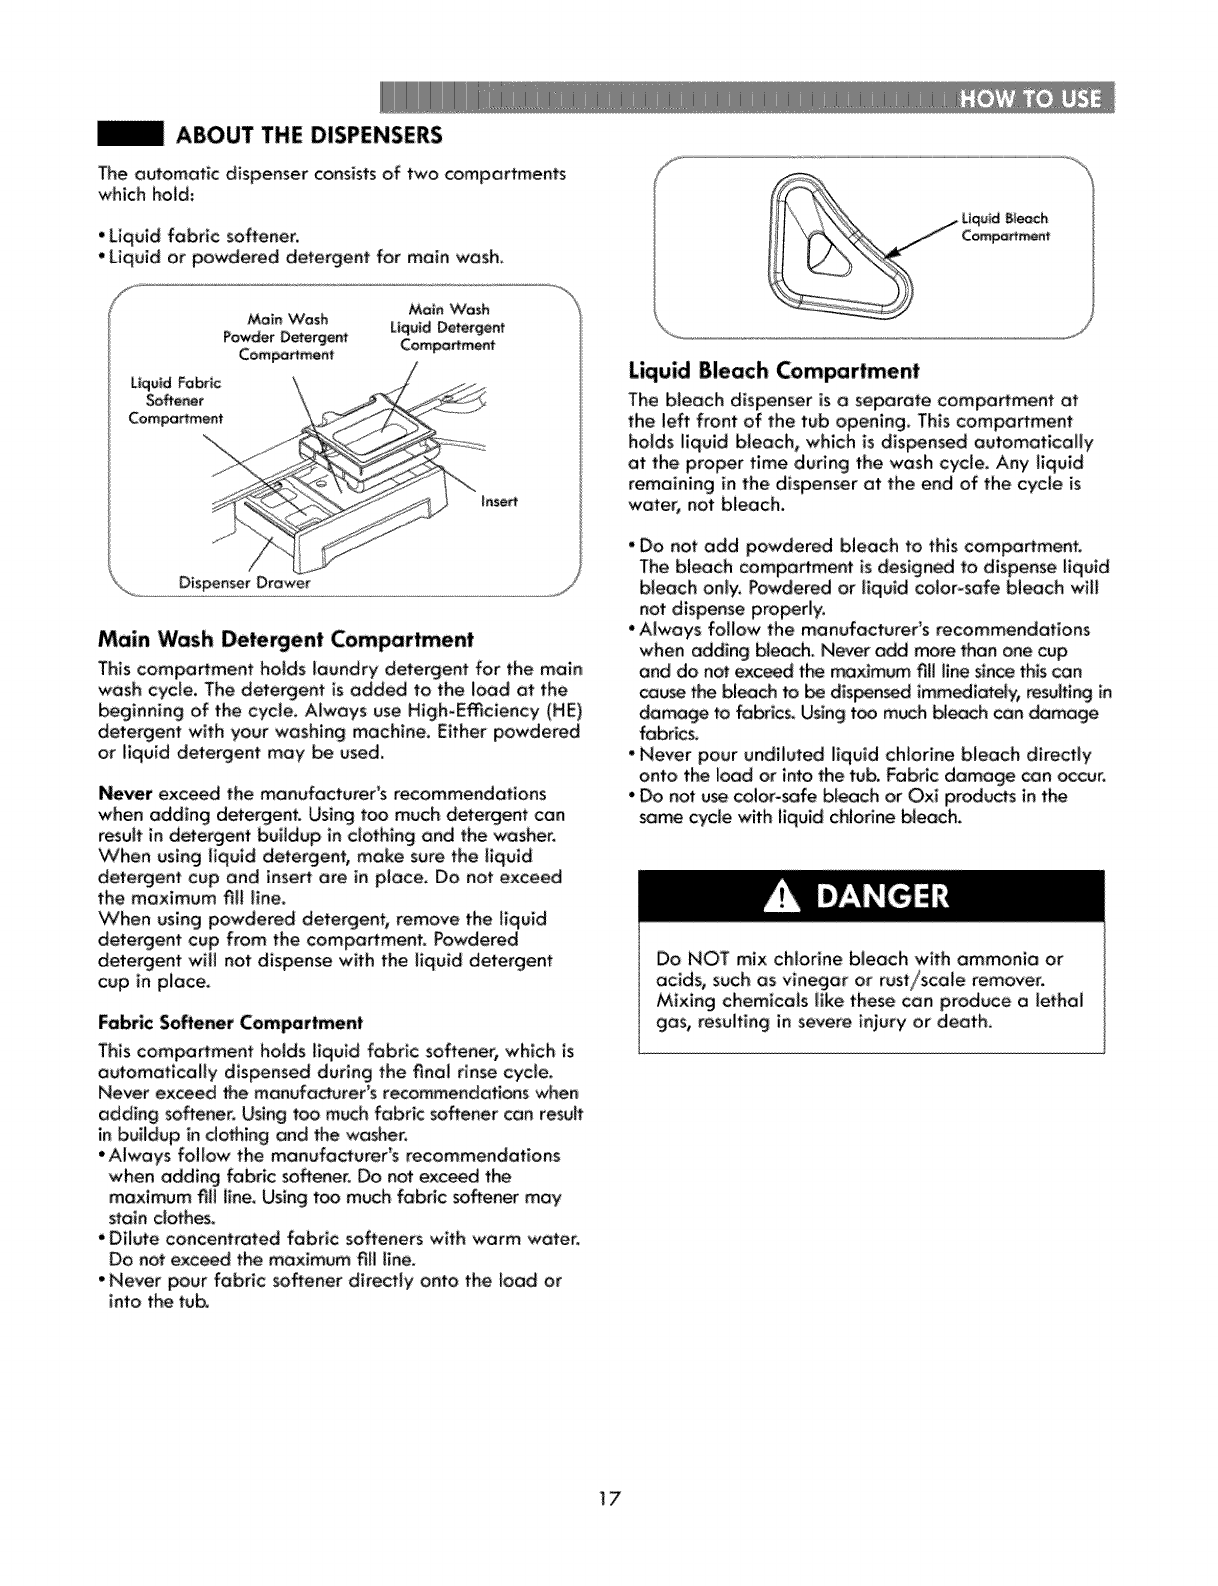
|ABOUT THE DISPENSERS
The automatic dispenser consists of two compartments
which hold:
• Liquid fabric softener,
• Liquid or powdered detergent for main wash,
Main Wash Detergent Compartment
This compartment holds laundry detergent for the main
wash cycle, The detergent is added to the load at the
_ginning of the cycle, Always use High-E_clency (HE)
dmergent with your washing machine. Either powdered
or liquid dmergent may be used.
Never exceed the manufacturer's recommendations
when adding detergent. Using too much detergent can
resuff in detergent buffdup in clothing and the washer.
When using liquid detergent, make sure the liquid
detergent cup and insert are in place. Do not exceed
the maximum fill line.
VChen using powdered detergent, remove the liquid
detergent cup from the compa_ment. Powdered
dmergent will not dispense with the liquid detergent
cup in place.
Fabric Softener Compartment
This compa_ment holds liquid fabric softener, which is
automatically dispensed during the final rinse cycle,
Never exceed _e manufa_urer's recommendations when
adding softener. Using too much fabric softener can result
in buildup in clothing and the washer.
•Always follow the manufacturer's recommendations
when adding fabric softener. Do not exceed the
maximum fill llne, Using too much fabdc softener may
stain clothes.
• Dilute concentrated fabric softeners with warm water.
Do not exc_d the maximum fill line.
• Never pour fabric softener directly onto the load or
into the tub.
Liquid Bleach Compartment
The bleach dispenser is a separate compartment at
the left front of the tub opening. This comportment
holds liquid bleach, which is dispensed automotlcolly
at the proper time during the wash cycle. Any liquid
remaining in the dispenser at the end of the cycle is
water, not bleach.
•Do not add powdered bleach to this coml=_flment.
The bleach compaflment is designed to dispense liquid
bleach only. Powdered or liquid color-safe bleach will
not dispense properly.
•Always follow the manufacturer's recommendations
when adding bleach. Never add more than one cup
and do not exceed the moxlmum fill line since this can
_use the bleach to _ disused immediately, resultin_ in
damage to fabrics, Using too m_h bleach can damage
fabrics.
• Never pour undiluted liquid chlorine bleach directly
onto the load or into the tub. Fabric damage can _cur.
-Do not use color-safe bleach or Oxl produ_s in the
same cycle with liquid chlodne bleach.
Do NOT mix chlorine bleach with ammonia or
acids, such as vinegar or rust/scale remover.
Mixing chemicals like these can produce a lethal
gas, resulting in severe injury or death.
17

|DETERGENT AND DISPENSER USE
A Word About Detergents
High-Efficiency (HE} detergents produce fewer suds,
dissolve more emciently to improve washing and
rinsing performance, and help to keep the interior of
your washer clean. Using dete_ent that _snot HE may
cause oversudslng and unsatisfactory performance
which could result in error codes, cycle failure, and
machine damage,
Liquid Powdered
Detergent
i,o.o, o,o oooowo, oo0o,oi
detergent using me measurements provided by me
detergent manufacturer,
The normal amount of HE detergent needed, for
average loads, is less than _/2of the recommended
maximum. Use less detergent for soft water, light soil
or smaller loads. Never use more than the maximum
amount recommended by the detergent
manufacturer.
Designed to use only
High-Emciency (HE) detergent
IMPORTANT:Yourwashing macNne is designed for use
wlth only High-Efficiency(HE}detergents, HEdetergents
are formulated specifically for High- y washers
and contain suds-reducing agents. Ahvays look for the
HEsymboi when purchasing detergent.
IMPORTANT: Not all detergents are the same. Pay
careful attention to the amount of detergent used to avoid
overusing, poor rinsing and detergent buildup in clothing,
and residue buildup that can contribute to odors in the
machine. NEVER use a cup or scoop other than the one
supplied by the manufacturer of the detergent "you
are using, Never use more than the maximum amount of
de'rergent recommended by the manufacturer.
Always measure the detergent amount. While HE
detergents are designed for this type of washing
machine, be careful when measuring the detergent. For
most normal loads, no more than _/_to 1/2 of cap or
scoop of HE detergent should be used.
NOTE: Extra care must be exercised when using 2X and
3X concentrated detergents because even a little bit extra
can contribute to the problems mentioned above.
NOTE: Detergents designated as HE compatible may not
provide optimal results.
Using the Softener and Detergent Dispenser
To add detergent, bleach, and fabric softener to the
automatic dispenser:
Open the dispenser drawer,
Load the laundry products into the
appropriate compartments.
Close the drawer before starting the cycle.
NOTE: it is normal for a small amount of water to
remain in the bleach and softener compartments at the
end of the cycle.
IMPORTANT: Do not place or store laundry products,
such as detergent, bleach, or liquid fabric softener, on
top of your washer or dryer. Wipe up any spills immedi-
ately, These produ_s can damage the finish and controls.
Using the Liquid Bleach Dispenser
The bleach: dispenser automatically dilutes and dispenses
liquid bleach at the proper time in the wash cycle.
_
Check clothing core labels for special instructions.
Measure liquid bleach carefully, following
instructions on the bo_[e. HighLemciency washers
use less water, so less bleach is needed. One half
cup is enough for most loads.
Carefully pour the pre-measured amount of bleach
directly into the bleach dispenser, if you are using
powdered bleach of any kind, pour it dlrect_y into
the tub before adding the laundry. Never add
powdered bleach to the liquid bleach dispenser.
•Never pour undiluted liquid chlorine bleach directly
onto clothes or into the tub.
•Do not pour powdered bleach into bleach
•Do not place laundry items on top of the bleach
dispenser when loading and unloading the washer.
'Always measure and pour bleach carefully./kxoid overfilling
or splashingwhen,adding b_eoch to the dispenser.The
maximum capacity, of the bteach dispenser is one cup of
bleach per wash cycle, Ove_lHng could result in b_eoch
being dispensed immedlate_y.
1_8
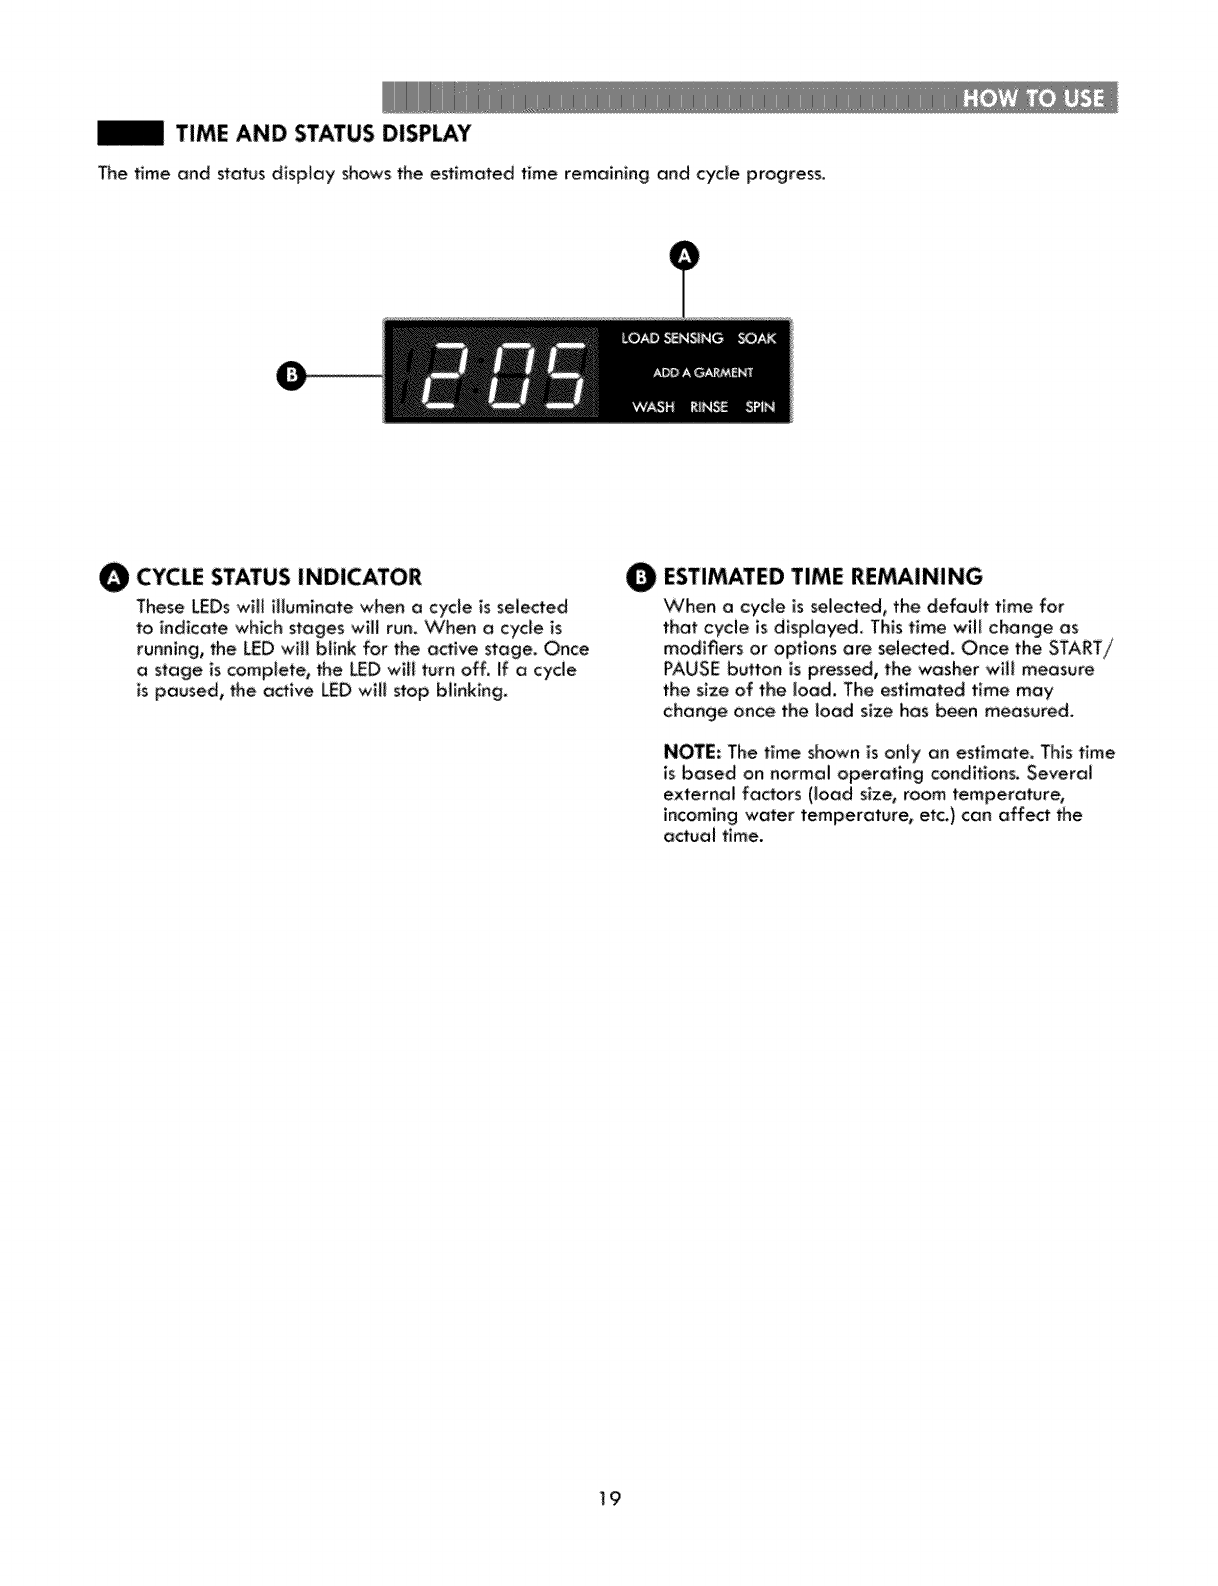
TIME AND STATUS DISPLAY
The time and status dlsplay shows the estimated time remaining and cycle progress.
CYCLE STATUS INDICATOR
These LEDs wffl iffumlnate when a cycle is selected
to indicate which stages wiff run. When a cycle is
running, the LED will blink for the active stage. Once
astage is complete, the LED wiH turn off. If a cycle
is paused, the a_ive LED wffl stop bllnklng_
OESTIMATED TIME REMAINING
When a cycle is selected, the default time for
that cycle is displayed. This time will change as
modifiers or options ore sele_ed, Once the START/
PAUSE button is pressed, the washer will measure
the size of the load. The estimated time may
change once the load size has been measured.
NOTE: The time shown is only an estimate. This time
is based on normal operating conditions. Several
external factors (load size, room temperature,
incoming water temperature, etc.} can affect the
actual time.
19

|CYCLE MODIFIER BUTTONS
Each cycle has default settings that are selected
automatically. You may also customize these settings
using the cycle modifier buttons. Press the button for
the desired modifier untll the indicator light for the
desired setting is [it. The washer automatlco[[y adjusts
the water level for the type and size of wash load for
best resuits and maximum emclency. Due to the high-
nature of this product, water levels may be much lower
than expected. This is normal and cleaningirlnsing
performance wffl not be compromised,
NOTE: To protect your garments, not every wosh/rlnse
temperature, spin speed, soll level, or option is avail-
able with every cycle. Achime wil| sound and the LED
will not light if a selection is not allowed.
Extra Hot
Hot
Warm
Cold
Tap Cold
Extra High
High
Medium
Low
No Spin
Heavy
Normal
Light
WASH TEMP
WASH TEMP selects me wash and rinse temperature
combination for the selected cycle, Press the WASH
TEMP button until the indicator light for the desired
setting is lit.
*Select the wash temperature suitable for the type
load "youare washing. Foffow the garment
fabric care Iabels for best results,
• Cold rinses use less energy. The actuat cold rinse
temperature depends on the temperature of the
cold water at the faucet.
O
O
SPIN SPEED
Higher spin speeds e×tract more water from clothes,
reducing drying t_me and saving energy.
Press the SPIN SPEED button until the desired speed
_sseiected. Some fabrics, such as deticates, require
o slower spin speed. To protect your dothlng, not ail
spin speeds are available for oH cycles.
SOiL LEVEL
Adjusting the soil level setting wi[[ modify the
cycle times and/or wash actions. Press the SOiL
LEVEL button until the desired soft [eve[ is selected.
2O
|OPTION BUTTONS
Your washing machinefeatures several additional cycle
options that customize cyclesto meet yc_jr individual needs.
O Turn ON He washer and pressthe cyclebuffon to select
the desired cycle, if the cycle _lectian is changed after
the optics have been _lected, allsettings willbe
changed to He defauit settingsfor the new cycle.
O Use the modifier buttons the for
cycle to adjust settings
thatcycle.
O Press_ cycle option button(s)for the option(s) you
w_ld like to add. The button will light when that option
isseiected. If the sele_:l option is not allowed for the
_le_ed cycle, the chime wffl soundtwice to alert you
end the LEDwillnotiIIuminate.
O Pressthe START!PAUSEbuttonto startthe cycle. After o
brief delay, the lid will I_k and the cycle will begin.
NOTE:
• To protect your garments, not every optlon is available with
e_ry cycle.
• If the START/PAUSE button is not pressed within four
minutes to staff the cycle, the control will sh_ off: and all
settings will be lost.
ACCELA WASH
Seled He STE,_A_,TREATbutton to add He
cleaning power of steam to He selected cycle.
Adding steam to cycles helps provide improved
cleaning performance, giving fabrics the benefit
of a deep dean. The steam option is not available on all
cycles.
O Turn ON He washer and press He cycle button to
sele_ a cycle that allows He steam option.
O Press the STEAM TREAT button. The wa_er will
automatlcelly adjust the cycle settings,
O Set any options.
other desired
O Press the START/PAUSE button to start the cycle.
CAUTION
• The lid may _ _ry warm during steam cycles, Thisis
normal.
"Do not attempt to override tee door lock mechanism or
reach into the washer during a steam cycle. Steam can
cau_ severeburns.
IMPORTANT NOTES ABOUT STEAM CYCLES:
• Steam may not _ vlslble during the steam cycles. This is
normal
• Do not use steam with delicate fabrics, such as wool and
silk, or easily discolored fabrics.
EXTRA RINSE
This option Wil_ add an extra rinse to _e se-
lected cycle.Use thisoptionto help ensurethe
removal of detergent or bleach residue from
fabrics. Liquid fabric softener, if used, is always
dispensed inHe final rinse.
NOTE: You cannm sel_t the EXTRA RINSE option with the
RINSE & SPIN cycle.
WATER PLUS
I-w_iI Use this option if you wish to add more water to
L_..[!_.__your wash I_d. This option is es_cially useful
for large or bulky loads.
The ADD A GARMENT light will
illuminate during the _rly stage of the
wash cycle to indicate that it is safe to
pause the cycle to add more items°
Once the ADD A GARMENT light g_s out, additional
laundry should not be added to the load. Doing so may
result in un_tisfactory performance becau_ the washer
•,viii not compen_te for the additional garments.
O Press the START/PAUSE button to pause the washer.
O Open the lid after it unlocks.
,Add 'four additional items.
OClosethe lid.
O Press the START/PAUSE button. The cycle will resume
after the lid locks.
Press repeatedly to adjust the volume of
1• -_I,_,ChlmeI the chime. The chime will sound at the new
volume with each press of the button. When
no chime is heard, the chime is off. The
volume settings are LOW - HIGH - OFE
The chime volume can be odiusted at any time as iong as
the washer is turned ON,
21
OPTION BUTTONS
FABRIC SOFTENER
i' Fabric softener is dispensed in the final rinse,
This washer is designed to save rinse water by
L_-_J .
using a let spray rinse system (SMARTRINSE)
in NORMAL and HEAVY DUTY cycles. Press the FABRIC
SOFTENER button to change the final rinse from spray
rinse to regular rinse so that the fabric softener is most
effective.
NOTE: Select the FABRIC SOFTENER o_ion or
EXTRA RINSE option if liquid fabric softener is used
in NORMAL and HEAVY DUTY cycles. Failure to
select one of these options wit greatly reduce the
effectiveness of the softener.
MY CYCLE
M;Y CYCLE allows you to store a cus'_mized
/ " CyMOSewash cycle for future use. ft allows you to _ve
.....................favorite tem_atur_ spin speed, soil level, and
other options for a cycle, a_ then recall them at the touch
of a bu_on.
NOTE: You can only save one cycle at a time. Pressing
and holding the MY CYCLE button will overwrite any
previously saved cycle.
To save a MY CYCLE:
Press _e POV'/ER button turn the washer,
to on
Press the cycle button to select the desired cycle.
Pros the cyde modifier _ons to change _e desired
_tting,
Press _e modifier buttons add the desired
cycle to
options,
O Press and hold the MY CYCLE button.
To recall aMY CYCLE:
Press the POWER button to turn on the washer.
Pressthe MY CYCLE _atton_ The _ _i_s will
displayed,
O Press the START/PAUSE button to start the cycle,
NOTE: MY CYCLE can be adjusted the same as any
other cycle. Howeve G once any other button is pressed,
the MY CYCLE button LED will turn off indicating that
the smtings are no longer those of your saved cycle.
_ This option provides max 180 mln_es
. ___._ presoak prior to the start of the selected cycle. Use
the SOAK option to presoak
garments to help remove difflcult spats or stains on
fabrics. At the end of the presoak time_ the _lected cyde will
begin with the same water used for the soak.
DELAY WASH
Once you have selected the cycle and
_ Del_y other settings, press this button to delay the
Was5
start of the wash cycle. Each press of the
button increases the delay time by one hour, for up to
19 hours. Once the desired detoy time is set, press the
START/PAUSE button to start the delay time,
NOTE: If the START/PAUSE button is not pressed to
begin the delay time, the washer will automatically shut
off after four minutes.
RINSE & SPIN
_lnm Select this option to rinse and spin o load
L...._..sp_"] separately from o regular cycle, This can be
helpful in preventing fresh stains from setting in
fabrics, You can change the spin speed by pressing the
SPIN SPEED button
Press the START/PAUSE button to turn on the
washeir_
Press the RINSE & SPIN button.
Press the SPIN SPEED button to select the desired
spin speed. Selecting NO SPIN is not allowed.
@ Press the START/PAUSE button,
CONTROL LOCK
U_ _is optionto disable _e control_ Thisfea-
ture con prevent childrenfrom changing cycles or
operating _e machine. Once _e cent_teli_k iS
set, it must be deactivated before any controls,except the
PO;WERbutton, can be used. Once the washer has shutoff,
the POWER bL,ctonwill allow the machine to be _rned ON,
but the controls will still be locked, VChen_e controls are
locked, [L will display alternately wffh _e estimated time
remaining. Pressand ho_d_e CONTROL LOCK button for
three seconds to adlvate or deactivate Control Lock.
22
SPECIAL DRAIN FEATURE
This washer is equipped with a specia_ feature that is
designed to make your washer as safe as possible.
If the washer is paused or shut off while there is still water
in the tub, the water will drain after several minutes, This
helpskeep,childrensafeby reducingthe possibilityof
con be restarted
tf no action is taken, the dr- error code will display and
the water willdrain from the tub. Once the washer begins
draining the water, the controls ore disabled and the
drain process cannot be interrupted. Once the water is
completely drained, the washer will shut off.
NOTE: In the unlikely event that the washer experiences
o problem that causes an error code to be displayed,the
washer will still drain after several minutes, Howeve5 only
the original error code wH_be displayed,

WARN IN G: To reduce the risk of nre,electric shock, or injury to persons,read and foltow this entire U_ &
Care Guide, includingthe Important Safety Instructions,before operating thiswasher.
• Unplug the washer _efore c|eaning to avoid the riskof electric shock. Failure to fellow this warning can cause seri-
ousinjury, fire, etedric shock,or death.
• w
Neve_ u_ harsh chemicals,abrasive cleaners, or _lvents to clan the washer° They ill damage the finish.
REGU_R CLEANING
Cleaning the Exterior
Proper care of your washer can extend its life. The outside
of the machine can be dean_ with warm water and a
mild, n_nabrasive hou_hoJd detergent.
Immediately wipe off any spiffswith a soft, damp cloth.
IMPORTANT."Do _t u_ solven% cleaning a_cohoJs_or
similar prodS. Never u_ steel wool or abrasive cleaners
because they can damage the surface,
_re and Cleaning of the Interior
Use a towel or soft cloth to wipe around the wa_er ffd
opening and ffd glass.
Always remove items from the wa_er as s_n as the cycle
is complete. Leaving damp itemsin the washer can cause
wrinkling, color transfe_ and odor. Runthe CLaN WASH-
ERcycle orate a month, or more often if needed, to remove
detergent buffdupand other residue.
Clean Washer Cycle
Remove any clothing in the tub.
Add liquid chlorine bleach or another tub cleaner
designed specificaffy for cleanlng washers.
-If usingliquid chlorinebleach
Add ffquid chlorine bleach to the bleach
compartment.
NOTE: Add one cup of liquid bleach. Do not exceed the
maximum tiff fine and do nat pour undiluted liquid bleach
dlredty into the _b
O-If usingpowdered deane_
Remove the liquid detergent _p and add powder
cleaner to the main wash compartment of the dis-
penser drawer.
- If usingatablet cleaner
Putthe tablet direly intothe tub.
NOTE:
• Do not add tabletcleaner to the dispenser drawer.
•Do not add any laundry- detergent or fabric s_oftenerto
the dispenser drawer when using CLEAN WASHER.
OClose the lid and pressthe POWER buttonto turn the
wa_,er ON. Pressthe CLEANWASHERbutton, then
pressthe START/PAUSEbJtton to begin the cycle,
Selecting any other cycle after CLEANWASHERhas
been selected ,,viiicausethe CLEANVv{ASHERcycle to
be can_ffed.
After the cycle endst open the lidand allow the tub
interior to dry completely.
Storing the Washer
If the washer will not be used for an extended period of
time and is in an area that could be exposed to freezing
temperatures, perform the following steps to prated the
wa_er from damage.
Turn OFF the water supply.
O Disconn_ hosesfrom water supply and drain water
from hoses.
O Plug the cord into a properly grc.Jnded el_ical
power
outlet,
O Add I of n_toxk r_r_ti_al vehicle
gallon (Rv)a_
tiffeeze to the empty t_aband cl_ the lid. NEVERuse
auto.tire antifreeze,
O
O
@
O
@
Press the POWER _ffon, then pros the DRAIN & SPIN
button. Press the START/PAUSE button to activate
the drain pump, Allow the drain pump to run
for one minute, then press the POWER button to
shut off the washer. This will expel some of the
antifreeze, leaving enough to protect the washer
from damage.
Unplug the power cord, dry the _b interior with a soft
cloth_and closethe lid.
Remove_ inse_ from the dispenser.Drain any water
in the compa_ments and i_ themdry.
Store the washerin an uprig_ positi®.
To remove the antifreeze from the washer after
storage, run a complete EXPRESS Vv'ASH cycle using
detergent. Do not add laundry to this cycle.
Removing Mineral Buildup
if you live in an area with hard water, mineral scale
can form on internal components of the washer. Use of
awater softener is recommended in areas with hard
water.
Use a descale5 such as Vv'asher Magic: ®, to remove
visible mineral buffdup. After descaling, always run the
CLEAN WASHER cycle before washing clothing.
Mineral scale and other spots may be removed from
the stainless steel tub using a stainless steel cleaner. Do
NOT use steel wool or abrasive cleaners.
Leave the Lid Open
If the washer will not be used for several days_ leave
the lld open overnight to allow the tub to dry.
NOTE: Runthe CLEAN"WASHERcycle once a month, If a
mildewy or musty smell is present, run the dean wa_er
cyde once a week for thr_ consecutive weeks. 23
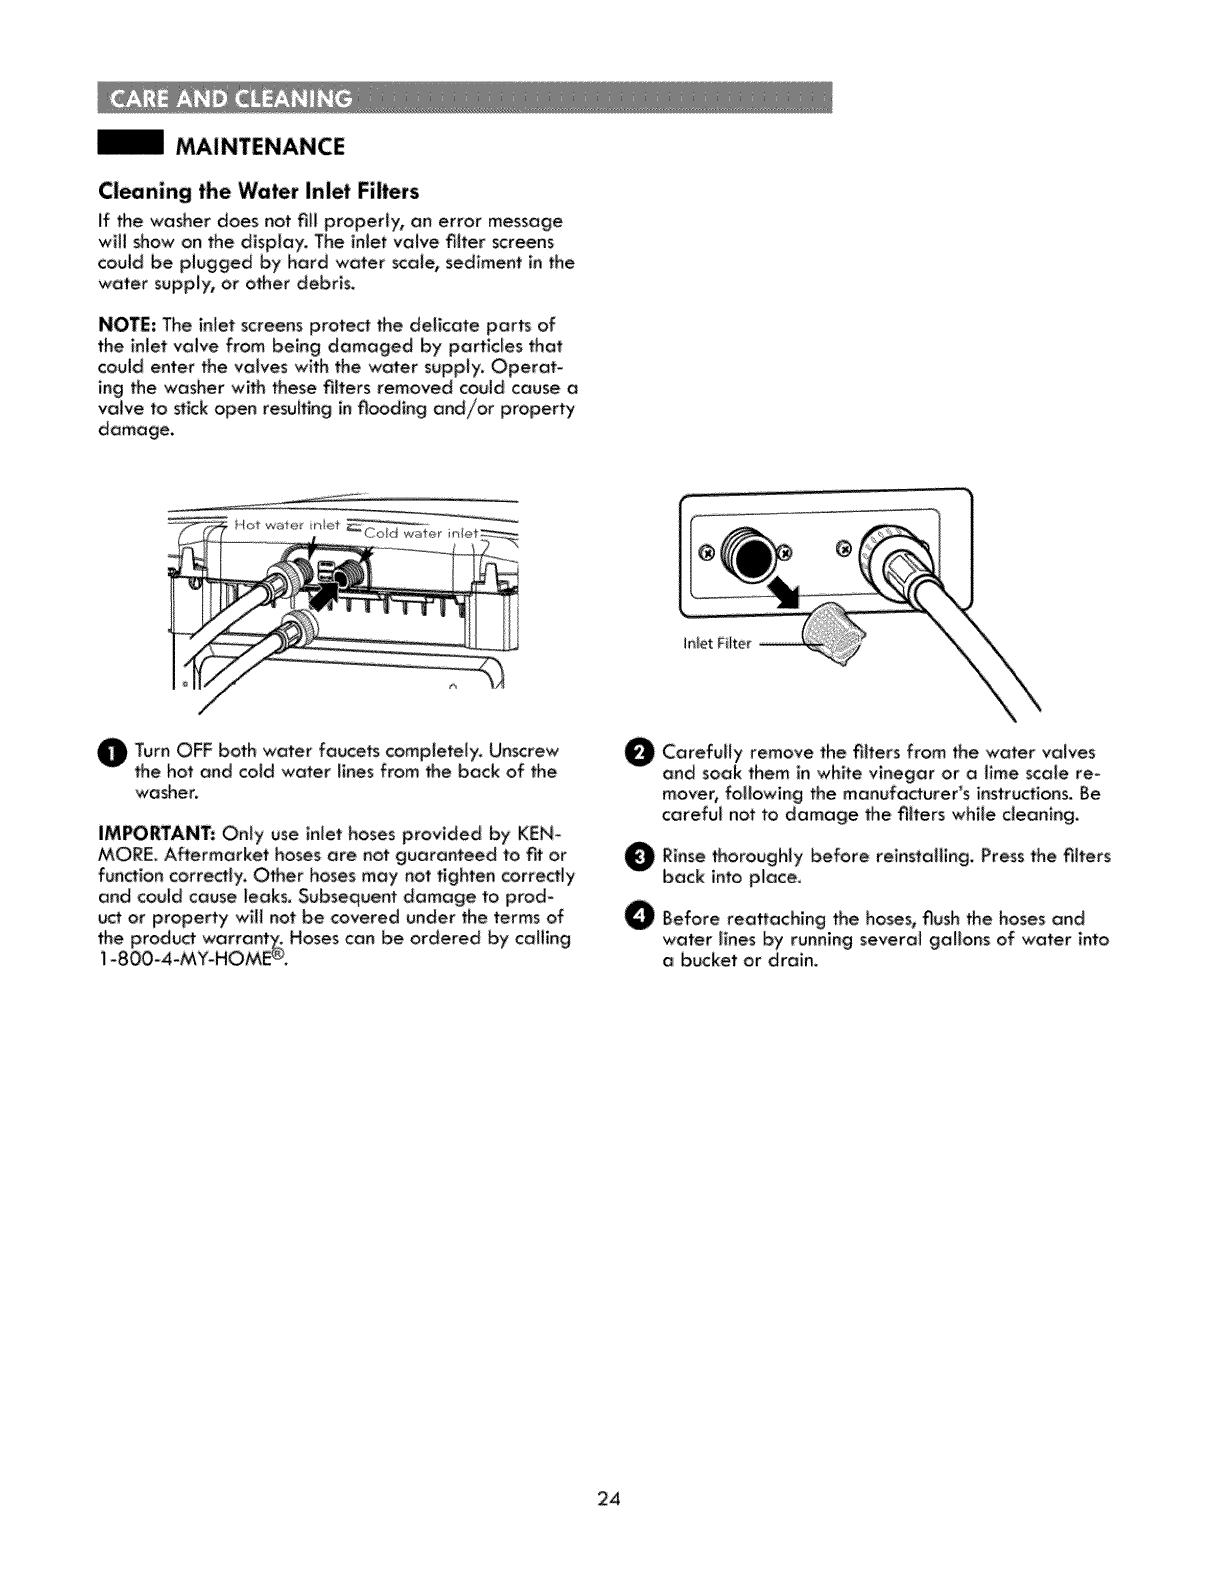
MAINTENANCE
Cleaning the Water Inlet Filters
_f the washer does not tiff proper_y, on error message
will show on the display. The inlet valve filter screens
could be plugged by hard water _al_ sediment in the
water supply, or other debris.
NOTE: The inlet screens protect the delicate parts of
the inlet valve from being damaged by particles that
could enter the valves with the water supply. Operat_
ing the washer with these riflers removed could cause a
valve to stick open resulting in flooding and/or property
damage.
/
O Turn OFF both water faucets completely, Unscrew
the hot and cold water lines from the back of the
washer,
IMPORTANT: Only use inlet hoses provided by KEN-
MORE. Aftermarket hoses ore not guaranteed to fit or
fundlon correctly. Other hoses may not tighten correctly
and could cause leaks. Subsequent damage to prod-
uct or property .,viii not be covered under me terms of
me product warrant_: Hoses can be ordered by calling
i _800-4-MY-HOME _,
O Carefully the filters from the valves
remove water
and soak them in white vinegar or a llme scale re-
mover, following the manufacturer's instructlons. Be
careful not to damage _e filters while cleaning.
Rinse before Press the filters
_ho rO_ h_ _ reinstalling,
back into p_ace,
O Before reattaching the hoses, flush the hoses and
water lines by running several gallons of water into
o bucket or drain,
24
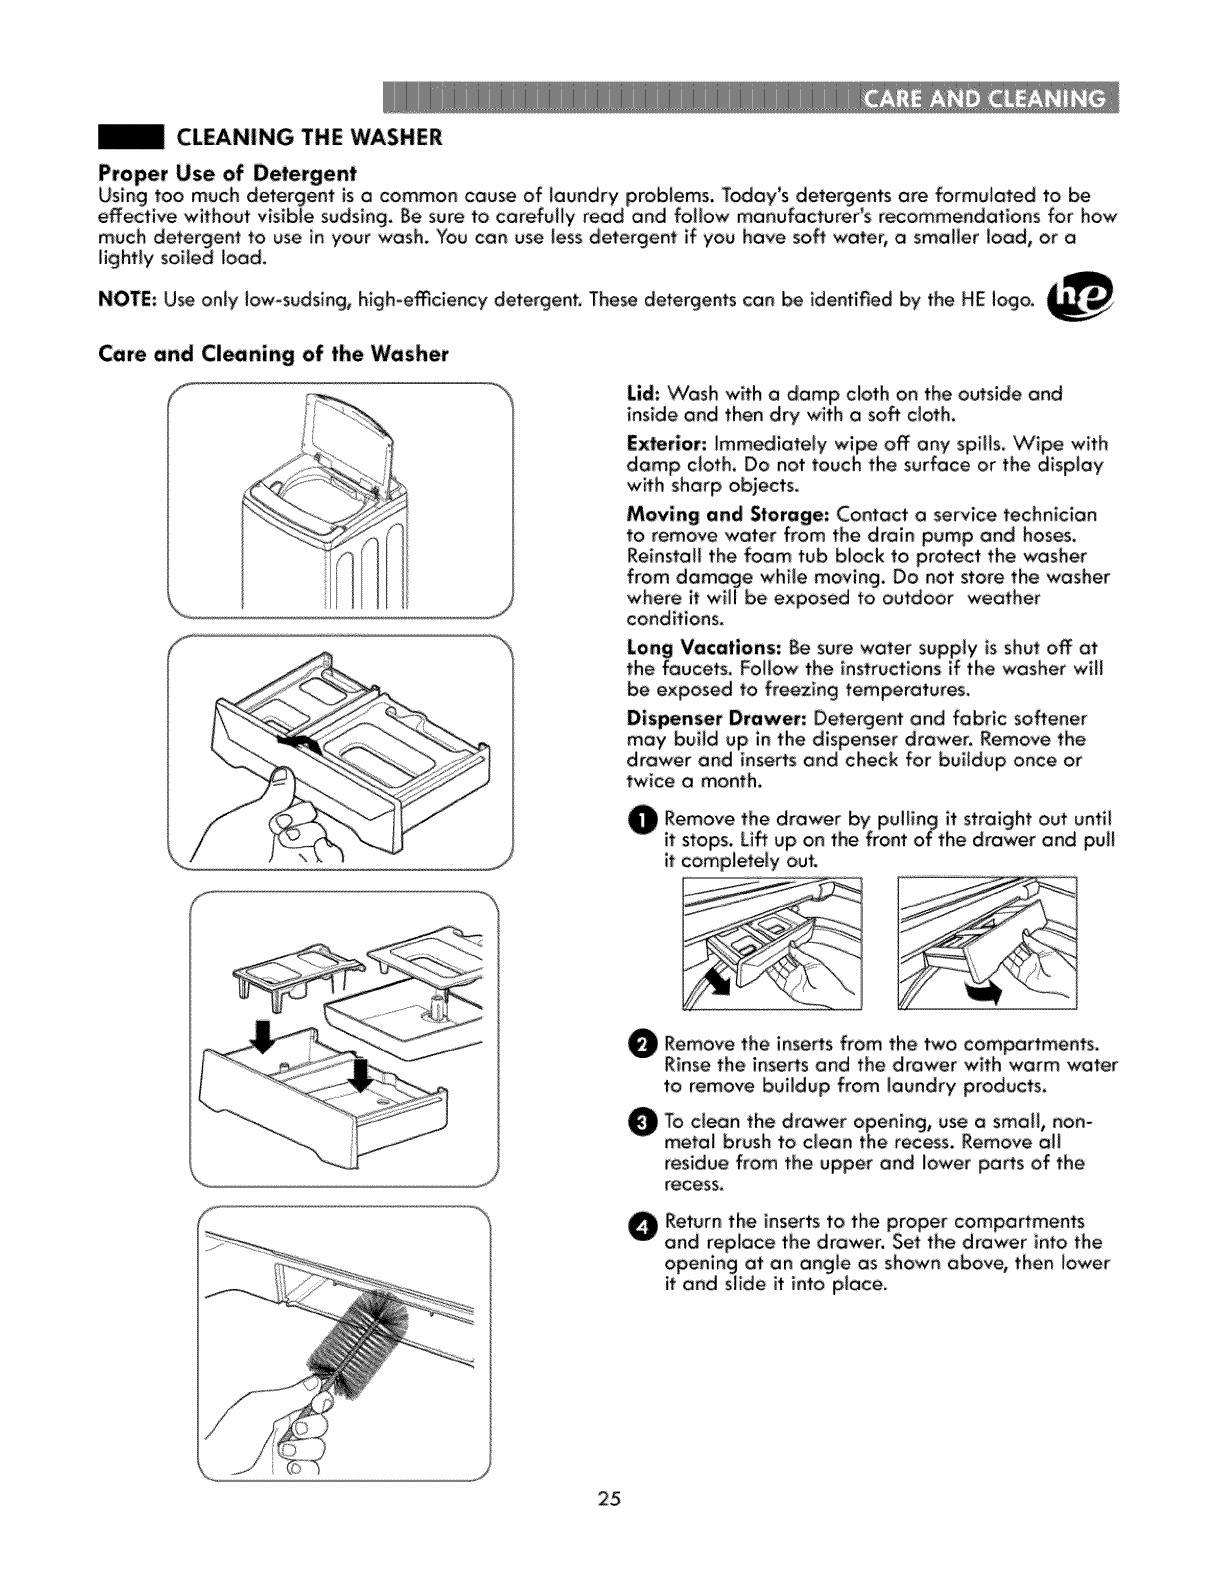
CLEANING THE WASHER
Proper Use of Detergent
Using too much detergent is o common cause of laundry problems. Today's detergents are formulated to be
effective without visible sudsing, Be sure to carefully read and follow manufacturer's recommendations for how
much detergent to use in your wash_ You can: use less detergent if you have soft ware5 a smaller load, or a
lightly soiled load.
NOTE: Use only low-sudsing, h_gh-emciency detergent. These detergents can be identified by the HE logo.
Care and Cloning of the Washer
f
J
J
Lid: VVash wffh a damp cloth on the outside and
inside and then dry with a soft cloth,
with sharp objects,
Moving and Storage: Contact a service technician
to remove water from the drain pump and hoses,
Reinstall the foam tub block to protect the washer
from damage while moving, Do not store the washer
where it will be exposed to outdoor weather
conditions.
Long Vacations: Be sure water supply is shut off at
the faucets, Follow the instructions if the washer will
be exposed to freezing temperatures,
Dispenser Drawer: Detergent and fabric softener
may build up in the dispenser drawer, Remove the
drawer and inserts and check for buildup once or
twice a month,
Remove the drawer by pulling it straight out until
it stops, Lift up on the front of the drawer and pull
it completely out.
Remove insets two compartments.
the from the
Rinse the inserts and the drawer with warm "wafer
to remove buildup from laundry products.
O o clean the drawer opening, use a small, non-
metal brush to clean the recess, Remove aH
residue from the upper and lower parts of the
recess,
OReturn the inserts to the proper compa_ments
and replace the drawer, Set the drawer into the
opening at an angle as shown above, then lower
it and slide it into place.
25
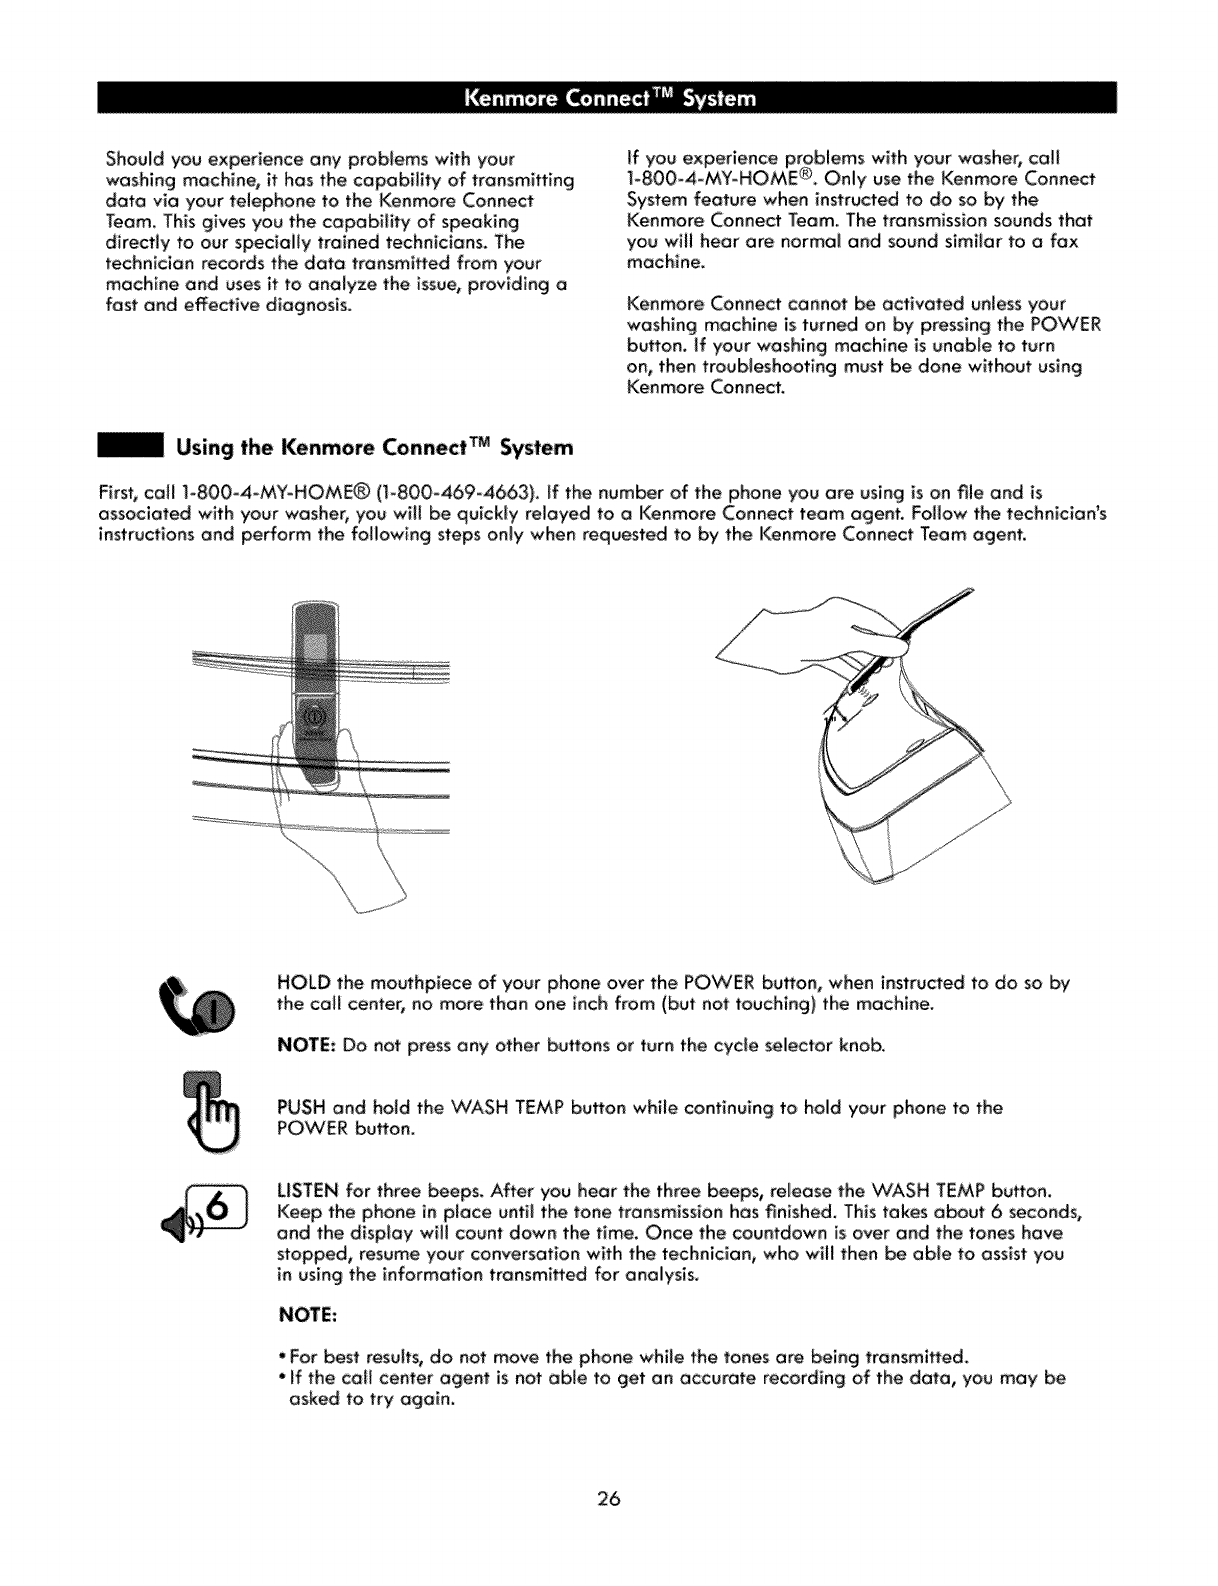
Should you experience any problems with your
washing machine, it has the capabffffy of transmitting
data via your telephone to the Kenmore Connect
Team. This gives you the capability of speaking
directly to our speciaHy trained techniclans_ The
technician records the data fransmiffed from your
machine and uses it to analyze the issue, providing a
fast and effective diagnosis.
System feature when instructed to do so by the
Kenmore Connect Team. The transmission sounds that
you will hear are normal and sound similar to a fax
machine.
Kenmore Connect cannot be activated unle_ your
washing machine is turned on by pressing the POb^¢ER
button. If your washing machine is unable to turn
on, then troubleshooting must be done without using
Kenmore Connect.
Using the Kenmore Connect TM System
First, caff 1-800-4-MY-HOME® (1-800-469-4663). If the number of the phone you are using is on file and is
associated with your washer, you will be quickly relayed to a Kenmore Connect team agent. Follow the technician's
instructions and pe_orm the foHowing steps only when requested to by the Kenmore Connect Team agent.
HOLD the mouthpiece of your phone over the POWER button, when instructed to do so by
the call center_ no more than one inch from (but not touching) the machine.
NOTE: Do not press any other buttons or turn the cycle selector knob.
PUSH and hold the WASH TEMP button while continuing to hold your phone to the
PO'WER button.
LISTEN for three beeps. After you hear the three beeps, release the VVASH TEMP button.
Keep the phone in place untff the tone transmission has finished. This takes about 6seconds,
and the disploy will count down the time. Once the countdown is over and the tones have
stopped, resume your conversation with the technician, who will then be able to assist you
in using the information transmiffed for analysis,
NOTE:
"For best resuffs, do not move the phone while the tones are being transmitted.
"If the caff center agent is not able to get an accurate recording of the data, you may be
asked to try again.
26
NORMAL SOUNDS YOU MAY HEAR
The following sounds may be heard whffe me washer is
operating. They are normal.
Lid lock relay when the Jld iocks and un_ocks, Humming or gulling:
Drain pump _spumping water from the washer at times
dudng a cycle.
Spraying or hissing:
Water spraying or circulating during the cycle.
BEFORE CALLING FOR SERVICE
"Yourwashing machine is equipped with an automatic error-monitoring system to detect and diagnose problems at
an eaHy stage_ If "yourwasher does not function properly or does not run,ion at off° check the foiiawlng before you
call for service:
Rattling and Foreignoblects,s_h askeys,coins,or safe_ pins_ Stop was_r, ck_k tub and drain filter for foreign obie_
noi_ ............... ..........If r_!se _ffnues after was_r is re_arted, _ff for s_vice.
Vibrating n_se
Heavy wash loads may produce a thumping
sound,
Washer load may be out of balance.
P_aging materials were not removed.
'vVa_ load may _ ur_v_ly distributed in
_b.
are resting firmly and
Thisis normal. If sound contlnues,washer _sprobabiy
ou¢of balance. Stop and redistribute wash load.
Pause_e cyde and redistribute the _oad after the ffd
unJocks.
S._ _e UNPACKmNGAND R_OVING SHIPPINGtC_ATE-
RAL secti_ in_i_taffationrequire_s.
Po_e _ cycle and redistri_Jte_ load after tkelid
unlades.
See Leveling the Washer intk,elnstaffatbn Instru_ions.
Floor not r[gld enough. Make sure that the floor is solid and does not flex.
Water leaking Inlet hose connection is loose at faucet
or washer.
House drain pipes are dogged.
Drain hose has come out of drain or
_snot _nsertedfar enough.
A (arge item such as a pil(ow or bianket is
above the top of the tub.
Check hosesfor leaks, cracks and spffts.
Check and tighten hose connections.
tions in the drain. Conta_ a plumber to repair drain
pipe.
hose flange. For larger drain pipes, insert the drain
hose into the pipe _-2 inchespast the flange.
bad of items that flora suchas pillows.
Stop the washer and check the lood. Make sure the
load does not crest above the top edge of the tub_
Wrinkling _,_/osher not un_oaded promptly,
Vv'asher overloaded.
Hot and co_d water in_et hoses are reversed.
Always remove items from the washer as soon os the
cycle is complete.
Hat water rinse can set wrinkles in garments. Check
the in_et hose connections
27
BEFORE CALLING FOR SERVICE (continued)
Too much deter_nt or ira:affect HE detergercr_ are formgl_ed specifcally for
deterS, High-_fic_e_y wa_ers and contain suds_red_ing
agents. Only u_ detergent wffh the High-Eff-
ciency IHE) logo. For detergent quantities refer
to the How to Use section,
B_each or so_ener dispensed D_spenser compartment _soverfJled causing
too soon. bleach or softener to dSspense_mmedlate_y,
ALWAYS measure bleach to prevent overfHing -
one cup maximum_
Dispenser drawer closed too qulckly causing
softener to dispense immediateb,.
81each or settler was added Always use the dispensers to ensure that laundry
dk_Iy to the wash bad _nthe tub. products are properly dispensed at the rlght
time _nthe cycle.
Washer was not unloaded promptly. Always remove items from the washer as soon as
possible after the cycle is compiete,
Ctothes were not properly sorted. Always wash dark colors separately from light
colors and whites to prevent discoloration.
Never wash heavily soiled items washed with
lightly soiled items,
Washer will nat turn ON Power cord is net properly plugged in. Make sure that the plug is plugged securely _nto
a grounded, 3-prong, t 20-VAC, 60-Hz ou¢let_
NOTE: ff the washer stopped House fuse is blown, circuit breaker has Reset circuit breaker or replace fuse_ Do not
during a cycle due to a loss of tripped, or power outage has occurred, increase fuse capacity, ff the problem is a circuit
power, the washer will resume the overload, hove it corrected by a qualified
cycle where ff stopped when the e_ectr_cian_
power is restored. House fuse is bbwn, circuit breaker has Reset circuit breaker or replace fuse. if more
tripped, d_ to muffip_e than one appliance is connected to the outleb
appliances on one outlet, cali on eiectrlc_on to have an additional ckcult
installed.
M_ ormi_ _ inw_sher
Water leaks
Thewasher automatkaHy adjusts the
washtime for the am_m of laundry,
water pressureand _er operating
oonditions.
Incorrect or too much detergent has
been used.
Oversudsing of detergent.
Thisisnormal _ wa_r adiust_ cycle t_,_ auto-
ma_icaffyto provide optimal resu_ _r _ _l_
c_ Thetime r_aining sk_vn in the display _ _iy
on _imate, _ time may vary,
Use on_y High_Efficie_y {HE)detergent in accor-
dance wlth the. manufacturer's instructions.
Oversudsing may create leaks, and may be
caused by the type and amount of detergent
used. High-Emclency detergent is the only
detergent recommended. Make sure that
detergent and any additives are put into the
correct d_spenser compa_ments, The normal
amount of detergent to use is _/4to !/2 of
the maximum amount recommended by the
detergent manufacturer. Always reduce the
amount of detergent if the load is small or
lightly soiled, or if your water is very so_,
Neiver use more than the maximum amount
recommended by the detergent manufacturer,
28
BEFORE CALLING FOR SERVICE (continued)
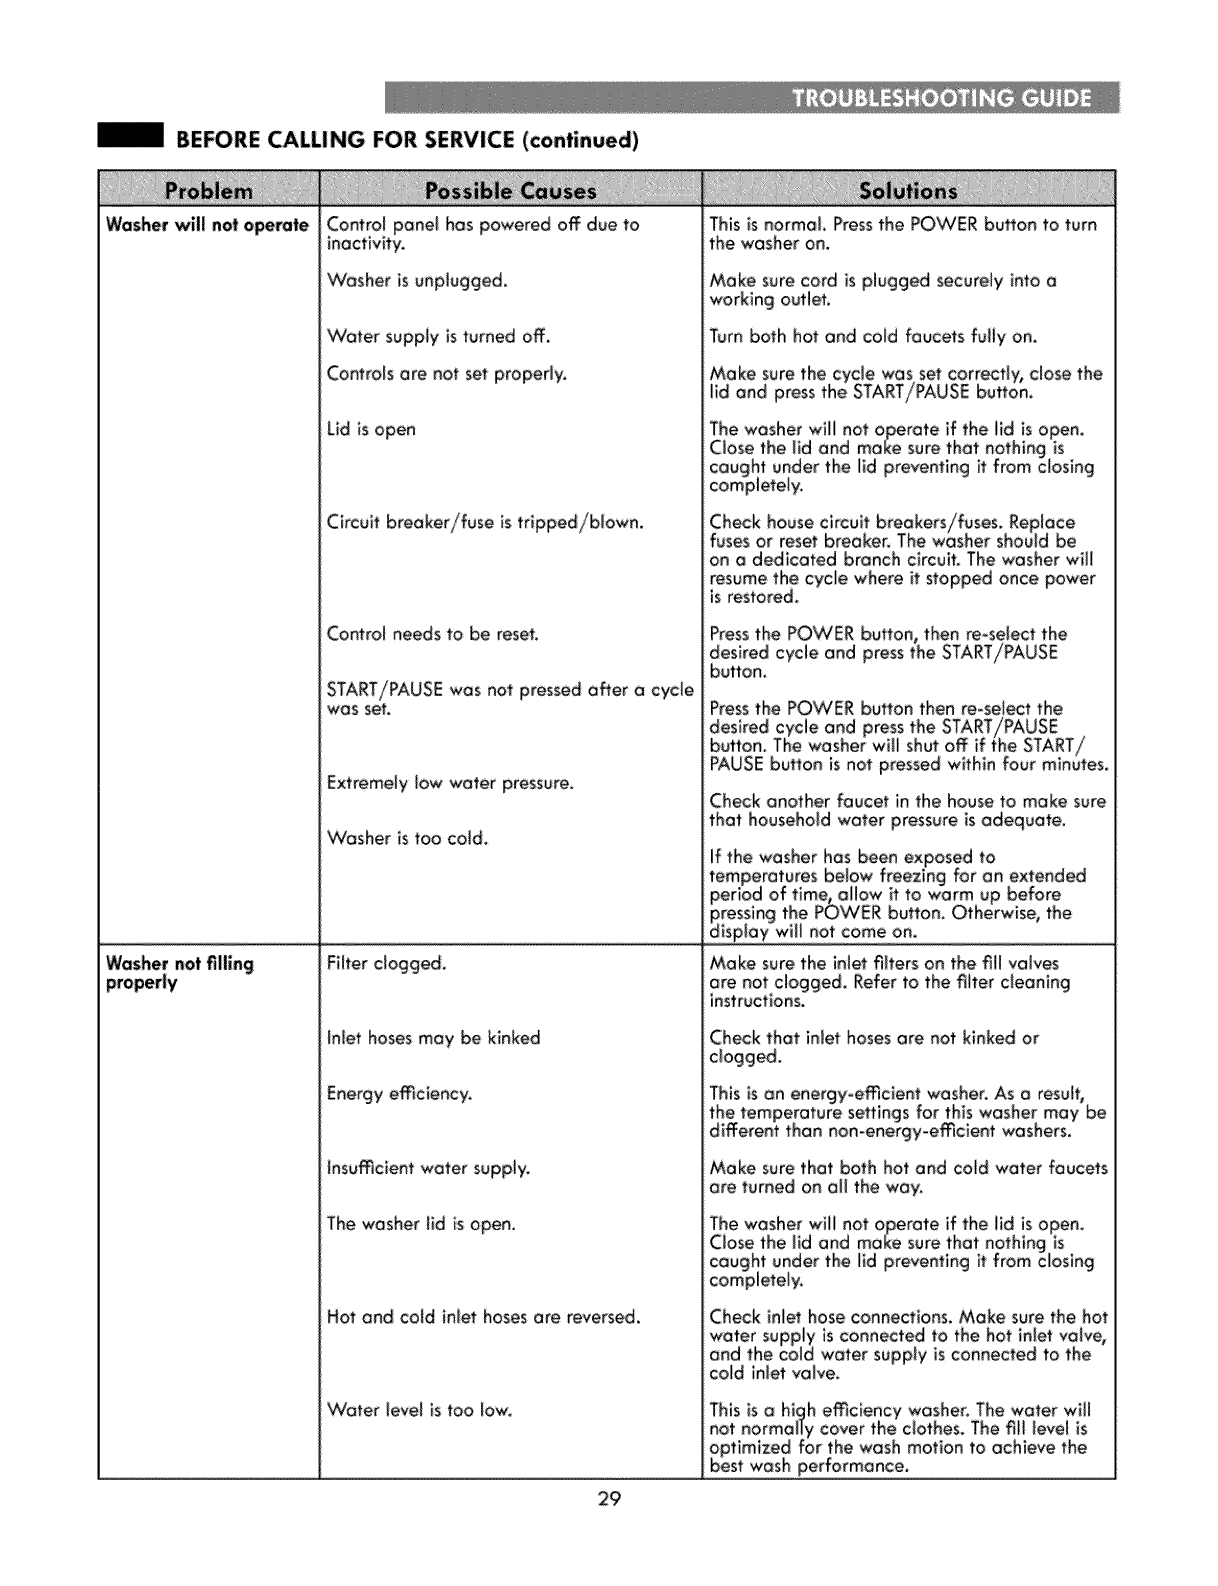
Washer will nota_rate Control panel has powered off due to
inacfivffy.
Washer _sunplugged.
VCater supply is turned off.
Controls are not set properly.
Lid _sopen
This is normal. Press the POWER button to turn
the washer on.
Make sure cord is plugged securely into a
working outlet.
Turn both hot and coid faucets fully on,
Make sure the cycle was set correctly, close the
lid and press the START/PAUSE button.
Washer not filling
Circuit breaker/fuse is tripped/blown.
Control needs to be reset.
START/PAUSE was not pressed after a cycle
was set,
E×tremely Jaw water pressure,
"Washer is too cold.
Filter dogged,
Inlet hoses may be k{nked
Energy emciency.
tnsumcient water supply.
The washer Hd is open,
Hot and cold inlet hoses are reversed.
"Water _evel is too low,
on a dedicated branch circuit. The washer will
resume the cycle where it stopped once power
is restored.
Press the POWER button, then re-select the
desired cycle and press the START/PAUSE
bufon.
Press the POWER button then re-select the
Check another faucet in the house to make sure
that household water pressure _sadequate.
Make sure the in:let filters on the _tl valves
are not clogged. Refer to the filter cleaning
instructions.
Check that iniethoses are not kinked or
clogged.
Make sure that both hot and cold water faucets
are turned on oil the way,
Check in_et hose connections. Make sure the hot
cold inlet valve.
29
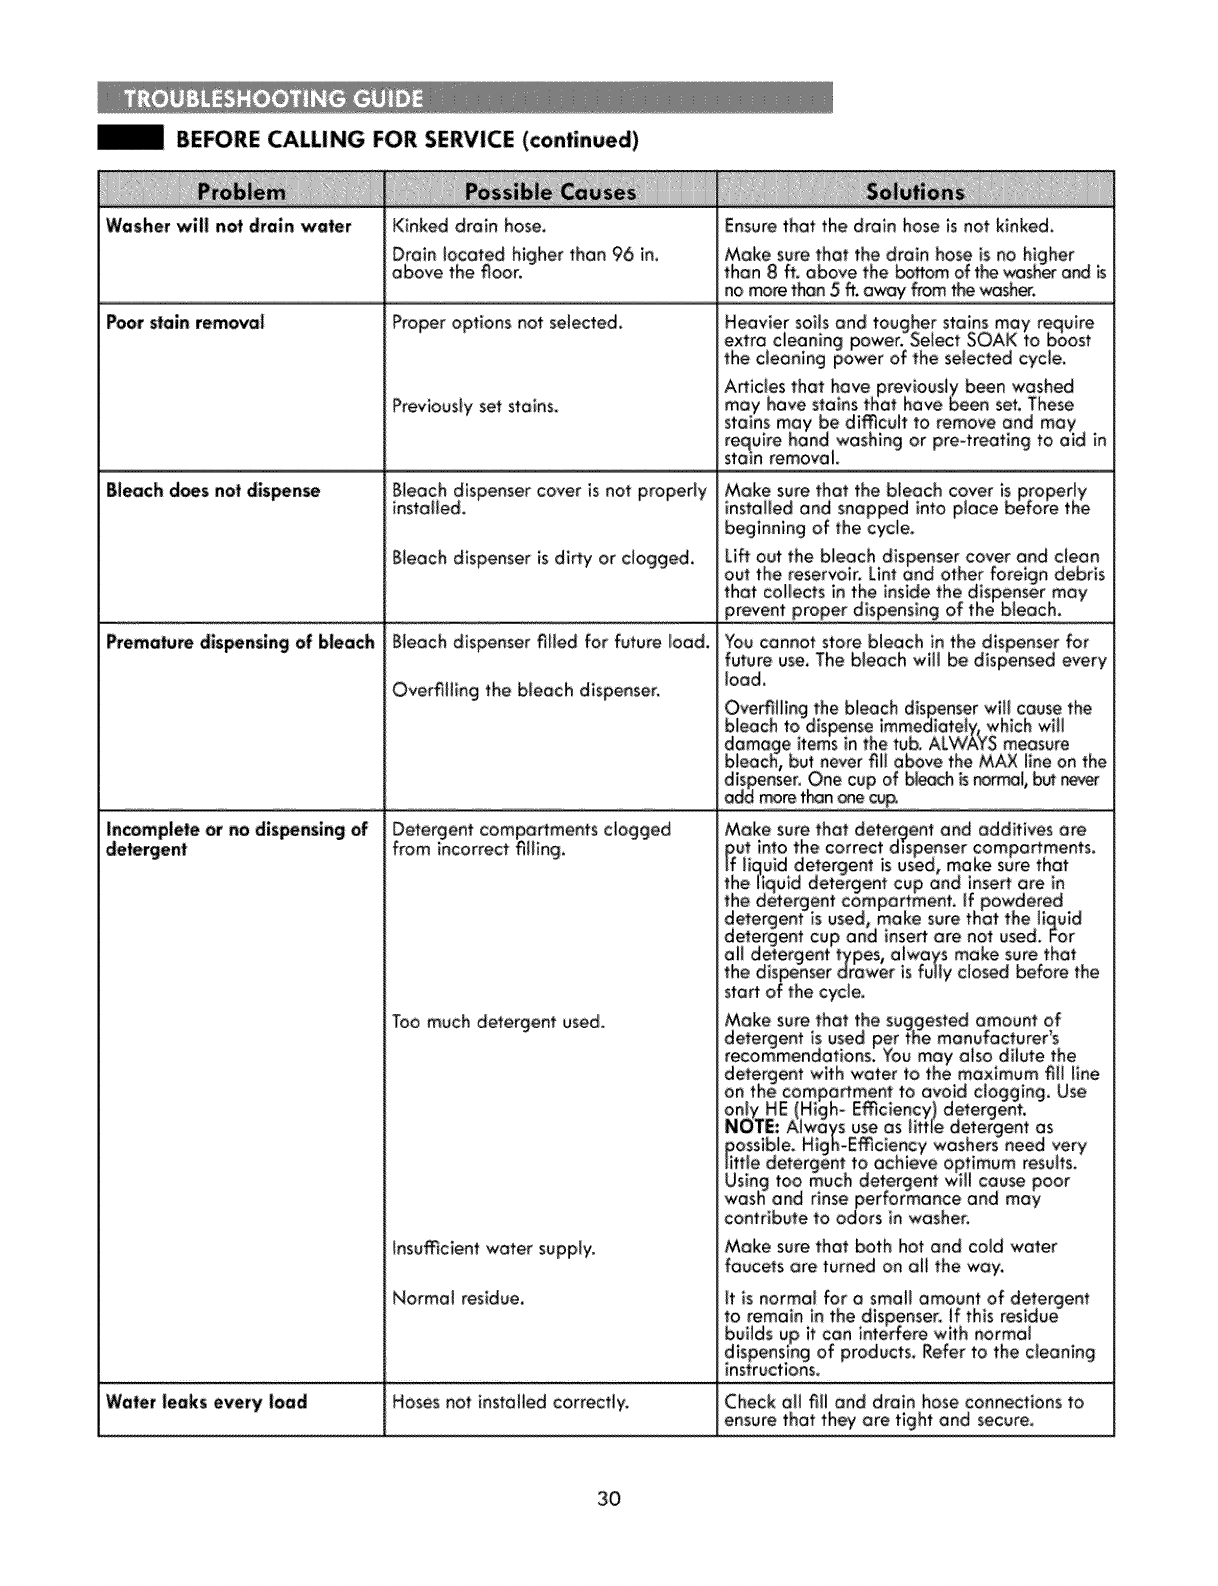
BEFORE CALLING FOR SERVICE (continued)
Washer "wily not drain water Kinked drain hose. Ensure that the drain hose is not k_nked.
Drain located higher than 96 in, Make sure that the drain hose is no higher
above the floor, than 8 ft. above the bottom of the _s_er a_ is
_no more than 5 if, away from f_ washer,
Pool slain removal Proper options not selected.
Artlcles that have previously been washed
Previously set stains, may have stains t'Kat have been set_These
stains may be dimcult to remove and may.
require hand washing or pre-treating to aid in
stain removal.
Bleach does net dis_nse Bleach dispenser cover is not properly
instaffed,
Bleach d_spenser is dirty or clogged,
Premature dispensingof bleach
Incomplete or no dis_nsing of
Bleach dispenser filled for future _oad.
Overfilling the bleach dispenser.
Detergent compa_ments clogged
from _ncorrect filling.
beginning of the cycle.
L_ out the bleach dispenser cover and c_ean
out the reservoir. Lint and other foreign debris
load.
Too much detergent used.
Jnsumcient water suppJy.
Normal residue.
sta# of the cycle,
contribute to odors in washer,
Make sure that both hot and cotd water
faucets are turned on oil the way,
Wafer leaks every load Hoses not installed correctly. Check all ill! and drain hose connections to
ensure that they are tight and secure,
30,
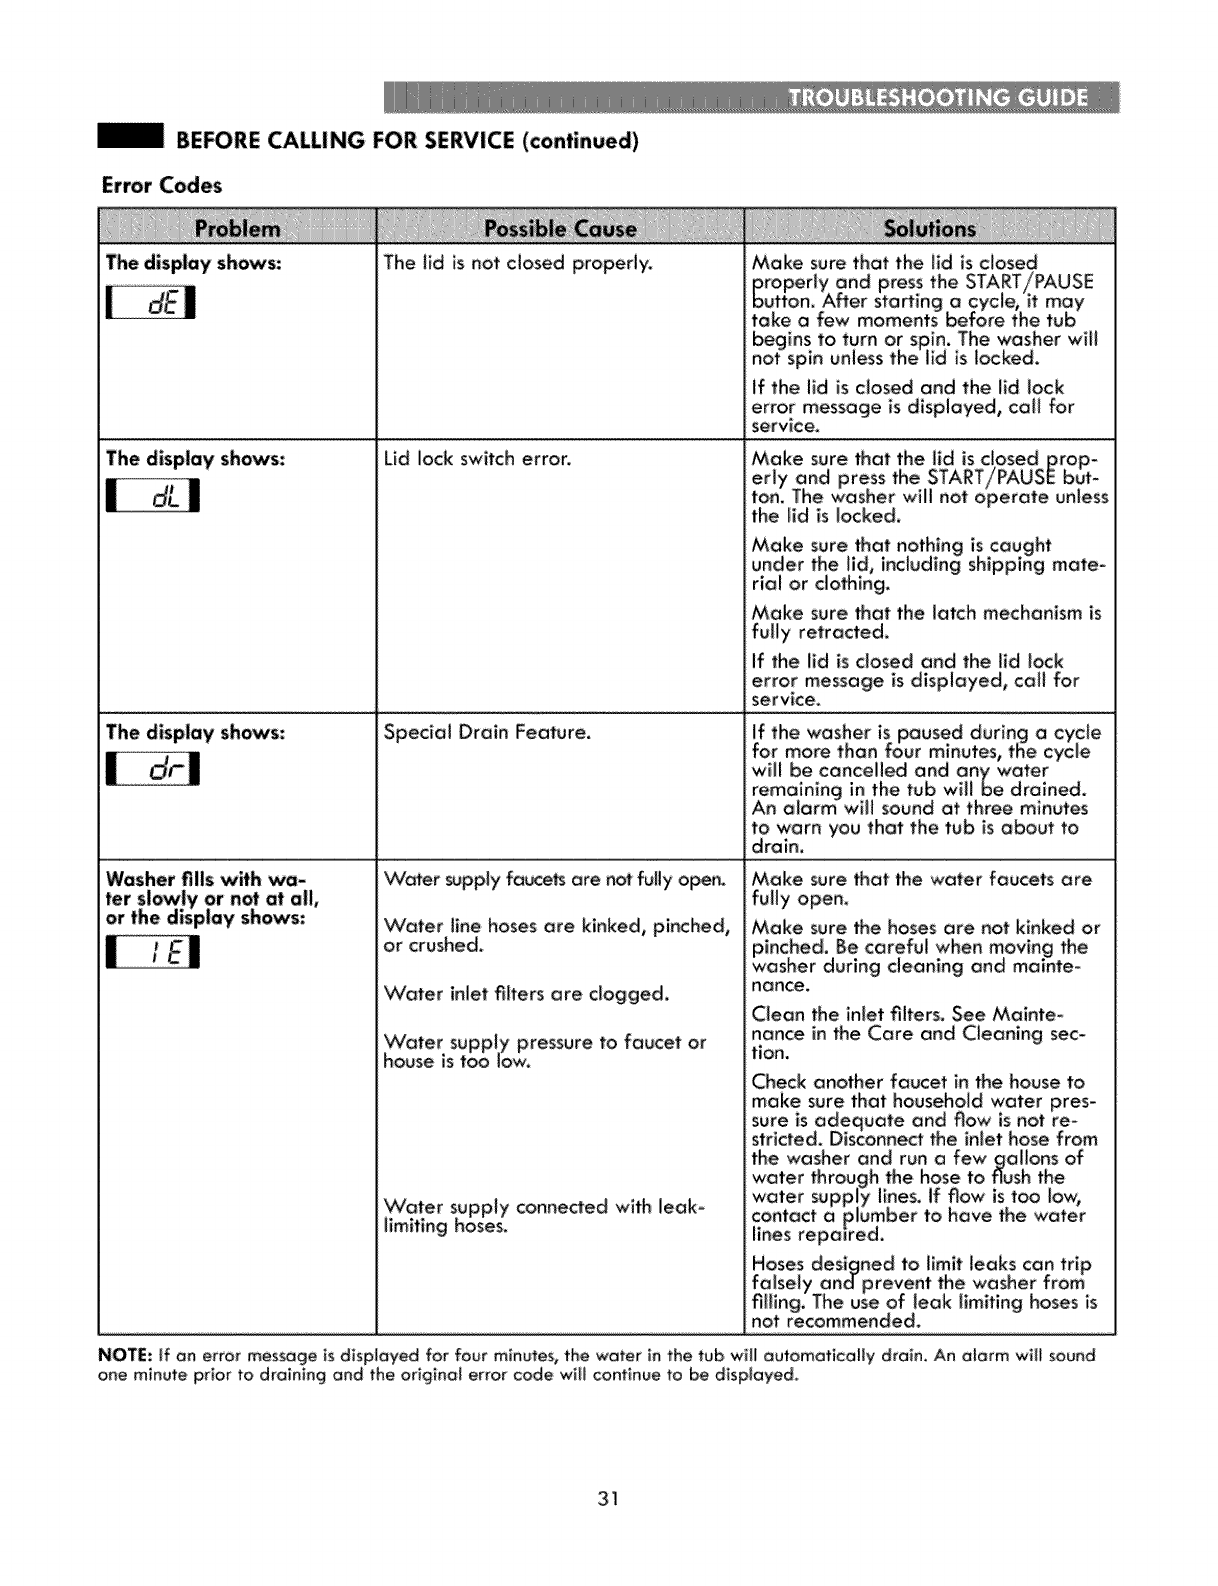
|BEFORE CALLING FOR SERVICE (continued)
Error Codes
The display shows: The lid is not ciosed properly.
The display shows:
Make sure that the iid is closed
begins to turn or spin. The washer will
not spin unless the _id is _ocked.
If the lid is closed and the lid lock
error message is displayed, call for
service,
Lid lock switch error,
The display shows: Special Drain Feature.
_Nater _pply faucets are not fully op_.
Water line hoses are kinked, pinched,
or crushed.
Water inlet riflers are clogged.
Water supply pressure to faucet or
house is tab IO_.
Washer fills with wa-
Water supply connected with leak-
limiting hoses.
the lid is locked.
Make sure that nothing is caught
under the lid, including shipping mate-
rial or clothing.
Make sure that the latch mechanism is
fully retracted,
If the lid is closed and the lid lock
error message is displayed, call for
service.
to warn you that the tub is about to
drain,
Make sure that the water faucets are
fully open,
Make sure the hoses ore not kinked or
pinched. Be careful when moving the
washer during cleaning and mainte-
nance.
Ciean the inlet fiiters. See Mainte-
nance in the Core and Cleaning sec-
tion.
Check another faucet in the house to
make sure that household water pres-
NOTE: If an error message is displayed for four minutes, the water in the tub will automatically drain, An alarm will sound
one minute pr_or to draining and the orlgina_ error code wiii continue to be displayed.
31
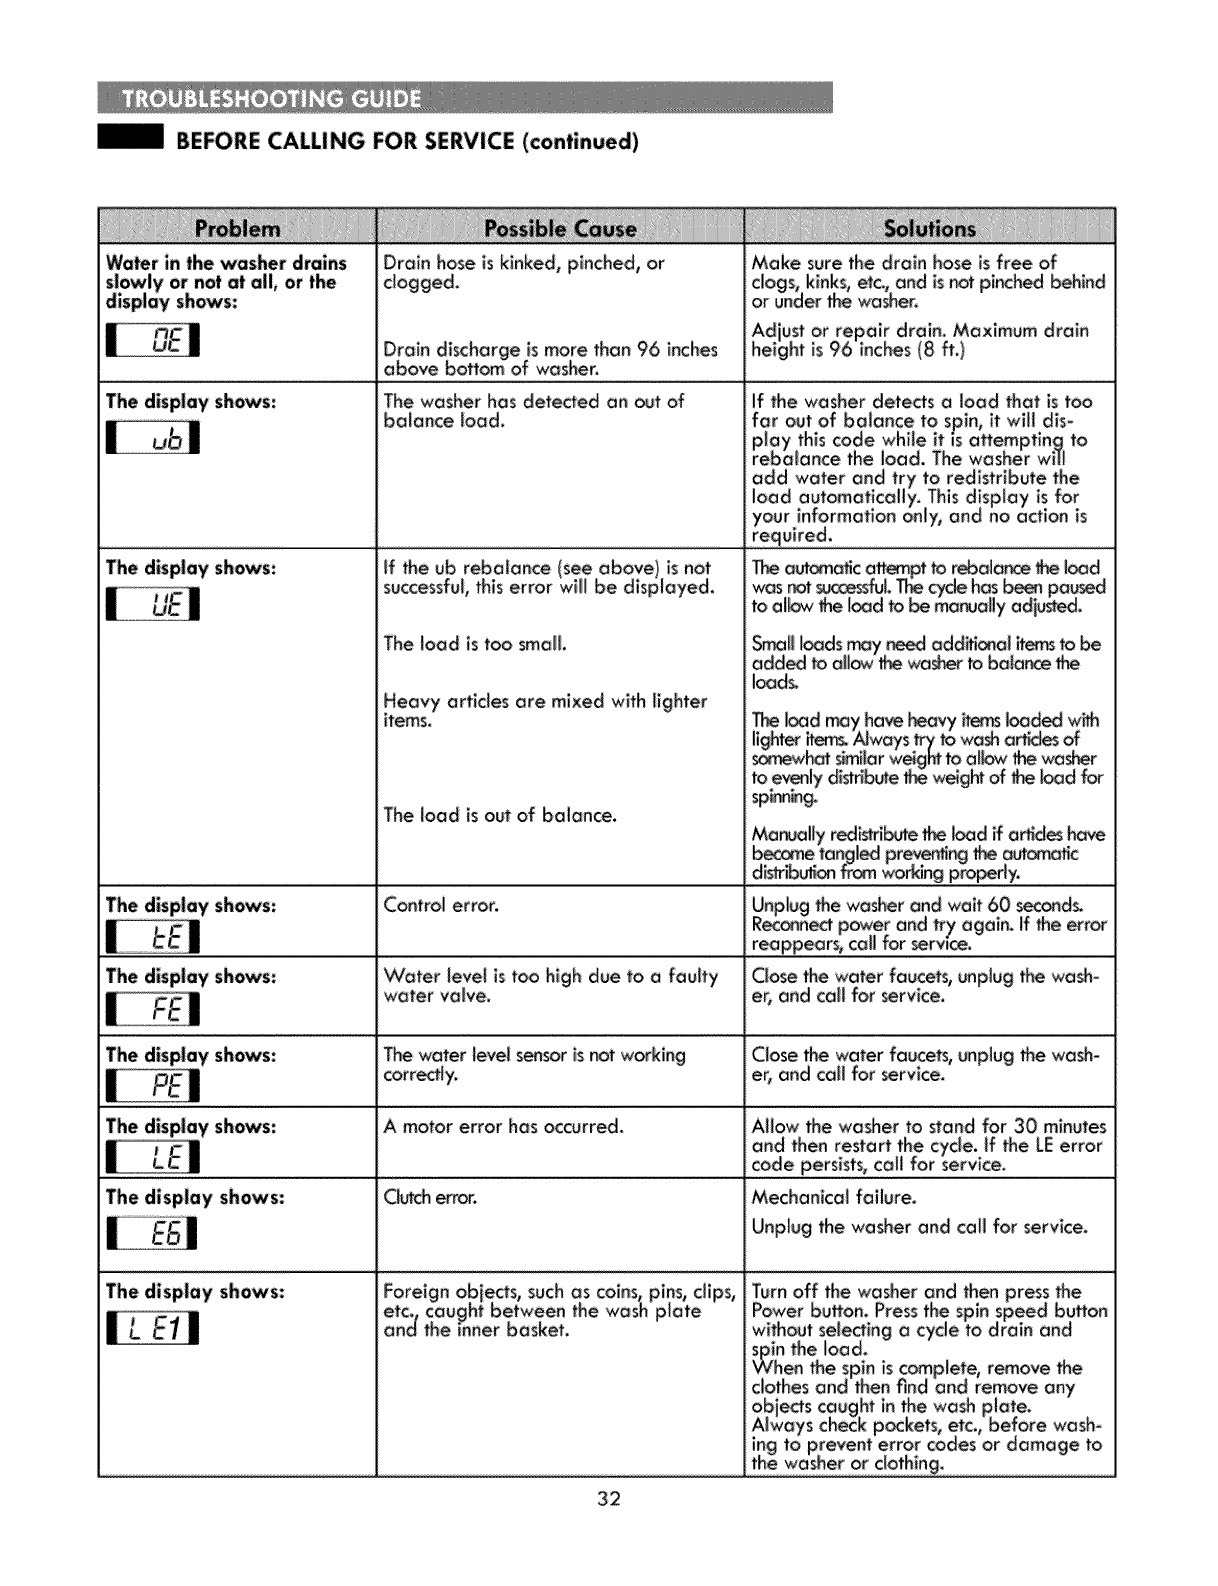
BEFORE CALLING FOR SERVICE (continued)
Water in the washer drains Drain hose is kinked, pinched, or Make sure the drain hose is free of
s!o-_ty or not at all, or the dogged, ciogs, kinks, etc., and is not pinc_d behind
d_splay shows: or under _ washer.
Adiust or repair drain_ Maximum drain
Drain discharge is more than 96 inches height is 96 inches(8 ft.)
above bottom of washer.
The display shows: The washer has dete_ed an out of
balance load. If the washer deteds a load that is too
add water and try to redistribute the
load automaticallY/. This display is for
your information on_y,and no action is
...................................... required. .................
The displa-¢sh_s: ff the ub rebalance (see above) is not
successful,this error wil_ be displayed.
The load is too small
Ioad_
Heavy articles are mixed with lighter
items.
spl_in_
The load is out of balance. Manually r_i_hb_e _ _d if a_ hove
ber_ tanged preven_ng _ autonomic
distributionfrom Workingpm_rly.
The display shows: Control error; Unplug _e wasker and wait 60 seconds.
Reconn_ power and tr7 again, If _e error
...................................................................................................................................................................................................................................................................................................................................................................................................................................................................................................................................................................................................for serv!ce...............................................................................................................................................
The display shows: Water level is too high due to a faulty Close _e water faucets, unplug the wash-
water valve, er, and call for service.
The display shows: The water level s_sor is not working Close the water faucets, unplug the wash-
correctly, or, and call for service.
The display shows: A motor error has _curred. Allow the washer to stand for 30 minutes
and then restart the cycle, if the LEerror
code persists, call for service.
The display shows: Clutcherror. Mechanical failure.
Unplug the washer and call for service.
The display shows:
ob]e_s caught in the wash plate.
Always check pockets, etc., before wash-
ing tO prevent error codes or damage to
the washer or C!otbing.
32
f_KENMORE ELITE LIMITED WARRAN_
FOR ONE Y_R from the date of sale this appliance is warranted against defects in material or workmanship
when it is corredly installed, operated and maintained according to off supplied instrudions.
WITH PROOF OF SALE,a defective appliance will receive free repair or repJacement at option of seller.
To arrange for warranty servlce_caff 1_800-44,_Y_HOME® (1_800-469-4663)
This warrant-/appJi_ for only 90 DAYS from the sele date if this appliance is ever used for other than private
household purpose.
This wa_n_¢ oovers ONLY d_ in material and workmanship, and _11 NOT pay _r:
1.ExpendabJe itemsthat can wear out from no_al use,including but not JJmlt_ to riflers, belts, bags or screw-in
_ fight bulbs.
2.A _rv-ice technician to inst_Jd the user in co_ produd instaffation, operation or maintenance_
3.A service technidan to dean or maintain thisproduct
4.Damage to or _ilure of Mis product_ ff is not instalJed,operated or maintained according to the aft instrudions
supplied with the product.
5.Damage to or _ilure of this produd resu_ng from accident, abuse, misuse or use br other than i_ inte_ed
purpose.
6.Damage to or failure of this produd _u_ _ Me use of dete_ents, cJeane_, chemicals or utensils _her Man
those recommended in aft instrudions suppffed with the produd.
7.Damage _ or _ilure of po_ or systems_utting from unauMorlzed modifications made to this produd.
Disclaimer of implied warranti_; limitation of rem_ies
This warranty applies only while this appliance is used in the United States.
This warran_ gives you specificJegal rights, and you may also have other rights which vary from state
to state.
Sears Brands Management Corporation, Hoffman Estates, IL 60179
33
INSTRUCCIONESiMPORTANTES Acuerdosmaestros de protecci6n
pare brindar aSos de funcionamiento _able. No obstente,
al igual que cualquier otto producto, es posib_eque requiera
un mantenimienta preventive a alguna re_raci6n coda cierte
tlemp_ Ahi es cuando confer con un Acuerdo maestro de
protecci6n pu_e ayudarle a ahorrar fiempo y d[nera.
E_acuerdo maestro de protecci6n tambi6n b ayuda a extender
la vide _ti_de sunuevo producto.E_Acgerdo _ _ncluyetos
sigu,ientespuntos:
0nicamentelos defectosde fabricaci6n.Nuestracaberturava
trata de una prote-cci6nreal
U_o dot detergent° y de[ di_pen_odor .................................. 50
Fund6_'_de drenoje espedel...................................................54
CU|DADO Y LIMPIEZA
Lirnpieza regular. ...............................................................................55
Monten_miento.........................................................................56
Limpiezode Iolevodoro........................................................57
SISTEMAKENMORE CONNE_ TM ................................................58
_ deJ sistem_ ;'Kenmore Conn.°of TM ......................................... 58
GUIA DESOLUCION D_ PROBLEM_".S
Son|dosnorma|es que se puede_ escuchar...........................59
Antes de soff¢itor a_isfen¢iet_¢nico......................................6]-64
C6digo_ de error...................................................................63-64
GARANT|A,_..............................................................................................65
SERVICIO TECNICO....................................................Contro_rtado
Ene/°specie de _b_io, tog|sire !o lethe de to ¢ompro_el modelo y
n_merode sere del preclude. Ustedencontror6 el n6merode modelo
y de _rie impresoen vno piece de identlf_eci_ ubtcod_ dentro de
I_ tape de/o Iovodor_. Tongae_o informod6n di_ponlb{ecuandose
comv_{q_ecc_n_or_ con re_ci6n o suprod_¢o.
N,° de modelo
Fecho de compro
N._ de serie
G_orde est_s instruccionesy su redba de venta pare referenci_
fu_ra.
• V_sffasas_ domi;dilo il[mitadas y servic[o en t_o el _is
lodes los vec_ que has neceslte, cuando has nee°site.
• Gatanffa pot defectos de _bricact6n: reemp_oza de s_
producto _t seproducen cu_tro o m6s fall,s dentro de la_ dace
moses.
•Reempl_zo de| producte: si _te no puede repararse.
• Controlde mantenimiento preventive anual a_dido, sin
cargos extra,
• Ayuda r6pida pot tel_feno: Io Ilamamos resoluci6n r6plda,
Sopor_ telef6ni_ de un representante de Sea_ sabre redes
los p_odudes. Pieoseen ne_tros coma un "manual de usuatio
clue habW'.
• Protecci6nde picasde tensi6n contta doses elects|cosdebidos
afiuctuaciones de |a energia.
° Pto|ec¢i6n anua| de $_0 par _rdida de cam|do que se
ha'_ p_ducido come resultado gr_ folio mec6nica cualquier
_efrigeradot e congo|odorcubierto.
° Reintegro par alquiler si la repara_i6n de su pr_u_o tarda
ross de |o prometiSo,
•_% de de_nto del preclonor_l _c_uier _vkb
repamci6n _ cubler_ y de piezasrelaclonadasinstaLadas.
Una vezqve adq_iera el Acuerdo,_lo tiene que hacerun IIamado
teief6nlco pare programarel _rvicio. PuedeHomerencua/q_ier
momentade die o de noche,o c_rdinar un serv_ciot_cn_coon_ine,
ElAcuerdo maestro de protecci6_ es u_ compra sin riesgos.
Si usted to cancela pot c_alquier raz6n durante el perbdo de
garantia del prod_cto, Ie devoir°tomes Ia totalidad dot dineroo
o una devaluci6_ prorrateada en cualquier memento despu_
de q_e expire e_ periodo de garantia. Adq_iera hay mismo su
Acuerdo m_estro de protecci6n,
Se apllcan algunas iimitaclan_ y exclusbnes,
Pareco_r preclosy einfor_c_n adicionalen los EE.UU.
ik_me al 1-800_27-6655.
Servlcbde insta_ci6nde Sears
Parasolidtarioinstolad6nprofesionolde _rs de
electrodom6sticas, dispa_itivas pare apertvr_ de puertas de
garaie, calentadores de ag_a y otros eIedrodom6_t_cos, ff_me
34 en los EE.UU. o Coned6 o:_-800-4-MY-HOM_.
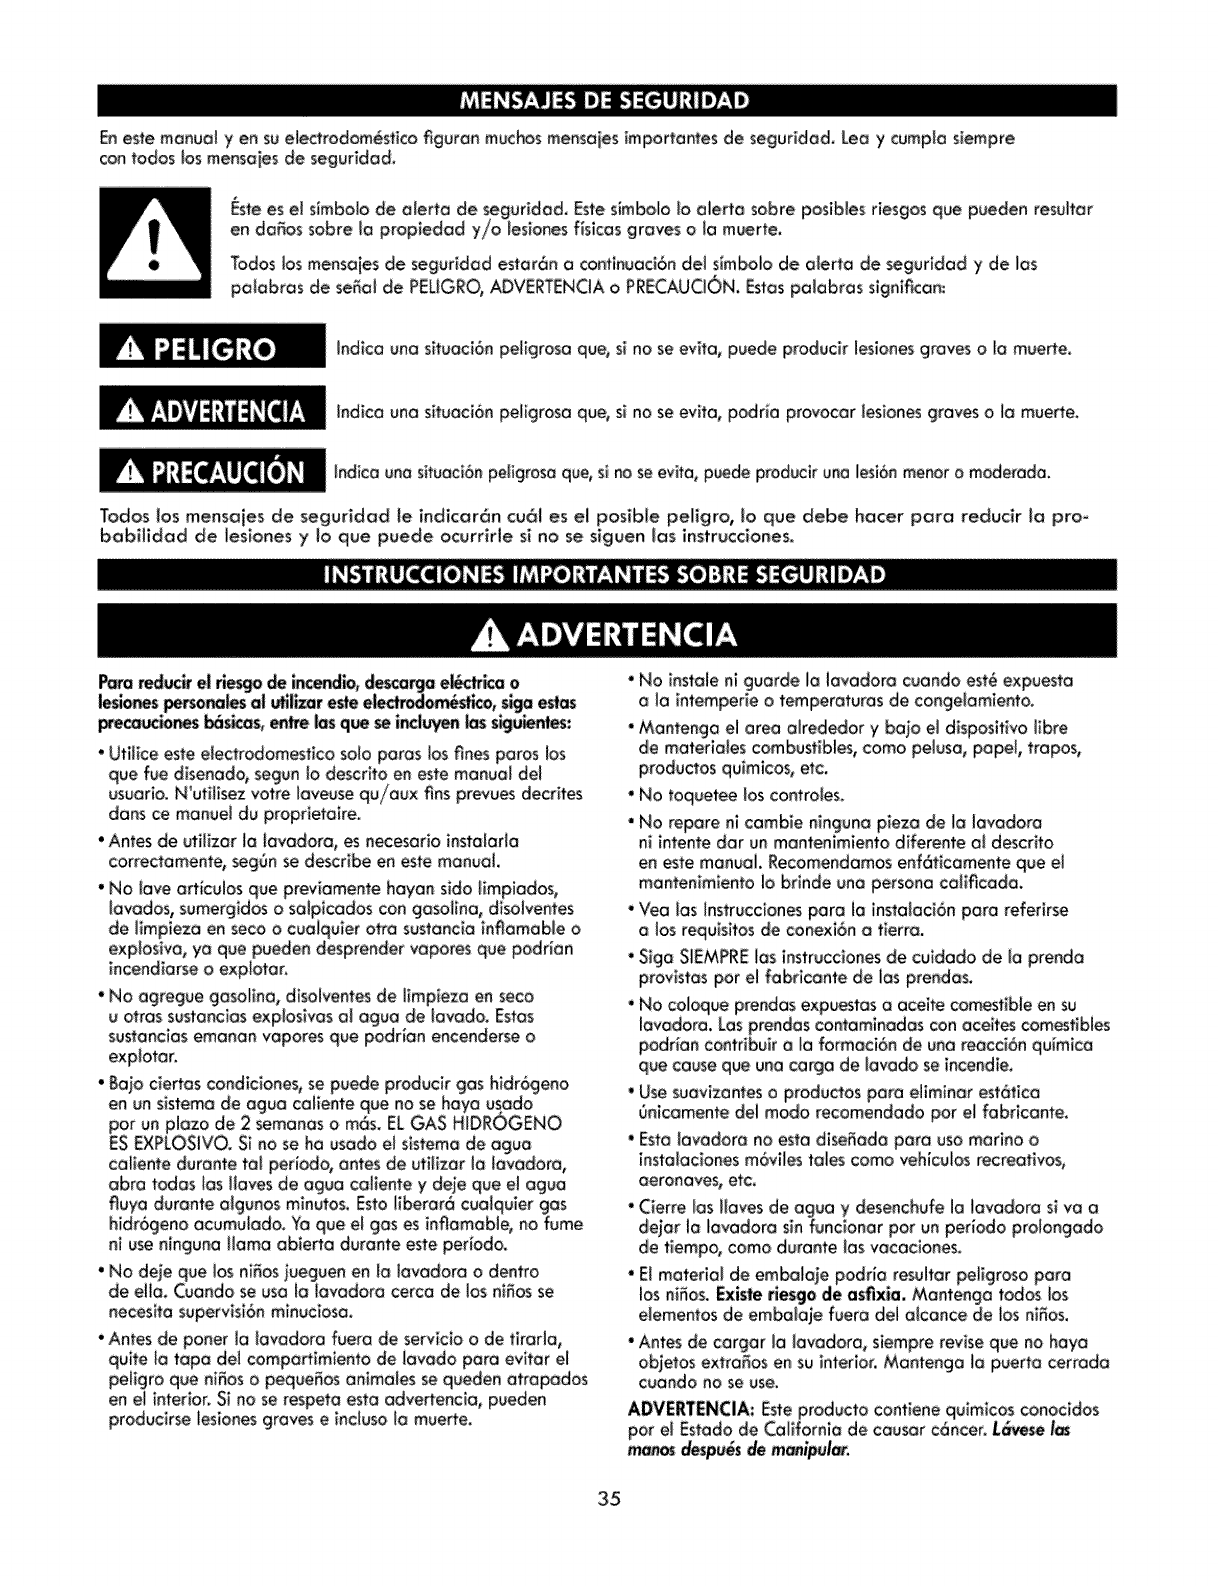
Eneste mongol yen suelectrodom_sficofiguran mvchosmensaiesimporfontes de segvridod. Leo y cvmplo si_pre
con todos los mensaiesde seguridad_
Estees el s_mbolode olerto de seguridod, Estes_mbolob olerto sabre posib_esriesgosq_ pueden resultor
en donas sabre Io prop_edad yio ies_onesfis_cosgroves o la muerte,
Todoslos mensaiesde seguridad estar6n o con_inuoci6ndel s_mbolode olerto de seguridod y de k_s
polabros de seno_de PELtGRO,ADVERTENOAo PRECAUCION,Estospolobros s_gnificon:
Indico uno situoci6n petigrosa que, si no se evita, puede producir lesiones groves o la muerte.
[ndico uno situoc[6n pe[igresa que, si no se ev[ta, podria provocar lesiones graves o ta muerte.
Indicounosituoci6npe[igrosoque,si nose evita, puedeproducirunalesi6nmenoro moderada.
Todos 1asmensoies de seguridod le indicor6n cu61 es el posible peligro, Io que debe hocer pore reduclr Io pro_
bobilldad de lesiones y Io qua puede ocurrlrle sl no se slguen los instrucdones,
PareredL_:irel rie_o de india, _carga e_ica o
iesiones_les al utillmre_e electmdom_stico,si_ _as
preca_iones _sicas, entrelosq_ _inc|uyen_s skjulentes:
•Utiiice esfe e_ectrodomesfico solo paras las fines paros los
que rue disenodo_ segun _odescrito en este manual del
usuor_o. N'utilisez votre laveuse qu/iaux fins prevues decrites
dens ce manue_ du proprietake.
• Antes de ut_tizar !a lavadoro, es necesado _nstalarto
correctamente, seggn se describe en este manual
•No _ave artkvlos qua previamente hoyan sido _mpiodos,
_avados, s_mergidos o salpicodos con gasoline, diso_ventes
de ISmp_ezaen seco o cuoiqu_er otto svstoncia infiamab_e a
exp_oslva,ya que pueden desprender vopores qua podrian
_ncendiarse o expiator.
• No agregve gasoline, dlsolventes de limpiezo en seco
uarras sustancias exp_oslvos al ague de Iovodo. Estos
sustanclas emonan vapores qve podr_an encenderse o
expiator.
• Baio ciertos condiciones, so puede produck gas hidr6geno
co[_ente dvronte toi periodo_antes de vtiHzor !o tovodoro,
obro tadoslosliavesde ogua coI_entey d_e qve eloguo
fivyo duronte a_gvnos mlnvtos. Esto_berar6 cvo_qvler gas
h_dr6geno acvmvlado. Yo que el gas es infiomoble, no fume
ni useninguna Homo abierto duronte este perbdo.
•No deje qve _os nines _eguen en _o}ovodora o dentro
de ella. Cvando se usa ia[m_adoracercodo losn_Sosse
necesffo supervis_6n mlnvc_oso,
• Antes de poner Io _avodora fuero de servicio o de firorlo_
qvlte la t_pa del comparfim_ento de _avodo pare ev_tar e_
peiigro que n_noso peqvenos onimales se queden o_ropodos
en et interior. Si no se respet_ esto odvertencio_ pveden
p_oduckse _es_onesgraves e_nclusoIo muerte.
• Na inst_le nl gvorde la tavodoro cuando estd expuesta
alaintemperie o _emperatvros de cangetamiento.
"Montenga el area akededor y boio el disposit_vo libre
de materia_es combustibles, coma peluso, popel, trapos,
productos qvimicos_ etc.
•No toquetee tes contra_es.
• No repare nl combie nlnguna pieza de _o lavodoro
ni intente dar un manten_miento dlferente a_descrito
en este monvoi, Recomendamos enfdtlcamente que el
manfenimlento la br_nde uno persona cal_ficada.
• Veo Ins Instrucciones para la insfo_aci6n paro referirse
o _osreqvisitos de canexidn a t_erra.
•S_ga SIEMPRElos ins_rucc_onesde cvidado de la prendo
prov_stasper el fabricante de _asprendos.
• No coloque prendas expuestas a aceite comestible en su
[ovadora. Los prendas cantomlnodas con aceites comestibles
podrian contribvk a _a formacidn de _no reocci6n qu_m_co
que co_se que una cargo de _avodose _ncend_e,
•Use suovi=antes a producfos paro eliminar estdtico
Onicomente del mode recamendado par e_fobrlconte.
•Estaiovodorono estadiseSadaparo use marine o
insta_ac_onesm6viles ta_es come vehicvbs recreativos,
oeranaves, eft,
de t_empa, come durante _asvac_clones.
elementos de emba_a_e feero del alconce de bs nines.
* Antes de career !a _avodora, s_ernpre revise qua no haya
ob_etos e×tra_os en su interior. Mantengo _apuerto cerrada
¢uando no se use,
ADVERTENClA: Esteproductocontieneqvlmicosconocidos
per elEstodode CoHfornlade cousorcdncer.LdveseI_
ma_s despu_s de manipular.
35

_ra r_k el riesgodein_ndlo_desca_ael_rlca o I_enes
_al_ atu_ffzoresteel_._l_t_, _gaestas_uciones
b_sicas_entrelosq_ sei_Juyenlosslgu[entes:
*Desenchufela Iovadoroantesde pr_eder a sulimpiezapare
evitar_sibles descorgose_ricos
.No ufiffcenu_o productosqu_m_cosfuefles,ffmp{oderesabrasives
edlsotventesparellmp_orIoIovadoraDa_r6n e_acobode
* No coloquetropesgrasososo aceit_os sabrela Iovadora Estas
sustanclasd_p_denreputesqua_dHan prenderfuegoa bs
m_e_tales
.No!aveprendosquaest_nsuciosconoceitev_eta_ode cocina.
Losmismospuedehqueer conaigode oceite_Jegodellavodoy
prendersefdego.
.Descone_eesteele_rodem_HcedeIotemodecerrie_eantesde
muerte,
'No combinedetergente_suavizontesyarrasprecludesde
lavondeHadedife_entesfobricantesenunomismocargo,o menus
quaasiseespecifiqueenlaefiqueta.
*No mazdab_nq_ad_ _n cbro_ omonia_o6rides,coma
ytnogre,Sigalosdi_cc_s dei_quete ol u_r pruritus de
Iovo_eHo.Unu_ i_e_dopu_epr_ucirgo_svenenosos,Ioqua
pu_e resumer_ heHdosgroveso IOmuerte.
*Ne co_ue losmanesdenotede }oksvadorocuandosus_ortes
• CensultelosINSTRUCCIONESDEINSTALACION_ra o_e_r
informod6ndetailodadelosproced_mientosdec0nex_6natlerra.
Juntoconio_ovodora_ e_uentron_osinstruction,sdeinstolaci6n
comareferenc_o.$icomblarodebOOrIo_ovodora_co_rateo uno
personadel_rvic_ocoffficadopareq_ tocontroley re_o_.S_no
secumjoleconestoadvertenclo_ _r6n producerlesionesgroves,
ince_ies,de.argos e_tficas e muerte.
•Bajoningunacircuns_oncio,_rteoquitelatercorodav_jo
(deconexl6na Herra}delcableel6_rico.$t nosecump_econ
estaodvertenclase_dr6n producer_esb_sgroves,{ncendlos,
descorgasel6ctricoso muerte
• ParmotivesdeseguH_odpersonal_e_e e_ectrodom_icodebe
esterconectodoc_tierrao_ecuodomen_e.Sinosecump_econ
asiaadverten¢io_ _dr6n pr_ucirlesionesgroves,incendios,
descorgasel6ctricasomuerte.
Elcablede alimentoci_nde _te elect_odom_sticoest_equipado
conunenchufedeiresc_av_ios(deconexi6no tlerro)quacoincide
conunatome decorfle_e _orotresc!oviias(deconext6noflerro)
pgroas!minimizerIo _s_bd_dadde descargael6ctHcadees_e
e_ec_rouom6stico
•EstaIovodorade_ e_arench_adao onetomede corrientede
'Nocombi_ de_e_es,suovlzantes_ro ro_ yarraspr_u_osde
Iovanderiadedfferentesfa_lca_ enunam_smocotodo0a me_s
quaos_Io espe_flquetoetiqueta.
, Nomezcleb_nqueadorconclaraconomoniacoo 6cidos,come
vinagrePareuserprod_osdeIovar_efia,sigoiosi_ruccionesde_
paqueteUnusain.bide puedeproducirgo_s ve_s_ Ioqua
puederesultarenheridosgroveso_amue_e.
*Nocolequelosmo_ dentrode_ _ovodorocua_o_a es_en
fu_bnamlentp_Antesde_rgar, descargore ogre_rpre_as,
es_re o que_atina sede!encjotota_mentean_s _ meterlosmon_
_e_ro S_nosig_ estaadvertencia_ podfianproducklesbos
gra_s__e_io, electr_uci6no Iomuefle
'LoIovadoradei0eHaester_empreco_tc_oauntc_modecorriente
ir_ividual_Jetangounveltaie_mi_l quacorres_a o los
es_ciflcocio_s d_evoltaic_minal de_place._estemode
obtendr6unrendlmie_e6primoytam_h evitor6qua_ prc_uzco
_brevolta_e ien el cableodode Ioca_ q_di_ _recer e!
rie_o de incendio_r _brecalen_amientedelos _bles.
'Nur_:ode_nchufe_JIovadorotiradedelcabledealImentaci6n_
•Re.re e reemplocedeinmedi_oredesbsconesdealtmentaci6n
quaest6n_iodosodo,odesdeolgOnmode.Ne useuncablecon
cortadurosoab_si6nenol_uno_rtedelmismooensusextremes.
Consulteunpnofes_onalcuah_cododel_rvicbt_r_ca.S_no_u_
estaadvertenct9 sepodHonproducirtestone_groves,incor_b,
electrocud6nola muerte
•Ai ins_alaro cambiardeI_ar _alaL_dora, evitep_nzor,apk_ar
oda_aretcabledeaffmentaci6n.Sinosigueestoadver_enciose
podHonproducirlesionesgraves,incend_o,electrocu_6nolo muerte
•LoIovadorade_ setinstolodaconunatomea tbrroapropi_a
perunt6cnicocuollficodo_uecump_aconlosc6digosIoca_es,pare
evitarriesgesdeelectroc_i6ny gorantizarlaestobiffdodde_operate
durontesufuncionomiento.
•LoIovodoraes_da. Senecesitondoso m6spersonaspore
inostalarymoverelelectrodom6sticoSir_ secumpleesta
odvertencia,sepodrianproducirda_osenlapropiedadydo_s
corporalesgroves
•Noa_moceneni_n_o_ela lavadoroenlugaresexpuestosa
tempen_turasbaiocorenia incSeme_tosmeteorol_kos S!nosigue
od_ert_to, se_Han produclrdo_>sparfiffracio_
• Conelfin de reducirel riesgodeelectrocuci6nnoInstoleIolavadoro
enespodosh6medos.Sinosiguee_oodvertenciase_fian
produdrlesionesgroves,incendio,electrocuci6noIomuerte.
• A findered_ir elriesgodelesi6npersonal,debeodherksea redes
losprocedlmientosde_guHdodr_omendodosporto industfio,
inclusoe!usedeguontesd9 mangolargoygalasdes_urldad.E!
ir_umpl_mientodeestasadvertenciosdese_uridodenestemortal
podfianocasionardo_ a taproptedod,les_6npersonalo mue_e
• Nu_ intenteuHlizare_ee_ectremodomesHcosiestadenude,Hone
unafolio,esta_rcialmentede_rmodo,tie_ partesdances ole
faffanp_rtes_iflcluidouncableo unench_ danado
• PareminimizerIo posibilidaddeq_ ocurrounodescorgael_rico,
qntesderealizercuolqulertareode mantenimientoo limpieza
desconec_eesteelectrodomesticodelsumin_sCroe_ectricoo
casequitor_:io
36
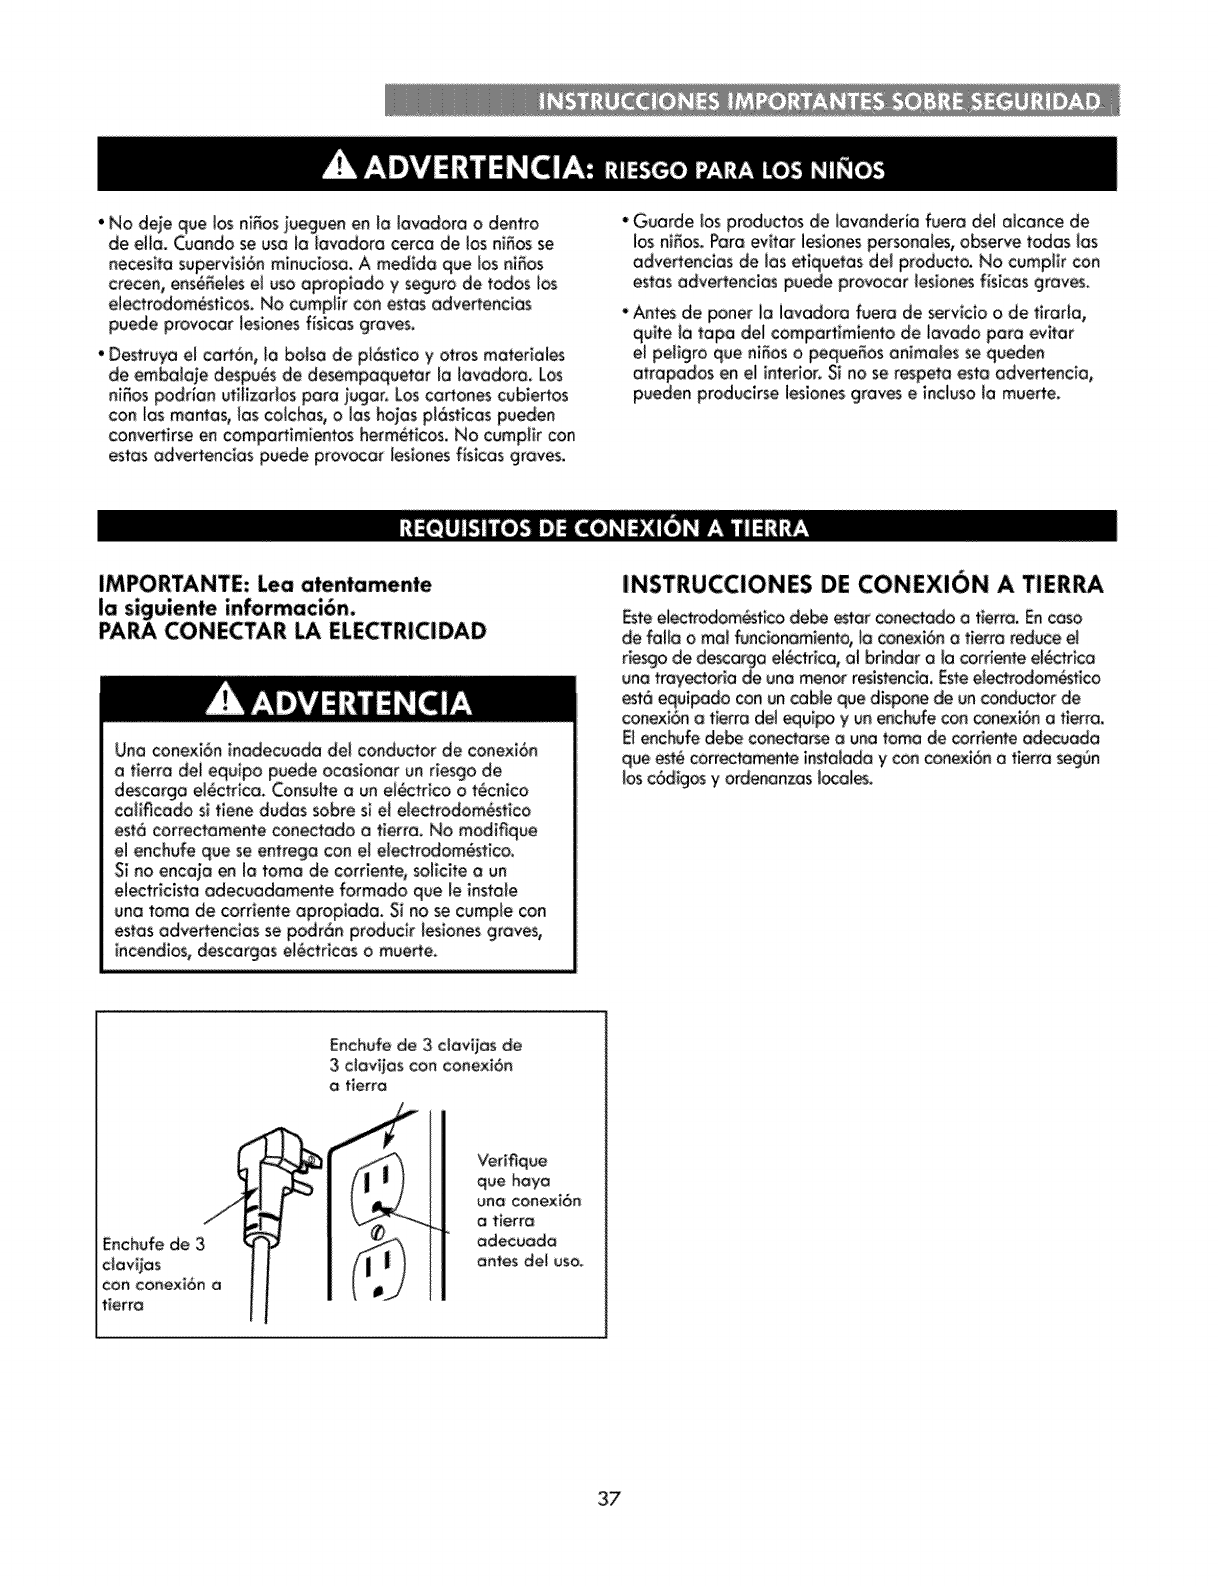
• No deje que los niSos _ueguen en la lavadora o dentro
de ella. Cuando se usa la lavodora cerca de _oshi,as se
necesJta supervisi6n minudosa. A med_do que los hi,as
cmceno ens65eles e{ use apropiado y seguro de todos los
emectrodom6sficos. No cumplk con estas advertencias
puede provocar leslones fis_cas graves.
• Destruya el cart6n, _abalsa de pt6stico y arras materiales
de embama_edespu6s de desempaquetar la lavodora. Los
niSos podrlan ufilizarlos pora jugar. Los cartones cubiertos
con ias mantas, tas colchas, o [as hojas pi6sficas pueden
converfirse en compartimientos herm_ticos. No cumplJr con
estas advertencias puede provocar [esiones fis_cas graves.
• Guarde los productos de lavander_a fvera deJ alcance de
los n_5os.Pora evffar les_onespersona_es,observe todas _as
advertencias de ias etlquetas del producto. No cumpffr con
estas advertenc_as puede provecar les_onesfislcas graves.
• Antes de poner la iavadora fuera de serv_cio o de firaria,
atrapados en el interlor. Si no se respeta esta advertencia,
pueden produckse Jes_onesgraves eincluso la muerte.
IMPORTANTE: Lea atentamente
la siguiente informaci6n.
PARA CONECTAR _ELECTRICIDAD
Una conexi6n inadecuada del conductor de conexi6n
a tierra de! equipo puede ocasionar en riesgo de
d_cargo el_ctr}co. Consuhe a un et_ctHco o t_cnlco
caHficado s_fiene dudas sabre sl eJ etectrodom6sfico
est6 correctamente conectado a tierro. No madifique
el enchufe qua seentrega con el e_ectrodom6sfico.
Si no encaia en la toma de corriente, sol,cite a un
electric_sta adecgadamente formado qua _einstale
una toma de corriente apropiada. Si no se cumpie con
estas advertenclas se podr6n produclr lesiones graves,
incentives, descargas ei6ctrlcas o muerte.
INSTRUCCIONES DE CONEXI_N A TiERRA
Esteet_trodom6stica de_ _tar conectodo a tierra. En car_
de faiJa o mai funcionamlento, la conexi6n a ti_'ra redL,ce el
tie,go de d_carga e_6ctrica, al bdndar a _a _rriente el_ctrica
una trayectorio de una menor resistencia. Esteet_rodom_stico
est6 equi_do con un cable que dis_ne de un conductor de
conexi6n a tierra dot equi_ y un enchufe con conexi6n a tierra.
El enchufe debe conectarse o _na toma de corrie_te ade-cuada
que est6 correctamente instalada y con conexi6n a tierra seg6n
los c6dlq_osy ordenanzas i_a_.
Enchufe de 3 claviias de
3 davijas con conexi6n
aflerra
Enchgfe de 3
con eanex_6n a
tierr_
Verifique
que hayo
uno conexi6n
a tierra
a_ecuada
antes ciel usa.
37
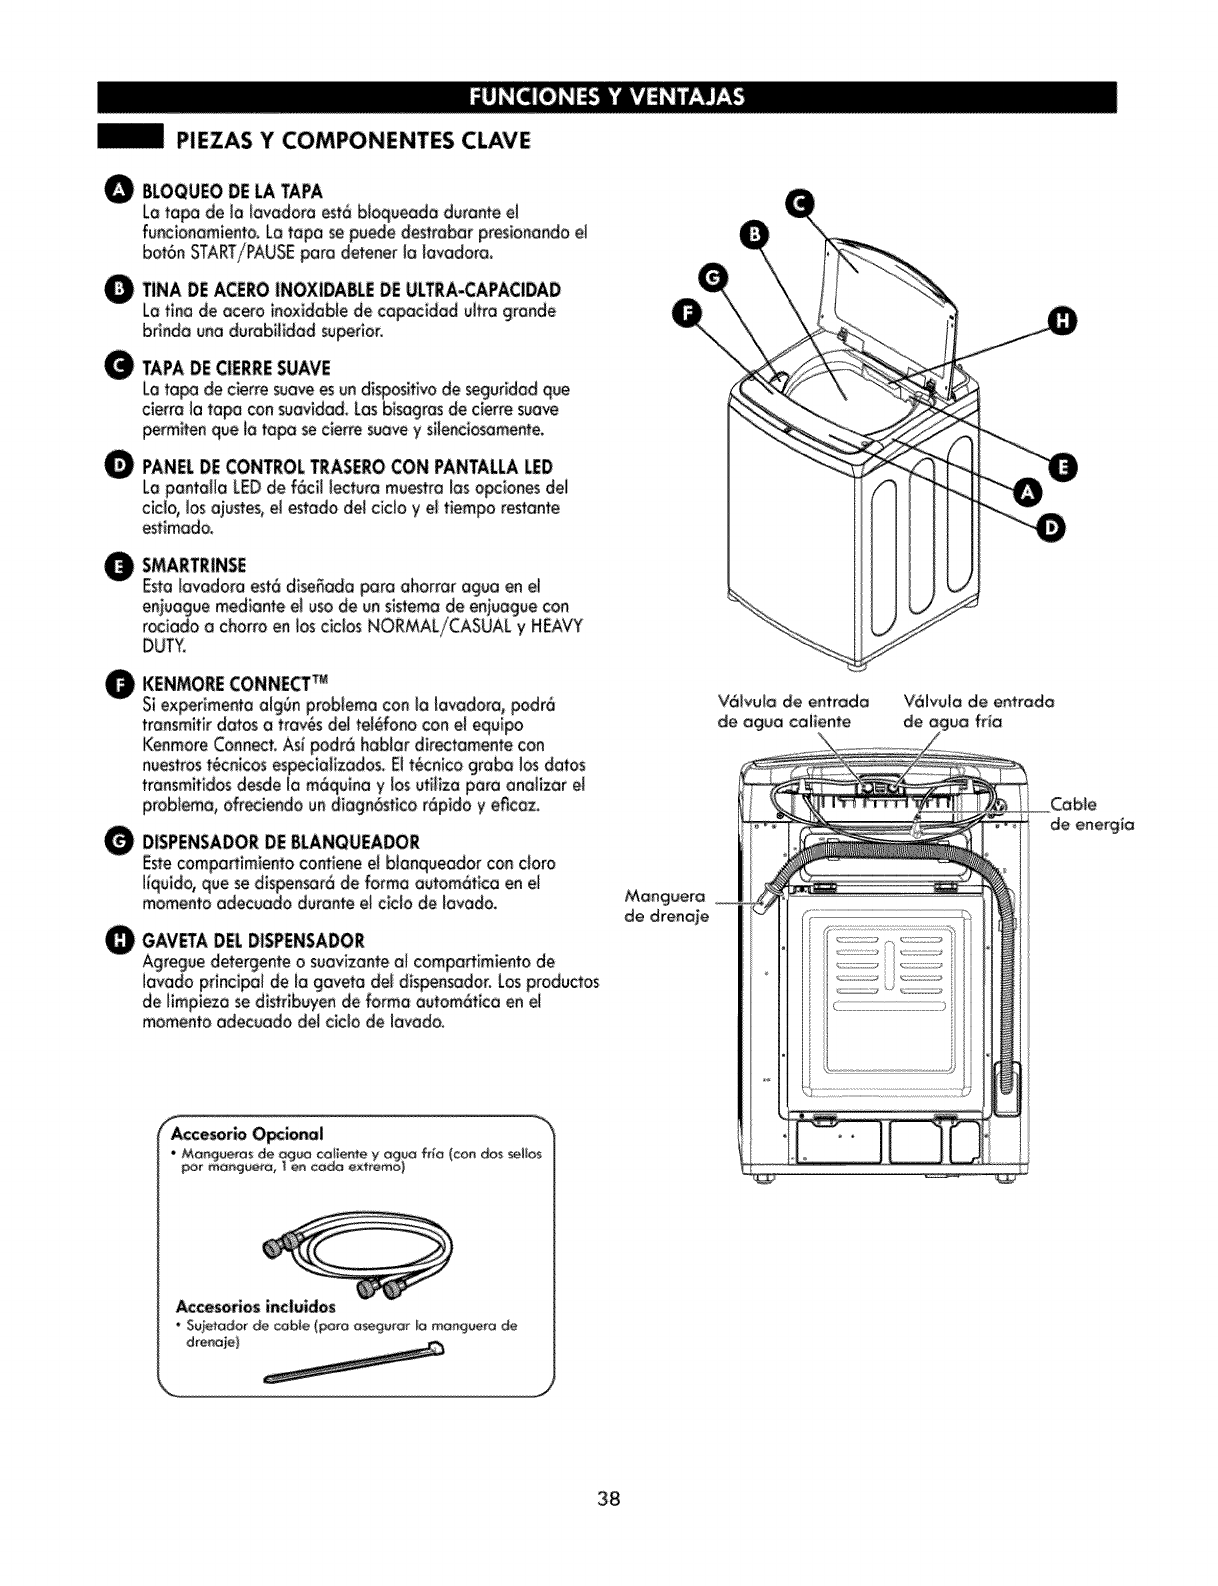
PIEZAS Y COMPONENTES CLAVE
O
O
BLOQUEODELATAPA
Latapa:de Io lavadora est6bloqueadadurante eJ
func_onam_ento.La tapa sepuededestrabarpresionandoe_
bot6n START/PAUSEpara detenerIo lavodora_
TiNA DEACERO iNOXiDABLE DE ULTRA-CAPACIDAD
La t_nade ocero ino×_dab{ede capocldad ultra grande
brinda una durabiffdad superior.
TAPADECtERRESUAVE
LQta_ declerresuaveesund_sposffivode _uridad que
cierrala tapa con suavldad.Lasbisagrosdecierresuave
_rmffen queJatapa secierresuaveysiJenclosamente.
PANELDE CONTROL TRASEROCON PANTALLA LED
La pantaHo LED de f6cil lecfura muestro los o_iones del
cido, los ajus_es,el estodo del ciclo y el tiempo res_onfe
esfimodo_
@SMARTRINSE
Esto_ovodoraest6di_ffado paroahorroroguoen el
@
O
DUTY.
KENMORE CONNECT TM
Si experimento olgOnprob_emocon _o_ovadora, podr6
tronsmitir dotos a tray, sdel te_efonocon el equipo
Kenmore Conner. As_podr6 hob_or directomente con
nuestros tecnicos especia_izodos. E_t_cnico grabo los dotos
transmitidos desde [o m6quino ylos gtffko poro ona_kor e[
prob[ema, offeciendo un diogn6stico r6pido y eficoz.
D|SPENSADORDEBLANQUEADOR
Estecomporfim}ento contienee_blonqueodorcon c[oro
liquido,que sedispen_r6 de formo outom6ticoen et
momentoadecuododurante el cido de Iovodo.
GAVETA DELD|SPENSADOR
Agregue dete_gente osuavizante al comparfimiento de
[evado pr_ncipo!de [o go'veto de_d_spensodor. Losproductos
de llmpiezo se d_strlbuyen de forma autom6fko en et
momento adecuodo de[ cic_o de i_vado.
,M_r_gu÷ra_ 4e _ggo ¢o_ente yag_J _:_{_{ca_ dos seffo_
Accesorios inc|uidos
'_ Su_e_dor de c_b|e {p_r_ _g_ro_ _ mo_ueto de
dre_e_
V6lvu_a de entr_da
de _gu_ callente
V6[vuta de entrada
M_guera __
de dre_e
38
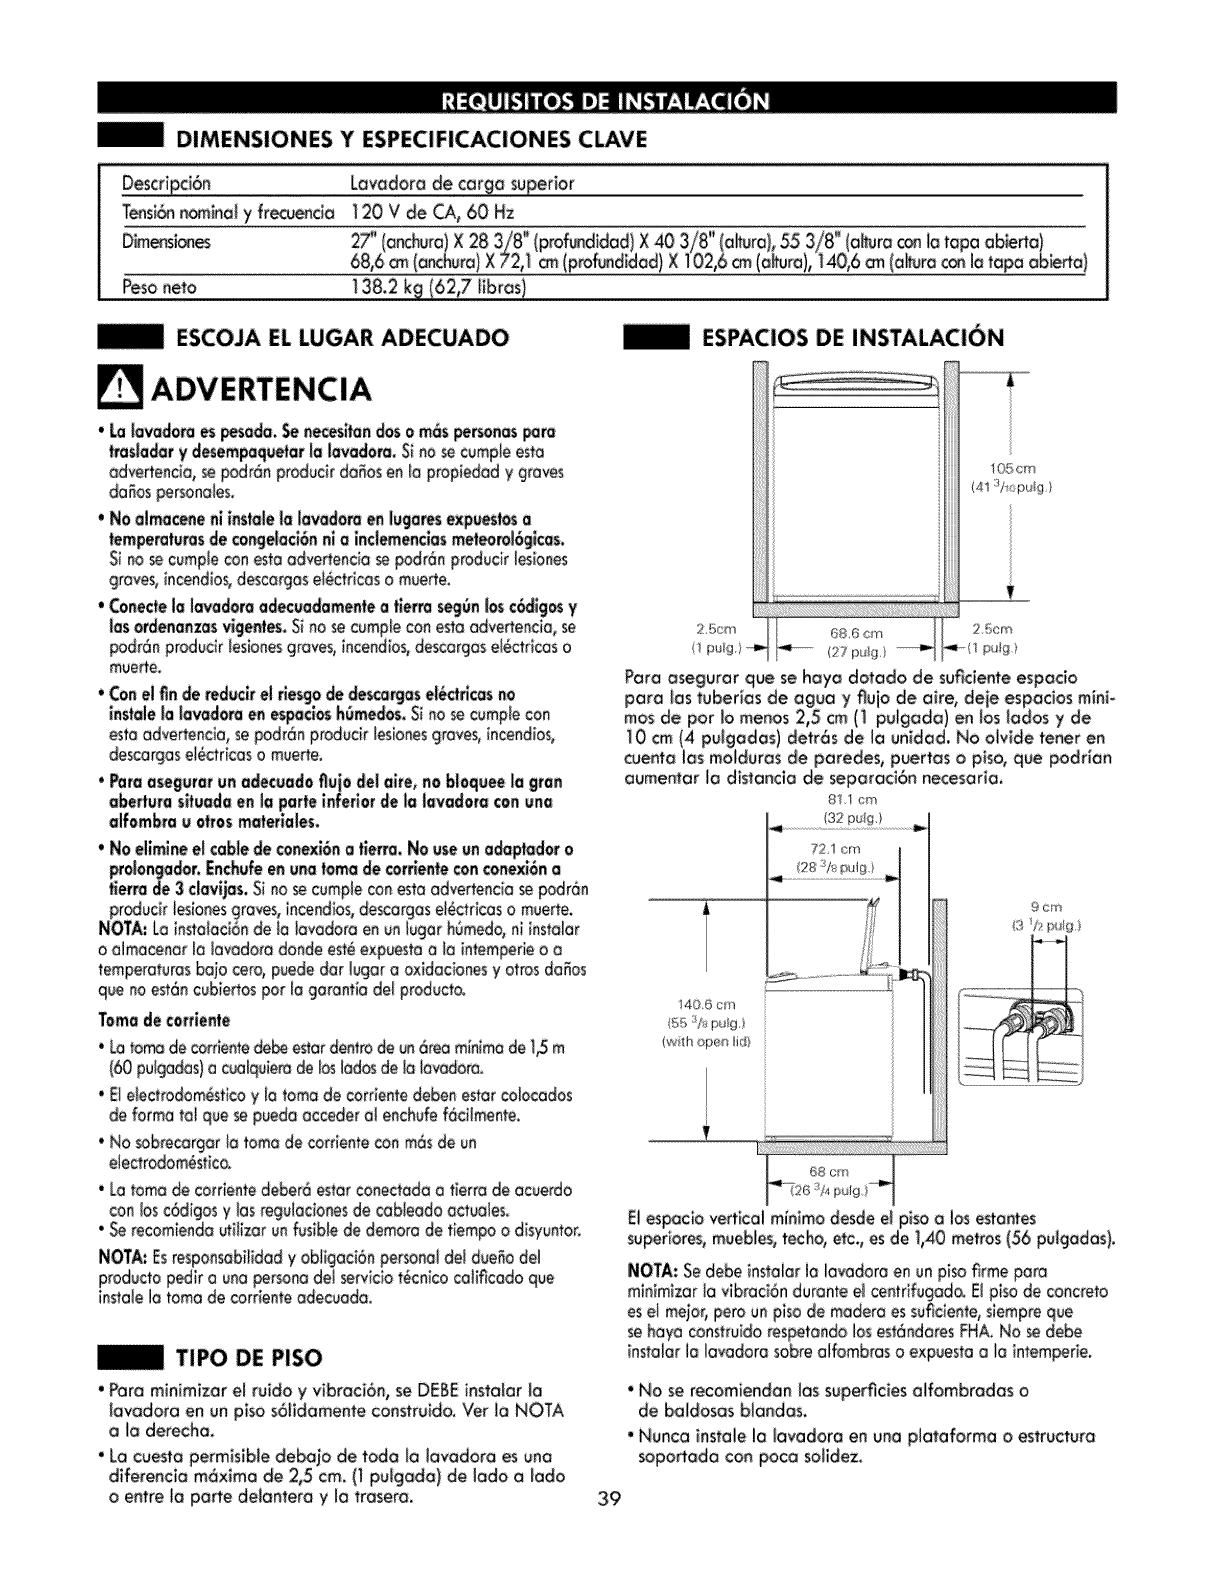
DiMENSIONES Y ESPECIFiCACIONES CLAVE
Lavadora de cargo superior
Tensi6nn_inot yffecuenda 120 V de CA, 60 Hz
Dim_sic_nes
Peso neto t 3&2 kg (62_7 Jibros)
ESCOJA EL LUGAR ADECUADO
'La lavadera es pesada, _ necesffandos o m6s personas_m
ttaslader y desempaquetar la lavadora, S_no se cump[e esta
advertencia, se _dr6n produck daces en la propledad y graves
' No almacene nlinstale la lavadom en lugares expuestosa
temperatures de congelaci6nnioinctemenclasmeteorol6gicas.
Si no _ cumplecon esta adve_encia se podr6n producir bsiones
graves, (ncendlos,descargesel_ctr_casomue_e.
• Conectela lavadora adecuadamentea tierra segOnl_ c6dlges y
los ordenanzasvigenles_Si no se cump)e con esmodvertencia,
podr6n produclr )es(onesgraves,incendios,descargeseI_ctricas o
muerte.
' Canelfin dereducirel rie_ de descorgasel_clhcasno
instalela la_dora en es_ciosh_m_os, SinosecumpIecon
asiaadvertencia,sepodr6nprodu@lesbnesgraves,incendios_
descargaset_ctricese mue_e,
' Pareaseguratun adecuedefiuiedel affe, no blequeela gran
eberturasiluadaen la parleinferiordele lavadoraconuna
aifembrau afrosmoleriales.
•No elimine el cablede conexi6n a tierra. No useun adaptador o
prolongador.Enchufeen una tome de cor6entecon conexi6n a
fferra de 3 clavijas_S(no se cumpJecon esto odve_tenciase podr6n
produ@ !esionesgraves, incendbs, descargose/6ctr{caso muerte.
NOTA: Lo (nstolaci6n de to )avadoro en un bear hOmedo,ni (nste)ar
o o(macenar )a )avadoro donde est_ e×puestaa )a intemperie o e
temperaturesbojo care, puede dot )ugoro oxidaciones yotros do_os
qua no est6n cubiertos par le garent_adel produ#o.
Tome de corriente
' Latame de corrbnte debe esterdentin de un6roe minimade 1_ m
(60 putgad_s)a cualquierade )as(odesde )a )avadora,
•E)eiectrodom_stico y (a tome de corriente deben ester co)acacias
de forma to) qua _ puede acceder a) enchufe f6ciJmente.
•No _brecargar/a tome de cordente con m6s@ un
e(ectrodom6stico.
'Latome de carriente deber6 ester cenectada a tierra de acuerdo
con (asc6digos y}asreg_(acionesde cab)eedo ectuaies.
'Serecomiendo utiJizarun fuslbJede demote de fiempo odisyuntor.
NOTA: EsresponsabiJNedy ob(igaci6n persona/de( dueBode(
productopedke unapersonade)serviciot_c_icocelificadoqua
ins_a(e(atome de corriente adecuada.
TIPO DE PISO
•Pore minimizer el ruida y vibraci6n, se DEBE inste(or )e
levodore en un plso s6lldemente construldo. Ver )eNOTA
o (a derecha_
• Le cuesto permisible debejo de toda la (avedora es uno
diferencie m6xime de 2_5 cm, (1puigeda) de lode o lode
o entre (o porte delentere yJo trosero.
ESPACIOS DE INSTALACION
10cm
25cm 686 cm 25cm
(! 27 pu]g,} p_,_!_)
Pare o_gurar que se heya dotodo de suficierrte espado
i 0 cm (4 pulgodas) detr6s de (o unided. No oivide tenet en
cuentalosmoidurosde poredes,puerieso piso,que padrian
oumen(or lodistonciode seporeci6nr_ecesorie.
! 406 cm
{55 si_ pug )
(with ope_ (id!
9 cm
El espoc:iovertical minima desde e( piso a los estantes
superiores, muebles_techo, etc., es de !,40 mefros (56 pulgodos).
NOTA: Se debe instaiar (oIovadara en un pbo firme pare
minimizer (o vibroci6n detente el centrifugodo. E(pisode concrete
es e) meier, pete un piso de madero es su@ciente,siempre que
se haya construido respetondo (ase#6ndores FHA.No sedebe
)nstaJar(a)avadora sabreaffombras o expuesta e Ia intemperie.
"No se recomiendon (as superficies elfombrodes o
de baMoses bJe_dos.
'Nunca instate la )evadoro en una plataformo o estrucfura
soporiada can pace solidez.
39
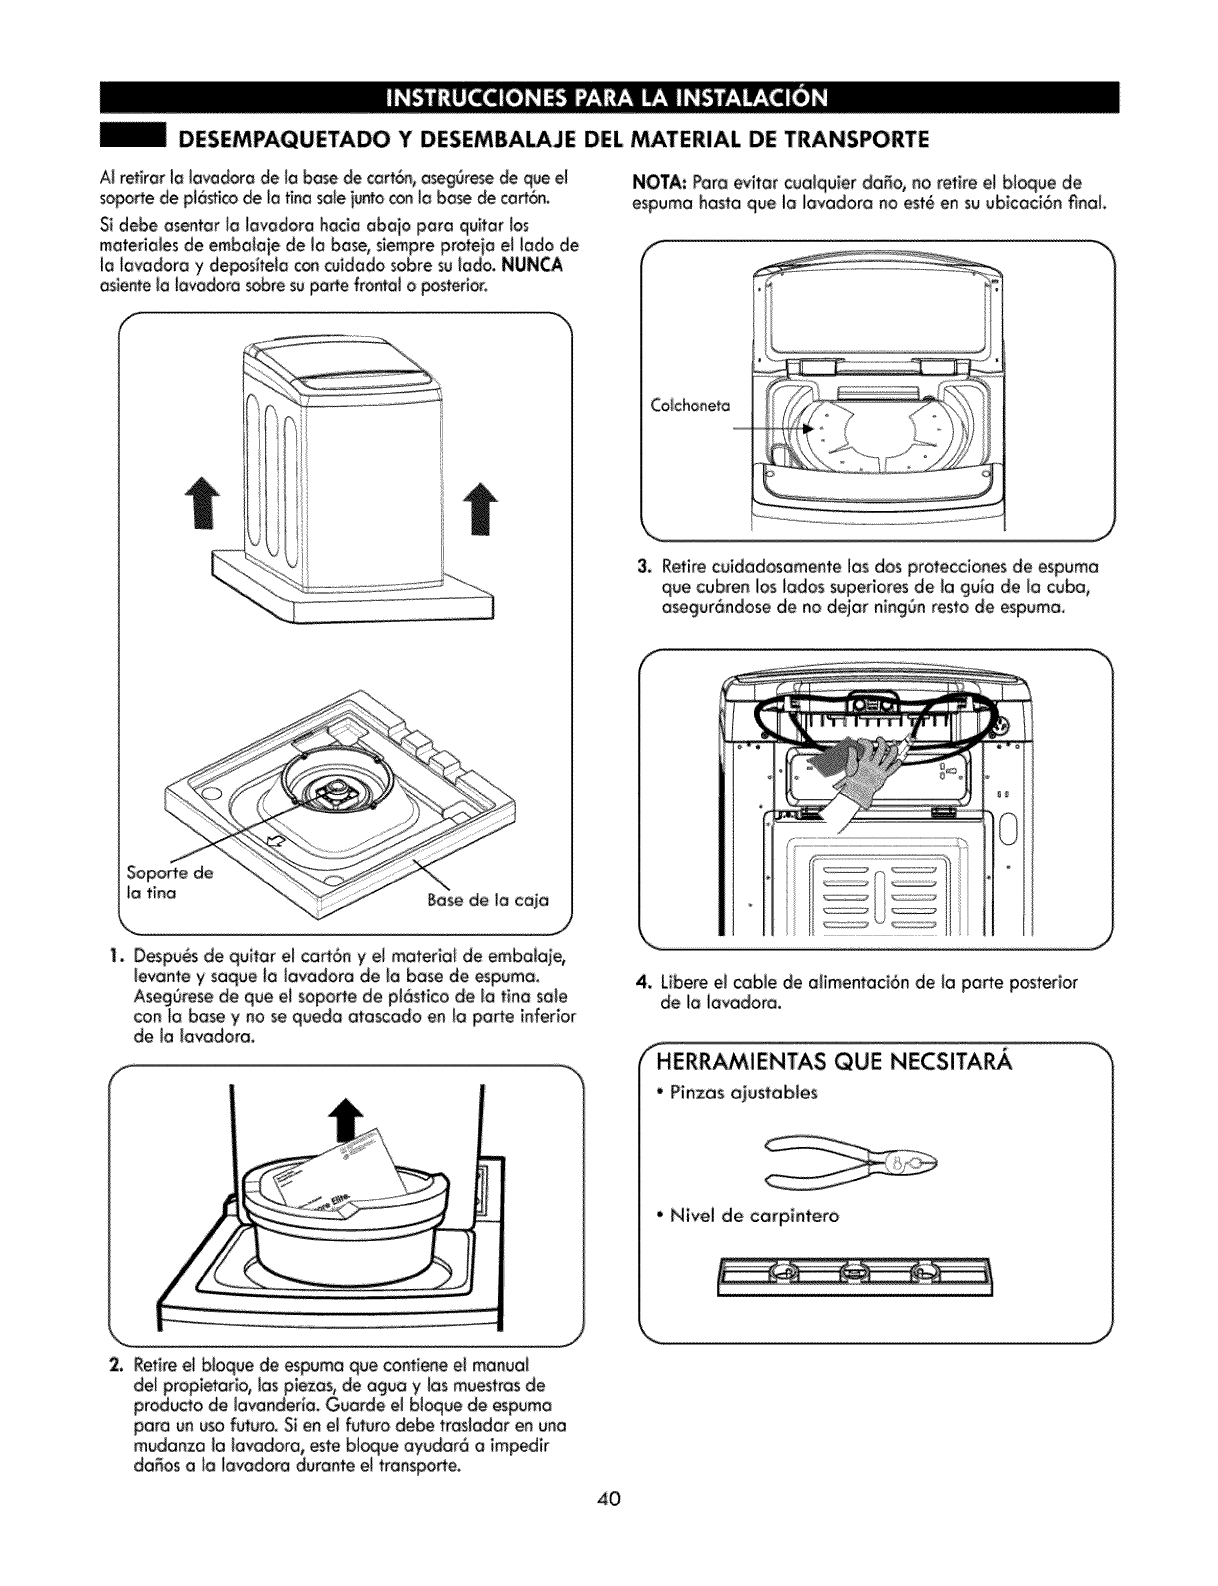
DESEMPAQUETADO Y DESEMBALAJE DEL MATERIAL DE TRANSPORTE
AI retirorla tavadorade _abasede cert6n,e_g_rese de q_ el
soportede pI6sti_ de _afine se_eiuntoconla basede cart&n.
Si debe asentaria iovedora hacia abaio pare quitar ias
mateHalesde embalaie de la base,siempreprotejael lado de
la lavadora y depositelacon cu_dadosabre sulado. NUNCA
asientela lavadorasabresu portefrontal o posterior.
Basede _a caia
J
1. Despu6s de quffar el cart6n y e_materia_ de emba_aie,
levante y saque _a favadora de la base de espuma.
Aseggrese de que el soporte de pl6stlco de _a tina sale
con _abase y no se queda atascado en la pa_e inferlor
de la Javadora.
2. Retire e_bJoquede espuma que contiene e_manuai
del propietario_ los piezas, de ague y los muestras de
producto de lavanderia. Guarde el bl_ue de espuma
pare un usa futuro. Si en eJfuturo debe trasJadar en una
mudanza la _avadora_ _te bJoqueayudar6 a impedir
da_os a _alavadora durante e_transpose.
NOTA: Pare evitar cue!queer da_o_ no retire et bloque de
espuma haste que la lavadora no est6 en su ubicac_6n final
J
3, Retirecuidado_amente losdos proteccionesde espuma
que cubren losladossuperior_de lagu_Qde Iacuba,
asegur6ndosede no de_arningOntestade espuma,
4. L{bere ei cable de alimentaci6n de la pane pasterlar
de la iavadora.
"_HERRAMIENTAS QUE NECSITARA
•Pinzas ajustables
• Nivel de carplntero
40,

CONEXION DE LAS TUBER|AS DE AGUA
*IMPORTANTE: Use mangueras nuevas cuQndo instale la
lavadora, NO reutiffce los antiguas mangueras.
"IMPORTANTE: SOLO use ias mangueras de entrado
sumintstradas con KENMORE. Los mongueras comerciales
no tienen garantfa de que se ajusten o funcionen
correctamente, arras mangueras puede que no se aprieten
correctamente yocasLonen fugas. Los doses subsiguientes
a los productos o )a propiedad no quedar6n cubiertos de
acuerdo con (ast6rminos de )a garanfia de) producto.
• La presi6n de( suministro de ague debe ester entre ]4_5
psi yll6 psi (]00~800 kPa), S( Ja presi6n del suministro de
ague es superior a ]16 psi, se debar6 instaiar una v6[vula de
reducci6n de la presi6n de( ague.
• Peri6dicamente_ compruebe los mangueras en busca de
grietas_ fugas ydesgastes, yreemplace la manguera s(
necesario,
•Aseg6rese de qua los mangueras no est6n estkadas,
pinzadas, ap)astadas o retorcidas.
• La tavadora no se deberla ]nstaJar ni almocenar en un
bgar sometido a temperatures de conge(aci6n. Pueden
da6arse los tuberias de ague y mecanismos internes de la
lavadora. Sila )avadora estuvo expuesta o temperatures
de congelaci6n antes de la insto(aci6n_ permita que
permanezca a temperature omblente par varlas hares antes
de u_Ho y verifique la presencia de p6rdldas antes de(
funcionamiento.
SeUo de coucho Se)io de cagche
MQnguero
de _sgva
(entrada de
ague en Io
lavadora) de ague (a
Ja tuber_o)
Inspeccione e( accesorio roscado de coda manguera y
veriflque que have un seffo de game en ambos extremes.
3. Siempre deie flulr uno e dos (itros de ague atrav6s de
coda manguera de entroda pare ayudar o evitar futures
problemascon pantal(asde fi(troobstru_daso(racier(a
suciedod, dep6sffos de minera(es yarras residues de (us
tuber(as de ague. De paso, a) haceHo comprobar6 cu6(
es (amanguera de ague caffenteycu6((ade ague ff(a.
J
4. Cenecte (atuberiode ague co)(ente(roia)a (aentradade
ague ca(iente ubiceda en (eperte tresere de le (evade-
re. Conecte le rubella de ague fr(o (azul) eta entrado
peso de( ague y revise si hey fuges,
NOTA: AsegOrese de no enroscar me( )as accesorios de
2, Conecte )as mangueras de suministro de acjua a los
((ayesde paso de ague ca(iente yfria yapt(ere )as
conexiones con (o mona. A cont(nuaci6n, utiIice unos
a(lcates para apretarJas afros 2/_de vue(to,
41
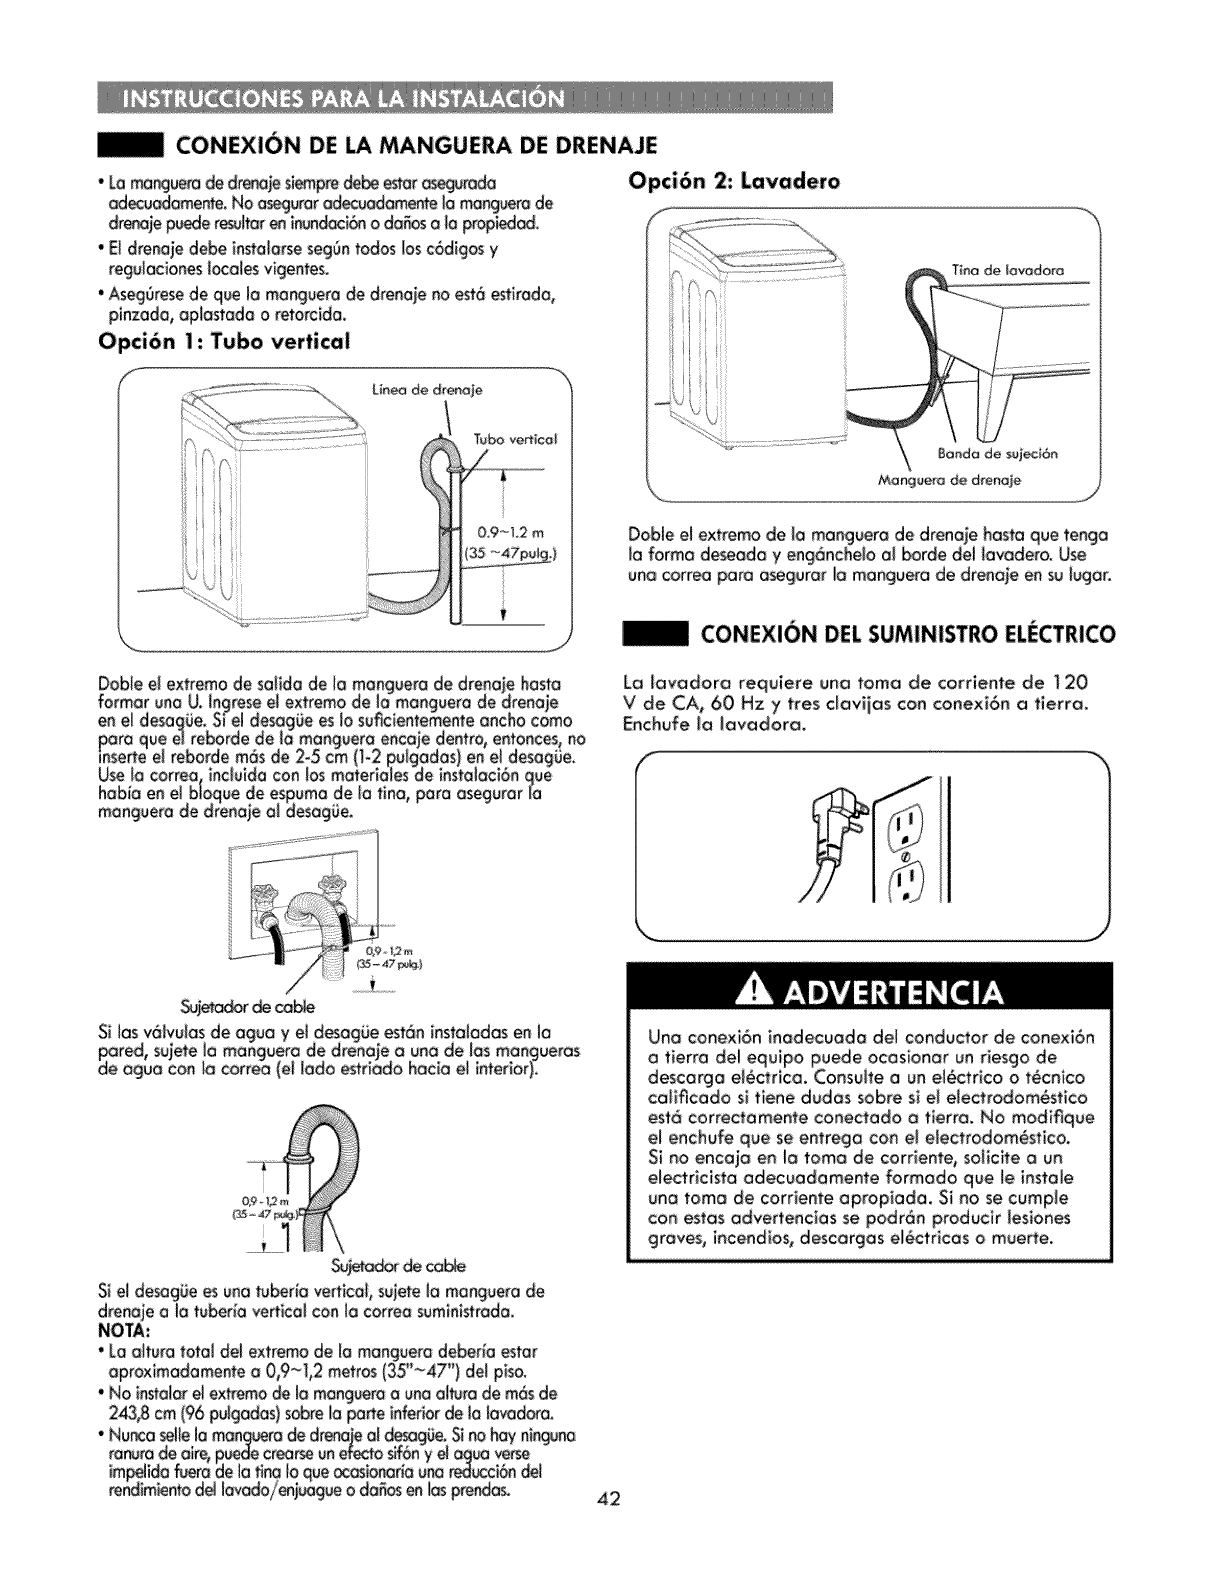
CONEXI6N DE _MANGUERA DE DRENAJE
•Lo mangue_ de drena_esiemp_edebe estera_urado
ad_:uodomente. No a_urar _÷cuadamente ta mangue_ de
drenaje puede_ffar en inund_i6n o da_eso lo propiedod.
• E_drenoje debe instatarse seg6n redes _osc6digos y
regutaciones tc_:atesvigentes
•Aseg_rese de que Io monguera de drenaje no est6 _Hroda0
pinzodo, ap_astado oretorcido.
Opci6n I: Tubo vertical
L_ea de dren_je
J
Opci6n 2: Lavadero
J
Doble elextreme de _omonguero de drenojehostoque tengo
Ioformo deseodo y eng6ncheioelbordedelJovodero.Use
uno coffeeporo o_guror Iomonguero de drenojeen su beer.
CONEXION DEL SUMINISTRO ELECTRICO
Lo lavadora requ_ere una tome de corriente de ! 20
V de CA, 60 Hz y tres claviias con conexi6n a tierra.
Enchufe_a iovodoro.
_ble
Sieldesogg:eesuno tuberiove_icol,suieteIomonguero de
drenojeo Iotu_r_o vertico_con kscoffeesuministrodo.
NOTA:
•Lo oituratotoldeJextremede [omonguerodeber_oester
oprox_modomente o 0,9~1,2 metros (35_~47") de_piso_
' No _n_oiorel e×tremo de Io mong_ero o uno o_turode m6s de
2_,8 cm (96 puigodos) sobre J__ne inferior de _oJevodoro.
"Nude serie Iomong_ro de drenoieo__g_Oe. Sino heyni_uno
tenurede oire,pu_e cr_rseunefc_:tosff6ny _ua v_se
impelidofu_o de IoHr_oIoque_osb_do unor_ci6n d_
re_idimie_o de_Iovc_doienj_ue o do_ en_osprer_dos. 42
Uno conexi6n inodecuodo dei conductor de conex_6n
otierro del equ_po puede ocos_onor un r_esgo de
descorgo ei6ctrico. Consuite o un e_actr_co o t6cnico
co_ificodo s_tSene dudes sobre s_el electrodom6stlco
est6 correctomente conectado o tlerro. No mod_que
el enchufe que se entrego con e_eiectrodom6stico.
Si no encojo en to tome de corriente, soHcite o un
e_ectricist_ odecuodomente formodo que _e instole
uno tome de corriente apropiodo. Si no se cump_e
con estosodvertenciosse podr6n producirleslones
groves, incendios, descorgos e_6ctricos o muerte.

NIVELACION DE LA LAVADORA
Lo tino de su nuevo iovodoro giro o velocidodes muy
eievodos. Poro mlnlmizor _ovlbroci6n, los ruidos y
los movlmlentos no deseados, el plso de_r6 set uno
superficle perfectamente nive_ado ys6ffdo.
NOTA: Ajuste _ospotos nivelodoros solo en Io m_ido
nece_rio poro nlve_or _oiovodora.
Lo extensi6n de los potas nlvelodoras
m6s de _onecesario pu_e causor
vlbraci6n de la Javadora.
NOTA: Antes de in_tolorIo Javodoro,
y oceites, de formo que los _atos
de opoyo del e_e_strodom&sticono
puedon deslizarsecon fociffdad.
Los F:_tasde opoyo F:<_rianmoverse o desffzorse,
conllevondo una vibroci6n yruido excesivosderivodosde
un contocto deficiente con el piso.
Los cuatro paras niveladoras deben apoyarse
firmemente en el piso. Intente mover _o lovadora de
uno esquino hoclo otto para oseguror que _ascuotro
paras nivelodoras tengan un contocto flrme sobre e_
piso.
i. Co_oque io _ovodoro en el _ugar final,tomando
io precouci6n especla_ de no apretor, forzar nl
op_ostarlos rubellas de drenoje y agua. Coloque
un nlvel sobre _o porte superior de _o _avadora_
1
|
_,_ Subir Bo_ar
2. Aiuste lo poto nivelodoro. Gire en sentido hororio
paro levontor la iavodoro yen sentldo ontihoroHo
poro bojoHo.
•Pora comprobor si Io Iovodora est6 nivelado de Iodo
o Iodo, coloque un nlvel en el fi|o posterior de la
tapo.
•Pora comprobor sila topo est6 nivelod_ de ode_onte
hocio otr6s, co_oque un nivel en e| Iotero_ de _o
Iovodoro en e_ borde donde se unen e_ _oterol de_
mueble y Io topa superior. No cobque el nivel en Io
pone superior nl en Io topa. Si uti_izo esos referencios,
el resuitodo set6 una lavadora desnlvelado.
M_ Bien
3. Poro osegurorse de que Io _avodora est6
correctomente nivelodo, abro to topo y mire desde
orriba poro vet si _o tino est6 centrodo. Si Io tino
NO est6 centrodo como muestro e_dibuio a la
izquierdo, vueba o o_ustor Io pota. Si tiene un nivel,
compruebe Io lavodoro con el nlveL
43

ADVERTENCIA: P=a reducir el riesgo de incendio, descarga el_ctrica o lesiones persona|es, lea
V cump|a completamente este manual de uso ycuidado, inclu_ndo las insttucciones importantes sobre
seguridad_ antes de poner en funcionamiento la lavadora.
|FUNCIONES DEL PANEL DE CONTROL
I
i j
O BOTON POWER (ENCENDERiAPAGAR)
Pres_oneeste bot6npora prender la Javadoro. Presi6-
nelo de nuevo para apagarla. AI presionarel bot6n
bar6 tras unQ breve pausa,
NOTA: Si la lavadora permoneceinactiva
durante cuatro m_nutostras Qpagada, sedrenor6
autom6tlcamente toda el Qguaqua permanezcaen la
fina. Un_ atarma sonar6un minute antesde{ drena_e
yet c6d_gode "dr" aparecer6 en pantaHa.Enese
momenta puederein_c_arla _avadora.S_nembargo,
en cuanto seinicie el drenaie, sesuspender6ntodas
las funcionesy e_mensa_e"dr" semos_rar6basra qua
se complete e_dre_a_eylodes bs ajustes_el ckio se
O PERIL_ DEL SELECTORDE CICLO
Gi_e est_ periffa papaseleccionar el tide q_e desk.
Un_ vez selecdonado el cicb deseado, se mostrar6n
en pa_taffa bs aiustesest6ndar p_r_ dicho cido.
Estosaiustes pgedencambiarse _t_izando los botones
de ai_ste de_ciclo en cualqu_ermomenta _ntes de
q_e el dale comlence.
OBOT_N START!PAUSE
Presione este bot6n par_ inidor el cldo se_ecdon_do.
Si ia tav_dor_ est6 funclonado, _se este bot6n para
poner en pa_o el cicb sinperder bs aiustes actuates.
NOTA: SI no pres_ono el bot6n START/PAUSE antes de
que transcurran 4 minutes tros se_eccionarun c_cb, _a
lavadara se apagar_ a_am6ticamente. S_ta _avadora
est6 en pagsa durante gn clclo par m6s de cgatro
minutes, se canceler6 el cic!o y sedrenar6 e_ ag_a qua
permanezc_ en _atina. Una alarma sonar6 a los tres
minutes para _dvertkle de que la t_n_ est6 a p_nfo de
dre_arse.
0BOTONES MODIFICADORES DE CICLO
Ufilice e_tosbatones par_ de,nit _osaiustes de_cido
se_eccionada.Losindicadores _minososub_cadossabre
bs ba_onesm_estr_n la se_ecci6n_gaL
gCICLO ESPECIAL Y BOTONES DE OPCION
E_tosbo_es le permitens,elecdonarcid_ u opcio_s
APANTALLA DE TIEMPO Y ESTADO
La p_n_ll_ m_estrae_estado del cicloy e_tiempo
restante esfimedo,
NOTA: Para proteger sus prendas, no todos los _justes est6n dSsponibles para todas I_s se[_ciones de
ciclos.
44
MANEJO DE LA LAVADORA
Bleach
0
0
C_SlFICAC_ON DE _S PRENDASY CARGADE LALAVADORA
Clos_fiquetas prendaspot tlpo de te_a,n_velde suciedod, color y
tomo_o de io cargo, segOnsea necesario_Abro _atape y cargue
Losprendas se_eccionadosen _oIovadora.
PRODUCTO DE LIMPIEZA
Agregue detergente de elta efic_enc_a (HE:)el d_spensador de
detergente.
_W_
START
PAU_
O
O
O
O
O
O
PRENDERLALAVADORA
Prestoneel bot6n POWERpare prender la lavedore. Los luces
olrededor de la perilla dei _lector se iluminar6ny _ emitir6 un
ovi_ sonoro,
SELECCIONARUN CICLO
Gire Ia perlllo del selector de cldo en c_olquier dkecci6n pore
seleccionarel cicloque de_e. MY CYCLE,DRAIN& SP_Ny CLaN
WASHERse setecclonanpres_cmandolosbetakes de opci6n.Se
mostror6n los relates predefinidosde temperature de _avodoy
enjuogue,velocidod de centrifugado, ntvel de suciedody tosaiustes
de opci6npara dic_ cido.
SELECCIONARLOSMODIFICADORESDE CICLOY LASOPCIONES
Silo desea_ohoro puede c_mbi_r _osaiustespredeterminado_de_
cido _teccionodo. Use los botones modtficodores de cido WASH
TEMP,SP_NSPEED,SOiL LEVEL
NOTA: No todes ias opclones est6_ dlspon_bJespare todos _os
c_c_os.Saner6 un ev_sa sonora d_ferente y el LED no se encender6 si
no se permite une determlneda setecc_6n,
INICIAR ELCICLO
Presionee_bot6_START/PAUSEpare qua comienceel c_clo.Letape
se bbquear6 y Io Iovadora se ogit_r6 brevemente sinague par_
medir el pesode Io cargo_
LUZ PAt_ AGREGARUNA PRENDA
La _uzADD A GARMENTse prender6 al principio de_cldo de
lavado pore indicar qge es seguro agregar m6s prendas a io
cargo. Presioneel bo_6nSTART/PAUSEpare pausor e_cido y
ogregor prendas ala carga_
NOTA: No se recomienda egreger prendas a menos que to luz ADD
A GARMENT est_ encendide, ye que podrla reduck el rend_mlento
del levada,
FIN DELCICLO
A_fina_izaret cldo, soe_r6 un_v_sosonoro_Retke i_mediatemente
la rope de la lavedora pare reducir les arruges.
45
GUiA DE CICLOS
Normal
Nlercjen
_CERTIFICADO PaR NSF: NSF :_nternafiono_ (anteriormente_ [
National _nltotion Foundation, Fu_doci6n Nacionol de I
Saneomiento}_ cenifica que el cJclo de des_nf_ci6n SANITIZE
reduce el 99,9% de las boctedas presentesen la coloda yque
no setransmitir6 ningune bacteria ala sigulente carga.
MWsucio
Ligero
Normal
Lige_
Normal
Ligero
M_rySUCiO
Ligero
M_ysucio
Ligero
=: Opci6n disponible
: Aiuste predeterminado
NOTA: Pore proteger sus prendas, no todes los temperatures de levedo, velocidades de centdfugado, niveles de
sucleded y opciones est6n dlsponiblespare redes losciclos.Sonar6 un arise sonoro yel LED no se iluminar6slno
se permite une determinade se_ecci6n,
*Lo ievadora o_ustar6 de farina autom6tica el tiempo de levado pore Io confided de colada, presi6n del ague,
ague ydem6s condlciones de funcionem_ento.
Estos cities usan diferentes movlmlentos de lavado pare opfimlzar el rendimiento de la llmpleza o el cuidado
de les prendas, Los movimuentos de lavado pueden sonar de forma dlstinta en las dife_entes fases del clc|o de
lavado, Esto es normal.
46
ProtocoloP172
Desempeno de des_nfeccionde lavodorasde rope
reslde_cielesy comercielesde tamano familiar,

GUiA DE CICLOS
DeepWash
ii!liil
iiiiiiii
Muysucie
= Opci6a dispoaib[e
= A[_ste predeferminedo
NOTA: Pare proteger sus prendos, no todes [as temperatures de [evade, veloc:idodes de centrlfugedo, niveles de
suciedod y opclones est6n dlsponibles pore fades los clc[os, Sonar6 un evlso sonora y el LED no se iluminor6 si no
se permlte uno determlnoda selecci6n.
*Lo [ovodora aju#or6 de formo outom6fica el tiempo de [evade pore [o confided de co[ado, presi6n de[ ague,
ague ydem6s condiciones de funcionamiento_
Estos tic!as usan diferentes movimientos de lavado pare optimizer el rendimlento de la limpieza o el cuidado
de los prendas. Los movimientos de lavado pueden sonar de farina distlnta en los diferentes rases del cicla de
levodo. Esto es normal.
47
CL_IFICACION DE LASCARGASDE LAVADO
•No cargue prendas a trav6s de [a tina. Si no sesigue
esto odve_encio, podrion producirse fugos o doffos en los
tej_dos.
coma oimohodas o edredones. S_no se sigue esta
odvertencio, se pueden producer fugas.
• S$es pos_b_e,no love la ropo resistente ol oguo. Si debe
hocedo_ seIecclone el cic[o de ropo voluminosa/ropa de
coma.
acampar, mpa _ra esquiar0equi_ para exteriores y
articu|os similares.
Agtupaci6n de prendas similates
Poro obtener los meiores resuffados a[ lavor y reducir
los posibiIidadesde doSar los prendas,es necesorio
tenet cu_dodo a Io horo de c[asfflcor [o ropo en cotodos
formadas par prendas s[mi[ares.Si semezdan dfferentes
tlpos de tejidoso nive_e$de suciedad, el rend_miento
dot lavado se vet6 degradado, y podrian produclrse
transferenclas de co_oro deco[oradones, daffos en los
te[idos oformaci6n de pelusasen los prendas. Loste[idos
se deben dos_ficar en gruposto[ coma se describe o
continuaci6n_
Co|ores
Closi_que los prendos por color. Los prendos oscuros
_untos en una corga seporodo de los prendas bJancas
ode colores c[oros. MezcJor prendas oscuros con
prendos ciaras puede dar coma resu[tado e[ finte o[a
decoJoraci6n de [as prendas m6s c_aras.
Nivel de suciedad
Lave la ropo muy sucio junta. Si se _ava ropo que no est6
muy sucla en momlsma coioda que ia ropa muy suc_a, es
muy poslbie que _a ropo con poca suc_edad no se iave
bien.
T;_ de tejido
Los prendas detlcadas no se deben mezc/ar con prendas
m6s pesadas y res_stentes. Lovor prendas de[_cados _unto
con tejldos pesados pu_e causer doSos en los prendos m6s
de_icodos. Si se [avon prendos pesodos en uno cargo de
ropo de_icoda, puede resul_or que fo ropo pesodo no se lave
corre_:fomente yque se produzcon doSos en Ins prendos
de[icodos.
Ti_ de pe|usas
A_gunos teiidos otroen IQs pe[usos mientros que arras
sue[tQn peJusas en e[ proceso de [ovodo. Ev_te mezc[or
prendos recoiectoros de pe_sas con prendas generodor_s
de peJusos en ta m_smo co[ado. $_ mezc[o estos dos fipos
de tej[dos, se formar6n bolas y pe[usos en los prendos
recolectoros de pelusos. (Par ejemp[o_ recolector de
peJusas:b_zo de re, ida o punto; producfor de pe_usos:
too[[o de fe[po}.
Etiquetas de cuidado de las prendas
Muchos prendos de vestir induyen uno et[queto de
c_idado de Io prendo. Ufil_ce e[ sig_iente diogromo pora
aiustar et cic[o y los opc:iones para cuidor la prenda de
acuerdo con [as recomendaciones dei fobricante.
F Fabric Care _bels _'_
Machi_
wash
w_ 00 • 00 •
Carga de |a lav_dora
•Compruebe q_e todos los boisHIos est6n voc_os. O_efos
coma clips, cerilIas_ bo[_grofos_ monedos y Haves pueden
doffor tonto [o _ovodoro coma los prendos.
'Cierre cremolleros, broches y cordones paro evitor
engonches oenredos en afros prendos.
'ApHque un tratamiento prev[o a tax 6teas m_y suc$os
poro mejoror e_ resultodo.
•Mezde prendos grandes y pequeSos en Io mismo cargo.
Corgue primero los prendos grandes.
•Los prendas grandes no deben ocupar m6s de ia mffad
de [ocargo totoide [acolodo,
• Lo Iovodoro se puede corgor compJetomenfe, pero [o
tino no debe estor oborrotodo con prendos. Lo fopo de
[o [ovodoro se debedo eerror can foc_[_dod.
"Poro ev_tar una coiodo deseq_Hibrada, no _ave prendos
_n_cos. Agreg_e _no o dos prendos simiJores o io
co[ado. Los prendos grondes yvoium_nosos, coma los
coberfores, edredones oco[chos, doberman _ovorse
individuoJmente.
• Lo _ovodoro no se [ichor6 de oguo n_func_onor6 si[o
topo esf6 obie_o.
NOTA: Use e[ cic_oporo prendos vo[um_nosos y de coma
con
absorbentes coma arras prendos ydeberlon _ovarse en
uno co[ado independiente poro [ogror _nos res_todas
6ptimos.
Losprendos voluminososse deben collar Io m6s obojo
[a t_no.
Lo lovodoro defecfor6 de formo autom6fico el tomoffo
de [o cargo. Deb_do ol sistemo de [ovodo de oJto
eficiencio, es posib[e que el hive! de oguo no cubro
comp[etomente la cargo de ropo.
48
ACERCA DE LOS DiSPENSADORES
El dispensador autom6tico est6 compuesto de dos
compartlmientos que contienen:
• Suavizante iiquido.
• Detergente en polvo o llquido pore e! Iovodo
principal.
/,J_'
principal de
detergente en polvo
pare tavadora
principal de
detergente ffquido
pare tavadora
de suavizGdor
de teia ffquido
'%_.................................... J
Compartimiento del detergente del lavado
Este comporfimlento contiene el detergente pare el cicio
prlncipel del loved& El detergente se ogrego olo cargo
el principio del cicJo. Utitice siempre detergente de alto
eflclencie (HE) con su Iovadora, Se puede user tanto
detergente ffquido come en polvo.
AI agregar et detergente, nun_ exceda los
recomendacion_ del fabricanle. Si usa demasiodo
detergenle_puede sucederqueen I_ar de diluirse
acumuleen la m_ yen Io lavadora,
Cgendo use detergente liquldo, oseg6rese de que el
reclplente pore el detergente tiquldo y el inse#o est6n en
su sift& No excedo le INee de Henado m6×imo.
Cuendo use detergente en polvo, retire el rec_plente del
detergente liquido del compa#imient& El detergente
en pelvo no se dlspensar6 sl el reciplente de detergente
liquldo est6 en el compo#_mlento_
Comperfimiento del suavizante
Este compe_imiento contiene e( suovizante )iquido, que
se dispenser6 de farina outom6tice durente el cicto de
At egregar el suevlzante, nunce excede los recomendo-
clones
del {abricante, Si usa demesiedo suevizonte, puede
suceder queen luger de dHu_rse se ocumule en le rope y
en le levedore.
•AI agregor el suevizonte, respetesiempre los
recom_deciones det fabricente. No excedo lo finea de
lenado m6ximo. Eluse de demasiado suavizante puede
menchar los prendas,
• Diluye el suovizonte concentrodo con ague temptodo,
No e×ceda Io linen de Ilenodo m6ximo_
• Nunca vie_o el suovlzonte directamente en Io cargo o
dentro de Io fine.
Compartimiento del blanqueador liquido
E[ dispensador del blanqueador es un comportimiento
independlente situedo en ta porte delontere izqulerde de
fa aberture de le fine. Estecompartimiento confiene el
bianqueador de clara llquldo, que se dispenser6 de farina
outom6tlce en el memento adecuodo durante el ciclo de
levedo, Cueiquler ffquido que hoye en el dlspensador al
final del ciclo ser6 ague, no blanqueedor,
• No agregue bianqueedor con protector de color ffquido
o en poivo a este compartimient& Ei compo#imlento dei
blenqueedor est6 dlseRedo pore dlspensar Onicomenfe
blenqueodor de clare I[quide, Et blenqueedor con
protector de color i[quido o en peb_o no se dispenser6
correctemente.
• AI agreger el blonqueador, respete slempre Ins
recomendeciones del fabricente_ Nunce ogregue m6s
de un vesito y no excedo [e linee de Henedo m6ximo yo
qua eso podrfa provocar que el btanqueador se dispense
inmedietemente y deffe los tejidos. User demosiodo
blanqueador puede defer los tejidos.
• Nunco vierto el btonqueodor de clara liquido sin diluir
d_rectamente en le cargo o dentro de la fine. Se pueden
produclr dates en el tejldo.
• No utffice clare decolorente ni productos de Oxi en el
mismo cic/o con e! btanqueedor Hquldo de cioFo.
NO mezcJe blonqueador can clare con
amonlaco o 6cidos, coma vinagre o productos
anti6xido oontiherrumbre,
Lo mezcla de productos qulmlc:os de este
tipo puede generor gases letales, qua pueden
oceslonor leslones groves e incluso Io muerte,
49
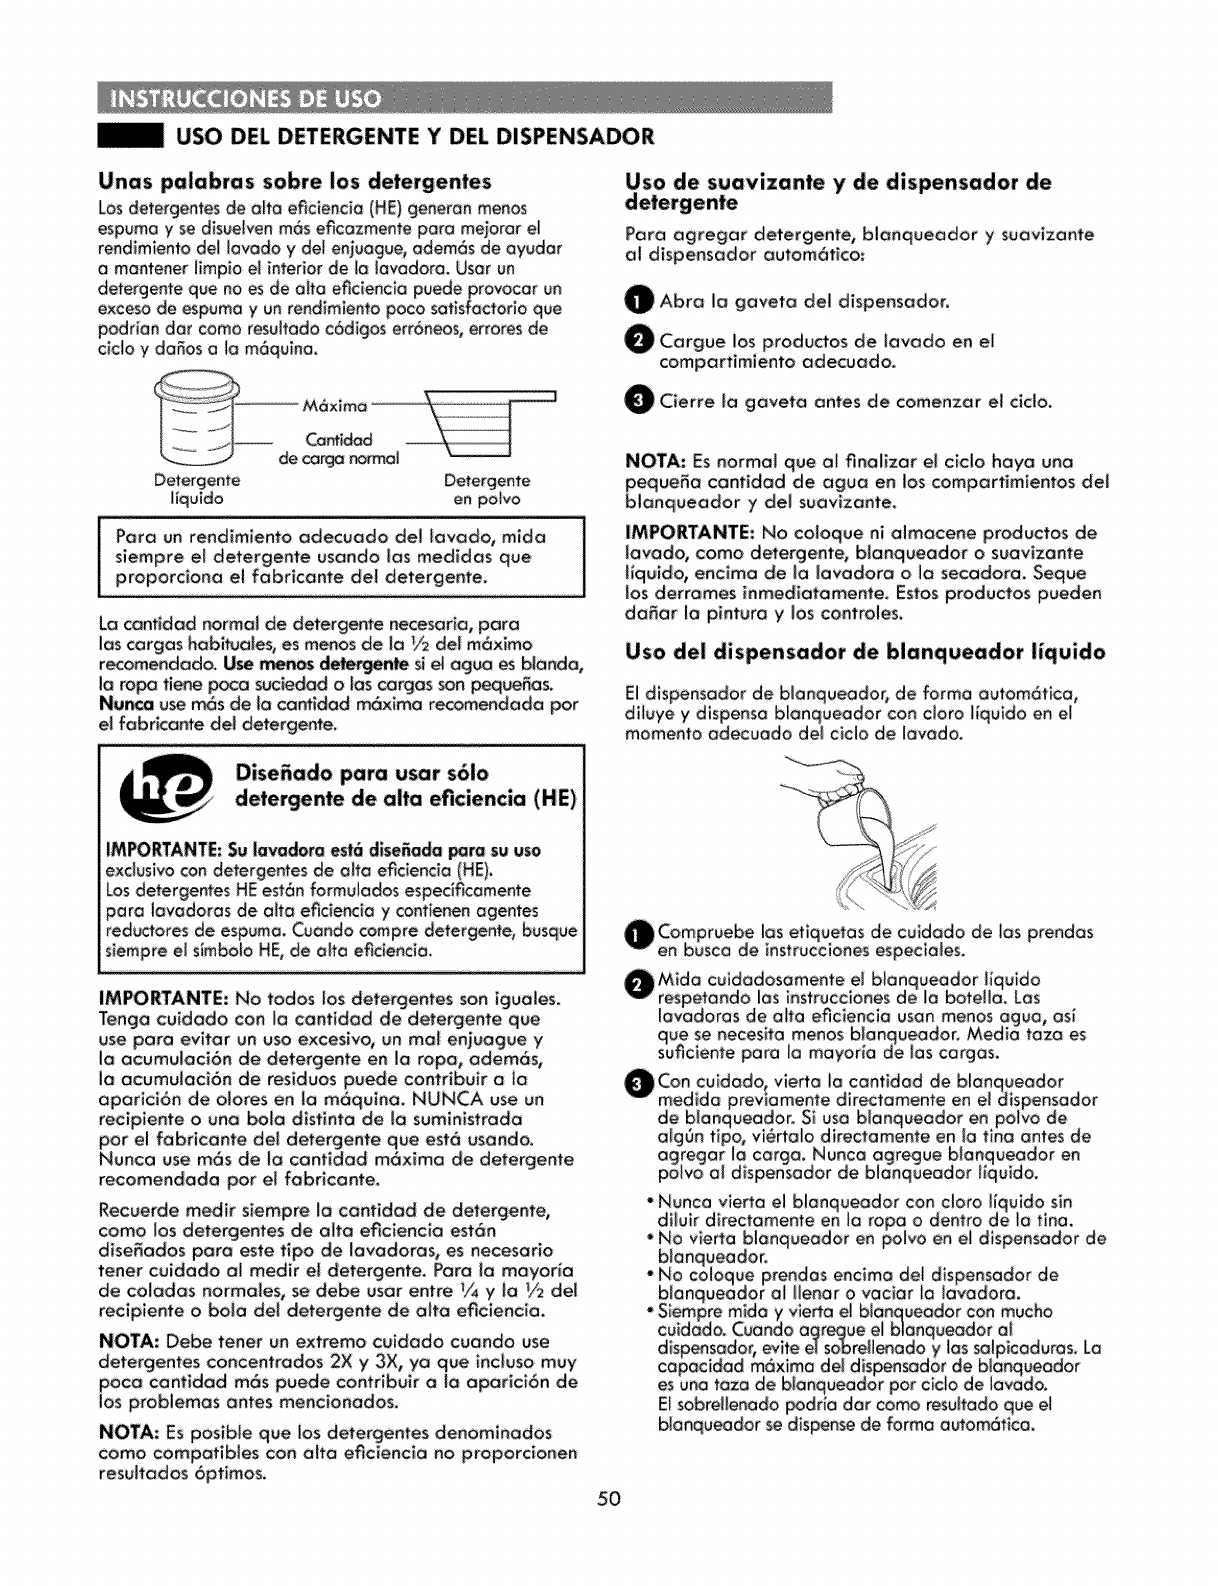
USO DEL DETERGENTE Y DEL DISPENSADOR
Unas palabras sobre los detergentes
Los detergent_ de afro e_clenc_a (HE} generan menos
espuma y se d_suelven m6s eficazmente para mejorar e[
detergente que no es de affa eficlencla puede provocar on
exceso de espuma y un rend[m_ento poco _Hsfactorio qua
podrian dar coma resulfado c6digos err6neos, errores de
cic[o y daffos a _am6qgina.
_ M6xima' ............
Can_dc_
de CQ_._Qnorrr_[ " -
Hqu[do en poNo
La cantidad normal de detergente necesaria, para
los cargos habi_JaIes,es menosde la _/2del m6x[mo
recomendado. U_ rr,e_ dsi e[ aguo es b[anda,
[c_row tie_ poca suciedad o los _rgas son _ueffas.
I'_lu_ u_ m6s de la cantidad m6x_ma recGcnendada par
el fabrlcante del detergente.
Disefiado para usar s61o
detergente de alta eficiencia (HE)
IMPORTANTE: Su lavadora est6 dise_ada _ra su uso
exctus_vo con deterge_es de oita efic_encio (HE).
Losdetergentes HE est6n formuiados espec_ficamente
pora Iovadoros de alto efic_e_o ycontienen agentes
redu_ores de espumo. Cuondo compre detergente_ busque
s[empre el s[mbolo HE, de aIta efic[enc[a.
IMPORTANTE: No todos los detergentes son [guales.
Tango cu[dodo con [_ cantld_d de detergente qge
gse para evffar gn usa exceslvo_ vn ma[ enj_ogue y
[a ocumu[aci6n de detergente en [a rop_, adem6s,
la ocum_loc_6n de residuos puede contr_bu_r _ [o
aparlc_6n de o_ores en ta m6qutno. NUNCA use gn
recip[ente o _no bo_a disfinta de _a sgministrad_
par el fabdconte del detergente que est6 us_ndo.
Nunca use m6s de 1o cant_dad m6×ima de detergente
recomendoda par el f_brlconte.
Recuerde medir s_empre _o contidod de detergente,
coma [as detergentes de a[to eflc_en¢_ est6n
d_seffados pora este fipo de [ovadoros_ es necesario
tenet ¢gidado o[ medir e[ detergenteo Para [a mayoria
de co[adas normales, se debe usor entre _/_y [o _/:_de[
reclplente o boia del detergente de aff_ efic_enclo.
NOTA: De_ tenet vn extremo cuidodo cvando use
detergentes concentrados 2X y 3X, yo que _nclvso muy
oca cantidad m6s puede contribuir a _o aporlci6n de
as problemas antes menc_onados.
NOTA: Es posible que los detergentes denominados
coma comp_tlbles con alto eficienc_ano proporcionen
resultodos 6ptimos.
Uso de suavizante yde dispensador de
Para agregar detergente, blanqueador y suovlzante
al d[spensador autom6tico:
O Abra la gaveta de[ dispensodor.
O Cargue los prodvctos de lavado en el
compartimlento adecuada.
O Cierre [a goveta antes de comenzar el clclo.
NOTA: Es normal que ol finalizarel ciclohaya uno
pequeffa confidod de agua en los comparfimientos de[
blanqueodor y de[ suovizante.
|MPORTANTE: No co[oque ni almocene prodvctos de
[avado, coma detergente, blanqueador o suavizonte
Hqu_do, encimcs de _a [avadora a la secadora. Seque
los derrames inmediatomente. Estos productos pueden
daSor Io p_ntura y los contro[es.
Uso del dispensador de bianqueador ffquido
Eldispensodor de blanqueador,de forma autom6fica,
diluyey dispensablanqueodor con claral[quidoen e[
momenta adecuodo del cido de [avodo.
O Compruebe _as etiquetas de cuidado de _as prendas
en bvsca de instrucciones especiaIes.
L_
Elsobrellenado_drio dar coma resultadoque el
blanqueodor se dispense de formo autom6tica.
50,

|PANTALLA DE TIEMPO Y ESTADO
La pantalia de tiempa y estada muestra el tiempa esfimada restante y el progresa del cicla,
AINDICADOR DE ESTADO DEL CICLO
Estas LEDse ilum_nan cuando se selecciana un clda
para indicar los fases que se van a reai_zar. Cuan-
da un cicio est6 en marcha, el LED parpadear6
para _afase actlva. Una vez camplefada JQlose,
el LEDse apagar6_ S_un clclo est6 en pausa, el
LEDactivo deiar6 de parpadear.
OTIEMPO ESTIMADO RESTANTE
Cuando se selecclona un clcla, se muestra el tiempo
esfimado para dlcha ciclo. Ese tiempa puede
cambiar a med_da que se acjrecjan apciones o si
se modifican _osojustes, Una vez se pu_sael bat6n
START/PAUSE, _olavadora medk6 el tamaSo de la
carcjo. El tiempa estlmado que se muestra puede
cambiar si el control mod_flca el ciclo deb_do a_
ramada de la carcja.
NOTA: El tiempo que se muestra es s61ouna
esfimaci6n. Este fiempo est6 ca|culado en base a
condlc_ones hormones de func_onamlento. Algunos
factores externos (famaSo de _a carcja, temperatu-
ra de _ahabffaci6n_ temperatura del QCJuQentran-
re, etc.) pueden afectar QI tiempa real.
5:1
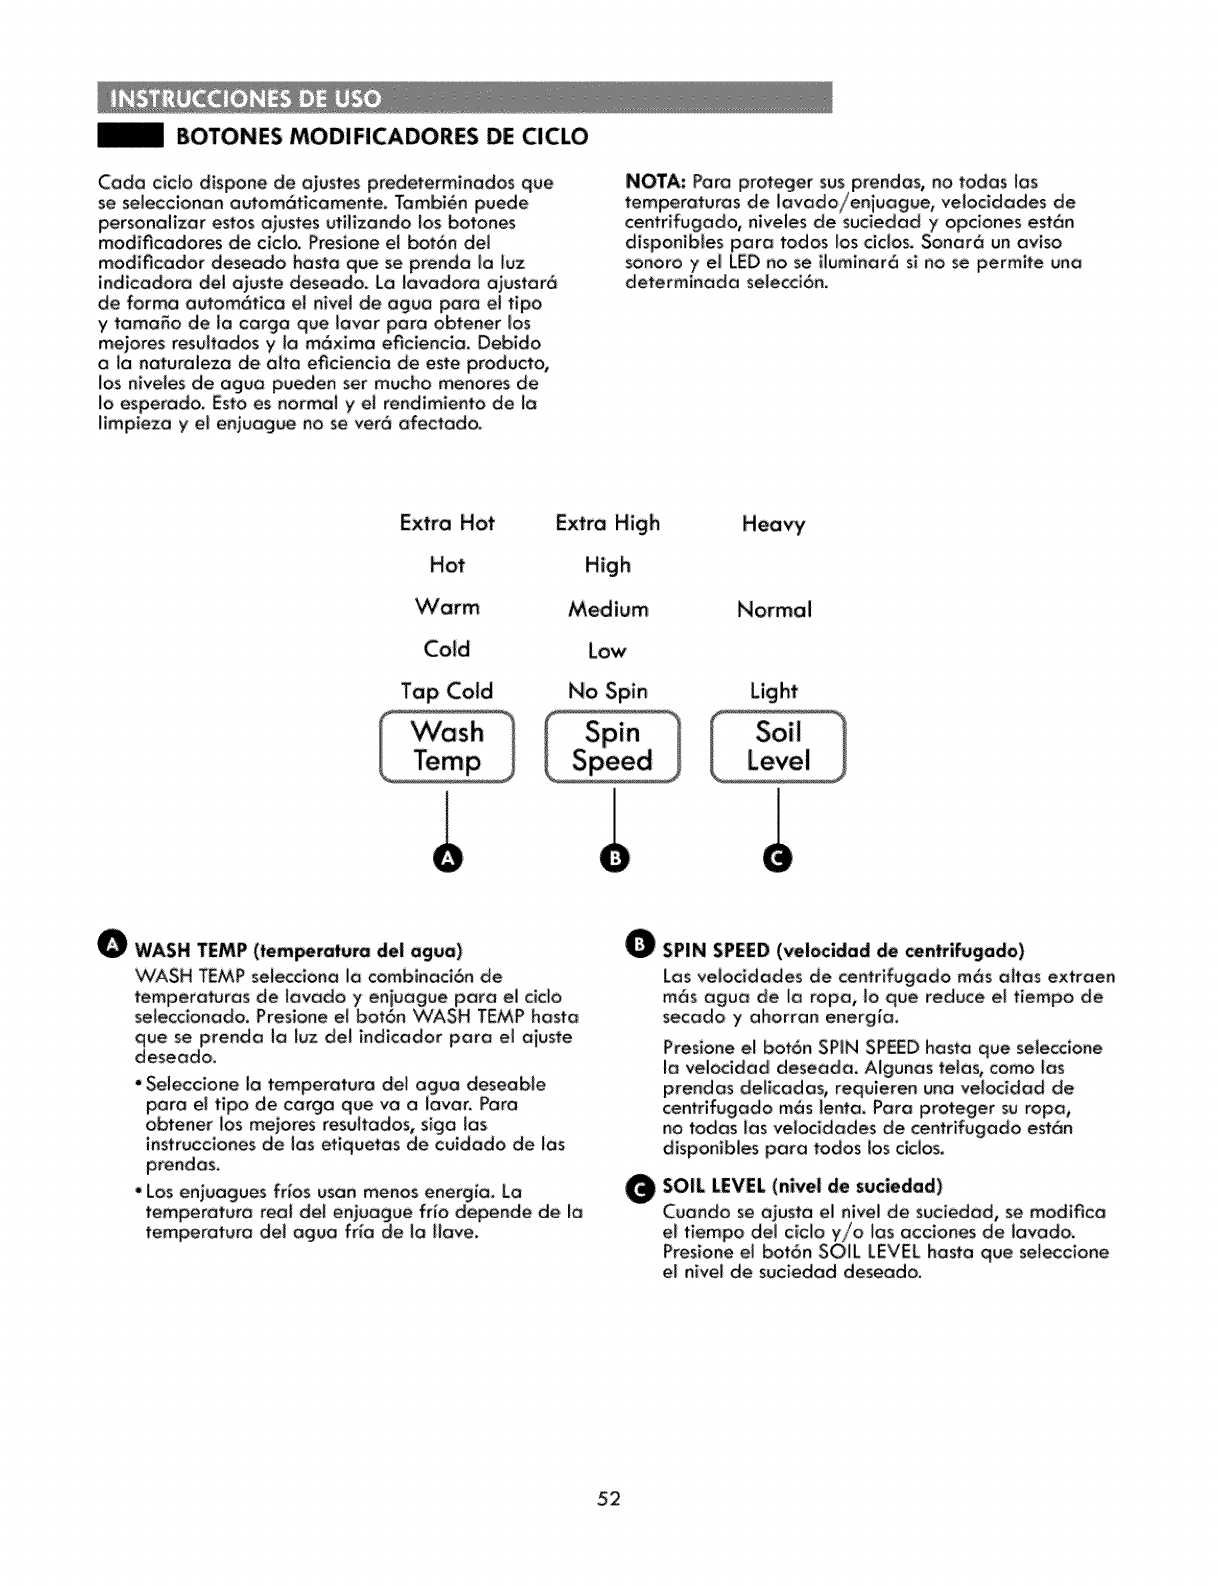
|BUTANES MODiFICADORES DE CICLO
Coda clclo dispone de a_ustes predeterminados que
se se_ecclonan autom6ficamente, Tamb_n puede
personQl_zar estos ojustes ufi_izando tos butanes
modiflcadores de ciclo. Presione el bot6n de{
modificador deseado haste que se prenda _a {uz
indicadora del ajuste deseado. La _avQdora ajgstar6
de farina autom6tlca el nivel de ague parQ el fipo
ytamaffo de [a cargo que laver pare obtener los
mejores resultQdos y la m6xlma eficlencla. Debido
ala naturalezQ de alto efic_encia de este producto_
{as niveles de ague pueden set mucho menores de
_o esperado. Esto es normal yel rendim_enfo de la
limpieza y el enjuague no se vet6 afectadoo
disponibles paro todos los cicios. Sonar6 un aviso
sonora yet LEDno se iluminor6 si no se permite uno
determinada selecci6n.
Extra Hot
Hot
Warm
Cold
Tap Cold
Extra High
High
Medium
Low
No Spin
Heavy
Normal
Light
AWASH TEMP (tem_reture de! ague)
VCASH TEMP sei_ciona io combinoc_6n de
temperatures de Jovado y eniuogue pore el c_do
selecc_onodo. Presione et bot6n VVASH TEMP haste
que se prendo Io _uz del _ndicodor pore el ojuste
deseodo_
• Se|eccione la temperature de| ague deseable
pare e_ tlpo de cargo que va a _ovar. Poro
obtener los mejores resultodos, s_ga los
instrucciones de los efiquetas de cu_dado de los
prendas.
•Los enjuagues frbs usan menus energia. La
temperature rea_ del enjuague fr_o depende de la
temperature de_ aguo frio ae la Have_
O
0
SPIN SPEED (veiocided de centrifugado)
Los veiocldodes de centHfugodo m6s o_tos extraen
m6s ague de io ropo, io que reduce e_fiempo de
secado y ahorran energ_o.
Pres_one el bot6n SPIN SPEED hosto que seleccione
io ve_ocldod deseado. Algunas telas_ coma los
prendas deW,codas, requieren gnu ve_ocidod de
centHfugodo m6s lento_ Pare proteger su ropa_
no todos los ve_oddodes de centrifugado est6n
disponlb_es pare todos los clclos,
SOIL LEVEL (nivel de suciedad)
Cuando se ojusta e_nive_ de sucledad, se modifica
el fiempo del c_clo y/o los acclones de lavado.
Preslone el bot6n SOiL LEVELhaste que seiecclone
el nivel de suc_edaddeseado,
52
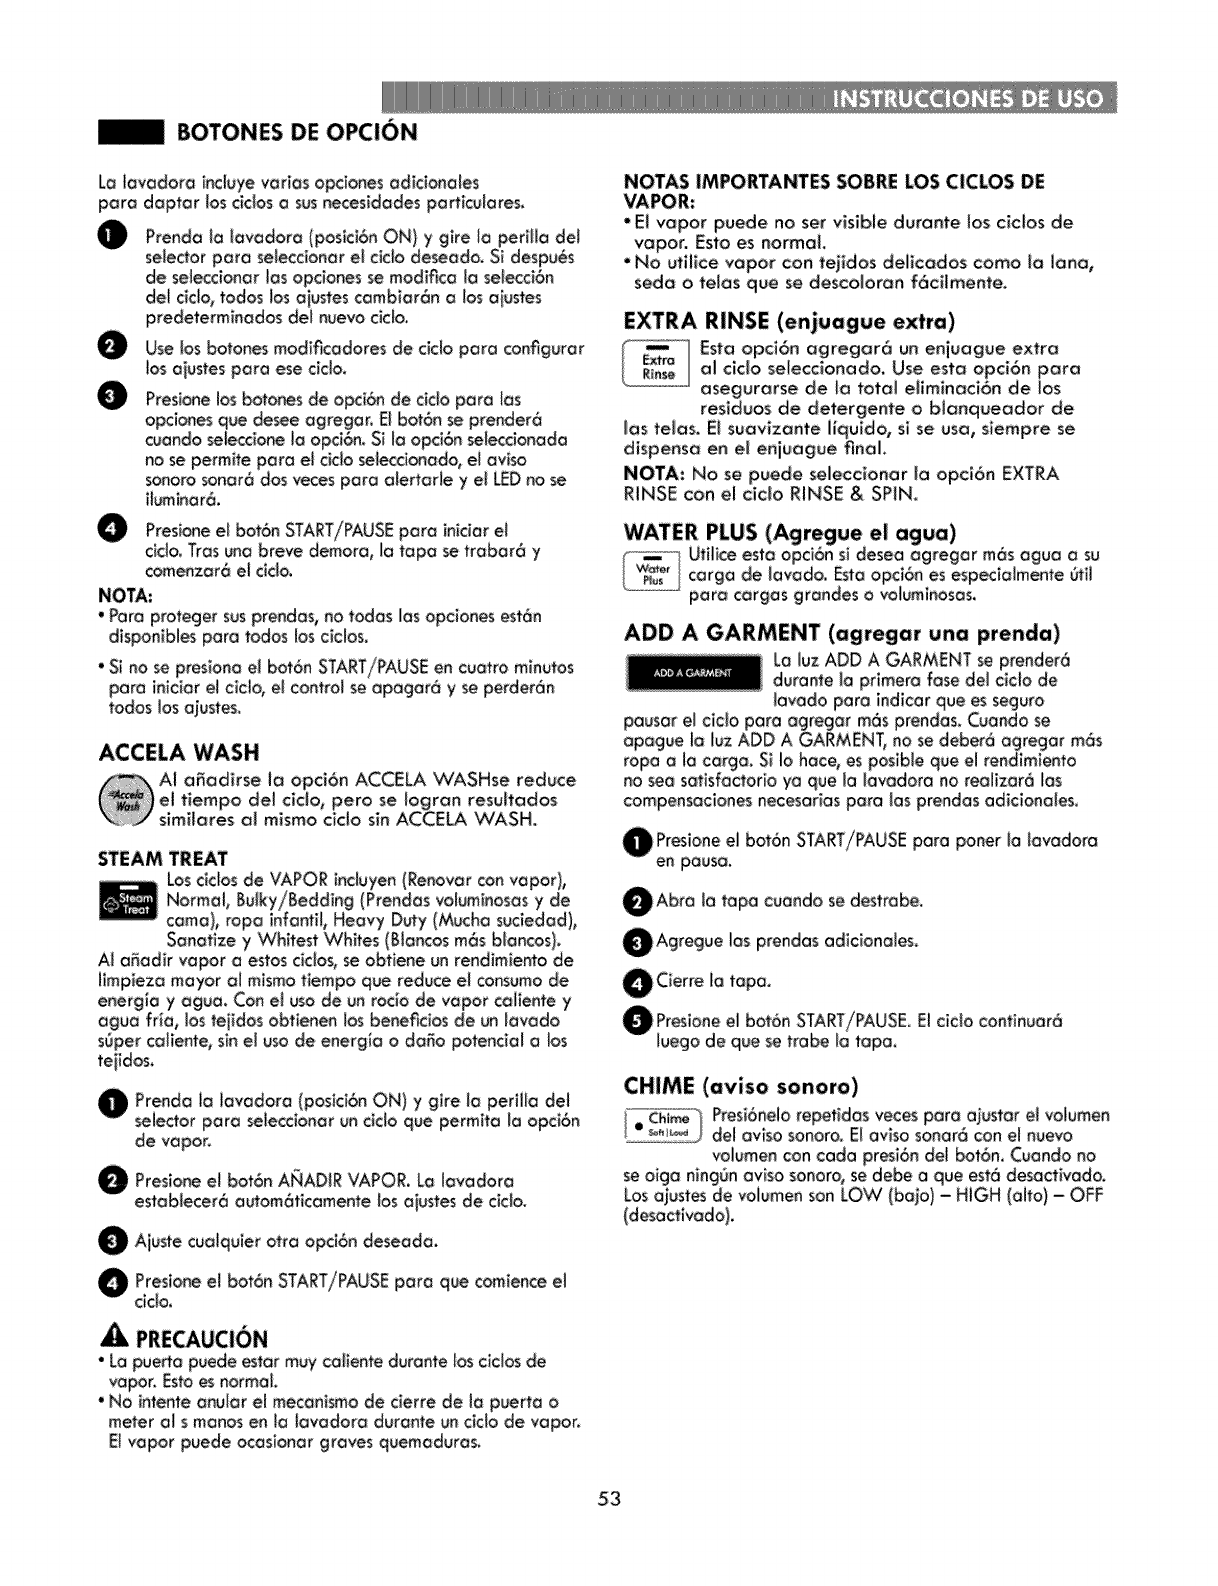
|BOTONES DE OPCION
La _avadora inciuyevaries opcionesadicic_qales
pare daptar toscidos a sus_cesidades particulates.
:
@
de seteccionar_osopcio_s semodifica la selecci6n
del clcio,todostosoiusfes cambiar6n a !_ aiustes
predetermlnodos dei nuevo cldo_
Use Josbotonesmodificadores de cido pare configurar
los aiustespore ese cido.
Presione los bat__es de ol:_i6n de ctdo pare los
opcianes q_ desee agregar. E! bot6n se prender6
cuando seleccio_ lo opci6n. Sila opci_ _leccionada
no se permite paro el ciclo mleccionado, el av_so
sonora _nar6 dos veces pare alertar_e y e_LED no se
ffuminar6.
Presionee_bot6n START/PAUSEpore inidar eJ
cido. Trasuno breve demora, _atapose trabar6 y
comenzar6 el cido.
NOTA:
*Pare proteger susprendas, no todas _asopciones est6n
disponibles pare todos los c_clos.
*Si no se presiona e_bot6n START/PAUSEen cuatra minutos
pare inicior e_c_cb, e_contro_se apagar6 yse perder6n
todas los a_ustes.
ACCELA WASH
AI a_adirse la opci6n ACCELA VVASHse reduce
el tlempo del cido, pero se _ogran resuffados
simi_ares al mismo cido sin ACCELA WASH,
STEAM TREAT
Loscictosde VAPOR _nduyen(Re_wr con vapor),
Sanatize y Whitest Whffes (Blancosm6s blancos).
AI a_adlr vapor a estos c_clos,seobfiene un rendlmiento de
I_mpiezomayor al m_smofiempo que reduce el consumode
energla y ague, Can:e_usa de un rocb de vapor co_ientey
ague trio, los teiidas abfien_ _osbenefidos de un lavado
s6per caliente, sin el usa de energ_ao deSo potenc_ala los
teiidos,
Prenda _a_ovadora {posic_6nON)y gire _aperiH_ del
seie_or par_ se_eccionarun c_doqua permita la opc_6n
de vapor.
@ Presio_ et bot6n VAPOR.La lavadoro
At_4ADi_
estabtecer6 au_om6fieamentebs aiustes de cldo.
Ajustecualquierotra opci6n deseada.
O reslone et bot6nSTArT/PAUSEpare que comienceel
cicio.
PRECAUCI6N
• La puerto puede ester muy caliente durante _osciclos de
vapor, Esfa es normal
•Na intente onu_or el meconismo de cierre de to puerto o
meter a_s manos en _a _avador_ durante un cido de vapor.
E1v_por puede ocasionar graves quemadur_s,
NOTAS IMPORTANTES SOBRE LOS CICI.OS DE
VAPOR:
•El vapor puede no set visible durante _os c_clos de
vapor. Esto es normal.
•No util_ce vapor can tejldos deHc_dos coma _a lane,
soda o tales que se desco[oran f6ci[mente.
EXTRA RINSE (enjuague extra)
Est_ opci6n agregar6 un eni_ag_e extraal c_clo seleccionado. Use esta opc_6n pare
asegurarse de la tota_ effm_nac_6n de _os
res_duos de detergente o bianqueador de
_as teias, Ei suavlzante ffquSdo, si se usa, s_empre se
d_spensa en e_ eniuague final
NOTA: No se puede se_eccionar la opci6n EXTRA
RINSE con el c:ic_o RINSE & SPIN.
ADD A GARMENT (agregar una prenda)
L_ luz ADD A GARMENT se prender6
durante io primera fase del cicb de
lavodo paro indlcor qua es segura
paus_r e_ciclo pore agregor m6s prendas. Cu_ndo se
opague I_ luz ADD A GARMENT, no se deber6 ogregar m6s
rope a _acargo. Sila h_ce, es posib_e qua el rendimiento
no sea satisfoctodo yo qua la lavodoro no realizer6 los
compensociones necesorios pore _osprendas odiclonoles,
@ Preslone e_bot6n START/PAUSE paro poner ia lav_dora
en _uso.
Abra la tape cuando se destrobe.
Agregue los prend_s _dicianales.
OC_erreI_ tapa.
@ Presione el bot6n START/PAUSE. El cic_o confinu_r6
luego de que se trabe _a tape.
CHIME (aviso sonoro)
C_m__ Presi6nelo repet_d_s veces pare a_ustar e_vo_umen
e_'_ _ del avlso sonora. E_av_so sonar6 con e_nuevo
volumen con c:ada presi6n del bot6n. Cuando no
se o_ga ningOn av_sa sonora, se debe o qua est6 desactivada.
Los ajustes de voiumen son LOW (bajo) -HIGH (alto) - OFF
(desactivada).
5:3
BOTONES DE OPCION
FABRIC SOFTENER (suavizante)
F_ Elsuevizanfese disfribuyeen e_enjuaguefinal,Esto
I Fa_c I
L_t_%_Jlavadoraest6d_seEadapare aborterague en el
enjueguemediante eluse de un s{stemade eniuegue
con roclodoQ chorroen loscMos NORMAL/CASUAL y
HEAVY DUTY. Presioneelbot6n FABRIC SOFTENER pore
cembier elenjuaguefinaide enjuoguecon roclodooi
enjuoguenormal pare que elsuavizentesee m6s eficoz.
NOTA: Seleccioneleopci6n FABRIC SOFTENER o EXTRA
RINSE sise usa suovizonteen {ascitiesNORMAL/CASUAL
VHEAVY DUTY, Si no seleccionauna de estasopclones,se
reduck6 enormemente Ioefecfivldodde_suavizente.
MY CYCLE (mi title)
My El bot6n MY CYCLE_e_rmite guarder un clcto
de lavado _rsonalkado pore utH_zaHoen afro
memento. De esta manera, podr6 guarder sus
a]ustes favorites de temperature, velc_dded de centrifugado,
nive_de suci_ad ydem6s opcionespareun cidoy,m6s
ode[ante, recuperartos con s61opresionor un bot6m
NOTA: S61opuede guarder un cidoo Io vez,Ai montener
preslonodoelbot6n MY CYCLE, se sobrescrlbir6cuoiquier
ciclopreviomenteguardodo,
Pare guerdm un tide _rsonalizado:
@Presione el bot6n POWER la lavodora,pore prender
O Gire Io del sele_or de cicto setecdonor
perHla pore
ele_doque desee.
Preslone el bot6n de MOD}FiCADOR DE CiCLO pore
camblar el oiuste deseodo.
O Presione el bot6n de OPCION DE CICLO pore ogregor
los opcionesdeseadas,
OMantengo presionodo ei bot6n MY CYCLE.
Pare recu_tar un ciclo _rsonalizado:
Presione el bot6n POWER pore prender le tovadore.
0 res_oneel bof6n MY CYCLE, Se mostror6n los o_ustes
guordodos,
0 Presloneelbot6n START/PAUSE pore que comience
el cic{o,
NOTA: Elcido personelizodose puede ajustorde Io mismo
menero que cuelquierafrocicb.No obstonfe,une vez qua
se presionecuo_quie{ottobot6n,elLED se epegor6 pare
indicerqua iosejustesya no coincldenexectemente con los
delciclopersonolizodo,
SOAK (remojo)
Estoopci6nproporclonoun remo[odo previo
max ] 80 minutes antes de que comience el ci¢lo
selecclonad& Use _oopci6n SOAK pare remoior
previemente _os prendos con e__n de effminor _osmenchos
difkiles de los prendos. A_ final de_ tiempo de remoio, el
c_cb seleccionado comenzor6 con _omismo ague usoda
poro elremoio.
DELAY WASH (lavado demorado)
[ #e_ay I D_pu6s de seleccioner el ciclo y IOSdemos
" wo_ ajustes, pr_ione este _t6n pore demeter e_
iniciodelciclode Iovodo,Code presi6ndelbot6n
oumento uno heraelfiempo de demote, osihos_o_9 horos_
Una vez _toblecido el fiempo de demote, presione el bc46n
START/PAUSE pore que comience o correr et Hempo de
demote,
NOTA: S_no so preslona el bot6n START/PAUSE pore que
comience a corre_ el fiempo de refreso, Io Iovodore se
opogor6 de formo emom6fico el cobo de cuofro minutes.
baton SPINSPEED.
@Presione e[ bot6n START!PAUSEpore prender[a
lavadoro.
Presionee_bot6n RINSE& SPIN,
selecclonor Ioopci6n NO SPIN,
OPres_one el bot6n START/PAUSE,
CONTROL LOCK (bloqueo de los €ontroles)
l° c_=i] Ufiilce esto opci6n porodeshobffitar loscommles_Esto
ii _ _ {und6n _mpldequa tos hires camblen los daleso moneien
ia m6qulne_Une vez oc_vodo el Noqueo de los contro!es,
esnecesorlodesoctlvorloantesde quasopueda usercuoiqu_erode
losconfreres,excep_oel bof6n de olimentoci6n. Uno vez opogoda Io
_ovode_o,el bot6n de eHmen_oci6npermiHr6 prender _em6quino,
pare loscomroles continuar6n Noqueodos. Cuendo los con_ro_eses-
_6nbloqueodos,e_mensoie_ oporecer6oltemotivomenteiuntocon
de 1o_controles.
FUNCION DE DRENAJE ESPECIAL
EstaIovodoroest6equ_padaconune{unci6nesp_cia_
diseSodoporequesuIovadoroseaIom6s seguropos_b_e.
SiIoievodoraentreen pauseo _ opego mientrasa0n heyagueen
Iofine,elaguesedrenor6trenscurridosvariesmlnutos.Estooyudoa
protegero _o_ni_osyo que reduceIoposibiHdodde quequedeague
en Iofine. LoIovodoro sepuede re_nicioren cua/qu{ermementoantes
de qua comiencee_drenaie.
Si no se reeiizo n_ngunoocci6n, oporecer6 el c6digo de erro_ dr
ysodrenor6elague de _ofine.En cuontolaIovodorocomience
e_procesode drenoje, sedeshobillfor6n los controlesyno so
podr6 interrumpir eilprocesode drenaie. Cuandose hayo drenado
completamenfe el ague,IoIovodoreseopegor&
NOTA: Enelpacepro_Ne supues_ode qua laIovodoropresence
un problemo que causequa se mues_reunc6digo de error en
pentollo,_oIovodorao_nas_drenar6_ronscurridosvariesm nufos.Sin
emborgo_s6_ose mostroroel c6digo de error odginaL
54
ADVERTENCiA: rata, uci,ol,e,godeincenaio,aos=,goo 0t ooelesiono,po.ono e,,leaycumplacompletamente
_te manualdeusay cuidado,inckryendolasinst_cclonesimportancessabreseguride_,antesdeponerenfuncionamientola lay°dora.
• Desenchufe_alay°doraant_ de proced_ asu limpiezeparaevitarpesiblesd_ca_as el_ctHcas.Si nosesigeeestaedvertencia,
?pdricmecosionarseriesgosde leslonesgroves,!ncendlo,descorgael6ctricoo, inc!u_o,rnuerte.
•NO_fice nunca_u_ quimlcosF_es_ fim_ a_s o_[sol_ _m limp_r _csla_. _or6n etacabad_
LIMPIEZA REGULAR
Limpieza dei exterior
Unoscuidadosadecuados prolongor6n la v_da OtHde me
lavadoro. Puede limpior el exteriorde _am6quine con ague
caliente y un detergente dorn_sticosuaveyno abrasive.
Umpie inmediatamente cua_quierdeft°me con un patio
suavey h_medo.
IMPORTANTE:No utHicea{cohotesde ffmpiezo, disolventes
ni productos s_mHares.No utiHcenunco _onamet61ican_
Hmpiodoresobraslvos; puedendoSar la superficie.
Cuidadoy limpiezadelinterior
UseunetooIIoo untropesuavepareHmpiarokededor
de Io ober_ro y de_cristol de Jotape de !e _ovodora.
Siempre saque _osprendosde _a_avadoro en cuento se
compiete el cicb_ Deior prendoshOmedasen _a_avodoro
puede ocasbnar _oaparki6n de errugas, transferendas
de cobry obres, UtiHceel cldo CLaN WASHERune vez
el rues,o m6s o menudo s_es nec_orio, pore eHminerJa
ocumulaci6n de detergente y dem6s residues.
Ciclo de limpieza de la lavadora
redola de Ioti_
Soque re_o
Agregueblonqueodo_condora Hquidouafro Hmpiodorde
tinesdis_odees_cificementeporelimpierIovodores,
Siusa blonqu_or conclara ffquido
Agregueb_enqueedorcon clara Hquidoel compo_imiento
de/Nenqueodor.
NOTA:Agregueunoraze de bJonqueodorJiquido_No excedo
ta lineade Henedom6×imoy no vierto blenqueodorHqu_dosin
diMr directementeen_otino.
- $i _a Jimpiadoresen polvo
Retire_oraze de dete_ente llquidoy ogreguee_ilmpiodor
en peevee_comportimientode favodo prlndpa_de in
goveto dei dispensation
- Siusa unJJmpladoren tabletas
|ngresela tablet° dkectamenteen la fin°.
NOTA:
•No ingreseelHmpiodoren tab_etosenIogavetade_
• No agregue detergente ni suovizonte o Io goveta del
dispensodorcuando useIoo_i6n CLEAN WASHER.
Almacenamiento de la lavadora
Si no se va a user la lavadora duronte un pedodo
prolongado y se encuentro en una zone de inviernos
rigurosos, reoHce los s]guientes posespare proteger Ja
_avadora de cuo_quier dose.
0 Gerre e_sumlnlstrode ague.
0 Oescone_e los mangueras del suministrode ague y
drenoie e_ague contenida en ias mangueras.
Enchufe el cable de alimentoct6n a una tome de
corriente conectadaa Herra adecuadamente.
Agregue 3,5 _tros de anHconge_onte no t6x_co de Hpo
RV en la tino vocia y derre Io tape.
Jo bom_ de deseg_Je. Deje que Io bombo de drene]e
funcione duronte un m;nuto y luego presione el bot6n
Iovadoro.
Oesenchufe el cable de aHmentoci6n_ el Interior
seque
de _atin° con un trope suave y cierre la tape,
0Retire los _nsertosde_ dispensodor, Drene e_ague de
_oscompartimientos y d6ielos secar.
0Nmecene In iovadora en pos_d6n verHcoL
Pera extraer et enticonge_ante de ia ksvadora tres e_
almacenamlento, eiecute uncido DE LAVADO EXPRES
complete usando detergente. No agregue rope o este
ciclo.
Eliminaci6n de la acumulaci6n de minerales
Siviveen une zone donde elague esdure,se pueden
former dep6sitos de mlnereles en los componentes internes
de Je_evodoro,Se recomlendeuserun descelcificedoren
zones con ecJUe aura,
Useun deslncrustante, coma Washer Magic ®, pare
el_m_nar_aocumu!oci6n visible de m_neroles,Despu6s de
des_ncrustor,ejecute siempre un clc_oCLEAN VVASHER
ent'esde preceder o laver tope.
Cuondo finelice ef ciclo_obre Io tape y deje qua e! interior
de lefinese seque comp_etomente,
NOTA: Utilicee_cMo de UMPIEZA DE LA LAVADORA uno
_z alm_ Sipe_cibeo}oro humedad omoho, utiliceeJcido
de Hmpiezo de to Iovodoro uno vez o {o semona duronte ires
semanos consecutivos,
Hmpiador pare ocero inoxldoble. NO ufilice nunce lone
met611ce niHmplodores abrasives.
Deje la tapa abierta
Si no vo o user Io _ovodora en varies dies, deie _atape
ebierte duronte In noche pare permitir que se seque le
t_no_
5:5
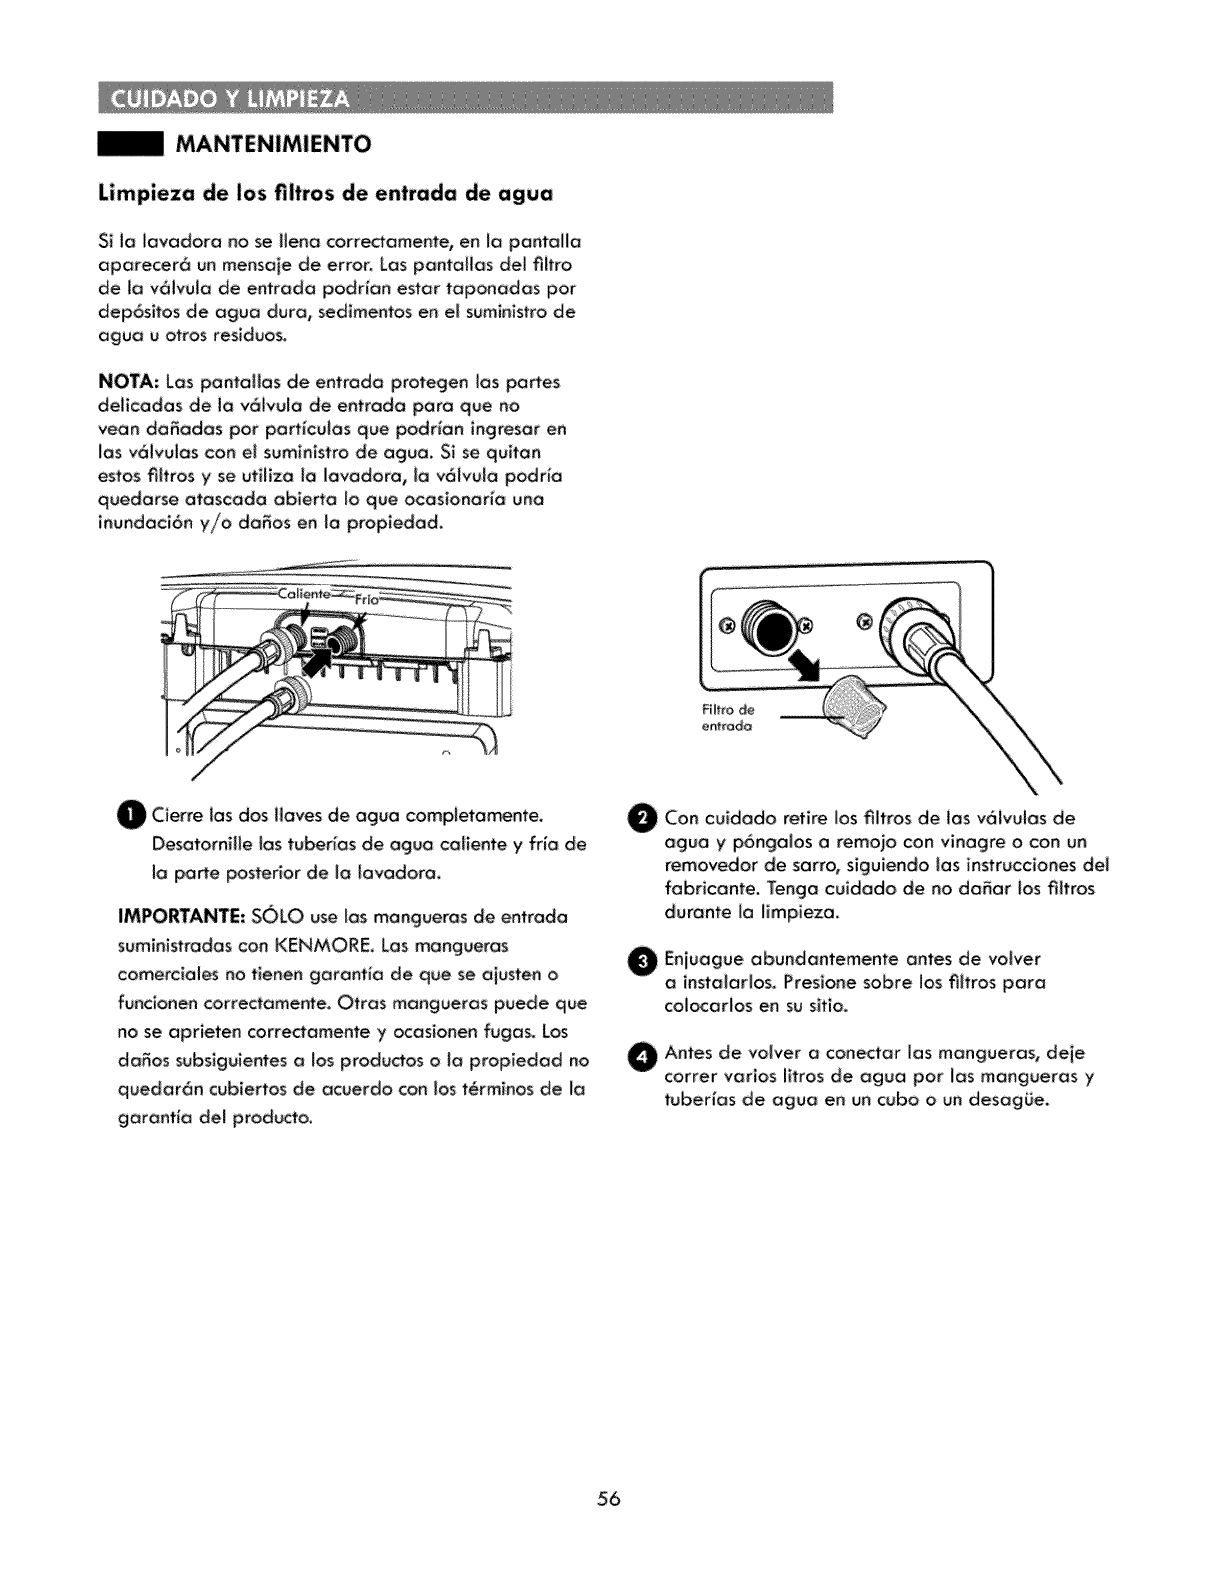
|MANTENIMIENTO
Limpieza de los fi|tros de entrada de agua
Si Ja lavadora no se llena correctamente, en la pantal_a
aparecer6 un mensaie de error. Los pantoHas del fiffro
de la v6_vu_o de entrada podr_an estar taponadas par
dep6sffos de agua dura, sedlmentos en el sumlnlstro de
agua u arras residuos.
NOTA: Los pantallos de entrada protegen los partes
deHcadas de lo v6}vula de entrado para que no
vean da_ados par porficulas que podrlon ingresor en
Ios v61vulas con el sum_nlstro de aguo. Si se quitan
estos filtros y se utilizo I0 lovadora, la v61vula podrlo
quedorse atascado obierta Io que ocQs_onarla une
inundaci6n y/o da_os en la propledod,
F_itro de
O Cierre los dos Ilaves de oguo completomente,
Desotornlile los tuberios de oguo callente y trio de
ia pa_e posterior de io Iovadoro.
IMPORTANTE: SOLO use los mangueros de entrada
suministradascon KENMORE, Los mangueras
comercioles no tienen gorontla de que se aiusten o
funcionen correctamente. Otros mongueras puede que
no se aprieten correctamente y ocasionen fugas. Los
doSos subsiguientes o los productos o Io propiedod no
quedar6n cublertos de acuerdo con los t_rminos de fa
garont{a del producto.
O
O
O
Con culdodo retire los filtros de {as v61vulas de
agua yp6ngalos o remoio con vinagre o con un
removedor de sorro, slgulendo {as instrucciones del
fabrican_e. Tonga cuidado de no da_ar los filtras
durante la [impieza.
Eniuague abundantemente antes de volver
a instalarlos. Presione sabre los fiitros para
colocorlos en su sifio.
Antes de voJver o conector los mangueras, deje
correr varlos litros de oguo par los mangueras y
_berias de aguo en un cuba o un desogOe.
56

LIMPIEZA DE _LAVADORA
Use adecuado de| detergente
Usar demasiodo detergente es uno de los causes habituales de los probJemas de lavanderia. Los detergentes act_les
est6n formu_ados para ser eficaces sin _puma visible. AsegOrese de ieery cumpilr _asrecomendac_ones de_ fabHcante
acerca de cu6nto detergente u_r en el _avado, Se puede usar menos detergente si el agua es blonde, _a cargo de ro_
es p_ue_a o fiene poca sucledad,
BETA: Use s61o detergentes de atta eficiencia y poca espumo. Podr6 idenfificor estos detergentes per e_ Iogotipo
HE.
Cuidado ylimpieza de la lavadora
f
Tapa: Limpie con un trope hOmedo el exterior yet interior y,
a continuaci6n, seque con un trope suave,
Exterior: Seque los derrames inmed_atamente, Limpie con
un trope h_medo, No toque la superficie de la pantalla con
objetos punzantes.
Mudanza yalmacenamiente: Sollcffe o un t6cnico de
mantenlmlento que sQqueel ague de los mangueros yde io
bomba de drena/e, Vuelva acobcar el btoque de espuma
de la tina pare proteger la _ovac!ora durante la mudanza,
No almacene la _avgdorQ donde pueda estar expuesto a _a
in_emperle,
Vacaciones largos: AsegOrese de que et sumln_strode
agua est6 corrode en Jos ffaves_ Siga los instrucc_ones
sila _avadora va o estor expuesta a temperaturos de
conge_aci6n,
Gaveta del dispensador: El detergente y el suavizante
pueden haberse acumulado en to gQveta del dispensador,
E×traiga la gGveto y los _nsertosy compruebe st hay
acumu_aciones una o dos veces per rues,
Saque Ja gaveta tirando de ella hasta que se
detenga. Levante la porte delantera de Ja gaveta y
sac ueJa ¢omp_etamente.
0Retire los insertos de los dos compa_imientos.
En_uogue los inse_os y la gaveta con agua templada
para d_uir los acumulaclones de producfos de
lavander_o.
Paro limpiar la abemura de Ja gaveta_ use un cepiffo
pequeSo que no sea met6_ico para Jimpiar el hueco.
Effmine fades los residues de la pa_e superior e
inferior del hueco.
O Vue_va a instalar los insertos en los compaflimientos
correspondientes y vue_va o colocar la gaveta,
Coloque _o gaveta en _a abertura en 6ngulo come
se muestra en la sigulente imogen y _uego b6jela y
desffce|a en su sltlo.
57

Siexperimentaolggnprob)ema con la lavadora, podr6
transmltir dates o troves de_ tei_fono con el equipo
Kenrnore Connect. As_podr6 habIar d_rectomente con
nuestros t_cnicos especiaffzados_ El t_cnico grebe los
dotes tronsmlt_dosdesde )o m6qu_na y)as utiHza pore
Qno_izar e_prob)emo, ofreciendo un diagn6stico r6pido
yeficaz.
Connect cuando se [o pida el equ_po de Kenmore
Connect. Los son_dos de transmis[6n que olr6 son
normales y suenan de forma parec_do aun equipo de
fox.
Kenmore Connect no se puede activar csmenos que
la _avodora se enclendo pu_sodo e_ _t6n POWER.
Si la Iovadora no se puede encendert la soluci6n
de probtemas deber6 ffevorse a cabo sin uHIizar
Kenmore Connect.
Use del sistema Kenmore Connect TM
Primero, comuniquese a) I_800-4_MY-HOME® (1-800-469_4663). Si el nOmero de) te)_fono que est6 utffizoncto est6
en el orchlvo, y se asoc_a con la )avadora, usted ser6 retrcmsmitido r6pldamente a un agente de) equipo Kenmore
Connect. S_ga )as instrucclones de) t_cnico y sigo estos poses cuando se )e solicffe.
MANTENGA el micr6fono del tel6fono sobre el bot6n de ENCENDIDO, cuando el centre
de Ilamadas se to soilcite, a no m6s de 2,5 cm (pete sin tocar) la m6qulna.
NOTA: No pulse ning_n otro bot6n ni gire el monde del selector de ciclo.
MANTENGA PULSADO el bot6n de 'WASH TEMP mientras sigue sujetando el telafono
sobre el bot6n POWER.
ESPEREAESCUCHAR tres pitidos. Tras escuchar los tres pffldos, suelte e) bot6n de WASH
TEMP. Mantenga e) tel_fono en su sffio basra que haya termtnado I_ transm_st6nde tones.
Esto tarda unos 6segundos y en la pantalla aparecer6 e_rec:uentode Hempo. Una vez
flnaffzada la cuenta atr6s y cuando los tones se hayan detenido, reanude su conversaci6n
con el t_cnlco que _epodr6 ayudar a utiffzar )a _nformaci6n transmff_da para e_an611s_s.
NOTA:
•Paro obtener meiores res_ffados, no m_eva el te!_fono mientros se est_n tr_smitiendo los
tonos.
•Si e_ _gente de) centro de Ilam_das no puede grab_r con precisi6n _os datos_ qulz6 le
p_da que Io intente de nuevo_
58

SONIDOS NOR_LES QUE SE PUEDEN ESCUCHAR
Los sigulentes sonidos se pueden o_r mlentras la lava-
dora est6 en funclonamlento° Son ruidos normales°
Clics:
Rel_ del bloqueo de la tape cuando _atape se traba
y destraba.
Rociado o sibilante:
Ague roci6ndose o clrcuJando durante e_cida.
Zumbido o botboteo:
La bomba de drenaie bombeando ague desde la
lavadora durante un cido.
ANTES DE SOLiCiTAR ASISTENCiA TECNiCA
Su tavadora est6 equipada con un sistema autom6tico de monitorizaci6n de errores pare detectar y diagnosticar
problemas en una fase temprana. Situ lavadora no funclona correctamente o no funciona en absolute, comprue-
be Io slguiente antes de framer al servicio t_cnico:
Ruido Objetos e×traSos, coma lioves, monedos, o Detengo I0 lavadora, compruebe Ja tina y el flitro de drenoje en
imperdib_es, pueden ester en la tino o en la busco de obietos extra,as. Si despu_s de reiniciar io lavadora el
traqueteo bomba. .................................... ruido con_in6a,flame a! servicio. ...................
_nido de Los cargos de prendas pesodos pueden Es$oes normal. Si el sonido continua, es posible que ia lavadora
gol_s produck un sonido de goJpes, est6 desboJanceada. Det6ngalo y redistribuya la cargo de
lavado.
Es posible que _ocorga de to lavadora Pause el ciclo y redistribuya _ocorga despu_s de qua Jotape se
desjr@e::
No se hen reflrado todos los motedaJes deJ
Es posib_e que Io cargo de {evade no est6
uniformemente distribu_do en Ja tino,
No todas los pates niveiodores se
encuentran opoyedas firmemente en ei
Consuffe Io secci6n DESEMPAQUETADO Y DESEMBA_JE DEL
MATERIALDE TRANSPORTE en los requisites de insta_oci6n_
Pause eJ cicto y redlstribuya _acargo despu_s de qu_ la tope se
destrabe_
C®sulte ]o secci6n Nivelaci6n de la Javodora en los lnstrucciones.
A_g_rese de qua ei piso sea s6ffdo yno ceda_ Consuite la
E/piso no es Io suficientemente rlgido secci6n Tipo de p_soen Reguisitos de instaJaci6n_
Compruebe Jesmangueras en busco de fugas, grietas y ruptures.Le conexi6n de Jasmengueras de ogue
no est6 bien encojoda en la Hove o en la
lavodora_
Los _berias de drenaie de la cosa est6n
La manguera de drenoie se ha soJido del
drenoje o
no est6 insertodo Io suF_ciente,
Une prenda grende_ coma una almohada
o un coberto5 est6n sabre I_ parle superior
de Io fine.
La tavador_ no se ha descargedo
inmediatamenteo
L.a tavadora est6 sobrecargada_
Las mengueras de entrada de egua frfa y
caJiente est6n invertldas_
Arrugas
C_pruebe y apriete los conexiones de Jasmangueros,
Lo lavadora bombeo ague muy r6pldomente_ Compruebe si
detente eJ drenoje, el ague vuefve hacia atr6s y se sole de Ja
_berla de drenaje_ Si ve ague saliendo det desagLie, comprue_
que le instoJaci6n de Jo mo_guera de drenaje es cortege y
busque si hay algOn taponamiento en eJ desogge. P6ngese en
contacto con un plomero pare reperar la tuberla de drenaje_
Amarre Io monguere de drenoie o la monguera de entrado o
o uno tuberla ilia pore impedir que _ pueda salir durante eJ
drenaje. Deberlo ester insertado al rebo_de entas tuberlas de
drenaie m6s pequeSes o el reborde deberla ester insertodo entre
3 y 5 centlmetros en _atuberia de drenaje.
Use eJ ciclo BULKY/BEDDING pare Jasprendes grandes o
voiuminosas. Tonga touche cuidado ynunc_ lave m6s de I_ mitad
de Ja cargo con prendas que flatan, coma los a_mohadas_
Pore _ lav_dora y compruebe _ac_rga. AsegOrese de que la
cargo no sobre_gs9 Ja porte superior d e !9 t!na:
Siempre saque Jasprendas de Ja Javadora en cuanto se complete
eJ cicla.
La lavadora se puede cargar completamente, perola fin_ no
debe estar abarrotada con prendas, La tapa de ta Javadora se
deberia cerrar can faciJidod,
E_en_uaguecan agu_ caffente puede hacer apareeer arrugas en _as
_rendas. Cgmp[ue_ !as conex!on_.de Jasmangueros de entrado_
59
ANTES DE SOLICITAR ASiSTENCIA T_CNICA (continuaci6n)
Exceso de espuma Demaslado detergente o detergente Losdetergentes HEest6n farmvladoses_: e
inadecuado, pare Javadoras de alto e£_:ie_ciay conti_ e_tes
_bre _ascanfidades de deterge, c®sulte la _cd_
Instr_i_s.
Manchas
La lavadota no se prende.
NOTA: Si la lavadora se
detiene durante un ciclo
debido a una interrupci6n
en ei suministro eJ6ctdco,
la lavadora confinuar6 e!
clclo en el punto donde se
detuvo cuondo se resfaure
el sumini_ro.
E_bJonqueador o el suavizan,te se hen
distribuide demastado pronto,
de _avado en la tina,
Lo Javadora no se descarg6
inmedJatamente,
La ropa no se agmp6 correctamente.
El cable de aHmentad6n no se ha
enchufodo de farina ade_oda.
ha fundldo el fusible., ha saltado el
disyuntor o se ha producido un carte
de sgministro eJ_ctrica _ la vivienda,
Se ha fundido ei fuslble, ha saltado
el disyuntor, debldo a la canexi6n
de varies etectrodom6sficos en una
misma tome de corHente.
El comparfimiento deJdispensador se ha
sobreHenado Io qve ha ocasionado que e!
b_onqueodor ae_suavizante se distribuyan
inmediatamente, S_EMPREmida el blonqueador
pare evitar el sobrellenado - vna taza a! m6ximo.
distribvyera inmediatomente,
correctamente en el momenta adecvedo de_ tide,
Slempre Javabs _bres osaJros_rados _ los
coloresclam_ y _ b_ar_Jos_ara e_¢itarJa
Nunca lave prendas con touche sucledad iunto con
arras con pace suciedad,
CA, 60 Hz ytres daviias con tome de tierra,
es une sobrecarga deJ drcuito, haga que Io
soiucioneun eledridstacuaiificado_
Reinicle el disyuntorosustituyo el fuslble. Si hay
m6s de un electrodom6sfico conectado o Iotome
de corriente, flame a un electrieisto pare que le
instoIe un circuito odicional.
El title de lavado tarda La lavadora aiusta de farina
m_s de Io normal autom6ticaeltiempo de lavado en
funci6n de la cantldad de rope pare resuffados 6primes pare el ciclo selecci®ado. El
tavor, la presi6n del ague y dem6s tiempo restante que se muestra en la pantaffa es
candldones de funcionam_enfo, s61ouna estimaci6n, E_tiempo rea_ puede verier.
elate humedad omoho en _ ha estado usondo demasiado Use s61odetergente de alto eficiendo (HE) de
ia iavadora detergente o un detergente acuerdo con los instrucdones de! fabdcante.
inad_uado,
E_interior de !a tina no se lay6 Eiecute el cido de limpieza, CLEAN WASHER, con
corre_amente,
Fugas de ague Exceso de espuma de detergente. El e×c_ de e_ma puede provocor flagas_y
#Jade ester _asionado _r el ripe y_a_nfidad
de d_ergeme usodo. $6to se recamienda e_usa de
detergente de afro e_eien¢ia. Aseg0re_ de q_
el detergente y cvalqgier aditivo _ agregan a l_
comp_#imi_os ade_od_ del dis_n_dor, Le
co_idad de deterge_te normal qua _ de_ u_r est6
entre una !/4 pe#e y ta "1/2de _a_idad m6xim_a
recomendada _ el fabricate del detergente
Siempre redvzeo le contidod de detergente si_ cargo
espeq_eSoo tiene_o suciedad,o sie|ogua
mvy bloke. Nur_cau_ m6s de ksca_idod m6xlma
recomeed_a _ el febric_nte del deerge_e.
60,

|ANTES DE SOLICITAR ASISTENCIA TECNICA (continuaci6n)
La lavadora no
funciona
La lavadora no
se llena de agua
correctamente
E_pane_ de cont_o_ se ha apogado debldo a
lo inactMdad,
La lavadora est6 desenchufada,
E_suminlst_o de ague est6 cerrado_
Los controtes no est6n a_ustados
correctamenteo
La tam est6 abierta
E_disyunto_ ha saltado o el fusible se ha
fundido_
Se debe re;n;e_ar el control
No se presion6 START/PAUSE despu_s de
ajustar un ciclo.
La presi6n de_ ague es e×_remadomeete boja,
La Iovodora est6 demosiado fr_a,
E_fiffro est6 taponado.
Los mongueras de entrada pueden ester
rotor€ides
Ef_cienc_a energ6fica.
_nsuficiente sumin_stro de ague°
La tape de la iovodora est6 abierta.
Los manggeros de entrada de ague ffia y
eo_tente est6n inve_idas.
E_nivel de ague est6 demosiodo bajo,
Esto es normal, Preslone el bot6n POWER pare
prender la k_vadora.
AsegOrese de que el cable est6 correctomente
enchufodo en una tome de corr$ente que funcione.
Abro completamente los dos iiaves de ague fria y
caiiente,
AsegOrese de que el ciclo se ajust6 correctamente,
cterre Io topo y preslone el bot6n START/PAUSE,
La lavadora no funcionar6 sila tope est6 abierta.
Cierre _ tope y asegOrese de q_e no hay node
atasc:ado bajo la totoa q_e impida que se eierre
Comprgebe los disy_ntores y f_sibles de Io case.
Sgstffuyo lOS fgs_bleso reinieie el disygntor. La Iovadora
deberia ester en un ramal de circ_ito ded_cado_Lo
tovadora continuer6 el c_clo en ei bgar en qee se
detuvo uno vez restourado lo olimentoci6n.
Presione el bot6n POWER_tuego vgelva o se_eccionar
_i_c_c_ deseado y presione el bat6n START/PAUSE,
Compruebe afro ilove de la case pore osegurarse de
que Io prest6n de_ ague es Io odeeuodo,
Si la lavodoro ha estado expuesta a temperatures
par debaio de_ p_nto de conge_aci6n durante un
pervade prolongodo de tiempo, permita que se
e_llente antes de presionar el bot6n POWER. En otto
ease, [a pantalla no se prender6,
AsegOrese de que los _ffros de entrada de los
v61vulas de Itenado no est6n taponados, Consglte los
instrucc_ones de llmpleza de _[tros.
Compr_ebe q_e los m_ngueras de entrada no e_6n
retorcidos n_ ot_s_adas,
Esta es un_ lavadora energ_ticomente eficiente,
Par le t_nfo, los o_ustes de temperature pare esta
lovadora pueden set distlntos de los lavadoras que
no son efie_entes energ@tieomenfe,
AsegOrese de qee los Ilaves de aggo trio ycoliente
est6n comp_etamente ob[ertas,
L_ lavadora no funelonor6 si Io tape est6 ob_er_a,
Cierre _o repay asegOrese de q_e _o hay node
moscodo bajo Ia tope qge _mpida que se c}erre
Compr_ebe los conexiones de los mangueras de
entrado_ AsegOrese de que e_ sumintstro de og_o
¢a[iente est6 conectodo ala v6[_u[o de entrada de
agu_ caliente yde que e_ sumi_tstro de ague fria est6
coneetado o _a v61vu[a de entrado de ague trio,
Esto Iovodora es de alto eficienci_ Normolmente et
ague no cubrt_6 [as prendas. El nivel de ffenodo est6
optimizodo pore el movimiento de Javodo y, de esta
monera_ Iograr el meier rendtmlento de lovado,
6]
ANTES DE SOLICiTAR ASISTENCIA TECNiCA (continuaci6n)
La lavadora La manguera del drena_e est6 Aseg0rese de que Ja mQnguera de drenaje no est6 retorcida.
no drena retorc_do. Aseg6rese de que ia manguera de drena_e no est_ a una
E! desag_e est6 ub_cado a una affura affura superior a _os 243,8 cm (8 pies) pot encima de la
superior a _os 243,8 cm 18 pies) pot parte _nferior de la lavadora yque no est_ auna distancia
encima de_ piso. superior a los _ metros 15 pies) de la lavadora.
Mala No se _Ieccionaron las opc_ones
eliminaci6n de adecuados.
las manchas meiorar el _der de ffmp_a de[ cic[o seleccionado.
Las prendas que se ban _avado anteriormente pueden tener
Manchas asentadas previamente.
Q
mano o _a apffcaci6n de un tratamiento previo que aygde a
eliminar las manchas.
Ei La tapa det dispensadar del AsegOrese de que la topa del dlspensador del blanqueador
blonqueador no est6 insta_ada est6 eorreetamente instalada yblen cerrada en su sitio antes
no se correctamente, de ¢omenzar el cido,
E! dispensador del b_anqgeador est6
se aeumulon dentro dem dispensador pueden impedi_ la
correcta distribuci6n deJ blanqueador,
Premature El dispensador de[ blanqueador est6 No puede almacenar el blanqueador en del dispensador
dlstribu¢i6n relleno para una earga futura, para un future use. El blanqueador se distribuir6 en cada
del carga,
Sabreilenado del dtspensador del El sobrellenado dei dispensador de blanqueador ocasionar6
blanqueador, que el blanqueador se distribuya inmediatamente, io
que daSar6 Jasprendas en ta tina, $1EMPRE mida el
pero nunca agregue m6s de una taza,
Compa_imientos de detergente A_g6re_ de que el detergente ylos aditivos se Qgregan
o nin_una taponados deb_do a un re[[enado a [as eompartimientos adecuados de[ di:s_n_dor. Si u_
dlstrlbuci6n de incorrecto, detergente ffquldo_ asegOrese de que la taza para el detergente
Fugas de
Se us6 demasiado detergenfe.
Ins_ciente sum_n_strode agga.
Residua normal
Las mang_eras no est6n tnstaiadas
correctamente,
llquido y el inserto est_n eft el compa_imiento de d_ergenfe.
Si u_ detergente en _vo, asegOrese de que no _ usen la
tara _ra el detergente llquido ni e_ insetto. Para todos los
fipos de detergente, aseg0rese siempre de que _a gaveta deI
dispensador est_ totalmente cerrad_ antes de_ inicio del ciclo.
Aseg_rese de usa_ la eantidad de detergente sugerida en _as
reeomendaciones de_ fabricante. Para evita_ taponamientos,
HE (alta e_eiencia).
NOTA: Siempre use la menor cantidad posib_e de
detergente. Las lavadoras de alta eficiencia reqgieren
rendimiento del lavado ye! en_uagge_ ypuede ¢ontr_bu_r a
la apariei6n de o_ores en la lavadora.
Aseg0rese de que ias llaves de agua fr_a ycaffente est_n
eompletamente abiertas.
puede tnte6ertr en _a dlstrlbuci6n norma_ de _os productos.
Consuite I:as instrucctones de Itmpleza.
Compruebe todas las cone×iones de las mangueras de
entrada ydrenaie papa asegurarse de que est6n a_st_das y
seguras.
62
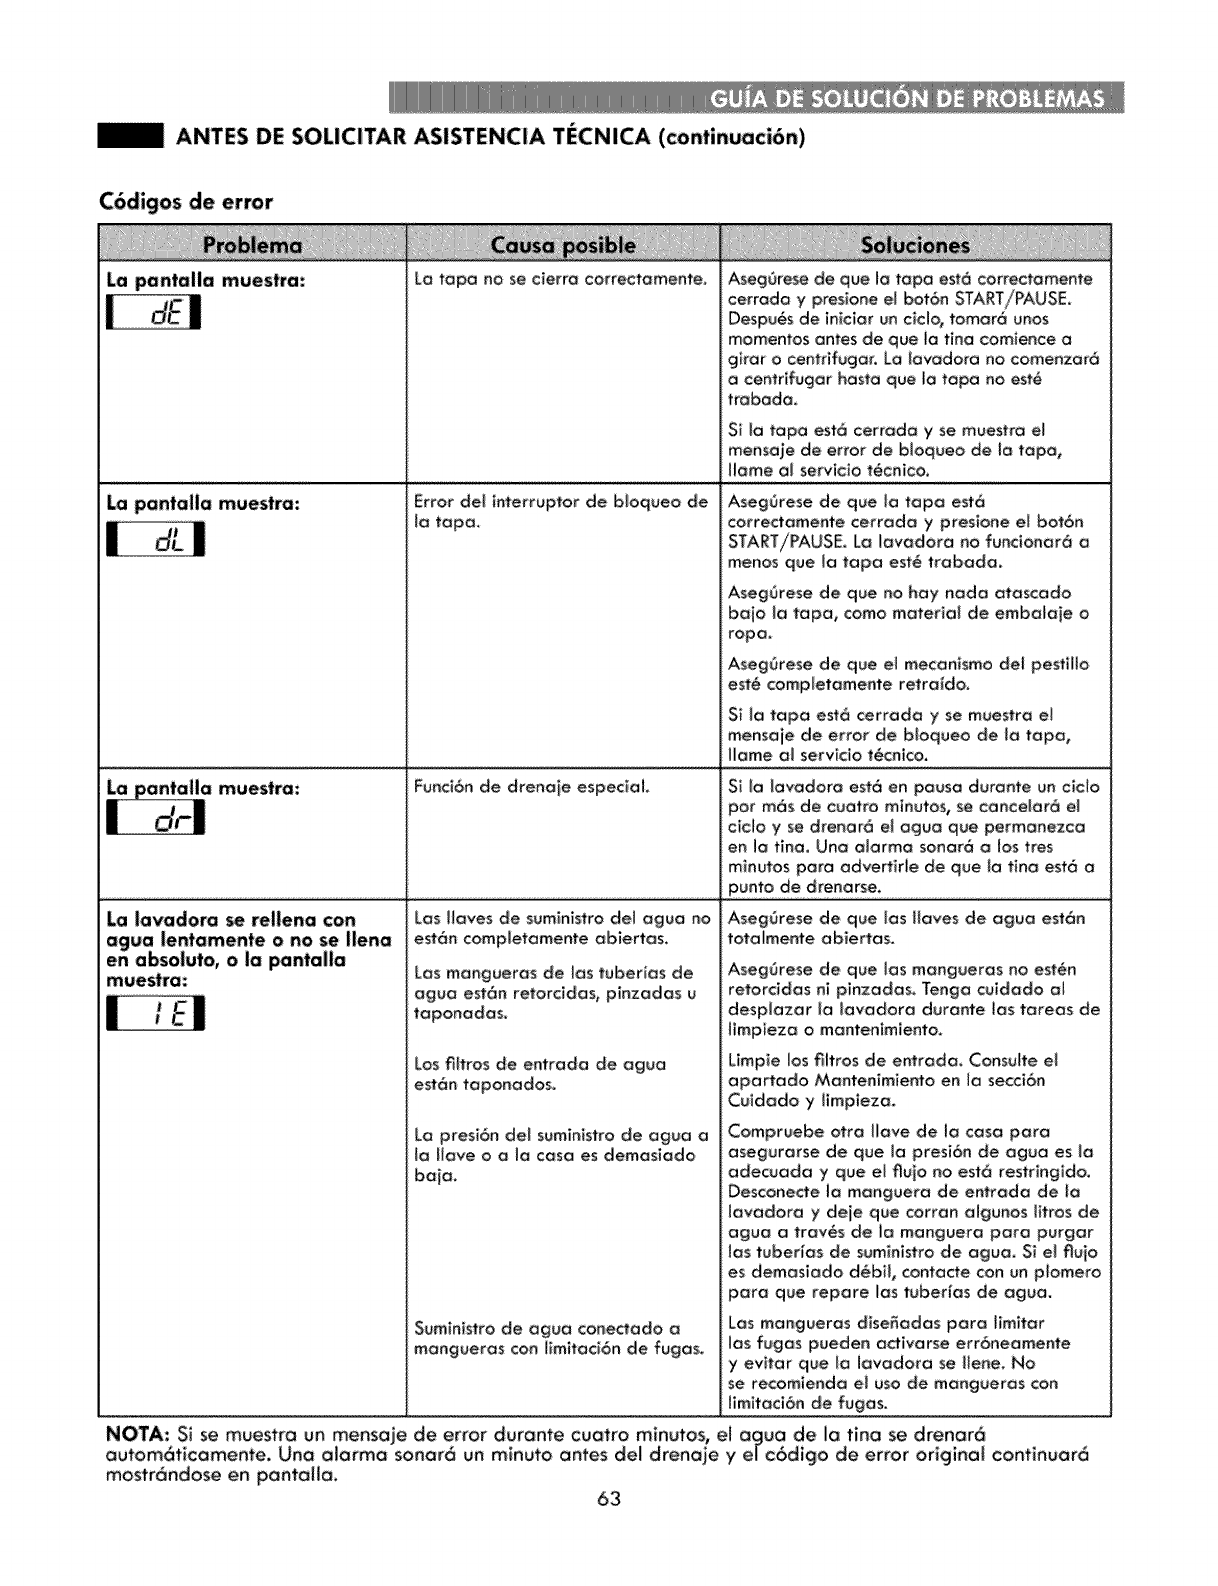
|ANTES DE SOLiCiTAR ASISTENCiA TECNICA (continuaci6n)
C6digos de error
La pantalla muestra:
La pantalia muestra:
Lo tapo no se cierro correctomente_
Error de_ interrupter de bloqgeo de
Io tope.
Aseg0rese de que la tope est6 correctamente
cerrada y presione el bot6n START/PAUSE,
Despu_s de inicior un cicmo, tamer6 unos
mementos antes de qua _o tlno comience a
gtrar o centrifuger. Lo _evadora no comenzer6
a centrffugar haste que _e tope no est_
trabada,
Si _e tape est6 ¢errada y se muestre el
menseie de error de bloqueo de io taper
llama el servicio t_cnico,
Aseg6rese de que lo tape est6
corr'ectemente cerrede y presione el bot6n
STA£T/PAUSE Le Iovadoro no funcionar6 o
menos que le tope est_ trebodo.
Aseg6rese de que no hay node atascedo
be{o _e tope, coma materiel de embeloie o
rope.
Aseg6rese de que el mecanismo del pestiHo
est6 completemente retre_do,
Si le tape est6 cerrede y se muestre e_
menseie de error de bloqueo de ie tape,
flame el ser,4cio t6cnico,
muestra: Fund6n de drenoie especial. S_ Io lavadora est6 en pause durante un c_clo
La iavadora se reilena con Los lloves de suministro det ague no
est6n ¢ompletomente ebiertes,
Los mongueres de los tuberias de
ague est6n retorcides, pinzedes u
repertories.
Los filtros de entrado de ague
Le presi6n del suministro de ague o
Je Hove o ole case es demosiedo
boie,
Sumin_stro de ague c:onectado a
mengueres con Hmitect6n de fuges.
muestra:
per m6s de cuotro m_nutos, se cence}er6 el
c_clo y se drenor6 et ague qua permanezca
en la t_na.Una alarma sonar_ o los ires
minutes pare edvertMe de qua _e t_na est6 e
punto de drenarse.
AsegOrese de que los ffeves de ague est6n
totelmente ebiertes.
Aseg6rese de que ies mengueres no est_n
retorcides ni pSnzedes. Tengo cuidodo el
desplezer la lavedoro duronte _es toreos de
timpiezo o menten_miento.
Limpte 1as fiffros de entrada, Consuite el
opertedo Mentenim_ento en la secci6n
Cuidodo y limpiezo.
Compruebe otre Have de le case pare
esegurerse de que !e presi6n de ague es te
edecuede y que el fluio no est6 restring_do.
Descenecte Jo monguera de entroda de to
movedoro y deie qua carton olgunos fftros de
oggo o troves de Io menguera pare purger
los tuberios de sum_nistre de ague, Si e_ fiu{o
es demesSedo d_bH, contecte can: un p_omero
pare que repore _es tuber_es de ague.
Los mangueros diseSedos paro timitor
los fugos pueden a_ivarse err6neomente
y evffar que la levadora se Hene.No
se recomtende el usa de mangueres con
NOTA: Si se muestra un mensaje de error durante cuatro m_nutos, el ague de _afine se drenar6
autom6ticamente. Una aJarma sonar6 un minute antes del drenaie yerc6digo de error origina_ continuer6
mostr6ndose en pantai[a. 63
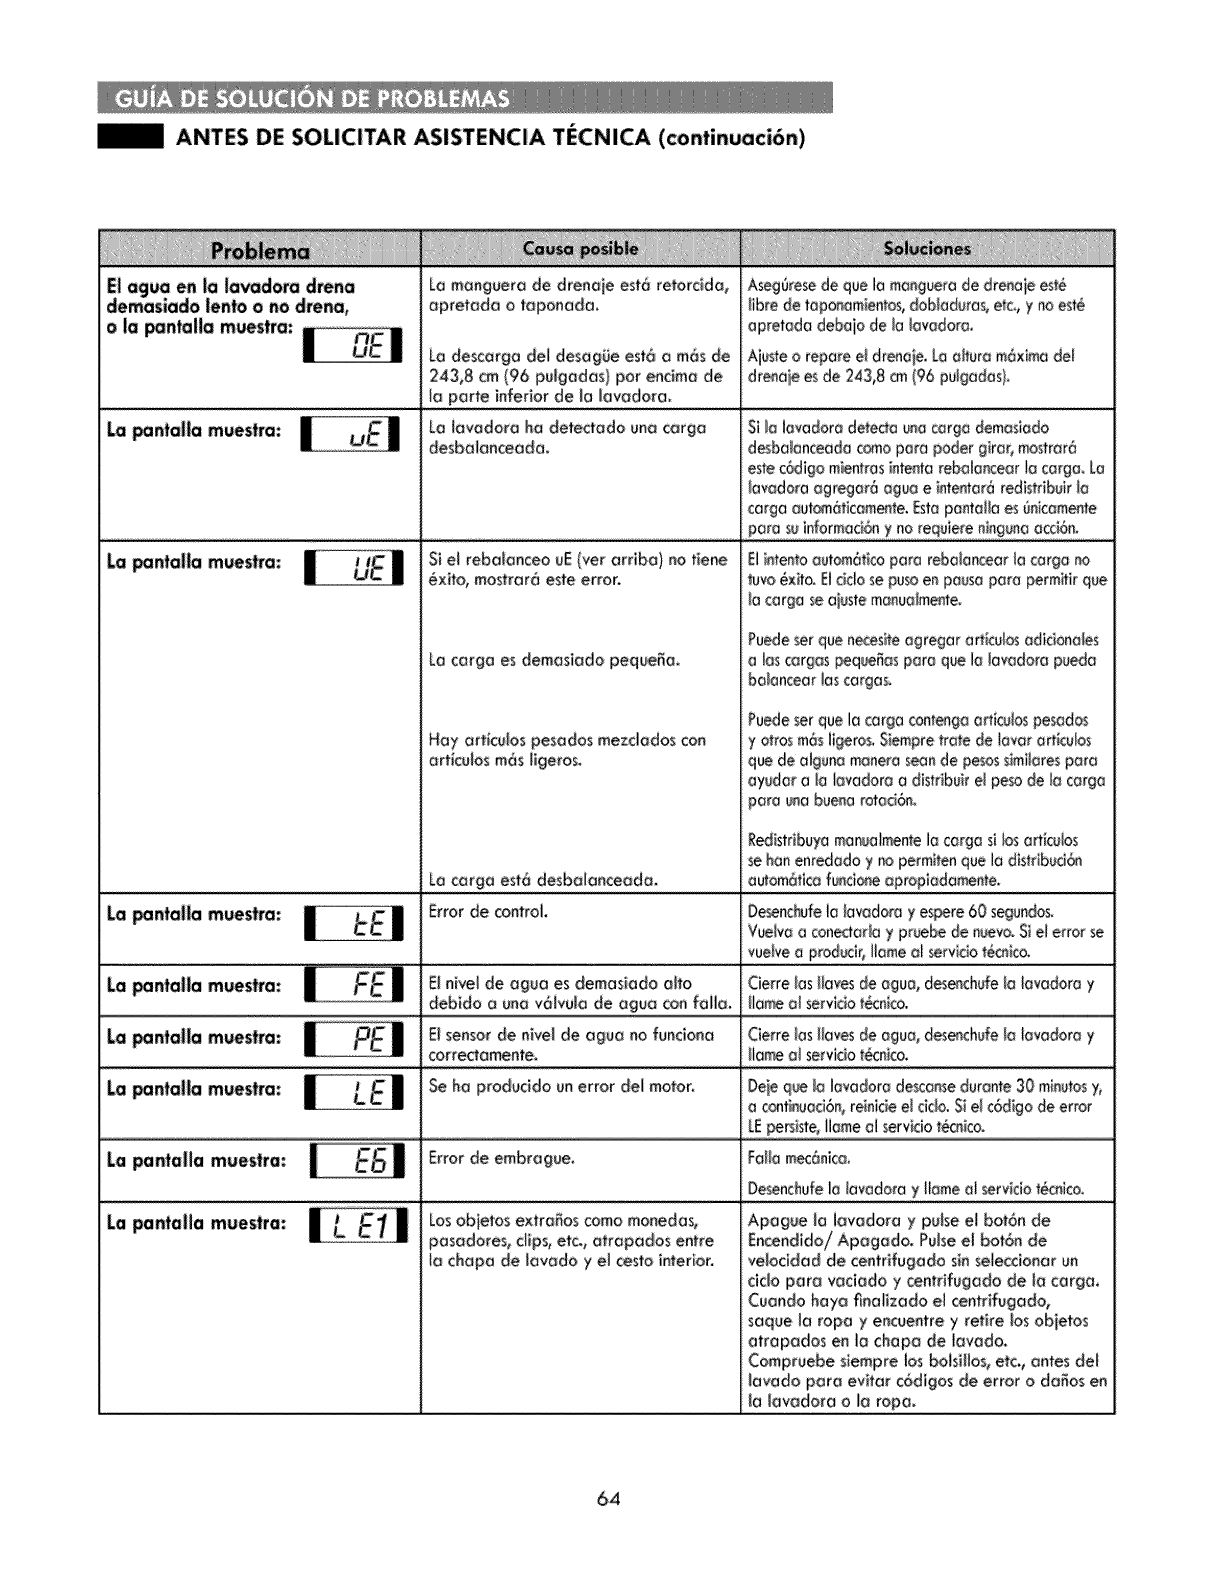
jjjjjjjj_ ANTES DE SOLICITAR ASISTENCIA TECNICA (continuaci6n)
La manguero de drenoje est6 retorcida, Aseggresede qua I0 manguerode d_eneiees_
fibre de taponami_tos, doNeduras,etc, y r_oest_
o|a pantalia muestra: apretada debaio de JaInundate.
Lo descorgo del desagge est6 o m6s de Aiu_e o repore e_drenaie,Lo oEturom6x_madel
243,8 cm (96 puJgodosi par encime de drenaie esde 243,8 _ (96 pulgades)_
. lo porte inferior de la lavodore.
La pantalla muestra: Le [ovedora ha detectado uno cargo Si_alavadora detectaunocargo demosiodo
desbo[anceoda, desba_anceadacomapore peder giror_mastror6
estec6digo mientrasintentareboloncear_ocorgo_La
lavadara agregar6 ague e intentar6redistrlbuir_a
cargo aut_6ticam_te, EstapanteHeesgnicamente
pare soinfarmaci6ny no requiereni_gunoo_i6_
La pantalla muestra: St el rebolanceo #E (vet arr_bo) no tiene Elintentaautom6ticepare reboianceor_ocargo
_×#o, mostrar6 este error, tuvo_xita_Elcido se poseen pausepare permiti_que
la cargo se aiustemonuolmente_
Puedeset queneces#eagregar arficubs odicionales
Lo cargo es demos.iodo peque_o, a loscarga_peque_aspare que la lavadoro pueda
Puedeserque k_cargo contengaorticuJospesodes
Hay ort_cglospesodos mezdados con y arrasm6sligeras.Siempretrote de !over ort_cubs
ort_cuiosm6:sfigeros, qua de algunamaneraseende pe_s $imiJorespore
ayudor o la lavadora a distribukel pesode Io cargo
pare unabuenarotod_
£edistdbuyamanualmentela cargosi losattitudes
sehenenredada y no permitenque Io distrlbg¢i6n
.......... La cargo est6 desbolonceodo_ autom6ticafunci_e aprop!odam_te_ .....
La pantaiia mues_a: Error de control De_nchu_eia lavadora yes_re 60 segu_dos.
Vuelvaa cone_ada y pruebede _vo. Sie_error se
La panlalla muestm: ElniveJ de ageo es demosiodo alto Cierre Insltavesde ague, des_chufe la Iovodora y
debido o one v6ivgJa de ague con feffo, itomea_serviclat_cnico_
La pantaila muestra: E_sensor de nlve[ de ogu_ no funclono Qerre losflares de ague, desenchufe_alavedora y
corredome_te_ iiameat serv$ciot_cnico_
La pan.tie muestra: Se ha prod_cido u# error deJmotor. Deieque _alavadora desca_seduronte30 minutesy,
a canfinuoci6n,reinicieel cido. Sie! c6digo de error
LEper_iste,Ilomeal serviciot6cnico.
La panlalla muesffa: Error de embrogoe. F:ollamec6nica_
Desenchufe_a[evadorayflameor servicio_nico.
La pantalla muestra: Los obietos extraffos come monedes,
pasadores, dips, etc., otrapodos entre
!o chopo de lovodo y e_ cesta interior.
Apogee la lovodoro y po_seel bot6n de
Encendido/Apogado. Pulseet bot6n de
vebcided de centrifugodo sSnse_eccionorun
ciclo pore vododo y centrifugado de Io cargo.
Cuo_do hayo flno_izodo el centrifugado,
saqoe la rope y en_ue_tre y retire los objetos
otropodos en _achapo de _ovado.
Campr_ebe siempre los boisillos_eta, antes de_
_avado pore evitor c6digos de error o dares en
Io Iovodora o Io rope.
64

Garantia limitada de Kenmore Elite
POR UN At_-lOa partir de _afecha de venta, este eJectrodom6stico est6 cubierto por Io gorantio contra defectos
de rnateria_ o mano de obra cuando la instataci6n, operaci6n y mantenimiento de_ e_ectrodomestico son
correctos y siguen todas los instrucdones sumlnist_das.
JUNTO CON _ PRUEBA DE VENTA, ef eWectrodomestlcodef_uoso reclbi_ sin cargo su reparaci6n o
reemp_azo, a o_i6n det vendedoro
Para solicitor serY'icloen garant_a, comuniquese ak 1-800-4-MY-HOME® I1 _800-469-4663).
Esta co_gra de garantia apllca s6_o pot 90 digs a _ir de la fecha de venta sl el electrodom_stico es
ufilizado pare otto fin que no sea de uso dom_stico.
Esta gamntia cubre Onicamente los defectos de material ymano de ohm, y NO pagan:
1.Etementos consumibm_ que puedan desgastarse debido al u_ no_a_, induyendo entre otros, los fiffros,
correas, bombiffas y bolsas ex_aibles.
2.Un tecni_ de serv_cio_ra ense_r at usua_o la instalaci6n, funcionamlento o mantenimlento correctos del
3.Un t_nlco de _r,,icio pare reafizar labores de llmpieza o rr_ntenlmle_o del producto.
4.Da_os oaverias como co de no _uir todas las instruccionesde instaJaci6n, fl.sndonamiento o
mantenimierrto _nduldas con el producto.
5.Da_os o averias en ca_ de accidente, abut, uso inad_uado o u_ con pro_sitos distintos a los fines para
_osque el productofue dise_ado°
6.Da_os o over,as en ca_ de uti_i_r detergentes_ limpiadores, s,Jstanciasquimicas o utensifios distintos a bs
recornendados en los ins_Jcciones induldas con el p_ucto.
7.Da_os o _las de I_ _mponente_ o sistemas como resuffado de modifi_cion_ h_has s_nautorizaci6n a este
producto.
De_scargo de res_nsabi|idad de gamntias implicitas; limitaci6n de acciones lega|_
El 0nlco y exdusivo recu_o del diente _io esta garantie ffmltada ser6 _areparaci6n de_ producto como se
indica en la presente. Los garant_as imp_citas, ind_yendo garantias de comerciabi_idad y aptitud pare un
objetivo partlcu|ar, se encuentran _mitadas a un aho o el periodo m6s corto permitido mr |a _ey.Sea_ no
sera responsabte de los da_os incidenta_es o derivados. Aigunos estados yprovincias no permiten _a
exciusi6n o fimltaci6n de da_os o_imitaciones inc_dentaleso resultantes, o limitaciones sabre la duraci6n
de garantias impiicitas o de comerclabffidad o aptitud, pot io tanto ias llmltaclones o exciusiones anteriores
pueden no apticarse en su caso.
Esta garantia podr6 apllca_e s6_osi este e_ectrodomestico se utifiza en los Estados Unldos.
Estagarant_a le otorga derechos legales espec_ficos,y usted tambien pgede confer con otros derechos,
que pueden variar de estado aestado.
_Brands _nagement Corporation, Heffman Estates, IL 60179
J
65

66

67

Your Home
For troubleshooting, product manuals and expeR advice:
www.managemylife.com
For repair - in your home - of all major brand appliances,
lawn and garden equipment, or heating and cooling systems,
no matter who made it, no matter who sold it!
For the replacement pars, accessories and
owner's manuals that you need to do-it-yourself.
For Sears professional installation of home appliances
and items like garage door openers and water heaters.
1-8004-MY-HOME ®
Call an_ime, day or night (U.S.A. and Canada)
wv,rw.sears.com www.sears.ca
Our Home
For repair of carry-in items like vacuums, lawn equipment,
and electronics, call anytime for the location of your nearest
Sears Pa_s & Repair Service Center
1-800-488-1222 (U.S.A.) t -800_69_663 (Canada)
www.sears.com www,sears.ca
To purchase a protection agreement on a product serviced by Sears:
1-800-827-6655 (U.S.A.) 1-800-361-6665 (Canada)
Pare pedJr servicio de reparaci6n
a domicilio, y para ordenar piezas:
1-888-SU-HOGAR ®
(1-888-784-6427)
_w.sears.com sesrs
Au Canada pour service en frangais:
1-800-LE-FOYER Mc
_w, sears, ca
@Registered Trademark /_r_Trademark of KCD _P LLC in the United States, or Sears Brands, LLC in other countries
TM
@ Marea Registrada /Marca de F&bric_ de KCD IP LLC en Estados Unidos, a Sears, Brands LLC in otros pa/ses
_,c Marque de commerce / Marque d6pos6e de Sears Brands, LLC
