Kenmore Elite 79661422410 User Manual DRYER Manuals And Guides 1411119L
User Manual: Kenmore Elite 79661422410 79661422410 KENMORE ELITE DRYER - Manuals and Guides View the owners manual for your KENMORE ELITE DRYER #79661422410. Home:Laundry & Garment Care Parts:Kenmore Elite Parts:Kenmore Elite DRYER Manual
Open the PDF directly: View PDF ![]() .
.
Page Count: 72
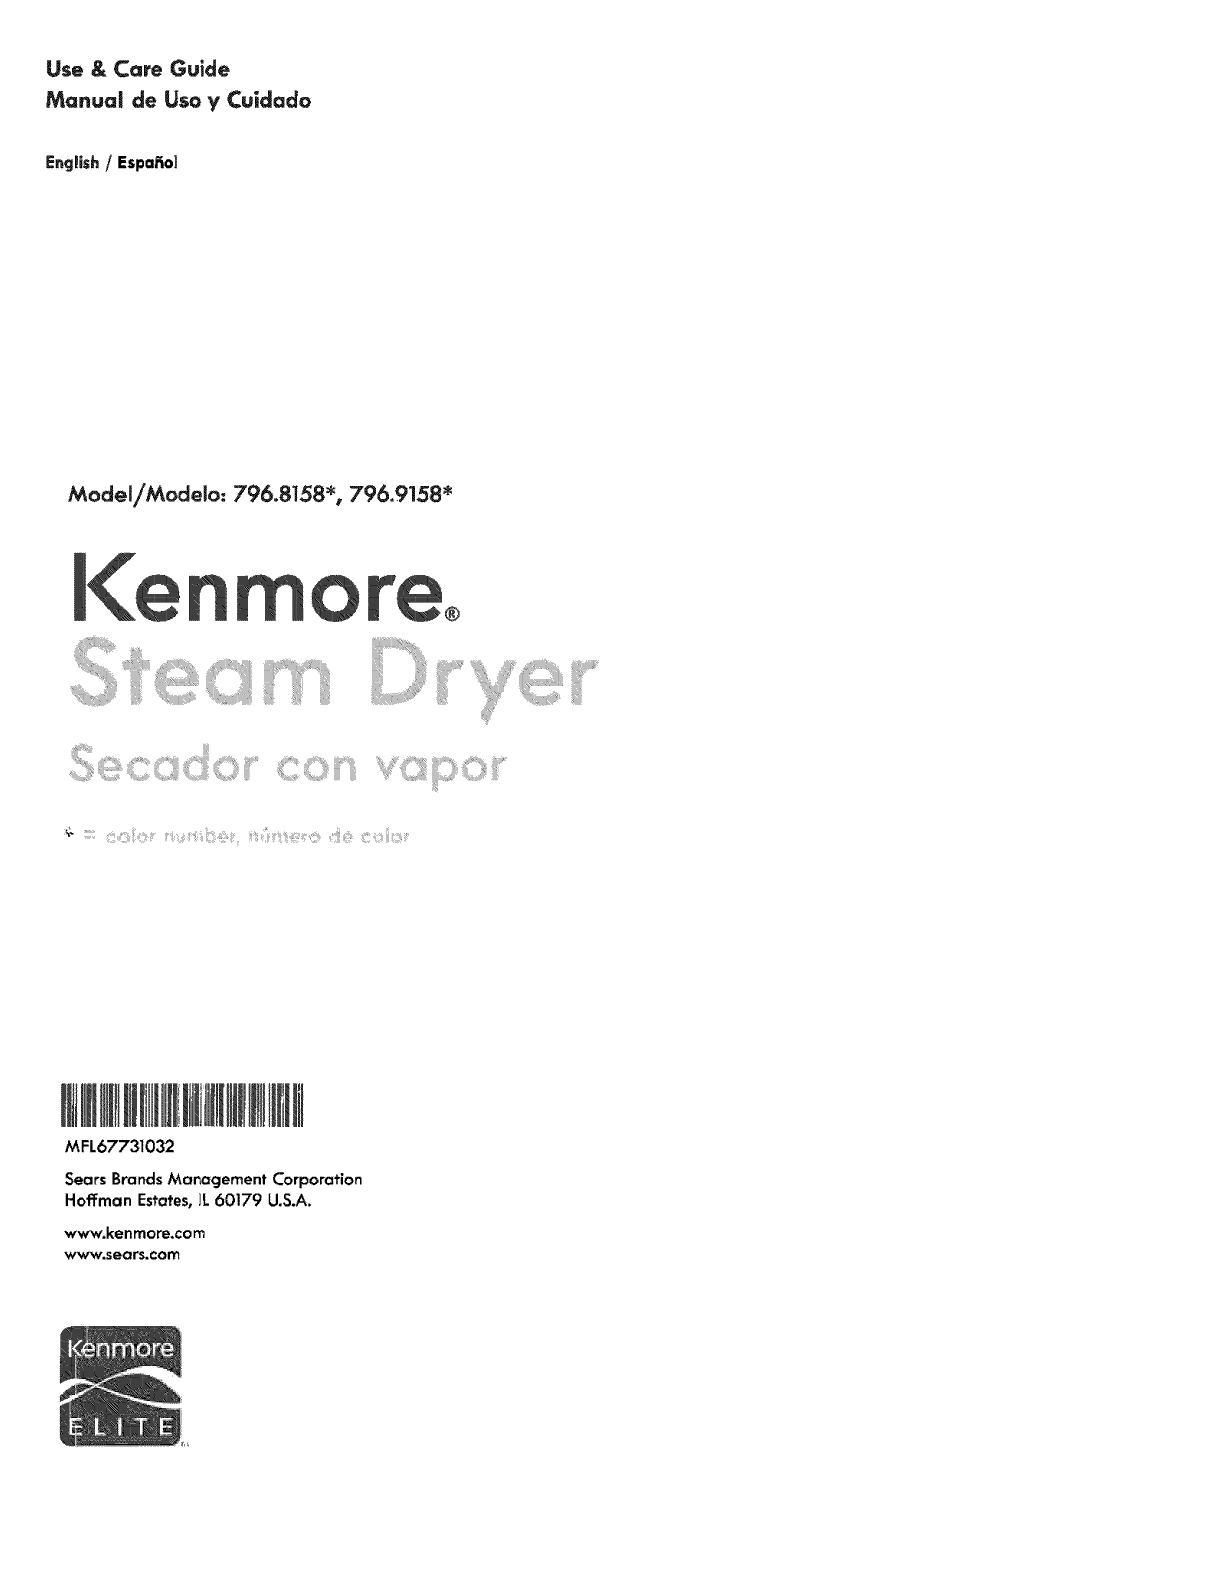
Use & Care Guide
Manual de Uso y Cuidado
Eng!ish /Espafiol
Model/Modelo: 796.8158 _, 796.9158"
MFL67731032
Sears BrandsManagement Corporation
Hoffman Estates,]L 60179 U.S.A.
www.kenmore.corn
www.sears.com
IMPORTANT SAFETY INSTRUCTIONS .................... 3-6
GROUNDING REQUIREMENTS ................................... 4
FEATURES AND BENEFITS
Key Parts and Components ........................................ 7
INSTALLATION INSTRUCTIONS
Key Dimensions and Specifications .......................... 8
Location Requirements ................................................ 8
Choose the Proper Location ....................................... 8
Clearances .................................................................... 8
Installation with Optional Pedestal Base
or Stacking Kit ............................................................. 9
Optiona! Accessories .................................................. 9
Connecting Gas Dryers ............................................ 10
Gas Requirements (Gas Models Only) ..............10-11
Electrical Requirements ..................................... 10&12
Connecting Electrical Dryers .............................. 12-13
Venting the Dryer ................................................. 14-15
Leveling the Dryer ..................................................... ]6
Reversing the Door Swing ........................................ 16
Final installation Check ............................................ 17
HOW TO USE
Control Panel Features ............................................. ]8
Operotir, g the Dryer ................................................. 19
Cycle Guide ......................................................... 20-21
Sorting Loads ............................................................. 22
Loading the Dryer ..................................................... 22
Time and Status Display .......................................... 23
Cycle Modiner Buttons ............................................ 24
Cycle Options and Special Features ...................... 25
Wrin..de Guard .................................................... 25
ControlLock ........................................................ 25
My Cycle .............................................................. 25
Damp Dry Signal ................................................. 25
Save Energy+ ....................................................... 25
Installing and Using the Drying Rack................ 25
Steam Features ................................................... 25-27
Important Notes About Steam Functions ....... 26
Usingthe STEAM REFRESHCycle ................... 26
STAT!C SHIELD .................................................... 26
IRON READY....................................................... 26
Filling the Steam Feeder .................................. 27
Important Notes about Steam Cycles ............ 27
USER MAINTENANCE INSTRUCTIONS
Regular Cleaning ..................................................... 28
Cleonincthe Exterior ......................................... 28
Cleaninc the Interior .......................................... 28
Cleonini Around and Under the Dryer ........... 28
CJeanini the Lint Filter ...................................... 28
Maintaining the Exhaust System ............................. 29
Kenmote ConnectTM Sys|em ......................................... 30
TROUBLESHOOTING GUIDE
Before Calling for Service ................................. 31-33
WARRANTY ................................................................... 34
SERVICE .......................................................... Back Cover
In the space below, record the date of purchase, model,
and serial number of your product. You wiff find the
model and serial number printed on an identification
plate located inside the dryer door. Have these items of
information available whenever you contact Sears
concerning your product.
Model No.
Date of Purchase
Serial No.
Save these instructions and your sales receipt for future
reference.
Master Prolecfion Agreements
Congratulations on making a smart purchase. Your new
Kenmore ®product is designed and manufactured for
years of dependable operation. But like all products,
it may require preventive maintenance or repair from
time to time.That's when having a Master Protection
Agreement can save you money and aggravation.
The Master Protection Agreement also helps extend the
life of your new product. Here's what the Agreement*
includes:
•Parts and labor needed to help keep products
operating properly under normal use, not just defects.
Our coverage goes well beyond the product warranty.
No deductible, no functional failure excluded from
coverage - real ptotecffon.
•Expert service by a force of more than 10,000
authorized Sears service technicians, which means
someone you can trust will be working on your product.
• Unlimited service calls and nationwide service, as often
as you want us, whenever you want us.
*"No-lemon" guarantee - replacement of your
covered product if four or more product failures occur
within 12 months.
* Product replacement if your covered product can not
be fixed.
• Annuan Preventive Maintenance Check at yourrequest
- no extra charge.
• Fast help by phone -we call it Rapid Resolution.
Phone support from aSears representative on all
products.Think of us as a "talking owner's manual."
"Power surge protection against electrical damage due to
power fluctuations.
"$250 food loss protection annually for any food
spoilage that is the resuffof mechanical failure of any
covered refrigerator or freezer.
"Rental reimbursement if repair of your covered
product takes longer than promised.
•25% discount off the regular price of any non-covered
repair service and related installed parts.
Once you purchase the Agreement_ a simple phone call
is all that it takes for you to schedule service. You can
call at any time day or night or schedule a service
appointment online.
The Master Protection Agreement is a risk-free purchase.
If you cancel for any reason during the product warranty
period, we will provide a full refund, or aprorated refund
anytime after the product warranty period expires,
Purchase your Master Protection Agreement today!
Some limitations and exclusions apply.
For prices and additional information in the U.S.A.
call 1-B00-827-6655.
*Coverage in Canada varies an some items.
Fat full details call Sears Canada at 1-B00-361-6665.
Sears instaffafion Service
For Sears professional installation of home appliances,
garage door openers, water heaters, and other major
home items, in the U.S.A. or Canada call:
1-800-4-MY-HOME ®.
READ ALL iNSTRUCTiONS BEFORE USE
Your safety and the safety of others is very important.
We have provided many important safety messages in this manual and on your appliance. Always read and
obey all safety messages.
Ths is the safety alert symbol.
Ths symbol alerts you to potential hazards that can kill or hurt you and others.
AN safety messages will forlow the safety alert symbol and either the word DANGER or WARNING.
These words mean:
A DANGER: indicates a hazardous situationwhich, if not avoided, will result in death or seriousinjury.
WARN| NG: Indicates a hazardous situation which, if not avoided, could result indeath or seriousinjury.
----_ CAUTION: I°dicoteso hazardous s_tuation which, if not avoided, could resuff in minor or
moderate injury.
Aft safety messages wi}_ tell you what the potential hazard is, tell you how to reduce the chance of injury, and
tell you what can happen if the instructions are not followed.
WARN ING: yoursofe ,thei.formotio,in,hismanoomm stboto,owedto
minimize the risk of fire or explosion, electric shock, or to prevent properly damage, personal injury,
or loss of life.
• Do not install aclothes dryer wife flexible plastic venting materials, ff a flexlble metal (foil type) duct is installed,
it must be of a specific Pope_dentlfied by the appliance manufacturer as suifabie for use with c_othes dryers.
Flexlble venting materials are known to collapse, be easlly crushed, and trap lint. These conditions wiff obstruc_
clothes dryer airflow and increase the risk of fire.
• Do not store or use gasoline or other flammable vapors and ilquids in the vicinity of this appllance or any
other oppffances.
.Installation and service must be performed by o qualified instaffer, service agency, or the gas supplier.
• Install the clothes dryer according to fee manufacturer's instructlons and local codes.
"Save these instructions.
WHAT TO DO iF YOU SMELLGAS:
1. Do not try to light a match or cigarette, or turn on any gas or eledrlcal appliance.
2. Do not touch any electrical switches. Do not use any phones in your bulldlng.
3. Clear the room, buitdlng, or area of all occupants.
4. Immediately call your gas supplier from a neighbor's phone. Carefully follow the gas supplier's instructions.
5. if you cannot reach your gas supplier, coil the fire department.
SAVE THI:SE INSTRUCTIONS
BASIC SAFETY PRECAUTIONS
WARNING: To,odooothe.skof..,oiootHcshock, "Jo'Vtopo.o.swho.usi.g,hi,opp,a.ce,
follow basic precautions, including the following:
"Read all instructions before using the dryer.
*Before use, the dryer must be properly installed, as
described in this manual.
" Do not place items exposed to cooking oils in your
dryer. Items contaminated with cooking oils may
contribute to a chemica! reaction that could cause a
load to catch fire.
-Do not dry articles that have been previously cleaned
in, washed in, soaked in, or spotted with gasoline,
dry-cleaning solvents, or other flammable or explosive
substances, as they give off vapors that could ignite
or explode.
"Do not reach into the dryer if the drum or any other
part is moving.
"Do not repair or replace any part of the dryer or
attempt any servicing unless specifically recommended
in this Use and Care Guide or in published user-repair
instructions that you understand and have the skills to
carry out.
.Do not tamper with controls.
,Before the dryer is removed from service or discarded,
remove the door to the drying compartment.
*Do not allow children to play on or in the dryer. Close
supervision of children is necessary when the dryer is
used near children.
"Do not use fabric softeners or products to eliminate
static unless recommended by the manufacturer of the
fabric softener or product.
"Do not use heat to dry articles containing foam rubber
or similarly textured rubber-like materials.
*Keep area around the exhaust opening and adjacent
surrounding areas free from the accumulation of lint_
dust, and dirt.
*The interior of the dryer and exhaust vent should be
cleaned periodically by qualified service personnel.
"Do not install or store the dryer where it will be
exposed to the weather.
*Always check the inside of the dryer for
foreign objects.
"Clean the lint rifler before or after each load.
AWARNING: This product contains chemicals known
to the State of California to cause cancer and birth
defects or other reproductive harm. Washhands after
handling.
CALIFORN|A SAFE DRINKING WATER AND
TOXIC ENFORCEMENT ACT
This act requires the Governor of California to publish
alist of substances known to the state to cause cancer,
birth defects, or other reproductive harm and requires
businesses _o warn customers of potential exposure
to such substances.Gas appliances can cause minor
exposure to four of these substances, namely benzene,
carbon monoxide, formaldehyde, and soot, caused
primarily by the incomplete combustion of naturalgas
or LP fuels.
Properly adjusted dryers w{IIminimize incomptete
combustion. Exposure to these substances can be
minimized further by properly venting the dryer to the
outdoors.
WARNING: mp,ope,co..ec,o.of
equipment-groundlng
conductor can resuff in a
risk of eJectric shock. Check with a quafffied electrician
or service person if you are in doubt as to whether the
applianceisproperly grounded. Do not modify the plug
provided with the appliance. If it will not fit the outlet,
have a proper outlet installed by a qualified electrician.
This appliance must be connected to a grounded metal,
permanent wiring system or an equipment grounding
conductor must be run with the circuit conductors and
connected to the equipment grounding terminaJ or lead
on the appliance. Electrical shock can result if the dryer
is not propedy grounded.
GROUNDING REQUIREMENTS
This appliance must be grounded. In the event of
malfunction or breakdown, grounding will reduce
the risk of electric shock by providing a path of least
resistance for electric current. This appliance must be
equipped with a cord having an equipment-grounding
conductor and a grounding plug. The plug must be
plugged into an appropriate outlet that is properly
installed and grounded in accordance with all local
codes and ordinances.
4
SAFETY iNSTRUCTiONS FOR iNSTALLATiON
AWARN ING: Toreducetheriskofnre,eloctrlcshock,orinjorytoparso.swhenusingthisappliance,
follow basic precautions, including the following:
- Properly ground dryer to conform wffh all governing
codes and ordinances. Follow details in the installation
instructions.Electrical shockcan result if the dryer is not
properly grounded.
"Before use, the dryer must be properly' installed as
described in this manual. Electrical shock can result if
the dryer is not properly grounded.
*Install and s_ore the dryer where it will not be exposed
to temperatures below freezing or exposed to
the weather.
oAff repairs and servicing must be performed by an
authorized service technician unless specificaffy
recommended in this Use & Care Guide. Use only
authorized factory parts. Failure to follow thiswarning
can cause serious injury,fire, electrical shock, or death.
•To ='educe the risk of electrical shock, do not install the
dryer in humid spaces. Failure to follow this warning
can cause serious injury,fire, electrical shock, or death.
*Conned to a properly rated, prefected, and sized
power ci_uit to avoid electrlcal overload. Improper
power circuits can melt, creating risk of electrical shock
and/or fire hazard.
* Remove all packing items and dispose of all shipping
materials properly. Failure to do so can result in death,
fire, explosion, burns, or death.
* Place dryer at least 18 inches above the floor for a
garage installation. Failure to do so can result in fire,
explosion, burns, or death.
=Keep all packaging from children. Packaging material
can be dangerous for children. There is a risk of
suffocation.
* Do nat install near items that produce heat or open
flame such as stoves or cooking ovens. Failure to follow
this warning can cause product deformation, smoke and
fire.
* Do not place candles or cigarettes on top of the
product. Failure to follow this warning can cause
product deformation, smoke and fire.
=Remove all protective vinyl film from the product.
Failure to do so can cause product deformation, smoke
and fire.
Exhaus|iDucfing:
* Gas dryers MUST be exhausted to the outside. Failure
to follow these instructionscan result in f_re or death.
* The dryer exhaust system must be exhausted to the
outside of the dweffing, if the dryer is not exhausted
outdoors, some fine lint and large amounts of
moisture wlll be expelled into the laundry area. An
accumulation of lint in any area of the home can
create a health and fire hazard.
•Use only rigid metaJ or Nexible metal 4 inch diameter
duct inside the dryer cabinet or for exhausting to the
outside. Use of plastic or other combustible dactwork
can cause af_re. Punctured ductwork can cause a fire
if it collapses or becomes otherwise restricted in use or
during ins*.allation.
* Ductwork is riot provided with the dryer, and you
should obtain the necessary ductwork locally. The end
cap should have hinged dampers to prevent backdraff
when the dryer is not in use. Failure to follow these
instructionscan result in fire or death.
•The exhaust duct must be 4 inches (10.2 cm) in
diameter with no obstructions. The exhaust duct
should be kept as short as possible. Make sure to
clean any old ducts before installing your new dryer.
Failure to follow these instructionscan result in fire or
death.
• Rigid or semi rigid metal ductlng is recommended
for use between the dryer and the wall. In speclal
installations when it is impossible to make a
connection with the above recommendations, a UL
listed flexible metal transition duct may be used
between the dryer and wall connection only. The
use of this ductlng wlll affect drying time. Failure to
follow these instructionscan result in fire or death.
"DO NOT use sheet metal screws or other fasteners
which extend into the duct thai could catch lint and
reduce the efficiency of the exhaust system. Secure
all joints with duct tape. For complete details, follow
the Installation mnstructions.Failure to follow these
instructionscan result in fire or death.
SAFETY iNSTRUCTiONS FOR STEAM FUNCTIONS
AWARN ING: Toreducetheriskofft.,,eloctricsh=k,orinjurytoPe.o..who.usi.gthl,app,onc.,
follow baste precautions, including the following:
• Do no| open the dryer door during steam cycles.
Failure to follow these instructions con result in a
burn hazard.
* De no# dry articles that have been previously cleaned
in, washed in, soaked in, or spotted with gasoline,
dry-cleaning solvents, or other flammable or explosive
substances, as they give off vapors that could ignite or
exptode. Fa!lure to follow these instructionscan result in
fire or death.
"Do not 011the steam feeder with gasoline, dry=
cleaning solvents, or other flammable or explosive
substances. Failure to follow these instructions can
result in fire or death.
"Do not touch the steam nozzle in the drum during
or after the steam cycle. Failure to follow these
instructions can result in a burn hazard.
• Do not fill the steam feeder with hot water (over
86°F/30°C). Failure to follow these instructions can
result in aburn hazard.
SAFETY INSTRUCTIONS FOR CONNECTING ELECTRICITY
AWARN iNG: To reduce the risk of fire, eledric shock, or injury to persons when using this appliance,
follow basic precautions, including the following:
Do not, under any circumstances, cut or remove
the ground prong from the power cord. To prevent
personal injury or damage to the dryer, the electrical
power cord must be plugged into a properly
grounded outlet.
• Far personal safety, this dn/er must be properly
grounded. Failure to do so can result in electrical
shock or injury.
"Refer to the installation instrucflons in thls manual
for specific electrical requirements for your model
Failure to foffow these instructionscan create an
electrical shock hazard and/or a fire hazard.
* This dryer must be plugged into a properly grounded
outlet. Electrical shock can result if the dryer is not
properly grounded. Have the wall outlet and circuit
checked by a qualified elecfrlcian to make sure the
outlet is properly grounded. Failure to follow these
instructions can create an electrical shock hazard
and/or a fire hazard.
* The dryer should always be plugged into its own
individual electrical outlet which has a voltage rating
that matches the rating plate. This provides the best
performance and also prevents overloading house
wiring circuits which could cause a fire hazard from
overheated wires.
•Never unplug your dryer by pulllng on the power
cord. Always grip the plug firmly and pull straight
out from the outlet. The power cord can be damaged,
resulting in a risk of fire and electrical shock.
* Repair or replace immediately all power cords that
have become frayed or otherwise damaged. Do nat
use a cord that shows cracks or abrasion damage
along its length or at either end. The cord can
and/or p°wer
melt, creating electrical shock fire hazard.
* When instaJling or moving the dryer, be careful not
to pinch, crush, or damage the power cord. This will
prevent injury and prevent damage to the dryer from
fire and electrical shock.
SAVE THESE iNSTRUCTiONS
6

KEY PARTS AND COMPONENTS
There are several important components that are
referenced inthis manual.
OASY-TO-USE CONTROL PANEL
Rotate the cycle selector knob to select the desired
dry cycle. Add cycle options or adjust settings with
the touch of a button.
O IME AND STATUS DISPLAY
The easy-to-read LED display showscycJe status
and estimated time remaining.
_YCLEMODIFIERS
Adjust the cycle settings suchas temperature and
dry level with the touch of a button.
NOTE: Not all settings are available for all cycles.
OTEAM FEEDER
This drawer contains the reservoir for the water
used by the dryer to create steam for the STEAM
REFRESHcycle and other steam features.
@ CHECK VENT
(Duct Blockage Sensing System)
The Check Vent [Duct blockage sensingsystem)
detects and alerts you to blockages in the exhaust
system that reduce airflow from the dryer.
Maintaining clean exhaust system ducts improves
operating emciency and heips minimize service
calls, saving you money.
ULTRA-CAPACITY DRUM
The ultra-large drum offers superior durability.
OASY=ACCESSREVERSIBLE DOOR
The wide-opening, see-through glass door
provides easy access for loading and unloading.
Door swing can be reversed to adjust for
installation location.
0FRONT-MOUNT LINT FILTER
The front-mount lint filter allows for easy access
and cleaning between loads.
LEVELING FEET
Four leveling feet (two in front, and two in back)
adjust to improve dryer stability on uneven floors.
Power Cord
Location
(Gas Models)
Terminat Block
Access Panel
[Electric ModeJs)
:'_ i _
Gas Connection
Location
(Gas Models)
Exhaust Duct
Outlet
Rear of Dryer
7
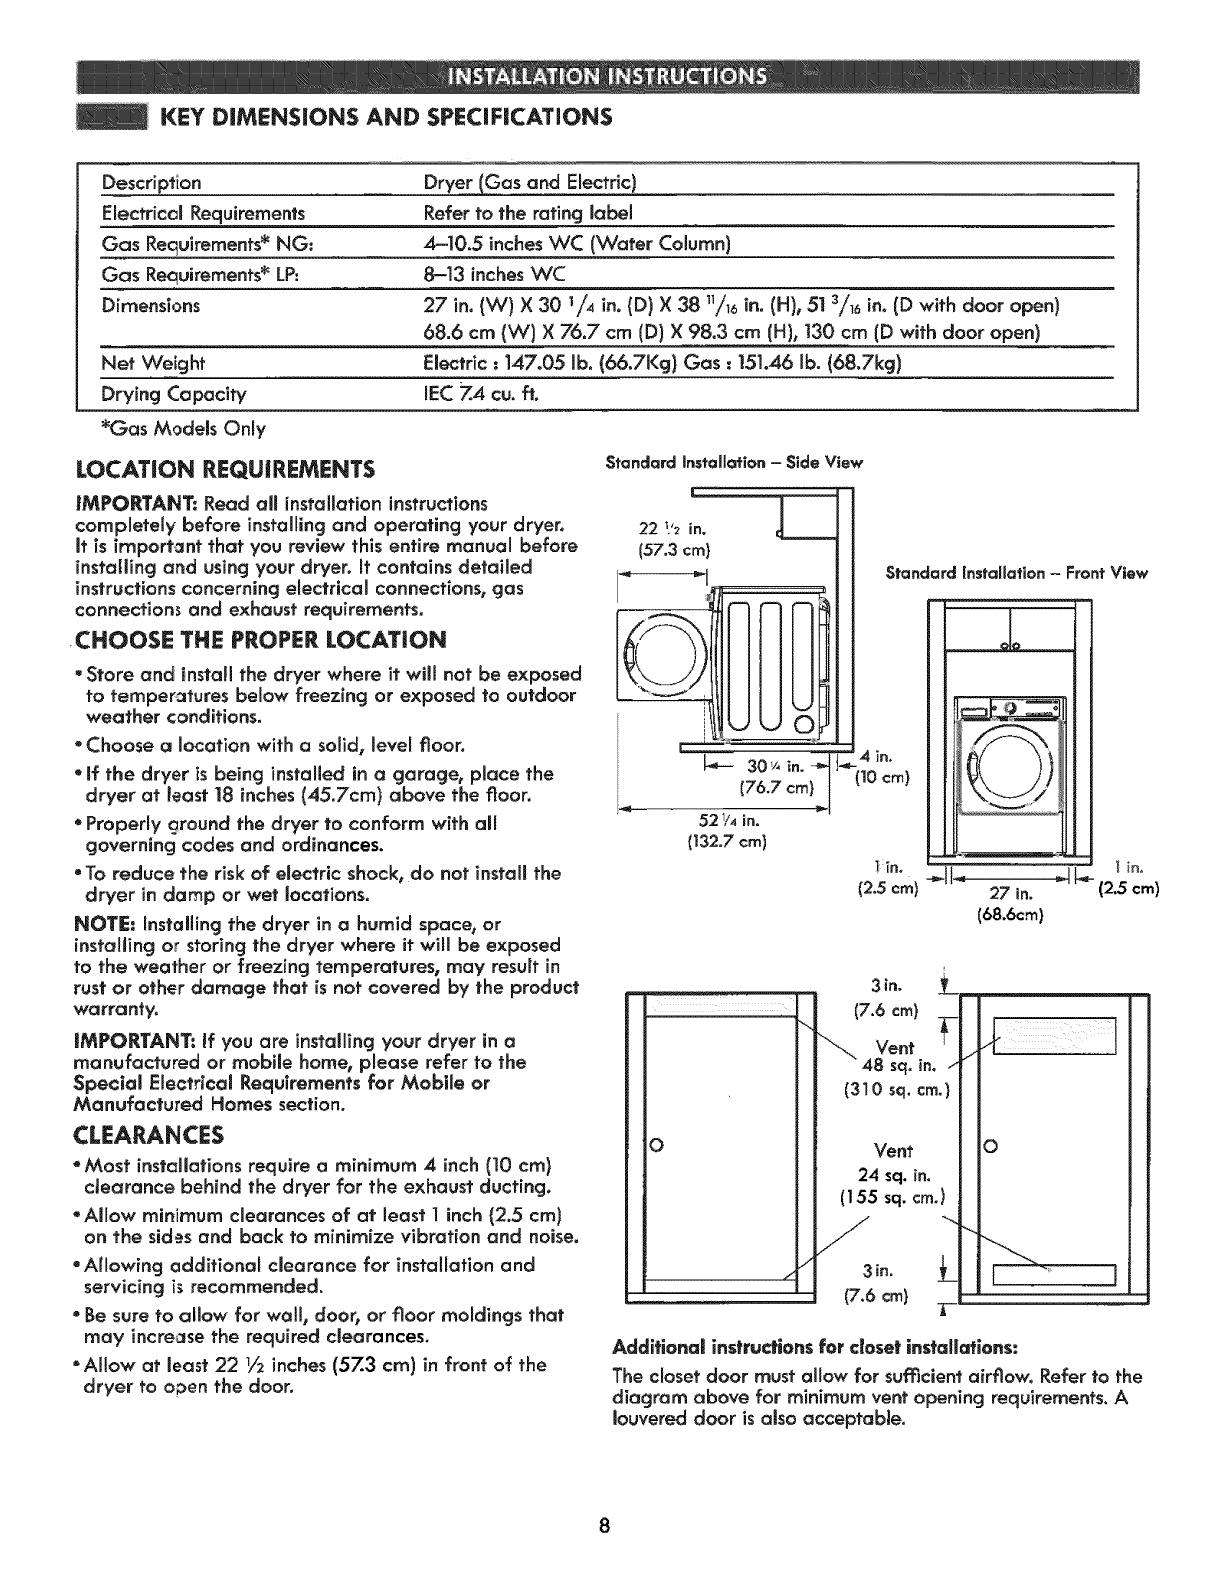
KEY DIMENSIONS AND SPECIFICATIONS
Description
Electrical Requirements
Gas Requirements* NG:
Gas ReQuirements* LP:
Dimensions
Dryer (Gas and Electric)
Refer to the rating label
4--10.5 inches WC (Water Column)
8-13 inches VVC
27 in. (W) X30 I/4 in, {D) X38 11/16in. (H), 51 sil_ in, (D with door open)
Net Weight
Drying Capacity
*Gas Models Only
68.6 cm (W) X76.7 cm (D) X98.3 cm (H), 130 cm (D with door open)
Electric : 147.05 lb. (66°7Kg) Gas : 151.46 lb. (68.7kg)
IEC 7.4 cu. ft.
LOCATION REQUIREMENTS
iMPORTANT: Read all installation instructions
completely before installing and operating your dryer.
It is important that you review this entire manual before
installing and usingyour dryer. It contains detailed
instructions concerning electrical connections, gas
connections and exhaust requirements.
CHOOSE THE PROPER LOCATION
•Store and install the dryer where it will not be exposed
to temperatures below freezing or exposed to outdoor
weather conditions.
"Choose alocation with a solid, level floor.
• If the dryer isbeing installed in agarage, place the
dryer at least 18 inches (45.7cm) above the floor.
•Properly ground the dryer to conform with all
governing codes and ordinances.
•To reduce the risk of electric shock, do not install the
dryer in damp or wet locations.
NOTE: Installing the dryer in a humid space, or
installing or storing the dryer where it will be exposed
to the weather or freezing temperatures, may result in
rust or other damage that is not covered by the product
warranty.
IMPORTANT: if you are installing your dryer in a
manufactured or mobile home, please refer to the
Special Electrical Requirements for Mobile or
Manufactured Homes section.
CLEARANCES
"Most installations require o minimum 4 inch (10 cm)
clearance behind the dryer for the exhaust ducting.
,Allow minimum clearances of at least 1inch (2.5 cm)
on the sides and back to minimize vibration and noise.
•Allowing additional clearance for installation and
servicing is recommended.
•Be sure to allow for wall, door, or floor moldings that
may increase the required clearances.
•Allow at least 22 1/2inches (57.3 cm) in front of the
dryer to o_en the door.
StandardInstallation= SideView
I
22 ;.'_ in.
(57.3 cm}
3"
30 '/,in. _'_
/
(76.7 crn} J
52 I/4 in.
(132.7 cm)
Standard Installation -Front View
4 in.
(10 cm)
(2.5 ¢m) 27 in. (2.5 cm)
(68.6cm)
3in. ___
(7.6 cm)
Vent
sq, in. 1
(310 sq. cm.)
Vent
24 sq. in.
(155 sq.cm.)
J -
/3in. L
(7.6 cm) 7-
O
Addffional instructions for closet installations:
The closet door must allow for sufficient airflow. Refer to the
diagram above for minimum vent opening requirements. A
Iouvered door is also acceptable.
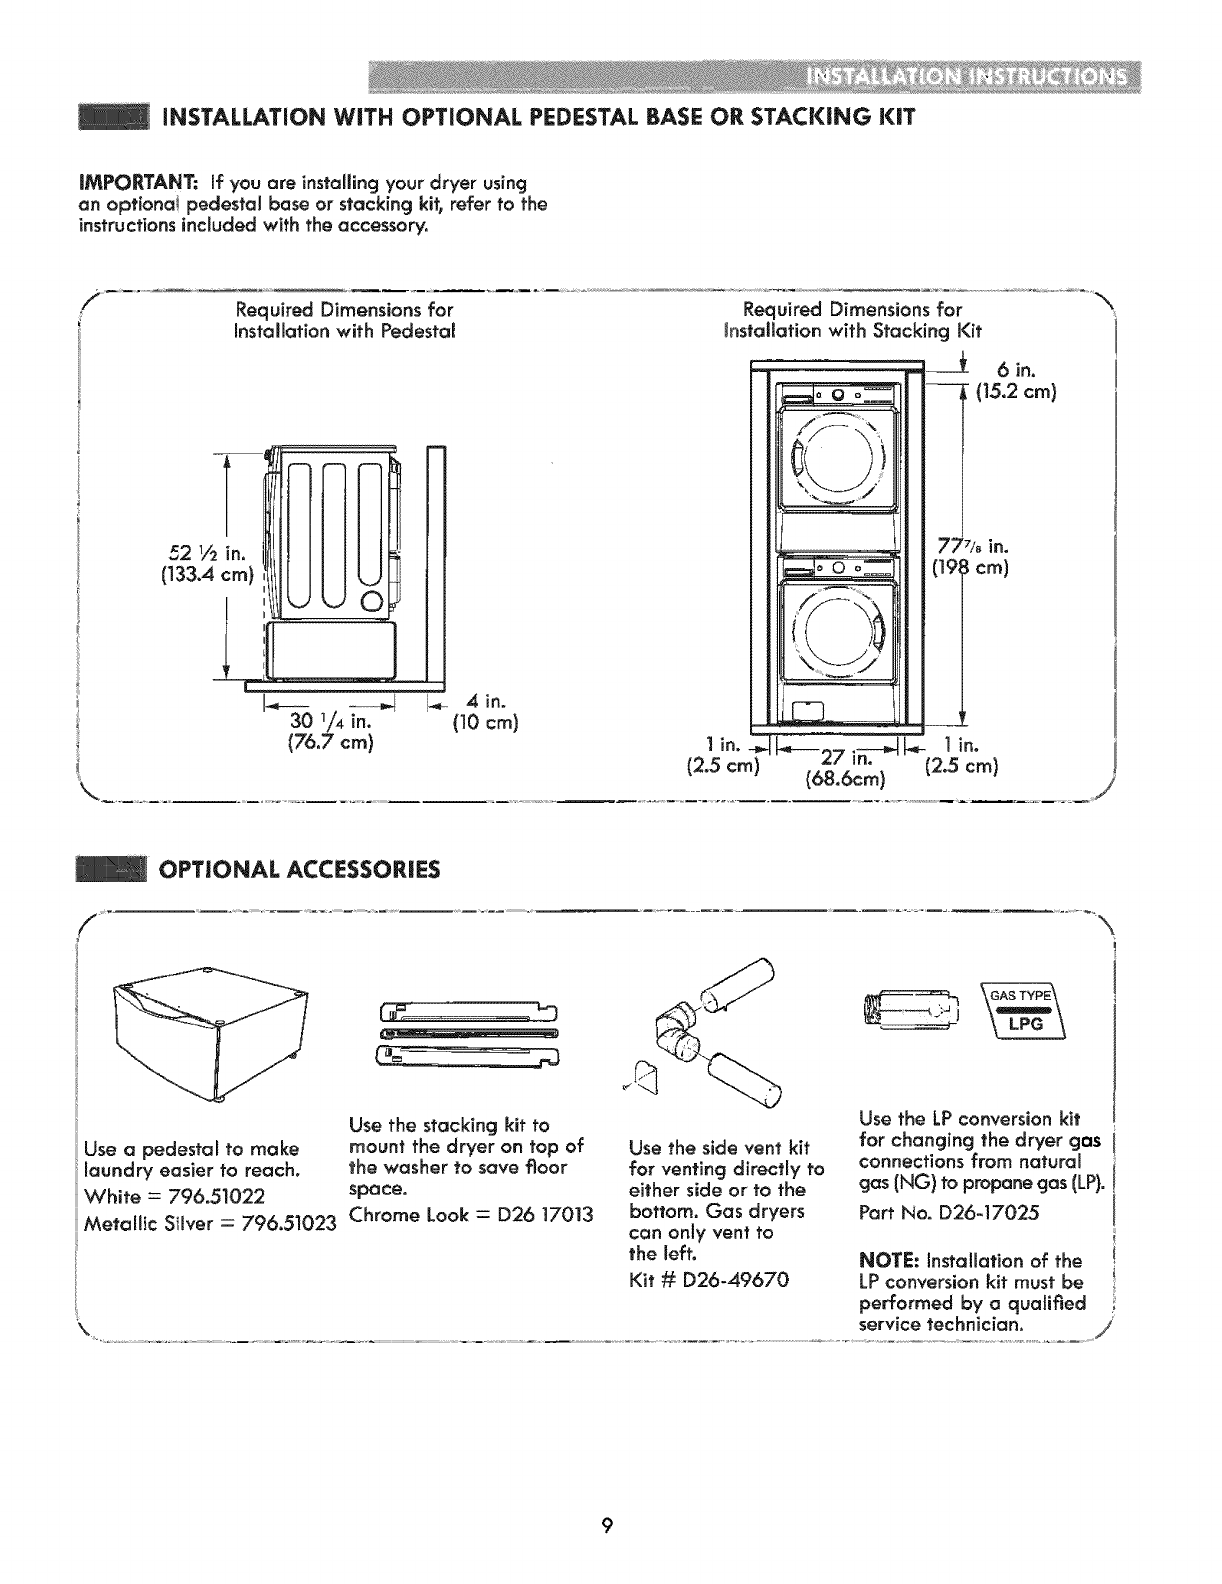
iNSTALLATiON WiTH OPTIONAL PEDESTAL BASE OR STACKING KiT
iMPORTANT: if you are instaBingyour dryer using
an opfiona! pedestaJ base or stacking kit, refer to the
instructionsincluded with the accessory.
/
\
Required Dimensions for
Installation with Pedestal
1/21-1n
52
(133.4__
30 1/4 in.
(76.7 cm)
4in.
(10 cm)
OPTIONAL ACCESSORIES
.
Use a pedestal to make
laundry easier to reach.
White =796.51022
Metallic Silver =796.51023 Chrome Look =D26 17013
Use the stacking kit to
mount the dryer on top of
the washer to save floor
space.
Use the side vent kit
for venting directly to
either side or to the
bottom. Gas dryers
can only vent to
the left,
Kit # D26-49670
Use the LP conversion kit
for changing the dryer gas
connections from natural
gas (NG) to propane gas (LP).
Part No. D26-17025
NOTE: Installation of the
LPconversion kit must be
9
CONNECTING GAS DRYERS
GAS REQUIREMENTS (GAS MODELS ONLY)
AWARN ING: Toreducetheriskoffire,
electric shcck, or injury to persons when using this
appliance, follow basic precautions, including
the foltowirg:
* Gas supply requirements: As shipped from the
factory, this dryer is configured for use with natural
gas (NG). it car=be converted for use with propane
(LP) gas. Gas pressure must not exceed 8 inches
wa_er column for (biG), or 13 inches water column for
(LP).
* A qualified service or gas company technician must
connect the dryer to the gas service. Failure to follow
these instructionscan result in fire, explosion, or death.
=isolate the dryer from the gas supply system by
closing its individual manual shutoff valve dLmrlngany
pressure testing of |he gas supply. Faiture to do sa can
result in fire, explosion, or death.
• Supply llne requirements: Your laundry room must
have a rigid gas supply llne to your dryer, in the
United States, an indivldual manual shutoff valve
MUST be installed within o$ least 6 ft. (1.8 m) of the
dryer, in accordance with the National Fuel Gas Code
ANSI Z223.1 or Canadian gas installation code CSA
B149.1. A Vs inch NPT pipe plug must be installed.
Failure to do so can result in fire, explosion, or death.
"If using arigid pipe, the rigid pipe should be ½ inch
IPS. if acceptable under |ocal codes and ordinances
and when acceptable to your gas supplier, 3/_ inch
approved tubing may be used where lengths ore less
than 20 ft. (6.1 m). Larger tubing should be used for
lengths in excess of 20 ft. (6.1 m). Failure to do so can
result in fire, explosion, or death.
* Connect the dryer to the type of gas shown on
the nameplate. Failure to do so can result in fire,
explosion, or death.
•To prevent contamination of the gas valve, purge the
gas supply of air and sediment before connecting
the gas supply to the dryer. Before tightening the
€onnection beh_,een the gas supply and the dryer,
purge remaining air until the odor of gas is detected.
Failure to do so can result in fire, explosion, or death.
• DO NOT use an open flame to inspect for gas leaks.
Use a noncorrosive leak detection fiuid_ Failure to do
so can result in fire, explosion, or death.
-Use only a new AGA- or CSA-cerfified gas supply
line with flexible stainless steel connectors. Failure to
do so can result in fire, explosion, or death.
* Securely tighten all gas connections. Failure to do so
can result in fire, explosion, or death.
"Use TeRon tape or aplpe-jolnt compound that is
insoluble in propane (LP) gas on all pipe threads.
Failure to do so can result in fire, explosion,
or death.
oDO NOT attempt any disassembly of the dryer;
disassembly requires the affentlon and tools of
an au_ho_zed and qualified service technician or
company. Faitureto follow this warning can result in fire,
explosion, or death.
ELECTRICAL REQUIREMENTS FOR
GAS MODELS ONLY
• Do not, under any circumstances, c_ or remove the
third (ground) prong from the power cord. Failure
ta fallow this warning can result in fire, explosion, or
death.
"For personal safety, this dryer must be properly
grounded. Failure to follow this warning can result in
fire, explo_ion, or death.
• The power cord of this dryer is equipped with
a3-prong (grounding) plug which mates with a
standard 3-prong (grounding) wall outlet to minimize
the possibility of electric shack hazard from this
appllance. Failure to follow this warning can result in
fire, explosion0or death.
*Thls dryer must be plugged into a |20-VAt, 60-Hz.
grounded outlet protected by a |5-ampere fuse or
circuit breaker. Failure to follow this warning can result
in fire, explosion, or death.
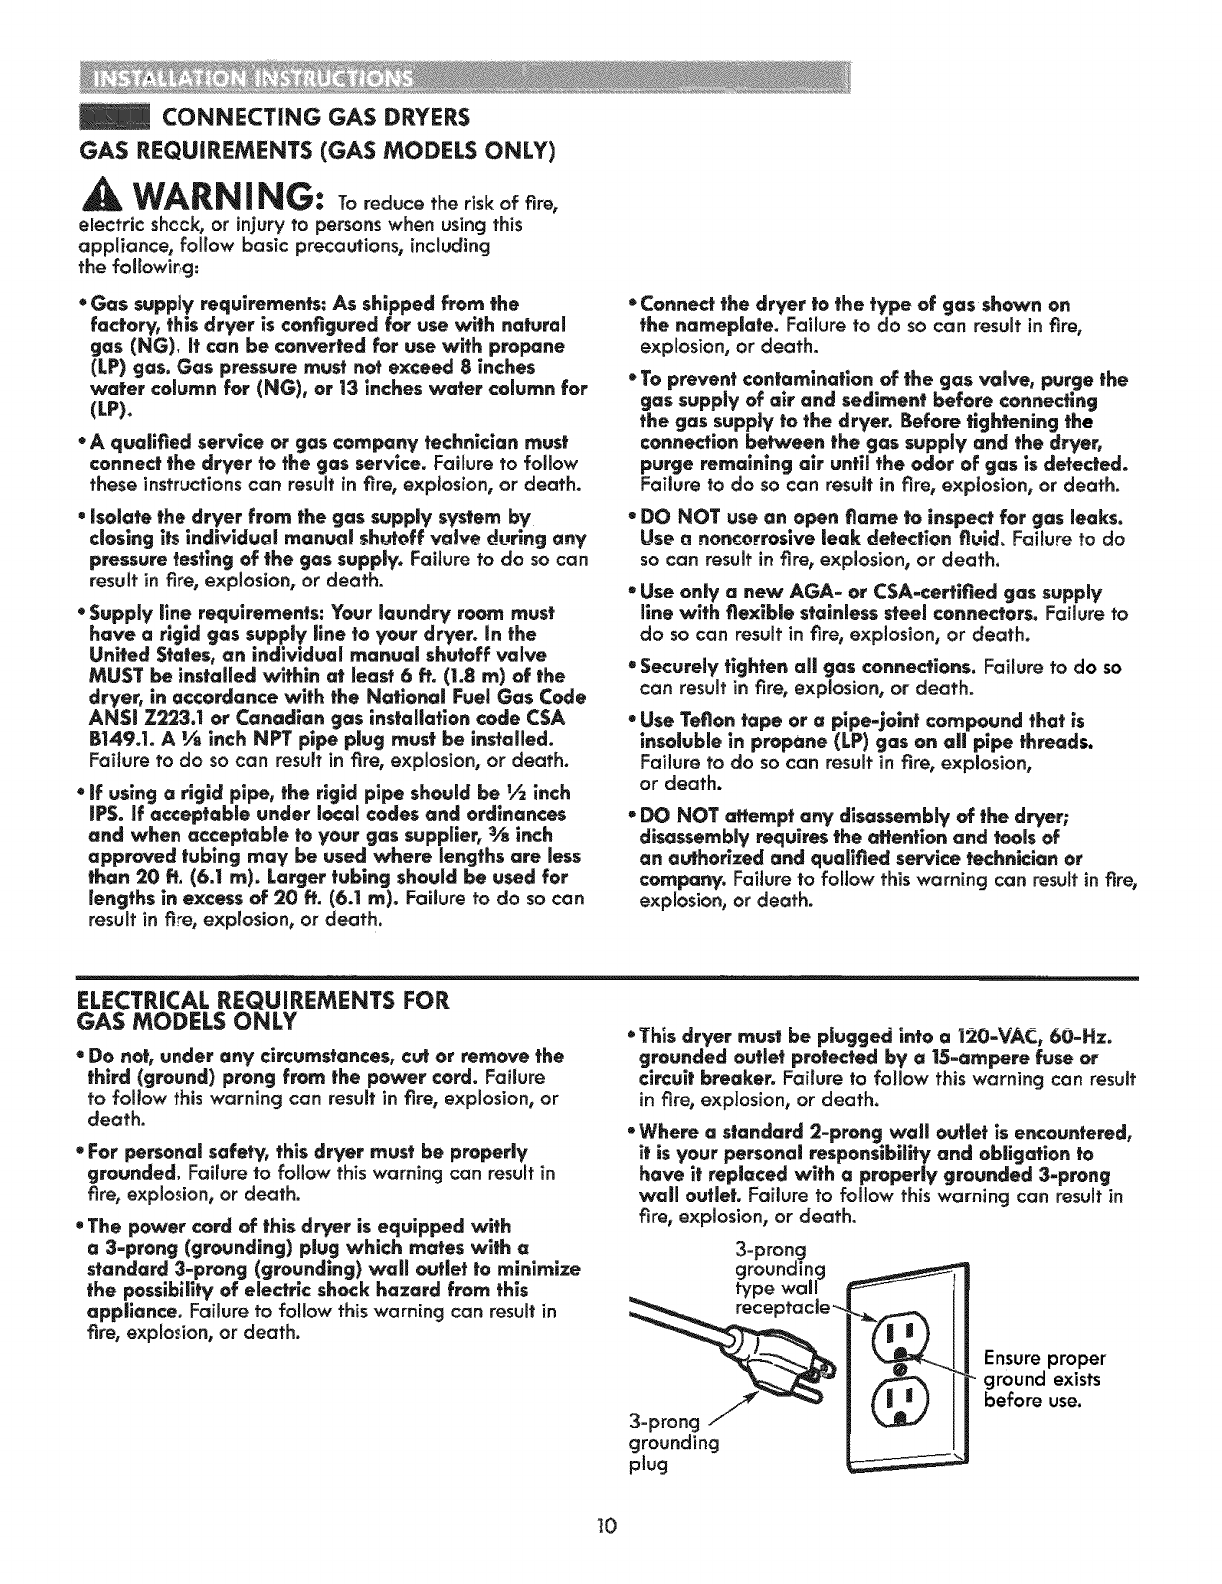
• Where astandard 2-prong wall outlet is encountered,
it is your personal responsibility and obligation to
have it replaced with aproperly grounded 3-prong
wall outlet. Failure to follow this warning can result in
fire, explosion, or death.
3=prong
grounding
type wall
grounding
plug
Ensure proper
ground exists
before use.
10
CONNECTING GAS DRYERS (continued)
,A WARNING: Toreducether.koffire,
electric shc.ck, or injury to personswhen using this
appliance, follow basic precautions, including
the following:
* installation and service must be performed by a
qualified installer, service agency, or the gas supplier.
Failure to do so can result in fire, explosion, or death.
*Use only a new stainless steel flexibie connector and
a new AGA-cerfiNed connector. Failure to do so can
result in_re, explosion, or death.
"A gas shutoff valve must be installed within 6 ft.
(1.8 m) of the dryer. Failure to do so can result in fire,
explosion_or death.
* The dryer is configured for natural gas when
shipped from the factory. Make sure fhaf the drier
is equipped with the correct burner nozzle for the
type of gas being used (natural gas or propane gas).
Failure to do so can result in fire, explosion, or death.
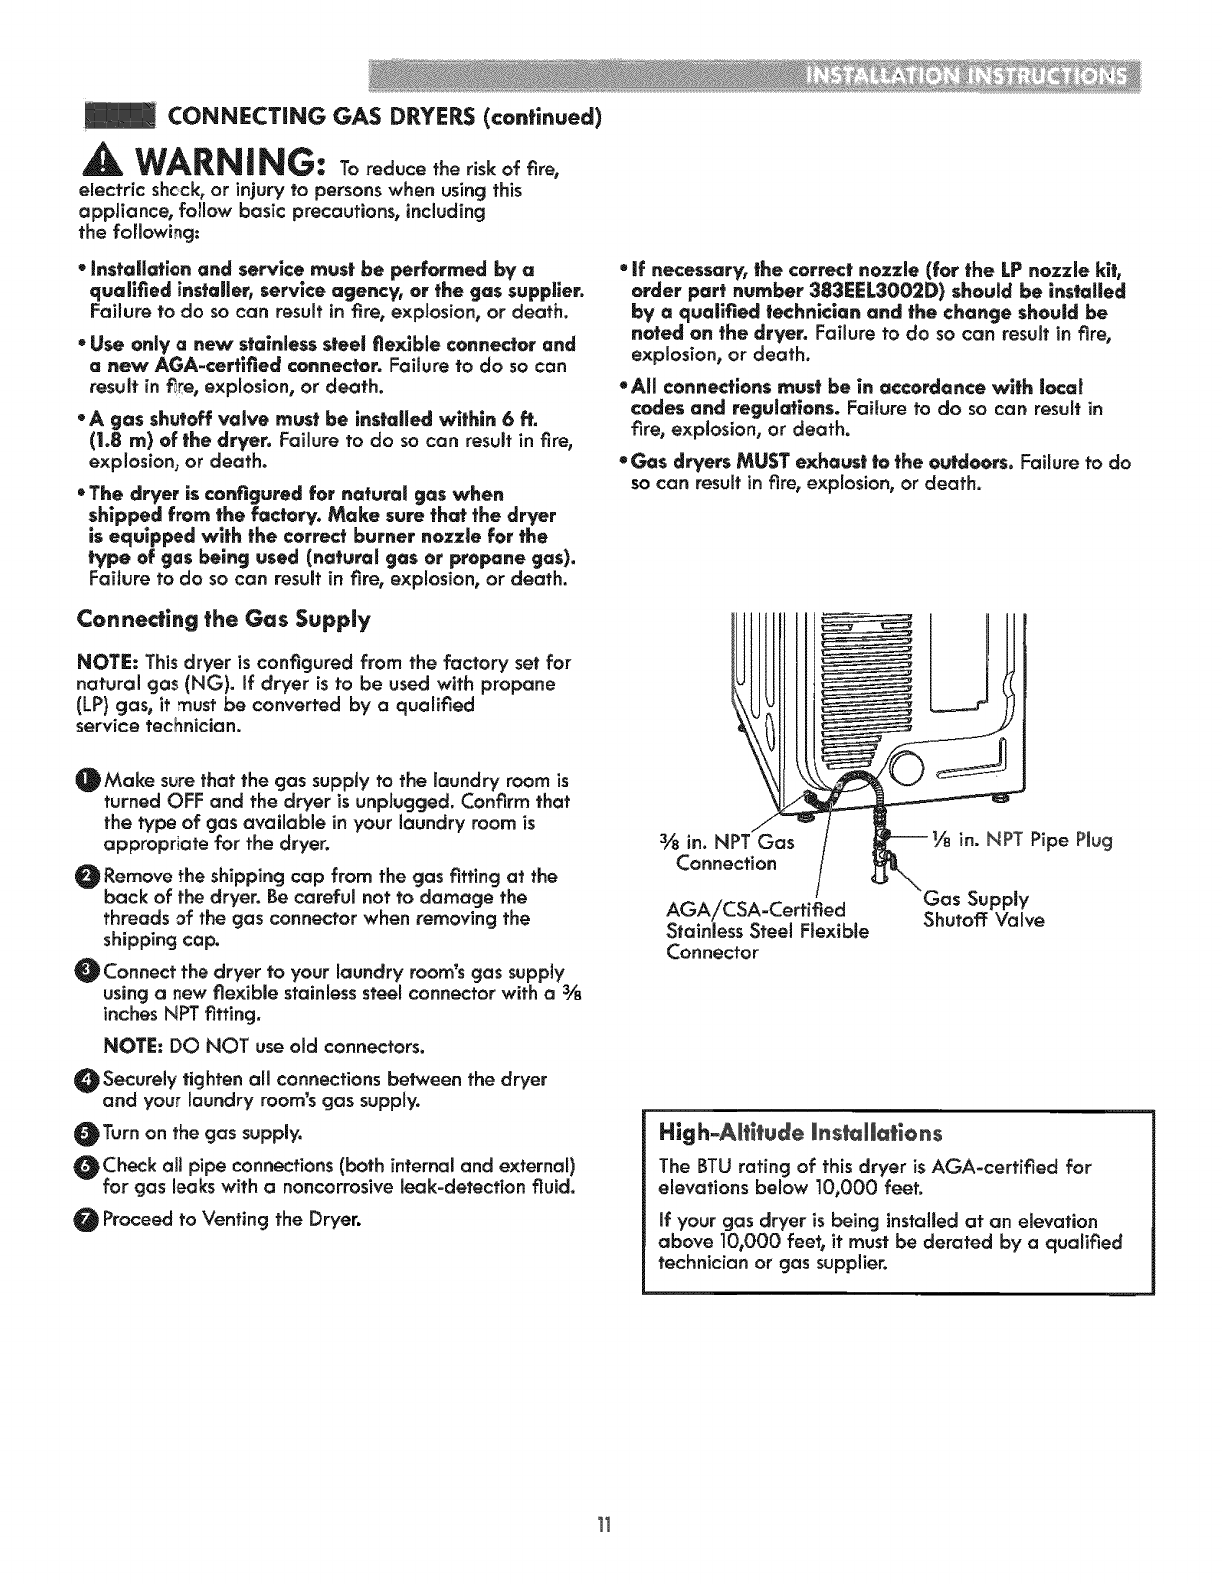
Connecting the Gas Supply
NOTE: This dryer is configured from the factory set for
natural gas (NG). If dryer is to be used with propane
(LP} gas, it must be converted by a qualified
service technician.
* If necessary, the correct nozzle (for the LP nozzle kit,
order part number 383EEL3002D) should be installed
by aqualified technician and the change should be
noted an the dryer. Failure to do so can result in fire,
explosion, or death.
.All connections must be in accordance with local
codes and regulations. Faiture to do so can result in
fire, explosion, or death.
"Gas dryers MUST exhaust to the outdoors. Failure to do
so can result in fire, explosion, or death.
OMake surethat the gas supply to the laundry room is
turned OFF and the dryer is unpJugged. Confirm that
the type of gas available in your laundry room is
appropriate for the dryer.
Remove the shipping cap from the gas fitting at the
back of the dryer. Be careful not to damage the
threads of the gas connector when removing the
shipping cap.
_Connect the dryer to your laundry room's gas supply
using a new flexible stainless steel connector with a 3/s
inches NPT fitting.
NOTE: DO NOT use old connectors.
OSecurely tighten all connections between the dryer
and your laundry room's gas supply.
_Turn on the gas supply.
_Check all pipe connections (both internal and external)
for gas leaks with a noncorrosive leak-detection fluid.
Proceed to Venting the Dryer.
3/8in. NPT Gas
Connection
AGA!CSA-Cerfifled
Stainless Steel Fiexibie
Connector
--Y8 in. NPT Pipe PRug
Gas Supply
Shutoff Valve
High-Altitude installations
The BTU rating of this dryer is AGA-certified for
elevations below 10,000 feet.
If your gas dryer is being installed at an elevation
above 10,000 feet, it must be derated by aqualified
technician or gas supplier.
11
CONNECTING ELECTRIC DRYERS
ELECTRICAL REQUIREMENTS
WARNING: Tohelppreventare,
electrical shock, seriousinjury, or death, the wiring
and grounding must conform to the latest edition of
the National Electrical Code, ANSI/NFPA 70 and all
applicable local regulations. Please contact aqualified
electrician to check your home's wiring and fuses to
ensure that your home has adequate electrical power to
operate the dryer.
to,Mobile
AWARNING: To reduce the risk of fire,
electric shock, or injury to persons when using this
appliance, follow basic precautions, including the
following:
• Any instatlaflon in amanufactured or mobile
home must comply with the Manufadured Home
Construction and Safety Standards Title 24 CFR, Part
3280 or Standard CAN/CSA Z240 MH and local codes
and ordinances.
°A 4=wire connection is required for oil mobile and
manufactured home installations, as well as all new
construction after January 1, 1996. Failure to do so
can result in fire, explosion, or death.
WARNING: Toreducetheriskof
fire, electric shock, or injury to personswhen using this
appliance, follow basic precautions, including
the following:
* This dryer must be connected to a grounded metal,
permanent wiring system, or an equipment grounding
conductor must be run wlth the circuit conductors and
connected to the equipment grounding terminal or
lead on the dryer. Failure to do so con result in fire,
explosion, or death.
"The dryer has its own terminal black that must be
connected to a separate 240 VAC, 60=Her|=_ single
phase circuit, fused at 30 amperes (the circuit must be
fused an bath sides of the llne). ELECTRICAL SERVICE
FOR THE DRYER SHOULD BE OF THE MAXIMUM
RATE VOLTAGE LISTED ON THE NAMEPLATE. DO
NOT CONNECT DRYER TO 110-, 115=,OR 120-VOLT
CiRCUiT. Failure to follow these instructions can result
in fire, explosion, or death.
oif branch circuit to dryer is 15 ft. (4.5 m) or less in
length, use UL (Underwriters Laboratories) llsted No.-
10 AWG wire (copper wire only), or as required by
local codes, if over 15 ft. (4.50 m), use UL-Ested No.-8
AWG wire (copper wire only), or as required by local
codes. Allow sufficient slack in wiring so dryer can
be moved from its normal location when necessary.
Failure to do so can result in fire, explosion, or death.
•The power cord (plgfail) connection be_een wall
receptacle and dryer terminal block IS NOT supplied
wlth the dryer. Type of pigtail and gauge of wire
must conform to local codes and wlfh instructions on
the following pages. Failure to follow these instructions
can result in fire, explosion, or death
* A 4-wire connection is required for all new
construction after January 1, 1996. A 4-wire
connection must be used where local codes do not
permit grounding through the neutral wire. Failure to
do so can result in fire, explosion, or death.
12
CONNECTING ELECTRIC DRYERS (continued)
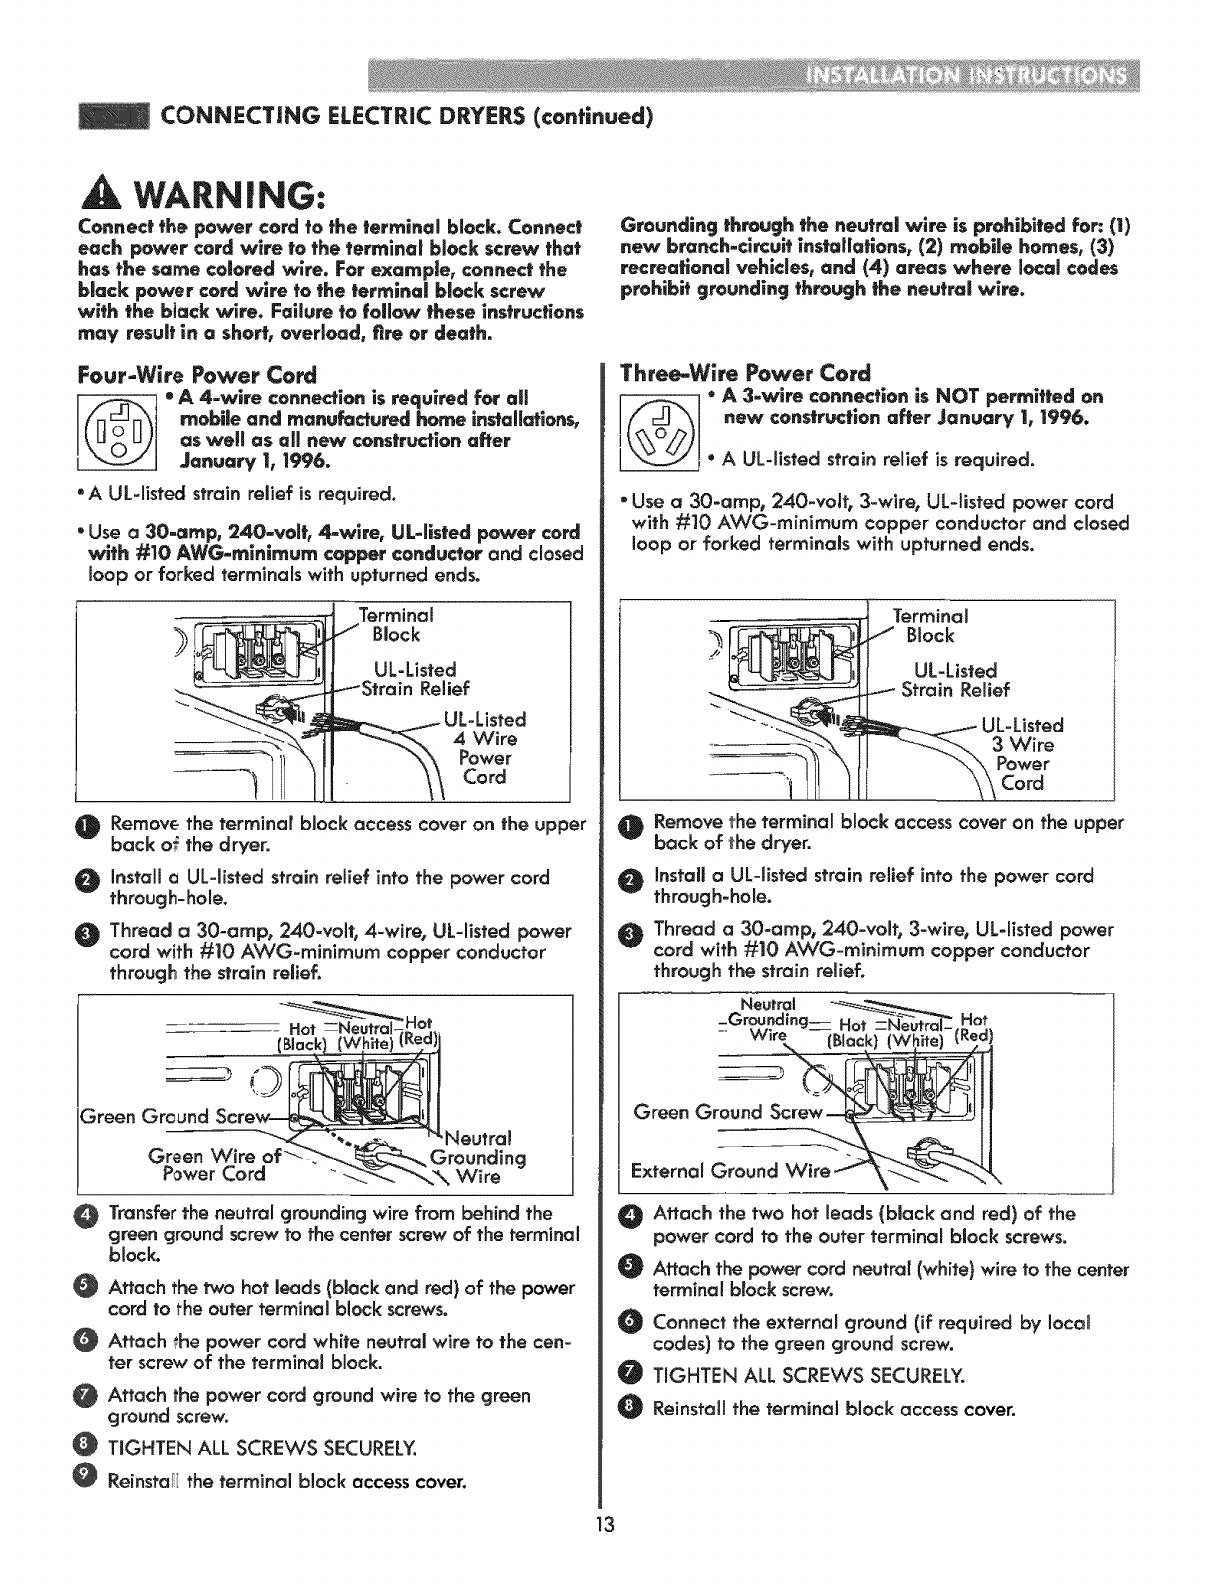
WARNING:
Connect the power cord to the terminal block. Connect
each power cord wire to the termlnal block screw that
has the same colored wire. For example, connect the
black power cord wire to the terminal block screw
with the biack wire. Failure to follow these instructions
may result in o short, overload, fire or death.
Four-Wire Power Cord
eA4-wlre connection is reAulred for all
mobile and manufactured home in_allafionsr
as well as all new construction offer
Jonua_ 1, 1996.
• A UL-listed strain relief is required.
•Use a 30.amp, 240-volt_ 4-wlre, UL-listed power cord
with #10 AWG-mlnlmum copper conductor and closed
loop or forked terminals with upturned ends.
?Terminal
Block
4 Wire
Power
__ Cord
O Remove the terminal block access cover on the upper
back o_ the dryer.
Install aUL-listed strain relief into the power cord
through-hole.
Thread a 30-amp, 240-volt, 4-wireo UL-listed power
cord with #10 AVCG-minimum copper conductor
through the strain relief.
Green Ground 'Neutral
Green Wire Grounding
Power Cord __--_ Wire
O Transfer the neutral grounding wire from behind the
green ground screw to the center screw of the terminal
block.
Attach the two hot leads (black and red) of the power
cord to the outer terminal block screws.
Attach _he power cord white neutral wire to the cen-
ter screw of the terminal block.
Attach the power cord ground wire to the green
ground screw.
TIGHTEN ALL SCREWS SECURELY.
O Reinsta I the terminal block access cover.
Grounding through the neutral wire is prohibited for: (1)
new branch-circuff instaffations, (2) mobile homes, (3)
recreo|ionoi vehicles, and (4) areas where local codes
prohibit grounding through fhe neutral wire.
Three-Wire Power Cord
. A 3-wire connectlon is NOT permiffed on
new construcflon after January 1, 1996.
*A UL-listed strain relief is required.
•Use a 30-amp0 240-voff0 3-wire, UL-listed power cord
with #10 AWG-minimum copper conductor and closed
loop or forked terminals with upturned ends.
?Terminal
Block
UL-Listed
Relief
JL-Listed
Power
Cord
Remove the terminal block access cover on the upper
back of _hedryer.
Install o UL-listed strain relief into the power cord
throug h=hole.
Thread a 30-amp_ 240-voff0 3-wire, UL-listed power
cord with #10 AWG-minimum copper conductor
through the strain relief.
Neutral ___
-Grounding-- H,_ -_-_l Hot
-Wire ............. (Red)
Green Ground
External Ground
g
@
@
@
@
Attach the two hot leads {block and red) of the
power cord to the outer terminal block screws.
Attach the power cord neutral (white) wire to the center
termina! btock screw.
Connect the external ground (if required by local
codes) to the green ground screw.
TIGHTEN ALL SCREWS SECURELY.
Reinstall the terminal block access coven
13
VENTINGTHEDeYER
|MPORTANT! CHECK YOUR EXHAUST SYSTEM FOR PROBLEMS
The most common cause of dryer problems is poor *
exhaust venting. Before installing your new dryer,
check the items listed below to make sure you get the
best possible performance. This can save you time and
money by reducing cycle times and increasing energy •
e{_)ciency.
• DIRTY OR DAMAGED EXHAUST DUCTS. Lint builds
up in exhaust ducts over time. This decreases the
airflow and makes the dryer work harder. Visually
inspect your ducts from both ends and have them
cleaned if they have not been cleaned recently.
* WRONG VENT MATERIAL. Check your vent to make
sure it is rigid or semi-rigid metal ducfing, if your
venting is plastic or flexible foil, have if replaced
before ushg the dryer.
RESTRICTED OR DAMAGED VENT HOOD. Check
your vent hood outside. !t must be clean and free of lint
buildup. Check the damper and make sure it opens fully
and easily.
EXCESSIVELY LONG VENT. Measure the length of your
exhaust system and count the elbows. Use the chart
below to see if your duct is too (ong. If it is fad (one,
have the duct routed to another mocafion that is within
the venting guidelines.
oDO NOT USE PLASTIC OR FOIL VENTING. The
transition duct from your dryer to the waft must be rigid
or semi-rigid metal ducfing. If your old transition duct is
plastic or foil_ REPLACE IT with semi-rigid metal ducting.
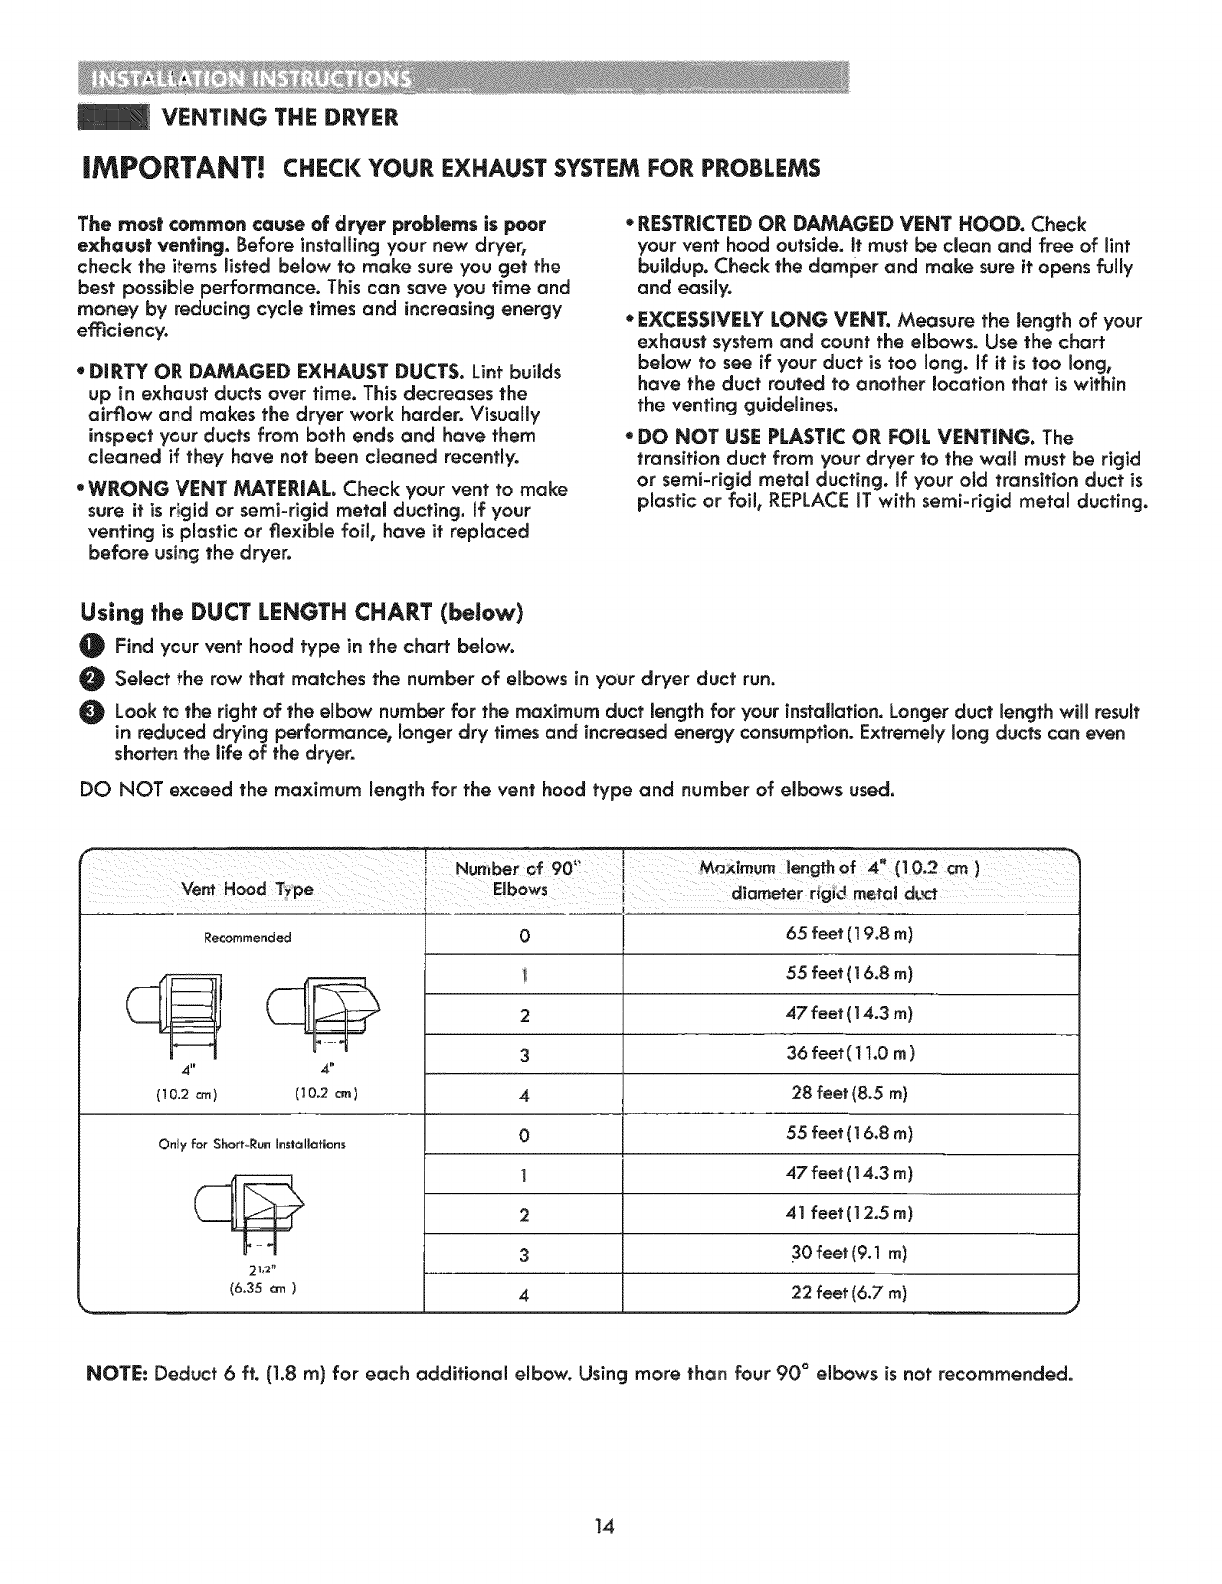
Using the DUCT LENGTH CHART (be|ow)
0 Find ycur vent hood type in the chart below.
Select the row that matches the number of elbows in your dryer duct run.
Look to the right of the elbow number for the maximum duct length for your installation. Longer duct length will result
in reduced drying performance, longer dry times and increased energy consumption.Extremely long ducts can even
shortenthe life of the dryer.
DO NOT exceed the maximum length for the vent hood type and number of elbows used.
Number _f 90! Max!mum lengthof 4 (10..-¢m)
vo.iHood Elbowsr!gidm_tel dL_t
Recommended
4" 4 _
(!0.2 cm) (10.2 cm)
Onl, for Short_Ru_ Installations
0
i
2
3
4
0
65 feet (I 9.8 m)
55 feet ( 16.8 m)
47 feet ( 14.3 m)
36 feet ( 11.0 rn)
28 feet (8.5 rn)
55 feet ( 16.8 m)
(6.35 ¢rn )
1
2
3
4
47 feet (14.3 m)
41 feet(12.5 m)
30 feet (9.1 m)
22 feet (6.7 m)
NOTE: Deduct 6ft. (1.8 m) for each additional elbow. Using more than four 90 ° elbows is not recommended.
14
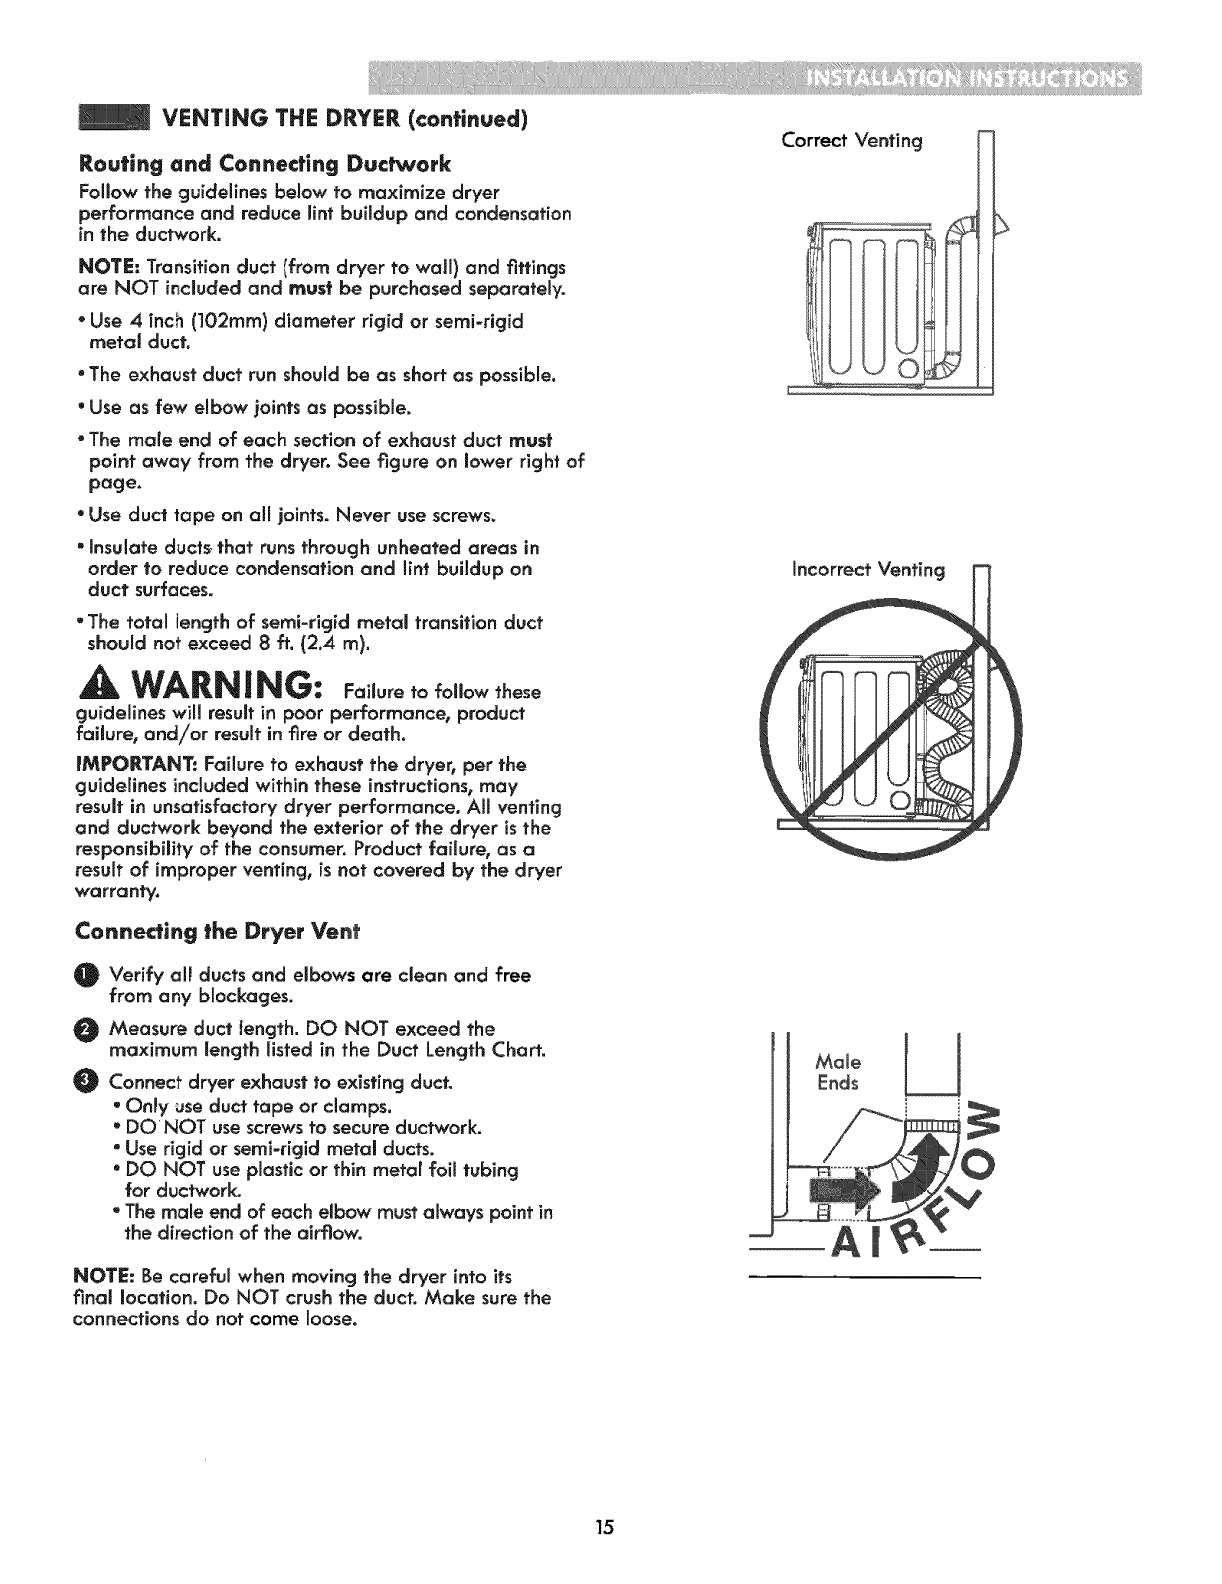
VENTING THE DRYER (continued)
Routing and Connecting Duclwork
Follow the guidelines below to maximize dryer
performance and reduce lint buildup and condensation
in the ductwork.
NOTE: Transition duct _from dryer to wall) and fittings
are NOT included and must be purchased separately.
*Use 4 inch {102ram} diameter rigid or semi-rigid
metal duct.
• The exhaust duct run should be as short as possible.
•Use as few elbow joints as possible.
•The male end of each section of exhaust duct must
point away from the dryer. See figure on lower right of
page.
•Use duct tape on all joints. Never use screws.
•Insulate ducts, that runs through unheated areas in
order to reduce condensation and lint buiJdup on
duct surfaces.
•The total length of semi-rigid metal transition duct
should not exceed 8 ft. (2.4 m).
AWARNING: Failuretofo,owthese
guidelines wil! result in poor performance, product
failure, and/or result in fire or death.
IMPORTANT: Failure to exhaust the dryer, per the
guidelines included within these instructions, may
result in unsatisfactory dryer performance. All venting
and ductwork beyond the exterior of the dryer is the
responsibility of the consumer. Product failure, as a
result of improper venting, is not covered by the dryer
warranty.
Conneding the Dryer Vent
O Verify aft ducts and elbows are cleon and free
from any blockages.
Measure duct }ength. DO NOT exceed the
maximum length listed in the Duct Length Chart.
Connect dryer exhaust to existing duct.
*Only use duct tape or clamps.
"DO NOT usescrewsto secureduc_ork.
"Use rigid or semi-rigid metal ducts.
*DO NOT use plastic or thin metal foil tubing
for ductwork.
- The male end of each elbow must always point in
the direction of the airflow.
NOTE: Be careful when moving the dryer into its
final location. Do NOT crush the duct. Make sure the
connections do not come loose.
Correct Venting
, i
Incorrect Venting
Ii
15
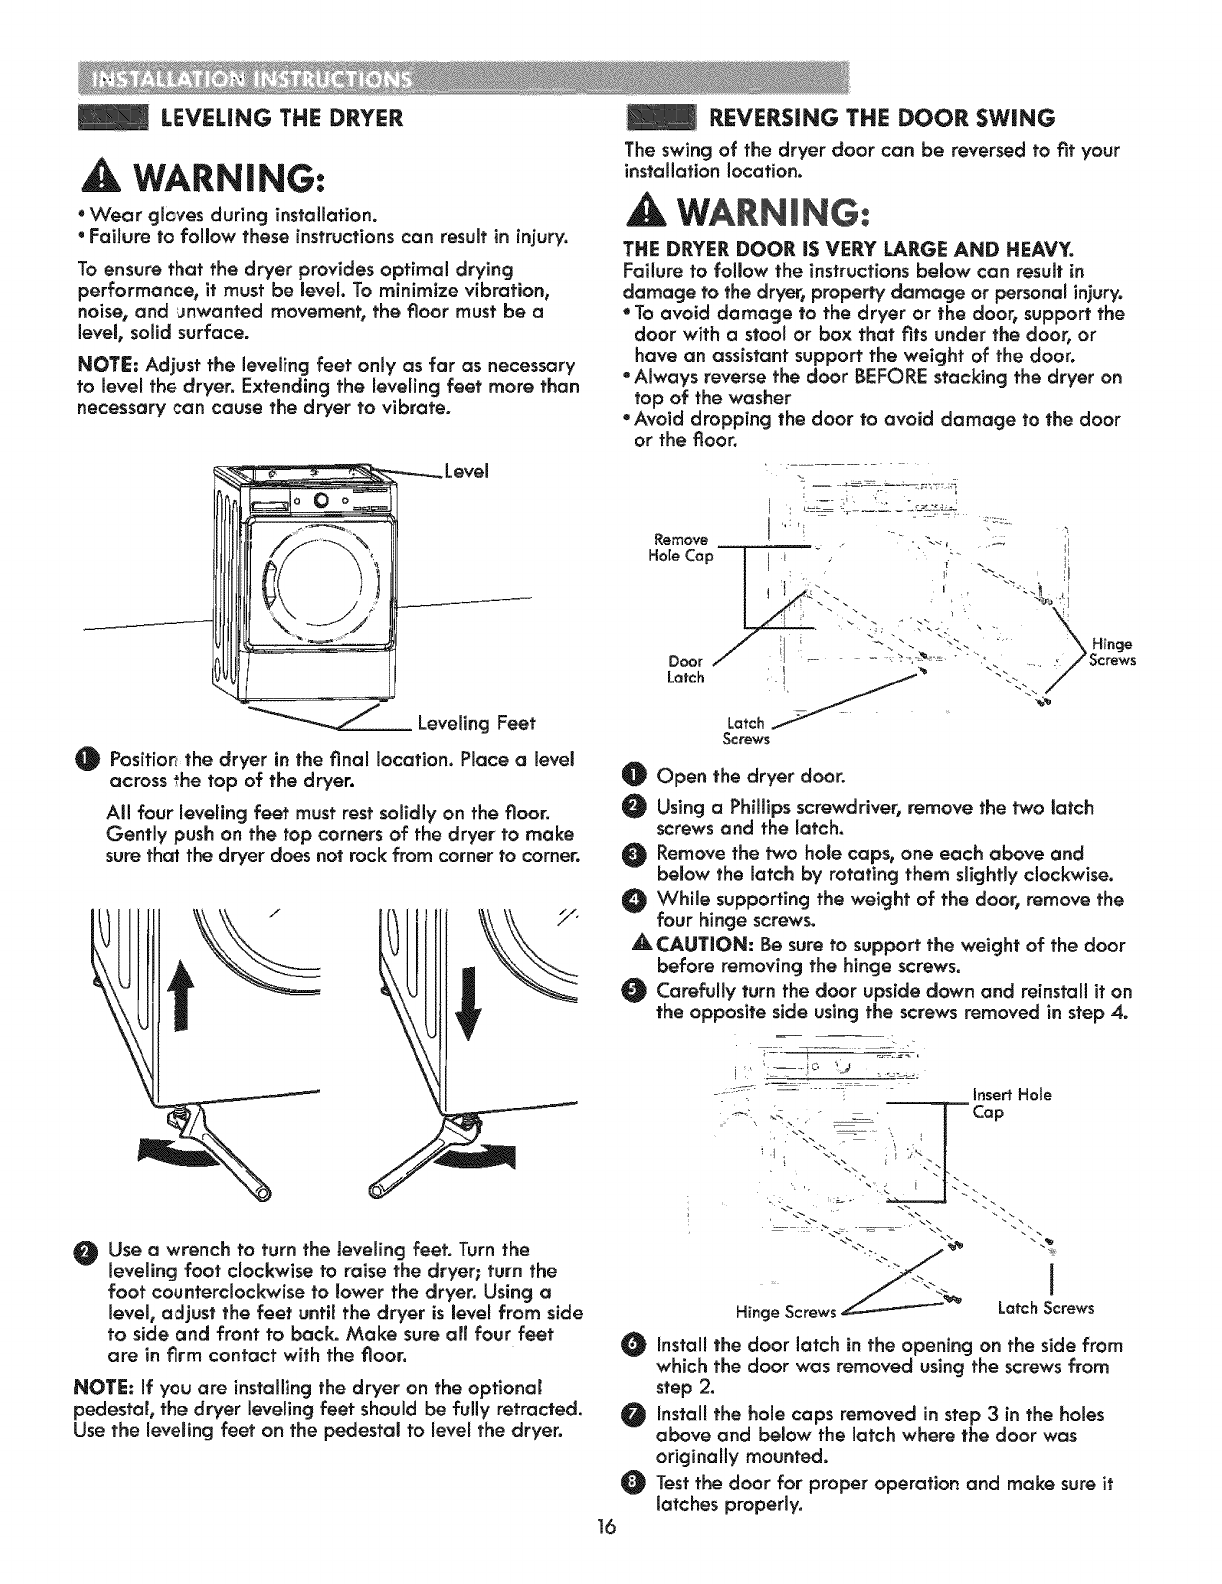
LEVELING THE DRYER
WARNING:
* Wear gloves during installation.
, Failure to follow these instructions can result in injury.
To ensure that the dryer provides optimal drying
performance, it must be level. To minimize vibration,
noise, and _nwanted movement, the floor must be a
level, solid surface.
NOTE: Adjust the leveling feet only as far as necessary
to level the dryer. Extending the leveling feet more than
necessary can cause the dryer to vibrate.
-.-,-.........Level
i
-..;.....
- _=_i----
"__ Leveling Feet
O Position the dryer in the final location. Place alevel
across the top of the dryer.
All four leveIing feet must rest solidly on the floor.
Gently push on the top corners of the dryer to make
sure that the dryer does not rock from corner to corner.
Use a wrench to turn the leveling feet. Turn the
leveling foot clockwise to raise the dryer; turn the
foot counterclockwise to lower the dryer. Using a
level, ac_just the feet untff the dryer is level from side
to side and front to back. Make sure arl four feet
are in firm contact with the floor.
NOTE: If you are installing the dryer on the optional
pedestal, the dryer leveling feet should be fully retracted.
Use the leveling feet on the pedestal to level the dryer.
REVERSING THE DOOR SWING
The swing of the dryer door can be reversed to fit your
installation location.
WARNING:
THE DRYER DOOR IS VERY LARGE AND HEAVY.
Faffure to foffow the instructions below can result in
damage to the dryer_property damage or personal injury.
* To avoid damage to the dryer or the door, support the
door with a stool or box that fits under the door, or
have an assistant support the weight of the door.
*Always reverse the door BEFORE stacking the dryer on
top of the washer
*Avoid dropping the door to ovoid damage to the door
or the floor.
I
Remove
Halocop ," ,:--
_'_"-, ".L-:.,-., Hinge
Latch i-
Screws
Open the dryer door.
Using aPhillips screwdriver, remove the two latch
screws and the latch.
Remove the two hole caps, one each above and
below the latch by rotating them slightly clockwise.
While supporting the weight of the door, remove the
four hinge screws.
Ak eJ_UTION: Be sureto support the weight of the door
before removing the hinge screws.
Carefully turn the door upside down and reinstall it on
the opposite side using the screws removed in step 4.
--_ ....:"....._;_:. - " insert Hole
"_ 1--- Cap
L
Hinge Screws Latch Screws
Install the door latch in the opening on the side from
which the door was removed using the screws from
step 2.
Install the hole cops removed in step 3 in the holes
above and below the latch where the door was
originally mounted.
Test the door for proper operation and make sure it
_otches properly.
16
FINAL iNSTALLATION CHECK
Once you have completed the _nstallation of the dryer
and i? is in its final location, confirm proper operation
with the following steps and tests.
is gas turned on? (Gas models only)
Is dryer plugged in? Dryer should always be
plugged into the proper outlet.
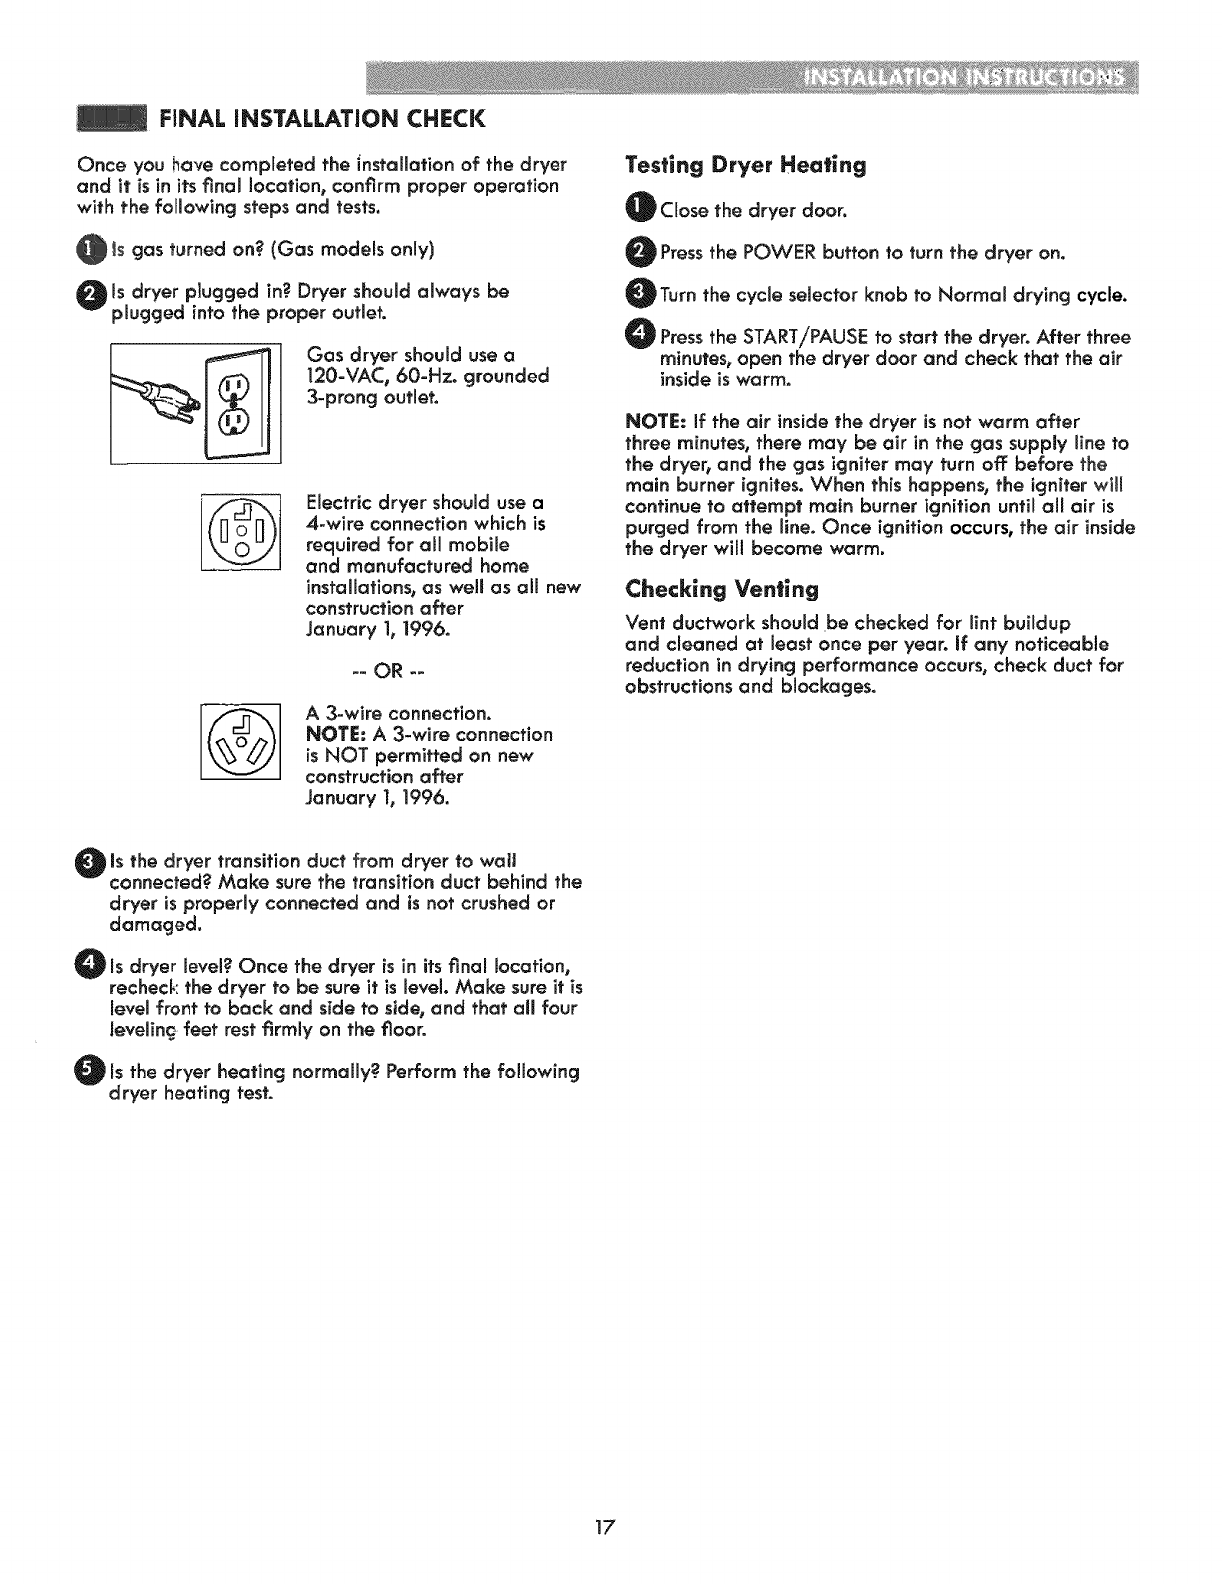
Gas dryer should use a
120-VAC, 60-Hz. grounded
3-prong outlet.
Electric dryer should use a
4-wire connection which is
required for a!l mobile
and manufactured home
installations, as well as all new
construction after
January 1, 1996.
-- OR --
A3-wire connection,
NOTE: A 3-wire connection
is NOT permitted on new
construction after
January 1, 1996.
Testing Dryer Heating
Close the dryer door.
Pressthe POWER button to turn the dryer on.
Turn the cycle selector knob to Normal drying cycle.
O Pressthe START/PAUSE to start the dryer. After three
minutes_ open the dryer door and check that the air
inside is warm.
NOTE: If the air inside the dryer is not warm after
three minutes, there may be air in the gas supply line to
the dryer, and the gas igniter may turn off: before the
main burner ignites. When this happens, the igniter will
continue to attempt main burner ignition until all air is
purged from the line. Once ignition occurs, the air inside
the dryer will become warm.
Checking Ven|ing
Vent ductwork should be checked for lint buildup
and cleaned at least once per year. If any noticeable
reduction in drying performance occurs, check duct for
obstructions and blockages.
is the dryer transition duct from dryer to wall
connected? Make sure the transition duct behind the
dryer is properly connected and is not crushed or
damaged,
msdryer level? Once the dryer is in its final location,
recheck the dryer to be sure it is level. Make sure it is
level front to back and side to side, and that all four
levelin_ feet rest firmly on the floor.
Is the dryer heating normally? Perform the following
dryer heating test.
17
AWARN ING: To,eduoefh°, ,kof el, ,ic,ho0k.o,i,io,Vto ,eodfhl,o,,,o
manual, including fee Important Safety Instructions, before operating fhls dryer.
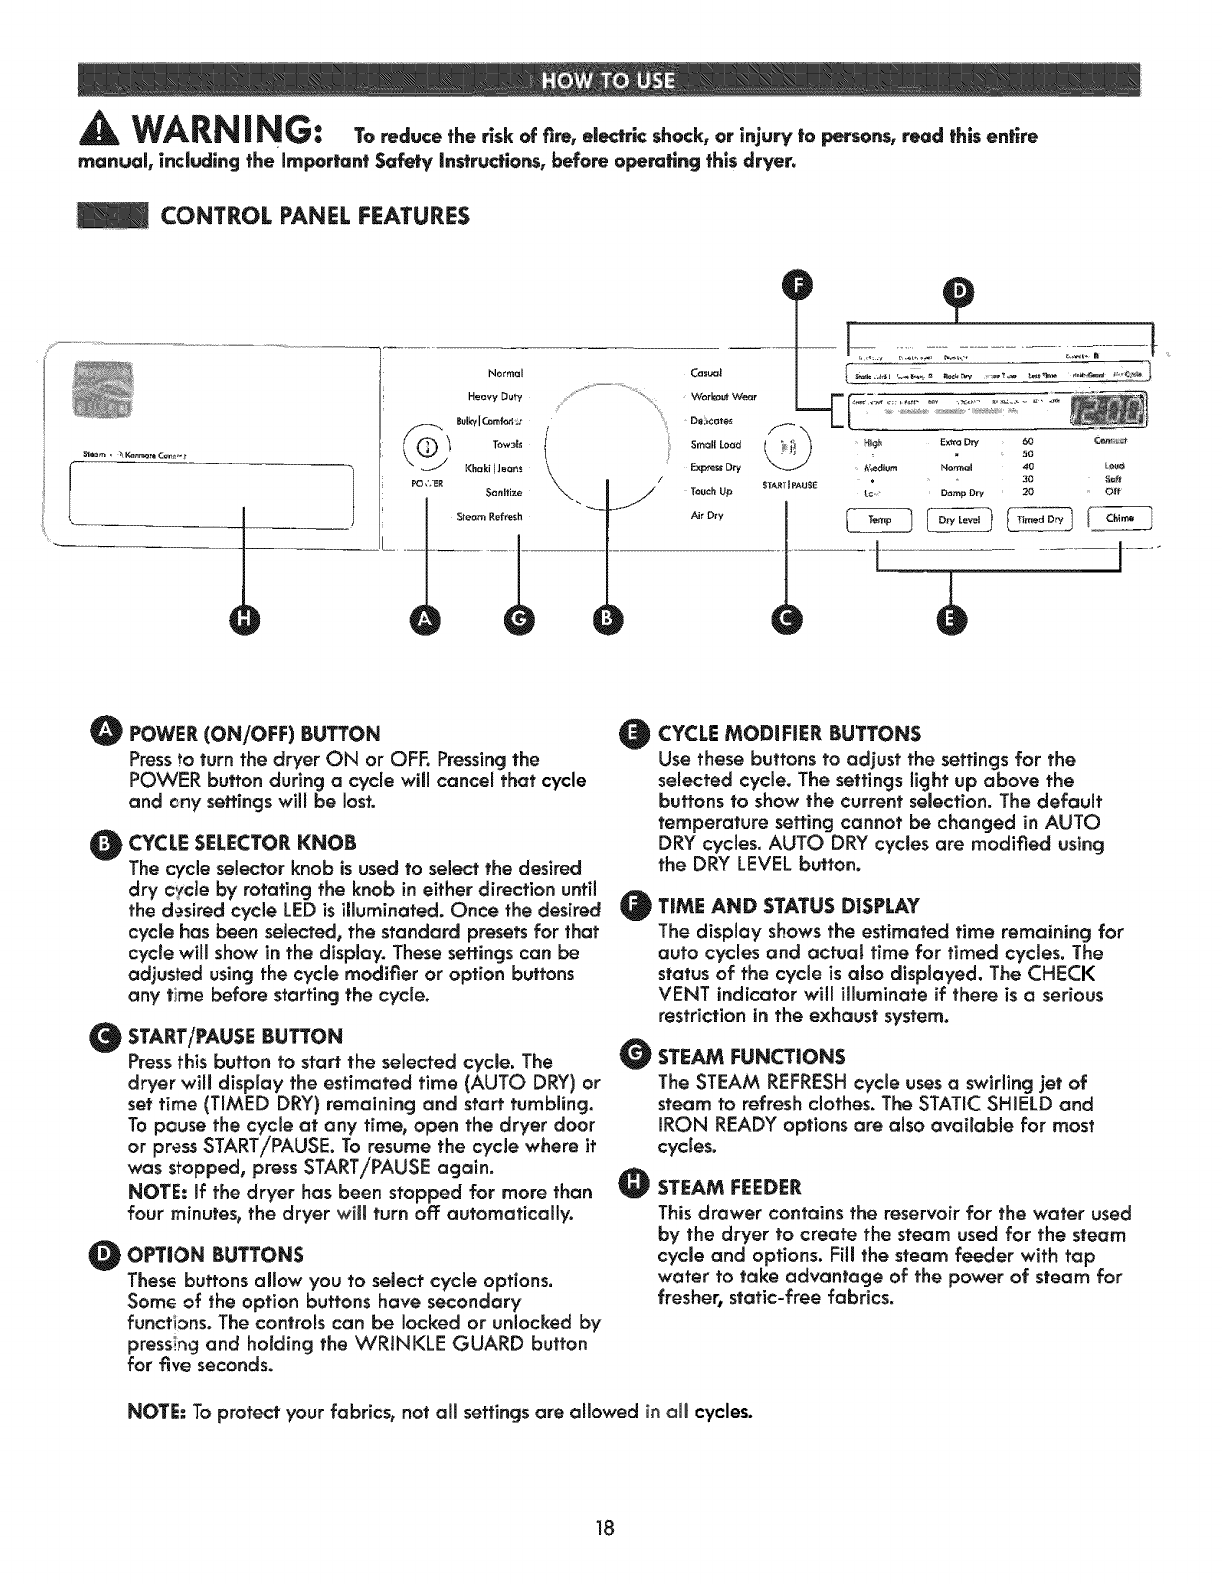
CONTROL PANEL FEATURES
I
No_'mal
Heavy Du_
Bulk_l_mf_,
Khaki FJeans
Sanitize
Cas_|
Workout Veer
De +COtes
Srn_|l Load
Expre_ Dry
Touch Up
Air D_y
Extra Dry
Normal
D_p Dry
50
40 LOU_
20 Off
I
O
O
0
0
POWER (ON/OFF) BUTTON
Pressto turn the dryer ON or OFF.Pressing the
POWER button during a cycle will cancel that cycle
and any settings will be lost.
CYCLE SELECTOR KNOB
The cycle selector knob is used to select the desired
dry cycle by rotating the knob in either direction until
the desired cycle LEDis illuminated. Once the desired
cycle has been selected, the standard presetsfor that
cycle will show in the display. These settings can be
adjusted using the cycle modifier or option buttons
any time before starting the cycle.
@
@
START/PAUSE BUTTON
Pressthis button to start the selected cycle. The
dryer will display the estimated time (AUTO DRY) or
set time (TIMED DRY) remaining and start tumbling.
To pause the cycle at any time, open the dryer door
or pressSTART/PAUSE. To resume the cycle where it
was stopped, press START/PAUSE again.
NOTE: If the dryer has been stopped for more than
four minutes, the dryer will turn off: automatically.
OPTION BUTTONS
These buttons allow you to select cycle options.
Some of the option buttons have secondary
functions. The controls can be locked or unlocked by
pressk_g and holding the WRINKLE GUARD button
for five seconds.
CYCLE MODIFIER BUTTONS
Use these buttons to adjust the settings for the
selected cycle. The settings light up above the
buttons to show the current selection. The default
temperature setting cannot be changed in AUTO
DRY cycles. AUTO DRY cycles are modified using
the DRY LEVEL button.
TIME AND STATUS DISPLAY
The display shows the estimated time remaining for
auto cycles and actual time for timed cycles. The
status of the cycle is also displayed. The CHECK
VENT indicator will illuminate if there is a serious
restriction in the exhaust system.
STEAM FUNCTIONS
The STEAM REFRESHcycle uses aswirling jet of
steam to refresh clothes. The STATIC SHIELD and
IRON READY options are also available for most
cycles.
STEAM FEEDER
This drawer contains the reservoir for the water used
by the dryer to create the steam used for the steam
cycle and options. Fill the steam feeder with tap
water to take advantage of the power of steam for
fresher, static-free fabrics.
NOTE: To protect your fabrics, not all settings are allowed in aH cycles.
]8
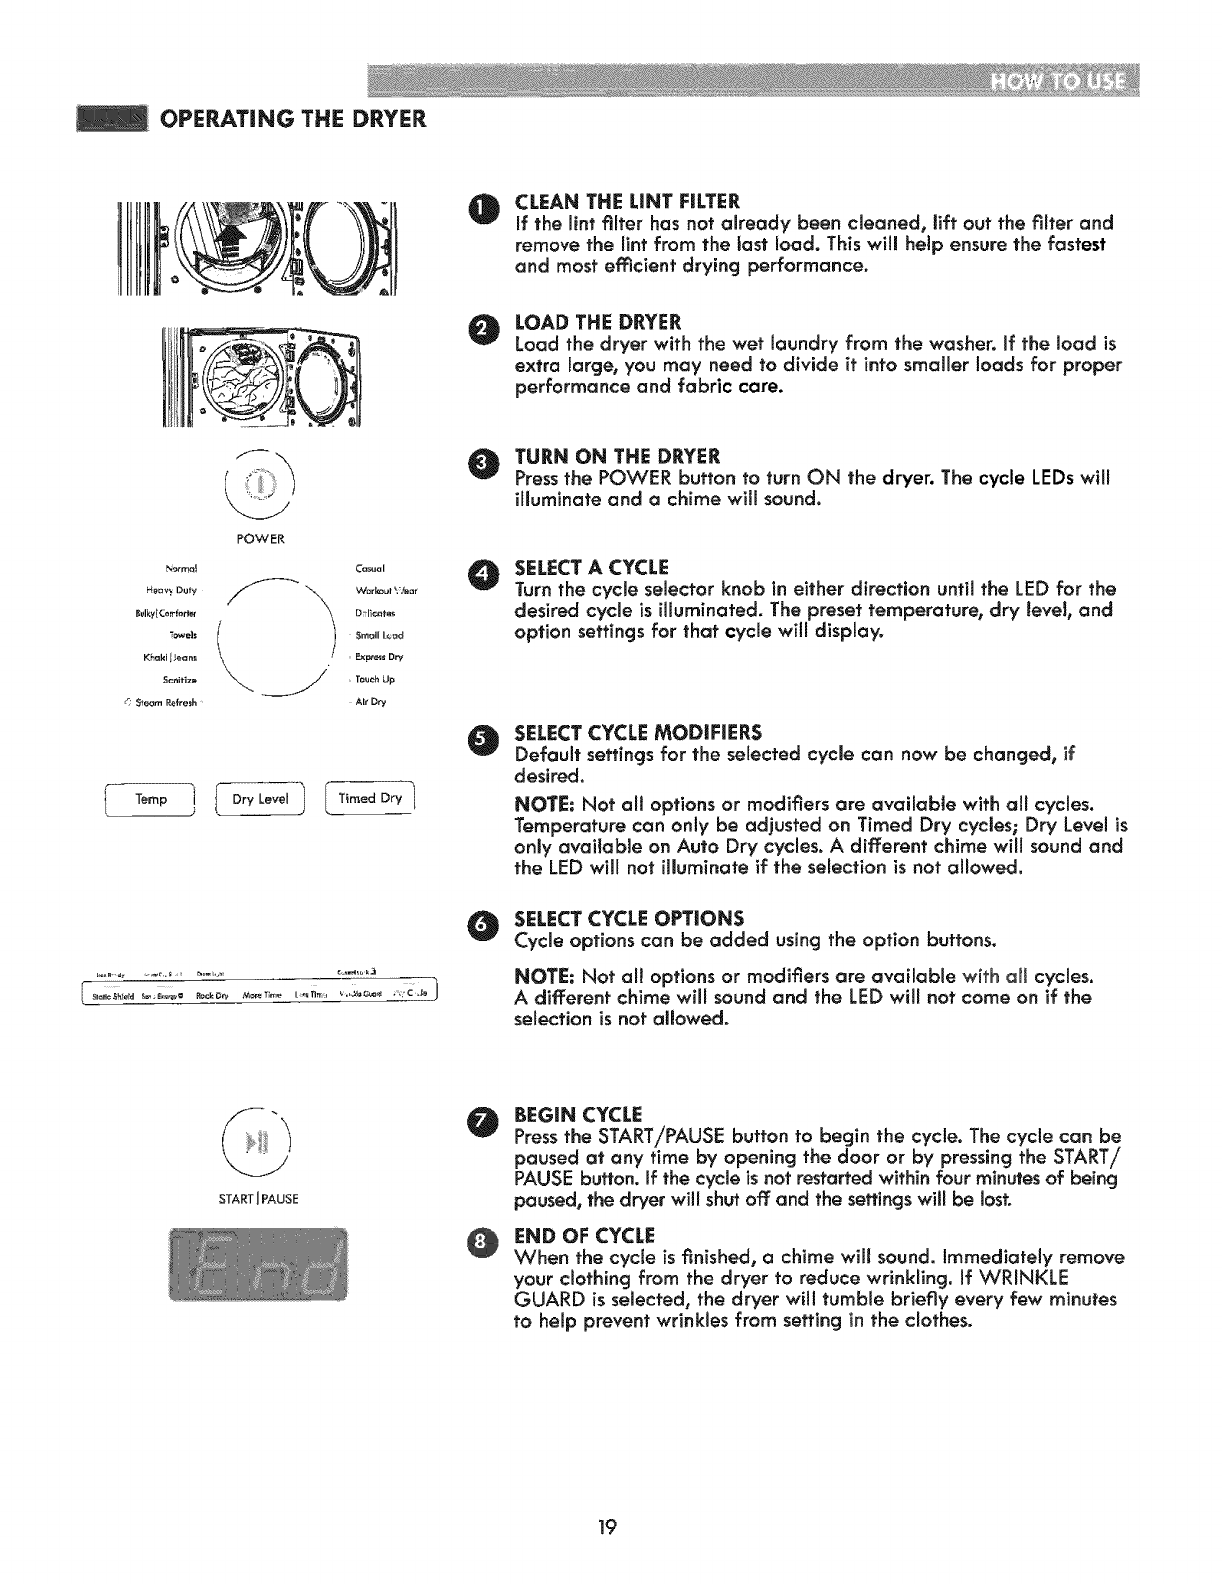
OPERATING THE DRYER
@CLEAN THE LiNT FILTER
If the lint filter has not akeady been cleaned, lift out the filter and
remove the lint from the tast load. This will help ensure the fastest
and most efficient drying performance.
@LOAD THE DRYER
Load the dryer with the wet laundry from the washer. If the load is
extra large, you may need to divide it into smaller loads for proper
performance and fabric care.
POWER
N_rm_} Ca_al
Hg_v_ Duty _\ War_t _,/_ar
BdkylG_rffer_ _1 D Ii_t_s
Khaki [ean_ Expels Dry
Scnifiz_ / Trough Up
<: Ste_rn P_fresh AI_ Dry
I Temp I DryLeveJ I I TimedDry l
TURN ON THE DRYER
Pressthe POWER button to turn ON the dryer. The cycle LEDs will
illuminate and achime will sound.
OSELECT A CYCLE
Turn the cycle selector knob in either direction until the LED for the
desired cycle is illuminated. The preset temperature, dry level, and
option settings for that cycle will display.
SELECT CYCLE MODIFIERS
Default settings for the selected cycle can now be changed, if
desired.
NOTE: Not all options or modifiers are available with al[ cycles.
Temperature can only be adjusted on Timed Dry cycles; Dry Level is
only available on Auto Dry cycles. A different chime wi[[ sound and
the LED will not illuminate if the selection isnot allowed.
SELECT CYCLE OPTIONS
Cycle options can be added using the option buttons.
NOTE: Not all options or modifiers are available with all cycles.
A different chime wi[[ sound and the LED will not come on if the
selection is not affowed.
START[PAUSE
@
@
BEGIN CYCLE
Press the START/PAUSE button to begin the cycle. The cycle can be
paused at any time by opening the door or by pressing the START/
PAUSE button, if the cycle is not restarted within four minutes of being
paused, the dryer will shut off and the settings will be lost.
END OF CYCLE
When the cycle is finished, a chime will sound. Immediately remove
your clothing from the dryer to reduce wrinkling. If WRINKLE
GUARD is selected, the dryer will tumble briefly every few minutes
to help prevent wrinkles from setting in the clothes.
19
CYCLEGUIDE
The cycle guide below shows the available optionsand recommendedfabric types for AUTO DRYcycles.
::;NOTE:The default time and actual time will vary depending on the size of the load and moisture content.
Auto Dry Cycles
Auto Dry cycles utilize a sensor that detects moisture levels in the clothes and adjusts the drying time as needed to ensure superior
results. The drier automatically sets the dry level and temperature at the recommended setting for each cycle. The estimated time
remaining will be shown in the display.
= available option
= default setting
O
I.=
IModifiers
Medium
Normal Work clothes, etc. Gas76 _
Adjustable
High Noima] 54 '
Jeans,itemsheavyweight Adjustable _ ....
Heavy Duty
• u, ,, ,,,
Towels Detains, towels, heavy MI_: h gh No_mal _ ....._._.
cottons Adjustable
,,,,, ,,
Bulky/Comforter Comforter, pillows, Medium _orma|
shirts Adjustable
Khaki/Jeans Jeans, color fading Medium Off 35
material _ _
Sanitize Comforter, bedding, High; Extra _70 _;_12
children's clothing, etc.
,,,,,,,,,,,,
Comforter,shirts,trousers Mid high Off 20 Garment
Steam Refresh 1-5garments (DO NOT r_ :
usefor delicatefabrics) Adjustable Count _;'_
Casual Permanent press, Mid low Normal 32
synthetic items Adjustable ......_:_':
_orko_t Wear Workout wear
Lingerie, sheets,
Delicates blouses
Mid low Normal " 28
Adjustable
Only normal & High Normal ' 30
SmaJ_Load cotton/towel fabric
type (Max 3 Ib) Adjustable
NOTE: To protect your garments, not every dry level, or option is available with every cycle. Temperature settings cannot be
changed. Adifferent chime will sound and the LED will not illuminate or the selection will not change if the selection is not altowed.
_ERTIFIED BY NSF
NSF International (formerly the National Sanitation Foundation), certifies that the SANITIZE cycle reduces 99,9% of bacteria on
laundry, and none of the bacteria will carry over onto the next laundry load.
•The default settings for the SANITIZE cycle are HIGH temperature and EXTRA DRY. These default settings cannot be changed,
•Do NOT use this cycle with delicate items or fabrics.
•Steam cannot be added to the SANITIZE cycle.
2O
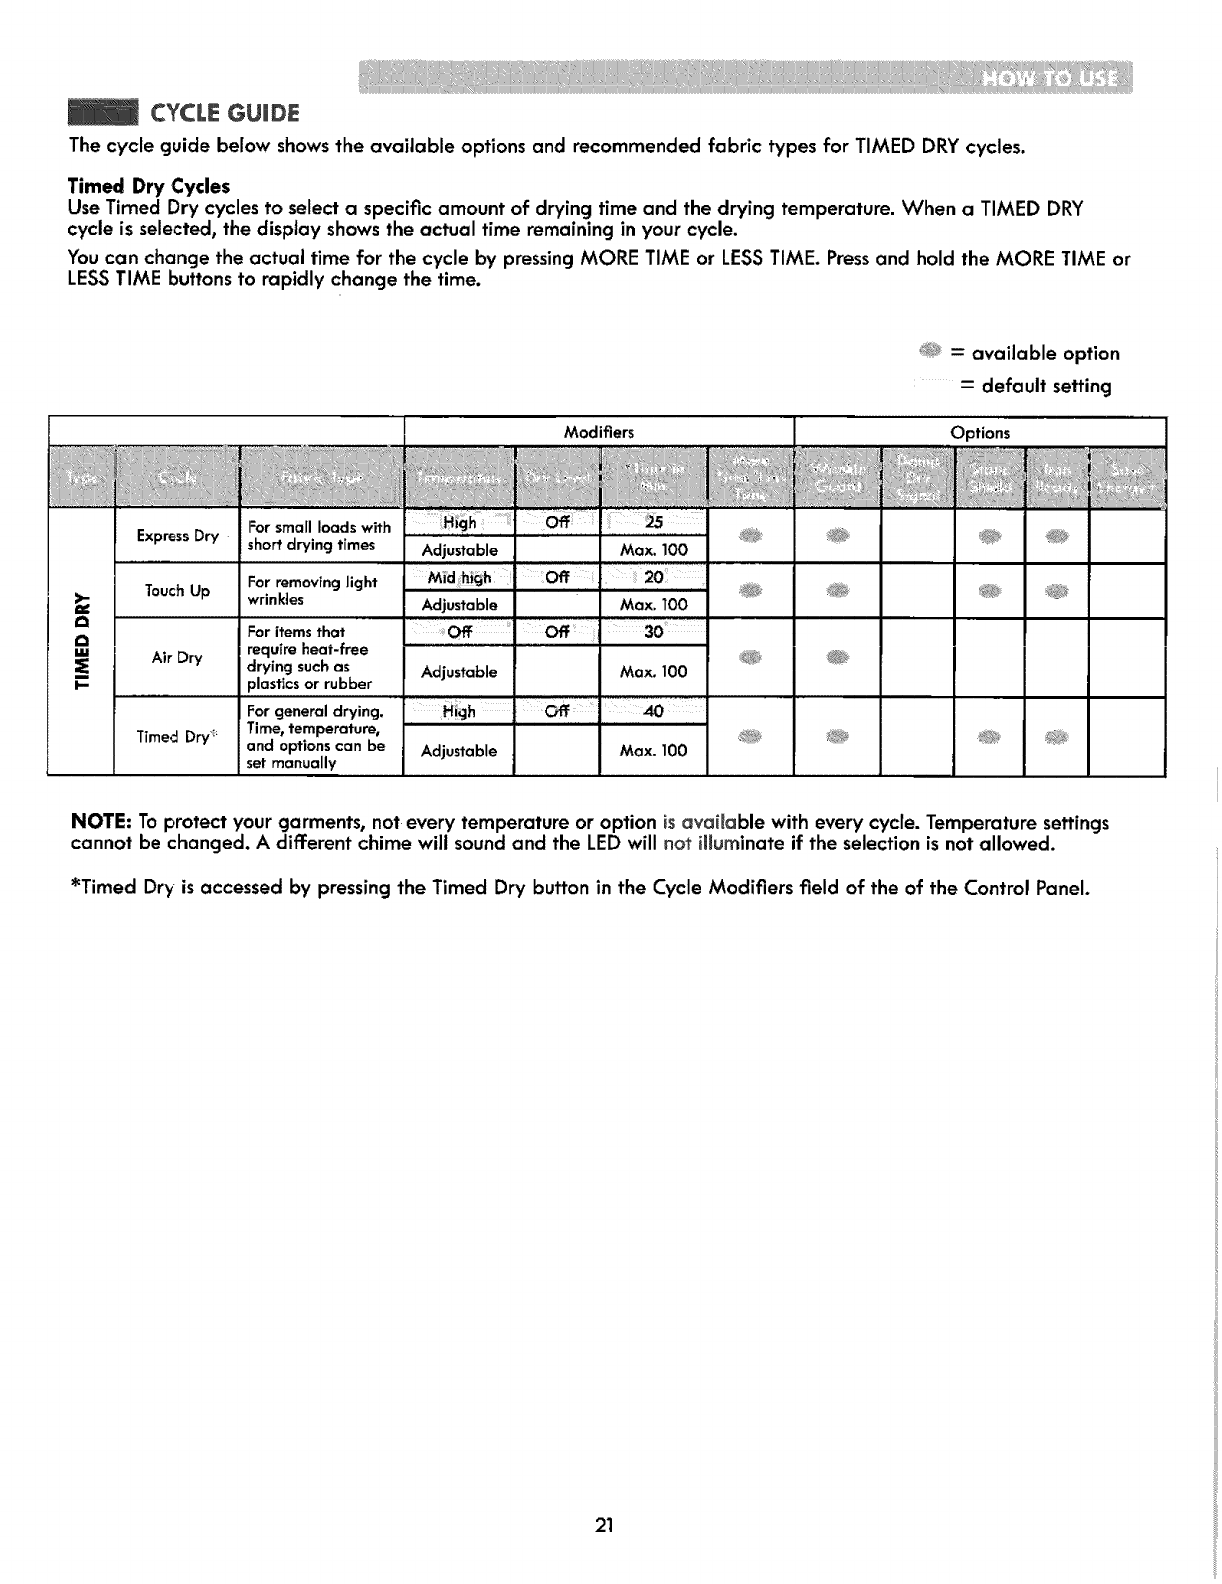
CYCLE UmDE
The cycle guide below showsthe available options and recommended fabric types for TIMED DRY cycles.
Timed Dry Cycles
Use Timed Dry cycles to select a specific amount of drying time and the drying temperature. When a TIMED DRY
cycle is selected, the display shows the actual time remaining in your cycle.
You can change the actual time for the cycle by pressingMORE TIME or LESSTIME. Pressand hold the MORE TIME or
LESSTIME buttons to rapidly change the time.
a
cI
ULI
I-
For small loads with
Express Dry short drying times
Modifiers
Touch Up
Air Dry
Timed Dry _
For removfng light
wrinkles
For items that
require heat-free
drying such as
plastics or rubber
For general drying.
Timextemperature,
and options can be
set manually
Midh!gh
Adjustable
Adjustable
High
Adjustable
OfF J;i
20
Max. 100
30
Max. 100
40
Max. 100
= available option
-- default setting
Options
!i
NOTE: To protect your garments, not every temperature or option is available with every cycle. Temperature settings
cannot be changed. A different chime will sound and the LED will not illuminate if the selection is not allowed.
*Timed Drv is accessed by pressing the Timed Dry button in the Cycle Modifiers field of the of the Control Panel.
21
WARNING:
including the Important Safety InstrucfionSrbefore operating this dryer.
To reduce the risk of fire, electric shock, or injury to persons, read this entire manual,
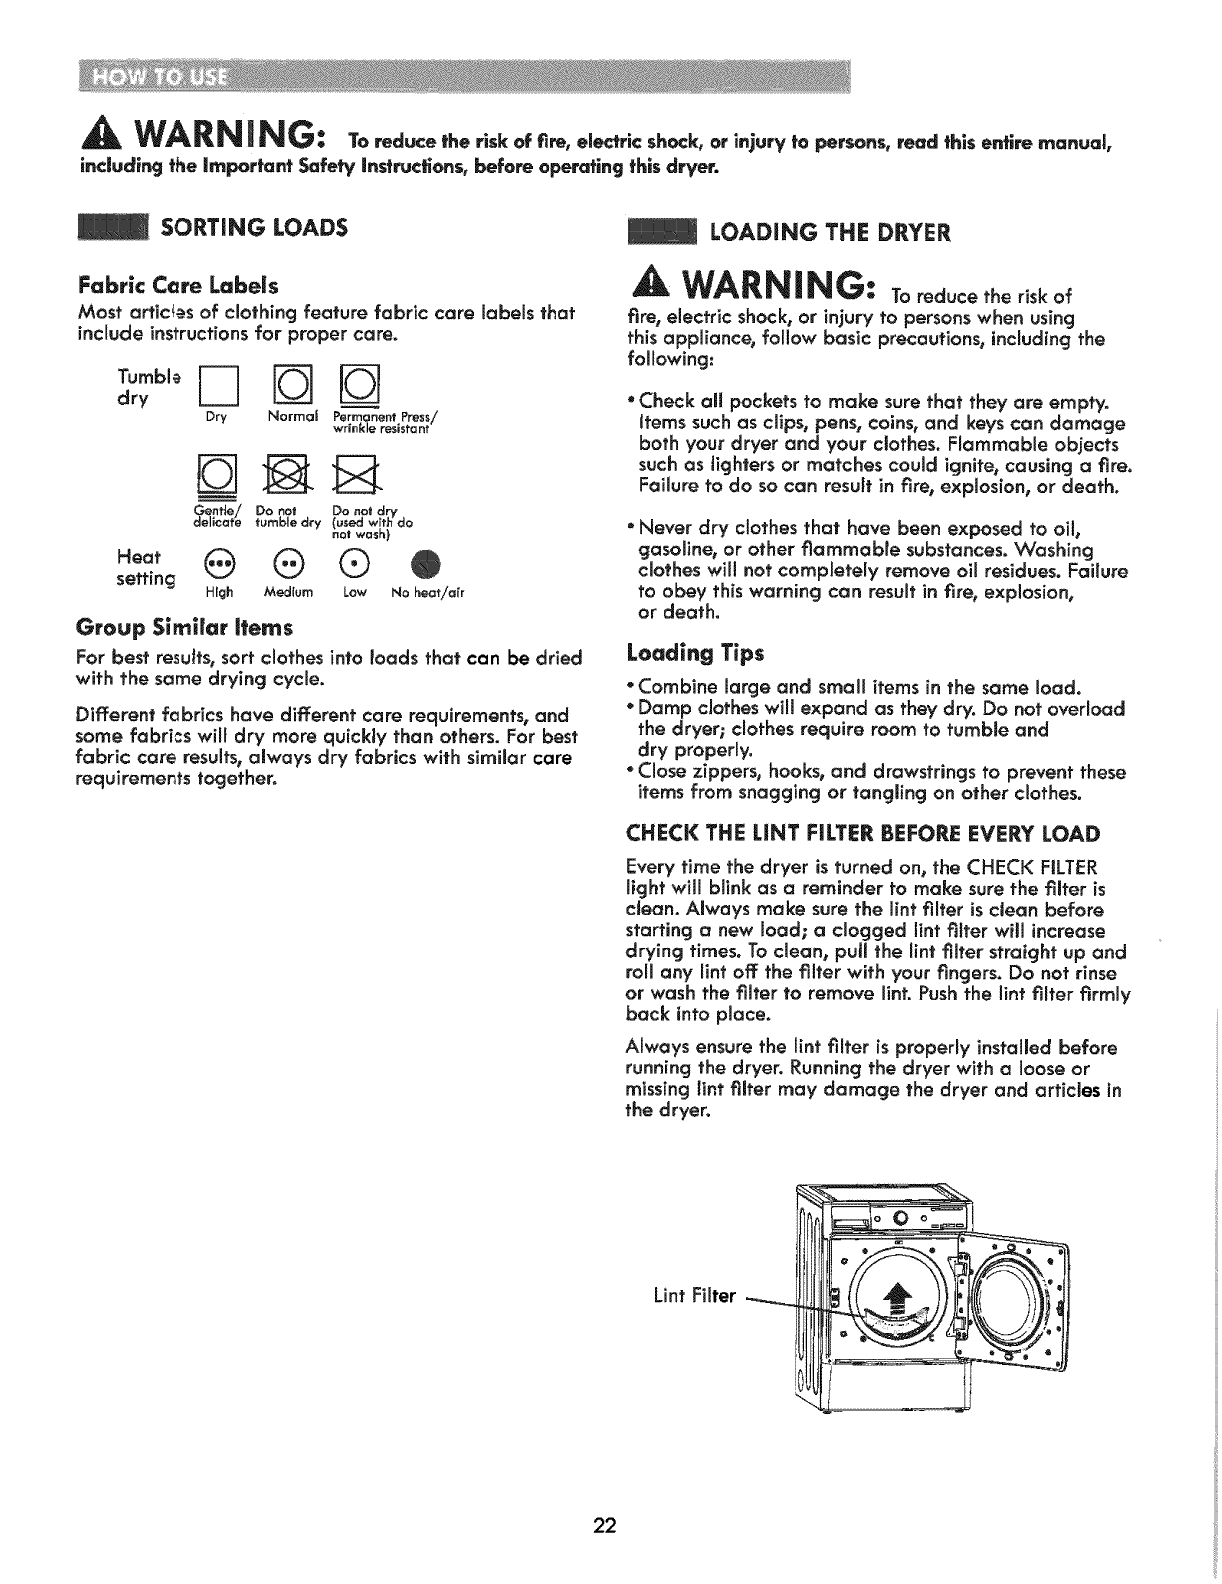
SORTINGLOAOS
Fabric Care Labels
Most articles of clothing feature fabric care labels feat
include instructionsfor proper care.
dry
Dry Normal Permanent Press/
wrinkle resistant
G_nfle/ Do not Do not dry
Jcate tumble dry _usea wit,_ Go
not wash)
0 ® ®
High Medium Low No heat/air
Group Simffar ffems
For best resuffs, sort clothes into loads that can be dried
with the same drying cycle.
Different fabrics have different care requirements, and
some fabrics will dry more quickly than others. For best
fabric care results,always dry fabrics with similar care
requirements together°
LOADING THE DRYER
AWARNING: Toreducetheriskof
fire, electric shock, or injury to personswhen using
this appliance, follow basic precautions, including the
following:
* Check aH pockets to make sure that they are empty.
items suchas clips, pens, coins, and keys can damage
both your dryer and your cbthes. Flammable objects
such as Jighters or matches could ignite, causing a fire.
Failure to do so can result in fire, explosion, or death.
"Never dry clothes that have been exposed to oil,
gasoliner or other flammable substances. Washing
clothes will not completely remove oil residues. Faiiure
to obey this warning can result in fire, explosion,
or death.
Loading Tips
"Combine large and small items in the same load.
*Damp cJotheswill expand as they dry. Do not overload
the dryer; clothes require room to tumble and
dry properly.
"Close zippers, hooks, and drawstrings to prevent these
items from snagging or tangling on other clothes.
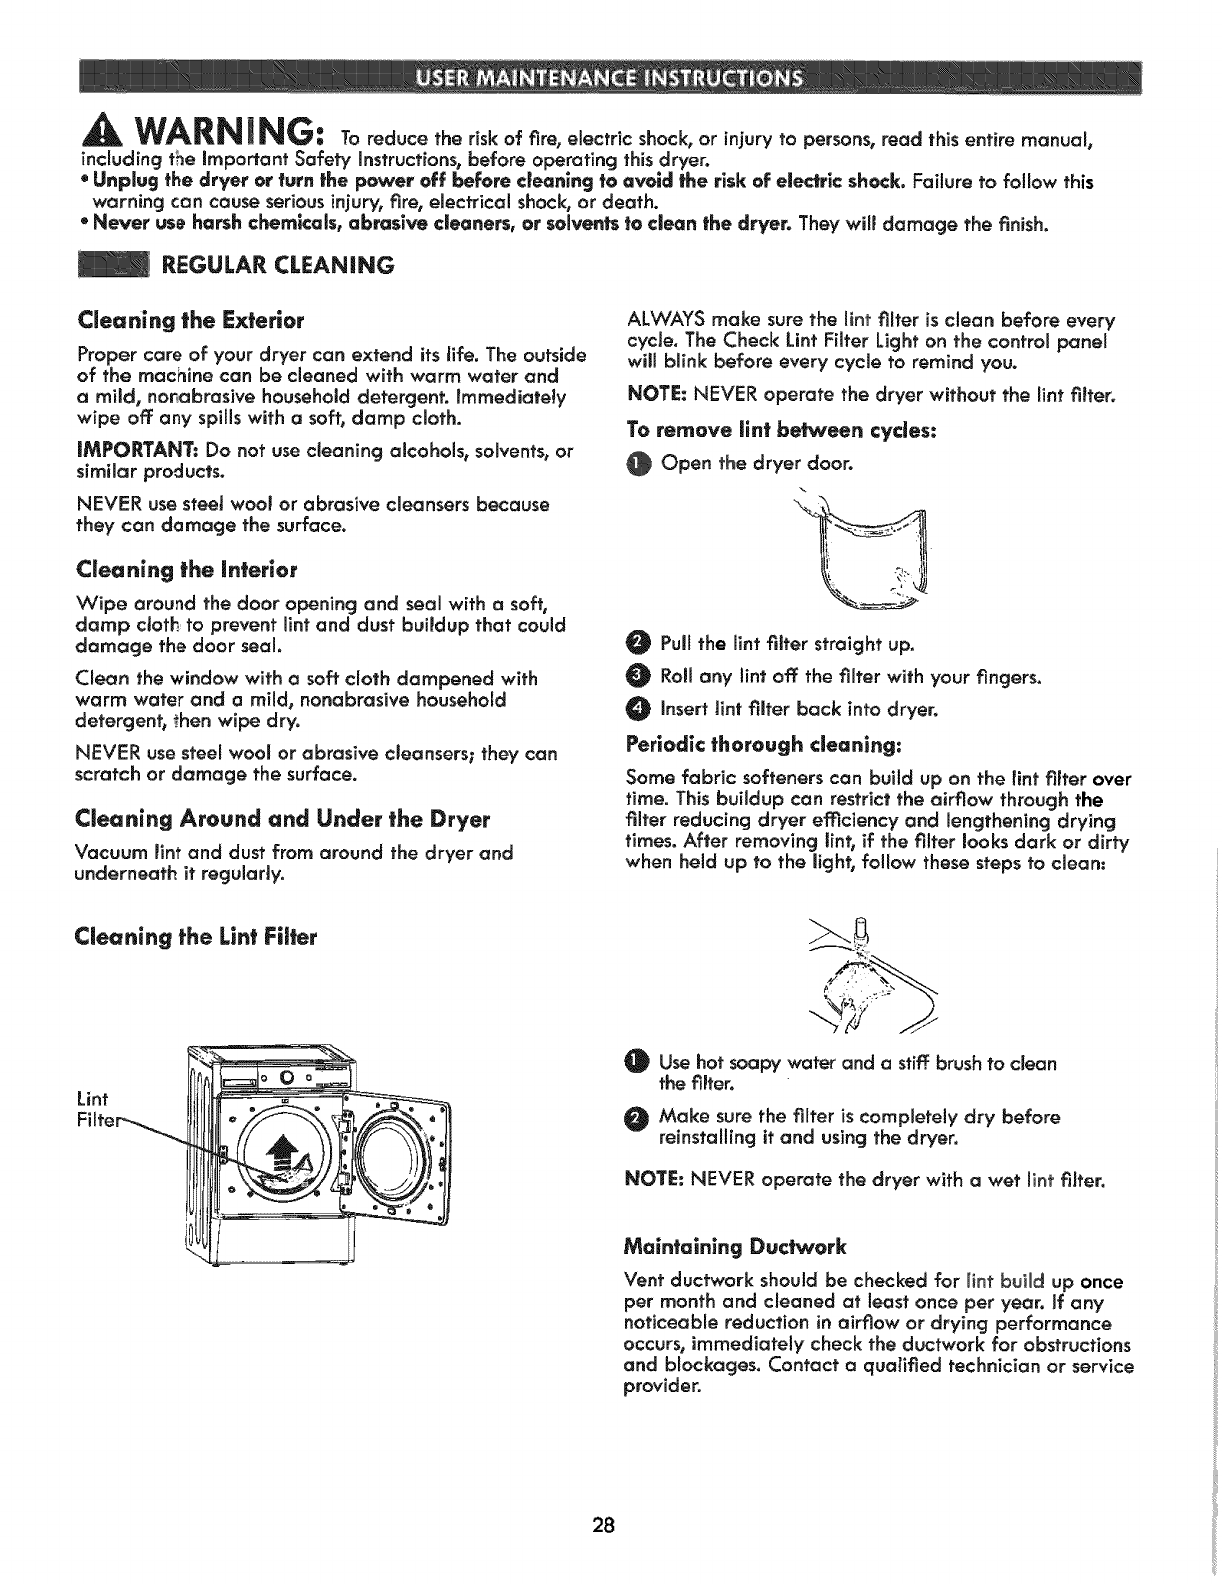
CHECK THE LINT FILTER BEFORE EVERY LOAD
Every time the dryer is turned on, the CHECK FtLTER
light will blink as a reminder to make sure the fiffer is
cJean. Always make sure the lint filter is dean before
starting a new load; a clogged lint rifler will increase
drying times. To clean, puJl the lint filter straight up and
roll any lint off the filter with your fingers. Do not rinse
or wash the filter to remove lint. Push the lint filter firmly
back into place.
Always ensure the lint filter is properly installed before
running the dryer. Running the dryer with a loose or
missing lint filter may damage the dryer and articles in
the dryer.
LintFilter
22
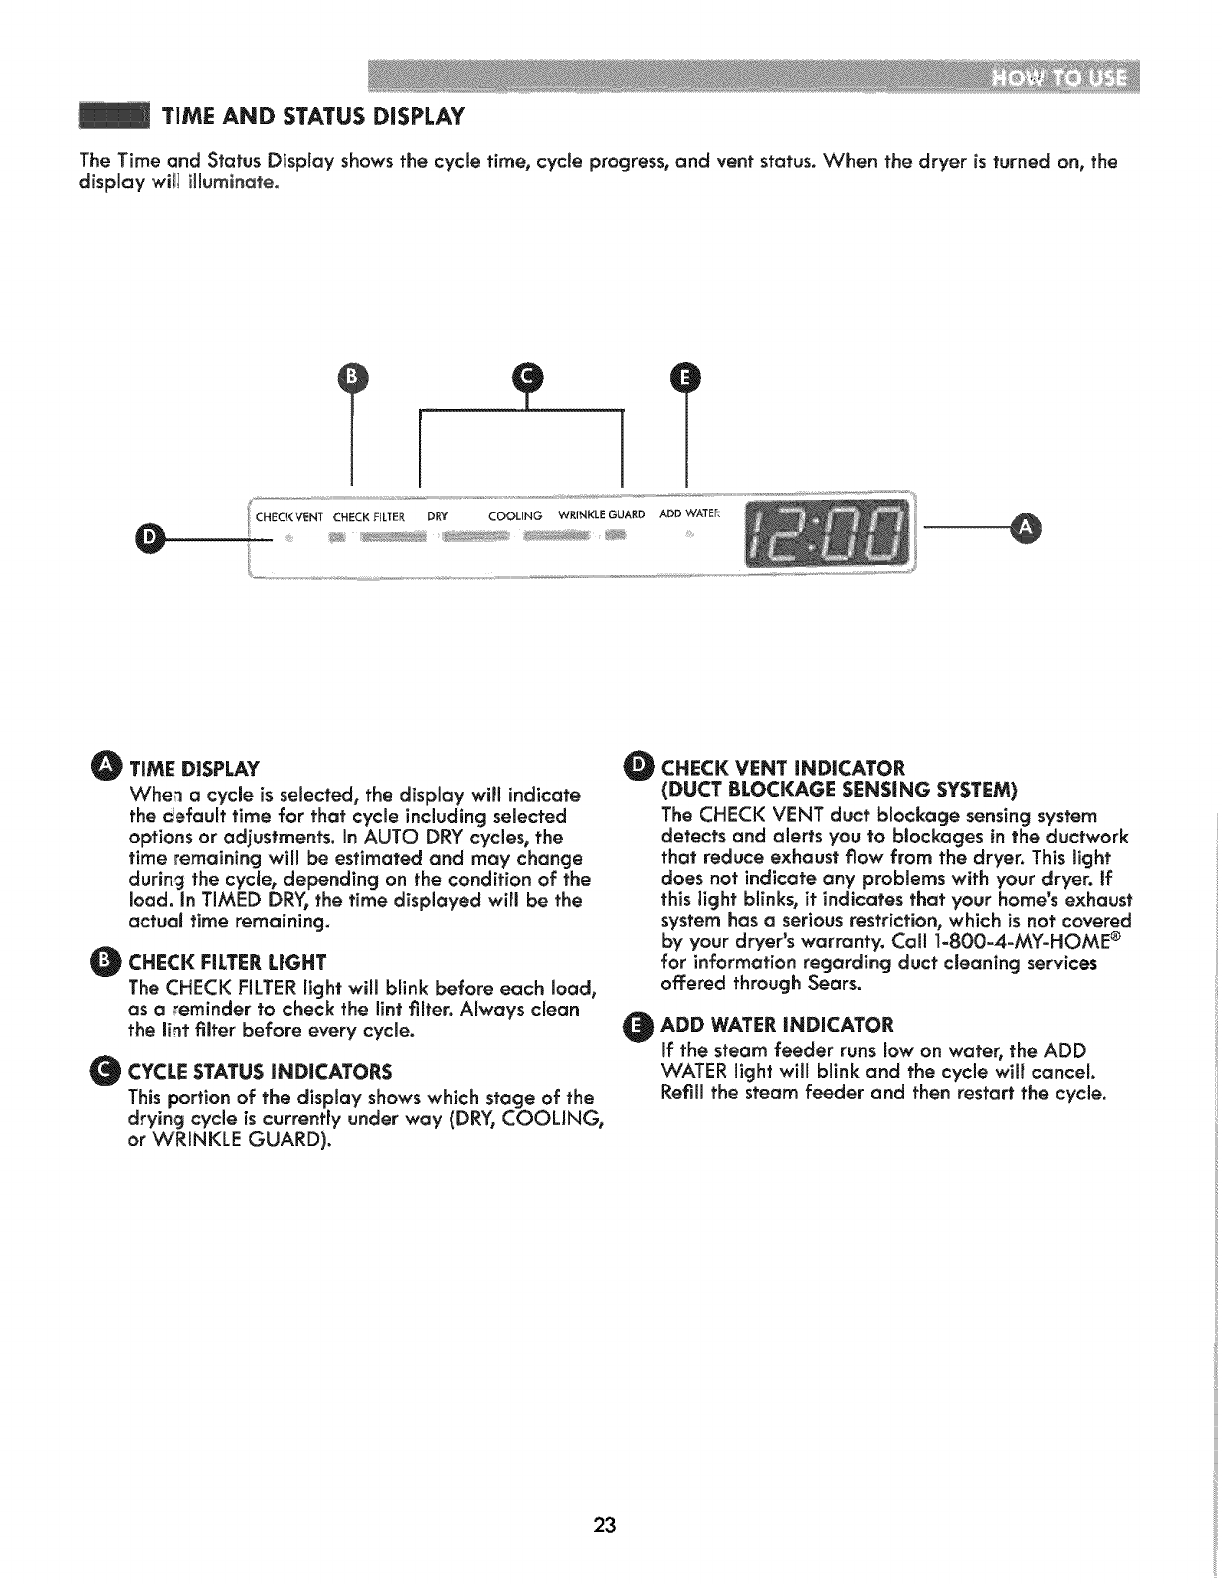
TIME AND STATUS DISPLAY
The Time and Status Display shows the cycle time, cycle progress,and vent status. When the dryer is turned on, the
display will illuminate.
COOLING
' !
WRINKLE GUARD ADD VY'ATEr,
O
@
O
TIME DISPLAY
When a cycle is selected, the display will indicate
the _efault time for that cycle including selected
options or adjustments. In AUTO DRY cycles, the
time remaining will be estimated and may change
during the cycle, depending on the condition of the
load. In TIMED DRY, the time displayed wiff be the
actual time remaining.
CHECK FILTER LIGHT
The CHECK FILTERlight will blink before each load,
as a _eminder to check the lint filter. Always clean
the li_t filter before every cycle.
CYCLE STATUS INDICATORS
This portion of the display showswhich stage of the
drying cycle is currently under way (DRY° COOUNG,
or WRINKLE GUARD).
OCHECK VENT INDICATOR
(DUCT BLOCKAGE SENSING SYSTEM)
The CHECK VENT duct blockage sensing system
detects and alerts you to blockages in the ductwork
that reduce exhaust flow from the dryer. This light
does not indicate any problems with your dryer, tf
this light blinks, it indicates that your home's exhaust
system has a serious restriction, which is not covered
by your dryer's warranty. Call 1-800-4-MY-HOME ®
for information regarding duct cleaning services
offered through Sears.
ADD WATER INDICATOR
If the steam feeder runs low on water, the ADD
WATER light will blink and the cycle will cancel.
Refill the steam feeder and then restart the cycle.
23
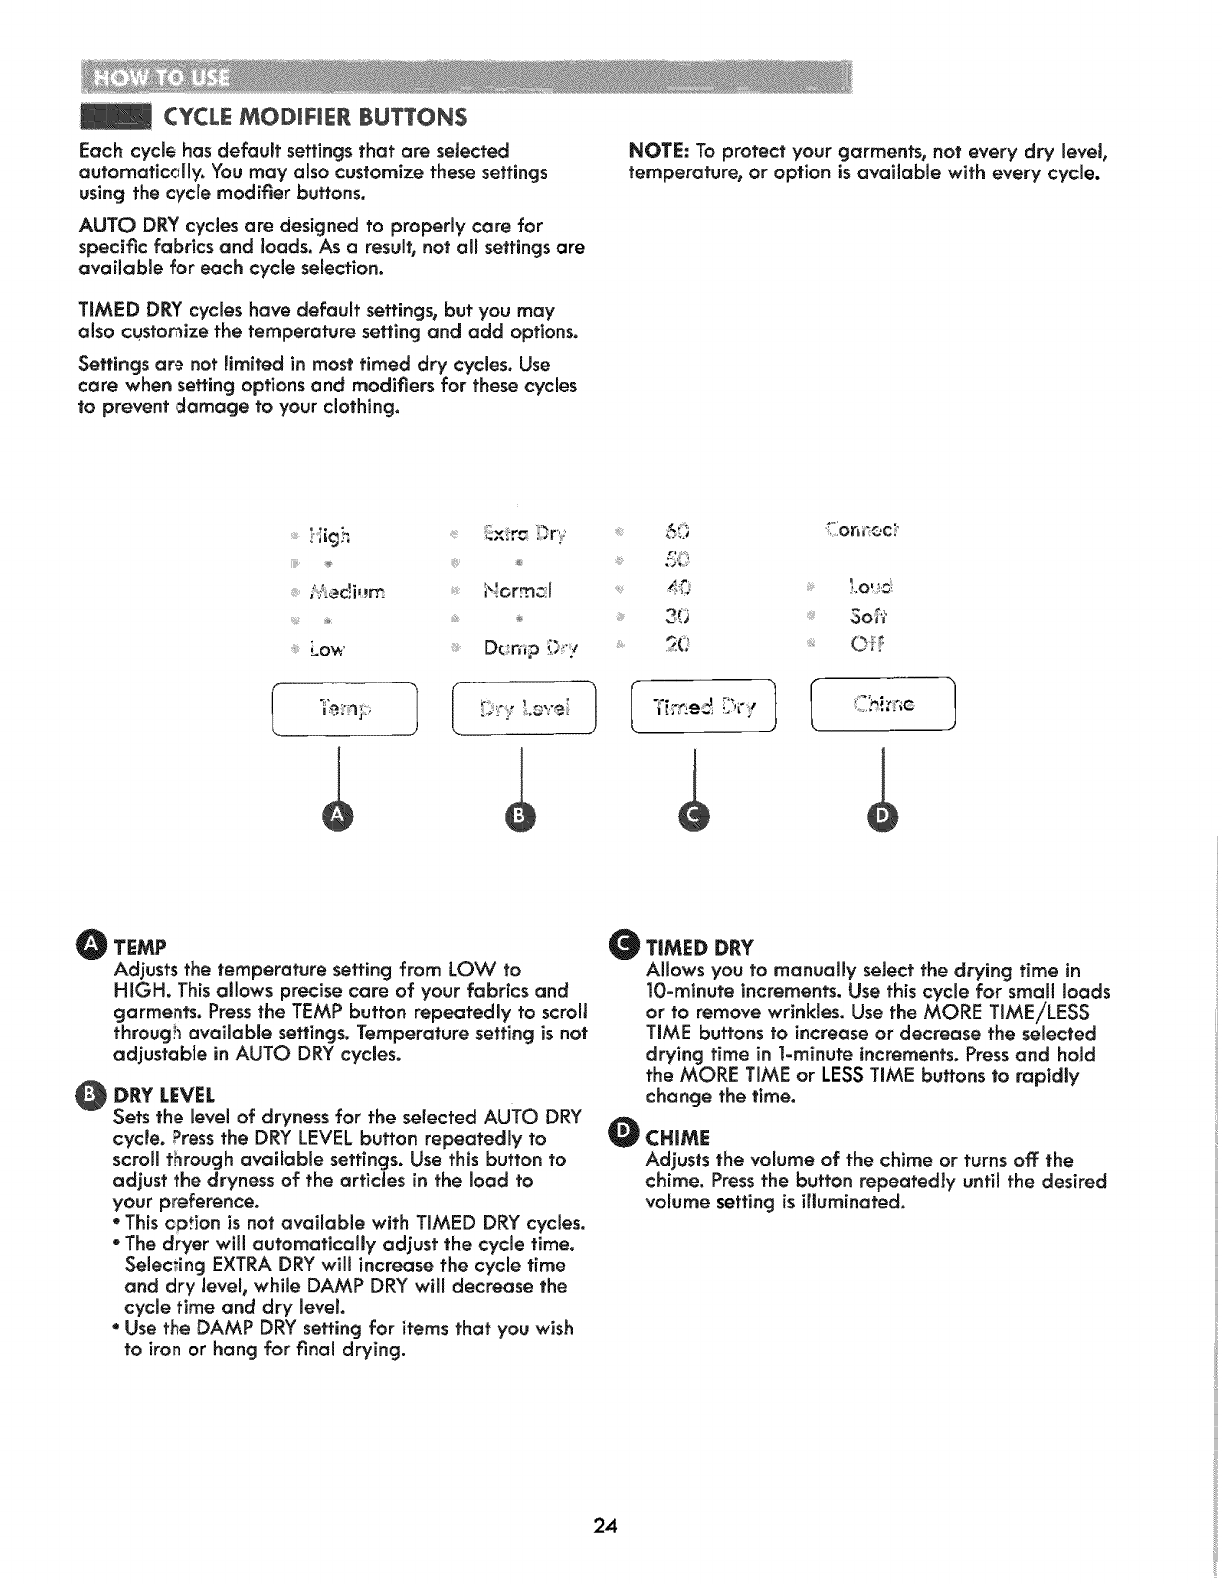
CYCLE MODIFIER BUTTONS
Each cycle has default settings that are selected
automatically. You may also customize these settings
using the cycle modifier buttons.
AUTO DRY cycles are designed to properly care for
specific fabrics and Ioadso As a result, not all settings are
available for each cycle selection.
TIMED DRY cycles have default settings, but you may
also customize the temperature setting and add options.
Settings are not limited in most timed dry cycles. Use
care when setting options and modifiers for these cycles
to prevent damage to your clothing.
NOTE: To protect your garments, not every dry level,
temperature, or option is available with every cycle.
iii!!: :ii!!!i!_
_i_LOW D_ n_i_ _!'/
4r_. Love_,
30 3o_t
O TEMP
Adjusts the temperature setting from LOW to
HIGH. This allows precise care of your fabrics and
garments. Pressthe TEMP button repeatedly to scroll
through available settings, Temperature setting is not
adjustable in AUTO DRY cycles.
DRY LEVEL
Sets the level of dryness for the setected AUTO DRY
cycle. Pressthe DRY LEVEL button repeatedly to
scroll through available settings. Use this button to
adjust the dryness of the articles in the load to
your preference.
• This c_otion is not available with TIMED DRY cycles.
• The dryer will automatically adjust the cycle time.
Selecting EXTRA DRY will increase the cycle time
and dry leveb while DAMP DRY will decrease the
cycle time and dry level
•Use the DAMP DRY setting for items that you wish
to iron or hang for final drying.
O
@
TIMED DRY
Allows you to manually select the drying time in
lO-minute increments. Use this cycle for small loads
or to remove wrinkles. Use the MORE TIME/LESS
TIME buttons to increase or decrease the selected
drying time in 1-minute increments. Pressand hold
the MORE TIME or LESSTIME buttons to rapidly
change the time.
CHIME
Adjusts the volume of the chime or turns off the
chime. Pressthe button repeatedly until the desired
volume setting is iffuminated.
24
CYCLE OPTIONS AND SPECIAL FEATURES
Your dryer features several additionai cycle options and special features to meet your individual needs. For all steam
features, see the following pages.
WRINKLE GUARD
Selecting this option will tumble the
Wrin':tcG_arc_ clothes after the cycle ends for a few
seconds every few minutes without heat.
This option is active for 150 minutes after the end of
the cycle_ or until the door is opened. This helps prevent
wrinkles if the clothes are not removed immediately
after the cycle has finished.
CONTROL LOCK
co,:-rolLock_ Use this option to disable the controls.
The Control Lock can only be activated
............... during a cycte. When the controls are
WrinkleG,;ard mocked"CL" will display alternately
with the estimated time remaining, if
Wrinkle Guard is not activated when the controls are
locked, the LED will blink. Once set, the Control Lock
must be turned off before the controls can be used.
Press and hold the WRINKLE GUARD button for three
seconds tc lock or unlock the controls.
MY CYCLE
,- _ MYdryCyclecycleforall°wsfutureY°Uuse.t°storeltallowsacustomizedyouto
save favorite temperature_ dry level_and
other options far a cycle, and then recall them at the touch
of a button.
NOTE: any one My Cycle can be saved at a time. Press
and hold the MY CYCLE button to overwrite any previ-
ously saved cycle.
To save a MY CYCLE:
Pressthe POWER button to turn on the dryer.
eTurn the cycle selector knob to select the desired cycle=
O Pressthe CYCLEMODiFiERbuttonto changethe desire,d setting.
O Pressthe CYCLEOPTION button to add the desired options.
OPressand hold the MY CYCLEbutton.
To recaW aMY CYCLE:
Press the POWER button to turn on the dryer.
Pressthe _V_YCYCLEbutton. The stored settingswill
be displayed.
O Press the START/PAUSE button to start the cycle.
DAMP DRY SIGNAL
l Damp0rySignal if yOUselect the Damp Dry Signal option,
the dryer will emit a chime when the clothes
.... are just short of completely dry, in case
Save t'nerc_y_ you want to remove them for ironing or
hang drying. To select, pressand hold
the SAVE ENERGY+ button for five seconds.
SAVE ENERGY+
......................................IThis option helps to reduce the energySaveE.ne;'gy_;_ consumption of the Normal cycle,
depending on the size of the load. The
drying time will change when Save Energy+ is selected
NOTE: The SAVE ENERGY+ option is turned on by
defau!t on the Normal cycle, if you want a faster drying
time, turn off: the SAVE ENERGY+ option on the Normal
cycle,
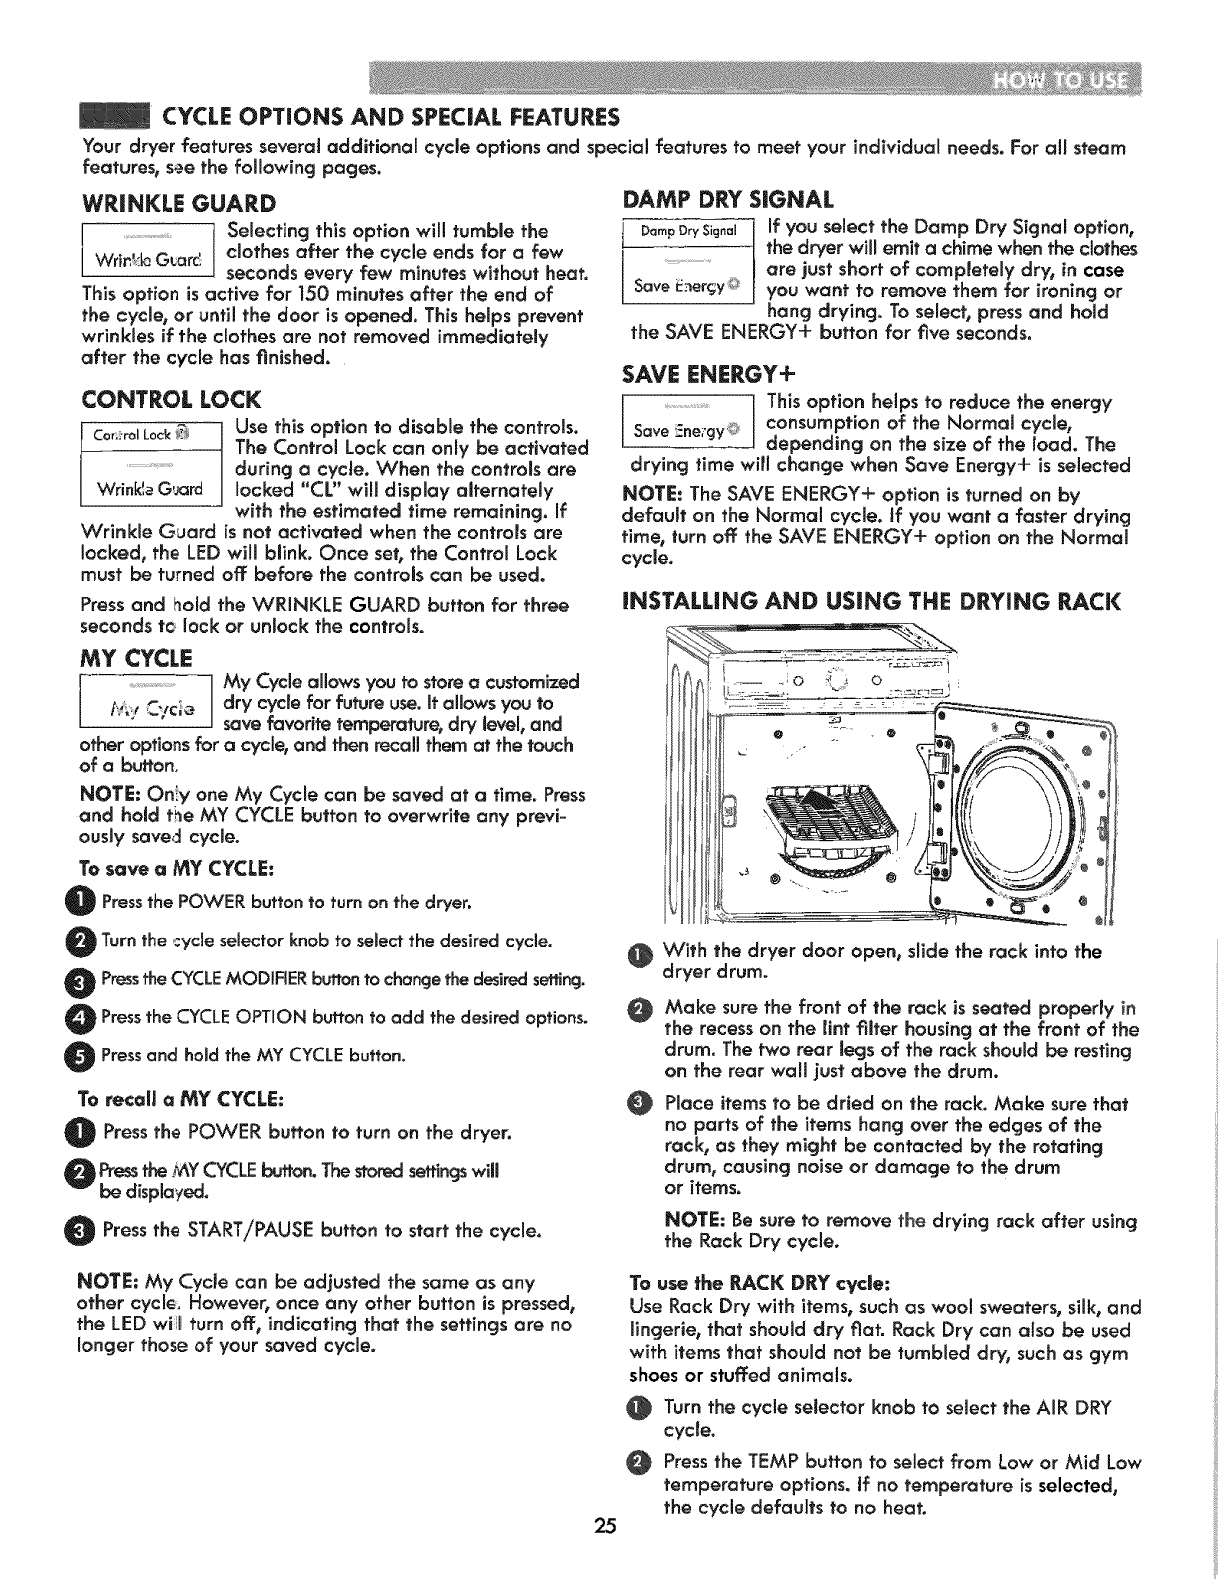
iNSTALLiNG AND USING THE DRYING RACK
i
With the dryer door open, slide the rack into the
dryer drum.
@
@
Make sure the front of the rack is seated property in
the recess on the lint filter housing at the front of the
drum. The two rear legs of the rack should be resting
on the rear wall just above the drum.
Place items to be dried on the rack, Make sure that
no parts of the items hang over the edges of the
rack, as they might be contacted by the rotating
drum, causing noise or damage to the drum
or items.
NOTE: Be sure to remove the drying rack after using
the Rack Dry cycJe.
NOTE: My Cycle can be adjusted the same as any
other cycle. However, once any other button is pressed,
the LED wil turn off, indicating that the settings are no
longer those of your saved cycle.
25
To use the RACK DRY cycle:
Use Rack Dry with items, such as wool sweaters, silk_and
lingerie, that should dry fiat. Rack Dry can also be used
with items that should not be tumbled dry, such as gym
shoes or stuffed animals.
Turn the cycle seJector knob to select the AIR DRY
cycle.
Press the TEMP button to select from Low or Mid Low
temperature options, if no temperature is selected,
the cycle defaults to no heat.
STEAM FEATURES
WARNING:
"Do not open the dryer door during Steam Cycles.
Steam can cause severe burns.
"Do not flli the steam feeder with gasoline, dry cleaning
solvents, or other flammable or explosive substances.
They give off vapors that could explode.
"Do not drink water from the steam feeder.
*Do not fili the steam feeder with hot water (over
86°F/30"C}.
*Do not touch the steam nozzle in the drum during or
after the steam cycle.
IMPORTANT NOTES ABOUT STEAM FUNCTIONS:
*Steam may not be clearly visible during the steam
functions. This is normal
"Do not use Steam Refresh with items such as wool,
wool blanketst leather jackets, silk, wet clothes, lingerie,
foam products, or electric blankets.
-For best resuJts_load articles of similar size and fabric
type. Do not overload.
*if the home's exhaust system is restricted, the
performance of the steam functions will be reduced.
*During steam operation, the clothes witt tumble for
only a few seconds, once a minute.
"The steam feeder must be filled with water up to the
MAX line. Otherwise, the ADD "WATERlight
may illuminate.
Using the STEAM REFRESH cycle
The Steam Refresh cycle uses the power of steam to
quickly reduce wrinkies and odor in fabrics, it brings
new life to wrinkled clothes that have been stored for
an extended period of time, and it can make heavily
wrinkled clothes easier to iron. STEAM REFRESHcan
also be used to help reduce odors in clothes, such as
ctothes that were worn in a room where people had
been smoking. This cycle can refresh from one to five
garments, or one bulky item such as o comforter. There
are three settings available. Use 3 for one to three
garments and _ for four or five garments. The bt9
(big) setting should be used for bulky items. Best results
are achieved with 70/30 cotton/poryblend fabrics.
NOTE: The STATIC SHIELD option can be used together
with the STEAM REFRESHcycle to help prevent
static electricity after the cycle.
Turn the dryer ON and select the STEAM REFRESH
cycle.
Select the STATIC SHIELD option, if desired.
The default number of garments is three. Pressthe
MORE TIME or LESS TiME button to adjust the load
size, as described above.
Press the START/PAUSE button to start the cycle.
STATIC SHIELD
J ......................................This option uses steam late in the drying
Static Shietd cycle to reduce the static electricity
caused by dry fabrics rubbing together.
Change the steam time by pressing the MORE TIME
and LESS TIME buttons to display the approximate
number of articles in the load: 7_9, 11, 14, 16 or 18.
NOTE: When STATIC SHIELD is added to auto dry
cycles, the Damp Dry level cannot be selected.
iRON READY
IronReady The Iron Ready option provides uniform,
properly dampened fabrics for ironing,
which can save time and make ironing
Static Shie!d easier. Change the steam time by pressing
the MORE TIME or LESS TIME button,
depending on the number of garments in the load: 1, 2,
3, 4, or 5.
Press and hold the STATIC SHIELD button for three
seconds to access the iron Ready function.
NOTE: After the STATIC SHIELD or IRON READY op-
tion is selected in timed dry cycles, the MORE TfME and
LESSTIME buttonswill change the number of garments,
as described above. After the cycle has started, the
MORE TiME and LESSTIME buttons are disabled.
26
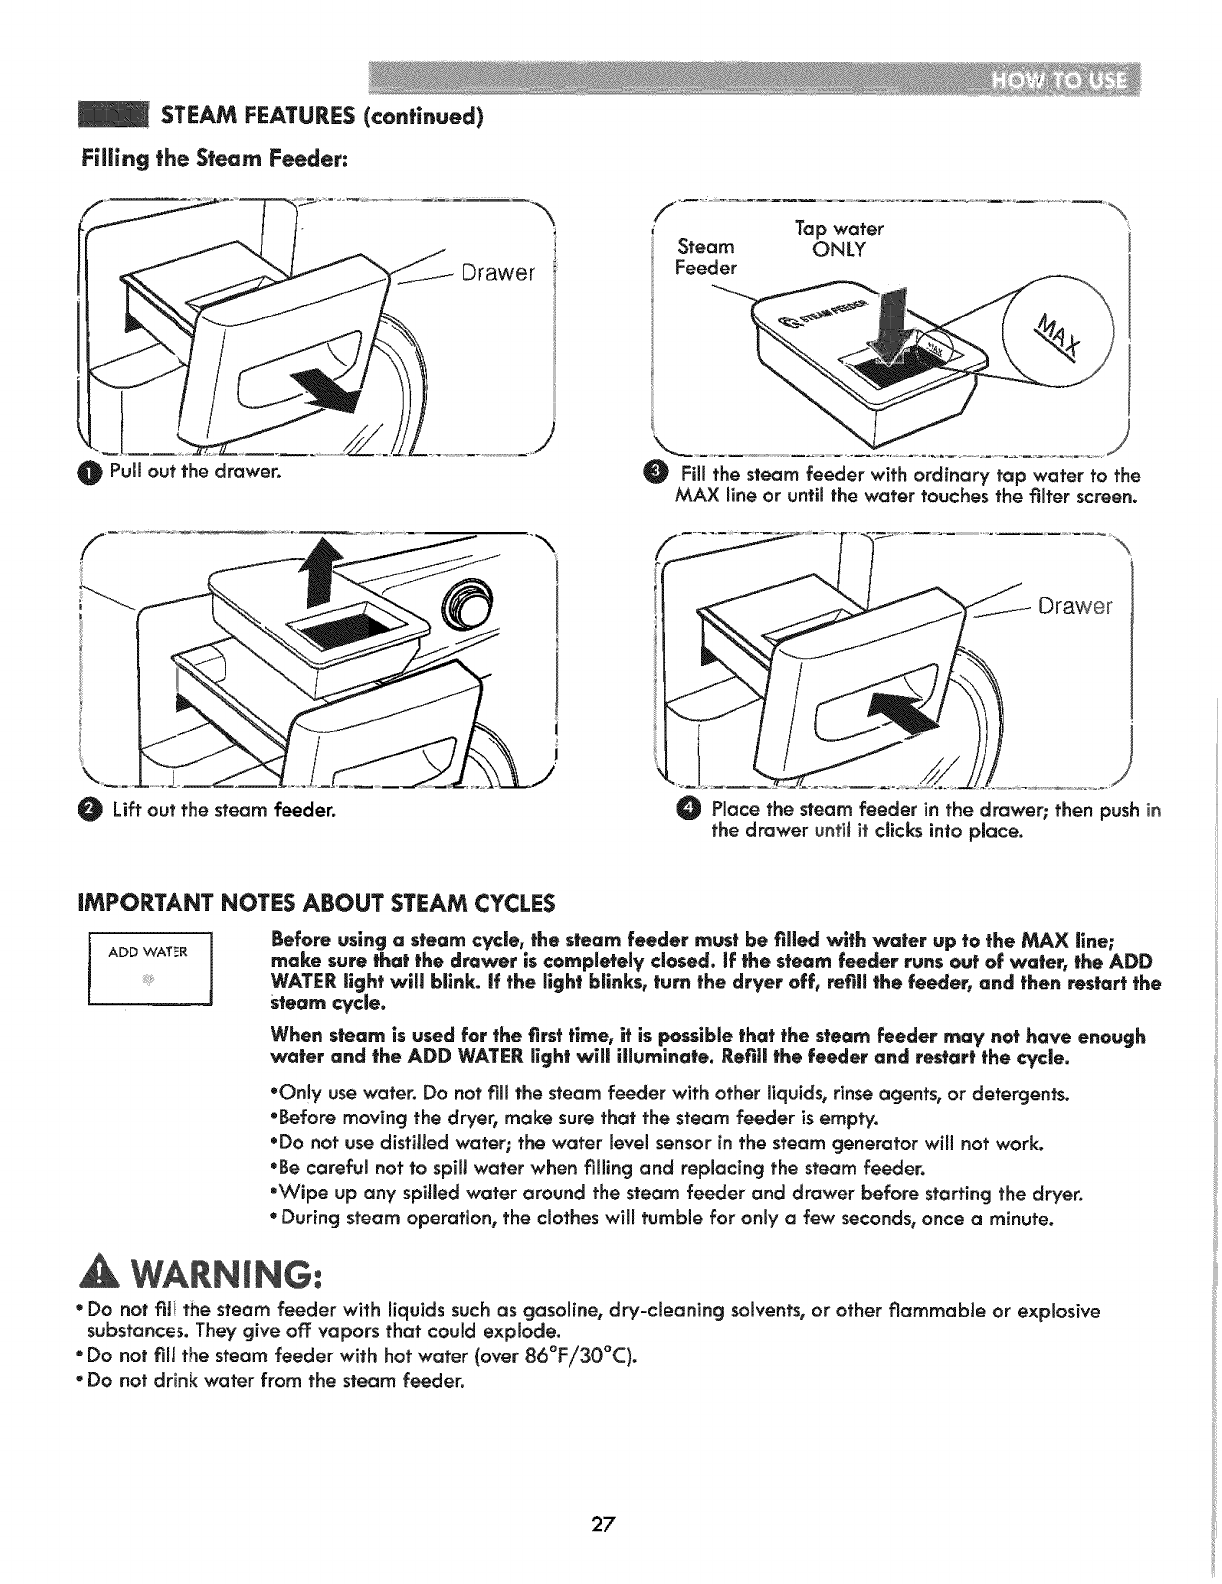
O Pull out the drawer.
Drawer
.....
Lift out the steam feeder.
Steam
Feeder
Tap water
ONLY
Fill the steam feeder with ordinary tap water to the
MAX line or until the water touches the filter screen.
{
Place the steam feeder in the drawer; then push in
the drawer unfit it clicks into place.
iMPORTANT NOTES ABOUT STEAM CYCLES
ADD WATER ]
Before using asteam cycle, the steam feeder must be tiffed with wafer up to the MAX line;
make sure that the drawer is completely closed. Jf the steam feeder runs out of wafer, the ADD
WATER light will bllnk, if the llght blinks, turn the dryer off, refill the feeder, and then restart the
Steam cycle.
When steam is used far the first time, if is possible that the steam feeder may not have enough
water and the ADD WATER light wiff illuminate. Refiff the feeder and restart the cycle.
.Oniy use water. Do not fill the steam feeder with other liquids, rinse agents, or detergents.
•Before moving the dryer, make sure that the steam feeder isempty.
•Do not use distiaJedwater; the water level sensor in the steam generator will not work.
•Be careful not to spili water when filling and replacing the steam feeder.
•Wipe up any spilled water around the steam feeder and drawer before starting the dryer.
•During steam operation, the clothes will tumble for only a few seconds,once aminute.
• Do not fili the steam feeder with liquids such as gasoline, dry-cleaning solvents, or other flammable or explosive
substances. They give off vapors that could explode.
•Do not fill the steam feeder with hot water (over 86°F/30°C).
•Do not drink water from the steam feeder.
27
WARN ING: Toreducetheriskoffire,olectr cshock,or injury to persons,readthis entire manual,
including the Important Safety Instructions,before operating thisdryer.
• Unplug the dryer or turn the power off before c}eanlng to avoid the risk of eledric shock. Failure to follow this
warning can cause serious injury, fire, electrical shock,or death.
"Never use harsh chemicals, abrasive cleaners, or solvents to clean the dryer. They will damage the finish.
REGULAR CLEANING
Cleaning the Exterior
Proper care of your dryer can extend its life. The outside
of the machine can be cleaned with warm water and
a mild, nonabrasive household detergent, rmmediate_y
wipe off any spillswith asoft, damp cloth.
IMPORTANT." Do not use cleaning alcohols, solvents,or
similar products.
NEVER use steel wool or abrasive cleansers because
they can damage the surface.
Cleaning the Interior
Wipe around the door opening and seal with a soft,
damp cloth to prevent lint and dust buildup that could
damage the door seal.
Clean the window with a soft cloth dampened with
warm water and a mild, nonabrasive household
detergent, then wipe dry.
NEVER use steel wool or abrasive cleansers; they con
scratch or damage the surface.
Cleaning Around and Under the Dryer
Vacuum lint and dust from around the dryer and
underneath it regularly.
ALVVAYS make sure the lint filter is clean before every
cycle. The Check Lint Filter Light on the control panel
will blink before every cycle to remind you.
NOTE: NEVER operate the dryer without the lint filter.
To remove ilnt between cycles:
Open the dryer door.
Pull the lint filter straight up.
Roll any lint off the filter with your fingers.
Insert lint filter back into dryer.
Periodic thorough cleaning:
Some fabric softeners can build up on the lint fiffer over
time. This buildup can restrict the airflow through the
filter reducing dryer emciency and lengthening drying
times. After removing ffnt, if the filter looks dark or dirty
when held up to the light, follow these steps to clean:
Cleaning the Lint Filter
Lint
Filte_
Use hot soapy water and a stiff:,brushto clean
the rifler.
Make sure the filter is completely dry before
reinstalling it and using the dryer.
NOTE: NEVER operate the dryer with a wet lint filter.
Maintaining Ductwork
Vent ductwork should be checked for lint build up once
per month and cleaned at least once per year. Jfany
noticeable reduction in airflow or drying performance
occurs, immediately check the ducfwork for obstructions
and blockages. Contact a quatified technician or service
provider.
28
MAINTAINING THE EXHAUST SYSTEM
The most common cause of dryer problems is poor exhaust venting. Poor exhaust venting may result from the
following conditions:
* DIRTY OR DAMAGED EXHAUST DUCTS
* WRONG VENT MATERIAL
RESTRICTED OR DAMAGED VENT HOOD
*EXCESSIVELY LONG VENT
*THE USE OF PLASTIC OR FOiL VENTING
Mi'il
o ma n ng the Exhaust System
Vent ducts should be checked for lint buildup and
cleaned at least once per year. If any noticeable
reduction in drying performance occurs, check the ducts
for obstructions and blockages.
If the CHECK VENT indicator illuminates, the exhaust
system should be checked immediately for damage
or obstructions. The CHECK VENT indicator signals a
serious reduction in exhaust airflow which will greatly
reduce energy ef_ciency and increase drying times.
Damaged or restricted exhaust systems are not covered
by the dryer warranty. Damage to the dryer that is
caused by damaged, restricted, or otherwise inadequate
exhaust systems is not covered by the dryer warranty.
CHECK VENT Indicator
The CHECK VENT warning system is designed to
help you avoid the reduced performance caused by
restrictions in the household exhaust system. The CHECK
VENT indicator illuminates to alert you when problems
in the system occur, so you can have them repaired.
While you should always check and maintain your
exhaust system regularly, the CHECK VENT warning
system will detect and alert you if serious problems
develop in your home's exhaust system. This includes
exhaust systemsthat are unsatisfactory for any reason
including a blockage in the venting, crushed/kinked
venting, or venting which exceeds the maximum
recommended length requirement as described in the
instaffafion section.
NOTE: The total length includes the _ength from the
back of the dryer to the outside vent hood, PLUS a
factor for every 90 °elbow in the exhaust system. For
example, if the distance from the back of the dryer to
the vent hood is 30 feet, and there are four elbows in
the system, then it exceeds the 28 foot maximum length O
allowed for those conditions as specified in the Duct
Length Chart.
The CHECK VENT indicator on the control panel will
alert you that the exhaust system is not moving enough
air from the dryer to the outside. This lack of airflow will
lead to long dry times, poor drying and possibly dryer
failure.
As a reminder, external dryer venting is considered
part of your home and is not covered by the product
warranty or protection agreements. There are services
available for cleaning/maintaining the externa_ venting.
Sears provides this service via Sears Carpet, Upholstery,
and Duct Cieaning. Call 1-800-661-6594 to schedule
duct cleaning service from Sears (if it is available in
your area).
CHECK VENT Operation
The CHECK VENT system usescomponents already
in the dryer. By monitoring these components over the
course of several cycles, the control is able to determine
how much restriction there is in the exhaust system, if
it detects ahigh level of restriction, it will turn on the
CHECK VENT light to alert you to the condition. The
dryer will continue to operate after the light comes
on, but you should have the exhaust system cleaned or
repaired immediately to avoid longer dry times and
higher energy consumption.
IMPORTANT: In order for a dryer to properly and
efficiently dry your clothes, it is extremely important that
the exhaust system is as short and clean as possible, it
MUST be less than the maximum length specifications
as outlined in the installation section. It is also very
important that you make sure that when the dryer is
instaffed, the exhaust system is ctean and clear of any
restrictions and is not kinked or crushed.
Failure to meet these guidelines will result in long dry
times, increased energy consumption and possibly even
clothing damage or dryer failure. When exhaust system
restrictions become extreme, the CHECK VENT light will
blink to alert you to the condition so you can have the
exhaust system cleaned or repaired.
To prevent false alarms and for increased reliability,
the dryer will monitor the exhaust condition for
several loads. If multiple, consecutive cycles exceed
the restriction limits, the control will blink the CHECK
VENT indicator.
Ablinking CHECK VENT indicator means the external
venting should be checked for potentia_ restrictions as
soon as possible.
The CHECK VENT indicator will remain active
(blinking} until the restriction is resolved AND the
control has verified the improved airflow for
several cycles.
O After the exhaust is cleaned it will
or repaired, take
several cycles for the CHECK VENT indicator to reset
and turn off the light.
NOTE: The CHECK VENT indicator is designed to
measure performance over several consecutive cycles
before activating or deactivating, to avoid false alarms.
A very large load, suchas a large comforter, could
cause the CHECK VENT system to sense that the exhaust
system is restricted, but this would not cause the light to
blink. However, if several large loads were to run back
to back, the CHECK VENT indicator could be activated.
29
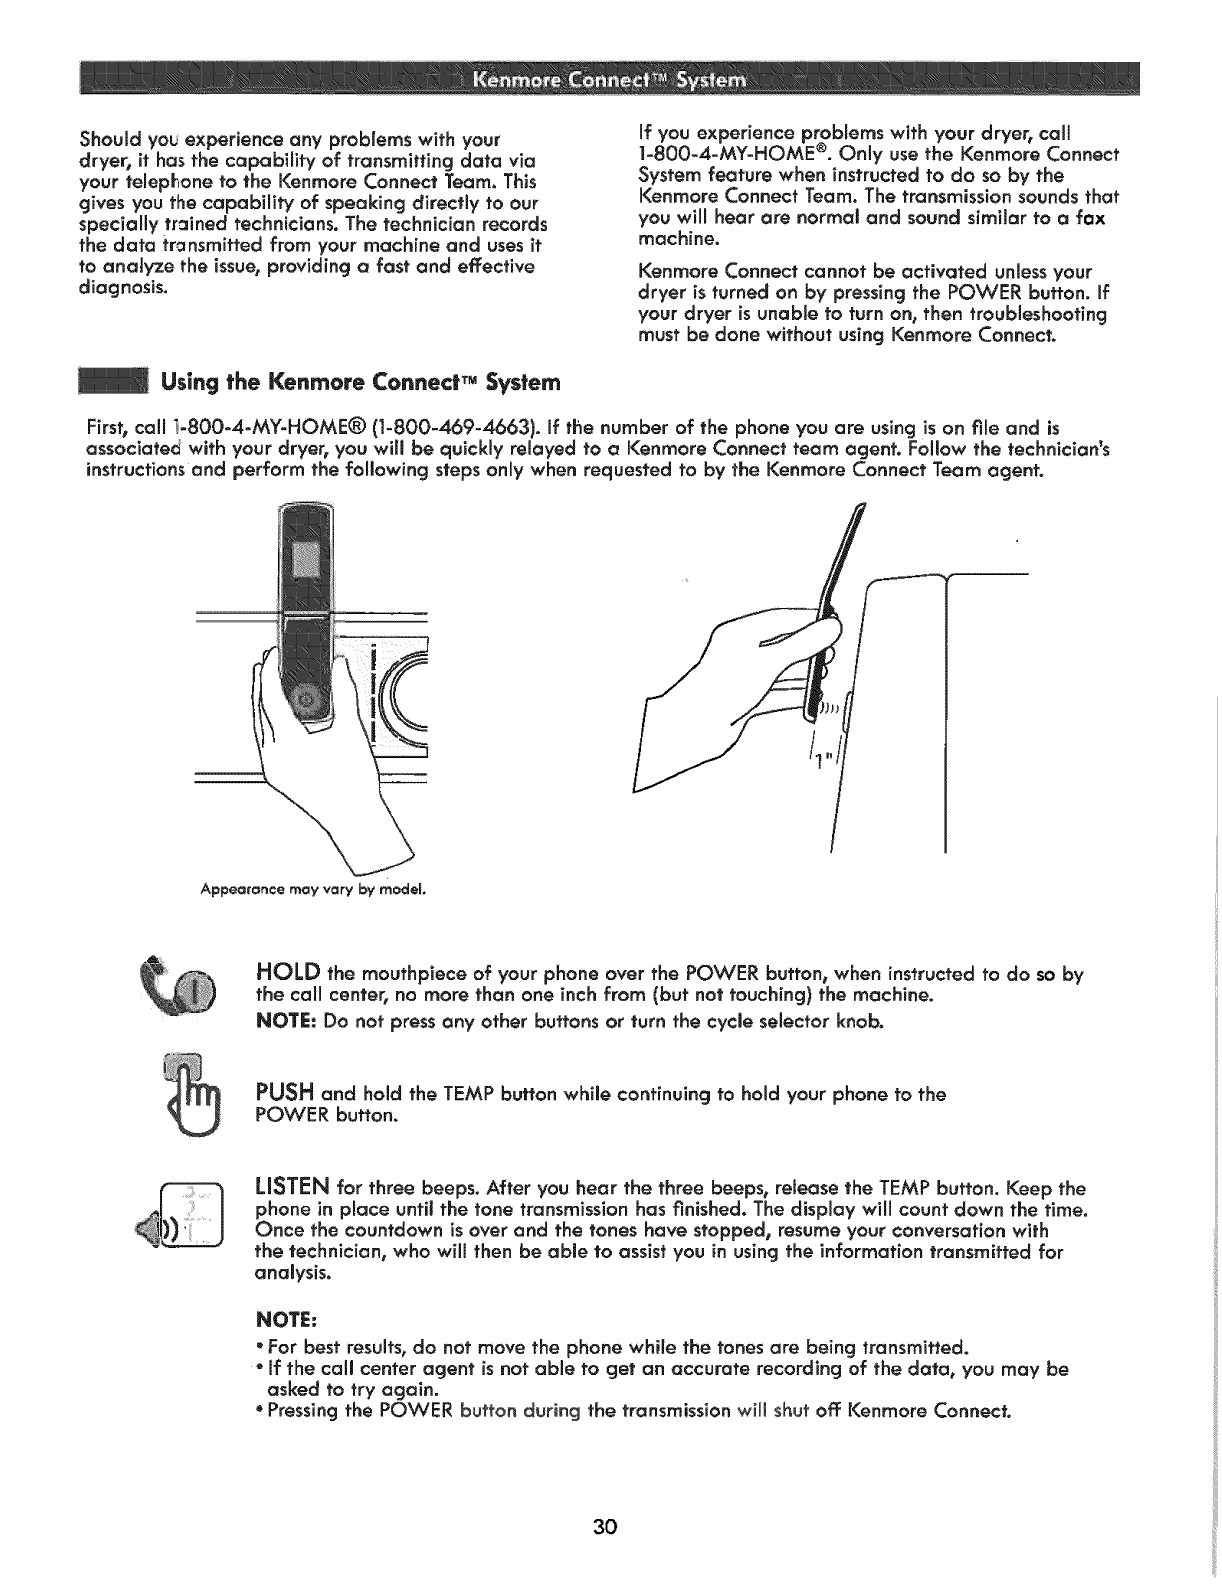
Should you experience any problems with your
dryer, it has the capability of transmitting data via
your telephone to the Kenmore Connect Team. This
gives you the capability of speaking directly to our
specially trained technicians. The technician records
the data transmitted from your machine and uses it
to analyze the issue, providing a fast and effective
diagnosis.
Jf you experience problems with your dryer, call
1-800-4-MY-HOME ®. Only use the Kenmore Connect
System feature when instructed to do so by the
Kenmore Connect Team. The transmission sounds that
you will hear are normal and sound similar to a fax
machine.
Kenmore Connect cannot be activated unlessyour
dryer is turned on by pressing the POWER button. If
your dryer is unable to turn on, then troubleshooting
must be done without using Kenmore Connect.
Using the Kenrnore Connec| TM System
First, call _-800-4-MY-HOME® (1-800-469-4663). mfthe number of the phone you are using is on file and is
associated with your dryer, you will be quickly reUayed to a Kenmore Connect team agent. Follow the technician's
instructions and perform the following steps only when requested to by the Kenmore Connect Team agent.
/1"/
/
f
Appearance may vary by modek
HOLD the mouthpiece of your phone over the POV-/ER button, when instructed to do so by
the call center, no more than one inch from (but not touching) the machine.
NOTE: Do not press any other buttons or turn the cycle selector knob.
PUSH and hold the TEMP button whffe continuing to hold your phone to the
POWER button.
LISTEN for three beeps. After you hear the three beeps, retease the TEMP button. Keep the
phone in place until the tone transmission has finished. The display will count down the time.
Once the countdown is over and the tones have stopped, resume your conversation with
the technician, who will then be able to assist you in using the information transmitted for
analysis.
NOTE:
•For best results, do not move the phone while the tones are being transmitted.
• If the call center agent is not able to get an accurate recording of the data, you may be
asked to try again.
•Pressing the POWER button during the transmission will shut off Kenmore Connect.
3O
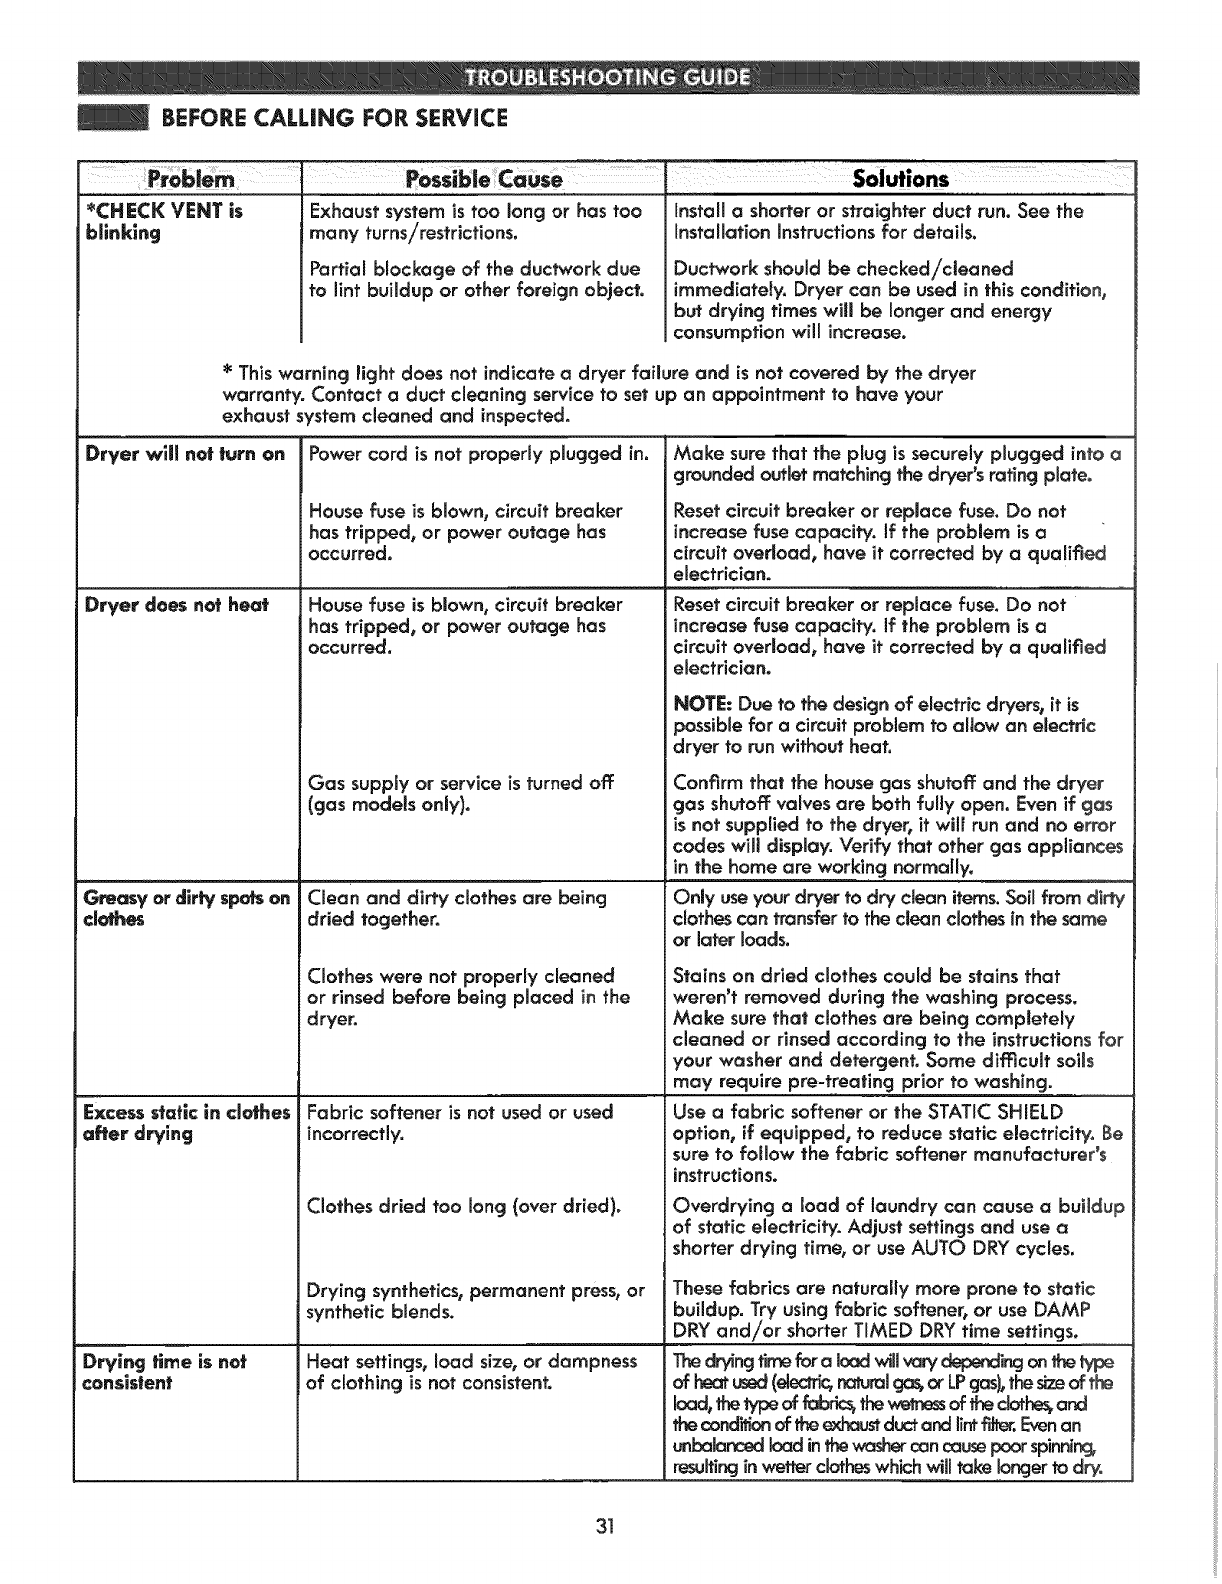
BEFORE CALLING FOR SERVICE
----IP_b Possible CaUse
*CHECK VENT is Exhaust system is too long or has too
blinklng many turns/restrictions.
Partial blockage of the ductwork due
to lint buildup or other foreign object.
Install a shorter or straighter duct run. See the
Installation Instructions for details.
Ductwork should be checked/cleaned
immediately. Dryer can be used in this condition,
but drying times will be longer and energy
consumption will increase.
*This warning light does not indicate a dryer failure and is not covered by the dryer
warranty. Contact a duct cleaning service to set up an appointment to have your
exhaust systemcleaned and inspected.
Dryer will not turn on
Dryer does not heat
Greasy or dir|y spo_ on
doff_es
Excess sfaffc in clothes
after drying
Power cord is not properly plugged in.
House fuse is blown, circuit breaker
has tripped, or power outage has
occurred.
House fuse is blown, circuit breaker
has tripped, or power outage has
occurred.
Gas supply or service is turned off
(gas models only).
Clean and dirty clothes are being
dried together.
Clothes were not properly cleaned
or rinsed before being placed in the
dryer.
Fabric softener is not used or used
incorrectly.
Clothes dried too long (over dried).
Drying synthetics,permanent press,or
synthetic blends.
Heat settings, load size, or dampness
of clothing is not consistent.
Drying time is not
consis|enf
Make sure that the plug is securely plugged into a
grounded outlet matching the dryer's rating plate.
Reset circuit breaker or replace fuse. Do not
increase fuse capacity. If the problem is a
circuit overload, have it corrected by a qualined
electrician.
Reset circuit breaker or replace fuse. Do not
increase fuse capacity, if the problem is a
circuit overload_ have it corrected by a qualified
electrician.
NOTE: Due to the design of electric dryers, it is
possible for a circuitproblem to allow an electric
dryer to run without heat.
Confirm that the house gas shutoff and the dryer
gas shutoff valves are both fully open. Even if gas
is not supplied to the dryer, it wiff run and no error
codes will display. Verify that other gas appliances
inthe home are working normally.
Only use your dryer to dry clean items.Soil from dirty
clothescan transfer to the dean clothesin the same
or later loads.
Stains on dried clothes could be stains that
weren't removed during the washing process.
Make sure that clothes are being completely
cleaned or rinsed according to the instructions for
your washer and detergent. Some difficult soils
may require pre-treating prior to washing.
Use afabric softener or the STATIC SHIELD
option, if equipped, to reduce static electricity. Be
sure to fotlow the fabric softener manufacturer's
instructions.
Overdrying eload of laundry can cause abuildup
of static electricity. Adjust settings and use a
shorter drying time, or use AUTO DRY cycles.
These fabrics are naturally more prone to static
buildup. Try using fabric softener,or use DAMP
DRY and/or shorter TIMED DRY time settings.
Thedryingtimefor a load will vary depending onthe type
of heat used(electric,naturalgas,or LPgas),the sizeof the
load, thetype of fabrics,the_ of theclothes_and
the cond_on of the exhaustductand lintfitter.Evenan
unbalanced load inthewashercan causepoor spinning,
resultingin wetter clotheswhich will take Ior_jer to dry.
31
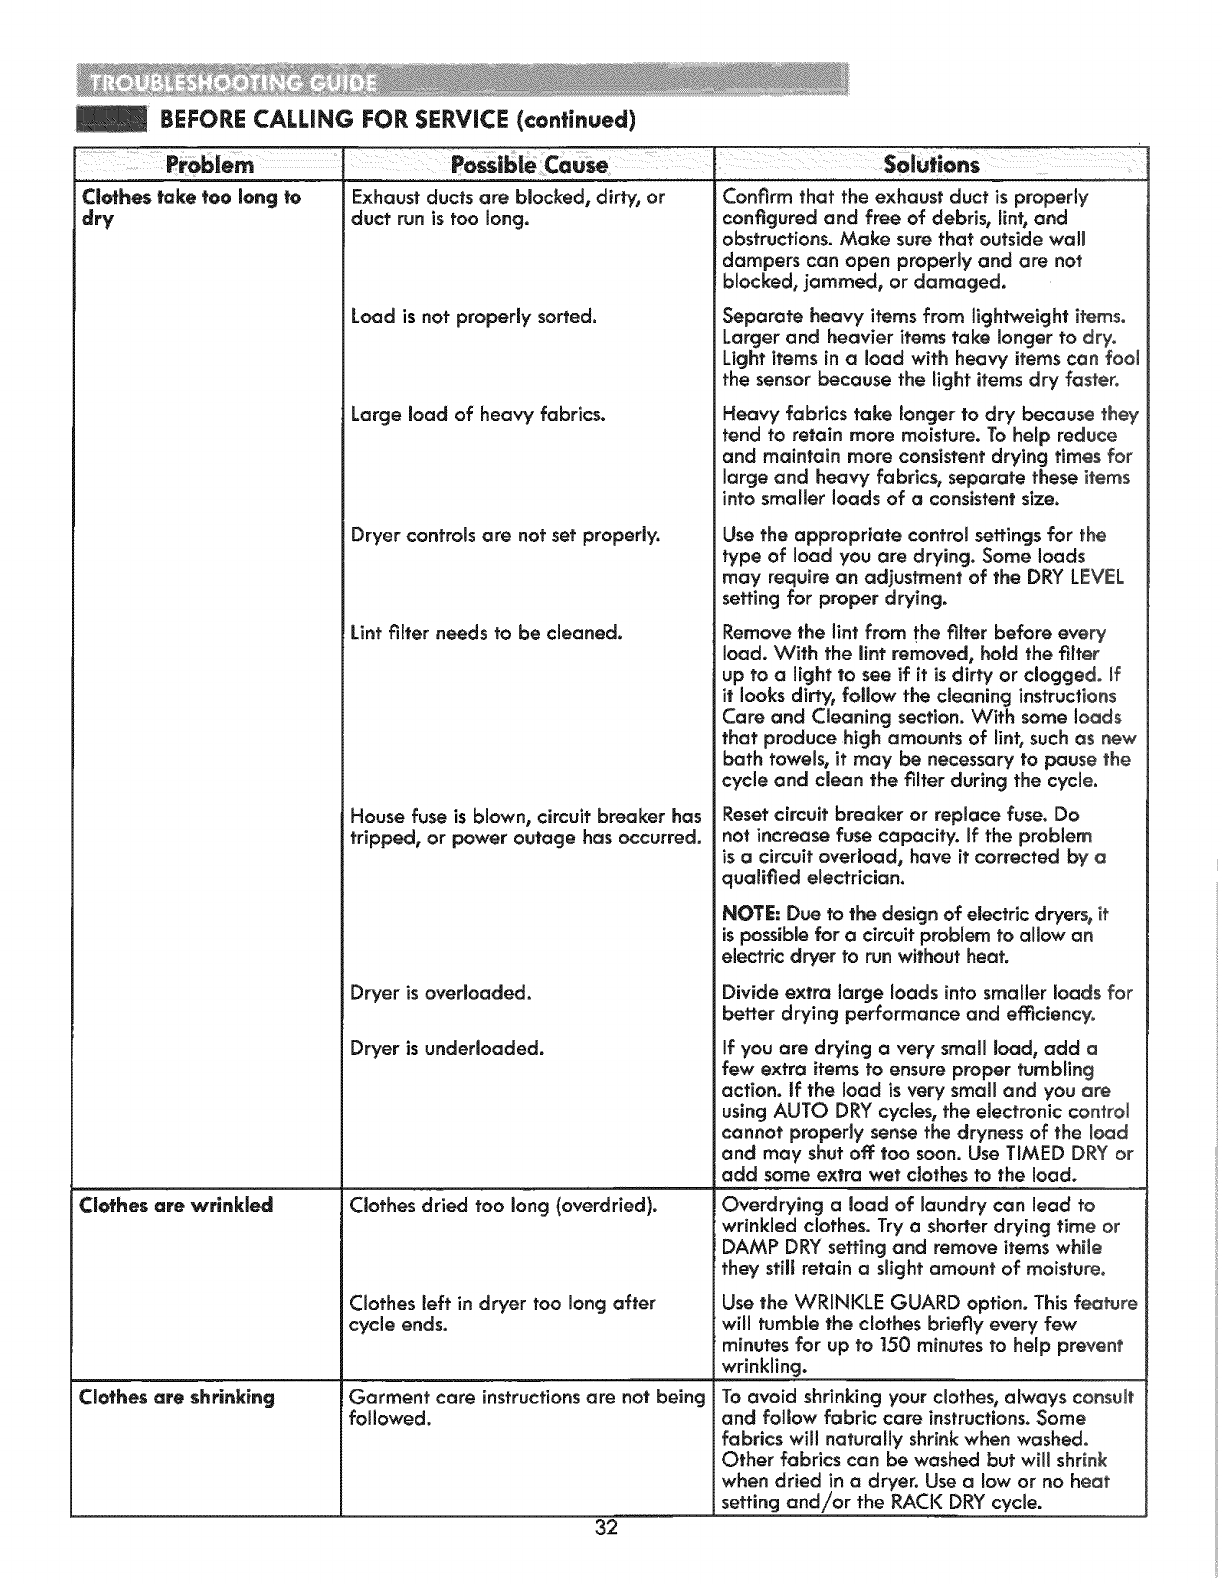
BEFORE CALLmNG FOR SERVICE (continued)
Problem _ Possib|e Cause
C_othes take toe long to Exhaust ducts are blocked, dirty, or
dry duct run is too long.
Load is not properly sorted.
Large load of heavy fabrics.
Dryer controls are not set properly.
Lint filter needs to be cleaned.
House fuse is blown, circuit breaker has
tripped, or power outage has occurred.
Dryer is oveHoaded.
Dryer is underloaded.
Clothes are wrinkJed Clothes dried too long (overdried).
Clothes left in dryer too long after
cycle ends.
Clothes are shrinking Garment care instructionsare not being
followed.
32
Solutions
Confirm that the exhaust duct is properly
configured and free of debris, lint, and
obstructions. Make sure that outside wall
dampers can open properly and are not
blocked, jammed, or damaged.
Separate heavy items from lightweight items.
Larger and heavier items take longer to dry.
Light items in a load with heavy items con fool
the sensor because the light items dry faster.
Heavy fabrics take longer to dry because they
fend to retain more moisture. To help reduce
and maintain more consistent drying times for
large and heavy fabrics, separate these items
into smaller loads of a consistentsize.
Use the appropriate control settings for the
type of load you are drying. Some loads
may require an adjustment of the DRY LEVEL
setting for proper drying.
Remove the lint from the filter before every
load. With the lint removed, hold the filter
up to alight to see if it is dirty or clogged. If
it looks dirty, follow the cleaning instructions
Care and Cleaning section. With some loads
that produce high amounts of lint, such as new
bath towels, it may be necessary to pause the
cycle and clean the filter during the cycle.
Reset circuit breaker or replace fuse. Do
not increase fuse capacity. Jfthe problem
_sa circuit oveHoad_ have it corrected by a
qualified eJectrician.
NOTE: Due to the design of electric dryers, it
is possibJefor a circuit problem to allow an
electric dryer to run without heat.
Divide extra large loads into smaller loads for
better drying performance and efficiency.
If you are drying a very small load, add a
few extra items to ensure proper tumbling
action. If the load is very small and you are
using AUTO DRY cycles, the electronic control
cannot property sense the dryness of the lead
and may shut off too soon. Use TIMED DRY or
add some extra wet c_othesto the load.
Overdrying a load of laundry can lead to
wrinkled clothes. Try a shorter drying time or
DAMP DRY setting and remove items while
they stiJlretain a slight amount of moisture.
Use the WRINKLE GUARD option. This feature
will tumble the clothes briefly every few
minutes for up to 150 minutes to help prevent
wrinkling.
To avoid shrinking your clothes, always consuJt
and follow fabric care instructions.Some
fabrics will naturally shrinkwhen washed.
Other fabrics can be washed but will shrink
when dried in adryer. Use a low or no heat
setting and/or the RACK DRY cycle.
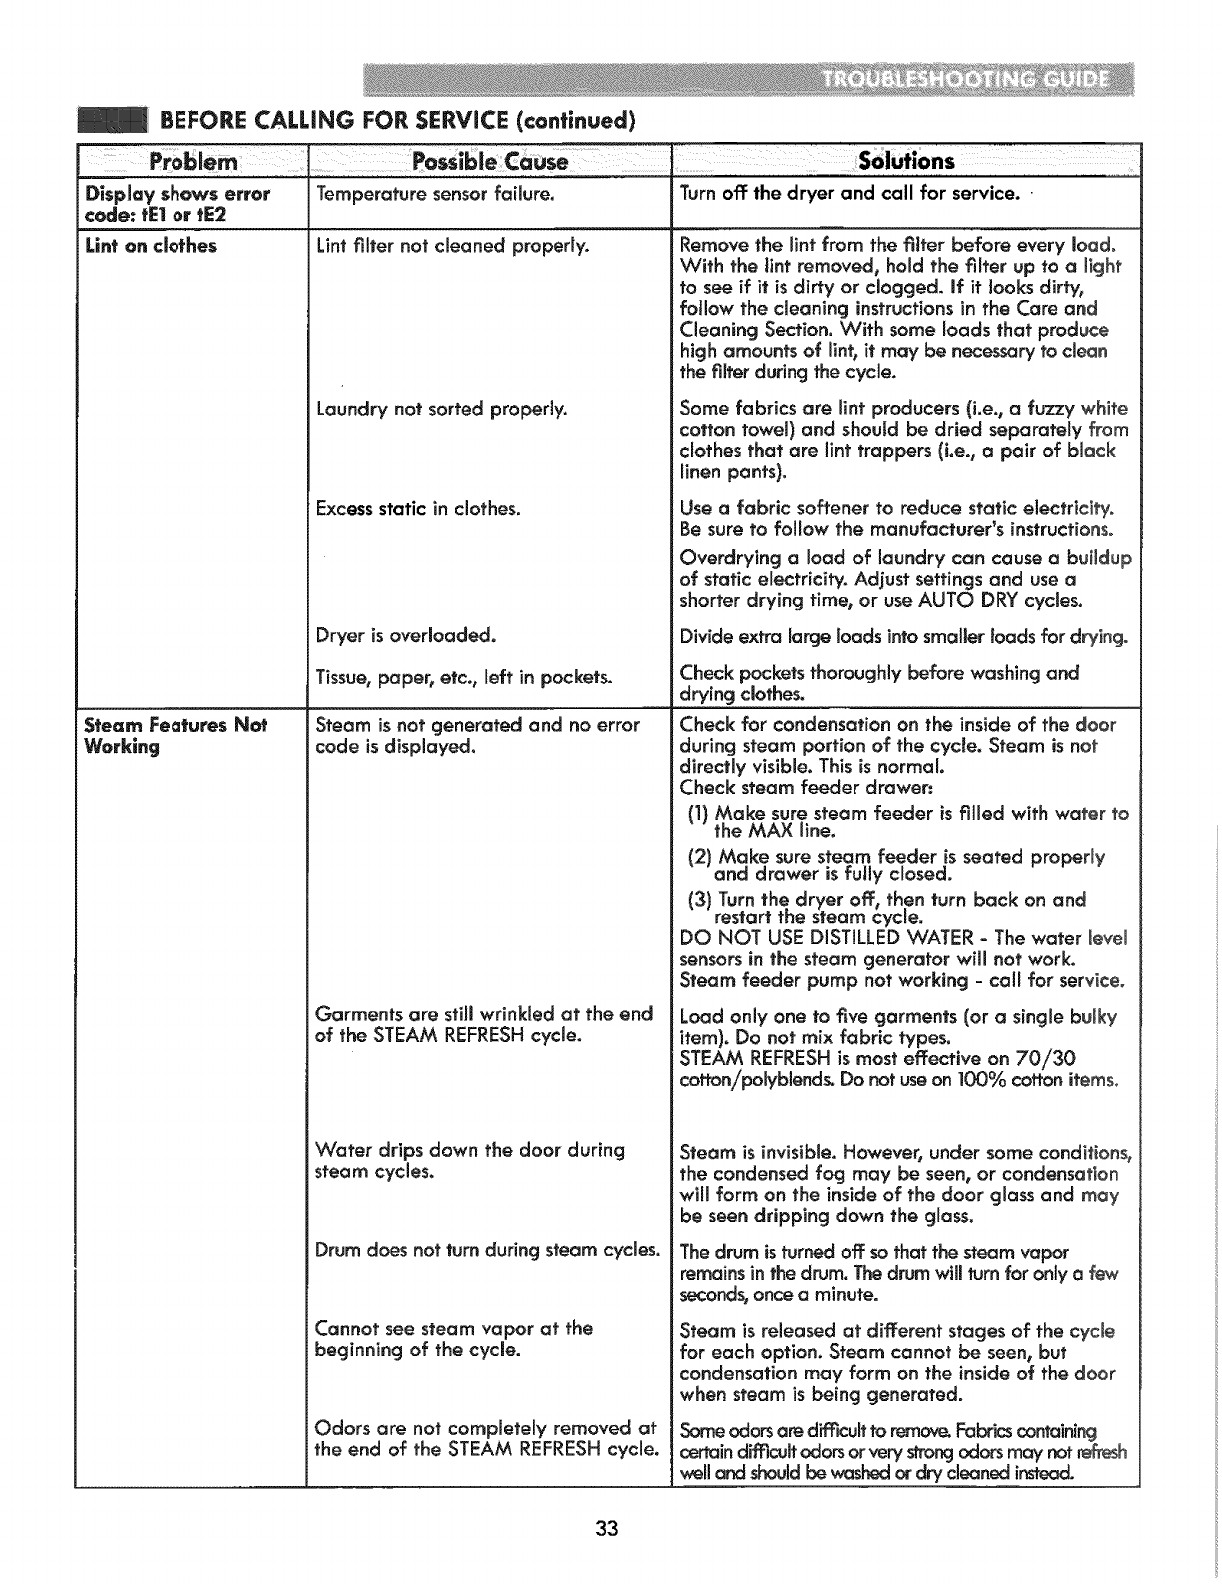
Display shows error
code: tel or rE2
Lint an clothes
Sfeam Features Not
Working
BEFORE CALLING FOR SERVICE (continued)
Temperature sensor failure.
Lint filter not cleaned properly.
Laundry not sorted properly.
Excessstatic in clothes.
Dryer is overloaded.
Tissue,paper, etc., left in pockets.
Steam is not generated and no error
code is displayed.
Garments are stll wrinkled at the end
of the STEAM REFRESHcycle.
Water drips down the door during
steam cycles.
Drum does not turn during steam cycles.
Cannot see steam vapor at the
beginning of the cycle.
Odors are not completely removed at
the end of the STEAM REFRESHcycle.
Turn off the dryer and call for service.
Remove the lint from the fitter before every load.
With the lint removed, hold the filter up to a light
to see if it is dirf'y or clogged. If it looks dirty_
fotlow the cleaning instructionsin the Care and
Cleaning Section. With some loads that produce
high amounts of linb it may be necessary to clean
the filter during the cycle.
Some fabrics are lint producers (i.e., a fuzzy white
cotton towel) and should be dried separately from
clothes that are lint trappers (i.e., a pair of black
linen pants),
Use a fabric softener to reduce static electricity,
Be sure to follow the manufacturer's instructions.
Overdrying a load of laundry can cause a buildup
of static electricity. Adjust settings and use a
shorter drying time, or use AUTO DRY cycles.
Divide extra large loads into smaller loads for drying.
Check pocketsthoroughly before washing and
drying clothes.
Check for condensation on the inside of the door
during steam portion of the cycle. Steam is not
directly visible. This is normal.
Check steam feeder drawer:
(1) Make sure steam feeder is filled with water to
the MAX line.
12) Make sure steam feeder is seated properly
and drawer is fully closed.
(3) Turn the dryer off, then turn back on and
restart thesteam cycle.
DO NOT USE DISTILLED WATER - The water level
sensors in the steam generator will not work.
Steam feeder pump not working - call for service.
Load only one to five garments (or asingle bulky
item). Do not mix fabric types.
STEAM REFRESHis most effective on 70/30
cotton!polyblends. Do not use on 100% cotton items.
Steam is invisible. However, under some conditions,
the condensed fog may be seen, or condensation
will form on the inside of the door glass and may
be seen dripping down the glass.
The drum isturned off so that the steam vapor
remains in the drum. The drum will turn for only a few
seconds,once aminute.
Steam is released at different stages of the cycle
for each option. Steam cannot be seent but
condensation may form on the inside of the door
when steam is being generated.
Someodors are difflcult to remove.Fabricscontaining
certaindimcult odors or very s_ong odors may not_h
well and shouldbe washedor dry cleanedinstead.
33
Kenmore Limited Warranty
FOR ONE YEAR from the date of sale this appliance is warranted against defects in material or
workmanship when it is correctly installed, operated and maintained according to all supplied instructions.
W!TK PROOF OF SALE, a defective appliance will receive free repair or replacement at option of seller.
To arrange for warranty service, call 1-800-4-MY-HOME® (1-800-469-4663).
This warranty applies for oniy 90 DAYS from the sale date if this appliance is ever used for other than
private household purposes.
This warranty covers ONLY defects in materlai and workmanship, and wlJl NOT pay for:
1. Expendable items that can wear out from normal use, including but not limited to filters, belts, screw-in
base light bulbs, and bags.
2. A _ervice technician to instruct the user in correct product installation, operation or maintenance.
3. A _ervice technician to clean or maintain this product.
4. Damage to or failure of this product if it is not installed, operated or maintained according to al! the
instructionssupplied with the product.
5. Damage to or failure of this product resultingfrom accident, abuse, misuseor use for other than its
in:ended purpose.
6. Damage to or failure of this product caused by the use of detergents, cleansers, chemicats or utensils
other than those recommended in all instructionssupplied with the product.
7. Damage to or failure of parts or systemsresulting from unauthorized modifications made to this product.
Disclalmer of implied warranties; limitation of remedies
Customer's sole and exclusive remedy under this limited warranty shall be product repair or replacement
as provided herein. Implied warranties, including warranties of merchantability or fitness for aparticular
purpose, are limited to one year or the shortest period allowed by law. Seller shall not be liable for
incidental or consequential damages. Some states and provinces do not allow the exclusion or limitation of
incidental or consequential damages, or limitation on the duration of implied warranties of merchantability
or fitness, so these exclusions or limitations may not apply to you.
This warranty applies only while this appliance is used in the United States.
This _v:_rran_ gives you specific legal rights, and you may also have other rights which vary from state to state.
Sears Brands Management Corporation, Hoffman Estates, IL 60179
34

35
INSTRUCaONES IMPORTANTES SOBRE SEGURIDAD.. 37-40
REQUISITOS DE CONEXI6N A TIERRA ............................ 38
FUNCIONES Y VENTAJAS
Piezas y componentes clave ............................................. 41
INSTRUCCIONES PARA LA INSTALACI6N
Dimensiones y especificaciones clave ........................... 42
Requisitos de ubicaci6n .................................................... 42
Escoja el lugar adecuado ................................................ 42
Espacios de instalaci6n .................................................... 42
Instalaci6n con base de pedestal
o kit de montaje sobre la tavadora opcionales ............ 43
Accesorics opcionales ...................................................... 43
Requisitos de gas .............................................................. 44
Conexi6n de las secadoras de gas ......................... 44-45
Requisitos el_ctricos ................................................. 44&46
Conexi6n de las secadoras el_ctricas .................... 46-47
Ventilaci6n de la secadora ....................................... ,48-49
Nivelaci6n de la secadora .............................................. 50
Inversi6n dela puerta ...................................................... 50
Comprobaci6n final de la instalaci6n .............................. 51
INSTRUCCIONES DE USO
Funcione: del panel de control ...................................... 52
Funcionarniento de la secadora ..................................... 53
Guia de ciclos .............................................................54.55
Clasificaci6n de cargas ................................................... 56
Carga de la secaclora ..................................................... 56
Pantalla de tiempo y estado .......................................... 57
Botones modificadores de ciclo ..................................... 58
Opciones de ciclos yfunciones especiales ................... 59
Antiarrugas ................................................................. 59
Bloq_eo de los controles ........................................... 59
Mi ciclo ....................................................................... 59
Secado h6medo .......................................................... 59
De ahorro de enercjfa ............................................. 59
Instalaci6n y uso de la rejilla de secado ............. 59
Funciones de vapor .................................................... 60-61
Acerca del vapor ..................................................... 60
Uso del ciclo REFRESCADO CON VAPOR ........... 60
Uso de la opci6n ANTIESTATICA ............................. 60
Uso de la opci6n PLANCHADO F:_,CIL .................. 60
Ltenado del alimentador de vapor .......................... 61
Notas importantes sobre los ciclos de vapor ......... 61
INSTRUCCIONES DE MANTENIMIENTO DEL USUARIO
Limpieza regular ............................................................... 62
Limpieza del exterior ................................................. 62
Limpieza del interior .................................................. 62
Limpieza alrededor de la secadora y
debajo de ella ............................................................. 62
Umpieza del filtro de pelusas .................................. 62
Mantenimiento del sistema de ventilaci6n .................... 63
Sistema I(enmore Connect TM ............................................ 64
GU|A DE SOLUCION DE PROBLEMAS
Antesde solicitarasistenciat(_cnica........................65-67
GARANTJA .............................................................................68
SERVICIO .....................................................Cubiertaposterior
En el espacio de abaio, registre la fecha de la compra,
el modelo y n_mero de serie del producto. Encontrar6
el modelo y e! n0mero de serie impreso en la placa de
identificaci6n situada en el interior de la puerta de la
secadora. Tenga esta informaciBn a mano siempre que se
ponga en contacto con Sears con relaci6n a su producto.
N.° de modelo.
Fecha de ccmpra
N.° de serie
Guarde estas instrucciones y su recibo de venta para
referencia futura.
36
Acuerdos maestros de protecci6n
Felicidades por haber realizado una compra inteligente.
Su nuevo producto Kenmore ® est6 disefiado yfabricado para
brindar afios de funcionamiento fiable. No obstante, al icjual
que cualquier otro producto, es posible que requiera un
mantenimiento preventivo o alcjuna reparaci6n cada cierto
tiempo. Pot este motivo, disponer de un contrato maestro de
protecci6n puede ahorrarle dinero ymolestias.
El acuerdo maestro de protecci6n tambi_n Io ayuda a
extender la vida 0til de su nuevo producto. A continuaci6n,
se indica Io que incluye este contrato*:
• Material y mano de obra necesario para mantener
los productos en funcionamiento bajo usa normal, no
Onicamente los defectos de fabricaci6n. Nuestra cobertura
va mucho mas all6 de la garantia del producto. No hay
ninguna falla funcional deducible que se excluya de la
cobertura: se trata de una protecci6n real.
• Servicio experto Ilevado a cabo por un personal de m6s de
10.000 t_cnicos de servicio expertos de Sears, Io que significa
que alguien en quien puede confiar trabajar6 en su producto.
• Sin limite de solicitudes de reparaci6n y servicio en el pals,
con tanta frecuencia como desee yen cualquier momento.
• Funcionamiento garantizado: sustituci6n del producto
cubierto pot el servicio si se producen cuatro om6s averfas
del producto en un plazo de 12 meses.
• Reemplazo del producto: si 6ste no puede repararse.
• Comprobaci6n anual de mantenimiento preventivo si Io
solicita, sin ning0n gasto adicional.
• Ayuda r6pida por tel_fono: tambi_n Ilamada soluci6n
r6pida. Asistencia por tel_fono de un representante de Sears
para cualquier producto. Piense en nosotroscomo un"manual
de usuarioque habla".
• Protecci6n de sobretensiones contra dafios el_ctricos debidos
a fluctuaciones de energfa.
• Prote¢ci6n anual de $250 por p6rdida de comida que
se haya producido como resultado una falla mec6nica
cualquier refrigerador o concjelador cubierto.
• Reembolso del alquiler si la reparaci6n del producto
cubierto por el servicio tarda m6s de Io previsto.
•25% de descuento del precio normal de cualquier servicio
de reparaci6n no cubierto y de piezas relacionadas
insta [adas.
Una vez que adquiera el Acuerdo, s61otiene que hacer
un Ilamado telef6nico para programar el servicio. Puede
Ilamarnos en cualquier momento del d_a o de la noche0 o
fijar la cita de la reparaci6n atray,s de Internet.
El Acuerdo maestro de protecci6n es una compra sin riesgos.
Si por cualquier motivo cancela el contrato durante el piazo
de garantia del producto, le devolveremos todo el importe o
bien una cantidad prorrateada una vez que haya finalizado
el plazo de garant|a del producto.
Adquiera hoy mismo su Acuerdo maestro de protecci6n.
Se aplican algunas limitaciones y exclusiones.
Para consultar precios ye informaci6n adlcional en los EE. UUo
Ilame al 1-800-827-6655.
*La cobertura en Canad6 varia en algunos aspectos.
Para m6s detalles, Ilame a Sears Canad6 a !-800-361-6665.
Servicio de instalaci6n de Sears
Para soiicitar la instalaci6n profesional de Sears de
electrodom_sticos dispositivos para apertura de puertas de
garaje, calentadores de acjua yotros electrodom_sticos,
Ilame en los EE. UU. o Canad6 a:
1-800-4-MY-HOME ®
LEA TODAS LAS INSTRUCCIONES ANTES DE UTILIZAR
ESTE PRODUCTO
f
Su seguridad V la de los dem6s es muv importan|e.
Homes incluido nurnerosos rnensajes de seguridad en este manual sabre su electrodorn_stico. Lea ycurnpla siempre
todos los mensajes de seguridad.
Este es el sfrnbomo de alerta de seguridad.
Este s_rnbola le avisa de posibles peligros de rnuerte o lesiones pare usted o los dem6s.
Todos los rnensajes de seguridad incluir6 el sfrnbolo de alerta yla palabra PELIGRO o ADVERTENCIA.
Estas pat:3bras significan:
APELIGRO: _._cao.osi,0aci6ope,gro_que, si no se evita, puede producir lesiones graves o la rnuerte.
A_b,A DV ERI"ENCiA: I.dica0°asJt0=i6°pe,g._=qoe,si°o=ev_.pod.°p=_o=rt_io._sgrovesoIornue._.
w
PRECAUCiON: I.dicao°asitooci6,pal|eraseque.si.o seevita,p0e_op_od_ci_0.olesi6°me.=o
rnoderada°
Todos ruesmensajes de seguridad le indicar6n cu6J es el posible peligro, Jo que debe hater pare reducir la probabHidad
de lesiones y ]o que puede ocurrirle si no se siguen Ias instrucciones.
al rn[nirno el riesgo de incendio, explosi6n o descarga ei_clrlca, asi corn° prevenlr adecuadarnente da_os
rnaferiales, lesiones personales o muer_e.
• No instale |a secadoro de rope con maferiales de ventilaci6n de pi6stico flexlbie. S| se ins|ale un conducto rnef6|ico flexible
(de Hpo I_rnina de rnela_), debe se_ dei f|po concrete especificado per el fabricante del operate come adecuado pare
usarle con $ecade_as. Se sabe que los rnateriale$ de ventilaci6n flexibles se colapsan, se pueden aplas_ar con facilidad y
atrapan pe|usas. Estas c_rcunstanclas pueclen obstacuffzar el flujo de aire de _a secadora Vaurnentar e| riesgo de incentive.
• No guarde ni uffffce gasoline ni ning0n otto gas o ffquido inflarnable cerca de es_e elec|mdorn6sfico o de cualquier efro.
• La |nstala¢i6n y el servlclo deben se_ _eaHzades per un t_cnlco cuaffficado0 una agenc_a de mantenirnlenfe e _a
compafiia de gas.
•|nsfale la _ecado_e $iguiende los |nstrucciones del fabrlcante y |as no,me|ires ieca|es.
• Guarde es_as|nsfrucciones.
QUE HACER S| HUELE A GAS:
1. No intenfe encender una cerlila o un clgarriffo, n| tampoco ni_g_n operate que func|ene co_ gas oeiectr|cidad.
2. No toque ning0n interrupter el_ctrlco. No utfflce nlng0n tel_fono en su edificlo.
3. Despeje de personas _a habi_ci6n, ediflcio o zone.
4. Llerne i_mediatarnen|e ala cornpafiia de gas desde e_ tel6fone de un vecina. Siga a_entarnente los |nsfrucciones
de la campa_ia de gas.
5. Si no puede penerse en contacta con la carnpafiia de gas, Ilarne alos bomberes.
GUA_DE ESTAS _NSTRUCC_O_ES
37
PRECAUCIOHE$ BA$iCAS DE SEGURIDAD
ADVERTENCtA: Para reduclr el rie_jo de incendio,descarga ei6ctrica o leslonesf|sicasal utilizar este
electrodom_sfico,sigaestasprecaucionesb6sicas,entre losque seincluyen las sigulentes:
•Lea todas las instrucciones antes de utilizar la secadora.
• Antes de utilizar la secadora, es necesario instalarla
correctamente, seg_n se describe en este manual.
•No introduzca en la secadora articu!os que hayan estado
expuestos a aceites de cocina. Losarffculos impregnados de
aceites de cocina pueden contribuir a una reacci6n quimica
que podr_a hacer que una carga se incendiase.
•No seque arficulos que previamente hayan sido limpiados,
lavados, s_mergidos o salpicados con gasolina, disolventes
de limpieza en seco o cualquier otra sustancia inflamable o
explosivo, ya que pueden desprender vapores que podrian
incendiarse o explotar.
•No introduzca los manos en la secadora mientras el tambor
o cualquier otto elemento est_ en movimiento.
•No repare ni sustituya ninguna pieza de la secadora ni intente
repararla a menos que se recomiende especfficamente en
esta gufa de usoy cuidado, o en instruccionespublicadas de
reparaciones que comprenda y sepa aplicar.
•No toquetee los contro_es.
Antes de poner Ia secadora fuera de servicio o desecharla,
retire mapuerta del compartimento de secado.
*No permita que los niRosjueguen encima de la secadora
o en su interior. Si se usa la secadora cerca de nifios, ser6
necesario vigilarlos atentamente.
*No utilice suavizantes ni productos para eliminar la est6tica
a menos que Io recomiende el fabricante del suavTzante
o producto.
No utiiice el color para secar articulos que contengan
gomaespuma o materiales con una textura similar.
•Evite la acumulaci6n de pelusa, polvo o tierra alrededor
del 6rea de la apertura de ventilaci6n y 6teas adyacentes.
• La parte interior de la secadora y el conducto de
ventilaci6n se deber6n limpiar peri6dicamente, y la misma
deber6 ser realizada pot t@cnicoscualificados.
"No instole ni coloque esta secadora en lugares donde
pueda estar expuesta alas inclemencias meteorot6gicas.
° Antes de cargar la secadora, revise siempre que no haya
objetos extrafios en su interior.
•Retire Io pelusa del filtro antes de cada cargo.
ADVERTENCIA: Este producto confiene quimicos
conocidos pot el Estado de California como causantes de
c6ncer ydefectos de nacimiento u otros daRos reproductivos.
L6vese las manos despu6s de usarlo.
LEY EJECUTIVA SOBRE LA SEGURIDAD DEL
AGUA POTABLE Y LOS AGENTES TOXICOS
DE CALIFORNIA
Esta tey requiere que el gobernador de California publique
una lista de sustancias que se sabe que producen c6ncer,
defectos cong_nitos o cualquier otra lesi6n reproductiva,
y obligo a los empresas a advertir a los clientes sobre la
posible exposici6n a tales sustancias. Los electrodom_sticos
de gas pueden ocasionar una exposici6n leve a cuotro de
estas sustancias, en concreto benceno, mon6xido de carb6n,
formaldeh_do y hollfn, generados principalmente por la
combusti6n incompleta del gas natural o el propano.
Uno secadora correctamente ajustada minimizar6 la
combusti6n incompleta. La exposici6n a estas sustoncias se
puede minimizar adn m6s dotando a la secadoro de una
ventilaci6n adecuoda al exterior.
,A. ADVERTENCIA: Unaconexi6n
inadecuada del
conductor de €onexi6n a tierra del equipo puede ocasionar
un riesgo de descarga el6ctrlca. Consulte a un el6ctrico o
t&cnico cuolificado si tiene dudas sobre si el electrodom_stico
est6 correctamente conectado a tierra. No modifique el
enchufe que se entrego con el electrodom_stico. Si no
encoja en la toma de corriente, solicite a un electricista
adecuadamente forrnado que le instale una toma de
corriente apropiada. Este electrodom_stico debe conectarse
a un sistema de cableado permanente met61ico con conexi6n
atierro o se debe tender un conductor para la conexi6n
atierra del equipo con los conductores del circuito y
conectado al terminal de conexi6n a tierra del equipo o al
conductor de suministro del electrodom6stico. Si la secadora
no se encuentra adecuadamente conectada a tierra, se
pueden producir descargas el_tricas.
REQUI$ ?O$ DE CONEXJ6N A ?iER
Este electrodom_stico debe estar conectado atierra. En caso
de oveda o fallo de funcionamiento, la conexi6n atierra
reducir6 el riesgo de descarga el_ctrica, al proporcionar a la
corriente el_ctrica una trayectoria de una menor resistencia.
Este electrodom6stico debe estar equipado con un cable que
disponga de un conductor de conexi6n a tierra del equipo y
un enchufe con conexi6n a tierra. El enchufe debe conectarse
a una toma de corriente adecuada que est_ correctamente
instalada y con conexi6n a tierra seg6n las normativas y las
ordenanzas locales.
38
INSYRUCCIONES DE $EGURiIDAD PARA LA INSTALACION
ADV ERTEHCIA: Po.= edooi em deincendiowdes¢arga ei_ctrlca oieslonesfisicasaluliffzaresl_
eieci_dam_stico, siga estas procauciones b6sicas, entre las que se incluyen |as _guientes:
*Conede la secadora adecuadamente a tlerra segOn las
norma|ivas y |as ordenanzas vigentes. Siga los de,aries
en las _nstr'Jcciones de instalaci6n. $i la secadora no se
encuentra _decuadamente conectada a tierra, se pueden
producir descargas el_ctricas.
* Antes de uffffzar la secadara, es necesario |nstalaHa
carredamente, seg_n se describe en esto manual. Si la
secadora no se encuentra adecuadamenfe conectada a
tierra, se p_Jeden producir descargas el_ctricas.
•|nsta|e y almaceno la secaclora en un lugar no expueslo a
fernperafuras inferlores al punte de cangelaci6n ni expues|a
a la infemperie.
*Tados |as trabajos de roparaci6n y rnantenirnienta deber6n
set reaHzados par un |6cnlco autorlzado a menas que se
den arras recemendaclones e_pec_cas on esFeManual de
usa V cuidada. Utilice _1o piezas de f6brica au|arizadas.
Si no se cumple con esta advertencia se podr6n producir
lesiones graves, incendios, descargas el_ctricas omuerte.
• Can el fin de reduclr el rlesgo de descargas el@ctrlcasno
|nsk_le la secadora en espacias h_medas. Si no se curnpJe
con esta advertencia se podr6n producir lesiones graves,
incendios, descargas e_@ctricasomuer_e.
• Canecte un c_rculto o_drlc_ clasificado, pmteglda y
adecuado para evita_ sobreca_gas ei_ct_cas. Un circuito
e!_c_rico inadecuado se puede flsndir_ creando descargas
el_ctricas y/o riesgo de incendio.
Quffe fodas los elementos de embala_e y deseche
adecuadamente ratios _o_materia_es do onv|o. Si no se
curnple con esto se podr6 producir una explosi6n, incendio,
quemaduras o muerte.
Co|aquo la secadora a una altura minima de 46 crn
(18 pulgadas) sabre el suela papa una instalaci6n en e|
garaje. Si no se cumple con esto se podrc_ producir una
exptosi6n, incendio0quemaduras o muerte.
Mantenga _odas los envafforios alejadas de los niEas. Los
rnateriales de los envofforios pueden resuffar peiigrosos para
los ni_os. Existe riesgo de asfixia.
No le instale cerca de un e|emento qua gene_a ca_ar_coma
una cacina oun homo de cocci6n. Si no se cumple con esta
adverfencia se puede provocar una deformaci6n, hurno o
un incendio.
•No celaque velas nl clgarrillas sabre el producto. Si no
se cumple con esta advertencia se puede provocar una
de_%rmaci6n_humo o un incendio.
• Quffe la policula de vinilo protec_a del producta. Si no
se cumpte con esta advertencia se puedo provocar una
defarmaci6n, hurno o un incendio.
Ventilaci6n/conductos:
* Las secadoras de gas DEBEN tarter un conducta de
venfilacJbn al exterior. Si no se siguen estas instrucciones
se podr6 producer incendio o muerte.
• El slstema de ventllaci6n de la secadara debo dlriglrse _
exterior de |a vivienda. Si la socadara no se ven_ila
al exterior, se expu_sar_ pelusa V grandes cantldades
de humedad a|a zona de lavanderia. Una acumulaci6n
de pelusa en cualquier zona de la vivienda puede crear
un peligro :_e incendio y para _a salud.
* Use Onicamon_e sis_emas de ven|ilaci6n de nnotal Hgida
eflexib|e de 10,2 cm (4 pulgadas) de di6metro dentra de!
gablnete de la secadara e para venfliaci_n a| exterior.
Los sls_emas de venti|aci_n de p|cistica uafro rnateria_
pueden causar incendlas. Los slstomas de ventffac|_n
agujereados pueden causar incendios si so colapsan o
bloquoan cturante el usa ola instalaci6n.
* El sistema de ventHac}6n no se incluye con la secadora,
par la que deberb abtenerla Iocalmente. La tapa termlnal
deber_ _enor reguiadores de |ire con bisagras para prevenir
el retorna de descarga cuanclo no se usa la secadora.
Si no se sig_Jenes_asins_rucciones se podr_ producir
incencfio om_orte.
* E| canducte de escape deberc_ tener 10,2 cm (4 pu_gadas)
de dicirne_ro sin abstruccianes. El canducte de escape
deber_ _antenerse le rn_s carta paslb_e. Aseg_rese
de Hmplar cua_quier tipo de conducte antigua antes
de insl_iar su secadara nuova. Si no se siguen es_as
]nsfrucciones se podr6 producir incendio o muerte.
"Se recomienda usar canducfos r_gidas esemlrrigldas entre
la secadora y la pared. En ins|a_acianes particulates,
cuando os imposible _eallzar una canoxi6n slgulenda las
recomondaciones antes inci_caclas__nlcamen|e se puede
utillzar un cenducta rnet_|ico de transic_6n aprobado par UL
entre la secaclara y |a conexi6n de pared. Usar es|e tlpa de
conduc_a afecta_ al tiempa de secadoo Si no se siguenestas
insfruccionesse podr6 producir incendio ornuerte.
• NO ufilice |ernillos do I_mina de metal ni otto tlpe de
sujec|anes que se extlendan den_ra del canducto y puedan
atra_r peiusa y reduclr la eflclencla del sistema de
veniilaci6n. Asegure todas las uniones con cinta aislante
impermeable. Para m6s detalles, siga las instruccionesde
instalaci6n. Si no se siguen estas instrucciones se podr6
producir incendio o muerte.
39
INSTRUCCIONES DE SEGURIDAD PARA LAS FUNCIONES CON VAPOR
AA DV ERTENC!A: Pararedooi do1.€eerie,do argoel rioooleslonesffslcasalulilizaresfe
elecirodom_stice, slga estas precauciones b6sicas, entre las qua se inciuyen las slguien|es:
* No abra la puerta de ia secadara durante los ciclos de
vapor. Si no se siguen estas instrucciones podr[a existir un
riesga de quemadura.
* No seque prendas que previamen_e se hayan llrnplado,
tavado, sumergido asalpicado con gasolina, solven|es
de lavado en seco o cualquler otra susfancla inflarnabie
oexplosiva, ya que se pueden desprender vapores que
podr|an incendiarse a explotar. Si no se siguen estas
instruccior,es se podr6 producir incendio o rnuer_e.
No Ilene el alimeniador de vapor con gasaffna, solvente
de lavado en seco a cualquler otra sustancia inf|amable
o expiosiva. STno se siguen estas instrucciones se podr6
producir incendio o muerte.
No toque |a boquiffa de vapor en e| fambar durante el
clclo de vapor a despu6s de finallzado el mlsrna. Si no
se siguen estas instrucciones podHa existir un riesgo de
quemadura°
No Ilene el allmentador de vapor con agua caliente (m6s de
30°C/86°F).Si no se sTguenestas instrucciones podrla existir
un riesgo de quernadura.
INSYAUCCIONES DE SEGURIDAD PA_k LAS CONEXmOHES EL_:CTR_CAS
ADVEATENCIA: Pore reduc|r o| rio ode inca.rile, descarga el6ctrica o lesianes fislcas al utfflzar este
elecirodom_stlco, slga estas precauclones b6sicas, entre las qua se incluyen las siguientes:
. Bajo ninguna clrcunstancla0 carte oquite la clavlja de
conex_6n a tlerra del cable el_ctrico° Para evitar lesiones
personales o da_os a Ja secadora, el cable el_ctrico debe
estar conectado a una toma de corriente con la conexi6n
a tierra adecuada.
* Per motlvos de segurldad personal, este electrodam_st|co
debe estar conectado a tierra adecuadamente. Si no se
cumple esta advertencia, se podr6n producir descargas
el_ctricas olesiones.
"Consulte las instrucciones de ins|aiaci6n de esfe manua|
para ebtener los requlsitas el&:fr|cos especiflcos de su
mode|a. $i no se sicjuen estas instruccionest se podr6n
producir descargas ei_ctricas yio riesgo de incendio.
• Esta secodora debe enchufarse a una tama de carrlente
canectada a |terra adecuadamente. $i la secadora nase
encuentra adecuadamente canec|ada a |terra, se pueden
producir descargas el_ctricas. Solicffe a un electricista
cualificado que controie la tama de carriente y el clrcuffo
e|_ctrlco para asegurarse de que la toma de carrlente
est6 correctarnente conec|ada a tierra. Si no se siguen
estas instrucciones, se podr6n producir descargas el_ctricas
y/o riesgo de incendio.
* La secadora debe estar siernpre enchufada a su Foma
de corHente indlvldua|, con ia das_ficaci6n de tensi6n
correspondlenfe ala p_aca de da|os de servicio. Esto
garantiza el me|or funcionamiento y adem6s previene la
sobrecarcja de los circuitos demhogar, Io cual podria ocasionar
riesgos de incendio debido amrecalentarniento de cables.
No desenchufe nunca la secadora _irando del cable de
corrien|e, Agarre slempre el enchufe firmernenie y iire
del mlsma para retiraHo de |a _ama de corrlente. El cable
de corriente podria resultar da_ado, Io que ocasionaria un
riesgo de incendio odescarga el_ctrica.
Repare o reernplace de |nrnedia_o lodes las cables de
corrlente pe_ados o can cua_quier ffpo de da_o. No use
un cable can coriaduras o abrasi6n sabre su exlensi6n
a extremes. Este cable de corfiente se puede fundir_
ocasionando un riesgo de descargas el_ctricas yio
incendio.
A! instalar e camblar de _ugar la secadora0 |enga cuidado
de no farzar, aplastar oda_ar el cable de allmentaci6no
De esta manera, evitar6 heridas o da_os debido a
incendios odescargas el_ctricas sabre la secadora.
GUAADE ESTA$ _NSTAUCC_OHES
4O
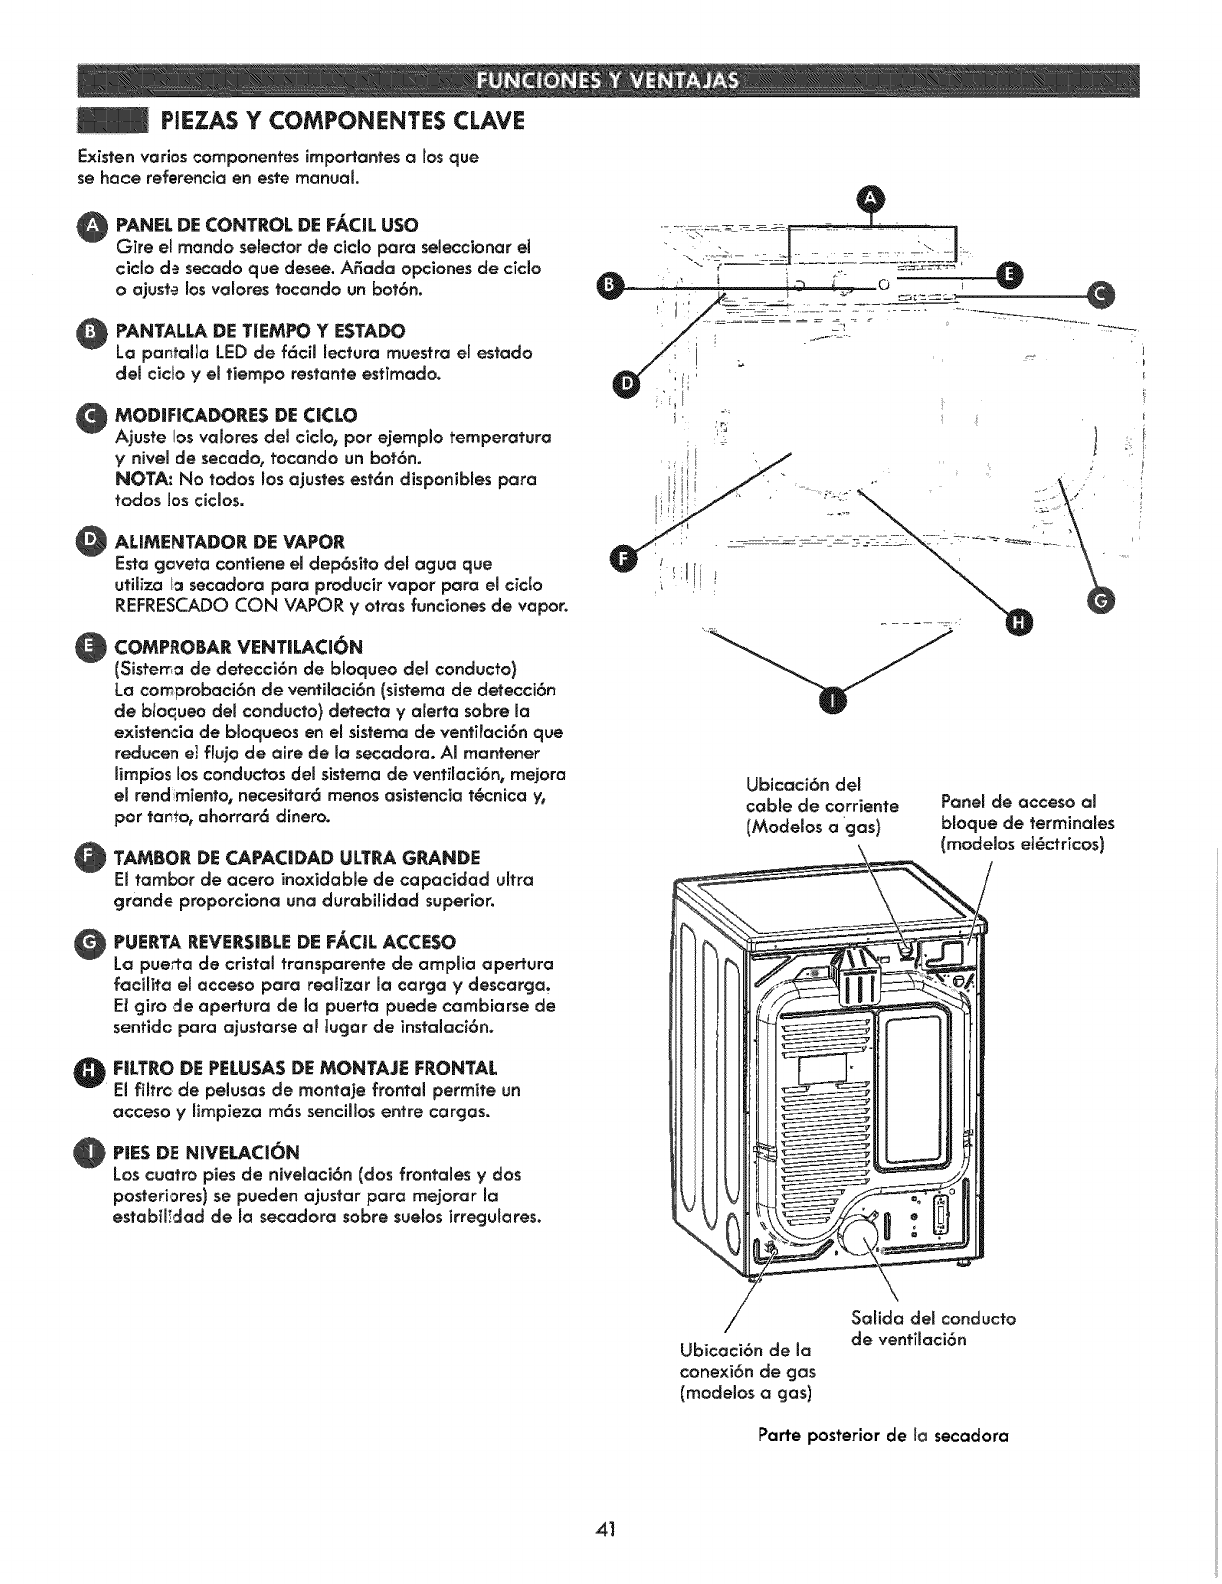
PJEZAS Y COMPONENTES CLAVE
Existen varios componentes importantes a los que
se haoe referencia en este manual.
OANEL DE CONTROL DE FACJL usa
Oire el rnando selector de cicio para seieccionar ei
eiclo de secado que desee. A_ada opciones de cTclo
oajuste los valores tocando un bot6n.
PANTALLA DE T|EMPO Y ESTADO
Lo pantaila LED de f6cii lectura rnuestra el estado
del cicto y el tiempo restante estTmadoo
MODiFJCADORES DE CiCLO
Ajuste 1asvalores del ciclo_ par ejernplo temperatura
y nivel de secado, tocando un bot6n.
NOTA: No todos los ajustes est6n d!sponibles para
todos bs ciclos.
ALIMENTADOR DE VAPOR
Esta gcveta contiene el dep6sito del agua que
utiliza I_ secadora para producir vapor para el cicfo
REFRESCADO CON VAPOR yarras funciones de vapor.
COMPROBAR VENTiLACI6N
(Sisterr_ade detecci6n de bloqueo deJ conducto}
La co_robaci6n de ventiiaci6n (sisterna de detecci6n
de bloqueo del conducto) detecta yalerta sabre la
existencia de bloqueos en emsisterna de vent;laci6n que
reducen e] flujo de aire de la secadora. AI mantener
mimpiosmosconductos demsistema de ventilaci6n0 mejora
el rendrnTento, necesitar6 rnenos asistencia t_cnica y,
par ta_to0 ahorrar6 dinero.
TAMBOR DE CAPAC|DAD ULTRA GRANDE
El tambor de acero inoxidable de capacidad ultra
grande proporciona una durabilidad superior.
_UERTA REVERSIBLE DE FAC|L ACCESO
La pue_a de cristal transparente de amplia opertura
facilita el acceso para realfzar la carga y descarga.
El giro _:_eapertura de la puerta puede cambiarse de
sentidc para ajustarse al lugar de instaiaci6n.
O|LTRO DE PELUSAS DE MONTAJE FRONTAL
El filtrc de peiusas de montaje frontal perrnite un
acceso y limpieza rn6s sencillos entre cargos°
OiES DE NiVELACI(_N
Los cuatro pies de nivelaci6n (dos frontales y dos
posteriores) se pueden ajustar para mejorar la
estabil!clad de la secadora sabre suelos irregulares.
Ubicaci6n del
cable de corriente
(Modelos a gas)
Panel de acceso al
bloque de terminales
(modelos et_ctricos)
/
Ubicaci6n de la
conexi6n de gas
(modelos a gas)
\
Salida del conducto
de ventilaci6n
Parte posterior de la secadora
41
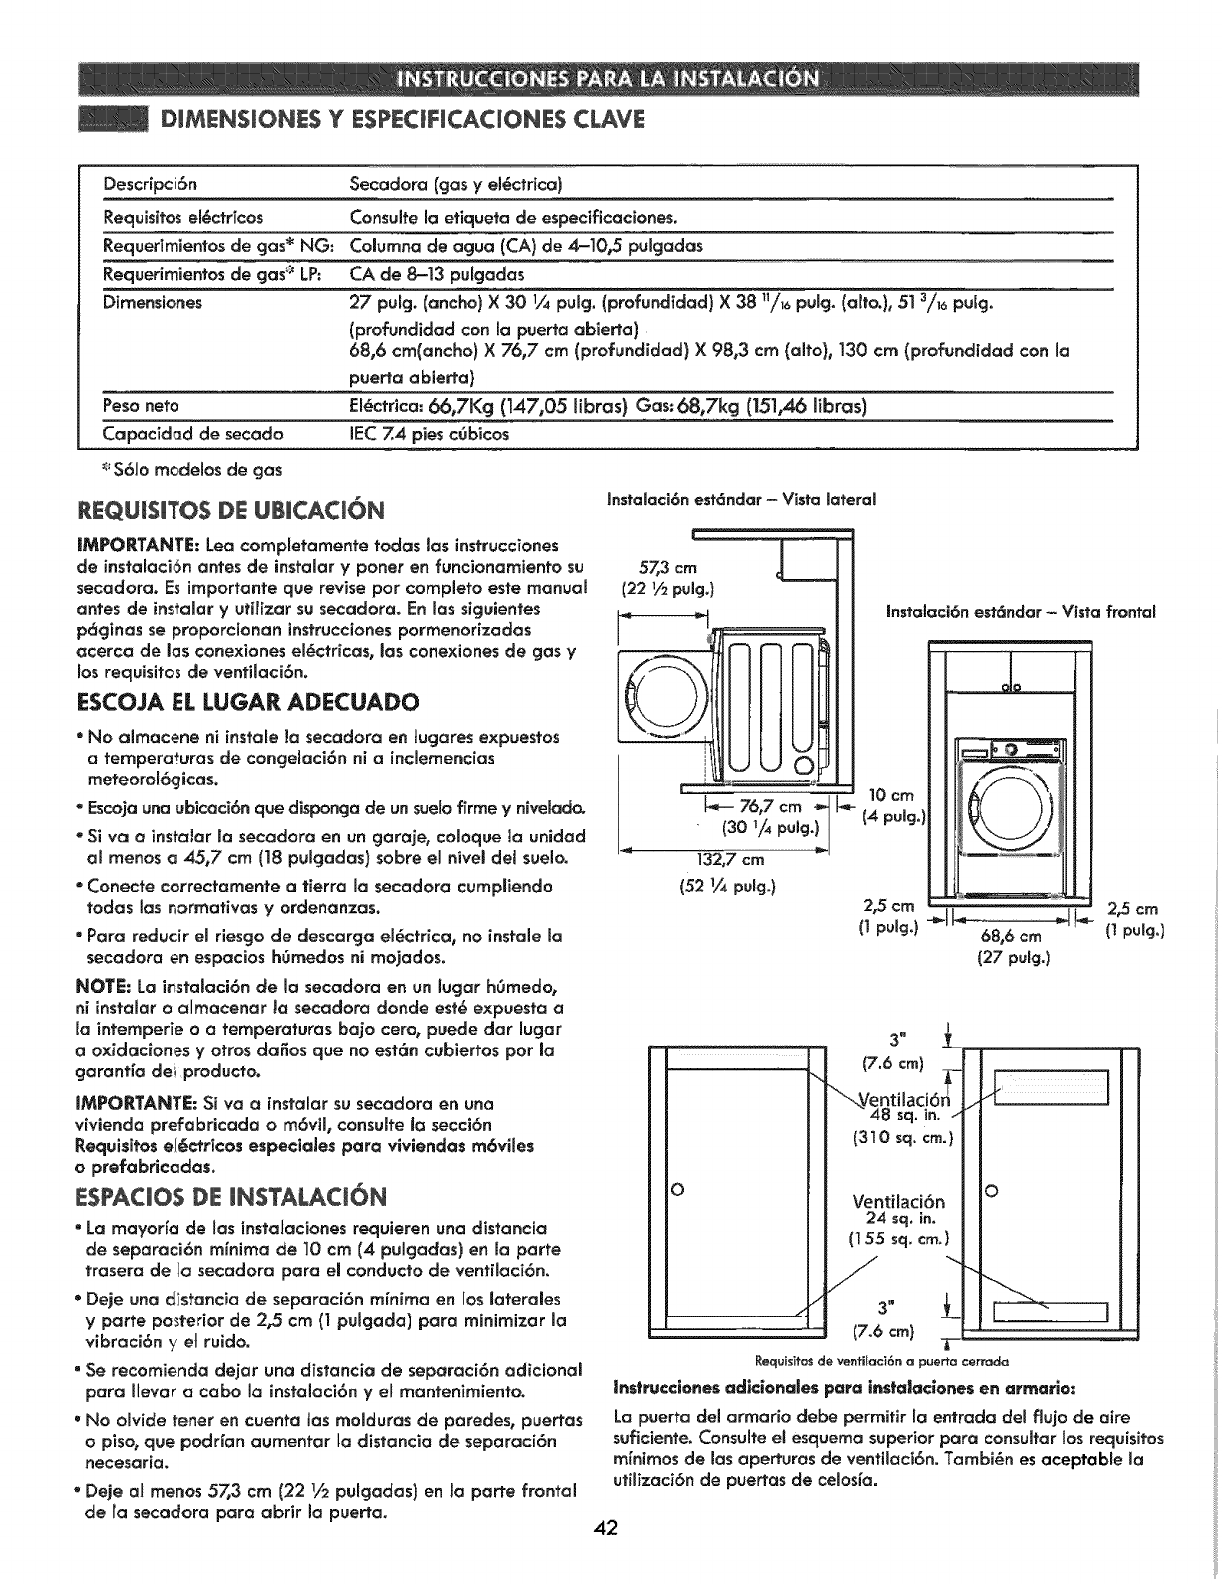
DIMENS ONE$ Y ESPECWFJCACIONE$CLAVE
Descripci6n Secadora [gas y el_ctrica)
Requisites el_ctdeos Consulfe la etiquefa de especificacioneso
Requerirnientos de gas* NG: Columna de agua (CA) de 4-10,5 pulgadas
Requerirnientos de gas_ LP: CA de 8-13 pulgadas
Dimensiones 27 pulg. Iancho) X 30 1/_pulg. (profundTdad) X38 11/16pulgo (altoo), 513/16 pulcj.
(profundidad con la puerta abierta)
68,6 cm(ancho) X 76,7 cm (profundidad) ×98,3 cm (alto), 130 crn (profundidad con la
puerta abierta}
Peso net0 El_ctrica: 66_7Kg (147_05 libras) Gas:68°7kg (151,46 libras)
Capacidad de secado IEC 7.4 pies c_bieos i
_$61o mcdelos de gas
REQUISITES DE UBmCACU6N
|MPORTANTE: Lea completamente todas las instrucciones
de instalaci6n antes de instalar y poner en funcionamiento su
secadora. Es importante que revise par complete este manual
antes de instalar y utilizar su secadora. En las siguientes
p6cjinas se proporcionan instruceiones pormenodzadas
acerca de las eonexiones el_etdcas, las conexiones de gas y
los requisites de ventilaci6n.
m:SCOJA EL LUGAR ADECUADO
•No almacene ni insfale la secadora en tugares expuestos
a tempera_uras de congelaci6n ni a inclemencias
meteorol6gicas.
•Escoja una ubicaci6n que disponga de un suelo firme yniveJado.
•Siva ainsta_ar la secadora en un garage, coloque la unidad
ammenos a 45,7 cm (18 pumcjadas) sabre el nivel del suelo.
•Conecfe correctamente a tierra la secadora cumpliendo
todas las r_ormativas yordenanzas.
• Para reducir el riesgo de descarga el_ctrica_ no instale la
secadora en espacios h_medos ni rnojados.
NOTE: La i_stalaci6n de Ja secadora en vn lugar hOmedo,
ni instalar o almacenar la secadora clonde est_ expuesta a
la intemperie o a femperaturas bajo cero, puede dar lucjar
a oxidaciones yarras da_os que no est_n cubiertos par la
garanHa dei producto.
IMPORTANTE: Siva a instalar su seeadora en una
vivienda prefabricada o m6vil, eonsulte ia secci6n
Requisites e/_ccricos especiaJes para viviendas m6viles
oprefabricadas.
ESPACIOS Din:INSTALACi6N
•La mayoria de las instalaciones requieren una distancia
de separaci6n rnfnima de 10 crn (4 pulgadas) en Ia parte
trasera de la secadora para el conducfo de ventilaci6n°
•Deje una distancia de separaci6n mfnima en ios laterales
yparte posterior de 2,5 cm (1 pulgada) para minimizar la
vibraci6n yet ruidoo
"Se recomienda dejar una distancia de separaci6n adicional
para IJevar a cabola instalaci6n y el mantenirnientoo
•No oivide tener en cuenta tas molduras de paredes, puertas
opiso, que podr_an aumentar la distancia de separaci6n
necesaria.
"Deje ai menos57,3 crn (22 _/_puigadas) en la parte frontal
de ta secadora para abrir la puerta.
lnstalaci6n est6ndar - Vista lateral
O
(7.6 cm)
sq. in.
(310 sq. cm.}
Ventilaci6n
24 sq. in.
(155 sq, cm.)
3"
(7.6 cm)
68,6 cm
(27 pule.)
O
Requisitos de ventiloci6n opuerto cerr_da
|nstrucciones ad|¢ionaJes para ins_a|a¢iones en armarie:
La puerta del armario debe permifir la entrada del flujo de aire
suficiente. Consulte el esquema superior para consuffar los requisites
mi'nimos de las aperturas de venfilaci6n. TambiSn es aceptable la
utilizaci6n de puertas de celesta.
42
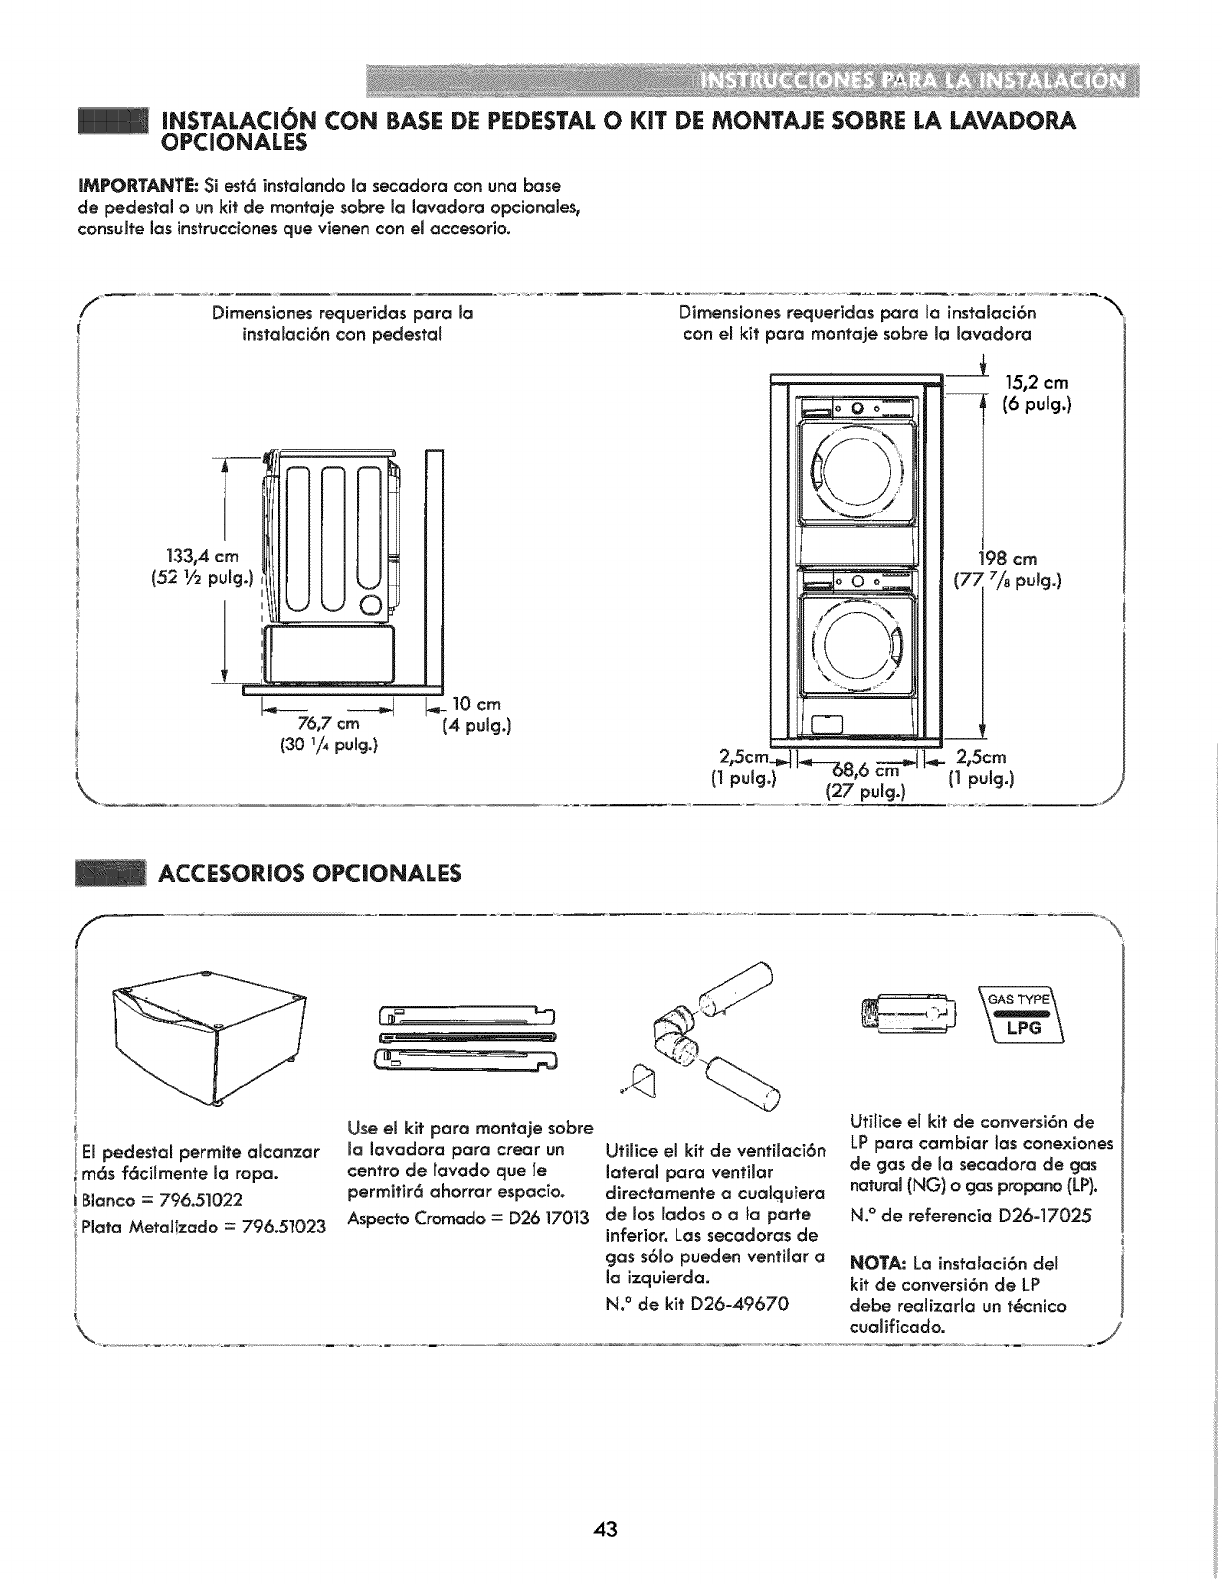
INSTALACi6N CON BASE DE PEDESTAL O KiT DE MONTAJE SABRE LA LAVADO_
OPCIONALES
IMPORTANTE: Si est6 instaJando la secadora con una base
de pedestal o un kit de montaje sabre la lavadora opcionoles,
consuite los instrucciones que vienen con el accesorio.
Dirnensiones requeridas poro mo
insto_oci6n con pedestal
Dimensiones requeridas para lo instalaci6n
con el kit paro montaje sabre Io lavadoro
!5,2 cm
(6 pulg.)
\
133,4 cm
(52 _/2pulg.)
___J
76,7 cm (4 pulg.)
(301/4pulg.)
(I pulg.)
2,5cm
!_{ipulg.)
(27 pulg.)
ACCESORiOS OPCIONALES
f
El pedestal permite alconzar
m6s f6cilmente la ropo.
Blanco : 796.51022
Metalizado = 796.5]023
Useel kit paro monfoje sabre
_alavodora para crear un
centro de tavado que ie
permitir6 ahorror espacio,
Utilice el kit de ventilaci6n
lateral pora ventilar
directamente a cualquiera
Aspecto Cromado = D26 17013 de los Eados o a la parte
inferior. Los secodoros de
gas s61o pueden ventilor o
la izquierda.
N? de kit D26-49670
Utifice el kit de conversi6n de
LP para cambiar las conexiones
de gas de la secadora de gas
natural (NG) o gas propano (LP).
N.° de referencia D26-17025
NOTA: La instalaci6n del
kit de conversi6n de LP
debe realizorlo un t6cnico
cualificado.
43
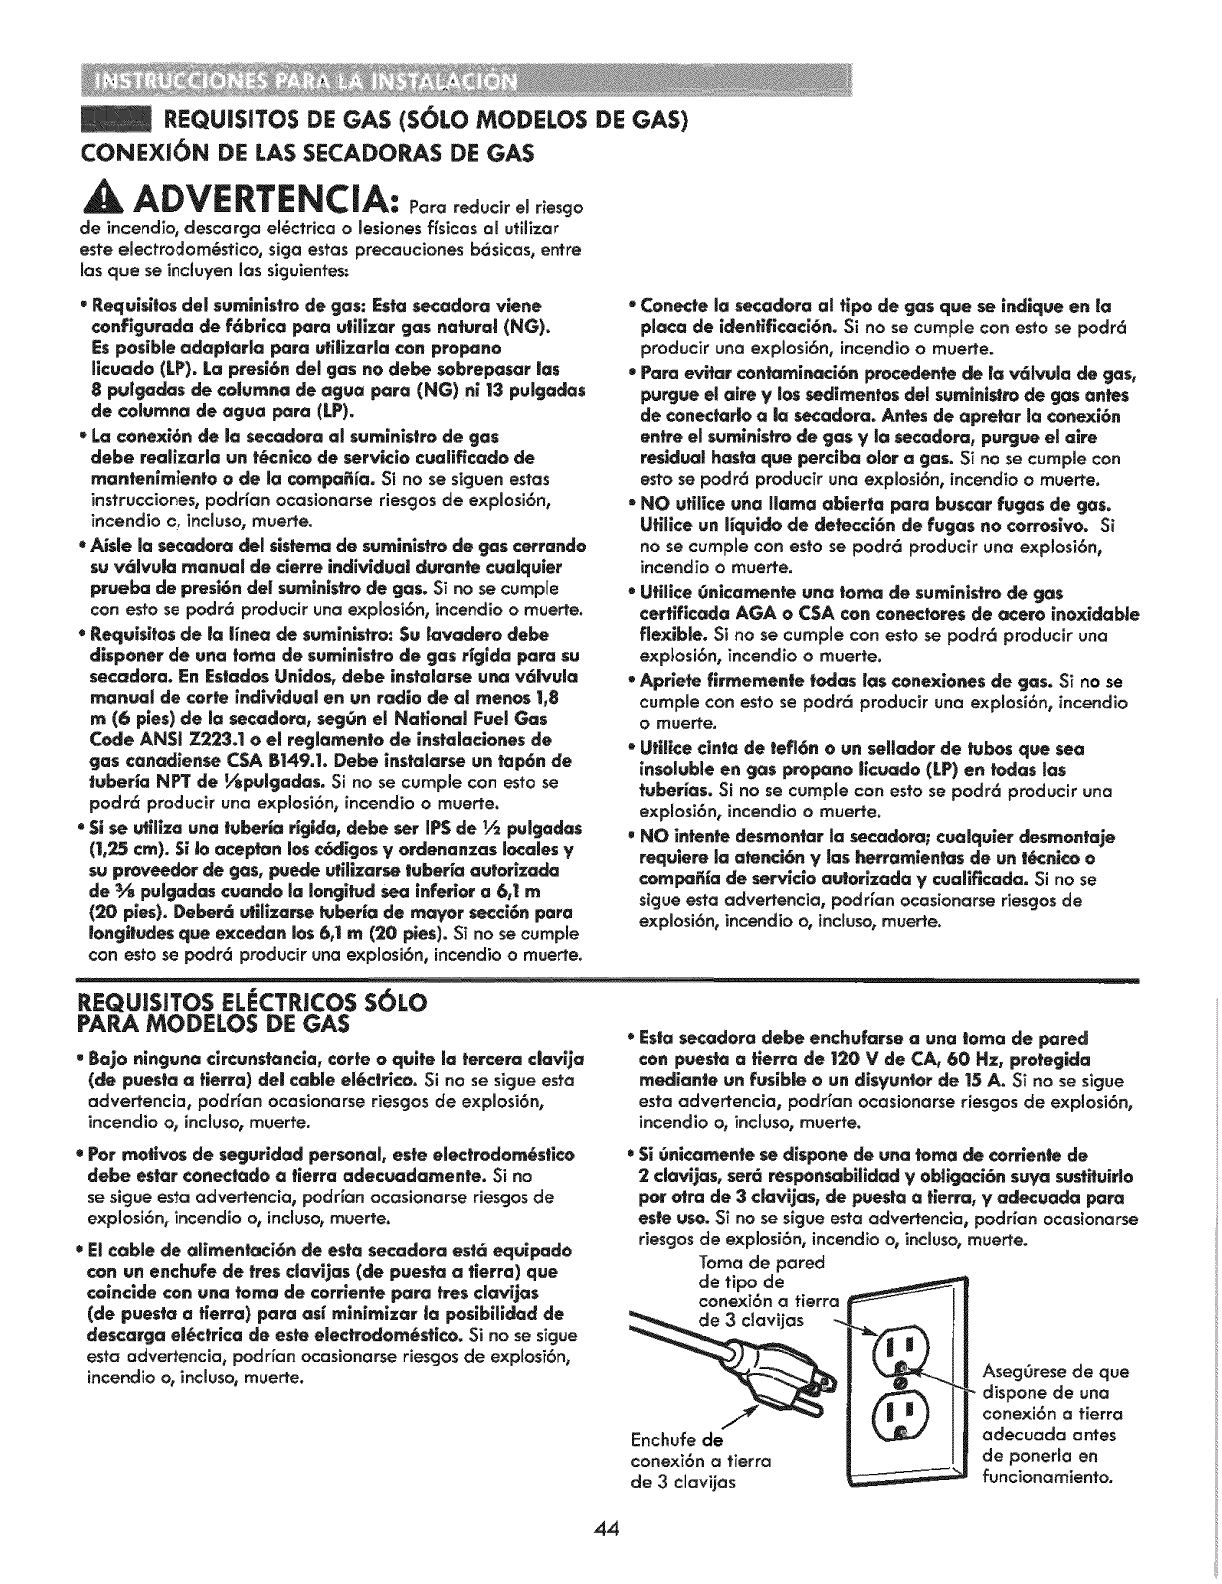
REQUISiTeS DE GAS (S6LO MODELOS DE GAS)
CONEXI6N DE LAS SECADORAS DE GAS
ADVERTENCIA: Par°rodoc rel.e, o
de incendio, descarga el6ctdca o Jesiones ffsicas al utilizar
este electrodom_stico, siga estas precauciones b6sicas, entre
los que se incluyen los siguientes:
•Requlsltos del sumlnlstro de gas: Esta secodora viene
canfigurada de f6brica para utilizar gas natural (NG).
Esposible adaptarla para uffEzarla con prepana
llcuado (LP). La presi6n del gas no debe sobtepasar |as
8pulgadas de ¢alumna de agua para (NG)n113 pulgadas
de ¢oJurnna de ague para (LP).
• La conexi6n de |a secadora al surnlnlstra de gas
debe realizarla un t6cnico de servlclo cualiffcado de
montenlmTento ode la compa_ia. Si no se siguen estas
insfrucciones, podrian ocasionarse riesgos de explosi6n,
]ncendioe, ]neluso,muerfe.
• Ais|e la secadara del sls_ema de suminlstm de gas cerranda
su v61vu|a manual de cierre indivldua| duranfe cua|quler
prueba de presi6n de| sumlnisfro de gas. Si no se cumpie
con esto se podr6 producir una explosi6n, incendio o rnue_e.
•Requisffos de |a |inea de suministro: Su |avadero debe
dlspaner de una tama de suminlsfra de gas Hgida para s°
secadera. En Es|adas Unides, debe |nstalarse una v6ivula
manual de carte indlvidual en un radio de al menos 1,8
m (6 pies) de la secadora, segOn el Natlana| Fuel Gas
Code ANSi Z223.1 o el reglamenta de instalaciones de
gas canadlense CSA B149.|. Debe instalarse un tap6n de
|uberia NP'r de _pulgadas. Si no se cumple con esto se
podr6 producir una explosi6n, incendio o muerte.
•Si _ ut|ffza una |uberia rig|do, debe set IPS de ½ pulgadas
(1,25 cm). S| |o aceptan los c_:Jigos yordenanzas k_ales y
su proveedor de gas, puede utlllzarse luber|a aufarlzada
de 3/_ pu|gadas cuanda la lengifud sea inferior a 6,1 m
{20 pies). Deber6 °tiffza_e tuberia de mayor secci6n pare
|ongltudesque excedan los6,1m (20 pies).SI no se cumple
con esfo se podr6 producir °no explosi6n_ incendio o muerte.
* Conecte la secadora al fipo de gas que se indique en |a
placa de idenfificaci6n. Si no se cumple con esto se podr6
producir una explosi6n, incendio o muerte.
"Para evltar confamlnaci6n procedente de Ia v61wla de gas,
purgue el aire y los sedimentas del su_inlstto de gas antes
de conectar|o a |a secadara. Antes de apretar ia conexi6n
entre el suminlstm de gas yla secadora, purgue el aire
res|dual basra que perclba olaf agas. Si no se cumple con
esto se podr6 producir una explosi6n, incendio o muerte.
"NO ufiffce una ffama ablerfa para buscar fugos de gas.
Ufilice un liquido de defecci6n de fugas no corrosivo. Si
no se cumple con esfo se podr6 producir °no explosi6n,
incendio o muerte.
* Utillce gnicarnente una |area de sumin_stra de gas
cerffficada AGA oCSA con conectores de acero inoxidab|e
flexible. SI no se cumple con esto se podr6 producir una
exptosi6n, incendio o muerte.
"Apriete firmemen|e |arias |as conexlones de gas. S_ no se
cumple con esto se podr6 producir una explosi6n, incendio
omuerte.
"Utliice cinta de tefl6n o un seffador de tubas que sea
insoluble en gas p_pana |icuada (LP) en todas Ins
rubellas. Si no se cumple con esfo se podr6 producir una
explosi6n, incendio o muerte.
.NO intente desmon|ar la secadara; cgalquler desmentaje
requlere la afenci6n y los herramientas de un t6cnico e
¢ompa_|a de servicia autorlzada ycualificada. Si no se
sicjueestaadveri'encia,podrfan ocasionarseriesgosde
explosi6n,incendioo,incluso,muerte.
F
REQU|S|TOS ELECTR_COS S_)LO
PARA MODELOS DE GAS
• Baja ninguna circunstancla, carte o quite _atercera c|avlja
(de puesta a fierra) de| cable e_drico. $i no se sigue esta
advertencia, podHan ocasionarse riesgos de explosi6n,
incendio o, incluso0muerte.
* Esta secadoro debe enchufarse auna |area de pored
con puesfa atlerra de 120 Vde CA, _0 Hz, pretegida
median|e un fusible o un d|syuntor de 15 A. Si no se sigue
esfa advertencia, podr_an oeasionarse riesgos de explosi6n,
incendio o, inclose, muerte.
* Par motlvos de seguridod persona_, esfe e_ec_radam_s|ica
debe esfar conectado a flerra adecuadamente. Si no
se sigue esta advertencia, podr{an ocasionarse riesgos de
explosi6n, incendio o, inc_uso,muerte.
* El cable de affmentaci6n de esfa secadota es|_ equlpado
con un enchufe de |res c|avijas (de puesta a tierra) que
coincide con una toma de carrlente para ires clav|_as
(de puesta a tlerra) para as{ mlnimlzar |a poslbllidad de
des€argo e|@etrica de este electrodam_sfi¢a. Si no se sigue
esfa advertencia_ podr{an ocasionarse riesgos de exp_osf6n_
incendio o, inc_uso,muerte.
* Si 0nicamen|e se dispone de una tema de corrlente de
2 clarions, ser_ responsabllldad y obligaci6n suya sustffuirlo
par _ra de 3 clavijas, de puesta a tlerra, y adecuada pora
es_euse. S_ no se sigue esta advertencia, podHan ocas{onarse
riesgos de explosi6n, incendio o, incluso, muerte.
Toma de pared
de ripe de
conexi6n a tierra
_" Aseg0rese de que
..__ {|_') I|conexi6natierra
"_J_J I _ adecuada antesEnchufe de
conexi6n a tierra _! | de poneria en
de 3 cJavijas _ funcionamiento.
44
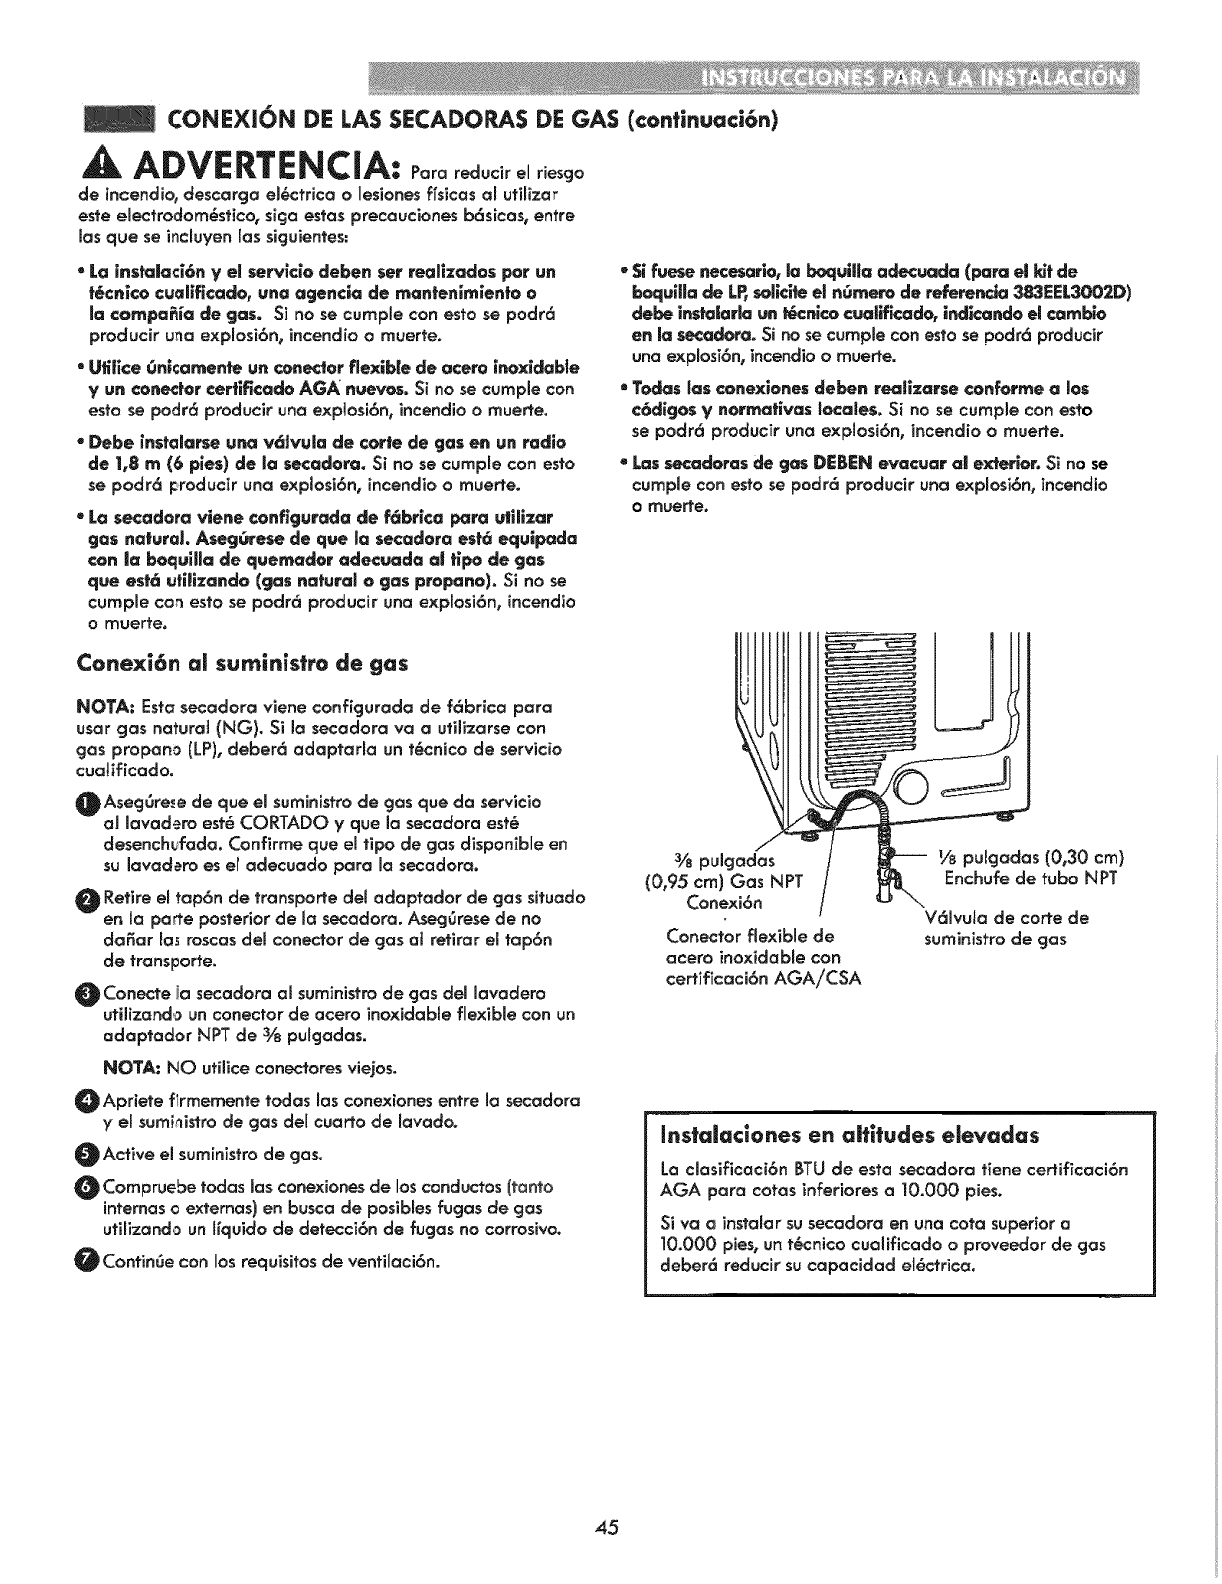
CONEXION DE LAS $ECADORAS DE GAS (continuaci6n)
4k ADVERTENCIA: Para reducir e] riesgo
de incendio, descarga eJ_ctricao lesionesfTsicasaJ utilizer
esteelectrodom6stico,sicjaestas precavc]ones b6sicos, entre
masqueseincluyen[assicjuientes:
• La insta|aci6n y el servicio deben set reaffzados per un
t6cnice cuallficade, una agencia de rnantenimlente o
la compafiia de gas. S] no se cumple con esto se podr6
producir ureaexplosi6n, incendio o muerte.
•Ufilice gnicarnente un conector flexibEe de ocero inoxidable
y un conector certiflcado AGA nuevos. Si no se cumple con
esto se podr6 produc]r uno exp!osi6n, incendio o muerte.
* Debe ;nstalarse una v6Jvula de cor|e de gas on un radio
de 1,8 m (6 pies) de la secadora. Si no se cumple con esto
se podr6 producir una explosi6n, incendio o muerte.
• La secadora viene configurada de f6br|ca pare g||llzar
gas na|ura|. Aseggrese de que la secadora est6 equipade
con |a boquifla de quernador adecuada a| ripe de gas
que est6 utillzando (gas nature| o gas propane). Si no se
cumple eo_ esto se podr6 producir una explosi6n, incendio
omuerte.
. $1fuese necesarie, la boquiHa adecuada (pare e| kit de
boquiHa de LP,soffcffe el ngmero de referenda 383EEL3002D)
debe insta|aHe un _cnico cualificado, |ndlcando el eatable
en la secadora. Si no se cumple con esto se podr6 producir
uno explosT6n,incendio o muerte.
•Todas _as conexienes deben reallzarse conferme a los
c6digos ynermativas locales. Si no se cumple con es_o
se podr6 producTr una explosi6n, incendio o muerte.
• Los secaderas de gas DEBEN evacuar a! exterior. Si no se
curnple con esto se podr_ producir una explosi6n, incendio
0mge_e,
Conexi6n al suministro de gas
NOTA: Esta secadora viene configurada de f6brica pare
user gas natural {NG)o Si Ja secadora va autilizarse con
gas propane (LP), deber6 adaptarlo un t_cnico de servicio
cua_ificado.
OAsecj6rese de que el suministro de gas que da servicio
aJ lavadero est_ CORTADO yque la secadora est_
desench_fada. Confirme que el ripe de gas disponible en
su lavadero es el adecuado pare la secadora.
Retire el tap6n de transporte del adaptador de gas situado
en la pone posterior de la secadora. Aseg_rese de no
da_ar los roscas demconector de gas al retirar el tap6n
de transporte.
_Conecte ia secadora al suministrode gas del lavadero
utiJizar_d_ un conector de acero inoxidable flexible con un
adaptodor NPT de 3/8 pulgadas.
NOTA: NO utilice conectores viejos.
Apriete firmernente redes los conexiones entre la secadora
y eJsurni_istro de gas del cuar?o de lavadoo
_Active el suministro de gas.
Compruebe redes |as conexiones de loscenductos Itanto
internes oexternas) en busca de posibles fugas de gas
utilizando un ffquido de detecci6n de fugas no corrosive.
ContinUe con los requisites de ventiJaci6n.
3/8pulcjados
(0,95 cm) Gas NPT
Cone×i6n
Conector flexible de
acero inoxidable con
certificaci6n AGAiCSA
Yspulgadas (0,30 cm)
Enchufe de tube NPT
Vdlvula de corte de
surninistrode gas
ins_a_aclones en affltudes e_evadas
La closificaci6n BTU de esta secadora tiene certificaci6n
AGA pare cotes inferiores o 10.000 pies.
Siva _ instalar su secadora en una cote superior a
10.000 pies, vn t@cnico cuolificado o proveedor de gas
deber6 reducir su capacidad eJdctrico.
45

REQUISITes ELECTRICOS
CONEXION DE LAS SECADORAS ELECTRICAS
ADVERTENCIA: Pareoy0daro
prevenir incendios, descargas el6ctricas, mesionesgraves o
incluso la m,Jerte, el cable°do y la puesta a tierra deben
cumpLir ia edicT6n m6s reciente del National Electrical Code_
ANSIiNFPA 70 ytodas masnOrmafivas locales de aplicaci6n.
P6ngase en contacto con un emectricistacualificado par°
cornprobar el cable°do ylos fusib_esde su viviend° par°
asegurarse de que dispone de mapotencia el_ctrica adecuada
par° utifizar la see°dora.
ADVERTENCIA: Papa riesgo
de incendio, descarga electric° o lesiones fisicas al utiIizar
este electro_om_stico, siga estas precauciones b6sicas, entre
las que se i_cluyen massiguientes:
= Cuelquler instalaci6n en una vlvlenda pre_bHcada o m6vll
debe cumpllr con |as direcfrices del Manufactured Home
Cans|ruction and Safety Standards, fitulo 24 CFR, secci6n
3280 6con el est6ndar CAN/CSA Z240 MH y los c6dlgos y
erdenanzas locales.
* Es necesario una €onexi6n tetrafilar pare las instal°clones
realizada$ en todas las vlviendas m6viles y prefabricades,
asi coma _oda nueva construcci6n apartir del 1 de enero
de 1996. S] no se cumple con esto se podr6 producir uno
exp!osi6n, incendio o rnuerte.
e' i _ ' '
I_quis'r_os _ _para _elosel_i_
ADVERTENCIA: Porereducirriesga
de incendio_ descarga electric° o _esiones ffsicas al utilizar
este etectrodom_stico, siga estas precauciones b6sicas, entre
_asque se incluyen las siguientes:
. Esta secadera debe conecttarse a un slsfema de cable°do
permanence me|_ffco con conexi_n atierra ose debe
tender un conductor pare la conexi6n a tierra del equipo
con los conducfores del circui|o y conectado al fermlnal de
conexi6n atlerra del equlpe e ai conductor de suministra
de la secadora. Si no se cumple con esto se podr6 producir
un° explosi6n, incendio o muerte.
• Lo secadora d_spone de un bloque de |erminoles p_opia que
debe cenec|erse a un circuito manof6slco independlente
de 240 V de CA V 60 Hz, can fusible de 30 A. El circuito
debe disponer de fusib_es en °robes ex_remas de la ffnea.
EL SERVICIO ELECTRiCO PARA LA SECADORA DEBE
SER DEL M_,XIMO VOLT/LIE NOMINAL INDICADO EN
LA PLACA DE ESPECIFICACIONES. NO CONECTE LA
SECADORA A UN CiRCUITO DE 110, 115 6120 VOLTIOS.
Si no se siguen estas instrucciones, podHan ocasionarse
riesgos de explosi6n, incendio o, induso, muerte.
* St el ramal de| clrcuffo a la secadore ffene una Iongitud
igual oinferior a 4,5 m {15 pies), vffffce el cable AWG
n__ 10 con c_asiflcaci6n UL (Underwriters Laboratories)
(_Io cable de cobre) o el que requleran _as normativas
locales. Si super° _os 4,50 m (15 pies), utilice el cable AWG
n, _ 8 con claslflcaci_n UL (s_lo cable de cobre) o e_que
requieran _as normativas locales. Permffa la suflclente
holgura en el cab|earle par° que la secadera pueda
set desplazada de su ubicaci6n habitua| cuando sea
necesaria. Si no se cumple con esto se podr6 producir una
expiosi6n, _ncendio o muerte.
* La cenexi6n del cable de alimen_ci6n (cable flexible
de cenexi6n) entre ia tom° de pared y el bloque de
termlnales de la secadora NO SE INCLUYE con |a unidad.
El ffpo de cable flexible de cenexi6n y su calibre deben
cumplir las nermatlvas Ioceles y las instruccianes que
se proporcionan en las p6glnas slgulenteso Si no se
siguen estas instrucciones, podr_an ocasionarse r_esgos de
exp_osi6n, incendio o, incluso, muerte.
• Es necesarie dispener de una conexi6n tetrafllar en
ted° nueva censtrucci6n aparfir del 1 de enero de 1996.
Debe u|iffzarse una conexi_n te|rafi_ar aili donde las
norma|ivas _ocales no perrnffon la pues|a a tlerra a tray,s
del cable neut.. Si no se cumple est° °dverfencia, se
podr6 producir una explosi6n, incendio o rnuerte.
46
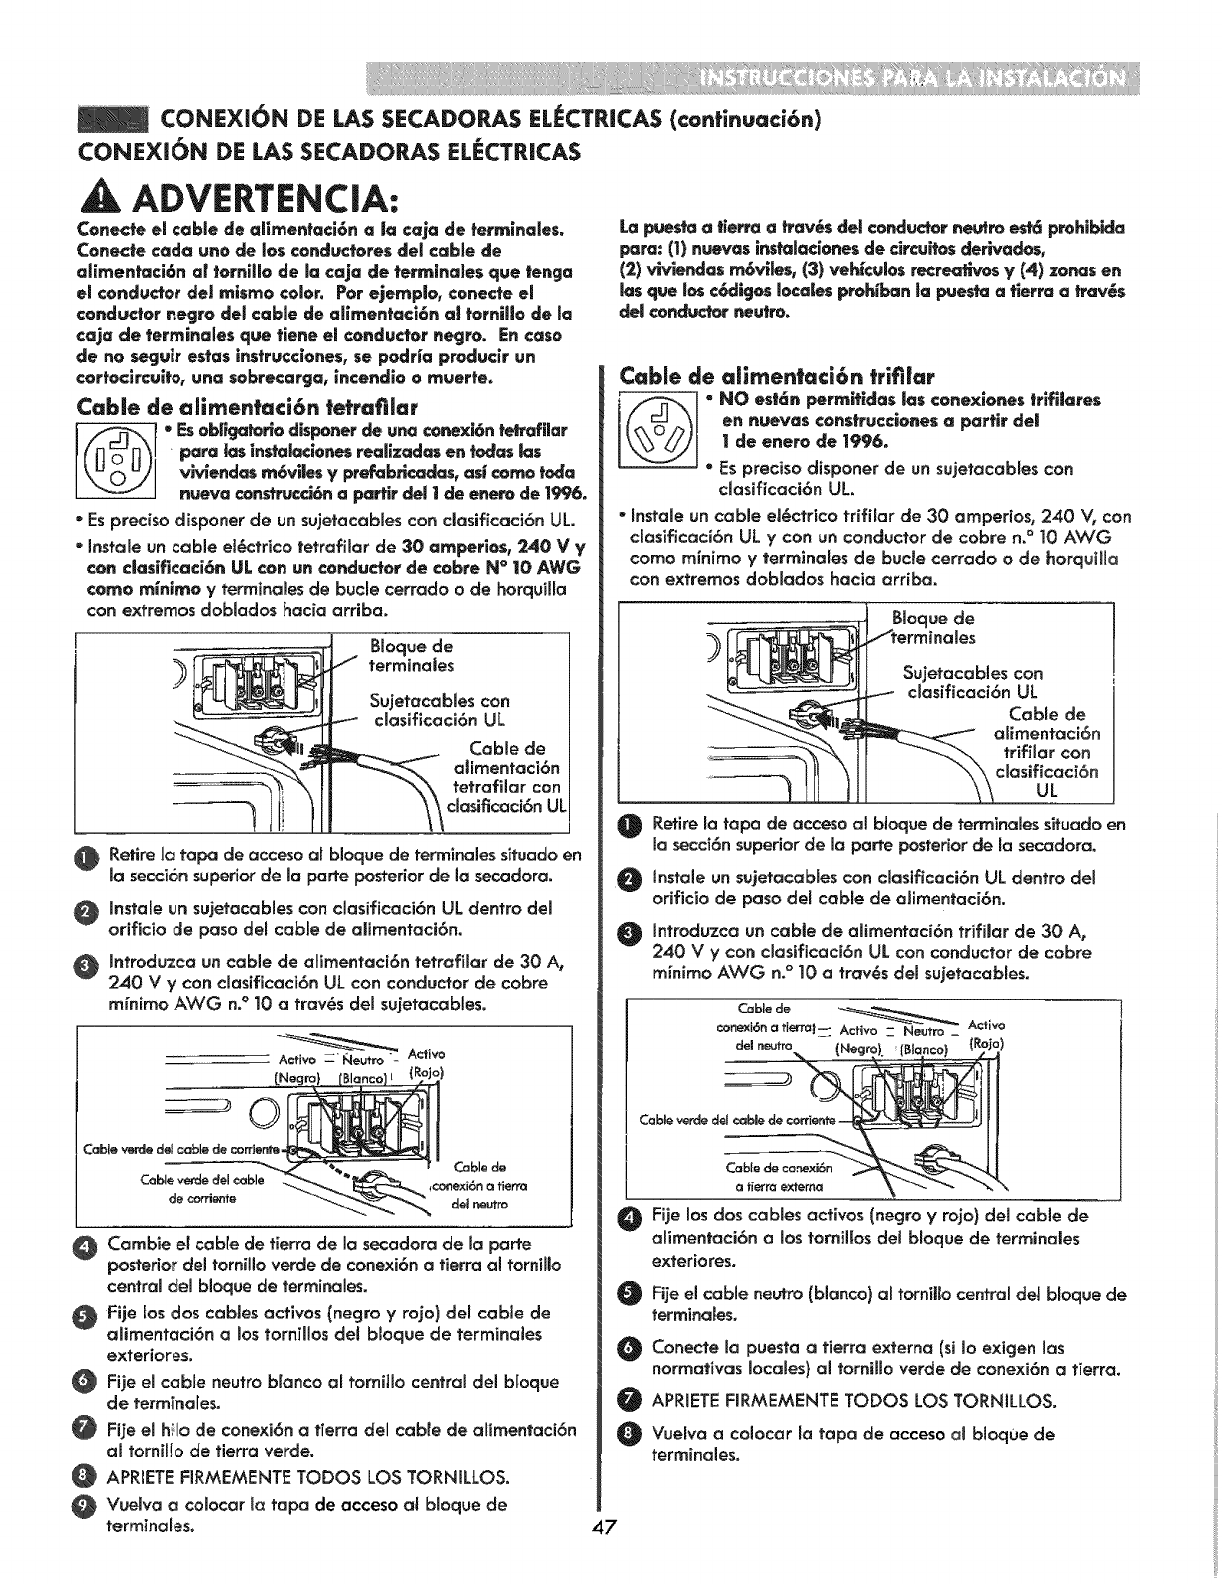
CONEXI6N DE LAS SECADORAS EL_CTRICAS (conffnuaci6n)
CONEXI6N DE LAS SECADORAS ELECTRICAS
?BIoque de
terminales
Sujetacables con
clasificoci6n UL
Cable de
alirnentaci6n
tetraflar con
clasificaci6n UL
Retire la tape de acceso al bloque de term|hales situado en
la secci6n superior de la porte posterior de la secadora.
instale un sujetacables con clasificaci6n UL dentro del
orificio de paso del cable de alimentaci6n.
Introdu:_ca un cable de alimentaci6n tetrafilar de 30 A,
240 V y con clasificaci6n UL con conductor de cobre
mfnimo AWG n.° 10 atray,s del sujetacables.
Cambie el cable de tierra de la secadora de la parte
posterior del torniHo verde de conexi6n atierra al tornillo
central c_elbloque de term|hales.
@ Fije los dos cables act|yes (negro yrojo) del cable de
alimentaci6n a los tornillos del bloque de terminales
exteriores.
OFije el cable neutro b[anco al tornitlo central del bloque
de terrninales.
Fije el hilo de conexi6n a fierra del cable de affmentaci6n
al tornil!o de tierra verde.
APRIETE RRMEMENTE TODOS LOS TORNILLOS.
Vuelva a colocar la tape de acceso al bloque de
terminalgs.
La puesta a |ien'a atray,s del conductor neu_m es_ prohibida
pare: (1) nueves instalecienes de circuffa$ derlvedes_
(2) vlvlendas m6viles_ (3) vehiculos recrea'_vos y H) zones en
los que Ic_ c6diges leca|es prob_an ia pues_ a Sierra a trav6$
de| conduc_r neu|ro.
Cable de alimentaci6n trifilar
"Oes|6n permiffdes ias conexiones |tit|lares
en nuevas construcclones a perfir de|
| de enere de ]996.
"Es precise disponer de un sujetacables con
clasificaci6n UL
• Instale un cable ei_ctrico trifilar de 30 arnperios, 240 % con
clasificaci6n UL ycon un conductor de cobra n.° 10 AWG
carrie minirno yterrninales de bude cerrado o de horquilma
con extremes doblados hacia arriba.
?Bloque de
Sujetacebles con
clasificaci6n UL
Cable de
_ alimentaci6n
trifilar con
clasificaci6n
ub
Retire la tape de acceso ol bloque de terrninales situado en
la secci6n superior de la perte posterior de la secadora.
Instale un sujetacabies con clasificaci6n UL dentro del
orificio de paso del cable de aiimentaci6n.
Introduzca un cabte de alirnentaci6n trifilar de 30 A,
240 V ycon clasificaci6n UL con conductor de cobra
minima AWG n.° 10 a trav6s del sujetacables.
Cable de cene×i6n
Q _[e_r_ ex_em_
Fije los dos cables act|yes (negro yrojo) del cable de
alimentaci6n a los families del bloque de terminales
exteriores.
Fije el cable negro {blanco) al torn|lie central del bloque de
terminales.
Conecte la puesta a tierra externa (si Io exigen los
norrnativas locales) al torn|lie verde de conexi6n a tierra.
APRIETE FIRMEMENTE TODOS LOS TORNILLOS.
Vuelva a colocar la tape de acceso al bloqOe de
terminales.
47
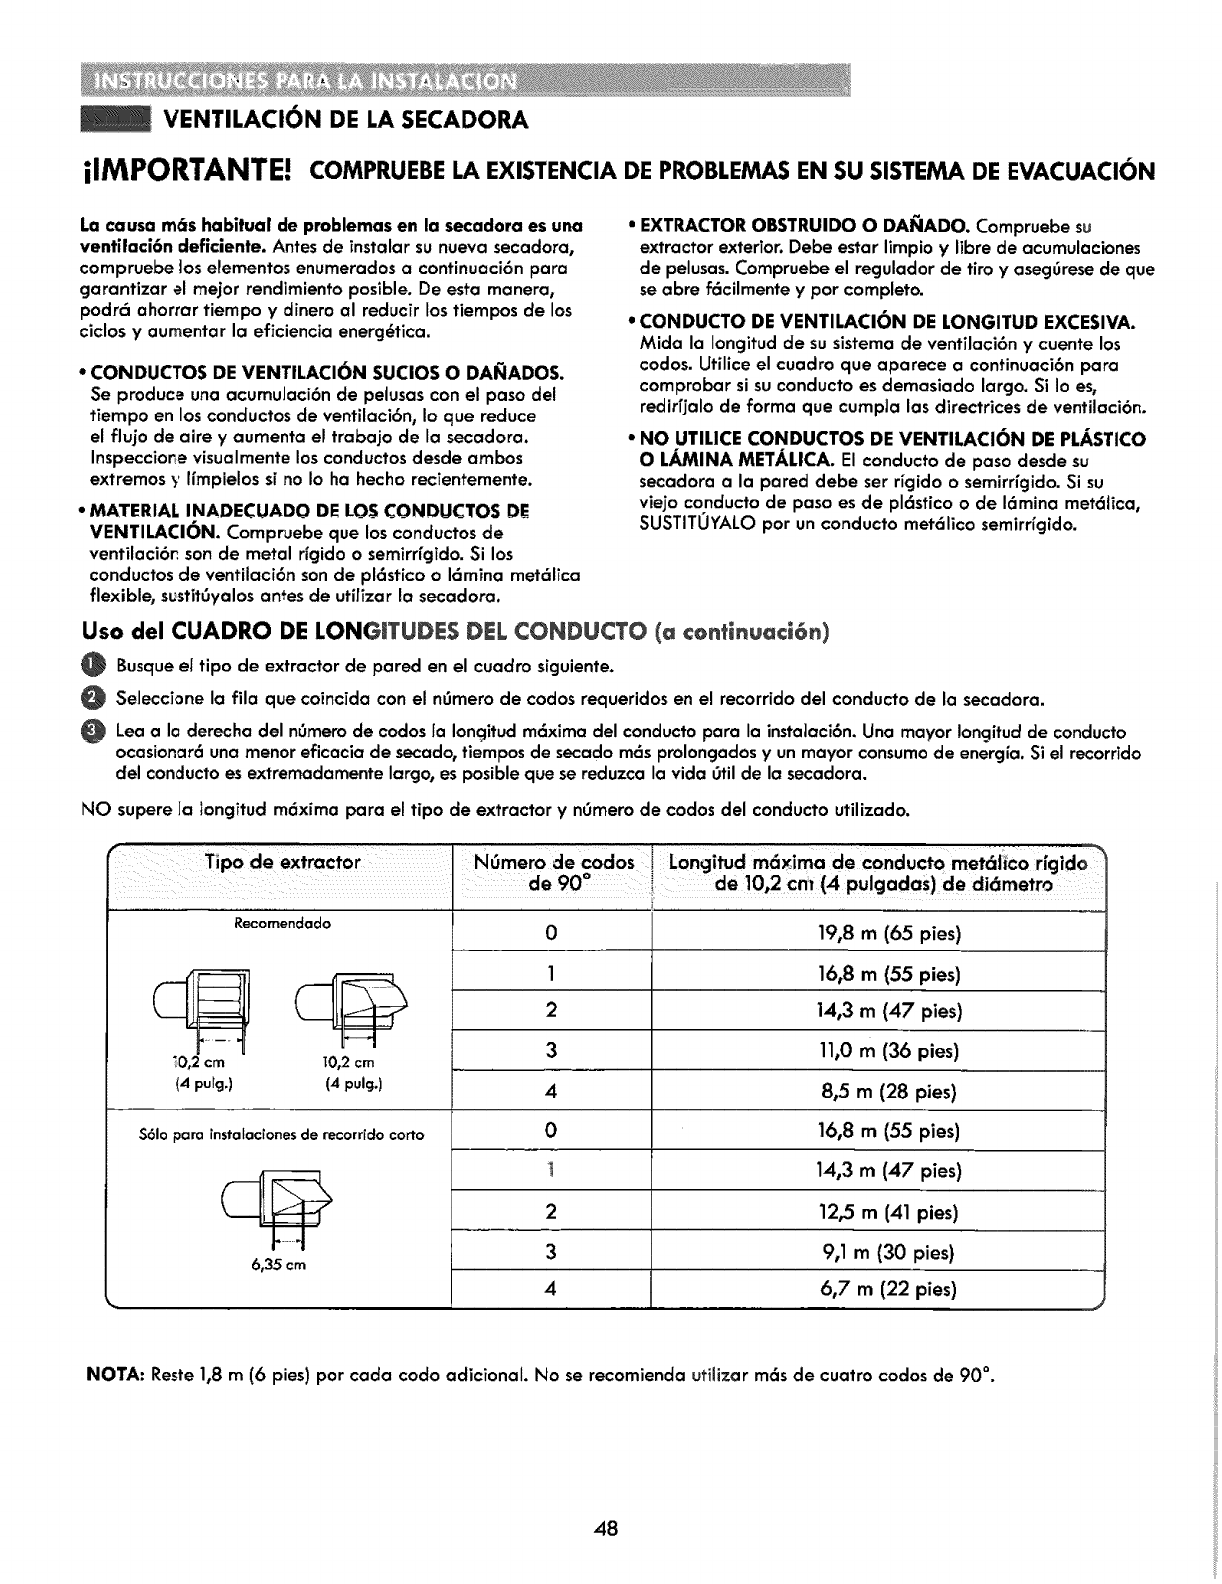
VENTILACION DE LA SECADORA
ilMPORTANTEJ COMPRUEBE LA EXISTENCIA DE PROBLEMAS EN SU SISTEMA DE EVACUACION
La causa m6s habitual de problemas en la secadora es una
ventilaci6n deficiente. Antes de instalar su nueva secadora,
compruebe los elementos enumerados a continuaci6n para
garantizar el mejor rendimiento posible. De esfa manera,
podr6 ahorrar tiempo y dinero al reducir los tiempos de los
ciclos yaumentar la eficiencia energ6tica.
* CONDUCTOS DE VENTILACION SUCIOS O DAI_IADOS.
Se produce una acumulaci6n de pelusas con el paso del
tiempo en los conductos de ventilaci6n, Io que reduce
el flujo de aire y aumenta el trabajo de la secadora.
Inspeccione visualmente los conductos desde ambos
extremos y ffmpielos si no Io ha hecho recTenfemente.
*MATERIAL INADECUADO DE LOS CONDUCTOS DE
VENTILACI(_)N. Compruebe que los conductos de
ventilaci6r, son de metal Hgido o semirHgTdo.Si los
conductos de ventilaci6n son de pl6stico o 16mina rnet61Tca
flexible, sustit6yalos antes de utifTzar la secadora.
•EXTRACTOR OBSTRUIDO O DAI_iADO. Compruebe su
extractor exterior. Debe estar limpio y Iibre de acumulaciones
de pelusas. Compruebe el regulador de tiro y aseg6rese de que
se abre f_cilmente ypor completo.
• CONDUCTO DE VENTILATION DE LONGITUD EXCESIVA.
Mida la iongitud de su sistema de ventilaci6n y cuente los
codos. Utilice el cuadro que aparece a continuaci6n para
comprobar si su conducto es demasiado largo. Si Io ess
redirrjalo de forma que cumpla los directrices de ventilaci6n.
*NO UTILICE CONDUCTOS DE VENTILACION DE PLASTICO
O L_INA METALICA. El conducto de paso desde su
secadora a la pared debe set rigido o semirHgido. Si su
viejo conducto de paso es de pl6stico o de 16mina rnet61ica,
SUSTITOYALO por un conducto met61ico semirHgido.
Uso del CUADRO DE LONGITUDES DEL ¢ONDUCTO (a ¢ontlnuaci6n)
Busque el tipo de extractor de pared en el cuadro siguiente.
Seleccione la ilia que coincida con el n0mero de codos requeridos en e! recorrido del conducto de la secadora.
Lea a Io derecha del n0mero de codos Ia Ionqitud m6xirna del conducto para la instataci6n. Una mayor !ongitud de conducto
ocasionar6 una menor eficacia de secado, tiempos de secado mcls prolongados y un mayor consumo de energia. Si el recorrido
ctel conducto es extremadamente largo, es posible que se reduzca la vida Otilde la secadora.
NO supere ]a tongitud m6xima para el tipo de extractor y n_mero de codos del conducto utilizado.
ri_=
TJpo de extractor Numero de codos Long_tud maxima de conducto met_hco rnq,do
o
de 90 de 10,2 cm (4 pulcjadas) de didmetro
Recomendado
_0,2cm T0,2cm
m (65 pies)
(4 pulg.) (4 pulg.)
$61o para instalaciones de necorrido corto
6,35 cm
0 19,8
1 16,8 m (55 pies)
2 1,4,3 m (47 pies)
3 11,0 m (36 pies)
8,5 m (28 pies)
16,8 m (55 pies)
14,3 m (47 pies)
12,5 m (41 pies)
9,1 m (30 pies)
6,7 m (22 pies)
4
0
2
3
4
NOTA: Reste 1,8 m (6 pies) por cada codo adicionat. No se recomienda utilizar m6s de cuatro codos de 90 °.
48
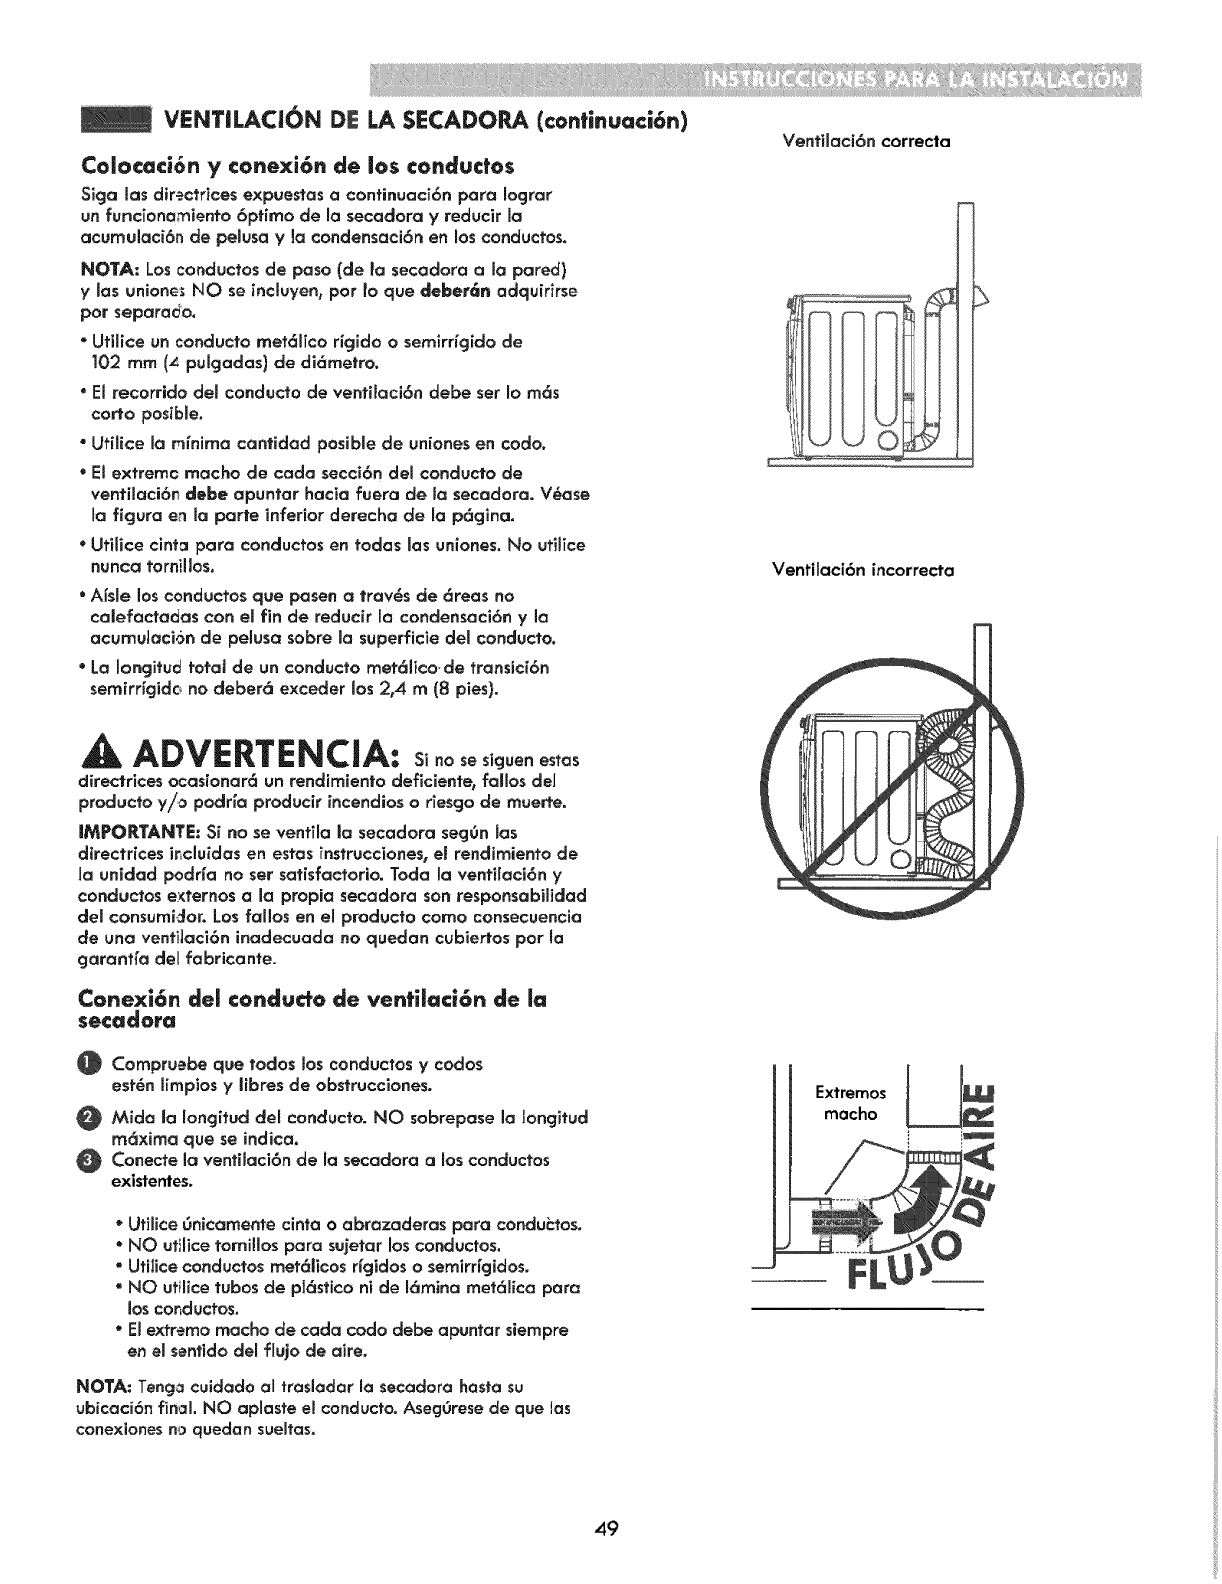
VENTJLACJ6N DE LA SECADORA (confinuaci6n)
Coiocaci6n y conexi6n de los €onductos
Siga las directrices expues?as a continuaci6n para Iocjrar
un funcionamiento 6primo de la secadora y reducir ma
acurnulaci6n de pelusa yla condensaci6n en mosconductoso
NOTA: Los conductos de paso (de la secadora ama pored}
y Jas unione_ NO se incluyen, par fo que deberc_n adquirirse
par separado.
-Utilice un conducto met6m[co r_gido o sernirr_gido de
102 mm (z: pulgadas) de di6metro.
• El recorrido del conducto de ventilaci6n debe set Io m6s
corto posible.
"Utilice la rnfnima can_idad posible de uniones en coda.
•El extrernc macho de cada secci6n demconducto de
ventiiaci6n debe apuntar hacia fuera de la secadora. V_ase
la ficjura e_ la parte inferior derecha de la p6gina.
"Utilice cinta para conductos en todas las uniones. No utilice
nunca tomilJos.
•Afsle los conductos que pasen atrav_s de 6reas no
calefactadas con el fin de reducir macondensaci6n yla
acumu_aci6n de pelusa sabre la superficie del conducto.
*La Iongituc_total de un conducto met61ico de transici6n
semirrigidcno deber6 exceder los 2,4 m (8 pies}.
F
Ventilaci6n correcta
Ventilaci6n incorrecta
ADVERTENCIA: noses 00enes,os
direc_rices ocasionar6 un rendimiento deficiente, fallos del
producto y/o podr[a producir incendios o riesgo de muerte.
|MPORTANTE: Si no se ventila la secadora secj0n las
directrices incluidas en estas instrucciones, el rendimiento de
la unidad podrfa no ser satisfactorio. Toda la ventilaci6n y
conductos externos ala propia secadora son responsabiiidad
del consumidor. Los fallos en el producto corno consecuencia
de una ventilaci6n inadecuada no quedan cubiertos par la
garantfa deJfabricante.
Conexi6n del conducfo de ventilaci6n de la
secadora
Compruebe que todos Josconductos y codas
est_n I[mpios y libres de obstrucciones.
Mida la longitud del conductoo NO sobrepase la longitud
m6xima que se indica.
Conecte la ventilaci6n de _a secadora alos conductos
existentes.
"Utimice 6nicamen?e cinta o abrazaderas para condu_:tos.
*NO utilice tornillos para sujetar los conductos.
"Uti]ice conductos met61icos rfgidos o semirr[gidos.
"NO ut_lice?ubosde p]6stico ni de 16mina met61ica para
los conductos.
" El extremo macho de cada coda debe apuntar siempre
en el sentido del flujo de aire.
NOTA: Tenga cuidada al trasladar la secadora hasta su
ub[caci6n final. NO aplaste e! conducto. Aseg0rese de que las
conexiones no quedan sueltas.
Extremos
macho
49
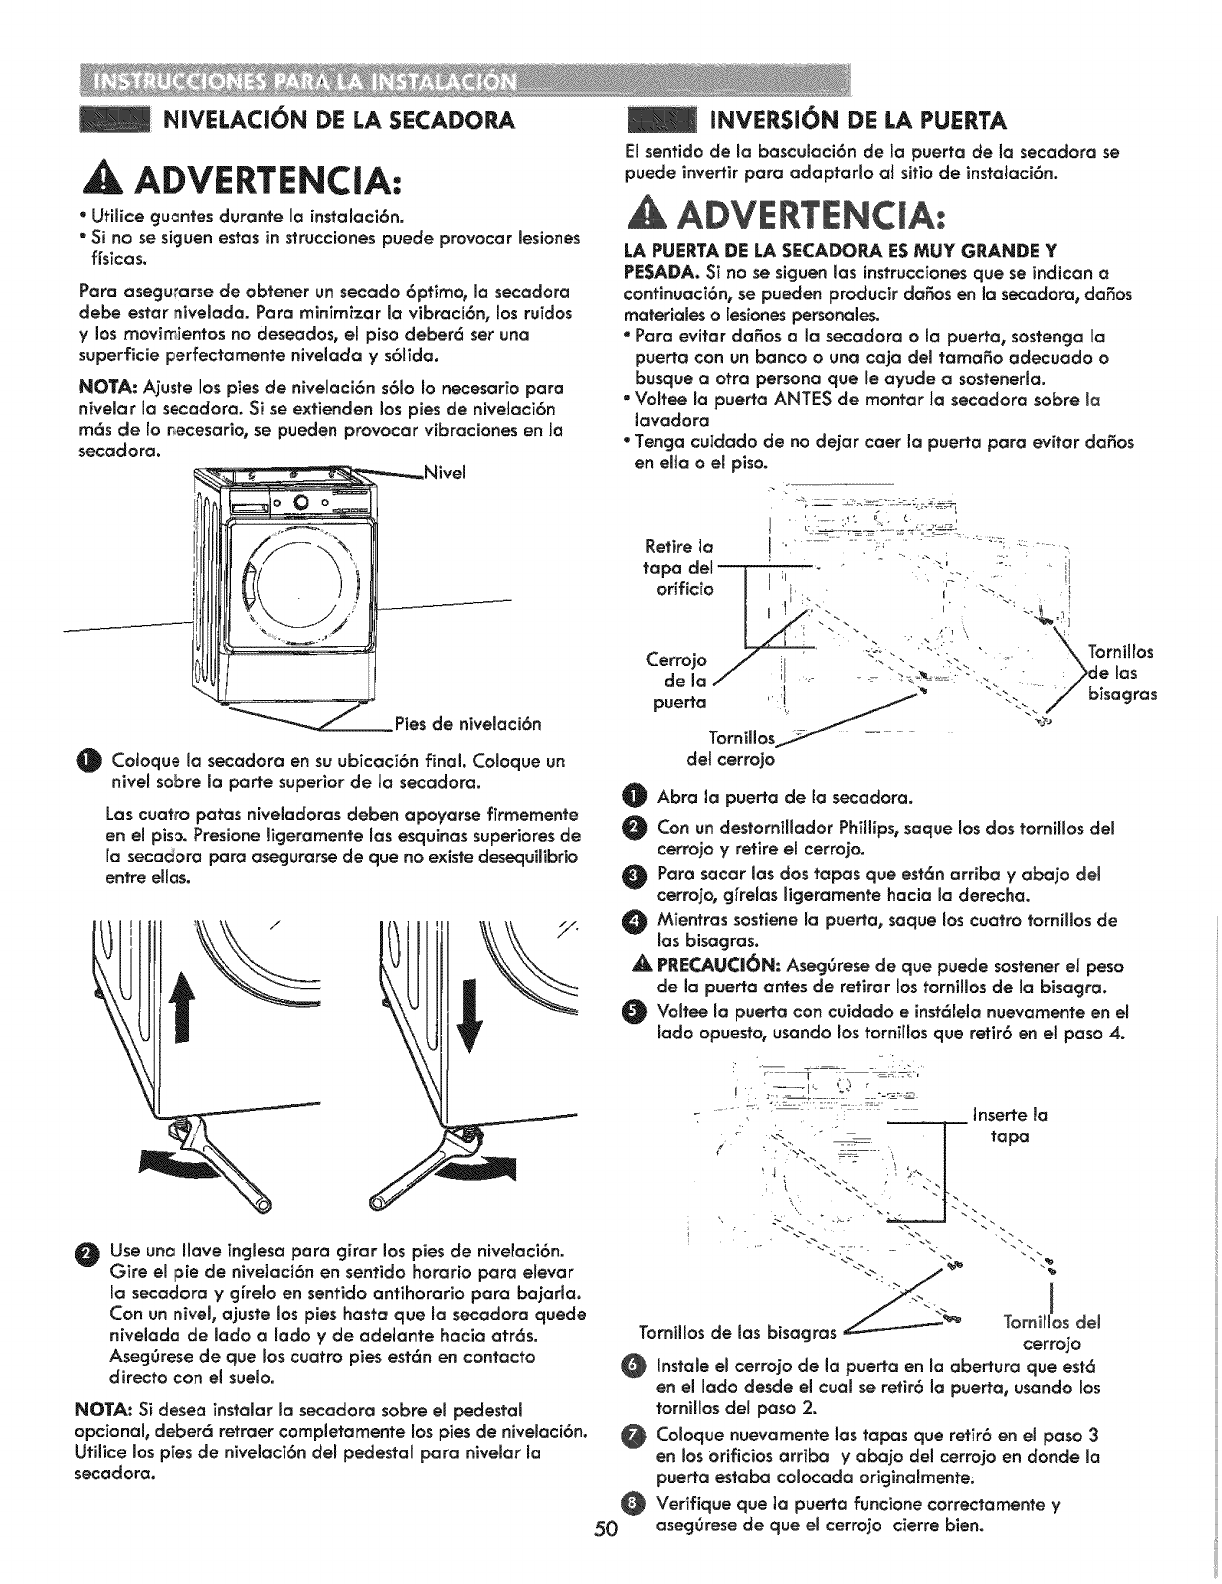
N|VELACION DE LA SECADOR_
AADVERTENCIA:
•Utilice guantes durante la instalaci6n.
"Si no se siguen es?as in s?rucciones puede provocar lesiones
fisicas.
Para asegurarse de obtener un secado 6primo, la secadora
debe estar nivelada. Para minTmizar la vibraci6n, 1asruidos
ylos movimientos no cteseados, empiso deber6 set una
superficie perfectamente nivelada ys6Wda.
NOTA: Ajuste los pies de nivelaci6n s61o Io necesario para
nivelar la secadora. Si se extienden los pies de nivetaci6n
m6s de Io necesario, se pueden provocar vibraciones en Ja
secadora.
-=-=.=_Nivel
_Pies de nivelaci6n
O CoIoque la secadora en su ubTcacT6n final. Coloque un
nivel sabre la parte superior de _a secadora.
Las cuatro paras niveladoras deben apoyarse firmemente
en el piss. Presione ligeramente las esquinas superiores de
[a secadora para asegurarse de que no existe desequilibrio
entre elias.
Use uno ffave Tnglesapara girar los pies de nive_aci6n.
Gire el pie de nivelaci6n en sentido horatio para eJevar
Ja secadora y gke!o en sentido antihorario para bajarla.
Con un nivel, ajuste los pies basra que la secadora quede
nivelada de lado a lado y de adelante hacia atr6s.
Aseg0rese de que Jos ouatro pies est6n en contocto
directo con el suelo.
NOTA: Si desea instalar la secadora sabre el pedestal
opcionab deber6 retraer completamente los pies de niveJaci6n.
Utilice los pies de nivelaci6n de_ pedestal para nivelar la
seoadora.
iNVERSI6N DE LA PUERTA
EI senfido de la basouiaoi6n de la puerta de la secadora se
puede invertir para adaptaHo at sitio de instaiaci6n.
ADVERTENCIA:
LA PUERTA DE LA SECADO_ ES MUY GRANDE Y
PESADA. Si no se siguen las instruociones que se indican a
confinuaci6n, se pueden produoir da_os en la secadora, da_os
materiales o [esionespersonales.
"Para evitar da_os a la secadora o la puerta, sostencja la
puerta con un banco o una caja del ramada adecuado o
busque a otra persona que le ayude a sosteneHa.
- Voffee la puerta ANTES de mantar la secadara sabre la
lavadora
*Tenga ouidado de no dejar caer la puerta para evitar da_os
en ella o el piso.
Retire la I "_ ......... _-:.... L.......,
orifioio I i, .' i"_" \_. I
I/_L'r N
Lerrojo /i_ .- - -- :° -,
puerta ...! _ "\,. ibmagras
Tornillos _i_ "_ .... ">
det cerrojo
Abra la puerta de _a secadora°
@
Con un destornillador Phillips, saque los dos tomillos del
cerrojo yretire el cerrojo.
Para sacar las dos tapas que est6n arriba yabajo de_
cerrojo, g_relas iigeramente hacia la dereoha.
MTentras sostiene la puerta, saque los cuatro tornillos de
las bisagras.
PRECAUC|6N: Aseg6rese de que puede sostener el peso
de ia puerta antes de retirar los tornillos de la bisacjra.
Voltee la puerta con cuidado e inst61ela nuevamente en el
lade opuesto0 usando los torn[ffos que retir6 en el paso 4.
<-\. _ ".,%
__'_ TorniHLsdel
Tornillos de las bisagras oerro_o
Instale el cerrojo de la puerta en la abertura que est6
en el lado desde el oual se retir6 la puerta, usando los
tornillos del paso 2.
Co_oque nuevamente las tapas que refit6 en el paso 3
en los orificios arriba yabajo del cerrojo en dande la
puerta estaba colocada originalmente.
@Verifique que ta puerto funcione correctamente y
50 aseg_rese de que el cerro_o cierre bien.
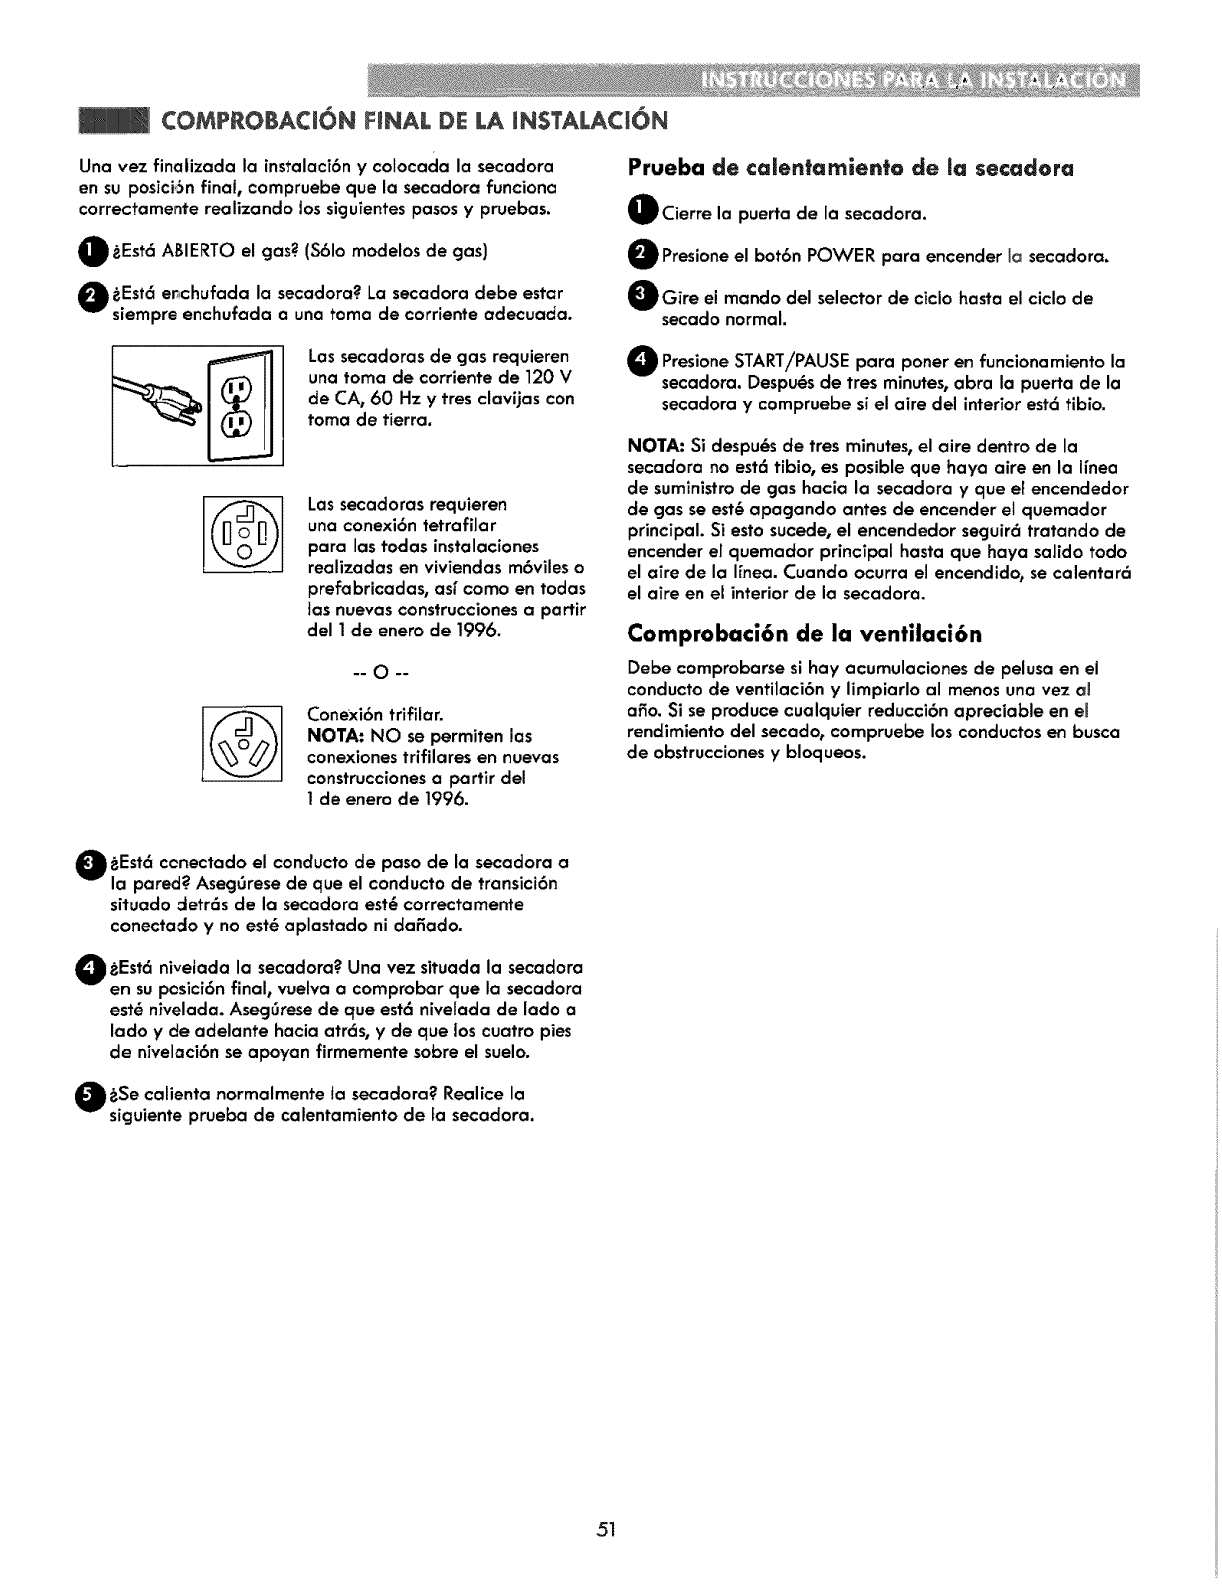
r
Una vez finalizada la ins_'alaci6n ycolocada la secadora
en su posici6n final_ compruebe clue la secadora funciono
correctamente realizando los siguientes pasos y pruebas.
BEst6 ABIERTO el modelos de
gas2.(S61o gas)
_Est6 erchufada la secadora? La secadora debe estor
siempre enchufada a una toma de corriente adecuada.
COMPROBACJON FINAL DE LA INS?ALACt6N
Prueba de camentamiento de la secadora
Cierre la puerta de la secadora.
Presione el bot6n POWER para encender la secadora.
Gire el mando del selector de cicio hasta el ciclo de
secado normal.
Las secadoras de gas requieren
una toma de corriente de 120 V
de CA, 60 Hz ytres clavijas con
toma de tierra.
Las secadoras requieren
una conexi6n tetrafilar
para las todas instalaciones
realizadas en viviendas m6viles o
prefabricadas, as_como en todas
tas nuevas construcciones a partir
del 1 de enero de !996.
-" O--
Conexi6n trifilar.
NOTA: NO se permiten las
conexiones trifilares en nuevas
construcciones a partir del
1 de enero de 1996.
Presione START/PAUSE para poner en funcionamiento la
secadora. Despu_s de tres minutes, abra la puerta de la
secadora ycompruebe si el aire del interior est6 tibio.
NOTA: Si despu_s de tres minutes, el aire dentro de la
secadora no est6 tibio, es posible que haya aire en Io Ifnea
de suministro de gas hacia la secadora y que el encendedor
de gas se est_ apagando antes de encender el quemador
principal. Si esto sucede, el encendedor seguir6 tratando de
encender el quemador principal hasta que haya salido todo
el aim de la I[nea. Cuando ocurra el encendido, se calentar6
el aire en el interior de la secadora.
Comprobaci6n de la ventilaci6n
Debe comprobarse si hay acumulaciones de pelusa en el
conducto de ventilaci6n y limpiarlo al menos una vez aJ
a_o. Si se produce cualquier reducci6n apreciable en el
rendimiento del secado, compruebe los conductos en busca
de obstrucciones y bloqueos.
@_Est6 ccnectado el conducto de de la secadora a
paso
Io pared? AsegOrese de que el conducto de tronsici6n
situado detr6s de la secadora est6 correctomente
conectado y no est_ aplastado ni dafiado.
_Est6 nivetada la secadora? Una vez situada la secadora
en su pcsici6n final, vuelva a comprobor que la secadora
est_ nfvelada. Aseggrese de que est6 nivelada de lado a
lado y de adelante hacia atr6s, yde que los cuatro pies
de nivelaci6n se apoyan firmemente sobre el suelo.
_Se calienta normalmente la secadora? Realice la
siguiente prueba de calentamiento de Fasecadora.
51
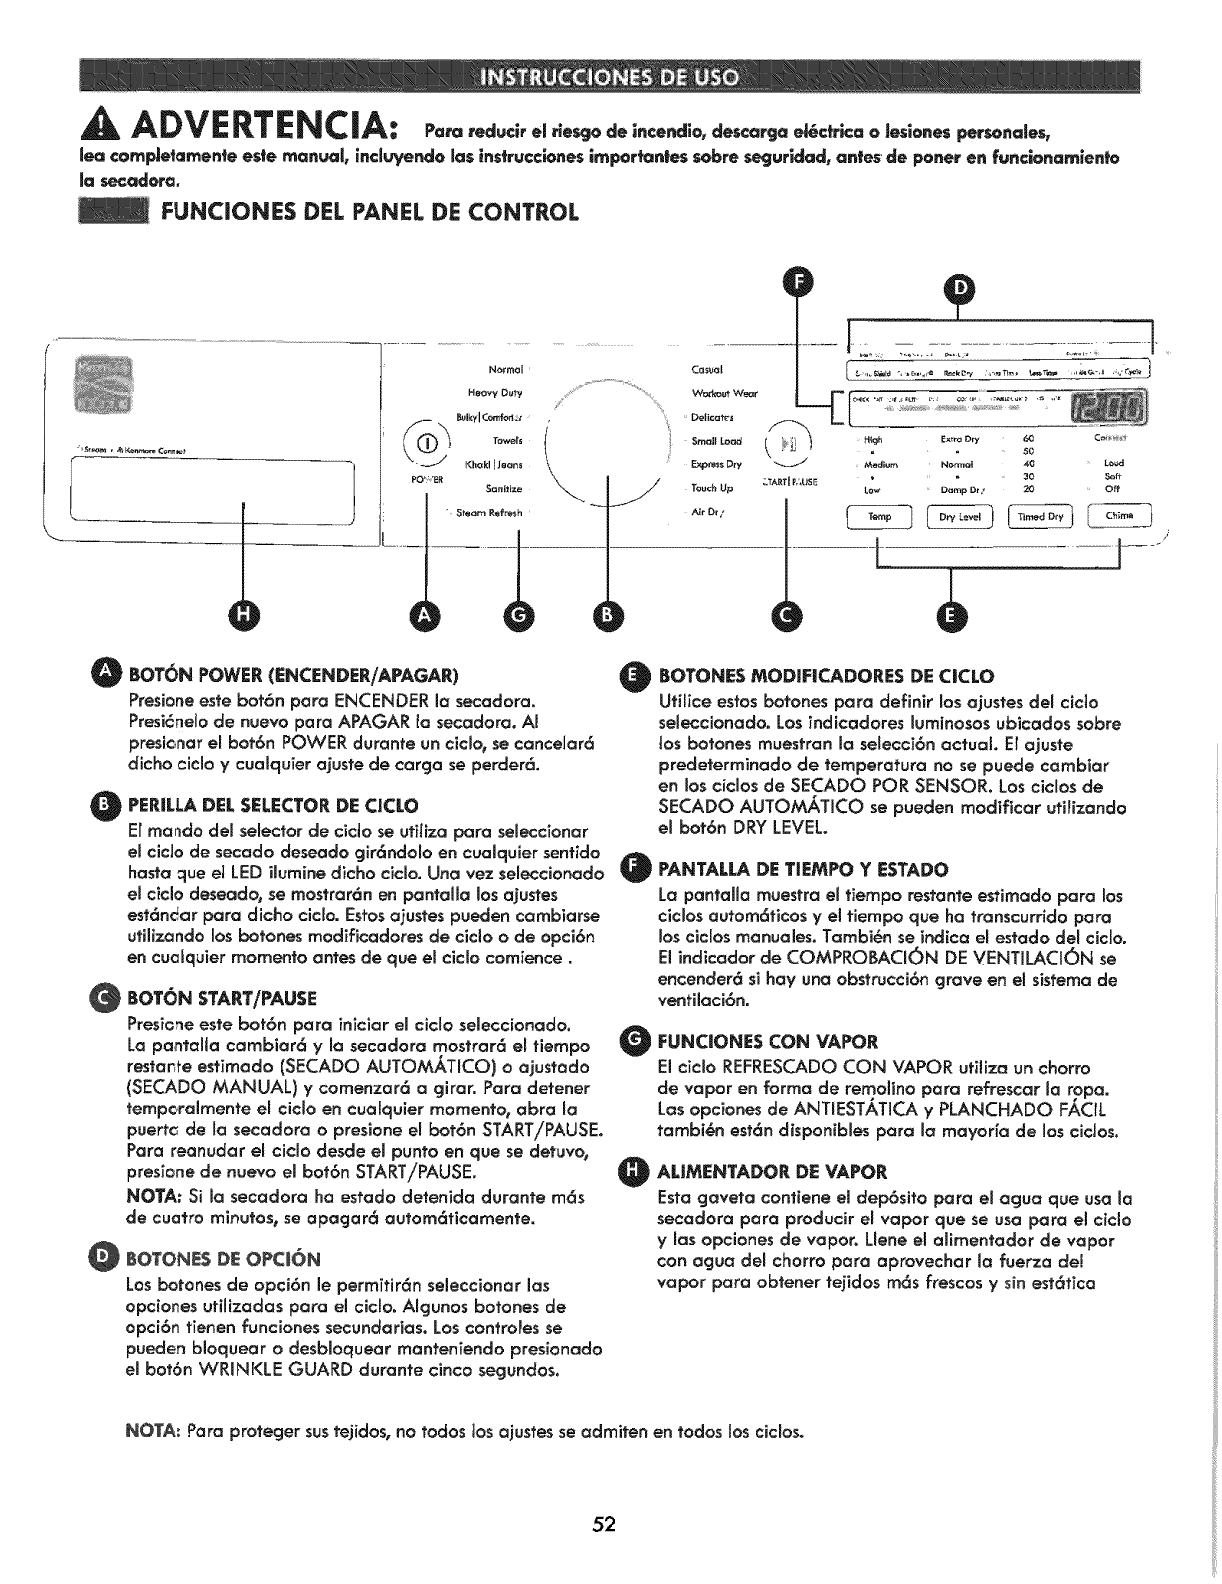
ADVERTENCIA: Po=.°d=i. o_,o,9o de incendiof descarga e|6cf.ica ° |esiene$ pe.t_nales.
lea compJetamente este manual, induyendo 1as|nstrucclones impor_ntes sabre segurldad, antes de pane, en funcionarnien_o
la r_ecadora.
FUNC|ONES DEL PANEL DE CONTROL
N_rmol
Haovy Duty
_lky[ (k_nf_rt t
_wet_
"Khokl I J_ans
PO'; "_R
Sani:_ize
(D
Ca_al
w_J_ Wer_r
belicat_s
Small Loact
E,_m_s P_'y
_uch Up
A_r Dr /
Loud
*_30 S_ft
ZTART[ F:£USE Lo_ Damp Dr/ _x0 Off
I I
O BOTON POWER (ENCENDER/APAGAR) @
Presioneesfe bot6n para ENCENDER la secadora.
Presi6nelo de nuevo para APAGAR [a secadora. A!
presionar el bot6n POWER durante un ciclo0 se cancelar6
dicho ciclo y cualquier ajuste de carga se perder6.
@PER|LLA DEL SELECTOR DE CICLO
ELma_do del selector de cido se ufi/iza para seieccionar
emcicJo de secado deseado gir6ndoJo en cualquier sentido
hasfa que el LED ilumine dicho ciclo. Una vez se{eccionado
el ciclo deseado_ se mostrar6n en pantaHa los ajusfes
est6ndar para dicho ciclo. Estos ajustes pueden cambiarse
utilizando los bofones mod_ficadores de ciclo o de opci6n
en cua[quiermomenta antesde que elciclocomience.
@BOT()N START/PAUSE
Presic_e este bot6n para iniciar el ciclo seleccionado.
La pan_lia cambiar6 y la secadora rnostrar6 el tiempo
restar_te esf]mado (SECADO AUTOMATICO) o ajustado
(SECADO MANUAL) ycomenzar6 a girar. Para detener
temporalmente el ciclo en cualquier memento, abra la
puerta de la secadora o presione el bot6n START/PAUSE.
Para reanudar el ciclo desde el punto en que se detuvo,
presione de nuevo el bot6n START/PAUSE. @
NOTA: Si la secadora ha estado detenida durante m6s
de cuafro minutes, se apagar6 autom6ticamenfe.
O BOTONES DE OPC_ON
Los botones de opci6n le permftir6n seleccionar las
opciones utilizadas para el ciclo. Algunos botones de
opci6n tienenfunciones secundarias.Los controiesse
pueden bloquear o desbloquear manteniendo presionado
el bot6n WRINKLE GUARD durante cinco segundos.
BOTONES MODIRCADORES DE CICLO
Utilice esfos botones para definir los ajustes del ciclo
seleccionado. Los indicadores luminosos ubicados sobre
los bofones muestran la selecci6n actual. El ajuste
predeferminado de femperatura no se puede cambiar
en los ciclos de SECADO PeR SENSOR. Los ciclos de
SECADO AUTOMATICO se pueden modificar utilizando
el bot6n DRY LEVEL.
PANTALLA DE TiEMPO YESTADO
La pantaHa rnuestra el fiempo restan_e estirnado para los
ciclosautom_ticosy elfiempo que ha transcurridopara
losciciosmanuales.Tambi6n se indicaelestado del cic[o.
El indicador de COMPROBACI_N DE VENTILACt_N se
encender6 si hay una obstrucci6n grave en el sistema de
ventilaci6n.
FUNCIONE$ CON VAPOR
El ciclo REFRESCADO CON VAPOR uti!iza un chorro
de vapor en forma de remolino para refrescar la ropa.
Las opciones de ANTIEST,_TICA y PLANCHADO FACIL
tambi_n est6n dispon{bles para la mayoffa de los cicios.
ALIMENTADOR DE VAPOR
Esta gaveta contiene el dep6sito para el agua que usa la
secadora para producir el vapor que se usa para el ciclo
y las opciones de vapor. Llene el alimentador de vapor
con agua del chorro para aprovechar la fuerza del
vapor para obtener tejidos m6s frescos ysin est6tica
NOTA: Para proteger sus tejidos, no todos tos ajustes se admiten en fodos los cicios.
52
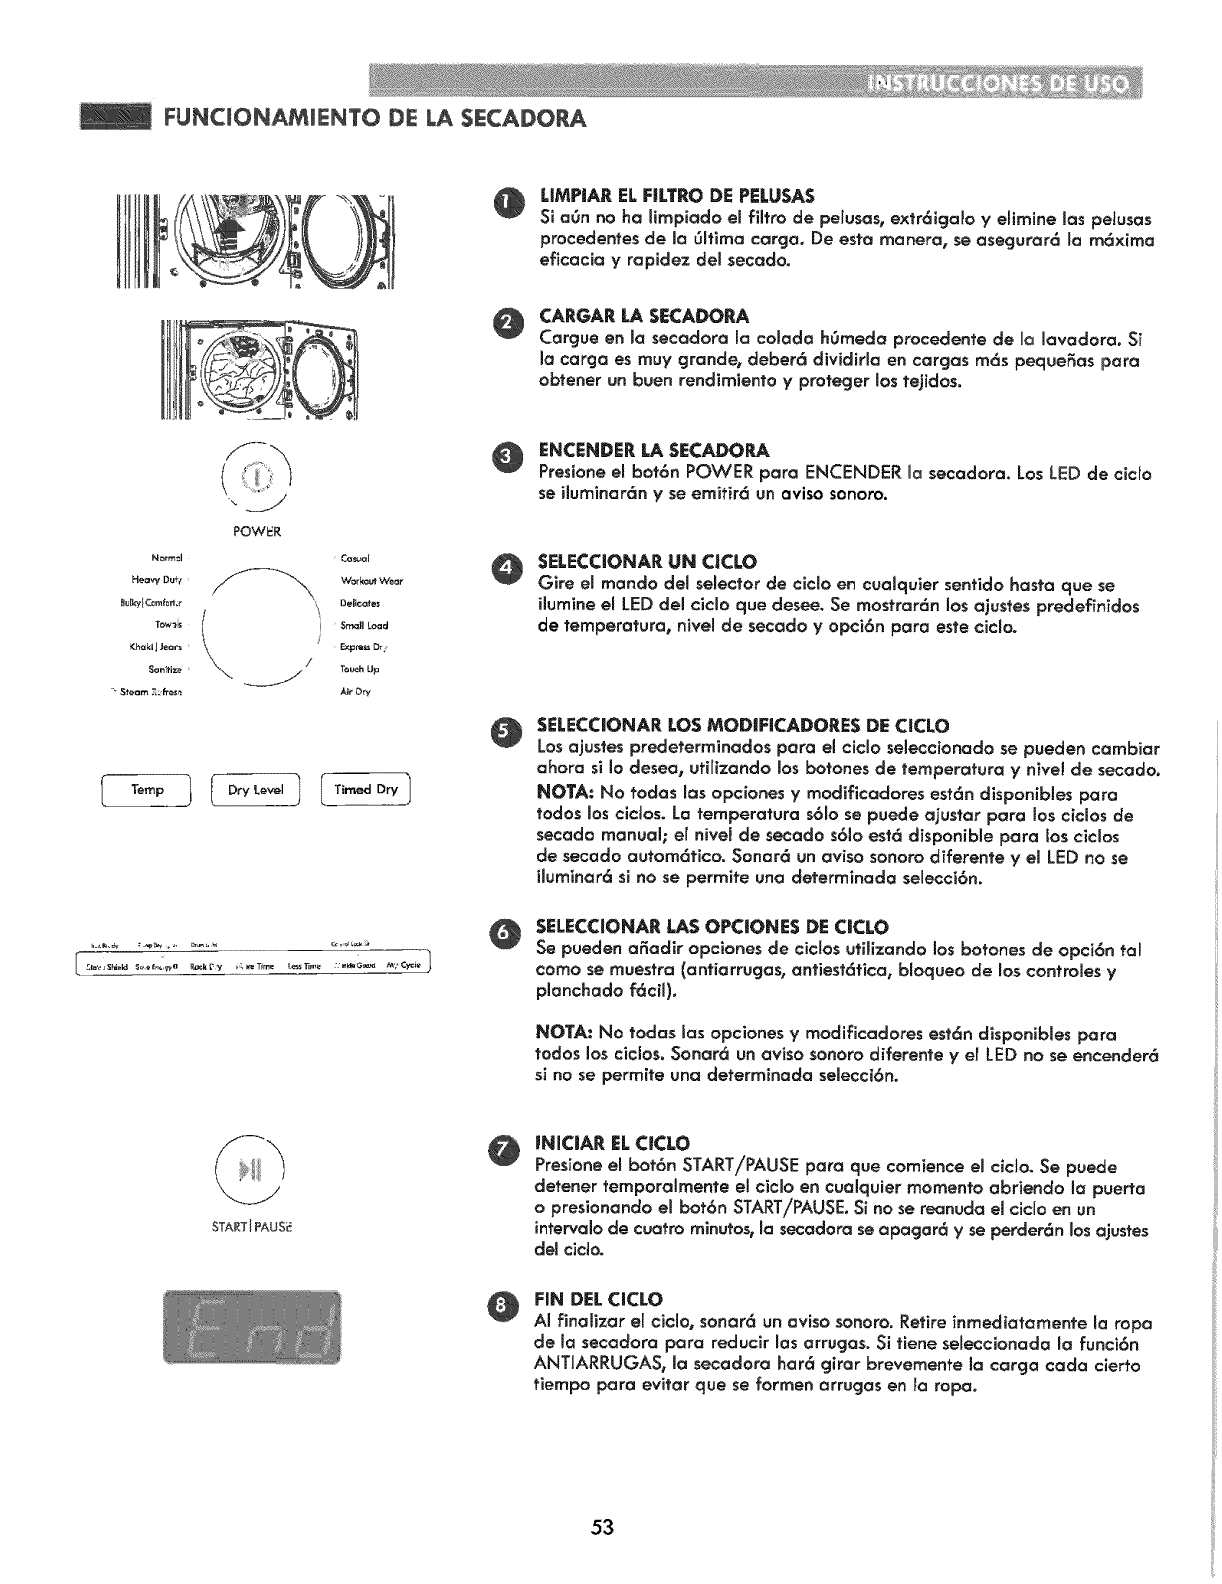
FUNCJONAMIENTO DE LA $ECADORA
LIMPIAR EL F|LTRO DE PELUSAS
Si a0n no ha lirnpiado el filtro de peJusas, extr6icja!o yeJirnine las pelusas
procedentes de la _ltima carga. De esta manera, se asegurar6 la m6xima
eficacia y rapidez del secado.
@CARGAR LA SECADORA
Cargue en la secadora la colada h0meda procedente de Ualavadora. Si
la carga es muy grande, deber6 dividirla en cargas m6s peque_as para
obtener un buen rendirniento yproteger los tejidos.
POWER
I • ]
ENCENDER LA SECADO_
Presione el bot6n POWER para ENCENDER Io secadora. Los LED de ciclo
se iluminar6n y se emitir6 un aviso sonoro.
O
@
SELECCIONAR UN C|CLO
Gire el mando del selector de ciclo en cualquier sentido basra que se
ilurnine el LED del ciclo que desee. Se mostrar6n los a_ustes predefinidos
de temperatura, nivel de secado y opci6n pora este ciclo.
SELECCIONAR LOS MOD|FICADO_ES DE CICLO
Los ajustes predeterminados para el ciclo seleccionado se pueden cambiar
ahora si Io desea, uti[izando los botones de temperatura y nivel de secado.
NOTA: No _'odas las opciones ymodificadores est6n disponibles para
todos los ciclos. La temperatura s6b se puede ajustar para los ciclos de
secado manual; er nivel de secado s61o est6 disponible para los ciclos
de secado autom6tico° Sonar6 un aviso sonoro diferente y el LED no se
iluminor6 si no se permite una determinada selecci6n.
SELECCIONAR LAS OPC|ONES DE CICLO
Se pueden afiadir opciones de ciclos uti!izando los botones de opci6n tal
como se muestra (antiorrugas, antiest6tica, bloqueo de los controles y
planchado f6cil),
NOTA: No todas los opciones y modificadores est6n disponibles para
todos los ciclos0 Sonar6 un aviso sonoro diferente y el LED no se encender6
si no se permite vna determinada selecci6n.
START IPAUS_
@|NIC|AR ELCICLO
Presione el bot6n START/PAUSE para que comience el cicto. Se puede
detener temporolmente el ciclo en cualquier rnomento abriendo la puerta
o presionando el bot6n START/PAUSE. Si no se reanuda el ciclo en un
intervab de cuatro minutos0 la secadora se apagar6 y se perder6n los ajustes
del cicto.
@FiN DEL ClCLO
AI finolizar el ciclo0 sonar6 un aviso sonoro. Retire inmediatamente la ropo
de la secadora para reducir las arrugas. Si tiene seleccionada la funci6n
ANTIARRUGAS, la secadoro bar6 girar brevernente la carga cada cierto
tiempo para evitor que se formen arrugos en la ropo.
53
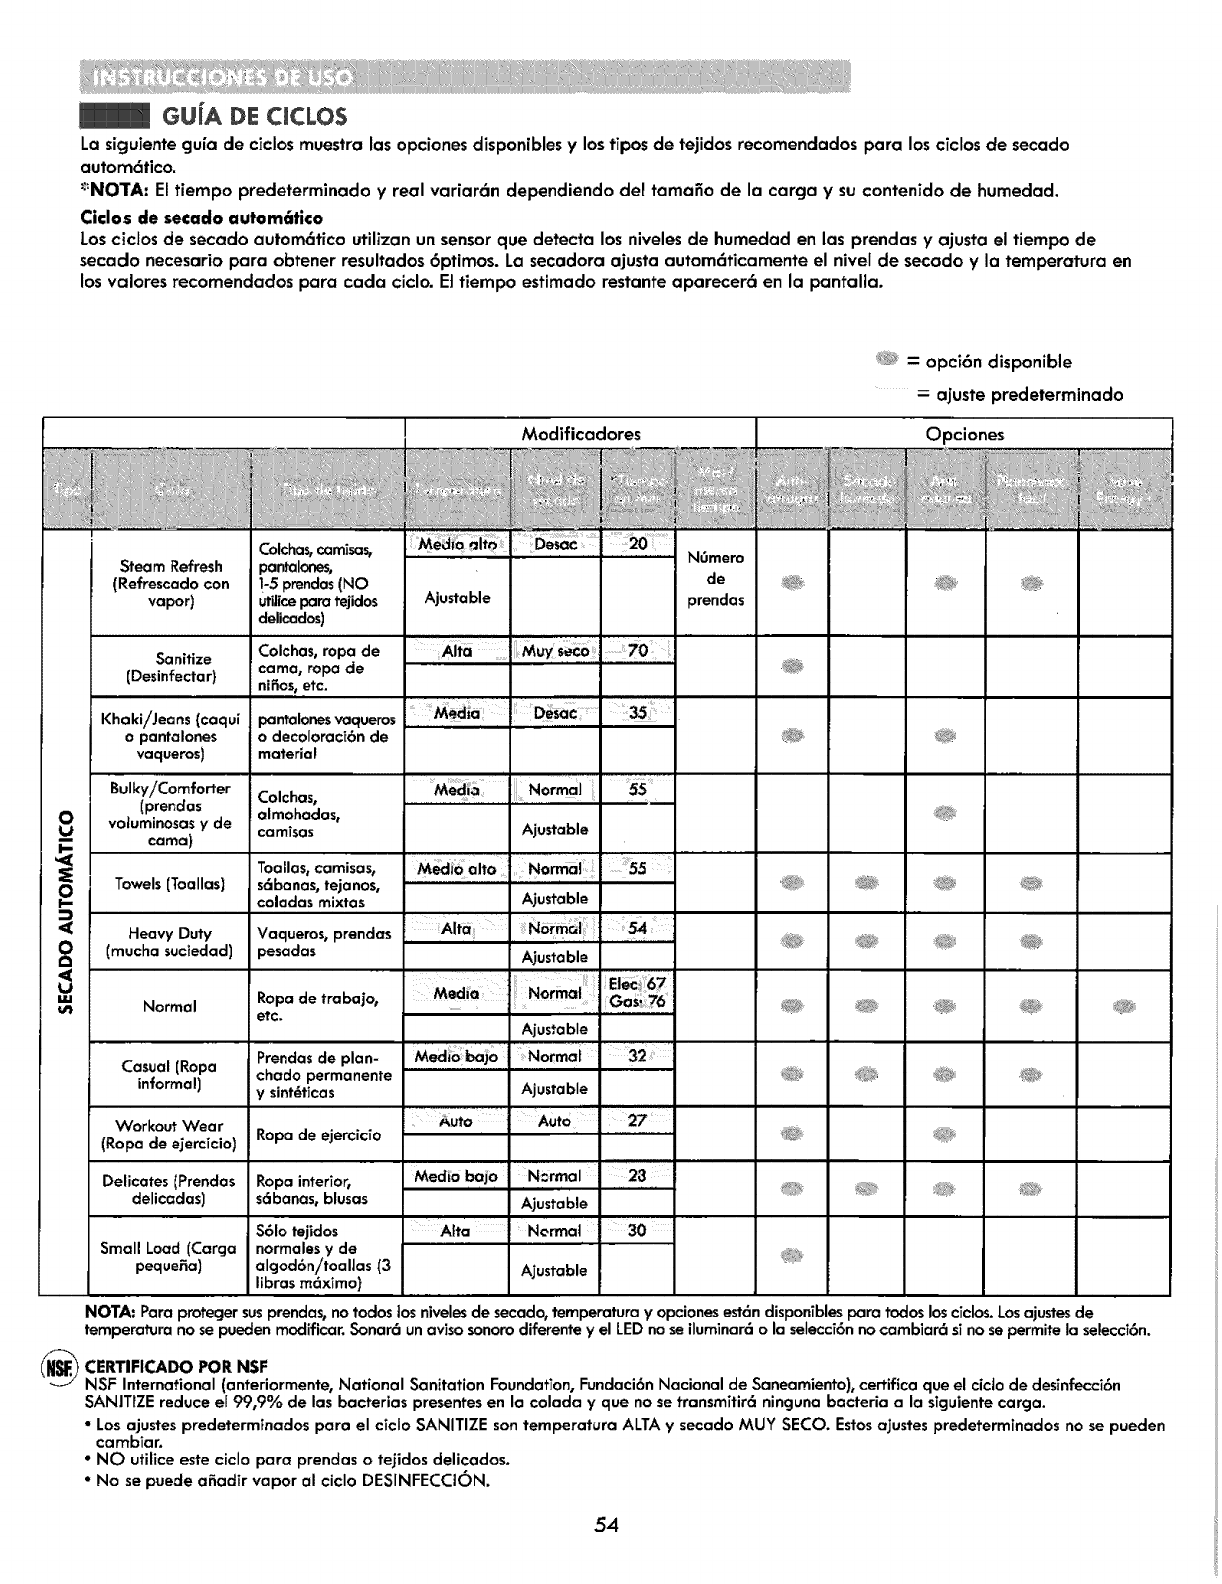
|GU[A DECICLOS
La siguiente guia de ciclos muestra las opciones disponibles y los tipos de tejidos recomendados para los ciclos de secado
autom6tico.
:::NOTA: El fiempo predeterminado y real variar6n dependiendo del tama_o de la cargo y su contenido de humedad.
Ciclos de secado autom6tico
Los ciclos de secado autom6tico utilizan un sensor que detecta los niveles de humedad en las prendas y ajusta el tiempo de
secado necesario para obtener resultados 6ptimos. La secadora ajusta autom6ticamente el niveI de secado y la temperatura en
los valores recomendados para cada ciclo. Et tiempo estimado restante aparecer6 en la pantalla.
o
I.-
o
!--
::3
<
o
Ill
_;_ = opci6n disponible
:ajuste predeterminado
Modificadores Opciones
ii_iiiiii_iiiiiiiiiiiiii!i!_iiiiiiii!!i_ii!_iiiiiiiii!!!ii_iiiiiiiii_iii
Colchas_camisas, M_i_ _it_ N0mero
Steam ttefresh pantalones,
(Refrescado con !-5 prendas (NO de
vapor) utilicepara tejidos Ajustable prendas
delicados)
Sanitize Colchas, ropa de
cama, ropa de
(Desinfectar} nlfies, etc.
,,,,,,,,,,,,
Alto Muy_,eco. 70
Khaki/Jeans {caqui pantalonesvaqueros
o pantalones o decolorac[6n de
vaqueros) material
Bulky/Comforter Colchas,
(prendas almohadas,
voluminosas y de camisas
cama)
Toallos, camisas,
Towels (Toallas) s6banas, tejanos,
coladas mixtas
Heavy Duty Vaqueros, prendas
(muaha suciedad) pesadas
Normal Ropa do trabajo,
etc.
Casual (Ropa Prendas de plan-
informal) chodo permanente
y sint_ticas
Workout Wear
(P,opa de ejercicio) Ropa de ejercic_o
Delicates (Prendas Ropa interior,
delic=das] s6banas, blusas
Ajustable
i ,,,,,, ....... ,,,,,,
No_l: : 55
Ajustable
A,iustable
I",loimai EJec 67
Ajustable
S61o tejidos
Small Load (Carga normales y de
pequefia) algod6n/toaflas (3
libras m6ximo}
Ajustable
Auto !Auto 27
Medi0 bojo N:rmal 23
Ajustable
Alto Normal 30
Ajustable
NOTA: Para proteger susprendas, no todos los niveles de secado, temperatura y opciones est6n disponibles para todos los ciclos. Los ajustes de
temperatura no se pueden modificar. Sonard un aviso sonora diferente y el LED no se iluminar6 o la selecaf6n no cambiar6 si no se permite la selecci6n.
_-_ CERTIFICADO PaR NSF
NSF International (anteriormente, National Sanitation FoundatTon, Fundaci6n Nacional de Saneamiento), certifica que el cido de desinfecciBn
SANITIZE reduce eI 99,9% de las bacterias presentes en la colada yque no se transmitir6 ninguna bacteria a la siguiente carga.
• Los ajustes predeterminados para el ciclo SANITIZE son temperatura ALTA y secado MUY SECO. Estos ajustes predeterminados no se pueden
cambiar.
° NO utilice este ciclo para prendas o tejidos delicados.
• No se puede afiadir vapor al ciclo DESINFECCiON.
54
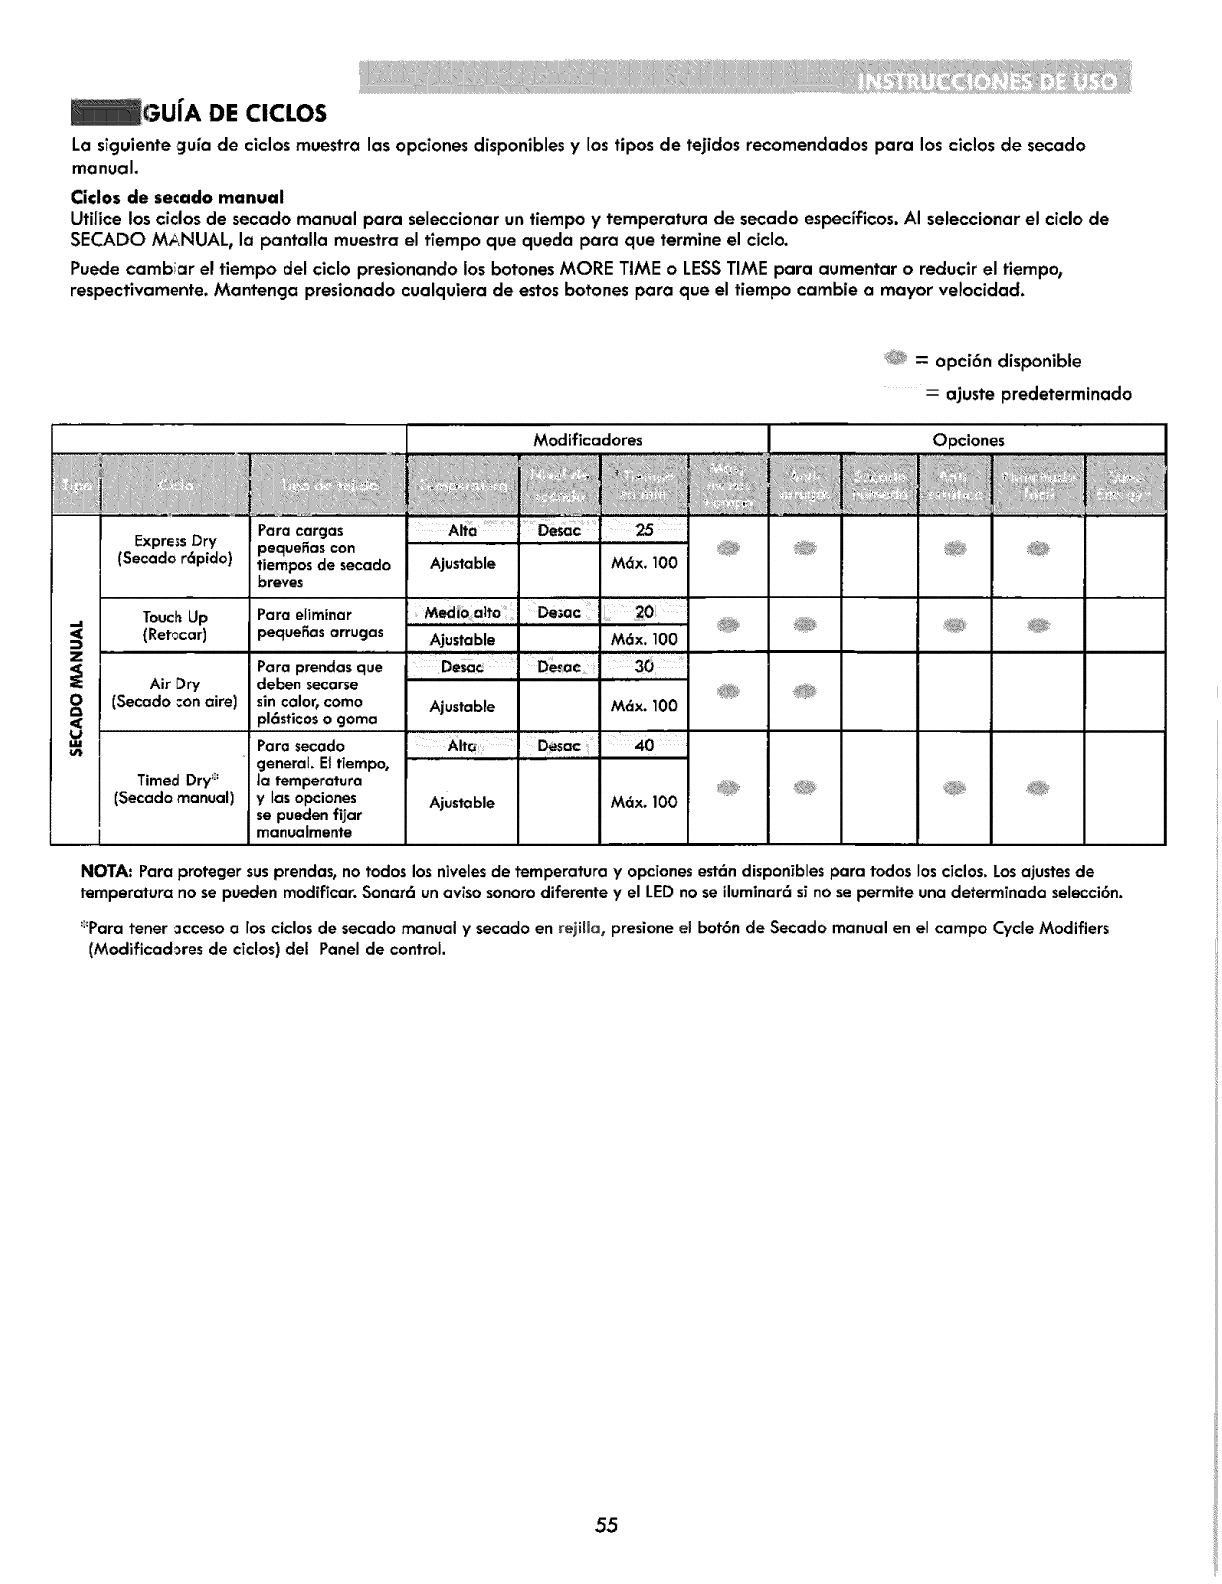
_GU[A DE CICLOS
La sTcjuiente guia de ciclos muestra las opciones disponibles y los tipos de tejidos recomendados para los ciclos de secado
manual.
Ciclos de secado manual
Utilice los ciclos de secado manual para seleccionar un tiempo y temperatura de secado especlficos. AI seleccionar el ciclo de
SECADO MANUAL, la pantalla muestra el tTempo que queda para que termine el ciclo.
Puede cambiar el tiempo del ciclo presionando los botones MORE TIME o LESS TIME para aumentar o reclucir el fiempo,
respectivamente. Mantencja presionado cualquiera de estos botones para que el tiempo cambie a mayor ve!ocidad.
O= opci6n disponible
_- ajuste predeterminado
z
O
ILl
Express Dry
(Secado r6pido)
Touch Up
(Ret0car)
Air Dry
(Secado :on aire)
Timed Dry _
(Secado manual)
Para cargos
pequefios con
tiempos de secado
breves
Para eliminar
pequefias orrugas
Para prendas que
deben secorse
sin calor_ como
}16sticos o gomo
Para secado
cjenerol. El fiempo,
]a temperatura
ylas opciones
se pueden fijar
manuaJmente
Ajustable
Ajustable
De_c
Ajustable
AIt_
Ajustable
Modificadores
_ii i;; ;;_iiiiii_iii_iiiiiii
.... 25
De,ac 20 I
Defoe 30
M_x. 100
Opciones
i!iii!!!ii!!;_': !_ii_i;iiiiiiiii_
NOTA: Para proteger susprendas,no todos losnivelesde temperatura y opcionesestdndisponiblespara todos los ciclos.Losajustesde
temperatura nose pueden modificar.Sonar6 unaviso sonorodiferente y el LED no seiluminar_ s_no sepermite una determinada selecci6n.
=;'Para tenor acceso a los ciclos de secado manual y secado en rejilia, presione el bot6n de Secado manual en el campo Cycle Modifiers
(Modificad_res de ciclos) del Panel de control
55
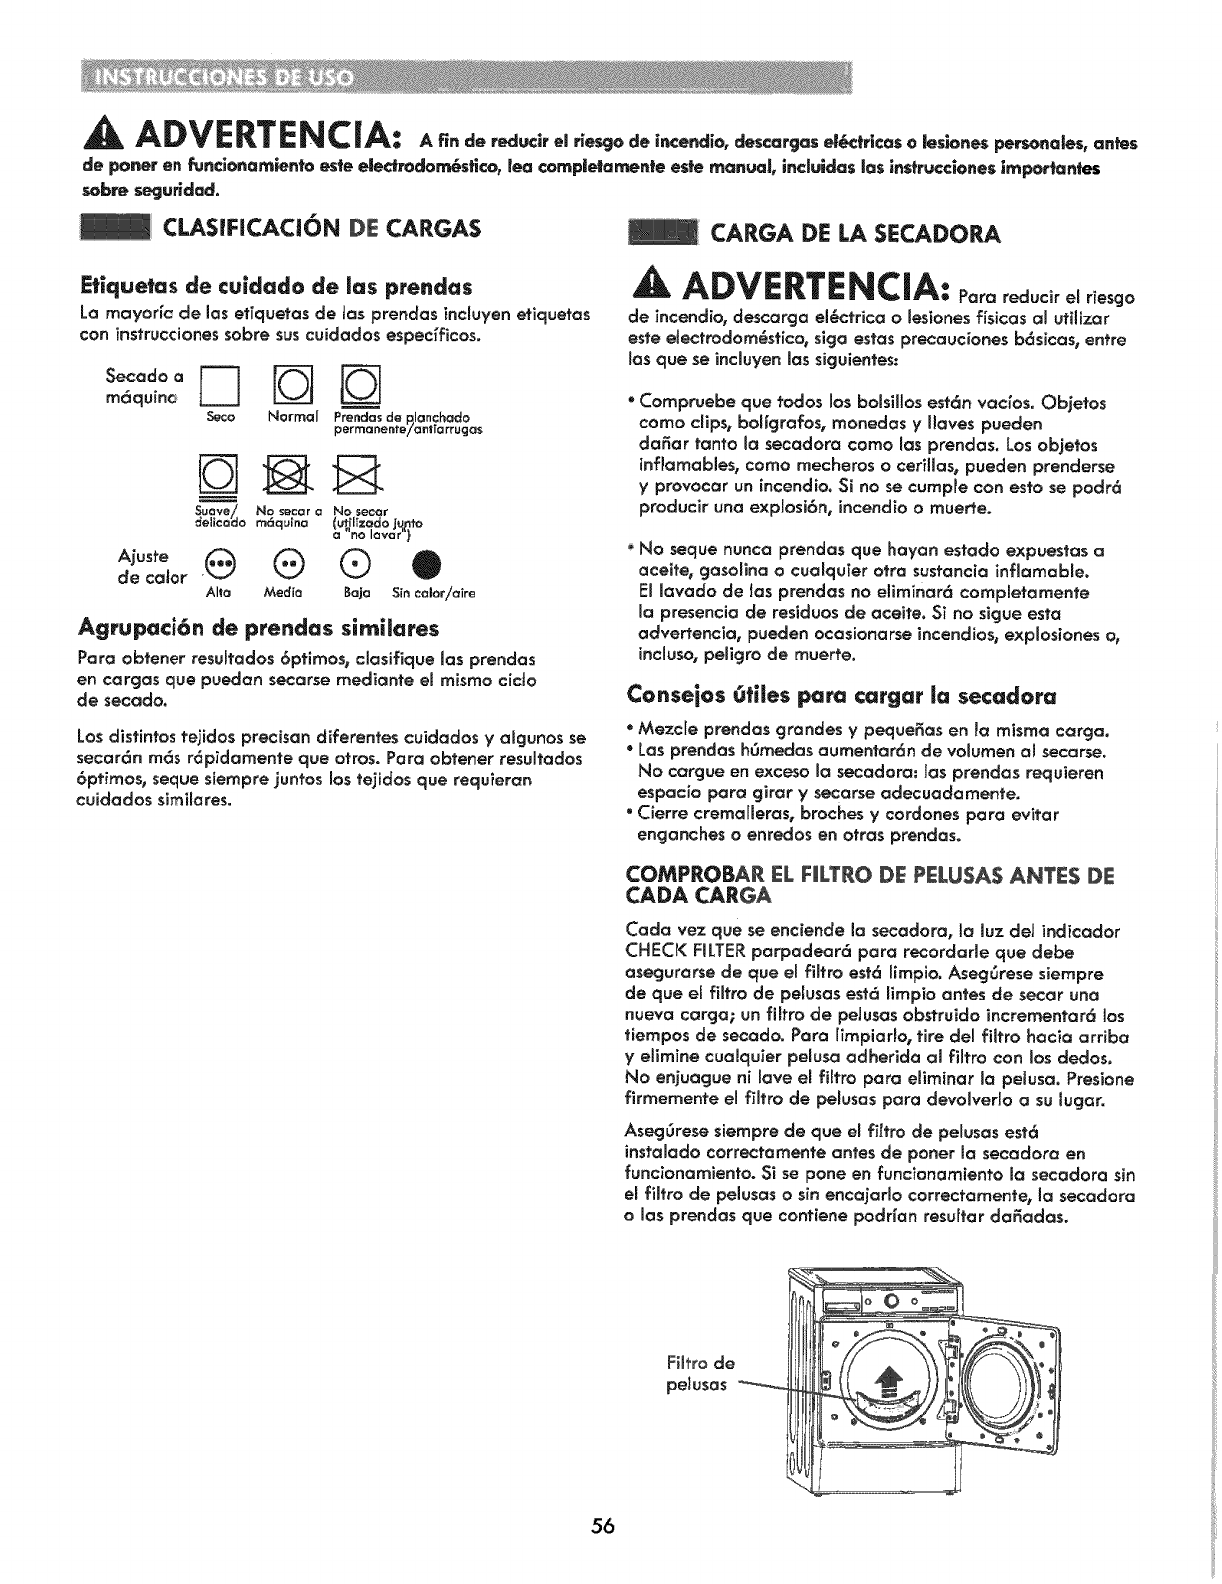
ADVERTENCIA: A,.de.. o01.°,.i° odoince,dJ°, descorgas e|_:,ricas o |eslones personales, antes
de porter en fundonamlente este e|edrodom6stico_ |ea cornp|e|amen|e esfe manual, induldas los instrucciones importentes
sabre segurldad.
CLAS_FICACJ6N DE CARGAS _CAP.GA DE LA SECADORA
E|iquetas de cuidado de los prendas
La rnayorlc de Jasetiqoetas de Jas prendas incmoyenetiquetos
con instruccior_es sabre sos cuidodos espec{ficos.
moqumo
Seco Normal Prendas de p,lanchada
permar_ent_/antio rruga_
Suave/, No s_car oNo secar
aelicaao m6quina {utilizada jq_
a"no laver }
@ ® ® ®
de color
Alto Media Baja Sin caloriaire
Agrupac_6n de prendas slmilares
Pare obtener resuffados 6ptimos, cJasifique Jas prendas
en cargos que puedon secarse rnedionte eJrnismo cicto
de secede.
Los distintos tejidos precisan dJferentes cuidados y aJgunos se
secar6n m6s r6pidamente que arras. Pare obtener resuJtados
6ptimos, seque siernpre juntos los tejidos que requieran
cuidados sJrnileres.
ADVERTENCIA: Pore od.c,rel. esgo
de incendio, descorga el_ctrica o Jesiones fisicas ol utilizer
este electrodom_stico, siga estas precauciones b6sicas, entre
los que se incJuyen los siguientes:
* Compruebe que todos los boJsilos est6n voc[os. Objetos
coma clips, boligrofos, monedas y J!aves pueden
daEar tonto la secodora coma los prendas. Los objetos
Jnflornables, coma mecheros o cerillas, pueden prenderse
y provocar un incendio. Si no se cumple con esto se podr6
producir una expJosJ6n°incendio o muerte.
No seque nonce prendas que hoyan estado expuestas a
aceJte, gasoline o cuaiquTer otra sustancia inflomabie.
El Javado de ]as prendas no eliminar6 completarnente
Ja presencia de residues de aceite. Si no sigue esta
odvertencio, pueden ocasionarse incendios, expJosiones o,
inclose, peiJgro de muerte,
Conseios _tiles para cargar ia secadora
•Mezcle prendas grandes y peque_os en _o mJsma cargo.
"Los prendas h6medas oumentor6n de volurnen al secarse.
No cargue en exceso Io secadoro, los prendas requieren
espacio pare girar ysecarse odecuadamente.
•Cierre cremafferos, broches ycordones pare evitar
encjonches oenredos en arras prendas.
COMPROBAR EL F|LTRO DE PELUSAS ANTES DE
CADA CARGA
Coda vez que se enciende la secadoro, Io luz del indicodor
CHECK FILTER parpadear6 pare recordarle que debe
asegurarse de que eJfiJtre est6 ffrnpio. Aseg@ese siempre
de que e[ fiJtro de pelusas est6 Jimpio antes de secar una
nueva cargo; un fiffro de pelusas obstruido incrementar6 los
tiempos de secede. Pare [irnpiarlo, tire deJ filtro hacio arriba
yelirnine cualquier pelusa adherido al filtro con los dedes°
No enjuague ni Jove eJ filtro pare eJiminar la peJusa. Presione
firmemente el fiffro de pelusas pare devolverlo asu lugor.
Aseg_rese siernpre de que el filtro de pelusos est6
instoJado correctamente antes de poner Io secadoro en
funcionamJento. Si se pone en funcionamiento la secadora sin
eJ fiJtro de peJusaso sin encajaflo correctamente, la secadora
o los prendas que contiene podrian resuttar da_odos.
56
Filtro de
pelusas
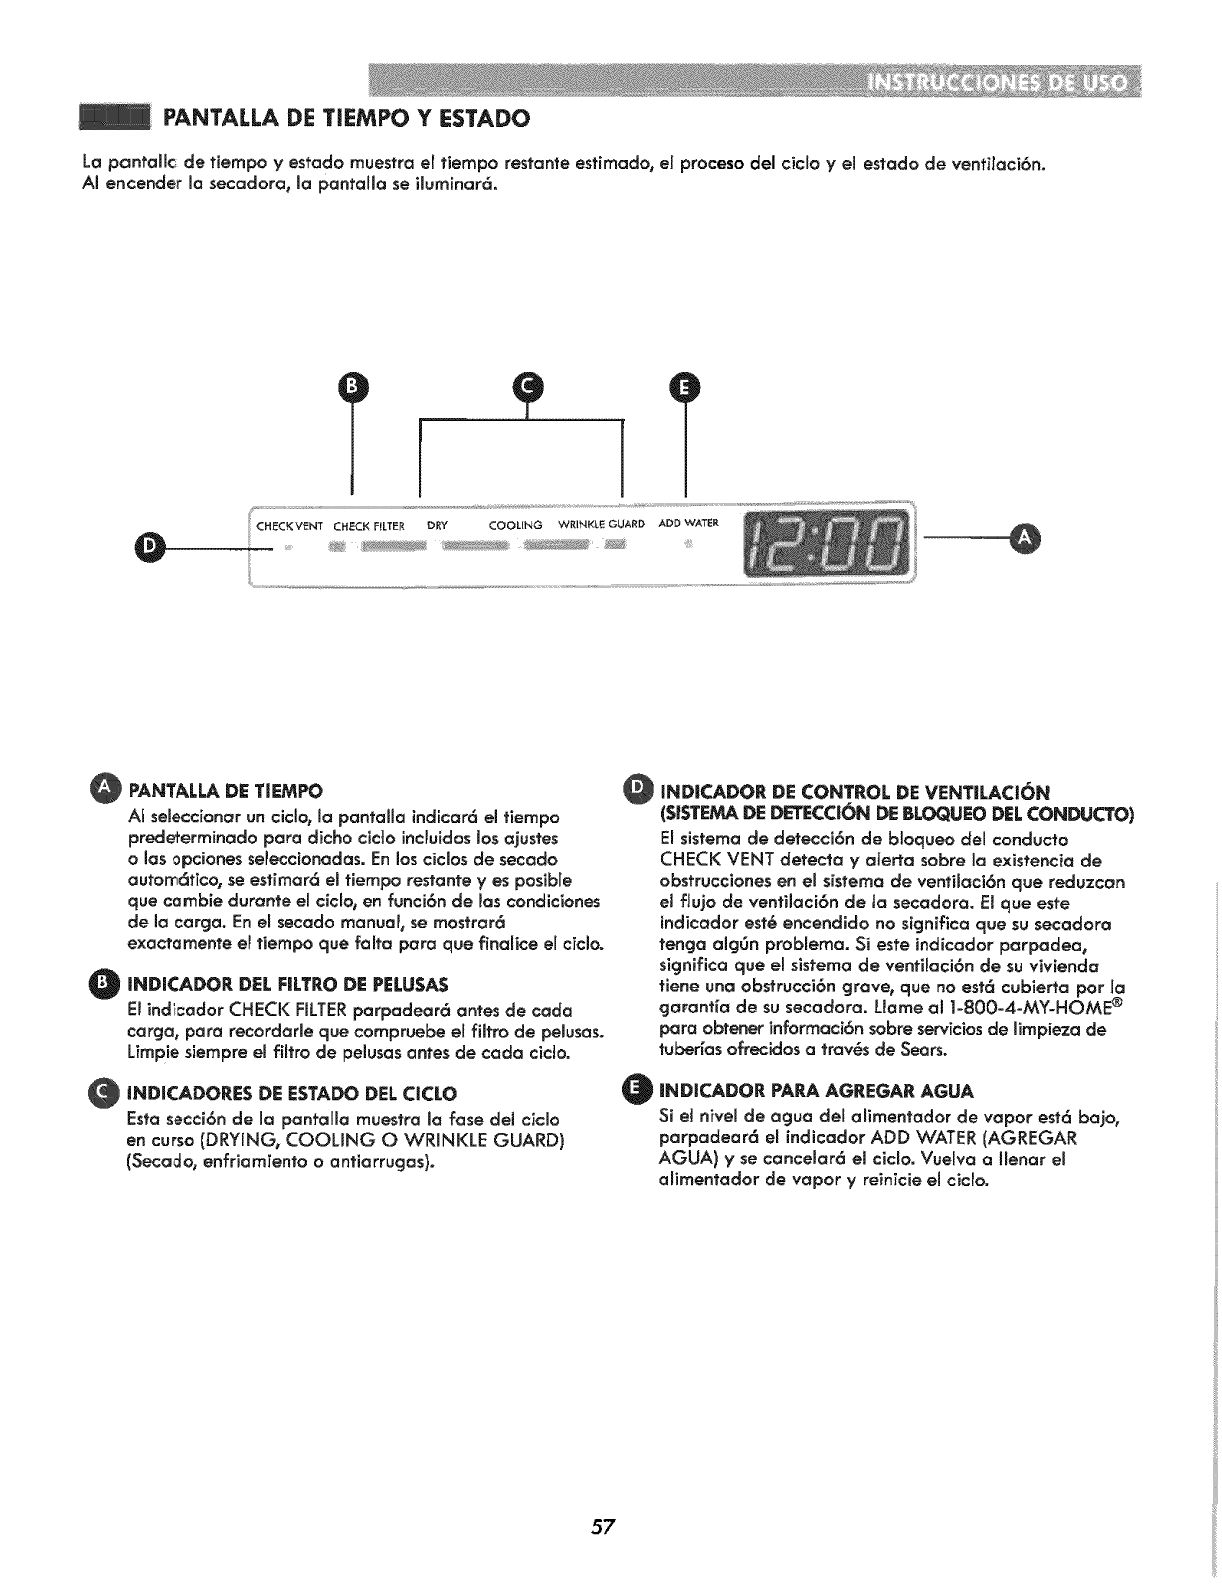
PANTALLADE TIEMPO Y ESTADO
La pantaH¢: de tiernpo y estado muestra e[ tiempo restante estimado, el proceso del cicio y el estado de ventilaci6n.
Ai encender Io secadora, la pantallo se ibminar6.
@
@
@
PANTALLA DE TIEMPO
Ai seleccionar un ciclo_ Io pantalla indicar6 el tiempo
predeterminado para dicho cic]o incluidos los ajustes
olas 0pciones sePeccionodas. En los ciclos de secado
autom('_tTco,se estimar6 el tiempo restante yes posible
que cambie durante el cicmo_en funci6n de los concliciones
de la cargo. En el secado manual, se mostrar6
e×actamente el tiempo que folfa para que finalice eJcicloo
INDICADOR DEL FILTRO DE PELUSAS
El indi:ador CHECK FILTERparpadear6 antes de cada
carga, para recordorle que compruebe el filtro de pelusas.
Limpie siempre el fiffro de pelusas antes de cada cicio°
|NDICADORES DE ESTADO DEL CICLO
Esta secci6nde la panfallamuestra la lose del cJclo
en curso (DRYING, COOLING O WRINKLE GUARD)
(Secac/o_ enff_amiento oantiorrugas}.
O INDiCADOR DE CONTROL DE VENT|LACI(_N
(SISTEMA DE DETECa()N DE BLOQUEO DELCONDUCTO)
Elsistemade detecci6n de bloqueo del conducto
CHECK VENT detecta y aleri'asabre laexistenciade
obstrucciones en el sistema de ventilaci6n que reduzcon
el fJujo de ventilaci6n de ta secadora. El que este
indicador est_ encendido no significa que su secadora
tenga alg6n problema. Si este indicador parpadea,
significa que ei sistema de venfilaci6n de su vivienda
tiene una obstrucci6n grave, que no est6 cubierta par la
garanfia de su secadora. Uame al 1-800=4=MY-HOME ®
para obtener informaci6n sabre servicios de limpieza de
tuber[as ofrecidos a trav_s de Sears.
OINDICADOR PARA AGREGAR AGUA
Si ei nivel de agua dei alimentador de vapor est6 bajo,
parpadear6 el indicador ADD WATER (AGREGAR
AGUA) yse cancelar6 el ciclo. Vuelva a llenar el
aiimentador de vapor yreinicie el ciclo.
57
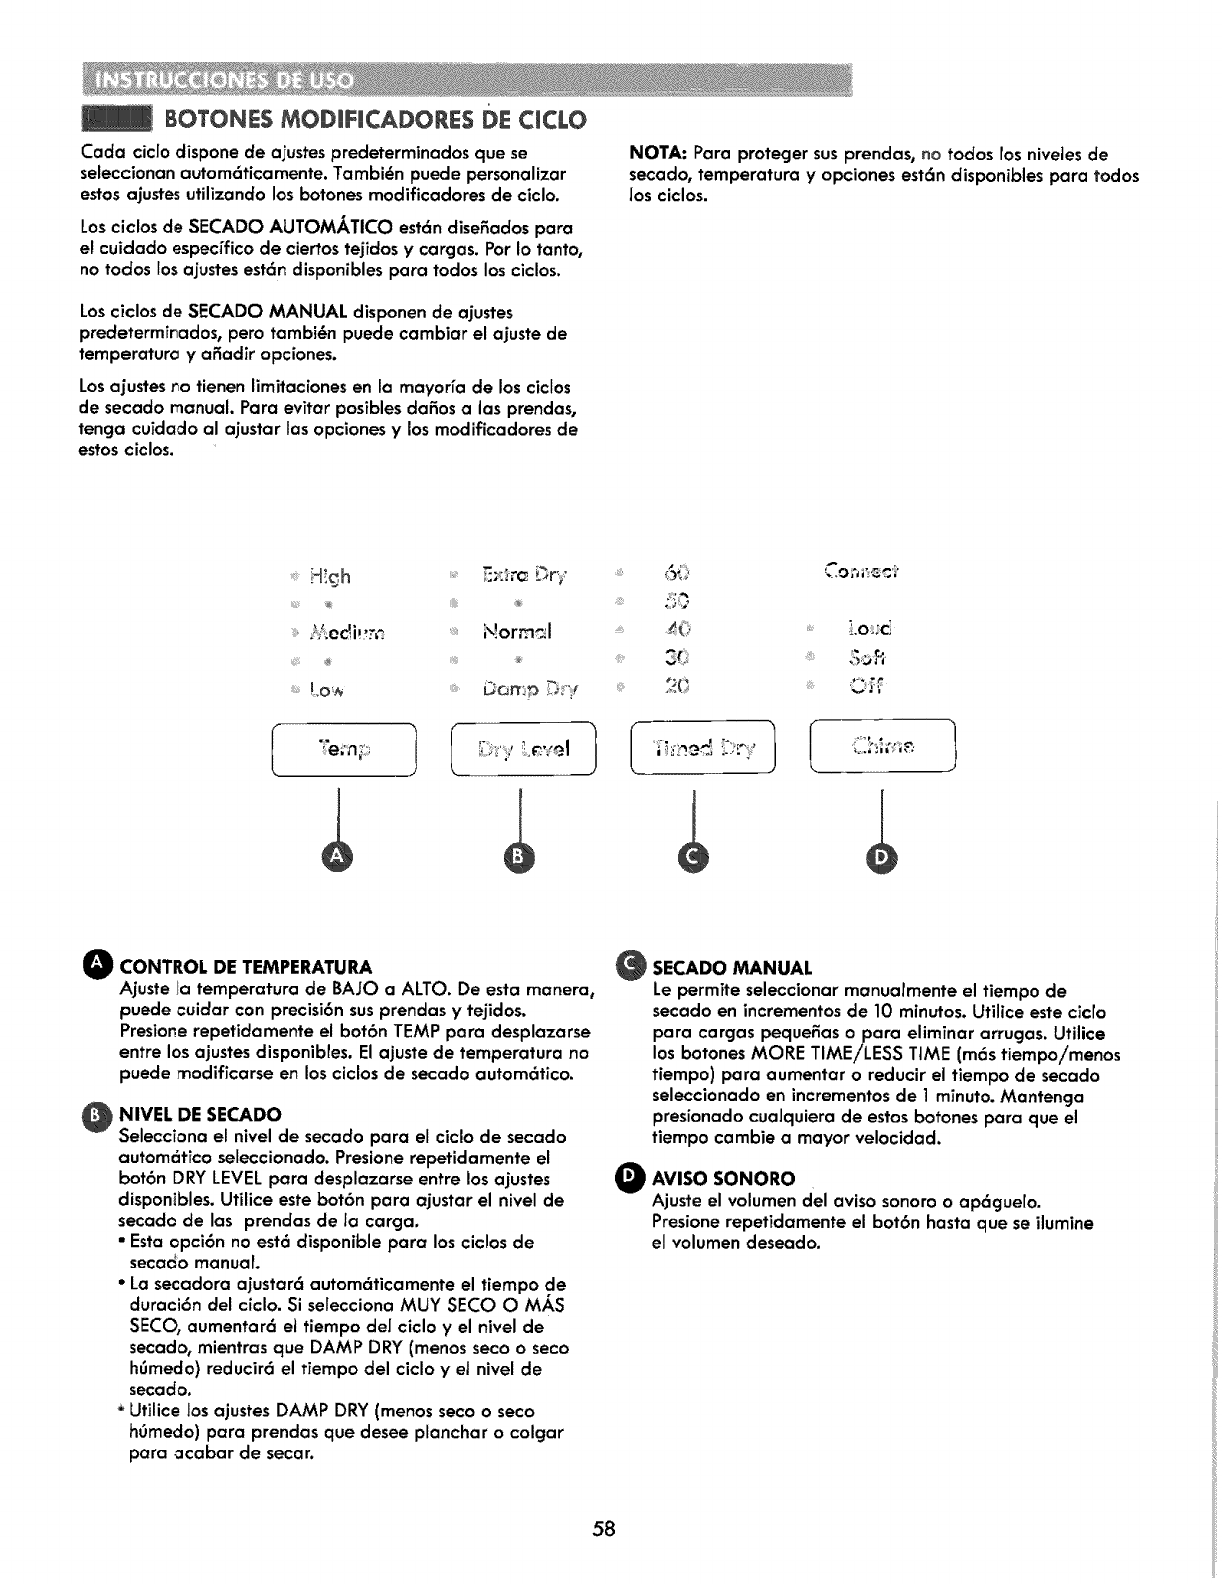
BOTONE$ MODmFmCADORES DE CJCLO
Coda ciclo dispone de ajustes predeterminados que se
seleccionan autom6ticamente. Tambi_n puede personalizor
estos ajustes utilizando los botones modificadores de ciclo.
Losciclos de SECADO AUTOMikTICO est6n dise_ados para
el cuidado especffico de ciertos tejidos y cargos. Par Io tanto,
no todos los ajustes est6n disponibles para todos los ciclos.
Los ciclos de SECADO MANUAL disponen de ajustes
predeterminados, pero tambi_n puede cambiar el ajuste de
temperaturo y afiadir opciones.
Los aiustes no tienen limitaciones en la mayoHa de los ciclos
de secado manual. Para evitar posibles da_os a Jasprendas,
tenga cuidado al ajustar las opciones y los modificadores de
estos ciclos.
NOTA: Para proteger susprendas, no todos los nivetes de
secado, temperatura yopciones est6n disponibJes para todos
Jos ciclos.
H!gh
[,O'_
8_
@
Normal
t;-_,,, L_','el
4(i
20
Co,'._,sct
Lad
}
CONTROL DE TEMPERATURA
Ajuste la temperatura de BAJO a ALTO. De esta manera,
puede cuidar con precisi6n sus prendas y tejidos.
Presione repetidamente el bot6n TEMP para desplazarse
entre los ajustes disponibles. El ajuste de temperatura no
puede modificarse en los ciclos de secado autom6tico.
NIVEL DE SECADO
Selecciona el nivel de secado para el ciclo de secado
automatico seleccionado. Presione repetidamente el
bot6n DRY LEVEL para desplazarse entre los ajustes
disponibles. Utilice este bot6n para ajustar el nivel de
secado de las prendas de Ia carcja.
" Esta opci6n no est6 disponibJe para los cic!os de
secodo manual
*La secadora ajustar6 autom6ticamente el tiempo de
duraci6n del ciclo. Si selecciona MUY SECO O M,_S
SECO, aumentar6 et tiempo de] ciclo y el nivel de
secado, mientras que DAMP DRY (menos seco o seco
h_medo) reducir6 el tiempo del ciclo y et nivel de
secado.
Utilice los ajustes DAMP DRY (menos seco o seco
h0medo) para prendas que desee planchar o colgar
para acabar de secar.
SECADO MANUAL
Le permite seleccionar manualmente el tiempo de
secado en incrementos de 10 minutos. Utilice este cicro
para cargas peque_as o para eliminar arrugas. Utilice
los botones MORE TIME/LESS TIME (m6s tiempoimenos
tiempo) para aumentar o reducir ei tiempo de secado
seleccionado en incrementos de I minuto. Mantenga
presionado cuaJquiera de estos botones para que el
tiempo cambie a mayor velocidad.
AVISO SONORO
Ajuste el volumen del aviso sonoro oap6gue[o.
Presione repetidamente el bot6n hosta que se ilumine
el volumen deseado.
58
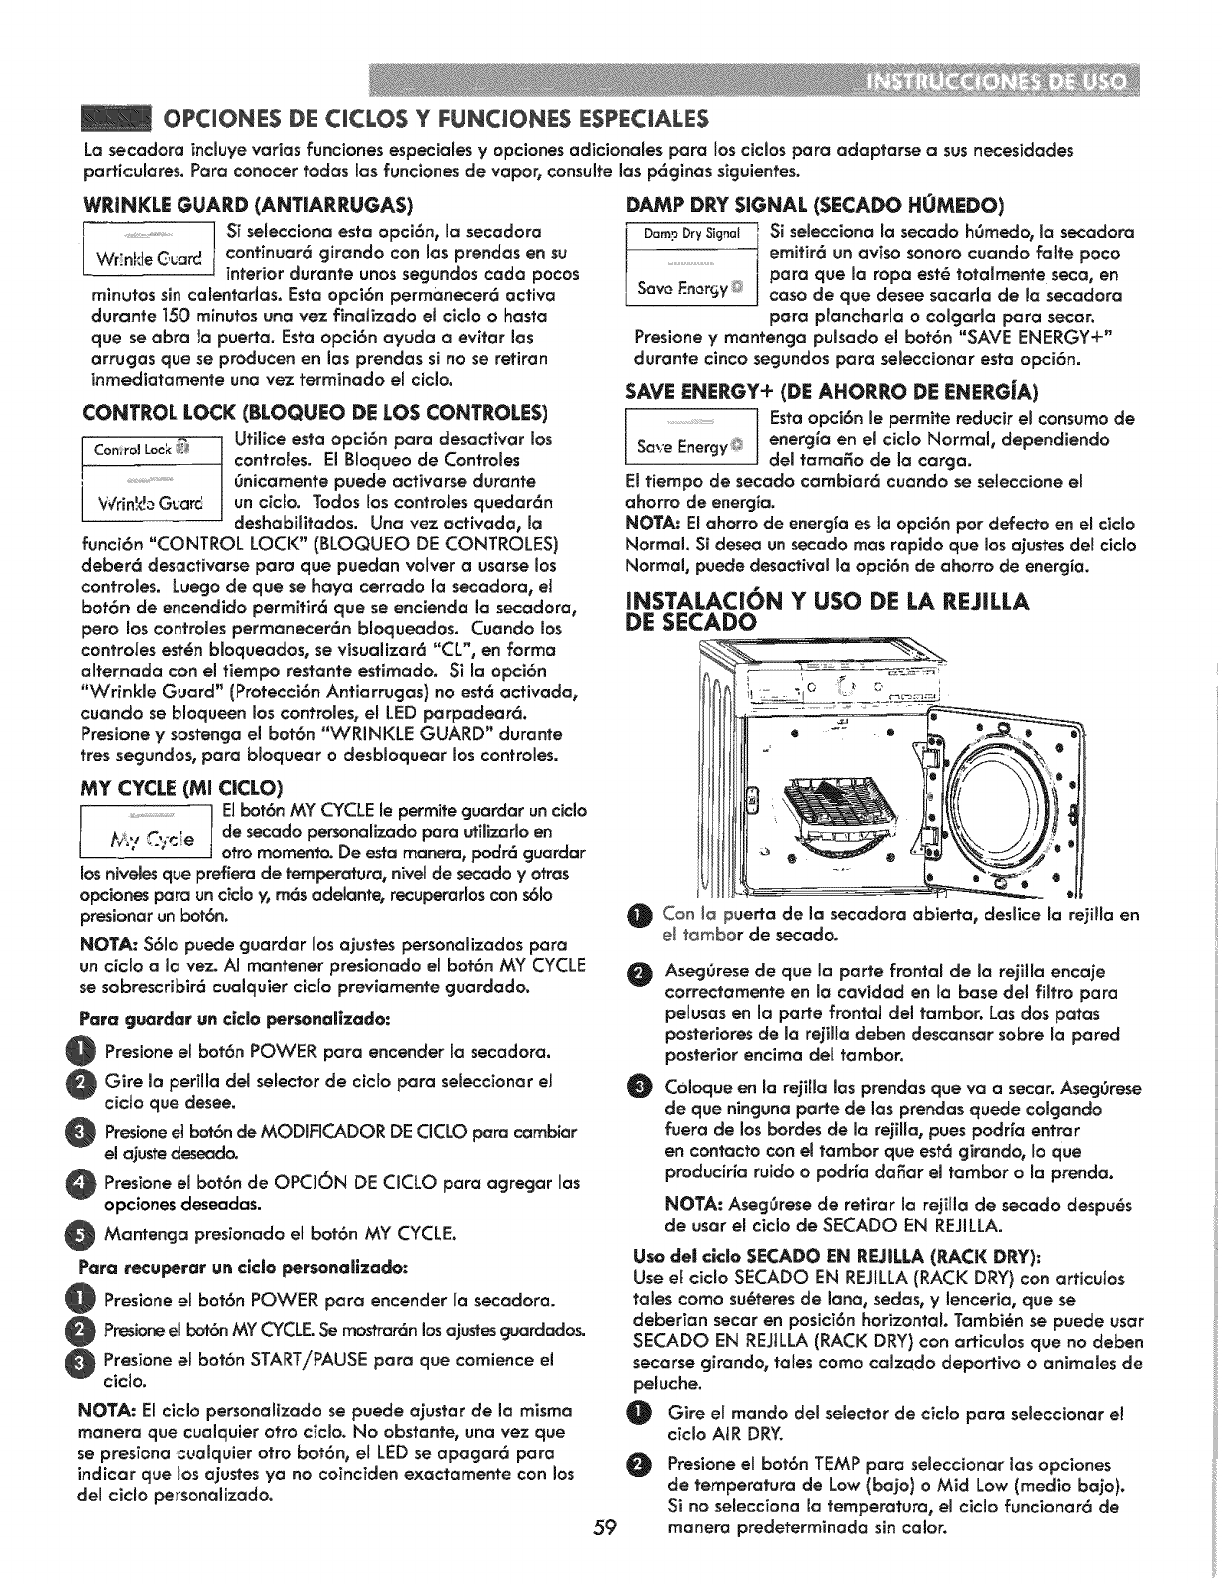
OPCIONES DE CICLO$ Y FUNCJONE$ ESPECIAILE$
La secodora incluye varias funciones especiales yopciones adicionales para los ciclos para adapfarse a sus necesidades
particulates. Pare conocer todas las funciones de vapor, consulte las p6ginas siguientes.
WRINKLE GUARD (ANTIARRUGAS)
I ...................I STselecciona esfa opci6n, Ia secadora
JWr!nHe continuar_ girando con las prendas en su
Guar_ Jinferior durante unos segundos coda pocos
minutos sin caientarlas. Esta opci6n permanecerc_ acfiva
durante 150 m[nufos una vez finaiizado el cicio o basra
que se abra _apuerto. Esta opci6n ayuda a evitar los
arrugas que se producen en ias prendas si no se retiran
inmediatamente una vez terminado el ciclo.
CONTROL LOCK (BLOQUEO DE LOS CONTROLES)
ConroiLock _ Utilice esta opci6n pare desacfivar los
confroFes. El Bloqueo de Controles
...............................................6nicamente puede acfivarse durante
j Wrinkb G_arc_ un quedar6n
ciclo, Todos los controies
deshabilifados. Una vez acfivada, !a
funci6n "CONTROL LOCK" (BLOQUEO DE CONTROLES)
deber6 desactivarse pare que puedan volver a usarse los
controles. Luego de que se haya cerrado la secadora, ei
bot6n de encend]do permifir6 que se encienda la secadora,
pero los controles permanecer6n bloqueados. Cuando los
controies est_n bloqueados, se visualizer6 "CL", en farina
altemada con el tiempo restante estimado. Sila opci6n
"Wrinkle G,Jard" (Protecci6n Anfiarrugas) no est_ activada,
cuando se bioqueen los controles, el LED parpadear6.
Presione y sostenga el bot6n "WRINKLE GUARD" durante
fres segundos, pare bioquear o desbloquear los confroles.
MY CYCLE (MI CICLO)
I '_7 _'icle i E' bOt6nMY cYcLE .e permiteguardaruncic'Odesecado personaiizado paro uti,,zar,o en
otto momenta. De esta manera, podr6 guardar
los niveles q_e prefiera de temperature, niveJde secado yafros
opciones pare un ciclo y, m6s adeiante, recuperarbs con s61o
presionar un bot6n.
NOTA: S6ic puede guarder los ajustes personalizados pare
un ciclo a io vez. AI mantener presionado el bot6n MY CYCLE
se sobrescribir6 cuaiquier cicla previamente guardado.
Parcwguardar un clclo personollzado:
Presione el bot6n POWER para encender la secadora.
Gire la perilia del selector de cicfo pare seleccionar eJ
cicto que desee.
Presione el bot6n de MODiFICADOR DE CiCLO pare cambiar
Oel ajuste deseadc_
Presione el bot6n de OPC]ON DE CICLO pare agregar los
opciones deseadas.
O Mantencja presionado el bot6n MY CYCLE.
Para recuperar un cicio personallzado:
Presione el bot6n POWER pare encender la secadora.
Presioneel bat6n MY CYCLE.Se mostrar6n los ajusfes guardados.
Presione eI bot6n START/PAUSE pare que comience el
ciclo.
NOTA: El ciclo personalizado se puede ajustar de la misma
manera que cuaiquier afro cicmo. No obstante, una vez que
se presiona cualquier otto bot6n, el LED se apagar6 pare
indicar que los ajustes ya no coincTden exactamente con los
del ciclo pe_sonaiizado.
59
DAMP DRY SIGNAL (SECADO HOMEDO)
j Dam_DrySignaJ Si selecciona la secado hOmedor la secadora
j .................................emifir6 un aviso sonora cuando falte poco
para que la rope est_ totalmente seca, en
I Save En_rr_y_ caso de que desee sacarla de la secadora
pare plancharla o coJgarla pare secar.
Presione ymantenga pulsado el bot6n "SAVE ENERGY+"
durante cinco segundos pare seleccionar esta opci6n.
SAV i:: ENERGY+ (DE AHORRO DE ENERG|A}
...............................I Esta opci6n le permite reducir el consumo de
Save Energy_ energfa en el ciclo Normal, dependiendo
del famaSo de la carga.
El fiempo de secado combiar6 cuando se seleccione el
ahorro de energ_a.
NOTA: El ahorro de energ_a es la opci6n par defecto en el ciclo
Normal. Si desea un secado mes rapido que los ajustes del ciclo
Normal, puede desactlval ia opci6n de ahorro de energia.
INSTALACION Y usa DE LA REJILLA
DE SECADO
O
Con la _uerfa de la secadora abierta, deslice la re iilo en
el t_mbor de secado.
@
O
AsegOrese de que ia parte frontal de la rejilla encaje
correctamente en la cavidad en la base del filtro pare
peruses en la porte frontal del tambor. Los dos pates
posteriores de ia rejilla deben descansar sabre la pared
posterior encima del tambor.
Coioque en ia rejiIla ias prendas que va a secar. AsegOrese
de que ninguna porte de los prendas quede coigando
fuera de los bordes de la rejilla, pues podr_a entrar
en contacto con el tambor que est6 girando, Io que
producir_a ruido o podHa defer el tambor ola prenda.
NOTA: AsegOrese de retirar la rejilla de secado despu@s
de user el ciclo de SECADO EN REJILLA.
Usa del ciclo SECADO EN REJILLA (RACK DRY):
Use et cicio SECADO EN REJtLLA (RACK DRY) con articutos
tales coma su_teres de lane, sedas, y lenceria, que se
deberian secar en posici6n horizontal Tambi_n se puede user
SECADO EN REJILLA (RACK DRY} con articulos que no deben
secarse girando, tales coma caizado deportivo o animales de
peluche.
Oire el mando del selector de cic!o para seleccionar e!
ciclo AiR DRY.
@Presione el bot6n TEMP pare seleccionar los opciones
de ternperatura de Low (bajo) o Mid Low (media bajo).
Si no selecciona la temperature, el ciclo funcionar6 de
manera predeterminada sin color.
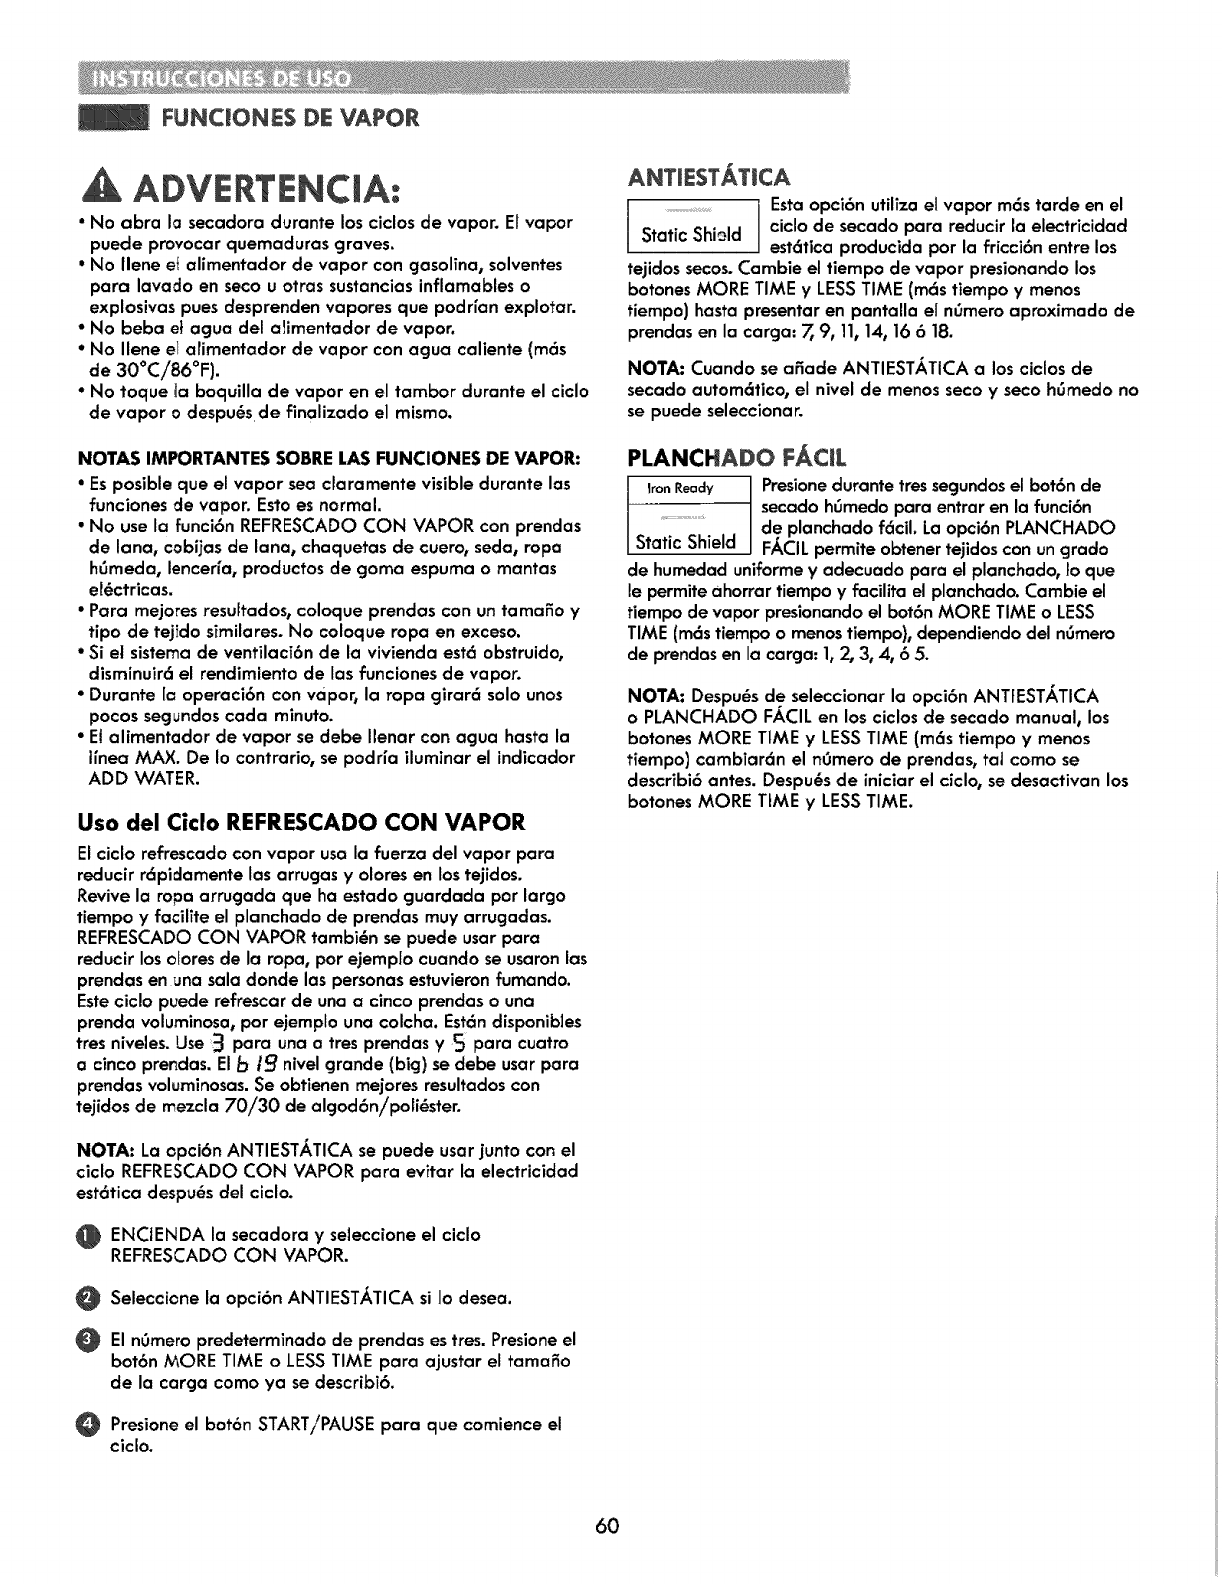
FUNCmONES DE VAPOR
ADVERTEHCIA:
" No abra la secadora durante los ciclos de vapor. El vapor
puede provocar quemaduras graves.
• No llene el alimentador de vapor con gasolina, solventes
para lavado en seco u otras sustancias inflamables o
explosivas pues desprenden vapores que podrfan explotar.
•No beba e} agua del alimentador de vapor.
• No llene el arimentador de vapor con agua caliente (m(_s
de 30°C/86°F).
• No toque _aboquilla de vapor en el tambor durante el ciclo
de vapor o despu_sde finalizado el mismo.
NOTAS IMPORTANTES SOBRE LAS FUNCIONES DE VAPOR:
• Es posible que el vapor sea claramente visible durante las
funciones de vapor. Esto es normal.
• No use la funci6n REFRESCADO CON VAPOR con prendas
de lana, cobijas de lana, chaquetas de cuero, seda, ropa
h6meda, lenceHa, productos de goma espuma o mantas
el_ctricas.
•Para mejores resultados, coloque prendas con un tamafio y
tipo de tejido similares. No coloque ropa en exceso.
•Si el sistema de ventilaci6n de la vivienda est6 obstruido,
disminuir6 el rendimiento de las funciones de vapor.
•Durante [o operaci6n con vapor, la ropa girar6 solo unos
pocos segundos cada minuto.
•El alimentador de vapor se debe Ilenar con agua hasta la
Ifnea MAX. De Io contrario, se podr{a iluminar el indicador
ADD WATER.
Uso del Ciclo REFRESCADO CON VAPOR
El ciclo refrescado con vapor usa la fuerza del vapor para
reducir r6pidamente las arrugas y olores en los tejidos.
Revive la ropa arrugada que ha estado guardada por largo
tiempo yfacilTte el planchado de prendas muy arrugadas.
REFRESCADO CON VAPOR tambi6n se puede usar para
reducir los ctores de la ropa, por ejemplo cuando se usaron las
prendas en una sala donde las personas estuvieron fumando.
Este ciclo puede refrescar de una a cinco prendas o una
prenda voluminosa, per ejemplo una colcha. Est6n disponibles
tres niveles. Use 3 para una a tres prendas y5 para cuatro
a cinco prendas. El b/9 nivel grande (big) se debe usar para
prendas voluminosas. Se obtienen mejores resultados con
tejidos de mezcla 70/30 de algod6nipoli_ster.
NOTA: La opci6n ANTIEST,_TICA se puede usar junto con el
ciclo REFRESCADO CON VAPOR para evitar la electricidad
est6tica despu@s del ciclo.
ENCIENDA la secadora y seleccione el ciclo
REFRESCADO CON VAPOR.
Seleccione la opci6n ANTIEST,_TICA si 1odesea.
El n0mero predeterminado de prendas es tres. Presione el
bot6n MORE TIME o LESS TIME para ajustar el tama_o
de la carga como ya se describT6.
Presione el bot6n START/PAUSE para que comience el
ciclo.
........................................Esta opci6n utilTza el vapor m6s tarde en el
Static Shield cJclo de secado para reducir la electricidad
est6fica producida por la fricci6n entre los
tejidos secos. Cambie el tiempo de vapor presionando los
botones MORE TIME yLESS TIME (m6s tiempo ymenos
tiempo) hasta presentar en pantalla el n_mero aproximado de
prendas en la carga: 7, 9, 11,14, 16 618.
NOTA: Cuando sea_ade ANTIESTATICAa losciclosde
secado autom6tico, el nivel de menos seco y secoh_medo no
se puede seleccionar.
PLANCHADO FACIL
konReady Presione durante tres segundosel bot6n de
secado h6medo para entrar en la funci6n
de planchado f6cil. La opci6n PLANCHADO
Static Shield F_CIL permite obtener tejidos con un grado
de humedad uniforme yadecuado para el planchaclo, Foque
le permite ahorrar tiempo yfacilita el planchado. Cambie el
tiempo de vapor presianando el bot6n MORE TIME o LESS
TIME (m6s tiempo o menos tiempo}, dependiendo clel n6mero
de prendas en la carga: 1, 2, 3, 4, 6 5.
NOTA: Despu_s de seleccionar la opci6n ANTFESTATICA
o PLANCHADO F,_.CILen los ciclos de secado manual, los
botones MORE TIME yLESS TIME (m6s tiempo ymenos
tiempo) cambiar6n el ngmero de prendas, tat como se
describi6 antes. Despu6s de iniciar el ciclo, se desactivan los
botones MORE TLME yLESS TIME.
6O

FUNCIONES DE VAPOR (confinuaci6n)
L|enado del Alimentador de vapor:
O HomeIc gaveta.
agua del
Alimentador chorro
SOLO
de vapor
Llene el atimentador de vapor con agua corriente de{
chorro basra la ffnea MAX o basra que el agua toque la
malla del filtro.
t
/
ion
J
j)
O Cotoque el alimentador de vapor en {a gaveta y
emp6jela basra que haga clic en su posici6n.
NOTAS IMPORTANTES SABRE LOS CJCLO$ DE VAPOR
Antes de usar un clc|o de vapor, debe ffenar con agua eJaffmen|ador de vapor basra la ffnea MAX;
aseg_0rese de que la gaveta es_ completamen|e cerrada. Si el alimentador de vapor se queda s{n agua,
el indicador ADD WATER parpadear6. S{ Io hate, apague la secadara, flene el alimentador y relnide e|
c{cJode vapor.
Cuanda use vapor par prirnera vez, es posible que el a|imen_ador de vapor no tenga agua suficienfe
y se ilumlne el indlcadar ADD WATER. L|ene e| affmentador y reinlcie el cida.
"Use 0nicarnente agua. No Ilene el alirnentador de vapor con otros Ifquidos, enjuagues ni detergentes.
•Antes de mover Ja secadora, aseg_rese de que el alimentador de vapor est_ vacfo.
• No ut{mioeagua destlada pues eJ sensor de niveJ de agua en el generador de vapor no funcionar6.
•Tenga cuidado de no derramar agua cuando est_$colocando agua en el alimentador de vapor.
•Lirnpie cuamquier agua que se ha,/a derramado cerca del alirnentador de vapor y la gaveta antes
de arrancar _a secadora.
•Durante maoperaci6n con vapor, maropa girar6 solo unos pocos segundos coda minuto.
ADVERTENCIA:
•No I{ene el alimentador de vapor con ffquidos coma gasolina, so[ventes para lavado al seco u arras sustancias inflarnables
oexplosivas, pues desprenden vapores que podr{an explotar.
•No iJene e! alimentador de vapor con agua caliente {m6s de 30°C/86°F).
•No beba el agua del afimentador de vapor.
61
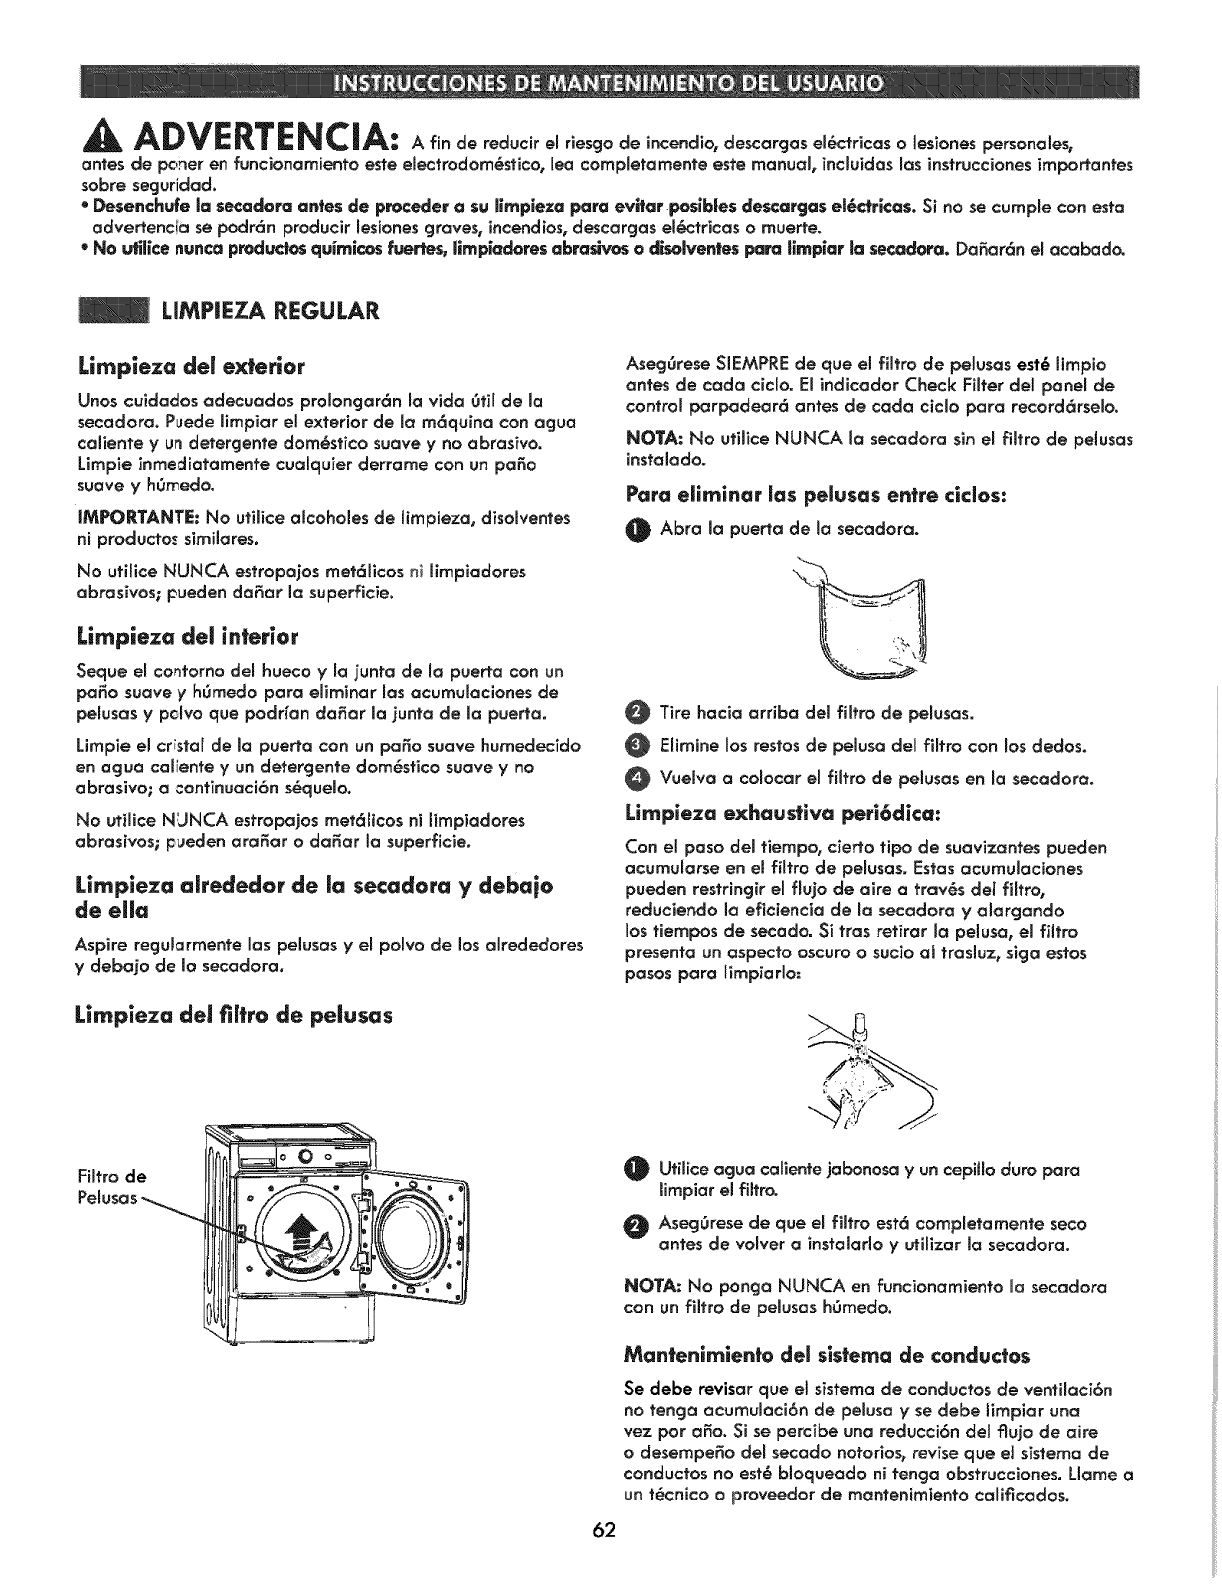
AA_ rJIT_ _P|A
| _VVCR|_|_|_* A fin de reducir emriesgo de incendio_ descargas el_ctr]cas o les,ones personaJes,
antes de poner en funcionamiento este electrodorn_stico, Jea completamente este manual, incluidas los instrucciones importantes
sabre seguridad.
• Desenchufe Jasecadora antes de preceder a $u fimpieza pare evi|ar posJbles descargcls el_c¢ricas. Si no se cumple con esta
advertencla se podr6n producir lesiones gravest incendios, descargas el_ctricas omuerte.
•No ufil;ce nunca produc|o_ quimica_ fuer'res, limpladores abrasives e disolventes para limp;at la set,dora. Da_ar6n el acabado.
LIMP|EZA REGULAR
Limpieza de| exterior
Unos cuidados adecuados proRongar6n mavida 0ill de la
secadora. Puede limpiar ei exterior de la m6quina con agua
caliente yu_ detergente domESsticosuave yno abrasive.
Limpie inmediatarnente cualqu_er derrame con un pa_o
suave yhgmedo.
IMPORTANTE: No utiiice alcoholes de limpieza, disomventes
ni productos sirnilares.
No ufilice NUNCA estropajos met61icos ni limpiadores
abrasives; pueden da_ar la superficie.
Limpieza del interior
Seque el co_torno del hueco yla junta de la puerto con un
pa_o suave y hgmedo para eliminar los acumulaciones de
pemusasy pclvo que podrfan dofiar la junta de la puerto.
Lirnpie el crrstal de la puerto con un paffo suave humedecido
en agua caliente yun detergente dom6stico suave yno
abrasive; a continuaci6n s6quelo.
No utilice NUNCA estropajos met61icos ni limpiadores
abrasives; p_eden ara_ar o dafiar la superficie.
Limpleza airededor de Jasecadora y debaio
de efla
Aspire regularrnente los pelusas y el pomvode los akededores
ydebajo de Io secadora.
Limpieza deJ fiffro de pe|usas
Filtro de
Pemusas
62
Aseg6rese SIEMPRE de que el filtro de pelusas est6 lirnpio
antes de coda ciclo. El indicador Check Filter del panel de
control parpadear6 antes de coda ciclo para record6rse_o.
NOTA: No utilice NUNCA la secadora sin el filtro de pelusas
instalodo.
Para ellrnina_ _as pelusas entre cities:
Abra la puerto de la secadora.
Tire hacia arriba del filtro de pe_usas.
Elimine los restos de pelusa del filtro con _osdedos.
Vue_va a co_ocar e_ fiffro de pelusas en la secadora.
Lirnpleza exhaustlva peri6dica:
Con el paso del fiempo, cierto ripe de suavizantes pueden
acumularse en el filtro de pelusas. Estas acumulaciones
pueden restringir e_ flujo de aire otray,s del fitro0
reduciendo la eficiencia de la secadora yalargando
Jos tiempos de secado. Sitras ret_rar la pelusa, el fiJtro
presento un aspecto oscuro o sucio al trasluz0 siga estos
poses para lirnpiarlo:
Ufilice acjuacaliente jabonosa yuncepHloduropara
limpiar el fiffro.
Aseggrese de que el filtro est6 completamente seco
antes de velvet a instalarloy utilizar la secadora.
NOTA: No pongo NUNCA en funcionamiento _a secadora
con un fiffro de pelusas h6medo.
Mantenlmien|o de_ slstema de conduc_os
Se debe revisor que el sfsterna de conductos de ventiloci6n
no tenga ocumulaci6n de pelusa yse debe _impiar una
vez per a_o. Si se percibe una reducci6n del fluio de aire
odesempe_o de_ secado notaries, revise que e_sisterna de
conductos no est_ bloqueado ni tenga obstrucciones. Llame a
un t_cnico o proveedor de mantenimiento califlcodos.
MANTENIMiENTO DEL $1STEMA DE VENTILACI6N
La causa m6s habituam de problernas en |a secadora es una ventffaci6n deficiente. Una ventilaci6n deficiente puede producirse
per _ossiguientes motives:
* CONDUCTOS DE VENT|LACI_N SUCIOS O DAI_ADOS
* MATERIAL |NADECUADO DE LOS CONDUCTOS DE
VENT|LACION
" EXTRACTOR OBSTRUiDO O DAI_IADO
* CONDUCTO DE VENTILACION DE LONGITUD EXCESIVA
ouse DE CONDUCTOS DE VENTILACi6N DE PLASTICO O
LAMINA METAL|CAo
Mantenlrniento dei slstema de ventilaci6n
Deben comprobarse los eonductos de ventilaci6n en busca do
acurnumaciones de pelusa ylimpiarJos a! menos una vez at a_o.
Si se produce cualquier reducci6n aprec[able en el rendimiente
del secado, compruebe los conductos en busca de obstrucciones
ybloqueos.
Si se ilumina el indicador CHECK VENT, debe comprobarse
inmediatamente la existencia de obstrucciones o da_os en
el sistema de ventilac[6n. Emindicador CHECK VENT indTca
una reducci6n grave en la ventilaci6n del flujo de aire que
reducir6 dr6sticamente emrendimiento energ_tico y aumentar6
mostiempos cle secado. Los sistemasde venti[aci6n da_ados o
restringidos no est6n cubiertos per la garant_a de la secadora.
Los daffos ocasionados en la secadora derivados de sistemas
de ventilaci6n da_ados, obstruidos o inadecuados per cualquier
otro rnotivo, no est6n cubiertos per la garanffa de la unidad.
Indlcador CHECK VENT
E!sistema de advertencia CHECK VENT ha side diseEado para
ayudarle a evitar la reducci6n del rendimiento que pueden
ocasionar rasobstrucciones en e] sistema de ventilaci6n de la
vivienda. El indicador CHECK VENT se ilurnina para avisarle
cuando se produce un problema en et sistema, de manera que
pueda repararloo
Aunque dek,e cornprobar yreaffzar el mantenimiento del sistema
de ventilaci6n recjumarmente,el sistemade advertencia CHECK
VENT detectar6 yle avisar6 de cualquier probmemagrave que
se desarrolle en el sisterna do ventilaci6n de la vivienda. Entre
estos, se incluyen sistemasde ventilaci6n que no sean adecuados
per cualquier motive0 incluido una obstrucci6n en la ventilaci6n0
conductos aplastados o retorcidos, o una ventilaci6n que supere
la Iongitud mc_xima recornendada tal coma se describe on la
secci6n de instalaci6n.
NOTA: La Wongitudtotal incluye la Iongitud desde la pgrte U
posterior de _asecadora hasta el extractor exterior, MAS un
factor per coda code de 90 ° en el sistema de ventilaci6n. Per
ejemplo, si la distancia desde maparte posterior de la secadora
basra el extractor es de 9 m (30 pies), yhay cuatro codes en el
sistema, superar6 la Iongffud m6xima de 8r5 m (28 pies) que se
permite en estoscondiciones.
El indicador CHECK VENT del panel de control le avisor6 de
que eJsistema de ventilaci6n no est6 desplazando suficiente
aire de masecadora at exterior. Esta reducci6n dei flujo de aire
ocasionar_ tiempos de secado m6s largos, un secado deficiente
y, probablemente, aveHas en masecadora.
Le recordarnos que eJsistema de ventilaci6n externa de
la secadora so considera parte de suvivienda y no est6
cubierta per !a garanffa del producto ni per los contratos de
protecci6n. Hay servicios disponibJespara reafizar la limpieza
oel mantenimiento de maventimaci6n externa. Sears effete
este servicio mediante Sears Carpet, Upholstery, and Duct
Cleaning. Liome ai 1-800-661-6594 para solicitar ei servicio
de mantenimiento de conductos de Sears (si est6 disponible
en su zona). 63
Funcionamiento de CHECK VENT
El sisterna CHECK VENT utiliza componentes que ya se
encuentran en la secadora. Mediante la supervisi6n de estos
componentes durante varies cicios, el control puede determinar
el nivel de obstrucci6n que presenta el sistema de ventilaci6n.
Si detecta un alto niveJ de obstrucci6n, encender6 el indicador
CHECK VENT para avisaHe del problema. La secadora
seguir6 funcionando despu_s do que se ilumine el indicador,
pero deber6 limpiar o reparar inmediatamente el sistema
de ventilaci6n para evitar que se prolonguen los tiempos de
secado y un mayor consume de energ_a.
BMPORTA_Y_: Para que _a secadora pueda secar
_as prendas de manero adecuada y eficiente, es
extremadamente importante que el sistema de venti_aci6n
sea Io m6s carte yest_ _o m6s limpio posible. Su longitud
DEBE ser inferior alas especificaciones de _ongit_d m6xima
que se detallaban en la secci6n de insta_aci6n. Tambi_n es
rnuy importante que se asegure de que cuondo se instate la
secadora, el sistema de ventilaci6n est_ limpio, no presente
obstrucciones yno est_ aplastado ni retorcido.
Si no se cumplen estas directrices se alargar6n _ostiempos
de secado, se consumir6 m6s energ_a y es posible que incluso
las prendas resuffen da_adas o se produzca una aver_a en la
secadora. Cuando la obstruccT6n deJ sistema de ventilaci6n sea
crffica, el indicador CHECK VENT parpadear6 para avisar_e do
este prob_ema, de manera que pueda _impiarlo o repararlo.
Para evit_r falsas alarmas ofrecer
Yuna mayor
confiabilidad, la secadora examinar6 eI estado de
ventilaci6n durante varias cargas. Si durante varias cargas
consecutivas se superan _os ffmites de obstrucci6n, e_
control har6 parpadear e_ indicodor CHECK VENT.
Cuando parpadea e_ indicador CHECK VENT, indica que
es necesario comprobar Io antes posib_e la ventilaci6n
externa en busca de posib_es obstrucciones.
El indicador CHECKVENT permanecer6encendido
(parpadeando) basra que se haya resueffo la obstrucci6n
Y ADEMAS el control haya comprobado que e_flu]o de
aire ha mejorado durante varies cicJos.
Una vez limpiado o reparado e_sistema de ventilaci6n,
el indicador CHECK VENT tarda varies ciclos en
restablecerse y apagar el indicador.
NOTA: E_indicador CHECK VENT ha side dise_odo para
medir eJrendimiento durante varies ciclos consecutivos antes do
activarse o desact_varse, con objeto de evitar falsas a_armas.
Uno carga muy grande, come unedred6n muy vo_uminoso,
puede hacer que el sistema de comproboci6n de la ventilaci6n
detecte que el sistema de venti_aci6n est6 obstruido, pero en
este case no haHa que el indicador parpadease. No obstante, si
seejecutar6n consecutivamente varias cargas muy grandes, es
posibJe que se encendiese el indicador CHECK VENT.

Si experimenta alcj6n problerna con Ja secadora,
podr6 transmitir dates atroves del tel@tone con
el equipo Kenmore Connect. As[ podr6 hablar
directamente con nuestros t_cnicos especializados.
El t_cnico cjraba los dates transmitidos desde la
m6quina yJosutiliza para analizar el probJema,
ofreciendo un diacjn6stico r6pido y eficaz.
Use dei sistema Kenrnore Connect TM
Si experimenta problemas con la secadora, Ilome al
1-800-4-MY-HOME e. $61o utilice el sistema Kenmore
Connect cuando se Io pida el equipo de Kenmore
Connect. Los sonidos de transmisi6n que oir6 son
normales y suenan de forma parecida a un equipo de
fax.
Kenmore Connect no se puede activar a rnenos que
la secodora se encienda pulsodo el bot6n POWER.
Sila secadora no se puede encender, la soluci6n de
problemas deber6 llevorse a cabo sin utilizar Kenmore
Connect.
Pr]mero_ comuniquese al 1-800-4-MY-HOME® (1-800-469-4663). Si el ngmero del tel_fono que est6 utilizando est6
en el archive, y se asocia con la secadora, usted set6 retransmitido r6pidamente a un agente del equipo Kenmore
Connect. Siga los instruccionesdel t_cnico ysiga estos poses cuando se le solicite.
/1/
/
Apariencia puede variar seg0n el modelo
MANTENGA el m_cr6fono del tel_fono sobre el bot6n de ENCENDIDO0 cuando el centre
de Ilamadas se Io solicite, ano m6s de 2,5 cm (pero sin tocar) la m6quina.
NOTA: No pulse ninggn otto bet6n nl gire el mando de_ selector de cicio.
MANTENGA PULSADO el bot6n de TEMP mientras sigue sujetando el tel_fono sobre el
bot6n POWER.
ESPEREA ESCUCHAR tres pTfidos.Tras escuchar los tres pitidos0 sueffe el bot6n de
TEMP. Mantencja el tel_fono en su sitio basra que haya terminado la transmisi6n de tones.
En la pantaffa aparecer6 el recuento de fiempo. Una vez finolizada la cuenta atr6s y
cuando los tones se hoyan deten_do, reanude su conversaci6n con el t_cnico qua 18podr6
ayudar autiffzar la informaci6n transmfflda para el an61isis.
NOTA:
*Para obtener me]ores resultados, no mueva el tel_fono mientras se est_n trasrnitiendo los
tonos.
"Si el agente del centre de Ilamadas no puede grabar con precisi6n los datos_quiz6 Je pida
que Io intente de nuevo.
*Si pulsa el bot6n POWER durante la transmisi6n se apagar6 el sistema Kenmore Connect.
64
ANTES DE SOLICITAR ASISTENCIA TI:CNICA
_:_La luz CHECK VENT parpadea. El sistema de ventTlaci6n es demasiado larcjo
o tiene demasiaclos cambTos de direcci6ni
obstrucciones.
Existen bloqueos parciates en los conductos
par acumulaciones de pelusas u otros objetos
extra fios.
Instale un conducto con un recorrido m6s corto o recto.
Consulte las TnstruccTones de instalaci6n para obtener
m6s detalles.
El conducto debe comprobarse/limpiarse
inmedJatamente. La secadora puede utffizarse en estas
condiciones, pero ios tiempos de secado ser6n mayores y
aumentar6 el consumo el@ctrico.
_uEste indicador de advertencia no sefiala una averla de la secadora y no est6 cubierto par la garantla
de la m6quina. P6ngase en contacto con eJ servicio de limpieza de conductos para concertar una cita
y limpiar e inspeccionar su sistema de ventilaci6n.
.......,,,,,,,, ....
La secadora no se encJende. Elcable de alimentacT6n no se ha enchufado de Compruebe que el enchufe est6 conectado flrmemenle a
forma adecuada, una toma de pared con conex|6n de cor_.xi6n a tierm q_e
La secadora no calienta.
Manchas de grasa o sucledad en las
prendas
Electricidad est6tica exceslva en
las prendas tras el secado
Se ha fundido el fusTble, ha sattado el disyuntor
o se ha producido un carte de suministro
el_ctr|co en la vivienda.
Se ha fundido ei fusible, ha saltado el disyuntor
o se ha producido un carte de suminJstro
el6ctrico en la vivienda.
,,,,,, ,,,,,
Suministro o servicTo de gas eortado (s61o
modelos de gas).
Se han secado juntas prendas limpias y sucias.
Las prendas no se ITmpTaron o enjuagaron
adeeuadamente antes de introducirlas en la
secadora.
No se ha utitizado suavizante o se ha usado de
farina incorrecta.
Se est6n secando prendas sint_$ticas,de
planchado permanente o de mezcla sint@tica.
Los ajustes de cator, tamafio de la carga o
humedad en las prendas no son consistentes.
El tiempo de secado no es
€onsistente.
coincTda con la placa de especificaciones de la secodara.
ReTnicie el disyuntor o sustituya el fusible. No aumente la
capacidad del fusible. Si el problema es una sobrecarcja
dei cTrcuito, hacja que Io solucTone un electricJsta
cualificado.
Reinicie el disyuntor o sustituya et fusible. No aumeni'e la
capacidad del fusible. ST et problema es una sobrecarcja
dei circuito, hacja que Io solucione un electricista
cualificado.
NOTA:Debido aI disefio de las secadoras el6ctricas_ es
posTble que un problema del circuito permffa que una
secadora el6ctdca funcione sin cator.
Compruebe que las v61vulas de carte de gas de ia
vTvienda y la secadora estcin abiertas par compietc_
Aunque Ja secadoro no disponga de suministro de cjass
funcionar6 y no mostrar6 c6cligos de error. Compruebe
que funcionen con normalidad otros electrodom_sticos de
Ia vTvienda que utTITcen cjas.
,,,,,,
Utilice su secadora s61o para secar prendas limpias; la ropa
suda puede contaminar prendas limpias introducidas en la
misma corcja o en cargas posterTores.
Las manchas en prendas secas podr{an no haber sido
eiirninadas durante el proceso de lavado. Aseq_rese de
que ias prendas ban sido limpiadas o enjuaqadas par
completo seg0n las instruccTones de su lavadora y deJ
fabricante del detercjente. Ciertas manchas clific|les
podrian requerir un tratamiento previo at lavado_
Utilice un suavTzante o la opci6n ANTIESTATICA_ si
dispone de ella, para reducir la electrieidad est6ticao
Asecj0rese de seguir Ias instrucciones del fabricante.
Estos tejidos son, par naturaleza, m_ls propensos a
acumular electricTdad est_tica. Intente utilizar suavTzante
o utilice la opci6n DAMP DRY Yio un ajuste de tiernpo
m6s corto para la funci6n de secado manual.
Fl tiempo de secado de una carcja variar_ dependiendo
del tipo de calor utilizado (el@ctricot gas naturat o
gas LP), el tama_o de Ia carcja, los tipos de tejidos_ la
humedad de las prendas y el estado de los conductas
de ventiiacT6n y del fTItro de pelusas. Inciuso una carga
desequilibrada en Ia lavadora puede ocasionar un
centrifucJado deficiente_ que har6 que las prendas est6n
m6s h0medas ytarden mc_s tiempo en secarse.
65
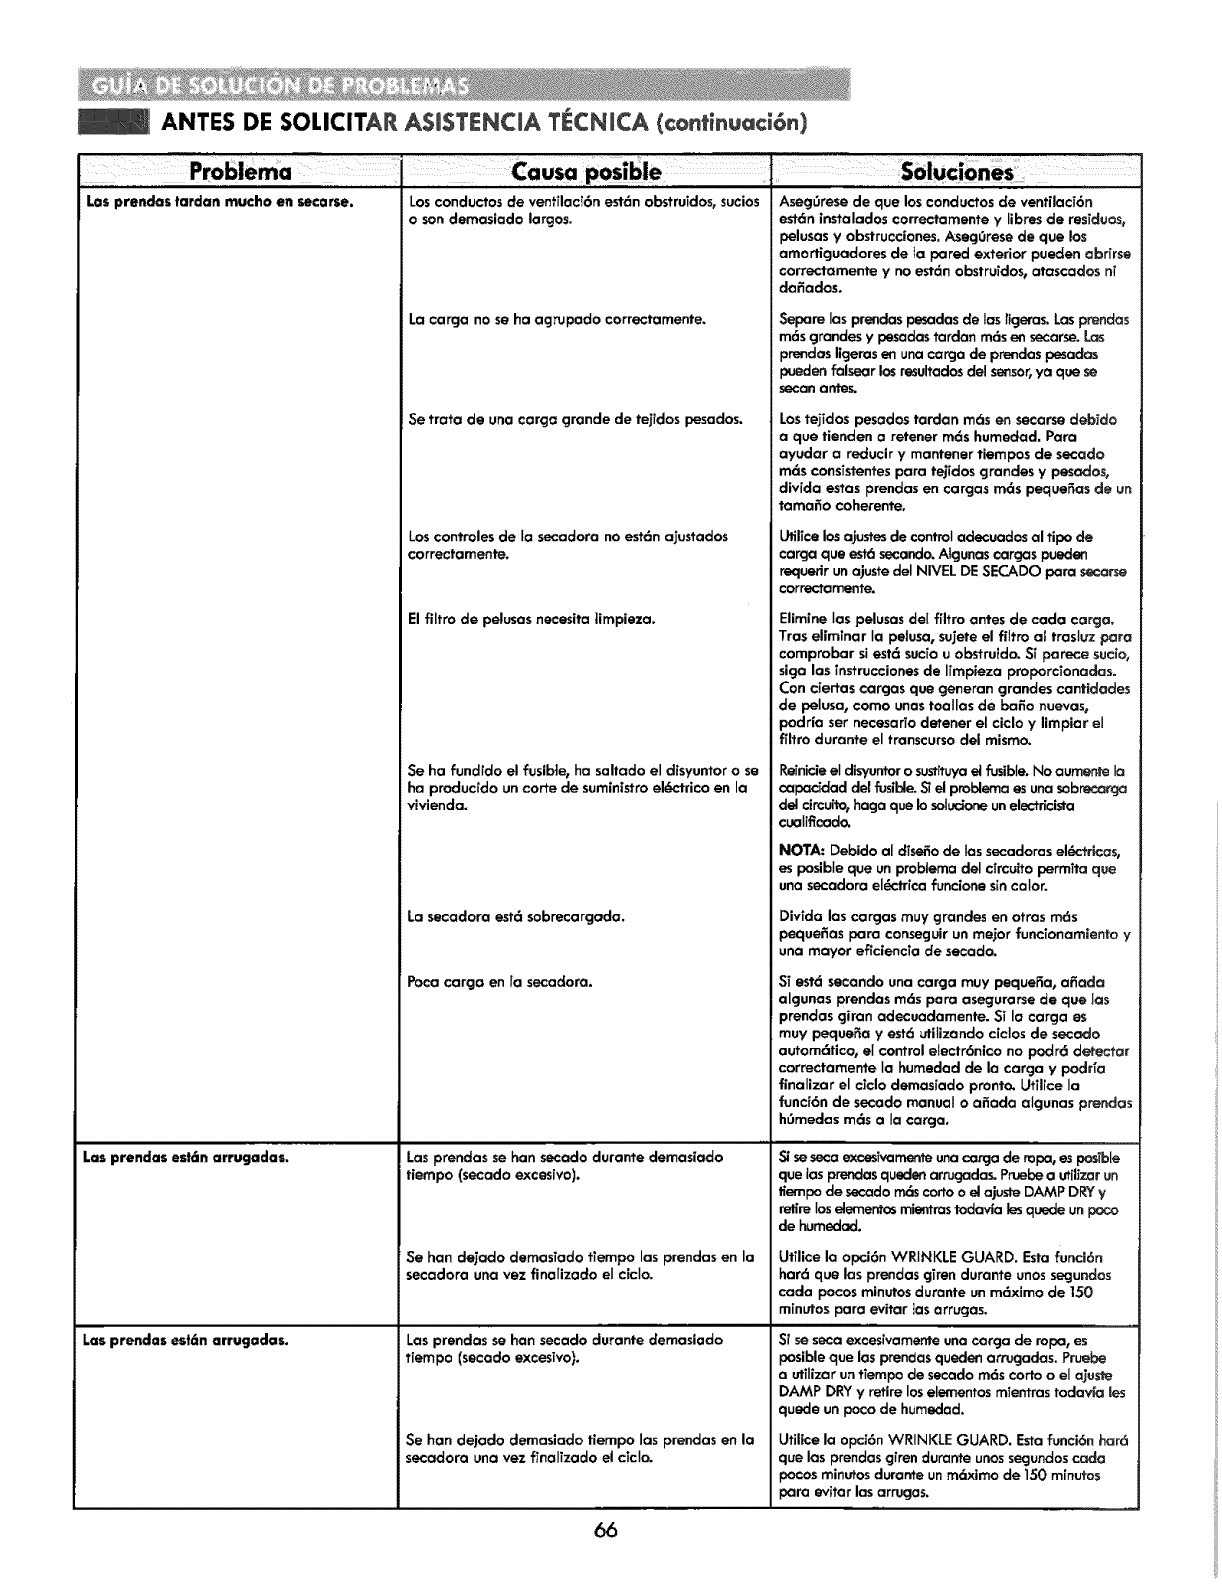
ANTES DE SOLICITAR ASISTENC_A TECN_CA (continuclci6n)
Los conductos de venfilac_6n est6n obstruTdos, sucios
o son demasiado largos.
La carqa no se ha acj_upado correctamente.
Se trata de una cargo grande de te]fdos pesados.
Los prendas tardan mucho en secarse.
Los prendas est6n arrugadas.
Losprendas est6n arrugadas.
Los controles de la secadora no est6n ajustados
correctamente.
El filtro de pelusas necesita timpieza.
Se ha fundido el fusible, ha saltado el dlsyuntor o se
ha producldo un carte de sumlnistro el_--trlco en la
vlvlenda.
La secadora est6 sobrecargada.
Poca cargo en ta secacioro.
Las prendas se han secado durante demasiado
t|empo (secado excesivo).
Se han dejado demasTado tTempo las prendas en la
secadora una vez finalizado eI dcIo.
Las prendas se han secado durante demaslado
tiempo (secado excesivo).
Se ban dejado demasiado tiernpo los prendas en la
secadora una vez fTnaffzadoel cTclc_
Aseg0rese de que los conductos de ventilacT6n
estdn instalados correctamente y libres de res[duos_
pelusas y obstrucciones. Aseg0rese de que los
amortiguadores de Ia pared exterior pueden abr[rse
correctamente y no estcin obstruidos_ atascados r_T
dafiados.
Sepam Ias prendas pesadas de los llgeras. Los prendas
m6s grandes y pesadas tardan rods en secarse. [as
prendas ligeras en una cargo de prendas pesados
pueden falsear los resultados del sensor,ya que se
secan antes.
LostejTdos pesadostordan rods en secarsedeb_do
a que tienden o retener m6s humedad. Pora
ayudar a reducir y mantener tiempos de secado
m6s consTstentespara tejldos grandes y pesados,
div[da estasprendas en cargas m6s pequefias de un
tamafio coherente.
Utifice los ajustes de control adecuades al tipo de
carga que estd secando. Atgunas cargas pueden
requerir un ajuste del NIVEL DE SECADO para secarse
correctamente.
Elimine Ias pelusas del filtro antes de cada cargo.
Tras elim|nar Ia peJusa, sujete el fiffro al trasJuz poro
comprobar si estc_suc[o u obstruldo. ST parece suclo0
siga ias Tnstrucciones de ffmpieza proporcTonadas.
Con ciertas cargas que generan grandes cantidodes
de pelusa, coma unas toaHas de bafio nuevas,
podria ser necesar_o detener el clclo y llmpJar el
filtro durante el transcurso del mJsmc_
Reinicie el disyuntor o sustffuya el fusible. No aumenfe Io
capacidad del fusible. STel pmblerna es una sobrecarga
del circuiJo_haga que Io sotuclone unelectricista
cualificad_
NOTA: Debido al dTsefiode tas secadorasel_rlcas,
es posible que un problemadel cTrcultopermffa que
una secadora el_ctricafuncionesincator.
Divida las carcjas muy grandes en otras m6s
pequefias para conseguir un mejor funoionam|ento y
una mayor efrciencTa de secado.
ST est6 secando una cargo muy pequefia_ afiodo
algunas prendas m6s para asegurarse de que los
prendas giron adecuadamente. $1 la carga es
muy pequefia y est6 ufilizando ciclos de secado
autom6ticot el control electr6nioo no podr6 detector
correctamente la humedad de la carga y podr[o
flnallzar el cJclo demos[ado pronto. UtHice la
funcf6n de secado manual o afioda algunas prendos
hOmedas m6s aIa carga,
SI se seca e_xc_e_,Tva_ una carga de ropa, es posTble
que las prendas queden arrugadas. Pruebe a utilJzar un
tlempo de secado m6s corto o el ajuste DAMP DRY y
retire los elementos mientras todavia les quede un poco
de humedad.
UtTlice la opci6n WRINKLE GUARD. Esta fund6n
har6 que las prendas gTren durante unos segundos
coda pocos minutos durante un m6xlmo de 150
minutos para evitar ]as arrugas.
,,,,,
Sr se seca excesivamente una carga de ropa, es
poslble que los prendas queden arrugadas. Pruebe
o ufiSlzor un tTempo de secado m6s corto o el ajus?e
DAMP DRY y retire los elementos m_entras todov[o les
quede un poco de humedad.
Utilice la opci6n WRINKLE GUARD. Esta funci6n har6
que las prendas giren durante unos segundos coda
pocos minutos duronte un mn6ximo de 150 mrnutos
paro evitor las arrugas.
66
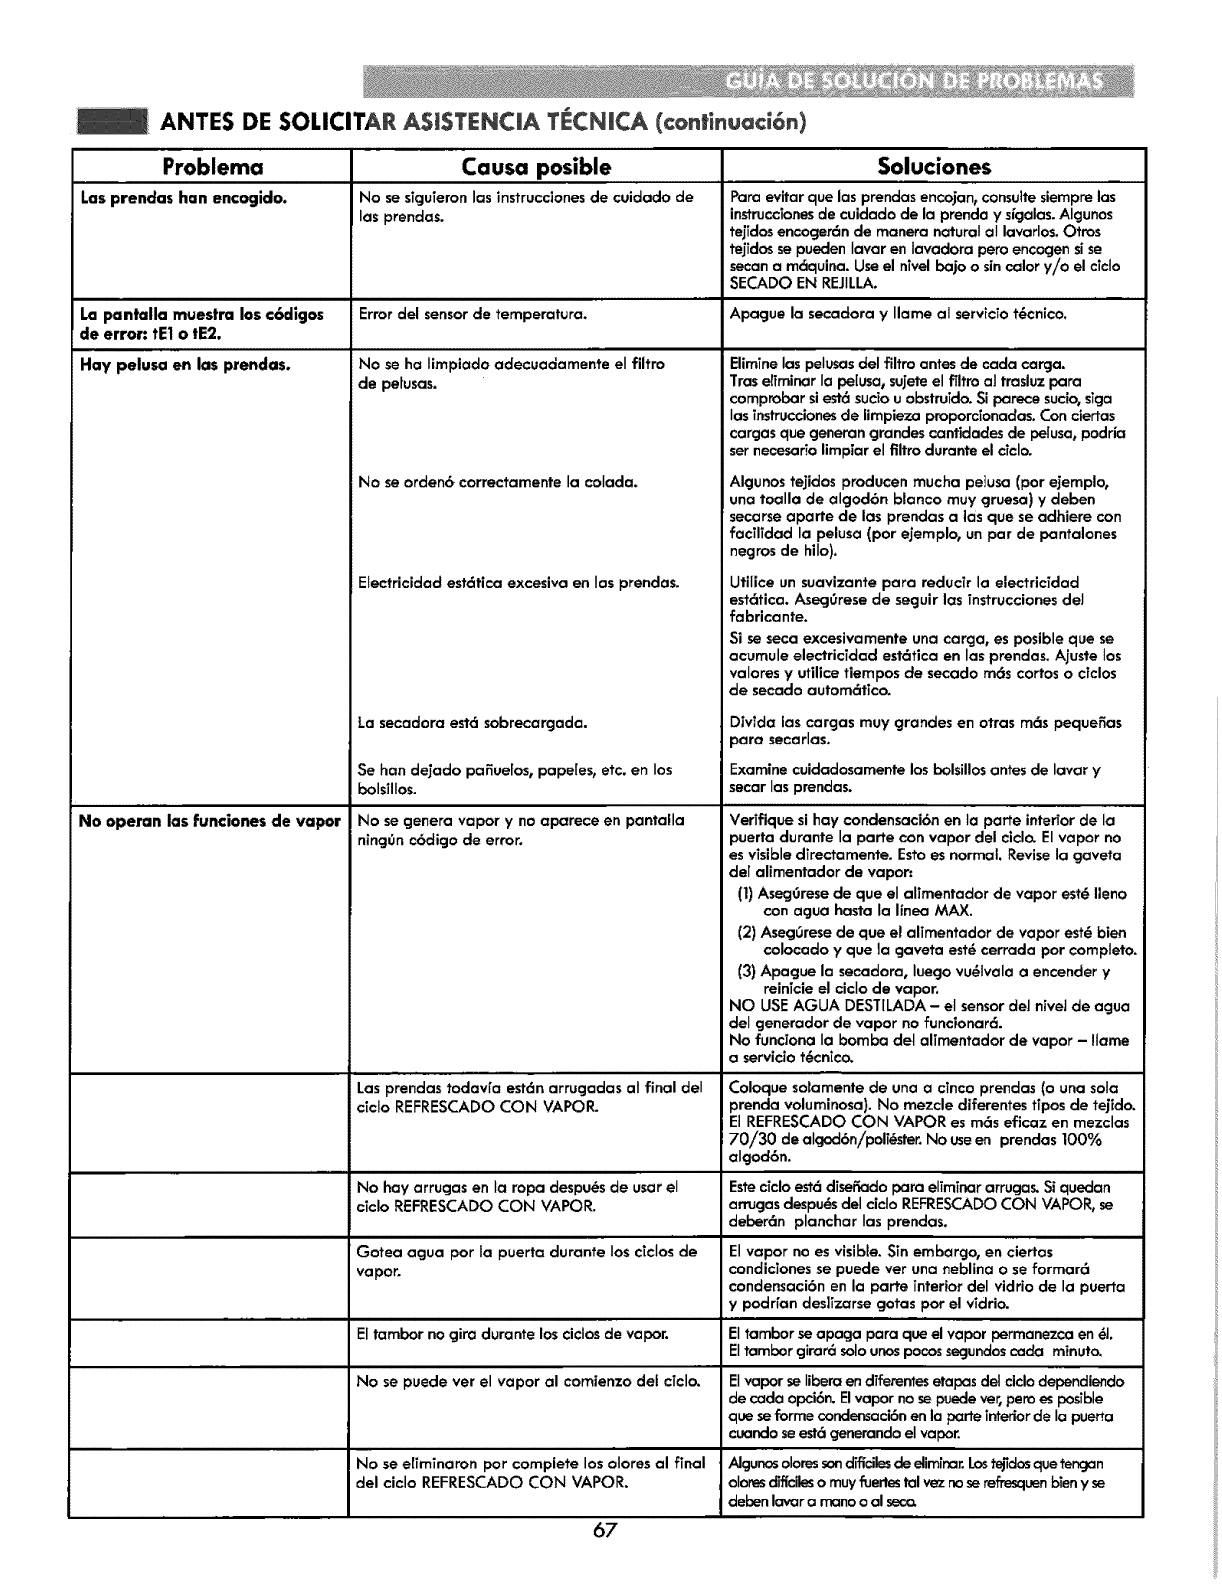
ANTES DE SOLICITAR ASiST_:NCiA TECNmCA (¢ontinuaci6n)
Problema Causa posible
Las prendas han encogido. No se siquieron las instrucclones de cuidado de
las prendas.
=,
La pantalla muestra los c6dlgos Error del sensor de temperatura,
de error: tEl o tE2.
Hay pelusa en las prendas. No se ha limpiado adecuadamente el filtro
de pefusas.
No operan las funciones de vapor
No se orden6 correctamente la colada.
Electricidad est6tica excesiva en las prendos.
La secadora est6 sobrecargada.
Se han dejado pafiue[os, pape[es, etc. en los
bolsillos.
No se genera vapor y no aparece en pantafla
ning_n c6digo de error,
,,,,,L ,, ,,,,,,,,,,,,,,,,,,,,,,,,,,,,,,,,,,,,,,,,,
Las prendas todav[a est6n arrugadas aJ final deI
cicto REFRESCADO CON VAPOR.
No hay arrugas en ta ropa despu@sde usar el
ciclo REFRESCADO CON VAPOR.
Gotea agua por ta puerta durante los cicJos de
vapor.
El tambor no gira durante los cictos de vapor.
No se puecle ver el vapor al comienzo def cTclo.
No se e[iminaron pot complete los olores al final
del cicJo REFRESCADO CON VAPOR.
Soluciones
m
Paro evitar que los prendas encojan, consulte siempre los
instrucciones de cuidado de la prenda y sfgalas. Algunos
teiidos encoger_n de manera natural at lavarlos. Otms
te]Jdos se pueden Javar en Javadora pero encogen si se
secan a m6quina. Use el nivel bajo o sin calor Yio el cicio
SECADO EN REJILLA.
Apague la secadora yIlame at servicTo t_cnico,
Elimine las pelusasdel filtro antes de cada carga.
Tras effminar Ia pelusa,sujete el filtro aJtmsluz para
comprobar si est6 sucio u obstruido. Si porece sucio,siga
Ias Tnstruccionesde iimpieza proporcionadas. Con eiertas
cargos que generon grandes cantidades de pefusa,podria
sernecesarTolimpiar el filtro durante el crclo.
Algunos tejidos producen mucha pelusa (por ejemplo,
una toalla de algodbn blanco muy gruesa) y deben
secarse oparte de las prendas alas que se adhiere con
facilidad la peluso (por ejemplo, un par de pantalones
negros de hilo),
UtiIice un suavizante para reducir la electricidad
est6tica, AsecjOrese de seguir los instrucciones deJ
fabricante,
Si se seca excesivamente una carga, es posible que se
acumule electricTdad est6tica en las prendas. Ajuste los
valores y utilice tiempos de secado m6s cortos o cicios
de secado autom6tico,
Divida ias cargas muy grandes en otras m6s pequefias
para secarlas.
Examine cuidadosamente los bolsillos antes de lavar y
secar las prendas,
,,,,,,,,,,,,,,
Verifique si hay condensaci6n en la parte interior de la
puerta durante la parte con vapor dei ciclo. El vapor no
es visible directamente. Esto es normal. Revise la gaveta
del alimentador de vapor=
(1) AsegOrese de que el alimentador de vapor est_ Ileno
con agua hasta la linea MAX,
(2) Aseggrese de que e! alimentador de vapor est_ bien
colocado y que la gaveta est6 cerrada por completo.
(3} Apague la secadora, luego vu@lvala a encender y
reinicie el ciclo de vapor,
NO USE AGUA DEST[LADA - el sensor del niveJ de agua
del generador de vapor no funcionarci.
No funciona la bomba del alimentador de vapor - Ilame
a servicio t_cnico,
=_,
Coloque solamente de una a cinco prendas (o una sola
prenda voluminosa). No mezcle diferentes tipos de tejido,
El REFRESCADO CON VAPOR es m6s eficaz en mezclas
170/30 de alcjod6nipoli@ster. No use en prendas 100%
algod6n.
EstecTcloest6 disefiado pora elTminararrugas. Si quedan
arrugas despu_s del ciclo REFRESCADOCON VAPOR, se
deber6n planchar las prendas.
El vapor no es visible. Sin embargo, en ciertas
condiciones se puede ver una neblina o se formar6
condensacibn en la parte interior del vidria de la puerta
y podrian deslizarse gotas pot el vidrio.
Eltambor se apoga para que el vapor permanezca en _.
El tambor giran_ solo unos pocos segundos cada minuto,
Elvapor se Iibero en diferentesetapas del ciclodepondiendo
de cada opci6n. Elvapor no se puede ver,perues posible
que se forme condensaci6nen la parte irrterior de la puerta
cuanclose est6 generando el vapor.
hJgunosoloress_ndiffcilesde eliminar.Los_'idos que tengan
oloresdTficileso muy flJerlestalvez no se refTesquenbieny se
deben lavara rnanoo al secc_
67
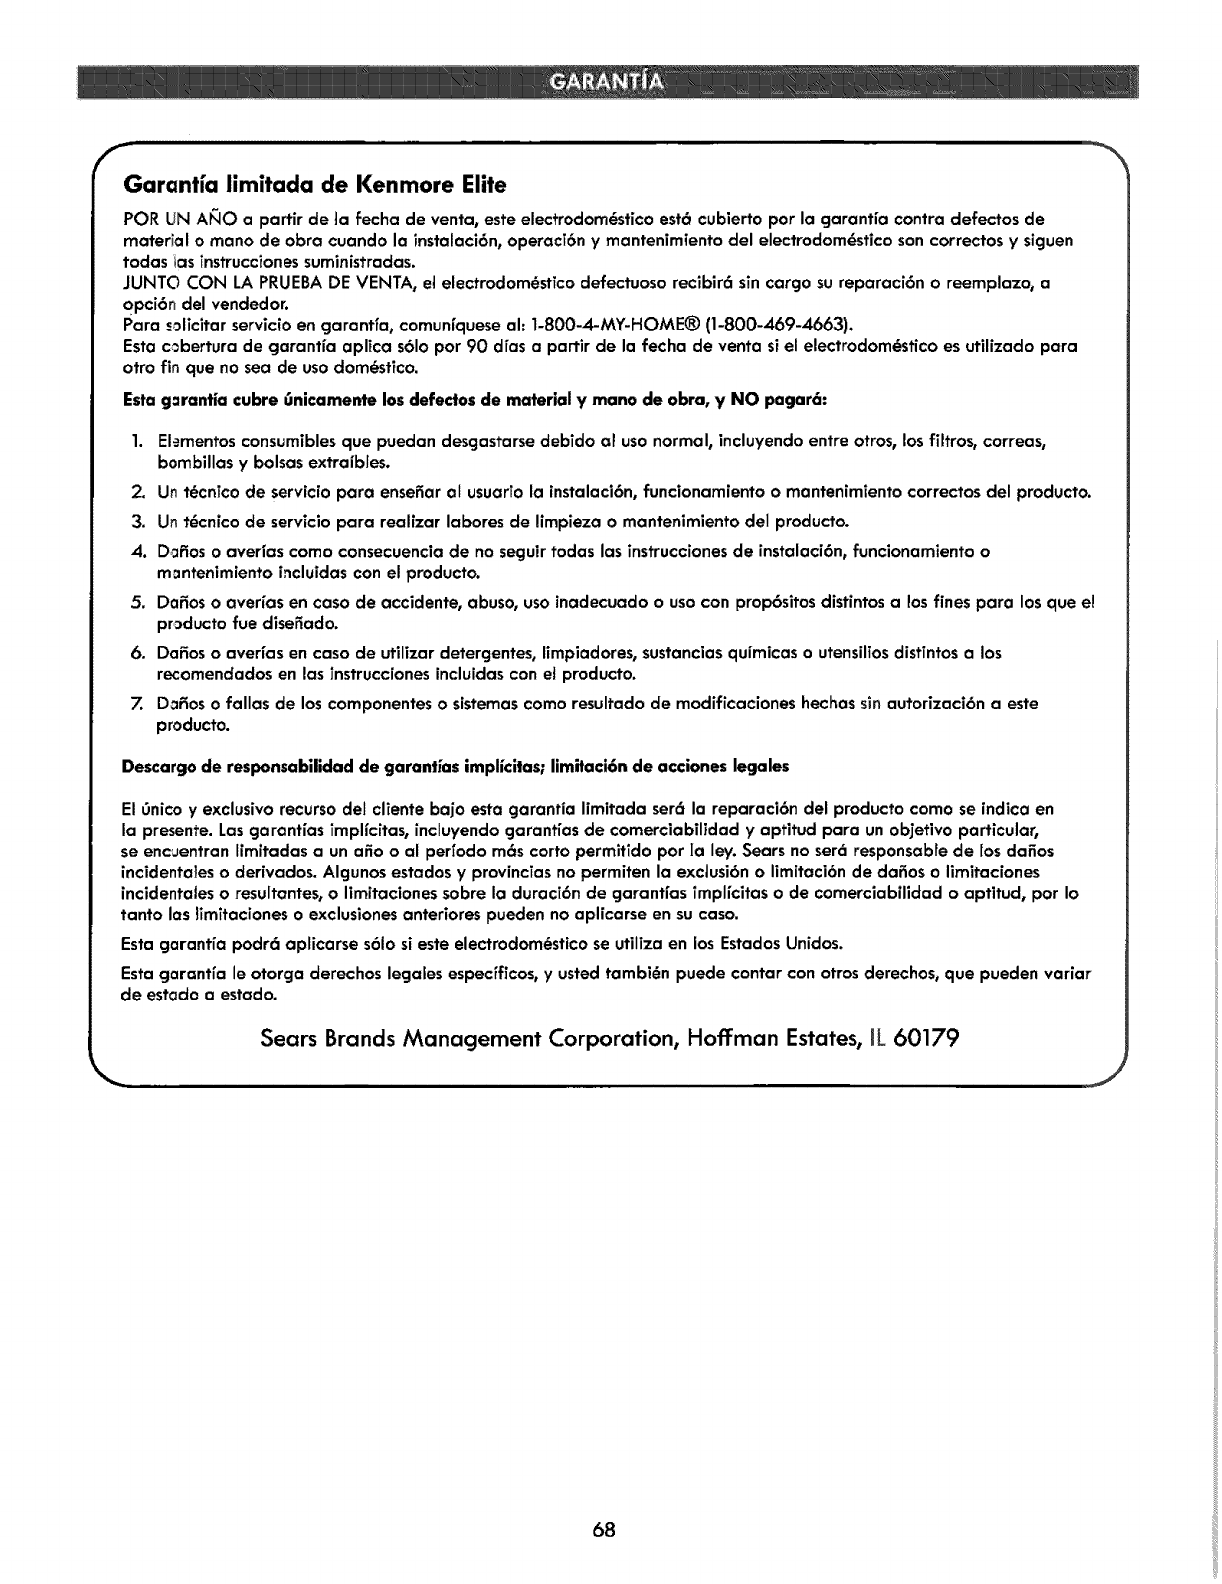
Garant[a limitada de Kenmore Elite
POR UN ANO a parfir de Ja fecha de venta, este electrodom_stico est6 cubierto por la garant[a contra defectos de
material o mano de obra cuando la instalaci6n, operacT6n y mantenimiento del electrodom_stico son correctos y siguen
todas tas Tnstrucciones suministradas.
JUNTO CON LA PRUEBA DE VENTA, et electrodom_stTcodefectuoso recibir6 sin cargo su reparaci6n o reemplazo, a
opci6n del vendedor.
Para solicitar servicio en garantfa, comun[quese al: 1-800-4-MY-HOME® (1-800-469-4663).
Esta cobertura de garantla aplica s61opor 90 d[as a partir de la fecha de venta si el electrodom@sficoes utillzado para
otto fin que no sea de uso dom@stico.
Esta g=ranfia cubre Linicamente los defedos de material y mano de obra, y NO pagar6:
1. Elementos consumibles que puedan desgastarse debido al uso normal, incluyendo entre otros, los filtros, correas,
bombillas y bolsas extra|b[es.
2. Un t@cnico de servicio para ensefiar al usuarTo la instalaci6n, func|onamlento o manfenimiento correctos del producto.
3. Un t_cn[co de serviclo para real[zar labores de limpieza o mantenimiento del producto.
4. D,_fios o averias corno consecuencia de no seguir todas las instrucciones de instalaci6n, funcionamiento o
mantenimiento L_cluidas con el producto.
5. Da_os o averfas en caso de accidente, abuso, uso inadecuado o uso con prop6sitos distJntos a !os fines para los que e!
pr3ducto fue disefiado.
6. Dafios o aver|as en caso de util|zar detergentes, limpiadores_ sustancias qu|micas o utensilTos distTntos a los
recomendados en las Tnstrucciones incluidas con et producto.
7. Dafios o fallas de los componentes o sistemas como resultado de modificaciones hechas sin autorizaclbn a este
producto.
Descargo de responsabilidad de garantias implicitas; limitaci6n de acciones legales
El 6nico y exclusivo recurso del cliente bajo esta garantia limitada ser6 la reparaci6n del producto como se Jndica en
la presente. Las garantias impl|citas, incluyendo garantias de comerciabilidad y aptitud para un ob]etivo particular,
se encuentran limitadas a un afio o al perfodo m6s corto permltido por |a ley. Sears no set6 responsal01e de los dafios
incidentales o derivados. Algunos estados y provincias no permiten la excJusibn o limitaci6n de da_os o limltaclones
incidentales o resultantes_ o limitaciones sobre la duracT6n de garant[as TmpHcitas o de comerciabilidad o aptitud, par Io
tanto las ?imitaciones o exclusiones anteriores pueden no aplicarse en su caso.
Esta cjarant[a podr6 aplicarse s61o st este electrodom_stico se utiliza en los Estados Unidos.
Esta cjarantfa le otorga derechos legales espec[ficos, y usted tambi(_n puede contar con otros derechos, que pueden variar
de estado a estado.
_1,,11111,,,,,i,11,
Sears Brands Management Corporation, Hoffman Estates, IL 60179
J
68

69

70

71
Your Home
For troubleshooting, product manuals and expert advice:
managemylife
....:ili
iiiiiiiiiiiiiiiiii,_
www.managemylife.corn
For repair - in your home - of all major brand appliances, ....
lawn and garden equipment, or heating and cooling systems,
no matter who made it, no matter who sold it!
For the replacement parts, accessories and
owner's manuals that you need to do-it-yourself.
For Sears professional installation of home appliances
and items like garage door openers and water heaters.
1-800-4-MY-HOME ® (1=800=469-4663)
Call anytime, day or night (U.S.A. and Canada)
WWW.SO_lr$.COrn www,sesrs.ca
Our Home !............
For repair of carry-in items like vacuums, lawn equipment,
and electronics, call anytime for the location of your nearest
Sears Parts &Repair Service Center
1-800488-1222 (U.S.A.) 1-8004694663 (Canada)
WWW,S_SrS,COR3 WWW,SeSr$.C8
To purchase a protection agreement on a product serviced by Sears: i
1-800-827-6655 (U.S.A.) 1-800-361=6665 (Canada)
Para pedir servicio de reparaci6n Au Canada pour service en frangais:
a domicilio, y para ordenar piezas: 1=80O-LE=FOYER _c
1-888-SU-HOGAR ® (1-800-533-6937)
(1-888-784-6427) www.sears.ca
www.sears.com S_arS
TM
®Registered Trademark /Trademark of KCD IP, LLC in the United States, or Sears Brands, LLC in other countries
® Marca Registrada /TMMarca de F_brica de KCD IP, LLC en Estados Unidos, o Sears Brands, LLC in otros paises
_c Marque de commerce /MoMarque d6pos_e de Sears Brands, LLC
