Kenmore 10653369300 User Manual REFRIGERATOR Manuals And Guides L0307062
KENMORE Side by Side Refrigerator Manual L0307062 KENMORE Side by Side Refrigerator Owner's Manual, KENMORE Side by Side Refrigerator installation guides
User Manual: Kenmore 10653369300 10653369300 KENMORE REFRIGERATOR - Manuals and Guides View the owners manual for your KENMORE REFRIGERATOR #10653369300. Home:Kitchen Appliance Parts:Kenmore Parts:Kenmore REFRIGERATOR Manual
Open the PDF directly: View PDF ![]() .
.
Page Count: 53
®
Side by Side Refrigerator
Refrigerador de dos puertas
R_fri _rateur c6te &c6te
Sears Roebuck and Co., Hoffman Estates, IL 60179 U.S.A. www.sears.com
2261090 Sears Canada, Inc., Toronto, Ontario, Canada M5B 2B8 www.sears.ca
TABLE OF CONTENTS
WARRANTY ..................................................................................... 2
REFRIGERATOR SAFETY .............................................................. 3
Proper Disposal of Your Old Refrigerator .................................... 3
INSTALLATION INSTRUCTIONS .................................................. 4
Unpacking .................................................................................... 4
Location Requirements ................................................................ 4
Electrical Requirements ................................................................ 5
Base Grille .................................................................................... 5
Door Removal ............................................................................... 6
Door Closing ................................................................................. 8
Water Supply Connection ............................................................ 8
Water System Preparation ........................................................... 9
Normal Sounds .......................................................................... 10
REFRIGERATOR USE ................................................................. 10
Ensuring Proper Air Circulation ................................................. 10
Using the Controls ..................................................................... 10
Water and Ice Dispensers ......................................................... 12
Water Filtration System ............................................................. 13
Ice Maker and Storage Bin........................................................ 14
REFRIGERATOR FEATURES ..................................................... 15
Refrigerator Shelves .................................................................. 15
Dell Drawer ................................................................................ 15
Convertible Vegetable/Meat Drawer, Crisper and Covers ....... 15
Convertible Vegetable/Meat Drawer Temperature Control ...... 16
Crisper Humidity Control ........................................................... 16
Wine Rack .................................................................................. 16
Utility Bin .................................................................................... 16
FREEZER FEATURES ................................................................. 17
Freezer Shelf .............................................................................. 17
Freezer Basket or Bin ................................................................ 17
DOOR FEATURES ....................................................................... 17
Tilt-out Freezer Door Bin ........................................................... 17
Chilled Door Bin......................................................................... 17
Door Rails .................................................................................. 18
Door Bins ................................................................................... 18
REFRIGERATOR CARE ............................................................... 18
Cleaning ..................................................................................... 18
Changing the Light Bulbs .......................................................... 19
Power Interruptions ................................................................... 20
Vacation and Moving Care ........................................................ 20
TROUBLESHOOTING .................................................................. 21
PROTECTION AGREEMENTS .................................................... 23
In the U.S.A ................................................................................ 23
In Canada .................................................................................. 24
Accessories ............................................................................... 24
WATER FILTER CERTIFICATIONS ............................................ 24
PRODUCT DATA SHEETS .......................................................... 25
SERVICE NUMBERS ............................................... BACK COVER
WARRANTY
ONE-YEAR FULL WARRANTY ON REFRIGERATOR
For one year from the date of purchase, when this refrigerator is
operated and maintained according to instructions attached to or
furnished with the product, Sears will repair this refrigerator, free
of charge, if defective in material or workmanship.
FIVE-YEAR FULL WARRANTY ON SEALED REFRIGERATION
SYSTEM
For five years from the date of purchase, when this refrigerator is
operated and maintained according to owner's instructions
attached to or furnished with the product, Sears will repair the
sealed system (consisting of refrigeration, connecting tubing, and
compressor), free of charge, if defective in materials or
workmanship.
The above warranty coverage applies only to refrigerators which
are used for storage of food for private household purposes and
excludes original and replacement Kenmore Filtered Ice & Water
filter cartridges (if equipped with the filter system). Original and
replacement cartridges are warranted for 30 days, parts only,
against defects in material or workmanship.
WARRANTY SERVICE IS AVAILABLE BY CONTACTING THE
NEAREST SEARS SERVICE CENTER IN THE UNITED STATES
OR CANADA.
This warranty applies only while this product is in use in the
United States or Canada. This warranty gives you specific
legal rights, and you may also have other rights which vary
from state to state or province to province.
Warranty terms may vary in Canada. Contact your local Sears
Service Center for complete details.
Sears, Roebuck and Co.
Dept. 817WA, Hoffman Estates, IL 60179
Sears Canada, Toronto, Ontario, Canada M5B 2B8
Product Record
In the space below, record your complete model number, serial
number, and purchase date. You can find this information on the
model and serial number label located on the inside wall of the
refrigerator compartment.
Have this information available to help you obtain assistance or
service more quickly whenever you contact Sears concerning
your refrigerator.
Model number 106.
Serial number
Purchase date
Save these instructions and your sales receipt for future
reference.
2
REFRIGERATOR SAFETY
Your safety and the safety of others are very important.
We have provided many important safety messages in this manual and on your appliance. Always read and obey all
safety messages.
This is the safety alert symbol.
This symbol alerts you to potential hazards that can kill or hurt you and others.
All safety messages will follow the safety alert symbol and either the word "DANGER" or
"WARNING." These words mean:
You can be killed or seriously injured if you don't
immediatelv follow instructions.
You can be killed or seriously injured if you don't
follow instructions.
All safety messages will tell you what the potential hazard is, tell you how to reduce the chance of injury, and tell you
what can happen if the instructions are not followed.
IM PORTANT SAFETY INSTRUCTIONS
WARN IN G: To reduce the risk of fire, electric shock, or injury when using your refrigerator, follow these basic
precautions:
• Plug into a grounded 3 prong outlet.
• Do not remove ground prong.
• Do not use an adapter.
• Do not use an extension cord.
• Disconnect power before servicing.
• Replace all panels before operating.
• Remove doors from your old refrigerator.
Use nonflammable cleaner.
• Keep flammable materials and vapors, such as
gasoline, away from refrigerator.
• Use two or more people to move and install
refrigerator.
• Disconnect power before installing ice maker (on
ice maker kit ready models only).
• Use a sturdy glass when dispensing ice or water
(on some models).
SAVE THESE INSTRUCTIONS
Proper Disposal of
Your Old Refrigerator
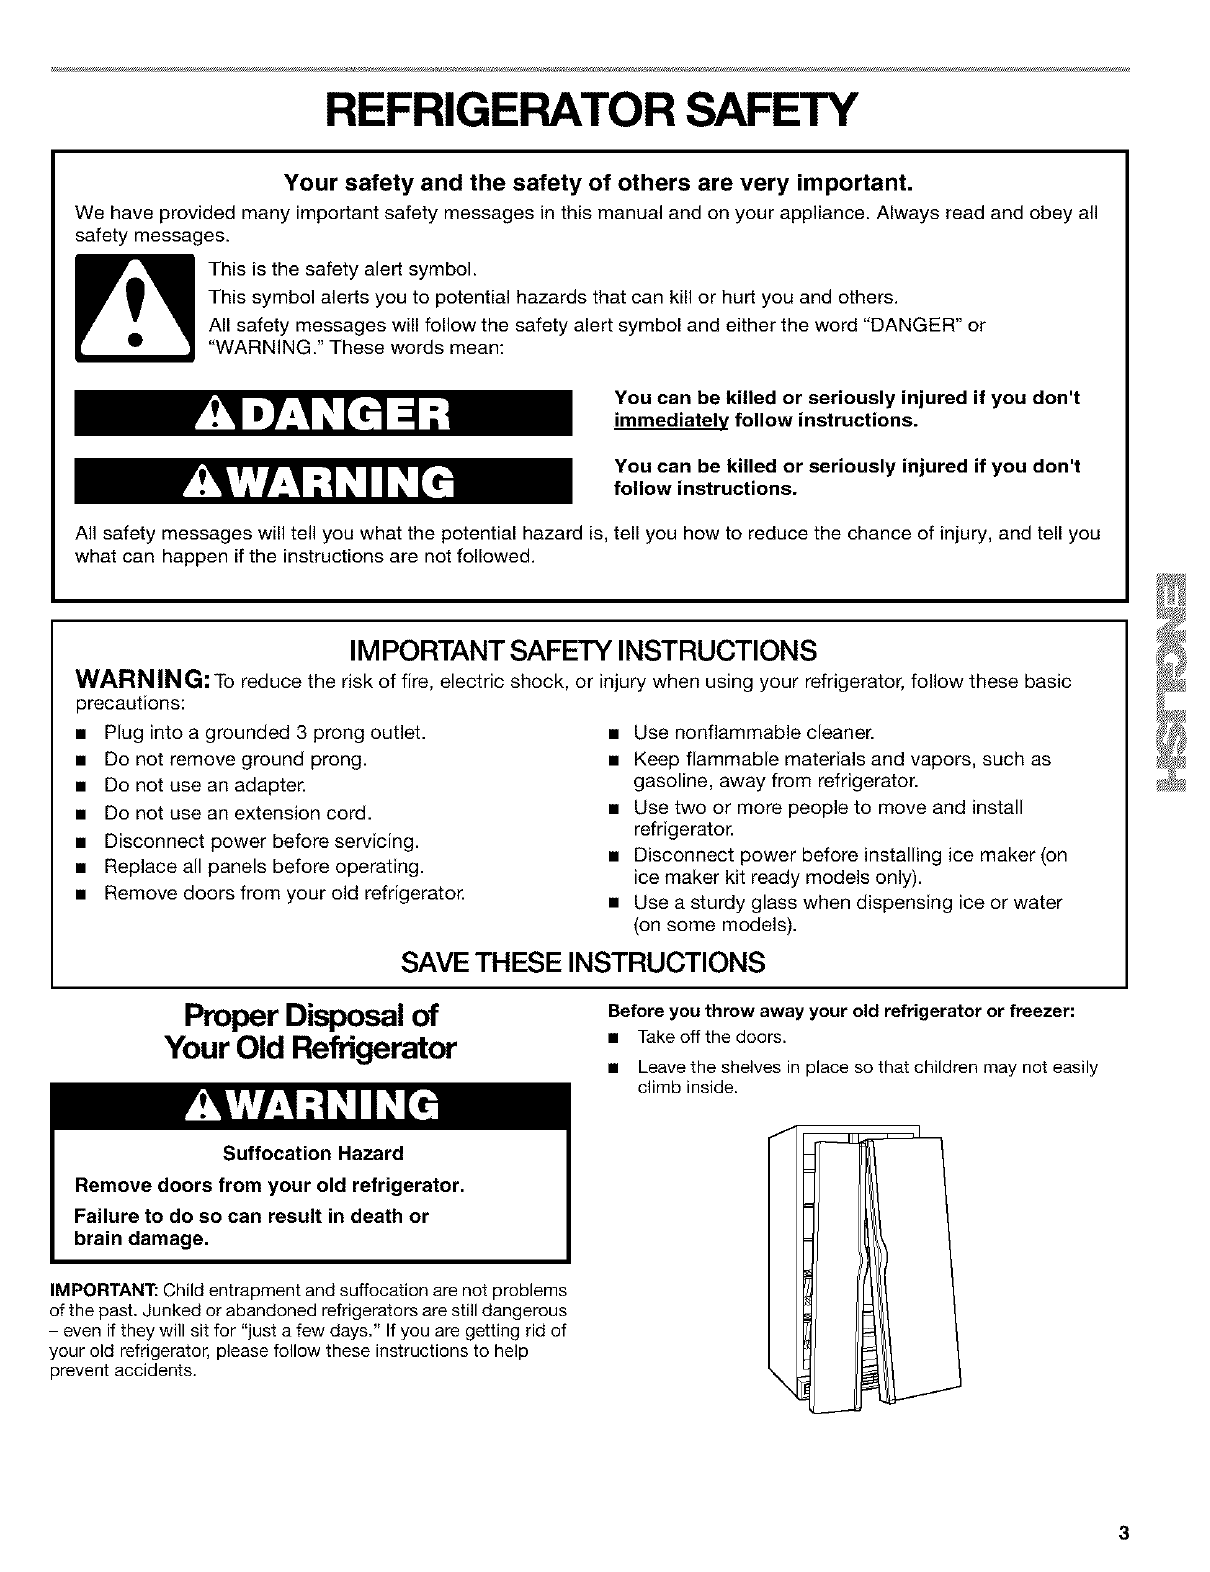
Before you throw away your old refrigerator or freezer:
• Take off the doors.
• Leave the shelves in place so that children may not easily
climb inside.
IMPORTANT: Child entrapment and suffocation are not problems
of the past. Junked or abandoned refrigerators are still dangerous
- even if they will sit for "just a few days." If you are getting rid of
your old refrigerator, please follow these instructions to help
prevent accidents.
INSTALLATION
INSTRUCTIONS
Removing packaging materials
• Remove tape and glue residue from surfaces before turning
on the refrigerator. Rub a small amount of liquid dish soap
over the adhesive with your fingers. Wipe with warm water
and dry.
Do not use sharp instruments, rubbing alcohol, flammable
fluids, or abrasive cleaners to remove tape or glue. These
products can damage the surface of your refrigerator. For
more information, see the "Refrigerator Safety" section.
When Moving Your Refrigerator:
Your refrigerator is heavy. When moving the refrigerator
for cleaning or service, be sure to protect the floor.
Always pull the refrigerator straight out when moving it.
Do not wiggle or "walk" the refrigerator when trying to move
it, as floor damage could occur.
Cleaning before use
After you remove all of the packaging materials, clean the inside
of your refrigerator before using it. See the cleaning instructions
in the "Refrigerator Care" section.
important information to know about glass shelves
and covers:
Do not clean glass shelves or covers with warm water when
they are cold. Shelves and covers may break if exposed to
sudden temperature changes or impact, such as bumping.
For your protection, tempered glass is designed to shatter
into many small, pebble-size pieces. This is normal. Glass
shelves and covers are heavy. Use special care when re-
moving them to avoid impact from dropping.
Explosion Hazard
Keep flammable materials and vapors, such as
gasoline, away from refrigerator.
Failure to do so can result in death, explosion,
or fire.
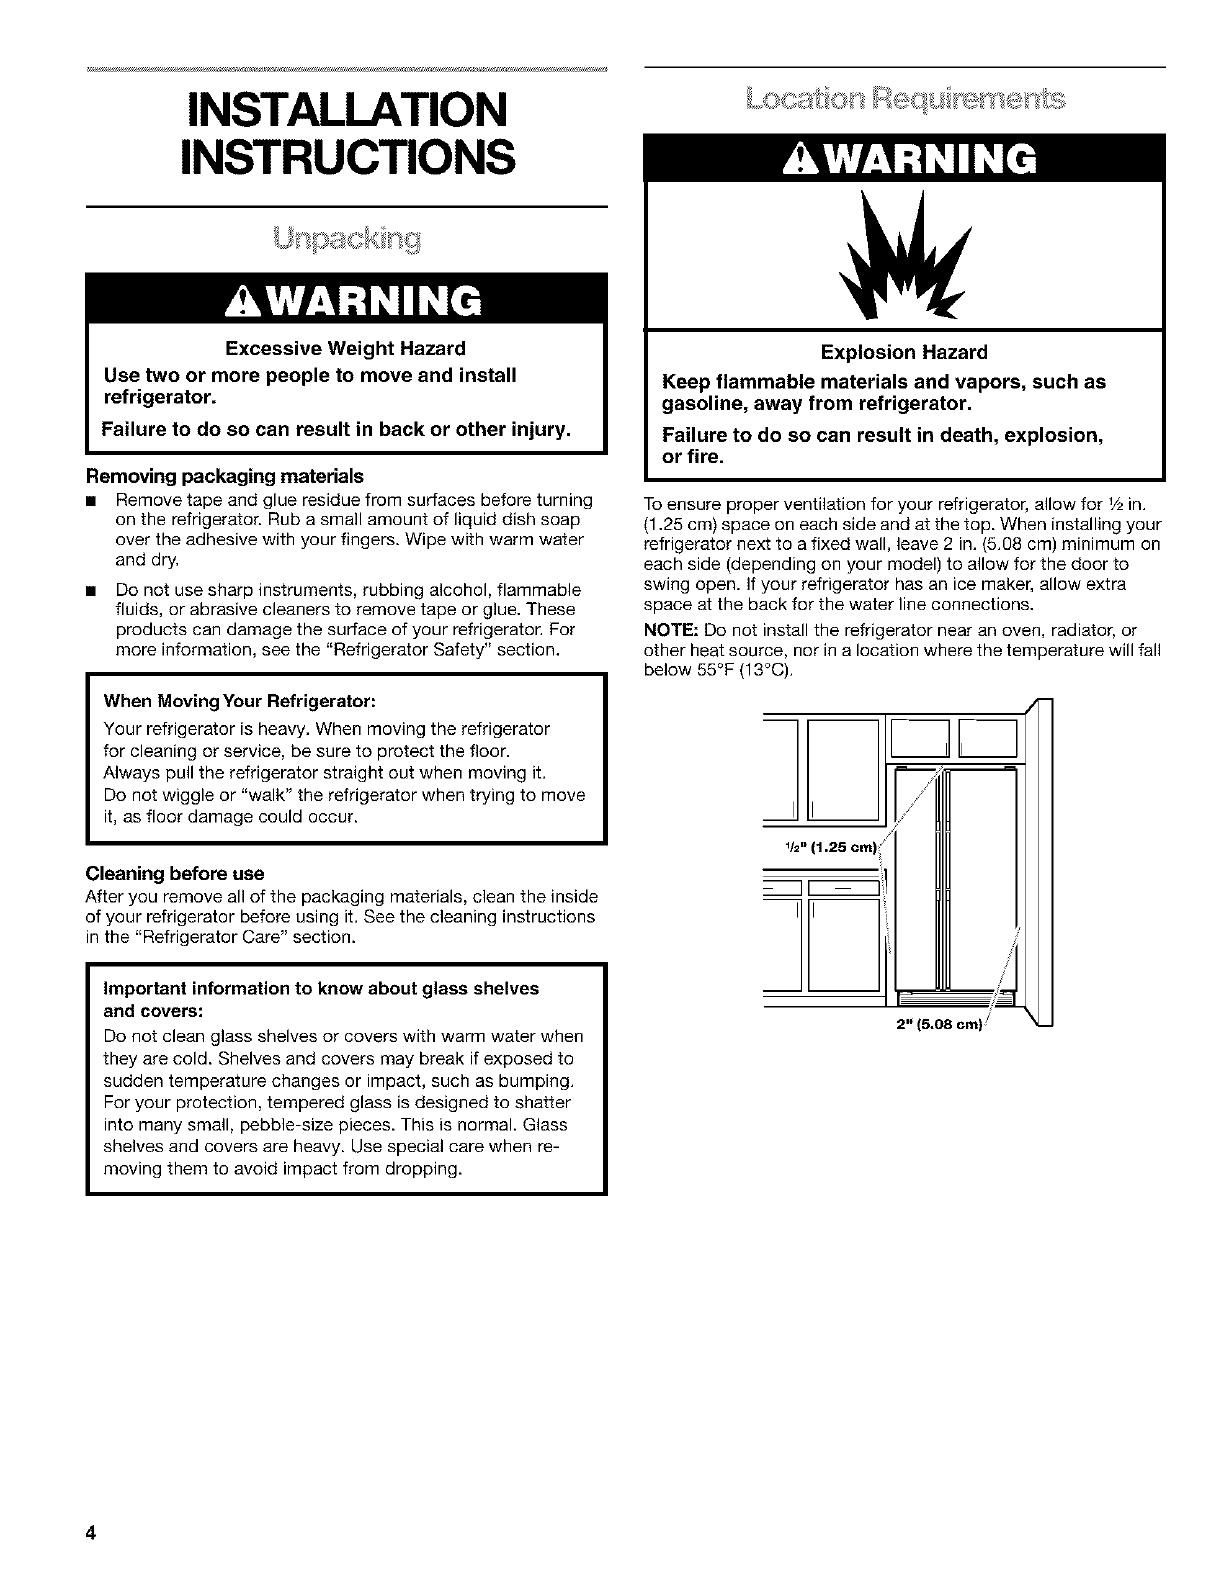
To ensure proper ventilation for your refrigerator, allow for V2in.
(125 cm) space on each side and at the top. When installing your
refrigerator next to a fixed wall, leave 2 in. (5.08 cm) minimum on
each side (depending on your model) to allow for the door to
swing open. If your refrigerator has an ice maker, allow extra
space at the back for the water line connections.
NOTE: Do not install the refrigerator near an oven, radiator, or
other heat source, nor in a location where the temperature will fall
below 55°F (13°C).
JL
1/2n (1,25 cm)( ?
i
/
/
/
-i--
2" (5.08 cm)
4
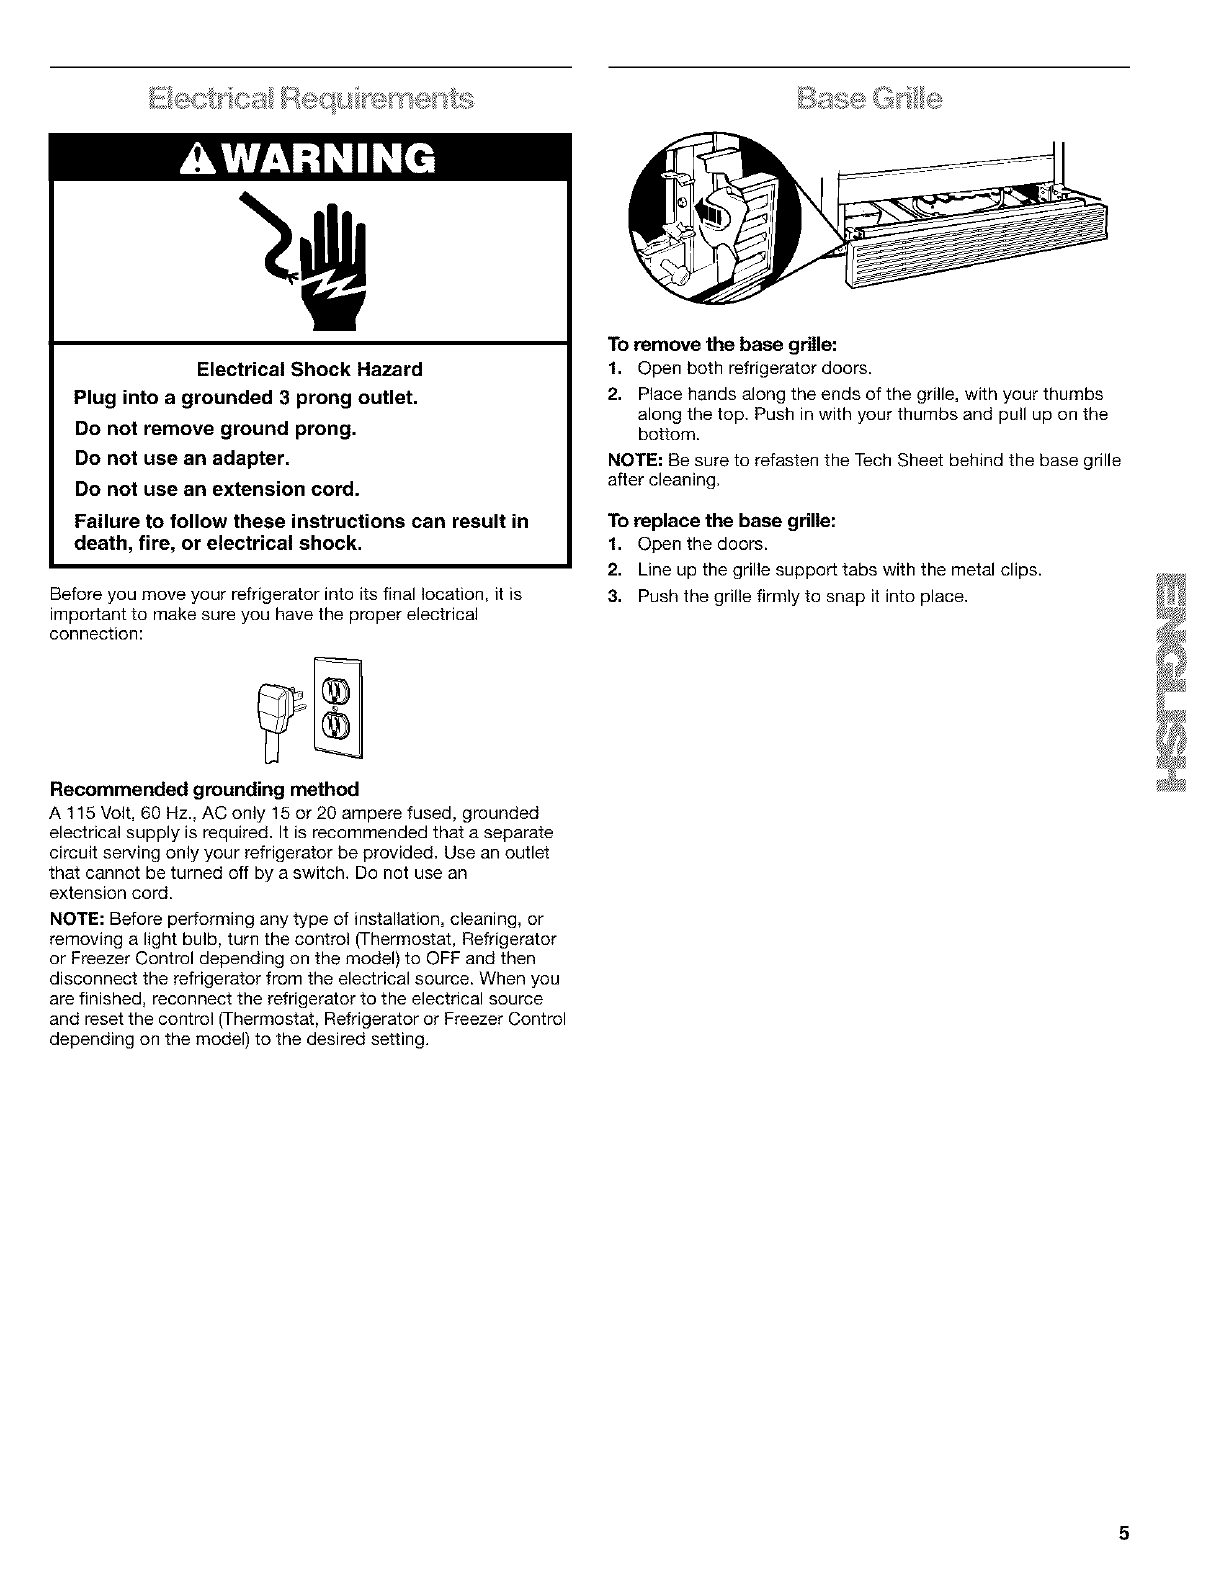
ElectricalShockHazard
Plugintoagrounded3 prongoutlet.
Donot removegroundprong.
Donot useanadapter.
Donot useanextensioncord.
Failureto follow these instructions can result in
death, fire, or electrical shock.
Before you move your refrigerator into its final location, it is
important to make sure you have the proper electrical
connection:
Recommended grounding method
A 115 Volt, 60 Hz., AC only 15 or 20 ampere fused, grounded
electrical supply is required. It is recommended that a separate
circuit serving only your refrigerator be provided. Use an outlet
that cannot be turned off by a switch. Do not use an
extension cord.
NOTE: Before performing any type of installation, cleaning, or
removing a light bulb, turn the control (Thermostat, Refrigerator
or Freezer Control depending on the model) to OFF and then
disconnect the refrigerator from the electrical source. When you
are finished, reconnect the refrigerator to the electrical source
and reset the control (Thermostat, Refrigerator or Freezer Control
depending on the model) to the desired setting.
To remove the base grille:
1. Open both refrigerator doors.
2. Place hands along the ends of the grille, with your thumbs
along the top. Push in with your thumbs and pull up on the
bottom.
NOTE: Be sure to refasten the Tech Sheet behind the base grille
after cleaning.
To replace the base grille:
1. Open the doors.
2. Line up the grille support tabs with the metal clips.
3. Push the grille firmly to snap it into place.
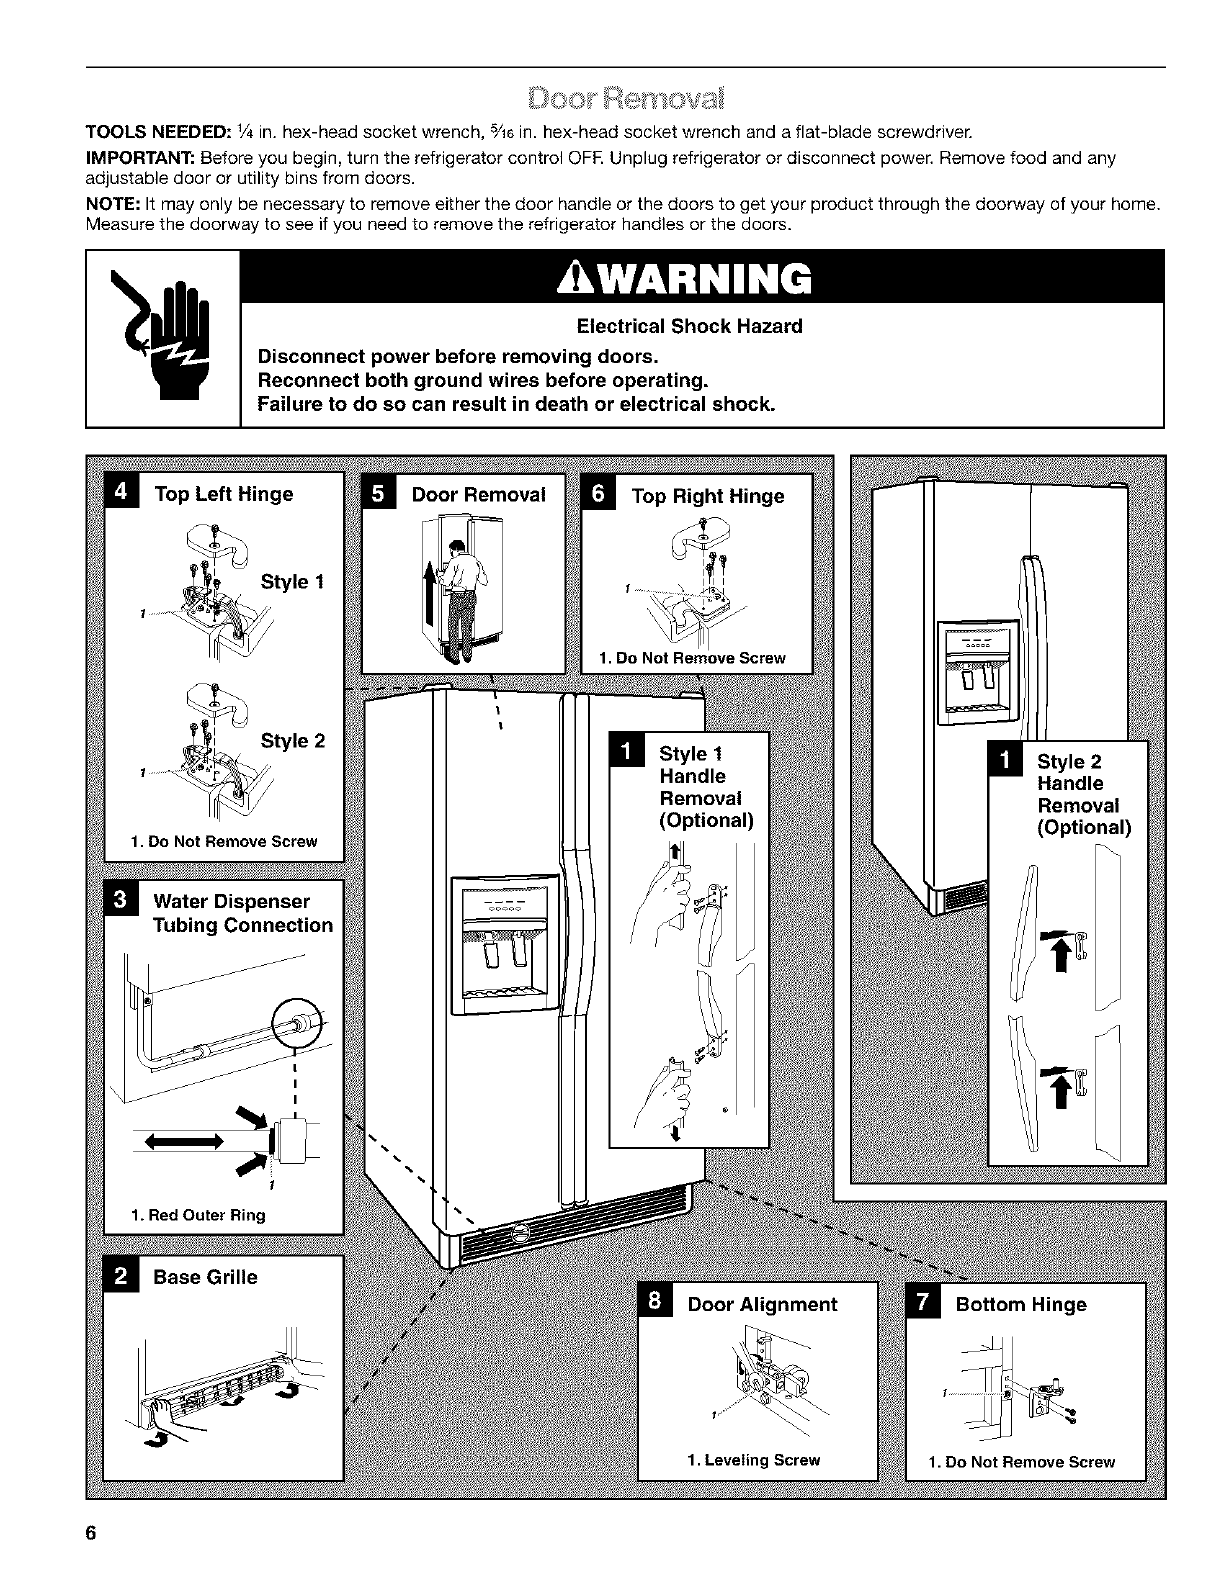
TOOLSNEEDED:¼in.hex-headsocketwrench,5/16in.hex-headsocketwrenchandaflat-bladescrewdriver.
IMPORTANT: Before you begin, turn the refrigerator control OFE Unplug refrigerator or disconnect power. Remove food and any
adjustable door or utility bins from doors.
NOTE: It may only be necessary to remove either the door handle or the doors to get your product through the doorway of your home.
Measure the doorway to see if you need to remove the refrigerator handles or the doors.
Electrical Shock Hazard
Disconnect power before removing doors.
Reconnect both ground wires before operating.
Failure to do so can result in death or electrical shock.
Top Left Hinge
Style 1
Style 2
1. Do Not Remove Screw
Water Dispenser
Tubing Connection
1
1. Red Outer Ring
Base Grille
Door Removal Top Right Hinge
1. Do Not Remove Screw
HStyle 1
Handle
Removal
(Optional)
Door Alignment
1. Leveling Screw
Bottom Hinge
1. Do Not Remove Screw
6
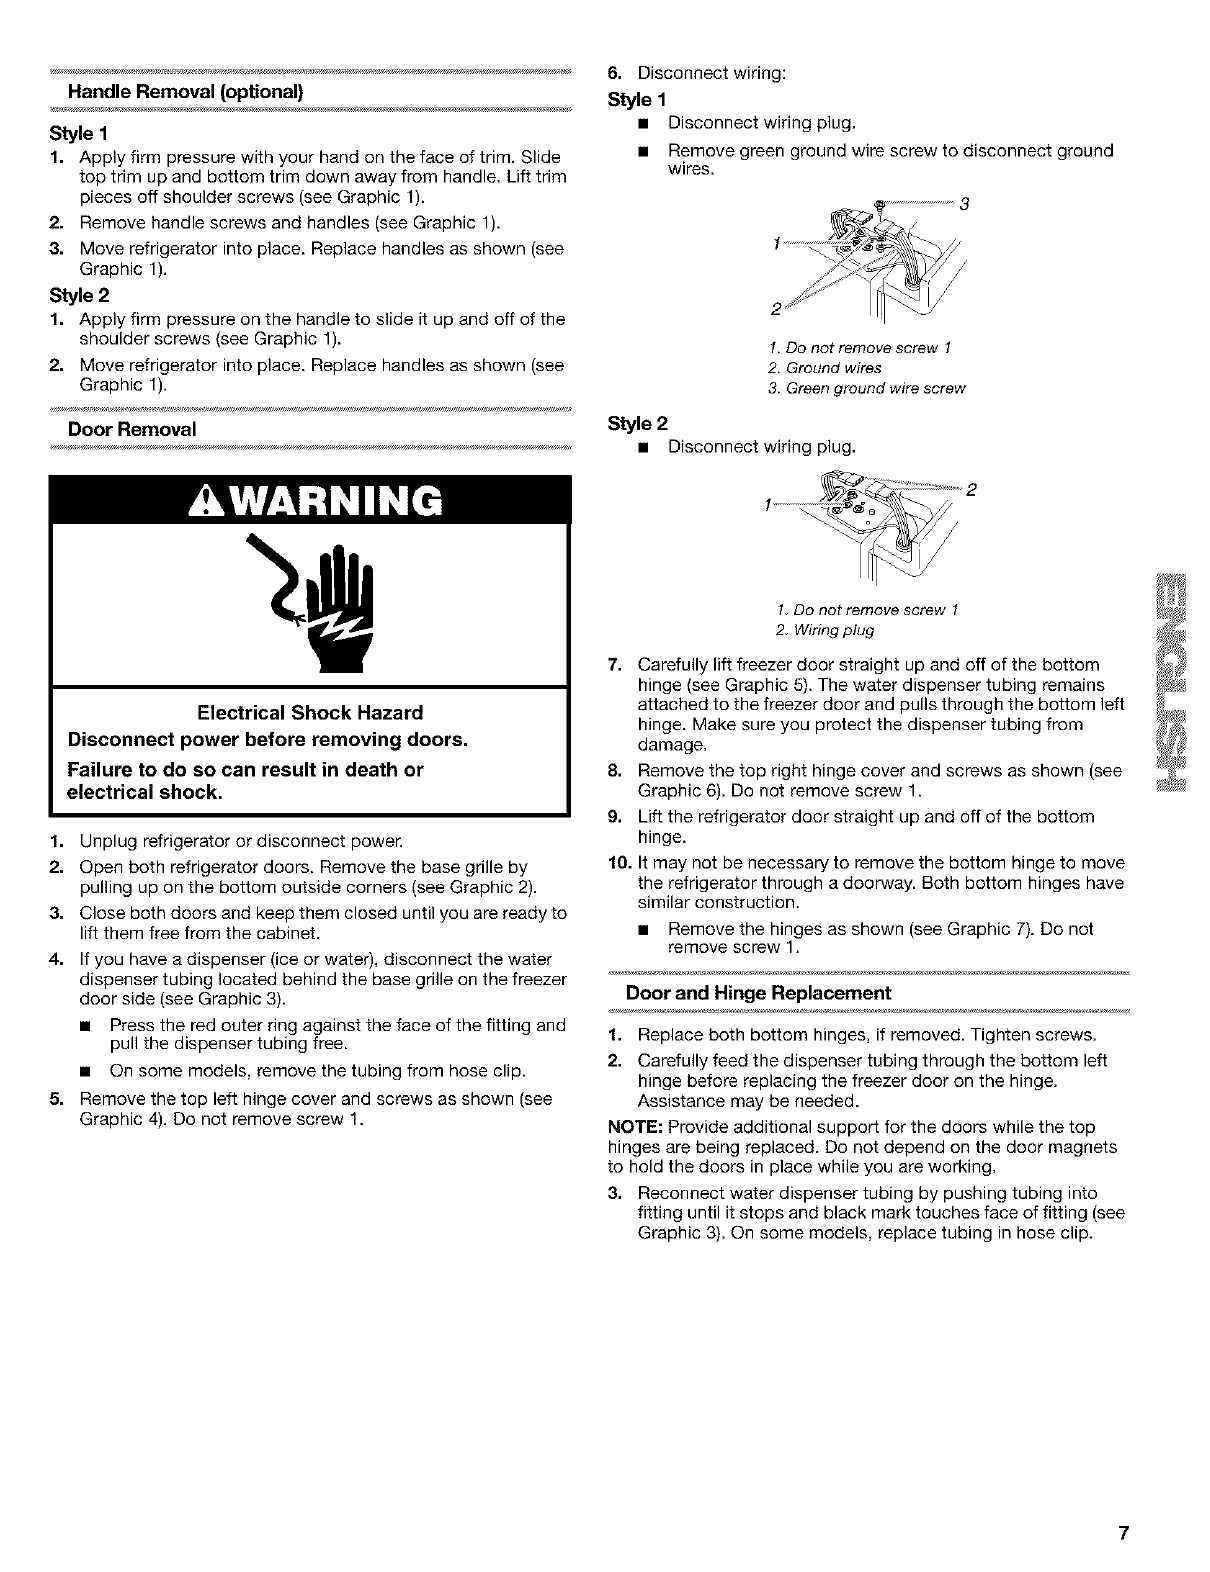
6. Disconnect wiring:
Handle Removal (optional) Style 1
Style 1
1. Apply firm pressure with your hand on the face of trim. Slide
top trim up and bottom trim down away from handle. Lift trim
pieces off shoulder screws (see Graphic 1).
2. Remove handle screws and handles (see Graphic 1).
3. Move refrigerator into place. Replace handles as shown (see
Graphic 1).
Style 2 __
1. Apply firm pressure on the handle to slide it up and off of the
shoulder screws (see Graphic 1).
2. Move refrigerator into place. Replace handles as shown (see
Graphic 1).
Door Removal Style 2
• Disconnect wiring plug.
• Disconnect wiring plug.
• Remove green ground wire screw to disconnect ground
wires.
!. Do not remove screw 1
2. Ground wires
3. Green ground wire screw
Electrical Shock Hazard
Disconnect power before removing doors.
Failure to do so can result in death or
electrical shock,
1. Unplug refrigerator or disconnect power.
2. Open both refrigerator doors. Remove the base grille by
pulling up on the bottom outside corners (see Graphic 2).
3. Close both doors and keep them closed until you are ready to
lift them free from the cabinet.
4. If you have a dispenser (ice or water), disconnect the water
dispenser tubing located behind the base grille on the freezer
door side (see Graphic 3).
• Press the red outer ring against the face of the fitting and
pull the dispenser tubing free.
• On some models, remove the tubing from hose clip.
5. Remove the top left hinge cover and screws as shown (see
Graphic 4). Do not remove screw 1.
1. Do not remove screw !
2. Wiring plug
7. Carefully lift freezer door straight up and off of the bottom
hinge (see Graphic 5). The water dispenser tubing remains
attached to the freezer door and pulls through the bottom left
hinge. Make sure you protect the dispenser tubing from
damage.
8. Remove the top right hinge cover and screws as shown (see
Graphic 6). Do not remove screw 1.
9. Lift the refrigerator door straight up and off of the bottom
hinge.
10, It may not be necessary to remove the bottom hinge to move
the refrigerator through a doorway. Both bottom hinges have
similar construction.
• Remove the hinges as shown (see Graphic 7). Do not
remove screw 1.
Door and Hinge Replacement
1. Replace both bottom hinges, if removed. Tighten screws.
2. Carefully feed the dispenser tubing through the bottom left
hinge before replacing the freezer door on the hinge.
Assistance may be needed.
NOTE: Provide additional support for the doors while the top
hinges are being replaced. Do not depend on the door magnets
to hold the doors in place while you are working.
3. Reconnect water dispenser tubing by pushing tubing into
fitting until it stops and black mark touches face of fitting (see
Graphic 3). On some models, replace tubing in hose clip.
4. Alignandreplacethetoplefthingeasshown(seeGraphic4).
Tightenscrews.
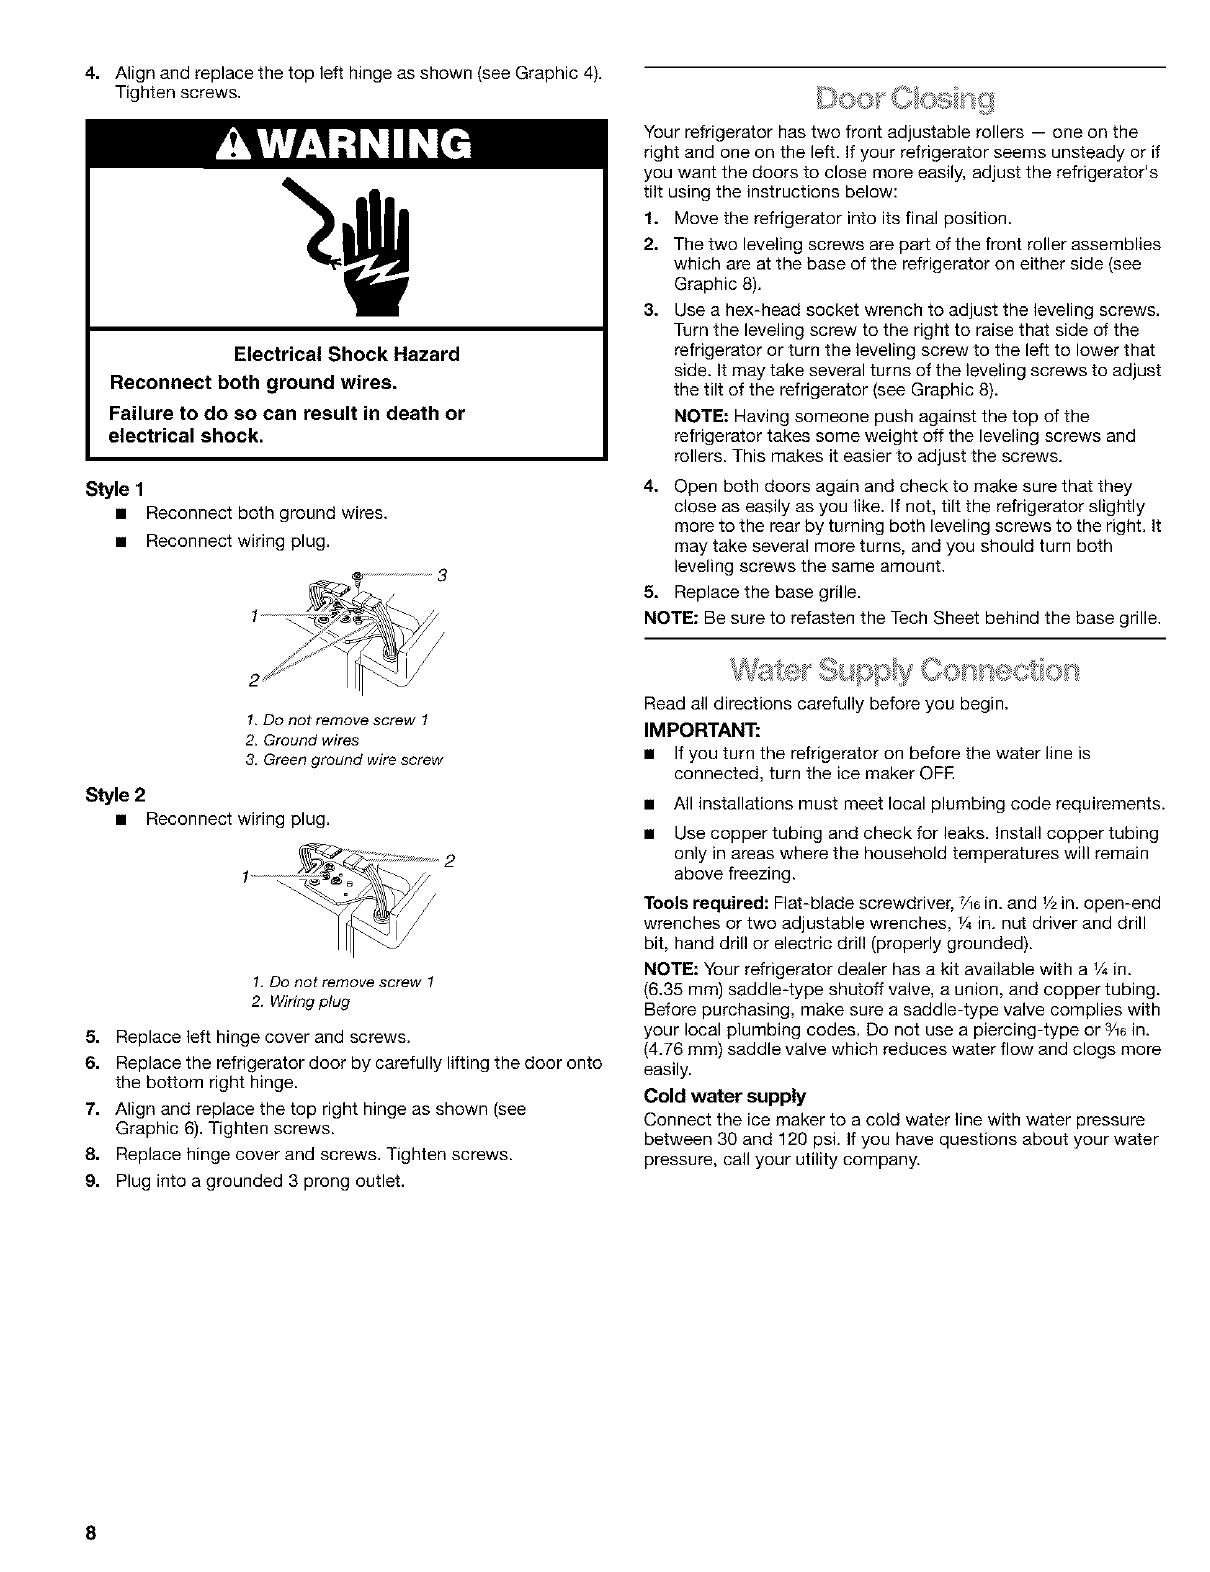
Electrical Shock Hazard
Reconnect both ground wires.
Failure to do so can result in death or
electrical shock.
Style 1
• Reconnect both ground wires.
• Reconnect wiring plug.
1. Do not remove screw 1
2. Ground wires
3. Green ground wire screw
Style 2
• Reconnect wiring plug.
1, Do not remove screw 1
2. Wiring plug
5. Replace left hinge cover and screws.
6. Replace the refrigerator door by carefully lifting the door onto
the bottom right hinge.
7. Align and replace the top right hinge as shown (see
Graphic 6). Tighten screws.
8. Replace hinge cover and screws. Tighten screws.
9. Plug into a grounded 3 prong outlet.
Your refrigerator has two front adjustable rollers -- one on the
right and one on the left. If your refrigerator seems unsteady or if
you want the doors to close more easily, adjust the refrigerator's
tilt using the instructions below:
1. Move the refrigerator into its final position.
2. The two leveling screws are part of the front roller assemblies
which are at the base of the refrigerator on either side (see
Graphic 6).
3. Use a hex-head socket wrench to adjust the leveling screws.
Turn the leveling screw to the right to raise that side of the
refrigerator or turn the leveling screw to the left to lower that
side. It may take several turns of the leveling screws to adjust
the tilt of the refrigerator (see Graphic 8).
NOTE: Having someone push against the top of the
refrigerator takes some weight off the leveling screws and
rollers. This makes it easier to adjust the screws.
4. Open both doors again and check to make sure that they
close as easily as you like. If not, tilt the refrigerator slightly
more to the rear by turning both leveling screws to the right. It
may take several more turns, and you should turn both
leveling screws the same amount.
5. Replace the base grille.
NOTE: Be sure to refasten the Tech Sheet behind the base grille.
Read all directions carefully before you begin.
IMPORTANT:
• If you turn the refrigerator on before the water line is
connected, turn the ice maker OFE
• All installations must meet local plumbing code requirements.
• Use copper tubing and check for leaks. Install copper tubing
only in areas where the household temperatures will remain
above freezing.
Tools required: Flat-blade screwdriver, 7/16in. and V2in. open-end
wrenches or two adjustable wrenches, V4in. nut driver and drill
bit, hand drill or electric drill (properly grounded).
NOTE: Your refrigerator dealer has a kit available with a V4in.
(6.35 mm) saddle-type shutoff valve, a union, and copper tubing.
Before purchasing, make sure a saddle-type valve complies with
your local plumbing codes. Do not use a piercing-type or 3/16in.
(4.76 mm) saddle valve which reduces water flow and clogs more
easily.
Cold water supply
Connect the ice maker to a cold water line with water pressure
between 30 and 120 psi. If you have questions about your water
pressure, call your utility company.
8
Connecting to Water Line
1. Unplug refrigerator or disconnect power.
2. Turn OFF main water supply. Turn ON nearest faucet long
enough to clear line of water.
3. Locate a 1_ in. to 1V4in. (1.25 cm to 3.18 cm) vertical COLD
water pipe near the refrigerator.
NOTE: Horizontal pipe will work, but drill on the top side of
the pipe, not the bottom. This will help keep water away from
the drill and normal sediment from collecting in the valve.
4.
5.
Determine the length of copper tubing you need. Measure
from the connection on the lower left rear of refrigerator to the
water pipe. Add 7 ft. (2.1 m) to allow for cleaning. Use V4in.
(6.35 ram) O.D. (outside diameter) copper tubing. Be sure
both ends of copper tubing are cut square.
Using a grounded drill, drill a V4in. hole in the cold water pipe
you have selected.
HHHS 1
!. Cotd WaterPipe 5. Compression Sleeve
2. Pipe Clamp 6. Shutoff Valve
3. Copper Tubing 7. Packing Nut
4. Compression Nut
6. Fasten the shutoff valve to the cold water pipe with the pipe
clamp. Be sure the outlet end is solidly in the V4in. drilled hole
in the water pipe and that the washer is under the pipe clamp.
Tighten the packing nut. Tighten the pipe clamp screws
carefully and evenly so washer makes a watertight seal. Do
not overtighten or you may crush the copper tubing.
7. Slip the compression sleeve and compression nut on the
copper tubing as shown. Insert the end of the tubing into the
outlet end squarely as far as it will go. Screw compression nut
onto outlet end with adjustable wrench. Do not overtighten.
8. Place the free end of the tubing in acontainer or sink, and
turn ON the main water supply. Flush the tubing until water is
clear. Turn OFF the shutoff valve on the water pipe. Coil the
copper tubing.
Connecting to Refrigerator
1. Attach the copper tube to the valve inlet using a compression
nut and sleeve as shown. Tighten the compression nut. Do
not overtighten. Use the tube clamp on the back of the
refrigerator to secure the tubing to the refrigerator as shown.
This will help prevent damage to the tubing when the
refrigerator is pushed back against the wall.
2. Turn shutoff valve ON.
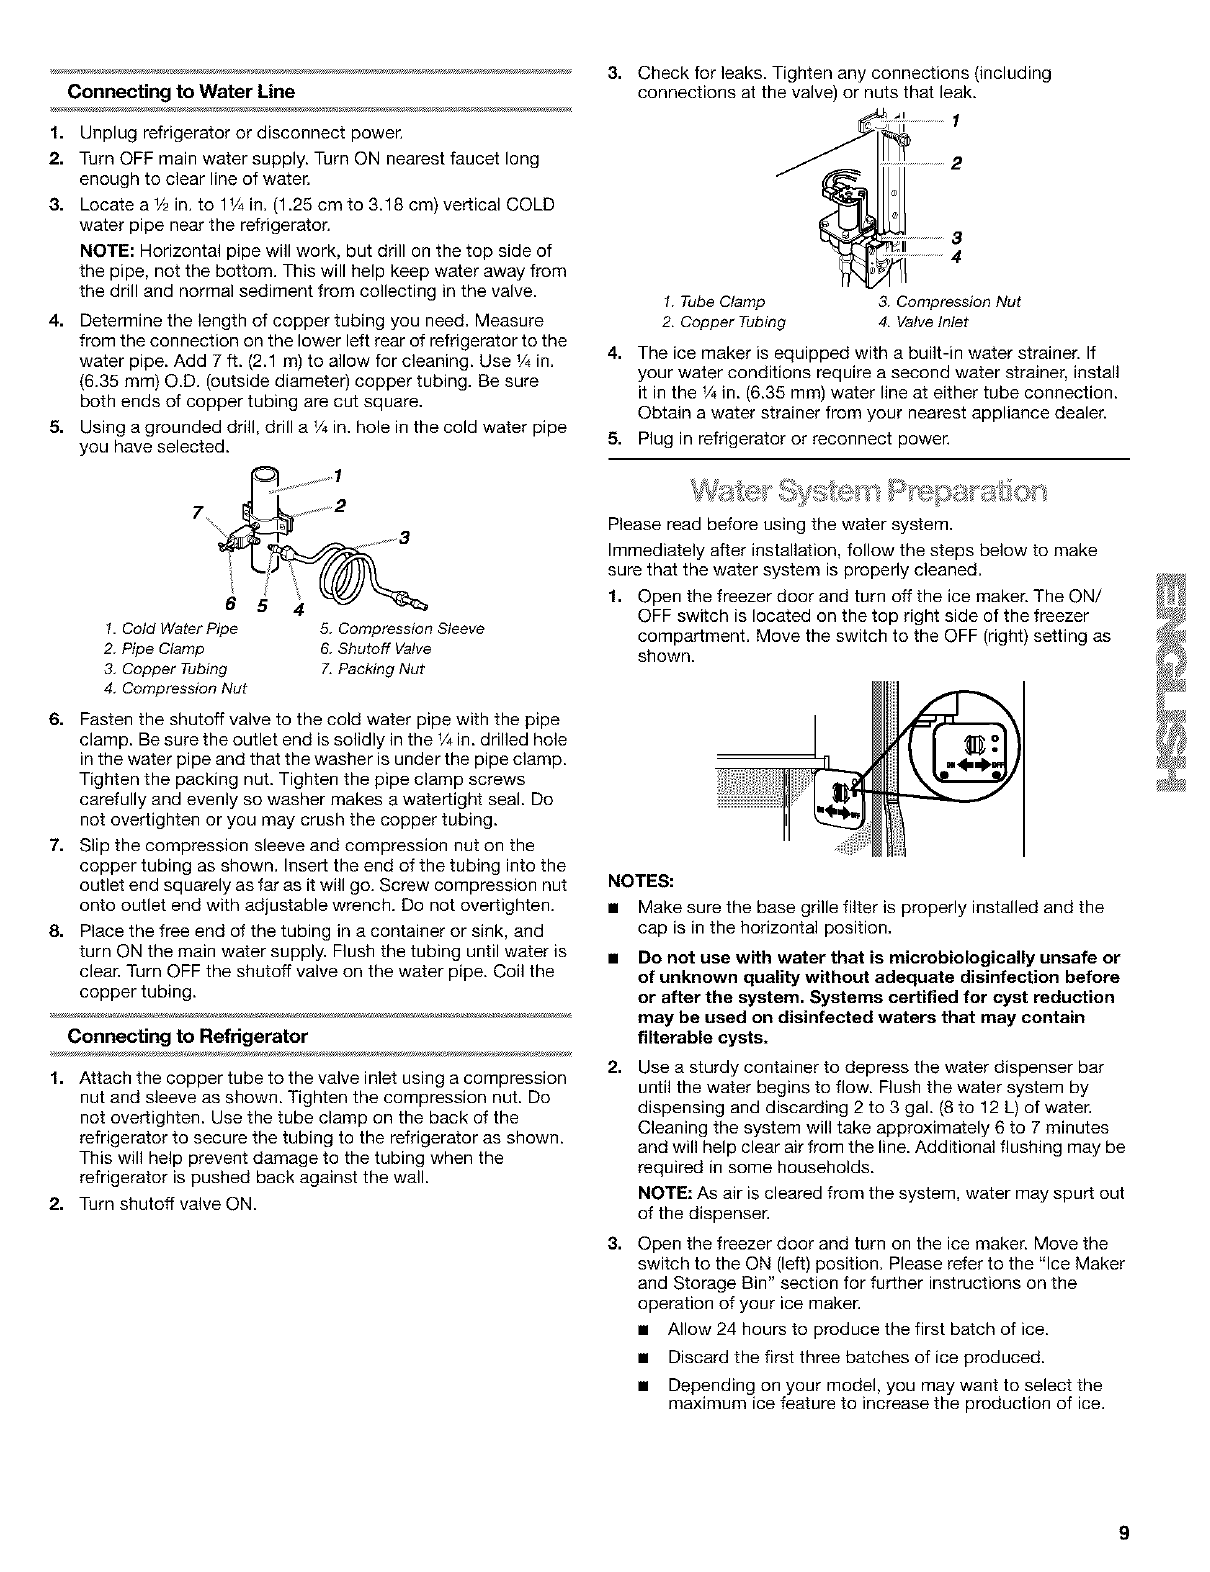
3. Check for leaks. Tighten any connections (including
connections at the valve) or nuts that leak.
!. Tube Clamp
2. Copper Tubing
3. Compression Nut
4. Valve Inlet
4. The ice maker is equipped with a built-in water strainer. If
your water conditions require a second water strainer, install
it in the V4in. (6.35 mm) water line at either tube connection.
Obtain a water strainer from your nearest appliance dealer.
5. Plug in refrigerator or reconnect power.
Please read before using the water system,
Immediately after installation, follow the steps below to make
sure that the water system is properly cleaned,
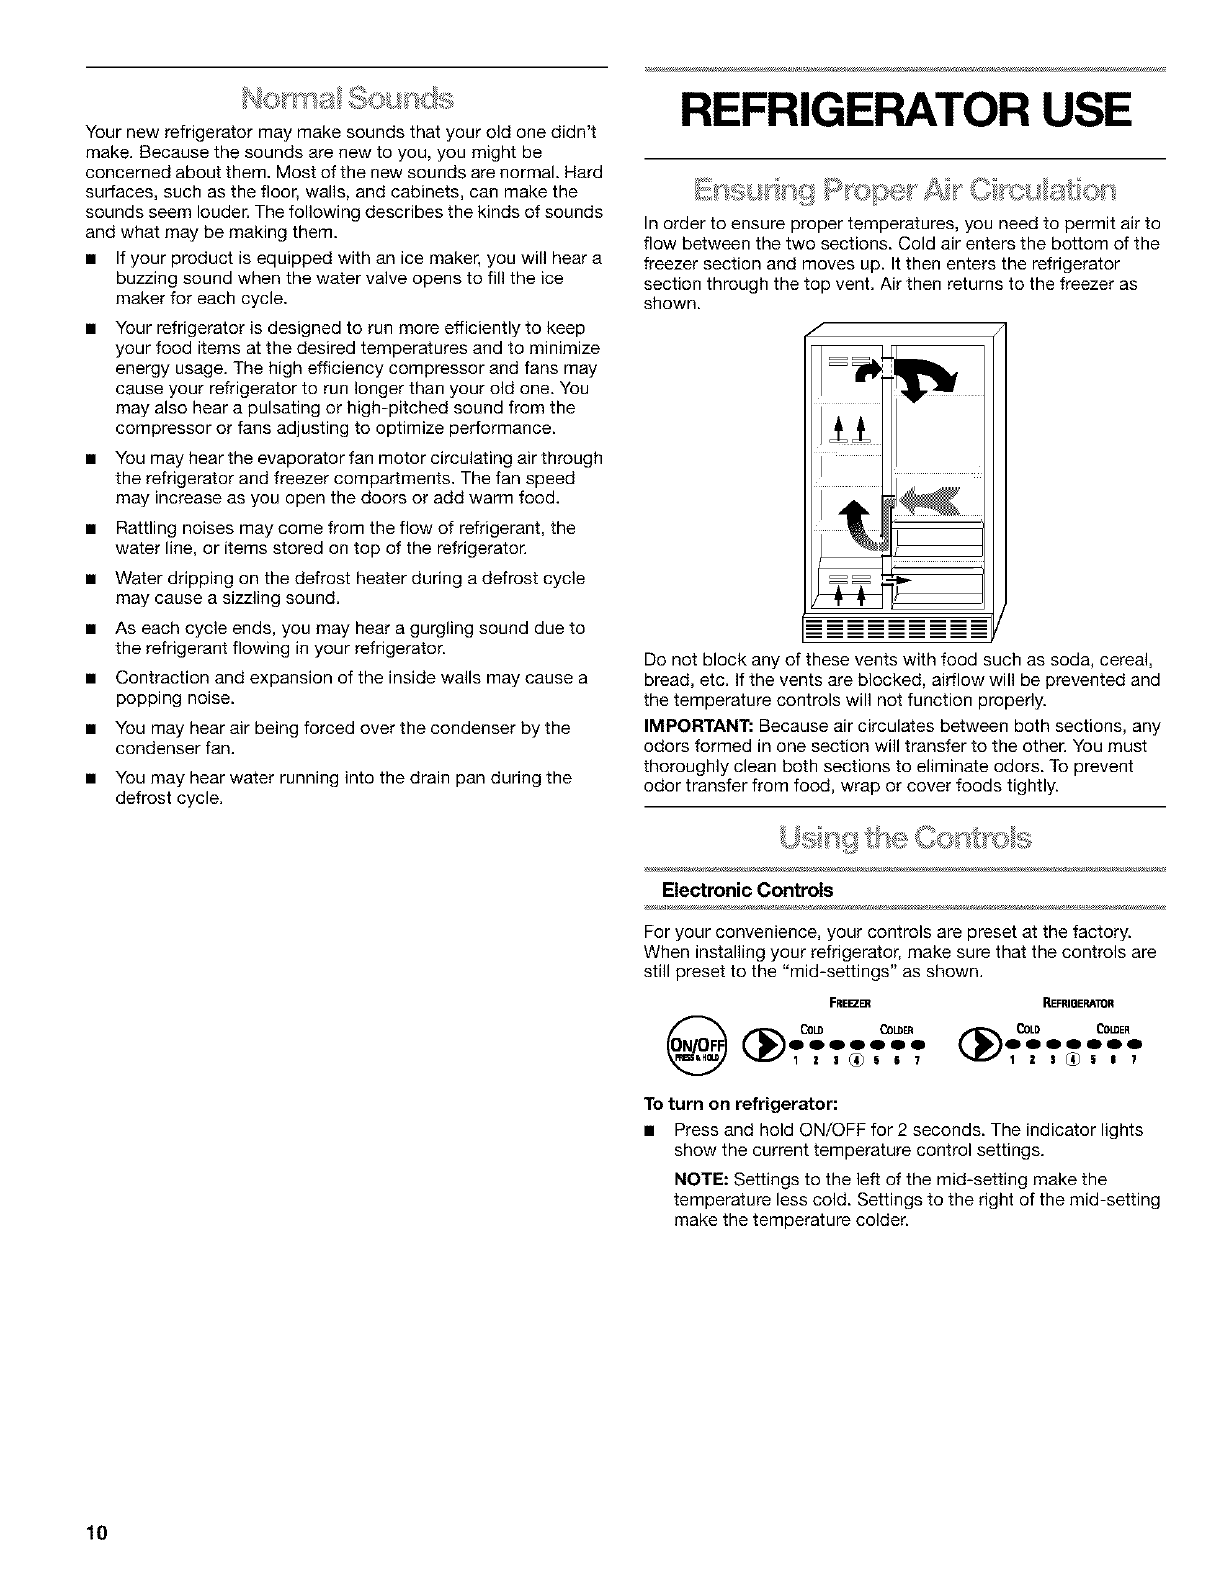
1, Open the freezer door and turn off the ice maker, The ON/
OFF switch is located on the top right side of the freezer
compartment, Move the switch to the OFF (right) setting as
shown.
NOTES:
• Make sure the base grille filter is properly installed and the
cap is in the horizontal position.
Do not use with water that is microbiologically unsafe or
of unknown quality without adequate disinfection before
or after the system. Systems certified for cyst reduction
may be used on disinfected waters that may contain
filterable cysts.
2. Use a sturdy container to depress the water dispenser bar
until the water begins to flow. Flush the water system by
dispensing and discarding 2 to 3 gal. (8 to 12 L) of water.
Cleaning the system will take approximately 6 to 7 minutes
and will help clear air from the line. Additional flushing may be
required in some households.
NOTE: As air is cleared from the system, water may spurt out
of the dispenser.
3. Open the freezer door and turn on the ice maker. Move the
switch to the ON (left) position. Please refer to the "Ice Maker
and Storage Bin" section for further instructions on the
operation of your ice maker.
• Allow 24 hours to produce the first batch of ice.
• Discard the first three batches of ice produced.
• Depending on your model, you may want to select the
maximum ice feature to increase the production of ice.
REFRIGERATOR USE
Your new refrigerator may make sounds that your old one didn't
make. Because the sounds are new to you, you might be
concerned about them. Most of the new sounds are normal. Hard
surfaces, such as the floor, walls, and cabinets, can make the
sounds seem louder. The following describes the kinds of sounds
and what may be making them.
• If your product is equipped with an ice maker, you will hear a
buzzing sound when the water valve opens to fill the ice
maker for each cycle.
Your refrigerator is designed to run more efficiently to keep
your food items at the desired temperatures and to minimize
energy usage. The high efficiency compressor and fans may
cause your refrigerator to run longer than your old one. You
may also hear a pulsating or high-pitched sound from the
compressor or fans adjusting to optimize performance.
You may hear the evaporator fan motor circulating air through
the refrigerator and freezer compartments. The fan speed
may increase as you open the doors or add warm food.
Rattling noises may come from the flow of refrigerant, the
water line, or items stored on top of the refrigerator.
Water dripping on the defrost heater during a defrost cycle
may cause a sizzling sound.
As each cycle ends, you may hear a gurgling sound due to
the refrigerant flowing in your refrigerator.
Contraction and expansion of the inside walls may cause a
popping noise.
You may hear air being forced over the condenser by the
condenser fan.
• You may hear water running into the drain pan during the
defrost cycle.
In order to ensure proper temperatures, pu need to permit air to
flow between the two sections. Cold air enters the bottom of the
freezer section and moves up. It then enters the refrigerator
section through the top vent. Air then returns to the freezer as
shown.
I
Do not block any of these vents with food such as soda, cereal,
bread, etc. If the vents are blocked, airflow will be prevented and
the temperature controls will not function properly.
IMPORTANT: Because air circulates between both sections, any
odors formed in one section will transfer to the other. You must
thoroughly clean both sections to eliminate odors. To prevent
odor transfer from food, wrap or cover foods tightly.
Electronic Controls
For your convenience, your controls are preset at the factory.
When installing your refrigerator, make sure that the controls are
still preset to the "mid-settings" as shown.
FRE_ REFPJEIERATOR
LOt/) COLDER COL[_ COMER
OOOOOOO OQQQOOO
To turn on refrigerator:
• Press and hold ON/OFF for 2 seconds. The indicator lights
show the current temperature control settings.
NOTE: Settings to the left of the mid-setting make the
temperature less cold. Settings to the right of the mid-setting
make the temperature colder.
10

IMPORTANT:
• The Refrigerator Control adjusts the refrigerator compartment
temperature. The Freezer Control adjusts the freezer
compartment temperature.
• Wait 24 hours after you turn on the refrigerator before you put
food into it. If you add food before the refrigerator has cooled
completely, your food may spoil. Adjusting the Refrigerator
and Freezer Controls to a colder setting will not cool the
compartments any faster.
• If the temperature is too warm or too cold in the refrigerator or
freezer, first check the air vents to be sure they are not
blocked, before adjusting the controls.
• The preset settings should be correct for normal household
usage. The controls are set correctly when milk or juice is as
cold as you like and when ice cream is firm.
Adjusting Electronic Controls
NOTE: Wait at least 24 hours between adjustments. Recheck the
temperatures before other adjustments are made.
If you need to adjust temperatures:
• Press the FREEZER or REFRIGERATOR arrow to move the
indicator light to the right, one setting at a time. Continue
moving the indicator light until the desired setting is reached.
/z) Oo o
I 2 3 _5 6 7 t
NOTE: With each press of the arrow, you will hear a beep as
the light moves to the next setting. The indicator light moves
to a setting of "7" and then returns to the setting of "1 ."
CONDITION: SETTING ADJUSTMENT:
REFRIGERATOR too cold REFRIGERATOR Control
- Not set correctly for one setting lower
conditions
REFRIGERATOR too warm REFRIGERATOR Control
- High use or room very warm one setting higher
FREEZER too cold FREEZER Control one
- Not set correctly for setting lower
conditions
FREEZER too warm/too little ice FREEZER Control one
- High use or heavy ice usage setting higher
Additional Electronic Control Panel Features
Additional features are located on the control panel at the top of
the refrigerator compartment.
Water Filter Indicator Light and Reset
NOTE: Do not use with water that is microbiologically unsafe
or of unknown quality without adequate disinfection before
or after the system. Systems certified for cyst reduction may
be used on disinfected waters that may contain filterable
cysts.
The water filter display will help you know when to change your
water filter cartridge. To change your filter, see the "Changing a
Base Grille Filter" section.
INDICATOR: STATUS:
GOOD (green) New filter installed
ORDER (yellow) Order filter, 10% filter life remains
REPLACE (red) or when Replace water filter
water flow decreases
• After changing the water filter cartridge, reset the water filter
indicator by pressing and holding the RESET for 2 seconds,
The status light will change from Replace (red) to Good
(green) when the system is reset.
WA_RRLnER
_O
_O
11
Accelerated Ice Production
The accelerated ice feature assists with temporary periods of
heavy ice usage by increasing ice production over a 24-hour
period.
• Press ICE touch pad to set the freezer temperature to -10°F
(-23°C). The Accelerated Ice setting will remain on for 24
hours unless manually turned off.
If increased ice production is desired at all times, set the
Freezer Control to a colder setting. Adjusting the freezer to a
colder temperature may make some foods, such as ice
cream, harder.
Cut Hazard
Use a sturdy glass when dispensing ice or water.
Failure to do so can result in cuts.
Depending on your model, you may have one or more of the
following options: the ability to select either crushed or cubed
ice, a special light that turns on when you use the dispenser, or a
lock option to avoid accidental dispensing.
The ice dispenser
Ice dispenses from the ice maker storage bin in the freezer. When
the dispenser lever is pressed:
• A trap door opens in a chute between the dispenser and the
ice bin. Ice moves from the bin and falls through the chute.
• When you release the dispenser lever, the trap door closes
and the ice dispensing stops, The dispensing system will not
operate when the freezer door is open.
Some models dispense both cubed and crushed ice. Before
dispensing ice, select which type of ice you prefer. The button
controls are designed for easy use and cleaning.
• For cubed ice, press the CUBE button until the red indicator
appears in the window above the CUBE button.
ICE
CRUSH CUBE
• For crushed ice, press the CRUSH button until the red
indicator appears in the window above the CRUSH button.
For crushed ice, cubes are crushed before being dispensed. This
may cause a slight delay when dispensing crushed ice. Noise
from the ice crusher is normal, and pieces of ice may vary in size.
When changing from CRUSH to CUBE, a few ounces of crushed
ice will be dispensed along with the first cubes.
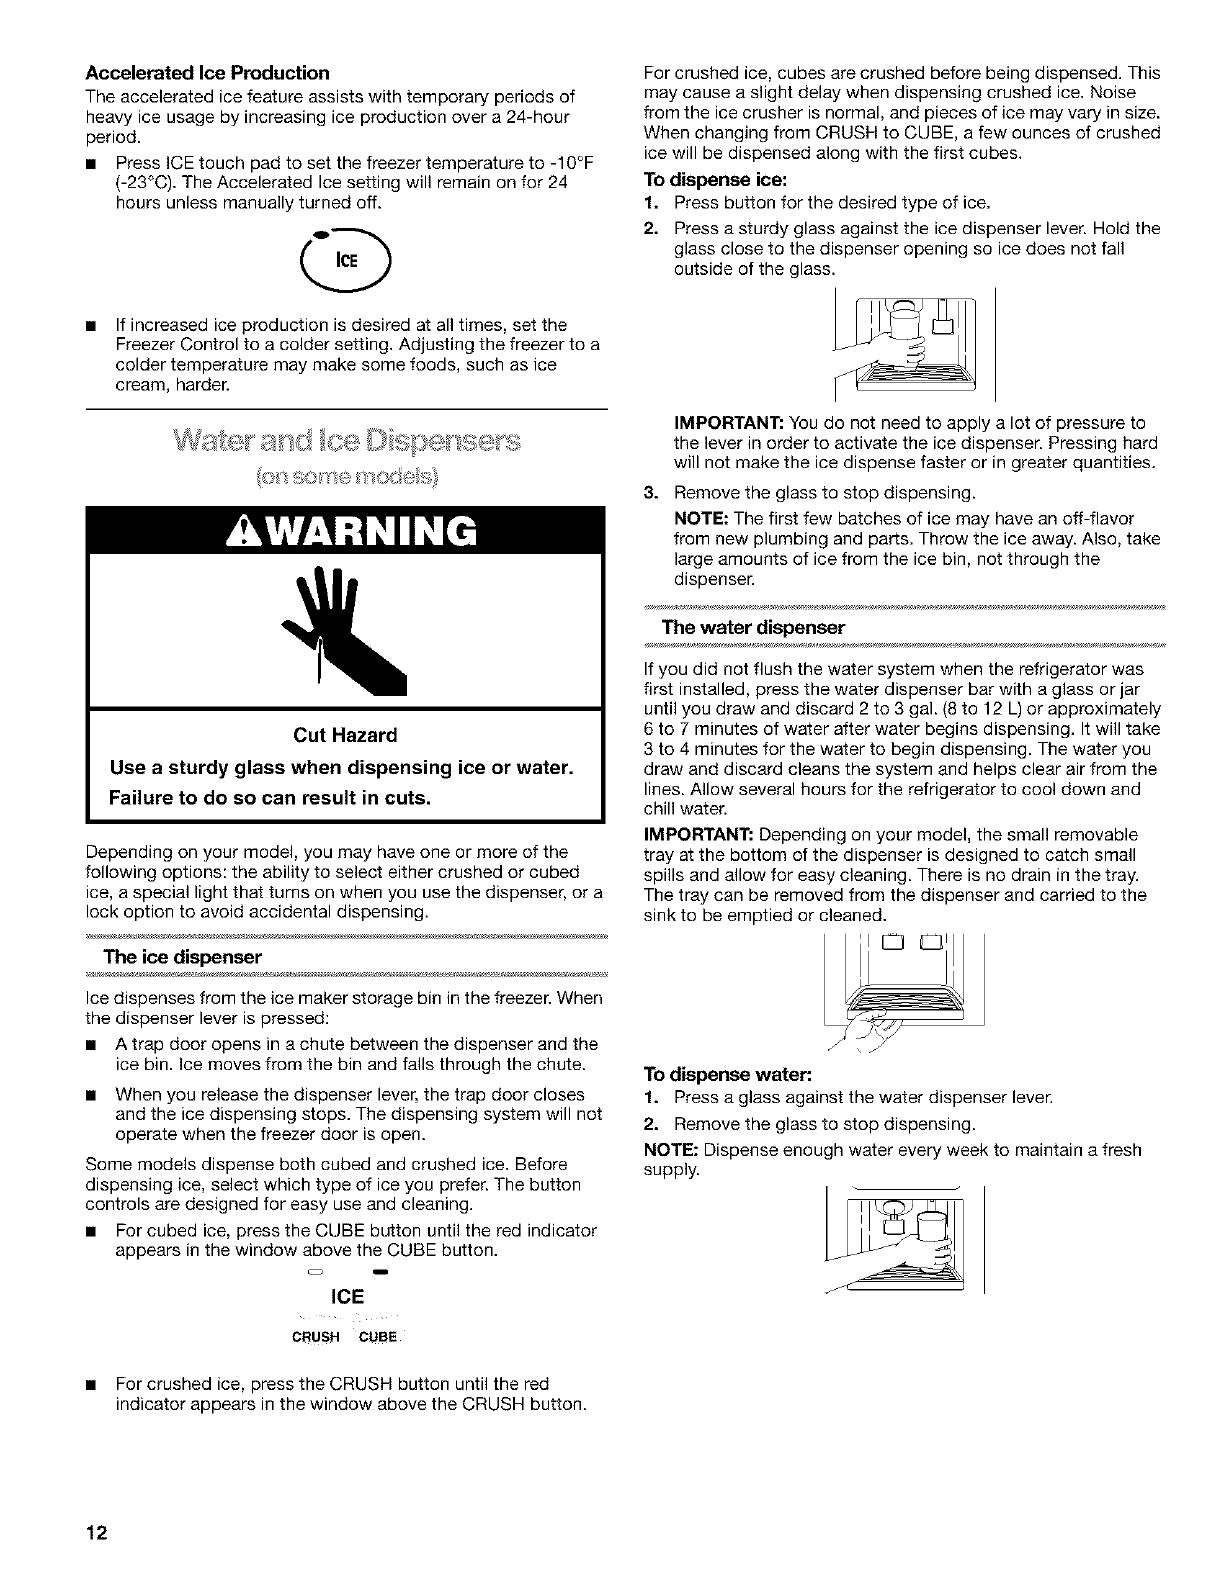
To dispense ice:
1. Press button for the desired type of ice.
2. Press a sturdy glass against the ice dispenser lever. Hold the
glass close to the dispenser opening so ice does not fall
outside of the glass.
IMPORTANT: You do not need to apply a lot of pressure to
the lever in order to activate the ice dispenser. Pressing hard
will not make the ice dispense faster or in greater quantities.
3. Remove the glass to stop dispensing.
NOTE: The first few batches of ice may have an off-flavor
from new plumbing and parts. Throw the ice away. Also, take
large amounts of ice from the ice bin, not through the
dispenser.
The water dispenser
If you did not flush the water system when the refrigerator was
first installed, press the water dispenser bar with a glass or jar
until you draw and discard 2 to 3 gal. (8 to 12 L) or approximately
6 to 7 minutes of water after water begins dispensing. It will take
3 to 4 minutes for the water to begin dispensing. The water you
draw and discard cleans the system and helps clear air from the
lines. Allow several hours for the refrigerator to cool down and
chill water.
IMPORTANT: Depending on your model, the small removable
tray at the bottom of the dispenser is designed to catch small
spills and allow for easy cleaning. There is no drain in the tray.
The tray can be removed from the dispenser and carried to the
sink to be emptied or cleaned.
To dispense water:.
1. Press a glass against the water dispenser lever.
2. Remove the glass to stop dispensing.
NOTE: Dispense enough water every week to maintain a fresh
supply.
12
The dispenser light Changing a base grille water filter cartridge
The dispenser area has a light. It can be turned on manually by
pressing the ON button at the right-hand side of the control
panel. The red indicator above the ON button will appear.
On some models: Whenever you use the dispenser the lever will
automatically turn the light on.
LIGHT
OFF ON
NOTE: See the "Changing the Light Bulbs" section for
information on changing the dispenser light bulb.
On models without crushed ice, the light switch is a rocker-style
type. Push the switch to turn the light on, and push again to turn
the light off.
The dispenser lock (on some models)
Your dispenser can be turned off for easy cleaning or to prevent
accidental dispensing by small children and pets. To turn off the
dispenser, press the LOCK button. The indicator will appear
above the LOCK button and the ice and water dispensers will not
work. To unlock the dispenser, press the UNLOCK button until
the indicator appears. Then continue to dispense ice or water as
usual.
DISPENSER
LOCK UNLOC K
NOTE: The lock feature does not shut off power to the product,
to the ice maker, or to the dispenser light. It simply deactivates
the dispenser levers.
The base grille water filter is located below the freezer
compartment door. Depending on your model, you may have a
filter that is installed behind the base grille (Style 1) or a filter that
is installed through the base grille (Style 2).
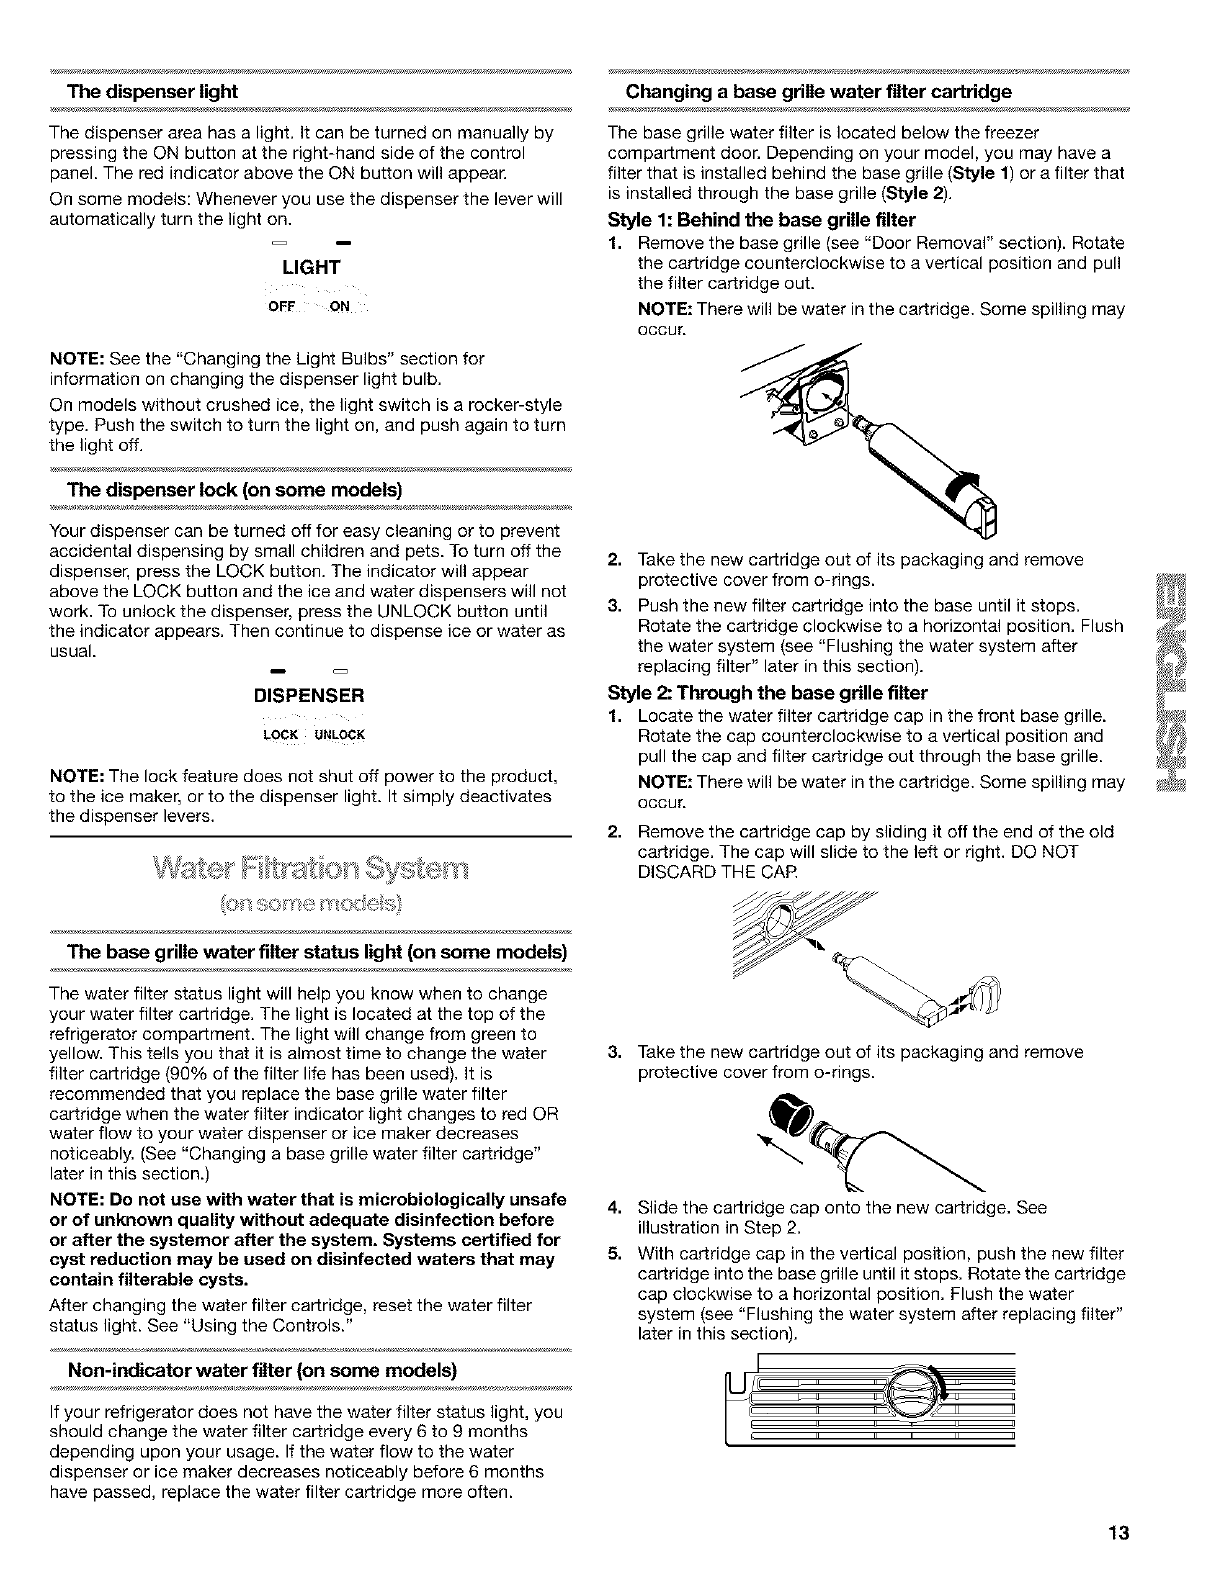
Style 1: Behind the base grille filter
1. Remove the base grille (see "Door Removal" section). Rotate
the cartridge counterclockwise to a vertical position and pull
the filter cartridge out.
NOTE: There will be water in the cartridge. Some spilling may
occur.
2. Take the new cartridge out of its packaging and remove
protective cover from o-rings.
3. Push the new filter cartridge into the base until it stops.
Rotate the cartridge clockwise to a horizontal position. Flush
the water system (see "Flushing the water system after
replacing filter" later in this section).
Style 2: Through the base grille filter
1. Locate the water filter cartridge cap in the front base grille.
Rotate the cap counterclockwise to a vertical position and
pull the cap and filter cartridge out through the base grille.
NOTE: There will be water in the cartridge. Some spilling may
occur.
2. Remove the cartridge cap by sliding it off the end of the old
cartridge. The cap will slide to the left or right. DO NOT
DISCARD THE CAR
The base grille water filter status light (on some models)
The water filter status light will help you know when to change
your water filter cartridge. The light is located at the top of the
refrigerator compartment. The light will change from green to
yellow. This tells you that it is almost time to change the water
filter cartridge (99% of the filter life has been used). It is
recommended that you replace the base grille water filter
cartridge when the water filter indicator light changes to red OR
water flow to your water dispenser or ice maker decreases
noticeably. (See "Changing a base grille water filter cartridge"
later in this section.)
NOTE: Do not use with water that is microbiologically unsafe
or of unknown quality without adequate disinfection before
or after the systemor after the system. Systems certified for
cyst reduction may be used on disinfected waters that may
contain filterable cysts.
After changing the water filter cartridge, reset the water filter
status light. See "Using the Controls."
Non-indicator water filter (on some models)
3. Take the new cartridge out of its packaging and remove
protective cover from o-rings.
4. Slide the cartridge cap onto the new cartridge. See
illustration in Step 2.
5. With cartridge cap in the vertical position, push the new filter
cartridge into the base grille until it stops. Rotate the cartridge
cap clockwise to a horizontal position. Flush the water
system (see "Flushing the water system after replacing filter"
later in this section).
If your refrigerator does not have the water filter status light, you
should change the water filter cartridge every 6 to 9 months
depending upon your usage. If the water flow to the water
dispenser or ice maker decreases noticeably before 6 months
have passed, replace the water filter cartridge more often.
13
Flushing the water system after replacing filter Remove and replace the storage bin
Use a sturdy container to depress the water dispenser bar until
the water begins to flow. Flush the water system by dispensing
and discarding 2 to 3 gal. (8 to 12 L) of water. Cleaning the
system will take approximately 6 to 7 minutes and will help clear
air from the line. Additional flushing may be required in some
households.
NOTE: As air is cleared from the system, water may spurt out of
the dispensen
Using the dispenser without the water filter
1.
2.
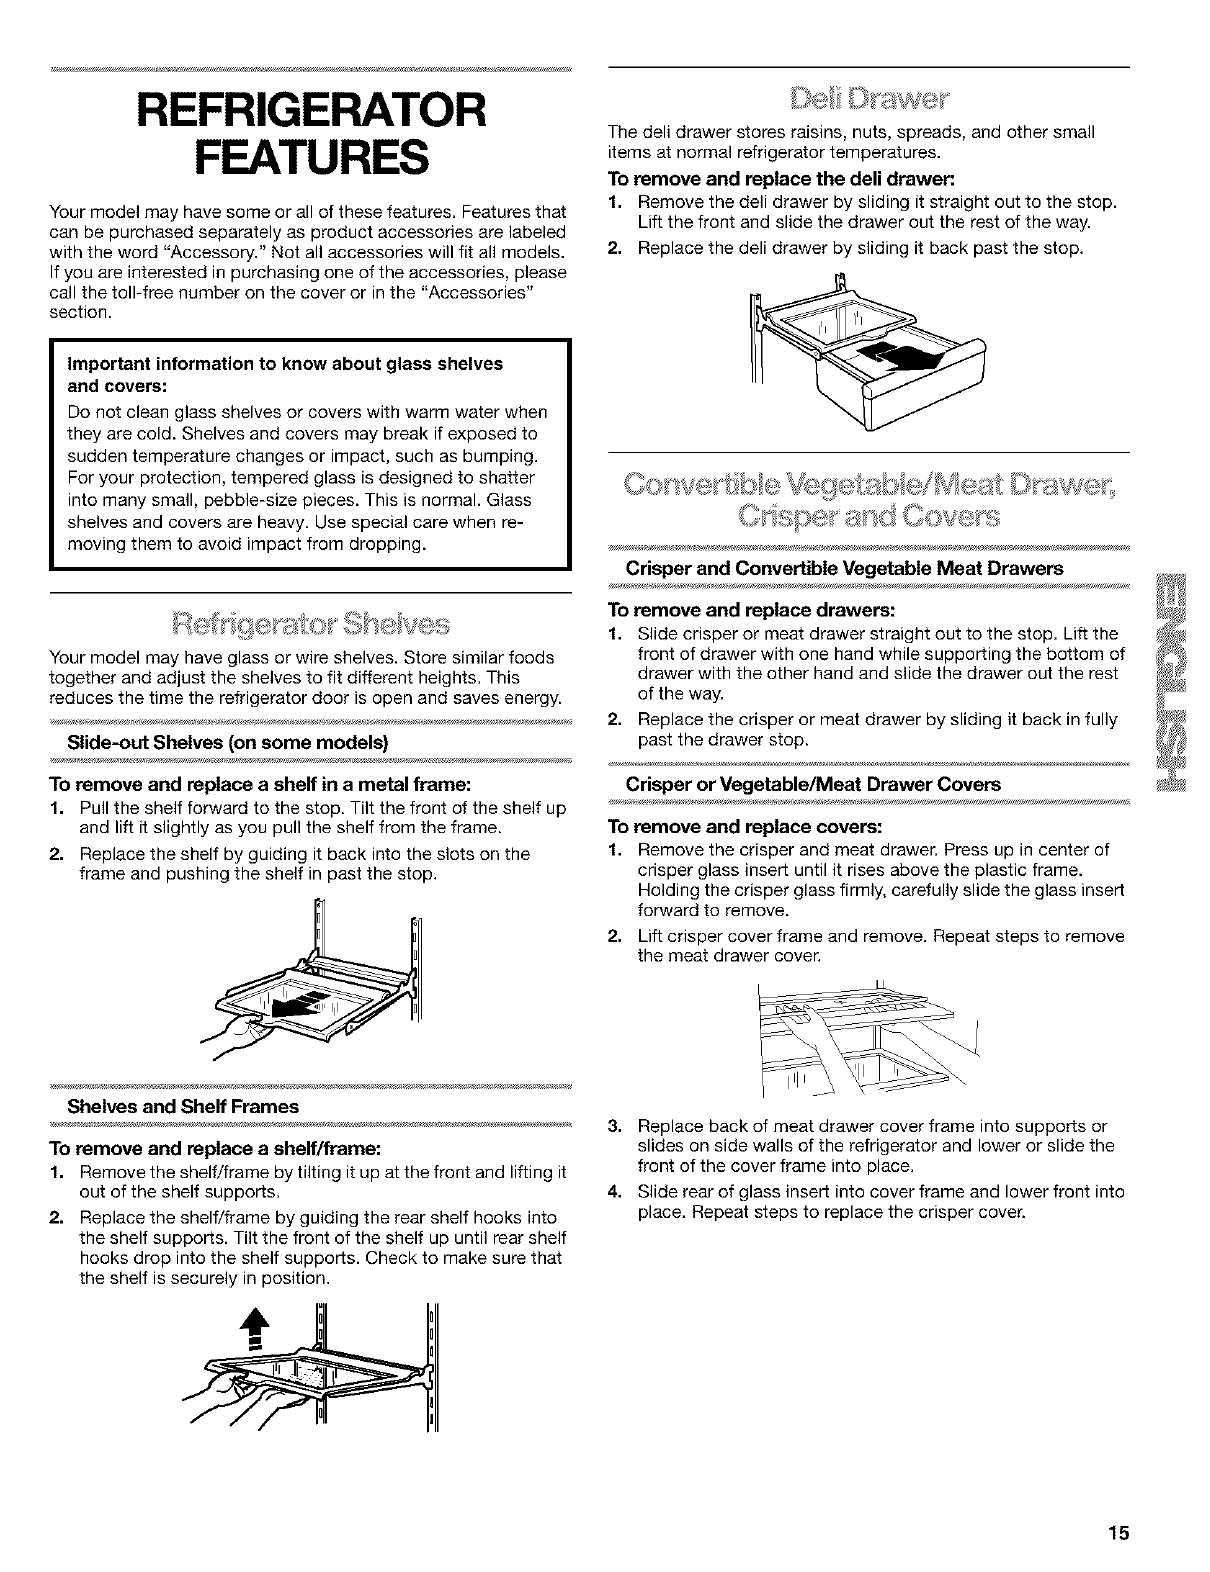
Hold the base of the storage bin with both hands and press
the release button to lift the storage bin up and out.
NOTE: It is not necessary to turn the ice maker control to the
OFF (right) position when removing the storage bin. The
sensor cover ("flipper door") on the left wall of the freezer
stops the ice maker from producing ice if the door is open or
the storage bin is removed.
Replace the storage bin on the door and push down to make
sure it is securely in place.
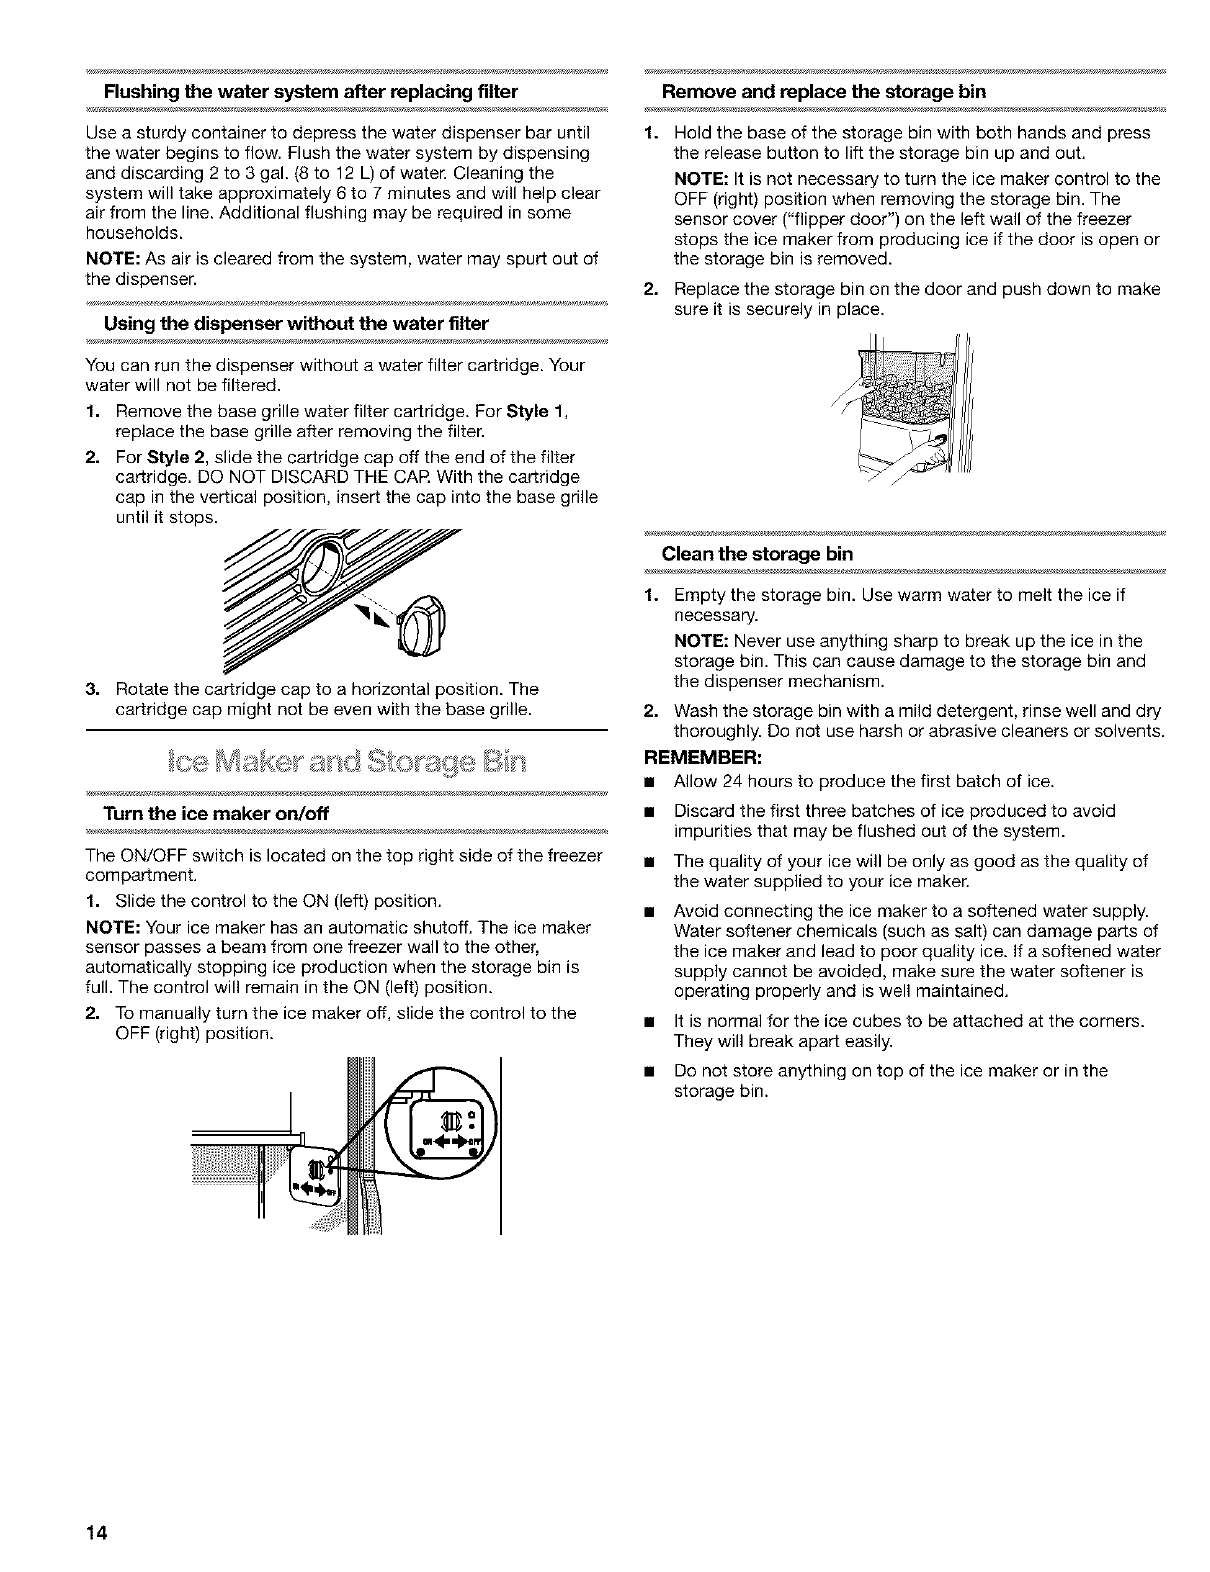
You can run the dispenser without a water filter cartridge. Your
water will not be filtered.
1. Remove the base grille water filter car[ridge. For Style 1,
replace the base grille after removing the filter.
2. For Style 2, slide the cartridge cap off the end of the filter
cartridge. DO NOT DISCARD THE CAR With the cartridge
cap in the vertical position, insert the cap into the base grille
until it stops.
a, Rotate the cartridge cap to a horizontal position. The
cartridge cap might not be even with the base grille.
Turn the ice maker on/off
The ON/OFF switch is located on the top right side of the freezer
compartment.
1. Slide the control to the ON (left) position.
NOTE: Your ice maker has an automatic shutoff. The ice maker
sensor passes a beam from one freezer wall to the other,
automatically stopping ice production when the storage bin is
full. The control will remain in the ON (left) position.
2. To manually turn the ice maker off, slide the control to the
OFF (right) position.
Clean the storage bin
1o Empty the storage bin. Use warm water to melt the ice if
necessary.
NOTE: Never use anything sharp to break up the ice in the
storage bin. This can cause damage to the storage bin and
the dispenser mechanism.
2. Wash the storage bin with a mild detergent, rinse well and dry
thoroughly. Do not use harsh or abrasive cleaners or solvents.
REMEMBER:
• Allow 24 hours to produce the first batch of ice.
• Discard the first three batches of ice produced to avoid
impurities that may be flushed out of the system.
• The quality of your ice will be only as good as the quality of
the water supplied to your ice maker.
Avoid connecting the ice maker to a softened water supply.
Water softener chemicals (such as salt) can damage parts of
the ice maker and lead to poor quality ice. If a softened water
supply cannot be avoided, make sure the water softener is
operating properly and is well maintained.
• It is normal for the ice cubes to be attached at the corners.
They will break apart easily.
• Do not store anything on top of the ice maker or in the
storage bin.
14
REFRIGERATOR
FEATURES
Your model may have some or all of these features. Features that
can be purchased separately as product accessories are labeled
with the word "Accessory." Not all accessories will fit all models.
If you are interested in purchasing one of the accessories, please
call the toll-free number on the cover or in the "Accessories"
section.
Important information to know about glass shelves
and covers:
Do not clean glass shelves or covers with warm water when
they are cold. Shelves and covers may break if exposed to
sudden temperature changes or impact, such as bumping.
For your protection, tempered glass is designed to shatter
into many small, pebble-size pieces. This is normal. Glass
shelves and covers are heavy. Use special care when re-
moving them to avoid impact from dropping.
Your model may have glass or wire shelves. Store similar foods
together and adjust the shelves to fit different heights. This
reduces the time the refrigerator door is open and saves energy.
Slide-out Shelves (on some models)
To remove and replace a shelf in a metal frame:
1. Pull the shelf forward to the stop. Tilt the front of the shelf up
and lift it slightly as you pull the shelf from the frame.
2. Replace the shelf by guiding it back into the slots on the
frame and pushing the shelf in past the stop.
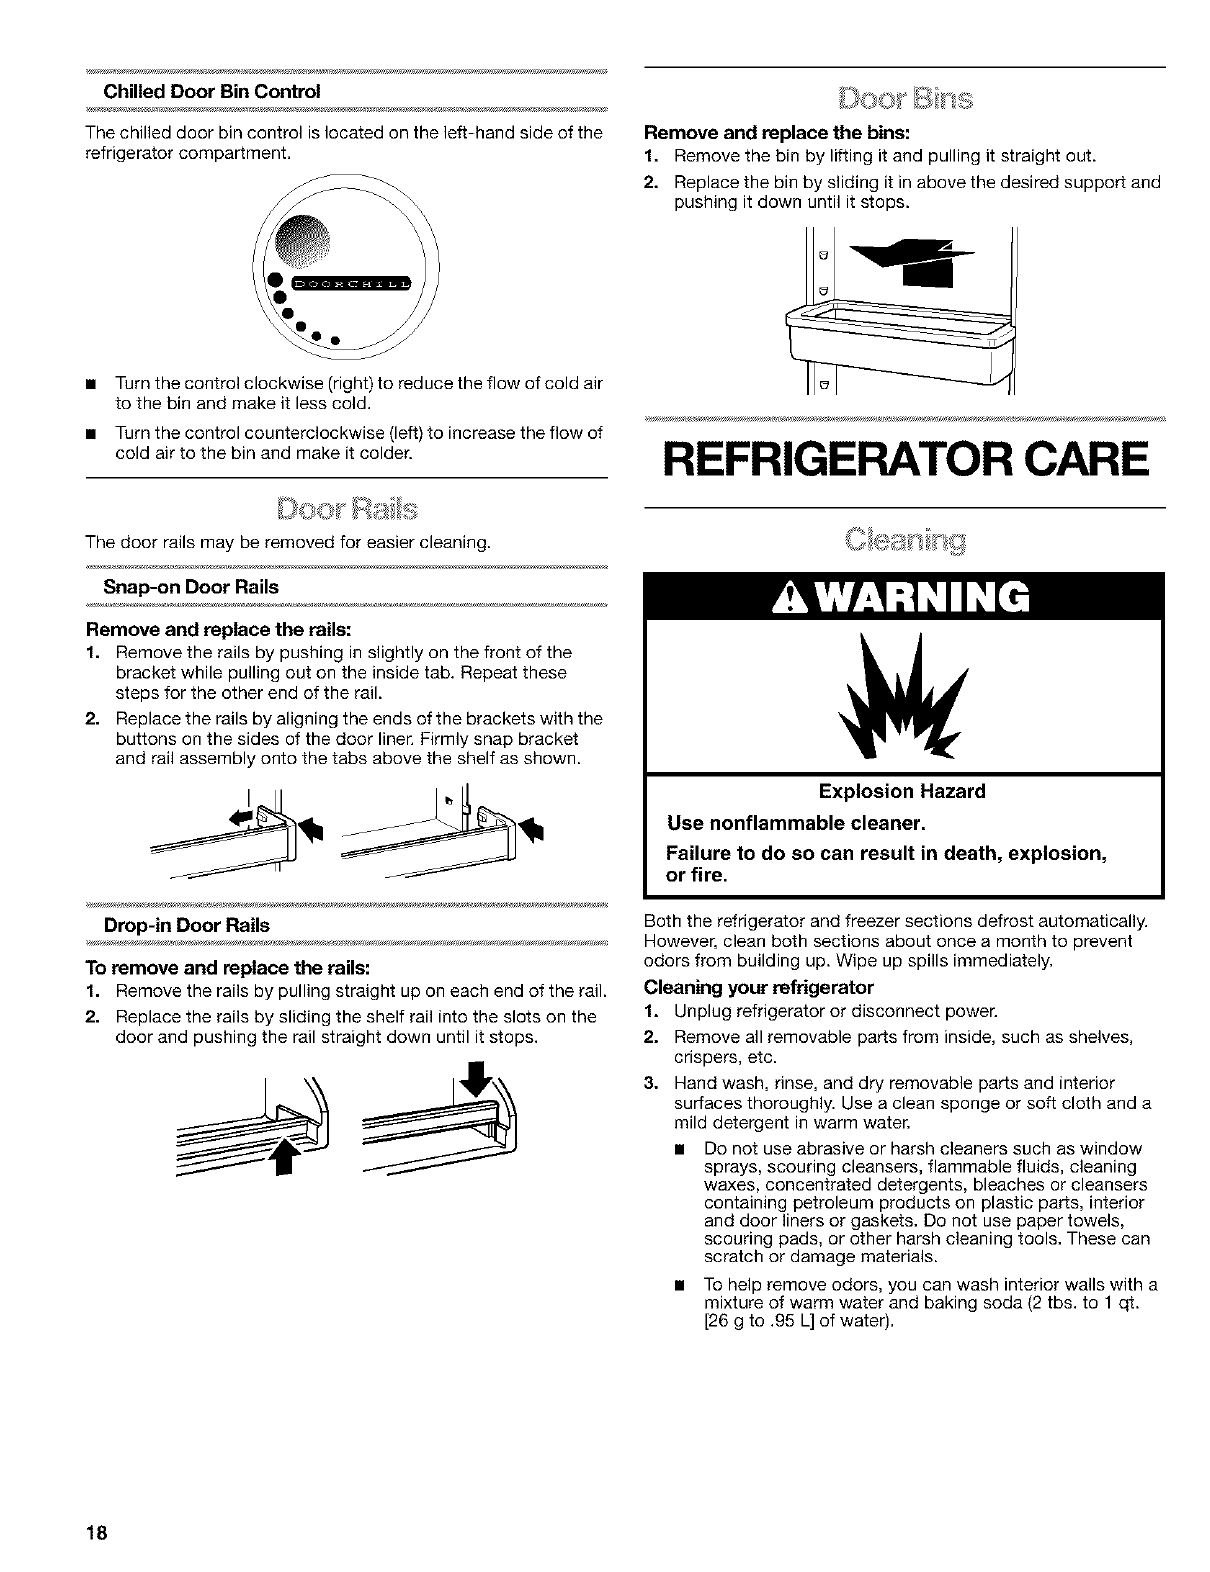
The dell drawer stores raisins, nuts, spreads, and other small
items at normal refrigerator temperatures.
To remove and replace the dell drawer.
1. Remove the dell drawer by sliding it straight out to the stop.
Lift the front and slide the drawer out the rest of the way.
2. Replace the dell drawer by sliding it back past the stop.
Crisper and Convertible Vegetable Meat Drawers
To remove and replace drawers:
1. Slide crisper or meat drawer straight out to the stop. Lift the
front of drawer with one hand while supporting the bottom of
drawer with the other hand and slide the drawer out the rest
of the way.
2. Replace the crisper or meat drawer by sliding it back in fully
past the drawer stop.
Crisper or Vegetable/Meat Drawer Covers
To remove and replace covers:
1. Remove the crisper and meat drawer. Press up in center of
crisper glass insert until it rises above the plastic frame.
Holding the crisper glass firmly, carefully slide the glass insert
forward to remove.
2. Lift crisper cover frame and remove. Repeat steps to remove
the meat drawer cover.
Shelves and Shelf Frames
To remove and replace ashelf/frame:
1. Remove the shelf/frame by tilting it up at the front and lifting it
out of the shelf supports.
2. Replace the shelf/frame by guiding the rear shelf hooks into
the shelf supports. Tilt the front of the shelf up until rear shelf
hooks drop into the shelf supports. Check to make sure that
the shelf is securely in position.
3. Replace back of meat drawer cover frame into supports or
slides on side walls of the refrigerator and lower or slide the
front of the cover frame into place.
4. Slide rear of glass insert into cover frame and lower front into
place. Repeat steps to replace the crisper cover.
15

C_'_!_s!_ _/_'_/_t_t __SW@_ _
The convertible vegetable/meat drawer can be adjusted to
properly chill meats or vegetables• The air inside the pan is
cooled to prevent "spot" freezing and can be set to keep meats
at the National Livestock and Meat Board recommended storage
temperatures of 28 °- 32°F (-2°- 0°C).
IMPORTANT: To extend freshness, wrap meats in airtight,
moisture-proof materials before storing. Always store meat as
recommended.
Adjusting the control
The convertible control comes preset at the lowest meat setting.
To change a control setting: Move the control to the right
(colder) or to the left (less cold) as desired•
To store vegetables: Set the control to VEG (all the way to the
left) to store vegetables at their optimal storage temperatures
(which need to be warmer than those for meat).
You can control the amount of humidity in the moisture-sealed
crisper. Adjust the control to any setting between LOW and
HIGH.
LOW (open) lets moist air out of the crisper for best storage of
fruits and vegetables with skins.
• Fruit: Wash, let dry and store in refrigerator in plastic bag or
crisper. Do not wash or hull berries until they are ready to use.
Sort and keep berries in original container in crisper, or store
in a loosely closed paper bag on a refrigerator shelf.
• Vegetables with skins: Place in plastic bag or plastic
container and store in crisper.
HIGH (closed) keeps moist air in the crisper for best storage of
fresh, leafy vegetables.
• Leafy vegetables: Wash in cold water, drain and trim or tear
off bruised and discolored areas• Place in plastic bag or
plastic container and store in crisper.
Humidity control location:
Humidity Control is located on the crisper drawer.
IMPORTANT: If food starts to freeze, move the control to the left
(less cold). Remember to wait 24 hours between adjustments.
Doing so gives the temperature of the food time to change.
Meat storage guide
Store most meat in original wrapping as long as it is airtight and
moisture-proof. Rewrap if necessary. See the following chart for
storage times• When storing meat longer than the times given,
freeze the meat.
Fresh fish or shellfish ......................... use same day as purchased
Chicken, ground beef, variety meat (liver, etc.) ................ 1-2 days
Cold cuts, steaks/roasts ................................................... 3-5 days
Cured meats ................................................................... 7-18 days
Leftovers - Cover leftovers with plastic wrap, aluminum foil, or
plastic containers with tight lids.
SOS@ ¢/SO _*:_S ,*f%3C(_SSO '!/
To remove and replace the wine rack:
1. Remove the wine rack by pulling it straight out from the shelf.
2. Replace the wine rack by sliding it in between the shelf and
the wall of the refrigerator.
NOTE: For long-term storage, place eggs in a covered container
or in their original carton on an interior shelf.
16

FEATURES
Your model may have some or all of these features. Features that
can be purchased separately as product accessories are labeled
with the word "Accessory." Not all accessories will fit all models.
If you are interested in purchasing one of the accessories, please
call the toll-free number on the cover or in the "Accessories"
section.
(s _ _ ::,e_of she yes varies w%_ ¢_0;_e}
Remove and replace the shelf:
1. Lift the shelf up and off of the supports to remove it.
2. Replace the shelf by placing it in the supports. Check to be
sure the shelf is securely in place.
,l, I,II
Frozen food storage guide
Storage times will vary according to the quality and type of food,
the type of packaging or wrap used (should be airtight and
moisture-proof), and the storage temperature. Ice crystals inside
a sealed package are normal. This simply means that moisture in
the food and air inside the package have condensed, creating ice
crystals.
Put no more unfrozen food into the freezer than will freeze within
24 hours (no more than 2 to 3 Ibs. of food per cubic foot
[907-1,350 g per L] of freezer space). Leave enough space in the
freezer for air to circulate around packages. Be careful to leave
enough room for the door to close tightly.
For more information on preparing food for freezing, check a
freezer guide or reliable cookbook.
DOOR FEATURES
Your model may have some or all of these features. Features that
can be purchased separately as product accessories are labeled
with the word "Accessory." Not all accessories will fit all models.
If you are interested in purchasing one of the accessories, please
call the toll-free number on the cover or in the "Accessories"
section.
Remove and replace the bin:
1. Remove the bin by pulling out on the tabs behind the basket
to release it from the door liner.
2. Replace the bin by aligning the tabs with the buttons on the
sides of the door liner. Firmly snap the tabs onto the buttons
as shown.
Cool air from the freezer is directed to the door bin directly
beneath the vent.
NOTE: The dairy compartment and can rack are not chilled.
The freezer basket or bin can be used to store bags of frozen
fruits and vegetables that may slide off freezer shelves.
Remove and replace the freezer basket or bin:
1. Remove the basket or bin by sliding it out to the stop.
2. Lift the front to slide the basket or bin out the rest of the way.
3. Replace the basket or bin by positioning it on the rails, Lift the
basket or bin front slightly while pushing it in fully past the
stops.
17
Chilled Door Bin Control
The chilled door bin control is located on the left-hand side of the
refrigerator compartment,
Remove and replace the bins:
1. Remove the bin by lifting it and pulling it straight out.
2. Replace the bin by sliding it in above the desired support and
pushing it down until it stops.
Turn the control clockwise (right) to reduce the flow of cold air
to the bin and make it less cold.
Turn the control counterclockwise (left) to increase the flow of
cold air to the bin and make it colder. REFRIGERATOR CARE
The door rails may be removed for easier cleaning.
Snap-on Door Rails
Remove and replace the rails:
1. Remove the rails by pushing in slightly on the front of the
bracket while pulling out on the inside tab. Repeat these
steps for the other end of the rail.
2. Replace the rails by aligning the ends of the brackets with the
buttons on the sides of the door liner. Firmly snap bracket
and rail assembly onto the tabs above the shelf as shown.
Explosion Hazard
Use nonflammable cleaner.
Failure to do so can result in death, explosion,
or fire.
Drop-in Door Rails Both the refrigerator and freezer sections defrost automatically.
__ However, clean both sections about once a month to prevent
To remove and replace the rails:
1. Remove the rails by pulling straight up on each end of the rail.
2. Replace the rails by sliding the shelf rail into the slots on the
door and pushing the rail straight down until it stops.
odors from building up. Wipe up spills immediately.
Cleaning your refrigerator
1. Unplug refrigerator or disconnect power.
2. Remove all removable parts from inside, such as shelves,
crispers, etc.
3. Hand wash, rinse, and dry removable parts and interior
surfaces thoroughly. Use a clean sponge or soft cloth and a
mild detergent in warm water.
• Do not use abrasive or harsh cleaners such as window
sprays, scouring cleansers, flammable fluids, cleaning
waxes, concentrated detergents, bleaches or cleansers
containing petroleum products on plastic parts, interior
and door liners or gaskets. Do not use paper towels,
scouring pads, or other harsh cleaning tools. These can
scratch or damage materials.
• To help remove odors, you can wash interior walls with a
mixture of warm water and baking soda (2 tbs. to 1 qt.
[26 g to .95 L] of water).
18
4. Wash stainless steel and painted metal exteriors with a clean
sponge or soft cloth and a mild detergent in warm water. Do
not use abrasive or harsh cleaners. Dry thoroughly with a soft
cloth. For additional protection against damage to painted
metal exteriors, apply appliance wax (or auto paste wax) with
a clean, soft cloth. Do not wax plastic parts.
NOTE: To keep your Stainless Steel refrigerator looking like
new and to remove minor scuffs or marks, it is suggested that
you use the manufacturer's approved Stainless Steel Cleaner
& Polish.
IMPORTANT: This cleaner is for Stainless Steel parts only!
Do not allow the Stainless Steel Cleaner & Polish to come into
contact with any plastic parts such as the trim pieces,
dispenser covers or door gaskets. If accidental contact does
occur, clean plastic part with a sponge and mild detergent in
warm water. Dry thoroughly with a soft cloth. To order the
cleaner, see the "Accessories" section.
5. There is no need for routine condenser cleaning in normal
home operating environments. If the environment is
particularly greasy or dusty, or there is significant pet traffic in
the home, the condenser should be cleaned every 2 to 3
months to ensure maximum efficiency.
If you need to clean the condenser:
• Remove the base grille. See "Base Grille" or "Door
Removal" section.
• Use a vacuum cleaner with a soft brush to clean the grille,
the open areas behind the grille and the front surface area
of the condenser.
• Replace the base grille when finished.
6. Plug in refrigerator or reconnect power.
NOTE: Not all appliance bulbs will fit your refrigerator. Be sure to
replace the bulb with one of the same size and shape. The
dispenser light requires a heavy duty 1g-watt bulb. All other lights
require a 4g-watt appliance bulb. Replacement bulbs are
available from your dealer.
1. Unplug refrigerator or disconnect power.
2. Remove light shield when applicable as shown.
NOTE: To clean the light shield, wash it with warm water and
liquid detergent. Rinse and dry the shield well.
3. Remove light bulb and replace with one of the same size,
shape and wattage.
4. Replace light shield when applicable as shown.
5. Plug in refrigerator or reconnect power.
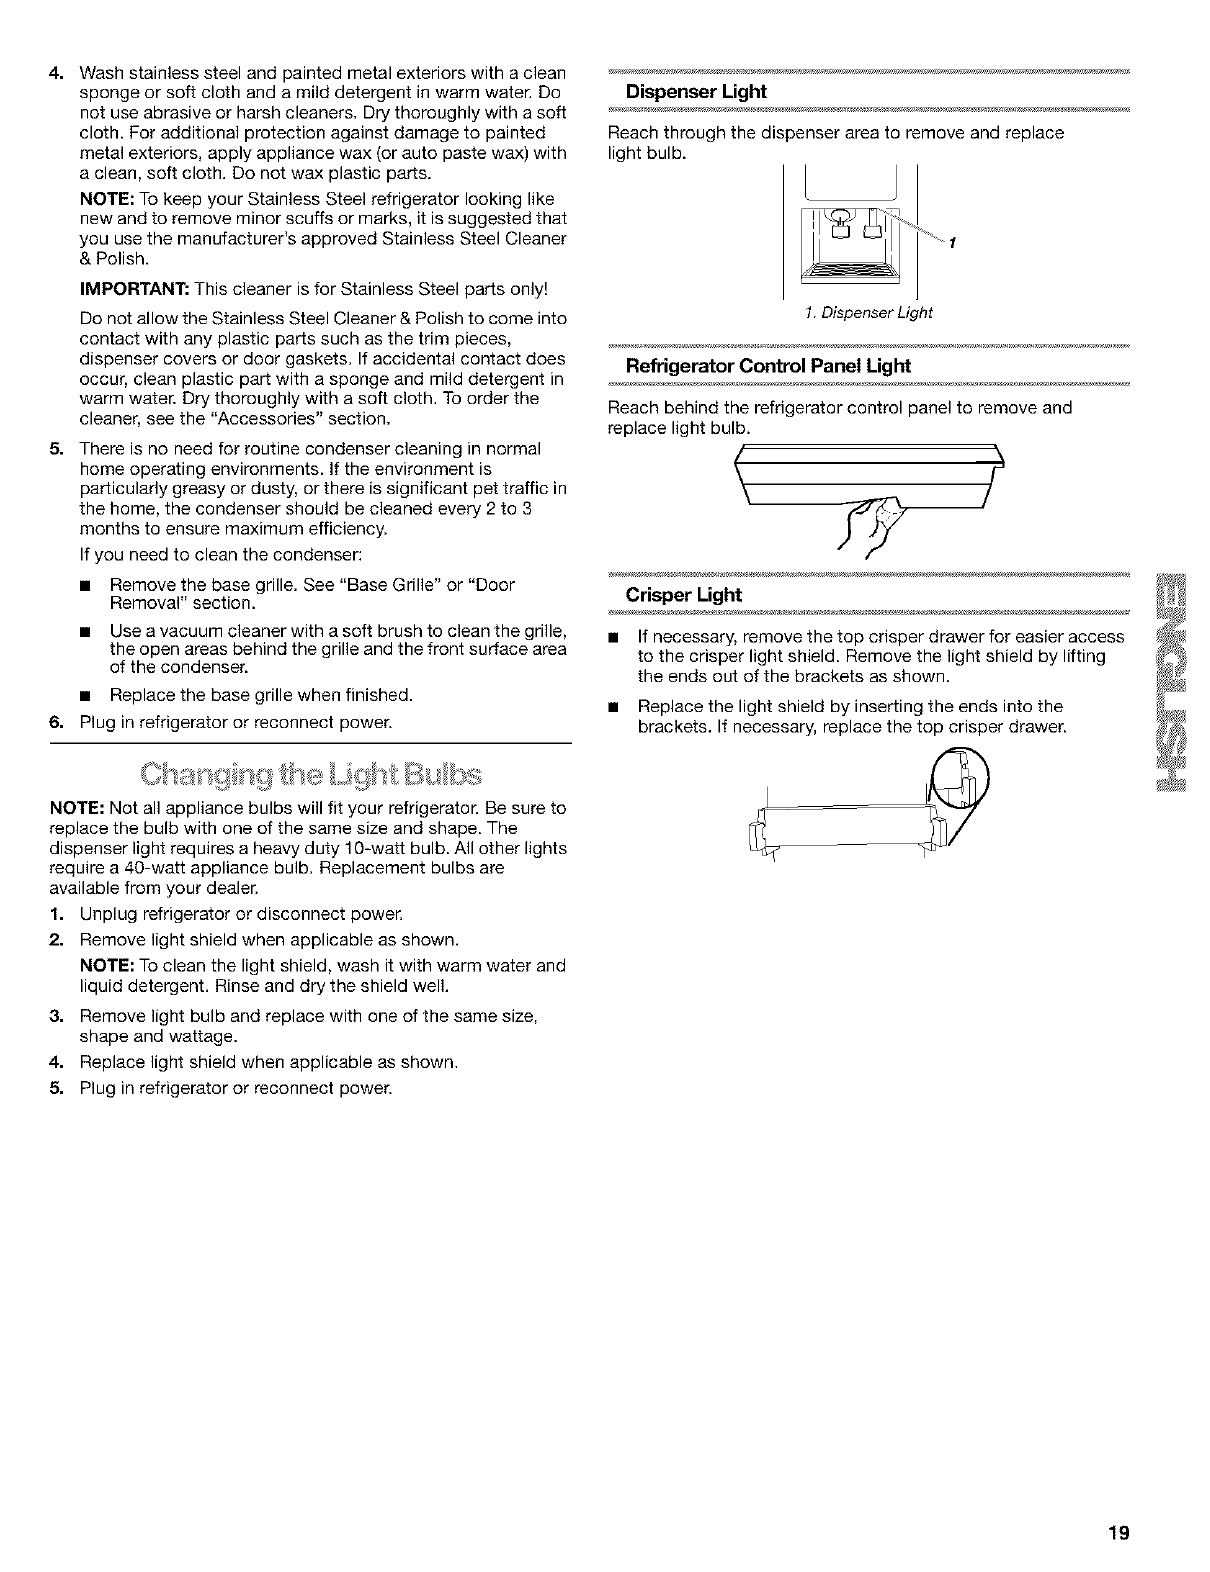
Dispenser Light
Reach through the dispenser area to remove and replace
light bulb.
1. Dispenser Light
Refrigerator Control Panel Light
Reach behind the refrigerator control panel to remove and
replace light bulb.
Crisper Light
• If necessary, remove the top crisper drawer for easier access
to the crisper light shield. Remove the light shield by lifting
the ends out of the brackets as shown. ' '
• Replace the light shield by inserting the ends into the
brackets. If necessary, replace the top crisper drawer.
19
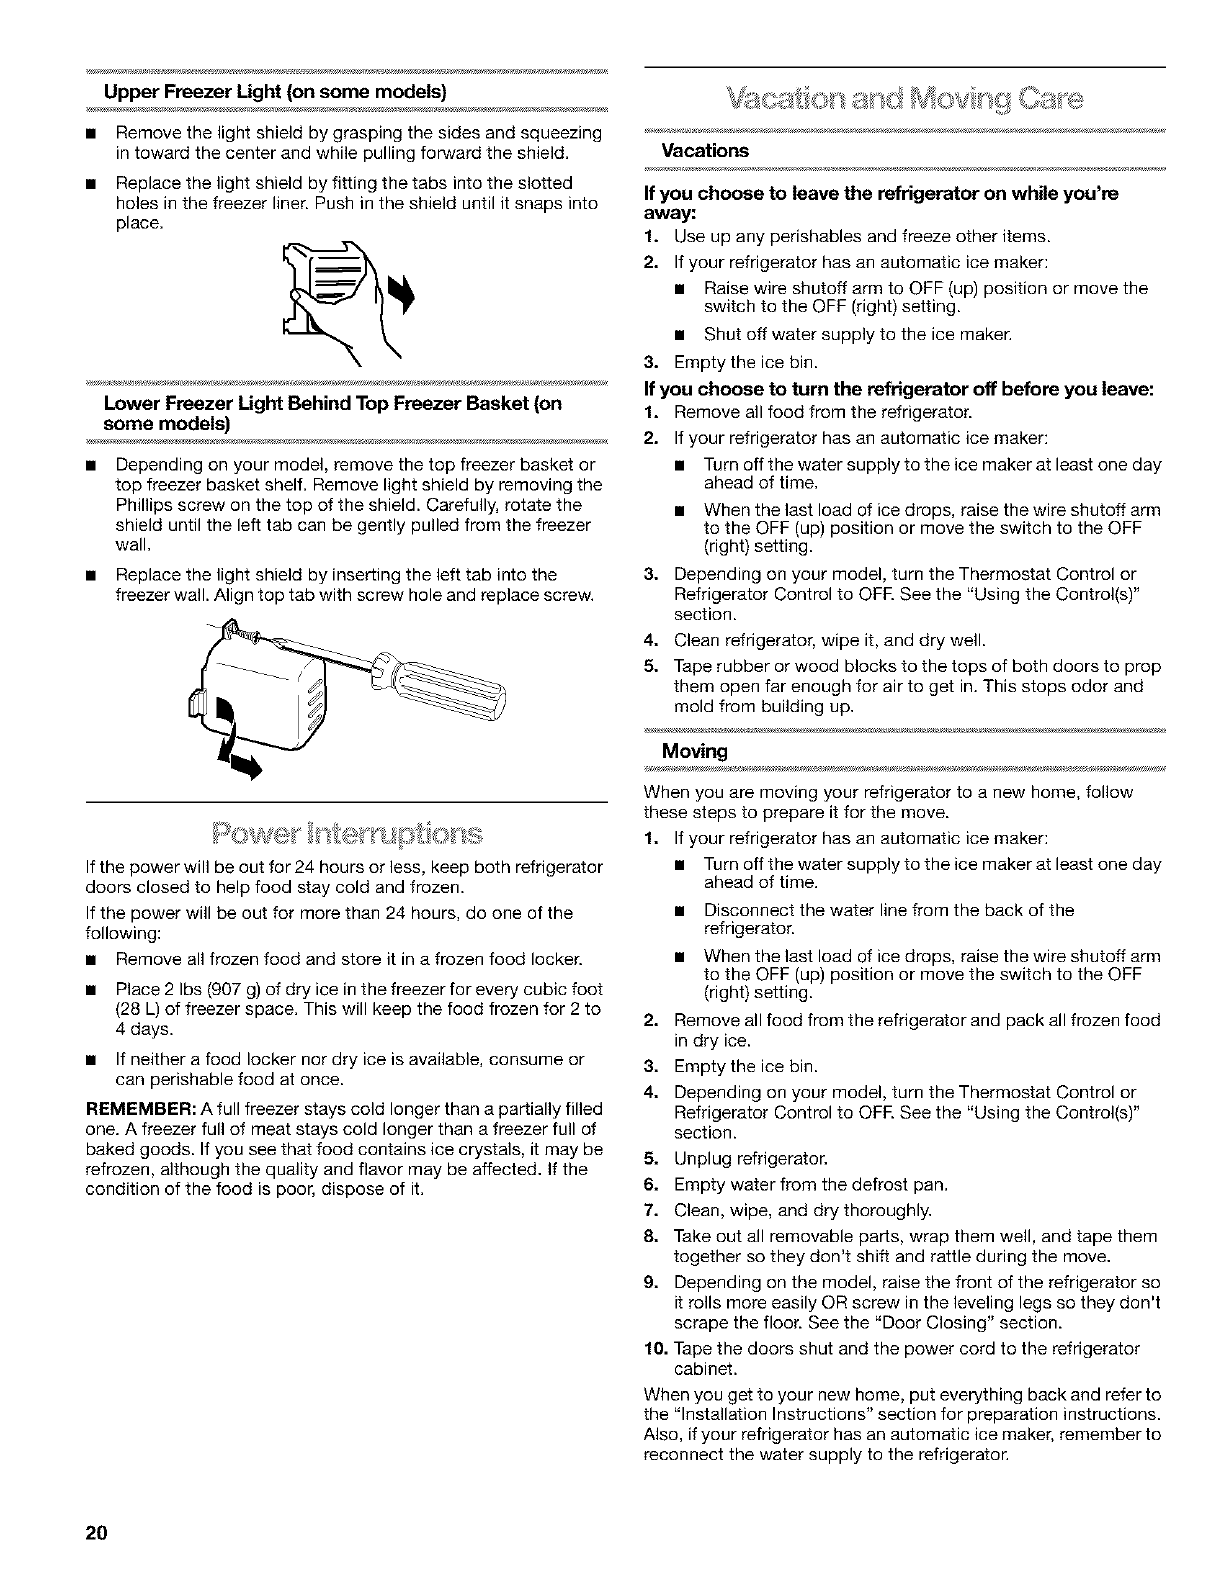
Upper Freezer Light (on some models) %f;i_,J_ 0 8_'_(, _OV g 08[_'@
• Remove the light shield by grasping the sides and squeezing
in toward the center and while pulling forward the shield.
Replace the light shield by fitting the tabs into the slotted
holes in the freezer liner. Push in the shield until it snaps into
place.
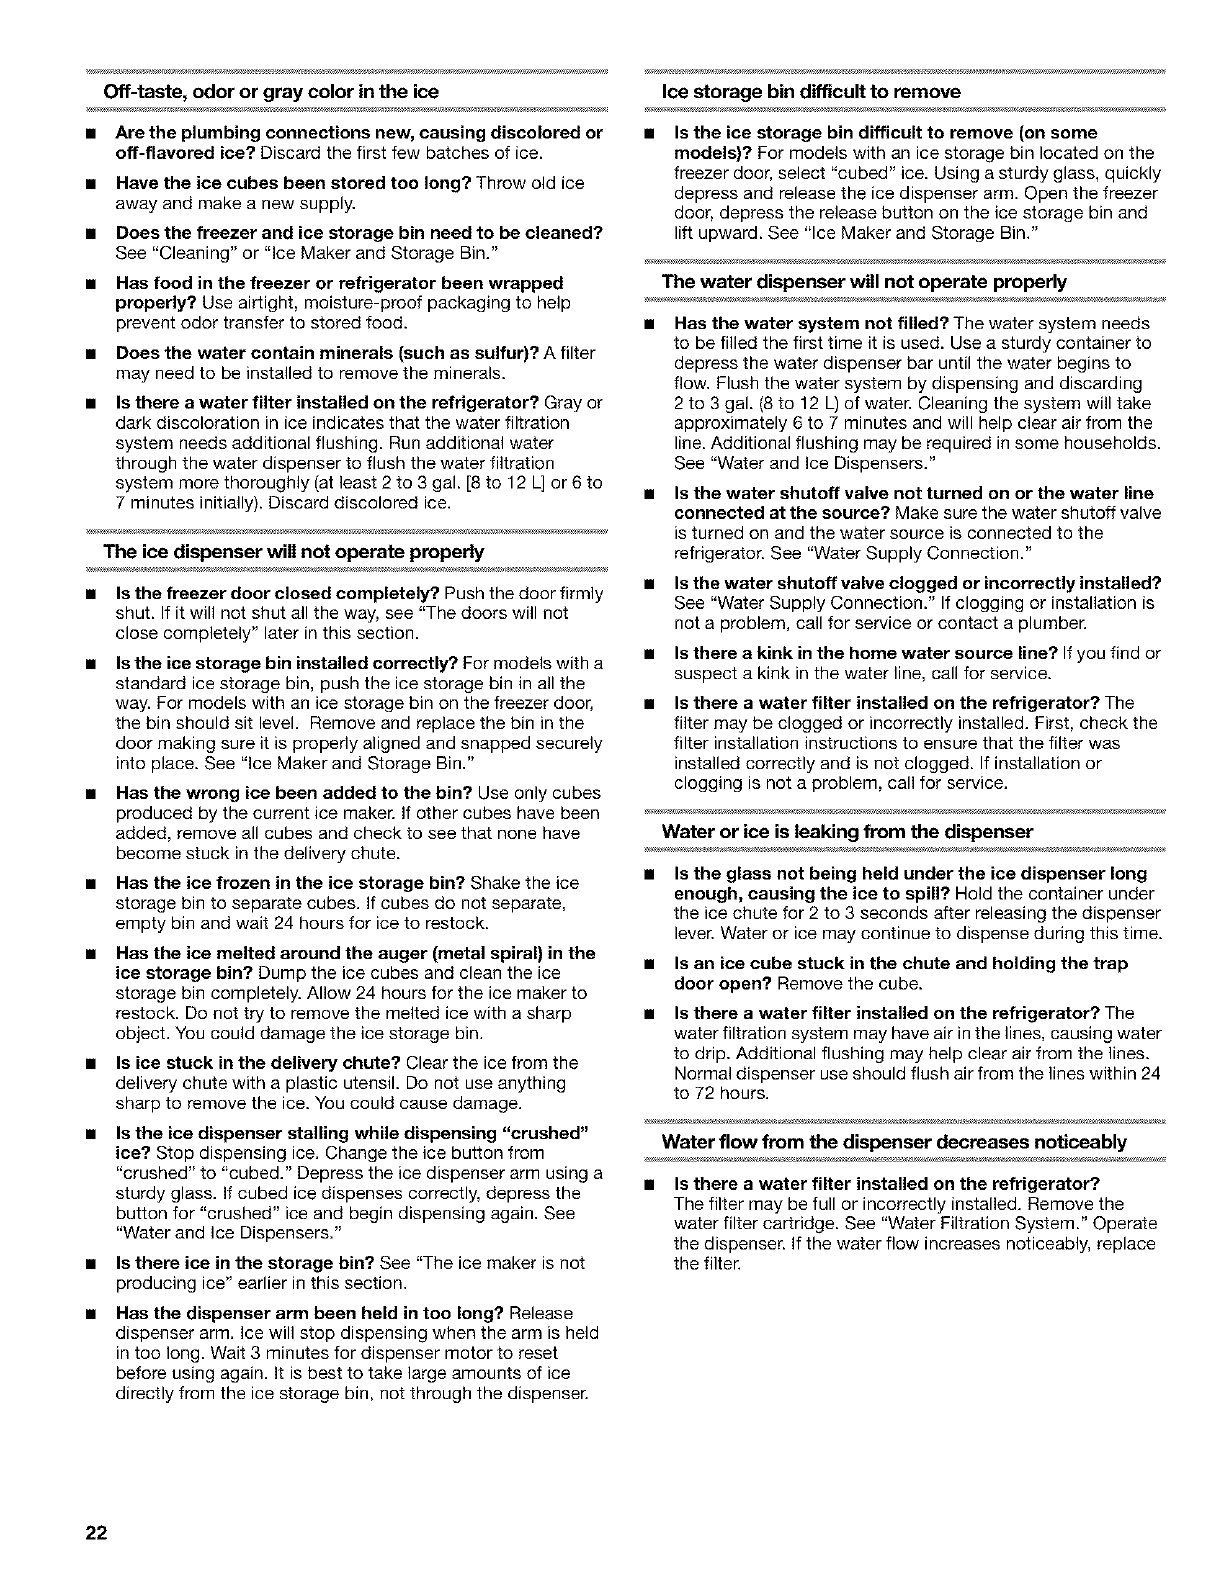
Lower Freezer Light Behind Top Freezer Basket (on
some models)
Depending on your model, remove the top freezer basket or
top freezer basket shelf. Remove light shield by removing the
Phillips screw on the top of the shield. Carefully, rotate the
shield until the left tab can be gently pulled from the freezer
wall.
• Replace the light shield by inserting the left tab into the
freezer wall. Align top tab with screw hole and replace screw.
Vacations
If the power will be out for 24 hours or less, keep both refrigerator
doors closed to help food stay cold and frozen.
If the power will be out for more than 24 hours, do one of the
following:
• Remove all frozen food and store it in a frozen food locker.
• Place 2 Ibs (907 g) of dry ice in the freezer for every cubic foot
(28 L) of freezer space. This will keep the food frozen for 2 to
4 days.
• If neither a food locker nor dry ice is available, consume or
can perishable food at once.
REMEMBER: A full freezer stays cold longer than a partially filled
one. A freezer full of meat stays cold longer than a freezer full of
baked goods. If you see that food contains ice crystals, it may be
refrozen, although the quality and flavor may be affected. If the
condition of the food is poor, dispose of it.
If you choose to leave the refrigerator on while you're
away:
1. Use up any perishables and freeze other items.
2. If your refrigerator has an automatic ice maker:
• Raise wire shutoff arm to OFF (up) position or move the
switch to the OFF (right) setting.
• Shut off water supply to the ice maker.
3. Empty the ice bin.
If you choose to turn the refrigerator off before you leave:
1. Remove all food from the refrigerator.
If your refrigerator has an automatic ice maker:
• Turn off the water supply to the ice maker at least one day
ahead of time.
3.
• When the last load of ice drops, raise the wire shutoff arm
to the OFF (up) position or move the switch to the OFF
(right) setting.
Depending on your model, turn the Thermostat Control or
Refrigerator Control to OFR See the "Using the Control(s)"
section.
4.
5.
Clean refrigerator, wipe it, and dry well.
Tape rubber or wood blocks to the tops of both doors to prop
them open far enough for air to get in. This stops odor and
mold from building up.
Moving
When you are moving your refrigerator to a new home, follow
these steps to prepare it for the move.
1. If your refrigerator has an automatic ice maker:
• Turn off the water supply to the ice maker at least one day
ahead of time.
• Disconnect the water line from the back of the
refrigerator.
• When the last load of ice drops, raise the wire shutoff arm
to the OFF (up) position or move the switch to the OFF
(right) setting.
2. Remove all food from the refrigerator and pack all frozen food
in dry ice.
3. Empty the ice bin.
4. Depending on your model, turn the Thermostat Control or
Refrigerator Control to OFR See the "Using the Control(s)"
section.
5. Unplug refrigerator.
6. Empty water from the defrost pan.
7. Clean, wipe, and dry thoroughly.
8. Take out all removable parts, wrap them well, and tape them
together so they don't shiff and rattle during the move.
9. Depending on the model, raise the front of the refrigerator so
it rolls more easily OR screw in the leveling legs so they don't
scrape the floor. See the "Door Closing" section.
10. Tape the doors shut and the power cord to the refrigerator
cabinet.
When you get to your new home, put everything back and refer to
the "Installation Instructions" section for preparation instructions.
Also, if your refrigerator has an automatic ice maker, remember to
reconnect the water supply to the refrigerator.
20

TROUBLESHOOTING
Try the solutions suggested hers first in order to avoid the
cost of an unnecessary service call.
Your refrigerator will not operate
•Is the power supply cord unplugged? Plug into a grounded
3 prong outlet.
•Has a household fuse or circuit breaker tripped? Replace
the fuse or reset the circuit breaker.
Is the refrigerator or freezer control turned to the OFF
position? See "Using the Controls."
Is the refrigerator defrosting? Recheck to see if the
refrigerator is operating in 30 minutes. Your refrigerator will
regularly run an automatic defrost cycle.
Is the refrigerator not cooling? For models with digital
controls, turn the unit OFF then ON again to reset. See "Using
the Controls." If this does not correct the problem, call for
service.
The lights do not work
•Is the power supply cord unplugged? Plug into a grounded
3 prong outlet.
• Is a light bulb loose in the socket or burned out? See
"Changing the Light Bulbs."
Are the doors not closed completely? Close the doors
firmly. If they do not close completely, see "The doors will not
close completely" later in this section.
Are the condenser coils dirty? This prevents air transfer and
makes the motor work harder. Clean the condenser coils. See
"Cleaning."
Are the door gaskets not sealed all the way around?
Contact a technician or other qualified person.
NOTE: Your new refrigerator will run longer than your old one
due to its high-efficiency motor.
The refrigerator seems to make too much noise
• The sounds may be normal for your refrigerator. See "Normal
Sounds,"
The ice maker is not producing ice or not enough ice
•Has the ice maker just been installed? Wait 72 hours for full
ice production to begin. Once your refrigerator is cooled, the
ice maker should produce 70 to 120 cubes every 24 hours.
There is water in the defrost drain pan
•Is the refrigerator defrosting? The water will evaporate. It is
normal for water to drip into the defrost pan.
• Is it more humid than normal? When it is humid, expect that
the water in the defrost pan will take longer to evaporate.
The motor seems to run too much
Is the room temperature hotter than normal? The motor
will run longer under warm conditions. At normal room
temperatures, expect your motor to run about 40% to 80% of
the time. Under warmer conditions, it will run even more.
Has a large amount of food just been added to the
refrigerator?. Adding a large amount of food warms the
refrigerator. The motor normally will run longer to cool the
refrigerator back down.
•Are the doors opened often? The motor will run longer
when this occurs. Conserve energy by getting all items out at
one time, keeping food organized, and closing the door as
soon as possible.
•Are the controls not set correctly for the surrounding
conditions? See "Using the Controls."
Is the freezer temperature cold enough to produce ice?
Wait 24 hours after ice maker hookup for ice production. See
"Using the Controls."
Is the ice maker wire shutoff arm in the OFF (arm up)
position (on some models)? Lower the wire shutoff arm to
the ON (arm down) position. See "Ice Maker and Storage
Bin,"
Is the ice maker switch in the OFF (right) position (on
some models)? Move ice maker switch to the ON (left)
position. See "Ice Maker and Storage Bin."
Is the water line shutoff valve to the refrigerator turned
on? Turn on the water valve. See "Water Supply Connection."
Does the ice maker mold have water in it or has no ice
been produced? Make sure your refrigerator has been
connected to a water supply and the supply shutoff valve is
turned on. See "Water Supply Connection."
Is an ice cube jammed in the ice maker ejector arm?
For models with a standard ice storage bin, remove the ice
from the ejector arm with a plastic utensil. For models with an
ice storage bin on the freezer door, access the ice maker by
depressing the ice sensor door on the upper left side of the
freezer interior. While depressing the sensor door, lift the ice
maker service door and remove the ice from the ejector with
a plastic utensil. See "Ice Maker and Storage Bin."
Has a large amount of ice just been removed? Allow 24
hours for ice maker to produce more ice.
Are the controls set correctly?. See "Using the Controls."
Is there a water filter installed on the refrigerator? The
filter may be clogged or installed incorrectly. Check the filter
installation instructions to ensure that the filter was installed
correctly and is not clogged. If installation or clogging is not a
problem, call a technician or other qualified person.
NOTE: If not due to any of the above, there may be a problem
with the water line. Call for service.
21
Off=taste, odor or gray color in the ice Ice storage bin difficult to remove
•Are the plumbing connections new, causing discolored or
off-flavored ice? Discard the first few batches of ice.
Have the ice cubes been stored too long? Throw old ice
away and make a new supply.
Does the freezer and ice storage bin need to be cleaned?
See "Cleaning" or "ice Maker and Storage Bin."
Has food in the freezer or refrigerator been wrapped
properly? Use airtight, moisture-proof packaging to help
prevent odor transfer to stored food.
Does the water contain minerals (such as sulfur)? A filter
may need to be installed to remove the minerals.
Is there a water filter installed on the refrigerator? Gray or
dark discoloration in ice indicates that the water filtration
system needs additional flushing. Run additional water
through the water dispenser to flush the water filtration
system more thoroughly (at least 2 to 3 gal. [8 to 12 L] or 6 to
7 minutes initially). Discard discolored ice.
The ice dispenser will not operate properly
•Is the freezer door closed completely? Push the door firmly
shut. If it will not shut all the way, see "The doors will not
close completely" later in this section.
Is the ice storage bin installed correctly?. For models with a
standard ice storage bin, push the ice storage bin in all the
way. For models with an ice storage bin on the freezer door,
the bin should sit level. Remove and replace the bin in the
door making sure it is properly aligned and snapped securely
into place. See "Ice Maker and Storage Bin."
Has the wrong ice been added to the bin? Use only cubes
produced by the current ice maker. If other cubes have been
added, remove all cubes and check to see that none have
become stuck in the delivery chute.
Has the ice frozen in the ice storage bin? Shake the ice
storage bin to separate cubes. If cubes do not separate,
empty bin and wait 24 hours for ice to restock.
Has the ice melted around the auger (metal spiral) in the
ice storage bin? Dump the ice cubes and clean the ice
storage bin completely. Allow 24 hours for the ice maker to
restock. Do not try to remove the melted ice with a sharp
object. You could damage the ice storage bin.
Is ice stuck in the delivery chute? Clear the ice from the
delivery chute with a plastic utensil. Do not use anything
sharp to remove the ice. You could cause damage.
Is the ice dispenser stalling while dispensing "crushed"
ice? Stop dispensing ice. Change the ice button from
"crushed" to "cubed." Depress the ice dispenser arm using a
sturdy glass. If cubed ice dispenses correctly, depress the
button for "crushed" ice and begin dispensing again. See
"Water and Ice Dispensers."
Is there ice in the storage bin? See "The ice maker is not
producing ice" earlier in this section.
Is the ice storage bin difficult to remove (on some
models)? For models with an ice storage bin located on the
freezer door, select "cubed" ice. Using a sturdy glass, quickly
depress and release the ice dispenser arm. Open the freezer
door, depress the release button on the ice storage bin and
lift upward. See "Ice Maker and Storage Bin."
The water dispenser will not operate properly
Has the water system not filled? The water system needs
to be filled the first time it is used. Use a sturdy container to
depress the water dispenser bar until the water begins to
flow. Flush the water system by dispensing and discarding
2 to 3 gal. (8 to 12 L) of water. Cleaning the system will take
approximately 6 to 7 minutes and will help clear air from the
line. Additional flushing may be required in some households.
See "Water and Ice Dispensers."
Is the water shutoff valve not turned on or the water line
connected at the source? Make sure the water shutoff valve
is turned on and the water source is connected to the
refrigerator. See "Water Supply Connection."
Is the water shutoff valve clogged or incorrectly installed?
See "Water Supply Connection." If clogging or installation is
not a problem, call for service or contact a plumber.
Is there a kink in the home water source line? Ifyou find or
suspect a kink in the water line, call for service.
Is there a water filter installed on the refrigerator? The
filter may be clogged or incorrectly installed. First, check the
filter installation instructions to ensure that the filter was
installed correctly and is not clogged. If installation or
clogging is not a problem, call for service.
Water or ice is leaking from the dispenser
Is the glass not being held under the ice dispenser long
enough, causing the ice to spill? Hold the container under
the ice chute for 2 to 3 seconds after releasing the dispenser
lever. Water or ice may continue to dispense during this time.
Is an ice cube stuck in the chute and holding the trap
door open? Remove the cube.
Is there a water filter installed on the refrigerator? The
water filtration system may have air in the lines, causing water
to drip. Additional flushing may help clear air from the lines.
Normal dispenser use should flush air from the lines within 24
to 72 hours.
Water flow from the dispenser decreases noticeably
Is there a water filter installed on the refrigerator?
The filter may be full or incorrectly installed. Remove the
water filter cartridge. See "Water Filtration System." Operate
the dispenser. If the water flow increases noticeably, replace
the filter.
Has the dispenser arm been held in too long? Release
dispenser arm. Ice will stop dispensing when the arm is held
in too long. Wait 3 minutes for dispenser motor to reset
before using again. It is best to take large amounts of ice
directly from the ice storage bin, not through the dispenser.
22
The dispenser water is not cool enough The doors will not close completely
Has the refrigerator been newly installed? Allow 24 hours
for the refrigerator to cool completely.
Has a large amount of water been recently dispensed?
Allow 24 hours for the water to cool completely.
Has water not been recently dispensed? The first glass of
water may not be cool. Discard the first glass of water.
The divider between the two compartments is warm
The warmth is probably due to normal operation of the
automatic exterior moisture control. If still concerned, call for
service.
Temperature is too warm
•Are the air vents blocked in either compartment? This
prevents the movement of cold air from the freezer to the
refrigerator. Remove any objects from in front of the air vents.
See "Ensuring Proper Air Circulation" for the location of air
vents.
•Are the door(s) opened often? The refrigerator will warm
when this occurs. Keep the refrigerator cool by getting all
items out at one time, keeping food organized, and closing
the door as soon as possible.
Has a large amount of food just been added to the
refrigerator or freezer?. Adding a large amount of food
warms the refrigerator. It can take several hours for the
refrigerator to return to the normal temperature.
•Are the controls set correctly for the surrounding
conditions? See "Using the Controls."
Is the refrigerator not cooling? For models with digital
controls, turn the unit OFF then ON again to reset. See "Using
the Controls." If this does not correct the problem, call for
service.
There is interior moisture buildup
•Are the air vents blocked in the refrigerator?. Remove any
objects from in front of the air vents, See "Ensuring Proper Air
Circulation" for the location of air vents.
Are food packages blocking the door open? Rearrange
containers so that they fit more tightly and take up less
space.
Is the ice storage bin out of position? For models with an
interior ice storage bin, push the ice storage bin in all the way.
If the ice storage bin does not go in all the way, it may not be
put in straight. Pull it out and try again. For models with an ice
storage bin located on the freezer door, the bin should sit
level. To remove the bin, press the release button on the right
side of the bin and lift straight up. Replace the bin in the door
making sure it is properly aligned and snapped securely into
place. See "Ice Maker and Storage Bin."
Are the pans, shelves, bins, or baskets out of position?
Put the crisper cover and all pans, shelves, bins, and baskets
back into their correct positions. See the "Convertible
Vegetable/Meat Drawer, Crisper and Covers" section for
more information.
Are the gaskets sticking? Clean gaskets according to the
directions in the "Cleaning" section.
Does the refrigerator wobble or seem unstable? Level the
refrigerator. See "Door Closing."
Were the doors removed during product installation and
not properly replaced? Remove and replace the doors
according to the instructions in the "Door Removal" section,
or call a qualified service technician.
Thedoors a_ diffi It toopen ...........
•Are the gaskets dirty or sticky? Clean gaskets according to
the directions in the "Cleaning" section.
Computer Troubleshooting (on some models)
See "Computer and Software User Guide" for information
regarding your computer system.
PROTECTION
AGREEMENTS
•Are the doors opened often? Avoid humidity buildup by
getting all items out at one time, keeping food organized, and
closing the door as soon as possible.
•Is the room humid? It is normal for moisture to build up
inside the refrigerator when the room air is humid.
•Is the food packaged correctly? Check that all food is
securely wrapped. Wipe off damp food containers before
placing in the refrigerator.
•Are the controls set correctly for the surrounding
conditions? See "Using the Controls."
•Was a self-defrost cycle completed? It is normal for
droplets to form after the refrigerator self-defrosts.
Master Protection Agreements
Congratulations on making a smart purchase. Your new
Kenmore®appliance is designed and manufactured for years of
dependable operation. But like all products, it may require
preventive maintenance or repair from time to time. That's when
having a Master Protection Agreement can save you money and
aggravation.
Purchase a Master Protection Agreement now and protect
yourself from unexpected hassle and expense.
23
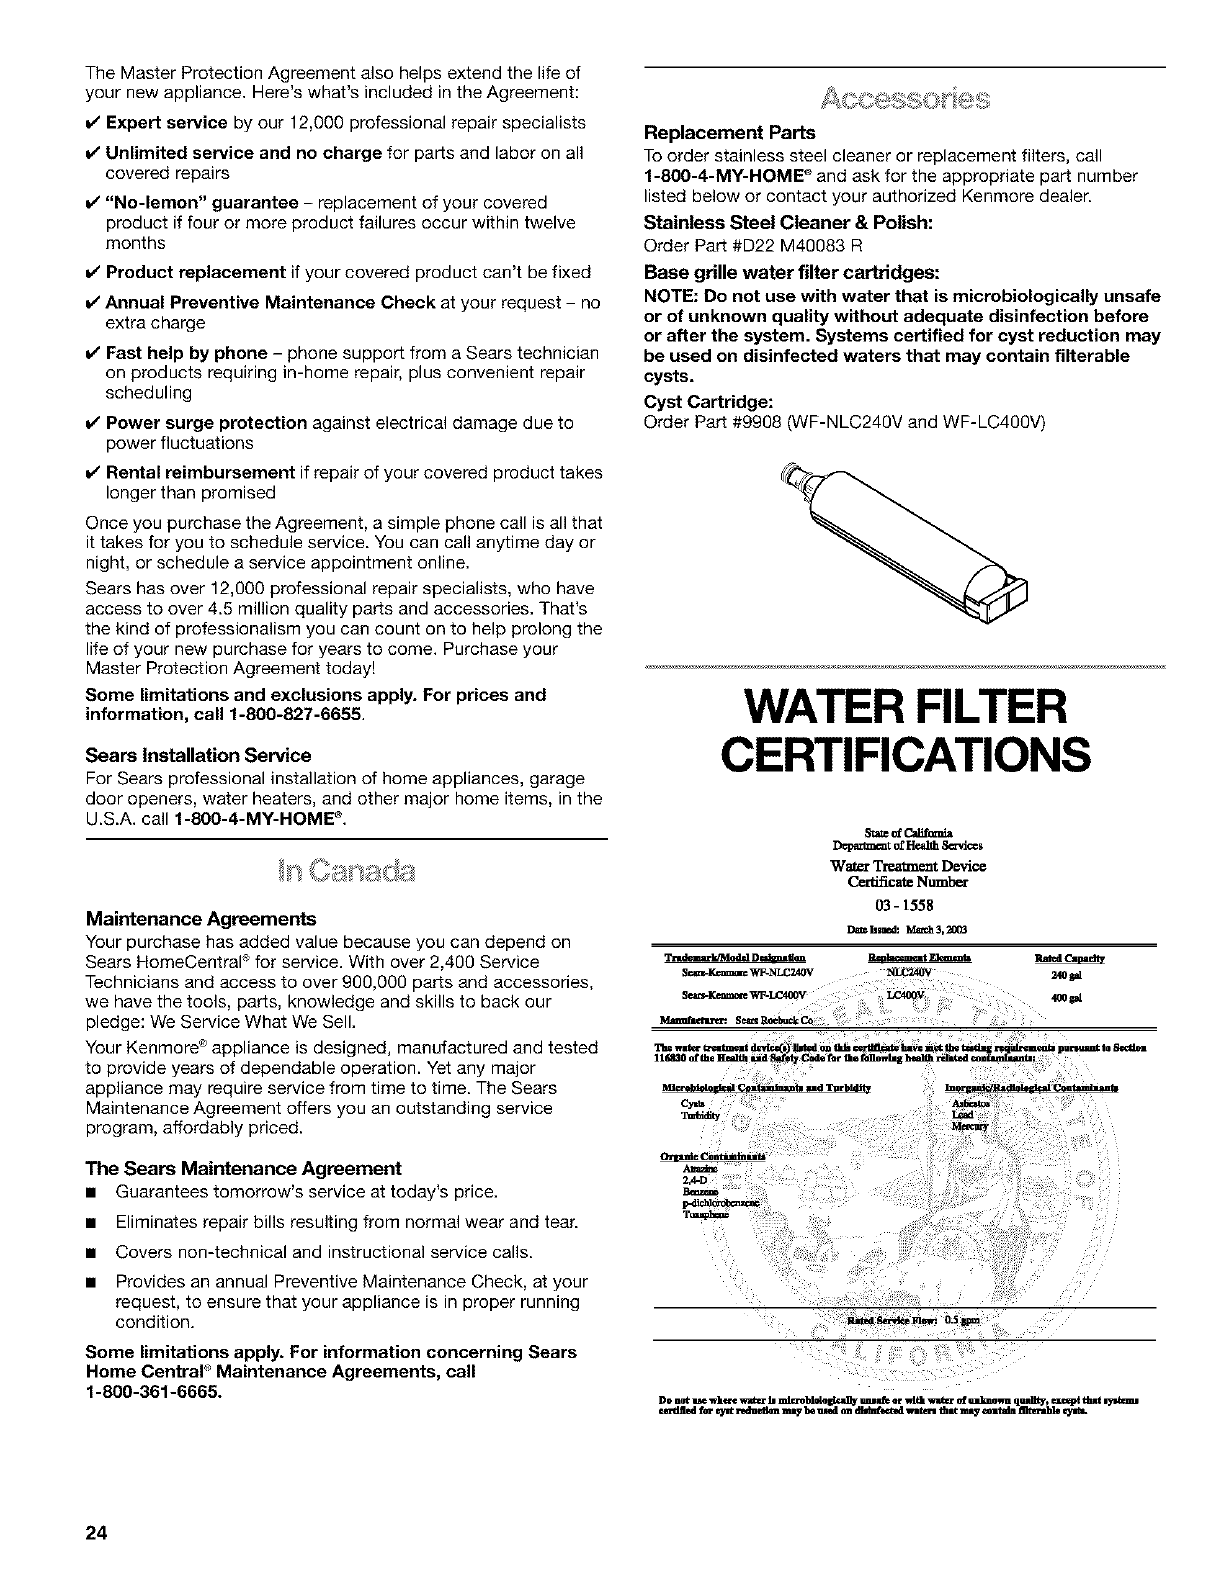
The Master Protection Agreement also helps extend the life of
your new appliance. Here's what's included in the Agreement:
V' Expert service by our 12,000 professional repair specialists
V' Unlimited service and no charge for parts and labor on all
covered repairs
V' "No-lemon" guarantee - replacement of your covered
product if four or more product failures occur within twelve
months
V' Product replacement if your covered product can't be fixed
V' Annual Preventive Maintenance Check at your request - no
extra charge
V' Fast help by phone - phone support from a Sears technician
on products requiring in-home repair, plus convenient repair
scheduling
V' Power surge protection against electrical damage due to
power fluctuations
V' Rental reimbursement if repair of your covered product takes
longer than promised
Once you purchase the Agreement, a simple phone call is all that
it takes for you to schedule service. You can call anytime day or
night, or schedule a service appointment online.
Sears has over 12,000 professional repair specialists, who have
access to over 4.5 million quality parts and accessories. That's
the kind of professionalism you can count on to help prolong the
life of your new purchase for years to come. Purchase your
Master Protection Agreement today!
Some limitations and exclusions apply. For prices and
information, call 1-800-827-6655.
Sears Installation Service
For Sears professional installation of home appliances, garage
door openers, water heaters, and other major home items, in the
U.S.A. call 1-8OO-4-MY-HOME ®.
Maintenance Agreements
Your purchase has added value because you can depend on
Sears HomeCentral ®for service. With over 2,400 Service
Technicians and access to over 900,000 parts and accessories,
we have the tools, parts, knowledge and skills to back our
pledge: We Service What We Sell.
Your Kenmore ®appliance is designed, manufactured and tested
to provide years of dependable operation. Yet any major
appliance may require service from time to time. The Sears
Maintenance Agreement offers you an outstanding service
program, affordably priced.
The Sears Maintenance Agreement
• Guarantees tomorrow's service at today's price.
• Eliminates repair bills resulting from normal wear and tear.
• Covers non-technical and instructional service calls.
• Provides an annual Preventive Maintenance Check, at your
request, to ensure that your appliance is in proper running
condition.
Some limitations apply. For information concerning Sears
Home Central "_Maintenance Agreements, call
1-800-361-6665.
Replacement Parts
To order stainless steel cleaner or replacement filters, call
f-8OO-4-MY-HOME ®and ask for the appropriate part number
listed below or contact your authorized Kenmore dealer.
Stainless Steel Cleaner & Polish:
Order Part #D22 M40083 R
Base grille water filter cartridges:
NOTE: Do not use with water that is microbiologically unsafe
or of unknown quality without adequate disinfection before
or after the system. Systems certified for cyst reduction may
be used on disinfected waters that may contain filterable
cysts.
Cyst Cartridge:
Order Part #9908 (WF-NLC240V and WF-LC400V)
WATER FILTER
CERTIFICATIONS
Smt_ofCa]if_aia
Daparlmmto£Heal_5_dc_s
WaterTreatmentDmdce
CerfiimateNumber
03-1558
D_ k_ed: M=ch 3,2_
24
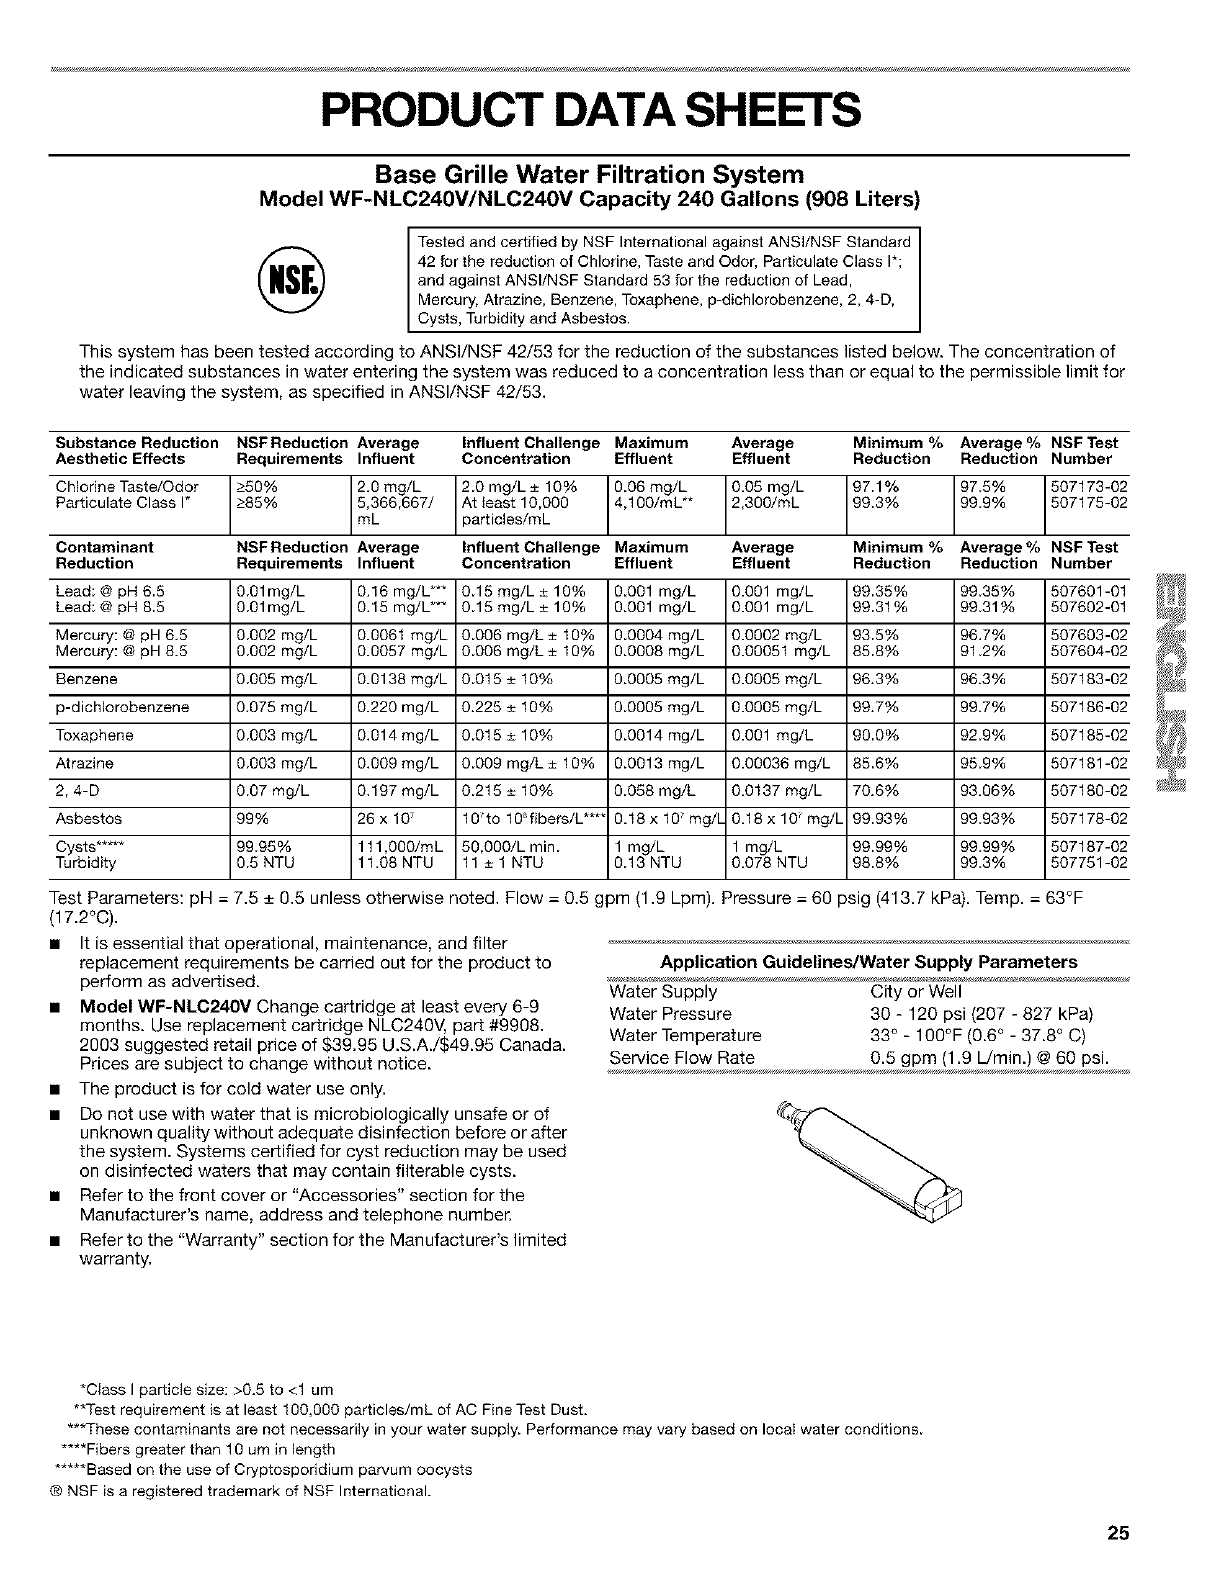
PRODUCT DATA SHEETS
Base Grille Water Filtration System
Model WF-NLC240V/NLC240V Capacity 240 Gallons (908 Liters)
Tested and certified by NSF International against ANSI/NSF Standard
42 for the reduction of Chlorine, Taste and Odor, Particulate Class I*;
and against ANSI/NSF Standard 53 for the reduction of Lead,
Mercury, Atrazine, Benzene, Toxaphene, p-dichlorobenzene, 2, 4-D,
Cysts, Turbidity and Asbestos.
This system has been tested according to ANSI/NSF 42/53 for the reduction of the substances listed below. The concentration of
the indicated substances in water entering the system was reduced to a concentration less than or equal to the permissible limit for
water leaving the system, as specified in ANSI/NSF 42/53.
Substance Reduction NSFReduction Average Influent Challenge Maximum Average Minimum %Average % NSF Test
Aesthetic Effects Requirements Influent Concentration Effluent Effluent Reduction Reduction Number
Chlorine Taste/Odor 250% 2.0 mg/L 120 mg/L ± 10% 0.06 mg/L 0.05 mg/L 971% 975% 607173-02
Particulate Class I* 285% 6,366,667/ IAt least 10,000 4,100/mL** 2,300/mL 993% 999% 607176-02
mL Iparticles/mL
Contaminant NSFReduction Average Influent Challenge Maximum Average Minimum % Average% NSF Test
Reduction Requirements Influent Concentration Effluent Effluent Reduction Reduction Number
Lead: @ pH 65 001mg/L 0.16 mg/L*** 015 mg/L ± 10% 0.001 mg/L 0.001 mg/L 9935% 9935% 607601-01
Lead: @ pH 86 001mg/L 0.16 mg/L*** 015 mg/L ± 10% 0.001 mg/L 0.001 mg/L 9931% 9931% 607602-01
Mercury: @ pH 6.5 0002 mg/L 0.0061 mg/L 0006 mg/L ± 10% 0.0004 mg/L 0.0002 mg/L 935% 96.7% 607603-02
Mercury: @ pH 8.5 0002 mg/L 0.0057 mg/L 0006 mg/L ± 10% 0.0008 mg/L 0.00051 mg/L 858% 91 2% 607604-02
Benzene 0005 mg/L 0.0138 mg/L 0015 ± 10% 0.0005 mg/L 0.0005 mg/L 96.3% 96.3% 507183-02
3-dichlorobenzene 0.075 mg/L 0.220 mg/L 0.225 ± 10% 0.0005 mg/L 0.0005 mg/L 99.7% 99.7% 507186-02
Toxaphene 0.003 mg/L 0.014 mg/L 0.015 ± 10% 0.0014 mg/L 0.001 mg/L 90.0% 92.9% 507185-02
Atrazine 0.003 mg/L 0.009 mg/L 0.009 mg/L ± 10% 0.0013 mg/L 0.00036 mg/L 85.6% 95.9% 507181-02
2, 4-D 0.07 mg/L 0.197 mg/L 0.215 ± 10% 0.058 mg/L 0.0137 mg/L 70.6% 93.06% 507180-02
Asbestos 99% 26 x 107 107to 108fibers/L **** 0.18 x 10 mg/[ 0.18 x 10⁷ mg/L 99.93% 99.93% 507178-02
Cysts ..... 99.95% 111,000/mL 50,000/L min. 1 mg/L 1 mg/L 99.99% 99.99% 507187-02
Turbidity 0.5 NTU 11.08 NTU 11 ± 1 NTU 0.13 NTU 0.078 NTU 98.8% 99.3% 507751-02
Test Parameters: pH = 7.5 _+0.5 unless otherwise noted. Flow = 0.5 gpm (1.9 Lpm). Pressure = 60 psig (413.7 kPa). Temp. = 63°F
(17.2°C).
• It is essential that operational, maintenance, and filter
replacement requirements be carried out for the product to
perform as advertised.
•Model WF-NLC240V Change cartridge at least every 6-9
months. Use replacement cartridge NLC240V, part #9908.
2003 suggested retail price of $39.95 U.S.A./S49.95 Canada.
Prices are subject to change without notice.
• The product is for cold water use only.
• Do not use with water that is microbiologically unsafe or of
unknown quality without adequate disinfection before or after
the system. Systems certified for cyst reduction may be used
on disinfected waters that may contain filterable cysts.
• Refer to the front cover or "Accessories" section for the
Manufacturer's name, address and telephone number.
• Refer to the "Warranty" section for the Manufacturer's limited
warranty.
Application Guidelines/Water Supply Parameters
Water Supply City or Well
Water Pressure 30 - 120 psi (207 - 827 kPa)
Water Temperature 33 ° - 100°F (0.6 ° - 37.8 ° C)
Service Flow Rate 0.5 gpm (1.9 L/min.) @ 60 psi.
*Class I particle size: >0.5 to <1 um
**Test requirement is at least 100,000 particles/mL of AC Fine Test Dust.
***These contaminants are not necessarily in your water supply. Performance may vary based on local water conditions.
****Fibers greater than 10 um in length
*****Based on the use of Cryptosporidium parvum oocysts
® NSF is a registered trademark of NSF International.
25
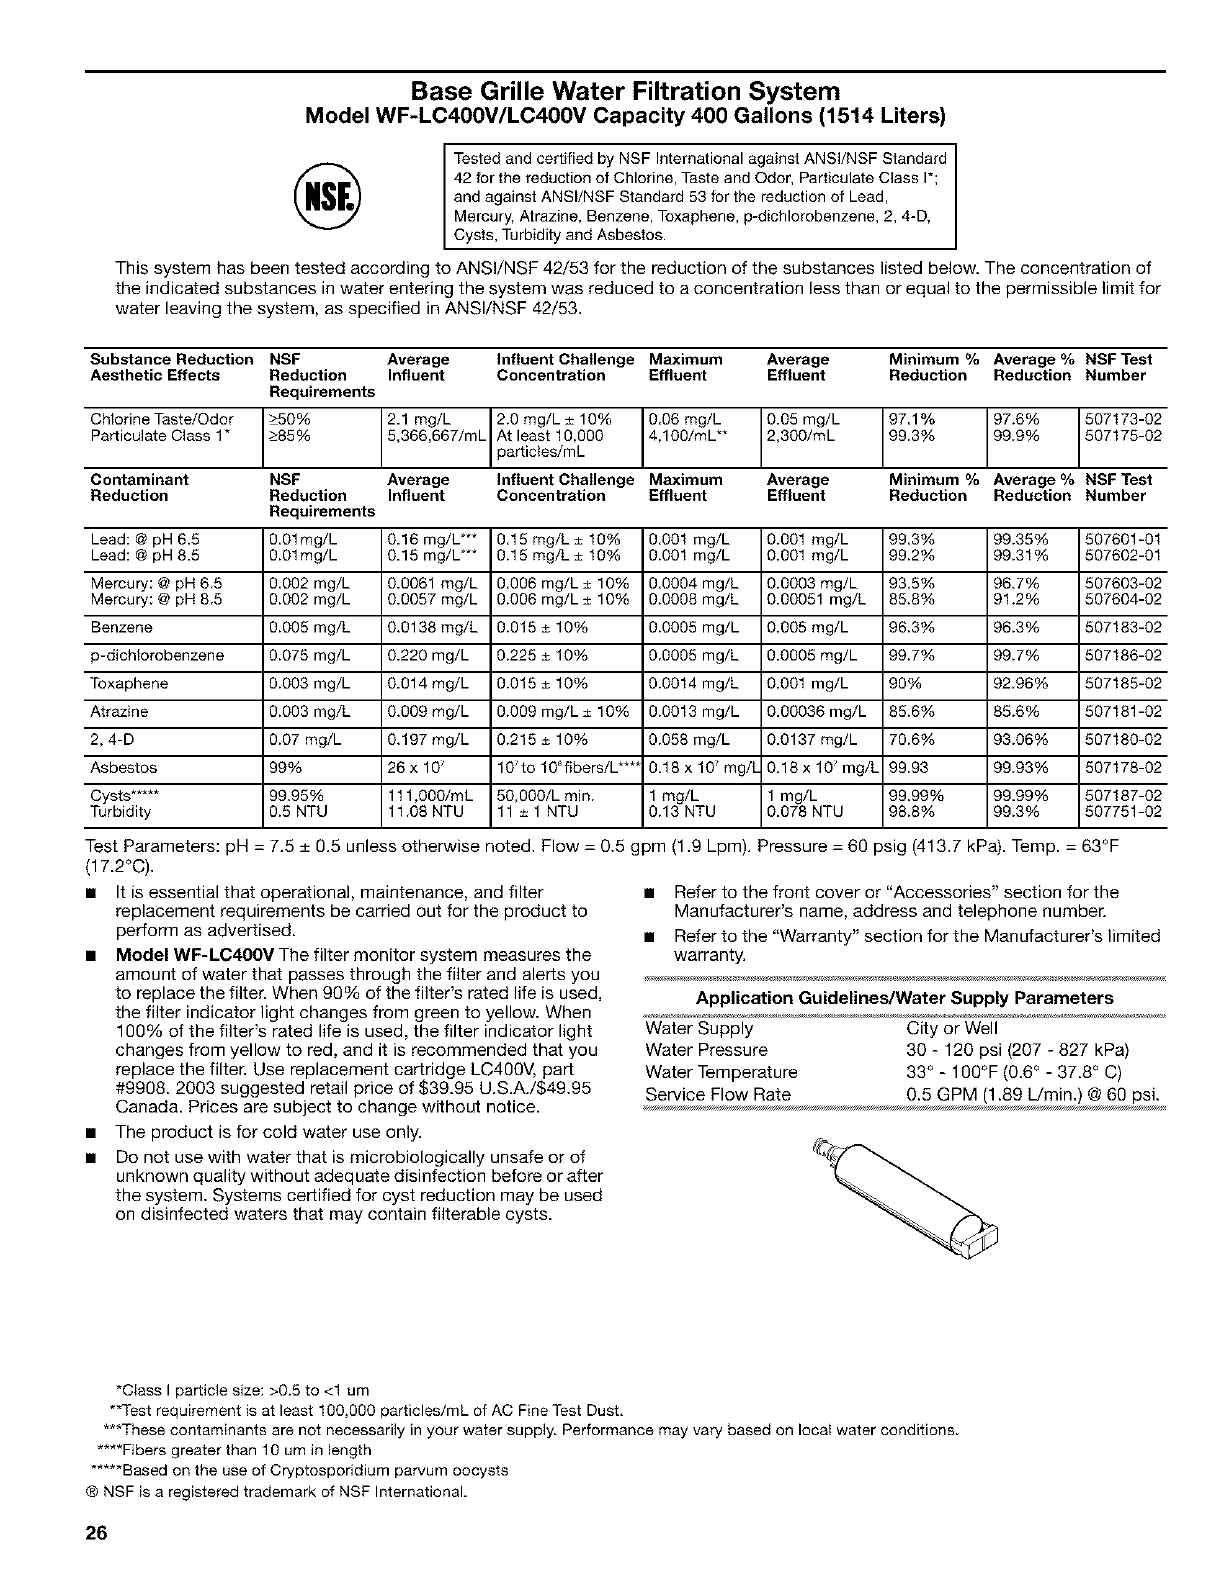
Base Grille Water Filtration System
Model WF-LC400V/LC400V Capacity 400 Gallons (1514 Liters)
I Tested and certified by NSF International against ANSI/NSF Standard
42 for the reduction of Chlorine, Taste and Odor, Particulate Class I*;
and against ANSI/NSF Standard 53 for the reduction of Lead,
Mercury, Atrazine, Benzene, Toxaphene, p-dichlorobenzene, 2, 4-D,
Cysts, Turb d ty and Asbestos.
This system has been tested according to ANSI/NSF 42/53 for the reduction of the substances listed below. The concentration of
the indicated substances in water entering the system was reduced to a concentration less than or equal to the permissible limit for
water leaving the system, as specified in ANSI/NSF 42/53.
Substance Reduction NSF Average Influent Challenge Maximum Average Minimum %Average % NSF Test
Aesthetic Effects Reduction Influent Concentration Effluent Effluent Reduction Reduction Number
Requirements
Chlorine Taste/Odor ->50% I2.1 mg/L I 2.0 mg/L ± 10% 0.06 mg/L 0.05 mg/L 97.1% 97.6% 507t73-02
Particulate Class 1" _>85% I5,366,667/mLI At least 10,000 4,100/mL** 2,300/mL 99.3% 99.9% 507175-02
I Ipartictes/mL
Contaminant NSF Average Influent Challenge Maximum Average Minimum %Average % NSF Test
Reduction Reduction Influent Concentration Effluent Effluent Reduction Reduction Number
Requirements
Lead: @ pH 6.5 0.01mg/L 0.16 mg/L*** 0.15 mg/L ± 10% 0.001 mg/L 0.001 mg/L 99.3% 99.35% 507601-01
Lead: @ pH 8.5 0.01mg/L 0.15 mg/L*** 0.15 mg/L ± 10% 0.001 mg/L 0.001 mg/L 99.2% 99.3t% 507602-01
Mercury @ pH 6.5 0.002 mg/L 0.0061 mg/L 0.006 mg/L ± 10% 0.0004 mg/L 0.0003 mg/L 93.5% 96.7% 507603-02
Mercury @ pH 8.5 0.002 mg/L 0.0057 mg/L 0.006 mg/L ± 10% 0.0008 mg/L 0.00051 mg/L 85.8% 91.2% 507604-02
Benzene 0.005 mg/L 0.0138 mg/L 0.015 ± 10% 0.0005 mg/L 0.005 mg/L 96.3% 96.3% 507183-02
3-dichlorobenzene 0.075 mg/L 0.220 mg/L 0.225 ± 10% 0.0005 mg/L 0.0005 mg/L 99.7% 99.7% 507186-02
Toxaphene 0.003 mg/L 0.014 mg/L 0.015 ± 10% 0.0014 mg/L 0.001 mg/L 90% 92.96% 507185-02
Atrazine 0.003 mg/L 0.009 mg/L 0.009 mg/L ± 10% 0.0013 mg/L 0.00036 mg/L 85.6% 85.6% 507181-02
2, 4-D 0.07 mg/L 0.197 mg/L 0.215 ± 10% 0.058 mg/L 0.0137 mg/L 70.6% 93.06% 507180-02
Asbestos 99% 26 x 10_ 10_to 10_fibers/L **** 0.18 x 10 _mg/I 0.18 x 10⁷ mg/L 99.93 99.93% 507178-02
Cysts ..... 99.95% 111 ,O00/mL 50,000/L min. 1 mg/L mg/L 99.99% 99.99% 507187-02
Turbidity 0.5 NTU 11.08 NTU 11 ± 1 NTU 0.13 NTU 0.078 NTU 98.8% 99.3% 507751-02
Test Parameters: pH = 7.5 _+0.5 unless otherwise noted. Flow = 0.5 gpm (1.9 Lpm). Pressure = 60 psig (413.7 kPa). Temp. = 63°F
(17.2°C).
• It is essential that operational, maintenance, and filter
replacement requirements be carried out for the product to
perform as advertised.
• Model WF-LC400V The filter monitor system measures the
amount of water that passes through the filter and alerts you
to replace the filter. When 99% of the filter's rated life is used,
the filter indicator light changes from green to yellow. When
109% of the filter's rated life is used, the filter indicator light
changes from yellow to red, and it is recommended that you
replace the filter. Use replacement cartridge LC40OV, part
#9998. 2003 suggested retail price of $39.95 U.S.A./$49.95
Canada. Prices are subject to change without notice.
• The product is for cold water use only.
• Do not use with water that is microbiologically unsafe or of
unknown quality without adequate disinfection before or after
the system. Systems certified for cyst reduction may be used
on disinfected waters that may contain filterable cysts.
• Refer to the front cover or "Accessories" section for the
Manufacturer's name, address and telephone number.
• Refer to the "Warranty" section for the Manufacturer's limited
warranty.
Application Guidelines/Water Supply Parameters
Water Supply City or Well
Water Pressure 30 - 120 psi (207 - 827 kPa)
Water Temperature 33 ° - IOO°F (0.6 ° - 37.8 ° C)
Service Flow Rate 0.5 GPM (1.89 L/rain.) @ 60 psi.
*Class I particle size: >0.5 to <1 um
**Test requirement is at least 100,000 particles/mL of AC Fine Test Dust.
***These contaminants are not necessarily in your water supply. Performance may vary based on local water conditions.
****Fibers greater than 10 um in length
*****Based on the use of Cryptosporidium parvum oocysts
® NSF is a registered trademark of NSF International.
26
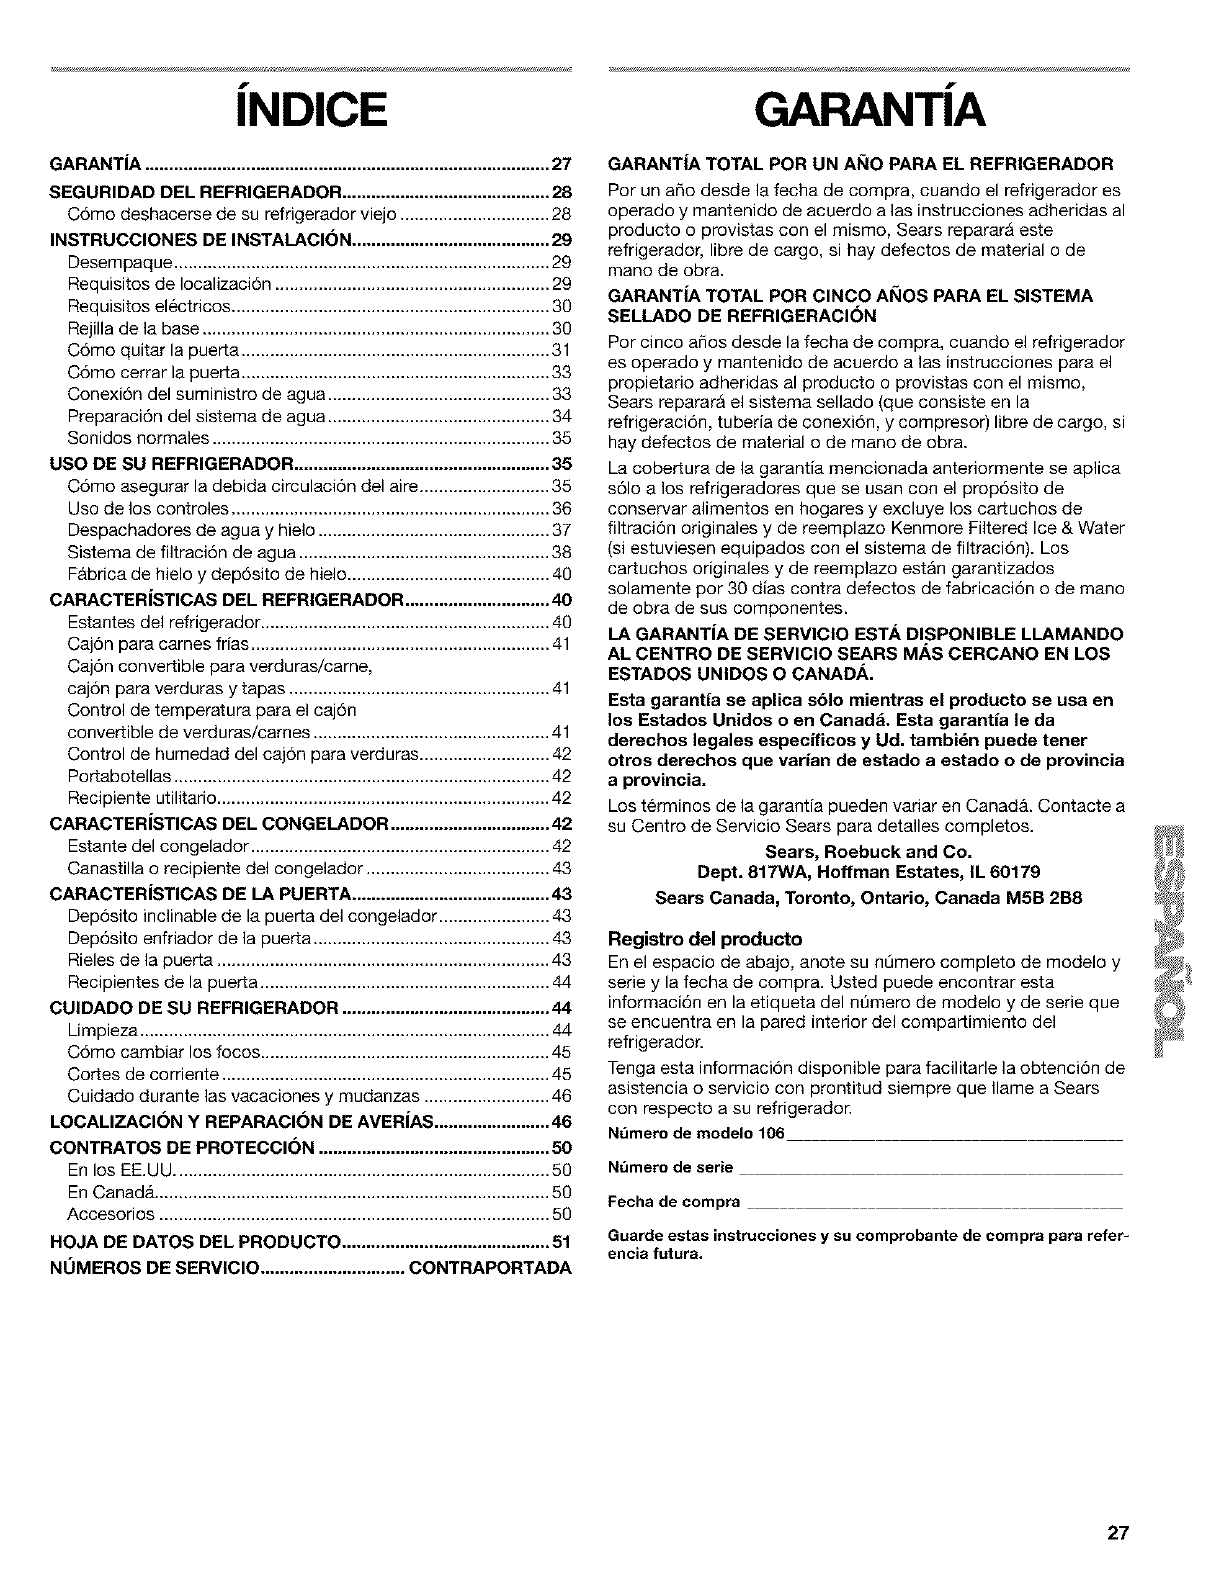
f
INDICE
GARANTiA .................................................................................... 27
SEGURIDAD DEL REFRIGERADOR ........................................... 28
C6mo deshacerse de su refrigerador viejo ............................... 28
INSTRUCClONES DE INSTALACI()N ......................................... 29
Desempaque .............................................................................. 29
Requisitos de Iocalizaci6n ......................................................... 29
Requisitos electricos .................................................................. 30
Rejilla de la base ........................................................................ 30
C6mo quitar la puerta ................................................................ 31
C6mo cerrar la puerta ................................................................ 33
Conexi6n del suministro de agua .............................................. 33
Preparaci6n del sistema de agua .............................................. 34
Sonidos normales ...................................................................... 35
USO DE SU REFRIGERADOR ..................................................... 35
C6mo asegurar la debida circulaci6n del aire ........................... 35
Uso de los controles .................................................................. 36
Despachadores de agua y hielo ................................................ 37
Sistema de filtraci6n de agua .................................................... 38
Fabrica de hielo y dep6sito de hielo .......................................... 40
CARACTERiSTICAS DEL REFRIGERADOR .............................. 40
Estantes del refrigerador ............................................................ 40
Caj6n para carnes frias .............................................................. 41
Caj6n convertible para verduras/carne,
caj6n para verduras y tapas ...................................................... 41
Control de temperatura para el caj6n
convertible de verduras/cames ................................................. 41
Control de humedad del caj6n para verduras ........................... 42
Portabotellas .............................................................................. 42
Recipiente utilitario ..................................................................... 42
CARACTERiSTICAS DEL CONGELADOR ................................. 42
Estante del congelador .............................................................. 42
Canastilla o recipiente del congelador ...................................... 43
CARACTERiSTICAS DE LA PUERTA ......................................... 43
Dep6sito inclinable de la puerta del congelador ....................... 43
Dep6sito enfriador de la puerta ................................................. 43
Rieles de la puerta ..................................................................... 43
Recipientes de la puerta ............................................................ 44
CUlDADO DE SU REFRIGERADOR ........................................... 44
Limpieza ..................................................................................... 44
C6mo cambiar los focos ............................................................ 45
Cortes de corriente .................................................................... 45
Cuidado durante las vacaciones y mudanzas .......................... 46
LOCALIZACI()N Y REPARACION DE AVERiAS ........................ 46
CONTRATOS DE PROTECCI()N ................................................ 50
En los EE,UU .............................................................................. 50
En Canada .................................................................................. 50
Accesorios ................................................................................. 50
HOJA DE DATOS DEL PRODUCT() ........................................... 51
NOMEROS DE SERVICIO .............................. CONTRAPORTADA
f
GARANTIA
GARANT[A TOTAL POR UN AI_IO PARA EL REFRIGERADOR
Per un aSo desde la fecha de compra, cuando el refrigerador es
operado y mantenido de acuerdo a las instrucciones adheridas al
producto o provistas con el mismo, Sears repararA este
refrigerador, libre de cargo, si hay defectos de material o de
mano de obra.
GARANT[A TOTAL POR CINCO AI_IOS PARA EL SISTEMA
SELLADO DE REFRIGERACI()N
Por cinco afios desde la fecha de compra, cuando el refrigerador
es operado y mantenido de acuerdo alas instrucciones para el
propietario adheridas al producto o provistas con el mismo,
Sears repararA el sistema sellado (que consiste en la
refrigeraci6n, tubeda de conexi6n, y compresor) libre de cargo, si
hay defectos de material o de mano de obra.
La cobertura de la garantia mencionada anteriormente se aplica
s61o a los refrigeradores que se usan con el prop6sito de
conservar alimentos en hogares y excluye los cartuchos de
filtraci6n originales y de reemplazo Kenmore Filtered Ice & Water
(si estuviesen equipados con el sistema de filtraci6n). Los
cartuchos originales y de reemplazo estan garantizados
solamente por 30 dias contra defectos de fabricaci6n o de mano
de obra de sus componentes.
LA GARANTiA DE SERVICIO EST.&,DISPONIBLE LLAMANDO
AL CENTRO DE SERVICIO SEARS MAS CERCANO EN LOS
ESTADOS UNIDOS O CANADA.
Esta garantia se aplica sblo mientras el producto se usa en
los Estados Unidos o en Canad& Esta garantia le da
derechos legales especificos y Ud. tambidn puede tener
otros derechos que varian de estado a estado o de provincia
aprovincia.
Los terminos de la garantia pueden variar en Canada.. Contacte a
su Centro de Servicio Sears para detalles completos.
Sears, Roebuck and Co.
Dept. 817WA, Hoffman Estates, IL 60179
Sears Canada, Toronto, Ontario, Canada M5B 2B8
Registro del producto
En el espacio de abajo, anote su nt]mero complete de modelo y
serie y la fecha de compra. Usted puede encontrar esta
informaci6n en la etiqueta del nt]mero de modelo y de serie que
se encuentra en la pared interior del compartimiento del
refrigerador.
Tenga esta informaci6n disponible para facilitarle la obtenci6n de
asistencia o servicio con prontitud siempre que Ilame a Sears
con respecto a su refrigerador.
Nt_merode modele 106
Nt_mero de serie
Fecha de compra
Guarcle estas instrucciones y su comprobante de compra para refer=
encia futura.
27
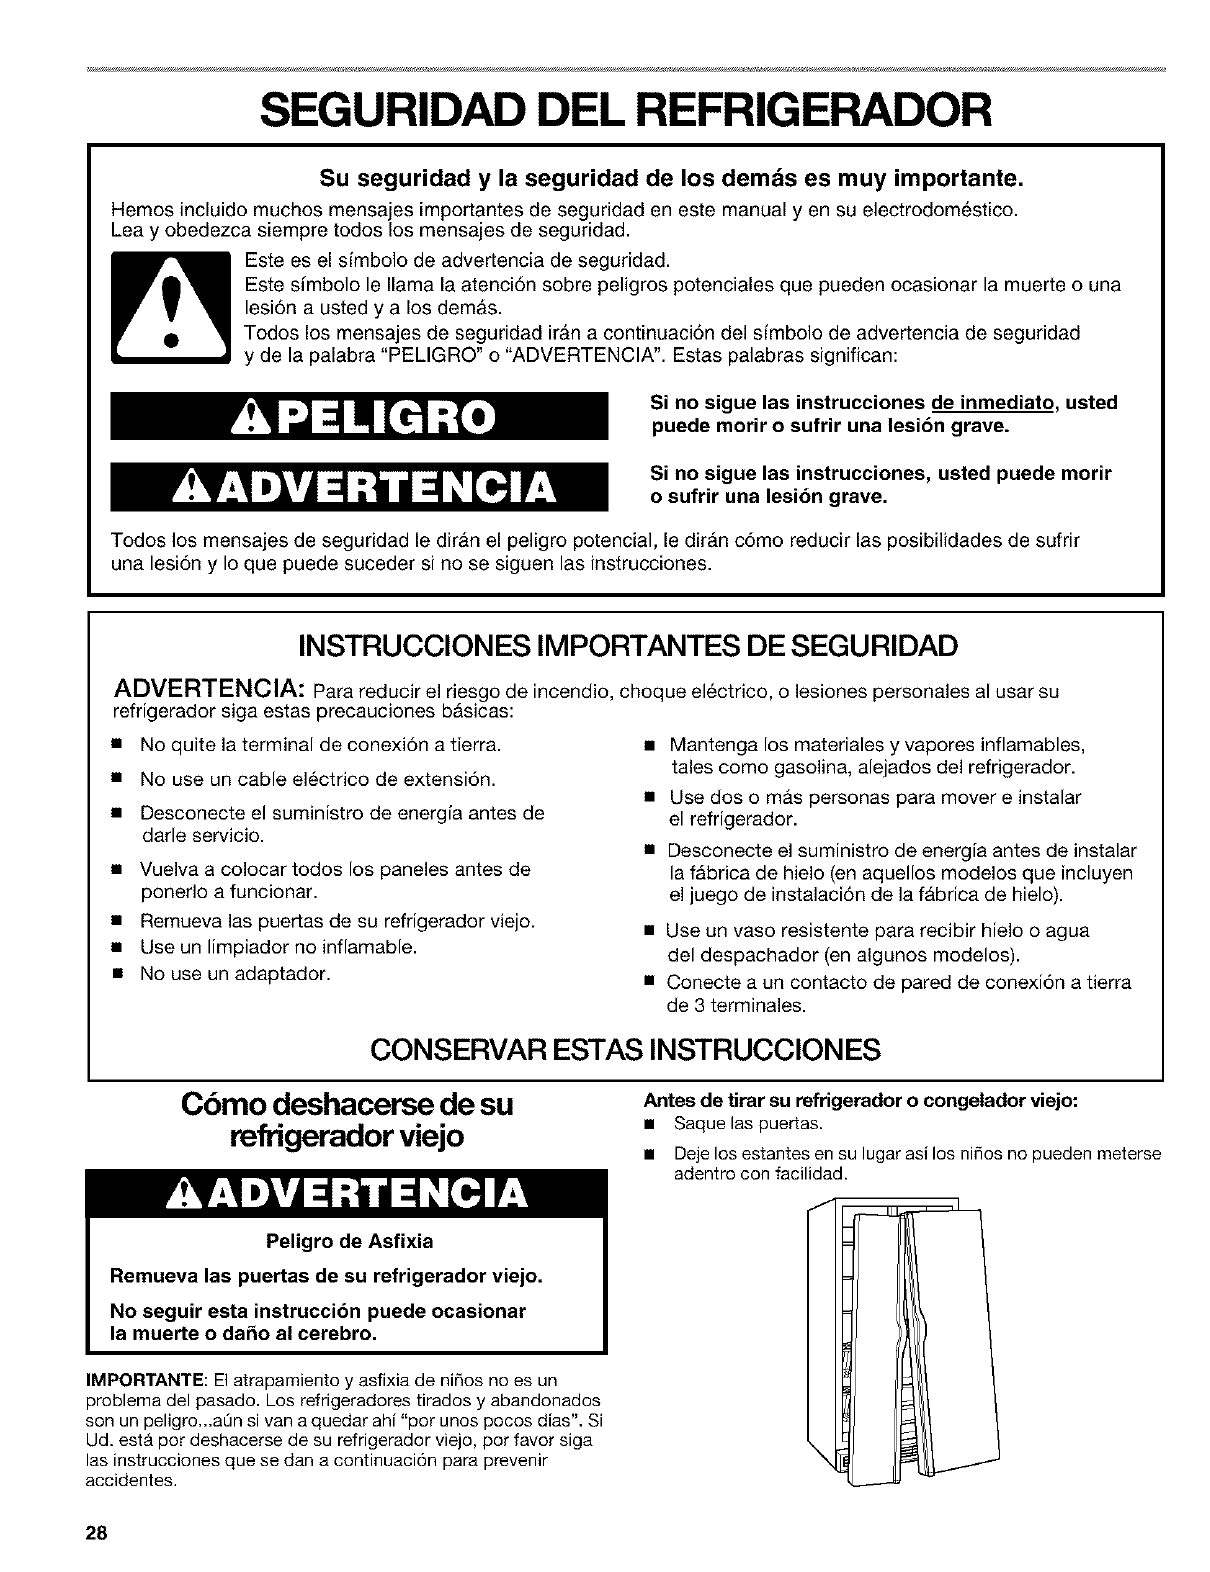
SEGURIDAD DEL REFRIGERADOR
Su seguridad y la seguridad de los demds es muy importante.
Hemos incluido muchos mensajes importantes de seguridad en este manual y en su electrodom_stico.
Lea y obedezca siempre todos los mensajes de seguridad.
Este es el sfmbolo de advertencia de seguridad.
Este sfmbolo le llama la atenci6n sobre peligros potenciales que pueden ocasionar la muerte o una
lesi6n a usted y a los demas.
Todos los mensajes de seguridad iran a continuaci6n del simbolo de advertencia de seguridad
y de la palabra "PELIGRO" o "ADVERTENClA". Estas palabras significan:
Si no sigue las instrucciones de inmediato, usted
puede morir o sufrir una lesi6n grave.
Si no sigue las instrucciones, usted puede morir
o sufrir una lesi6n grave.
Todos los mensajes de seguridad le diran el peligro potencial, le dir_n c6mo reducir las posibilidades de sufrir
una lesi6n y Io que puede suceder si no se siguen las instrucciones.
INSTRUCCIONES IMPORTANTES DE SEGURIDAD
ADVERTENCIA: Para reducir el riesgo de incendio, choque el6ctrico, o lesiones personales al usar su
refrigerador siga estas precauciones bAsicas:
• No quite la terminal de conexi6n a tierra.
• No use un cable el_ctrico de extensi6n.
• Desconecte el suministro de energfa antes de
darle servicio.
• Vuelva a colocar todos los paneles antes de
ponerlo a funcionar.
• Remueva las puertas de su refrigerador viejo.
• Use un limpiador no inflamable.
• No use un adaptador.
Mantenga los materiales y vapores inflamables,
tales como gasolina, alejados del refrigerador.
Use dos o m_.s personas para mover e instalar
el refrigerador.
Desconecte el suministro de energfa antes de instalar
la fAbrica de hielo (en aquellos modelos que incluyen
el juego de instalaci6n de la fAbrica de hielo).
• Use un vaso resistente para recibir hielo o agua
del despachador (en algunos modelos).
• Conecte a un contacto de pared de conexi6n a tierra
de 3 terminales.
CONSERVAR ESTAS INSTRUCClONES
Cbmo deshacerse de su
refrigerador viejo
Antes de tirar su refrigerador o congelador viejo:
•Saque las puertas.
• Deje los estantes en su lugar asilos nifios no pueden meterse
adentro con facilidad.
IMPORTANTE: El atrapamiento y asfixia de nifios no es un
problema del pasado. Los refrigeradores tirados y abandonados
son un peligro...aOn si van a quedar ahi "por unos pocos dias". Si
Ud. estb. pot deshacerse de su refrigerador viejo, por favor siga
las instrucciones que se dan a continuaci6n para prevenir
accidentes.
28
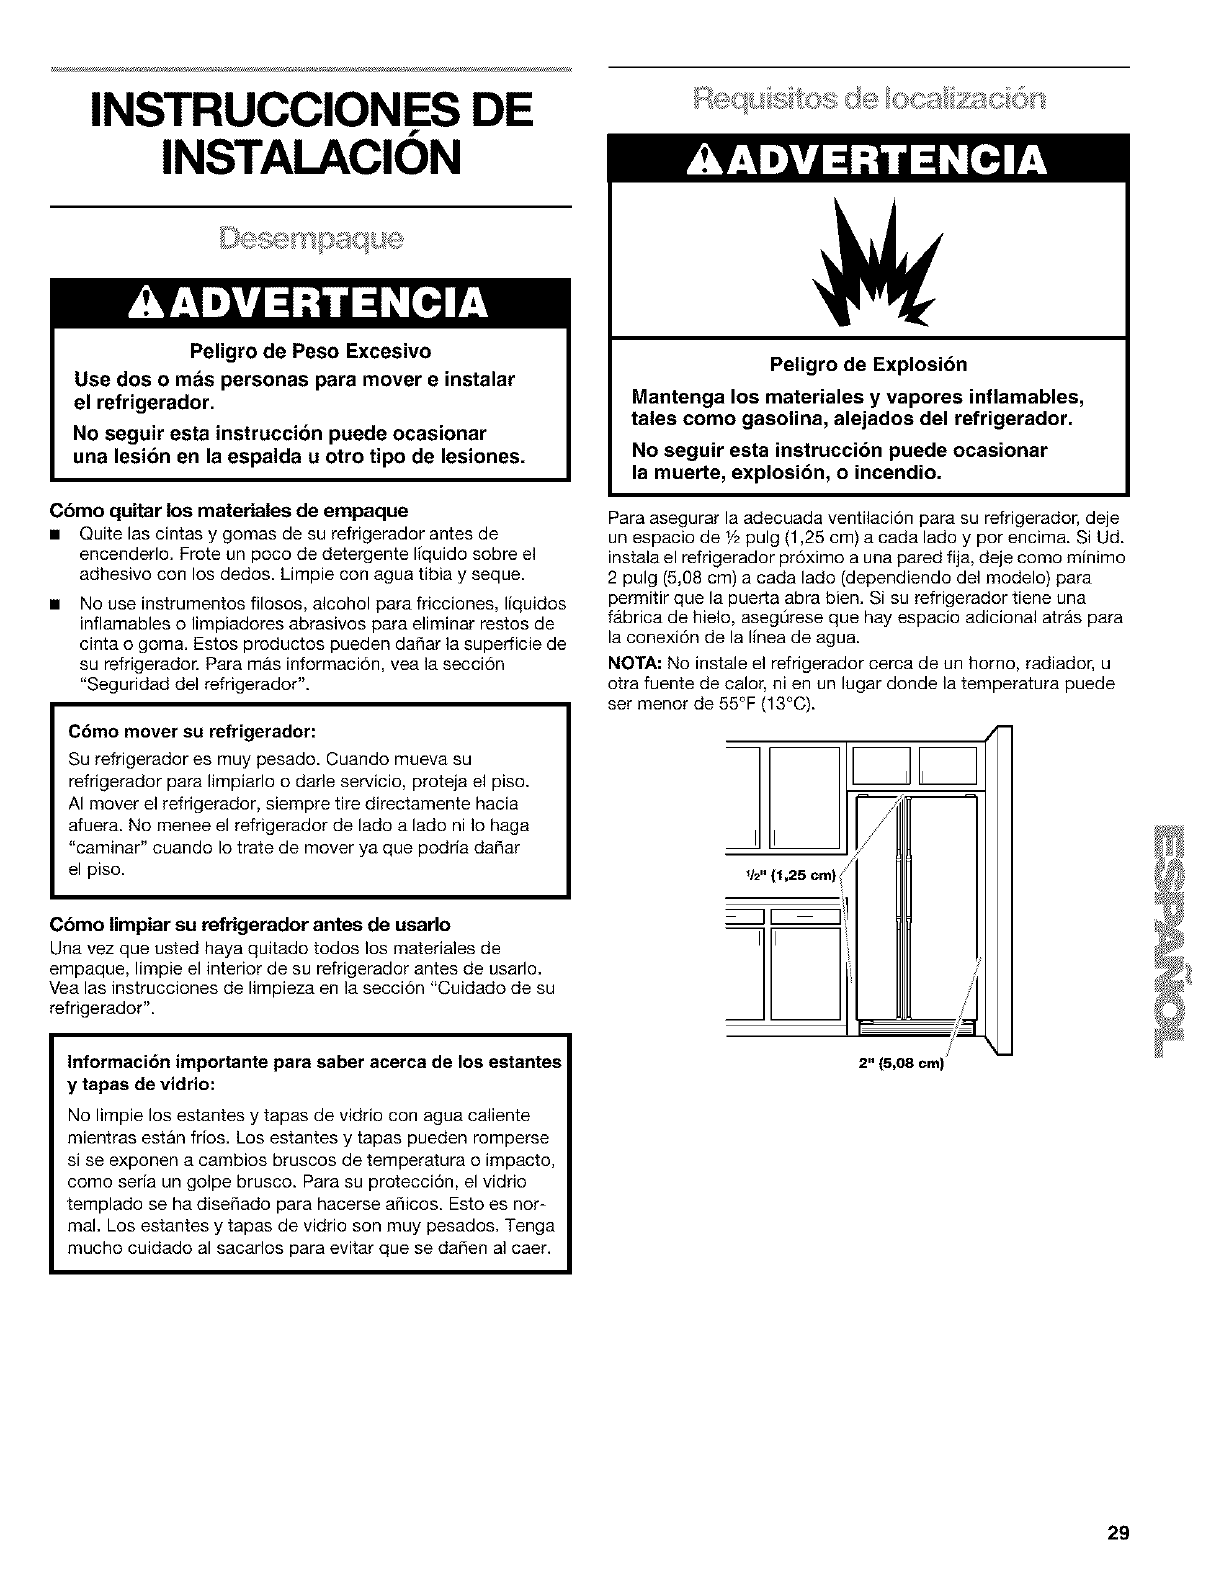
INSTRUCCIONES DE
f
INSTALACION
Peligro de Peso Excesivo
Use dos o m_s personas para mover einstalar
el refrigerador.
No seguir esta instruccibn puede ocasionar
una lesibn en la espalda u otro tipo de lesiones.
Cbmo quitar los materiales de empaque
•Quite las cintas y gomas de su refrigerador antes de
encenderlo. Frote un poco de detergente liquido sobre el
adhesivo con los dedos. Limpie con agua tibia y seque.
No use instrumentos filosos, alcohol para fricciones, liquidos
inflamables o limpiadores abrasivos para eliminar restos de
cinta o goma. Estos productos pueden daSar la superficie de
su refrigerador. Para mas informaci6n, yea la secci6n
"Seguridad del refrigerador".
C6mo mover su refrigerador:
Su refrigerador es muy pesado. Cuando mueva su
refrigerador para limpiarlo o darle servicio, proteja el piso.
AI mover el refrigerador, siempre tire directamente hacia
afuera. No menee el refrigerador de lado a lado ni Io haga
"caminar" cuando Io trate de mover ya que podria daSar
el piso.
Cbmo limpiar su refrigerador antes de usarlo
Una vez que usted haya quitado todos los materiales de
empaque, limpie el interior de su refrigerador antes de usarlo.
Vea las instrucciones de Iimpieza en la secci6n "Cuidado de su
refrigerador".
Informaci6n importante para saber acerca de los estantes
y tapas de vidrio:
No Iimpie los estantes y tapas de vidrio con agua caliente
mientras estan frios. Los estantes y tapas pueden romperse
si se exponen a cambios bruscos de temperatura o impacto,
como seria un golpe brusco. Para su protecci6n, el vidrio
templado se ha diseSado para hacerse afiicos. Esto es nor-
mal. Los estantes y tapas de vidrio son muy pesados. Tenga
mucho cuidado al sacarlos para evitar que se da_en al caer.
Peligro de Explosibn
Mantenga los materiales y vapores inflamables,
tales come gasolina, alejados del refrigerador.
No seguir esta instruccibn puede ocasionar
la muerte, explosi6n, o incendio.
Para asegurar la adecuada ventilaci6n para su refrigerador, deje
un espacio de 1/2pulg (1,25 cm) a cada lado y por encima. Si Ud.
instala el refrigerador pr6ximo a una pared fija, deje como minimo
2 pulg (5,08 cm) a cada lado (dependiendo del modelo) para
permitir que la puerta abra bien. Si su refrigerador tiene una
f_.brica de hielo, asegQrese que hay espacio adicional atras para
la conexi6n de la linea de agua.
NOTA: No instale el refrigerador cerca de un homo, radiador, u
otra fuente de calor, ni en un lugar donde la temperatura puede
ser menor de 55°F (13°C).
/
_/2" (1,25 cm)
JL
/
/
/
/
7_
/
2" {5,08 cm)
29

Peligro de Choque El_ctrico
Conecte a un contacto de pared de conexi6n a
tierra de 3 terminales.
No quite el terminal de conexi6n a tierra.
No use un adaptador.
No use un cable eldctrico de extensi6n.
No seguir estas instrucciones puede ocasionar
la muerte, incendio o choque eldctrico.
Antes de mover el refrigerador a su posici6n definitiva, es
importante asegurarse que Ud. tiene la conexi6n electrica
adecuada:
M_todo de conexibn a tierra recomendado
Se requiere una fuente de energia electrica de 115 Voltios,
60 Hz., CA solamente y con fusibles de 15 6 20 amperios,
debidamente conectados a tierra. Se recomienda que se use un
circuito separado s61o para su refrigerador. Use un tomacorriente
que no se puede apagar con un interruptor. No use un cable de
extensi6n.
NOTA: Antes de realizar cualquier tipo de instalaci6n, Iimpieza o
de quitar un foco de luz, ponga el Control (del termostato, del
refrigerador o del congelador dependiendo del modelo) en la
posici6n de apagado (OFF) y luego desconecte el refrigerador de
la fuente de energia. Cuando Ud. haya terminado, reconecte el
refrigerador a la fuente de energia electrica y vuelva a poner el
Control (del termostato, del refrigerador o del congelador
dependiendo del modelo) en la posici6n deseada.
Para retirar la rejilla de la base:
1. Abra ambas puertas del refrigerador.
2. Sujete la rejilla con sus manos por los extremos, con los
pulgares en la parle superior. Empuje hacia adentro con los
pulgares y tire hacia arriba desde el fondo.
NOTA: AsegQrese de volver a fijar la ficha tecnica en la parte
trasera de la rejilla de la base despues de limpiar.
Para volver a coloear la rejilla de la base:
1. Abra las puertas.
2. Alinee las leng0etas del soporte de la rejilla con los
sujetadores metalicos.
3. Empuje la rejilla con firmeza para que enganche en su lugar.
3O
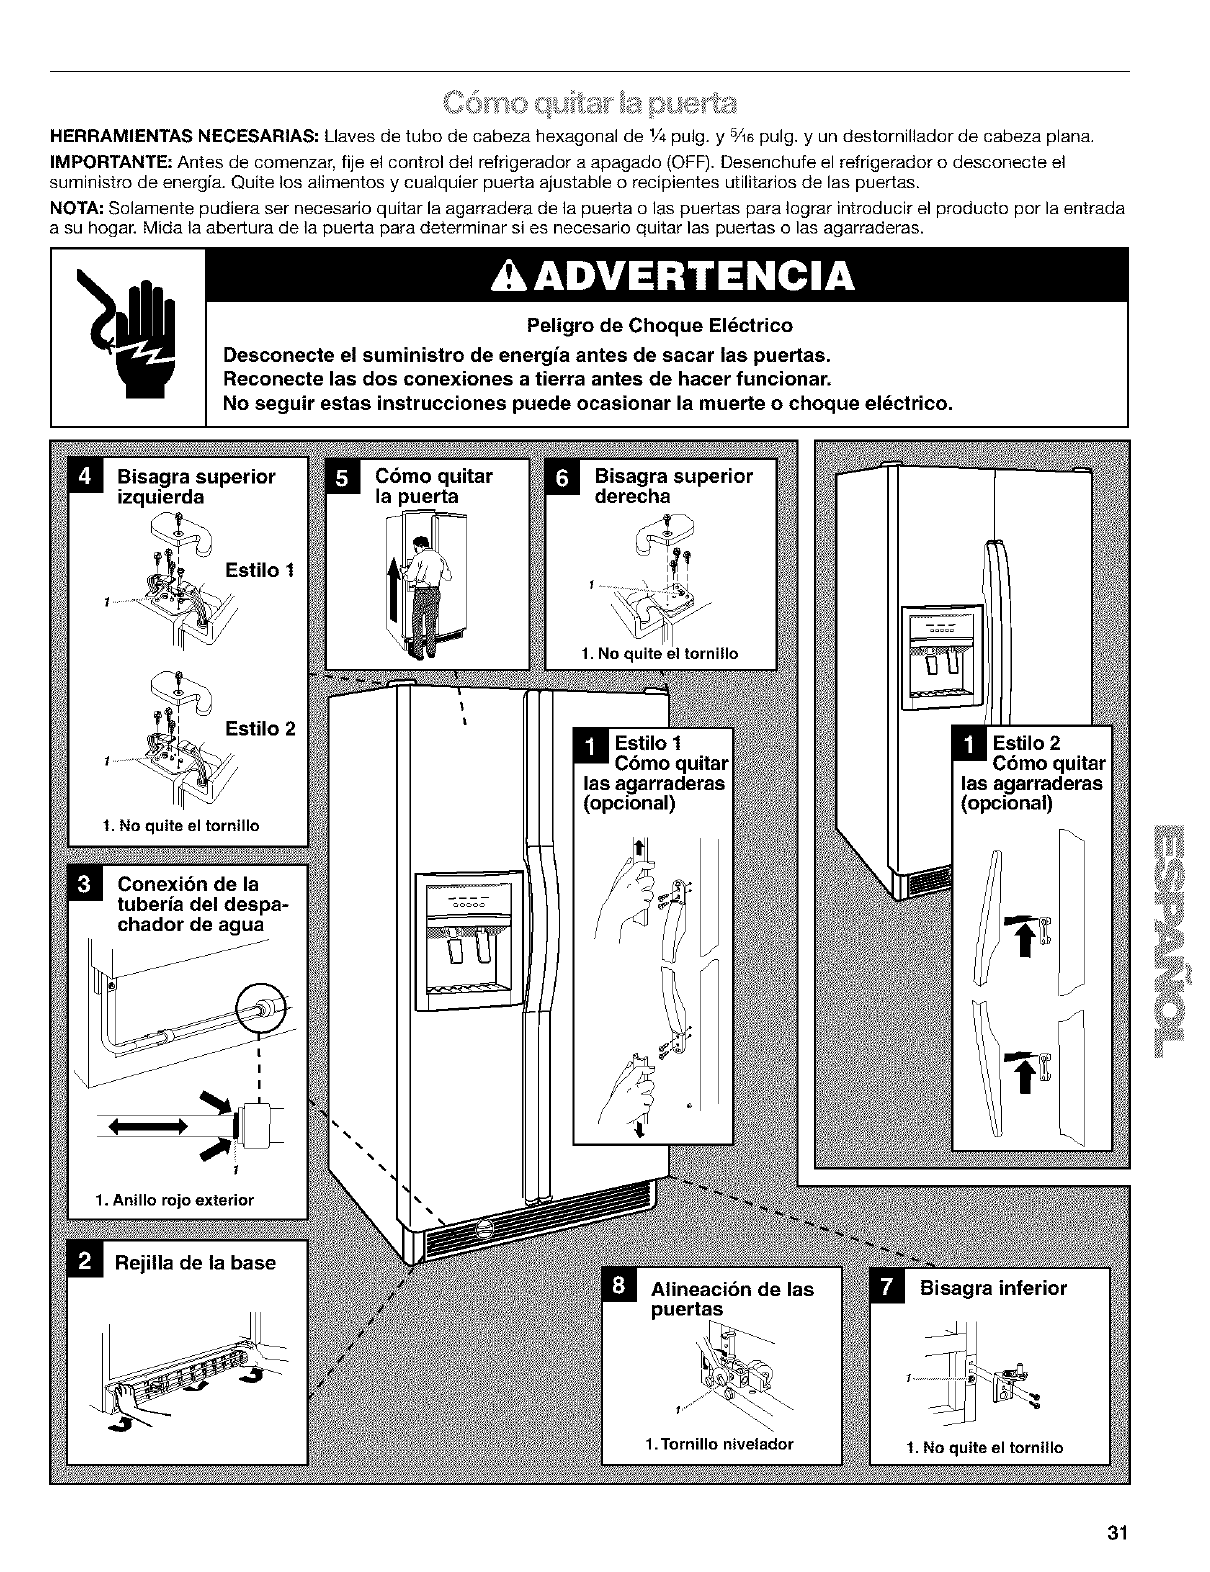
HERRAMIENTAS NECESARIAS: Llaves de tubo de cabeza hexagonal de 1/4pulg. y 5A6pulg. y un destornillador de cabeza plana.
IMPORTANTE: Antes de comenzar, fije el control del refrigerador a apagado (OFF). Desenchufe el refrigerador 0 desconecte el
suministro de energia. Quite los alimentos y cualquier puerta ajustable 0 recipientes utilitarios de las puertas.
NOTA: Solamente pudiera set necesario quitar la agarradera de la puerta 0 las puertas para Iograr introducir el producto pot la entrada
a su hogan Mida la abe_ura de la pue_a para determinar si es necesario quitar las puertas 0 las agarraderas.
Peligro de Choque Eldctrico
Desconecte el suministro de energia antes de sacar las puertas.
Reconecte las dos conexiones a tierra antes de hacer funcionar.
No seguir estas instrucciones puede ocasionar la muerte o choque eldctrico,
\
Bisagra superior
izquierda
t. No quite el tornillo
Conexi6n de la
tuberia del despa-
chador de agua
I
,
1
1. Anillo rojo exterior
Rejina de la base
C6mo quitar
la puerta Bisagra superior
derecha
1. No quite el tornillo
Estilo 1
]uitar
las agarraderas
(opcional)
Alineacibn de las
puertas
I"
1. Tornillo nivelador
Bisagra inferior
t. No quite el tornillo
31
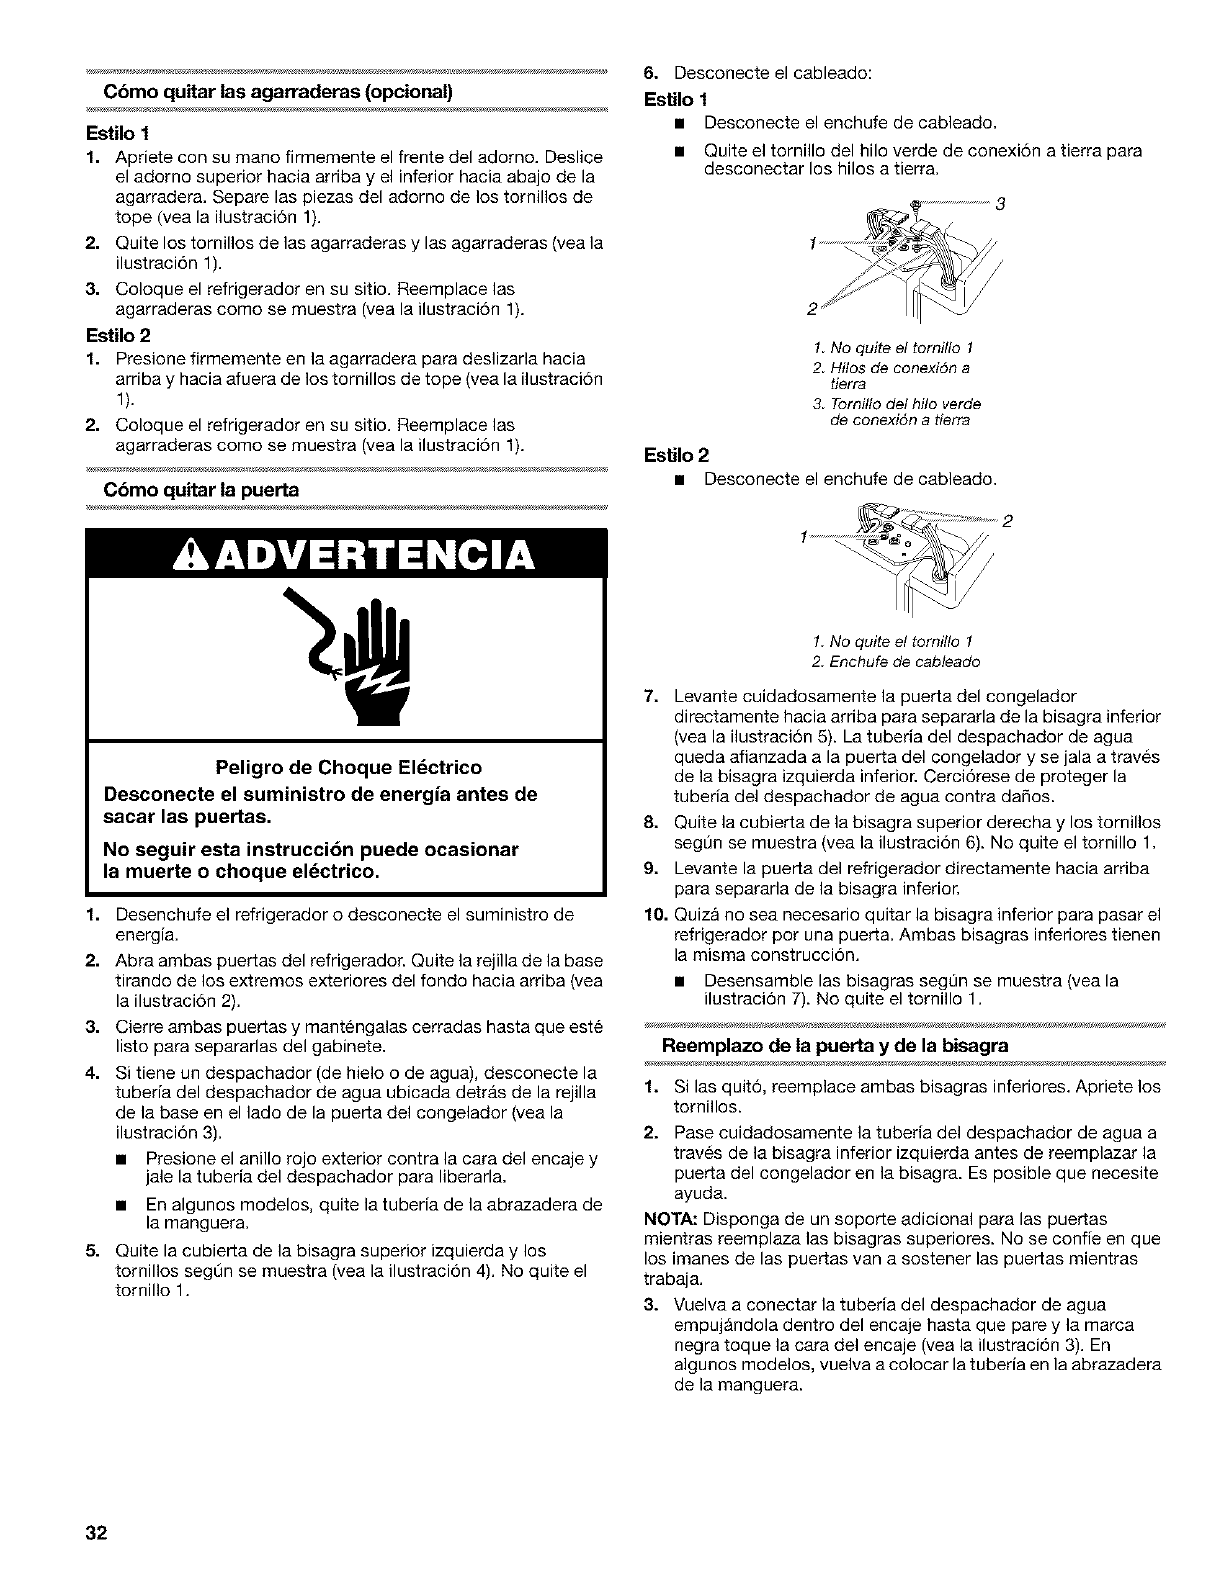
Cbmo quitar las agarraderas (opcional)
Estilo 1
1. Apriete con su mano firmemente el frente del adorno. Deslice
el adorno superior hacia arriba y el inferior hacia abajo de la
agarradera. Separe las piezas del adorno de los tornillos de
tope (vea la ilustraci6n 1).
2. Quite los tornillos de las agarraderas y las agarraderas (vea la
ilustraci6n 1).
3. Coloque el refrigerador en su sitio. Reemplace ias
agarraderas como se muestra (vea la ilustraci6n 1).
Estilo 2
1. Presione firmemente en la agarradera para deslizarla hacia
arriba y hacia afuera de los tornillos de tope (vea la ilustraci6n
1).
2. Coloque el refrigerador en su sitio. Reemplace las
agarraderas como se muestra (vea la ilustraci6n 1).
Cbmo quitar la puerta
6. Desconecte el cableado:
Estilo 1
• Desconecte el enchufe de cabieado.
• Quite el tornillo del hilo verde de conexi6n a tierra para
desconectar los hilos a tierra.
1. No quite el tornillo 1
2. Hitos de conexidn a
tierra
3. Tornillo del hflo verde
de conexi6n a tierra
Estilo 2
• Desconecte el enchufe de cabieado.
Peligro de Cheque Eldctrico
Desconecte el suministro de energia antes de
sacar las puertas.
No seguir esta instruccibn puede ocasionar
la muerte o cheque eldctrico.
1. Desenchufe el refrigerador o desconecte el suministro de
energia.
2. Abra ambas puertas del refrigerador. Quite la rejilla de la base
tirando de los extremos exteriores del fondo hacia arriba (vea
la ilustraci6n 2).
3. Cierre ambas puertas y mantengalas cerradas hasta que este
listo para separarlas del gabinete.
4. Si tiene un despachador (de hielo o de agua), desconecte la
tubeda del despachador de agua ubicada detrb.s de la rejilla
de la base en el lado de la puerta del congelador (vea la
ilustraci6n 3).
• Presione el anillo rojo exterior contra la cara del encaje y
jale la tuberia del despachador para liberarla.
• En algunos modelos, quite la tuberia de la abrazadera de
la manguera.
5. Quite la cubierta de la bisagra superior izquierda y los
tornillos segQn se muestra (vea la ilustraci6n 4). No quite el
tornillo 1.
1. No quite el tornillo 1
2. Enchufe de cableado
7. Levante cuidadosamente la puerta del congelador
directamente hacia arriba para separarla de la bisagra inferior
(vea la ilustraci6n 5). La tuberia del despachador de agua
queda afianzada a la puerta del congelador y se jala a traves
de ia bisagra izquierda inferior. Cerci6rese de proteger la
tuberia del despachador de agua contra dafios.
8. Quite la cubierta de la bisagra superior derecha y los tornillos
segt]n se muestra (vea la ilustraci6n 6). No quite el tornillo 1.
9. Levante la puerLa del refrigerador directamente hacia arriba
para separarla de la bisagra inferior.
10. Quiza no sea necesario quitar la bisagra inferior para pasar el
refrigerador por una puerta. Ambas bisagras inferiores tienen
la misma construcci6n.
• Desensamble las bisagras segt]n se muestra (vea la
ilustraci6n 7). No quite el tornillo 1.
Reemplazo de la puerta y de la bisagra
1. Si las quit6, reempiace ambas bisagras inferiores. Apriete los
tornillos.
2. Pase cuidadosamente la tuberia del despachador de agua a
traves de la bisagra inferior izquierda antes de reemplazar la
puerta del congelador en la bisagra. Es posible que necesite
ayuda.
NOTA: Disponga de un soporte adicional para las puertas
mientras reemplaza las bisagras superiores. No se confie en que
los imanes de las puertas van a sostener las puertas mientras
trabaja.
3. Vuelva a conectar la tuberia del despachador de agua
empujandola dentro del encaje hasta que pare y la marca
negra toque la cara del encaje (vea la ilustraci6n 3). En
algunos modelos, vuelva a colocar la tuberia en la abrazadera
de la manguera.
32
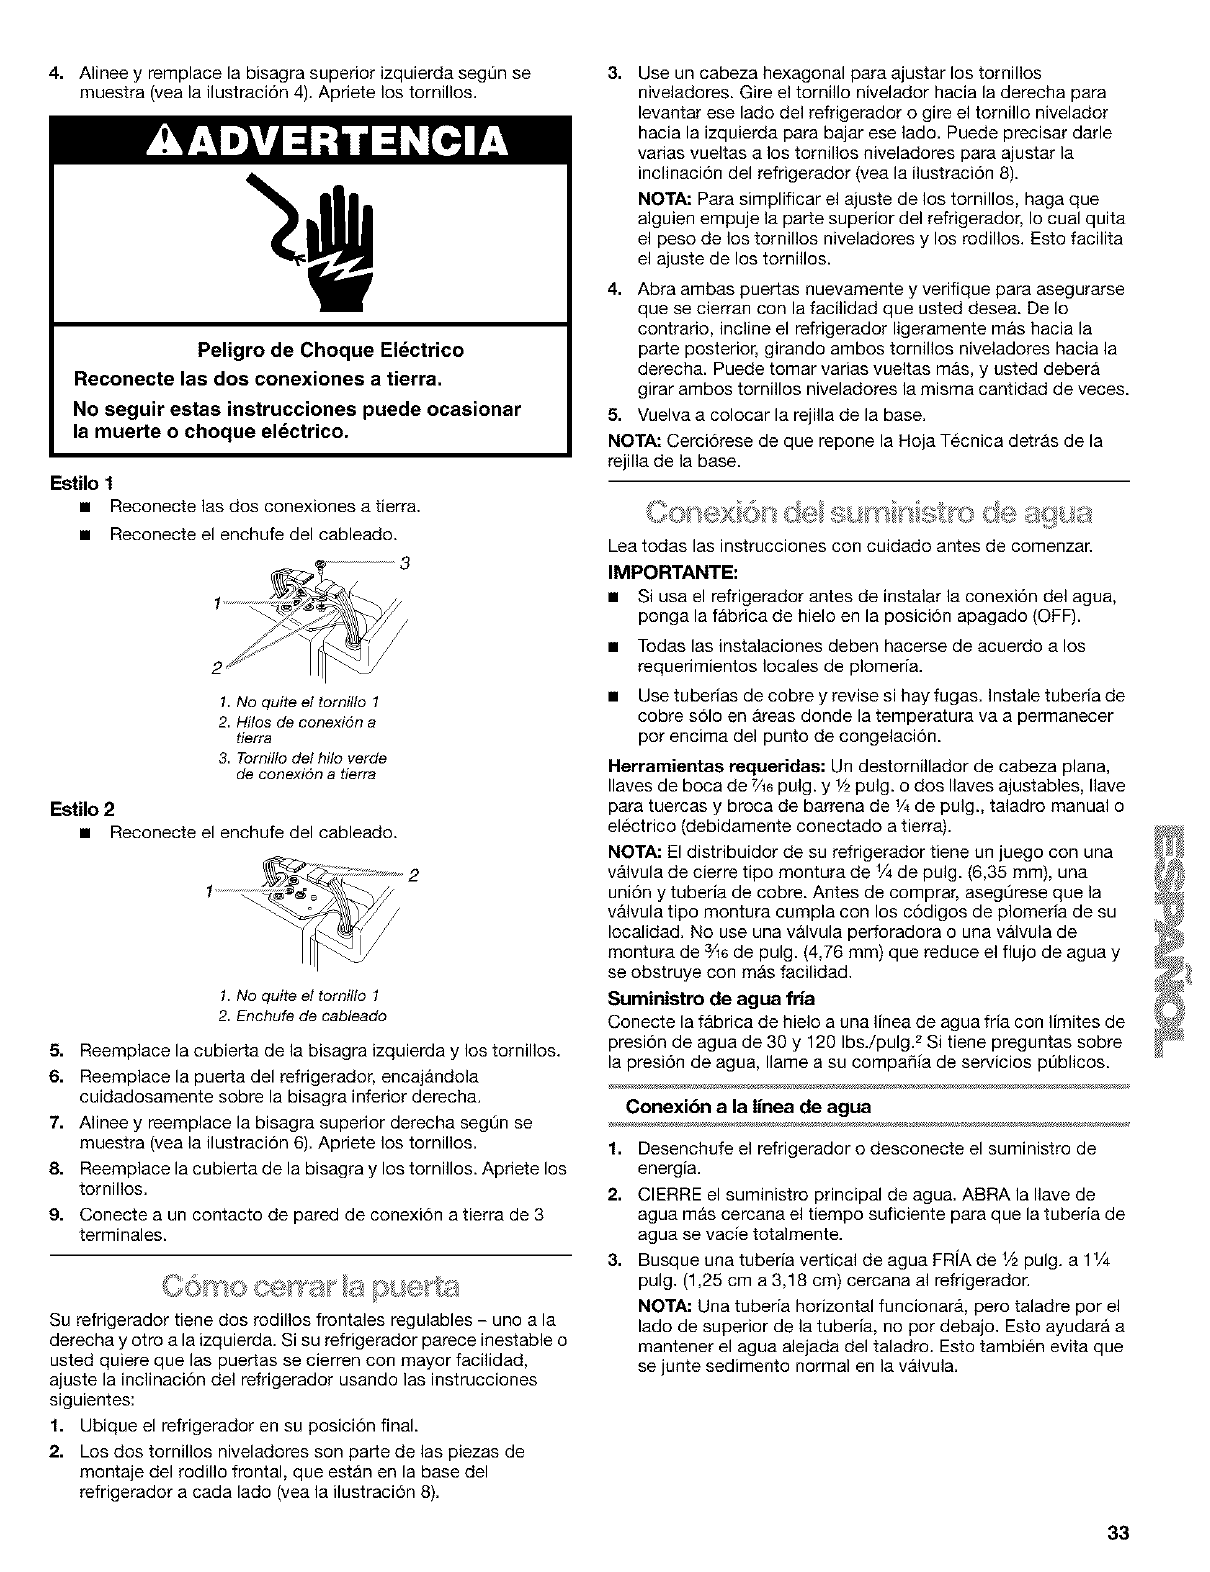
4. Alinee y remplace la bisagra superior izquierda segt]n se
muestra (vea la ilustraci6n 4). Apriete los tornillos.
Peligro de Choque El_ctrico
Reconecte las dos conexiones a tierra.
No seguir estas instrucciones puede ocasionar
la muerte o choque eldctrico.
Estilo 1
•Reconecte las dos conexiones a tierra.
• Reconecte el enchufe del cableado.
1. No quite el tornillo 1
2. Hitos de conexi4n a
tierra
3. Tornillo del hilo verde
de conexi4n a tierra
Estilo 2
• Reconecte el enchufe del cableado.
1. No quite el tornillo 1
2. Enchufe de cableado
5. Reemplace la cubierta de la bisagra izquierda y los tornillos.
6. Reemplace la puerta del refrigerador, encajandola
cuidadosamente sobre la bisagra inferior derecha.
7. Alinee y reemplace la bisagra superior derecha segOn se
muestra (vea la ilustraci6n 6). Apriete los tornillos.
8. Reemplace la cubierta de la bisagra y los tornillos. Apriete los
tornillos.
9. Conecte a un contacto de pared de conexi6n a tierra de 3
terminales.
Su refrigerador tiene dos rodillos frontales regulables - uno a la
derecha y otro a la izquierda. Si su refrigerador parece inestable o
usted quiere que las puertas se cierren con mayor facilidad,
ajuste la inclinaci6n del refrigerador usando las instrucciones
siguientes:
1. Ubique el refrigerador en su posici6n final.
2. Los dos tornillos niveladores son parte de las piezas de
montaje del rodillo frontal, que estan en la base del
refrigerador a cada lado (yea la ilustraci6n 8).
3, Use un cabeza hexagonal para ajustar los tornillos
niveladores. Gire el tornillo nivelador hacia la derecha para
levantar ese lado del refrigerador o gire el tornillo nivelador
hacia la izquierda para bajar ese lado. Puede precisar darle
varias vueltas a los tornillos niveladores para ajustar la
inclinaci6n del refrigerador (vea la ilustraci6n 8).
NOTA: Para simplificar el ajuste de los tornillos, haga que
alguien empuje la parte superior del refrigerador, Io cual quita
el peso de los tornillos niveladores y los rodillos. Esto facilita
el ajuste de los tornillos.
4. Abra ambas puertas nuevamente y verifique para asegurarse
que se cierran con la facilidad que usted desea. De Io
contrario, incline el refrigerador ligeramente mas hacia la
parle posterior, girando ambos tornillos niveladores hacia la
derecha. Puede tomar varias vueltas mAs, y usted debera
girar ambos tornillos niveladores la misma cantidad de veces.
5. Vuelva a colocar la rejilla de la base.
NOTA: Cerci6rese de que repone la Hoja Tecnica detras de la
rejilla de la base.
........ ,, 8gUS
,,I, _=!_ *,/,_4,11 *,,, ==
Lea todas las instrucciones con cuidado antes de comenzar.
IMPORTANTE:
• Si usa el refrigerador antes de instalar la conexi6n del agua,
ponga la fabrica de hielo en la posici6n apagado (OFF).
• Todas las instalaciones deben hacerse de acuerdo a los
requerimientos locales de plomeria.
• Use tuberias de cobre y revise si hay fugas. Instale tuberia de
cobre s61o en Areas donde la temperatura va a permanecer
por encima del punto de congelaci6n.
Herramientas requeridas: Un destornilador de cabeza plana,
Ilaves de boca de 7Mepulg. y 1/2pulg. o dos laves ajustables, lave
para tuercas y broca de barrena de ¼ de pulg., taladro manual o
electrico (debidamente conectado a tierra).
NOT,a,:El distribuidor de su refrigerador tiene un juego con una
vAIvula de cierre tipo montura de 1/4de pulg. (6,35 mm), una
uni6n y tuberia de cobre. Antes de comprar, asegOrese que la
vAIvula tipo montura cumpla con los c6digos de plomeria de su
Iocalidad. No use una valvula perforadora o una valvula de
montura de 3/16de pulg. (4,76 mm) que reduce el flujo de agua y
se obstruye con mas facilidad.
Suministro de agua fria
Conecte la fabrica de hielo a una linea de agua fria con limites de
presi6n de agua de 30 y 120 Ibs./pulg? Si tiene preguntas sobre
la presi6n de agua, Ilame a su compafiia de servicios pt)blicos.
Conexi6n a la linea de agua
1. Desenchufe el refrigerador o desconecte el suministro de
energia.
2. CIERRE el suministro principal de agua. ABRA la lave de
agua mas cercana el tiempo suficiente para que la tuberia de
agua se vacie totalmente.
3. Busque una tuberia vertical de agua FRIA de 1/2pulg. a 1¼
pulg. (1,25 cm a 3,18 cm) cercana al refrigerador.
NOTA: Una tuberia horizontal funcionarA, pero taladre por el
lado de superior de la tuberia, no por debajo. Esto ayudarA a
mantener el agua alejada del taladro. Esto tambien evita que
se junte sedimento normal en la vAIvula.
33
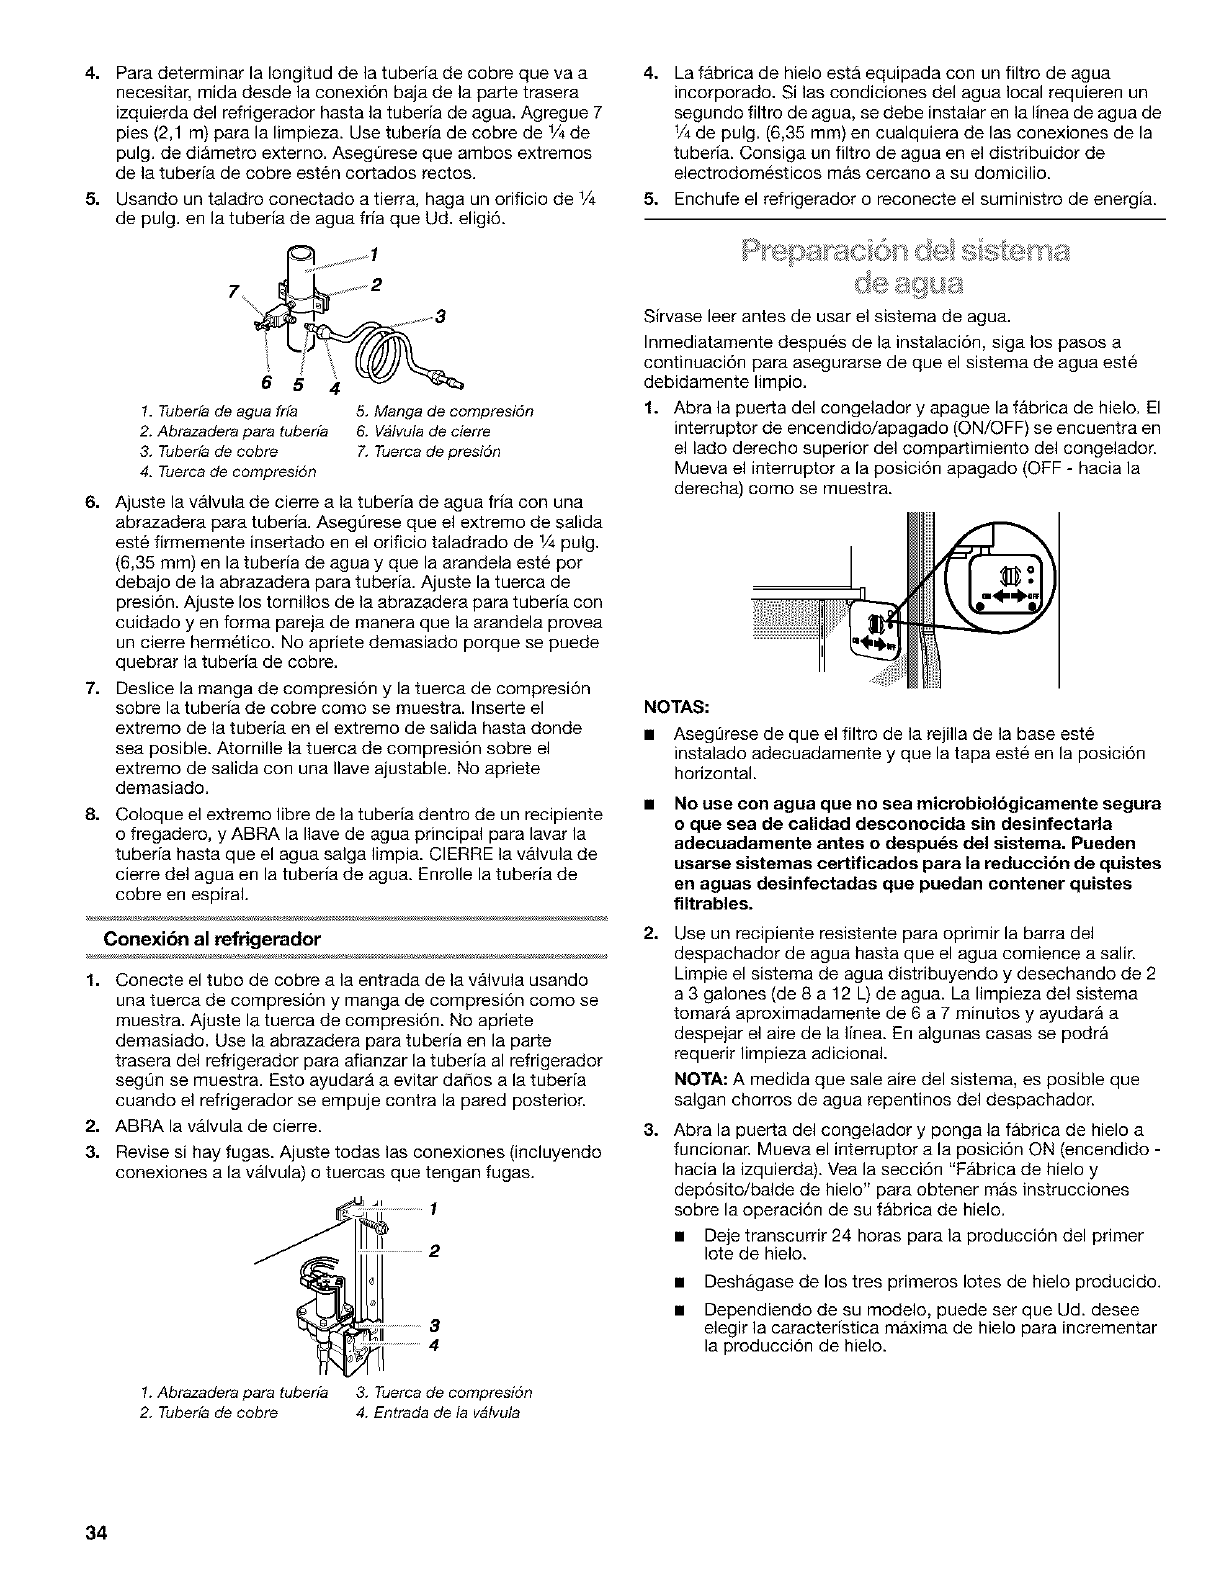
4. Para determinar la Iongitud de la tuberia de cobre que va a
necesitar, mida desde la conexi6n baja de la parle trasera
izquierda del refrigerador hasta la tuberia de agua. Agregue 7
pies (2,1 m) para la limpieza. Use tuberia de cobre de 1/4de
pulg. de diametro externo. Asegt]rese que ambos extremos
de la tuberia de cobre esten cortados rectos.
5. Usando un taladro conectado a tierra, haga un orificio de 1/4
de pulg. en la tuberia de agua fria que Ud. eligi6.
4. La f_.brica de hielo estA equipada con un filtro de agua
incorporado. Si las condiciones del agua local requieren un
segundo filtro de agua, se debe instalar en la linea de agua de
1/4de pulg. (6,35 mm) en cualquiera de las conexiones de la
tubed& Consiga un filtro de agua en el distribuidor de
electrodomesticos mas cercano a su domicilio.
5. Enchufe el refrigerador o reconecte el suministro de energia.
6
!. Tuberfa de agua frfa
2. Abrazadera para tuberfa
3. Tuberfa de cobre
4, Tuerca de compresi6n
5. Manga de compresi6n
6. Vblvula de cierre
7. Tuerca de presi6n
6. Ajuste la v_.lvula de cierre a la tuberia de agua fria con una
abrszadera para tuberia. Asegt]rese que el extremo de salida
este firmemente insertado en el orificio taladrado de 1/4pulg.
(6,35 mm) en la tuberia de agua y que la arandela este por
debajo de la abrazadera para tuberia. Ajuste la tuerca de
presi6n. Ajuste los tornillos de la abrazadera para tuberia con
cuidado yen forma pareja de manera que la arandela provea
un cierre hermetico. No apriete demasiado porque se puede
quebrar la tuberia de cobre.
7. Deslice la manga de compresi6n y la tuerca de compresi6n
sobre la tuberia de cobre como se muestra. Inser[e el
extremo de la tuberia en el extremo de salida hasta donde
sea posible. Atornille la tuerca de compresi6n sobre el
extremo de salida con una Ilave ajustable. No apriete
demasiado.
8. Coloque el extremo libre de la tuberia dentro de un recipiente
o fregadero, y ABRA la Ilave de agua principal para lavar la
tuberia hasta que el agua salga limpia. ClERRE la v_.lvula de
cierre del agua en la tuberia de agua. Enrolle la tuberia de
cobre en espiraL
Conexibn al refrigemdor
1. Conecte el tubo de cobre a la entrada de la v_.lvula usando
una tuerca de compresi6n y manga de compresi6n como se
muestra. Ajuste la tuerca de compresi6n. No apriete
demasiado. Use la abrazadera para tuberia en la parte
trasera del refrigerador para afianzar la tuberia al refrigerador
segt]n se muestra. Esto ayudarb, a evitar da_os a la tuberia
cuando el refrigerador se empuje contra la pared posterior.
2. ABRA la valvula de cierre.
3. Revise si hay fugas. Ajuste todas las conexiones (incluyendo
conexiones a la v_.lvula) o tuercas que tengan fugas.
..................1
............... 2
iiiiiiiiiiiiiiii
!. Abrazadera para tuberfa 3. Tuerca de compresi6n
2. Tuberfa de cobre 4. Entrada de la v4lvuta
Sirvase leer antes de usar el sistema de agua.
Inmediatamente despues de la instalaci6n, siga los pasos a
continuaci6n para asegurarse de que el sistema de agua este
debidamente limpio.
1. Abra la puerta del congelador y apague la f_.brica de hielo. El
interruptor de encendido/apagado (ON/OFF) se encuentra en
el lado derecho superior del compartimiento del congelador.
Mueva el interruptor a la posici6n apagado (OFF - hacia la
derecha) como se muestra.
NOTAS:
• Asegt]rese de que el filtro de la rejilla de la base este
instalado adecuadamente y que la tapa este en la posici6n
horizontal.
2.
3.
No use con agua que no sea microbiolbgicamente segura
o que sea de calidad desconocida sin desinfectarla
adecuadamente antes o despu_s del sistema. Pueden
usarse sistemas certificados para la reducci6n de quistes
en aguas desinfectadas que puedan contener quistes
filtrables.
Use un recipiente resistente para oprimir la barra del
despachador de agua hasta que el agua comience asalir.
Limpie el sistema de agua distribuyendo y desechando de 2
a 3 galones (de 8 a 12 L) de agua. La limpieza del sistema
tomara aproximadamente de 6 a 7 minutos y ayudara a
despejar el aire de la line& En algunas casas se podra
requerir limpieza adicionaL
NOTA: A medida que sale aire del sistema, es posible que
salgan chorros de agua repentinos del despachador.
Abra la puerta del congelador y ponga la fabrica de hielo a
funcionar. Mueva el interruptor a la posici6n ON (encendido -
hacia la izquierda). Vea la secci6n "Fabrica de hielo y
dep6sito/balde de hielo" para obtener mas instrucciones
sobre la operaci6n de su fabrica de hielo.
• Deje transcurrir 24 horas para la producci6n del primer
Iote de hielo.
• Deshagase de los tres primeros Iotes de hielo producido.
• Dependiendo de su modelo, puede set que Ud. desee
elegir la caracteristica maxima de hielo para incrementar
la producci6n de hielo.
34
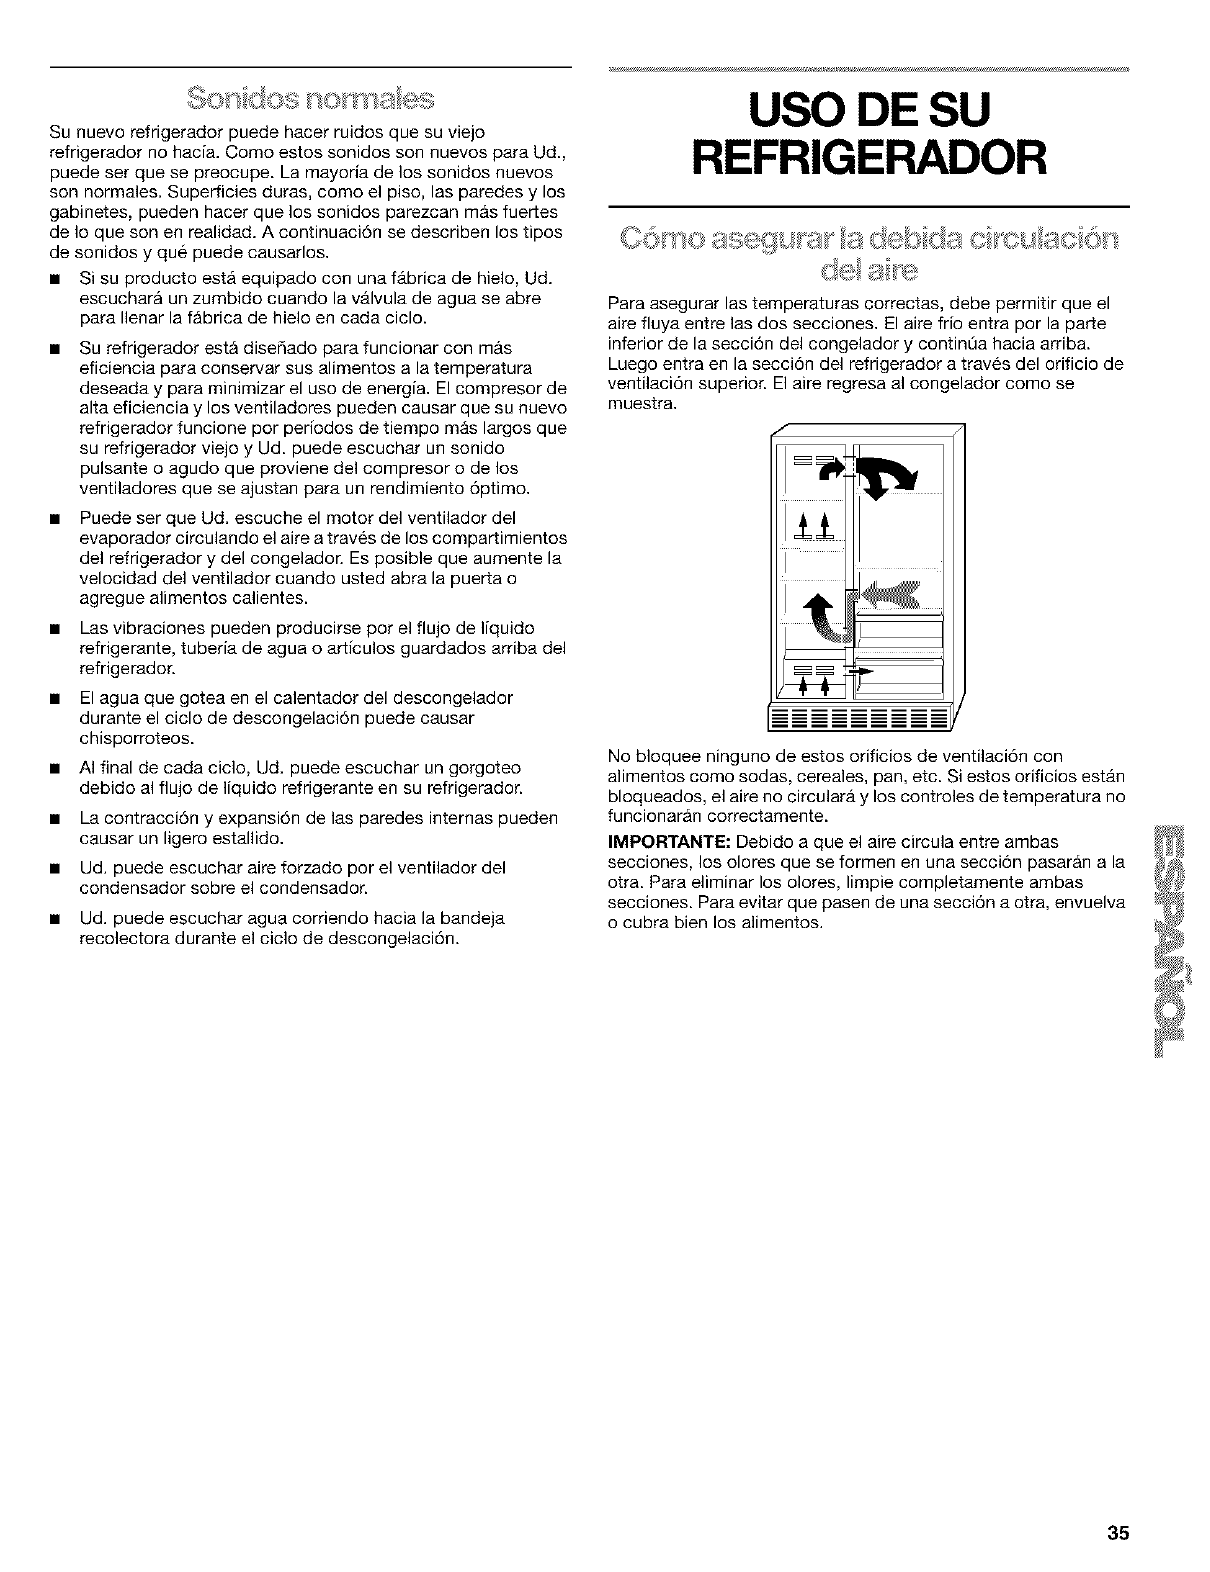
¢cs(B=!,(IO_,, I I0 1 _+;;;_d,_,
Su nuevo refrigerador puede hacer ruidos que su viejo
refrigerador no hacia. Como estos sonidos son nuevos para Ud.,
puede set que se preocupe. La mayoria de los sonidos nuevos
son normales. Superficies duras, como el piso, las paredes y los
gabinetes, pueden hacer que los sonidos parezcan mas fuerfes
de Io que son en realidad. A continuaci6n se describen los tipos
de sonidos y que puede causarlos.
• Si su producto esta equipado con una fb.brica de hielo, Ud.
escuchara un zumbido cuando la vb.lvula de agua se abre
para llenar la fabrica de hielo en cada ciclo.
• Su refrigerador esta dise_ado para funcionar con mas
eficiencia para conservar sus alimentos a la temperatura
deseada y para minimizar el uso de energia. El compresor de
alta eficiencia y los ventiladores pueden causar que su nuevo
refrigerador funcione por periodos de tiempo mas largos que
su refrigerador viejo y Ud. puede escuchar un sonido
pulsante o agudo que proviene del compresor o de los
ventiladores que se ajustan para un rendimiento 6ptimo.
Puede ser que Ud. escuche el motor del ventilador del
evaporador circulando el aire a traves de los compartimientos
del refrigerador y del congelador. Es posible que aumente la
velocidad del ventilador cuando usted abra la puerta o
agregue alimentos calientes.
Las vibraciones pueden producirse por el flujo de liquido
refrigerante, tuberia de agua o articulos guardados arriba del
refrigerador.
El agua que gotea en el calentador del descongelador
durante el ciclo de descongelaci6n puede causar
chisporroteos.
• AI final de cada ciclo, Ud. puede escuchar un gorgoteo
debido al flujo de liquido refrigerante en su refrigerador.
• La contracci6n y expansi6n de las paredes internas pueden
causar un ligero estallido.
• Ud. puede escuchar aire forzado por el ventilador del
condensador sobre el condensador.
• Ud. puede escuchar agua corriendo hacia la bandeja
recolectora durante el ciclo de descongelaci6n.
REFRIGERADOR
Para asegurar las temperaturas correctas, debe permitir que el
aire fluya entre las dos secciones. El aire frio entra por la parte
inferior de la secci6n del congelador y contint]a hacia arriba.
Luego entra en la secci6n del refrigerador a traves del orificio de
ventilaci6n superior. El aire regresa al congelador como se
muestra.
l'lb
No bloquee ninguno de estos orificios de ventilaci6n con
alimentos como sodas, cereales, pan, etc. Si estos orificios estb.n
bloqueados, el aire no circularb, y los controles de temperatura no
funcionaran correctamente.
IMPORTANTE: Debido a que el aire cimula entre ambas
secciones, los olores que se formen en una secciSn pasaran a la
otra. Para eliminar los olores, limpie completamente ambas
secciones. Para evitar que pasen de una secciSn a otra, envuelva
o cubra bien los a]imentos.
35
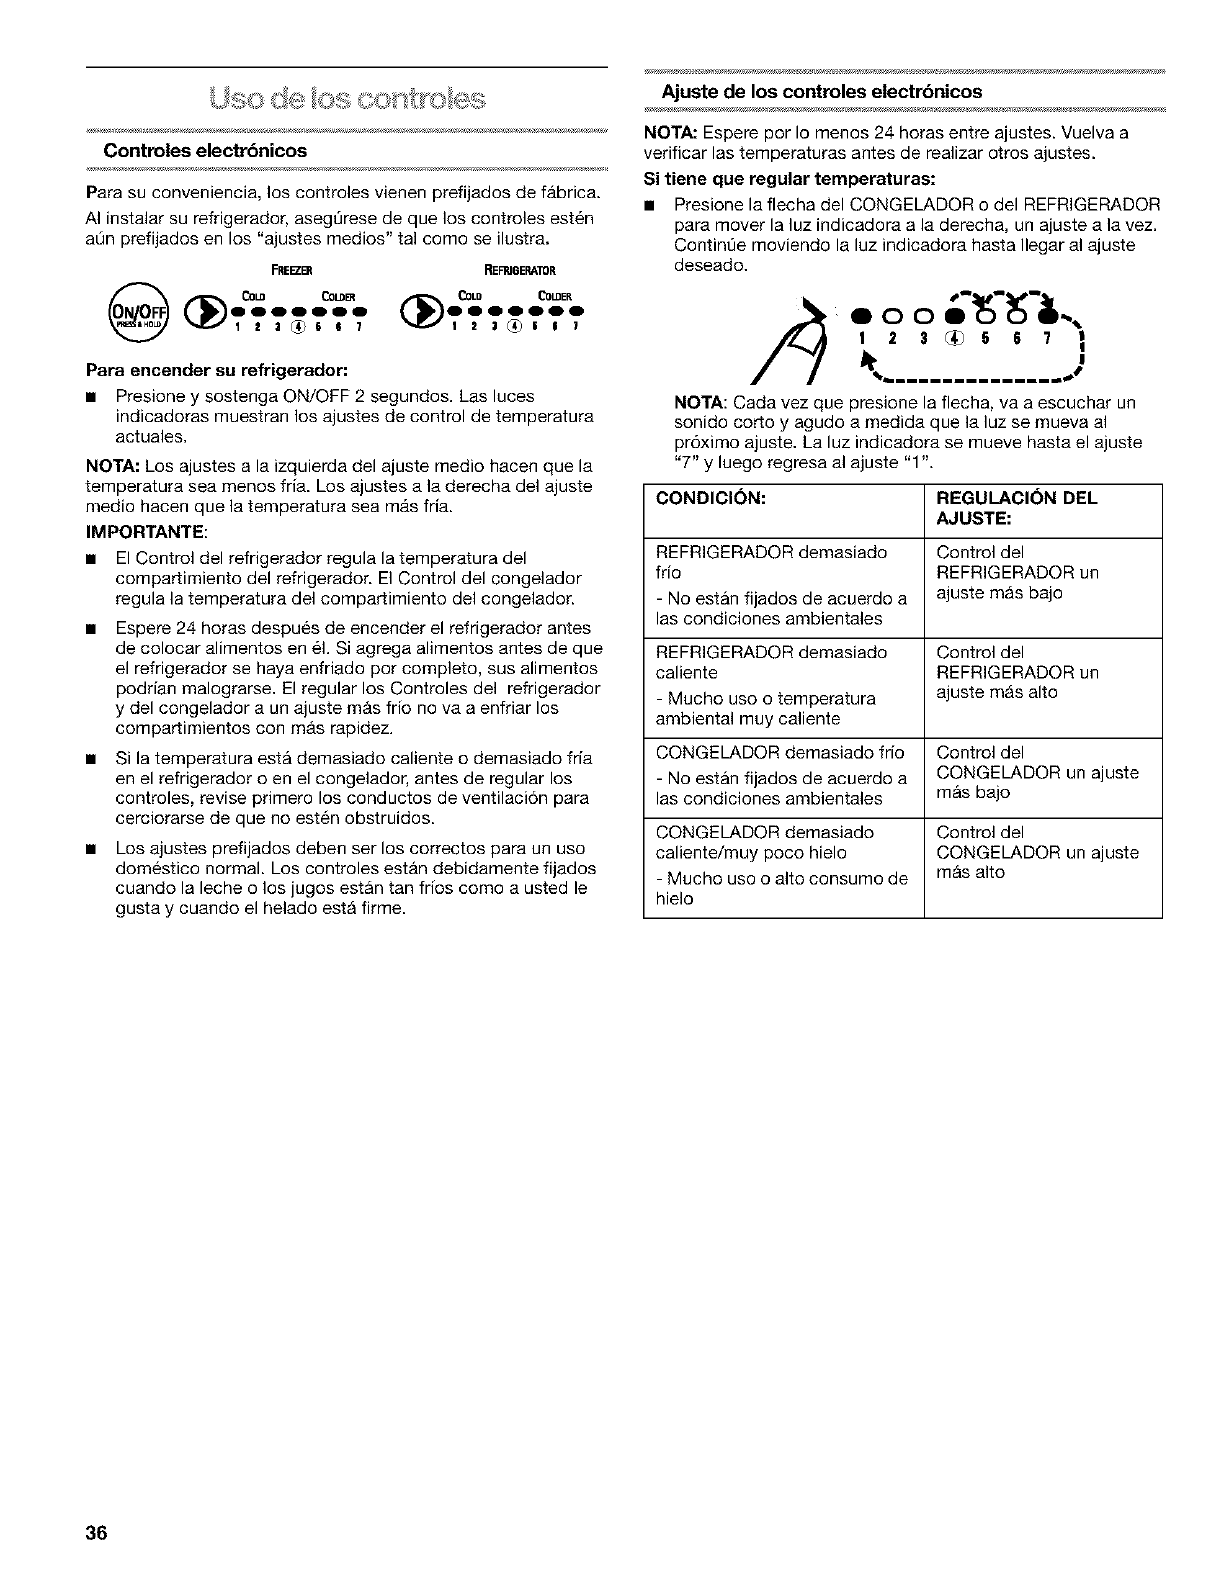
I,olii0 .IC_ lO,r> ........=........ =......
Controles electr6nicos
Para su conveniencia, los controles vienen prefijados de fabrica.
AI instalar su refrigerador, asegt]rese de que los controles esten
at]n prefijados en los "ajustes medios" tal como se ilustra.
FREEZB_ REFRIGERATOR
COw COLO_ COLD LOWER
Para encender su refrigerador:
•Presione y sostenga ON/OFF 2 segundos. Las luces
indicadoras muestran los ajustes de control de temperatura
actuales.
NOTA: Los ajustes a la izquierda del ajuste medio hacen que la
temperatura sea menos fria. Los ajustes a la derecha del ajuste
medio hacen que la temperatura sea mb.s fria.
IMPORTANTE:
• El Control del refrigerador regula la temperatura del
compartimiento del refrigerador. El Control del congelador
regula la temperatura del compartimiento del congelador.
Espere 24 horas despues de encender el refrigerador antes
de colocar alimentos en el. Si agrega alimentos antes de que
el refrigerador se haya enfriado por completo, sus alimentos
podrian malograrse. El regular los Controles del refrigerador
y del congelador a un ajuste mb.s frio no va a enfriar los
compartimientos con mb.s rapidez.
Si la temperatura esta demasiado caliente o demasiado fria
en el refrigerador o en el congelador, antes de regular los
controles, revise primero los conductos de ventilaci6n para
cerciorarse de que no esten obstruidos.
Los ajustes prefijados deben ser los correctos para un uso
domestico normal. Los controles estb.n debidamente fijados
cuando la leche o los jugos estan tan frios como a usted le
gusta y cuando el helado esta firme.
Ajuste de los controles electr6nicos
NOTA: Espere por Io menos 24 horas entre ajustes. Vuelva a
verificar las temperaturas antes de realizar otros ajustes.
Si tiene que regular temperaturas:
• Presione la flecha del CONGELADOR o del REFRIGERADOR
para mover la luz indicadora a la derecha, un ajuste a la vez.
Contint]e moviendo la luz indicadora hasta Ilegar al ajuste
deseado.
/Z) ° o o
I 2 s 7 I
............... J
NOTA: Cada vez que presione la flecha, va a escuchar un
sonido corto y agudo a medida que la luz se mueva al
pr6ximo ajuste. La luz indicadora se mueve hasta el ajuste
"7" y luego regresa al ajuste "1".
CONDICI()N: REGULACI()N DEL
AJUSTE:
REFRIGERADOR demasiado Control del
frio REFRIGERADOR un
- No estan fijados de acuerdo a ajuste mas bajo
las condiciones ambientales
REFRIGERADOR demasiado Control del
caliente REFRIGERADOR un
- Mucho uso o temperatura ajuste mas alto
ambiental muy caliente
CONGELADOR demasiado frio Control del
- No estan fijados de acuerdo a CONGELADOR un ajuste
las condiciones ambientales mas bajo
CONGELADOR demasiado Control del
caliente/muy poco hielo CONGELADOR un ajuste
- Mucho uso o alto consumo de mas alto
hielo
36
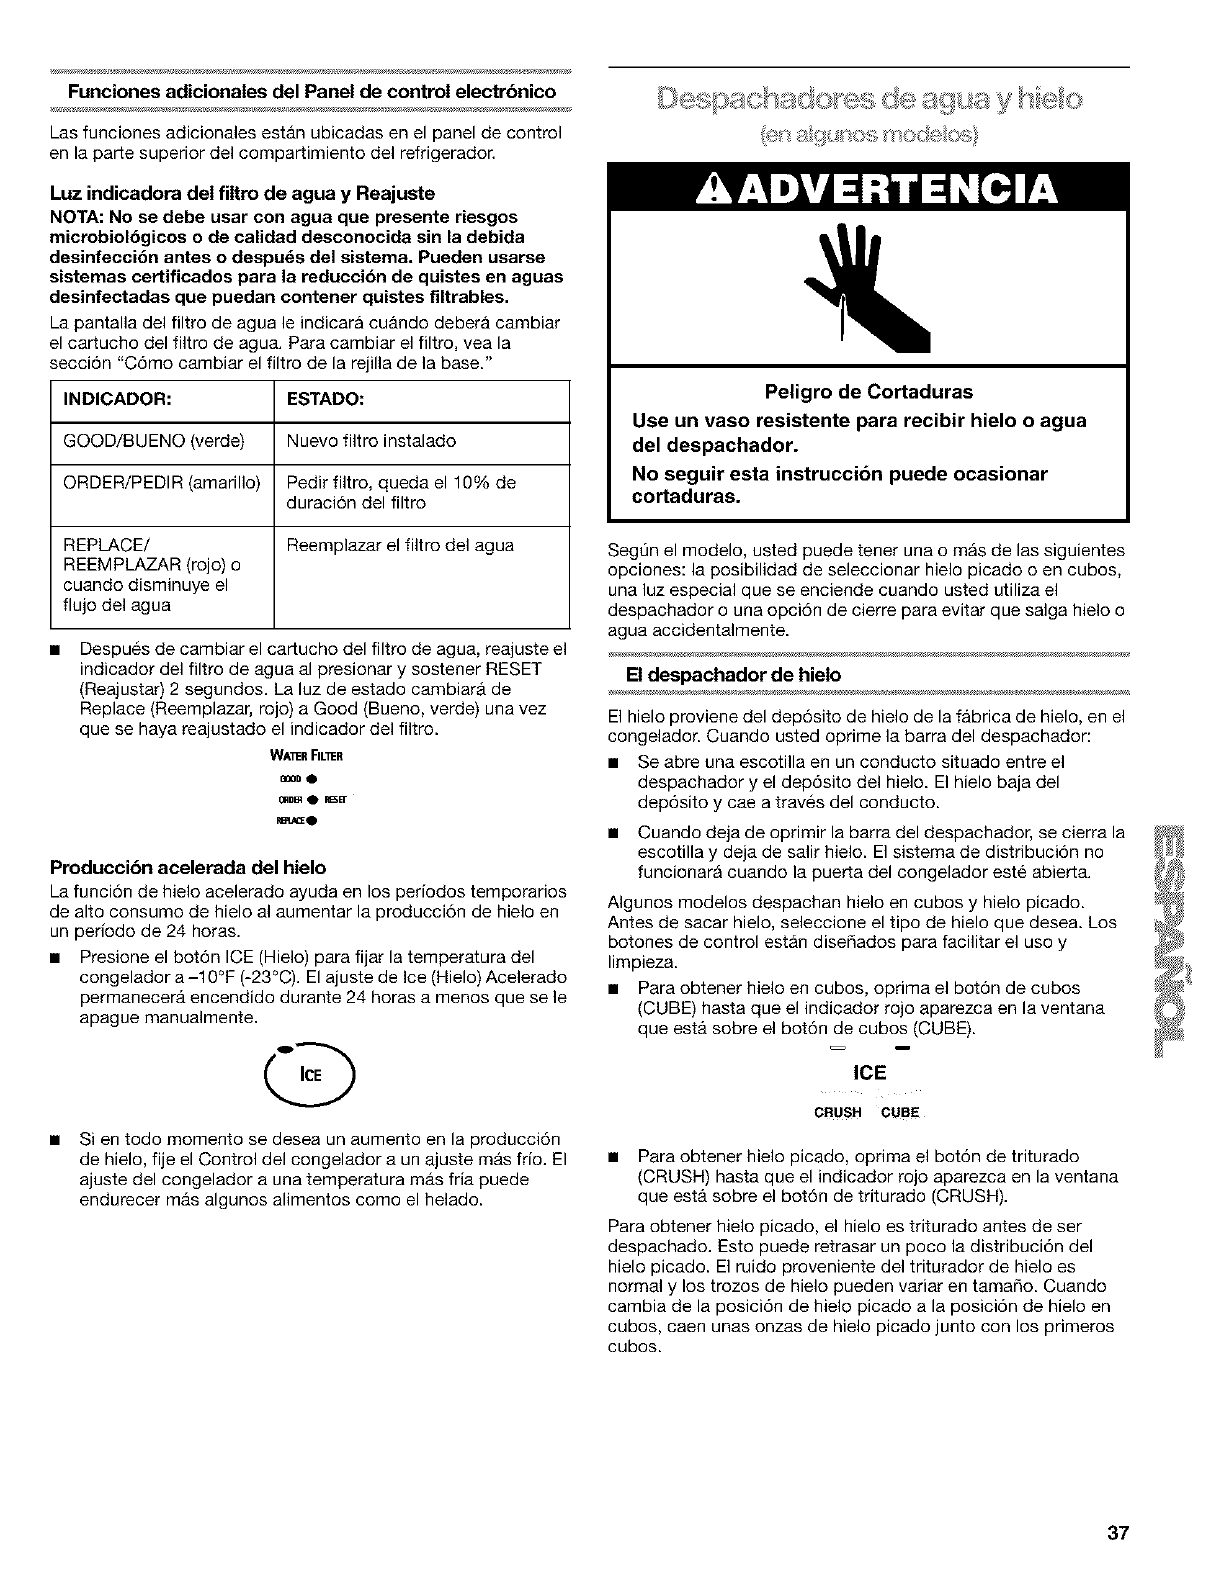
Funciones adicionales del Panel de control electrbnico
Las funciones adicionales estb.n ubicadas en el panel de control
en la parte superior del compartimiento del refrigerador.
Luz indicadora del filtro de agua y Reajuste
NOTA: No se debe usar con agua que presente riesgos
microbiolbgicos o de calidad desconocida sin la debida
desinfeccibn antes o despu_s del sistema. Pueden usarse
sistemas certificados para la reduccibn de quistes en aguas
desinfectadas que puedan contener quistes filtrables.
La pantalla del filtro de agua le indicara cu_.ndo debera cambiar
el cartucho del filtro de agua. Para cambiar el filtro, vea la
secci6n "C6mo cambiar el filtro de la rejilla de la base."
INDICADOR: ESTADO:
GOOD/BUENO (verde) Nuevo filtro instalado
ORDER/PEDIR (amarillo) Pedir filtro, queda el 10% de
duraci6n del filtro
REPLACE/ Reemplazar el filtro del agua
REEMPLAZAR (rojo) o
cuando disminuye el
flujo del agua
Despues de cambiar el cartucho del filtro de agua, reajuste el
indicador del filtro de agua al presionar y sostener RESET
(Reajustar) 2 segundos. La luz de estado cambiara de
Replace (Reemplazar, rojo) a Good (Bueno, verde) una vez
que se haya reajustado el indicador del filtro.
WA_ER FIL_ER
eeeD•
OqDm• _SET
mqSC_O
Produccibn acelerada del hielo
La funci6n de hielo acelerado ayuda en los periodos temporarios
de alto consumo de hielo al aumentar la producci6n de hielo en
un periodo de 24 horas.
• Presione el bot6n ICE (Hielo) para fijar la temperatura del
congelador a -10°F (-23°C). El ajuste de Ice (Hielo) Acelerado
permanecer_, encendido durante 24 horas a menos que se le
apague manualmente.
• Si en todo momento se desea un aumento en la producci6n
de hielo, fije el Control del congelador a un ajuste mb.s frio. El
ajuste del congelador a una temperatura mb.s fria puede
endurecer mb.s algunos alimentos como el helado.
Peligro de Cortaduras
Use un vaso resistente para recibir hielo o agua
del despachador.
No seguir esta instrucci6n puede ocasionar
cortaduras.
Segt]n el modelo, usted puede tenet una o mas de las siguientes
opciones: la posibilidad de seleccionar hielo picado o en cubos,
una luz especial que se enciende cuando usted utiliza el
despachador o una opci6n de cierre para evitar que salga hielo o
agua accidentalmente.
El despachador de hielo
El hielo proviene del dep6sito de hielo de la fabrica de hielo, en el
congelador. Cuando usted oprime la barra del despachador:
• Se abre una escotilla en un conducto situado entre el
despachador y el dep6sito del hielo. El hielo baja del
dep6sito y cae a traves del conducto.
• Cuando deja de oprimir la barra del despachador, se cierra la
escotilla y deja de salir hielo. El sistema de distribuci6n no
funcionara cuando la puerta del congelador este abierta.
AIgunos modelos despachan hielo en cubos y hielo picado.
Antes de sacar hielo, seleccione el tipo de hielo que desea. Los
botones de control estan dise_ados para facilitar el uso y
limpieza.
• Para obtener hielo en cubos, optima el bot6n de cubos
(CUBE) hasta que el indicador rojo aparezca en la ventana
que est,. sobre el bot6n de cubos (CUBE).
ICE
CRUS H CUBE
• Para obtener hielo picado, oprima el bot6n de triturado
(CRUSH) hasta que el indicador rojo aparezca en la ventana
que est,. sobre el bot6n de triturado (CRUSH).
Para obtener hielo picado, el hielo es triturado antes de ser
despachado. Esto puede retrasar un poco la distribuci6n del
hielo picado. El ruido proveniente del triturador de hielo es
normal y los trozos de hielo pueden variar en tama_o. Cuando
cambia de la posici6n de hielo picado a la posici6n de hielo en
cubos, caen unas onzas de hielo picado junto con los primeros
cubos.
37
Para despachar hielo:
1. Oprima el botAn del tipo de hielo que desee.
2. Oprima con un vaso resistente la barra del despachador de
hielo. Sostenga el vaso junto al orificio del despachador para
que el hielo no caiga fuera del vase.
IMPORTANTE: No necesita aplicar mucha presiAn a la barra
para activar el despachador de hielo. Oprimir mucho no har_.
que el despachador funcione con m_.s rapidez o produzca
mayor cantidad de hielo.
3. Retire el vase para detener la salida de hielo.
NOTA: Los primeros Iotes de hielo pueden tenet real sabor
debido a las conexiones de plomeda y piezas nuevas.
Deseche ese hielo. Ademas, saque grandes cantidades de
hielo del depAsito de hielo, y no a traves del despachador.
El despachador de agua
Si no limpi6 el sistema de agua cuando se instal6 el refrigerador
por primera vez, oprima la barra del despachador de agua con un
vaso o jarra hasta que saque y descarte de 2 a 3 galones (8 a 12
litros) o aproximadamente 6 6 7 minutos despues de que el agua
comience a salir. Toma de 3 a 4 minutos para que el agua
comience a salir. El agua que usted saca y descarta limpia el
sistema y ayuda a despejar el aire de la lineas. Deje que pasen
varias horas para que el refrigerador se enfrie y pueda enfriar el
agua.
IMPORTANTE: Dependiendo de su modelo, la charola peque_a
desmontable que se encuentra en el fondo del despachador estb.
disefiada para contener derrames pequefios y permitir una
limpieza fb.cil. La charola no tiene drenaje. La charola puede
quitarse del despachador y Ilevarse a un lavabo para vaciarse o
limpiarse.
La luz del despachador
El Area del despachador tiene una luz. Puede encenderse con la
mano oprimiendo el botAn de encendido (ON) situado a mano
derecha del panel de control. Aparecerb. el indicador rojo que
est,. sobre el botAn de encendido (ON).
En algunos modelos: Cuando usted utilice el despachador, la
barra encenderb, autom_.ticamente la luz.
LIGHT
OFF ON
NOTA: Para informaciAn sobre cAmo cambiar el foco del
despachador, vea la secciAn "CAme cambiar los feces".
En los modelos que no tienen hielo picado, el interrupter de luz
es de tipo oscilante. Oprima el interrupter para encender la luz, y
oprimalo otra vez para apagarla.
El cierre del despachador (en algunos modelos)
Su despachador puede apagarse para facilitar la limpieza o para
evitar que sea activado accidentalmente por nidos o animales
domesticos. Para apagar el despachador, oprima el botAn de
cierre (LOCK). El indicador aparecera sobre el botAn de cierre
(LOCK) y los despachadores de hielo y de agua no funcionaran.
Para reactivar el despachador, oprima el botAn de reactivaciAn
(UNLOCK) hasta que el indicador aparezca. Luego contin[3e
distribuyendo hielo o agua como de costumbre.
DISPENSER
LOC_UN_C K
NOTA: La funciAn de cierre no interrumpe el flujo electrico a la
unidad, a la fabrica de hielo o a la luz del despachador.
Unicamente desactiva las barras del despachador.
Para despaehar agua:
1. Oprima un vaso contra la barra del despachador de agua.
2. Retire el vase para detener la salida del agua.
NOTA: Haga salir suficiente agua cada semana para mantener un
suministro fresco.
La luz del estado del filtro de agua de la rejilla de la base
(en algunos modelos)
La luz del estado del filtro de agua le ayudara a saber cuando
debe cambiar el cartucho de su filtro de agua. La luz esta
ubicada en la parle superior del compartimiento del refrigerador.
La luz cambiara de verde a amarillo. Esto le dice que ya es casi
tiempo de cambiar el cartucho del filtro de agua (90% de la
duraciAn del filtro ha sido usada). Se recomienda que reemplace
el cartucho del filtro de agua de la rejilla de la base cuando la luz
del estado del filtro de agua cambie a rojo O el flujo de agua al
despachador o a la fabrica de hielo disminuya visiblemente. (Vea
"CAmo cambiar el cartucho del filtro de agua de la rejilla de la
base" mas adelante en esta secciAn.)
NOTA: No use con agua que no sea microbiolbgicamente
segura o que sea de calidad desconocida sin desinfectarla
adecuadamente antes o despu_s del sistema. Pueden usarse
sistemas certificados para la reduccibn de quistes en aguas
desinfectadas que puedan contener quistes filtrables.
Despues de cambiar el cartucho del filtro de agua, vuelva a
programar la luz del estado del filtro de agua. Vea "Uso de los
controles."
38
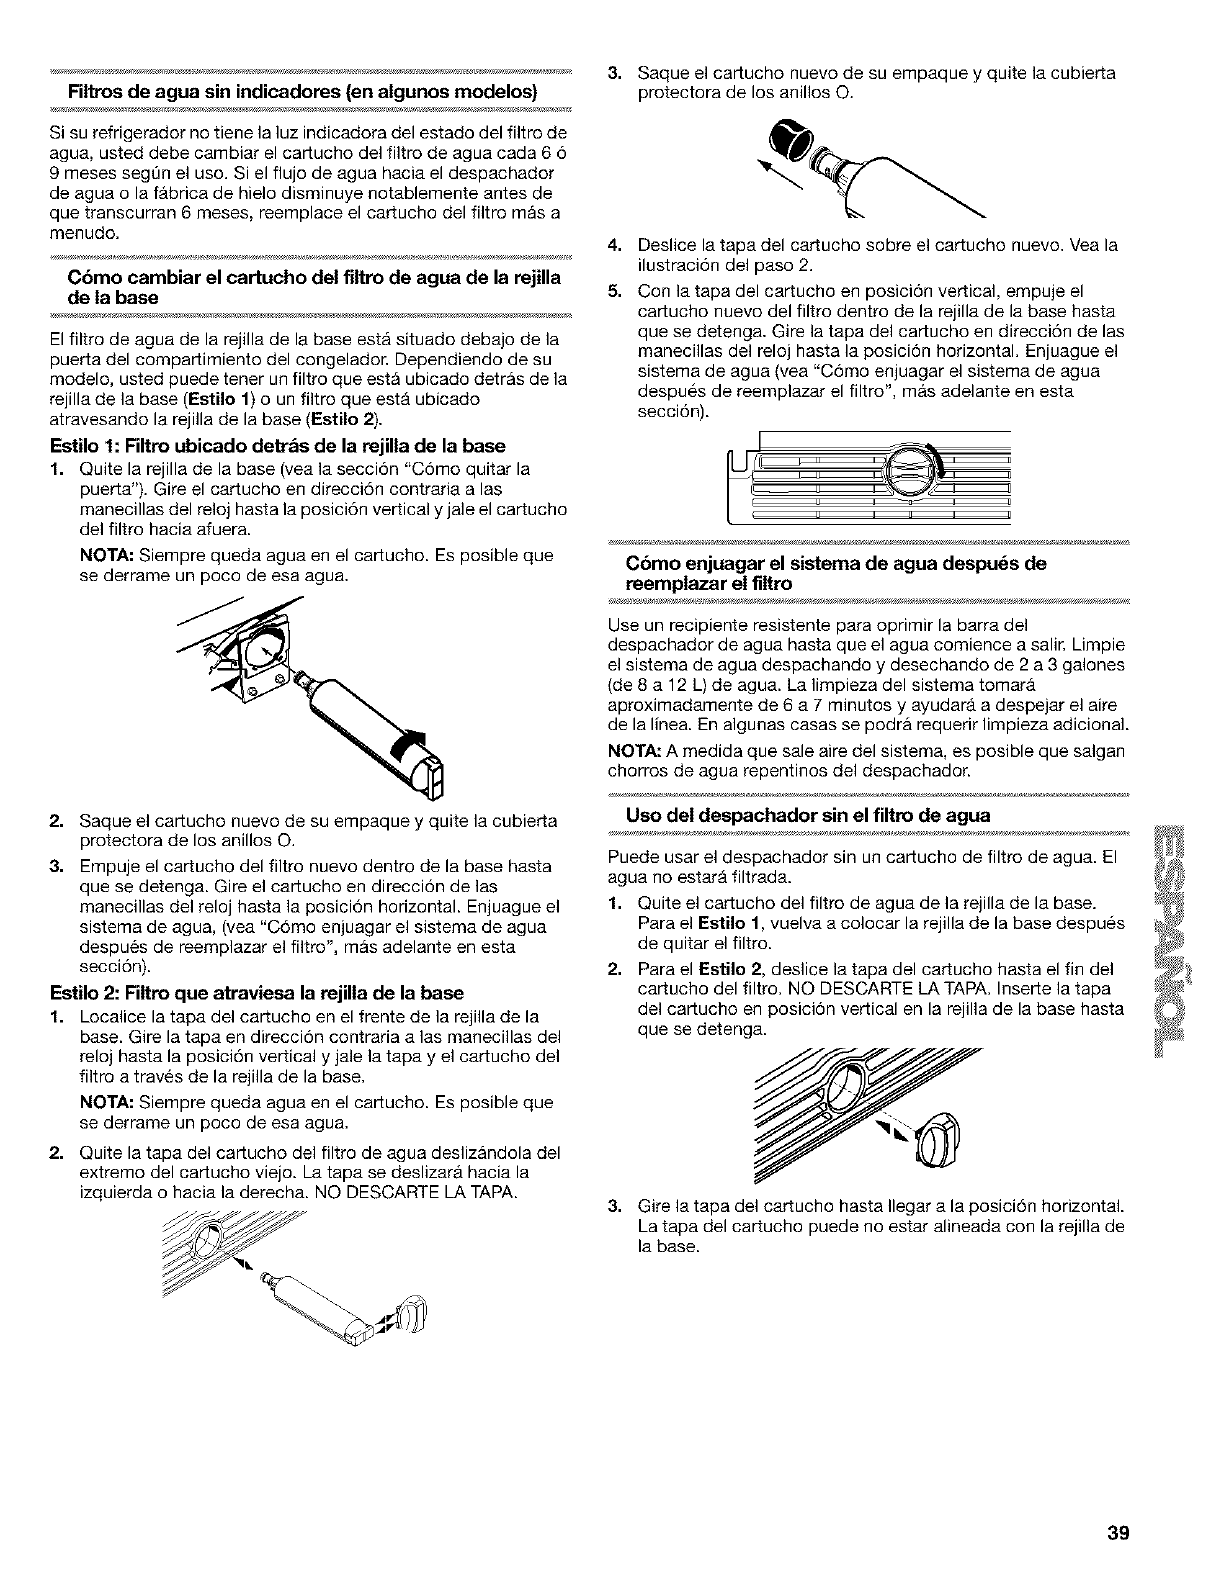
Filtros de agua sin indicadores (en algunos modelos)
Si su refrigerador no tiene la luz indicadora del estado del filtro de
agua, usted debe cambiar el cartucho del filtro de agua cada 6 6
9 meses segt]n el uso. Si el flujo de agua hacia el despachador
de agua o la fb.brica de hielo disminuye notablemente antes de
que transcurran 6 meses, reemplace el cartucho del fiitro mas a
menudo.
Cbmo cambiar el cartucho del filtro de agua de la rejilla
de la base
El filtro de agua de la rejilla de la base esta situado debajo de la
puerta del compartimiento del congelador. Dependiendo de su
modelo, usted puede tener un filtro que esta ubicado detras de la
rejilla de la base (EstUo 1) o un filtro que estb. ubicado
atravesando la rejilla de la base (Eetilo 2).
Estilo 1: Filtro ubicado detr&s de la rejilla de la base
1. Quite la rejilla de la base (vea la secci6n "C6mo quitar la
puerta"). Gire el cartucho en direcci6n contraria alas
manecillas del reloj hasta la posici6n vertical y jale el cartucho
del filtro hacia afuera.
NOTA: Siempre queda agua en el cartucho. Es posible que
se derrame un poco de esa agua.
2. Saque ei cartucho nuevo de su empaque y quite la cubierta
protectora de los anillos O.
3. Empuje el cartucho del filtro nuevo dentro de la base hasta
que se detenga. Gire el cartucho en direcci6n de las
manecillas del reloj hasta la posici6n horizontal. Enjuague el
sistema de agua, (vea "C6mo enjuagar el sistema de agua
despues de reemplazar el filtro', mas adelante en esta
secci6n).
Estilo 2: Filtro que atraviesa la rejilla de la base
1. Localice la tapa del cartucho en el frente de ia rejilla de la
base. Gire la tapa en direcci6n contraria alas manecillas del
reloj hasta la posici6n vertical y jale la tapa y el cartucho del
filtro a traves de la rejilla de la base.
NOTA: Siempre queda agua en el cartucho. Es posible que
se derrame un poco de esa agua.
2. Quite la tapa del cartucho del filtro de agua deslizandola del
extremo del cartucho viejo. La tapa se deslizara hacia la
izquierda o hacia la derecha. NO DESCARTE LA TAPA.
3. Saque el cartucho nuevo de su empaque y quite la cubierta
protectora de los anillos O.
4. Deslice la tapa del cartucho sobre el cartucho nuevo. Vea la
ilustraci6n del paso 2.
5. Con la tapa del cartucho en posici6n vertical, empuje el
cartucho nuevo del filtro dentro de la rejilla de la base hasta
que se detenga. Gire la tapa del cartucho en direcci6n de las
manecillas del reloj hasta la posici6n horizontal. Enjuague el
sistema de agua (vea "C6mo enjuagar el sistema de agua
despues de reemplazar el filtro", mas adelante en esta
secci6n).
I
Cbmo enjuagar el sistema de agua despu_s de
reemplazar el filtro
Use un recipiente resistente para oprimir la barra del
despachador de agua hasta que el agua comience a salir. Limpie
el sistema de agua despachando y desechando de 2 a 3 galones
(de 8 a 12 L) de agua. La iimpieza del sistema tomarb.
aproximadamente de 6 a 7 minutos y ayudara a despejar el aire
de la linea. En algunas casas se podra requerir limpieza adicional.
NOTA: A medida que sale aire del sistema, es posible que salgan
chorros de agua repentinos del despachador.
Uso del despachador sin el filtro de agua
Puede usar el despachador sin un cartucho de filtro de agua. El
agua no estarb, filtrada.
1. Quite el cartucho del filtro de agua de la rejilla de la base.
Para el EstUo 1, vuelva a colocar la rejilla de la base despues _y[
de quitar el filtro.
2. Para el Estilo 2, deslice la tapa del cartucho hasta el fin del _
cartucho del filtro. NO DESCARTE LA TAPA. Inserte la tapa
del cartucho en posici6n vertical en la rejilla de la base hasta _
que se detenga.
3. Gire la tapa del cartucho hasta Ilegar a la posici6n horizontal
La tapa del cartucho puede no estar alineada con la rejilla de
la base.
39
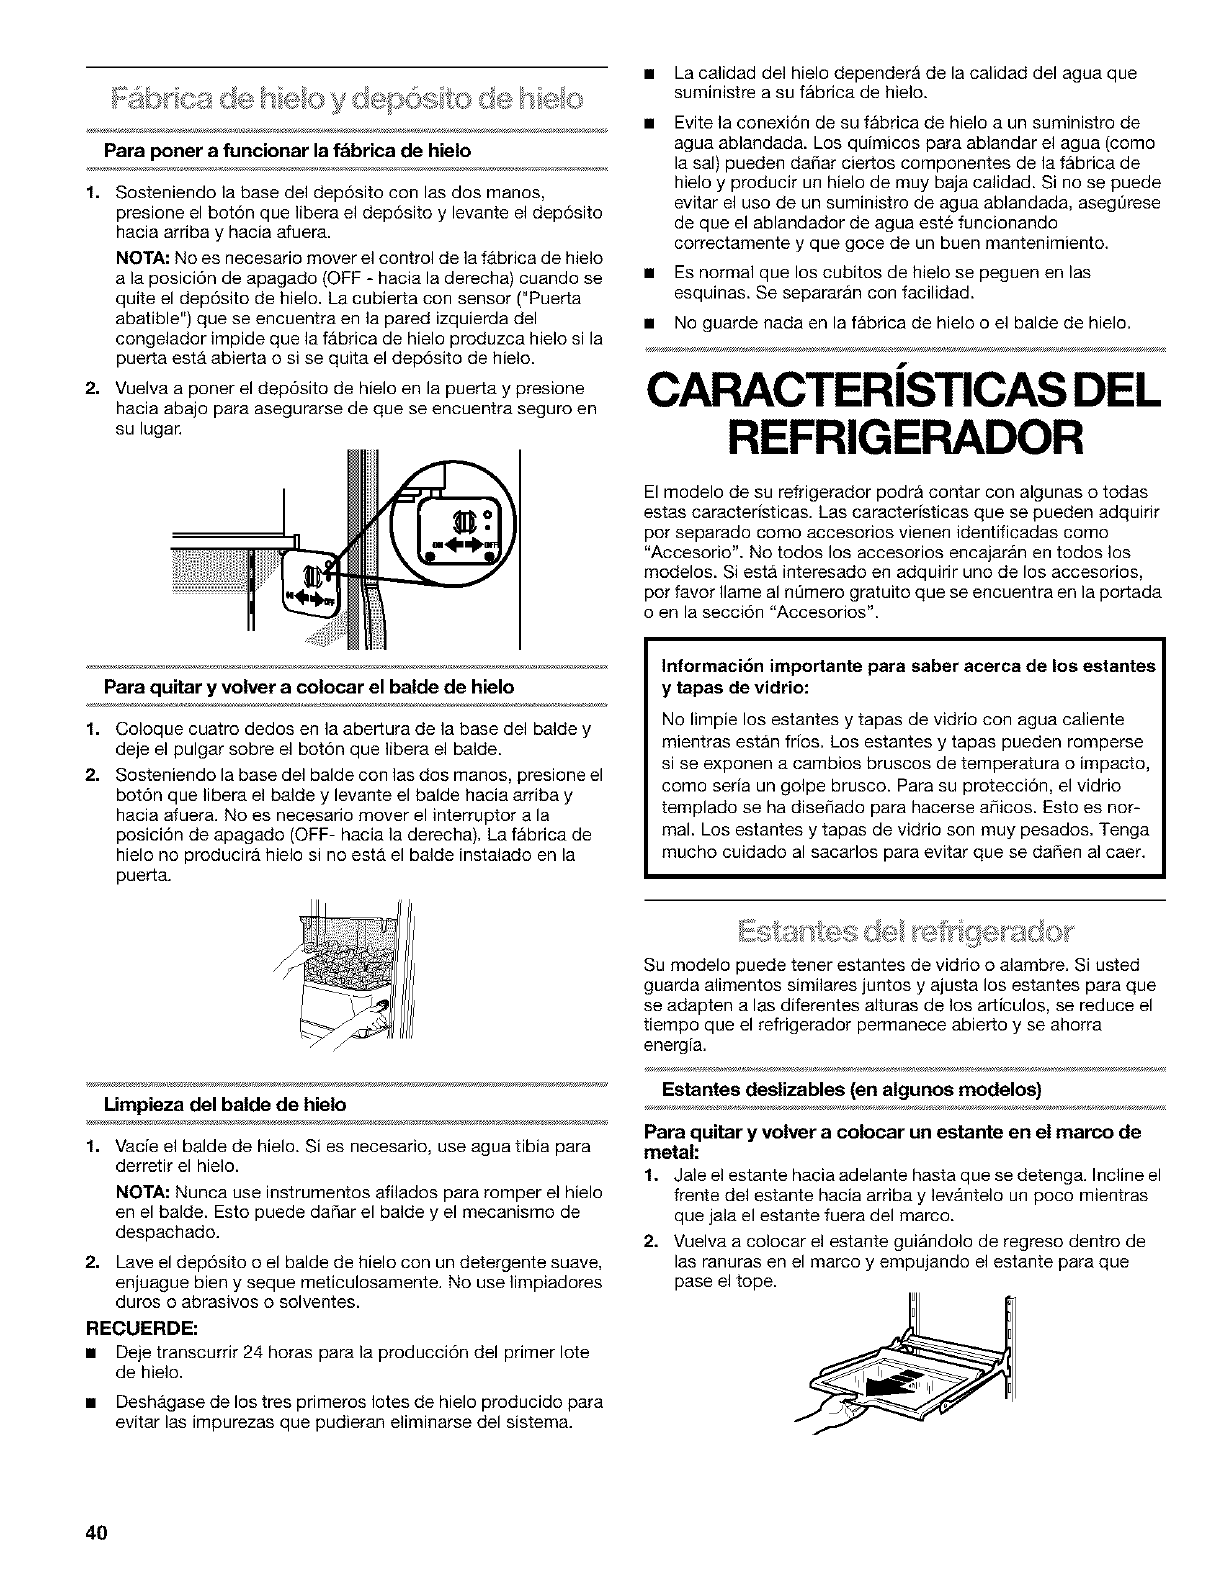
de seeydep6s de seo
Para poner a funcionar la fdbrica de hielo
1. Sosteniendo la base del dep6sito con las dos manos,
presione el bot6n que libera el dep6sito y levante el dep6sito
hacia arriba y hacia afuera.
NOTA: No es necesario mover el control de la fabrica de hielo
a la posici6n de apagado (OFF - hacia la derecha) cuando se
quite el dep6sito de hielo. La cubierta con sensor ("Puerta
abatible") que se encuentra en la pared izquierda del
congelador impide que la fb.brica de hielo produzca hielo si la
puerta estb. abierta o si se quita el dep6sito de hielo.
2. Vuelva a poner el dep6sito de hielo en la puerta y presione
hacia abajo para asegurarse de que se encuentra seguro en
su lugar.
• La calidad del hielo dependerA de la calidad del agua que
suministre a su fabrica de hielo.
Evite la conexi6n de su fabrica de hielo a un suministro de
agua ablandada. Los quimicos para ablandar el agua (como
la sal) pueden dafiar ciertos componentes de la fabrica de
hielo y producir un hielo de muy baja calidad. Si no se puede
evitar el uso de un suministro de agua ablandada, asegt]rese
de que el ablandador de agua este funcionando
correctamente y que goce de un buen mantenimiento.
Es normal que los cubitos de hielo se peguen en las
esquinas. Se separaran con facilidad.
• No guarde nada en la fabrica de hielo o el balde de hielo.
f
CARACTERISTICAS DEL
REFRIGERADOR
El modelo de su refrigerador podra contar con algunas o todas
estas caracteristicas. Las caracteristicas que se pueden adquirir
por separado como accesorios vienen identificadas como
"Accesorio". No todos los accesorios encajaran en todos los
modelos. Siesta interesado en adquirir uno de los accesorios,
por favor Ilame al nt]mero gratuito que se encuentra en la portada
o en la secci6n "Accesorios".
Para quitar y volver a colocar el balde de hielo
1. Coloque cuatro dedos en la abertura de la base del balde y
deje el pulgar sobre el bot6n que libera el balde.
2. Sosteniendo la base del balde con las dos manos, presione el
bot6n que libera el balde y levante el balde hacia arriba y
hacia afuera. No es necesario mover el interruptor a la
posici6n de apagado (OFF- hacia la derecha). La fabrica de
hielo no producir_, hielo si no estb. el balde instalado en la
puerta.
Informaci6n importante para saber acerca de los estantes
y tapas de vidrio:
No Iimpie los estantes y tapas de vidrio con agua caliente
mientras estan frios. Los estantes y tapas pueden romperse
si se exponen a cambios bruscos de temperatura o impacto,
como seria un golpe brusco. Para su protecci6n, el vidrio
templado se ha disefiado para hacerse afiicos. Esto es nor-
mal. Los estantes y tapas de vidrio son muy pesados. Tenga
mucho cuidado al sacarlos para evitar que se da_en al caer.
Limpieza del balde de hielo
1. Vacie el balde de hielo. Si es necesario, use agua tibia para
derretir el hielo.
NOTA: Nunca use instrumentos afilados para romper el hielo
en el balde. Esto puede da_ar el balde y el mecanismo de
despachado.
2. Lave el dep6sito o el balde de hielo con un detergente suave,
enjuague bien y seque meticulosamente. No use limpiadores
duros o abrasivos o solventes.
RECUERDE:
• Deje transcurrir 24 horas para la producci6n del primer Iote
de hielo.
• Desh_.gase de los tres primeros Iotes de hielo producido para
evitar las impurezas que pudieran eliminarse del sistema.
Su modelo puede tener estantes de vidrio o alambre. Si usted
guarda alimentos similares juntos y ajusta los estantes para que
se adapten a las diferentes alturas de los articulos, se reduce el
tiempo que el refrigerador permanece abierto y se ahorra
energia.
Estantes deslizables (en algunos modelos)
Para quitar y volver a coloear un estante en el marco de
metal:
1. Jale el estante hacia adelante hasta que se detenga. Incline el
frente del estante hacia arriba y lev_.ntelo un poco mientras
que jala el estante fuera del marco.
2. Vuelva a colocar el estante guiandolo de regreso dentro de
las ranuras en el marco y empujando el estante para que
pase el tope.
40
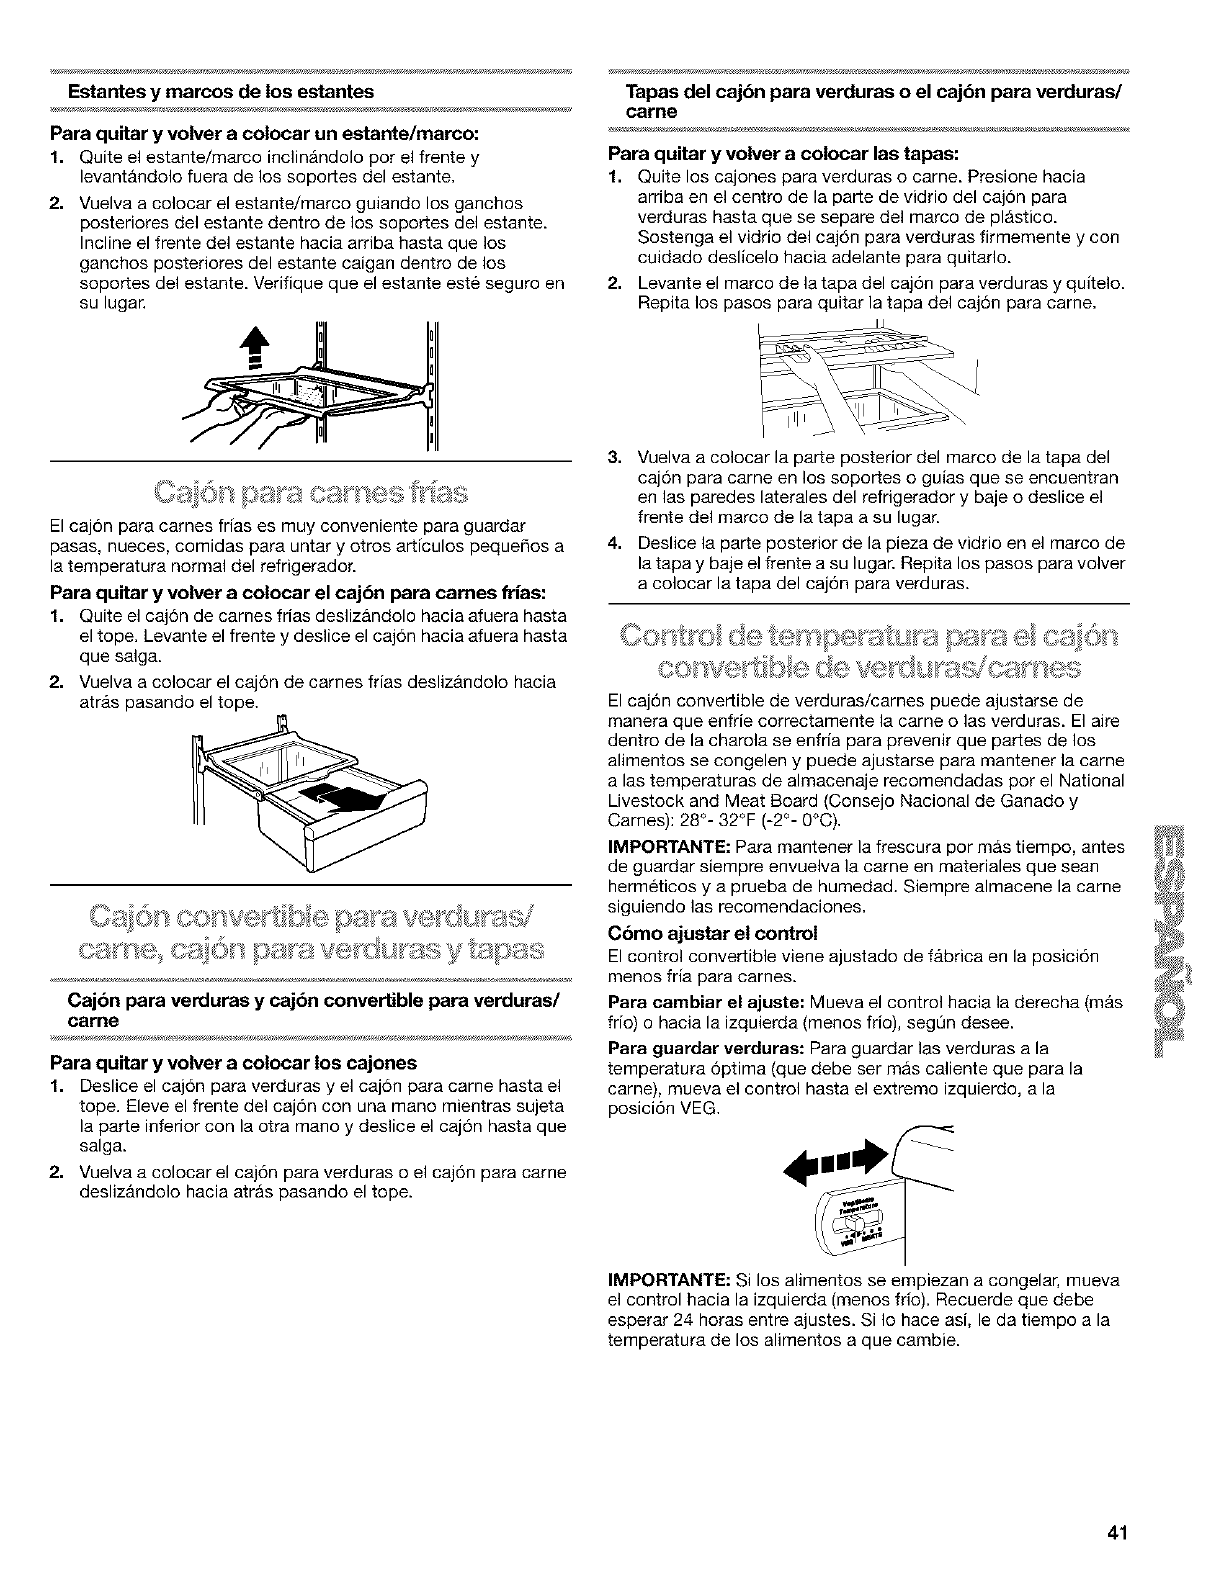
Estantes y marcos de los estantes
Para quitar y volver a colocar un estante/marco:
1. Quite el estante/marco inclinandolo por el frente y
levant_.ndolo fuera de los soportes del estante.
2. Vuelva a colocar el estante/marco guiando los ganchos
posteriores del estante dentro de los soportes del estante.
Incline el frente del estante hacia arriba hasta que los
ganchos posteriores del estante caigan dentro de los
soportes del estante. Verifique que el estante este seguro en
su lugar.
El caj6n para carnes frias es muy conveniente para guardar
pasas, nueces, comidas para untar y otros articulos pequefios a
la temperatura normal del refrigerador.
Para quitar y volver a colocar el cajbn para cames frias:
1. Quite el caj6n de carnes frfas desliz&ndolo hacia afuera hasta
el tope. Levante el frente y deslice el caj6n hacia afuera hasta
que salga.
2. Vuelva a colocar el caj6n de carnes frfas desliz_.ndolo hacia
atr_.s pasando el tope.
Cajbn para verduras y cajbn convertible para verduras/
came
Para quitar y volver a colocar los cajones
1. Deslice el caj6n para verduras y el caj6n para carne hasta el
tope. Eleve el frente del caj6n con una mano mientras sujeta
la parle inferior con la otra mano y deslice el caj6n hasta que
salga.
2. Vuelva a colocar el caj6n para verduras o el caj6n para came
desliz_.ndolo hacia arras pasando el tope.
Tapas del cajbn para verduras o el cajbn para verduras/
came
Para quitar y volver a colocar las tapas:
1. Quite los cajones para verduras o came. Presione hacia
arriba en el centro de la parle de vidrio del caj6n para
verduras hasta que se separe del marco de plastico.
Sostenga el vidrio del caj6n para verduras firmemente y con
cuidado deslicelo hacia adelante para quitarlo.
2. Levante el marco de la tapa del caj6n para verduras y quitelo.
Repita los pasos para quitar la tapa del caj6n para came.
3. Vuelva a colocar la parte posterior del marco de la tapa del
caj6n para came en los soportes o guias que se encuentran
en las paredes laterales del refrigerador y baje o deslice el
frente del marco de la tapa a su lugar.
4. Deslice la parte posterior de la pieza de vidrio en el marco de
la tapa y baje el frente a su lugar. Repita los pasos para volver
a colocar la tapa del caj6n para verduras.
El caj6n convertible de verduras/carnes puede ajustarse de
manera que enfrfe correctamente la came o las verduras. El aire
dentro de la charola se enfrfa para prevenir que partes de los
alimentos se congelen y puede ajustarse para mantener la came
alas temperaturas de almacenaje recomendadas por el National
Livestock and Meat Board (Consejo Nacional de Ganado y
Carnes): 28°- 32°F (-2°- 0°C).
IMPORTANTE: Para mantener la frescura por mas tiempo, antes
de guardar siempre envuelva la came en materiales que sean
hermeticos y a prueba de humedad. Siempre almacene la came
siguiendo las recomendaciones.
Cbmo ajustar el control
El control convertible viene ajustado de f_.brica en la posici6n
menos fria para carries.
Para cambiar el ajuste: Mueva el control hacia la derecha (m_.s
frfo) o hacia la izquierda (menos frio), segQn desee.
Para guardar verduras: Para guardar las verduras ala
temperatura 6ptima (que debe ser mas caliente que para la
came), mueva el control hasta el extremo izquierdo, ala
posici6n VEG.
IMPORTANTE: Si los alimentos se empiezan a congelar, mueva
el control hacia la izquierda (menos frio). Recuerde que debe
esperar 24 horas entre ajustes. Si Io hace asi, le da tiempo a la
temperatura de los alimentos a que cambie.
41
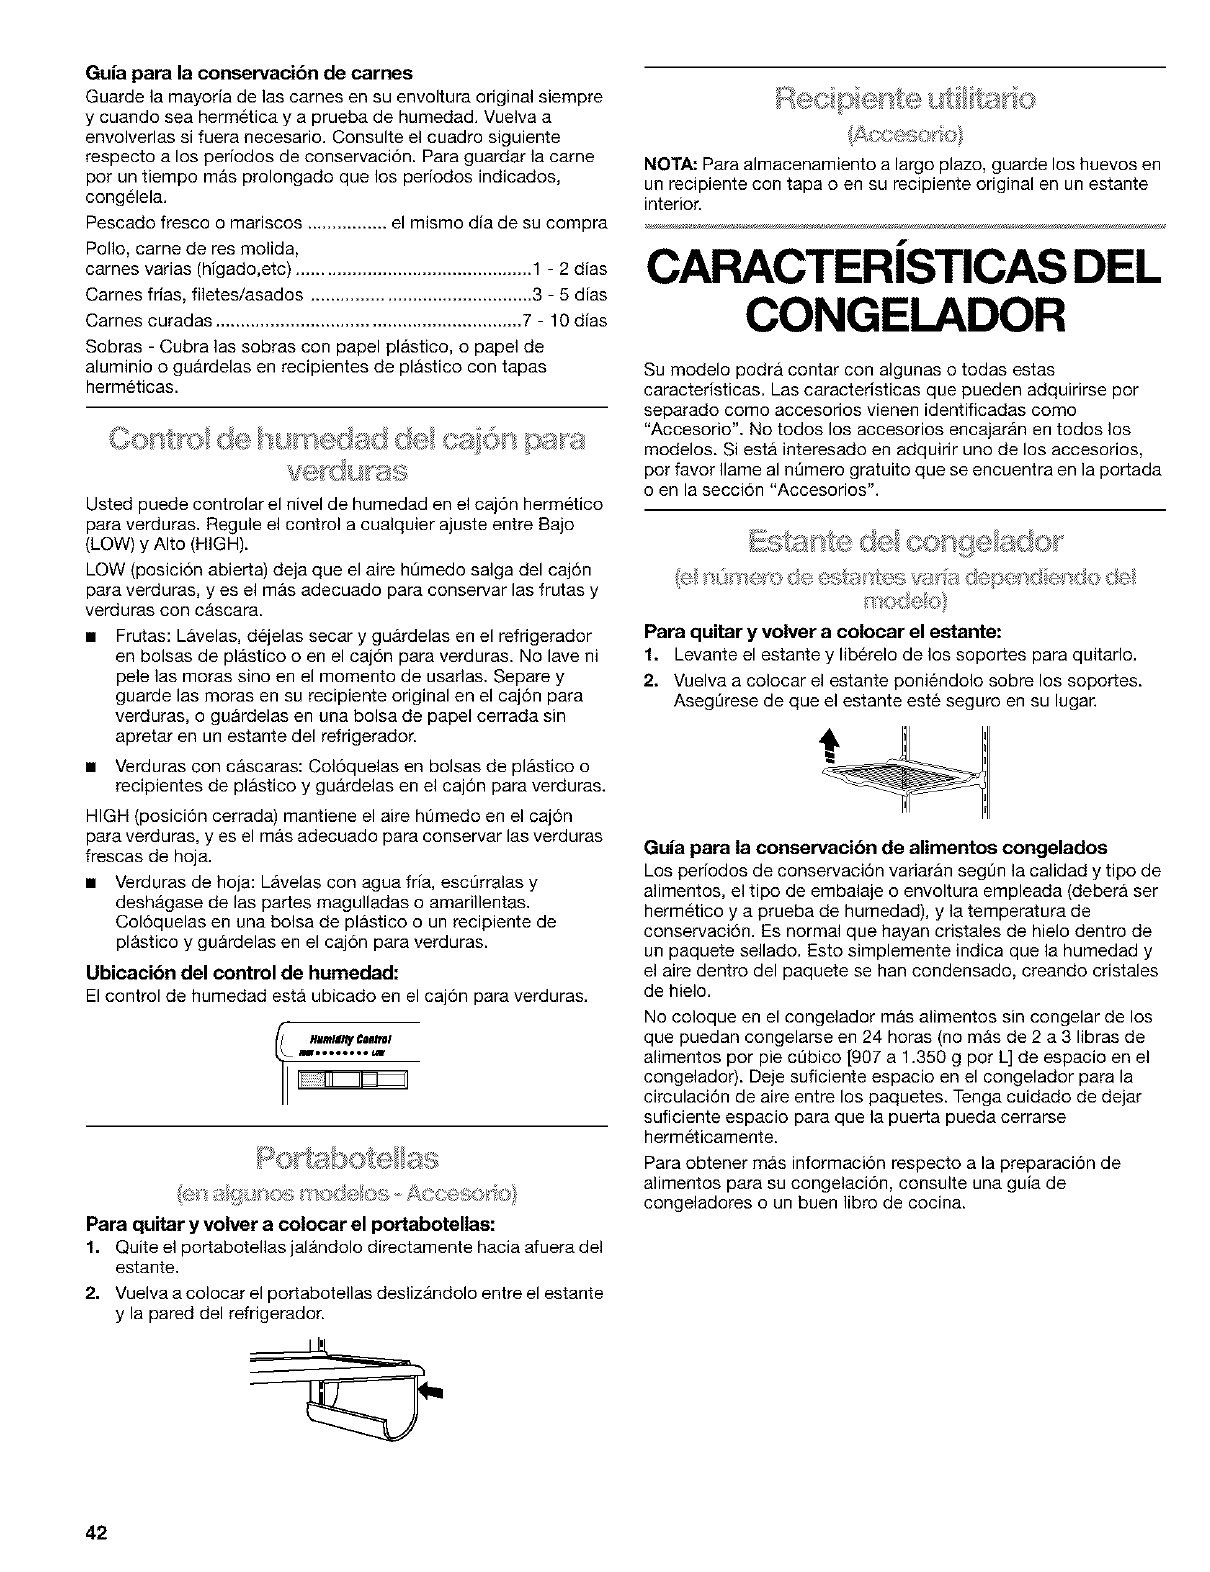
Guia para la conservaci6n de carries
Guarde la mayoria de las carnes en su envoltura original siempre
y cuando sea hermetica y a prueba de humedad. Vuelva a
envolverlas si fuera necesario. Consulte el cuadro siguiente
respecto a los periodos de conservaci6n. Para guardar la came
por un tiempo mas prolongado que los periodos indicados,
congelela.
Pescado fresco o mariscos ................ el mismo dia de su compra
Polio, came de res molida,
cames varias (higado,etc) ............................................... 1 - 2 dias
Carnes frias, filetes/asados ............................................ 3 - 5 dias
Carnes curadas ............................................................. 7 - 10 dias
Sobras - Cubra las sobras con papel plastico, o papel de
aluminio o guardelas en recipientes de plastico con tapas
hermeticas.
Usted puede controlar el nivel de humedad en el caj6n hermetico
para verduras. Regule el control a cualquier ajuste entre Bajo
(LOW) y Alto (HIGH).
LOW (posici6n abierta) deja que el aire h[3medo salga del caj6n
para verduras, yes el mas adecuado para conservar las frutas y
verduras con cascara.
Frutas: Lavelas, dejelas secar y guardelas en el refrigerador
en bolsas de plastico o en el caj6n para verduras. No lave ni
pele las moras sino en el momento de usarlas. Separe y
guarde las moras en su recipiente original en el caj6n para
verduras, o guardelas en una bolsa de papel cerrada sin
apretar en un estante del refrigerador.
• Verduras con cascaras: Col6quelas en bolsas de plastico o
recipientes de plastico y guArdelas en el caj6n para verduras.
HIGH (posici6n cerrada) mantiene el aire hBmedo en el caj6n
para verduras, y es el mas adecuado para conservar las verduras
frescas de hoja.
• Verduras de hoja: Lavelas con agua fria, esct]rralas y
deshagase de las partes magulladas o amarillentas.
Col6quelas en una bolsa de plastico o un recipiente de
plastico y guardelas en el caj6n para verduras.
Ubicacibn del control de humedad:
Elcontrol de humedad esta ubicado en el caj6n para verduras,
% ;7 S *,_*
Para quitar y volver a colocar el portabotellas:
1. Quite el portabotellas jalAndolo directamente hacia afuera del
estante.
2. Vuelva a colocar el portabotellas deslizAndolo entre el estante
y la pared del refrigerador.
Re6p J k, ut / ts ' o
NOTA: Para almacenamiento a largo plazo, guarde los huevos en
un recipiente con tapa o en su recipiente original en un estante
interior.
f
CARACTERISTICAS DEL
CONGELADOR
Su modelo podra contar con algunas o todas estas
caracteristicas. Las caracteristicas que pueden adquirirse por
separado como accesorios vienen identificadas como
"Accesorio". No todos los accesorios encajaran en todos los
modelos. Siesta interesado en adquirir uno de los accesorios,
por favor Ilame al nt]mero gratuito que se encuentra en la portada
o en la secci6n "Accesorios".
£o }ta tesv#'_:_ <;d
Para quitar y volver a colocar el estante:
1. Levante el estante y Iiberelo de los soportes para quitarlo.
2. Vuelva a colocar el estante poniendolo sobre los soportes.
Asegt]rese de que el estante este seguro en su lugar.
Guia para la conservacibn de alimentos congelados
Los periodos de conservaci6n variaran segt]n la calidad y tipo de
alimentos, el tipo de embalaje o envoltura empleada (debera ser
hermetico y a prueba de humedad), y la temperatura de
conservaci6n. Es normal que hayan cristales de hielo dentro de
un paquete sellado. Esto simplemente indica que la humedad y
el aire dentro del paquete se han condensado, creando cristales
de hielo.
No coloque en el congelador mas alimentos sin congelar de los
que puedan congelarse en 24 horas (no mas de 2 a 3 Iibras de
alimentos por pie ct]bico [997 a 1.350 g pot L] de espacio en el
congelador). Deje suficiente espacio en el congelador para la
circulaci6n de aire entre los paquetes. Tenga cuidado de dejar
suficiente espacio para que la puerta pueda cerrarse
hermeticamente.
Para obtener mas informaci6n respecto a la preparaci6n de
alimentos para su congelaci6n, consulte una guia de
congeladores o un buen libro de cocina.
42
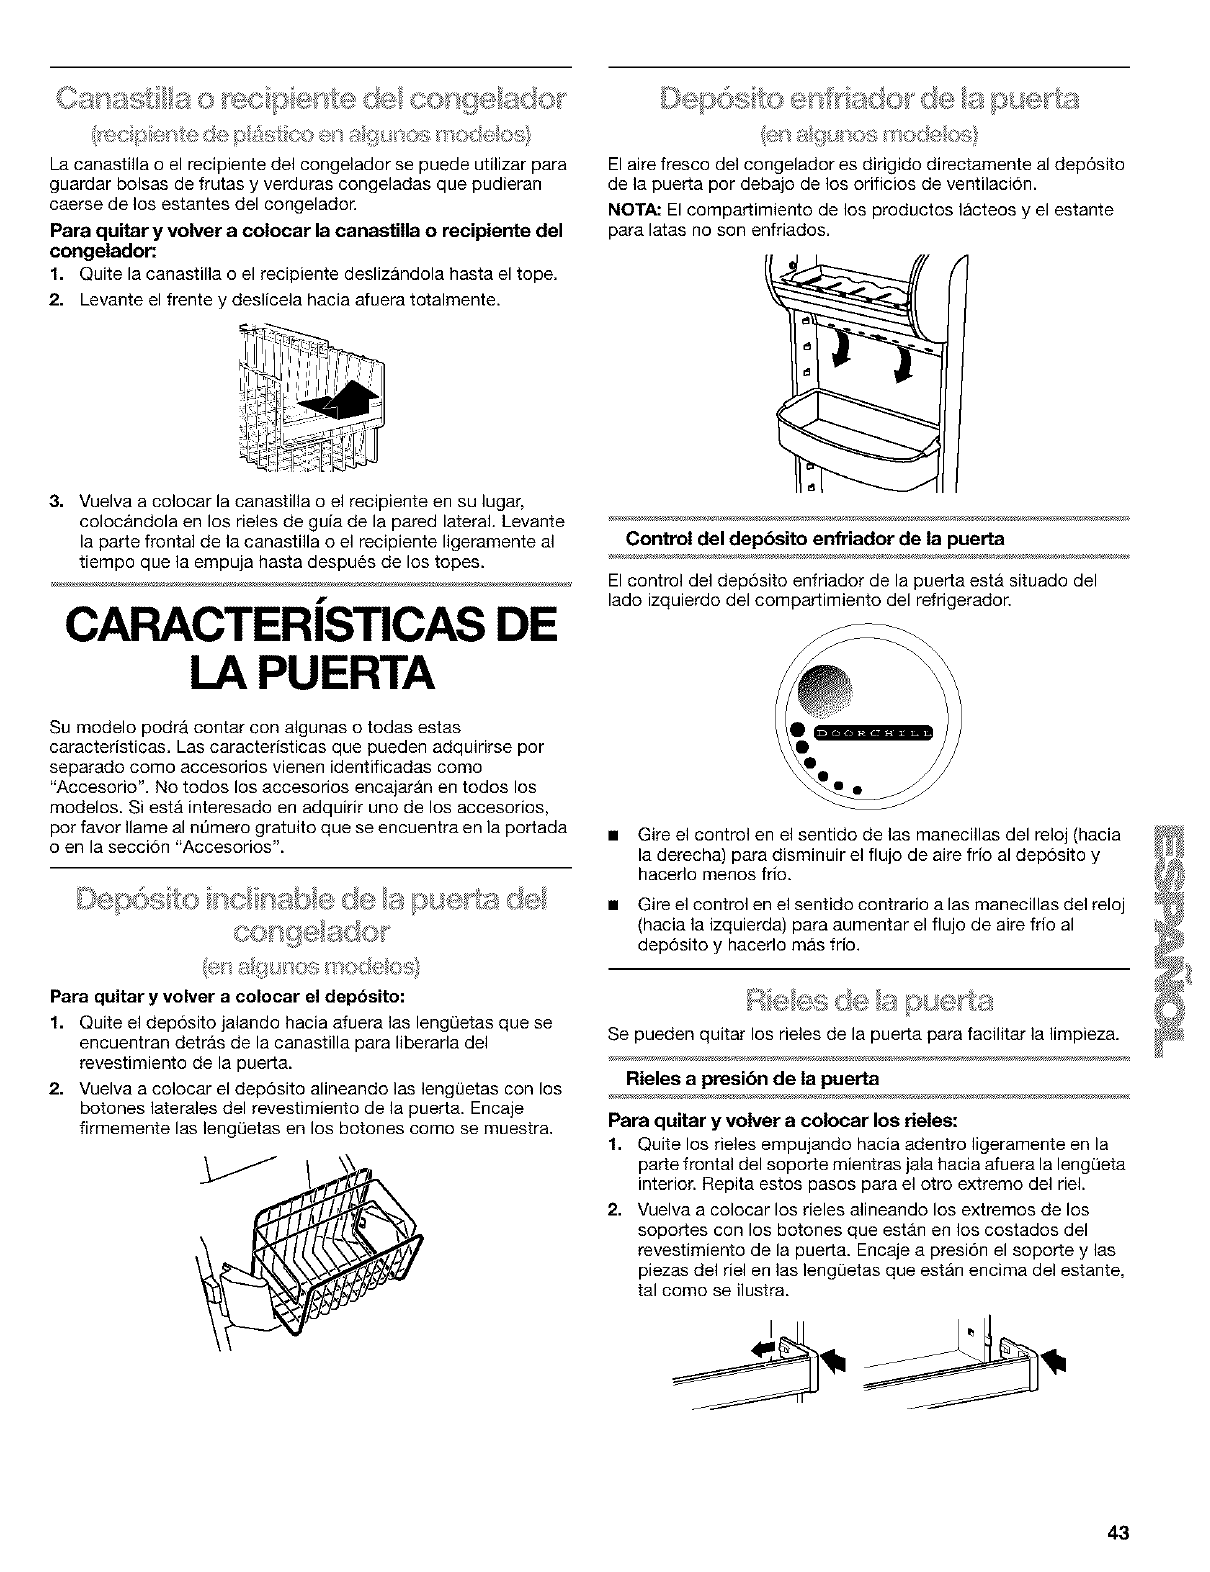
(_eo b e s_e _:e p _u_ co ÷s a gu sos _ode o_;}
La canasti]la o el recipiente de1 congelador se puede utilizar para
guardar bolsas de frutas y verduras congeladas que pudieran
caerse de los estantes del congelador.
Para quitar y volver a colocar la canastilla o recipiente del
congelador:
1. Quite la canastilla o el recipiente deslizandola hasta el tope.
2. Levante el frente y deslicela hacia afuera totalmente.
El aire fresco del congelador es dirigido directamente al dep6sito
de la puerta por debajo de los orificios de ventilaci6n.
NOTA: El compartimiento de los productos I_icteos y el estante
para latas no son enfriados.
3. Vuelva a colocar la canastilla o el recipiente en su lugar,
colocandola en los rieles de guia de la pared lateral. Levante
la parle frontal de la canastilla o el recipiente ligeramente al
tiempo que la empuja hasta despues de los topes.
f
CARACTERISTICAS DE
LA PUERTA
Su modelo podra contar con algunas o todas estas
caracteristicas. Las caracteristicas que pueden adquirirse por
separado como accesorios vienen identificadas como
"Accesorio'. No todos los accesorios encajarb.n en todos los
modelos. Si estb. interesado en adquirir uno de los accesorios,
por favor Ilame al nt]mero gratuito que se encuentra en la portada
o en la secci6n "Accesorios".
Control del depbsito enfriador de la puerta
El control del dep6sito enfriador de la puer_a estb. situado del
lado izquierdo del compartimiento del refrigerador.
• Gire el control en el sentido de las manecillas del reloj (hacia
la derecha) para disminuir el flujo de aire frio al dep6sito y
hacerlo menos frio.
• Gire el control en el sentido contrario alas manecillas del reloj
(hacia la izquierda) para aumentar el flujo de aire frio al
dep6sito y hacerlo m_is frio.
Para quitar y volver a colocar el depbsito:
1. Quite el dep6sito jalando hacia afuera las lengOetas que se
encuentran detr_.s de la canastilla para liberarla del
revestimiento de la puer_a.
2. Vuelva a colocar el dep6sito alineando las lengL_etas con los
botones laterales del revestimiento de la puerta. Encaje
firmemente las leng(Jetas en los botones como se muestra.
Se pueden quitar los rieles de la puer_a para facilitar la limpieza.
Rieles a presibn de la puerta
Para quitar y volver a colocar los deles:
1. Quite los rieles empujando hacia adentro ligeramente en la
parte frontal del soporte mientras jala hacia afuera la lengtJeta
interior. Repita estos pasos para el otro extremo del riel.
2. Vuelva a colocar los rieles alineando los extremos de los
soportes con los botones que estb.n en los costados del
revestimiento de la puer_a. Encaje a presi6n el soporte y las
piezas del riel en las leng0etas que est_in encima del estante.
tal como se ilustra.
43
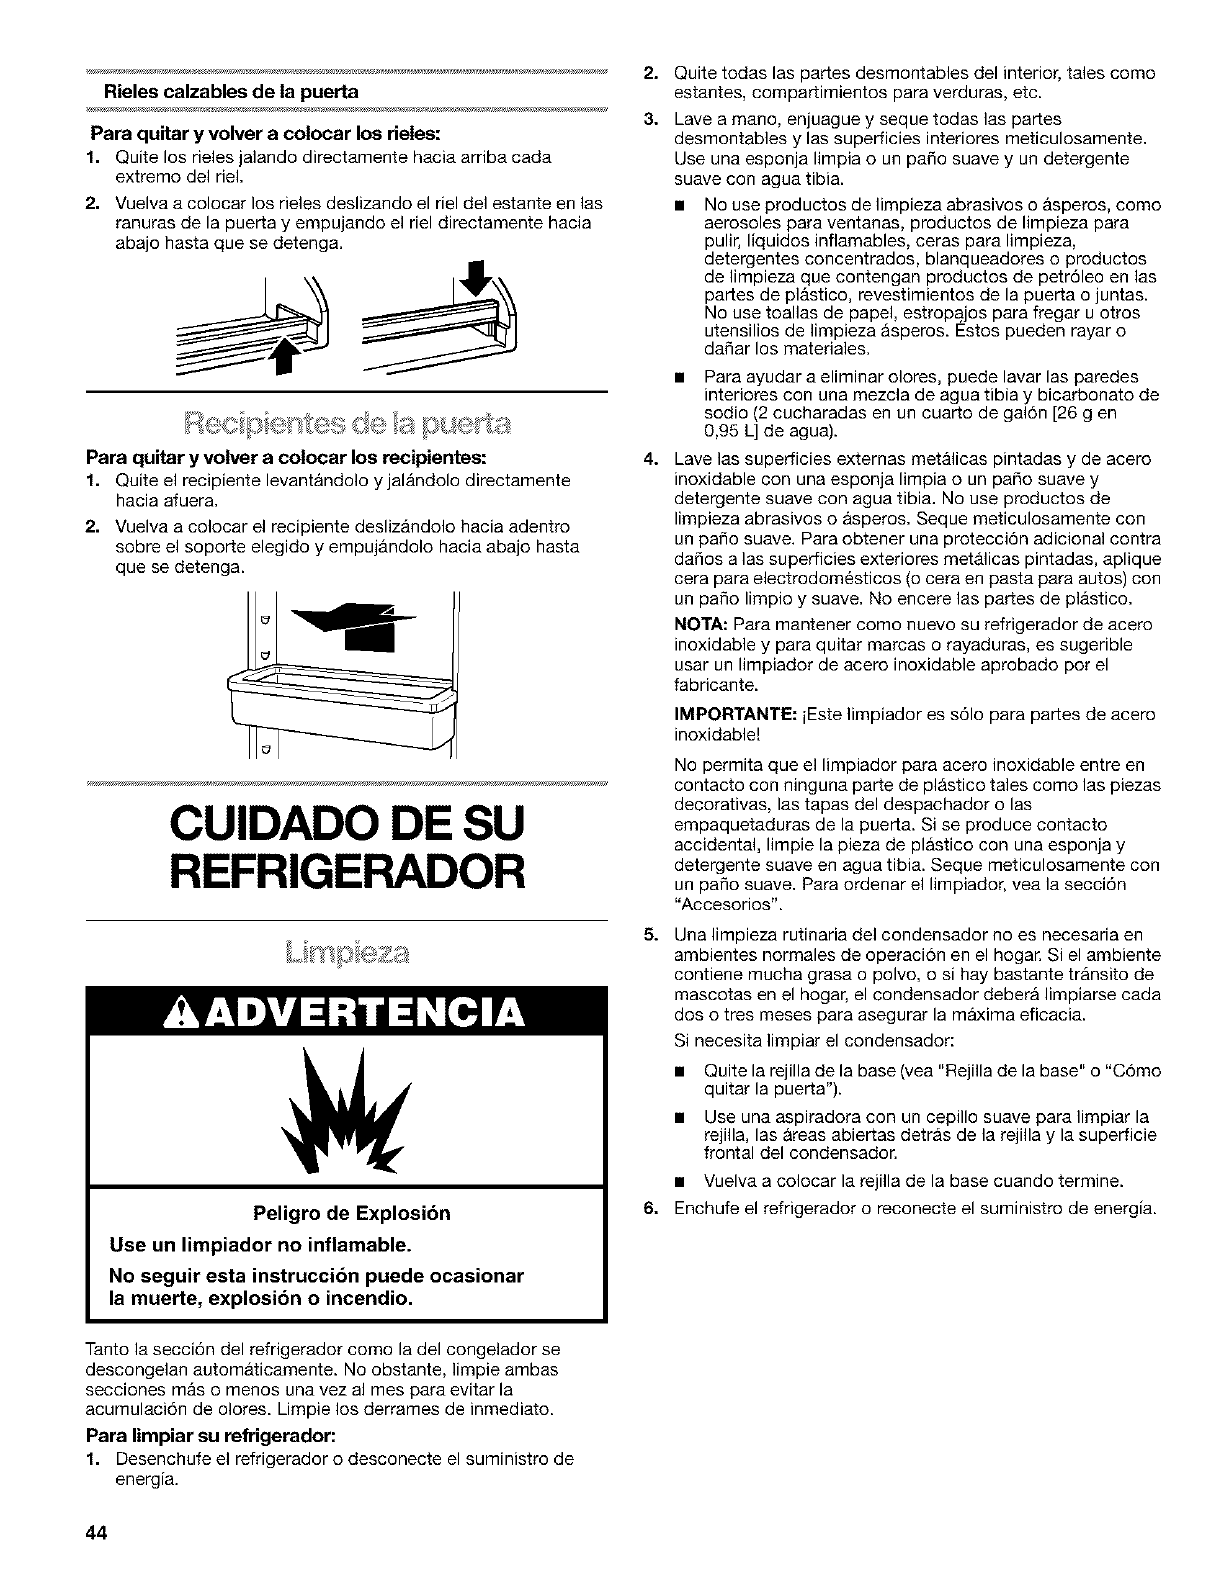
Rieles calzables de la puerta
Para quitar y volver a colocar los rieles:
1. Quite los rieles jalando directamente hacia arriba cada
extremo del riel.
2. Vuelva a colocar los rieles deslizando el riel del estante en las
ranuras de la puerta y empujando el riel directamente hacia
abajo hasta que se detenga.
Para quitar y volver a colocar los recipientes:
1. Quite el recipiente levantandolo y jalb.ndolo directamente
hacia afuera.
2. Vuelva a colocar el recipiente desliz_.ndolo hacia adentro
sobre el soporte elegido y empuj_.ndolo hacia abajo hasta
que se detenga.
CUlDADO DE SU
REFRIGERADOR
Peligro de Explosibn
Use un limpiador no inflamable.
No seguir esta instrucci6n puede ocasionar
la muerte, explosibn o incendio.
Tanto la secci6n del refrigerador como la del congelador se
descongelan automb.ticamente. No obstante, limpie ambas
secciones mas o menos una vez al mes para evitar la
acumulaci6n de olores. Limpie los derrames de inrnediato.
Para limpiar su refrigerador:
1. Desenchufe el refrigerador o desconecte el suministro de
energia.
2. Quite todas las partes desmontables del interior, tales como
estantes, compartimientos para verduras, etc.
3. Lave a mano, enjuague y seque todas las par[es
desmontables y las superficies interiores meticulosamente.
Use una esponja limpia o un patio suave y un detergente
suave con agua tibia.
• No use productos de limpieza abrasivos o _.speros, como
aerosoles para ventanas, productos de limpieza para
pulir, liquidos inflamables, ceras para limpieza,
detergentes concentrados, blanqueadores o productos
de limpieza que contengan productos de petr61eo en las
par[es de pl_.stico, revestimientos de la puerta o juntas.
No use toallas de papel, estropajos para fregar u otros
utensilios de limpieza asperos. Estos pueden rayar o
datiar los materiales.
Para ayudar a eliminar olores, puede lavar las paredes
interiores con una mezcla de agua tibia y bicarbonato de
sodio (2 cucharadas en un cuarto de gal6n [26 g en
0,95 L] de agua).
41 Lave las superficies externas metalicas pintadas y de acero
inoxidable con una esponja limpia o un patio suave y
detergente suave con agua tibia. No use productos de
limpieza abrasivos o asperos. Seque meticulosamente con
un patio suave. Para obtener una protecci6n adicional contra
datios alas superficies exteriores metalicas pintadas, aplique
cera para electrodomesticos (o cera en pasta para autos) con
un patio limpio y suave. No encere las partes de pl_.stico.
NOTA: Para mantener como nuevo su refrigerador de acero
inoxidable y para quitar marcas o rayaduras, es sugerible
usar un limpiador de acero inoxidable aprobado por el
fabricante.
IMPORTANTE: iEste limpiador es s61o para par[es de acero
inoxidable!
No permita que el limpiador para acero inoxidable entre en
contacto con ninguna parte de plastico tales como las piezas
decorativas, las tapas del despachador o las
empaquetaduras de la puer[a. Si se produce contacto
accidental, limpie la pieza de plastico con una esponja y
detergente suave en agua tibia. Seque meticulosamente con
un patio suave. Para ordenar el limpiador, yea la secci6n
"Accesorios".
51
61
Una limpieza rutinaria del condensador no es necesaria en
ambientes normales de operaci6n en el hogar. Si el ambiente
contiene mucha grasa o polvo, o si hay bastante transito de
mascotas en el hogar, el condensador debera limpiarse cada
dos o tres meses para asegurar la m_xima eficacia.
Si necesita limpiar el condensador:
• Quite la rejilla de la base (vea "Rejilla de la base" o "C6mo
quitar la puerta").
• Use una aspiradora con un cepillo suave para limpiar la
rejilla, las &teas abiertas detras de la rejilla y la superficie
frontal del condensador.
• Vuelva a colocar la rejilla de la base cuando termine.
Enchufe el refrigerador o reconecte el suministro de energia.
44
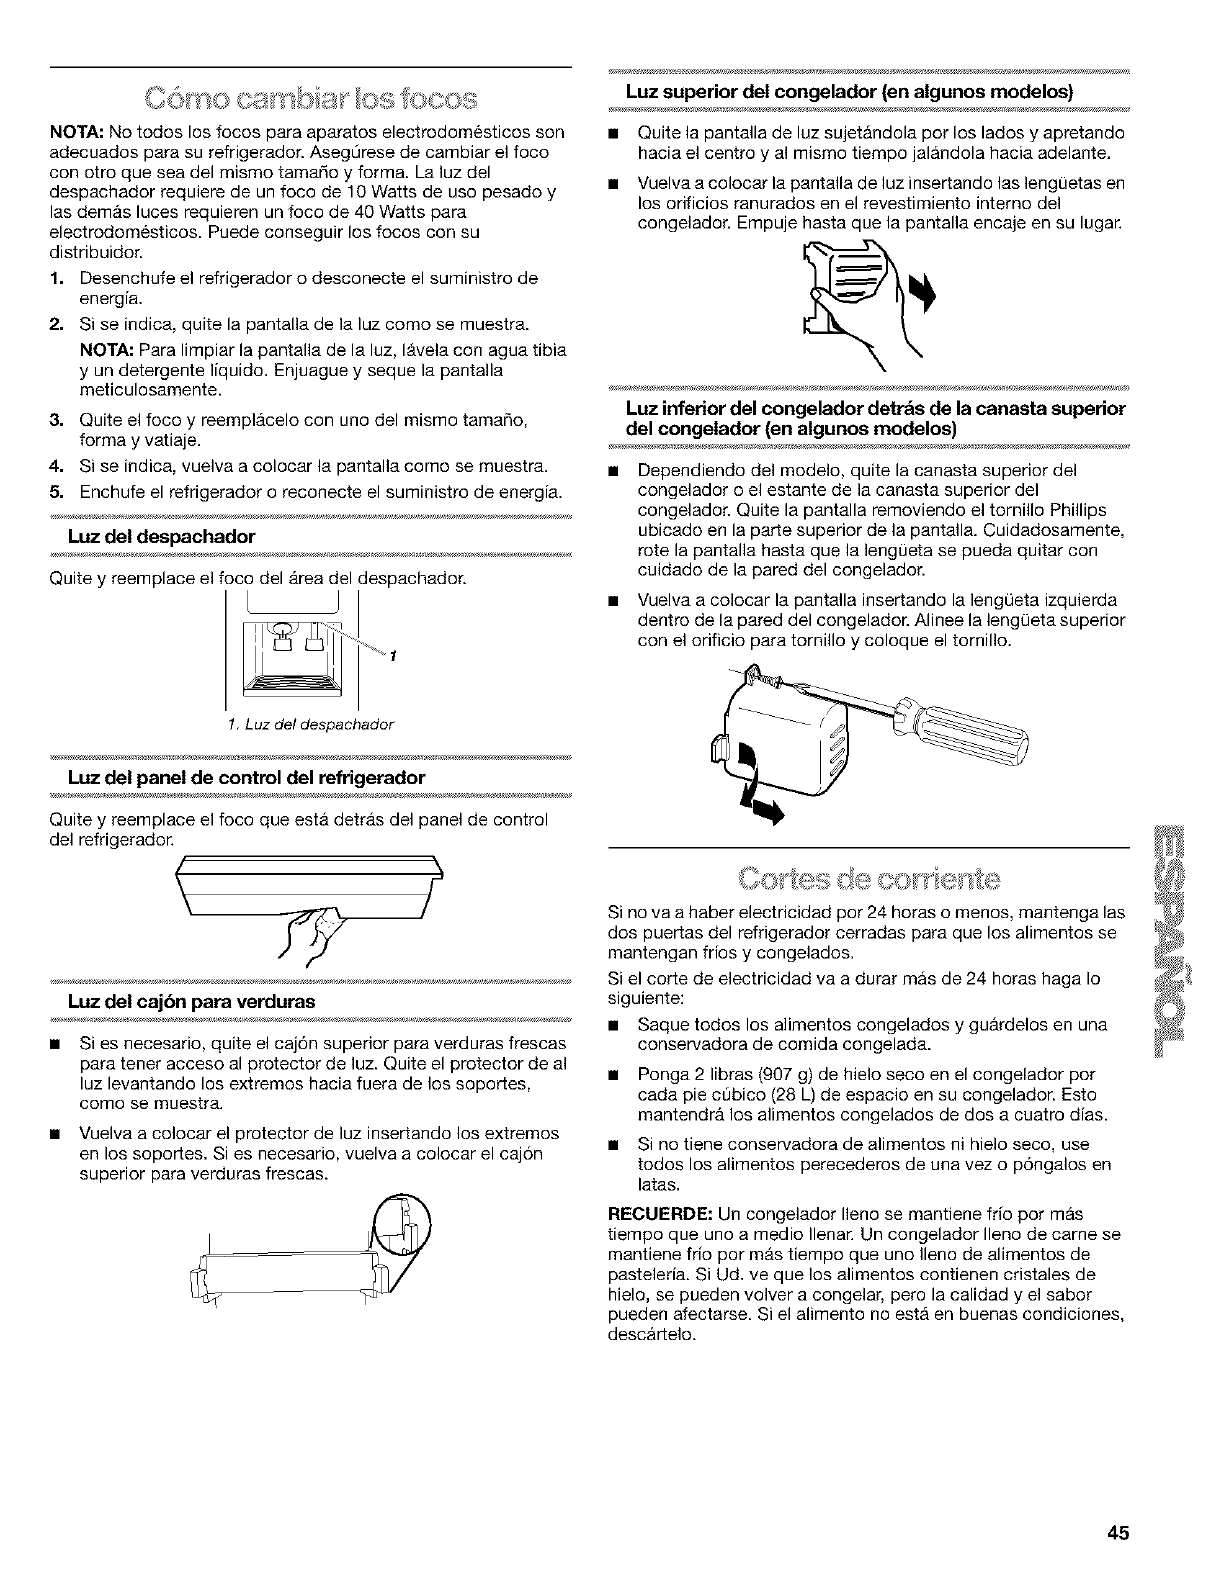
NOTA: No todos los focos para aparatos electrodomesticos son
adecuados para su refrigerador. AsegOrese de cambiar el foco
con otro que sea del mismo tama5o y forma. La luz del
despachador requiere de un foco de 10 Watts de uso pesado y
las demas luces requieren un foco de 40 Watts para
electrodomesticos. Puede conseguir los focos con su
distribuidor.
1. Desenchufe el refrigerador o desconecte el suministro de
energia.
2. Si se indica, quite la pantalla de la luz como se muestra.
NOTA: Para limpiar la pantalla de la luz, Ib.vela con agua tibia
y un detergente liquido. Enjuague y sequela pantalla
meticulosamente.
3. Quite el foco y reempl_.celo con uno del mismo tamaSo,
forma y vatiaje.
4. Si se indica, vuelva a colocar la pantalla como se muestra.
5. Enchufe el refrigerador o reconecte el suministro de energia.
Luz del despachador
Quite y reemplace el foco del _.rea del despachador.
I
1. Luz del despachador
Luz del panel de control del refrigerador
Quite y reemplace el foco que estb. detrb.s del panel de control
del refrigerador.
Luz del caj6n para verduras
• Si es necesario, quite el caj6n superior para verduras frescas
para tenet acceso al protector de luz. Quite el protector de al
luz levantando los extremos hacia fuera de los soportes,
como se muestra.
• Vuelva a colocar el protector de luz insertando los extremos
en los soportes. Si es necesario, vuelva a colocar el caj6n
superior para verduras frescas.
Luz superior del congelador (en algunos modelos)
• Quite la pantalla de luz sujetandola por los lados y apretando
hacia el centro y al mismo tiempo jalandola hacia adelante.
• Vuelva a colocar la pantalla de luz insertando las leng0etas en
los orificios ranurados en el revestimiento interno del
congelador. Empuje hasta que la pantalla encaje en su lugar.
Luz inferior del congelador detr_s de la canasta superior
del congelador (en algunos modelos)
Dependiendo del modelo, quite la canasta superior del
congelador o el estante de la canasta superior del
congelador. Quite la pantalla removiendo el tornillo Phillips
ubicado en la parte superior de la pantalla. Cuidadosamente,
rote la pantalla hasta que la lengL)eta se pueda quitar con
cuidado de la pared del congelador.
• Vuelva a colocar la pantalla insertando la lengQeta izquierda
dentro de la pared del congelador. Alinee la lengL)eta superior
con el orificio para tornillo y coloque el tornillo.
Si no va a haber electricidad por 24 horas o menos, mantenga las
dos puertas del refrigerador cerradas para que los alimentos se
mantengan frios y congelados.
Si el corte de electricidad va a durar mas de 24 horas haga Io
siguiente:
• Saque todos los alimentos congelados y gub.rdelos en una
conservadora de comida congelada.
• Ponga 2 libras (907 g) de hielo seco en el congelador por
cada pie ct]bico (28 L) de espacio en su congelador. Esto
mantendr_, los alimentos congelados de dos a cuatro dias.
• Si no tiene conservadora de alimentos ni hielo seco, use
todos los alimentos perecederos de una vez o p6ngalos en
latas.
RECUERDE: Un congelador Ileno se mantiene frio por m&s
tiempo que uno a medio Ilenar. Un congelador Ileno de came se
mantiene frio por mb.s tiempo que uno Ileno de alimentos de
pasteleria. Si Ud. ve que los alimentos contienen cristales de
hielo, se pueden volver a congelar, pero la calidad y el sabor
pueden afectarse. Si el alimento no esta en buenas condiciones,
descartelo.
45
('_' *i _.,,,,,<,., ,_ ....... '.......' 'II[_iI,,8+,.,I.,,BIe.<_+y
Vacaciones
Si Ud. decide dejar el refrigerador funcionando mientras
est& ausente:
1. Use todos los arlculos perecederos y congele el resto.
2. Si su refrigerador tiene f_.brica de hielo automatica:
• Levante el brazo de control de alambre a la posici6n
hacia arriba (OFF) o mueva el interruptor a la posici6n
derecha (OFF).
• Cierre el suministro de agua a la fb.brica de hielo.
3. Vacie el dep6sito de hielo.
Si Ud. decide apagar el refrigerador antes de irse:
1. Saque toda la comida del refrigerador.
2. Si su refrigerador tiene f_.brica de hielo autom&tica:
• Cierre el suministro de agua a la fb.brica de hielo por Io
menos un dia antes.
• Cuando el t_ltimo Iote de hielo caiga, levante el brazo de
control de alambre a la posici6n hacia arriba (OFF) o
mueva el interruptor a la posici6n derecha (OFF).
3. Coloque el control del termostato (o control del refrigerador
dependiendo del modelo) en la posici6n de apagado (OFF).
Vea "Uso del (de los) control(es)".
4. Limpie el refrigerador, pasele un trapo y sequelo bien.
5. Fije bloques de goma o de madera con cinta adhesiva a
ambas puertas para que queden abiertas y el aire circule.
Esto evita que se formen olores y que crezcan hongos.
Mudanza
Si Ud. muda su refrigerador a una casa nueva, siga los siguientes
pasos para prepararse para la mudanza.
1. Si su refrigerador tiene f_.brica de hielo automatica:
• Cierre el suministro de agua a la fb.brica de hielo por Io
menos un dia antes.
• Desconecte la tubeda de agua de atras del refrigerador.
• Cuando el t_ltimo Iote de hielo caiga, levante el brazo de
control de alambre a la posici6n hacia arriba (OFF) o
mueva el interruptor a la posici6n derecha (OFF).
2. Saque toda la comida del refrigerador y empaque todos los
alimentos congelados en hielo seco.
3. Vacie el dep6sito de hielo.
4. Apague (OFF) el control del termostato (o el control del
refrigerador, dependiendo del modelo). Vea "Uso del (de los)
control(es)".
5. Desenchufe el refrigerador.
6. Vacie el agua de la bandeja recolectora.
7. Limpie, pasele un trapo y seque bien.
8. Saque todas las partes desmontables, envuelvalas bien y
aseglL_relascon cinta adhesiva para que no se sacudan
durante la mudanza.
9. SegQn el modelo, levante la parte delantera del refrigerador
para que ruede con facilidad o atornille las patas niveladoras
para no rayar el piso. Consulte la secci6n "Cierre de la
puerta" o "Cierre y alineamiento de la puerta".
10. Sostenga las puertas cerradas y el cable pegado al gabinete
del refrigerador con cinta adhesiva.
Cuando Ilegue a la casa nueva, ponga todo de nuevo y lea la
secci6n "lnstrucciones de instalaci6n" para obtener
instrucciones de preparaci6n. Ademas, si su refrigerador tiene
fabrica de hielo automatic& recuerde volver a conectar el
suministro de agua al refrigerador.
f
LOCALIZACION Y
f
REPARACION DE
f
AVERIAS
Siga las sugerencias que aparecen a continuacibn para
evitar el costo de una visita de servicio innecesaria.
Su refrigerador no funciona
• &Estb desconectado el cable el_ctrico? Conecte a un
contacto de pared de conexi6n a tierra de 3 terminales.
&Se quemb un fusible de la casa o se disparb un
disyuntor? Reemplace el fusible o reposicione el circuito.
&Est& el control del refrigerador o del congelador en la
posicibn apagado (OFF)? Vea la secci6n "Uso de los
controles".
&Se est& descongelando el refrigerador? En 30 minutos
vuelva a revisar si el refrigerador esta funcionando. Su
refrigerador activa regularmente un ciclo de descongelaci6n
automb.tica.
&No est& enfriando el refrigerador? Para modelos con
controles digitales, gire la unidad a apagado (OFF) y luego a
encendido (ON) para volver a fijarla. Vea la secci6n "Uso de
los controles". Si at_n asi no puede corregir el problema,
Ilame solicitando servicio.
Las luces no funcionan
• &Est& desconectado el cable el_ctrico? Conecte a un
contacto de pared de conexi6n a tierra de 3 terminales.
• &Est_ flojo un foco o se ha quemado? Vea la secci6n
"C6mo cambiar el(los) foco(s)".
Hay agua en la bandeja recolectora de agua
• &Se est& descongelando el refrigerador? El agua se
evaporar& Es normal que caigan gotas de agua en la bandeja
recolectora de agua.
•&Est& m&s h_medo que Io normal? Cuando este ht]medo,
tenga en cuenta que el agua en la bandeja recolectora
tardar_, mas en evaporarse.
46
Parece que el motor funciona excesivamente
• &Est& la temperatura ambiente m&s caliente que Io
normal? En condiciones de calor, el motor funciona por
periodos mas largos. Cuando la temperatura ambiente es
normal, el motor funciona entre 40% y 80% del tiempo. Si la
habitaci6n est,. caliente, puede funcionar por m_.s tiempo.
• &Se acaba de agregar una gran cantidad de alimentos al
refrigerador? Agregar grandes cantidades de alimentos
hace que se caliente el refrigerador, Es normal que el motor
funcione por periodos m_.s prolongados para volver a enfriar
el refrigerador.
• &Se han abierto las puertas a menudo? Cuando esto
ocurre, el motor puede funcionar por periodos mas largos.
Para ahorrar energia, trate de sacar todo Io que necesita del
refrigerador de una sola vez, mantenga los alimentos
organizados y cierre la puerta inmediatamente despues de
sacarlos.
•&No se han ajustado los controles correctamente de
acuerdo con las condiciones circundantes? Vea la secci6n
"Uso de los controles".
•&No estbn las puertas completamente cerradas? Cierre
las puertas con firmeza. Si no cierran completamente, vea
"Las puertas no cierran completamente" m_.s adelante en
esta secci6n.
•&Est&n sucios los serpentines del condensador?
Esto impide la transferencia del aire y hace que el motor
trabaje mas, Limpie los serpentines del condensador. Vea la
secci6n "Limpieza".
•&No est&n selladas por completo las empaquetaduras de
la puerta? Llame a una persona calificada o a un tecnico.
NOTA: Su nuevo refrigerador funcionar_, por periodos mb.s
largos que su refrigerador anterior debido al motor de alto
rendimiento.
El refrigerador parece hacer mucho ruido
• Los sonidos pueden ser normales para su refrigerador.
Consulte la secci6n "Sonidos normales".
La f_brica de hielo no produce hielo o no produce
suficiente hielo
•&Se acaba de instalar la f_brica de hielo? Deje transcurrir
72 horas para que la fabrica de hielo comience a producir
hielo. Una vez que su refrigerador se ha enfriado, la fabrica
de hielo debe empezar a producir de 70 a 120 cubos cada 24
horas.
&Est& abierta la v_lvula de cierre de la tuberia del agua al
refrigerador? Abra la v_.lvula de agua. Vea la secci6n
"Conexi6n del suministro de agua".
&Tiene agua el molde de la f&brica de hielo o no se ha
producido hielo? Verifique si su refrigerador ha sido
conectado al suministro de agua de su casa y si la valvula de
cierre estb. abierta. Vea la secci6n "Conexi6n del suministro
de agua".
&Se trabb un cubo de hielo en el brazo eyector de la
f_brica de hielo? En los modelos con dep6sito de hielo
interior, saque el hielo del brazo eyector con un utensilio de
plastico. En modelos con balde de hielo ubicado en la puerta
del congelador, puede tener acceso a la fabrica de hielo
oprimiendo la puerta del sensor de hielo que se encuentra en
el lade izquierdo superior del interior del congelador. Mientras
oprime la puerta del sensor, eleve la puerta de servicio de la
fabrica de hielo y quite el hielo del brazo eyector con un
utensilio de plastico. Vea la secci6n "F_.brica de hielo y
dep6sito/balde de hielo".
&Se acaba de sacar una gran cantidad de hielo? Deje
transcurrir 24 horas para que la fabrica de hielo se
restablezca.
•&Se han ajustado correctamente los controles? Vea la
secci6n "Uso de los controles".
&Tiene un filtro de agua instalado en el refrigerador? Este
filtro puede estar obstruido o haberse instalado
incorrectamente. Primero revise las instrucciones de
instalaci6n del filtro para asegurarse de que el filtro rue
instalado correctamente y no esta obstruido. Si la instalaci6n
es correcta y no hay obstrucciones, Ilame a una persona
calificada o a un tecnico.
NOTA: Si el problema no se debe a ninguna de las
alternativas indicadas, puede haber un problema en la
tuberia de agua. Llame solicitando servicio.
El hielo tiene mal sabor, mal olor o un color gdsdceo
• &Son nuevas las conexiones de plomeria, produciendo un _
hielo descolorido o de mal sabor? Deseche los primeros
Iotes de hielo. _
•&Se han guardado los cubes de hielo per mucho tiempo?
Tire los cubos de hielo viejos y obtenga un nuevo Iote. _
•&Se necesita limpiar el congelador y el depbsito o balde _/_
de hielo? Vea la secciSn "Limpieza" o "F_.brica de hielo y
depSsito/balde de hielo".
•&Se han envuelto debidamente los alimentos en el
congelador oel refrigerador? Use empaques hermeticos
contra humedad para ayudar a prevenir transferencia de
olores en la comida almacenada.
•&Est& la temperatura del congelador Io suficientemente •
fria para hacer hielo? Espere 24 horas despues de haber
conectado la fabrica de hielo para que se produzca hielo. Vea
la secciSn "Uso de los controles". •
•&Est& el brazo de control de alambre de la fbbrica de
hielo (en algunos modelos} en la posicibn apagado (OFF -
braze hacia arriba)? Baje el brazo de control de alambre a la
posiciSn encendido (ON-brazo de control de alambre hacia
abajo). Vea la secci6n "F_.brica de hielo y dep6sito/balde de
hielo".
•&Est& el interruptor de la f&brica de hielo (en algunos
modelos} en la posicibn apagado (OFF-hacia la derecha)?
Mueva el interruptor de la fb.brica de hielo a la posici6n
endendido (ON-hacia la izquierda). Vea la secci6n "Fabrica
de hielo y depSsito/balde de hielo".
&Contiene el agua minerales (como el azufre)? Podria ser
necesario instalar un filtro para eliminar los minerales.
&Tiene un filtro de agua instalado en el refrigerador? Un
descoloramiento o un color gris del hielo indican que el
sistema de filtrado de agua necesita enjuagarse mas. Haga
cotter m_.s agua a traves del despachador de agua para
enjuagar el sistema de filtrado de agua con mayor cuidado
(inicialmente, de 2 a 3 galones [8-12 L] o por 6 5 7 minutos).
Deseche el hielo descolorido.
47
El despachador de hielo no funciona debidamente El despachador de agua no funciona debidamente
&Est& cerrada completamente la puerta del congelador?
Cierre la puerta con firmeza. Si no se cierra completamente,
vea "Las puertas no cierran completamente" mb.s adelante
en esta secci6n.
&Se ha instalado correctamente el depbsito o el balde de
hielo? En modelos con dep6sito de hielo interior, empuje el
dep6sito de hielo completamente hasta el fondo. En
modelos con balde de hielo ubicado en la puerta del
congelador, el balde debe estar nivelado. Quite y vuelva a
colocar el balde en la puerta asegurandose de que este
debidamente alineado y que encaje firmemente en su lugar.
Vea la secci6n "F_.brica de hielo y dep6sito/balde de hielo".
&Se ha agregado hielo incorrecto en el depbsito o balde?
Use Qnicamente el hielo producido pot su fabrica de hielo
actual. Si ha introducido otto tipo de hielo, saque todos los
cubos y revise que no se haya atascado ninguno en el
conducto de salida.
&Se ha congelado el hielo en el depbsito o balde? Agite el
dep6sito o el balde para que se separen los cubos. Si no se
separan, vacie el dep6sito o balde y deje transcurrir 24 horas
para que se vuelva a Ilenar de hielo.
&No se ha Ilenado el sistema de agua? El sistema de agua
debe Ilenarse la primera vez que se usa. Use un recipiente
resistente para oprimir la barra del despachador de agua
hasta que el agua comience a salir. Limpie el sistema de agua
distribuyendo y desechando de 2 a 3 galones (de 8 a 12 L) de
agua. La limpieza del sistema tomara aproximadamente de 6
a 7 minutos y ayudara a despejar el aire de la line& En
algunas casas se podra requerir limpieza adicional. Vea la
secci6n "Despachadores de agua y hielo".
&La v_lvula de cierre de agua no est& abierta o la tuberia
del agua no est& conectada al suministro? Verifique si la
valvula de cierre del agua esta abierta y el suministro de agua
est,. conectado al refrigerador. Vea la secci6n "Conexi6n del
suministro de agua".
&Est& la v_lvula de cierre del agua atascada o no rue
instalada correctamente? Consulte "Conexi6n del
suministro de agua". Si el problema no es atascamiento o
mala instalaci6n, solicite servicio o Ilame a un plomero.
&Hay an estrechamiento en la tuberia de agua de la casa?
Si encuentra o sospecha que hay un estrechamiento en la
tuberia del agua, solicite servicio.
&Se ha derretido el hielo alrededor del espiral met_lico en
el balde de hielo? Descarte los cubos de hielo y limpie bien
el balde. Deje transcurrir 24 horas para que se vuelva a Ilenar
de hielo. No trate de quitar el hielo derretido con un objeto
afilado. Puede dafiar el balde.
&Hay hielo atascado en el conducto de salida? Quite el
hielo del conducto de salida con un utensilio de pl_.stico. No
use ningQn objeto afilado para quitar el hielo. Puede da_ar la
unidad.
&El despachador de hielo se atasca mientras vierte el
hielo "picado"? Detenga el despachador de hielo. Cambie el
bot6n de hielo de "picado" a "en cubos". Oprima el brazo del
despachador de hielo con un vaso resistente. Si despacha el
hielo en cubos correctamente, optima el bot6n para hielo
"picado" y comience a despachar de nuevo. Consulte la
secci6n "Despachadores de agua y hielo".
&Tiene un filtro de agua instalado en el refrigerador? Este
filtro puede estar obstruido o haberse instalado
incorrectamente. Primero revise las instrucciones de
instalaci6n del filtro para asegurarse de que el filtro fue
instalado correctamente y no estb. obstruido. Si la instalaci6n
es correcta y no hay obstrucciones, solicite servicio.
Hay fUtracibn de agua o hielo en el despachador
&No se deja el vaso el tiempo suficiente debajo del
despachador de hielo, haciendo que se derrame el hielo?
Sostenga el recipiente debajo del conducto de hielo dos o
tres segundos despues de soltar la palanca del despachador.
Puede despachar agua o hielo durante este tiempo.
•&Se ha atascado un cubo de hielo en el conducto y
mantiene abierta la escotUla? Quite el cubo.
•&Hay hielo en el balde? Vea "La fabrica de hielo no produce
hielo" anteriormente en esta secci6n.
&Se ha mantenido el braze del despachador oprimido por
mucho tiempo? Suelte el brazo del despachador. Cuando el
brazo se mantiene oprimido mucho tiempo, se interrumpe la
distribuci6n de hielo. Espere tres minutos para que el motor
del despachador se reposicione antes de usarlo de nuevo. Es
meier sacar grandes cantidades de hielo directamente del
dep6sito o balde de hielo, no del despachador.
El balde de hielo es dificU de sacar
&Es dificil sacar el balde de hielo (en algunos modelos}?
Para modelos dotados de balde de hielo ubicado en la puerta
del congelador, seleccione hielo "en cubos". Usando un vaso
resistente, oprima y suelte con rapidez el brazo del
despachador de hielo. Abra la puerta del congelador, oprima
el bot6n interruptor que esta en el balde de hielo y lev_.ntelo.
Consulte la secci6n "F_.brica de hielo y dep6sito/balde de
hielo".
&Tiene un filtro de agua instalado en el refrigerador? El
sistema de filtrado de agua pudiera tener aire en las lineas, Io
que ocasionaria que gotee el agua. Se puede eliminar el aire
de las lineas con enjuagues adicionales. El uso normal del
despachador deberia eliminar el aire de las lineas en un
periodo de 24 a 72 horas.
El flujo de agua del despachador disminuye
considerablemente
&Tiene un filtro de agaa instalado en el refrigerador? Este
filtro puede estar Ileno o incorrectamente instalado. Saque el
cartucho del filtro de agua (vea la secci6n "Sistema de
filtraci6n de agua".) Ponga a funcionar el despachador. Si el
flujo de agua aumenta notablemente, cambie el filtro.
48
El agua del despachador no est& 1o suficientemente fria
•&Ha instalado recientemente su refrigerador? Deje
transcurrir 24 horas para que el refrigerador se enfrie
completamente.
•&Se ha despachado recientemente una gran cantidad de
agua? Deje transcurrir 24 horas para que el agua se enfrie
completamente.
•&No se ha usado el despachador de agua recientemente?
Puede ser que el primer vaso de agua no este frio. Descarte
el agua del primer vaso.
El divisor entre los dos compartimientos est& caliente
• Probablemente el calor se debe al funcionamiento normal del
control autom&tico de humedad exterior. Si sigue teniendo
problemas, solicite servicio.
La temperature est& demasiado caliente
•&Est&n bloqueados los orificios de ventilaci6n en
cualquiera de los compartimientos? Esto impide la
circulaci6n del mire frio del congelador a] refrigerador. Saque
todos los objetos que bloquean los orificios de ventilaci6n.
Vea la ubicaci6n de estos orificios en la secci6n "C6mo
asegurar la debida circulaci6n del aire'.
•&Se abre(n} la(s} puerta(s) con frecuencia? El refrigerador
se calienta cuando esto ocurre. Mantenga el refrigerador frio
sacando todo Io que necesita del refrigerador de una sola
vez, manteniendo los alimentos organizados de manera que
sea f_.ci] encontrarlos y cerrando la puerta inmediatamente
despues de sacarlos.
•&Se acaba de agregar una gran cantidad de alimentos al
refrigerador o al congelador? Agregar grandes cantidades
de alimentos calienta el refrigerador. Pueden transcurrir
varias horas para que el refrigerador recupere su temperatura
normal
•&Se han ajustado los controles correctamente de
acuerdo alas condiciones circundantes? Vea la secci6n
"Uso de los controles".
•&No est& enfriando el refrigerador? Para modelos con
controles digitales, gire la unidad a apagado (OFF) y luego a
encendido (ON) para volver a fijarla. Vea la secci6n "Uso de
los controles". Si at_n asi no puede corregir el problema,
Ilame solicitando servicio.
Hay acumulaci6n de humedad en el interior
•&Est&n bloqueados los orificios de ventilaci6n en el
refrigerador? Saque todos los objetos que bloquean los
orificios de ventilaci6n. Vea la ubicaci6n de los orificios en la
secci6n "C6mo asegurar la debida circulaci6n del mire'.
•&Se abre(n} la(s) puerta(s) con frecuencia? Evite la
acumulaci6n de humedad sacando todo Io que necesita del
refrigerador de una sola vez, manteniendo los alimentos
organizados y cerrando la puerta inmediatamente despues
de sacarlos.
• &Eet& h_meda la habitaci6n? Es normal que se acumule
humedad dentro del refrigerador cuando el aire exterior esta
hL3medo.
&Se han envuelto correctamente los alimentos? Verifique
que todos los alimentos esten bien envueltos. Seque los
recipientes hL_medos antes de colocarlos en el refrigerador.
&Se han ajustado los controles correctamente de
acuerdo alas condiciones circundantes? Vea la secci6n
"Uso de los controles".
•&Se ha completado un ciclo de descongelacibn
autom_tica? Es normal que se formen gotitas cuando este
se descongela automaticamente.
Las puertas no se cierran completamente
•&Hay paquetes de comida que impiden que se cierre la
puerta? Ordene los recipientes de manera que queden mas
juntos y ocupen menos espacio.
&Est& el dep6sito o el balde de hielo mal colocado? En
modelos con dep6sito de hielo interior, empuje el dep6sito de
hielo hasta el fondo. Si el dep6sito de hielo no Ilega hasta el
fondo, puede ser que no este derecho. S&quelo y vuelva a
empujarlo. En modelos con balde de hielo ubicado en la
puerta del congelador, el balde debe estar nivelado. Para
quitar el balde, oprima el bot6n para liberar el balde que se
encuentra del lado derecho del mismo y levante directamente
hacia arriba. Vuelva a colocar el balde en la puerta
asegurandose de que este debidamente alineado y que
encaje firmemente en su lugar. Vea la secci6n "Fabrica de
hielo y dep6sito/balde de hielo".
&Est&n las bandejas, parrillas, dep6sitos o canastillas mal
colocados? Coloque la tapa del caj6n de verduras y todas
las bandejas, parrillas, dep6sitos y canastillas en la posici6n
correcta. Para mas informaci6n, vea la secci6n "Caj6n
convertible para verduras/carne, caj6n para verduras y
tapas".
&Est&n las empaquetaduras pegajosas? Limpie las
empaquetaduras de acuerdo con las instrucciones en la
secci6n "Limpieza".
&Se balancea el refrigerador o no est& nivelado? Nivele el
refrigerador. Vea la secci6n "Como cerrar la puerta".
&Se desmontaron las puertas durante la instalaci6n de la
unidad y no se volvieron a instalar correctamente? Quite y
vuelva a colocar las puertas de acuerdo con la secci6n
"C6mo quitar la puerta" en algunos modelos, o llame a un
tecnico de servicio calificado.
Es dificil abdr las puertas
•&Est&n las empaquetaduras sucias o pegajosas? Limpie
las empaquetaduras de acuerdo con las instrucciones en la
secci6n "Limpieza".
Soluci6n de problemas para computadoras (algunos
modelos)
Vea el "Guia para usuarios de computadora y software" para
informaci6n sobre su sistema de computadora.
49
CONTRATOS DE
f
PROTECCION
Contratos Maestros de Proteccibn
iFelicitaciones per su inteligente adquisici6n! Su nuevo
electrodomestico Kenmore ®ha sido dise_ado y fabricado para
brindarle a_os de funcionamiento confiable. Pero al igual que
todos los productos, puede necesitar mantenimiento preventivo
o reparaci6n de vez en cuando. Es alli donde el Contrato Maestro
de Protecci6n puede ahorrarle dinero e inconvenientes.
Adquiera un Contrato Maestro de Protecci6n hoy y prot_jase
contra molestias y gastos inesperados.
El Contrato Maestro de Protecci6n tambien ayuda a prolongar la
vida de su nuevo artefacto. He aqui Io que se incluye en el
Contrato:
VServicio Experto por nuestros 12.000 especialistas en
reparaci6n competentes
VServicio ilimitado y gratuito para repuestos y mane de obra
en todas las reparaciones protegidas por el contrato
V' Garantia "sin disguetos" - reemplazo de su producto
protegido si ocurren cuatro o mb.s fallas del producto en el
transcurso de doce meses
Reemplazo del producto si su producto protegido no puede
ser reparado
V' Revisibn Anual de Mantenimiento Preventivo a solicitud
suya - sin costo adiciona]
V' Ayuda r&pida por tel6fono - asistencia per telefono a cargo
de un tecnico de Sears para productos que deban se
reparados en su hogar, ademas de un horario de reparaci6n
conveniente
V' Proteccibn de sobrevoltaje contra daSos electricos debido a
fluctuaciones de electricidad
V' Reembolso de la renta si la reparaci6n de su producto
protegido tarda mb.s de Io prometido
Una vez adquirido el Contrato, tan s61o tiene que Ilamar para fijar
la visita de servicio tecnico. Usted puede Ilamar a cualquier hora,
de dia o de noche, o fijar una visita tecnica en Internet.
Sears cuenta con un equipo de mas de 12.000 especialistas en
reparaci6n competentes, quienes tienen a disposici.6n mas de
4,5 millones de repuestos y accesorios de calidad. Ese es el tipo
de profesionalismo con el que usted puede contar para ayudade
a prolongar la vida de su nuevo artefacto por muchos afios mas.
iAdquiera hoy su Contrato Maestro de Protecci6n!
Se aplican algunas limitaciones y exclusiones. Para obtener
precios einformacibn adicional, Ilame al 1-888-'784-6427.
Servicio de Instalacibn de Sears
Para la instalaci6n profesional de artefactos electrodomesticos,
arbridores de puertas de garaje, calentadores de agua y otros
articulos importantes de la casa, en los EE.UU. Ilame al
1-800-4-MY-HOME ®.
Contratos de mantenimiento
Su compra adquiere un nuevo valor ya que usted puede confiar
en Sears HomeCentral ®para obtener servicio de reparaci6n. Con
mas de 2.400 especialistas capacitados en reparaciones y
acceso amas de 900.000 piezas de repuesto y accesorios,
contamos con las herramientas, piezas, conocimiento y la
destreza para asegurarnos de respaldar nuestra promesa de que:
Reparamos Io que vendemos.
Su electrodomestico Kenmore ® est,. disefiado, fabricado y
sometido a prueba para proporcionarle afios de funcionamiento
confiable. No obstante, cualquier electrodomestico moderno
puede necesitar servicio tecnico de vez en cuando. El contrato
de mantenimiento Sears le ofrece un programa de servicio
excepcional, a un precio accesible.
El contrato de mantenimiento Sears
• Garantiza el servicio tecnico del mafiana a precios de hey.
• Elimina las facturas de reparaci6n producidas por el uso
normal y el desgaste.
• Cubre las visitas de servicio no tecnicas y educativas.
• Proporciona una revisi6n anual de mantenimiento preventivo
a solicitud suya, para asegurarse de que su electrodomestico
est,. en condiciones apropiadas de funcionamiento.
Se aplioan oiertas restriociones. Para obtener informaoibn
referente a los Contratos de mantenimiento de Sears Home
Central ®,Ilame al 1-800-361-6665.
Refacciones
Para pedir el Iimpiador de acero inoxidable o filtros de repuesto,
Ilame al 1-800-4-MY-HOME ®y pida el nt]mero de pieza
apropiado que se enlista abajo o p6ngase en contacto con su
distribuidor autorizado Kenmore.
Limpiador de Acero Inoxidable:
Pieza No. D22 M40083 R
Cartuchos del sistema de la filtracibn de agua de rejilla
de la base:
NOTA: No usar con agua que no sea microbiolbgicamente
segura o de calidad desconocida sin desinfectarla
adecuadamente antes o despu_s del sistema. Pueden usarse
sistemas certificados para la reduccibn de quistes en aguas
desinfectadas que puedan contener quistes filtrables.
Cartucho de quistes:
Pieza No. 9908 (WF-NLC240V y WF-LC400V)
50
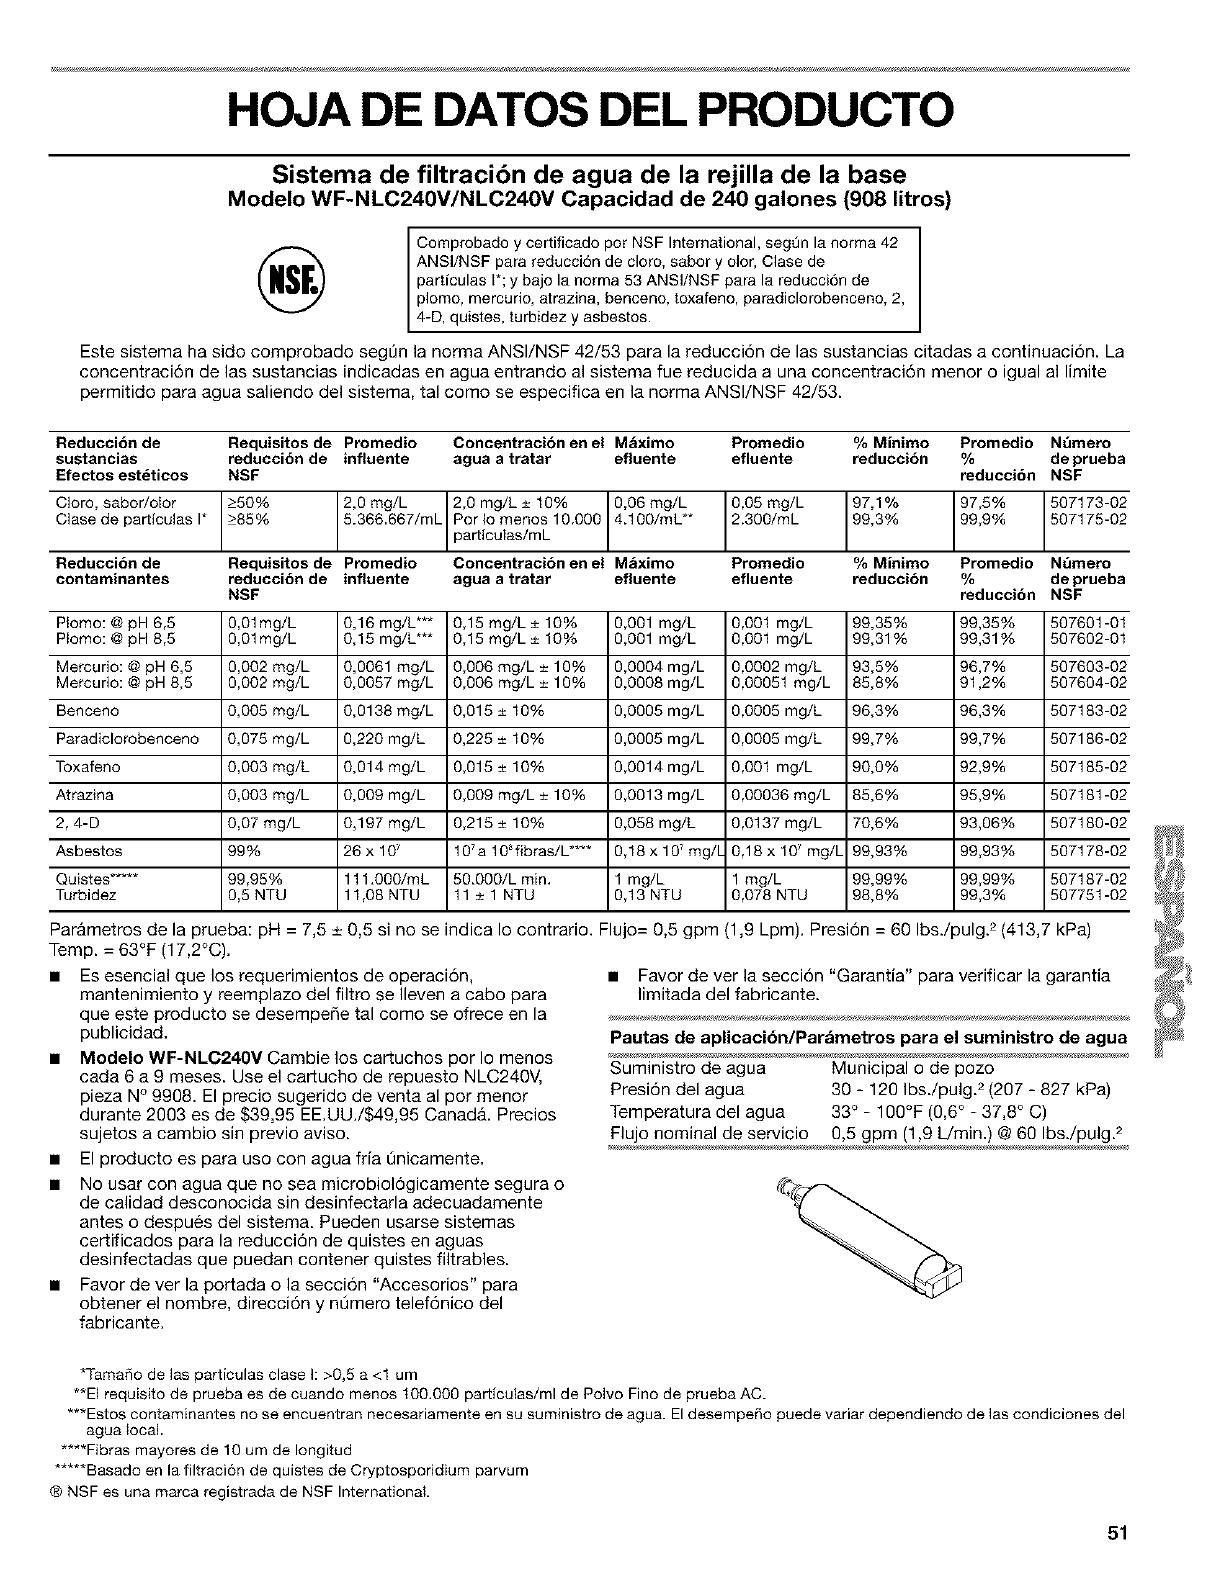
HOJA DE DATOS DEL PRODUCTO
Sistema de filtracibn de agua de la rejilla de la base
Modelo WF-NLC240V/NLC240V Capacidad de 240 galones (908 litros)
Comprobado y certificado por NSF International, seg0n la norma 42
ANSI/NSF para reduccidn de cloro, sabor y olor, Clase de
part[culas I*; y bajo la norma 53 ANSI/NSF para la reducci6n de
plomo, mercurio, atrazina, benceno, toxafeno, paradiclorobenceno, 2,
4-D, quistes, turbidez y asbestos.
Este sistema ha sido comprobado seg0n la norma ANSI/NSF 42/53 para la reducci6n de las sustancias citadas a continuaci6n. La
concentraci6n de las sustancias indicadas en agua entrando al sistema fue reducida a una concentraci6n menor o igual al limite
permitido para agua saliendo del sistema, tal como se especifica en la norma ANSI/NSF 42/53.
Reducci6n de Requisitos de Promedio Concentracibn en el M&ximo Promeclio %iinimo Promedio Nfirnero
sustancias reducci6n de influente agua a tratar efluente efluente reduccibn %deprueba
Efectos est_ticos NSF reducci6n NSF
CIoro, sabor/olor 250% 2,0 mg/L 2,0particulas/mLmg/L± 10% 4.10'0600/mL**mg/L0,05 mg/L 97,1% 99,9%97'5% 507173-02
Clasedeparticulasl* 285% 5.366.667/mL Porlomenos19.000 2.300/mL 99,3% 567175-02
Reducci6n de Requisitos de Promedio Concentracibn en el M&ximo Promedio %iinimo Promedio Nfirnero
contaminantes reducci6n de influente agua a tratar efluente efluente reduccibn %deprueba
NSF reducci6n NSF
PIomo: @ pH 6,5 0,01mg/L 0,16 mg/L*** 0,15 mg/L ± 10% 0,001 mg/L 0,001 mg/L 99,35% 99,35% 507601-01
Ptomo: @ pH 8,5 9,01mg/L 0,15 mg/L*** 0,15 mg/L ± 10% 0,001 mg/L 0,001 mg/L 99,31% 99,31% 567662-01
Mereurio: @ pH 6,5 9,002 mg/L 0,0061 mg/L 0,006 mg/L ± 19% 0,0904 mg/L 0,0092 mg/L 93,5% 96,7% 567663-02
Mercurio: @pH 8,5 9,002 mg/L 0,0057 mg/L 0,006 mg/L ± 19% 0,0908 mg/L 0,00951 mg/L 85,8% 91,2% 567664-02
Benceno 0,005 mg/L 0,0138 mg/L 0,015 ± 10% 0,0005 mg/L 0,0005 mg/L 96,3% 96,3% 507183-02
Paradiclorobenceno 0,075 mg/L 0,220 mg/L 0,225 ± 10% 9,0005 mg/L 9,0005 mg/L 99,7% 99,7% 507186-02
Toxafeno 0,003 mg/L 0,014 mg/L 9,015 ± 10% 9,0014 mg/L 9,001 mg/L 90,6% 92,9% 567185-02
Atrazina 0,003 mg/L 0,009 mg/L 0,009 mg/L ± 10% 9,0013 mg/L 9,00036 mg/L 85,6% 95,9% 507181-02
2, 4-D 0,07 mg/L 0,197 mg/L 9,215 ± 10% 0,058 mg/L 9,0137 mg/L 70,6% 93,06% 507180-02 ,
0,18 x 197 mg/[ 0,18 x 10⁷ mg/L 99,93% 99,93% 507178-02 _
1 mg/L 1 mg/L 99,99% 99,99% 567187-02 _'/_[_
0,13 NTU 0,078 NTU 98,8% 99,3% 507751-02
Flujo= 0,5 gpm (1,9 Lpm). Presi6n = 60 Ibs./pulg. 2 (413,7 kPa)
• Favor de ver la secci6n "Garantia" para verificar la garantia __
limitada del fabricante. _"
Pautas de aplicaci6n/Par&metros para el suministro de agua
Suministro de agua Municipal o de pozo
Presi6n del agua 30 - 129 Ibs./pulg. 2 (207 - 827 kPa)
Temperatura del agua 33 ° - 10O°F (0,6 ° - 37,8 ° C)
Flujo nominal de servicio 0,5 gpm (1,9 L/rain.) @ 69 Ibs./pulg.
Asbestos 99% 26 x 107 107a 108fibras/L....
Quistes..... 99,95% 111.000/mL 50.000/L rain.
Turbidez 9,5 NTU 11,08 NTU 11± 1 NTU
Parametros de la prueba: pH = 7,5 _+0,5 si no se indica Io contrario.
Temp. = 63°F (17,2°C).
• Es esencial que los requerimientos de operaci6n,
mantenimiento y reemplazo del filtro se Ileven a cabo para
que este producto se desempe_e tal como se ofrece en la
publicidad.
•Modelo WF-NLC240V Cambie los cartuchos por Io menos
cada 6 a 9 meses. Use el car[ucho de repuesto NLC240V,
pieza N°9908. El precio sugerido de venta al por menor
durante 2003 es de $39,95 EE.UU./$49,95 CanadA. Precios
sujetos a cambio sin previo aviso.
• El producto es para uso con agua fria 0nicamente.
• No usar con agua que no sea microbiol6gicamente segura o
de calidad desconocida sin desinfectarla adecuadamente
antes o despues del sistema. Pueden usarse sistemas
certificados para la reducci6n de quistes en aguas
desinfectadas que puedan contener quistes filtrabies.
• Favor de ver la portada o la secci6n "Accesorios" para
obtener el nombre, direcci6n y n0mero telef6nico del
fabricante.
*Tamafio de las particulas clase h >0,5 a<1 um
**El requisito de prueba es de cuando menos t00.000 part[culas/ml de Polvo Fino de prueba AC.
***Estos contaminantes no se encuentran necesariamente en su suministro de agua. El desempefio puede variar dependiendo de las condiciones del
agua local.
.... Fibras mayores de 10 um de Iongitud
*****Basado en la filtraci6n de quistes de Cryptosporidium parvum
® NSF es una marca registrada de NSF International.
51
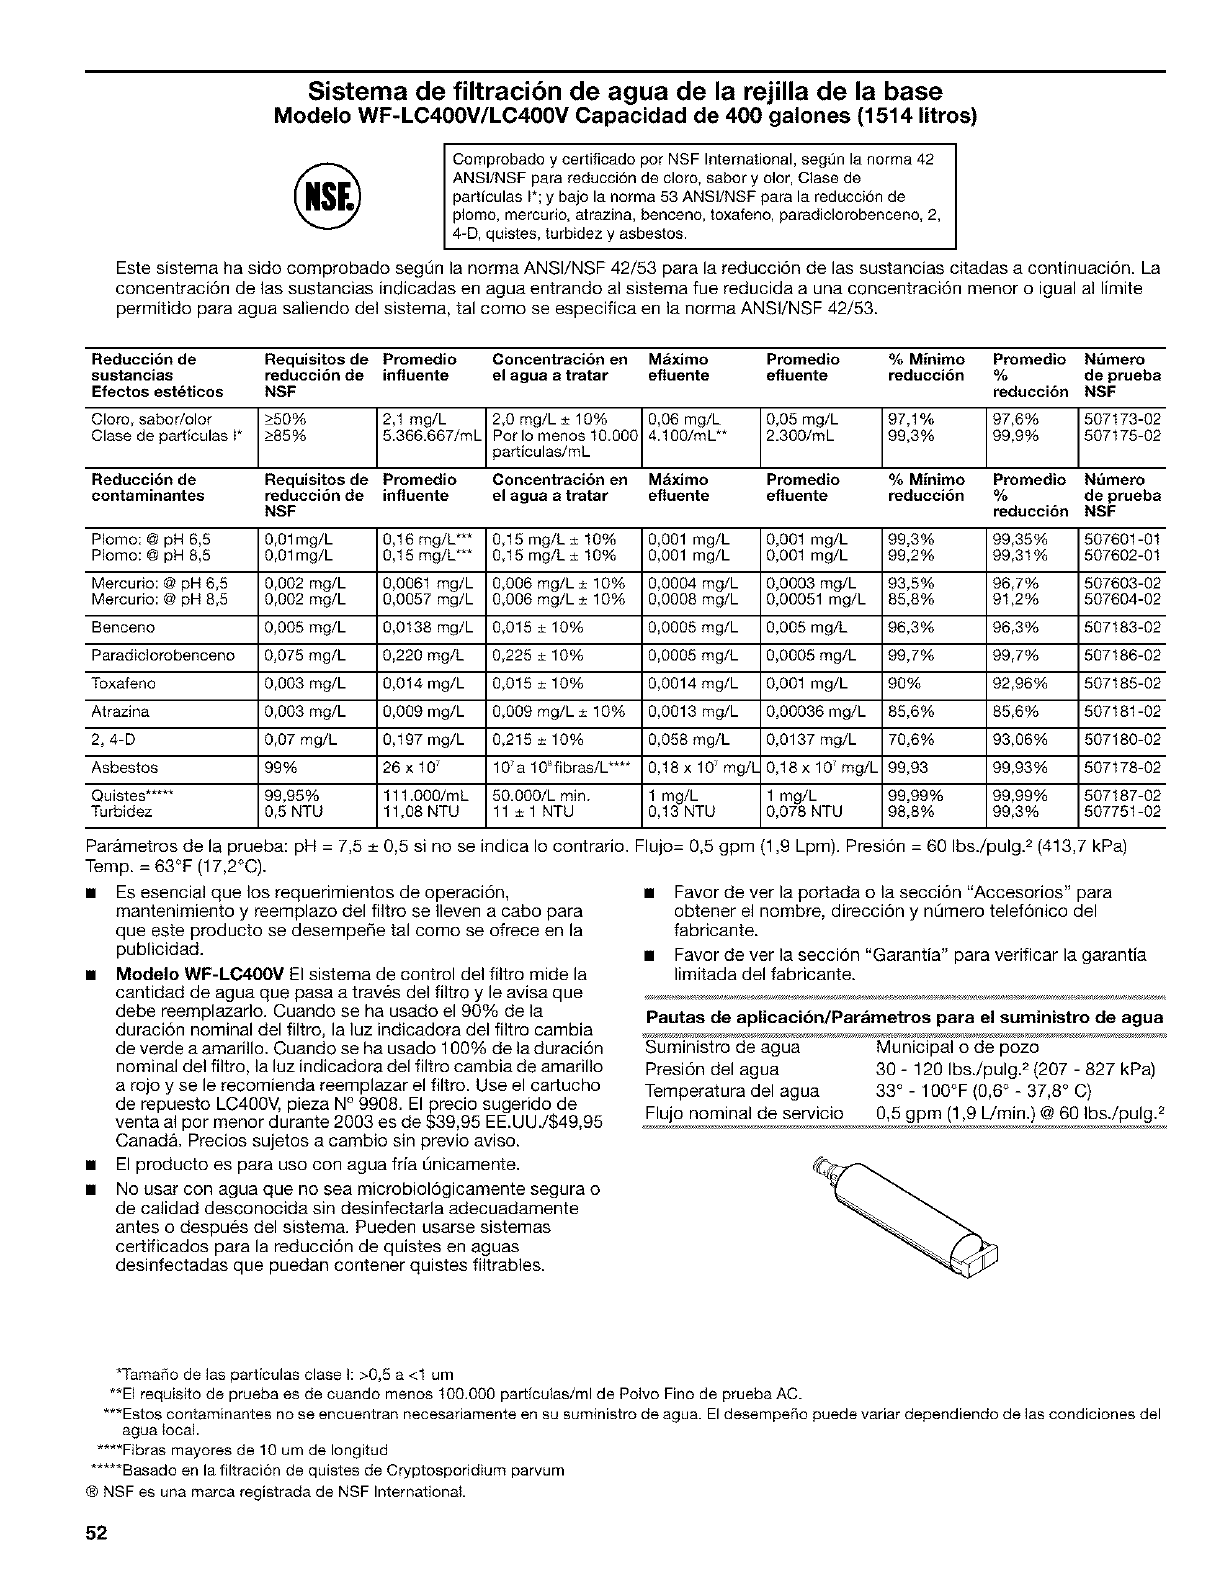
Sistema de filtracibn de agua de la rejilla de la base
Modelo WF-LC400V/LC400V Capacidad de 400 galones (1514 litros)
Comprobado y certificado por NSF International, segQn la norma 42
ANSI/NSF para reduccidn de cloro, sabor y olor, Clase de
particulas I ; y bajo la norma 53 ANSI/NSF para la reducci6n de
plomo, mercurio, atrazina, benceno, toxafeno, paradiclorobenceno, 2,
4-D, qu stes, turb dez y asbestos.
Este sistema ha sido comprobado segL3n la norma ANSI/NSF 42/53 para la reducciSn de las sustancias citadas a continuaciSn. La
concentraci6n de las sustancias indicadas en agua entrando al sistema fue reducida a una concentraci6n menor o igual a] limite
permitido para agua saliendo del sistema, tal como se especifica en la norma ANSI/NSF 42/53.
Reducci6n de Requisitos de Promedio Concentracibn en M&ximo Promedio %Minimo Prornedio N_rnero
sustancias reducci6n de influente el agua atratar efluente efluente reduccibn %de prueba
Efectos est_ticos NSF reduccibn NSF
Cloro, sabor/olor 250% 2,1 mg/L I 2,0 mg/L ± 10% 0,06 rng/L 0,05 rng/L 97,1% 97,6% 507t73-02
Clase de particulas I* 285% 5.366.667/mL I Por Io rnenos 10.000 4.100/mL** 2.300/mL 99,3% 99,9% 507175-02
Iparticulas/mL
ReducciSn de Requisitos de Promedio Concentracibn en M&ximo Promedio %Minimo Prornedio N_rnero
contaminantes reducci6n de influente el agua atratar efluente efluente reduccibn %de prueba
NSF reduccibn NSF
PIomo: @ pH 6,5 0,01mg/L 0,16 rag/L*** 0,15 mg/L ± 10% 0,001 mg/L 0,001 mg/L 99,3% 99,35% 507601-01
PIomo: @ pH 8,5 0,01mg/L 0,15 mg/L*** 0,15 mg/L ± 10% 0,001 mg/L 0,001 mg/L 99,2% 99,3t% 507602-01
Mercurio: @ pH 6,5 0,002 mg/L 0,0061 mg/L 0,006 mg/L ± 10% 0,0004 mg/L 0,0003 mg/L 93,5% 96,7% 507603-02
Mercurio: @ pH 8,5 0,002 mg/L 0,0057 mg/L 0,006 mg/L ± 10% 0,0008 mg/L 0,00051 mg/L 85,8% 91,2% 507604-02
Benceno 0,005 mg/L 0,0138 mg/L 0,015 ± 10% 0,0005 mg/L 0,005 mg/L 96,3% 96,3% 507183-02
Paradiclorobenceno 0,075 mg/L 0,220 mg/L 0,225 ± 10% 0,0005 mg/L 0,0005 mg/L 99,7% 99,7% 507186-02
Toxafeno 0,003 mg/L 0,014 mg/L 0,015 ± 10% 0,0014 mg/L 0,001 mg/L 90% 92,96% 507185-02
Atrazina 0,003 mg/L 0,009 mg/L 0,009 mg/L ± 10% 0,0013 mg/L 0,00036 mg/L 85,6% 85,6% 507181-02
2, 4-D 0,07 mg/L 0,197 mg/L 0,215 ± 10% 0,058 mg/L 0,0137 mg/L 70,6% 93,06% 507180-02
Asbestos 99% 26 x 10 10_a 10_fibras/L .... 0,18 x 10⁷ mg/t 0,18 x 10⁷ mg/L 99,93 99,93% 507178-02
Quistes ..... 99,95% 111.000/mL 50.000/L min. 1 mg/L 1 mg/L 99,99% 99,99% 507187-02
Turbidez 0,5 NTU 11,08 NTU 11 ± 1 NTU 0,13 NTU 0,078 NTU 98,8% 99,3% 507751-02
Parametros de la prueba: pH = 7,5 _+0,5 si no se indica Io contrario. Flujo= 0,5 gpm (1,9 Lpm). Presi6n = 60 Ibs./pulg. 2 (413,7 kPa)
Temp. = 63°F (17,2°C).
• Es esencial que los requerimientos de operaci6n,
mantenimiento y reemplazo del filtro se Ileven a cabo para
que este producto se desempe_e tal como se ofrece en la
publicidad.
•Modelo WF-LC400V El sistema de control del filtro mide la
cantidad de agua que pasa a traves del filtro y le avisa que
debe reemplazarlo. Cuando se ha usado el 90% de la
duraci6n nominal del filtro, la luz indicadora del filtro cambia
de verde a amarillo. Cuando se ha usado 190% de la duraci6n
nominal del filtro, la luz indicadora del filtro cambia de amarillo
a rojo y se le recomienda reemplazar el filtro. Use el cartucho
de repuesto LC400V, pieza N°9908. Elprecio sugerido de
venta al por menor durante 2003 es de $39,95 EE.UU./$49,95
CanadA. Precios sujetos a cambio sin previo aviso.
• El producto es para uso con agua fria L3nicamente.
• No usar con agua que no sea microbiol6gicamente segura o
de calidad desconocida sin desinfectarla adecuadamente
antes o despues del sistema. Pueden usarse sistemas
certificados para la reducci6n de quistes en aguas
desinfectadas que puedan contener quistes filtrables.
• Favor de ver la portada o la secci6n "Accesorios" para
obtener el nombre, direcci6n y nOmero telef6nico del
fabricante.
• Favor de ver la secci6n "Garantia" para verificar la garantia
limitada del fabricante.
Pautas de aplicacibn/Par&metros para el suministro de agua
Suministro de agua Municipal o de pozo
Presi6n del agua 39 - 120 Ibs./pulg. 2 (207 - 827 kPa)
Temperatura del agua 33 ° - 1O0°F (0,6 ° - 37,8 ° C)
Flujo nominal de servicio 0,5 gpm (1,9 Wmin.) @ 69 Ibs./pulg.
*Tamafio de las particulas clase I: >0,5 a <1 um
**El requisito de prueba es de cuando menos t00.000 particulas/ml de Polvo Fino de prueba AC.
***Estos contaminantes no se encuentran neeesariamente en su suministro de agua. El desempeSo puede variar dependiendo de las condiciones del
agua local.
.... Fibras mayores de 10 um de Iongitud
*****Basado en la filtraci6n de quistes de Cryptosporidium parvum
® NSF es una marca registrada de NSF International.
52
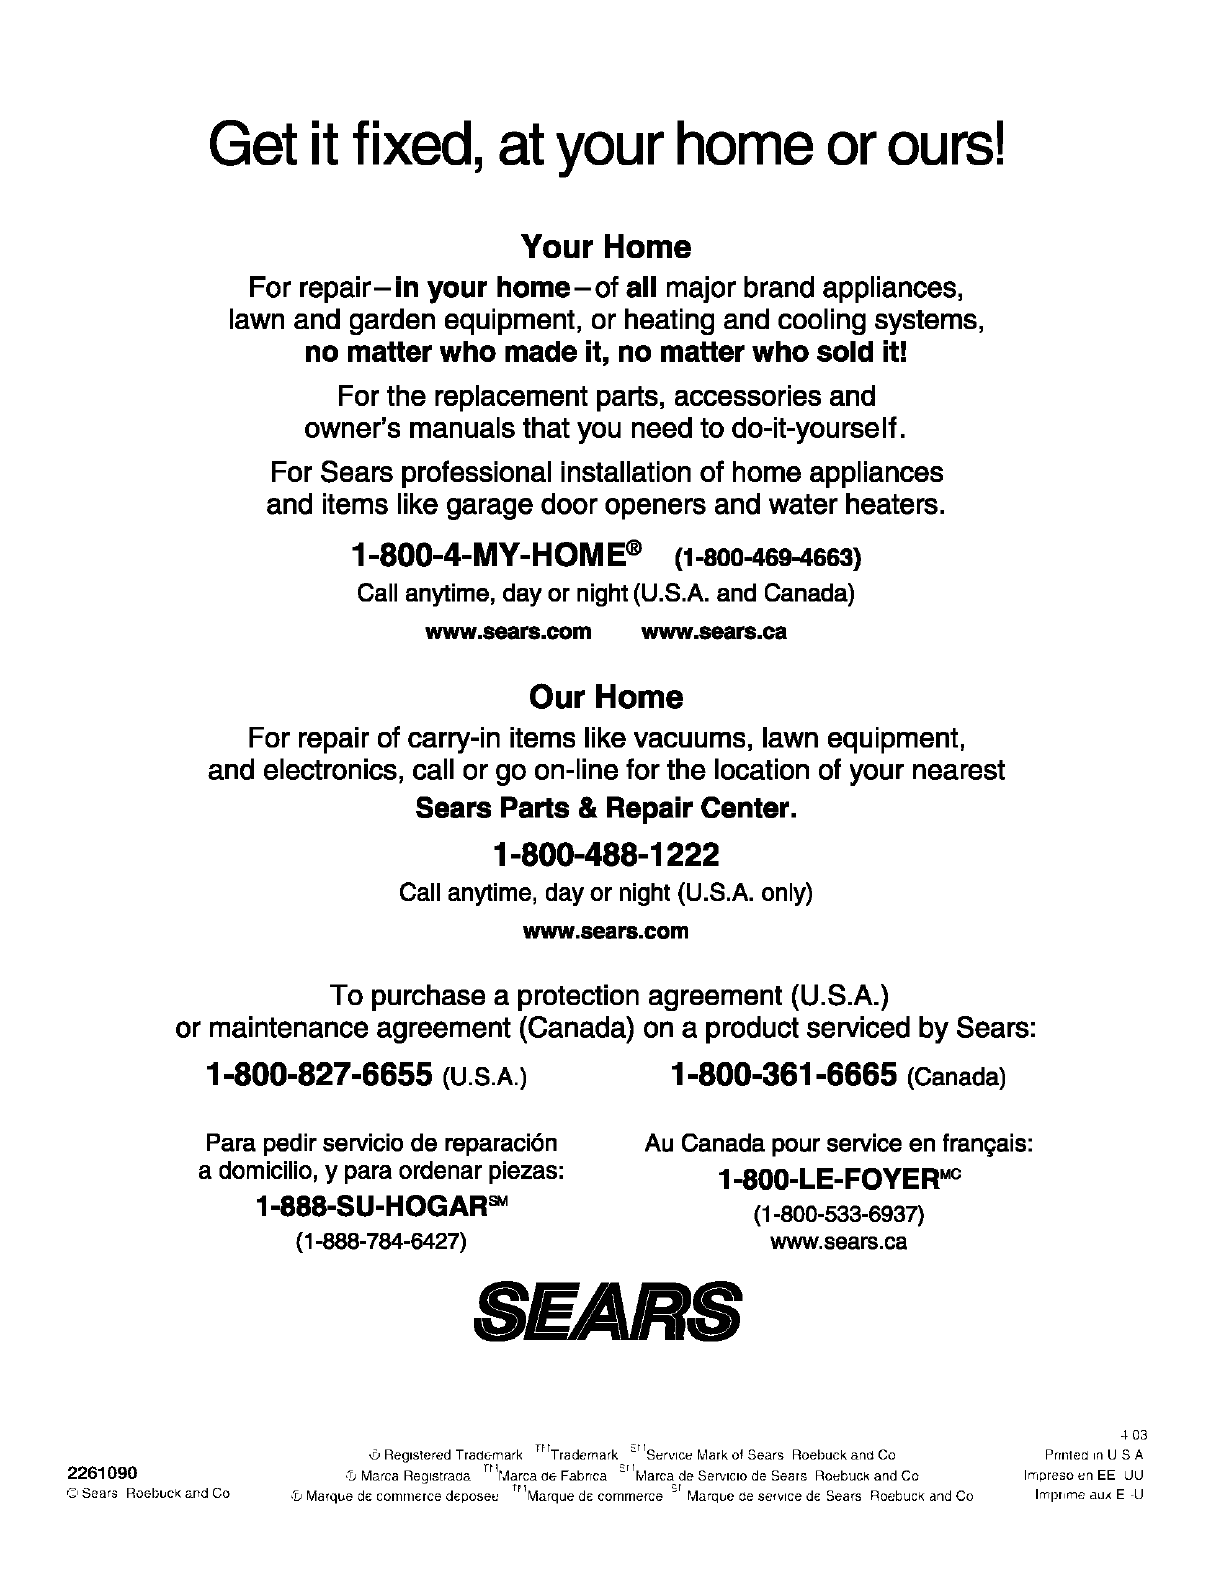
Get it fixed, at your home or ours!
Your Home
For repair-in your home-of all major brand appliances,
lawn and garden equipment, or heating and cooling systems,
no matter who made it, no matter who sold it!
For the replacement parts, accessories and
owner's manuals that you need to do-it-yourself,
For Sears professional installationof home appliances
and items like garage door openers and water heaters,
1-800-4-MY-HOME ®(1-800-469-4663)
Call anytime, day or night(U,S,A, and Canada)
www.sears.com www.sears.ca
Our Home
For repair of carry-in items like vacuums, lawn equipment,
and electronics, call or go on-line for the locationof your nearest
Sears Parts & Repair Center.
1-800-488-1222
Call anytime, day or night (U.S.A. only)
www,sears,com
To purchase aprotection agreement (U,S,A.)
or maintenance agreement (Canada) on a product serviced by Sears:
1-800-827-6655 (U.S.A.) 1-800-361-6665 (Canada)
Para pedir servicio de reparaci6n
adomicilio, ypara ordenar piezas:
1-888-SU-HOGAR _
(1-888-784-6427)
Au Canada pour service en frangais:
1-800-LE-FOYER "c
(1-800-533-6937)
www.sears.ca
SEARS
2261090
rJ Sears Roebuck and Co
_ReglsteredTrademark ;flTrademark _rIs_rvlceMarkofSears Roebuck anL_Co
,_ Marca Reglstrada Tr_Marca de Fabrrca _rIMarc a de Se_'lclo de Sears Roebuck and Co
,_uMarque dc COI,II,ICrce dcpose_ trlaarque dc commerce sr MArque ¢Jeservice dc Sears Roebuck and Co
4 03
Prrnte_ in U S A
ImpresoenEE LJLJ
Irrrprlme all,,: E U
