Kenmore 11016202691 User Manual AUTOMATIC WASHER Manuals And Guides L0712269
KENMORE Residential Washers Manual L0712269 KENMORE Residential Washers Owner's Manual, KENMORE Residential Washers installation guides
User Manual: Kenmore 11016202691 11016202691 KENMORE AUTOMATIC WASHER - Manuals and Guides View the owners manual for your KENMORE AUTOMATIC WASHER #11016202691. Home:Laundry & Garment Care Parts:Kenmore Parts:Kenmore AUTOMATIC WASHER Manual
Open the PDF directly: View PDF ![]() .
.
Page Count: 72
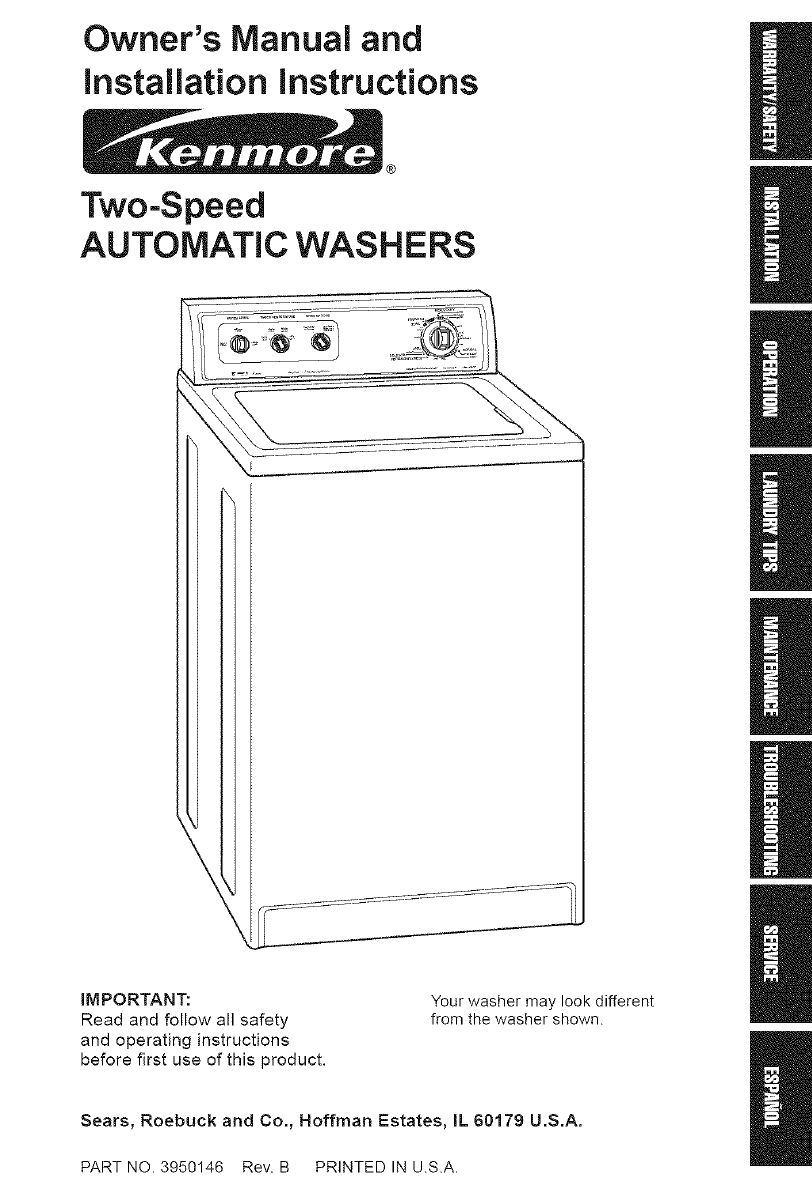
Owner's Manual and
installation instructions
®
Two-Speed
AUTOMATIC WASHERS
IMPORTANT:
Read and follow all safety
and operating instructions
before first use of this product.
Your washer may look different
from the washer shown.
Sears, Roebuck and Co., Hoffman Estates, IL 60179 U.S.A.
PART NO. 3950146 Rev. B PRINTED IN U.S.A.
B
m
BEFORE USING YOUR NEW WASHER
SEARS AUTOMATIC WASHER WARRANTY
IMPORTANT SAFETY iNSTRUCTiONS
INSTALLATION INSTRUCTIONS
OPERATING YOUR WASHER
LAUNDRY TIPS
CARING FOR YOUR WASHER
TROUBLESHOOTiNG
SEARS MAINTENANCE AGREEMENT
2
3
4
5
2O
28
30
31
35
Please read this manual. It will help
you install and operate your new
Kenmore washer in the safest and
most economical way.
For more information about the care
and operation of Kenmore appliances
call your nearest Sears store. You will
need the complete model and serial
numbers when requesting information.
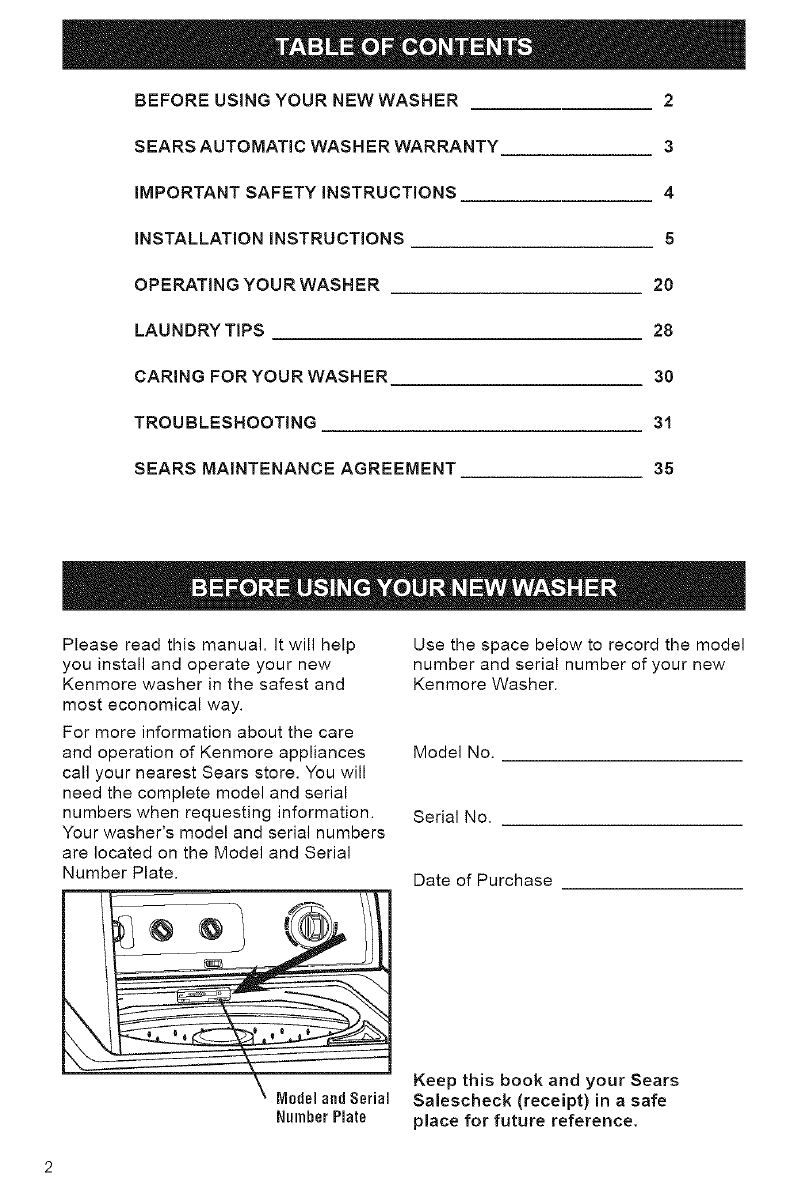
Your washer's model and serial numbers
are located on the Model and Serial
Number Plate.
Use the space below to record the model
number and serial number of your new
Kenmore Washer.
Model No.
Serial No.
Date of Purchase
\
'Model and Serial
Number Plate
Keep this book and your Sears
Salescheck (receipt) in a safe
place for future reference.
FULL 1-YEAR WARRANTY
ON MECHANICAL AND
ELECTRICAL PARTS
For one year from the date of purchase,
when the washer is installed and operated
in accordance with the instructions in
the Owner's Manual, Sears will repair or
replace any mechanical or electrical parts
in this washer, if defective in material or
workmanship.
LIMITED 5-YEAR WARRANTY
ON GEARCASE PARTS
After one year and until five years from
the date of purchase, Sears will furnish
replacement parts for any defective gear-
case parts. You will be charged for labor.
LIMITED 10-YEAR WARRANTY
ON PLASTIC TUB
After one year and until ten years from
date of purchase, Sears will furnish a
replacement plastic tub for any plastic
tub which is defective in material or work-
manship. You will be charged for labor.
If the washer is subjected to other than
private family use, the above warranty
coverage is effective for only 90 days.
WARRANTY SERVICE 18 AVAILABLE
BY CONTACTING THE NEAREST
SEARS SERVICE CENTER iN THE
UNITED STATES.
This warranty applies only while this
product is in use in the United States.
This warranty gives you specific legal
rights, and you may also have other
rights which vary from state to state.
Sears Roebuck and Co., Dept. 817WA,
Hoffman Estates, IL 60179.
Your safety and the safety of others is very important.
We have provided many important safety messages in this manual
and on your appliance. Always read and obey all safety messages.
This is the safety alert symbol. This symbol alerts
you to hazards that can kill or hurt you and others.
All safety messages will be preceded by the safety
alert symbol and the word "DANGER" or "WARNING."
These words mean:
You will be killed or seriously
injured if you don't follow
instructions.
You can be killed or seriouslyinjured if you don't follow
instructions.
All safety messages will identify the hazard, tell you how to reduce the
chance of injury, and tell you what can happen if the instructions are
not followed.
YOUR SAFETY IS IMPORTANT TO US
WARNING: To reduce the risk of fire,
electric shock, or injury to persons
when using your washer, follow basic
precautions, including the following:
• Read all instructions before using
the washer.
• Do not wash articles that have been
previously cleaned in, washed in, soaked
in, or spotted with gasoline, dry-cleaning
solvents, other flammable or explosive
substances as they give off vapors that
could ignite or explode.
• Do not add gasoline, dry-cleaning
solvents, or other flammable or explosive
substances to the wash water. These
substances give off vapors that could
ignite or explode.
• Under certain conditions, hydrogen gas
may be produced in a hot water system
that has not been used for 2 weeks or
more. HYDROGEN GAS IS EXPLOSIVE.
If the hot water system has not been
used for such a period, before using a
washing machine, turn on all hot water
faucets and let the water flow from each
for several minutes. This will release any
accumulated hydrogen gas. As the gas is
flammable, do not smoke or use an open
flame during this time.
• Do not allow children to play on or in the
washer. Close supervision of children is
necessary when the washer is used near
children.
• Before the washer is removed from
service or discarded, remove the lid.
• Do not reach into the washer if the tub
or agitator is moving.
• Do not install or store this washer where
it will be exposed to the weather.
• Do not tamper with controls.
• Do not repair or replace any part of the
washer or attempt any servicing unless
specifically recommended in the Owner's
Manual or in published user-repair
instructions that you understand and
have the skills to carry out.
SAVE THESE INSTRUCTIONS
IMPORTANT: Observe all governing codes and ordinances.
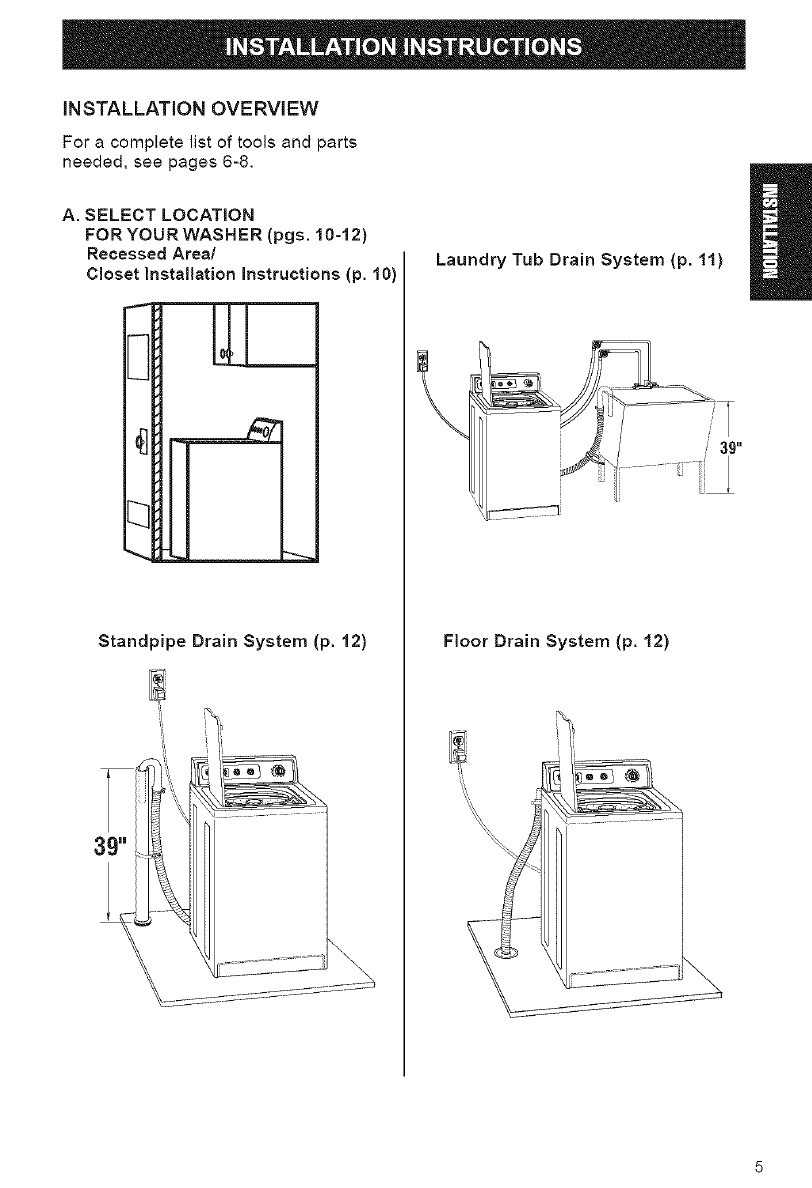
INSTALLATION OVERVIEW
For a complete list of tools and parts
needed, see pages 6-8.
A. SELECT LOCATION
FOR YOUR WASHER (pgs. 10-12)
Recessed Areal
Closet installation instructions (p. 10)
Standpipe Drain System (p. 12)
39"
\
\
Laundry Tub Drain System (p. 11)
T=.=.=.=-=-=-=-_
Floor Drain System (p. 12)
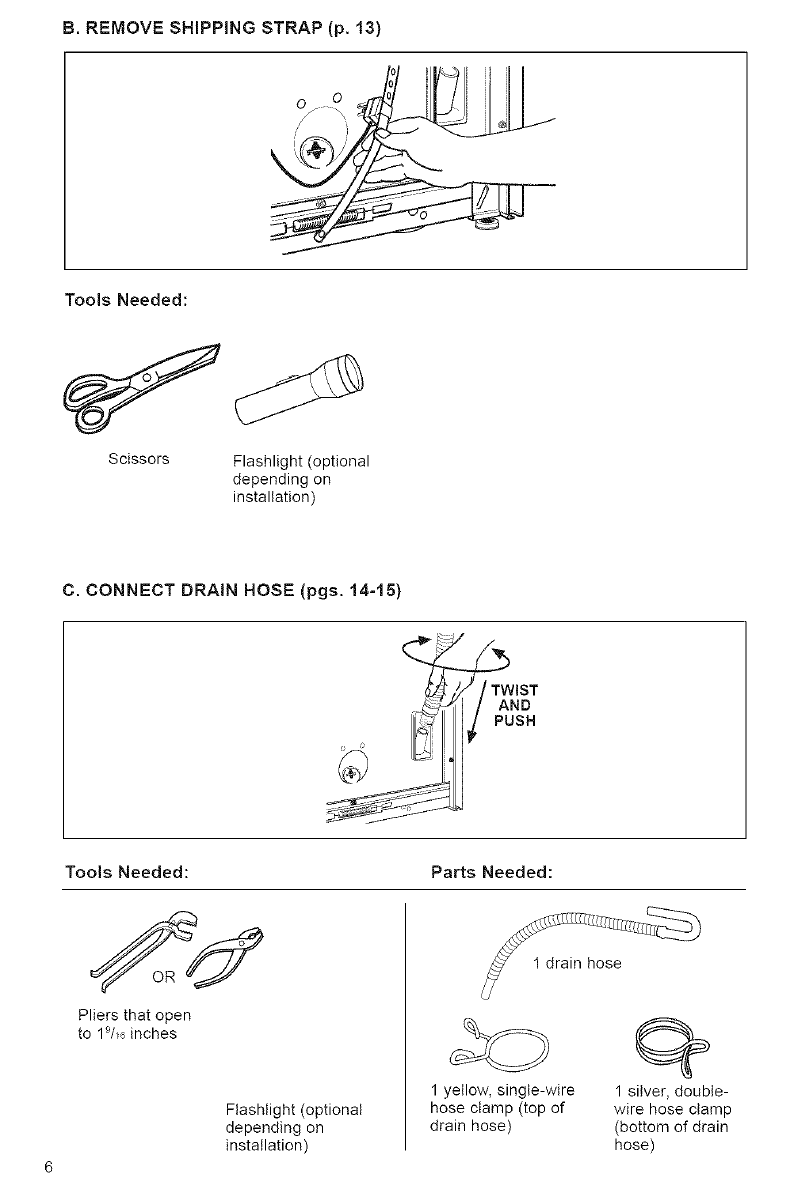
B. REMOVE SHIPPING STRAP (p. 13)
Tools Needed:
Scissors Flashlight (optional
depending on
installation)
C, CONNECT DRAIN HOSE (pgs, 14-15)
__/TWIST
_>'1 /AND
Tools Needed: Parts Needed:
Pliers that open
to 1_/, inches
Flashlight (optional
depending on
installation)
1 yellow, single-wire
hose clamp (top of
drain hose)
1 silver, double-
wire hose clamp
(bottom of drain
hose)
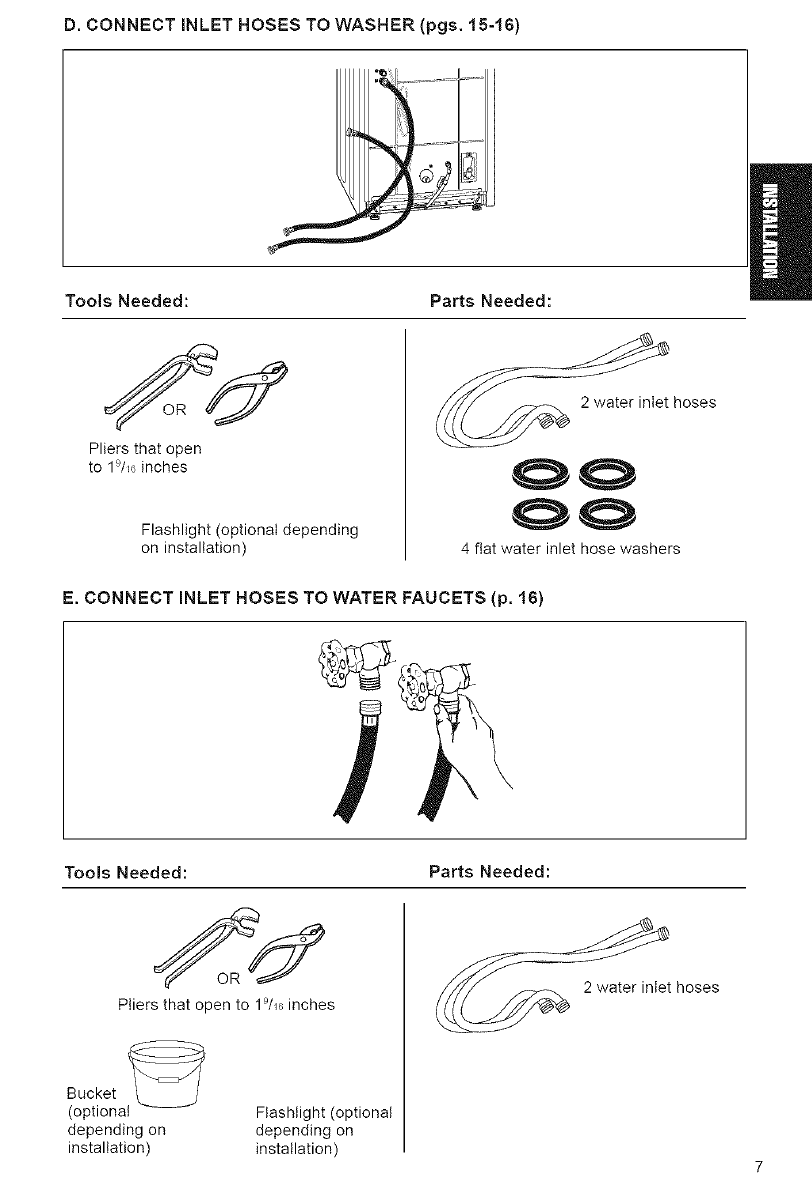
D. CONNECT INLET HOSES TO WASHER (pgs. 15-16)
l:_ ...... ]....
Tools Needed: Parts Needed:
Pliers that open
to 19/_6inches
Flashlight (optional depending
on installation)
2 water inlet hoses
4 fiat water inlet hose washers
E. CONNECT INLET HOSES TO WATER FAUCETS (p, 16)
Tools Needed: Parts Needed:
Pliers that open to 19h6 inches
Bucket ,_
(optional Flashlight (optional
depending on depending on
installation) installation)
2 water inlet hoses
F. SECURE DRAIN HOSE (p. 17)
Tools Needed: Parts Needed:
Flashlight (optional
depending on
installation)
Shipping strap with fastener
G. LEVEL WASHER (p. 18)
Tools Needed: Parts Needed:
9h6-1nch open-
end wrench
Flashlight (optional
depending on installation)
Wood block
2 front leveling legs with nuts
Selectingtheproperlocationforyour
washerwillimproveitsperformance
andminimizeconcernslikewasher
walkornoise.
ELECTRICALREQUIREMENTS
120-Volt,60-Hz.,AC-only,15-or
20-amperefusedelectricalsupplyis
required.(Time-delayfuseorcircuit
breakerisrecommended.)Connectto
individualbranchcircuit.
ElectricalShockHazard
Plugintoagrounded3-prong
outlet.
Donotremovegroundprong.
Do not use an adapter.
Do not use an extension cord.
Failure to follow these instructions
can result in death, fire, or
electrical shock.
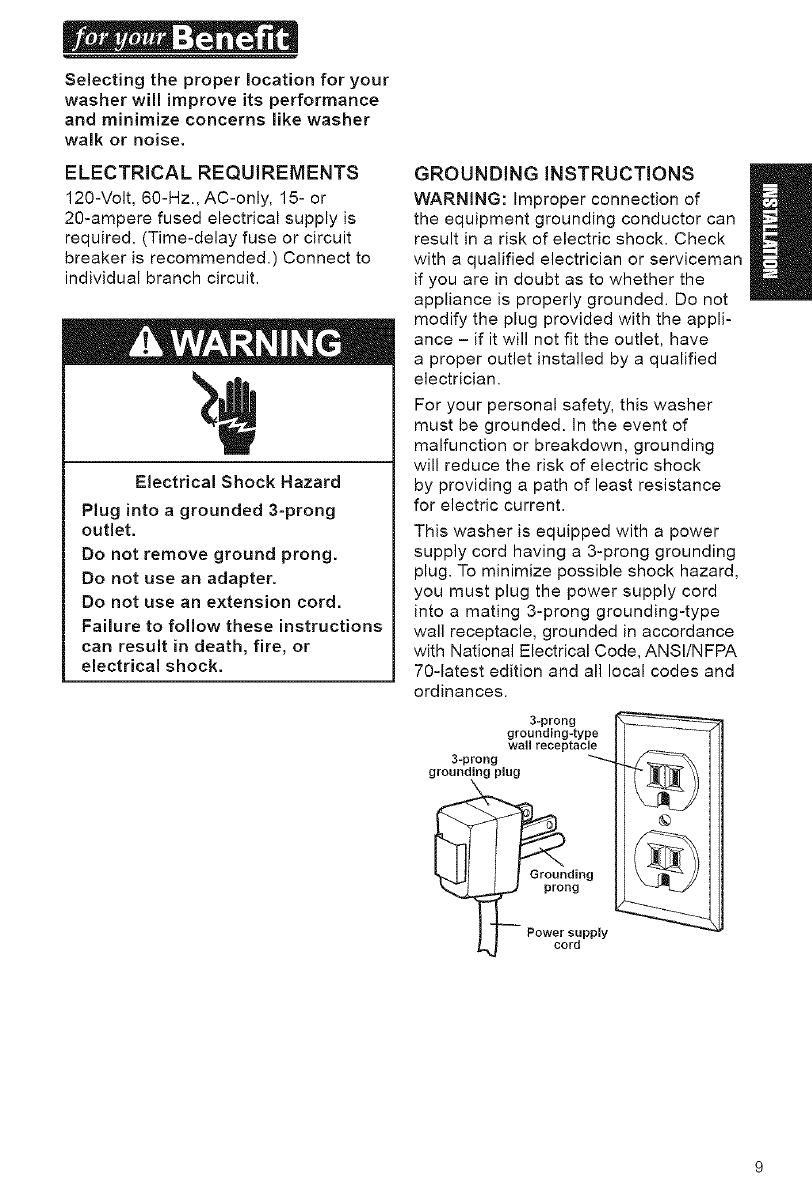
GROUNDING INSTRUCTIONS
WARNING: Improper connection of
the equipment grounding conductor can
result in a risk of electric shock. Check
with a qualified electrician or serviceman
if you are in doubt as to whether the
appliance is properly grounded. Do not
modify the plug provided with the appli-
ance - if it will not fit the outlet, have
a proper outlet installed by a qualified
electrician.
For your personal safety, this washer
must be grounded. In the event of
malfunction or breakdown, grounding
will reduce the risk of electric shock
by providing a path of least resistance
for electric current.
This washer is equipped with a power
supply cord having a 3-prong grounding
plug. To minimize possible shock hazard,
you must plug the power supply cord
into a mating 3-prong grounding-type
wall receptacle, grounded in accordance
with National Electrical Code, ANSI/NFPA
70-latest edition and all local codes and
ordinances.
3-prong
grounding-type
wail receptacle
3-prong
grounding plug
Grounding
prong
Power supply
©
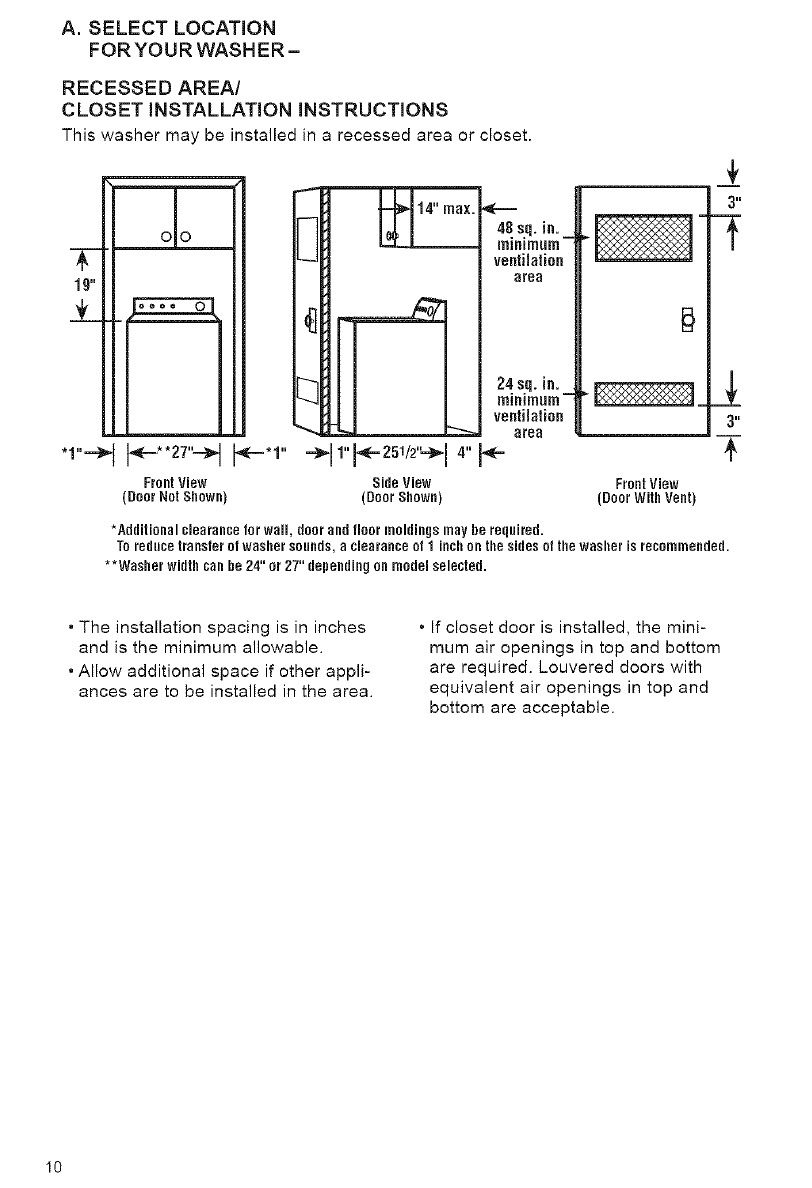
A. SELECT LOCATION
FOR YOU R WASHER -
RECESSED AREAl
CLOSET iNSTALLATiON iNSTRUCTiONS
This washer may be installed in a recessed area or closet.
48sq. in.
minimum-
ventilation
area
I}
/
24 sq. in. .L
minimum -
ventilation 3"
area
÷4
FrontView
(DoorWithVent)
*Additionalclearanceforwall, door andfloor moldings mayhe required.
Toreducetransferoiwashersounds,a clearanceol 1inchon thesidesof the washeris recomlnended.
**Washerwidth canhe24"or27"dependingonmodelselected.
* The installation spacing is in inches
and is the minimum allowable.
* Allow additional space if other appli-
ances are to be installed in the area.
* If closet door is installed, the mini-
mum air openings in top and bottom
are required. Louvered doors with
equivalent air openings in top and
bottom are acceptable.
I0
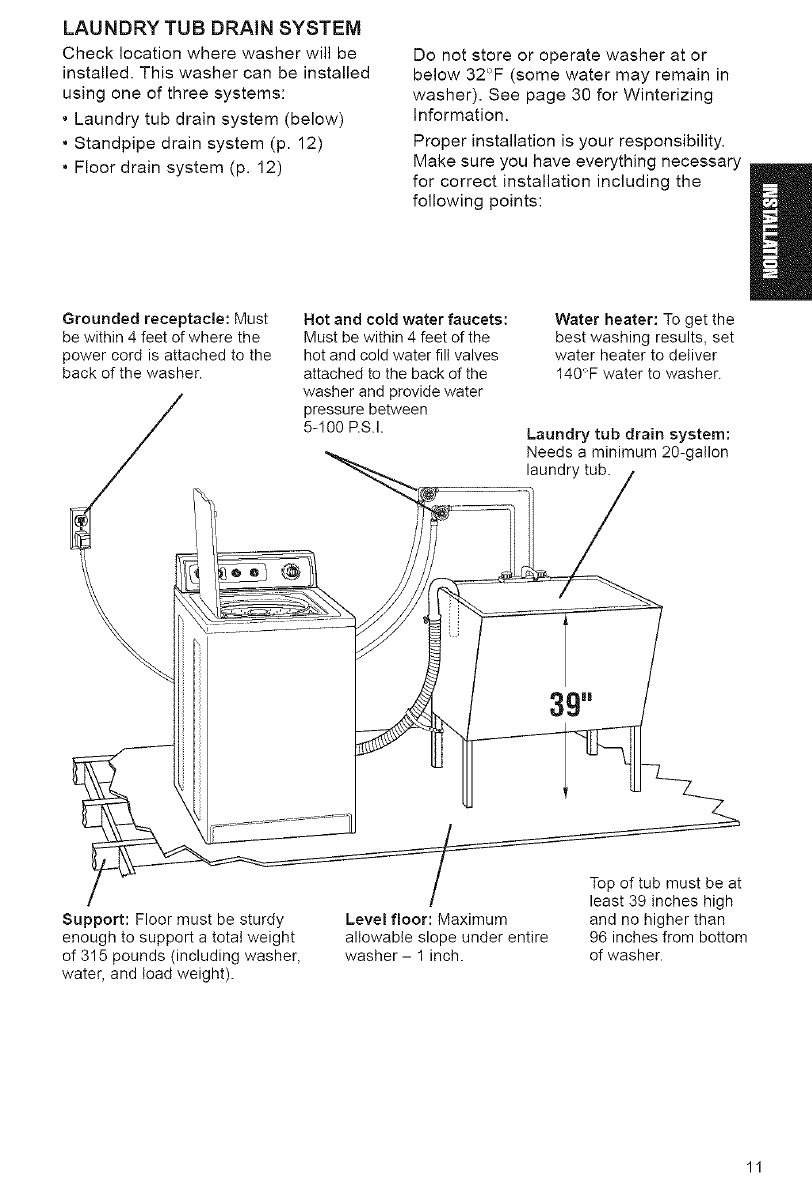
LAUNDRY TUB DRAIN SYSTEM
Check location where washer will be
installed. This washer can be installed
using one of three systems:
• Laundry tub drain system (below)
• Standpipe drain system (p. 12)
• Floor drain system (p. 12)
Do not store or operate washer at or
below 32°F (some water may remain in
washer). See page 30 for Winterizing
information.
Proper installation is your responsibility.
Make sure you have everything necessary
for correct installation including the
following points:
Grounded receptacle: Must
be within 4 feet of where the
power cord is attached to the
back of the washer.
Hot and cold water faucets:
Must be within 4 feet of the
hot and cold water fill valves
attached to the back of the
washer and provide water
pressure between
5-I00 RS.I.
Water heater: To get the
best washing results, set
water heater to deliver
I40)F water to washer.
Laundry tub drain system:
Needs a minimum 20-gallon
laundry tub.
7_ =- --==,........
__________-------
Support: Floor must be sturdy
enough to support a total weight
of 315 pounds (including washer,
water, and toad weight).
Level floor: Maximum
allowable slope under entire
washer- I inch.
Top of tub must be at
least 39 inches high
and no higher than
96 inches from bottom
of washer.
11

ALTERNATE LOCATIONS-
STANDPIPE AND FLOOR DRAIN SYSTEMS
Siphon break: Must be purchased
separately. See chart below.
Standpipe drain system: Needs a two-inch
minimum diameter standpipe with minimum
carry-away capacity of 17 gallons per minute.
Top of standpipe must be at least 39 inches
high and no higher than 96 inches from
bottom of washer.
Floor drain system: Requires a siphon
break, see chart below. A minimum carry-
away capacity of 17 gallons per minute is
required.
If you have: You will need to buy:
Laundry tub or standpipe Sump pump system
higher than 96 inches (if not already available)
1-inch diameter standpipe 2-inch diameter to 1-inch diameter
standpipe adapter, Part No. 3363920
Overhead sewer Standard 20 gallon, 39-inch high drain
tub or utility sink and sump pump
(available from local plumbing suppliers)
Floor drain Siphon break, Part No. 285320;
additional drain hose, Part No. 3357090;
and Connector Kit, Part No. 285442
Parts listed are available from your local Sears store or Sears Service Center.
Call 1-800-366-PART (1-800-366-7278).
I2

B. REMOVE SHIPPING STRAP
Removing the shipping strap is
necessary for smooth operation.
If the shipping strap is not
removed, the washer will make
excessive noise.
To prevent floor damage, set washer onto
cardboard before moving across floor.
Move washer close to its final location.
STEP 1. Read, then remove the label
over the electrical plug and shipping strap.
STEP 2. Pull the yellow shipping strap
completely out of the washer. There
should be three cotter pins on the end
of the shipping strap when it is pulled
out of the washer. The electrical plug is
attached to this shipping strap.
STEP 3. Pull firmly to remove the
end of the shipping strap that remains
pinned to the back of washer. This will
release the rear self-leveling legs.
Pin PULL
Electrical plug
ippmg s rap
STEP 4. Cut the shipping strap about
16 inches from plug end. Look for the
words "CUT HERE." Remove shipping
strap from the electrical plug.
Pin
NOTE: For use in securing the drain
hose, save the end of the shipping strap
that does not have the three cotter pins.
Discard the rest.
13
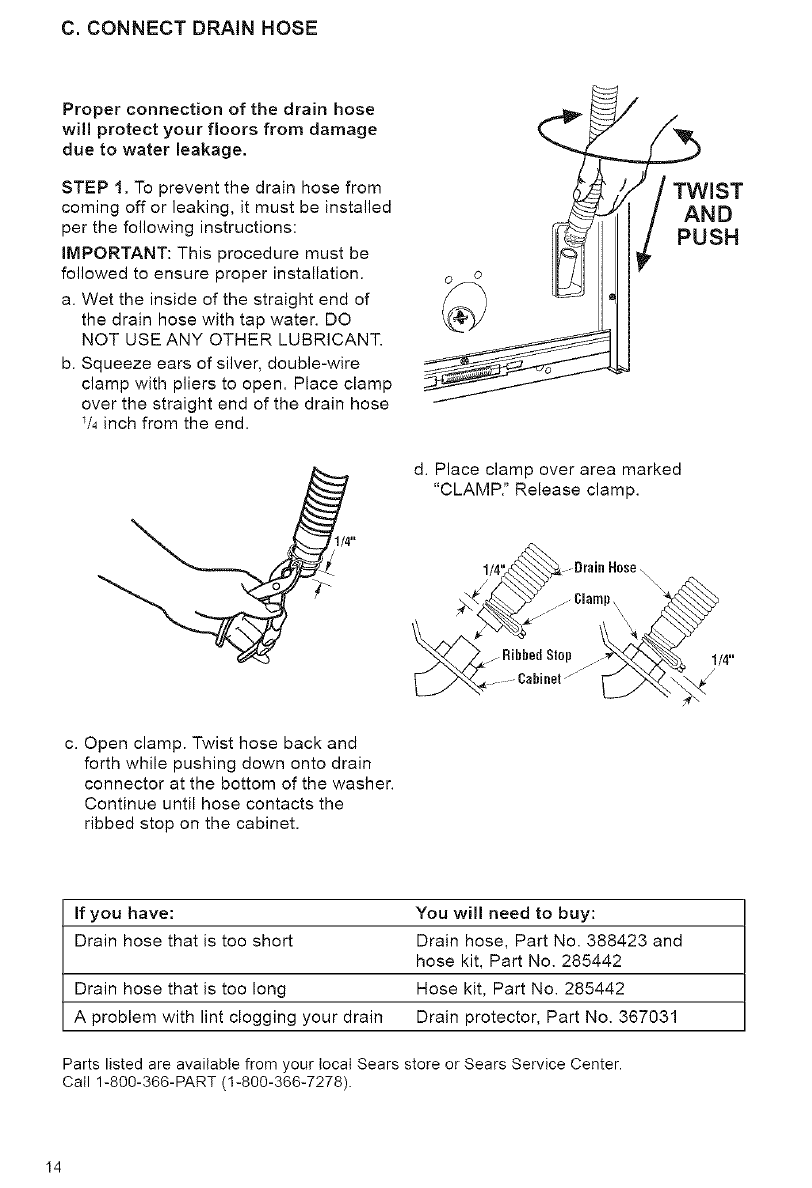
C. CONNECT DRAIN HOSE
Proper connection of the drain hose
wil! protect your floors from damage
due to water leakage,
STEP 1. To prevent the drain hose from
coming off or leaking, it must be installed
per the following instructions:
IMPORTANT: This procedure must be
followed to ensure proper installation.
a. Wet the inside of the straight end of
the drain hose with tap water. DO
NOT USE ANY OTHER LUBRICANT.
b. Squeeze ears of silver, double-wire
clamp with pliers to open. Place clamp
over the straight end of the drain hose
1/4 inch from the end.
d. Place clamp over area marked
"CLAMP." Release clamp.
c. Open clamp. Twist hose back and
forth while pushing down onto drain
connector at the bottom of the washer.
Continue until hose contacts the
ribbed stop on the cabinet.
If you have: You will need to buy:
Drain hose that is too short Drain hose, Part No. 388423 and
hose kit, Part No. 285442
Drain hose that is too long Hose kit, Part No. 285442
A problem with lint clogging your drain Drain protector, Part No. 367031
Parts listed are available from your local Sears store or Sears Service Center.
Catl 1-800-366-PART (1-800-366-7278).
I4
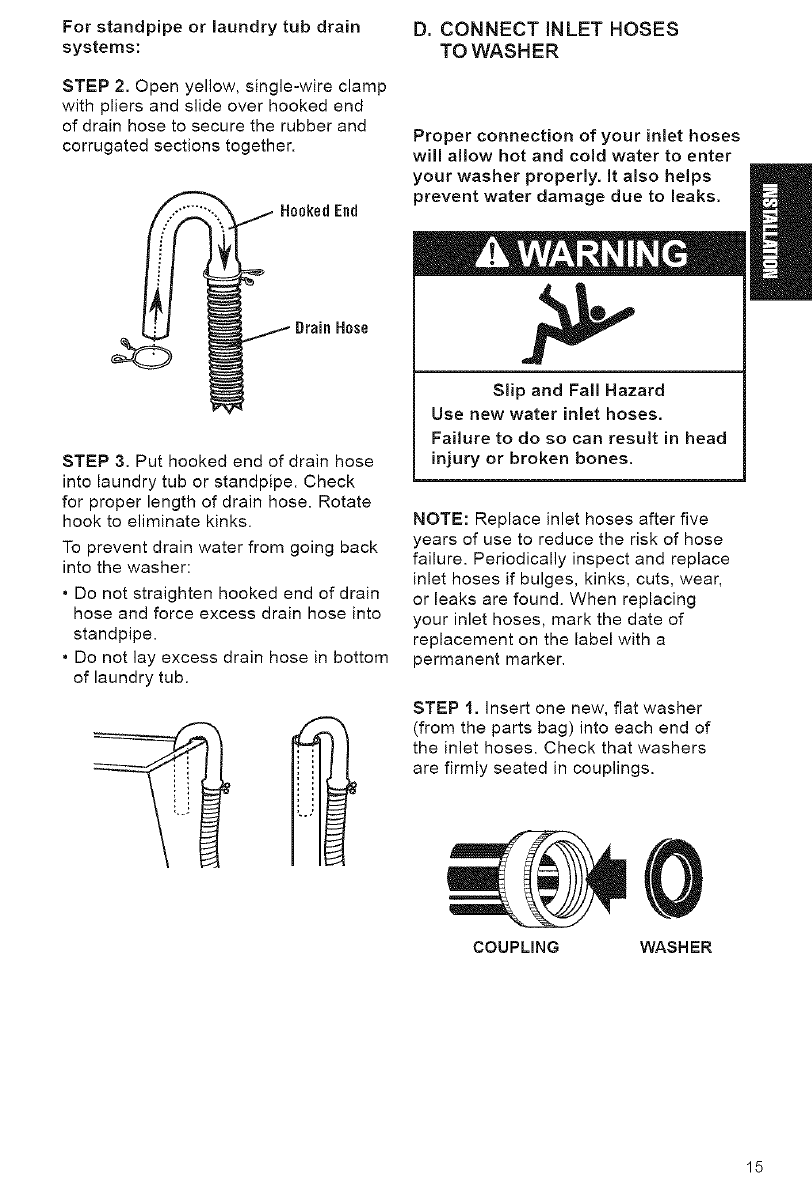
Forstandpipeorlaundry tub drain
systems:
STEP 2. Open yellow, single-wire clamp
with pliers and slide over hooked end
of drain hose to secure the rubber and
corrugated sections together.
HookedEnd
D. CONNECTINLETHOSES
TOWASHER
Proper connection of your inlet hoses
will allow hot and cold water to enter
your washer properly, it also helps
prevent water damage due to leaks.
DrainHose
STEP 3. Put hooked end of drain hose
into laundry tub or standpipe. Check
for proper length of drain hose. Rotate
hook to eliminate kinks.
To prevent drain water from going back
into the washer:
• Do not straighten hooked end of drain
hose and force excess drain hose into
standpipe.
• Do not lay excess drain hose in bottom
of laundry tub.
Slip and Fall Hazard
Use new water inlet hoses.
Failure to do so can result in head
injury or broken bones.
NOTE: Replace inlet hoses after five
years of use to reduce the risk of hose
failure. Periodically inspect and replace
inlet hoses if bulges, kinks, cuts, wear,
or leaks are found. When replacing
your inlet hoses, mark the date of
replacement on the label with a
permanent marker.
STEP 1. Insert one new, flat washer
(from the parts bag) into each end of
the inlet hoses. Check that washers
are firmly seated in couplings.
COUPLING WASHER
15
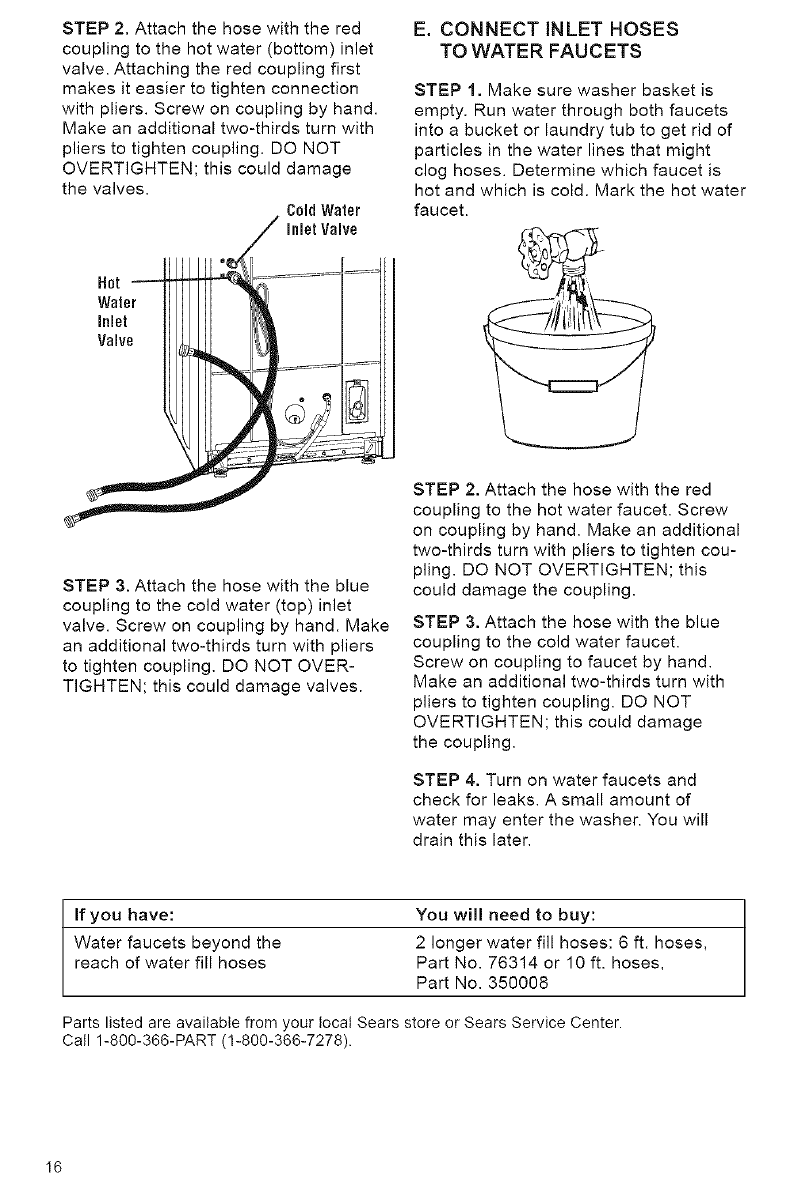
STEP2.Attachthehosewiththered
couplingtothehotwater(bottom)inlet
valve.Attachingtheredcouplingfirst
makesiteasiertotightenconnection
withpliers.Screwoncouplingbyhand.
Makeanadditionaltwo-thirdsturnwith
plierstotightencoupling.DONOT
OVERTIGHTEN;thiscoulddamage
thevalves. CaldWater
Inlet Valve
STEP 3. Attach the hose with the blue
coupling to the cold water (top) inlet
valve. Screw on coupling by hand. Make
an additional two-thirds turn with pliers
to tighten coupling. DO NOT OVER-
TIGHTEN; this could damage valves.
E. CONNECT INLET HOSES
TO WATER FAUCETS
STEP 1. Make sure washer basket is
empty. Run water through both faucets
into a bucket or laundry tub to get rid of
particles in the water lines that might
clog hoses. Determine which faucet is
hot and which is cold. Mark the hot water
faucet.
STEP 2. Attach the hose with the red
coupling to the hot water faucet. Screw
on coupling by hand. Make an additional
two-thirds turn with pliers to tighten cou-
pling. DO NOT OVERTIGHTEN; this
could damage the coupling.
STEP 3. Attach the hose with the blue
coupling to the cold water faucet.
Screw on coupling to faucet by hand.
Make an additional two-thirds turn with
pliers to tighten coupling. DO NOT
OVERTIGHTEN; this could damage
the coupling.
STEP 4. Turn on water faucets and
check for leaks. A small amount of
water may enter the washer. You will
drain this later.
If you have: You will need to buy:
Water faucets beyond the 2 longer water fill hoses: 6 ft. hoses,
reach of water fill hoses Part No. 76314 or 10 ft. hoses,
Part No. 350008
Parts listed are available from your local Sears store or Sears Service Center.
Call 1-800-366-PART (1-800-366-7278).
I6
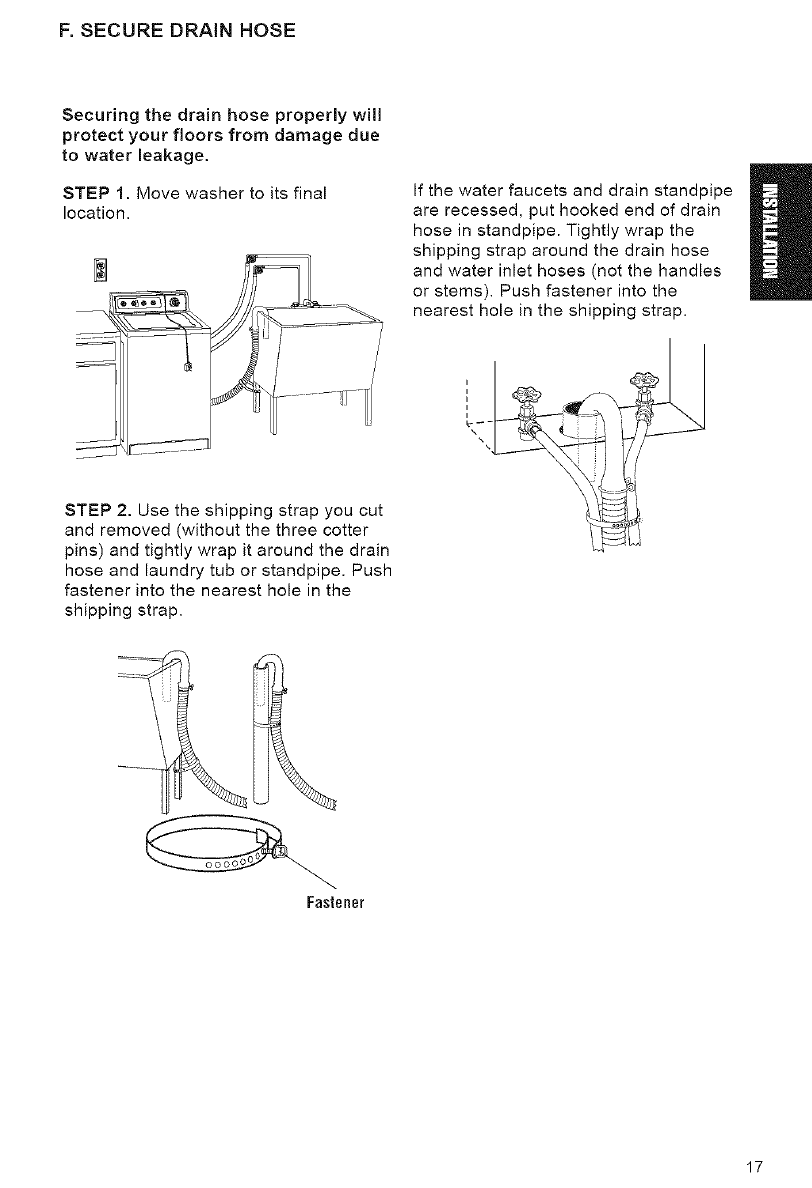
F. SECURE DRAIN HOSE
Securing the drain hose properly will
protect your floors from damage due
to water leakage.
STEP 1. Move washer to its final
location.
STEP 2. Use the shipping strap you cut
and removed (without the three cotter
pins) and tightly wrap it around the drain
hose and laundry tub or standpipe. Push
fastener into the nearest hole in the
shipping strap.
m
If the water faucets and drain standpipe
are recessed, put hooked end of drain
hose in standpipe. Tightly wrap the
shipping strap around the drain hose
and water inlet hoses (not the handles
or stems). Push fastener into the
nearest hole in the shipping strap.
Fastener
17
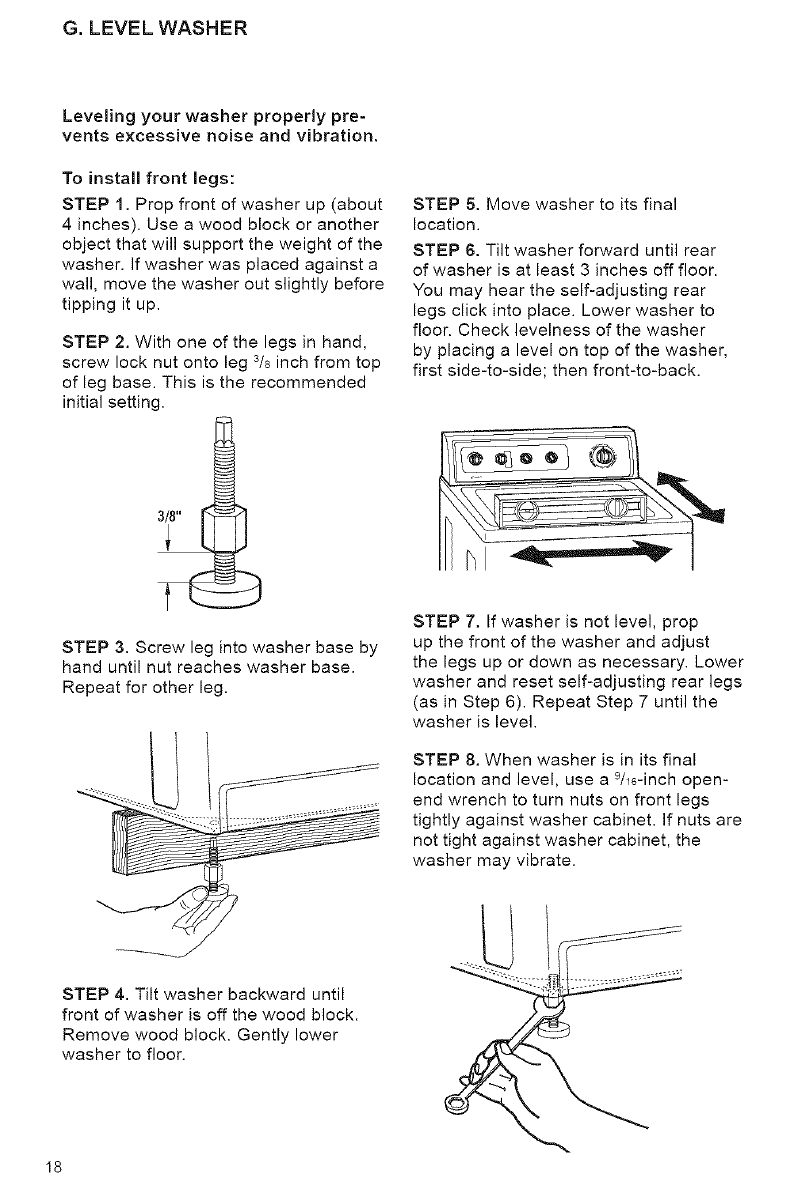
G. LEVEL WASHER
Leveling your washer properly pre-
vents excessive noise and vibration.
To install front legs:
STEP 1. Prop front of washer up (about
4 inches). Use a wood block or another
object that will support the weight of the
washer. If washer was placed against a
wall, move the washer out slightly before
tipping it up.
STEP 2. With one of the legs in hand,
screw lock nut onto leg s/8 inch from top
of leg base. This is the recommended
initial setting.
STEP 3. Screw leg into washer base by
hand until nut reaches washer base.
Repeat for other leg.
STEP 5. Move washer to its final
location.
STEP 6. Tilt washer forward until rear
of washer is at least 3 inches off floor.
You may hear the self-adjusting rear
legs click into place. Lower washer to
floor. Check levelness of the washer
by placing a level on top of the washer,
first side-to-side; then front-to-back.
STEP 7. If washer is not level, prop
up the front of the washer and adjust
the legs up or down as necessary. Lower
washer and reset self-adjusting rear legs
(as in Step 6). Repeat Step 7 until the
washer is level.
STEP 8. When washer is in its final
location and level, use a 9/16-inch open-
end wrench to turn nuts on front legs
tightly against washer cabinet. If nuts are
not tight against washer cabinet, the
washer may vibrate.
STEP 4. Tilt washer backward until
front of washer is off the wood block.
Remove wood block. Gently lower
washer to floor.
I8
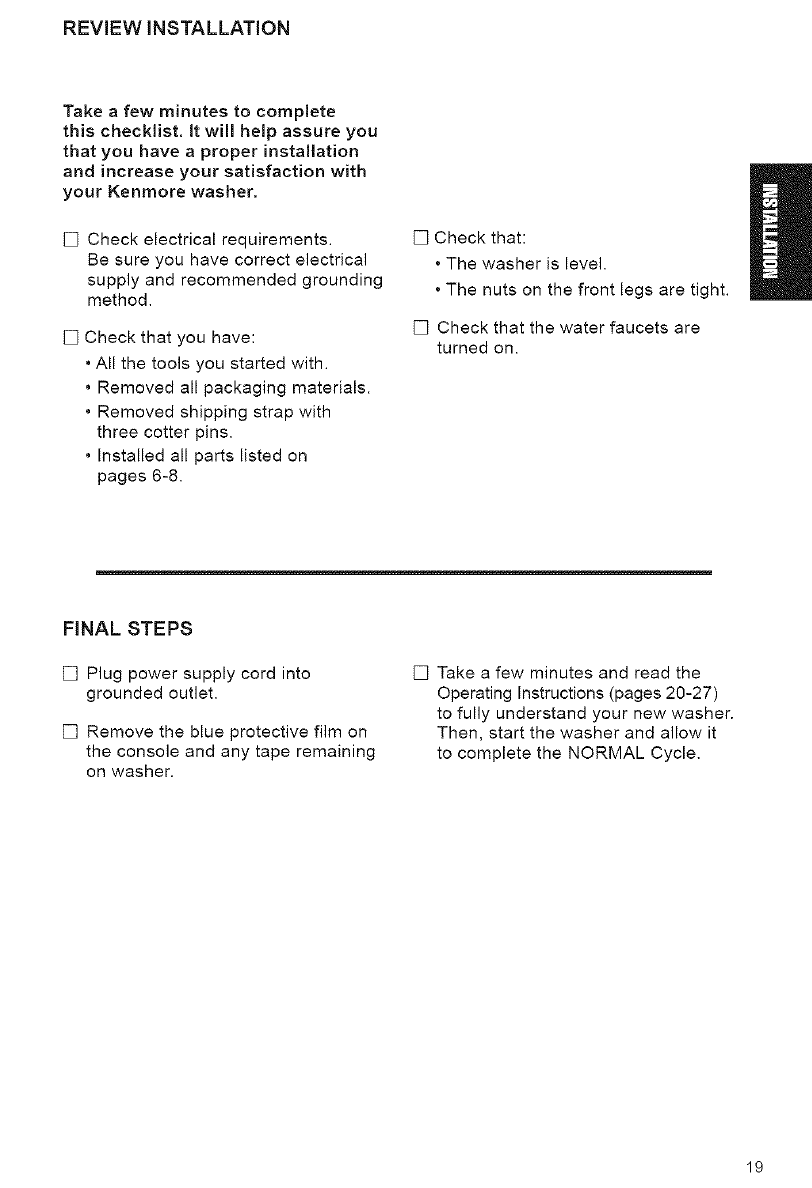
REVIEW INSTALLATION
Take a few minutes to complete
this checklist, it will help assure you
that you have a proper installation
and increase your satisfaction with
your Kenmore washer.
[] Check electrical requirements.
Be sure you have correct electrical
supply and recommended grounding
method.
[] Check that you have:
• All the tools you started with.
• Removed all packaging materials.
• Removed shipping strap with
three cotter pins.
• Installed all parts listed on
pages 6-8.
[] Check that:
• The washer is level.
• The nuts on the front legs are tight.
[] Check that the water faucets are
turned on.
FINAL STEPS
[] Plug power supply cord into
grounded outlet.
[] Remove the blue protective film on
the console and any tape remaining
on washer.
[] Take a few minutes and read the
Operating Instructions (pages 20-27)
to fully understand your new washer.
Then, start the washer and allow it
to complete the NORMAL Cycle.
19
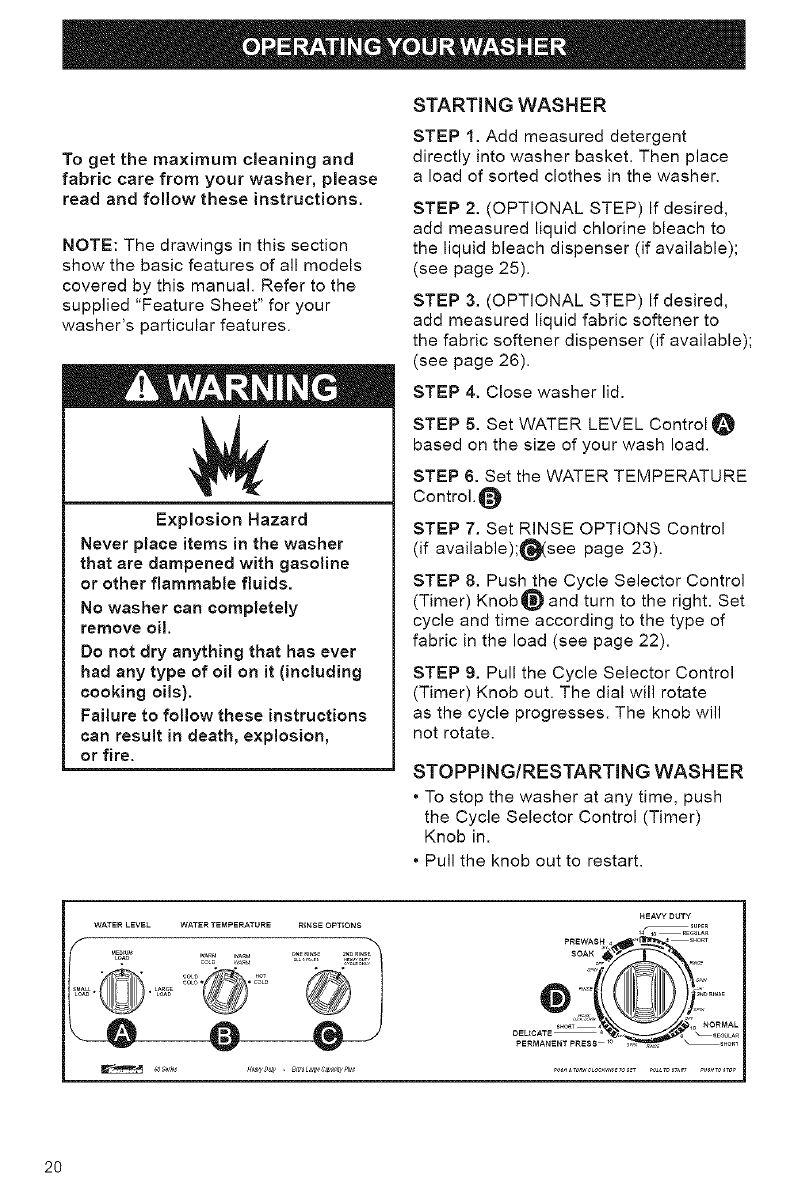
To get the maximum cleaning and
fabric care from your washer, please
read and follow these instructions.
NOTE: The drawings in this section
show the basic features of all models
covered by this manual. Refer to the
supplied "Feature Sheet" for your
washer's particular features.
Explosion Hazard
Never place items in the washer
that are dampened with gasoline
or other flammable fluids.
No washer can completely
remove oil.
Do not dry anything that has ever
had any type of oil on it (including
cooking oils).
Failure to follow these instructions
can result in death, explosion,
or fire.
STARTING WASHER
STEP 1. Add measured detergent
directly into washer basket. Then place
a load of sorted clothes in the washer.
STEP 2. (OPTIONAL STEP) If desired,
add measured liquid chlorine bleach to
the liquid bleach dispenser (if available);
(see page 25).
STEP 3. (OPTIONAL STEP) If desired,
add measured liquid fabric softener to
the fabric softener dispenser (if available);
(see page 26).
STEP 4. Close washer lid.
STEP 5. Set WATER LEVEL Control O
based on the size of your wash load.
STEP 6. Set the WATER TEMPERATURE
Control._
STEP 7. Set RINSE OPTIONS Control
(if available);_(see page 23).
STEP 8. Push the Cycle Selector Control
(Timer) Knob_ and turn to the right. Set
cycle and time according to the type of
fabric in the load (see page 22).
STEP g. Pull the Cycle Selector Control
(Timer) Knob out. The dial will rotate
as the cycle progresses. The knob will
not rotate.
STOPPING/RESTARTING WASHER
• To stop the washer at any time, push
the Cycle Selector Control (Timer)
Knob in.
• Pull the knob out to restart.
HEAVYDUTYsupE R
P?wAs,_,,__4, _E_T_
PERMANENT PRESS 1_ ,_ _SHO_'
2O
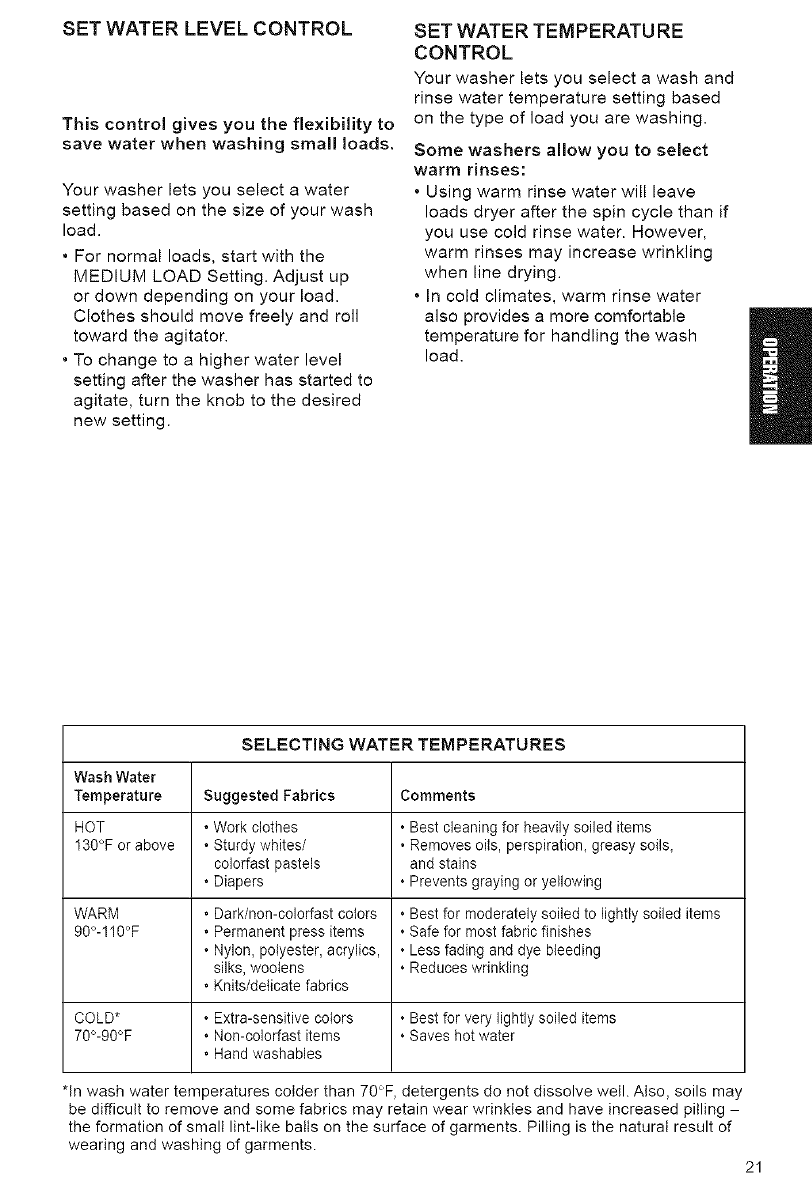
SET WATER LEVEL CONTROL
This control gives you the flexibility to
save water when washing small loads.
Your washer lets you select a water
setting based on the size of your wash
load.
• For normal loads, start with the
MEDIUM LOAD Setting. Adjust up
or down depending on your load.
Clothes should move freely and roll
toward the agitator.
• To change to a higher water level
setting after the washer has started to
agitate, turn the knob to the desired
new setting.
SET WATER TEMPERATU RE
CONTROL
Your washer lets you select a wash and
rinse water temperature setting based
on the type of load you are washing.
Some washers allow you to select
warm rinses:
• Using warm rinse water will leave
loads dryer after the spin cycle than if
you use cold rinse water. However,
warm rinses may increase wrinkling
when line drying.
• In cold climates, warm rinse water
also provides a more comfortable
temperature for handling the wash
load.
SELECTING WATER TEMPERATURES
Wash Water
Temperature Suggested Fabrics Comments
HOT • Work clothes •Best cleaning for heavily soiled items
130°F or above • Sturdy whites/ • Removes oils, perspiration, greasy soils,
colorfast pastels and stains
• Diapers •Prevents graying or yellowing
WARM • Dark/non-colorfast colors •Best for moderately soiled to lightly soiled items
90°-110°F • Permanent press items •Safe for most fabric finishes
• Nylon, polyester, acrylics, •Less fading and dye bleeding
silks, woolens •Reduces wrinkling
• Knits/delicate fabrics
COLD* •Extra-sensitive colors •Best for very lightly soiled items
70°-90°F • Non-colorfast items •Saves hot water
• Hand washables
*In wash water temperatures colder than 70°F detergents do not dissolve well. Also, soils may
be difficult to remove and some fabrics may retain wear wrinkles and have increased pilling -
the formation of small lint-like balls on the surface of garments. Pilling is the natural result of
wearing and washing of garments.
21
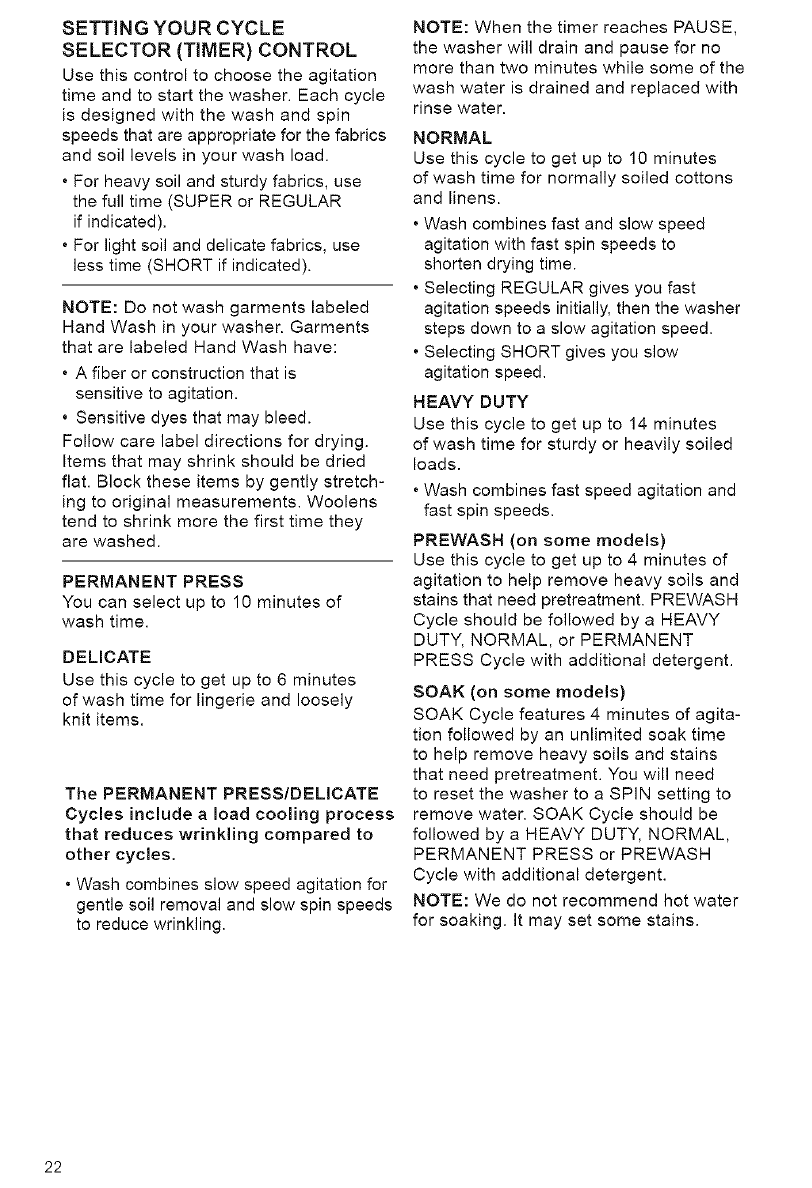
SETTINGYOURCYCLE
SELECTOR(TIMER) CONTROL
Use this control to choose the agitation
time and to start the washer. Each cycle
is designed with the wash and spin
speeds that are appropriate for the fabrics
and soil levels in your wash load.
*For heavy soil and sturdy fabrics, use
the full time (SUPER or REGULAR
if indicated).
*For light soil and delicate fabrics, use
less time (SHORT if indicated).
NOTE: Do not wash garments labeled
Hand Wash in your washer. Garments
that are labeled Hand Wash have:
• A fiber or construction that is
sensitive to agitation.
• Sensitive dyes that may bleed.
Follow care label directions for drying.
Items that may shrink should be dried
flat. Block these items by gently stretch-
ing to original measurements. Woolens
tend to shrink more the first time they
are washed.
PERMANENT PRESS
You can select up to 10 minutes of
wash time.
DELICATE
Use this cycle to get up to 6 minutes
of wash time for lingerie and loosely
knit items.
The PERMANENT PRESS/DELICATE
Cycles include a load cooling process
that reduces wrinkling compared to
other cycles.
• Wash combines slow speed agitation for
gentle soil removal and slow spin speeds
to reduce wrinkling.
NOTE: When the timer reaches PAUSE,
the washer will drain and pause for no
more than two minutes while some of the
wash water is drained and replaced with
rinse water.
NORMAL
Use this cycle to get up to 10 minutes
of wash time for normally soiled cottons
and linens.
• Wash combines fast and slow speed
agitation with fast spin speeds to
shorten drying time.
• Selecting REGULAR gives you fast
agitation speeds initially, then the washer
steps down to a slow agitation speed.
• Selecting SHORT gives you slow
agitation speed.
HEAVY DUTY
Use this cycle to get up to 14 minutes
of wash time for sturdy or heavily soiled
loads.
• Wash combines fast speed agitation and
fast spin speeds.
PREWASH (on some models)
Use this cycle to get up to 4 minutes of
agitation to help remove heavy soils and
stains that need pretreatment. PREWASH
Cycle should be followed by a HEAVY
DUTY, NORMAL, or PERMANENT
PRESS Cycle with additional detergent.
SOAK (on some models)
SOAK Cycle features 4 minutes of agita-
tion followed by an unlimited soak time
to help remove heavy soils and stains
that need pretreatment. You will need
to reset the washer to a SPIN setting to
remove water. SOAK Cycle should be
followed by a HEAVY DUTY, NORMAL,
PERMANENT PRESS or PREWASH
Cycle with additional detergent.
NOTE: We do not recommend hot water
for soaking. It may set some stains.
22
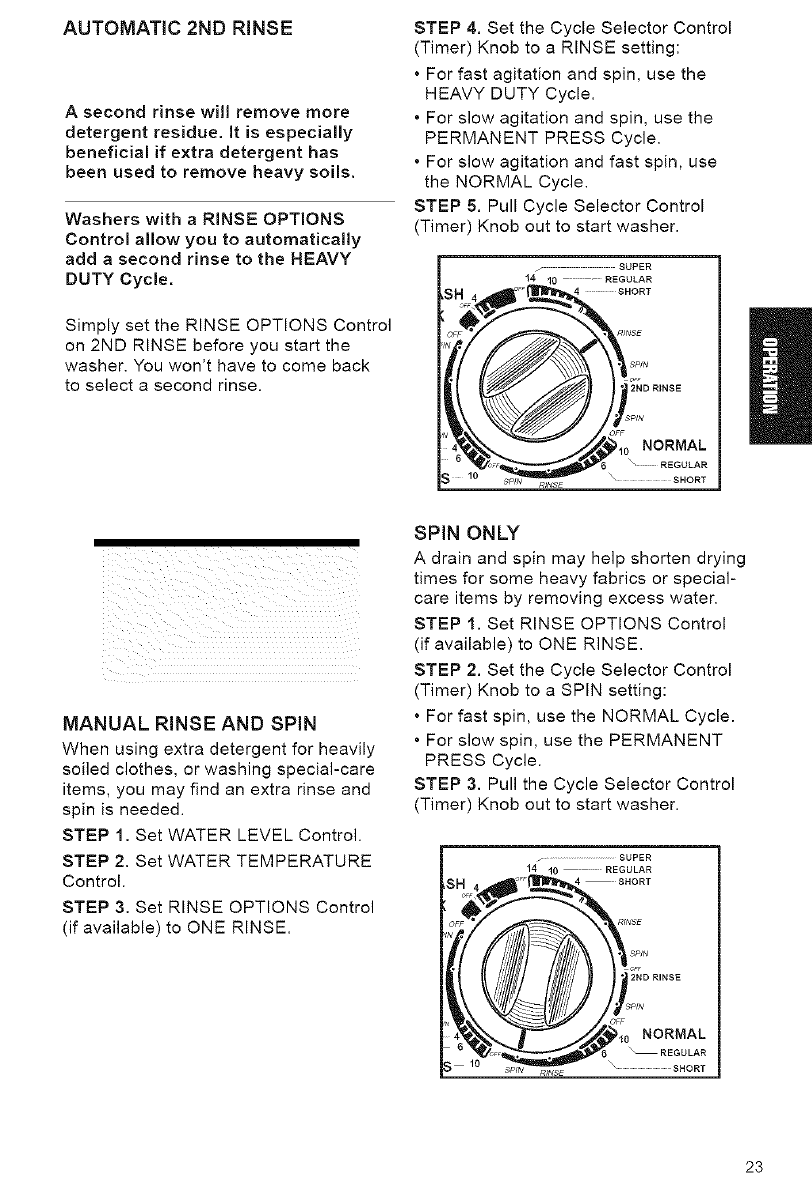
AUTOMATIC 2ND RINSE
A second rinse will remove more
detergent residue, it is especially
beneficial if extra detergent has
been used to remove heavy soils.
Washers with a RINSE OPTIONS
Control allow you to automatically
add a second rinse to the HEAVY
DUTY Cycle,
Simply set the RINSE OPTIONS Control
on 2ND RINSE before you start the
washer. You won't have to come back
to select a second rinse.
STEP 4. Set the Cycle Selector Control
(Timer) Knob to a RINSE setting:
• For fast agitation and spin, use the
HEAVY DUTY Cycle.
• For slow agitation and spin, use the
PERMANENT PRESS Cycle.
• For slow agitation and fast spin, use
the NORMAL Cycle.
STEP 5. Pull Cycle Selector Control
(Timer) Knob out to start washer.
fSUPER
14 10 REGULAR
s IIIIIIIIRE ,"
_i iii iii iii iii iii iii iii iii
MANUAL RINSE AND SPiN
When using extra detergent for heavily
soiled clothes, or washing special-care
items, you may find an extra rinse and
spin is needed.
STEP 1. Set WATER LEVEL Control.
STEP 2. Set WATER TEMPERATURE
Control.
STEP 3. Set RINSE OPTIONS Control
(if available) to ONE RINSE.
SPIN ONLY
A drain and spin may help shorten drying
times for some heavy fabrics or special-
care items by removing excess water.
STEP 1. Set RINSE OPTIONS Control
(if available) to ONE RINSE.
STEP 2. Set the Cycle Selector Control
(Timer) Knob to a SPIN setting:
• For fast spin, use the NORMAL Cycle.
• For slow spin, use the PERMANENT
PRESS Cycle.
STEP 3. Pull the Cycle Selector Control
(Timer) Knob out to start washer.
....................................SUPER
"iJ } " 2ND RINSE
._ 10 SPIN RINSE \ SHORT
23
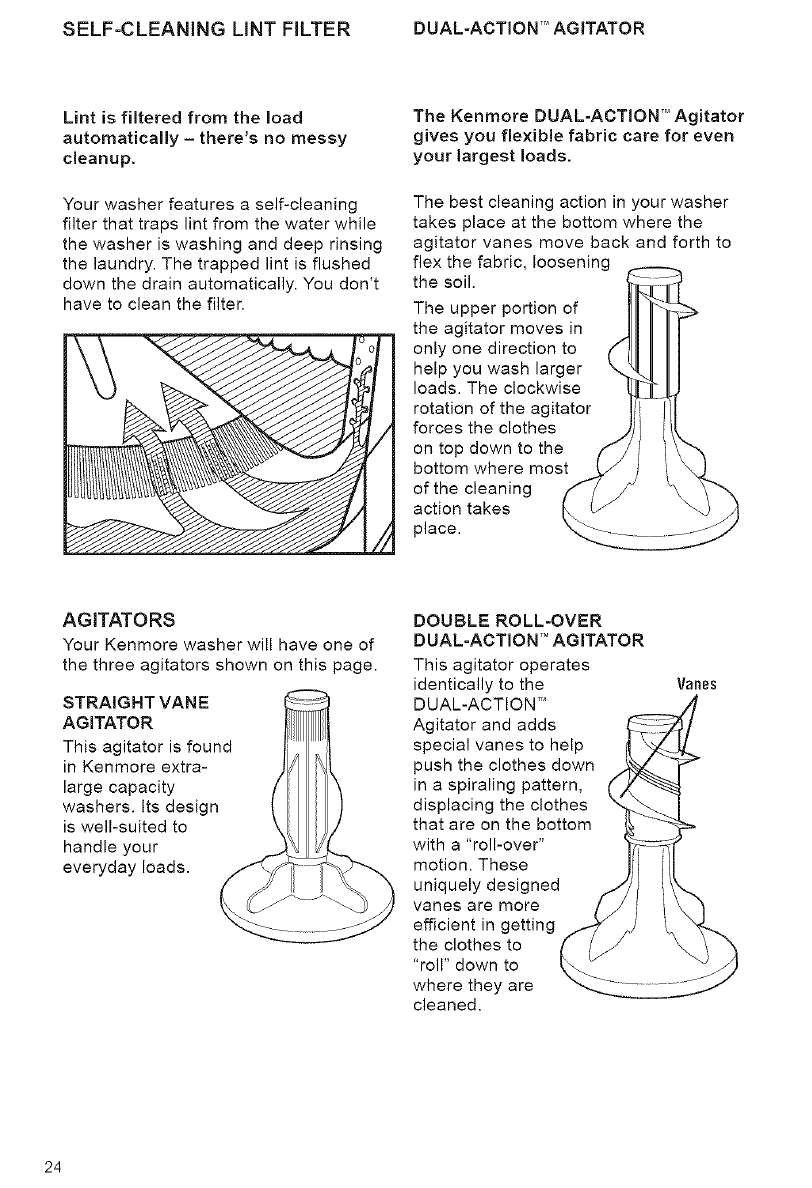
SELF-CLEANING LINT FILTER DUAL-ACTION xI"AGITATOR
Lint is filtered from the load
automatically -there's no messy
cleanup.
Your washer features a self-cleaning
filter that traps lint from the water while
the washer is washing and deep rinsing
the laundry. The trapped lint is flushed
down the drain automatically. You don't
have to clean the filter.
The Kenmore DUAL-ACTION TM Agitator
gives you flexible fabric care for even
your largest loads.
The best cleaning action in your washer
takes place at the bottom where the
agitator vanes move back and forth to
flex the fabric, loosening
the soil.
The upper portion of
the agitator moves in
only one direction to
help you wash larger
loads. The clockwise
rotation of the agitator
forces the clothes
on top down to the
bottom where most
of the cleaning
action takes
place.
AGITATORS
Your Kenmore washer will have one of
the three agitators shown on this page.
STRAIGHT VANE
AGITATOR
This agitator is found
in Kenmore extra-
large capacity
washers. Its design
is well-suited to
handle your
everyday loads.
DOUBLE ROLL-OVER
DUAL-ACTION TM AGITATOR
This agitator operates
identically to the
DUAL-ACTION T"
Agitator and adds
special vanes to help
push the clothes down
in a spiraling pattern,
displacing the clothes
that are on the bottom
with a "roll-over"
motion. These
uniquely designed
vanes are more
efficient in getting
the clothes to
"roll" down to
where they are
cleaned.
Vanes
24
UNDERSTANDING NORMAL
WASHER SOUNDS
Your new washer may make sounds that
your old one didn't. Because the sounds
are unfamiliar, you may be concerned
about them.
The following describes some of the
normal sounds you may hear and what
causes them.
During Washing
When you select a small load size set-
ting for a small wash load, your washer
has a lower water level. With this lower
water level, you may hear a clicking sound
from the upper portion of the agitator.
During Drain
The rate that water is drained from your
washer depends on your installation. If
water is drained quickly from the washer,
you may hear air being pulled through
the pump. This happens during the end
of draining.
After Drain and Before Spin
When the cycle changes from draining
to spinning, you may hear a noise as the
gearcase shifts.
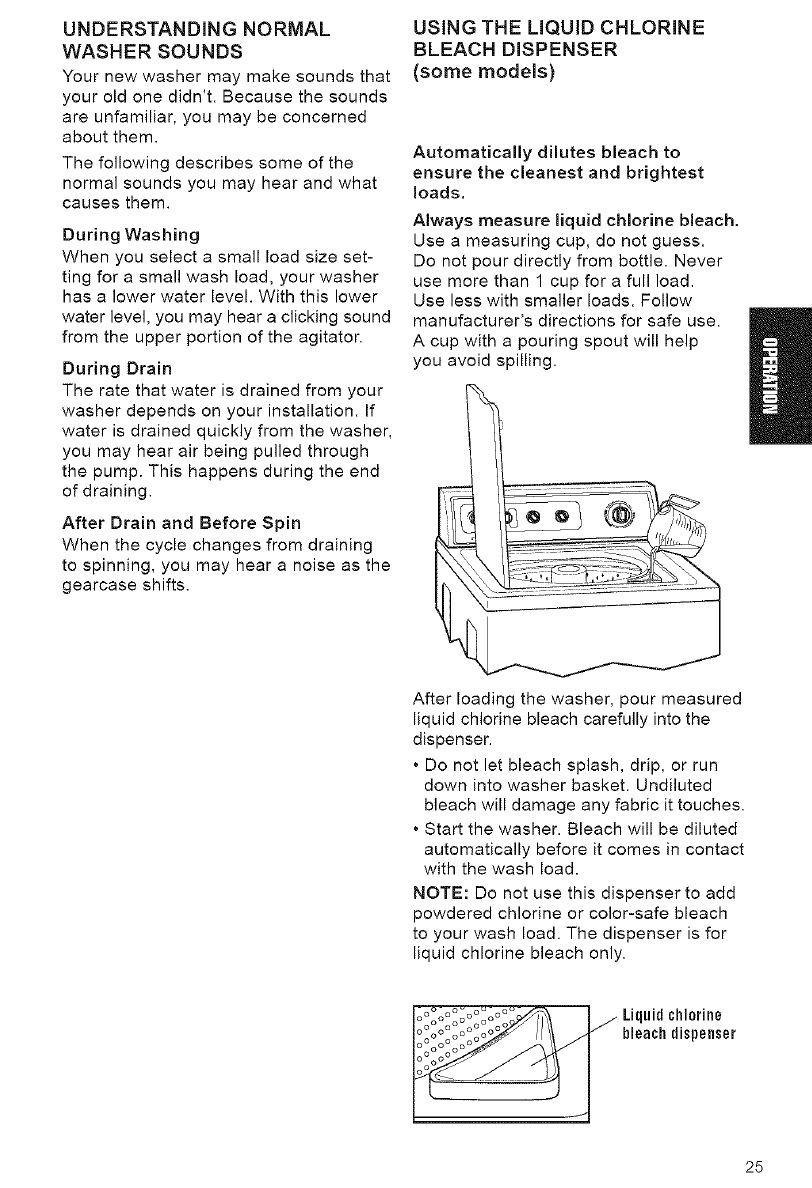
USING THE LIQUID CHLORINE
BLEACH DISPENSER
(some models)
Automatically dilutes bleach to
ensure the cleanest and brightest
loads,
Always measure liquid chlorine bleach.
Use a measuring cup, do not guess.
Do not pour directly from bottle. Never
use more than 1 cup for a full load.
Use less with smaller loads. Follow
manufacturer's directions for safe use.
A cup with a pouring spout will help
you avoid spilling.
After loading the washer, pour measured
liquid chlorine bleach carefully into the
dispenser.
• Do not let bleach splash, drip, or run
down into washer basket. Undiluted
bleach will damage any fabric it touches.
• Start the washer. Bleach will be diluted
automatically before it comes in contact
with the wash load.
NOTE: Do not use this dispenser to add
powdered chlorine or color-safe bleach
to your wash load. The dispenser is for
liquid chlorine bleach only.
Liquid chlorine
bleach dispenser
25
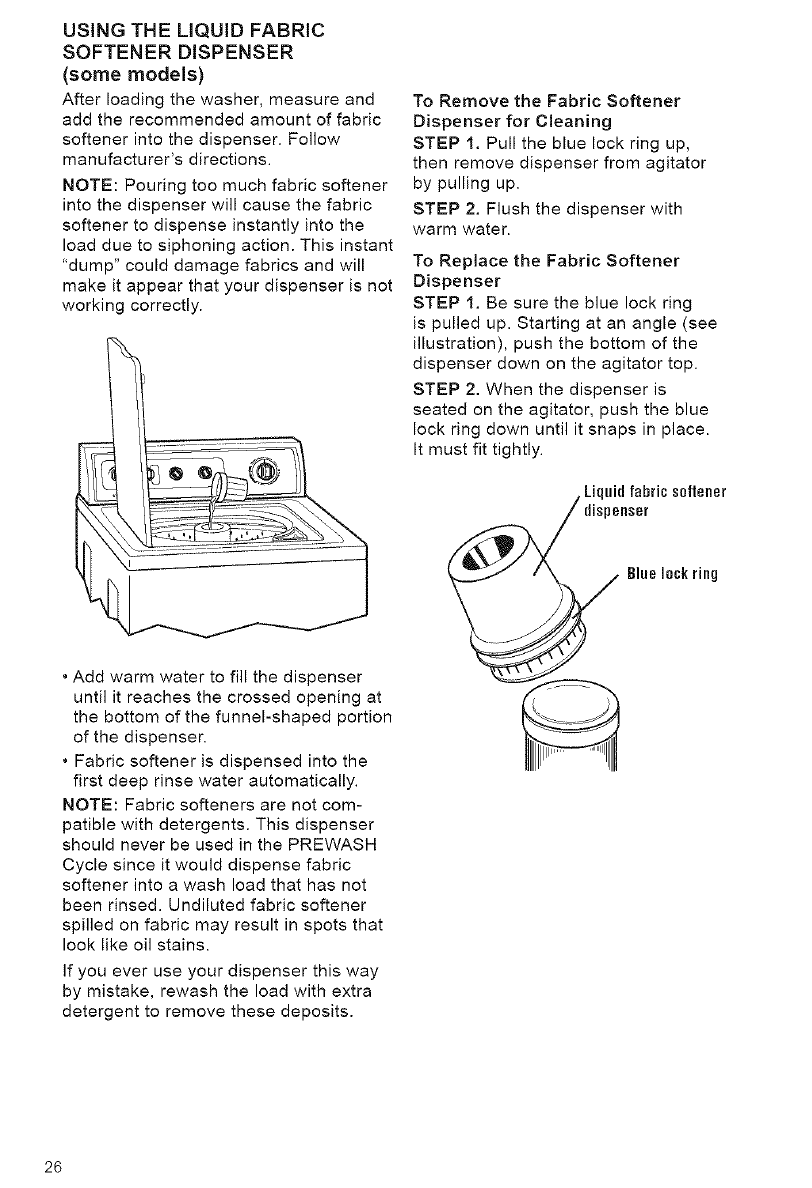
USINGTHELIQUIDFABRIC
SOFTENERDISPENSER
(some models)
After loading the washer, measure and
add the recommended amount of fabric
softener into the dispenser. Follow
manufacturer's directions.
NOTE: Pouring too much fabric softener
into the dispenser will cause the fabric
softener to dispense instantly into the
load due to siphoning action. This instant
"dump" could damage fabrics and will
make it appear that your dispenser is not
working correctly.
• Add warm water to fill the dispenser
until it reaches the crossed opening at
the bottom of the funnel-shaped portion
of the dispenser.
• Fabric softener is dispensed into the
first deep rinse water automatically.
NOTE: Fabric softeners are not com-
patible with detergents. This dispenser
should never be used in the PREWASH
Cycle since it would dispense fabric
softener into a wash load that has not
been rinsed. Undiluted fabric softener
spilled on fabric may result in spots that
look like oil stains.
If you ever use your dispenser this way
by mistake, rewash the load with extra
detergent to remove these deposits.
To Remove the Fabric Softener
Dispenser for Cleaning
STEP 1. Pull the blue lock ring up,
then remove dispenser from agitator
by pulling up.
STEP 2. Flush the dispenser with
warm water.
To Replace the Fabric Softener
Dispenser
STEP 1. Be sure the blue lock ring
is pulled up. Starting at an angle (see
illustration), push the bottom of the
dispenser down on the agitator top.
STEP 2. When the dispenser is
seated on the agitator, push the blue
lock ring down until it snaps in place.
It must fit tightly.
Liquid fabric softener
26
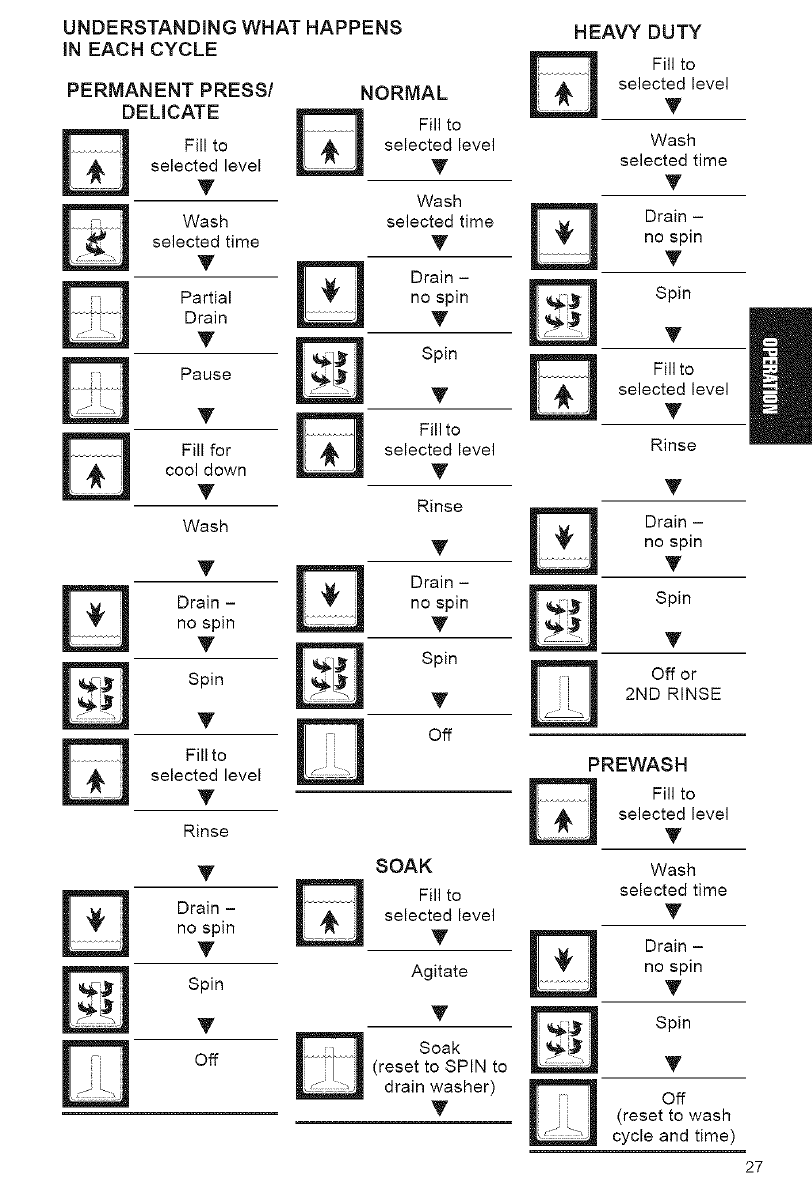
UNDERSTANDING WHAT HAPPENS
iN EACH CYCLE
PERMANENT PRESS/ NORMAL
DELICATE _ Fill to
Fill to selected level
W
selected level y
TWash
Wash selected time
selected time y
Y _ Drain -
Partial no spin
W
Drain y
Y _ Spin
D Pause Y
Y _ Fill to
Fill for selected level
cool down y
TRinse
Wash T
Y _ Drain -
Drain - no spin
W
no spin y
T
Spin
Spin T
T D off
Fill to
selected level
T
Rinse
y SOAK
D Fill to
Drain - selected level
no spin y
T
Spin Agitate
T T
D D
Off (reset to SPIN to
drain washer)
T
HEAVY DUTY
Fill to
selected level
T
Wash
selected time
T
Drain -
no spin
T
Spin
T
Fill to
selected level
T
Rinse
T
Drain -
no spin
T
Spin
T
Off or
2ND RINSE
PREWASH
Fill to
selected level
T
Wash
selected time
T
Drain -
no spin
T
Spin
T
°"
(reset to wash
cycle and time)
27
PREPARING CLOTHES
FOR WASHING
Follow these recommendations
to help you prolong the life of
your garments.
• Close zippers, snaps, and hooks to
avoid snagging other items. Remove
pins, buckles, and other hard objects
to avoid scratching the washer interior.
Remove non-washable trim and
ornaments.
• Empty pockets and turn them
inside out.
• Turn down cuffs, brush away lint
and dirt.
• Turn synthetic knits inside out to
avoid pilling.
• Tie strings and sashes so they will
not tangle.
Mend tears, loose hems, and seams.
Treat spots and stains.
Stained or wet garments should be
washed promptly for best results.
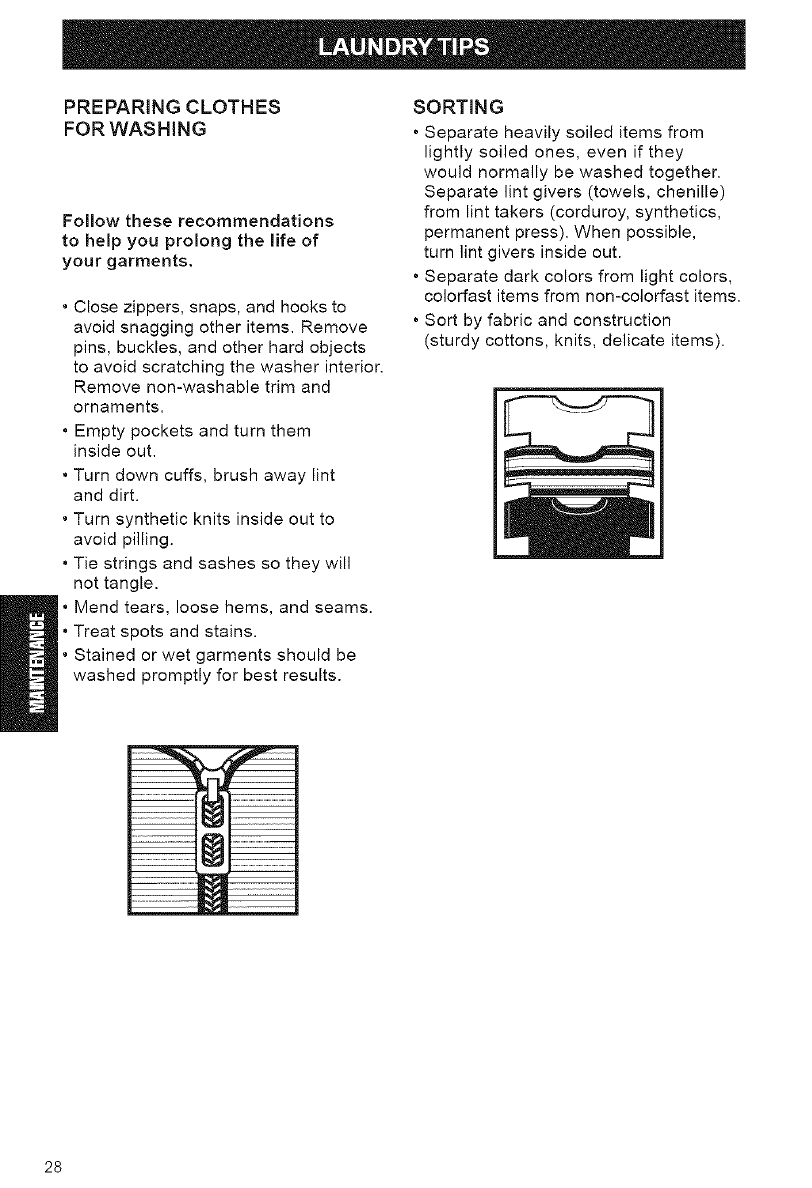
SORTING
• Separate heavily soiled items from
lightly soiled ones, even if they
would normally be washed together.
Separate lint givers (towels, chenille)
from lint takers (corduroy, synthetics,
permanent press). When possible,
turn lint givers inside out.
• Separate dark colors from light colors,
colorfast items from non-colorfast items.
• Sort by fabric and construction
(sturdy cottons, knits, delicate items).
28
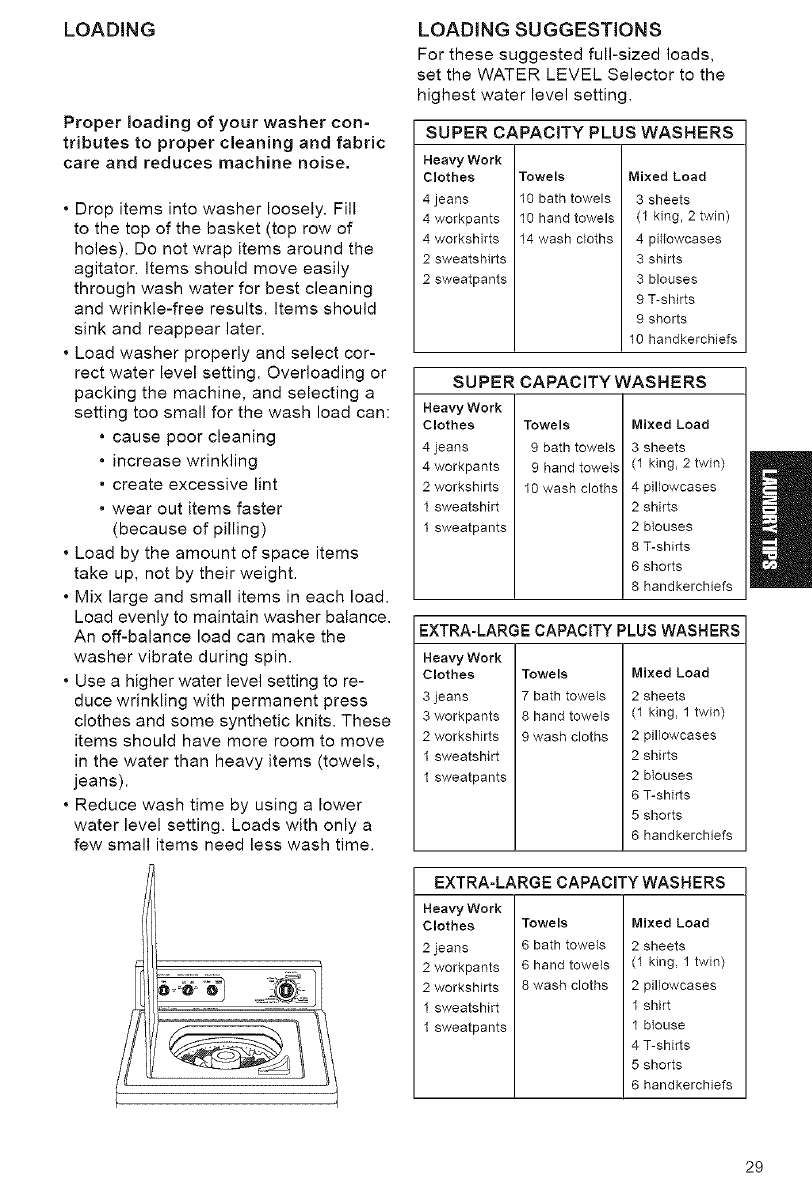
LOADING
Proper loading of your washer con-
tributes to proper cleaning and fabric
care and reduces machine noise,
• Drop items into washer loosely. Fill
to the top of the basket (top row of
holes). Do not wrap items around the
agitator, items should move easily
through wash water for best cleaning
and wrinkle-free results. Items should
sink and reappear later.
• Load washer properly and select cor-
rect water level setting. Overloading or
packing the machine, and selecting a
setting too small for the wash load can:
• cause poor cleaning
• increase wrinkling
• create excessive lint
• wear out items faster
(because of pilling)
• Load by the amount of space items
take up, not by their weight.
• Mix large and small items in each load.
Load evenly to maintain washer balance.
An off-balance load can make the
washer vibrate during spin.
• Use a higher water level setting to re-
duce wrinkling with permanent press
clothes and some synthetic knits. These
items should have more room to move
in the water than heavy items (towels,
jeans).
• Reduce wash time by using a lower
water level setting. Loads with only a
few small items need less wash time.
LOADING SUGGESTIONS
For these suggested full-sized loads,
set the WATER LEVEL Selector to the
highest water level setting.
SUPER CAPACITY PLUS
Heavy Work
Clothes
4 jeans
4 workpants
4 workshirts
2 sweatshirts
2 sweatpants
WASHERS
Towels Mixed Load
10 bath towels 3 sheets
10 hand towels (1 king, 2 twin)
14 wash cloths 4 pillowcases
3 shirts
3 blouses
9 T-shirts
9 shorts
10 handkerchiefs
SUPER CAPAClTYWASHERS
Heavy Work
Clothes
4 jeans
4 workpants
2 workshirts
1 sweatshirt
1 sweatpants
Towels Mixed Load
9 bath towels 3 sheets
9 hand towels (1 king, 2 twin)
10 wash cloths 4 pillowcases
2 shirts
2 blouses
8 T-shirts
6 shorts
8 handkerchiefs
EXTRA-LARGE CAPACITY PLUSWASHERS
Heavy Work
Clothes
3 jeans
3 workpants
2 workshirts
1 sweatshirt
1 sweatpants
Towels Mixed Load
7 bath towels 2 sheets
8 hand towels (1 king, 1 twin)
9 wash cloths 2 pillowcases
2 shirts
2 blouses
6 T-shirts
5 shorts
6 handkerchiefs
EXTRA-LARGE CAPACITY WASHERS
Heavy Work
Clothes
2 jeans
2 workpants
2 workshirts
1 sweatshirt
1 sweatpants
Towels Mixed Load
6 bath towels 2 sheets
6 hand towels (1 king, 1 twin)
8 wash cloths 2 pillowcases
1 shirt
1 blouse
4 T-shirts
5 shorts
6 handkerchiefs
29
CLEANINGYOUR WASHER
Proper care of your washer can extend
its life. This section explains how to care
for your washer properly and safely.
Exterior
Wipe up detergent, bleach, and other
spills with a soft, damp cloth or sponge
as they occur. Occasionally wipe the
outside of the washer to keep it looking
like new.
Do not put sharp or metal objects in your
washer. They can damage the finish.
Check all pockets for pins, clips, money,
bolts, nuts, etc. Do not lay these objects
on your washer after emptying pockets.
Interior
Clean interior with 1 cup of chlorine
bleach mixed with 2 cups of detergent.
Run washer through a complete cycle
using hot water. Repeat process if
necessary.
NOTE: Remove hard water deposits
using only cleaners labeled as washer
safe.
WATER INLET HOSES
Replace inlet hoses after five years
of use to reduce the risk of hose
failure. Periodically inspect and
replace inlet hoses if bulges, kinks,
cuts, wear, or leaks are found. When
replacing your inlet hoses, mark the
date of replacement on the label with
a permanent marker.
WINTER STORAGE OR
MOVING CARE
Install and store your washer where
it will not freeze. Because some water
may stay in the hoses, freezing can
damage your washer. If storing or
moving your washer during freezing
weather winterize it.
To winterize washer:
1. Shut off both water faucets.
2. Disconnect and drain water inlet
hoses.
3. Put 1 quart of n.Y.-type antifreeze
in the basket.
4. Run washer on a SPIN setting for
about 30 seconds to mix the anti-
freeze and water. Some of the mixture
will pump out while the washer spins.
5. Unplug the power supply cord.
To use washer again:
1. Flush water pipes and hoses.
2. Reconnect water inlet hoses.
3. Turn on both water faucets.
4. Reconnect power supply cord.
5. Run the washer through a complete
cycle with 1 cup of detergent to clean
out antifreeze.
NON-USE OR VACATION CARE
Operate your washer only when you
are at home. If you will be on vacation or
not using your washer for an extended
period of time, you should:
• Unplug the power supply cord or turn
off electrical power to the washer.
• Turn off the water supply to the washer.
This helps avoid accidental flooding
(due to a water pressure surge) while
you are away.
30
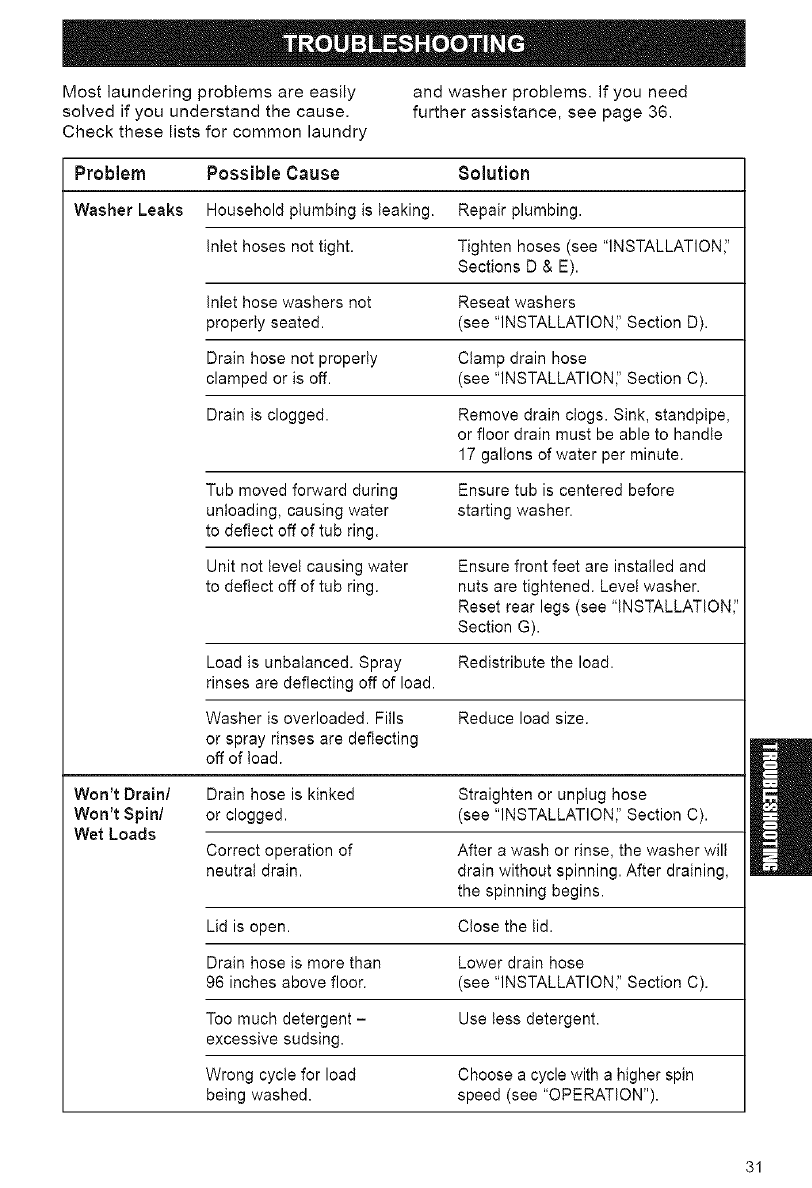
Mostlaunderingproblemsareeasily andwasherproblems.Ifyouneed
solvedifyouunderstandthecause, furtherassistance,seepage36.
Checktheselistsforcommonlaundry
Problem Possible Cause Solution
Washer Leaks Household plumbing is leaking. Repair plumbing.
Inlet hoses not tight. Tighten hoses (see "INSTALLATION['
Sections D & E).
Inlet hose washers not Reseat washers
properly seated. (see "INSTALLATIONI' Section D).
Drain hose not properly Clamp drain hose
clamped or is off. (see "INSTALLATIONI' Section C).
Drain is clogged. Remove drain clogs. Sink, standpipe,
or floor drain must be able to handle
17 galions of water per minute.
Tub moved forward during Ensure tub is centered before
unloading, causing water starting washer.
to deflect off of tub ring.
Unit not level causing water Ensure front feet are installed and
to deflect off of tub ring. nuts are tightened. Level washer.
Reset rear legs (see "INSTALLATION
Section G).
Load is unbalanced. Spray Redistribute the load.
rinses are deflecting off of load.
Washer is overloaded. Fills Reduce load size.
or spray rinses are deflecting
off of toad.
Won't Drain/ Drain hose is kinked Straighten or unplug hose
Won't Spin/ or clogged. (see "INSTALLATIONI' Section C).
Wet Loads
Correct operation of After a wash or rinse, the washer will
neutral drain, drain without spinning. After draining,
the spinning begins.
Lid is open. Ctose the lid.
Drain hose is more than Lower drain hose
96 inches above floor. (see "INSTALLATION;' Section C).
Too much detergent - Use tess detergent.
excessive sudsing.
Wrong cycle for load Choose a cycle with a higher spin
being washed, speed (see "OPERATION").
31
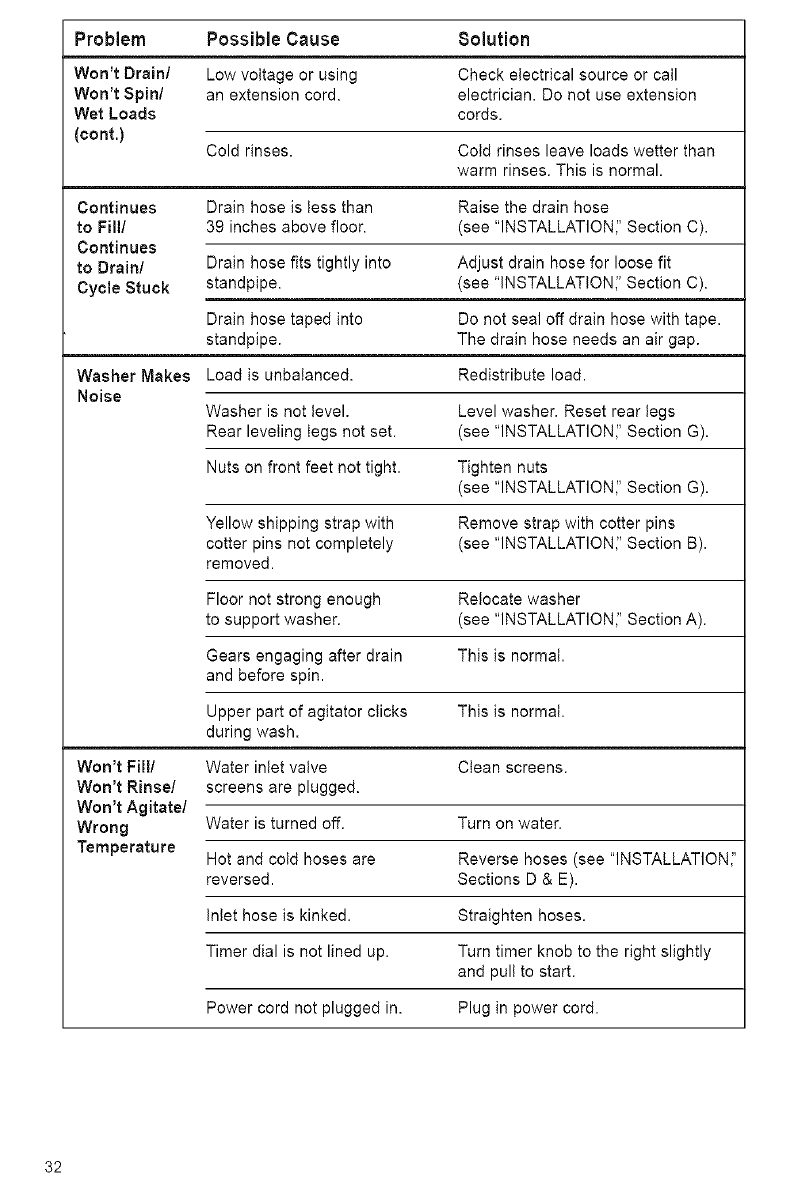
Problem Possible Cause Solution
Won't Drain/ Low voltage or using Check electrical source or call
Won't Spin/ an extension cord. electrician. Do not use extension
Wet Loads cords.
(cont.) Cold rinses. Cold rinses leave loads wetter than
warm rinses. This is normal.
Continues Drain hose is tess than Raise the drain hose
to Fill/ 39 inches above floor. (see "INSTALLATIONI' Section C).
Continues
to Drain/ Drain hose fits tightly into Adjust drain hose for loose fit
Cycle Stuck standpipe. (see "INSTALLATION_' Section C).
Drain hose taped into Do not seal off drain hose with tape.
standpipe. The drain hose needs an air gap.
Washer Makes Load is unbalanced. Redistribute load.
Noise Washer is not level. Level washer. Reset rear legs
Rear leveling legs not set. (see "INSTALLATIONI' Section G).
Nuts on front feet not tight. Tighten nuts
(see "INSTALLATIONI' Section G).
Yellow shipping strap with Remove strap with cotter pins
cotter pins not completely (see "INSTALLATION_' Section B).
removed.
Floor not strong enough Relocate washer
to support washer. (see "INSTALLATION," Section A).
Gears engaging after drain This is normal.
and before spin.
Upper part of agitator clicks This is normal.
during wash.
Won't Fill/ Water inlet valve Clean screens.
Won't Rinse/ screens are plugged.
Won't Agitate/
Wrong Water is turned off. Turn on water.
Temperature Hot and cold hoses are Reverse hoses (see "INSTALLATIONI'
reversed. Sections D & E).
inlet hose is kinked. Straighten hoses.
Timer dial is not lined up. Turn timer knob to the right slightly
and pull to start.
Power cord not plugged in. Plug in power cord.
32
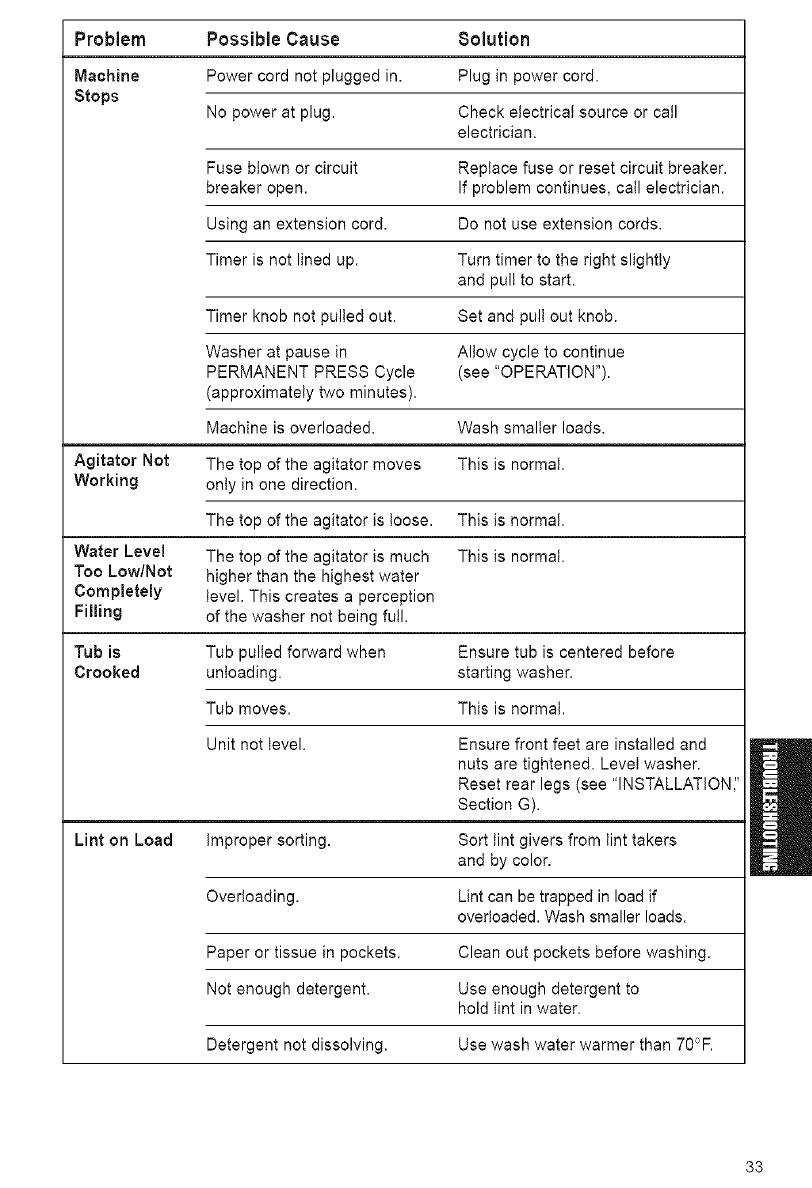
Problem Possible Cause Solution
Machine Power cord not plugged in. Plug in power cord.
Stops No power at plug. Check electrical source or call
electrician.
Fuse blown or circuit Replace fuse or reset circuit breaker.
breaker open. If problem continues, catl electrician.
Using an extension cord. Do not use extension cords.
Timer is not lined up. Turn timer to the right slightly
and pull to start.
Timer knob not pulled out. Set and pull out knob.
Washer at pause in Allow cycle to continue
PERMANENT PRESS Cycle (see "OPERATION").
(approximately two minutes).
Machine is overloaded. Wash smaller loads.
Agitator Not The top of the agitator moves This is normal.
Working only in one direction.
The top of the agitator is loose. This is normal.
Water Level The top of the agitator is much This is normal.
Too Low/Not higher than the highest water
Completely level. This creates a perception
Filling of the washer not being full.
Tub is Tub pulled forward when Ensure tub is centered before
Crooked unloading, starting washer.
Tub moves. This is normal.
Unit not level. Ensure front feet are installed and
nuts are tightened. Level washer.
Reset rear legs (see "INSTALLATION
Section G).
Lint on Load improper sorting. Sort lint givers from tint takers
and by color.
Overloading. Lint can be trapped in load if
overloaded. Wash smaller loads.
Paper or tissue in pockets. Clean out pockets before washing.
Not enough detergent. Use enough detergent to
hold tint in water.
Detergent not dissolving. Use wash water warmer than 7O°F.
33
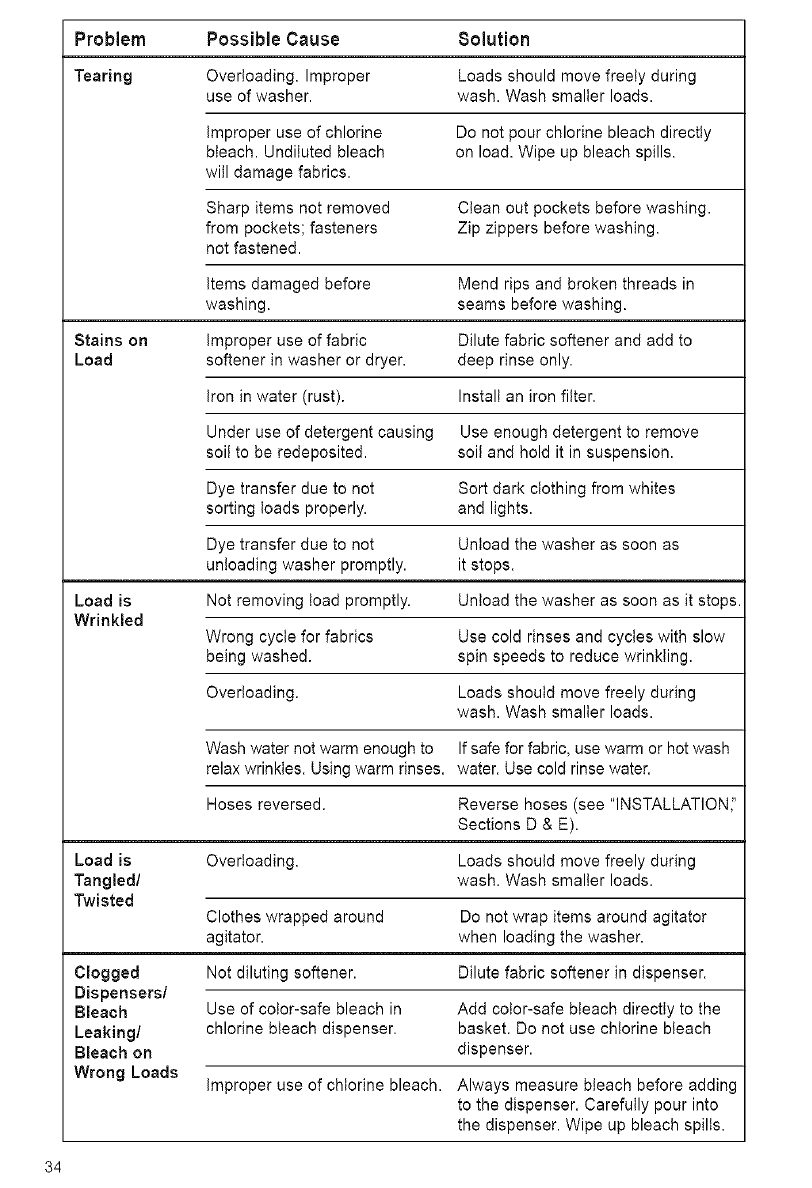
Problem Possible Cause Solution
Tearing Overloading. Improper Loads should move freely during
use of washer, wash. Wash smaller loads.
improper use of chlorine Do not pour chlorine bleach directly
bleach. Undiluted bleach on load. Wipe up bleach spills.
will damage fabrics.
Sharp items not removed Clean out pockets before washing.
from pockets; fasteners Zip zippers before washing.
not fastened.
items damaged before Mend rips and broken threads in
washing, seams before washing.
Stains on improper use of fabric Dilute fabric softener and add to
Load softener in washer or dryer, deep rinse only.
Iron in water (rust). Install an iron filter.
Under use of detergent causing Use enough detergent to remove
soil to be redeposited, soil and hold it in suspension.
Dye transfer due to not Sort dark clothing from whites
sorting loads properly, and lights.
Dye transfer due to not Unload the washer as soon as
unloading washer promptly, it stops.
Load is Not removing toad promptly. Unload the washer as soon as it stops.
Wrinkled
Wrong cycle for fabrics Use cold rinses and cycles with slow
being washed, spin speeds to reduce wrinkling.
Overloading. Loads should move freely during
wash. Wash smaller loads.
Wash water not warm enough to If safe for fabric, use warm or hot wash
relax wrinkles. Using warm rinses, water. Use cold rinse water.
Hoses reversed. Reverse hoses (see "INSTALLATIONI'
Sections D & E).
Load is Overloading. Loads should move freely during
Tangled/ wash. Wash smaller loads.
Twisted
Clothes wrapped around Do not wrap items around agitator
agitator, when loading the washer.
Clogged Not diluting softener. Dilute fabric softener in dispenser.
Dispensers/
Bleach Use of color-safe bleach in Add color-safe bleach directly to the
Leaking/ chlorine bleach dispenser, basket. Do not use chlorine bleach
Bleach on dispenser.
Wrong Loads improper use of chlorine bleach. Always measure bleach before adding
to the dispenser. Carefully pour into
the dispenser. Wipe up bleach spills.
34
KENMORE WASHERS
We Service What We Sell
"We Service What We Sell" is our
assurance you can depend on Sears
for service. Your washer has added
value when you consider that Sears
has service units nationwide, staffed
with professional technicians specifically
trained on Sears appliances and having
parts, tools and equipment to ensure
that we meet our pledge to you...
"We Service What We SelE
Sears Maintenance Agreement
Maintain the value of your Kenmore
washer with a Sears Maintenance
Agreement. Kenmore washers are
designed, manufactured, and tested
for years of dependable operation. Yet
any appliance may require service from
time to time.
The Sears Maintenance Agreement
• Is your way to buy tomorrow's service
at today's prices.
• Eliminates repair bills resulting from
normal use.
• Allows for as many service calls as
required.
• Provides for service by professional
Sears Trained Technicians.
• Even if you don't need repairs, the
Maintenance Agreement offers an
annual preventative maintenance
checkup at your request!
For more information,
call 1-800=827-6655.
35
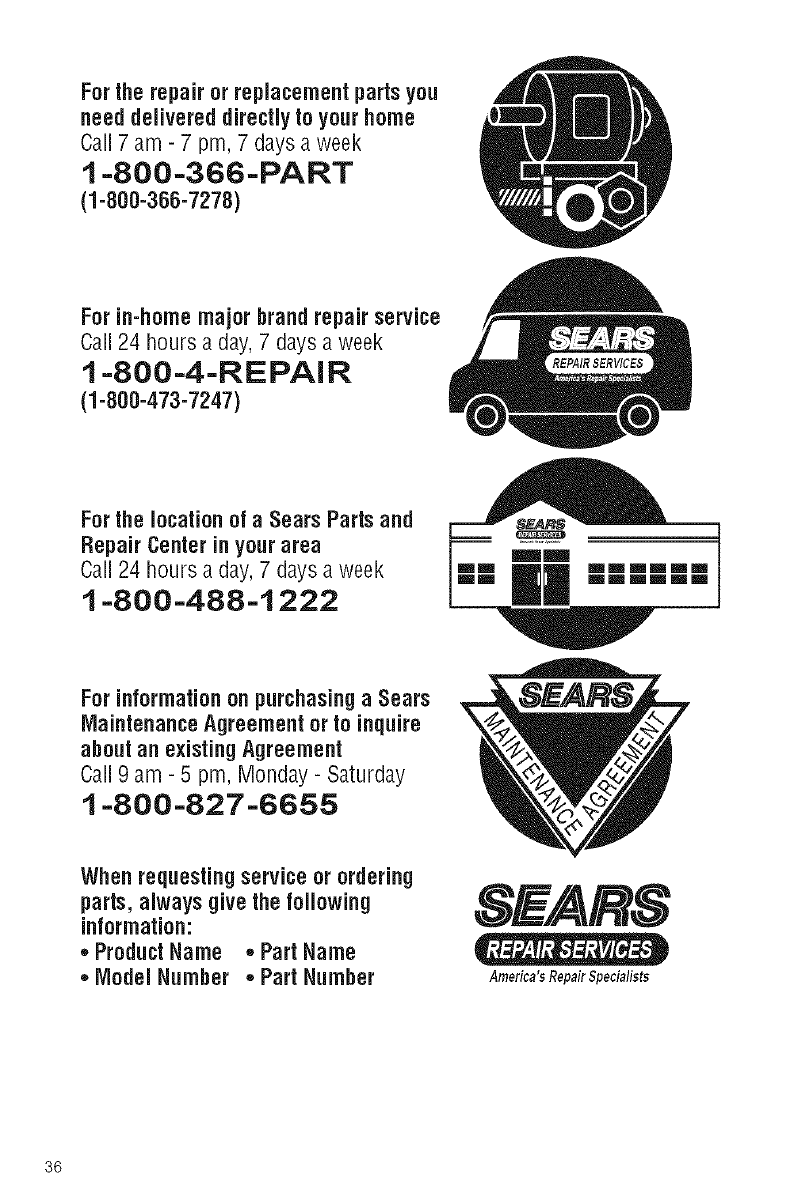
Forthe repair or replacement partsyou
need delivered directly to yourhome
Call 7 am - 7 prn, 7 days a week
1-800-366-PART
(1-800-366-7278)
For in-home major brandrepair service
Call 24 hours a day,7 days a week
1-800-4-REPAIR
(1-800-473-7247)
For the locationof a Sears Parts and
Repair Centerin yourarea
Call 24 hours a day, 7 days a week
1-800-488-1222
For informationon purchasinga Sears
MaintenanceAgreement or to inquire
aboutan existingAgreement
Call 9 am -5 pm, Monday -Saturday
1-800-827-6655
When requesting serviceor ordering
parts, always give the following
information:
•Product Name •Part Name
•Model Number •Part Number
36
America'sRepairSpecialists
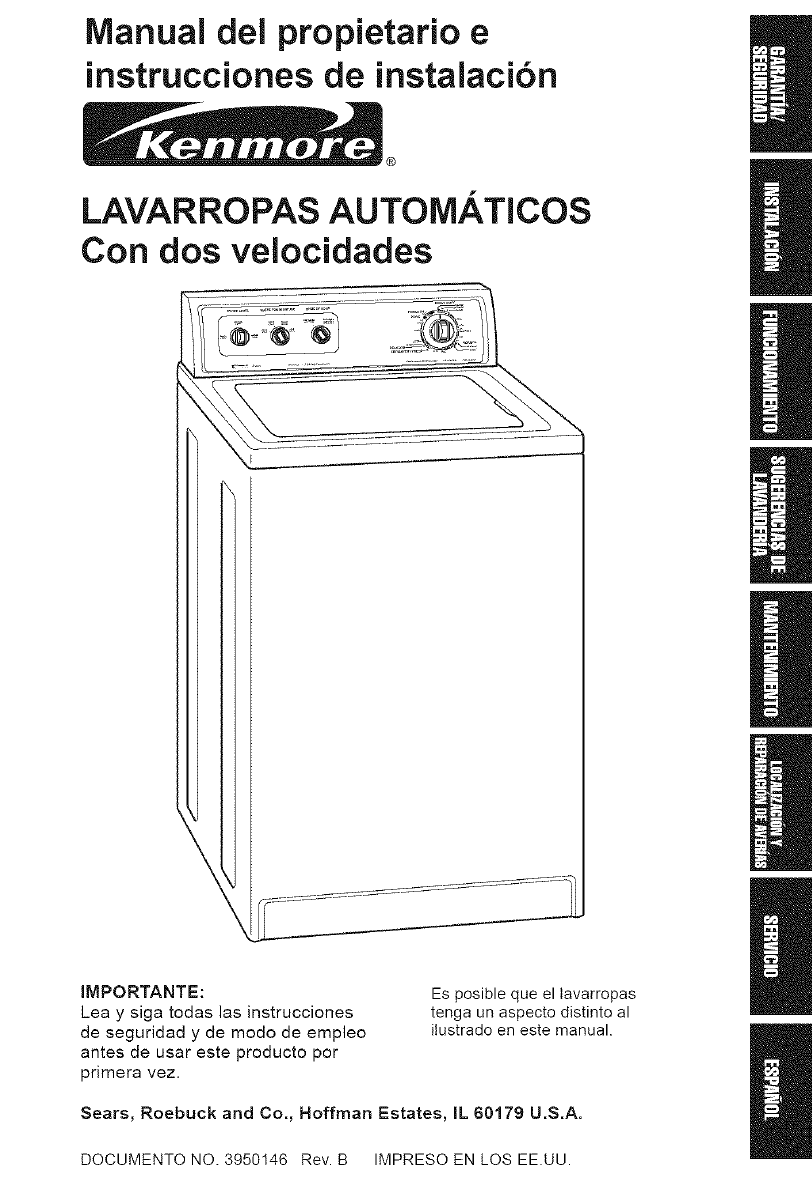
Manual del propietario e
instrucciones de instalaci6n
®
LAVARROPAS AUTOMATICOS
Con dos velocidades /
/
IMPORTANTE:
Lea y siga todas las instrucciones
de seguridad y de modo de empleo
antes de usar este producto por
primera vez.
Es posible que el tavarropas
tenga un aspecto distinto al
itustrado en este manual.
Sears, Roebuck and Co., Hoffman Estates, IL 60179 U.S.A.
DOCUMENTONO. 3950146 Rev. B IMPRESOEN LOS EE.UU.
/
/
ANTES DE USAR SU NUEVO LAVARROPAS 2
GARANTiA DEL LAVARROPAS AUTOMATiCO SEARS 3
INSTRUCCiONES iMPORTANTES DE SEGURIDAD 4
INSTRUCCIONES DE iNSTALACION 5
FUNCiONAMiENTO DEL LAVARROPAS 20
SUGERENCiAS DE LAVANDERiA 28
CUiDADO DEL LAVARROPAS 30
LOCALiZACiON Y REPARACiON DE AVERiAS 31
ACUERDO DE MANTENiMiENTO SEARS 35
Por favor, lea este manual, pues le
ayudar& en la instalacion y funciona-
miento de su nuevo lavarropas Kenmore
de la manera mas segura y econ6mica.
Para obtener informacion adicional
sobre el cuidado y funcionamiento de
los electrodomesticos Kenmore, Ilame
al establecimiento Sears mas cercano.
Necesitara tenet a mano los nQmeros
completos del modelo y de serie de su
lavarropas, los cuales se encuentran en
la placa del modelo y del nQmero de serie.
-@ /¸
\
Placa del modeloy
del n_mero de serie
Use el espacio a continuacion para
registrar el nOmero del modelo y de serie
de su nuevo lavarropas Kenmore.
No. del modelo
No. de serie
Fecha de compra
Guarde este libro y el comprobante
de venta (e! recibo) Sears en un lugar
seguro para consultar en el futuro.
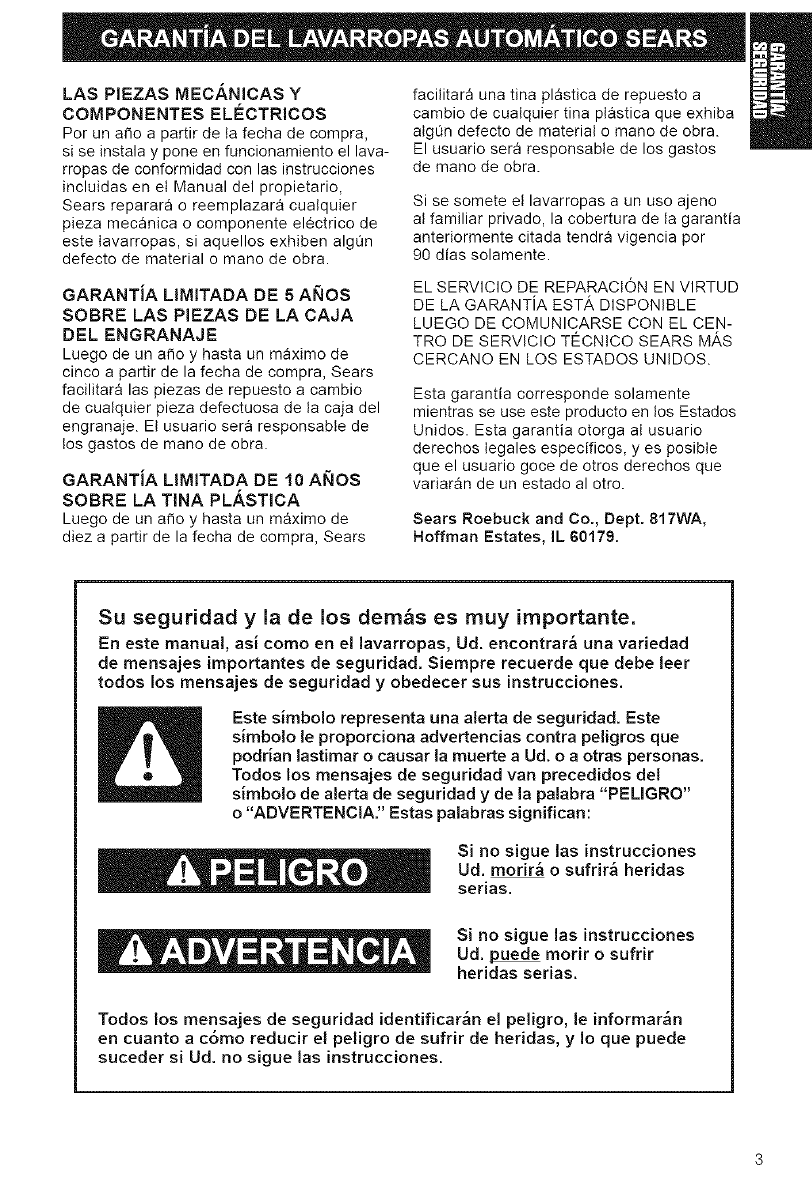
LASPiEZAS MEC_.NiCAS Y
COMPONENTES ELECTRiCOS
Per un afio a partir de ta fecha de compra,
si se instala y pone en funcionamiento el lava-
rropas de conformidad con las instrucciones
incluidas en el Manual del propietario,
Sears reparara o reemplazara cualquier
pieza mecanica o componente electrico de
este tavarropas, si aquellos exhiben algOn
defecto de material o mane de obra.
GARANTiA LJMITADA DE 5 A_,IOS
SOBRE LAS PIEZAS DE LA CAJA
DEL ENGRANAJE
Luego de un afio y hasta un m_ximo de
cinco a partir de la fecha de compra, Sears
facilitara las piezas de repuesto a cambio
de cualquier pieza defectuosa de ta caja del
engranaje. Et usuario sera responsable de
los gastos de mano de obra.
GARANTiA LIMITADA DE 10 ANOS
SOBRE LA TINA PL_.STICA
Luego de un afio y hasta un maximo de
diez a partir de la fecha de compra, Sears
facilitara una tina plSstica de repuesto a
cambio de cualquier tina plastica que exhiba
atgC_ndefecto de material o mane de obra.
El usuario sera responsable de los gastos
de mane de obra.
Si se somete el lavarropas a un use ajeno
at familiar privado, la cobertura de la garantia
anteriormente citada tendra vigencia per
90 dias solamente.
EL SERVlCIO DE REPARACION EN VlRTUD
DE LA GARANTJA EST', DISPONIBLE
LUEGO DE COMUNICARSE CON EL CEN-
TRO DE SERVIClO TECNtCO SEARS M_,S
CERCANO EN LOS ESTADOS UNIDOS.
Esta garantia corresponde solamente
mientras se use este producto en los Estados
Unidos. Esta garantia otorga al usuario
derechos tegales especificos, yes posibte
que el usuario goce de otros derechos que
variaran de un estado al otro.
Sears Roebuck and Co., Dept. 817WA,
Hoffman Estates, IL 60179.
Su seguridad y la de los demos es muy importante.
En este manual, asi como en el lavarropas, Ud. encontrar& una variedad
de mensajes importantes de seguridad. Siempre recuerde que debe leer
todos los mensajes de seguridad y obedecer sus instrucciones.
Este simbolo representa una alerta de seguridad. Este
simbolo le proporciona advertencias contra peligros que
podrian lastimar o causar la muerte a Ud. o a otras personas.
Todos los mensajes de seguridad van precedidos del
simbolo de alerta de seguridad y de la palabra "PELIGRO"
o "ADVERTENClA." Estas palabras significan:
Si no sigue las instrucciones
Ud. morir& o sufrir& heridas
serias.
Si no sigue las instrucciones
Ud. puede morir osufrir
heridas serias.
Todos los mensajes de seguridad identificar&n el peligro, le informar&n
en cuanto a c6mo reducir et petigro de sufrir de heridas, y Io que puede
suceder si Ud. no sigue las instrucciones.
SU SEGURIDAD NOS IMPORTA MUCHiSIMO
ADVERTENCIA: a fin de reducir el riesgo
de incendio, descarga electrica o lesi6n
sufrida por tas personas que usen el
tavarropas, deben seguirse precauciones
basicas, incluidas tas siguientes:
Lea todas las instrucciones antes de
usar el tavarropas.
oNo lave los articulos que ya se hayan
timpiado, lavado, remojado o manchado con
gasolina, disolventes de limpieza en seco,
otras sustancias inflamabtes o explosivas,
puesto que estas despiden vapores que
podrian encenderse o causar una explosi6n.
oNo a_ada gasolina, disolventes de timpieza
en seco, u otras sustancias inflamables
o exptosivas al agua de lavado. Estas
sustancias despiden vapores que podrian
enoenderse o causar una explosi6n.
oEn ciertas condiciones, puede generarse
hidr6geno en un sistema de agua caliente
que no se haya usado per dos semanas
o un periodo mayor. EL HIDROGENO ES
INFLAMABLE. Si no se ha usado el sistema
de agua caliente por dicho periodo, antes
de usar el lavarropas, abra todos los grifos
de agua caliente y deje que corra el agua
desde cada uno pot varios minutos. Esta
accidn liberara todo el hidrdgeno que se
haya acumulado. Debido a la inflamabilidad
de dicho gas, no fume ni use una llama
descubierta durante este tiempo.
• No permita que jueguen nines en et
tavarropas o en sus inmediaciones. Es
necesaria la cuidadosa vigitancia de los
ni_os toda vez que se use el tavarropas
cerca de los ni_os.
• Quite ta puerta del lavarropas antes
de ponerlo fuera de funcionamiento o
de descartarto.
• No introduzca ta mano en el lavarropas si la
tina o el agitador de aspas esta en movimiento.
• No instale ni almacene este tavarropas
donde estara sometido a la intemperie.
• No trate de forzar los controles.
• No repare ni cambie pieza alguna det
tavarropas ni intente reatizar ninguna tarea
de servicio tecnico, excepto cuando asi
se le indique especificamente en el Manual
del propietario o en instrucciones de
reparacidn por et usuario publicadas que
usted entienda y para cuya ejecucidn cuente
con ta habilidad necesaria.
GUARDE ESTAS INSTRUCCIONES
IMPORTANTE: Observe todos los codigos y reglamentos gubemamentales.

RESUMEN DE INSTALACION
Si desea ver una lista completa de
herramientas y piezas necesarias,
consulte tas paginas 6-8.
A. ESCOJA EL LUGAR DONDE DESEA
INSTALAR EL LAVARROPAS (p_gs. 10-!2)
Instrucciones para la instalacion en un
lugar empotradolguardarropas (pag. 10)
Sistema de desagLie pot tuberia vertical
(pag. 12)
Sistema de desagOe por pila para
lavar ropa (pag. 11)
Sistema de desagiie por el suelo
(p&g. 12)
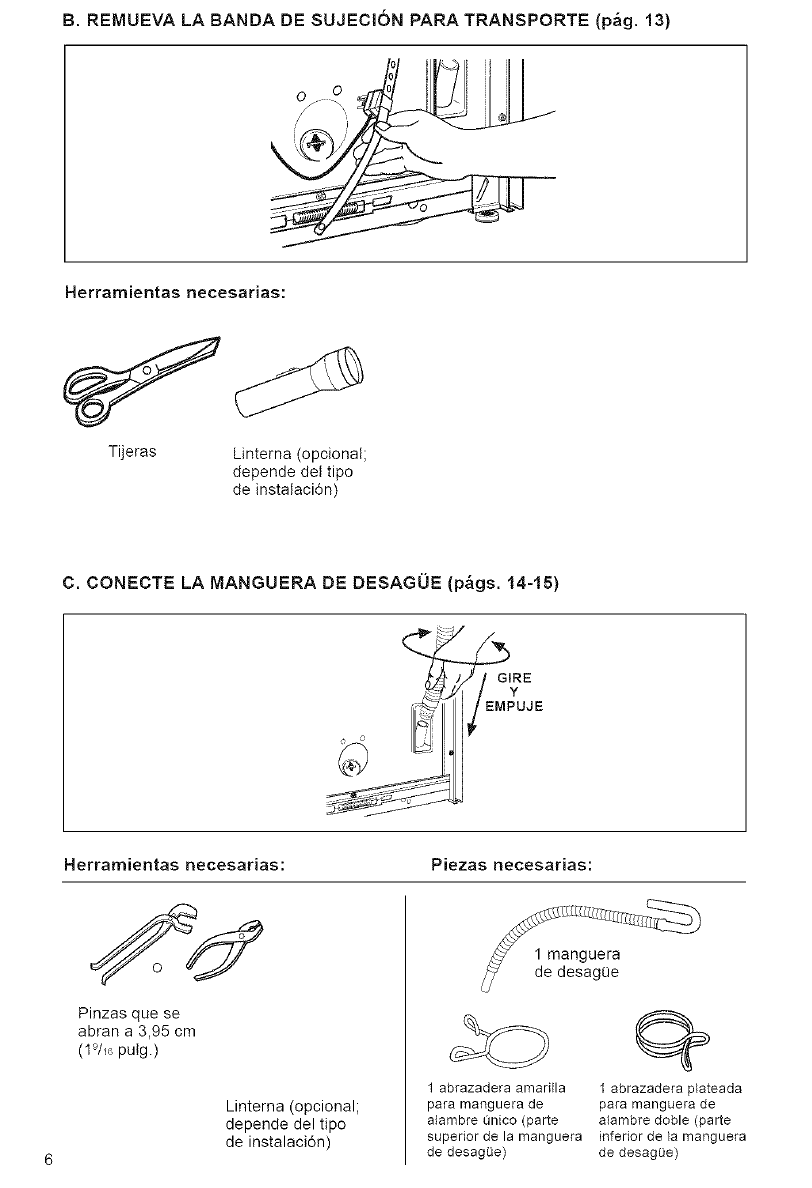
B. REMUEVA LA BANDA DE SUJECION PARA TRANSPORTE (p_g. 13)
0oi i
Herramierttas rtecesarias:
Tijeras Linterna (opcional;
depende del tipo
de instalaci6n)
C. CONECTE LA MANGUERA DE DESAGUE (p_gs. 14=15)
"r;,_ EMPUJE
Herramientas necesarias: Piezas necesarias:
Pinzas que se
abran a 3,95 cm
(1%6 putg.)
Linterna (opcional;
depende del tipo
de instalaci6n)
1 abrazadera amarilla
para manguera de
alambre t_nico (parte
superior de la manguera
de desagOe)
1 abrazadera plateada
para manguera de
alambre doble (parte
inferior de Lamanguera
de desagOe)
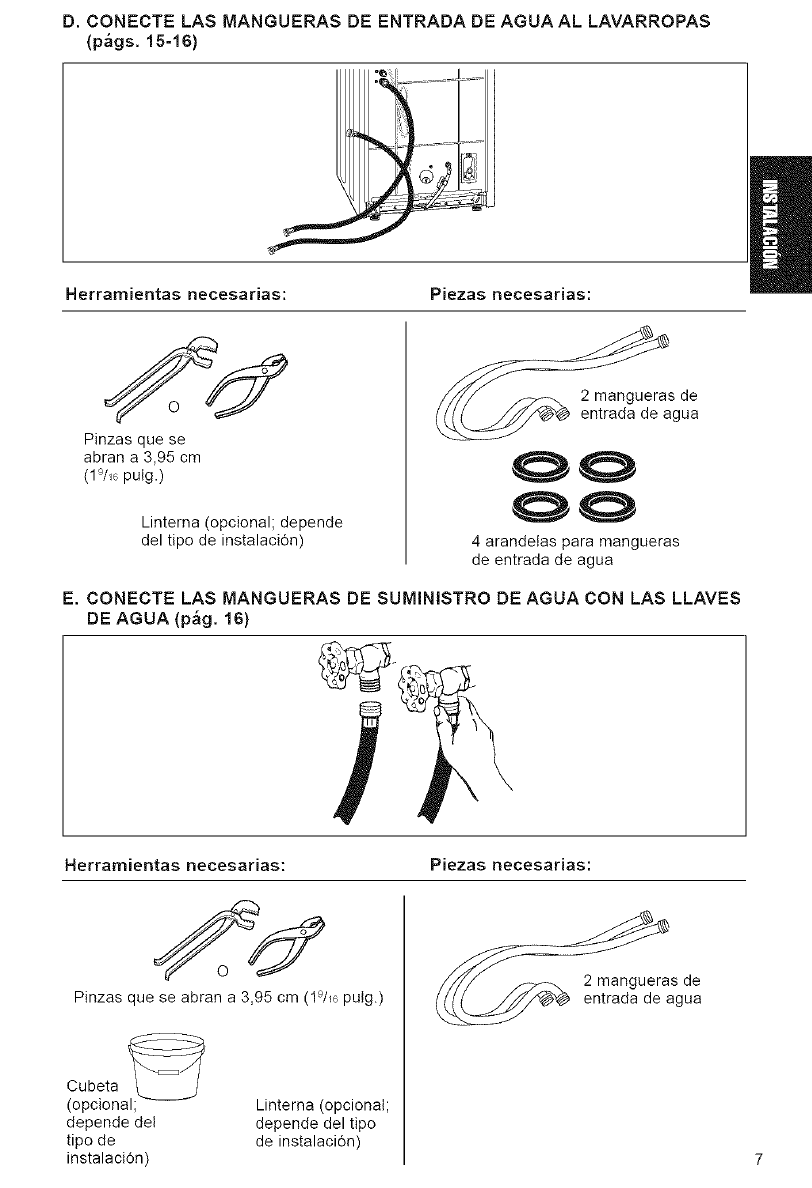
D. CONECTE LAS MANGUERAS DE ENTRADA DE AGUA AL LAVARROPAS
(p_gs. 15-16)
=
Herramientas necesarias: Piezas necesarias:
Pinzas que se
abran a 3,95 cm
(19//6 pulg.)
Linterna (opcional; depende
del tipo de instalaci6n)
2 mangueras de
entrada de agua
4 arandelas para mangueras
de entrada de agua
E. CONECTE LAS MANGUERAS DE SUMINISTRO DE AGUA CON LAS LLAVES
DE AGUA (p_g. 16)
Herramientas necesarias: Piezas necesarias:
Pinzas que se abran a 3,95 cm (I_/_6 pulg.)
Cubeta ,_
(opcional; Linterna (opcional;
depende del depende del tipo
tipo de de instalaci6n)
instalaci6n)
2 mangueras de
entrada de agua
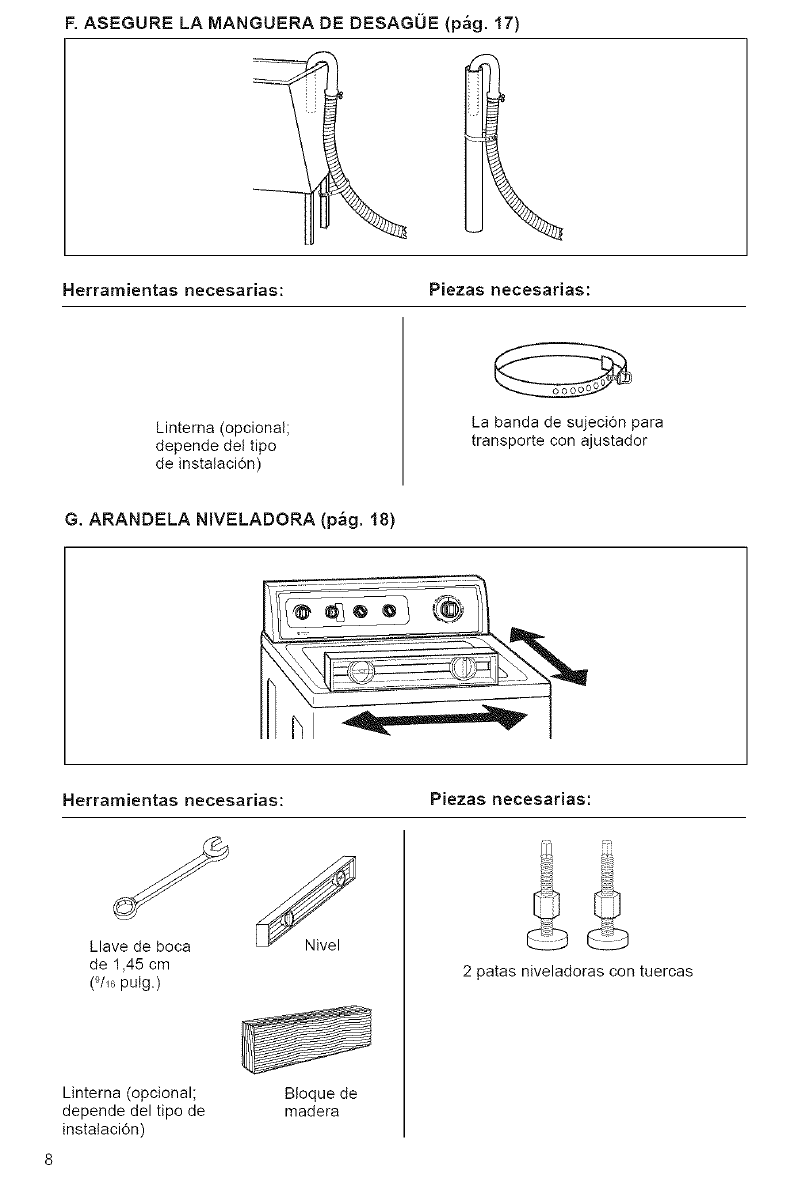
F. ASEGURE LA MANGUERA DE DESAGOE (p_g. 17)
Herramientas necesarias: Piezas necesarias:
Linterna (opcional;
depende del tipo
de instalaci6n)
La banda de sujeci6n para
transporte con ajustador
G. ARANDELA N[VELADORA (p_g. 18)
Herramientas necesarias: Piezas necesarias:
Llave de boca
de 1,45 cm
(9//0pulg.)
Linterna (opcional; B!oque de
depende del tipo de madera
instataci6n)
2 patas niveladoras con tuercas

La seleccibn de ia Iocalizaci6n adecuada
para su lavarropas mejorar_ su rendimiento y
reducir& inquietudes tales como la "caminata"
oruido producido por e! lavarropas.
DEMANDA ELECTRICA
Se necesita una atimentaci6n electrica de
I20 voltios, 60 hertzios, CA sotamente, de
I5 o 20 amperes y protegida con fusibles.
Se recomienda el empleo de un fusible
retardador o disyuntor. Conecteto con un
circuito de rama individual.
Peligro de descarga electrica
Introduzca el enchufe en un
tomacorriente con pueeta a tierra
de tree clavijas.
No quite la clavija de puesta a tierra.
No use un adaptador.
No utilice un cable prolongador.
La opci6n de no seguir estas
instrucciones puede causar la muerte,
un incendio o choque electrico.
INSTRUCCIONES PARA
LA PUESTA ATIERRA
ADVERTENCIA: la conexi6n incorrecta
del conductor de puesta a tierra del equipo
puede ocasionar un peligro de descarga
electrica. Confirme con un electricista o
reparador calificado si tiene duda alguna
en cuanto a la puesta a tierra correcta del
electrodomestico. No modifique el enchufe
provisto con el electrodomestico: si aquel
no entra en el tomacorriente, pida a un
electricista calificado que te instate un
tomacorriente adecuado.
Para su propia seguridad, debe ponerse a
tierra este tavarropas. En caso de funciona-
miento defectuoso o averia, ta puesta a tierra
reducira e! riesgo de sufrir una descarga
electrica at facilitar una via de menor
resistencia para ta corriente electrica.
Se ha equipado este lavarropas con un
cable de alimentaci6n etectrica que tiene un
enchufe con puesta a tierra de tres clavijas.
Para minimizar el probable peligro de
descarga electrica, debe enchufarse el cable
de alimentaci6n etectrica en un enchufe
mural hembra coincidente para tres ctavijas,
puesto a tierra de conformidad con el regla-
mento de instalaciones electricas nacionates,
L_Itimaedici6n de ANSI/NFPA 70, asi como
con todos los c6digos y ordenanzas locales.
Enchufemgral hembra
tipopuestaatierra
Enchufeconpuesta paratres¢lavijas
atierra detres
©
¢lavija
Clavija de puesta
atierra
Cable de alimenta¢i_
el_ct_ica
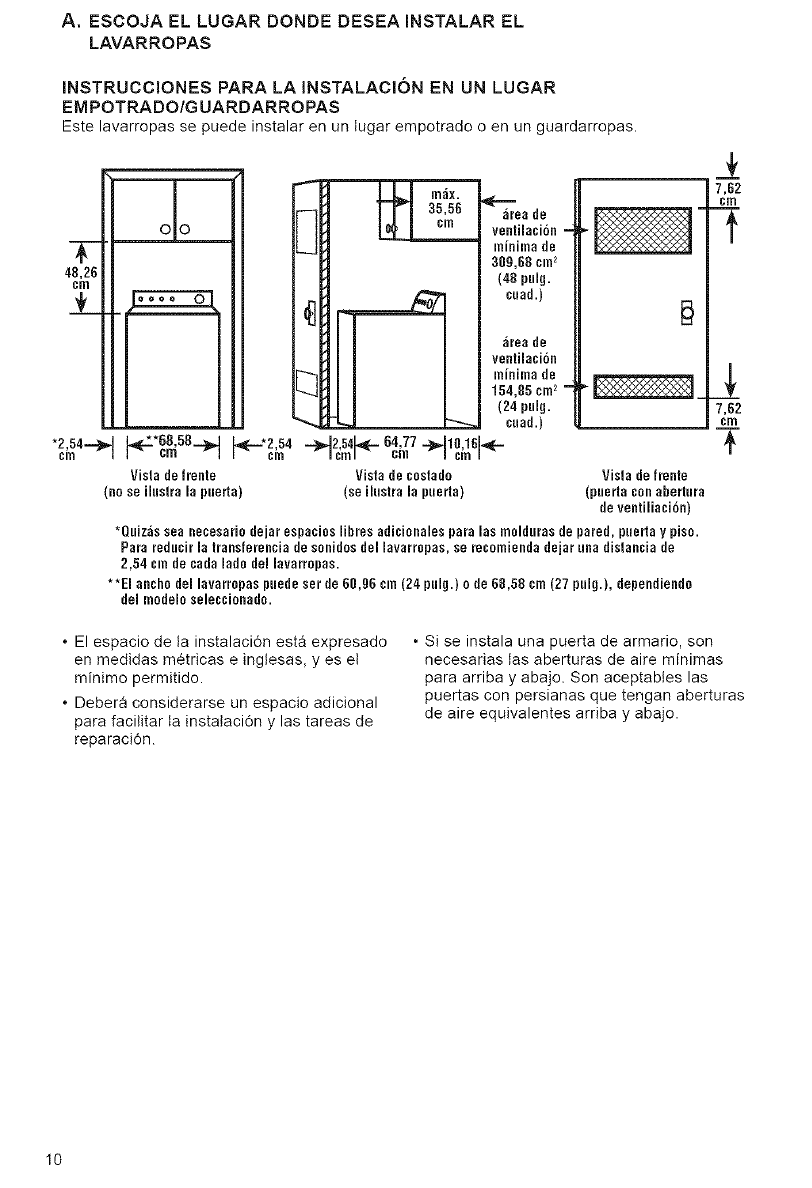
A. ESCOJA EL LUGAR DONDE DESEA INSTALAR EL
LAVARROPAS
INSTRUCCIONES PARA LA INSTALACION EN UN LUGAR
EMPOTRADO/G UARDARROPAS
Este lavarropas se puede instalar en un tugar empotrado o en un guardarropas.
cm /
Vista de frente
(no se ihlstra la paerta)
"H_ m_ix.
35,56 _rea de
ventiiaci6n
minima de
309,68 cIn2
(48 palg.
cuad.)
_rea de
ventiJaci6n
minima de
154,85 sm2
(24 palg.
caad.)
.._---'2,54 ..-_2 54J_[-.-64,'77 ...-_11016J_-
cm _ml "cm Ic_ i
Vista de ¢astado
(se ilustra la puerta)
Vista de frente
(ptierta can abertara
de ventiliacion)
*Quiz_s sea necesarJa dejar espacios Jibresadicionales para las molduras de pared, paerta ypisa.
Para reducir la transferencia de sonidos del lavarrapas, se recomienda dejar una dJstancia de
2,54 cm de cada lado del lavarropas.
**EJ ancha del lavarrapas puede ser de 60,96 ¢m (24 palg.) o de 68,53 ¢m (27 pulg.), dependienda
deJ modeJo seleccionada.
7,62
Cffl
7,62
cm
T
oEl espacio de la instalaci6n esta expresado
en medidas m_tricas e ingtesas, yes et
minima permitido.
oDebera considerarse un espacio adicional
para facilitar ta instataci6n y las tareas de
reparaci6n.
* Si se instala una puerta de armario, son
necesarias las aberturas de aire minimas
para arriba y abajo. Son aceptables las
puertas con persianas que tengan aberturas
de aire equivalentes arriba y abajo.
I0
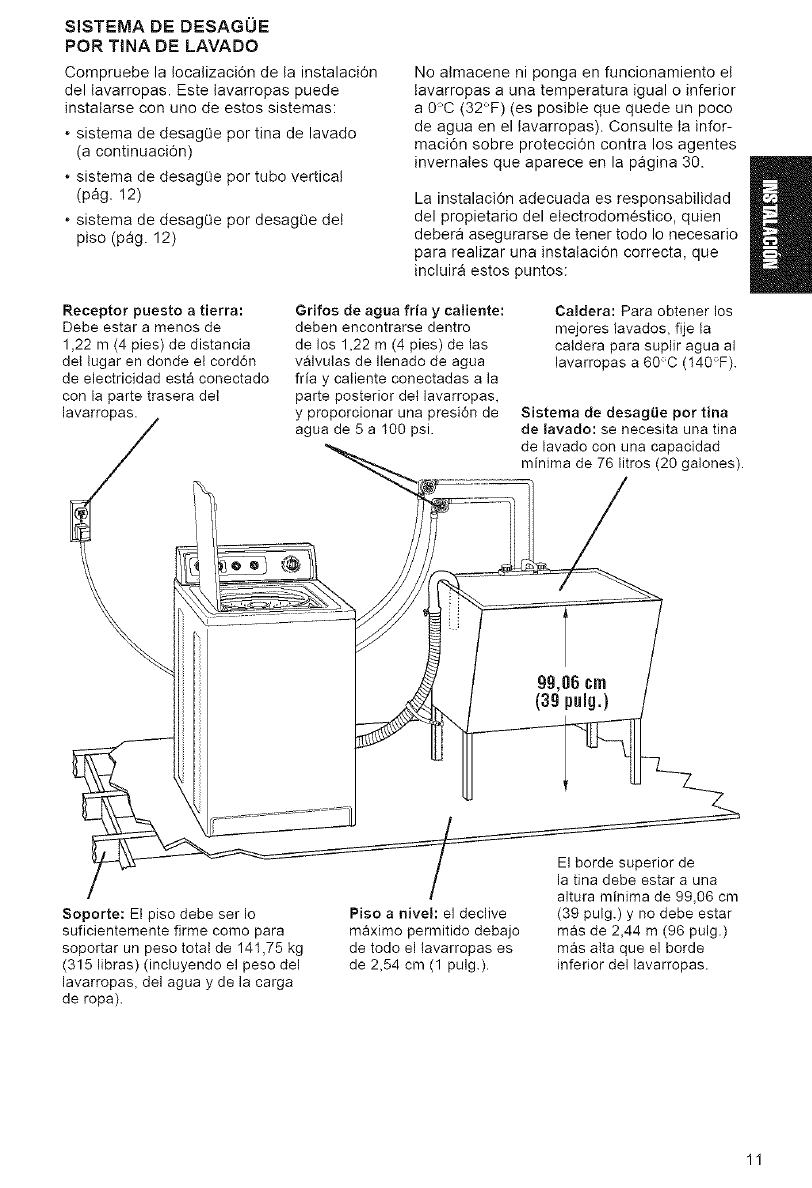
SiSTEMA DE DESAGUE
POR TINA DE LAVADO
Compruebe la localizacidn de la instalacidn
del lavarropas. Este lavarropas puede
instalarse con uno de estos sistemas:
sistema de desagQe per tina de lavado
(a continuacidn)
osistema de desagQe por tube vertical
(pag. 12)
sistema de desagQe por desagQe del
piso (pag. 12)
No almacene ni ponga en funcionamiento el
tavarropas a una temperatura igual o inferior
a 0°C (32°F) (es posible que quede un poco
de agua en el lavarropas). Consulte ta infer-
macidn sobre proteccidn contra los agentes
invernates que aparece en la pagina 30.
La instalacidn adecuada es responsabilidad
del propietario del electrodom_stico, quien
debera asegurarse de tener todo Io necesario
para realizar una instatacidn correcta, que
incluira estos puntos:
Receptor puesto a tierra:
Debe estar a menos de
1,22 m (4 pies) de distancia
del lugar en donde et cord6n
de electricidad esta conectado
con la parte trasera del
I
Grifos de agua fria y caliente:
deben encontrarse dentro
de los 1,22 m (4 pies) de las
valvulas de Ilenado de agua
fria y catiente conectadas a la
parte posterior det lavarropas,
y proporcionar una presi6n de
agua de 5 a 100 psi.
t;
Soporte: El piso debe ser Io
suficientemente firme como para
soportar un peso total de 141,75 kg
(315 libras) (incluyendo el peso del
lavarropas, del agua y de la carga
de ropa).
Piso a nivet: el declive
maximo permit!do debajo
de todo el lavarropas es
de 2,54 cm (1 pulg.).
Caidera: Para obtener los
mejores lavados, fije la
catdera para suplir agua al
lavarropas a 60°C (140°F).
Sistema de desagi.ie per tina
de tavado: se necesita una tina
de lavado con una capacidad
minima de 76 litros (20 galones).
El borde superior de
ia tina debe estar a una
aitura minima de 99_06 cm
(39 pulg.) y no debe estar
mas de 2A4 m (96 pulg.)
mas atta que el borde
inferior del lavarropas.
11
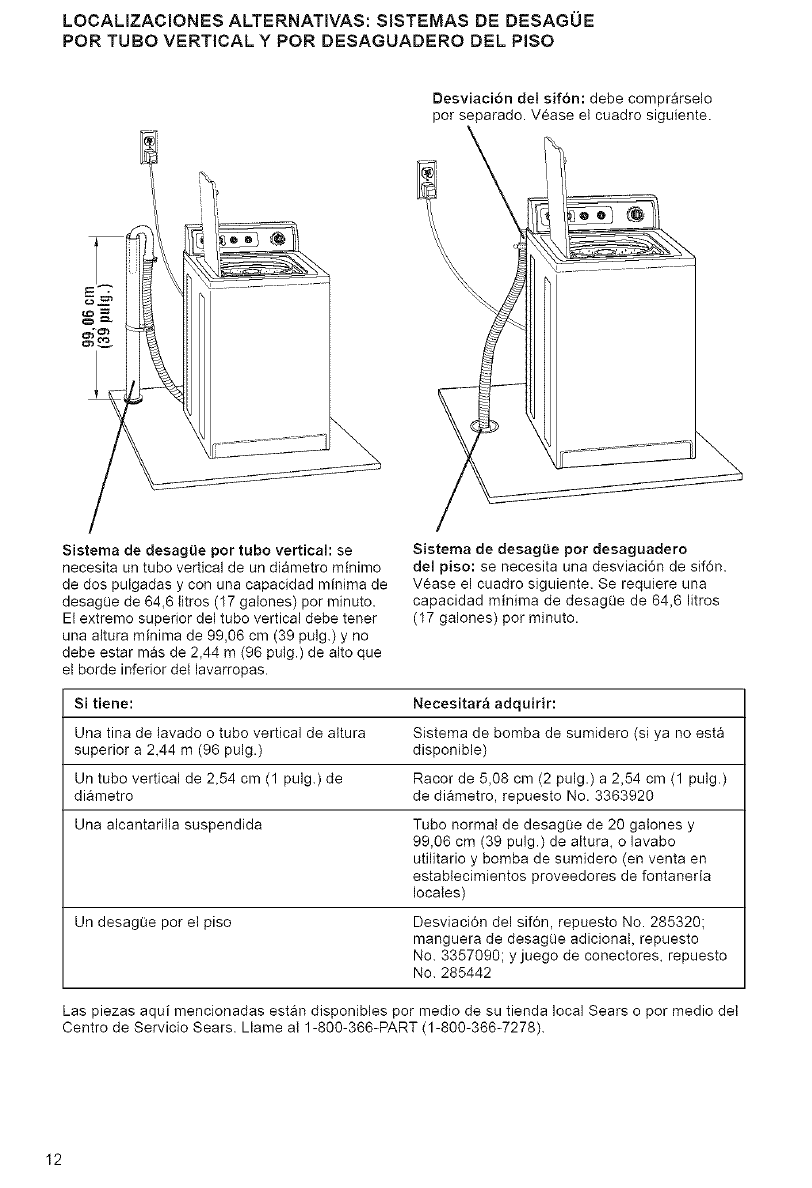
LOCALIZACIONES ALTERNATIVAS: SISTEMAS DE DESAGOE
POR TUBO VERTICAL Y POR DESAGUADERO DEL PiSO
Desviaci6n del sif6n: debe comprarselo
por separado. Vease el cuadro siguiente.
@
Sistema de desag{.ie por tubo vertical: se
necesita un tube vertical de un diametro minimo
de dos pulgadas y con una capacidad minima de
desagL_e de 64,6 litros (17 galones) por minute.
Et extreme superior del tuba vertical debe tener
una attura minima de 99,06 cm (39 pulg.) y no
debe estar mas de 2,44 m (96 pulg.) de alto que
el borde inferior dei lavarropas.
Sistema de desagi.ie pot desaguadero
del piso: se necesita una desviaci6n de sif6n.
VCase el cuadro siguiente. Se requiere una
capacidad minima de desagOe de 64,6 litros
(17 galones) por minuto.
Si tiene: Necesitar& adquirir:
Una tina de lavado o tubo vertical de altura Sistema de bomba de sumidero (si ya no esta
superior a 2,44 m (96 pulg.) disponible)
Un tubo vertical de 2,54 cm (1 pulg.) de Racor de 5,08 cm (2 pulg.) a 2,54 cm (1 pulg.)
diametro de diametro, repuesto No. 3363920
Una alcantarilla suspendida Tubo normal de desag(Je de 20 galones y
99,06 cm (39 pulg.) de altura, o lavabo
utilitario y bomba de sumidero (en venta en
establecimientos proveedores de fontaneria
locales)
Un desagLie par el piso Desviaci6n del sif6n, repuesto No. 285320:
manguera de desag0e adicionaL repuesto
No. 3357090; y juego de conectores, repuesto
No. 285442
Las piezas aqui mencionadas estan disponibles par medio de su tienda local Sears o por media del
Centro de Servicio Sears. Llame al 1-800-366-PART (1-800-366-7278).
I2
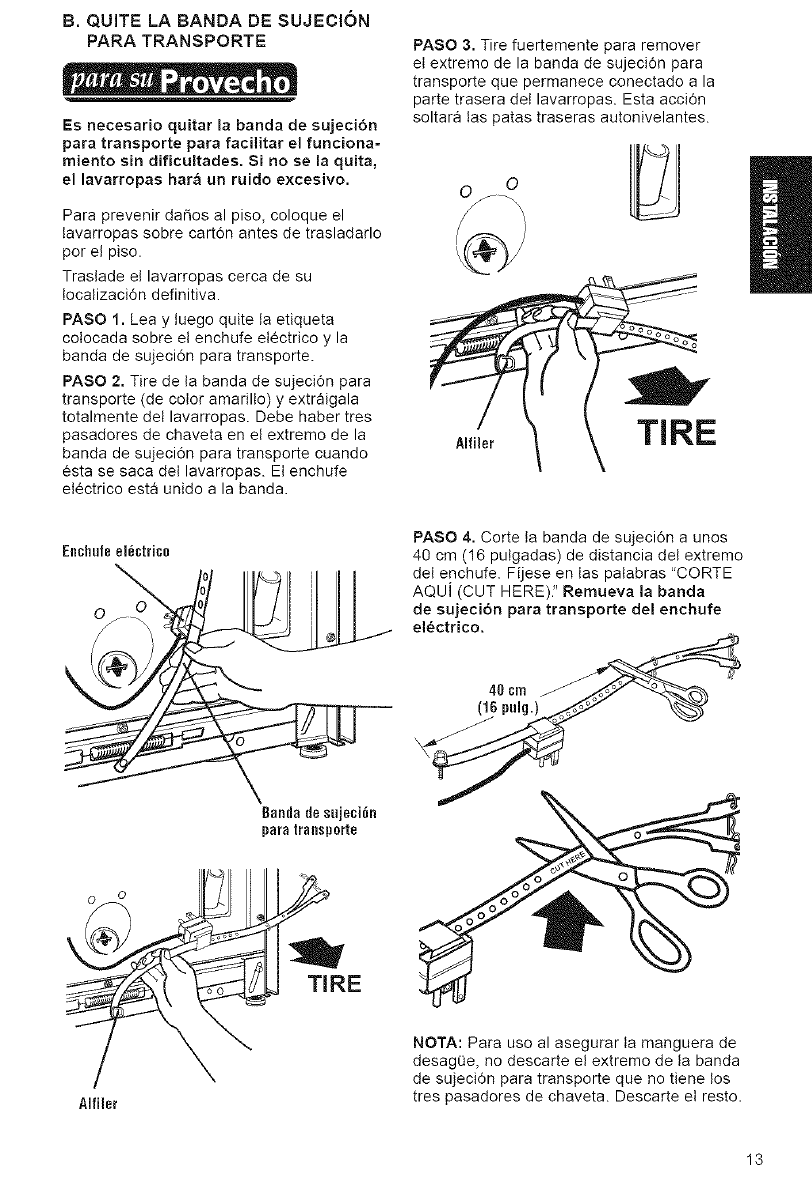
B, QUITE LA BANDA DE SUJECION
PARA TRANSPORTE
Es necesario quitar la banda de sujecibn
para transporte para facilitar el funciona-
miento sin difieultades. Si no se la quita,
el lavarropas hara un ruido excesivo.
Para prevenir da_os al piso, coloque el
tavarropas sobre cart6n antes de trasladarlo
por e! piso.
Traslade el lavarropas cerca de su
tocatizacidn definitiva.
PASO 1. Lea y tuego quite la etiqueta
colocada sobre et enchufe electrico y la
banda de sujeci6n para transporte.
PASO 2. Tire de ta banda de sujecidn para
transporte (de color amarillo) y extraigala
totalmente del lavarropas. Debe haber tres
pasadores de chaveta en el extremo de la
banda de sujeci6n para transporte cuando
esta se saca det lavarropas. El enchufe
electrico esta unido a la banda.
PASO 3. Tire fuertemente para remover
el extremo de la banda de sujecidn para
transporte que permanece conectado a la
parte trasera del lavarropas. Esta accidn
soltara tas patas traseras autonivelantes.
,,,,,0r TIRE
Enchule electric0
°1
o
ooo
Banda de sujeci_n
paratransp0rte
o o
Alfiler
PASO 4. Corte la banda de sujeci6n a unos
40 cm (16 putgadas) de distancia del extremo
del enchufe. Fijese en las patabras "CORTE
AQUi (CUT HERE)." Remueva la banda
de sujecibn para tranaporte de! enchufe
el_ctrico.
NOTA: Para uso al asegurar ta manguera de
desagLie, no descarte el extremo de la banda
de sujecidn para transporte que no tiene los
tres pasadores de chaveta. Descarte el resto.
13
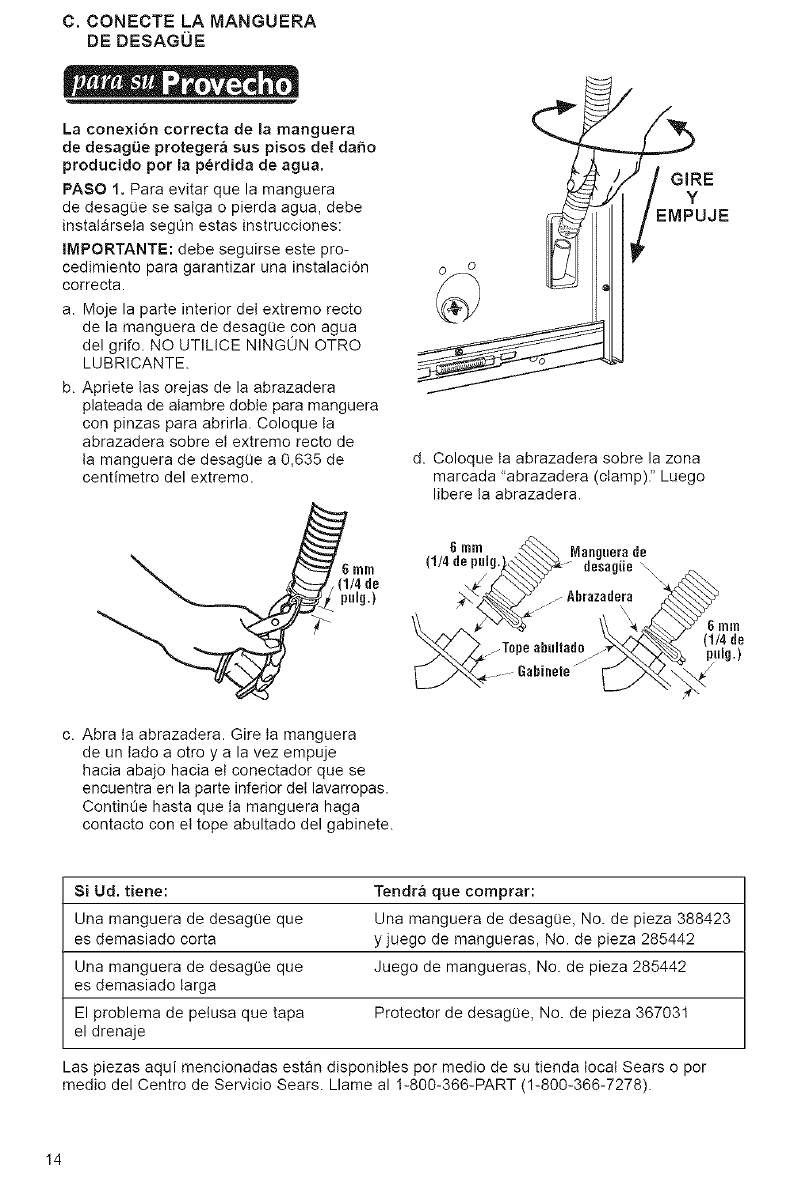
C.CONECTELA MANGUERA
DEDESAGOE
La cone×i6n correcta de la manguera
de desag0e proteger& sus pisos de! daho
producido por la p_rdida de agua.
PASO 1. Pare eviter que la manguera
de desagLie se salga o pierda ague, debe
instatarseta segQn estas instrucciones:
IMPORTANTE: debe seguirse este pro-
cedimiento pare garantizar una instalaci6n
correcta.
a. Moje la parte interior del extremo recto
de la manguera de desagQe con ague
del grifo. NO UTILICE NINGUN OTRO
LUBRICANTE.
b. Apriete tas orejas de la abrazadera
plateada de alambre doble pare manguera
con pinzas pare abrirla. Coloque la
abrazadera sobre et extremo recto de
ta manguera de desagQe a 0,635 de
centimetro del extreme.
c. Abra ta abrazadera. Gire ta manguera
de un lado a otro y ala vez empuje
hacia abajo hacia et conectador qua se
encuentra en la parte inferior del lavarropas.
ContinQe haste qua la menguera haga
contacto con et tope abultado del gabinete.
GIRE
Y
EMPUJE
d. Coloque ta abrazadera sobre la zone
marcada "abrazadera (clamp)." Luego
libereta abrazadera.
6 mm Manguera de
(1/4 de ptilg, desagiie
jTope abulladej
.... Gabinele _
Eiln
(1/4de
p[ilg.)
Si Ud. tiene: Tendra que comprar:
Una manguera de desag(_e que Una manguera de desagQe, No. de pieza 388423
es demasiade certa yjuege de mangueras, No. de pieza 285442
Una manguera de desagQe que Juego de mangueras, No. de pieza 285442
es demasiado large
El problema de pelusa qua tape Protector de desag_e, No. de pieza 367031
el drenaje
Las piezas aqui mencionadas estan disponibles por medio de su tienda local Sears o por
medio del Centre de Servicio Sears. Llama al 1-800-366-PART (1-800-366-7278).
I4
ParalossietemasdedesagLieportubo
verticalopor tina de lavado:
PASO 2. Abra la abrazadera amarilla de un
solo alambre con pinzas y deslicela sobre
e! extremo con forma de gancho de la
manguera de desagSe para asegurar que
se unan tas secciones de hule y arrugadas.
Extremocon
gaflcho
D. CONECTE LAS MANGUERAS
DE LLENADO AL LAVARROPAS
La conexi6n correcta de las mangueras
de Ilenado permitira la admisibn adecuada
al lavarropas del agua fria y camiente y,
adem_s, facilitar_ evitar los dahos pot
agua debido ap_rdidas.
Manguerade
desagiie
PASO 3. Coloque el extremo con forma de
gancho de la manguera de desag_e dentro
de la tina para lavar ropa o dentro det tubo
vertical de desagSe. AsegOrese de que la
manguera de desagSe tenga la Iongitud
necesaria. Rote el gancho para eliminar
arrugas.
Para impedir que el agua de desagOe vuelva
al lavarropas:
*No estire el extremo con forma de gancho
de la manguera de desagSe ni fuerce el
exceso de la manguera dentro del tubo
vertical de desagLie.
*No tienda et exceso de manguera de
desag0e en el fondo de ta tina de lavado.
Peligro de resbalbn y caida
Use mangueras nuevas de Ilenado
de agua.
La opci6n de no seguir estas
instrucciones puede provocar lesiones
en la cabeza, fracturas en los huesos,
o maguHaduras.
NOTA: Reemplace las mangueras de entrada
de agua despues de cinco aSos de uso paras
reducir el riesgo de que fallen las mangueras.
Inspeccione peri6dicamente y reemplace tas
mangueras de entrada de agua si aparecen
bultos, arrugas, cortaduras, desgaste o fugas
de agua. AI reemplazar las mangueras de
entrada de agua marque ta fecha de reemplazo
en ta etiqueta con un marcador permanente.
PASO 1. Introduzca una arandela nueva
plana (de la bolsa de piezas) en cada uno de
los extremos de las mangueras de entrada
de agua. Revise la instalaci6n para asegurarse
de que esten asentadas firmemente en los
acoptamientos.
ACOPLAMiENTO ARANDELA
15
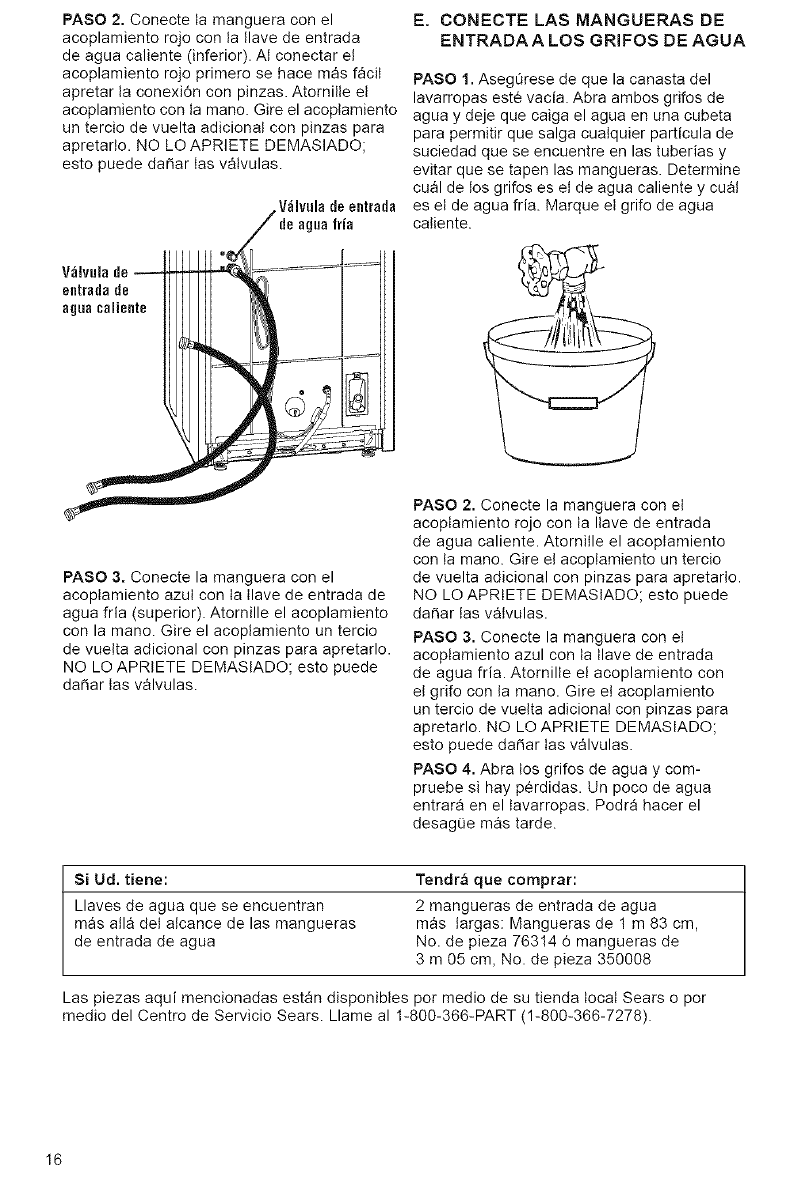
PASO2.Conectetamangueraconel
acoplamientorojocontallavedeentrada
deaguacaliente(inferior).AIconectaret
acoplamientorojoprimerosehacemasfacit
apretarlaconexi6nconpinzas.Atornilleel
acoplamientoconlamano.Gireelacoptamiento
unterciodevueltaadicionatconpinzaspara
apretarlo.NOLOAPRIETEDEMASIADO;
estopuededa_artasvalvulas.
V;ilvulade
entrada de
agua caliente
V_lvula deentrada
Ida
PASO 3. Conecte la manguera con el
acoplamiento azut con la llave de entrada de
agua fria (superior). Atornille el acoplamiento
con la mano. Gire el acoplamiento un tercio
de vuetta adicional con pinzas para apretarlo.
NO LO APRIETE DEMASIADO; esto puede
da_ar tas valvulas.
E. CONECTE LAS MANGUERAS DE
ENTRADA ALOS GRIFOS DE AGUA
PASO !. AsegL_rese de que la canasta del
lavarropas este vacia. Abra ambos grifos de
agua y deje que caiga el agua en una cubeta
para permitir que salga cualquier particula de
suciedad que se encuentre en las tuberias y
evitar que se tapen las mangueras. Determine
cual de los grifos es el de agua caliente y cuat
es el de agua fria. Marque el grifo de agua
catiente.
PASO 2. Conecte la manguera con el
acoplamiento rojo con ta Itave de entrada
de agua caliente. Atornitle el acoptamiento
con ta mano. Gire el acoplamiento un tercio
de vuelta adicional con pinzas para apretarto.
NO LO APRtETE DEMASIADO; esto puede
dafiar las vatvulas.
PASO 3. Conecte la manguera con el
acoplamiento azul con ta tlave de entrada
de agua fria. Atornille e! acoplamiento con
el grifo con la mano. Gire et acoplamiento
un tercio de vuelta adiciona! con pinzas para
apretarlo. NO LO APRIETE DEMASIADO;
esto puede da_ar tas valvulas.
PASO 4. Abra los grifos de agua y com-
pruebe si hay p_rdidas. Un poco de agua
entrara en el tavarropas. Podra hacer el
desagQe mas tarde.
Si Ud. tiene: Tendr_ que comprar:
Llaves de agua que se encuentran 2 mangueras de entrada de agua
mas alia det alcance de las mangueras m_s largas: Mangueras de 1 m 83 cm,
de entrada de agua No. de pieza 76314 6 mangueras de
3 m 05 cm, No. de pieza 350008
Las piezas aqui mencionadas estan disponibles por medio de su tienda local Sears o por
medio del Centro de Servicio Sears. Llame al 1-800-366-PART (1-800-366-7278).
I6
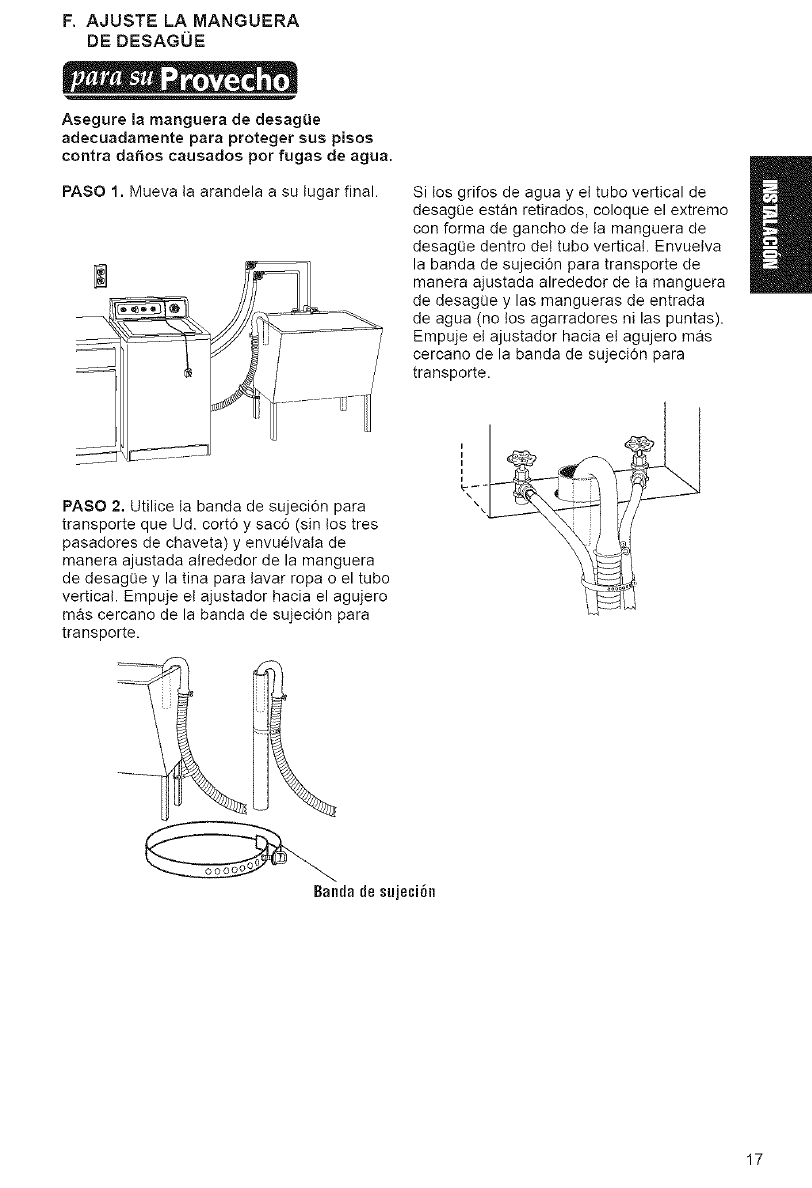
F. AJUSTE LA MANGUERA
DEDESAGOE
Asegure la manguera de desagOe
adecuadamente para proteger sus pisos
contra dahos causados por fugas de agua.
PASO 1. Mueva ta arandela a su tugar final.
J
PASO 2. Utilice la banda de sujeci6n para
transporte que Ud. cort6 y sac6 (sin los tres
pasadores de chaveta) y envuelvala de
manera ajustada alrededor de la manguera
de desag(_e y la tina para lavar ropa o el tube
vertical. Empuje et ajustador hacia el agujero
mas cercano de la banda de sujeci6n para
transporte.
m
Si los grifos de agua y el tubo vertical de
desagSe estan retirados, coloque el extreme m
con forma de gancho de la manguera de
desagLie dentro det tubo vertical. Envuetva
la banda de sujeci6n para transporte de
manera ajustada alrededor de ta manguera
de desagSe y las mangueras de entrada
de agua (no los agarradores ni las puntas).
Empuje el ajustador hacia el agujero mas
cercano de la banda de sujeci6n para
transporte.
Banda de suje¢i6n
17
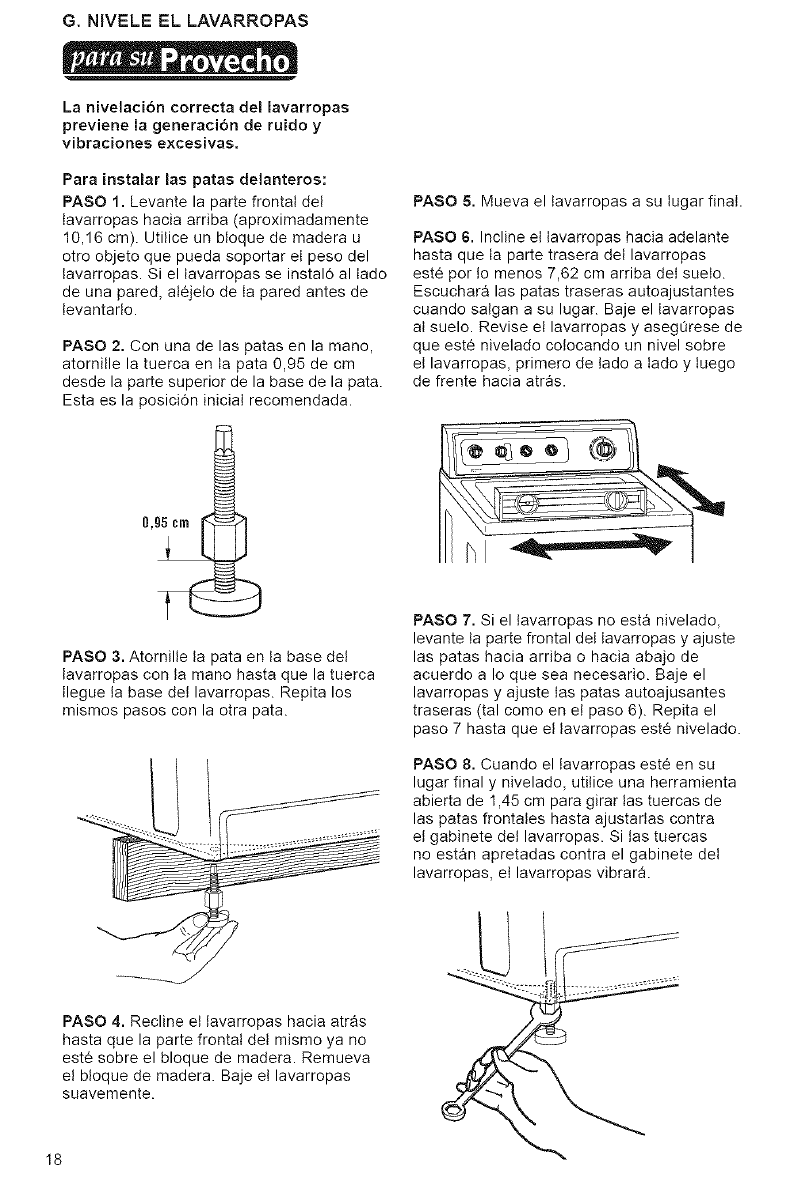
G, NIVELE EL LAVARROPAS
La nivelaci6n correcta del lavarropaa
previene la generacibn de ruido y
vibracionea e×cesivas.
Para instalar las patas delanteros:
PASO 1. Levante la parte frontal del
tavarropas hacia arriba (aproximadamente
I0,16 cm). Utilice un bloque de madera u
etro ebjeto que pueda soportar et peso del
tavarropas, Si el tavarrepas se instal6 al lade
de una pared, al_jelo de ta pared antes de
tevantarto,
PASO 2. Con una de las patas en la mane,
atornille la tuerca en ta pata 0,95 de cm
desde la parte superior de la base de la pata.
Esta es la posici6n inicial recomendada.
PASO 3. Atornille ta pata en ta base det
tavarropas con ta mano hasta que la tuerca
tlegue la base de! lavarropas. Repita los
mismos pasos con la etra pata.
PASO 5. Mueva el tavarropas a su tugar final.
PASO 6. Incline el lavarropas hacia adelante
hasta que la parte trasera det lavarropas
este por lo menos 7,62 cm arriba det sueto.
Escuchara las patas traseras autoajustantes
cuando sa!gan a su lugar. Baje el lavarropas
at suelo, Revise el lavarropas y asegL_rese de
que este nivelado celocando un nivel sobre
el lavarropas, primero de tado a tado y tuego
de frente hacia atras,
PASO 7. Si el tavarropas no esta nivelado,
levante ta parte frontal del lavarropas y ajuste
las patas hacia arriba o hacia abajo de
acuerde a Io que sea necesario. Baje el
lavarropas y ajuste tas patas autoajusantes
traseras (tal cemo en et paso 6). Repita el
paso 7 hasta que el tavarropas est_ nivelado.
PASO 8. Cuando el lavarropas est_ en su
lugar final y nivelado, utitice una herramienta
abierta de 1,45 cm para girar tas tuercas de
las patas frentates hasta ajustarlas contra
el gabinete del lavarropas. Si las tuercas
no estan apretadas contra el 9abinete det
lavarropas, el lavarropas vibrara,
PASO 4. Recline el lavarropas hacia atras
hasta que la parte frontal del mismo ya no
este sebre el bloque de madera, Remueva
e! bloque de madera, Baje el lavarrepas
suavemente.
I8
REVISE LA iNSTALACION
T6mese unos cuantos minutos para
completar esta lista de revisi6n. Le
ayudar_ a asegurarse de que se ha
Iogrado una instalacibn adecuada
yasi aumentar su satisfacci6n con
su lavarropas Kenmore.
[] Revise los requisitos de suministro
electrico. AsegOrese de que cuenta con
el suministro electrico adecuado y de que
esta usando el metodo recomendado de
puesta a tierra.
[] Asegt3rese de que:
. Tiene todas las herramientas con tas
que empez6.
. Ha removido todos los materiales de
transporte.
. Ha removido ta banda de sujeci6n para
transporte con los tres pasadores de
chaveta.
. Instal6 todas tas piezas mencionadas
en tas paginas 6-8.
[] Revise que:
• Et lavarropas est_ nivelado
• Las tuercas de las patas frontales
esten apretadas.
[] AsegOrese de que los grifos de agua
esten abiertos.
PASOS FINALES
[] Conecte el cable de suministro electrico
en el tomacorriente puesto a tierra.
[] Remueva la capa protectora azut que esta
en la consola y cualquier pieza de cinta
que haya quedado en et lavarropas.
[] T6mese atgunos minutos para leer las
Instrucciones de funcionamiento (paginas
20-27) para comprender completamente
el funcionamiento de su tavarropas nuevo.
Luego, active el lavarropas y permita que
complete el ciclo normal (NORMAL).
19
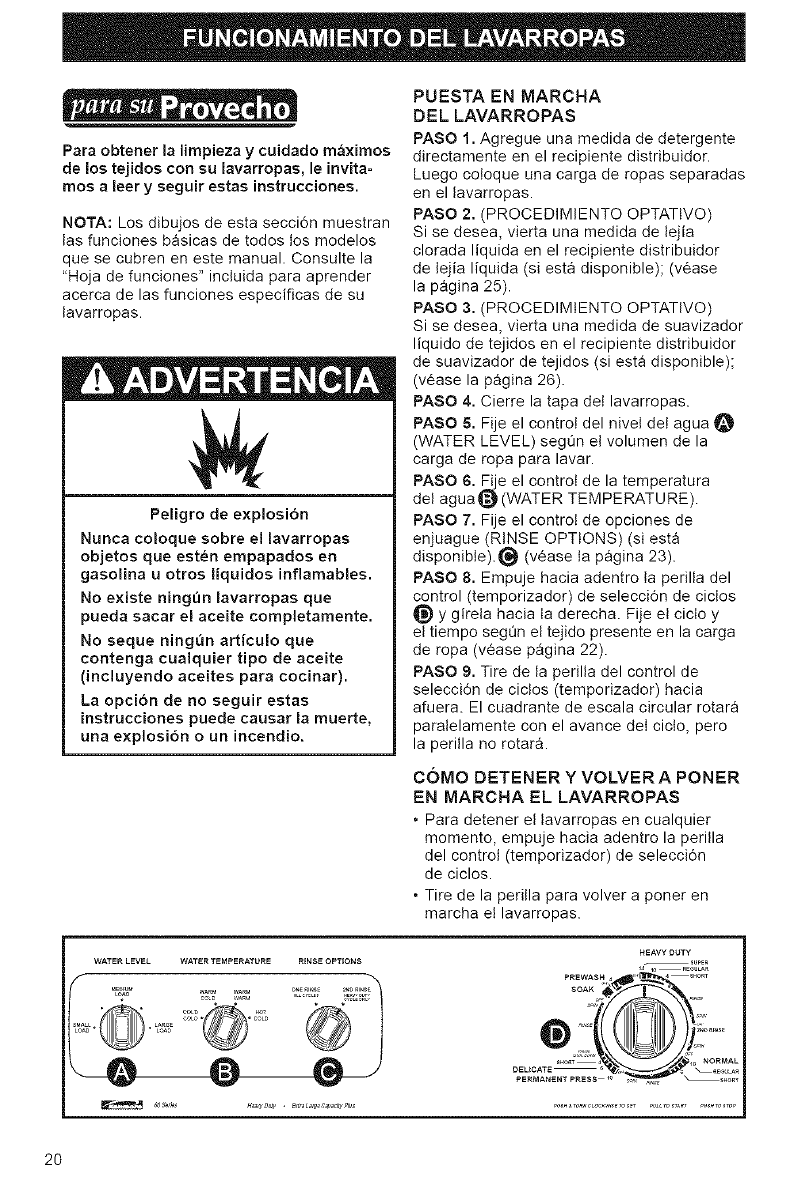
Para obtener la limpieza ycuidado m_ximos
de los tejidos con su lavarropas, le invita-
mos aleer y seguir estas instrucciones.
NOTA: Los dibujos de esta secci6n muestran
tas funciones basicas de todos los modelos
que se cubren en este manual. Consulte la
"Hoja de funciones" incluida para aprender
acerca de las funciones especificas de su
tavarropas.
Peligro de explosi6n
Nunca coloque sobre el lavarropas
objetos que esten empapados en
gasolina uotros liquidos inflamables.
No existe ningen lavarropas que
pueda sacar el aceite completamente.
No seque ning_n articulo que
contenga cualquier tipo de aceite
(incluyendo aceites para cocinar).
La opcion de no seguir estas
instrucciones puede causar la muerte,
una explosi6n o un incendio.
PUESTA EN MARCHA
DEL LAVARROPAS
PASO 1. Agregue una medida de detergente
directamente en el recipiente distribuidor.
Luego coloque una carga de ropas separadas
en el lavarropas.
PASO 2. (PROCEDIMIENTO OPTATtVO)
Si se desea, vierta una medida de lejia
clorada Iiquida en el recipiente distribuidor
de lejia liquida (siesta disponible); (vease
la pagina 25).
PASO 3. (PROCEDIMtENTO OPTATIVO)
Si se desea, vierta una medida de suavizador
liquido de tejidos en el recipiente distribuidor
de suavizador de tejidos (si esta disponible);
(vease la pagina 26).
PASO 4. Cierre la tapa det lavarropas.
PASO 5. Fije el control del nivet del agua O
(WATER LEVEL) segOn et volumen de la
carga de ropa para lavar.
PASO 6. Fije el control de la temperatura
del agua_ (WATER TEMPERATURE).
PASO 7. Fije el control de opciones de
enjuague (RINSE OPTIONS) (siesta
disponible)._ (vease ta pagina 23).
PASO 8. Empuje hacia adentro ta perilla del
control (temporizador) de selecciOn de ciclos
_) y girela hacia la derecha. Fije el ciclo y
el tiempo segOn el tejido presente en la carga
de ropa (v_ase pagina 22).
PASO 9. Tire de la perilla del control de
selecci6n de cictos (temporizador) hacia
afuera. El cuadrante de escala circular rotara
paralelamente con el avance det cicto, pero
la perilla no rotara.
COMO DETENER Y VOLVER A PONER
EN MARCHA EL LAVARROPAS
• Para detener el tavarropas en cualquier
momento, empuje hacia adentro la perilla
del control (temporizador) de selecci6n
de ciclos.
• Tire de la perilla para volver a poner en
marcha el lavarropas.
HEAVY_)UTYsupE R
OELICATE._ ....... 6 _._\ _aEe_a
2O
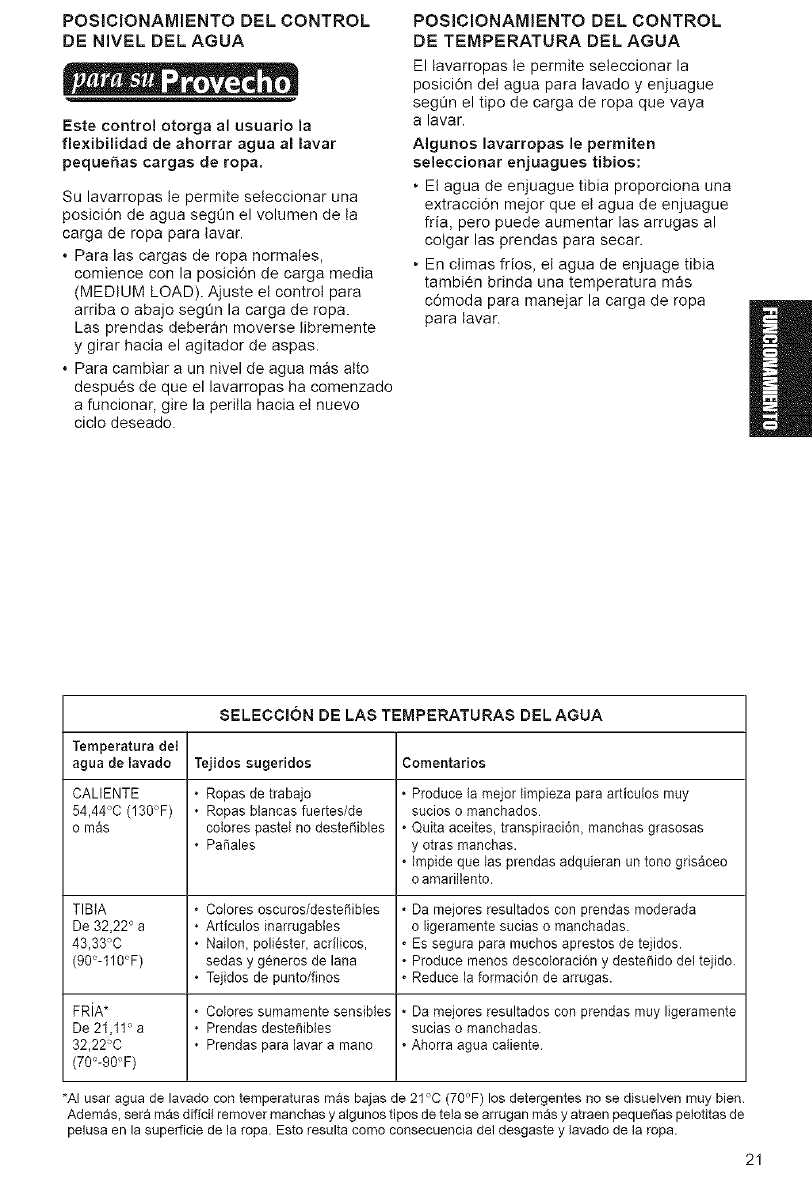
POSICIONAMIENTO DEL CONTROL
DE NiVEL DEL AGUA
Este control otorga al usuario la
flexibilidad de ahorrar agua al lavar
pequeSas cargas de ropa.
Su lavarropas le permite seteccionar una
posici6n de agua segt_n el volumen de ta
carga de ropa para tavar.
*Para las cargas de ropa normates,
comience con la posicidn de carga media
(MEDIUM LOAD). Ajuste el control para
arriba o abajo segt_n la carga de ropa.
Las prendas deberan moverse tibremente
y girar hacia el agitador de aspas.
*Para cambiar a un nivel de agua mas alto
despues de que el lavarropas ha comenzado
a funcionar, gire la peritla hacia el nuevo
ciclo deseado.
POSICIONAIVllENTO DEL CONTROL
DE TEMPERATURA DEL AGUA
El lavarropas le permite seleccionar la
posici6n del agua para lavado y enjuague
segt_n el tipo de carga de ropa que vaya
a lavar.
AIgunos lavarropas le permiten
seleccionar enjuagues tibios:
•El agua de enjuague tibia proporciona una
extracci6n mejor que el agua de enjuague
fria, pero puede aumentar las arrugas al
colgar las prendas para secar.
• En climas frios, el agua de enjuage tibia
tambien brinda una temperatura mas
c6moda para manejar la carga de ropa
para tavar.
SELECCI6N DE LAS TEMPERATURAS D_:LAGUA
Temperatura del
agua de lavado Tejidos sugeridos Comentarios
CALIENTE •Ropas de trabajo Produce la meier limpieza para articuios muy
54,44°C (130°F) •Ropas btancas fuertes/de sucios o manchados
o m_s coIores pastel no desteSibies *Quita aceites, transpiraci6n, manchas grasosas
•PaSales y otras manchas.
•Impide que las prendas adquieran un tono gris_ceo
o amariliento.
TIBIA *Colores oscuros/desteSibtes Da mejores resultados con prendas moderada
De 32,22" a •Articulos inarrugabtes o ligeramente sucias o manchadas.
43,33°0 •Nailon, poli6ster, acrilicos, *Es segura para muchos aprestos de tejidos.
(90"-110"F) sedas y gCneros de lana •Produce menos descoloraci6n y destefiido del tejido.
•Tejidos de punto/finos *Reduce la formaci6n de arrugas.
FRiA* *Colores sumamente sensibies Da mejores resultados con prendas muy ligeramente
De 21,11" a •Prendas destenibles sucias o manchadas.
32,22°C •Prendas para lavar a mano *Ahorra agua caliente.
(70"-90OF)
*AI usar agua de lavado con temperaturas mas bajas de 21 °C (70°F) los detergentes no se disuelven muy bien.
Ademas, sera mas dificil remover manchas y algunos tipos de tela se arrugan mas y atraen pequefias pelotitas de
pelusa en la superricie de la ropa. Esto resulta como consecuencia del desgaste y tavado de la ropa.
21
POSICIONAMtENTODELCONTROL
(TEMPORIZADOR)DE SELECCI6N
DE CICLOS
Use este control para esooger el tiempo de
agitaci6n y para poner en marcha el lavarropas.
Cada ciclo esta disei_ado de acuerdo al tipo de
lavado y centrifugado que son necesarios para
la carga de ropa a lavar.
,Use tiempo completo para los tejidos suma-
mente sucios y prendas fuertes (SUPER O
REGULAR si asi Io indica).
,Use menos tiempo para los tejidos ligera-
mente sucios y prendas finas (SHORT si asi
Io indica).
NOTA: No lave en el lavarropas ropa que
contenga instrucciones de lavado a mano.
La ropa que contiene instrucciones de lavado
a mano tiene:
•Una fibra o construcci6n que es sensible
a la agitaci6n.
•Tintas sensibles que pueden deste_irse.
Siga las instrucciones de las etiquetas de la
ropa para el secado. La ropa que se puede
encoger se debe secar en posici6n plan&
Coloque esta ropa dandole su forma natural
y original estirandola suavemente. La ropa
de lana tiende a encogerse mas la primera
vez que se lava.
INARRUGABLES (PERMANENT PRESS)
Puede seleccionar un maximo de 10 minutos
de tiempo de lavado.
PRENDAS FINAS (DELICATE)
Use 6 minutos de este ciclo para ropa interior
o prendas de punto suelto.
Los cictos INARRUGABLES/PRENDAS
FINAS (PERMANENT PRESS/DELICATE)
incluyen un proceso de enfriado de carga
que reducen la formaci6n de arrugas
durante otros cictos.
•Este lavado inoluye la agitaoi6n de vetooidad
lenta para remover la suciedad y velocidad
de centrifugado lenta para reducir las arrugas.
NOTA: cuando el temporizador llegue a la pausa
(PAUSE), el lavarropas se vaciara de agua y
pausara por un periodo no mayor de dos minutos,
en tanto que se desag0e parte del agua de lavado
y sea reemplazada por agua fresca.
PRENDAS NORMALES (NORMAL)
Use este ciclo para obtener un m_ximo de
10 minutos de lavado para prendas de algod6n
e hilo que esten muy sucias.
• El lavado combina la agitaci6n de vetocidad
ra#da y lenta con las velocidades de centrifugado
rapido para acortar el tiempo de secado.
• At seleccionar la velocidad regular (REGULAR)
la agitaci6n de veiocidad sera rapida y luego
pasa a una agitaciOn de velocidad mas lent&
• AI seleccionar la posici6n de velocidad corta
(SHORT) la veiocidad de agitaciOn sera lent&
SERVICIO PESADO (HEAVY DUTY)
Use este ciclo para obtener un m_ximo de
14 minutos de lavado para prendas de gran
suciedad.
• El lavado combina la agitaci6n a velocidad
rapida con las velocidades de centrifugado
rapido.
PRELAVADO (PREWASH)
(en atgunos modelos)
Use este cicto para obtener un m_ximo de
4 minutos de agitaci6n para facilitar la eliminaci6n
de manchas rebeldes que necesiten tratamiento
previo. AI ciclo prelavado (PREWASH) le debera
seguir el ciclo servicio pesado, normal o inarruga-
bles (HEAVY DUTY, NORMAL o PERMANENT
PRESS) con detergente adicional.
REMOJO (SOAK) (en algunoe modetos)
El ciclo de remojo (SOAK) utiliza 4 minutos de
agitaciOn seguidos per un periodo ilimitado de
remojo para ayudar a remover suciedad y manchas
rebeldes que necesiten pretratamiento. Necesitara
porter el lavarropas a cero en la posiciOncentrifugar
(SPIN) para eliminar el agua. AI ciclo de remojo
(SOAK) le debera seguir el ciclo servicio pesado,
normal, inarrugables o prelavado (HEAVY DUTY,
NORMAL, PERMANENT PRESS o PREWASH)
con detergente adicional.
NOTA: No recomendamos el agua caliente para
el remojo. Puede fijar algunas manchas.
22

SEGUNDO ENJUAGUE AUTOMATIcO
Un segundo enjuague remover& mas
residuos de detergente. Es especialmente
etil sise ha usado detergente adicional
para remover manchas rebeldes.
Los lavarropas que tienen controles de
opciones de enjuague (RINSE OPTIONS)
le permiten a_adir un segundo enjuague
automaticamente al ciclo de servicio
pesado (HEAVY DUTY).
Simplemente debera fijar el control de
opciones de enjuague (RINSE OPTIONS)
en el segundo enjuague (2ND RINSE) antes
de porter el lavarropas a funcionar. No tendra
que volver a seleccionar un segundo enjuague.
ENJUAGUE Y CENTRIFUGADO
MANUALES
Cuando usa detergente adicional para ropas
con manchas rebeldes, o lava prendas que
requieren cuidado especial, podria necesitar
un enjuague y centrifugado adicionat.
PASO 1. Posicione el control de nivel del
agua (WATER LEVEL).
PASO 2. Posicione el control de temperatura
del agua (WATER TEMPERATURE).
PASO 3. Posicione el control de las opciones
de enjuague (RINSE OPTIONS) (si esta
disponibte) en un enjuague (ONE RINSE).
PASO 4. Fije la peritla del control de selecci6n
de ciclos (temporizador) en ta posicidn de
enjuague (RINSE):
• Para agitaci6n y centrifugado rapido, use
la posici6n servicio pesado (HEAVY DUTY).
• Para agitaci6n y centrifugado lento, use
ta posici6n inarrugables (PERMANENT
PRESS).
• Para agitaci6n lenta y centrifugado rapido,
use la posicidn normal (NORMAL).
PASO 5. Tire ta perilta del control de
seleccidn de cictos (temporizador) para
encender el lavarropas.
/SUPER
14 I0 REGULAR
SPIN R_NSE
CENTRIFUGADO SOLAMENTE
Un desagLie y centrifugado puede ayudar
a reducir el tiempo de secado para algunas
telas gruesas y prendas de atencidn especial
at remover el exceso de agua.
PASO 1. Posicione el control de opciones
de enjuague (RINSE OPTIONS) (siesta
disponible) en un enjuague (ONE RINSE).
PASO 2. Posicione la periIla det control de
selecci6n de ciclos (temporizador) en la
posici6n centrifugado (SPIN):
• Para un centrifugado rapido, use ta posici6n
normal (NORMAL).
• Para un centrifugado lento, use ta posiciOn
inarrugables (PERMANENT PRESS).
PASO 3. Tire la perilla de control de selecci6n
de ciclos (temporizador) para encender el
lavarropas.
/SUPER
14 10 REGULAR
4 SHORT
NORMAL
\\ SHORT
23
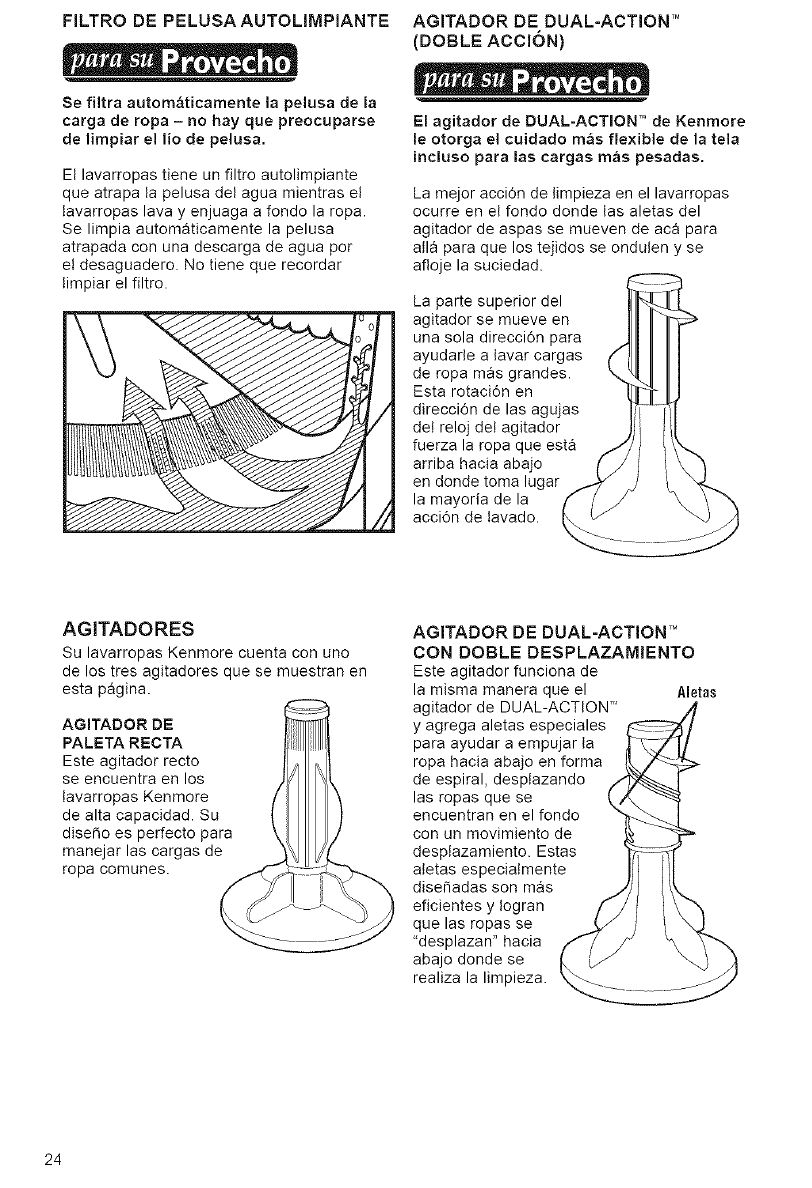
FILTRO DE PELUSA AUTOLIMPIANTE
Se filtra autom&ticamente la pelusa de la
carga de ropa - no hay que preocuparse
de limpiar el lio de pelusa.
El lavarropas tiene un filtro autolimpiante
que atrapa ta pelusa del agua mientras el
tavarropas lava y enjuaga a fondo la ropa.
Se limpia automaticamente la pelusa
atrapada con una descarga de agua per
e! desaguadero. No tiene que recordar
timpiar el filtro.
AGITADOR DE DUAL-ACTION TM
(DOBLE ACCION)
El agitador de DUAL-ACTION TM de Kenmore
le otorga el cuidado m&e flexible de ia tela
incluso para las cargas mas pesadas.
La mejor acci6n de limpieza en el lavarropas
ocurre en el fondo donde las aletas del
agitador de aspas se mueven de aca para
atla para que los tejidos se ondulen y se
afloje la suciedad.
La parte superior del
agitador se mueve en
una sola direcci6n para
ayudarle a lavar cargas
de ropa mas grandes.
Esta rotaci6n en
direcci6n de las agujas
det reloj det agitador
fuerza la ropa que esta
arriba hacia abajo
en donde toma lugar
la mayoria de la
acci6n de tavado.
AGITADORES
Su lavarropas Kenmore cuenta con uno
de los tres agitadores que se muestran en
esta pagina.
AGITADOR DE
PAL_:TA RECTA /_ _l I
Este agitador recto }_ _,Jl
se encuentra en los VY _l.
tavarropas Kenmore /_ '_
de alta capacidad. Su _ I I
dise_o es perfecto para \/[ J/
manejar las cargas de _._ _f..
ropa comunes. ..fC-f_:- _ _.__
AGITADOR DE DUAL=ACTION TM
CON DOBLE DESPLAZAMiENTO
Este agitador funciona de
la misma manera que el
agitador de DUAL-ACTION T''
y agrega aletas especiales
para ayudar a empujar la
ropa hacia abajo en forma
de espiral, desplazando
las ropas que se
encuentran en el fondo
con un movimiento de
desplazamiento. Estas
atetas especiatmente
dise_adas son mas
eficientes y togran
que las ropas se
"desplazan" hacia
abajo donde se
realiza la limpieza.
Aletas
24

COMPRENSIONDELOS SONIDOS
NORMALES DEL LAVARROPAS
Et nuevo lavarropas podra producir sonidos
que su viejo tavarropas no hacia. Puesto que
los sonidos no le seran familiares, es posible
que le preocupen.
A continuaci6n se detallan algunos de los
sonidos normales que puede oir, asi como
sus causas.
Durante el lavado
Cuando selecciona una posici6n de volumen
peque_o de carga para una carga peque_a
de tavado, el lavarropas tiene un nivel bajo de
agua. Con este nivel bajo de agua, es posible
que escuche un sonido de clic proveniente de
ta parte superior de agitador de aspas.
Durante e! desagi.ie
La velocidad de desagQe del agua del
tavarropas dependera de su instalacidn. Si
et agua se vacia rapidamente det lavarropas,
es posible que escuhe la succidn de aire por
ta bomba. Esto ocurre durante el final del
desagLie.
Luego del desagi3e y antes del
centrifugado
Cuando cambia el ciclo de desagOe at de
centrifugado, es posible que escuche un
ruido mientras ta caja del engranaje cambie
de velocidad.
USO DEL RECIPIENTE DISTRIBUiDOR
DE LEJiA CLORADA LiQUIDA
(algunos modelos)
Diluya la lejia autom&ticamente para
asegurar las cargas mas limpias y
brillantes.
Siempre mida la lejia clorada liquida.
Use una taza medidora, no adivine la
medida. No vierta ta lejia directamente
de ta botella. No use nunca mas de
1 taza per carga. Use menos cantidad
para las cargas de ropa mas reducidas.
Siga las instrucciones del fabricante para
usarlo con seguridad. Una taza con un
pico vertidor le ayudara a evitar derrames.
Luego de cargar el lavarropas, vierta la
medida de lejia ctorada liquida cuidadosa-
mente en el recipiente distribuidor.
•No deje que la lejia salpique, gotee o
se corra hasta ai interior det tambor del
lavarropas. La lejia sin diluir daSara los
tejidos con los que entre en contacto.
•Ponga en marcha el tavarropas. La tejia sera
distribuida automaticamente antes de que
entre en contacto con ta carga de tavado.
NOTA: No use este recipiente distribuidor
para aSadir cloro en polvo o lejia cromotoler-
ante. El recipiente distribuidor esta diseSado
para recibir tejia clorada tiquida sotamente.
_ecipiente
distribgiderde
lejia ¢lorada
liquida
25
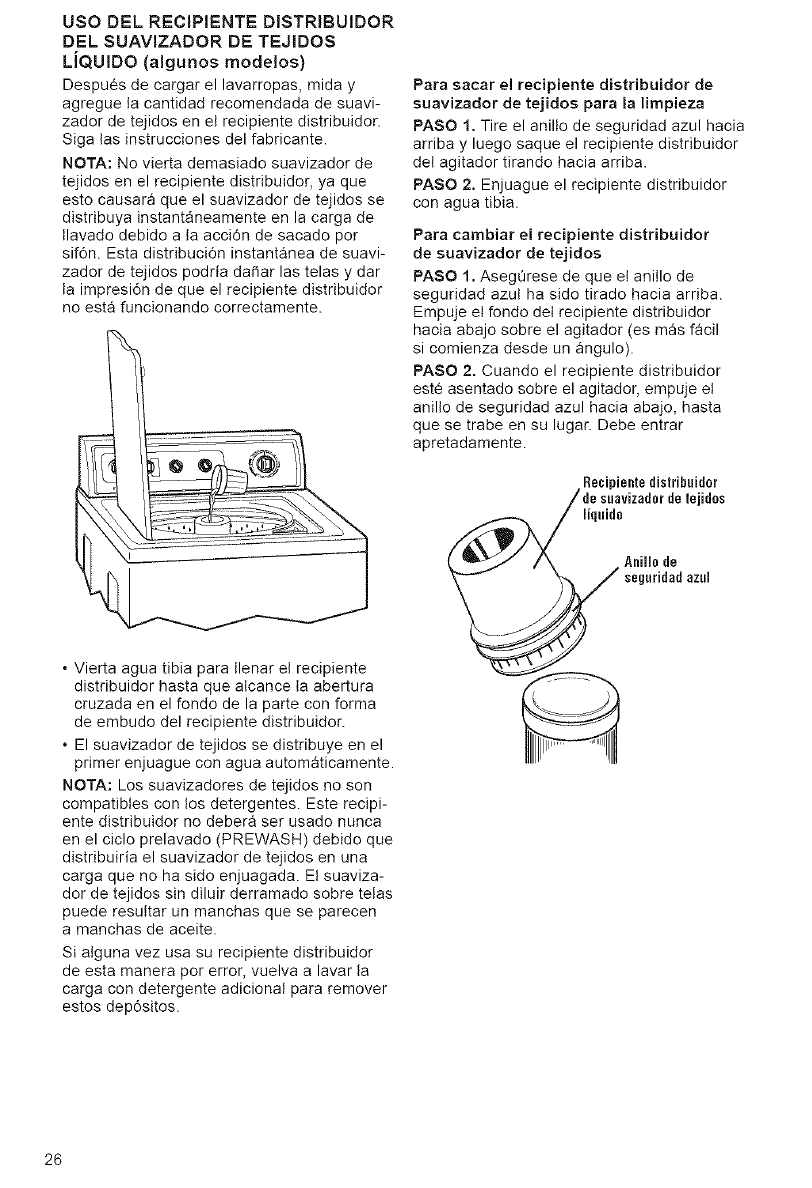
USODELRECIPIENTEDiSTRIBUiDOR
DELSUAVIZADORDETEJIDOS
LIQUIDO (algunos modelos)
Despues de cargar el lavarropas, mida y
agregue la cantidad recomendada de suavi-
zador de te]idos en el recipiente distribuidor.
Siga tas instrucciones del fabricante.
NOTA: No vierta demasiado suavizador de
tejidos en el recipiente distribuidor, ya que
esto causara que el suavizador de tejidos se
distribuya instantaneamente en la carga de
tlavado debido a la acci6n de sacado por
sif6n. Esta distribuci6n instantanea de suavi-
zador de tejidos podria da_ar las telas y dar
ta impresi6n de que el recipiente distribuidor
no esta funcionando correctamente.
*Vierta agua tibia para llenar el recipiente
distribuidor hasta que alcance la abertura
cruzada en el fondo de la parte con forma
de embudo del recipiente distribuidor.
*El suavizador de tejidos se distribuye en el
primer enjuagae con agua automaticamente.
NOTA: Los suavizadores de tejidos no son
compatibles con tos detergentes. Este recipi-
ente distribuidor no debera ser usado nunca
en el ciclo prelavado (PREWASH) debido que
distribuiria el suavizador de tejidos en una
carga que no ha sido enjuagada. Et suaviza-
dor de tejidos sin diluir derramado sobre telas
puede resultar un manchas que se parecen
a manchas de aceite.
Si alguna vez usa su recipiente distribuidor
de esta manera per error, vuelva a lavar la
carga con detergente adicional para remover
estos dep6sitos.
Para sacar el recipiente distribuidor de
suavizador de tejidos para la limpieza
PASO 1. Tire el anillo de seguridad azul hacia
arriba y luego saque el recipiente distribuidor
del agitador tirando hacia arriba.
PASO 2. Enjuague el recipiente distribuidor
con agua tibia.
Para cambiar el recipiente distribuidor
de suavizador de tejidos
PASO 1. AsegOrese de que et anillo de
seguridad azut ha sido tirado hacia arriba.
Empuje el fondo del recipiente distribuidor
hacia abajo sobre el agitador (es mas facil
si comienza desde un angulo).
PASO 2. Cuando el recipiente distribuidor
este asentado sobre el agitador, empuje el
anilto de seguridad azul hacia abajo, hasta
que se trabe en su lugar. Debe entrar
apretadamente.
_eecsi,,ievi_aecl___bl[_ijl_ros
liquido
Anillode
seguridadazul
26
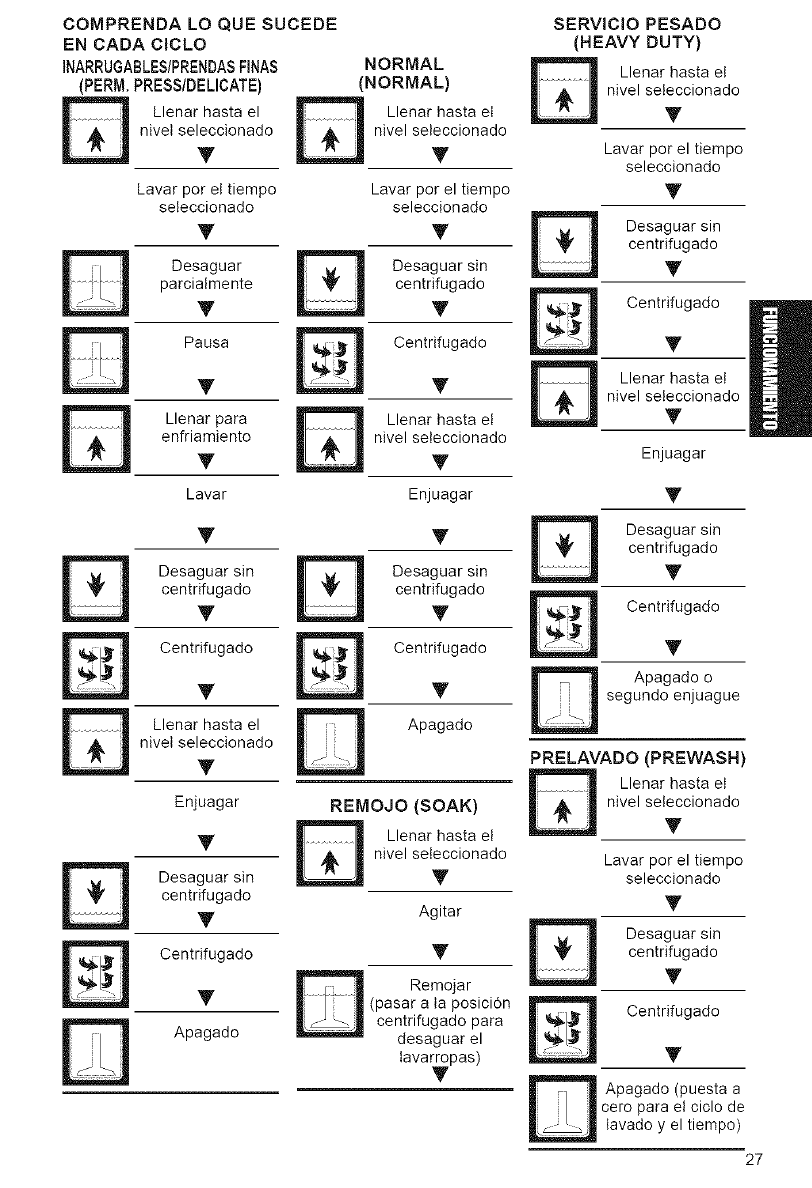
COMPRENDA LO QUE SUCEDE
EN CADA ClCLO
INARRUGABLES/PRENDASFINAS
(PERM. PRESS/DELICATE)
Llenar hasta el
nivel seleccionado
T
NORMAL
(NORMAL)
Llenar hasta el
nivel seleccionado
T
D
D
D
Lavar por el tiempo
seleccionado
T
Desaguar
parcialmente
T
Pausa
T
Llenar para
enfriamiento
T
Lavar
T
Desaguar sin
centrifugado
T
Centrifugado
T
Llenar hasta el
nivel seleccionado
T
Enjuagar
T
Desaguar sin
centrifugado
T
Centrifugado
T
Apagado
SERVICIO PESADO
(HEAVY DUTY)
Llenar hasta el
nivel seleccionado
T
Lavar por el tiempo
seleccionado
Desaguar sin
centrifugado
Centrifugado
-D
Llenar hasta el
nivel seleccionado
T
@
D
D
@
D
Enjuagar
T
_ Desaguar sin
centrifugado
T
_ Centrifugado
T
D Apagado
REMOJO (SOAK)
Llenar hasta el
nivel seteccionado
T
Lavar por el tiempo
seleccionado
T
Desaguar sin
centrifugado
T
Centrifugado,_,
Llenar hasta el
nivel seleccionado
T
Enjuagar
T
Desaguar sin
centrifugado
T
_ Centrifugado
T
Apagado o
segundo enjuague
PRELAVADO (PREWASH)
Llenar hasta et
nivel seleccionado
T
Agitar
Remojar
(pasar a ta posici6n
centrifugado para _
desaguar el
tavar_pas)
Lavar por el tiempo
seleccionado
T
Desaguar sin
centrifugado
T
Centrifugado
T
_ Apagado (puesta a
cero para el ciclo de
lavado y el tiempo)
27
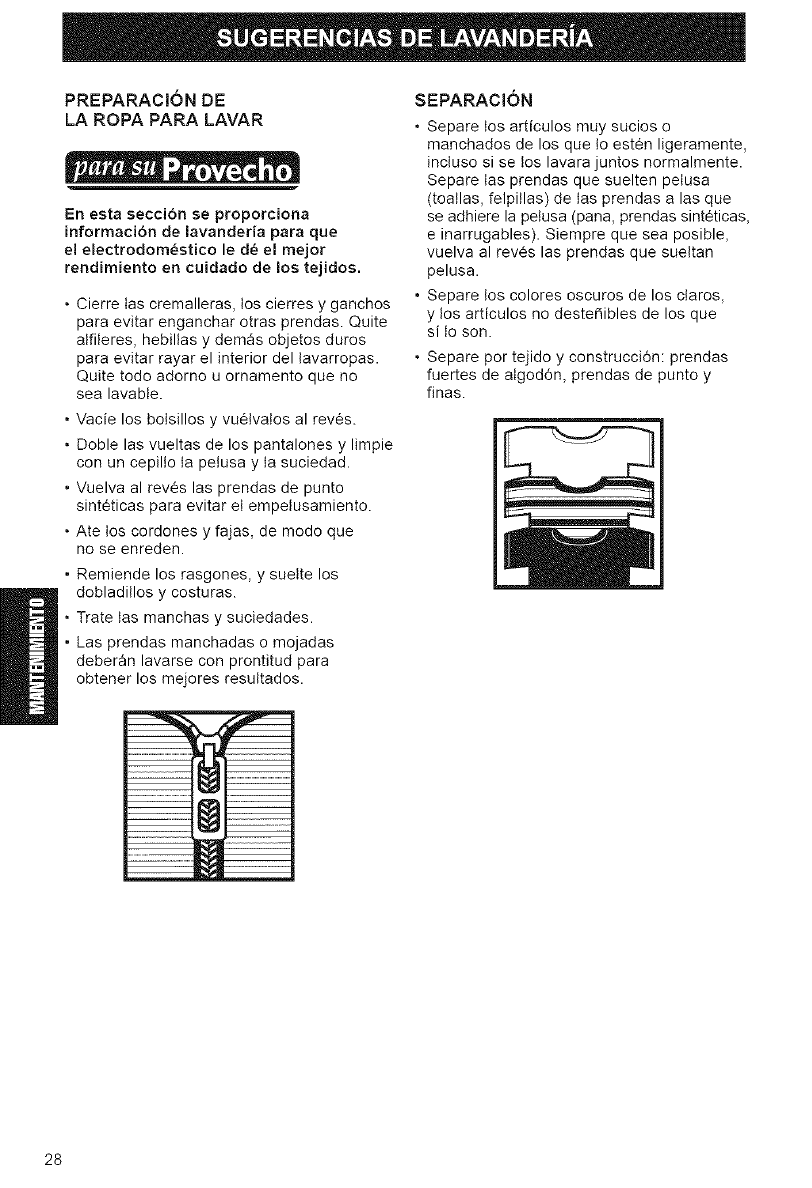
PREPARACiON DE
LA ROPA PARA LAVAR
_:n esta seccibn se proporciona
infermaci6n de lavanderia para que
el emectrodomestico le d_ el mejor
rendimiento en cuidado de los tejidos.
• Cierre las cremalleras, los cierres y ganchos
para evitar enganchar otras prendas. Quite
atfileres, hebillas y demas objetos duros
para evitar rayar el interior del tavarropas.
Quite todo adorno u ornamento que no
sea lavable.
• Vacie los bolsillos y vuetvatos al reves.
• Doble las vueltas de los pantalones y limpie
con un cepillo ta pelusa y ta suciedad.
• Vuelva al reves las prendas de punto
sinteticas para evitar el empelusamiento.
• Ate los cordones y fajas, de modo que
no se enreden.
• Remiende los rasgones, y suelte los
dobladillos y costuras.
• Trate tas manchas y suciedades.
• Las prendas manchadas o mojadas
deberan lavarse con prontitud para
obtener los mejores resuttados.
SEPARACION
• Separe los articulos muy sucios o
manchados de los que to esten ligeramente,
incluso si se los lavara juntos normalmente.
Separe las prendas que suelten pelusa
(toallas, felpillas) de tas prendas a las que
se adhiere la petusa (pana, prendas sinteticas,
e inarrugables). Siempre que sea posible,
vuelva al reves las prendas que sueltan
pelusa.
• Separe los colores oscuros de los ctaros,
y los articulos no destefiibles de los que
si lo son.
• Separe por tejido y construcci6n: prendas
fuertes de atgod6n, prendas de punto y
finas.
28
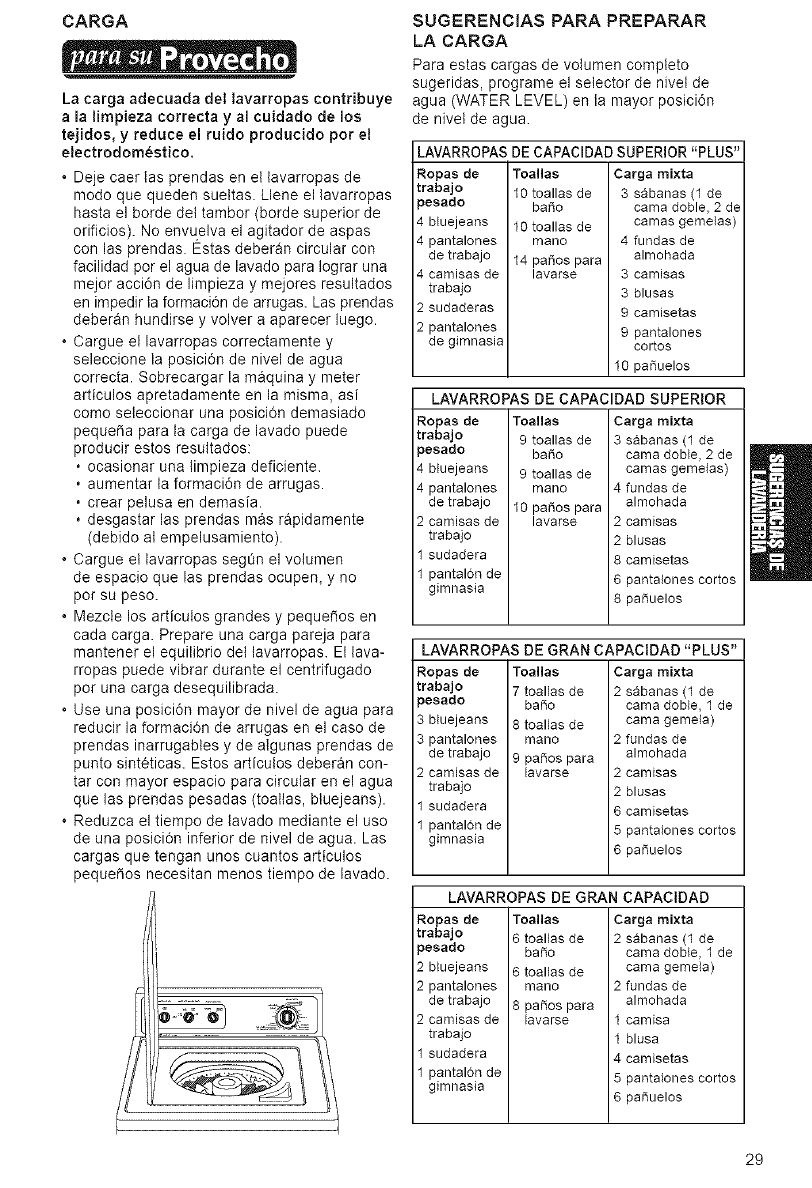
CARGA
Lacargaadecuadadettavarropascontdbuye
alatimpiezacorrectayal cuidado de los
tejidos, y reduce el ruido producido pot et
etectrodom_stico.
• Deje caer tas prendas en el lavarropas de
modo que queden suettas. Llene el lavarropas
hasta el borde del tambor (borde superior de
oriflcios). No envuelva el agitador de aspas
con las prendas. Estas deberan circular con
facilidad por el agua de lavado para Iograr una
mejor acci6n de limpieza y mejores resultados
en impedir ta formaci6n de arrugas. Las prendas
deberan hundirse y volver a aparecer luego.
• Cargue el lavarropas correctamente y
seleccione la posici6n de nivel de agua
correcta. Sobrecargar la maquina y meter
articulos apretadamente en la misma, asi
como seleccionar una posici0n demasiado
pequeSa para la carga de lavado puede
producir estos resultados:
, ocasionar una limpieza deficiente.
, aumentar la formaci6n de arrugas.
, crear pelusa en demasia.
, desgastar las prendas m_s rapidamente
(debido at empelusamiento).
Cargue el lavarropas segOn el volumen
de espacio que las prendas ocupen, y no
por su peso.
• Mezcle los articulos grandes y peque_os en
cada carga. Prepare una carga pareja para
mantener el equilibrio del lavarropas. Et lava-
rropas puede vibrar durante el centrifugado
pot una carga desequilibrada.
• Use una posici6n mayor de nivel de agua para
reducir la formaci6n de arrugas en el caso de
prendas inarrugables y de algunas prendas de
punto sinteticas. Estos articulos deberan con-
tar con mayor espacio para circular en el agua
que las prendas pesadas (toatlas, bluejeans).
Reduzca el tiempo de lavado mediante el uso
de una posici0n inferior de nivel de agua. Las
cargas que tengan unos cuantos articulos
pequeSos necesitan menos tiempo de lavado.
SUGERENCiAS PARA PREPARAR
LA CARGA
Para estas cargas de votumen completo
sugeridas, programe el selector de nivel de
agua (WATER LEVEL) en la mayor posici6n
de nivet de agua.
LAVARROPAS DE CAPACIDAD
Ropas de
trabajo
:_esado
4 bluejeans
4 pantalones
de trabajo
4 camisas de
trabajo
2 sudaderas
2 pantalones
de gimnasia
Toallas
10 toallas de
ba_o
10 toallas de
mano
14 pa_os para
lavarse
SUPERIOR "PLUS"
Carga mixta
3 sabanas (1 de
cama doble, 2 de
camas gemelas)
4 fundas de
almohada
3 camisas
3 blusas
9 camisetas
9 pantalones
cortos
10 pa_uelos
LAVARROPAS DE CAPA¢IDAD SUPERIOR
Ropas de
trabajo
_esado
4 bluejeans
4 pantalones
de trabajo
2 camisas de
trabajo
1 sudadera
1 pantalon de
gimnasia
Toallas Carga rni×ta
9 toallas de 3 sabanas (1 de
baSo cama doble, 2 de
9 toallas de camas gemelas)
mano 4 fundas de
10 paSos para almohada
lavarse 2 camisas
2 blusas
8 camJsetas
6 pantalones cortos
8 pa_uelos
LAVARROPAS DE GRAN CAPACIDAD "PLUS"
Ropas de
trabajo
3esado
3 b_uejeans
3 pantalones
de trabajo
2 camisas de
trabajo
1 sudadera
1 pantalon de
gimnasia
Toallas Carga rnixta
7 toaHas de 2 sabanas (1 de
ba_o cama doble, 1 de
8 toaHas de cama gemela)
mano 2 fundas de
almohada
9 pa_os para
Favarse 2 camisas
2 blusas
6 camisetas
5 pantalones cortos
6 pa_uelos
LAVARROPAS DE GRAN CAPACIDAD
Ropas de Toallas Carga mixta
trabajo 6 toaHas de 2 sabanas (1 de
_esado ba_o cama doble, 1 de
2 bluejeans 6 toallas de cama gemela)
2 pantalones mano 2 fundas de
de trabajo 8 paSos para almohada
2 camisas de lavarse 1 camisa
trabajo 1 blusa
1 sudadera 4 camisetas
1 pantaDn de 5 pantalones cortos
gimnasia 6 pa_uelos
29
LIMPIEZA DEL LAVARROPAS
El cuidado adecuado del tavarropas puede
prolongar su vida Qtil. En esta secci6n
exptisaremos c6mo cuidar el lavarropas
correcta y seguramente.
Exterior
Limpie todo resto de detergente, tejia u otros
derrames con un paso o esponja suave y
hQmeda apenas aquetlos ocurran. De vez
en cuando, limpie el exterior del lavarropas
para mantener su aspecto nuevo.
No coloque objetos puntiagudos o metaticos
en el interior del tavarropas, pues pueden
da_ar el acabado. Examine el contenido de
todos los bolsiltos para detectar la presencia
de alfileres, clips, dinero, pernos, tuercas,
etc. No deje estos objetos sobre el tavarropas
tuego de vaciar los bolsillos.
Interior
Limpie el interior con una taza de lejia
clorada mezclada con 2 tazas de detergente.
Ponga el lavarropas en funcionamiento por
un ciclo completo con agua catiente. Repita
e! proceso si es necesario.
NOTA: quite los dep6sitos de agua catcarea
solamente con limpiadores en cuyo rdtulo
se indique que no presentan riesgo de da_o
alguno al lavarropas.
MANGUERAS DE ENTRADA DE AGUA
Reemplace las mangueras de entrada de
agua despues de cinco a_os de uso para
reducir el riesgo de que fallen tas mangueras.
Inspeccione peri6dicamente y reemplace las
mangueras de entrada de agua si aparecen
bultos, arrugas, cortaduras, desgaste o fugas
de agua. At reemplazar tas mangueras de
entrada de agua marque ta fecha de reemplazo
en la etiqueta con un marcador permanente.
ALMACENAJE INVERNAL 0CUIDADO
DURANTE LA IVlUDANZA
Instale y almacene et lavarropas donde no
sufrira temperaturas de congelaci6n. Debido
a que es posible que quede algo de agua en
las mangueras, la congelaci6n puede daSar
el lavarropas. Si almacena o trastada el
lavarropas durante tiempo invernat riguroso,
protejalo contra los agentes invernales.
Para proteger el lavarropas contra los
agentes invernales:
1. Cierre ambos grifos de agua.
2. Desconecte y desagQe las mangueras
de tlenado de agua.
3. Vierta un cuarto de anticongelante tipo
R.V. en el tambor.
4. Ponga et lavarropas en funcionamiento en
posici6n de centrifugado (SPIN) per unos
30 segundos para mezclar el anticonge-
lante con el agua. Parte de la mezcla
saldra bombeada para afuera mientras
el lavarropas opera el centrifugado.
5. Desenchufe el cable de alimentaci6n.
Para usar nuevamente el lavarropas:
1. Haga correr agua por los tubos y
mangueras.
2. Vuelva a conectar tas mangueras de
Itenado de agua.
3. Abra ambos grifos de agua.
4. Vuelva a conectar e! cable de alimentaci6n.
5. Ponga et lavarropas en funcionamiento
por un ciclo completo con una taza de
detergente para timpiar los restos de
anticongelante.
FALTA DE USO 0CUIDADO
DURANTE LAS VACACIONES
Ponga e! lavarropas en funcionamiento sola-
mente cuando este en casa. Siva a salir de
vacaciones o no va a usar et lavarropas por
un largo periodo, debera hacer to siguiente:
•Desconecte el cable de alimentaci6n
o interrumpa el suministro de energia
al lavarropas.
•Interrumpa el suministro de agua al
tavarropas. Esta acci6n ayuda a evitar
ta inundaci6n accidental (debido a una
irrupci6n de la presi6n del agua) en
ausencia suya.
30
La mayor parte de los problemas con el lavado de ropa y el funcionamiento del
tavado de ropa se solucionan facilmente si se lavarropas. Si se necesita ayuda adicional,
entiende ta causa. Repase estas listas para consulte ta pagina 36.
identificar los problemas comunes con el
Problema Causa probable Soluci6n
El tavarropas La instalaci6n sanitaria de la Repare la instalaci6n sanitaria.
pierde agua casa tiene pOrdidas de agua.
Las mangueras de Ilenado no Ajuste las mangueras (consulte las
estan ajustadas, secciones D y E de "INSTALAC!ON').
Las arandelas de la manguera Vuelva a asentar las arandelas (consulte
de Ilenado no estan debidamente las secci6n D de "INSTALACI6N").
La manguera de desag_3e no Afiance la manguera de desag(Je.
esta correctamente sujeta con (consulte las secci6n C de
la abrazadera o se ha salido. "INSTALACION").
El desaguadero esta atascado. Quite los objetos que obstruyen el
desaguadero. El lavabo y el tubo
vertical deben poder recibir 64,6 litros
(17 galones) de agua par minuto.
La tina se movi6 para adelante Cerci6rese de que la tina este centrada
durante la descarga, y par esa antes de porter el lavarropas en marcha.
causa el agua se corre fuera
del are de la tina.
La unidad no esta nivelada, y par Cerci6rese de que los pies delanteros
esa causa el agua se corre esten instalados y se hayan ajustado
fuera del aro de la tina. las tuercas. Nivele el lavarropas.
Reajuste las patas traseras (consulte
las secci6n G de "INSTALAC!ON').
La carga esta desequilibrada. Redistribuya la carga.
Los enjuagues par rocio se
desvian de la carga.
El lavarropas esta sobrecargado. Reduzca el volumen de la carga.
Los reltenos o enjuagues por
rocio se desvian de la carga.
Et lavarropas La manguera de desagOe esta Enderece o desatasque la manguera
no vacia el agua/ retorcida o atascada. (consulte las secci6n C de
no centrifugal "INSTALACION").
da cargas Funcionamiento correcto del Luego de un lavado o enjuague,
mojadas desagQe neutro, el lavarropas vaciara el agua sin
centrifugar. Luego del desag(Je,
comienza el centrifugado.
La tapa esta abierta. Cierre la tapa.
El extremo de la manguera de Baje la manguera de desagOe (consulte
desagQe esta a mas de 2,44 m las secci6n C de "INSTALACION").
(96 pulg.) por encima del piso.
Demasiado detergente: la espuma Use menos detergente.
del detergente se inmoviliza.
Ciclo equivocado para ta carga Escoja un cicto que tenga una mayor
de ropa que se esta tavando, velocidad de centrifugado (consulte
"FUNCIONAMIENTO").
31
Problema Causa probable Soluci6n
Et tavarropas no Baja tensi6n, o empleo de Repare la instalaci6n el¢ctrica y no
vaeia et agua/ cables de prolongaci6n, use cable prolongador.
no centrifugal Enjuagues fries. Los enjuagues fries dejan las cargas
da cargas mas mojadas que los enjuagues tibios.
mojadas (cont.) Esto es normal.
Sigue La manguera de desagLie Eleve la posici6n de la manguera
Hen_ndose de se encuentra a menos de de desagQe (consulte las secci6n C
agua/sigue de 99,06 cm (39 pulg.) de "INSTALACION").
vaciando encima del piso.
agua/ciclo La manguera de desag_e Ajuste la manguera de desagQe para
inmovilizado se introduce ajustadamente que tenga un ajuste mas holgado (con-
en el tubo vertical, sulte las secci6n C de "INSTALAC!ON').
La manguera de desagOe No selle la manguera de desagOe con
ajusta unida con cinta en el cinta. La manguera de desagOe necesita
tubo vertical, una brecha para que el air fluya.
El tavarropas La carga de ropa esta Redistribuya la carga.
hace ruidos desequilibrada.
El lavarropas no esta niveiado. Nivele el tavarropas. Reposicione los
Los pies nivelantes posteriores pies posteriores (consulte las seccidn G
no estan colocados, de "INSTALAC!0N").
Las tuercas de los pies Ajuste las tuercas (consulte las
delanteros no estan ajustadas, secci6n G de "INSTALAC!ON').
La banda amarilla de sujeci6n Quite la banda de sujecidn para
para transporte con los transporte con los pasadores
pasadores de aletas no se de aletas (consulte las seccidn B
quit6 totalmente, de "INSTALAC!ON").
El piso no es Io suficientemente Reubique el lavarropas (consulte las
resistente para aguantar el peso secci6n A de "INSTALACION").
del lavarropas.
Los engranajes embragan Esto es normal.
luego del desagQe y antes
del centrifugado.
La parte superior del agitador de Esto es normal.
aspas hace clics durante el lavado.
El lavarropas Los filtros de la valvula de Limpie los filtros.
no se tlena admisi6n de agua estan obturados.
de agua/ Se ha interrumpido la Abra el paso del agua.
no enjuaga/
no agita/ cornente del agua.
temperatura Las mangueras de agua caliente lnvierta las mangueras. (consulte, las
equivocada y fria estan invertidas, secciones D y E de "INSTALACION").
La manguera de Ilenado esta Enderece las mangueras.
retorcida.
El cuadrante de escala circular del Gire ligeramente la perilla del
temporizador no esta alineado, temporizador hacia la derecha y tire de
ella para poner en marcha el lavarropas.
Et cable de alimentaci6n no Enchufe el cable.
esta enchufado.
32
Problerna Causa probable Soluci6n
La m_quina El cable de atimentaci6n Enchufe el cable.
se deNene no esta enchufado.
No pasa electricidad por Revise el suministro el_ctrico o Ilame
el cable de alimentaci6n, a un electricista.
Fusible quemado o disyuntor Reemplace el fusible o el cortacircuitos.
abierto. Si el problema contintJa, Ilame a un
electricista.
Uso de un cable proiongador. No use cables de prolongaci6n.
El temporizador no esta Gire ligeramente la perilla del
alineado, temporizador hacia ta derecha y tire de
ella para porter en marcha e( lavarropas.
La perilla del temporizador Empuje ta perilta hacia adentro y
no ha sa(ido hacia afuera, vu_lvala a tirar hacia afuera.
El lavarropas esta en pausa Deje que el ciclo prosiga.
en el cicto de inarrugab(es (consulte "FUNCIONAMIENTO').
(PERMANENT PRESS)
(aproximadamente 2 minutos).
La maquina esta sobrecargada. Lave cargas mas pequel_as.
El agitador La parte superior del agitador Esto es normal.
de aspas no de aspas se mueve solamente
funciona en un sentido.
La parte superior del agitador Esto es normal.
de aspas esta floja.
El nivel del agua La parte superior del agitador Esto es normal.
es demasiado de aspas esta mucho mas alta
bajo/el lavarropas que el nivel de agua mas elevado.
no se Ilena EIIo crea la percepci6n de que
completamente el lavarropas no esta tleno.
La tina est_ La tina se movi6 hacia adelante Cerci6rese de centrar ta tina antes
torcida durante la descarga, de poner en marcha el lavarropas.
La tina se mueve. Esto es normal.
La unidad no esta nive(ada. AsegQrese de que los pies delanteros
estCn instatados y de que )as tuercas
estCn ajustadas. Nivele et lavarropas.
Reposicione los pies posteriores (consulte
)as secci6n G de "INSTALACION").
Petusa en Separaci6n incorrecta de las Separe las prendas que sueltan pelusa
la carga prendas, de las prendas alas que se adhiere la
pelusa, y por color.
Sobrecarga. La pelusa puede quedarse atrapada
en la carga si el lavarropas esta sobre-
cargado. Lave cargas mas pequeSas.
Papel o pai_uelo de papel Vacie los bolsiltos antes del lavado.
en los bolsillos.
No hay suficiente detergente. Use suficiente detergente para retener
la pelusa en el agua.
El detergente no se disuelve. Use agua de lavado de mas de
38°C (70°F).
33

Problema Causa probable Sotuci6n
Desgarrones Sobrecarga. Uso incorrecto Las cargaa deberan circular libremente
del lavarropas, durante el tavado. Lave cargas mas
pequel_as.
Uso incorrecto de la lejia clorada. No vierta la lejia clorada directamente
El cloro no diluido daSara la tela en la carga. Limpie los derrames
de su ropa. de lejia.
No se han quitado los elementos Vacie los bolsillos antes del lavado.
puntiagudos de los bolsillos; Cierre las cremalleras antes del lavado.
los cierres no estan cerrados.
Articulos dal_ados antes Remiende los rasgones y las hebras
del lavado, cortadas en las costuras enjuague a
lavado.
Manchas en Uso incorrecto del suavizador Diluya el suavizador de tejidos y
la carga de tejidos en el lavarropas o aSadalo solamente al enjuague a
secarropas, fondo.
Hierro (6xido ferroso) en el agua. Instale un filtro de 6xido ferroso.
Usa insuficiente del detergente Use suficiente detergente para quitar la
que causa el redep6sito de la suciedad y mantenerla en suspensi6n.
suciedad.
Transferencia del tei_ido par no Separe las prendas de color oscuro
haber separado correctamente de las de color blanco y clara.
las cargas.
Transferencia del teSido par no Descargue el lavarropas tan pronto
haber descargado inmediatamente como se detenga.
el lavarropas.
La carga sate No se sac6 inmediatamente. Descargue el lavarropas tan pronto
arrugada la carga.
Ciclo incorrecto para los tejidos Use enjuagues frios y ciclos con
que se estan lavando, centrifugados a velocidad baja para
reducir la formaci6n de arrugas.
Sobrecarga. Las cargas deberan circular libremente
durante el tavado. Lave cargas mas
pequel_as.
El agua de lavado no se calienta Io Si no se daSara la tela, utilice agua
suficiente para relajar las arrugas, tibia o caliente. Use agua fria para el
Se esta usando enjuagues tibias, enjuague.
Las mangueras estan instaladas Invierta la posici6n de las mangueras
equivocadamente. (consulte las,secciones D y E de
"INSTALACION").
La carga sate Sobrecarga. Las cargas deberan circular libremente
enredada/ durante el tavado. Lave cargas mas
enroscada pequel_as.
Las ropas quedan envueltas No envuelva la ropa atrededor det
alrededor del agitador de aspas, agitador al introducir la carga de ropa
al lavarropas.
Recipientes El suavizador no se diluye. Diluya el suavizador de tejidos en el
distribuidores recipiente distribuidor.
atascados/
p_rdida de tejia/ Usa de lejia cromotolerante Vierta lejia cromototerante directamente
aparece lejia en el recipiente distribuidor de en el tambor o recipiente distribuidor
en las cargas la lejia ctorada, de detergente. No use el recipiente
equivocadas distribuidor de la lejia clorada.
Usa incorrecto de la lejia clorada. Siempre mida la lejia antes de verterla
al recipiente distribuidor. Vi_rtala con
cuidado al mismo. Limpie los derrames
de lejia.
34
LAVARROPAS KENMORE
Reparamos Io que vendemos
La frase "Reparamos Io que vendemos" es
nuestra garantia de que usted puede confiar
en Sears para obtener servicie de reparaci6n.
Su lavarropas tiene valor agregado cuando
usted considera que Sears tiene unidades
de servicio tecnico en todo el pais, con un
ptantel de tecnicos profesionates especifi-
camente capacitados en electrodomesticos
Sears yen la posesi6n de piezas de
repuesto, herramientas y equipos para
asegurarse de que cumplimos nuestra
promesa: "Reparames to que vendemos."
El Acuerdo de mantenimiento Sears
• Es la manera de adquirir el servicio tecnico
del mar_ana a precios de hoy.
• Elimina las facturas de reparaci6n
producidas por el uso normal.
• Permite tantas visitas de servicio como
sean necesarias.
• Facilita el servicio de reparaci6n por parte
de tecnices prefesienates capacitades por
Sears.
• AQn si usted no necesita reparaci6n alguna,
e! Acuerdo de mantenimiento ofrece un
examen de comprobaci6n preventivo anual
ia pedido!
Acuerdo de mantenimiento Sears
Mantenga el valor de su tavarrepas Kenmore
con un Acuerdo de mantenimiento Sears. Los
tavarropas Kenmore se hart disefiado,
fabricado y probade para brindar afios de
funcienamiento fiable. At3n asi, cualquier
electrodom_stico moderno podra necesitar
servicio tecnico de vez en cuando.
Para obtener mas informacibn,
Ilame al 1-800-827-6655.
35
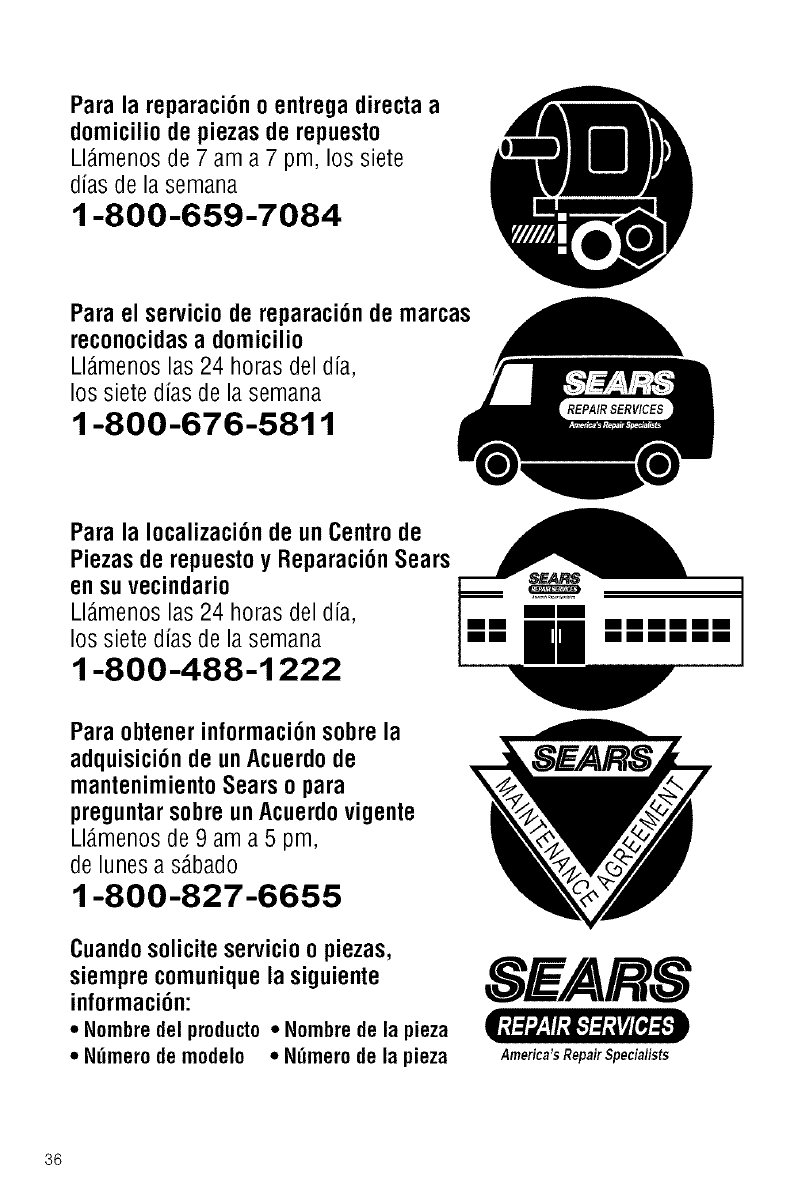
Para la reparaci6n oentrega directa a
domicilio de piezas de repuesto
Ll_menos de 7 am a 7 pm, los siete
dias de la semana
1-800-659-7084
Para el servicio de reparaci6n de marcas
reconocidas a domicilio
Ll_menos las 24 horas del dia,
los siete dias de la semana
1-800-676-5811
Para la Iocalizaci6n de un Centro de
Piezas de repuesto y Reparaci6n Sears
en su vecindario
Ll_menos las 24 horas del dia,
los siete dias de la semana
1-800-488-1222
Para obtener informaci6n sobre la
adquisici6n de un Acuerdo de
mantenimiento Sears o para
preguntar sobre un Acuerdo vigente
Ll_menos de 9 am a 5 pm,
de lunes a s_bado
1-800-827-6655
Cuando solicite servicio o piezas,
siempre comunique la siguiente
informaci6n:
• Nombredelproducto,, Nombrede la pieza
• Nz_merodemodelo * Nz_merodela pieza
SEARS
36
America'sRepairSpecialists
