Kenmore 11621714111 User Manual VACUUM Manuals And Guides 1501283L
User Manual: Kenmore 11621714111 11621714111 KENMORE VACUUM - Manuals and Guides View the owners manual for your KENMORE VACUUM #11621714111. Home:Vacuums & Floor Care Parts:Kenmore Parts:Kenmore VACUUM Manual
Open the PDF directly: View PDF ![]() .
.
Page Count: 60
Use & Care Guide
Manual de Uso y Cuidado
I<enmor
}'16.2_X}4
Vacuum Cleaner Help Line:
1-877-531-7321
8:00am-5:00pm EST, M-F
(U.S.A. and Canada)
Sears Brands Management Corporation
Hoffman Estates, IL 60179 USA
www.kenmore.com
www.sears.com
www.kmart.com
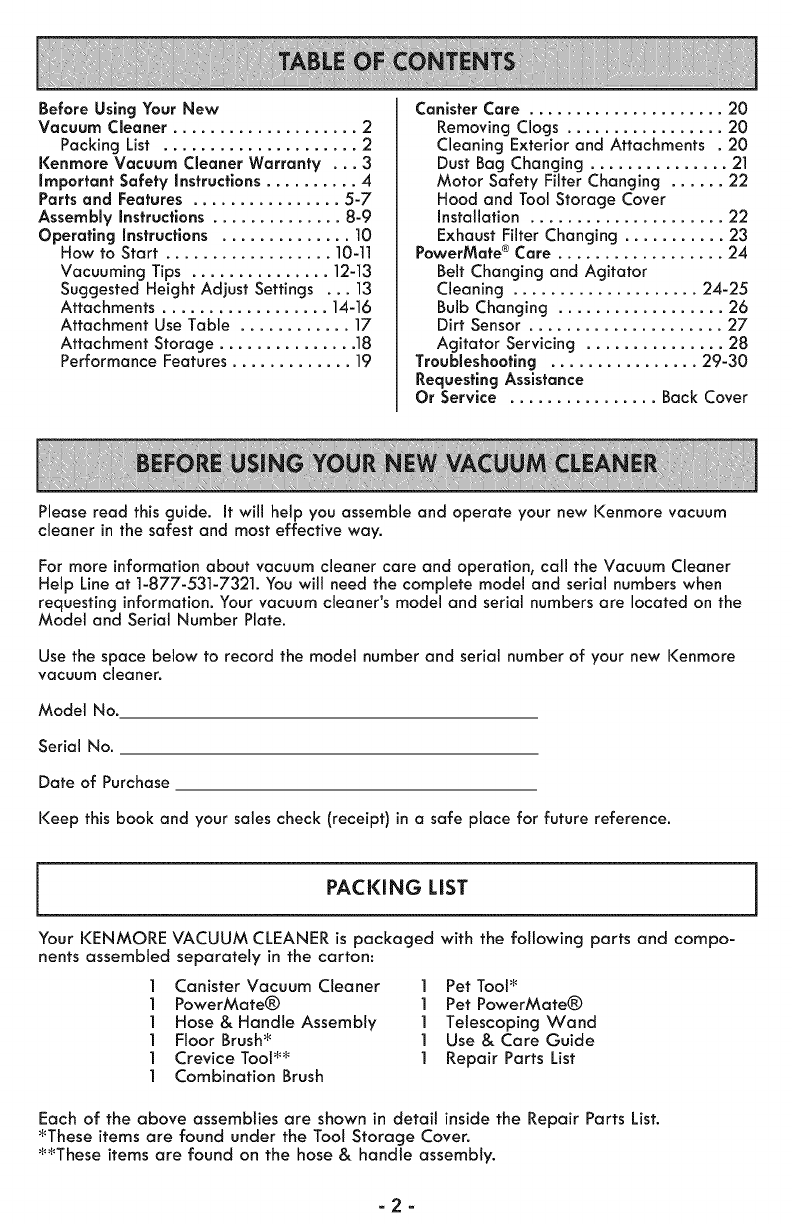
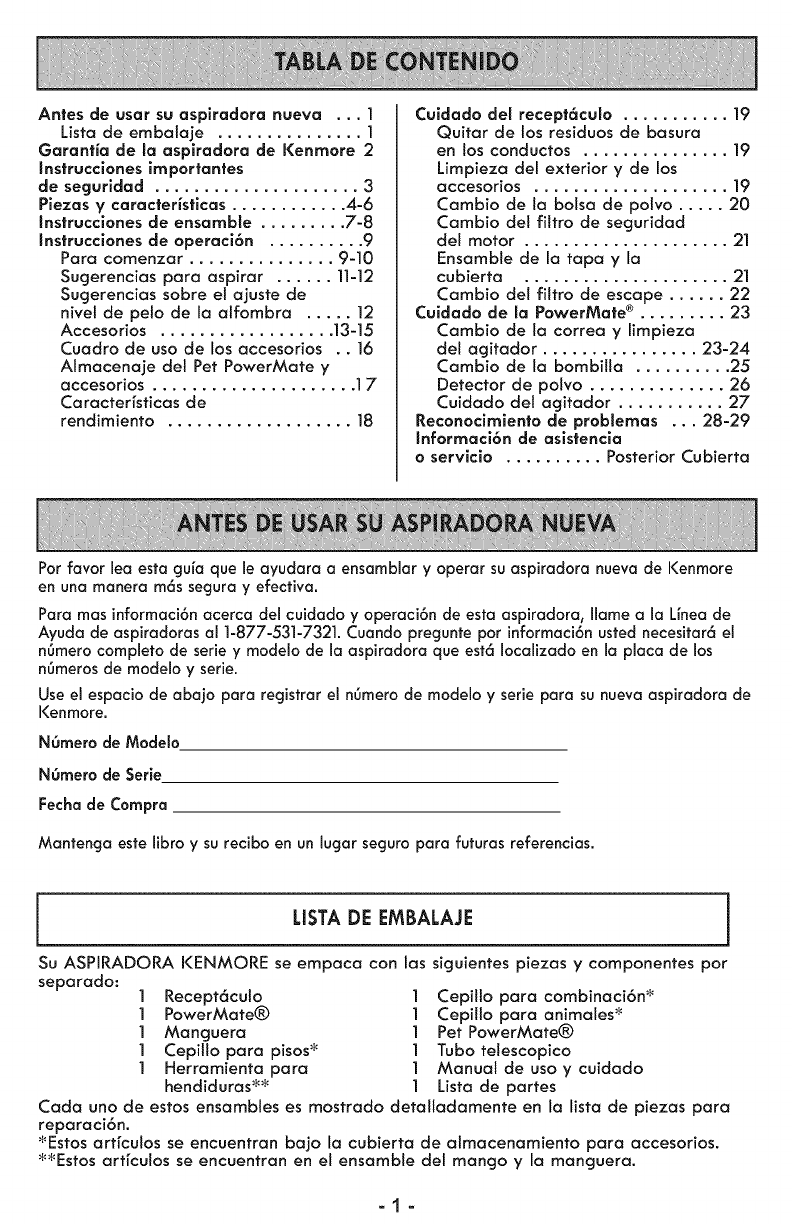
Before Using Your New
Vacuum Cleaner .................... 2
Packing List ..................... 2
Kenmore Vacuum Cleaner Warranty . . . 3
important Safety instructions .......... 4
Parts and Features ................ 5-7
Assembly instructions .............. 8-9
Operating instructions .............. 10
How to Start .................. 10-11
Vacuuming Tips ............... 12-13
Suggested Height Adjust Settings . .. 13
Attachments .................. 14-16
Attachment Use Table ............ 17
Attachment Storage ............... 18
Performance Features ............. 19
Canister Care ..................... 20
Removing Clogs ................. 20
Cleaning Exterior and Attachments .20
Dust Bag Changing ............... 21
Motor Safety Filter Changing ...... 22
Hood and Tool Storage Cover
Installation ..................... 22
Exhaust Filter Changing ........... 23
PowerMate ®Care .................. 24
Belt Changing and Agitator
Cleaning .................... 24-25
Bulb Changing .................. 26
Dirt Sensor ..................... 27
Agitator Servicing ............... 28
Troubleshooting ................ 29-30
Requesting Assistance
Or Service ................ Back Cover
Please read this guide. It will help you assemble and operate your new Kenmore vacuum
cleaner in the safest and most effective way.
For more information about vacuum cleaner care and operation, call the Vacuum Cleaner
Help Line at 1-877-531-7321. You will need the complete model and serial numbers when
requesting information. Your vacuum cleaner's model and serial numbers are located on the
Model and Serial Number Plate.
Use the space below to record the model number and serial number of your new Kenmore
vacuum cleaner.
Model No.
Serial No.
Date of Purchase
Keep this book and your sales check (receipt) in asafe place for future reference.
PACKING LIST
Your KENMORE VACUUM CLEANER is packaged with the following parts and compo-
nents assembled separately in the carton:
Canister Vacuum Cleaner
PowerMate®
Hose & Handle Assembly
Floor Brush*
Crevice Tool**
Combination Brush
1 Pet Tool*
1 Pet PowerMate®
1 Telescoping Wand
1 Use & Care Guide
1 Repair Parts List
Each of the above assemblies are shown in detail inside the Repair Parts List.
*These items are found under the Tool Storage Cover.
**These items are found on the hose & handle assembly.
-2-

I(ENMORE LIMITED WARRANTY
FOR ONE YEAR from the date of sale this appliance is warranted against defects in
material or workmanship when it is correctly installed, operated and maintained
according to all supplied instructions.
WITH PROOF OF SALE, return adefective appliance to the retailer from which it was
purchased for free repair or replacement at option of seller.
This warranty applies for only 90 DAYS from the sale date if this appliance is ever used
for other than private household purposes.
This warranty covers ONLY defects in material and workmanship, and will NOT pay
for:
1. Expendable items that can wear out from normal use, including but not limited to
fiJters, belts, bags or screw-in base light bulbs.
2. A service technician to clean or maintain this appliance, or to instruct the user in
correct appliance installation, operation and maintenance.
3. Service calls to correct appliance installation not performed by Sears authorized
service agents, or to repair problems with house fuses, circuit breakers, house wiring,
and plumbing or gas supply systems resulting from such installation.
4. Damage to or failure of this appliance resulting from installation not performed by
Sears authorized service agents, including installation that was not in accord with
electrical, gas or plumbing codes.
5. Damage to or failure of this appliance, including discoloration or surface rust, if it is
not correctly operated and maintained according to aJl supplied instructions.
6. Damage to or failure of this appliance, including discoloration or surface rust,
resulting from accident, alteration, abuse, misuse or use for other than its intended
purpose.
7. Damage to or failure of this appliance, including discoloration or surface rust,
caused by the use of detergents, cleaners, chemicals or utensils other than those
recommended in all instructions supplied with the product.
8. Damage to or failure of parts or systemsresulting from unauthorized modifications
made to this appliance.
9. Service to an appliance if the model and serial plate is missing, altered, or cannot
easily be determined to have the appropriate certification logo.
Disclaimer of implied warranties; limitation of remedies
Customer's sole and exclusive remedy under this limited warranty shall be product
repair or replacement as provided herein. Implied warranties, including warranties of
merchantability or fitness for a particular purpose, are limited to one year or the
shortest period allowed by law. Seller shall not be liable for incidental or consequential
damages. Some states and provinces do not allow the exclusion or limitation of
incidental or consequential damages, or limitation on the duration of implied warranties
of merchantability or fitness, so these exclusions or limitations may not apply to you.
This warranty applies only while this appliance is used in the United States.
This warranty gives you specific legal rights, and you may also have other rights which
vary from state to state.
Sears Brands Management Corporation, Hoffman Estates, IL 60179
-3-
Read all instructionsin the manual before assembling or using your vacuum cleaner
WARNING
Your safety is important to us. To reduce the risk of fire, electrlcal shock, injury to persons or
damage when using your vacuum cleaner, follow basic safety precautions.
Use your vacuum cleaner only as described in
this manual. Use only with Sears
recommended attachments.
Disconnect electrical supply before servicing
or cleaning out brush area. Failure to do so
could result in electrical shock or brush
suddenly starting.
Do not leave vacuum cleaner when plugged
in. Unplug from outlet when not in use and
before servicing.
To reduce the risk of electrical shock - Do not
use outdoors or on wet surfaces.
Do not allow to be used as a toy. Close
attention is necessary when used by or near
children.
Do not use with damaged cord or plug. If
vacuum cleaner is not working as it should,
has been dropped, damaged, left outdoors,
or dropped into water, return it to a Sears
Service Center.
Do not pull or carry by cord, use cord as a
handle, close door on cord, or pull cord
around sharp edges or corners. Do not run
vacuum cleaner over cord. Keep cord away
from heated surfaces.
Do not unplug by pulling on cord. To unplug,
grasp the plug, not the cord.
Do not handle plug or vacuum cleaner with
wet hands.
Do not put any objects into openings.
Do not use with any opening blocked; keep
free of dust, lint, hair and anything that may
reduce airflow.
Keep hair, loose clothing, fingers, and all
parts of body away from openings and
moving parts.
Turn offall controlsbefore unplugging.
Use extra care when cleaning on stairs. Do
not put on chairs, tables, etc. Keep on floor.
Do not use vacuum cleaner to pick up
flammable or combustible liquids (gasoline,
cleaning fluids, perfumes, etc.), or use in
areas where they may be present. The fumes
from these substances can create a fire
hazard or explosion.
Do not pick up anything that is burning or
smoking, such as cigarettes, matches, or hot
ashes.
Do not use vacuum cleaner without dust bag
and/or filters in place.
Always change the dust bag after vacuuming
carpet cleaners or freshener, powders and
fine dust. These products clog the bag, reduce
airflow and can cause the bag to burst.
Failure to change bag could cause permanent
damage to the vacuum cleaner.
Do not use the vacuum cleaner to pick up
sharp hard objects, small toys, pins, paper
clips, etc. They may damage the vacuum
cleaner or dust bag.
Do not operate vacuum cleaner without the
exhaust filter or exhaust filter door in place.
The hose contains electrical wires. Do not use
when damaged, cut, or punctured. Replace if
cut or worn. Do not pick up sharp objects.
Always turn off and unplug the vacuum
cleaner before connecting or disconnecting
either hose, Handi-Mate Jr.® (if applicable),
or nozzle.
Hold plug when rewinding onto cord reel. Do
not allow plug to whip when rewinding.
You are responsible for making sure that your
vacuum cleaner is not used by anyone unable
to operate it properly.
SAVE THESE INSTRUCTIONS
Proper assembly and safe use of your vacuum cleaner are your responsibilities. Your
vacuum cleaner is intended for Household use. Read this Owner's Manual carefully
for important use and safety information. This guide contains safety statements under
warning and caution symbols.
=4=
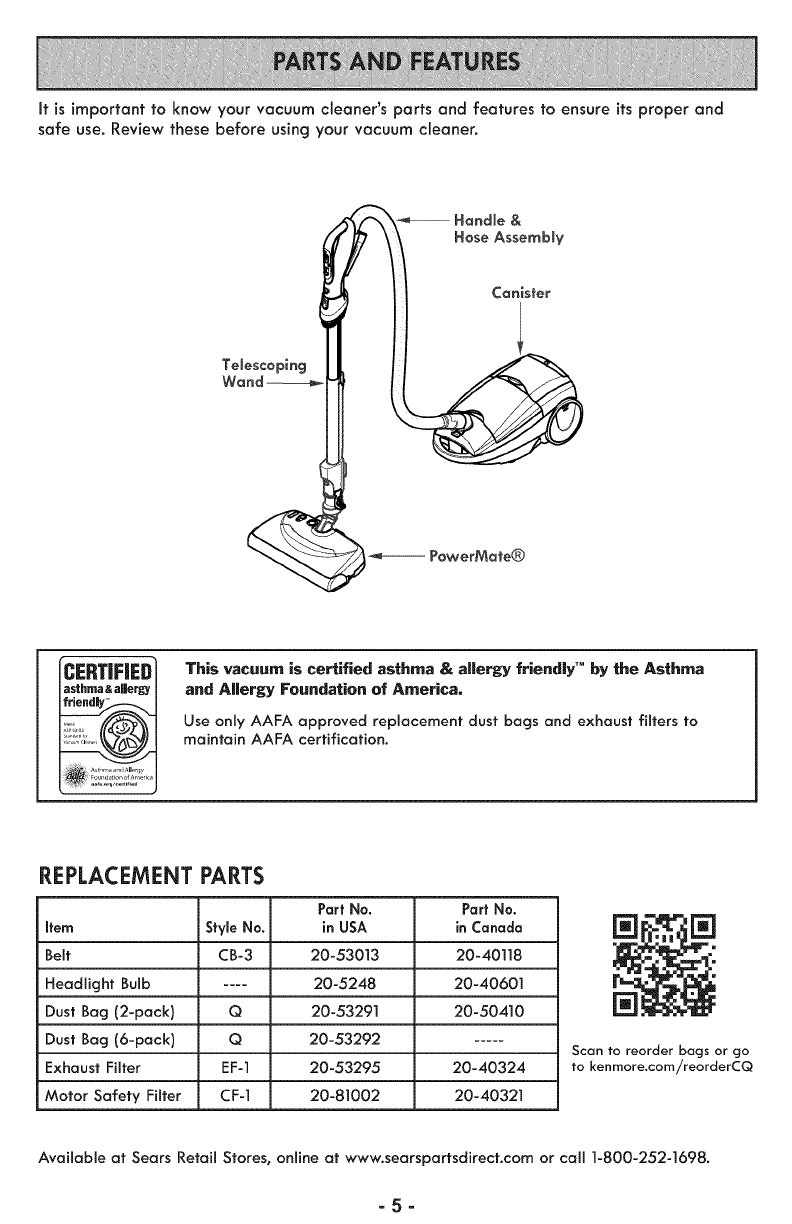
It is important to know your vacuum cleaner's parts and features to ensure its proper and
safe use. Review these before using your vacuum cleaner.
Handle &
Hose Assembly
Telescoping
PowerMote®
CERTiFiED
asthma &aJJer_
This vacuum is certified asthma &allergy friendly TM by the Asthma
and Allergy Foundation of America.
Use only AAFA approved replacement dust bags and exhaust filters to
maintain AAFA certification.
REPLACEMENT PARTS
Part No.
Item Style No. in USA
Belt CB-3 20-53013
Headlight Bulb .... 20-5248
Dust Bag (2-pack) Q 20-5329]
Dust Bag (6-pack) Q 20-53292
Exhaust Filter EF-] 20-53295
Motor Safety Filter CF-] 20-81002
Part No.
in Canada
20-40]]8
20-40601
20-50410
20-40324
20-40321
[]
Scan to reorder bags or go
to kenrnore.com/reorderCQ
Available at Sears Retail Stores, online at www.searspartsdirect.com or call 1-800-252-1698.
-5-
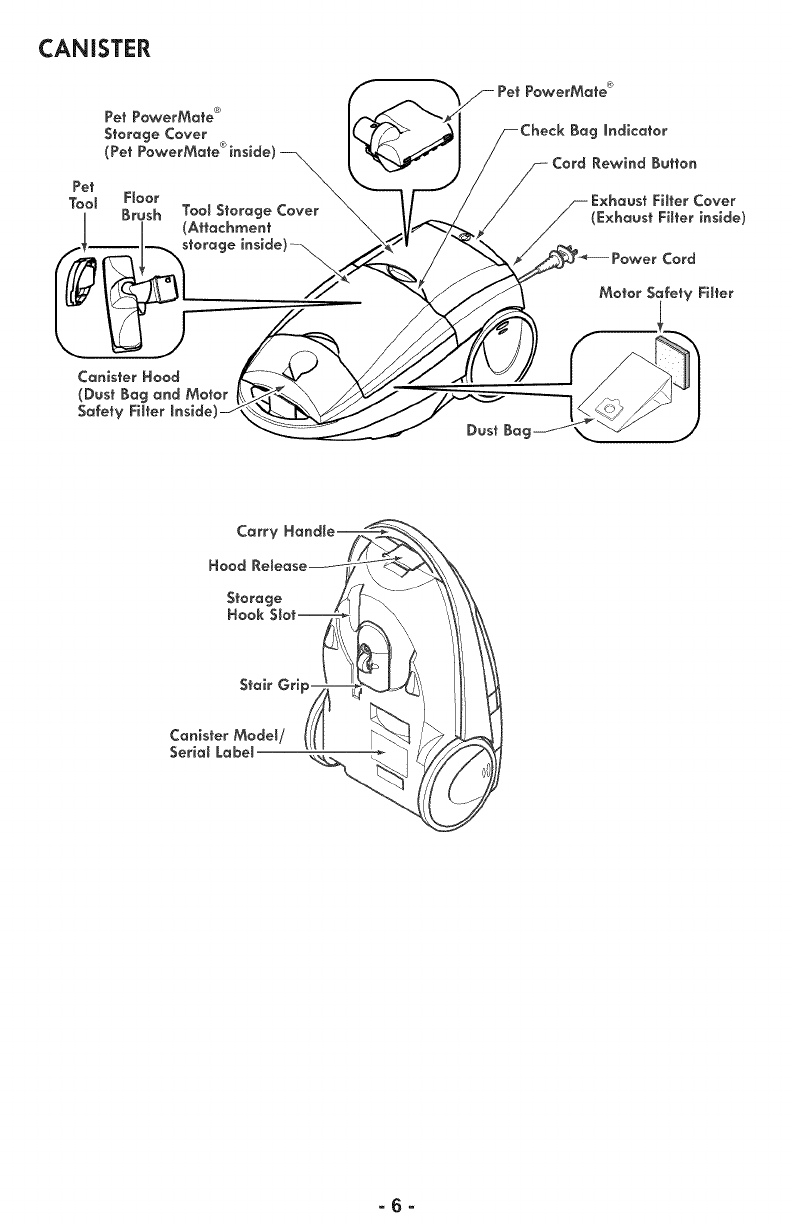
CANISTER
Pet
Tool
Carry
Hood
Storage
Hook
=6=
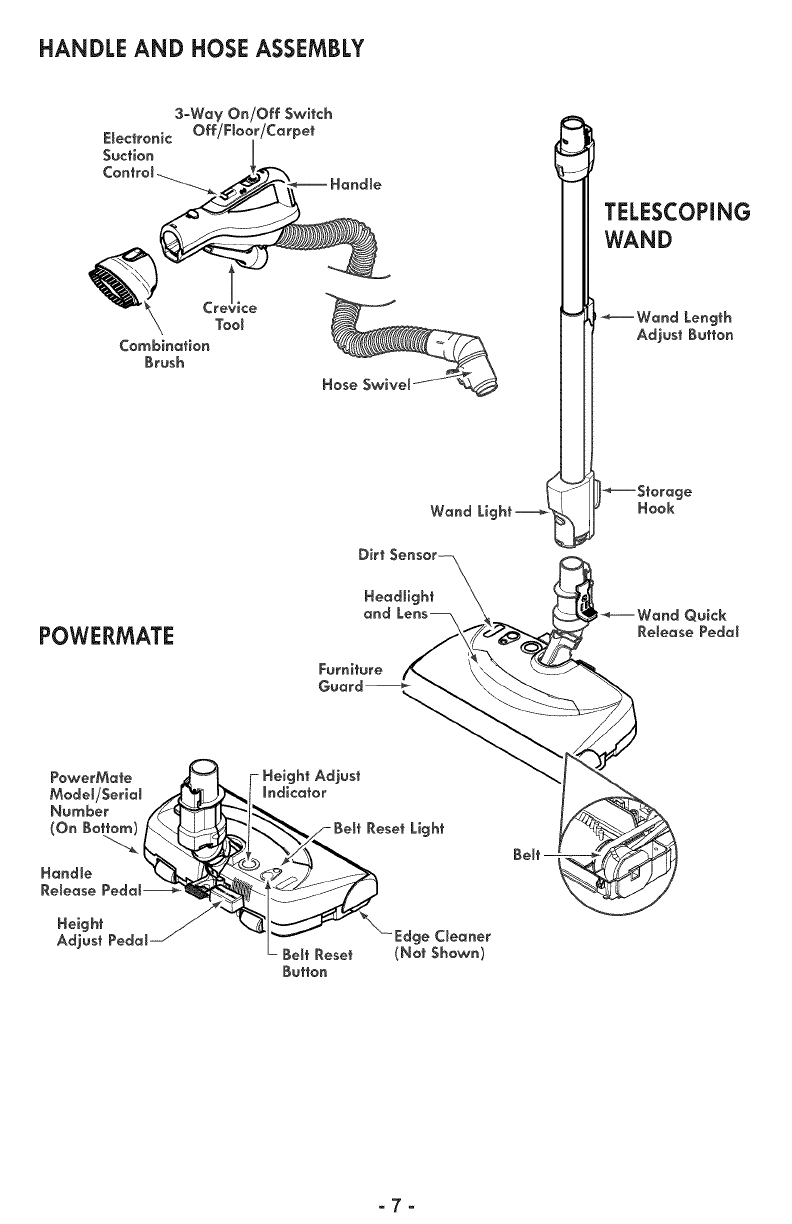
HANDLE AND HOSE ASSEMBLY
Cregice
Tool
Combination
Brush
Wand Light
POWERMATE
PowerMate ._'_ 7Height Adjust
Modet/Seriot._2'_,l mnd_cotor
(onBot_/_-_t__-'l, _.,_BeB ResetLight
Height _ "X: ___
Adjust Pedal j"_Edge Cleaner
- BeB Reset (Not Shown)
Button
TELESCOPING
WAND
_Wond Length
Adjust Button
-7-
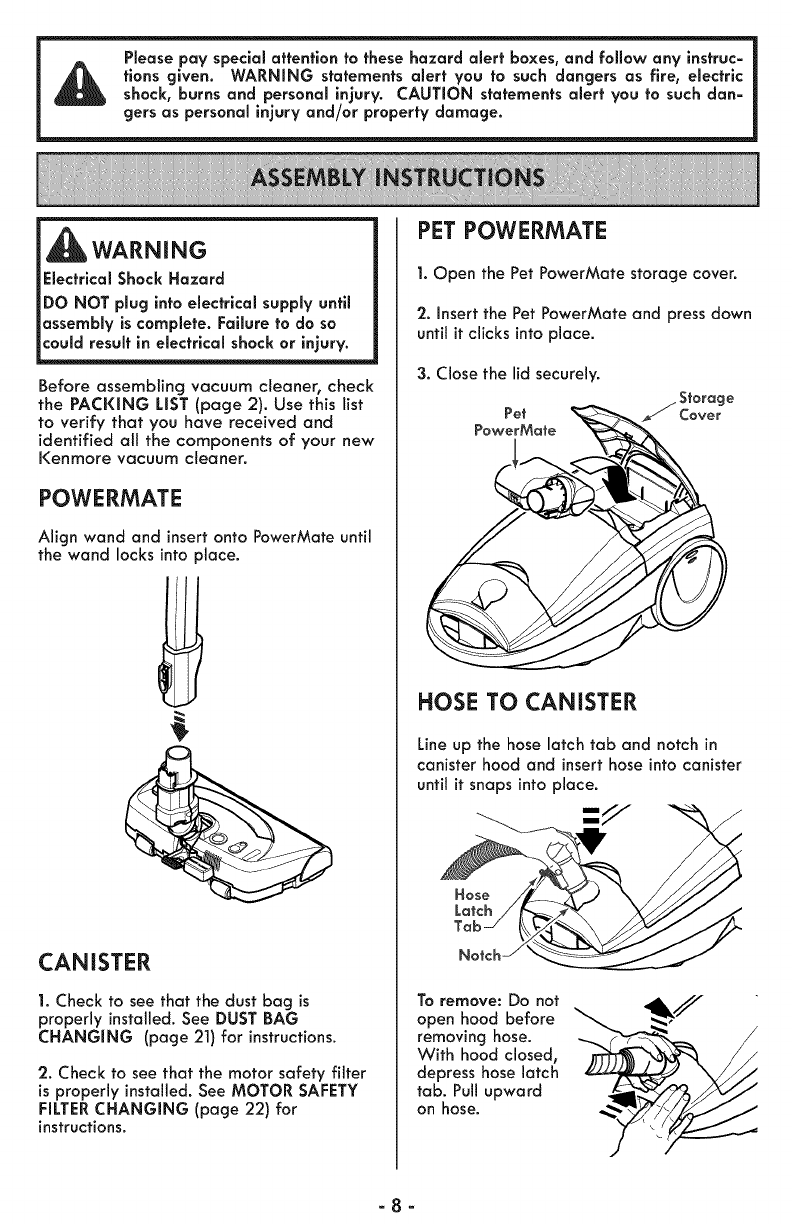
Please pay special attention to these hazard alert boxes, and follow any instruc-
tions given. WARNING statements alert you to such dangers as fire, electric
shock, burns and personal injury. CAUTION statements alert you to such dan-
gers as personal injury and/or property damage.
WARNING
Electrical Shock Hazard
DO NOT plug into electrical supply until
assembly is complete. Failure to do so
Before assembling vacuum cleaner, check
the PACi(ING LiST (page 2). Use this list
to verify that you have received and
identified all the components of your new
Kenmore vacuum cleaner.
POWERMATE
Align wand and insert onto PowerMate until
the wand locks into _lace.
CANISTER
1. Check to see that the dust bag is
properly installed. See DUST BAG
CHANGING (page 21) for instructions.
2. Check to see that the motor safety filter
is properly installed. See MOTOR SAFETY
FILTERCHANGING (page 22) for
instructions.
PET POWERMATE
1. Open the Pet PowerMate storage cover.
2. insert the Pet PowerMate and press down
until it clicks into place.
3. Close the lid securely.
PowerMafe
HOSE TO CANISTER
Line up the hose latch tab and notch in
canister hood and insert hose into canister
until it snaps into place.
://-
To remove: Do not
open hood before
removing hose.
With hood closed,
depress hose latch
tab. Pull upward
on hose.
-8-
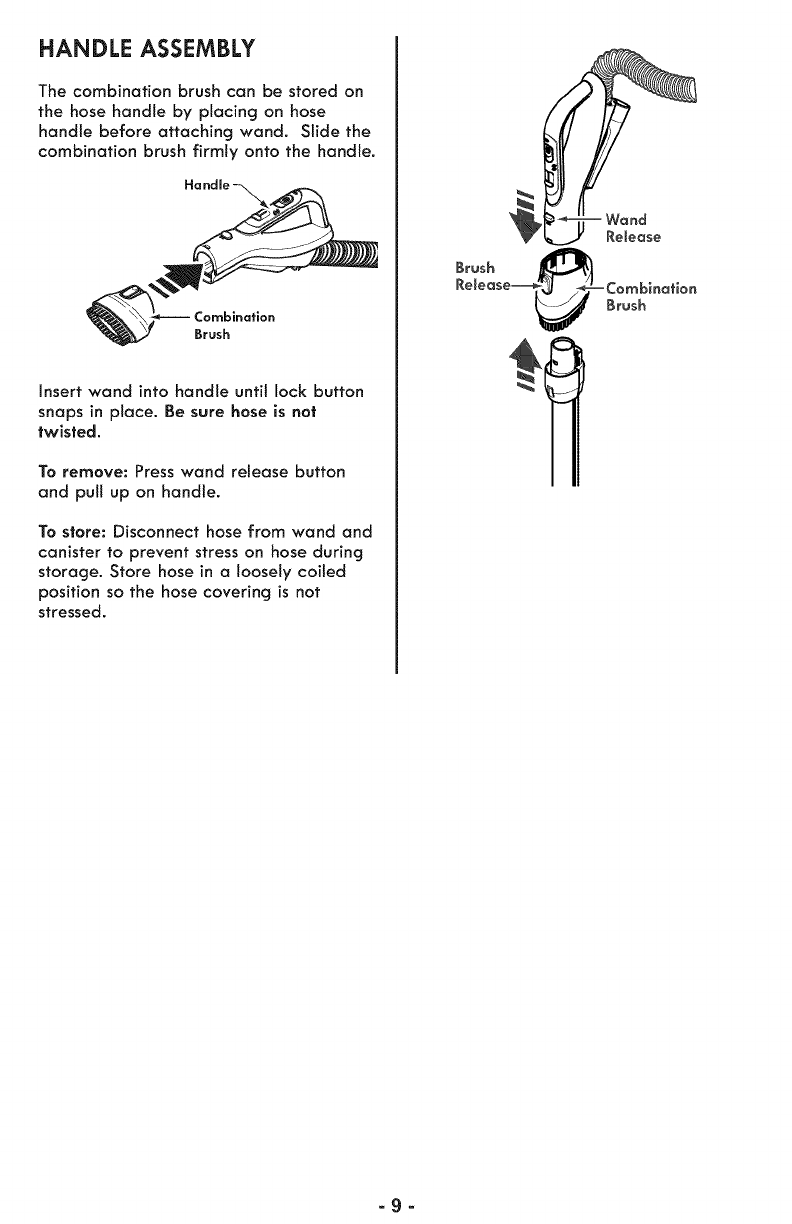
HANDLE ASSEMBLY
The combination brush can be stored on
the hose handle by placing on hose
handle before attaching wand. Slide the
combination brush firmly onto the handle.
:ombination
Brush
Insert wand into handle until lock button
snaps in place. Be sure hose is not
twisted.
To remove: Press wand release button
and pull up on handle.
To store: Disconnect hose from wand and
canister to prevent stress on hose during
storage. Store hose in aloosely coiled
position so the hose covering is not
stressed.
-9-
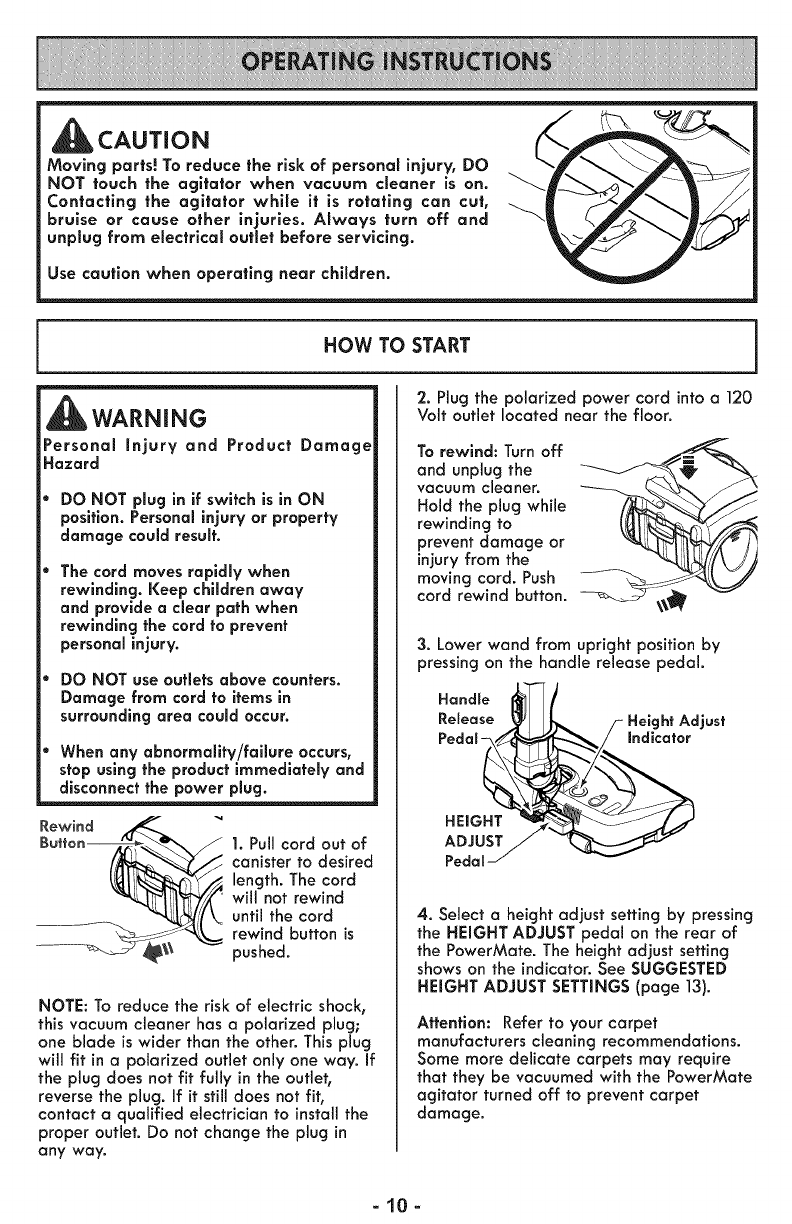
CAUTION
Moving parts! To reduce the risk of personal injury, DO
NOT touch the agitator when vacuum cleaner is on.
Contacting the agitator while it is rotating can cut,
bruise or cause other injuries. Always turn off and
unplug from electrlcal outlet before servicing.
Use caution when operating near children.
HOW TO START
WARNING
Personal injury and Product Damage
Hazard
DO NOT plug in if switch is in ON
position. Personal injury or property
damage could result.
The cord moves rapidly when
rewinding. Keep children away
and provide a clear path when
rewinding the cord to prevent
personal injury.
DO NOT use outlets above counters.
Damage from cord to items in
surrounding area could occur.
When any abnormality/failure occurs,
stop using the product immediately and
disconnect the power plug.
Rewind _
Button_,,_\_u_,x _ 1. Pull cord out of
canister to desired
length. The cord
will not rewind
until the cord
rewind button is
pushed.
NOTE: To reduce the risk of electric shock,
this vacuum cleaner has a polarized plug;
one blade is wider than the other. This plug
will fit in a polarized outlet only one way. If
the plug does not fit fully in the outlet,
reverse the plug. If it still does not fit,
contact aqualified electrician to install the
proper outlet. Do not change the plug in
any way.
2. Plug the polarized power cord into a 120
Volt outlet located near the floor.
To rewind: Turn off
and unplug the
vacuum cleaner.
Hold the plug while
rewinding to
prevent damage or
injury from the
moving cord. Push
cord rewind button.
3. Lower wand from upright position by
pressing on the handle release pedal.
Handle _-_ L /- Height Adjust
Release._J
Pedal-x/_ _//_ Indicator
4. Select aheight adjust setting by pressing
the HEIGHT ADJUST pedal on the rear of
the PowerMate. The height adjust setting
shows on the indicator. See SUGGESTED
HEIGHT ADJUST SETTINGS (page 13).
Attention: Refer to your carpet
manufacturers cleaning recommendations.
Some more delicate carpets may require
that they be vacuumed with the PowerMate
agitator turned off to prevent carpet
damage.
-10-
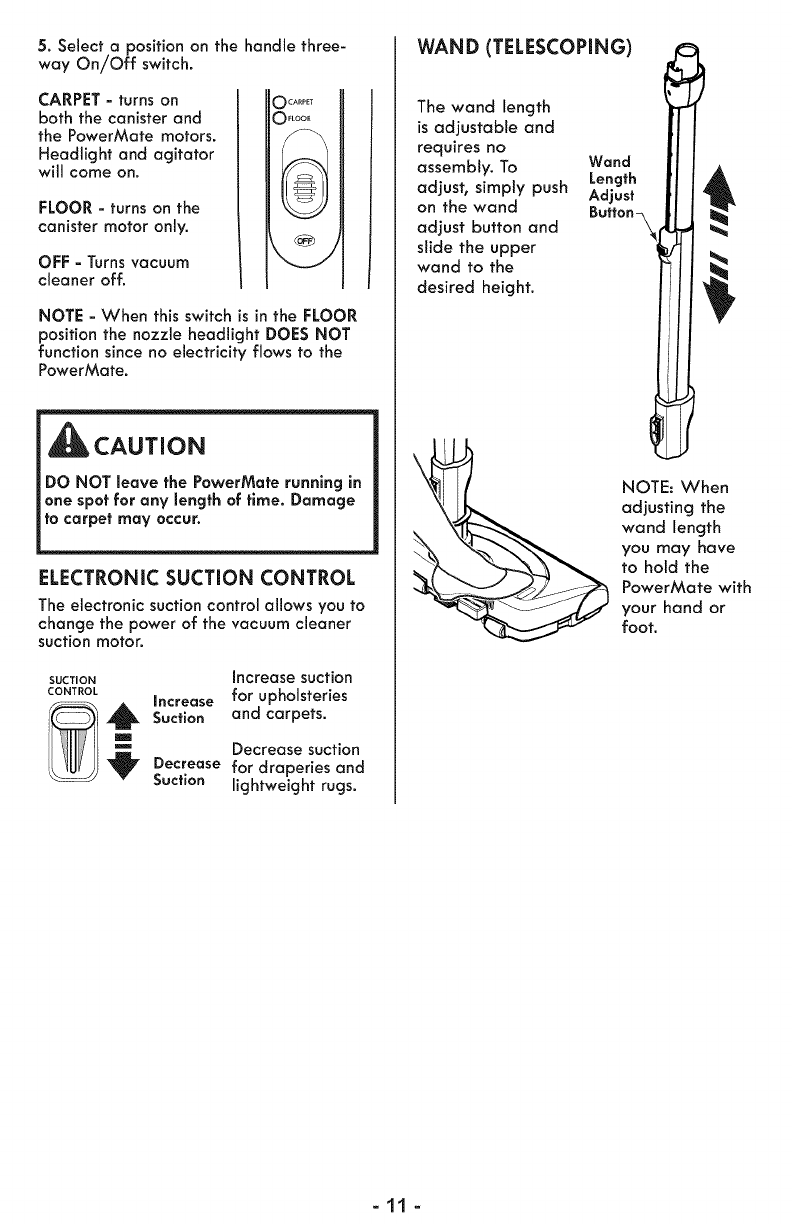
5. Select a position on the handle three-
way On/Off switch.
CARPET - turns on
both the canister and
the PowerMate motors.
Headlight and agitator
will come on.
FLOOR - turns on the
canister motor only.
OFF - Turns vacuum
cleaner off.
) CARPET
)FLOOR
NOTE - When this switch is in the FLOOR
position the nozzle headlight DOES NOT
function since no electricity flows to the
PowerMate.
CAUTION
DO NOT leave the PowerMate running in
one spot for any length of time. Damage
to carpet may occur.
ELECTRONIC SUCTION CONTROL
The electronic suction control allows you to
change the power of the vacuum cleaner
suction motor.
SUCTION Increase suction
CONTROL Increase for upholsteries
_Suction and carpets.
Decrease suction
_ Decrease for draperies and
Suction lightweight rugs.
WAND (TELESCOPING)
The wand length
is adjustable and
requires no
assembly. To
adjush simply push
on the wand
adjust button and
slide the upper
wand to the
desired height.
Wand
Length
Adjust
Button_
NOTE: When
adjusting the
wand length
you may have
to hold the
PowerMate with
your hand or
foot.
-11 -
VACUUMINGTiPS
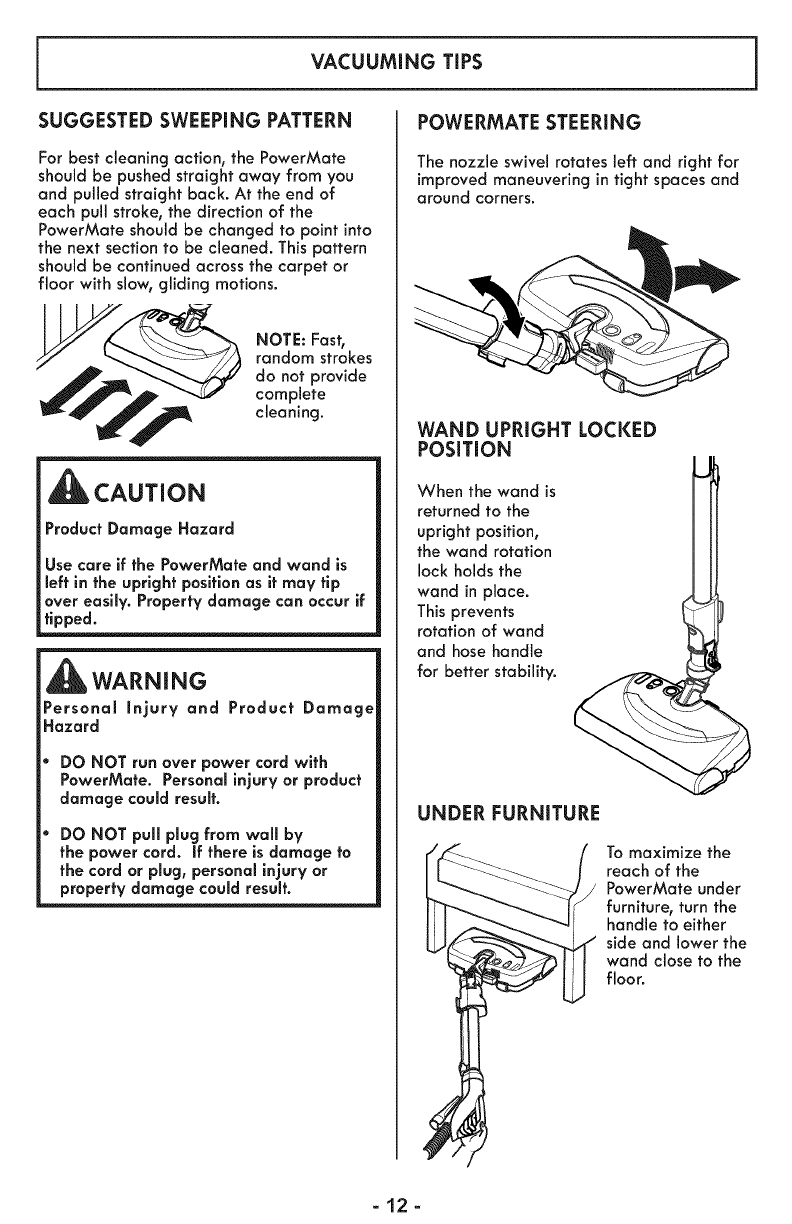
SUGGESTED SWEEPING PATTERN
For best cleaning action, the PowerMate
should be pushed straight away from you
and pulled straight back. At the end of
each pull stroke, the direction of the
PowerMate should be changed to point into
the next section to be cleaned. This pattern
should be continued across the carpet or
floor with slow, gliding motions.
NOTE: Fast,
random strokes
do not provide
complete
cleaning.
CAUTION
Product Damage Hazard
Use care if the PowerMate and wand is
left in the upright position as it may tip
over easily. Property damage can occur if
tipped.
WARNING
Personal Injury and Product Damage
Hazard
DO NOT run over power cord with
PowerMate. Personal injury or product
damage could result.
DO NOT pull plug from wall by
the power cord. If there is damage to
the cord or plug, personal injury or
property damage could result.
POWERMATE STEERING
The nozzle swivel rotates left and right for
improved maneuvering in tight spaces and
around corners.
WAND UPRIGHT LOCKED
POSiTiON
When the wand is
returned to the
upright position,
the wand rotation
lock holds the
wand in place.
This prevents
rotation of wand
and hose handle
for better stability.
UNDER FURNITURE
To maximize the
reach of the
PowerMate under
furniture, turn the
handle to either
side and lower the
wand close to the
floor.
-12-
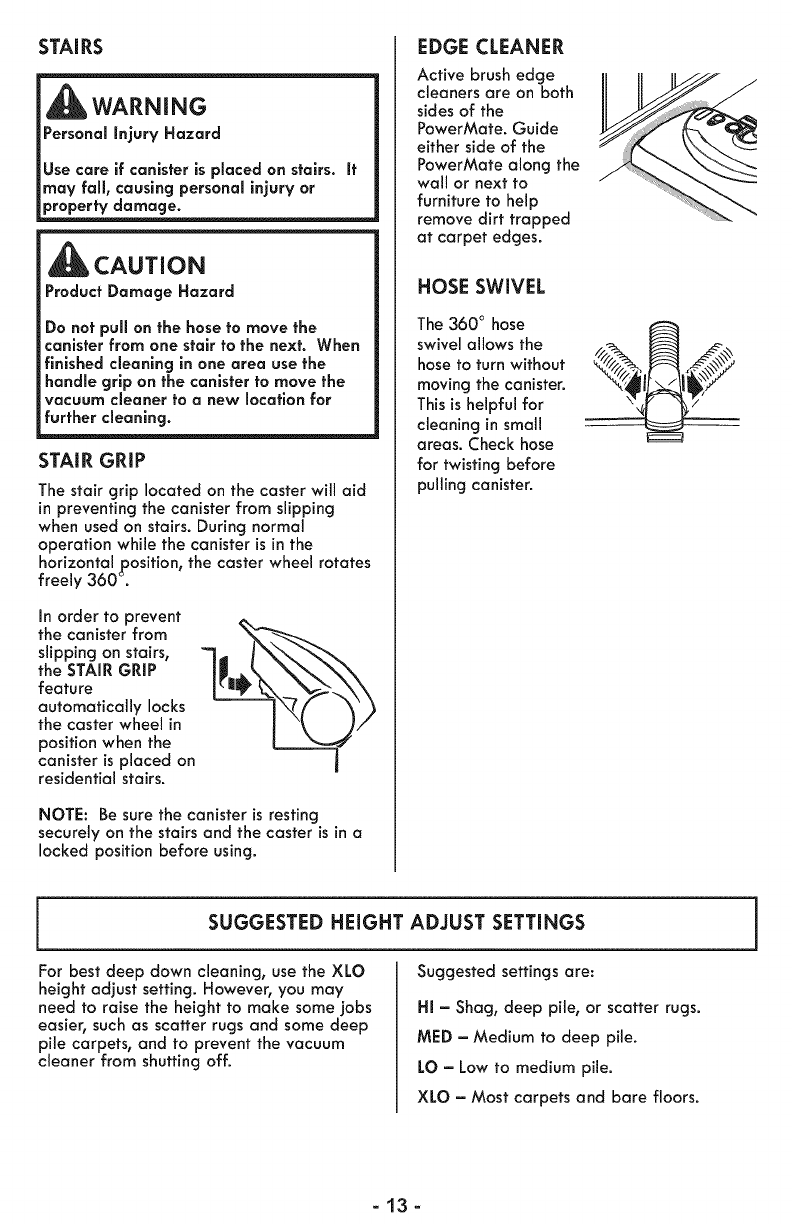
STAIRS
WARNING
Personal Injury Hazard
Use care if canister is placed on stairs. It
may fall, causing personal injury or
property damage.
_CAUTION
Product Damage Hazard
Do not pull on the hose to move the
canister from one stair to the next. When
finished cleaning in one area use the
handle grip on the canister to move the
vacuum cleaner to a new location for
further cleaning.
STAIR GRIP
The stair grip located on the caster will aid
in preventing the canister from slipping
when used on stairs. During normal
operation while the canister is in the
horizontal position, the caster wheel rotates
freely 360 _.
In order to prevent
the canister from
slipping on stairs,
the STAIR GRIP
feature
automatically locks
the caster wheel in
positionwhen the
canister is placed on
residential stairs.
NOTE: Be sure the canister is resting
securely on the stairs and the caster is in a
locked position before using.
EDGE CLEANER
Active brush edge
cleaners are on both
sides of the
PowerMate. Guide
either side of the
PowerMate along the
wall or next to
furniture to help
remove dirt trapped
at carpet edges.
HOSE SWIVEL
The 360 ° hose
swivel allows the
hose to turn without
moving the canister.
This is helpful for
cleaning in small
areas. Check hose
for twisting before
pulling canister.
SUGGESTED HEIGHT ADJUST SETTINGS
For best deep down cleaning, usethe XLO
height adjust setting. However, you may
need to raise the height to make some jobs
easier, such as scatter rugs and some deep
pile carpets, and to prevent the vacuum
cleaner from shutting off.
Suggested settings are:
HI = Shag, deep pile, or scatter rugs.
MED =Medium to deep pile.
LO =Low to medium pile.
XLO =Most carpets and bare floors.
=13=
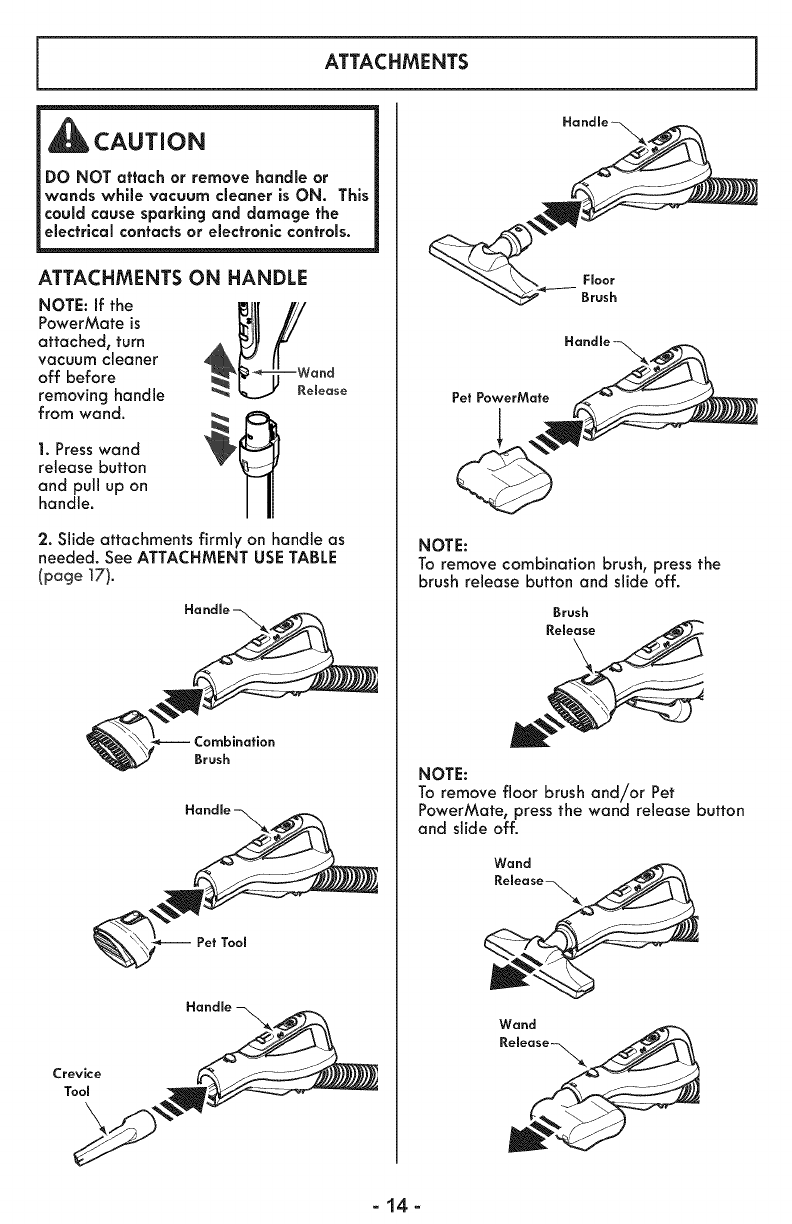
ATTACHMENTS
CAUTION
DO NOT attach or remove handle or
wands while vacuum cleaner is ON. This
could cause sparking and damage the
electrical contacts or electroniccontrols.
ATTACHMENTS ON HANDLE
NOTE: if the _k _'_ll_'///_._ZW
PowerMate is
attached, turn
vacuum cleaner
off before and
removing handle Remease
from wand. __
1. Presswand
release button
and pull up on
handle.
2. Slide attachments firmly on handle as
needed. See ATTACHMENT USE TABLE
(page ]7).
:ornbination
Brush
Pet Tool
Crevice
Tool
Floor
Brush
Pet PowerMate
NOTE:
To remove combination brush, pressthe
brush release button and slide off.
Brash
NOTE:
To remove floor brush and/or Pet
PowerMate, pressthe wand release button
and slide off.
Wand
Wand
-14-
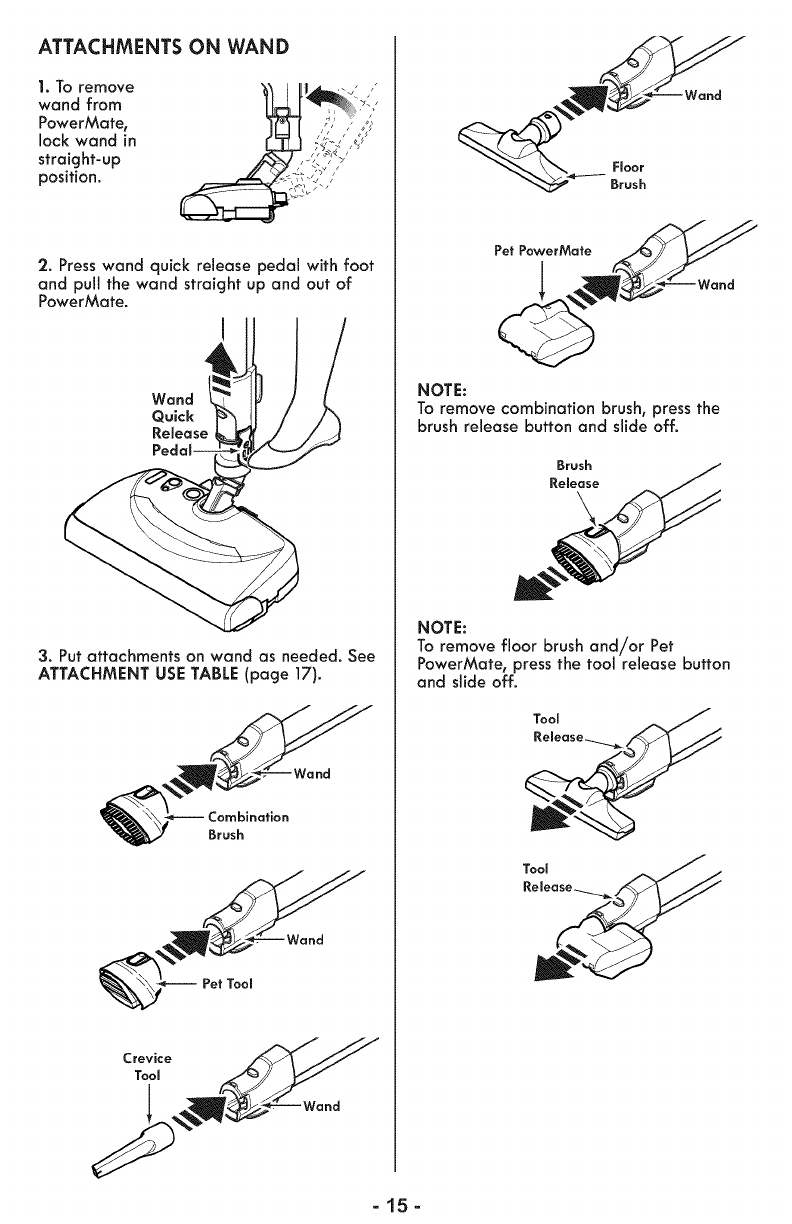
ATTACHMENTS ON WAND
1. To remove
wand from
PowerMate,
lock wand in
straight-up
position.
2. Press wand quick release pedal with foot
and pull the wand straight up and out of
PowerMate. '/
3. Put attachments on wand as needed. See
ATTACHMENT USETABLE (page 17).
Combination
Brash
Pet Tool
Crevice
Tool
Floor
Brush
Pet PowerMate
NOTE:
To remove combination brush, press the
brush release button and slide off.
Brush
Release
NOTE:
To remove floor brush and//or Pet
PowerMate, pressthe tool release button
and slide off.
Tool AJ
Release-_../_
Tool
-15-
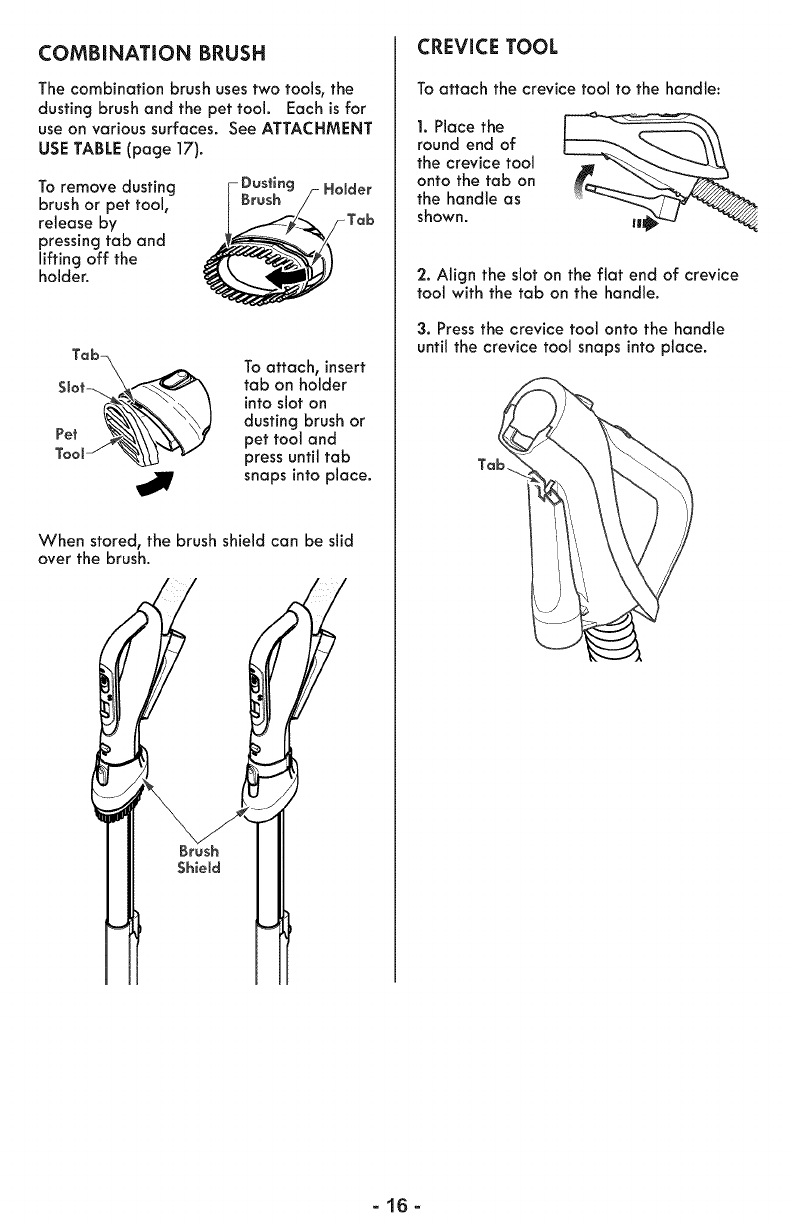
COMBINATION BRUSH
The combination brush usestwo tools, the
dusting brush and the pet tool. Each is for
use on various surfaces. See ATTACHMENT
USETABLE (page 17).
To remove dusting
brush or pet tool,
release by
pressing tab and
lifting off the
holder.
- Dvsfing ....
Brush "/rloiaer
Tob
Toolj _ _v
,J
To attach,insert
tab on holder
into slot on
dusting brush or
pet tool and
press until tab
snaps into place.
When stored, the brush shield can be slid
over the brush.
CREVICE TOOL
To attach the crevice tool to the handle:
1. Place the
round end of
the crevice tool
onto the tab on
the handle as
shown.
2. Align the slot on the flat end of crevice
tool with the tab on the handle.
3. Press the crevice tool onto the handle
until the crevice tool snaps into place.
-16-
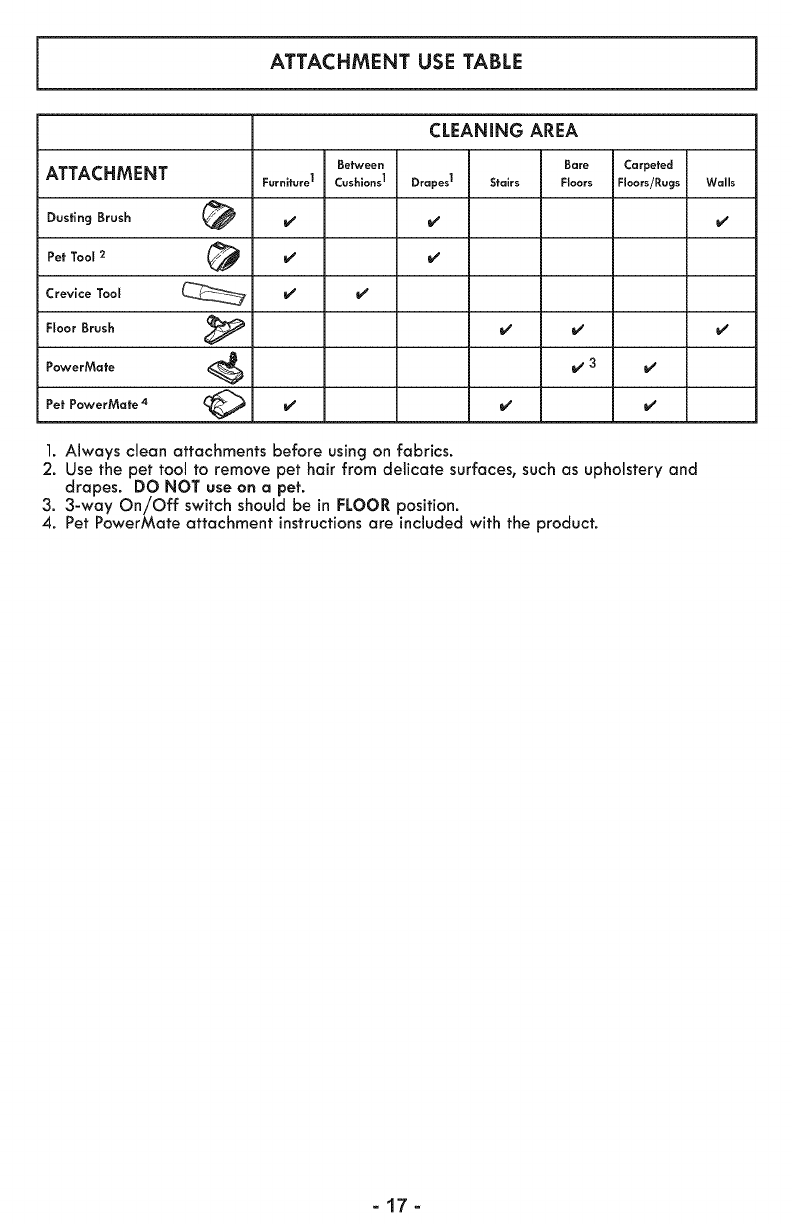
ATTACHMENT USE TABLE
CLEANING AREA
Between Bare Carpeted
ATTACHMENT Farnlturo ] Cushions ]Drapes ] Stairs FI.... Floors/Rugs Walls
Dusting Brush (_ _ _
Pet Tool 2 (_ _
Crevice Tool _ _
Floor Brush _ _ _
PowerMate _ _ 3
Pet PowerMate 4 _ _ _
1. Always clean attachments before using on fabrics.
2. Use the pet tool to remove pet hair from delicate surfaces, such as upholstery and
drapes. DO NOT use on a pet.
3. 3-way On//Off switch should be in FLOOR position.
4. Pet PowerMate attachment instructionsare included with the product.
-17-
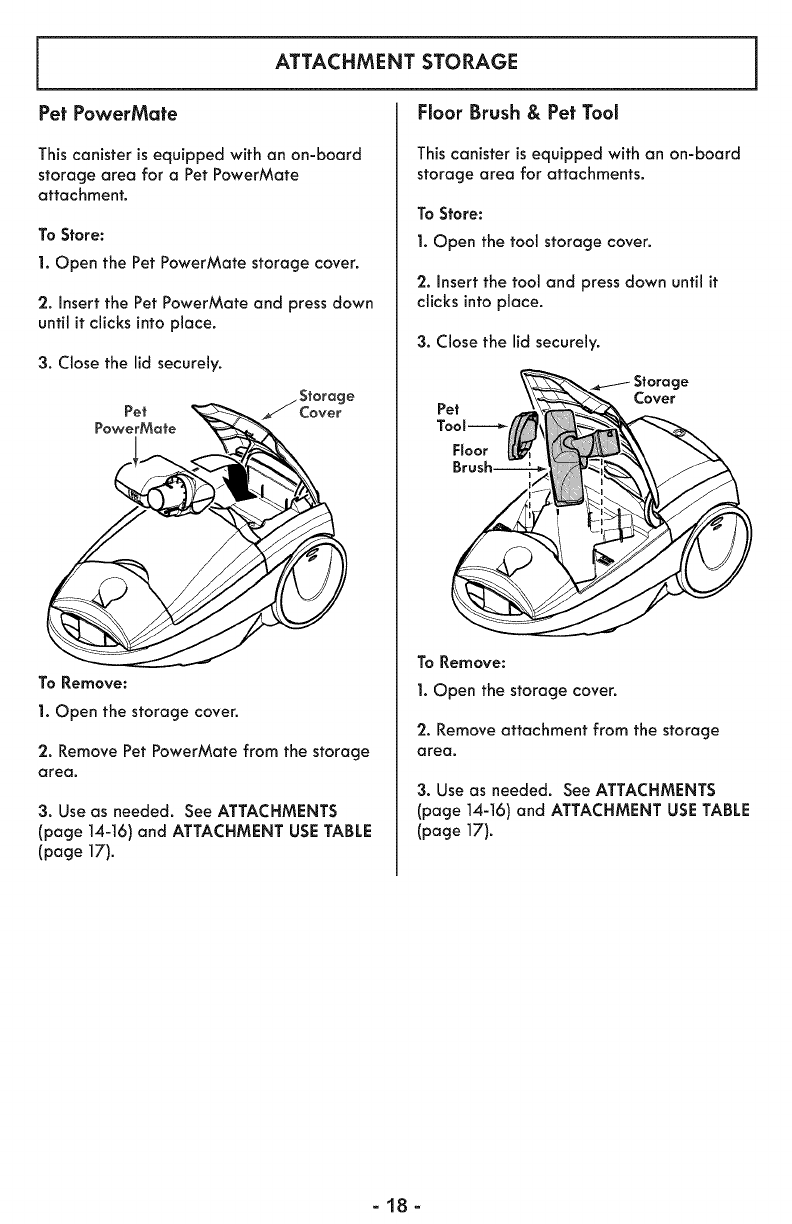
ATTACHMENTSTORAGE
PetPowerMate
This canister is equipped with an on-board
storage area for a Pet PowerMate
attachment.
To Store:
1. Open the Pet PowerMate storage cover.
2. Insert the Pet PowerMate and press down
until it clicks into place.
3. Close the lid securely.
Pet
To Remove:
1. Open the storage cover.
jStorage
Cover
2. Remove Pet PowerMate from the storage
area.
3. Use as needed. See ATTACHMENTS
(page 14-16) and ATTACHMENT USE TABLE
(page 17).
Roor Brush & Pet Tool
Thiscanisterisequippedwith an on-board
storage area for attachments.
To Store:
1. Open the tool storage cover.
2. Insert the tool and press down until it
clicks into place.
3. Close the lid securely.
Cover
To Remove:
1. Open the storage cover.
2. Remove attachment from the storage
area.
3. Use as needed. See ATTACHMENTS
(page 14-16) and ATTACHMENT USE TABLE
(page 17).
-18-
PERFORMANCE FEATURES
WARNING
Personal injury Hazard
Always turn off and unplug the vacuum
cleaner before cleaning the agitator area
as agitator may suddenly restart. Failure
to do so can result in personal injury.
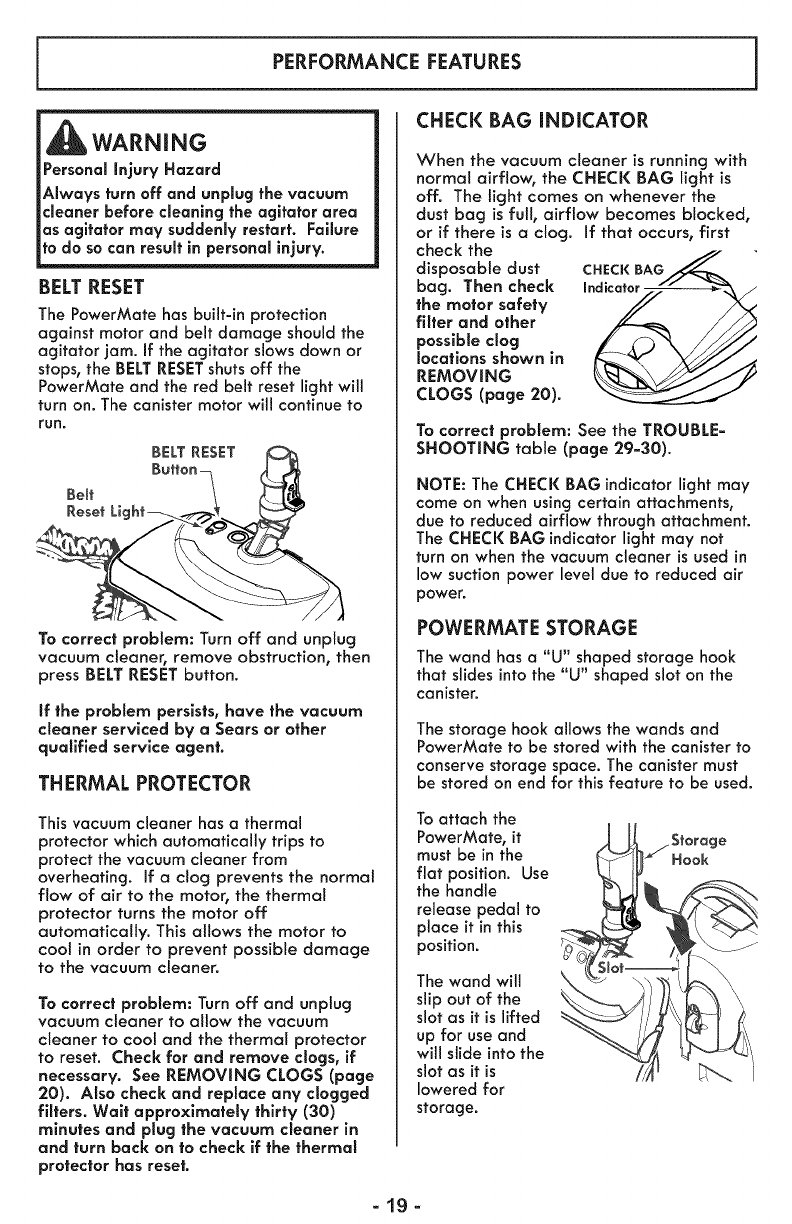
BELT RESET
The PowerMate has built-in protection
against motor and belt damage should the
agitator jam. if the agitator slows down or
stops, the BELT RESET shuts off the
PowerMate and the red belt reset light will
turn on. The canister motor will continue to
run.
BELT RESET
BeB
To correct problem: Turn off and unplug
vacuum cleaner, remove obstruction, then
press BELT RESET button.
If the problem persists, hove the vacuum
cleaner serviced by a Sears or other
qualified service agent.
THERMAL PROTECTOR
This vacuum cleaner has a thermal
protector which automatically trips to
protect the vacuum cleaner from
overheating. If a clog prevents the normal
flow of air to the motor, the thermal
protector turns the motor off
automatically. This allows the motor to
cool in order to prevent possible damage
to the vacuum cleaner.
To correct problem: Turn off and unplug
vacuum cleaner to allow the vacuum
cleaner to cool and the thermal protector
to reset. Check for and remove dogs, if
necessary. See REMOVING CLOGS (page
20). Also check and replace any clogged
filters. Wait approxlmately thirty (30)
minutes and plug the vacuum cleaner in
and turn back on to check if the thermal
protector has reset.
CHECK BAG iNDiCATOR
When the vacuum cleaner is running with
normal airflow, the CHECK BAG light is
off. The light comes on whenever the
dust bag is full, airflow becomes blocked,
or if there is a clog. If that occurs, first
check the
disposable dust CHECKBAG
bag. Then check Indicator-
the motor safety
fitter and other
possible clog
locations shown in
REMOVING
CLOGS (page 20).
To correct problem: See the TROUBLE=
SHOOTING table (page 29=30).
NOTE: The CHECK BAG indicator light may
come on when using certain attachments,
due to reduced airflow through attachment.
The CHECK BAG indicator light may not
turn on when the vacuum cleaner is used in
low suction power level due to reduced air
power.
POWERMATE STORAGE
The wand has a "U" shaped storage hook
that slides into the "U" shaped slot on the
canister.
The storage hook allows the wands and
PowerMate to be stored with the canister to
conserve storage space. The canister must
be stored on end for this feature to be used.
To attach the
PowerMate, it
must be in the
flat position. Use
the handle
release pedal to
place it in this
position.
The wand will
slipout of the
slot as it is lifted
up for use and
will slide into the
slot as it is
lowered for
storage.
=lg=
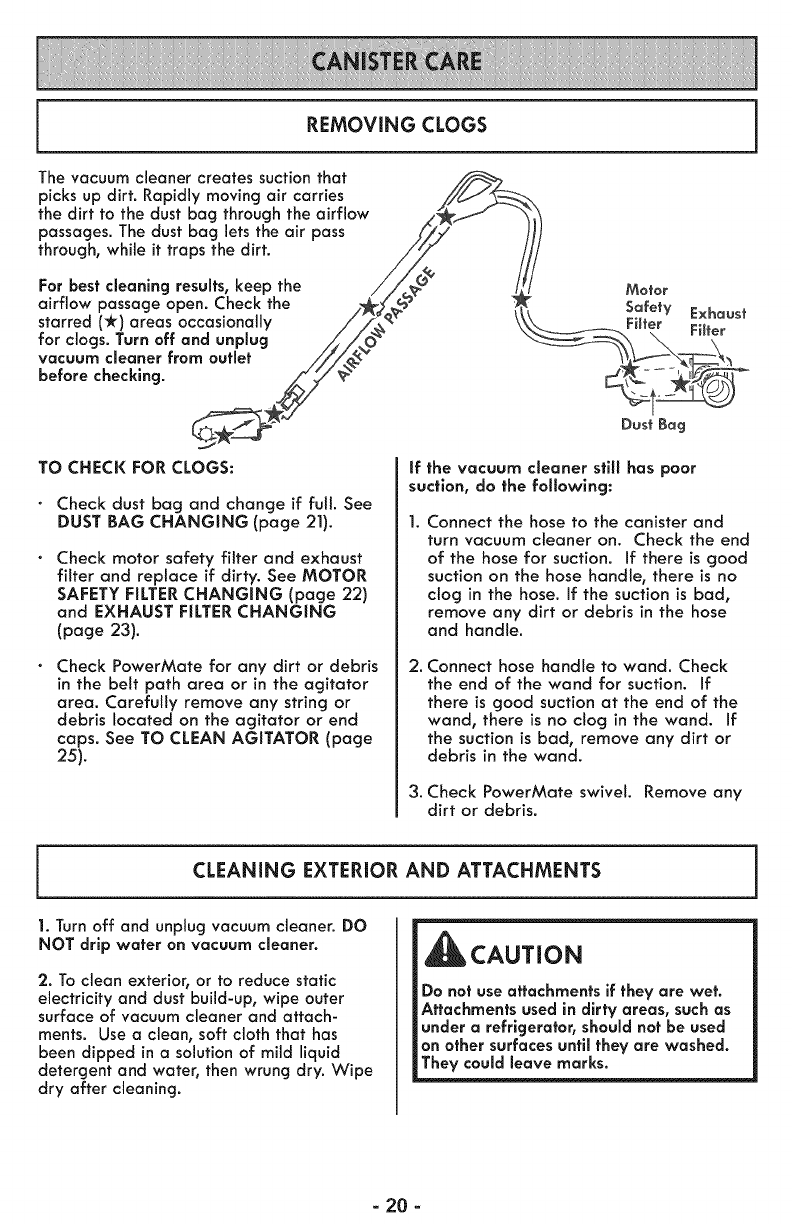
REMOVING CLOGS
The vacuum cleaner creates suction that _/_,/_
picks up dirt. Rapidly moving air carries
the dirt to the dust bag through the airflow
passages. The dust bag lets the air pass
through, while it traps the dirt.
For best cleaning results, keep the /Motor
airflow passage open• Check the _
starred (*) areas occasionally /7_ _\ S_fety Exhaust
Filter
o,,o°0o° ,o0
vacuum cleaner from outlet ///_"
before checking.
_' Dust Bag
TO CHECK FOR CLOGS:
Check dust bag and change if full. See
DUST BAG CHANGING (page 21).
Check motor safety filter and exhaust
filter and replace if dirty. See MOTOR
SAFETY FILTER CHANGING (page 22)
and EXHAUST FILTER CHANGING
(page 23).
Check PowerMate for any dirt or debris
in the belt path area or in the agitator
area. Carefully remove any string or
debris located on the agitator or end
caps. See TO CLEAN AGITATOR (page
25).
if the vacuum cleaner still has poor
suction, do the following:
Connect the hose to the canister and
turn vacuum cleaner on. Check the end
of the hose for suction. If there is good
suction on the hose handle, there is no
clog in the hose. If the suction is bad,
remove any dirt or debris in the hose
and handle.
2. Connect hose handle to wand. Check
the end of the wand for suction. If
there is good suction at the end of the
wand, there is no clog in the wand. If
the suction is bad, remove any dirt or
debris in the wand.
3. Check PowerMate swivel. Remove any
dirt or debris.
CLEANING EXTERIOR AND ATTACHMENTS
1. Turn off and unplug vacuum cleaner. DO
NOT drip water on vacuum cleaner.
2. To clean exterior, or to reduce static
electricity and dust build-up, wipe outer
surface of vacuum cleaner and attach-
ments. Use a clean, soft cloth that has
been dipped in a solution of mild liquid
detergent and water, then wrung dry. Wipe
dry after cleaning.
CAUTION
Do not use attachments if they are wet.
Attachments used in dirty areas, such as
under a refrigerator, should not be used
on other surfaces until they are washed.
They could leave marks.
-20 -
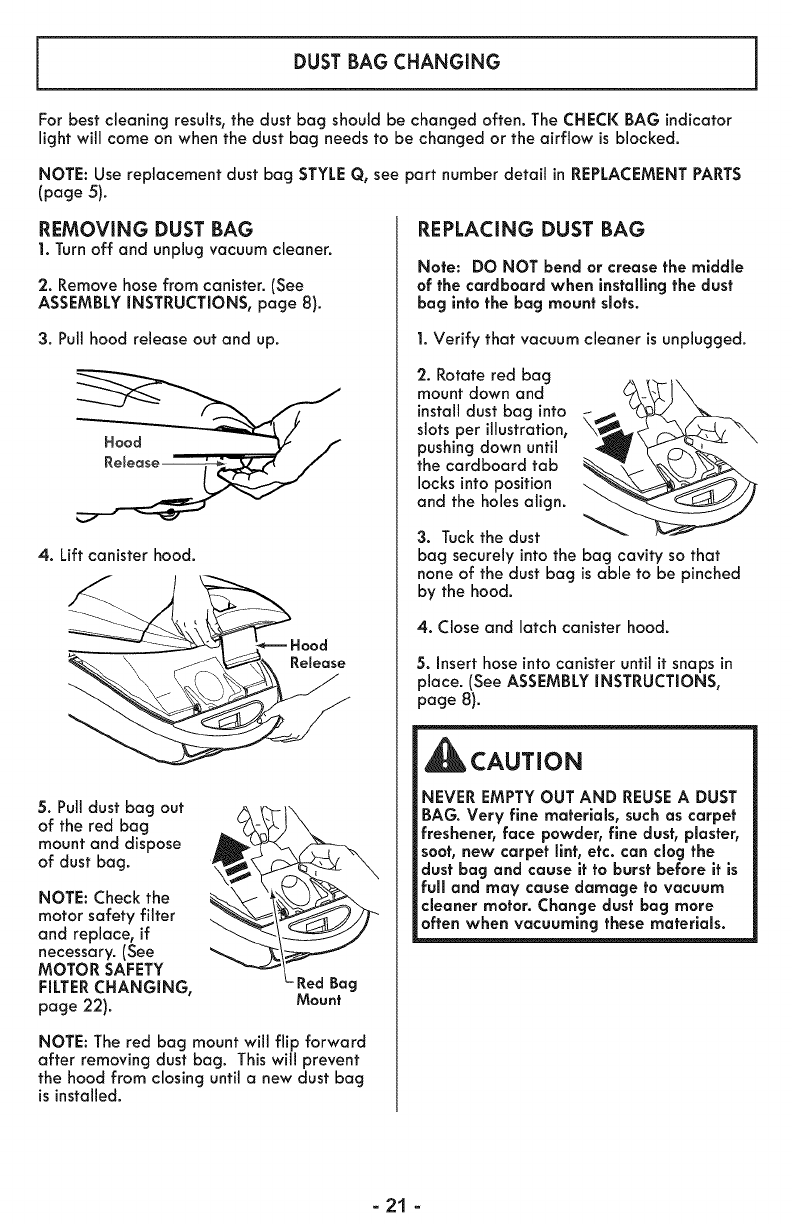
DUSTBAGCHANGING
For best cleaning results, the dust bag should be changed often. The CHECK BAG indicator
light will come on when the dust bag needs to be changed or the airflow is blocked.
NOTE: Use replacement dust bag STYLEQ, see part number detail in REPLACEMENTPARTS
(page 5).
REMOVING DUST BAG
1. Turn off and unplug vacuum cleaner.
2. Remove hose from canister. (See
ASSEMBLYINSTRUCTIONS, page 8).
3. Pull hood release out and up.
4. Lift canister hood.
_Hood
5. Pull dust bag out
of the red bag
mount and dispose
of dust bag.
NOTE: Checkthe
motor safety filter
and replace, if
necessary.(See
MOTOR SAFETY
FILTERCHANGING,
page 22).
NOTE: The red bag mount will flip forward
after removing dust bag. This will prevent
the hood from closing until a new dust bag
is installed.
REPLACING DUST BAG
Note: DO NOT bend or crease the middle
of the cardboard when installing the dust
bog into the bag mount slots.
1. Verify that vacuum cleaner isunplugged.
2. Rotate red bag
mount down and
install dust bag into
slots per illustration,
pushing down until
the cardboard tab
locks into position
and the holes align.
3. Tuck the dust
bag securely into the bag cavity so that
none of the dust bag is able to be pinched
by the hood.
4. Close and latch canister hood.
5. insert hose into canister until it snaps in
place. (See ASSEMBLY INSTRUCTIONS,
page 8).
CAUTION
NEVER EMPTY OUT AND REUSE A DUST
BAG. Very fine materlols, such as carpet
freshener, face powder, fine dust, piaster,
soot, new carpet llnt, etc. can clog the
dust bag and cause it to burst before it is
full and may cause damage to vacuum
cleaner motor. Change dust bag more
often when vacuuming these materials.
-21 -
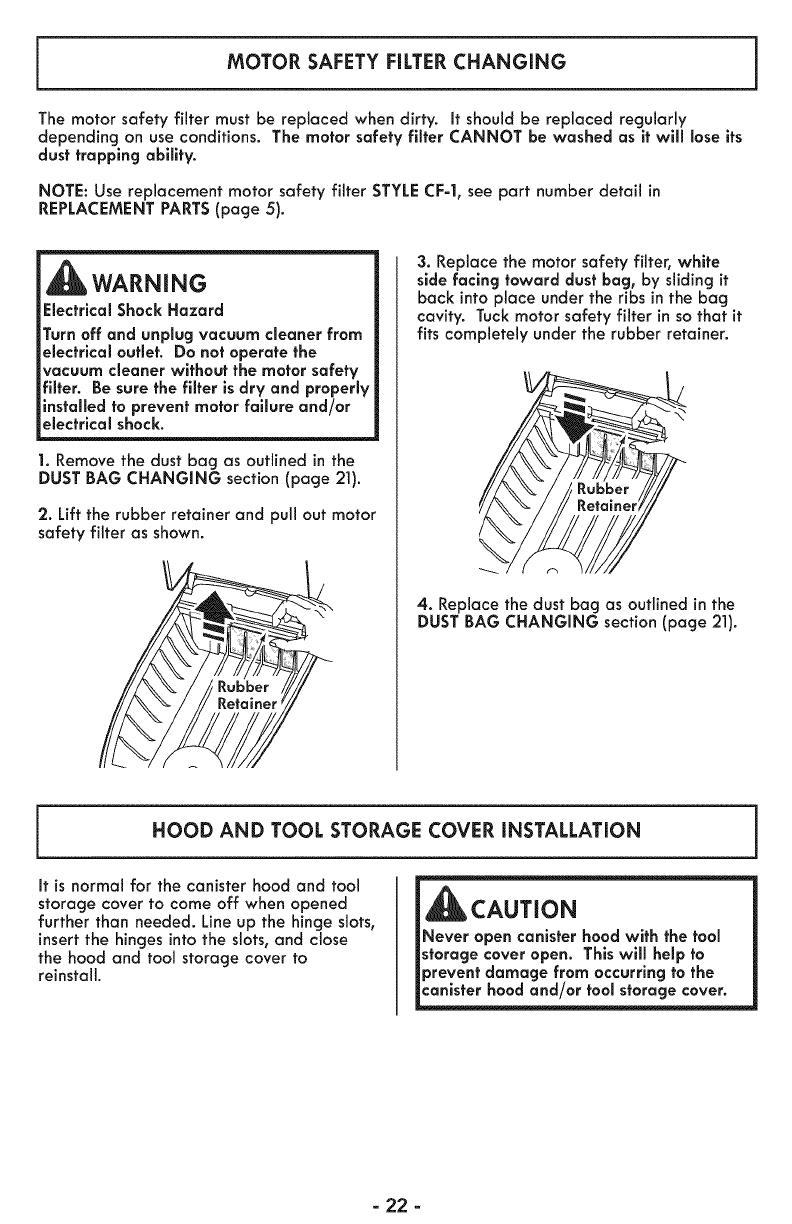
MOTORSAFETYFILTERCHANGING
The motor safety filter must be replaced when dirty. It should be replaced regularly
depending on use conditions. The motor safety filter CANNOT be washed as it will lose its
dust trapping ability.
NOTE: Use replacement motor safety filter STYLE CF-l, see part number detail in
REPLACEMENT PARTS (page 5).
WARNING
Electrical Shock Hazard
Turn off and unplug vacuum cleaner from
electrical outlet. Do not operate the
vacuum cleaner without the motor safety
filter. Be sure the filter is dry and properly
installed to prevent motor failure and/or
electrical shock.
1. Remove the dust bag as outlined in the
DUST BAG CHANGING section (page 21).
2. Lift the rubber retainer and pull out motor
safety filter as shown.
3. Replace the motor safety filter, white
side facing toward dust bag, by sliding it
back into place under the ribs in the bag
cavity. Tuck motor safety filter in so that it
fits completely under the rubber retainer.
\
4. Replace the dust bag as outlined in the
DUST BAG CHANGING section(page 21).
HOOD AND TOOL STORAGE COVER INSTALLATION
It is normal for the canister hood and tool
storage cover to come off when opened
further than needed. Line up the hinge slots,
insert the hinges into the slots, and close
the hood and tool storage cover to
reinstall.
-22 -

EXHAUST FILTER CHANGING
The exhaust filter must be replaced regularly. Replace the exhaust filter when the entire sur-
face area is covered evenly. The exhaust filter CANNOT be washed as it will lose its dust
trapping ability.
NOTE: Use replacement exhaust filter STYLEEF-I0 see part number detail in REPLACEMENT
PARTS(page 5).
WARNING
Fire and/or Electrical Shock Hazard
Do not operate with a clogged exhaust
filter or without the exhaust filter installed.
Do not operate without filter cover
installed.
1. Pull out and down on ___
the exhaust filter cover
to remove from the
canister and lay aside.
__--_ Exhaust 2o Pull the exhaust
Filter filter up and out
from the rear of
__ the canister.
3. Replace the
exhaust filter. _______
Place the new
exhaust filter Exhaust
into the Filter
canister with __/
the foam seal
facing towards
the canister.
Slots
4. Replace the
exhaust filter cover
by placing the two
tabs on the filter
cover into the slots
on the canister and
rotate into place
until it snaps closed.
- 23 -
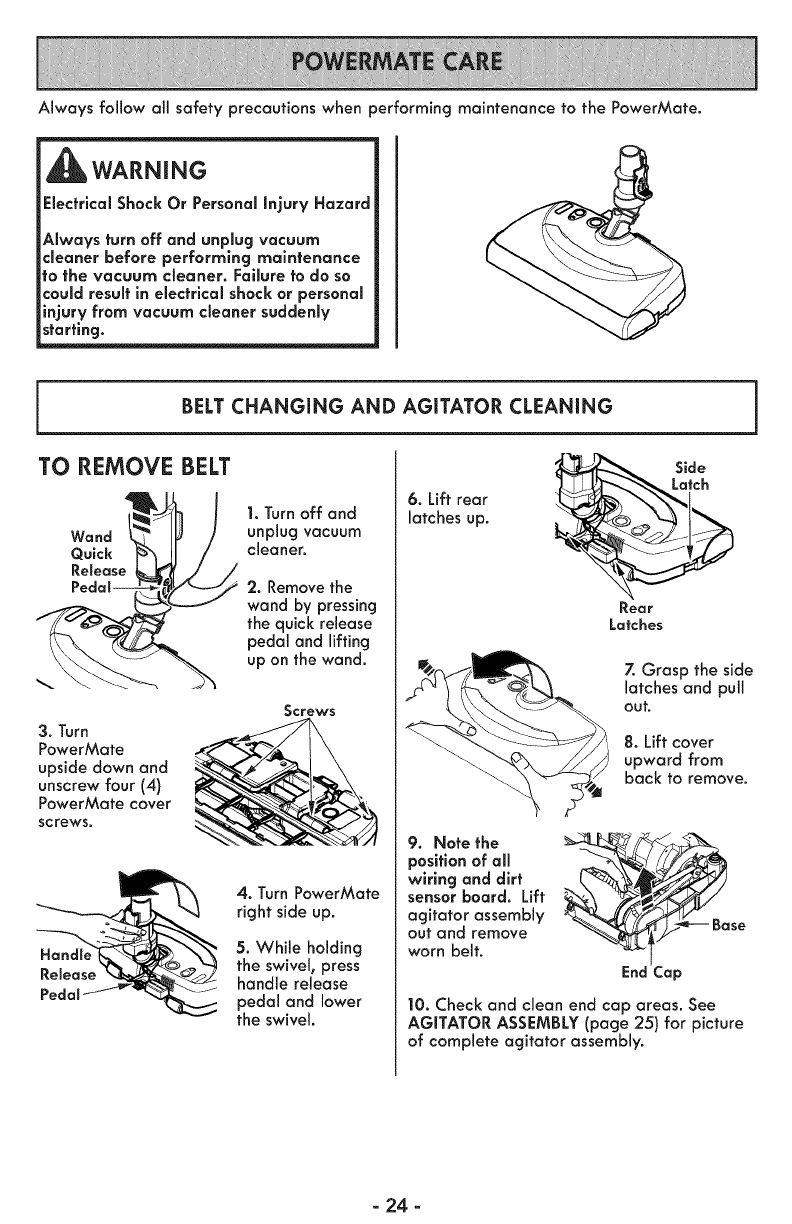
Always follow all safety precautions when performing maintenance to the PowerMate.
WARNING
Electrlcal Shock Or Personal injury Hazard
Always turn off and unplug vacuum
cleaner before performing maintenance
to the vacuum cleaner. Fallure to do so
could result in electrical shock or personal
injury from vacuum cleaner suddenly
starting.
BELT CHANGING AND AGITATOR CLEANING
TO REMOVE BELT
Quick _"_ II /
Release _._ 4
3. Turn
PowerMate
upside down and
unscrew four (4)
PowerMate cover
screws.
1. Turn off and
unplug vacuum
cleaner.
2. Remove the
wand by pressing
the quick release
pedal and lifting
up on the wand.
Screws
Release
4. Turn PowerMate
right side up.
5. While holding
the swivel, press
handle release
pedal and lower
the swivel.
6. Lift rear
latches up.
Sid_
tch
Rear
Latches
7. Grasp the side
latches and pull
out.
8. Lift cover
upward from
back to remove.
position of all
wiring and dirt
sensor board. Lift
agitator assembly
out and remove se
worn belt.
End Cap
10. Check and clean end cap areas. See
AGITATOR ASSEMBLY (page 25) for picture
of complete agitator assembly.
- 24 -
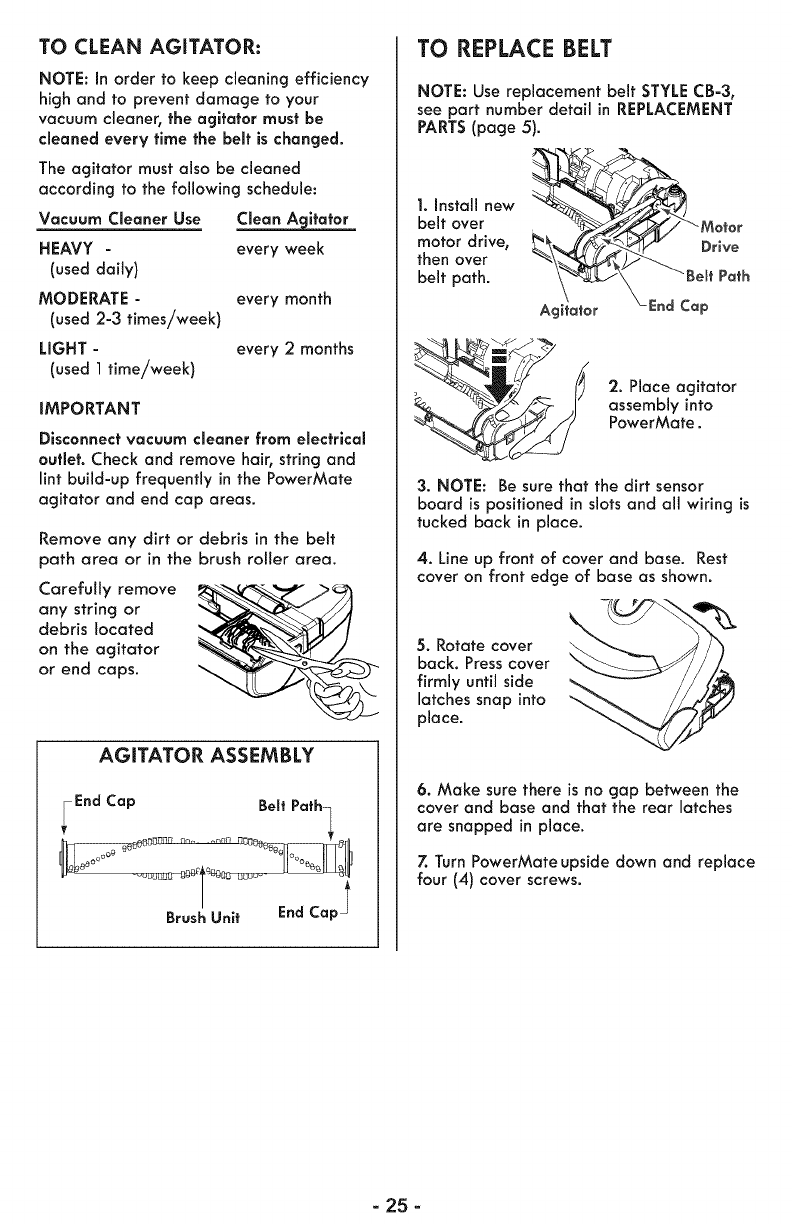
TOCLEAN AGITATOR:
NOTE: In order to keep cleaning efficiency
high and to prevent damage to your
vacuum cleaner, the agitator must be
cleaned every time the belt is changed.
The agitator must also be cleaned
according to the following schedule:
Vacuum Cleaner Use Clean Agitator
HEAVY - every week
(used daily)
MODERATE - every month
(used 2-3 times/week)
LIGHT - every 2 months
(used ] time/week)
IMPORTANT
Disconnect vacuum cleaner from electrical
outlet. Check and remove hair, string and
lint build-up frequently in the PowerMate
agitator and end cap areas.
Remove any dirt or debris in the belt
path area or in the brush roller area.
Carefully remove
any string or
debris located
on the agitator
or end caps.
AGITATOR ASSEMBLY
End Cap Belt Path]
Brush/ Unit End Cap I
TO REPLACE BELT
NOTE: Use replacement belt STYLE CB-3,
see part number detail in REPLACEMENT
PARTS (page 5).
1. Install new
belt over
motor drive,
then over
belt path.
Agitator
3. NOTE: Be sure that the dirt sensor
board is positioned in slots and all wiring is
tucked back in place.
2. Place agitator
assembly into
PowerMate.
4. Line up front of cover and base. Rest
cover on front edge of base as shown.
5. Rotate cover
back. Press cover
firmly until side
latches snap into
place.
6. Make sure there is no gap between the
cover and base and that the rear latches
are snapped in place.
Z Turn PowerMate upside down and replace
four (4) cover screws.
- 25 -
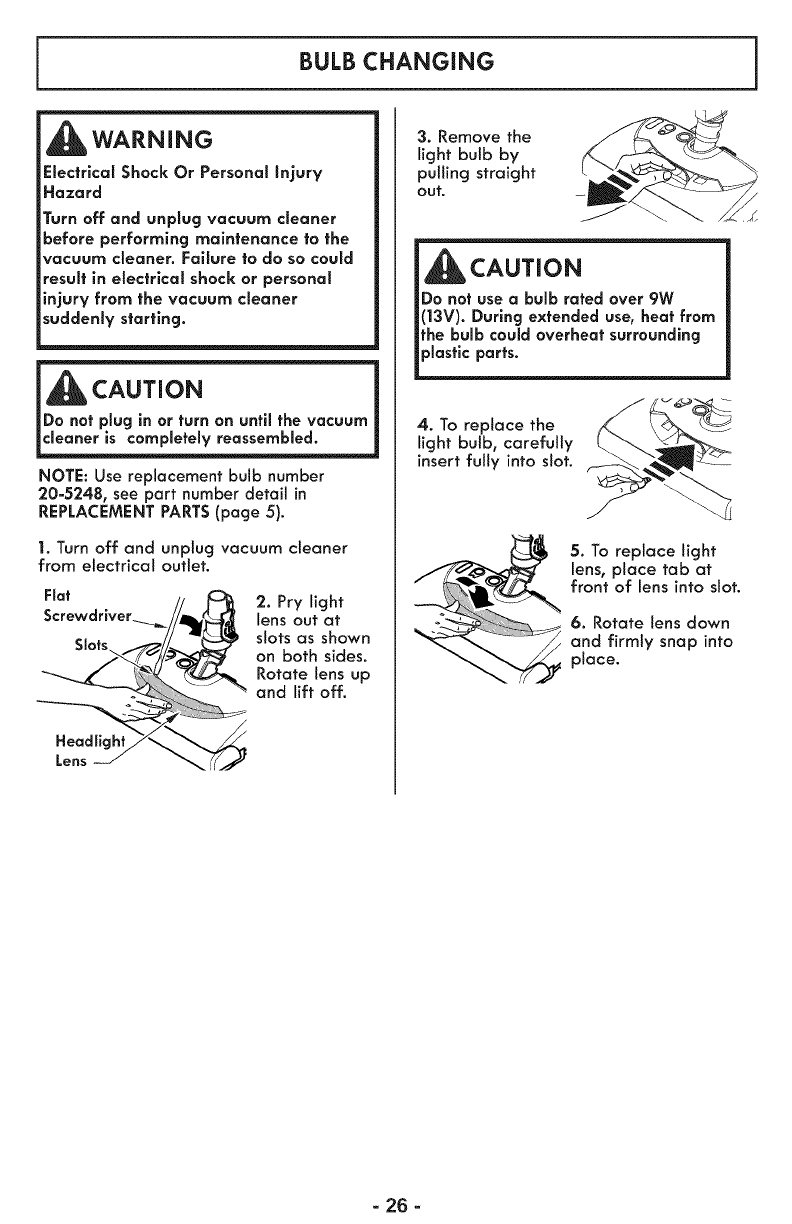
BULB CHANGING
WARNING
Electrical Shack Or Personal Injury
Hazard
Turn off and unplug vacuum cleaner
before performing maintenance to the
vacuum cleaner. Failure to do so could
result in electrical shock or personal
injury from the vacuum cleaner
suddenly starting.
c uTio.
Do not plug in or turn on until the vacuum
NOTE: Use replacement bulb number
20-5248, see part number detail in
REPLACEMENT PARTS (page 5).
1. Turn off and unplug vacuum cleaner
from electrical outlet.
FSaf
Screwdriver
Slots
ght
Lens
'2. Pry light
lens out at
slots as shown
on both sides.
Rotate lens up
and lift off.
3. Remove the
light bulb by
pulling straight
out.
_CAUTION
Do not use a bulb rated over 9W
(13V). During extended use, heat from
the bulb could overheat surrounding
plastic parts.
4. To replace the
light bulb, carefully
insert fully into slot.
5. To replace light
lens, place tab at
front of lens into slot.
6. Rotate lens down
and firmly snap into
place.
-26 -
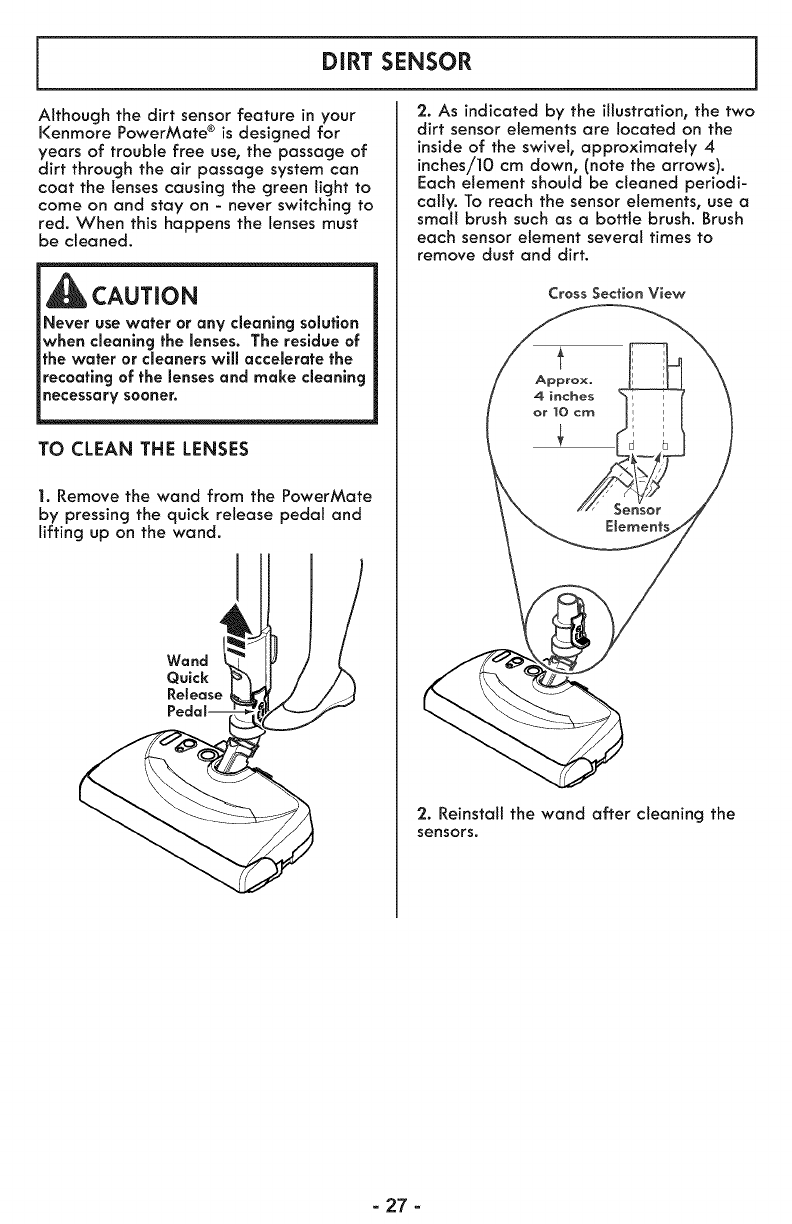
DIRT SENSOR
Although the dirt sensor feature in your
I<enmore PowerMate ® is designed for
years of trouble free use, the passage of
dirt through the air passage system can
coat the lenses causing the green light to
come on and stay on - never switching to
red. When this happens the lenses must
be cleaned,
CAUTION
__r[w__Neveruse water or any cleaning solution
when cleaning the lenses. The residue of
the water or cleaners will accelerate the
recoatlng of the lenses and make cleaning
TO CLEAN THE LENSES
1. Remove the wand from the PowerMate
by pressing the quick release pedal and
lifting up on the wand.
Wond
Quick
Release
Pedal--
2. As indicated by the illustration, the two
dirt sensor elements are located on the
inside of the swivel, approximately 4
inches/]O cm down, (note the arrows).
Each element should be cleaned periodi-
cally. To reach the sensor elements, use a
small brush such as a bottle brush. Brush
each sensor element several times to
remove dust and dirt.
Cross Section View
2. Reinstall the wand after cleaning the
sensors.
=27 =
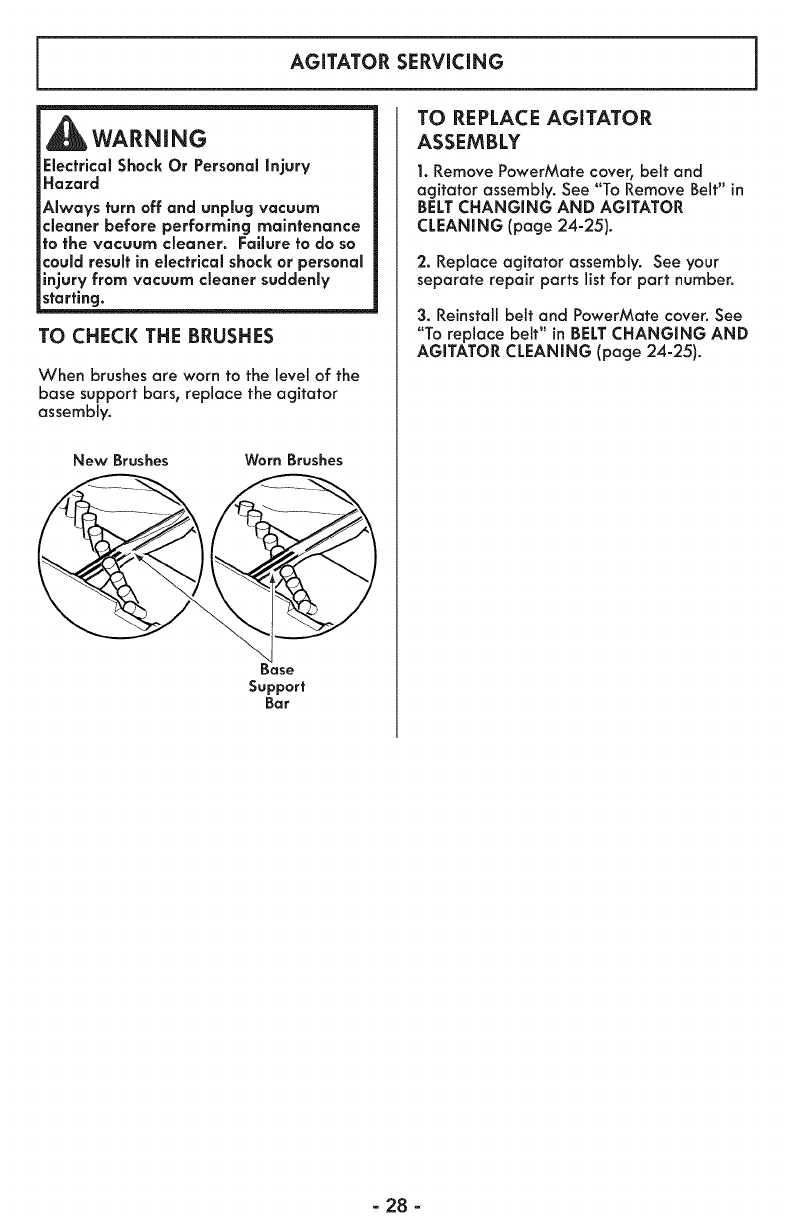
AGITATOR SERViCiNG
_lib WARNiNG
Electrical Shock Or Personal Injury
Hazard
Always turn off and unplug vacuum
cleaner before performing maintenance
to the vacuum cleaner. Failure to do so
could result in electrical shock or personal
injury from vacuum cleaner suddenly
starting.
TO CHECK THE BRUSHES
When brushes are worn to the level of the
base support bars, replace the agitator
assembly.
New Brushes Worn Brushes
Base
Support
Bar
TO REPLACE AGITATOR
ASSEMBLY
1. Remove PowerMate cover, belt and
agitator assembly.See "To Remove Belt"in
BELTCHANGING AND AGITATOR
CLEANING (page 24-25).
2. Replace agitator assembly. See your
separate repair parts list for part number.
3. Reinstall belt and PowerMate cover. See
"To replace belt" in BELT CHANGING AND
AGITATOR CLEANING (page 24-25).
-28 -
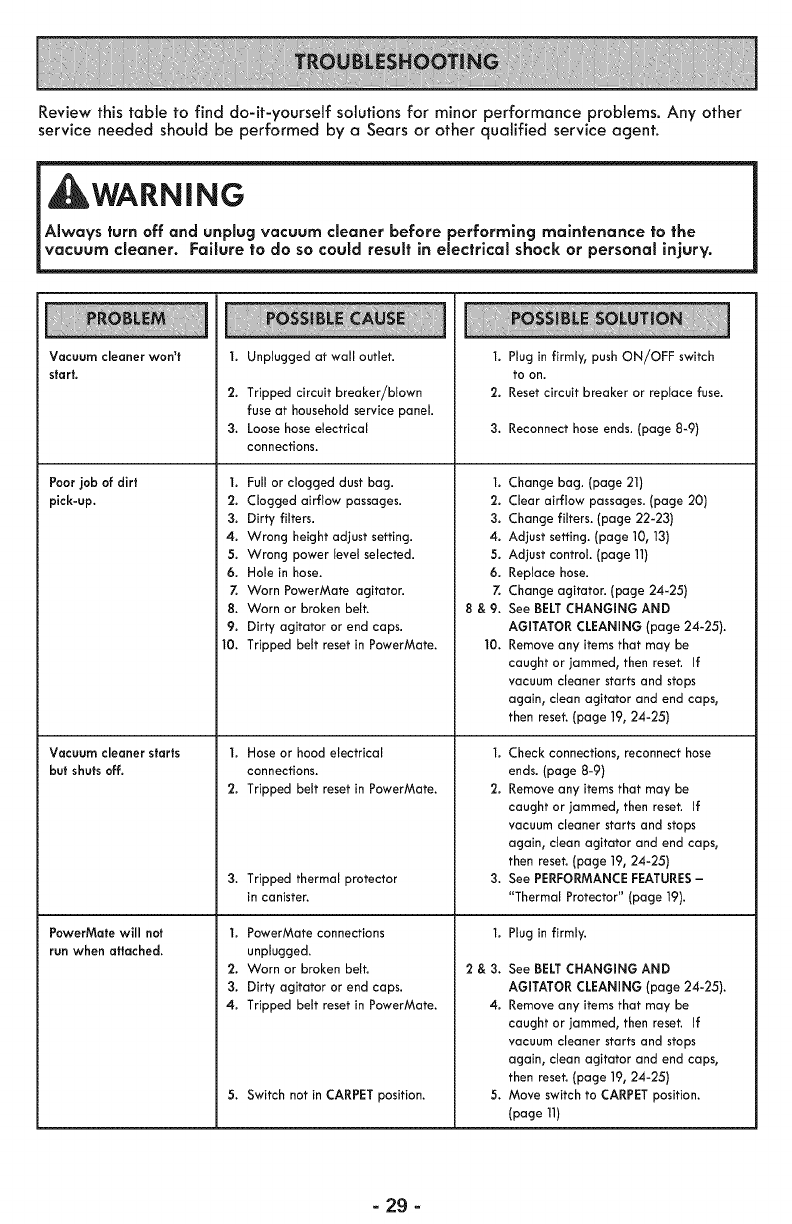
Review this table to find do-it-yourself solutions for minor performance problems. Any other
service needed should be performed by a Sears or other qualified service agent.
WARNING
Always turn off and unplug vacuum cleaner before performing maintenance to the
vacuum cleaner. Fallure to do so could result in electrlcal shock or personal injury.
Vacuum cleaner won't
start.
I.
2.
Poor job of dirt I.
pick=up. 2.
3.
4.
5.
6.
7.
8.
9.
10.
Vacuum cleaner starts
but shuts off.
PowerMate will not
run when attached.
Unplugged at wall outlet.
Tripped circuit breaker/blown
fuse at household service panel.
Loose hose electrical
connections.
Full or clogged dust bag.
Clogged airflow passages.
Dirty filters.
Wrong height adjust setting.
Wrong power level selected.
Hole in hose.
Worn PowerMate agitator.
Worn or broken belt.
Dirty agitator or end caps.
Tripped belt reset in PowerMate.
I. Hose or hood electrical
connections.
2. Tripped belt reset in PowerMate.
3. Tripped thermal protector
in canister.
1. PowerMate connections
unplugged.
2. Worn or broken belt.
3. Dirty agitator or end caps.
4. Tripped belt reset in PowerMate.
5. Switch not in CARPET position.
I. Plug in firmly, push ON/OFF switch
to on.
2. Reset circuit breaker or replace fuse.
3. Reconnect hose ends. (page 8-9)
I. Change bag. (page 21)
2. Clear airflow passages. (page 20)
3. Change filters. (page 22-23)
4. Adjust setting. (page 10, 13)
5. Adjust control. (page 11)
6. Replace hose.
ZChange agitator. (page 24-25)
8& 9. See BELTCHANGING AND
AGITATOR CLEANING (page 24-25).
10. Remove any items that may be
caught or jammed, then reset. If
vacuum cleaner starts and stops
again, clean agitator and end caps,
then reset. (page 19, 24-25)
I. Check connections, reconnect hose
ends. (page 8-9)
2. Remove any items that may be
caught or jammed, then reset, if
vacuum cleaner starts and stops
again, clean agitator and end caps,
then reset. (page 19, 24-25)
3. See PERFORMANCE FEATURES-
"Thermal Protector" (page 19).
I.
2&3.
4.
5.
Plug in firmly.
See BELTCHANGING AND
AGITATOR CLEANING (page 24-25).
Remove any items that may be
caught or jammed, then reset, if
vacuum cleaner starts and stops
again, clean agitator and end caps,
then reset. (page 19, 24-25)
Move switch to CARPET position.
(page 11)
- 2g -
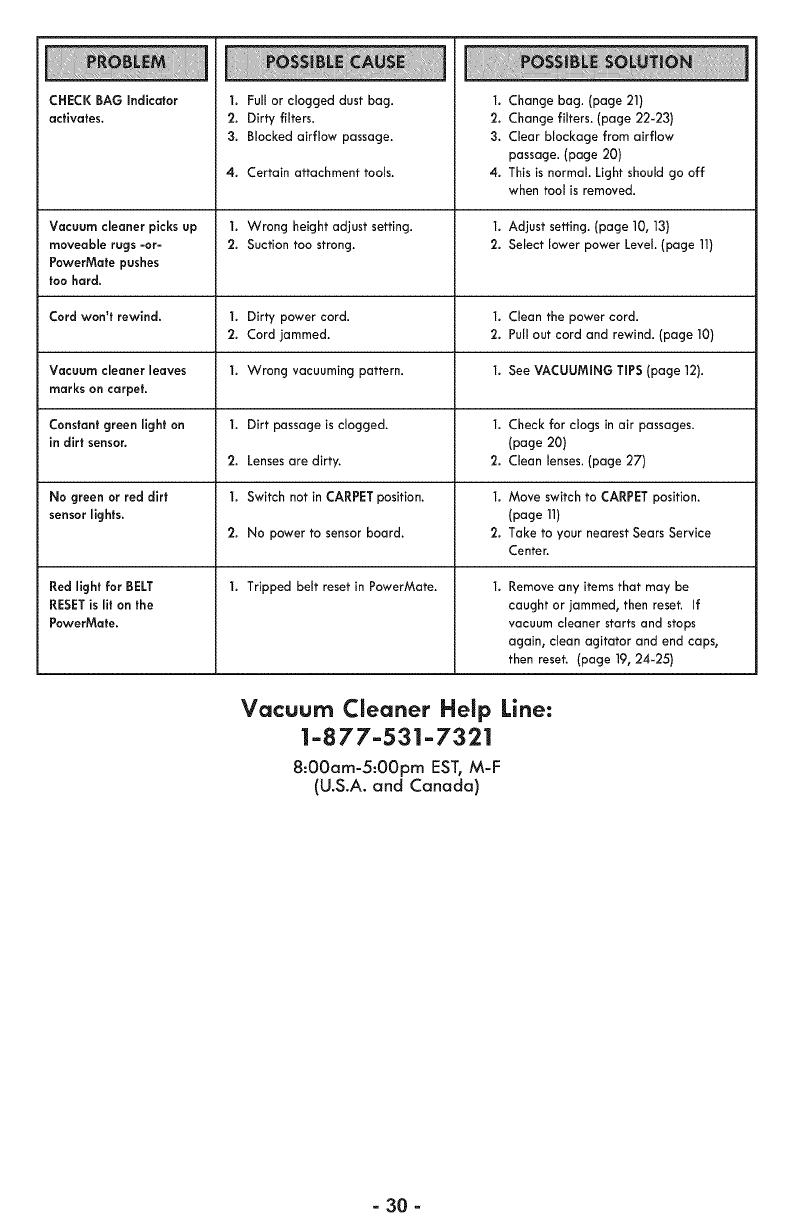
CHECK BAG indicator
activates.
Vacuum cleaner picks up
moveable rugs -or-
PawerMate pushes
too hard.
Cord won't rewind.
Vacuum cleaner leaves
marks on carpet.
Constant green light on
in dirt sensor.
No green or red dirt
sensor lights.
Red light for BELT
RESETis lit on the
PowerMate.
I. Full or clogged dust bag.
2. Dirty filters.
3. Blocked airflow passage.
4. Certain attachment tools.
I. Wrong height adjust setting.
2. Suction too strong.
I. Dirty power cord.
2. Cord jammed.
I. Wrong vacuuming pattern.
I. Dirt passage is clogged.
2. Lenses are dirty.
I. Switch not in CARPET position.
2. No power to sensor board.
I. Tripped belt reset in PowerMate.
I. Change bag. (page 21)
2. Change filters. (page 22-23)
3. Clear blockage from airflow
passage. (page 20)
4. This is normal. Light should go off
when tool is removed.
I. Adjust setting. (page 10, 13)
2. Select lower power Level. (page 11)
I. Clean the power cord.
2. Pull out cord and rewind. (page 10)
I. See VACUUMING TIPS (page 12).
I. Check for clogs in air passages.
(page 20)
2. Clean lenses. (page 27)
I. Move switch to CARPET position.
(page 11)
2. Take to your nearest Sears Service
Center.
Remove any items that may be
caught or jammed, then reset. If
vacuum cleaner starts and stops
again, clean agitator and end caps,
then reset. (page 19, 24-25)
Vacuum Cleaner Help Line:
1-877-531-7321
8:00am-5:OOpm EST,M-F
(U.S.A. and Canada)
-30 -
An|es de usar su aspiradera nueva . .. ]
Lista de embalaje ............... ]
Garanfia de la aspiradora de Kenmere 2
Instruccienes impertantes
de seguridad ..................... 3
Piezas V caracter_sticas ............ 4-6
Instrucclones de ensamble ......... 7-8
Instruccienes de eperaci6n .......... 9
Para comenzar ............... 9-10
Sugerencias para aspirar ...... 11-12
Sucjerencias sobre el ajuste de
nivel de pete de la alfombra ..... 12
Accesorios .................. 13-15
Cuadro de use de los accesorios .. 16
Almacenaje det Pet PowerMate y
accesorios ..................... ] 7
Caracterfsticas de
rendimiento ................... 18
Culdado del recept6culo ........... 19
Quitar de los residues de basura
en los conductos ............... 19
Limpieza del exterior y de los
accesorios .................... 19
Cambio de la bolsa de polvo ..... 20
Cambio del fittro de secjuridad
del motor ..................... 21
Ensamble de la tapa y la
cubierta ..................... 21
Cambio det filtro de escape ...... 22
Culdado de la PowerMate ® ......... 23
Cambio de la correa ylimpieza
del acjitador ................ 23-24
Cambio de la bombitla .......... 25
Detector de polvo .............. 26
Cuidado del agitador ........... 27
Reconocimlento de problemas ... 28-29
Informaci6n de aslstencla
o servlclo .......... Posterior Cubierta
Per favor lea esta gufa que le ayudara a ensamblaryoperar su aspiradora nueva de Kenmore
en una manera m6s segura y efecfiva.
Para mas informaci6nacerca del cuidado y operaci6n de esta aspiradora,Ilame a la Unea de
Ayuda de aspiradoras al ]-877-53]-732]. Cuando pregunte per informaci6nusted necesitar6 el
nOmerocomplete de serie y modelo de la aspiradora que est6 Iocalizado en la placa de los
nOmerosde modelo y serie.
Use el espacio de abajo para registrar el n6mero de modelo y serie para su nueva aspiradora de
Kenmore.
NOmero de Modelo
NOmero de $erie
Fecha de Compra
Mantenga este libro y su recibo en un lugar seguro para futuras referencias.
LISTA DE EMBALAJE
Su ASPIRADORA I<ENMORE se empaca con las sicjuientes piezas y componentes per
separado: 1 Recept6culo 1 Cepilto para combinaci6n _
1 PowerMate® 1 Cepillo para animales _
1Mancjuera 1 Pet PowerMate®
1Cepilto para pisos _ 1 Tube telescopico
] Herramienta para 1 Manual de use ycuidado
hendiduras _ 1 Lista de partes
Cada uno de estos ensambles es mostrado detalladamente en la lista de piezas para
reparaci6n.
_Estos arficulos se encuentran bajo la cubierta de almacenamiento para accesorios.
_Estos arficulos se encuentran en el ensambte del mango y la mancjuera.
-1-
Garanfia limitada de Kenmore
DURANTE un a_o a partir de la fecha de compra este aparato est6 garantizado contra
defectos de material o mano de obra cuando sees instalado correctamente, operado y
mantenido seg6n las instrucciones suministradas.
CON LA PRUEBADE COMPRA, devuetva el aparato defectuoso a la tienda donde Io
compr6 para la reparaci6n o reemplazo sin costo a discreci6n del vendedor.
Esta garantra es v6tida solamente durante 90 dras desde la fecha de compra,
si la aspiradora se utiliza para otros fines que no scan el uso familiar privado.
Esta garanfia cubre EXCLUSIVAMENTE los defectos de materiales Vfabricaci6n VNO
pagar6:
1. Los elementos desechables que puedan desgastarse con un uso normal, incluyendo
sin car6cter excluyente, fiitros, correas, botsas., ybombitlas con rosca en la base.
2. Un t6cnico det servicio t6cnico para limpiar o mantener este aparato, o para que
ense_e al usuario ainstalar, manejar omantener correctamente el producto.
3. Llamadas de servicio para corregir instalaciones de un aparato no realizadas pot
agentes de servicios autorizados por Sears o para reparar problemas con fusibles
de casas, interruptores de circuitos, cableado de cam, y plomerfa o sistemas de
atimentaci6n de gas que resulten de la instataci6n.
4. Dafios o faltas en este aparato que resutten de una instalaci6n no realizada pot
agentes de servicio autorizados pot Sears, incluyendo instalaci6n que no rue de
acuerdo a los c6digos de electricidad, gas oplomer_a.
5. Da_os o faltas de este aparato, incluyendo descoloraci6n u oxido en la superficie, si
no se ha manejado correctamente o mantenido siguiendo todas las instrucciones
incluidas con el producto.
6. Da_os o fallas de este aparato, incluyendo descoloraci6n uoxido en la superficie,
originados pot accidente, alteraci6n, abuso, uso incorrecto o uso del producto para
otros fines distintos de los indicados.distintos de los indicados.
7. Dafios o fatlas de este aparato, incluyendo descoloraci6n u oxido en la superficie,
causados pot el uso de detergentes, limpiadores, productos qu_micos o utensilios
diferentes alos recomendados en todas las instrucciones que se incluyen con el
producto.
8. Da_os o averras de las piezas osistemas causados pot modificaciones no
autorizadas que se hayan hecho a este producto.
9. Servicio aun aparato si el modelo yetiqueta de serie faltan, son alteradas o si no
se puede determinar f6cilmente si tienen el logo de certificaci6n apropiado
Limitaci6n de responsabilidad de las garanfias impffcltas; limitaci6n de remedios
El 6nico yexclusivo remedio del cliente bajo esta garantra limitada ser6 el reemplazo
det aparato seg6n Io indicado en este documento. Las garant_as impffcitas, incluyendo
las garant_as de comerciabilidad o idoneidad para un prop6sito espec_fieo, se limitan a
un a_o o el perbdo m6s corto permitido pot la ley. El comerciante no set6 responsabte
pot da_os incidentates ni consecuenciales. Algunos estados no permiten la exclusi6n o
limitaci6n de da_os incidentales o consecuenciales, ni limitaciones en la duraci6n de las
garantras impffcitas de comerciabitidad o idoneidad, pot Io que estas exclusiones o
limitaciones podrfan no aplicar en su caso.
Esta garantfa aplica solamente cuando este aparato se utiliza en Estados Unidos.
Esta garantra le otorga derechos tegales especfficos, y usted podr[a tener otros
derechos que varran en funci6n de cada estado.
Sears Brands Management Corporation, Hoffman Estates, IL 60179
-2-
Lea las instrucclones en este manual antes de arrnar o usar su aspiradora.
ADVERTENCIA:
Su seguridad es muV irnportante para nosotros. Para reducir el riesgo de incendio, choque
el_ctrico, lesi6n corporal o da_os al utiJizar su aspiradora, actOe de acuerdo con precauciones
b6sicas de seguridad, entre elias:
Use suaspiradora 6nicamente en la forma
descrita en este manual. Use 6nicamente con
accesorios recomendados por Sears.
Desconecte el cord6n el_ctrico antes de
componer o timpiar el 6rea del cepiilo. La falia
de hacer esto puede resuitar en choque
el_ctrico o en el sObito arranque del cepillo.
No abandone la aspiradora cuando est_
conectada. Descon_ctela cuando no la est_
usando yantes de darie mantenimento.
Para reducir el riesgo de choque ei_ctrico, no
use suaspiradora al aire libre ni sobre
superficies mojadas.
No permita que sea utilizada coma juguete. Se
requiere tener mayor cuidado cuando sea
utilizada en la proximidad de niSos opor ni5os.
No use la aspiradora si et cord6n o et enchufe
est6n daSados. Si la aspiradora no est6
funcionando adecuadamente o si se ha dejado
caer, est6 daSada, se ha dejado expuesta a la
intemperie o se ha dejado caer en agua,
devu_lvala aun Centro de servicio de Sears.
No jale ni transporte la aspiradora por el
cord6n; no use el cord6n como mango; no cierre
puertas sobre el cord6n; no jale el cord6n sobre
rebordes agudos ni esquinas. No pase la
aspiradora sabre el cord6n. Mantenga el cord6n
alejado de superficies calientes.
No desconecte la aspiradora tirando del cord6n
ei_ctrico. Para desconectarla, jale el enchufe, no
el cord6n.
No toque la aspiradora ni el enchufe con las
manos mojadas.
No coloque objetos en las aberturas.
No utilice la aspiradora si alguna abertura est6
bloqueada; mant_ngala libre de polvo, pelusa,
cabellos y cualquiera cosa que podria disminuir
el flujo de aire.
Mantenga el cabello, ropa suelta, dedos y todas
las partes del cuerpo alejados de las aberturas
y piezas mec6nicas.
GUARDE ESTAS
El armado y uso seguro de su aspiradora son su re.,
Apague todos los controtes antes de
desenchufar.
Tenga cuidado especial al utilizar la aspiradora
en escalones. No la coloque sobre sillas, mesas,
etc. Mant_ngala en el piso.
No use la aspiradora para aspirar Ifquidos
inflamables o combustibles (gasolina, Ifquidos
para limpieza, perfumes, etc.) ni la use en
lugares donde _stos podrfan estar presentes. Los
vapores de estas sustancias pueden crear un
peligro de incendio oexplosi6n.
No levante ninguna cosa que se est_ quemando
oemitiendo humo, como cigarrillos, cerillos o
cenizas calientes.
No use la aspiradora sintener instalada la botsa
para polvo y/o los filtros.
Cambie siempre a bolsa de polvo para el polvo
despu_s de aspirar timpiadores o refrescantes
de alfombra, polvos, y polvo fino. Estos
productos atascan la bolsa de potvo, reducen la
circulaci6n de aire y pueden causar que reviente
la bolsa de polvo. La falla de cambiar la bolsa
puede causar da_o permanente ala aspiradora.
No use la aspiradora para levantar objetos
agudos, juguetes pequeSos, alfileres,
sujetapapeles, etc. Podrian daSar la aspiradora.
No opere sin el filtro de escape ni la cubierta
del filtro de escape instalados.
La manguera contiene cables el_ctricos. No la
use cuando est6 daSada, cortada, o perforada.
Reemplace si est6 cortada o desgastada. No
levante objetos afilados.
Siempre apagu_ y desconecte la aspiradora
antes de conectar odesconectar la manguera,
el tubo, Pet HandiMate, o la boquilla.
Sujete el enchufe con la mano al enrotlar el
cord6n el_ctrico. Para desconectarla, jale el
enchufe, no el cord6n.
Usted es responsable de asegurar que su
aspiradora no sea utilizada por ninguna persona
que no pueda manejarla correctamente.
NSTRUCCIONES
_onsabilidad. Esta aspiradora ha sido dise_ada
exclusivamente para uso dom_stico. La aspiradora deber6 almacenarse en un lugar seco y en el
interior. Lea este Manual de Uso yCuidado detenidamente, pues contiene informaci6n importante
sobre seguridad y uso. Esta guia contiene informaci6n sobre seguridad debajo de s_mbotos de
advertencia cuidado.
-3-
Esimportante conocer las piezas y caractefisficas de su aspkadora para asegurar su usoade-
cuado y seguro. Examfnelasantes de usar su aspkadora.
Tubo
Telesco °
PowerMa_e®
[CERTiFiED
|asthma&aJJergy
:,: ,,. askflma an_ Allergy
_;: Foundat or, of Amefic_
This vacuum is certified asthma _ a|iergy friendly'" by the Asthma
and Allergy Foundation of America.
Usalizando solamente boisas de poJvo y fiitros de escape con cerfificaci6n
AAFA para mantener cerfificaci6n AAFA.A
PARTESDE REEMPLAZO
item EstiloNo.
Correa CB-3
Bombilla ....
BoJsa para poivo
(Paquete de 2) Q
Bolsa para polvo
(Paquete de 6) Q
Filtro de escape EF-]
FiJtro de secjuridad CF-]
del motor
Pieza NO
en EUA
20-53013
20-5248
20-53291
20-53292
20-53295
20-81002
Pieza N°
en Canad6
20-40118
20-40601
20-50410
20-40324
20-40321
Escanear para reordenar
las bolsas or visitar
kenmore.com/reorderCQ
Disponibie en las tiendas Sears, en la p6gina www.searspartsdirect.com o Ilamando al 1-800-252-1698.
-4-
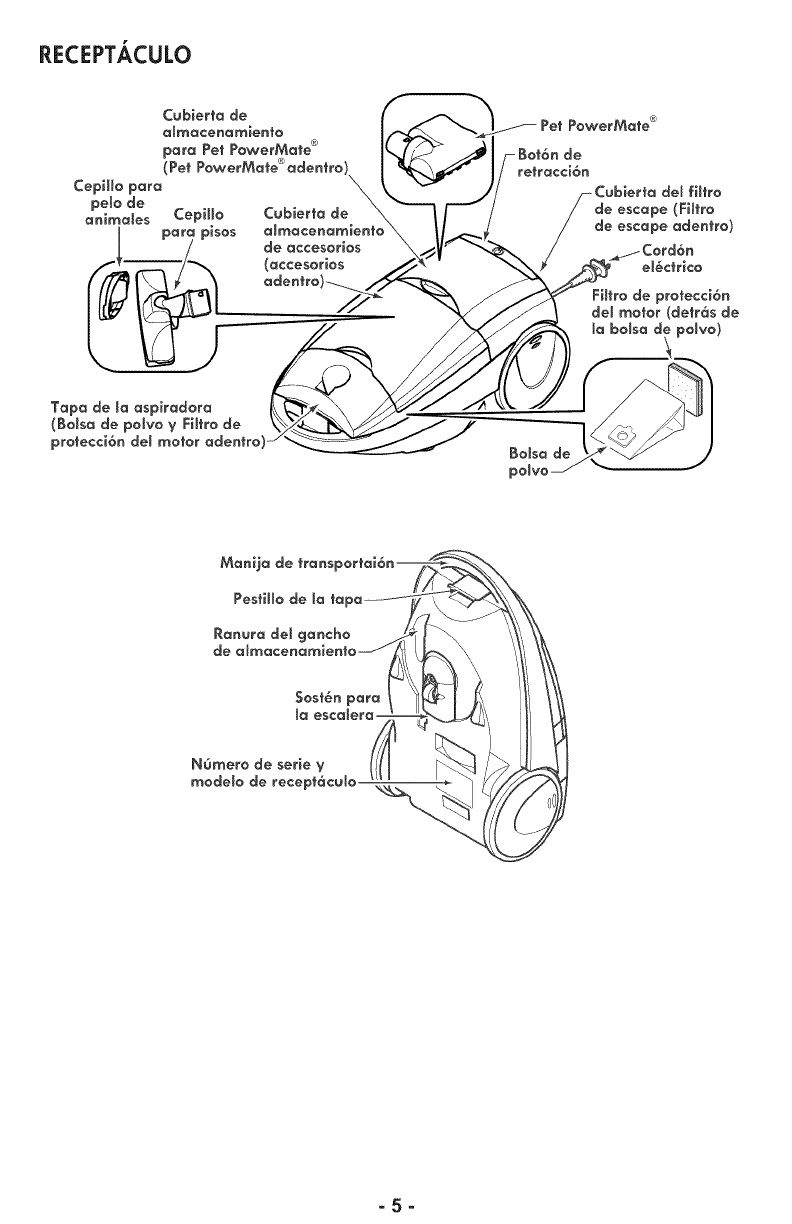
RECEPTACULO
re_racci6n
del filtro
de escape (Filtro
de escape adentro)
el_ctrico
-5-
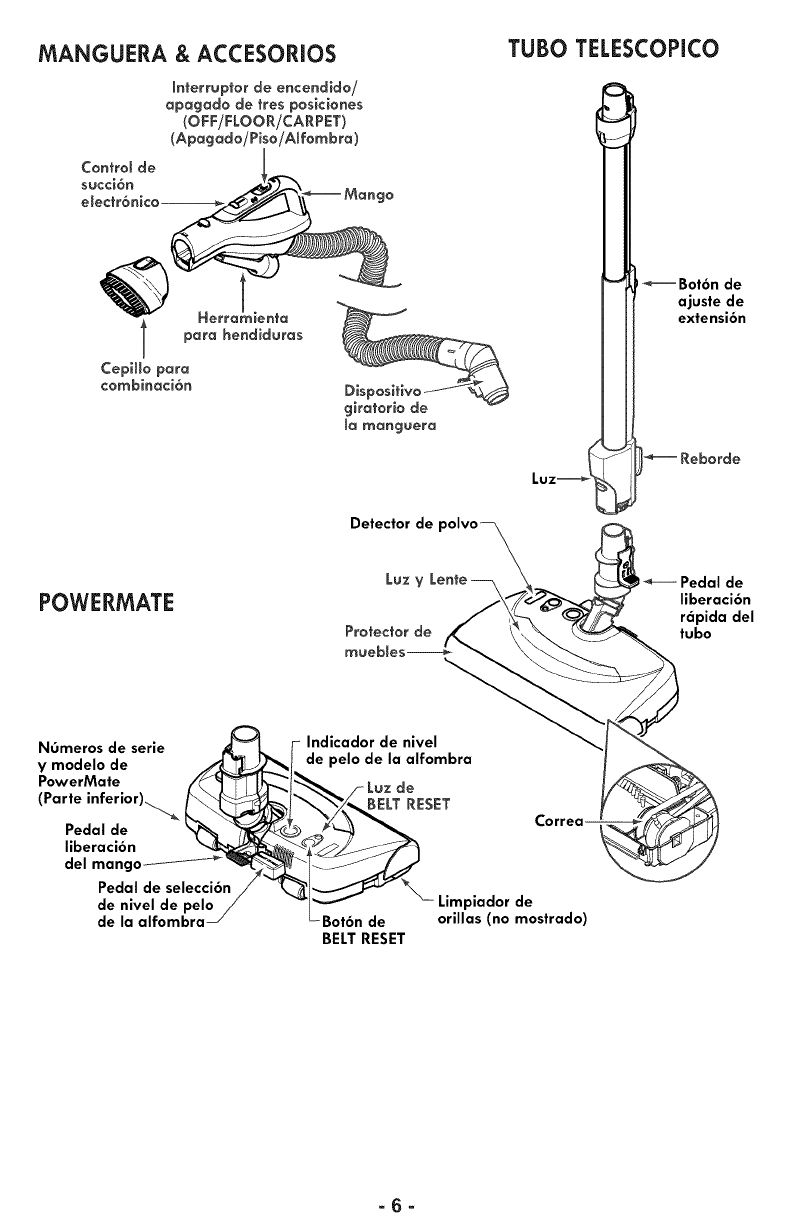
MANGUERA & ACCESORIOS
lnterruptor de encendido/
apagado de tres posiciones
(OFF/FLOOR/CARPET)
(Apagado/Piso/Alfornbra)
Detector de
TUBO TELESCOPICO
Luzm_-_
Bot6n de
ajuste de
extensi6n
Reborde
POWERMATE Pedal de
liberaci6n
r6pida del
tubo
NOmeros de serie t_ F
y modelo de _"_JJ_/
PowerMate //"__I_
(Parte inferi°r)_ __t _
Indicador de nivel
de pelo de la alfombra
_/- Luzde
Limpiador de
Bot6n de orillas (no mostrado)
BELTRESET
=6=
Par favor ponga especlal atenci6n a _stos recuadras con alerta de riesgo.
ADVERTENCIA: Esta informaci6n le alertar6 del pellgro de fuego, chaque el_ctrico,
quemaduras V lesiones. CUIDADO: Esta informaci6n le alertara de peligros coma
lesianes y da_os ala prapiedad.
ADVERTENCIA
Pellgro de choque el_ctrlco
No canecte la aspiradara basra que termine
de armarla. De la contrario podria causar un
chaque el_ctrica olesi6n corporal.
Antes de armar la aspiradora, reivise la
LISTA DE EMBALAJE (p6g 1). Use esta lista
para verificar e identificar que ha recibido
todos los componenfes de su nueva aspirado-
ra I<enmore.
POWERMATE
Alinar el tuba telescopi-
co y infroduzca en la
PowerMate hasta que el
pedal de liberaci6n
quede fijo en posici6n.
RECEPTACULO
1. Abra la tapa del recept6culo.
2. Examineque la balsa para polvoeste
insfalada correctamenfe. Consultelas instruc-
clones de instalaci6nen: CAMBIO DELA
BALSA DE POLVO(p6g 20).
3. Examine que el filtrode seguridaddel
motor que esteinstaladocorrectamente.
Consulte las instruccionesde instalaci6nen:
CAMBIO DELRLTRO DESEGURIDADDEL
MOTOR (p6g 21).
PETPOWERMATE
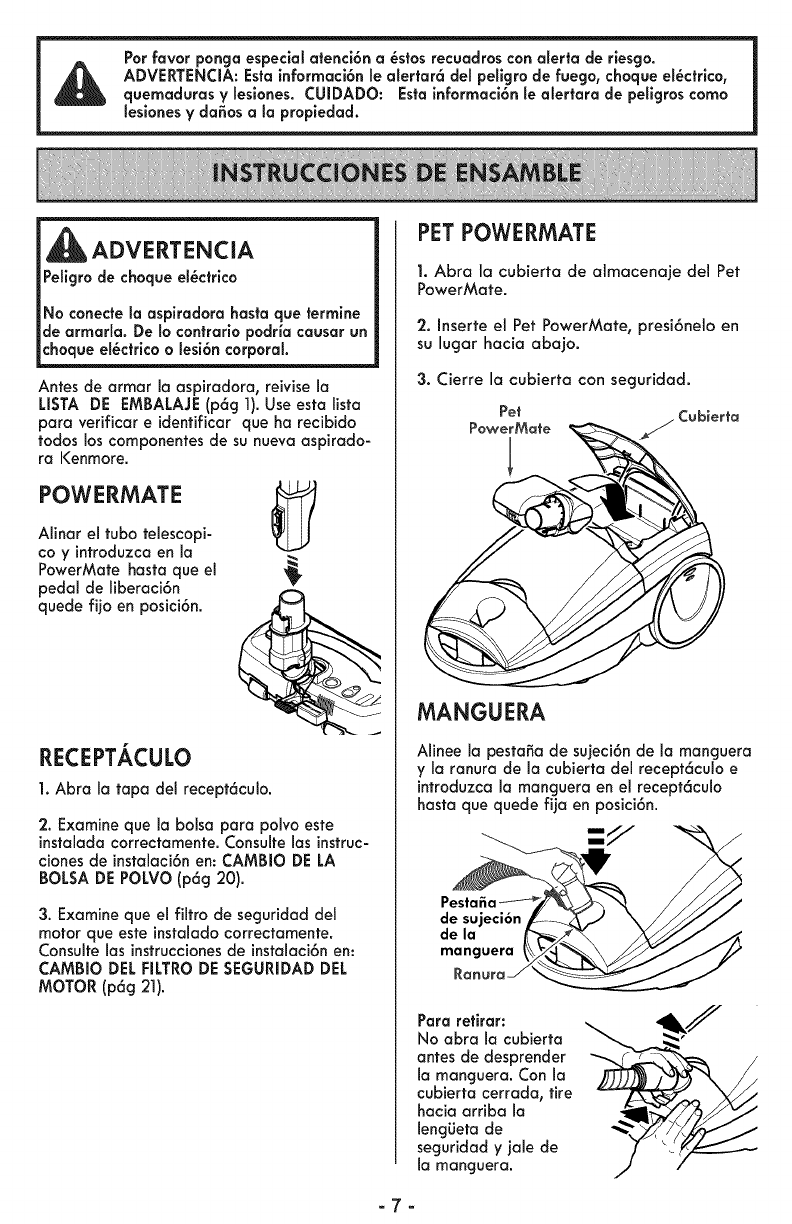
I. Abra la cubierta de almacenaje del Pet
PowerMate.
2. Inserte el Pet PowerMate, presi6nelo en
su lugar hacia abajo.
3. Cierre la cubierta con seguridad.
Per ubierfa
PowerMafe
MANGUERA
Alinee la pestafiade sujeci6n de la manguera
y la ranura de la cubierta del recept6culoe
introduzcala manguera en el recept6culo
hasta que quede fija en posici6n.
de sujeci6n F--
de la
manguera _
RanuraJX_
Para retirar:
No abra la cubierfa
antes de desprender
la manguera. Con la
cubierta cerrada, tire
hacia arriba la
lengiJeta de
seguridad y jale de
la manguera.
=7=

MANGO
El Cepillo de combinacion puede ser
almacenado en el mango de la manguera,
colocandolo en el mango antes de
conectar el tubo telescopico. Desliza el
cepillo de combinaci6n firmemente dentro
del mango.
para
combinaci6n
Introduzca el tubo en el mango basra que el
bot6n quede en posici6n. AsegOresede que la
manguera noest6 torcida.
Para retirar:Oprima el bot6n de liberaci6n
r6pida del mango para liberar el mango y
tire del mango hacia arriba.
Para Guardar: Para prevenir la presi6n de la
manguera mientras se guarda, desuna la
manguera del tubo de la aspiradora. Guarde
la manguera en una posici6n enrollada y floja
de ta! manera que la tapa de la manguera no
se estire.
-8-
,CUIDADO (_.___ _"/ _
iPartes en movimlento! Para reducir el riesgo de da_os "____
corporales, no toque el agitador cuando la asplradora _
est6 encendlda. El tocar el agitador mientras que est6 _.
girando puede cortar, contusionar o causar otras
lesiones. Siempre apague y desconecte del
tomacorriente antes de dar rnantenlmlento. Tenga
culdado al asplrar cerca de ni_os.
PARA COMENZAR
_ADVERTENCIA
Peligrade _esi6npersonal ¥ da_o al
_roducto
SIEMPRE apague ante de desconectar.
El cord6n el_ctrlco se mueve
r6pldamente durante el enrollamlento.
Mantenga alejados a los ni_os V
asegure espacia llbre suficiente para
evltar leslones persanales al enrollar
el cord6n.
NO use los enchufes lacalizadas sabre
los muebles. Los objetas cercanos
padrian resultar da_ados.
Cuando alguna anormalidad/desperfec-
to ocurra, pare de usar el producto
inmediatarnente y descon_ctelodel
toma corrienfe.
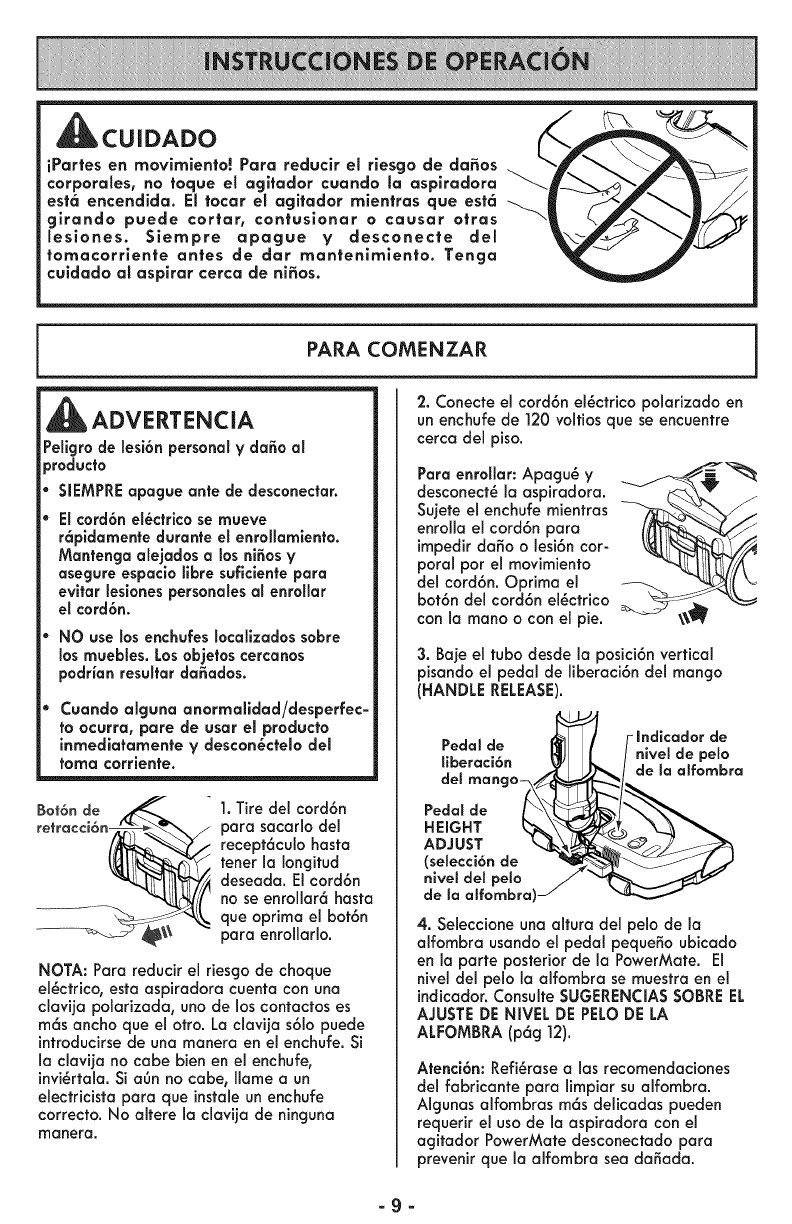
Bot6nde
retracci6n__
1. Tire del cord6n
para sacarlo del
recept6culobasra
tener la Iongitud
deseada. Elcord6n
no se enrollar6 basra
que optima el bot6n
para enrollarlo.
NOTA: Para reducir el riesgo de choque
el_ctrico,esta aspiradora cuenta con una
clavija polarizada, uno de los contactos es
m6s ancho que el otro. La clavija s61opuede
introducirsede una manera en el enchufe. Si
la clavija no cabe bien en el enchufe,
invi_rtala.Si aOnno cabe, Ilame a un
electricista para que instaleun enchufe
correcto. No altere la clavija de ninguna
manera.
2. Conecte el cord6n el_ctrico polarizado en
un enchufe de ]20 volfios que se encuentre
cerca del piso.
Para enrollar:Apagu_ y_
desconecf_ la aspiradora. _ U'<
Sujete el enchufe mientras
enrolla el cord6n para
impedirda_o o lesi6n cor-
poral par el movimiento
del cord6n. Oprima el __\_,_
bot6n del cord6n el_ctrico '_
con la mano o con el pie.
3. Baje el tuba desde la posici6n vertical
pisando el pedal de liberaci6n del mango
(HANDLE RELEASE).
Pedal de
liberaci6n nlvel de pelo
de Sa alfombra
Pedal de
HEIGHT
ADJUST
(seSecci6n de
nlvel del pelo
de la alfombra)
4. Seleccione una alfura del pelo de la
alfombra usando el pedal pequefioubicado
en la parte posterior de la PowerMate. El
nivel del pelo la alfombra se muestra en el
indicador.Consulte SUGERENCIASSABREEL
AJUSTEDE NIVEL DE PELODELA
ALFOMBRA(p6g ]2).
Atenci6n:Refi_rase alas recomendaciones
del fabricante para limpiar sualfombra.
Algunas alfombras m6s delicadas pueden
requerir el usade la aspiradora con el
agitador PowerMate desconectado para
prevenir que la alfombra sea da_ada.
-9-
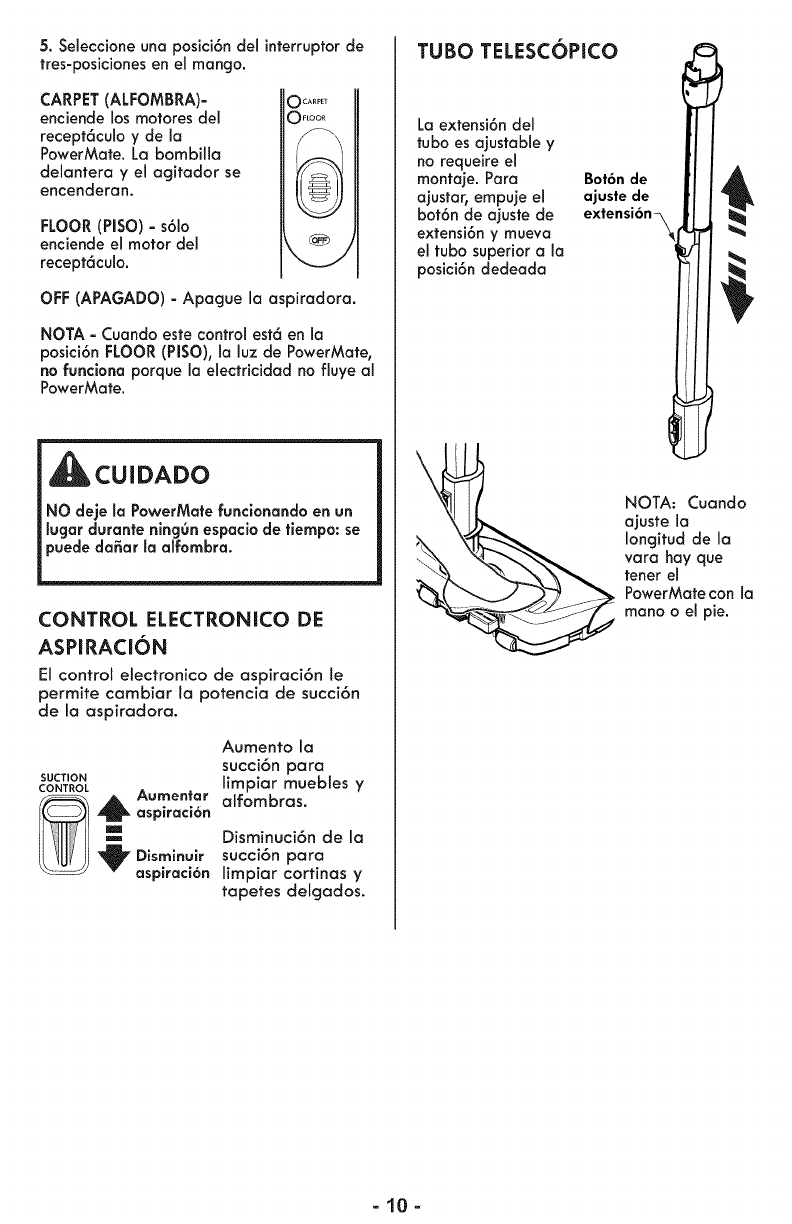
5. Seleccione una posici6n del interruptor de
tres-posiciones en el mango.
CARPET(ALFOMBRA)-
enciende los motores del
recept6culo y de la
PowerMate. La bombilla
delantera y el agitador se
encenderan.
FLOOR (PISO) - s61o
enciende el motor del
recept6culo.
CARPET
OFLOOR
OFF(APAGADO) - Apague la aspiradora.
NOTA - Cuando este control est6 en la
posici6n FLOOR(PISO), la luz de PowerMate,
no funciona porque la electricidad no fluye al
PowerMate.
CUIDADO
NO deje la PowerMate funclonando en un
lugar durante ningOn espacio de tiempo: se
puede da_ar la alfombra.
CONTROL ELECTRONICO DE
ASPIRACION
El control electronico de ospiraci6n le
permite cambiar Io potencio de succi6n
de Io ospirodoro.
Aumento Io
succi6n para
SUCTION limpiar muebtes y
CONTROL
_,_ Aumentar olfombras.
aspiraci6n
Disminuci6n de Io
Disminuir succi6n para
aspiraci6n limpiar cortinas y
topetes delgodos.
TUBO TELESC6PICOBot6nde
La extensi6n del
tuba es ajustable y
no requeire el
montaje. Para
ajustar0 empuje el
bot6n de ajuste de
extensi6n y mueva
el tubo superior a la
posici6n dedeada
NOTA: Cuando
ajuste la
Iongitud de la
vara hay que
tener el
PowerMate con la
mano o el pie.
-10-

SUGERENCIAS PARA ASPIRAR
Estilo de limpiezo sugerido.
Para obtener la mejor acci6n de limpieza se
recomienda empujar la PowerMate en direc-
ci6n directamente opuesta austed y jalarla en
Ifnea recta. AI final de cada pasada de
regreso, cambie la direcci6n de la PowerMate
hacia la siguiente secci6n a limpiar. Contin6e
asf a trav_s de toda la alfombra o piso de una
manera lento y deslizante.
NOTA: Los
pasadas r6pidas y
al azar no Iogran
una limpieza
completa.
CUIDADO
Pellgro de lesi6n personal V do_o al
producto
Tenga culdado si el PowerMotey Io
monguero se dejon en posici6nvertical pues
puedencoerse f_cilmente. SIse volteon
puede hober do_o de propiedod.
ADVERTENCIA
Pellgrode lesi6n personaly do_o ol
_roducto
No otropelleel cord6n el@ctrlcocon la
PowerMote. Hay un pellgrode lesi6n
corporalododosde propledod.
No tire del cord6nel@ctricopora
desenchufarlode Io pored. Si hay dodos
en el cord6n el_ctricooel enchufe,hay un
pellgro de lesi6n corporal o dodosde
propiedod.
DISPOSITIVO GIRATORIO DEL
POWERMATE
El dispositivo giratorio gira a la izquierda y
ala derecha para maniobrar mejor en
espacios reducidos yalrededor de
esquinas.
SUJETADOR DE TUBO
TELESCOPICO EN POSICION
Cuando el tubo
telescopico es
retornado a la
posici6n vertical, el
seguro de rotaci6n
engancha el tubo
telescopico en su
lugar, esto previene
la rotaci6n del
tubo telescopico y
el mango de la
manguera para
una mejor
estabilidad.
POR DEBAJO DE LOS MUEBLES
Para maximizar
el alcance de la
PowerMate pot
debajo de los
muebles, voltear
el mango para
__ el lado deseado
y bajar el tubo
telescopico
cerca del piso.
=11 =
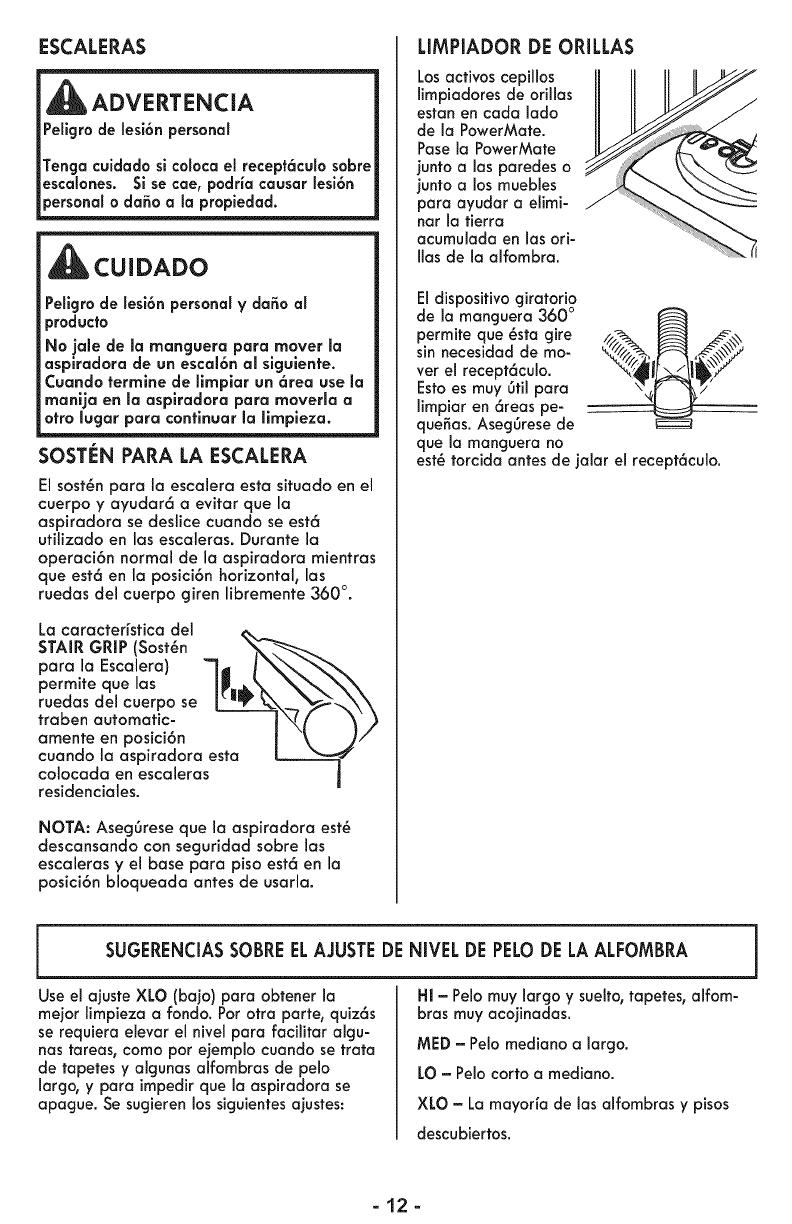
ESCALERAS
_i_ ADVERTENCIA
Peligrode lesi6n personal
Tenga cuidado slcolocael recept6culosobre
escalones. Si se cae, podria causar iesi6n
personalo da_o ala propiedad.
CUIDADO
Peligro de iesi6n personal y da_o al
producto
No jale de la manguera para mover Io
aspiradora de un escal6n al slguiente.
Cuando termlne de llmpiar un 6tea use la
manija en la aspiradoro paro moverlo a
otto lugor pora continuor la limpiezo.
SOSTEN PARA LA ESCALERA
El sost_n para la escalera esta situado en el
cuerpo y ayudar6 a evitar que la
aspiradora se deslice cuando se est6
utilizado en las escaleras. Durante la
operaci6n normal de la aspiradora mientras
que est6 en la posici6n horizontal, los
ruedas del cuerpo giren libremente 360 °.
La caracter_sfica del
STAIRGRiP (Sost_n
para la Escalera)
permite que las
ruedas del cuerpo se
traben automatic-
amente en posici6n
cuando la aspiradora esta
colocada en escaleras
residenciales.
NOTA: Aseg0rese que la aspiradora est_
descansando con seguridad sobre las
escaleras y el base para piso est6 en la
posici6n bloqueada antes de usarla.
LIMPIADOR DE ORILLAS
oacvoco
limpiadores de orillas
estan en coda lado
de Io PowerMate.
Posela PowerMate
junto a los paredes o
junto o los muebles _
para ayudar a elimi-
narIotierra
acumulada en los ori-
Ilas de la alfombra.
Eldispositivo giratorio
de lamanguera 360 °
permite que _sta gire
sin necesidad de mo-
ver el recept6culo.
Estoes muy 6til para
limpior en 6reas pe-
que_as. Aseg0resede
que la manguera no
est_ torcida antes de jalar el recept6culo.
SUGERENCIASSOBREELAJUSTEDENIVEL DE PELODELAALFOMBRA
Use el ajuste XLO (bajo) pora obtener la
mejor limpieza a rondo. Por otra parte, quiz6s
se requiera elevar el nivel para facilitar algu-
nas tareas, como por ejemplo cuando se trata
de tapetes yalgunas alfombros de pelo
largo, ypara impedirque la aspiradora se
apague. Se sugieren los siguientesaiustes:
HI = Pelomuy largo y suelto_tapetes, alfom-
bras muy acojinadas.
MED= Pelo mediano a largo.
LO = Pelocorto a mediano.
XLO - La mayorla de los alfombras y pisos
descubiertos.
-12-
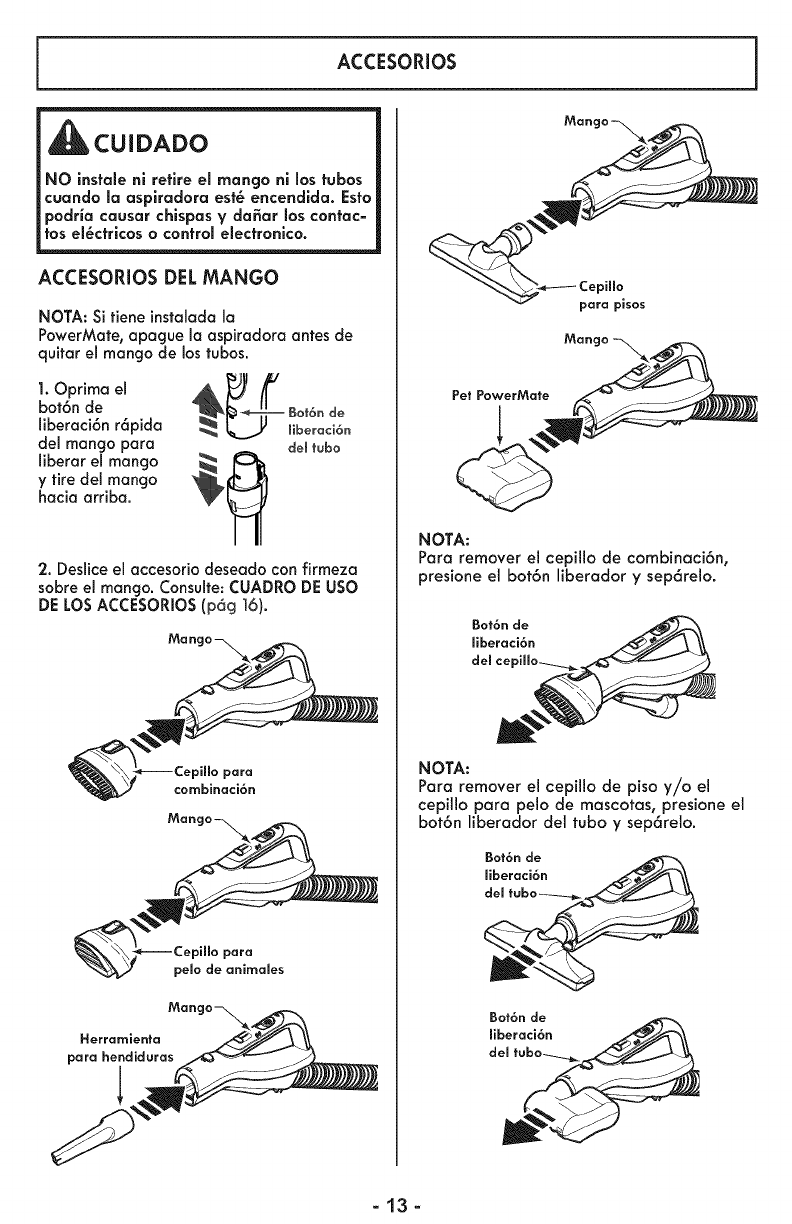
ACCESORIOS
Man_
CUIDADO
NO insfale ni retire el mango ni los tubos
cuando la asplradora est_ encendlda. Esto
podria causar chispas y da_ar los contac-
los el_cfricos ocontrol elecfronico.
ACCESORIOS DELMANGO
NOTA: Si fiene instalada la
PowerMate, apague la aspiradora antes de
quitar el mango de los tubos.
1. Oprima el _/_ /_'
bot6n de _k U Bot6nde
liberaci6n r6pida liberaci6n
del mango para del tubo
liberar el mango _lh
y tire del mango
hacia arriba.
2. Deslice el accesorio deseado con firmeza
sobre el mango. Consulte: CUADRO DE USO
DE LOS ACCESORIOS (p6g 16).
para
combinaci6n
para
pelo de anirnales
_on_
Herramienta
para hendiduras
para pisos
Man_
NOTA:
Para remover el cepillo de combinaci6n,
presione el bot6n liberador y sep6relo.
Bot6n de
liberaci6n
del
NOTA:
Para remover el cepillo de piso y/o el
cepillo para pelo de mascotas, presione el
bot6n liberador del tubo y sep6relo.
Bot6n de
liberaci6n
del
Bot6n de
liberaci6n
-13-
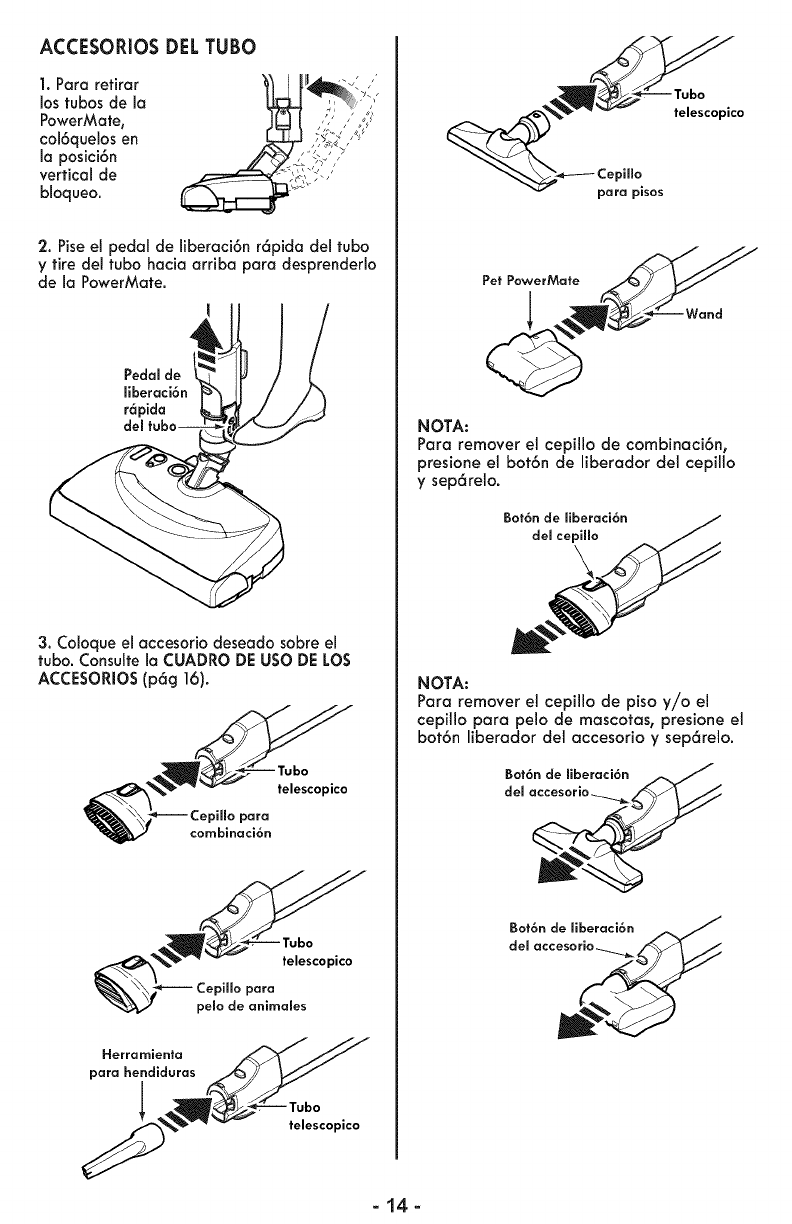
ACCESORIOSDEL TUBO
I.Para retirar
lostubos de la
PowerMate,
coi6quelosen
laposici6n
vertical de
bloqueo.
2.Piseelpedalde liberaci6nr6pidadeltuba
y tire del tuba hacia arriba para desprenderlo
de la PowerMate.
Pedal de
fiberaci6n
r6pida
3. Coloque el accesorio deseado sobre el
tuba. Consulte la CUADRO DE USO DE LOS
ACCESORIOS (p6g 16).
telescopico
para
combinaci6n
Herramienta
para hendiduras
telescopico
telescopico
>illo
para pisos
NOTA:
Para remover el cepillo de combinaci6n,
presione el bot6n de liberador del cepillo
ysep6relo.
Bot6n de liberaci6n
del cepillo
NOTA:
Para remover el cepillo de piso y/o el
cepillo para pelo de mascotas, presione el
bot6n liberador del accesorio y sep6relo.
Bot6n de liberaci6n /_,J
del a_
Bot6n de liberaci6n
del accesorio_ _
-14-
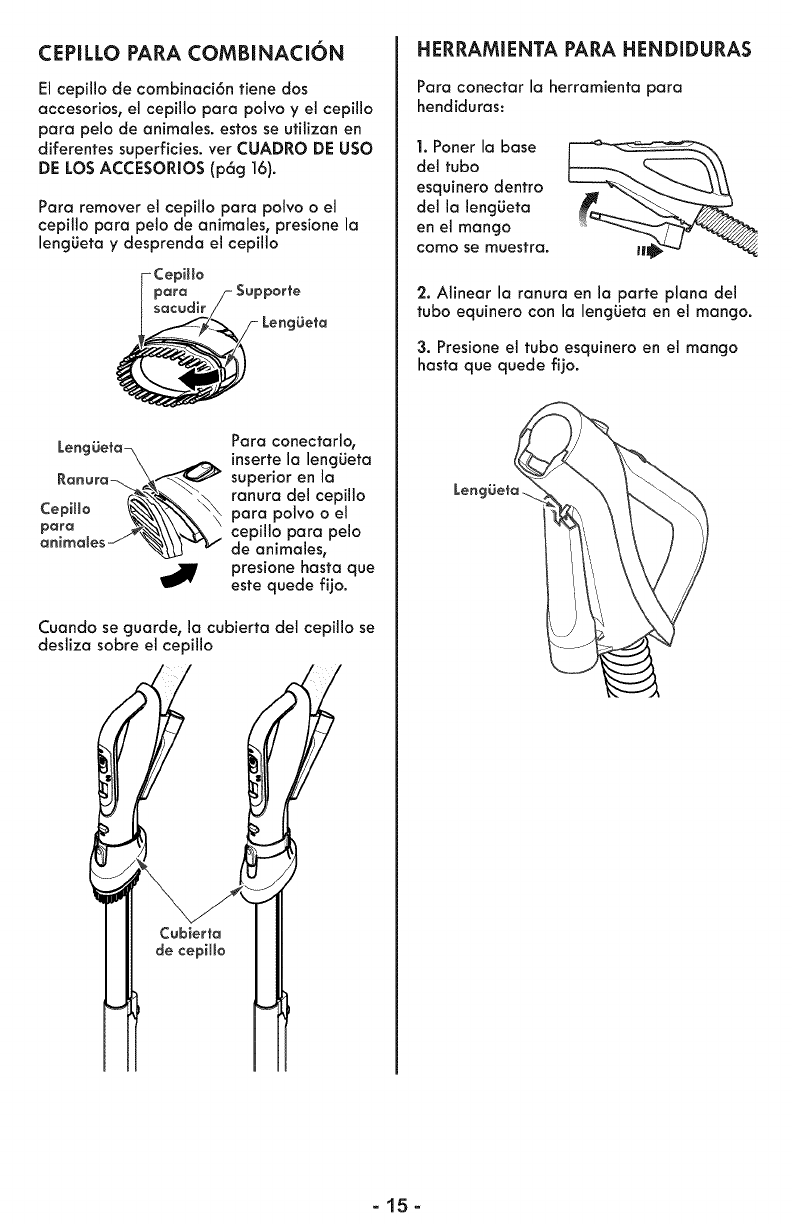
CEPILLOPARACOMBINACI6N
El cepillo de combinaci6n tiene dos
accesorios, el cepillo para polvo y el cepillo
par° pelo de animales, estos se utilizan en
diferentes superficies, vet CUADRO DE USO
DE LOSACCESORIOS (p6g 16).
Para remover el cepiIIo par° polvo oel
cepillo par° pelo de animales, presione la
leng_Jeta y desprenda el cepillo
ara /- $upporte
Lenggeta_
Para conectarlo,
inserte la leng[Jeta
superior en la
ranura del cepillo
par° polvo o el
cepillo par° pelo
de animales,
presione hasta que
este quede fijo.
Cuando se guarde, la cubierta del cepillo se
desliza sobre el cepillo
HERRAMIENTA PARA HENDIDURAS
Par° conectar la herramienta par°
hendiduras:
1. Poner la base
del tubo
esquinero dentro
della leng_Jeta
en el mango
como se muestra.
2. Alinear la ranura en la parte plan° del
tubo equinerocon la lengL_etaen el mango.
3. Presione el tubo esquineroen el mango
hasta que quede fijo.
-15-

CUADRO DE USO DE LOS ACCESORIOS
Area de Lirnpleza
Entre Pisos Pisos
ACCESORIO Muebles ! cojlnes 1 Cortlnas ! Escal.... descublertos alfornbrados/ Paredes
Affoml0ras
Cepillo para sacudir
Cepillo para anirnales 2(_ _
Herramienta V' qv_
para hendiduras
Cepillo para pisos _ _ _
PowerMate _--_ V' 3V'
Pet PowerMate 4
I.Siempre limpie los accesorios antes de usar sabretelas.
2. Use el cepillo para pelo de animales para remover los cabellos de superficies delicadas,
como Io son tapicerias ycortinas. NO se utilice en animales.
3. Elinterruptorde 3 posiciones debe estaren la posici6n FLOOR(PISO).
4. PetPowerMate incluyensuspropias instruccionespara usode accesorios.
-16-
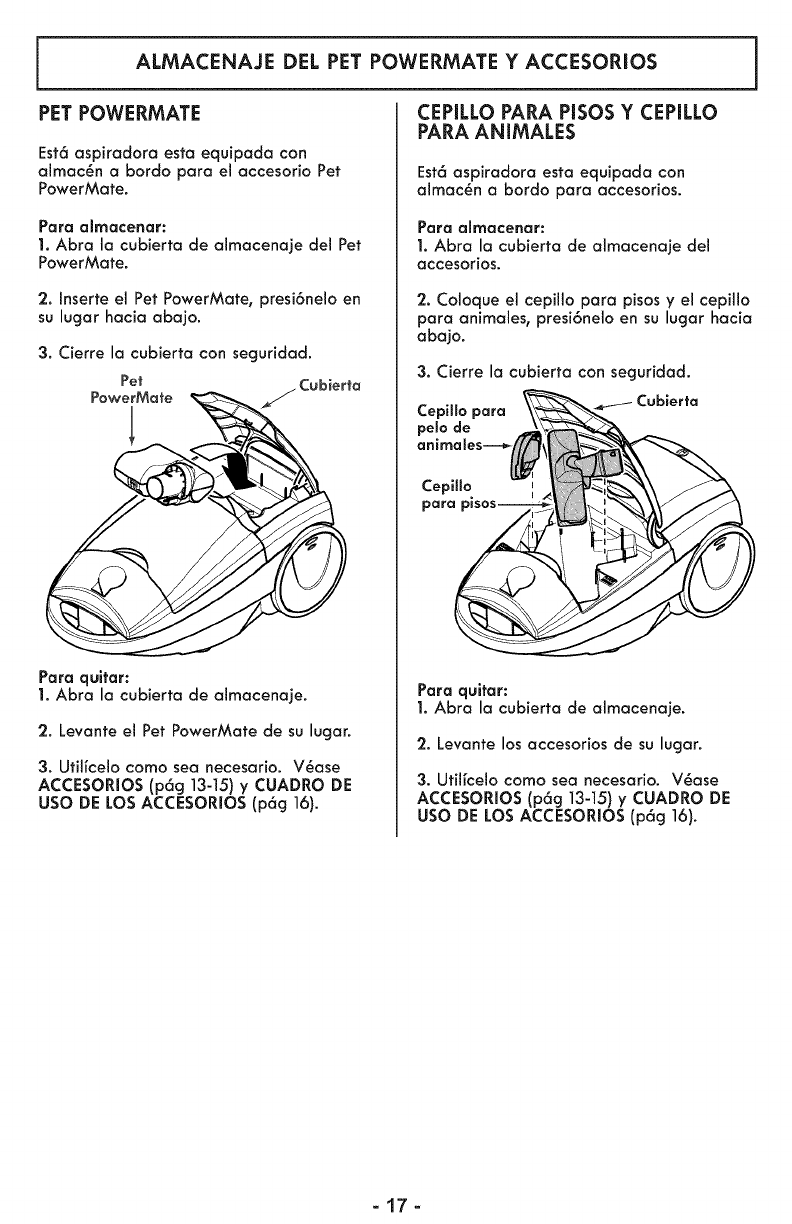
ALMACENAJE DEL PET POWERMATE Y ACCESORIOS
PET POWERMATE
Est6 aspiradora esta equipada con
almac_n a bordo para el accesorio Pet
PowerMate.
Para alrnacenar:
1. Abra la cubierta de almacenaje del Pet
PowerMate.
2. Inserte el Pet PowerMate, presi6nelo en
su lugar hacia abajo.
3. Cierre la cubierta con seguridad.
Pet .Cubierfa
PowerMa_e
}
Para qultar:
1. Abra la cubierta de almacenaje.
2. Levante el Pet PowerMate de su lugar.
3. Utiffcelo como sea necesario. V_ase
ACCESORIOS (p6g 13-15) y CUADRO DE
USO DE LOS ACCESORIOS (p6g 16).
CEPILLO PARA PISOS Y CEPILLO
PARA ANIMALES
Est6 aspiradora esta equipada con
almac_n a bordo para accesorios.
Para affnacenar:
1. Abra la cubierta de almacenaje del
accesorios.
2. Coloque el cepillo para pisosy el cepillo
para animales, presi6neloen su lugar hacia
abajo.
3. Cierre la cubierta con seguridad.
CepiHo para
pelo de
CepiHo
para F
Para qultar:
1. Abra la cubierta de almacenaje.
2. Levante los accesorios de su lugar.
3. Ufil[celo como sea necesario. V_ase
ACCESORIOS (p6g 13-15)y CUADRO DE
USO DE LOSACCESORIOS (p6g 16).
-17-
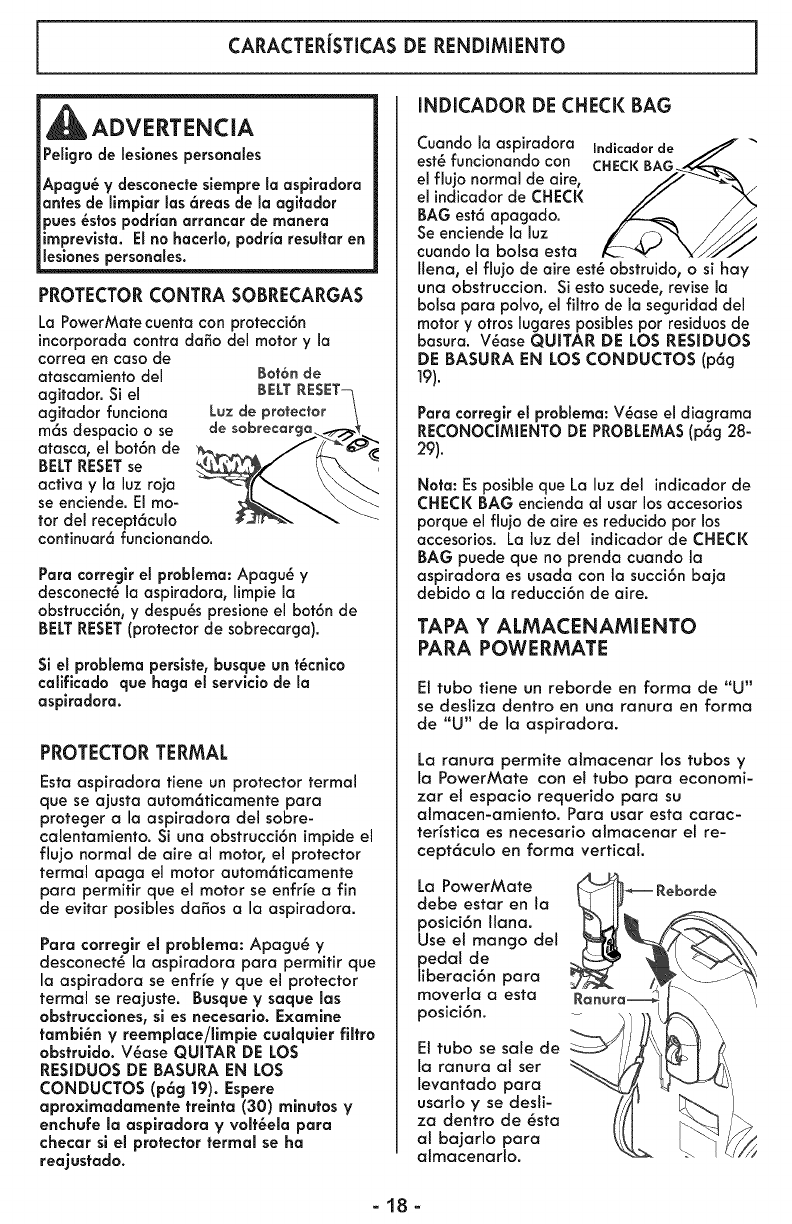
CARACTERJSTICASDE RENDIMIENTO
_lib ADVERTENCIA
Pellgro de leslones personales
Apagu_ y desconecte slempre la asplradora
antes de limplar los 6reas de la acjitadar
pues _stos podrfan arrancar de manera
imprevlsta. El no hacerlo, podria resultar en
lesianes personales.
PROTECTORCONTRA SOBRECARGAS
La PowerMote cuenta con protecci6n
incorporadacontra da_o del motor y Io
correa en caso de
atascamiento del
agitador. Si el
agitador funciona
m6s despacio o se
atasca, el bot6n de
BELTRESETse
activa y la luz roja
se enciende. El mo-
tor del recept6culo
Bot6n de
BELT RESET- 1
Luz de protector \
de sobrecarga _.---_._
continuar6 funcionando.
Para corregk el problema: Apagu_ y
desconect_ la aspiradoro, limpie la
obstrucci6n, y despuSspresione ei bot6n de
BELTRESET(protector de sobrecargo).
Si el problema perslste, busque un t_cnico
calificado que haga el servicio de la
aspiradora.
PROTECTORTERMAL
Esta aspiradoro tiene un protector termal
que se ajusta outom6ticamente para
proteger a la aspiradora del sobre-
calentamiento. Si una obstrucci6n impide el
flujo normal de aire al motor, el protector
termal apaga el motor autom6ticamente
para permitir que el motor se enfrfe a fin
de evitar posibles daSos a la aspiradora.
Para corregir el problema: Apagu_ y
desconect_ la aspiradora para permitir que
la aspiradora se enfrfe y que el protector
termal se reajuste. Busque y saque los
obstrucclones, si es necesarlo. Examine
fambi_n V reemplace/llmpie cualquier filtro
obstruido. V_ase QUITAR DE LOS
RESIDUOS DE BASURA EN LOS
CONDUCTOS (p6g 19). Espere
aproxlmadamente treinta (30) mlnutos y
enchufe la aspiradora y volt_ela para
checar si el protector fermal se ha
reajustado.
INDICADOR DE CHECK BAG
Cuando la aspirodora Indicadorde J
elfiujonormal de aire,
elindicador de CHECK
BAG est6 apagado.
Se enciende ,a,uz __
cuando la balsa esta
Nena, elflujode aireest_obstruido,o sihay
una obstruccion. Siestosucede,revisela
balsa para polvo,el filtrode laseguridaddel
motor yotroslugaresposiblespar residuosde
basura. V_ase QUITAR DE LOS RI:SIDUOS
DE BASURA EN LOS CONDUCTOS (p6g
19).
Para correglr el problema: V_ase el diagrama
RECONOCIMIENTO DE PROBLENIAS (p6g 28-
29).
Nora: Esposible que La luz del indicodor de
CHECK BAG encienda al usar los accesorios
porque el flujo de aire es reducido par los
accesorios. La luz del indicodor de CHECK
BAG puede que no prenda cuando la
aspiradora es usada con Io succi6n baja
debido a la reducci6n de aire.
TAPA YALMACENAMIENTO
PARA POWERMATE
El tuba tiene un reborde en forma de "U"
se des[iza dentro en una ranura en forma
de "U" de la aspiradora.
La ranura permite almacenar los tubas y
la PowerMate con et tuba para economi-
zar el espacio requerido para su
almacen-amiento. Para usar esta carac-
ter_stica es necesario almacenar el re-
cept6cuJo en forma vertical.
La PowerMate
debe estar en la
posici6n liana.
Use el mango del
pedal de
liberaci6n para
moverla a esta
posici6n.
El tuba se sate de
la ranura al ser
levantado para
usarlo y se desli-
za dentro de _sta
al bajarlo para
almacenarlo.
-18-
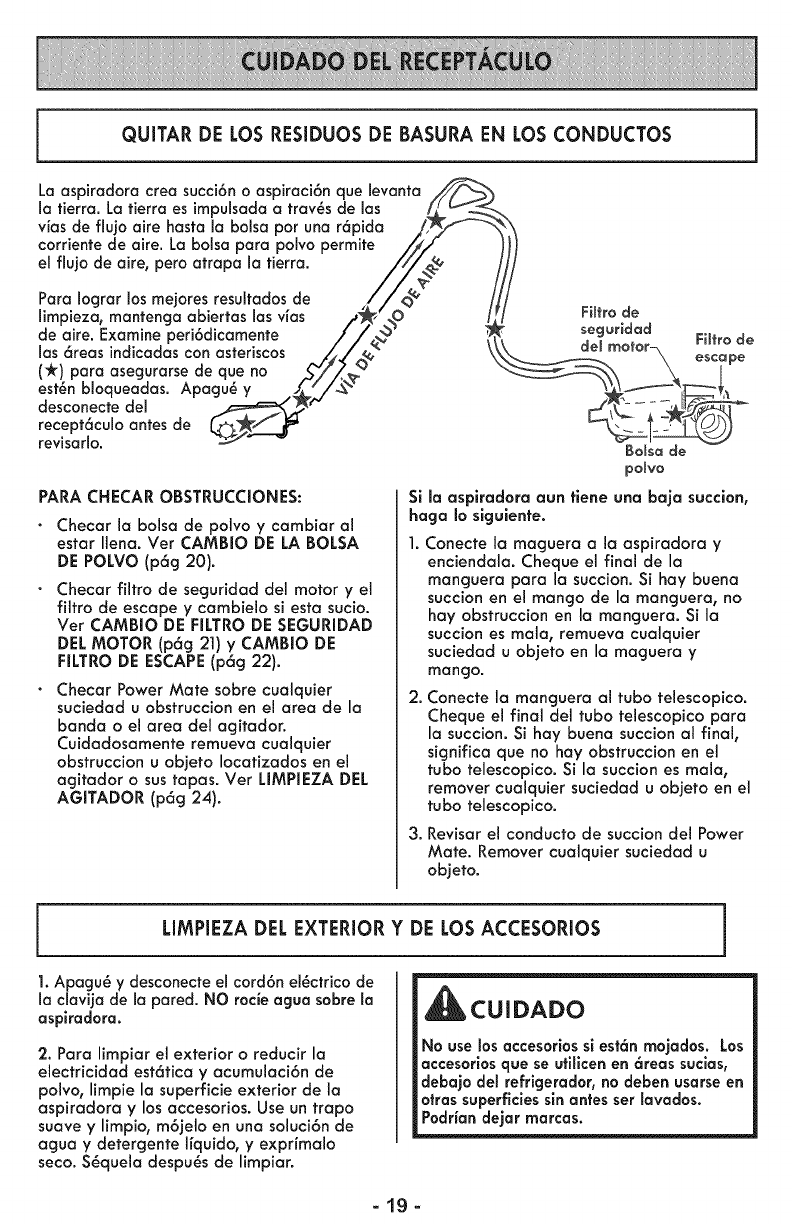
QUITAR DE LOS RESIDUOS DE BASURA EN LOS CONDUCTOS
La aspiradora crea succi6n o aspiraci6n que levanta
la tierra. La tierra es impulsadaa trav_s de las _
vfas de flujo aire hasta la bolsa par una r6pida ,/,_/__
corriente de aire. La bolsa para polvo permite ///r ,/
el flujo de aire, pero atrapa la tierra. ////_
//
Para Iograr los mejores resultados de ,(/<3 _"
limpieza, mantenga abiertas las v_as t_,_O" Filtrode
de aire. Examine peri6dicamente //,<_b seguridad
las 6reas indicadascon asteriscos LJ__ k\ det rnotor-_ Filtro de
Xescape
(_) para asegurarse de que no S/?_" __-_===_1_,_, |__L_ f
est_n bloqueadas. Apagu_ y_-//._"
receptdculoantes de (,_$__
revisarlo. _"_/- _ Boisade
polvo
PARA CHECAR OBSTRUCCIONES:
Checar la bolsa de polvo y cambiar al
estor Ilena. Vet CAMB]O DE LA BOLSA
DE POLVO (p6g 20).
Checar filtro de seguridad del motor y el
filtro de escape y cambielo si esta sucio.
Ver CAMBIO DE RLTRO DE SEGURIDAD
DELMOTOR (p6g 21) y CAMBIO DE
FILTRODE ESCAPE(p6g 22).
Checar Power Mate sobre cualquier
suciedad uobstruccion en el area de la
banda o el area del ogitodor.
Cuidodosamente remueva cuolquier
obstruccion u objeto Iocatizados en el
agitodor o sus tapas. Vet UMPIEZA DEL
AGITADOR (p6g 24).
Si la aspiradora aun tiene una baja succion,
haga Io sigulente.
Conecte la maguera a la aspiradora y
enciendala. Cheque el final de la
manguera para la succion. Si hay buena
succionen eJmango de la manguera, no
hay obstruccion en Io manguera. Si la
succiones mola, remueva cualquier
suciedad uobjeto en la maguera y
mango.
2. Conecte la manguera al tubo telescopico.
Cheque el final del tubo telescopico para
la succion. Si hay buena succion al final,
significa que no hay obstruccion en el
tubo telescopico. Si la succion es mala,
remover cualquier suciedad uobjeto en el
tubo telescopico.
3. Revisar el conducto de succion del Power
Mate. Remover cualquier suciedad u
objeto.
LIMPIEZA DEL EXTERIOR Y DE LOS ACCESORIOS
1. Apagu_ y desconecte el cord6n el_ctrico de
la clavija de la pared. NO rocie agua sabre _a
aspiradora.
2. Para limpiar el exterior o reducir la
electricidad est6tica yacumulaci6n de
polvo, limpie la superficie exterior de Io
aspiradora y los accesorios. Use un trapo
suave y limpio, m6jelo en una soluci6n de
agua ydetergente ffquido, y exprfmalo
seco.S_quela despu_s de limpiar.
CUIDADO
No use los accesorios sl est6n mojados. Los
accesorios que se utillcen en 6reas suclas,
debajo del refrlgerador, no deben usarse en
arras superficies sin antes set lavados.
Podrian dejar marcas.
=lg=
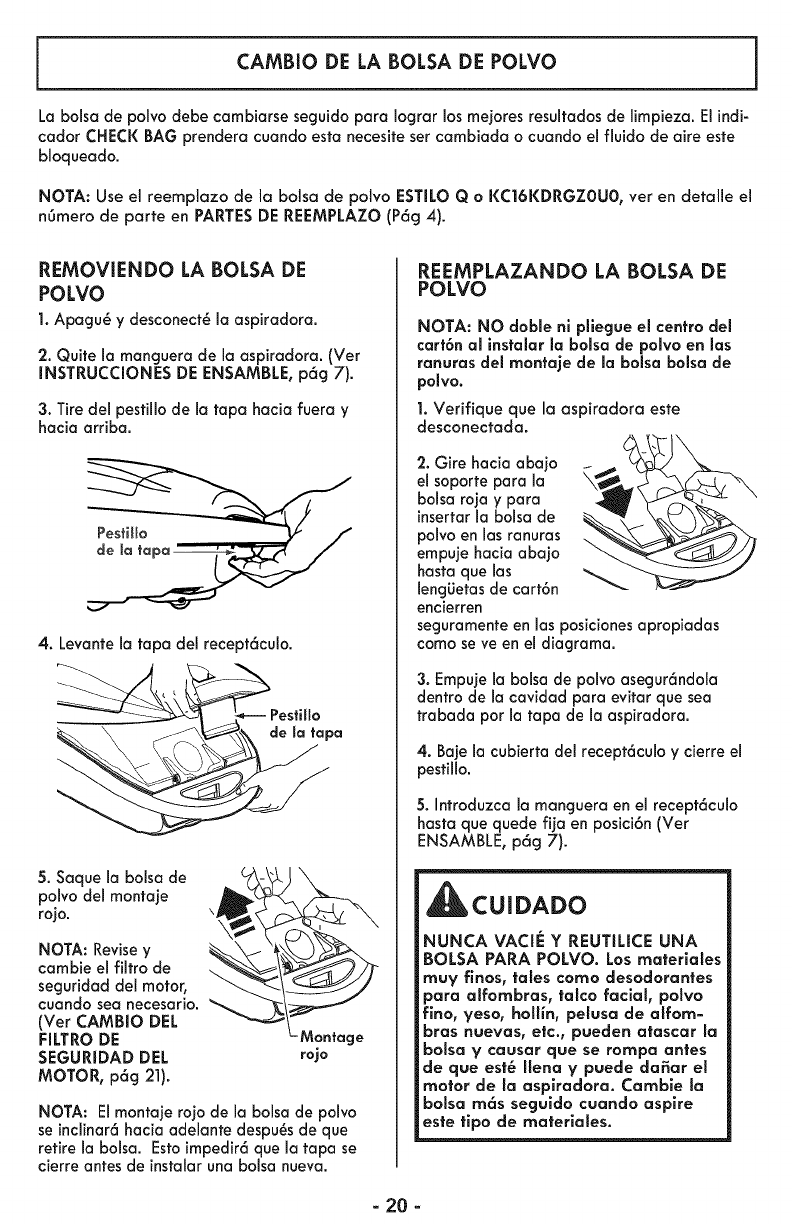
CAMBIO DE LA BOLSA DE POLVO
La bolsa de polvodebe cambiarse seguido para Iograr los mejores resultados de limpieza. El indi-
cador CHECK BAG prenderacuando esta necesite ser cambiada o cuando el fluido de aire este
bloqueado.
NOTA: Use el reemplazo de la bolsa de polvo ESTILOQ o KC16KDRGZOUO, ver en detalle el
n6mero de parte en PARTESDE REEMPLAZO (P6g 4).
REMOVIENDO LA BOLSA DE
POLVO
1. Apagu_ y desconecf_ la aspkadora.
2. Quite la manguera de la aspiradora. (Ver
INSTRUCCIONES DE ENSAMBLE,p6g 7).
3. Tire del pestillode la fapa hacia fuera y
hacia arriba.
4. Levante la fapa del recept6culo.
_Pestillo
polvo del montaje
rojo. \
NOTA: Revise y_%__
cambie el filtro de
seguridad del motor,
cuando sea necesario.
(Ver CAMBIO DEL
FILTRO DE Montage
SEGURIDAD DEL rojo
MOTOR, p6g 21).
NOTA: Elmontaje rojo de la bolsa de polvo
seinclinar6 hacia adelante despu_sde que
retire la bolsa. Estoimpedir6 que la tapa se
cierre antes de instalar una bolsa nueva.
REEMPLAZANDO LA BOLSA DE
POLVO
NOTA: NO doble ni pliegue el centro del
cart6n al instalar la bolsa de polvo en los
ranuras del monfaje de la bolsa bolsa de
polvo.
1. Verifique que la aspiradora este
desconectada.
2. Gire hacia abajo
el soporte para la
balsa roja y pora
insertar la bolsa de
polvo en las ranuras
empuje hacia abajo
basra que las
lengLietas de cart6n
encierren
seguramente en las posiciones apropiadas
como se ve en el diagrama.
3. Empuje la bolsa de polvo asegur6ndola
dentro de Io cavidad para evitar que sea
trabada por la tapa de la aspiradora.
4. Baje la cubierta del recept6culo y cierre el
pestillo.
5. Introduzca la manguera en el recepf6culo
basra que quede fija en posici6n(Vet
ENSAMBLE,p6g 7).
CUIDADO
NUNCA VACIE Y REUTILICE UNA
BOLSA PARA POLVO. Los materlaies
muy finos, tales como desodorantes
para affombras, talco facial, potvo
fino, veso, hoff_n, pelusa de alfom-
bras nuevas, etc., pueden atascar la
bolsa V causar que se rompa antes
de que est_ ffena y puede da_ar el
motor de la aspiradora. Camble la
bolsa m6s seguido cuando aspire
este tlpo de materlales.
-20 -
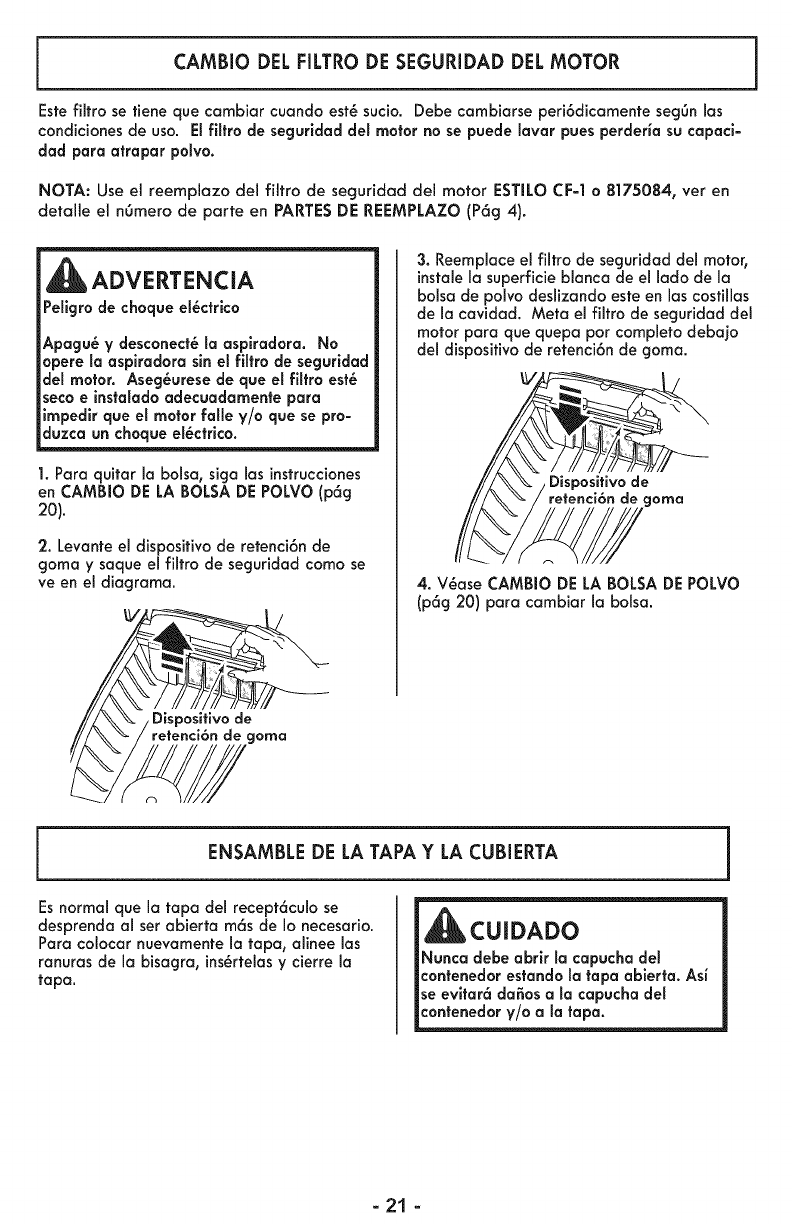
CAMBIODEL FILTRO DE SEGURIDAD DEL MOTOR
Estefiltro se tiene que cambiar cuando est_ sucio. Debe cambiarse peri6dicamente seg0nlas
condiciones de uso. El filtro de seguridod del motor no se puede lavor puesperderiosu copoci-
dad paro atropor polvo.
NOTA: Use el reemplazo del filtro de seguridad del motor ESTILOCF-I o8175084, vet en
detalle el n0mero de parte en PARTESDE REEMPLAZO (P6g 4).
ADVERTENCIA
Peligrode choque el_ctrico
Apogu_ ydesconect_ la ospkadora. No
opere Io asplradora sin el filtro de seguridad
del motor. Aseg_urese de que el filtro est_
seco einstalodo adecuadamente para
impedlr que el motor falle y/o que se pro-
duzco un choque el_ctrico.
1. Para quitar la bolsa, siga las instrucciones
en CAMBIO DE LA BOLSA DEPOLVO (p6g
20).
2. Levante el dispositivo de retenci6n de
goma y saque el filtro de seguridad como se
ve en el diagrama.
3. Reemplace el filtro de seguridad del motor,
instalela superficie blanca de el lado de la
bolsa de polvo deslizando este en las costillas
de la cavidad. Meta el filtro de seguridad del
motor para que quepa por completo debajo
del dispositivo de retenci6n de goma.
de
de gorna
4. V_ase CAMBIO DE LA BOLSA DEPOLVO
(p6g 20) para cambiar la bolsa.
de
retenci6nde goma
ENSAMBLE DE LA TAPA YLA CUBIERTA
Esnormal que la tapa del recept6culo se
desprenda al ser abierta m6s de Io necesario.
Para colocar nuevamente la tapa, alinee los
ranuras de la bisagro, ins_rtelasy cierre la
tapa.
CUIDADO
Nunca debe abrir la capucho del
contenedor estandola tapa ablerta. Asi
seevltar6 dodosa la capucho del
contenedor V/o o la topa.
=21 =
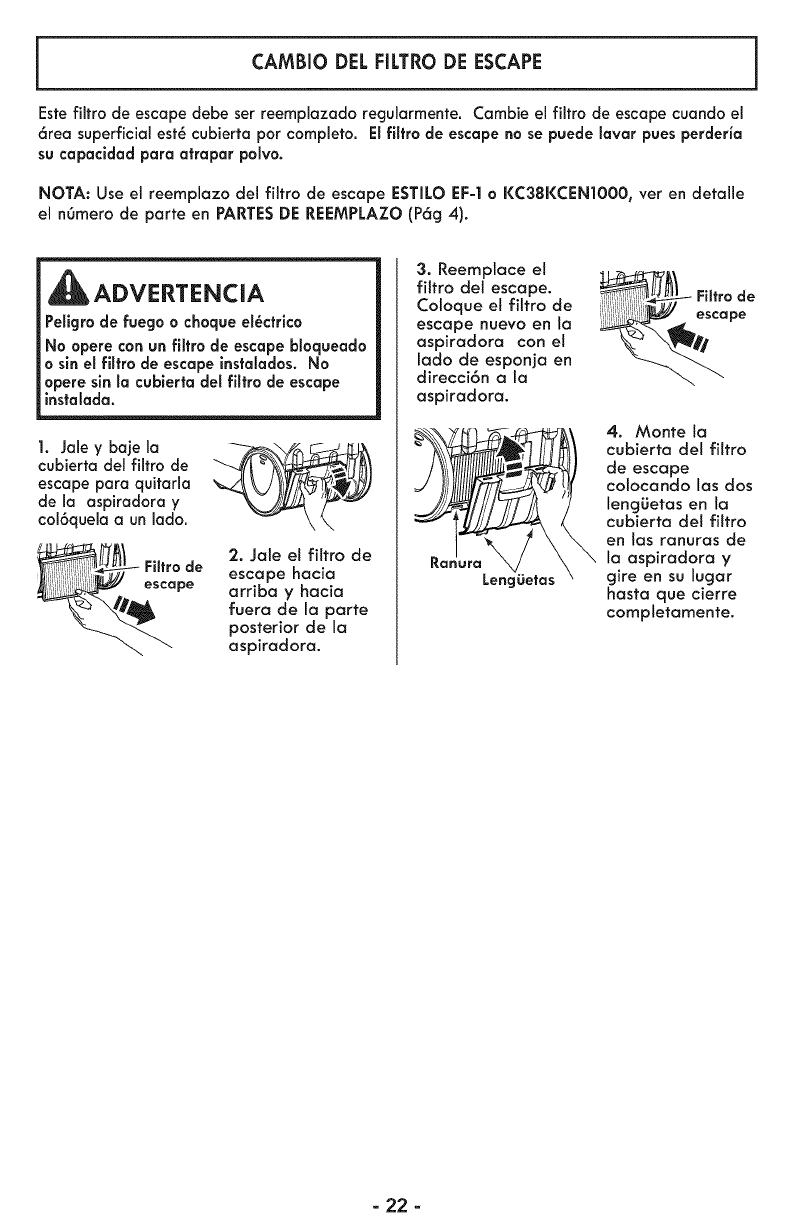
CAMBIO DEL FILTRO DE ESCAPE
Este filtro de escape debe ser reemplazado regularmenfe. Cambie el filtro de escape cuando el
6tea superficial est6 cubierta par completo. El filtra de escape no se puede lavar pues perderia
su capacidad para atrapar palvo.
NOTA: Use el reemplazo del filtro de escape ESTILO EF-1 o I(C381(CEN1000, ver en detalle
el n6mero de parte en PARTES DE REEMPLAZO (P6g 4).
ADVERTENCIA
Pellgro de fuego o choque el6ctrlco
No opere con un filtro de escape bloqueado
o sin el filtro de escape instalados. No
opere sin la cubierta del filtro de escape
instalada.
1. Jale y baje la
cubierta del filtro de
escape para quitarla
de la aspiradora y
col6quela a un lado.
de
escape
2. Jate el filtro de
escape hacia
arriba y hacia
fuera de la parte
posterior de la
aspiradora.
3. Reemplace el
filtro del escape. __ FiStra de
Coloque et filtro de _'_-_---"'_escape
escape nuevo en la __j
aspiradora con el
lado de esponja en
direcci6n a la
aspiradora.
4. Monte ta
cubierta de! filtro
de escape
colocando las dos
lengLietas en la
cubierta det fittro
en las ranuras de
la aspiradora y
gire en su lugar
hasta que cierre
completamente.
-22 -
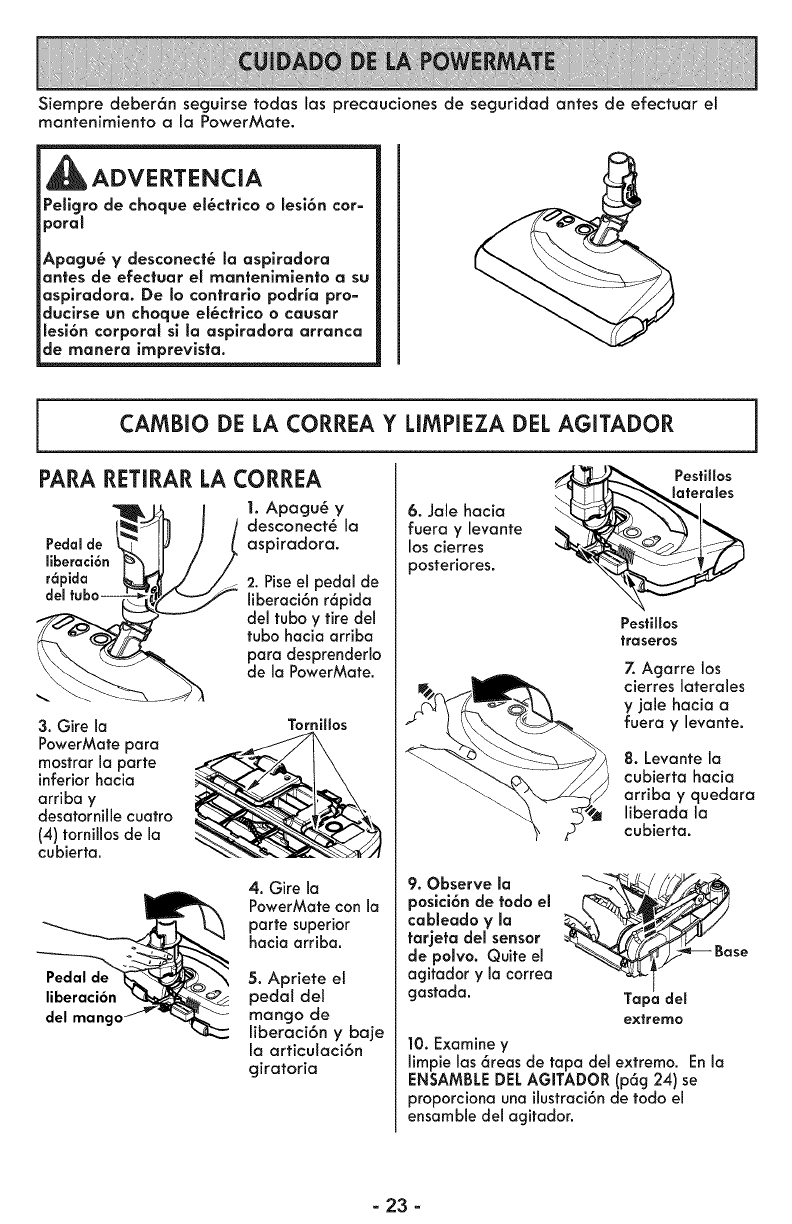
Siempre deber6n seguirse todas las precauciones de seguridad antes de efectuar el
mantenimiento a la PowerMate.
_ADVERTENCIA
Pellgro de cheque el6ctrlco o lesi6n cor-
poral
_pagu6 y desconect6 la aspiradora
antes de efectuar el mantenimlento asu
aspiradora. De Io contrario podria pro-
ducirse un cheque el6ctrlca e causar
lesi6n corporal sl la aspiradora arranca
de manera imprevlsta.
CAMBIO DE LA CORREA Y LIMPIEZA DEL AGITADOR
PARA RETIRAR LA CORREA
1. Apagu6 y
desconect6 la
aspiradora.
2. Piseel pedal de
liberaci6n r6pida
del tuba ytire deJ
tuba hacia ar6ba
para desprenderlo
de la PowerMate.
3. Gire la
PowerMate para
mostrar la parte
inferiorhacia
arriba y
desatornille cuatro
(4) tornillos de la
cubierta.
Tornillos
Pedal de
liberaci6n
del
4. Gire la
PowerMate con la
parte superior
hacia arriba.
5. Apriete el
pedal del
mango de
liberaci6n y bale
la arficulaci6n
giratoria
6. Jale hacia
fuera y levante
los cierres
posteriores.
PestiHos
traseros
7. Agarre los
cierres laterales
yjale hacia a
fuera y levante.
8. Levante la
cubierta hacia
arriba y quedara
liberada la
cubierta.
9. Observe la _ _/_
poslci6n de rode el
cableado Vla .
tarjeta del sensor
de polvo. Quite el se
agitador yla correa
gastada. Tapa des
extreme
10. Examine y
limpie las 6teas de tapa del extremo. En la
ENSAMBLE DEL AGITADOR (p6g 24) se
proporciona una ilustraci6n de rode el
ensamble del agitador.
-23 -
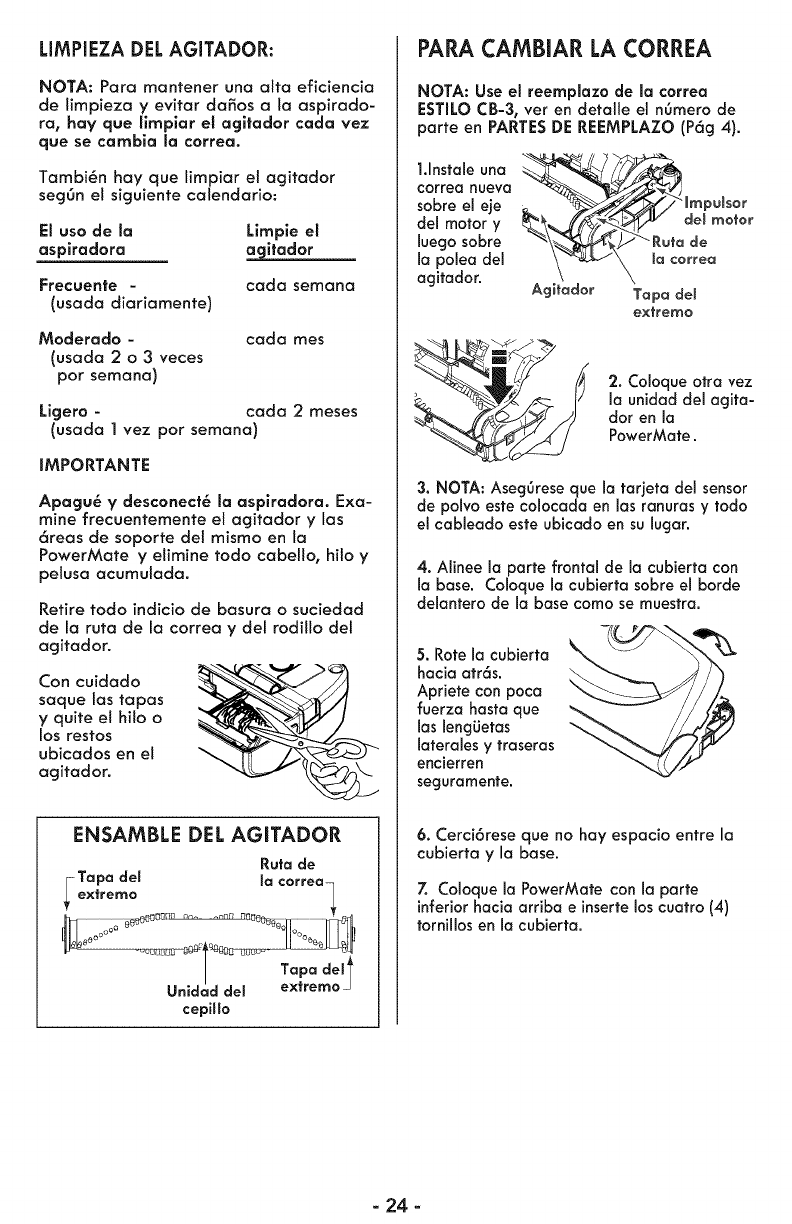
LIMPIEZADELAGITADOR:
NOTA: Para mantener una alta eficiencia
de limpieza y evitar dafios a la aspirado-
ra, hay que limplar el agitador coda vez
que se cambia la correa.
Tambi_n hay que limpiar et agitador
seg6n el sicjuiente catendario:
El usa de la Limpie el
aspiradora agitador
Frecuente -
(usada diariamente)
cada semana
Moderado -
(usada 2 o 3 veces
por semana)
cada rues
Ligero - cada 2 meses
(usada 1 vez por semana)
IMPORTANTE
Apagu_ y desconect_ la aspiradora. Exa-
mine frecuentemente et agitador y las
6reas de soporte del mismo en la
PowerMate y elimine todo cabello, hito y
pelusa acumulada.
Retire todo indicio de basura o suciedad
de la ruta de la correa ydel rodillo del
agitador.
Con cuidado __
saque las tapas
quite ef hilo o
_/osrestos
ubicados en el
agitador.
ENSAMBLE DEL AGITADOR
Rutade
-Tapa des la correa_
extremo /
°o_b
/ TaPa deJt
Unidad deJ extremo
cepillo
PARA CAMBIAR LA CORREA
NOTA: Use el reemplazo de la correa
ESTILOCB-3, ver en detaUe el n6mero de
parte en PARTE$DE REEMPLAZO (P6g 4).
1.1nstale una
correa nueva
sobre el eje mmputsor
delmotory _,_//_b_ delrno,or
Iuego sobre "_'\_%_.,'_y_-Ruta de
la polea del \'-x_,_J\ _ correa
agitador. \ \
Agifador Tapa del
extremo
2. Coloque otra vez
la unidad del agita-
dor en la
PowerMote.
3. NOTA: AsegOrese que la tarjeta del sensor
de polvo este colocada en las ranuras y fodo
el cableado este ubicado en su lugar.
4. Alinee la parte frontal de la cubierta con
la base. Coloque la cubierta sobre el borde
delantero de la base como se muestra.
5. Rote la cubierta
hacia atr6s.
Apriete con poca
fuerza hasta que
las lengUetas
laterales ytraseras
encierren
seguromente.
6. Cerci6rese que no hay espacio entre la
cubierta yla base.
7. Coloque la PowerMate con la parte
inferior hacia ardba einserte los cuatro (4)
tornillos en la cubierta.
-24 -
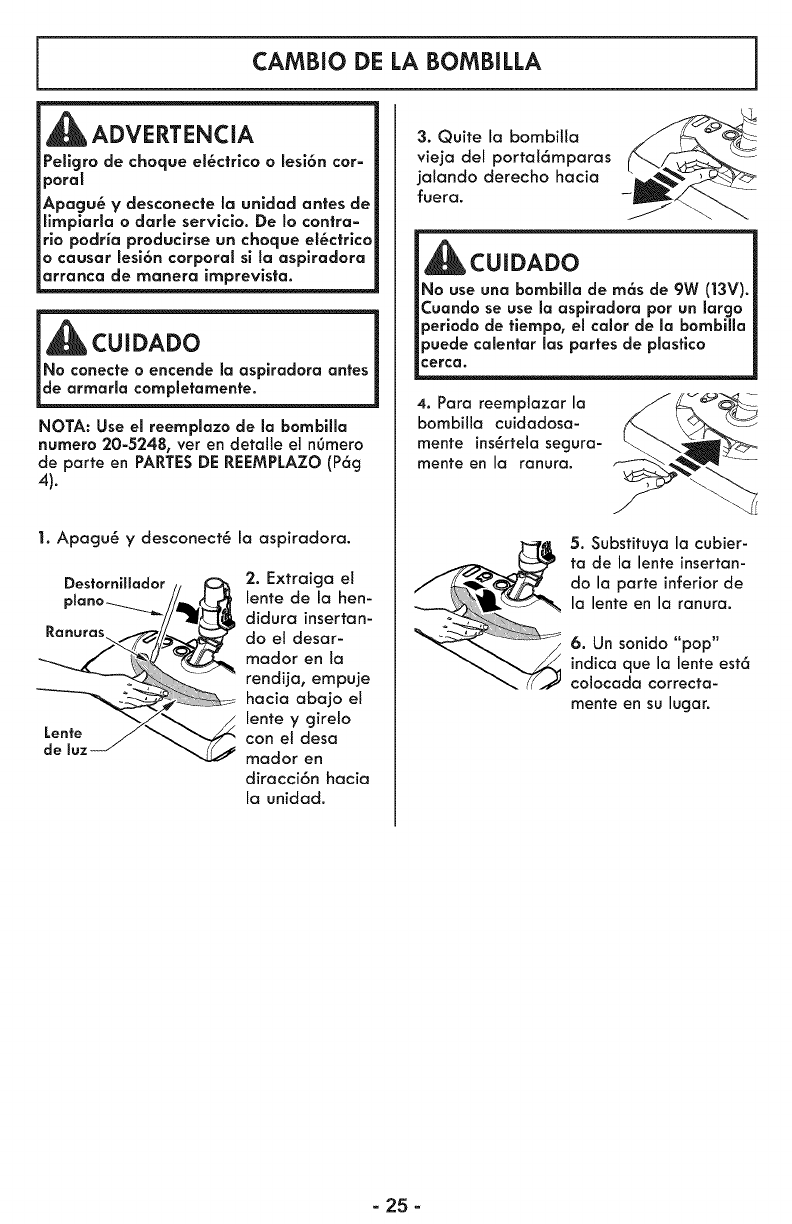
CAMBIO DE LA BOMBILLA
ADVERTENCIA
Pellgro de choque el_ctrico o lesi6n cot=
poral
Apagu_ y desconecte la unidad antes de
llrnpiarla o darle servlcio. De Io contra=
rio podria produclrse un choque el_ctrico
o causar lesi6n corporal si la aspiradora
arranca de manera imprevista.
CUIDADO
No conecte o encende la aspiradora antes
de armarla completamente.
NOTA: Use el reemplazo de la bombilla
numero 20-5248, ver en detalle el nOmero
de parte en PARTES DE REEMPLAZO (P6g
4).
1. Apagu_ ydesconect_
DestorniHador
Ranuras
Lente
de luz
la aspiradora.
2. Extraiga el
lente de la hen-
didura insertan-
do el desar-
mador en la
rendUa, empuje
hacia abajo et
lente y gire!o
con el desa
mador en
diracci6n hacia
la unidad.
3. Quite la bombitla
vieja del portal6mparas
jalando derecho hacia
fuera.
CUIDADO
No use una bombilla de m6s de 9W (13V).
Cuando se use la asplradora por un largo
periodo de tlempo, el calor de la bornbilla
puede calentar las partes de plastico
cerca.
4. Para reemplazar la
bombiila cuidadosa-
mente ins_rtela segura-
mente en la ranura.
5. Substituya la cubier-
ta de la lente insertan-
do la parte inferior de
la lente en la ranura.
6. Un sonido "pop"
indica que la lente est6
colocada correcta-
mente en su lugar.
=25 =
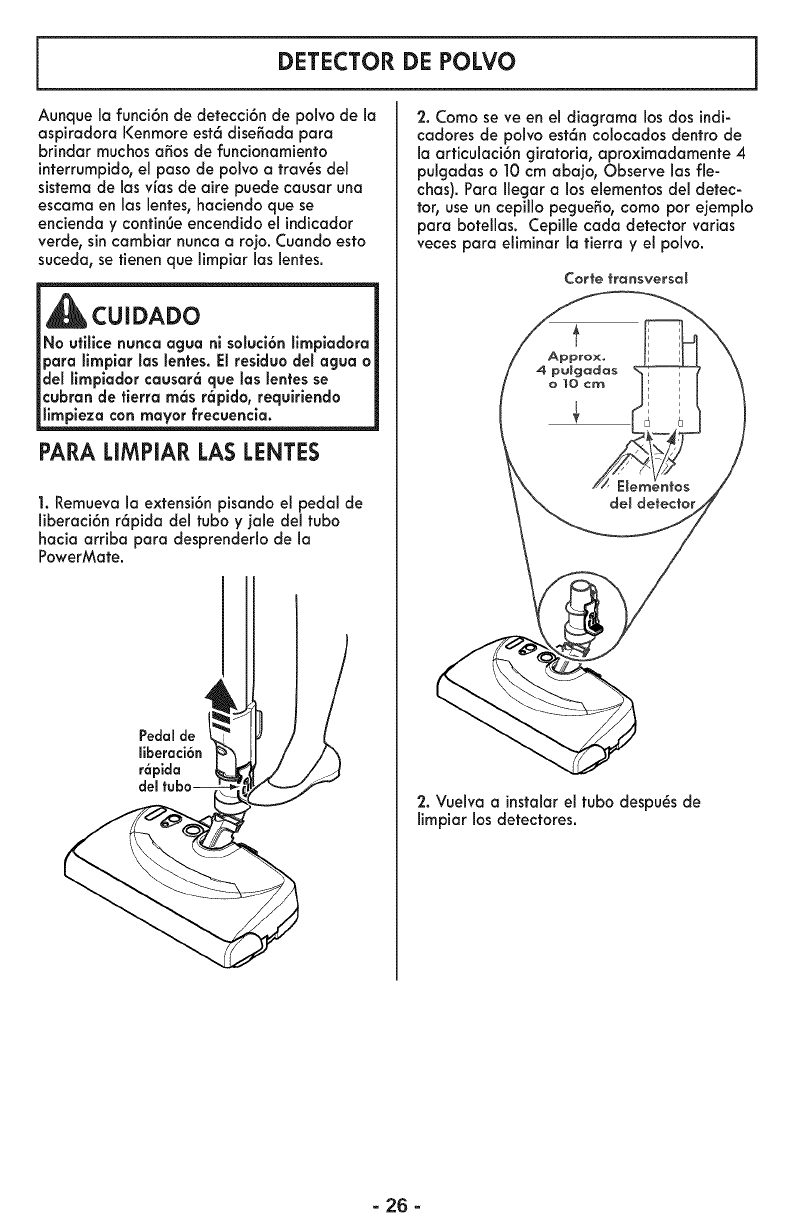
DETECTOR DE POLVO
Aunque la funci6n de detecci6n de polvo de la
ospirodora Kenmore est6 dise_ado para
brindar muchosa_os de funcionamiento
interrumpido,el paso de polvo o troves del
sistema de las vfas de oire puede causor una
escama en los lentes, haciendo que se
encienda y continOeencendido el indicador
verde, sin combiar nunco o rojo. Cuando esto
suceda, se tienen que limpiar 1aslentes.
CUIDADO
No utlllce nunca agua ni soluci6nllmpladora
para llmplar los lentes.El reslduo del agua o
del limpladorcausar6 que loslentes se
cubran de tierra m6s r6pldo, requiriendo
PARA LIMPIAR LAS LENTES
1. Remuevala extensi6n pisando el pedal de
liberaci6n r6pida del tubo y jale del tubo
hacio arriba para desprenderlo de la
PowerMate.
2. Como se ve en el diagrama los dos indi-
cadores de polvo est6n colocados dentro de
la orticulaci6ngirotoria, aproximadamente 4
pulgadaso 10 cm abojo, Observe las fie-
chas). Para Ilegar alos elementos del detec-
tor, use uncepillo pegue5o, como por ejemplo
para botellos. Cepille cada detector varias
veces para eliminar la tierra y el polvo.
Corte transversal
2. Vuelva ainstalar el tubo despu_s de
limpiar los detectores.
-26 -
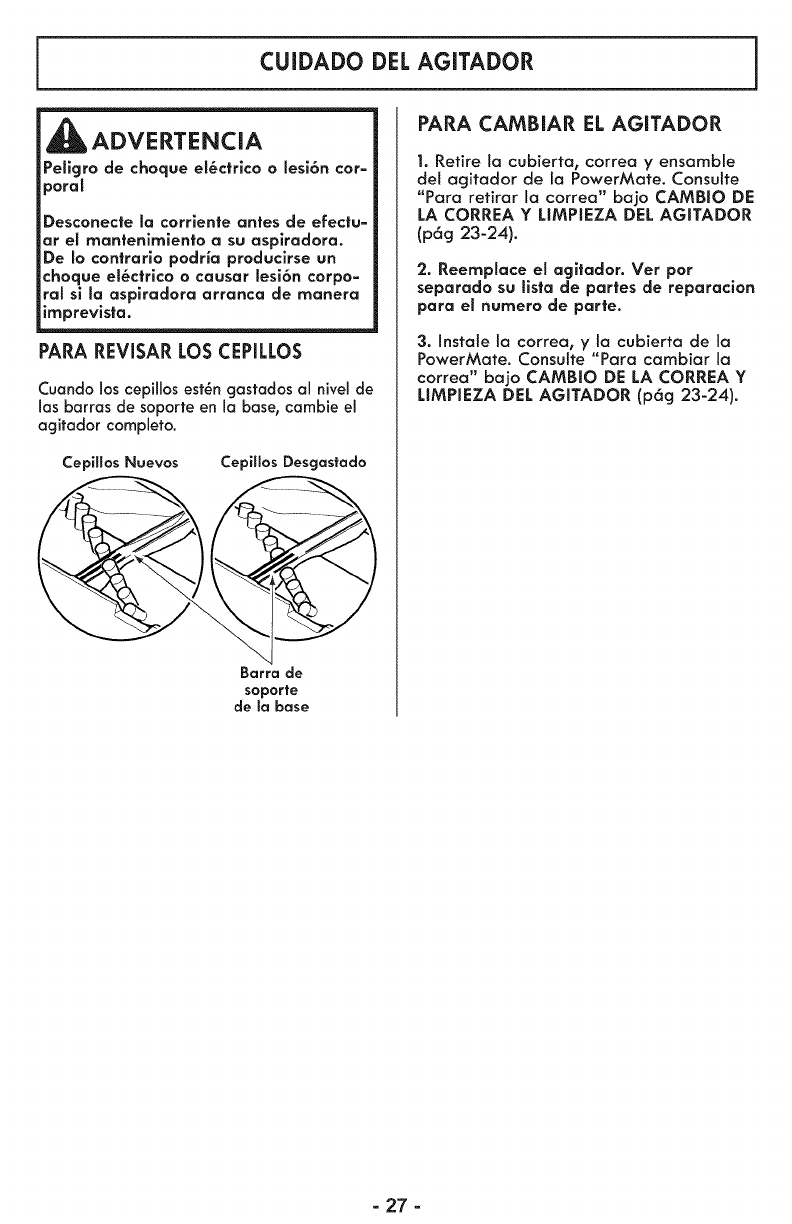
CUIDADO DEL AGITADOR
_ADVERTENCIA
Peligro de choque el_ctrico o lesi6n car=
_oral
_)esconecte la corrlente antes de efectu=
ar el rnantenimiento asu aspiradora.
De la corttrario podria producirse un
choque el_ctrlco o causar lesi6n corpo-
ral sl la aspiradora arranca de manera
imprevls|a.
PARA REVISAR LOS CEPILLOS
Cuando los cepillos est_n gastados al nivel de
las barras de soporte en la base, cambie el
agitador completo.
Cepillos Nuevos Cepillos Desgastado
Barra de
soporte
de la base
PARA CAMBIAR EL AGITADOR
1. Retire la cubierta, correa y ensamble
del agitador de la PowerMate. Consulte
"Para retirar la correa" bajo CAMBIO DE
LA CORREA Y LIMPIEZA DEL AGITADOR
(p6g 23-24).
2. Reernplace el agitador. Vet par
separado su tista de partes de reparaclon
para el numero de porte.
3. Instale la correa, y la cubierta de la
PowerMate. Consulte "Para cambiar la
correa" bajo CAMBIO DE LA CORREA Y
LIMPIEZA DEL AGITADOR (p6g 23-24).
-27 -
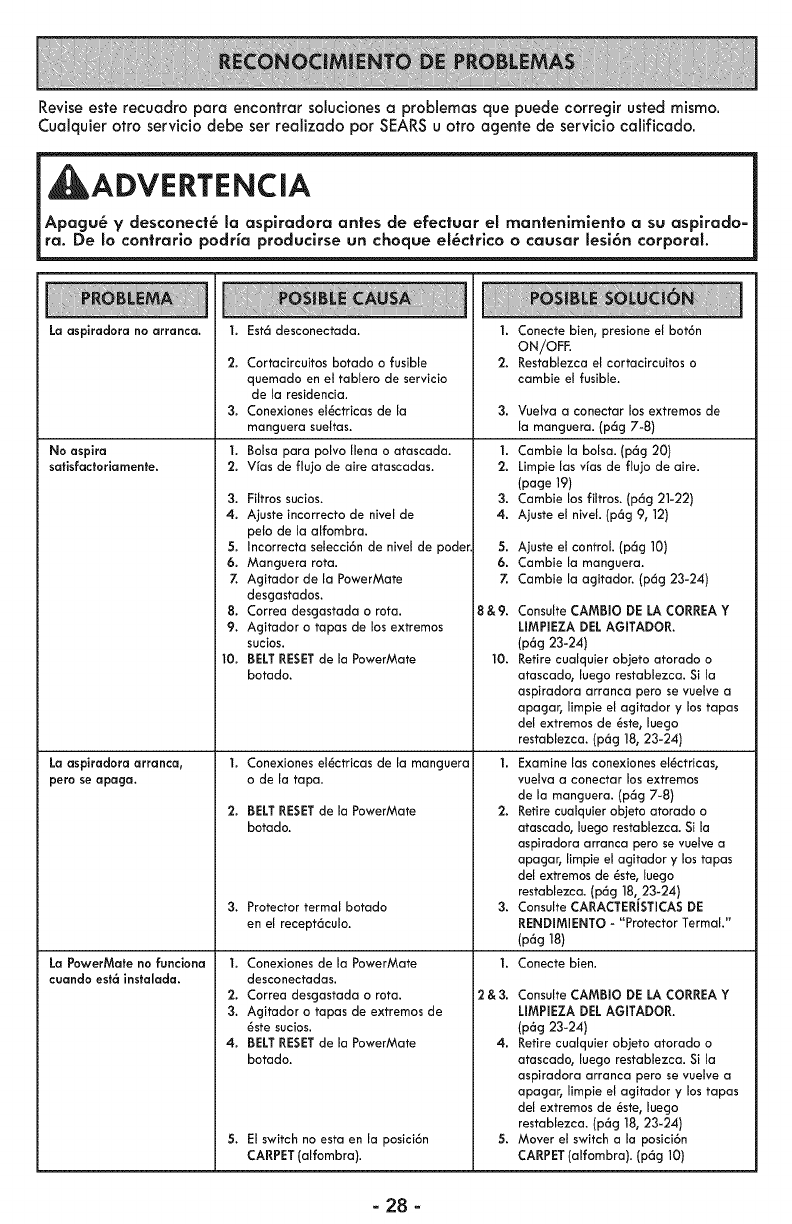
Reviseeste recuadro para encontrar solucionesa problemas que puede corregir usted mismo.
Cualquier otro servicio debe ser realizado por SEARSu otro agente de servicio calificado.
l DVERTENCIA
Apagu_ y desconect_, la asplradora antes de efectuar el mantenimlento a su aspirado=
ra. De Io contrario podHa producirse un choque el_ctrico o causar lesi6n corporal.
I. Est6 desconectada. I.
2. Cortacircuitos botado o fusible 2.
quemado en eLtabrero de servicio
de la residencia.
3. Conexiones el_ctricas de ra 3.
manguera suertas.
I. Borsa para porvo rlena o atascada. I.
2. V_as de flujo de aire atascadas. 2.
3. Filtros sucios. 3.
4. Ajuste incorrecto de nivel de 4.
peto de la alfombra.
5. Incorrecta selecci6n de nivel de poder 5.
6. Manguera rota. 6.
7. Agitador de la PowerMate 7.
desgastados.
8. Correa desgastada o rota. 8 & 9.
9. Agitador o tapas de los extremos
sucios.
BELT RESET de la PowerMate 10.
botado.
I. Conexiones elSctricas de la manguera I.
o de la tapa.
2. BELT RESETde la PowerMate 2.
botado.
3. Protector termal botado 3.
en el recept6culo.
I. Conexiones de La PowerMate I.
desconectadas.
2. Correa desgastada o rota. 2 & 3.
3. Agitador o tapas de extremos de
_ste sucios.
4. BELT RESETde la PowerMate 4.
botado.
5.
5. El switch no esta en la posici6n
CARPET(alfombra).
La aspiradora no arranca.
No aspira
satisfactoriamente.
La aspiradora arranca,
pero se apaga.
La PowerMate no funciona
cuando est_ instalada.
i10.
Conecte bien, presione el bot6n
ON/OFF
Restabrezca el cartacircuitos a
cambie el {usibre.
Vuelva a conectar ros extremos de
la manguera. (p6g 7-8)
Cambie la balsa. (p6g 20)
Limpie las v[as de flujo de aire.
(page 19)
Cambie los filtras. (p6g 21-22)
Ajuste el niveh (p6g 9, 12)
Ajuste el control. (p6g 10)
Cambie la manguera.
Cambie la agitadar. (p6g 23-24)
Consulte CAMBIO DE LA CORREA Y
LIMPIEZA DEL AGITADOR.
(p6g 23-24)
Retire cualquier objeto atorado o
atascado, luego restablezca. Si la
aspiradora arranca pero se vuelve a
apagar, limpie el agitador y los tapas
del extremos de _ste, luego
restablezca. (p6g 18, 23-24)
Examine las conexiones el_ctricas,
vuelva a canectar los extremos
de la manguera. (p6g 7-8)
Retire cualquier objeto atorado o
atascado, luego restablezca. Si la
aspiradora arranca pero se vuelve a
apagar, limpie el agitador y los tapas
del extremos de _ste, luego
restablezca. (p6g 18,,23-24)
Consulte CARACTERISTICASDE
RENDIMIENTO - "Protector TermaL"
(p6g 18)
Conecte bien.
Consulte CAMBIO DE LA CORREA Y
LIMPIEZA DEL AGITADOR.
(p6g 23-24)
Retire cualquier objeto atorado o
atascado, luego restablezca. Si la
aspiradora arranca pero se vuelve a
apagar, limpie el agitador y los tapas
del extremos de _ste, luego
restaNezca. (p6g 18, 23-24)
Mover el switch a la posici6n
CARPET(alfombra). (p6g 10)
-28 -
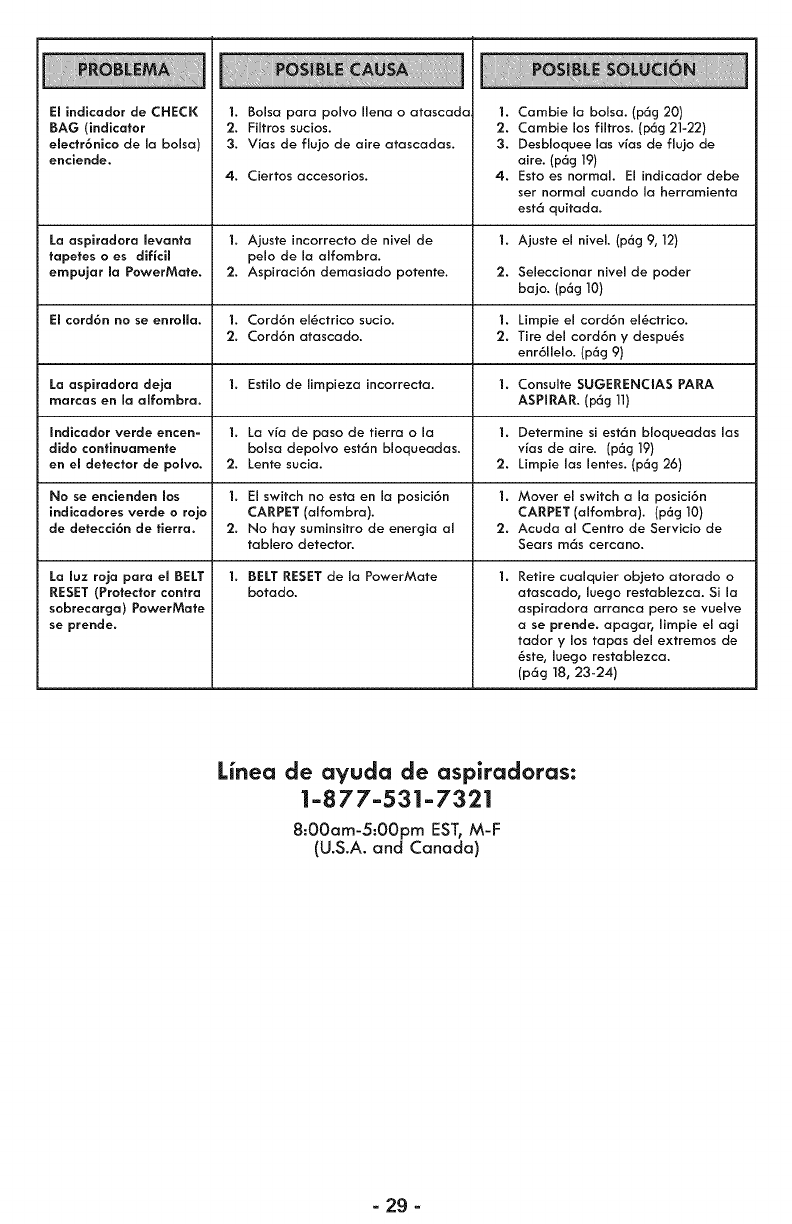
El indicador de CHECK
BAG (indicator
electr6nico de la balsa)
enciende.
1. Boisa para polvo Hena o atascada
2. F:iffrossucios.
3. Vias de fiujo de aire atascadas.
4. Ciertos accesorios.
1. Cambie ia bolsa. (p6g 20)
2. Cambie los fiitros. (p6g 21-22)
3. Desbloquee los vlas de fiu)o de
aire. (p6g 19)
4. Esto es normal Ei indicador debe
ser normal cuando la herramienta
est6 quitada.
La aspiradora levanto 1. Ajuste incorrecto de nivel de 1. Ajuste el niveL (p6g 9, 12)
tapetes o es dil:icil pelo de la alfombra.
empujar la PowerMate. 2. Aspiraci6n demasiado potente. 2. Seleccionar nivel de poder
bajo. (p6g 10)
El cord6n no se enroHa. 1. Cord6n el_ctrico sucio. 1. Limpie el cord6n el_ctrico.
2. Cord6n atascado. 2. Tire del cord6n ydespu_s
enr611elo. (p6g 9)
La aspiradora deja 1. Estilo de limpieza incorrecta. 1. Consulte SUGERENCIAS PARA
marcas en la alfombra. ASPIRAR. (p6g 11)
Indicador verde encen- 1. La via de paso de tierra ola 1. Determine si est6n bloqueadas los
dido continuamente boisa depolvo est6n bioqueadas, vlas de aire. (p6g 19)
en ei detector de poivo. 2. Lente sucia. 2. Limpie los lentes. (p6g 26)
No se encienden los 1. El switch no esta en la posici6n 1. Mover el switch a la posici6n
indicadores verde o rojo CARPET (alfombra). CARPET (alfombra). (p6g 10)
de detecci6n de tierra. 2. No hay suminsitro de energia al 2. Acuda al Centro de Servicio de
tablero detector. Sears m6s cercano.
1. BELT RESET de la PowerMate 1.
botado.
La iuz roja para ei BELT
RESET (Protector contra
sobrecarga) PowerMate
se prende.
Retire cualquier ob)eto atorado o
atascado, luego restablezca. Si la
aspiradora arranca pero se vuelve
a se prende, apagar, iimpie el agi
tador y los topos del extremos de
_ste, iuego restablezca.
(p6g 18, 23-24)
Linea de ayuda de aspiradoras:
1-877-531-7321
8:00am-5:OOpm EST,M-F
(U.S.A. and Canada)
-2g -

Your Home
For troubleshooting, product manuals and expert advice:
www.managemylife,com
For repair - in your home - of all major brand appliances,
lawn and garden equipment, or heating and cooling systems,
no matter who made it, no matter who sold it !
For the replacement parts, accessories and
owner's manuals that you need to do-it-yourself.
For Sears professional installation of home appliances
and items like garage door openers and water heaters.
1-800-4-MY-HOME ®Ca, anytime, day or night
(I-800-469-4663) (U.S.A. and Canada
www,sears,com www,sears,ca
TM
® Registered Trademark /Trademark of KCD IP, LLC in the United States, or Sears Brands, LLC in other countries
® Marca Registrada /TM Marca de Fabrica de KCD IP, LLC en Estados Unidos, o Sears Brands, LLC in otros paises
McMarque de commerce /MDMarque depos6e de Sears Brands, LLC
P/N C01ZDPT20U00 - I<C01ZDPTZOU0
