Kenmore 11629612990 User Manual CANISTER VACUUM CLEANER Manuals And Guides L0802697
KENMORE Vacuum, Canister Manual L0802697 KENMORE Vacuum, Canister Owner's Manual, KENMORE Vacuum, Canister installation guides
User Manual: Kenmore 11629612990 11629612990 KENMORE CANISTER VACUUM CLEANER - Manuals and Guides View the owners manual for your KENMORE CANISTER VACUUM CLEANER #11629612990. Home:Vacuums & Floor Care Parts:Kenmore Parts:Kenmore CANISTER VACUUM CLEANER Manual
Open the PDF directly: View PDF ![]() .
.
Page Count: 42
Owner's Manual
Vacuum Cleaner
Model 116.29612
116.29712
116.29713
CAUTION:
Read and follow all
safety and operating
instructions before first
use of this product.
Sears, Roebuck and Co., Hoffman Estates, IL 60179 U.S.A.
www.sears.com
Part No, COIZAUJ10UOO-4370919 Printed in UoS,A,
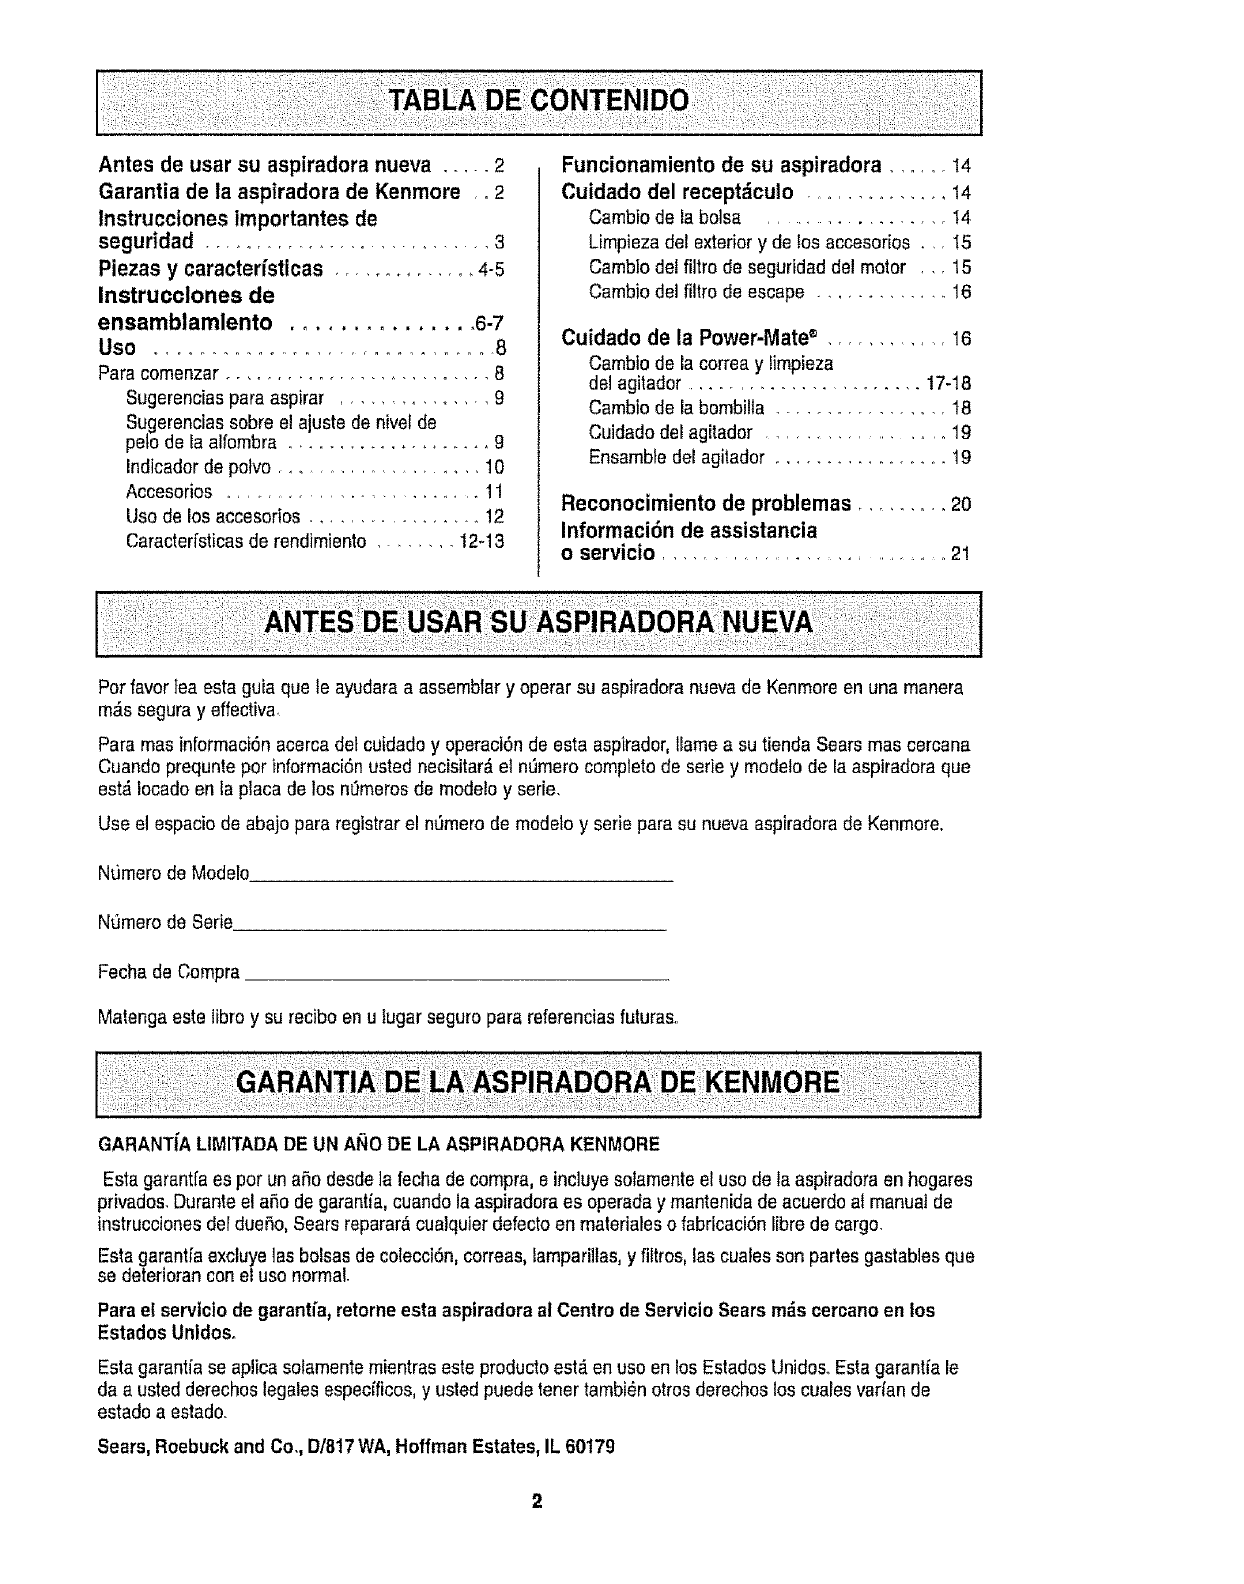
Before Using Your New Vacuum ....... 2
Kenmore Vacuum Cleaner Warranty • or2
Important Safety Instructions .......... 3
Parts and Features ................. 4-5
Assembly instructions .............. 6-7
Use .................................. 8
How to Start ............................. 8
Vacuuming Tips .................... 9
Suggested Pile Height Settings ......... 9
Dirt Sensor ........................ 10
Attachments ....................... 1!
Attachment Use Chart .................... 12
Performance Features ............. 12-13
How Your Vacuum Works .............. 14
Canister Care ......................... 14
Bag Changing ...................... 14
Cleaning Exterior and Attachments ..... 15
Motor Safety Filter Changing .......... 15
Exhaust Filter Changing .............. 16
Power-Mate ®Care .................... 16
Belt Changing and Agitator Cleaning.. 17-t8
Light Bulb Changing ................ 18
Agitator Servicing .................... 19
Agitator Assembly .................. 19
Troubleshooting ............................... 20
Requesting Assistance Or Service ,,. 21
Please read this guide. It will help you assemble and operate your new Kenmore vacuum in
the safest and most effective way_
For more information about vacuum cleaner care and operation, call your nearest Sears store°
You will need the complete model and serial numbers when requesting information. Your vacu-
um's model and serial numbers are located on the Model and Serial Number Plate.
Use the space below to record the model number and serial number of your new Kenmore
vacuum.
Model No,,
Serial No.
Date of Purchase
Keep this book and your sales check (receipt) in a safe place for future reference°
LIMITED ONEYEAR WARRANTY ON KENMOREVACUUM CLEANER
This warranty is for one year from the date of purchase, and includes only private household
vacuum cleaner use, During the warranty year, when this vacuum cleaner is operated and
maintained according to the owner's manual instructions, Sears will repair any defects in
material or workmanship free of charge.
This warranty excludes vacuum bags, belts, light bulbs, and filters, which are expendable parts
and become worn during normal use.
For warranty service, return this vacuum cleaner to the nearest Sears Service Center in
the United States.
This warranty applies only while this product is in use in the United States. This warranty gives
you specific legal rights, and you may also have other rights which vary from state to state.
Sears, Roebuck and Co., DI817WA, Hoffman Estates, IL 60179

WARNING
Your safety is important to us, To reduce the risk of fire, electrical shock, injury to
persons or damage when using your vacuum cleaner, follow basic safety precau-
tions including the following:
Read this manual before assembling or
using your vacuum cleaner,
Use your cleaner only as described in this
manual. Use only with Sears recommended
attachments°
To reduce the risk of electrical shock - Do
not use outdoors or on wet surfaces,
Disconnect electrical supply before servic-
ing or cleaning out brush area. Failure to do
so could result in electrical shock or brush
suddenly starting
Always turn cleaner off before connecting or
disconnecting the hose or Power-Mate ®.
Always turn cleaner off before unplugging.
Do not unplug by pulling on cord To unplug,
grasp the plug, not the cord_
Hold plug when rewinding onto cord reel.
Do not allow plug to whip when rewinding,
Do not use with damaged cord or plug. If
cleaner is not working as it should, has been
dropped, damaged, left outdoors, or dropped
into water, return it to a Sears Service
Center,
Do not pull or carry by cord, use cord as a
handle, close door on cord, or pull cord
around sharp edges or corners. Do not run
cleaner over cord. Keep cord away from
heated surfaces.
Do not leave cleaner when plugged in.
Llnplug from outlet when not in use and
before servicing.
Do not allow to be used as a toy Close
attention is necessary when used by or near
children.
Do not handle plug or cleaner with wet
hands.
Do not put any objects into openings.
Do not operate the cleaner with a punctured
hose. The hose contains electrical wires.
Replace if cut or worn. Avoid picking up
sharp objecls.
Do not use with any opening blocked; keep
free of dust, lint, hair and anything that may
reduce air flow,
Keep hair, loose clothing, fingers, and all
parts of body away from openings and mov-
ing parts.
Do not use cleaner without dust bag and/or
filters in place,
Always change the dust bag after vacuum-
ing carpet cleaners or freshener, powders
and fine dust. These products clog the bag,
reduce airflow and can cause the bag to
burst. Failure to change bag could cause
permanent damage to the cleaner°
Do not use the cleaner to pick up sharp hard
objects, small toys, pins, paper clips, etc.
They may damage the cleaner or dust bag.
De not pick up anything that is burning or
smoking, such as cigarettes, matches, or hot
ashes.
Do not use cleaner to pick up flammable or
combustible liquids (gasoline, cleaning fluids,
perfumes, etc_), or use in areas where they
may be present. The fumes from these sub-
stances can create a fire hazard or explo-
sion.
Use extra care when cleaning on stairs. Do
not put on chairs, tables, etc. Keep on floor.
You are responsible for making sure that
your vacuum cleaner is not used by anyone
unable to operate it properly,
Do not operate without exhaust filter or
exhaust filter cover installed.
SAVE THESE INSTRUCTIONS
Proper assembly and safe use of your vacuum cleaner are your responsibilities.Your cleaner
is intended only for household use_ Read this Owner's Manual carefully for important use and
safety information. This guide contains safety statements under warning and caution symbols.
Please pay special attention to these boxes and follow any instructions given. WARNING
statements alert you to such dangers as fire, electrical shock, burns and personal injury_CAU-
TION statements alert you to such dangers as personal injury and/or property damage.
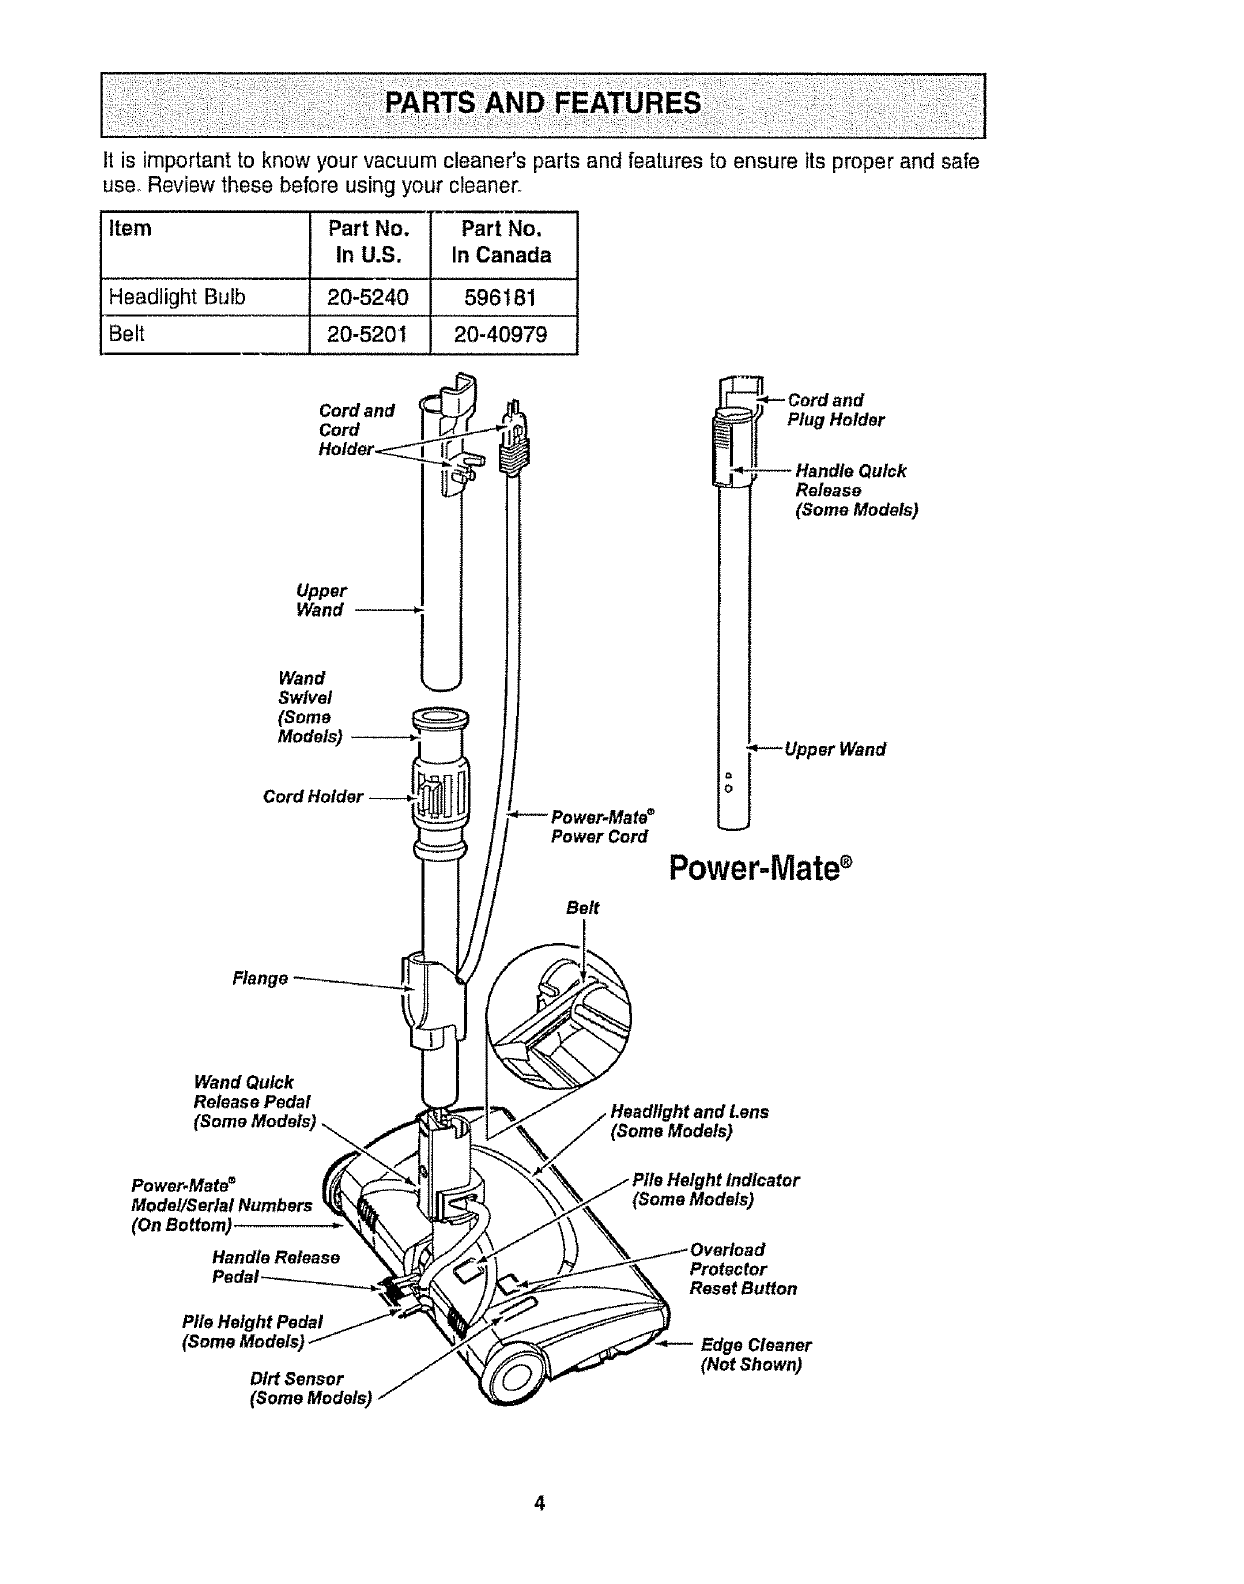
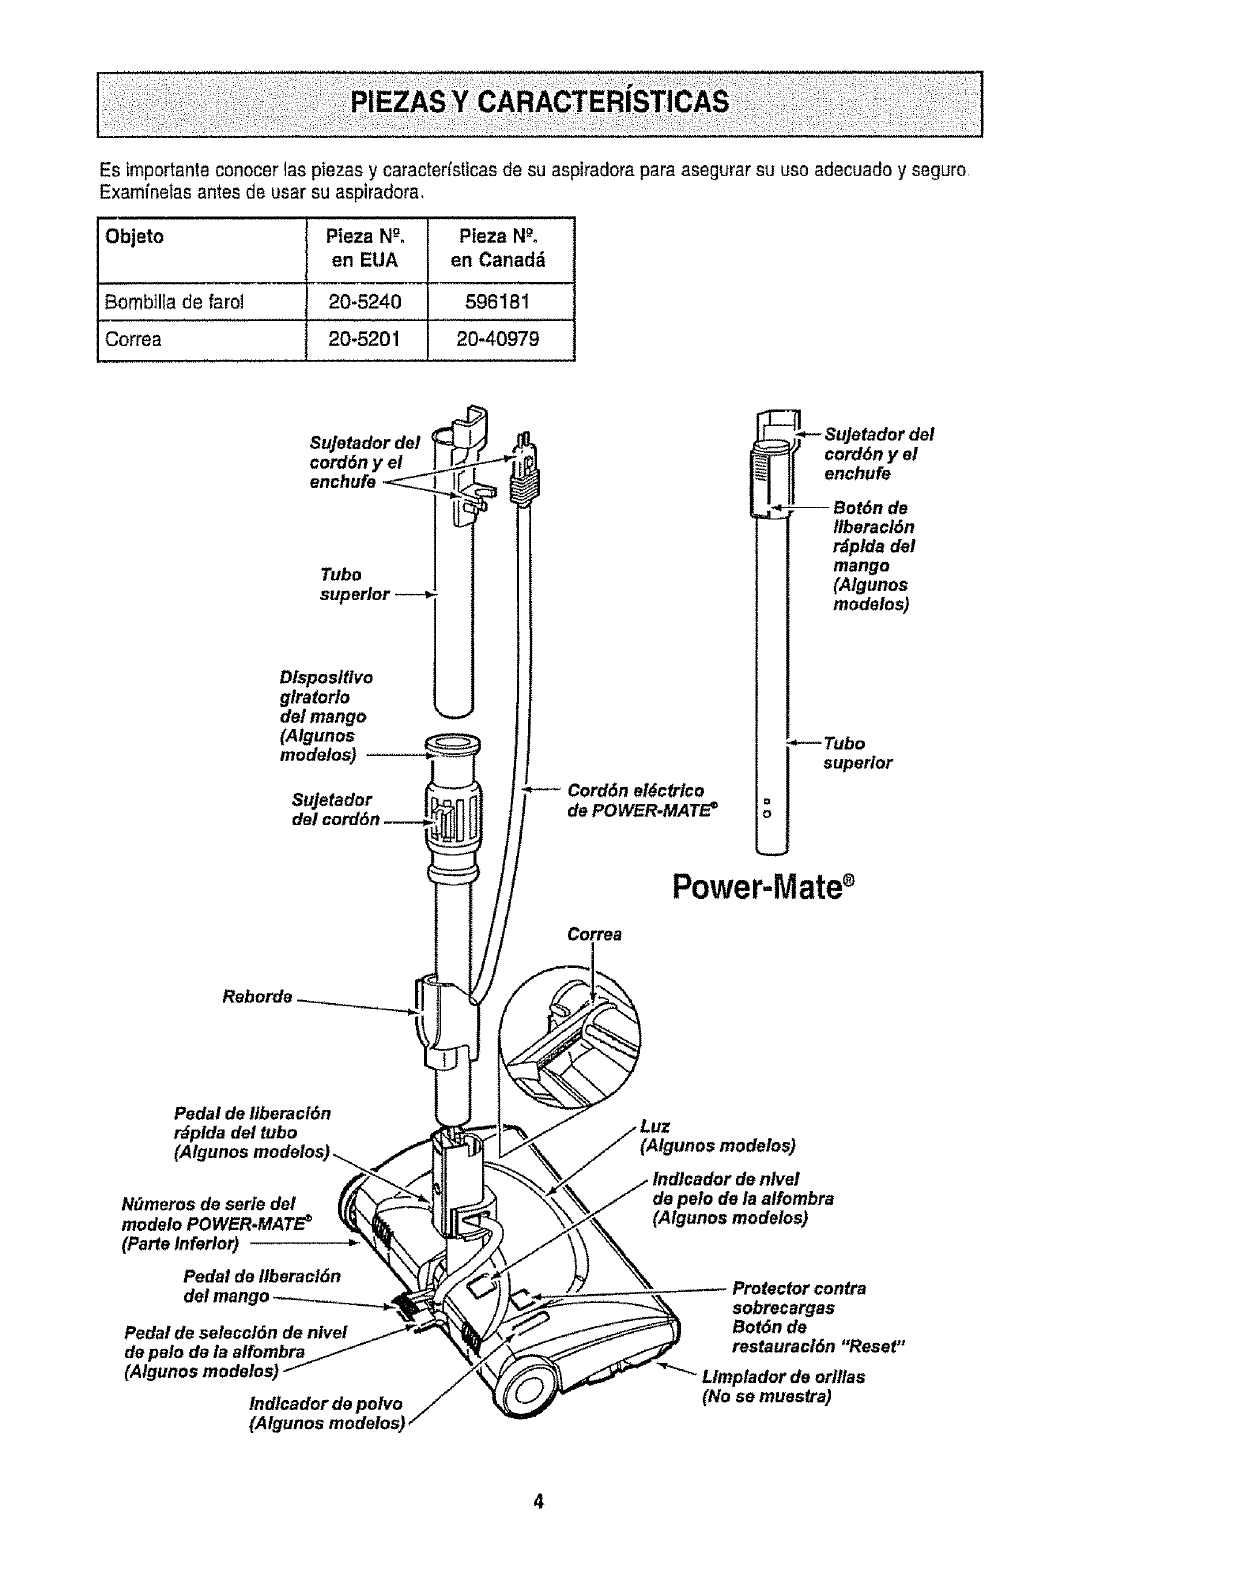
It is importantto knowyourvacuumcleaner'spartsandfeaturesto ensureits proper and safe
use, Review these before using your cleaner.
Item Part No. Part No.
In U.S. In Canada
Headlight Bulb 20-5240 596t 81
Belt 20-5201 20-40979
Cord and
Cord
Holder<_z_
Upper
Wand
Wand !___
Swivel
(Some
Bilt
Wand Quick
Release Pedal
(Some Models)
_- Cord and
Plug Holder
Handle Quick
Release
(Some Models)
--Upper Wand
Power-Mate
Power.Mate ®
Model/Serial Numbers
(On Bottom)
Handle Release
Pile Height Pedal
Dirt Sensor
(Some Mode/s_
Protector
Reset Button
EdgeCleaner
(Not Shown)
4
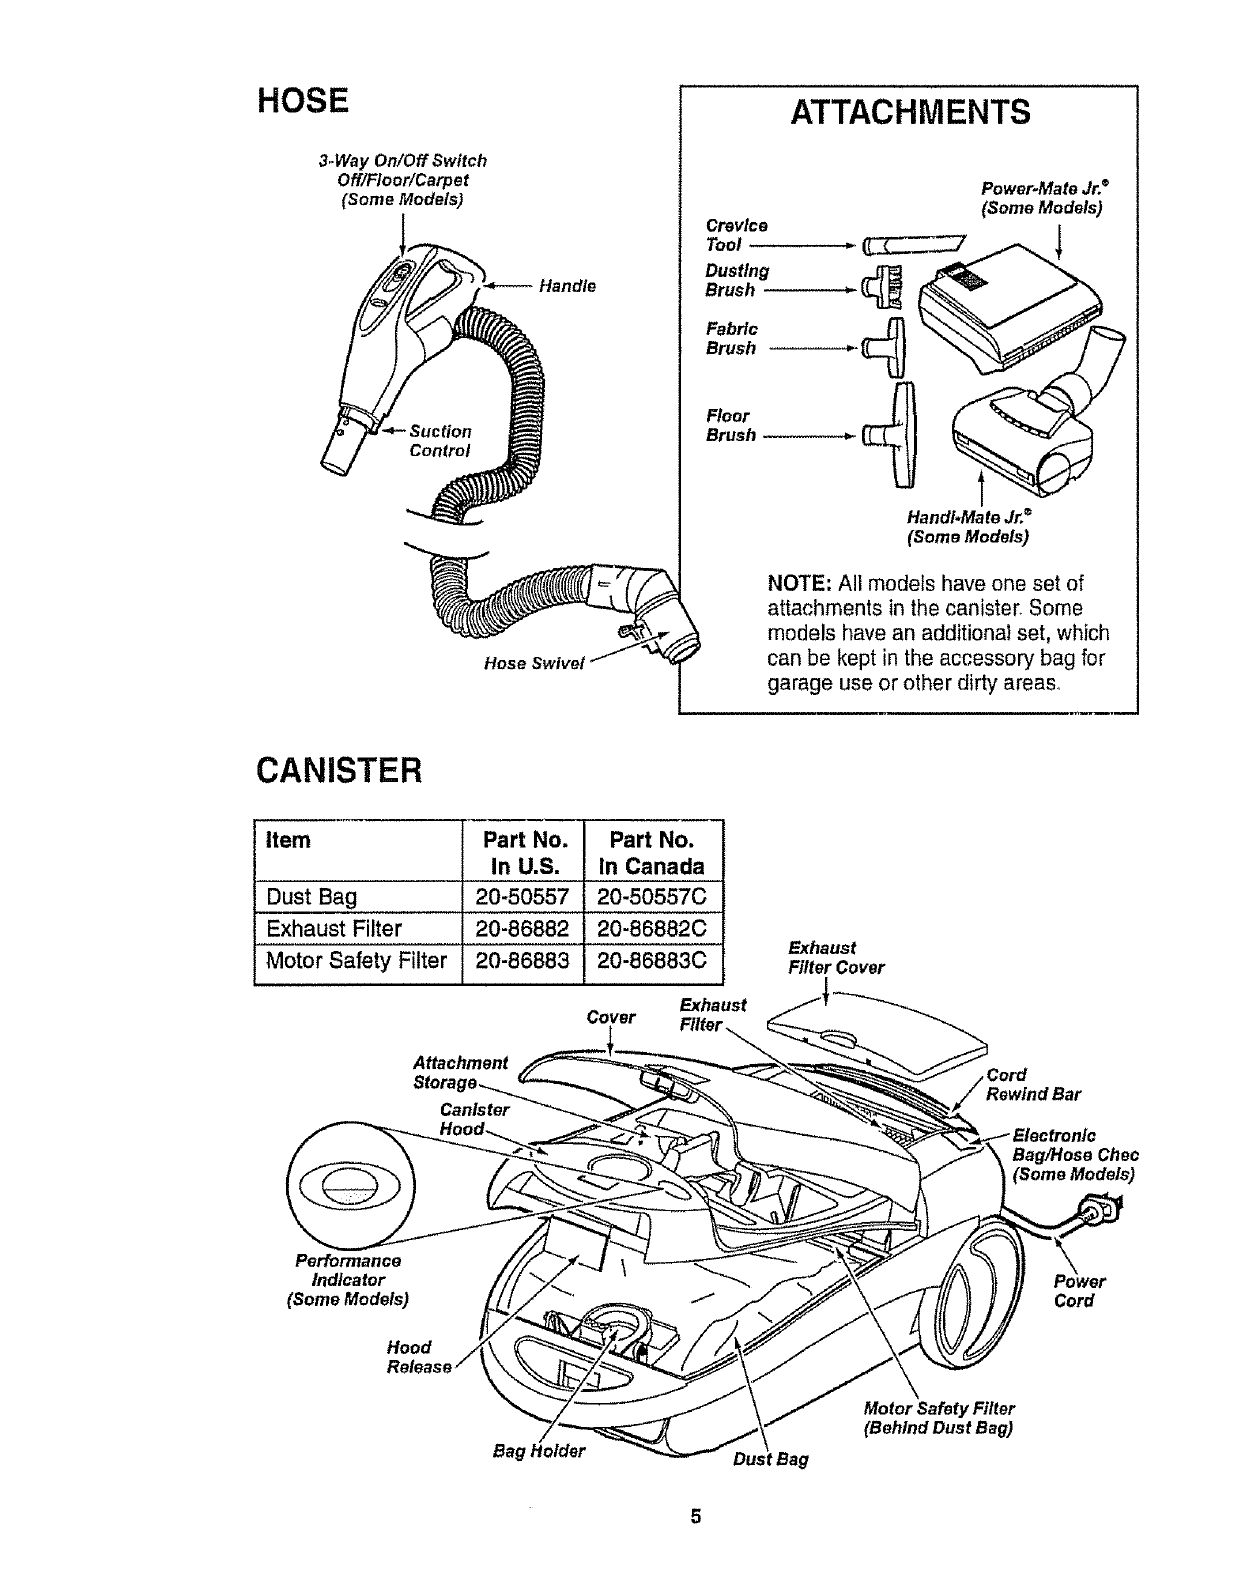
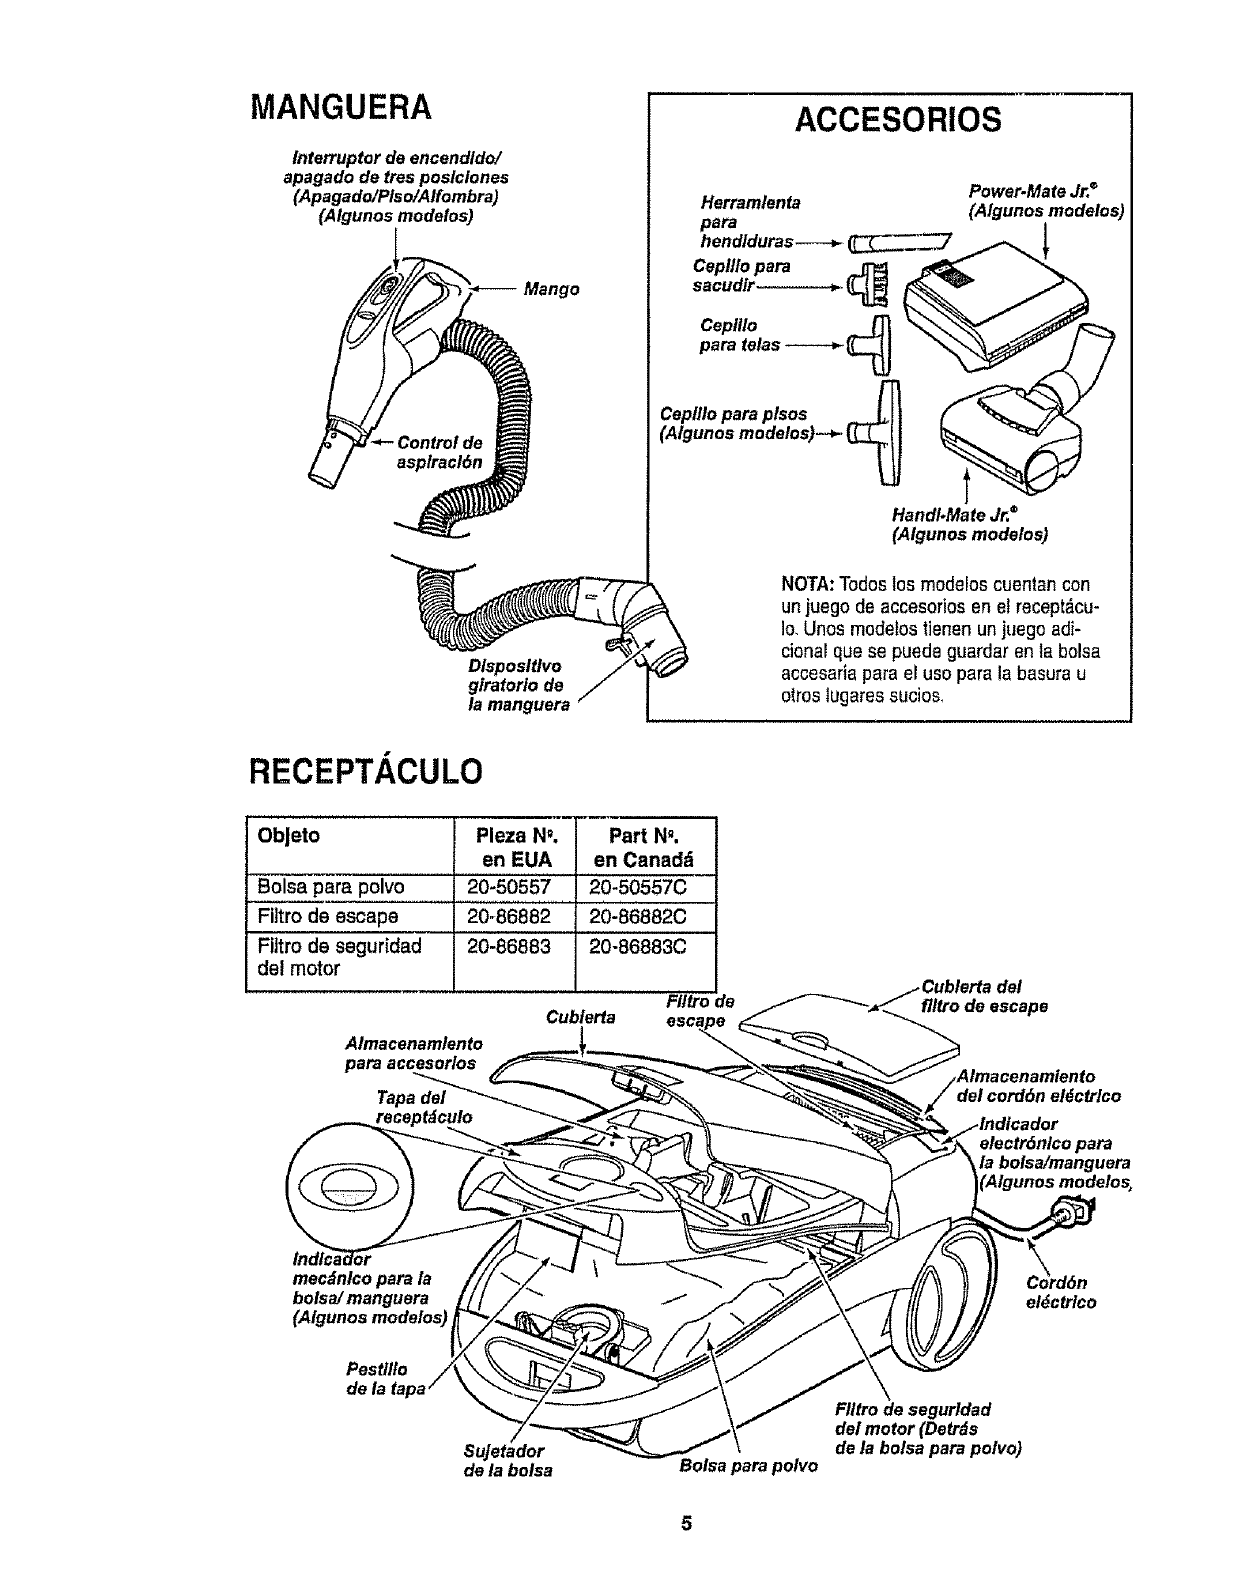
HOSE
3-Way On/Off Switch
Off/Floor/Carpe t
(Some Models)
Hose Swivel
ATTACHMENTS
Crevice
Tool
Dusting
Brush
Fabric
Brush
Floor
Brush
Power-Mate Jr.®
(Some Models)
Hand#Mate Jr.®
(Some Models)
NOTE: All models have one set of
attachments in the canister. Some
models have an additional set, which
can be kept in the accessory bag for
garage use or other dirty areas..
CANISTER
item Part No. Part No,
In U.S. In Canada
Dust Bag 20-50557 20-50557C
Exhaust Filter 20-86882 20-86882C
Motor Safety Filter 20-86883 20-86883C
Cover Exhaust
Filter ._
Attachment
Stora
Canister
Exhaust
Filter Cover
,Cord
BagtHose Chec
(Some Models)
Performance
Indicator
(Some Models)
Hoed
Cord
Bag Holder
Motor Safety Filter
(Behind Dust Bag)
WARNING
Electrical Shock Hazard
DO NOT plug into electrical supply
until assembly is complete. Failure
to do so could result in electrical
shock or injury,
, i , i , ,,i.ii
Before assembling vacuum, check the
PACKING LIST on the cover of the separate
Repair Parts List, Use this list to verify that
you have received all the components of
your new Kenmore vacuum.
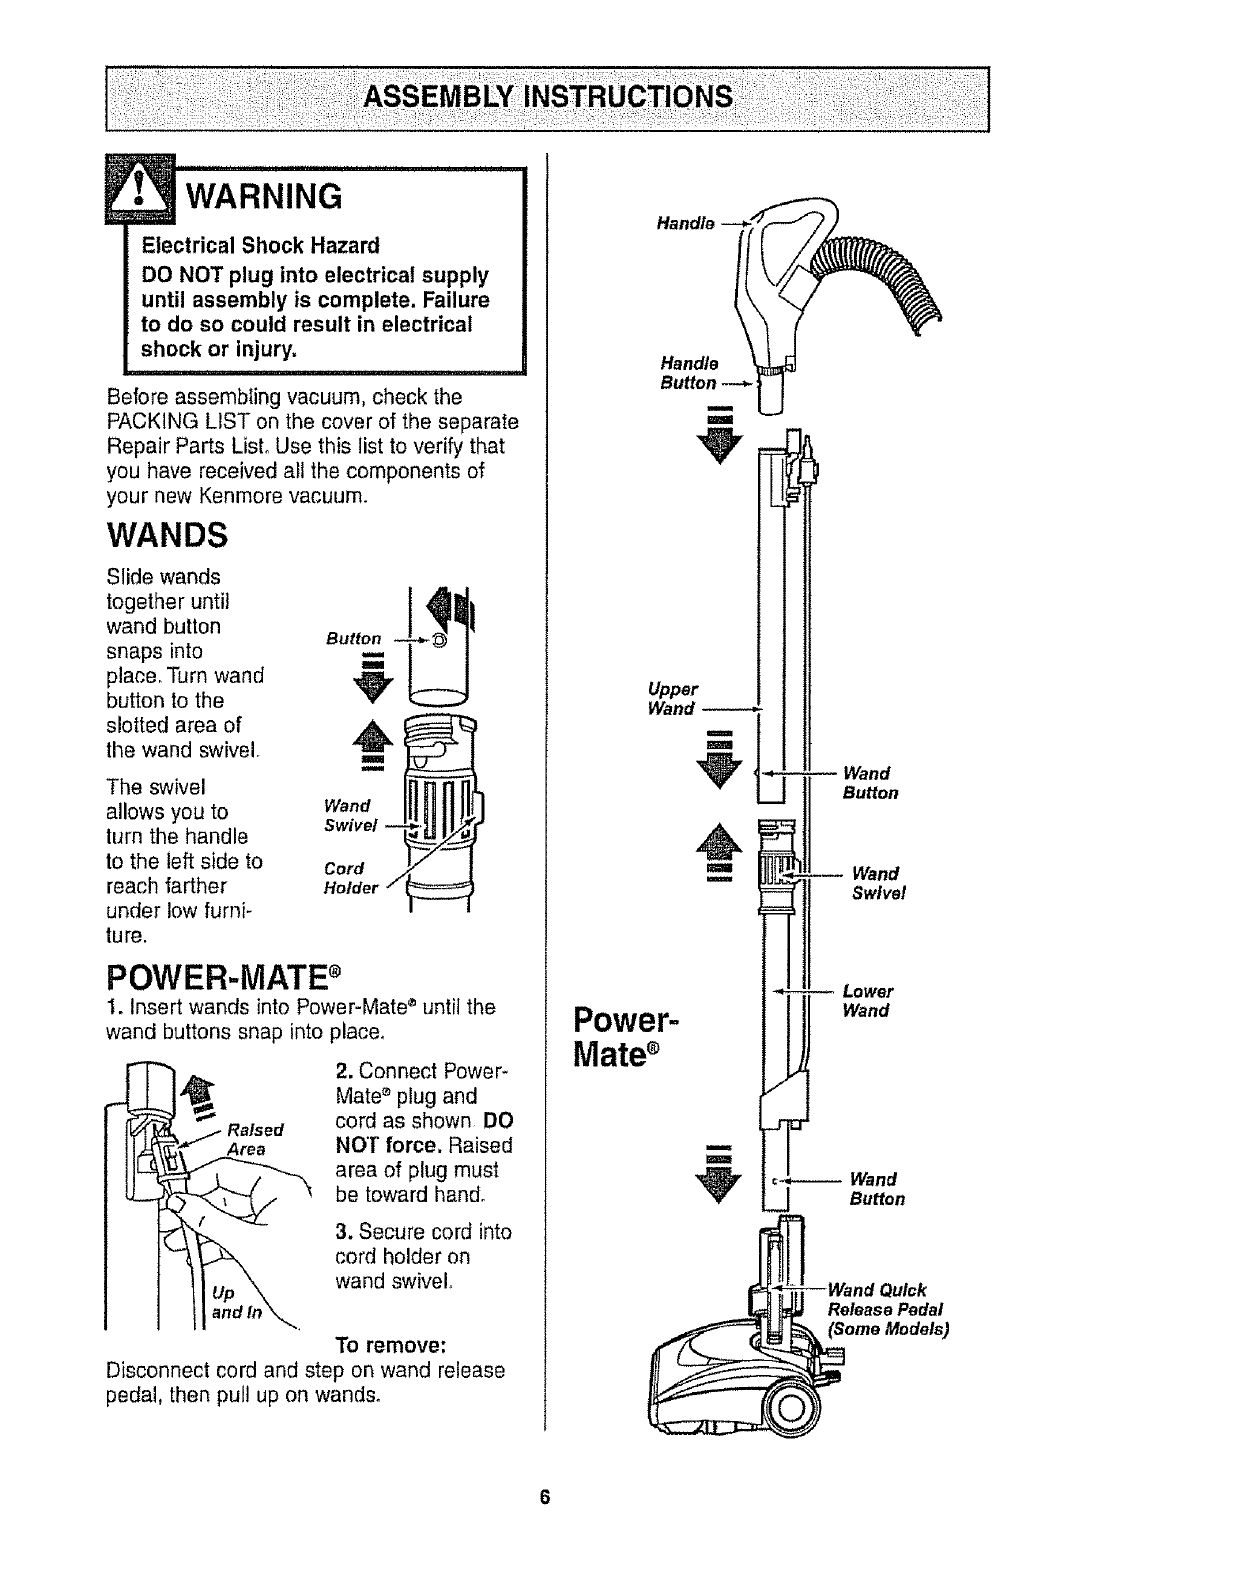
WANDS
Slide wands
together until
wand button
snaps into
place, Turn wand
button to the
slotted area of
the wand swivel.
The swivel
allows you to
turn the handle
to the left side to
reach farther
under low furni-
ture.
Button
Swivel --
Cord
Holder 7
POWER-MATE ®
1. Insert wands into Power-Mate ® until the
wand buttons snap into placer
2. Connect Power-
Mate _ plug and
Raised cord as shown DO
Area NO'[" force. Raised
area of plug must
be toward hand.
3. Secure cord into
cord holder on
wand swivel°
To remove:
Disconnect cord and step on wand release
pedal, then pull up on wands.
Handle
Upper
Wand -----*
m
U
u
m
Power-
Mate
m
m
Wand
Button
Wand
Swivel
Lower
Wand
_ulck
Release Pedal
(Some Models)
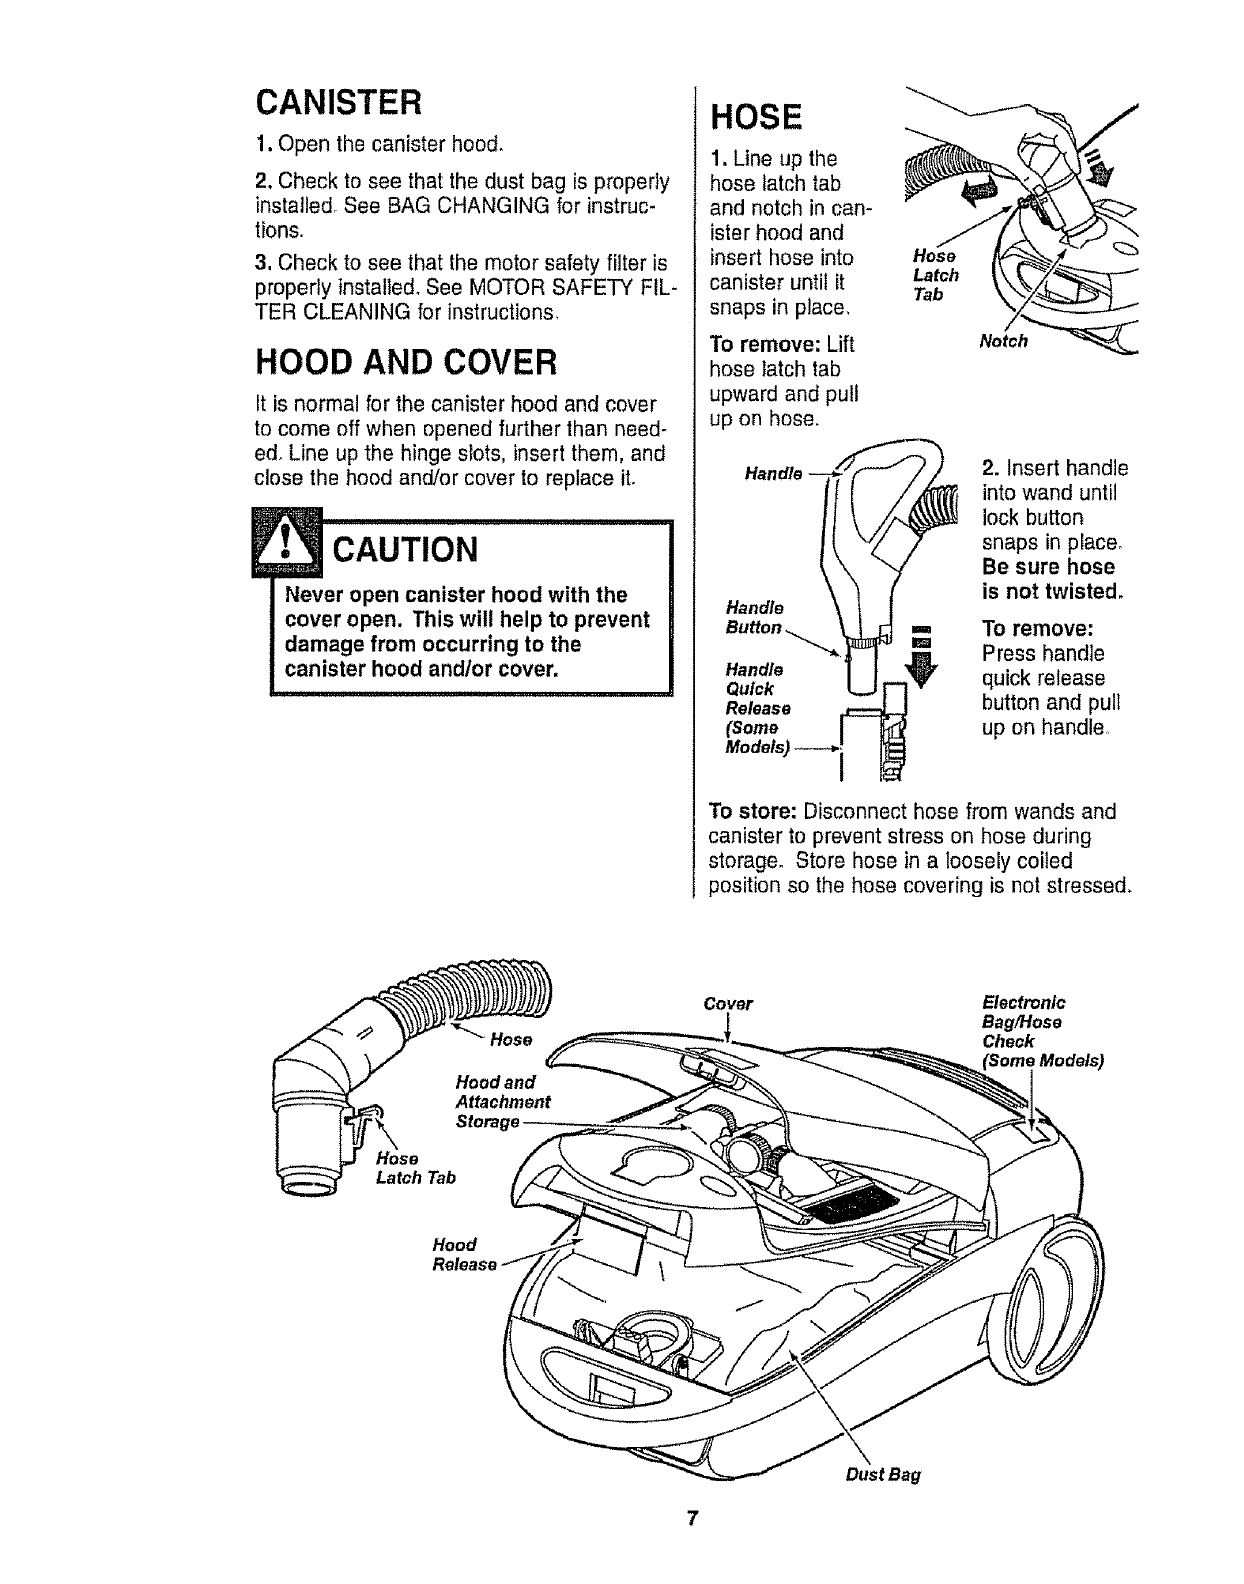
CANISTER
1. Open the canister hood.
2. Check to see that the dust bag is properly
installed. See BAG CHANGING for instruc-
tions.
3, Check to see that the motor safety filter is
properly installed. See MOTOR SAFETY FIL-
TER CLEANING for instructions.
HOOD AND COVER
It is normal for the canister hood and cover
to come off when opened further than need-
ed. Line up the hinge slots, insert them, and
close the hood and/or cover to replace it.
E
•CAUTION
Never open canister hood with the
cover open. This will help to prevent
damage from occurring to the
canister hood andlor cover,
HOSE
1. Line up the
hose latch tab
and notch in can-
ister hood and
insert hose into
canister until it Latch
Tab
snaps in place.
To remove: Lift
hose latch tab
upward and pull
up on hose.
Release
(Some
Models) _--_'1
Notch
2. Insert handle
into wand until
lock button
snaps in place_
Be sure hose
is not twisted.
To remove:
Press handle
quick release
button and pull
up on handle.
To store: Disconnect hose from wands and
canister to prevent stress on hose during
storage. Store hose in a loosely coiled
position so the hose covering is not stressed.
Hose
Latch Tab
Cover Electronic
BaglHose
Check
Hood
Dust Bag
HOW TO START
Personal Injury and Product Damage
Hazard
• DO NOT plug in if switch is in ON
position. Personal injury or
damage could result.
• The cord moves rapidly when
rewinding. Keep children away
and provide a clear path when
rewinding the cord to prevent
personal injury°
,DO NOT use outlets above
counters. Damage from cord to
items in surrounding area
could occur.
J!J!ll IIIII I i iiiiiiiii1,,,,,11
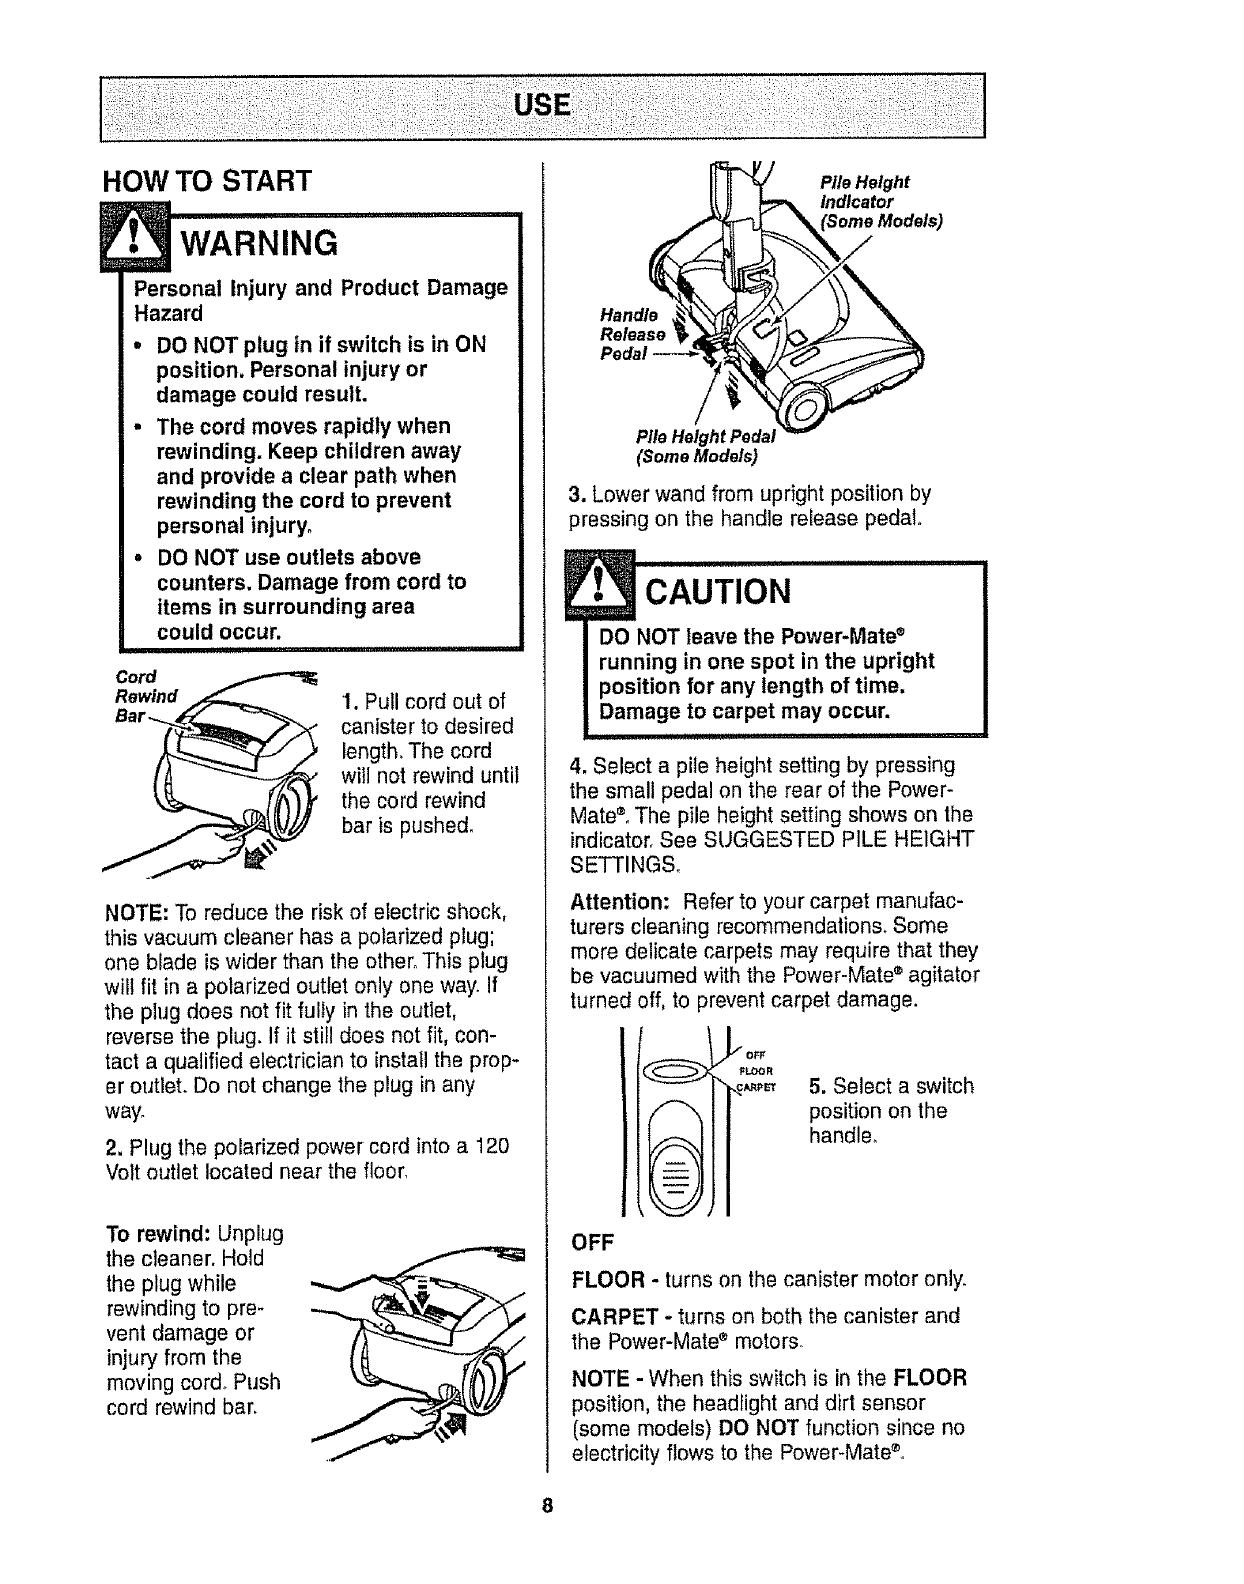
Cord
Rewind 1. Pull cord out of
canister to desired
length, The cord
will not rewind until
the cord rewind
bar is pushed°
NOTE: To reduce the risk of electric shock,
this vacuum cleaner has a polarized plug;
one blade is wider than the other. This plug
will fit in a polarized outlet only one way. if
the plug does not fit fully in the outlet,
reverse the plug. If it still does not fit, con-
tact a qualified electrician to install the prop-
er outlet. Do not change the plug in any
way.
2. Plug the polarized power cord into a 120
Volt outlet located near the floor,
To rewind: Unplug
the cleaner. Hold
the plug while
rewinding to pre-
vent damage or
injury from the
moving cord° Push
cord rewind bar.
Pile Height
Indicator
Handle
Release
Pile Height Pedal
(Some Models)
3. Lower wand from upright position by
pressing on the handle release pedal,,
ECAUTION ...............................
DO NOT leave the Power-Mate ®
running in one spot in the upright
position for any length of time.
Damage to carpet may occur.
4. Select a pile height setting by pressing
the small pedal on the rear of the Power-
Mate®° The pile height setting shows on the
indicator. See SUGGESTED PILE HEIGHT
SETTINGS_
Attention: Refer to your carpet manufac-
turers cleaning recommendations. Some
more delicate carpets may require that they
be vacuumed with the Power-Mate ®agitator
turned off, to prevent carpet damage.
= -- =
= -- =
L, -- /d
\--._/]
_OFF
FLOOR
\._ 5. Select a switch
position on the
handle°
OFF
FLOOR - turns on the canister motor only.
CARPET -turns on both the canister and
the Power-Mate ®motors_
NOTE - When this switch is in the FLOOR
position, the headlight and dirt sensor
(some models) DO NOT function since no
electricity flows to the Power-Mate ®.
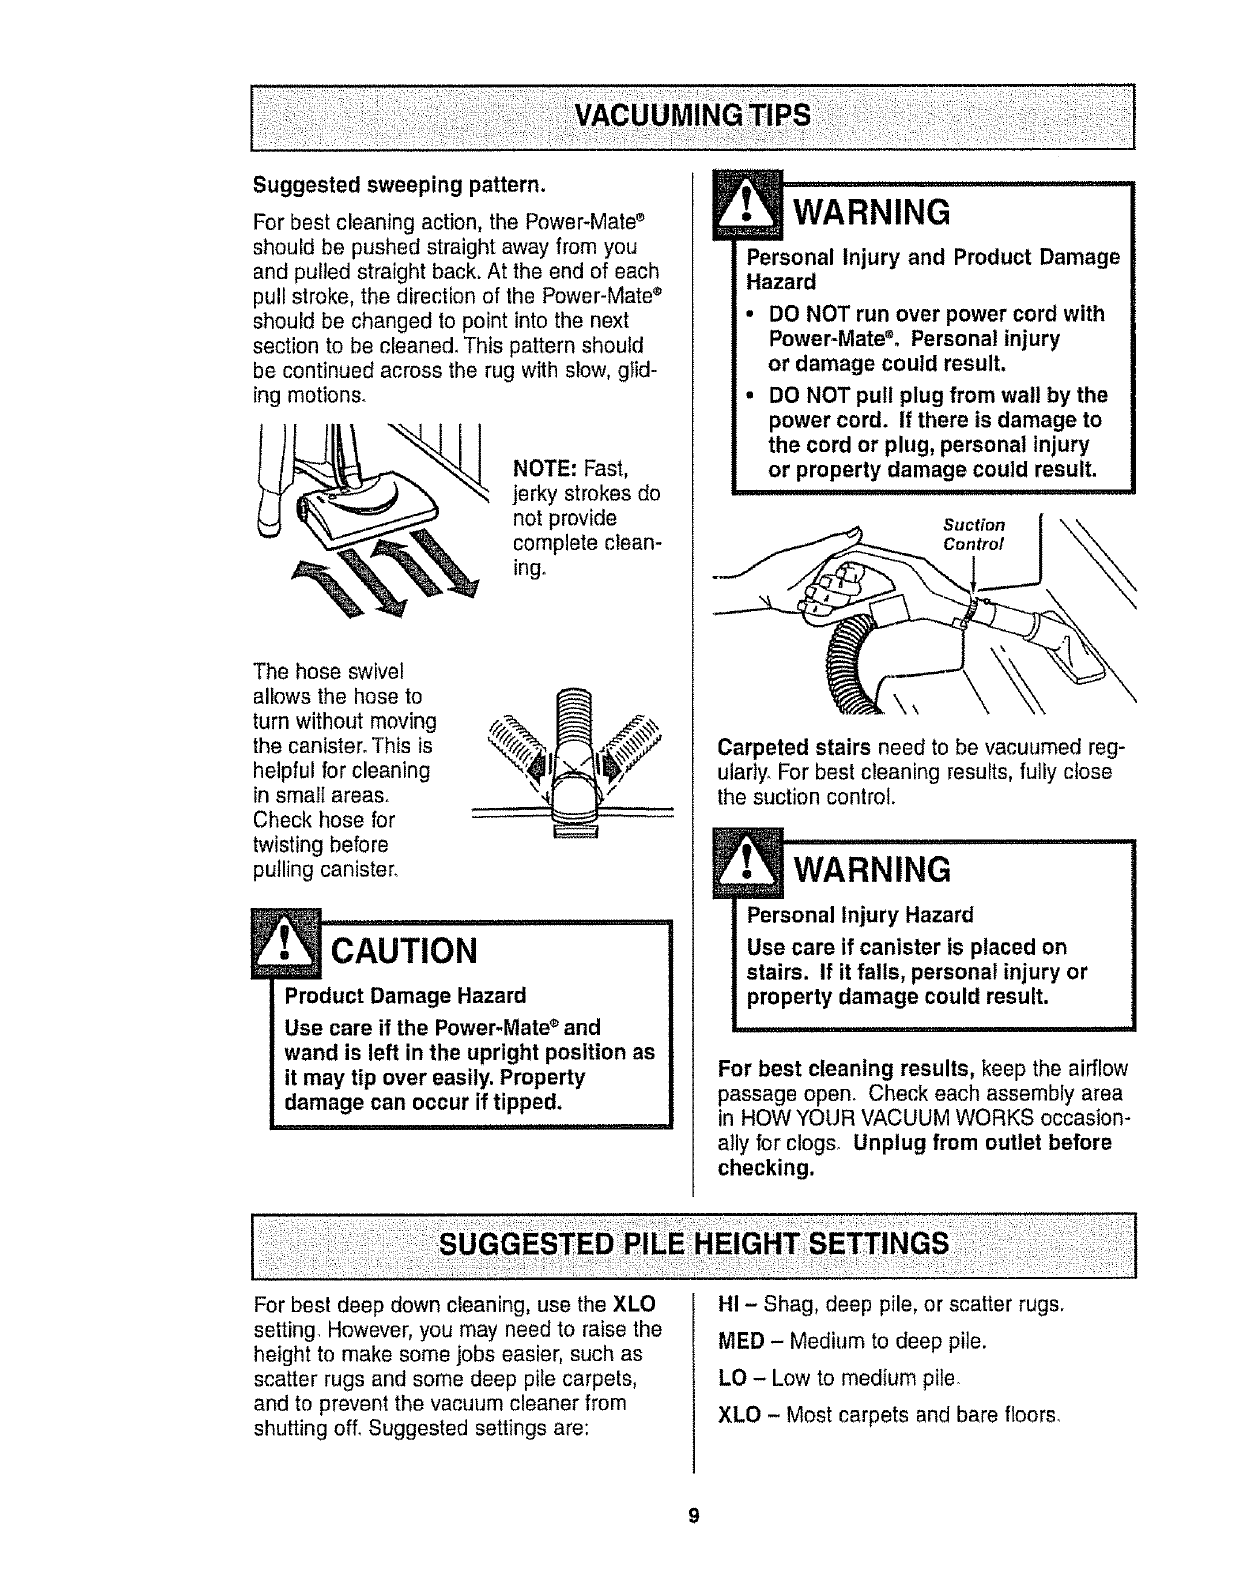
Suggested sweeping pattern.
For best cleaning action, the Power-Mate s
should be pushed straight away from you
and pulled straight back. At the end of each
pull stroke, the direction of the Power-Mate ®
should be changed to point into the next
section to be cleaned. This pattern should
be continued across the rug with slow, glid-
ing motions.
NOTE: Fast,
jerky strokes do
not provide
complete clean-
ing.
The hose swivel
allows the hose to
turn without moving
the canister. This is
helpful for cleaning
in smalI areas.
Check hose for
twisting before
pulling canister.
E•CAUTION
Product Damage Hazard
Use care if the Power-Mate ®and
wand is left in the upright position as
it may tip over easily. Property
damage can occur if tipped.
E• WARNING
Personal Injury and Product Damage
Hazard
• DO NOT run over power cord with
Power-MateS° Personal injury
or damage could result.
• DO NOT pull plug from wall by the
power cord. If there is damage to
the cord or plug, personal injury
or property damage could result.
Suction
Control
Carpeted stairs need to be vacuumed reg-
ularly. For best cleaning results, fully close
the suction control.
J...... rn,,
WARNING
Personal Injury Hazard
Use care if canister is placed on
stairs. If it falls, personal injury or
property damage could result.
For best cleaning results, keep the airflow
passage open. Check each assembly area
in HOWYOUR VACUUM WORKS occasion-
ally for clogs_ Unplug from outlet before
checking.
For best deep down cleaning, use the XLO
setting However, you may need to raise the
height to make some jobs easier, such as
scatter rugs and some deep pile carpets,
and to prevent the vacuum cleaner from
shutting off. Suggested settings are:
HI - Shag, deep pile, or scatter rugs.
MED - Medium to deep pile.
LO - Low to medium pile.
XLO - Most carpets and bare floors.
SOME MODELS TO CLEAN THE LENSES
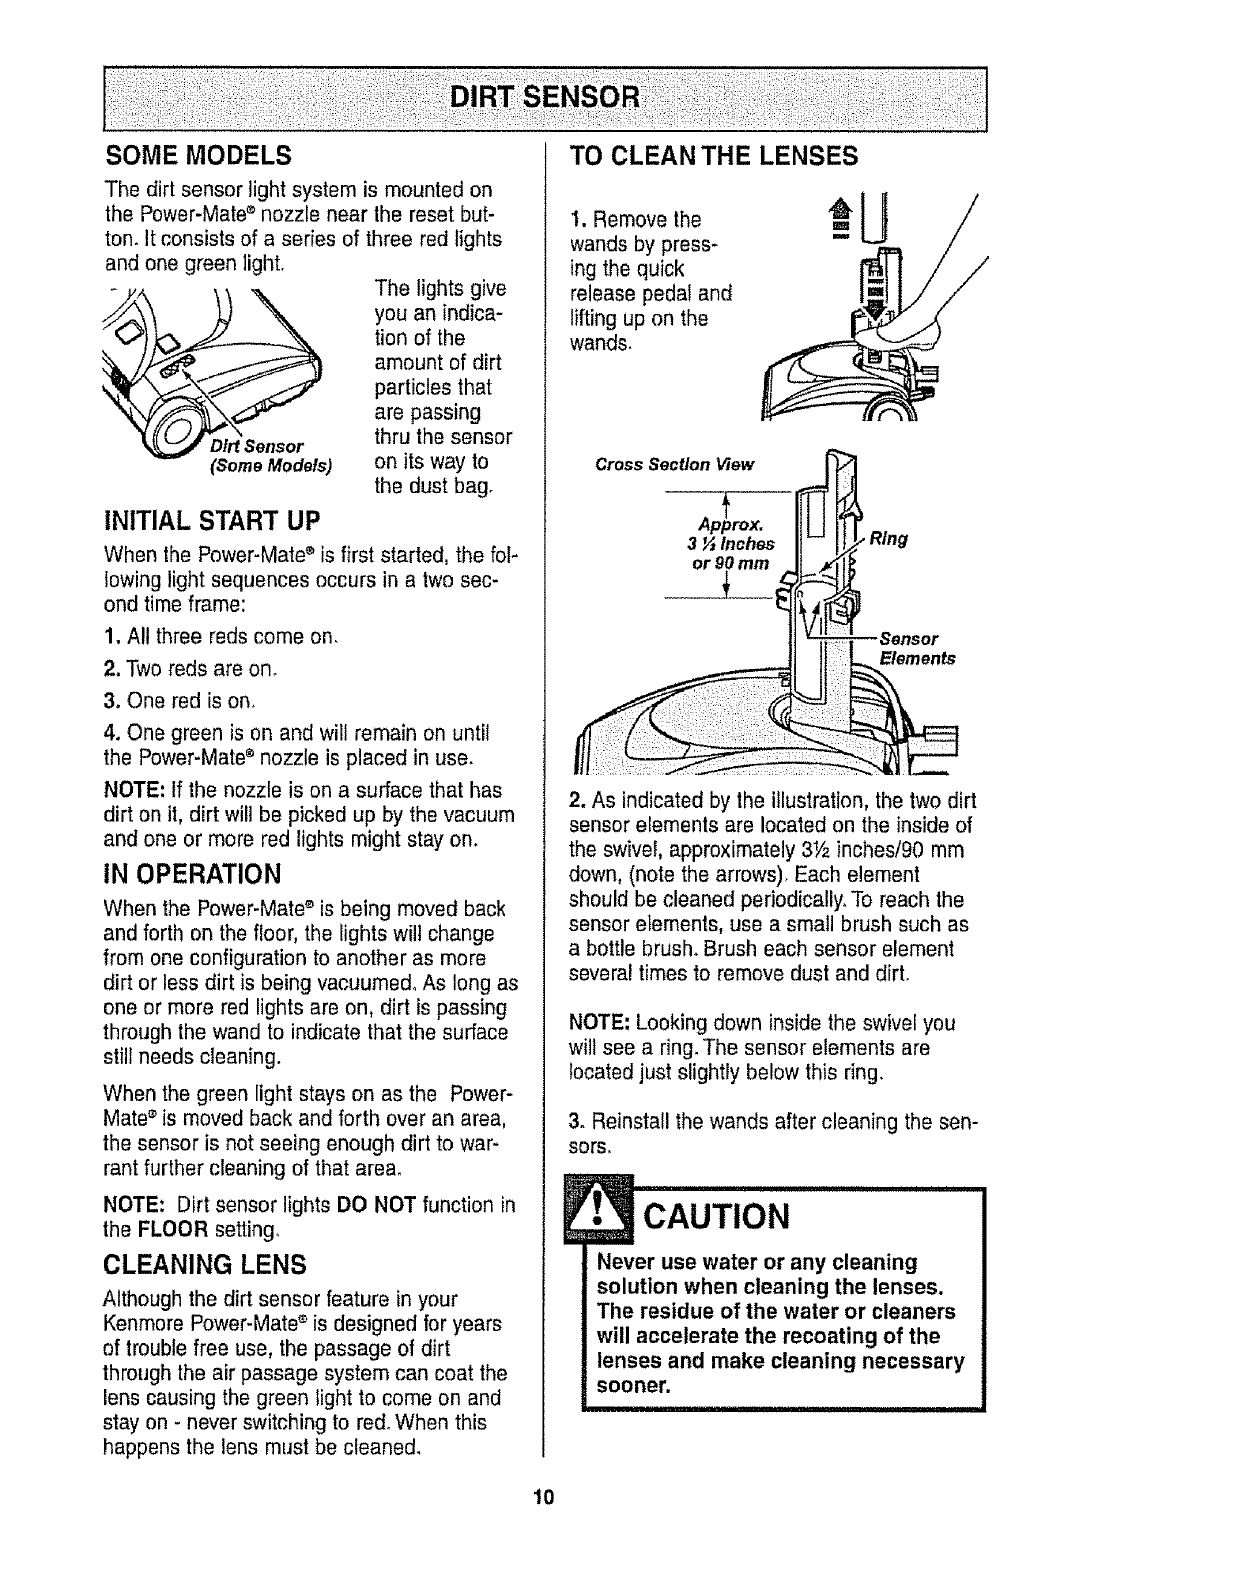
The dirt sensor light system is mounted on
the Power-Mate ®nozzle near the reset but-
ton. It consists of a series of three red lights
and one green light,
The lights give
you an indica-
tion of the
amount of dirt
particles that
are passing
Dirt Sensor thru the sensor
(SomeModels) on its way to
the dust bag.
INITIAL START UP
When the Power-Mate ®is first started, the fol-
lowing light sequences occurs in a two sec-
ond time frame:
1. All three reds come on,
2. Two reds are on o
3. One red is on.
4. One green is on and will remain on until
the Power-Mate ® nozzle is placed in use.
NOTE: tf the nozzle is on a surface that has
dirt on it, dirt will be picked up by the vacuum
and one or more red lights might stay on.
IN OPERATION
When the Power-Mate ®is being moved back
and forth on the floor, the lights will change
from one configuration to another as more
dirt or less dirt is being vacuumed° As long as
one or more red lights are on, dirt is passing
through the wand to indicate that the surface
still needs cleaning.
When the green light stays on as the Power-
Mate®is moved back and forth over an area,
the sensor is not seeing enough dirt to war-
rant further cleaning of that area°
NOTE: Dirt sensor lights DO NOT function in
the FLOOR setting,
CLEANING LENS
Although the dirt sensor feature in your
Kenmore Power-Mate ®is designed for years
of trouble free use, the passage of dirt
through the air passage system can coat the
lens causing the green light to come on and
stay on - never switching to red° When this
happens the lens must be cleaned.
1, Remove the
wands by press-
ing the quick
release pedal and
lifting up on the
wands.
Cross Section View
Apirox.
3_Inches
or 90 mm
.Sensor
Elements
2. As indicated by the illustration, the two dirt
sensor elements are located on the inside of
the swivel, approximately 3Y_ inches/90 mm
down, (note the arrows), Each element
should be cleaned periodically. To reach the
sensor elements, use a small brush such as
a bottle brush. Brush each sensor element
several times to remove dust and dirt.
NOTE; Looking down inside the swivel you
wilt see a ring. The sensor elements are
located just slightly below this ring,
3. Reinstall the wands after cleaning the sen-
sors,
E• CAUTION
Never use water or any cleaning
solution when cleaning the lenses.
The residue of the water or cleaners
will accelerate the recoating of the
lenses and make cleaning necessary
sooner.
10
ATTACHMENTS ON
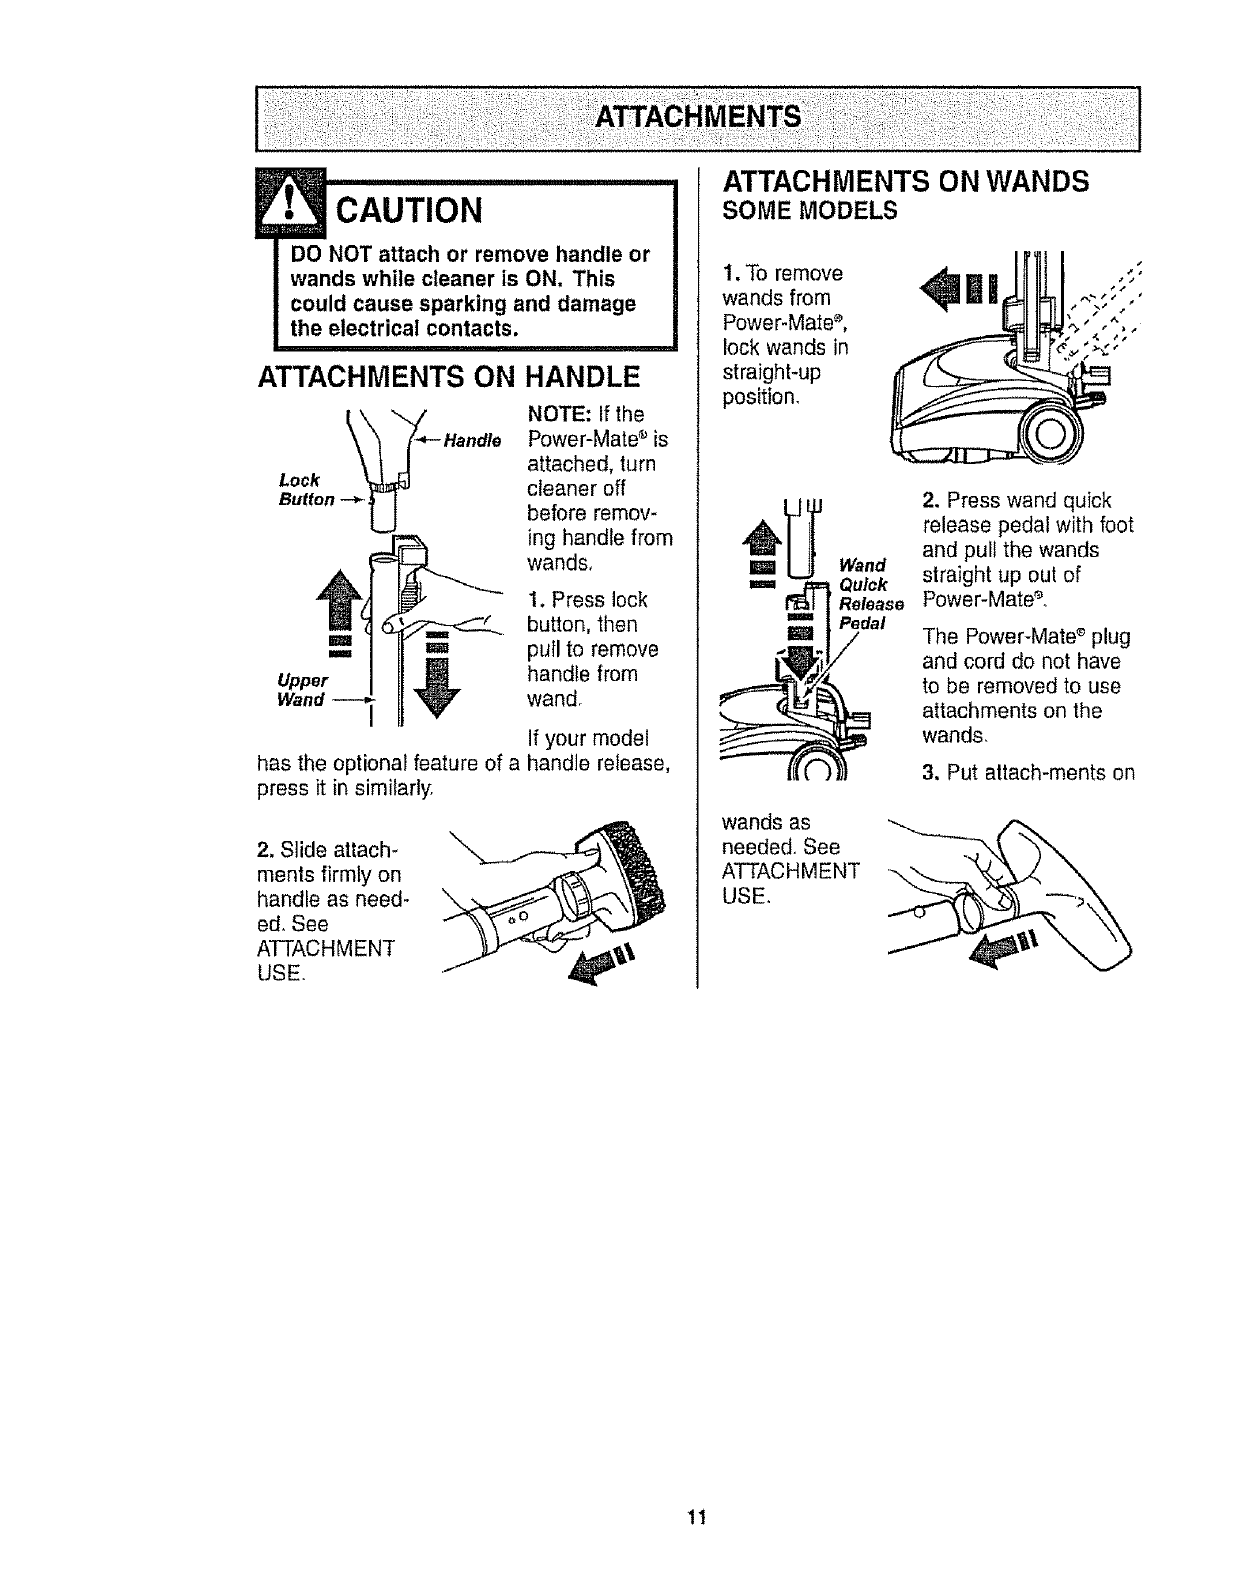
•CAUT,o.
DO NOT attach or remove handle or
wands while cleaner isON. This
could cause sparking and damage
the electrical contacts.
HANDLE
NOTE: If the
Power-Mate _ is
attached, turn
Lock cleaner off
Button -_ before remov-
ing handle from
wands,
1. Press lock
button, then
,,,==_ '=1 pull to remove
Upper _!_ handle from
Wand V wand°
has the optional feature of a
press it in similarly.
If your model
handle release,
2. Slide attach-
ments firmly on
handle as need-
ed. See
ATTACHMENT
USE.
ATTACHMENTS ON WANDS
SOME MODELS
1.Toremove _ II| ";
wands from "" '
Power-Mate s, ,.
lock wands in _.
straight-up I
position,
m
m
wands as
needed., See
ATTACHMENT
USE.
Wand
Quick
Release
Pedal
/
2. Press wand quick
release pedal with foot
and pull the wands
straight up out of
Power-Mate e,
The Power-Mate_ plug
and cord do not have
to be removed to use
attachments on the
wands,
3. Put attach-merits on
11
ATTACHMENT
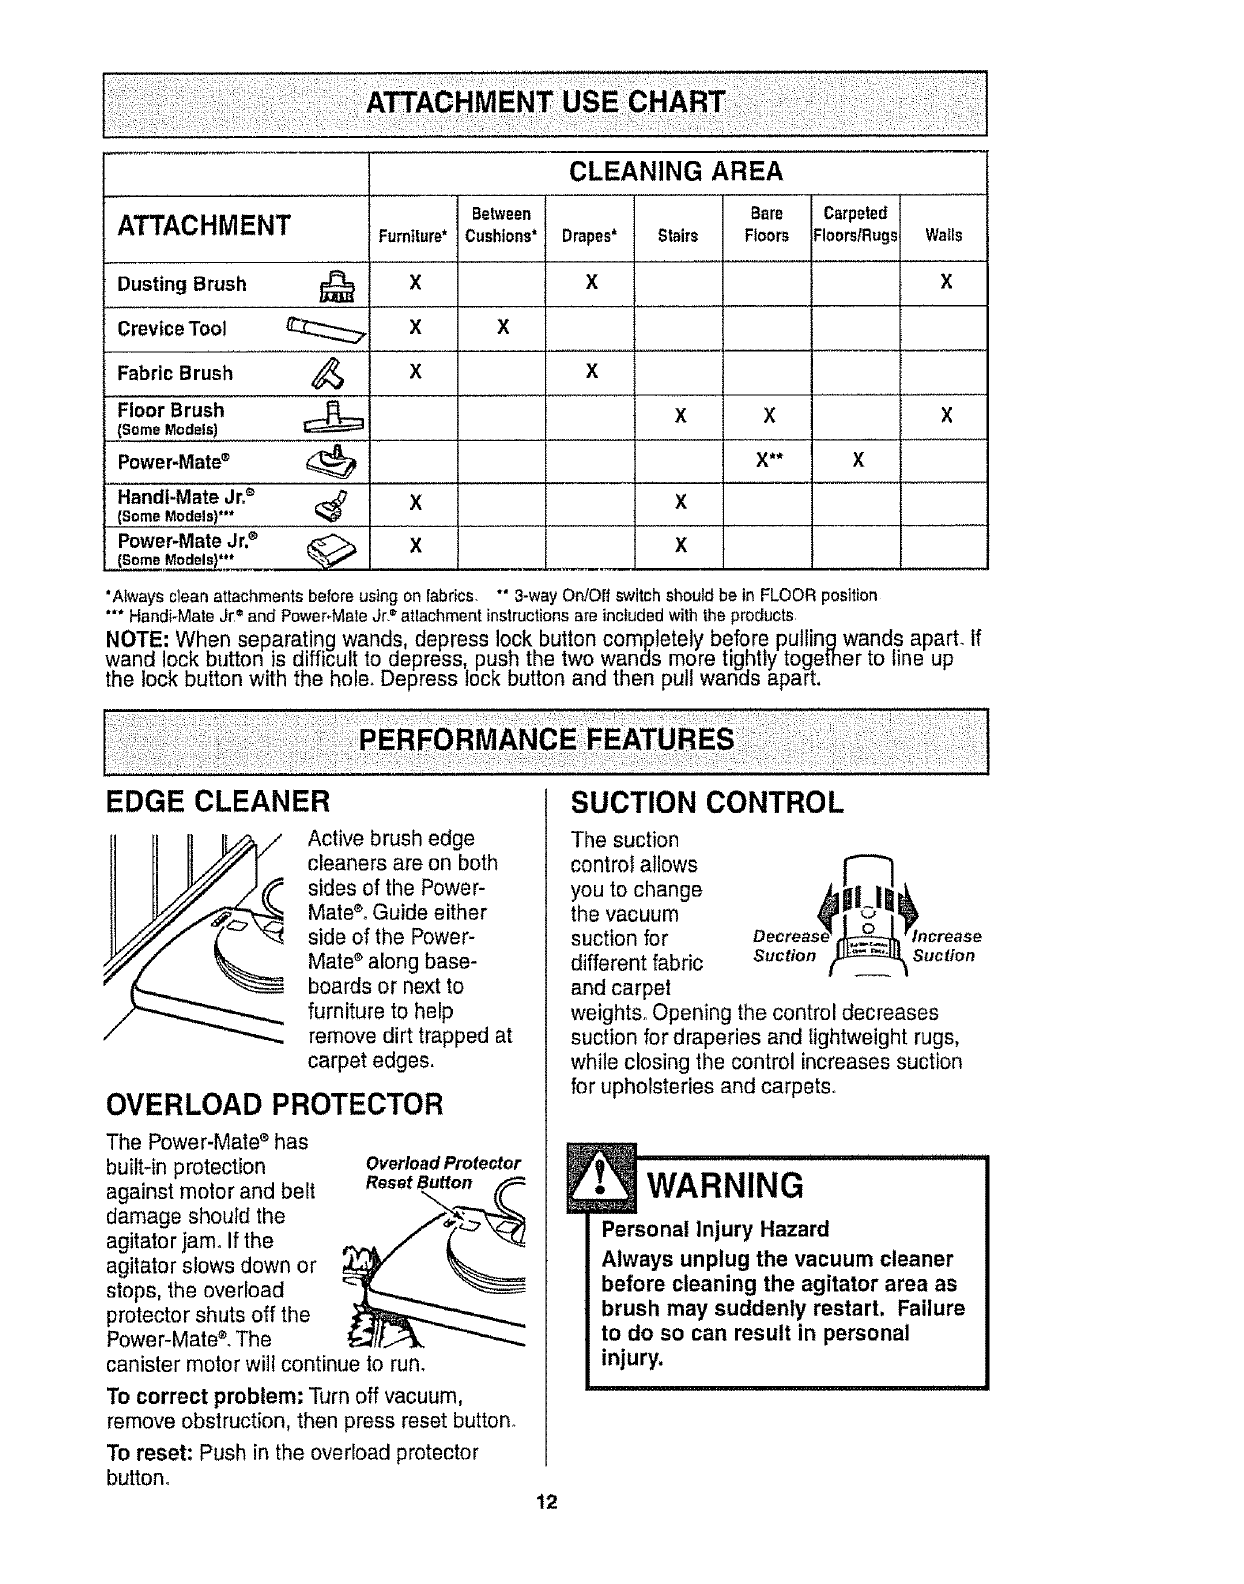
Dusting Brush
Crevice Tool
Fabric Brush
-FleorBrush
(Some Models)
Furniture*
'"_ ................. X
x
x
Power-Mate®
Handt-Mate Jr=_'
(Some Models}***
Power-Mate Jr.®
(Some Models)***
x
x
X
CLEANING AREA
Bare
Drapes* Stairs Floors
x
x
x X
X**
X
X
Carpeted
Floors/Rugs= Walls
x
X
x
'Always clean attachments before using on fabrics. *" 3-way On!Offswitch should be in FLOOR position
'** Handi_Mate Jr = and Power-Mate Jr.= atlachment instructionsare included with the products
NOTE: When separating wands, depress lock button completely before putlingwands aparL If
wand lock button is difficul! to depress push the two wands more tightly together to line up
the lock button with the nolo. Depress lock button and then pu wanas apar[.
EDGE CLEANER
Active brush edge
cleaners are on both
sides of the Power-
Mate®° Guide either
side of the Power-
Mate ®along base-
boards or next to
furniture to help
remove dirt trapped at
carpet edges.
OVERLOAD PROTECTOR
The Power-Mate s has
built-in protection
against motor and belt
damage should the
agitator jam° If the
agitator slows down or
stops, the overload
protector shuts off the
Power-Mate ®. The
canister motor will continue to run.
OveHoad Protector
Reset Button
To correct problem: Turn off vacuum,
remove obstruction, then press reset button.
To reset: Push in the overload protector
button°
12
SUCTION CONTROL
The suction
control allows
you to change
the vacuum
suction for
different fabric Suction Suction
and carpet
weights. Opening the control decreases
suction for draperies and Iightweight rugs,
while closing the control increases suction
for upholsteries and carpets
WARNING ..............
Personal Injury Hazard
Always unplug the vacuum cleaner
before cleaning the agitator area as
brush may suddenly restart, Failure
to do so can result in personal
injury,
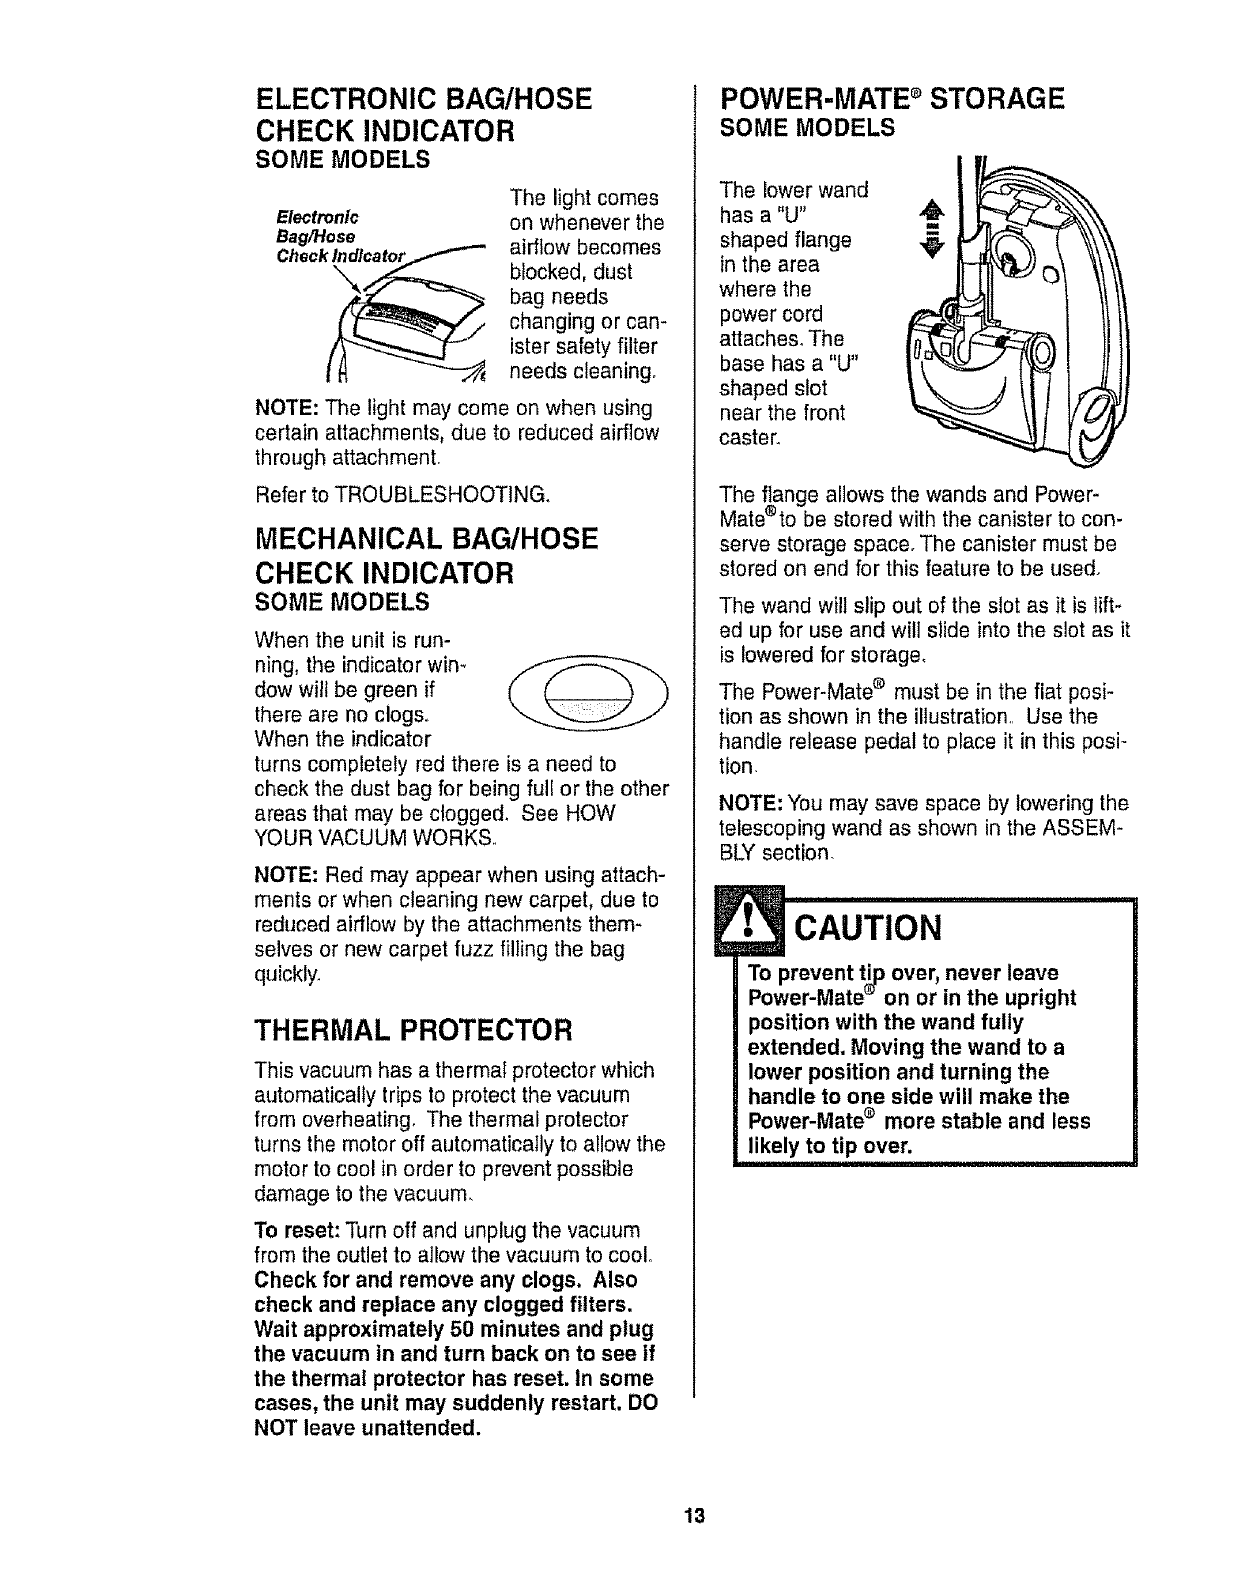
ELECTRONIC BAG/HOSE
CHECK INDICATOR
SOME MODELS
Electronic
Bag/Hose
Check
The light comes
on whenever the
airflow becomes
blocked, dust
bag needs
changing or can-
ister safety filter
needs cleaning.
NOTE: The light may come on when using
certain attachments, due to reduced airflow
through attachment.
Refer to TROUBLESHOOTING.
MECHANICAL BAG/HOSE
CHECK INDICATOR
SOME MODELS
When the unit is run-
ning, the indicator win-
dow will be green if
there are no clogs.
When the indicator
turns completely red there is a need to
check the dust bag for being full or the other
areas that may be clogged, See HOW
YOUR VACUUM WORKS.
NOTE: Red may appear when using attach-
ments or when cleaning new carpet, due to
reduced airflow by the attachments them-
selves or new carpet fuzz filling the bag
quickly.
THERMAL PROTECTOR
This vacuum has a thermal protector which
automatically trips to protect the vacuum
from overheating. The thermal protector
turns the motor off automatically to allow the
motor to cool in order to prevent possible
damage to the vacuum.
To reset: Turn off and unplug the vacuum
from the outlet to allow the vacuum to coolo
Check for and remove any clogs. Also
check and replace any clogged filters.
Wait approximately 50 minutes and plug
the vacuum in and turn back on to see if
the thermal protector has reset. In some
cases, the unit may suddenly restart, DO
NOT leave unattended.
POWER-MATE d STORAGE
SOME MODELS
The lower wand
has a "U"
shaped flange
in the area
where the
power cord
attaches_ The
base has a "U"
shaped slot
near the front
caster.
The flange allows the wands and Power-
Mate®to be stored with the canister to con-
serve storage space. The canister must be
stored on end for this feature to be used°
The wand will slip out of the slot as it is lift-
ed up for use and will slide into the slot as it
is lowered for storage,
The Power-Mate ® must be in the flat posi-
tion as shown in the illustration, Use the
handle release pedal to place it in this posi-
tion.
NOTE: You may save space by lowering the
telescoping wand as shown in the ASSEM-
BLY section.
tCAUT,ON
To prevent tip over, never leave
Power-Mate '_ on or in the upright
position with the wand fully
extended. Moving the wand to a
lower position and turning the
handle to one side will make the
Power-Mate ® more stable and less
likely to tip over.
13
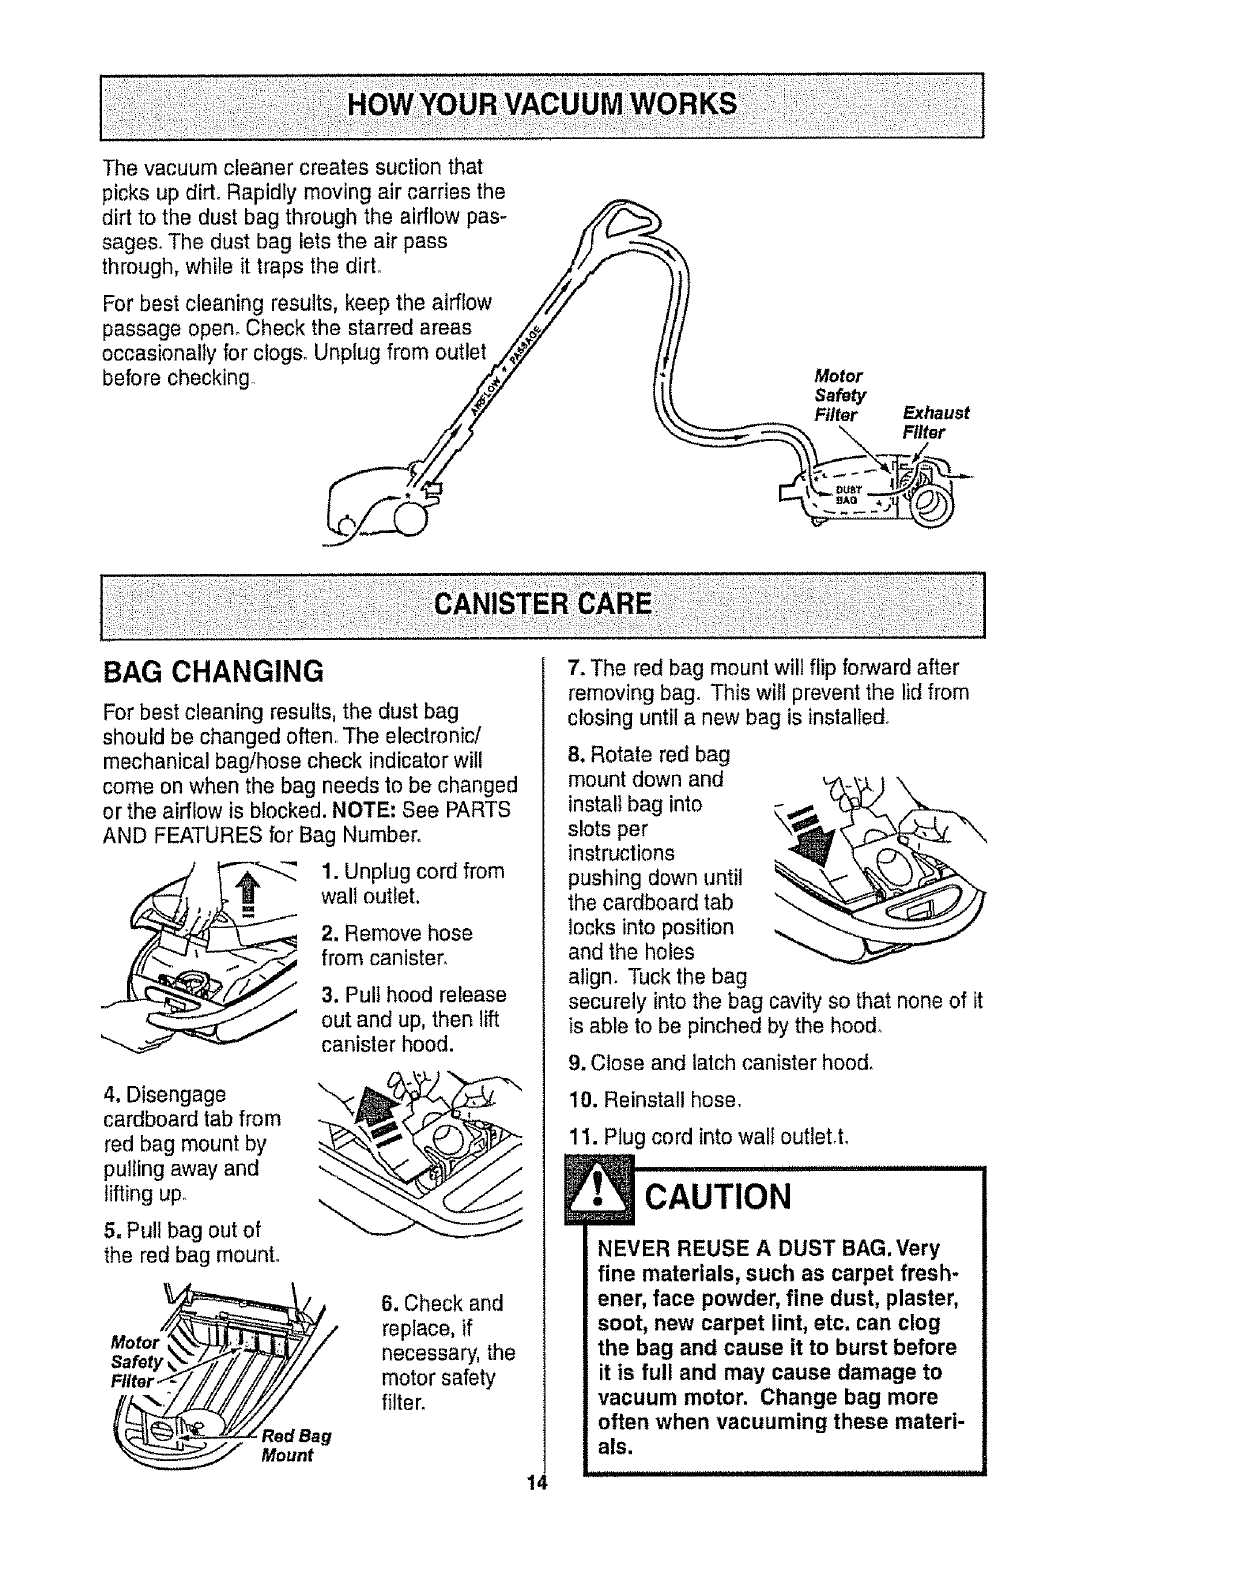
Thevacuumcleanercreatessuctionthat
picksupdirt.Rapidlymovingaircarriesthe
dirt tothe dustbagthroughthe airflowpas-
sages..Thedustbagletstheairpass /)
through, while it traps the dirt° /_/_'_ "; Y
For best cleaning results, keep the airflow ////
passage open° Check the starred areas ,,/_/"
occasionally for clogs. Unplug from outlet ./_,#/7 /
before checking __ _ Motor
Safety
Filter Exhaust
"\ Filter
BAG CHANGING
For best cleaning results, the dust bag
should be changed often.. The electronic/
mechanical bag/hose check indicator will
come on when the bag needs to be changed
or the airflow is blocked. NOTE: See PARTS
AND FEATURES for Bag Number.
1. Unplug cord from
wall outlet.
2. Remove hose
from canister,
3. Pull hood release
out and up, then lift
canister hood.
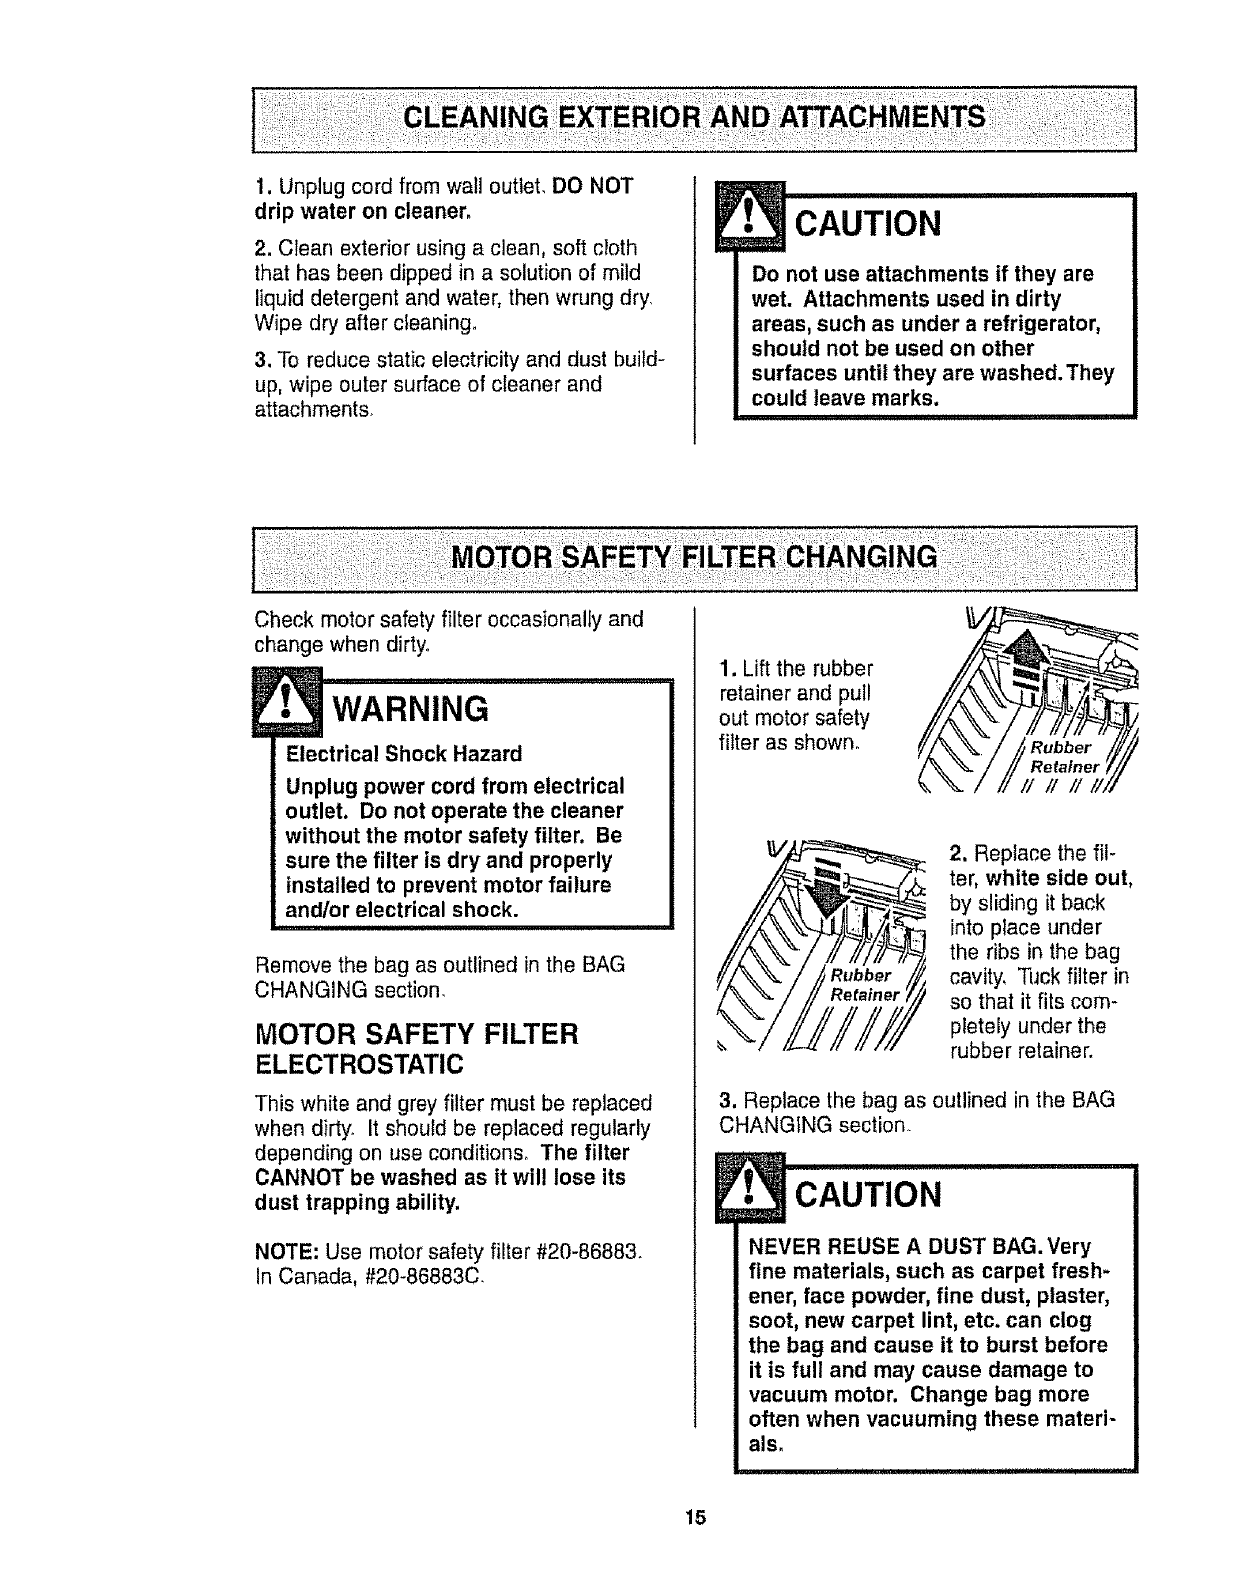
4, Disengage
cardboard tab from
red bag mount by
pulling away and
lifting up.
5, Pull bag out of
the red bag mount°
r_//k'__/ 6. Check and
Moto replace, if
Safety _._/i f ]/7/// necessary, the
Ftlter._//////'///,//D//// motor safety
"'__d an, filter.
Mount 14
7. The red bag mount will flip forward after
removing bag. This will prevent the lid from
closing until a new bag is installed°
8. Rotate red bag
mount down and
install bag into
slots per
instructions
pushing down until
the cardboard tab
locks into position
and the holes
align. Tuck the bag
securely into the bag cavity so that none of it
is able to be pinched by the hood.
9. Close and latch canister hood.
10. Reinstall hose.
11. Plug cord into wall outlet,t.
C,°T,O, I
NEVER REUSE A DUST BAG. Very
fine materials, such as carpet fresh-
ener, face powder, fine dust, plaster,
soot, new carpet lint, etc. can clog
the bag and cause it to burst before
it is full and may cause damage to
vacuum motor. Change bag more
often when vacuuming these materi-
als.
1. Unplug cord from wall outlet, DO NOT
drip water on cleaner.
2. Clean exterior using a clean, soft cloth
that has been dipped in a solution of mild
liquid detergent and water, then wrung dry.
Wipe dry after cleaning.
3, To reduce static electricity and dust build-
up, wipe outer surface of cleaner and
attachments.
1•CAUTION
Do not use attachments if they are
wet. Attachments used in dirty
areas, such as under a refrigerator,
should not be used on other
surfaces until they are washed.They
could leave marks.
Check motor safety filter occasionally and
change when dirty.
Electrical Shock Hazard
Unplug power cord from electrical
outlet. Do not operate the cleaner
without the motor safety filter. Be
sure the filter is dry and properly
installed to prevent motor failure
and/or electrical shock.
Remove the bag as outlined in the BAG
CHANGING section.
MOTOR SAFETY FILTER
ELECTROSTATIC
This white and grey filter must be replaced
when dirty° It should be replaced regularly
depending on use conditions. The filter
CANNOT be washed as it will lose its
dust trapping ability,
NOTE: Use motor safety filter #20-86883.
In Canada, #20-86883C,
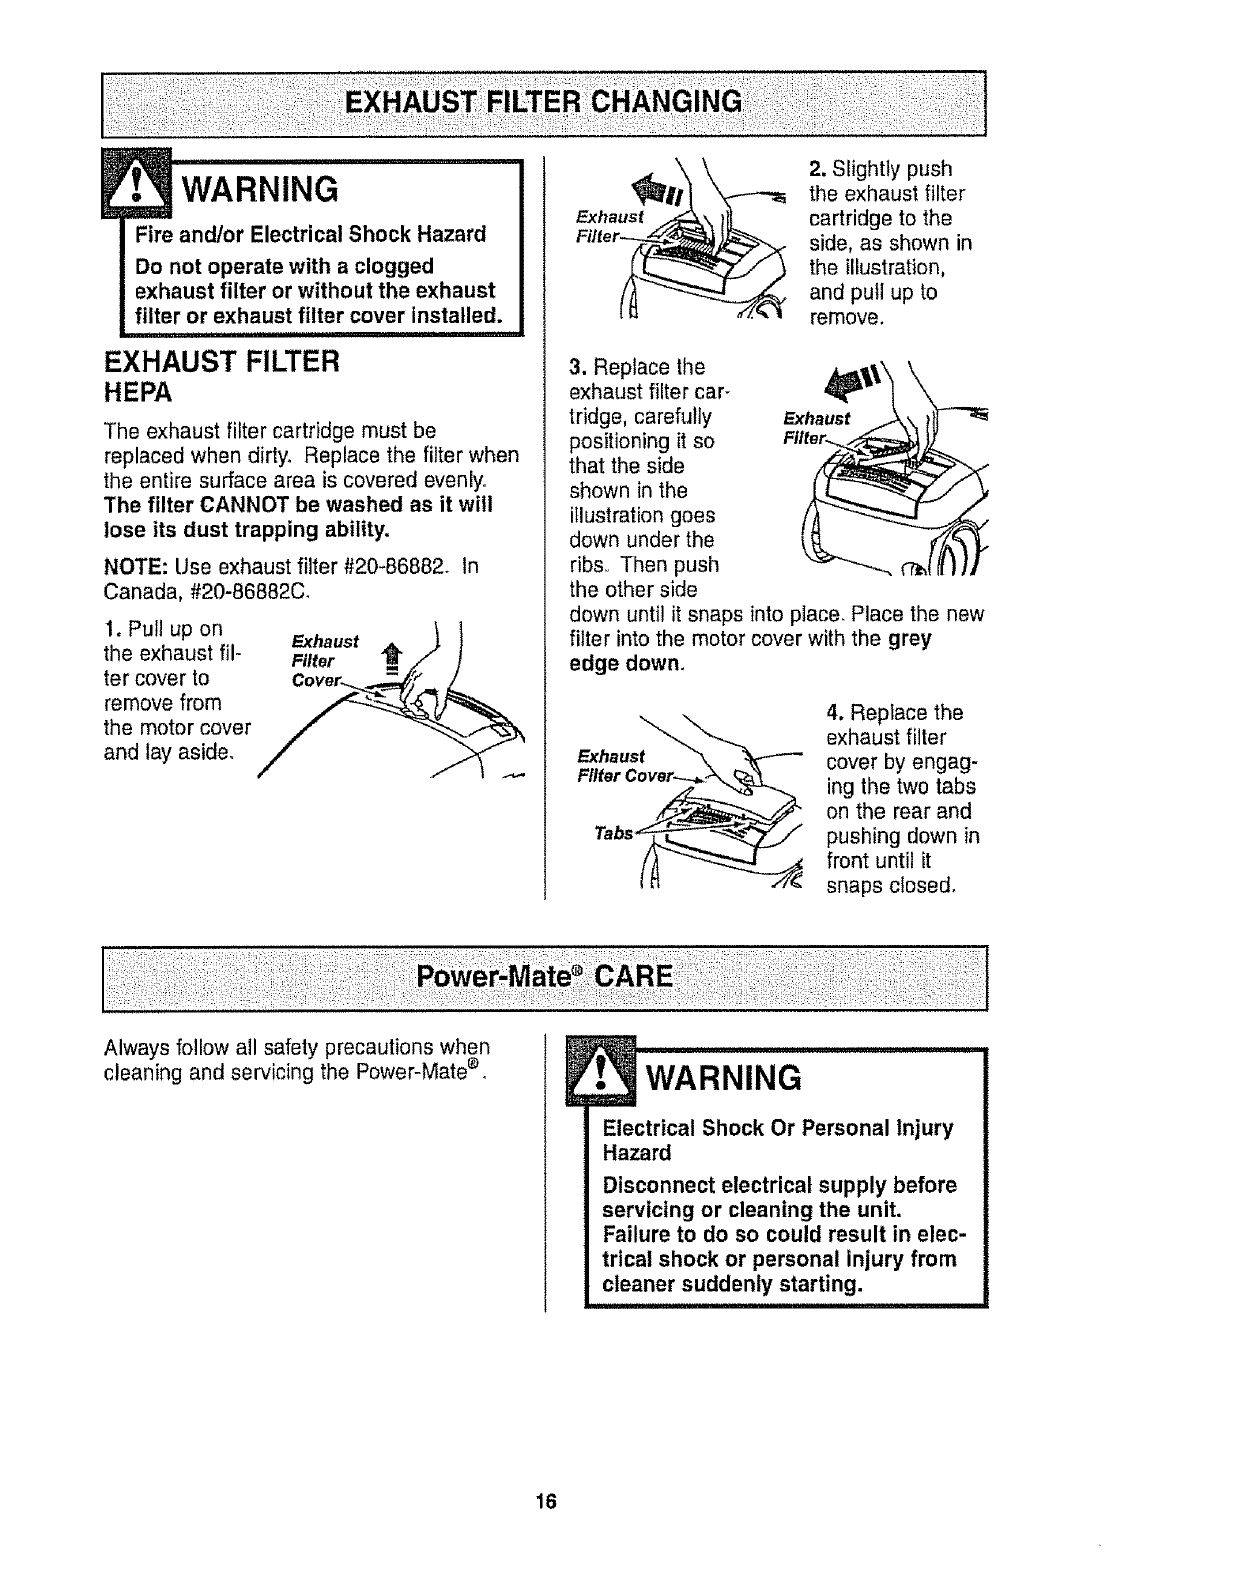
1. Lift the rubber
retainer and pul!
out motor safety
filter as shown.
2, Replace the fil-
ter, white side out,
by sliding it back
into place under
the ribs in the bag
cavity. Tuck filter in
so that it fits com-
pletely under the
rubber retainer.
3, Replace the bag as outlined in the BAG
CHANGING section.
!
NEVER REUSE A DUST BAG. Very
fine materials, such as carpet fresh-
ener, face powder, fine dust, plaster,
soot, new carpet lint, etc. can clog
the bag and cause it to burst before
it is full and may cause damage to
vacuum motor. Change bag more
often when vacuuming these mated-
als,
15
WARNING
Fire andtor Electrical Shock Hazard
Do not operate with a clogged
exhaust filter or without the exhaust
filter or exhaust filter cover installed.
EXHAUST FILTER
HEPA
The exhaust filter cartridge must be
replaced when dirty. Replace the filter when
the entire surface area is covered evenly.
The filter CANNOT be washed as it will
lose its dust trapping ability.
NOTE: Use exhaust filter #20-86882° In
Canada, #20-86882C.
1. Pul! up on Exhaust \ 1
the exhaust ill- Filter "_ /J" j!
ter cover to Cover_ A_,_/_ /
remove from _
the motor cover
and lay aside.
2. Slightly push
the exhaust filter
cartridge to the
side, as shown in
the illustration,
and pull up to
remove.
3. Replace the
exhaust filter car-
tridge, carefully Exhaust
positioning it so Filter..
that the side
shown in the
illustration goes
down under the
ribs,, Then push
the other side
down until it snaps into place. Place the new
filter into the motor cover with the grey
edge down.
Exhaust
4. Replace the
exhaust filter
cover by engag-
ing the two tabs
on the rear and
pushing down in
front until it
snaps closed.
Always follow all safety precautions when
cleaning and servicing the Power-Mate ® WARNING
Electrical Shock Or Personal Injury
Hazard
Disconnect electrical supply before
servicing or cleaning the unit.
Failure to do so could result in elec-
trical shock or personal injury from
cleaner suddenly starting.
16
TO REMOVE BELT
CAUTION
When you remove the end caps, a
small metal washer on each end
may come off. DO NOT lose these
two metal washers.
TO CLEAN AGITATOR:
NOTE: In order to keep cleaning efficiency
high and to prevent damage to your vacu-
um, the agitator must be cleaned every time
the belt is chan eg#dd.
The agitator must also be cleaned accord-
ing to the following schedule:
Vacuum Use
HEAVY -
(used daily)
MODERATE -
(used 2-3 times/week)
LIGHT -
(used 1time/week)
Clean Agitator
every week
every month
every 2 months
Remove any dirt or debris tn the belt path
area or in the brush roller area.
Carefully remove any string or debris
located on the agitator, end caps, wash-
ers or agitator shaft.
IMPORTANT
Replace the
washers and
the end caps.
See the explod-
ed view for cor-
rect
assembly.
Disconnect cleaner from electrical outlet.
Check and remove hair, string and lint build-
up frequently in the Power-Mate ® agitator
and end cap areas. If build-up becomes
excessive, disconnect Power-Mate ® from
wand and follow the steps below.
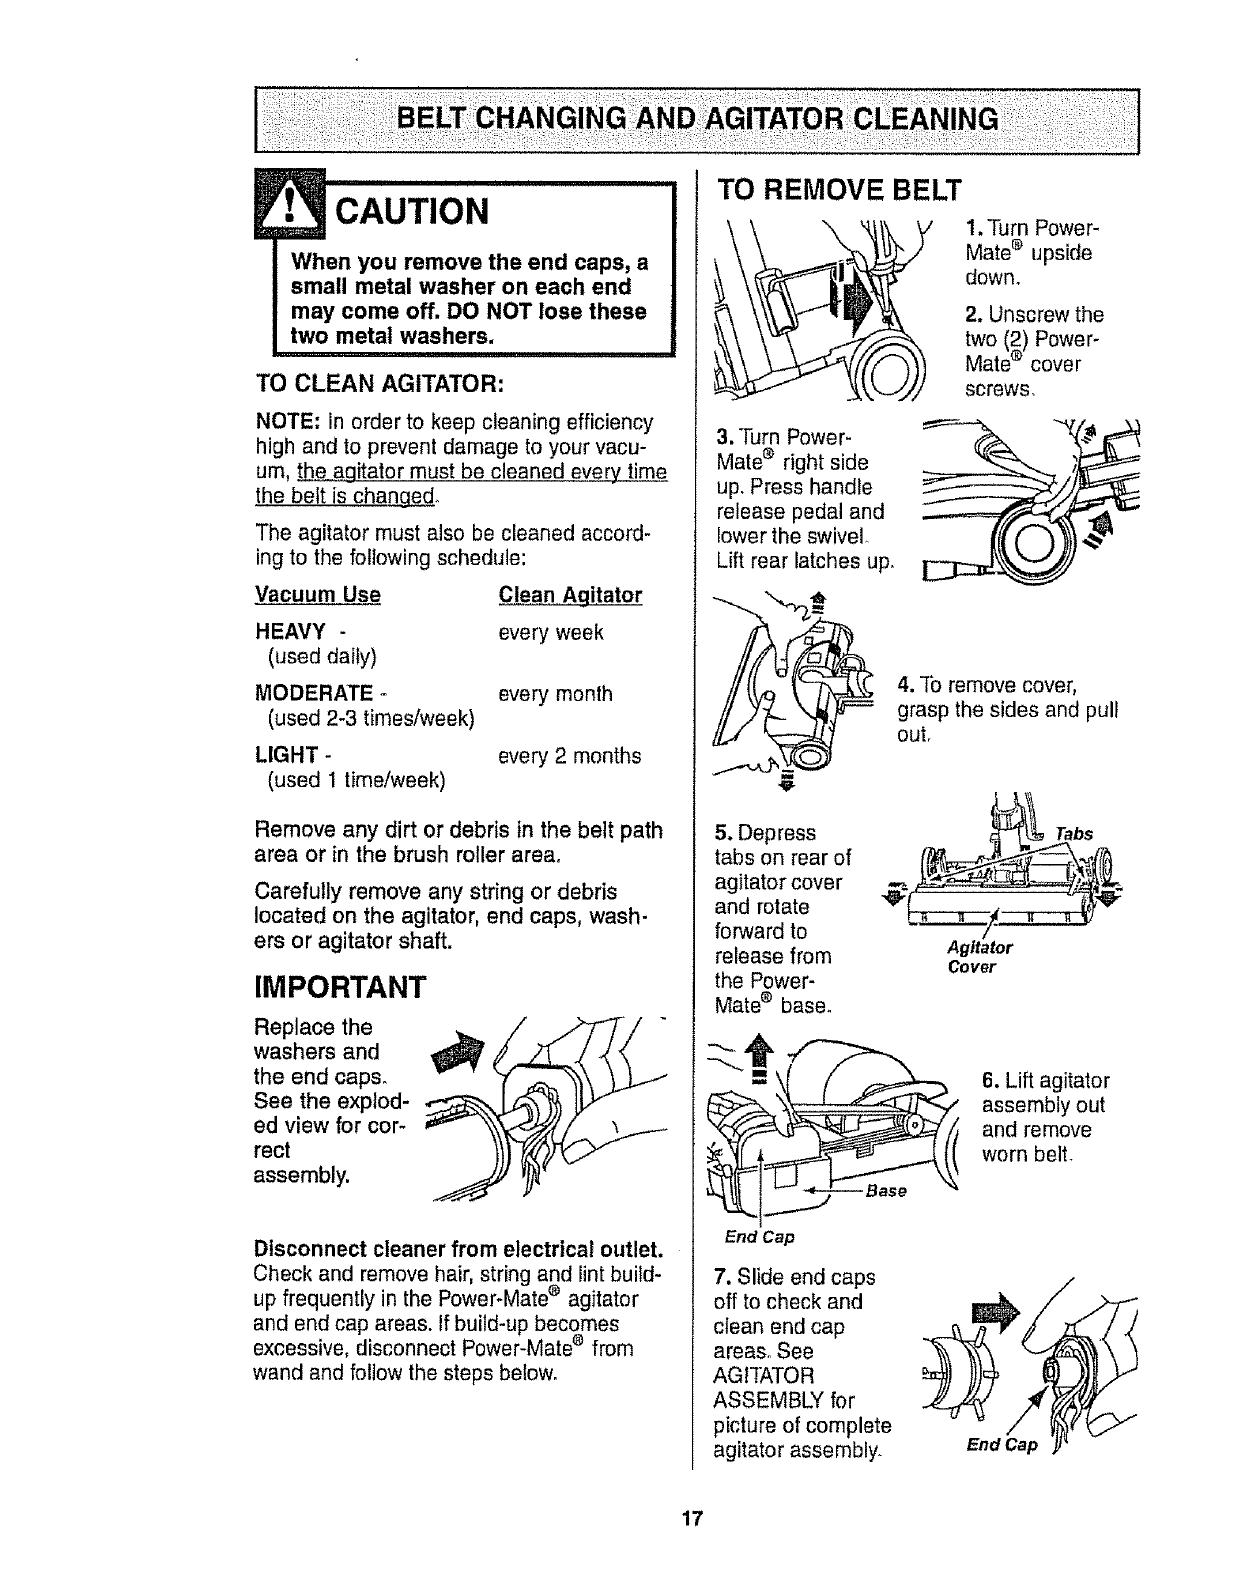
3. Turn Power-
Mate ® right side
up. Press handle
release pedal and
lower the swivel
Lift rear latches up.
1. Turn Power-
Mate e upside
down_
2. Unscrew the
two (2) Power-
Mate ® cover
screws,
4. To remove cover,
grasp the sides and pull
out.
5. Depress
tabs on rear of
agitator cover
and rotate
forward to
release from
the Power-
Mate ® baser
End Cap
Tabs
Agita_r
Cover
6. Lift agitator
assembly out
and remove
worn belt.
7. Slide end caps
off to check and
clean end cap
areas. See
AGITATOR
ASSEMBLY for
picture of complete
agitator assembly. EndCap
17
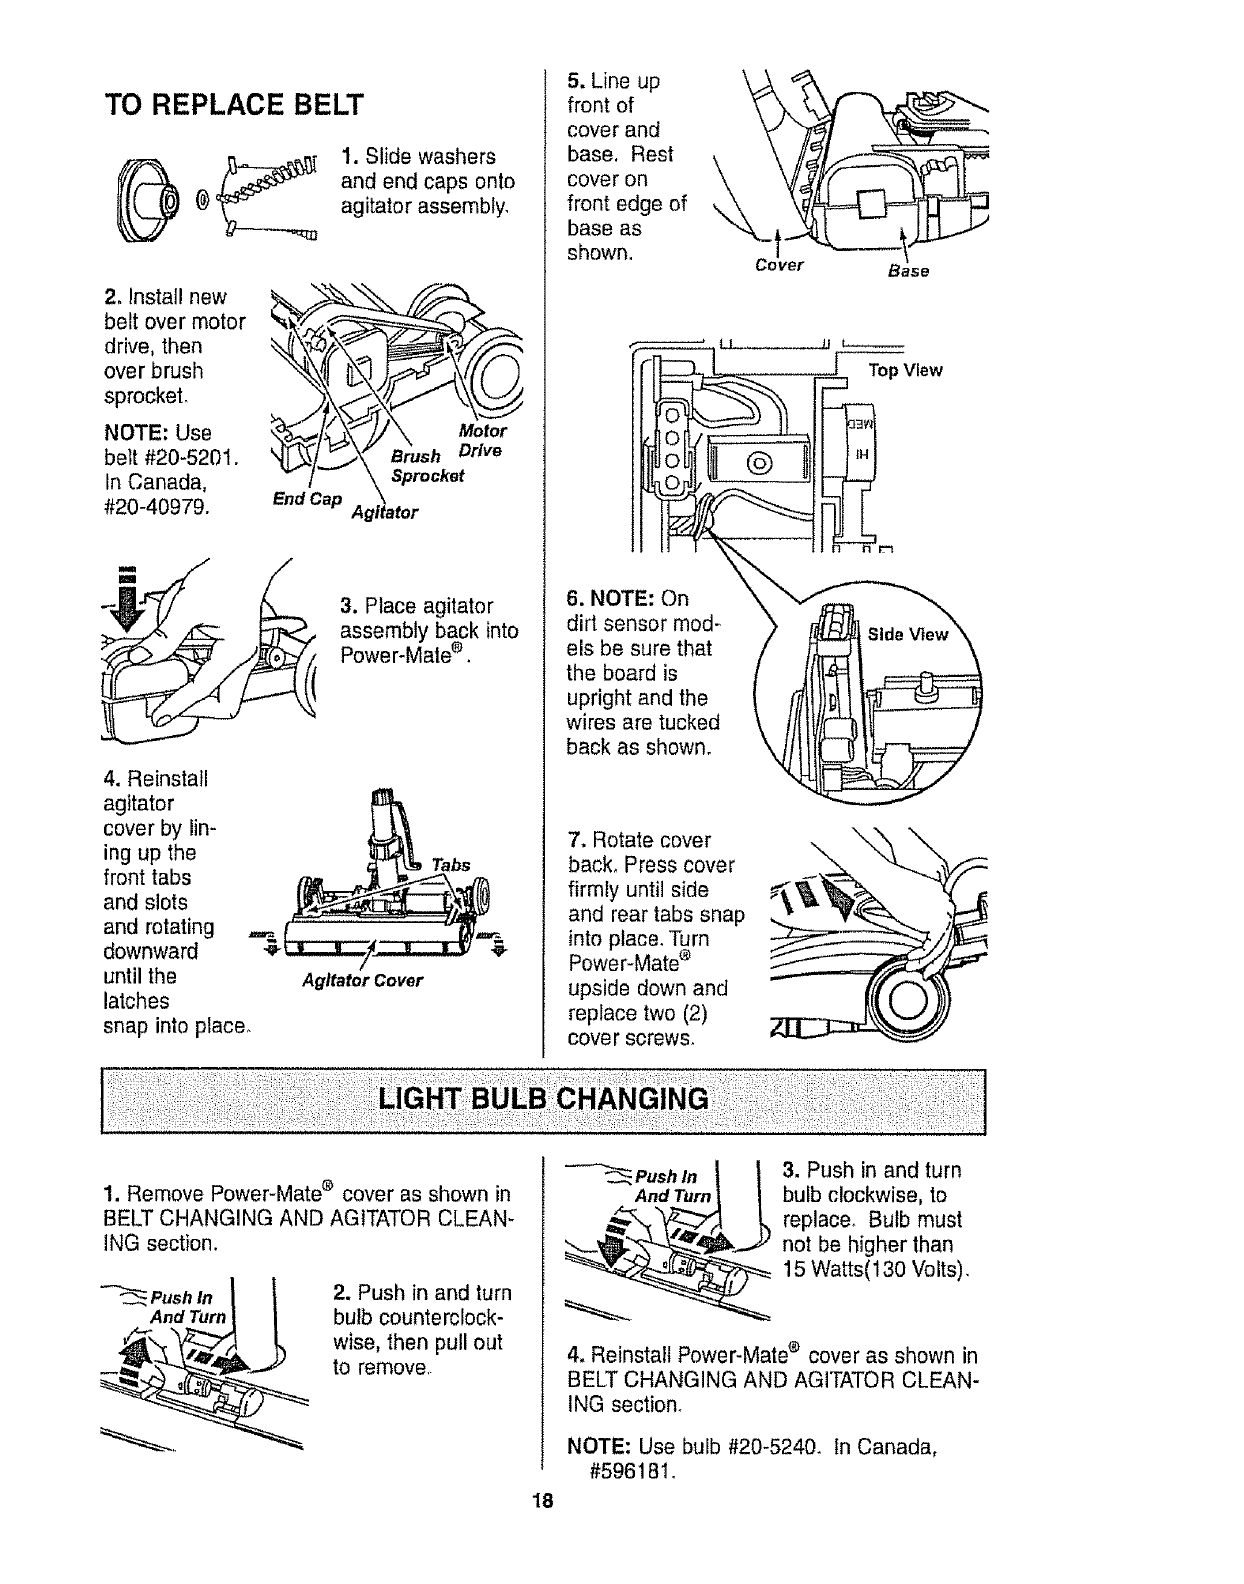
TO REPLACE BELT
1. Slide washers
and end caps onto
agitator assembly.
2. Install new
belt over motor
drive, then
over brush
sprocket.
NOTE; Use
belt #20-5201.
In Canada,
#20-40979.
3. Place agitator
assembly back into
Power-Mate ®.
4. Reinstall
agitator
cover by lin-
ing up the
front tabs
and slots
and rotating
downward
until the
latches Agitator Cover
snap into place.
5. Line up
front of \
cover and
base. Rest
cover on __
front edge of
base as
shown, Cover Base
\
6. NOTE: On
dirt sensor mod= )
els be sure that
the board is
upright and the
wires are tucked
back as shown, k4
[Top View
7. Rotate cover
back, Press cover
firmly until side
and rear tabs snap
into place. Turn
Power-Mate ®
upside down and
replace two (2)
cover screws_
1. Remove Power-Mate ® cover as shown in
BELT CHANGING AND AGITATOR CLEAN-
ING section.
Push in
And Turn
2. Push in and turn
bulb counterclock-
wise, then pull out
to remove,
Push In
And Turn
3. Push in and turn
bulb clockwise, to
replacer Bulb must
not be higher than
15 Watts(130 Volts).
18
4. Reinstall Power-Mate e cover as shown in
BELT CHANGING AND AGITATOR CLEAN-
ING section.
NOTE: Use bulb #20-5240. In Canada,
#596181o
!wARN,' G
Electrical Shock Or Personal Injury
Hazard
Disconnect electrical supply before
servicing or cleaning the unit.
Failure to do so could result in elec-
trical shock or personal injury from
cleaner suddenly starting,
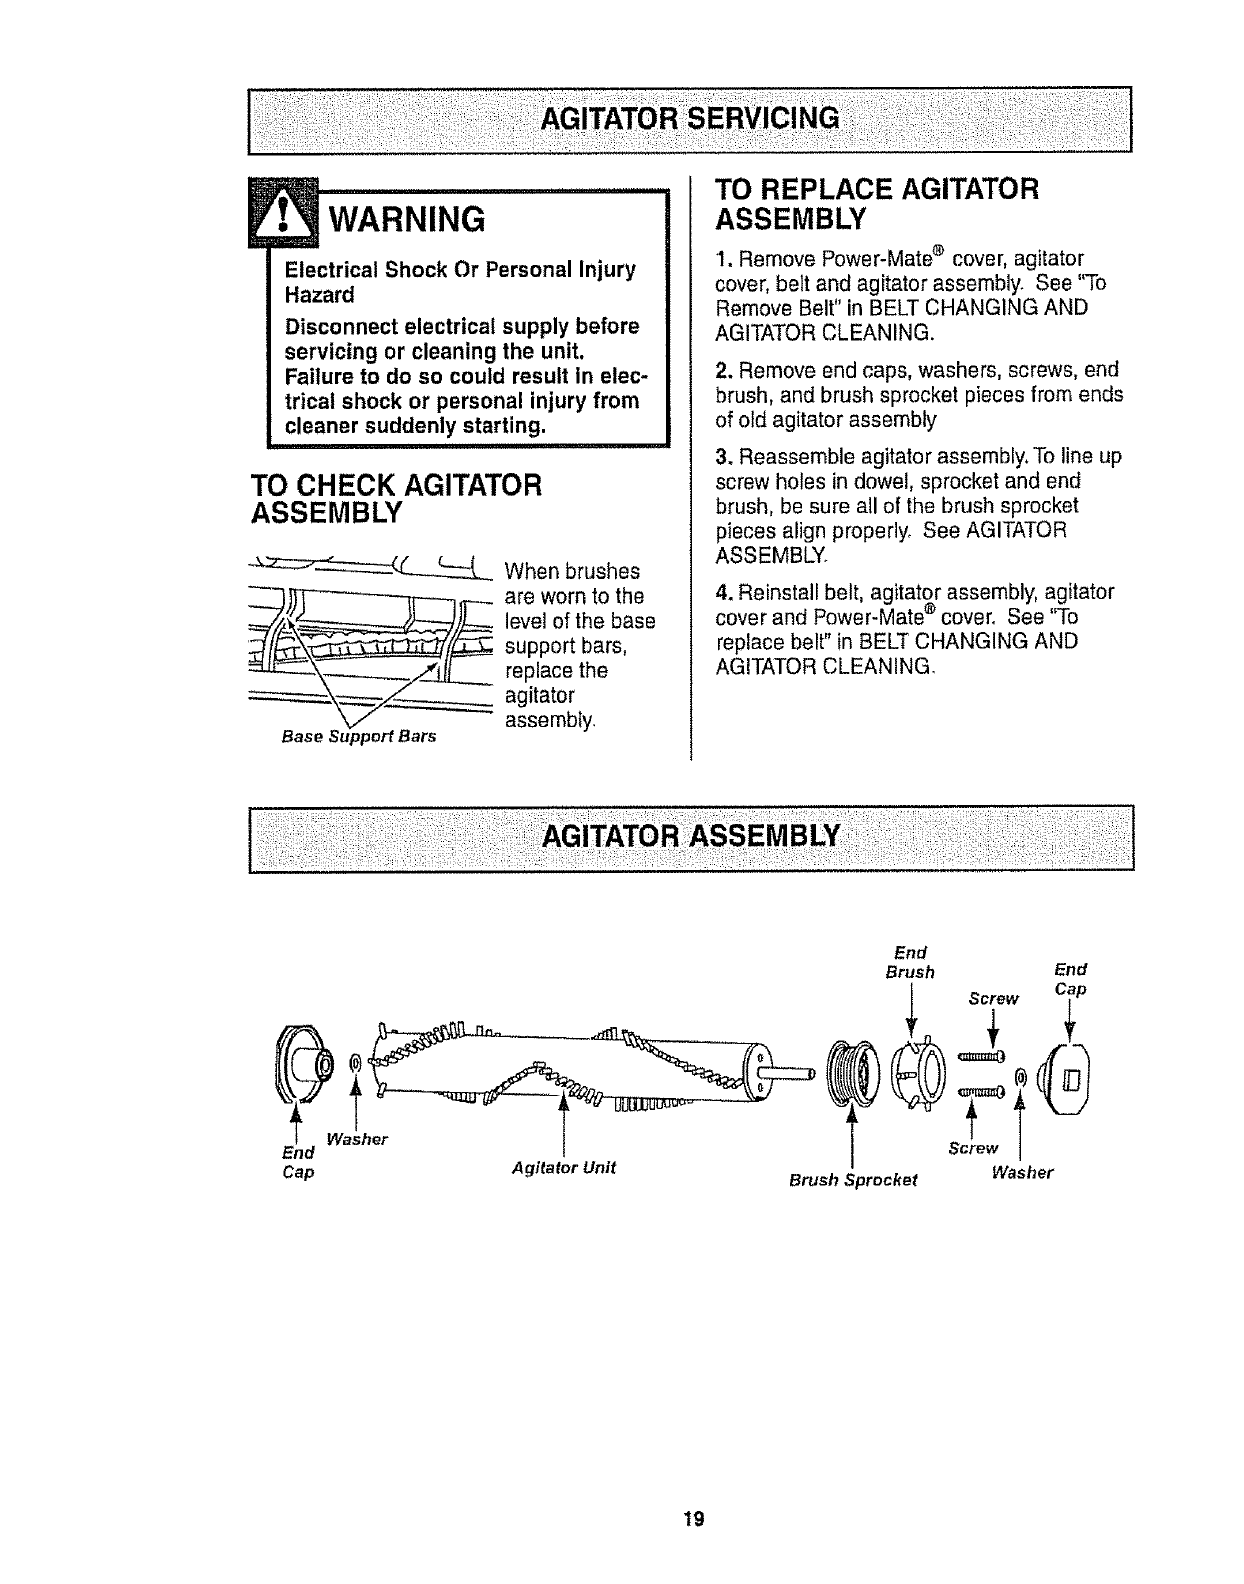
TO CHECK AGITATOR
ASSEMBLY
__ When brushes
are worn to the
level of the base
support bars,
replace the
agitator
assembly_
Base Support Bars
TO REPLACE AGITATOR
ASSEMBLY
1, Remove Power-Mate ® cover, agitator
cover, belt and agitator assembly. See "To
Remove Belt" in BELT CHANGING AND
AGITATOR CLEANING.
2. Remove end caps, washers, screws, end
brush, and brush sprocket pieces from ends
of old agitator assembly
3. Reassemble agitator assembly. To line up
screw holes in dowel, sprocket and end
brush, be sure all of the brush sprocket
pieces align propedyo See AGITATOR
ASSEMBLY.
4. Reinstall belt, agitator assembly, agitator
cover and Power-Mate ® cover° See "To
replace belt" in BELT CHANGING AND
AGITATOR CLEANING.
End
Cap Agitator Unit
Washer
End
Brush End
rT
Screw
Washer
Brush Sprocket
19
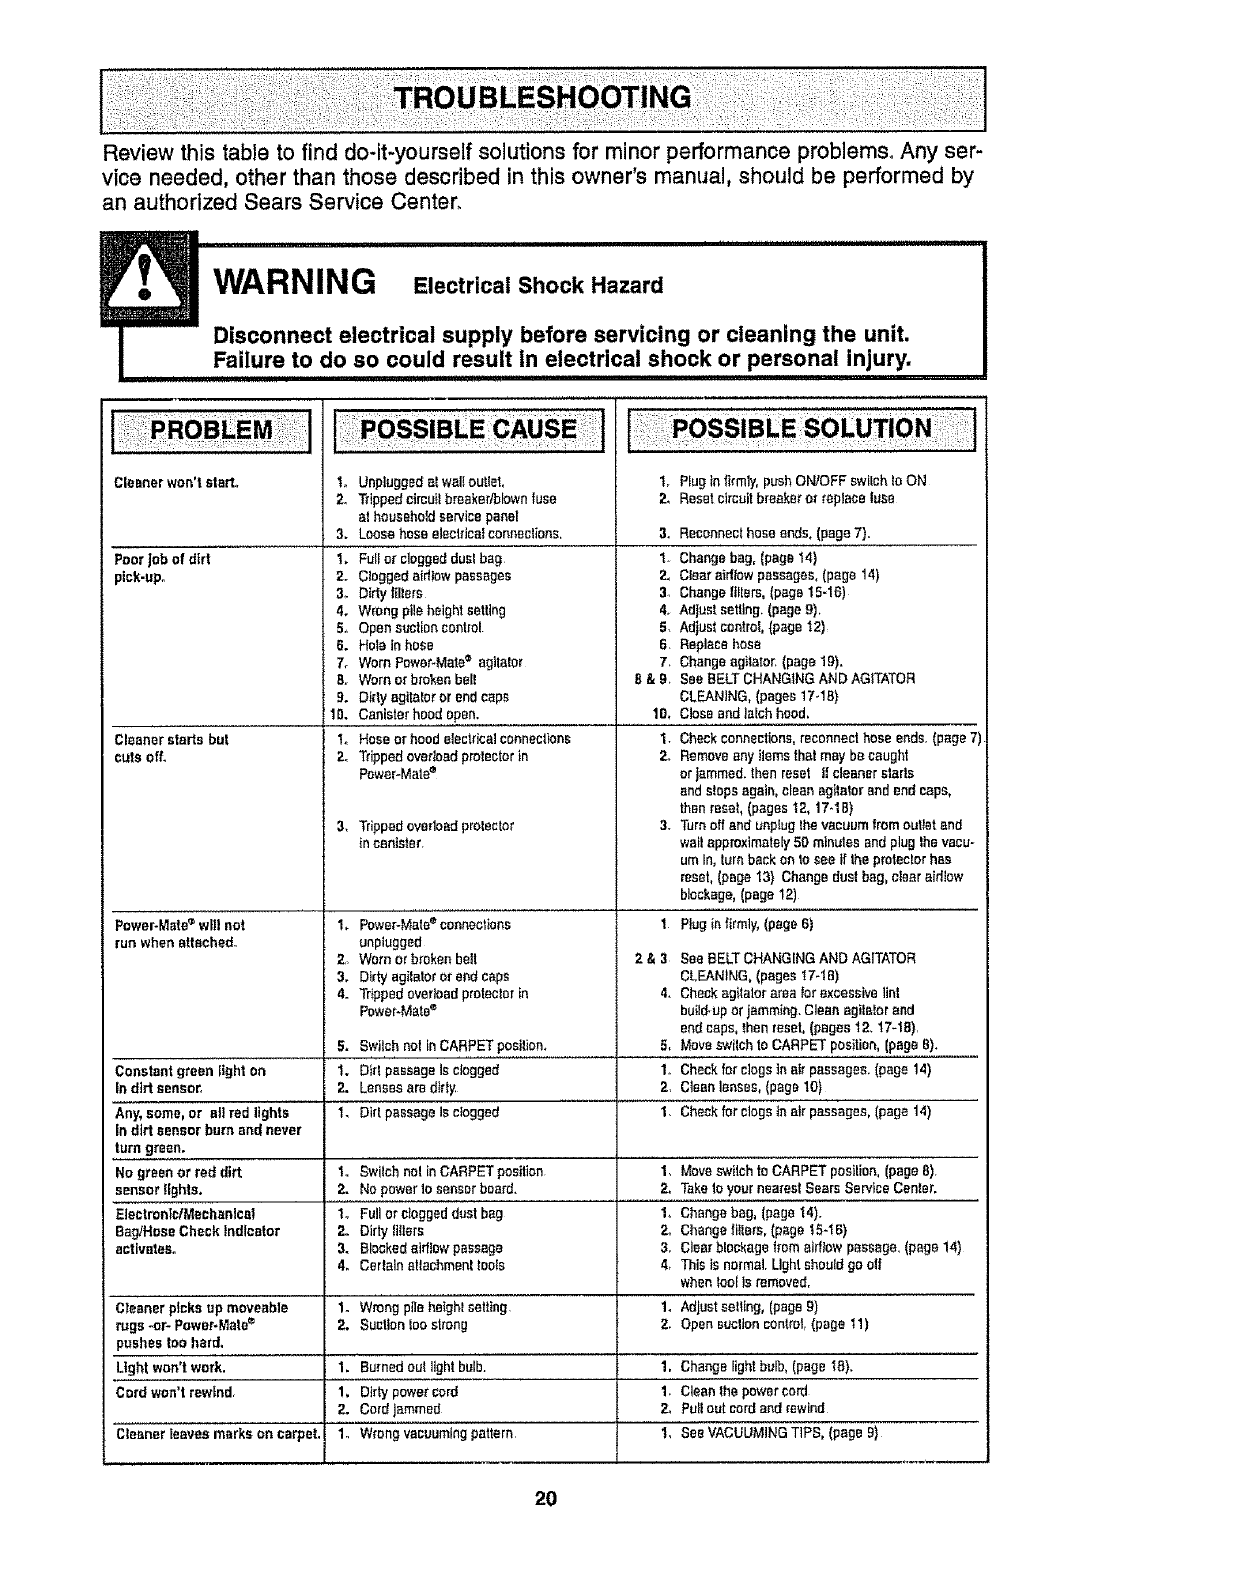
Review this table to find do-it-yourself solutions for minor performance problems, Any ser-
vice needed, other than those described in this owner's manual, should be performed by
an authorized Sears Service Center_
WARNING Electrical Shook Hazard
Disconnect electrical supply before servicing or cleaning the umt.
Fa,lure to do so could result in electrical shock or personal injury.
Cleaner won'tstart,, t.
2,
3.
PoorJobof dirt t,
pick-upo 2.
3_
4.
5.
6.
7o
B.r
9.
10.
Cleanerstarts but 1o
cuts off. 2.
3,
Power-Mate'_'will not 1,
un whenattached° 2
3.
4.
5.
Constantgreen gght on 1.
in dirt sensor, 2.
Any,some,or all red lights 1o
in dirt sensor bum and never
1. Plugin|I_mly,pushON/OFF switchIo ON
2, Resetetmuitbreaker"or replaceluse
Unpluggedat walloutlet.
Tripped cimuitbreaker/blownfuse
at householdservicepanel
Loosehoseelectrica_connections, 3,
FuIFor cloggedduelbag 1.
Clogged airliow passages 2,
Dirty Inters 3_
Wrongpile height setting 4.
Opensuctioncontrol 5,
HoIa inhose 6.
Worn Power-Mate®agitaIor 7.
Worn or brokenbelt B &g.
Dirty agitalororendcaps
Canisterhood open. 1O,
Hoseor hoodelectricalconnectbns 1.
Trippedovedoadprotectorin 2,
Power-Mate=
Trippedoverloadprotector 3.
incanister
Power-Mate_'connectbns 1
unplugged
Wornorbrokenbolt 2 & 3
Dirtyagilatoror end caps
Trippedovedoadproteclerin 4.
power-Mate®
Bwilchnot inCARPETposition, 5,
Did passageIs clogged 1.,
LensesaredtriF 2,
Dirt passageIs clogged 1,
Swilchnot inCARPETposition 1.
Nopowerto sensorboard. 2.
Fullor dogged dust bag 1,.
Dirty fl!ters 2,
Blockedairflowpassage 3.
CerlalnaUachmenttools 4,
Wrong pile heightsetting 1.
Suctionlogstrong 2.
Burnedoutlight bulb. 1,
Dtrtypowercord 1.
CordJammed 2_
Wrongvacuumingpattern 1,
Reconnecthoseends, (page7).
Changebag, (page 14)
Clear airflowpassages,(page 14)
Changeglints, (page 15-16)
Adjustsetting.(gage9).
Adjust control,(page 12)
Replace hose
Changeagitator. (page lg).
See BELTCHANGINGAND AGITATOR
CLEANING,(pages 17-1B)
Close and taIchhood,
Checkconnections,reconnect hoseends.(page7)
Removeanyitemsthatmay be caught
or jammed,then reset if cleanerstars
and stopsagain,cleanagitalor and endcaps,
thenrese!,(pages 12, 17-1B)
Turnoff andunplug the vacuumfromougatand
wait approximately50 minutesand plug lhevacu-
um In, turnback on 10see If the protecforhas
reset,(paget3) Change dustbag, clear aidtow
blockage,(page12)
Plugisfirmly,(page 6)
SeeBELTCHANGINGANDAGITATOR
CLEANING,(pages '_7-tB)
Checkagitatorarea forexcessivelint
build,up orjamming. Cleanagitelorand
endcaps,thenreset,(pages 12. 17-18)
Moveswilch toCARPET position,(page B).
Checkfordogs In Bitpassages. (page 14)
Cleanlenses,(pageI0)
Checkfor clogsinair passages, (page 14)
turn green.
No greenor red dirt t° Moveswitch toCARPET posilion, (page 8)
sensorlights. 2. Taketoyour nearestSears ServiceCenter.
EiectronfolMechenlael 1_ Changebag, (page 14).
Bag,Hose Check Indicator 2,. Changefillers,(page t 5-t 6)
activates° 3. Clearblockagefrom airflow passage.(page 14)
4. Thisis normal.Lightshould go og
whenfool Is removed.
Cleanerpicks up moveable 1. Adjustse!ttng, (pageg)
rugs -or- Power+Mate®2. Opensuclion control(page ! 1)
}nshes toohard,
Light won'twork. 1. Changelightbulb,(pagetB).
Cord won'trewind, 1, Cleanthepower cord
2, Puffout cordand rewind
Cleaner leaves marks on carpet, 1., SeeVACUUMINGTIPS, (page 9)
20
!
For repair of major brand appliances in your own home...
no matter who made it, no matter who sold it!
1-800-4-MY-HOME ® Anytime, day or night
(1-800-469-4663) (U.S.A. and Canada)
wwwosears.com www,sears.ca
For repair of carry-in products like vacuums, lawn equipment, and
electronics, call for the nearest Sears Parts and Repair Center,
1-800-488-1222 Anytime, day or night (US A only)
www.sears.com
For the replacement parts, accessories and owner's manuals
that you need to do-it-yourself, call Sears PartsDirectSM!
1-800-366-PART
(t-800-366-7278)
6a.m-I1 p.m., 7days aweek
(USA only)
www,sears.com/partsdirect
To purchase or inquire about a Sears Service Agreement
or Sears Maintenance Agreement:
1-800-827-6655 (U_SoA) 1-800-361-6665 (Canada)
7 a.m - 5 p.m, CST, Men. - Sat. 9 a m - 8 p.m. EST, M - F,4 pro. SaL
Para Dedirservicio de reparaci6n a
domicilio, y para ordenar piezas:
1-888-SU-HOGAR sM
(1-888-784-6427)
Au Canada pour service en frangais:
1-8O0-LE-FOYER _c
(1_800_533-6937)
wv.pNrSears.ca
LHomeOentral
@Sears, Roebuck and Co.
TM
® RegisteredTrademark/Trademark/SMService Markof Sears,Roebuckand Co
® MarcaRegistrada 1TMMarcade Fabrtea/sMMarcade Servtciode Sears,Roebuckand Co
Mc Marque decommerce/_'_ Marque de;posSe de Sears, Roebuckand Co
21

Manual Del Propietario
Aspiradora
Modelo 116.29612
116,29712
116.29713
CUIDADO:
Lea y sigue todas las
instrucciones de operaci6n
y seguridad antes del uso de
este producto.
Sears, Roebuck and Co., Hoffman Estates, IL 60179 U.S.A.
www.sears.com
Pieza N-° CO1ZAUJ 1OUO_-4370919 Impreso en EUA
Antes de usar su aspiradora nueva ..... 2
Garantia de la aspiradora de Kenmore o2
Instrucciones importantes de
seguridad ........................... 3
Piezas y caracteHsticas ............... 4-5
Instrucclones de
ensamblamlento ............... 6-7
Uso ................................. 8
Para comenzar ......................... 8
Sugerenciaspara aspirar ............... 9
Sugerenciassobre el a uste de nivel de
peo de la alfombra .................... 9
Indicadorde potvo ..................... 10
Accesorios ......................... 11
Use de los accesorios ................ 12
Caracterfsticasde rendimiento ....... 12-13
Funcionamiento de su aspiradora ....... I4
Cuidado del recept_culo ................. 14
Cambio de la bolsa ............... 14
Limpieza del exteriory de los accesorios . .. I5
Cambio del _tro de seguridad del motor ..r 15
Cambio del filtro de escape ............. 16
Cuidado de la Power-Mate ®............ 16
Cambto de la correa y fimpieza
del agitador ....................... 17-18
Cambio de la bombilla ................. 18
Cuidado del agitador .................. 19
Ensambte del agitador ................. t9
Reconocimiento de problemas ......... 20
Informaci6n de assistancia
o servicio ................................ 21
Per favortea esta guia que te ayudara a assemblar y operar su aspiradora nueva de Kenmore en una manera
rods segura y effectiva.
Para mas informaci6n acerca del cuidado y operaciOnde esta aspirador,IEamea su tienda Sears mas cercana
Cuando prequnte per informaci6n usted necisitard el n8mero complete de serie y modetode la aspiradora que
est,_locado en la placa de los nt_merosde modelo y serie.
Use el espacio de abajo para registrar el nOmerode modelo y serie para su nueva aspiradora de Kenmore.
N'3merode Modelo
Nt_merode Serie
Fecha de Compra
Matenga este libro y su recibo en u lugar seguro para referencias futuras..
GARANTfALIMITADADE UN At_ODE LA ASPIRADORA KENMORE
Esfa garantfa es per un aSo desde la fecha de compra, e incluye solamente el use de la aspiradora en hogares
privados. Durante e! afio de garantia, cuando la aspiradora es operada y mantenida de acuerdo al manual de
instrucciones de[ dueSo,Sears reparar&cualquier defecto en materiales o fabricaci6n iibre de cargo.
Esta garantia excluye las bolsas de colecciSn,correas, lampariltas,y fittres, las cualesson partes gastables que
se deterioran con el use normal.
Para e! servicio de garantfa,retorneesta aspiradora al Centro de Servicio Sears m_s cercanoen los
Estados Unidoso
Esta garantfase aplica solamente mientras este producto est_ en use en los Estados Unities. Esta garantfa le
da a usted derechos legales especificos,y usted puede tener tambi_n otros derechos los cualesvarfan de
estado a estado.
Sears, Roebuckand Co,, D/817WA, Hoffman Estates,IL 60179
ADVERTENCIA
Su seguridad es muy irnportante pare nosotrosoPare reducir e! rtesgo de incendio, cheque
el_ctrico, lest6n corporal o da_os al uttllzar su esptradora,act_e de acuerdo con precauciones
bdsicas de seguridad, entre elias:
t.ea este manualantes de armar o utilizarsu aspira_
dora
Use su aspiradoraLinicamenteenla formadescrita
en este manual Use _nicamentecon accesorios
recomendadosper Sears
Pare reducirel riesgo de cheque et_ctrico,no use
su aspiradoraal aire libra ni sobre superficiesmeja-
des
Desconecteet cord6n el_ctrice antesde componer
o Iimpiarel _readel cepillo.De Io contrario,el cepilto
podrfa arrancardeform imprevistao pedrfa
producirseun cheque el_ctrico.
Siempredebe apagarla aspiradoraantesde
coneclaro desconeetarla manguerade la Power-
Mate®.
Siempredebeapagarsu aspiradoraantesde des-
conectarla
No desconectefa aspiraderatirandodel cord6n
el_ctrico.Paredescenectarla,hale el enchufe,noel
cord6n_
Sujete el enchufecon la maneal enrollarel cord6n
el_ctrico.Paradesconectada,hale en enchufe,no el
cord6n,
Nouse Is aspiradorasi el cord6n o el enchufeest_
da_ado.Si la aspiradorano est_funcionandoade-
cuadamenteo si se hadejado caer,est,_daSada,se
ha dejadoexpuestaala intemperieo se ha dejado
caer en ague,devu_lvalaa unCentrede serviciode
Sears.
No hale ni transportela aspiradoraper el cord6n;no
use el cord6ncome mango;no derre puertassobre
ei cerd6n;no haleel cord6n sabrerebordesagudos
ni esquinas.No paso laaspiradora sobreel cord6n.
Mantengae! cord6n alejadode superficiesealientas.
No abandoneta aspiradoracuando est_conectada.
Descon_ctelacuando no laest_ usando y antesde
darleservicio
No permitaqua sea utilizadacomejugueteSe
requieretenor mayorcuidado cuandosea utitizada
en laproximidadde niSose per niSos.
No toque la aspiradorani el enchufecon tasmanes
mojadasGUARDE ESTAS
No use Ia aspiradorasi la mangueraest_rote,La
mangueracentienealambresel_ctrices.C_mbielasi
est_ roteo desgastada Eviteaspirer obietos
agudos.
No coloque objetosen ]asaberturas.
No utilicela aspiradorasi algunaaberturaest,. blo-
queada;mant6ngalatfbrede polvo,petusa,cabetlos
y cualquieracosaqua podrfa disminuirel flujo de
aire.
Mantengaelcabelto,ropa suelta,dodos y todas las
partes delcuerpo alejadosde las aberturasy piezas
mec_,nicas,
No use la aspiradorasin tenorinslalada la bolsa
parapolvo y/o los filtros
Cambie stempre la bolsa parepolvo despu_sde
aspirertimpiadoresde alfombrasodesodorantes,
talcos y pelvesfines. Estosproductos atascanla
boise,reducen el fluje de aire y puedencauserqua
_sta se rompaoSi no cambiala boise podrfaecasio-
nar daSopermanenteala aspiradora,
No use fa aspiradorapare levantarebjetosagudos,
juguetespeque_os,attileres,sujetapapeles,etc.
Podrl'andafter laaspiradorao la balsa parapolvo.
No levanteningunacosa quase est_ quemandoo
emitiendohumo,come cigarriIles,cerilloso cenizas
calientes.
No use la aspiradoraparaaspirer Ifquidosinflama-
bias o combuslibles(gasolina,Ifquidospare lim-
pieza,perfumes,etc) ni la use en Iugaresderide
_stospodrfan ester presentes,Los vaporesde estas
sustanciaspuedencroat un peligrode incendioo
exptosi6n
Tenga cuidadoespecial a! utilizerla aspiradoraen
escalones.No la coloque sobresiltas,mesas,etch
Mant_ngalaen el piso.
Usted es responsabledeasegurar quesu aspire-
dorano sea utilizadaper ningunapersonaqua no
puedamanejarlacorrectamente.
No opera sin el filtre de escapenila cubierta de! fil-
tre de escapeinstafados
NSTRUCClONES
El armado y use seguro de su aspiradora son su res _ensabilidad Esta aspiradora ha side dise_ada
excluslvamentepara use dom_stico. La aspiradoradeber,_almacenarse en un lugar seco y en el interior.
Leaeste Manual de! prepietario detenidamente,pues eontiene informaci6n importante sobre seguddad y
use Esta quia contiene informaci6n sobre seguridad debajo de simbolos de advertiencia cuidade Per
favorponga atenci6n especial a eslas instruccionesdadas. Advertencla: Este infermaci6n Ie alertar_,con
el poligro de fuego, cheques electricos,quemadasy lesiones. Cutdado: Este infermaci6nle alertara a
pe!!gros come !as!onesy dares de propiedad_
Es importanteconocer 1aspiezas y caracterfsticas de su aspiradora para asegurar su uso adecuado y seguro
Examfnefasantes de usar su aspiradora,
Objeto Pieza Ng. Pieza N-°,
en EUA en Canad_
Bombilla de farol 20-5240 596181
Correa 20-5201 20-40979
Sujetador del
cord6n yel
enchufe
Tubo
superior
Dlsposltlvo
glratorlo
del mango
(Algunos
modelos)
Su]etador Cord6n el6ctrlco
de POWER-MATE =
,-- SuJatador del
cord6n y el
enchufe
-- Bot6n de
Ilberacl6n
r_plda del
mango
(Algunos
modelos)
,--- Tubo
superior
Correa
Power-Mate®
Pedal de ltberacl6n
r_plda del tubo
Ndmeros de serie del
modelo POWER-MATE €
(Parte Inferior)
Pedal de Ilberacl6n
Pedal de seleccl6n de nivel
de pelo de la aifombra
lndlcador de polvo
(Algunos modelos)
nlvel
de pelo de la alfombra
(Algunos modelos)
Protector contra
sobrecargas
Bot6n de
restauracl6n "Reset"
Llmplador de orlllas
(No se muestra)
MANGUERA
lnterruptor de encendldo/
apagado de tres poslclones
(Apagado/Plso/Alfombra)
(Algunos modelos)
Mango
Dlsposltlvo
giratorio de
la manguera
ACCESORIOS
Herramlenta
Cepllto para _ _ "_
HanOi.Mate Jr.®
(Algunos modelos)
Power.Mate Jr.®
(Algunos modelos)
NOTA:Todoslos modelos cuentan con
unjuegode accesorios en el recept_.cu-
Io,Unos modelos tienen un juego adi-
cional qua se puede guardar en la bolsa
accesaria para el uso para la basura u
otros lugares sucios_
RECEPTACULO
Obleto
Bolsa para polvo
Filtro de escape
Filtro de seguridad
del motor
Pleza N", Part N".
en EUA en Canadd
20-50557 20-50557C
20-86882 20-86882C
20-86883 20-86883C
FIItro de
Cublerta
Almacenamlento
para acoesorlos
Tapa dal
del
flitrode escape
e/ectr6nlco para
la bolsa/manguera
mecdnlco para la
bolsa/ manguera
(Algunos modelos)
Pestllto
Sujetador
de la botsa Bolsa para polvo
el_ctrlco
FIItro de segurldad
del motor (Detr_s
de la bolsa para polvo)
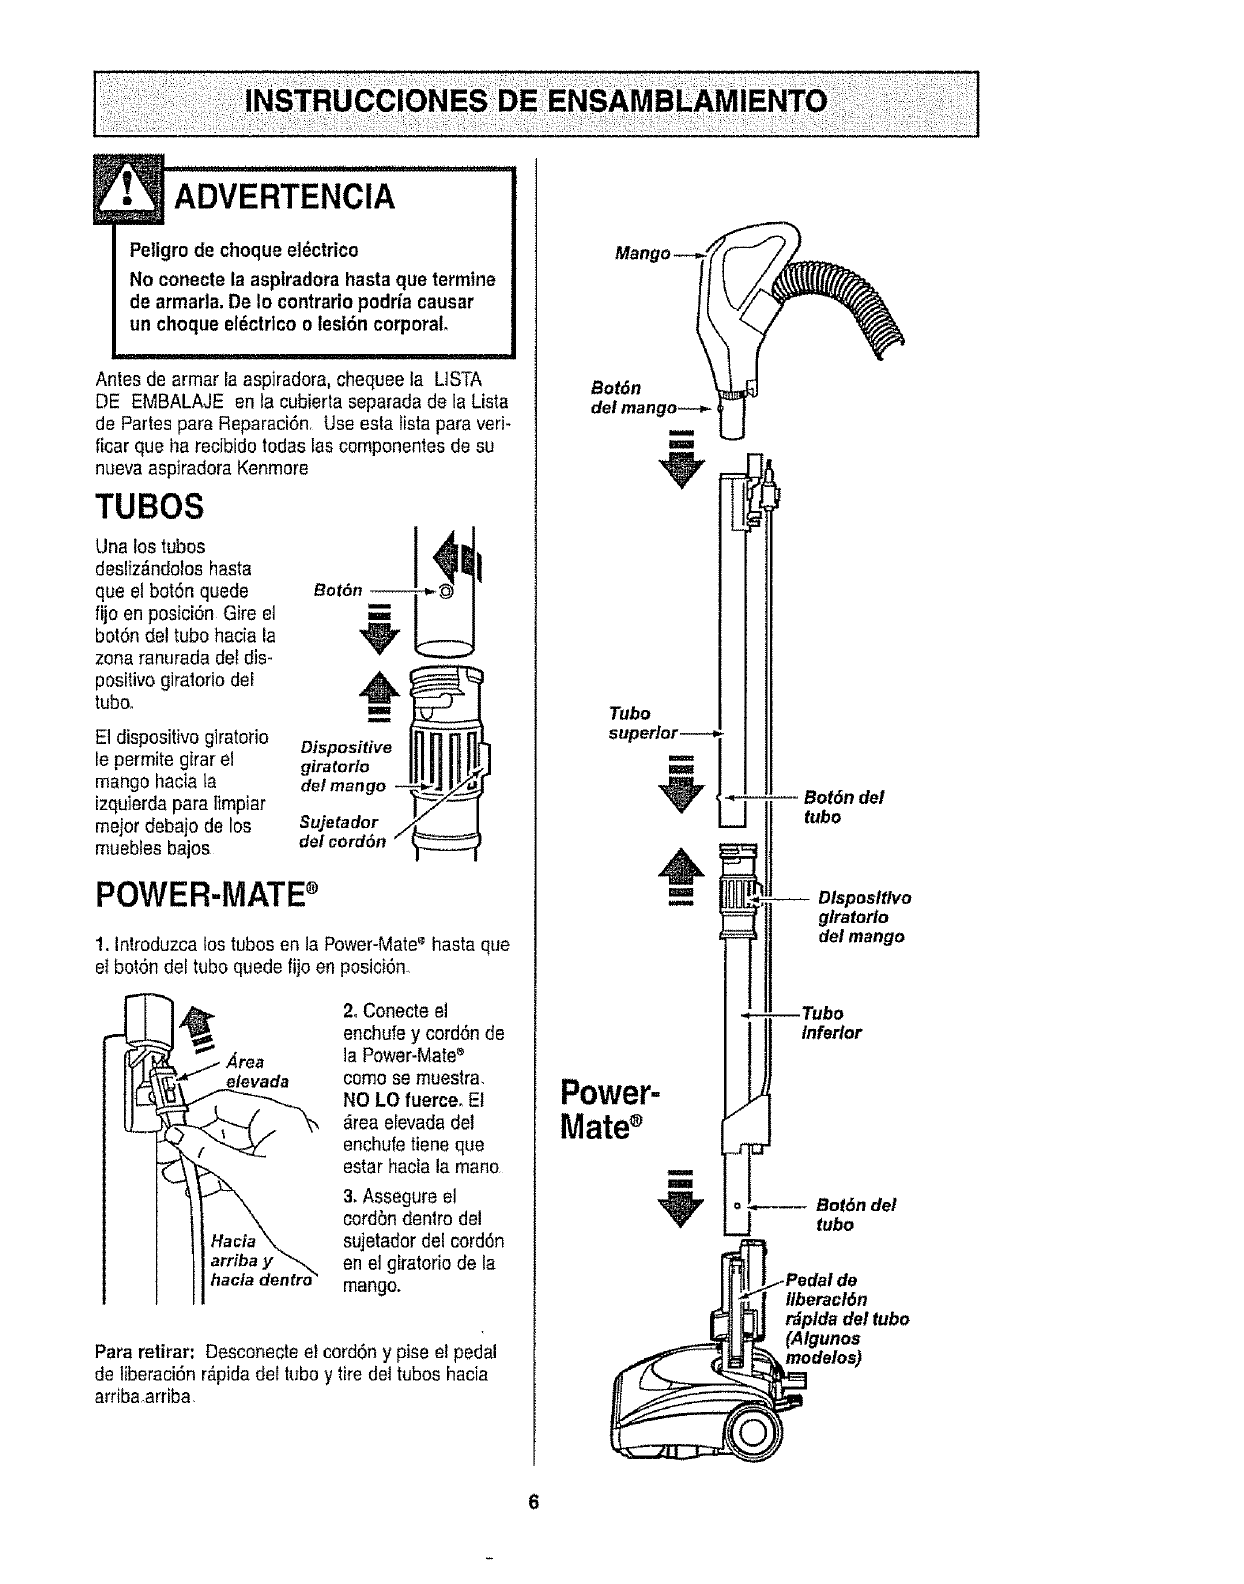
ADVERTENcIA
Peligro de cheque el6ctrico
No conecle la asplradorahasta que termine
de armada. De Io contrariopodrfa causar
un cheque el6ctrlco o lest6n corporal,
Antes de armar la aspiradora, chequee la LtSTA
DE EMBALAJE en la cubierta separada de la Lista
de Partes para Reparaci6n, Use esta fista para veri-
ficar que ha recibido todas las cempenentes de su
nueva aspiradora Kenmore
TUBES
Una los tubes
desliz_ndelosbasra
que el bot6n quede
fijoen posiciSn Gire el
botSn del tube hacia la
zona ranurada del dis-
positive giralorio del
tuboo
E1dispositivogiratorio
le permite girar el
mango haciala
izquierda para limpiar
meier debajo de los
muebles bajos
B°t6 1
Dispositive
giratorio
det mango - ,
Sujetador
del cord6n "/
POWER-MATEs
1. Introduzca tos tubesen la Power-Mate'_hasta que
el bet6n del tube quede fijoen posici6n.,
2. Conecte el
enchufe y cord6n de
la Power-Mate_
come se rnuestra.
NO LO fuerceo Et
_,reaeEevadadel
enchufe tiene que
estar hacia la mane
3. Assegure el
eord5n dentro del
sujetador del cord6n
en el giratorio de la
mango.
Para retirar" Desconecte el cordSny pise el pedal
de liberaci6n r_pida del tube y tire del tubes hacia
arriba arriba.
Power-
Mate
Bot6n del
tubo
Dlspositlvo
glratorlo
del mango
Inferior
Bot6n del
tubo
iPedai de
Ilberacl6n
r6plda del tubo
'AIgunos
odaros)
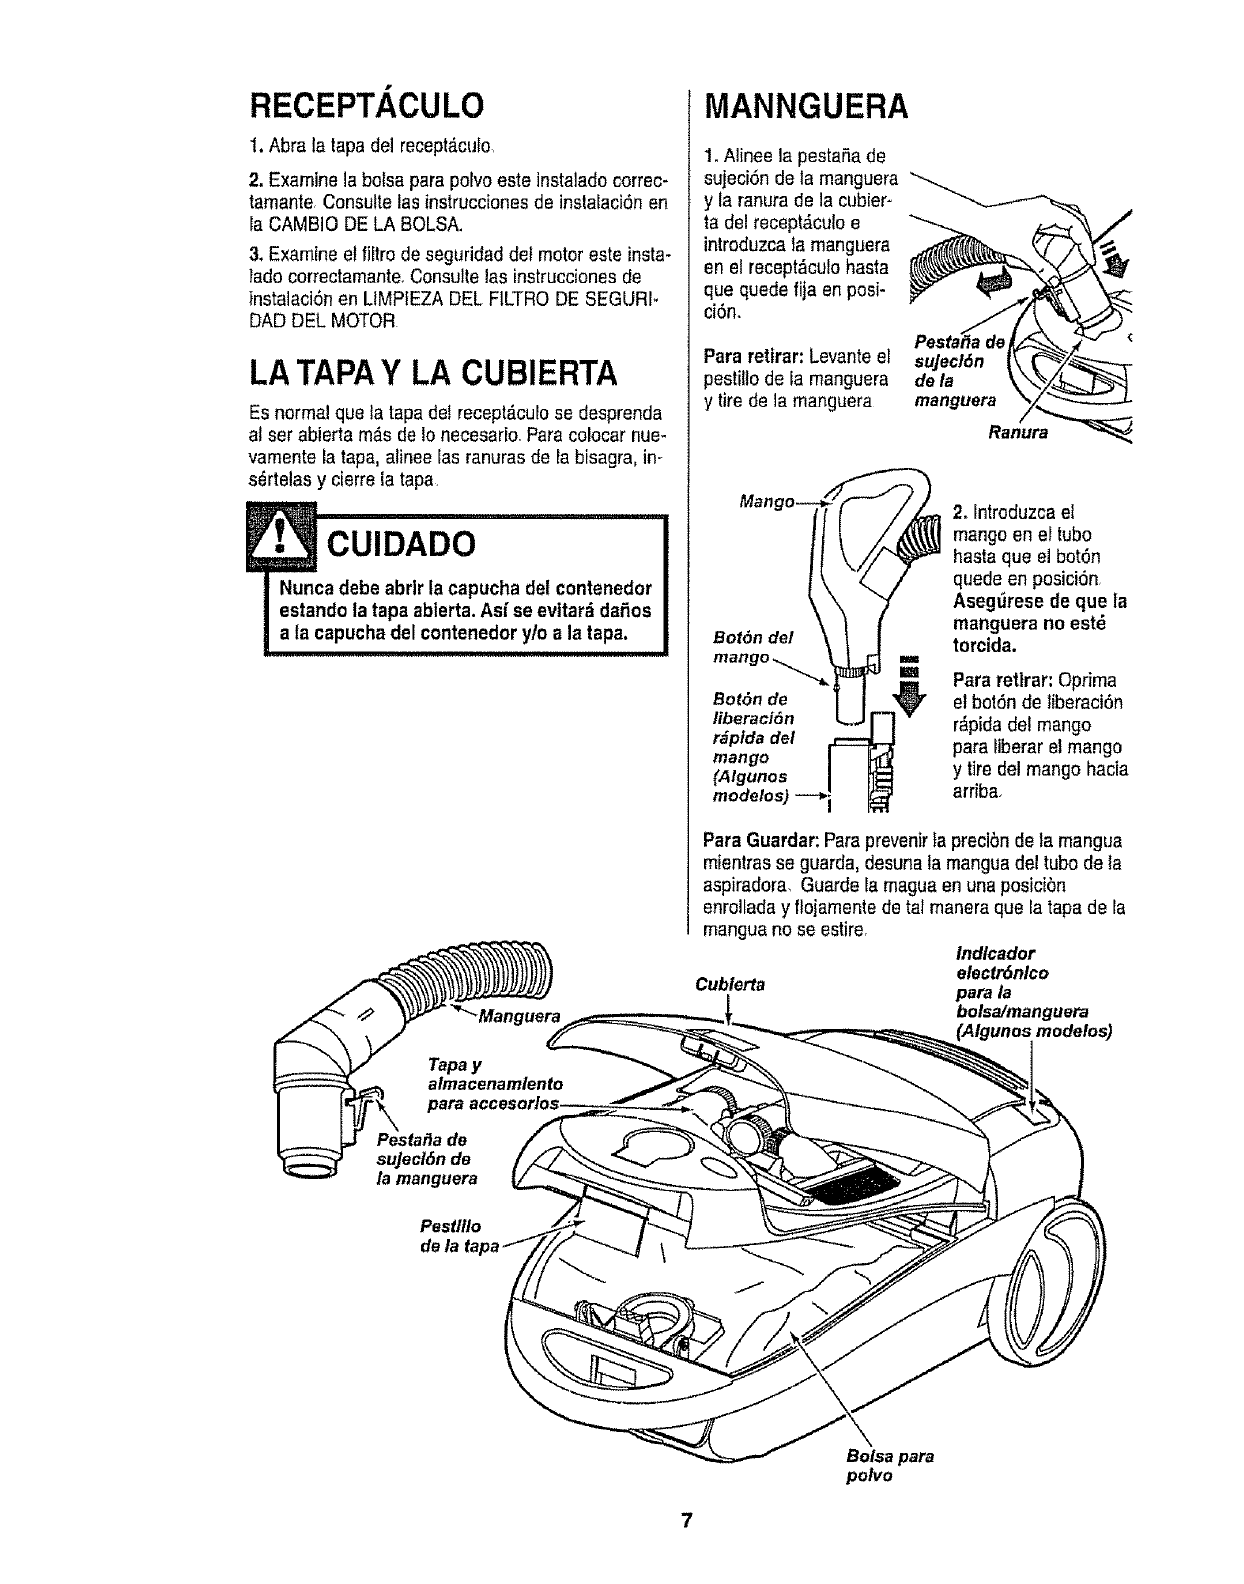
RECEPT. ,CULO
t. Abra la tapa dei recept_.culo,
2. Examine la bolsa parapolvo este instalado correc-
tarnante Consuttetas instrucciones de instaiaci6n en
la CAMBIO DE LA BOLSA.
3. Examine el filtro de seguridad del motor este insta-
lado correctamante,Consulte las instruccionesde
instalaci6n en LIMPIEZA DEL FILTRODE SEGURI*
DAD DEL MOTOR
LATAPAY LA CUBIERTA
Es normal que la tapa del recept_.culose desprenda
at ser abierta m_s de Io necesario. Para colocar nue-
varnente la tapa, alinee ias ranuras de la bisagra, in-
s_rtelas y cierre ia tapa
MANNGUERA
1, Aiinee la pestaSade
sujeci6n de la manguera
y la ranurade ]a cubier-
ta del recept,_culoe
introduzca la manguera
en et reeept&culobasra
que quede fija en posi*
ci6n°
Para retirar: Levante el
pestilio de la manguera
y tire de la manguera
sujecl6n
de la
manguera
Ranura
Man
Bot6n del
2, Introduzca el
mango en ei tubo
basraque el bot6n
quede en posici6n
Aseg_rese de que la
rnanguera no estd
torcida,
I
== Para retlrar: Optima
Bot6n de el bot6n de tiberaci6n
tiberaci6n r&pidadel mango
r_pfda del para liberarel mango
mango
(Algunos ytiredelmango hacia
modelos) arriba,
Para Guardar:Paraprevenir}a precibnde ;a rnangua
mientras se guarda, desuna la rnangua del tubo de la
aspiradora, Guarde la rnaguaen una posicibn
enroilada y flojarnentede tat manera que la tapa de la
mangua no se estire. Indlcador
electr6nlco
Cublerta para la
bolsa/manguera
(Algunosmodelos)
Pestlflo
Bolsa para
polvo
7
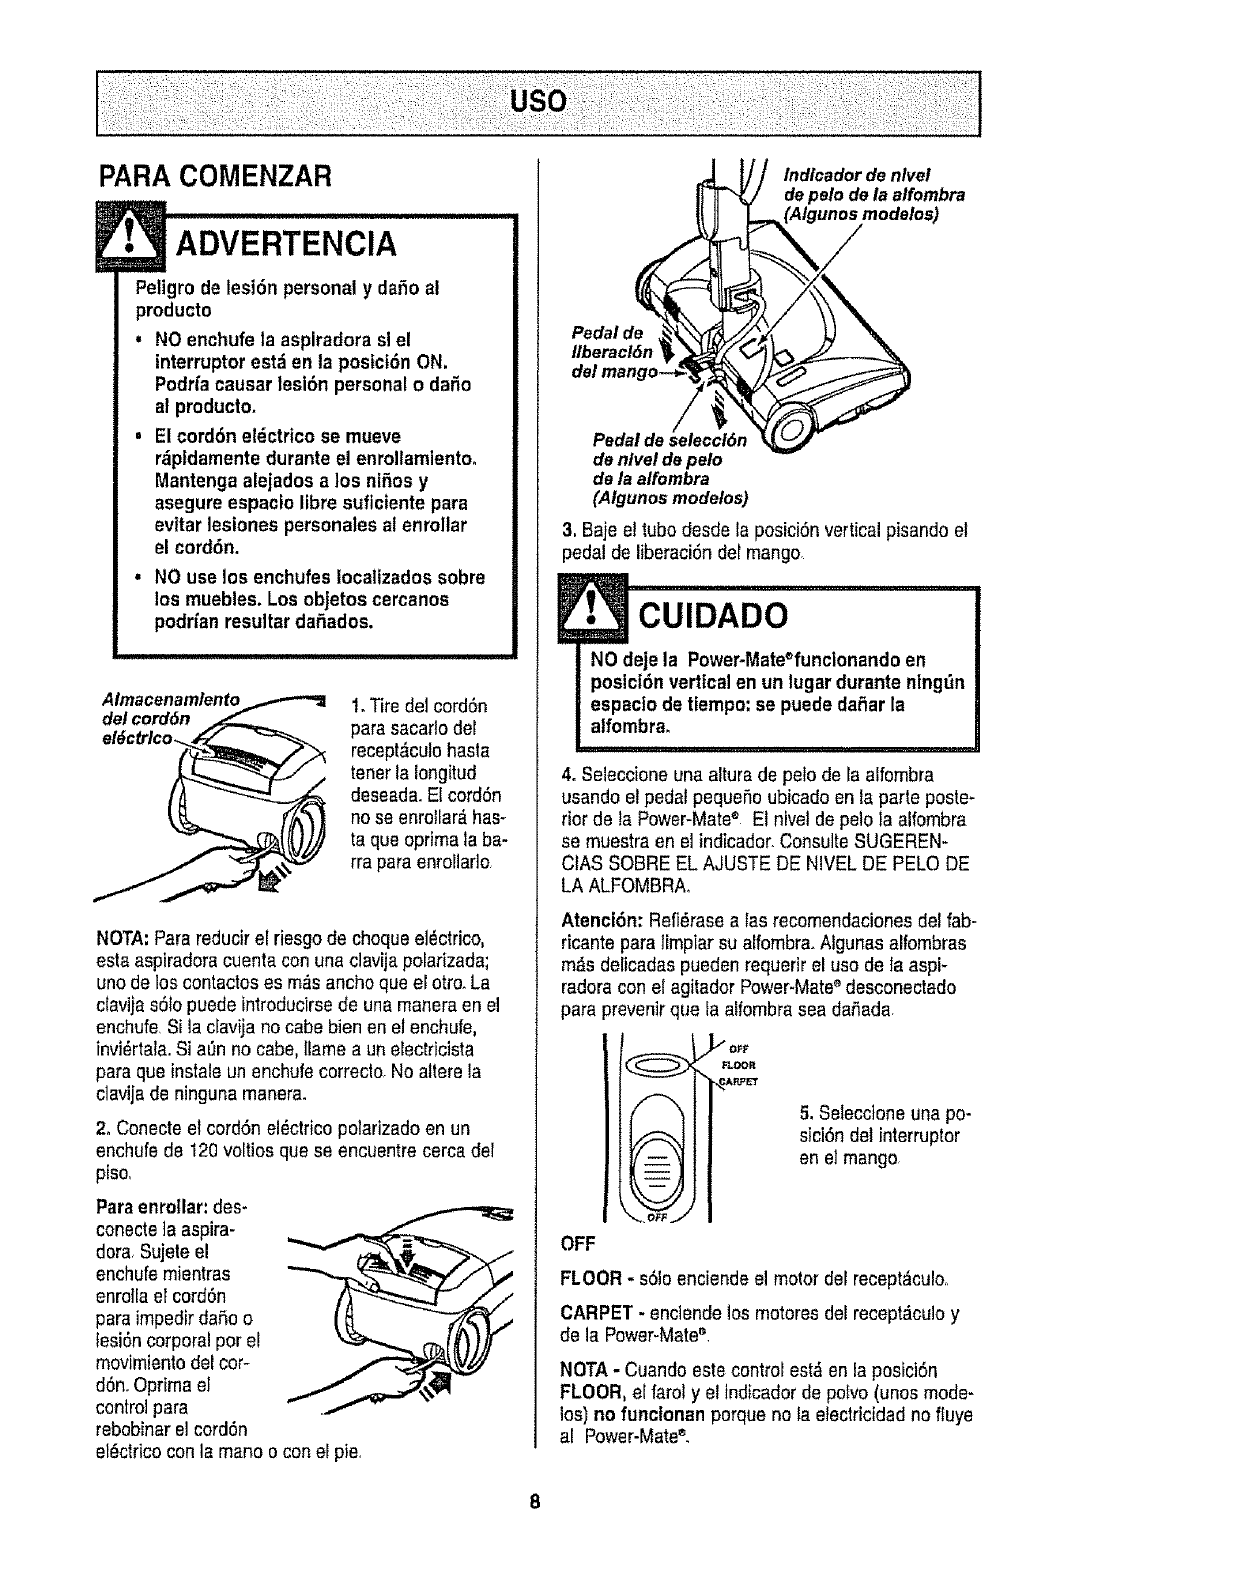
PARA COMENZAR
!•ADVERTENCIA
Peltgro de lesi6n personal y dafio al
producto
,NO enchufe la asplradora sl el
interrupter est;i en te posici6n ON.
PodHa causer lesi6n personal odaSo
af producto.
,El cord6n el_ctrico se mueve
r_pidamente duranteel enrollamlentoo
Mantenga alejados a los nifios y
asegure espacio libre suflciente pare
evitar lesiones personales al enrollar
el cord6n.
•NO use los enchufes Iocaltzados sobre
los muebles. Los objetos cercanos
podrfan resultar daSados.
Almacenamlento_,_-"_
del cord6n _,._ 1. Tire del cord6n
para sacarto del
recept,_culohaste
tenetla longitud
deseada.El cord6n
no se enrottar_,has-
ta que oprima la ba-
rra para enrollado
NOTA:Parereducir el riesgo de chequeel_ctrico,
esta aspiradora cuenta con una clavija polarizada;
uno de los contactos es m_s ancho que el otto. La
ctavijas61opuede introducirse de una manera en el
enchufe.Si la clavija no cabe bien en el enchufe,
invi_rtala. Si aOnno cabe, [famea un electricista
pare que instaleun enchufe correclo. No altere la
c]avijede ninguna manera.
2. Conecte el cordSn el_ctricopolarizado en un
enchufe de 120voltios que se encuentre cerca del
piso,
Pare enrollar:des-
conecte]aaspira-
dora. Sujete el
enchufemientras
enrollael cordon
pareimpedir daSoo
lesi6n corporal per el
movimientodel cor-
d6n. Oprima el
control para
rebobinarel cordon
el_ctdcocon la mane o con el pie.
Indlcador de nlvel
de pelo de la alfombra
modelos)
Pedal de
Ilberacl&n
Pedal de
de nlvel de pelo
de la alfembra
(Algunos modelos)
3, Baje el tube desde la posici6n vertical pisando el
pedal de liberaci6n del mango,
4oSeleccione una altura de pelo de la alfombra
usando el pedal pequeSoubicado en la parte poste-
rior de la Power-Mate® El nivel de pelo la alfornbra
se muestra en el indicador.Consulte SUGEREN-
CIAS SOBRE EL AJUSTE DE NIVEL DE PELO DE
LA ALFOMBRAo
Atenci6n: Refi_rase a las recomendacionesdel fab-
ricante pare limpiar su alfornbra.Algunas alfombras
m_s delicadas pueden requerir el usede la aspF
fedora con el agitador Power-Mate®desconectado
pare prevenir q!le fa alfombrasea daSada.
IOFF
"_ FLOOFt
%
iJ -- u
i -- i
E_ i iJ
_.0_
5, Seleccione una po-
sici6n det interrupter
en e] mango
OFF
FLOOR - s01oenciendeel motor del recept_culoo
CARPET - enclende los motores del recept_culo y
de la Power-Mate'_,
NOTA -Cuando este control est& en la posicl6n
FLOOR, el farol y el lndicador de polvo (unosmode-
los) no funclonan porque no la etectricidad no fluye
al Power-Mate®.
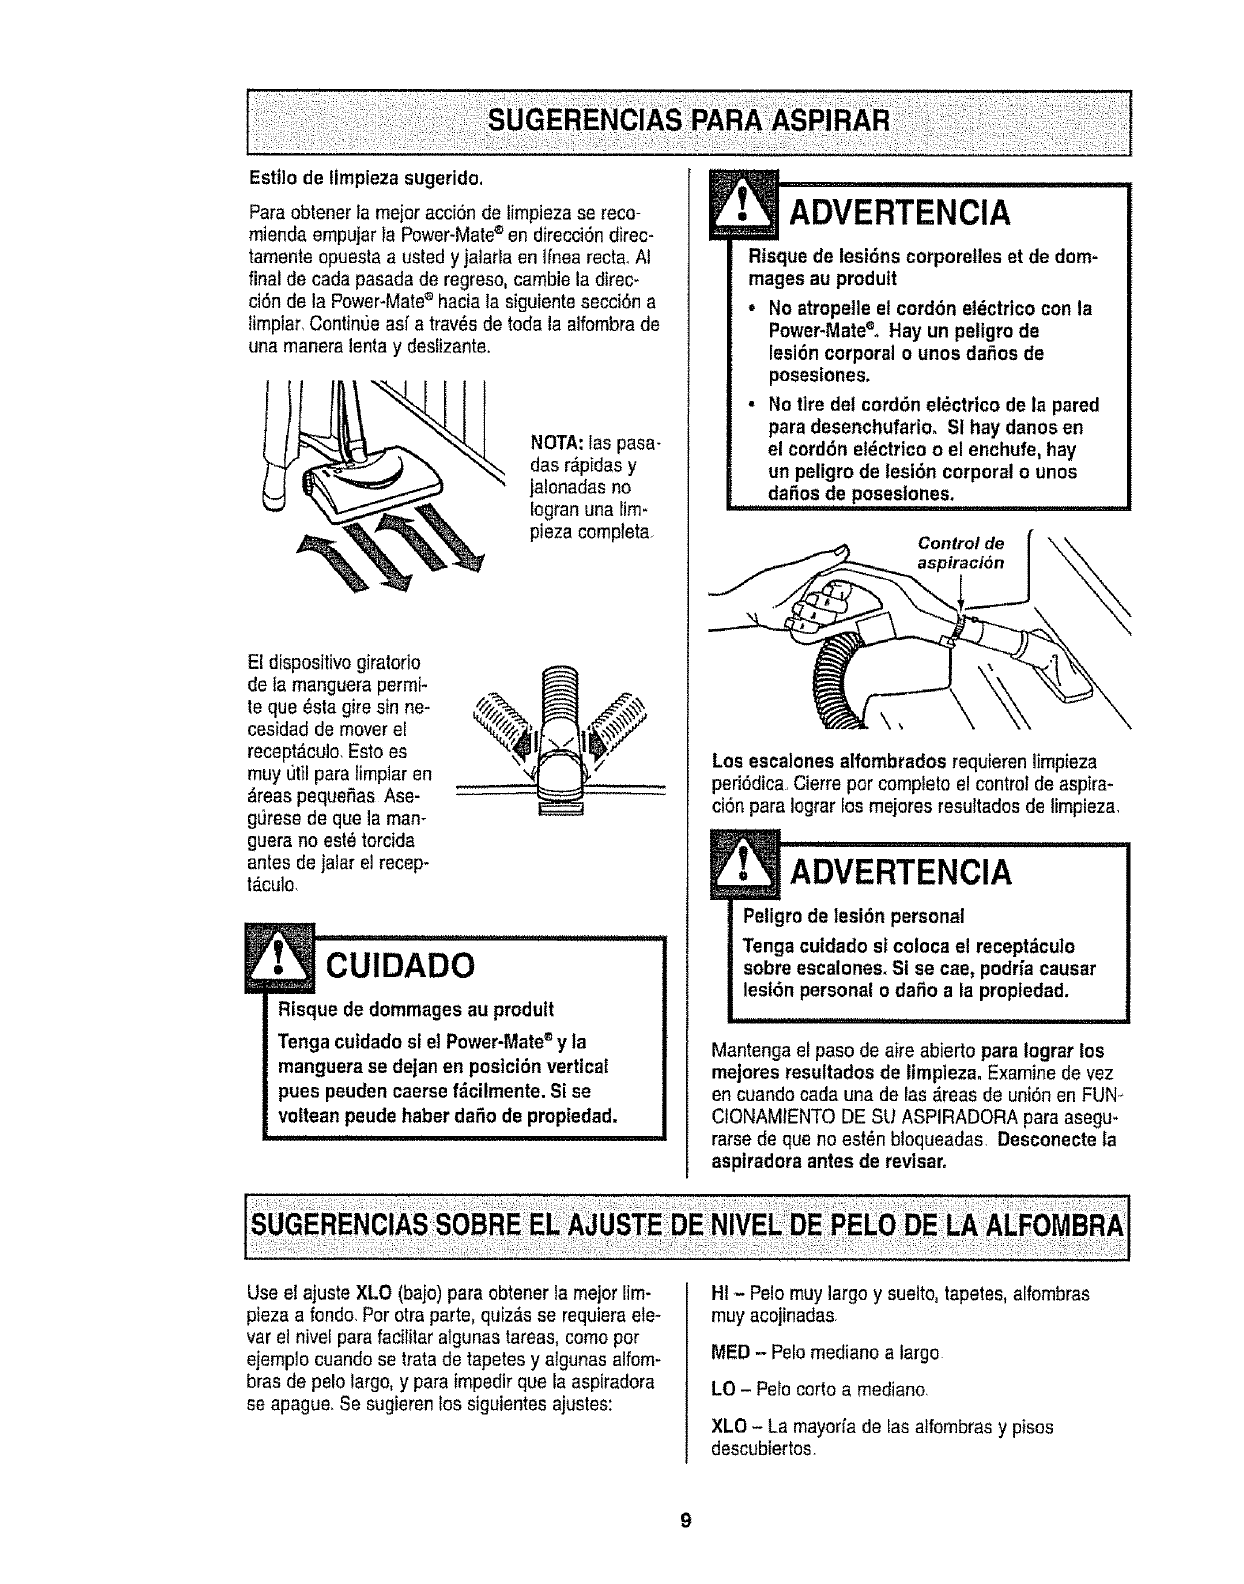
ParaobtenerIamejoracci6ndelimpiezasereco-
rniendaernpujarlaPower-Mate®endirecci6ndirec-
tarnenteopuestaaustedyjaiarlaen]fnearecta_At
final de cada pasada de regreso,cambie la direc-
ci6n de la Power-Mate® hacia la siguiente secci6n a
lirnptar,Continue asf a trav_s de toda la alfombrade
una manera lenta y deslizante.
NOTA: las pasa-
das r_pidas y
jalonadas no
Iogran una lirn*
pieza cornpteta.
El dispositivo giralorio
de la manguera permi-
te que _sta gire sin ne-
cesidad de mover el
recept_culo,Esto es
muy util para lirnpiar en
&teas pequefias Ase-
gLJresede que la man-
guera no est_torcida
antes de jalar el recep-
t_.culo,
!•CUIDADO
Risque de dommages au prodult
Tenga cutdadosl el Power-Mate®y la
manguera se dejan en posicidn vertical
pues peuden caerse fdcilmente. Si se
voItean peude haber dafio de propiedad.
ADVERTENCIA
Risque de lesiSns corporetles et de dom-
mages au produtt
• No atropetle el cord6n el_ctrico con la
Power-Matee, Hay un peligm de
lesl6n corporal o unos dafios de
posesiones.
•No tire del cord6n el_ctrlco de la pared
para desenchufario. SI hay danos en
el cord6n el_ctrico o el enchufe, hay
un peligro de lesl6n corporal o unos
dafios de poseslones.
Control de
Los escalones alfombrados requieren limpieza
peri(_dica.,Cierre por completo el control de aspira-
ci6n para Iograr ios rnejores resuttados de lirnpieza,
Peligro de lesi6n personal
Tenga cutdado st coloca el recept_culo
sobre escalones.Si se cae, podfia causar
lesl6n personal o dafio a la propiedad.
Mantenga el paso de aire abierto para iograr los
mejores resultados de limpleza. Examine de vez
en cuando cada una de Iasd.reasde uni6n en FUN_
CIONAMIENTO DE SU ASPIRADORA paraasegu*
rarse de que no est_n bloqueadasl Desconecte la
aspiradora antes de revisar.
Use el ajuste XLO (baio)para obtener la rnejor lirn-
pieza a rondo. Por otra parte, quiz_s se requieraele-
var el nive[para facililar algunas tareas,corno por
ejernplo cuando se trata de tapetes y algunas alfom-
bras de pelo largo, y para impedirque ia aspiradora
se apague, Se sugieren los siguientes ajusles:
HI - Pelo muy largo ysuelto, tapetes, alfombras
rnuy acojinadas
MED -Pelomediano a largo
LO - Pelo corto a mediano.
XLO - La mayorfa de fas alfombrasy pisos
descubiertos.
ALGUNOS MODELOS
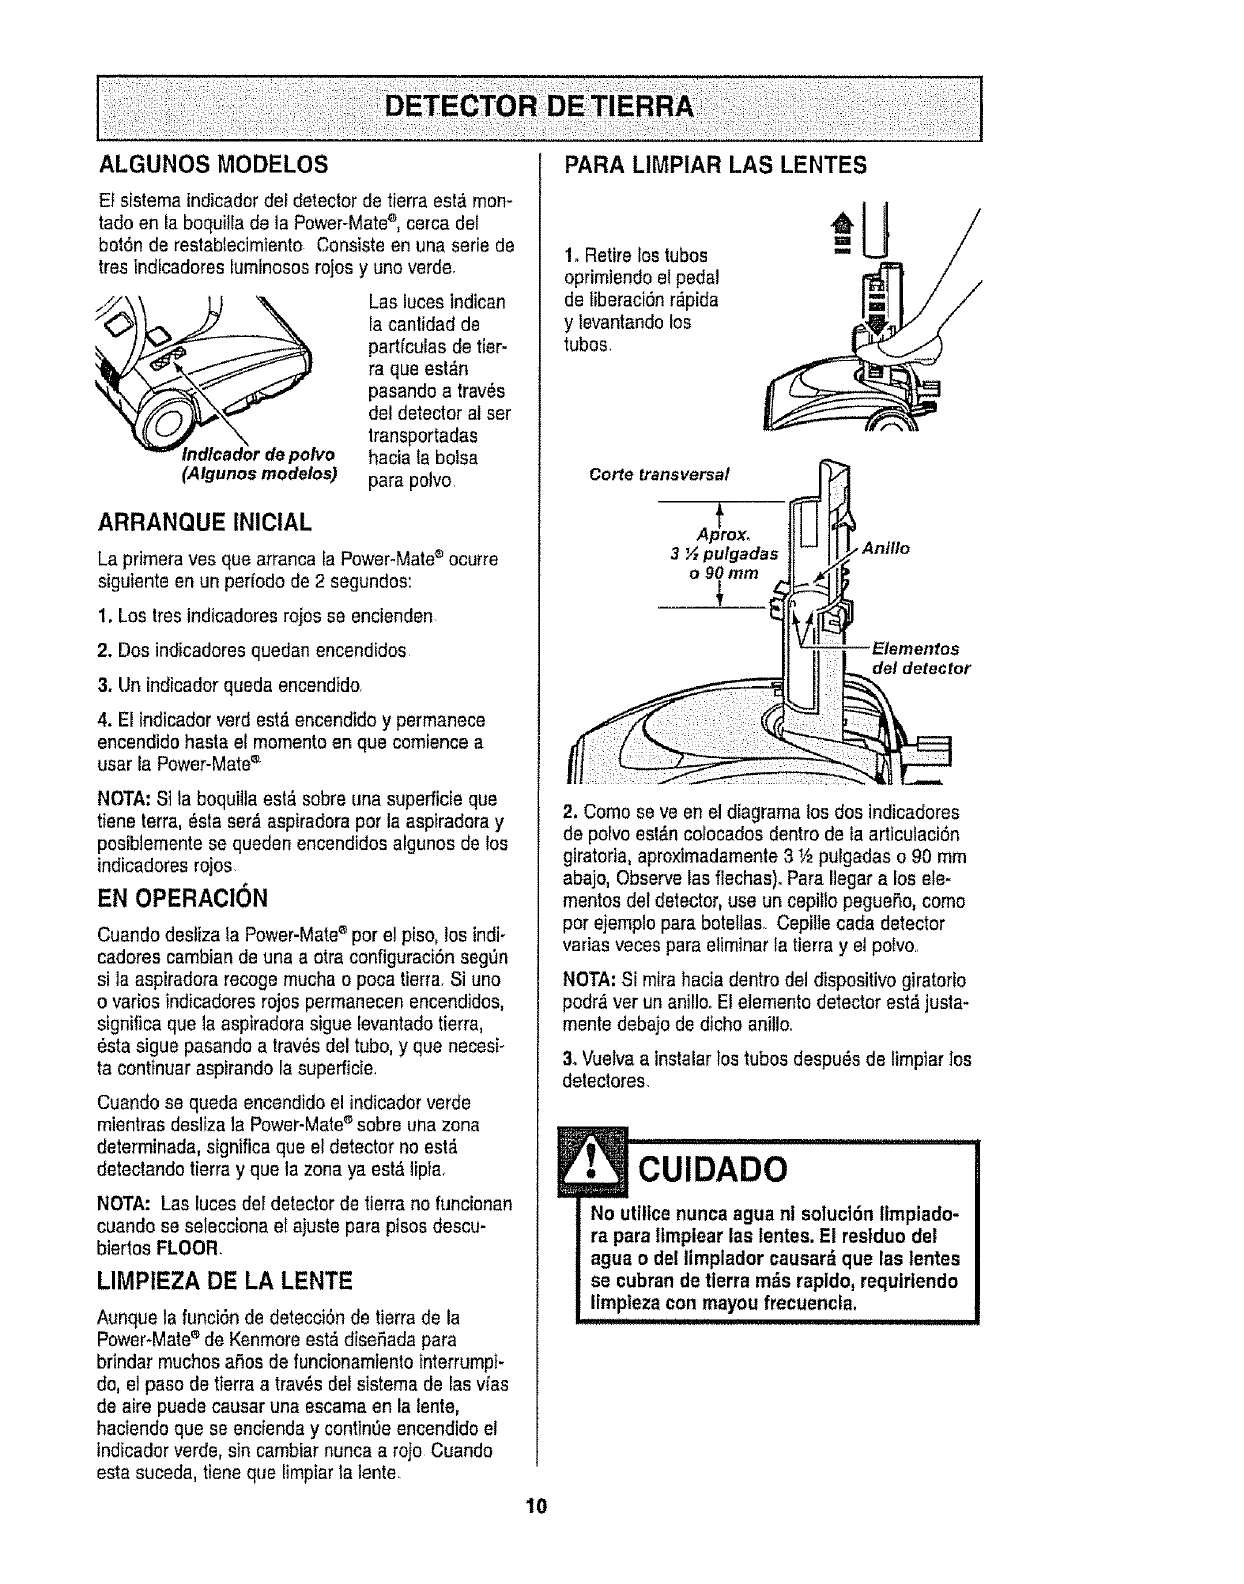
Ef sistema indicadordel detector de tierraest_ mon-
tado en la boquilla de la Power-Matee, cerca del
botSn de restabiecimiento Consiste en una serie de
tres indicadores luminosos rojos y uno verde.
Las lucesindican
la cant|dad de
partfculas de tier-
ra que est,'_n
pasando a trav_s
del detector al ser
lransportadas
po/vo hacia la bolsa
(Atgunos modelos) para polvo
ARRANQUE INICiAL
La pfimera yes que arranca [aPower-Mate® ocutre
siguiente en un per[ode de 2 segundos:
1. Los tres indicadores rojos se encienden
2. Dos indicadores quedan encendidos
3. Un indieadorqueda encendido,
4. El indicador verd est,. encendido y permanece
encendido hasta er memento en que comtence a
usar la Power-Matee
NOTA: S] la boqui]la est,, sobre una superfic[e que
tiene terra, _sta ser_ aspiradora per la aspiradora y
pesib]emente se queden encendidos algunos de los
indicadoresrojos
EN OPERAClON
Cuando desliza ta Power-Mate®per el piso, los indi-
cadores cambian de una a otra configuraciSn segen
si ]a aspiradora recoge mucha o poca tierra. Si uno
o varies indicadores rojos permanecen encendidos,
significa que ]aaspIradorasigue [evantadotierra,
_sta sigue pasando a tray, s del tube, y que necesi_
ta continuar aspirando la superficie.
Cuando se queda encendido el indicadorverde
mientras desliza ]a Power-Mate_ sobre una zona
determinada, significa que el detector no est,.
detectando tierra y que la zona ya est& ]ipia.
NOTA: Las luces deI detector de tierra no funcionan
cuando se selecciona el ajuste para pisos descu-
biertos FLOOR.
LIMPIEZA DE LA LENTE
Aunque la funci6n de detecciOnde tierrade la
Power-Mate®de Kenmore est_disefada para
brindar touches aSos de funcionamlento interrumpi-
do, el paso de tierra a trav_s del sistema de las v_as
de aire puede causar una escama en la lente,
haciendo que se encienda y continOeencendido el
indicador verde, sin cambiar nunca a rojo Cuando
esta suceda, tiene que limpiar la lente,
PARA LIMPIAR LAS LENTES
1. Retire los tubes
oprimiendo el pedal
de liberaciSnr_pida
y levantandolos
tubes.
Corte transversal
A_prex,
3½pu/gadas
o90turn
An|lie
Elementos
del detector
2. Come se ve en el diagrama los dos indicadores
de poivo est,'_ncolocadosdentro de la articulaci6n
giratoria, aproximadamente3 V2pulgadas o 90 mm
abajo, Observelas flechas)oPara Ilegara los ele-
mentos del detector,use un cepitlo pegueSo,come
per ejemplo para botellas Cepille cada detector
vadas veces para eliminar ia tierra y el polvo..
NOTA: Si mira hacia dentro del dispositivo giratorio
podr,_ver un anillo. El elemento detector est&justa-
mente debajo de dicho anill&
3oVuetvaa instalarlos tubes despu_s de limpiar los
detectores.
J• CUIDADO
No utilicenunca agua ni solucl6n limpiado-
ra para ttmplear las lentes. El restduo del
agua o del timplador causar_ que las |entes
se cubran de tierra m_s rap|do,requirtendo
limpieza con mayou frecuencla,
!!!!!!1!1, i ii iii i i i I I
10
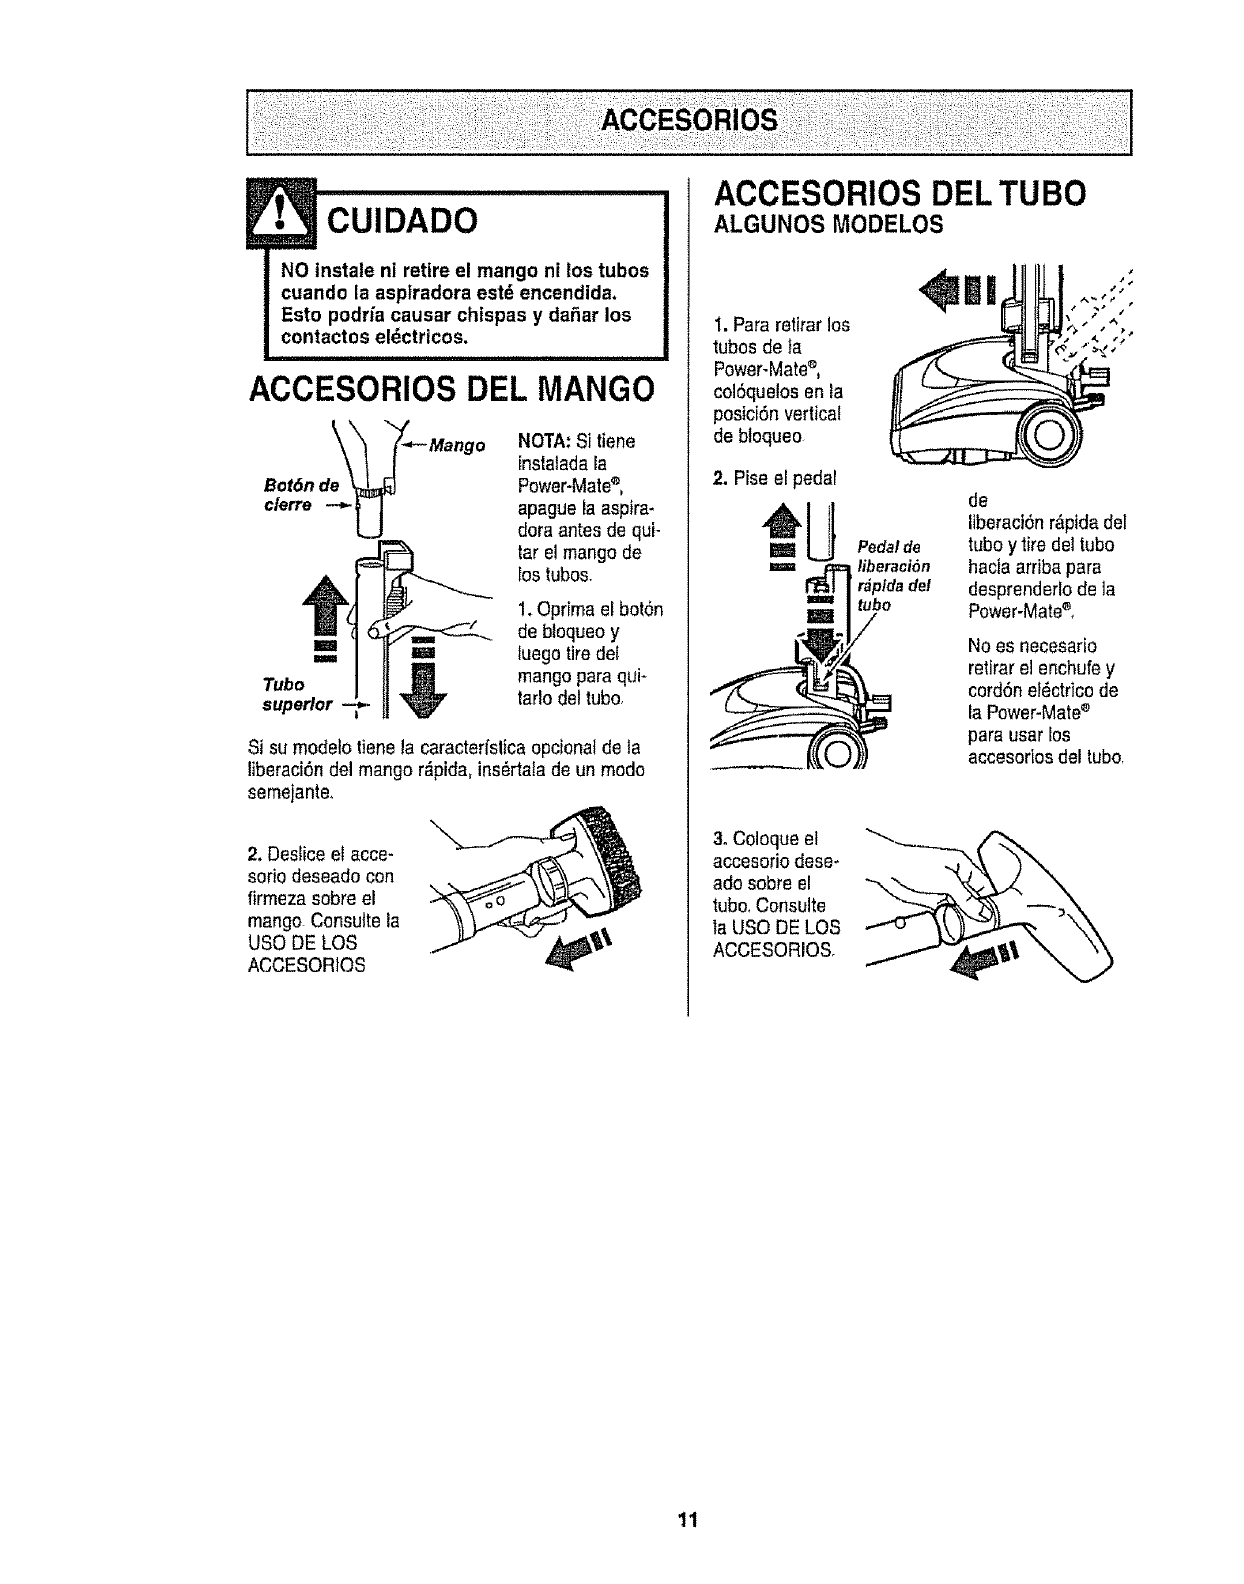
• CuIDADO
NO tnstale ni retire el mango ni los tubos
cuando la asplradora est_ encendida,
Esto podria causar chispas y dafiar los
contactos eldctricos.
ACCESORIOSDEL MANGO
Bot6n de_ _- Mango
NOTA: Si tiene
instaladala
Power-Mate®,
apague la aspira-
dora antes de qui-
tar el mango de
los tubos.
1. Oprima el bot6n
de bloqueoy
===Ea ml luego tiredel
Tubo _ mango paraqui-
superior _ratiodel tubo,
Si su modelo tienela caracterfslicaopcionatde la
liberaci6n del mango r_pida, ins_rtala de un modo
semejante.
2. Deslice el acce-
sorio deseado con
firmezasobreel
mango.Consulte la
USO DE LOS
ACCESORtOS
ACCESORIOS DEL TUBO
ALGUNOS MODELOS
1. Para retirarlos
tubosde _a
Power-Mate®,
col6quelos en la
posici6n vertical
de bloqueo
2. Pise el pedal
=U
3oColoque el
accesorio dese-
ado sobre el
tubo,Consulte
la USO DE LOS
ACCESORIOS
Pedal de
liberaei6n
r_pldadel
tubo
de
liberaci6n r&ptdadel
tuboy tire det tube
haciaarriba para
desprenderlo de la
Power-Mate®,
No es necesario
retirarel enchufey
cord6nel_ctricode
la Power-Mate_
para usar los
accesorios del tubo,
11
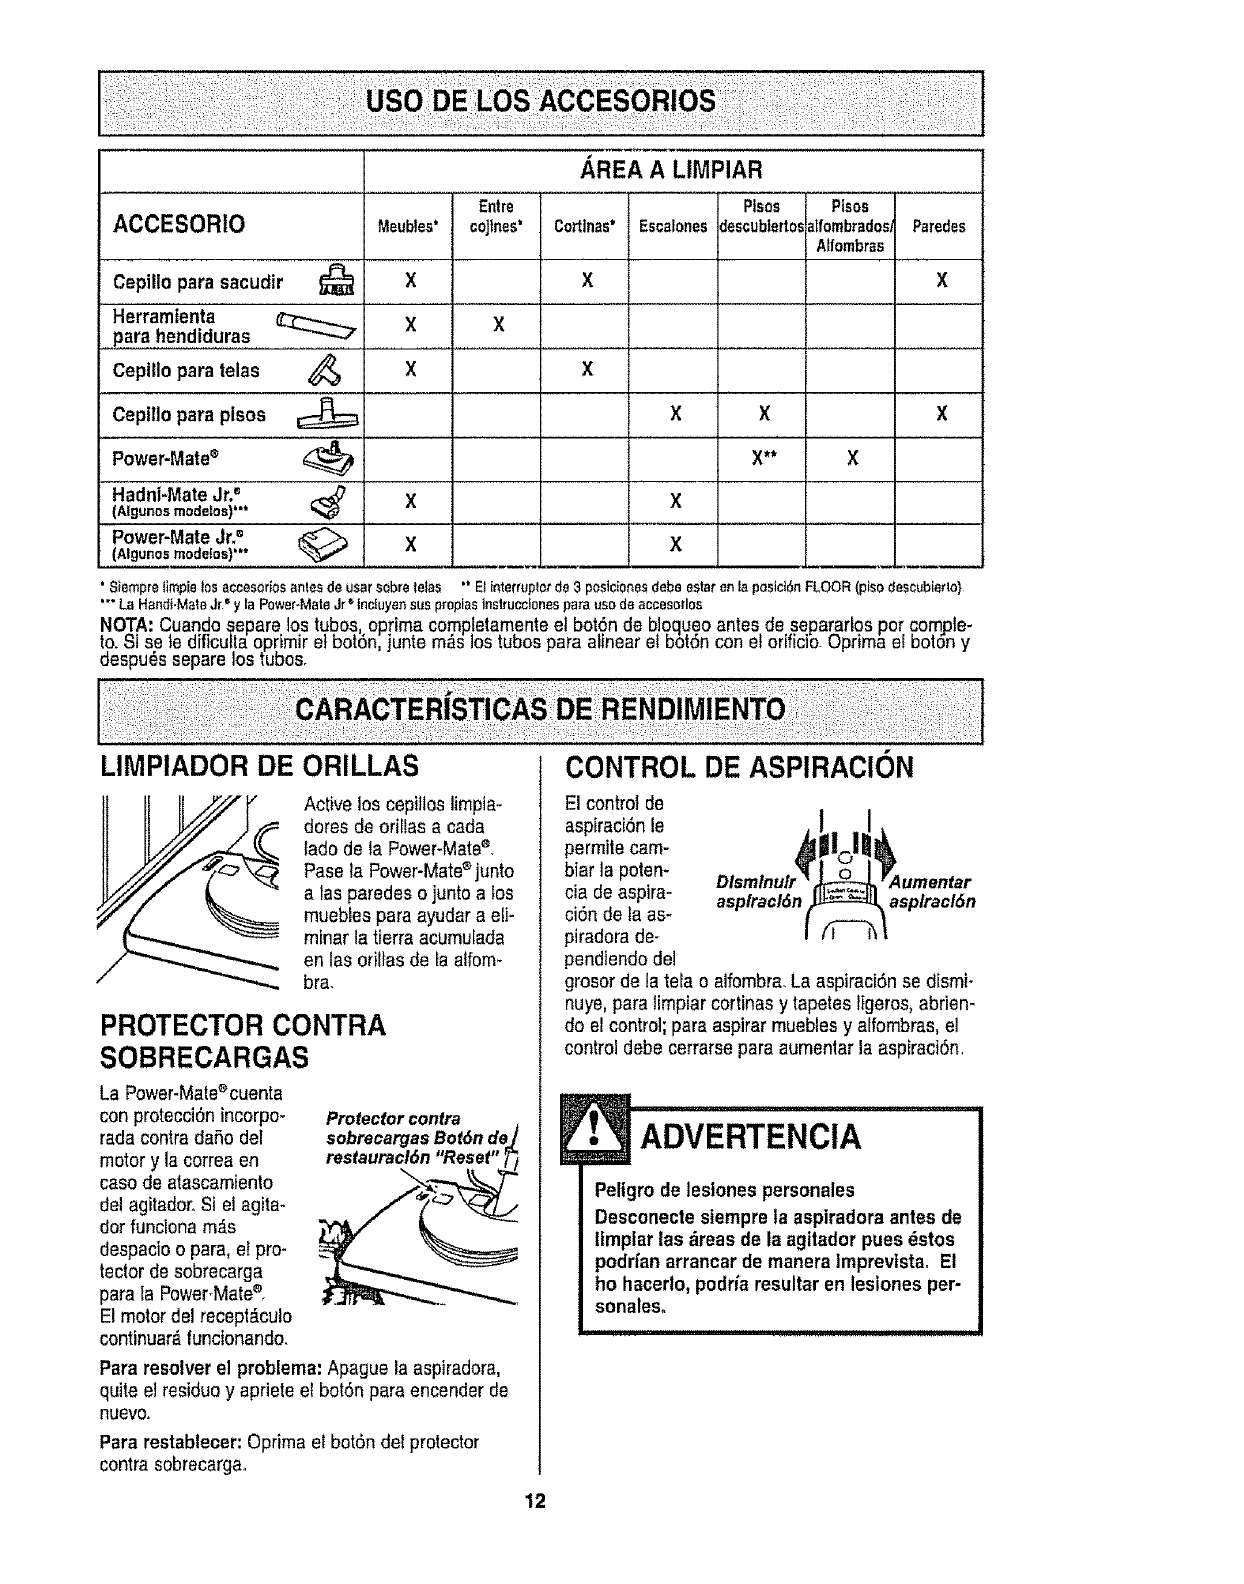
AREA A LIMPIAR
Entre Pisos Pisos
ACCESORIO Meubles' coJtnes' Cortlnas* EscalonesdescubtertosatfombradosParedes
Atfombras
Cepillo para sacudir _ X X X
Herramtenta X X
para hendiduras
telas _ X XCepillo para
Cepillo para pisos _X X X
Power-Matee _ X** X
Hadni-Mate Jr2 _X X
(Algunos modelos)"*
Power-MateJr? _X X l
(Algunosmode!os)'*" .,,.,.
'Siempretimpielos8ccesoriosantesde usersobretelas °"El interruplotde3 poslcionesdebe ester"enta peslct6nFLOOR(pisodescubie_to}
"" La HandFMat8J__'y faPower-MateJr*'inciuyensue proplasInstruccionespa_'auso deaccesorles
NOTA: Cuando separe los tubes optimacomp!etamenteet bot.6nde bloqu.eoantes desepararlos por compte-
to._i se _eeiticutta oprimir et bo_6n,juntem_s Joe_uoospara alinear el bot6n con el oriticio, uprima e boron y
despu_s separe los tubes.
LIMPIADOR DE ORILLAS
Active los cepitlos limpia-
dotes de orillas a cada
tado de la Power-Mate_,
Paso la Power-Matee junto
alas paredes o junto a los
muebles para ayudar a eli-
miner la tierra acumulada
en las orillas de fa alfom-
bra.
PROTECTOR CONTRA
SOBRECARGAS
La Power-Male®cuenta
con protecci6n incorpo-
rada contra da5o del
motor y la correa en
case de atascamiento
de! agitador..Si el agita-
dot funciona m,_s
despacioo para, el pro-
tector de sobrecarga
paraIa PowerMate®,
E1motor del recept_.cuto
continuar_,funcionando.
Protectorcontra
sobrecargasBot6n de./
restauracl6n"Reset" _/
Para resolver el problema: Apague la aspiradora,
quite el residuo y apriete el botSn para encender de
nuevo.
Para restablecer:Optima el bot6n del protector
contra sobrecarga_
12
CONTROL DE ASPIRACI()N
El control de
aspiracidn le
permite cam-
biar la poten- umentar
cia de aspire- asplracl6n asplracl6n
ci6n de la as-
piradora de-
pendiendo del
grosor de la tela o alfombra.La aspiraci6n se dismi-
nuye, pare limpiar cortinas y tapetes Iigeros, abrien-
doel control; para aspirar muebles y alfombras, el
control debe cerrarsepare aumenlar la aspiraci6n.
• ADVERTENClA
Peltgro de lestones personales
Desconecte stemprela aspiradora antes de
lfmplar las dreas de la agitador pues dstos
podrfan arrancar de manera Imprevtstao El
ho hacerto,podfia resultaren leslones per-
sonales.

INDICADOR ELECTRONICO
PARA LA BOLSA/MANGUERA
ALGUNOS MODELOS
Indlcador
electr6nlco para la
bolsa /_
La luz se enciende
en cuafquier memen-
to que se bloquee el
flujo de aire, cuando
la bolsa se Ilene o
cuando sea necesa-
rio cambiar e! filtro de
seguridad del recep-
t,'_culo.
NOTA: Es posibleque la luz tambi_n se encienda
cuando utUiceciertos accesorios debido a que el flu-
jo de aire se reduce al pasar per el accesorio.
Consulte el solucionador de problema&
INDICADOR DE MECANICO
PARA LA BOLSA/MANGUERA
ALGUNOS MODELOS
Cuando la aspiradora fun-
done, la ventana del indF
cadet est,. en rojo es nece-
sario reviser si la bolsa de
polvo est_ llena o haya
residues en otros lugares,
V_ase FUNCIONAMIENTODE SU ASPtRADORA.
NOTA: Es posible que la luz roja encienda al user
las herramientas o al user ta asp|fedora en la alfom-
bra nueva perque e! ftujo de aire es reducido per las
mismas herramientas o la pelusa de una atfombra
nueva que Ilena la boise r_pidamente
PROTECTORTERMAL
Esta aspiradora tiene un protector termal que se
ajusta autom,_ticamentepare proteger ala
aspiradora del sobrecalentamiento,Et protector
lermal apaga el motor autom_ticamente para
permttir que el motorse enfrfe a fin de evitar
posibles da_os ala aspiradora.
Para restablecer:Apague la aspiradora y des-
enchufe el cord6ndel tomacorriente para permitir
que la aspiradora se enfrfe. Busque y saque las
obstrucciones,sl es necesario. Examine tambt_n
y reemplaee cualquierfiltro obstruido, Espere
aproximadamente 50 minutes y enchufe la asp|-
radora y volt_ela pare ver sl el protector del
motor se ha reajustado. En algunos cases, la
unldad puede vo|ver a arrancar st_bltamente, NO
LA DEJE desatendtda.
TAPAY ALMACENAMIENTO
PARA POWER-MATE
ALGUNOS MODELOS
El tube inferiortie-
ne un reborde en
forma de "U"en la
zone de f]jaci6n de1
cord6n el_ctrico.La
base tiene una ra-
nura en forma de
"U" cerca de la par-
te frontal del recep-
t_culo.
N
La ranurapermite almacenar los tubes y la Power-
Mate® con el tube pare economizar el espacio re-
querido pare su almacenamient& Parausar esta ca-
racterfstica es necesano almacenar el recept_culo
en forma vertical,
El tube se sale de la ranuraal ser levantado pare
usado y se desliza dentro de 6sta al bajarlo pare al-
macenafle.
La Power-Mate® debe estar en la posici6n liana
come se ve en el diagram& Use el mango dot
pedal de liberaci6n para moverla a esta posici6no
NOTA: Se puede usar menos espacio si baja el
tube telesc6pico come se muestra en Ia secci6n
MONTAJE
!•CUIDADO
Para evitar volcaduras,nunca deje la Power-
®
Mate encendtda o en posicl6n vertical con
el tubo completamenteextendido.
Ajustandoel tubo a una posicidn m_isbaja_/
girandoel mango a un ledo, fa Power-Mate_
se haltarden una poslci6n rods estable y
serdrods dificil que se vuelque.
13
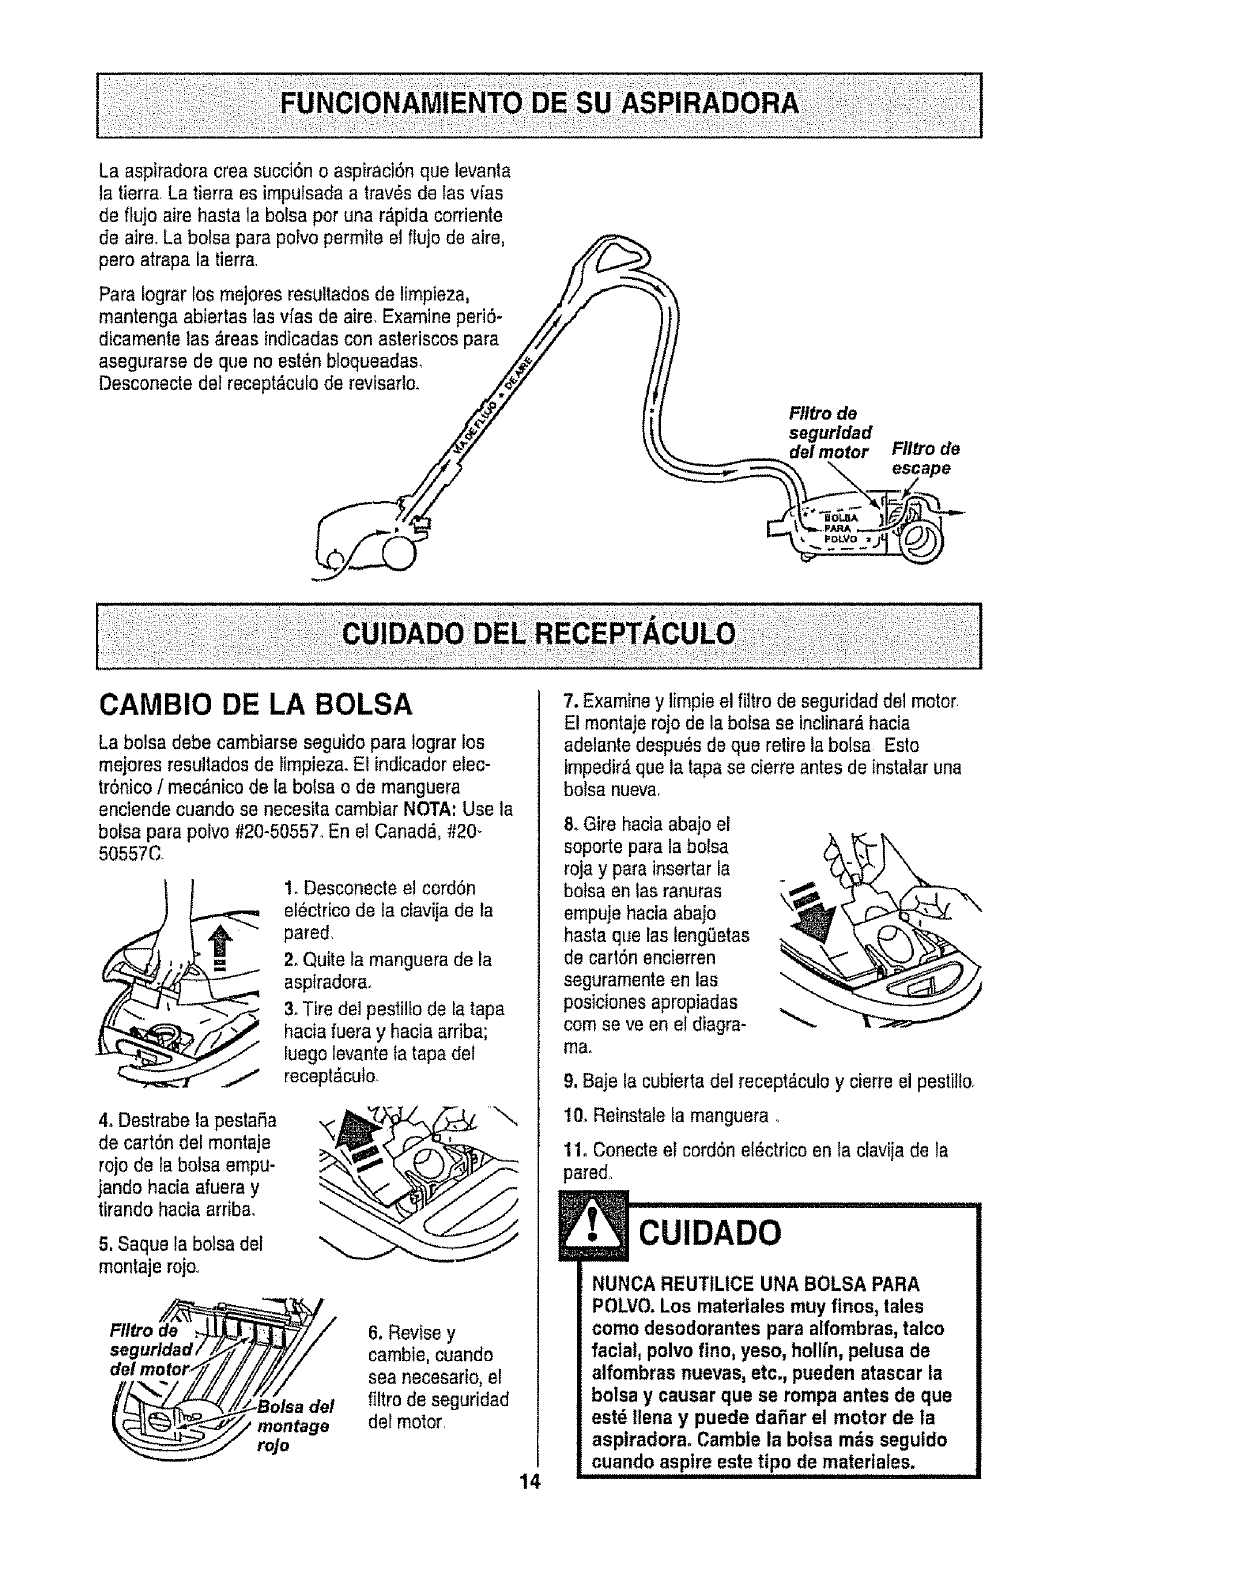
La aspiradora crea succi6n o aspiraci6nque levanta
la tierra, La tierra es imputsada a trav_s de las vfas
de flu}o aire haste la boise per una r_pida corriente
de aire, La boise para poFvopermite el flujo de aire,
pero atrapa la tierra /f_.__._
Pare Iograr los mejores resultados de limpieza, 1/1._-_"._
mantenga abie_'taslas vfas de aire, Examine periS- //_- Y
dicamente las _.reasindicadascon asteriscos para ///
asegurarse de que no est_n bloqueadas, _/
CAMBIO DE LA BOLSA
La boise debe cambiarseseguido pare Iograr los
mejeres resultados de limpieza. El indicador elec-
trOnico/mec_,nicode la bolsa o de manguera
enciende cuando se necesita cambiar NOTA: Use la
bolsa para polvo #20-50557. En el Canada, #20-
50557C
1. Desconecte el cordSn
el_ctrico de la cfavijade la
pared,
2. Quite la manguera de la
aspiradora.
3. Tire de1pestilto de ia tape
hacia fuera y hacia arriba;
luego levantela tapa del
recept,_cuto
4oDestrabe la pestaSa
de carton del montaje
rojo de la bolsa empu-
jando hacia afuera y
tirando hacia arriba.
5, Saquela bolsa del
montaje rojo.1
//2#
Ffltro de ._
segurldad/
delmotor_
6, Revise y
cambie, cuando
sea necesario, el
filtro de seguridad
del motor,
14
7. Examiney limpie el filtro de seguridad del motor
E! montajerojo de la boise se inclinerS,hacia
adelante despu_s de que retire laboise Esto
impedir_que la tape se cierre antes de instalar una
boise nueva,
8. Gire haeiaabajoel
soporte pare la bolsa
roja y para inserterla
botsa en fas ranuras
empuje hacia abajo
basra que las lengeetas
de cart6n encierren
seguramenteen las
posiclones apropiadas
corn seve en el diagra-
ma.
9, Baje la cubiertadel recept_-culoy cierre el pestil!o_
t0. Reinstale la manguera.
11. Conecte el cordSnel_ctriceen ta clavija de la
pared_
CUIDADO
NUNCA REUTILICE UNA BOLSA PARA
POLVO.Los matertales muy flnos, tales
como desodorantes para atfombras,talco
facial, polvo fino, yeso, hollfn,pelusa de
alfombras nuevas, etc., pueden atascar la
bolsa y causer que se rompa antes de que
estd Ilena y puede daSar el motor de la
asplradora. Camble la boise mds seguldo
cuando aspire este tipo de materlales.
1, Desconecte el cord6n el_clrico de la clavija de la
pared. NO choree agua sobre la aspiradora.
2_Limpie el exterior con un trapo suavey Imp|o, que
ha sido exprimido despu_s de remojar en una solu-
ci6n de agua y detergente lquido igero. Seque el
exterior con un trapo secodespu_s de fmpiar.
3. Limpie [a superficie exterior del recept_culoy de
los accesorios parareducir la electric|dad est#,ticay
la acumulaci6n de polvo.
CUIDADO
No use los accesoriossl est_n mojados.
Los accesorios que se utlicen en _reas
sucias, debajo del refrigerador_no deben
usarseen otras superficies sin antes ser
lavados. Podrian dejar marcas.
Examine erfttro de seguridad del motor de vez en
cuando y cambiocuandoest_sucio°
Peligro de choque e!_ctrico
Desenchufeel cordon de ta cordente el_c-
trica. No opere la aspiradora sin el flltro de
seguridad del motor. Aseg_urese de que el
fittro est_ seco e Instatado adecuadamente
para impedir que el motor fale ylo que se
produzca un choqueel_ctrico.
i,,
Para quitar la bolsa, siga las instruccionesen CAM-
BIO DE LA BOLSA.
FILTRO DE SEGURIDAD DEL
MOTOR
ELECTROST. TiCO
Este filtro setene que cambiar cuando est_ sucio.
Debe cambiarse peri6dicamente seg0n las condi-
clones de uso. El flltro no se puede lavar pues
prderfa su capscfdad para atrapar altrapar polvo.
NOTA: Useel fltro de seguridad de[ motor #2&
86883. En el Canada, #20-86883C
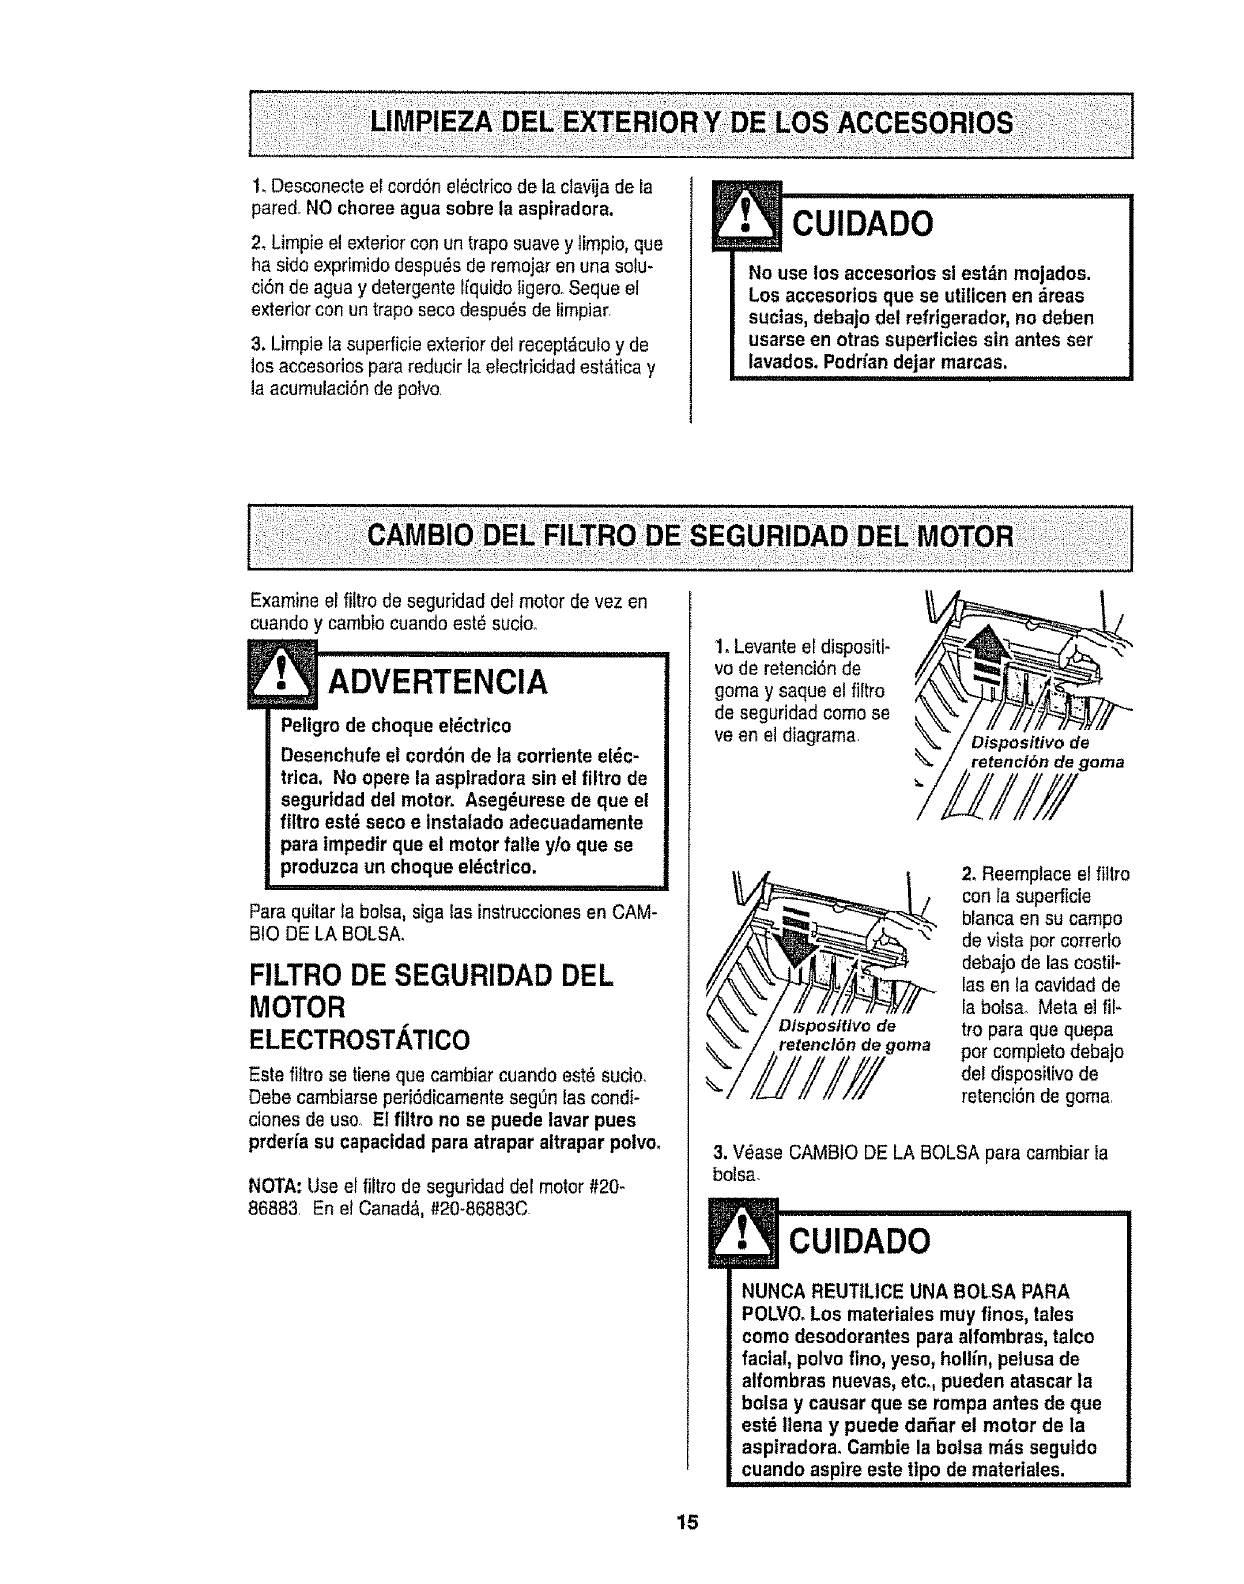
1. Levanteel disposti-
vo de retenci6n de
gorna ysaque el fittro
de seguridad come se
ve en el diagrama Dispositivo de
retenci6n de gorna
iLIH!I
2. Reemplace el filtro
con ia superficie
bianca en su carnpo
de vista por correrlo
debajo de las costil-
ias en la cavidad de
[a bolsa.. Meta el fi[-
tro para que quepa
por completo debajo
del dispositvo de
retencl6n de goma.
3. V_ase CAMBIO DE LA BOLSA para cambiar [a
bolsa.
!•CUIDADO
NUNCA REUTtLICEUNA BOLSA PARA
POLVO.Los materiales muy ftnos, tales
como desodorantespara alfombras, talco
facial, polvo fino, yeso, holiin, pelusa de
alfombras nuevas, etc., pueden atascar la
bolsa y causar que se rompa antes de que
est_ lena y puede daSar el motor de la
aspiradora. Cambie la botsa m_s seguldo
.cuan.do..aspireeste tipo de matertales.
15
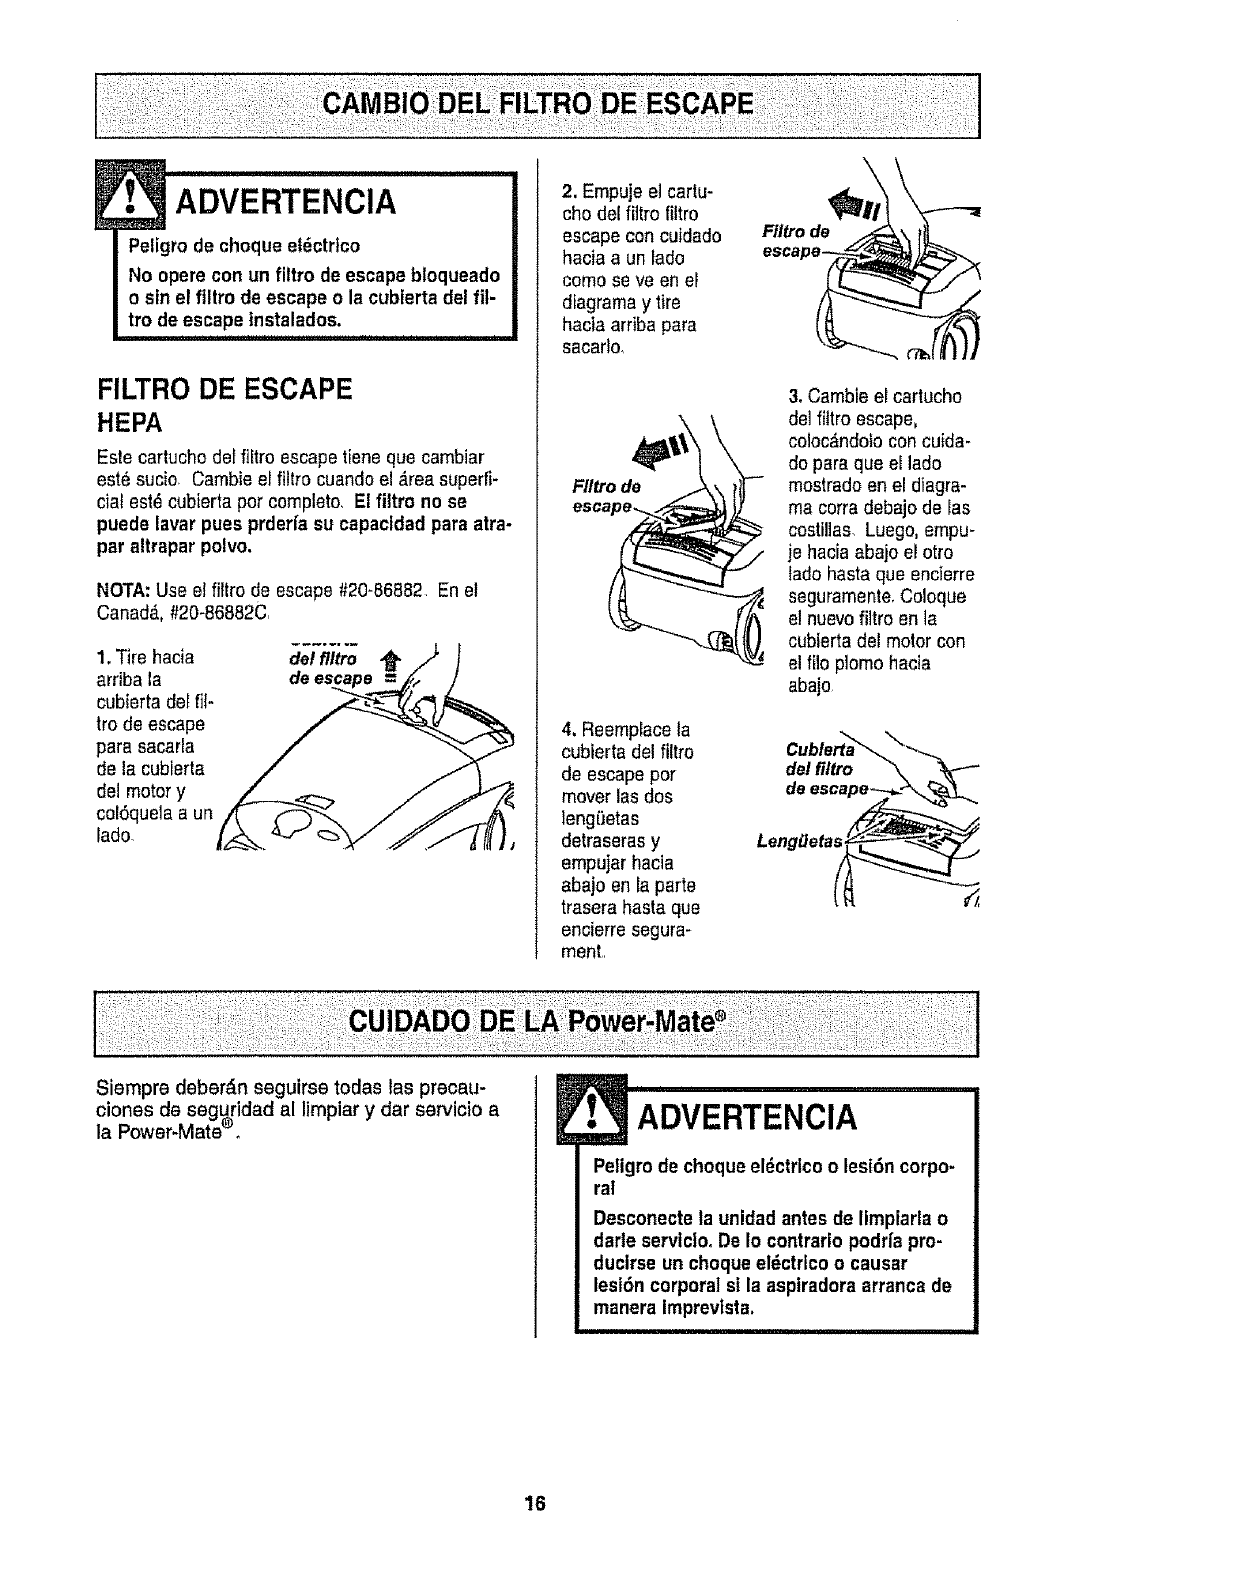
ADVERTENcIA
Peligro de cheque el6ctrlco
No opere con un filtro de escape bloqueado
o sin el flltro de escape o la cublerta del fil-
tro de escape lnstalados.
FILTRO DE ESCAPE
HEPA
Esle cartucho det filtro escapetieneque cambiar
est6 sucio Cambieel filtro cuando el _,reasuperfi-
cial est6 cubierta pot completo, El filtro no se
puede lavar pues prderfa su capacidad para atra-
par altrapar polvo,
NOTA: Use el filtro de escape #20-86882 En el
Canada.,#20-86882C
1. Tire hacia
arriba la
cubierta def ilt-
trode escape
para sacarla
de la cubierta
del motor y
col6quela a un
lado
del filtro ,_
de
2. Empuje e] cartu-
eho del filtro filtro
escape con cuidado
hacia a un lado
como se ve en el
diagrama y tire
hacia arriba para
sacarlo,
FIItro de _
4, Reemplace la
cubierta del filtro
de escape por
mover las dos
lengi_etas
detraseras y
empujar hacia
abajo en la parte
trasera hasta que
encierre segura-
ment,,
Ftltro de
3, Cambie el cartucho
del fittro escape,
coloc_ndolo con cuida-
do paraque el lado
mostrado en el diagra-
ma corra debajo de las
costillas, Luego, empu-
je hacia abajo el otto
lado hasta que encierre
seguramente,Coloque
el nuevo filtro en la
cubierta del motor con
el filo plomo hacia
abajo
Cuble_a _,
del filtro
Lenggetas
Siempre deber6n seguirse todas las precau- ADVERTENCIA
clones de seguridad al limpiar y dar servicio a
la Power-Mateeo
16
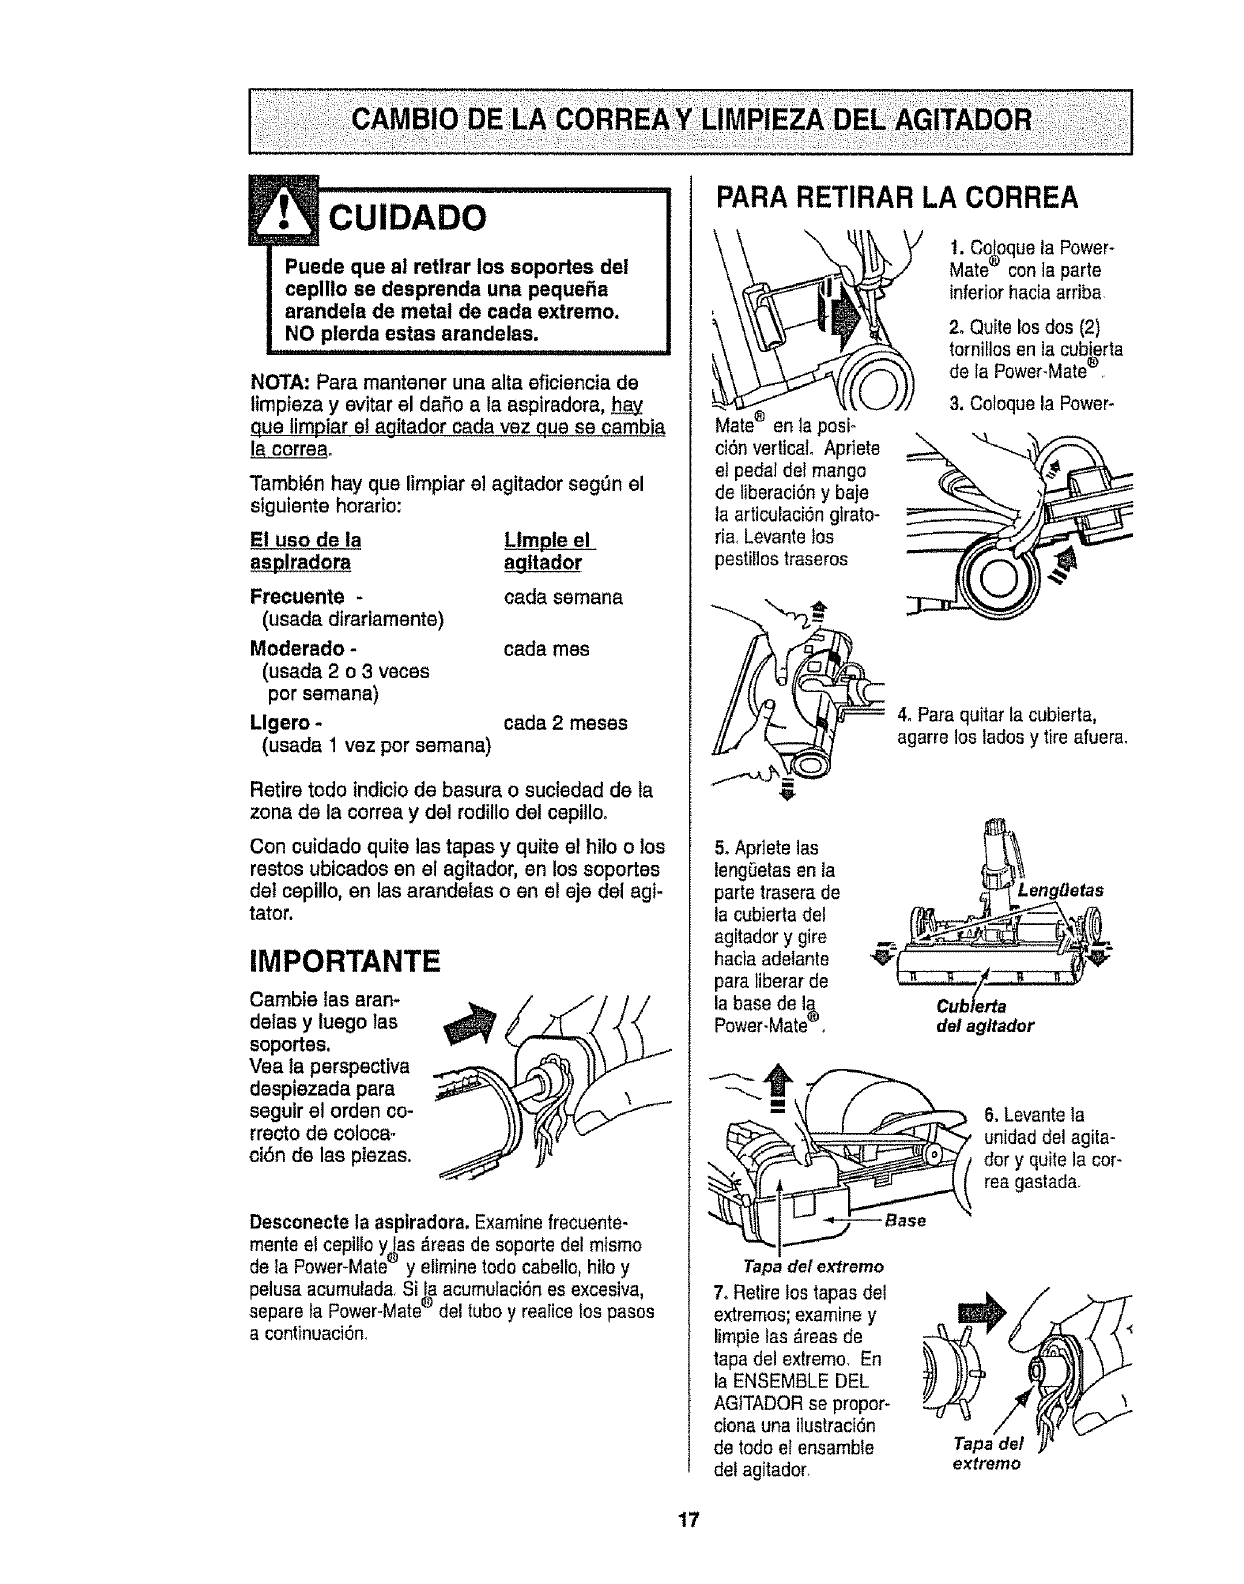
CUIDADO
NOTA: Pare mantener una alta eficiencia de
Iimpteza y evitar el dafio ala aspiradora,
que limpiar el agitador cada vez qua se cambia
la correa,.
Tambi_n hay que limpiar el agitador seg_n el
siguiente horario:
El uso de la LIm_
asplradora a_gltador
Frecuente -
(usada dirarlamente)
Moderado -
(usada 2 o 3 veces
por semana)
Llgero -
(usada 1 vez por semana)
cada semana
cada rues
cada 2 meses
Retire todo Indicto de basura o suciedad de la
zona de la correa y del rodillo del cepillo.
Con cuidado quite las tapes y quite el hilo o los
restos ubicados en el agitador, en los soportes
de! cepillo, en las arandelas o en el eje del agi-
tator.
IMPORTANTE
Cambie tas eran-
delas y luego las
soportes,
Vea ta perspective
despiezada pare
seguir ei orden eo-
rrecto de coloca=
oiSn de las piezas.
Desconecte la aspiradora. Examinefrecuente-
mente el cepillo y las _ireasde soporte del mismo
de la Power-Mate® y elimine todo cabelle, hilo y
pelusa acumulada<Si la acumulaci6n es excesiva,
®
separe ta Power-Mate del tuboy realice los pesos
a continuaci6n,
PARA RETIRAR LA CORREA
ci6n vertical° Apriete
el pedal del mango
de liberaci6n y baje
la articulaci6n gtrato-
ria, Levantelos
pestillos traseros
!. Coloque la Power-
Mate® con taparte
inferior hacia arriba.
2. Quite los dos (2)
tornillos en la cubierta
de la Power-Mate®,
3. Coloque la Power-
4. Pare quitar la cubierta,
agarre los lades y tire afuera.
5. Apriete las
lengOetasen la
parte trasera de
la cubiertadel
agitador y gire
hacia adelante
pare liberar de
la base de Ig.
Power-Mate_. del agltador
6. Levante ta
unidad del agita-
dory quite la cor-
rea gastada.
Tapa det ex_remo
7. Retire lostapes del
extremos;examiney
limpielas _reas de
tapa del extremo. En
la ENSEMBLE DEL
AGITADORse propor-
ciona una ilustraci6n
de todoet ensamble
del agitador_
Tapede/
extremo
17
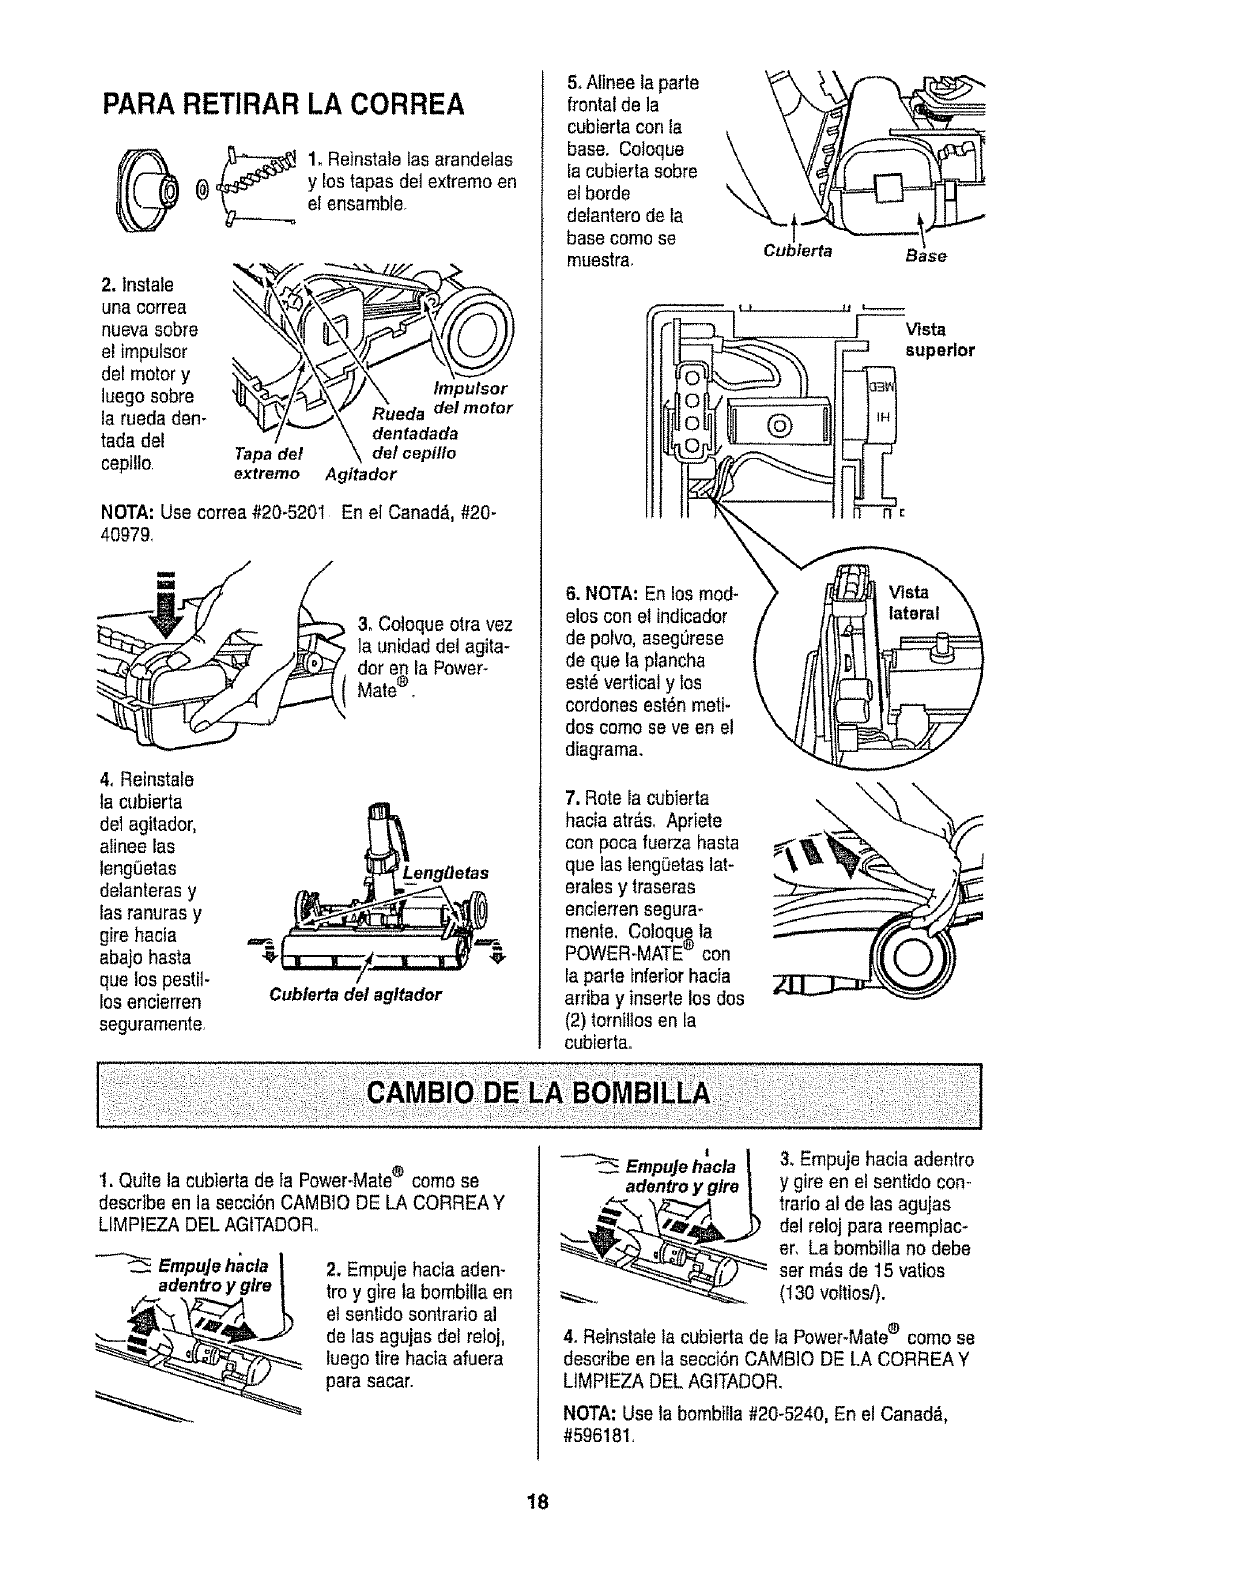
PARA RETIRAR LA CORREA
_ 1. Reinstale las arandeias
(_ y los tapas del extremoen
el ensamble.
2. lnstaie
una correa
nueva sobre
et impulsor
del motor y
luegosobre
la rueda den-
tada del
cepillo. Tapadet \\ de/cepillo
extremo Agitador
NOTA: Use correa #20_5201 En el Canada, #20-
40979
3, Coloque otra vez
la unidad del agita-
dor %nla Power-
Mate .
4. Reinstafe
la cubierta
de1agitador,
alinee las
leng0etas
delanterasy
las ranuras y
gire hacia
abajo hasta
que los pestit-
los encierren
seguramente,
/
Cublertadel agltador
5oAtinee la parle
frontal de la
cubierta con la
base. Coloque
la cubierta sobre
el borde
delantero de la
base come se
muestra.
6. NOTA: En los mod-
elos con el indicador
de polvo, asegL_rese
de que la plancha
est_ vertical y los
cordones est_n meti-
dos como se ve en el
diagrama.
7. Rote la cubierta
hacia atr&s. Apriete
con poca fuerza hasta
que las leng0etas lat-
erales y traseras
encierren segura-
mente, Coloque la
POWER-MATE® con
la parle inferior hacia
arriba y inserle los dos
(2) tomiUosen fa
cubierta.
\
Cubierta Base
[ Vista
superior
I. Quite la cubierta de la Power-Mate® come se
describe en Ia secei6n CAMBiO DE LA CORREA Y
LIMPIEZA DEL AGtTADOR.
EmpuJehacla
adentroy glre 2. Empuje hacia aden-
troy gire fa bombiUaen
et senlido sontrario al
de las agujas del reloj,
luego tire hacia afuera
para sacar.
EmpuJehacla 3, Empuje hacia adentro
ygire en el sentido con-
trario al de las agujas
del reloj para reemplac-
er, La bombilta no debe
ser m_s de 15 vatios
(130 voltiosi).
4. Reinstale la cubiertade la Power-Matee como se
describe en la secci6n CAMB!O DE LA CORREAY
LIMPIEZA DEL AGITADOR.
NOTA: Use la bombilla #20-5240, En el Canad,_,
#596181,
18
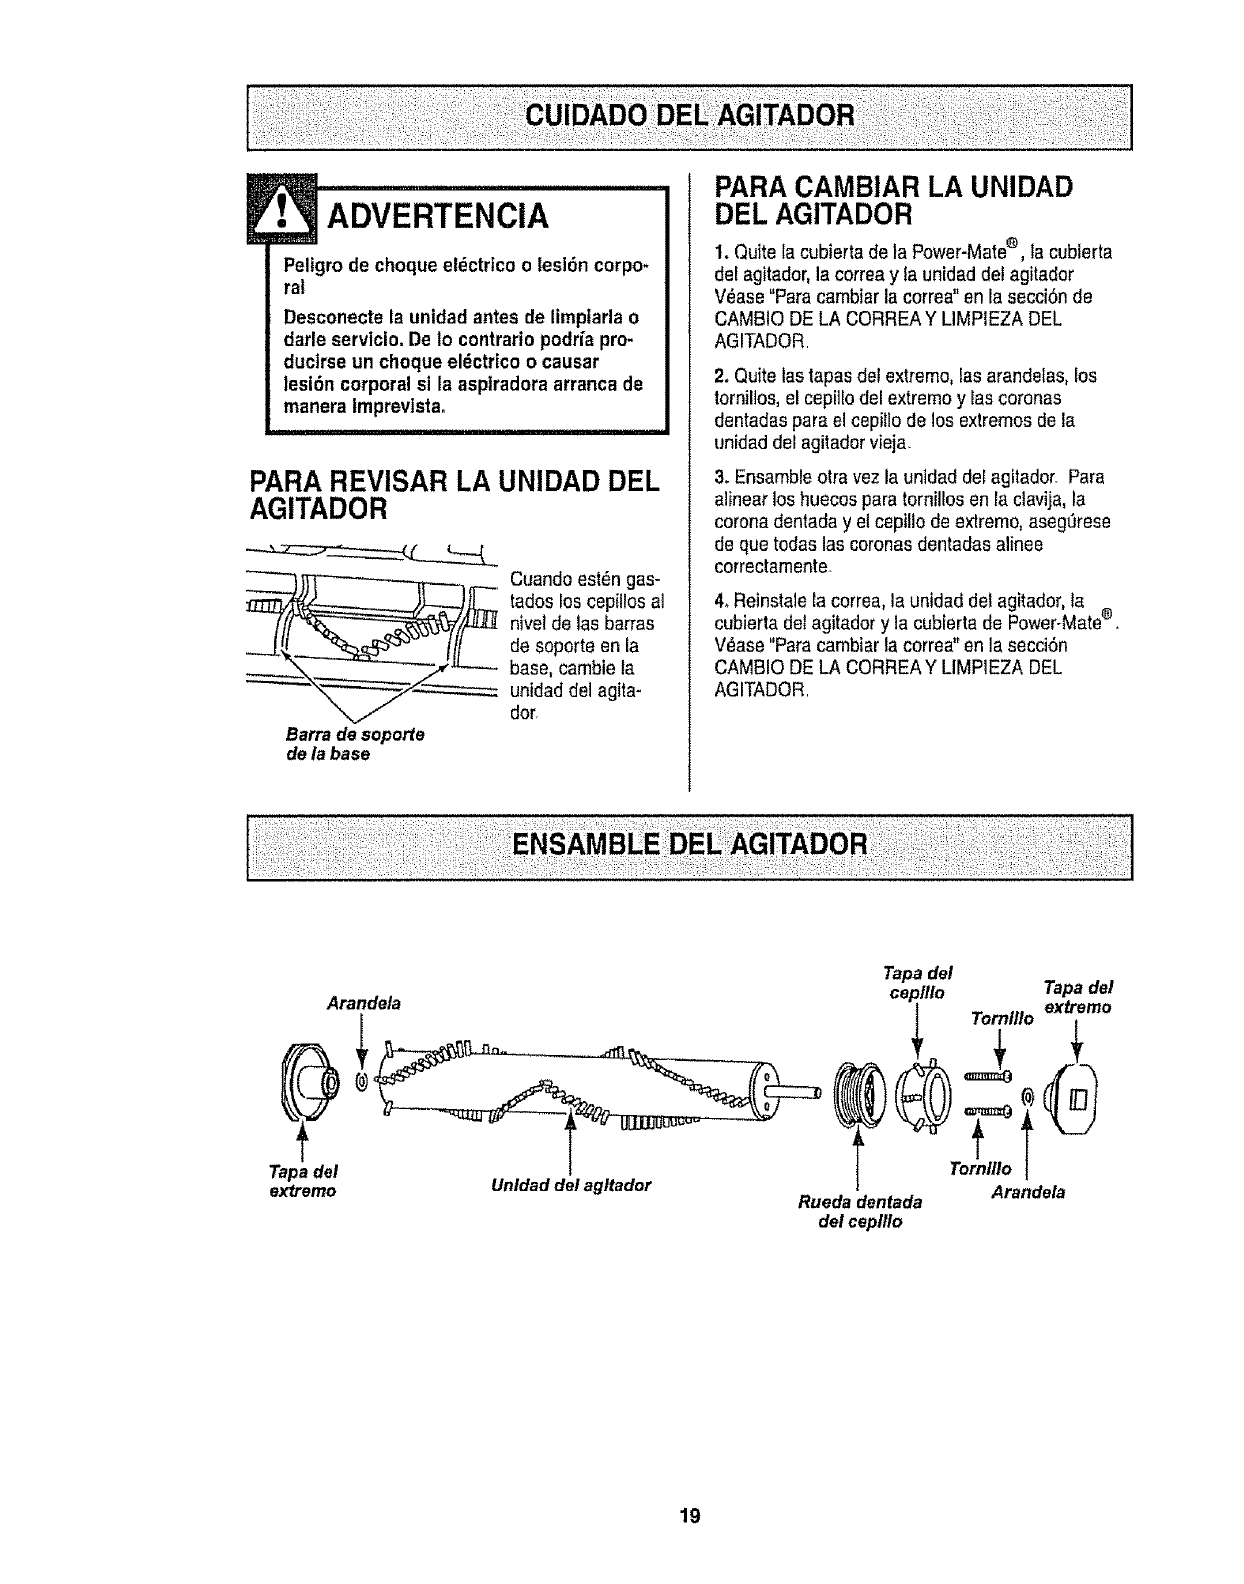
F•_ ADvERTENciA
Peligro de choque el_ctrtco o lesi6n corpo-
ral
Desconecte la untdad antes de limpiarla o
darle servicio. De Io contrariopodr_apro-
duclrse un choque el_ctrico o causar
lesi6n corporal sl la asptradora arranca de
manera lmprevista.
PARA REVISAR LA UNIDAD DEL
AGITADOR
Barra de soporfe
de la base
Cuando est_n gas-
tados los cepillos al
nivel de las barras
de soporte en la
base, cambie la
unidad del agita-
dor.
PARA CAMBIAR LA UNIDAD
DEL AGITADOR
1. Quite la cubierta de la Power-Mate®, la cubierta
def agitador,la correa y ta unidad del agitador
V_ase "Para cambiar la correa" en la secciSnde
CAMBIO DE LA CORREAY LIMPIEZA DEL
AGITADOR
2. Quite las tapas del extremo, Ias arandelas, Eos
tornillos,e! cepiilo del extremo y rascoronas
dentadaspara el cepillo de losextremos de la
unidad del agitador vieja.
3. Ensambleotravez la unidad del agitador. Para
alinear los huecos para torniirosen la ctavija,la
corona dentada y el cepillo de extremo, asegerese
de que todas las coronas dentadas alinee
correctamente-
4. Reinstale la correa, la unidad del ag[tador, la
cubierla del agitador y la cubierta de Power-Mate®,
V_ase "Para cambiar la correa"en la secci6n
CAMBIO DE LA CORREAY LIMPIEZA DEL
AGITADOR.
Tapa del
extremo
Arandela
Unldad del agltador
Tapadel
ceplllo Tapadel
ri
Tornlllo
Arandela
Rueda dentada
del ceplllo
19
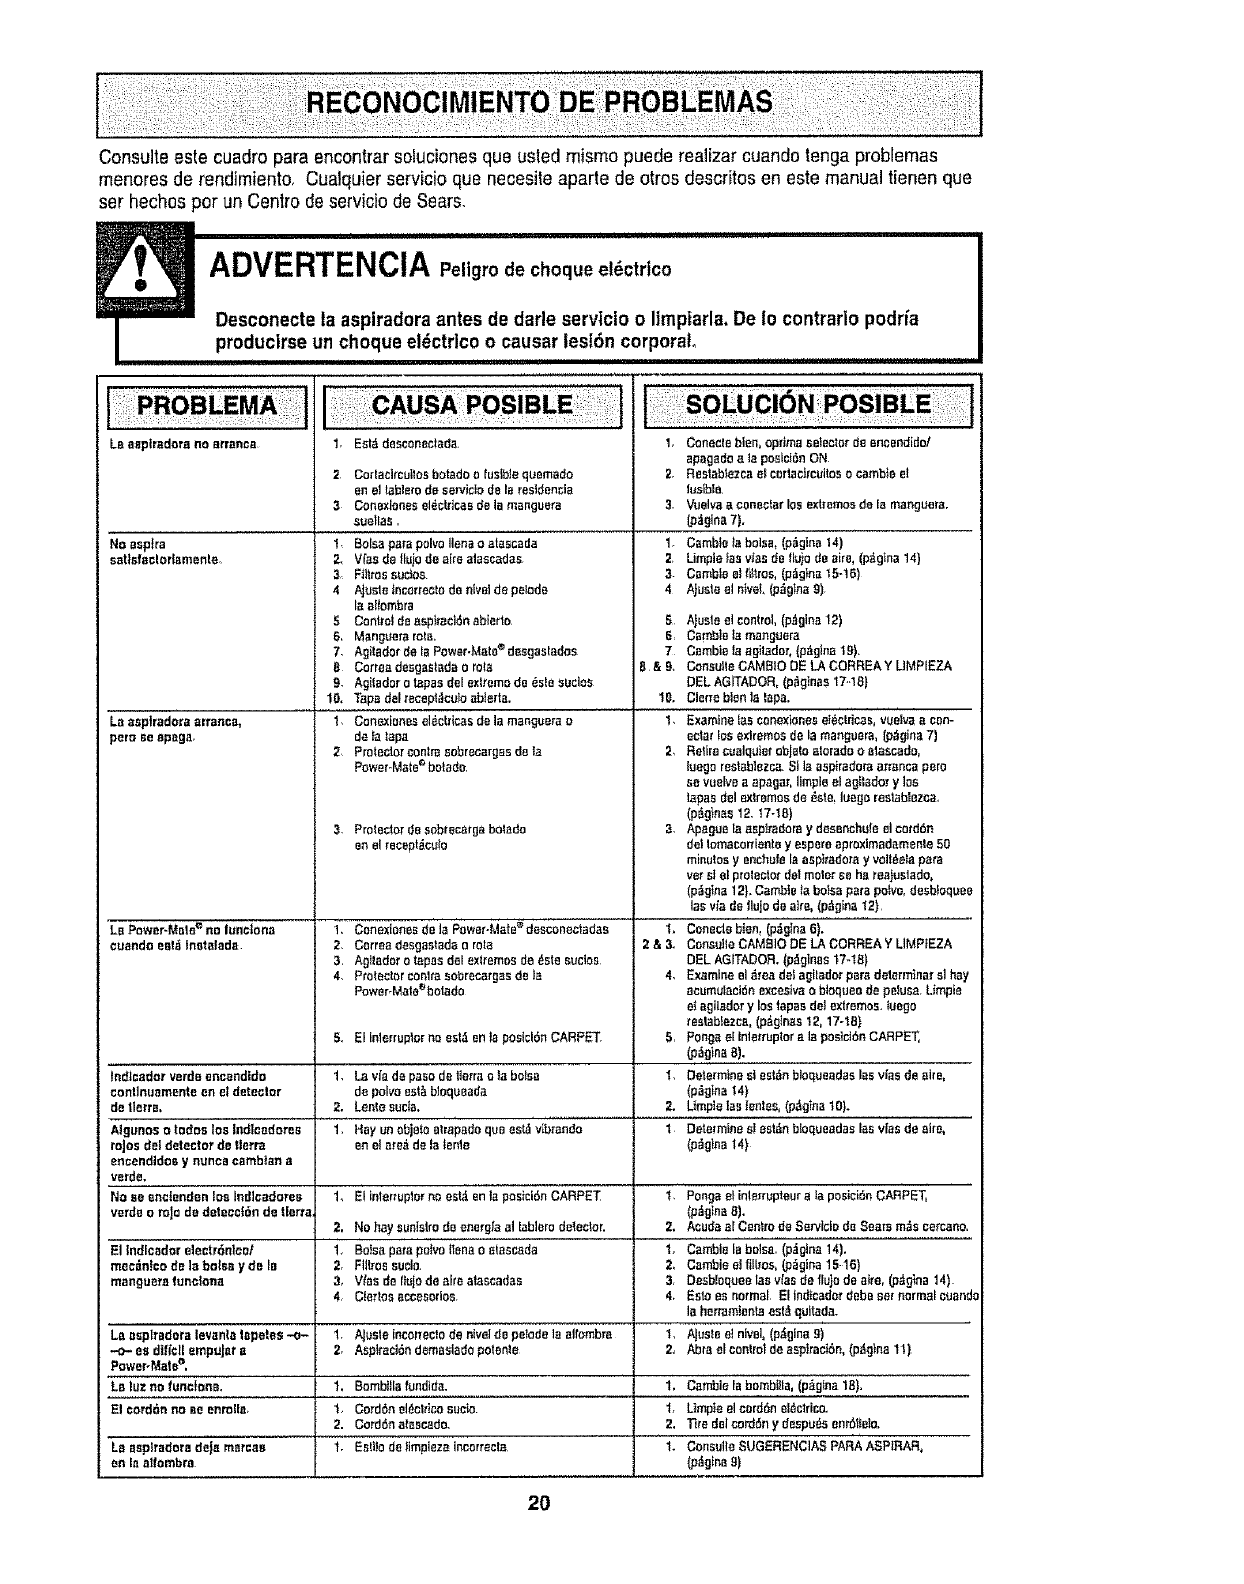
Consults este cuadro para encontrar soluciones que usted raisins puede realizer cuando tenga problemas
menores de rendimiento. Cualquier servicio que necesile aparte de otros descr[tos en este manual tienen que
set hechos par un Centre de servicio de Sears,
ADVERTENCIA P ,,g.odec,oq.oel ctrtco
Desconecte la aspiradora antes de darle servtcio o limpiarla, De Io contrarlo podrfa
producirse un choque el_ctrico o causar lesidn corporal
! L!I!! I I!lllJ'lllllllllllllllll
LBeeptradora no arranca
NOesptra
sotlofoclodamenle_
La asp|radars arranca_
pem ee epsga,
LoPower-Mete€ no lunotona
ouondo enI,_Inetotada
1 Eat&deseonectada.
2 Corlaeircutloabotado o fustb]e quemado
en el _blero de son,isis de la residencia
3Conaxiones eldctricae de la monguera
suetlas,
1, Bolaspare poles liens a atsscada
2, V[nado fluiode airsslsessdas
3 Ftt_rassutton
4 AjusteIncorreotadenivelde pelade
Isaltombra
5 Controtde aspitasidn abierto
6, Mangaera rata.
7. Agitsdor de lePower-Mats®desgaotados
8 Corroadesgastsdao rata
g. AgiIsdor o tapes del exltemo de 6ste suclos
10, Tspo del recept_cu_o obierta,
1Conexioeesddcbicas de la mangaera o
de _s_apa
2 ProtectoroonlrasobrecargBs de Ia
PoweroMate_bolodo,
Protectorde aobroca_gabotado
on el recept_ot_tn
t. ConexionesdelaPower.Mate_dssconectadae
2. Correa desgss_adaorote
3, Agitador o _aposdol extremosde/_ste sucios
4. Protector eonlra aobrecargesde Is
Powor-Malo%clado
1. Consoleblen, opdmaselector de eneendido!
apagado ata posicide ON
2, Restablezcael corlacircuitoso csmbte el
tualble.
3. _elva a coneotnrlos extremosdo Is mangaora,
(p_t@na7).
t. CembteIs balsa, (p_glno 14)
2, Limple _asvies de tlaio de airs, (p_tgin_14}
3- Csmblaalhttros,(p_gtnsta-16)
4Ajusia el niveL(p_olea 9)
5A}usie eI control,(p.,tgina12)
6, CembleIs manguera
7 CombioIs agitador, {p_tglna19).
B&9, ConsultsCAMBIO DE LA CORREAY LIMPIEZA
DEL AGITADOR, (p_gEnes17..18)
1{}. Cierrabienlo laps.
1, Examine {as oonexionaset_ctdeas, vuelvs a con-
eater_osaxtremos de la manguera, (p,tgins7)
2, Retirecuoiquier objeto storads o etascsdo,
luego reotsblezca.SI la ospiradoraarranoa pars
ae vuelvea apagor, Iimpie el agll_dor ylos
tapes del extremosde _ote,laega reslBbtezca.
(p_g}nss12, 17-18)
3, Apaguolaasplradoray dasenchufaeIcord6n
dot Iomoconiente y eepere oproxlmBdamenla50
minutos yenchufe la aspi_adorayvolt6olapars
vet atel protector dotmotor Be ho roalustado,
(p_gtna 12}. Cambieta bo_sopore pairs, desbfoquee
los via de Ilujo de airs, (p_gina 12)
1. Conectab|an,(pdglna6).
2 & 3_ ConsultsCAMelS DE LA CORREA Y LIMP_EZA
DEL AGITADOR. (pdginBs t?-t8)
4. Examineel _rea dot agitadorpare detorminarsl hay
aeumulacideexoasivao bisques de pelus_ Limpie
e_agilador y Ins tapes dot extremoa, tuego
restabfozca, (p_gtnss 12, 17-!8)
Pangs eI lnlerrsptoralaposlci6nCARPET,
(p_g_naB).
DeterminesI est_n bloqueadas lab vies de airs,
(p_gtna 14)
Utopia lag Ieeles, (p_glna10).
Determinesl asian bloqueadaa lea v{asde sire,
(p_gina14)
5., El Inlarruptcr no esI_en la posicidnCARPET 5,
Indiead_r verde encendido 1. La via de paso de t_errao la boles 1.
eontinunmente en el detector de poles eot_ bIoqueada
de tlerra, 2, Lentosusie. 2,
Aiganoa aradon los Indlcodores 1. Hay un objeta e_rnpadaqua eet_ivibzando I
rajas deI detector de tlerra an elare6 de islento
enoendidos ynones cambIan s
verde.
Naeeeneiendenloslndlcadorea 1_ Elinlorruplornnest_tenlaposici6nCARPET I PongseMnlerruptaoralapasicidnCARPET,
verde o roJo de detenci6n de tierra, (p_gina 8).
2, No hay aunislrode energ,_aat tabletsdeteclor, 2. Aeudaaf Centrode Serviciode Sears m_s cercano.
El Indlcodcr eIectrdnicof 1. Bo}sa patsp_{voItenao stsecada 1_ Camble labolsa. (pzJglns14).
mec_n!codelabols=iyde_e 2. Fiilroseuclo. 2, Cambieeifil[roa,(p_gina15-16)
mangusra funclona 3,, V_osde finis de aideatascadas 3, Desb_oqueelos v_ssde fiu}ode eke, (pdg_na14)
4. Clertosocoeeorlae 4. Esto es normal El ted[cedar deba set f=ormalo_ands
la horramien_ osI_qultada.
La osplradora levanlo tepeles -o.- 1. AJasle Inco_lecIo de eivel de pelodela aifombro 1, Aluste el niveI, (p&gina 9)
-.o-eadifl'eliempuJoro 2, AspirscIdndamosladopotsnte 2_ Abraelcontroldaasplractdn,(p_g)na11)
Power-Matee,
Lo luz no funclon_. 1, Bombllla f_ndtds. 1. Cambia Ia bombllla, (p_gina 1B}.
El cerddn no so enrolls. 1. Corddneldot_icosucia, t. Limpieel corddneldclriee.
2. Corddnatescado, 2, T_redeI corddn ydespu6sonr6I_olo.
La asp{radars de_e marcao t. Estilo deflmpiezaincorreeta 1- ConsultsSUGERENCIAS PARAASPIRAR,
on ta altombra _gfnn B)
2O
_i ¸ :/•!i:!_
i !! !i !':;iq'
i !!i:ii i_
_i_:iii _! !!i
!!!ili!!_ii_i!
!i!;i_i_!ilii
•i i!ii!i!;;Ji;i!i•
_,;i _;i :U:_ :i_ !=
For repair of major brand appliances in your own home...
no matter who made it, no matter who sold it]
1-800-4-MY-HOME ® Anytime, day or night
(1-800-469-4663) (USA, and Canada)
www.sears=com www, sears,ca
For repair of carry-in products like vacuums, lawn equipment, and
electronics, cal! for the nearest Sears Parts and Repair Center.
1-800-488-1222 Anytime, day or night (US.A. only)
www.sears.com
For the replacement parts, accessories and owner's manuals :
that you need to do-it-yourself, call Sears PartsDirectSM! i
1-800-366-PART 6 &m - 11 p m., 7 days a week i
(1-800-366-7278) (USA° only)
wwwosears.com/partsdirect
!
To purchase or inquire about a Sears Service Agreement
Ag
or Sears Maintenance reement: :
1-800-827-6655 (uo&A) 1-800-361-6665 (Canada)
7 a m - 5 p.m, CST, Mon - Sat. 9 a m. - 8 p.m. EST, M - F,4 p.m. SaL
Para pedir servicio de reparaciSn a Au Canada pour service en fran_ais:
dornicilio, y para ordenar piezas: 1-SO0-LE-FOYERMc
1-888-SU=HOGAR s_ (1-800-533-6937)
(1-888-784-6427) www.sears ca
I. HomeCentral I
!i_!!i_,i=:iiii_;:i
_!ii:i_i!_i!_i_!i_
J_ ;ili•:i ::_
• ::'•:_ i• i_i_ '
,:iili!iiii:i!iii_!;i_iii_'¸
© Sears, Roebuck and Co.
® Registered Trademark /T_._Trademark /s_ Service Mark of Sears, Roebuck and Co
® Marca Registrada /TM Marca de F&bfica /st,{ Marca de Servicio de Sears, Roebuck and Co
MCMarque de commerce /_to Marque d_pos_e de Sears, Roebuck and Co
21
