Kenmore 11633725202 User Manual VACUUM CLEANER Manuals And Guides L0403205
KENMORE Vacuum, Upright Manual L0403205 KENMORE Vacuum, Upright Owner's Manual, KENMORE Vacuum, Upright installation guides
User Manual: Kenmore 11633725202 11633725202 KENMORE VACUUM CLEANER - Manuals and Guides View the owners manual for your KENMORE VACUUM CLEANER #11633725202. Home:Vacuums & Floor Care Parts:Kenmore Parts:Kenmore VACUUM CLEANER Manual
Open the PDF directly: View PDF ![]() .
.
Page Count: 44
Owner's Manual
Manual Del Propietario
Vacuum Cleaner
Aspiradora
Model, Modelo 116.33725
116.33726
/
CAUTION: Read and follow all safety
and operating instructionsbefore first
use of this product.
CUIDADO: Lea y sigue todas las
instrucciones de operaciony seguridad
antes del uso de este producto.
Directions For Use
It is a violation of Federal law to use
this product in a manner inconsistent
with its labeling.
Direcciones de uso
Es una vio/acion a/a/ey Federal el uti/izar
este producto de una manera contraria
con su etiquetado,
Sears, Roebuck and Co., Hoffman Estates, IL 60179 U.S.A.
www.sears.com
Part No. CO1ZBVY1_UO_ Printed in U.S.A.
Before Using Your New Vacuum ...... 2
Kenmore Vacuum Cleaner Warranty... 2
Important Safety Instructions ......... 3
Parts and Features .................. 4
Assembly Instructions ............. 5-6
Operating Instructions ............... 7
Pile Height Selection and Setting ........ 7
Carpet/Bare Floor Selector ............ 8
Releasing the Handle ................. 8
ON/OFF Switch ..................... 8
Attachments ..................... 9-10
Attachment Use Chart ............... 10
Vacuuming Tips .................... 11
Performance Features ............... 11
Vacuum Cleaner Care ............... 12
Vacuum Storage ................... 12
Cleaning Exteriorand Attachments ...... 12
Dust Bin Cleaning ................ 13-14
Secondary Filter Cleaning ............ 14
FilterChanging/Cleaning ............. 15
Belt Changing andAgitator Cleaning .. 16-18
Clog Removal ..................... 21
Motor Protector ..................... 19
Headlight Bulb Changing .............. 20
Agitator Servicing ................... 21
Agitator Assembly .................. 21
Troubleshooting .................... 23
Please read this guide. It will help you assemble and operate your new Kenmore vacuum in
the safest and most effective way.
For more information about vacuum cleaner care and operation, call your nearest Sears
store, You will need the complete model and serial numbers when requesting information.
Your vacuum's model and serial numbers are located on the Model and Serial Number Plate.
Use the space below to record the model number and serial number of your new Kenmore
vacuum.
Model No ............................................
Serial No. .............................................
Date of Purchase .....................................
Keep this book and your sales check (receipt) in a safe place for future reference.
LIMITED ONE YEAR WARRANTY ON KENMORE VACUUM CLEANER
This warranty is for one year from the date of purchase, and includes only private household
vacuum cleaner use. During the warranty year, when this vacuum cleaner is operated and
maintained according to the owner's manual instructions, Sears will repair any defects in
material or workmanship free of charge.
This warranty excludes vacuum bags, belts, light bulbs, and filters, which are expendable parts
and become worn during normal use.
For warranty service, return this vacuum cleaner to the nearest Sears Service Center in
the United States.
This warranty applies only while this product is in use in the United States. This warranty gives
you specific legal rights, and you may also have other rights which vary from state to state.
Sears, Roebuck and Co., D/817 WA, Hoffman Estates, IL 60179
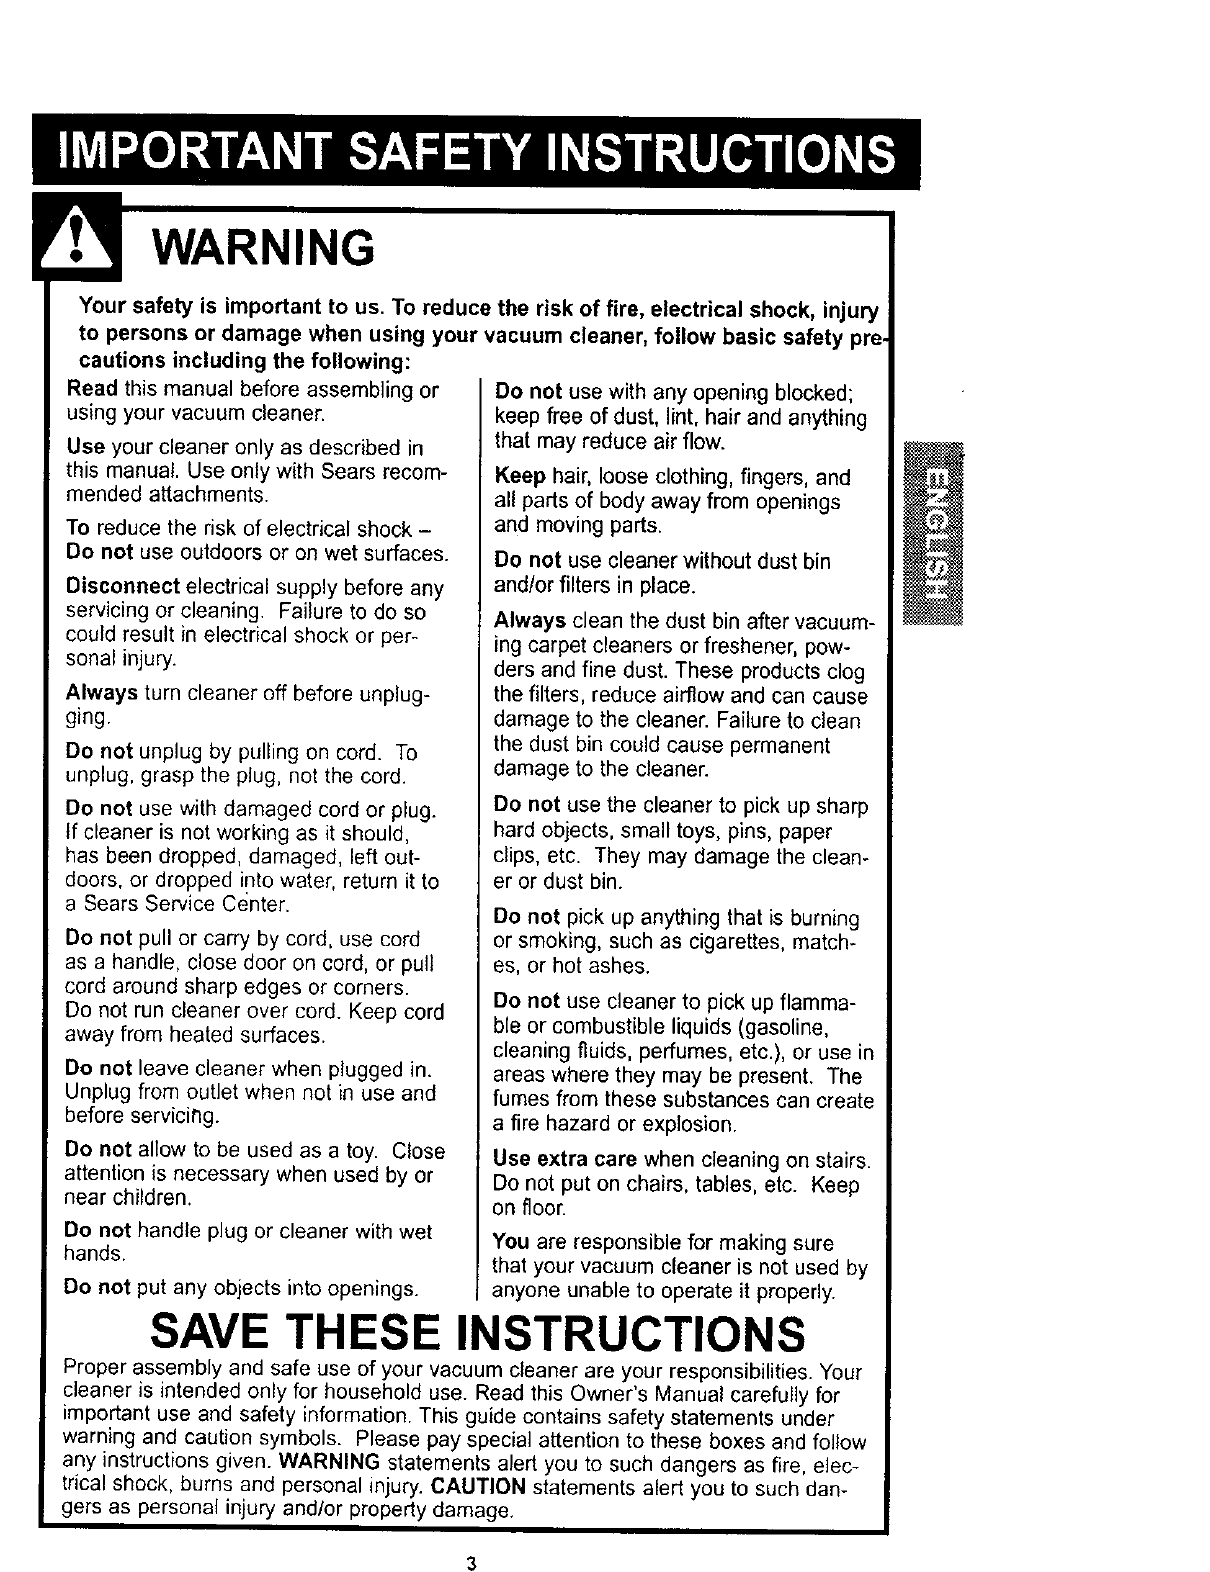
Your safety is important to us. To reduce the risk of fire, electrical shock, injury
to persons or damage when using your vacuum cleaner, follow basic safety pre-
cautions including the following:
Read this manual before assembling or
using your vacuum cleaner.
Use your cleaner only as described in
this manual. Use only with Sears recom-
mended attachments.
To reduce the risk of electrical shock -
Do not use outdoors or on wet surfaces.
Disconnect electrical supply before any
servicing or cleaning. Failure to do so
could result in electrical shock or per-
sonal injury.
Always turn cleaner off before unplug-
ging.
Do not unplug by pulling on cord. To
unplug, grasp the plug, not the cord.
Do not use with damaged cord or plug.
tf cleaner is not working as it should,
has been dropped, damaged, left out-
doors, or dropped into water, return it to
a Sears Service Cdnter.
Do not pull or carry by cord, use cord
as a handle, close door on cord, or pull
cord around sharp edges or corners.
Do not run cleaner over cord. Keep cord
away from heated surfaces.
Do not leave cleaner when plugged in.
Unplug from outlet when not in use and
before servicing.
Do not allow to be used as a toy. Close
attention is necessary when used by or
near children.
Do not handle plug or cleaner with wet
hands.
Do not put any objects into openings.
Do not use with any opening blocked;
keep free of dust, lint,hair and anything
that may reduce air flow.
Keep hair, loose clothing, fingers, and
all parts of body away from openings
and moving parts.
Do not use cleaner without dust bin
and/or filters in place.
Always clean the dust bin after vacuum-
ing carpet cleaners or freshener, pow-
ders and fine dust. These products clog
the filters, reduce airflow and can cause
damage to the cleaner. Failure to clean
the dust bin could cause permanent
damage to the cleaner.
Do not use the cleaner to pick up sharp
hard objects, small toys, pins, paper
clips, etc. They may damage the clean-
er or dust bin.
Do not pick up anything that is burning
or smoking, such as cigarettes, match-
es, or hot ashes.
Do not use cleaner to pick up flamma-
ble or combustible liquids (gasoline,
cleaning fluids, perfumes, etc.), or use in
areas where they may be present. The
fumes from these substances can create
a fire hazard or explosion.
Use extra care when cleaning on stairs.
Do not put on chairs, tables, etc. Keep
on floor.
You are responsible for making sure
that your vacuum cleaner is not used by
anyone unable to operate it properly.
SAVE THESE INSTRUCTIONS
Proper assembly and safe use of your vacuum cleaner are your responsibilities. Your
cleaner is intended only for household use. Read this Owner's Manual carefully for
impo.rtant use and safety information. This guide contains safety statements under
warning and caution symbols. Please pay special attention to these boxes and follow
any instructions given. WARNING statements alert you to such dangers as fire, elec-
trical shock, burns and personal injury. CAUTION statements alert you to such dan-
gers as personal injury andlor property damage.
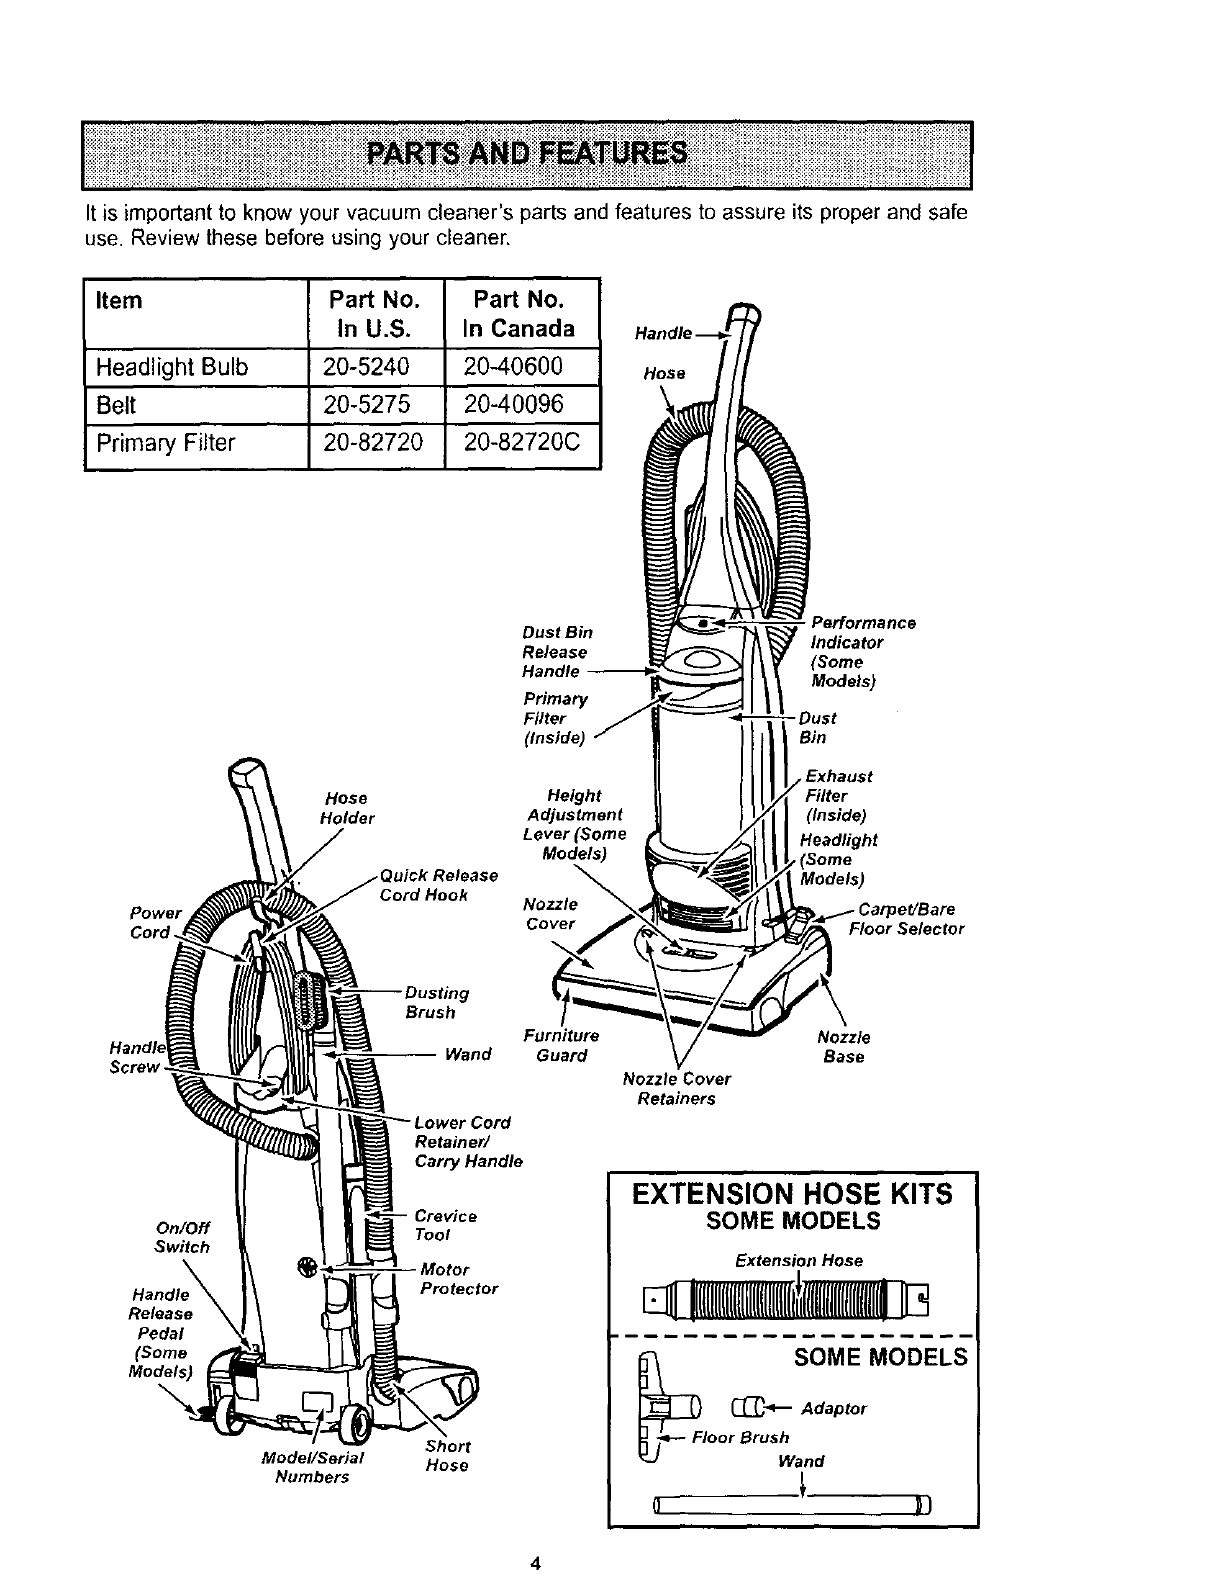
Itis importantto knowyourvacuumcleaner'spartsandfeaturesto assureits properandsafe
use.Reviewthesebeforeusingyourcleaner,
Item Part No. Part No.
In U.S. In Canada
Headlight Bulb 20-5240 20-40600
Belt 20-5275 20-40096
Primary Filter 20-82720 20-82720C
Hose
Power
Cord.
Hose
Holder
uick Release
Cord Hook
Dust Bin
Release
Handle --
Primary
Filter
(Inside)
Height
Adjustment
Lever (Some
Models)
Nozzle
Cover
Porforma nce
Indicator
(Some
Models)
-Dust
Bin
Exhaust
(Inside)
Headlight
_(Some
Models)
Floor Selector
Screw -
On/Off
Switch
Handle
Release
Pedal
(Some
Models)
Model/Serial
Numbers
Brush
Wand
Retained
Carry Handle
Crevice
Tool
Motor
Protector
Short
Hose
Furniture
Guard Nozzle
Base
Nozzle Cover
Retainers
EXTENSION HOSE KITS
SOME MODELS
Extension Hose
El !IItlIIIIIIIlUlIIlUlIIIII i
_Fi SOME MODELS
_-_-- Adaptor
oor BrUShan d
Before assembling vacuum, check the
PACKING LIST on the cover of the separate
Repair Parts List. Use this list to verify that
you have received all the components of
your new Kenmore vacuum,
Electrical Shock Hazard
Do not plug into the electrical sup-
ply until the assembly is complete.
Failure to do so could result in elec-
trical shock or injury.
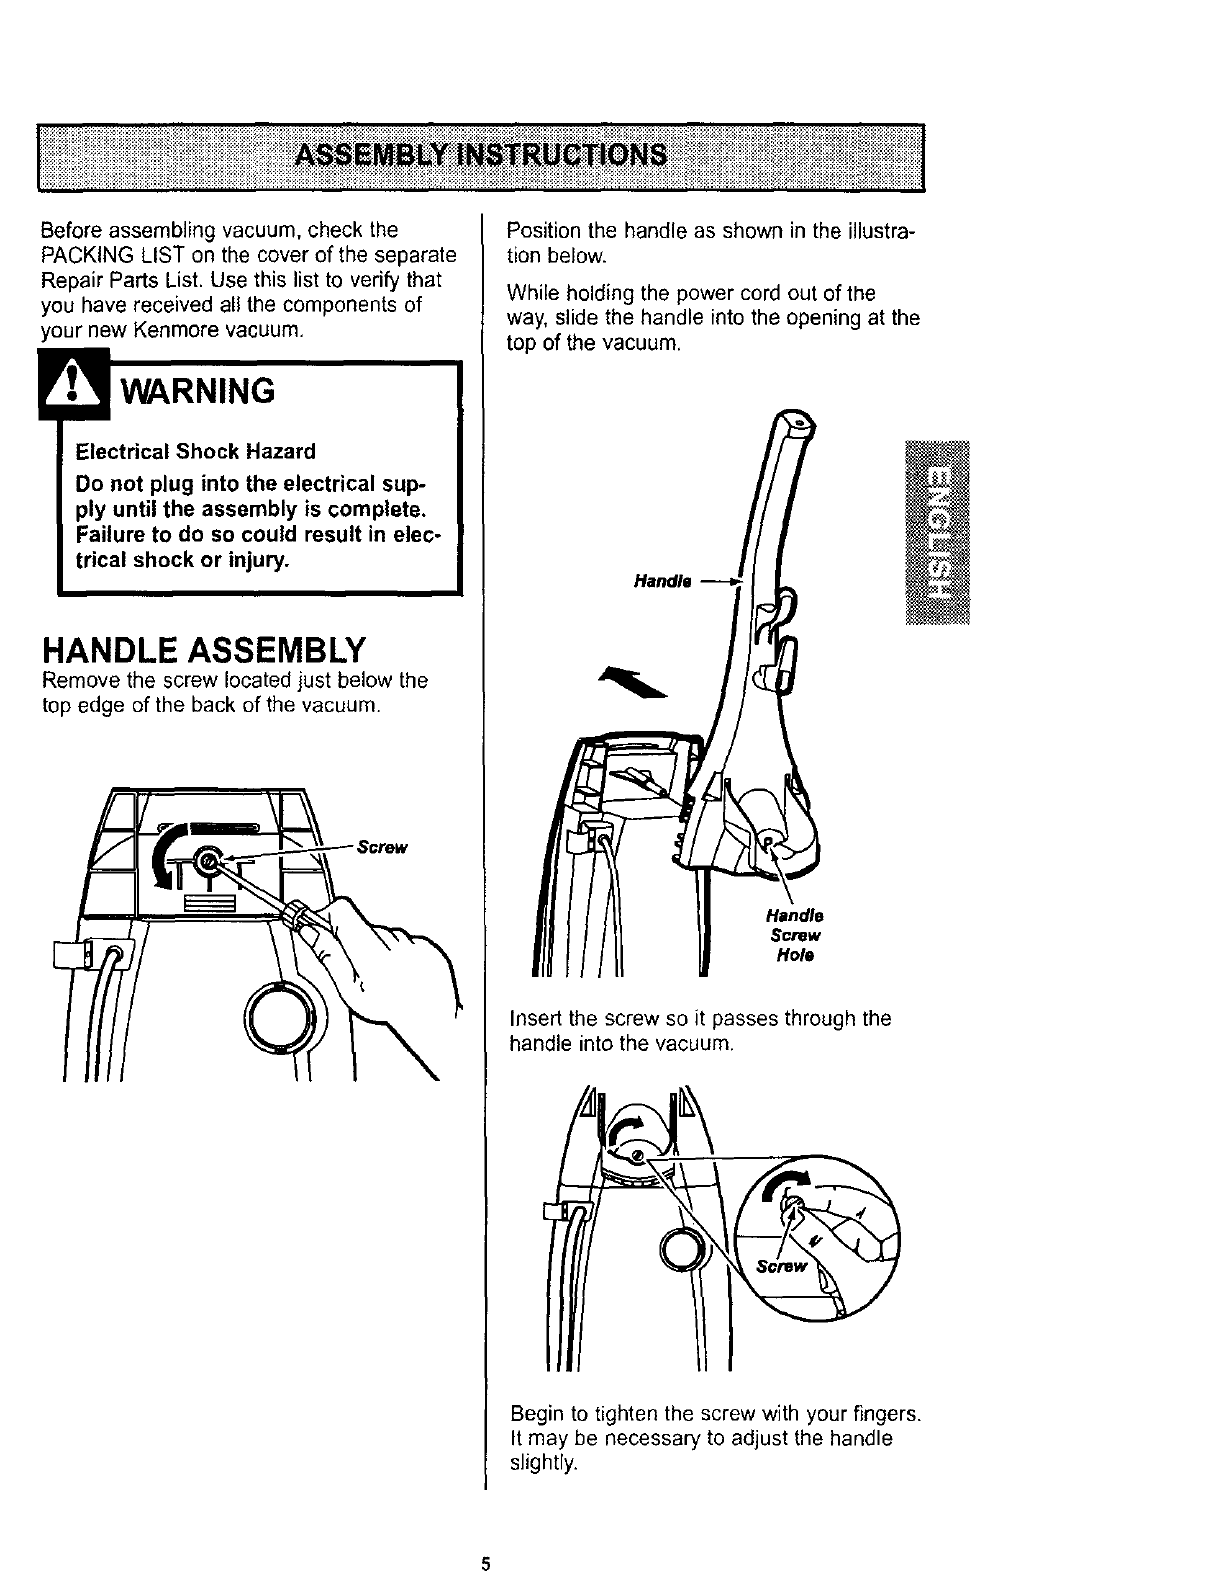
HANDLE ASSEMBLY
Remove the screw located just below the
top edge of the back of the vacuum.
Position the handle as shown in the illustra-
tion below.
While holding the power cord out of the
way, slide the handle into the opening at the
top of the vacuum,
Handle
Handle
Screw
Hole
Insert the screw so it passes through the
handle into the vacuum.
Begin to tighten the screw with your fingers.
It may be necessary to adjust the handle
slightly.
5
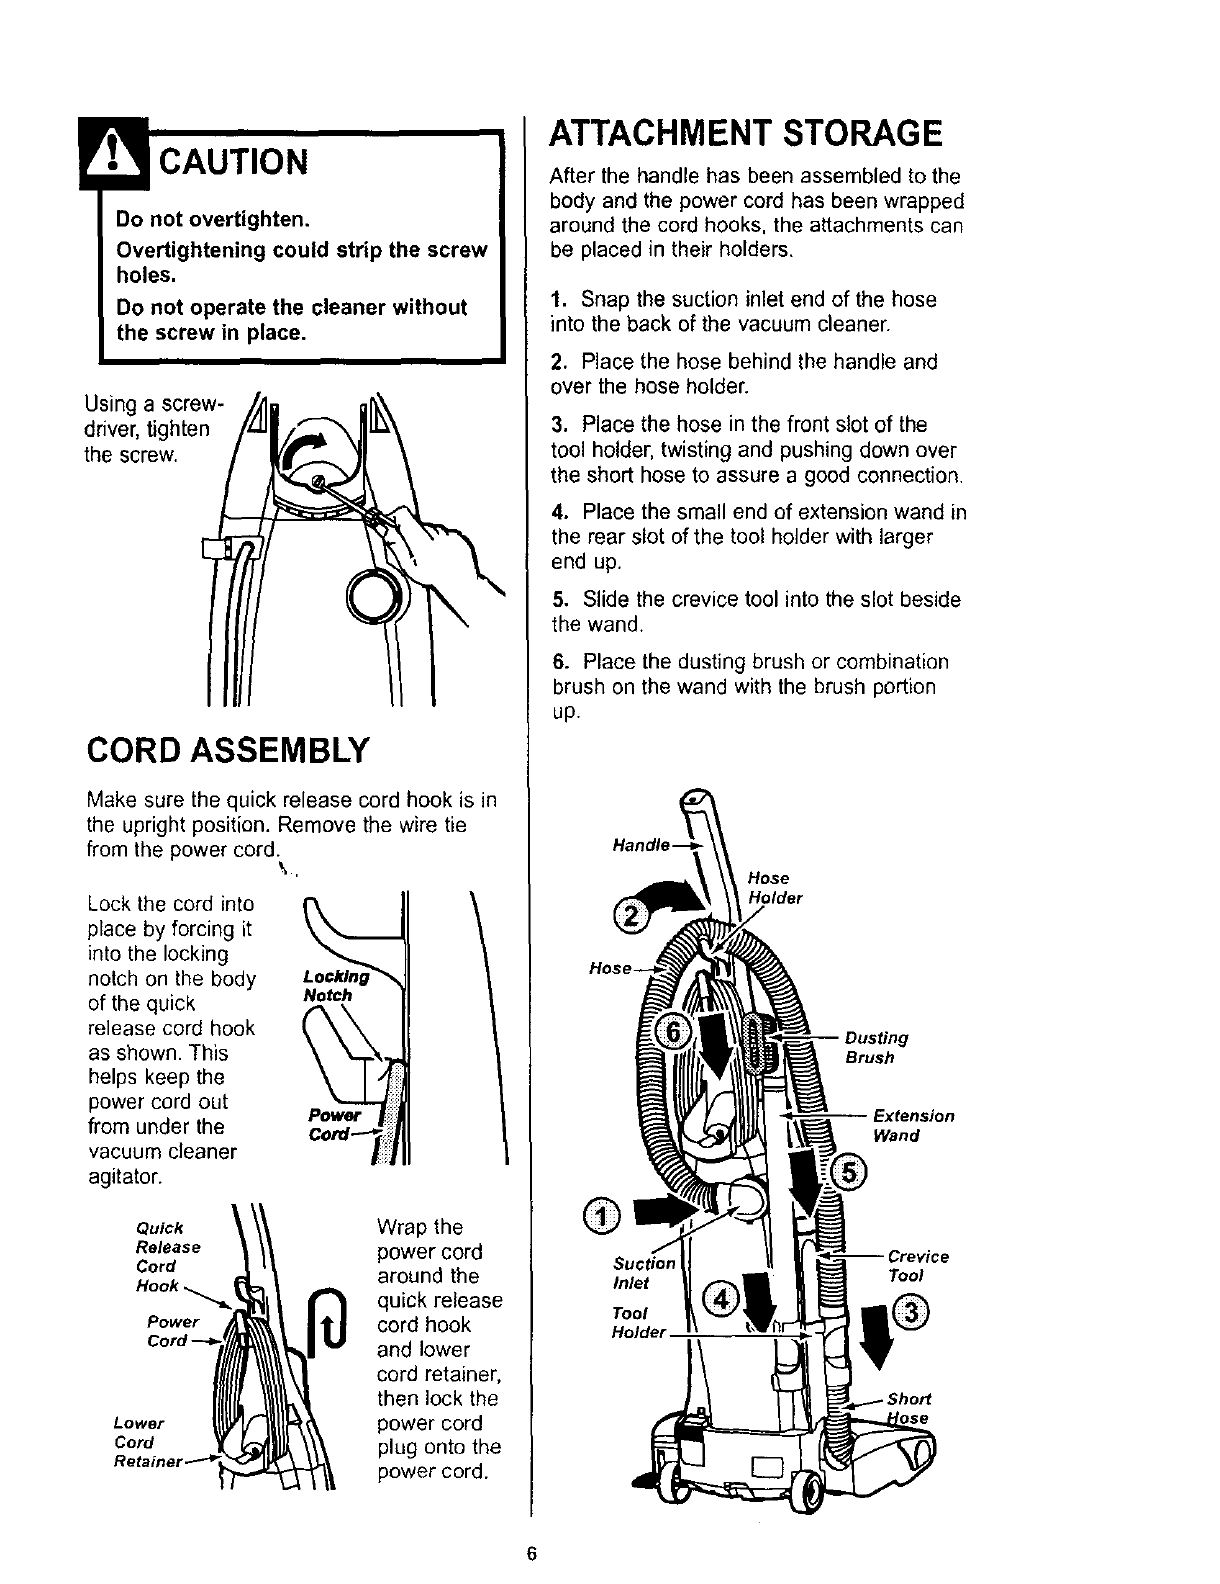
CAUTION
Do not overtighten.
Overtightening could strip the screw
holes.
Do not operate the cleaner without
the screw in place.
Using a screw-
driver, tighten
the screw.
CORD ASSEMBLY
Make sure the quick release cord hook is in
the upright position. Remove the wire tie
from the power cord. \.
Lock the cord into I'_
place by forcing it
into the locking
notch on the body
of the quick Notch
release cord hook
as shown. This
helps keep the
power cord out
from under the Cord :ii_l
vacuum cleaner
agitator.
Quick
Release
Cord
Power
Lower
Cord
Wrap the
power cord
around the
quick release
cord hook
and lower
cord retainer,
then lock the
power cord
plug onto the
power cord.
ATTACHMENT STORAGE
After the handle has been assembled to the
body and the power cord has been wrapped
around the cord hooks, the attachments can
be placed in their holders.
1. Snap the suction inlet end of the hose
into the back of the vacuum cleaner.
2. Place the hose behind the handle and
over the hose holder.
3. Place the hose in the front slot of the
tool holder, twisting and pushing down over
the short hose to assure a good connection.
4. Place the small end of extension wand in
the rear slot of the tool holder with larger
end up.
5. Slide the crevice tool into the slot beside
the wand.
6. Place the dusting brush or combination
brush on the wand with the brush portion
up.
Handle-
Hose
Holder
g
Brush
Wand
®
Inlet
Tool
Holde_
Tool
6
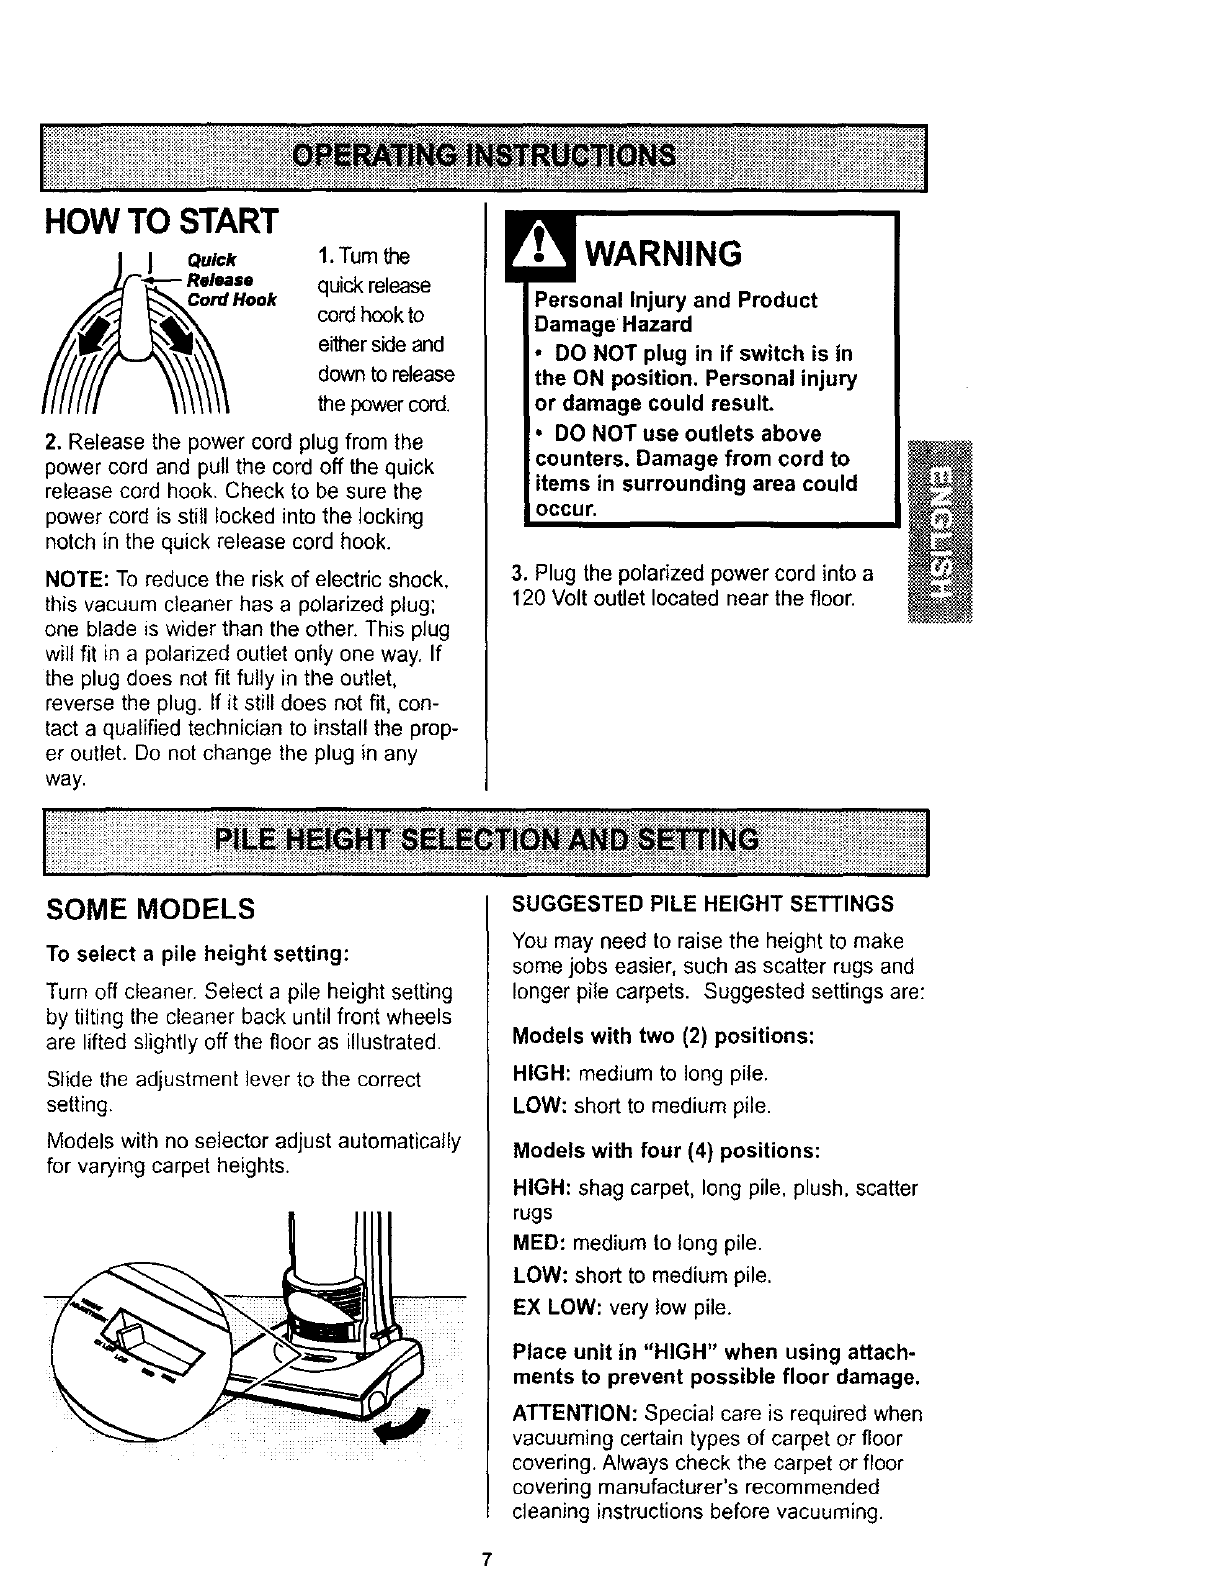
HOW TO START
CordHook
1.Turn the
quick release
cord hook to
either side and
down to release
the power cord.
2. Release the power cord plug from the
power cord and pull the cord off the quick
release cord hook. Check to be sure the
power cord is still locked into the locking
notch in the quick release cord hook.
NOTE: To reduce the risk of electric shock,
this vacuum cleaner has a polarized plug;
one blade is wider than the other. This plug
will fit in apolarized outlet only one way. If
the plug does not fit fully in the outlet,
reverse the plug. If it still does not fit, con-
tact a qualified technician to install the prop-
er outlet. Do not change the plug in any
way.
Personal Injury and Product
Damage Hazard
• DO NOT plug in if switch is in
the ON position. Personal injury
or damage could result.
DO NOT use outlets above
Damage from cord to
items in surrounding area could
occur.
3. Plug the polarized power cord into a
120 Volt outlet located near the floor.
SOME MODELS
To select a pile height setting:
Turn off cleaner. Select a pile height setting
by tilting the cleaner back until front wheels
are lifted slightly off the floor as illustrated.
Slide the adjustment lever to the correct
setting.
Models with no selector adjust automatically
for varying carpet heights.
SUGGESTED PILE HEIGHT SETTINGS
You may need to raise the height to make
some jobs easier, such as scatter rugs and
longer pile carpets. Suggested settings are:
Models with two (2) positions:
HIGH: medium to long pile.
LOW: short to medium pile.
Models with four (4) positions:
HIGH: shag carpet, long pile, plush, scatter
rugs
MED: medium to long pile.
LOW: short to medium pile.
EX LOW: very low pile.
Place unit in "HIGH" when using attach.
ments to prevent possible floor damage.
ATTENTION: Special care is required when
vacuuming certain types of carpet or floor
covering. Always check the carpet or floor
covering manufacturer's recommended
cleaning instructions before vacuuming.
7
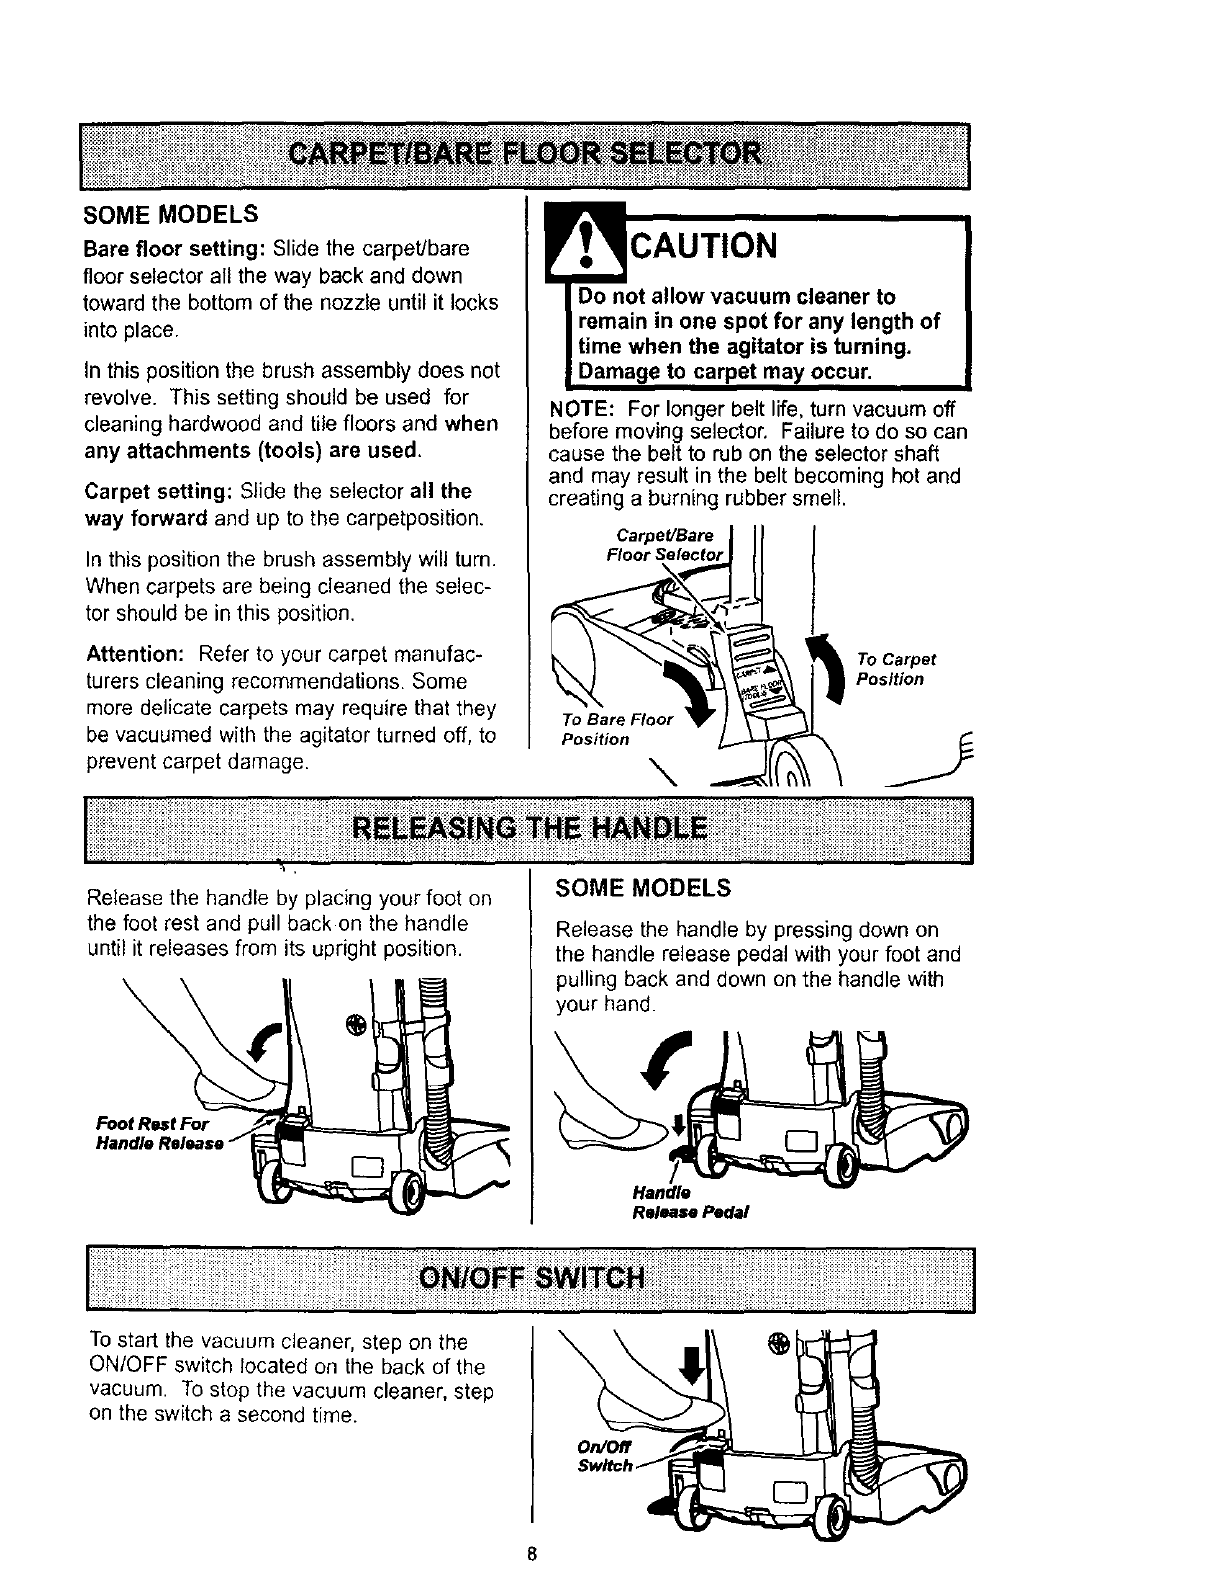
SOME MODELS
Bare floor setting: Slide the carpet/bare
floor selector all the way back and down
toward the bottom of the nozzle until it locks
into place.
in this position the brush assembly does not
revolve. This setting should be used for
cleaning hardwood and tile floors and when
any attachments (tools) are used,
Carpet setting: Slide the selector all the
way forward and up to the carpetposition.
In this position the brush assembly will turn.
When carpets are being cleaned the selec-
tor should be in this position.
Attention: Refer to your carpet manufac-
turers cleaning recommendations. Some
more delicate carpets may require that they
be vacuumed with the agitator turned off, to
prevent carpet damage.
!'I? CAUTION
Do not allow vacuum cleaner to
remain in one spot for any length of
time when the agitator is turning.
Damage to carpet may occur.
NOTE: For longer belt life, turn vacuum off
before moving selector. Failure to do so can
cause the belt to rub on the selector shaft
and may result in the belt becoming hot and
creating a burning rubber smell.
Carpet/Bare
Floor Selector
To Bare Floor
Position _
To Carpet
Position
Release the handle by placing your foot on
the foot rest and pull back on the handle
until it releases from its upright position.
\
Foot Rest For
Handle
SOME MODELS
Release the handle by pressing down on
the handle release pedal with your foot and
pulling back and down on the handle with
your hand.
Handle
Release Pedal
To start the vacuum cleaner, step on the
ON/OFF switch located on the back of the
vacuum. To stop the vacuum cleaner, step
on the switch a second time.
On/Off
8
•iiiiiiiiiiiiiiiii!iiiiiiiiii__ii__iiiiil;iiiii!iii!ii_,!!iiiiiiii!i__!ilJii;i;iiiiiiiiiiiii_HM_N_ ii_!ii_iiiiiiili!i!i!iiiiiii!i!ii_!_i_iii_!ili!iiiliiiiiiii_!i_!i!i!iiiiiiiiiiiiiiii_!_ili;ili!!iiiiiiiii!_i_ilili!ii
Personal Injury Hazard and Property
Hazard
DO NOT place hands or feet under-
neath the unit at any time. When
using attachments, the agitator con-
tinues rotating. Do not allow the
cleaner to remain in just one place
for a period of time as the agitator
may damage the floor surface.
Avoid placing the cleaner on furni-
ture, the fringed area of rugs, deep
pile carpeting, or carpeted stairs.
The ideal position for the cleaner
when using attachments is for the
unit to be on a level area with the
handle in the f_ position.
TO USE ATTACHMENTS
Place the cleaner on a flat surface, and
move the height adjustment to HIGH.
The attachments will fit on the hose or the
wand. In addition, the dusting brush or
combination brush will also fit on the crevice
tool.
The hose can be pulled off the short hose
by grasping the cuff and twisting while
pulling up,
!t,_ CAUTION
DO NOT pull the vacuum cleaner
around the room by the hose.
Property damage could result.
The attachments can be added to the hose
if the item to be cleaned is not far from the
cleaner. The hose on some models will
expand.
NOTE: When cleaner is turned on, the hose
on some models will have a tendency to
collapse due to suction of the cleaner.
If more reach is needed, the wand can be
attached to the hose and the attachments
can be added to the wand.
When using attachments, be careful
not to overextend the hose length
when reaching. Trying to reach
beyond the hose reach could cause
the cleaner to tip over.
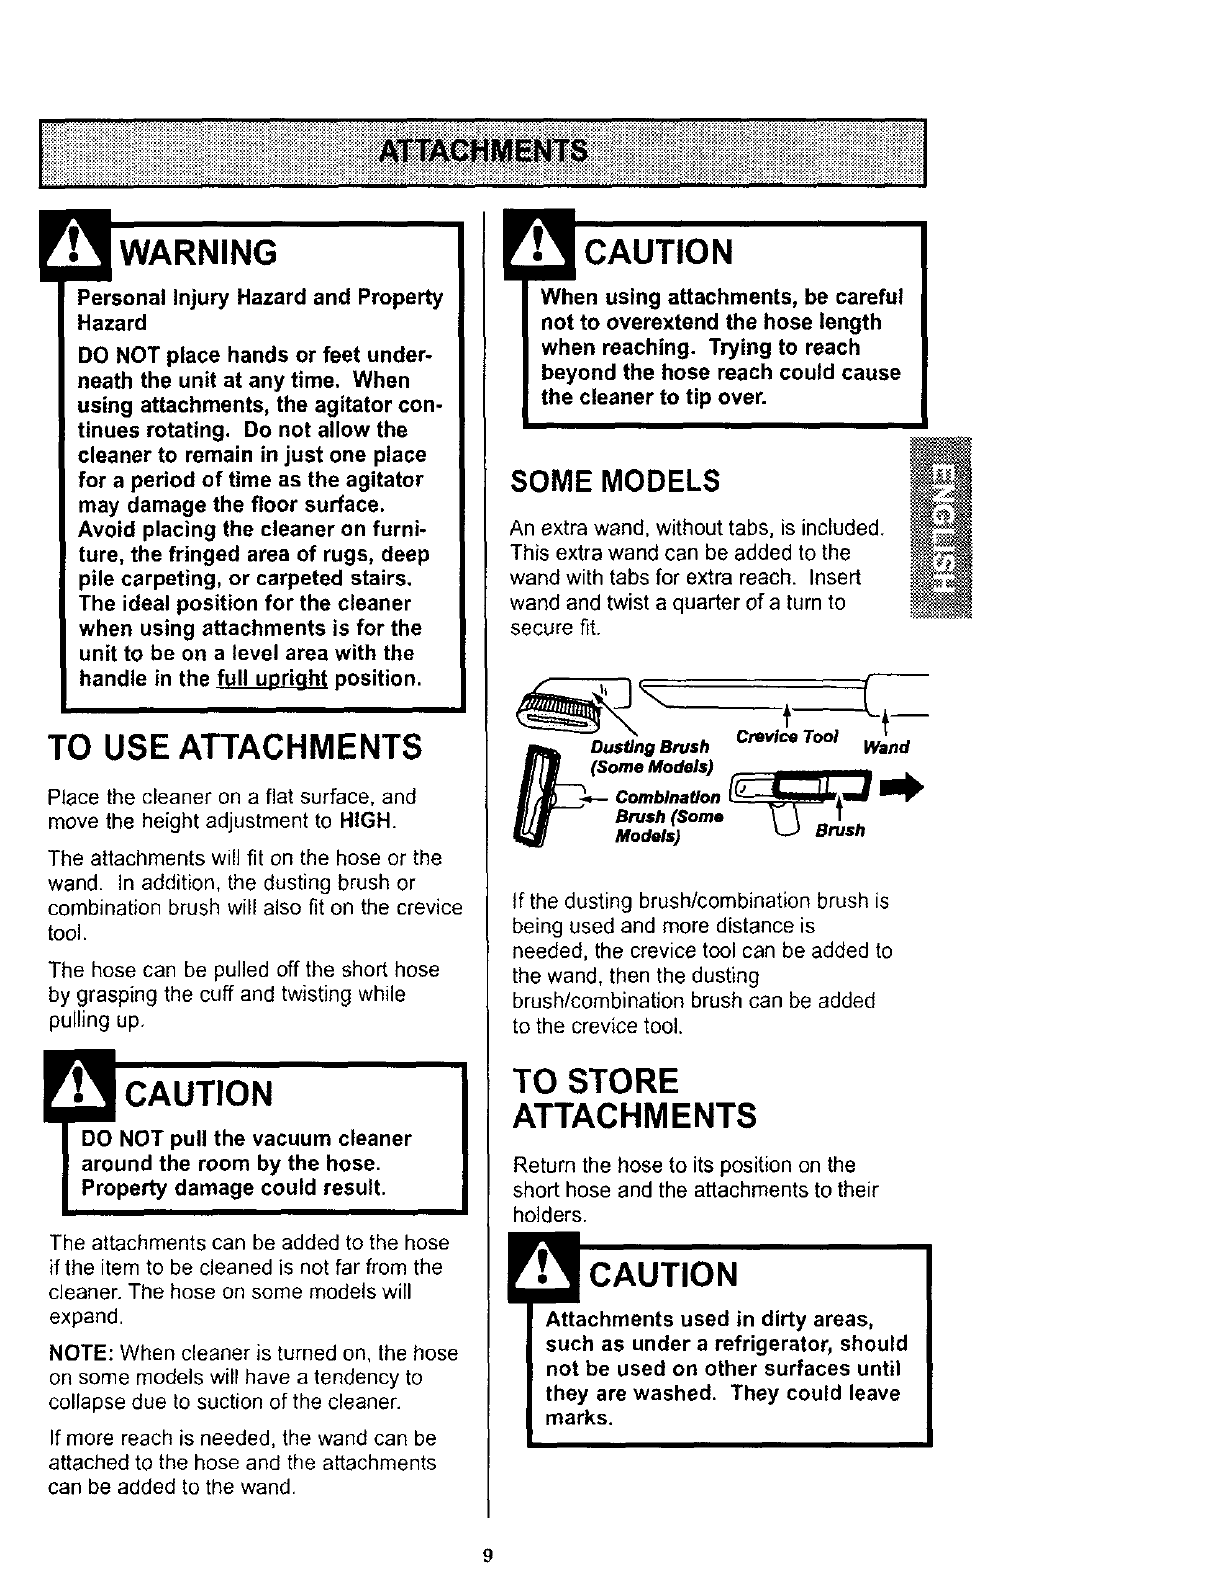
SOME MODELS
An extra wand, without tabs, is included.
This extra wand can be added to the
wand with tabs for extra reach. Insert
wand and twist a quarter of a turn to
secure fit.
Dus_ng Brush Wand
(Some Models) ,u
Combination _J_,_
Brush (Some _- _ T
Models) L.J Brush
If the dusting brush/combination brush is
being used and more distance is
needed, the crevice tool can be added to
the wand, then the dusting
brush/combination brush can be added
to the crevice tool.
TO STORE
ATTACHMENTS
Return the hose to its position on the
short hose and the attachments to their
holders.
CAUTION
Attachments used in dirty areas,
such as under a refrigerator, should
not be used on other surfaces until
they are washed. They could leave
marks.
9
When using the regular hose or with
the extension hose attached, the
cleaner should be on a solid surface
on the same level or below the level
of the user's feet. DO NOT use the
hoses when the cleaner is above the
level of the user's feet.
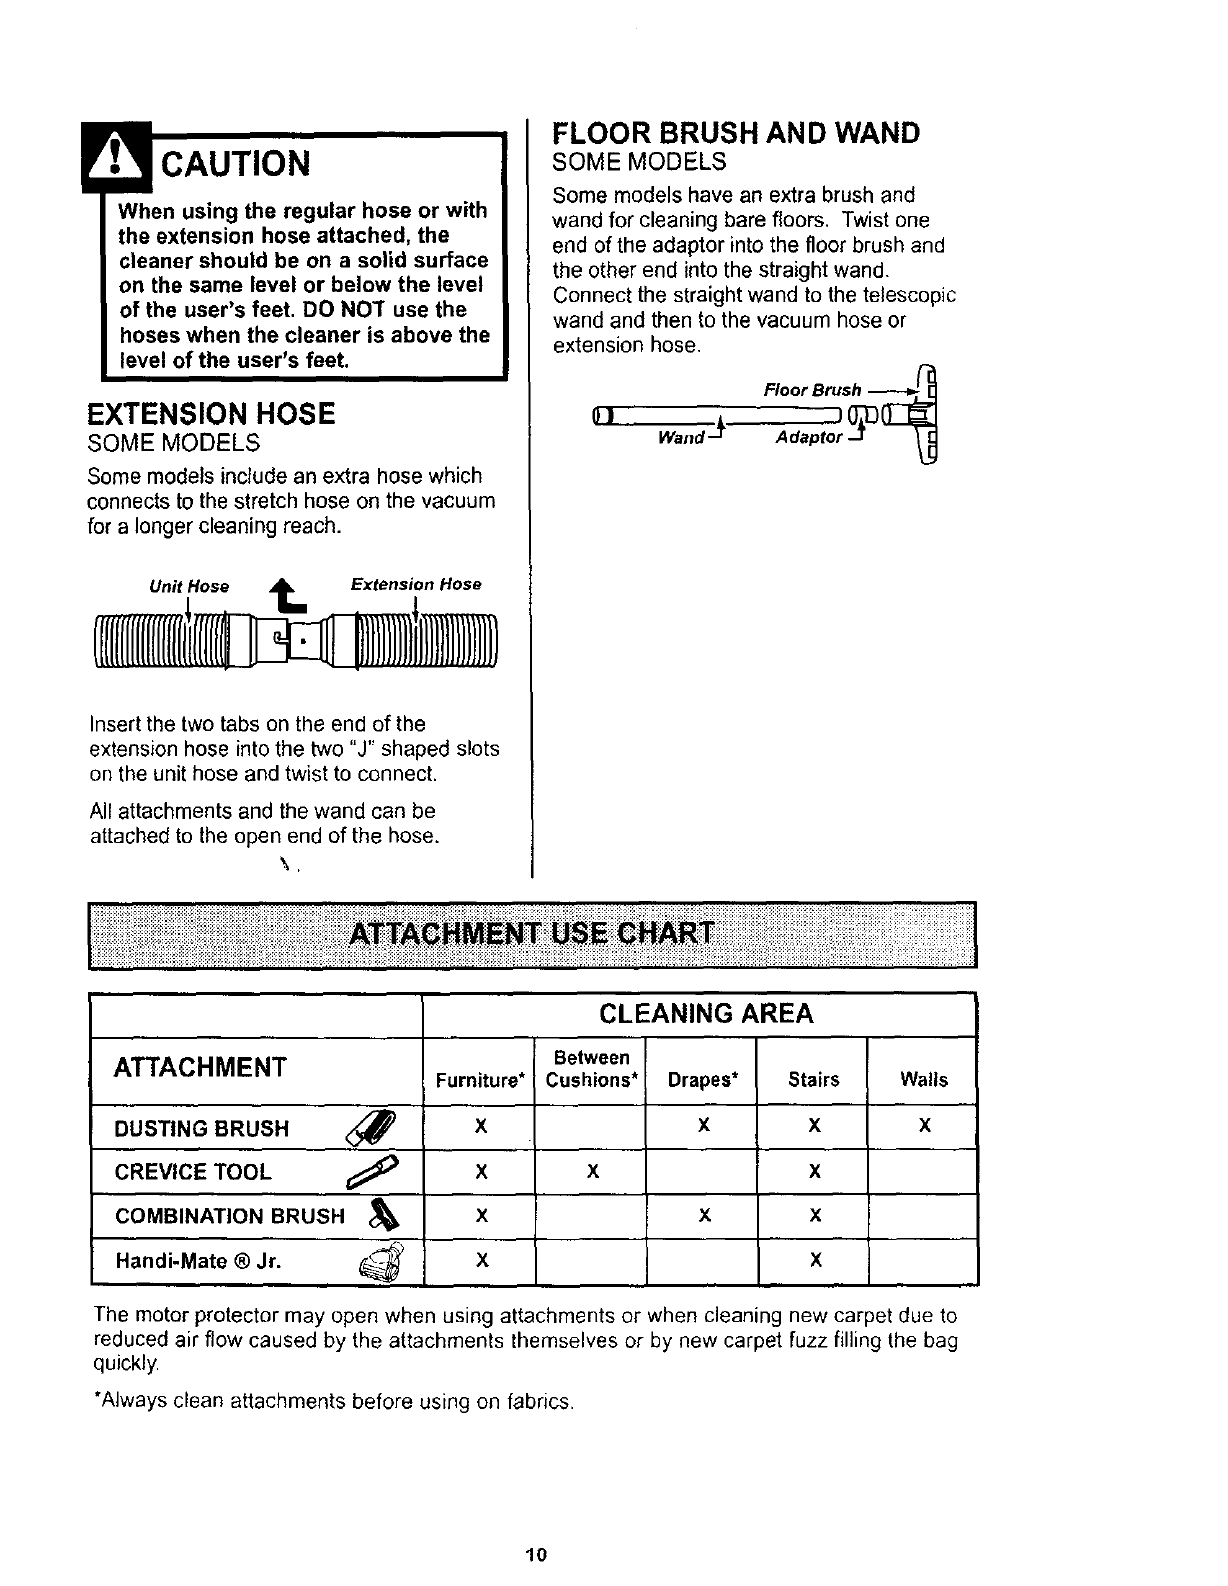
EXTENSION HOSE
SOME MODELS
Some models include an extra hose which
connects to the stretch hose on the vacuum
for a longer cleaning reach.
Unit Hose 1_ Extension Hose
Insert the two tabs on the end of the
extension hose into the two "J" shaped slots
on the unit hose and twist to connect.
All attachments and the wand can be
attached to the open end of the hose.
\.
FLOOR BRUSH AND WAND
SOME MODELS
Some models have an extra brush and
wand for cleaning bare floors. Twist one
end of the adaptor into the floor brush and
the other end into the straight wand.
Connect the straight wand to the telescopic
wand and then to the vacuum hose or
extension hose,
0]Wand-JL
CLEANING AREA
Between
ATTACHMENT Furniture* Cushions* Drapes* Stairs Wails
DUSTING BRUSH <_ X X X X
CREVICE TOOL _X X X
COMBINATION BRUSH &X X x
Handi-Mate ®Jr. _- X X
The motor protector may open when using attachments or when cleaning new carpet due to
reduced air flow caused by the attachments themselves or by new carpet fuzz filling the bag
quickly.
*Always clean attachments before using on fabrics.
10
::::::_::::_:::::_::::_:_:::::_::::_:::::_:_:_;:::;_:_:::::::_:::::::: :::: _:;::::::;;::_;:::::::::._:::,: ;,_::;;;: _::::;_::::_, :;:_ :::_: :::: :;; ::: _._::::_ :::::::::::::::::;;: ::::::::_::::;_::::::::::_:;_;:;::_::::::::::::::::;:;;:; :_::::::::: :::::;;: :
:::::::::::_:; ;; ::;;::::_;::::: _ ;::_::::: ::::_::;;:::_.;;; _;:: _ ::_::__ _'" • ,,: .,.-.., :.... .:., _.-.,:,.. ,...; :,,. • ,-,.,.•...: ::: : :::::;:_:;;;::::_:::::::::::: _;:: ::_ :::::::: ::: :: :::::
t_::_:::_:_:_::_::::_:_:_:_:::::_:::_:_:_:_:::::_:::_:_:_:_:_::::_:_:_:_:_$_:_:_:_:_:_;_:_:i_:!_!:_:_:_:_:_:_:_:_:_:_:_:_:i:i:i_i:i:_i:i_i_i:i:i_i_!_!:i:_:i:_$;:_:_:_$_:!i_:_:_:_:_ii_ii_ii_iiiiii_i_i_i_i_i_i_i_!_;_;_i_i_i;_;_!_!_i_i_i_i;i_i_ii_ii_i_i_i_i_i_i_i_!_i_!_!_i_i_i_i_i_i_i_i_i_i_iii_i_i!i_!_!_!_!_i_!_i_i%_i_i_i_i_i_i%I
Personal Injury Hazard
Use care if vacuum cleaner is
placed on stairs. If it falls, personal
injury or property damage could
result.
Carpet edges
Guide either side or the front of the nozzle
along a baseboard, The full length brushes
help remove trapped dirt at carpet edges.
Stairs
Put handle in full upright position. Use the
crevice tool or dustingbrush. Set the On/Off
switch to ON.
i !il ..............................
MOTOR PROTECTION
SYSTEM
Thermal Protector
This vacuum has a thermal protector which
automatically trips to protect the vacuum
from overheating. If a clog prevents the
normal flow of air to the motor, the thermal
protector turns the motor off automatically to
allow the motor to cool in order to prevent
possible damage to the vacuum. During this
time the headlight remains on.
To correct problem: If this occurs, turn the
vacuum off and unplug the power cord from
the outlet to allow the vacuum to cool and
the thermal protector to reset. Check for
and remove clogs, if necessary. Also
check and clean/replace any clogged
filters. Wait approximately thirty (30)
minutes and plug the vacuum in and turn
back on to see if the motor protector has
reset. The motor protector will not reset
if the vacuum is not turned off even if the
vacuum has cooled down.
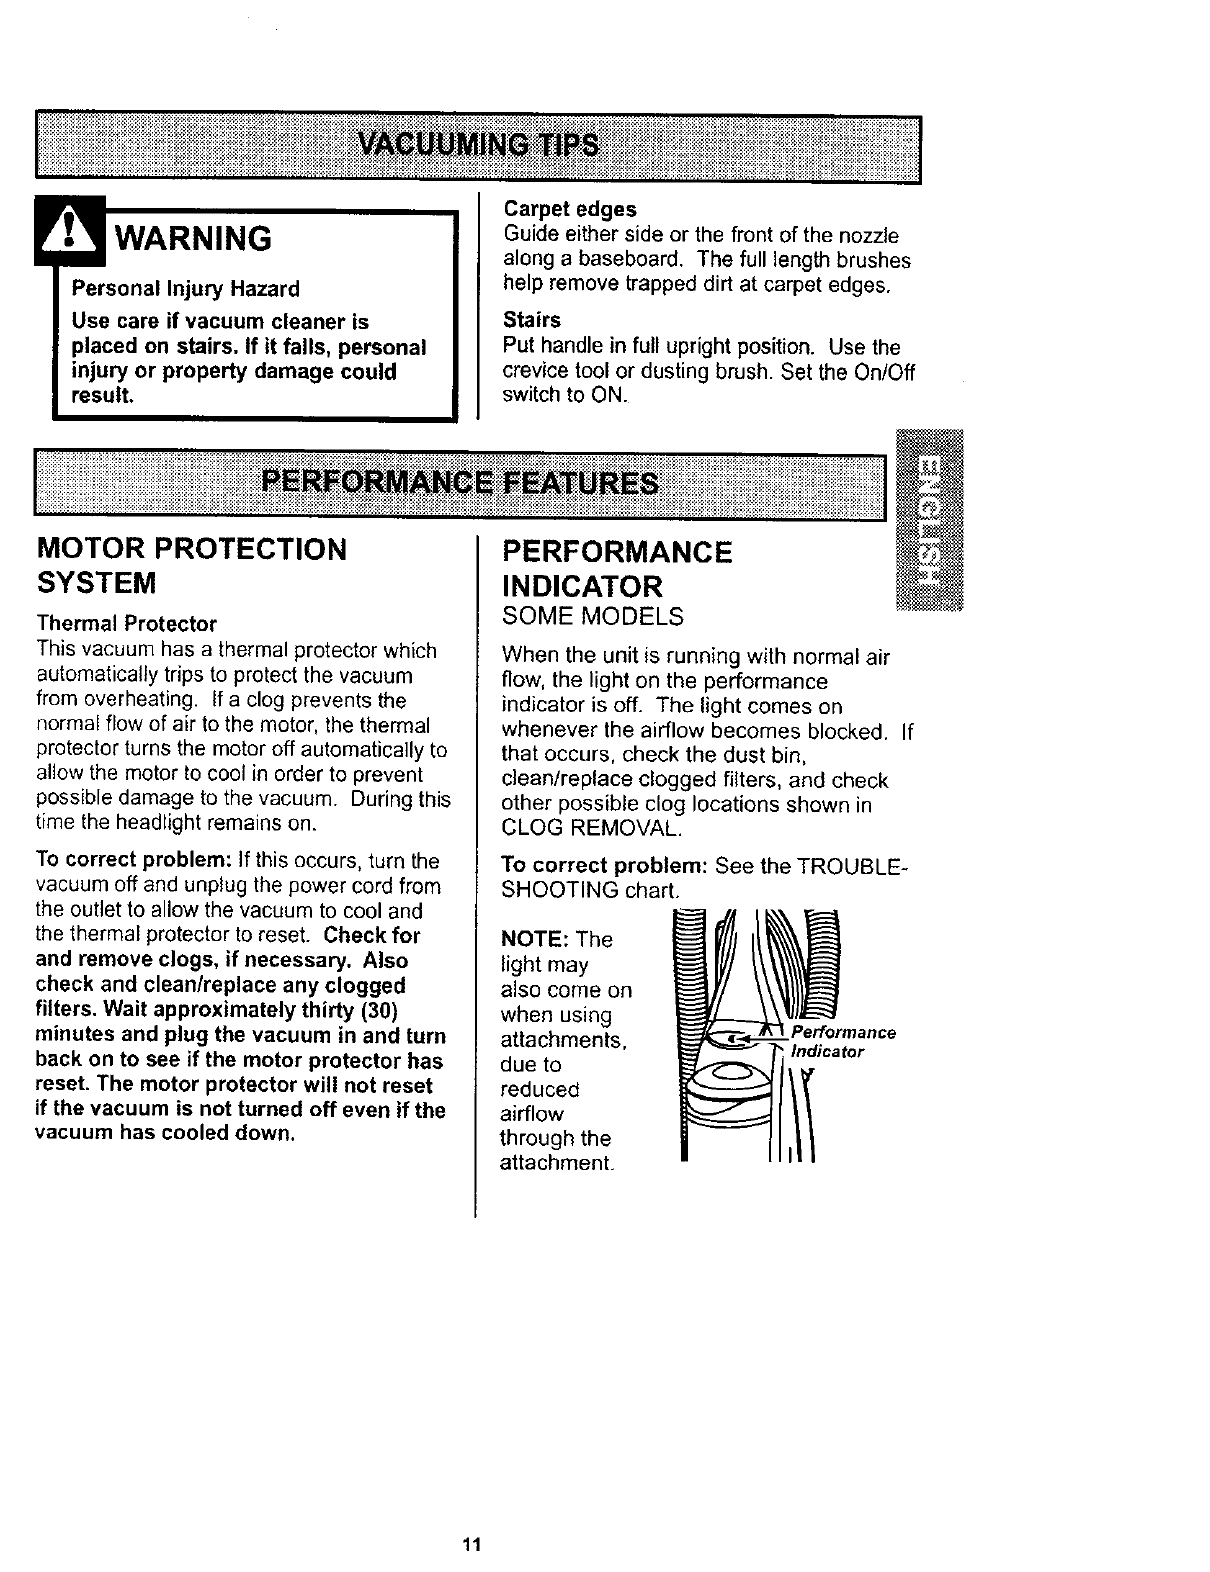
PERFORMANCE
INDICATOR
SOME MODELS
When the unit is running with normal air
flow, the light on the performance
indicator is off. The light comes on
whenever the airflow becomes blocked. If
that occurs, check the dust bin,
clean/replace clogged filters, and check
other possible clog locations shown in
CLOG REMOVAL.
To correct problem: See the TROUBLE-
SHOOTING chart.
NOTE: The
light may
also come on
when using
attachments,
due to
reduced
airflow
through the
attachment.
Performance
Indicator
11
Always follow all safety precautions when
cleaning and servicing the vacuum
cleaner.
Electrical Shock And Personal Injury
Hazard
Disconnect electrical supply before
servicing or cleaning the unit.
Failure to do so could result in elec-
trical shock or personal injury from
cleaner suddenly starting.
_i_i_i_ii_iii_i_iiiiiiiiiiiiiiiiiiiiii'iil i _i_ _i _ _ i i I
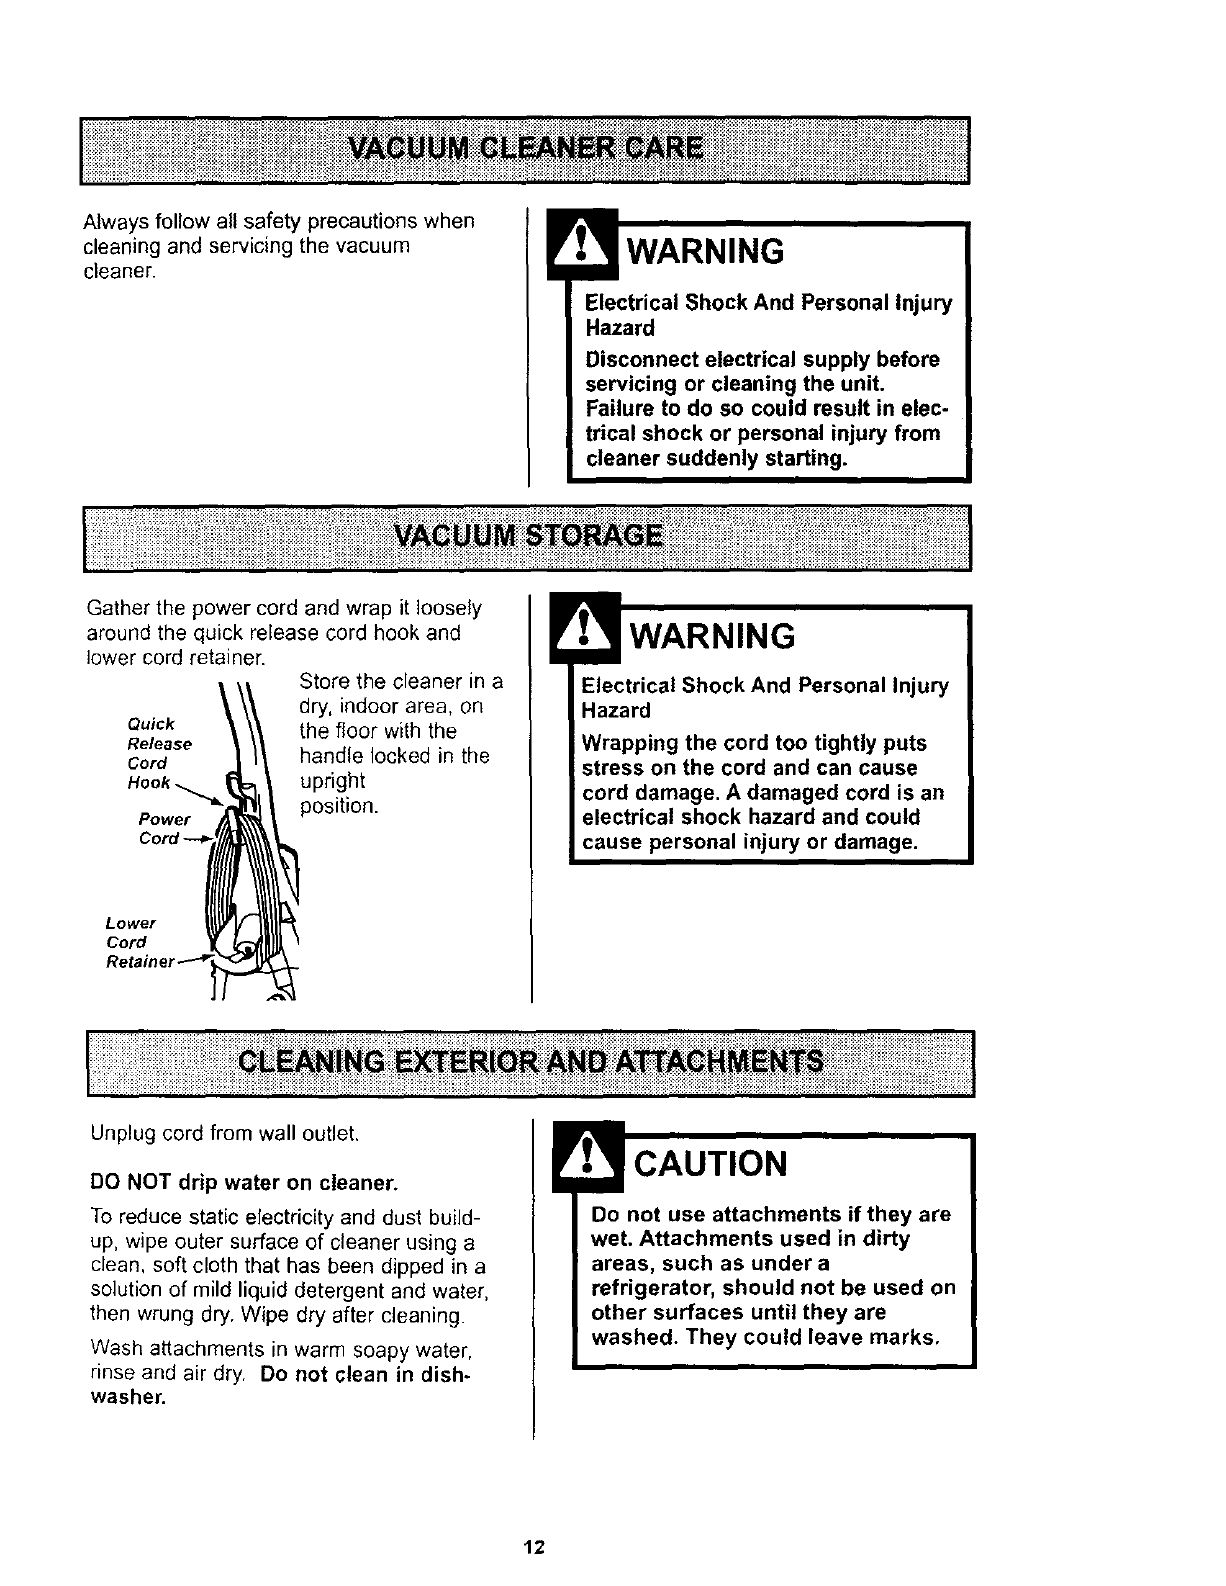
Gather the power cord and wrap it loosely
around the quick release cord hook and
lower cord retainer. Store the cleaner in a
dry, indoor area, on
Quick the floor with the
Release
Cord handle locked in the
Hook _upright
Power position.
Lower
Cord
Electrical Shock And Personal Injury
Hazard
Wrapping the cord too tightly puts
stress on the cord and can cause
cord damage. A damaged cord is an
electrical shock hazard and could
cause personal injury or damage.
I!!iii!ililiiiiiiiiiiiiiiii i ¸iiiiiiiiii i ii i!i!i i iJ it
Unplug cord from wall outlet.
DO NOT drip water on cleaner.
To reduce static electricity and dust build-
up, wipe outer surface of cleaner using a
clean, soft cloth that has been dipped in a
solution of mild liquid detergent and water,
then wrung dry. Wipe dry after cleaning.
Wash attachments in warm soapy water,
rinse and air dry. Do not clean in dish-
washer.
Do not use attachments if they are
wet. Attachments used in dirty
areas, such as under a
refrigerator, should not be used on
other surfaces until they are
washed. They could leave marks,
12
iiiiiiiiiiiiiiiiiiiiiii!iiiiiii!iiiiiiiiiiiiiii¸ii_i;_;_i_i__iii_iiiiii_i__i_i__ii¸_i_ii_i_ _!i_i_iI_ii_i_i_ili!iiiii_i!i:i_i_i_i_i_i_iiiii_i_i!_i:i_i_i_ii:::::iiii_
Li!iiiiiiiii!iiiiiiiiiiiiiiiiiiiiiiiiiiiiiiiiiii!!ii!i!i!!iiiiiiili_iiiiiiiii!_i_iii_iii_i_i_i_i_i_iiii!!_i_i_i!iii_i_ii_ii_i_i_iii_iiii!_;i_i_ii_iiiililililiiiii_i!iiiiiililili!iiiiiiiiiiliiii!ili!ii_ii_iiiilili!i _ili iiill_iiiii ii i_i__iii il i ill
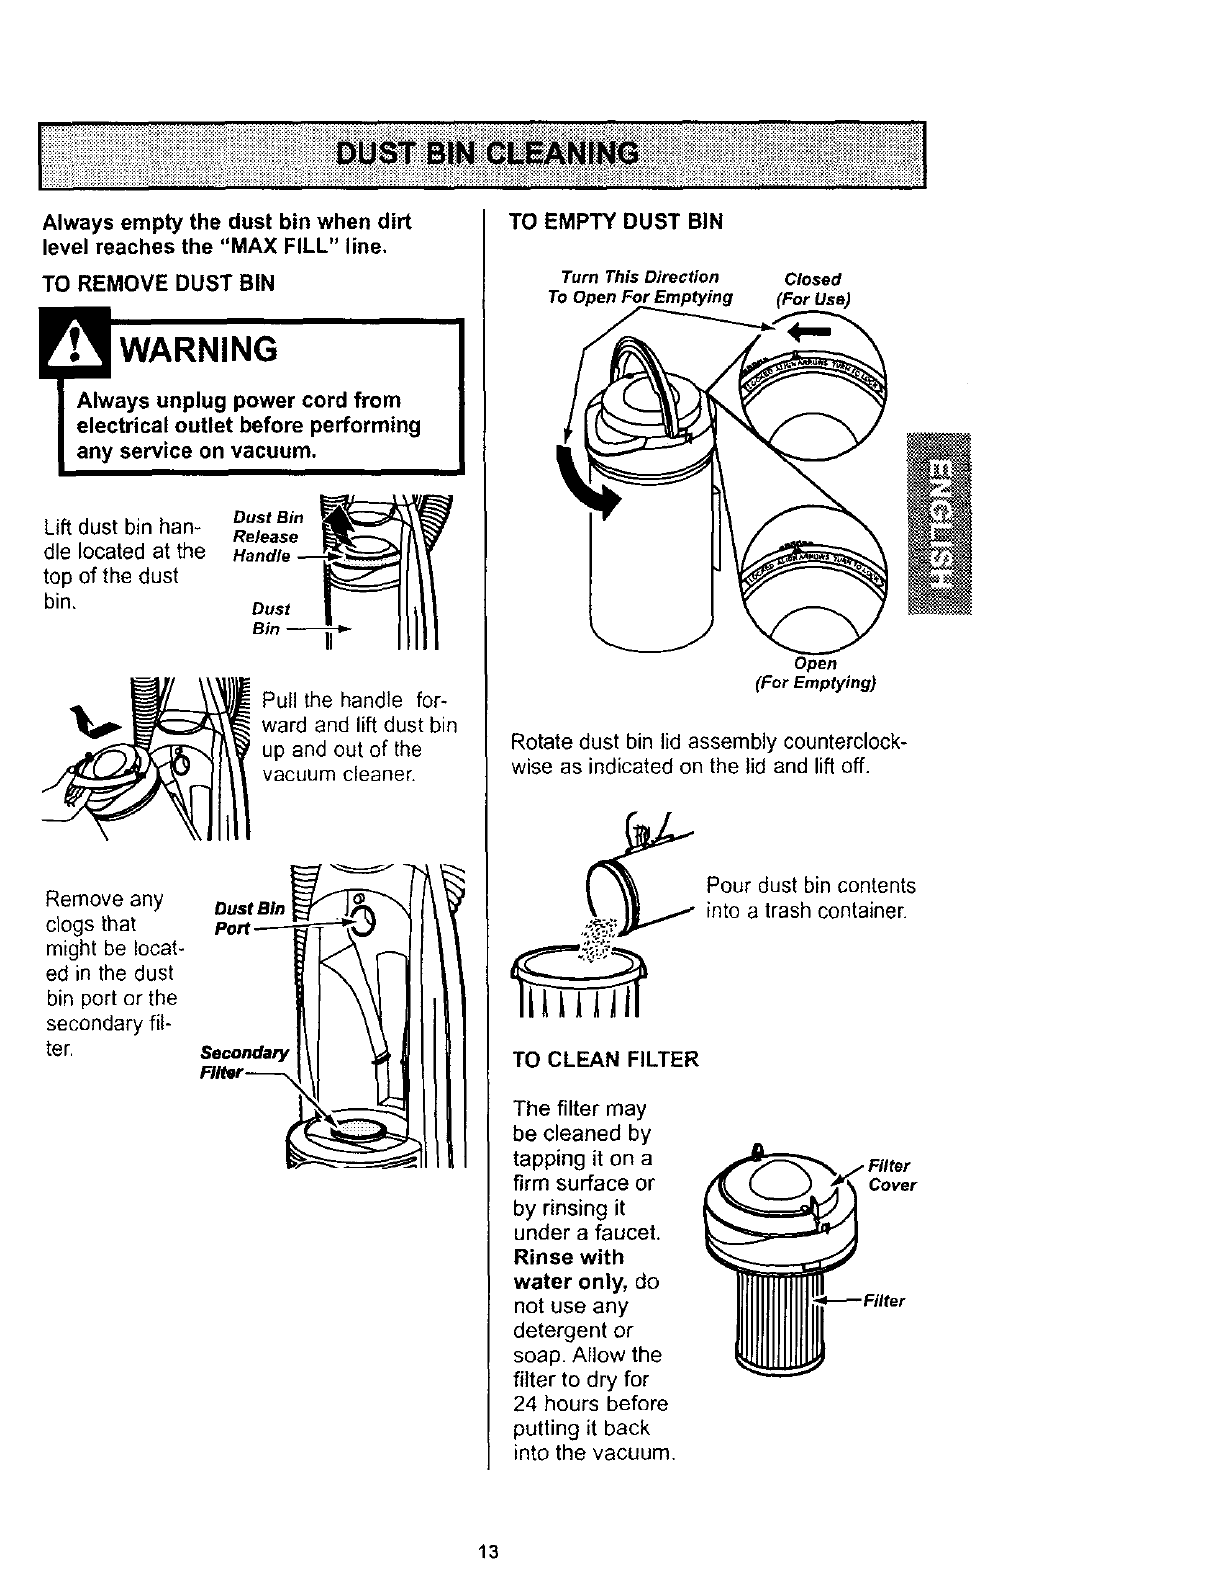
Always empty the dust bin when dirt
level reaches the "MAX FILL" line,
TO REMOVE DUST BIN
!rV.,_WARNING
IAlways unplug power cord from
electrical outlet before performing
any service on vacuum.
I
Lift dust bin han- Dust si.
Release
die located at the
top of the dust
bin, Dust
Pull the handle for-
ward and lift dust bin
up and out of the
vacuum cleaner.
Remove any
clogs that
might be locat-
ed in the dust
bin port or the
secondary fil-
ter. so=ona=,y I :_ _1II II
.,.r__ _1 ILlIll
TO EMPTY DUST BIN
Turn This Direction Closed
Open
(For Emptying)
Rotate dust bin lid assembly counterclock-
wise as indicated on the lid and lift off.
TO CLEAN FILTER
The filter may
be cleaned by
tapping it on a
firm surface or
by rinsing it
under a faucet.
Rinse with
water only, do
not use any
detergent or
soap. Allow the
filter to dry for
24 hours before
putting it back
into the vacuum.
Pour dust bin contents
into a trash container.
Cover
13
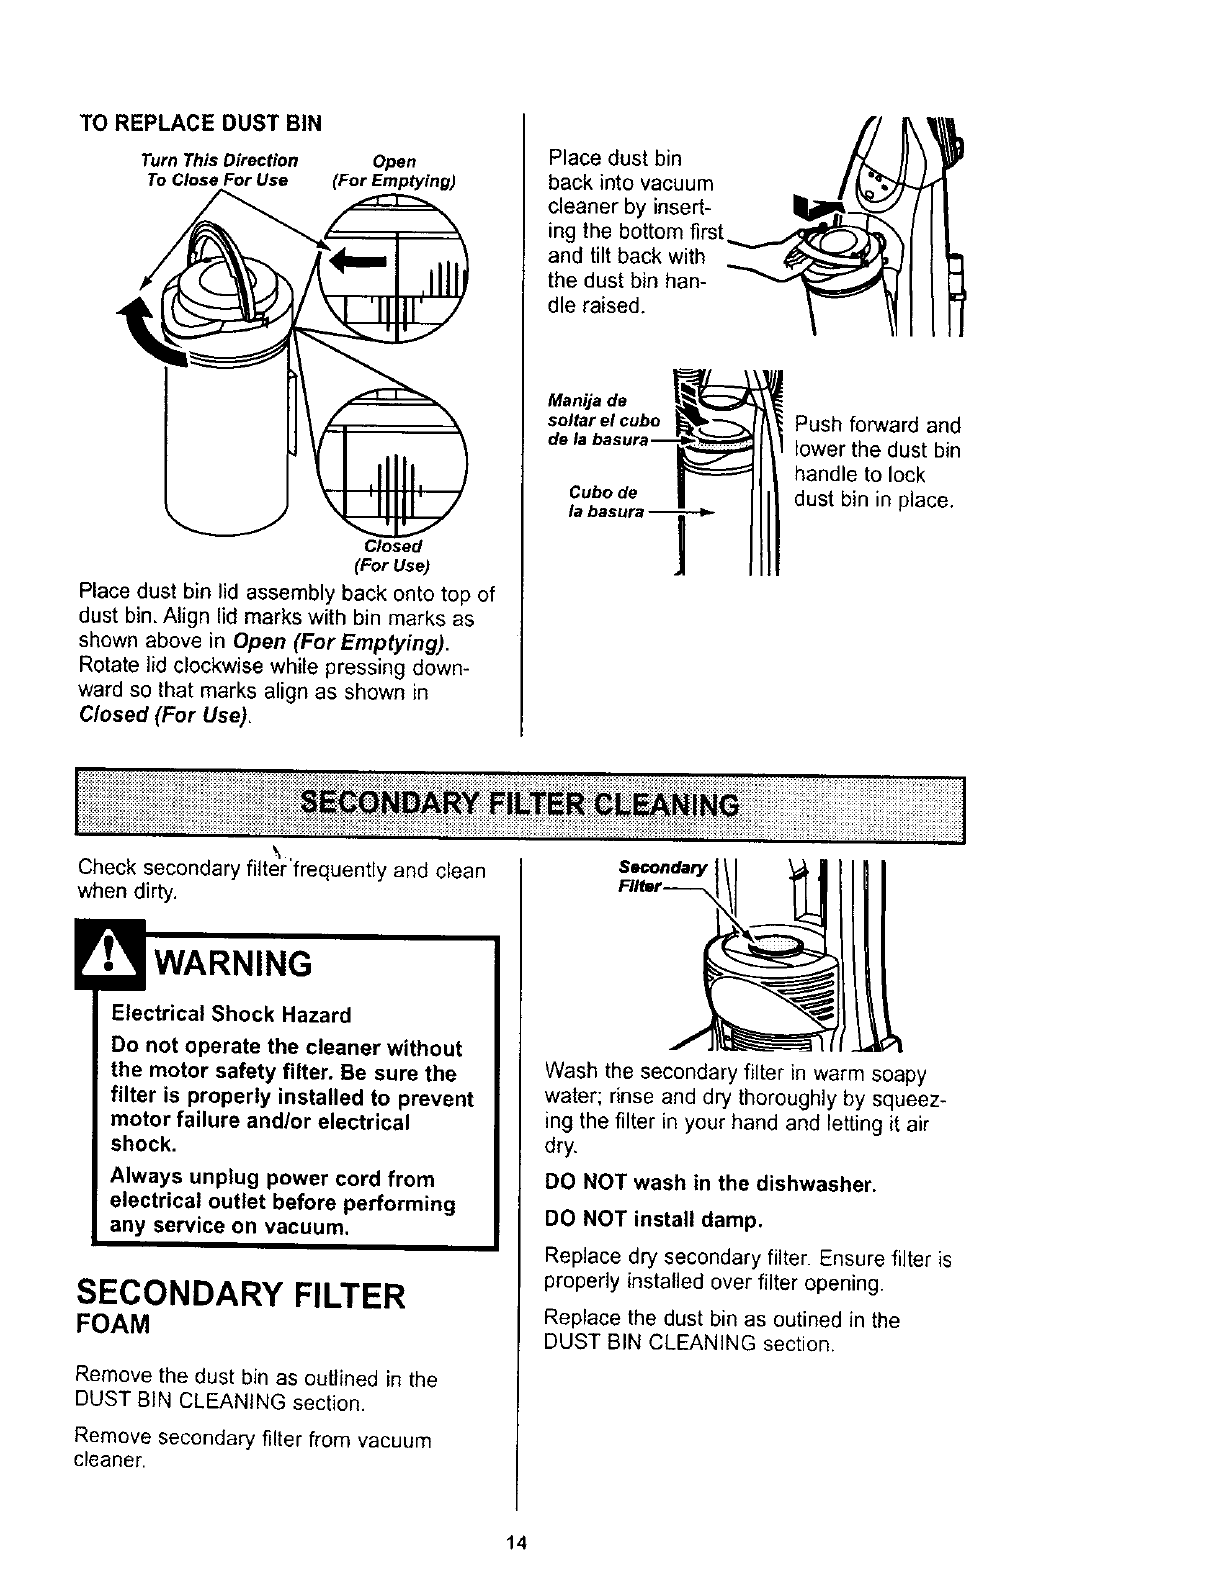
TO REPLACE DUST BIN
Turn This Direction Open
To Close For Use (For Emptying)
Closed
(For Use)
Place dust bin lid assembly back onto top of
dust bin. Align lid marks with bin marks as
shown above in Open (For Emptying).
Rotate lid clockwise while pressing down-
ward so that marks align as shown in
Closed (For Use),
7/
Place dust bin
back into vacuum
cleaner by insert-
ing the bottom first
and tilt back with
the dust bin han-
dle raised.
Manija de
soltar el cubo
dela
Cubode
Push forward and
lower the dust bin
handle to lock
dust bin in place.
\
Check secondary fiiter'frequently and clean
when dirty.
Electrical Shock Hazard
Do not operate the cleaner without
the motor safety filter. Be sure the
filter is properly installed to prevent
motor failure and/or electrical
shock.
Always unplug power cord from
electrical outlet before performing
any service on vacuum.
SECONDARY FILTER
FOAM
Remove the dust bin as outlined in the
DUST BiN CLEANING section,
Remove secondary filter from vacuum
cleaner.
Secondary
Filter--
Wash the seconda[y filter in warm soapy
water; rinse and dry thoroughly by squeez-
ing the filter in your hand and letting it air
dry.
DO NOT wash in the dishwasher.
DO NOT install damp.
Replace dry secondary filter. Ensure filter is
properly installed over filter opening.
Replace the dust bin as ootined in the
DUST BIN CLEANING section.
14
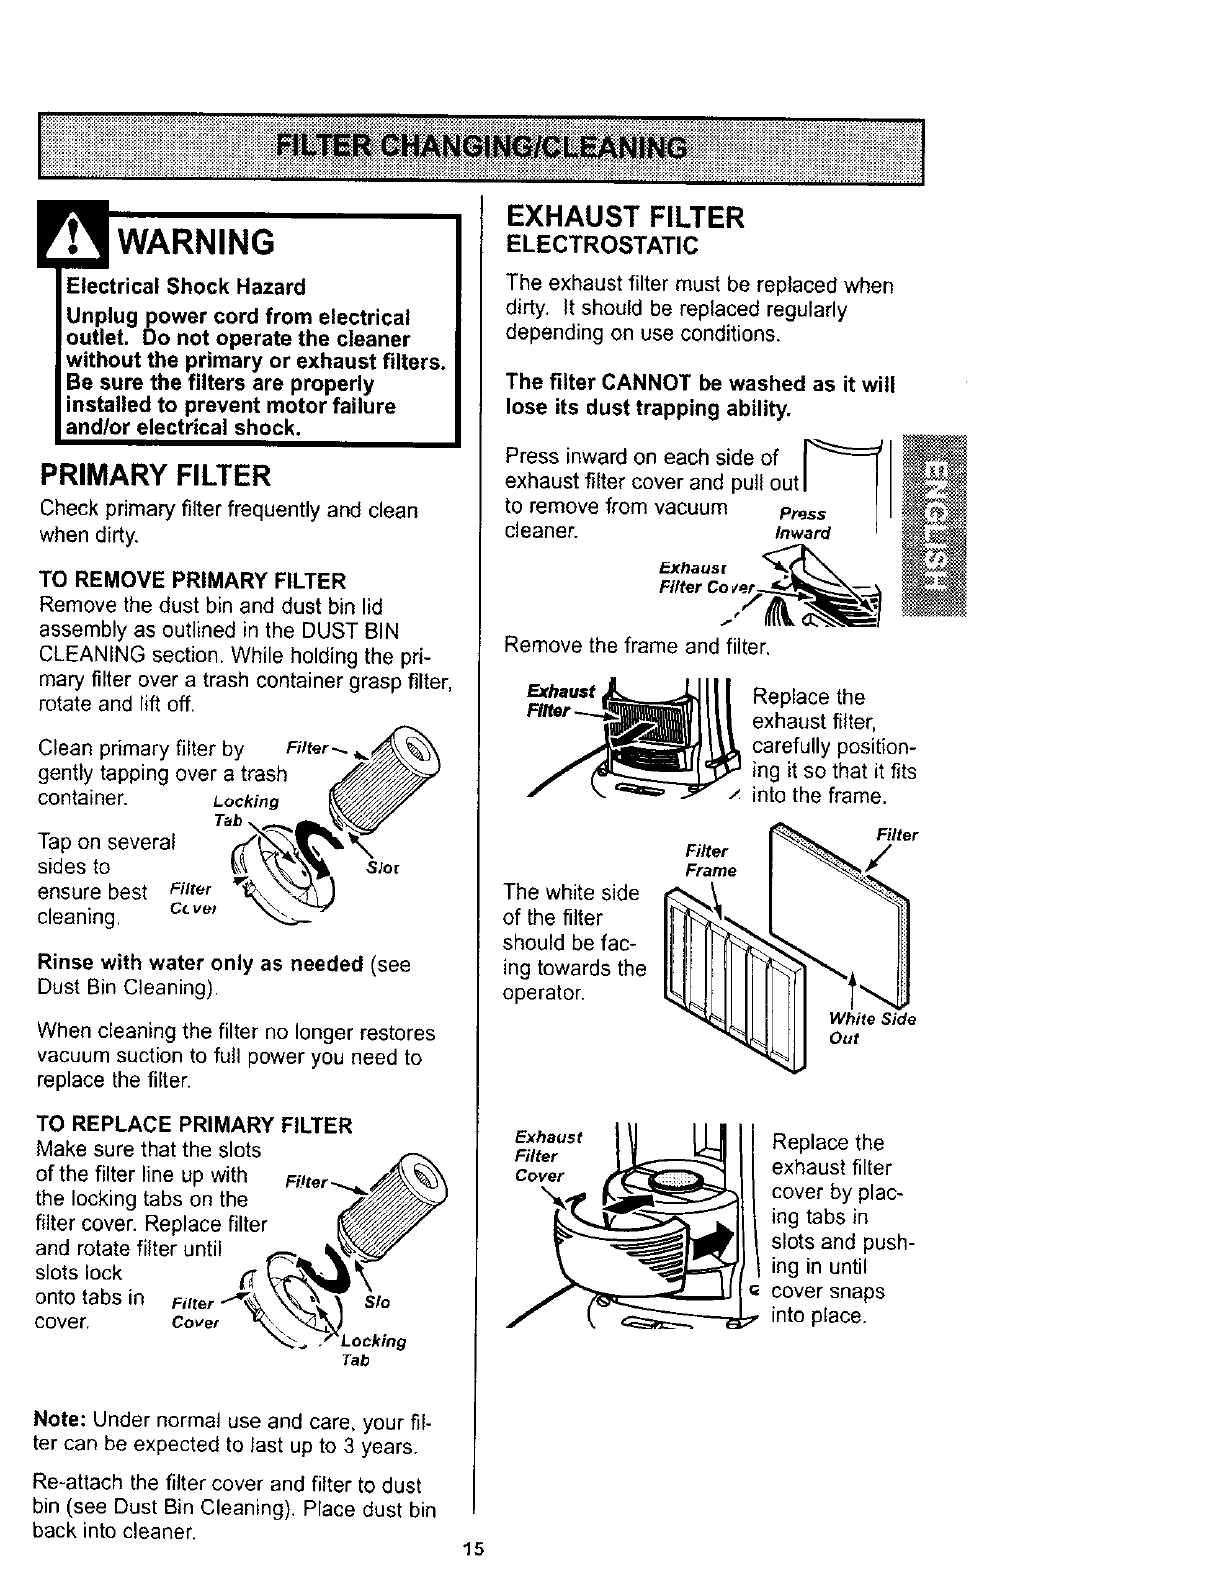
Electrical Shock Hazard
Unplug power cord from electrical
outlet. Do not operate the cleaner
without the primary or exhaust filters.
Be sure the filters are properly
installed to prevent motor failure
and/or electrical shock.
PRIMARY FILTER
Check primary filter frequently and clean
when dirty.
TO REMOVE PRIMARY FILTER
Remove the dust bin and dust bin lid
assembly as outlined in the DUST BIN
GLEANING section• While holding the pri-
mary filter over a trash container grasp filter,
rotate and lift off.
Clean primary filter by
gently tapping over a trash
container. Locking
Tab
Tap on several
sides to
ensure best Filter
cleaning, c_ ve_
Filter _.
Slot
Rinse with water only as needed (see
Dust Bin Cleaning).
When cleaning the filter no longer restores
vacuum suction to full power you need to
replace the filter.
TO REPLACE PRIMARY FILTER
Make sure that the slots
of the filter line up with
the locking tabs on the
filter cover. Replace filter
and rotate filter until
slots lock
onto tabs in
cover. Cove_
Tab
Note: Under normal use and care, your fil-
ter can be expected to last up to 3 years.
Re-attach the filter cover and filter to dust
bin (see Dust Bin Cleaning). Place dust bin
back into cleaner. 15
EXHAUST FILTER
ELECTROSTATIC
The exhaust filter must be replaced when
dirty. It should be replaced regularly
depending on use conditions.
The filter CANNOT be washed as it will
lose its dust trapping ability.
Press inward on each side of
exhaust filter cover and pull out I[ I
to remove from vacuum P ress._ ] I
cleaner. Inward
Remove the frame and filter.
Replace the
exhaust filter,
carefully position-
ing it so that it fits
into the frame.
The white side
of the filter
should be fac-
ing towards the
operator.
Filter
Frame
Filter
White Side
Out
Exhaust
Filter
Cover
Replace the
exhaust filter
cover by plac-
ing tabs in
slots and push-
ing in until
cover snaps
into place.
Electrical Shock Or Personal Injury
Hazard
Disconnect electrical supply before
servicing or cleaning the unit.
Failure to do so could result in elec-
trical shock or personal injury from
cleaner suddenly starting.
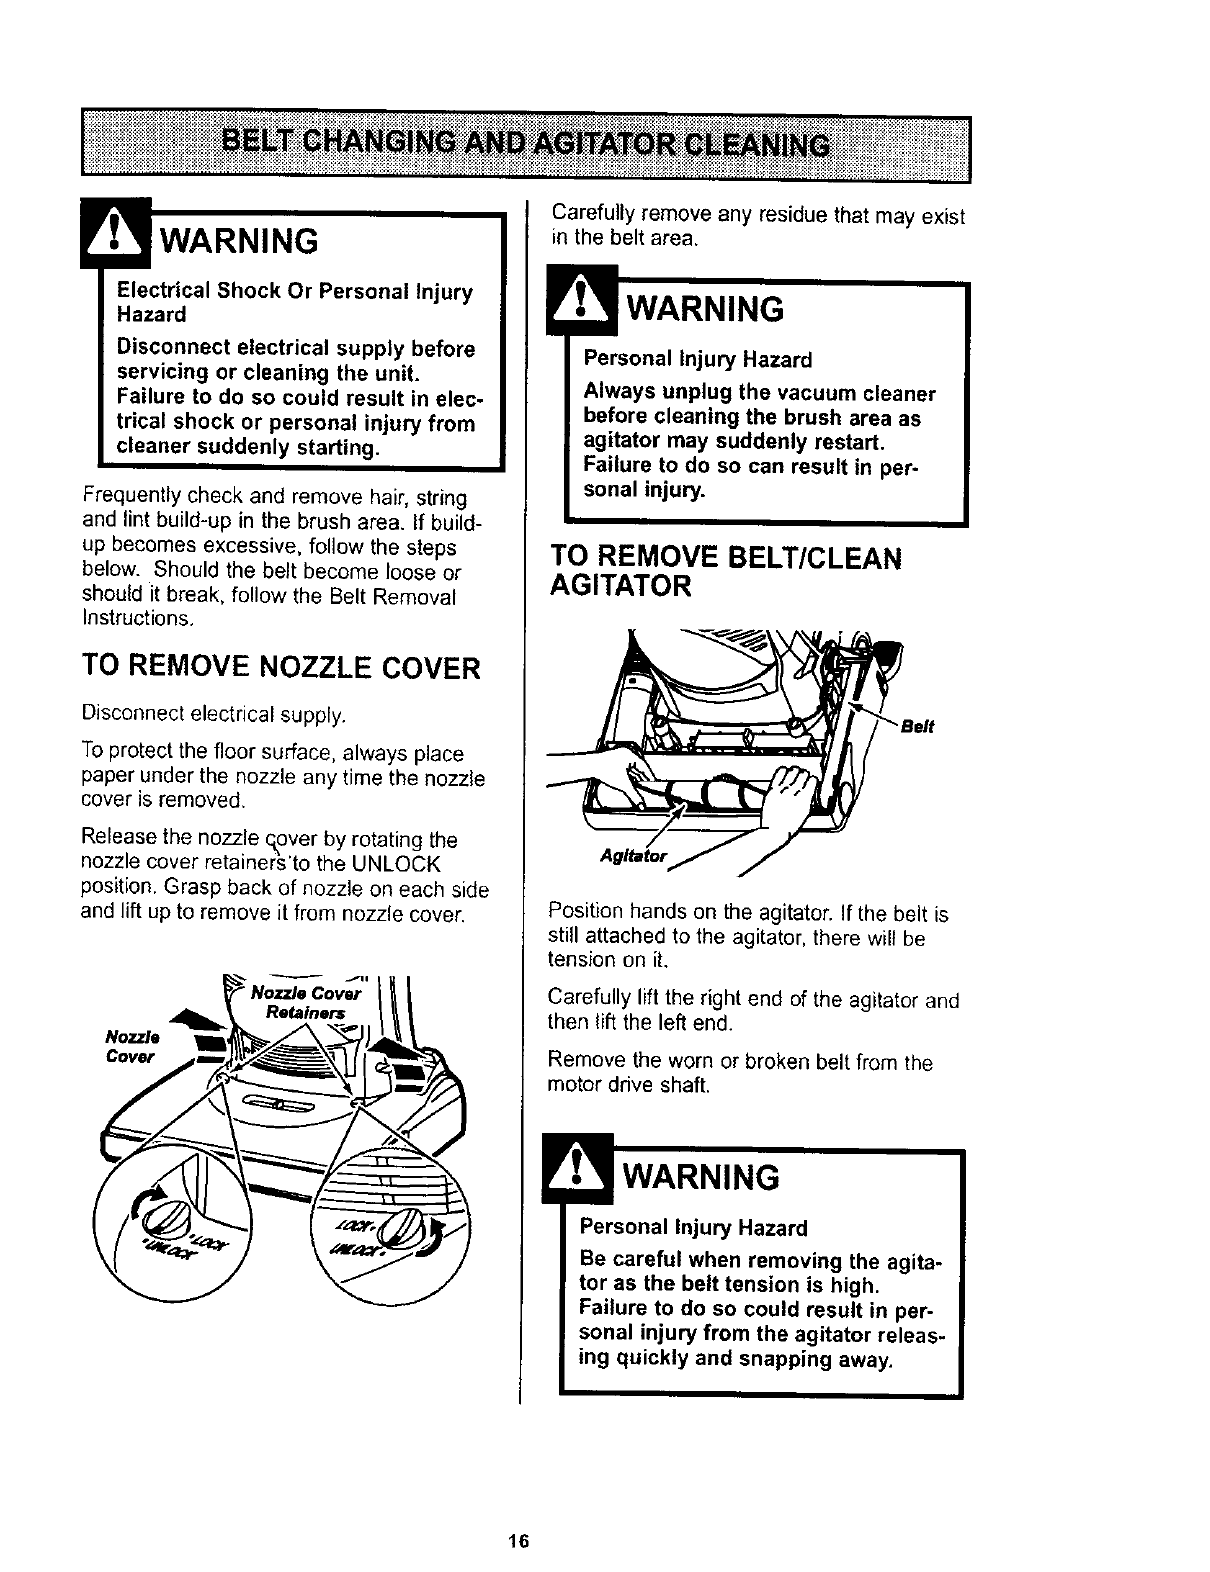
Frequently check and remove hair, string
and lint build-up in the brush area, If build-
up becomes excessive, follow the steps
below. Should the belt become loose or
should it break, follow the Belt Removal
Instructions,
TO REMOVE NOZZLE COVER
Disconnect electrical supply.
To protect the floor surface, always place
paper under the nozzle any time the nozzle
cover is removed,
Release the nozzle q,over by rotating the
nozzle cover retainer;_'to the UNLOCK
position. Grasp back of nozzle on each side
and lift up to remove it from nozzle cover.
Nozzle
Cover
Carefully remove any residue that may exist
in the belt area.
Personal Injury Hazard
Always unplug the vacuum cleaner
before cleaning the brush area as
agitator may suddenly restart,
Failure to do so can result in per-
sonal injury.
TO REMOVE BELT/CLEAN
AGITATOR
Position hands on the agitator. If the belt is
still attached to the agitator, there will be
tension on it.
Carefully lift the right end of the agitator and
then lift the left end.
Remove the worn or broken belt from the
motor drive shaft.
Personal Injury Hazard
Be careful when removing the agita-
tor as the belt tension is high.
Failure to do so could result in per-
sonal injury from the agitator releas-
ing quickly and snapping away.
16
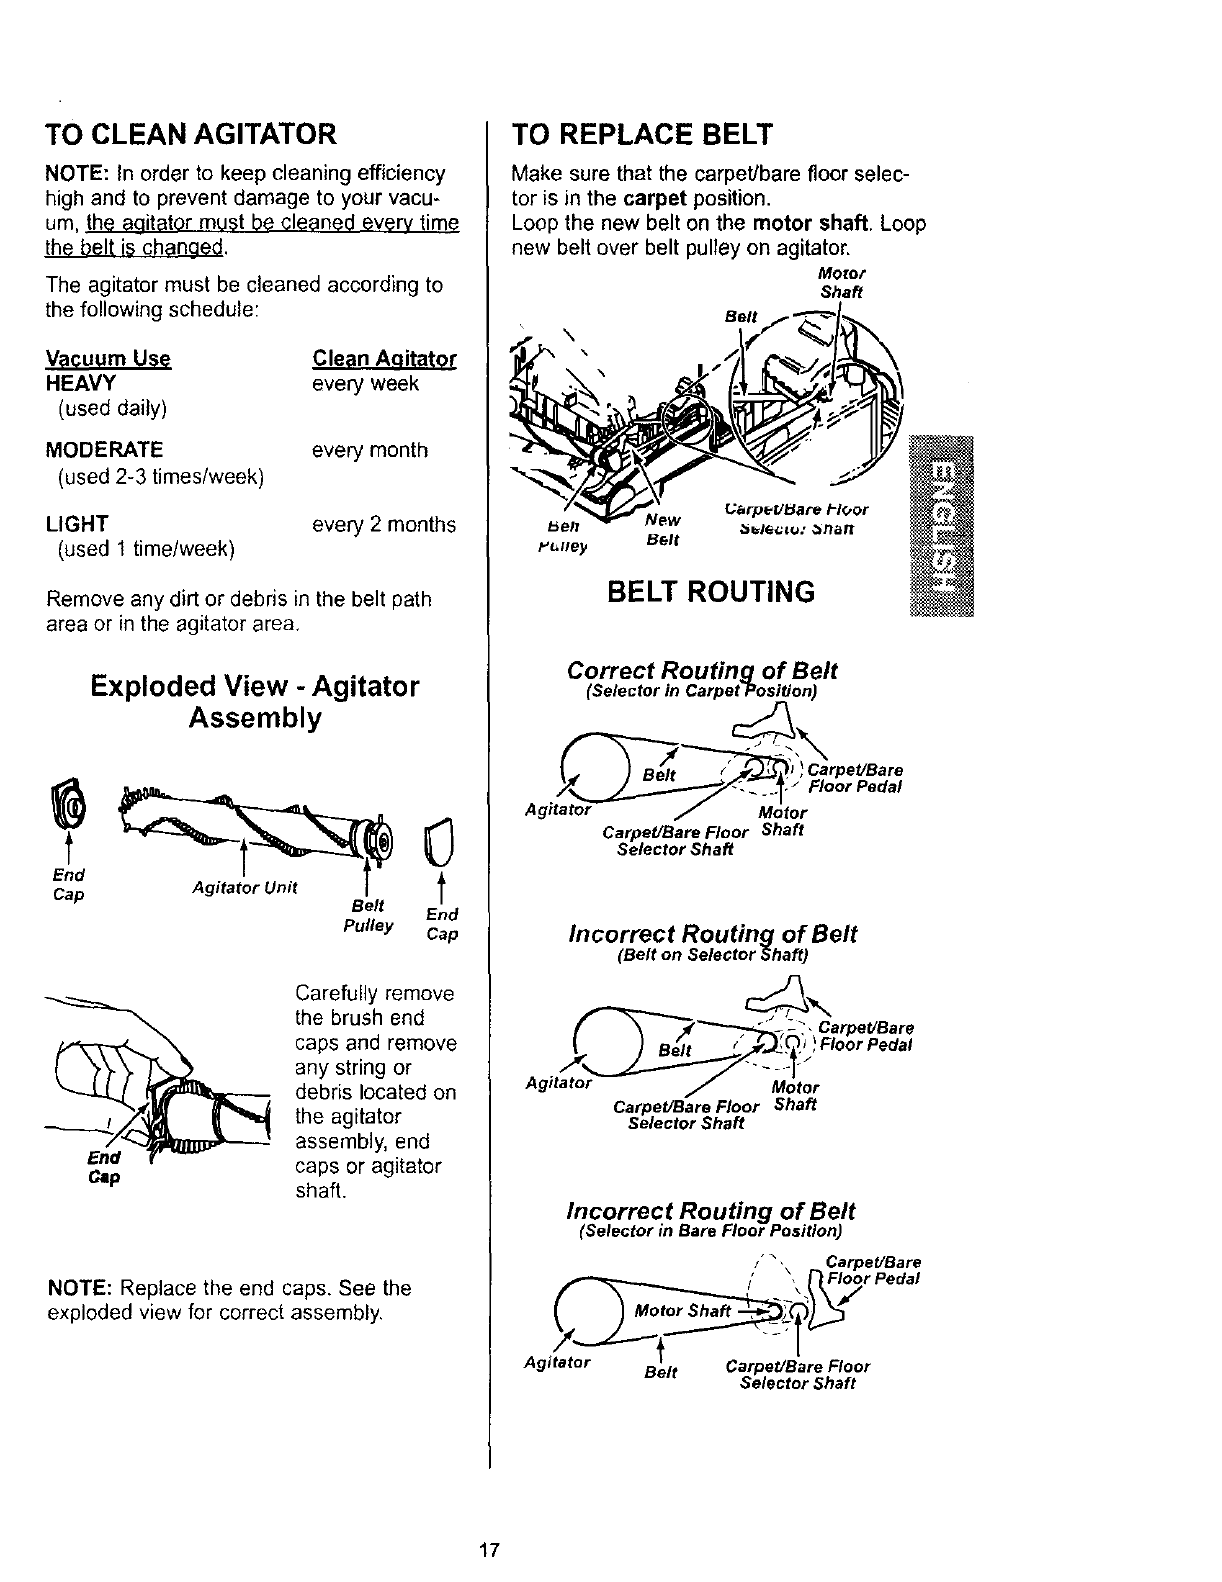
TO CLEAN AGITATOR
NOTE: In order to keep cleaning efficiency
high and to prevent damage to your vacu-
um, the agitator must be cleaned every time
the belt is chanaed.
The agitator must be cleaned according to
the following schedule:
V_quum Use
HEAVY
(used daily)
MODERATE
(used 2-3 times/week)
Clean Aaitator
every week
every month
LIGHT
(used 1 time/week)
every 2 months
Remove any dirt or debris in the belt path
area or in the agitator area.
Exploded View - Agitator
Assembly
Belt End
Pulley Cap
Carefully remove
the brush end
caps and remove
any string or
debris located on
the agitator
assembly, end
caps or agitator
shaft.
NOTE: Replace the end caps. See the
exploded view for correct assembly.
TO REPLACE BELT
Make sure that the carpet/bare floor selec-
tor is in the carpet position.
Loop the new belt on the motor shaft. Loop
new belt over belt pulley on agitator.
Motor
Shaft
Belt
\
Uarp_UBare i-IGor
Y_lley Belt
BELT ROUTING
Correct Routing of Belt
(Selector in Carpet Position)
Carpet/Bare Floor Shaft
Selector Shaft
Incorrect Routing of Belt
(Belt on Selector Shaft)
f_d_-_,, arpet/Bare
Agitator _Motor
Carpet/Bare Floor Shaft
Selector Shaft
Incorrect Routing of Belt
(Selector in Bare Floor Position)
I,\ C rpet/Bare
I' ,FI Floor Pedal
Agitator Carpet/Bare Floor
Belt Selector Shaft
17
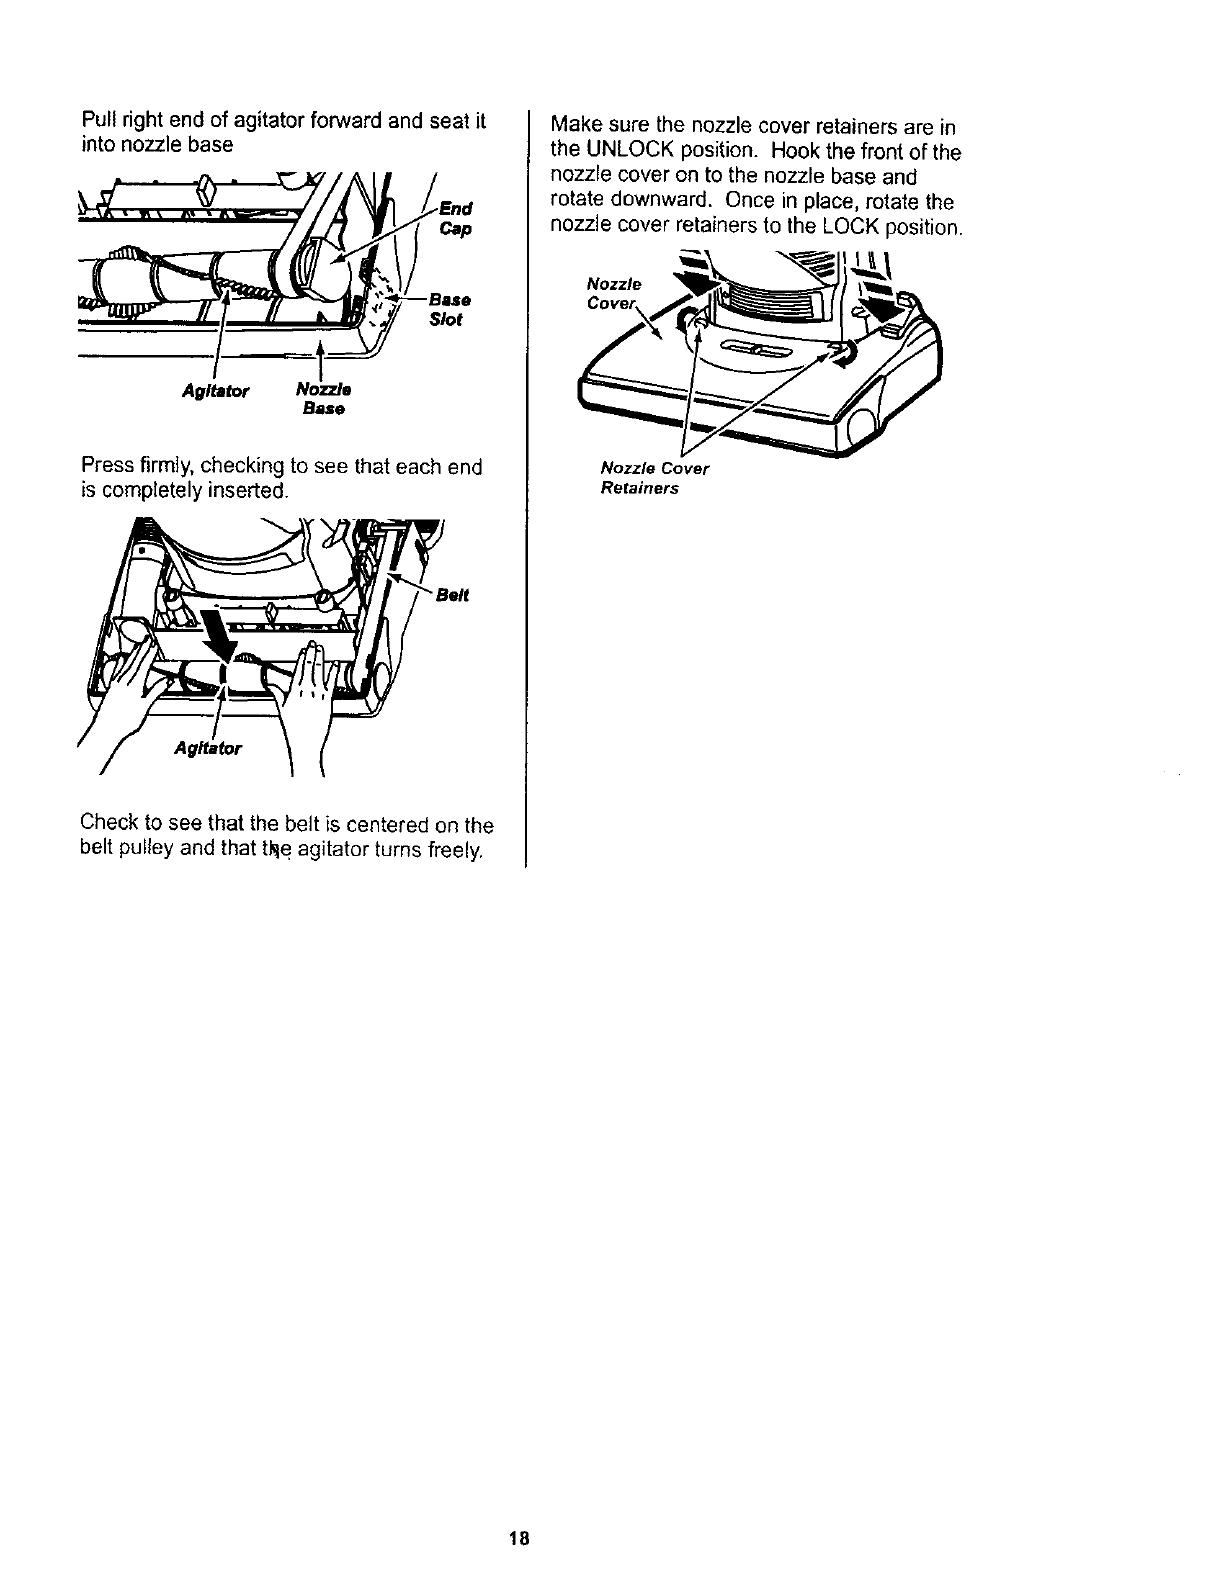
Pull right end of agitator forward and seat it
into nozzle base
Agitator Nozzle
Base
Press firmly, checking to see that each end
is completely inserted.
'Belt
Agitator
Check to see that the be;t is centered on the
belt pulley and that tke agitator turns freely,
Make sure the nozzle cover retainers are in
the UNLOCK position. Hook the front of the
nozzle cover on to the nozzle base and
rotate downward. Once in place, rotate the
nozzle cover retainers to the LOCK position.
Nozzle
Nozzle Cover
Retainers
18
Electrical Shock Or Personal Injury
Hazard
Disconnect electrical supply before
servicing or cleaning the unit.
Failure to do so could result in elec-
trical shock or personal injury from
cleaner suddenly starting.
Always follow all safety precautions when
cleaning and servicing the vacuum cleaner.
If the cleaner does not seem to have ade-
quate suction, first check if the dust bin is
full or if a filter is clogged. See DUST BIN
CLEANING and FILTER CLEANING /
CHANGING.
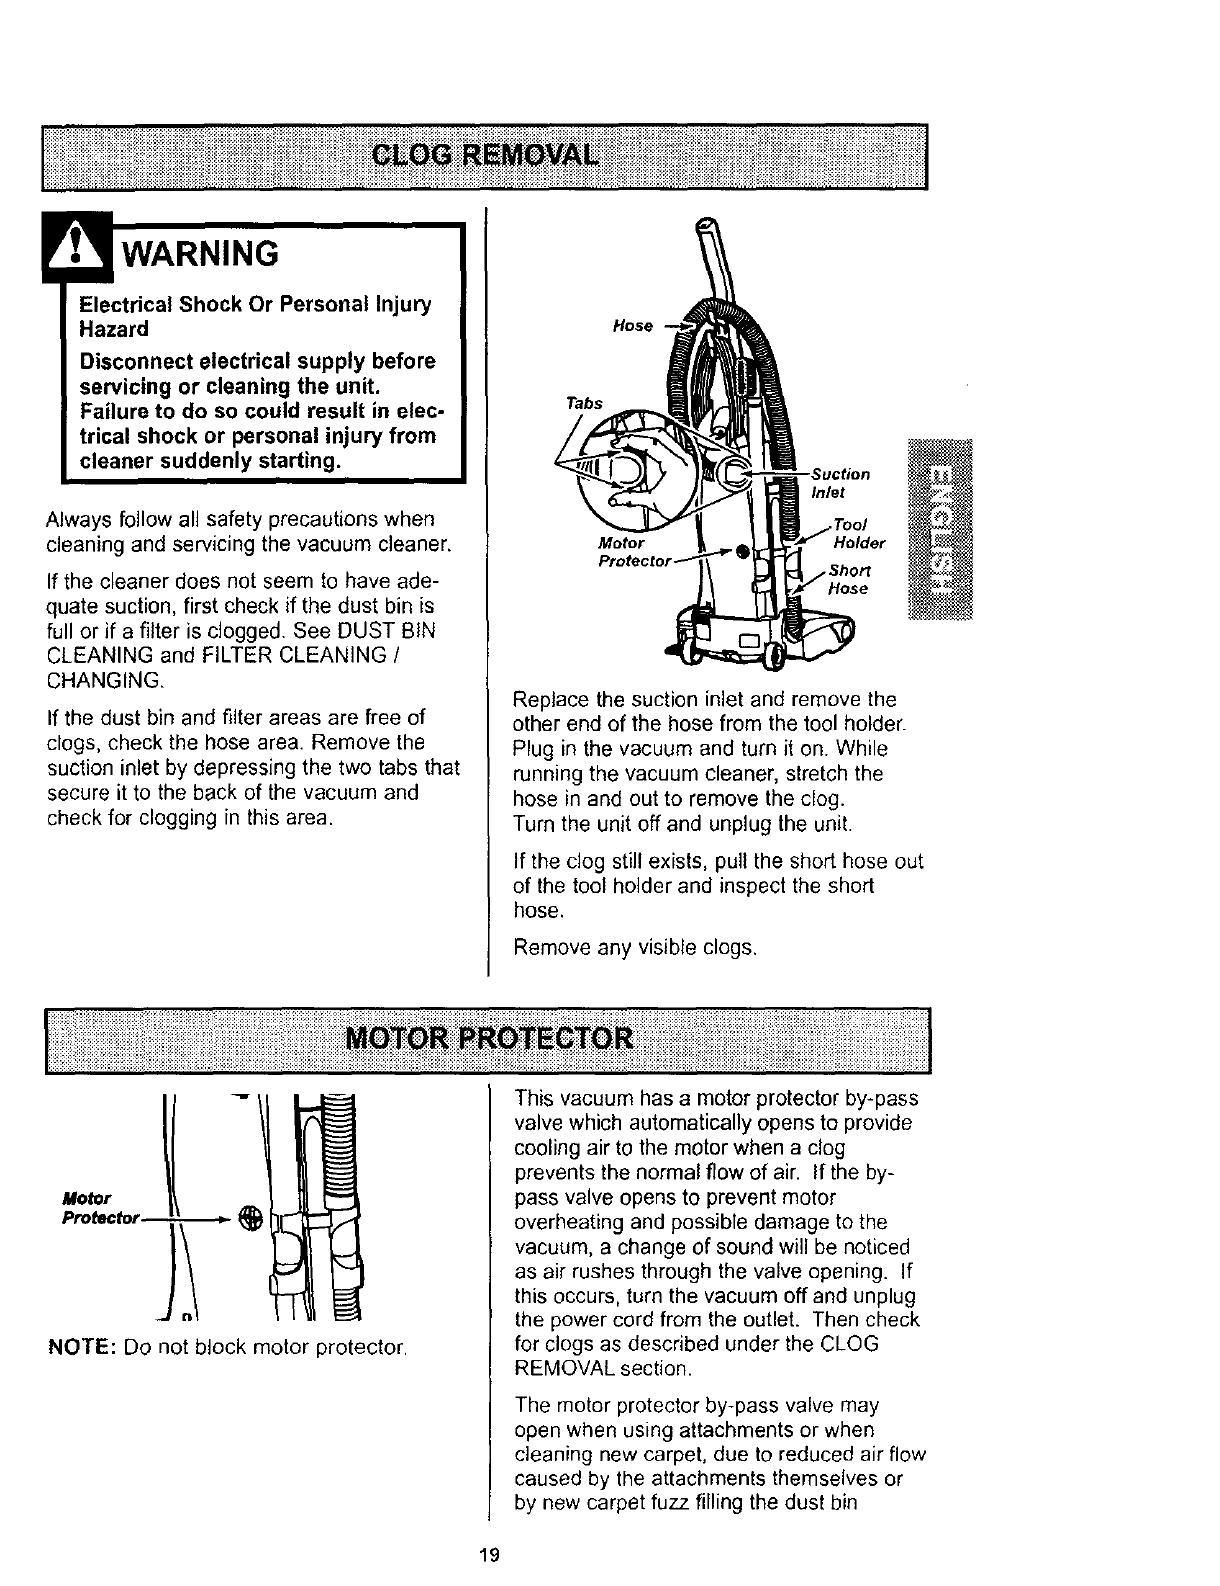
If the dust bin and filter areas are free of
clogs, check the hose area. Remove the
suction inlet by depressing the two tabs that
secure it to the back of the vacuum and
check for clogging in this area.
Hose
Tabs
Inlet
Motor Holder
Replace the suction inlet and remove the
other end of the hose from the tool holder.
Plug in the vacuum and turn it on. While
running the vacuum cleaner, stretch the
hose in and out to remove the clog.
Turn the unit off and unplug the unit.
If the clog still exists, pull the short hose out
of the tool holder and inspect the short
hose.
Remove any visible clogs.
NOTE: Do not block motor protector.
This vacuum has a motor protector by-pass
valve which automatically opens to provide
cooling air to the motor when a clog
prevents the normal flow of air. If the by-
pass valve opens to prevent motor
overheating and possible damage to the
vacuum, a change of sound will be noticed
as air rushes through the valve opening. If
this occurs, turn the vacuum off and unplug
the power cord from the outlet. Then check
for clogs as described under the CLOG
REMOVAL section.
The motor protector by-pass valve may
open when using attachments or when
cleaning new carpet, due to reduced air flow
caused by the attachments themselves or
by new carpet fuzz filling the dust bin
19
_i_i_iiiiii_i_i_!ii_!i_iii!ii_!_ii_iii_!i!ii!_!i_!_!i_i_i_!_ii_iiiiii_!_!i_i_i_iii_!i_;_ii_iiii_i_!_i!_!_i_i!_!i_!_i_!_i_i_i_!_!ii_ii_iii_iiii_i!i_!ii_i_i_i`!ill_ii_!_!_!_!i_ii_iQ!_!ii_i_ii_!ii_i_ii!iiiiii_ii!iiii!_i_ii'iiiii!iiii_il_ii_iiii
SOME MODELS
Electrical Shock Or Personal Injury
Hazard
Disconnect electrical supply before
servicing or cleaning the unit.
Failure to do so could result in elec-
trical shock or personal injury from
cleaner suddenly starting.
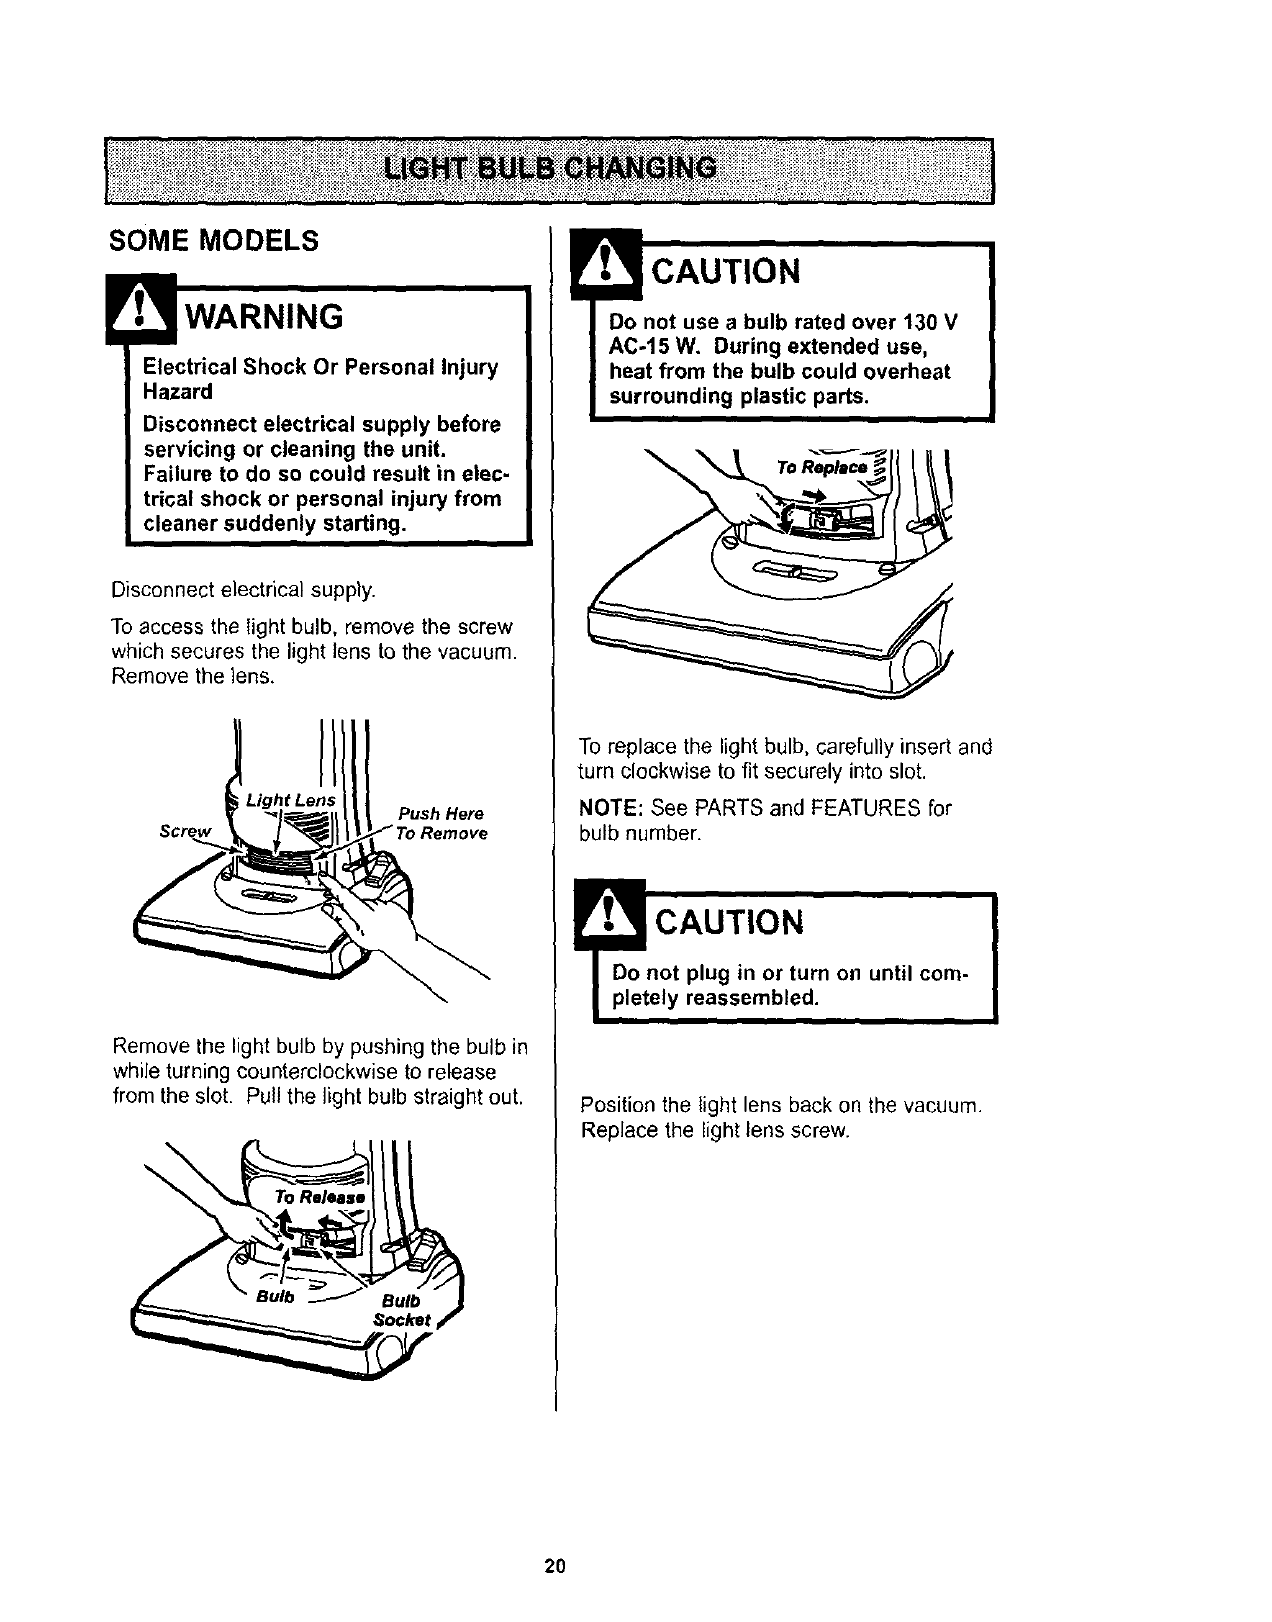
Disconnect electrical supply.
To access the light bulb, remove the screw
which secures the light lens to the vacuum.
Remove the lens.
Push Here
Screw Remove
Remove the light bulb by pushing the bulb in
while turning counterclockwise to release
from the slot. Pull the light bulb straight out.
\
CAUTION
Do not use a bulb rated over 130 V
AC-15 W. During extended use,
heat from the bulb could overheat
surrounding plastic parts.
\
To replace the light bulb, carefully insert and
turn clockwise to fit securely into slot.
NOTE: See PARTS and FEATURES for
bulb number.
!'_._ CAUTION "
Do not plug in or turn on until com-
pletely reassembled.
i
Position the light lens back on the vacuum.
Replace the light lens screw.
2O
i_i_i_!ii_i_:_:_:i_:_:i_:_i_i_i_:_!_:_ii_i_i_:_:_i_i_i_iiiii:_:,i_ _:_i_=i_ii_:_:_:i:_:_:_:_i_=_:ii_:_iii_:_i_:_:_i_=:_:_i_:_i_i_=_:_i_
li_iii_i_i_i_i_!ii_i_i_iii_i_i_iiiii;i_i_i_i_i_iiiii_i_i_i_i_iii_i_iiiii_i_i_ii_!_!_!_i_!i_i_iiii!!!_i_i_i_i_i_i_i_iiiii!_i_i_i_i_!_i_i_ii_iii;!!;!i_;_i_i_!i_;i_iiiii;i;ili!i!iiiiii_i_i_i_iiiii_;!i;!i!iiiiliiiiiiiiii_ii!iiii;ii_i;!!iiliiiliiiliiiiiii!i !i!!ililililiiiiiiiiii!!iilliiiiiiii!!!iliil
Electrical Shock Or Personal Injury
Hazard
Disconnect electrical supply before
servicing or cleaning the unit. Failure
to do so could result in electrical
shock or personal injury from clean-
er suddenly starting.
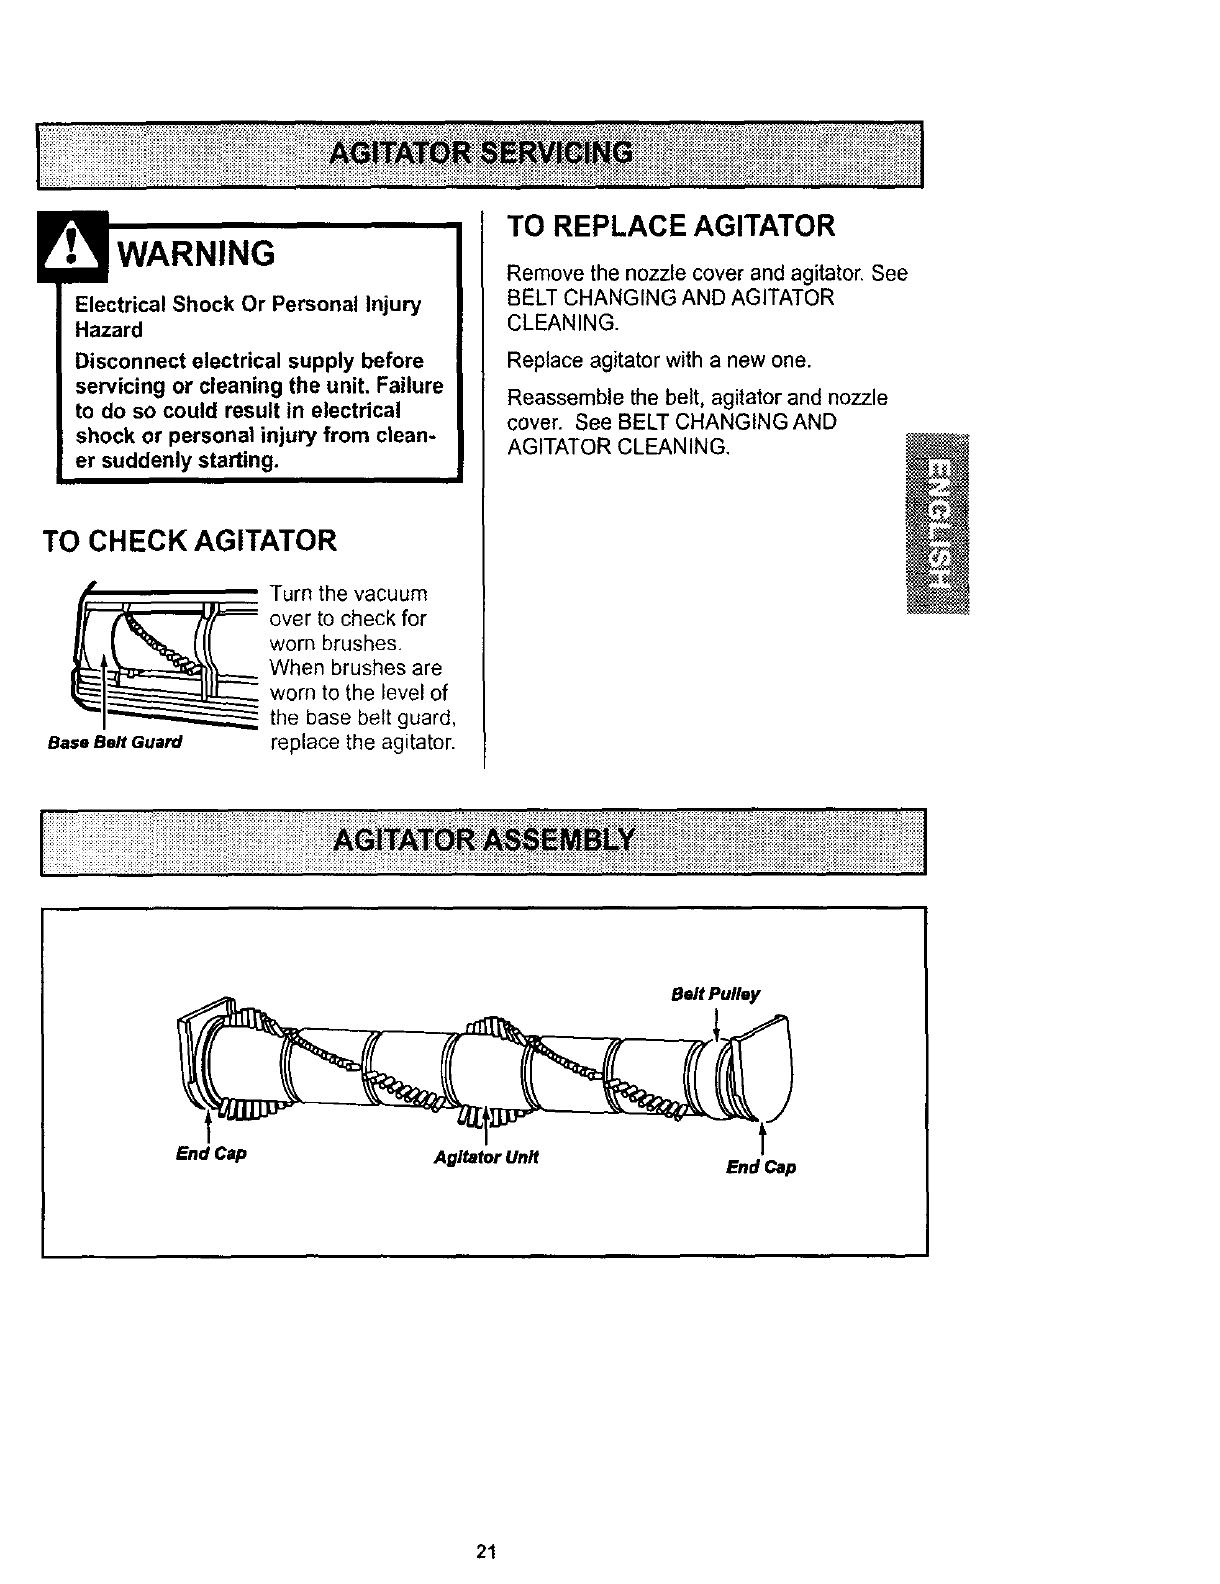
TO CHECK AGITATOR
_l Turn the vacuum
over to check for
worn brushes.
When brushes are
worn to the level of
the base belt guard,
Base Be# euard replace the agitator.
TO REPLACE AGITATOR
Remove the nozzle cover and agitator, See
BELT CHANGING AND AGITATOR
CLEANING.
Replace agitator with a new one.
Reassemble the belt, agitator and nozzle
cover. See BELT CHANGING AND
AGITATOR CLEANING.
End Cap Agitator Unit End Cap
21
_i_iliiiliii!_iii_iiiiiiiii'iiiiiiil_iiiiii_iiii_iiii!iiiii_i_i ii_i_iiiiii_i_iiii_!!ii_iiiiiii_ii!!iiliii_!!i!!i_iiiiii_!_!iii_!iiJi_iiiii_illiiii_
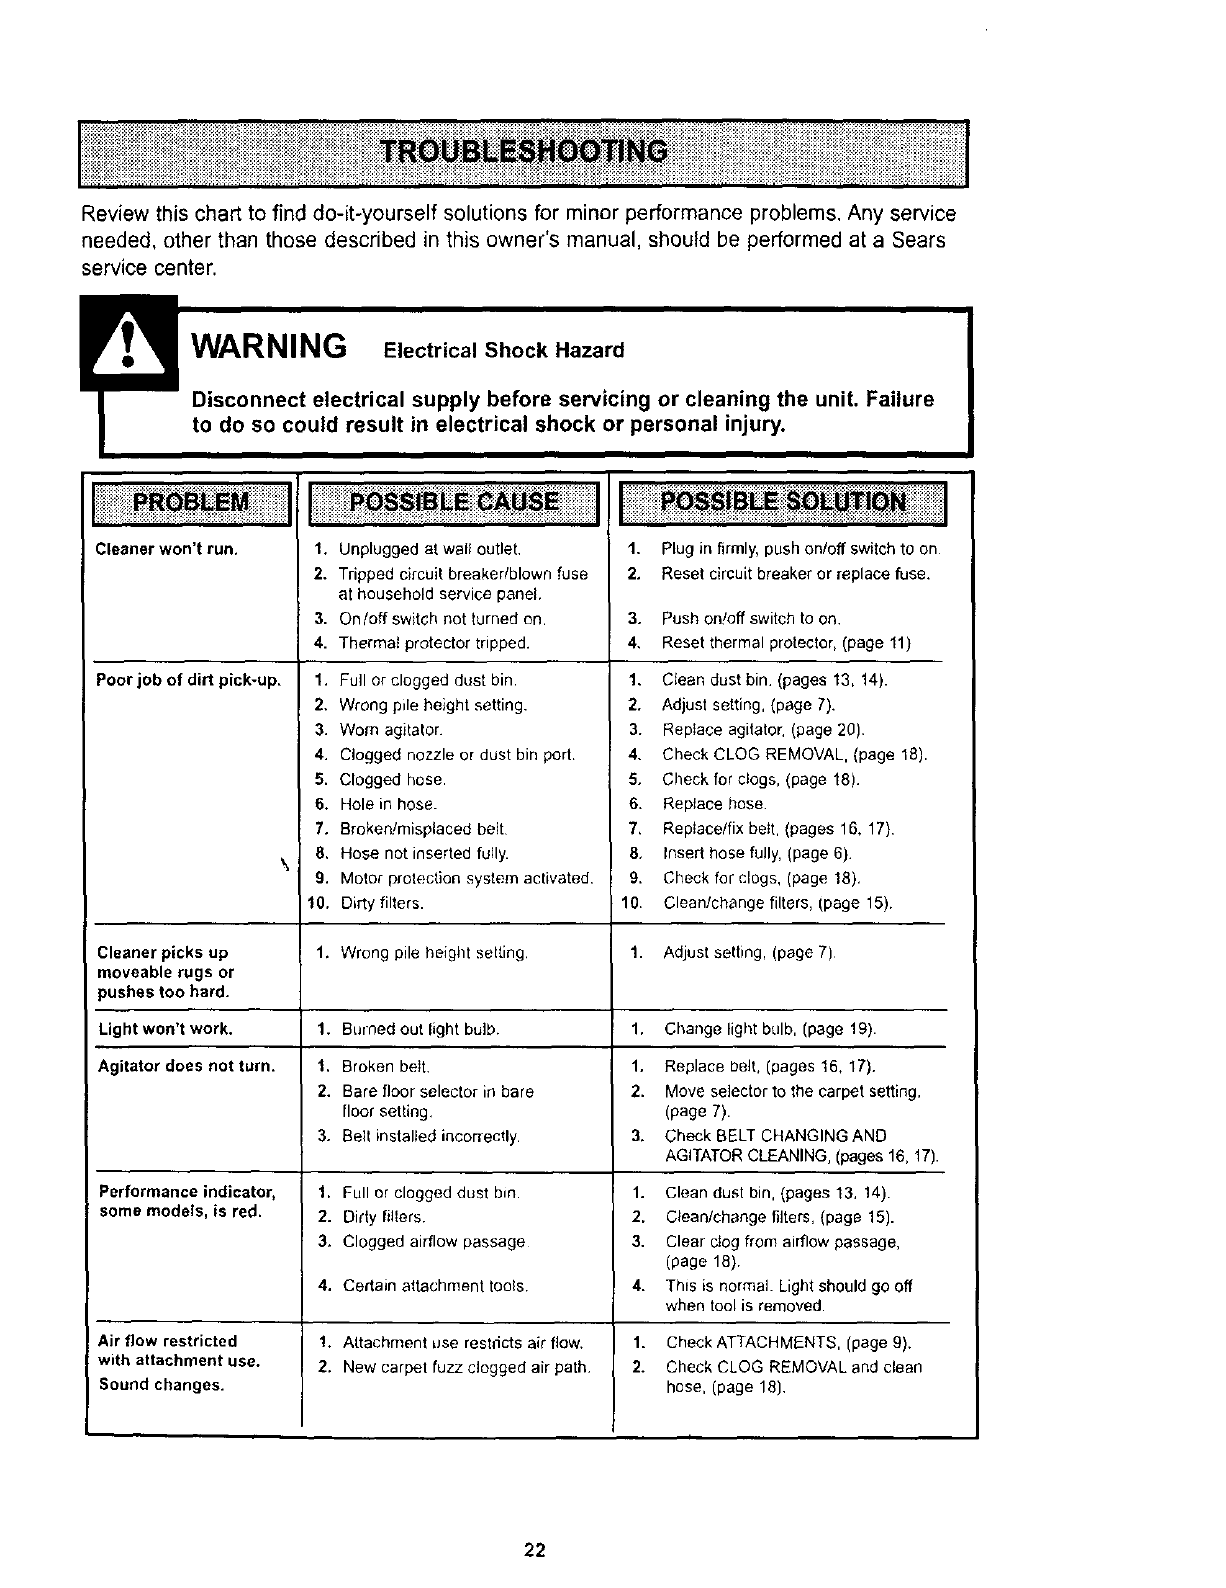
Review this chart to find do-it-yourself solutions for minor performance problems. Any service
needed, other than those described in this owner's manual, should be performed at a Sears
service center.
!Disconnect electrical supply before servmmg or cleaning the unit. Failure
to do so could result in electrical shock or personal injury.
Cleaner won't run.
Poor job of dirt pick-up.
1. Unplugged at wal outlet,
2. Tripped circuit breaker/blown fuse
at household service panel,
3. On/off switch not turned on.
4. Thermal protector tripped.
1. Full or clogged dust bin.
2. Wrong pile height setting.
3. Worn agitator.
4. Clogged nozzle or dust bin port.
5. Clogged hose.
6, Hole in hose.
7. Broken!misplaced belt
8. Hose not inserted fully.
9. Motor protection system activated,
10. Dirty filters.
1. Plug in firmly, push on/off switch to on
2. Reset circuit breaker or replace fuse.
3. Push on!off switch to on.
4, Reset thermal protector, (page 11)
1. Ctean dust bin. (pages 13, 14).
2. Adjust setting, (page 7).
3. Reptace agitator, (page 20).
4. Check CLOG REMOVAL, (page 18).
5. Check for clogs, (page 18).
6. Reptace hose
7, Replace/fix bet, (pages 16, 17).
8, Insert hose fully, (page 6)
9. Check for clogs, (page 18),
10. Clean/change filters, (page 15).
\
Cleaner picks up t. Wrong pile height setting, 1. Adjust setting, (page 7)
moveable rugs or
pushes too hard.
Light won't work. 1. Burned out light bulb. 1, Change light bulb, (page t9).
Agitator does not turn. 1, Broken belt. 1. Replace belt, (pages 16, 17).
2. Bare floor selector in bare 2. Move selector to the carpet setting,
floor setting. (page 7).
3. Belt installed incorrectly. 3. Check BELT CHANGING AND
AGITATOR CLEANING, (pages 16, 17).
Performance indicator, 1, Full or clogged dust bin. 1. Clean dust bin, (pages 13, 14).
some models, is red, 2. Didy fl{ers. 2, Cleanfchange filters, (page 15).
3. Clogged airflow passage 3. Clear ctog from airflow passage,
(page 18)
4, Certain attachment tools. 4. This is normal. Light should go off
when tool is removed.
Air flow restricted 1. Attachment use restdcts air flow. 1. Check ATTACHMENTS, (page 9).
with attachment use. 2, New carpet fuzz. clogged air path 2. Check CLOG REMOVAL and clean
Sound changes, hose, (page 18)
22
i i i i E i i%!iiiiii;iiiii z ii %iiiiiil i iiiii i
I iiii i ii;i iii!;i ii ;iiii@i i!!i i ;!ii!i!iiiiiii i ;iiiii iii!iiiiiiiiiii!i iiiiiiiiiiii!!!! i!!iiii iiii!i!i!i!i!i!ii
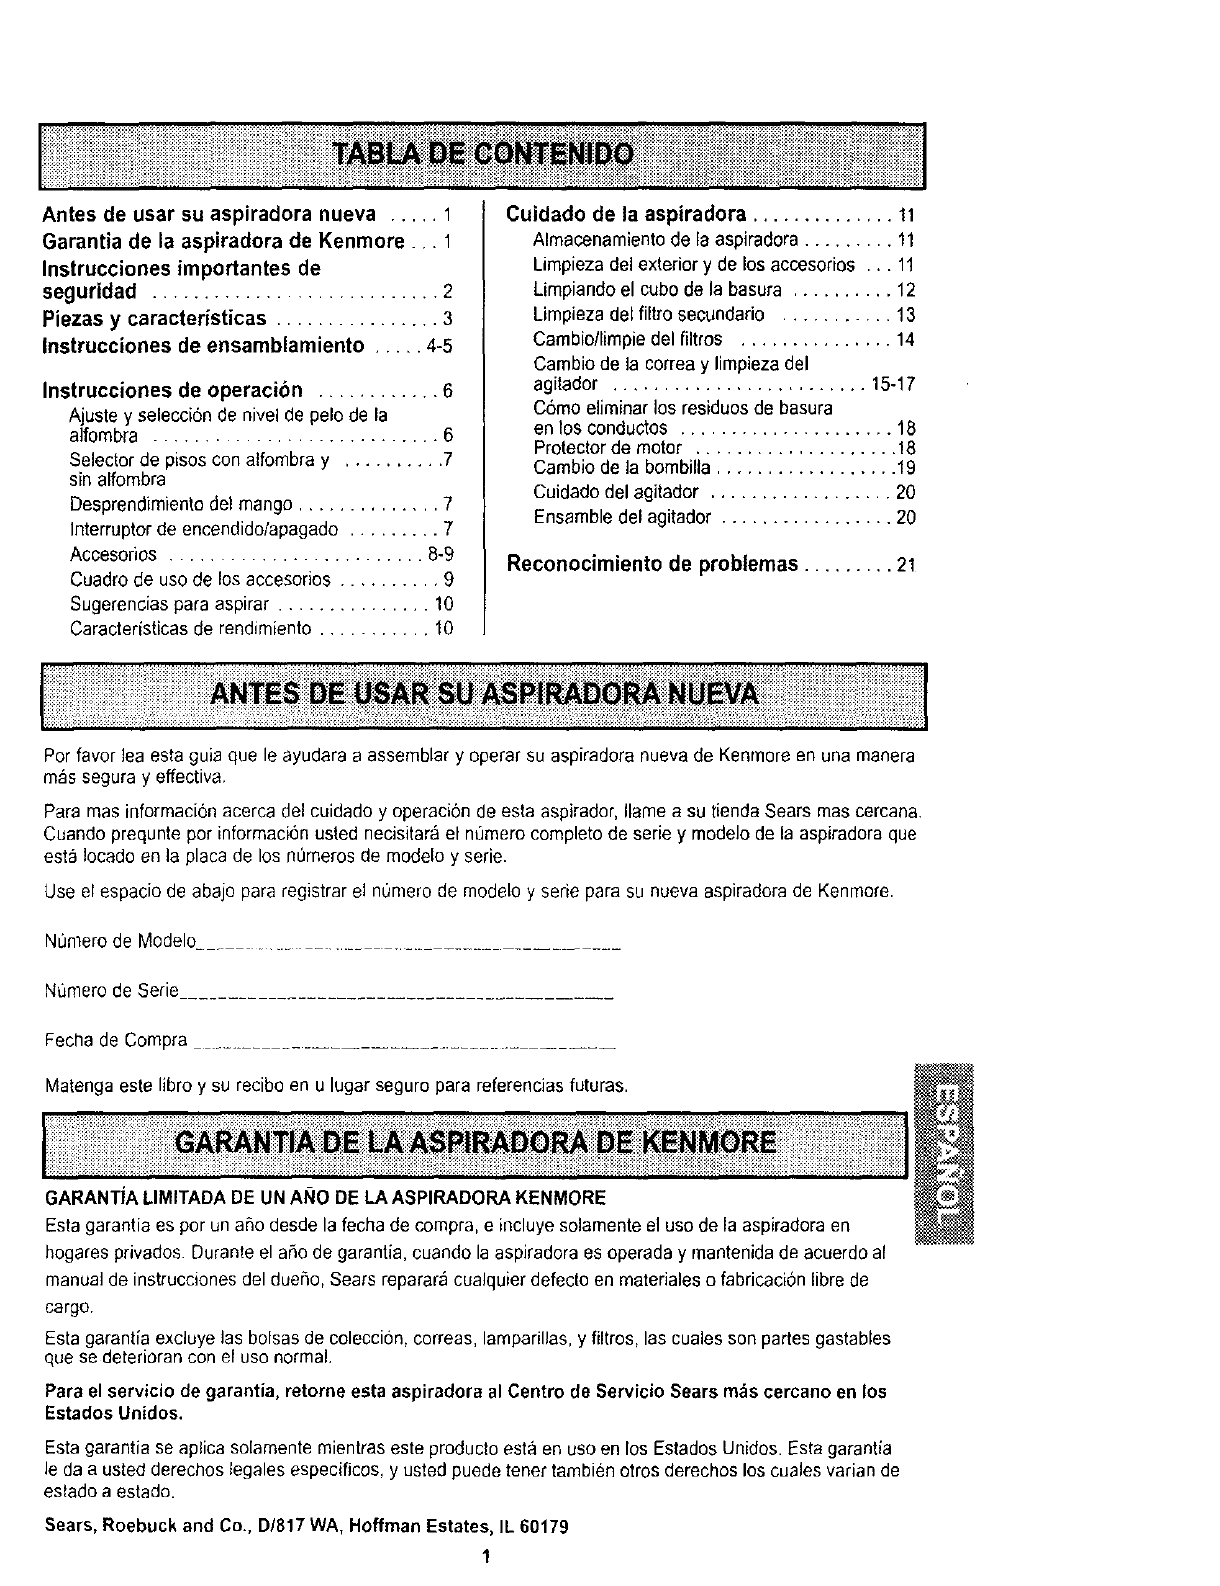
Antes de usar su aspiradora nueva ..... 1
Garantia de la aspiradora de Kenmore ... 1
Instrucciones importantes de
seguridad ............................ 2
Piezas y caracteristicas ................ 3
Instrucciones de ensamblamiento ..... 4-5
Instrucciones de operacibn ............ 6
Ajuste y selecci6n de nivel de pelode la
alfombra ............................ 6
Selector de pisos con alfombra y .......... 7
sin alfombra
Desprendimientodel mango .............. 7
Interrupter de encendido/apagado ......... 7
Accesorios ......................... 8-9
Cuadro de use de los accesorios .......... 9
Sugerencias para aspirar ............... 10
Caracteristicas de rendirniento ........... 10
Cuidado de la aspiradora .............. 11
Almacenamiento de la aspiradora ......... 11
Limpiezadel exterior y de los accesorios ... 11
Limpiando el cube de la basura .......... 12
Limpiezadel filtro secundario ........... 13
Cambio/limpie del filtros ............... 14
Cambio de la correa y limpieza del
agitador ......................... 15-17
C6mo eliminar los residues de basura
en los conductos ..................... 18
Protector de motor .................... 18
Cambio de la bombilla .................. 19
Cuidado del agitador .................. 20
Ensamble del agitador ................. 20
Reconocimiento de problemas ......... 21
Per favor lea esta guia que le ayudara a assemblar y eperar su aspiradora nueva de Kenmore an una manera
mas segura y effectiva.
Para mas informacion acerca del cuidado y operaci6n de esta aspirador, Ilame a su tienda Sears mas cercana.
Cuando prequnte per informaci6n usted necisitar_ el n_mero complete de serie y modelo de la aspiradora que
est;_!ocado en la placa de los n=Jmerosde modelo y serie.
Use el espacio de abajo para registrar el nOmerode rnodelo y serie para su nueva aspiradora de Kenmore.
Numero de Modelo......................................
Numero de Serie
Fecha de Compra ....................................
Matengaeste libro y su recibo en u lugar seguro para referencias futuras.
GARANTIA LIMITADADE UN ANO DE LAASPIRADORA KENMORE
Estagarantia es per un a_o desde la fecha de compra, e incluye solamente el use de la aspiradora en
hogares privados. Duranteel aSode garantia, cuando la aspiradora es operada y rnantenidade acuerdo al
manual de instrucciones del dueSo, Sears reparar_ cualquier defecto en materiales o fabricacion libre de
cargo.
Esta garantia excluye las bolsas de coleccion, correas, lamparillas, y filtros, las cuales son partes gastables
que se deterioran con el use normal.
Para el servicio de garantia, retorne esta aspiradora al Centre de Servicio Sears m_scercano en los
Estados Unidos.
Esta garantia se aplica solamente mientras este producto esta en use en los Estados Unidos. Esta garantia
le da a usted derechos tegales especificos, y usted puede tenertambien otros derechos los cuales varian de
estado a estado.
Sears, Roebuck and Co., D/817 WA, Hoffman Estates, IL 60179
1
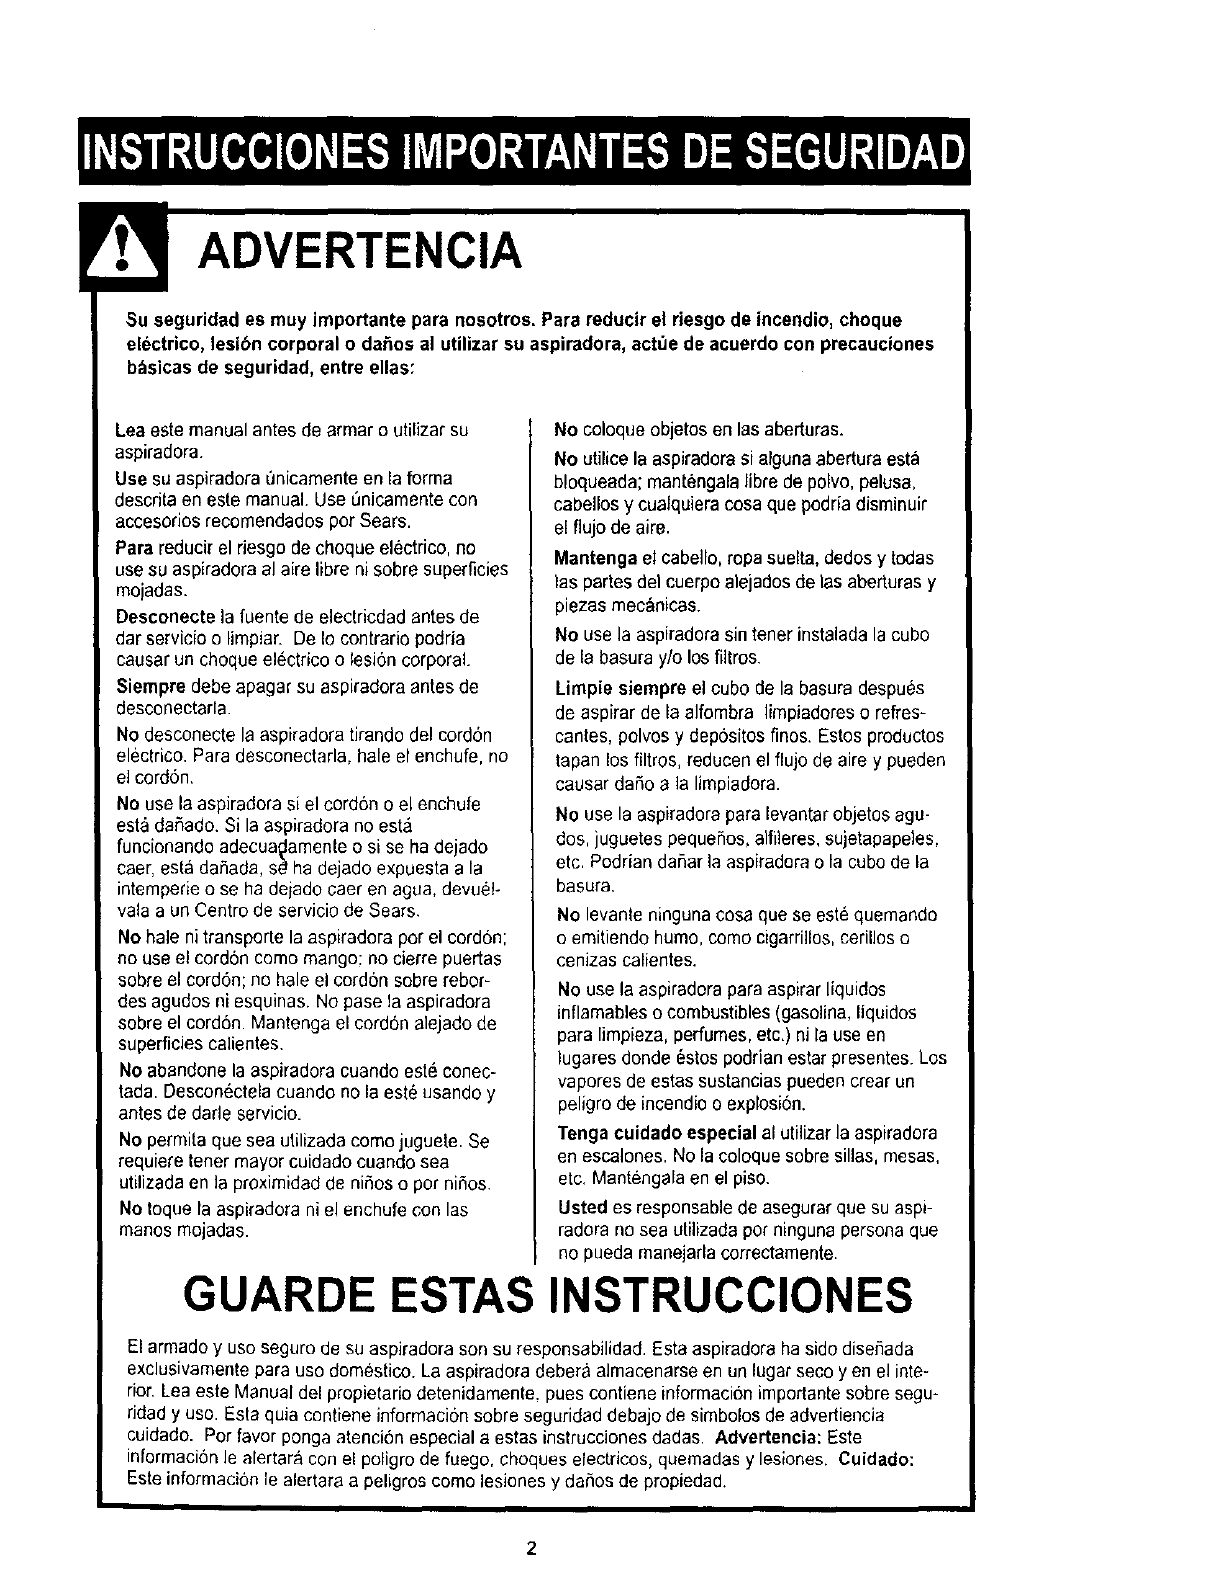
ADVERTENCIA
guridad es muy importante para nosotros, Para reducir el riesgo de incendio, choque
ico, lesibn corporal o daSos al utilizar su aspiradora, act_e de acuerdo con precauciones
b_sicas de seguridad, entre elias:
Lea eate manual antes de armar o utilizar su
aspiradora.
Use su aspiradora 0nicamente en la forma
descdta en este manual. Use Onicamentecon
accesorios recomendados per Sears.
Para reducir el riesgo de choque electrico, no
use su aspiradora al aire Iibre ni sobre superficies
mojaclas.
Desconecte la fuente de electricdad antes de
dar servicio o limpiar. De Io contrario podrJa
causar un choque el_ctrico o lesi6n corporal.
Siempre debe apagar su aspiradora antes de
desconectarla.
No desconecte la aspiradora tirando del cord6n
electrico. Para desconectarla, hale el enchufe, no
elcord6n,
No use la aspiradora si el cord6n o el enchufe
esta dafiado. Si la aspiradora no esta
funcionando adecua_lamenteo si se ha dejado
caer, est&dahada, s_ ha dejado expuesta a la
intemperieo se ha dejado caer en agua, devue!-
vala a un Centro de servicio de Sears.
No hale ni transporte la aspiradora por el cordon;
no use el cordon como mango; no cierre puertas
sobre el cord6n; no hale el cord6n sobre rebor-
des agudos ni esquinas. No pase la aspiradora
sebre el cordon. Mantenga el cord6n alejado de
superficies calientes.
No abandone la aspiradora cuando este conec-
tada. Descon6ctela cuando no la est_ usando y
antes de darle servicio.
No permita que sea utilizada como juguete. Se
requiefe tenet mayor cuidado cuando sea
utilizada en la proximidad de niSos o pot ni5os.
No toque la aspiradora ni el enchufe con las
manos mojadas.
No coloque objetos en las aberturas.
No utilice la aspiradora si alguna abertura esta
bloqueada; mant_ngalalibre de polvo, pelusa,
cabellos y cualquiera cosa que podriadisminuir
el flujo de aire.
Mantenga el cabello,ropa suelta, dedos y todas
las partes del cuerpo alejadosde las aberturas y
piezas mecanicas.
No use la aspiradora sin tener instalada la cubo
de la basura y/o los filtros.
Lirnpie siempre el cubo de la basura despu#s
de aspirar de la alfombra limpiadores o refres-
cantes, polvos y depositos finos. Estos productes
tapan los filtros, reducen el flujo de aire y pueden
causar da5o a la limpiadora.
No use Is aspiradora paralevantarobjetos agu-
dos, juguetespequehos,alfileres, aujetapapeles,
etc. Podrian dahar la aspiradera o la cube de la
basura.
No levanle ninguna cosa que se este quemando
o emitiendo humo, como cigarriIIos,ceriUoso
cenizas calientes.
No use la aspiradora para aspirar liquidos
inflamables o combustibles (gasolina,liquidos
para limpieza, perfumes,etc.) ni la use en
lugares dende 6stos podrian estar presentes.Los
vapores de estas sustancias pueden crear un
peligro de incendio o explosi6n.
Tenga cuidado especial al utilizar la aspiradora
en escalones. No la coloque sobre sillas, mesas,
etc, Mantengala en el piso.
Usted es responsable de asegurar que su aspl-
radora no sea ufilizada pot ningunapersona que
no pueda manejaria correctamente.
GUARDE ESTAS INSTRUCCIONES
El armado y uso seguro de su aspiradora son su responsabilidad. Esta aspiradora ha sido diseSada
exclusivamente para uso domestico. La aspiradora debera almacenarse en un lugar seco yen el inte-
rior. Leaeste Manual del propietario detenidamente, pues contiene informaci6nimportante sobre segu-
rJdady use. Esta quia contiene inforrnaci6n sobre seguridad debajo de simbolos de advertiencia
cuidado. Pot favor ponga atenci6n especial a estas instrucciones dadas. Advertencia: Este
informaci6n le alertara con el poligrode fuego, ehoques electriccs, quemadasy lesiones. Cuidado:
Este informacion le alertara a peligros como lesiones y da5os de propiedad.
i:: ::::::::::::::::::::_::::::;_: :_::::::::::::::::::::;:::::::::::::,: ::::::: :::::::::::;::::::::::;;:::: :;:::::;;;:::: ::: ::+::;::::;_;;; :,_;::::: :::::::::;:::::;;:: :,,,::::::::::::::_::,:::::::::: ::::::::::::::|
:_:_;_;_:ii_:_:_:_:_:!:!:_:_:_:_31:_:_:_:_:i_3_:_:_:_:_:_:_:_i:_:_:_:_:_:_:_:_;_:_:_:_:_:_:_:_:!:!:_!:_:_i_¢_:_::I;::::_:_:_:;:::::_:::_:::::_:::i_:_i::::::_:::_:;:_3::_:_:_!_"_::_:__:::_¢:_::i:_::::_::_:::_:_:_::::_:_:_::;:_:_::::_:_:_:_:_:_:_!:::::::_i_:_:_:_:_:_:_:_:_:_i_!i_!_!i_:_:_:_:_:_iii_:ii:_:_:_:_:_:_:_:_:_:_:_:!:iii:_:
I
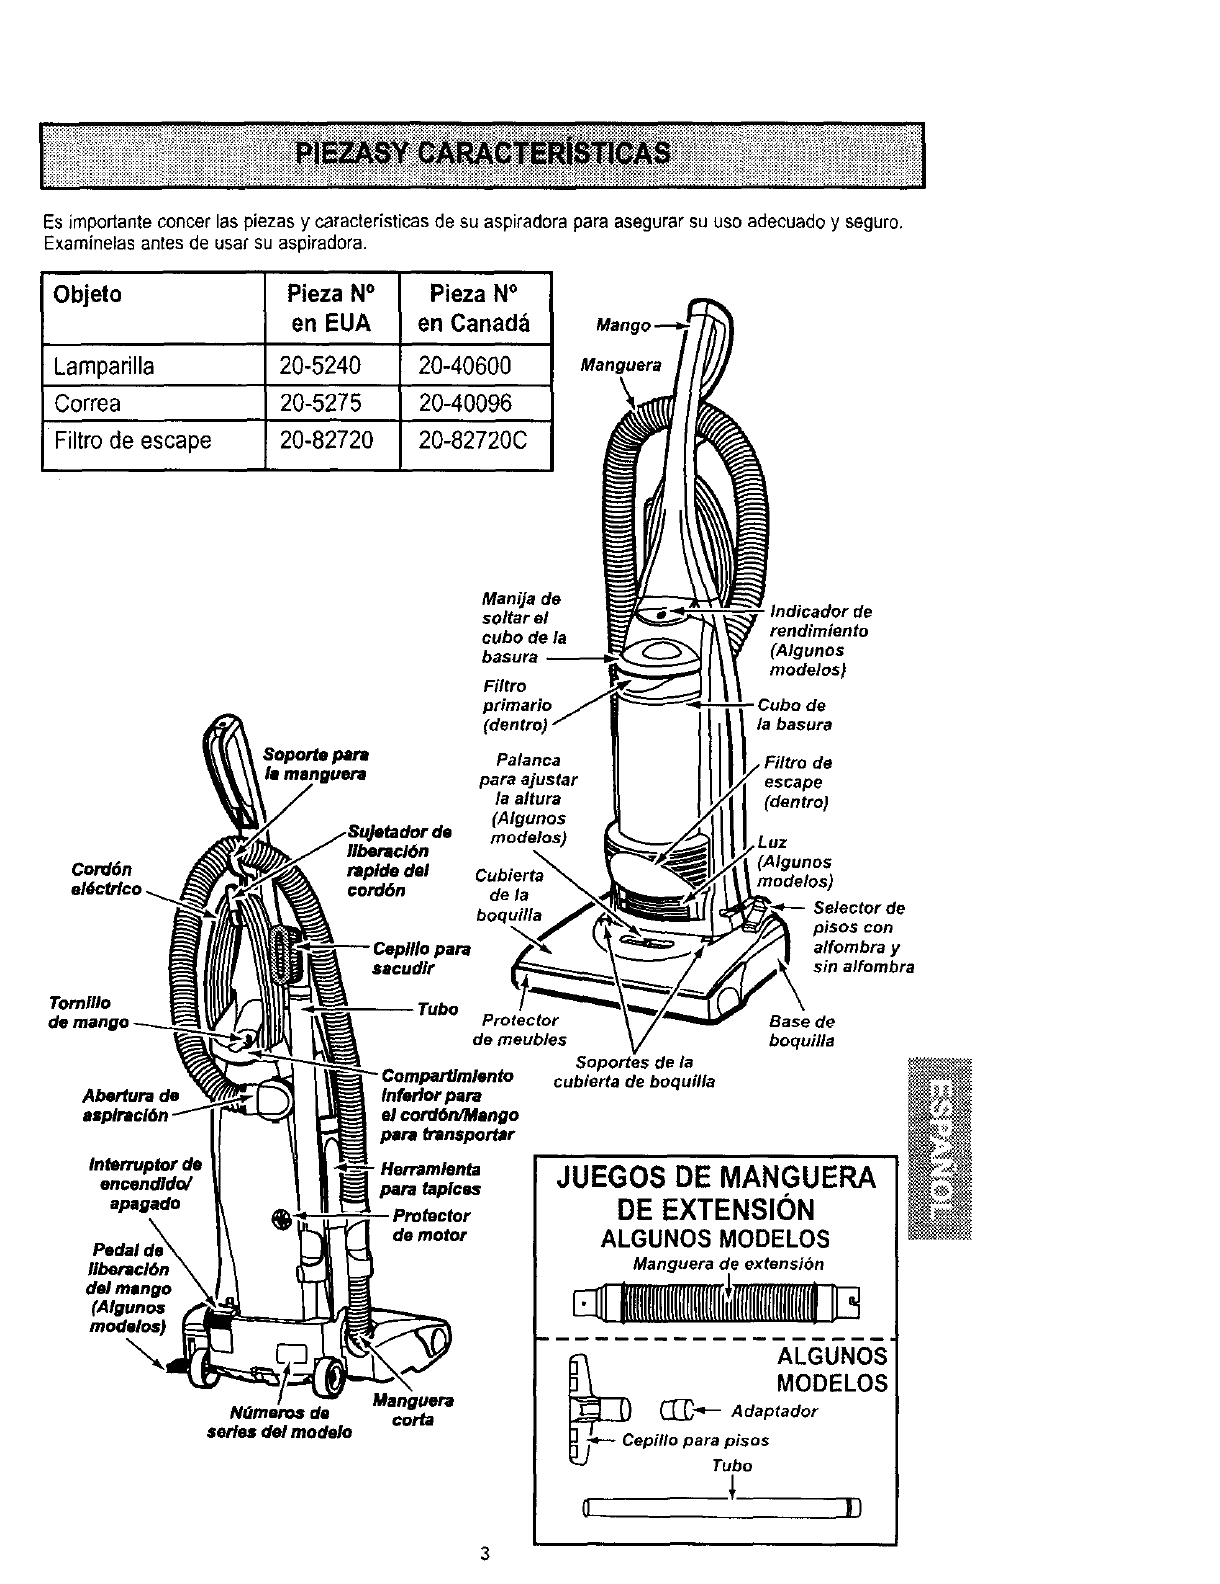
Es impor/ante concer las piezas y caracteristicas de su aspiradora pare asegurar su use adecuado y seguro.
Examinelas antes de usar su aspiradora.
Objeto Pieza N° Pieza N°
en EUA en Canad_
Lamparilla 20-5240 20-40600
Correa 20-5275 20-40096
Filtro de escape 20-82720 20-82720C
Manguera
Cord6n
eldctrlco._
Tornl/Io
Abertura de
Interruptor de
encendldo/
apagado
Pedal de_
Ilberacl6n \
del mango \
(Algunos
\
Nt3meros de
aeries del modelo
Manija de
soltar el
cube de la
Filtro
Palanca
pare ajustar
/a altura
(Algunos
modelos)
Ilberacl6n
raplde del
€orddn de la
boquilla
sacudlr
Tube Protector
de meubles
Soportes de la
cubierta de boquilla
Inferlor para
el cord6n/Mango
para transportar
- Herramlenta
pare taplcu
Pro_ctor
de motor
Manguera
corta
Indicador de
rendimiento
(Atgunos
modeles}
de
la basura
Filtro de
(dentro)
,Luz
(Algunos
modelos)
Selector de
pisos con
alfombra y
sin altombra
Base de
boquifa
JUEGOS DE MANGUERA
DE EXTENSION
ALGUNOS MODELOS
Manguera de extensi6n
mm(mll(ml
_c ALGUNOS
_- MODELOS
Adaptador
epillopar;p::s +
Antes de armar la aspiradora, chequee la LISTA
DE EMBALAJE en la cubierta separada de la Lista
de partes para Reparac[Sn. Use esta lista para ver-
ificar que ha recibido todas las componentes de su
nueva aspiradora Kenmore.
Peligro de choque eldctrico
No conecte la aspiradora hasta que ter-
mine de armada° De Io contrario podria
causar un choque electrico o lesiSn corpo-
ral.
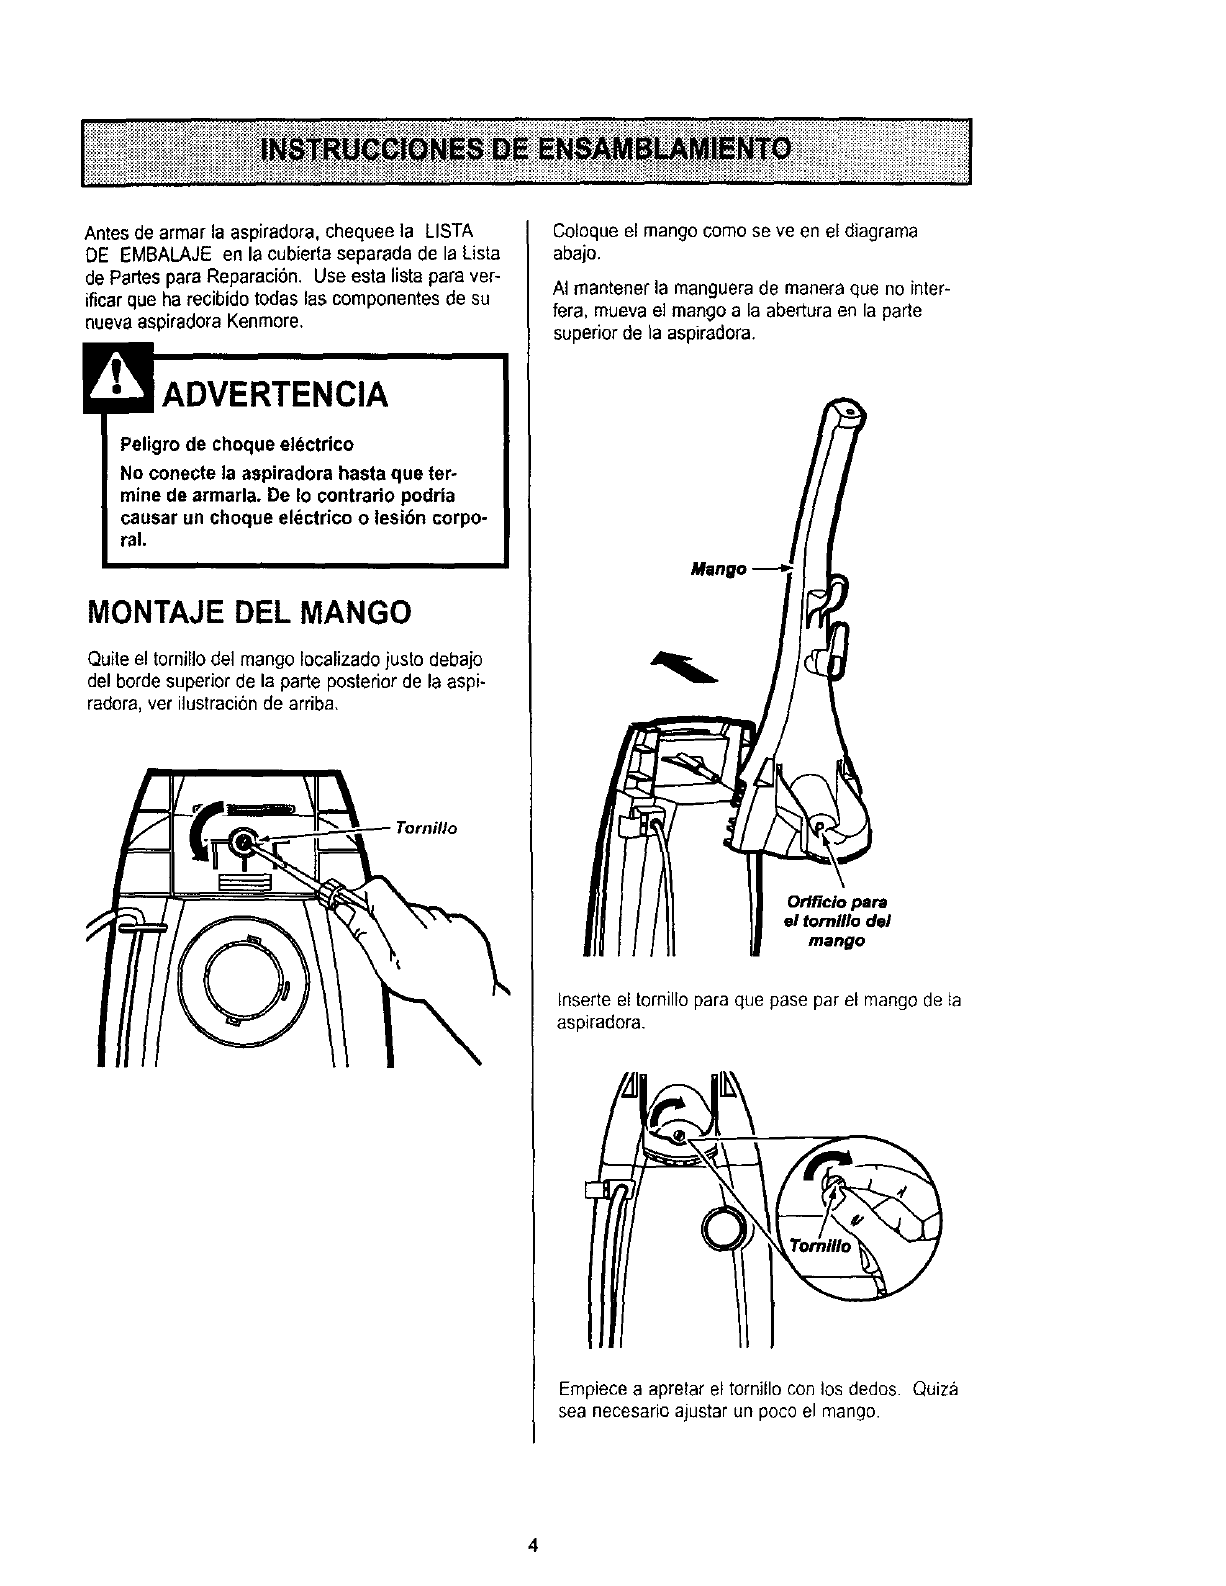
MONTAJE DEL MANGO
Quite el tornillo de] mango [ocalizado justodeba]o
del borde superior de la parte posterior de la aspi-
radora, ver ilustraci6n de arriba.
Coloque el mango como se ve en el diagrama
abajo.
AI mantener la manguera de manera que no inter-
fera, mueva e] mango a la abertura en la parte
superior de la aspiradora.
Orlflcio pera
el tornlllo del
mango
Inserte el tomillo para que pase par el mango de ta
aspiradora.
Empiecea apretar el tornillo con los dedos. Quiza
sea necesario ajustar un poco el mango.
4
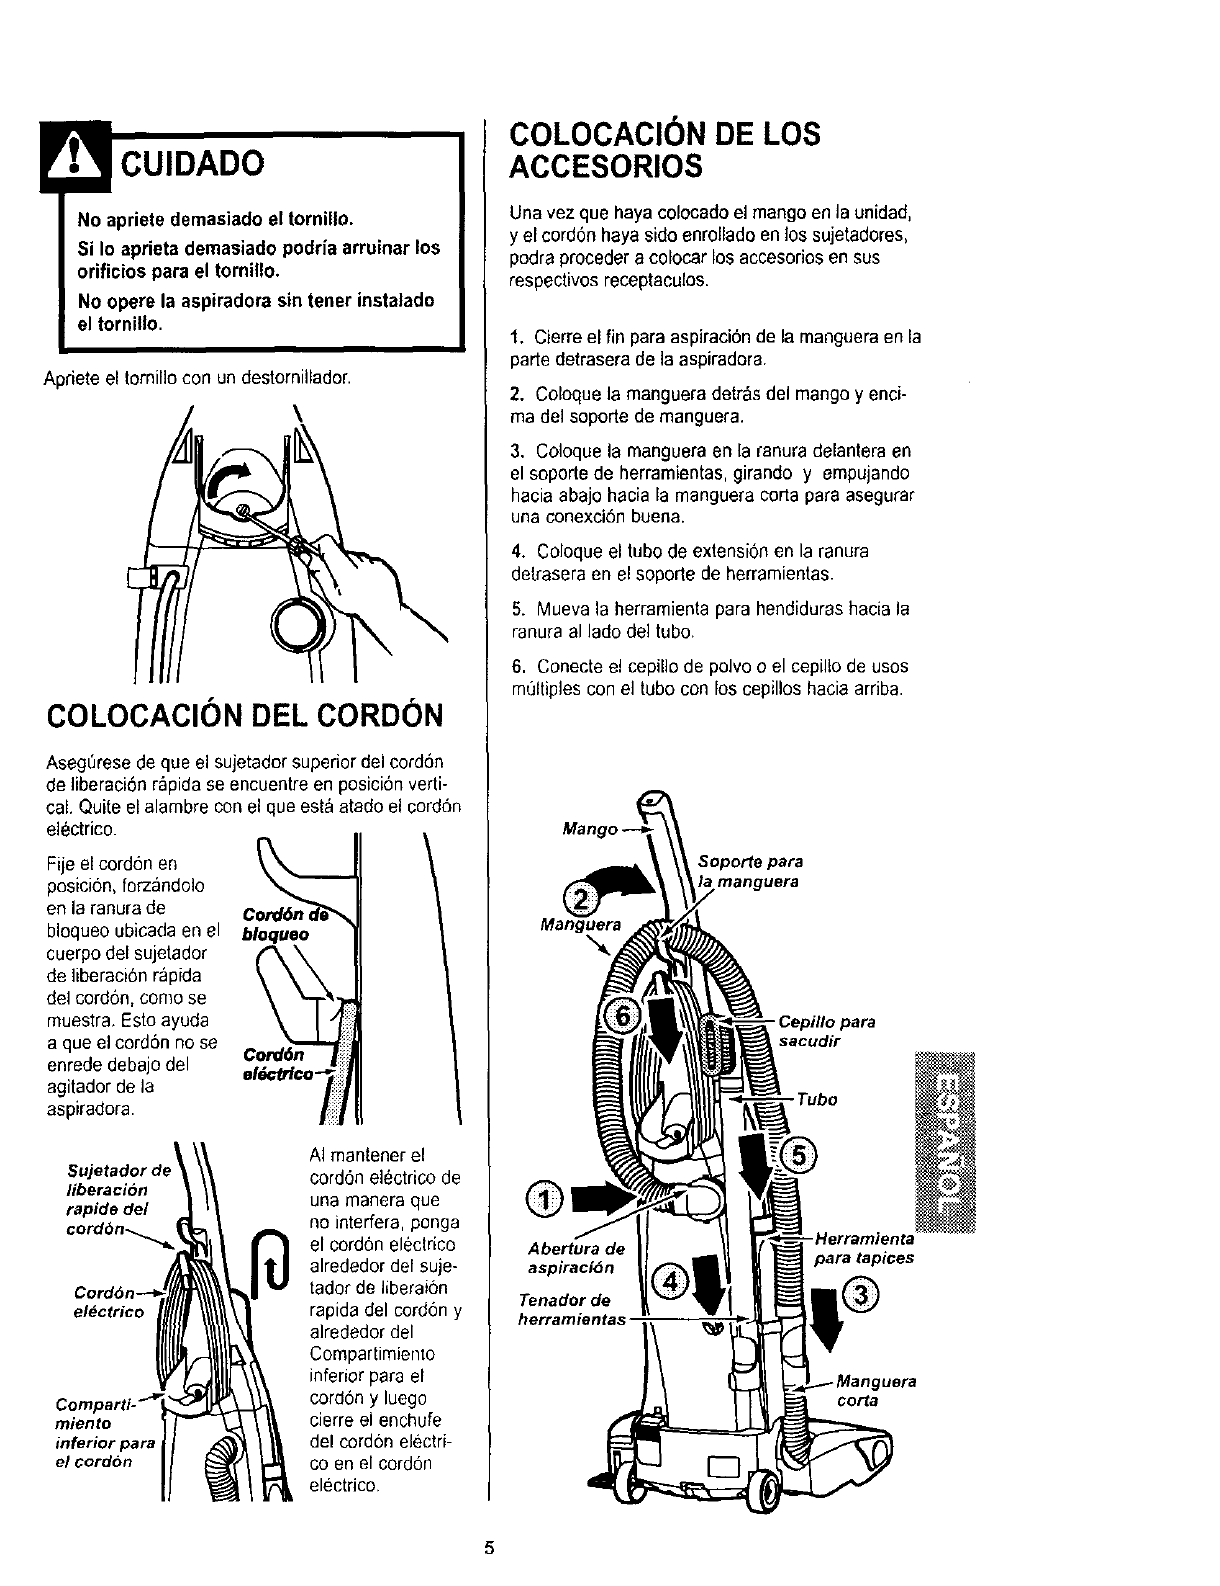
No apriete demasiado el tornillo.
Si Io aprieta demasiado podria arruinar los
orificios para el tornillo.
No opere la aspiradora sin tener instalado
el tornitlo.
Apriete el tornil]ocon un destomillador.
\
COLOCAClON DEL CORDON
AsegL_resede que el sujetador superior del cord6n
de ]iberaci6n r_pida se encuentreen posiciOnverti-
cal. Quite el alambre con el que est_ atado el cord6n
electrico.
Fije el cordon en
posicion, forzando]o
en la ranura de
bloqueo ubicada en el
cuerpo del sujetador
de Iiberaci6nrapida
del cord6n, como se
muestra, Estoayuda
a que el cord6n no se
enrede debajodel
agitador de la
aspiradora
Cord6n j
el6cfrico7
el_ctrico
miento
inferior para
el cordbn
AI mantener el
cord6n el_ctrico de
una manera que
no interfera, ponga
el cord6n electrico
alrededor del suje-
tador de liberai6n
rapida del cord6n y
alrededor del
Compartimiento
inferior para el
cord6n y luego
cierre el enchufe
del cordon electri-
co en el cordon
electrico.
COLOCACION DE LOS
ACCESORIOS
Una vez que haya colocado el mango en la unidad,
y el cord6n haya side enrollado en los sujetadores,
podra proceder a colocar los accesoriosen sus
respectivos receptaculos.
1. Cierre el fin paraaspiraci6n de la manguera en la
parte detrasera de la aspiradora.
2. Coloque la manguera detr&sdel mango y enci-
ma del soporte de manguera.
3. Coloque la manguera en la ranura delantera en
el soporte de herramientas,girando y empujando
hacia abajo hacia la manguera corta para asegurar
una conexciOnbuena.
4. Coloque el tubo de extension en la ranura
detrasera en el soporte de herramientas.
5. Mueva la herramienta para hendiduras hacia la
ranura al lade de] tubo,
6. Conecte el cepillo de polvo oel cepiltode uses
multiples con el tubo con los cepillos hacia arriba.
manguera
Manguera
-Cepillo para
sacudir
-Tubo
®
- Herramienta
Abertura de para tapices
aspiraciOn
Tenador de
herramientas
corta
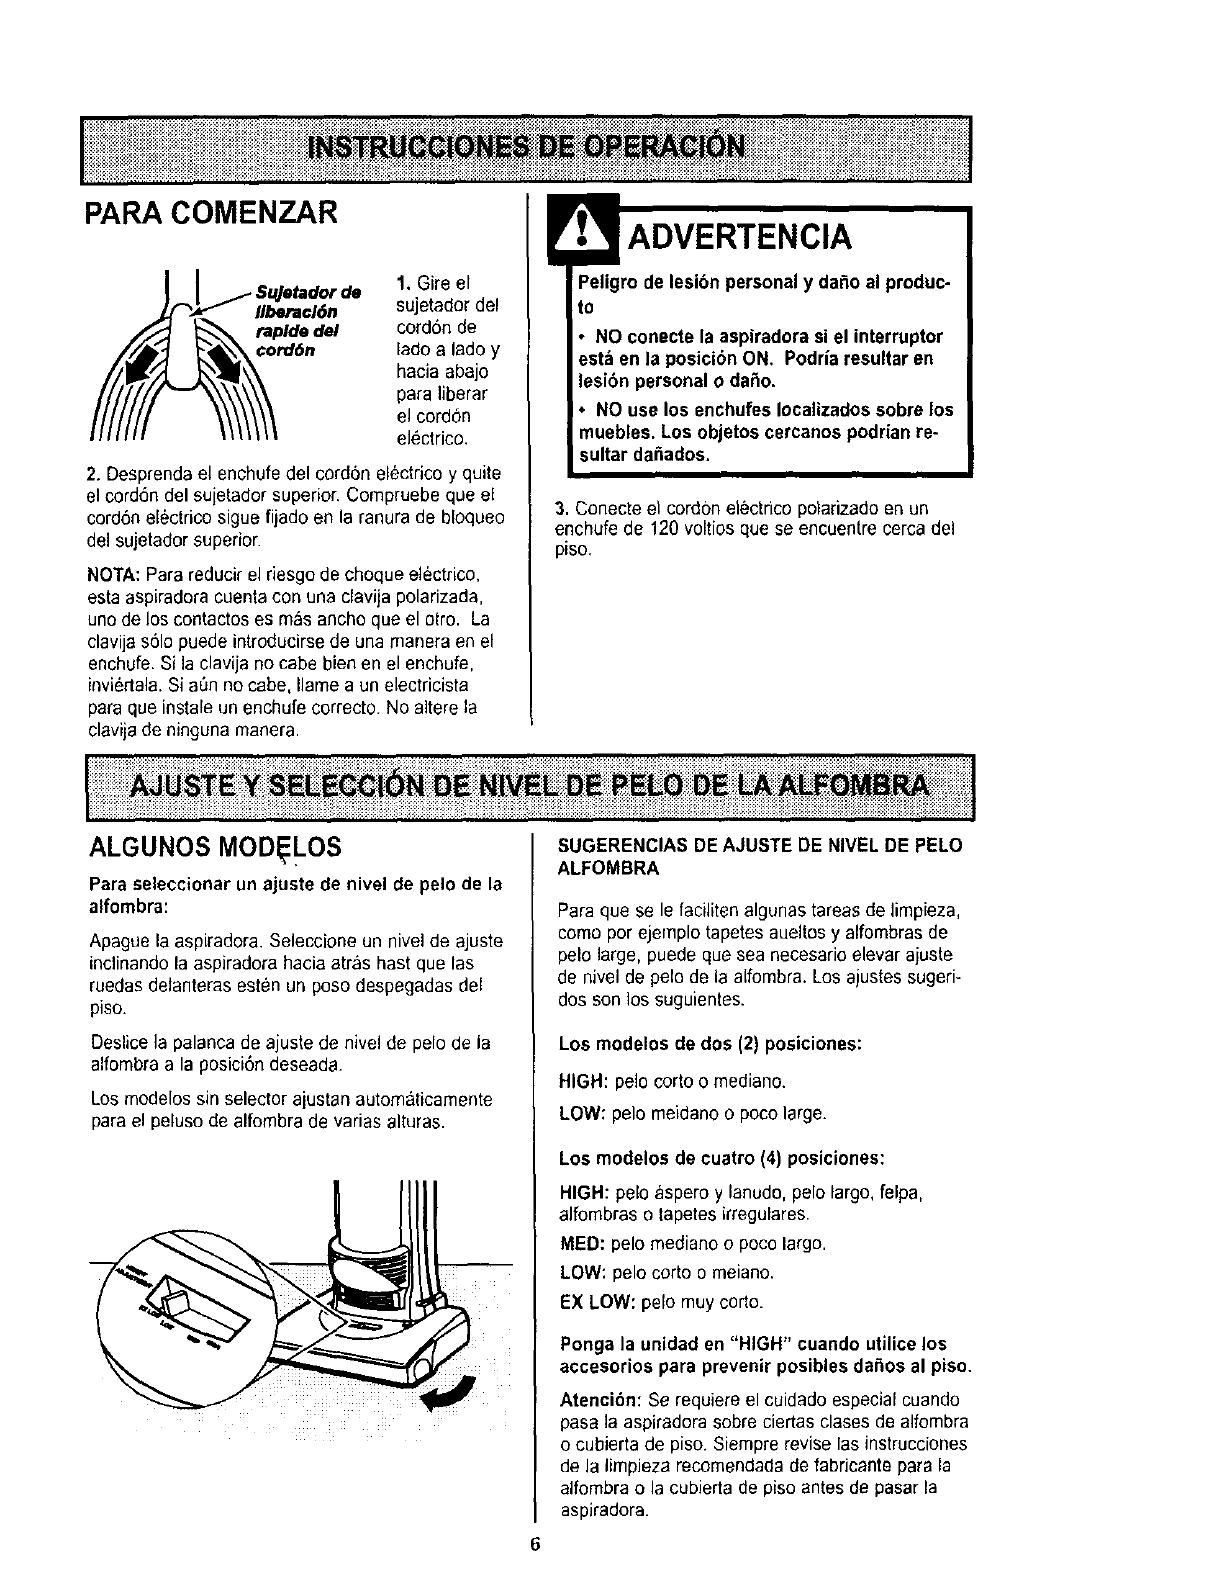
PARA COMENZAR
rde 1. Gire el
Ilberacl6n sujetador del
taplde del cord6n de
¢ord6n lado a ladoy
hacia abajo
para liberar
el cordon
el_ctrico.
2. Desprenda el enchufedel cord6n eDctrico y quite
el cord6n del sujetador superior. Compruebe que el
cord6n el6ctrice sigue fijado en la ranura de bloqueo
del sujetador superior.
NOTA: Para reducir el riesgo de choque electrico,
esta aspiradora cuenta con una clavija polarizada,
uno de los contactos es mas ancho que el otto. La
clavija s61opuede introducirse de una manera en el
enchufe. Si la clavija no cabe bien en el enchufe,
invi6rtala. Si a6n no cabe, Ilame a un electricista
paraque instale un enchufe correcto. No altere la
clavijade ninguna manera.
ADVERTENCIA
ro de lesibnpersonal y dafio al produc-
to
• NO conecte la aspiradorasi el interruptor
est_ en la posicibnON, Podria resultar en
lesibn personal o daSo.
•NO use los enchufes Iocalizados sobre los
muebles. Los objetos cercanos podrian re-
sultar da6ados.
3. Conecte el cordon electrico polarizado en un
enchufe de 120 voltios que se encuentre ¢erca del
piso.
Lii iiiiiiiiiii!i!i!i ii!i!iiiii i!i!iiiiiiiiii!iiiii!i ii!i!i!i iiiiiiiiiii i i iiiiii!i! i iiiiii!i i! !!!iii ! ! i!i i ii iiiii!iii! ! ii i iii!i! iiliiii!iiii i iii!i!i!i!i!iii!ilililiiii!iii!iiiii!!!i!iii!
ALGUNOS MOD LOS
Para seleccionar un ajuste de nivel de pelo de la
alfombra:
Apague la aspiradora. Seleccione un nivel de ajuste
inclinando la aspiradora hacia atras hast que las
ruedas delanteras est#n un poso despegadas del
piso.
Deslice la palanca de ajustede nivel de pelo de ia
alfombra a la pesici6n deseada.
Losmodelos sin selector ajustan autom&ticamente
parael peluso de alfombra de varias alturas.
SUGERENCIAS DE AJUSTE DE NIVEL DE PELO
ALFOMBRA
Para que se le faciliten algunas tareas de limpieza,
como por ejemplo tapetes aueltos y alfombras de
pelo large, puede que sea necesarie elevar ajuste
de nivel de pelo de la alfombra, Los ajustes sugeri-
dos son los suguientes.
Los modelos de dos (2) posiciones:
HIGH: pelo corto omediano.
LOW: pelo meidano o poco large.
Los modelos de cuatro (4) posiciones:
HIGH: peloaspero y lanudo,pelolargo,felpa,
alfombras otapetesirregulares.
MED: pelo mediano opoco largo.
LOW: pelo corto o meiano.
EX LOW: pelo muy corto.
Ponga la unidad en "HIGH" cuando utilice los
accesorios para prevenir posibles da_oe al piso.
Atenci6n: Se requiereel cuidado especial cuando
pasa ]a aspiradora sobre ciertas clases de alfombra
o cubierta de piso. Siempre revise las instrucciones
de la limpJezarecomendadade fabficante para la
alfombra o la cubierta de piso antes de pasarla
aspiradora.
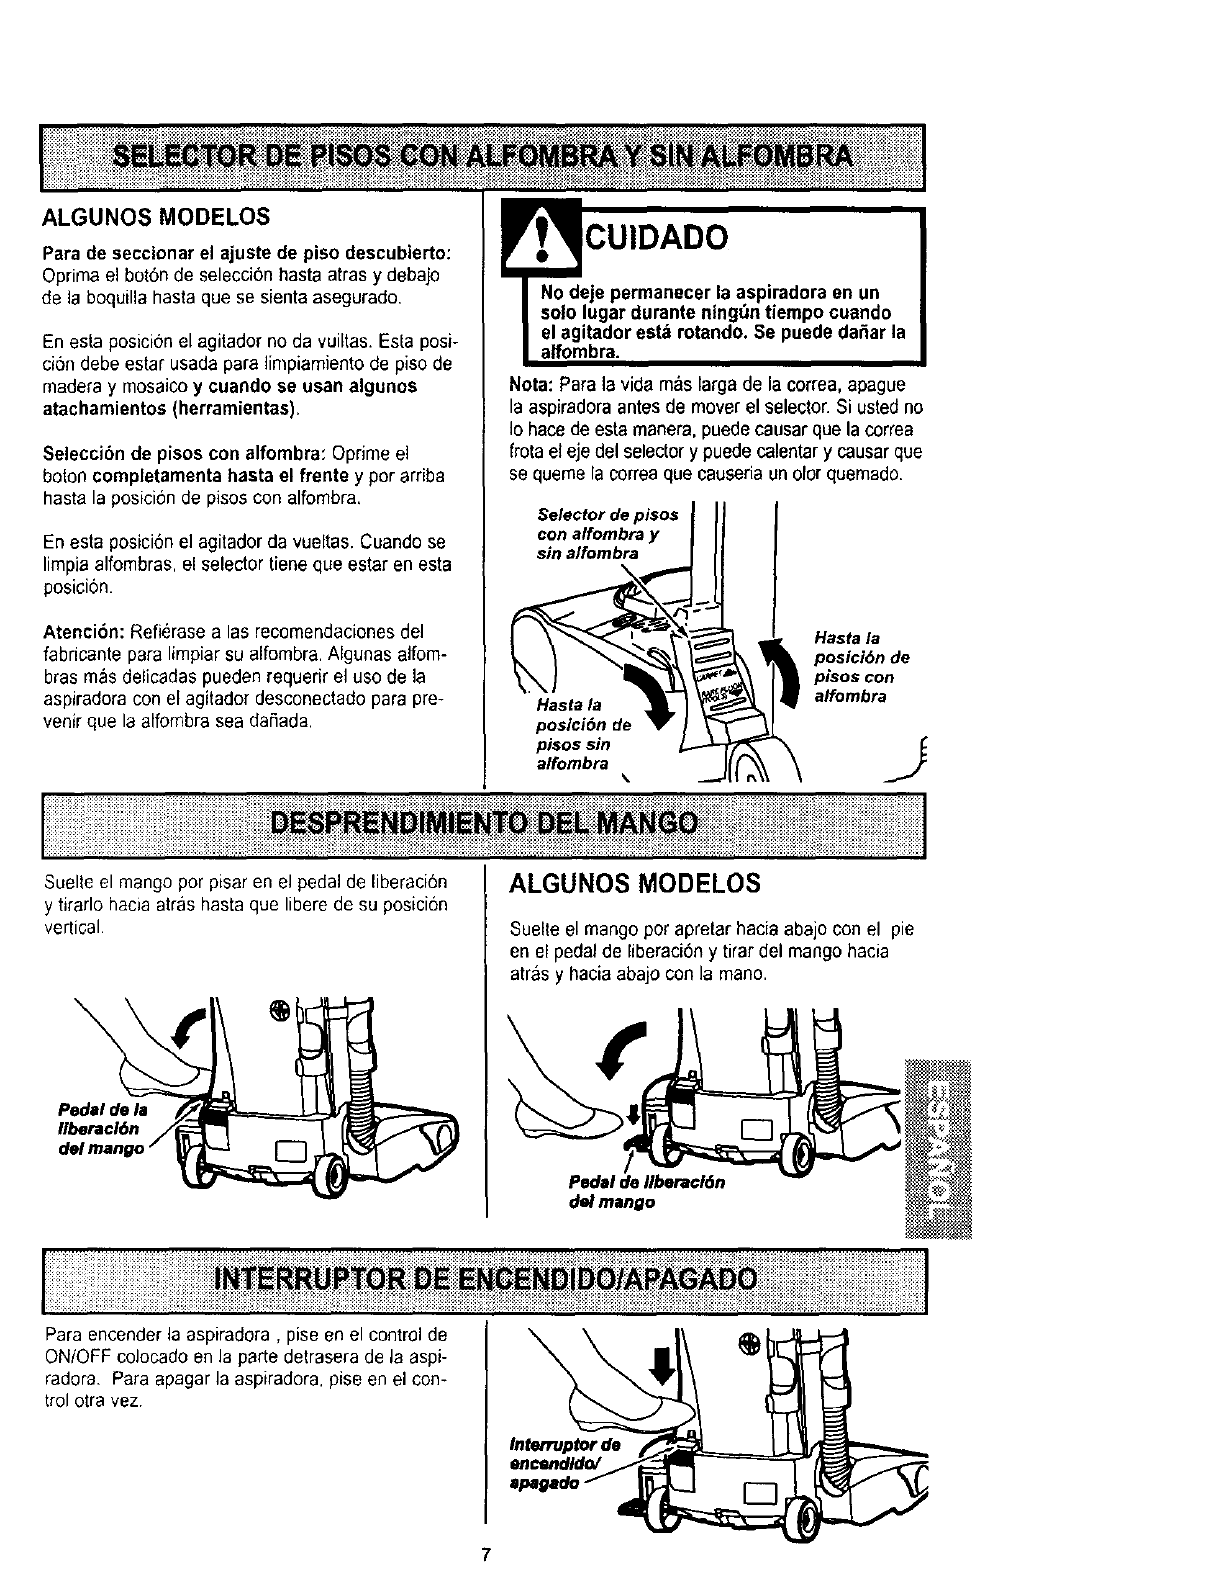
ALGUNOS MODELOS
Para de seccionar el ajuste de piso descubierto:
Optima el bot6n de selecci6n hasta atras y debajo
de la boquilla hasta que se sienta asegurado,
En esta posici0n el agitador no da vuiltas.Esta posi-
ci6n debe estar usada para limpiamiento de piso de
madera y mosaico y cuando se usan algunos
atachamientos (herramientas).
Seleccibn de pisos con alfombra: Oprime el
boton completamenta hasta el frente ypor ardba
hasta la posicionde pisos con alfombra,
En esta posici6nel agitador da vueltas. Cuando se
limpia alfombras, el selector tiene que estar en esta
posici0n.
Atenci6n: Refierase alas recomendaciones del
fabricante para limpiar su alfombra. Algunas atfom-
bras mas delicadas pueden requedr el uso de la
aspiradora con el agitador desconectado para pre-
venir que la alfombra sea daRada,
E CUIDADO
No deje permanecer la aspiradora en un
solo lugar durante ningt_ntiempo cuando
el agitador est_ rotando. Se puede da_ar la
alfombra.
Nota: Para la vida m&slarga de la correa,apague
la aspiradora antes de mover el selector. Si ustedno
Io hace de esta manera, puedecausar que la correa
frota el eje del selectory puede calentary causarque
se queme la eorreaque causeriaun olor quemado.
Selector de pisos III I
con alfombra y ]I_I
sin a/fombra _Hasta la
posicibn de
pisos con
alfombra
i;;iiii!!J ]
i i!ilil;i i!i!ii!ili!iliiii i ;ii!i!!!ii!i!i!i!!ilililili!i i! !i!ii iil;
Suelte el mango por pisar en el pedal de liberaci6n ALGUNOS MODELOS
y tirarlo hacia arras hasta que libere de su posici6n
vertical. Suelte el mango por apretar hacia abajo con el pie
en el pedal de liberaci6n y tirar del mango hacia
arras y hacia abajo con la man&
(
Pedal de flbera¢16n
del mango
Para encender la aspiradora, pise en el control de
ON/OFF colocado en la parte detrasera de la aspi-
radora. Para apagar la aspiradora, pise en el con-
trol otra vez
Interruptor de
encendldo/
7
Peligro de choque electdco o lesibn corpo-
ral
No ponga las manos o los pies debajo de la
m_quina cuando a_ade la manguera.
Mientras se usan los accesorios, la
agitador empieza a girar. No deje que la
aspiradora se quede en un sblo lugar por
un periodo extendido, porque la agitador
puede hacer daSoa la superficie del suelo.
No ponga la aspiradora encima de
muebles, en el fleco de la alfombra, en una
alfombra de pelo largo, ni en escaleras
alfombradas. La posicion ideal para la
aspiradoracuando se usan los accesorios
esta en un drea plana con el mango en la
posicibnvertical.
COMO UTILIZAR LOS
ACCESORIOS
Coloque la aspiradora en unasuperficie plana y pon-
ga el graduador de altura en HIGH.
Los accesorios pod#,n colocarse en la manguera o
en el tubo.Adem_s, el c_pillo para polvo tambien
podr&colocarse en la boquilla para huecos reduci-
dos.
La manguera y el tubo pueden saearse de la man-
gueracorta tom_ndolos pot el extremo y tirando ha-
cia arriba.
!CUIDADO
NO tire de la aspiradora por la manguera
en la habitacibn. Podrian ocurrir da£tosa
sus pertenencias.
Los accesorios $e pueden conectar a la manguera si
el objeto que se desea limpiarno esta lejos de la
aspiradora La manguera, en algunos modelos, se
expandir&
NOTA:Cuando la aspiradora este prendida, la
manguera, en algunos modelos, tendera a caerse
debido a la succion de la aspiradora.
Si desea mas extension, puede conectar el tubo a la
manguera y los accesoriosal tubo.
CUIDADO
AI utilizar los accesorios para limpiar, ten-
ga cuidado de no sobrepasar el alcance de
la manguera. Si Io hace, podda ocasionar
que la aspiradora se caiga.
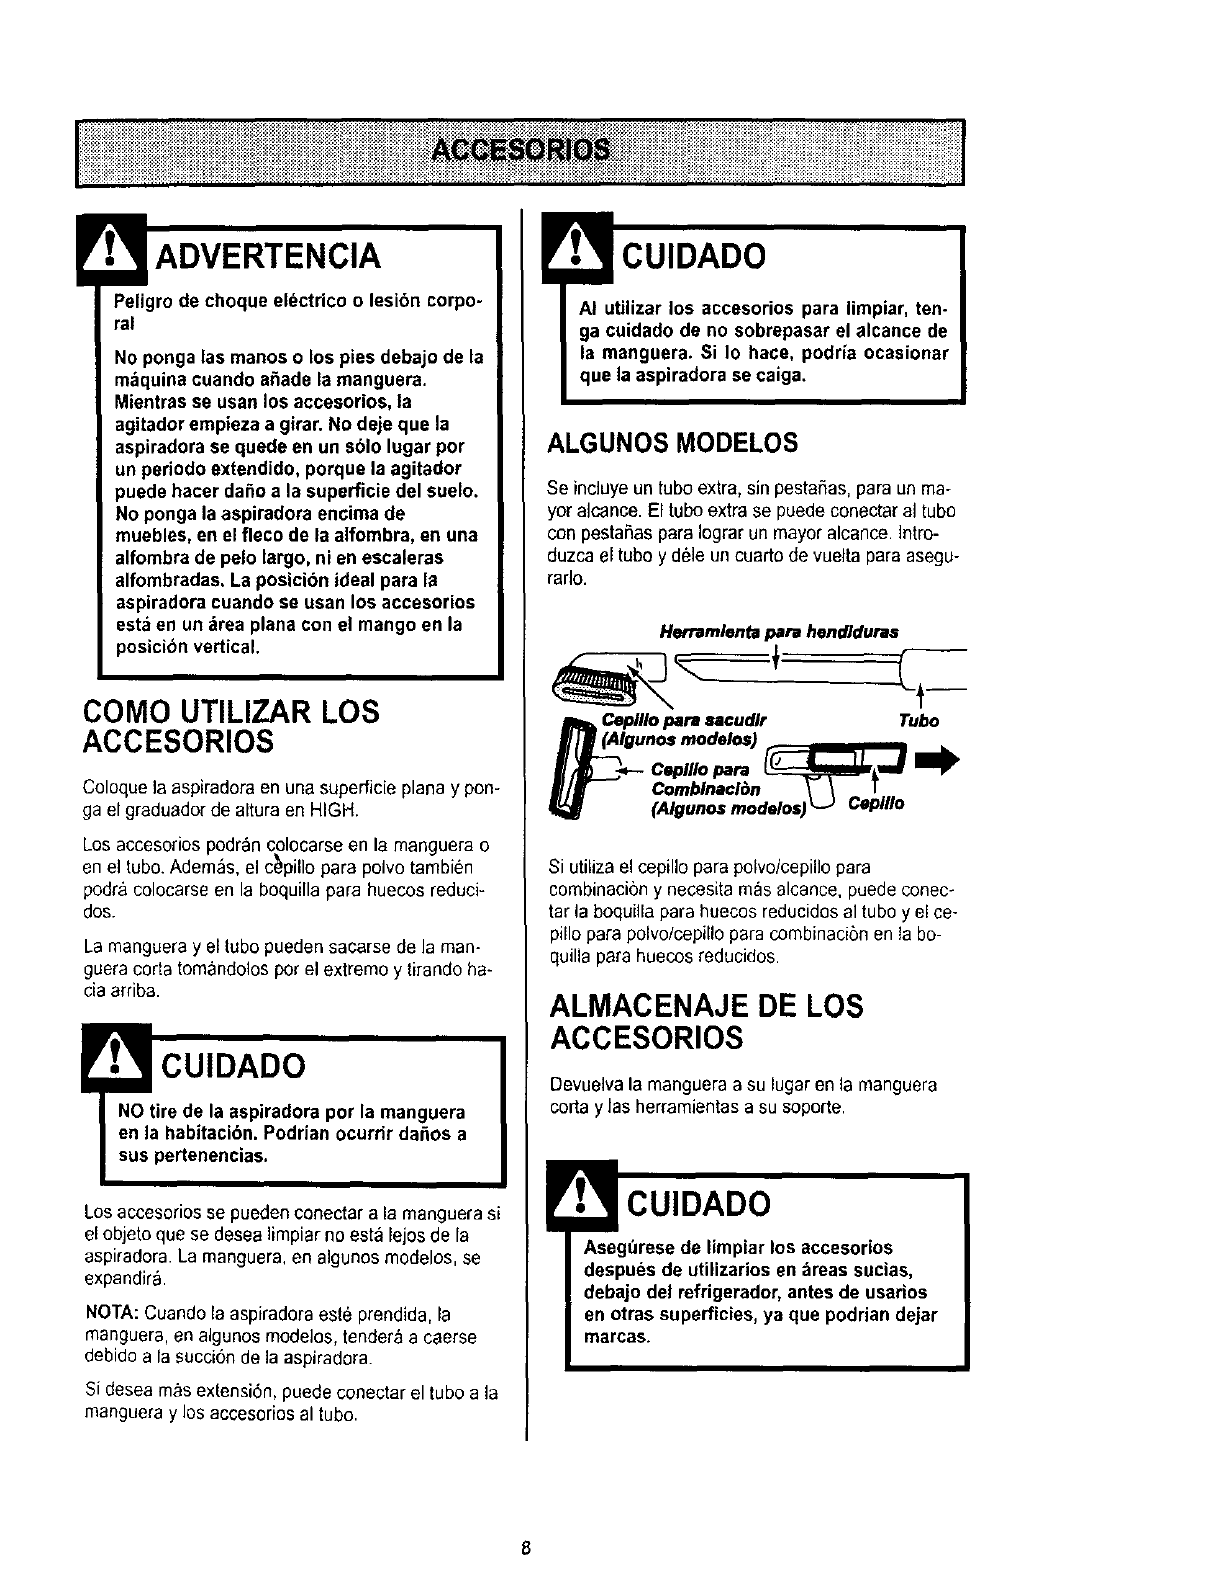
ALGUNOS MODELOS
Se ineluye un tubo extra, sin pestaSas,para un ma-
yor alcance. El tubo extra se puede conectar al tubo
con pestaSas para Iograr un mayor alcance. ]ntro-
duzca el tubo y dele un cuarto de vuelta para asegu-
rarlo.
Herramlentapard hendiduras
N_ (AIgCeplllopara sacudlr Tubo
unos modelos)
Elf Combinacl_n \- \ T
(Algunosmodelos)L_ CeplUo
Si utilizael cepillo para polvo/cepillo para
combinacibny necesita mas alcance, puede conec-
tar la boquilla para huecos reducidosal tubo y el ce-
pillo para polvo/cepillo para combinacibn en la bo-
quilla para huecos reducidos.
ALMACENAJE DE LOS
ACCESORIOS
Devuelva la manguera a su lugar en la manguera
corta y las herramientas a su soporte.
CUIDADO
Asegt_resede limpiar los accesorios
despues de utilizarios en areas sucias,
debajo del refrigerador, antes de usarfos
en otras superficies,ya que podrian dejar
marcas.
8
CUIDADO
Cuando use la manguera en forma normal o
con la manguera de extensi6n instalada, la
aspiradora debe mantenerse sobre una
superficie firme al mismo nivel o aun nivel
inferior que los pies del usuario. NO use las
mangueras cuando la aspiradora est_ a un
nivel m_s alto que los pies del usuario.
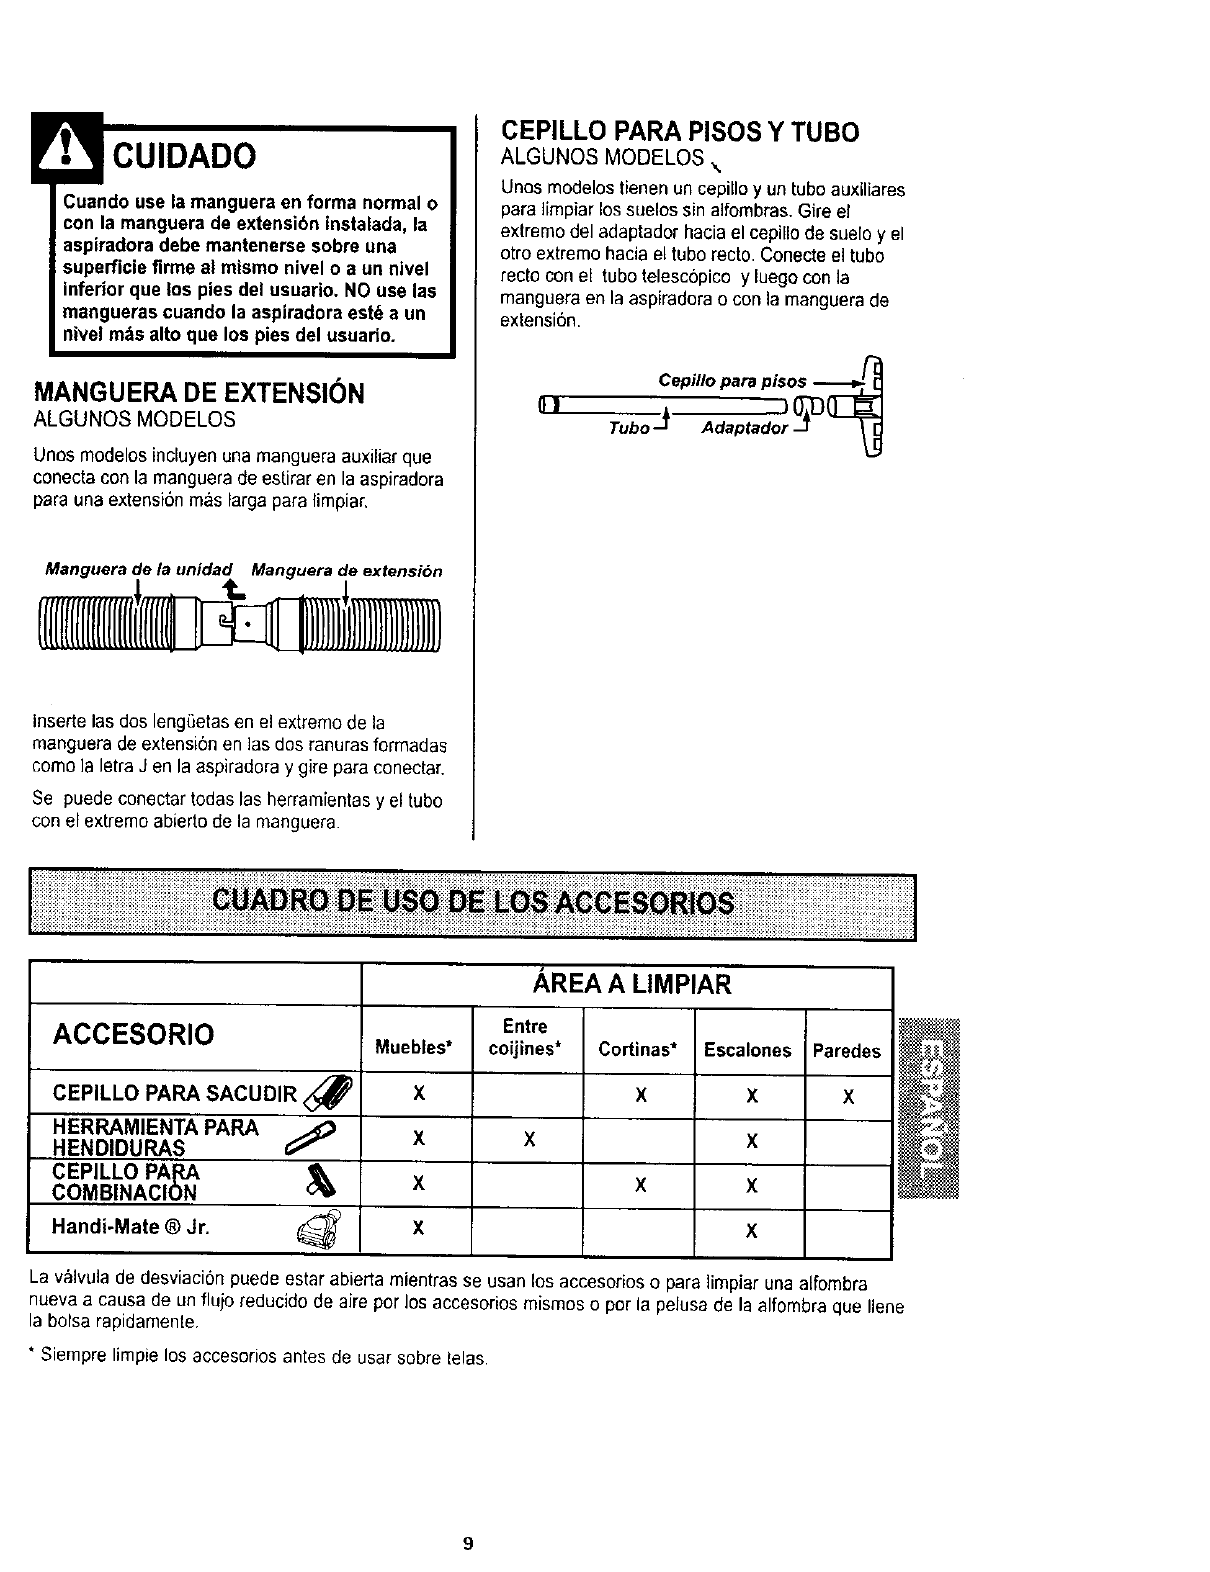
MANGUERA DE EXTENSI6N
ALGUNOS MODELOS
Unos modelos incluyen una manguera auxiliar que
conecta con la manguera de estirar en la aspiradora
para una extensi6n mas larga para limpiar,
Manguera de la unidad Manguera de extensibn
insertelasdos lengSetasen el extremede la
manguera de extensi6n en ]as dos ranuras formadas
come la letra J en la aspiradora y gire para conectar.
Se puede conectar todas las herramientas y el tube
con el extreme abierto de la manguera.
CEPILLO PARA PISOS Y TUBO
ALGUNOS MODELOS \
Unes modelos tienen un cepillo y un tube auxiliares
para ]impiar los suelos sin alfombras.Gire el
extreme del adaptador hacia el cepillo de suelo y el
otro extreme hacia el tube recto. Conecte el tube
recto con el tube telesc6pico y luego con la
manguera en la aspiradora o con la manguera do
extensi6n.
[1!
Cepillopara pisos --_
AREA A LIMPIAR
Entre
ACCESORIO auebles* coijines* Cortinas* Escalones Paredes
CEPILLO PARA SACUDIR <_ X X X X
HERRAMIENTA PARA
HENDIDURAS G;_ X X X
CEPILLO PApJ_ _X X X
COMBINACION
Handi-Mate ®Jr. _X X
La v,_lvulade desviacion puede estar abierta mientras se usan los accesorios o para limpiar una alfombra
nueva acausa de un flujo reducido de aire per los accesorios mismos o por la pelusa de la alfombra que Ilene
la bolsa rapidamente.
* Siempre limpie los accesorios antes de usar sobre lelas.
I !iiiiii!iiiili!iiiiiiiiiiii!ii!!iiililiiii i !ii £ii i ii iiiiiiiiiiiiiiiiiiiiiiiiii;iiiiiiiii!iiiiil;iiiiiiiiiiiiiiiii;iiiiiiillI
iiiiiiiiiiliiiiiiiiiiiiiiiiiii!!!!!iiiiiiiiiiiiiiiiiiiiii!ii!!i!iiilli iiiiiiiiiiiiiiiiiii i iiiiiiiiiiii ili iii iii i iii iiiiiiil
Peligro de lesibn personal
Actue con precaucibn si coloca la aspira-
dora sobre escalones. Si se cae, podria
causar lesibn personal o da£ma la propie-
dad.
Orillas de alfombras.
Guie unode los costados o la parte anterior de la
boquila aIo largo del borde de la pared. Los cepi-
]loslargos ayudan a aspirar la tierra atrapada en las
orillas de las alfornbras.
Escalones.
Coloque el mangoen ]a posicibnvertical.Use la
herramienta para hendiduras o el cepillo para
sacudir. Coloque el interruptor de encendido/apaga-
do en ON.
SISTEMA DE PROTECTION
DE MOTOR
Protector Termal
Esta aspiradora tiene un protector termal que se
ajusta autom_ticamente para proteger a la
aspiradora del sobrecalentamiento. Si una
obstruccion impide el flajo normal de aire al motor, el
protector termal apaga e] motor automaticamente
parapermilr que el motor se enfrie a fin de evitar
posiblesdaSos a la aspiradora. Duranle este tiempo
la ]uzdelantera se mantiene prendida.
Para corregir el proble_na:Si esto ocurre, apague
la aspiradora y desenchufe el cordon de]
tomacorrientepara permitir que la aspiradora se
enfrie y que el protector termal se reajusle. Busque
y saque las obstrucciones, si es necesario.
Examinetambi_n y reemplace/limpie cualquier
filtro obstruido. Espere aproximadamente treinta
(30) minutos y enchufe la aspiradora y volt_ela
para ver si el protector del motor se ha
reajustado. El protector del motor no se
reajustar& si no se ha apagado la aspiradora aun
cuando la aspiradora se haya enfriado.
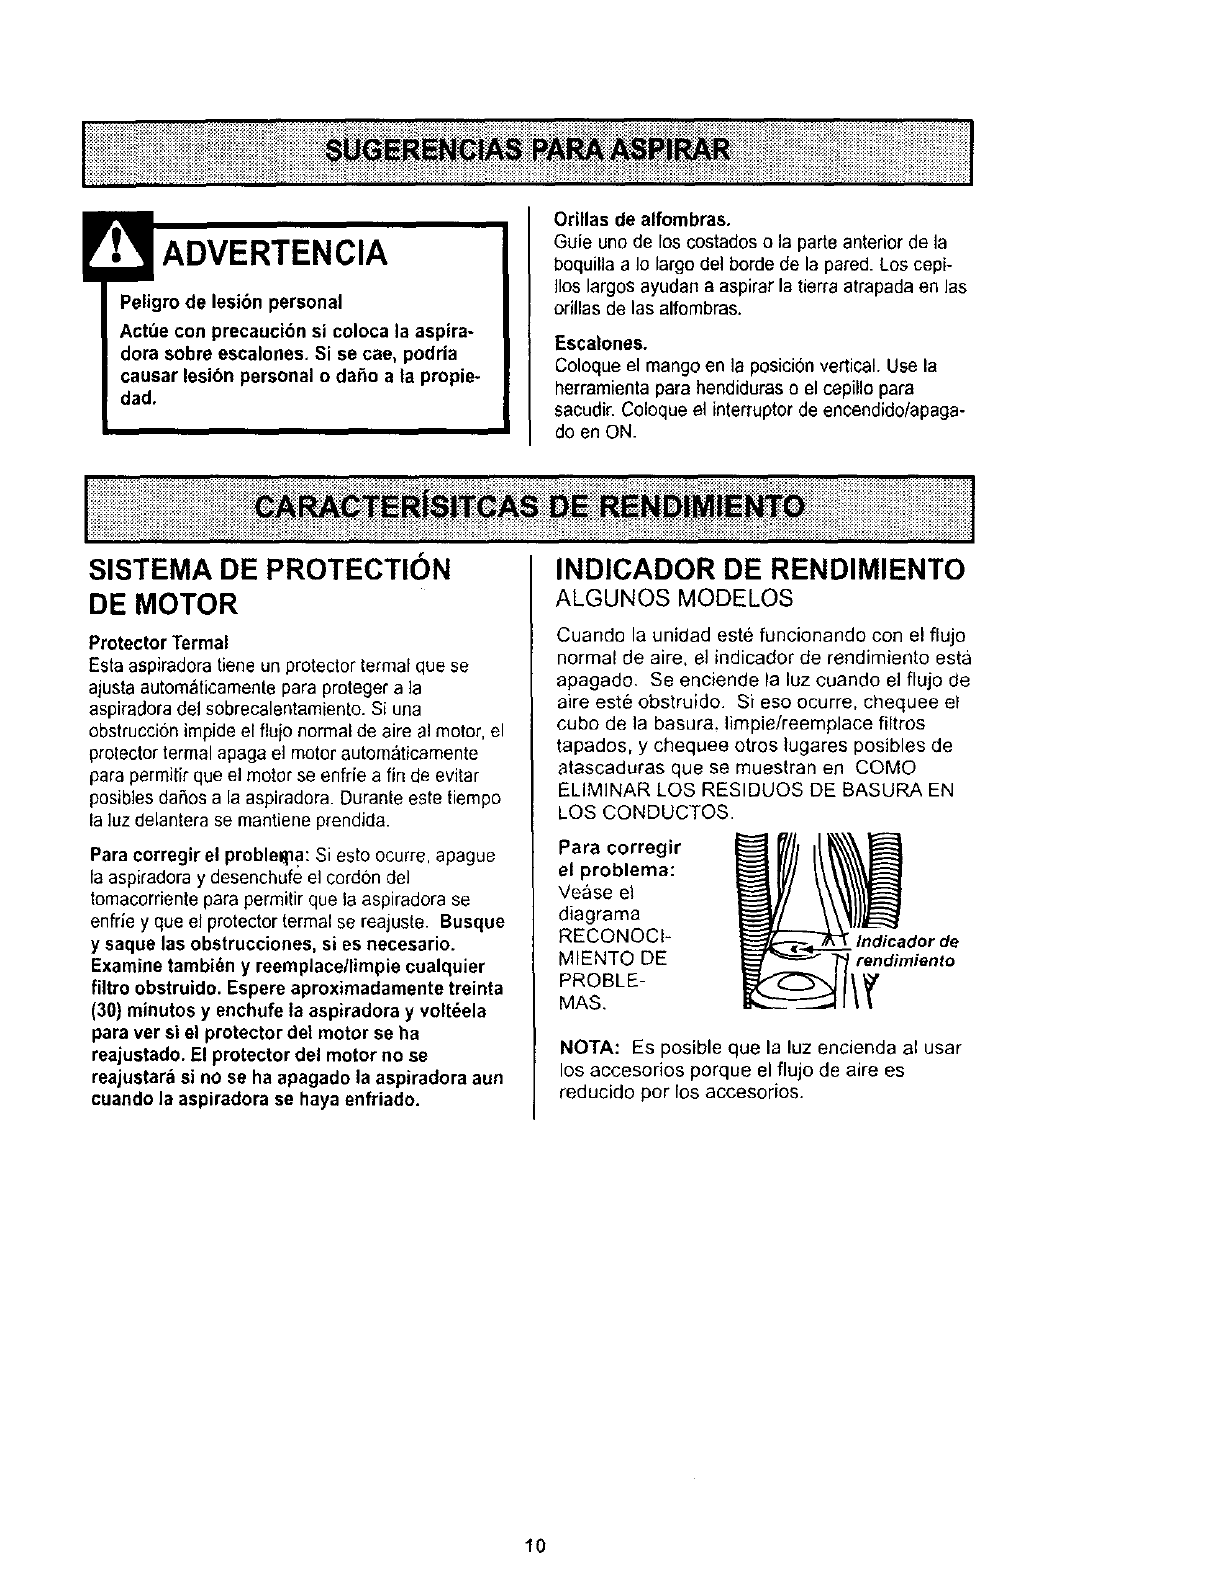
INDICADOR DE RENDIMIENTO
ALGUNOS MODELOS
Cuando la unidad este funcionando con el flujo
normal de aire, el indicador de rendimiento esta
apagado. Se enciende la luz cuando el flujo de
aire este obstruido. Si eso ocurre, chequee el
cubo de la basura, limpie/reemplace filtros
tapados, y chequee otros lugares posibles de
atascaduras que se muestran en COMO
ELIMINAR LOS RESlDUOS DE BASURA EN
LOS CONDUCTOS.
Para corregir
el problema:
Vease el
diagrama
RECONOCI-
MIENTQ DE
PROBLE-
MAS.
rendimiento
NOTA: FS posible que la luz encienda al usar
los accesorios porque el flujo de aire es
reducido pot los accesorios.
10
Sigasiempretodaslasinstruccionesdeseguridad
allimpiarydarleservicioasu aspiradora.
Peligro de cheque el6ctrico o lesi6n corpo-
ral
Desconecte la unidad antes de limpiarla o
darle servicio. De Io contrario podria pro-
ducirse un cheque el6ctrico o causar
lesibn corporal si la aspiradora arranca de
manera imprevista.
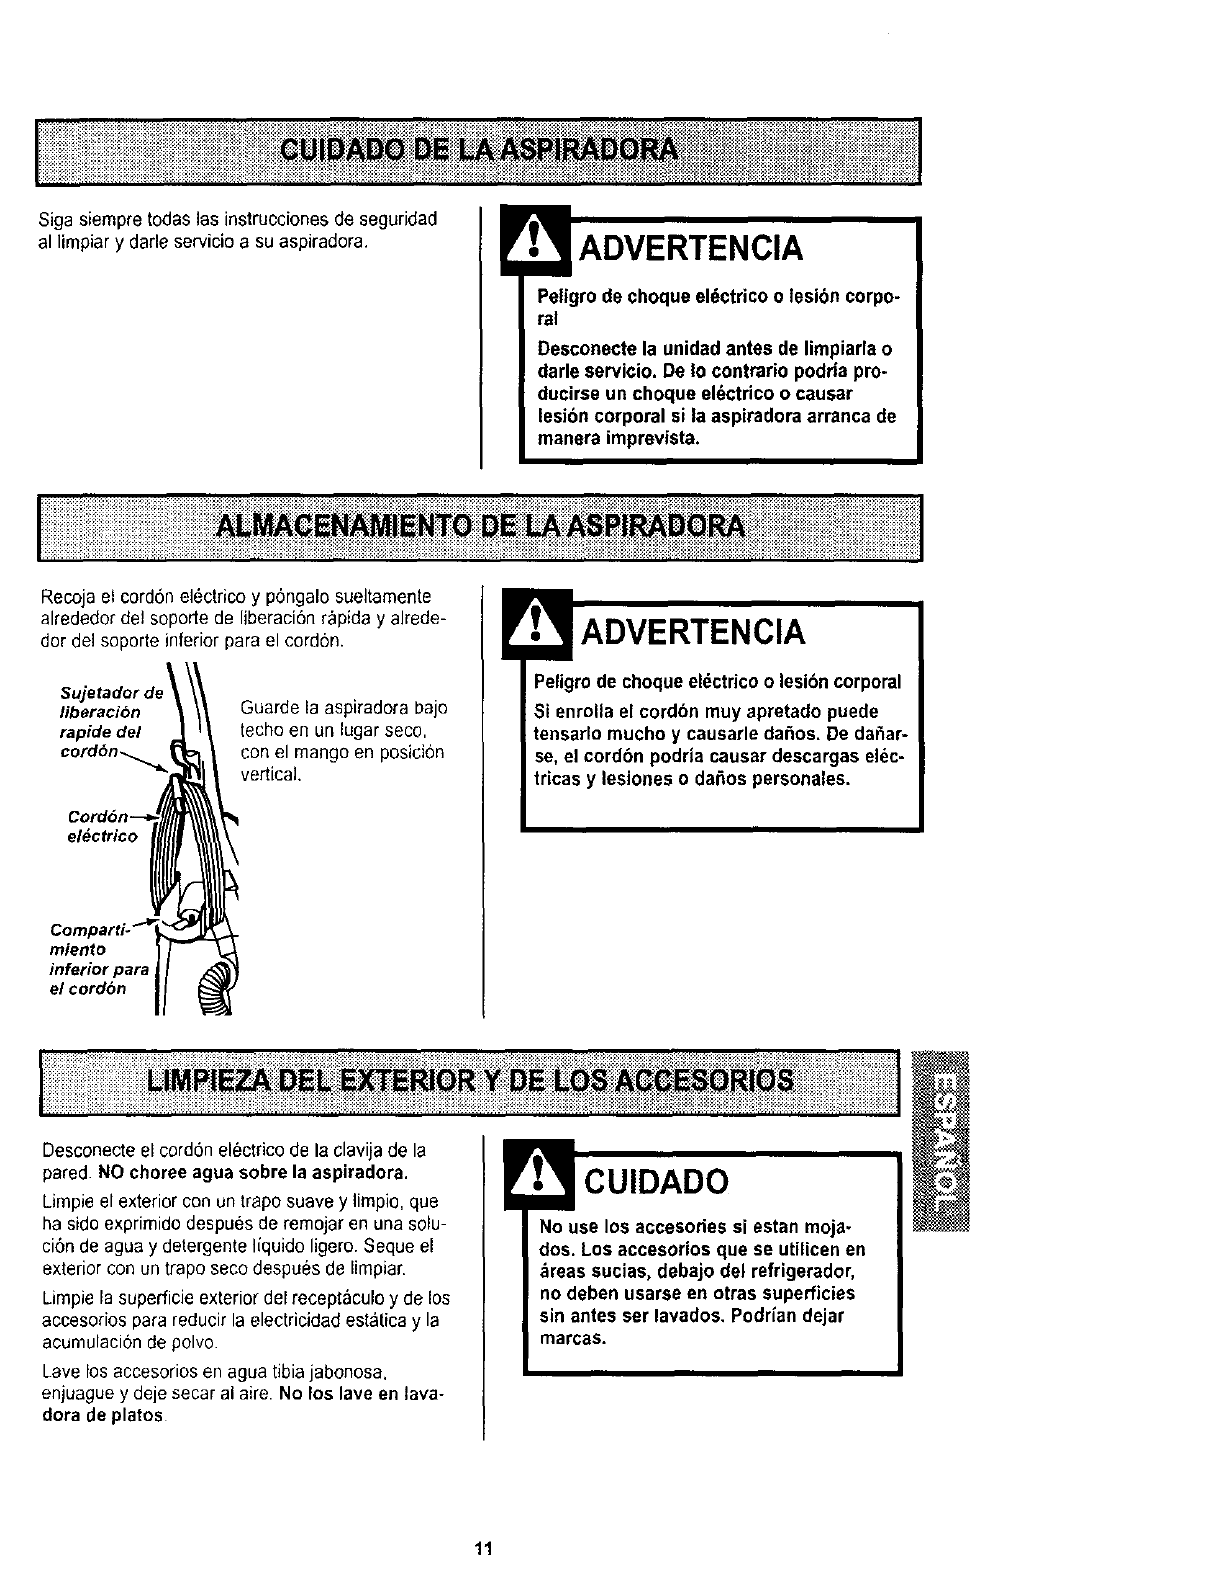
Recoja el cord6n el_ctricoy p6ngalo sueltamente
alrededor del soporte de liberaci6n rapida y alrede-
dor del soporte inferior pars el cordon.
s.j
liberacibn
rapide del
cord6n....._,
Guarde la aspiradora bajo
techo eo un lugar seco,
con el mango en posieion
vertical,
el#ctrico
miento
inferior para ,
el cord6n
Peligro de cheque eldctricoo lesibn corporal
Si enrolla el cordbn muy apretado puede
tensarlo mucho y causarle daSos. De dafiar-
se, el cordbn podrla causar descargas el_c-
tricas y lesiones o da£=ospersonales.
I!!iiiiilililiiiiiiiiiiiiiiiiiiiiii!ii!iiiii!!_!!i!_i_i_i_ii_iiiii_ii_i_;_i_i_iiiiiii!i!_!i!i!!i_i_i_iii_i_!i!iii!i!i!i!!!iiiiili!_i_i_i_iii!i!i!iiii_i!i!i!i!i!i!_!_!_!_i_iii_i_iii!i!iiii!i!!!i_!_iiii!ili_i_!ii!i_iii!iii!!i!_!ii!!iliy!i_i_i!ii!_i_iiii_iiii!iiiiii_i_i_i_i_ii!i!i!ii!_iii!i;!i!i!i!i!_!i_i_i!ii!i_iiiii!!!!!!i!iiiiiiiiiiii!i!!!!l
Desconecte el cordon electrico de la clavija de la
pared. NO choree agua sobre la aspiradora.
Limpie el exterior con un trapo suave y limpio, que
ha side exprimido despues de remojar en una solu-
ci6n de agua y detergente I[quido ligero. Seque el
exterior con un trapo seco despu_s de limpiar.
Limpie la superficie exterior del recept_culo y de los
accesorios para reducir la electricidad estatica y la
acumulacion de polvo.
Lave los accesorios en agua tibia jabonosa.
enjuague y deje secar al aire. No los lave en lava-
dora de plates
No use los accesories si estan moja-
dos. Los accesorios que se utilicen en
,_reassucias, debajo del refrigerador,
no deben usarse en otras superficies
sin antes ser lavados, Podrian dejar
marcas.
11
Siempre vacie el cube de la basura cuando el
nivel de basura alcanza la linea "MAX FILL."
PARA SACAR EL CUBO DE LA BASURA:
!ADVERTENCIA
Siempre desconecte el cordbn _lectrico
antes de reparar alguna parte de la aspi-
radora.
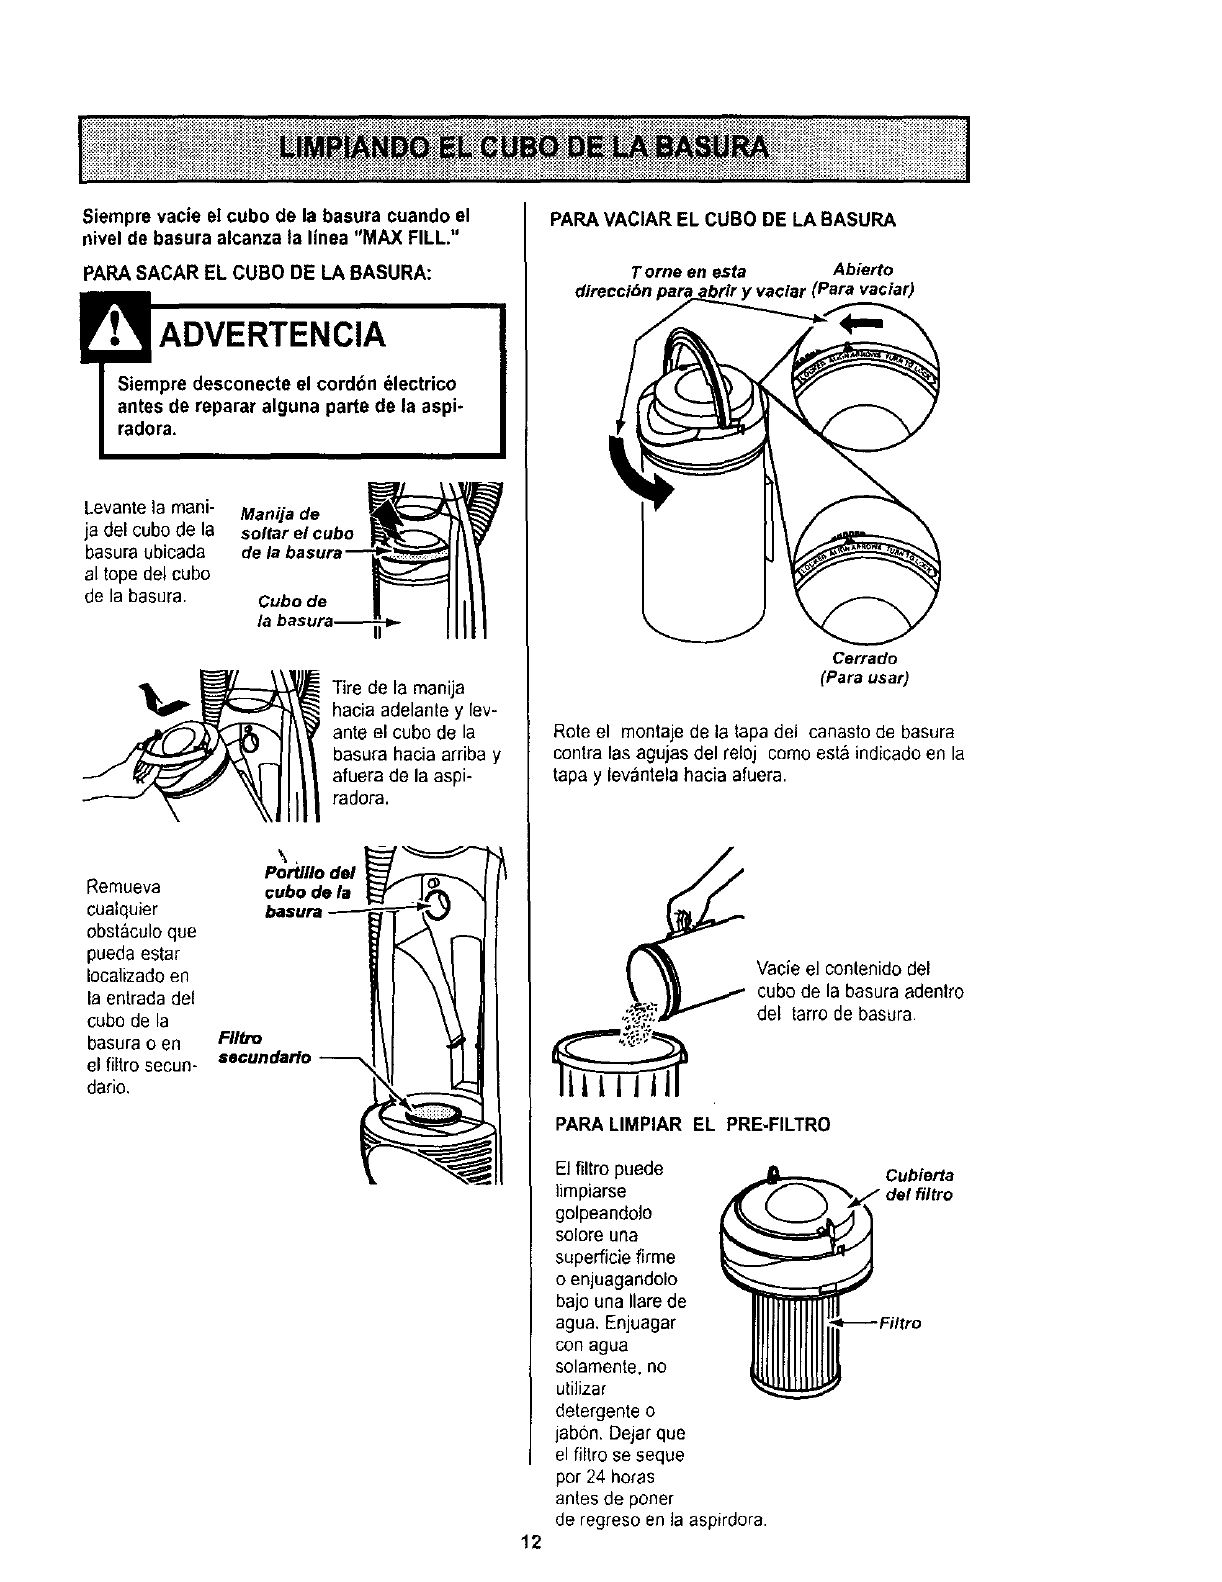
Levantela mani- Manija de
ja del cube de la soltar el cube
basura ubicada
al tope del cube
de la basura, Cube de
/,1
Tire de la manija
hacia adelante y lev-
ante el cube de la
basura hacia arriba y
afuera de la aspi-
radora.
Portlllodel
Remueva cube de la
cualquier basura
obstC*culoque
pueda estar
Iocalizadoen
la entrada del
cube de la
basura o en FIItte
seculldario
el filtro secun-
dado.
PARAVACIAR EL CUBO DE LA BASURA
Torne en esta Abierto
direccibn 'vaclar (Para vaciar)
Cerrado
(Para usar)
Rote el montaje de la tapa del canasto de basura
contra las agujas del reloj comeest_ indicado en la
tapa y levantela hacia afuera.
Vacie el contenido del
cube de la basura adentro
del tarro de basura
12
PARA LIMPIAR EL PRE-FILTRO
El filtro puede
limpiarse
golpeandolo
solore una
superficie firme
o enjuagandolo
bajo una Ilare de
agua. Enjuagar
con agua
solamente, no
utilizar
detergente o
jabsn. Dejar que
el filtro se seque
per 24 horas
antes de porter
de regreso en la aspirdora.
Cubierta
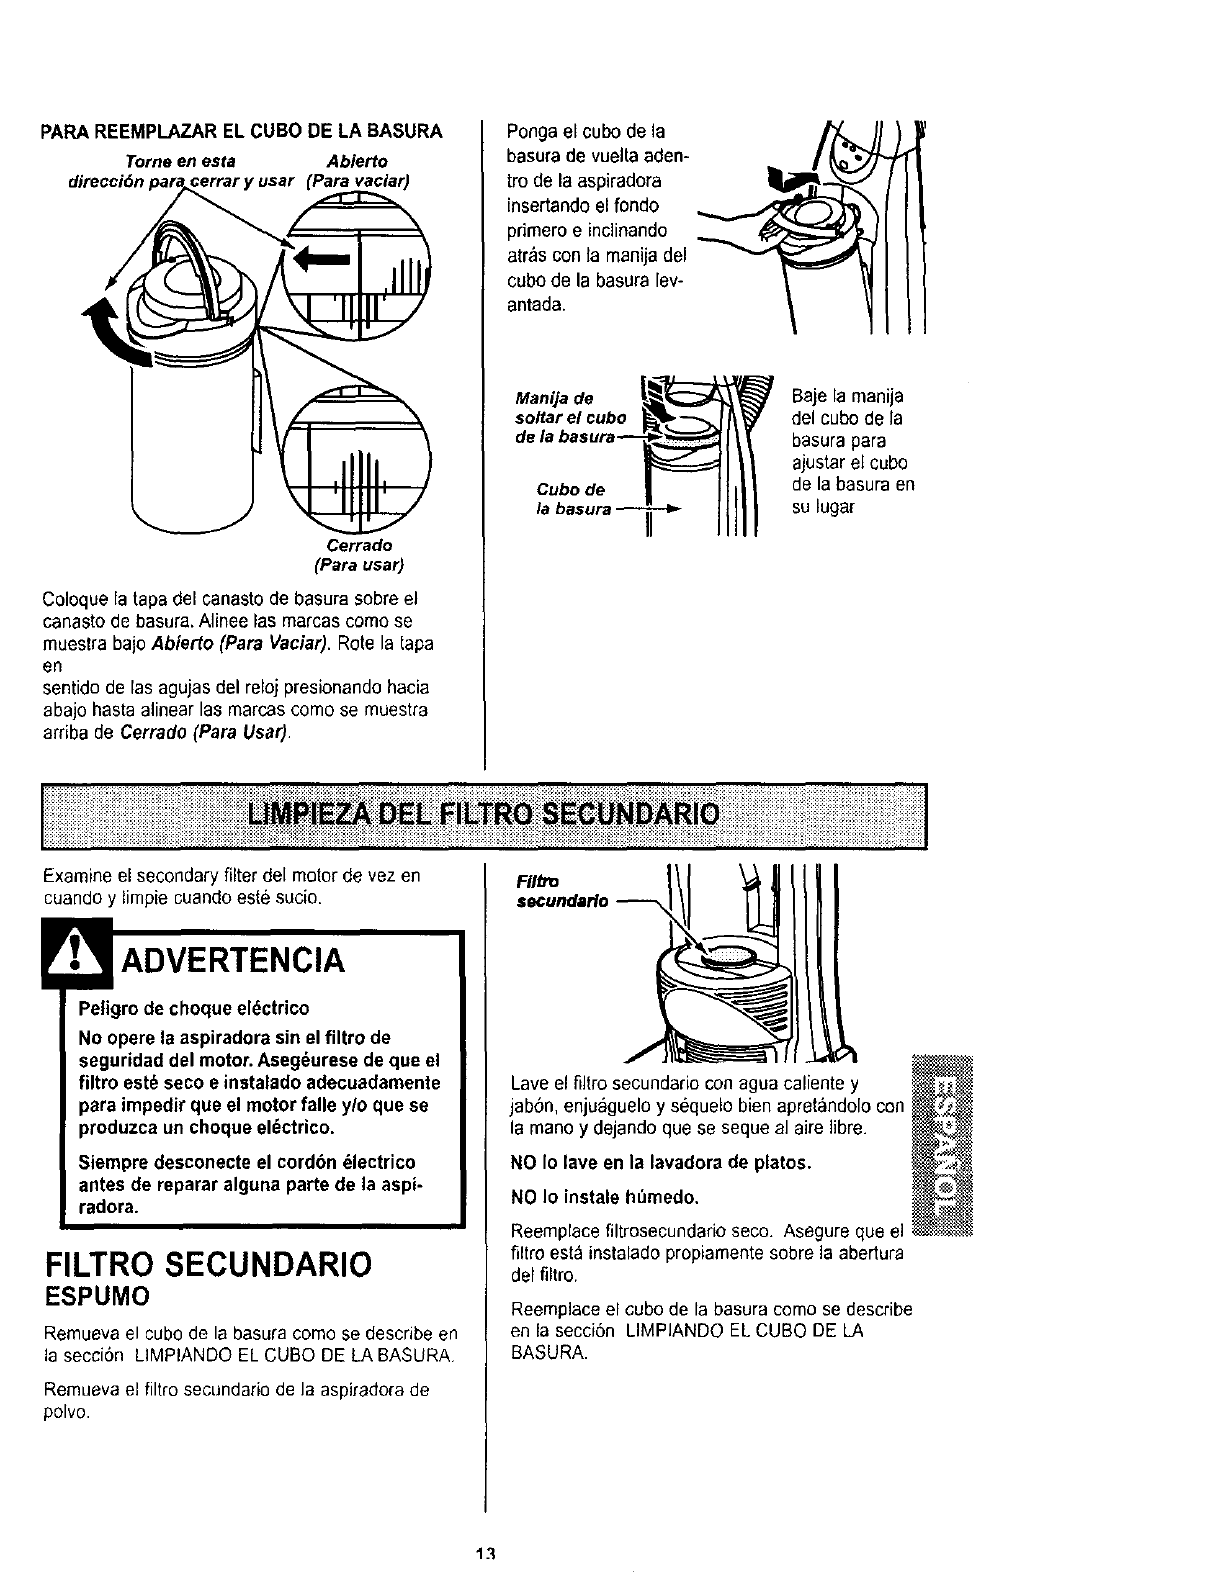
PAPA REEMPLAZAR EL CUBO DE LA BASURA
Tome en esta Abierto
direcci6n (Pare vaciar)
Cerrado
(Para usar)
Coloque la tapa del canasto de basura sobre el
canasto de basura.Alinee las marcas come se
muestra bajo Abierto (Pare Vaciar). Rote la tapa
en
sentido de las agujas del reloj presionando hacia
abajo hasta alinear las marcas come se muestra
arriba de Cerrado (Pare Uear).
Ponga el cube de la
basura de vuelta aden-
tro de la aspiradora
insertando el rondo
primero e inclinando
atr_s con la manija del
cube de la basura lev-
antada.
Manijade Baje la manija
soltar el cube del cube de la
basura para
ajuetar el cube
Cube de de la basura en
su lugar
Examine el secondary filter del motor de vez en
cuando y lirnpiecuando este sucio.
Peligro de cheque el_ctrico
No opere la aspiradorasin el filtro de
seguridad del motor.Aseg_urese de que el
filtro est_ seeo e inetalado adecuadamente
para impedir que el motor falle y/o que se
produzca un choque el(_ctrico.
Siempre desconecte el cordbn _lectrico
antes de reparar alguna parte de la aspi-
radora.
FILTRO SECUNDARIO
ESPUMO
Remueva el cubo de la basura como se describe en
la secci6n LIMPIANDO EL CUBO DE LA BASURA,
Remueva el filtro secundafio de la aspiradora de
polvo.
FIItto
secundarlo
Lave el nitro secundario con ague caliente y
jab6n, enjuaguelo y s_quelo bien apret&ndolo con
la rnanoy dejando que se seque al aire libre.
NO Io lave en la lavadorade plates.
NO Io instale h_medo.
Reemplace filtrosecundedo seco. Asegure que el
filtro est_ instalado propiamentesobre la abertura
del filtro.
Reemplace el cube de la basura come se describe
en la seccion LIMPIANDO EL CUBO DE LA
BASURA.
v_
E '
@
13
::::: : ::: :::::_:::: : : ::::::;._. ,_::._._.._.::......-..,::.,./,,..::_...:::-:...::-:.....+-:..,,_ ,..:: "', ;:-,'::: ._ .._:.....,,-.,::...,:.....:::;: ;::::: ;:::;;::::::::::: :;;::::::::::::: ::::::::
: _ ...... _::;ii_ _::: _:_;i_:ki::: t::_:: _!_:_!_ _,,___i_;_;_i_
Peligro de choque el_ctrico
Desenchufe el cable de poder del tomacor-
riente, No opere la limpiadora sin el filtro
primario o el filtro de escape. Est_ seguro
que el filtros este instalado propiamente
para prevenir falla del motor y/o sacudida
el_ctrica.
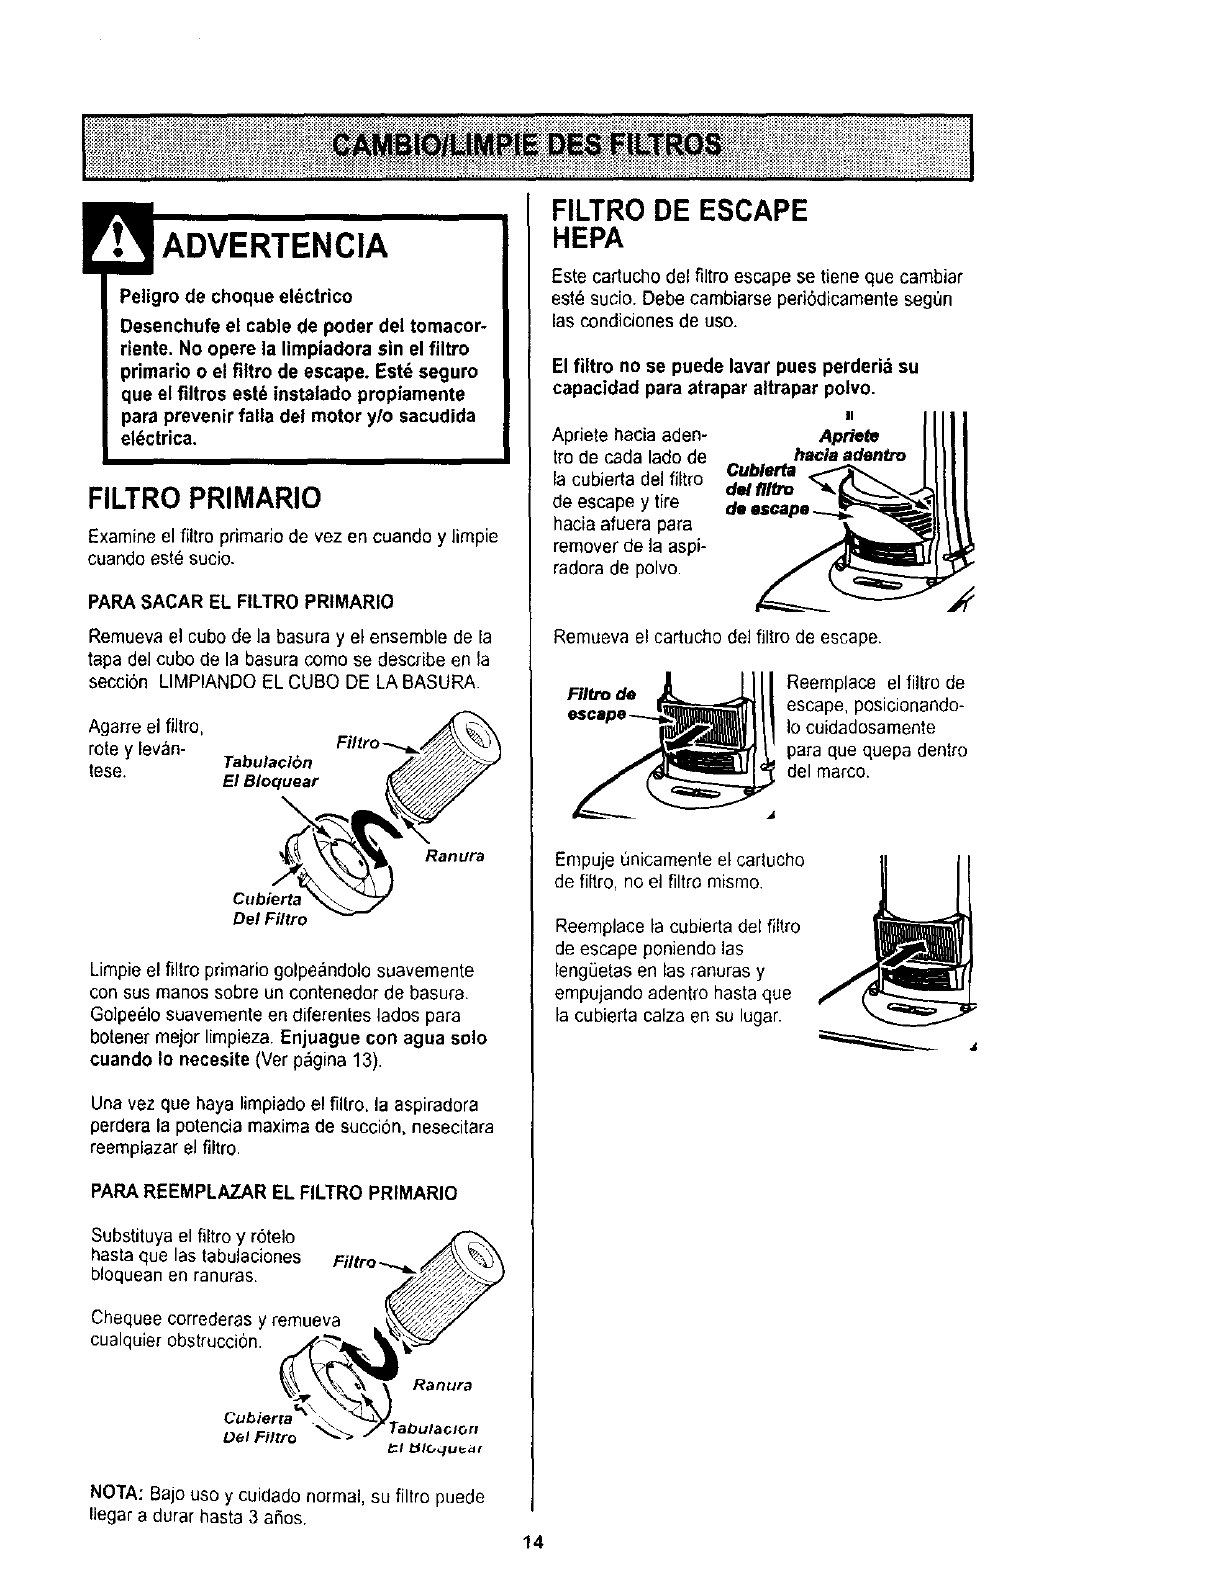
FILTRO PRIMARIO
Examineel filtro pdmario de vez en cuandoy limpie
cuando este sucio.
PARA SACAR EL FtLTROPRIMARIO
Remueva el cubo de la basura y el ensemble de la
tapa del cubo de la basura como se describe en la
secci6n LIMPIANDO EL CUBO DE LA BASURA.
Agarre el fiJtro,
rote y levan-
tese. Tabulaci6n
El Bloquear
Ranura
Cubierta
Del Filtro
Limpie el filtro primario golpe_ndolo suavemente
con sus manos sobre un contenedor de basura.
Golpe_lo suavementeen diferentes lados para
botener mejor limpieza. Enjuague con agua solo
cuando Io neeesite(Ver p_gina13).
Una vez que haya limpiado el filtro, la aspiradora
perdera la potencia maxima de succiSn, nesecitara
reemplazar el filtro.
PARA REEMPLAZAR EL FILTRO PRIMARIO
Substituya el filtro y r6telo
hasta que las tabulaciones Filtro_..//./_\_...p._.,_,
bloquean en ranuras. _
Chequee corredera.sy remuev._a k_'_# "
oualqu,erobstrucc,on, i.___1 _1_
Lo°,oo,o.,
L_el Eilrro _"
_l _IC, quea_
FILTRO DE ESCAPE
HEPA
Este cartucho del filtro escape se tiene que cambiar
est_ sucio. Debe cambiarse periSdicamentesegt_n
las condiciones de use.
El filtro no se puede lavar pues perderia su
capacidad para atrapar altrapar polvo. (
Apriete hacia aden- Apt_t_
tro de cada lado de haclaa#en#e
la cubierta del filtro Cubl_r_a
de/fl/tro
de escape y tire
hacia afuera para
remover de la aspi-
radora de polvo.
Remueva el cartucho del filtro de escape•
FIItro de Reemplace el filtro de
escape, posicionando-
Io cuidadosamente
para que quepa dentro
del marco.
Empuje unicamente el cartucho
de filtro, no el filtro mismo.
Reemplace la cubierta del fiitro
de escape poniendo las
lengSetasen las ranuras y
empujando adentro hasta que
la cubierta calza en su lugar.
NOTA: Bajo uso y cuidado normal, su filtro puede
Ilegara durar hasta 3 aSos.
14

Peligro de choque el_ctrico o lesibn corpo-
ral
Desconecte la unidad antes de limpiarla o
darle servicio. De Io contrario podria pro-
ducirse un choque el_ctrico o causar
lesibn corporal si la aspiradoraarranca de
manera imprevista.
Frecuentemente revise el &readel cepillo y quite
redo pelo, cord6n o pelusa que se haya acumulado.
Di la acumulacibn es excesiva, siga las instruc-
clones a continuaci6n. Si la correa se aflojara o
rompiera, siga las instrucciones para quitar la cor-
tea.
PARA QUITAR LA CUBIERTA DE
LA BOQUILLA
Desenchufela unidad de la corriente el_ctrica.
Para proteger la superficie del sue]o, siempre ponga
papel debajo de la boca de la m_quina cuando se
saca la cubierta de la boquilla.
Libere la cubierta de boquilla por girar los soportes
de la cubierta de boquilla a la posici6n UNLOCK,
Agarre ambos lados la parte trasera de la boquilla y
levante la cubierta para quitarla de la base de la
boquilla.
Soportes de la
cubierta de
Cubierta
de la
boquflla
Cepille o quite cualquJerresiduo que est6 en al area
de correas,
Peligro de lesibn personal
Siempre desenchufe la aspiradora antes de
limpiar el _rea del cepillo, ya que _ste
podria empezar a funcionar repentina-
mente. No hacerlo podria resultaren una
lesi6n personal.
PARA QUITAR LA CORREA/
LIMPIAR EL AGITADOR
Agltador
Coloque las manos en el agitador. Si la correa ya
esta instalada en el agitador, babr&tensi6n en el
agitador. Tenga cuidado cuando levanta el agitador
de la boquilla.
Quite la correa desgastada o rota del eje de trans-
misi6n del motor.
Quite toda basura o restos de] area que recorre la
correa o del area del cepillo cilfndrico.
ADVERTENCIA
Peligro de lesi6n personal
Tenga cuidado al quitar el cepillo ilindri-
co, la tensibn de la correa es grande. Si
no tiene precauci6n podria sufrir una
lesi6n personal si el cepillo se libera r_p-
idamente y sale disparado.
15

NOTA:Paremantenerunaaltaeficienciade
limpiezayevitareldafioala aspiradora,hay aue
limoiar el aaitador cada vez eue se cambia ta
co,tea,
El agitador se debe limpiar despu6s de haberlo
usado de 7 a 10 veces.
The agitator must be cleaned according to
the following schedule:
Utilisation de
FR#QUENTE -
(utilisation quotidienne)
MODERC:E-
(utilisation 2 _ trois fois
par semaine)
L_G#RE -
(utilisation hebdomadaire)
Nettovaae de
ILagitat_
hebdomadaire
Mensuel
Bimensuel
Retiretodo indicio de basura o suciedad de la zona
de la correa y del agitador,
Perspectiva despiezada -
Agitador
et emo agitador Polea /
pare Tape del
correa extreme
Con cuidado quite
lastapas y quite el
hilo o los restos
ubicadosen el
agitador,en los
seportes del cepil-
Io, o en el eje del
agitador. extreme
Cambie las tapes deJextreme. Vea la perspective
despiezada paraseguir el orden correcto de coloca-
cion de las piezas.
PARA CAMBIAR LA CORREA
Asegurase que el selectorde pisos con y sin alfom-
bra este en la posicibn de pisos con alfombra.
Coloque la nueva correa aErededordel eje de trans-
misibn del motor. Coloque la correa nueva
sobre la polea del agitador.
£je de
transmision
Correa del motor
rteova
Selector de pisos
Poles pare Correa con elfombra y sin
correa neuva alfombra
CORREA SOBRE LA RANURA GUIA
Correa Estd Centrada
Sobre la Ranura Guia
(Selector de pisos con y sin alfombra
este en la posici6n de pisos con alfombra)
A. - _Selector
getaaor _de pisos
h_'_ _:. con alfom-
• " _ /" / f_F'q"_','l bra y sin
Eje del selectorde Eje de
pisos con y sin transmisidn
alfombra del motor
Correa No Est_ Centrada
Sobre la Ranura Guia
(Correa aldrededor del eje del selector
de pisos con y sin alfombra)
•_.._"_-_- Selector
Agttado_..__ _de pisos
_-'_"""'-_ _ • conalfom-
I),-'-_./,_.=_ 1'.4¢f_,_0'_)bray sin
:\sl,om.ro
Eje de
EdJedel selector transmisi6n
e pisos cony del motor
sin alfombra
16
Correa No Est_ Centrada
Sobre la Ranura Guia
(El selector de pisos con y sin alfombra
este en la posi¢i6n de pisos sin alfombra)
Selector de
pisos con
Agitador Correa "_alfombra y
r\sin alromora
Eje de Eje del selector
transmisi6n de pisos con
del motor y sin alfombra
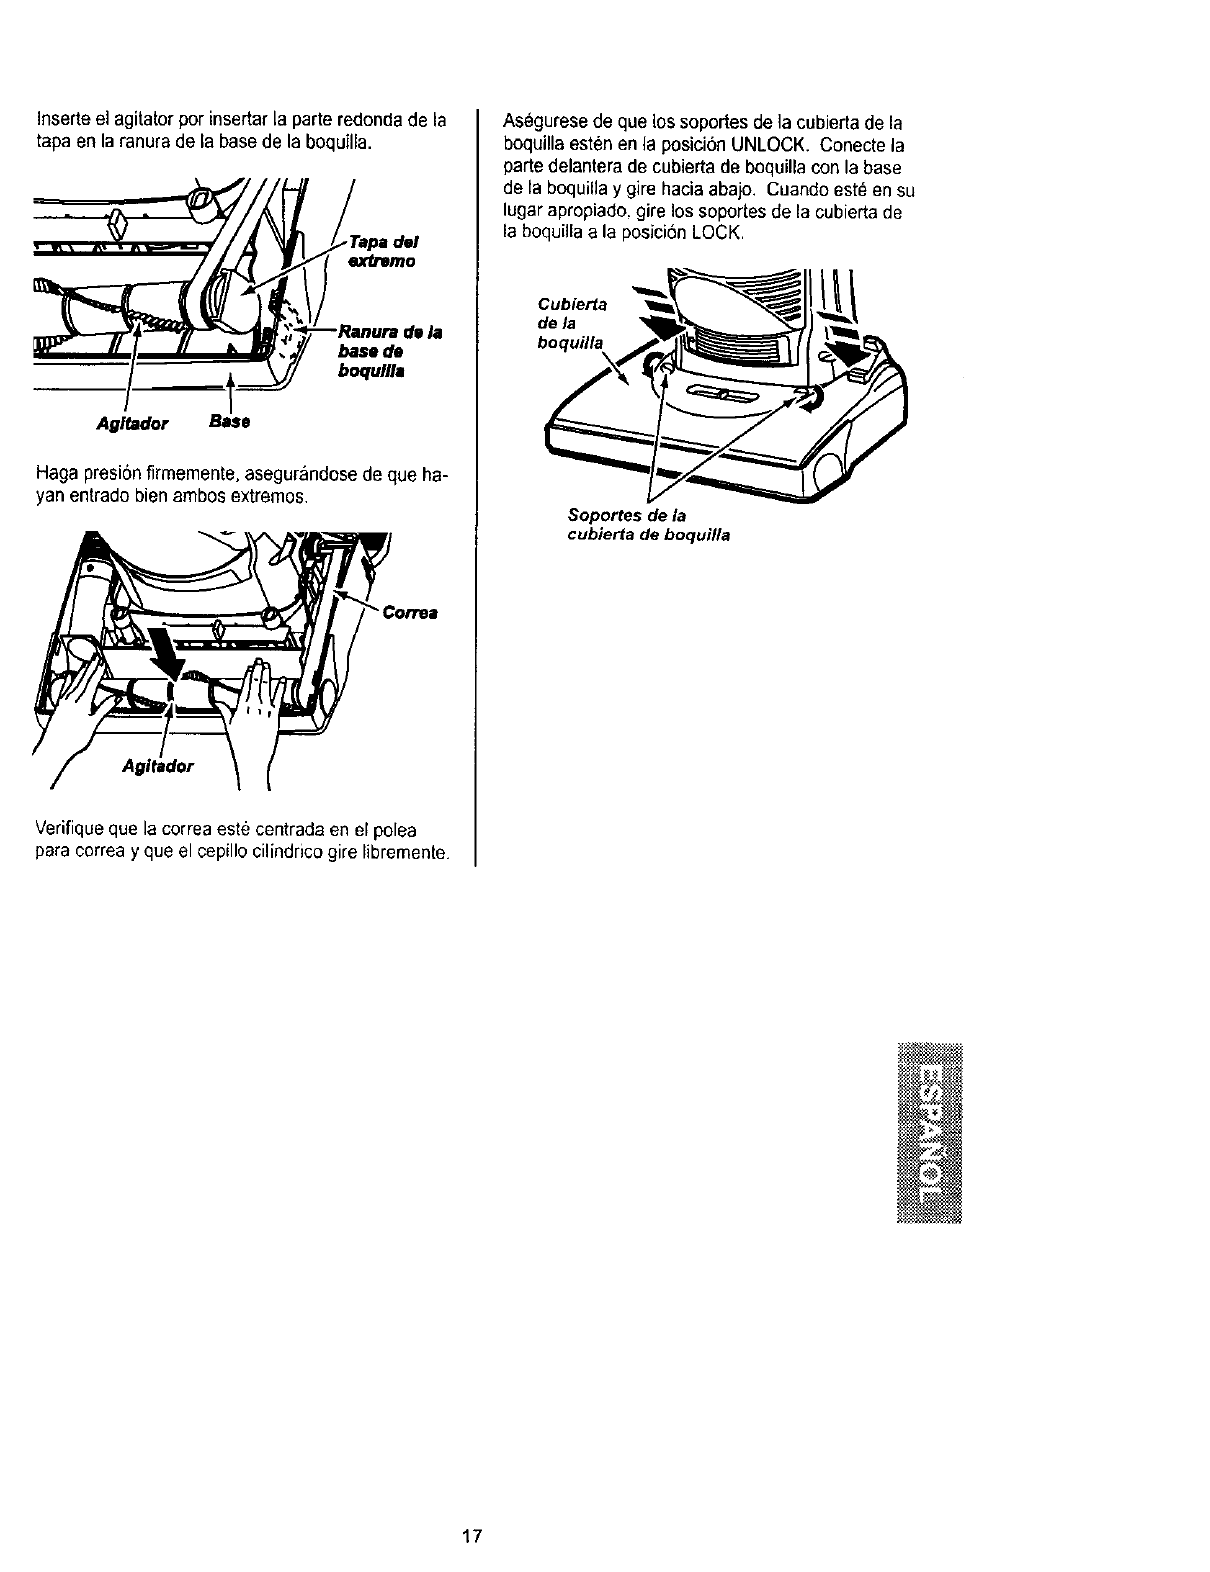
Inserte el agitator por insertar la parte redonda de la
tapa en la ranura de la base de la boquJlla.
dl la
base de
boqullla
Agltador
Haga presi0n firmemente, asegur_ndose de que ha-
yan entrado bien ambos extremos.
Agltador
Verifique que la correa este centrada en el polea
para correa y que el cepillo cilindrico gire libremenle.
Asegurese de que los soportes de ]a cubierta de la
boquilla esten en la posici6n UNLOCK• Conecle la
parte delantera de cubierta de boquilla con la base
de la boquilla y gire hacia abajo. Cuandoeste en su
lugar apropiado, gire los soporles de la cubierta de
la boquillaa la posici6nLOCK.
Cub_a
dela
boqufl_
Soportes de la
cubierta de boquilla
N
17
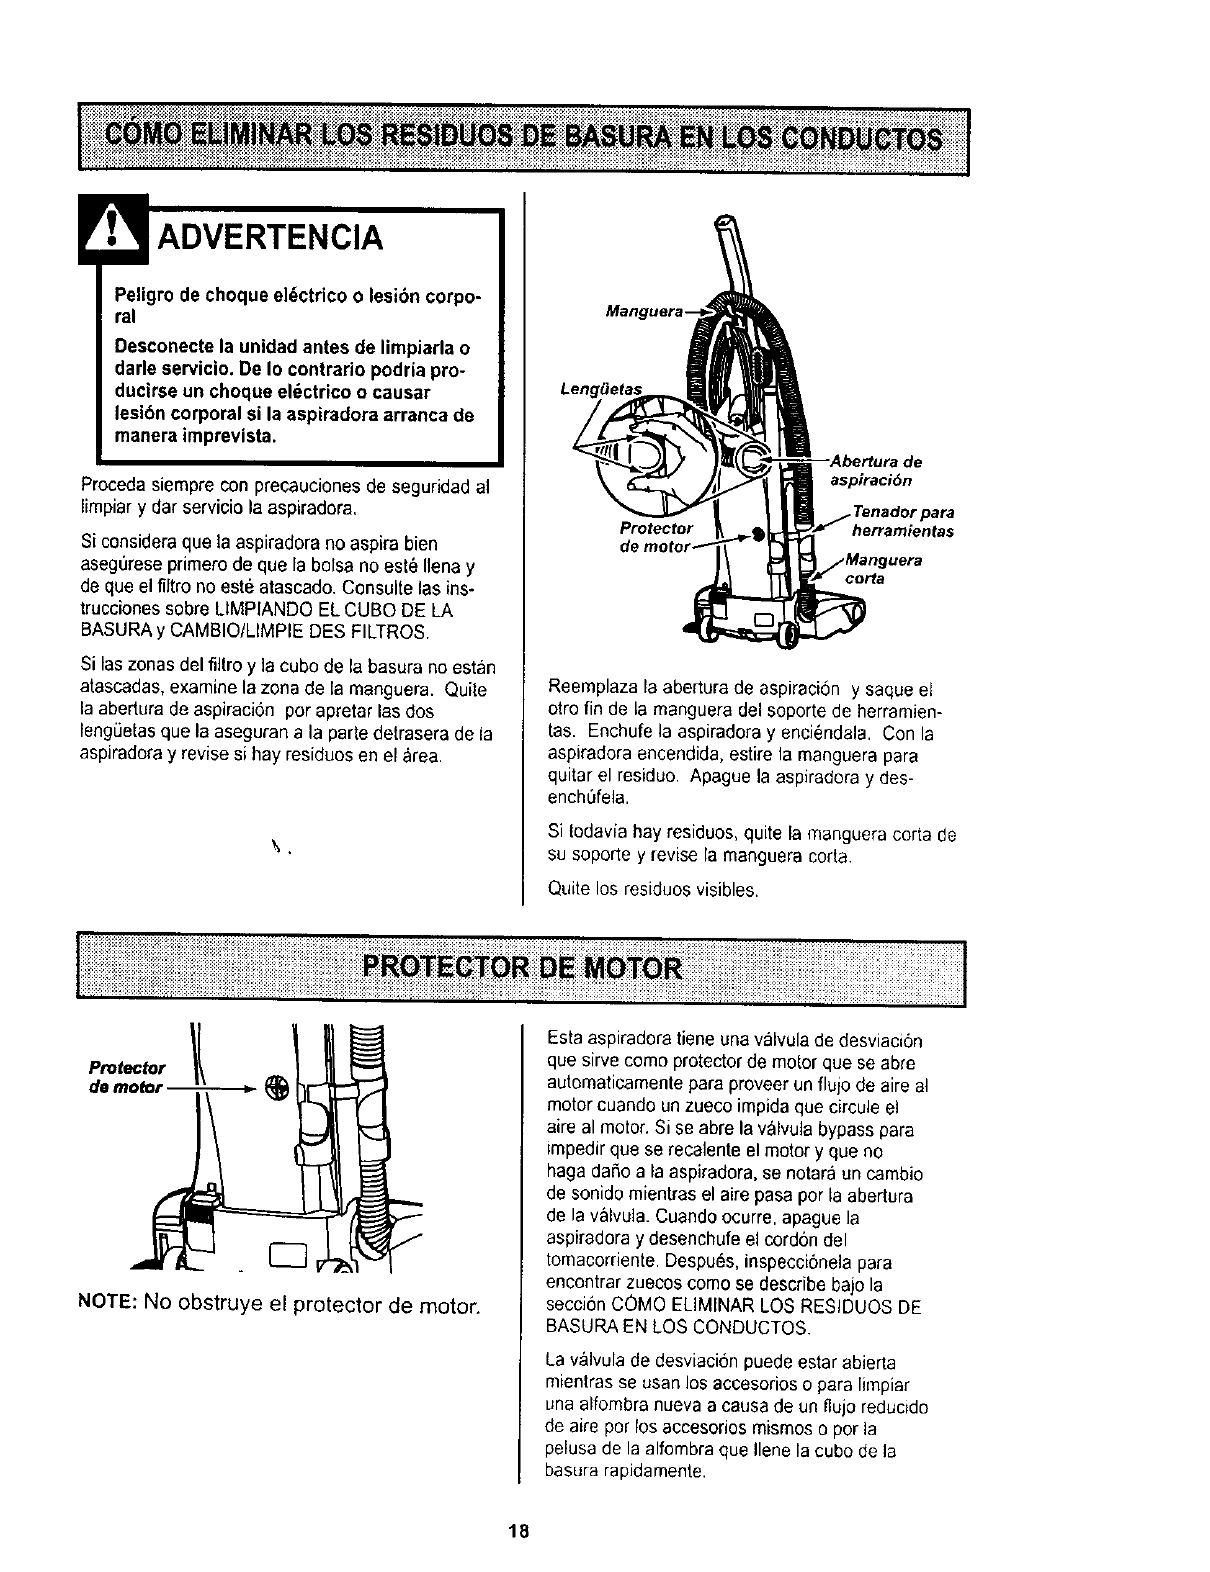
ADVERTENCIA
Peligro de choque el_ctrico o lesion corpo-
ral
Desconecte la unidad antes de limpiarla o
dade servicio. De Io contrario podria pro-
ducirse un choque el_ctrieo o eausar
lesibn corporal si la aspiradora arranca de
manera imprevlsta.
Proceda siempre con precauciones de seguridad al
limpiar y dar servicio la aspiradora.
Si consideraque la aspiradora no aspira bien
aseg0rese primero de que la balsa no est_ Ilena y
de que el filtrono est6 atascado. Consulte las ins-
trucciones sabre LIMPIANDO EL CUBa DE LA
BASURAy CAMBIO/LIMPIE DES FILTROS.
Si las zonasdel filtra y la cuba de la basara no astan
atascadas, examine la zona de la manguera. Quite
la abertura de aspiraci0n par apretar las dos
lengLietasqua la aseguran a la parte detrasera de la
aspiradora y revise si hay residuos en el _rea.
aspiraci6n
Protector herramientas
Reemplaza la abedura de aspiraci6n y saque el
otro fin de la manguera del seporte de herramien-
tas. Enchufe la aspiradora y enci_ndala. Con la
aspiradora encendida, estire la manguera para
quitar el residuo Apague la aspiradora y des-
ench6fela.
Si todavia hay residuos, quite la msnguera corta de
su soporte y revise la manguera carts.
Quite los residuos visibles.
NOTE: No obstruye el protector de motor.
Esta aspiradora tiene una vaNula de desviaci6n
que sirve coma protector de motor que se abre
autematicamente para proveer un flujo de aire al
motor cuando un zueco impida qua circule el
aire al motor. Si se abre la valvula bypass para
impedir qua se recalente el motor y que no
haga dafio a la aspiradora, se notara un cambio
de sonido mientras el aire pasa par Is abertura
de la valvula. Cuando ocurre, apague la
aspiradora y desenchufe el cordon del
tomacorriente. Despu6s, inspecoi6nelapara
encontrar zuecos coma se describe bajo la
secci6n COMO ELIMINAR LOS RESIDUOS DE
BASURAEN LOS CONDUCTOS.
La v&lvulade desviacion puede estar abierta
mientras se usan los accesorios o para limpiar
una affombra nueva a causa de un %jo reducido
de aire par los accesorios mismoso per la
pelusa de la alfombra que liana la cuba de Is
basura rapidamente.
18
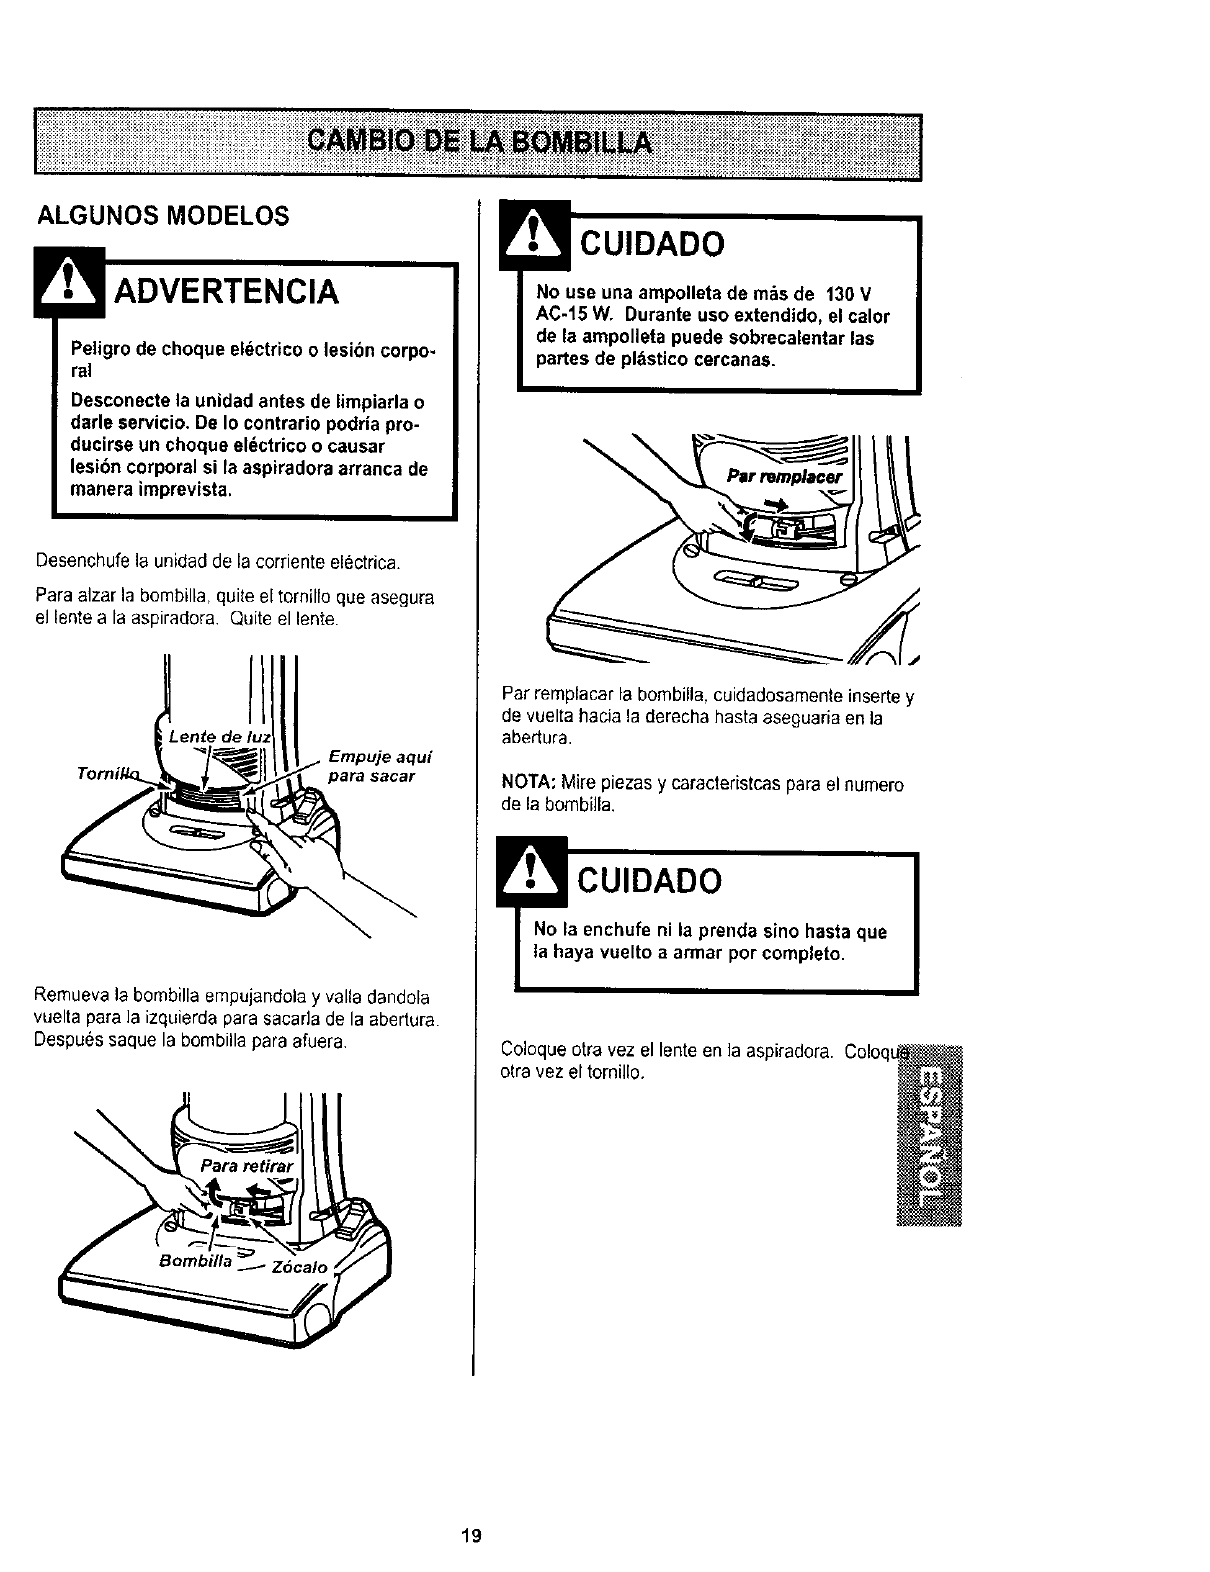
ALGUNOS MODELOS
Peligro de choque electrico o lesibn corpo-
ral
Desconecte la unidad antes de limpiarla o
darle servicio. De Io contrario podria pro-
ducirse un choque el_ctrico o causar
lesibn corporal si la aspiradoraarranca de
manera imprevista.
Desenchufela unidad de la corriente electrica.
Paraalzar la bombilla, quite el tornillo que asegura
el lente a la aspiradora Quite el lente.
'ente de
Empuje aqui
Remueva la bombilla empujandola y valla dandola
vuelta para la izquierda para sacada de la abertura.
Despues saque la bombilla para afuera.
\
CUIDADO
No use una ampolleta de m_s de 130 V
AC-15 W. Durante uso extendido, el calor
de la ampolleta puede sobrecalentar las
partes de pl_stico cercanas.
\
Par remplacar la bombilla, cuidadosamente insertey
de vuelta hacia la derecha hasta aseguaria en la
abertura.
NOTA: Mire piezas y caracteristcas parael numero
de la bombilla.
!CUIDADO
No la enchufe ni la prenda sino hasta que
la haya vuelto a armar por completo.
Coloque otra vez el lente en la aspiradora.
otra vez el tornillo.
19

Peligrodechoqueeldctricoo lesibncorpo-
ral
Desconectelaunidadantesdelimpiarlao
darleservicio.DeIocontrariopodriapro-
ducirseunchoqueel_ctricoocausar
lesi6ncorporalsilaaspiradoraarrancade
maneraimprevista.
PARA EXAMINAR EL AGITADOR
Protectorde la
correade la base
Coloque la
aspiradora con la
base hacia arriba
para revisar si los
cepillos est_n en
malas condiciones.
Cuando los cepillos
esten gastados al
nivel del protector de
base, reemplazca el
agitador.
PARA QUITAR EL AGITADOR
Quite la cubierta de la boquilla y el agitador. Vease
CAMBIO DE LA CORREA Y LIMPIEZADEL
AGITADOR.
Reemplazca el agitador con un nuevo.
Rearme la correa,el agitador y ]acubierta de la
boquilla. Vease CAMBIO DE LACORREAY
LIMPIEZA DEL AGITADOR,
Polea para€orrea
t
2O
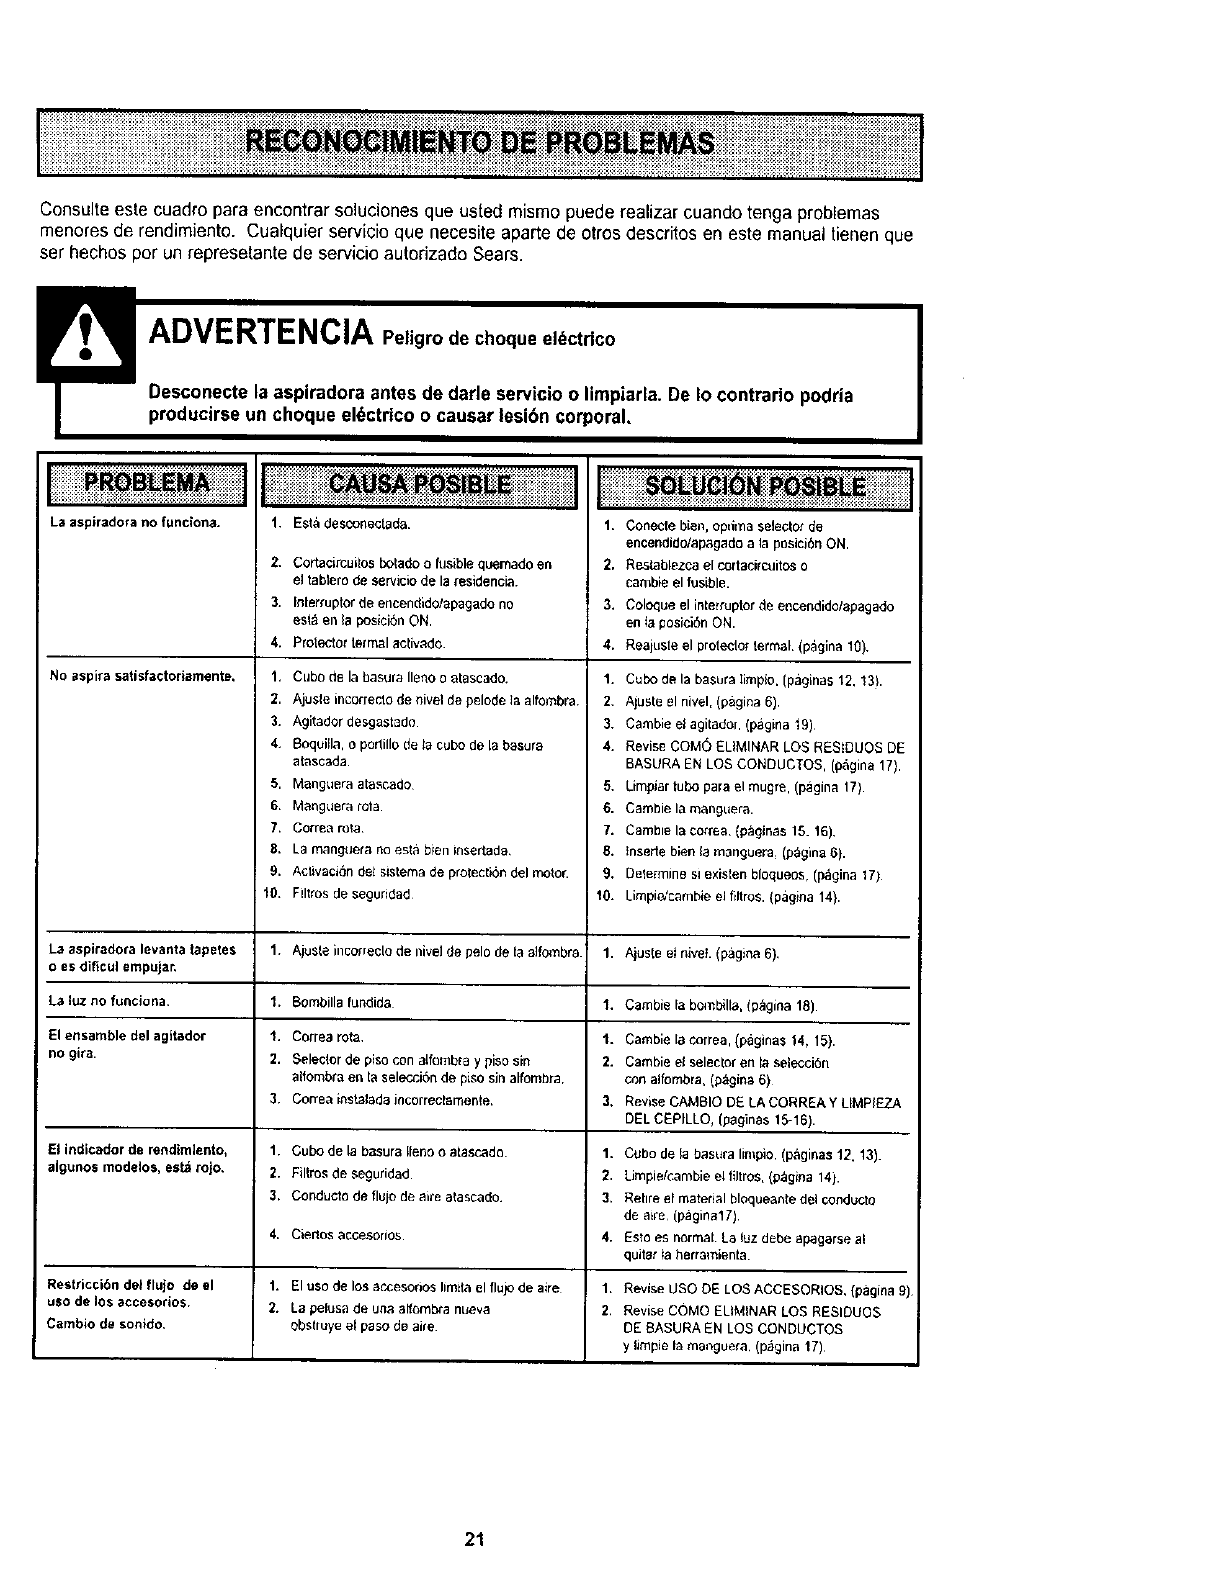
I" _: i i_i_i_i i i i_i_ ___i_ii_i___ii_iii_iii'i_'_____i_i_ii:J!__!!ii_i!"_'
iiii!i;iiiiii!!i_iiiiiii_i!_iiiiiiiiiiiiiiiiiiiiiiiii!i!iii!iii!i!iiiiiii_i!iiiii!iiiiiiiilil!iiiii!!iiiiiiiiii!i_iiiiiiiiiiiiiiiiiiii!!i!ilIiiiiiiliiliiiiiii!iiiiiiiiiili_iiiiiiiiiiiiiiiiiiiiiiiiiii!ii 1
Consulte este cuadro para encontrar solucionesque usted mismo puede realizar cuando tenga problemas
menoresde rendimiento. Cualquier servicio que necesite aparte de otros descritos en este manual tienen que
ser hechos per un represetante de servicio autorizado Sears.
La asplradora no funciona.
No aspira satisfactoriamente,
La aspiradora levanta tapetes
o es dificul empujar,
La luz no funcJona.
El ensambledelagttador
no gira.
El indicador de rendimiento,
aJgunos modelos, est_ rojo,
Restricci6n det flujo de el
use de los accesodos.
Cambio de sonido,
I
1. Esta desconectada.
2, Cortacirculos botado ofusible quemado en
el tabtero de servicio de la residencia.
3. Inler_uptor de encendido/apagado no
esl_ en la posiciSn ON.
4. Protector termal aclvado.
1. Cube de la basura Ileno o atascado.
2. Ajus_e incorrecto de nivel de pelode la alfombra.
3. Agitador desgastado
4, Boquila, o porlillo de ta cube de [a basura
atascada
5. Manguera atascado
6, Manguera rota
7. Correa rota
8. La manguela no esta bien insertada,
9. Activad&n det sistema de protecti6n del motor.
10. Filtros de seguridad
1. Ajuste incorrec[o de nivel de pelo de la a]fombra.
1. Bombilla fundida
1, Correa ro_,
2. Selecler de piso con alfombra y piso sin
aifomb_a en la selecci6n de piso sin alfombra,
3. Correa i;_stalada incorrectarnente.
1. Cubo de la basura lleno oalascado.
2. Filtros de seguridad
3. Conductodeflujodeaireatascado
4, Cier_os acGesorlos
1. El use de los ac,cesorios limita el flujo de aire
2. La pelusa de una aff_ml_a nueva
obsbuye el paso de aire
1. Conecle bien, opdma selectot de
enoendid01apagado a la pDsici{_rl ON,
2, Reslablezca el corlaciro]ito$ 0
call}ble el fusiblE.
3. Coloque el interrupter de encendido/apagado
en ta posiciOn ON.
4. Reajuste el protecto_ termal. (p_gina 10).
1. Cube de la basura Iimpio. (paginas 12, 13).
2. Aluste el nivel, (p&gina 6),
3. Cambie el agilador. (pagina 19)
4. Revise COM(_ ELIMINAR LOS REStDUOS DE
BASURA EN LOS CONDUC;OS, (p_gina 17).
5. Limpiar tube para el mugre, (pagina 17).
6. Cambie la manguera.
7. Camble la correa. (pagJnas 15. 16).
8. tnserte bien la rnanguera, (p_gina 6).
9. Delermine sl existen bloqueos, (l_gina 17)
10. LimpieJcambie el filtros. (pagina 14}.
1. Ajuste et nivet. (pagina 6),
1. Cambie la bombilla, (p_gina 18).
1. Cambielacorrea,(pagina$14. 15).
2. Cambie el selector en la selecci6n
con alfombra, (p;_glna 6)
3. Revise CAivIBIO DE LA CORREA YLIMPIEZA
DEL CEPILLO, {paginas 15-16).
1. Cube de la basura limpio. (p,_ginas 12. 13).
2. Limpiek'.ambie eHttros,(p_gina 14).
3. Rehre el material bloqueante del conducto
de aire (paginalTJ
4. Esto es normal La luz debe apagarse a!
quit_r fa herramienta.
1,
2.
Revise USO DE LOS ACCESORIOS, (pagina 9)
Revise COMO ELIMINAR LOS RESIDUOS
DE BASURA EN LOS CONDUCTOS
y limpie la ma_guera. (p_gina 17)
21
_fiX_, _at y_r :home or_m!
Your Home
F_ rep_ - in y_" home - oi aB ma|or _r_ _Rpt_r_eso
lawn _nd gar_ _ipmem, _ he_ing _nd Cooling systems.
no matte_ who _it. _o matter who s_ld It!
i_i_i_i_ii_
i_I _
Our Horl_
_nd e|_cl_r_ni<_, ce;ll o_r_o _qn-line,-_or th_ _neares_
Sea_ Pa_s a_d Repa_it C_rt,|_¢.,
_iiiiiiii
_i_ _SII _
_ i _
1_800-827=6655 (u_._4 t=800-361_665 _-,_,
Au C_anad_I;_r _L_a e_ _:
