Kenmore 40180084700 User Manual MICROWAVE Manuals And Guides L0807709
KENMORE Microwave/Hood Combo Manual L0807709 KENMORE Microwave/Hood Combo Owner's Manual, KENMORE Microwave/Hood Combo installation guides
User Manual: Kenmore 40180084700 40180084700 KENMORE MICROWAVE - Manuals and Guides View the owners manual for your KENMORE MICROWAVE #40180084700. Home:Kitchen Appliance Parts:Kenmore Parts:Kenmore MICROWAVE Manual
Open the PDF directly: View PDF ![]() .
.
Page Count: 64
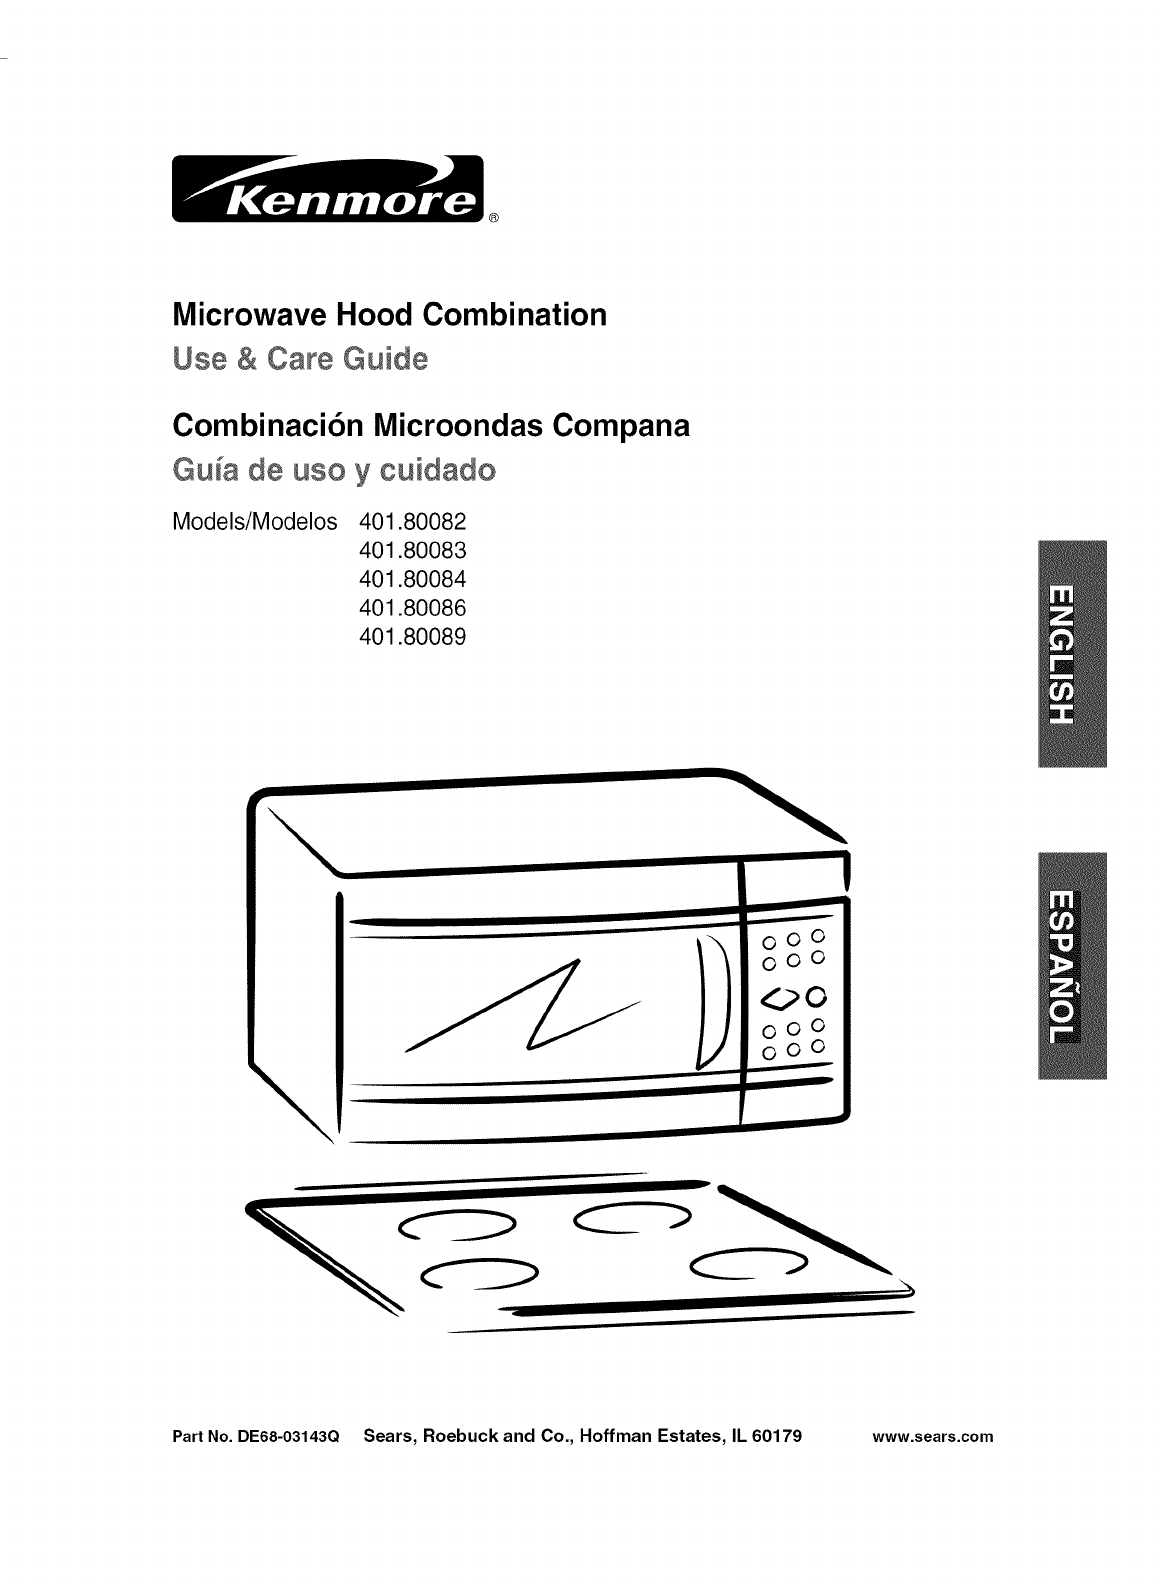
Microwave Hood Combination
Use &Care Guide
Combinaci6n Microondas Compana
Guia de uso Ycuidado
Models/Modelos 401.80082
401.80083
401.80084
401.80086
401.80089
II I
\
000
000
_0
000
000
I I I iiII
III I
i i
III
i u ,jN,
Part No. DE68-O3143Q Sears, Roebuck and Co., Hoffman Estates, IL 60179 www.sears.com
Table of
Contents
Microwave Hood Combination Warranty ......... 2
Sears Service ................................ 3
Master Protection Agreements ................. 3
IMPORTANT SAFETY INSTRUCTIONS ........... 5
Getting the Best cooking results ................ 8
Testing your dinnerware or cookware ............ 8
Featu res .................................... 9
Oven Specifications ......................... 9
Features ................................. 11
Operating instructions ....................... 12
Learn about your microwave oven ............. 12
Clock .................................... 12
Kitchen Timer ............................. 12
Control Setup ............................. 12
Turntable On/Off ........................... 13
Vent Fan ................................. 13
Delay Off ................................. 13
Child Lock ................................ 13
Add 30 Sec............................... 13
Light Timer ............................... 14
Light Hi!LoiOff ............................. 14
More/Less ................................ 14
Custom Program ........................... 15
Cooking at high power levels ................. 15
Cooking at lower power levels ................ 15
Cooking with more than one cook cycle ......... 16
Cooking guide for power levels ................ 16
Sensor operating instructions ................. 17
Sensor cooking guide ....................... 17
Adding or subtracting cook time ............... 17
Pizza Slice ............................... 18
Popcorn ................................. 18
Baked Potato ............................. 18
Vegetable ................................ 18
Cook .................................... 19
Reheat .................................. 19
Hold Warm ............................... 19
Kids Meals ............................... 21
Soften/Melt ............................... 22
Snacks .................................. 23
Auto Defrost .............................. 24
1 pound Defrost ........................... 25
Cooking guide ............................. 26
Cooking utensils ............................ 28
Microwave utensil guide ..................... 28
Care and Cleaning ........................... 29
Care and Cleaning ......................... 29
Cleaning the grease filter .................... 29
Charcoal Filter replacement .................. 30
Cooktop/Night Light replacement .............. 30
Oven Light replacement ..................... 31
Troubleshooting ............................ 32
Troubleshooting guide ...................... 32
Microwave Hood
Combination
Warranty
One Year Limited Warranty
When installed, operated and maintained according to all
instructions supplied with the product, if this appliance fails
due to a defect in material or workmanship within one year
from the date of purchase, call 1-800-4-MY-HOME ® to
arrange for free repair.
If this appliance is used for other than private family
purposes, this warranty applied for only 90 days from the
date of purchase.
This warranty covers only defects in material and
workmanship. Sears will NOT pay for:
1. Expendable items that can wear out from normal use,
including but not limited to filters, belts, light bulb, and
bags.
2. A service technician to instruct the user in correct
product installation, operation or maintenance.
3. A service technician to clean or maintain this product.
4. Damage to or failure of this product if it is not
installed, operated or maintained according to all
instructions supplied with the product.
5. Damage to or failure of this product resulting from
accident, abuse, misuse or use for other than its
intended purpose.
6. Damage to or failure of this product caused by the
use of detergents, cleaners, chemicals or utensils
other than those recommended in all instructions
supplied with the product.
7. Damage to or failure of parts or systems resulting
from unauthorized modifications made to this product.
Disclaimer or implied warranties; limitations of
remedies
Customer's sole and exclusive remedy under this limited
warranty shall be product repair as provided herein. Implied
warranties, including warranties of merchantability or fitness
for a particular purpose, are limited to one year or the
shortest period allowed by law. Sears shall not be liable
for incidental or consequential damages. Some states and
provinces do not allow the exclusion or limitations on the
duration of implied warranties of merchantability or fitness,
so these exclusions or limitations may not apply to you.
This warranty applied only while this appliance is used in
the United States.
This warranty gives you specific legal rights, and you may
also have other rights which vary from state to state.
Sears, Roebuck and Co., Dept. 817WA, Hoffman
Estates, IL 60179
Sears Service
Master Protection Agreements
Congratulations on making a smart purchase.
Your new Kenmore® product is designed and manufactured for years of dependable operation.
But like all products, it may require preventive maintenance or repair from time to time.
That's when having a Master Protection Agreement can save you money and aggravation.
The Master Protection Agreement also helps extend the life of your new product. Here's what the Agreement*
includes:
[] Parts and labor needed to help keep products operating properly under normal use, not just defects. Our
coverage goes well beyond the product warranty. No deductibles, no functional failure excluded from
coverage-- real protection.
[] Expert service by a force of more than 10,000 authorized Sears service technicians, which means
someone you can trust will be working on your product.
[] Unlimited service calls and nationwide service, as often as you want us, whenever you want us.
[] "No-lemon" guarantee - replacement of your covered product if four or more product failures occur within
twelve months.
[] Product replacement if your covered product can't be fixed.
[] Annual Preventive Maintenance Check at your request- no extra charge.
[] Fast help by phone - we call it Rapid Resolution - phone support from a Sears representative on all
products. Think of us as a '_talking owner's manual."
[] Power surge protection against electrical damage due to power fluctuations.
[] $250 Food Loss Protection annually for any food spoilage that is the result of mechanical failure of any
covered refrigerator or freezer.
[] Rental reimbursement if repair of your covered product takes longer than promised.
[] 10% discount off the regular price of any non-covered repair service and related installed parts.
Once you purchase the Agreement, a simple phone call is all that it takes for you to schedule service. You can
call anytime day or night, or schedule a service appointment online.
The Master Protection Agreement is a risk free purchase. If you cancel for any reason during the product
warranty period, we will provide a full refund. Or, a prorated refund anytime after the product warranty period
expires. Purchase your Master Protection Agreement today!
Some limitations and exclusions apply. For prices and additional information in the U.S.A. call 1-800-
827-6655.
* Coverage in Canada varies on some items. For full details call Sears Canada at 1-800-361-6665.
Sears Installation Service
For Sears professional installation of home appliances, garage door openers, water heaters, and other major
home items, in the U.S.A. or Canada call 1-800-4-MY-HOME®.
3
i¸fillillii!i!ii!i!iii_iiii!ii!ill!iiil!i!iiiiill¸i!ii!iiiiill!_!_!_!_iiii_iiiii!ii!i'iiiiiiiiilliiii!i!i!iiiii!_i_i;i_ii!_i_i_iiiiiiiiiiiliililiiii!i!i¸iiliiilii_ii_iiiiiiiii!iiilili!_i;!_i_iiiiiiiiiii'!_!_!_!ii!!!!i_iiiiii!_!!!_ili!i!iiiiiiiiiiiiiiiii_ii!iiili!ilili_iii_iii_il;ii_!_!:!!!!!ii!_!_!!!iiiii!iiiii!_!_!!iil'iliiii!ii!i!i!i!iiiiiiiii_i_i_i_ilil_ii_i!!!iii!iiiiili¸ii¸iili!ili!i!ii_iiiiillii!_!'!iiiiii!i_iiiiiiiii!iiiiiii!!iill¸iiiiii!ii!!!_ili!!iiiiiii!!iii_i!!!i!i,liilliiiiiii!iiiii_iiii_iiiii!i!_i!ii!ii!iiii!i!iili!_!_!iiiii!iliiii_iii!i!iii_ii!iliiiii!iiilii¸iiiiliiii!iiiii¸iliiiiii!i_i!iiii_i_i!_iiiiiiiilii;i!i_iiiii_i!!!!!_!!Jiili¸i!!_ii__!_i,!!!_!_iiiiii_!_!ii!iiii;!_!ii_ili!ii!iiii_!ii_iiiiiiii!ii_ii!iiiiiiiiiiilili!iii!!i!iii!i!iiliii_!iiiii!_!i!i!i!ililii_iiiiiiiii!ii_ii_iiiii!i!iiiii!_i!ii_ii!!_!iii_iiiiliiiii!ii_ii_iiiii!i!iiiii!_i!ii_ii!!_!iii_iiiiliiiii!ii_ii_iiiii!i!iiiii!_i!ii_ii!!_!iii_iiiiliiiii!ii_ii_iiiii!i!iiiii!_i!ii_ii!!_!iii_iiiiliiiii!ii_ii_iiiii!i!iiiii!_i!ii_ii!!_!iii_iiiiliiiii!ii_ii_iiiii!i!iiiii!_i!ii_ii!!_!iii_iiiiliiiii!ii_ii_iiiii!i!iiiii!_!i_iiiliiilil
FEDERAL
COMMUNICATIONS
COMMISSION
GROUNDING
INSTRUCTIONS
Oven MUST be grounded.
Grounding reduces risk of
electric shock by providing an
escape wire for the electric
current if an electrical short
occurs. This oven is equipped with a cord having a
grounding wire with a grounding plug. The plug must
be plugged into an outlet that is properly installed and
grounded. See Installation Instructions.
Consult a qualified electrician or servicer if grounding
instructions are not completely understood, or if doubt
exists as to whether the oven is properly grounded.
Do not use an extension cord. If the product power
cord is too short, have a qualified electrician install a
three-slot receptacle. This oven should be plugged
into a separate 60 hertz circuit with the electrical
rating as shown in specifications table. When the
oven is on a circuit with other equipment, an increase
in cooking times may be required and fuses can be
blown.
Microwave operates on standard household current,
110- 120V.
RADIO FREQUENCY
INTERFERENCE
STATEMENT (U.S.A.
ONLY)
This equipment generates and uses ISM frequency
energy and if not installed and used properly, that
is in strict accordance with the manufacturer's
instructions, may cause interference to radio and
television reception. It has been type tested and
found to comply with limits for ISM Equipment
pursuant to part 18 of FCC Rules, which are designed
to provide reasonable protection against such
interference in a residential installation.
However, there is no guarantee that interference will
not occur in a particular installation. If this equipment
does cause interference to radio or television
reception, which can be determined by turning the
equipment off and on, the user is encouraged to
try to correct the interference by one or more of the
following:
• Reorient the receiving antenna of the radio or
television.
• Relocate the microwave oven with respect to the
receiver.
° Move the microwave oven away from the
receiver.
• Plug the microwave oven into a different outlet so
that the microwave oven and the receiver are on
different branch circuits.
The manufacturer is not responsible for any radio
or television interference caused by unauthorized
modification to this microwave oven. It is the
responsibility of the user to correct such interference.
4
USA-MHC4 DE68-03143Q.indb 4 2007-06-12 6:40:09
IIMPORTANTSAFETY
NSTRUCTIONS
WHAT YOU NEED TO
KNOW ABOUT SAFETY
INSTRUCTIONS
Warning and Important Safety Instructions appearing
in this Use & Care Guide are not meant to cover all
possible conditions and situations that may occur.
Common sense, caution, and care must be exercised
when installing, maintaining, or operating microwave.
Always contact your dealer, distributor, service agent,
or manufacturer about problems or conditions you do
not understand.
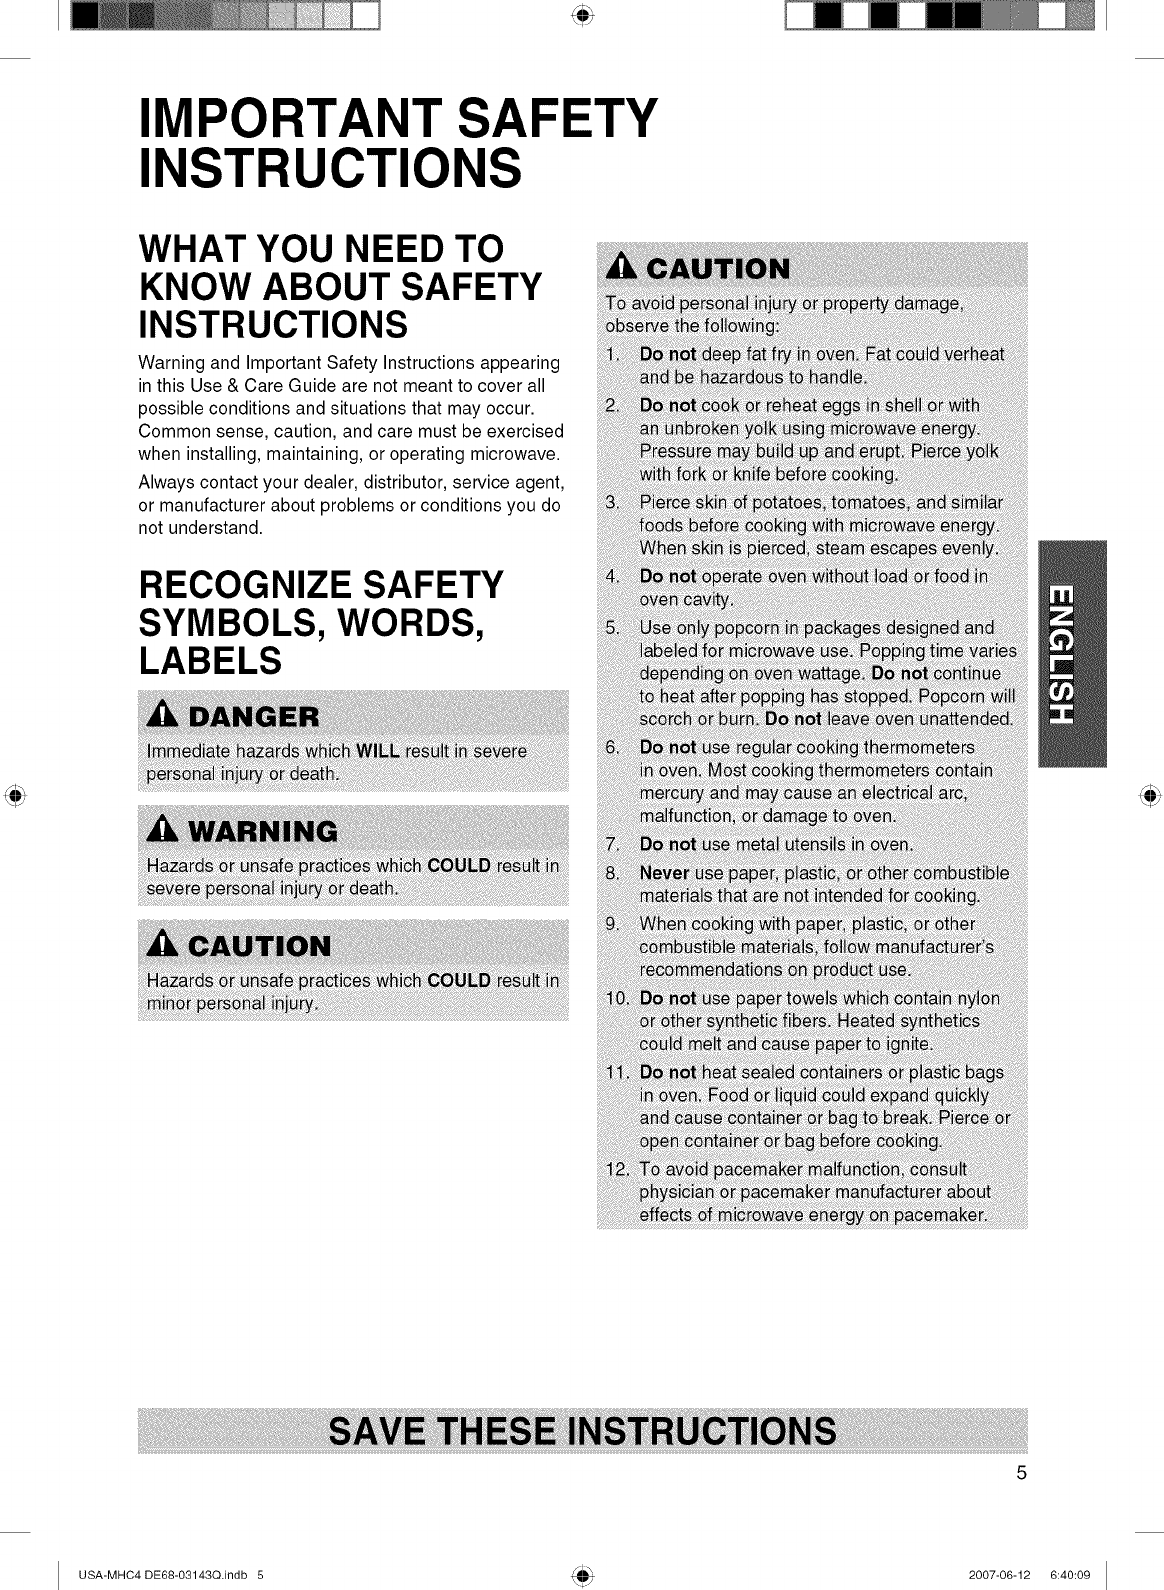
RECOGNIZE SAFETY
SYMBOLS, WORDS,
LABELS
USA-MHC4 DE68-03143Q.indb 5 2007-06-12 6:40:09

i¸fillillii!i!ii!i!iii_iiii!ii!ill!iiil!i!iiiiill¸i!ii!iiiiill!_!_!_!_iiii_iiiii!ii!i'iiiiiiiiilliiii!i!i!iiiii!_i_i;i_ii!_i_i_iiiiiiiiiiiliililiiii!i!i¸iiliiilii_ii_iiiiiiiii!iiilili!_i;!_i_iiiiiiiiiii'!_!_!_!ii!!!!i_iiiiii!_!!!_ili!i!iiiiiiiiiiiiiiiii_ii!iiili!ilili_iii_iii_il;ii_!_!:!!!!!ii!_!_!!!iiiii!iiiii!_!_!!iil'iliiii!ii!i!i!i!iiiiiiiii_i_i_i_ilil_ii_i!!!iii!iiiiili¸ii¸iili!ili!i!ii_iiiiillii!_!'!iiiiii!i_iiiiiiiii!iiiiiii!!iill¸iiiiii!ii!!!_ili!!iiiiiii!!iii_i!!!i!i,liilliiiiiii!iiiii_iiii_iiiii!i!_i!ii!ii!iiii!i!iili!_!_!iiiii!iliiii_iii!i!iii_ii!iliiiii!iiilii¸iiiiliiii!iiiii¸iliiiiii!i_i!iiii_i_i!_iiiiiiiilii;i!i_iiiii_i!!!!!_!!Jiili¸i!!_ii__!_i,!!!_!_iiiiii_!_!ii!iiii;!_!ii_ili!ii!iiii_!ii_iiiiiiii!ii_ii!iiiiiiiiiiilili!iii!!i!iii!i!iiliii_!iiiii!_!i!i!i!ililii_iiiiiiiii!ii_ii_iiiii!i!iiiii!_i!ii_ii!!_!iii_iiiiliiiii!ii_ii_iiiii!i!iiiii!_i!ii_ii!!_!iii_iiiiliiiii!ii_ii_iiiii!i!iiiii!_i!ii_ii!!_!iii_iiiiliiiii!ii_ii_iiiii!i!iiiii!_i!ii_ii!!_!iii_iiiiliiiii!ii_ii_iiiii!i!iiiii!_i!ii_ii!!_!iii_iiiiliiiii!ii_ii_iiiii!i!iiiii!_i!ii_ii!!_!iii_iiiiliiiii!ii_ii_iiiii!i!iiiii!_!i_iiiliiilil
PRECAUTIONS TO
AVOID POSSIBLE
EXPOSURE TO
EXCESSIVE
MICROWAVE ENERGY
A. DO NOT attempt to operate this oven with the
door open since open door operation can result
in harmful exposure to microwave energy. It is
important not to defeat or tamper with the safety
interlocks.
B. DO NOT place any object between the oven front
face and the door or allow soil or cleaner residue
to accumulate on sealing surfaces.
C. DO NOT operate the oven if it is damaged. It
is particularly important that oven door close
properly and that there is no damage to:
1. door (bent),
2. hinges and latches (broken or loosened),
3. door seals and sealing surfaces.
D. Oven should not be adjusted or repaired
by anyone except properly qualified service
personnel.
USA-MHC4 DE68-03143Q.indb 6 2007-06-12 6:40:09
USA-MHC4DE68-03143Q.indb7 2007-06-126:40:10
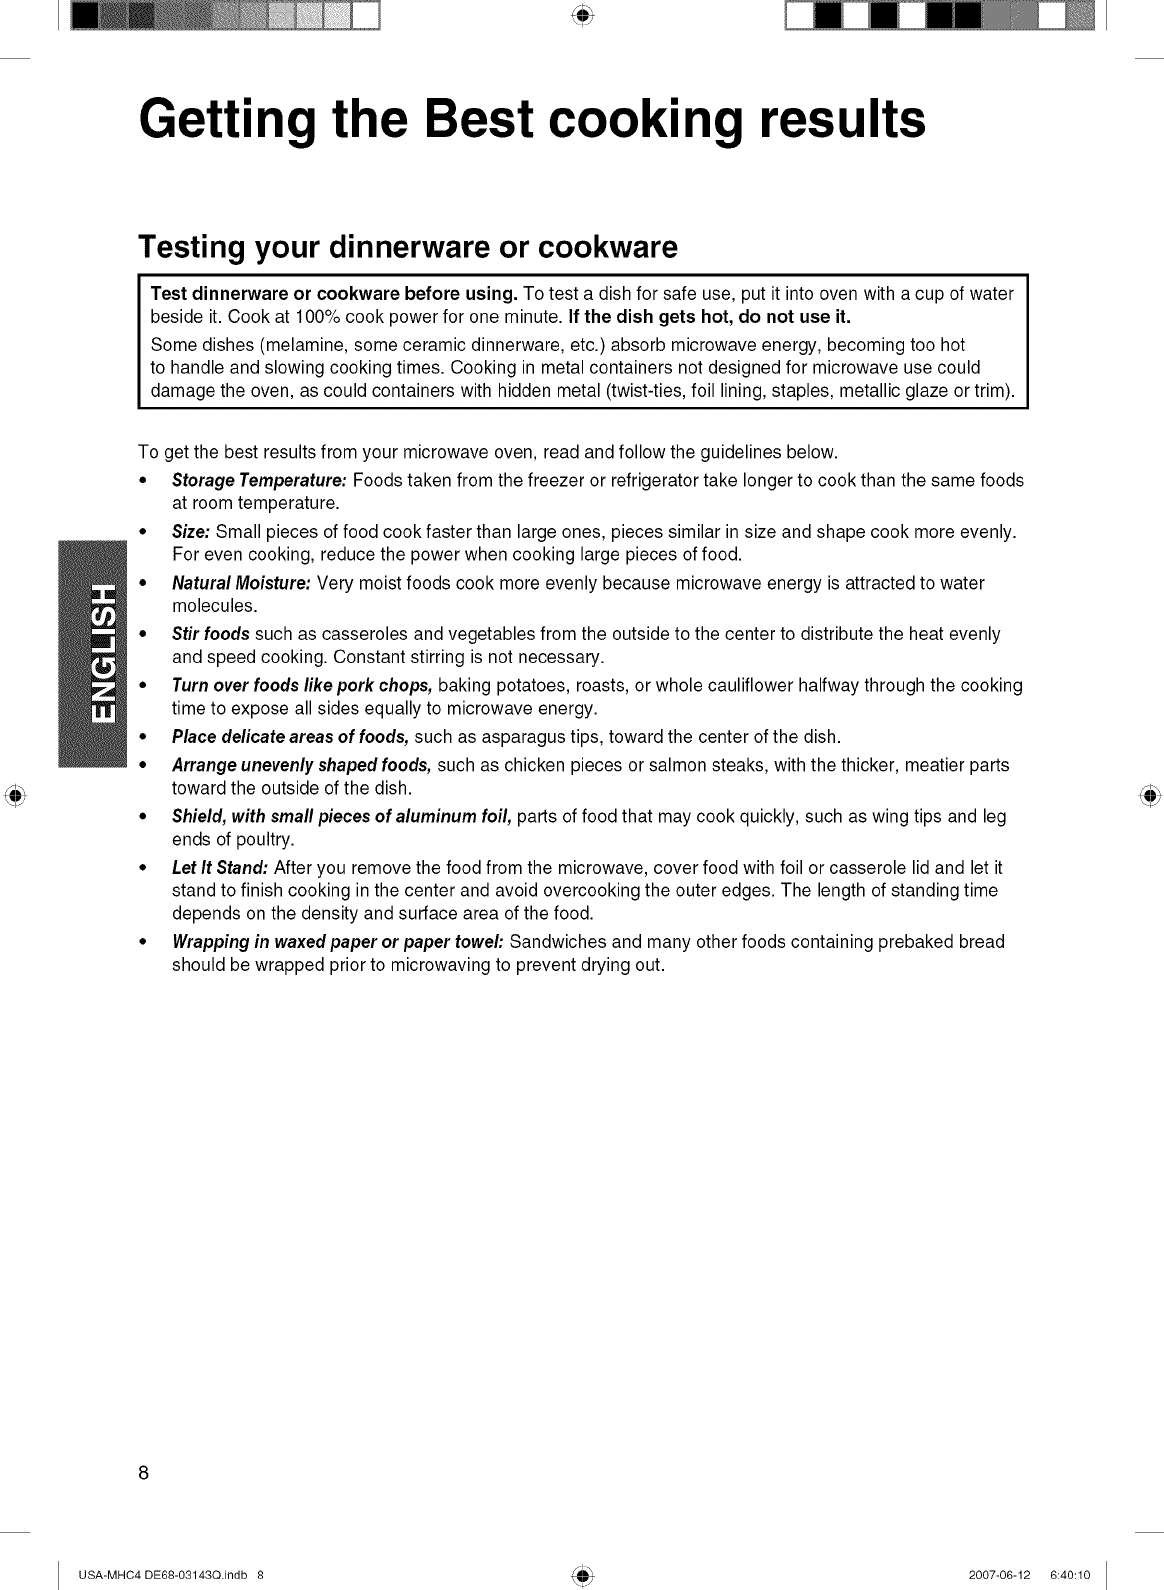
Getting the Best cooking results
Testing your dinnerware or cookware
Test dinnerware or cookware before using. To test a dish for safe use, put it into oven with a cup of water
beside it. Cook at 100% cook power for one minute. If the dish gets hot, do not use it.
Some dishes (melamine, some ceramic dinnerware, etc.) absorb microwave energy, becoming too hot
to handle and slowing cooking times. Cooking in metal containers not designed for microwave use could
damage the oven, as could containers with hidden metal (twist-ties, foil lining, staples, metallic glaze or trim).
To get the best results from your microwave oven, read and follow the guidelines below.
•Storage Temperature: Foods taken from the freezer or refrigerator take longer to cook than the same foods
at room temperature.
•Size: Small pieces of food cook faster than large ones, pieces similar in size and shape cook more evenly.
For even cooking, reduce the power when cooking large pieces of food.
• Natural Moisture: Very moist foods cook more evenly because microwave energy is attracted to water
molecules.
• Stir foods such as casseroles and vegetables from the outside to the center to distribute the heat evenly
and speed cooking. Constant stirring is not necessary.
• Turn over foods like pork chops, baking potatoes, roasts, or whole cauliflower halfway through the cooking
time to expose all sides equally to microwave energy.
• Place delicate areas of foods, such as asparagus tips, toward the center of the dish.
• Arrange unevenly shaped foods, such as chicken pieces or salmon steaks, with the thicker, meatier parts
toward the outside of the dish.
• Shield, with small pieces of aluminum foil, parts of food that may cook quickly, such as wing tips and leg
ends of poultry.
• Let It Stand: After you remove the food from the microwave, cover food with foil or casserole lid and let it
stand to finish cooking in the center and avoid overcooking the outer edges. The length of standing time
depends on the density and surface area of the food.
• Wrapping in waxed paper or paper toweh Sandwiches and many other foods containing prebaked bread
should be wrapped prior to microwaving to prevent drying out.
USA-MHC4 DE68-03143Q.indb 8 2007-06-12 6:40:10

Features
Door Handle Window with
Metal Shield
Cooking Guide
Door Safety
Lock System
Model and Serial
Number Plate
Oven Specifications
Wire Rack
o--
B
Glass Turntable ]
Oven Control
Panel
Input Power 1,650W
Frequency 2,450 MHz
Outer Dimensions 29 7/8(W) X 16 13/16(H) x 16 (D)
Net Weight 53.4 Ibs.
The wire rack gives you extra space when cooking in more than one container at the same time.
!use r:a k
1. Place rack securely in the four plastic supports.
• Rack MUST NOT touch metal walls or back of microwave oven.
2. Place equal amounts of food both ABOVE AND BELOW rack.
•Amount of food must be approximately the same to balance out cooking energy.
IMPORTANT"
• DO NOT store or use the wire rack in this oven unless more than one item is being cooked or a recipe calls for it.
• Damage to the oven could occur
USA-MHC4 DE68-03143Q,indb 9 2007-06-12 6:40:10
iiiiiillii!i!ii!i!iii!iiii!ii!iii!ii!iii!i!iiiiiiiiiiiiiiiiiiiiili!iiiiiilii!!iii!iiii!!iiii!!!!i!!iiiiiiiiiii!i!!!ii!i!iiiiiii_iiiiiiiii!i!iiiiiii!!!!!!!iiiiii!iiiii_iiiii!ii!iilli'!ii!i!i!iiiii_i!iii!!!iiiii!!!!ii!i!iiiiiiilli!iiiii!iii!!!!iiiiiii!i!iiii!!iii!iiiiiiiliii!i!iiiii!!i!ilili!!i!i!i!iiiiiiiiii!iiiiiiiiiii!i!iiiii!!i!ilili!!i!i!i!iiiiiiiiii!iiiiiiiiiii!i!iiiii!!i!ilili!!i!i!i!iiiiiiiiii!iiiiiiiiiii!i!iiiii!!i!ilili!!i!i!i!iiiiiiiiii!iiiiiiiiiii!i!iiiii!!i!ilili!!i!i!i!iiiiiiiiii!iiiiiiiiiii!i!iiiii!!i!ilili!!i!i!i!iiiiiiiiii!iiiiiiiiiii!i!iiiii!!i!ilili!!i!i!i!iiiiiiiiii!iiiiiiiiiii!i!iiiii!!i!ilili!!i!i!i!iiiiiiiiii!iiiiiiiiiii!i!iiiii!!i!ilili!!i!i!i!iiiiiiiiii!iiiiiiiiiii!i!iiiii!!i!ilili!!i!i!i!iiiiiiiiii!iiiiiiiiiii!i!iiiii!!i!ilili!!i!i!i!iiiiiiiiii!iiiiiiiiiii!i!iiiii!!i!ilili!!i!i!i!iiiiiiiiii!iiiiiiiiiii!i!iiiii!!i!ilili!!i!i!i!iiiiiiiiii!iiiiiiiiiii!i!iiiii!!i!ilili!!i!i!i!iiiiiiiiii!iiiiiiiiiii!i!iiiii!!i!ilili!!i!i!i!iiiiiiiiii!iiiiiiiiiii!i!iiiii!!i!ilili!!i!i!i!iiiiiiiiii!iiiiiiiiiii!i!iiiii!!i!ilili!!i!i!i!iiiiiiiiii!iiiiiiiiiii!i!iiiii!!i!ilili!!i!iii!iiiiiiiiiil!i
®
10
USA-MHC4 DE68-03143Q.indb 10 2007-06-12 6:40:10
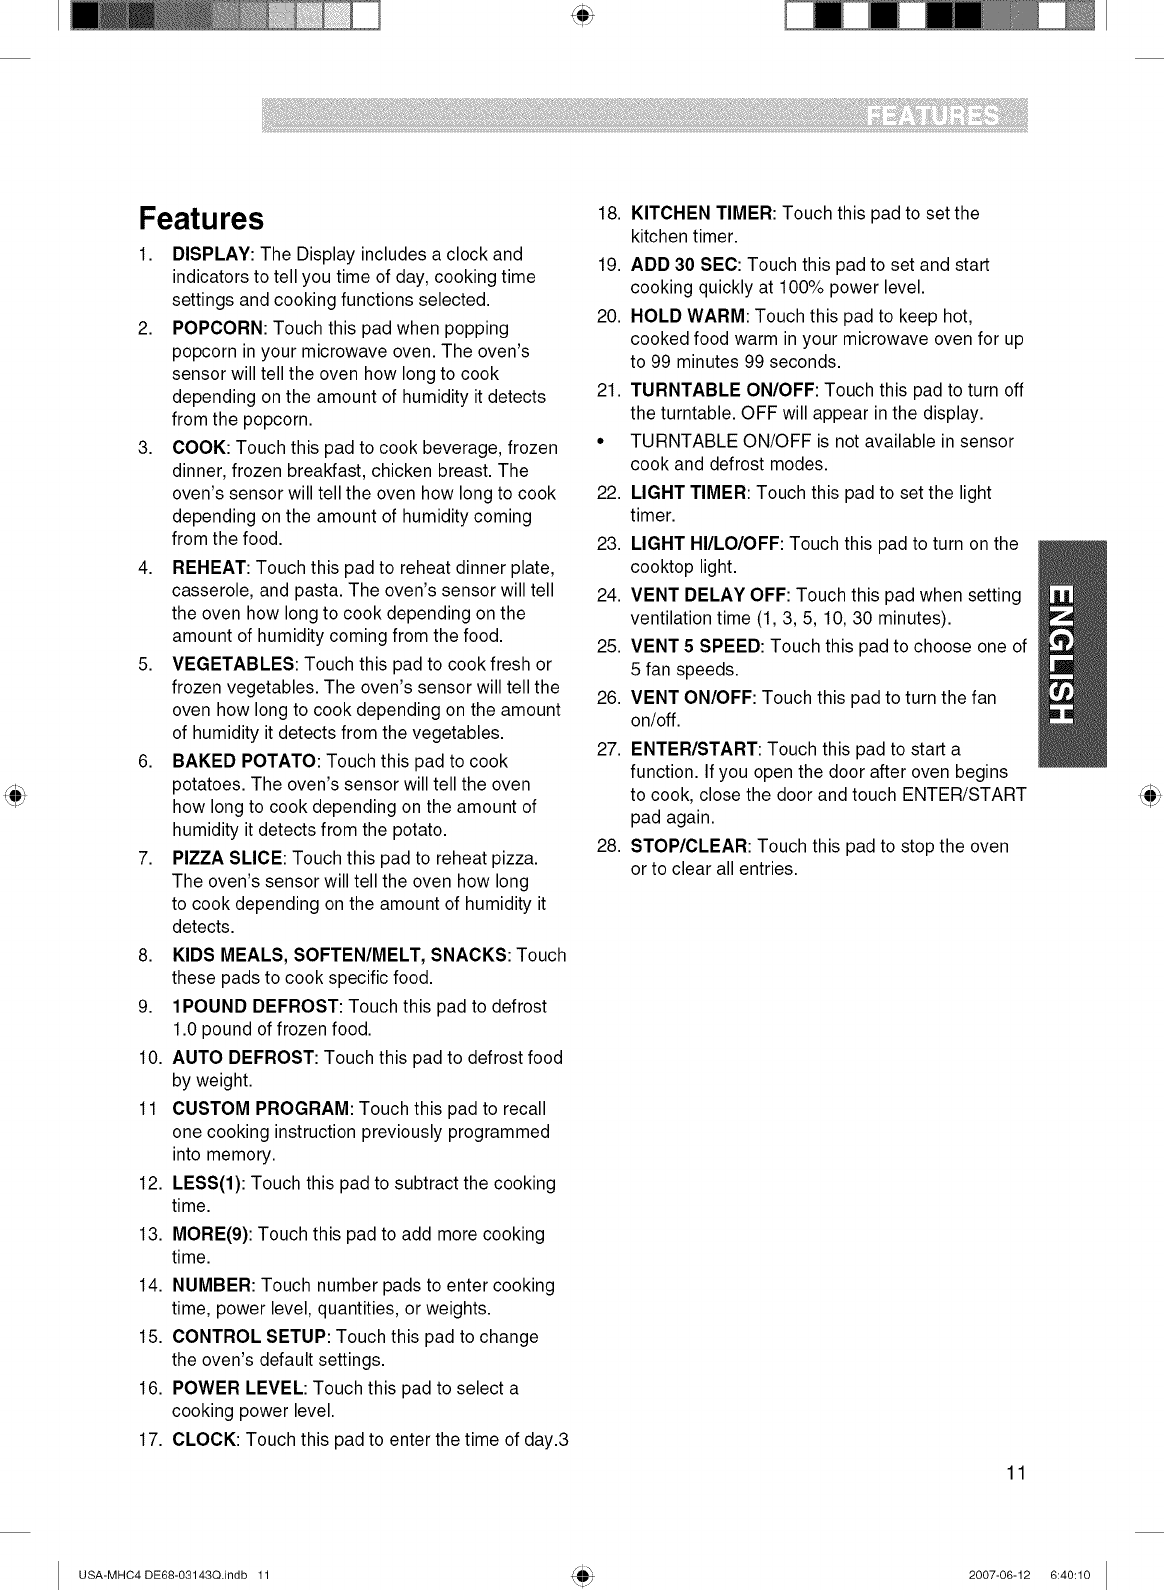
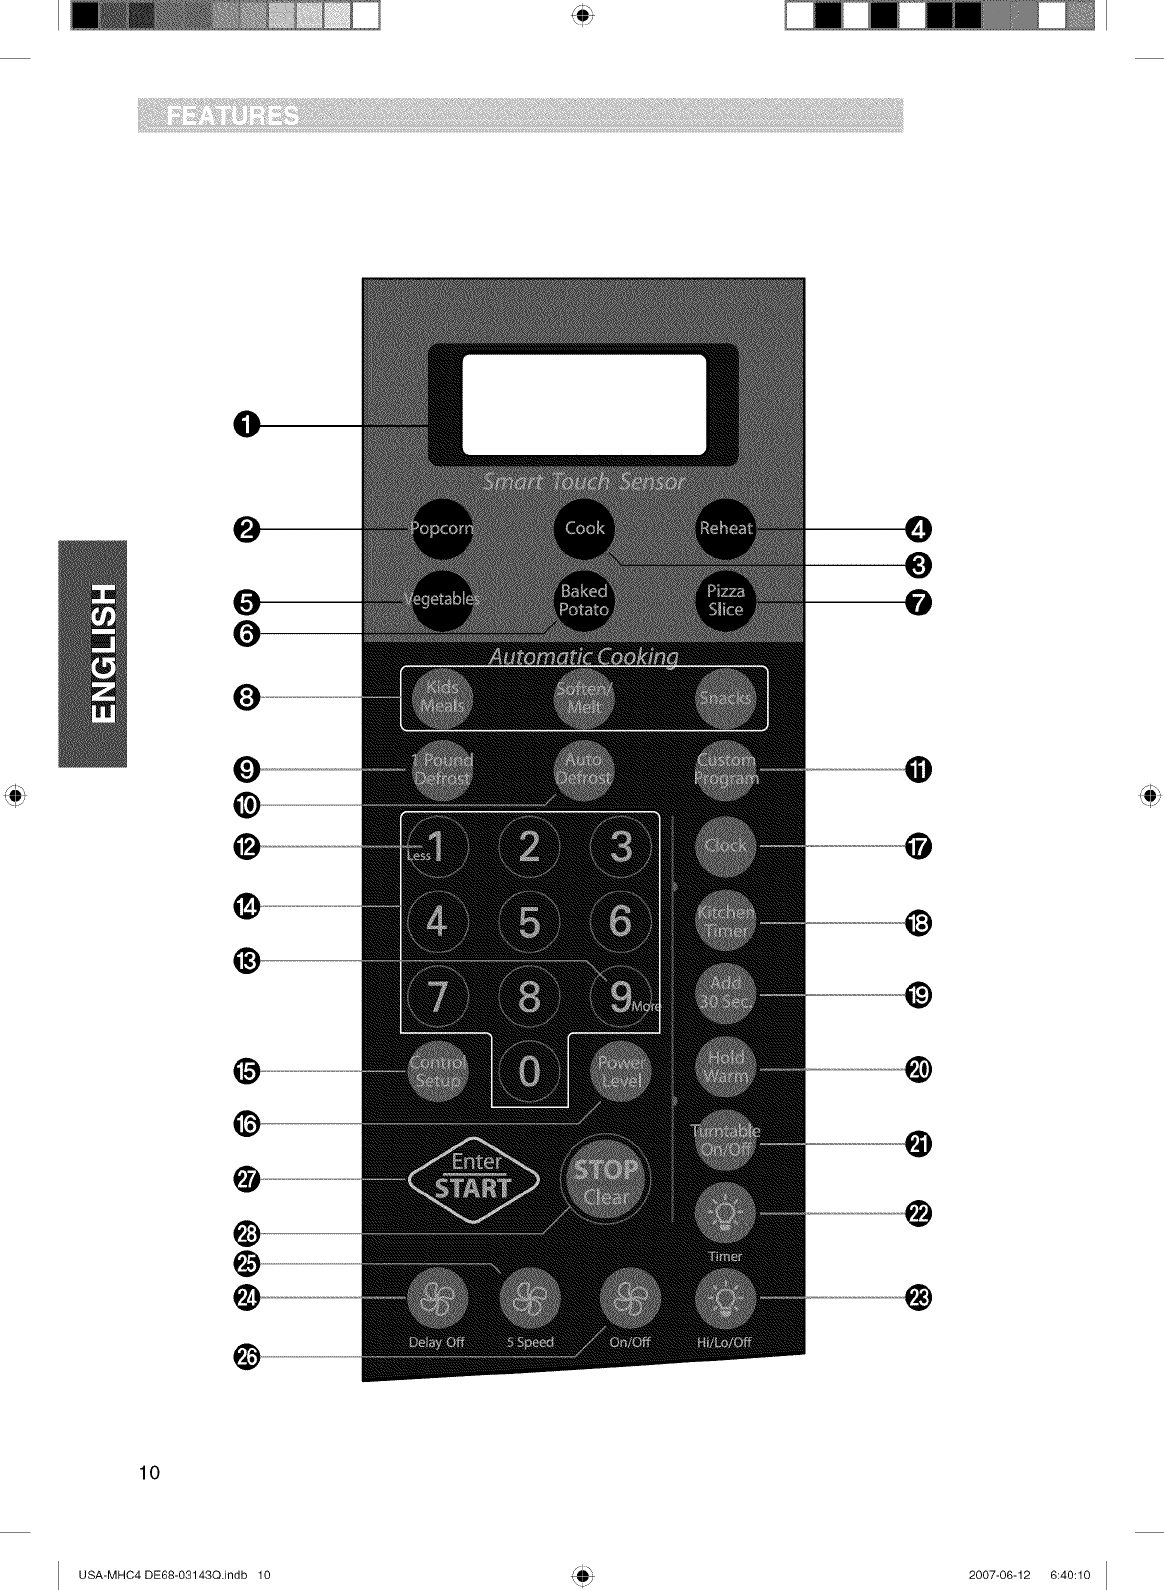
Features
1. DISPLAY: The Display includes a clock and
indicators to tell you time of day, cooking time
settings and cooking functions selected.
2. POPCORN: Touch this pad when popping
popcorn in your microwave oven. The oven's
sensor will tell the oven how long to cook
depending on the amount of humidity it detects
from the popcorn.
3. COOK: Touch this pad to cook beverage, frozen
dinner, frozen breakfast, chicken breast. The
oven's sensor will tell the oven how long to cook
depending on the amount of humidity coming
from the food.
4. REHEAT: Touch this pad to reheat dinner plate,
casserole, and pasta. The oven's sensor will tell
the oven how long to cook depending on the
amount of humidity coming from the food.
5. VEGETABLES: Touch this pad to cook fresh or
frozen vegetables. The oven's sensor will tell the
oven how long to cook depending on the amount
of humidity it detects from the vegetables.
6. BAKED POTATO: Touch this pad to cook
potatoes. The oven's sensor will tell the oven
how long to cook depending on the amount of
humidity it detects from the potato.
7. PIZZA SLICE: Touch this pad to reheat pizza.
The oven's sensor will tell the oven how long
to cook depending on the amount of humidity it
detects.
8. KIDS MEALS, SOFTEN/MELT, SNACKS: Touch
these pads to cook specific food.
9. 1POUND DEFROST: Touch this pad to defrost
1.0 pound of frozen food.
10. AUTO DEFROST: Touch this pad to defrost food
by weight.
11 CUSTOM PROGRAM: Touch this pad to recall
one cooking instruction previously programmed
into memory.
12. LESS(l): Touch this pad to subtract the cooking
time.
13. MORE(9): Touch this pad to add more cooking
time.
14. NUMBER: Touch number pads to enter cooking
time, power level, quantities, or weights.
15. CONTROL SETUP: Touch this pad to change
the oven's default settings.
16. POWER LEVEL: Touch this pad to select a
cooking power level.
17. CLOCK: Touch this pad to enter the time of day.3
18.
19.
20.
21.
22.
23.
24.
25.
26.
27.
28.
KITCHEN TIMER: Touch this pad to set the
kitchen timer.
ADD 30 SEC: Touch this pad to set and start
cooking quickly at 100% power level.
HOLD WARM: Touch this pad to keep hot,
cooked food warm in your microwave oven for up
to 99 minutes 99 seconds.
TURNTABLE ON/OFF: Touch this pad to turn off
the turntable. OFF will appear in the display.
TURNTABLE ON/OFF is not available in sensor
cook and defrost modes.
LIGHT TIMER: Touch this pad to set the light
timer.
LIGHT HI/LO/OFF: Touch this pad to turn on the
cooktop light.
VENT DELAY OFF: Touch this pad when setting
ventilation time (1, 3, 5, 10, 30 minutes).
VENT 5 SPEED: Touch this pad to choose one of
5 fan speeds.
VENT ON/OFF: Touch this pad to turn the fan
on/off.
ENTER/START: Touch this pad to start a
function. If you open the door after oven begins
to cook, close the door and touch ENTER/START
pad again.
STOP/CLEAR: Touch this pad to stop the oven
or to clear all entries.
11
USA-MHC4 DE68-03143Q.indb 11 2007-06-12 6:40:10
Operating instructions
Learn about your microwave
oven
This section introduces you to the basics you need to
know to operate your microwave oven. Please read
this information before use.
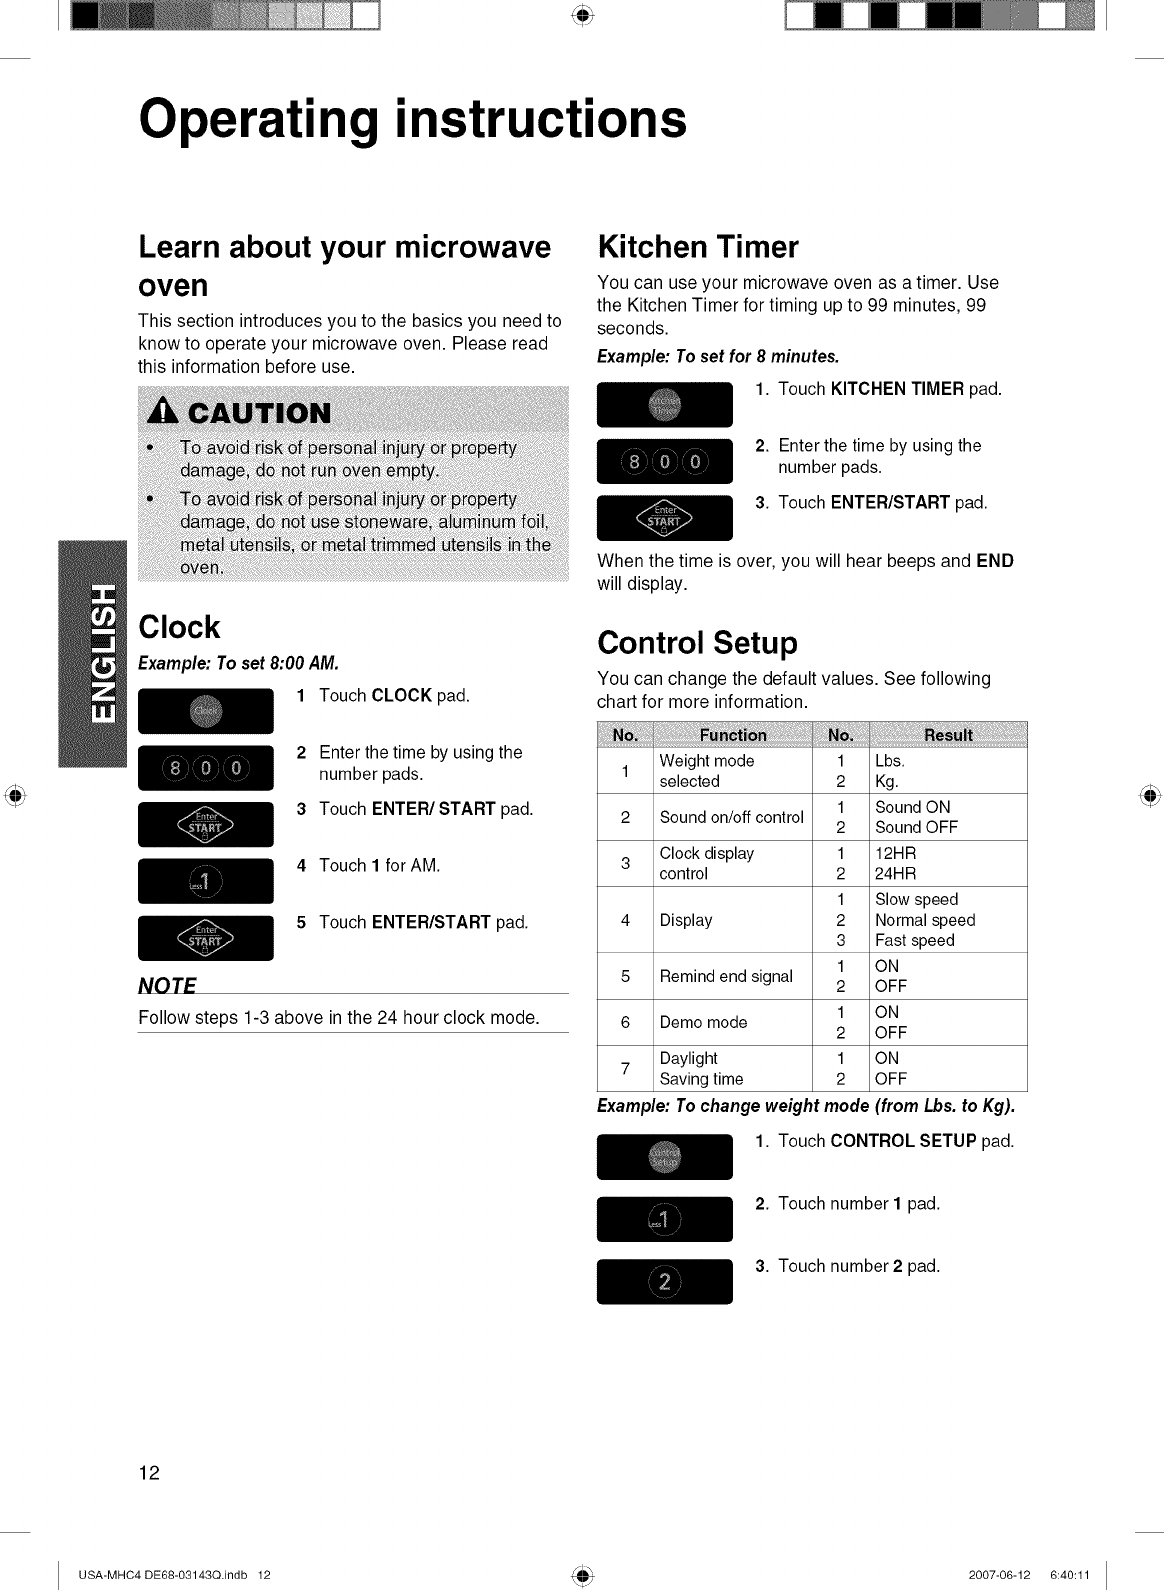
Kitchen Timer
You can use your microwave oven as a timer. Use
the Kitchen Timer for timing up to 99 minutes, 99
seconds.
Example: To set for 8minutes.
1. Touch KITCHEN TIMER pad.
2. Enter the time by using the
number pads.
3. Touch ENTER/START pad.
Clock
Example: To set 8:00 AM.
1 Touch CLOCK pad.
When the time is over, you will hear beeps and END
will display.
Control Setup
You can change the default values. See following
chart for more information.
Enter the time by using the
number pads.
3 Touch ENTER/START pad.
4 Touch 1 for AM.
5Touch ENTER/START pad.
NOTF
Follow steps 1-3 above in the 24 hour clock mode.
1 Weight mode 1 Lbs.
selected 2 Kg.
1 Sound ON
2 Sound on/off control 2 Sound OFF
3 Clock display 1 12HR
control 2 24HR
1 Slow speed
4 Display 2 Normal speed
3 Fast speed
1 ON
5 Remind end signal 2 OFF
1 ON
6 Demo mode 2 OFF
7 Daylight 1 ON
Saving time 2 OFF
Example: To change weight mode (from Lbs. to Kg).
1. Touch CONTROL SETUP pad.
2. Touch number I pad.
3. Touch number 2 pad.
12
USA-MHC4 DE68-03143Q.indb 12 2007-06-12 6:40:11
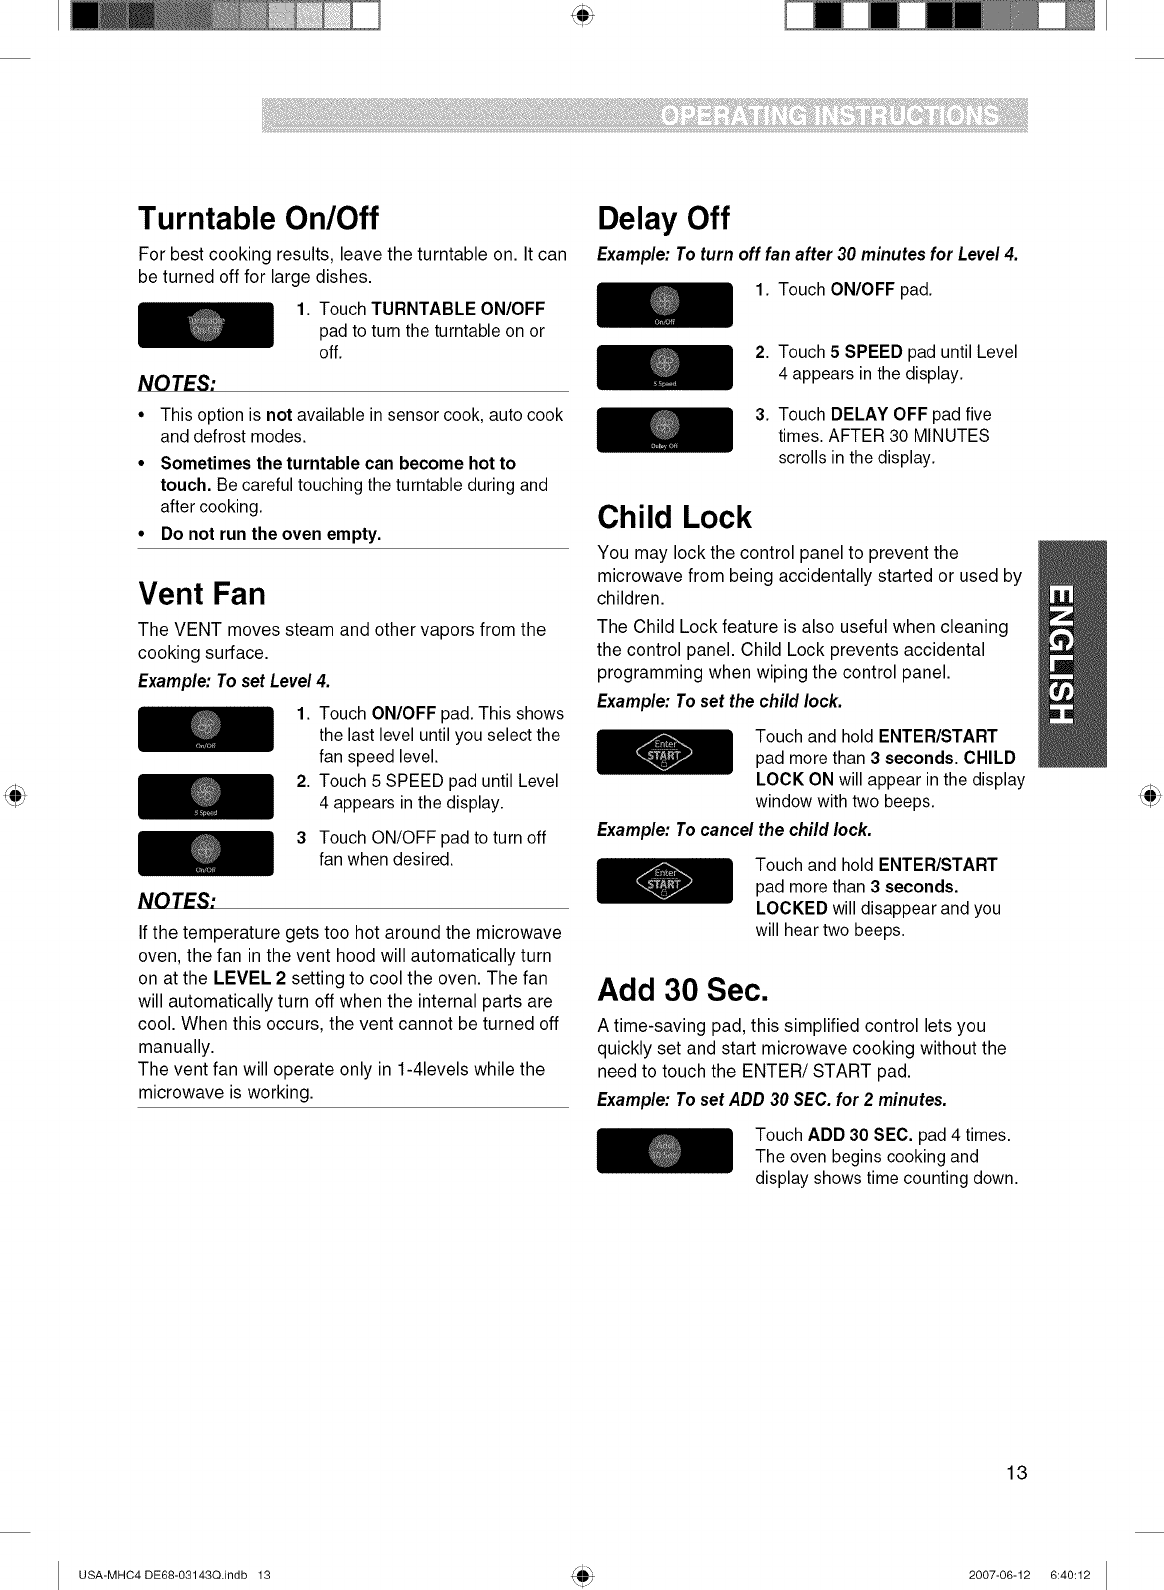
Turntable On/Off
For best cooking results, leave the turntable on. It can
be turned off for large dishes.
1. Touch TURNTABLE ON/OFF
pad to turn the turntable on or
off.
NOTES:
• This option is not available in sensor cook, auto cook
and defrost modes.
• Sometimes the turntable can become hot to
touch. Be careful touching the turntable during and
after cooking.
•Do not run the oven empty.
Vent Fan
The VENT moves steam and other vapors from the
cooking surface.
Example: To set Level 4.
NOTES:
1. Touch ON/OFF pad. This shows
the last level until you select the
fan speed level.
2. Touch 5 SPEED pad until Level
4 appears in the display.
3 Touch ON/OFF pad to turn off
fan when desired.
If the temperature gets too hot around the microwave
oven, the fan in the vent hood will automatically turn
on at the LEVEL 2 setting to cool the oven. The fan
will automatically turn off when the internal parts are
cool. When this occurs, the vent cannot be turned off
manually.
The vent fan will operate only in 1-4levels while the
microwave is working.
Delay Off
Example:Toturn off fan after 30 minutesfor Level4.
1. TouchON/OFFpad.
2. Touch 5 SPEED pad until Level
4 appears in the display.
3. Touch DELAY OFF pad five
times. AFTER 30 MINUTES
scrolls in the display.
Child Lock
You may lock the control panel to prevent the
microwave from being accidentally started or used by
children.
The Child Lock feature is also useful when cleaning
the control panel. Child Lock prevents accidental
programming when wiping the control panel.
Example: To set the child lock.
Touch and hold ENTER/START
pad more than 3 seconds. CHILD
LOCK ON will appear in the display
window with two beeps.
Example: To cancel the child lock.
Touch and hold ENTER/START
pad more than 3 seconds.
LOCKED will disappear and you
will hear two beeps.
Add 30 Sec.
A time-saving pad, this simplified control lets you
quickly set and start microwave cooking without the
need to touch the ENTER/START pad.
Example: To set ADD 30 SEC. for 2minutes.
Touch ADD 30 SEC. pad 4 times.
The oven begins cooking and
display shows time counting down.
13
USA-MHC4 DE68-03143Q.indb 13 2007-06-12 6:40:12
i¸ii_fillii!i!ii!i!iii_iiii!ii!iii!ii!iii!!iiiiiilliiiiii!_i!i!_iiii!!ii!ilii!iiiiiiili!i_iiiiiiiiiii!iilliiii_iiii!!i_!iiiii_iiii!iii!iiiiiiii!iii!_!!¸!iiiiiiiii!_'__i!!iii_ii;i_iiii!il!iiiii_i!i;i_iii_!!!'iii_i!!iii_i_i__i!'i_!!_"__i_iiii!_!ii!i!iii!_iiii!i!_!_!!ii!ii!_i_!_i!i_i_i_i'!!!!!iiii_iiiiiii'_ililiiii_iii'ilii!ii_ii!!_i!i!iiiiill¸__i_!i_i_!_iiii_i_iiii!i_iii!ili_i_i!ii!_iiiiiii'_iiiiiiiliiiiili!iii__i!i;;_i;_iiii!ii¸¸'_'!iiii!_!_iili!ii_i_i_ii_!_i_i_!_!!!i!iiilii!i!iiili!ii_ii!!!iiii!ii!iii!!_iiiii!_!_!i_i_i_iii!_i_iiii!i!ii!ii!i!iiii!_!i!iii!_!i!i_ii!!i!iiiiiiiiiiiiii!ii_ii_iiiii!i!iiiii!_i!ii_ii!!_!iii_iiiiiiiiii!ii_ii_iiiii!i!iiiii!_i!ii_ii!!_!iii_iiiiiiiiii!ii_ii_iiiii!i!iiiii!_i!ii_ii!!_!iii_iiiiiiiiii!ii_ii_iiiii!i!iiiii!_i!ii_ii!!_!iii_iiiiiiiiii!ii_ii_iiiii!i!iiiii!_i!ii_ii!!_!iii_iiiiiiiiii!ii_ii_iiiii!i!iiiii!_i!ii_ii!!_!iii_iiiiiiiiii!ii_ii_iiiii!i!iiiii!_i!ii_ii!!_!iii_iiiiiiiiii!ii_ii_iiiii!i!iiiii!_i!ii_ii!!_!iii_iiiiiiiiii!ii_ii_iiiii!i!iiiii!_i!ii_ii!!_!iii_iiiiiiiiii!ii_ii_iiiii!i!iiiii!_i!ii_ii!!_!iii_iiiiiiiiii!ii_ii_ii_iiiiiiii
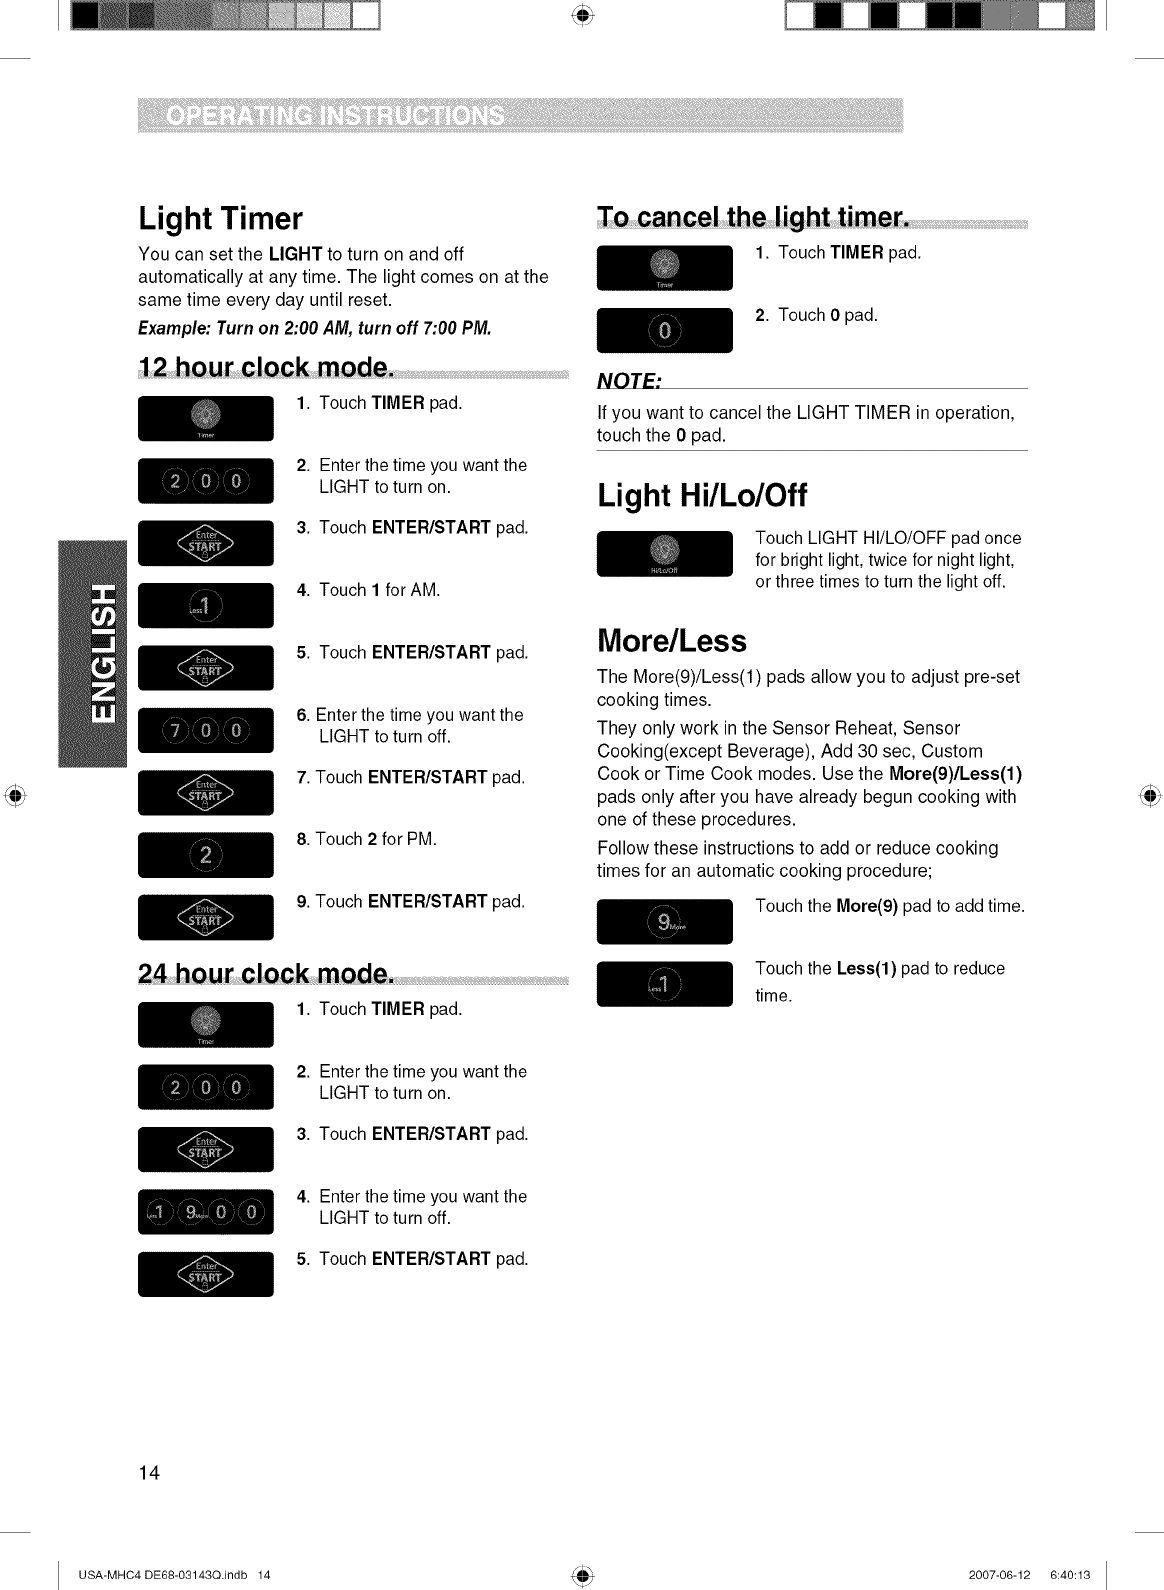
Light Timer
You can set the LIGHT to turn on and off
automatically at any time. The light comes on at the
same time every day until reset.
Example: Turn on 2:00 AM, turn off 7:00 PM.
2hou clQck mQde
1. Touch TIMER pad.
2. Enter the time you want the
LIGHT to turn on.
3. Touch ENTER/START pad.
4. Touch 1 for AM.
5. Touch ENTER/START pad.
6. Enter the time you want the
LIGHT to turn off.
7. Touch ENTER/START pad.
8. Touch 2 for PM.
9. Touch ENTER/START pad.
1. Touch TIMER pad.
2. Touch 0 pad.
NOTE"
If you wantto cancel the LIGHTTIMER in operation,
touch the 0 pad.
Light Hi/Lo/Off
Touch LIGHT HIiLO/OFF pad once
for bright light, twice for night light,
or three times to turn the light off.
More/Less
The More(g)/Less(1) pads allow you to adjust pre-set
cooking times.
They only work in the Sensor Reheat, Sensor
Cooking(except Beverage), Add 30 sec, Custom
Cook or Time Cook modes. Use the More(9)/Less(1)
pads only after you have already begun cooking with
one of these procedures.
Follow these instructions to add or reduce cooking
times for an automatic cooking procedure;
Touch the More(9) pad to add time.
24 hou_clock mode,
1. Touch TIMER pad.
Touch the Less(l) pad to reduce
time.
2. Enter the time you want the
LIGHT to turn on.
3. Touch ENTER/START pad.
4. Enter the time you want the
LIGHT to turn off.
5. Touch ENTER/START pad.
14
USA-MHC4 DE68-03143Q.indb 14 2007-06-12 6:40:13
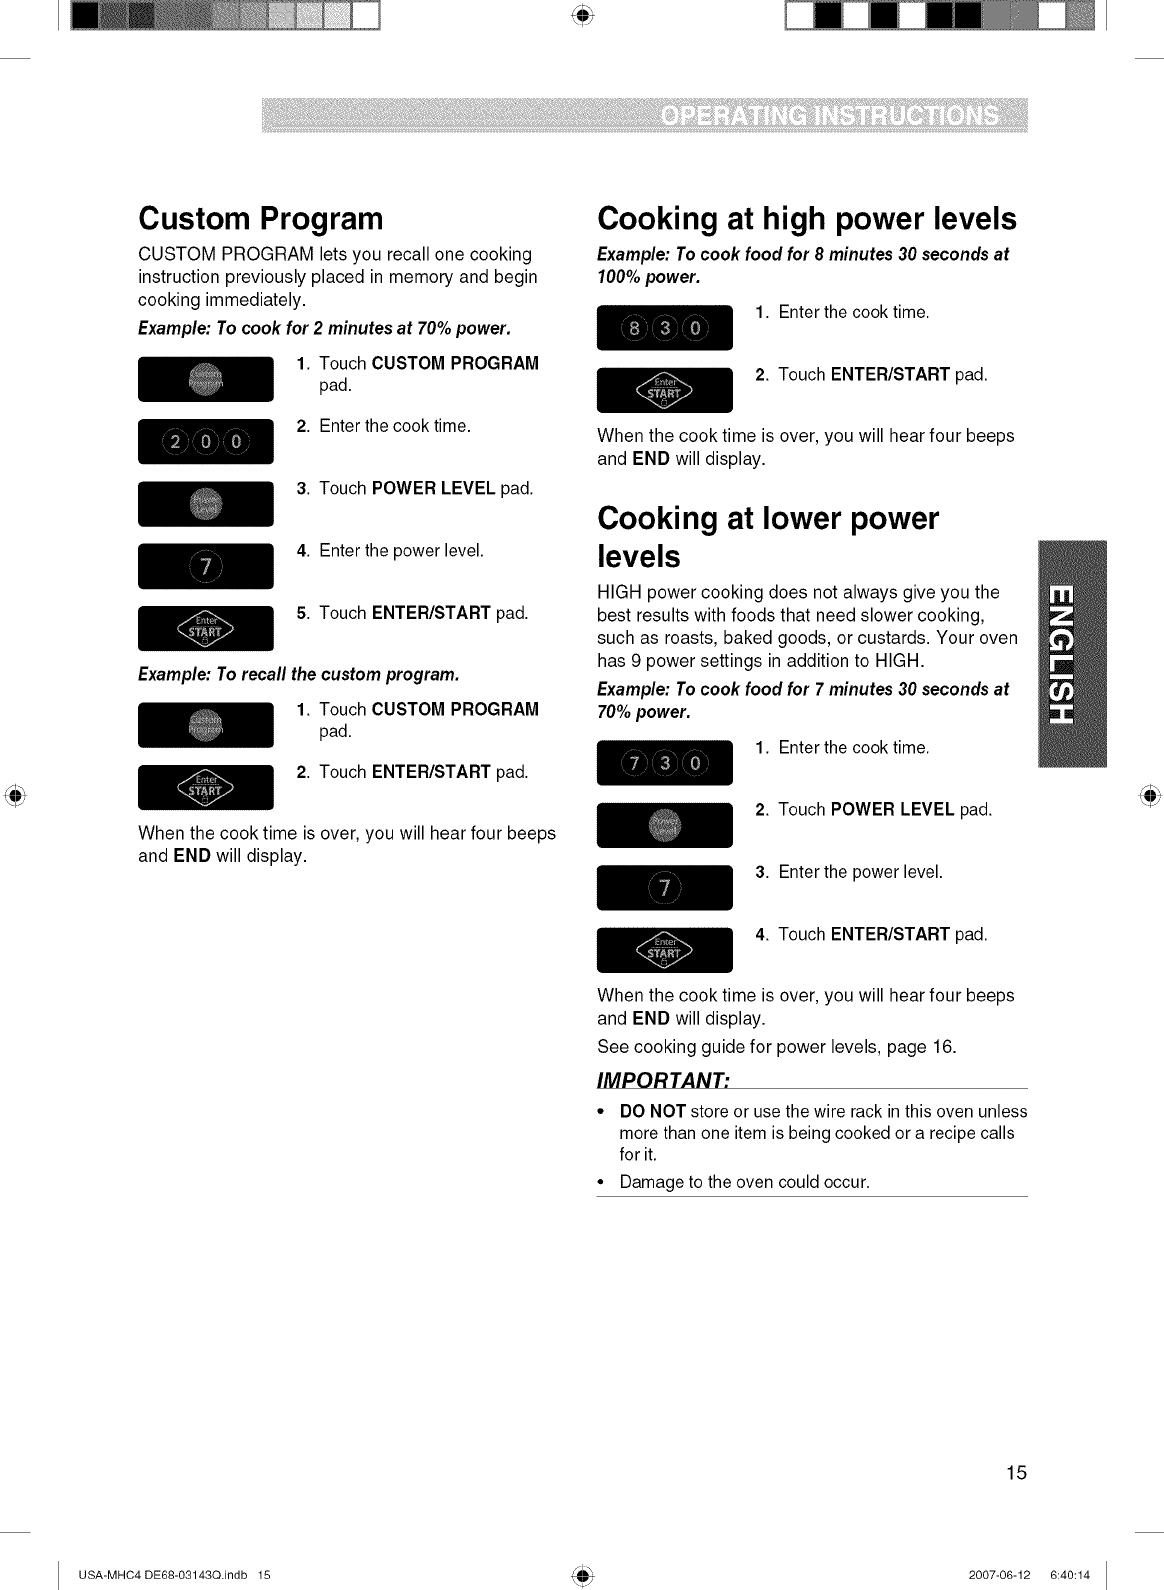
Custom Program
CUSTOM PROGRAM lets you recall one cooking
instruction previously placed in memory and begin
cooking immediately.
Example: To cook for 2minutes at 70% power.
1. Touch CUSTOM PROGRAM
pad.
2. Enter the cook time.
3. Touch POWER LEVEL pad.
4. Enter the power level.
5. Touch ENTER/START pad.
Example: To recafl the custom program.
1. Touch CUSTOM PROGRAM
pad.
2. Touch ENTER/START pad.
When the cook time is over, you will hear four beeps
and END will display.
Cooking at high power levels
Example: To cook food for 8minutes 30 seconds at
100% power.
1. Enter the cook time.
2. Touch ENTER/START pad.
When the cook time is over, you will hear four beeps
and END will display.
Cooking at lower power
levels
HIGH power cooking does not always give you the
best results with foods that need slower cooking,
such as roasts, baked goods, or custards. Your oven
has 9 power settings in addition to HIGH.
Example: To cook food for 7minutes 30 seconds at
70% power.
1. Enter the cook time.
2. Touch POWER LEVEL pad.
3. Enter the power level.
4. Touch ENTER/START pad.
When the cook time is over, you will hear four beeps
and END will display.
See cooking guide for power levels, page 16.
IMPORTANT:
• DO NOT store or use the wire rack in this oven unless
more than one item is being cooked or a recipe calls
for it.
• Damage to the oven could occur.
15
USA-MHC4 DE68-03143Q.indb 15 2007-06-12 6:40:14
i¸ii_fillii!i!ii!i!iiiiiii!ii!iii!ii!iii!!iiiiiilliiiiii!i!i!iiii!!ii!ilii!iiiiiiili!iiiiiiiiiiii!iilliiiiiiii!!i!iiiiiiiii!iii!iiiiiiii!iii!!!¸!iiiiiiiii!_'_i!!iiiiiiiiii!il!iiilii!i;iiii!!!iiii!!iiiiii!i!!iiiii!!ii!i!iii!iiii!i!!!!ii!ii!i!i!iiii!!!!!ifilliiiiiiililiiiiiiillii!iiii!!i!i!iiiiill¸__i!ii!iiiiiiiii!iiii!iiiii!ii!iiiiilliiiiiiililiiili!iiii!i;;iiiii!ii¸¸'_'!iiii!_!iili!iiliii!ii!!!!i!iiilii!i!iiili!iiii!!!iiii!ii!iii!!iiiii!!!iliiii!ilili!i!ii!ii!i!iiii!!i!iii!!i!iii!!i!iiiiiiiiiiiiii!iiiiiiiii!i!iiiii!i!ilii!!!iiliiiiiiiiii!iiiiiiiii!i!iiiii!i!ilii!!!iiliiiiiiiiii!iiiiiiiii!i!iiiii!i!ilii!!!iiliiiiiiiiii!iiiiiiiii!i!iiiii!i!ilii!!!iiliiiiiiiiii!iiiiiiiii!i!iiiii!i!ilii!!!iiliiiiiiiiii!iiiiiiiii!i!iiiii!i!ilii!!!iiliiiiiiiiii!iiiiiiiii!i!iiiii!i!ilii!!!iiliiiiiiiiii!iiiiiiiii!i!iiiii!i!ilii!!!iiliiiiiiiiii!iiiiiiiii!i!iiiii!i!ilii!!!iiliiiiiiiiii!iiiiiiiii!i!iiiii!i!ilii!!!iiliiiiiiiiii!iiiiiliiiiiiii
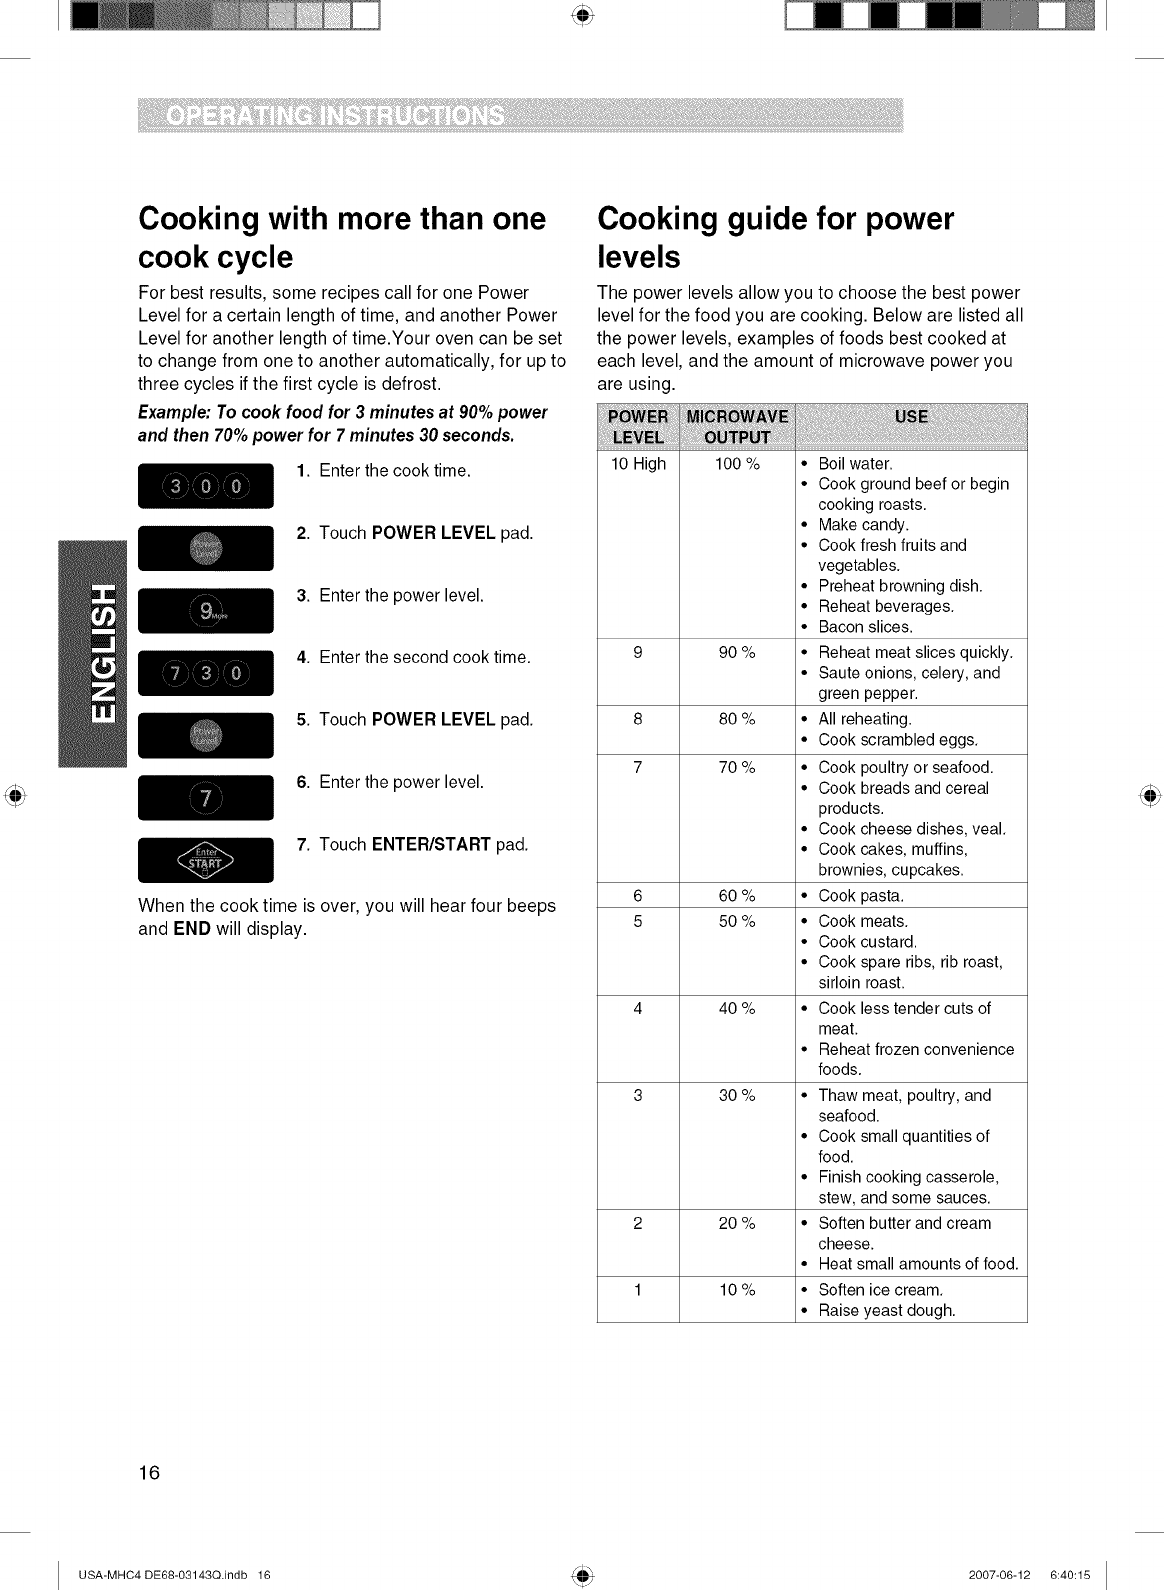
Cooking with more than one
cook cycle
For best results, some recipes call for one Power
Level for a certain length of time, and another Power
Level for another length of time.Your oven can be set
to change from one to another automatically, for up to
three cycles if the first cycle is defrost.
Example: To cook food for 3minutes at 90% power
and then 70% power for 7 minutes 30 seconds.
1. Enter the cook time.
2. Touch POWER LEVEL pad.
3. Enter the power level.
4. Enter the second cook time.
5. Touch POWER LEVEL pad.
6. Enter the power level.
7. Touch ENTER/START pad.
When the cook time is over, you will hear four beeps
and END will display.
Cooking guide for power
levels
The power levels allow you to choose the best power
level for the food you are cooking. Below are listed all
the power levels, examples of foods best cooked at
each level, and the amount of microwave power you
are using.
10 High 100 %
9 90 %
8 80 % •
7 70 % •
6 60 % *
5 50 % •
4 40 % •
3 30 % *
2 20 % •
1 10% •
• Boil water.
• Cook ground beef or begin
cooking roasts.
• Make candy.
• Cook fresh fruits and
vegetables.
• Preheat browning dish.
• Reheat beverages.
• Bacon slices.
• Reheat meat slices quickly.
• Saute onions, celery, and
green pepper
All reheating.
Cook scrambled eggs.
Cook poultry or seafood.
Cook breads and cereal
products
• Cook cheese dishes, veal.
• Cook cakes, muffins,
brownies, cupcakes.
Cook pasta.
Cook meats.
Cook custard.
Cook spare ribs, rib roast,
sirloin roast.
Cook less tender cuts of
meat.
Reheat frozen convenience
foods.
Thaw meat, poultry, and
seafood.
• Cook small quantities of
food.
Finish cooking casserole,
stew, and some sauces.
Soften butter and cream
cheese.
Heat small amounts of food.
Soften ice cream.
Raise yeast dough.
16
USA-MHC4 DE68-03143Q.indb 16 2007-06-12 6:40:15
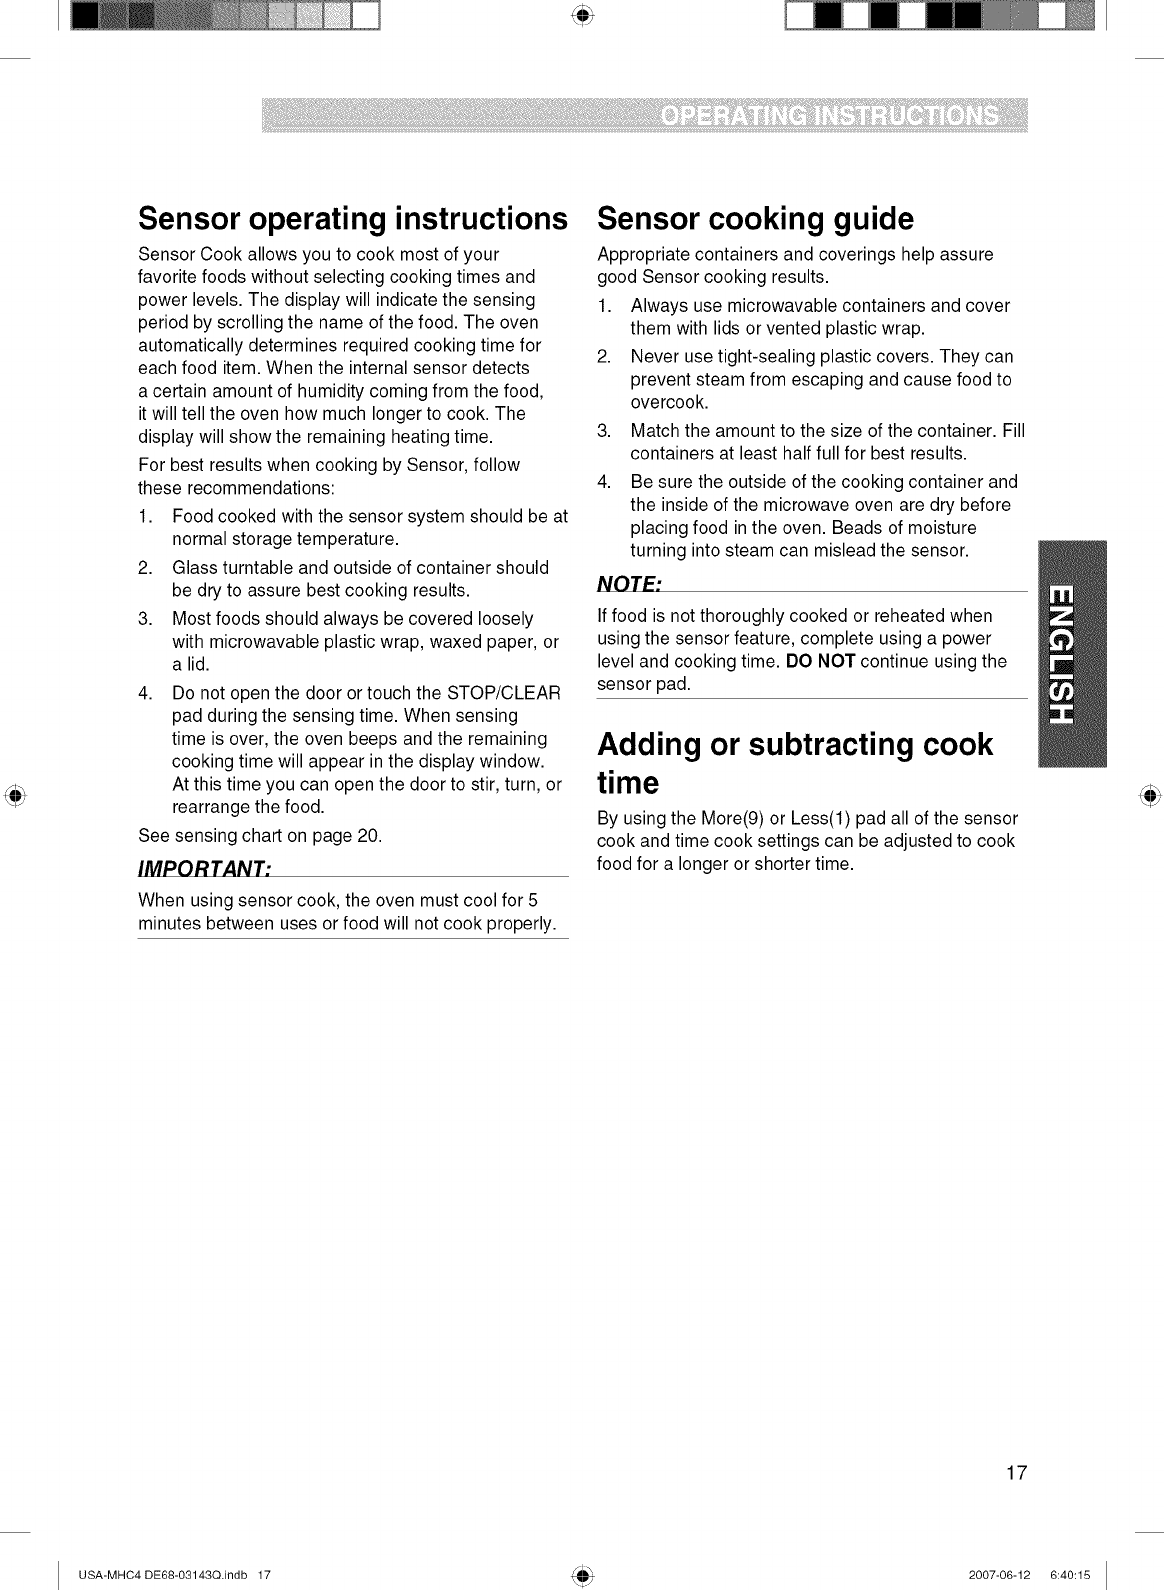
Sensor operating instructions
Sensor Cook allows you to cook most of your
favorite foods without selecting cooking times and
power levels. The display will indicate the sensing
period by scrolling the name of the food. The oven
automatically determines required cooking time for
each food item. When the internal sensor detects
a certain amount of humidity coming from the food,
it will tell the oven how much longer to cook. The
display will show the remaining heating time.
For best results when cooking by Sensor, follow
these recommendations:
1. Food cooked with the sensor system should be at
normal storage temperature.
2. Glass turntable and outside of container should
be dry to assure best cooking results.
3. Most foods should always be covered loosely
with microwavable plastic wrap, waxed paper, or
a lid.
4. Do not open the door or touch the STOP/CLEAR
pad during the sensing time. When sensing
time is over, the oven beeps and the remaining
cooking time will appear in the display window.
At this time you can open the door to stir, turn, or
rearrange the food.
See sensing chart on page 20.
IMPORTANT"
When using sensor cook, the oven must cool for 5
minutes between uses or food will not cook properly.
Sensor cooking guide
Appropriate containers and coverings help assure
good Sensor cooking results.
1. Always use microwavable containers and cover
them with lids or vented plastic wrap.
2. Never use tight-sealing plastic covers. They can
prevent steam from escaping and cause food to
overcook.
3.
4.
Match the amount to the size of the container. Fill
containers at least half full for best results.
Be sure the outside of the cooking container and
the inside of the microwave oven are dry before
placing food in the oven. Beads of moisture
turning into steam can mislead the sensor.
NOTE"
If food is not thoroughly cooked or reheated when
using the sensor feature, complete using a power
level and cooking time. DO NOT continue using the
sensor pad.
Adding or subtracting cook
time
By using the More(9) or Less(l) pad all of the sensor
cook and time cook settings can be adjusted to cook
food for a longer or shorter time.
17
USA-MHC4 DE68-03143Q.indb 17 2007-06-12 6:40:15
i¸ii_fillii!i!ii!i!iii_iiii!ii!iii!ii!iii!!iiiiiilliiiiii!_i!i!_iiii!!ii!ilii!iiiiiiili!i_iiiiiiiiiii!iilliiii_iiii!!i_!iiiii_iiii!iii!iiiiiiii!iii!_!!¸!iiiiiiiii!_'__i!!iii_ii;i_iiii!il!iiiii_i!i;i_iii_!!!'iii_i!!iii_i_i__i!'i_!!_"__i_iiii!_!ii!i!iii!_iiii!i!_!_!!ii!ii!_i_!_i!i_i_i_i'!!!!!iiii_iiiiiii'_ililiiii_iii'ilii!ii_ii!!_i!i!iiiiill¸__i_!i_i_!_iiii_i_iiii!i_iii!ili_i_i!ii!_iiiiiii'_iiiiiiiliiiiili!iii__i!i;;_i;_iiii!ii¸¸'_'!iiii!_!_iili!ii_i_i_ii_!_i_i_!_!!!i!iiilii!i!iiili!ii_ii!!!iiii!ii!iii!!_iiiii!_!_!i_i_i_iii!_i_iiii!i!ii!ii!i!iiii!_!i!iii!_!i!i_ii!!i!iiiiiiiiiiiiii!ii_ii_iiiii!i!iiiii!_i!ii_ii!!_!iii_iiiiiiiiii!ii_ii_iiiii!i!iiiii!_i!ii_ii!!_!iii_iiiiiiiiii!ii_ii_iiiii!i!iiiii!_i!ii_ii!!_!iii_iiiiiiiiii!ii_ii_iiiii!i!iiiii!_i!ii_ii!!_!iii_iiiiiiiiii!ii_ii_iiiii!i!iiiii!_i!ii_ii!!_!iii_iiiiiiiiii!ii_ii_iiiii!i!iiiii!_i!ii_ii!!_!iii_iiiiiiiiii!ii_ii_iiiii!i!iiiii!_i!ii_ii!!_!iii_iiiiiiiiii!ii_ii_iiiii!i!iiiii!_i!ii_ii!!_!iii_iiiiiiiiii!ii_ii_iiiii!i!iiiii!_i!ii_ii!!_!iii_iiiiiiiiii!ii_ii_iiiii!i!iiiii!_i!ii_ii!!_!iii_iiiiiiiiii!ii_ii_ii_iiiiiiii
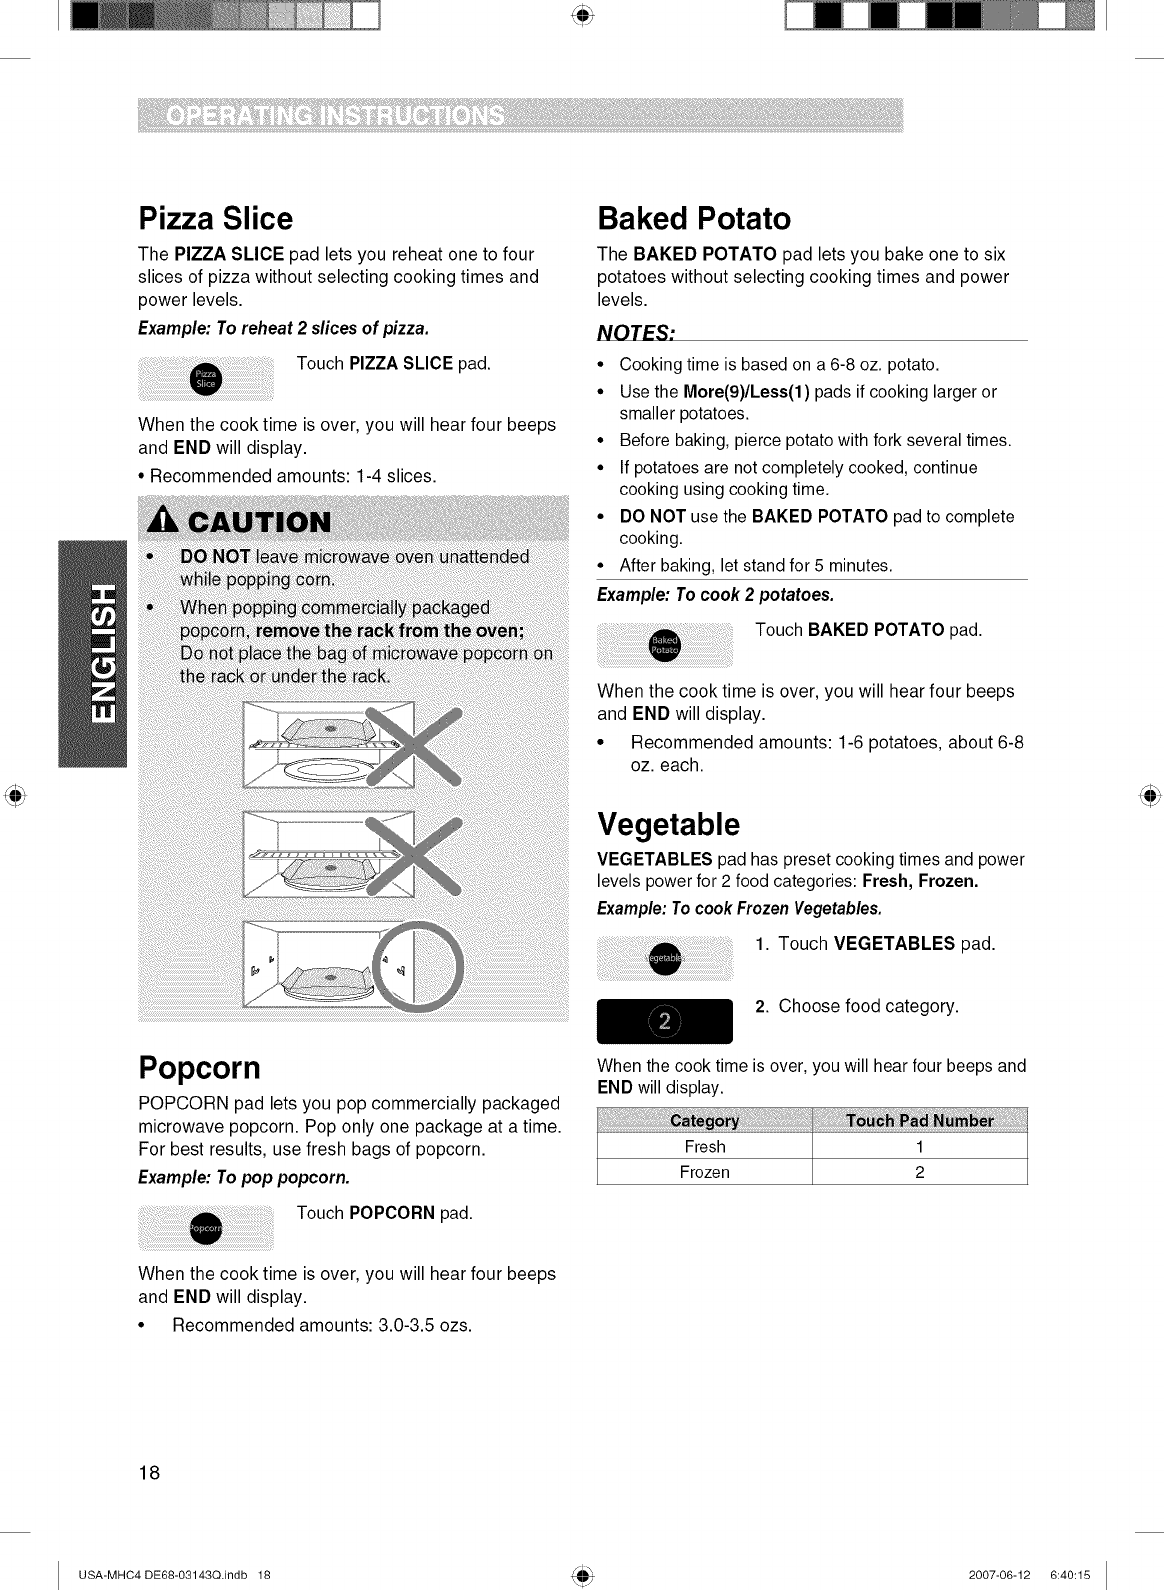
Pizza Slice
The PIZZA SLICE pad lets you reheat one to four
slices of pizza without selecting cooking times and
power levels.
Example: To reheat 2 sfices of pizza.
Touch PIZZA SLICE pad.
When the cook time is over, you will hear four beeps
and END will display.
• Recommended amounts: 1-4 slices.
Baked Potato
The BAKED POTATO pad lets you bake one to six
potatoes without selecting cooking times and power
levels.
NOTES:
• Cooking time is based on a 6-8 oz. potato.
• Use the More(9)/Less(1) pads if cooking larger or
smaller potatoes.
• Before baking, pierce potato with fork several times.
• If potatoes are not completely cooked, continue
cooking using cooking time.
• DO NOT use the BAKED POTATO pad to complete
cooking.
• After baking, let stand for 5 minutes.
Example: To cook 2 potatoes.
Touch BAKED POTATO pad.
When the cook time is over, you will hear four beeps
and END will display.
• Recommended amounts: 1-6 potatoes, about 6-8
oz. each.
Vegetable
VEGETABLES pad has preset cooking times and power
levels power for 2 food categories: Fresh, Frozen.
Example: To cook Frozen Vegetables.
1. Touch VEGETABLES pad.
2. Choose food category.
Popcorn
POPCORN pad lets you pop commercially packaged
microwave popcorn. Pop only one package at a time.
For best results, use fresh bags of popcorn.
Example: To pop popcorn.
Touch POPCORN pad.
When the cook time is over, you will hear four beeps and
END will display.
Fresh 1
Frozen 2
When the cook time is over, you will hear four beeps
and END will display.
• Recommended amounts: 3.0-3.5 ozs.
18
USA-MHC4 DE68-03143Q.indb 18 2007-06-12 6:40:15
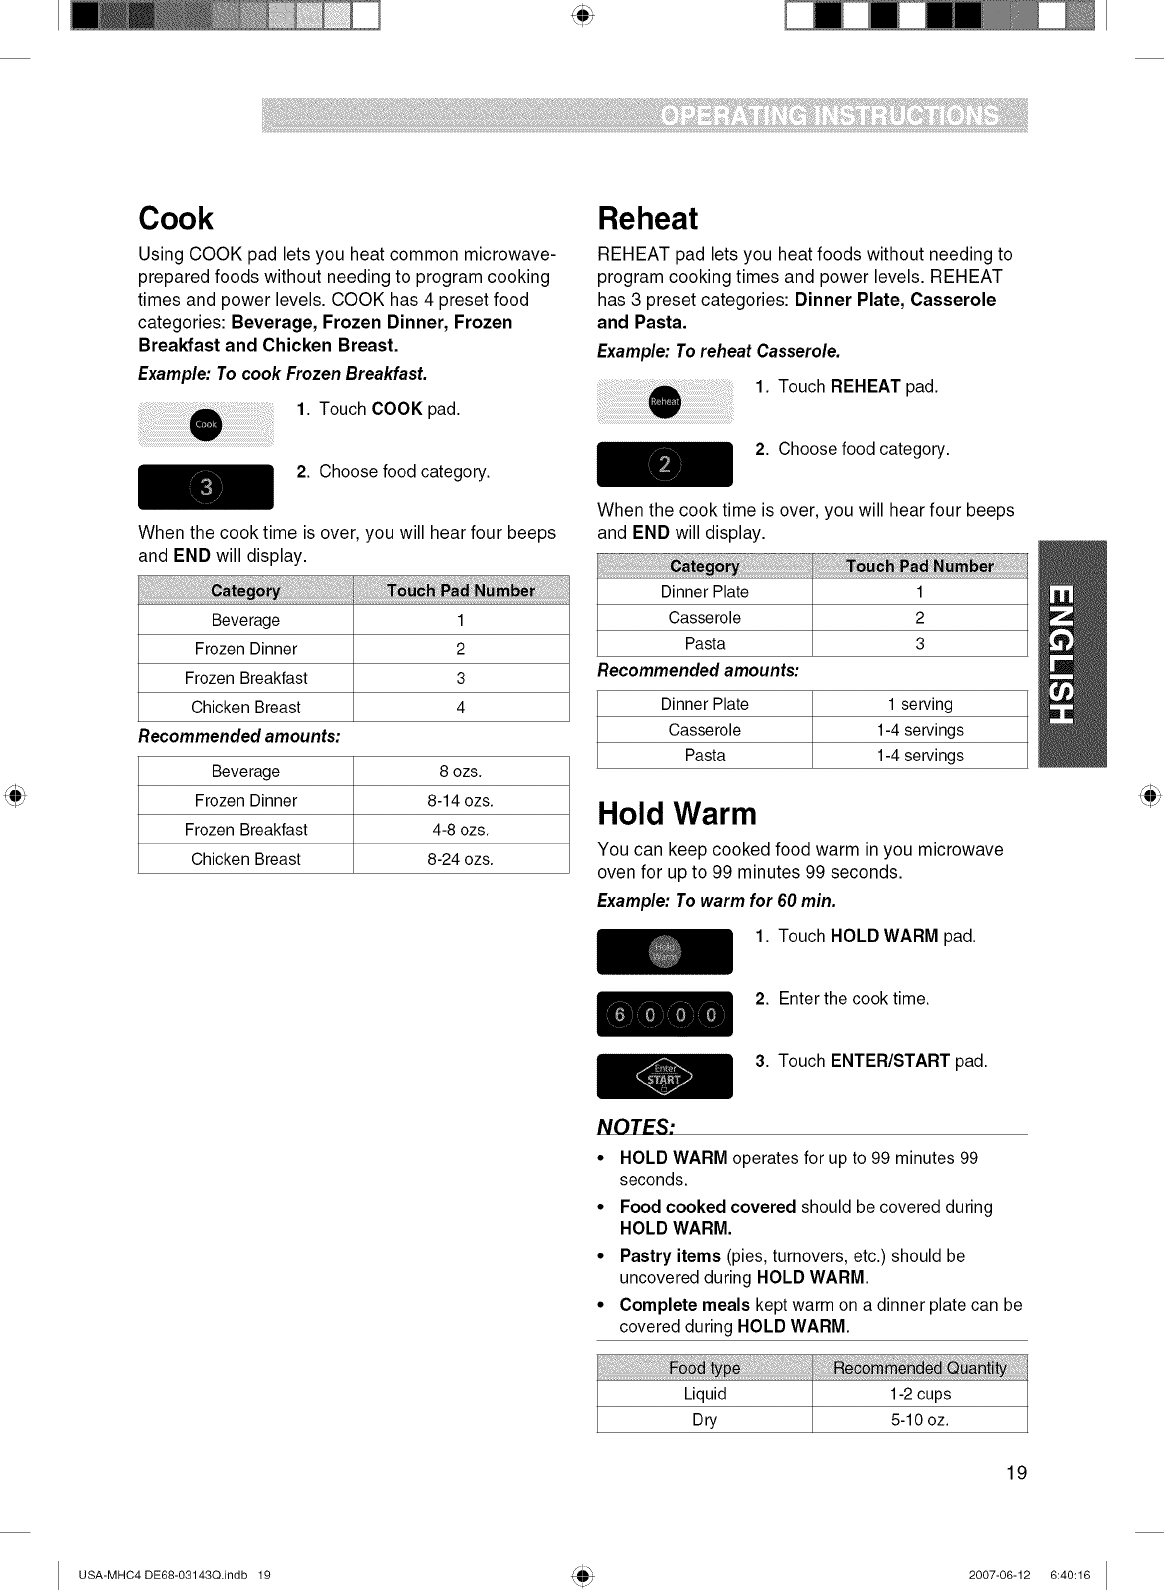
Cook
Using COOK pad lets you heat common microwave-
prepared foods without needing to program cooking
times and power levels. COOK has 4 preset food
categories: Beverage, Frozen Dinner, Frozen
Breakfast and Chicken Breast.
Example: To cook Frozen Breakfast.
1. Touch COOK pad.
2. Choose food category.
When the cook time is over, you will hear four beeps
and END will display.
Beverage
Frozen Dinner
Frozen Breakfast
Chicken Breast
Recommended amounts:
Beverage
Frozen Dinner
Frozen Breakfast
Chicken Breast
1
2
3
4
80ZS.
8-14 ozs.
4-8 ozs.
8-24 ozs.
Reheat
REHEAT pad lets you heat foods without needing to
program cooking times and power levels. REHEAT
has 3 preset categories: Dinner Plate, Casserole
and Pasta.
Example: To reheat Casserole.
1. Touch REHEAT pad.
2. Choose food category.
When the cook time is over, you will hear four beeps
and END will display.
Dinner Plate 1
Casserole 2
Pasta 3
Recommended amounts:
Dinner Plate 1 serving
Casserole 1-4 servings
Pasta 1-4 servings
Hold Warm
You can keep cooked food warm in you microwave
oven for up to 99 minutes 99 seconds.
Example: To warm for 60 min.
1. Touch HOLD WARM pad.
2. Enter the cook time.
3. Touch ENTER/START pad.
NOTES:
•HOLD WARM operates for up to 99 minutes 99
seconds.
• Food cooked covered should be covered during
HOLD WARM.
•Pastry items (pies, turnovers, etc.) should be
uncovered during HOLD WARM.
• Complete meals kept warm on a dinner plate can be
covered during HOLD WARM.
: a
Liquid 1-2 cups
Dry 5-10 oz.
19
USA-MHC4 DE68-03143Q.indb 19 2007-06-12 6:40:16
i¸ii_fillii!i!ii!i!iii_iiii!ii!iii!ii!iii!!iiiiiilliiiiii!_i!i!_iiii!!ii!ilii!iiiiiiili!i_iiiiiiiiiii!iilliiii_iiii!!i_!iiiii_iiii!iii!iiiiiiii!iii!_!!¸!iiiiiiiii!_'__i!!iii_ii;i_iiii!il!iiiii_i!i;i_iii_!!!'iii_i!!iii_i_i__i!'i_!!_"__i_iiii!_!ii!i!iii!_iiii!i!_!_!!ii!ii!_i_!_i!i_i_i_i'!!!!!iiii_iiiiiii'_ililiiii_iii'ilii!ii_ii!!_i!i!iiiiill¸__i_!i_i_!_iiii_i_iiii!i_iii!ili_i_i!ii!_iiiiiii'_iiiiiiiliiiiili!iii__i!i;;_i;_iiii!ii¸¸'_'!iiii!_!_iili!ii_i_i_ii_!_i_i_!_!!!i!iiilii!i!iiili!ii_ii!!!iiii!ii!iii!!_iiiii!_!_!i_i_i_iii!_i_iiii!i!ii!ii!i!iiii!_!i!iii!_!i!i_ii!!i!iiiiiiiiiiiiii!ii_ii_iiiii!i!iiiii!_i!ii_ii!!_!iii_iiiiiiiiii!ii_ii_iiiii!i!iiiii!_i!ii_ii!!_!iii_iiiiiiiiii!ii_ii_iiiii!i!iiiii!_i!ii_ii!!_!iii_iiiiiiiiii!ii_ii_iiiii!i!iiiii!_i!ii_ii!!_!iii_iiiiiiiiii!ii_ii_iiiii!i!iiiii!_i!ii_ii!!_!iii_iiiiiiiiii!ii_ii_iiiii!i!iiiii!_i!ii_ii!!_!iii_iiiiiiiiii!ii_ii_iiiii!i!iiiii!_i!ii_ii!!_!iii_iiiiiiiiii!ii_ii_iiiii!i!iiiii!_i!ii_ii!!_!iii_iiiiiiiiii!ii_ii_iiiii!i!iiiii!_i!ii_ii!!_!iii_iiiiiiiiii!ii_ii_iiiii!i!iiiii!_i!ii_ii!!_!iii_iiiiiiiiii!ii_ii_ii_iiiiiiii
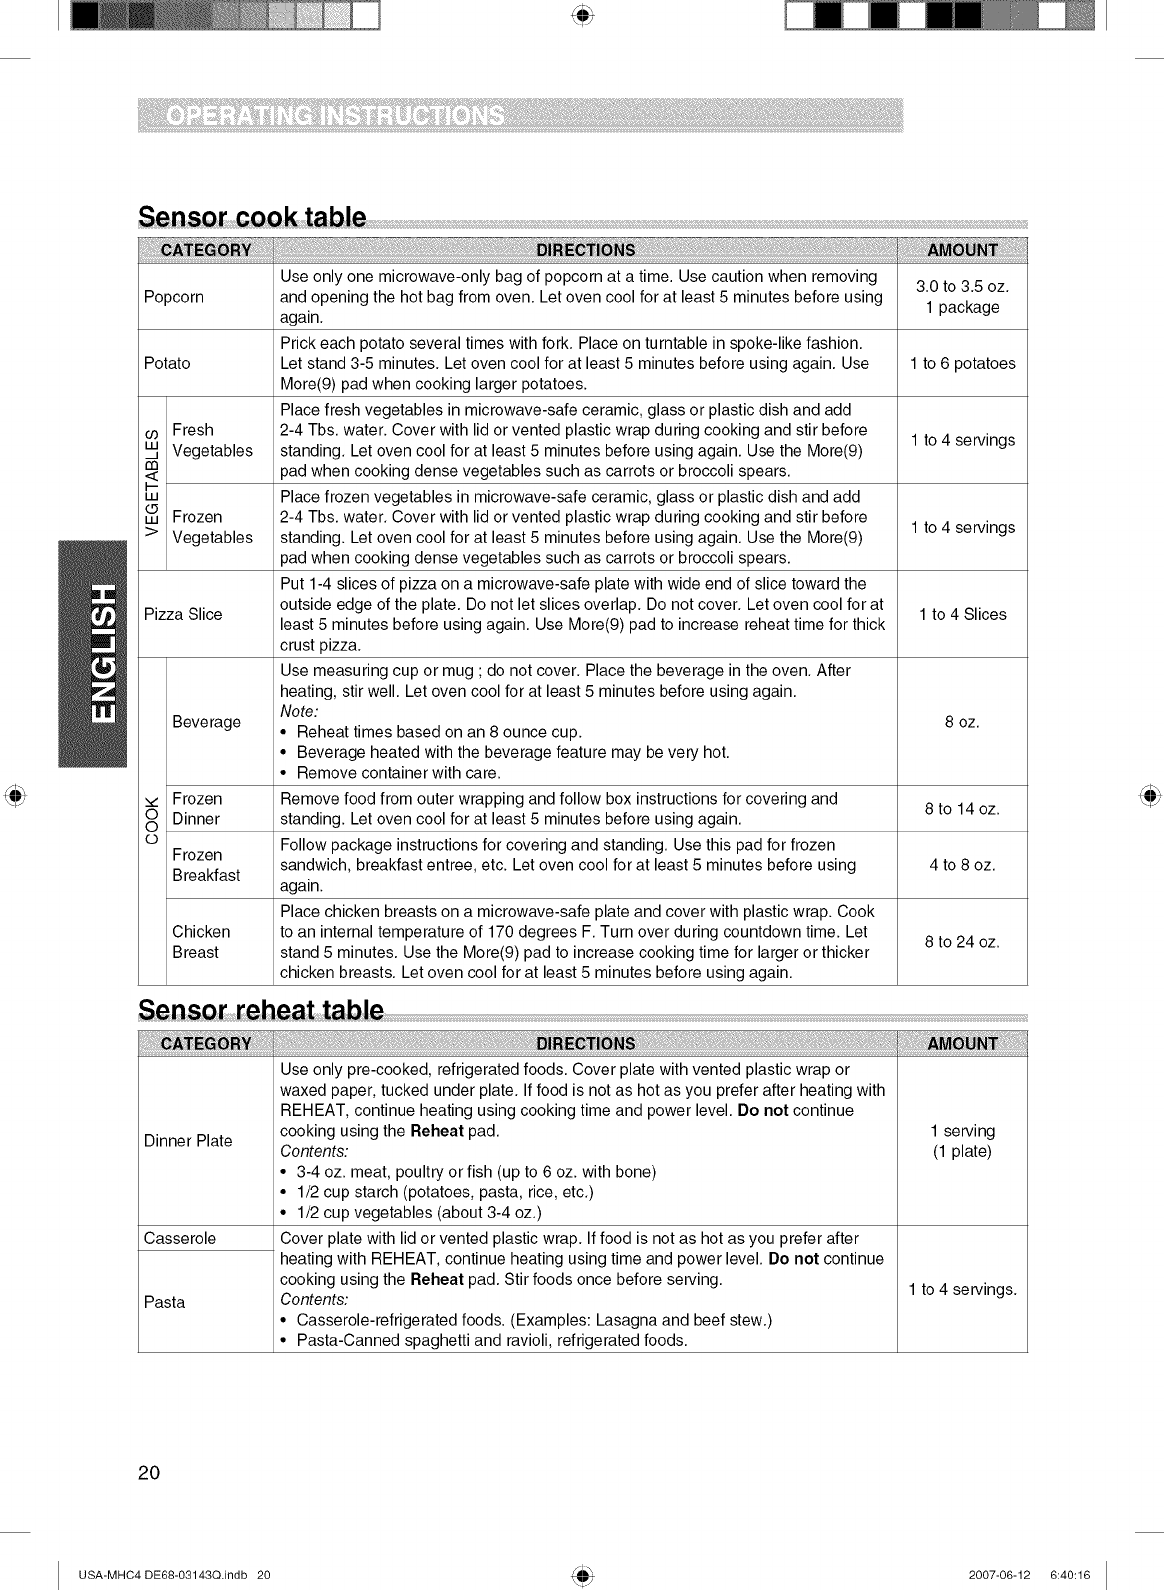
Benso c_k tab!e
....._ii:!ii!!i!_iiiii!!!i!_i_iIE!_I_I!_!.i_i!!!i!_iii_I,i!_i!_!i_!_!ij!_ii_!!i_!_!!!__!_!,i!i_i_!!!i!!_!_!_i!!_iii,!_i_!!i_!!iI_;!i!_i!i_!i!i_!!i_ii!i_i!_!i!i!!!_!_i!_!_i!;!!!!_!i!_!_!_!i_!i_!:!_!_i!i_i_i!i!_!!!ii_!i!i_i_!i!_!!i!i!i_!!_!ii_i!il_!_!_i!i_i_!i!!!i_i!i!,i!i_ii!!_i_i!!_i!_!!i!__i_!:_ii!i_i_i!i_!!_!!!_!_i!,!_i!;!!!!_!i!_!_!_!i_!i_!:!_!_i!i_i_i!i!_!!!ii_!i!i_i_!i!_!!i!i!i_!!_!ii_i!il_!_!_i!i_i_!i!!!i_i!i!,i!i_ii!!_i_i!!_i!_!!i!__i_!:_ii!i_i_i!i_!!_!!!_!_i!,!_i!;!_!__!_!_i!Ji_:!_ !!_i_i!_,_i_!!_!i!!_i_i!i!i!_i_i!i_!i!_!_!i!i_i!ii_i!!_ii_!i!_i_!!i!i_!i_ii!ii!_i!ii_i!il_!_!_i!i_i_!i!!!i_i!i!,i!i_ii!!_i_i!!_i!_!!i!_i_!:_ii!i_i_i!i_!!_!!!_!_i!,!_i!_i!!!!_!i!_!_!_!i_!i_!:!_!_i!i_i_i!i!_!!!ii_!i!i_i_!i!_!!i!i!i_!!_!ii_i!il_!_!_i!i_i_!i!!!i_i!i!,i!i_ii!!_i_i!!_i!_!!i!_i_!:_ii!i_i_i!i_!!_!!!_!_i!,!_i!_i!!!!_!i!_!_!_!i_!i_!:!_!_i!i_i_i!i!_!!!ii_!i!i_i_!i!_!!i!i!i_!!_!ii_i!il_!_!_i!i_i_!i!!!i_i!i!,i!i_ii!!_i_i!!_i!_ii!_ili'!_ii!_!!_iiii!!_!_!_i!_!i_!__!_!!_!!_ii_i i_i_!_¸!_!!i!_!_i!:_!_!i!i!_!_i!i!i_ii!_!i_!i!_i_
Use only one microwave-only bag of popcorn at a time. Use caution when removing 3.0 to 3.5 oz.
Popcorn and opening the hot bag from oven. Let oven cool for at least 5 minutes before using
again. 1 package
Prick each potato several times with fork. Place on turntable in spoke-like fashion.
Potato Let stand 3-5 minutes. Let oven cool for at least 5 minutes before using again. Use 1 to 6 potatoes
More(9) pad when cooking larger potatoes.
Place fresh vegetables in microwave-safe ceramic, glass or plastic dish and add
o_ Fresh 2-4 Tbs. water. Cover with lid or vented plastic wrap during cooking and stir before 1 to 4 servings
u.{, Vegetables standing. Let oven cool for at least 5 minutes before using again. Use the More(9)
ca pad when cooking dense vegetables such as carrots or broccoli spears.
<_
I-
',' Place frozen vegetables in microwave-safe ceramic, glass or plastic dish and add
Frozen 2-4 Tbs. water. Cover with lid or vented plastic wrap during cooking and stir before 1 to 4 servings
> Vegetables standing. Let oven cool for at least 5 minutes before using again. Use the More(9)
pad when cooking dense vegetables such as carrots or broccoli spears.
Put 1-4 slices of pizza on a microwave-safe plate with wide end of slice toward the
Pizza Slice outside edge of the plate. Do not let slices overlap. Do not cover. Let oven cool for at 1 to 4 Slices
least 5 minutes before using again. Use More(9) pad to increase reheat time for thick
crust pizza.
Use measuring cup or mug ; do not cover. Place the beverage in the oven. After
heating, stir well. Let oven cool for at least 5 minutes before using again.
Note: 8 oz.
Beverage • Reheat times based on an 8 ounce cup.
•Beverage heated with the beverage feature may be very hot.
• Remove container with care.
,,.. Frozen Remove food from outer wrapping and follow box instructions for covering and 8 to 14 oz.
OO Dinner standing. Let oven cool for at least 5 minutes before using again.
© Follow package instructions for covering and standing. Use this pad for frozen
Frozen
Breakfast sandwich, breakfast entree, etc. Let oven cool for at least 5 minutes before using 4 to 8 oz.
again.
Place chicken breasts on a microwave-safe plate and cover with plastic wrap. Cook
Chicken to an internal temperature of 170 degrees F. Turn over during countdown time. Let 8 to 24 oz.
Breast stand 5 minutes. Use the More(9) pad to increase cooking time for larger or thicker
chicken breasts. Let oven cool for at least 5 minutes before using again.
Senso_reh ble
Use only pre-cooked, refrigerated foods. Cover plate with vented plastic wrap or
waxed paper, tucked under plate. If food is not as hot as you prefer after heating with
REHEAT, continue heating using cooking time and power level. Do not continue
Dinner Plate cooking using the Reheat pad. 1 serving
Contents: (1 plate)
• 3-4 oz. meat, poultry or fish (up to 6 oz. with bone)
• 1/2 cup starch (potatoes, pasta, rice, etc.)
• 1/2 cup vegetables (about 3-4 oz.)
Casserole Cover plate with lid or vented plastic wrap. If food is not as hot as you prefer after
heating with REHEAT, continue heating using time and power level. Do not continue
cooking using the Reheat pad. Stir foods once before serving. 1 to 4 servings.
Pasta Contents:
• Casserole-refrigerated foods. (Examples: Lasagna and beef stew.)
• Pasta-Canned spaghetti and ravioli, refrigerated foods.
20
USA-MHC4 DE68-03143Q.indb 20 2007-06-12 6:40:16

Kids Meals
KIDS MEALS lets you heat 4 categories of food: Chicken Nuggets, Hot Dogs, French Fries and Frozen
Sandwiches.
Example: To cook frozen sandwiches.
1. Touch KIDS MEALS pad.
2. Choose food category(I-4).
3. Touch ENTER/START pad.
Chicken Nuggets 1
Hot Dogs 2
French Fries 3
Frozen Sandwiches 4
Kids Meals chart
1 serving (4-5 oz.) • Put a paper towel on top of plate and arrange nuggets in spoke fashion on
Frozen Chicken
Nuggets 2 servings (6-7 oz.) paper towel.
• Do not cover. Let stand 1 minute.
2 EA • Prick hot dogs, place on plate. When the oven beeps, add buns and re-start
Hot Dogs 4 EA the oven.
1 serving (4-5 oz.) • Place 2 paper towels on plate and arrange french fries on towels, do not
French Fries 2 servings (6-7 oz.) overlap.
• Blot with additional paper towel after removal from oven.
1 EA • Place frozen sandwich in susceptor "sleeve" (which is in package) and put
Frozen Sandwiches 2 EA on plate.
21
USA-MHC4 DE68-03143Q.indb 21 2007-06-12 6:40:17
i¸ii_fillii!i!ii!i!iii_iiii!ii!iii!ii!iii!!iiiiiilliiiiii!_i!i!_iiii!!ii!ilii!iiiiiiili!i_iiiiiiiiiii!iilliiii_iiii!!i_!iiiii_iiii!iii!iiiiiiii!iii!_!!¸!iiiiiiiii!_'__i!!iii_ii;i_iiii!il!iiiii_i!i;i_iii_!!!'iii_i!!iii_i_i__i!'i_!!_"__i_iiii!_!ii!i!iii!_iiii!i!_!_!!ii!ii!_i_!_i!i_i_i_i'!!!!!iiii_iiiiiii'_ililiiii_iii'ilii!ii_ii!!_i!i!iiiiill¸__i_!i_i_!_iiii_i_iiii!i_iii!ili_i_i!ii!_iiiiiii'_iiiiiiiliiiiili!iii__i!i;;_i;_iiii!ii¸¸'_'!iiii!_!_iili!ii_i_i_ii_!_i_i_!_!!!i!iiilii!i!iiili!ii_ii!!!iiii!ii!iii!!_iiiii!_!_!i_i_i_iii!_i_iiii!i!ii!ii!i!iiii!_!i!iii!_!i!i_ii!!i!iiiiiiiiiiiiii!ii_ii_iiiii!i!iiiii!_i!ii_ii!!_!iii_iiiiiiiiii!ii_ii_iiiii!i!iiiii!_i!ii_ii!!_!iii_iiiiiiiiii!ii_ii_iiiii!i!iiiii!_i!ii_ii!!_!iii_iiiiiiiiii!ii_ii_iiiii!i!iiiii!_i!ii_ii!!_!iii_iiiiiiiiii!ii_ii_iiiii!i!iiiii!_i!ii_ii!!_!iii_iiiiiiiiii!ii_ii_iiiii!i!iiiii!_i!ii_ii!!_!iii_iiiiiiiiii!ii_ii_iiiii!i!iiiii!_i!ii_ii!!_!iii_iiiiiiiiii!ii_ii_iiiii!i!iiiii!_i!ii_ii!!_!iii_iiiiiiiiii!ii_ii_iiiii!i!iiiii!_i!ii_ii!!_!iii_iiiiiiiiii!ii_ii_iiiii!i!iiiii!_i!ii_ii!!_!iii_iiiiiiiiii!ii_ii_ii_iiiiiiii
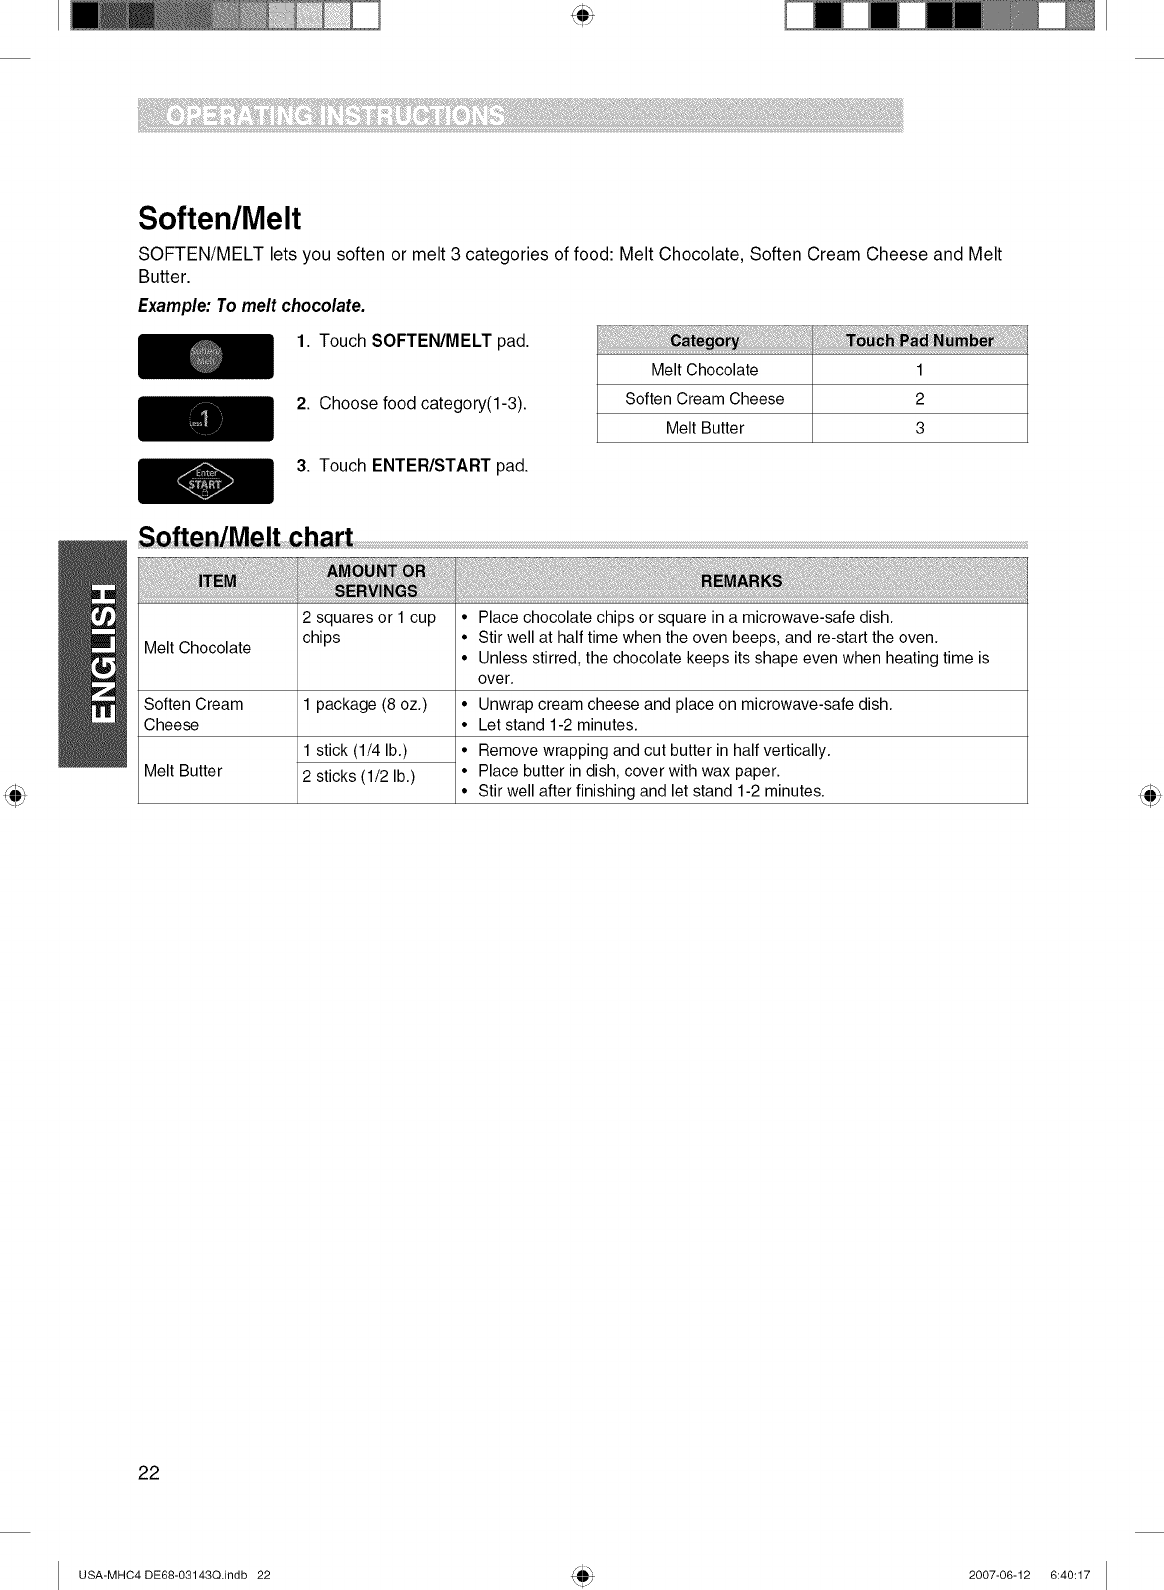
Soften/Melt
SOFTEN/MELT lets you soften or melt 3 categories of food: Melt Chocolate, Soften Cream Cheese and Melt
Butter.
Example: To melt chocolate.
1. Touch SOFTEN/MELT pad.
2. Choose food category(I-3).
3. Touch ENTER/START pad.
Melt Chocolate 1
Soften Cream Cheese 2
Melt Butter 3
S_AeotMe It char t
2 squares or 1 cup
Melt Chocolate chips
Soften Cream 1 package (8 oz.)
Cheese
1 stick (1/4 lb.)
Melt Butter 2 sticks (1/2 lb.)
• Place chocolate chips or square in a microwave-safe dish.
• Stir well at half time when the oven beeps, and re-start the oven.
• Unless stirred, the chocolate keeps its shape even when heating time is
over.
• Unwrap cream cheese and place on microwave-safe dish.
• Let stand 1-2 minutes.
• Remove wrapping and cut butter in half vertically.
• Place butter in dish, cover with wax paper.
• Stir well after finishing and let stand 1-2 minutes.
22
USA-MHC4 DE68-03143Q,indb 22 2007-06-12 6:40:17
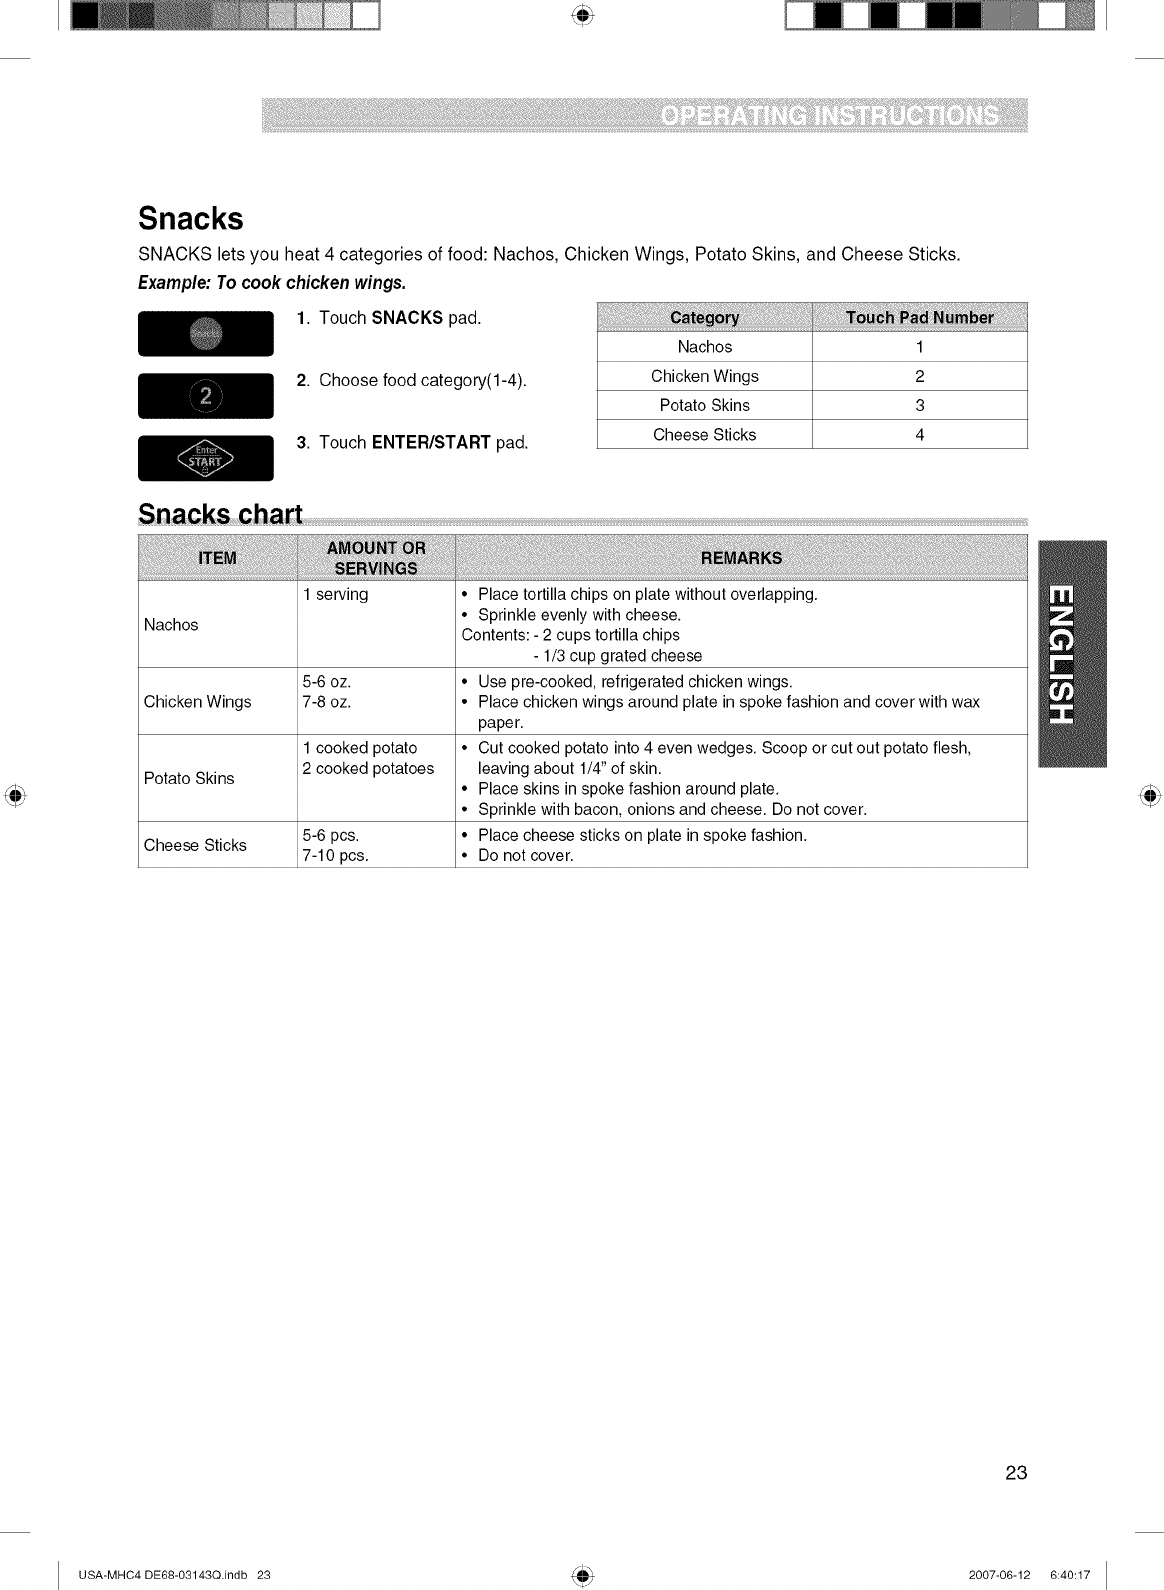
Snacks
SNACKS lets you heat 4 categories of food: Nachos, Chicken Wings, Potato Skins, and Cheese Sticks.
Example:To cook chickenwings.
1. Touch SNACKSpad.
2. Choose food category(I-4).
3. Touch ENTER/START pad.
Nachos 1
Chicken Wings 2
Potato Skins 3
Cheese Sticks 4
1 serving • Place tortilla chips on plate without overlapping.
• Sprinkle evenly with cheese.
Nachos Contents: - 2 cups tortilla chips
- 1/3 cup grated cheese
5-6 oz. • Use pre-cooked, refrigerated chicken wings.
Chicken Wings 7-8 oz. • Place chicken wings around plate in spoke fashion and cover with wax
paper.
1 cooked potato • Cut cooked potato into 4 even wedges. Scoop or cut out potato flesh,
2 cooked potatoes leaving about 1/4" of skin.
Potato Skins • Place skins in spoke fashion around plate.
• Sprinkle with bacon, onions and cheese. Do not cover.
5-6 pcs. • Place cheese sticks on plate in spoke fashion.
Cheese Sticks 7-10 pcs. • Do not cover.
23
USA-MHC4 DE68-03143Q.indb 23 2007-06-12 6:40:17
i¸ii_fillii!i!ii!i!iii_iiii!ii!iii!ii!iii!!iiiiiilliiiiii!_i!i!_iiii!!ii!ilii!iiiiiiili!i_iiiiiiiiiii!iilliiii_iiii!!i_!iiiii_iiii!iii!iiiiiiii!iii!_!!¸!iiiiiiiii!_'__i!!iii_ii;i_iiii!il!iiiii_i!i;i_iii_!!!'iii_i!!iii_i_i__i!'i_!!_"__i_iiii!_!ii!i!iii!_iiii!i!_!_!!ii!ii!_i_!_i!i_i_i_i'!!!!!iiii_iiiiiii'_ililiiii_iii'ilii!ii_ii!!_i!i!iiiiill¸__i_!i_i_!_iiii_i_iiii!i_iii!ili_i_i!ii!_iiiiiii'_iiiiiiiliiiiili!iii__i!i;;_i;_iiii!ii¸¸'_'!iiii!_!_iili!ii_i_i_ii_!_i_i_!_!!!i!iiilii!i!iiili!ii_ii!!!iiii!ii!iii!!_iiiii!_!_!i_i_i_iii!_i_iiii!i!ii!ii!i!iiii!_!i!iii!_!i!i_ii!!i!iiiiiiiiiiiiii!ii_ii_iiiii!i!iiiii!_i!ii_ii!!_!iii_iiiiiiiiii!ii_ii_iiiii!i!iiiii!_i!ii_ii!!_!iii_iiiiiiiiii!ii_ii_iiiii!i!iiiii!_i!ii_ii!!_!iii_iiiiiiiiii!ii_ii_iiiii!i!iiiii!_i!ii_ii!!_!iii_iiiiiiiiii!ii_ii_iiiii!i!iiiii!_i!ii_ii!!_!iii_iiiiiiiiii!ii_ii_iiiii!i!iiiii!_i!ii_ii!!_!iii_iiiiiiiiii!ii_ii_iiiii!i!iiiii!_i!ii_ii!!_!iii_iiiiiiiiii!ii_ii_iiiii!i!iiiii!_i!ii_ii!!_!iii_iiiiiiiiii!ii_ii_iiiii!i!iiiii!_i!ii_ii!!_!iii_iiiiiiiiii!ii_ii_iiiii!i!iiiii!_i!ii_ii!!_!iii_iiiiiiiiii!ii_ii_ii_iiiiiiii!!i!ii!iii
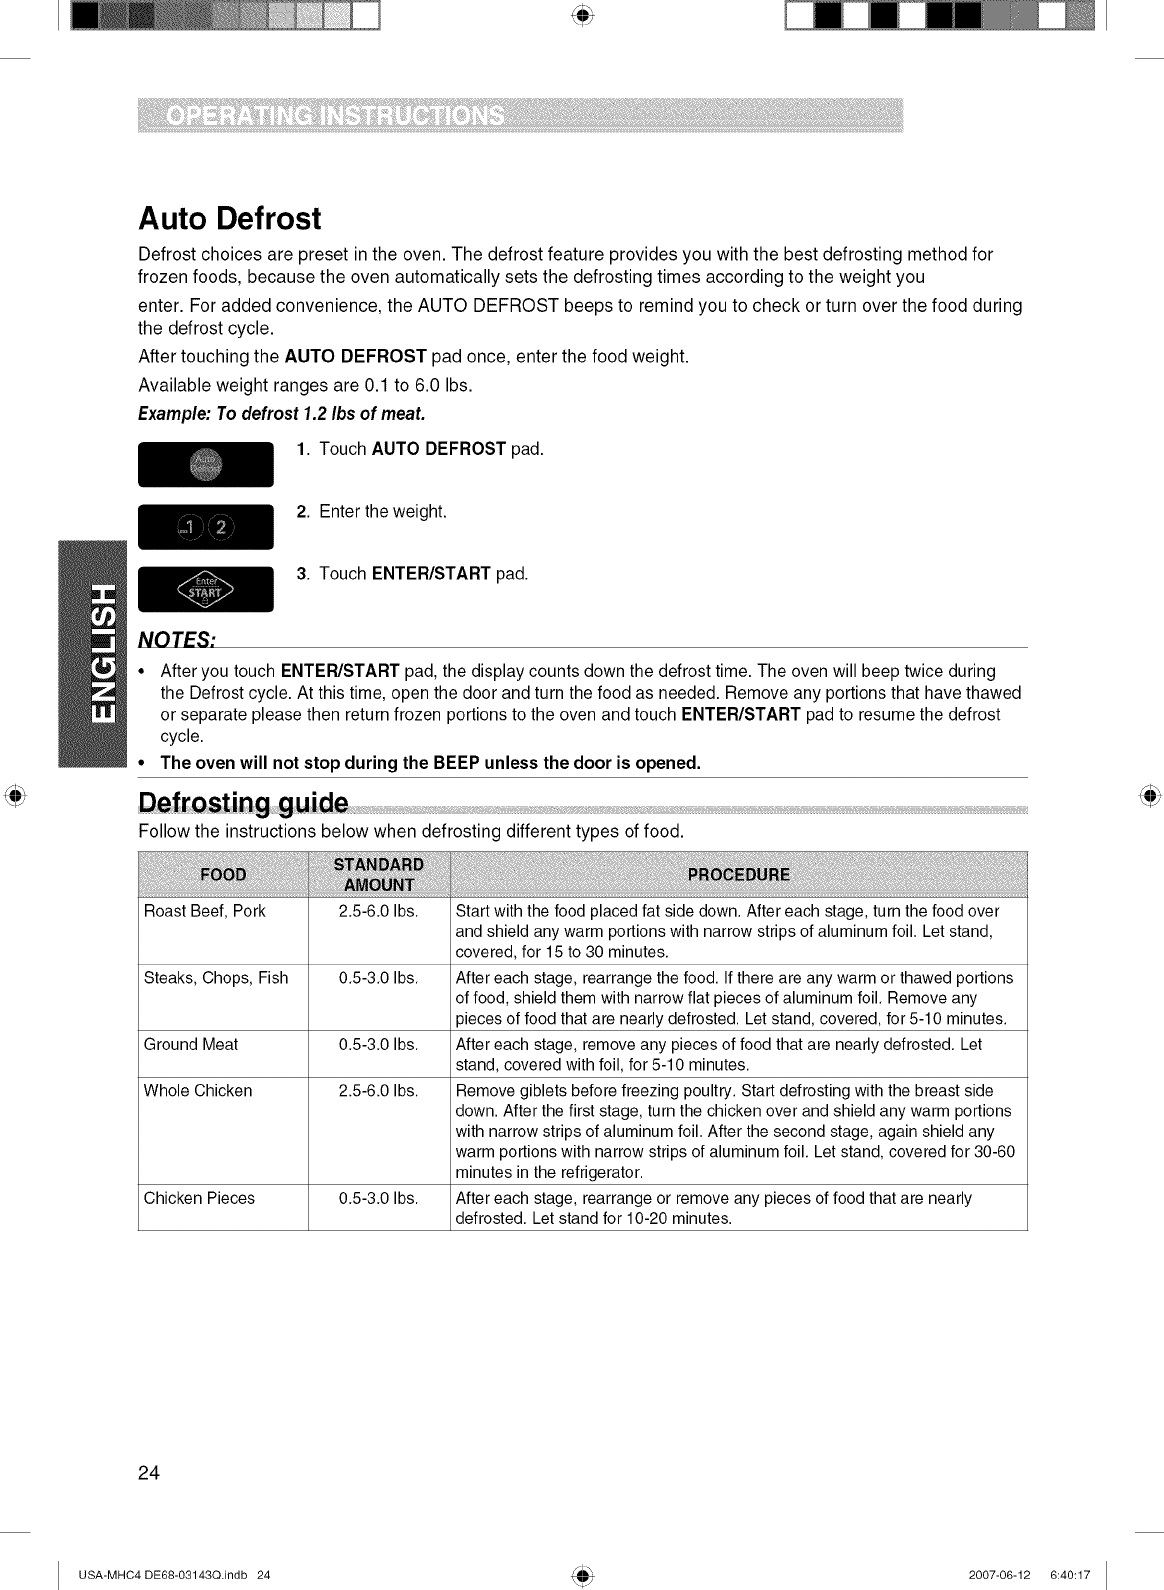
Auto Defrost
Defrost choices are preset in the oven. The defrost feature provides you with the best defrosting method for
frozen foods, because the oven automatically sets the defrosting times according to the weight you
enter. For added convenience, the AUTO DEFROST beeps to remind you to check or turn over the food during
the defrost cycle.
After touching the AUTO DEFROST pad once, enter the food weight.
Available weight ranges are 0.1 to 6.0 Ibs.
Example: To defrost 1.2 Ibs of meat.
1. Touch AUTO DEFROST pad.
2. Enter the weight.
3. Touch ENTER/START pad.
NOTES:
• After you touch ENTER/START pad, the display counts down the defrost time. The oven will beep twice during
the Defrost cycle. At this time, open the door and turn the food as needed. Remove any portions that have thawed
or separate please then return frozen portions to the oven and touch ENTER/START pad to resume the defrost
cycle.
• The oven will not stop during the BEEP unless the door is opened.
Follow the instructions below when defrosting different types of food.
Roast Beef, Pork 2.5-6.0 Ibs. Start with the food placed fat side down. After each stage, turn the food over
and shield any warm portions with narrow strips of aluminum foil. Let stand,
covered, for 15 to 30 minutes.
Steaks, Chops, Fish 0.5-3.0 Ibs. After each stage, rearrange the food. If there are any warm or thawed portions
of food, shield them with narrow flat pieces of aluminum foil. Remove any
pieces of food that are nearly defrosted. Let stand, covered, for 5-10 minutes.
Ground Meat 0.5-3.0 Ibs. After each stage, remove any pieces of food that are nearly defrosted. Let
stand, covered with foil, for 5-10 minutes.
Whole Chicken 2.5-6.0 Ibs. Remove giblets before freezing poultry. Start defrosting with the breast side
down. After the first stage, turn the chicken over and shield any warm portions
with narrow strips of aluminum foil. After the second stage, again shield any
warm portions with narrow strips of aluminum foil. Let stand, covered for 30-60
minutes in the refrigerator.
Chicken Pieces 0.5-3.0 Ibs. After each stage, rearrange or remove any pieces of food that are nearly
defrosted. Let stand for 10-20 minutes.
24
USA-MHC4 DE68-03143Q.indb 24 2007-06-12 6:40:17
• When using AUTO DEFROST, the weight to be entered is the net weight in pounds and tenths of pounds
(the weight of the food minus the container).
° Use AUTO DEFROST only for raw food. AUTO DEFROST gives best results when food to be thawed
is a minimum of 0°F (taken directly from a true freezer). If food has been stored in a refrigerator-freezer
that does not maintain a temperature of 5°F or below, always program a lower food weight (for a shorter
defrosting time) to prevent cooking the food.
° If the food is stored outside the freezer for up to 20 minutes, enter a lower food weight.
• The shape of the package alters the defrosting time. Shallow rectangular packets defrost more quickly than
a deep block.
° Separate pieces as they begin to defrost. Separated pieces defrost more easily.
• Shield areas of food with small pieces of foil if they start to become warm.
° You can use small pieces of aluminum foil to shield foods like chicken wings, leg tips, and fish tails, but the
foil must not touch the side of the oven. Foil causes arcing, which can damage the oven lining.
1pound Defrost
The 1 POUND DEFROST feature provides a rapid defrost for 1.0 pound frozen food. The oven automatically
sets the defrosting time.
Example: To defrost lib. ground beef.
1. Touch 1 POUND DEFROST pad.
2. Touch ENTER/START pad.
25
USA-MHC4 DE68-03143Q.indb 25 2007-06-12 6:40:18
i¸ii_fillii!i!ii!i!iii_iiii!ii!iii!ii!iii!!iiiiiilliiiiii!_i!i!_iiii!!ii!ilii!iiiiiiili!_i_iiiiiiiiiii!i_illiiii_i_iii!!i_!iiiii_ii'ii!iii!iiiiiiii!iii!_!!¸!iiiiiiiii!_'__i!!iii_ii;i_'iiii!il!ii'ili_i!i_;i_iii_!!!'_iii_i!!i'ii_i_i__i!'i_!!_"__i_iiii!_!ii!i!iii!_'iiii!i!_!_!!_ii!ii!_i_!_i!i_i_i_i'!!!!!iiii_iiiiiii"_ililiiii_iii_'ilii!ii_ii!!_'i!i!iiiiill¸__i_!i_i_!_''iiii_i_iiii!i_iii!ili_i_i!ii!_iiiiiii_'_iiiiiiiiii'iiili!iii__i!i;;_i;_'i_i_ii!ii¸¸'_'!iiii!_!_"_iili!ii_i_i_ii_!_i_i_!_!!!i!iiilii!i!iiili!ii_ii!!!iiii!ii!iii!!_iiiii!_!_!i_i_i_iii!_i_iiii!i!ii!ii!i!iiii!_!i!iii!_!i!i_ii!!i!iiiiiiiiiiiiii!ii_ii_iiiii!i!iiiii!_i!ii_ii!!_!iii_iiiiiiiiii!ii_ii_iiiii!i!iiiii!_i!ii_ii!!_!iii_iiiiiiiiii!ii_ii_iiiii!i!iiiii!_i!ii_ii!!_!iii_iiiiiiiiii!ii_ii_iiiii!i!iiiii!_i!ii_ii!!_!iii_iiiiiiiiii!ii_ii_iiiii!i!iiiii!_i!ii_ii!!_!iii_iiiiiiiiii!ii_ii_iiiii!i!iiiii!_i!ii_ii!!_!iii_iiiiiiiiii!ii_ii_iiiii!i!iiiii!_i!ii_ii!!_!iii_iiiiiiiiii!ii_ii_iiiii!i!iiiii!_i!ii_ii!!_!iii_iiiiiiiiii!ii_ii_iiiii!i!iiiii!_i!ii_ii!!_!iii_iiiiiiiiii!ii_ii_iiiii!i!iiiii!_i!ii_ii!!_!iii_iiiiiiiiii!ii_ii_ii_iiiiiiii!!i!ii!iii
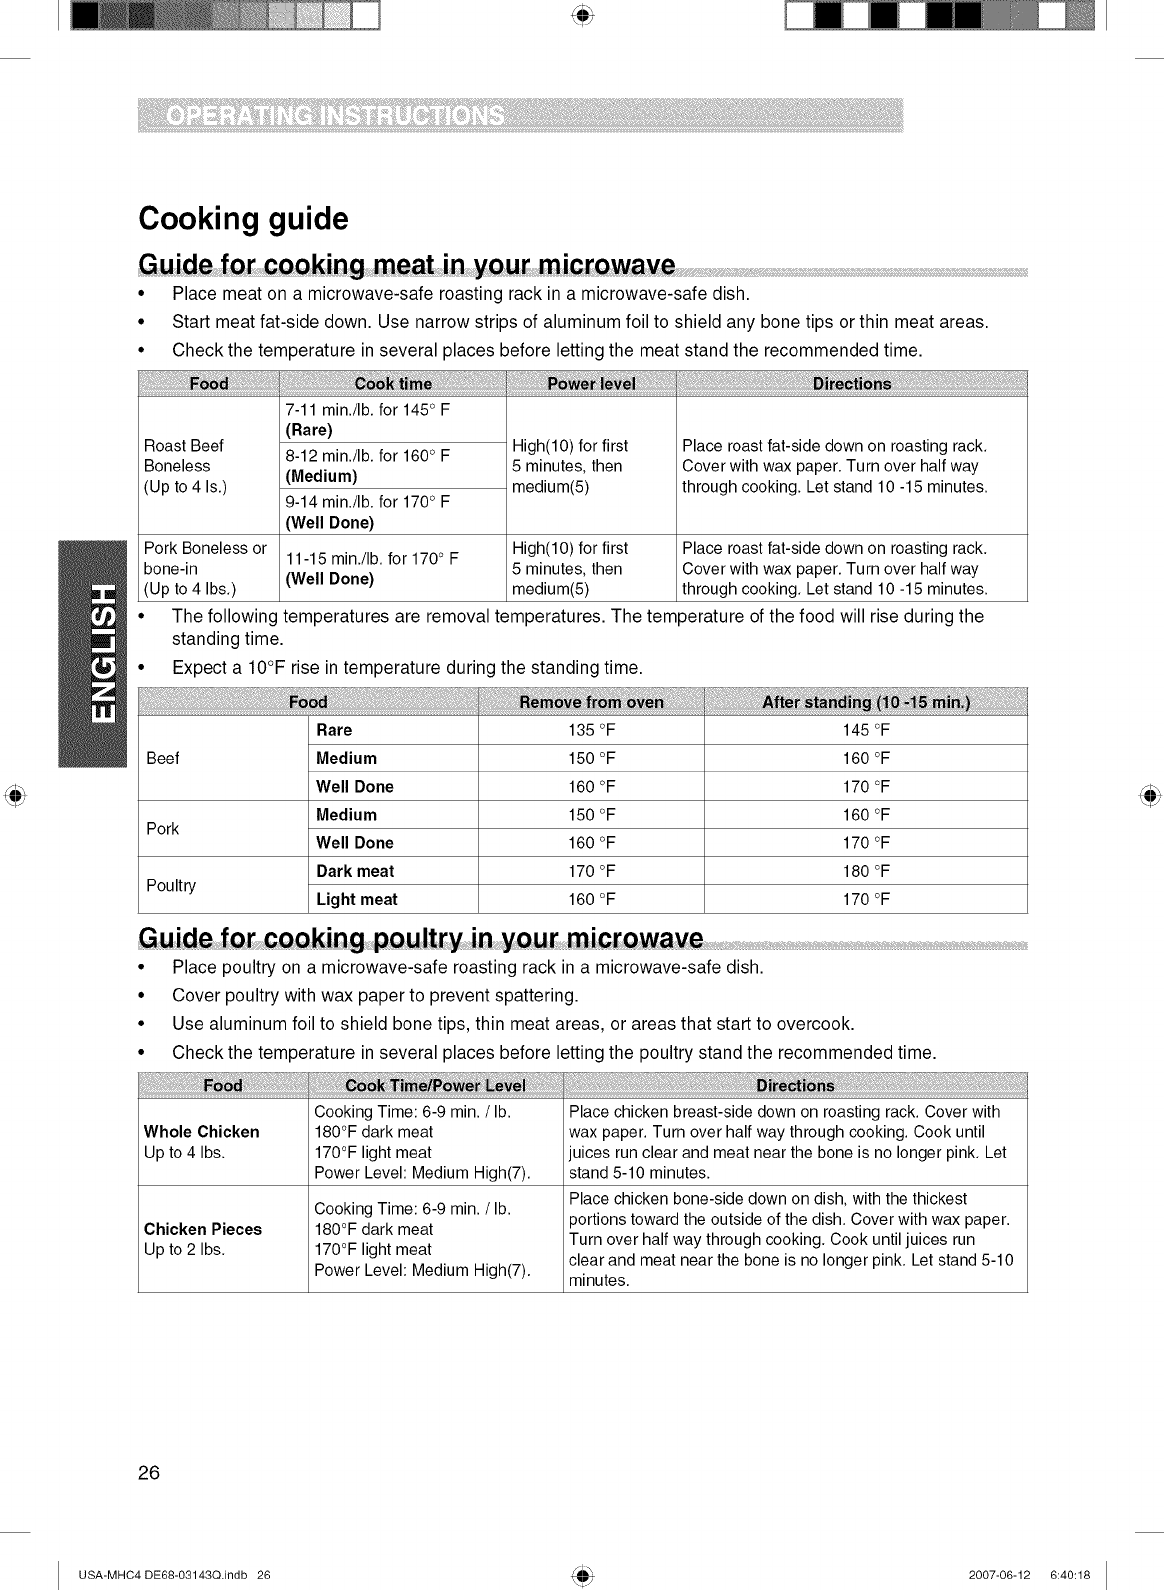
Cooking guide
• Place meat on a microwave-safe roasting rack in a microwave-safe dish.
• Start meat fat-side down. Use narrow strips of aluminum foil to shield any bone tips or thin meat areas.
• Check the temperature in several places before letting the meat stand the recommended time.
..... _a _:
7-11 min.!Ib, for 145 ° F
(Rare)
Roast Beef 8-12 min.!Ib, for 160 ° F High(10) for first Place roast fat-side down on roasting rack.
Boneless (Medium) 5 minutes, then Cover with wax paper. Turn over half way
(Up to 4 Is.) medium(5) through cooking. Let stand 10 -15 minutes.
9-14 min.!Ib, for 170 ° F
(Well Done)
Pork Boneless or 11-15 min.!Ib, for 170 ° F High(10) for first Place roast fat-side down on roasting rack.
bone-in (Well Done) 5 minutes, then Cover with wax paper. Turn over half way
(Up to 4 Ibs.) medium(5) through cooking. Let stand 10 -15 minutes.
The following temperatures are removal temperatures. The temoerature of the food will rise during the
standing time.
• Expect a 10°F rise in temperature during the standing time.
Rare 135 °F 145 °F
Beef Medium 150 °F 160 °F
Well Done 160 °F 170 °F
Medium 150 °F 160 °F
Pork Well Done 160 °F 170 °F
Dark meat 170 °F 180 °F
Poultry Light meat 160 °F 170 °F
• Place poultry on a microwave-safe roasting rack in a microwave-safe dish.
• Cover poultry with wax paper to prevent spattering.
• Use aluminum foil to shield bone tips, thin meat areas, or areas that start to overcook.
• Check the temperature in several places before letting the poultry stand the recommended time.
Whole Chicken
Up to 4 Ibs.
Chicken Pieces
Up to 2 Ibs.
Cooking Time: 6-9 rain. /lb.
180°F dark meat
170°F light meat
Power Level: Medium High(7).
Cooking Time: 6-9 rain. /lb.
180°F dark meat
170°F light meat
Power Level: Medium High(7).
Place chicken breast-side down on roasting rack. Cover with
wax paper. Turn over half way through cooking. Cook until
juices run clear and meat near the bone is no longer pink. Let
stand 5-10 minutes.
Place chicken bone-side down on dish, with the thickest
portions toward the outside of the dish. Cover with wax paper.
Turn over half way through cooking. Cook until juices run
clear and meat near the bone is no longer pink. Let stand 5-10
minutes.
26
USA-MHC4 DE68-03143Q.indb 26 2007-06-12 6:40:18
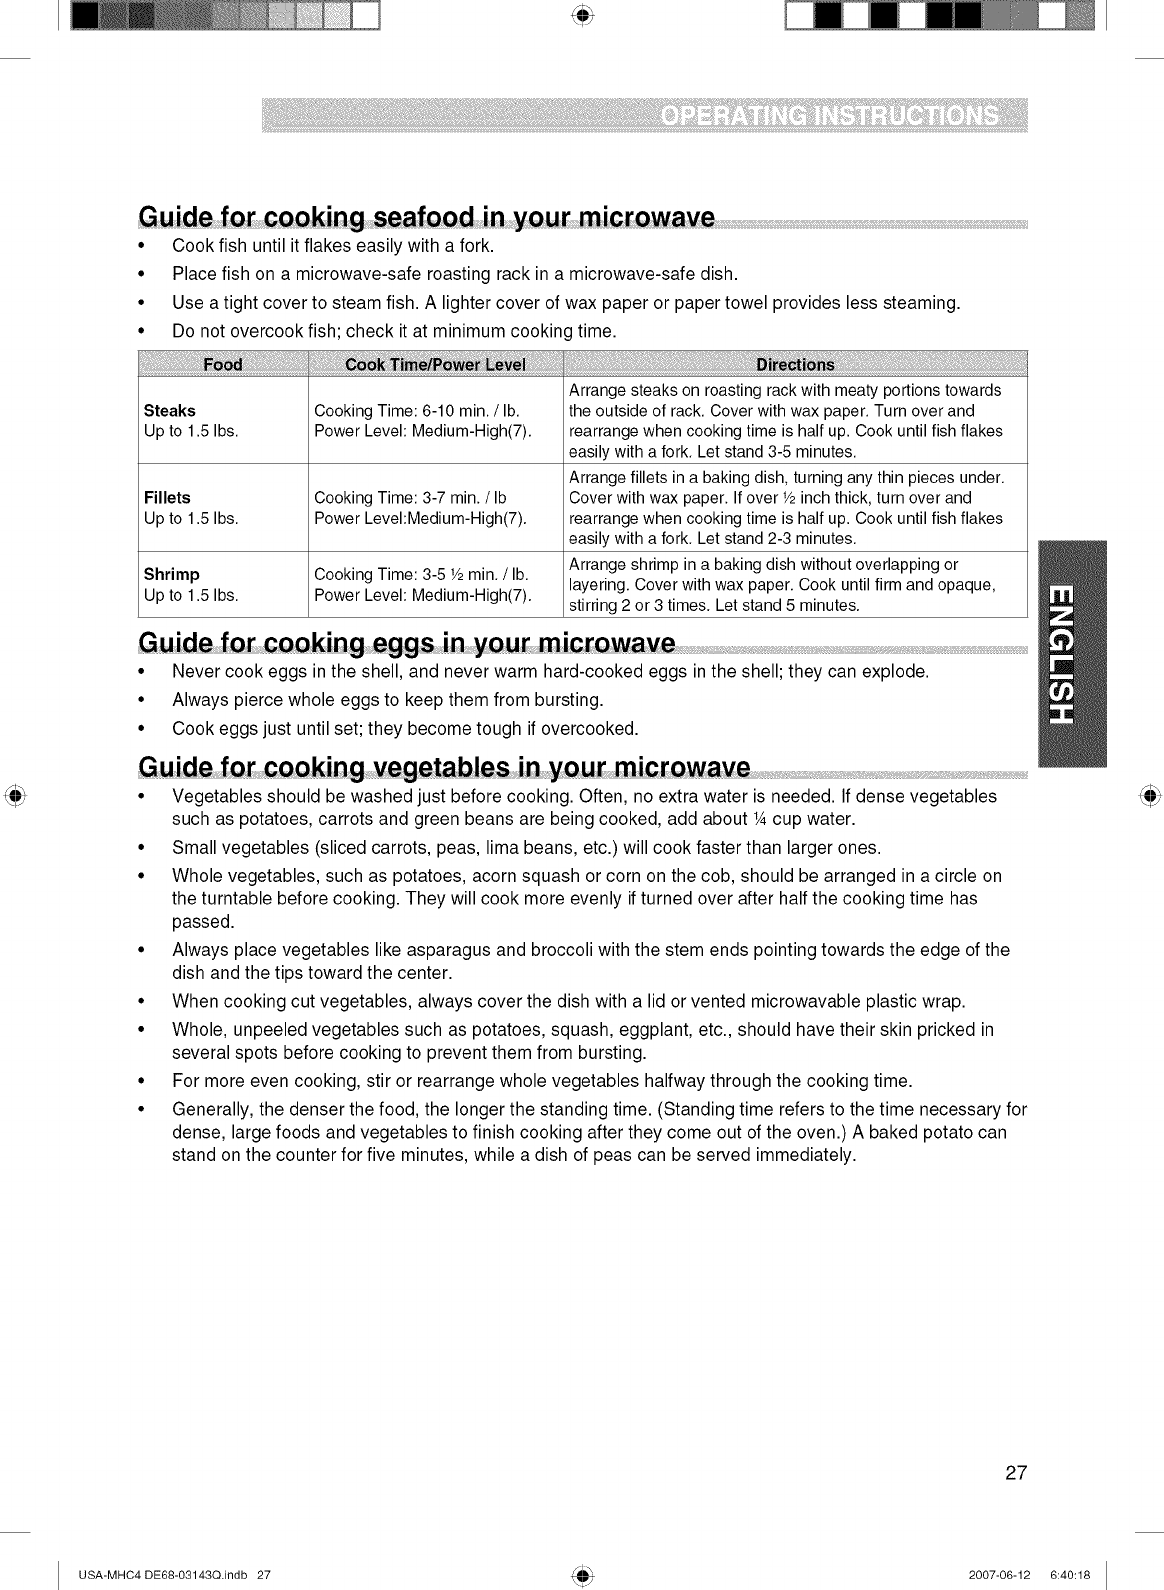
• Cook fish until it flakes easily with a fork.
° Place fish on a microwave-safe roasting rack in a microwave-safe dish.
° Use a tight cover to steam fish. A lighter cover of wax paper or paper towel provides less steaming.
• Do not overcook fish; check it at minimum cooking time.
..... : i
Arrange steaks on roasting rack with meaty portions towards
Steaks Cooking Time: 6-10 rain. /lb. the outside of rack. Cover with wax paper. Turn over and
Up to 1.5 Ibs. Power Level: Medium-High(7). rearrange when cooking time is half up. Cook until fish flakes
easily with a fork. Let stand 3-5 minutes.
Arrange fillets in a baking dish, turning any thin pieces under.
Fillets Cooking Time: 3-7 rain./Ib Cover with wax paper. If over 4/2inch thick, turn over and
Up to 1.5 Ibs. Power Level:Medium-High(7). rearrange when cooking time is half up. Cook until fish flakes
easily with a fork. Let stand 2-3 minutes.
Shrimp Cooking Time: 3-5 _/2rain. /lb. Arrange shrimp in a baking dish without overlapping or
layering. Cover with wax paper. Cook until firm and opaque,
Up to 1.5 Ibs. Power Level: Medium-High(7). stirring 2 or 3 times. Let stand 5 minutes.
° Never cook eggs in the shell, and never warm hard-cooked eggs in the shell; they can explode.
• Always pierce whole eggs to keep them from bursting.
• Cook eggs just until set; they become tough if overcooked.
° Vegetables should be washed just before cooking. Often, no extra water is needed. If dense vegetables
such as potatoes, carrots and green beans are being cooked, add about ¼ cup water.
• Small vegetables (sliced carrots, peas, lima beans, etc.) will cook faster than larger ones.
° Whole vegetables, such as potatoes, acorn squash or corn on the cob, should be arranged in a circle on
the turntable before cooking. They will cook more evenly if turned over after half the cooking time has
passed.
° Always place vegetables like asparagus and broccoli with the stem ends pointing towards the edge of the
dish and the tips toward the center.
• When cooking cut vegetables, always cover the dish with a lid or vented microwavable plastic wrap.
° Whole, unpeeled vegetables such as potatoes, squash, eggplant, etc., should have their skin pricked in
several spots before cooking to prevent them from bursting.
• For more even cooking, stir or rearrange whole vegetables halfway through the cooking time.
° Generally, the denser the food, the longer the standing time. (Standing time refers to the time necessary for
dense, large foods and vegetables to finish cooking after they come out of the oven.) A baked potato can
stand on the counter for five minutes, while a dish of peas can be served immediately.
27
USA-MHC4 DE68-03143Q.indb 27 2007-06-12 6:40:18
Cooking utensils
Microwave utensil guide
USE DO NOT USE
OVEN PROOF GLASS (treated for high
intensity heat):
Utility dishes, loaf dishes, pie plates, cake
plates, liquid measuring cups, casseroles
and bowls without metallic trim.
CHINA:
Bowls, cups, serving plates and platters
without metallic trim.
PLASTIC:
Plastic wrap (as a cover)-- lay the plastic
wrap loosely over the dish and press it to
the sides.
Vent plastic wrap by turning back one edge
slightly to allow excess steam to escape.
The dish should be deep enough so that
the plastic wrap will not touch the food. As
the food heats it may melt the plastic wrap
wherever the wrap touches the food.
Use plastic dishes, cups, semirigid freezer
containers and plastic bags only for short
cooking times.
Use these with care because the plastic
may soften from the heat of the food.
PAPER:
Paper towels, waxed paper, paper napkins,
and paper plates with no metallic trim or
design. Look for the manufacturer's label for
use in the microwave oven.
METAL UTENSILS:
Metal shields the food from microwave energy and produces uneven
cooking. Also avoid metal skewers, thermometers or foil trays. Metal
utensils can cause arcing, which can damage your microwave oven.
METAL DECORATION:
Metal-trimmed or metal-banded dinnerware, casserole dishes, etc. The
metal trim interferes with normal cooking and may damage the oven.
ALUMINUM FOIL:
Avoid large sheets of aluminum foil because they hinder cooking and may
cause harmful arcing. Use small pieces of foil to shield poultry legs and
wings. Keep ALL aluminum foil at least 1 inch from the side walls and
door of the oven.
WOOD:
Wooden bowls and boards will dry out and may split or crack when you
use them in the microwave oven. Baskets react in the same way.
TIGHTLY COVERED UTENSILS:
Be sure to leave openings for steam to escape from covered utensils.
Pierce plastic pouches of vegetables or other food items before cooking.
Tightly closed pouches could explode.
BROWNPAPER:
Avoid using brown paper bags.
They absorb too much heat and could burn.
FLAWEDOR CHIPPEDUTENSILS:
Any utensil that is cracked, flawed, or chipped may break in the oven.
METAL TWIST TIES:
Remove metal twist ties from plastic or paper bags.
They become hot and could cause a fire.
28
USA-MHC4 DE68-03143Q.indb 28 2007-06-12 6:40:18
Care and Cleaning
Care and Cleaning
For best performance and safety, keep the oven
clean inside and outside. Take special care to keep
the inner door panel and the oven front frame free
of food or grease build-up. Never use rough powder
or pads. Wipe the microwave oven inside and out,
including the hood bottom cover, with a soft cloth and
a warm (not hot) mild detergent solution. Then rinse
and wipe dry. Use a chrome cleaner and polish on
chrome, metal and aluminum surfaces. Wipe spatters
immediately with a wet paper towel, especially after
cooking chicken or bacon. Clean your oven weekly or
more often, if needed.
Follow these instructions to clean and care for your
oven.
•Keep the inside of the oven clean. Food particles
and spilled liquids can stick to the oven walls,
causing the oven to work less efficiently.
• Wipe up spills immediately. Use a damp cloth
and mild soap. Do not use harsh detergents or
abrasives.
• To help loosen baked on food particles or liquids,
heat two cups of water (add the juice of one
lemon if you desire to keep the oven fresh) in a
four-cup measuring glass at High power for five
minutes or until boiling. Let stand in the oven for
one or two minutes.
°Remove the glass tray from the oven when
cleaning the oven or tray. To prevent the tray
from breaking, handle it carefully and do not
put it in water immediately after cooking. Wash
the tray carefully in warm sudsy water or in the
dishwasher.
• Clean the outside surface of the oven with soap
and a damp cloth. Dry with a soft cloth. To
prevent damage to the operating parts of the
oven, don't let water seep into the openings.
• Wash the door window with very mild soap
and water. Be sure to use a soft cloth to avoid
scratching.
• If steam accumulates inside or outside the
oven door, wipe with a soft cloth. Steam can
accumulate when operating the oven in high
humidity and in no way indicates microwave
leakage.
• Never operate the oven without food in it; this
can damage the magnetron tube or glass tray.
You may wish to leave a cup of water in the oven
when it is not in use to prevent damage if the
oven is accidentally turned on.
Cleaning the grease filter
The grease filter should be removed and cleaned
often, at least once a month.
1. To remove grease filter, slide filter to the side.
Pull filter downward and push to the other side.
The filter will drop out.
2, Soak grease filter in hot water and a mild
detergent. Rinse well and shake to dry. Do not
use ammonia or place in a dishwasher. The
aluminum will darken.
3. To reinstall the filter, slide it into the side slot,
then push up and toward oven center to lock.
29
USA-MHC4 DE68-03143Q.indb 29 2007-06-12 6:40:18
iii!iiii!i!i!!i!iIii!!ii!i!!i!i!i!i!!ii!!!!!iiiillif!!!!i!!!!iii!ilili!i!i!!i!!!!iiiiiiiiiiiiiii!i!ii!!!!i!!!iii_ii!i!!ii!iii!i¸ii!i!i!ii!i!;iilii!i!!i!ii!!i!iI!ii!!i!i!!i!i!i!!!!iilliiii!i_i_iii!!!!!!!!!iiiiiiiillii!ii!iiiii!!!!!iiiii!i!!iii!i!iiiiii!i!i!!!i!i!i!!illIiii!i!i!iili!ii!ii!ili!i!!iiil;ii!ii!!!ilil!!!i!!i!iii_iii!i!!ii!i!ii!iii!!!!!!i!!!iI!iiiiiiiili!iiiii!i!iiii!!iiiii_iiiiiiiiii!i!¸iIi¸Iiii!iiiiiiiii!i!!ilIiiiiiiii!Iii!i!;i_Iii!!!iiiiiii!ii!i!!i!!!ii!iii!!!!iii!i!i!i!!i!i!il!i!!!!i!i!!i!i!ii!!i!i!!!!!!!!!i!!!iil!ii!ii!i!!i!ii!!!i!ii!i!i!!iiii!iii!ii!i!ii!i!!!!!!i!i!!!i!ii!!i!i!i!!iii!iIi!ii!!i!i!!i!!!!!i!i!i!!i!!!i!iii!i!i!!i!!ii!!i!ii!i!i!i!!i!!!!!!i!ii!!i!i!i!!i!i!iii!iiii!i!i!i!ii!i!i!i!i!!i!i!ii!!!!!!!i!ii!!i!i!i!!iii!iii!ii!!i!i!!i!!!!!i!i!i!!i!!!i!iii!i!i!!i!!ii!!i!ii!i!i!i!!i!!!!!!i!ii!!i!i!i!!i!i!iii!iiii!i!i!i!ii!i!i!i!i!!i!i!ii!!!!!!!i!ii!!i!i!i!!iii!iii!ii!!i!i!!i!!!!!i!i!i!!i!!!i!iii!i!i!!i!!ii!!i!ii!i!i!i!!i!!!!!!i!ii!!i!i!i!!i!i!iii!iiii!i!i!i!ii!i!i!i!i!!i!i!ii!!!!!!!i!ii!!i!i!i!!iii!iii!ii!!i!i!!i!!!!!i!i!i!!i!!!i!iii!i!i!!i!!ii!!i!ii!i!i!i!!i!!!!!!i!ii!!i!i!i!!i!i!iii!iiii!i!i!i!ii!i!i!i!i!!i!i!ii!!!!!!!i!ii!!i!i!i!!iii!iii!ii!ii!i
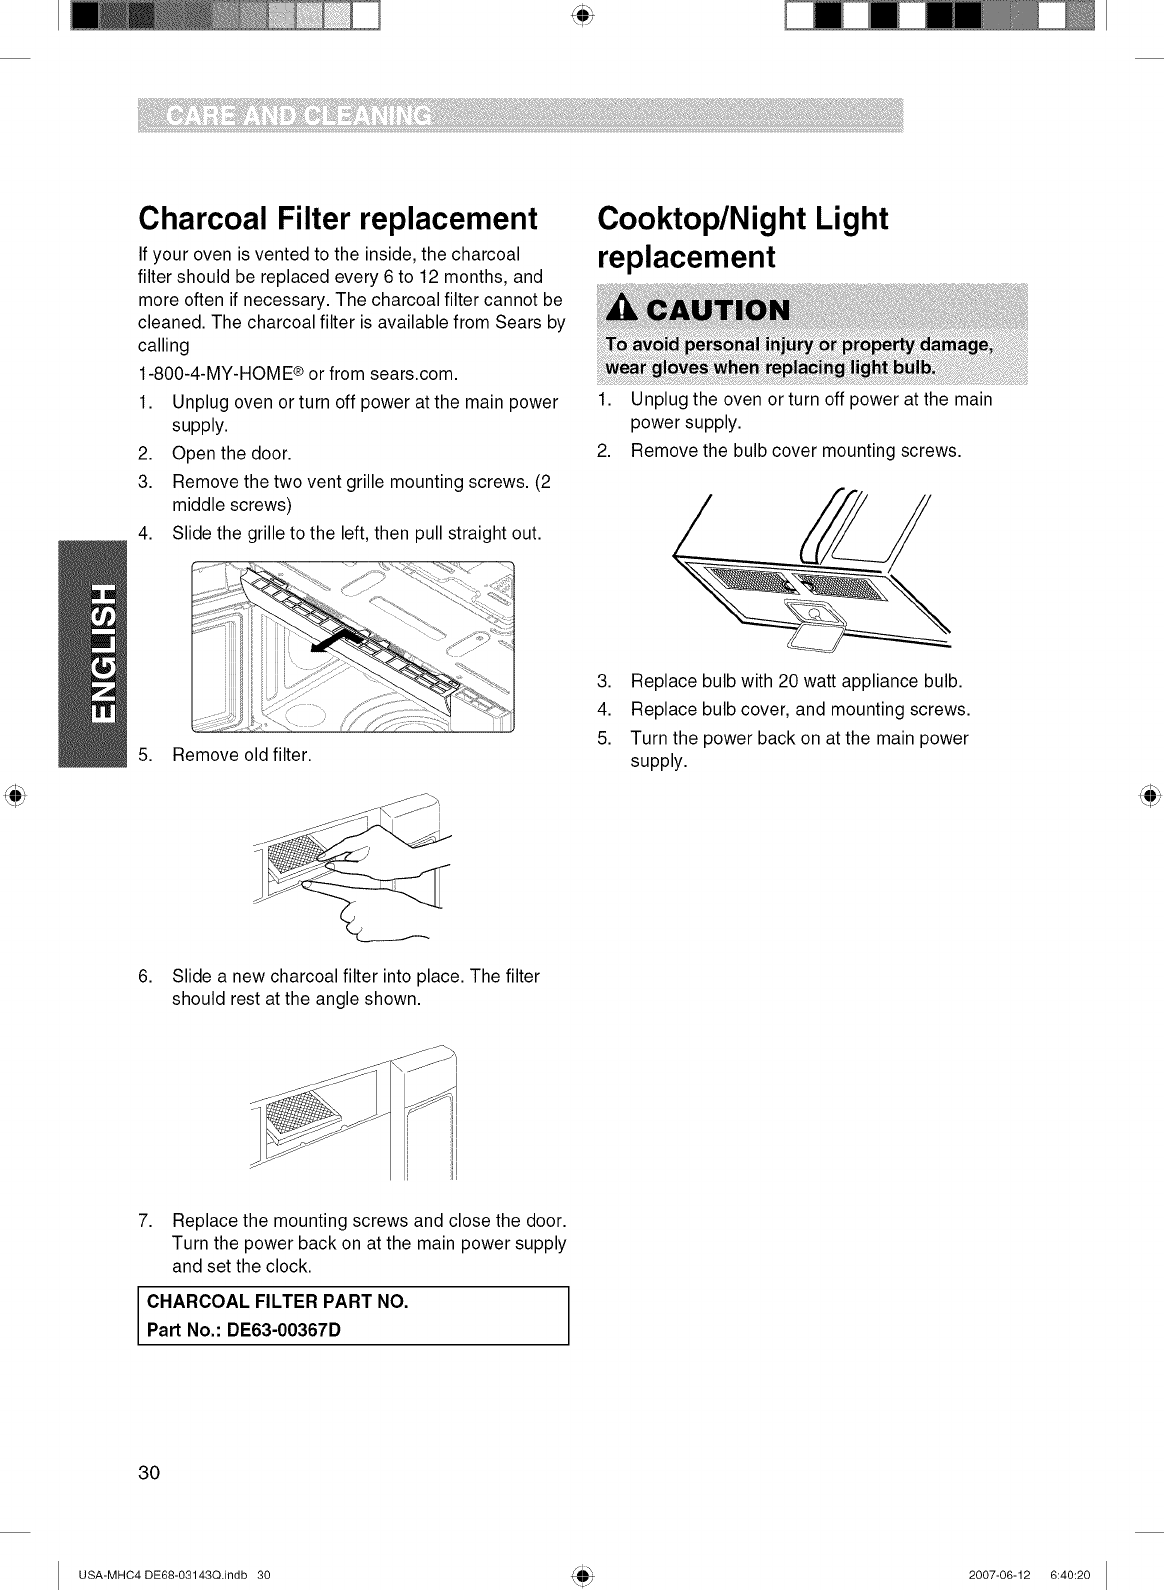
Charcoal Filter replacement
If your oven is vented to the inside, the charcoal
filter should be replaced every 6 to 12 months, and
more often if necessary. The charcoal filter cannot be
cleaned. The charcoal filter is available from Sears by
calling
1-800-4-MY-HOME® or from sears.com.
1. Unplug oven or turn off power at the main power
supply.
2. Open the door.
3. Remove the two vent grille mounting screws. (2
middle screws)
4. Slide the grille to the left, then pull straight out.
Cooktop/Night Light
replacement
1. Unplug the oven or turn off power at the main
power supply.
2. Remove the bulb cover mounting screws.
5. Remove old filter.
3,
4.
5.
Replace bulb with 20 watt appliance bulb.
Replace bulb cover, and mounting screws.
Turn the power back on at the main power
supply.
6. Slide a new charcoal filter into place. The filter
should rest at the angle shown.
7. Replace the mounting screws and close the door.
Turn the power back on at the main power supply
and set the clock.
CHARCOAL FILTER PART NO.
Part No.: DE63-00367D
30
USA-MHC4 DE68-03143Q.indb 30 2007-06-12 6:40:20
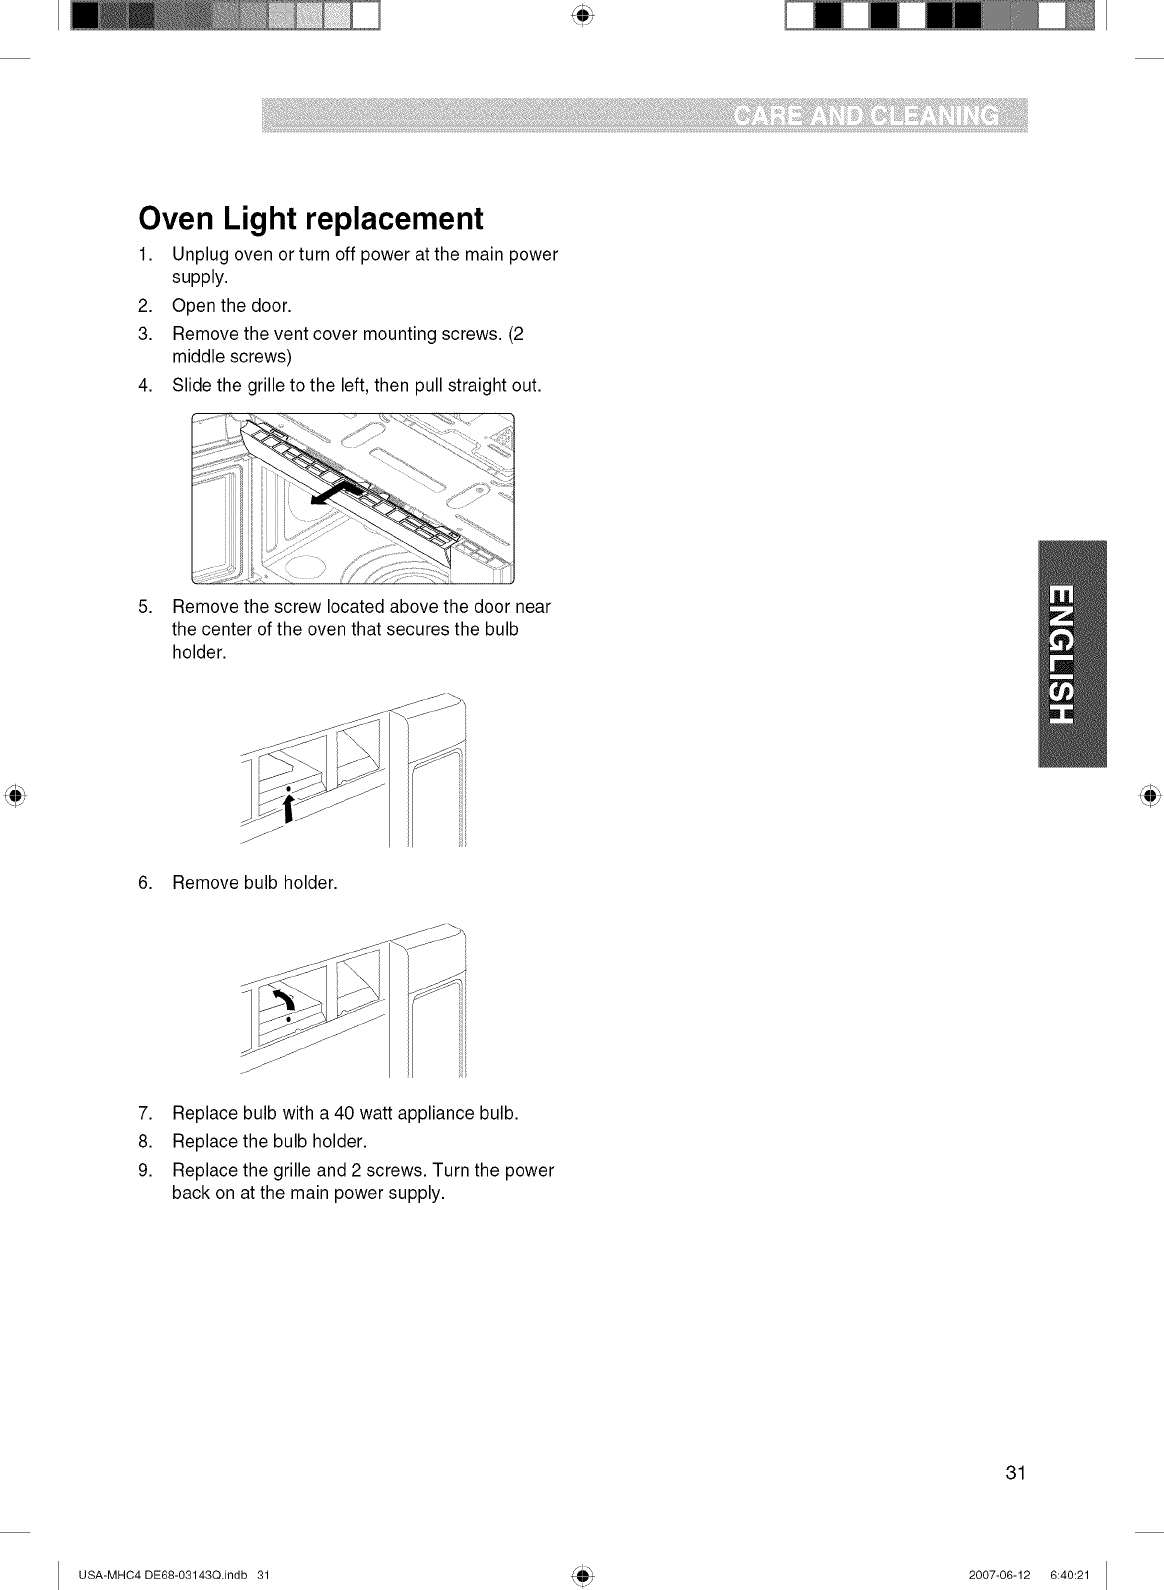
Oven Light replacement
1. Unplug oven or turn off power at the main power
supply.
2. Open the door.
3. Remove the vent cover mounting screws. (2
middle screws)
4. Slide the grille to the left, then pull straight out.
5. Remove the screw located above the door near
the center of the oven that secures the bulb
holder.
J
J
6. Remove bulb holder.
7. Replace bulb with a 40 watt appliance bulb.
8. Replace the bulb holder.
9. Replace the grille and 2 screws. Turn the power
back on at the main power supply.
31
USA-MHC4 DE68-03143Q.indb 31 2007-06-12 6:40:21

Troubleshooting
Troubleshooting guide
Before you call a repair person for your oven, check this list of possible problems and solutions.
• Properly insert the plug into a grounded outlet.
• If the outlet is controlled by a wall switch, make sure the wall switch is turned on.
• Remove the plug from the outlet, wait ten seconds, then plug it in again.
• Reset the circuit breaker or replace any blown fuse.
• Plug another appliance into the outlet; if the other appliance doesn't work, have a qualified electrician repair
the outlet.
• Plug the oven into a different outlet.
• Make sure the door is closed securely.
• Check to see if packing material or other material is stuck to the door seal.
• Check for door damage.
• Press STOP/CLEAR pad twice and re-enter all cooking instructions.
• If there has not been a power outage, remove the plug from the outlet, wait ten seconds, then plug it in
again. If there was a power outage, the time indicator will display: PLEASE TOUCH CLOCK AND SET
TIME OF DAY, Reset the clock and any cooking instructions.
• Reset the circuit breaker or replace any blown fuse.
• Make sure the oven is on its own 20 amp circuit line. Operating another appliance on the same circuit can
cause a voltage drop. If necessary, move the oven to its own circuit.
• Remove any metallic utensils, cookware, or metal ties. If using foil, use only narrow strips and allow at least
one inch between the foil and interior oven walls.
• Clean the turntable, roller ring and oven floor.
• Make sure the turntable and roller ring are positioned correctly.
• This is similar to the interference caused by other small appliances, such as hair dryers. Move your
microwave further away from other appliances, like your TV or radio.
NOTF"
If the oven is set to cook for more than 25 minutes, it will automatically adjust itself to 70 percent power after 25
minutes to avoid overcooking.
If none of these items are causing your problem,
call Sears service at 1-800-4-MY-HOME®
32
USA-MHC4 DE68-03143Q.indb 32 2007-06-12 6:40:21
Contenidos Garantia en
Combinacibn
GarantiaenCombinaci6n....................... 33
ServicioSears.............................. 34
Contratosmaestrosdeprotecci6n.................. 34
InstruccionesdeSeguridadImportantes............. 35
0btenerlosmejoresresultadosdecocci6n........... 39
Pruebadelavajillao losutensilios.................. 39
Oaracteristicas.............................. 40
Especificacionesdelhorno........................ 40
Features(Caracteristiques)........................ 42
ManualdeInstrucciones....................... 43
Conozcasuhornodemicroondas.................. 43
Clock(Reloj)................................... 43
KitchenTimer(TemporizadordeLaCocina)........... 43
ControlSetup(Configuraci6ndeControles)........... 43
TurntableOn/Off(PlatogiratorioActivado/Desactivado)..44
VentFan(Ventilaci6n)............................ 44
DelayOff(RetrasoApagado)...................... 44
ChildLock(BloqueoparaNi_os)................... 44
Add30Sec(Agregar30Seg.)..................... 44
LightTimer(TemporizadordelaLuz)................ 45
LightHiLo/Off(LuzAIta/Baja/Apagada).............. 45
More/Less(M_ts/Menos)......................... 45
CustomProgram(ProgramaPersonalizado).......... 46
Cocinarconnivelesdepotenciaaltos................ 46
Cocinarconnivelesdepotenciam_sbajos........... 46
Cocinarconm_.sdeunciclodecocci6n.............. 47
Guiadecocci6nparanivelesdepotenciam_sbajos.... 47
Instruccionesdelsensor.......................... 48
Guiadecocci6nconsensor....................... 48
Agregaro restartiempodecocci6n................. 48
PizzaSlice(RebanadadePizza).................... 49
Popcorn(PalomitasdeMaiz)...................... 49
BakedPotato(PapaalHorno)...................... 49
Vegetable(Verduras)............................ 49
Cook(Cocci6n)................................. 50
Reheat(Recalentamiento)........................ 50
HoldWarm(MantenerCaliente).................... 50
KidsMeals(ComidasparaNi_os)................... 52
Soften/Melt(Suavizar/Derretir)..................... 53
Snacks....................................... 54
AutoDefrost(DescongelamientoAutom_.tico)......... 55
1 poundDefrost(Descongelamientode1 Libra)....... 56
Guiadecocci6n................................ 57
UtensiliosparaCocinar........................ 59
Guiadeutensiliosparamicroondas................. 59
6uidadeyLimpieza........................... 68
Cuidadoy limpieza.............................. 60
Limpiezadelfiltrodegrasa........................ 60
Reemplazodelfiltrodecarb6n..................... 61
Reemplazode]aluzde]acubierta/luznocturna........ 61
Reemplazodelaluzdelhorno..................... 62
Soluci6ndeProblemas........................ 63
Guiadesoluci6ndeproblemas..................... 63
Garantialimitadade unafio
Si,trasserinstalado,operadoy mantenidosegt_ntodaslas
instruccionesincluidasconelproducto,esteelectrodom6stico
sufrieraaveriasdebidasadefectosdematerialomanodeobra,
dentrode]periodo deuna_odesdelafechadecompra,Ilamea]
1-800-4-MY-HOME®parasureparaci6ngratuita.
Siesteelectrodomdsticose utilizaconprop6sitosdistintosa los
finesprivadosdeunafamilia,estagarantias61oser_aplicable
durante90 diasdesdelafechade compra.
Estagarantiacubreunicamentelosdefectosdematerialy
manede obra.SearsNOcubrir;i:
1. Elementosconsumiblesquepuedengastarsedebidoaluso
normal,incluyendodeformaenunciativaperonolimitativa,
losfiltros,correas,bombillasy bolsasdelaunidad.
2. Unt6cnicodeservicioparamostraralusuariolainstalaci6n,
funcionamientoo mantenimientocorrectosdelproducto.
3. Unt_cnicodeserviciopararealizarlaboresdelimpiezao
mantenimientodelproducto.
4. Da_osoaveriasencasodenoacatarlasinstruccionesde
instalaci6n,funcionamientoomantenimientoincluidascon
elproducto.
5. Da_osoaveriasencasodeaccidente,abuso,uso
inadecuadoo usoconprop6sitosdistintosalosfinespara
losquefuedise_ado.
6. Da_osoaveriasencasodeutilizardetergentes,
limpiadores,sustanciasquimicasoutensiliosdistintosa
losrecomendadosenlasinstruccionesincluidasconel
producto.
7. Da_osoaveriasenlaspiezaso sistemasprococadaspor
modificacionesdelproductonoautorizadas.
Cl_iusuladeexenci6nde repensabilidado garantias
implicitas;
limitaci6nderecursos.Elt_nicoy exclusiverecursodelclientebajo
estagarantia limitadaser_lareparaci6n de] productocomose
hamencionado.Lasgarantiasimplicitas,incluyendogarantiasde
comerciabilidadoidoneidadparaunfin concreto,est_slimitadas
auna_ooelperiododetiemplm_sreducidopermitidoporlaley.
Searsnoser_reponsable delosda_osincidentalesoderivados.
Ciertosestadosy provinciasnopermitenexclusioneso limitaciones
olimitacionesdeda_osincidentalesoderivados,olimitacionesen
relaci6naladuraci6ndelasgarantias implicitas decomerciavilidad
o idoneidadm, deta]formaqueestaslimitacioneso excepciones
pueden no ser pertinentes parausted.
Estagarantia ser_ aplicable t_nicamentemientraseste
elecrodom_sticoseautilizadodentrodelosEstadosUnidos.
Estagarantia le otorgaunosderechoslegales especificos,eincluso
puedeconferifleotrosderechos,distintosdependiendodelestado
en que se encuentre.
Sears,Roebuckandco.,Dept.817WA,HoffmanEstates,IL
60179
33
USA-MHC4 DE68-O3143Q.indb 33 2007-06-12 6:40:21
Servicio Sears
Contratosmaestrosdeprotecci6n
Felicitacionesperhaberrealizadonnacomprainteligente.
SunuevoproductoKenmore®hasido disenadoy fabricadoparagarantizaranosdefuncionamientoconfiable.
Noobstante,al igualquetodoslosproductos,esposiblequerequieraunmantenimientopreventivooreparaci6nenalgunas
ocasiones.
Enesosmomentos,unContratomaestrodeprotecci6npuedeahorrarledineroy evitarleinconvenientes.
ElContratomaestrodeprotecci6ntambi6nIo ayudaa extenderlavida Otildesu nuevoproducto.A continuaci6n,
mencionamosIo queincluyeelContrato*:
[] Piezasy manedeobranecesariaparaayudara quelos productosfuncionencontinuamentedemaneraadecuadabajo
unusenormal,nos61oantedefectos.Nuestracoberturasobrepasala garantiadelprodncto.Nosecobrandeducibles,
nose excluyenfallasfuncionalesdelacobertura-- protecci6nreal.
[] Servicioespecializadoporpartedeungrupodem_sde10.000t_cnicosautorizadosdeSears,es decirquealguien
confiableestar_trabajandoensu producto.
[] Visitasdeserviciot_cnicoilimitadasyservicioenrodeel pals,lasvecesquedesee,cuandoquieraquenosnecesite.
[] Garantiacontradefectosdef;ibrica- reemplazodesu productoaseguradosi se producencuatrofallasdeproducto,o
m_s,dentrodelosprimerosdocemeses.
[] Reemplazodelproductosi nopuederepararse.
[] ControldemantenimientopreventiveanualcuandoIodesee-sin cargoadicional.
[] Asistenciatelef6nicariipida- ladenominamosResoluci6nRiipida- apoyotelef6nicoporpartede unrepresentantede
Searsparatodoslosproductos.Consid6renosun"manualdeusuarioquehabla".
[] Protecci6nencasodesobretensi6ncontradanosel6ctricosacausadefluctuacionesdeenergia.
[] Protecci6ndep_rdidadealimentospor$250anualesdebidoacualquiertipo dedesperdiciodealimentosacausade
fallasmecD.nicasdecualquierrefrigeradoro freezercubierto.
[] Reembelsedealqniler,si lareparaci6ndesu productotardam_.stiempodelprometido.
[] Descnentode110%delpreciodecualquierserviciodereparacionesnocubiertoy piezasinstaladasafines.
UnavezqueadquieraelContrato,s61odeberealizarunaIlamadatelef6nicaparaprogramarelservicio.Puedeprogramarun
serviciot6cnicoenlineaencualquiermomento,las24horas.
ElContratomaestrodeprotecci6nrepresentaunaadquisici6nsin riesgos.Siporalgt]nmotivo,Io canceladuranteel periodo
degarantiadelproducto,proporcionaremosunreembolsototal. 0 bien,un reembolsoprorrateadounavezquevenzael
periododegarantiadelproducto,iAdquierasu Contratomaestrodeprotecci6nya mismo!
Seaplicanalgunaslimitacionesyexclnsiones.Paraobtenerpreciose informaci6nadicionaldentrodelosEE.UU.,
comuniqueseal 1-800-827-6655.
* Lacobertnraen Canad_difiereen algnnospnntos.Paraobtenerinformaci6ndetallada,comnniqneseconSears
Canadlial 1-800-361-6665.
Serviciode Instalaci6ndeSears
Paraobtenerinstalaci6nprofesionaldeelectrodom6sticos,abridoresdepuertasdegarage,calentadoresdeaguay otros
articulosdelhogardeSearsenlos EE.UUo Canad&comuniqueseal1-800-4-MY-HOME®.
34
USA-MHC4 DE68-03143Q.indb 34 2007-06-12 6:40:21
Instrucciones de Seguridad
Importantes
Loquenecesitasaber
sobrelasinstruccionesde
seguridad
Lasadvertenciaseinstruccionesimportantessobre
seguridadqueaparecenenestaGuiadeusoy cuidadono
est_ndestinadasa cubrirtodaslasposiblescondicionesy
situacionesquepuedenocurrir.Debeactuarcon sentido
comOn,precauci6ny cuidadocuandoinstale,realiceel
mantenimientoo pongaenfuncionamientoel microondas.
Comunfquesesiemprecon suvendedor,distribuidor,agente
deservicioofabricantesi surgenproblemasosituaciones
queustednocomprende.
Reconozcalossimbolos,
advertenciasy etiquetasde
seguridad
35
USA-MHC4 DE68-03143Q.indb 35 2007-06-12 6:40:21
i¸ii_fillii!i!ii!i!iii_iiii!ii!iii!iiil!i!iiiiiiii!ii!iiiiiiiiii!!!!_iii!iiiiiiiii_i_i_i_ii!ii_!_!!!!iiiiii_iiiiiiililiii!i!iiii_ii!i!iii!il!iiiiiiii!iiiii!i!i!!_!!_!ii_i!iiiiiii_!i_i_iiiiiiil!i_ii!ii!iilli!i!_!!ilii!ii_i:i_!iiiiiiiilliiiiii!ii_!ii!i!i!i!_i_iiii!iii!i_i!iiii!i!!!!!_'!iii!!ii!!_i_!_!i!i_!i_i_iiiili_i_i'!i!ii!_!_!!!!_iii!iiiiii!i_i_i!:!_iiiii_iiiiiili'!i!ii_!:_i!_;_iiiii!iiiiiill_ii__!!!_!i_i!_!!iiii_!i_i!!_i!_!_ii!_il!i_ii¸_i_:ii_ii!i_i_i!¸_¸_ii!iiii_i,i_i_!i_i¸i¸iiiiiii_i'iii!ili!i!i!_¸'¸_iiii_i_i_illii_iiil;!ii_!ii!i!i!ii!_'!i!ii:ii_iiiii'!'__ilii!!'iiii_i!_i_ii;iii'ii!i!ili!iiii!i!i!ii_iii!illi!!__!iiii¸'_'!_ii'¸_¸_¸¸¸!iili'i!iiiiiii!iiill'i_ii_ii_iiiilli_!_ii:!ii_iiii_i!i!!ili_ii!_iiiiiii_iiil_¸_¸¸¸'iililliiii_!_'!!iii_iiii!'__iiiiiiiiiiii!!!_!ilii!iiiiii'iil_ili_iii¸¸_¸'¸iii!ii!_iii_i!_!_ii_i!il:!i_iii!i!i_!_i!_!!_!!iiiiiiii!i_iiiiiii!i!!iii!iiiiii!i!!iiii!iiiiiiiii!ilili!iiii_iiiliiiili!iii!!i!iii!i!illili_!iiiii!_!i!i!i!ililli_iiiiiiiii!ii_ii_iliii!i!iiiii!_i!ilili!!i!iii_iiiiiiiiii!ii_ii_iliii!i!iiiii!_i!ilili!!i!iii_iii
Instruccionesdeconexibna
tierra
ElhornoDEBEestarconectadoa __
tierra.LaconexiOnatierrareduce
elriesgodedescargaelectricaya
queofreceuncabledeescapepara
lacorrienteel_ctricaencasode
quehayauncortocircuito.EstehornoestAequipadocon
uncablequetieneunconductoratierracon unenchufe
conconexiOnatierra.Elenchufedebeconectarseaun
tomacorrientequeest_correctamenteinstaladoy conectado
atierra.ConsultelasinstruccionesdeinstalaciOn.
Consultea unelectricistao centrodeserviciocalificadosi
nocomprendebienlasinstruccionesdeconexiOnatierra,o
si tienealgunadudarespectodesi elhornoestAconectado
atierracorrectamenteNoutiliceuncableprolongador.Si
elcabledealimentaciOndelproductoesdemasiadocorto,
hagaqueunelectricistacalificadoinstaleuntomacorriente
detres ranuras.Estehornodebeenchufarseenuncircuito
de60Hzseparadocon losvaloreselectricosnominales
mostradosenlatabladeespecificaciones.Cuandoel horno
comparteelcircuitoconotrosequipos,quiz_.sseanecesario
unaumentoenlostiemposdecocciOny puedensaltarlos
fusibles.
Elmicroondasfuncionaconlacorrientenormaldom_stica,
110-120V.
36
Declaracibndeinterferencia
deradiofrecuenciade
la ComisibnFederalde
Comunicaciones(EE.UU.
solamente)
Esteequipogeneray utilizaenergiadefrecuenciaISiVI,y si
noseinstalay seutilizacorrectamente,esdecir,enestricto
cumplimientocon lasinstruccionesdelfabricante,puede
causarinterferenciaconla recepciOnderadioy television.
Sehacomprobadoy confirmadoquecumpleconlos limites
estipuladosparaEquiposISM(Industriales,Cientificos,
M_dicos)envirtuddelasecciOn18delos reglamentosde
laFCC,quehansidodise_adosparaproveerprotecciOn
razonablecontratal interferenciaenunainstalaciOn
residencial.
Sinembargo,no segarantizaquenohabr_interferencia
enalgunainstalaciOndeterminada.Siesteequipocausa
interferenciaconla recepciOnderadiootelevision,Io que
puededeterminarseapagandoy encendiendoelequipo,se
recomiendaqueelusuariointentecorregirlainterferencia
deunade lassiguientesmaneras:
• CambielaorientaciOndelaantenaderecepciOnde
radiootelevision.
• Ubiqueenotro lugarelhornodemicroondascon
respectoal receptor.
• Alejeelhornodemicroondasdelreceptor.
• Enchufeel hornodemicroondasenuntomacorriente
distinto paraqueel hornodemicroondasy el receptor
estenencircuitosdiferentes.
Elfabricantenoesresponsabledeningunainterferenciade
radiootelevisioncausadaporlamodificaciOnnoautorizada
deestehornodemicroondas.Esresponsabilidaddel
usuariocorregirtal interferencia.
USA-MHC4 DE68-O3143Q.indb 36 2007-06-12 6:40:22

Precaucionesparaevitarla
posibleexposici6na energia
demicroondasexcesiva
A. NOintentehacerfuncionarestehornocon lapuerta
abiertapuessepuedeproducirunaexposici6n
perjudicialalaenergiademicroondas.Esimportante
noalterarni modificarlastrabasdeseguridad.
B. NOcoloqueningenobjetoentrela partedelanteradel
hornoy lapuertanidejequeseacumulesuciedado
residuosdelimpiadoresenlassuperficiesdesellado.
C. NOpongaenfuncionamientoelhornosi est,.dafiado.
Esparticularmenteimportantequelapuertadelhorno
cierrebieny quenoseocasionendanosa:
1. lapuerta(doblada),
2. las bisagrasy pestillos(rotoso sueltos),
3. lasjuntasdelapuertay lassuperficiesdesellado.
D. Elhornonodebeserreguladoo reparadoporninguna
personaexceptoel personaldeserviciodebidamente
calificado.
37
USA-MHC4 DE68-03143Q.indb 37 2007-06-12 6:40:22
38
USA-MHC4 DE68-03143Q.indb 38 2007-06-12 6:40:22

Obtener los mejores resultados de
coccibn
Pruebadela vajillaolosutensilios
Pruebelavajillao losutensiliosantesdeusarlos.Paracomprobarqueun platoseaseguro,col6queloenel hornocon
unatazadeaguaal lado.Pongaenfuncionamientoelhornoduranteunminutoa1100%delapotenciadecocci6n.Siel
platosecalienta,noIouse.
Algunosplatos(demelamina,decer_mica,etc.)absorbenlaenergiadelmicroondas,secalientandemasiadocomopara
ser manipuladosy demoraneltiempodecocci6n.CocinarenrecipientesdemetalnodiseSadosparaser usadosen
hornosdemicroondaspodriandanarel horno,Iomismopodriasucederconlosrecipientescon metaloculto(atadurasde
alambre,papeldealuminio,grapas,esmalteo ribetesdemetal).
Paraobtenerlos mejoresresultadosdesu hornodemicroondas,leay sigalaspautasacontinuaci6n.
•Temperaturadealmacenamiento- Losalimentosquesesacandelfreezero refrigeradortardanm_stiempoencocinarse
quelos mismosalimentosatemperaturaambiente.
•Tamafio- Lostrozospequenosdealimentossecocinanm_.sr_pidoquelos demayortama_o,lostrozosdetamanoy
formasimilaressecocinanenformam_spareja.Paraunacocci6nuniforme,reduzcalapotenciacuandococinatrozos
grandesdealimentos.
•Humedadnatl/ral-Losalimentosmuyh_medosse cocinanenformam_sparejaporquelaenergiadelmicroondasseve
atraidapor lasmol_culasdeagua.
•Revuelva- losalimentostalescomoguisosy verdurasdesdeelexteriorhaciael centroparadistribuirel calorenforma
parejay acelerarla cocci6n.Noesnecesariorevolverconstantemente.
• D#vuelta-los alimentostalescomolaschuletasdecerdo,las papasalhorno,lascarnesasadaso lacoliflorenteraala
mitaddeltiempodecocci6nparaexponertodoslos ladosporigualala energiademicroondas.
• Coloquelasareasdelicadasdelosalimentos,talescomolas puntasdelosesp_.rragos,haciael centrodelplato.
•Acomodelosalimentosdeformasdesparejas,talescomolaspresasdepolioo losfiletesdesalm6ncon laspartesm_s
gruesashacialaparteexternadelplato.
•Protejacon pedazospequenosdepapeldealuminiolaspartesdelosalimentosquepuedancocinarsem_sr_pidamente,
talescomolaspuntasdelasalaso losextremosdelaspatasdelasaves.
•Dejereposar-Despu_sderetirarelalimentodelmicroondas,cQbraloconpapeldealuminioo latapadelrecipientey
d6jeloreposarparaqueseterminedecocinarenelcentroy paraevitarquelos bordesexternossecocinendemasiado.
Lacantidaddeltiempode reposodependedeladensidady lasuperficiedelalimento.
•Envolverenpapeldeceraoenunatoalladepapel-Losemparedadosy muchosotrosalimentosquecontienenpan
horneadopreviamentedebenenvolverseantesdecalentarlosenel microondasparaevitarquesesequen.
39
USA-MHC4 DE68-03143Q,indb 39 2007-06-12 6:40:22
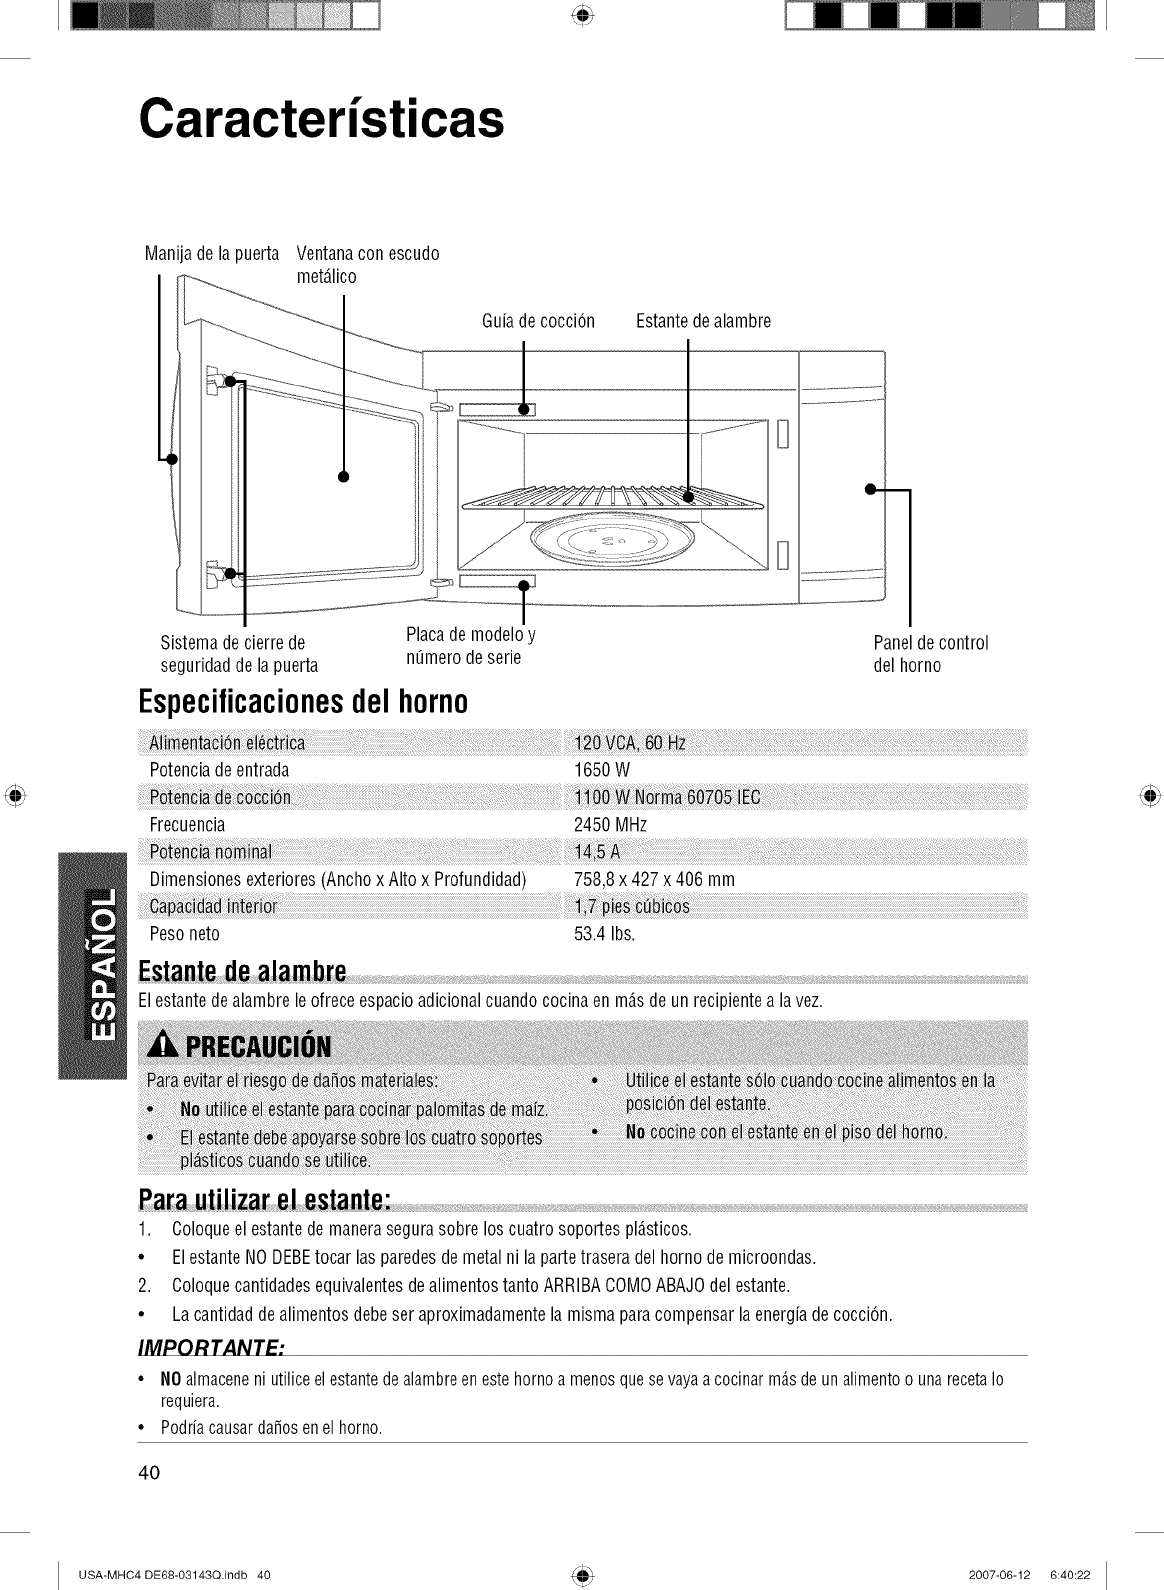
Caracterfsticas
Manijadelapuerta Ventanaconescudo
met_.lico
Sistemadecierrede
seguridaddelapuerta
Guiadecocci6n
I
Placademodeloy
nOmerodeserie
Estantedealambre
0- 1
Paneldecontrol
delhorno
Especificacionesdelhomo
Potenciadeentrada 1650W
Frecuencia 2450MHz
Dimensionesexteriores(Anchox Altox Profundidad) 758,8x 427x 406mm
Pesoneto 53.4 Ibs.
Elestantedealambreleofreceespacloadicionalcuandococinaenm_.sde unrecipientea lavez.
1. Coloqueel estantedemanerasegurasobreloscuatrosoportespl_.sticos.
• ElestanteNODEBEtocarlasparedesdemetalni lapartetraseradelhornodemicroondas.
2. ColoquecantidadesequivalentesdealimentostantoARRIBACOMOABAJOdelestante.
• Lacantidaddealimentosdebeseraproximadamentela mismaparacompensarlaenergiadecocci6n.
IMPORTANTF"
•NOalmaceneniutiliceelestantedealambreenestehornoamenosquesevayaacocinarm_sdeunalimentoo unarecetaIo
requiera.
• Podrfacausarda_osenelhorno.
4O
USA-MHC4 DE68-03143Q.indb 40 2007-06-12 6:40:22
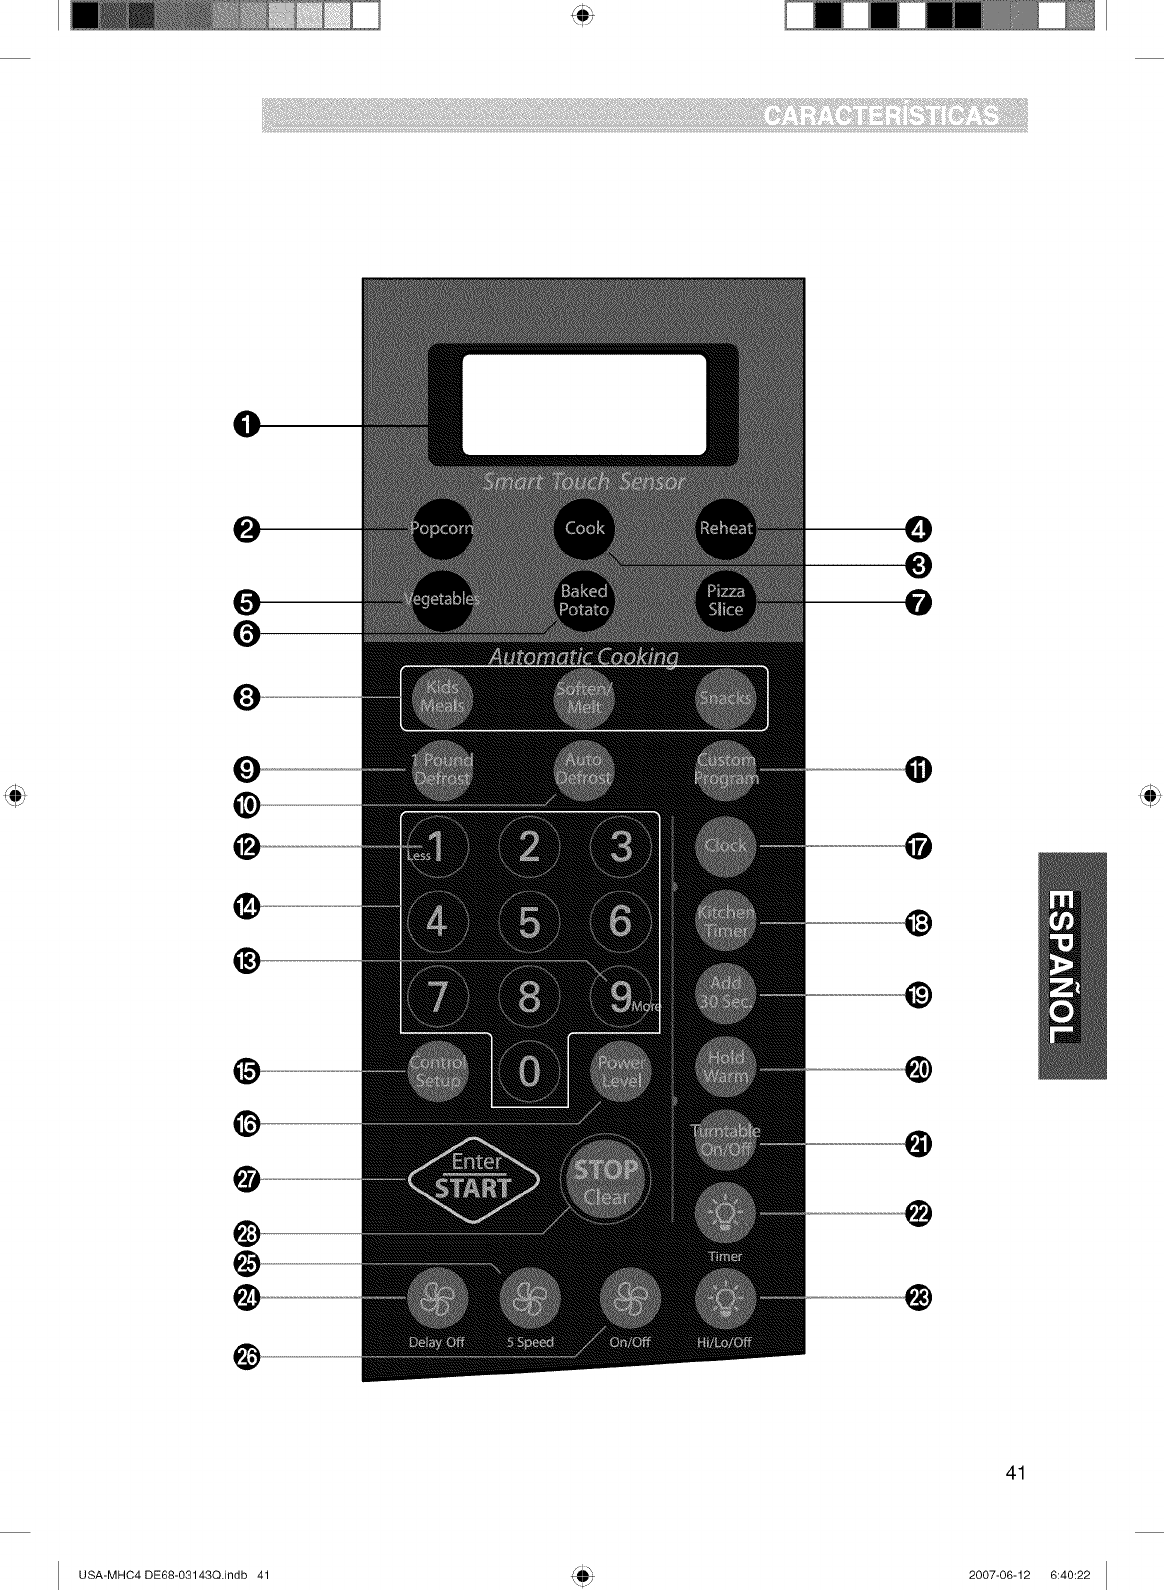
I I
®
41
USA-MHC4 DE68-03143Q.indb 41 2007-06-12 6:40:22
iiiiiill__!i!ii!_!_i_!i___!_i!i__!_i!_ii!!ii_i_________!:_!i!___!i_!__!_i_!!_i!!!!______________!!!i!!!!ii!!!iiiii!i!ii!!i;!!i!iiii!!i!i!!ilii!i!ii!i!!!i!!!i!iiiiii!iiii!iiii!iiii!ii!iiiiiiiiiiiiiiiiiii!iiii!i!!iiiiiiii!!i!ii!i!!!!iiliiiiiiiiiii!;ii!ii!iiiiiiiiiii!ili!il!i!i!!i!iliiil!if!!!!i!ii!iiliiiiiilliilil!i!ii_iiii!ii!i!iiiiiiiili!!ii!!!i!ii!i!!i!!!!i!iiiiiiliii_i_ii!!!!iiiliilili!ii!iiiiiii!iiiiii!i!ilili!i!!i!i!iiiiiii!iii!iiiiiiiii!i!i!i!iiii!!!i!iliiil!i!i!i!iiif!iiiiiiiiii!iliii!i!iiiii!!i!ilii!!!i!i!i!iiiiiiiiii!iiiiiiiiiii!i!iiiii!!i!ilii!!!i!i!i!iiiiiiiiii!iiiiiiiiiii!i!iiiii!!i!ilii!!!i!i!i!iiiiiiiiii!iiiiiiiiiii!i!iiiii!!i!ilii!!!i!i!i!iiiiiiiiii!iiiiiiiiiii!i!iiiii!!i!ilii!!!i!i!i!iiiiiiiiii!iiiiiiiiiii!i!iiiii!!i!ilii!!!i!i!i!iiiiiiiiii!iiiiiiiiiii!i!iiiii!!i!ilii!!!i!i!i!iiiiiiiiii!iiiiiiiiiii!i!iiiii!!i!ilii!!!i!i!i!iiiiiiiiii!iiiiiiiiiii!i!iiiii!!i!ilii!!!i!i!i!iiiiiiiiii!iiiiiiiiiii!i!iiiii!!i!ilii!!!i!i!i!iiiiiiiiii!iiiiiiiiiii!i!iiiii!!i!ilii!!!i!i!i!iiiiiiiiii!iiiiiiiiiii!i!iiiii!!i!ilii!!!i!i!i!iiiiiiiiii!iiiiiiiiiii!i!iiiii!!i!ilii!!!i!i!i!iiiiiiiiii!iiiiiiiliiliii!!
Features(Caracteristiques)
1. DISPLAY(PANTALLA):Lapantallaincluyeun reloje
indicadoresquelemuestranlahoradeldia,los ajustes
detiempodecocci6ny lasfuncionesdecocci6n
seleccionadas.
2. POPCORN(PALOMITASDEMAiZ):Oprimaestatecla
cuandopreparepalomitasdemaizensu hornode
microondas.Elsensorleindicar_,al hornocu_.nto
tiempococinardependiendodelacantidaddehumedad
quedetecteenlaspalomitasdemaiz.
3. COOK(COCCION):Oprimaestateclaparacocinar
bebidas,comidascongeladas,desayunoscongelados,
pechugasdepolio.Elsensorleindicar_,al hornocu_.nto
tiempococinardependiendodelacantidaddehumedad
provenientedelacomida.
4. REHEAT(RECALENTAMIENTO):Oprimaestatecla
pararecalentarunplatodecomida,guisosy pastas.
Elsensorleindicar_,al hornocu_.ntotiempococinar
dependiendodelacantidaddehumedadprovenientede
lacomida.
5. VEGETABLES(VERDURAS):Oprimaestateclapara
cocinarverdurasfrescaso congeladas.Elsensorle
indicar_,al hornocu_.ntotiempococinardependiendo
delacantidaddehumedadquedetecteenlasverduras.
6. BAKEDPOTATO(PAPAALHORNO):Oprimaestatecla
paracocinarpapas.Elsensorleindicar_,al horno
cu_.ntotiempococinardependiendodelacantidadde
humedadquedetecteenlas papas.
7. PIZZASLICE(REBANADADEPIZZA):Oprimaestatecla
pararecalentarla pizza.Elsensorleindicar_,alhorno
cu_.ntotiempococinardependiendodelacantidadde
humedadquedetecte.
8. KIDSMEALS,SNACKS,SOFTEN/MELT(COMIDAS
PARANINOS,SNACKS,ABLANDAR/DERRETIR):
Oprimaestasteclasparacocinarcomidasespecificas.
9. 1POUNDDEFROST(DESCONGELAMIENTO1LIBRA):
EstateclaofreceundescongelamientoRAPIDOpara
1,0 libradealimentoscongelados.
10. AUTODEFROST(DESCONGELAMIENTO
AUTOMATICO):Oprimaestateclaparadescongelar
alimentosseg_nel peso.
11 CUSTOMPROGRAM(PROGRAMAPERSONALIZADO):
Oprimaestateclapararecuperarunainstrucci6nde
cocci6npreviamenteprogramadaenlamemoria.
12. LESS(MENOS):Oprimaestateclapararestartiempo
decocci6n.
13. MORE(MAS):Oprimaestateclaparaagregarm_.s
tiempodecocci6n.
14. NOMERO:Oprimalasteclasnum6ricasparaingresarel
tiempodecocci6n,elniveldepotencia,lascantidades
o los pesos.
42
15. CONTROLSETUP(CONFIGURACII)NDECONTROLES):
Oprimaestateclaparamodificarlasconfiguraciones
predeterminadasdelhorno.
16. POWERLEVEL(NIVELDEPOTENCIA):Oprimaesta
teclaparaseleccionarunniveldepotenciadecocci6n.
17. CLOCK(RELOJ):Oprimaestateclaparaingresarla
horadeldia.
18. KITCHENTIMER(TEMPORIZADORDELACOCINA):
Oprimaestateclaparaconfigurareltemporizadordela
cocina.
19. ADD30 SEC(AGREGAR30 SEG):Oprimaestatecla
paraajustary comenzarr_.pidamenteenel nivelde
potenciade1100%.
20. HOLDWARM(MANTENERCALIENTE):Toqueestepad
para"lVlantenercaliente"lascomidascocinadasensu
hornohasta99minutos99segundos.
21. TURNTABLEON/OFF(PLATOGIRATORIOACTIVADO/
DESACTIVADO):Oprimaestateclaparadesactivar
elplatogiratorio.Aparecer_.lapalabra"OFF"
(desactivado)enla pantalla.
•TURNTABLEON/OFF(PLATOGIRATORIOACTIVADO/
DESACTIVADO)noest,.disponibleenlos modos
cocci6nconsensory descongelamiento.
22. LIGHTTIMER(TEMPORIZADORDELALUZ):Oprima
estateclaparaconfigurareltemporizadordelaluz.
23. LIGHTHI/LO/OFF(LUZALTA/BAJA/APAGADA):Oprima
estateclaparaencenderla luzdelacubierta.
24. VENTDELAYON/OFF(VENTILACIONRETRASADA
ACTIVADA/DESACTIVADA):Oprimaestateclacuando
configureeltiempodeventilaci6n(1,3, 5, 10,30
minutos).
25. VENT5 SPEED(VENTILACII)NCON5 VELOCIDADES):
Oprimaestateclaparaelegirunadelas5velocidades
delventilador.
26. VENTON/OFF(VENTILACIONACTIVADA/
DESACTIVADA):Oprimaestateclaparaencendero
apagarelventilador.
27. ENTER/START(INGRESAR/COMENZAR):Oprima
estateclaparainiciarunafunci6n.Siabrelapuerta
despu_sdequeelhornocomienzaa cocinar,cierrela
puertay oprimalatecla ENTER/START(INGRESAR/
COMENZAR)nuevamente.
28. STOP/CLEAR(APAGAR/ANULAR):Oprimaestatecla
paraapagarel hornooanulartodaslasentradas.
USA-MHC4 DE68-03143Q.indb 42 2007-06-12 6:40:22
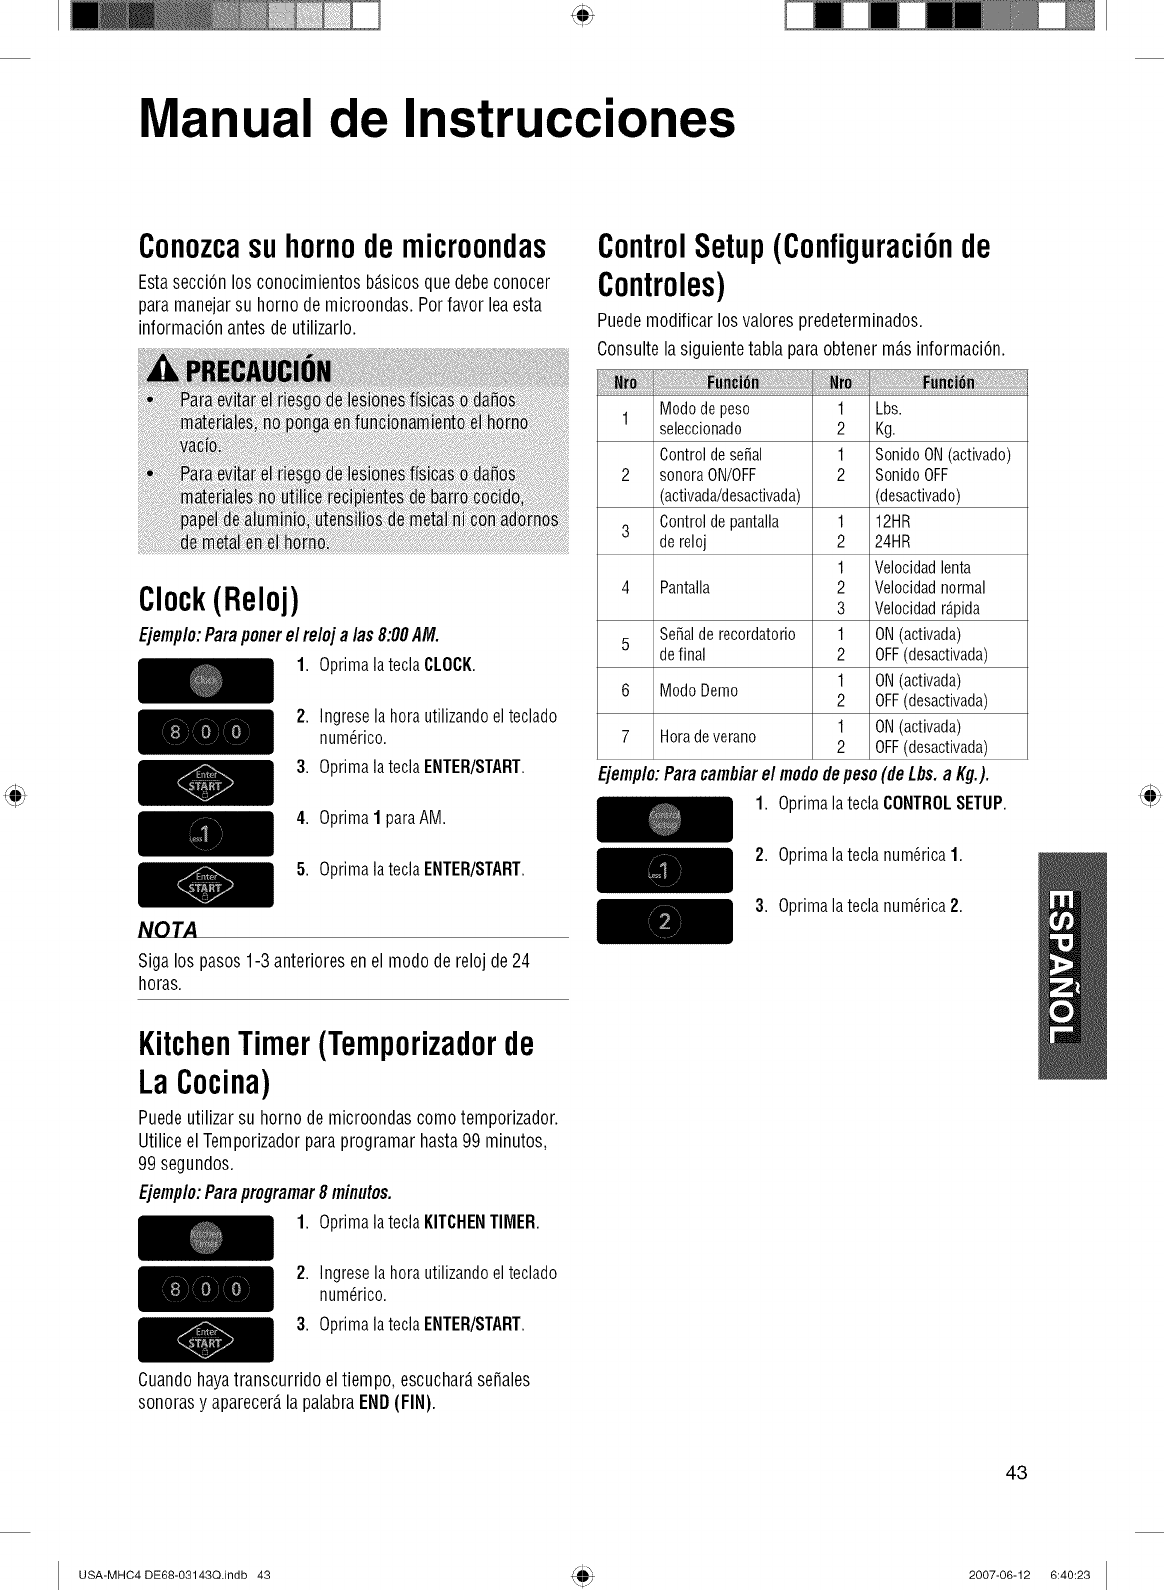
Manual de Instrucciones
Conozcasuhornodemicroondas
EstasecciOnlosconocimientosb_sicosquedebeconocer
paramanejarsu hornodemicroondas.Porfavorleaesta
informaci6nantesdeutilizarlo.
Clock(Reloj)
Ejemp/o:Paraportere/re/oj a/as 8:00AM.
1. Oprimalatecla CLOCK.
2. Ingresela horautilizandoel teclado
num_rico.
3. Oprimala teclaENTER/START.
4. Oprima1 paraAM.
5. Oprimala teclaENTER/START.
NOTA
Siga los pasos 1-3 anteriores en el modo de reloj de 24
horas.
ControlSetup(Configuraci6nde
Controles)
Puedemodificar los valores predeterminados.
Consulte la siguiente tabla para obtener m_s informaci6n.
1 Mododepeso 1 Lbs.
seleccionado 2 Kg.
Controlde sepal 1 SonidoON(activado)
2 sonoraON/OFF 2 SonidoOFF
(activada/desactivada) (desactivado)
Controlde pantalla 1 12HR
3dereloj 2 24HR
1 Velocidadlenta
4 Pantalla 2 Velocidadnormal
3 Velocidadr_pida
SePalde recordatorio 1 ON(activada)
5definal 2 OFF(desactivada)
1 ON(activada)
6 ModoDemo 2 OFF(desactivada)
1 ON(activada)
7 Horadeverano 2 OFF(desactivada)
Ejemplo:Paracambiarel mododepeso(deLbs.a Kg.).
1. OprimalateclaCONTROLSETUP.
2. Oprimalatecla num6rica1.
3. Oprimalatecla num6rica2.
KitchenTimer(Temporizadorde
LaCocina)
Puedeutilizar su horno de microondas como temporizador.
Utilice el Temporizador para programar hasta 99 minutos,
99 segundos.
Ejemplo:Paraprogramar 8 minutos.
1. Oprimala teclaKITCHENTIMER.
2. Ingreselahorautilizandoelteclado
num_rico.
3. Oprimala teclaENTER/START.
Cuandohayatranscurridoeltiempo,escuchar_se_ales
sonorasy aparecer_lapalabraEND(FIN).
43
USA-MHC4 DE68-03143Q.indb 43 2007-06-12 6:40:23
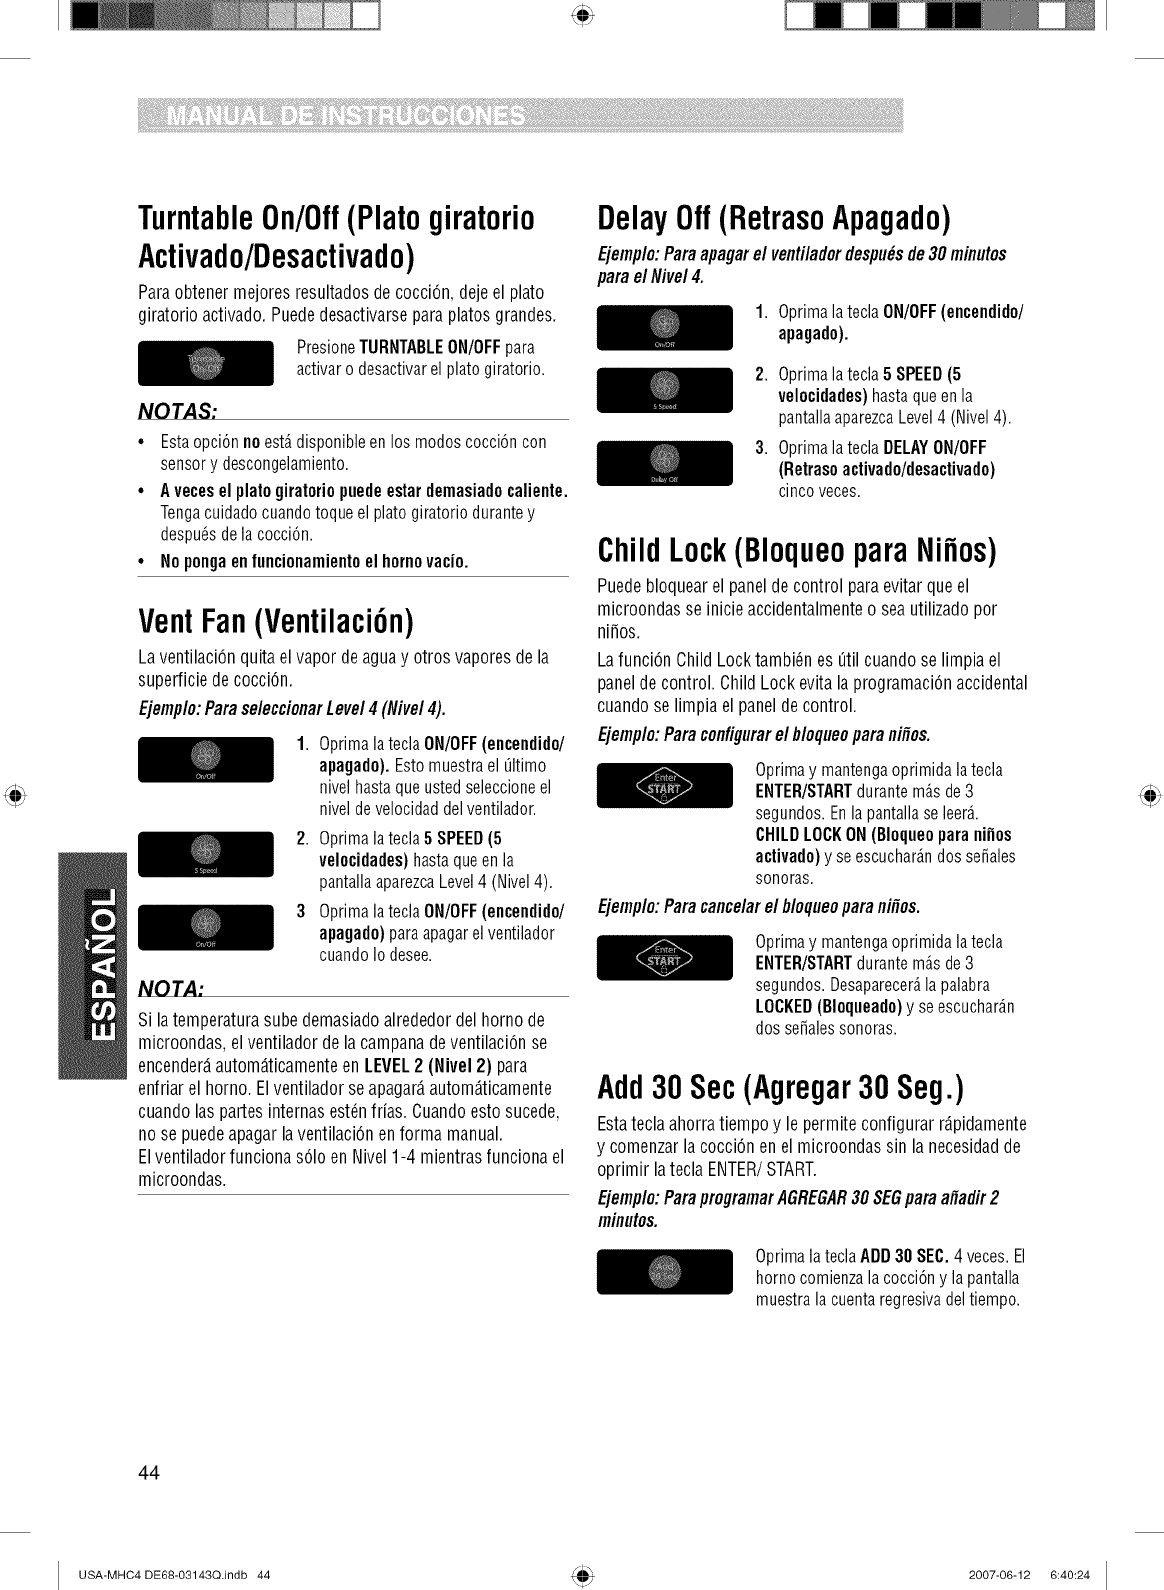
i¸ii_fillii!i!ii!i!iii_iiii!ii!iii!ii!iii!!i!i_iiil;iii!'!_!!'!i_iiiiiii!!!!!'!!iiiili!iiii:'i'!!_!_i_!iiiiiiiiiii!!_!_iiii!iil!iiiii!_!_!!_i_i!_iiiiii!iii!_!_!!!iiiiiillii!i!!'!_!_!iii!_iiii!_!_!!_!!!_!_!iiiiii!i!!iiiiii_,!_!_i_iiiiii_i!!!!ii!_i_i!_!:!_i_!;!ii_iiii_iiii!ii!ii¸ii!i!iiiiiiiiii_i_!!!!i¸ii!iiill_i_i_iii_i_i_i!_i!!!iiii;!iiiiiilli_iii!i!iiliililiiii_i!:!_!_i!iiiiiii_!_i_!i_i!!_iiiiii!_i!ilii!i_i_i_i_i_i_!;!:i'i!i!iii!illii!_!!!;i_i!i_!iiiiiilli¸!iii!_i'ii!_!_!;i_i_ii_i_i_iii:iiii!_iiiiiiii'!!iii!fill¸iii_i_i_i_!ii_!i!iiiiii!il_i_iii'i_i_il_ii_i_!_!!!i!ii!iiii!!i!i!iiii!i!iiiilii!_!_iiii!!i!ii_ii!!i!i!i!iiiiiiiiii!ii_iiiiiiii!i!iiiii!!i!ii_ii!!i!i!i!iiiiiiiiii!ii_iiiiiiii!i!iiiii!!i!ii_ii!!i!i!i!iiiiiiiiii!ii_iiiiiiii!i!iiiii!!i!ii_ii!!i!i!i!iiiiiiiiii!ii_iiiiiiii!i!iiiii!!i!ii_ii!!i!i!i!iiiiiiiiii!ii_iiiiiiii!i!iiiii!!i!ii_ii!!i!i!i!iiiiiiiiii!ii_iiiiiiii!i!iiiii!!i!ii_ii!!i!i!i!iiiiiiiiii!ii_iiiiiiii!i!iiiii!!i!ii_ii!!i!i!i!iiiiiiiiii!ii_iiiiiiii!i!iiiii!!i!ii_ii!!i!i!i!iiiiiiiiii!ii_iiiiiiii!i!iiiii!!i!ii_ii!!i!i!i!iiiiiiiiii!ii_iiiiiiii!i!i!ii!!iiii
TurntableOn/Off(Platogiratorio
Activado/Desactivado)
ParaobtenermejoresresultadosdecocciOn,dejeel plato
giratorioactivado.Puededesactivarseparaplatosgrandes.
PresioneTURNTABLEON/OFFpara
activarodesactivarelplatogiratorio.
NOTAS:
•Estaopci6n noest_disponibleenlos modos cocci6ncon
sensory descongelamiento.
•Avecesel platogiratorio puedeestardemasiadocaliente.
Tengacuidadocuandotoque el platogiratorio durantey
despu_sdela cocci6n.
•No pongaen luncionamientoel homovacio.
VentFan(Ventilaci6n)
LaventilaciOnquitaelvapordeaguay otrosvaporesdela
superficiedecocciOn.
Ejemplo:ParaseleccionarLevel4 (Nivel4).
1. Oprimala teclaON/OFF(encendido/
apagado).Estomuestrael _ltimo
nivel hastaqueusted se]eccionee]
nivelde velocidad delventilador.
2. Oprimalatecla5 SPEED(5
velocidades)hastaqueenla
pantallaaparezcaLevel4 (Nivel4).
30prima la teclaON/OFF(eneendido/
apagado)paraapagarel ventilador
cuandoIo desee.
NOTA"
Silatemperaturasubedemasiadoalrededordelhornode
microondas,el ventiladordelacampanadeventilaciOnse
encender_autom_ticamenteenLEVEL2(Nivel2) para
enfriarel horno.Elventiladorseapagar_autom_.ticamente
cuandolas partesinternasest_nfrias. Cuandoestosucede,
nose puedeapagarlaventilaciOnenformamanual.
ElventiladorfuncionasoloenNivel1-4mientrasfuncionael
microondas.
DelayOff(RetrasoApagado)
Ejemplo:Paraapagarel ventiladordespu_sde30minutos
paraelNive/4.
1. OprimalateclaON/OFF(encendido/
apagado).
2. Oprimalatecla5 SPEED(5
velocidades)hastaqueen la
pantallaaparezcaLevel4 (Nive]4).
3. Oprimalatecla DELAYON/OFF
(Retrasoactivado/desactivado)
cinco veces.
ChildLock(BloqueoparaNifios)
Puedebloquearel paneldecontrolparaevitarqueel
microondasseinicieaccidentalmenteo seautilizadopor
ni_os.
LafunciOnChildLocktambi_nes _til cuandose limpiael
paneldecontrol.ChildLockevitalaprogramaciOnaccidental
cuandoselimpiaelpaneldecontrol.
Ejemplo:Paraconfigurarel bloqueoparani#os.
Oprimay mantengaoprimida latecla
ENTER/STARTdurantem_.sde3
segundos.En lapantaiiaseleer_..
CHILDLOCKON(Bloqueoparani_os
activado)y se escuchar_.ndos se_ales
sonoras.
Ejemplo:Paracancelarel flloqueoparani#os.
Oprimay mantengaoprimida latecla
ENTER/STARTdurantem_.sde3
segundos.Desaparecer_.]apalabra
LOCKED(Bloqueado)y se escuchar_n
dosse_alessonoras.
Add30Sec(Agregar30 Seg.)
Estateclaahorratiempoy le permiteconfigurarr_pidamente
y comenzarlacocciOnenel microondassin lanecesidadde
oprimirlateclaENTER/START.
Ejemplo:ParaprogramarAGREGAR30SEGparaafiadir2
minutos.
0prima lateclaADD30 SEC.4 veces.El
horno comienza]acocci6ny la pantalla
muestralacuentaregresivadeltiempo.
44
USA-MHC4 DE68-03143Q.indb 44 2007-06-12 6:40:24

LightTimer(Temporizadorde la
Luz)
Puedeprogramar la LUZpara que se encienda y se apague
autom_ticamente en cualquier momento. La luz se enciende
a la misma hora cada dfa hasta que se reinicia.
Ejemplo:Se enciendea/as 2:00AM, se apagaa/as 7:00AM.
1. Oprimalatecla LIGHTTIMER.
2. Ingresela horaa ia quedeseaquese
enciendala LUZ.
3. Oprimala teclaENTER/START.
4. 0prima 1paraAM.
5. Oprimala teclaENTER/START.
6. Ingresela horaa la quedeseaquese
apaguela LUZ.
7. Oprimala teclaENTER/START.
8. Optima2paraPIV].
9. OptimalateclaENTER/START.
1. Optimaiatecla LIGHTTIMER.
.Ingreseia horaa la quedeseaquese
enciendala LUZ.
3. Optimala tecla ENTER/START.
Pourannulerle light timer(Minuteur
dleclairage)
1. Optimalatecla LIGHTTIMER.
2. Oprimaiatecla O.
NOTA:
Sideseacancelarel LIGHTTIMERenfuncionamiento,
oprimalateclaO.
LightHiLo/Off(LuzAlta/Baja/
Apagada)
OprimalateclaLIGHTHI/I_O/OFFuna
vez paraluzbrillante,dos vecespara
luz nocturna,o tresvecesparaapagar
la ]uz.
IVIore/Less(IVlds/IVlenos)
Los botones More/Less le permiten ajustar los tiempos de
cocci6n preconfigurados. $61ofuncionan en los modos
Sensor Reheat (recalentamiento con sensor), Sensor
cooking (cocci6n con sensor) (excepto para Bebidas),
Add 30 sec. (agregar 30 seg), Custom Cook (cocci6n
personalizada)o Time Cook (cocci6n por tiempo). Utilice
el bot6n More/Less s61odespu6s de haber comenzadoa
cocinar con uno de estos procedimientos.
ParaAGREGARm_stiempoa un
procedimientode cocci6nautom_tico:
Optimael bot6nMORE(9) (lYl;is).
ParaREDUCIRm_.stiempo de un
procedimientode cocci6nautom_tico:
Oprimael bot6nLESS(1) (Menos).
4. Ingreseia horaa la quedeseaquese
apaguela LUZ.
5. Optimala tecla ENTER/START.
45
USA-MHC4 DE68-03143Q.indb 45 2007-06-12 6:40:25
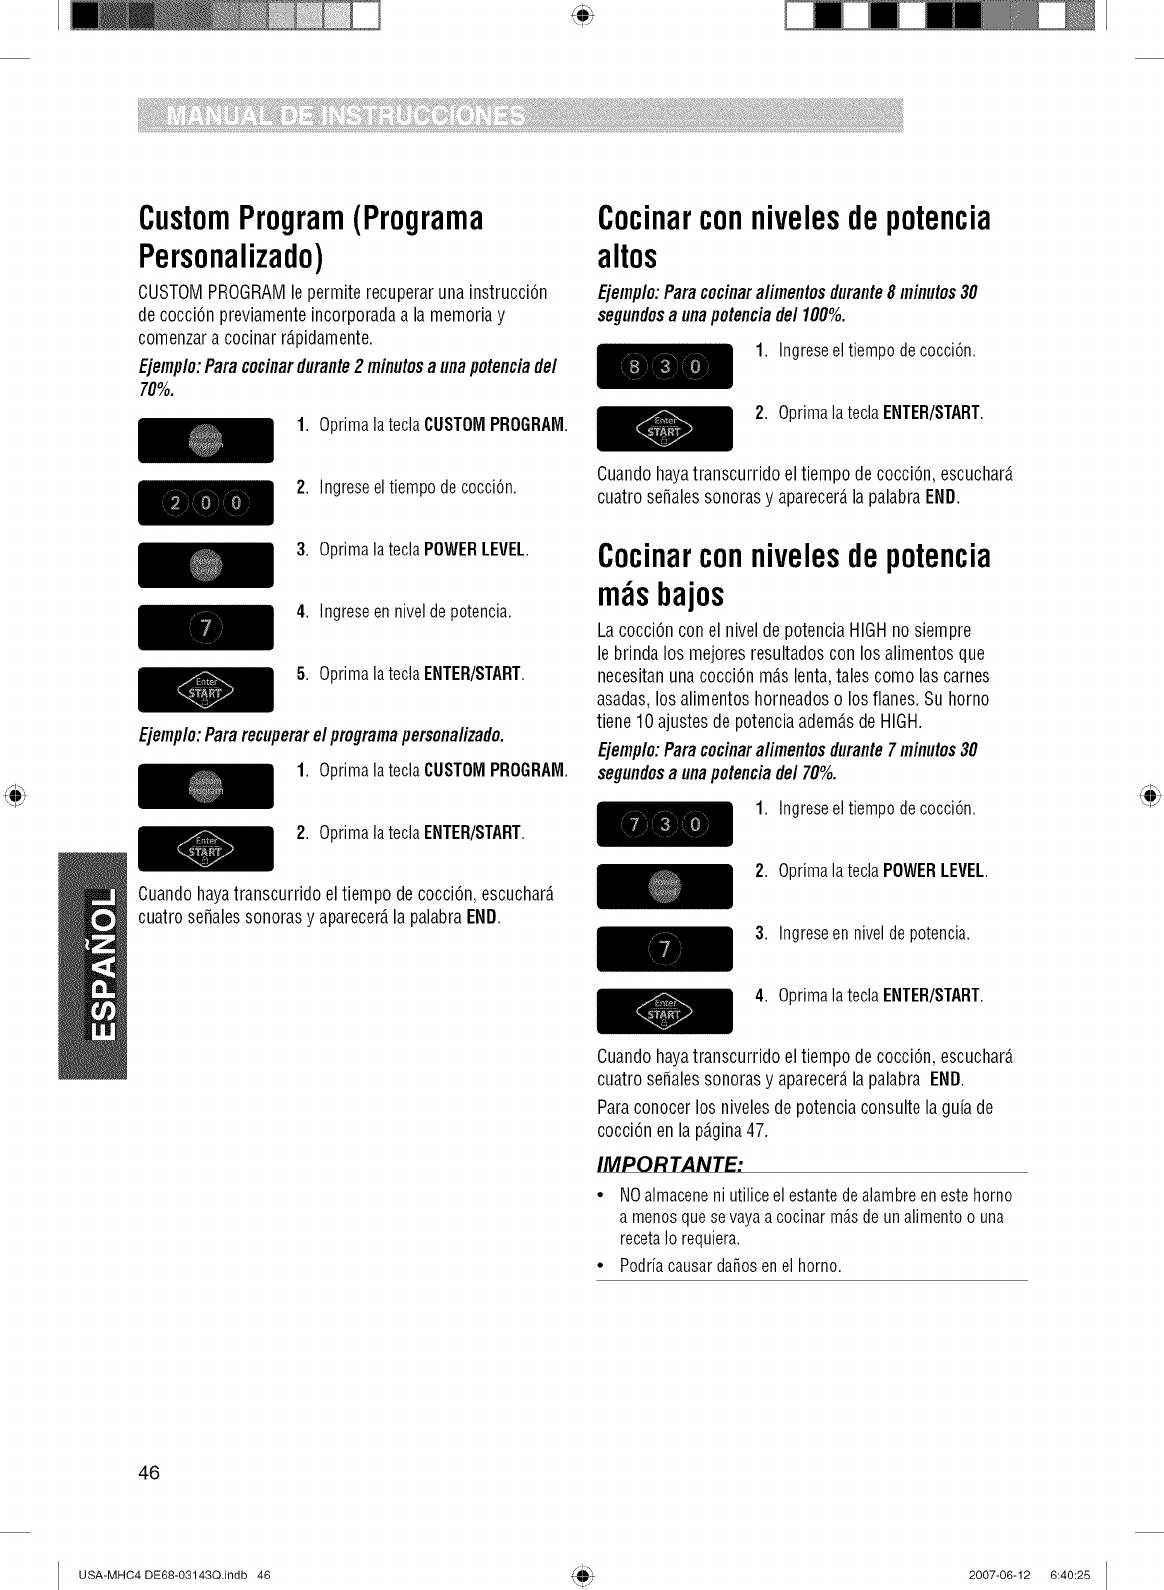
i¸ii_fillii!i!ii!i!iii_iiii!ii!iii!ii!iii!!i!i_iiil;iii!'!_!!'!i_iiiiiii!!!!!'!!iiiili!iiii:'i'!!_!_i_!ii'iiiiiiiii!!_!_iiii!iil!iiiii!_!_!!_i_i!_iiiiii!iii!_!_!!!iiiiiillii!i!!'!_!_!iii!_iiii!_!_!!_!!!_!_!iiiiii!i!!iii'iii_,!_!_i_iiiiii_i!!!!ii!_i_i!_!:!_i_!;!ii_iiii_iiii!ii!ii¸ii!i!iii"_iiiiiii_i_!!!!i¸i_i!iiill_i_i_iii_i_i_i!_i!!!iiii;!iiiiiilli_iii!i!iiliililiiii_i!:!_!_i!iiiiii_i_!_i_!i_i!!_iiiiii!_i!ilii!i_i_i_i_i_i_!;!:i'i!i!iii!illii!_!!!;i_i!i_!iiiiiilli¸!iii!_i'ii!_!_!;i_i_ii_i_i_iii:iiii!_iiiiiiii'!!'ii_i!fill¸iii_i_i_i_!ii_!i!iiiiii!il_i_iii'i_i_il_ii_i_!_!!!i!ii!iiii!!i!i!iiii!i!iiiilii!_!_iiii!!i!ii_ii!!i!i!i!iiiiiiiiii!ii_iiiiiiii!i!iiiii!!i!ii_ii!!i!i!i!iiiiiiiiii!ii_iiiiiiii!i!iiiii!!i!ii_ii!!i!i!i!iiiiiiiiii!ii_iiiiiiii!i!iiiii!!i!ii_ii!!i!i!i!iiiiiiiiii!ii_iiiiiiii!i!iiiii!!i!ii_ii!!i!i!i!iiiiiiiiii!ii_iiiiiiii!i!iiiii!!i!ii_ii!!i!i!i!iiiiiiiiii!ii_iiiiiiii!i!iiiii!!i!ii_ii!!i!i!i!iiiiiiiiii!ii_iiiiiiii!i!iiiii!!i!ii_ii!!i!i!i!iiiiiiiiii!ii_iiiiiiii!i!iiiii!!i!ii_ii!!i!i!i!iiiiiiiiii!ii_iiiiiiii!i!iiiii!!i!ii_ii!!i!i!i!iiiiiiiiii!ii_iiiiiiii!i!i!ii!!iiii
CustomProgram(Programa
Personalizado)
CUSTOMPROGRAMle permiterecuperarunainstrucci6n
decocciOnpreviamenteincorporadaa lamemoriay
comenzara cocinarr_.pidamente.
Ejemplo:Paracocinardurante2minutosa unapotenciade/
70%.
1. Oprimala teclaCUSTOMPROGRAM.
2. Ingreseeltiempo decocci6n.
3. Oprimala teclaPOWERLEVEL.
4. Ingreseen nivel de potencia.
5. Oprimala teclaENTER/START.
Ejemp/o:Pararecuperare/programapersona/izado.
1. OprimalateclaCUSTOMPROGRAM.
2. Oprimala teclaENTER/START.
CuandohayatranscurridoeltiempodecocciOn,escuchar_.
cuatrosefialessonorasy aparecer_,lapalabraEND.
Cocinarconnivelesdepotencia
altos
Ejemp/o:Paracocinara/imentosdurante8 minutos30
segundosa unapotenciade/100%.
1. Ingreseeltiempodecocci6n.
2. Oprimalatecla ENTER/START.
CuandohayatranscurridoeltiempodecocciOn,escuchar_.
cuatrosefialessonorasy aparecer_,lapalabraEND.
Cocinarconnivelesdepotencia
mzisbajos
Lacocci6nconel niveldepotenciaHIGHnosiempre
lebrindalos mejoresresultadoscon losalimentosque
necesitanunacocci6nm_.slenta,talescomolascarnes
asadas,losalimentoshorneadoso losflanes.Suhorno
tiene10ajustesdepotenciaadem_.sdeHIGH.
Ejemplo:Paracocinaralimentosdurante7minutos30
segundosa unapotenciade/70%.
1. Ingreseel tiempo de cocci6n.
2. Oprima]atecla POWERLEVEL.
3. Ingreseen nivelde potencia.
4. Oprimalatecla ENTER/START.
Cuandohayatranscurridoeltiempodecocci6n,escuchar_
cuatrose_alessonorasy aparecer_,lapalabraEND.
Paraconocerlosnivelesdepotenciaconsultelaguiade
cocciOnenla p_.gina47.
IMPORTANTF"
• NOalmaceneni utiliceel estantede alambreen este horno
a menosquesevaya a cocinar m_.sde unalimentoo una
recetaIo requiera.
• Podriacausarda_os enel horno.
46
USA-MHC4 DE68-03143Q.indb 46 2007-06-12 6:40:25
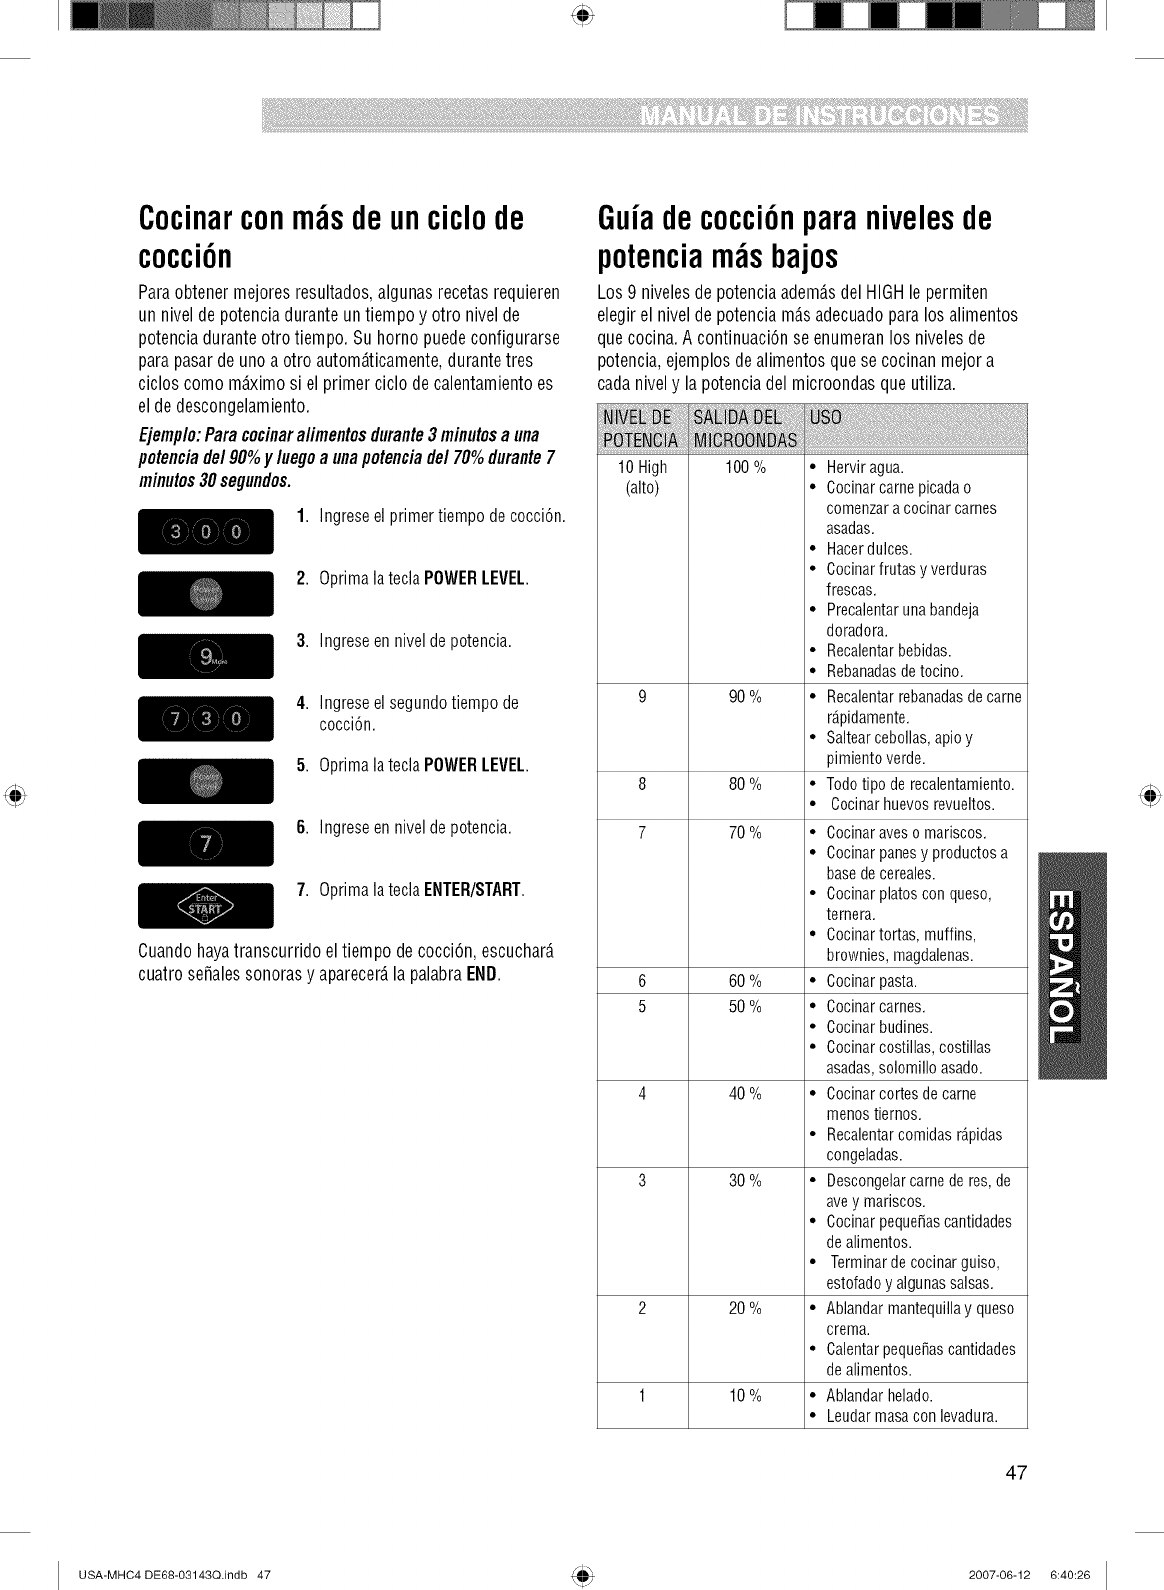
Cocinarcon deunciclode
cocci6n
Paraobtenermejoresresultados,algunasrecetasrequieren
unniveldepotenciaduranteuntiempoy otro nivelde
potenciaduranteotrotiempo.Suhornopuedeconfigurarse
parapasarde unoaotro autom_.ticamente,durantetres
cicloscomom_.ximosi el primerciclodecalentamientoes
eldedescongelamiento.
Ejemplo:Paracocinaralimentosdurante3minutosa una
potenciade/g0%y/uegoa unapotenciade/70%durante7
minutos30segundos.
1. Ingreseelprimertiempodecocci6n.
2. Optimala tecla POWERLEVEL.
3. Ingreseennivel de potencia.
4. Ingreseelsegundotiempode
cocci6n.
5. Oprimala teclaPOWERLEVEL.
6. Ingreseennive]depotencia.
7. Oprimala teclaENTER/START.
Cuandohayatranscurridoeltiempodecocci6n,escucharA
cuatroseSalessonorasy aparecer_,lapalabraEND.
Guiadecocci6nparanivelesde
potenciam isbajos
Los 9 niveles de potencia adem_.sdel HIGH le permiten
elegir el nivel de potencia mAsadecuadopara los alimentos
que cocina. A continuaci6n se enumeran los nivelesde
potencia, ejemplos de alimentos que se cocinan mejor a
cada nivel y la potencia del microondas que utiliza.
10High
(alto)
100%
9 90 %
8 80 %
7 70 %
6 60 %
5 50 %
4 40 %
3 30 %
2 20 %
1 10%
• Herviragua.
• Cocinarcamepicadao
comenzara cocinarcarries
asadas.
•Hacerdulces.
•Cocinarfrutasyverduras
frescas.
•Precalentarunabandeja
doradora.
• Recalentarbebidas.
•Rebanadasde tocino.
• Recalentarrebanadasdecarne
r_pidamente.
•Saltearcebollas,apioy
pimientoverde.
•Todotipoderecalentamiento.
• Cocinarhuevosrevueltos.
• Cocinarayeso mariscos.
• Cocinarpanesy productosa
basedecereales.
• Cocinarplatosconqueso,
ternera.
• Cocinartortas,muffins,
brownies,magdalenas.
• Cocinarpasta.
• Cocinarcarries.
• Cocinarbudines.
• Cocinarcostillas,costillas
asadas,solomilloasado.
•Cocinarcortesdecame
menostiernos.
• Recalentarcomidasr_pidas
congeladas.
• Descongelarcamederes,de
avey mariscos.
• Cocinarpeque_ascantidades
dealimentos.
• Terminardecocinarguiso,
estofadoy algunassalsas.
• Ablandarmantequillay queso
crema.
• Calentarpeque_ascantidades
dealimentos.
• Ablandarhelado.
• Leudarmasacon levadura.
47
USA-MHC4 DE68-O3143Q.indb 47 2007-06-12 6:40:26
i¸ii_fillii!i!ii!i!iii_iiii!ii!iii!ii!iii!!i!i_iiil;iii!'!_!!'!i_iiiiiii!!!!!'!!iiiili!iiiii'i'!!_!_i_!iiiiiiiiiii!!_!_iiii!iil!iiiii!_!_!!_i_i!_iiiiii!iii!_!_!!!iiiiiillii!i!!'!_!_!iii!_iiii!_!_!!_!!!_!_!iiiiii!i!!iiiiii_,!_!_i_iiiiii_i!!!!ii!_i_i!_!:!_i_!;!ii_iiii_iiii!ii!ii¸ii!i!iiiiiiiiii_i_!!!!i¸ii!iiill_i_i_iii_i_i_i!_i!!!iiii;!iiiiiilli_iii!i!iiliililiiii_i!:!_!_i!iiiiiii_!_i_!i_i!!_iiiiii!_i!ilii!i_i_i_i_i_i_!;!:i'i!i!iii!illii!_!!!;i_i!i_!iiiiiilli¸!iii!_i'ii!_!_!;i_i_ii_i_i_iii_iiii!_iiiiiiii'!!iii!fill¸iii_i_i_i_!ii_!i!iiiiii!il_i_iii'i_i_il_ii_i_!_!!!i!ii!iiii!!i!i!iiii!i!iiiilii!_!_iiii!!i!ii_ii!!i!i!i!iiiiiiiiii!ii_iiiiiiii!i!iiiii!!i!ii_ii!!i!i!i!iiiiiiiiii!ii_iiiiiiii!i!iiiii!!i!ii_ii!!i!i!i!iiiiiiiiii!ii_iiiiiiii!i!iiiii!!i!ii_ii!!i!i!i!iiiiiiiiii!ii_iiiiiiii!i!iiiii!!i!ii_ii!!i!i!i!iiiiiiiiii!ii_iiiiiiii!i!iiiii!!i!ii_ii!!i!i!i!iiiiiiiiii!ii_iiiiiiii!i!iiiii!!i!ii_ii!!i!i!i!iiiiiiiiii!ii_iiiiiiii!i!iiiii!!i!ii_ii!!i!i!i!iiiiiiiiii!ii_iiiiiiii!i!iiiii!!i!ii_ii!!i!i!i!iiiiiiiiii!ii_iiiiiiii!i!iiiii!!i!ii_ii!!i!i!i!iiiiiiiiii!ii_iiiiiiii!i!i!ii!!iiii
Instruccionesdelsensor
LaCocci6ncon Sensorle permitecocinarla mayoriade
susalimentosfavoritossin seleccionarlostiemposde
cocci6ny los nivelesde potencia.Lapantallaindicar_el
periododedetecci6ndesplazandoelnombredelalimento.
Elhornodeterminaautom_ticamenteeltiempodecocci6n
paracadaalimento.Cuandoelsensorinternodetectauna
ciertacantidaddehumedadprovenientedelalimento,
Indicar_.al hornocu_ntom_stiempococinar.Lapantalla
mostrar_eltiempodecalentamientorestante.Paraobtener
mejoresresultadosalcocinarconSensor,sigaestas
recomendaciones:
1. Losalimentoscocinadoscon elsistemadesensor
debenestaratemperaturadealmacenamientonormal.
2. Elplatogiratoriodevidrio y la parteexternadel
recipientedebenestarsecosparaasegurarmejores
resultadosdecocci6n.
3. Lamayoriadelos alimentosdebencubrirsesiempre,
sinapretar,con unenvoltoriopl_.sticoparamicroondas,
papeldecerao unatapa.
4. Noabrala puertanitoquelateclaSTOP/CLEARdurante
eltiempodedetecci6n.Cuandohayatranscurridoel
tiempodedetecci6n,seescuchar_unasepalsonoray
aparecer_eltiempodecocci6nrestanteenlapantalla.
Enestemomentopuedeabrirlapuertapararevolver,
darvueltao reacomodarlacomida.
Consultela p_gina51 paratabladesonsor.
IMPORTANTE"
Antesdevolverautilizarlacocci6nconsensor,sedebe
dejarenfriarelhornodurante5 minutosparaquelos
alimentossecocinencorrectamente.
Guiadecocci6nconsensor
Losrecipientesy lascubiertasadecuadasayudana
garantizarbuenosresultadosdecocci6nconSensor.
1. Siempreutilicerecipientesparamicroondasy ct]bralos
con sustapaso conunenvoltoriopl_sticocon
ventilaci6n.
2. Nuncautilicecubiertasdepl_.sticoherm_ticas.Pueden
evitarquesalgaelvapory hacerquelacomidasepase.
3. AjustelacantidadaltamaSodel recipiente.Llene
los recipientesal menoshastalamitadparaobtener
mejoresresultados.
4. Asegeresedequelaparteexternadelrecipientede
cocci6ny laparteinternadelmicroondasest_nsecas
antesdecolocarlacomidaenel horno.Lasgotasde
humedadqueseconviertenenvapordeaguapueden
engaSaralsensor.
NOTA:
Silacomidanoest_biencocinadao recalentadacuando
seutilizalafunci6nsensor,utiliceelniveldepotenciay el
tiempodecocci6n.NOsigautilizandolateclasensor.
Agregaro restartiempode
cocci6n
UtilizandolasteclasMORE(9)o LESS(l)sepuedenajustar
todaslas configuracionesdecocci6nconsensory cocci6n
contemporizadorparaunmayoro menortiempo.
48
USA-MHC4 DE68-03143Q.indb 48 2007-06-12 6:40:26
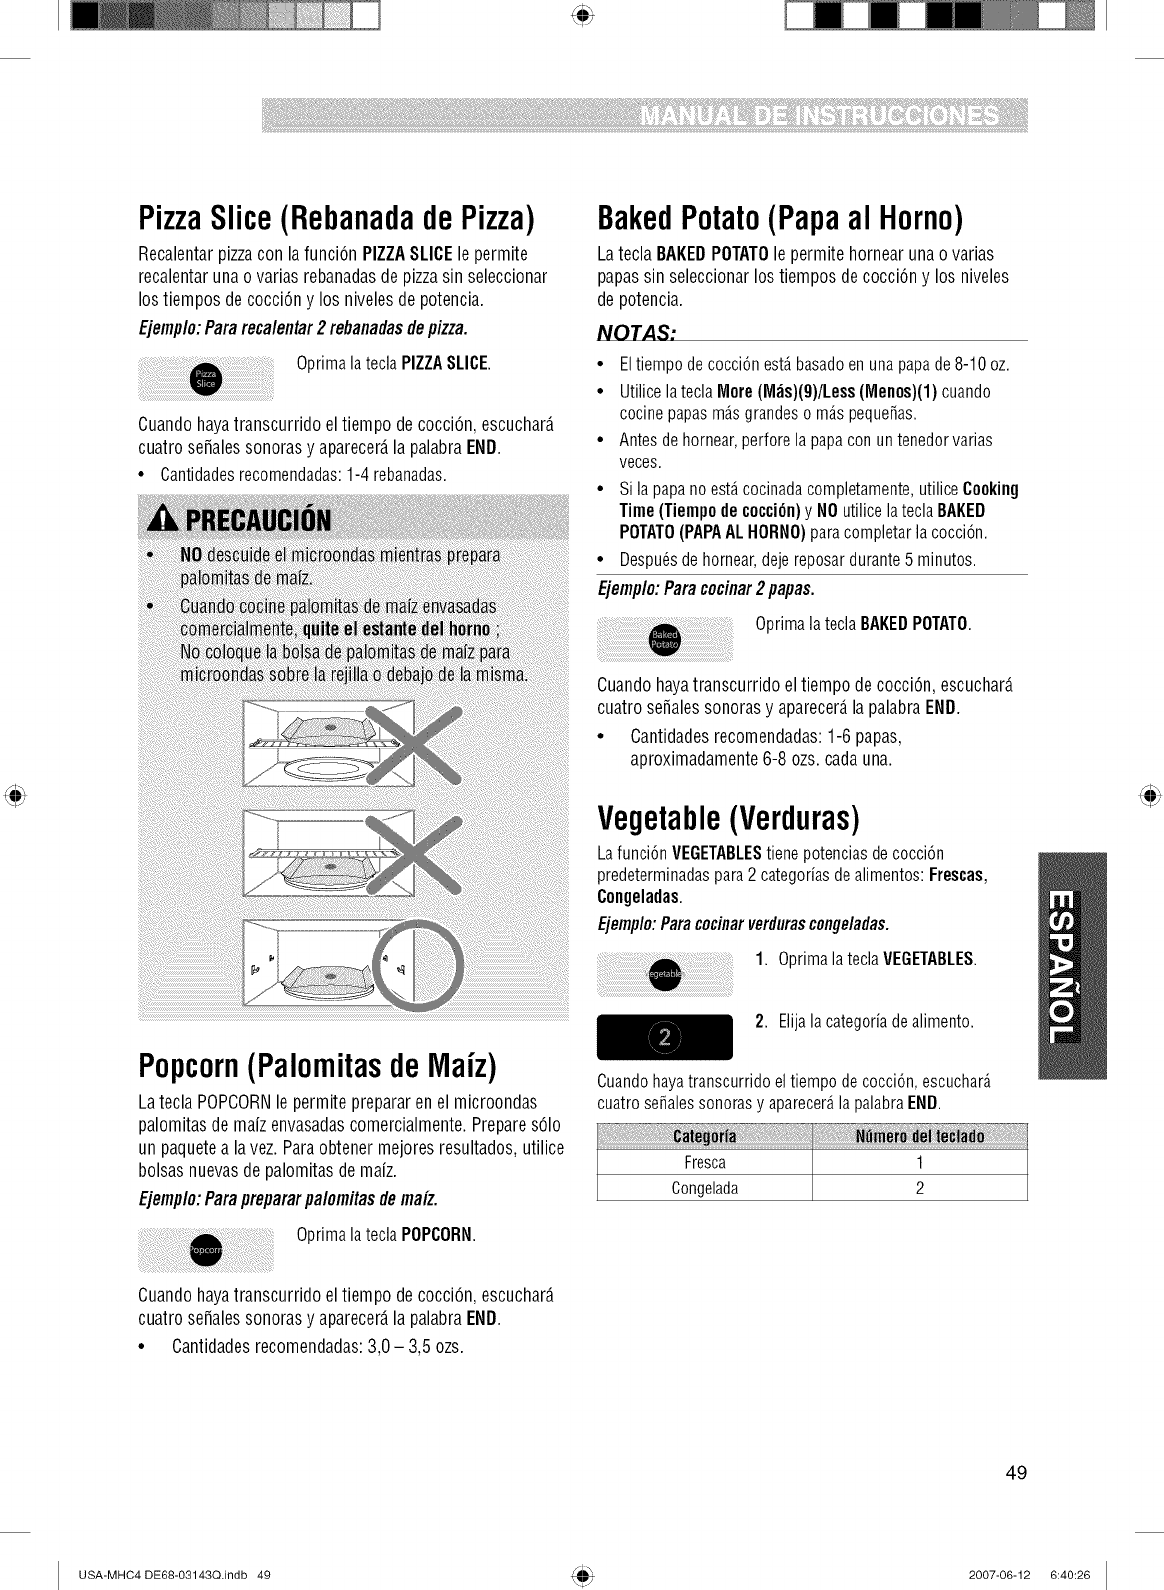
PizzaSlice(Rebanadade Pizza)
Recalentarpizzacon lafunci6nPIZZASLICElepermite
recalentarunao variasrebanadasdepizzasin seleccionar
lostiemposdecocci6ny losnivelesdepotencia.
Ejemplo:Pararecalentar2rebanadasdepizza.
Optimalatecla PIZZASLICE.
Popcorn(PalomitasdeMaiz)
LateclaPOPCORNlepermiteprepararenel microondas
palomitasdemaizenvasadascomercialmente.Prepares61o
unpaquetea lavez.Paraobtenermejoresresultados,utilice
bolsasnuevasdepalomitasdemaiz.
Ejemplo:Paraprepararpalomitasdemaiz.
Optima]atecla POPCORN.
BakedPotato(Papaal Horno)
LateclaBAKEDPOTATOlepermitehornearunao varias
papassin seleccionarlostiemposdecocci6ny losniveles
depotencia.
NOTAS:
•Eltiempode cocci6nest,.basadoen unapapade8-10 oz.
•Utilicelatecla More (IVl_s)(9)/Less(Menos)(1)cuando
cocinepapasm_.sgrandeso m_speque_as.
• Antes dehornear,perforela papaconuntenedorvarias
veces.
• Sila papa noest,.cocinadacompletamente,utiliceCooking
Time (Tiempode cocci6n)yNOutilice ]atecia BAKED
POTATO(PAPAAL HORNO)paracompletarla cocci6n.
•Despu_sdehornear,dejereposardurante5 minutos.
Ejemplo:Paracocinar2 papas.
OprimalateclaBAKEDPOTATO.
Cuandohayatranscurridoeltiempodecocci6n,escucharD.
cuatrose_alessonorasy aparecer6,lapalabraEND.
• Cantidadesrecomendadas:1-6papas,
aproximadamente6-8 ozs.cadauna.
Vegetable(Verduras)
Lafunci6nVEGETABLEStienepotenciasdecocci6n
predeterminadaspara2categoriasdealimentos:Frescas,
Congeladas.
Ejemplo:Paracocinarverdurascongeladas.
1. Optima]ateclaVEGETABLES.
2. Elijala categoriadealimento.
Cuandohayatranscurridoel tiempo de cocci6n,escuchar_.
cuatrose_alessonorasy aparecer_,la palabraEND.
Fresca 1
Congelada 2
Cuandohayatranscurridoeltiempodecocci6n,escuchar_.
cuatrose_alessonorasy aparecer6,lapalabraEND.
• Cantidadesrecomendadas:3,0- 3,5 ozs.
49
USA-MHC4 DE68-03143Q.indb 49 2007-06-12 6:40:26
ill'fillii!i!ii!i!iii_iiii!ii!iii!ii!iii!!i!i_iiil;iii!'!_!!'!i_iiiiiii!!!!!'!!_i!_:_!!_!_i_!_i_i_!!_!_!_i_!i_!_!_!!_i_!_i!_i_!_!_!!!_i_ii!i!!'!_!_!iii!_iiii!_!_!!_!!!_!_!iiiiii!i!!iii'iii_,!_!_i_iiiiii_i!!!!ii!_i_i!_!:!_i_!;!ii_iiii_iiii!ii!iiii!i!iii"_iiiiiii_i_!!!!ii_i!iiill_i_i_iii_i_i_i!_i!!!iiii;!iiiiiilli_iii!i!iiliililiiii_i!:!_!_i!iiiiii_i_!_i_!i_i!!_iiiiii!_i!ilii!i_i_i_i_i_i_!;!:i'i!i!iii!illii!_!!!;i_i!i_!iiiiiilli¸!iii!_i'ii!_!_!;i_i_ii_i_i_iii:iiii!_iiiiiiii'!!'ii_i!iiiiiii_i_i_i_!il_!i!iiiiii!ii_i_ill'i_i_il_ii_i_!_!!!i!ii!iiii!!i!i!iiii!i!iiiilii!_!_iiii!!i!ii_ii!!i!i!i!iiiiiiiiii!ii_iiiiiiii!i!iiiii!!i!ii_ii!!i!i!i!iiiiiiiiii!ii_iiiiiiii!i!iiiii!!i!ii_ii!!i!i!i!iiiiiiiiii!ii_iiiiiiii!i!iiiii!!i!ii_ii!!i!i!i!iiiiiiiiii!ii_iiiiiiii!i!iiiii!!i!ii_ii!!i!i!i!iiiiiiiiii!ii_iiiiiiii!i!iiiii!!i!ii_ii!!i!i!i!iiiiiiiiii!ii_iiiiiiii!i!iiiii!!i!ii_ii!!i!i!i!iiiiiiiiii!ii_iiiiiiii!i!iiiii!!i!ii_ii!!i!i!i!iiiiiiiiii!ii_iiiiiiii!i!iiiii!!i!ii_ii!!i!i!i!iiiiiiiiii!ii_iiiiiiii!i!iiiii!!i!ii_ii!!i!i!i!iiiiiiiiii!ii_iiiiiiii!i!i!ii!!iiiiiiiilil
Cook(Cocci6n)
Usar la tecla COOK(COCCII)N) le permite calentar comidas
comunes preparadas para microondas sin necesidadde
programar tiempos de cocciOnni niveles de potencia.
COOK(COCCION)tiene 4 categoriasde alimentos
predeterminadas.: Bebidas,comidas congeladas,
desayunoscongelados, pechugasde polio.
Ejemp/o:Paracocinarun desayunoconge/ado.
1. OptimalateclaCOOK.
2. Elijala categoriadealimento.
Cuandohayatranscurrido el tiempo de cocciOn,escuchar_
cuatro se_alessonoras y aparecer_ la palabra END.
Bebidas 1
Comidacongelada 2
Desayunocongelado 3
Pechugadepolio 4
Cantidadesrecomendadas
Bebidas 8 ozs.
Comidacongelada 8-14ozs.
Desayunocongelado 4-8 ozs.
Pechugadepolio 8-24ozs.
Reheat(Recalentamiento)
Latecla REHEAT(RECALENTAMIENTO)le permite calentar
alimentos sin necesidad de programar tiempos de cocci6n
ni niveles de potencia. REHEAT(RECALENTAIVlIENTO)tiene
3 categorias predeterminadas: Plato de comida, guisoy
pasta.
Ejemplo:Pararecalentar unguiso.
1. Oprima]atecla REHEAT.
2. Elijala categoriadealimento.
Cuandohayatranscurrido el tiempo de cocc_On,escuchar_
cuatro se_ales sonoras y aparecer_,la palabra END
Platodecomida 1
Guiso 2
pasta 3
Cantidadesrecomendadas
Platodecomida 1 portion
Guiso 1 &4 portions
pasta 1 &4 portions
HoldWarm(MantenerCaliente)
Puded mantener calientes y seguros los alimentos
cocinados, calentados en su horno de microondas hasta 99
minutos 99 segundos.
Ejemplo:Paracalientedurante60 minutos
1. Oprimalatecla HOLDWARMI
(IVlantenerCaliente).
2. Ingreseel primer tiempo de cocci6n.
3. Oprimalatecla ENTER/START.
5O
NOTAS:
• "Mantenercaliente"opera hastauntotal de99 minutos 99
segundos.
• Losalimentosya cocinadosdebenser cubiertos durante
"Mantenercaliente".
• Los platos depasteleria(pasteles,empanadas,etc.) deben
estarsin cubiertadurantelafunci6n "Mantenercaliente".
• Lascomidascompletasquese deseemantenercalientes
sobreun plato,debencubrirse durantelafunci6n "Mantener
caliente".
T_ ai!! :to ;,
Liquido 1-2tazas
Seco 5-10onza.
USA-MHC4 DE68-O3143Q.indb 50 2007-06-12 6:40:27
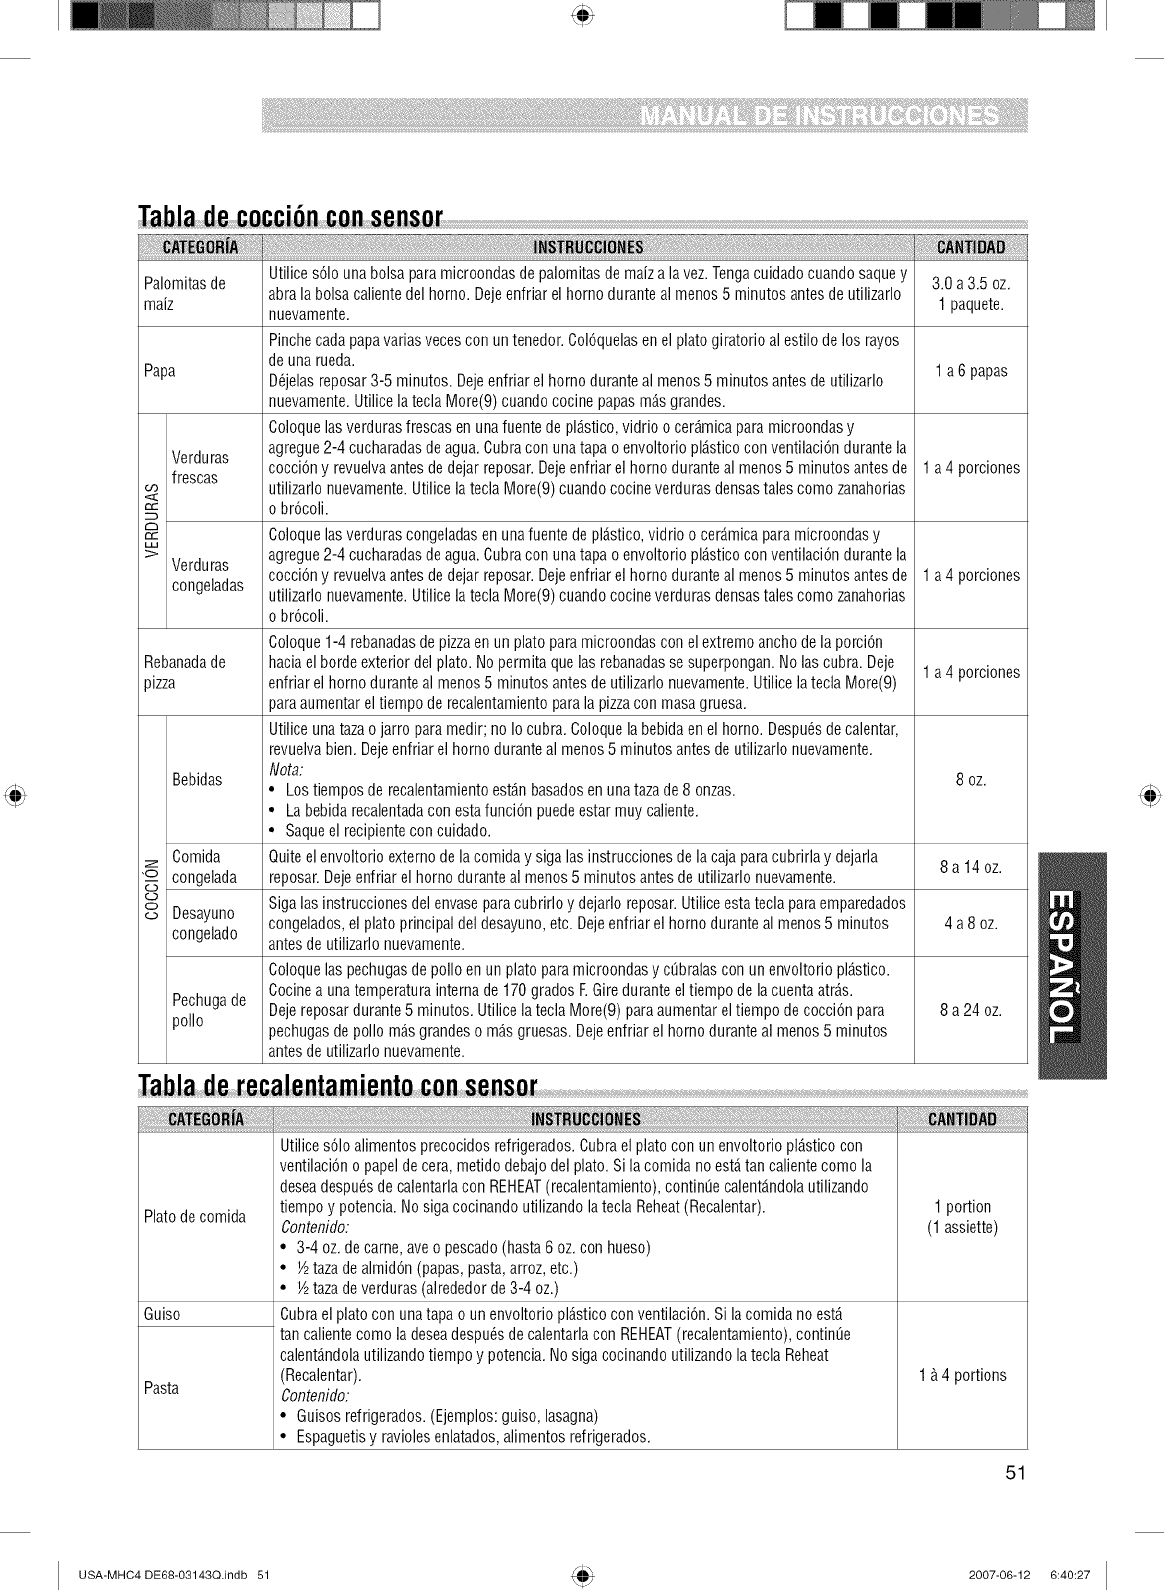
Palomitasde
maiz
Papa
Verduras
frescas
cO
t',r"
CC
I.,.u
Verduras
congeladas
Rebanadade
pizza
Bebidas
z Comida
congelada
¢-3
o° Desayuno
congelado
Pechugade
polio
Utilices61ounabolsaparamicroondasdepalomitasdemaizalavez.Tengacuidadocuandosaquey
abralabolsacalientedelhorno.Dejeenfriarelhomodurantealmenos5 minutosantesdeutilizarlo
nuevamente.
Pinchecadapapavariasvecesconuntenedor.Col6quelasenel platogiratorioal estilodelosrayos
deunarueda.
D6jelasreposar3-5 minutos.Dejeenfriarel homoduranteal menos5 minutosantesdeutilizarlo
nuevamente.Utilicela teclaMore(9)cuandococinepapasm_sgrandes.
Coloquelasverdurasfrescasen unafuentedepl_stico,vidrioo cer_micaparamicroondasy
agregue2-4cucharadasdeagua.Cubraconunatapaoenvoltoriopl_sticoconventilaci6ndurantela
cocci6ny revuelvaantesdedejar reposar.Dejeenfriarel homodurantealmenos5 minutosantesde
utilizarlonuevamente.UtilicelateclaMore(9)cuandococineverdurasdensastalescomo zanahorias
o br6coli.
Coloquelasverdurascongeladasenunafuentedepl_stico,vidrioo cerAmicaparamicroondasy
agregue2-4cucharadasdeagua.Cubraconunatapa oenvoltorioplAsticoconventilaci6ndurantela
cocci6ny revuelvaantesdedejar reposar.Dejeenfriarel homodurantealmenos5 minutosantesde
utilizarlonuevamente.UtilicelateclaMore(9)cuandococineverdurasdensastalescomo zanahorias
o br6coli.
Coloque1-4 rebanadasdepizzaen unplatoparamicroondasconelextremoanchodela porci6n
haciaelbordeexteriordelplato.Nopermitaquelasrebanadasse superpongan.Nolascubra.Deje
enfriarel hornoduranteal menos5 minutosantesde utilizarlonuevamente.UtilicelateclaMore(9)
paraaumentareltiempoderecalentamientoparalapizzaconmasagruesa.
Utiliceunatazao jarroparamedir;no Iocubra.Coloquela bebidaenel horno.Despu6sdecalentar,
revuelvabien.Dejeenfriarel homoduranteal menos5 minutosantesdeutilizarlonuevamente.
Nota:
• Lostiemposderecalentamientoest_nbasadosenunatazade8 onzas.
• Labebidarecalentadaconestafunci6npuedeestarmuycaliente.
• Saqueel recipienteconcuidado.
Quiteelenvoltorioexternodela comiday sigalasinstruccionesde lacajaparacubrirlay dejarla
reposar.Dejeenfriarel homodurantealmenos5 minutosantesde utilizarlonuevamente.
Sigalasinstruccionesdel envaseparacubrirloy dejarloreposar.Utiliceestateclaparaemparedados
congelados,el platoprincipaldeldesayuno,etc.Dejeenfriarelhomoduranteal menos5 minutos
antesdeutilizarlonuevamente.
Coloquelaspechugasde polio en un platoparamicroondasy cObralasconunenvoltoriopl_stico.
Cocinea unatemperaturainternade 170gradosF.Gireduranteeltiempodelacuentaatr_s.
Dejereposardurante5 minutos.Utilicela teclaMore(9)paraaumentareltiempode cocci6npara
pechugasdepolio m_sgrandeso mAsgruesas.Dejeenfriarel homodurantealmenos5 minutos
antesdeutilizarlonuevamente.
3.0a 3.5oz.
1 paquete.
1 a 6 papas
1a 4 porciones
1a 4 porciones
1a 4 porciones
8 OZ.
8a14oz.
4a8oz.
8a24oz.
Platodecomida
Guiso
Pasta
Utilices61oalimentosprecocidosrefrigerados.Cubrael platoconunenvoltoriopl_sticocon
ventilaci6no papeldecera,metidodebajodel plato.Si lacomidanoestdtancalientecomo la
deseadespu_sdecalentarlacon REHEAT(recalentamiento),continOecalentAndolautilizando
tiempoy potencia.NosigacocinandoutilizandolateclaReheat(Recalentar).
Contenido:
• 3-4 oz.decame,aveo pescado(hasta6 oz.conhueso)
• ½ tazadealmid6n(papas,pasta,arroz,etc.)
• ½ tazadeverduras(alrededorde3-4 oz.)
Cubraelplatoconunatapao unenvoltoriopl_sticoconventilaci6n.Si lacomidano est_
tancalientecomoladeseadespu_sde calentarlaconREHEAT(recalentamiento),continOe
calent_ndolautilizandotiempoy potencia.NosigacocinandoutilizandolateclaReheat
(Recalentar).
Contenido:
• Guisosrefrigerados.(Ejemplos:guiso,lasagna)
• Espaguetisy raviolesenlatados,alimentosrefrigerados.
1 portion
(1assiette)
1&4 portions
51
USA-MHC4 DE68-O3143Q.indb 51 2007-06-12 6:40:27
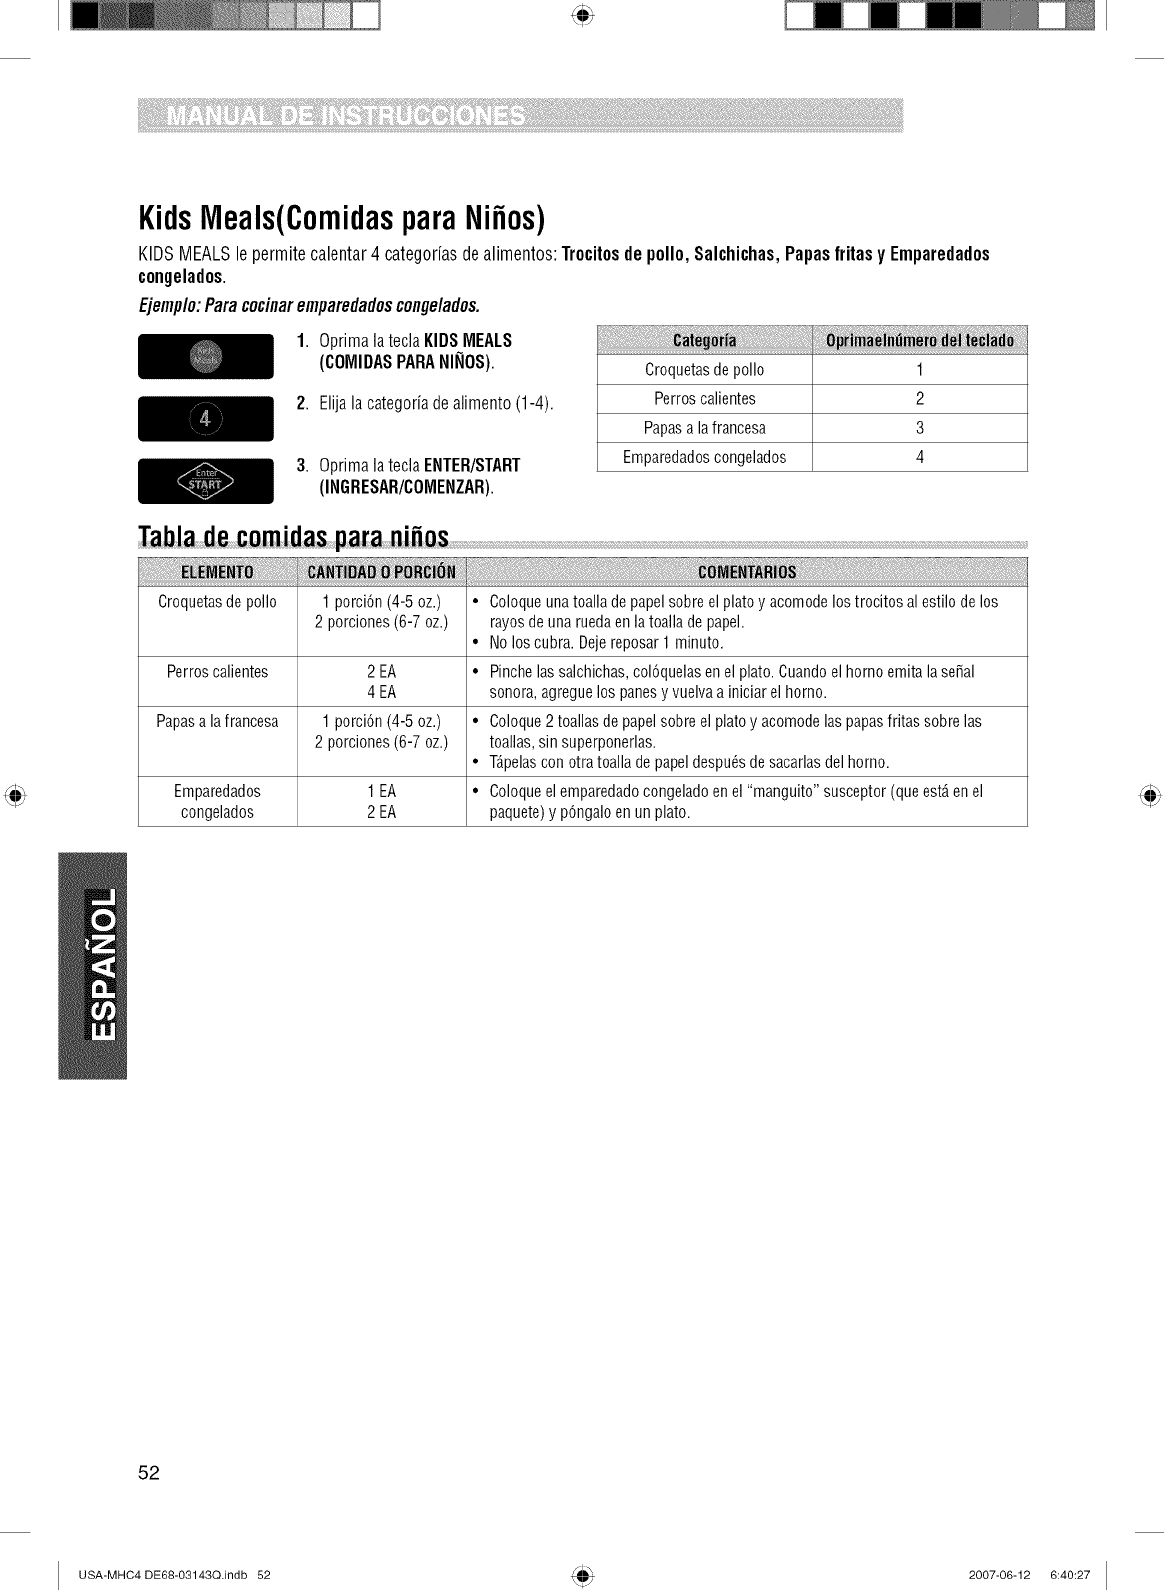
i¸ii_fillii!i!ii!i!iii_iiii!ii!iii!ii!iii!!i!i_iiil;iii!'!_!!'!i_iiiiiii!!!!!'!!iiiili!iiii:'i'!!_!_i_!ii'iiiiiiiii!!_!_iiii!iil!iiiii!_!_!!_i_i!_iiiiii!iii!_!_!!!iiiiiillii!i!!'!_!_!iii!_iiii!_!_!!_!!!_!_!iiiiii!i!!iii'iii_,!_!_i_iiiiii_i!!!!ii!_i_i!_!:!_i_!;!ii_iiii_iiii!ii!ii¸ii!i!iii'_iiiiiii_i_!!!!i¸ii!iiill_i_i_iii_i_i_i!_i!!!iiii;!iiiiiilli_iii!i!iiliililiiii_i!:!_!_i!iiiiii_i_!_i_!i_i!!_iiiiii!_i!ilii!i_i_i_i_i_i_!;!:i'i!i!iii!illii!_!!!;i_i!i_!iiiiiilli¸!iii!_i'ii!_!_!;i_i_ii_i_i_iii:iiii!_iiiiiiii'!!'iii!fill¸iii_i_i_i_!ii_!i!iiiiii!il_i_iii'i_i_il_ii_i_!_!!!i!ii!iiii!!i!i!iiii!i!iiiilii!_!_iiii!!i!ii_ii!!i!i!i!iiiiiiiiii!ii_iiiiiiii!i!iiiii!!i!ii_ii!!i!i!i!iiiiiiiiii!ii_iiiiiiii!i!iiiii!!i!ii_ii!!i!i!i!iiiiiiiiii!ii_iiiiiiii!i!iiiii!!i!ii_ii!!i!i!i!iiiiiiiiii!ii_iiiiiiii!i!iiiii!!i!ii_ii!!i!i!i!iiiiiiiiii!ii_iiiiiiii!i!iiiii!!i!ii_ii!!i!i!i!iiiiiiiiii!ii_iiiiiiii!i!iiiii!!i!ii_ii!!i!i!i!iiiiiiiiii!ii_iiiiiiii!i!iiiii!!i!ii_ii!!i!i!i!iiiiiiiiii!ii_iiiiiiii!i!iiiii!!i!ii_ii!!i!i!i!iiiiiiiiii!ii_iiiiiiii!i!iiiii!!i!ii_ii!!i!i!i!iiiiiiiiii!ii_iiiiiiii!i!i!ii!!iiii
KidsMeals(ComidasparaNifios)
KIDSMEALSlepermitecalentar4 categoriasdealimentos:Trocitosdepolio,Salchichas,Papasfritasy Emparedados
congelados.
Ejemp/o:Paracocinaremparedadosconge/ados.
1. Optimalatecla KIDSMEALS
(COIVlIDASPARANINOS).
2. Elijalacategoriadealimento(1-4).
3. OptimalateclaENTER/START
(INGRESAR/COMENZAR).
Croquetasdepolio 1
Perroscalientes 2
Papasa lafrancesa 3
Emparedadoscongelados 4
Croquetas de polio 1 porci6n (4-5 oz.) •Coloque una toalla de papel sobre el plato y acomode los trocitos al estilo de los
2 porciones(6-7oz.) rayosde unaruedaenlatoalladepapel.
• Noloscubra.Dejereposar1 minuto.
Perroscalientes 2 EA •Pinchelassalchichas,col6quelasenel plato.Cuandoel homoemitalase_al
4 EA sonora,agreguelos panesy vuelvaa iniciarel homo.
Papas a la francesa 1 porci6n (4-5 oz.) • Coloque 2 toallas de papel sobre el plato y acomode las papasfritas sobre las
2 porciones(6-7oz.) toallas,sin superponerlas.
• T_pelas con otra toalla de papel despu_s de sacarlas del homo.
Emparedados 1 EA • Coloque el emparedado congelado en el "manguito" susceptor (que est_ en el
congelados 2 EA paquete)y p6ngaloen un plato.
52
USA-MHC4 DE68-O3143Q.indb 52 2007-06-12 6:40:27
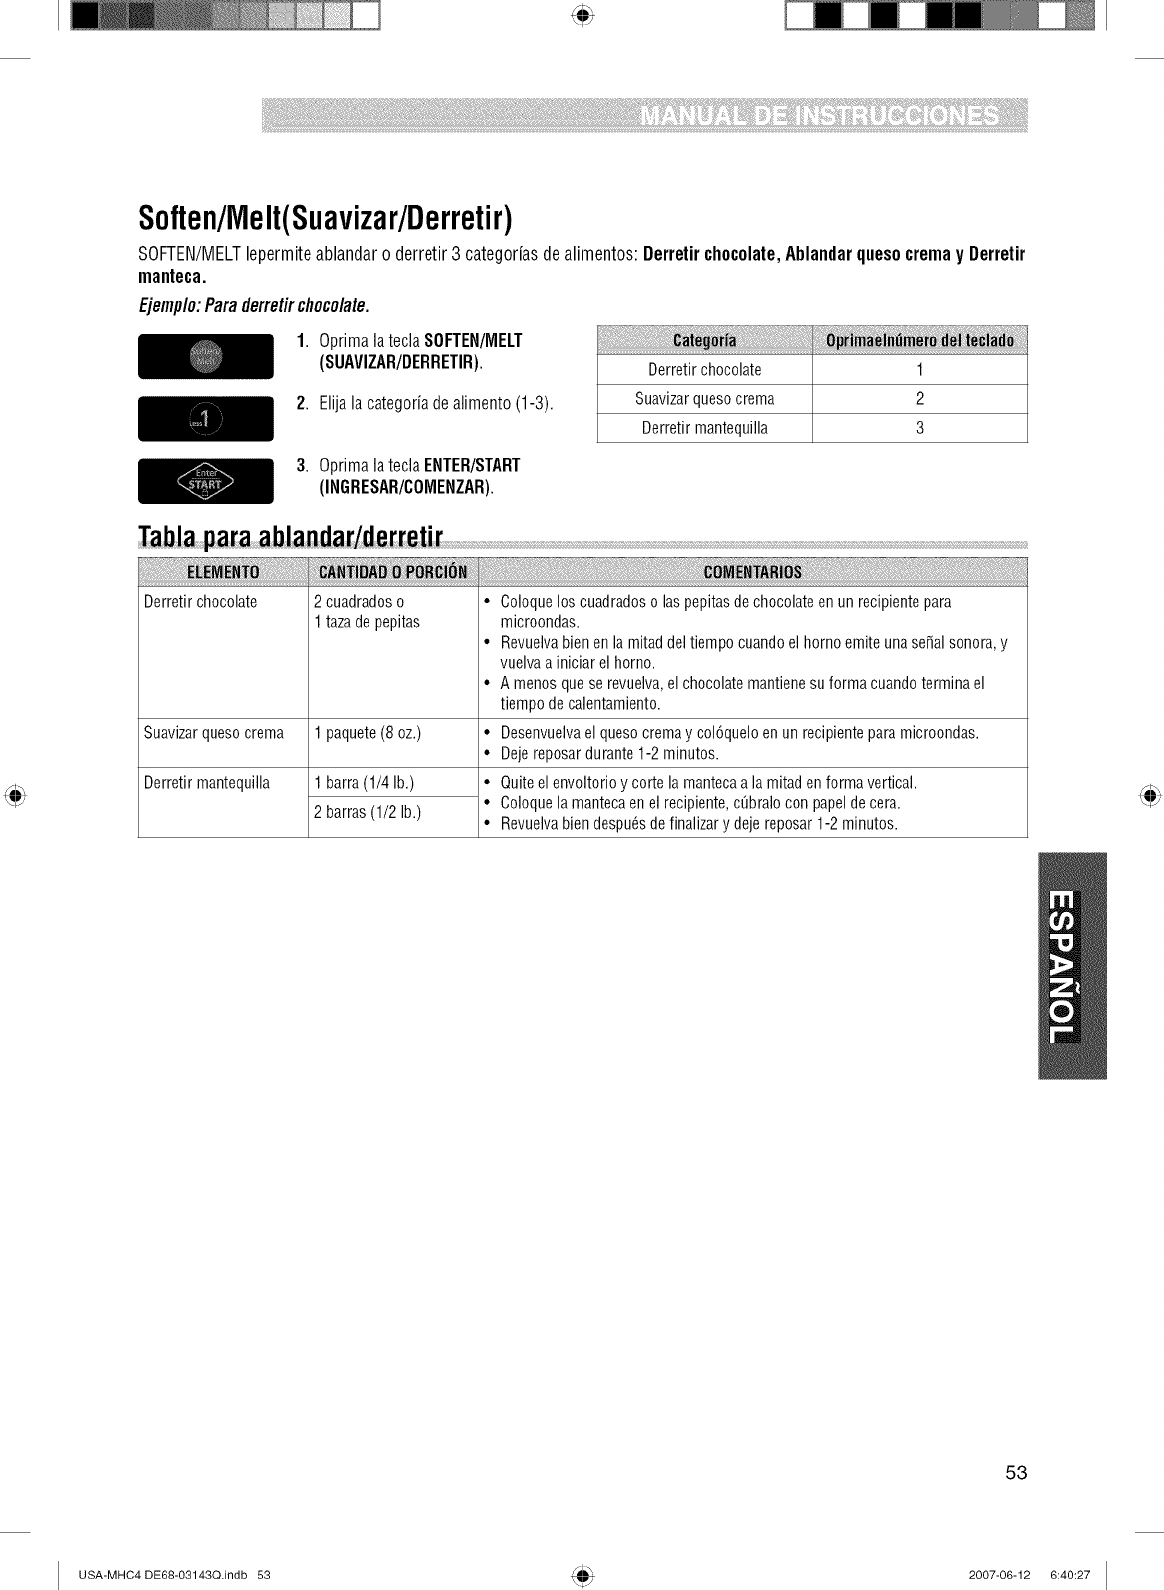
Soften/Melt(Suavizar/Derretir)
SOFTEN/MELTlepermite ablandar o derretir 3 categoriasde alimentos: Derretirchocolate,Ablandar queso crema y Derretir
manteca.
Ejemplo:Paraderretirchocolate.
1. OptimalateclaSOFTEN/MELT
(SUAVIZAR/DERRETIR).
2. Elijala categoriadealimento (1-3).
Derretirchocolate 1
Suavizarquesocrema 2
Derretirmantequilla 3
3. Oprimala teclaENTER/START
(INGRESAR/COMENZAR).
Derretirchocolate 2 cuadradoso • Coloquelos cuadradoso laspepitasdechocolateenunrecipientepara
1tazadepepitas microondas.
1 paquete(8 oz.)
1 barra(1/4 lb.)
2 barras(1/2lb.)
Suavizarquesocrema
Derretirmantequilla
• Revuelvabienenla mitaddel tiempocuandoel homoemiteunasepalsonora,y
vuelvaa iniciarel horno.
• A menosquese revuelva,elchocolatemantienesuformacuandoterminael
tiempodecalentamiento.
• Desenvuelvael quesocremay col6queloenunrecipienteparamicroondas.
• Dejereposardurante1-2minutos.
• Quiteelenvoltorioy cortela mantecaa lamitadenformavertical.
•Coloquela mantecaen el recipiente,ct_braloconpape]decera.
• Revuelvabiendespu_sdefinalizary dejereposar1-2 minutos.
53
USA-MHC4 DE68-O3143Q.indb 53 2007-06-12 6:40:27
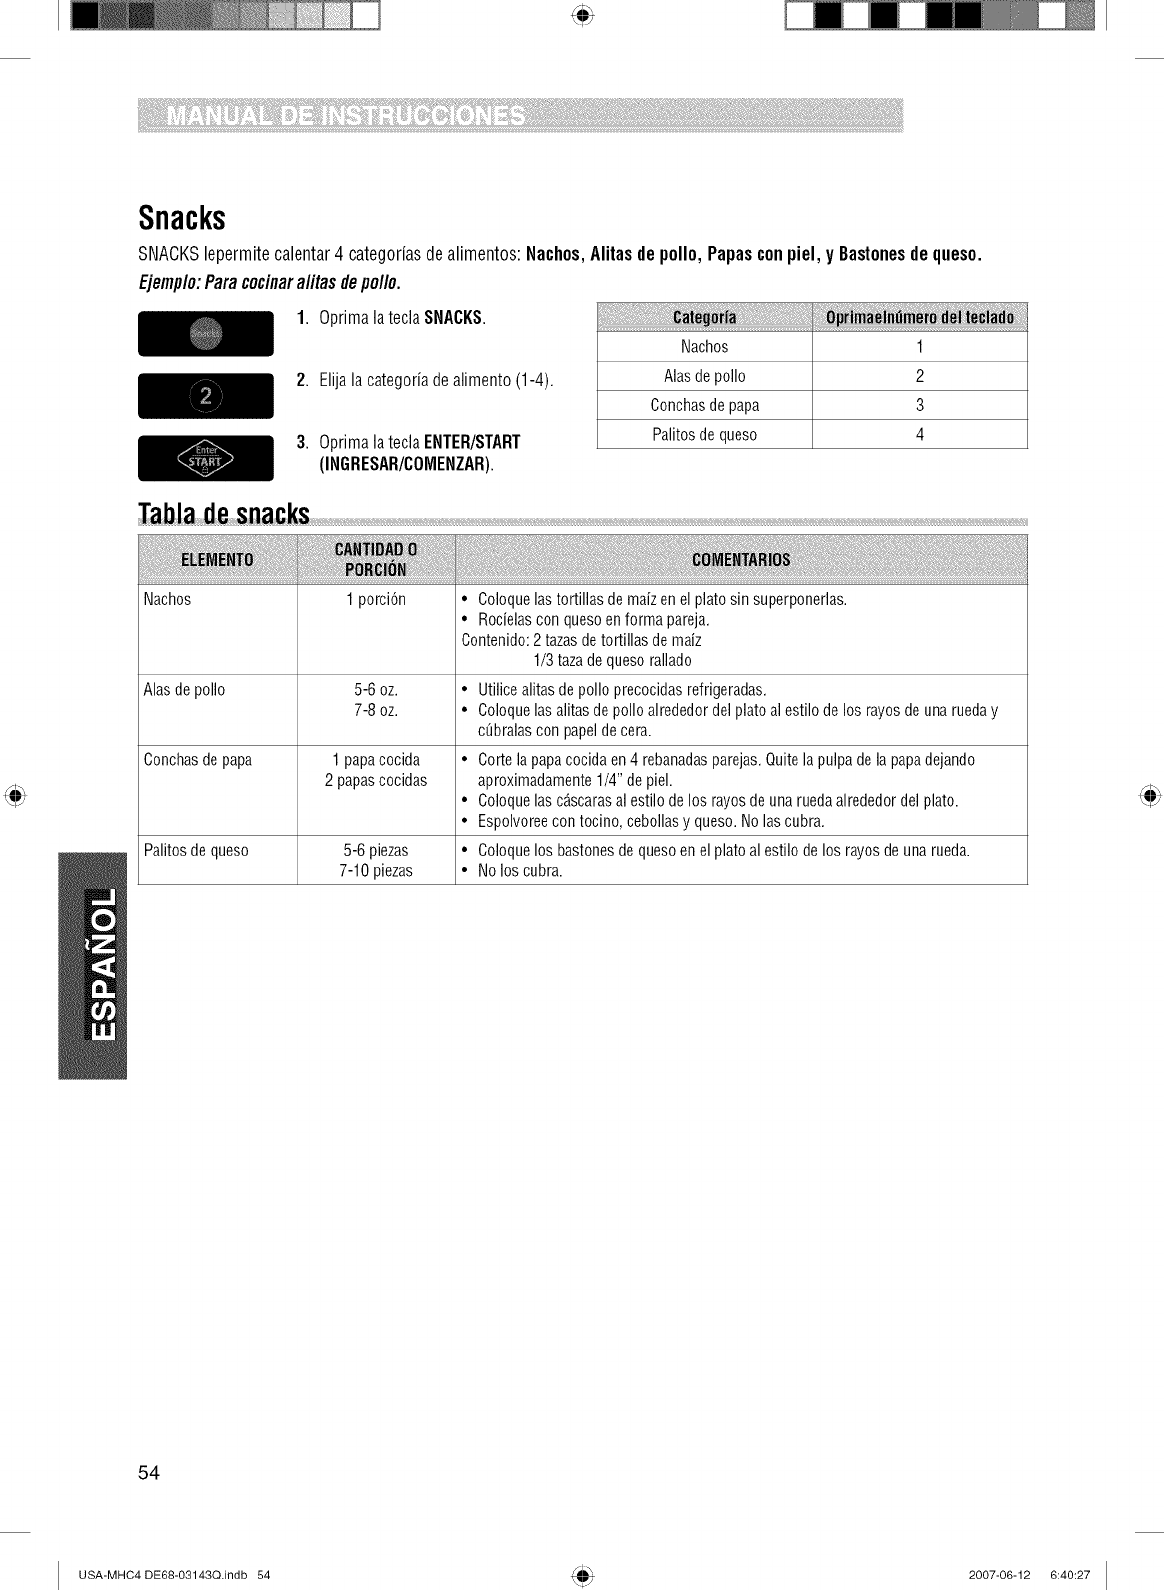
i¸ii_fillii!i!ii!i!iii_iiii!ii!iii!ii!iii!!i!i_iiii_iii!'!_!!'!i_iiiiiii!!!!!'!!iiiili!iiii:'i'!!_!_i_!ii'iiiiiiiii!!_!_iiii!iil!iiiii!_!_!!_i_i!_iiiiii!iii!_!_!!!iiiiiillii!i!!'!_!_!iii!_iiii!_!_!!_!!!_!_!iiiiii!i!!iii'iii_,!_!_i_iiiiii_i!!!!ii!_i_i!_!:!_i_!_!ii_iiii_iiii!ii!ii¸ii!i!iii"_iiiiiii_i_!!!!i¸i_i!iiill_i_i_iii_i_i_i!_i!!!iiii_!iiiiiilli_iii!i!iiliililiiii_i!:!_!_i!iiiiii_i_!_i_!i_i!!_iiiiii!_i!ilii!i_i_i_i_i_i_!_!:i'i!i!iii!illii!_!!!_i_i!i_!iiiiiilli¸!iii!_i'ii!_!_!;i_i_ii_i_i_iii:iiii!_iiiiiiii'!!'ii_i!fill¸iii_i_i_i_!ii_!i!iiiiii!il_i_iii'i_i_il_ii_i_!_!!!i!ii!iiii!!i!i!iiii!i!iiiilii!_!_iiii!!i!ii_ii!!i!i!i!iiiiiiiiii!ii_iiiiiiii!i!iiiii!!i!ii_ii!!i!i!i!iiiiiiiiii!ii_iiiiiiii!i!iiiii!!i!ii_ii!!i!i!i!iiiiiiiiii!ii_iiiiiiii!i!iiiii!!i!ii_ii!!i!i!i!iiiiiiiiii!ii_iiiiiiii!i!iiiii!!i!ii_ii!!i!i!i!iiiiiiiiii!ii_iiiiiiii!i!iiiii!!i!ii_ii!!i!i!i!iiiiiiiiii!ii_iiiiiiii!i!iiiii!!i!ii_ii!!i!i!i!iiiiiiiiii!ii_iiiiiiii!i!iiiii!!i!ii_ii!!i!i!i!iiiiiiiiii!ii_iiiiiiii!i!iiiii!!i!ii_ii!!i!i!i!iiiiiiiiii!ii_iiiiiiii!i!iiiii!!i!ii_ii!!i!i!i!iiiiiiiiii!ii_iiiiiiii!i!i!ii!!iiii
Snacks
SNACKSlepermitecalentar 4 categorias de alimentos: Nachos,Alitasde polio, Papascon piel, y Bastonesde queso.
Ejemp/o:Paracocinara/itas depo//o.
1. Optimala tecla SNACKS.
2. Elijalacategoriadealimento(1-4).
3. Optimala tecla ENTER/START
(INGRESAR/COMENZAR).
Nachos 1
Alasdepolio 2
Conchasdepapa 3
Palitosde queso 4
Alasdepolio 5-6 oz.
7-8 oz.
Conchasdepapa 1 papacocida
2 papascocidas
Palitosde queso 5-6 piezas
7-10piezas
• Rocielasconquesoenformapareja.
Contenido:2 tazasdetortillasdemaiz
1/3tazadequesorallado
• Utilicealitasde polio precocidasrefrigeradas.
• Coloquelasalitasdepolioalrededordelplatoalestilode los rayosde unarueday
ct_bralasconpapelde cera.
• Cortelapapacocidaen4 rebanadasparejas.Quitela pulpadelapapadejando
aproximadamente1/4"de piel.
• Coloquelascascarasalestilode los rayosdeunaruedaalrededordel plato.
• Espolvoreecontocino,cebollasy queso.Nolascubra.
• Coloquelos bastonesdequesoen elplatoalestilodelos rayosde unarueda.
• Noloscubra.
54
USA-MHC4 DE68-03143Q.indb 54 2007-06-12 6:40:27
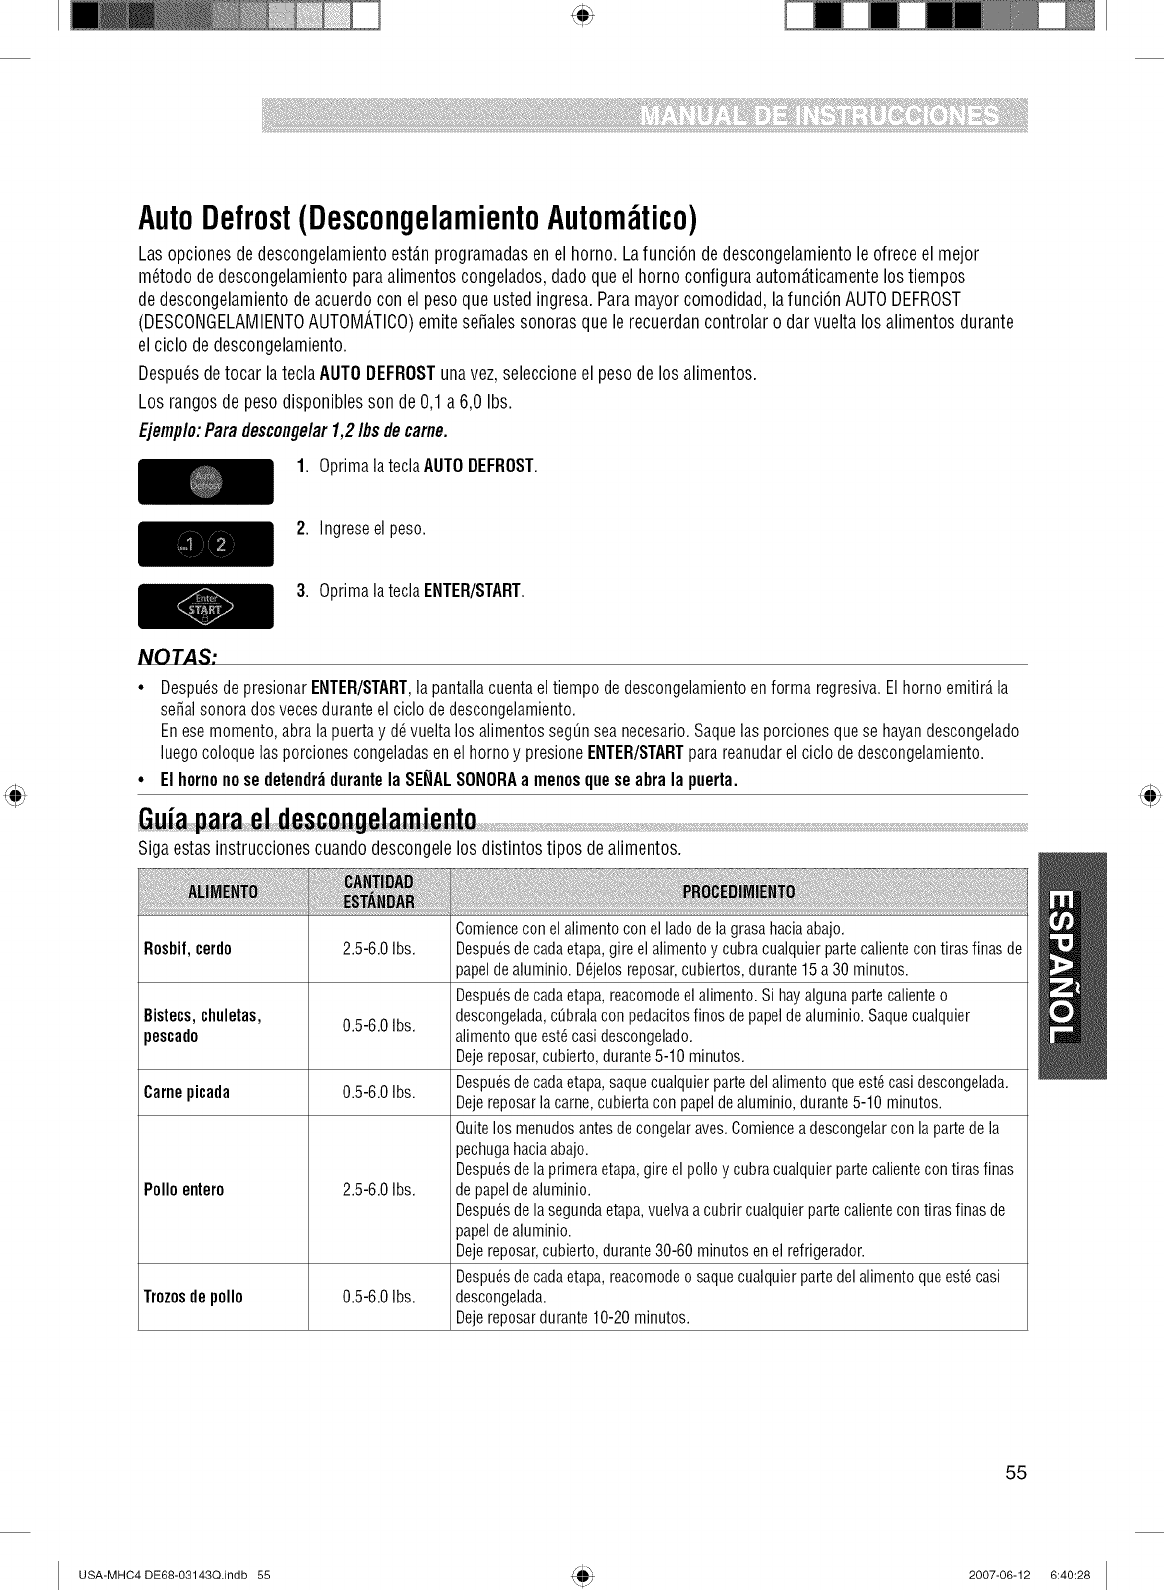
AutoDefrost(DescongelamientoAutom tico)
Las opciones de descongelamiento est_.nprogramadas en el horno. Lafunci6n dedescongelamiento le ofrece el mejor
m6todo de descongelamiento paraalimentos congelados, dadoque el horno configura autom_ticamente los tiempos
de descongelamiento de acuerdo con el peso que usted ingresa. Paramayor comodidad, la funci6n AUTO DEFROST
(DESCONGELAMIENTOAUTOMATICO)emite senales sonoras que le recuerdan controlar o dar vuelta los alimentos durante
el ciclo de descongelamiento.
Despu6s detocar la teclaAUTO DEFROSTuna vez,seleccione el peso de los alimentos.
Los rangos de peso disponibles son de 0,1 a 6,0 Ibs.
Ejemplo:Paradescongelar1,2 Ifls decame.
1. Oprimala teclaAUTODEFROST.
2. Ingreseel peso.
3. Oprimala teclaENTER/START.
NOTAS:
•Despu_sdepresionar ENTER/START,la pantallacuentael tiempo dedescongelamientoenforma regresiva.Elhorno emitir_,la
se_alsonorados veces duranteel cic]ode descongelamiento.
Enesemomento,abrala puertay d_ vueltalos alimentossegOnseanecesario.Saquelas porcionesquese hayandescongelado
luego coloquelasporcionescongeladasen el hornoy presioneENTER/STARTparareanudarel ciclo de descongelamiento.
•El hornonose detendr_durantela SENALSONORAa menosque seabrala puerta.
Siga estas instrucciones cuando descongelelos distintos tipos de alimentos.
Comiencecon elalimentoconel ladodelagrasahaciaabajo.
Rosbif,cerdo 2.5-6.0Ibs. Despu6sdecadaetapa,gireel alimentoy cubracualquierpartecalientecontirasfinasde
Bistecs,chuletas, 0.5-6.0Ibs.
pescado
Carnepicada 0.5-6.0Ibs.
2.5-6.0Ibs.Polioentero
Trozosdepolio 0.5-6.0Ibs.
papelde aluminio. D6jelos reposar, cubiertos, durante 15 a 30 minutos.
Despu_s de cada etapa, reacomode el alimento. Si hay alguna parte caliente o
descongelada, cObralacon pedacitos finos de papel de aluminio. Saque cualquier
alimento que estd casi descongelado.
Deje reposar, cubierto, durante 5-10 minutos.
Despu6s de cada etapa, saque cualquier parte de] alimento que estd casi descongelada.
Deje reposar la came, cubierta con papel de aluminio, durante 5-10 minutos.
Quite los menudos antes de congelar aves. Comience a descongelar con la parte de la
pechuga hacia abajo.
Despu_s de la primera etapa, gire el polio y cubra cualquier parte caliente con tiras finas
de pape] de aluminio.
Despu6s de la segunda etapa, vuelva a cubrir cualquier parte caliente con tiras finas de
papelde aluminio.
Deje reposar, cubierto, durante 30-60 minutos en el refrigerador.
Despu_s de cada etapa, reacomode o saque cualquier parte del alimento que est_ casi
descongelada.
Deje reposar durante 10-20 minutos.
55
USA-MHC4 DE68-03143Q.indb 55 2007-06-12 6:40:28
i¸ii_fillii!i!ii!i!iii_iiii!ii!iii!ii!iii!!i!i_iiii_iii!'!_!!'!i_iiiiiii!!!!!'!!iiiili!iiiii'i'!!_!_i_!iiiiiiiiiii!!_!_iiii!iil!iiiii!_!_!!_i_i!_iiiiii!iii!_!_!!!iiiiiillii!i!!'!_!_!iii!_iiii!_!_!!_!!!_!_!iiiiii!i!!iiiiii_,!_!_i_iiiiii_i!!!!ii!_i_i!_!:!_i_!_!ii_iiii_iiii!ii!ii¸ii!i!iiiiiiiiii_i_!!!!i¸ii!iiill_i_i_iii_i_i_i!_i!!!iiii_!iiiiiilli_iii!i!iiliililiiii_i!:!_!_i!iiiiiii_!_i_!i_i!!_iiiiii!_i!ilii!i_i_i_i_i_i_!_!:i'i!i!iii!illii!_!!!_i_i!i_!iiiiiilli¸!iii!_i'ii!_!_!;i_i_ii_i_i_iii_iiii!_iiiiiiii'!!iii!fill¸iii_i_i_i_!ii_!i!iiiiii!il_i_iii'i_i_il_ii_i_!_!!!i!ii!iiii!!i!i!iiii!i!iiiilii!_!_iiii!!i!ii_ii!!i!i!i!iiiiiiiiii!ii_iiiiiiii!i!iiiii!!i!ii_ii!!i!i!i!iiiiiiiiii!ii_iiiiiiii!i!iiiii!!i!ii_ii!!i!i!i!iiiiiiiiii!ii_iiiiiiii!i!iiiii!!i!ii_ii!!i!i!i!iiiiiiiiii!ii_iiiiiiii!i!iiiii!!i!ii_ii!!i!i!i!iiiiiiiiii!ii_iiiiiiii!i!iiiii!!i!ii_ii!!i!i!i!iiiiiiiiii!ii_iiiiiiii!i!iiiii!!i!ii_ii!!i!i!i!iiiiiiiiii!ii_iiiiiiii!i!iiiii!!i!ii_ii!!i!i!i!iiiiiiiiii!ii_iiiiiiii!i!iiiii!!i!ii_ii!!i!i!i!iiiiiiiiii!ii_iiiiiiii!i!iiiii!!i!ii_ii!!i!i!i!iiiiiiiiii!ii_iiiiiiii!i!i!ii!!iiii
• Cuandoutilizalafunci6nAUTODEFROST,el pesoquesedebeingresaresel pesonetoenlibrasy d_cimasdelibras(el
pesodelalimentomenoseldelrecipiente).
• UtiliceAUTODEFROSTsoloparaalimentoscrudos.AUTODEFROSTobtienemejoresresultadoscuandolos alimentos
quesedescongelar_nest_.na unminimodeO°F(sacadosdirectamentedeunaut_nticofreezer).Sielalimentose
almacen6enunrefrigerador-freezerquenomantieneunatemperaturade5°Fo menos,siempreprogrameunpeso
inferiordelalimento(duranteuntiempodedescongelamientom_.sreducido)paraevitarcocinarelalimento.
• Sielalimentoquedahasta20 minutosfueradelfreezer,ingreseun pesoinferiordelalimento.
• Laformadelenvasealteraeltiempodedescongelamiento.Lospaquetesrectangulareschatossedescongelanm_s
r_pidamentequeunbloqueprofundo.
• Separelos pedazosa medidaquecomienzanadescongelarse.Lospedazosseparadosse descongelancon m_.s
facilidad.
• Cubra_.reasdelosalimentosconpedacitospequeSosdepapeldealuminiosi comienzana calentarse.
• PuedeutilizarpequeSospedazosdepapeldealuminioparaprotegeralimentoscomolasalasdepolio,losextremos
delaspatasy lascolasdepescado,peroelpapelnodebetocarlos lateralesdelhorno.Elpapeldealuminioproduce
chispas,IoquepuededaSarelrevestimientodelhorno.
1poundDefrost(Descongelamientode1 Libra)
Lafunci6n1POUNDDEFROSTofreceundescongelamientor_pidoparaalimentoscongeladosde1,0 libra.Elhorno
configuraautom_ticamenteeltiempodedescongelamiento.
Ejemplo:ParadescongelarI lb.decamepicada.
1. Oprimalatecla1POUNDDEFROST.
2. Oprimala teclaENTER/START.
56
USA-MHC4 DE68-03143Q.indb 56 2007-06-12 6:40:28
Guiadecocci6n
• Coloquela carnesobreunaasaderaparamicroondasenunafuenteparamicroondas.
• Comienceacocinarlacarneconel ladedelagrasahaciaabajo.Utilicetirasfinasdepapeldealuminioparaproteger
cualquierpuntadehuesooAreadecarnedelgadas.
• Controlelatemperaturaenvarieslugaresantesdedejarreposarlacarneeltiemporecomendado.
Rosbifsin hueso
(hasta4 Ibs.)
Cerdosin huesoo
conhuesointerne
(hasta4 Ibs.)
7-11min./Ib,para145° F(Jugoso)
8-12min./Ib,para160° F(A punto)
9-14min./Ib,para170° F(Bien cocido)
11-15min./Ib,para170° F(Bien cocido)
Las siguientestemperaturas son las temperaturas alas
aumentar_ durante el tiempo de repose.
Espereun aumento de IO°F en latemperatura durante el
Alta(10) durantelos
primeros5 minutes,
luegomedia(5)
AIta(10) durantelos
primeros5 minutes,
luegomedia(5)
Coloqueelladedela grasahaciaabajoenla
asadera.
Cubraconpapeldecera.D6vueltaala mitad
delciclodecocci6n.Dejereposar10minutes.
Coloqueelladedela grasahaciaabajoenla
asadera.
Cubraconpapeldecera.Ddvueltaala mitad
delciclodecocci6n.Dejereposar10minutes.
uesesacanlos alimentos.Latemperaturadelalimento
tiempoderepose.
Jugosa
Carnedevaca
Carnedecerdo
Carnedeave
Apunto
Biencocida
Apunto
Biencocida
Cameoscura
Cameclara
135°F
150°F
160°F
150°F
160°F
170°F
160°F
145°F
160°F
170°F
160°F
170°F
180°F
170°F
• Coloquela carnede ave sobre una asadera para microondas en unafuente paramicroondas.
• Cubrala carne de avecon papel de cera para evitar salpicaduras.
• Utilice papel dealuminio para cubrir las puntas de los huesos, lasAreasde carnedelgada o las Areasque comienzana
cocinarse demasiado.
• Controle latemperatura envaries lugaresantes de dejar reposar la carne de ave el tiempo recomendado.
Polioenterehasta Tiempodecocci6n:6-9 rain./lb. Coloqueel ladedelapechugadel poliohaciaabajoen laasadera.
4 Ibs. 180°Fcameoscura Cubracon papeldecera.D6vueltaa lamitaddel ciclodecocci6n.
170°Fcameclara Cocinehastaquelosjugosseanclarosy lacamecercadelhuesoya
Nivelde potencia:Medianaalta (7). no searosada.Dejereposar5-10minutes.
Pedacitesdepolio Tiempodecocci6n:6-9 min./lb. Coloqueel ladedel huesodelpolio haciaabajoenlafuente,con las
hasta2 Ibs. 180°Fcameoscura porcionesm_s gruesashacialaparteexternadel plato.Cubracon
170°Fcameclara papelde cera.Ddvueltaala mitaddel ciclo decocci6n.Cocinehasta
Nivelde potencia:Medianaalta(7). quelosjugosseanclarosy lacamecercadel huesoyano searosada.
Dejereposar5-10minutes.
57
USA-MHC4 DE68-O3143Q.indb 57 2007-06-12 6:40:28

i¸ii_fillii!i!ii!i!iii_iiii!ii!iii!ii!iii!!i!i_iiii_iii!'!_!!'!i_iiiiiii!!!!!'!!iiiili!iiii:'i'!!_!_i_!iiiiiiiiiii!!_!_iiii!iil!iiiii!_!_!!_i_i!_iiiiii!iii!_!_!!!iiiiiillii!i!!'!_!_!iii!_iiii!_!_!!_!!!_!_!iiiiii!i!!iiiiii_,!_!_i_iiiiii_i!!!!ii!_i_i!_!:!_i_!_!ii_iiii_iiii!ii!ii¸ii!i!iiiiiiiiii_i_!!!!i¸ii!iiill_i_i_iii_i_i_i!_i!!!iiii_!iiiiiilli_iii!i!iiliililiiii_i!:!_!_i!iiiiiii_!_i_!i_i!!_iiiiii!_i!ilii!i_i_i_i_i_i_!_!:i'i!i!iii!illii!_!!!_i_i!i_!iiiiiilli¸!iii!_i'ii!_!_!;i_i_ii_i_i_iii:iiii!_iiiiiiii'!!iii!fill¸iii_i_i_i_!ii_!i!iiiiii!il_i_iii'i_i_il_ii_i_!_!!!i!ii!iiii!!i!i!iiii!i!iiiilii!_!_iiii!!i!ii_ii!!i!i!i!iiiiiiiiii!ii_iiiiiiii!i!iiiii!!i!ii_ii!!i!i!i!iiiiiiiiii!ii_iiiiiiii!i!iiiii!!i!ii_ii!!i!i!i!iiiiiiiiii!ii_iiiiiiii!i!iiiii!!i!ii_ii!!i!i!i!iiiiiiiiii!ii_iiiiiiii!i!iiiii!!i!ii_ii!!i!i!i!iiiiiiiiii!ii_iiiiiiii!i!iiiii!!i!ii_ii!!i!i!i!iiiiiiiiii!ii_iiiiiiii!i!iiiii!!i!ii_ii!!i!i!i!iiiiiiiiii!ii_iiiiiiii!i!iiiii!!i!ii_ii!!i!i!i!iiiiiiiiii!ii_iiiiiiii!i!iiiii!!i!ii_ii!!i!i!i!iiiiiiiiii!ii_iiiiiiii!i!iiiii!!i!ii_ii!!i!i!i!iiiiiiiiii!ii_iiiiiiii!i!i!ii!!iiii
• Cocineel pescadohastaquesepuedadesmenuzarfacilmentecon untenedor.
• Coloqueel pescadosobreunaasaderaparamicroondasenunafuenteparamicroondas.
• UtiliceunacubiertaceSidaparacocinarelpescadoalvapor.Unacubiertamaslivianadepapeldecerao toalladepapel
generamenosvapor.
• Nodejequeel pescadose pase,contr01eloeneltiempodecocci0nminimo.
Bistecs
Hasta1,5 Ibs. Tiempode cocci6n:6-10rain./lb.
Niveldepotencia:Medianaalta(7).
Tiempode cocci6n:3-7 min./lb.
Niveldepotencia:Medianaalta(7).
Filetes
Hasta1,5 Ibs.
Camarones Tiempode cocci6n:3-5 ½ min./lb.
Hasta1,5 Ibs. Niveldepotencia:Medianaalta(7).
Acomodelosbistecsenla asaderacon lasporcionesm_iscamosas
haciala parteexteriordelaasadera.Cubraconpapeldecera.D_vueltay
reacomodeel pescadocuandohayatranscurridola mitaddel tiempode
cocci6n.Cocineelpescadohastaquese puedadesmenuzarf_cilmente
conuntenedor.Dejereposar3-5 minutos.
Acomodelosfiletesen unafuenteparahorno,dandovueltacualquier
pedazofinito. Cubracon papeldecera.Sitienem_sde? pulgadasde
grosor,d_vueltay reacomodeelpescadocuandohayatranscurrido
lamitaddeltiempodecocci6n.Cocineel pescadohastaquesepueda
desmenuzarf_cilmenteconun tenedor.Dejereposar2-3 minutos.
Acomodeloscamaronesenunafuenteparahomosinsuperponerlosni
formarcapas.Cubraconpapelde cera.Cocinehastaqueestdnfirmes y
opacos,revolviendo2 o 3 veces.Dejereposar5 minutos.
• Nuncacocinehuevosconcascaray nuncacalientelos huevosduroscon lacascara;puedenexplotar.
• Siempreperforelos huevosenterosparaevitarqueestallen.
• Cocinelos huevoshastaqueapenasseendurezcan;quedandurossi se pasan.
Lasverdurasdebenlavarseantesdecocinarlas.PorIogeneral,nose necesitaaguaadicional.Sise cocmanverduras
densastalescomolaspapas,zanahoriasy habichuelas,agregueaproximadamente1Atazadeagua.
Lasverduraspeque_as(zanahoriasrebanadas,arvejas,frijoles,etc.)secocinaranmasrapidoquelasverdurasmas
grandes.
Lasverdurasenteras,talescomolaspapas,calabazaso mazorca,debenacomodarseencirculoenel platogiratorio
antesdecocinarlas.Secocinaranenformamasparejasi se danvueltaunaveztranscurridalamitaddeltiempode
cocci6n.
Siemprecoloquelasverdurascomoesparragosy br6coliconlos extremosdelostallosapuntandohaciaelbordedela
fuentey laspuntashaciaelcentro.
Cuandococineverdurascortadas,siemprecubralafuenteconunatapao envoltorioplasticoparamicroondascon
ventilaci6n.
Lasverdurasenterassin pelartalescomolaspapas,calabaza,berenjenas,etc.,debenpincharseenvarioslugaresantes
decocinarlasparaevitarqueestallen.
Paraunacocci6nmaspareja,revuelvao reacomodelasverdurasenterasa lamitaddeltiempodecocci6n.
PorIogenerar,cuantomasdensaes lacomida,mayorseraeltiempodereposo.(Eltiempodereposohacereferenciaal
tiemponecesarioparaquelasverdurasy losalimentosdensosy grandesterminendecocinarseunavezquesalendel
horno).Unapapaal hornopuedereposarenelmostradordurantecincominutosantesdequese completelacocciOn,
mientrasqueunafuentedearvejaspuedeservirsedeinmediato.
58
USA-MHC4 DE68-03143Q.indb 58 2007-06-12 6:40:28

Utensilios para Cocinar
Guiadeutensiliosparamicroondas
UTILICE NOUTILICE
VIDRIORESISTENTEALHORNO(tratadopara
calordealtadensidad):
Piatosdeusogeneral,piatosparapastelde
carne,platosparatartas,platosparatortas,tazas
paramedirliquidos,cacerolasy bolssinadornos
met_licos.
LOZA:
Bols,tazas,platosdeserviry bandejassin
adornosmet_licos.
PLASTICO:
Envoltoriopl_stico(comopor ejemplotapas)--
coloqueelenvoltoriopl_sticosin apretarsobrela
fuentey presi6nelohacialoslados.
Ventileelenvoltoriopl_sticodandovueltaun
bordeligeramenteparapermitirquesalga
el excesodevapor.Lafuentedebeser Io
suficientementeprofundaparaqueelenvoltorio
pl_isticonotoquelos alimentos.
A medidaquelosalimentosse calientanel
envoltoriopl_sticopuedederretirseenlas partes
dondetocalosalimentos.
Utilicefuentes,tazasy recipientesparafreezer
semirigidosdepl_stico.Utilicelosconcuidado
dadoqueelplAsticopuedeablandarseporel
calordelacomida.
PAPEL:
Toaliasdepapel,papeldecera,servilletasde
papely platosdepapelsinadornoni diseSos
metAlicos.
Observelasinstruccionesenlaetiqueta
delfabricanteparasu usoenel hornode
microondas.
UTENSILIOSDEMETAL:
Elmetalprotegea losaiimentosde laenergiadel microondasy produceuna
cocci6ndespareja.Tambidnevitelos pinchosde metal,losterm6metrosy las
bandejasdealuminio.Los utensiliosde metalpuedenproducirchispas,Io que
puededaSarsuhomodemicroondas.
DECORACIONDEMETAL:
Lavajilla,lasfuentesetc adornadoscon metalo con bordesde metal.Losadornos
demetalinterfierenconlacocci6nnormaly puedendaSaral homo.
PAPELDEALUMINIO:
Evitelashojasdepapelde aluminiograndesporquedificultanlacocci6ny pueden
producirchispasda5inas.UtilicepedacitospequeSosde papelde aluminiopara
protegerlaspatasy alasdepolio.MantengaTODOel papeldealuminiopor Io
menosa 1 pulgadadelasparedeslateralesy lapuertadel horno.
MADERA:
Losbolsy tablasdemaderase secar_ny puedenpartirseoagrietarsecuandolos
utilizaenel homodemicroondas.Lascestasreaccionande lamismamanera.
UTENSILIOSCONTAPASAPRETADAS:
AsegOresededejaraberturasparaquesalgaelvapordelos utensiliosqueest_in
tapados.
PerforelasbolsasdeplAsticodeverdurasu otrosalimentosantesde lacocci6n.
Lasbolsascerradasherm6ticamentepodrianexplotar.
PAPELMADERA:
Eviteutilizarbolsasdepapelmadera.
Absorbendemasiadocalory podrianquemarse.
UTENSILIOSDEFORMADOS0PICADOS:
Cualquierutensilioqueesteagrietado,deformadoo picadopuederomperseenel
homo.
CIERRESTRENZADOSDEMETAL:
Retirelos cierrestrenzadosdemetalde lasbolsasdepl_sticoo papel.
Secalientandemasiadoy podriancausarunincendio.
59
USA-MHC4 DE68-O3143Q.indb 59 2007-06-12 6:40:28
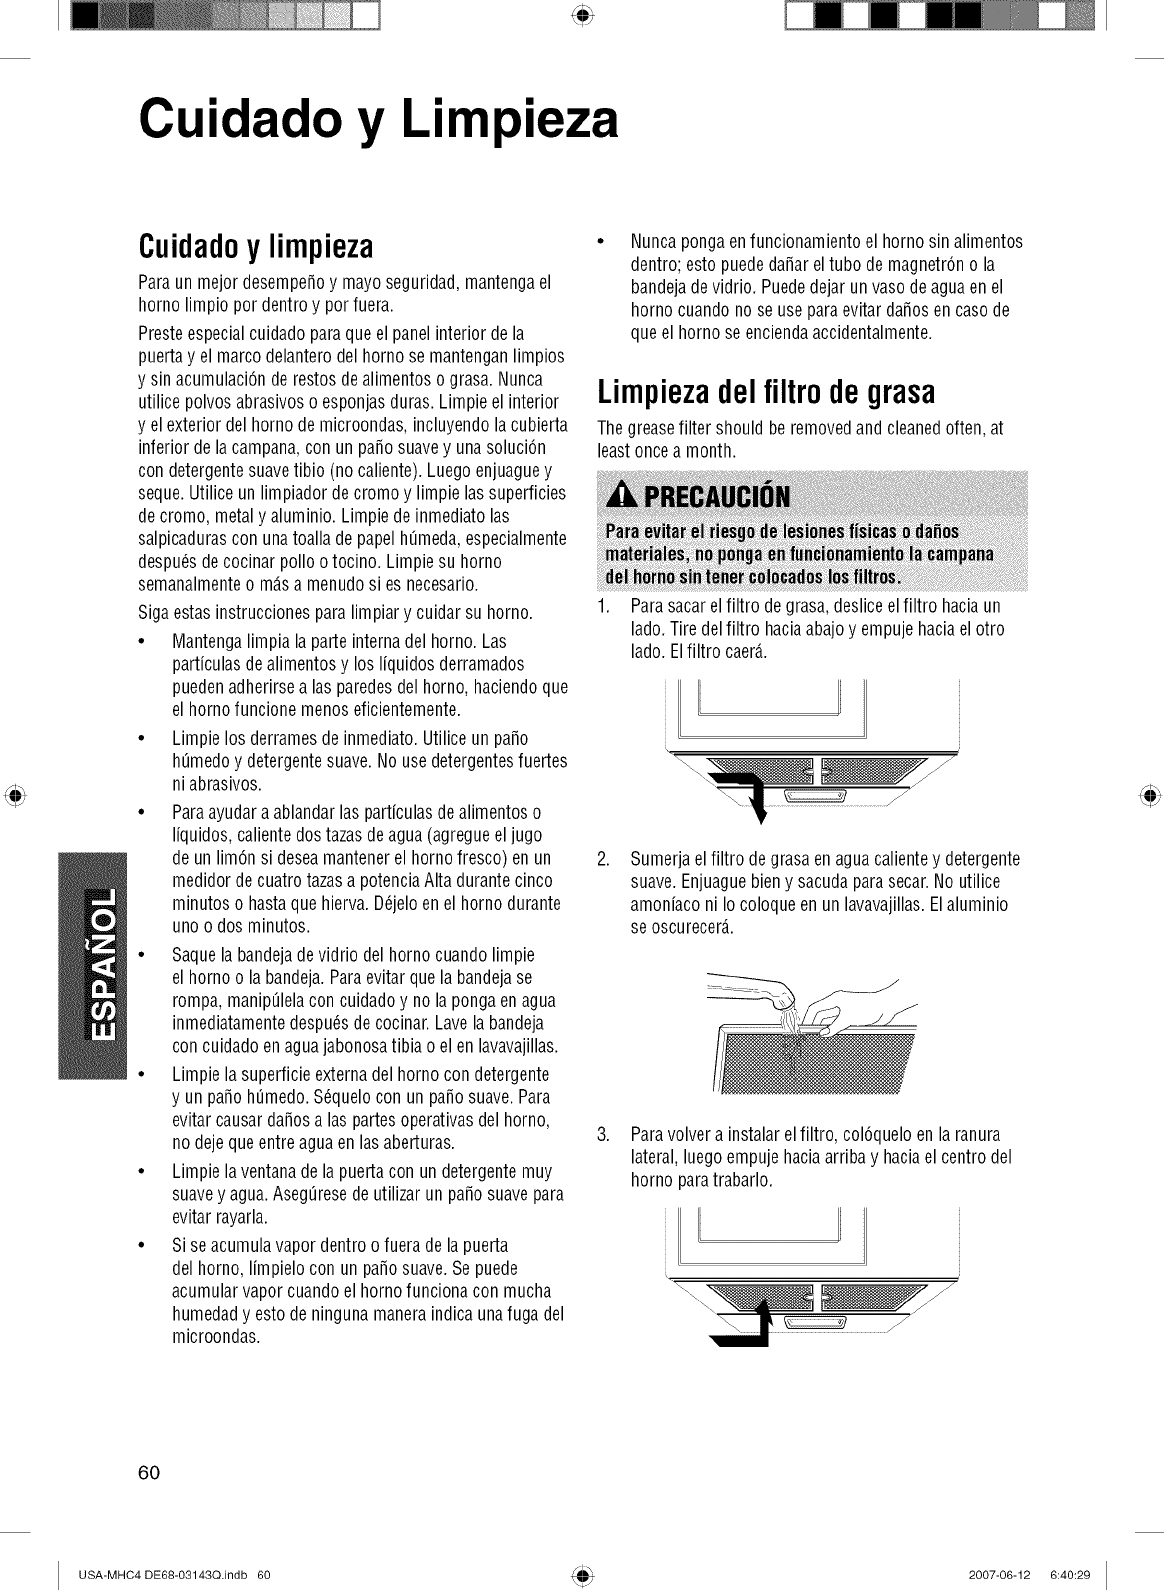
Cuidado y Limpieza
Cuidadoy limpieza
Paraun mejordesempefioy mayoseguridad,mantengael
hornolimpio pordentroy porfuera.
Presteespecialcuidadoparaqueelpanelinteriordela
puertay elmarcodelanterodelhornose mantenganlimpios
y sin acumulaci6nderestosdealimentoso grasa.Nunca
utilicepolvosabrasivoso esponjasduras.Limpieelinterior
y elexteriordelhornodemicroondas,incluyendolacubierta
inferiordelacampana,con unpatiosuavey unasoluci6n
condetergentesuavetibio (nocaliente).Luegoenjuaguey
seque.Utiliceunlimpiadordecromoy limpielassuperficies
decromo,metaly aluminio.Limpiedeinmediatolas
salpicadurasconunatoalladepapelh_meda,especialmente
despu_sdecocinarpoliootocino.Limpiesu horno
semanalmenteo m_.samenudosi esnecesario.
Sigaestasinstruccionesparalimpiary cuidarsu horno.
• Mantengalimpiala parteinternadel horno.Las
particulasdealimentosy los liquidosderramados
puedenadherirsealas paredesdelhorno,haciendoque
elhornofuncionemenoseficientemente.
• Limpielos derramesdeinmediato.Utiliceunpatio
hL]medoy detergentesuave.Nousedetergentesfuertes
niabrasivos.
• Paraayudara ablandarlasparticulasdealimentoso
liquidos,calientedostazasdeagua(agregueeljugo
deunlim6nsi deseamantenerel hornofresco)enun
medidordecuatrotazasa potenciaAltadurantecinco
minutoso hastaquehierva.D6jeloenelhornodurante
unoodos minutos.
• Saquela bandejadevidriodelhornocuandolimpie
elhornoo labandeja.Paraevitarquelabandejase
rompa,manipt_lelacon cuidadoy no lapongaenagua
inmediatamentedespu6sdecocinar.Lavela bandeja
concuidadoenaguajabonosatibia o elenlavavajillas.
• Limpielasuperficieexternadelhornocondetergente
y un panohemedo.S_queloconun patiosuave.Para
evitarcausardanosalas partesoperativasdelhorno,
nodejequeentreaguaenlasaberturas.
• Limpielaventanadelapuertacon undetergentemuy
suavey agua.Asegt_resedeutilizarunpatiosuavepara
evitarrayarla.
• Siseacumulavapordentroo fueradela puerta
delhorno,limpieloconunpatiosuave.Sepuede
acumularvaporcuandoelhornofuncionacon mucha
humedady estodeningunamaneraindicaunafuga del
microondas.
Nuncapongaenfuncionamientoelhornosin alimentos
dentro;estopuededanareltubo demagnetr6no la
bandejadevidrio.Puededejarunvasodeaguaenel
hornocuandonose useparaevitardafiosencasode
queelhornose enciendaaccidentalmente.
Limpiezadelfiltro degrasa
Thegreasefilter shouldberemovedandcleanedoften,at
leastoncea month.
1. Parasacarelfiltro degrasa,desliceelfiltro haciaun
lado.Tiredelfiltro haciaabajoy empujehaciaelotro
lado.Elfiltro caer_..
.Sumerjaelfiltro degrasaenaguacalientey detergente
suave.Enjuaguebieny sacudaparasecar.No utilice
amoniaconiIo coloqueenunlavavajillas.Elaluminio
se oscurecer_.
3. Paravolvera instalarelfiltro, col6queloenla ranura
lateral,luegoempujehaciaarribay haciael centrodel
hornoparatrabarlo.
6O
USA-MHC4 DE68-03143Q.indb 60 2007-06-12 6:40:29
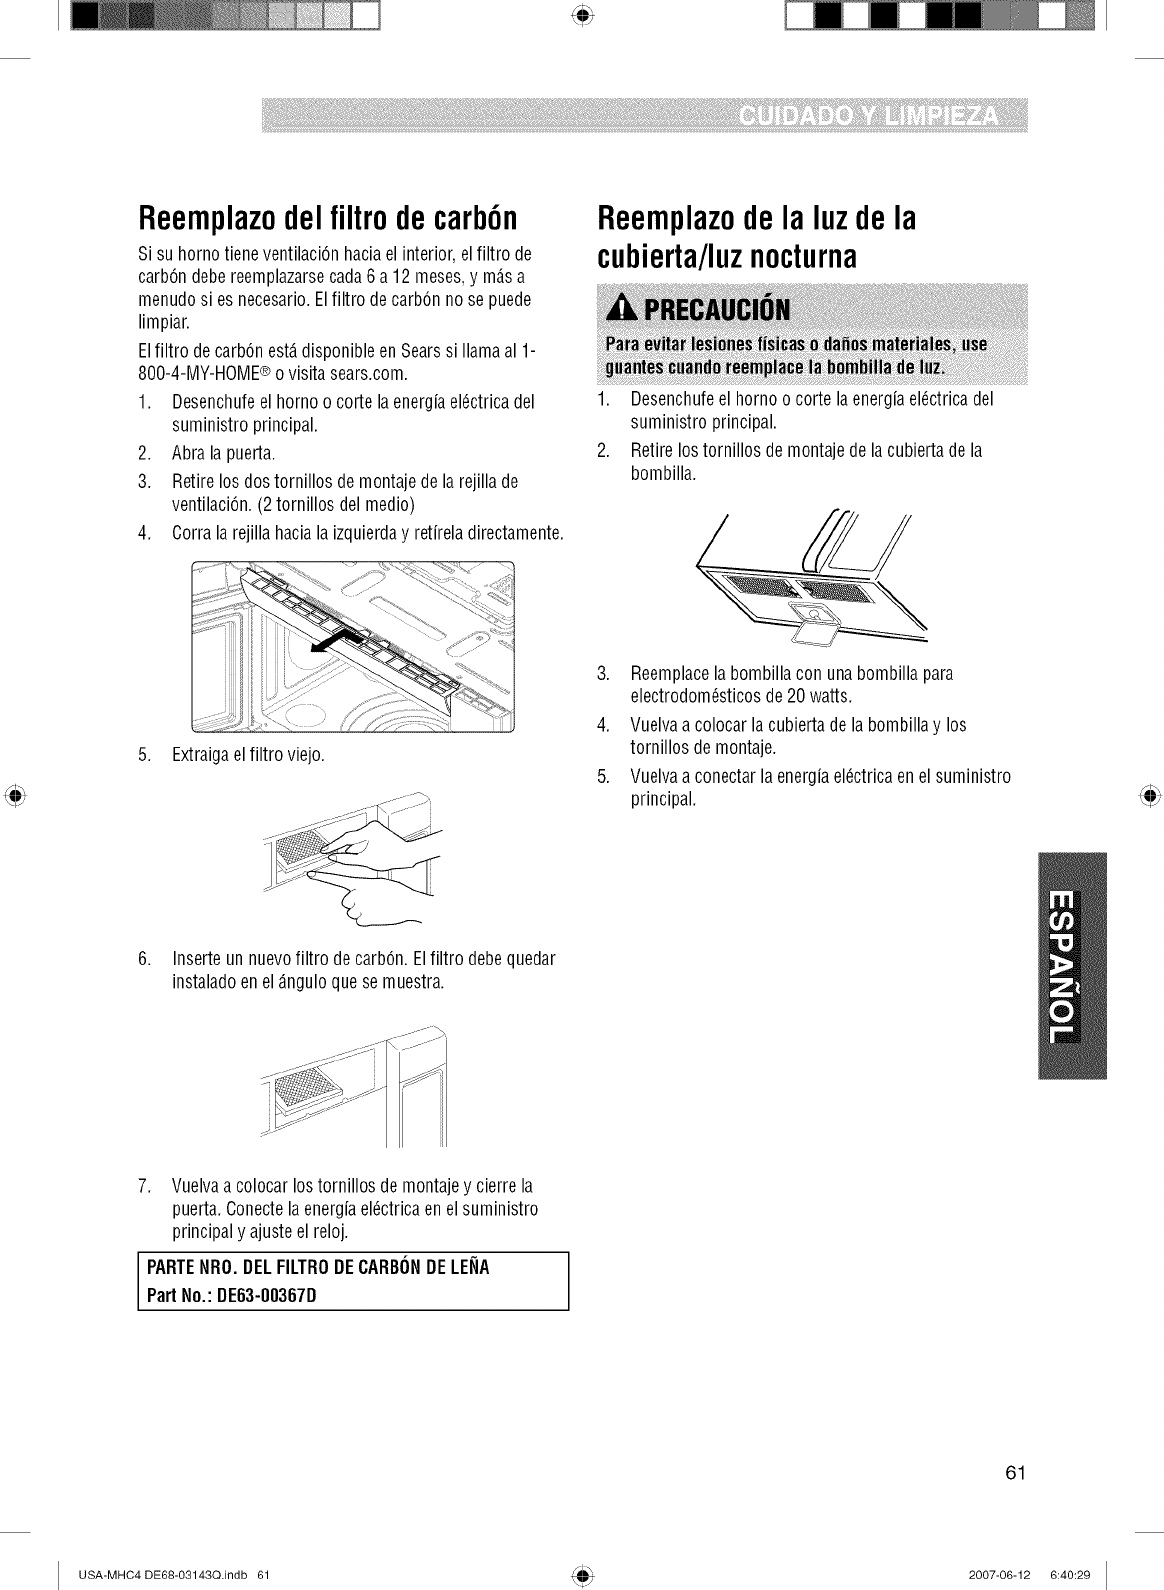
Reemplazodelfiltrodecarb6n
Sisu hornotieneventilaci6nhaciaelinterior,elfiltro de
carb6ndebereemplazarsecada6 a12 meses,y m_.sa
menudosi es necesario.Elfiltro decarb6nnosepuede
limpiar.
Elfiltro decarb6nest,.disponibleenSearssi llamaal 1-
800-4-MY-HOME®ovisitasears.com.
1. Desenchufeelhornoo cortelaenergiael6ctricadel
suministroprincipal.
2. Abrala puerta.
3. Retirelos dostornillosde montajedelarejillade
ventilaci6n.(2tornillosdelmedio)
4. Corralarejillahaciala izquierday retireladirectamente.
Reemplazodela luzdela
cubierta/luznocturna
1. Desenchufeel hornoo cortelaenergiael6ctricadel
suministroprincipal.
2. Retirelostornillosdemontajedelacubiertadela
bombilla.
5. Extraigaelfiltro viejo.
3. Reemplacelabombillacon unabombillapara
electrodom6sticosde20watts.
4. Vuelvaacolocarlacubiertadelabombillay los
tornillosdemontaje.
5. Vuelvaaconectarla energiael6ctricaenel suministro
principal.
6. Inserteunnuevofiltro decarb6n.Elfiltro debequedar
instaladoenel_.nguloquesemuestra.
7. Vuelvaa colocarlostornillosdemontajey cierrela
puerta.Conectelaenergfael6ctricaenelsuministro
principaly ajusteel reloj.
PARTENRO.DELFILTRODECARBONDELENA
PartNo.:DE63-OO367D
61
USA-MHC4 DE68-03143Q.indb 61 2007-06-12 6:40:29
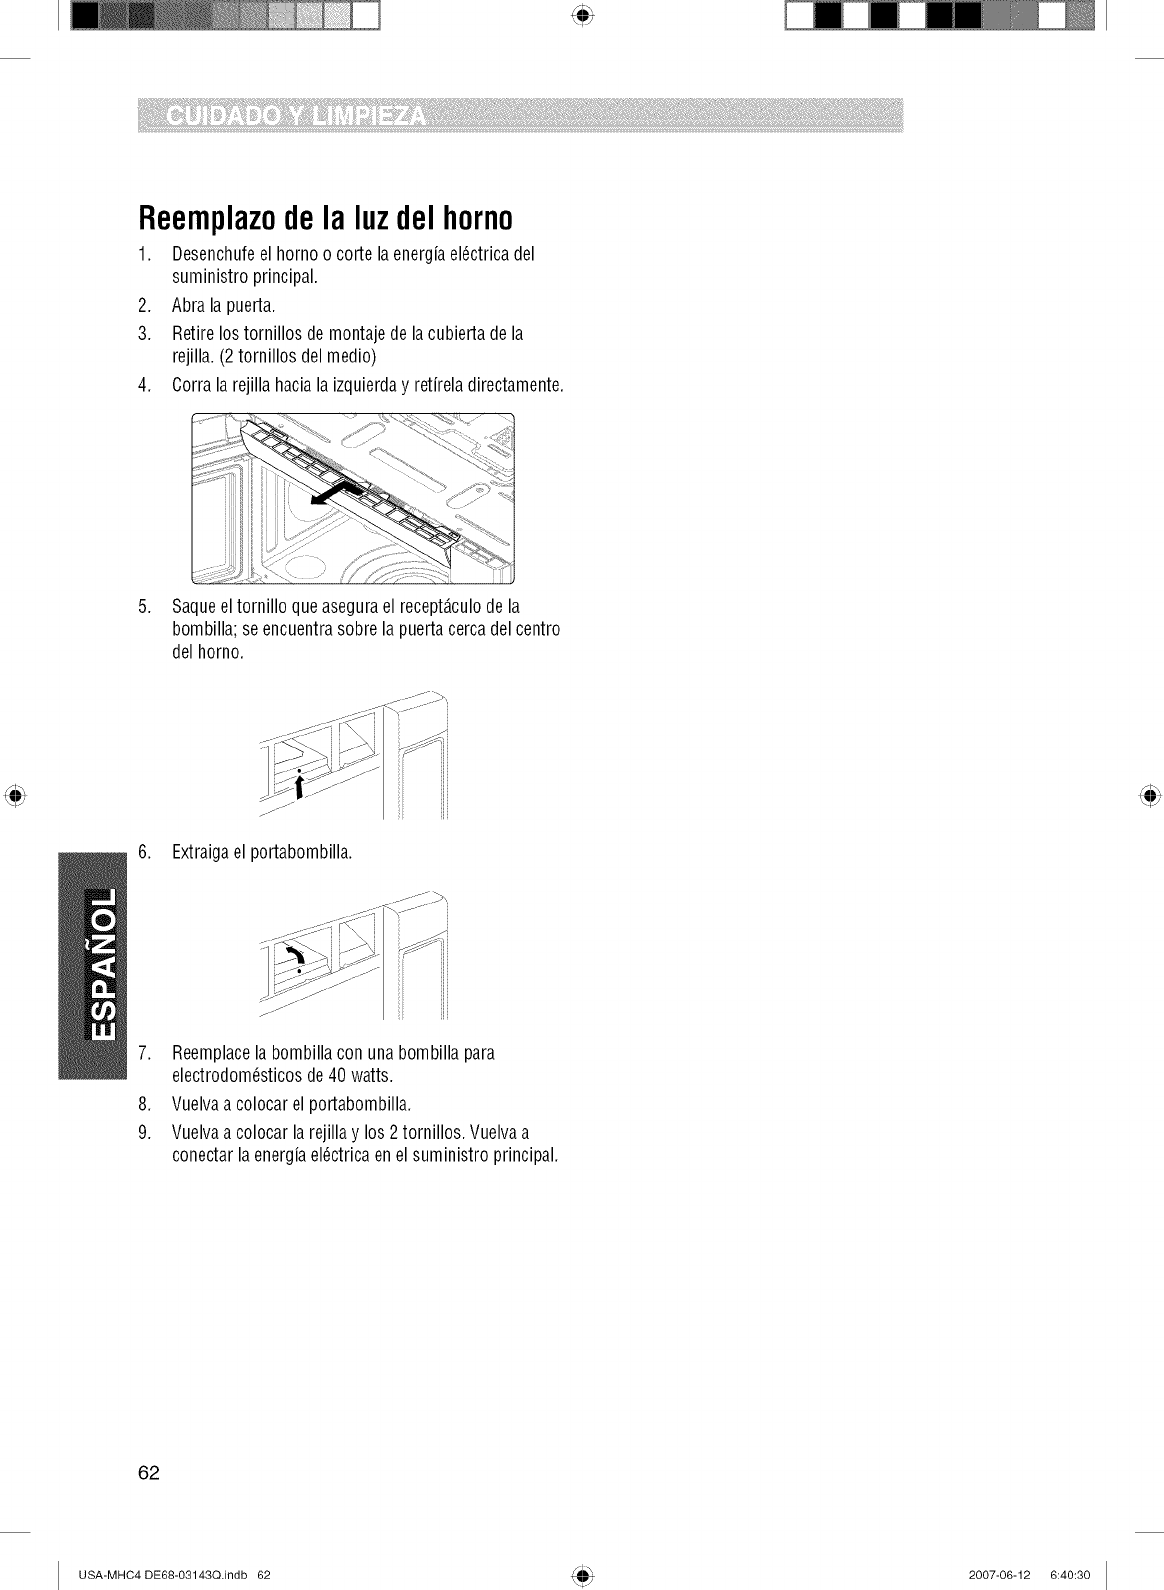
i¸iiIfillii!i!ii!i!iii!iiii!ii!iii!ii!iii!!iiiiiilliiiii!:i!i!ill!if!if!iiiiiiilli!!!!:ili!iiiilliiii!i!!iiiii!i!iiii!ii!iiiii!iiiii!i!i!!i!!iiiii!ilillii!!!!!!!!i!iiiilliiiiiii!iiii!iiiiiiiiiiii!iiililii!i!!!iii!i:ii!ii!!i!iiiiilili!iiii!i!!!iiiiii!ililii!iiiiil!iiiiiii!i!ii!if!i!!!ii!iiii!iiii!!iiii!!!i!!!il;iiiiiiiii!iiliii!iiii!iiiiiiiiii!i!!¸iiii!iil¸iiiiiiiiill!!i!iiiii!i!!i!!!!ii!i:iiliiiiili!i!!!iiiiiiiiii!!i!!i!!iii!i!i!il;ii!ii!i!!ii!ii!!iil!i!iiliii!ili!ilii!ii!ili;!iiii!iiiiiiiii!iii!ii!ilii!!iiiliiliiilii!iii!iiiii!iiiii!i!iiiii!!i!iliii!!i!i!i!iiiiiiiiii!iiiiiiiiiii!i!iiiii!!i!iliii!!i!i!i!iiiiiiiiii!iiiiiiiiiii!i!iiiii!!i!iliii!!i!i!i!iiiiiiiiii!iiiiiiiiiii!i!iiiii!!i!iliii!!i!i!i!iiiiiiiiii!iiiiiiiiiii!i!iiiii!!i!iliii!!i!i!i!iiiiiiiiii!iiiiiiiiiii!i!iiiii!!i!iliii!!i!i!i!iiiiiiiiii!iiiiiiiiiii!i!iiiii!!i!iliii!!i!i!i!iiiiiiiiii!iiiiiiiiiii!i!iiiii!!i!iliii!!i!i!i!iiiiiiiiii!iiiiiiiiiii!i!iiiii!!i!iliii!!i!i!i!iiiiiiiiii!iiiiiiiiiii!i!iiiii!!i!iliii!!i!i!i!iiiiiiiiii!iiiiiiiiiii!i!iiiii!!i!iliii!!i!i!i!iiiiiiiiii!iiiiiiiiiii!i!iiiii!!i!iliii!!i!i!i!iiiiiiiiii!iiiiiiiiiii!i!iiiii!!i!iliii!!i!i!i!iiiiiiiiii!iiiiiiiiiiiiiii!
Reemplazodelaluzdelhorno
1. Desenchufeelhornoo cortelaenergiael_ctricadel
suministroprincipal.
2. Abrala puerta.
3. Retirelostornillosdemontajedelacubiertadela
rejilla.(2tornillosdelmedio)
4. Corralarejillahaciala izquierday retireladirectamente.
5. Saqueeltornillo queasegurael recept_.culodela
bombilla;seencuentrasobrelapuertacercadelcentro
delhorno.
z_
/.j jj
6. Extraigaelportabombilla.
7. Reemplacela bombillacon unabombillapara
electrodom_sticosde40watts.
8. Vuelvaa colocarel portabombilla.
9. Vuelvaa colocarla rejillay los 2tornillos.Vuelvaa
conectarlaenergiael_ctricaenelsuministroprincipal.
62
USA-MHC4 DE68-03143Q.indb 62 2007-06-12 6:40:30

Solucibn de Problemas
GuiadesoluciCndeproblemas
AntesdeIlamara untCcnicoparasu horno,verifiqueestalistadeposiblesproblemasy soluciones.
•Insertecorrectamenteelenchufea untomacorrienteconectadoatierra.
• Sieltomacorrienteest_controladoporuninterruptordepared,aseg0resedequeel interruptordeparedest6
encendido.
• Retireelenchufedeltomacorriente,esperediezsegundosy vuelvaa enchufarlo.
• Reinicieel disyuntoro reemplacecualquierfusiblequemado.
• Enchufeotroaparatoeneltomacorriente;si elotro aparatonofunciona,Ilamea unelectricistacalificadoparaque
repareeltomacorriente.
• Enchufeelhornoenuntomacorrientediferente.
• Aseg0resedequela puertaest6biencerrada.
• Controlesi qued6materialdeembalajeuotro materialenlatrabadelapuerta.
• Controlequelapuertanoest6da_ada.
• PresioneSTOP/CLEARdos vecesy vuelvaa ingresarlasinstruccionesdecocciCn.
• Sino hubouncortedeelectricidad,retireelenchufedeltomacorriente,esperediezsegundosy vuelvaa enchufarlo.Si
hubouncortedeelectricidad,aparecer_el indicadordelahora:
PLEASETOUCHCLOCKANDSETTIMEOFDAY.(PORFAVOROPRIMACLOCK(RELOJ)Y CONFIGURELANORADEL
DiA.)Reinicieelrelojy oualquierinstrucciCndeoocoiCn.
• Reinicieel disyuntoro reemplacecualquierfusiblequemado.
• Assurez-vousquelefour estbranch6sur unelignede20amperes.Ponerenfuncionamientootro electrodomCsticoen
elmismocircuitopuedecausarunacaidadetensiCn.Siesnecesario,enchufeel hornoensu propiocircuito.
• Saquecualquierutensiliomet_.lico,articulosdecocinao cierresdemetal.Siusapapeldealuminio,utilicesCIotiras
pequenasy dejeal menosunapulgadaentreelpapeldealuminioy las paredesinterioresdelhorno.
• Limpieel platogiratorio,elanillogiratorioy el pisodelhorno.
• Aseg0resedequeel platoy elanillogiratorioestCncolocadoscorrectamente.
• Estoessimilara lainterferenciacausadaporotrosartefactospequenos,comoporejemplolos secadores.Alejem_ssu
microondasdeotroselectrodomCsticos,comosuTVo radio.
Nota:
si el hornoest,.programadoparacocinardurantem_sde25minutos,despu6sdelos25 minutosseajustar_.
autom_ticamentea unapotenciade170porcientoparaevitarquese pasela comida.
Siningunode estosarticulosesla causadelproblema,comuniqueseconel serviciot_cnicodeSearsal 1-800-4-1VIY-
HOME®.
63
USA-MHC4 DE68-03143Q.indb 63 2007-06-12 6:40:30

Your Home
For repair - in your home - of all major brand appliances,
lawn and garden equipment, or heating and cooling systems,
no matter who made it, no matter who sold it!
For the replacement parts, accessories and
owner's manuals that you need to do-it-yourself.
For Sears professional installation of home appliances
and items like garage door openers and water heaters.
1-800-4-MY-HOME ®(1-800-469-4663)
Call anytime, day or night (U.S.A.)
www,sears,com
For expert home so/utions advice: www.managemyhome.com
Our Home
For repair of carry-in items like vacuums, lawn equipment,
and electronics, call or go on-line for the location of your nearest
Sears Parts & Repair Service Center
1-800-488-1222 (U.S.A.)
Call anytime, day or night
www.sears.com
To purchase a protection agreement on a product serviced by Sears:
1-800-827-6655 (u.s.A.)
Para pedir servicio de reparacion
a domicilio, y para ordenar piezas:
1-888-SU-HOGAR ®
(1-888-784-6427)
Sealrs
SM
® Registered Trademark /TMTrademark /Service Mark of Sears Brands, LLC
® Marca Registrada /TMMarca de F_brica /SMMarca de Servicio de Sears Brands, LLC
MD
MCMarque de commerce /Marque depos6e de Sears Brands, LLC © Sears Brands, LLC
USA-MHC4 DE68-03143Q.indb 64 2007-06-12 6:40:31
