Kenmore 58072059200 User Manual AIR CONDITIONER Manuals And Guides L0306006
KENMORE Air Conditioner Room (42) Manual L0306006 KENMORE Air Conditioner Room (42) Owner's Manual, KENMORE Air Conditioner Room (42) installation guides
User Manual: Kenmore 58072059200 58072059200 KENMORE AIR CONDITIONER - Manuals and Guides View the owners manual for your KENMORE AIR CONDITIONER #58072059200. Home:Heating & Cooling Parts:Kenmore Parts:Kenmore AIR CONDITIONER Manual
Open the PDF directly: View PDF ![]() .
.
Page Count: 28
Owner's Manual
Manual del Propietario
®
ROOM AIR CONDITIONER
ACONDICIONADOR DE AIRE DE VENTANA
Model, Modelo 580.72059:;_
Sears, Roebuck and Co., Hoffman Estates, IL 60179 U.S.A.
www.sears.com
TABLE OF CONTENTS ........................2
WARRANTY ..............................................2
SAFETY .....................................................3
Important Safety Instructions ...................... 3
ELECTRICAL REQUIREMENTS .......4
INSTALLATION ........................................5
Installation Requirements ......................... 5
Installation ................................................ 6
How to Install ............................................ 6
Removal from Window ............................. 7
OPERATION .............................................8
How and Why ........................................... 8
Normal Sounds ........................................ 8
Capacity and Running Time ..................... 8
Features ................................................... 9
Using the Air Conditioner ......................... 9
Display ................................................... 10
Remote Control ...................................... 11
Howto insertBatteriesInto RemoteControl.-.-12
Air Direction Adjustment ......................... 12
MAINTENANCE ..................................... 13
Air Filter Cleaning ................................... 13
Air Conditioner Cleaning ........................ 13
Howto Remove the Front Grille .................. 13
How to Replace the Front Grille .................. 13
TROUBLESHOOTING ......................... 14
Before Calling for Service ...................... 14
ESPANOL ................................................ 15
SERVICE NUMBERS ............ Back Cover
FULL ONE YEAR WARRANTY ON
ROOM AIR CONDITIONER
For one year from the date of purchase, when this
air conditioner is operated and maintained for
normal room cooling according to instructions in this
owner's manual, Sears will repair this air
conditioner, free of charge, if defective in material or
workmanship.
FULL FIVE-YEAR WARRANTY ON
SEALED REFRIGERATION SYSTEM
For five years from the date of purchase, when this
air conditioner is operated and maintained for
normal room cooling according to instructions in this
owner's manual, Sears will repair the sealed
refrigeration system (consisting of refrigerant,
connecting tubing, and compressor), free of charge,
if defective in material or workmanship.
WARRANTY SERVICE IS AVAILABLE BY
CONTACTING SEARS SERVICE AT
1-800-4-MY-HOME ®
Warranty coverage applies only to air conditioners
used for non-commercial, private household
purposes.
This warranty applies only while this product is in
use in the United States.
This warranty gives you specific legal rights, and
you may also have other rights which vary from
state to state.
Sears, Roebuck and Co., D/817WA,
Hoffman Estates, IL 60179 U.S.A.
-2-
IMPORTANT SAFETY INSTRUCTIONS
The safety instructions below will tell you how to use your room air conditioner to avoid harm to yourself or
damage to your ROOM AIR CONDITIONER.
_FOR YOUR SAFETY
Do not store or usegasoline or other flammable vapors
and liquids in the vicinity of this or any other appliance.
Read product labels for flammability and other warnings.
V_PREVENT ACCIDENTS
To reducethe risk of fire, electrical shock, or injury to
personswhen using your air conditioner, follow basic
precautions, including the following:
•Be sure the electrical service is adequate for the model
you have chosen.
•If the air conditioner is to be installed i_ a window, you
will probably want to clean both sides of the glass first. If
the window is a triple-track type with a screen panel
included, you may want to remove the screen
completely before installation.
• Be sure the air conditioner has been securely and
correctly installed according to the separate installation
instructions provided with this manual. Save this manual
and installation instructions for possible future use in
removing or reinstalling this unit.
• Use gloves when handling the air conditioner. Be careful
to avoid cuts from sharp metal fins on front and rear coils.
ELECTRICAL INFORMATION
The complete electrical rating of your new room air
conditioner is stated on the serial plate. Refer to the rating
when checking the electrical requirements.
•Be sure the air conditioner is properly grounded. To
minimize shock and fire hazards, proper grounding is
important. The power cord is equipped with a
three-prong grounding plug for protectionagainst shock
hazards.
• Your air conditioner must be pluggedinto a properly
grounded wall receptacle. If the wall receptacle you
intendto use is not adequately grounded or protected by
a time delay fuse or circuit breaker, have a qualified
electrician install the proper receptacle.
•Do not run air conditioner witha protective covering.
This could result in mechanical damage within the air
conditioner.
•Do not usean extension cord or an adapter plug.
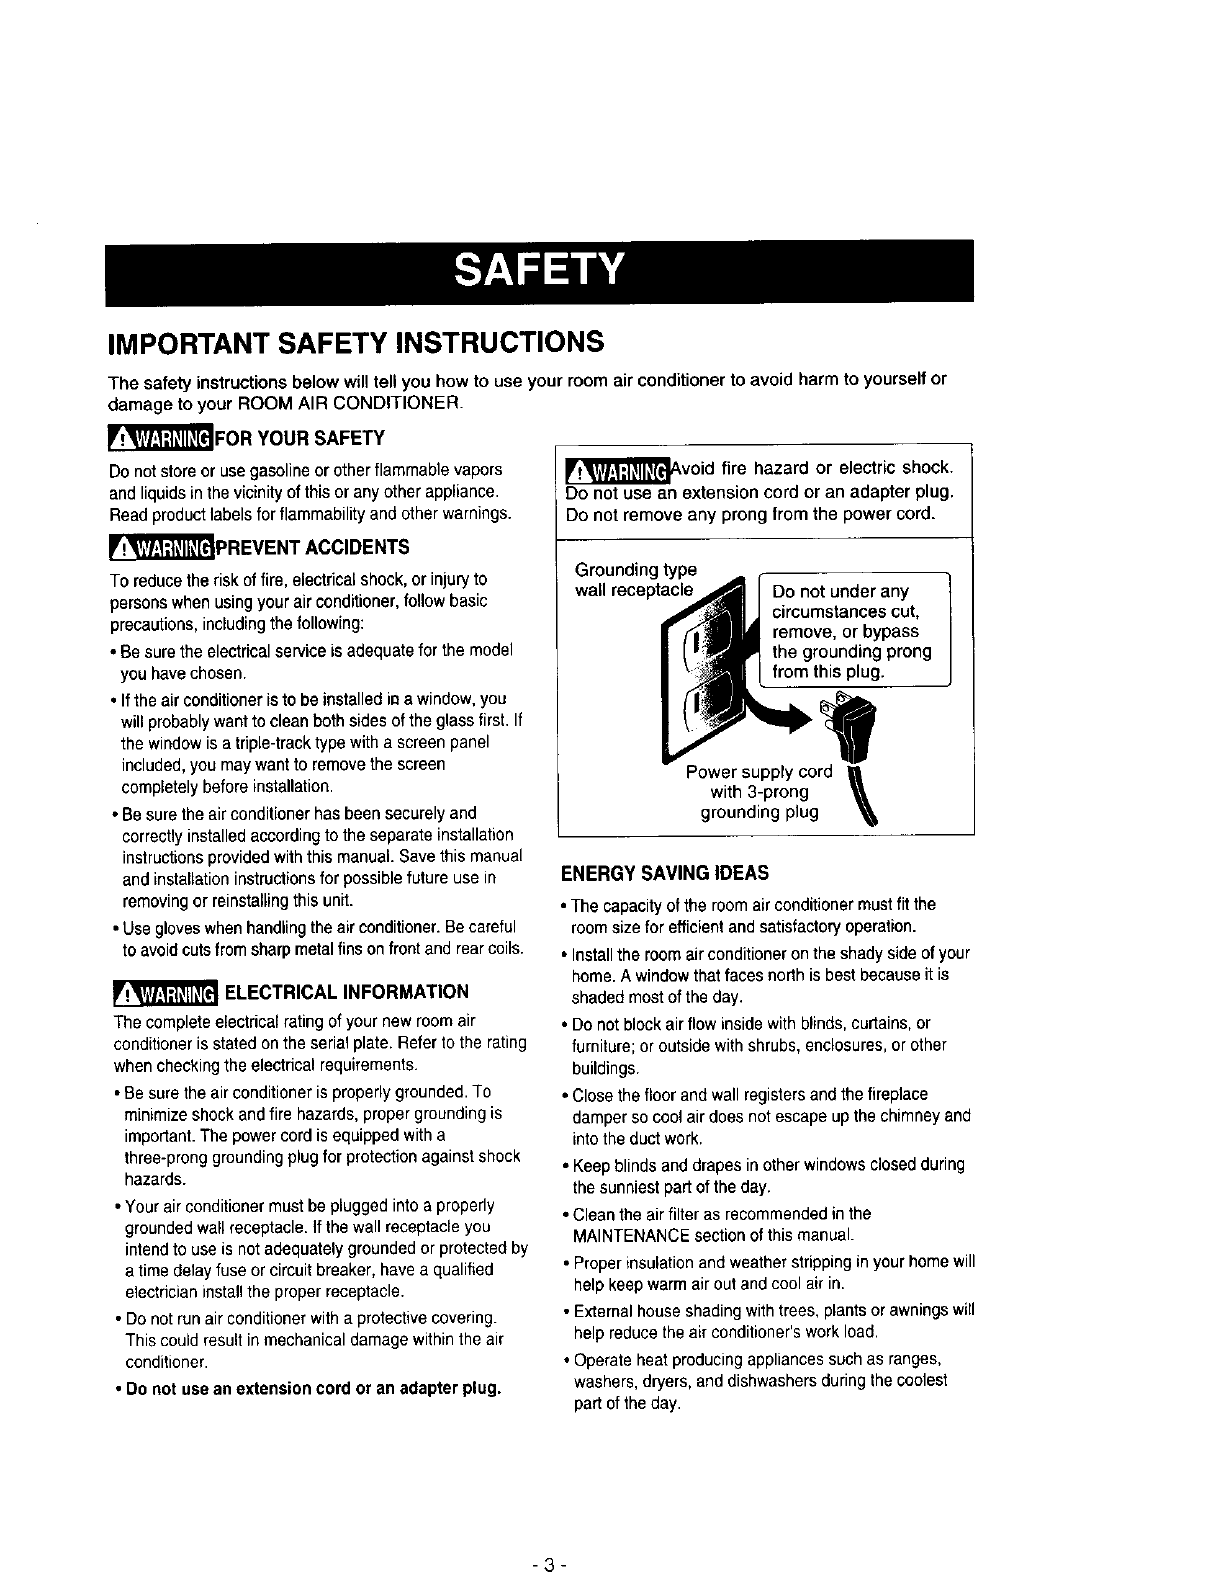
_l, Avoid fire hazard or electric shock.
Do not use an extension cord or an adapter plug.
Do not remove any prong from the power cord.
Grounding type
wall receptacle Do not under any t
circumstances cut, J
remove, or bypass
the grounding prong
from this plug.
Power supply cord
with 3-prong \
grounding plug
ENERGY SAVING IDEAS
•The capacity of the room air conditionermust fitthe
room size for efficient and satisfactory operation.
• Installthe room air conditioner on the shady side of your
home. A window that faces north isbest because it is
shaded most of the day.
• Do not block airflow insidewith blinds, curtains, or
furniture; or outside with shrubs, enclosures, or other
buildings.
• Close the floor and wall registers and the fireplace
damper so cool air does not escape upthe chimney and
intothe duct work.
• Keep blinds and drapes in other windows closed during
the sunniest part of the day.
• Clean the air filter as recommended inthe
MAINTENANCE section of this manual.
• Proper insulation and weather stripping in your home will
help keep warm air out and cool air in.
• External house shading with trees, plants or awnings will
help reduce the air conditioner's work load.
• Operate heat producing appliances such as ranges,
washers, dryers, and dishwashers during the coolest
part of the day.
-3-
OBSERVE ALL LOCAL CODES AND
ORDINANCES.
DO NOT, UNDER ANY CIRCUMSTANCES,
REMOVETHEPOWERSUPPLYCORD
GROUNDPRONG.
ELECTRICAL GROUND IS REQUIRED ON
THIS APPLIANCE.
A 115-volt 60 Hz, AC only, 15A fused and
properly grounded electrical supply is required,
A time delay fuse or time delay circuit breaker
is recommended. Use a dedicated circuit,
serving only this appliance.
DO NOT USE AN EXTENSION CORD.
RECOMMENDED GROUNDING METHOD
For your personal safety, this appliance must
be grounded, This appliance has a power
supply cord with a 3-prong grounding plug. To
minimize possible shock hazard, the cord must
be plugged into a mating grounding type wall
receptacle and grounded in accordance with
the National Electrical Code (ANSI/NFPA 70)
latest edition and all local codes and
ordinances. If a mating wall receptacle is not
available, it is the personal responsibility and
obligation of the customer to have a properly
grounded 3-prong wall receptacle installed by
a qualified electrician.
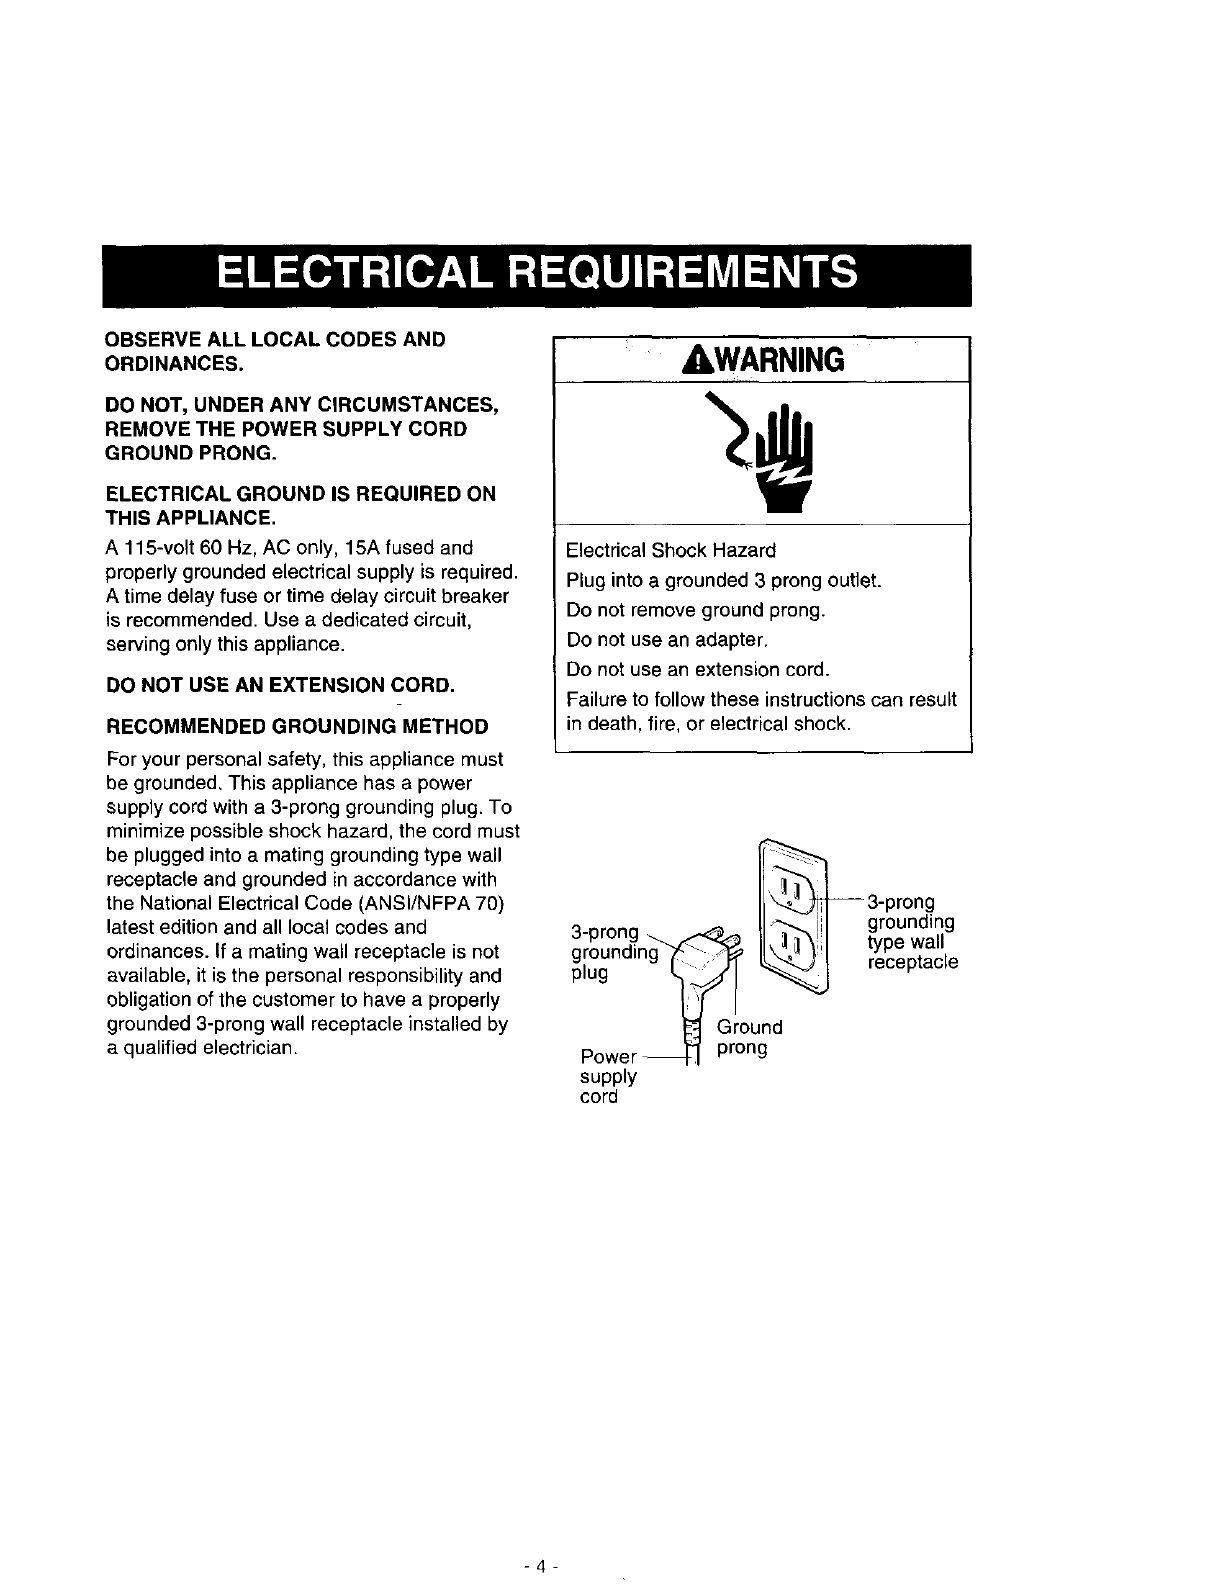
A, WARNING
Electrical Shock Hazard
Plug into a grounded 3prong outlet.
Do not remove ground prong.
Do not use an adapter.
Do not use an extension cord.
Failure to follow these instructions can result
in death, fire, or electrical shock.
_3-prong
3 nron" .._ II% I grounding
"_" _' type wall
groundmg_'_'-_/_ I
plug _1_ I _..,J receptacle
Ground
Power _ prong
supply
cord
-4-
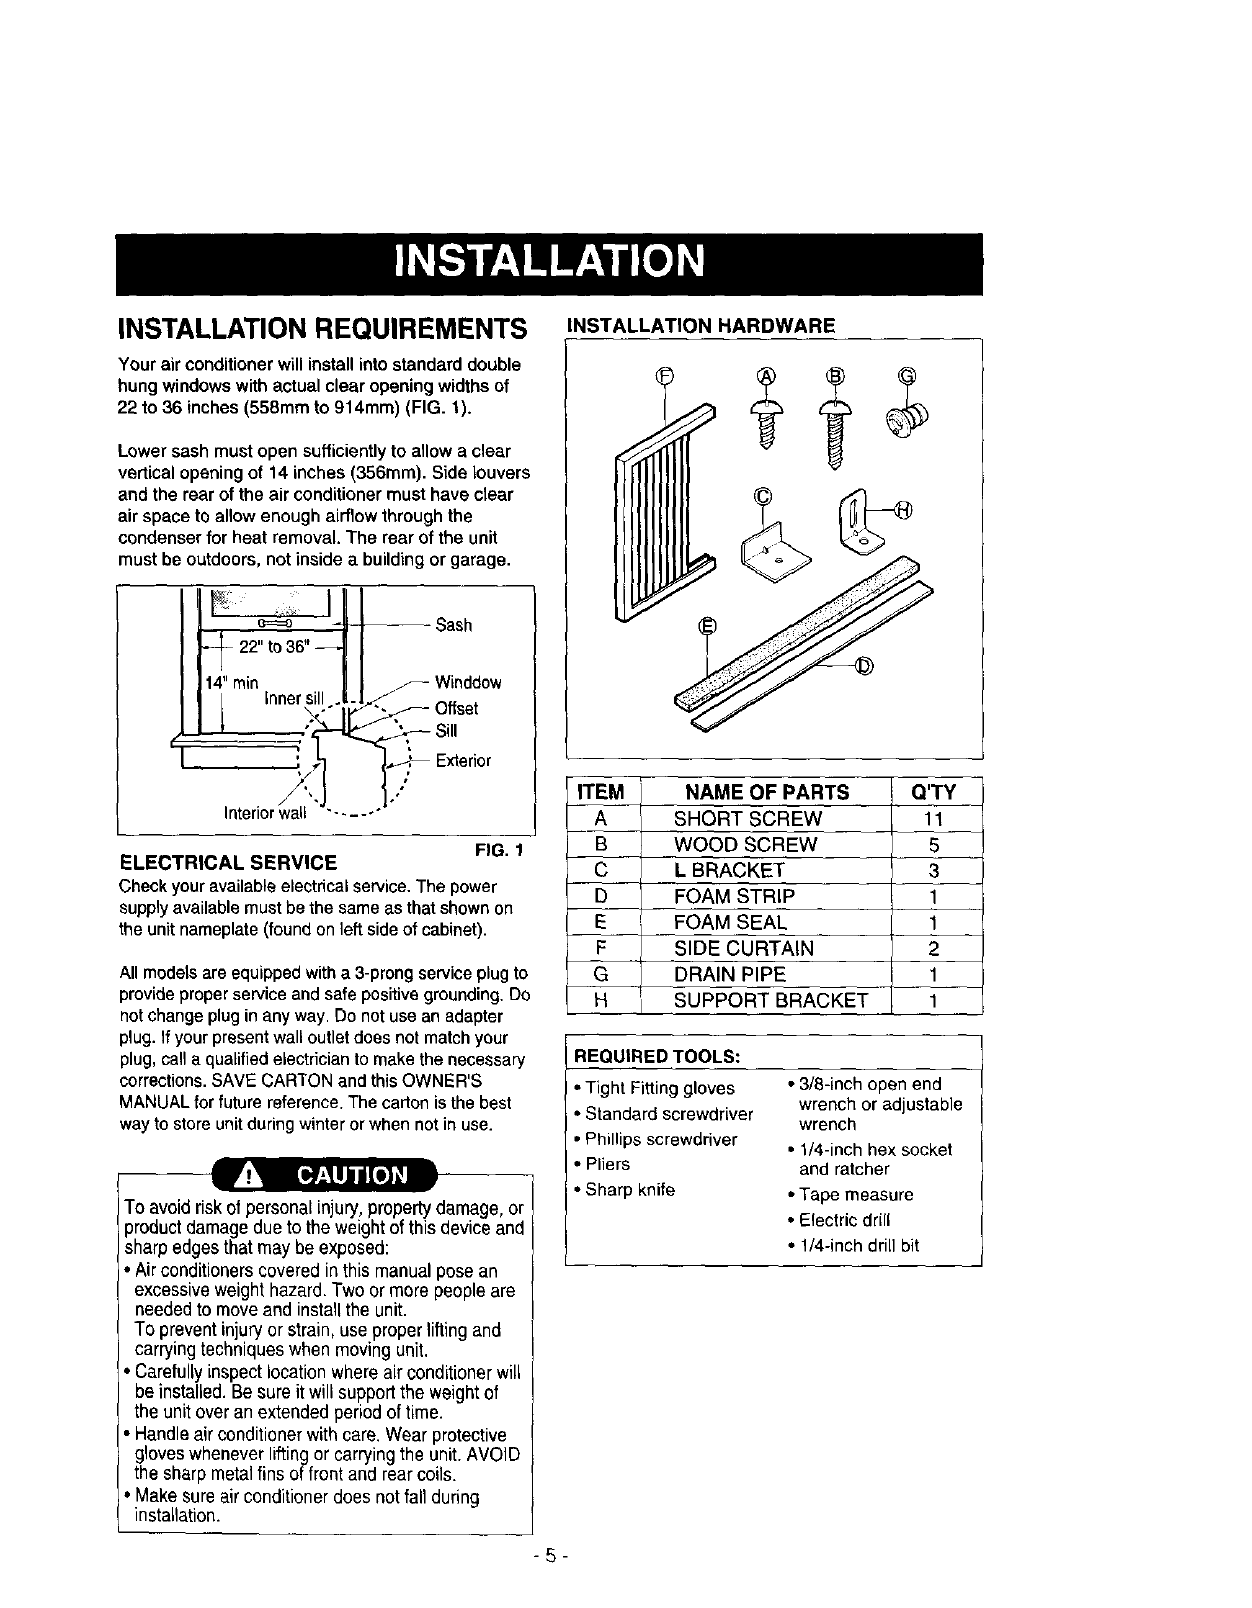
INSTALLATION REQUIREMENTS
Your air conditioner will install into standard double
hung windows with actual clear opening widths of
22 to 36 inches (558mm to 914mm) (FIG. 1).
Lower sash must open sufficiently to allow a clear
vertical opening of 14 inches (356rnm). Side louvers
and the rear of the air conditioner must have clear
air space to allow enough airflow through the
condenser for heat removal. The rear of the unit
must be outdoors, not inside a building or garage.
FIG. 1
ELECTRICAL SERVICE
Check your available electrical service. The power
supply available mustbe the same as that shown on
the unit nameplate (found on left side of cabinet).
All models are equipped with a 3-prong service plugto
provide proper service and safe positive grounding. Do
not change plug in any way. Do not use an adapter
plug. If your present wall outlet does not match your
plug, call a qualified electrician to make the necessary
corrections. SAVE CARTON and this OWNER'S
MANUAL for future reference. The carton is the best
way to store unit during winter or when not in use.
To avoid risk of personal injury,propertydamage, or
productdamagedue to theweightof this deviceand
sharp edgesthat may be exposed:
•Air conditionerscoveredin this manual pose an
excessiveweight hazard.Two or more peopleare
neededto moveand installthe unit.
To preventinjury or strain,use properlifting and
carryingtechniqueswhen moving unit.
• Carefully inspectlocationwhere air conditionerwill
be installed.Be sure it will supportthe weightof
the unit over anextended periodof time.
•Handleair conditionerwith care.Wear protective
gloveswheneverliftingor carryingthe unit. AVOID
the sharp metalfins of frontand rearcoils.
• Make sure air conditionerdoes not fall during
installation.
INSTALLATION HARDWARE
NAME OF PARTS Q'TY
SHORT SCREW 11
WOOD SCREW 5
L BRACKET 3
FOAM STRIP 1
FOAM SEAL 1
SIDE CURTAIN 2
DRAIN PIPE 1
SUPPORT BRACKET 1
REQUIRED TOOLS:
• Tight Fitting gloves
• Standard screwdriver
•Phillips screwdriver
• Pliers
• Sharp knife
• 3/8-inch open end
wrench or adjustable
wrench
• 1/4-inch hex socket
and ratcher
• Tape measure
• Electric drill
• 1/4-inch drill bit
-5-
INSTALLATION
Picka location whichwillallowyou toblow the cold air into
the areayou want.Windows used for installationmust be
strong enoughto suppod the weightof the airconditioner.
Good installation withspecial attentionto the properposition
of the unitwill lessenthe chancethat service will be needed.
If airconditioneris blockedby a storm windowframe, see
step 9 on page 7 before beginningto install.
HOW TO INSTALL
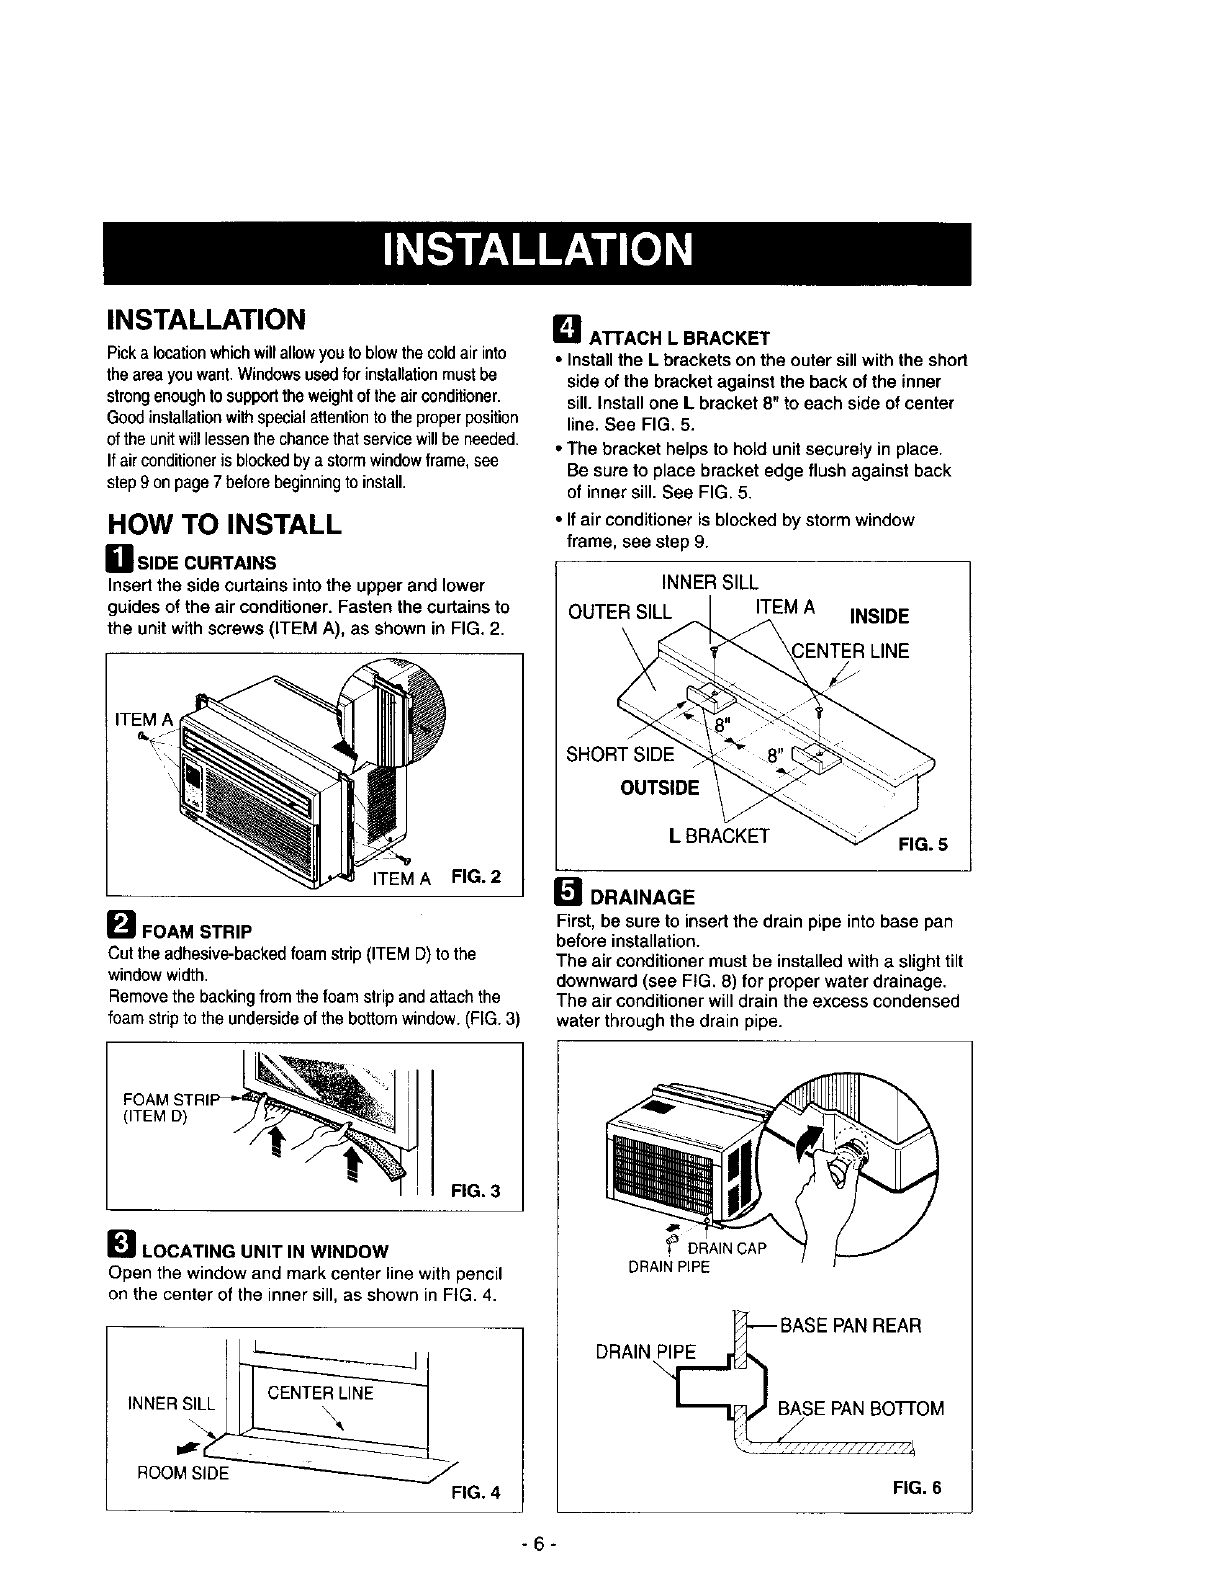
LI SIDE CURTAINS
Insert the side curtains into the upper and lower
guides of the air conditioner. Fasten the curtains to
the unit with screws (ITEM A), as shown in FIG. 2.
ITEM A FIG. 2
_"_ FOAM STRIP
Cut the adhesive-backed foam strip (ITEM D) to the
window width.
Remove the backing from the foam strip and attach the
foam strip to the underside of the bottom window. (FIG. 3)
DATTACH L BRACKET
• Installthe L brackets on the outer sillwith the short
side of the bracket against the back of the inner
sill. Install one Lbracket 8" to each side of center
line. See FIG. 5.
• The bracket helps to hold unit securely in place.
Be sure to place bracket edge flush against back
of inner sill. See FIG. 5.
•If air conditioner is blocked by storm window
frame, see step 9.
INNER SILL
OUTER SILL ITEM A INSIDE
3ENTER LINE
SHORT SIDE
OUTSIDE
LBRACKET FIG. 5
[] DRAINAGE
First, be sure to insert the drain pipe into base pan
before installation.
The air conditioner must be installed with aslight tilt
downward (see FIG. 8) for proper water drainage.
The air conditioner will drain the excess condensed
water through the drain pipe.
(ITEM D)
FIG. 3
]LOCATING UNIT IN WINDOW
Open the window and mark center line with pencil
on the center of the inner sill, as shown in FIG. 4.
fDRAINCAP
DRAINPIPE
[_--- BASE PAN REAR
DRAIN____
"--I_ BASE PAN BonOM
__, //,/.,/////, /_/_
FIG. 6
-6-
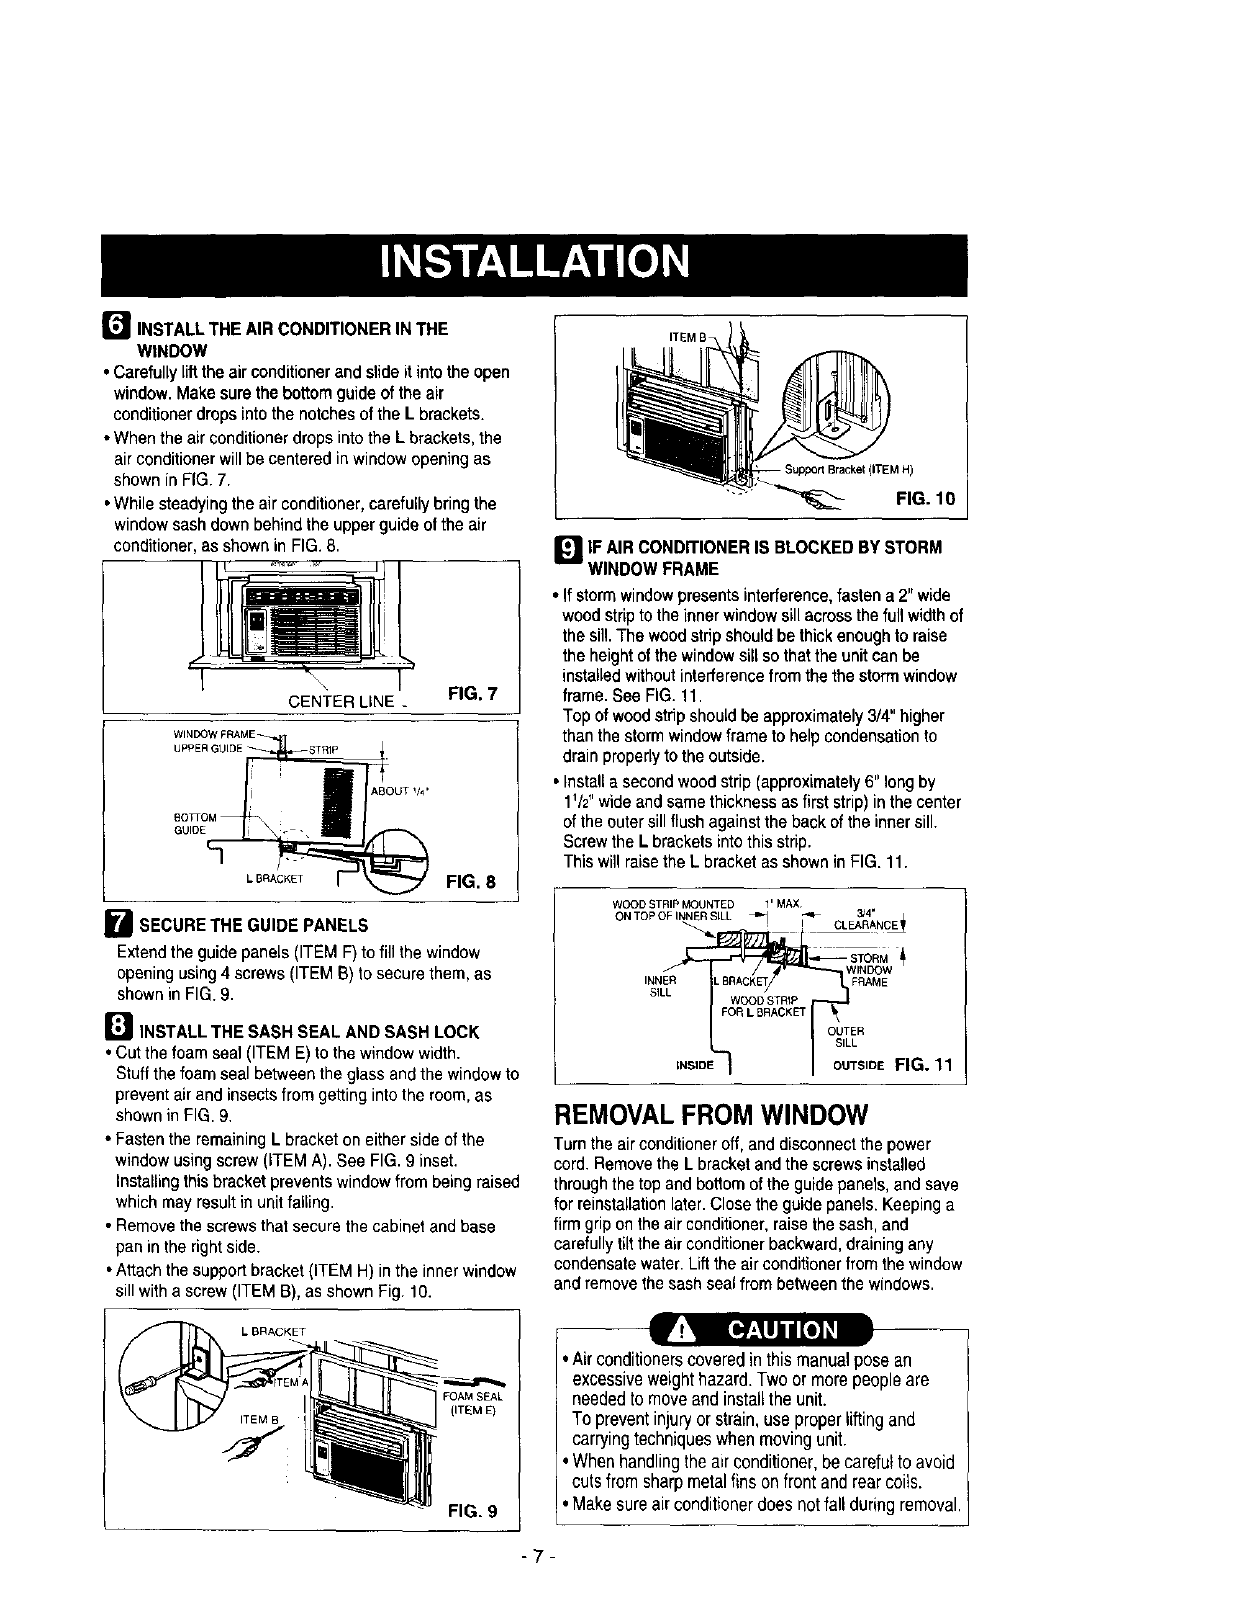
r"_ INSTALL THE AIR CONDITIONER IN THE
WtNDOW
• Carefullyliftthe airconditionerand slideit intothe open
window.Make surethe bottomguideof the air
conditionerdropsintothe notchesofthe Lbrackets.
• When the airconditionerdropsintothe Lbrackets,the
airconditionerwillbe centeredinwindowopeningas
shown in FIG. 7.
•While steadying the air conditioner, carefully bring the
window sash down behind the upper guide of the air
conditioner, as shown in FIG. 8.
WINDOW FRAME_
UPPER (
CENTER LINE _ FIG. 7
ABOUT V4"
BOrG
GUIOE
LBRACKET FIG. 8
_--_ SECURE THE GUIDE PANELS
Extend the guide panels (ITEM F) to fill the window
opening using 4 screws (ITEM B) to secure them, as
shown in FIG. 9.
_INSTALL THE SASH SEAL AND SASH LOCK
• Cut the foam seal (ITEM E) to the window width.
Stuff the foam seal between the glass and the windowto
prevent air and insects from getting intothe room, as
shown in FIG. 9.
• Fasten the remaining Lbracket on either side of the
window using screw (iTEM A). See FIG. 9 inset.
Installingthis bracket prevents window from being raised
which may result in unit falling.
• Remove the screws that secure the cabinet and base
pan in the right side.
•Attach the support bracket (ITEM H) in the inner window
sill with a screw (ITEM B), as shown Fig. t0.
__' Support Bracket (ITEMFIG.10H)
I_IF AIRCONDITIONERIS BLOCKEDBYSTORM
WINDOWFRAME
• If stormwindowpresents interference,fasten a 2" wide
woodstripto the innerwindowsill across thefull widthof
thesill.The woodstripshould be thickenoughto raise
the heightof thewindowsill so thatthe unit can be
installedwithoutinterferencefrom the thestormwindow
frame. See FIG. 11.
Top of woodsthpshould be approximately3/4"higher
than the storm window frame to help condensation to
drain properly to the outside.
• Installa second wood strip (approximately 6" long by
1_/2"wide and same thickness as first strip) inthe center
of the outer sill flush against the back of the inner sill.
Screw the Lbrackets intothis strip.
This will raise the L bracket as shown in FIG. 11.
WOOD STRIP MOUNTED 1" MAX
ON TOP OF INNER SILL _1 _ 3/4' ±
_ ! _ CLEARANCE T
INN E_RS_AT_K_P _S'LL OUTERSILL FRAME
TSIDE FIG. 11
REMOVAL FROM WINDOW
Turn the air conditioner off, and disconnect the power
cord. Remove the L bracket and the screws installed
through the top and bottom of the guide panels, and save
for reinstallation later. Close the guide panels. Keeping a
firm grip onthe air conditioner, raise the sash, and
carefullytilt the air conditioner backward, draining any
condensate water. Lift the air conditioner from the window
and remove the sash seal from betweenthe windows.
--_ FIG 9
•Airconditionerscoveredinthismanualposean
excessiveweighthazard.Twoor morepeopleare
neededto moveandinstallthe unit.
To preventinjuryorstrain,useproperliftingand
carryingtechniqueswhenmovingunit.
• Whenhandlingthe airconditioner,becarefulto avoid
cutsfromsharpmetalfinson frontandrearcoils.
• Makesureairconditionerdoesnotfall duringremoval,
-7-
HOW AND WHY
Your room air conditioner provides the following
functions to make hot weather living more
comfortable:
• Cools and circulates room air.
• Lowers humidity by removing excess moisture.
• Filters out summertime dust, dirt, and some
airborne impurities.
The air conditioner performs these functions by
drawing room air through a filter which traps dust
and dirt particles. The air then passes over a
cooling coil which refrigerates the air and removes
excess moisture. The same air is then returned to
the room- cooler, drier, and cleaner. Moisture
removed from the room air is carried to the outside
and evaporated.
Your air conditioner is designed to be easy to
operate and to provide plenty of cooling power.
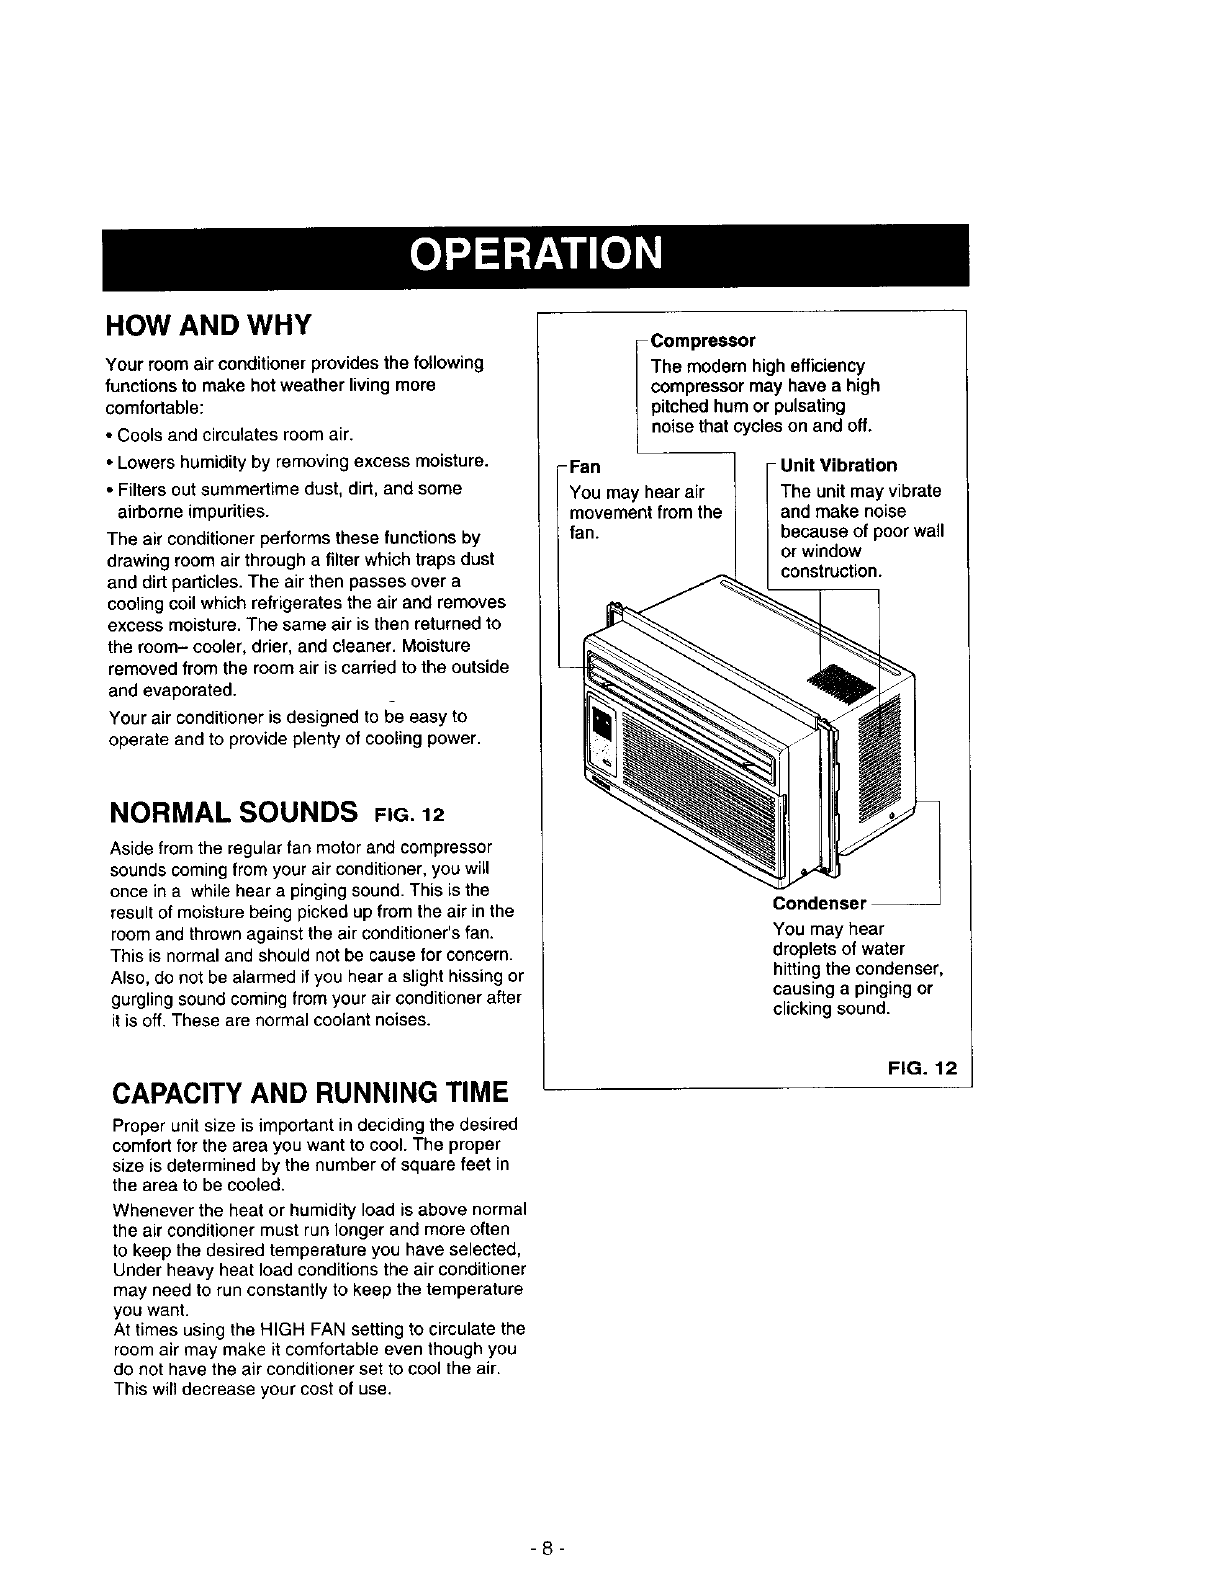
NORMAL SOUNDS FIG.12
Aside from the regular fan motor and compressor
sounds coming from your air conditioner, you will
once in a while hear a pinging sound. This is the
result of moisture being picked up from the air in the
room and thrown against the air conditioner's fan.
This is normal and should not be cause for concern.
Also, do not be alarmed if you hear a slight hissing or
gurgling sound coming from your air conditioner after
it is off. These are normal coolant noises.
CAPACITY AND RUNNING TIME
Proper unit size is important in deciding the desired
comfort for the area you want to cool. The proper
size is determined by the number of square feet in
the area to be cooled.
Whenever the heat or humidity load is above normal
the air conditioner must run longer and more often
to keep the desired temperature you have selected,
Under heavy heat load conditions the air conditioner
may need to run constantly to keep the temperature
you want.
At times using the HIGH FAN setting to circulate the
room air may make it comfortable even though you
do not have the air conditioner set to cool the air.
This will decrease your cost of use.
-Fan
iompressor
The modem high efficiency
compressor may have a high
pitched hum or pulsating
noise that cycles on and off.
-Unit Vibration
You may hear air
movement from the
fan.
The unit may vibrate
and make noise
because of poor wall
or window
construction.
Condensel
You may hear
droplets of water
hitting the condenser,
causing a pinging or
clicking sound.
FIG. 12
-8-
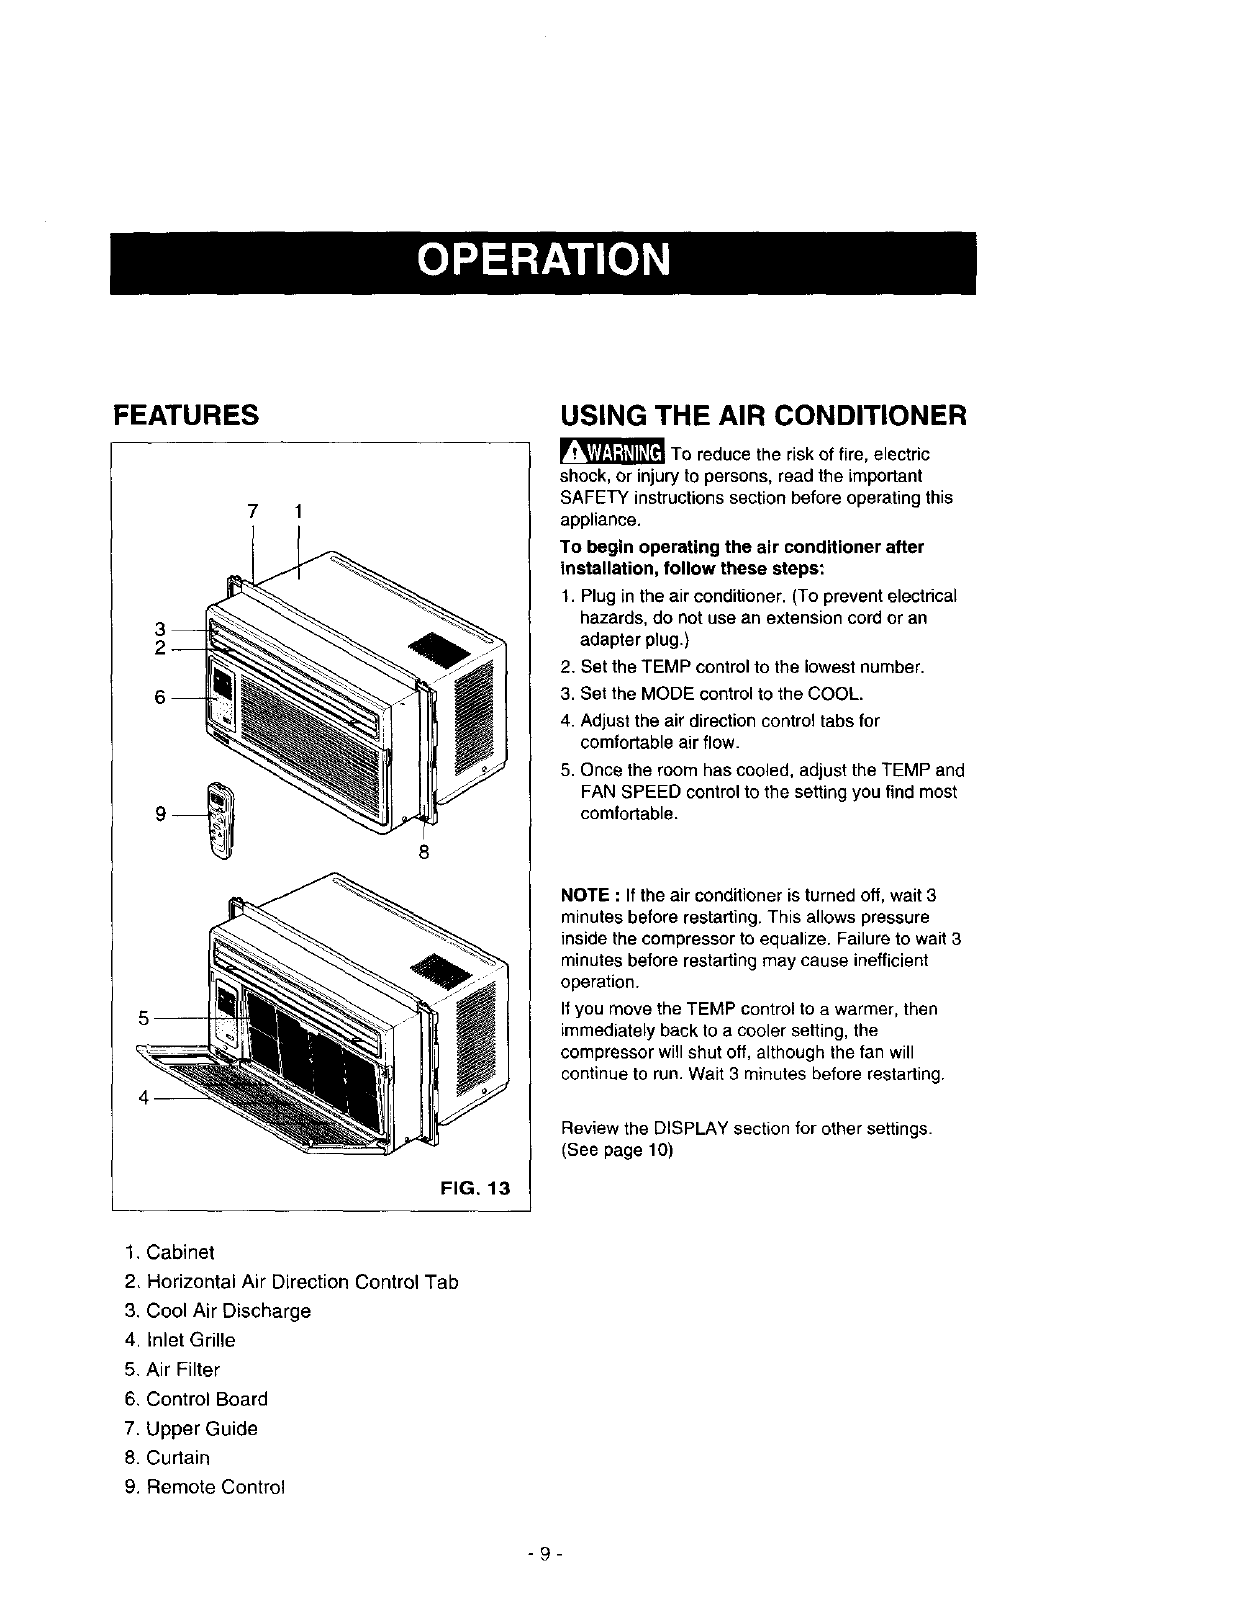
FEATURES
7 1
FIG, 13
USING THE AIR CONDITIONER
_To reduce the risk of fire, electric
shock, or injury to persons, read the important
SAFETY instructions section before operating this
appliance.
To begin operating the air conditioner after
installation, follow these steps:
1. Plug in the air conditioner. (To prevent electrical
hazards, do not use an extension cord or an
adapter plug.)
2. Set the TEMP control to the lowest number.
3. Set the MODE control to the COOL.
4. Adjust the air direction control tabs for
comfortable air flow.
5. Once the room has cooled, adjust the TEMP and
FAN SPEED control to the setting you find most
comfortable.
NOTE : If the air conditioner is turned off, wait 3
minutes before restarting. This allows pressure
inside the compressor to equalize. Failure to wait 3
minutes before restarting may cause inefficient
operation.
If you move the TEMP control to awarmer, then
immediately back to a cooler setting, the
compressor will shut off, although the fan will
continue to run. Wait 3 minutes before restarting.
Review the DISPLAY section for other settings.
(See page 10)
1, Cabinet
2, Horizontal Air Direction Control Tab
3. Cool Air Discharge
4, Inlet Grille
5, Air Filter
6, Control Board
7. Upper Guide
8. Curtain
9. Remote Control
-9-
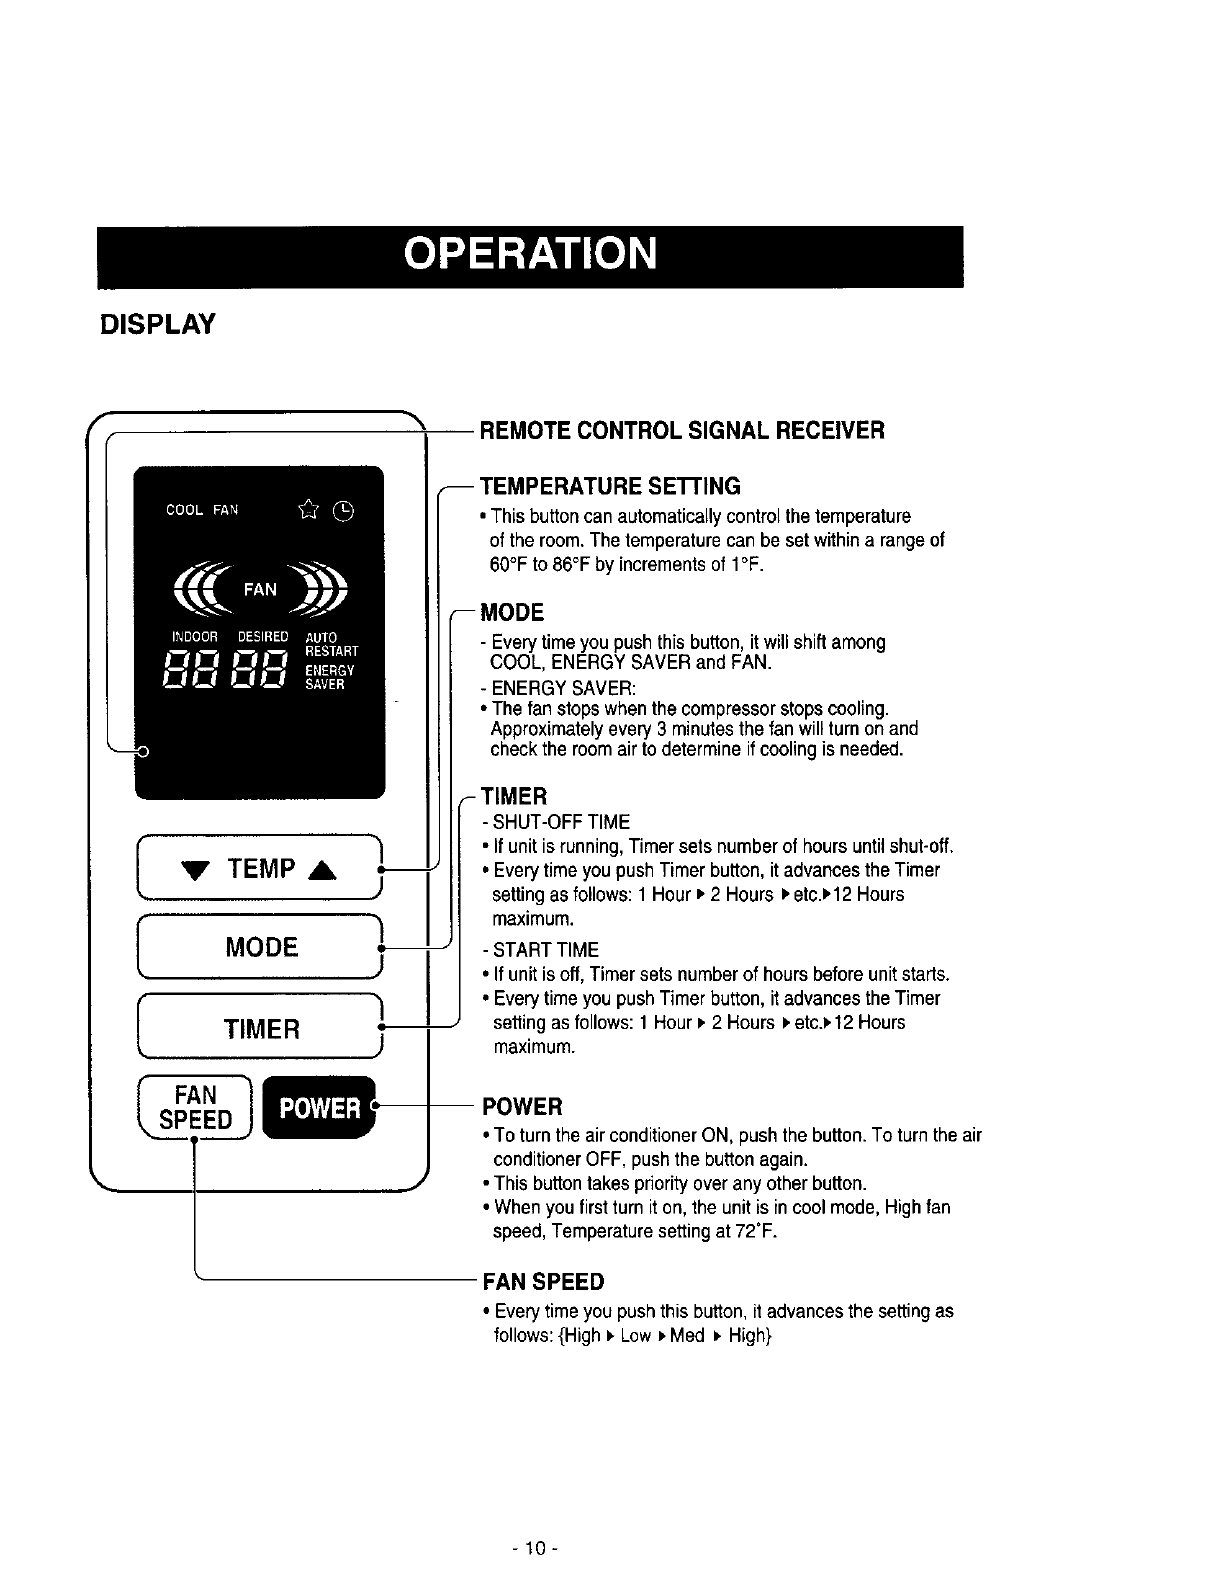
DISPLAY
"_' REMOTE CONTROL SIGNAL RECEIVER
VTEMP A.
1
MODE ,,_
J
/
TIMER )
FAN
SPEED
-- TEMPERATURE SEI-rlNG
•This button can automatically control the temperature
of the room.The temperature can be set within a range of
60°F to 86°F by increments of I°F.
-- MODE
- Everytime you pushthis button, it willshiftamong
COOL, ENERGY SAVER and FAN.
- ENERGY SAVER:
• The fan stops when the compressor stops cooling.
Approximately every 3 minutes the fan will turn on and
check the room air to determine if cooling is needed.
_TIMER
- SHUT-OFF TIME
• If unit is running,Timersetsnumberof hours untilshut-off.
•Everytime youpushTimer button,it advancesthe Timer
settingasfollows: 1 Hour_2 Hours_,etc._,12Hours
maximum.
-START TIME
• If unit is off, Timer sets number of hoursbefore unit starts.
• Every time you push Timer button, it advances the Timer
setting as follows: 1 Hour ,. 2 Hours ,.etc._.12 Hours
maximum.
• To turn the air conditioner ON, push the button. To turn the air
conditioner OFF, push the button again.
• This button takes priority over any other button.
• When you first turn it on, the unit is incool mode, High fan
speed, Temperature setting at 72°F.
FAN SPEED
•Everytimeyoupushthisbutton,it advancesthe setting as
follows: {High_,Low_Med _.High}
-10-
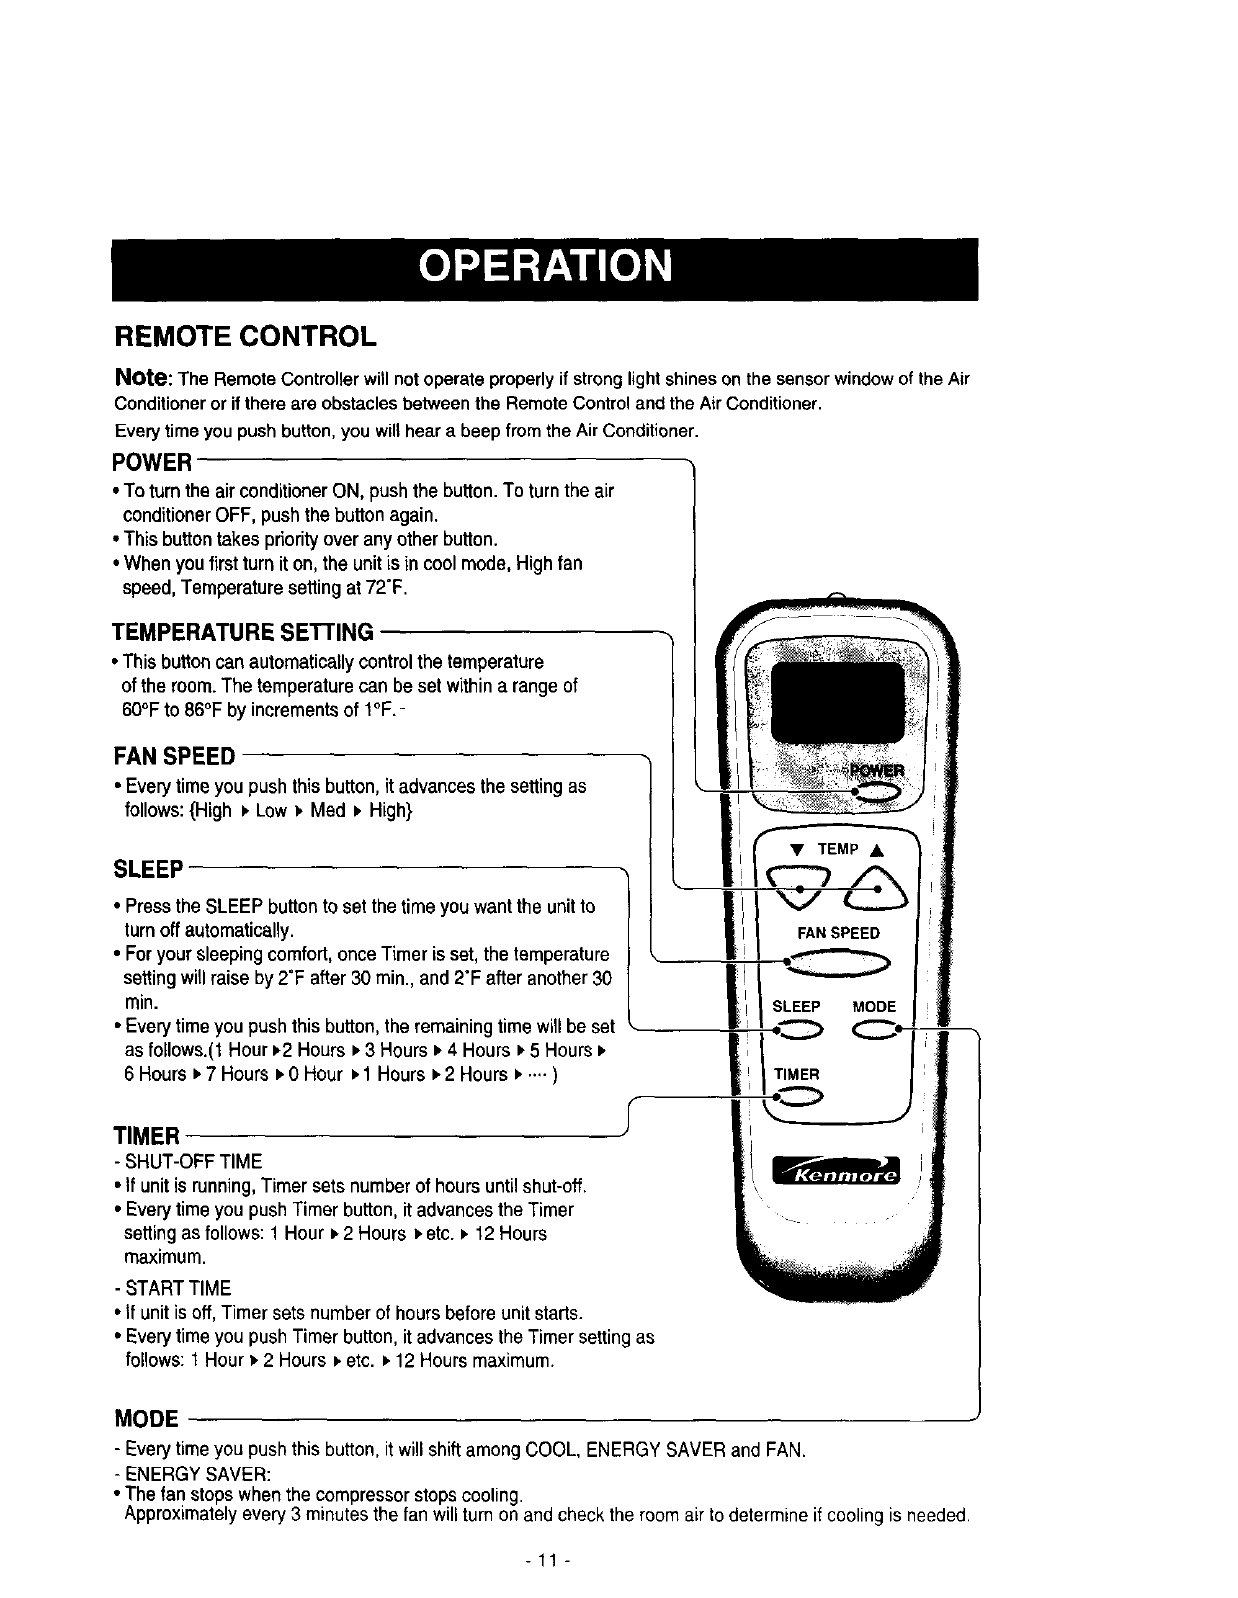
REMOTE CONTROL
Note: The Remote Controller will not operateproperlyif strong lightshinesonthe sensorwindowof theAir
Conditionerorif thereare obstaclesbetweenthe RemoteControlandthe AirConditioner.
Everytimeyoupushbutton,youwillheara beepfrom the AirConditioner.
POWER
• To turnthe airconditionerON, pushthe button.To turnthe air
conditionerOFF, pushthe buttonagain.
•This buttontakespriorityoverany otherbutton.
• When youfirst turnit on, the unitis in coolmode, Highfan
speed,Temperaturesettingat72"F.
TEMPERATURESETrlNG
•Thisbutton can automatically control the temperature
of the room. The temperature can be set within a range of
60°F to 86°F by increments of I°F. -
FAN SPEED
• Everytime you pushthis button, it advances the setting as
follows: {High _ Low i, Med =,High}
SLEEP
• Pressthe SLEEP button to set the time you want the unit to
turn off automatically.
• For your sleeping comfort, once Timer is set, the temperature
setting will raise by 2=Fafter 30 rain., and 2"F after another 30
min.
• Everytime you push this button, the remaining time will be set
as follows.(1 Hour=,2Hours _.3 Hours _,4 Hours t,5 Hours P,
6 Hours _.7 Hours _,0 Hour =,1 Hours _.2 Hours =...- ) f
TIMER
- SHUT-OFF TIME
•If unitis running, Timer setsnumberof hoursuntilshut-off.
•Everytime youpushTimerbutton,it advancesthe Timer
settingas follows: 1 Hour _2 Hours _.etc.=.12 Hours
maximum.
- STARTTIME
• If unit isoff, Timer setsnumberof hoursbeforeunitstarts.
• Everytime youpushTimerbutton,it advancestheTimer setting as
follows: t Hourv2 Hours_.etc. _.12Hoursmaximum.
('_TEM PA _
SLEEP MODE t
MODE
- Every time you push this button, it will shift among COOL, ENERGY SAVER and FAN.
- ENERGYSAVER:
• The fan stops when the compressor stops cooling.
Approximately every 3 minutes the fan will turn on and checkthe room air to determine if cooling is needed.
-11 -
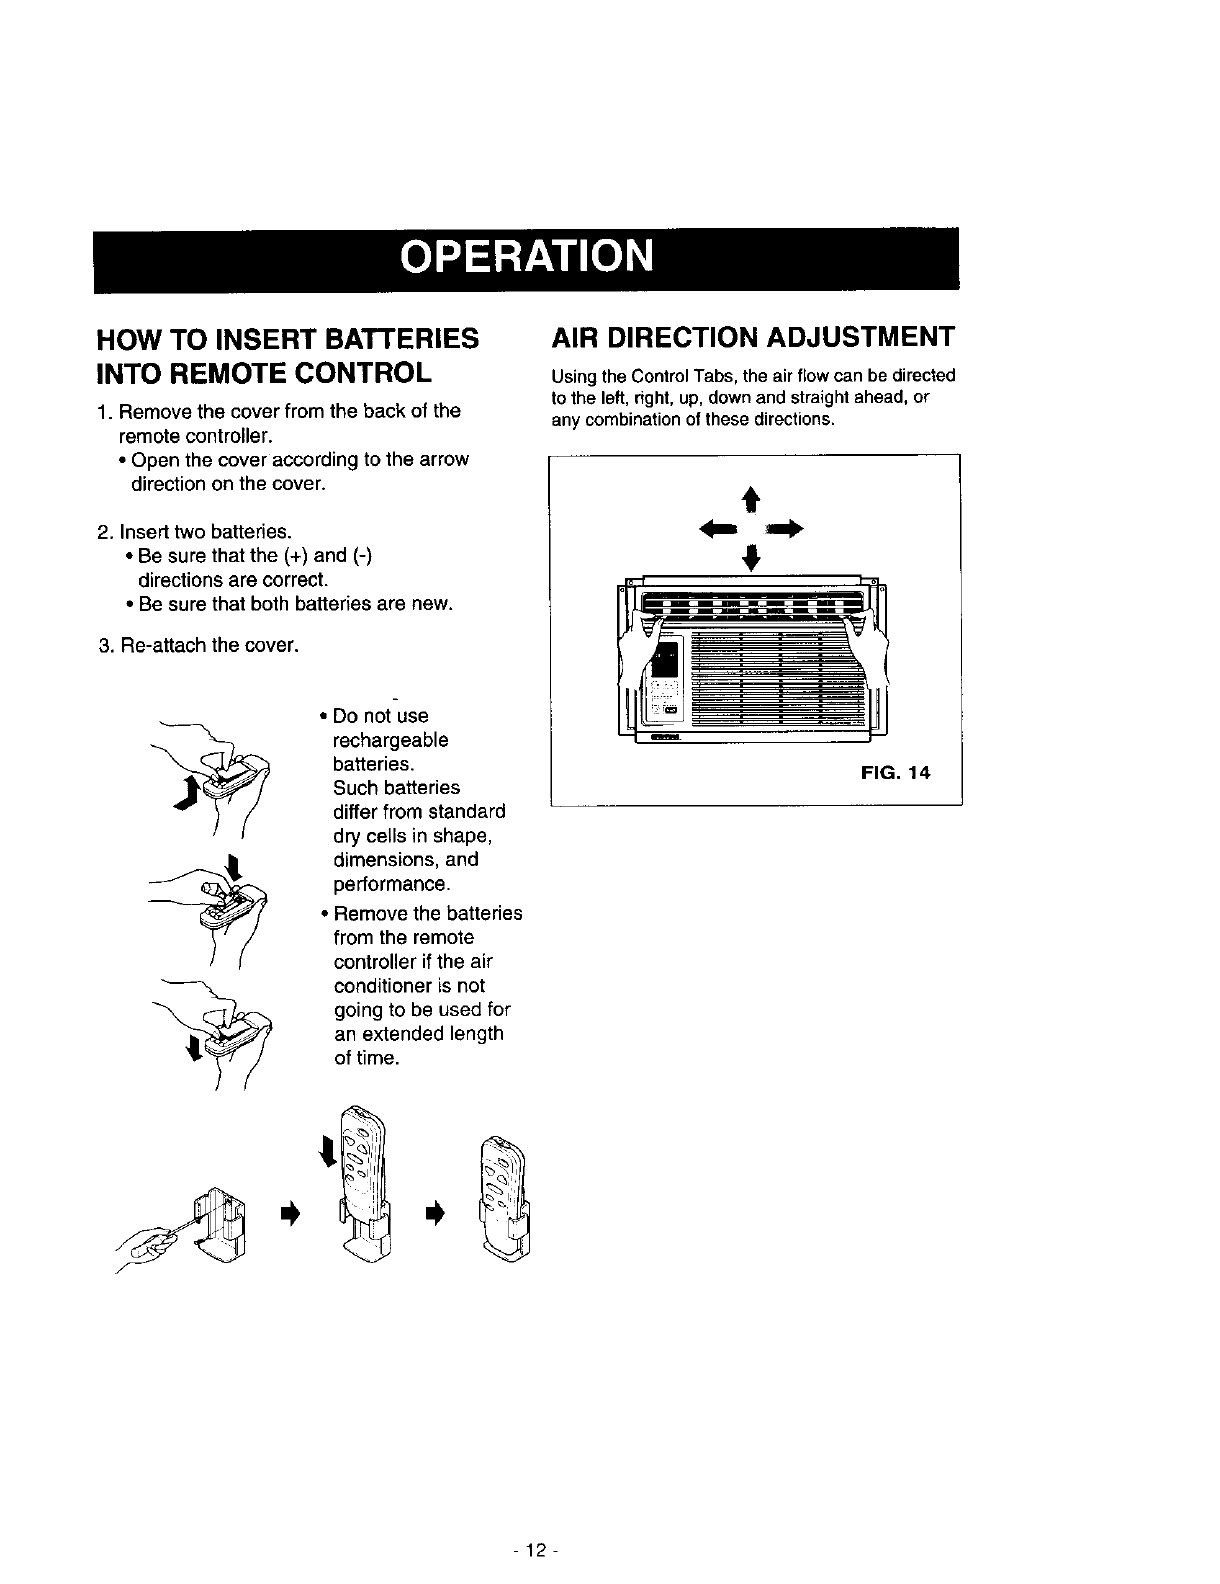
HOW TO INSERT BATTERIES
INTO REMOTE CONTROL
1. Remove the cover from the back of the
remote controller.
•Open the cover according to the arrow
direction on the cover.
2. Insert two batteries.
• Be sure that the (+) and (-)
directions are correct.
• Be sure that both batteries are new.
3. Re-attach the cover.
•Do not-use
rechargeable
batteries.
Such batteries
differ from standard
dry cells in shape,
dimensions, and
performance.
• Remove the batteries
from the remote
controller if the air
conditioner is net
going to be used for
an extended length
of time.
AIR DIRECTION ADJUSTMENT
Using the Control Tabs, the air flow can be directed
to the left, right, up, down and straight ahead, or
any combination of these directions.
t
0
FIG. 14
-12-

AIR FILTER CLEANING
The Air Filter will become dirty as it removes dust
from the inside air. It should be washed at least
every 2 weeks. If the Air Filter remains full of dust,
the air flow will decrease and the cooling capacity
win be reduced, possibly damaging the unit.
•Pull the inlet grille forward and pull out the air filter.
•Wash the Air Filter in warm water. Be sure to
shake off all the water before replacing the filter.
HOW TO REMOVE THE FRONT
GRILLE
•Pull the inlet grille forward.
• Remove the screw securing the Front Grille.
• Push the grille up from the bottom and pull the top
of the grille away from the case to lift the top tabs
out of their slots.
FIG. 15
AIR CONDITIONER CLEANING
Clean the front grille and inlet grille by wiping with a
cloth dampened in a mild detergent solution.
(FIG. 16)
The cabinet may be washed with mild soap or
detergent and lukewarm water, then polished with
liquid appliance wax.
To ensure continued peak efficiency, the condenser
coils (outdoor side of the unit) should be checked
periodically and cleaned if they become clogged
with soot or dirt from the atmosphere. Brush or
vacuum exterior coils to remove debris from fins.
FIG. 16
/
FIG. 17
HOW TO REPLACE THE
FRONT GRILLE
Attach the front grille to the cabinet by inserting the
tabs on the grille into the slots on the front of the
cabinet. Push the grille in until it snaps into place.
FIG. 18
-13-
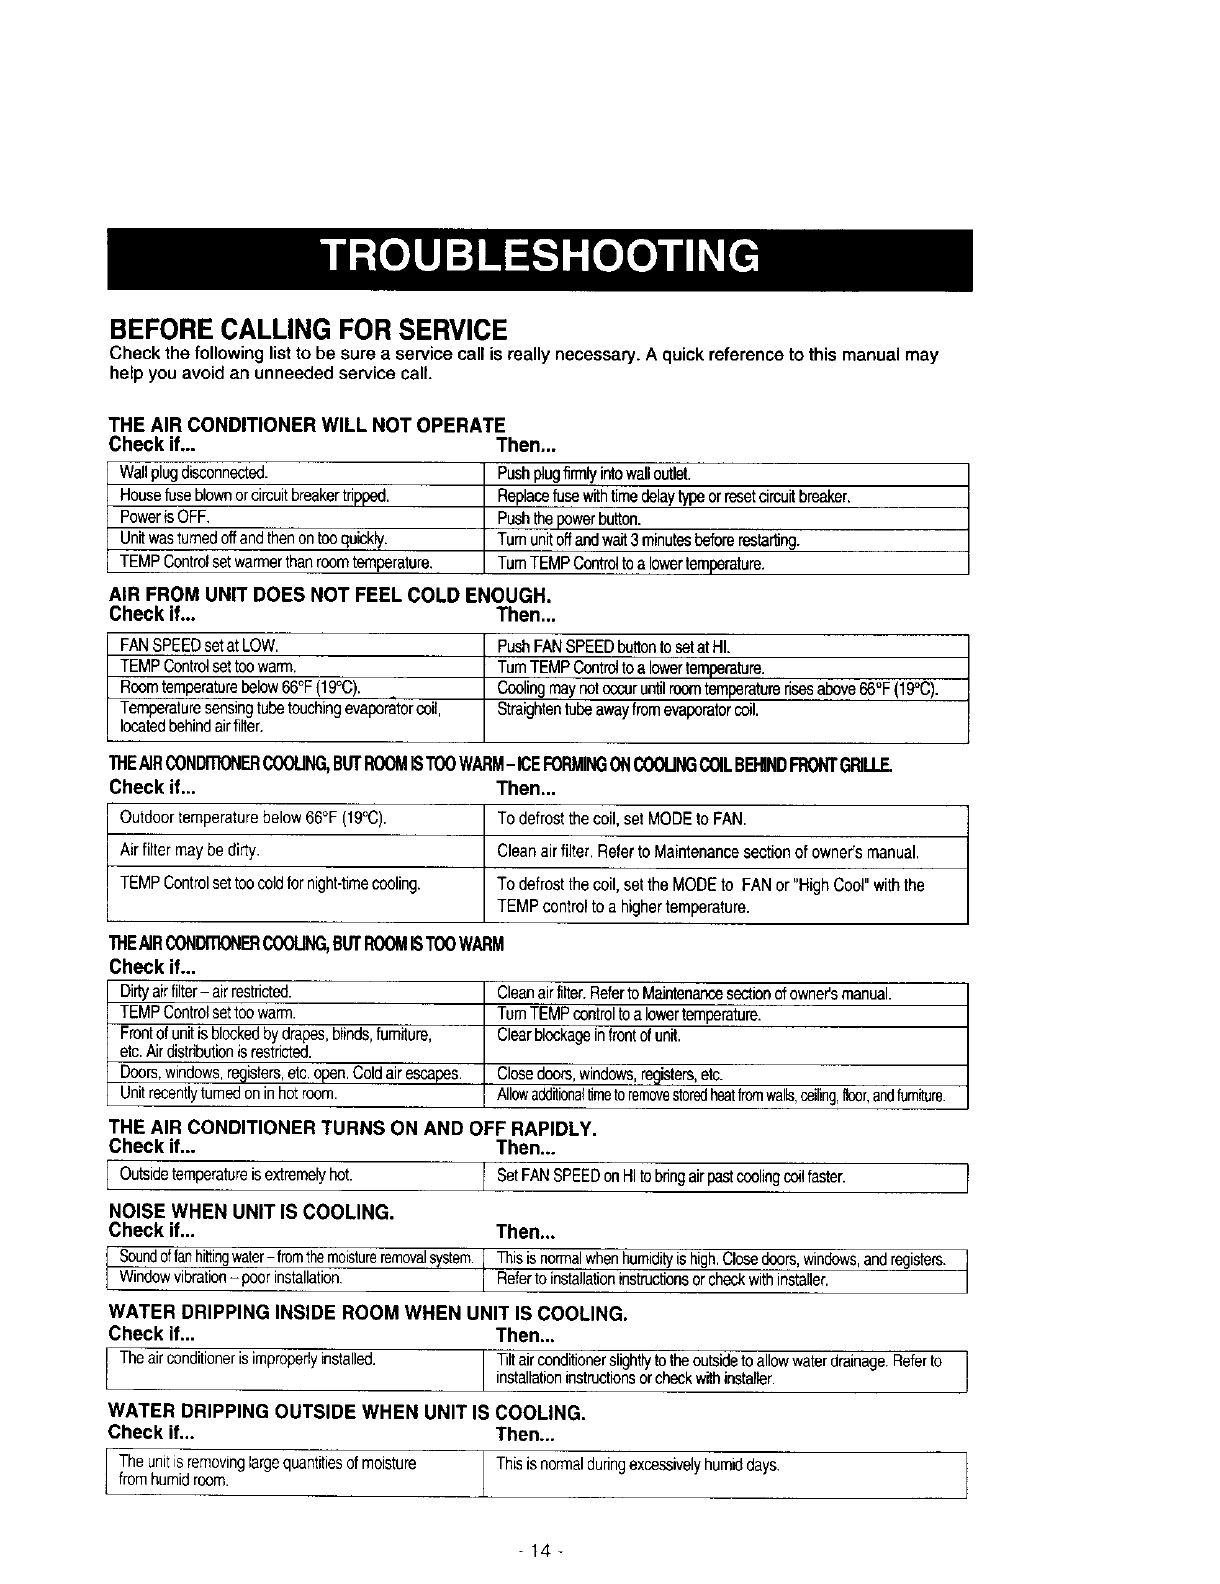
BEFORE CALLING FOR SERVICE
Check the following listto be sure a service call is really necessary. A quick reference to this manual may
help you avoid an unneeded service call.
THE AIR CONDITIONER WILL NOT OPERATE
Check if... Then...
Wallplugdisconnected.
Housefuseblownorcircuitbreakertdpped.
PowerisOFF.
Unitwasfumedoffandthenontooquickly.
TEMPControlsetwarmerthanroomtemperature.
Pushplugfirmlyintowalloutlet.
Replacefusewithtimedelaytypeorresetcircuitbreaker.
Pushthepowerbutton.
Tumunitoffandwait3 minutesbeforerestar_ng.
TurnTEMPControltoa lowertemperature.
AIR FROM UNIT DOES NOT FEEL COLD ENOUGH.
Check if... Then...
FANSPEEDsetat LOW.
TEMPControlsettoowarm.
Roomtemperaturebelow66°F(19°C).
Temperaturesensingtubetouchingevaperatorcoil,
locatedbehindairfilter.
PushFANSPEEDbuttonto setat HI.
TurnTEMPControltoa lowertemperature.
Coolingmaynotoccuruntilroomtemperaturerisesabove66°F(19°C).
Straightentubeawayfromevaporatorcoil.
THEAIRCONDrnoNERCOOUNG,BUTROOMISTOOWARM-ICEFORMINGONCOOUNGCOILBEHINDFRONtGRILLE
Check if...
Outdoortemperaturebelow66°F(19°C).
Airfiltermaybe dirty.
TEMPControlsettoocoldfornight-timecooling.
Then...
To defrostthecoil, set MODEto FAN.
Cleanairfilter. Referto Maintenancesectionof owner'smanual.
To defrostthecoil, setthe MODEto FANor"HighCool" withthe
TEMPcontrolto a highertemperature.
THEAIRCONDrnoNERCOOUNG,BUTROOMISTOOWARM
Check if...
Dirtyairfilter- airrestricted.
TEMPControlsettoowarm.
Frontof unitisblockedby drapes,blinds,furniture,
etc.Airdistributionisrestricted.
Doors,windows,recjisters,etc.open.Coldairescapes.
Unitrecentlyfumedoninhotroom.
Cleanair filter.Referto Maintenancesectionofowner'smanual.
TurnTEMPcontroltoa Iowsrtemperature.
Clearblockageinfrontofunit.
Closedoors,windows,registers,etc.
Allowadditionaltimetoremovestoredheatfromwalls,ceiling,floor,andfumiture.
THE AIR CONDITIONER TURNS ON AND OFF RAPIDLY.
Check if... Then...
I Outsidetemperetureisextremelyh°t I set FANsPEEDOnHItObringairpastcoolingcoilfaster" I
NOISE WHEN UNIT IS COOLING,
Check if... Then...
I Soundoffanhittingwater- fromthemoistureremovalsystem. Thisisnormalwhenhumidityishigh.Closedoors,windows,andregisters. I
Windowvibraion-poor insaliaion Referto installationinstructionsorcheckwithinstaller. I
WATER DRIPPING INSIDE ROOM WHEN UNIT IS COOLING.
Check if... Then...
I Theair conditioneris improperlyinstalled. ITiltairconditionerslightlytuthe outsideto allowwaterdrainage.Refertu I
installationinstructionsorcheckwithinstaller. !
WATER DRIPPING OUTSIDE WHEN UNIT IS COOLING.
Check if... Then...
The unitisremovinglargequantitiesof moisture Thisis normalduringexcessivelyhumiddays.
fromhumidroom.
-14-
INDICE DE MATERIAS ............................. 15
GARANTiA ................................................ 15
SEGURIDAD .............................................. 16
Importantesinstruccionesde seguridad..... 16
REQUERIMIENTOS ELECTRICOS ......... 17
INSTALACl6N ........................................... 18
Requerimientos para instalaci6n .......... 18
Instalaci6n ............................................. 19
C6mo instalarlo ..................................... 19
La eliminaci6n de la ventana ................. 20
OPERACI(_N .............................................. 21
C6mo y por que ..................................... 21
Sonidos normales.................................. 21
Capacidad y tiempo de funcionarniento .-.21
Caracteristicas ..................................... 21
Uso del equipo de aire acondicionado ....-22
Despliegue ............................................ 23
Control remoto ....................................... 24
Como a Baterias de Adicion en el
Control Remoto ..................................... 25
Ajuste para la direccion del aire ............ 25
MANTENIMIENTO .................................... 26
Limpieza del filtro del aire ...................... 26
Limpiezadelequipodeaire acondicionado..-.26
C6rno sacar la rejilla frontal ................... 26
C6mo a reemplaza el grille anterior ......26
CORRECCI6N DE FALLAS ...................... 27
Antesde LlarnarparaServicio...................... 27
PARA PEDIR SERVIClO ......Cubierta Trasera
GARANTiA DE UN ANO POR EL
EQUIPO DE AIRE ACONDICIONADO
DE HABITACION
Durante un aSocompleto a partir de la fecha de
compra, si este equipo de aire acondicionado recibe
mantenimientoy se utiliza para el enfriamiento
normal de habitaci6n segL_nlas instrucciones
indicadas en este manual del propietario, Sears
repararAgratuitamente este equipo de aire
acondicionado, si tiene alg0n defecto en materiales
o fabricacion.
GARANT|A TOTAL DE ClNCO ANOS
POR EL SISTEMA DE REFRIGERACION
HERMETICAMENTE SELLADO
Durante cinco aSos a partir de la fecha de compra,
si este equipo de aire acondicionado recibe
mantenimiento y se utiliza para el enfriamiento
normal de habitaci6n segL_nlas instrucciones
indicadas en este manual del propietario, Sears
reparar& gratuitamente el sistema de refrigeraci6n
hermeticamente sellado (que consiste en el agente
refrigerante, los tubos de conexion y el compresor),
si tiene alg6n defecto en materiales o fabricacion.
EL SERVIClO DE GARANT|A EST.&.A SU
DISPOSICI6N CON SOLO PONERSE EN
CONTACTO EL CENTRO DE SEARS AL
1-800-4-MY-HOME ®
La proteccion de garantia cubre unicamente a los
equipos de aire acondicionado usados para uso
domestico y no para uso comercial.
Esta garant/a s61o tiene validez mientras el producto
se este usando en los Estados Unidos.
Esta garantfa le da derechos legales especfficos y
usted puede tener otros derechos que varfan de
estado en estado.
Sears, Roebuck and Co., D/817WA,
Hoffman Estates, IL 60179 U.S.A.
-15-
IMPORTANTES INSTRUCCIONES DE SEGURIDAD
Las eiguientes instruccionee de eeguridad le indicardn c6mo usar su equipo de aire acondicionado de
habitaci6n para evitar da_os para usted mismo y para su EQUIPO DE AIRE ACONDICIONADO,
PeR SU SEGURIDAD
No almacene ni use gasolina u otros vapores y Ifquidos
inflamables cerca de este o cualquier otto
electrodomestico. Lea las etiquetas de los productos para
vet si contienen advertencias sobre el caracter inflamable
de los mismos y otras advertencias.
_ARA PREVENIR ACCIDENTES
Para reducir el riesgode incendios, descargas el_ctricas
o lesiones personales al user su equipo de aire
acondicionado, tome las precaucionesbdsicas, entre las
que est_n las siguientes:
•Aseg_rese de que la alimentaci6n electrica sea la
apropiada para el modelo que usted ha elegido.
• Si el equipode aire acondicionadodebe i_talarse en una
ventana,a ustedprobablementele conviene limpiar
primeroambosladesdel vidrio. Si laventana es del ripede
tres panelescon un panel incluidode pantalla,le conviene
sacar la ventanacompletamenteantes de la instalacion.
•Aseg0rese de que el equipo de aire acondicionado ha
side instalado correctamente y con seguridad segun se
sefiala en las instrucciones separadas de instalacion
que vienen en este manual. Conserve este manual y los
instrucciones de instalaci6n para usarlos posiblemente
en el future al sacar o volver a instalar esta unidad.
• Utilice guantes al manejar el equipo de aire
acondicionado, tenga cuidado para evitar cortadas con
las afiladas aletas met&licasque se hallan en los
serpentines frontales y posteriores.
INFORMACION ELECTRICA
En la placa de serie del fabricante se indica cual es la
capacidadelL_rica nominalcompletade su nuevoequipode
aire acondicionadopara habitaci6n.Consulteestaplaca
cuandovayaa verificarlos requenmientoselectricos.
•Asegt]resedeque el equipode aire acondicionadotenga
unaconexi6ncorrectaa tierra.Parareduciral minimo los
riesgosde descargasel_,ctricase incendio,es importante
conectarel equipocorrectamentea tierra.El cord6nde
alimentacionel6ctdcaestdequipadocon un enchufede ires
espigasconconexiona tierra para protegedecontrariesgos
dedescargasel_tricas.
•Suaire acondiciondodebe ser enchufadoen una tomade
la pareddebidamenteconectadoa la tierra.Si latoma de
corrientedepared que ustedpiensa usar no esta
conectadacorrectamentea tierrao noesta protegidacon
unfusibledeacci6nretardadao conun interrupterde
circuite,haga que unelectricistacaliflcadole instalelatoma
decorrientede pareden forrnacorrect&
• Nopongaa funcionarel equipode aireacondicionadocon
unacubiertaprotectoraextederencima.Estopodria
ocasionardar_osmec_nicosdentro del aire acondicionado.
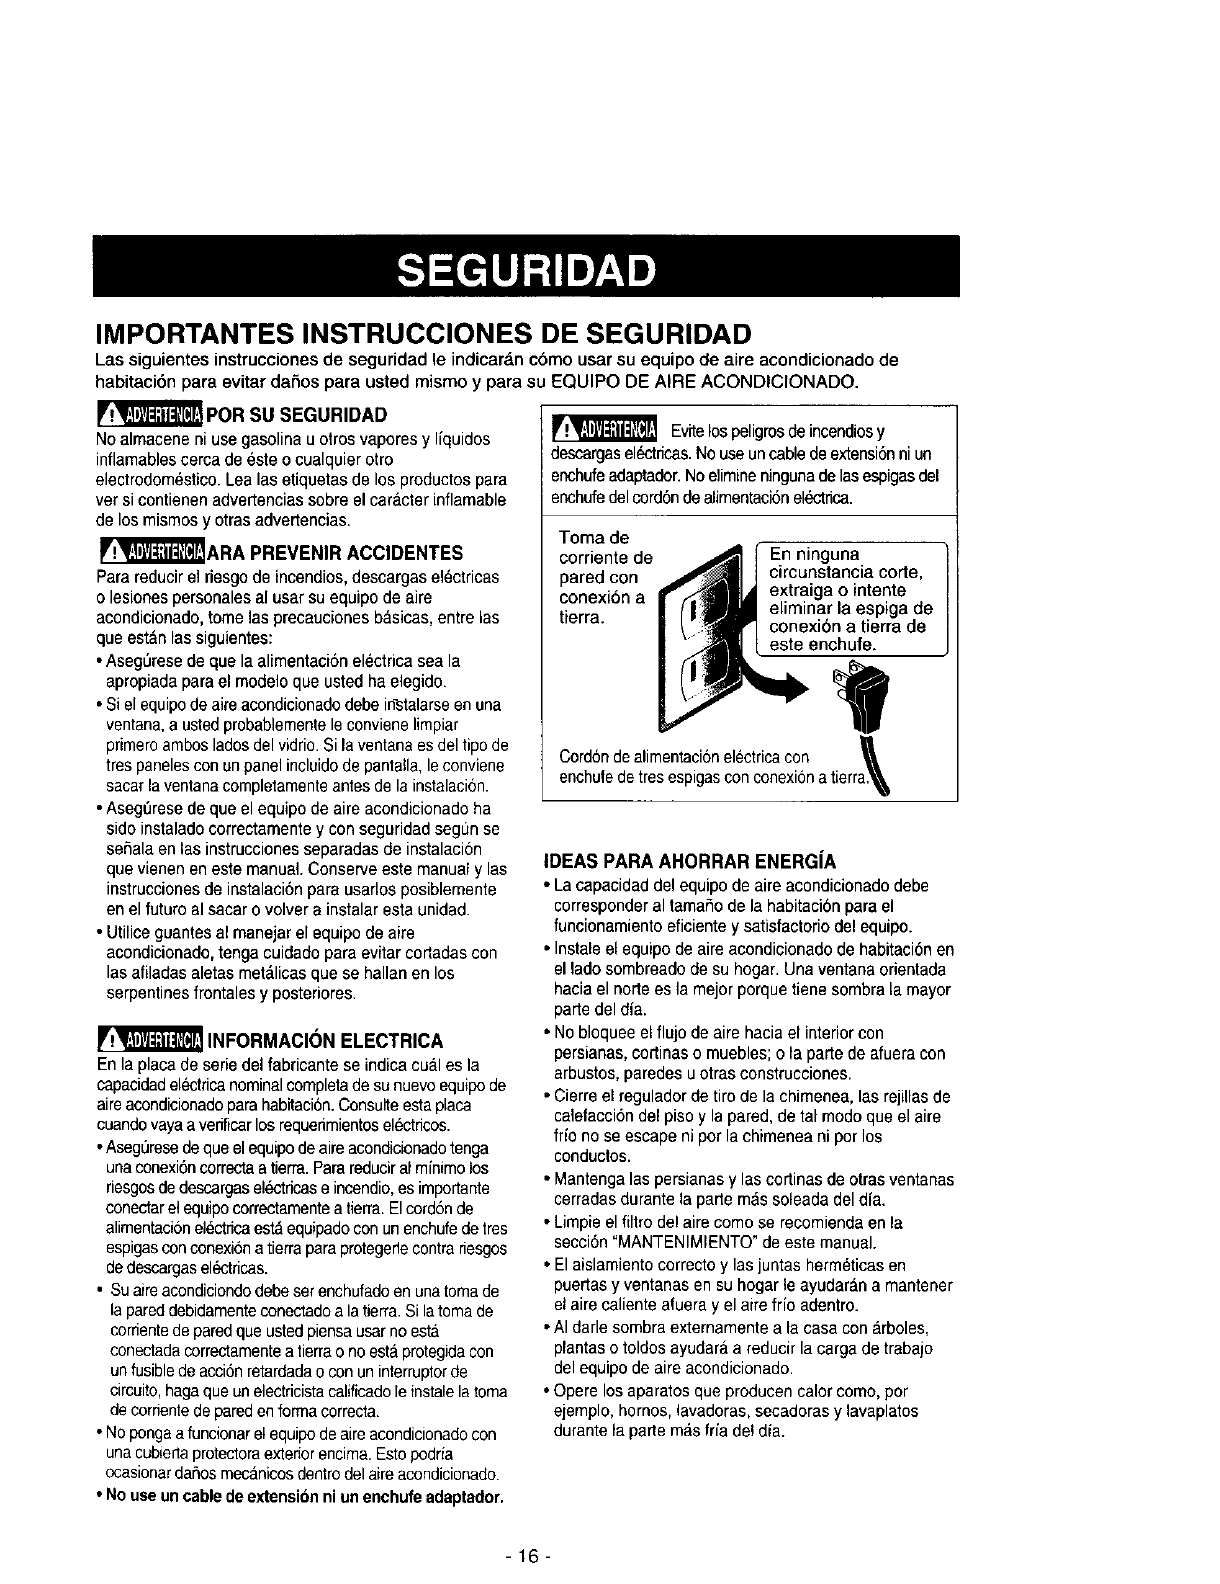
• No use un cable deextension ni un enchufe adaptador.
i _ Evitelospeligrosde incendiosy
descargaselL_tricas.No useun cable deextensi6nni un
enchufeadaptador.No elimineningunade lasespigasdel
enchufedel cord6nde alimentaci6nel_.ctdca.
Toma de
corriente de En ninguna /
pared con circunstancia code, /
conexi6n a extraiga o intente
eliminar la espiga de
tierra, conexi6n a tierra de
este enchufe.
Cord6nde alimentacionelectrica con I
enchufede tres espigasconconexiona tierra.'_
IDEAS PARA AHORRAR ENERG{A
• La capacidad del equipo de aire acondicionado debe
corresponder al tamafio de la habitaci6n para el
funcionamiento eficiente y satisfactorio del equipo.
• Instale el equipo de aire acondicionado de habitaci6n en
el lade sombreado de su hogar. Una ventana orientada
hacia el norte es la mejor porque tiene sombra ia mayor
parte del dia.
• No bloquee el flujo de aire hacia el interior con
persianas, cortinas o muebles; o la parte de afuera con
arbustos, paredes u otras construcciones.
• Cierre el regulador de tire de la chimenea, las rejillas de
calefacci6n del piso y la pared, de tal mode que el aire
frio no se escape ni per la chimenea ni per los
conductos.
• Mantenga las persianas y las cortinas de otras ventanas
cerradas durante la parte m&ssoleada del dfa.
• Limpie el filtro del aire come se recomienda en la
secci6n "MANTENIMIENTO" de este manual.
• El aislamiento correcto y las juntas hermeticas en
puertas y ventanas en su hogar le ayudaran a mantener
el aire caliente afuera y el aire frio adentro.
•AI darle sombra externamente a la casa con arboles,
plantaso toldosayudara a reducir la carga de trabajo
del equipo de aire acondicionado.
• Opere los aparatos que producen calor come, per
ejemplo, berries, lavadoras, secadoras y lavaplatos
durante la parte m_,sfrfa de! dia.
-16-
RESPETE TODOS LOS C(_DIGOS Y
REGLAMENTOS.
BAJO NINGUNA CIRCUNSTANCIA CORTE,
QUITE O EVITE EL USO DE LA CONEXION
A TIERRA DE ESTA CLAVIJA.
ESTE APARATO NECESITA SER
CONECTADO A TIERRA.
Se requiere una alimentaci6n ei_ctrica CA,
adecuadamente conectada a tierra con un
fusible de 15 A, de 60 Hz y de 115 V. Se
recomienda un fusible de retardo o un
disyuntor de circuito que alimente solamente a
este aparato.
NO USE CABLE ELECTRICO DE
EXTENSI6N.
MI_TODO RECOMENDADO DE CONEXION
A TIERRA
Per su propia seguridad este aparato debe
conectarse a tierra. Este aparato viene
equipado con un cable de alimentaci6n y una
clavija de tres terminales. Para reducir al
maximo el peligro de cheque el_ctrico, el cable
debe estar conectado a una conexi6n de pared
con conexi6n a tierra, y esta conexi6n debe
hacerse de acuerdo con la _ltima edici6n del
C6digo Eldctrico Nacional (ANSI/NFPA 70), asi
come con los c6digos y reglamentos locales.
Si no existe una conexi6n de pared adecuada,
el cliente tiene la responsabilidad y la
obligaci6n de mandar instalar, con un
electricista calificade, una conexi6n de pared
adecuada de tres terminales con conexi6n a
tierra.
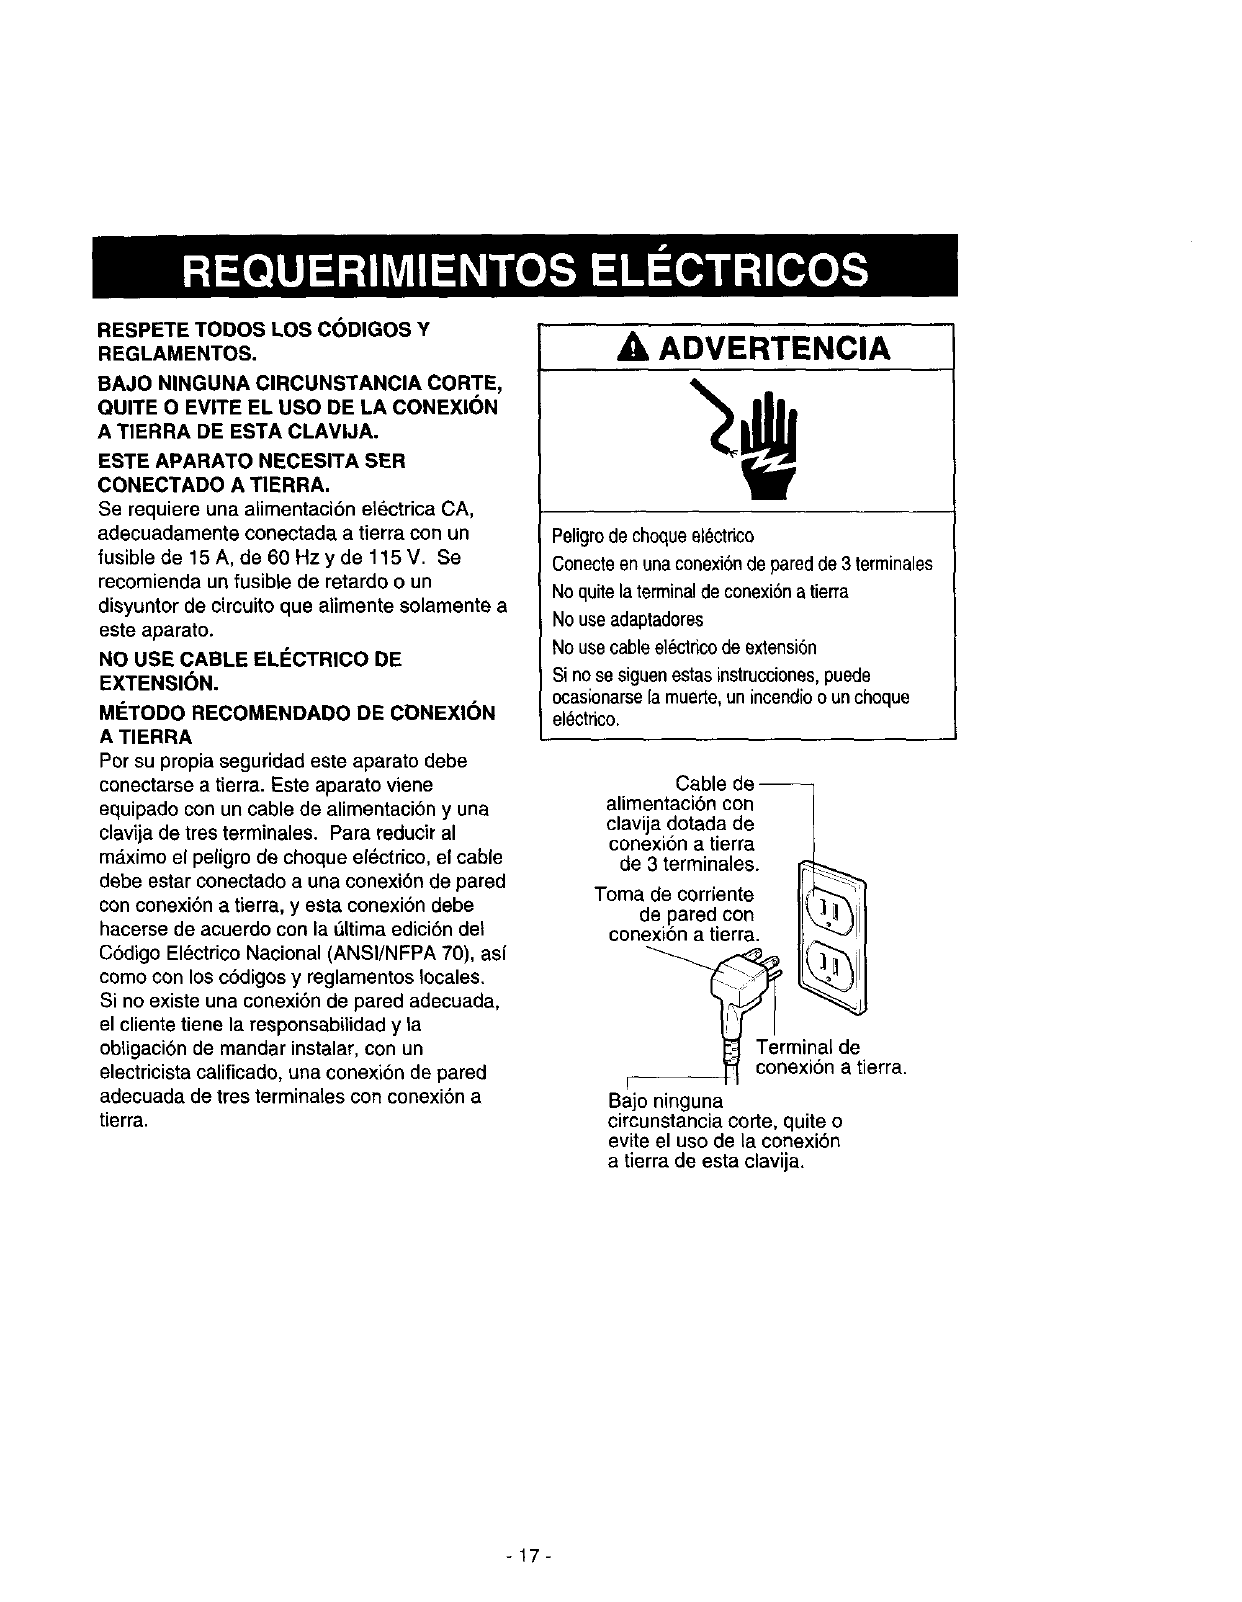
ADVERTENCIA
Peligrode chequeel6ctdco
Conecteen unaconexi6nde paredde 3 terminales
No quitela terminalde conexi6na tierra
No use adaptadores
No usecable el6cldcode extensi6n
Si nose siguenestas instrucciones,puede
ocasionarselamuerte,un incendioo uncheque
el6ctrico.
Cable de-
alimentaci6n con
clavija dotada de
conexi6n a tierra
de 3 terminales.
Toma de corriente _
de pared con _[! "_ I
conexi6n a tierra. _ I
"_']'el rminal de
conexi6n a tierra.
!H
Bajo ninguna
circunstancia code, quite o
evite el use de la conexi6n
a tierra de esta clavija.
-17-
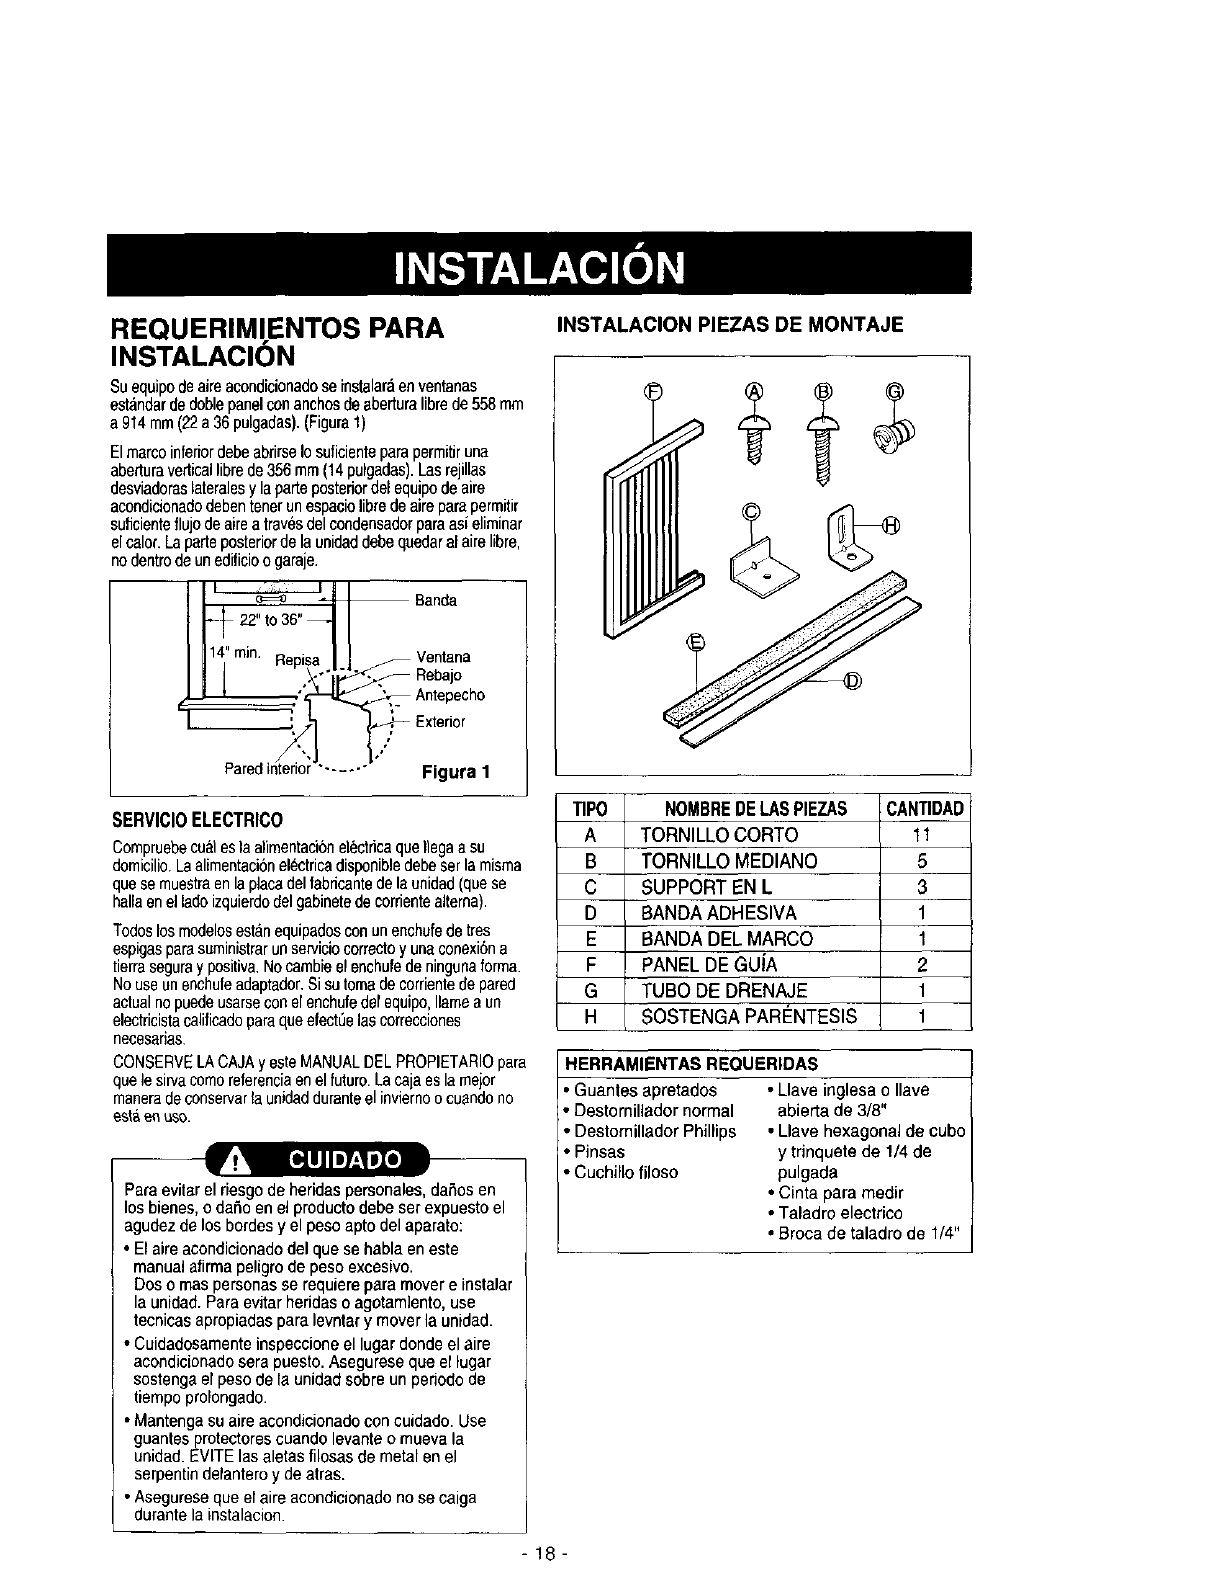
REQUERIMI.ENTOS PARA
INSTALACION
Sueqoipode aireacondicionsdose instalar_ienventanas
estandardedoblepanelconanehosdeaberturalibrede558mm
a 914mm(22a 36 pulgadas).(Figura1)
ElmarcoinferiordebeabrirseIosuficienteparapermitiruna
aberturaverticallibrede356mm(14pulgadas).Lasrejillas
desviadoraslateralesy laparteposteriordel equipodeaire
acondicionadodebentonerun espaciolibredeaireparapermitir
suficienteflujodeaireatravesdeleondensadorparaasi eliminar
el calor.La parteposteriorde la unidaddebequedaralaire Iibre,
nodentrode un edificioo garaje.
__ Banda
Ve_'a_ona
Antepecho
SERVICIOELECTRICO
Compruebecualesla alimentaci6nel6ctricaqueIlegaasu
domicilio.Laalimentaci6neleetricadisponibledebeserla misma
quesemuestraenlaplacadelfabricantedelaunidad(quese
hallaen elladoizquierdodel gabinetedecorrientealterna).
Todoslosmodelosest&nequipadosconunenchufede tres
espigasparasuministrarunserviciocorrectoy unaconexi6na
tierraseguray positiva.Nocambieelenchufede ningunaforrna.
Nouseun enchefeadaptador.Sisutomadecorrientedepared
actualnopuedeusarseconel enchufedefequipo,Ilamea un
electricistacalificadoparaqueefect_elae correcciones
necesarias.
CONSERVELA CAJAyesteMANUALDELPROPIETARIOpara
quele sirvacomoreferenciaen el futuro.Lacajaes la rnejor
manerade eonservarla unidadduranteel inviernoo cuandono
est,,en uso.
Para evitar el riesgo de heridas psrsonales, daRosen
los bienes,o daSoen el producto debe set expuesto el
agudez de los bordesy el peso apto del aparato:
•El aire acondicionadodel que se habla en este
manual afirma peligro de peso excesivo.
Dos o maspersonasse requiere para mover e instalar
la unidad. Para evitar heridas o agotam]ento, use
tecnicas apropiadas para levntar y mover la unidad.
•Cuidadosamenteinspeccioneel lugardonde el aire
acondicionado sera puesto. Asegurese que el lugar
sostenga el pesode la unidadsobre un periodo de
tiempo prolongado.
• Mantenga su aire acondicionado concuidado. Use
guantes protectorescuando levanteo mueva la
unidad. EVITElas aletas filosas de metal en el
serpentindelantero y de atras.
•Asegureseque el aire acondicionado no se caiga
durante la instalacion.
INSTALACION PIEZAS DE MONTAJE
TIPO NOMBREDEI.ASPIEZAS CANTIDAD
ATORNILLO CORTO 11
B TORNILLOMEDIANO 5
C SUPPORT EN L 3
D BANDA ADHESIVA 1
E BANDA DEL MARCO 1
F PANEL DE GUiA 2
G TUBO DE DRENAJE 1
H SOSTENGA PARI_NTESIS 1
HERRAMIENTASREQUERIDAS
• Guantes apretados
• Destornillador normal
• Destomillador Phillips
• Pinsas
•Cuchillo filoso
• Llave inglesa o Ilave
abierta de 3/8"
• Llave hexagonal de cubo
y trinquete de 1/4 de
pulgada
• Cinta para medir
• Taladro electrico
• Broca de taladro de 1/4"
-18-
INSTALACION
Escoja un lugar que le permitaIlevar el aire frio al _,rea
que desea. LaBventanas que ae usen para la instalaciOn
deben tenet la resistencia suficiente para soportar el peso
del equipo de aire acondicionado. Una buena instalaci6n
con atenci6n especial a la correcta posici6n de la unidad
disminuir& la probabilidad de que sea necesario efectuar
reparaciones.
COMO INSTALARLO
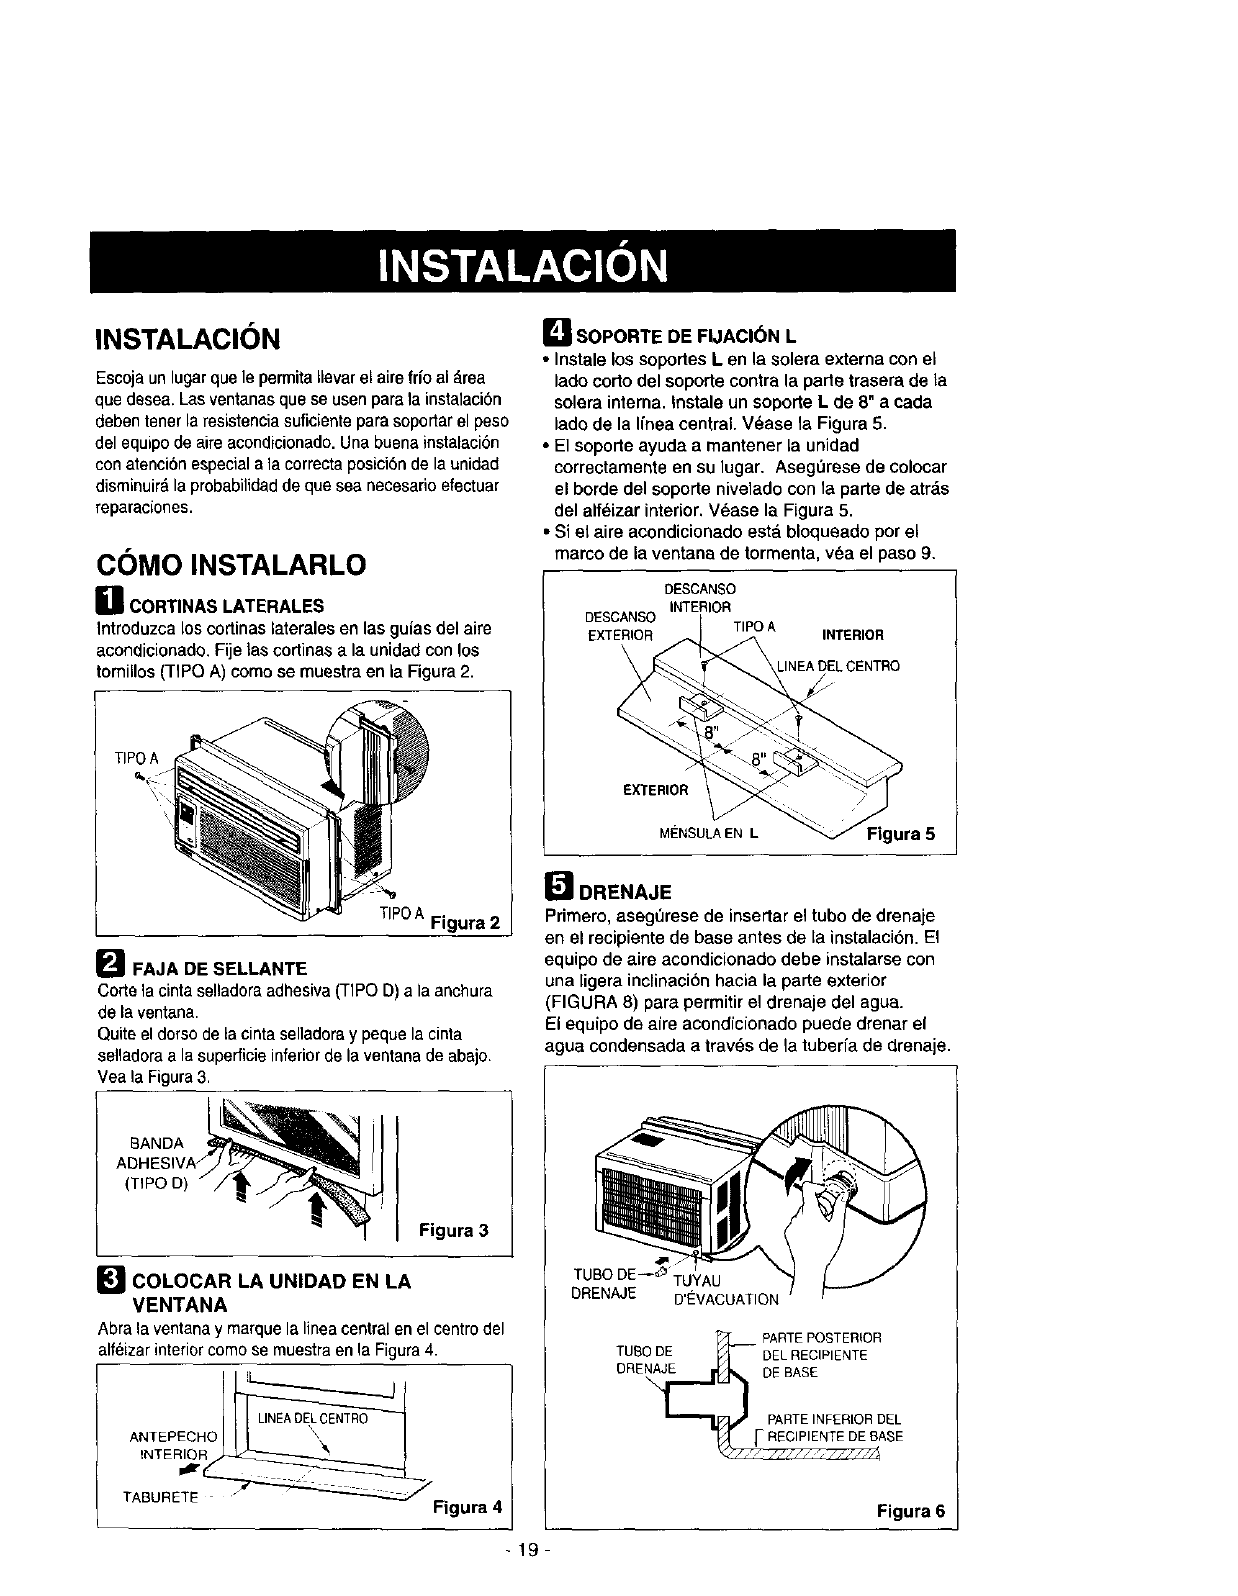
B CORTINAS LATERALES
Introduzca los cortinas laterales en las guias del aire
acondicionade. Fije las cortinas a la unidad con los
tomillos (TIPO A) como se muestra en la Figura 2.
TIPOA Figura 2
_FAJA DE SELLANTE
Corte la cinta selladora adhesiva (TIPO D) a la anchura
de la ventana.
Quite el dorso de la cinta senadoray peque la cinta
selladora a la superficie inferior de la ventana de abajo.
Vea la Figura 3.
BANDA
(TIPO D)
Figura 3
COLOCAR LA UNIDAD EN LA
VENTANA
Abra la ventana y marque la linea central en el centro del
alf_izar interior como se muestra en la Figura 4.
ANTEPECHO
INTE
TABURETE /_'_ Figura 4
-19-
L_ SOPORTE DE FIJACI(_N L
• Instale los soportes L en la solera exteroa con el
lado carlo del soporte contra la parte trasera de la
solera interoa. Instale un soporte L de 8" a eada
lado de la Ifnea central. V_ase la Figura 5.
•El soporte ayuda a roantener la unidad
correctamente en su lugar. Aseg0rese de colocar
el borde del soporte nivelado con la parte de atrds
del alf_izar interior. V_ase la Figura 5.
• Si el aire acondicionado est_ bloqueado por eL
marco de la ventana de tormenta, v_a el paso 9.
DESCANSO
INTERIOR
DESCANSO TIPO A
EXTERIOR INTERIOR
LINEA DEL£
EXTERIOR
MENSULA EN L _Figura 5
ODRENAJE
Primero, asegerese de insertar el tuba de drenaje
en el recipiente de base antes de la instalaci6n. El
equipo de aire acondieionado debe instalarse con
una ligera inclinaci6n hacia la parte exterior
(FIGURA 8) para permitir el drenaje del agua.
El equipo de aire acondicionado puede drenar el
agua condensada a trav6s de la tuberfa de drenaje.
TUBODE--_TUYA U
DRENAJE D'EVACUATION
PARTE POSTERIOR
TUBO DE DEL RECIPIENTE
DRENAJE DE BASE
PARTE INFERIOR DEL
_ASE
Figura 6
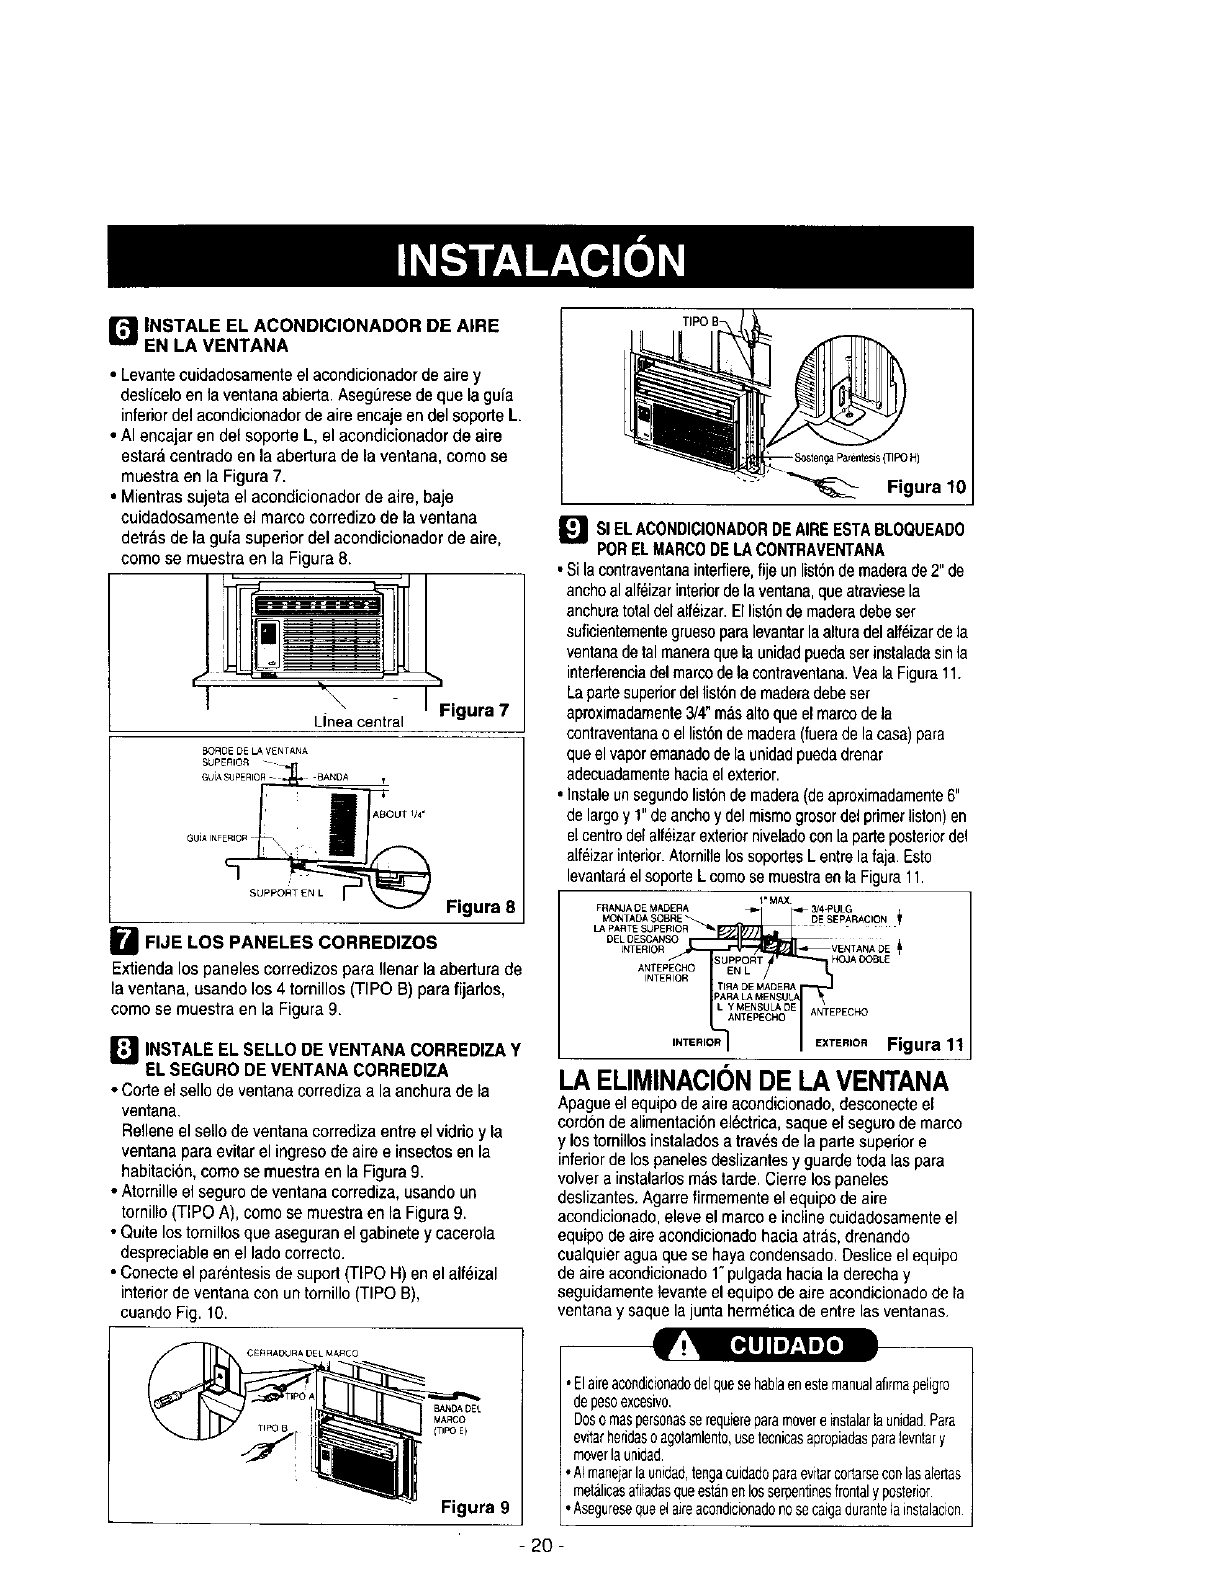
r_ INSTALE EL ACONDICIONADOR DE AIRE
EN LA VENTANA
•Levantecuidadosamenteel acondicionadorde aire y
desliceloen la ventana abierta.AsegL]resede que lagufa
inferior del acondicionadorde aire encaje en del soporle L
• AI encajar en del soporte L, el acoodicionador de aire
estara centrado en la abertura de la ventana, como se
muestra en la Figura 7.
•Mientras sujeta el acondicionador de aire, baje
cuidadosamente el marco corredizo de la ventana
detr&s de la guia superior del acondicionador de aire,
como se muestra en la Figura 8.
I -
\, I Figura 7
Llnea central
BORDE DE LA VENTANA NO, f
I f
oo,...FE..o°' I
Figura 8
IFIJE LOS PANELES CORREDIZOS
Extienda los paneles corredizos para Ilenar la abertura de
la ventana, usando los 4 tornillos (TIPO B) para fijarlos,
como se muestra en la Figura 9.
I_l INSTALE EL SELLO DE VENTANA CORREDIZA Y
EL SEGURO DE VENTANA CORREDIZA
• Corte el sello de ventana corredizaa la anchura de la
ventana,
Relleneel sello de ventana corredizaentre el vidrio y la
ventana para evitar el ingreso de aire e insectosen la
habitaci6n, come se muestra en la Figura 9.
• Atornille el seguro de ventanacorrediza, usando un
tornillo (TIPO A), como se muestra en la Figura9.
•Quite lostomillos que aseguranel gabinete ycacerola
despreoiableen el ladocorrecto.
• Conecte el parentesisde suporl (TIPO H) en el alf_izal
interior deventana con un tornillo (TIPO B),
cuando Fig. 10.
_SI ELACONDICIONADORDEAIREESTABLOQUEADO
PORELMARCODELA CONTRAVENTANA
•Sila contraventanainterfiere,fijeunlist6ndemaderade2" de
anchoal alteizarinteriordela ventana,queatraviesela
anchuratotaldel alt_izar.Ellist6nde maderadebeset
sutioieetementegruesoparalevantarlaalturadel alteizarde la
ventanadetal manerequela unidadpuedaserinstaladasinla
intederenciadelmarcodela contraventana.VealaFigura11.
La partesuperiordel list6nde maderadebe ser
aproxirnadamente3/4"rnasaltoque elmarcodela
contraventanao el list6nde madera(tuerade lacasa)pars
queelvaporernanadodelaunidadpuedadrenar
adecuadamentehaciaelexterior.
• InstaleunsegundolistOndemadera(de aproximadamente6"
de largoy 1"de anohoydel misrnogrosordel primerliston)en
el centrodelalfeizarexteriorniveladoconla parteposteriordel
alf6izarinferior.Atornillelos soportesL entrelafaja. Esto
levantaraelsoporteL comose rnuestraenla Figura11.
l" MAX
FRANJA OE MADERA _3/4-PULG
MONTADA SOBRE _ A _ _ DE SEPARAClO N
LA PARTE SUPERIOR _.
DEL DESCAN_OR_vENTANA DE /_
tNTERIOR p,Oj A OOBLE
AN fEPECHO
INTERIOR
ANTEPECNO
LA ELIMINACIC)NDE LA VENTANA
Apagueel equipode aire acondioionado,desconecteel
cordonde alimentaci6nel6ctrica,saqueel segurode marco
y lostornillos instaladosa travesde la partesuperiore
inferiorde lospanelesdeslizantesy guarde toda las para
volvera instalarlosmastarde. Cierre los paneles
deslizantes.Agarretirmementeelequipo de aire
acondicionado,eleveel marcoe incline cuidadosarnenteel
equipodeaire acondicionadohacia atras,drenando
cualquieragua quese hayaoondensado.Desliceel equipo
deaire acondicionado1"pulgada hacia laderechay
seguidamentelevanteel equipode aire acondicionadode la
ventanay saque lajunta herm_ticade entre losventanas
CERRAOURA DEL MARCO
BANDA DEL
MARCO
(TIP3 E)
Figura 9
. Elaireacondicionadodelquesehablaenestemanualafirmapeligro
depesoexces_vo,
DosomaspersonasserequiereparamovereinstalarlaunidadPara
evitarheridasoagotamlento,usetecnicasapropiadasparalevntary
moverlaunidad
•AImaneiarlaunidad,tengacuidadoparaevitarcortarseconlasalerias
metalicosatitadasqueestanenlosserpentinesfrontalyposterior
•AseguresequeelaJreacondicionadonosecaigadurontelainstalacion
- 20-
COMO Y PaR QU¢:
Su equipo de aire acondicionado de habitaciOn
brinda las siguientes funciones para hacer que la
vida en climas c_lidos sea mas confortable:
• Enfrfa y hace circular el aire par la habitacion
• Disminuye la humedad eliminando la humedad
excesiva.
• Filtra el polvo, el sucio y algunas impurezas
transportadas en el aire del clima veraniego.
El equipo de aire acondicionado realiza estas
funciones hacienda pasar el aire del media
ambiente a tray,s de un filtro que atrapa las
partlculas de polvo y sucio. El aire pasa entonces
par un serpentin de enfriamiento que refrigera el
aire y elimina el exceso de humedad. El mismo aire
regresa entonces al enfriador, secador y limpiador
del aire del ambiente. La humedad extraida del aire
ambiente es Ilevada al exterior y evaporada.
Su aire acondicionado esta disefiado para operar y
suministrar una enorme potencia de enfriamiento.
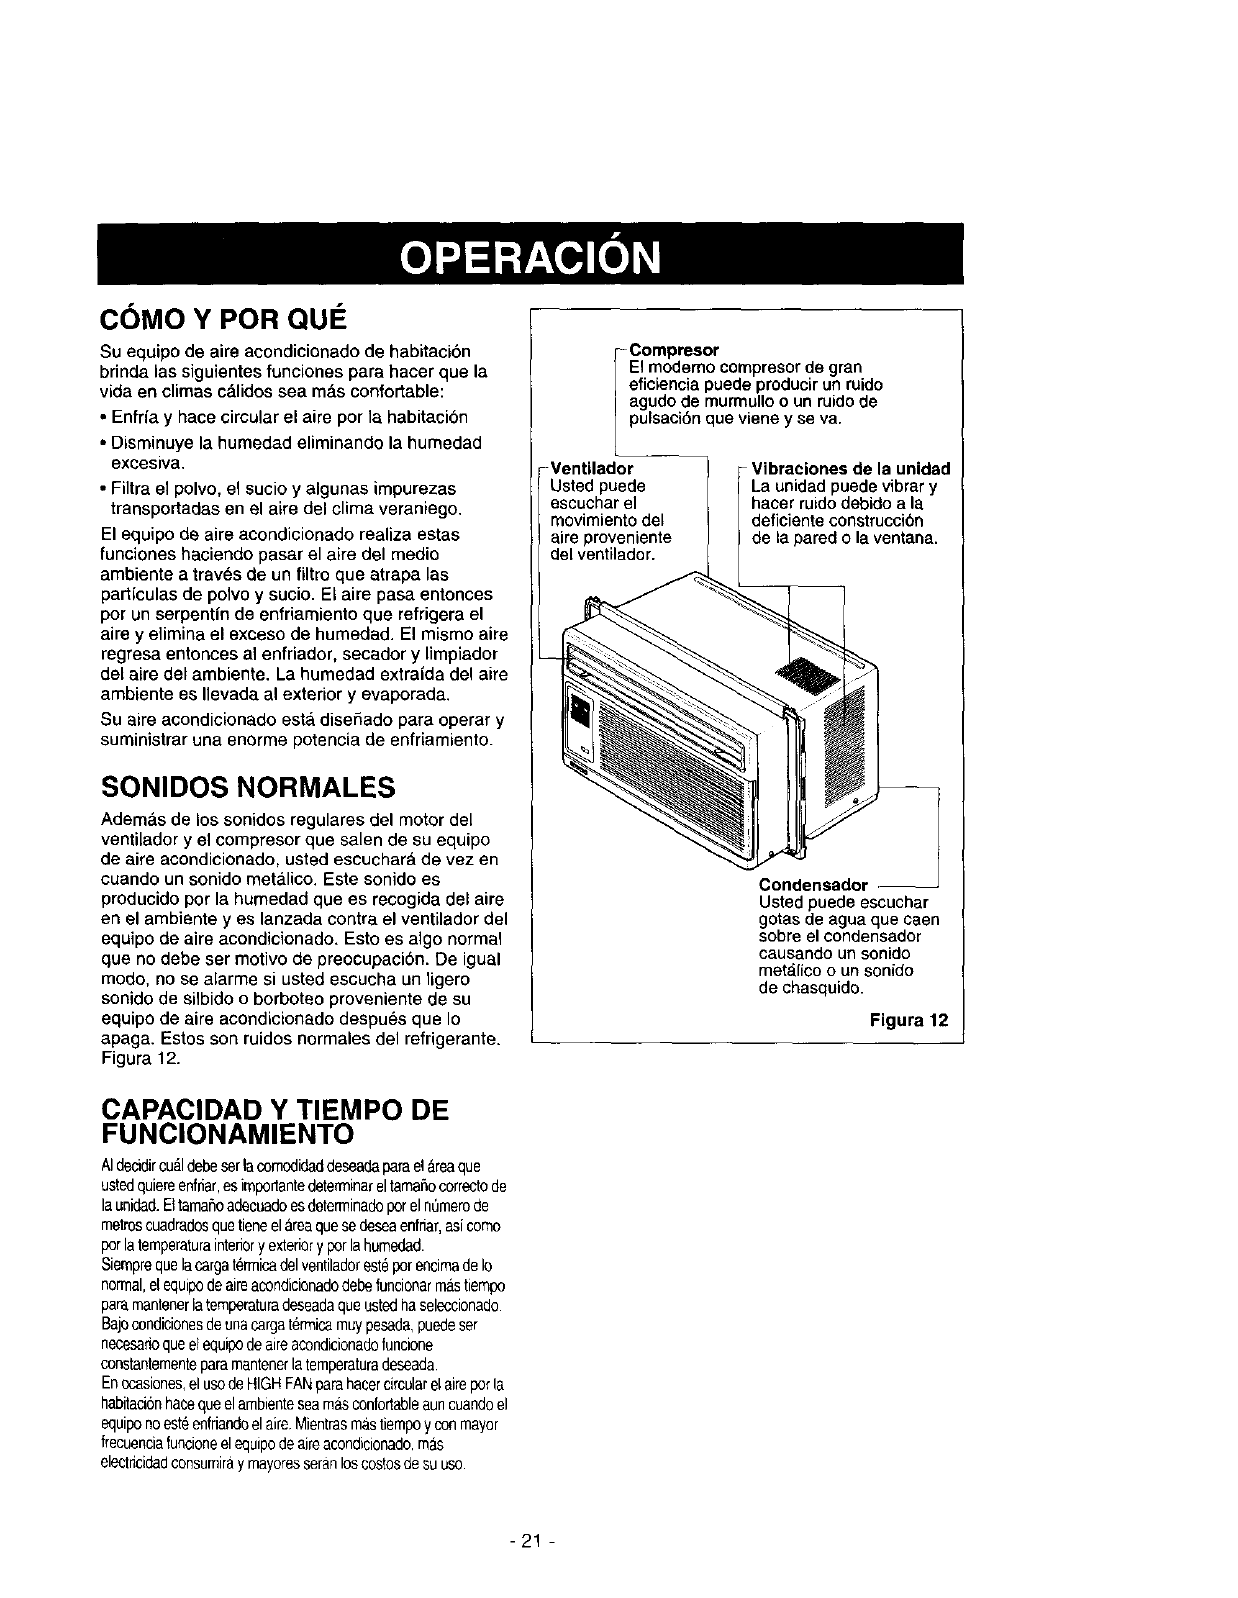
SONIDOS NORMALES
Adem&s de los sonidos regulares del motor del
ventilador y el compresor que salen de su equipo
de aire acondicionado, usted escuchara de vez en
cuando un sonido met&lice. Este sonido es
producido par la humedad que es recogida del aire
en el ambiente yes lanzada contra el ventilador del
equipo de aire acondicionado. Esto es alga normal
que no debe ser motivo de preocupaci6n. De igual
modo, no se alarme si usted escucha un ligero
sonido de silbido o borboteo proveniente de su
equipo de aire acondicionado despu6s que Io
apaga. Estos son ruidos normales del refrigerante.
Figura 12.
CAPACIDAD Y TIEMPO DE
FUNClONAMIENTO
AIdeddircu_ldebeserlacomodidaddeseadaparaelareaque
ustedquiereenfriar,esimpodantedeterminareltamaSocorrectode
launidad.Ettamafioadecuadoesdeterminadopareln0merode
metroscuadradosquetieneelareaquesedeseaenfdar,asicoma
parlatemperaturainteriory extedoryparlahumedad.
SiernprequelacargatermicadelventiladoresteparencimadeIo
normal,elequipodeaireacondicionadodebefuncionarrnastiempo
paramantenerlatemperaturadeseadaqueustedhaseleccionado
Bajocondicionesdeunacargat_rmicamuypesada,puedeset
necesarioqueelequipodeaireacondicionadofuncione
constantementeparamantenerlatemperaturadeseada
Enocasiones,elusadeHIGHFANparahatercircularelaireparla
habitacionhacequeelambiecteseamasconfortableauncuandoel
equiponoesteenfriandoelaire Mientrasmastiempoyconmayor
frecuenciafuncioneelequipodeaireacondicionado,mas
electncidadconsumiray mayoresseranloscostosde suusa.
Compresor
El modemo compresorde gran
eficiencia puede producir un ruido
agudo de murmullo o un ruido de
pulsaciOn que viene y se va.
-Ventilador Vibraeiones de la unidad
Usted puede La unidad puede vibrar y
escuchar el hacer ruido debido a la
movimiento del deficiente construcci6n
aire proveniente de la pared o la ventana.
del ventilador.
Condensador --
Usted puede escuchar
gotas de agua que caen
sabre el condensador
causando un sonido
meta.lico o un sonido
de chasquida.
Figura 12
-21 -
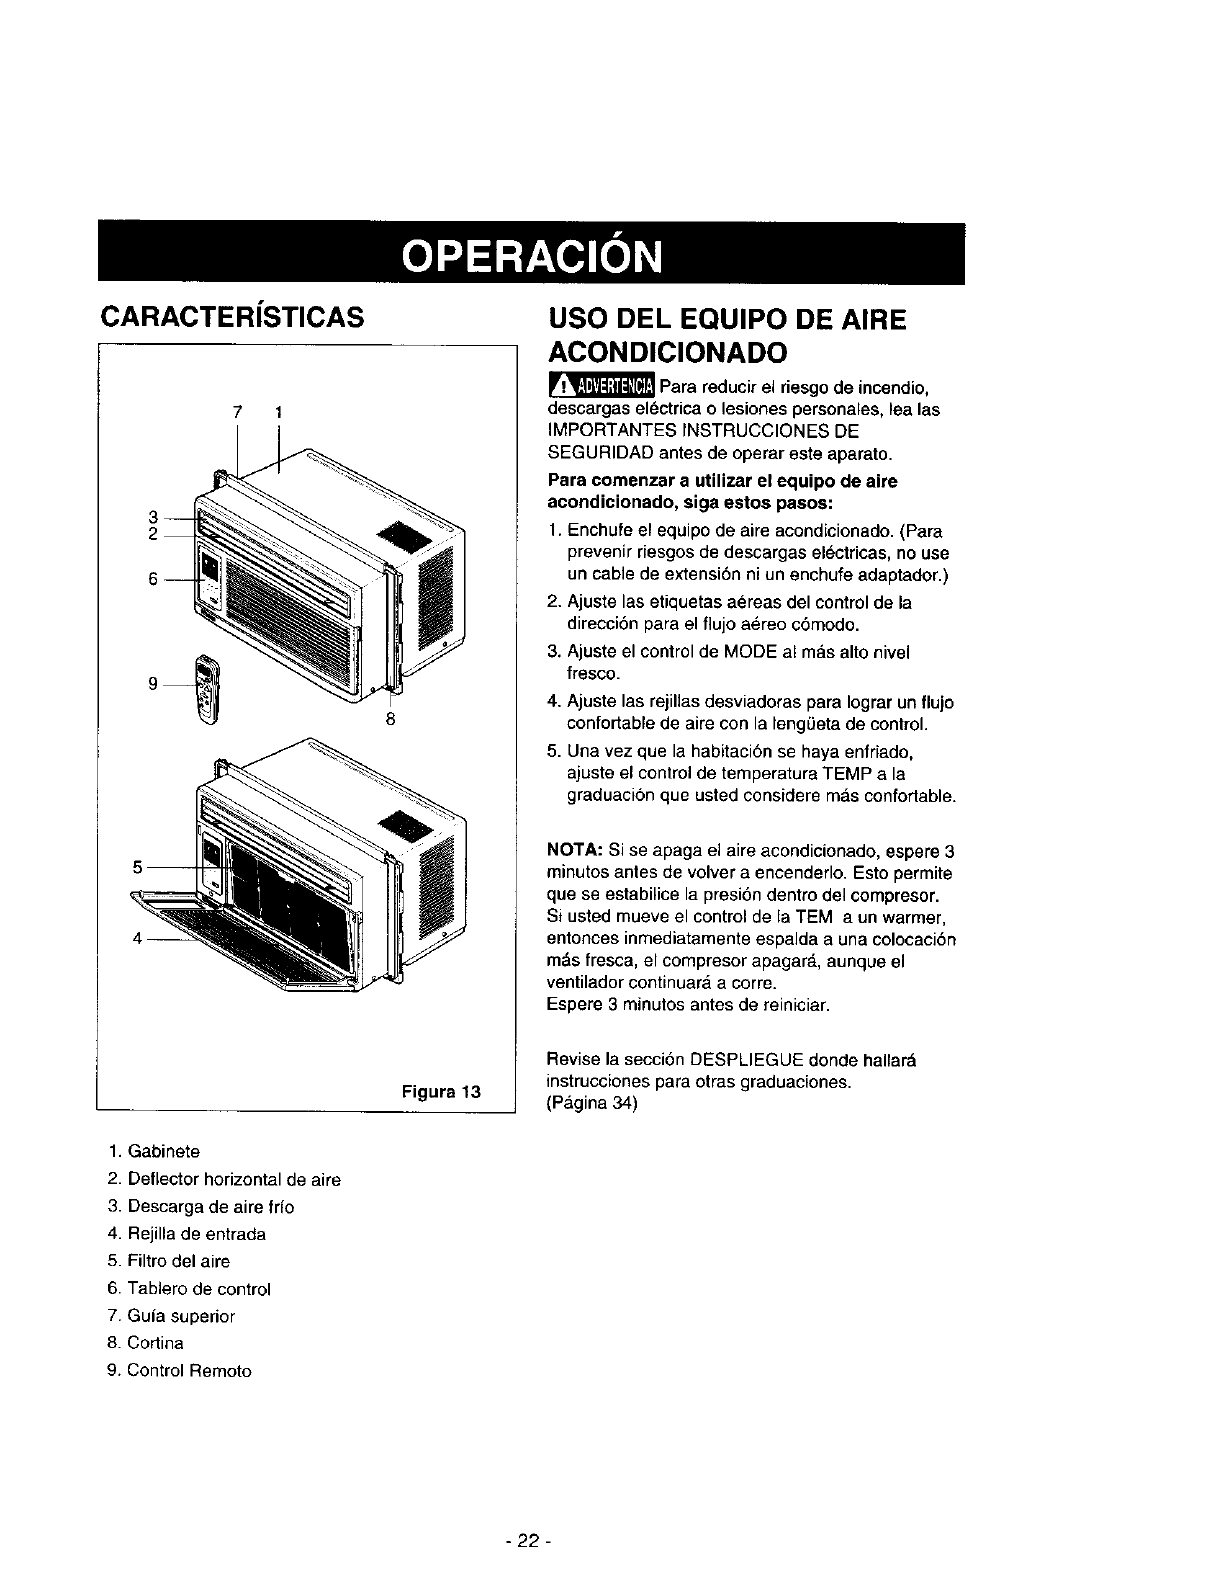
CARACTERiSTICAS
71
Figura 13
USO DELEQUIPO DE AIRE
ACON DICIONADO
_Para reducir el riesgo de incendio,
descargas electrica o lesiones personales, lea las
IMPORTANTES rNSTRUCCIONES DE
SEGURIDAD antes de operar este aparato.
Para eomenzar a utilizar el equipo de aire
aeondieionado, siga estos pasos:
1. Enchufe el equipo de aire acondicionado. (Para
prevenir riesgos de descargas electricas, no use
un cable de extensibn ni un enchufe adaptador.)
2. Ajuste las etiquetas a_,reas de1controt de la
direccibn para el flujo aereo c6modo.
3. Ajuste el control de MODE al mas alto nivel
fresco.
4. Ajuste las rejillas desviadoras para Iograr un flujo
confortable de aire con la lengOeta de control.
5. Una vez que la habitaei6n se haya enfriado,
ajuste el control de temperatura TEMP ala
graduaci6n que usted considere mas confortable.
NOTA: Si se apaga el aire acondicionado, espere 3
minutos antes de volver aeneenderlo. Esto permite
que se estabi_icela presion dentro del compresor.
Si usted mueve el control de la TEM a un warmer,
entonces inmediatamente espalda a una coloeaei6n
m_s fresca, el compresor apagard, aunque el
ventilador continuara a corre.
Espere 3 minutos antes de reinieiar.
Revise la seccion DESPLIEGUE donde halrar_l
instrucciones para otras graduaciones.
(P_.gina 34)
1. Gabinete
2. DefLector horizontal de aire
3. Desearga de aire frfo
4. Rejilla de entrada
5. Filtro del aire
6. Tablero de control
7. Guia superior
8. Cortina
9. Control Remoto
- 22 -
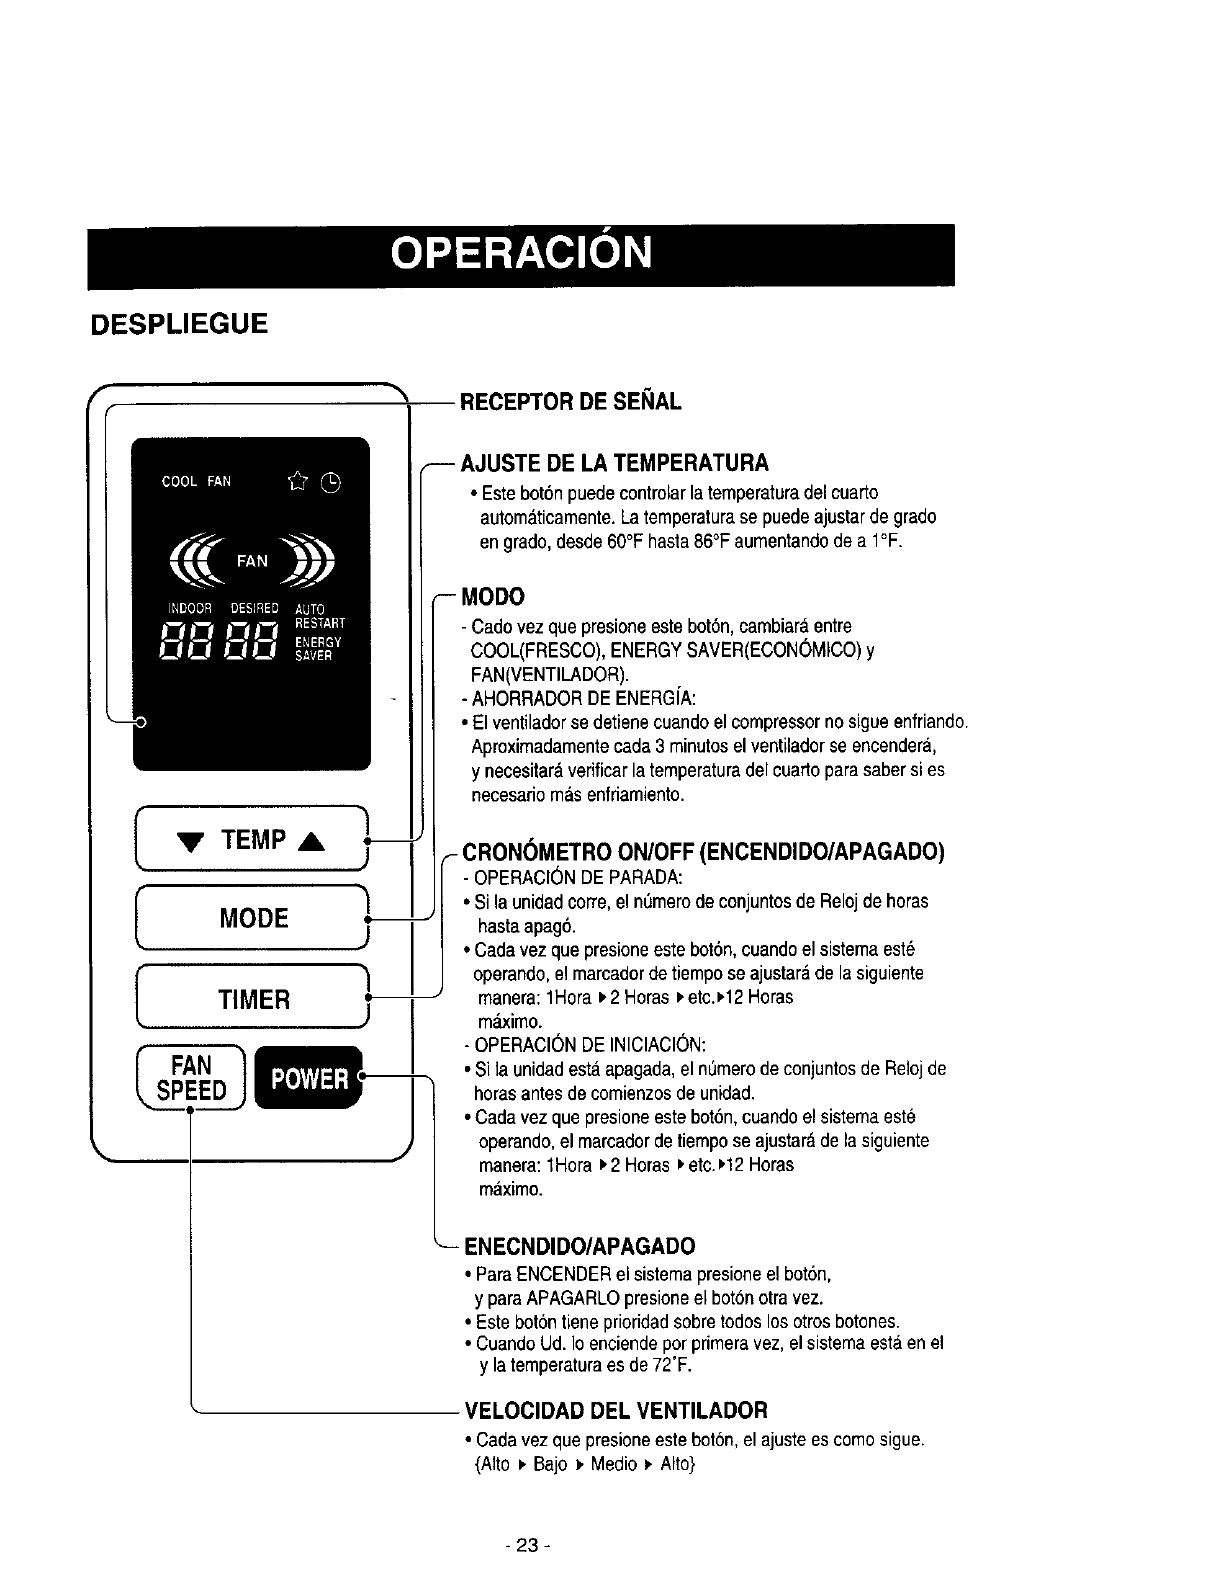
DESPLIEGUE
fRECEPTOR DE SENAL
I • TEMP,A I"_
I 1
MODE
TIMER
FAN
AJUSTE DE LA TEMPERATURA
•Estebot6npuedecontrolarlatemperaturadelcuarto
autom&ticamente.Latemperaturasepuedeajustarde grade
en grado,desde60°F hasta86°Faumentandode a 1°F.
-- MODO
- Cado vez quepresioneestebot6n,cambiar_,entre
COOL(FRESCO),ENERGYSAVER(ECON(_MICO)y
FAN(VENTILADOR).
- AHORRADORDE ENERGIA:
• El ventiladorse detienecuando el compressorno sigue enfriando.
Aproximadamentecada3 minutosel ventiladorse encendera,
y necesitara,verificarlatemperaturadel cuartoparasaber si es
necesarlomasenfriamiento.
_-CRON(_METRO ON/OFF (ENCENDIDO/APAGADO)
- OPERACI(_NDE PARADA:
• Si la unidadcorre,el n0merode conjuntosde Relojde horas
hastaapag6.
• Cadavez que presioneeste bot6n,cuando el sistemaest6
operando,el marcadordetiempose ajustarade la siguiente
manera:1Hora )2 Horas _.etc.H2 Horas
m_imo.
- OPERACI6N DE INICIACION:
• Si la unidadestaapagada,el n0merodeconjuntosde Reloj de
horasantesde comienzosde unidad.
• Cada vez quepresioneestebot6n,cuandoel sistemaeste
operando,el marcadordetiempose ajustardde lasiguiente
manera:1Hora _,2 Horas ='etc._,12Horas
maximo.
ENECNDIDO/APAGADO
• ParaENCENDERel sistemapresioneel bot6n,
y paraAPAGARLOpresioneel bot6notra vez.
• Estebot6ntiene prioridadsobre todoslos otrosbotones.
• CuandoUd.Io enciendepot primeravez, el sistemaestaen el
y la temperaturaes de 72'F.
VELOCIDAD DEL VENTILADOR
• Cadavez que presioneestebot6n,el ajustees comosigue.
(Alto _,Bajo _.Medio _.Alto}
-23-
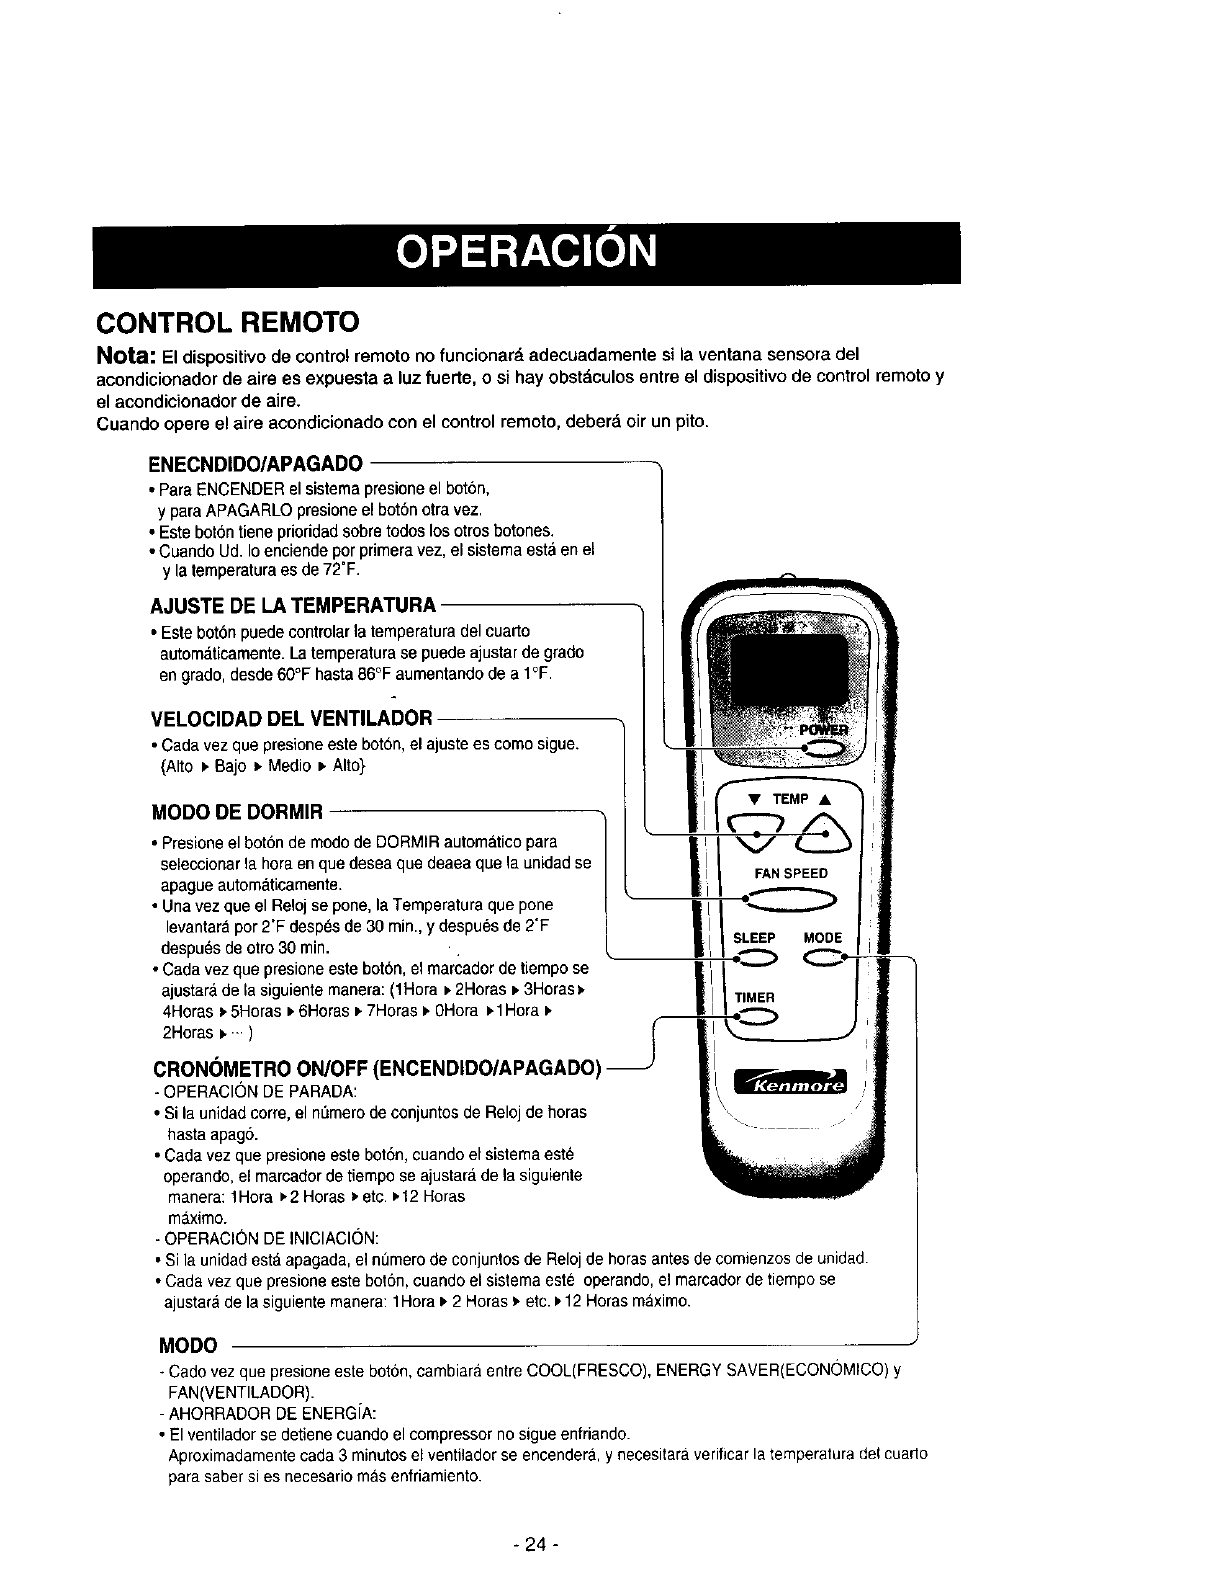
CONTROL REMOTO
Nota: El dispositivo de control remoto no funcionar_ adecuadamente si la ventana sensora del
acondicionador de aire es expuesta a luz fuerte, o si hay obst_culos entre el dispositivo de control remoto y
el acondicionador de aim.
Cuando opere el aire acondicionado con el control remoto, deber_ oir un pito.
ENECNDIDO/APAGADO
• Para ENCENDER el sistemapresioneel bot6n,
y paraAPAGARLOpresioneel bot6notravez.
• Este bot6ntieneprioridadsobretodoslos otrosbotones.
• CuandoUd. Ioenciendepor primers vez, el sisternaestaen el
y la ternperaturaes de 72'F.
AJUSTE DE LA TEMPERATURA
• Estebot6npuedecontrolarlatemperaturadelcuarto
autorn_ticamente.Latemperaturasepuedeajusterdegrado
engrado,desde60°Fhasta86°Faumentandodea I°F.
VELOClDAD DEL VENTILADOR
•Cadavezquepresioneestebot6n,el ajusteescornosigue,
{Alto _,Bajo • Medio• Alto}
MODO DE DORMIR
• Presione el bot6n de modo de DORMIR automatico para
seleccionar la heraen que desea que deaea que la unidadse
apague autornaticarnente.
• Una vez que el Relojse pone, la Ternperatura que pone
levantar_por 2'F desp_s de 30 min., y despud,s de 2"F
despu_s de otro 30 min.
•Gada vez que presione este bot6n, el marcador de tiempo se
ajustarade la siguiente manera: (1Hora v2Horas i, 3Horas•
4Horas • 5Horas v 6Horas _ 7Horas =*0Hora =*lHora =.
2Horas _..-.)
•TEMP •
FAN SPEED
CRONOMETRO ON/OFF (ENCENDIDO/APAGADO)
- OPERACIONDE PARADA:
• Si la unidadcorre, el n_rnerode conjuntos de Relojde horas \\ \
hasta apagS.
•Cada vez que presione este bot6n, cuando el sistema est_
operando, el marcador de tiempo se ajustara de la siguiente
manera: 1Hora P.2Horas _.etc. _,12Horas
m_,ximo.
- OPERACION DE INICIACIC)N:
• Si la unidad est'. apagada, el numerode conjuntos de Reloj de horasantes de comienzos de unidad.
•Cada vez que presione este bot6n, cuando el sistema este operando, el marcador de tiempo se
ajustara de la siguiente manera: 1Hora =.2 Horas • etc. ) 12 Horas rnaximo.
MODO
Cadovezque presioneestebot6n,carnbiaraentreCOOL(FRESCO),ENERGY SAVER(ECON(_MICO)y
FAN(VENTILADOR).
- AHORRADORDE ENERG[A:
•El ventiladorse detienecuandoel compressor nosigueentriando.
Aproxirnadarnentecada3 rninutosel ventiladorse encendera,y necesitara verificarla ternperaturadel cuarto
parasabersi es necesariornas enfriarniento.
-24 -
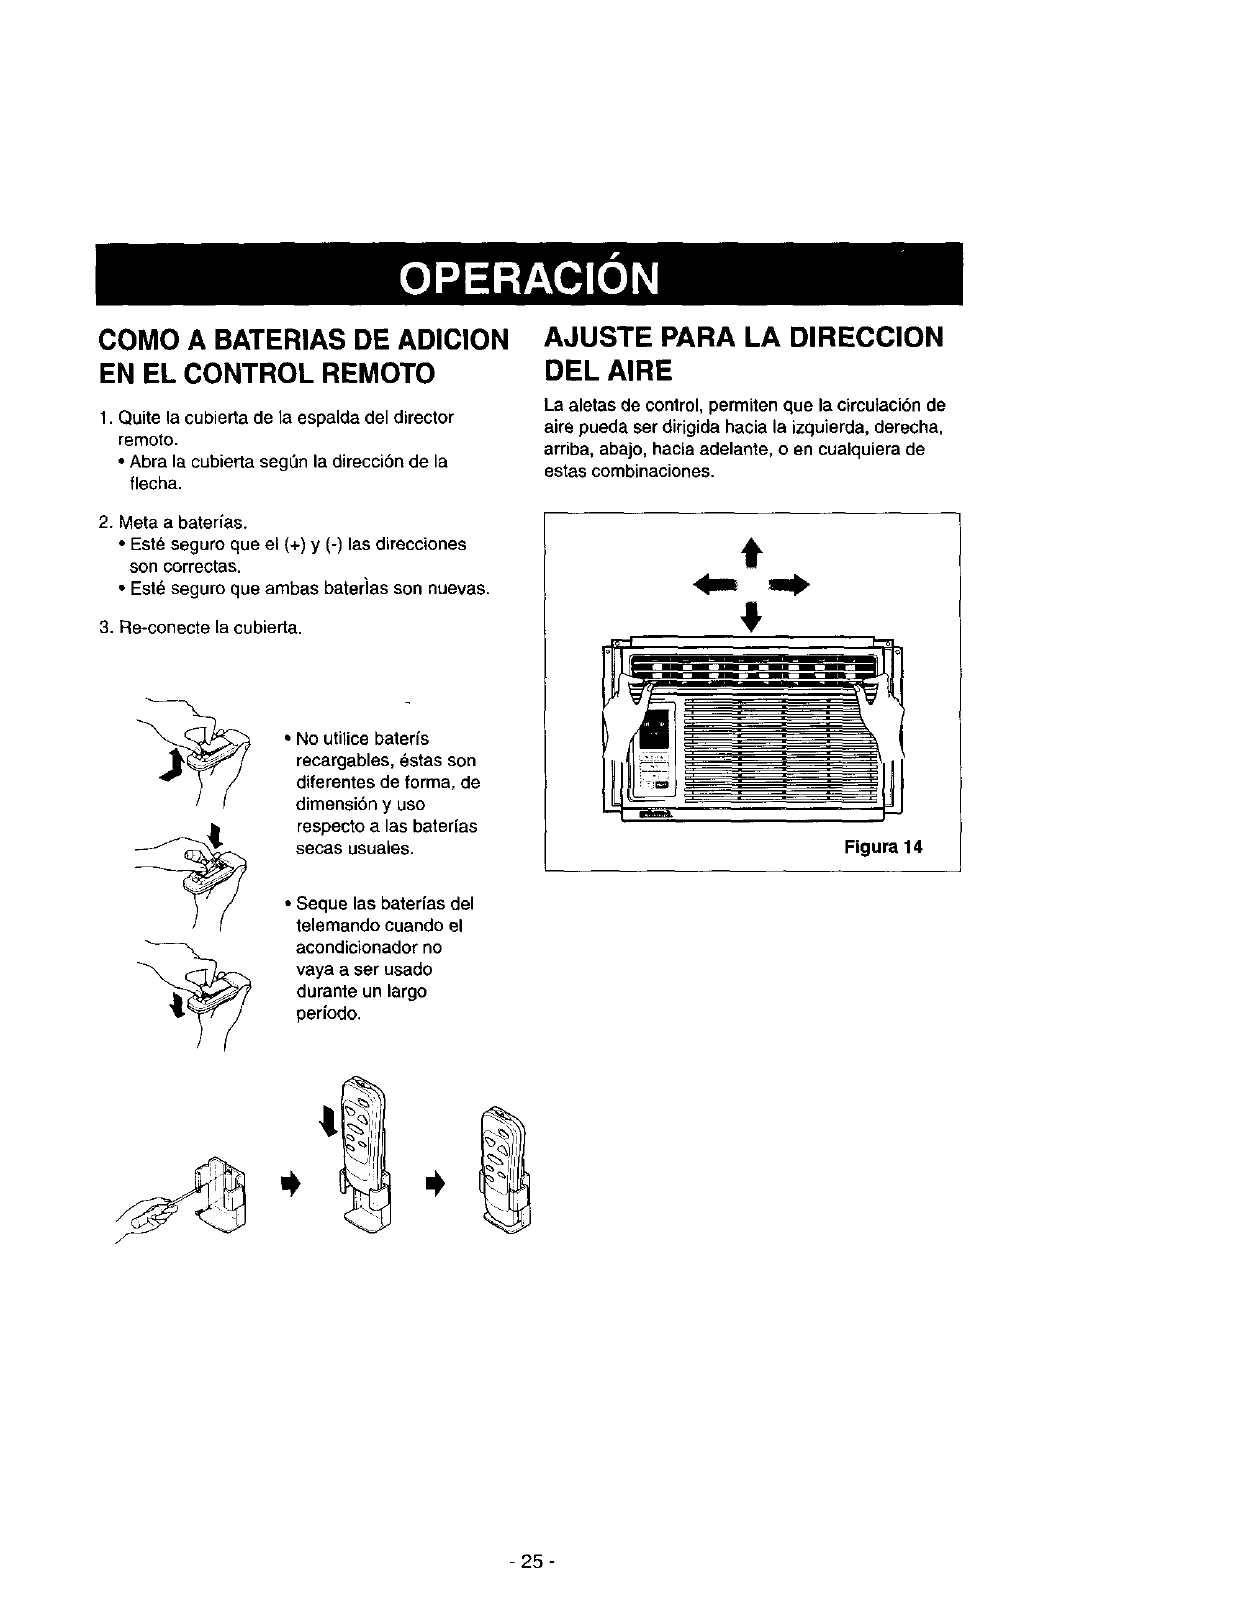
COMO A BATERIAS DE ADICION
EN EL CONTROL REMOTO
1. Quite la cubierta de la espalda del director
remoto.
• Abra la cubierta segL_nla direccibn de la
flecha.
2. Meta a baterfas.
• Este seguro que el (+) y (-) las direcciones
son correctas.
• Est_ seguro que ambas baterias son nuevas.
3. Re-conecte la cubierta.
• No utilice baterfs
recargables, 6stas son
diferentes de forma, de
dimensi6n y uso
respecto alas baterfas
secas usuales.
• Seque las baterfas del
telemando cuando el
acondicionador no
Maya a ser usado
durante un largo
perfodo.
AJUSTE PARA LA DIRECCION
DEL AIRE
La aletas de control, permiten que la circutaci6n de
aire pueda ser dirigida hacia la izquierda, derecha,
arriba, abajo, hacia adelante, o en cualquiera de
estas combinaciones.
!
Figura 14
- 25 -
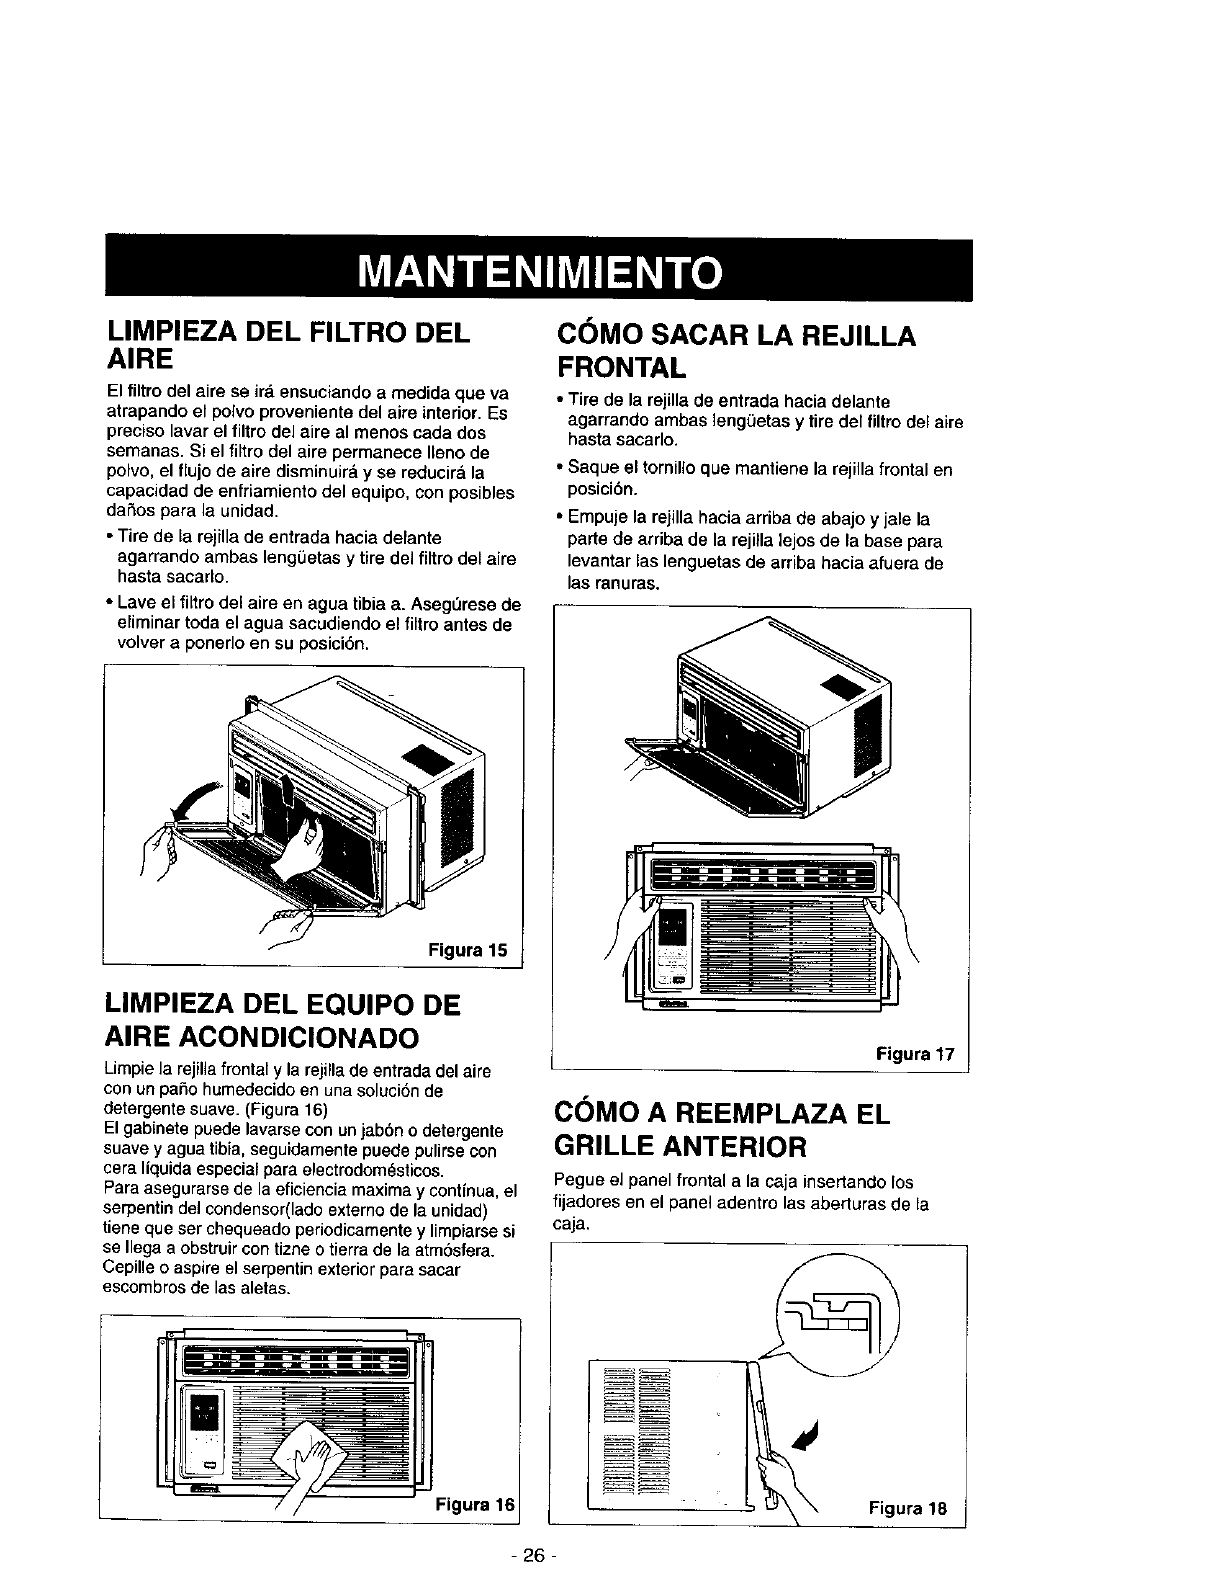
LIMPIEZA DEL FILTRO DEL
AIRE
El filtro del aire se ira ensuciando a medida que va
atrapando el polvo proveniente, del aire interim'. Es
preciso laver el filtro del aire al menos cada dos
semanas. Si el filtro del aire permanece Ileno de
polvo, el flujo de aire disminuir_l y se reducira la
capacidad de enfriamieeto del eqaipo, con posibles
dafios pare la unidad.
•Tire de la rejilla de entrada hacia delante
agarrando ambas leng(_etas y tire del filtro del aire
hasta sacaflo.
•Lave el filtrodel airs en agua tibia a. Aseg0rese de
eliminar toda el agua sacudiendo el filtro antes de
volver a ponerlo en su posici6n.
Figura 15
LIMPIEZA DEL EQUIPO DE
AIRE ACONDICIONADO
Limpie la rejillafrontal y la re)ilia de entrada del aire
con un patio humedeoido en una soluci6n de
detergente suave. (Figura 16)
El gabinete puede lavarse con un jabbn o detergente
suave y ague tibia, seguidamente paede pulirsscon
cera liquida especial para electrodom_sticos.
Para asegurarse de la eficiencia maxima y contfnua, el
serpentin del condensor(lado externo de la unidad)
tiene que ser chequesdo periodicamente y limpiarse si
se Ilega a obstruircon tizne o tierra de la atm6sfera.
Cepille o aspire el serpentin exterior pare sscar
escombros de las aletas.
Figura 16
C(_MO SACAR LA REJILLA
FRONTAL
•Tire de la rejilla de entrada hacia delante
agarrando ambas lengOetas y tire del filtro del aire
hasta sacarlo.
• Saque el tornillo que mantiene la rejilla frontal en
posici6n.
• Empuje la rejilla hacia arriba de abajo y jale la
parte de arriba de la rejilla lejos de la base para
levantar las lenguetas de arriba haeia afuera de
las ranuras.
Figure 17
COMO A REEMPLAZA EL
GRILLE ANTERIOR
Pegue el panel frontal ala caja insertando los
fijadores en el panel adentro las aberturas de Is
caja.
Figu_ra 18
- 26 -
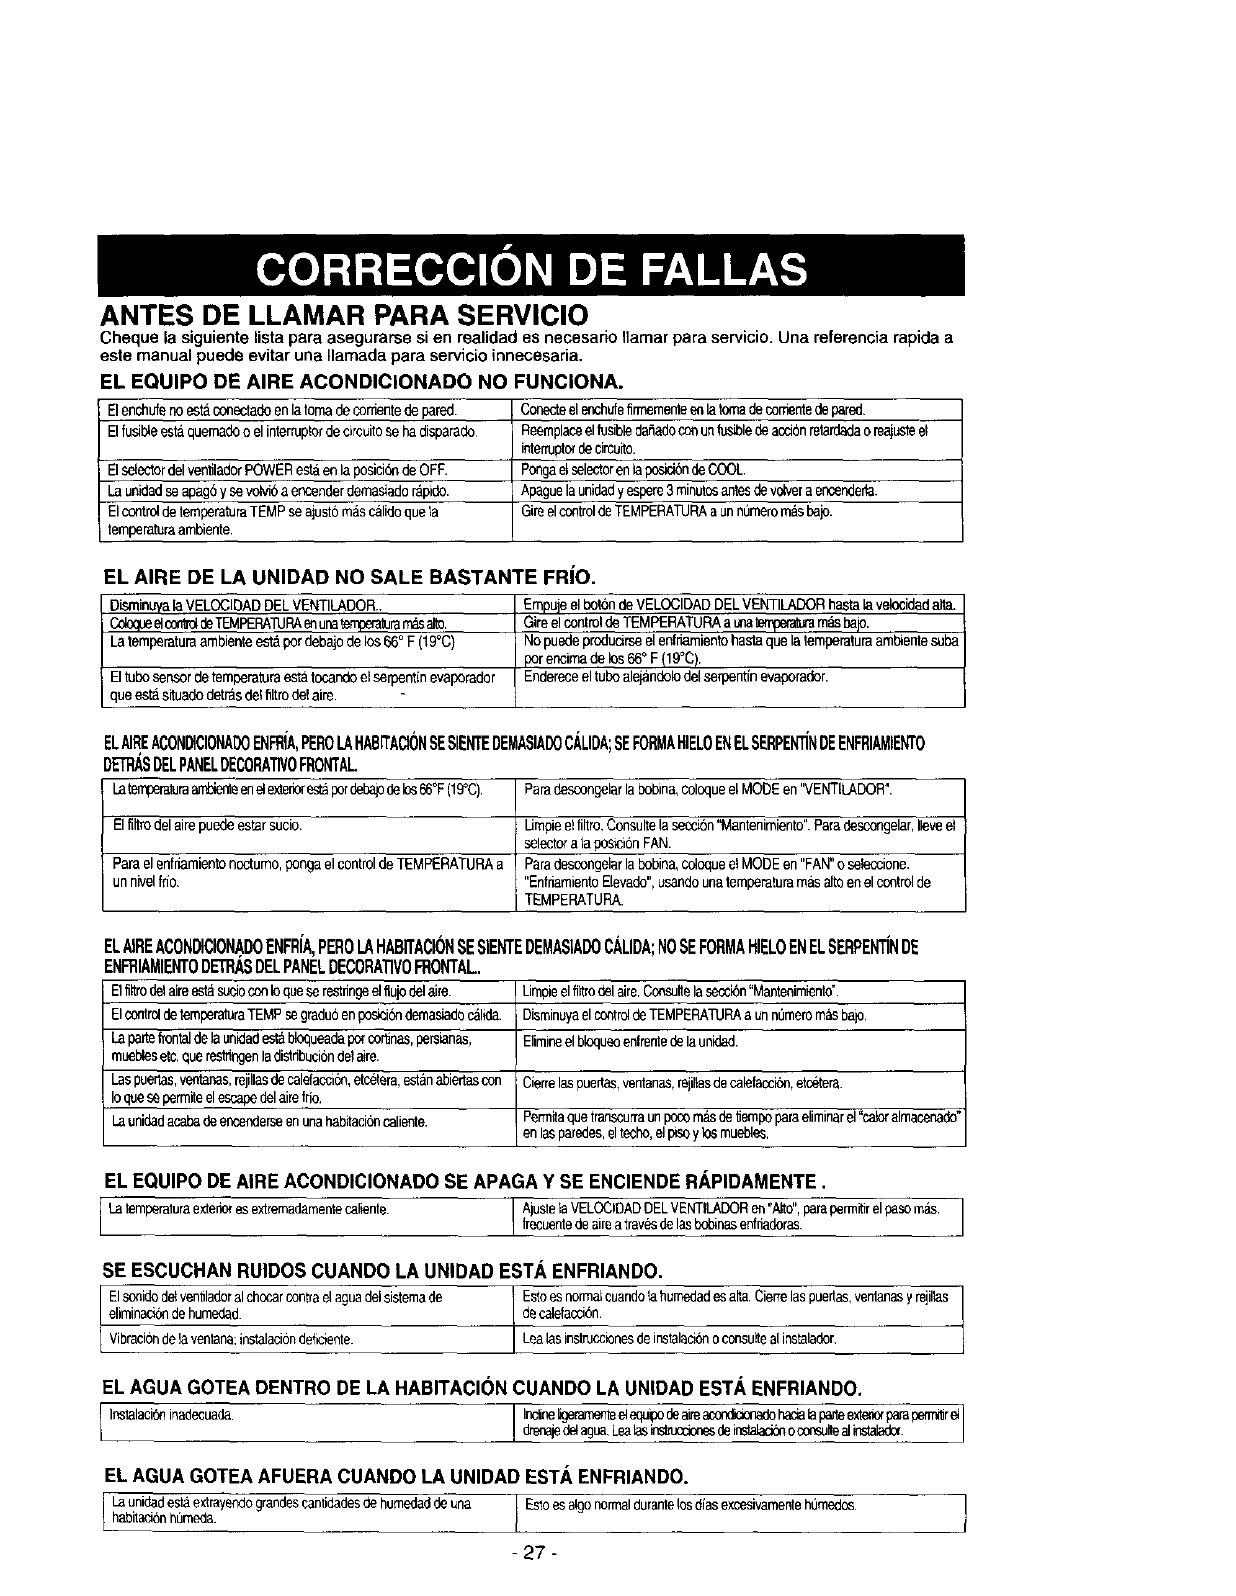
ANTES DE LLAMAR PARA SERVIClO
Cheque la siguiente lista para asegurarse si en realidad es necesado Ilamar para servicio. Una referencia rapida a
este manual puede evitar una Ilamada para servicio innecesaria.
EL EQUIPO DE AIRE ACONDIClONADO NO FUNClONA.
Elenchufenosetaconectadoenlatomade corrientede pared.
Elfusibleestaquemadoo el interruptofde circuitose hadisparado
ElselectordelventiladorPOWERestaen laposleionde OFF.
Launidadse apag6ysevutvi6a encenderdemasiedor_piclo.
ElcontroldetemperaturaTEMPseajustomascalideque la
temparaturaambiente.
Conecteelenchuteflrmementese latornadecorrlentedepared.
Rsemplaceelfusibleda6adoconun'fusibledeacci_Snretardadaoreajusteel
interruptordecircuito.
Psegaelselectoren tapos_onpaCOOL
Apaguela unidedy espere3 minutesantesdevolveraencenderia.
Gireelcontrolde TEMPERATURAa unn0rnerom_sbajo.
EL AIRE DE LA UNIDAD NO SALE BASTANTE FRIO.
DleminwalaVELOClDADDELVENTILADOR..
Cdoq_ elcor_ deTEMPERA_JRAenunatemperaturarngsalto.
Latemparaturaambientees_ pesdebajode los66° F (19°C)
Eltubosensordetemperaturaestatocar_oelserpentinevaporador
queestasituadodetr_sdelfiltrodelaire.
EmpujeelborondeVELOCIDADDELVENTILADORhastalaselocidedalia.
Gireelcontrolde TEMPERATURAauna_ m_sbajo.
Nopuedepredudrseel enfriamientohastaque latemperaturaambientesuba
porencimade los66° F(19°C).
Endereseel tuboalejandelodelserpentinevaporador.
ELAIREACONDICIONADOENFR(A,PEROLAHABITAC_NSESIENTEDEMASIADOCALIDA;SEFORMAHIELOENELSERPENTINDEENFRIAMIENTO
D_ DELPANELDECORATIVOFRONTAL
Latern!_ra amblonteenelexteriorestapotdebapdelos66°F(1SeC). Paradescongeiarladebina,coloqueel MObEen"VENTILADOR".
Elflltrodelairepuedeestarsucio Limpieelfiltro Consultelasescibn"Mantenimiento"Paradeessegelar,Ileveet
selectora tapoe_ciedFAN.
Parael enfriamientonoctumo,pongaelcontrolde TEMPERATURAa Paradescnogeiarlaedbina,coloqueel MODEen"FAN"o seleccione.
un nivelfrio. "EnfriamientoElevade",usandounatemperaturamasal_ enel controlde
TEMPERATURA.
ELAIREACONDICIONADOENFRIA,PEROLAHABITACI(3NSESIENTEDEMASIADOCALIDA;NOSEFORMAHIELOENELSERPENTiNDE
ENFRIAMIENTODETRASDELPANELDECORATIVOFRONTAL.
ElfilVodelaireest_suciononIoqueserestdngeelflujodelaJre. Limpieelfiltrodelaire.Consultslaseoclon"Mantenimiento_.
ElcontreldetemparaturaTEMPsegradu6enposid6ndemasiadocaltda. Disminuyael contreldeTEMPERATURAa unnGmerom_ balO.
La padefrontalde launidedestabfuqueadaparcoronas,persianes, Elimleeelbloquseenlrentedelaunidad.
m_blesete,querestringenladistdbuci6ndelelre.
Laspuedes,vsetanas,rejillasdecelefaccide,etcetera,estanabiertascon Cierrelaspuertas,ventanas,rejiflasdeselefaedde,elc6_ra.
Ioqseseparmiteelescapedelairefrio,
Launipadacabadeencenderseen usehab_iaci6ncaliente. Perm_taquetranscurraunpesom_sde_empaparaeliminarel"calorelmacenade"
en lasparedes,eltesho,elp,.soy los muebles.
EL EQUIPO DE AIRE ACONDICIONADO SE APAGA Y SE ENCIENDE RAPIDAMENTE.
I Latemperaturaexterle_esexiremadamentecallente AluetelaVELOCIDADOELVENTILADORen"_o",paraperm_relpason_s.recuentedeaireatravesdelaebdeinasendaderas I
SE ESCUCHAN RUIDOS CUANDO LA UNIDAD ESTA ENFRIANDO.
Elsonidedelventlledoralchocarcontraelaguadelsistemade I Estoeenormalcuandolahumedadesaria Cierrelas puertas,ventanasy rejil_s |
eliminaeldede humedad decelelaccied.
[ decelelaccled.
Vibraci6ndelaventana:instalaciondef_ente LselastnstnJCC_onesdeinstalac_onoconselteali_talador,
EL AGUA GOTEA DENTRO DE LA HABITACI(3N CUANDO LA UNIDAD ESTA ENFRIANDO.
I Instalaci6ninadecuada Irdno ligeramenteelequ_odeaireacsed_ionodohacialapa_ee_ parapam_ret
drenajedelagua,Leatasles_ delestalac_o csesultealinstal_.
EL AGUA GOTEA AFUERA CUANDO LA UNIDAD ESTA ENFRIANDO.
habitaddeLaunidedestahumeda.eXtrayendograndescantidadesde humededde una ,I Es_oesalgonormaldurantelosdiasexsesivamenteh0medos I
- 27 -

Get itfixed,at your h0me or ou !
Your Home
For repair- in your home-of all major brand appliances,
lawn and garden equipment, or heating and cooling systems,
no matter who made it, no matter who sold it!
For the replacement parts, accessories and
owner's manuals that you need to do-it-yourself.
For Sears professional installation of home appliances
and items like garage door openers and water heaters.
1-800-4-MY-HOME ®(1-800-469-4663)
Call anytime, day or night (U.S.A. and Canada)
www.sears.com www.sears.ca
Our Home
For repair of carry-in items like vacuums, lawn equipment,
and electronics, call or go on-line for the location of your nearest
Sears Parts & Repair Center.
1-800-488-1222
Call anytime, day or night (U.S.A. only)
www.sears.com
To purchase a protection agreement on a product serviced by Sears:
1-800-827-6655 (U.S.A.) 1-800-361-6665 (Canada)
Para pedir servicio de reparacion
a domicilio, y para ordenar piezas:
1-888-SU-HOGAR _
(1-888-784-6427)
Au Canada pour service en fran(}ais:
1-800-LE-FOYER Mc
(1-800-533-6937)
www.sears.ca
® Registered Trademark /TMTrademark /s_ Service Mark of Sears, Roebuck and CO
® Marca Registrada /TMMarca de F&brica /sM Marca de Servicio de Sears, Roebuck and Co
Mc Marque de commerce /MDMarque deposee de Sears, Roebuck and Co. © Sears, Roebuck and Co.
Par_ NO: 3828A20291C
