Kenmore 758154120 User Manual HUMIDIFIER Manuals And Guides L1001179
KENMORE Humidifier Manual L1001179 KENMORE Humidifier Owner's Manual, KENMORE Humidifier installation guides
User Manual: Kenmore 758154120 758154120 KENMORE HUMIDIFIER - Manuals and Guides View the owners manual for your KENMORE HUMIDIFIER #758154120. Home:Heating & Cooling Parts:Kenmore Parts:Kenmore HUMIDIFIER Manual
Open the PDF directly: View PDF ![]() .
.
Page Count: 32
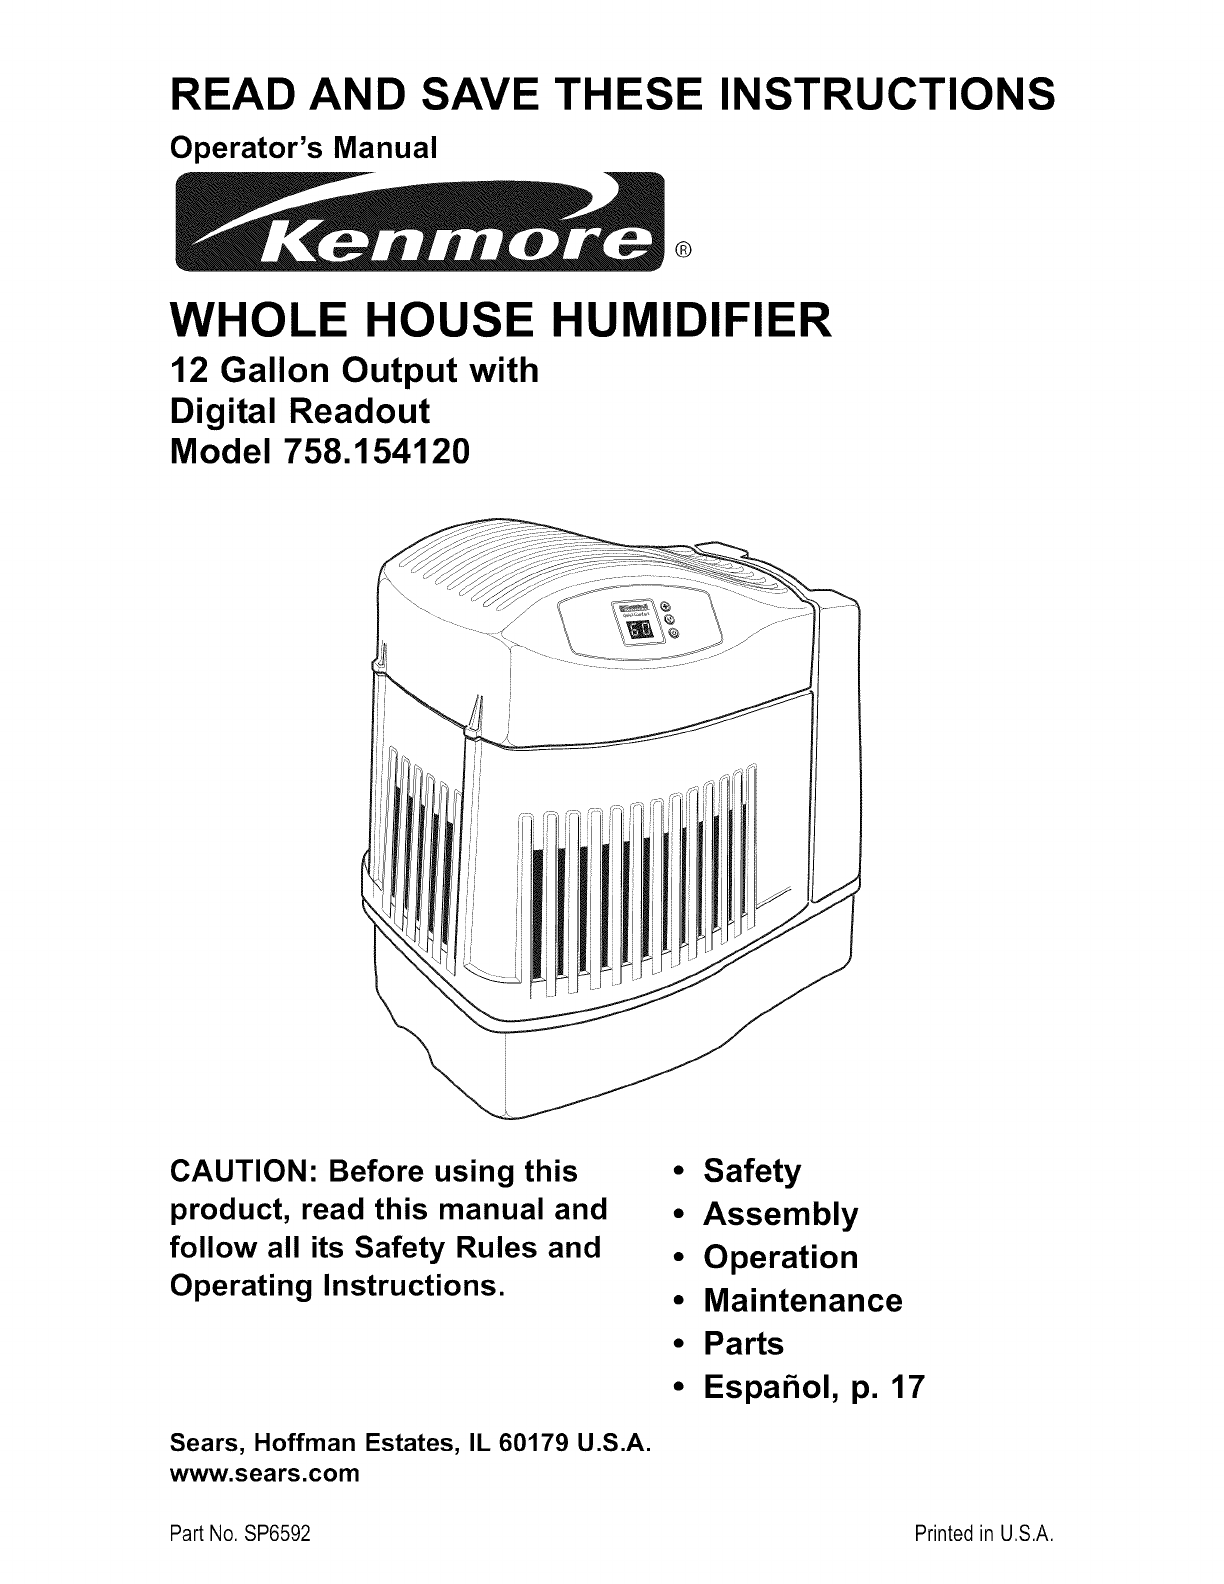
READ AND SAVE
Operator's Manual
THESE INSTRUCTIONS
®
WHOLE HOUSE HUMIDIFIER
12 Gallon Output with
Digital Readout
Model 758.154120
CAUTION: Before using this
product, read this manual and
follow all its Safety Rules and
Operating Instructions.
Sears, Hoffman Estates, IL 60179 U.S.A.
www.sears.com
• Safety
•Assembly
•Operation
•Maintenance
•Parts
•Espahol, p. 17
Part No. SP6592 Printed in U.S.A.
ONE YEAR FULL WARRANTY ON KENMORE HUMIDIFIER
If any part of this humidifier fails due to a defect in material or workmanship
within one year from the date of purchase, or it the humidifier motor fails due
to a defect in material or workmanship during the second year from the date
of purchase, RETURN THE HUMIDIFIER TO THE NEAREST SEARS PARTS &
REPAIR CENTER, and it will be repaired free of charge. This warranty does not
include humidifier filters, which are expendable parts that can wear out from
normal use in less than one year. This warranty gives you specific legal
rights, and you may also have other rights which vary from state to state.
Sears, Roebuck and Co., Dept. 817WA, Hoffman Estates, IL 60179
GENERAL SAFETY INSTRUCTIONS
Safety Signal Words
DANGER: means if the safety information is not
followed someone will be seriously injured or
killed.
WARNING: means if the safety information is
not followed someone could be seriously injured
or killed.
CAUTION: meansif the safetyinformationis
notfollowedsomeonemay be injured.
,To reduce the risk of fire or shock
hazard, plug humidifier directly into a 120V,
A.C. electrical outlet. Do not use extension
cords.
2. Keep the electric cord out of traffic areas. To
reduce the risk of fire hazard, never put the
electric cord under rugs, near heat registers,
radiators, stoves or heaters.
3. Always unplug the humidifier before moving it,
before cleaning, or whenever the humidifier is
not in service.
,Do not allow to be used as a toy. Close
attention is necessary when used by or near
children.
7. Never use your humidifier while any part is
missing or damaged in any manner.
8. To reduce the risk of electrical hazard or
damage to humidifier, do not tilt, jolt or tip
humidifier while unit is running.
9. To reduce the risk of damage to humidifier,
unplug when not in use.
10. To reduce the risk of accidental electrical
shock, do not touch the cord or controls with
wet hands.
11. To reduce the risk of fire, do not use near an
open flame such as a candle or other flame
2source.
12. Note the warning label shown below.
4. Keep the humidifier clean.
5. Do not put foreign objects inside the
humidifier.
WARNING: To reduce risk of fire, electric
shock, or injury always unplug before servicing
or cleaning.
Table of Contents
Warranty Information ............................................. 2
General Safety Instructions ................................... 2
To Save A Service Call .......................................... 3
Know Your Humidifier ............................................ 3
How Your Humidifier Works ................................... 4
Step 1. Getting Your Humidifier
Up and Running ................................................ 4
Step 2. Location Instructions ................................ 5
Electrical Hook-Up ................................................. 5
Step 3. Water Fill ................................................... 6
Step 4. Operating the Controls ......................... 7-8
Using Your Humidifier ....................................... 9-10
Replacement and Care of Filters ......................... 11
Cleaning and Maintenance .................................. 12
Troubleshooting .................................................. 13
Repair Parts ................................................... 14-15
2
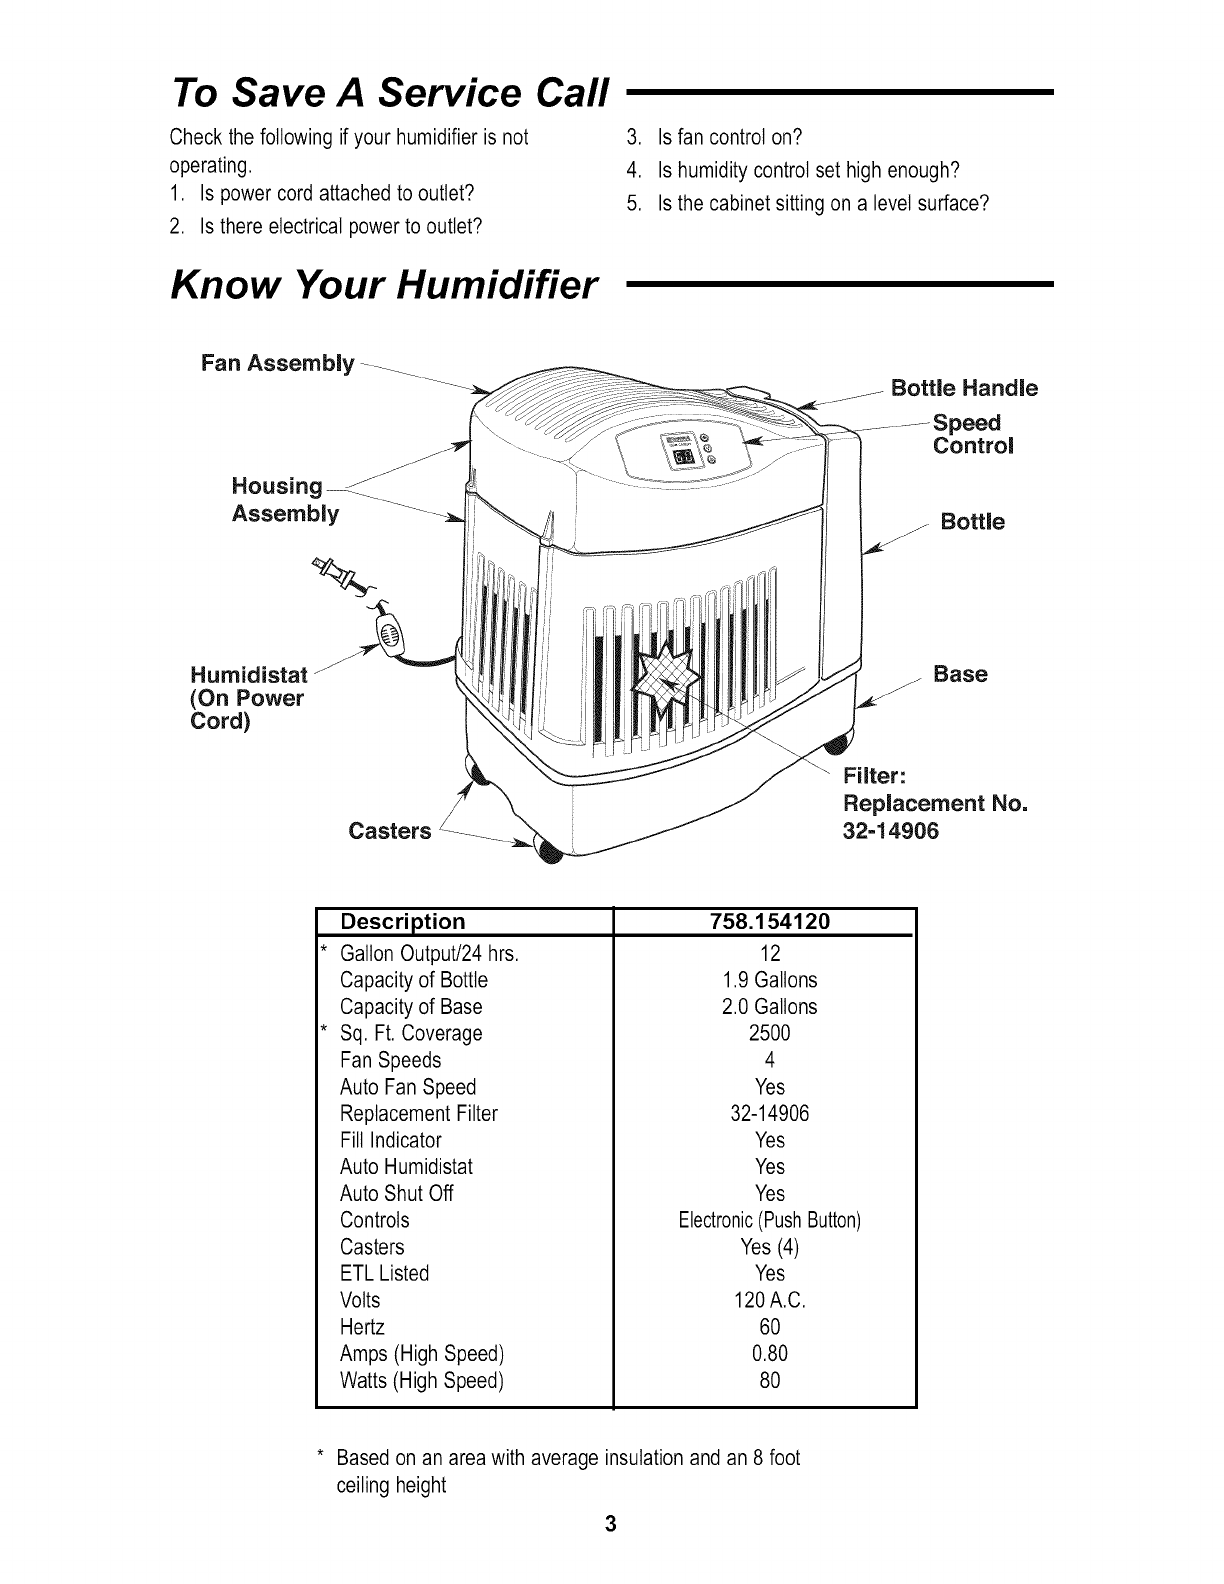
To Save A Service Call
Check the following if your humidifier is not
operating.
1. Is power cord attached to outlet?
2. Is there electrical power to outlet?
Know Your Humidifier
3. Is fan control on?
4. Is humidity control set high enough?
5. Is the cabinet sitting on a level surface?
Fan Assembly-_ Bottle Handle
peed
Control
Assembly
%
Bottle
Humidistat
(On Power
Cord)
Casters
f Base
_<_ Filter:
_,__ Replacement No,
32=14906
Description
Gallon Output/24 hrs.
Capacity of Bottle
Capacity of Base
Sq. Ft. Coverage
Fan Speeds
Auto Fan Speed
Replacement Filter
Fill Indicator
Auto Humidistat
758.154120
12
1.9 Gallons
2.0 Gallons
2500
4
Yes
32-14906
Yes
Yes
Auto Shut Off
Controls
Casters
ETL Listed
Volts
Hertz
Amps (High Speed)
Watts (High Speed)
Yes
Electronic(Push Button)
Yes (4)
Yes
120 A.C.
60
0.80
80
* Based on an area with average insulation and an 8 foot
ceiling height
3
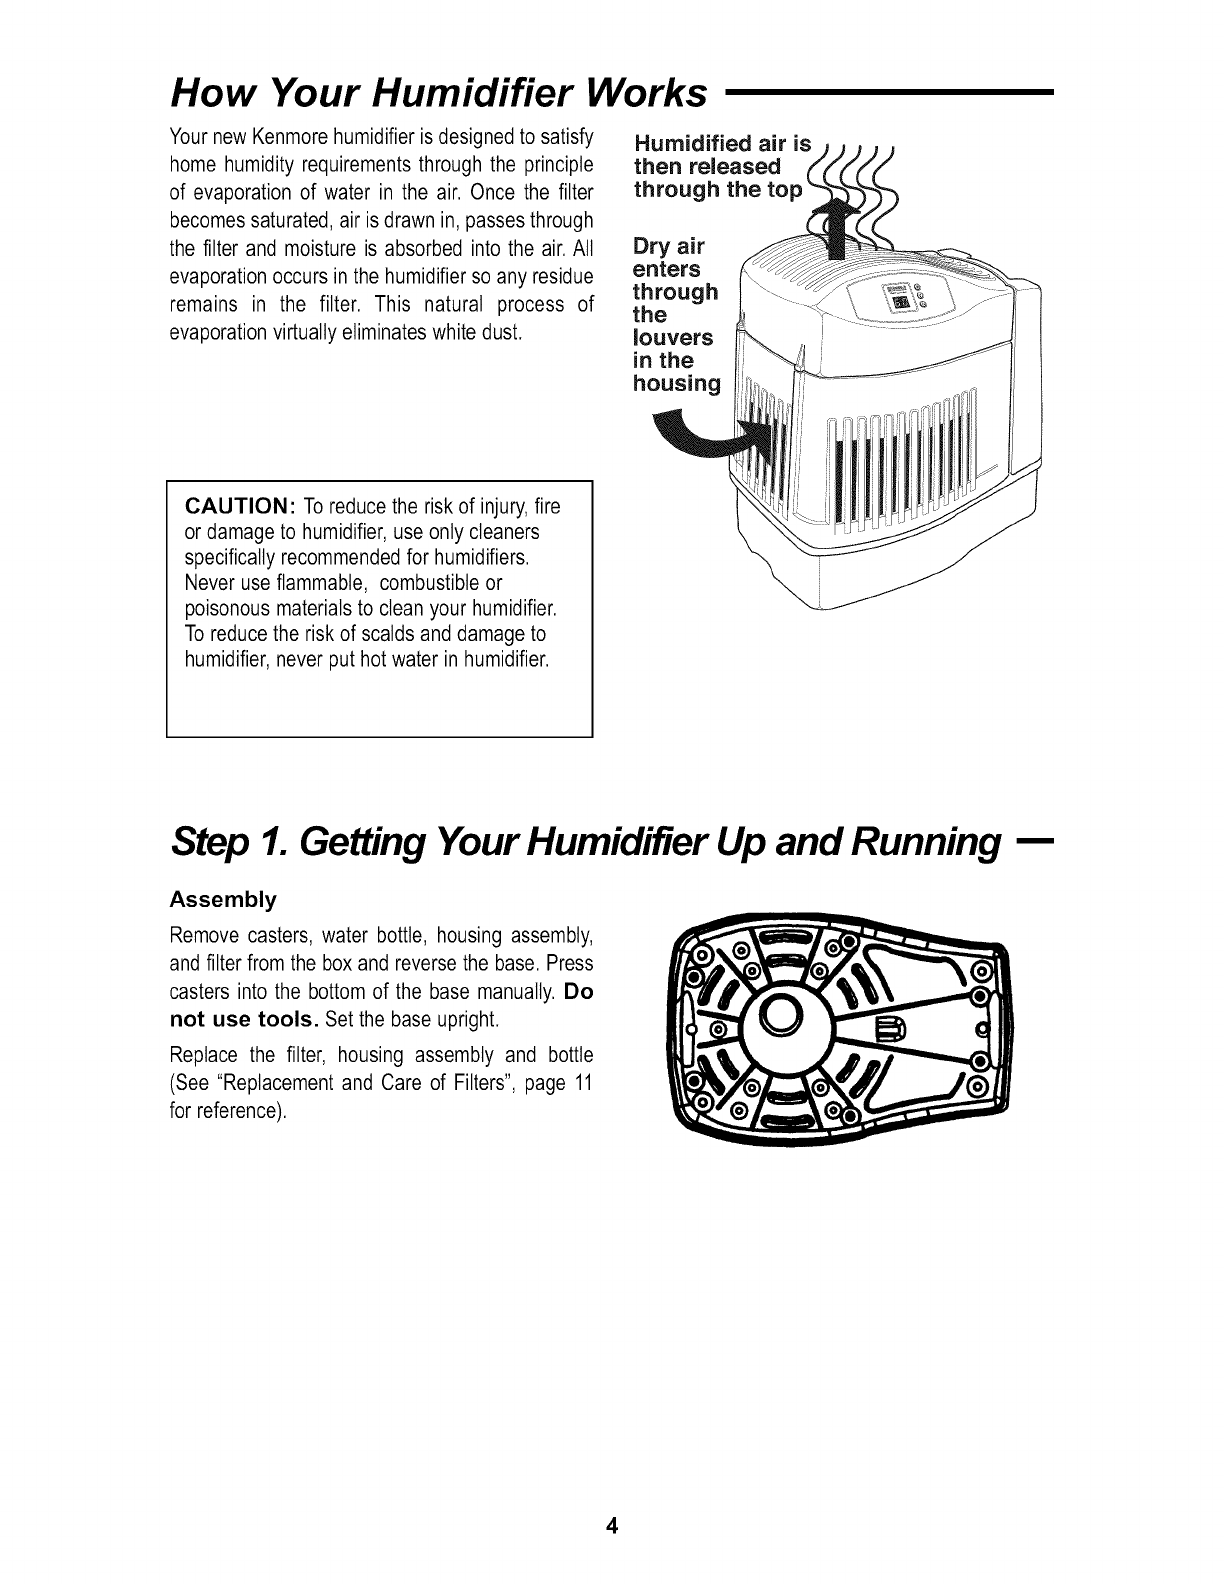
How Your Humidifier Works
Your new Kenmore humidifier is designed to satisfy
home humidity requirements through the principle
of evaporation of water in the air. Once the filter
becomes saturated, air is drawn in, passes through
the filter and moisture is absorbed into the air. All
evaporation occurs in the humidifier so any residue
remains in the filter. This natural process of
evaporation virtually eliminates white dust.
Humidified air is
then released
through the to
Dry air
enters
through
the
louvers
in the
housing
CAUTION: To reduce the risk of injury, fire
or damage to humidifier, use only cleaners
specifically recommended for humidifiers.
Never use flammable, combustible or
poisonous materials to clean your humidifier.
To reduce the risk of scalds and damage to
humidifier, never put hot water in humidifier.
Step 1. Getting Your Humidifier Up and Running
Assembly
Remove casters, water bottle, housing assembly,
and filter from the box and reverse the base. Press
casters into the bottom of the base manually. Do
not use tools. Set the base upright.
Replace the filter, housing assembly and bottle
(See "Replacement and Care of Filters", page 11
for reference).
4
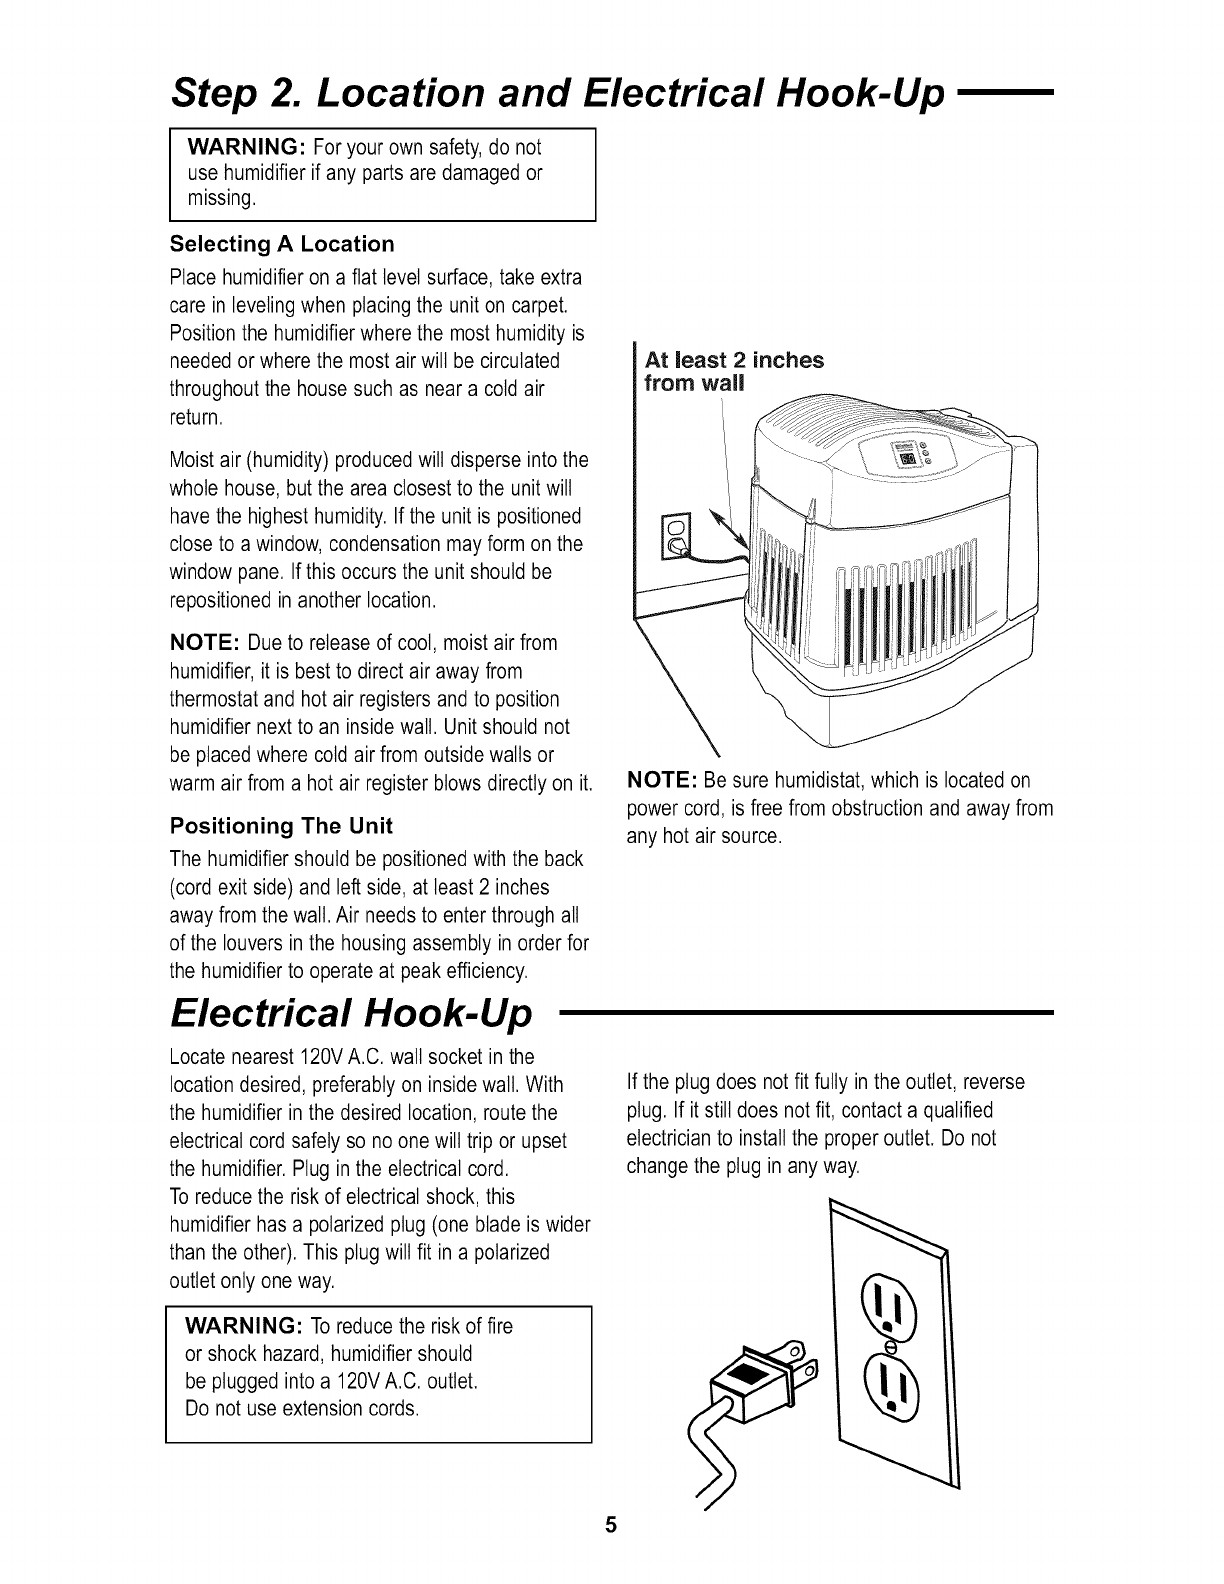
Step 2. Location and Electrical Hook-Up
WARNING: For your own safety, do not
use humidifier if any parts are damaged or
missing.
Selecting A Location
Place humidifier on a flat level surface, take extra
care in leveling when placing the unit on carpet.
Position the humidifier where the most humidity is
needed or where the most air will be circulated
throughout the house such as near a cold air
return.
Moist air (humidity) produced will disperse into the
whole house, but the area closest to the unit wilt
have the highest humidity. If the unit is positioned
close to a window, condensation may form on the
window pane. If this occurs the unit should be
repositioned in another location.
NOTE: Due to release of coot, moist air from
humidifier, it is best to direct air away from
thermostat and hot air registers and to position
humidifier next to an inside walt. Unit should not
be placed where cold air from outside walls or
warm air from a hot air register blows directly on it.
Positioning The Unit
The humidifier should be positioned with the back
(cord exit side) and left side, at least 2 inches
away from the wall. Air needs to enter through all
of the louvers in the housing assembly in order for
the humidifier to operate at peak efficiency.
Electrical Hook-Up
Locate nearest 120V A.C. wall socket in the
location desired, preferably on inside wall. With
the humidifier in the desired location, route the
electrical cord safely so no one will trip or upset
the humidifier. Plug in the electrical cord.
To reduce the risk of electrical shock, this
humidifier has a polarized plug (one blade is wider
than the other). This plug wilt fit in a polarized
outlet only one way.
WARNING: To reduce the risk of fire
or shock hazard, humidifier should
be plugged into a 120V A.C. outlet.
Do not use extension cords.
At least 2 inches
from wall
NOTE: Be sure humidistat, which is located on
power cord, is free from obstruction and away from
any hot air source.
If the plug does not fit fully in the outlet, reverse
plug. If it still does not fit, contact a qualified
electrician to install the proper outlet. Do not
change the plug in any way.
5
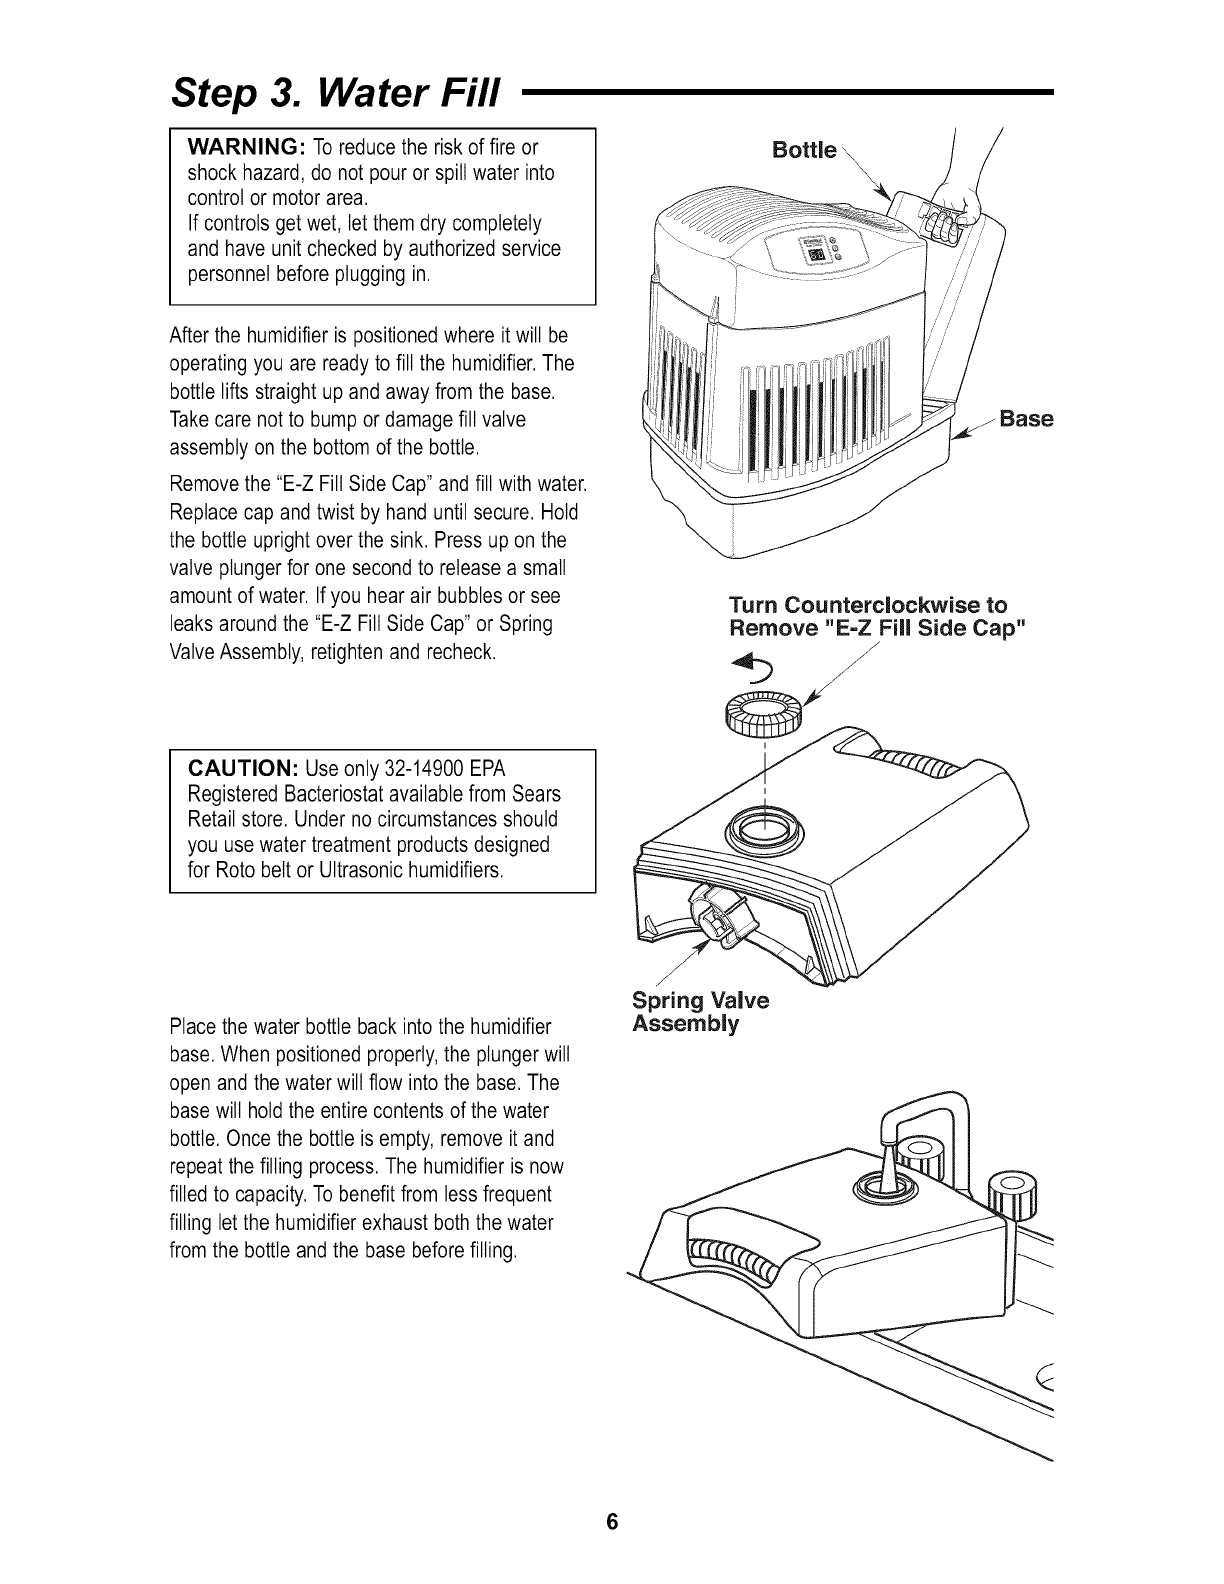
Step 3. Water Fill
WARNING: To reduce the risk of fire or
shock hazard, do not pour or spill water into
control or motor area.
If controls get wet, let them dry completely
and have unit checked by authorized service
personnel before plugging in.
Bottle
After the humidifier is positioned where it will be
operating you are ready to fill the humidifier. The
bottle lifts straight up and away from the base.
Take care not to bump or damage fill valve
assembly on the bottom of the bottle.
Remove the "E-Z Fill Side Cap" and fill with water.
Replace cap and twist by hand until secure. Hold
the bottle upright
valve plunger for
amount of water.
over the sink. Press up on the
one second to release a small
If you hear air bubbles or see
leaks around the "E-Z Fill Side Cap" or Spring
Valve Assembly, retighten and recheck.
Base
Turn Counterclockwise to
Remove "E-Z Fill Side Cap"
/
CAUTION: Use only 32-14900 EPA
Registered Bacteriostat available from Sears
Retail store. Under no circumstances should
you use water treatment products designed
for Roto belt or Ultrasonic humidifiers.
Place the water bottle back into the humidifier
base. When positioned properly, the plunger wilt
open and the water will flow into the base. The
base will hold the entire contents of the water
bottle. Once the bottle is empty, remove it and
repeat the filling process. The humidifier is now
filled to capacity. To benefit from less frequent
filling let the humidifier exhaust both the water
from the bottle and the base before filling.
/
,/
Spring Valve
Assembly
6
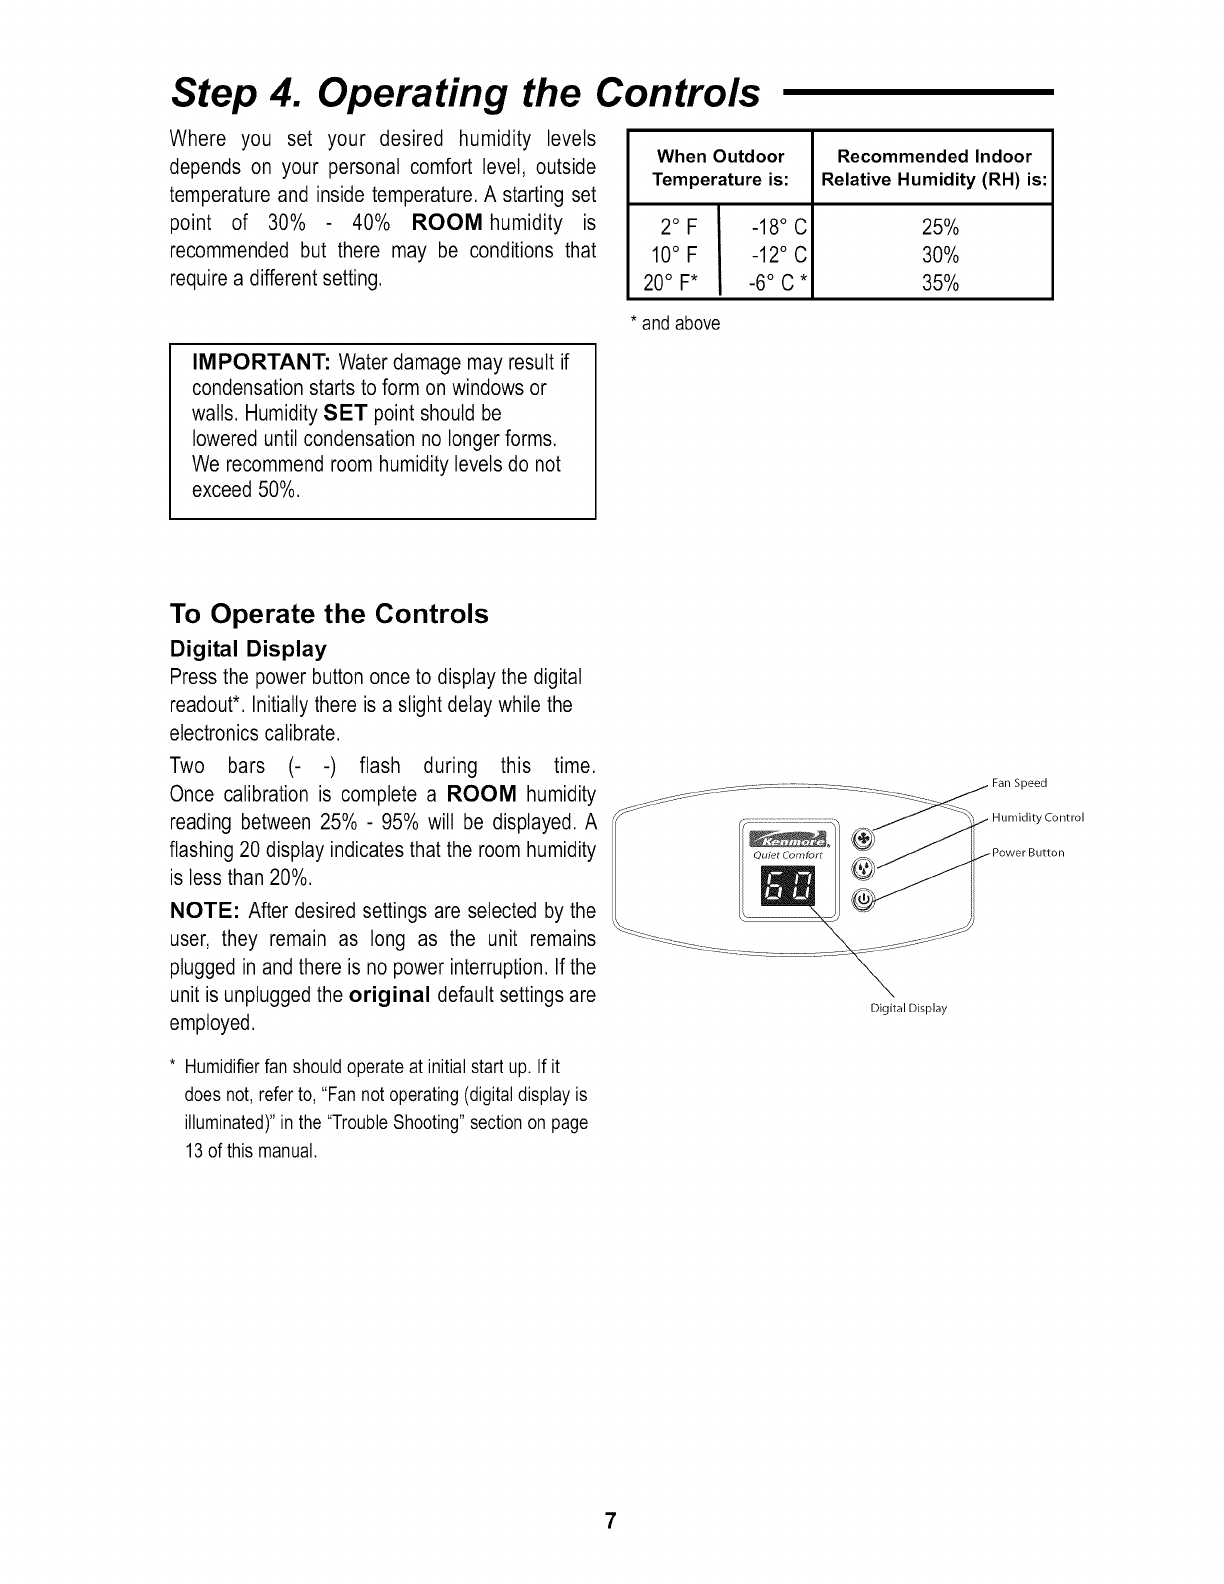
Step 4. Operating the Controls
Where you set your desired humidity levels
depends on your personal comfort level, outside
temperature and inside temperature. A starting set
point of 30% - 40% ROOM humidity is
recommended but there may be conditions that
require a different setting.
When Outdoor
Temperature is:
2°F _18°C
10° F -12° C
20° F* -6° C *
Recommended Indoor
Relative Humidity (RH) is:
25%
30%
35%
* and above
IMPORTANT: Water damage may result if
condensation starts to form on windows or
walls. Humidity SET point should be
lowered until condensation no longer forms.
We recommend room humidity levels do not
exceed 50%.
To Operate the Controls
Digital Display
Press the power button once to display the digital
readout*. Initially there is a slight delay while the
electronics calibrate.
Two bars (- -) flash during this time.
Once calibration is complete a ROOM humidity
reading between 25% - 95% will be displayed. A
flashing 20 display indicates that the room humidity
is less than 20%.
NOTE: After desired settings are selected by the
user, they remain as long as the unit remains
plugged in and there is no power interruption. If the
unit is unplugged the original default settings are
employed.
* Humidifierfan shouldoperateat initialstart up. If it
does not,refer to,"Fan not operating(digitaldisplayis
illuminated)"in the "TroubleShooting"sectionon page
13of this manual.
Digital Display
Fan Speed
Humidity Control
7
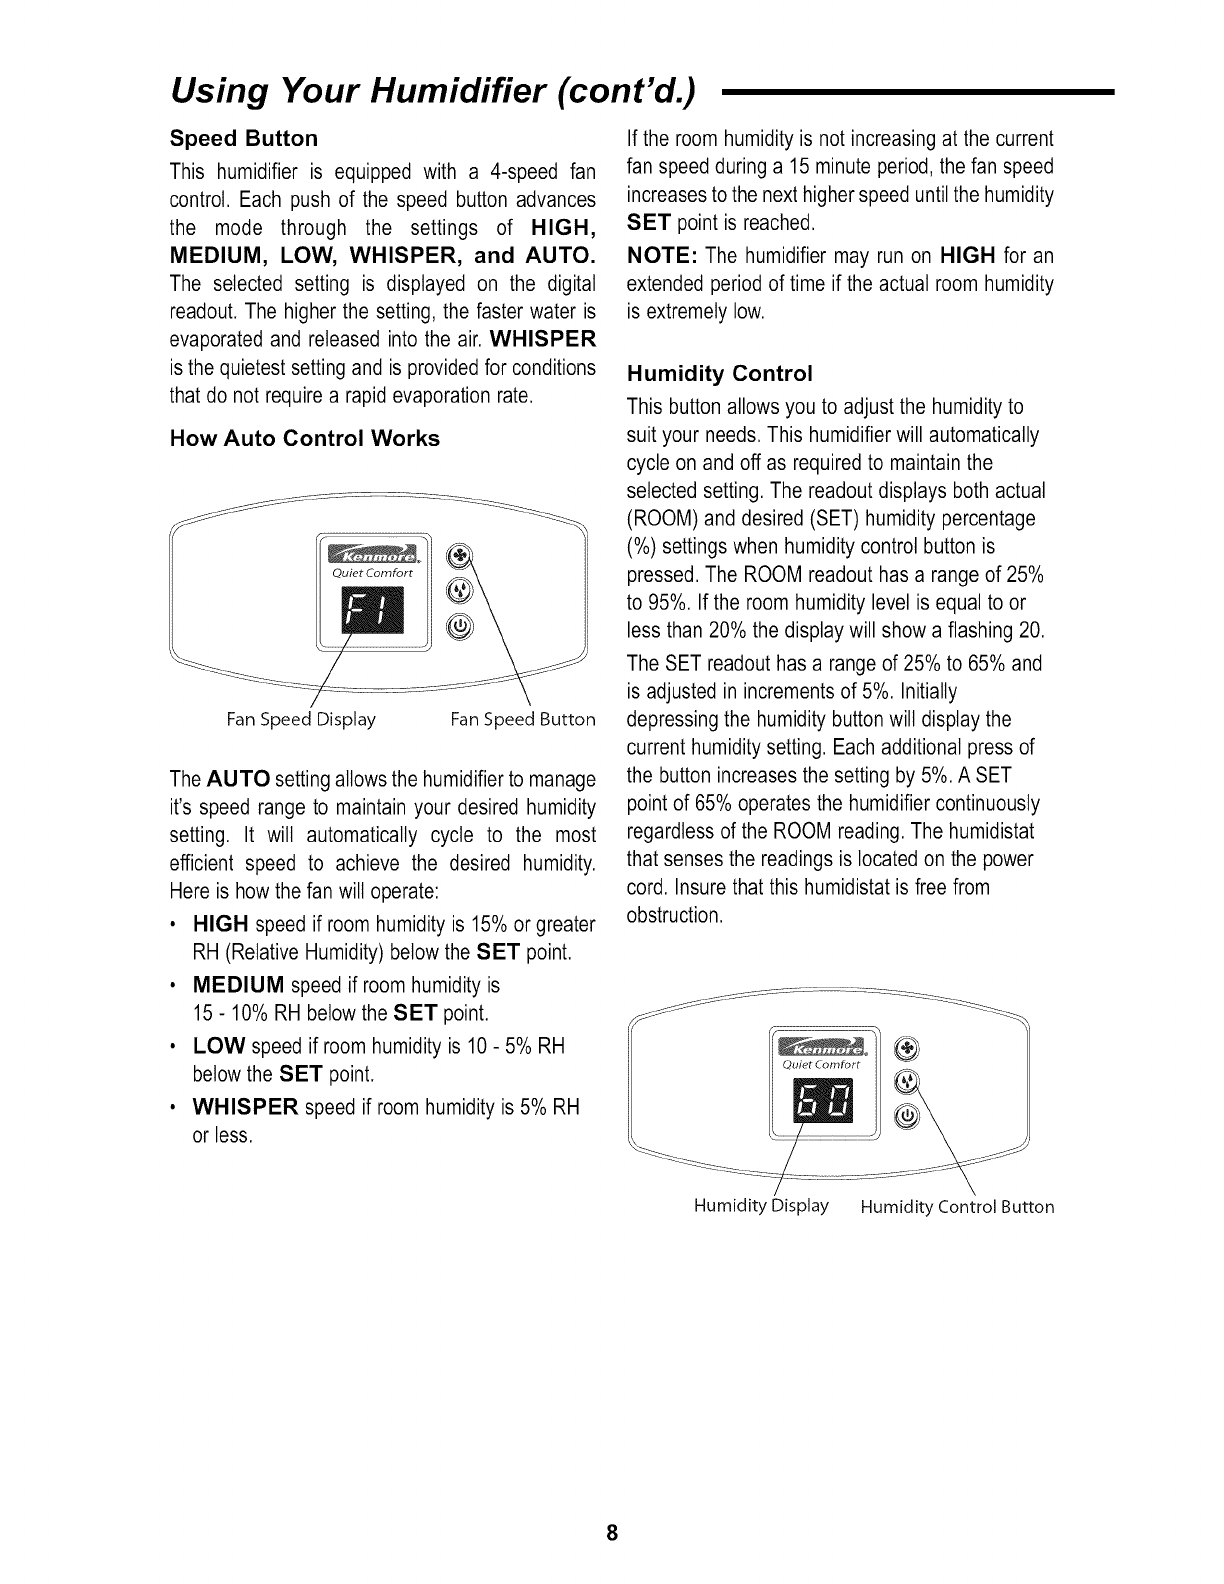
Using Your Humidifier (cont'd.)
Speed Button
This humidifier is equipped with a 4-speed fan
control. Each push of the speed button advances
the mode through the settings of HIGH,
MEDIUM, LOW, WHISPER, and AUTO.
The selected setting is displayed on the digital
readout. The higher the setting, the faster water is
evaporated and released into the air. WHISPER
is the quietest setting and is provided for conditions
that do not require a rapid evaporation rate.
How Auto Control Works
Quiet Comfort
Fan Speed Display Fan Speed Button
The AUTO setting allows the humidifier to manage
it's speed range to maintain your desired humidity
setting. It wilt automatically cycle to the most
efficient speed to achieve the desired humidity.
Here is how the fan wilt operate:
• HIGH speed if room humidity is 15% or greater
RH (Relative Humidity) below the SET point.
•MEDIUM speed if room humidity is
15 - 10% RH below the SET point.
• LOW speed if room humidity is 10 - 5% RH
below the SET point.
• WHISPER speed if room humidity is 5% RH
or less.
If the room humidity is not increasing at the current
fan speed during a 15 minute period, the fan speed
increases to the next higher speed until the humidity
SET point is reached.
NOTE: The humidifier may run on HIGH for an
extended period of time if the actual room humidity
is extremely low.
Humidity Control
This button allows you to adjust the humidity to
suit your needs. This humidifier will automatically
cycle on and off as required to maintain the
selected setting. The readout displays both actual
(ROOM) and desired (SET) humidity percentage
(%) settings when humidity control button is
pressed. The ROOM readout has a range of 25%
to 95%. If the room humidity level is equal to or
less than 20% the display will show a flashing 20.
The SET readout has a range of 25% to 65% and
is adjusted in increments of 5%. Initially
depressing the humidity button will display the
current humidity setting. Each additional press of
the button increases the setting by 5%. A SET
point of 65% operates the humidifier continuously
regardless of the ROOM reading. The humidistat
that senses the readings is located on the power
cord. Insure that this humidistat is free from
obstruction.
®
Quiet Comfort
Humidity Display Humidity Control Button
8
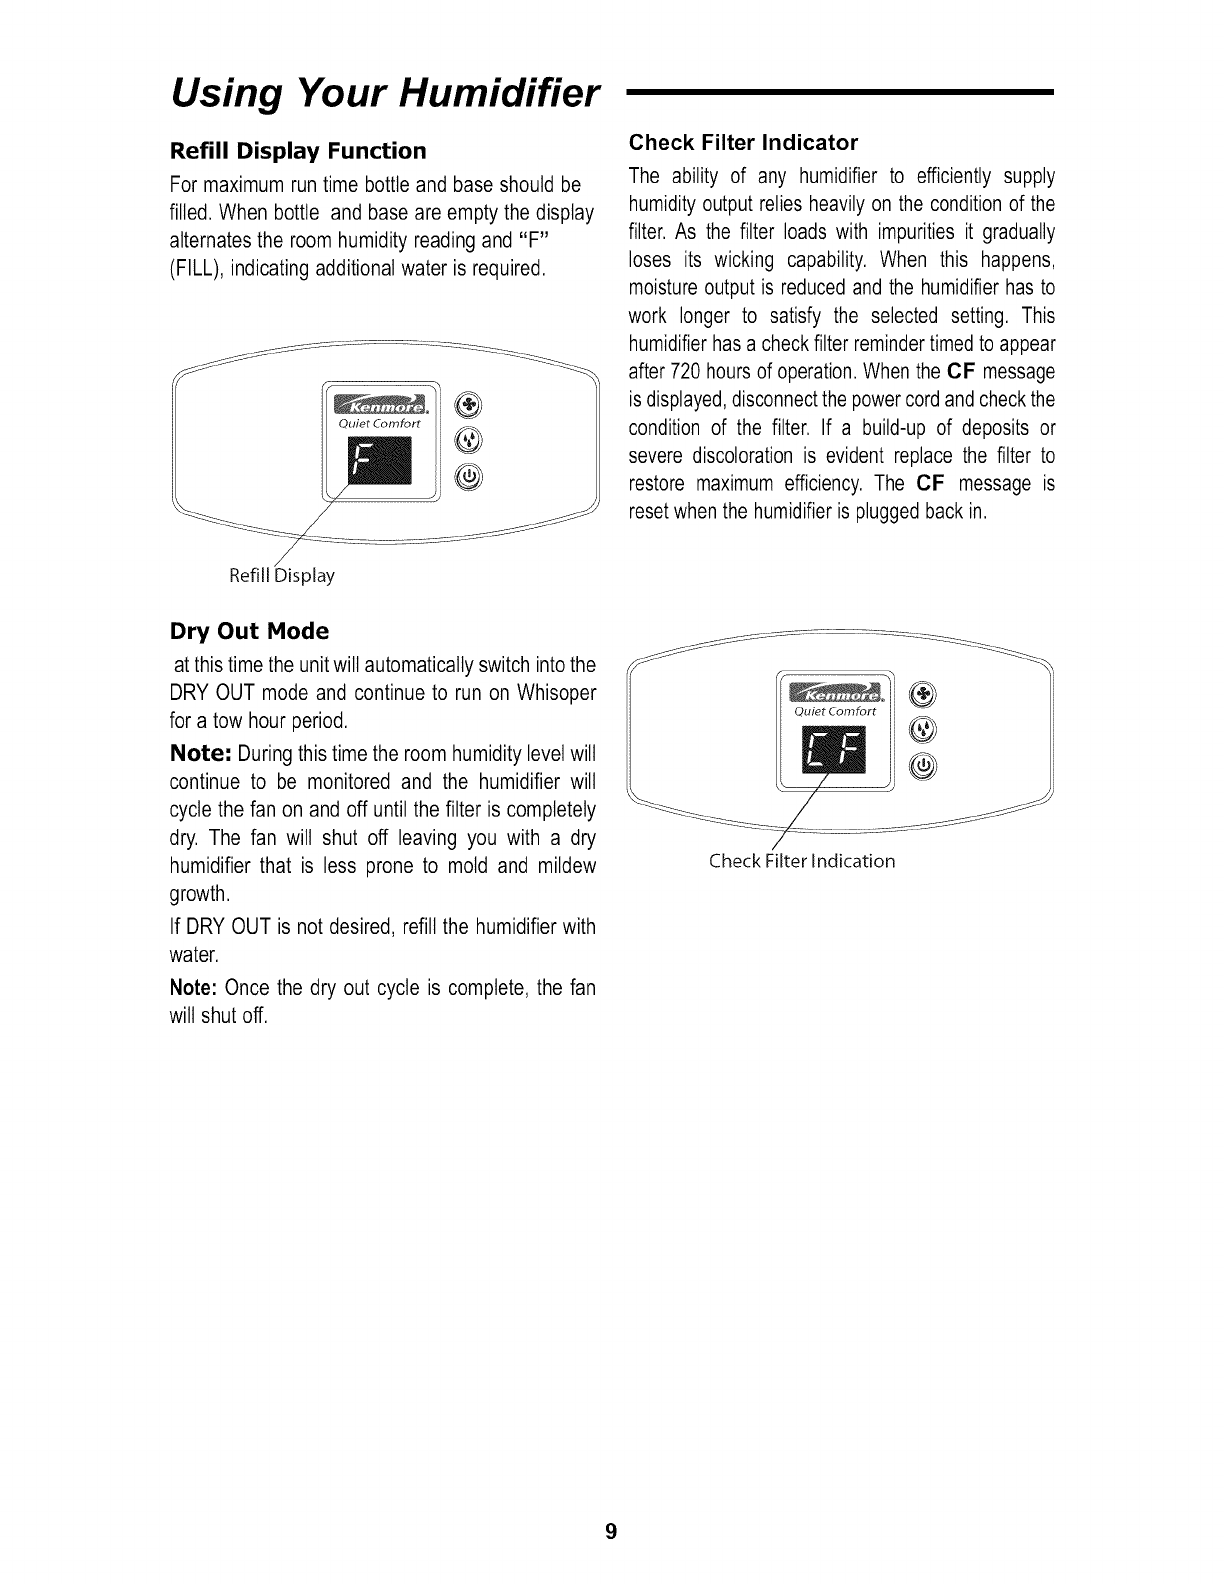
Using Your Humidifier
Refill Display Function
For maximum run time bottle and base should be
filled. When bottle and base are empty the display
alternates the room humidity reading and "F"
(FILL), indicating additional water is required.
Quiet Comfort
Check Filter Indicator
The ability of any humidifier to efficiently supply
humidity output relies heavily on the condition of the
filter. As the filter loads with impurities it gradually
loses its wicking capability. When this happens,
moisture output is reduced and the humidifier has to
work longer to satisfy the selected setting. This
humidifier has a check filter reminder timed to appear
after 720 hours of operation. When the CF message
is displayed, disconnect the power cord and check the
condition of the filter. If a build-up of deposits or
severe discoloration is evident replace the filter to
restore maximum efficiency. The CF message is
reset when the humidifier is plugged back in.
Refill Display
Dry Out Mode
at this time the unit will automatically switch into the
DRY OUT mode and continue to run on Whisoper
for a tow hour period.
Note: During this time the room humidity level will
continue to be monitored and the humidifier will
cycle the fan on and off until the filter is completely
dry. The fan wilt shut off leaving you with a dry
humidifier that is less prone to mold and mildew
growth.
If DRY OUT is not desired, refill the humidifier with
water.
Note: Once the dry out cycle is complete, the fan
wilt shut off.
Quiet Comfort ®
Check Filter Indication
9
Using Your Humidifier (cont'd.)
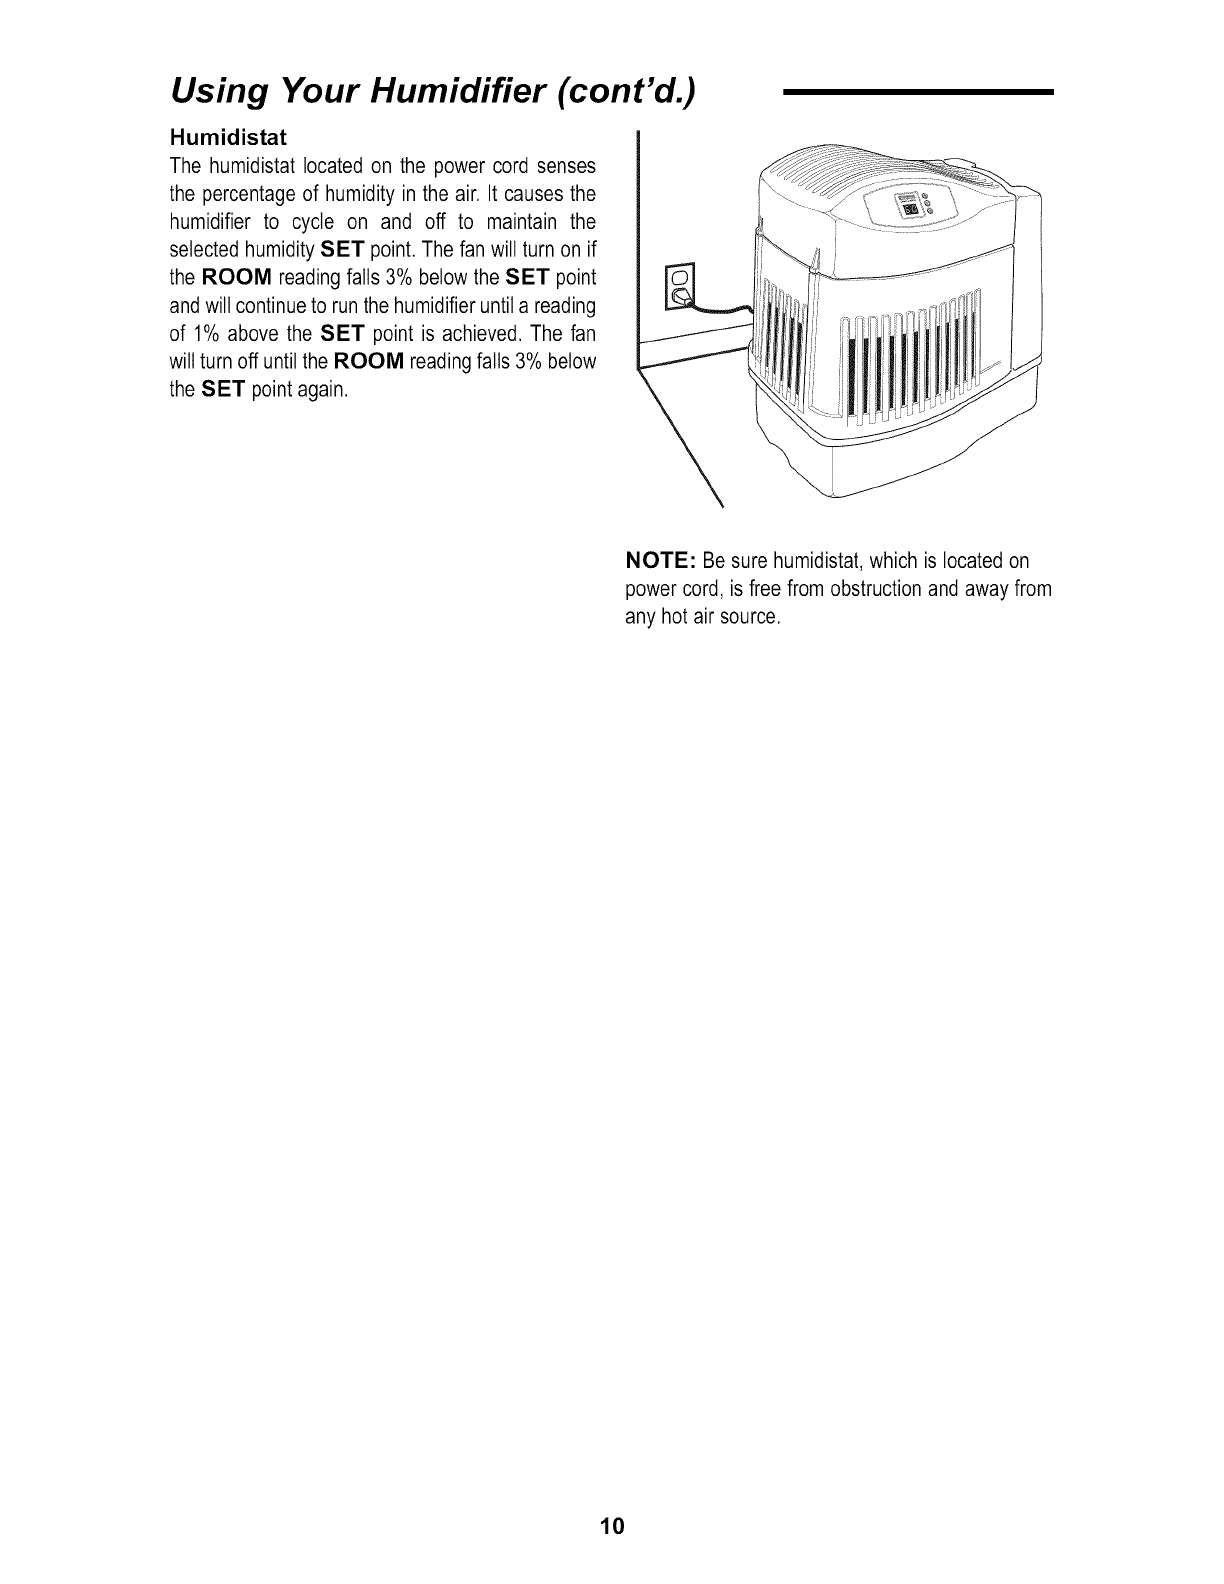
Humidistat
The humidistat located on the power cord senses
the percentage of humidity in the air. It causes the
humidifier to cycle on and off to maintain the
selected humidity SET point. The fan will turn on if
the ROOM reading falls 3% below the SET point
and will continue to run the humidifier until a reading
of 1% above the SET point is achieved. The fan
wilt turn off until the ROOM reading falls 3% below
the SET point again.
I
NOTE: Be sure humidistat, which is located on
power cord, is free from obstruction and away from
any hot air source.
10
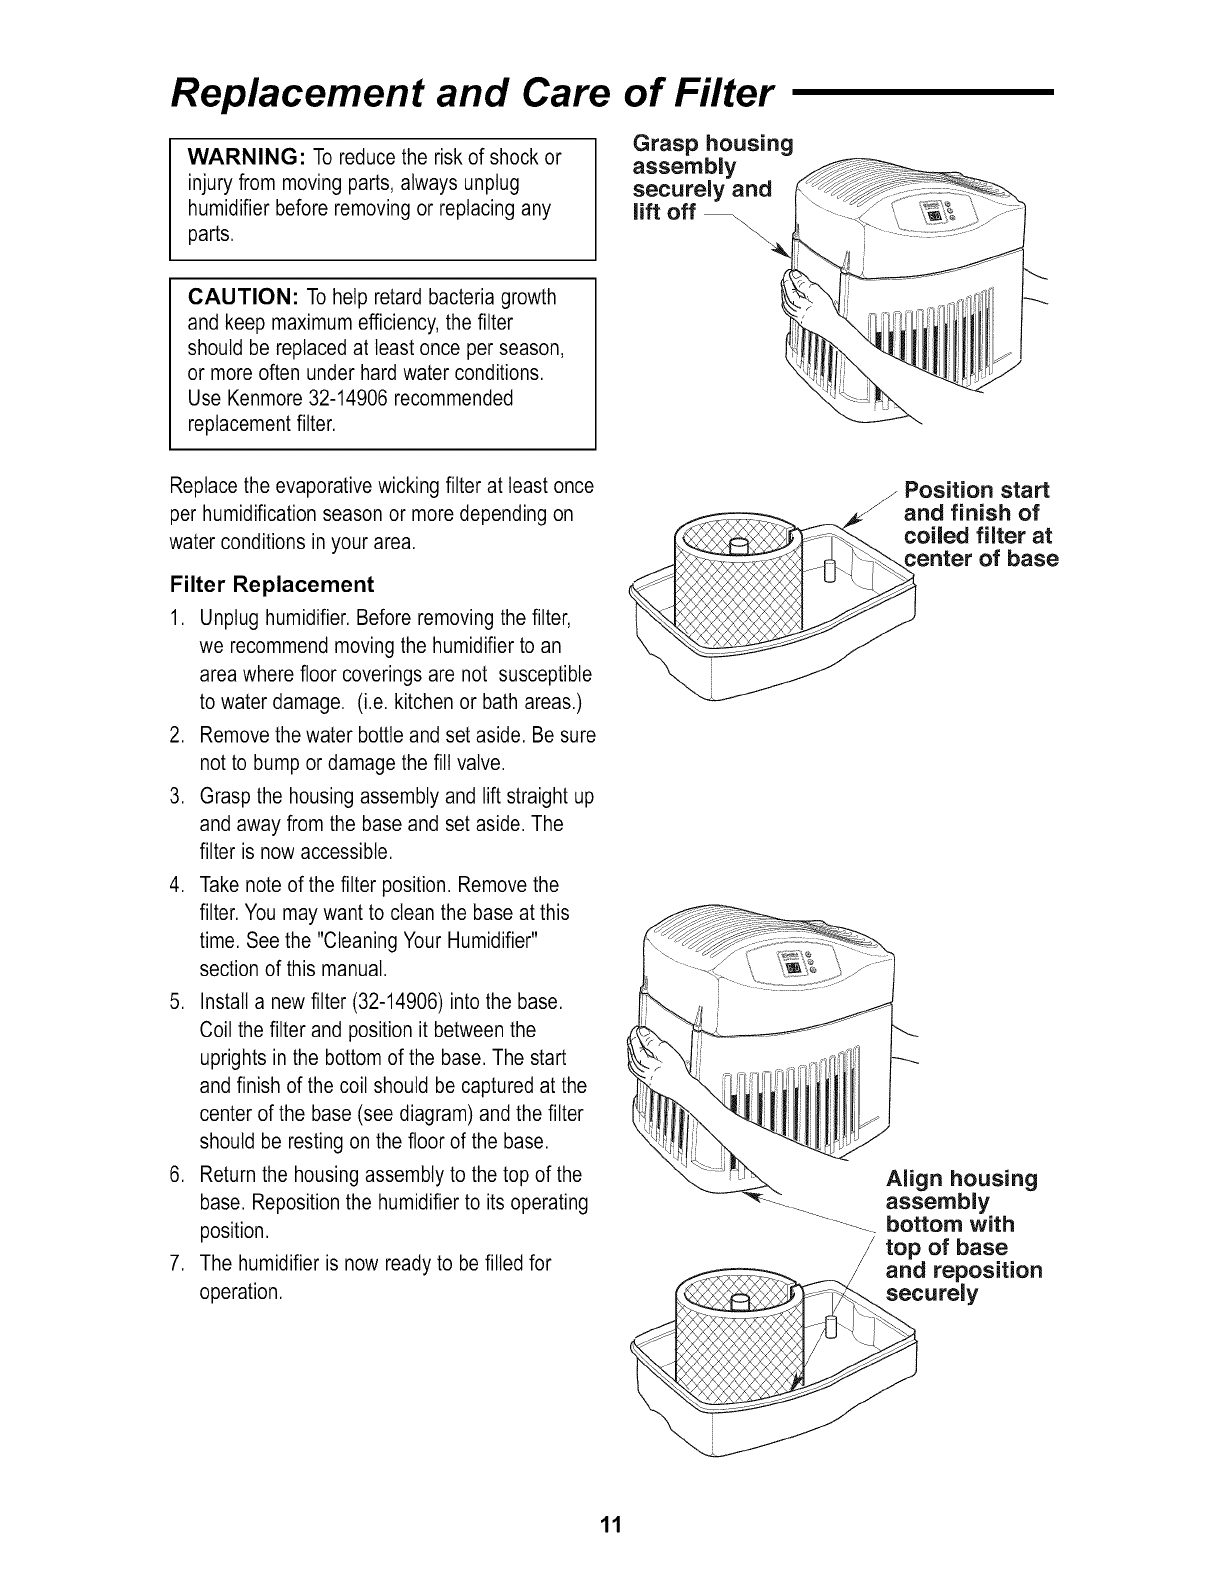
Replacement and Care of Filter
WARNING: To reduce the risk of shock or
injury from moving parts, always unplug
humidifier before removing or replacing any
parts.
Grasp housing
assembly
securely and
lift off
CAUTION: To help retard bacteria growth
and keep maximum efficiency, the filter
should be replaced at least once per season,
or more often under hard water conditions.
Use Kenmore 32-14906 recommended
replacement filter.
Replace the evaporative wicking filter at least once
per humidification season or more depending on
water conditions in your area.
Filter Replacement
1. Unplug humidifier. Before removing the filter,
we recommend moving the humidifier to an
area where floor coverings are not susceptible
to water damage. (i.e. kitchen or bath areas.)
2. Remove the water bottle and set aside. Be sure
not to bump or damage the fill valve.
3. Grasp the housing assembly and lift straight up
and away from the base and set aside. The
filter is now accessible.
,Take note of the filter position. Remove the
filter. You may want to clean the base at this
time. See the "Cleaning Your Humidifier"
section of this manual.
5. Install a new filter (32-14906) into the base.
Coil the filter and position it between the
uprights in the bottom of the base. The start
and finish of the coil should be captured at the
center of the base (see diagram) and the filter
should be resting on the floor of the base.
6. Return the housing assembly to the top of the
base. Reposition the humidifier to its operating
position.
7. The humidifier is now ready to be filled for
operation.
Position start
and finish of
oiled filter at
enter of base
Align housing
-_ assembly
---_-__ bottom with
top of base
and reposition
securely
11
Cleaning and Maintenance
WARNING: To reduce the risk of injury, fire or
damage to humidifier, use only cleaners
specifically recommended for humidifiers. Never
use flammable, combustible or poisonous
materials to clean your humidifier. To reduce the
risk of scalds and damage to humidifier, never
put hot water in humidifier.
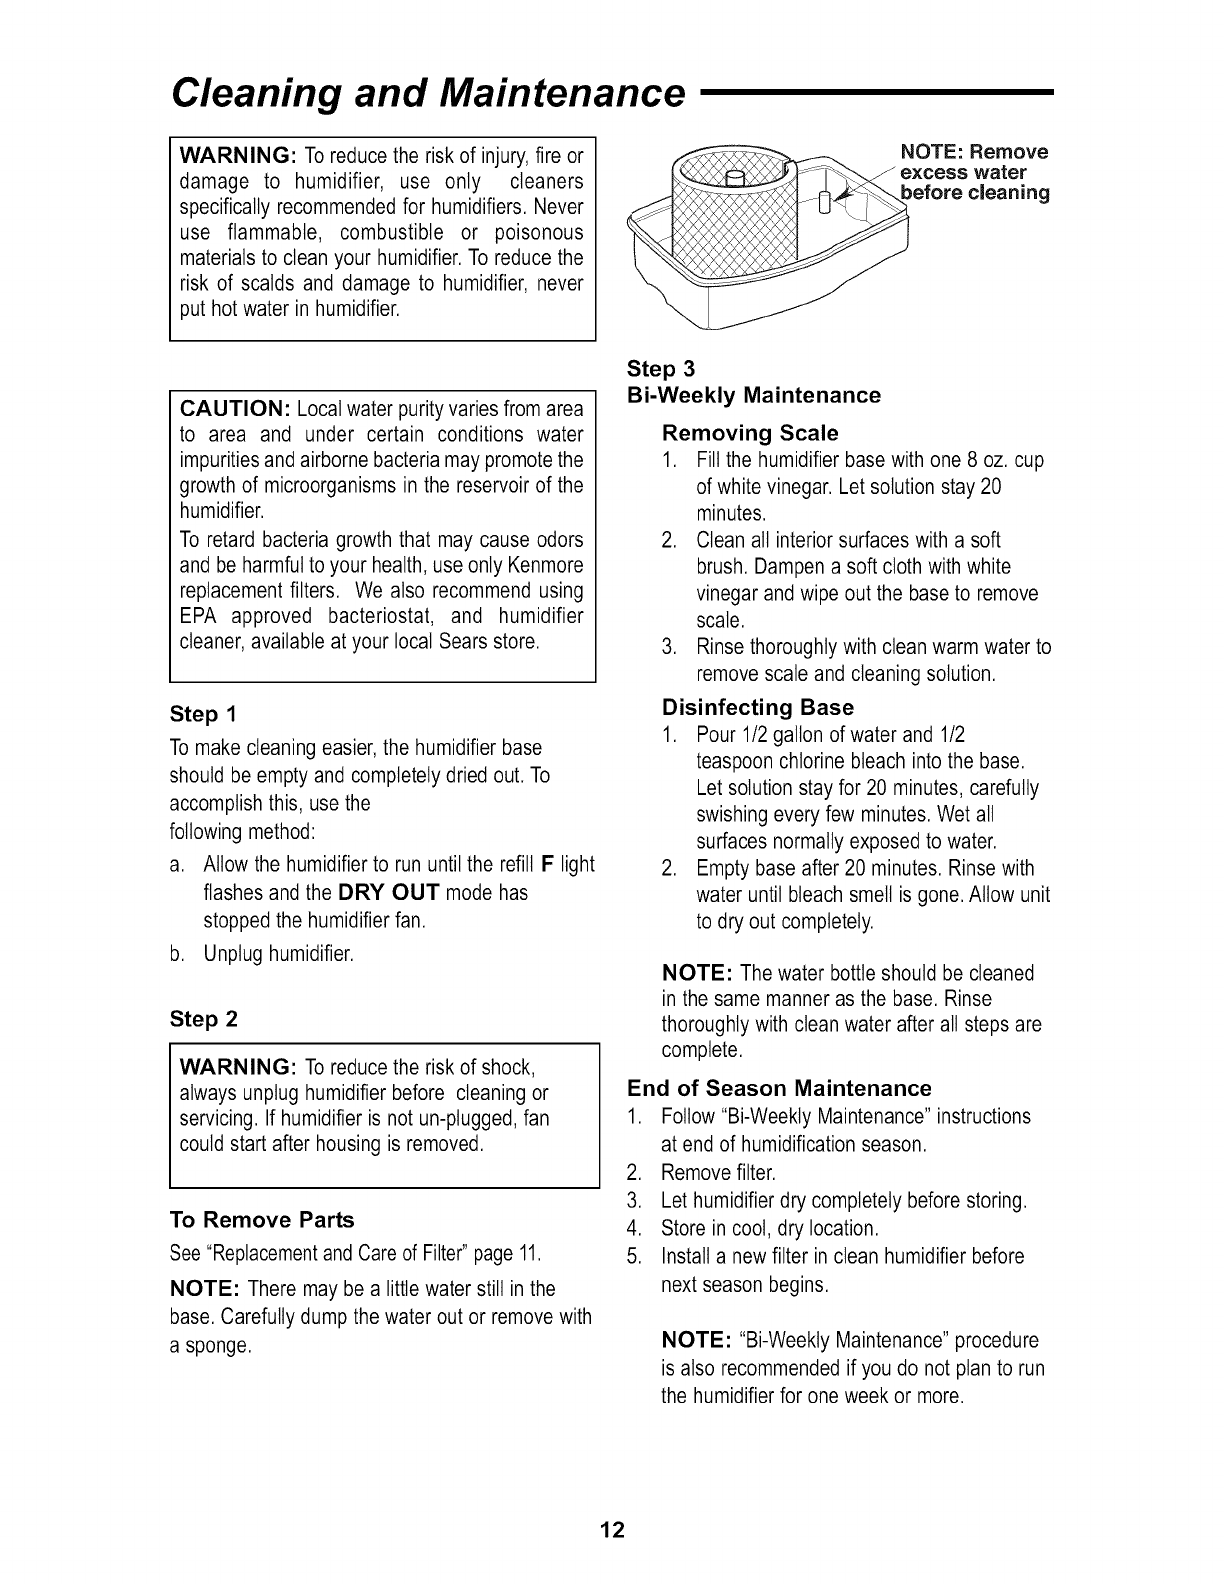
NOTE: Remove
Jexcess water
before cleaning
CAUTION: Local water purity varies from area
to area and under certain conditions water
impurities and airborne bacteria may promote the
growth of microorganisms in the reservoir of the
humidifier.
To retard bacteria growth that may cause odors
and be harmful to your health, use only Kenmore
replacement filters. We also recommend using
EPA approved bacteriostat, and humidifier
cleaner, available at your local Sears store.
Step 1
To make cleaning easier, the humidifier base
should be empty and completely dried out. To
accomplish this, use the
following method:
a. Allow the humidifier to run until the refill F light
flashes and the DRY OUT mode has
stopped the humidifier fan.
b. Unplug humidifier.
Step 2
WARNING: To reduce the risk of shock,
always unplug humidifier before cleaning or
servicing. If humidifier is not un-plugged, fan
could start after housing is removed.
To Remove Parts
See "Replacement and Care of Filter" page 11.
NOTE: There may be a little water still in the
base. Carefully dump the water out or remove with
a sponge.
Step 3
Bi-Weekly Maintenance
Removing Scale
1. Fill the humidifier base with one 8 oz. cup
of white vinegar. Let solution stay 20
minutes.
2. Clean all interior surfaces with a soft
brush. Dampen a soft cloth with white
vinegar and wipe out the base to remove
scale.
3. Rinse thoroughly with clean warm water to
remove scale and cleaning solution.
Disinfecting Base
1. Pour 1/2 gallon of water and 1/2
teaspoon chlorine bleach into the base.
Let solution stay for 20 minutes, carefully
swishing every few minutes. Wet all
surfaces normally exposed to water.
2. Empty base after 20 minutes. Rinse with
water until bleach smell is gone. Allow unit
to dry out completely.
NOTE: The water bottle should be cleaned
in the same manner as the base. Rinse
thoroughly with clean water after all steps are
complete.
End of Season Maintenance
1. Follow "Bi-Weekty Maintenance" instructions
at end of humidification season.
2. Remove filter.
3. Let humidifier dry completely before storing.
4. Store in coot, dry location.
5. Install a new filter in clean humidifier before
next season begins.
NOTE: "Bi-Weekty Maintenance" procedure
is also recommended if you do not plan to run
the humidifier for one week or more.
12
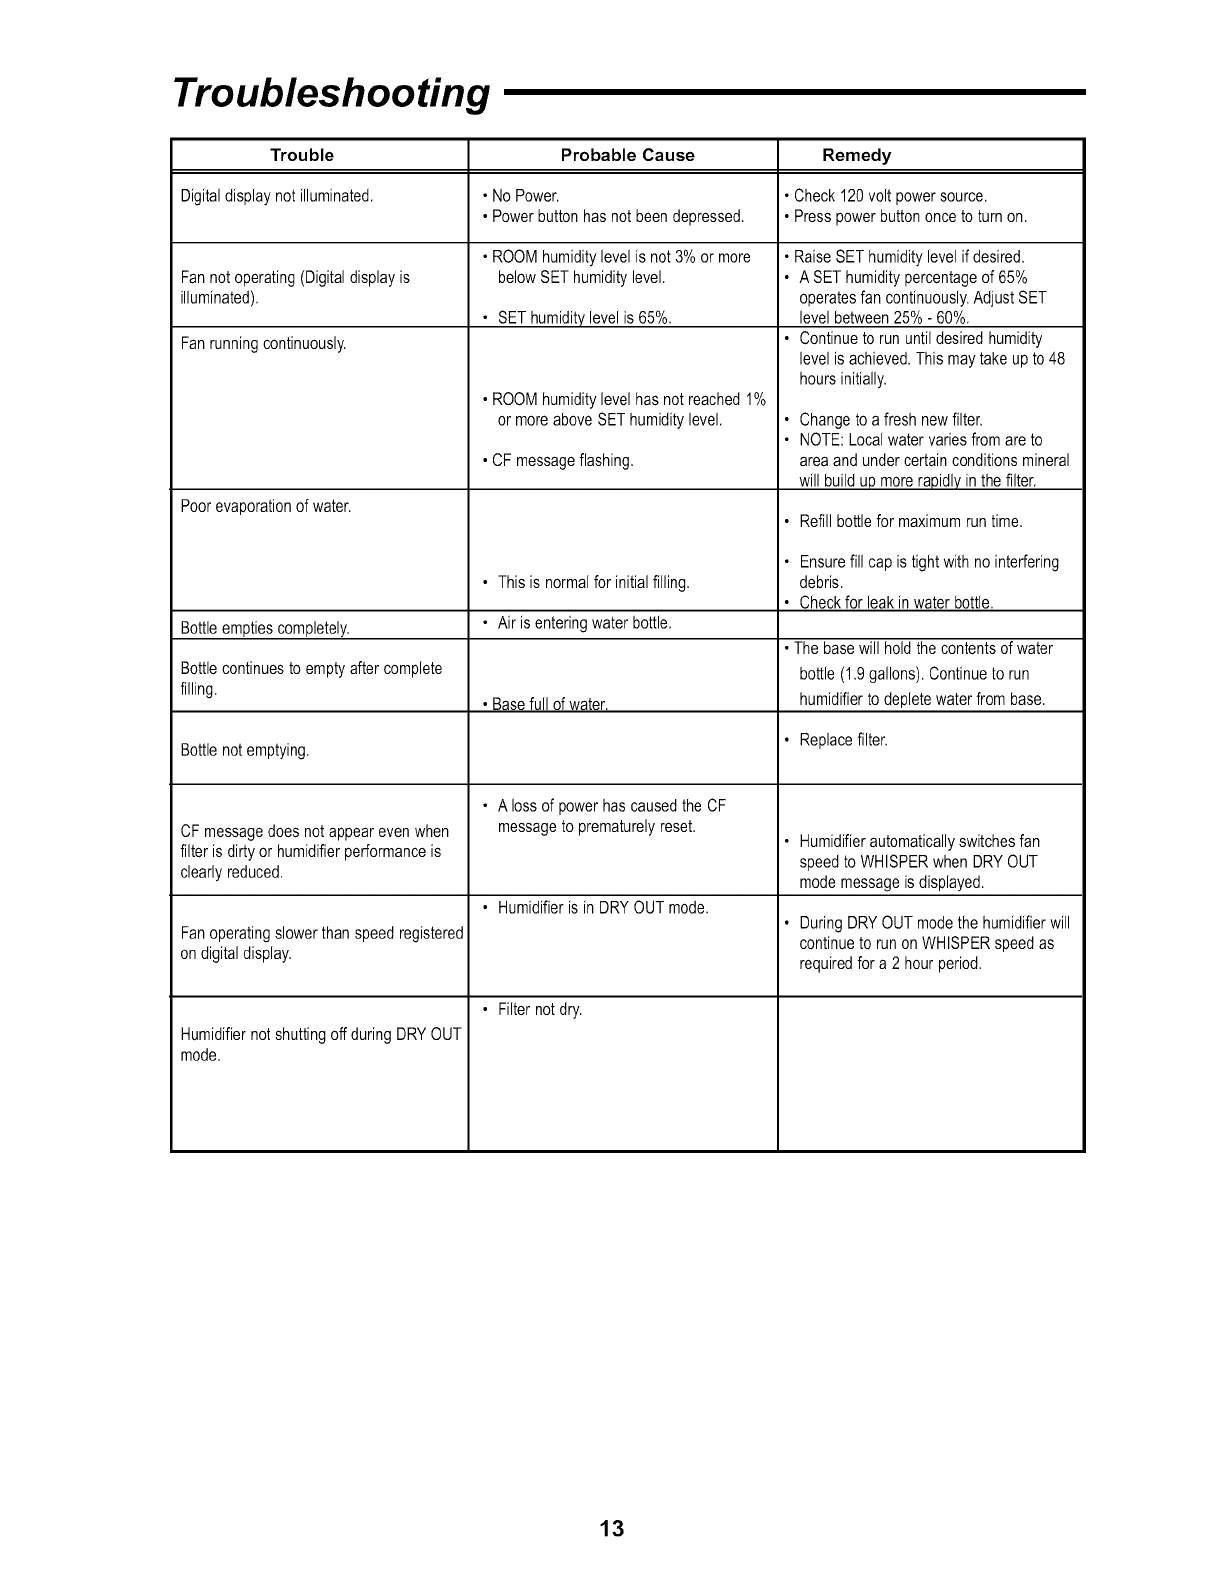
Troubleshooting
Trouble Probable Cause Remedy
Digitaldisplaynot illuminated. • NoPower. • Check 120volt powersource.
• Powerbuttonhasnot beendepressed. • Presspowerbuttononceto turn on.
• ROOMhumiditylevelis not3% or more
Fannotoperating(Digitaldisplayis belowSEThumiditylevel.
illuminated).
• SEThumiditylevel is 65%.
Fanrunningcontinuously.
Poorevaporationof water.
• ROOMhumiditylevelhas not reached1%
or moreaboveSEThumiditylevel.
• CF messageflashing.
• RaiseSET humiditylevelif desired.
• A SEThumiditypercentageof 65%
operatesfan continuously.AdjustSET
level between25%- 60%.
• Continueto run untildesiredhumidity
level isachieved.Thismaytakeup to48
hoursinitially.
Changeto a fresh newfilter.
NOTE:Localwatervariesfromare to
areaand undercertainconditionsmineral
will buildup morerapidlyin thefilter.
• Refill bottlefor maximumrun time.
• Thisis normalfor initialfilling.
Bottleemptiescompletely. • Air is enteringwater bottle.
•The basewill holdthe contentsof water
Bottlecontinuesto emptyafter complete bottle (1.9gallons).Continueto run
filling. • Basefull of water, humidifierto depletewaterfrom base.
Bottlenotemptying. • Replacefilter.
• A lossof powerhascausedthe CF
messageto prematurelyreset.
• Humidifieris in DRYOUTmode.
• Filternotdry.
CF messagedoes notappearevenwhen
filterisdirtyor humidifierperformanceis
clearlyreduced.
Fanoperatingslowerthan speedregistered
ondigitaldisplay.
HumidifiernotshuttingoffduringDRYOUT
mode.
• Ensurefill cap is tightwithno interfering
debris.
• Checkfor leak inwater bottle.
• Humidifierautomaticallyswitchesfan
speedto WHISPERwhenDRYOUT
modemessageis displayed.
• DuringDRYOUT modethe humidifierwill
continueto runon WHISPERspeedas
requiredfor a 2 hourperiod.
13
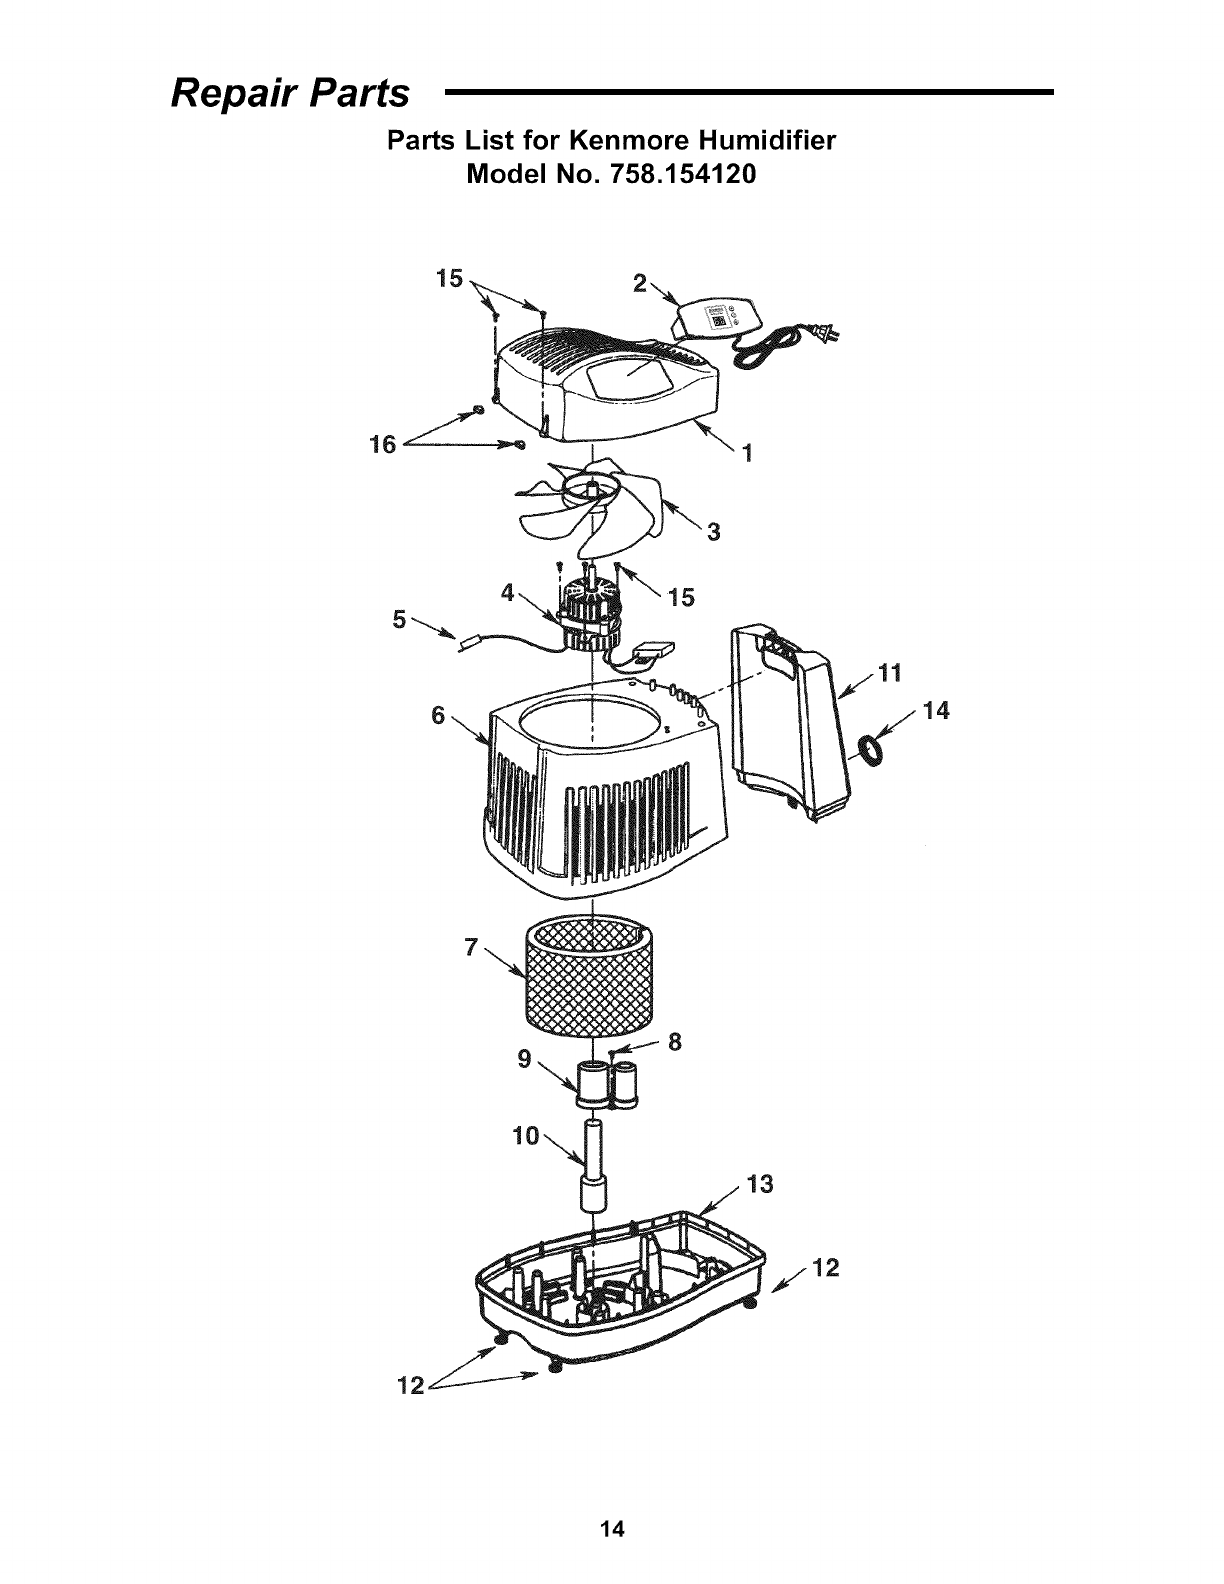
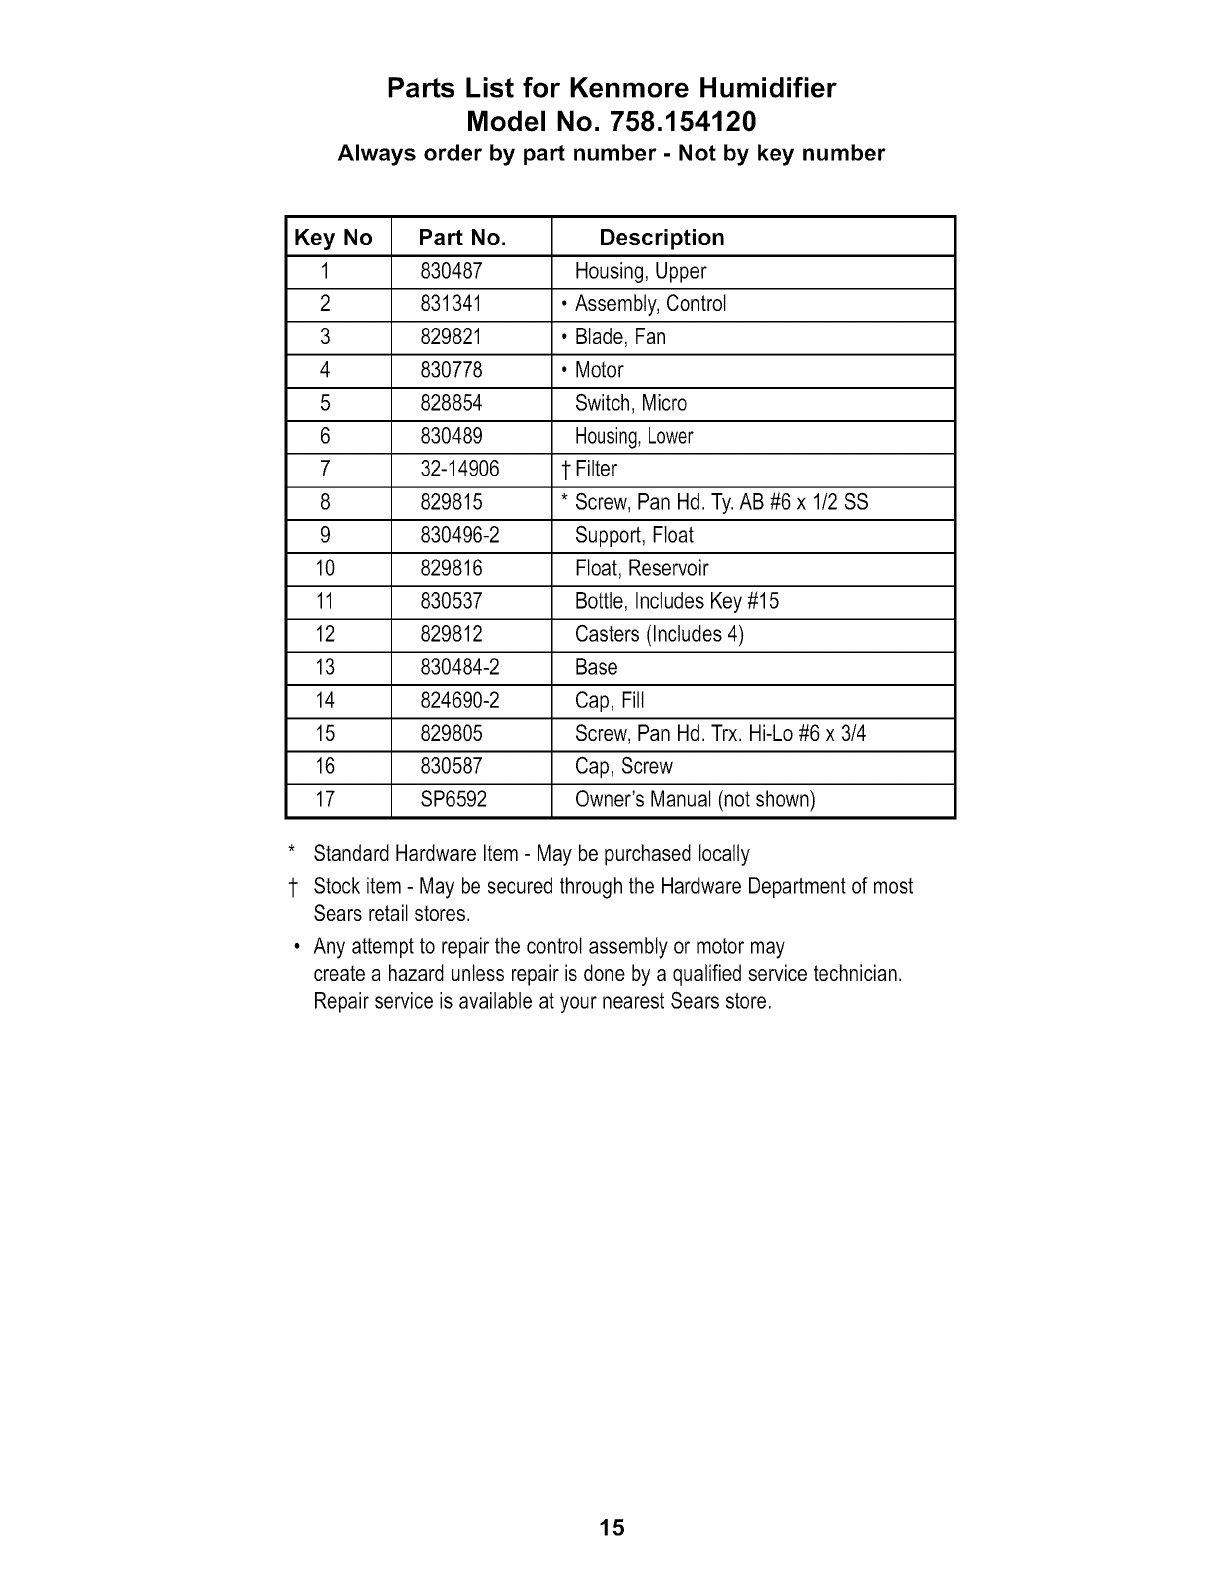
Repair Parts
Parts List for Kenmore Humidifier
Model No. 758.154120
15
3
6
8
14
13
14
Parts List for Kenmore Humidifier
Model No. 758.154120
Always order by part number - Not by key number
Key No Part No. Description
1 830487 Housing, Upper
2 831341 •Assembly, Control
3 829821 • Blade, Fan
4 830778 • Motor
5 828854 Switch, Micro
6 830489 Housing,Lower
7 32-14906 1 Filter
8 829815 * Screw, Pan Hd. Ty. AB #6 x 1/2 SS
9 830496-2 Support, Float
10 829816 Float, Reservoir
11 830537 Bottle, Includes Key #15
12 829812 Casters (Includes 4)
13 830484-2 Base
14 824690-2 Cap, Fill
15 829805 Screw, Pan Hd. Trx. Hi-Lo #6 x 3/4
16 830587 Cap, Screw
17 SP6592 Owner's Manual (not shown)
* Standard Hardware Item - May be purchased locally
1 Stock item - May be secured through the Hardware Department of most
Sears retail stores.
Any attempt to repair the control assembly or motor may
create a hazard unless repair is done by a qualified service technician.
Repair service is available at your nearest Sears store.
15

Notes
16
LEA Y GUARDE
Manual del usuario
ESTAS INSTRUCCIONES
MD
HUMIDIFICADOR PARA TODA LA CASA
Produccibn de 12 galones
con lectura digital
modelo 758.154120
PRECAUCION: Antes de
utilizar este producto, lea este
manual y siga todas las
normas de seguridad e
instrucciones de utilizacibn.
• Seguridad
•Ensamblaje
•Utilizacibn
•Mantenimiento
•Piezas
Sears, Hoffman Estates, IL 60179 U.S.A.
www.sears.com
No. de pieza SP6592 Impreso en U.S.A.
GARANTiA COMPLETA DE UN ANO PARA EL HUMIDIFICADOR
KENMORE
Si cualquier pieza de este humidificador falla debido a un defecto de material o de fabricaci6n
dentro del plazo de un afio a partir de la fecha de compra, o si el motor del humidificador falla
debido a un defecto de material o de fabricaci6n durante el segundo afio a partir de la fecha de
compra, DEVUELVA EL HUMIDIFICADOR AL CENTRO DE PIEZAS Y REPARACION DE
SEARS MAS CERCANO y sera reparado sin ningQn cargo. Esta garantia no incluye los filtros
del humidificador, que son piezas perecederas que se pueden desgastar por causa del uso
normal en menos de un afio. Esta garantia le confiere a usted derechos legales especificos y
es posible que usted tambien tenga otros derechos que varian de un estado a otro.
INSTRUCCIONES GENERALES DE SEGURIDAD
Palabras de serial de seguridad
PELIGRO: Significa que si no se sigue la
informaci6n de seguridad, alguien resultar_
lesionado gravemente o morir&
ADVERTENCIA: Significa que si no se sigue la
informaci6n de seguridad, alguien podria resuttar
lesionado gravemente o morir.
PRECAUCION: Significa que si no se sigue la
informaci6n de seguridad, alguien pudiera resuttar
lesionado.
1. Para reducir el riesgo de peligro de incendio o
descargas electricas, enchufe el humidificador
directamente en un tomacorriente de 120 V C.A.
No use cordones de extensi6n.
2. Mantenga el cable etectrico alejado de las zonas
de trafico. Para reducir el riesgo de peligro de
incendio, no ponga nunca el cord6n etectrico
debajo de alfombras ni cerca de salidas de calor,
radiadores de calor, estufas de cocina o
calentadores.
3. Desenchufe siempre et humidificador antes de
trasladarlo, antes de limpiarlo o siempre que no
este en servicio.
4. Mantenga limpio el humidificador.
5. No ponga objetos extrafios dentro del
humidificador.
indice
Informaci6n de garantia ..................................... 18
Instrucciones generales de seguridad ............... 18
Para ahorrarse una Ilamada de servicio ............19
Familiaricese con el humidificador ..................... 19
C6mo funciona el humidificador ........................ 20
Paso 1. Preparaci6n y puesta en
marcha det humidificador ............................. 20
Paso 2. Instrucciones de ubicaci6n ....................21
6. No deje que et humidificador se use como un
juguete. Es necesario prestar mucha atenci6n
cuando et humidificador sea usado por nifios o
cerca de eltos.
7. No utilice nunca el humidificador mientras alguna
pieza falte o este dafiada de cualquier manera.
8. Para reducir et riesgo de peligro electrico o dafios
al humidificador, no incline, sacuda ni vuetque et
humidificador mientras la unidad este en marcha.
9. Para reducir el riesgo de dafios al humidificador,
desenchOfeto cuando no este en uso.
10. Para reducir et riesgo de descargas etectricas
accidentales, no toque el cable de alimentaci6n ni
los controtes con las manos mojadas.
11. Para reducir et riesgo de incendio, no use el
humidificador cerca de una llama al descubierto,
como por ejemplo la de una vela u otra fuente de
llamas.
12. Fijese en la etiqueta de advertencia que se
muestra a continuaci6n.
ADVERTENCIA: Para reducir el riesgo de
incendio,descargaselectricaso lesiones,desenchufe
siempreel humidificadorantesde hacerleservicio de
ajustes y reparacioneso limpiarlo.
Conexi6n electrica ............................................. 21
Paso 3. Ltenado con agua ................................. 22
Paso 4. Utilizaci6n de los controtes ..............23-24
Utilizaci6n del humidificador ........................... 25-26
Reemplazo y cuidado det filtro ........................... 27
Limpieza y mantenimiento .................................. 28
Resotuci6n de probtemas ................................... 29
Piezas de repuesto ....................................... 30-31
18
Paraahorrarseuna Ilamadade servicio
Compruebe Io siguiente si el humidificador no
funciona.
1. 6Esta el cable de alimentaci6n conectado a un
tomacorriente?
2. _,Hayalimentaci6n electrica al tomacorriente?
3. 6Esta encendido el control del ventilador?
4. 6Esta el control de humedad ajustado a un nivel
Io suficientemente alto?
5. 6Esta el gabinete ubicado en una superficie
nivetada?
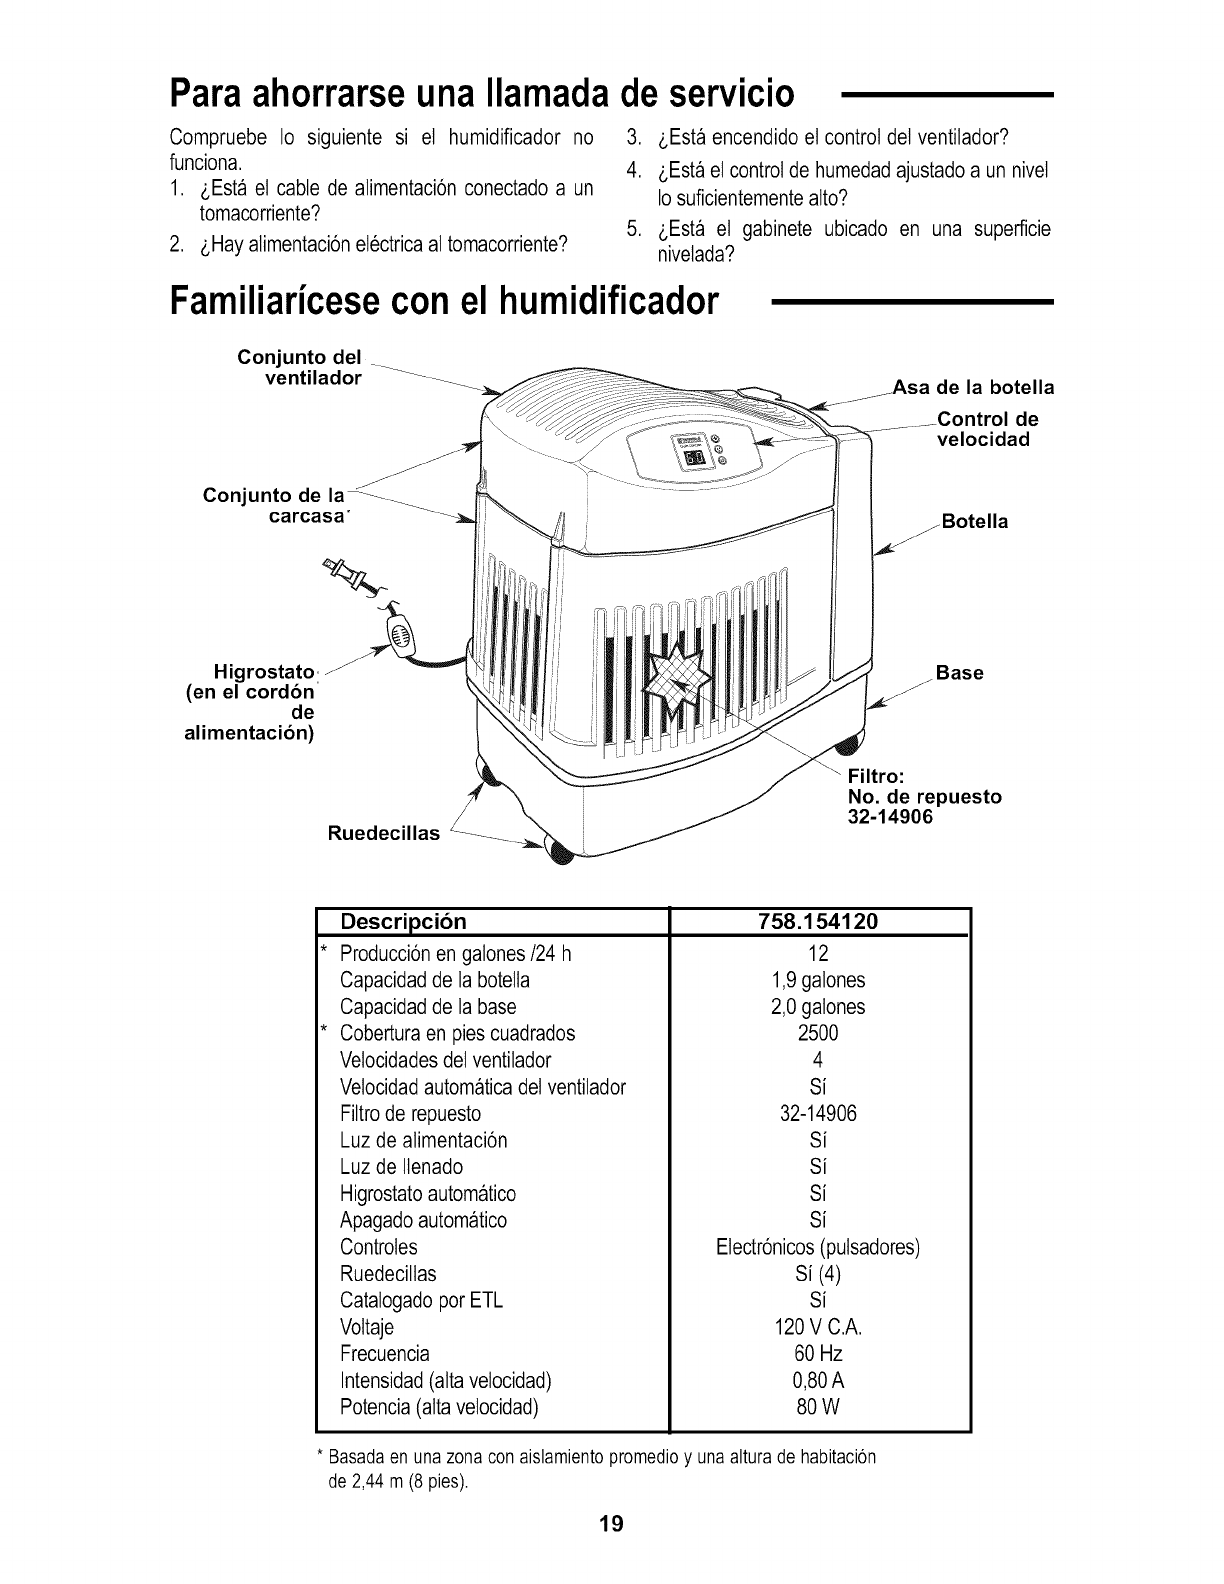
Familiaricesecon el humidificador
Conjunto del
ventilador
Conjunto de la_---_
carcasa"
Higrostato:
(en el cordon
de
alimentacion)
de la botella
de
velocidad
Botella
Base
Filtro:
No. de repuesto
32-14906
Descripcion
Producci6n en galones/24 h
Capacidad de la botella
Capacidad de la base
Cobertura en pies cuadrados
Vetocidades del ventilador
Vetocidad automatica del ventilador
Filtro de repuesto
Luz de alimentaci6n
Luz de Ilenado
Higrostato automatico
758.154120
12
1,9 galones
2,0 galones
2500
4
Si
32-14906
Si
Si
Si
Apagado automatico
Controtes
Ruedeciltas
Catalogado por ETL
Voltaje
Frecuencia
Intensidad (alta vetocidad)
Potencia (alta velocidad)
Si
Electr6nicos (putsadores)
Si (4)
Si
120 V C.A.
60 Hz
0,80 A
8OW
* Basadaen una zonacon aislamientopromedioy unaaltura de habitacion
de2,44 m (8 pies).
19

Cbmofunciona el humidificador
Su nuevo humidificador Kenmore esta disefiado para
satisfacer los requisitos de humedad del hogar a
traves del principio de la evaporaci6n del agua en el
aire. Una vez que el flltro se satura, se hace entrar
aire, el cual pasa a traves del filtro y absorbe hume-
dad. Toda la evaporaci6n ocurre en el humidificador,
por Io que todos los residuos permanecen en el filtro.
Este proceso natural de evaporaci6n elimina
practicamente el polvo blanco.
Luego, se expulsa
aire humidificado a
trav6s dela parte
superior
Elaire
seco
entra a
trav6s de
las rejillas
ubicadas
en la
carcasa
PRECAUCION: Parareducirel riesgode lesiones,
incendio o dafios al humidificador,utilice Onicamente
limpiadores recomendados especificamente para
humidificadores. No utilice nunca materiales
inflamables, combustibles o toxicos para limpiar el
humidificador.Parareducirelriesgode quemarsey de
dafiar el humidificador,no ponganunca agua caliente
en el humidificador.
Paso1. Preparacibny puestaen marcha
delhumidificador
Ensamblaje
Saque de la caja las ruedeciltas, la botelta de agua,
el conjunto de la carcasa y el filtro, e invierta la base.
Presione las ruedeciltas manualmente en la parte
inferior de la base. No use herramientas.
Ponga la base en posici6n al derecho.
Coloque de nuevo el filtro, et conjunto de la carcasa
y la botella (consutte "Reemplazo y cuidado de los
filtros", pagina 27, como referencia).
20
Paso2. Ubicaci6ny conexi6nel ctrica
ADVERTENCIA: Para su propia seguridad, no
utilice el humidificador si alguna pieza esta dai_ada
o falta.
Seleccion de una ubicacion
Cotoque el humidificador en una superficie ptana y
nivelada. Tenga cuidado adicional de nivelar la
unidad cuando la coloque sobre una alfombra.
Coloque et humidificador en et lugar donde se
necesite mas humedad o donde se haga circular la
mayor cantidad de aire a traves de la casa, como
por ejemplo cerca de un retorno de aire frio.
Et aire h0medo (humedad) producido se dispersara
por toda la casa, pero et area mas pr6xima a la
unidad tendra la humedad mas alta. Si la unidad
esta ubicada cerca de una ventana, es posible que
se forme condensaci6n en et vidrio de la ventana.
Si esto ocurre, se debe cotocar la unidad en otra
ubicaci6n.
NOTA: Debido a que el humidificador expulsa
aire frio y h0medo, 1omejor es dirigir el aire alejan-
doto del termostato y las salidas de aire caliente, y
posicionar el humidificador junto a una pared
interior. No debe cotocarse la unidad en lugares
donde et aire frio procedente de las paredes
exteriores o et aire caliente procedente de una sali-
da de aire caliente sople directamente hacia ella.
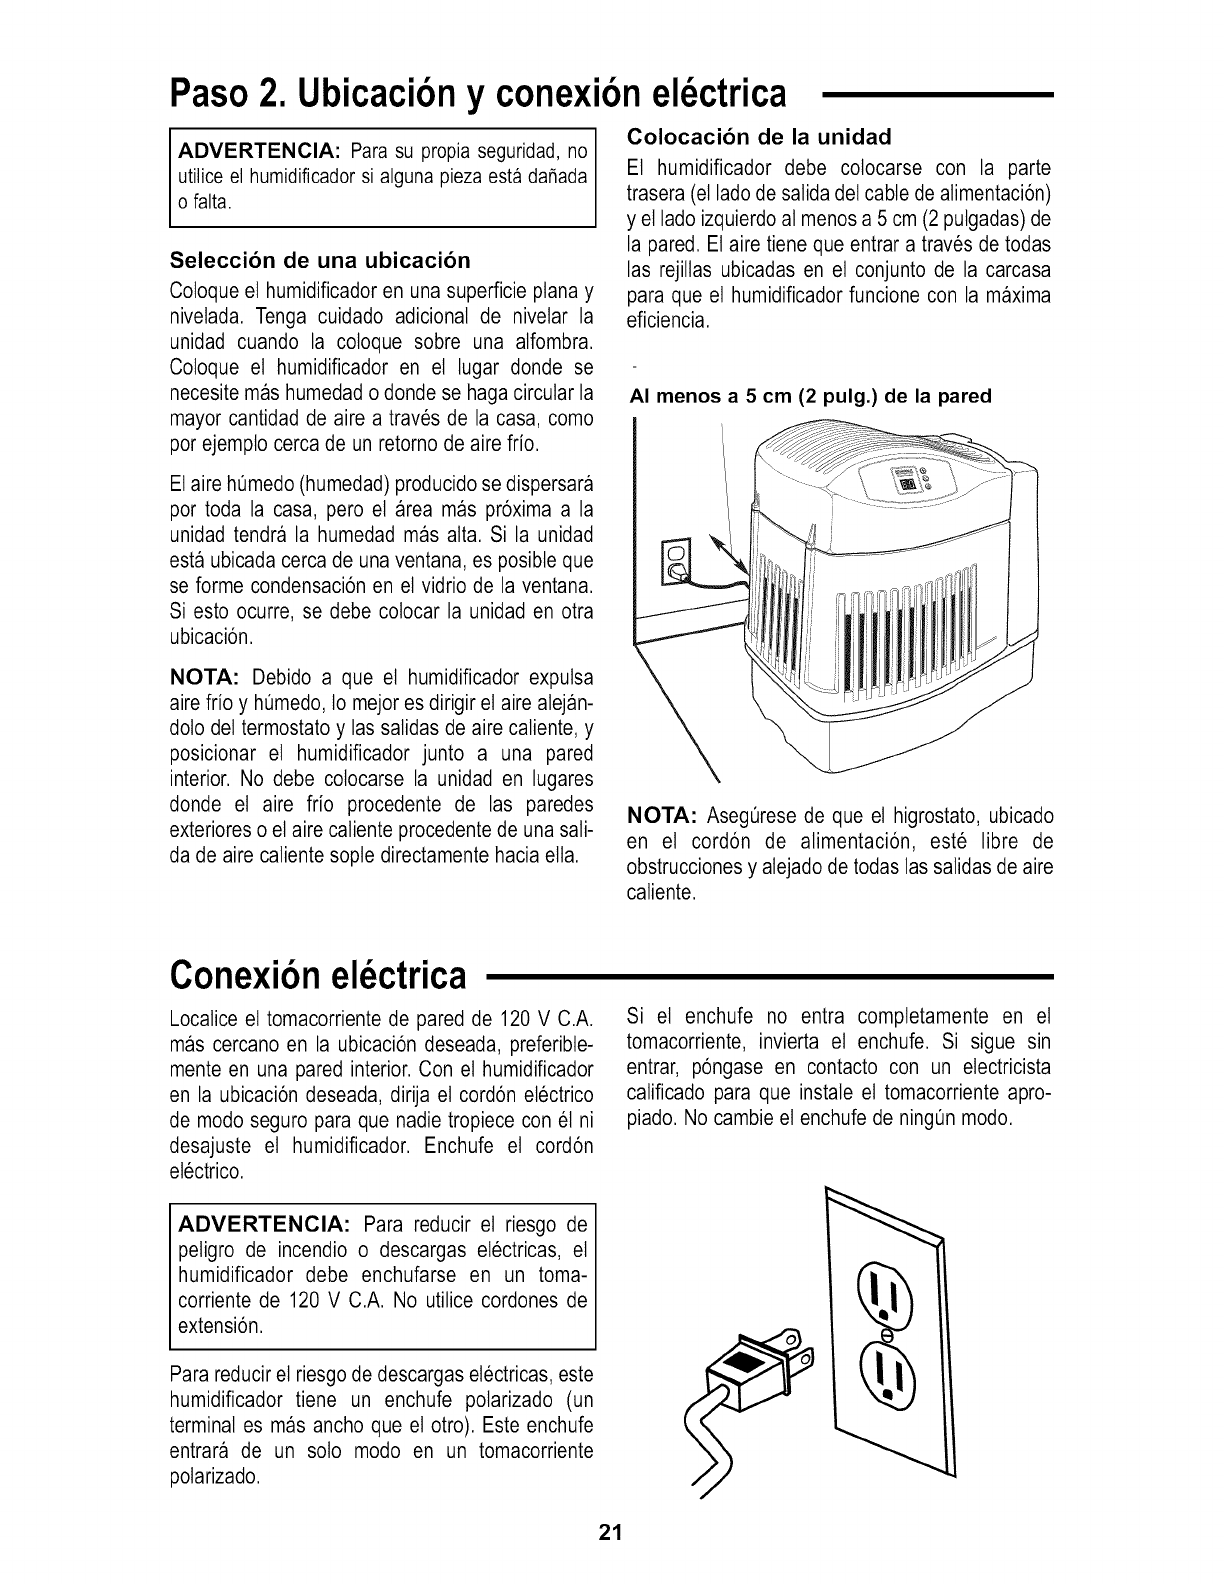
Colocacion de la unidad
Et humidificador debe colocarse con la parte
trasera (el lado de salida del cable de alimentaci6n)
y el lado izquierdo al menos a 5 cm (2 putgadas) de
la pared. Et aire tiene que entrar a traves de todas
las rejillas ubicadas en el conjunto de la carcasa
para que el humidificador funcione con la maxima
eficiencia.
AI menos a 5 cm (2 pulg.) de la pared
NOTA: AsegOrese de que el higrostato, ubicado
en el cord6n de alimentaci6n, este libre de
obstrucciones y alejado de todas las salidas de aire
caliente.
Conexi6nel ctrica
Localice et tomacorriente de pared de 120 V C.A.
mas cercano en la ubicaci6n deseada, preferible-
mente en una pared interior. Con et humidificador
en la ubicaci6n deseada, dirija el cord6n electrico
de modo seguro para que nadie tropiece con et ni
desajuste el humidificador. Enchufe el cord6n
electrico.
Si et enchufe no entra comptetamente en et
tomacorriente, invierta et enchufe. Si sigue sin
entrar, p6ngase en contacto con un electricista
calificado para que instale et tomacorriente apro-
piado. No cambie el enchufe de ningOn modo.
ADVERTENClA: Para reducir el riesgo de
peligro de incendio o descargas etectricas, et
humidificador debe enchufarse en un toma-
corriente de 120 V C.A. No utilice cordones de
extensi6n.
Para reducir el riesgo de descargas electricas, este
humidificador tiene un enchufe potarizado (un
terminal es mas ancho que el otro). Este enchufe
entrara de un solo modo en un tomacorriente
polarizado.
21
Paso3. Llenadoconagua
ADVERTENCIA: Para reducir el riesgo de
peligro de incendio o descargas electricas, no eche
ni derrame agua en el area de los controtes o del
motor. Si los controles se mojan, deje que se
sequen completamente y haga que la unidad sea
revisada por personal de servicio autorizado antes
de enchufarla.
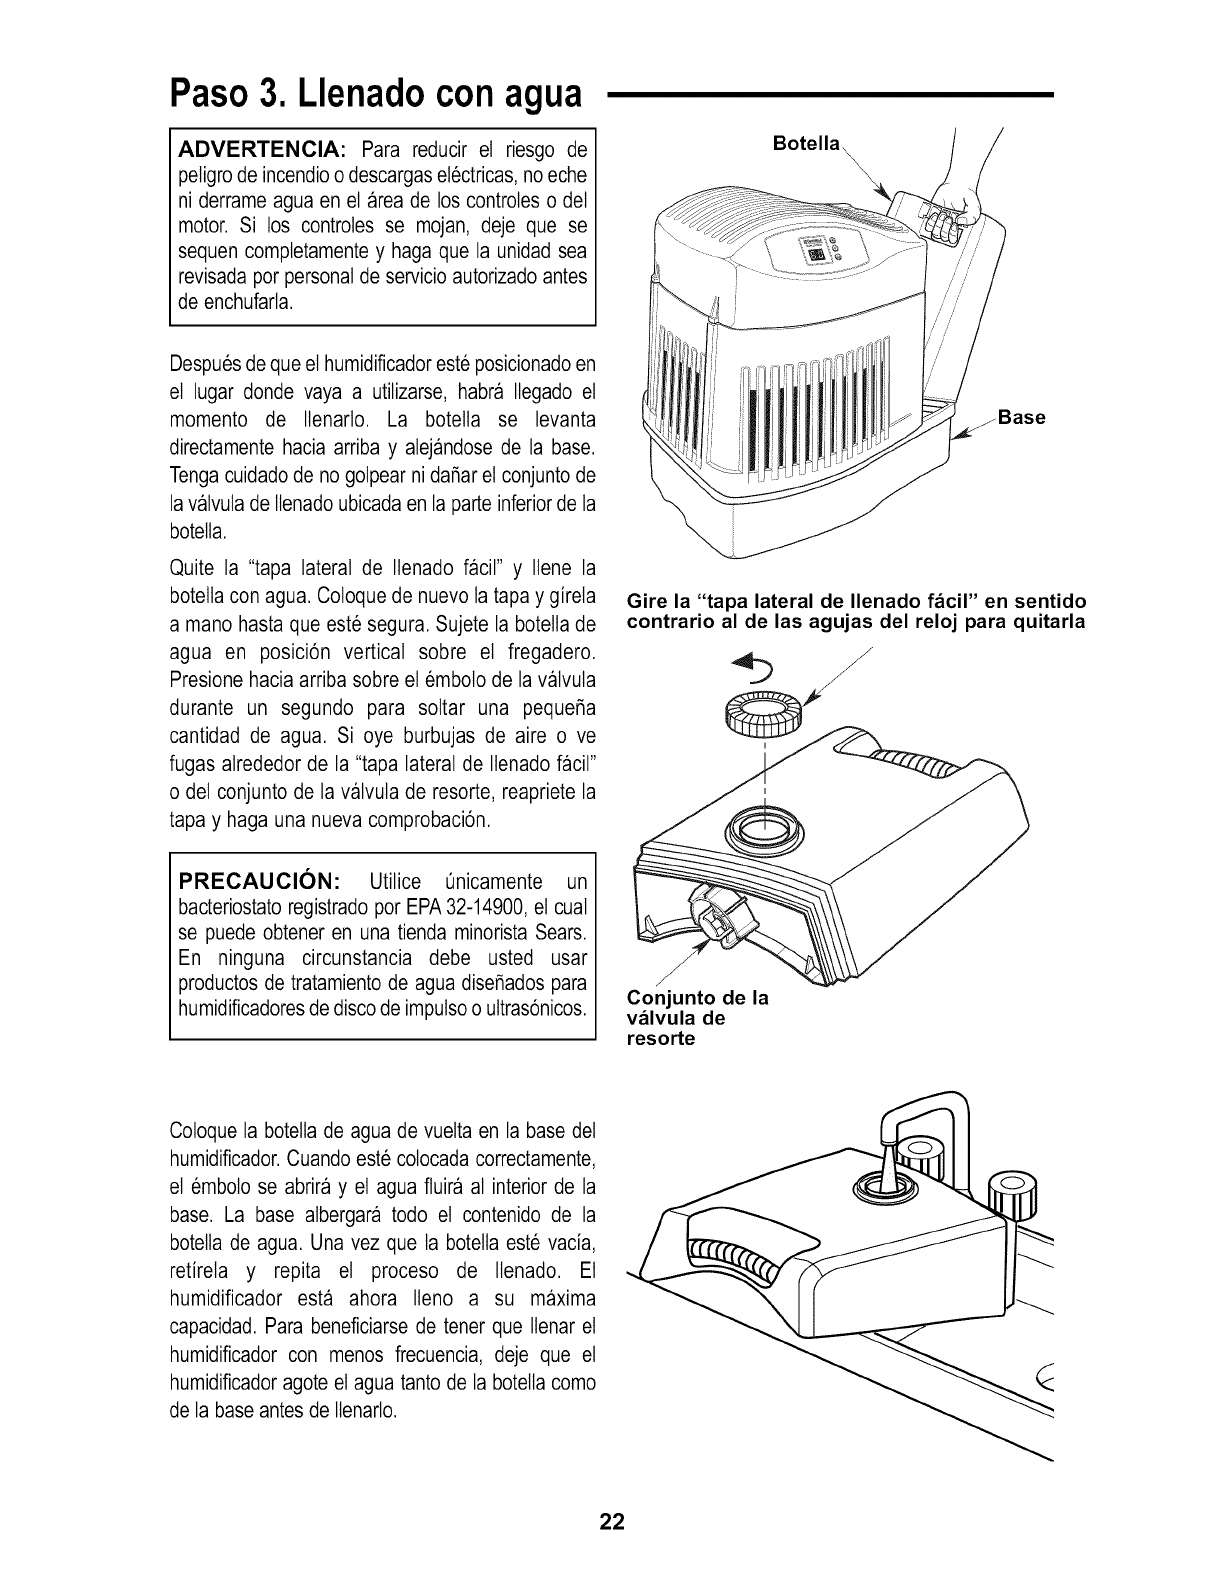
Botella_
Despues de que el humidificador este posicionado en
el lugar donde vaya a utilizarse, habra Itegado et
momento de Itenarlo. La botetta se levanta
directamente hacia arriba y alejandose de la base.
Tenga cuidado de no golpear ni dai_aret conjunto de
la valvuta de Itenado ubicada en la parte inferior de la
botelta.
Quite la "tapa lateral de Ilenado Dcil" y Ilene la
botella con agua. Coloque de nuevo la tapa y girela
a mano hasta que este segura. Sujete la botelta de
agua en posici6n vertical sobre et fregadero.
Presione hacia arriba sobre el emboto de la valvula
durante un segundo para sottar una pequei_a
cantidad de agua. Si oye burbujas de aire o ve
fugas alrededor de la "tapa lateral de Ilenado facil"
o det conjunto de la valvula de resorte, reapriete la
tapa y haga una nueva comprobaci6n.
PRECAUCION: Utilice Onicamente un
bacteriostato registrado por EPA 32-14900, el cual
se puede obtener en una tienda minorista Sears.
En ninguna circunstancia debe usted usar
productos de tratamiento de agua disei_ados para
humidificadores de disco de imputso o uttras6nicos.
_Base
Gire la "tapa lateral de Ilenado facil" en sentido
contrario al de las agujas del reloj para quitarla
/
/
/
Conjunto de la
valvula de
resorte
Coloque la botelta de agua de vuetta en la base det
humidificador. Cuando este colocada correctamente,
el emboto se abrira y el agua fluira al interior de la
base. La base albergara todo el contenido de la
botella de agua. Una vez que la botelta este vacia,
retirela y repita el proceso de Ilenado. Et
humidificador esta ahora Ileno a su maxima
capacidad. Para beneficiarse de tener que Itenar el
humidificador con menos frecuencia, deje que et
humidificador agote el agua tanto de la botelta como
de la base antes de ltenarlo.
22
Paso4. Utilizaci6nde los controles
El punto en el que ajuste los niveles de humedad
deseados depende de su nivel de confort personal, ta
temperatura exterior y la temperatura interior. Se
recomienda un punto de ajuste inicial de humedad
AMBIENTE det 30 al 40 por ciento, pero puede
haber condiciones que requieran un ajuste distinto.
IMPORTANTE: Si se empieza a formar
condensaci6n se pueden producir dai_os en las
ventanas o en las paredes causados por agua.
Debe bajarse el punto de AJUSTE de la hume-
dad hasta que ya no se forme condensaci6n.
Recomendamos que los niveles de humedad
ambiente no excedan el 50%.
Cuando la
temperatura
exterior es:
-10°F -24°C
2°F _18°C
10°F -12°C
20OF* _6oc *
La humedad
relativa interior
recomendada es:
2O%
25%
3O%
35%
y superior
Para utilizar los controles
Pantalla digital
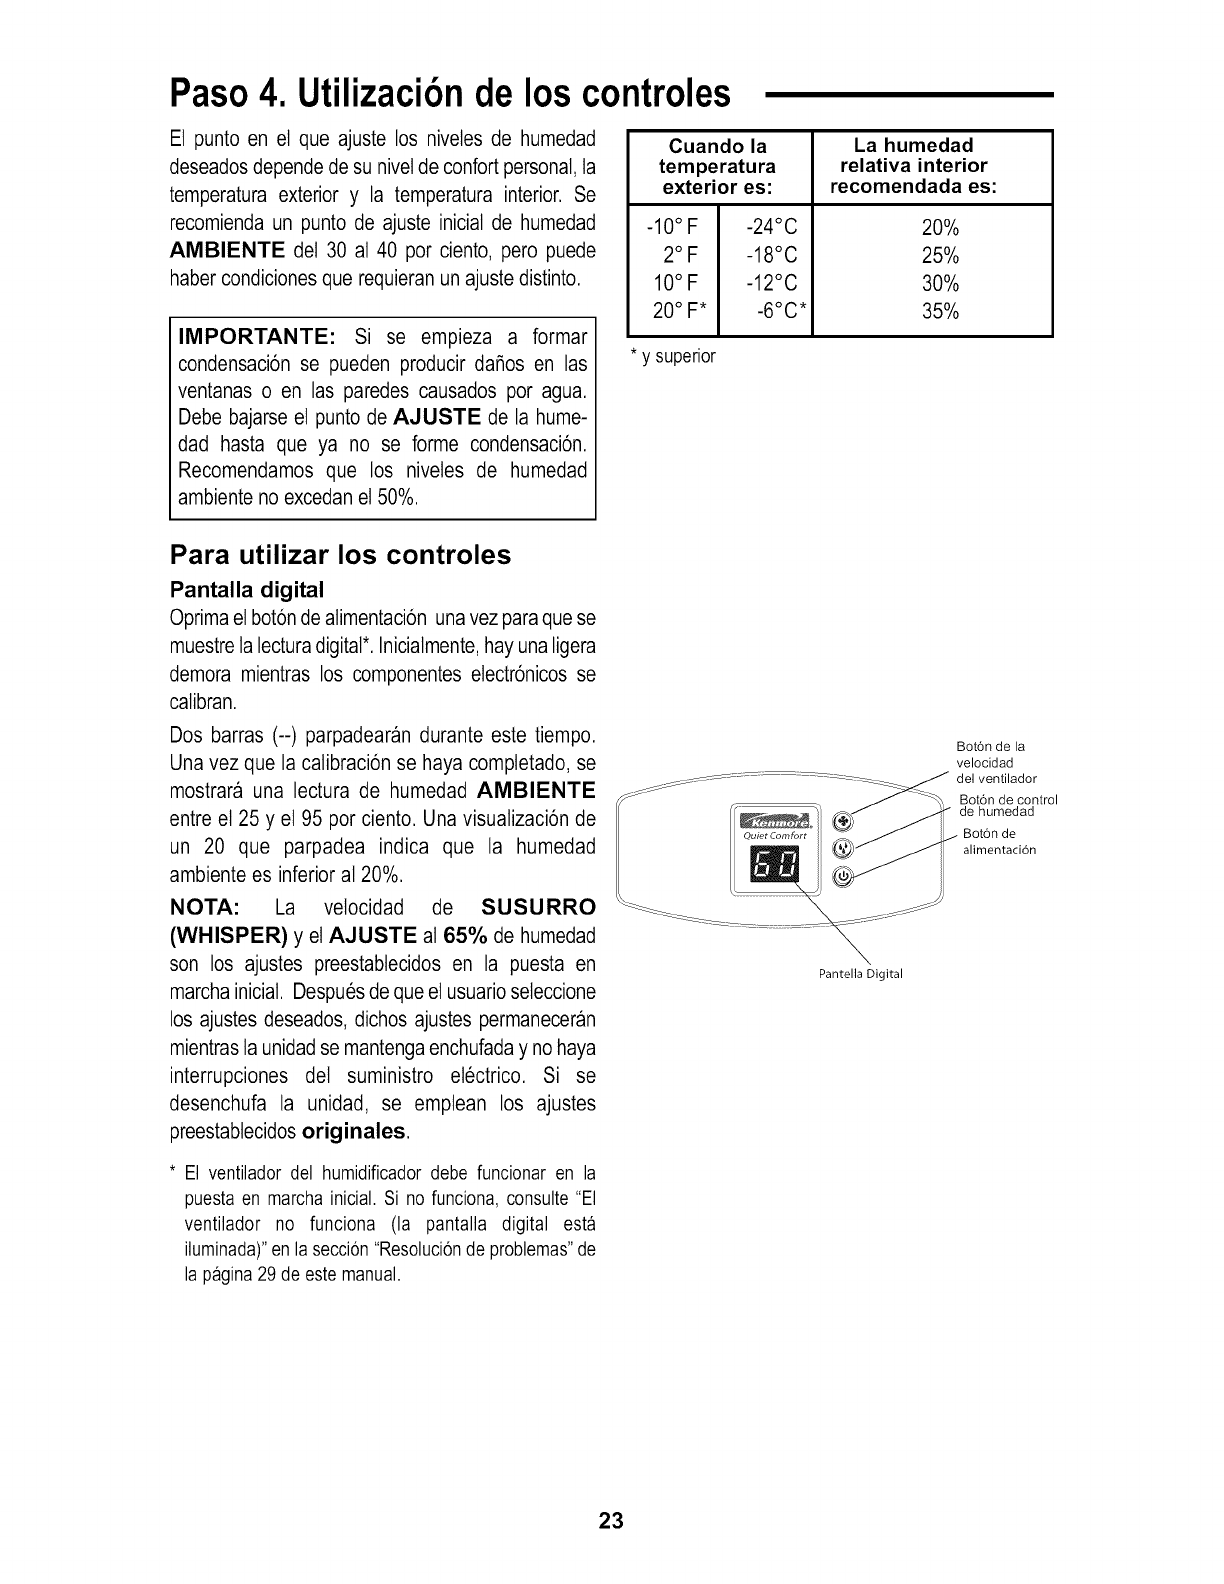
Oprima el bot6n de alimentaci6n una vez paraque se
muestre la lecturadigital*. Inicialmente, hay una ligera
demora mientras los componentes electr6nicos se
calibran.
Dos barras (--) parpadearan durante este tiempo.
Una vez que la calibraci6n se haya completado, se
mostrara una lectura de humedad AMBIENTE
entre et 25 y el 95 por ciento. Una visualizaci6n de
un 20 que parpadea indica que la humedad
ambiente es inferior a120%.
NOTA: La velocidad de SUSURRO
(WHISPER) y el AJUSTE al 65% de humedad
son los ajustes preestabtecidos en la puesta en
marcha inicial. Despues de que el usuario seleccione
los ajustes deseados, dichos ajustes permaneceran
mientras la unidad se mantenga enchufada y no haya
interrupciones del suministro etectrico. Si se
desenchufa la unidad, se emptean los ajustes
preestabtecidos originales.
* El ventilador del humidificadordebe funcionar en la
puestaen marcha inicial. Si no funciona, consulte "El
ventilador no funciona (la pantalla digital esta
iluminada)"en la seccion"Resolucionde problemas"de
la pagina29 de este manual.
Pantella Digital
Bot6n de la
velocidad
del ventilador
Bot6n de control
de humedad
Boron de
alimentaci6n
23
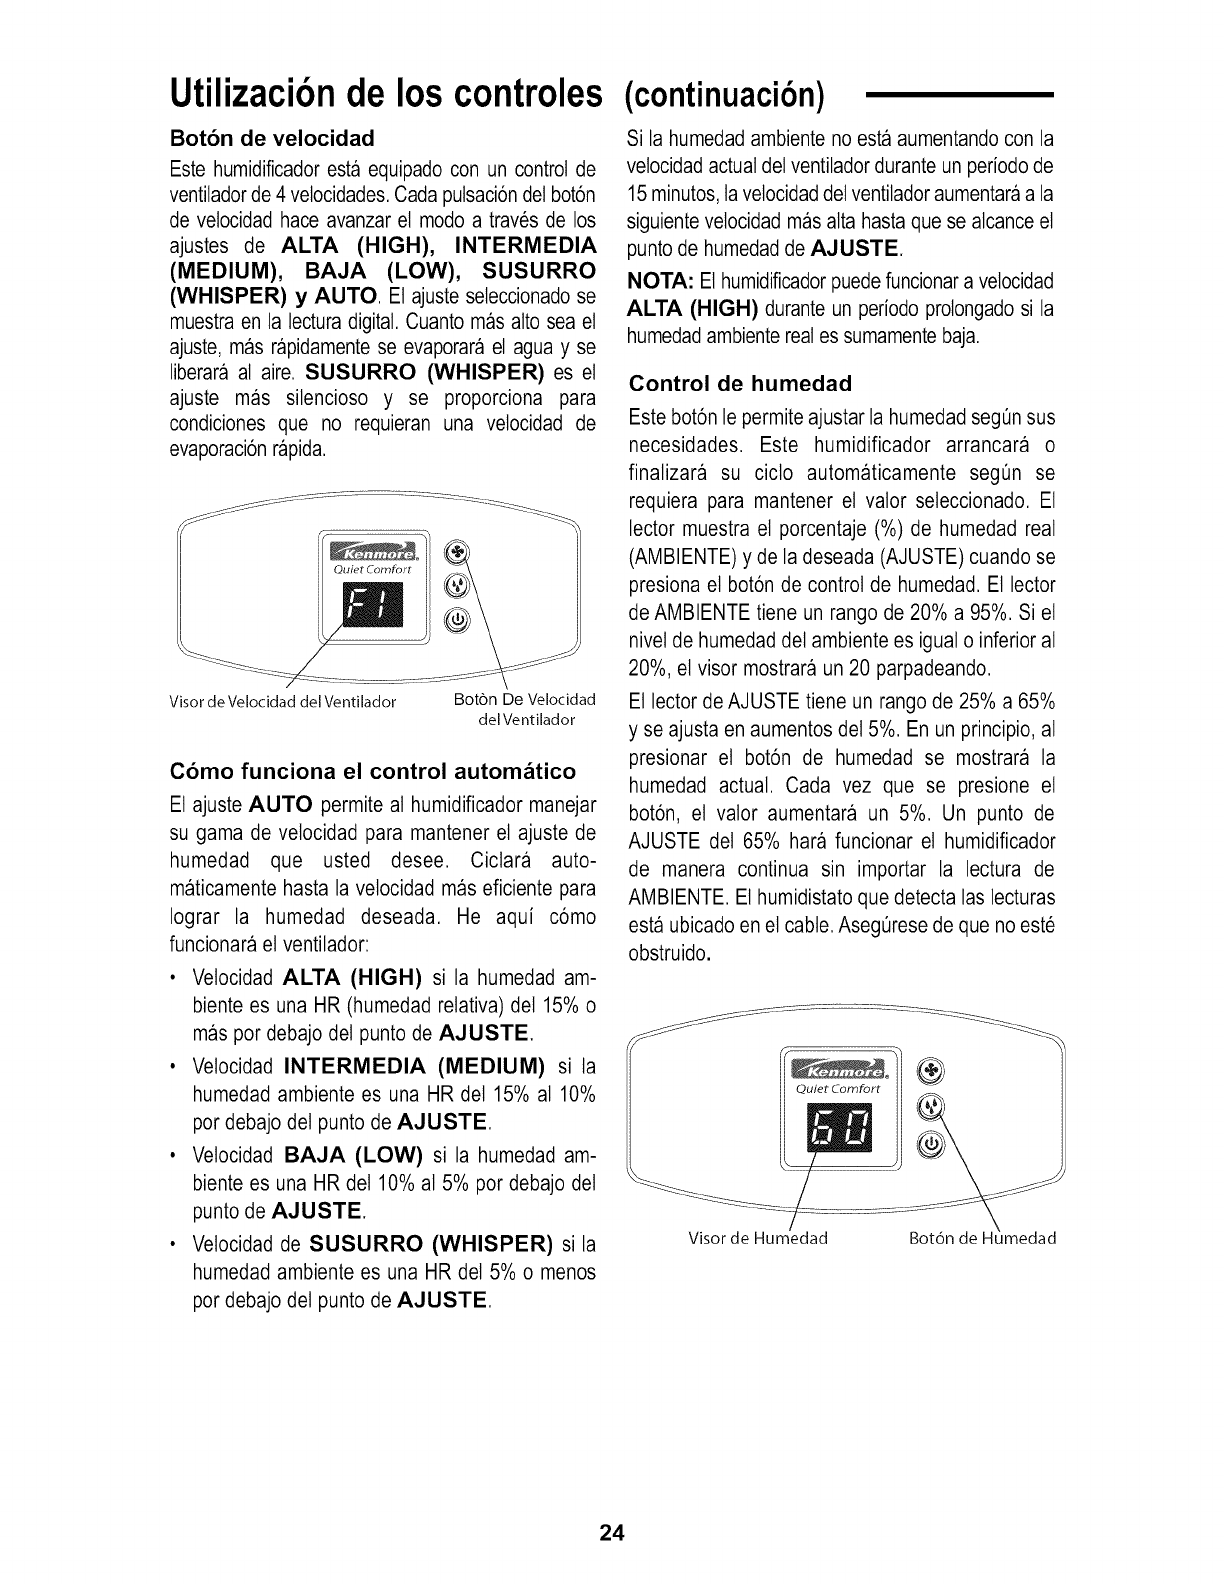
Utilizaci6nde los controles
Boton de velocidad
Este humidificador esta equipado con un control de
ventilador de 4 vetocidades. Cada putsaci6n del bot6n
de velocidad hace avanzar et modo a traves de los
ajustes de ALTA (HIGH), INTERMEDIA
(MEDIUM), BAJA (LOW), SUSURRO
(WHISPER) y AUTO. Et ajuste seteccionado se
muestra en la lectura digital. Cuanto mas alto sea el
ajuste, mas rapidamente se evaporara et agua y se
liberara al aire. SUSURRO (WHISPER) es et
ajuste mas silencioso y se proporciona para
condiciones que no requieran una velocidad de
evaporaci6n rapida.
Quiet Comfort
Visor de Velocidad del Ventilador Botbn De Velocidad
del Ventilador
Como funciona el control autom_tico
Et ajuste AUTO permite al humidificador manejar
su gama de velocidad para mantener et ajuste de
humedad que usted desee. Cictara auto-
maticamente hasta la velocidad mas eficiente para
Iograr la humedad deseada. He aqui c6mo
funcionara el ventilador:
• Velocidad ALTA (HIGH) si la humedad am-
biente es una HR (humedad relativa) de115% o
mas por debajo del punto de AJUSTE
• Vetocidad INTERMEDIA (MEDIUM) si ta
humedad ambiente es una HR del 15% al 10%
por debajo del punto de AJUSTE.
• Velocidad BAJA (LOW) si la humedad am-
biente es una HR de110% al 5% por debajo del
punto de AJUSTE
• Vetocidad de SUSURRO (WHISPER) si la
humedad ambiente es una HR del 5% o menos
por debajo del punto de AJUSTE.
(continuaci6n)
Si la humedad ambiente no esta aumentando con la
vetocidad actual del ventilador durante un periodo de
15 minutos, la velocidad det ventilador aumentara a la
siguiente velocidad mas alta hasta que se alcance el
punto de humedad de AJUSTE
NOTA: El humidificador puede funcionar a velocidad
ALTA (HIGH) durante un periodo prolongado si la
humedad ambiente real es sumamente baja.
Control de humedad
Este bot6n le permite ajustar la humedad seg0n sus
necesidades. Este humidificador arrancara o
finalizara su cicto automaticamente seg0n se
requiera para mantener el valor seleccionado. El
lector muestra el porcentaje (%) de humedad real
(AMBIENTE) y de la deseada (AJUSTE) cuando se
presiona et bot6n de control de humedad. Et lector
de AMBIENTE tiene un rango de 20% a 95%. Si el
nivet de humedad det ambiente es igual o inferior al
20%, et visor mostrara un 20 parpadeando.
El lector de AJUSTE tiene un rango de 25% a 65%
y se ajusta en aumentos det 5%. En un principio, al
presionar el bot6n de humedad se mostrara la
humedad actual. Cada vez que se presione et
bot6n, el valor aumentara un 5%. Un punto de
AJUSTE del 65% hara funcionar el humidificador
de manera continua sin importar la lectura de
AMBIENTE. Et humidistato que detecta las lecturas
esta ubicado en el cable. Aseg0rese de que no este
obstruido.
Visor de Humedad Bot6n
24
Utilizaci6ndel humidificador
Visor de Ilenado
Para Iograr un tiempo de funcionamiento maximo, se
deben Itenartanto ta botella como la base. Cuando ta
botetta y la base estan vacias, et visor muestra
alternando la lectura de humedad det ambiente y "F"
(LLENAR) para informar que se requiere mas agua.
Tambien en este momento, la unidad cambiara
automaticamente al MODO DE SECADO y
continuara funcionando a lavelocidad mas baja hasta
que el filtro se seque.
®
Quiet Comfort ®
®
Visor de Ilenado
Indicador de comprobacion del filtro
La capacidad de cualquier humidificador para
suministrar eficientemente humedad depende en gran
medida del estado del filtro. A medida que el filtro se
carga con impurezas, pierde gradualmente su
capacidad de mecha. Cuando esto ocurre, la
producci6n de humedad se reduce y el humidificador
tiene que trabajar mas tiempo para satisfacer el ajuste
seleccionado. Este humidificador tiene un recordatorio
de comprobaci6n del filtro temporizado para aparecer
despues de 720 horas de funcionamiento. Cuando la
pantalla muestre el mensaje COMPROBAR EL
FILTRO (CF), desconecteel cable de alimentaci6ny
compruebe el estado del filtro. Si es evidente que hay
una acumulaci6n de dep6sitos o una descoloraci6n
intensa, reemplaceel filtro para restablecer la maxima
eficiencia.ElmensajeCOMPROBAR EL FILTRO
(CF) se reajusta cuando el humidificador se enchufa
de nuevo.
MODO DE SECADO
Tambien en este momento, la unidad cambiara
automaticamente al MODO DE SECADO y
continuara funcionando a lavelocidad mas baja hasta
que el filtro se seque
NOTA: Durante este tiempo, se seguira super-
visando el nivet de humedad ambiente y et
humidificador encendera y apagara ciclicamente el
ventilador hasta que el filtro este completamente
seco. Et ventilador se apagar& dejando un
humidificador seco que es menos propenso al
crecimiento de moho y verdin. Si no se desea
MODO DE SECADO, reltene con agua el
humidificador.
NOTA: Una vez que se haya completado el ciclo de
secado, et ventilador se apagara y la luz de
RELLENO (F) permanecera iluminada. Et
humidificador se encendera de nuevo
automaticamente despues de reltenarlo.
Quiet Comfort ®
®
®
Visor para revisar el filtro
25
Utilizaci6ndel humidificador(continuaci6n)
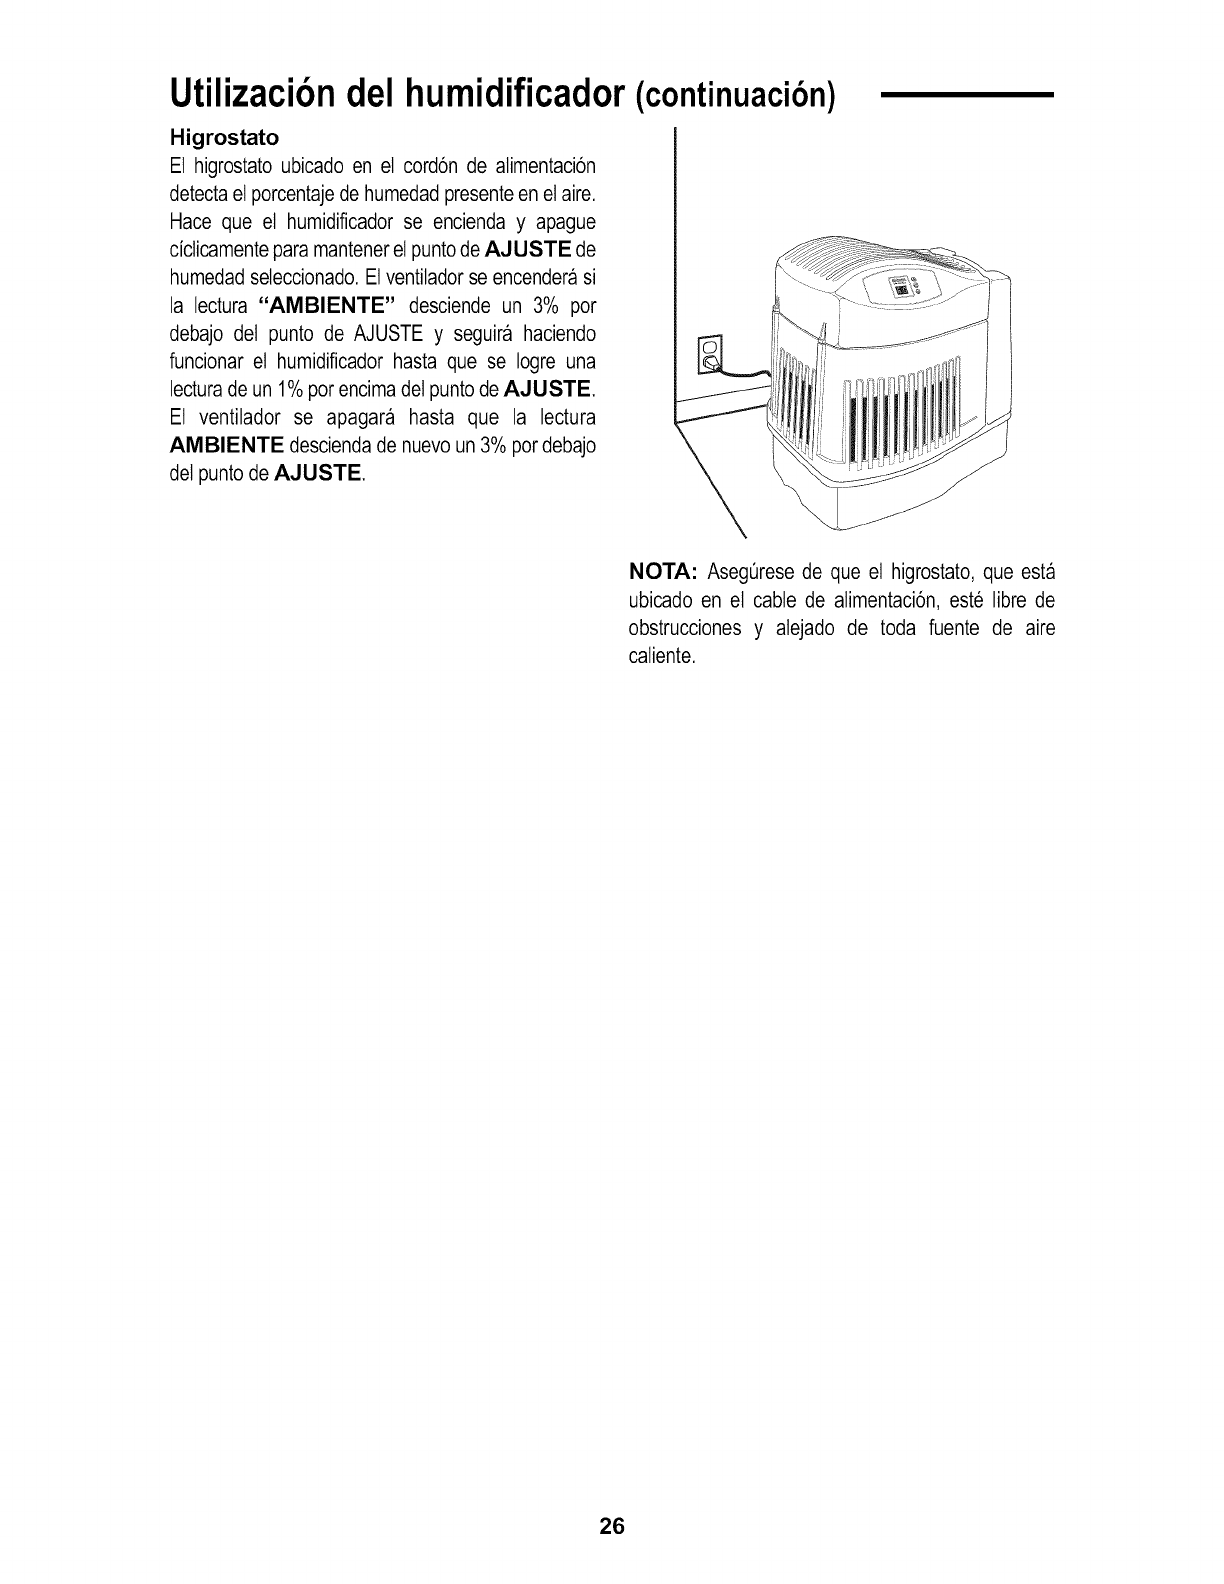
Higrostato
El higrostato ubicado en el cord6n de alimentaci6n
detecta el porcentajede humedad presenteen el aire.
Hace que et humidificador se encienda y apague
ciclicamente para mantener el punto de AJUSTE de
humedad seteccionado. El ventilador se encendera si
la lectura "AIMIBIENTE" desciende un 3% por
debajo del punto de AJUSTE y seguira haciendo
funcionar el humidificador hasta que se Iogre una
lecturade un 1% por encima del punto de AJUSTE
El ventilador se apagara hasta que la lectura
AIMIBIENTE descienda de nuevo un 3% pordebajo
del punto de AJUSTE
NOTA: Aseg_rese de que et higrostato, que esta
ubicado en et cable de alimentaci6n, este libre de
obstrucciones y alejado de toda fuente de aire
caliente.
26

Reemplazoy cuidadodel filtro
ADVERTENCIA: Parareducirel riesgodedescar-
gas electricas o lesiones causadas por las piezas
moviles, desenchufe siempre el humidificador antes
de quitar o reemplazarcualquierpieza.
Agarre la asamblea
de envoltura
firmemente y
levantelo le
PRECAUCION: Para ayudar a retardar el creci-
mientode bacteriasy mantenerla maximaeficiencia,
se debe reemplazarel filtro al menos una vez por
estacion,o mas a menudo en condiciones de agua
dura. Useel filtro de repuestorecomendadoKenmore
32-14906.
Reemptace el filtro de mecha vaporizador al menos
una vez por temporada de humidificaci6n o mas,
dependiendo de las condiciones del agua de su zona.
Reemplazo del filtro
1. Desenchufe et humidificador. Antes de quitar el
filtro, recomendamos trasladar et humidiflcador a
un lugar donde los revestimientos del piso no
esten propensos a sufrir dafios por causa del
agua (por ejemplo, zonas de cocina o de bafio.)
2. Quite ta botella de agua y p6ngala a un lado.
AsegOrese de no golpear ni dafiar la valvuta de
Itenado.
3. Agarre el conjunto de la carcasa, levanteto
directamente hacia arriba, alejandolo de ta base,
y p6ngalo a un lado. Una vez hecho esto, tendra
acceso al filtro.
4. Fijese en la posicbn del filtro. Quite et filtro.
Puede que quiera limpiar ta base en este
momento. Consulte la seccbn "Limpieza del
humidificador" de este manual.
5. Instale un filtro nuevo (32-14906) en la base.
Enrolle el flltro y cot6quelo entre los postes
ubicados en el fondo de la base. Et comienzo y el
final del arrottamiento deben quedar capturados
en el centro de ta base (vea el diagrama) y el filtro
debe estar descansando en el piso de la base.
6. Retorne el conjunto de la carcasa a la parte
superior de la base. Coloque de nuevo el humi-
dificador en su posici6n de funcionamiento.
7. Una vez hecho esto, el humidificador estara listo
para ser Itenado con el fin de utilizarlo.
Coloque el
comienzo y el
Jfinal del filtro
enrollado en el
centro de la
base
Alinee la parte
inferior del
conjunto de la
carcasa con
la parte superior
---_ de la base y
--_ reposicione la
unidad de modo
seguro
27
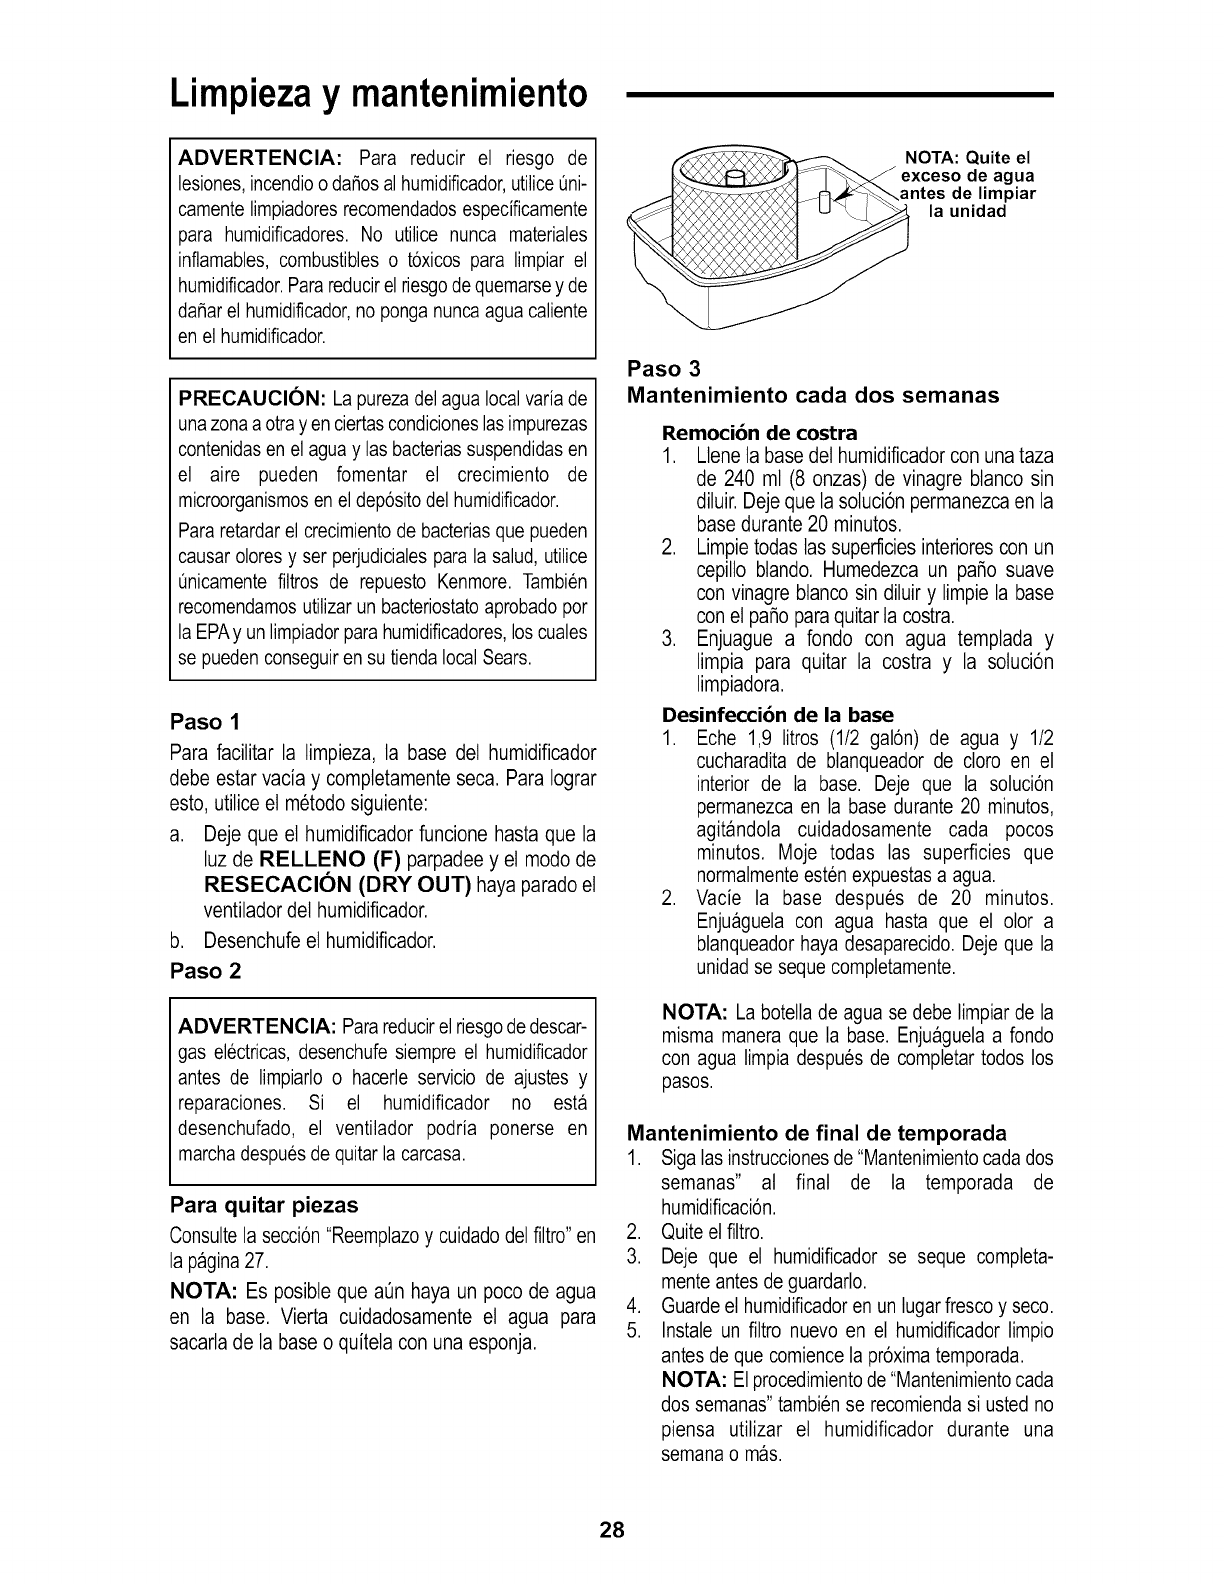
Limpiezay mantenimiento
ADVERTENCIA: Para reducir el riesgo de
lesiones,incendioo dafiosal humidificador,utiliceOni-
camente limpiadoresrecomendadosespecificamente
para humidificadores. No utilice nunca materiales
inflamables, combustibles o toxicos para limpiar el
humidificador.Parareducirelriesgode quemarsey de
dafiar el humidificador,no ponganunca agua caliente
en el humidificador.
PRECAUCION: La pureza delagua local varia de
unazona aotra yen ciertascondicioneslas impurezas
contenidasen el aguay las bacteriassuspendidasen
el aire pueden fomentar el crecimiento de
microorganismosen el depositodel humidificador.
Para retardarel crecimientode bacteriasque pueden
causarolores y ser perjudicialespara la salud, utilice
Onicamentefiltros de repuesto Kenmore. Tambien
recomendamosutilizarun bacteriostatoaprobadopor
la EPAy un limpiadorparahumidificadores,los cuales
se puedenconseguiren su tienda local Sears.
Paso 1
Para facilitar la limpieza, la base del humidificador
debe estar vacia y completamente seca. Para Iograr
esto, utilice el metodo siguiente:
a. Deje que el humidificador funcione hasta que la
luz de RELLENO (F) parpadee y el modo de
RESECAClON (DRY OUT) haya parado el
ventilador del humidificador.
b. Desenchufe el humidificador.
Paso 2
ADVERTENClA: Parareducirel riesgodedescar-
gas electricas, desenchufe siempre el humidificador
antes de limpiarlo o hacerle servicio de ajustes y
reparaciones. Si el humidificador no esta
desenchufado, el ventilador podria ponerse en
marchadespuesde quitar la carcasa.
Para quitar piezas
Consulte la secci6n "Reemplazoy cuidado del filtro" en
la pagina27.
NOTA: Es posibte que aQn haya un poco de agua
en la base. Vierta cuidadosamente el agua para
sacarla de la base o quitela con una esponja.
NOTA: Quite el
exceso de agua
antes de limpiar
la unidad
Paso 3
Mantenimiento cada dos semanas
Remocibn de costra
1. Ltene la base del humidificador con una taza
de 240 ml (8 onzas) de vinagre btanco sin
diluir. Deje que la sotuci6n permanezca en la
base durante 20 minutes.
2. Limpie todas las superficies interiores con un
cepillo blando. Humedezca un patio suave
con vinagre btanco sin diluir y limpie la base
con et patio para quitar la costra.
3. Enjuague a rondo con agua templada y
limpia para quitar la costra y la soluci6n
limpiadora.
Desinfeccibn de la base
1. Eche 1,9 litros (1/2 gal6n) de agua y 1/2
cucharadita de blanqueador de cloro en el
interior de la base. Deje que la soluci6n
permanezca en la base durante 20 minutos,
agitandola cuidadosamente cada pocos
minutos. Moje todas las superficies que
normalmenteesten expuestas a agua.
2. Vacie la base despues de 20 minutos.
Enjuaguela con agua hasta que el olor a
blanqueador haya desaparecido. Deje que la
unidadse seque completamente.
NOTA: La botella de agua se debe limpiar de la
misma manera que la base. Enjuaguela a fondo
con agua limpia despues de completar todos los
pasos.
Mantenimiento de final de temporada
1. Siga las instruccionesde "Mantenimientocada dos
semanas" al final de la temporada de
humidificaci6n.
2. Quite el filtro.
3. Deje que el humidificador se seque completa-
mente antes de guardarlo.
4. Guarde el humidificadoren un lugar fresco y seco.
5. Instale un filtro nuevo en el humidificador limpio
antes de que comience la pr6xima temporada.
NOTA: El procedimientode"Mantenimientocada
dos semanas"tambien se recomiendasi usted no
piensa utilizar el humidificador durante una
semana o mas.
28
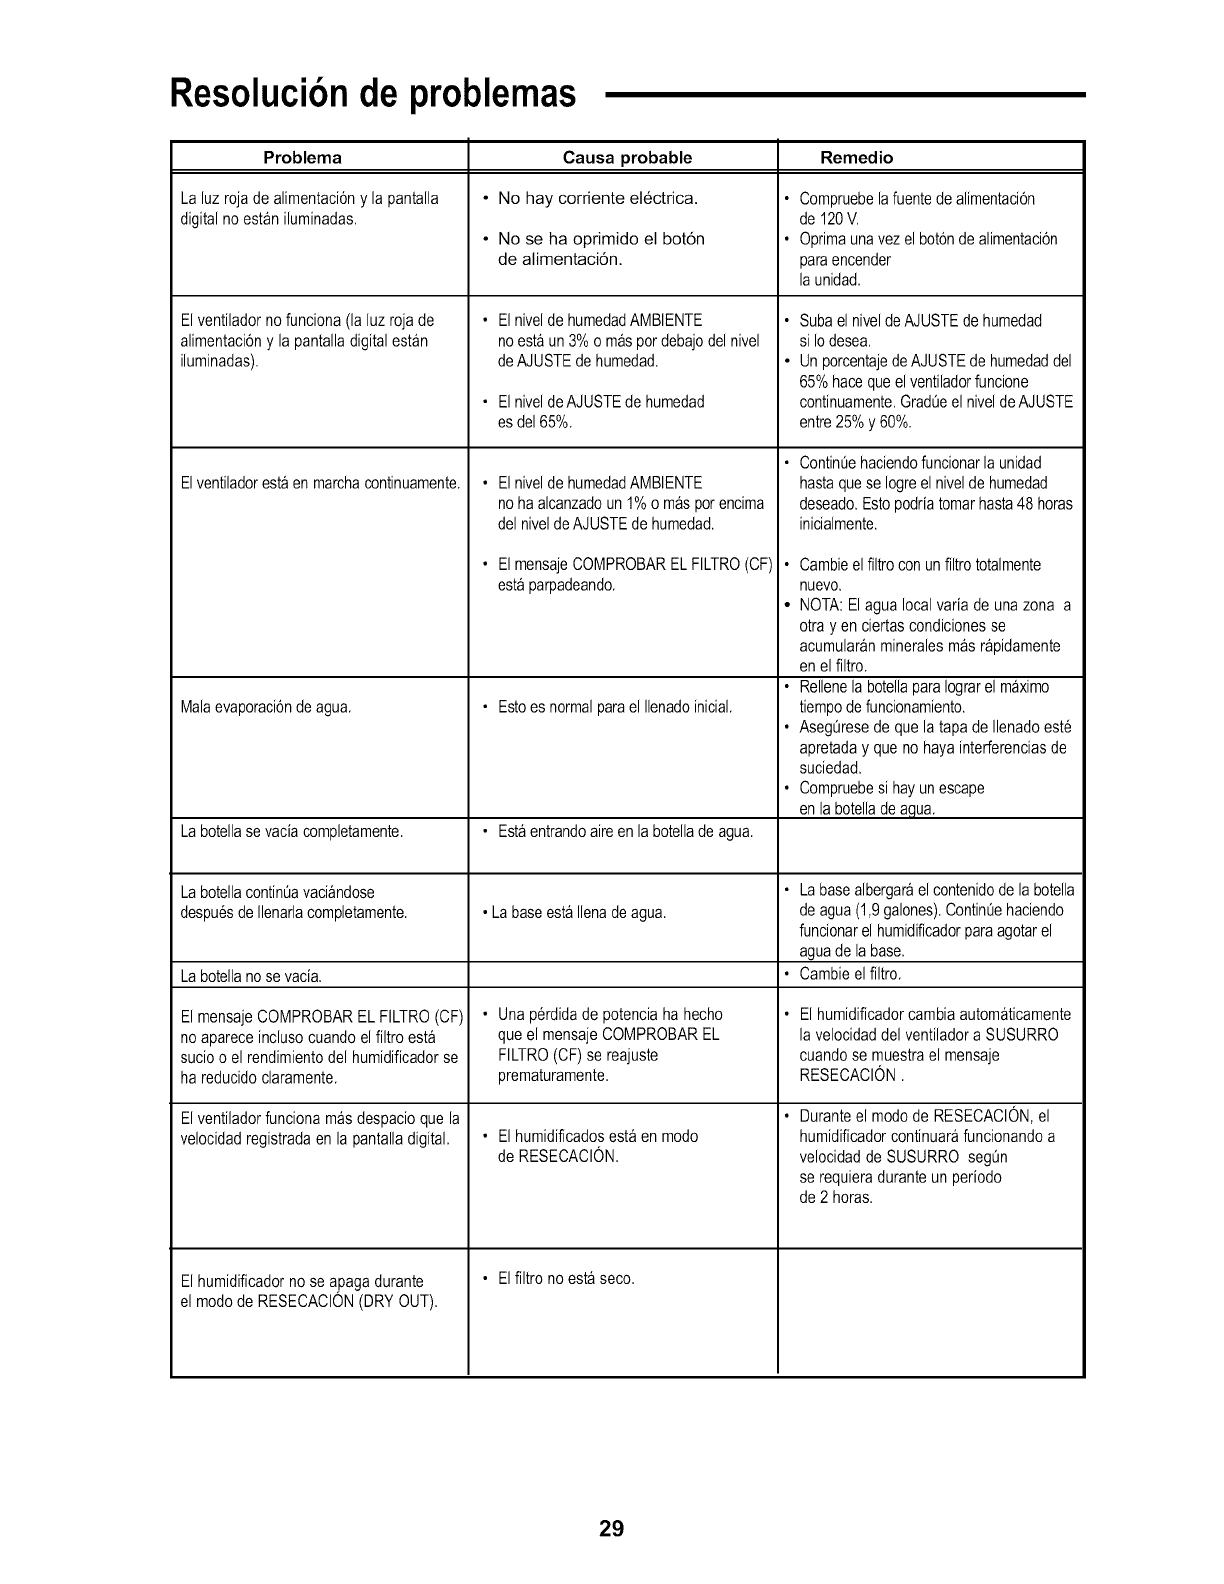
Resoluci6nde problemas
Problema
Lahz rojadealimentaciony lapantalla
digitalno estan ihminadas.
Elventiladornofunciona(laluzroja de
alimentaci6ny la pantalladigitalestan
iluminadas).
Elventiladorestaenmarchacontinuamente.
Malaevaporaci6ndeagua.
Labotellase vaciacompletamente.
Causa probable
•No hay corriente electrica.
• No se ha oprimido el bot6n
de alimentaci6n.
ElniveldehumedadAMBIENTE
noestaun 3%o maspordebajodel nivel
deAJUSTEde humedad.
ElniveldeAJUSTEdehumedad
es de165%.
ElniveldehumedadAMBIENTE
nohaalcanzadoun1%o masporencima
del nivelde AJUSTEde humedad.
ElmensajeCOMPROBARELFILTRO(CF)
estaparpadeando.
• Estoes normalparael Ilenadoinicial.
•Estaentrandoaireen la botellade agua.
Remedio
Compruebelafuentedealimentaci6n
de 120V.
Oprimaunavezel botonde alimentaci6n
paraencender
la unidad.
Subael niveldeAJUSTEdehumedad
si Iodesea.
Un porcentajedeAJUSTEde humedaddel
65%hacequeelventiladorfuncione
continuamente.Grad0eel niveldeAJUSTE
entre25%y 60%.
Contin0ehaciendofuncionarla unidad
hastaquese Iogreelniveldehumedad
deseado.Estopodriatomarhasta48 horas
inicialmente.
• Cambieelfiltroconun filtrototalmente
nuevo.
• NOTA:Elagualocal variade unazona a
otrayen ciertascondicionesse
acumularanmineralesmasrapidamente
enel filtro.
• Rellenela botellaparaIograrelmaximo
tiempode funcionamiento.
• AsegOresede quela tapade Ilenadoeste
apretaday que no hayainterferenciasde
suciedad.
• Compruebesi hayunescape
enla botelladeagua.
LabotellacontinOavaciandose • La basealbergarael contenidode labotella
despuesdeIlenarlacompletamente. • LabaseestaIlenadeagua. deagua(1,9galones).ContinOehaciendo
funcionarel humidificadorparaagotarel
aguade la base.
Labotellanose vacia. • Cambieel filtro.
El mensajeCOMPROBAREL FILTRO(CF)
noapareceinclusocuandoelfiltro esta
sucioo el rendimientodel humidificadorse
hareducidoclaramente.
Elventiladorfuncionamasdespacioquela
velocidadregistradaen la pantalladigital.
•Unaperdidade potenciaha hecho
que el mensajeCOMPROBAREL
FILTRO(OF)se reajuste
prematuramente.
•Elhumidificadosestaenmodo
de RESECACl0N.
•Elfiltrono estaseco.
El humidificadorno se apagadurante
el modode RESECACl0N(DRYOUT).
Elhumidificadorcambiaautomaticamente
la velocidaddel ventiladora SUSURRO
cuandose muestrael mensaje
RESECACION.
Duranteel mododeRESECACION,el
humidificadorcontinuarafuncionandoa
velocidadde SUSURROsegOn
se requieraduranteunperiodo
de2 horas.
29
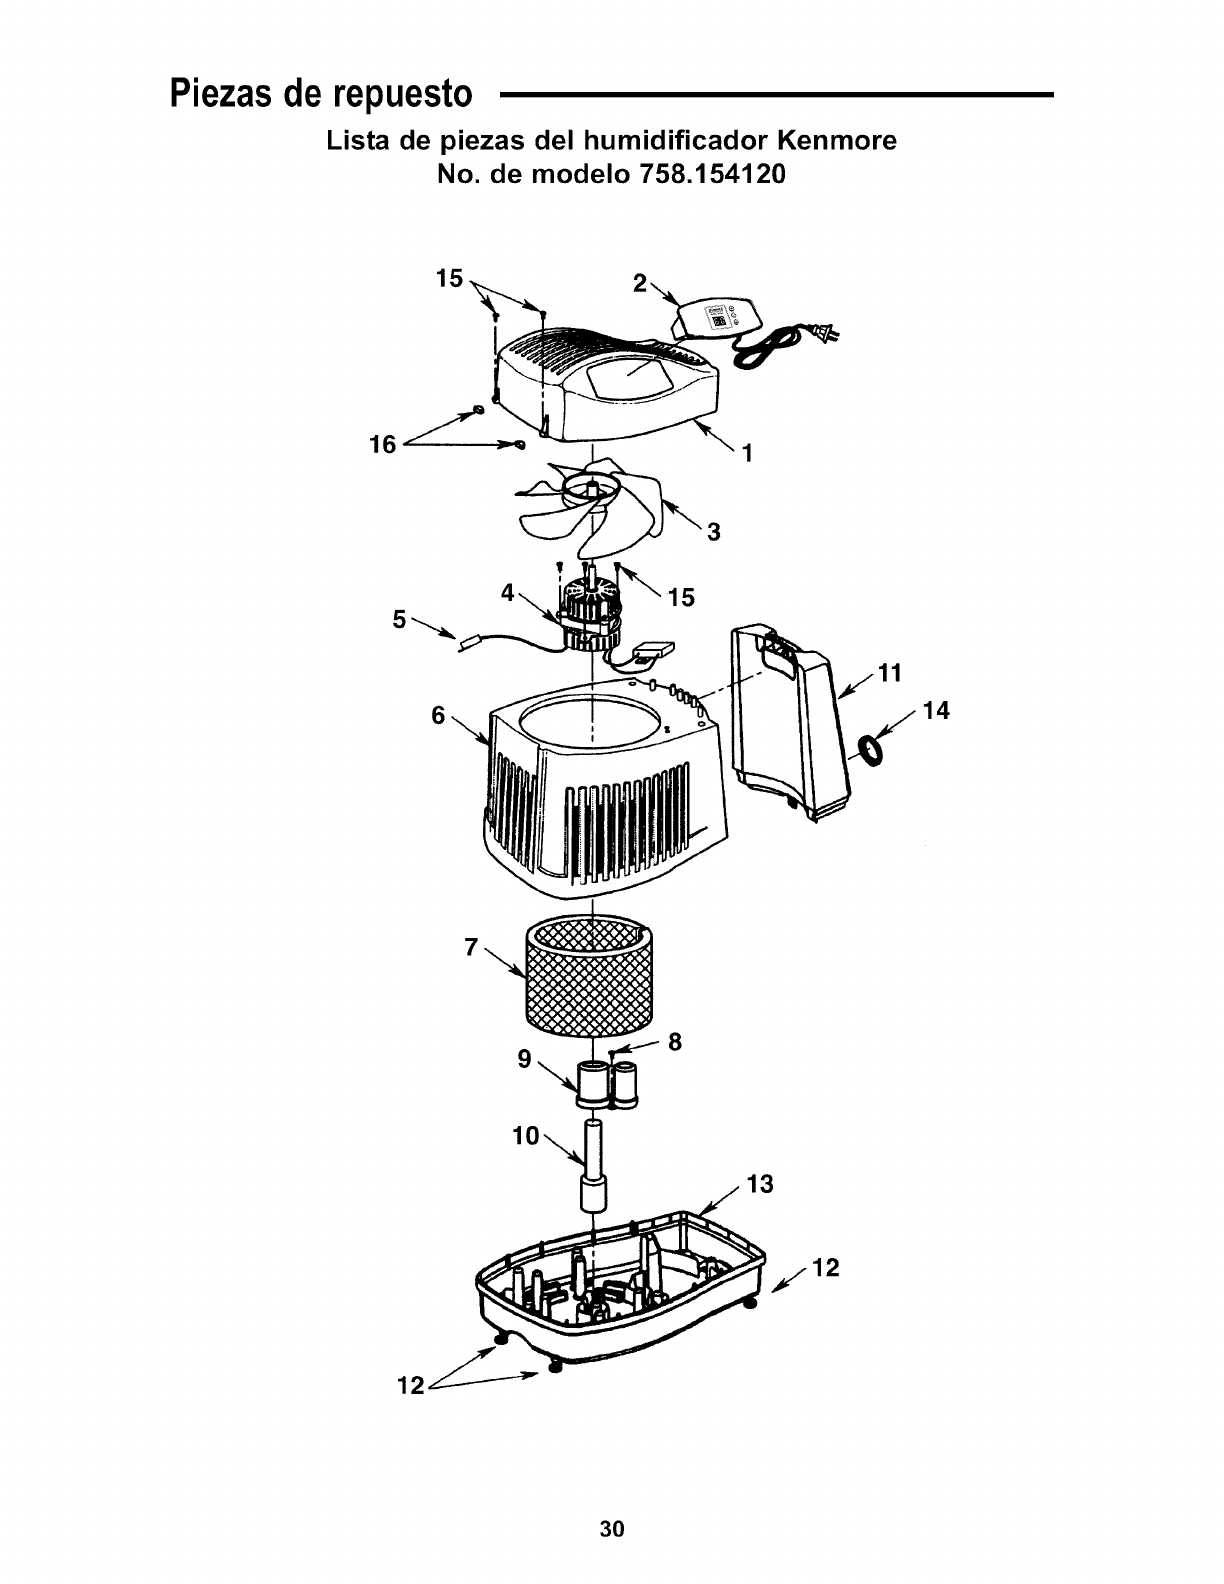
Piezasde repuesto
Lista de piezas del humidificador Kenmore
No. de modelo 758.154120
15
3
6
8
14
13
30
Lista de piezas del humidificador Kenmore
No. de modelo 758.154120
Pida siempre por nt_mero de pieza, no por nt_mero de clave
No. de
clave No. de piezr. Descripcion
1 830487 Carcasa superior
2 831341 • Conjunto de controles
3 829821 • Paleta del ventilador
4 830778 • Motor
5 828854 Microinterruptor
6 830489 Carcasa inferior
7 32-14906 1 Filtro
8 829815 * Tornillo de cabeza troncoc6nica
tipo AB No. 6 x 1/2 SS
9 830496-2 Soporte del ftotador
10 829816 Ftotador del dep6sito
11 830537 Botelta, incluye la clave No. 15
12 829812 Ruedecillas (incluye 4)
13 830484-2 Base
14 824690-2 Tapa de llenado
15 829805 Tornillo de cabeza troncoc6nica Trx.
Hi-Lo No. 6 x 3/4
16 830587 Tapa de tornillo
17 SP6592 Manual del usuario (no mostrado)
* Articulo de herrajes estandar. Se puede comprar Iocalmente.
1 Articulo de existencias. Se puede conseguir a traves del departamento de
ferreteria de la mayoria de las tiendas minoristas Sears.
• Todo intento de reparar el conjunto de los controles o et motor puede crear
un peligro, a menos que la reparaci6n sea realizada por un tecnico de
servicio calificado. El servicio de reparaciones esta disponibte en la tienda
Sears mas cercana.
31

Your Home
For expert troubleshooting and home solutions advice:
www,managerny home.corn
For repair - in your home - of all major brand appliances,
lawn and garden equipment, or heating and cooling systems,
no matter who made it, no matter who sold it!
For the replacement parts., a_essories and
owners manuals that you need to do-itiyourself.
For Sears professional installation of home appliances
and items Hke garage door openers and water heaters.
1-800-4-MY-HOME ® Call anytime, day or night
(1-800-46£4663) (U.S,A, and Canada)
_.sears.com www.sears.ca
Our Home
For repair of carry-in items like vacuums, lawn equipment,
and electronics, call anytime for the Ilocation of the nearest
Siea_ Pa_ & Repair Sewice Center
'1-800_8-'1222 (U.S.A.) 1-800_94663 (Canada)
_.sea_.com www.sea rs.ca
To purchase a protection agreement on a product sep,4_d by Sears:
1_00-827-6655 (USA) 1-800-361 4665 (Canada)
Au Car'_da _ur servi_ en francis:
11-8004_E#'OYERMc
(1.800-533-6937)
w,ww_sears._
@_rs _, LLC
® Registered Trademark /TMTrademark ,/SMSewice Mark of Sears Brands LLC
® Marca Re_istrada /TMMarca de F_lbd_ /SMMatca de Sewicio de Sears Brands, LLC
t_D
Mc Marque de commerce /Mal_ue d&_see de Seal_ B_nds, LLC
Part No. SP6592 Form No. SP6592-2 Printed in U.S.A. 011/09
