Kenmore 79095262991 User Manual ELECTRIC RANGE Manuals And Guides L0902404
KENMORE Free Standing, Electric Manual L0902404 KENMORE Free Standing, Electric Owner's Manual, KENMORE Free Standing, Electric installation guides
User Manual: Kenmore 79095262991 79095262991 KENMORE ELECTRIC RANGE - Manuals and Guides View the owners manual for your KENMORE ELECTRIC RANGE #79095262991. Home:Kitchen Appliance Parts:Kenmore Parts:Kenmore ELECTRIC RANGE Manual
Open the PDF directly: View PDF ![]() .
.
Page Count: 48
®
ELECTRIC SELF-CLEANING
Use & Care Guide
RANGE
FA ELECTRICA AUTOLIMPIANTE
Manual deI usuario
Z
r-
r_
L_
Z_
0
p,,
Sears Roebuck and Co,, HoffmanEstates, IL 60179 U.S.A_
www.,sea rs. co m
PIN 316000945 (9810)
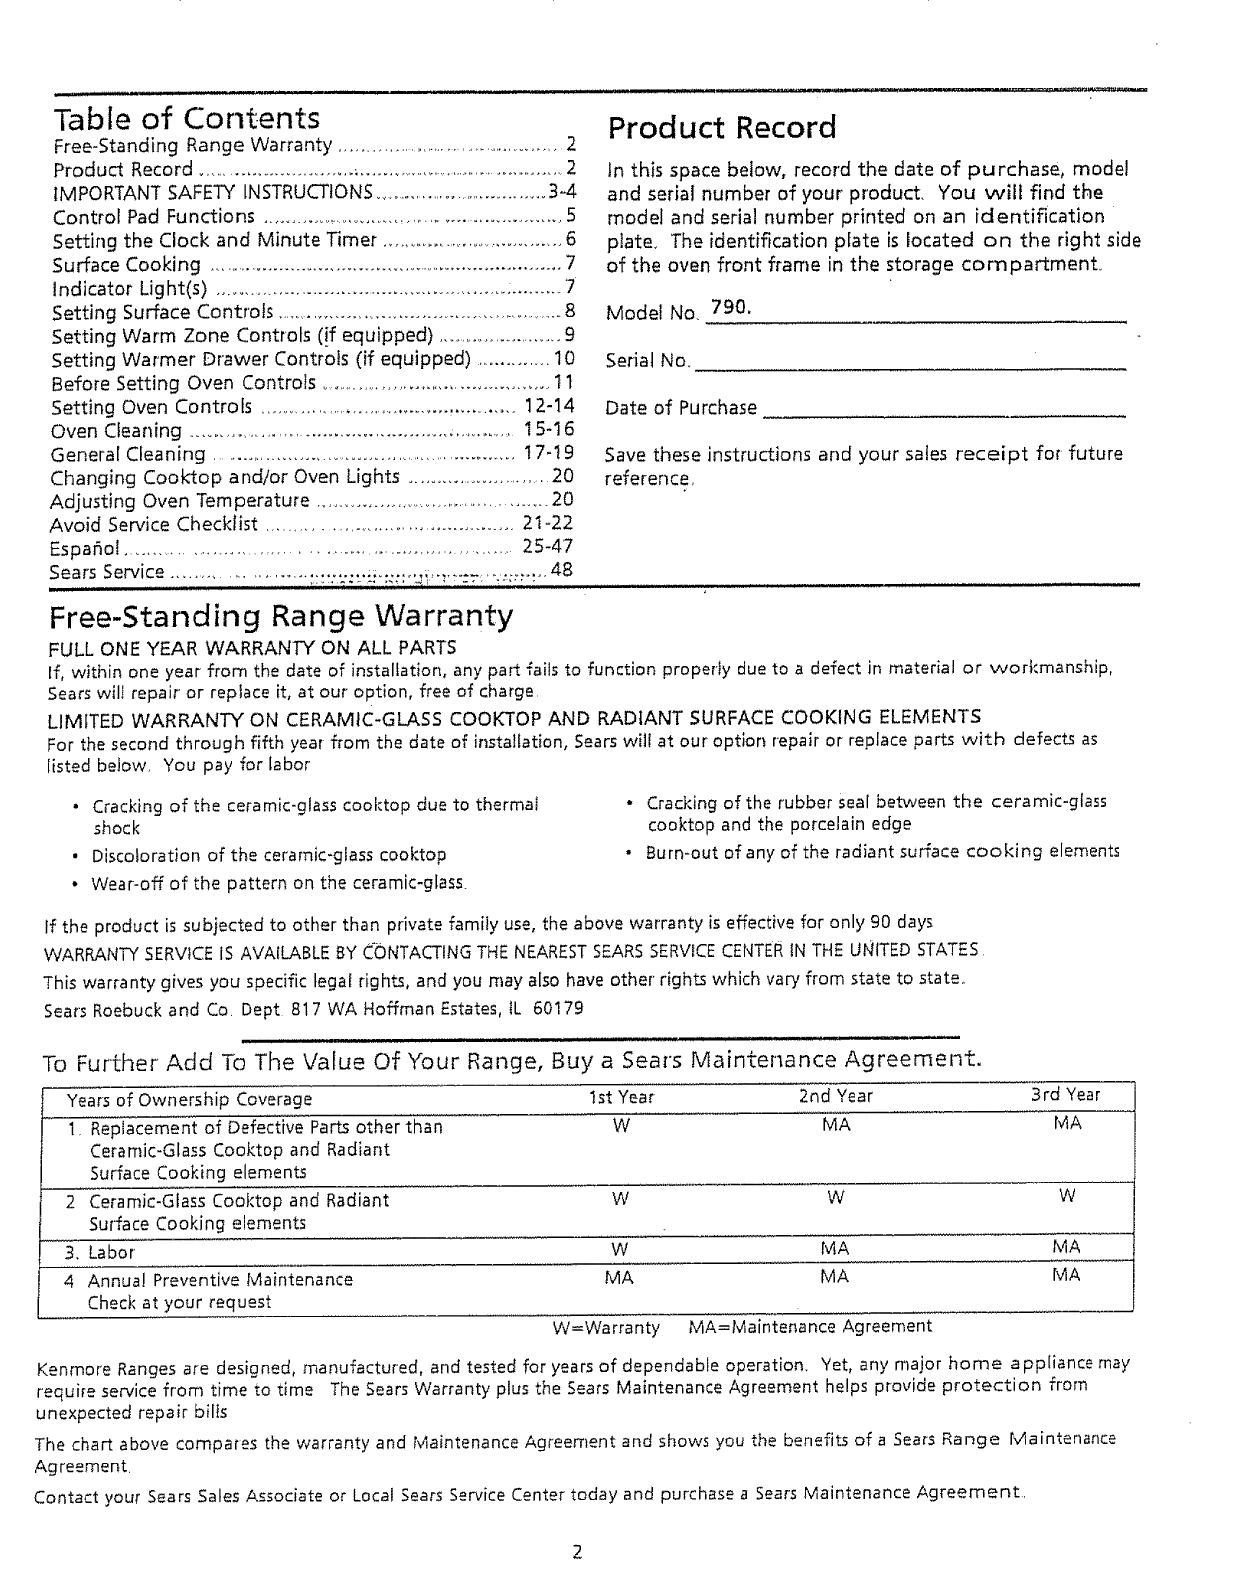
Table of Contents
Free-Standing Range Warranty .............................................. 2
Product Record ............................... .,..................................................2
IMPORTANT SAFETY INSTRUCTIONS ..................................... 3-4
Control Pad Functions ............................................................. 5
Setting the Clock and Minute Timer ........................................ 6
Surface Cooking .................................................................... 7
Indicator Light(s) ...................................................... :........ 7
Setting Surface Controls ........................................................ 8
Setting Warm Zone Controls (!f equipped) ......................... 9
Setting Warmer Drawer Controls (if equipped) .............. 10
Before Setting Oven Controls .......................................... t 1
Setting Oven Controls ...................................... , ...... 12-14
Oven Cleaning ............................................................. t 5-16
General Cleaning ............................................................ t7-t 9
Changing Cooktop and/or Oven Lights ......................... 20
Adjusting Oven Temperature ............................................... 20
Avoid Service Checklist ......................................... 2t-22
Espar_ol .................................................................... 25-47
Sears Service ................ :°":-:::':_':;"-',_;_:::_i"!::::_.7.::.:::..-'.__"_-48
t i
Product Record
In this space below, record the date of purchase, model
and serial number of your product. You will find the
model and serial number printed on an identification
plate. The identification plate is located on the right side
of the oven front frame in the storage compartment.
Model No. 790,
Serial No.
Date of Purchase
Save these instructions and your sales receipt for-future
reference,
Free-Standing Range Warranty
FULL ONE YEAR WARRANTY ON ALL PARTS
If, within one year from the date of installation, any part fails to function properly due to a defect in material or workmanship,
Sears wilt repair or replace it, at our option, free of charge.
LIMITED WARRANTY ON CERAMIC-GLASS COOKTOP AND RADIANT SURFACE COOKING ELEMENTS
For the second through fifth year from the date of installation, Sears wilt at our option repair or replace parts with defects as
listed beJow, You pay for labor
• Cracking of the ceramic-glass cooktop due to thermal
shock
• Discoloration of the ceramic-glass cooktop
• Wear-off of the pattern on the ceramic-glass.
• Cracking of the rubber seal between the ceramic-glass
cooktop and the porcelain edge
• Burn-out of any of the radiant surface cooking elements
If the product is subjected to other than private family use, the above warranty is effective for only 90 days
WARRANTY SERVICE IS AVAILABLE BY C°ONTACTINGTHE NEAREST SEARSSERVICECENTER IN THE UNITED STATES
This warranty gives you specific tegat rights, and you may also have other rights which vary from state to state..
Seats Roebuck and Co. Dept 817 WA Hoffman Estates, tL 60179
To Further Add TO The Value Of Your Range, Buy a Sears Maintenance Agreement.
Years of Ownership Coverage 1st Yea_ 2nd Year 3rd Year
1, Replacement of Defective Parts other than W MA MA
Ceramic-Glass Cooktop and Radiant
Surface Cooking elements
2 Ceramic-Glass Cooktop and Radiant W W W
Surface Cooking elements
3, Labor' W MA MA
4 Annual Preventive Maintenance MA MA MA
Check at your request
W=Warranty MA=Maintenance Agreement
Kenmore Ranges are designed, manufactured, and tested for years of dependable operation, Yet, any major home appliance may
require service from time to time The Sears Warranty plus the Sears Maintenance Agreement helps provide protec:tion from
unexpected repair bills
The chart above compares the warranty and Maintenance Agreement and shows you the benefits of a Sears Range Maintenance
Agreement.
Contact your Sears Sales Associate or Local Sears Service Center today and purchase a Sears Maintenance Agreement.
IMPORTANT SAFETY INSTRUCTIONS
Read all instructions before using this appliance.
Save these instructions for future reference.
This manual contains many important safety messages. Always read and obey all safety messages:
This is the safety alert symbol, tt alerts you to safety messages that inform you of hazards that can kill or hurt you Or others, or
cause damage to the product.
Indicates an imminently hazardous situation which, if not avoided may result in death or serious injury
indicates an imminently hazardous situation which, if not avoided may result in minor or moderate iniury ,Dr
product-damage:only_ :_
All safety messages will identif_y the hazard, tell you how to reduce the chance of injury, and tell you what can happen if the
instructions are not fo!iowed
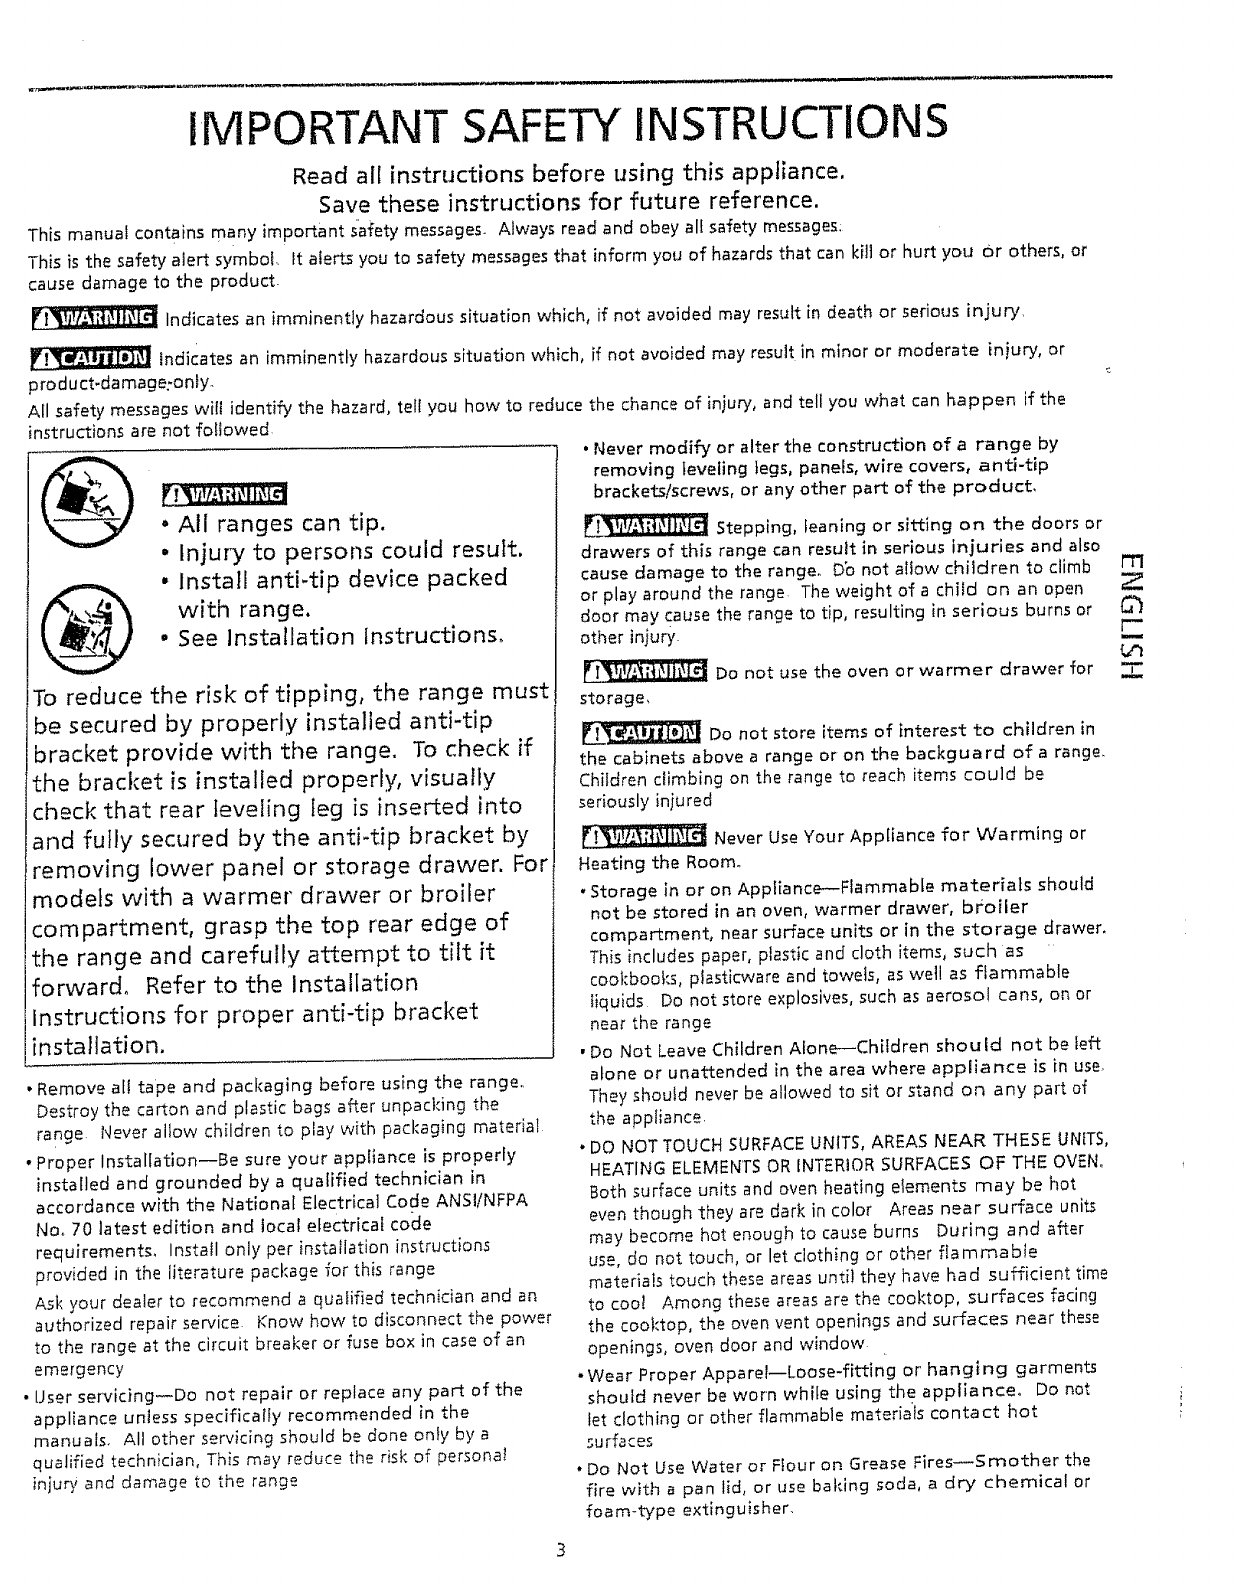
•Never modify or alter the construction of a range by
removing teveling legs, panels, wire covers, anti-tip
brackets!screws, or any other part of the product,
°All ranges can tip. _ Stepping, leaning or sitting on the doors or
"Injury to persons could result, drawers of this range can result in serious injuries and also
•Install anti-tip device packed cause damage to the range_ bb not alfow children to climb l'rl
with range, or play around the range The weight of a child on an open
door may cause the range to tip, resulting in serious burns or G-_
•See Installation Instructions, other injury I'-
b'l
Do not use the oven or warmer drawer for
To reduce the risk of tipping, the range must storage,
be secured by properly installed anti-tip
bracket provide with the range. To check if _ Do not store items of interest to children in
the cabinets above a range or on the backguard of a range.
the bracket is installed properly, visually ChiIdren climbing on the range to reach items could be
check that rear leveling leg is inserted into seriously injured
and fully secured by the anti-tip bracket by _ Never Use Your Appliance for Warming or
removing lower panel or storage drawer. For Heatingthe Room°
models with a warmer drawer or broiler •storage in or on Appliance--Flammable materials should
compartment, grasp the top rear edge of not be stored in an oven, warmer drawer, b#oiler
compartment, near surface units or in the storage drawer.
the range and carefully attempt to tilt it This includes paper, plastic and cloth items, such as
forward° Refer to the Installation coot;books0 piasticware and towets, as well as flammable
Instructions for proper anti-tip bracket _iquids Do not store explosives, such as aerosol cans, on or
near the range
installation. ,Do Not Leave Children Alone--Children should not be felt
alone or unattended in the area where appliance is in use
•Remove all tape and packaging before using the range.
Destroy the carton and plastic bags after unpacking the They ._houtd never be allowed to sit or stand on any part of
range Never allow children to play with packaging material the appliance,
• Proper Installation--Be sure your appliance is properly .DO NOT TOUCH SURFACE UNITS, AREAS NEAR THESE UNITS,
installed and grounded by a qualified technician in HEATING ELEMENTS OR INTERIOR SURFACES OF THE OVEN.
accordance with the National Electrical Code ANSI/NFPA Both surface units and oven heating elements may be hot
Nor 70 tatest edition and local electrical code even though they are dark in color Areas near surface units
requirements_ Install only per installation instructions may become hot enough to cause burns During and after
provided in the literature package for this range use, do not touch, or let clothing or other flammable
materials touch these areas unti) they have had sufficient time
Ask your dealer to recommend a qualified technician and an to coo! Among these areas are the cooktop, surfaces facing
authorized repair service Know how to disconnect the power the cooktop, the oven vent openings and surfaces near these
to the range at the circuit breaker or fuse box in case of an openings, oven door and window
emergency • Wear Proper Apparel--Loose-fitting or hanging garments
• User servicing_Do not repair or replace any part of the should never be worn while using the appliance° Do not
appliance untess specifically recommended in the let clothing or other flammable materials contact hot
manuals_ All other servicing should be done only by a surfaces
qualified technician, This may reduce ti_e risk of personal
injury and damage to the range •Do Not Use Water or Flour on Grease Fires_Smother the
fire with a pan lid, or use baking soda, a dry chemica! or
foam-type extinguisher.
IMPORTANT
• When heating fat or grease, watch it ciosely_ Fat or grease
may catch fire if al]owed to become too hot_
• Use Only Dry Potholders--Moist or damp potholders on
hot surfaces may result in burns from steam. Do not tet
pothotders touch hot heating elements. Do not use a towel
or other bulky cloth instead of a potholder.
• Do Not Heat Unopened Food Containers--Buildup of
pressure may cause container to burst and result in injury.
Remove the o_ven d6or from any unused range if it is to be
stored or discarded,
IMPORTANT--Do not attempt to operate the range during a
power failure, if the power fails, always turn off the range, tf
the range is not turned off and the power resumes, the range
will begin to operate again. Once the power resumes, reset
the clock and oven function
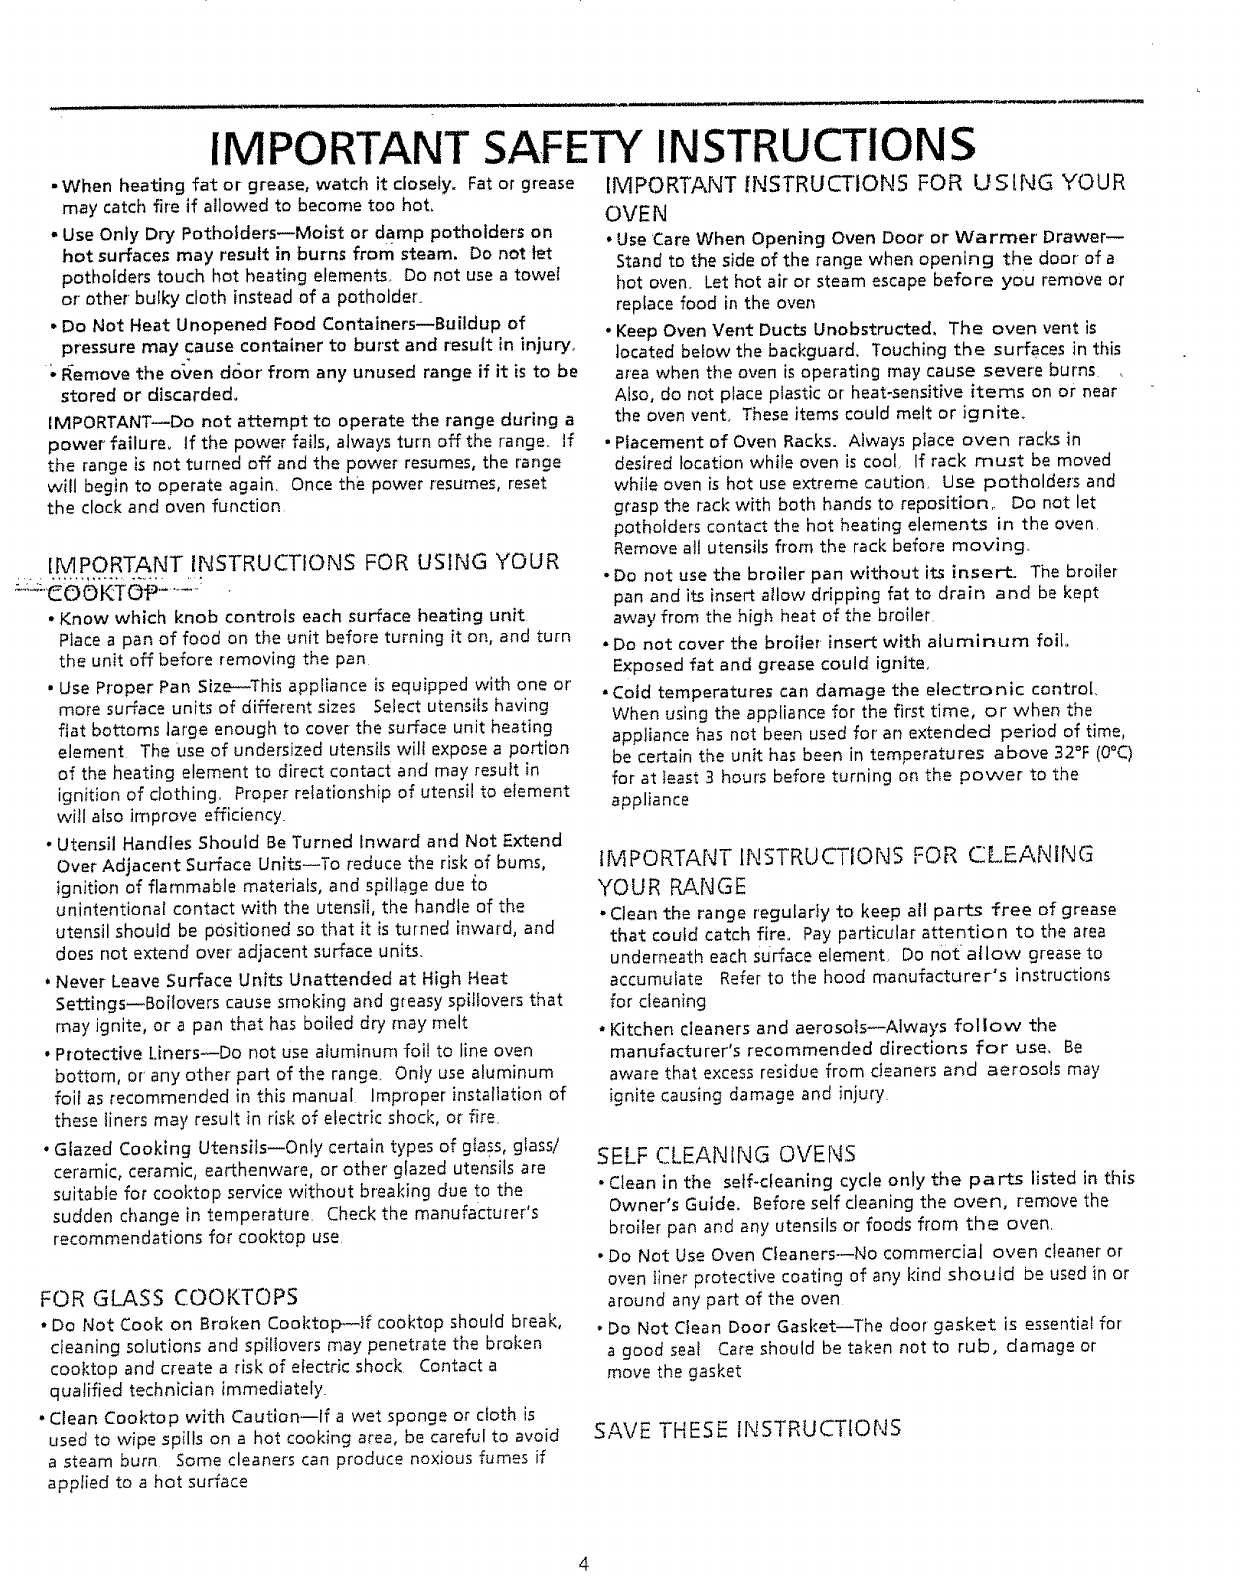
IMPORTANT INSTRUCTIONS FOR USING YOUR
•Know which knob controls each surface heating unit
Place a pan of food on the unit before turning it on, and turn
the unit off before removing the pan
• Use Proper Pan Size--This appliance is equipped with one or
more surface units of different sizes Select utensils having
fiat bottoms large enough to cover the surface unit heating
element The use of undersized utensils wilt expose a portion
of the heating element to direct contact and may result in
ignition of ctothing_ Proper relationship of utensil to element
will also improve efficiency.
° Utensil Handles Should Be Turned Inward and Not Extend
Over Adjacent Surface Unlts--To reduce the risk of bums,
ignition of flammable materials, and spillage due to
unintentional contact with the utensil, the handle of the
utensil should be positioned so that it is turned inward, and
does not ex_end over adjacent surface units.
, Never Leave Surface Units Unattended at High Heat
Settings_Boilovers cause smoking and greasy spillovers that
may ignite, or a pan that has boiled dry may melt
• Protective Liners_Do not use aiuminum foil to line oven
bottom, or any other part of the range. Onty use aluminum
foil as recommended in this manual Improper installation of
these liners may result in risk of electric shock, or fire
• Glazed Cooking Utensils_Only certain types of gtass, glass/
ceramic, ceramic, earthenware, or other glazed utensils are
suitable for cooktop service without breaking due to the
sudden change in temperature. Check the manufacturer's
recommendations for cooktop use
FOR GLASS COOKTOPS
• Do Not Cook on Broken Cooktop--lf cooktop shoutd break,
cleaning solutions and spillovers may penetrate the broken
cooktop and create a risk of electric shock Contact a
qualified technician immediately
• Clean Cooktop with Cautlon--lf a wet sponge or cloth is
used to wipe spills on a hot cooking area, be careful to avoid
a steam burn Some cleaners can produce noxious fumes if
apptied to a hot surface
INSTRUCTIONS
IMPORTANT INSTRUCTIONS FOR USING YOUR
OVEN
, Use Care When Opening Oven Door or Warmer' Drawer_
Stand to the side of the range when opening the door of a
hot oven. Let hot air or steam escape before you remove or
replace food in the oven
.Keep Oven Vent Ducts Unobstructed, The oven vent is
located below the backguard, Touching the surfaces in this
area when the oven is operating may cause severe burns
A(so, do not place plastic or heat-sensitive items on or near
the oven vent, These items could melt or ignite.
• Placement of Oven Racks. Always place oven racks in
desired location while oven is cool_ If rack must be moved
while oven is hot use extreme caution, Use potholders and
grasp the rack with both hands to reposition,, Do not let
pothofders contact the hot heating elements in the oven
Remove all utensils from the rack before moving,
• Do not use the broiler pan without its insert. The broiler
pan and its insert allow dripping fat to drain and be kept
away from the high heat of the broiler.
• Do not cover the broiler- insert with aluminum foil_
Exposed fat and grease could ignite_
• Cold temperatures can damage the electronic control
When using the appliance for the first time, or when the
appiiance has not been used for an extended period of time,
be certain the unit has been in temperatures above 32°F (0°C)
for at teast 3 hours before turning on the power to the
appliance
iMPORTANT INSTRUCTIONS FOR CLEANING
YOUR RANGE
° Clean the range regularly to keep all parts free of grease
that could catch fire. Pay particular attention to the area
underneath each surface elemenL Do not allow grease to
accumulate Refer to the hood manufacturer's instructions
for cieaning
• Kitchen cleaners and aerosots_Always follow the
manufacturer's recommended directions for use, Be
aware that excess residue from cleaners and aerosols may
ignite causing damage and injury.
SELF CLEAN1NG OVENS
oClean in the self-cleaning cycle only the parts listed in this
Owner's Guide. Before self cleaning the oven, remove the
broiler pan and any utensils or foods from the oven.
• Do Not Use Oven Cfeaners_No commercial oven cleaner or
oven liner protective coating of any kind should be used in or
around any part of the oven
° Do Not Ciean Door Gasket_The door gasket is essential for
a good seat Care should be taken not to rub, damage or
move the gasket
SAVE THESE INSTRUCTIONS

Control Pad Functions
CLEAR PAD-- Used to
dear any function
previously entered
except the time of day
and minute timer. Push
CLEAR to stop cooking.
BAKE PADIUsed to
enter the normal
baking mode
tem peratu re.
BROIL
Used to seie{:t
the variable
broil function
CLEAN PAD--
Used to select the
self-cleaning
cycle.
UP and DOWN ARROW PADS-- used along with the
function' pads to select oven temperature, cooking
time, stop time (when programming an automatic
READ THE INSTRUCTIONS CAREFULLY BEFORE USING THE OVEN. For
satisfactory use of your oven, become familiar with the various functions of
the oven as described below,
" CLOCK PAD-- Used
set the time of
day
INDICATOR
LIGHTS-- These
light to show which
feature is in use.
OVEN, PREHEAT & LOCi( LIGHTS-- The "OVEN" light
'will glow each time the oven unit turns on to maintain
the set oven temperature The "PREHEAT" light will glow
when the oven is first set to operate, or if the desired
temperature is reset higher than the actual oven
temperature The "LOCK" light will flash until the door
locks when the self-clean cycle is in use It glows
constantly after the door tocks
TIMER PAD--
Used to set or
cancel the minute
timer. The minute
timer does not
start or stop
cooMng
BAKE TIME PAD--
Used to enter the
length of the
baking time.
TIME PAD--
Used to set the I'T1
desired stop time Z
for baking. Can be
used with BAKE _---
TIME to program a Z
delayed bake cycle
The oven can be programrned to:
. Bake normally
• Time bake
• Broil
• Self-clean
For a silent contro[ panel:
When choosing a function, a beep will be heard each time a pad is pushed If desired, the controls can be
programmed for silent operation Push and hold @ After 7 seconds, the control will beep once, This will block the
controls from sounding when a pad is pushed To return the sound, push and hold @ again for 7 seconds until 1
beep is heard
Note: The control will return to the audible mode a_er a power outage
Terupert, lure conversion:
The electronic oven control is set to operate in °F (Fahrenheit) when shipped from the factory The oven can be
programmed for any temperature from i70°F to 550°F (65°C to 287°C)
To change the temperature to °C (Celsius) or from °C to °F (control should not be in a Bake or Clean mode):
} Push _- " " appears in the display
2 Push and hold the (_ until "HI" appears in the d}splay
3 Push and hold @ until °F or °C appears in tile display
4 Push the [_ or (_ to change °F to °C or °C to °F
5 Push any function pad to return to normal operating mode
5
Setting the Clock and
Minute Timer
Note: The oven function wilt not |
work if the time of day clock is not Jset.
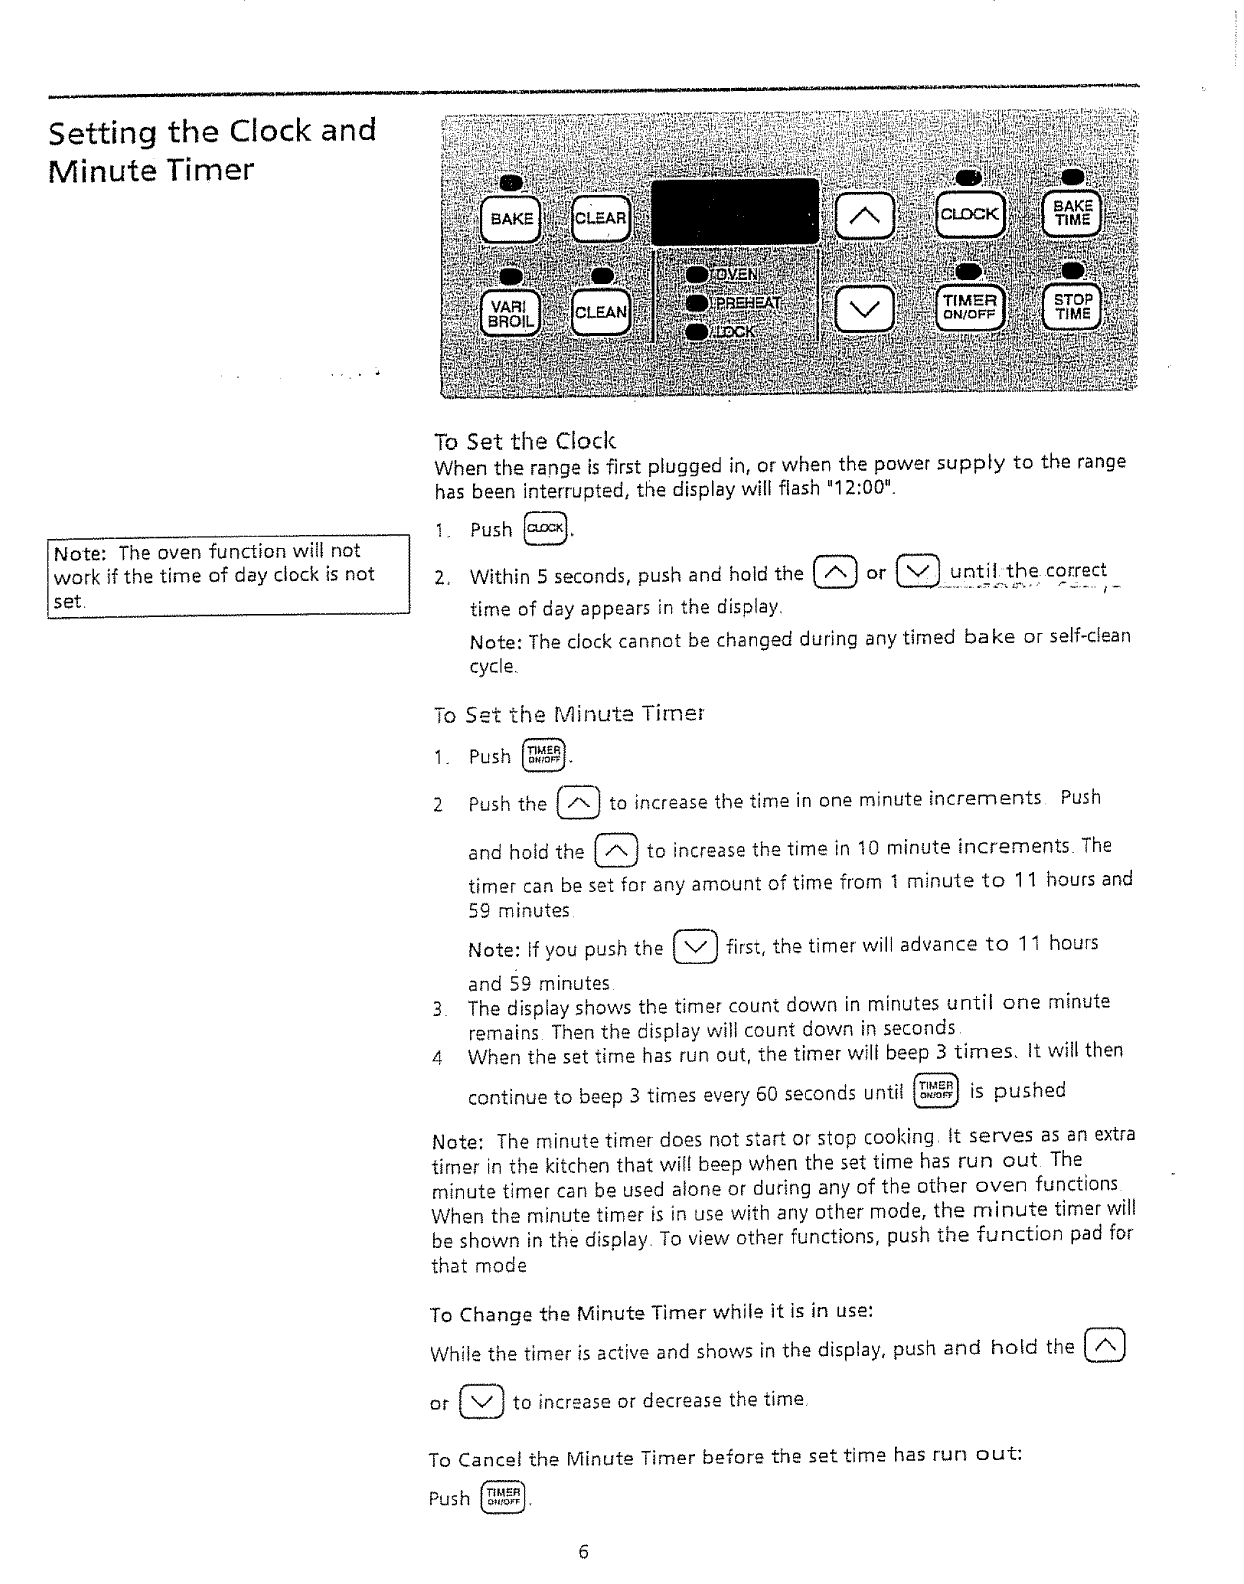
To Set the Clock
When the range is first plugged in, or when the power supply to the range
has been interrupted, the display will flash "12:00".
t. Push _.
2, Within 5 seconds, push and hold the C_ or @ until: the cor.rect
time of day appears in the display.
Note: The clock cannot be changed during any tiraed bake or self-clean
cycle.
To Set the Minute Time_'
1. Push @.
2 Push the [_ to increase the time in one minute increments Push
hotd the _ to increase the time in 10 minute increments. The
and
timer can be set for any amount of time from t minute to 1 1 hours and
59 minutes
Note: If you push the _ first, the timer will advance to 11 hours
and 59 minutes
3. The display shows the timer count down in minutes until one minute
remains Then the display will count down in seconds
4 When the set time has run out, the timer wilt beep 3 times, It will then
continue to beep 3 times every 60 seconds unti_ @ is pushed
Note: The minute timer does not start or stop cooking, it serves as an extra
timer in the kitchen that wii! beep when the set time has run out The
minute timer cart be used alone or during any of the other oven functions
When the minute timer is in use with any other mode, the minute timer' will
be shown in the display. To view other functions, push the function pad for
that mode
To Change the Minute Timer while it is in use:
While the timer is active and shows in the display, push and hold the (_
or (_ to increase or decrease the time
To Cancel the Minute Timer before the set time has r'un out:
Push _.

Surface Cooking Ceramic-Glass Cool<top
The ceramic-glass cooktop has electric heating coils located below the
surface of the glass. The design of the glass cooktop outlines the area of
the surface unit betow_ Most importantly, make sure the diameter of the
pan matches the diameter of the unit. Heat is transferred up through the
surface of the cooktop to the cooking utensil. Only flat-bottomed pans
should be used, The type and size of the cookware, number of surface units
in use and the settings of the units are factors that will' affect the amount
of heat that wilt spread to areas surrounding the surface units; The areas
surrounding the units may become hot enough to cause burns.
Thdcao_{_p should not be used as a cutting board or work surface in the
kitchen Dropping heavy or hard objects on the cool<top may crack it. Pans
with rough bottoms may scratch the cooktop surface. Do not place foods
directly on the smoothtop surface (without cooking utensils) damage to
glass or difficulty in cleaning will result
Radiant Surface Units
The Radiant Surface Unit is a group of heating coils enclosed in a ceramic
fixture below the glass coo_op. The unit temperature rises gradually and t'rl
evenly,, As the temperature rises, the unit will glow red To maintain the .....
selected setting, the unit wi_i cycle on and off, The heating unit retain]
enough heat to provide a uniform and consistent heat during the off cycle.
The ceramic fixture thermally insulates the heating unit, concentrating heat
in the heating zone. For efficient cooking, turn off the unit several minutes Z
before cooking is complete. This will allow residual heat to complete the
Cooking process. The amount of residual heat depends on the type and
quality of cooking utensil, the quantity of food being cooked and the
selected heat setting
Dual Radiant _<urface Units (if equipped)
The dual radiant su_ace unit is made up of an inner and outer coil within
the same surface unit. A control knob and rocker switch is used for
operating the different coils. The smaller unit or inner coil has a lower
wattage and can be used to prepare smaller quantities of food in smaller
pans The larger unit or both inner and outer coils has a higher wattage
and can be used to prepare larger quantifies of food in larger pans When
using the outer coil, both inner and outer colts operate.
indicator Light(s) There are 2 different surface control lights that will glow on your range--a
surface indicator and a hot cooktop surface indicator',
The surface indicator, located on the control panel, glows when any
surface unit is turned on A quick glance at the light after cooking is an
easy check to be sure all surface controls are turned off.
The hot cooktop surface indicator, located unde_ the glass cool(top or' on
the control panel, will come on as the surface cooking area heats up and
will continue to glow until the glass cooktop has cooled down to a
moderate level.
7
Setting Surface
Controls
Radiant Surface Unit ControE
_%_!_
Dual Radiant Surface Unit Controls
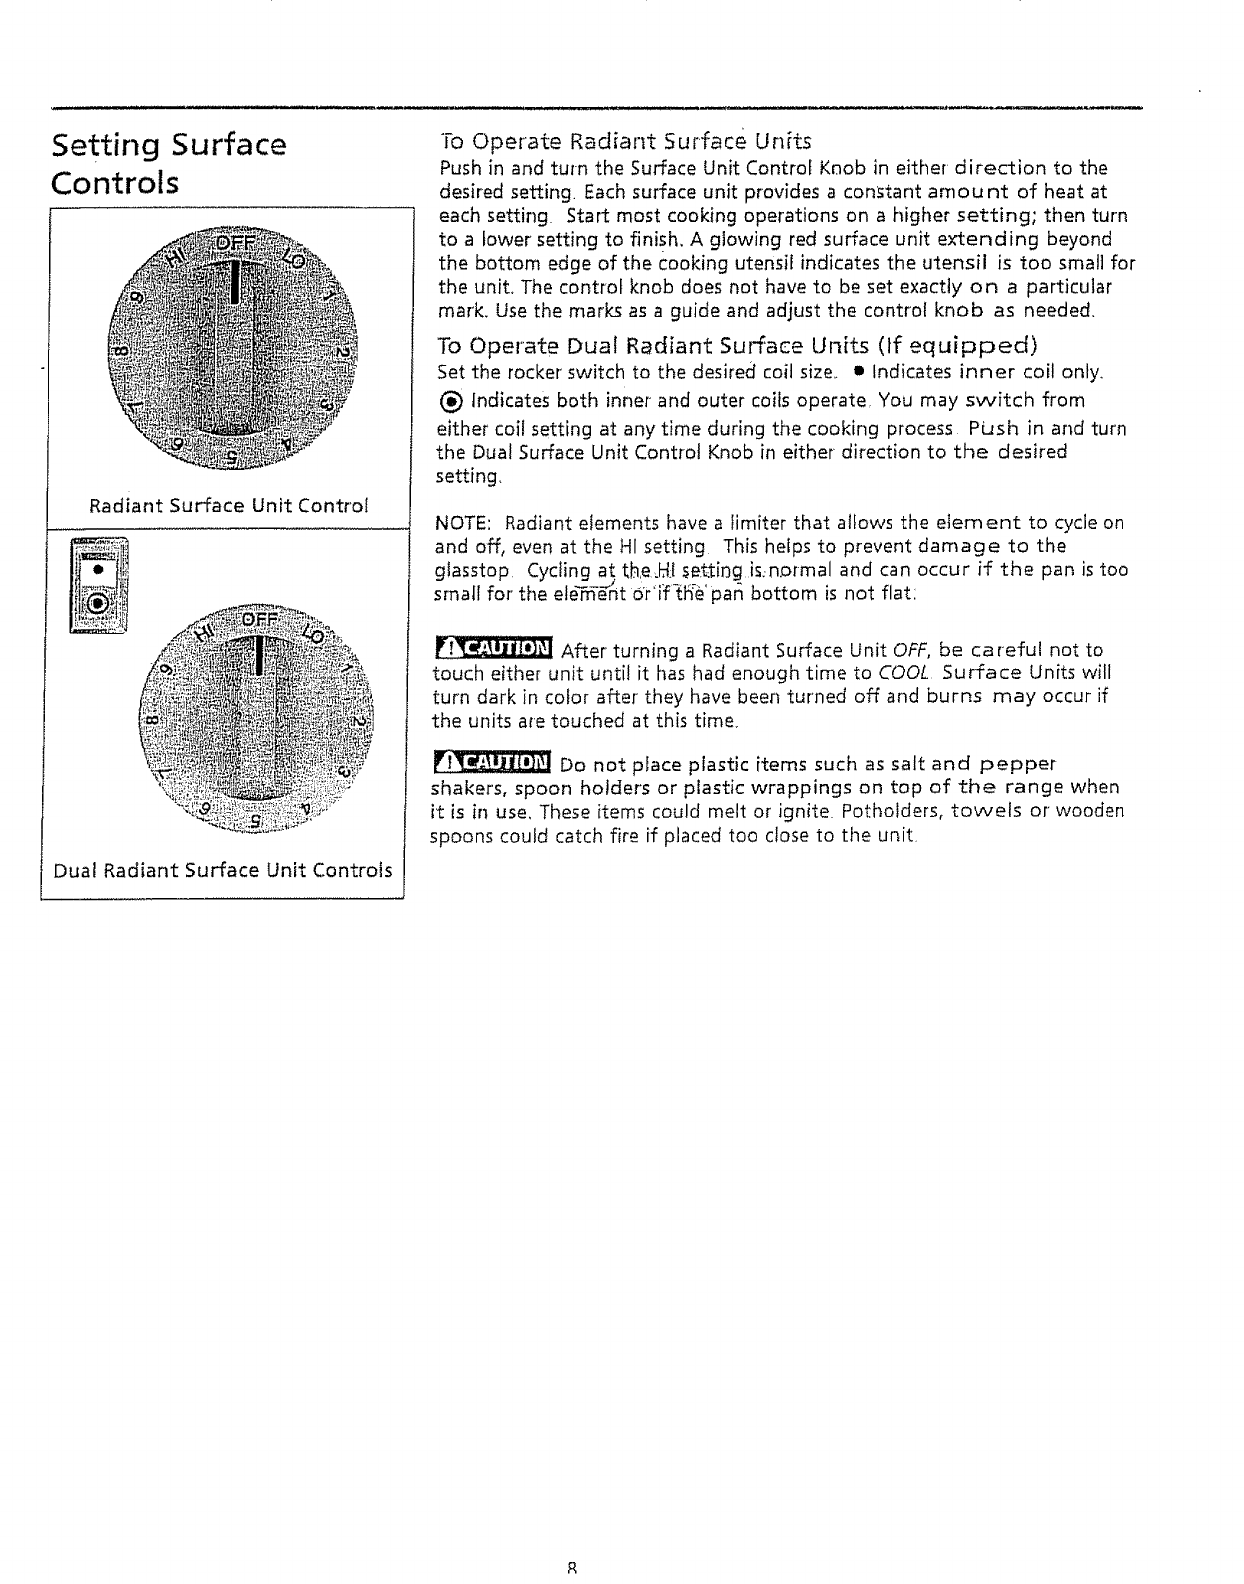
"Fo Operate Radiant Surface Units
Push in and turn the Surface Unit Control Knob in either direction to the
desired setting. Each surface unit provides a constant amount of heat at
each setting. Start most cooking operations on a higher setting; then turn
to a lower setting to finish. A glowing red surface unit extending beyond
the bottom edge of the Cooking utensil indicates the utensil is too small for
the unit. The control knob does not have to be set exactly on a particular
mark. Use the marks as a guide and adjust the control knob as needed.
To Opera±e Dual Radiant Sul-face Units (If equipped)
Set the rocker switch to the desired coil size. • Indicates inner coil only.
(_) indicates both inner and outer coils operate You may switch from
either coil setting at any time during the cooking process Push in and turn
the Dual Surface Unit Control Knob in either direction to the desired
setting,
NOTE: Radiant elements have a limiter that allows the element to cycle on
and off, even at the HI setting This helps to prevent damage to the
glasstop. Cycling at the J_:tse_tirJg is:nDrmal and can occur if the pan is too
small for' the ele_'n-T_ntoYi__t_e' par_ bottom is not flat:
After turning a Radiant Surface Unit OFF, be careful not to
touch either unit until it has had enough time to COOL Surface Units will
turn dark in color after they have been turned off and burns may occur if
the units are touched at this time.
Do not peace plastic items such as salt and pepper
shakers, spoon holders or plastic wrappings on top of the range when
it is in use, These items could melt or ignite. Potholders, towels or wooden
spoons could catch fire if placed too close to the unit.

Setting Warm Zone
Controls (if equipped)
Us; the warm zone to keep cooked
foods hot such as: vegetables,
gravies, casseroles, soups, stews,
breads, pastries and oven-safe dinner
ates
;_.... OFF H!
MED
WARMER ZONE
@
Warm Zone Recommended Food
Settings Chart
Fo6d Item Heating
Level
Breads/Pastries LO
Casseroles LO
Dinner Plates with Food LO
Eggs LO
Gravies LO
Meats MED
Sauces MED
Soups (cream) MED
Stews MED
Vegetables MED
Fried Foods HI
Hot Beverages HI
Soups (liquid) Ht
To Operate the Warm Zone
The purpose of the warm zone is to keep hot cooked foods at serving
temperature Always start with hot food It is not recommended to heat
coldfood on the warm zone.
All food placed on the warm zone should be covered with a lid or
alUminum foil to maintain quality. For best results, when warming pastries
or breads, the cover should have an opening to allow moisture to escape
Do not use plastic wrap to cover food, Plastic may melt onto the
surface and be very difficult to clean.
Use only dishware, utensils and cookware recommended for oven and
cooktop use on the warm zone.
Unlike the surface elements, the warm zone will not glow red
when it is hot,
Always use pothofders or oven mitts when removing food
from the warm zone as cookware and plates will be hot
To ,Set the Warm Zone Control FTI
1. To set the control, push in and turn the knob, The temperatures are
approximate, and are designa{ed by Hf, IVIEDand LO, However, the
control can be set at any position between HI and LO for different levels r"
of heating,
2,. When done, turn the control to OFF, The warm zone will remain warm I
until the hot surface indicator light goes off.
Temperature 5election
Refer to the chart in the side column for recommended heating levels, tf a
particular food is not listed, start with the medium level, and adjust as
needed. Most foods can be kept at serving temperatures by using the
medium level
Indicator Ligi_ts
The surface indicator light is located below the warm zone control It
turns on when the control is set, and stays on until the control is turned
off The hot surface indicator light, located under the glass cooktop, wilt
come on when the control is set and will continue to glow until the glass
cooktop has cooled down to a moderate level,
WARM & _ADY ZOi'¢_ k'NO£
/ .. _
::i°66- ®® 5
i,,e.........
\
INDICATOR LIGHT
WARM &READY ZONE
The cooktop and control panel shown above are representational Your
range may have a different design look and different features
9

Setting Warmer Drawer
Controls 0f equipped)
Use the warmer' drawer to keep hot
foods hot such as: vegetables,
gravies, meats, casseroles, biscuits
and rolls, pastries and heated dinner
plates., I
The warmer drawer is equipped with
Ia catch which may require extra force
lwhen opening and closing the
[drawer.
OFF HI
MED
WARMER DRAWER
Warmer Drawer Recommended
Food Settings Chart
Food item Setting
Roasts (Beef, Pork, Lamb) MED
Pork Chops Hi
Bacon HI
Hamburger Patties HI
Poultry HI
Gravies MED
Casseroles MED
Eggs MED
Fried Foods HI
Vegetables MED
Pizza HI
Biscuits MED
Rolls, soft LO
Roils, hard MED
Pastries MED
Empty Dinner Plates LO
Atranging Warmer Drawer Rack Positions
The rack can be used in 2 ways:
• In the upright position to allow low profile food items to be placed
both under' and on top of the rack (for' example, rolls or biscuits on top
of the rack and a casserole dish under)_
• In the downward position to allow you to place light weight food
items and empty dishware (for example, rolls or' pastries and dinner
plates), get the warmer drawer rack as shown below,
Upright Position Downward Position
To Operate the Warmer Drawer
Your range is equipped with a warmer drawer The purpose of the warmer
drawer is to keep hot cooked foods at serving temperature, Always start
with hot food It is not recommended to heat cold food in the warmer
drawer,
All food placed in the warmer drawer should be covered with a lid or
aluminum foil to maintain quality Do not use plastic wrap to cover
food. Plastic may melt onto the drawer and be very difficult to clean,
Use onty dishware, utens{ts and cookware recommended for oven use in
the warmer drawer
Afways use pothofders or oven mitts when removing food
from the warmer drawer as cookware and plates will be hot.
'ib Set the Thermostat Control
The thermostat control is used to select the temperature of the warmer
drawer, It is located on the control panel. To set the thermostat, push in
and turn the knob to the desired setting The temperatures are
approximate, and are designated by HI, MED and LO.
t. Turn the knob to select the desired temperature setting..
2. For best results, preheat the drawer' before adding food An empty
drawer will preheat in approximately 15 minutes
3 When done, turn the thermostat control to OFF
Temperature Selection
Refer to the chart for recommended settings If a particular food is not
listed, start with the medium setting If more crispness is desired, remove
the lid or aluminum foil
Most foods can be kept at serving temperatures by using the medium
setting. When a combination of foods are to be kept warm (for instance, a
meat with 2 vegetables and roll_,), use the high setting
Refrain from opening the warmer drawer while in use to eliminate ioss of
heat from the drawer.
indicator Light
The indicator light is located below the thermostat control. It turns on
when the control is set, and stays on until the control is turned off The
warmer drawer is inoperable during the self-clean cycle The indicator light
will not come on during the self-clean cycle
10
Before Setting
Controls
Oven Arranging Oven Racks
ALWAYS ARRANGE OVEN RACKS WHEN THE OVEN IS COOL (PRIOR TO
OPERATING THE OVEN). Always use oven mitts when using the oven.
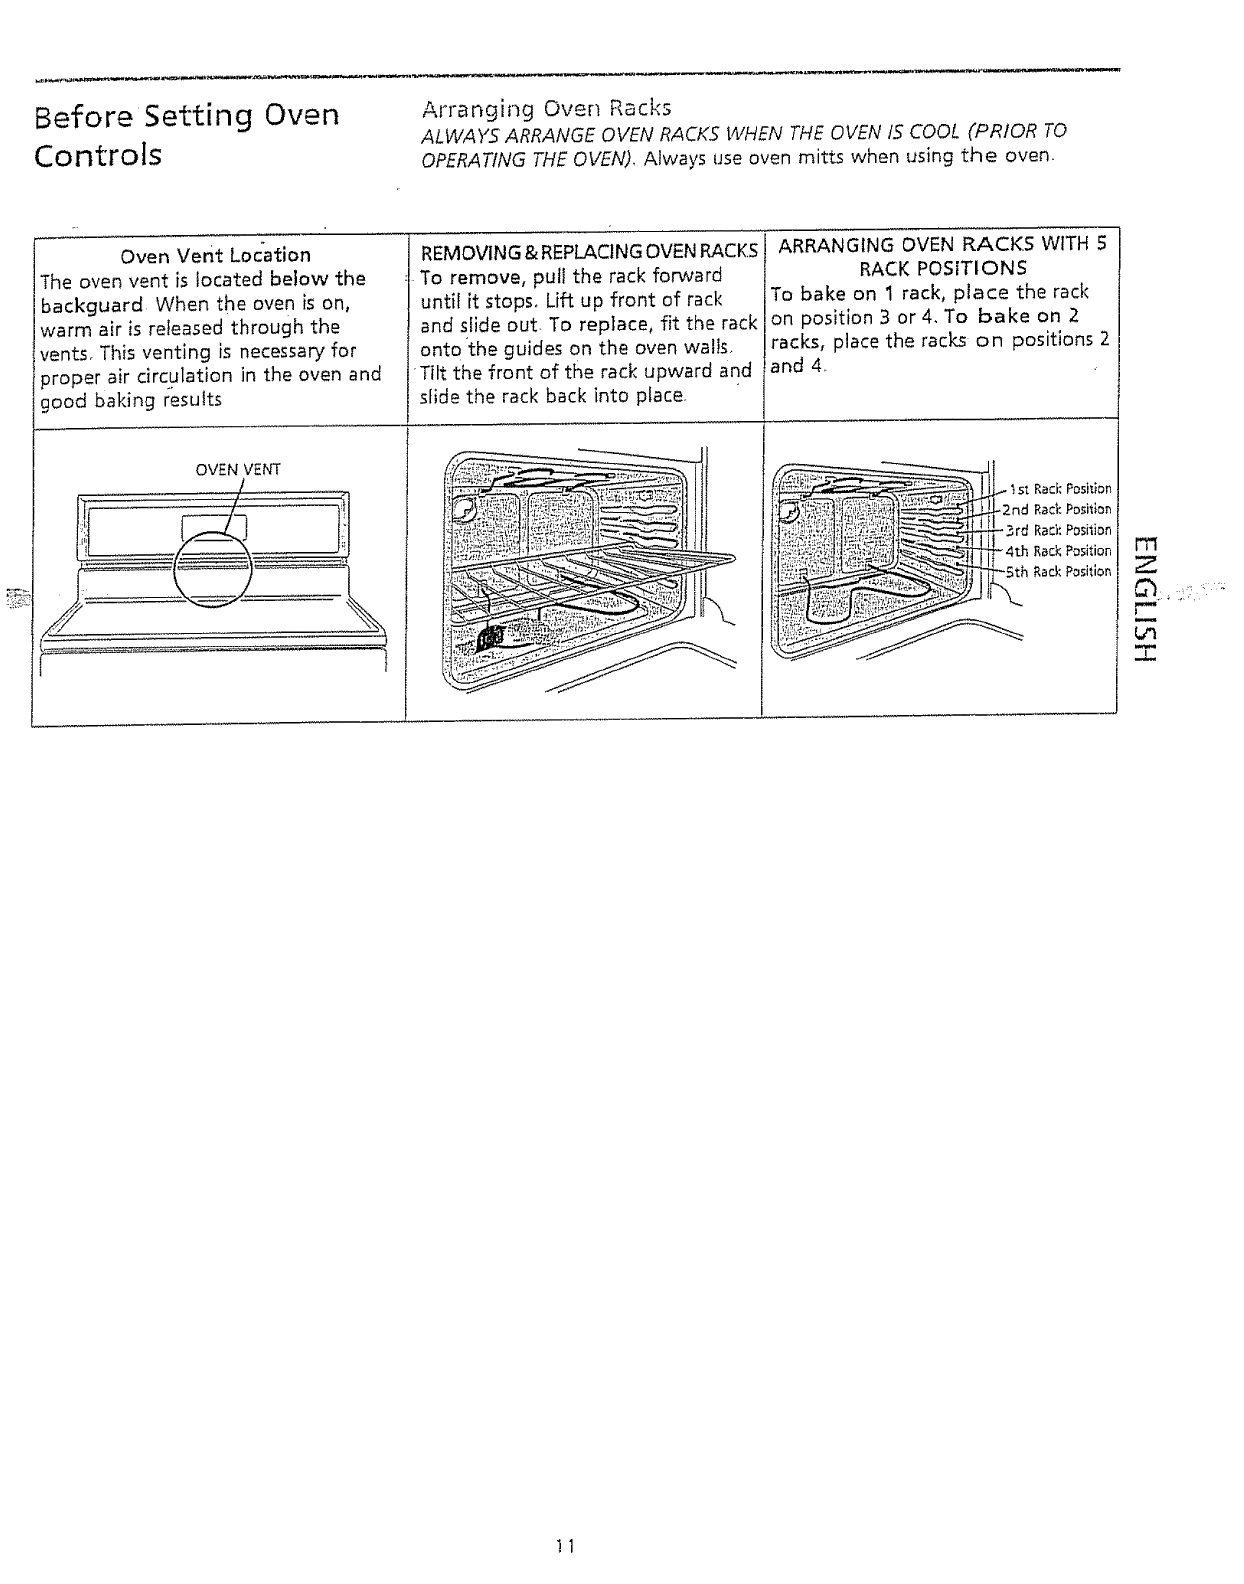
Oven vent Location
The oven vent is located below the
backguard When the oven is on,
warm air isreleased through the
vents. This venting is necessary for
3roper air circulation in the oven and
good baking results
OVEN VENT
I
I
REMOVING & REPLACINGOVEN RACKS
To remove, pull the rack forward
until it stops, Lift up front of rack
and slide out. To replace, fit the rack
onto the guides on the oven walls.
Tilt the front of the rack upward and
slide the rack back into place,
ARRANGING OVEN RACKS WITH 5
RACK POSITIONS
To bake on 1 rack, place the rack
on pos)fion 3or 4. To bake on 2
racks, place the racks on positions 2
and 4.
m
r_
L_
m
.J.
]1
Setting Oven Controls
Note: The oven function will not
work if the time of day clock is not
set.
Note: The oven control has a built-in
safety feature that wilt shut off the
oven if the control is left on for more
than tl hours 59 minutes.
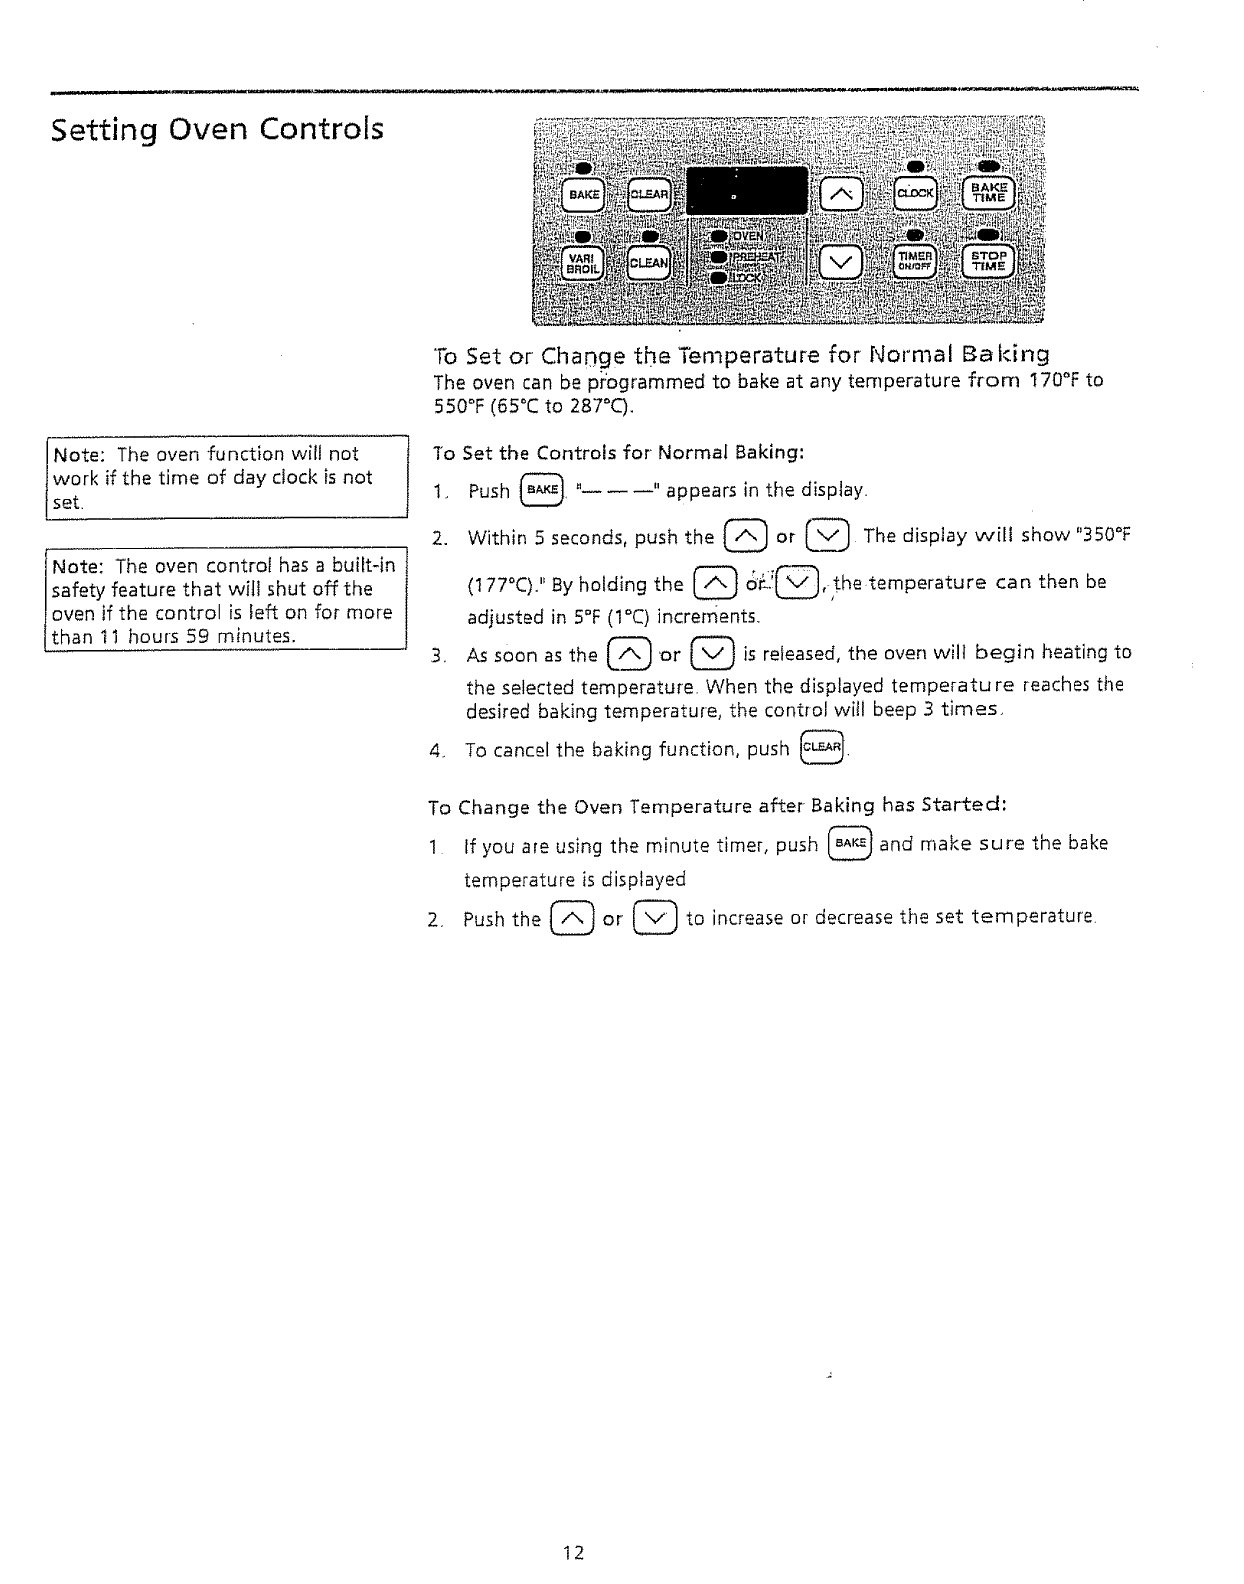
"To Set or Change the Temperature for Normal Baking
The oven can be pi:ogrammed to bake at any temperature from 170°F to
550°F (65°C to 287°C).
To Set the Controls for Normal Baking:
1_ Push (_ " " appears in the display.
2. Within 5 seconds, push the (_ or (__ The disptay will show "350°F
(177°C)." By holding the (_ o_.!@,-the.temperature can then be
adjusted in 5°F (1°C) increr_ents.
3. As soon as the _ 'or C_ is released, the oven will begin heating to
the selected temperature. When the displayed temperatu re reaches the
desired baking temperature, the control will beep 3 times.
4_ To cancel the baking function, push _.
To Change the Oven Temperature after Baking has Started:
1 ff you are using the minute timer, push _ and make sure the bake
temperature is displayed
2. Push the ['-A_ or' fv"_ to increase or decrease the set temperature.
12
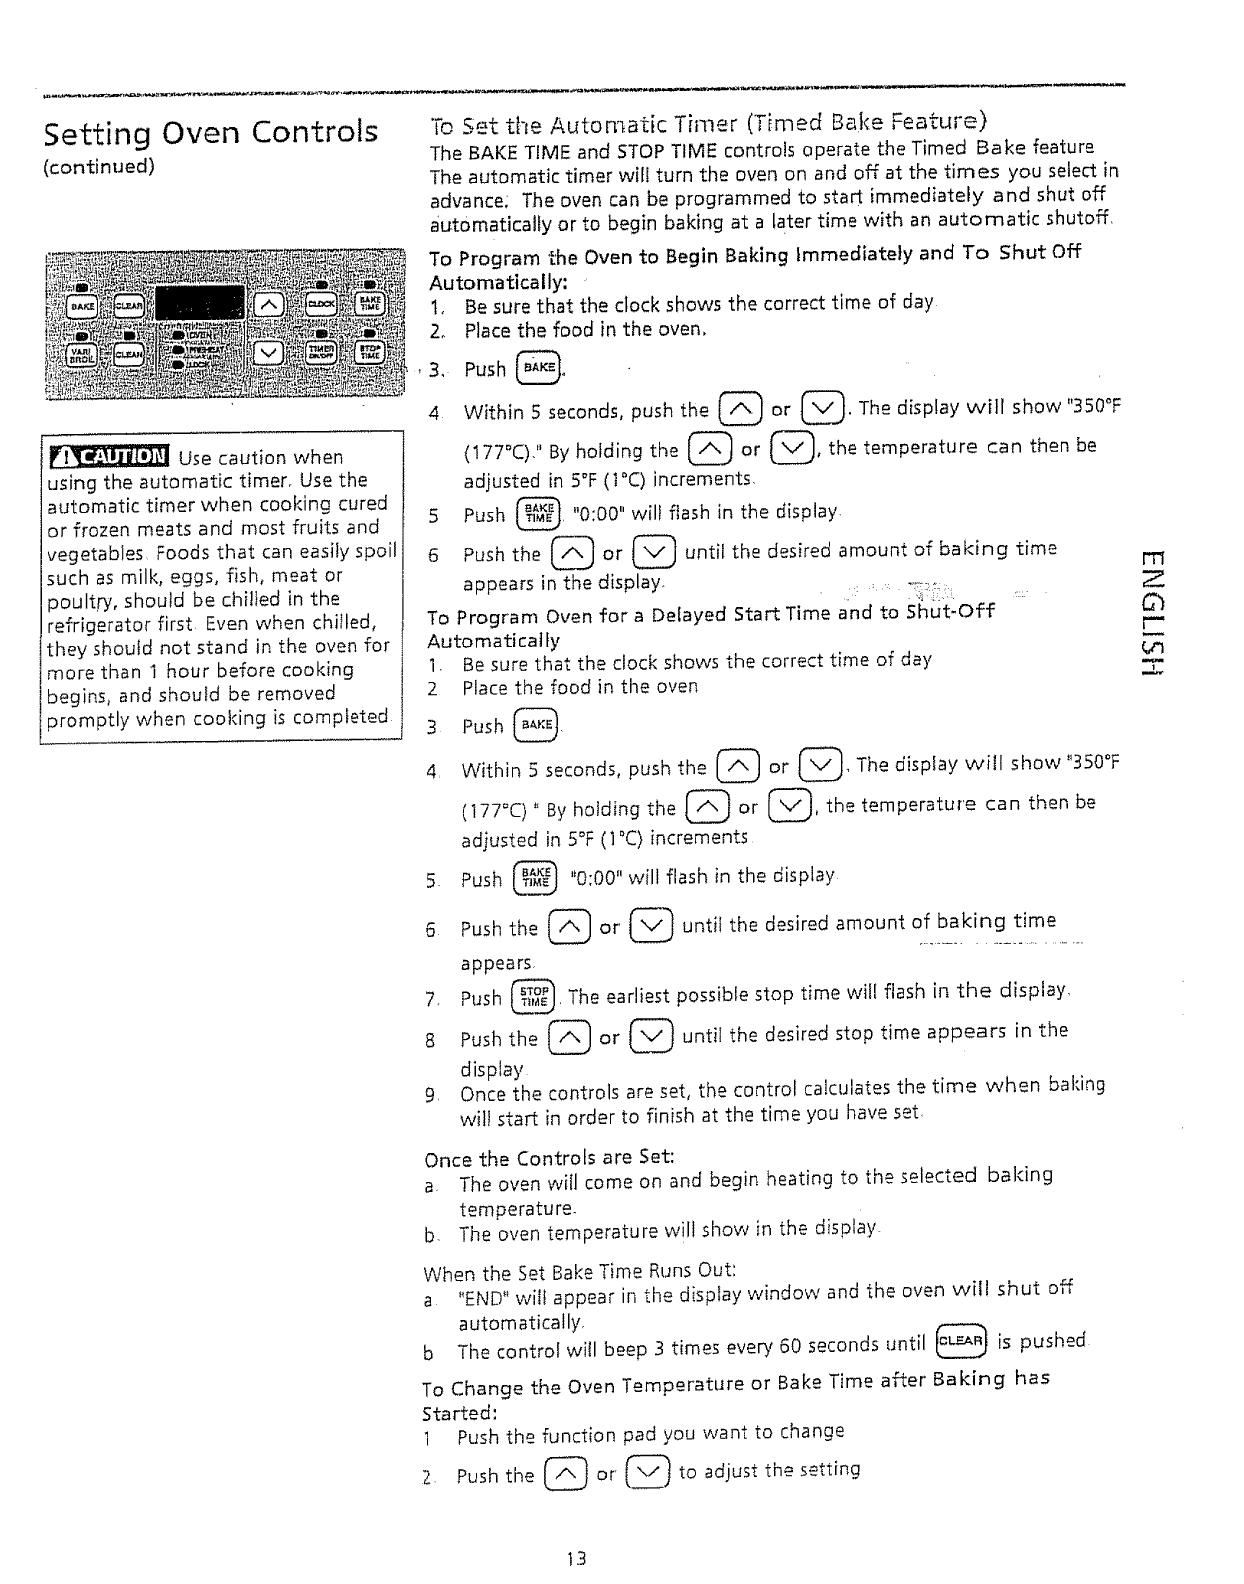
Setting Oven Controls
(continued)
Use caution when
using the automatic timer, Use the
automatic timer when cooking cured
or frozen meats and most fruits and
vegetables Foods that can easily spoil
such as milk, eggs, fish, meat or
poultry, should be chilted in the
refrigerator first. Even when chi_led,
they should not stand in the oven for
more than 1 hour before cooking
begins, and should be removed
promptly when cooking is completed
"ToSet the Automatic Thiner (Timed Bake Feature)
The BAKE TIME and STOP TIME controls operate the Timed Bake feature
The automatic timer will turn the oven on and off at the times you select in
advance; The oven can be programmed to start immediately and shut off
automatically or to begin baking at a later time with an automatic shutoff,
To Program the Oven to Begin Baking Immediately and To Shut Off
Automatically:
t, Be sure that the clock shows the correct time of day
2o Place the food in the oven,
3,. Push _o
seconds, push the (_ or (_, The display will show "350°F
4 Within 5
(177°C). '' By holding the _ or (_v_, the temperature can then be
adjusted in 5°F (; °C) increments,
_. °0:00" w[lt flash in the display.
5 Push
the _L_ or _ until the desired amount of baking time
J
6 Push
appears in the display.
To Program Oven for aDelayed Start Time and to Shut-Off
Automatically
1. Be sure that the clock shows the correct time of day
2 Place the food in the oven
3 Push _,
seconds, push the _ or (_, The dispfay will show "350°F
4 Within 5
(177°C) " By holding the _ or _.), the temperature can then be
adjusted in 5°F (1 °C) increments
5. Push @ "0:00" will flash in the display
6 Push the C_ or (_ until the desired amount of baking time
appears.
7. Push _. The earliest possible stop time will flash in the display,
8 Push the _ or (v_ until the desired stop time appears in the
display
9. Once the controls are set, the control calculates the time when baking
will start in order to finish at the time you have set.
Once the Controls are Set:
a. The oven will come on and begin heating to the selected bolting
temperature.
b. The oven temperature will show in the display.
When the Set Bake Time Runs Out:
a. "END" will appear in the display window and the oven will shut off
automatically,
b The control will beep 3 times every 60 seconds until _ is pushed
To Change the Oven Temperature or Bake Time after Baking has
Started:
1 Push the function pad you want to change
2 Push the (_ or' (_ to adjust the setting
FT_
r-"
m
t3
• .......... : =:== L,L,_,m
Setting Oven Controls
(continued)
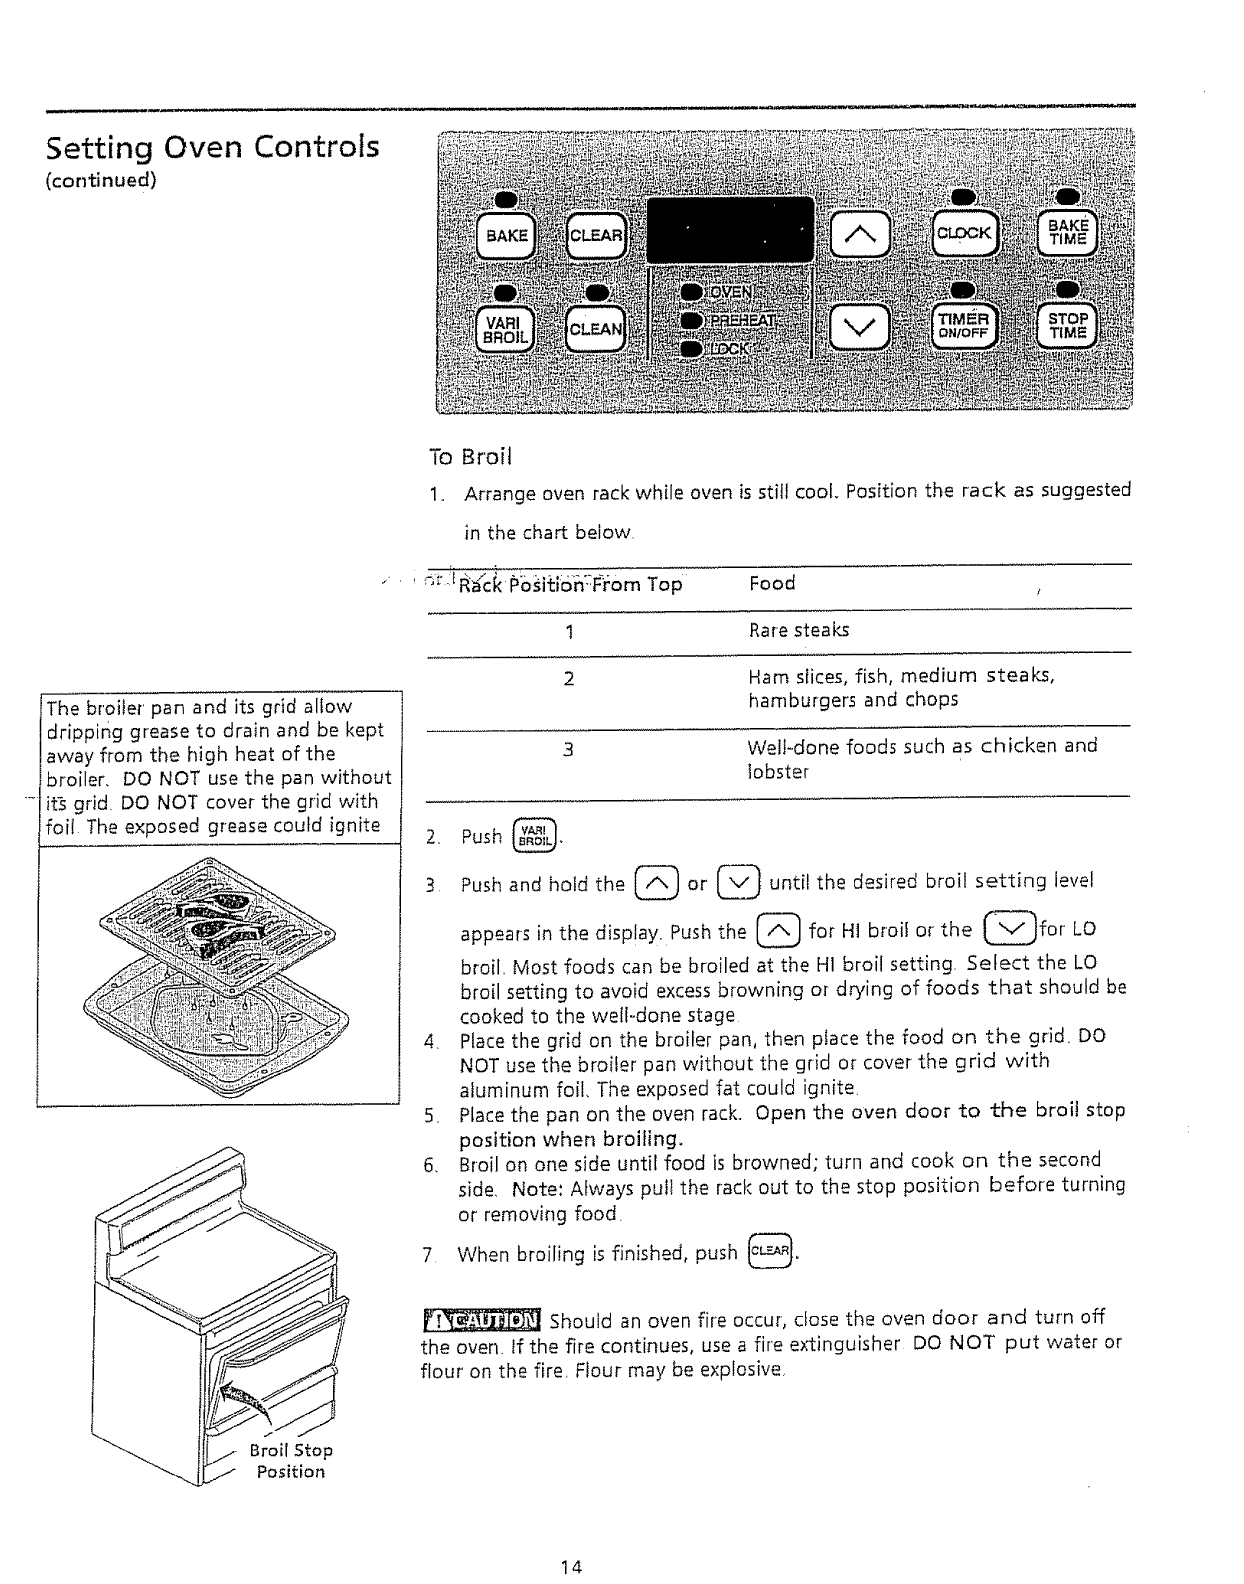
To Broit
1. Arrange oven rack while oven is still cool. Position the rack as suggested
in the chart below
Food
1 Rare steaks
2 Ham slices, fish, medium steaks,
hamburgers and chops
3 Well-done foods such as chicken and
tobster
The broiler pan and its grid allow
dripping grease to drain and be kept
away from the high heat of the
broiler, DO NOT use the pan without
it_ grid. DO NOT cover the grid with
foil The exposed grease could ignite
Broil Stop
Position
2, Push @,
3. Push and hold the _ or @ until the desired broil setting level
appears in the display. Push the _ for HI broil or the _for LO
broil. Most foods can be broiled at the HI broil setting. Select the LO
broil setting to avoid excess browning or drying of foods that should be
cooked to the welt-done stage
4, Place the grid on the broiler pan, then place the food on the grid. DO
NOT use the broiler pan without the grid or cover the grid with
aluminum foil, The exposed fat could ignite_
5. Place the pan on the oven rack. Open the oven door to the broil stop
position when broiling,
6, Broil on one side until food is browned; turn and cook on the second
side, Note: Always pull the rack out to the stop position before turning
or removing food.
7 When broiling is finished, push _,
Should an oven fire occur, close the oven door and turn off
the oven. If the fire continues, use a fire extinguisher DO NOT put water or
flour' on the fire_ FIour may be explosive_
14
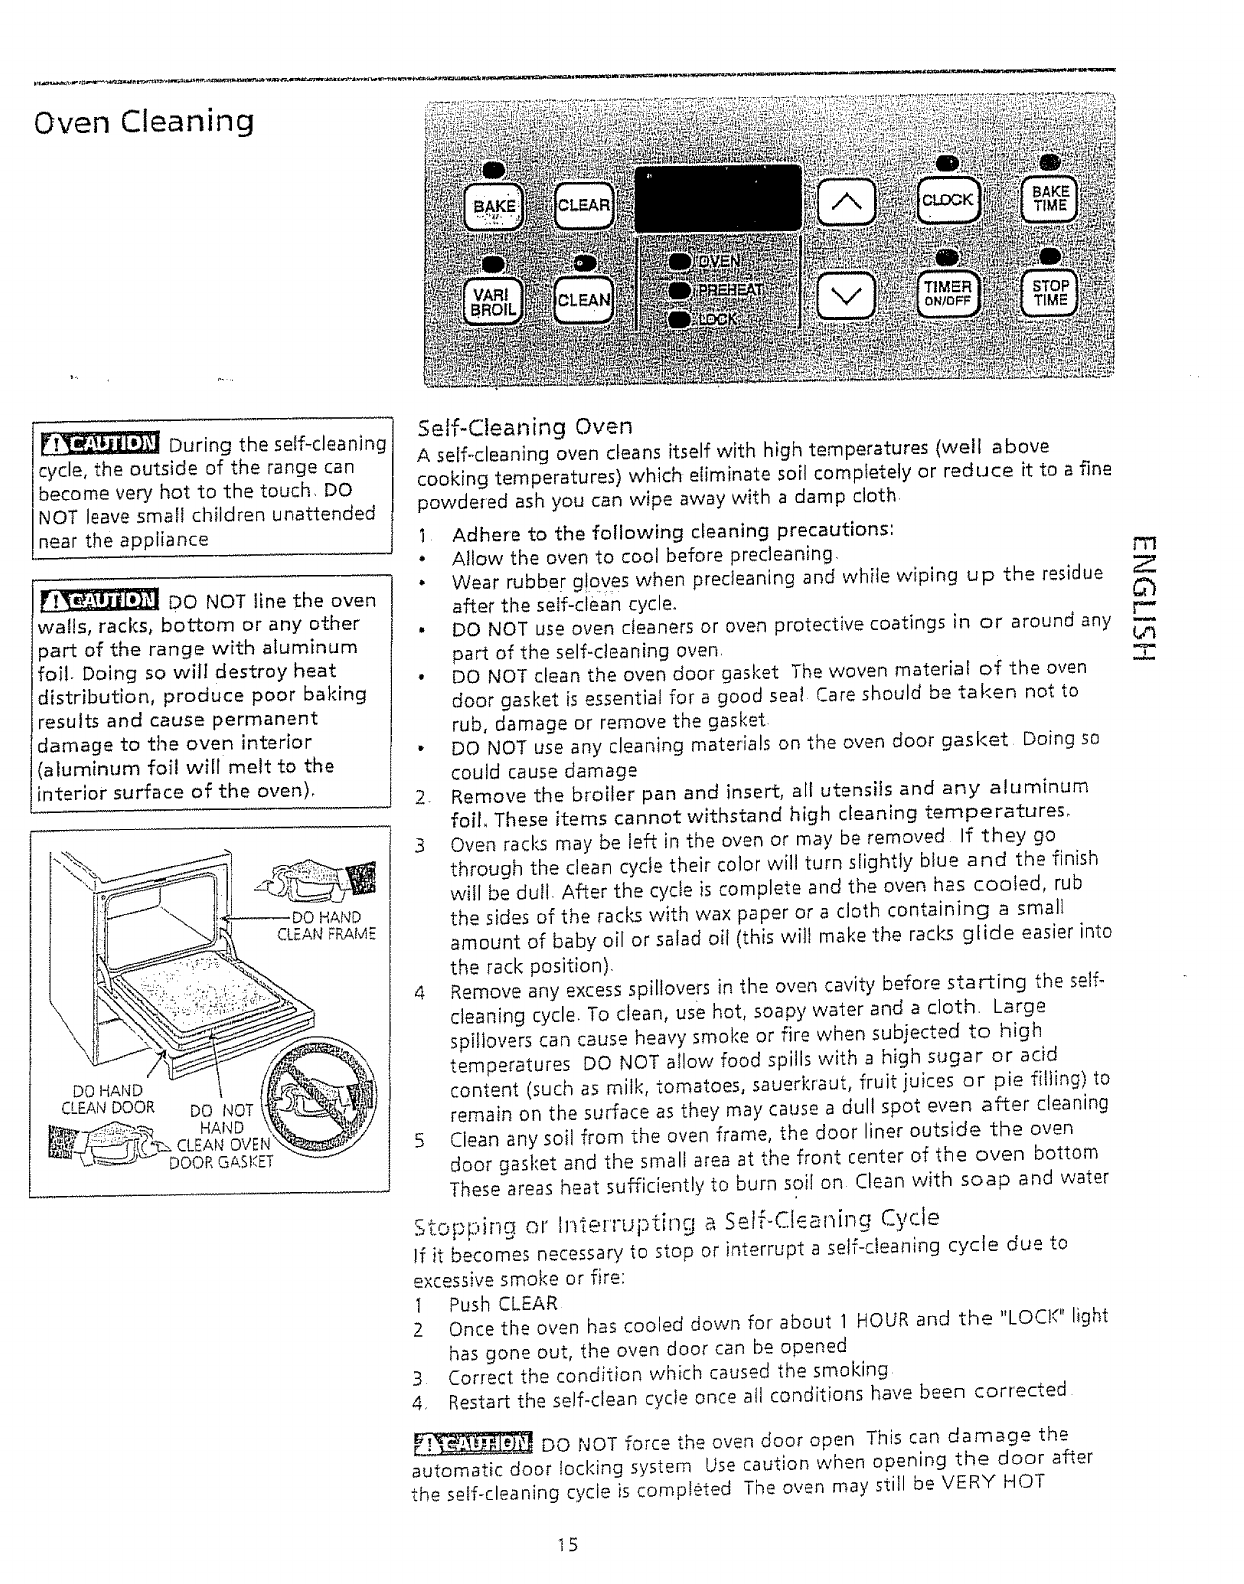
Oven Cleaning
Dur,o t,o o,f-c,o nio ]
cycle, the outside of the range can |
become very hot to the touch, DO |
NOT leave small children unattended
near the appliance I
i _ DO NOT line the oven
wafts, racks, bottom or any other
part of the range with aluminum
foil- Doing so wilI destroy heat
distribution, produce poor baking
results and cause permanent
damage to the oven interior
(aluminum foil will melt to the
interior surface of the oven)°
HAND
CLEAN FRAME
DO HAND
CLEANDOOR DO /gOT
CLEAN OVEN k
_'_" DOOR GAS_ET
SeJf-Cieaning Oven
A selfocleaning oven cleans itself with high temperatures (well above
cooking temperatures) which eliminate soil completely ar reduce it to a fine
powdered ash you can wipe away with a damp cloth,
1 Adhere to the following cleaning precautions:
. Allow the oven to cool before predeaning,
• Wear rubber g:!oves when predeaning and while wiping up the residue Z
after the self-clean cycle.
. DO NOT use oven cleaners or oven protective coatings in or around any U_
part of the self-cleaning oven. Z
• DO NOT clean the oven door gasket The woven material of the oven
door gasket is essential for a good seal Care should be taken not to
rub, damage or remove the gasket
•DO NOT use any cleaning materials on the oven door gasket Doing so
could cause damage
2. Remove the broiler pan and insert, all utensils and any aluminum
foil, These items cannot withstand high cleaning temperatures,
3Oven racks may be left in the oven or may be removed If they go
through the clean cycle their color will turn slightly blue and the finish
will be dull. After the cycle is complete and the oven has cooled, rub
the sides of the ratios with wax paper or a cloth containing a small
amount of baby oil or salad oil (this wilt make the racks glide easier into
the rack position),
4 Remove any excess spillovers in the oven cavity before starting the self-
cleaning cycle, To clean, use hot, soapy water and a cloth. Large
spillovers can cause heavy smoke or fire when subjected to high
temperatures DO NOT aIIow food spills with a high sugar or acid
content (such as milk, tomatoes, sauerkraut, fruit juices or pie filiing) to
remain on the surface as they may cause a dull spot even a_er cleaning
5 Clean any soil from the oven frame, the door liner outside the oven
door gasket and the small area at the front center of the oven bottom
These areas heat sufficiently to burn soil on Clean with soap and water
StopFing or Interrupting a Self-Cleaning Cycle
If it becomes necessary to stop or interrupt a self-cleaning cycle due to
excessive smoke or fire:
1 Push CLEAR
2 Once the oven has cooled down for about 1 HOUR and the "LOC!,'" light
has gone out, the oven door can be opened
3 Correct the condition which caused the smoking
4, Restart the self-clean cycle once all conditions have been corrected
DO NOT force the oven door open This can damage the
automatic door Iocking system Use caution when opening the door after
the self-cleaning cycle is completed The oven may still be VERY HOT
15

Oven Cleaning
(continued)
I_ Use care opening
when
the oven door after the sdf-cfeaning
cycte_ Stand to the side of the oven
when opening the door to allow hot
air or steam to escape.
,t°,:'"7_-7;:7_; .:J 7-
To Start the Self-Clean Cycle
*We recommend a 2 hour self-clean cycle for light soils and a 3 hour cycle
for' average to heavy soils (to assure satisfactory results),,
To Set the Controls for' a Seif-Cfean Cycle:
t, Be sure the clock shows the correct time of day,
2 Push _. " _appears in the display,
3 Push the (_] until "3:00" appears in the display for a 3hour cycle, or
C_ untiI "2:00" appears in the display for a 2 hour cycle,push the
4 As soon as the __(_ or (_ is released, "CLn" appears in the display
5 As soon as the controls are set, the motor driven lock will begin to close
automatically and the "LOCK" indicator light will flash. DO NOT open
the door while the light is flashing (it takes about t5 seconds for the
lock to close)_
6. The "LOCK" light will glow until the cleaning cycle is completed or
cancelled, and the oven temperature has cooled,
When the Self-Clean Cycle is Completed:
1 The time of day will appear in the display window and the "LOCK" light
will continue to glow.
2 Once the oven has cooled down for about 1 HOUR and the "LOCK" light
has gone out, the oven door can be opened
DO NOT force the oven door open. This can damage the
automatic door locking system Use caution when opening the door after
the self-cleaning cycle is completed The oven may still be VERY HOT
t6
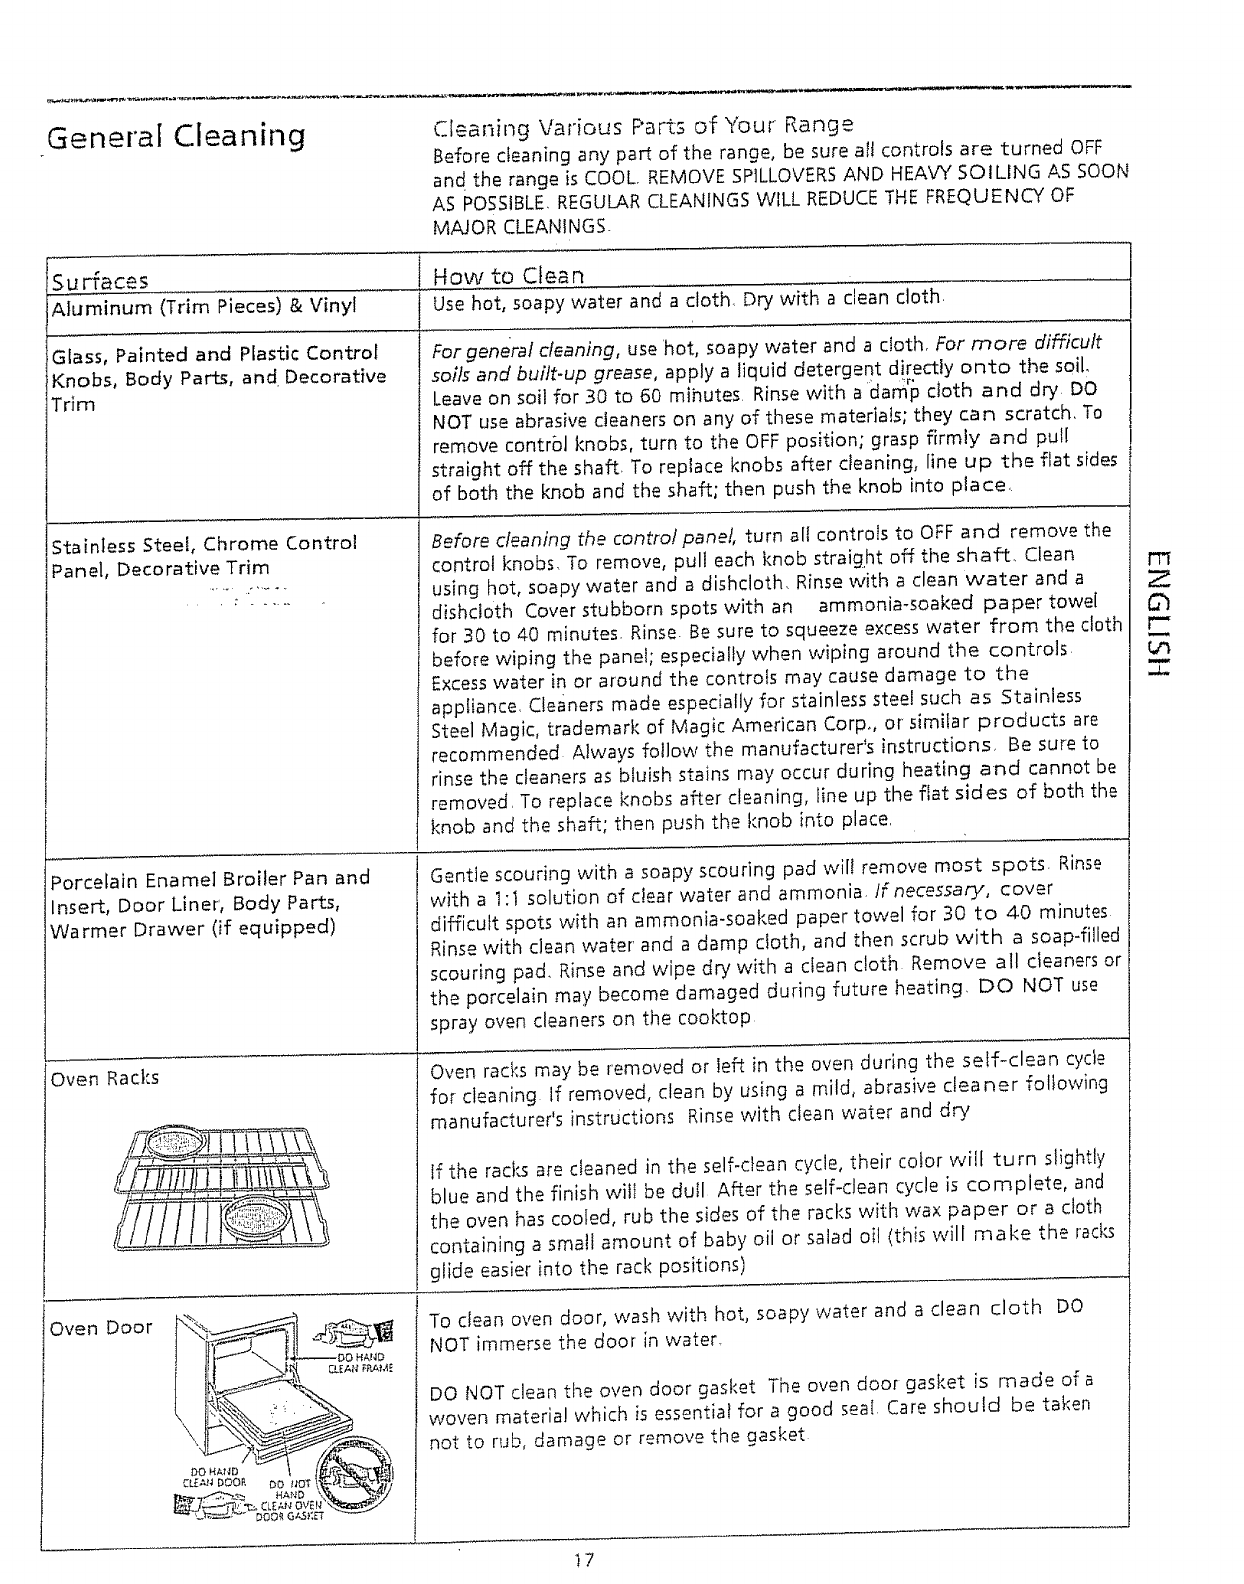
General Cleaning Cleaning Various Parts of Your Range
Before cleaning any part of the range, be sure all controls are turned OFF
and. the range is COOL, REMOVE SPILLOVERSAND HEAVY SOILING AS SOON
AS POSSIBLE.REGULAR CLEANINGS WILL REDUCETHE FREQUENCY OF
MAJOR GLEANINGS.
Surfaces I Haw to Clean
A1uminum (Trim Pieces) & Vinyl Use hot, soapy water and a cloth. Dry with a clean cloth.
Glass, Painted and Plastic Control
Knobs, Body Parts, and Decorative
Trim
Stainless Steel, Chrome Control
Panel, Decorative Trim
Forgeneral cleaning, use hot, soapy water and a cloth° For more aYfflcult
soils and built-up grease, apply a liquid detergent directly onto the soil,
Leave on soil for 30 to 60 mihutes Rinse with a dam"l_ cloth and dry. DO
NOT use abrasive cleaners on any of these materials; they can scratch, To
remove control knobs, turn to the OFF position; grasp firmly and pull
straight off the shaft. To replace knobs after cleaning, line up the flat sides
of both the knob and the shaft; then push the knob into place,
Before cleaning the controlpane!, turn all controls to OFF and remove the
control knobs, To remove, pull each knob straig.ht off the shaft, Clean
using hot, soapy water and a dishcloth. Rinse with a clean water and a
dishcloth Cover stubborn spots with an ammonia-soaked paper towel
for 30 to 40 minutes. Rinse. Be sure to squeeze excess water from the cloth
before wiping the panel; especially when wiping around the controls
Excess water in or around the controls may cause damage to the
appliance, Cleaners made especially for stainless steel such as Stainless
Steel Magic, trademark of Magic American Corp., or' _imilar products are
recommended Always follow the manufacturer's instructions, Be sure to
rinse the cleaners as bluish stains may occur during heating and cannot be
removed, To replace knobs after cleaning, fine up the fiat sides of both the
knob and the shaft; then push the knob into place.
Porcelain Enamel Broiler Pan and
Insert, Door Liner', Body Parts,
Warmer Drawer (if equipped)
Oven Racks
Gentle scouring with a soapy scouring pad will remove most spots, Rinse
with a 1:1 solution of clear water and ammonia, if necessary, cover
difficult spots with an ammonia-soaked paper towel for 30 to 40 minutes
Rinse with clean water' and a damp cloth, and then scrub with a soap-filled
scouring pad. Rinse and wipe dry with a clean cloth Remove all cleaners or
the porcelain may become damaged during future heating. DO NOT use
spray oven cleaners on the cooktop
Oven racks may be removed or left in the oven during the self-clean cycle
for cleaning If removed, clean by using a mild, abrasive cleaner following
manufacturer's instructions Rinse with clean water and dry
If the racks are cleaned in the self-clean cycle, their color will turn slightly
blue and the finish wilt be dull After the self-clean cycle is complete, and
the oven has cooled, rub the sides of the racks with wax paper or a cloth
containing a small amount of baby oil or salad oi! (this will make the racks
glide easier into the rack positions)
Oven Door
• fl t"_- _._ H_--,----DO HANO
CLg_I DOOR DO _10T \
To clean oven door, wash with hot, soapy water and a clean cloth DO
NOT immerse the door in water_
DO NOT clean the oven door gasket The oven door gasket is made of a
woven material which is essential for a good seal Care should be taken
not to rub, damage or remove the gasket
rTf
5h
r-'
u
b_
m
.4.
7

General Cleaning
DO NOT use a cooktopl
cleaner on a hot cooktop. The fumes /
can be hazardous to your heakh, and /
can chemica!ty damage the ceramic-
glass surface _._
Before deaning the
cooktop, be sure the controls are
turned to OFF and the cooktop is
COOL.
VN
Ceramic-Glass Cooktop Cleaning
Correct and consistent cleaning is essential to maintaining your ceramic-
glass cooktop. If food spills, grease spatters and metal rub-off from
aluminum cookware are not removed, they may be burned onto the surface
of the took'top and cause permanent discoloration.
Daily Cleaning
For normal soil:
,
Allow €ooktop surface to cool.
_:_.Miipeup spills and spatters using a clean paper towek Always use a
new, clean
paper towel when cleaning the ceramic-glass cooktop.
Rub a few drops of a recommended ceramic-glass cooktop cfeaning
cream onto soiled area using a'clean, damp paper towel. Buff with a
dry paper towel until all soil and cream are removed. Frequent cleaning
leaves a protective coating of silicone which helps in preventing
scratches and abrasions. Ciean surface with the cooktop cleaning cream
after each use_
Rinse with another clean damp, paper towel Buff dry with a d_pa. per
towel.
For heavy, burned-on soil:
1. Allow cooktop surface to cool.
2 Carefully scrape soil with a metal razor blade scraper Hold razor blade
scraper at a 30 ° angle to the cooktop.
3_ Remove loosened soil with a 'clean paper towel
4. Apply cooktop cleaning cream as described for normal soil
5_ .If any soil remains, repeat the steps listed above After all soil has been
removed, potish the entire surface with the cooktop cJeaning cream.
For' sugary spillovers:
Sugary spills can cause pitting of your cooktop surface Therefore, you must
begin cleaning the spills while the cook_top is still hot Use caution when
following,the steps below,
1. Turn off all surface units and remove all pans immediately..
2. Wearing an oven mitt, use a razor blade scraper to scrape the hot spill
out of the cooking zone to a cooler area on the cooktop
3 Allow the cooktop to cool.
4. Follow the instructions above for heavy, burned-on soil.
DO NOT use the following on the ceramic-glass cooktop:
• Abrasive plastic, nylon, metal scouring or cloth pads. They may scratch
the cooktop and make it more difficult to clean later.
• Sponges, cloths or dish towels. Lint or soil remaining on the cooktop
from a cloth or sponge can burn and cause discoloration.
• Anything that may melt (plastics, aluminum foil),
• Cleansers other than a recommended ceramic-glass cooktop cleaning
cream.
• Chlorine bleach, ammonia, hydrofluoric acid, chemical oven cleaners or
any other kind of chemical cleaner They may etch or discolor the
cooktop
18
General Cleaning
{continued)
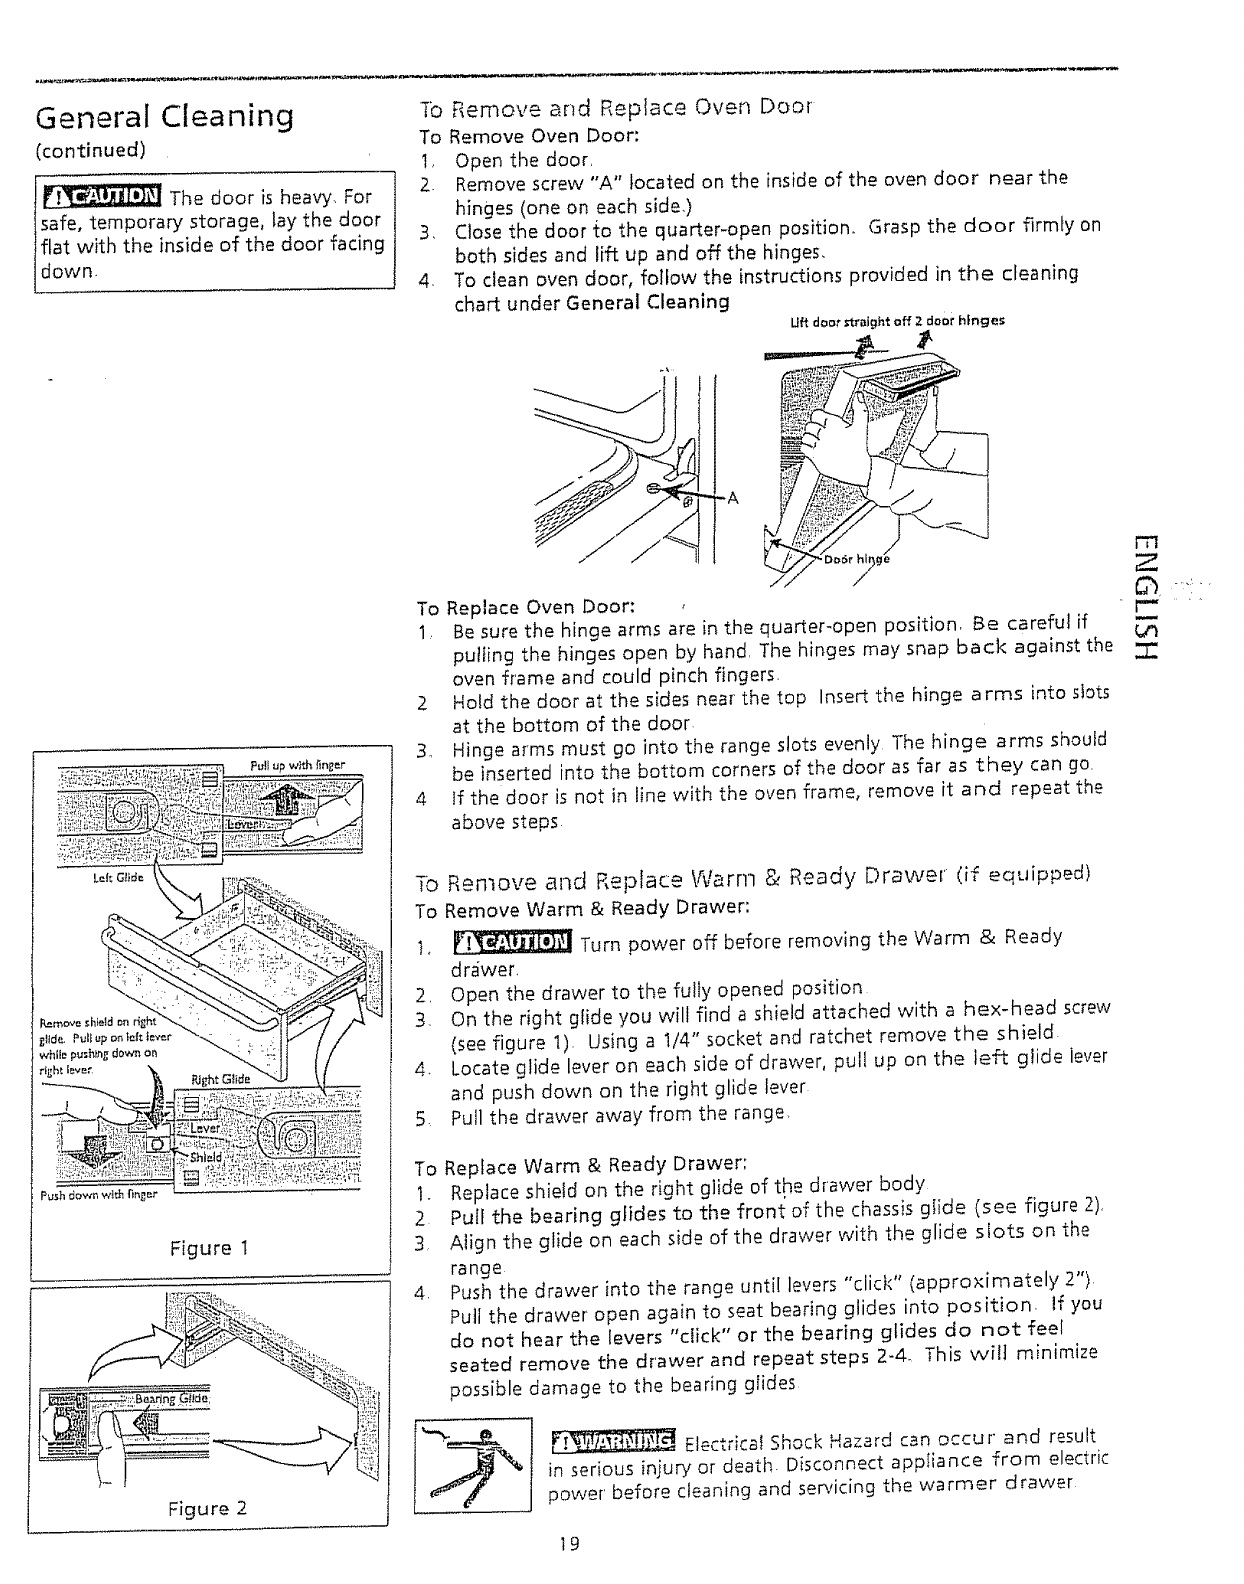
To Remove and Replace Oven Door
To Remove Oven Door:
I, Open the door,
2. Remove screw "A" located on the inside of the oven door near the
hinges (one on each side.)
3, Close the door {o the quarter-open position. Grasp the door firmly on
both sides and lift up and off the hinges,
4, To clean oven door, follow the instructions provided in the cleaning
chart under General Cleaning
U!_ door _raight off 2 door h|nge_
.... _a_,7_
h_,_!_# . "_',
fl
To Replace Oven Door: ,
I, Be surethe hingearms areinthe quarter_openposition,Be carefulif
putting the hinges open by hand, The hinges may snap back against the
oven frame and could pinch fingers,
2 Hold the door at the sides near the top Insert the hinge arms into slots
at the bottom of the door
3_ Hinge arms must go into the range s!ots evenly The hinge arms should
be inserted into the bottom corners of the door as far as they can go.
4 If the door is not in line with the oven frame, remove it and repeat the
above steps.
FT1
Z
TO Remove and Replace Warm & Ready Drawer (if equipped)
To Remove Warm & Ready Drawer:
1, _ Turn power off before removing the Warm & Ready
dr_iwer_
2, Open the drawer to the fully opened position
3. On the right glide you will find a shield attached with a hex-head screw
(see figure 1). Using a l/4" socket and ratchet remove the shield.
4. Locate glide lever on each side of drawer, pull up on the left glide lever
and push down on the right glide lever
5. Pull the drawer away from the range,
To Replace Warm & Ready Drawer:
I_ Replace shield on the right glide of the drawer body
2 Pull the bearing glides to the front of the chassis gNde (see figure 2),
3_ Align the glide on each side of the drawer with the glide slots on the
range
4. Push the drawer into the range until levers "click" (approximately 2")
Pull the drawer' open again to seat bearing glides into position. If you
do not hear the levers "click" or the bearing glides do not feel
seated remove the drawer and repeat steps 2-4. This will minimize
possible damage to the bearing glides
Electrical Shock Hazard can occur" and result
in serious injury or death. Disconnect appIiance from electric
power before cleaning and servicing the warmer drawer
19
Changing Cooktop
and/or Oven Lights
(some models)
Be sure the range is unplugged and all parts are COOL before
replacing the oven light, Wear a leather-faced glove for protection against
possible broken glass,
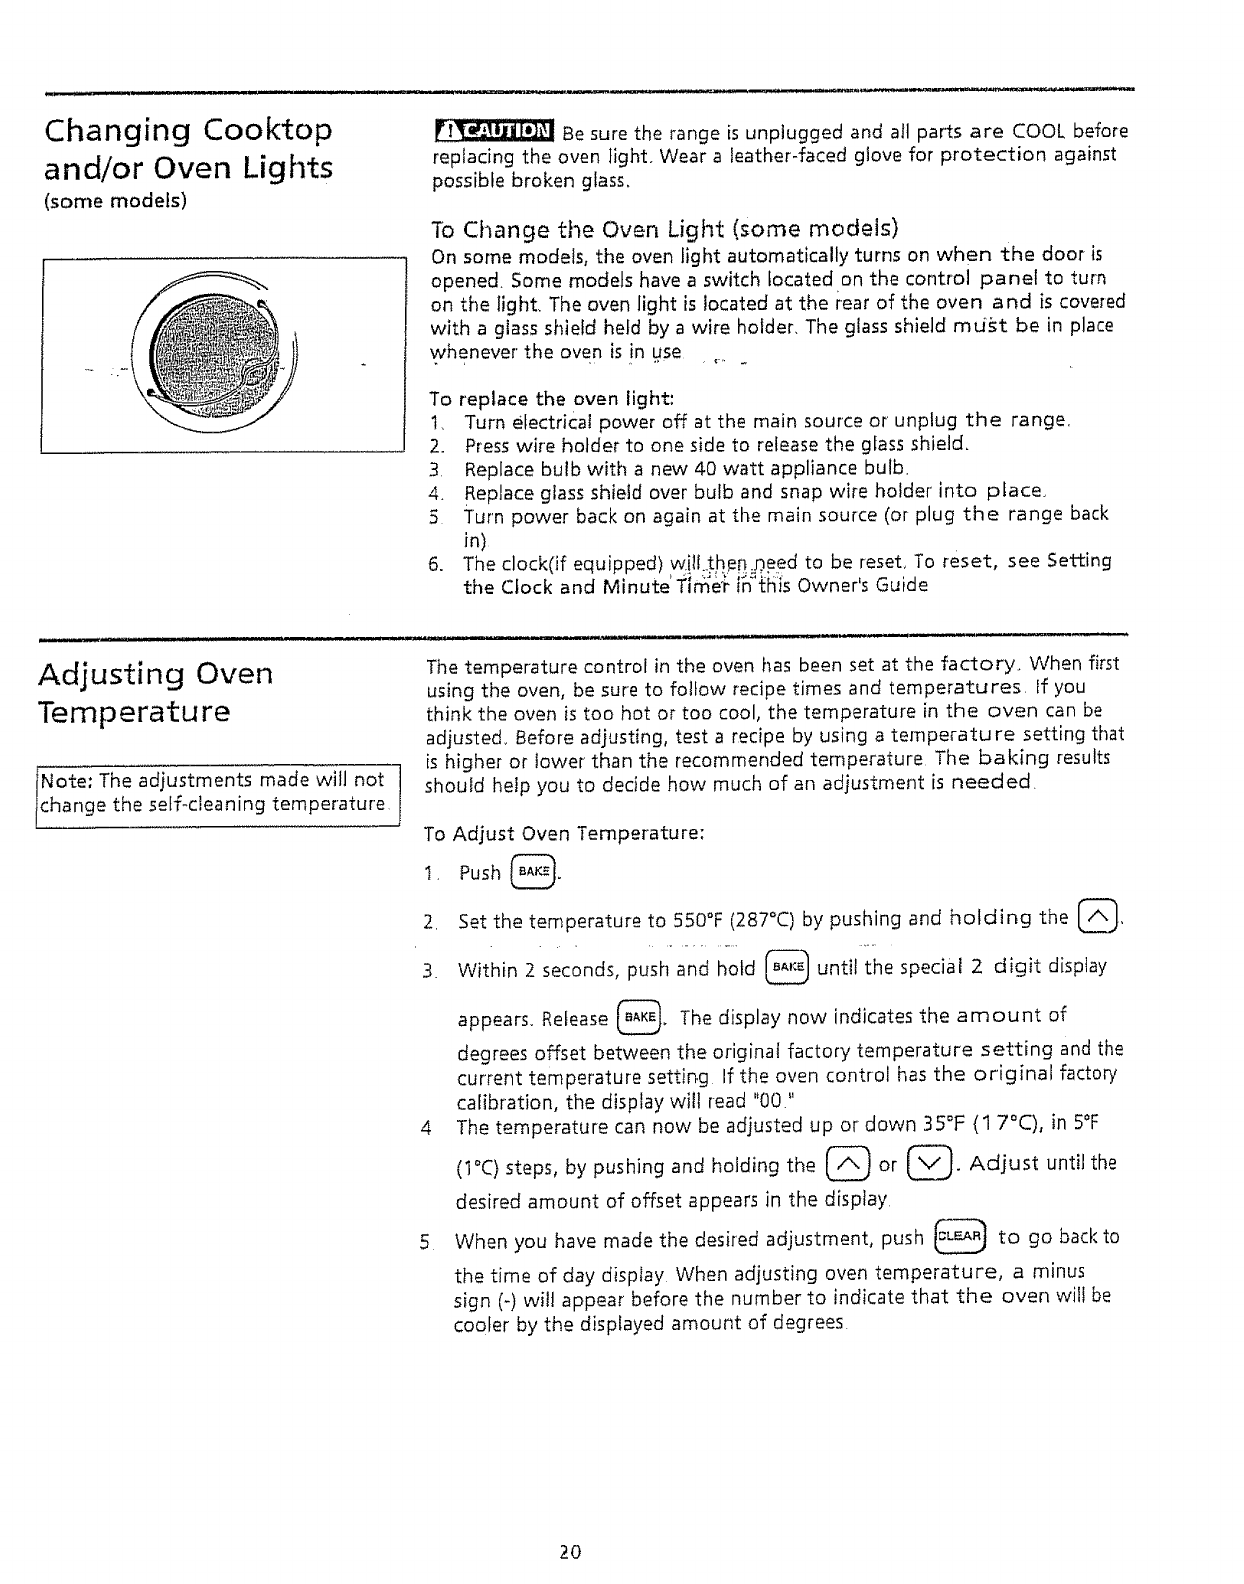
To Ci_ange the Oven Light (some models)
On some models, the oven light automatically turns on when the door is
opened. Some models have a switch located on the control panel to turn
on the light. The oven light is located at the iear of the oven and is covered
with a glass shield held by a wire holder, The glass shield must be in place
whenever' the oven is in use • •....
To replace the oven Eight:
1. Turn electrical power off at the main source or unplug the range,
2. Press wire holder to one side to release the glass shield.
3. Replace bulb with a new 40 watt appliance bulb.
4_ Replace glass shietd over bulb and snap wire holder' into pface_
5 Turn power back on again at the main source (or plug the range back
in)
6. The clock(if equipped) w:ilLth,en.need to be reset_ To reset, see Setting
the Clock and Minute Tirne;i: i_q'_hisOwner's Guide
Adjusting Oven
Temperature
Note: The adjustments made will not i
change the self-cleaning temperature J
The temperature control in the oven has been set at the factory_ When first
using the oven, be sure to follow recipe times and temperatures. If you
think the oven is too hot or too cool, the temperature in the oven can be
adjusted, Before adjusting, test a recipe by using a temperature setting that
is higher or lower than the recommended temperature The baking results
should help you to decide how much of an adjustment is needed.
To Adjust Oven Temperature:
1. Push _.
2. Set the temperature to 550°F (287°C) by pushing and holding the (_,
3. Within 2 seconds, push and hold _ until the special 2 digit display
4
5
appears. Release _. The display now indicates the amount of
degrees offset between the original factory temperature setting and the
current temperature setting If the oven control has the original factory
calibration, the display will read "00)'
The temperature can now be adjusted up or down 35°F (1 7°C), in 5%
(1°C) steps, by pushing and holding the (_ or (_. Adjust until the
desired amount of offset appears in the display
When you have made the desired adjustment, push _} to go back to
the time of day display When adjusting oven temperature, a minus
sign (-) wilt appear before the number to indicate that the oven will be
cooler by the displayed amount of degrees.
20
Avoid Service Checklist Before you call for sen,ice, review this list It may save you time and
expense The list includes common occurrences that are not the result of
defective workmanship or materials in this appliance
OCCURRENCE
This oven is equipped with a state of the art electronic oven controller_
Among its many features is a full time oven circuit diagnostics system. The
controller constantly monitors its internal circuitry as well as several crucial
oven circuits to insure they are al! operating correctly, tf at any time one of
these systems fails, the controller wilt immediately stop operation and
being beeping and flashing an error code of F1 or F3* in the display
window,
POSSIBLE CAUSEtSOLUTtON
Range is not level, Poor installation Place oven rack in center of oven Place a level on the oven rack
Adjust leveling legs at base of range until the oven rack is level.
Be sure floor is level and is strong and stable enough to adequately support range
If floor is sagging or sloping, contact a carpenter to correct the situation.
....; ::: "::::_ Kitchen cabinet alignment may make range appear unlevel Be sure cabinets are
square an_dt_ave sufficient room for range clearance
Cannot move appliance easily, Appliance Cabine_ not square or are built in too tightly Contact builder or installer to make
must be accessible for service, appliance accessible
Carpet interferes with range Provide sufficient space so range can be lifted over
carpet
*Oven control beeps and displays F1 or
F3.
Electronic control has detected a fault condition Push CANCEL to clear the display
and stop the beeping Reprogram oven If fault recurs, record fault number, push
CANCEL and contact an authorized Sears servicer
Incorrect control setting, Make sure the correct control is on for the surface unit to
Surface unit too hot or not hot enough, be used.
Surface unit does not heat. Lightweight or warped pans used- Use only flat, evenly balanced, reed]urn or
heav)_,eight cookware Flat pans heat better than warped pans Cookware
materials and weight of the material affect heating Heavy- and medium-weight
pans heat evenly Because lightweight pans heat unevenly, foods may burn easily
No power to the appliance Check steps under "Entire Appliance Does Not Operate"
in this Avoid Service ChecMist
incorrect control setting Make sure the correct control is on for the surface unit to
be used
Entire appliance does not operate. Make sure cord/plug is plugged tightly into outlet
Service wiring is not complete Contact your dealer, instalHng agent or authorized
servicer
Power outage Ci_eck house lights to be sure Call your local electric company for
service
Cooktopand/oroven light (some Replace or tighten bulb See Changing Cooktop and/or Oven Lights (some
models) does not work. models) in this Owner's Guide for instructions
m
r_
m
Z
2t
Oven smokes excessively during broiling° Control(s) not set properly Follow instructions under Setting Oven Controls
Make sure o,ven door is opened to broil stop position.
Meat too close to the elemenL Reposition the rack to provide proper' clearance
between the meat and the etemenL Preheat broil element for searing,
Meat not properly prepared. Remove excess fat from meat. Cut remaining fatty
edges to prevent curling, but do not cut into lean
Grid on broiler pan wrong side up and grease not draining Always place grid on
the broiler pan with ribs up and slots down to allow grease to drip into pan,
Grease has built up on oven surfaces Regular cleaning is necessary when broiling
frequently Old grease or food spatters cause excessive smoking.
Poor baking resuitSo
Self-cleaning cycle does not work,
Many factors affect baking results Make sure the proper rack position is used.
Center food in the Oven and space pans to allow air to circulate Allow the oven to
preheat to the set temperature before placing food in the ov_en Try adjusting the
recipe's recommended temperature or baking time If you feel the oven is too hot
or cool, see Adjusting Oven Temperature in this OwneCs Guide
Control(s) not set properly. Follow instructions under' Oven Cfeanlng_
Self-cleaning cycle was interrupted, Follow steps under "Stopping or interrupting a
Self-Cleaning Cycle" under Oven Cieanlng
Soll not completely removed after self-
cleaning cycfe_
Failure to clean bottom, front top of oven, frame of oven or door area outside oven
seal These areas are not in the self-cieaning area, but get hot enough to burn on
residue Clean these areas before the self-cleaning cycle Jsstarted Burned-on
residue can be cleaned with a stiff nylon brush and water or a nylon scrubber Be
careful not to damage the oven gasket
Flames inside oven or smoking from
vent,
Excessive spillavers in oven Set self-clean cycle for a longer cleaning time
Excessive spillovers in oven This is normat, especially for pie spiiiovers or large
amounts of grease on bottom of oven Wipe up excessive spitlovers before starting
cycle If flames or excessive smoke are present, stop the self-clean cycle and follow
steps under "Stopping or Interrupting a Self-Cleaning CycIe" in the Oven Cleaning
section,
Scratches or abrasions on cooktop
su trace,
Coarse particles such as salt or sand between cooktop and utensils can cause
scratches Be sure cooktop surface and bottoms of utensils are clean before usage
Small scratches do not affect cooking and will become less visible with time
Cleaning materials not recommended for ceramic-gIass cooktop have been used
See "Ceramic-Glass Cooktop Cleaning" in the General Cfeaning sectio n
Cookware with rough bottom has been used Use smooth, flat-bottomed
cookware
Metal marks, Sliding or scraping of metal utensils on cooktop surface Do not slide metal utensils
on cooktop surface Use a ceramic-glass cooktop cleaning creme to remove the
marls See "Ceramic-Glass Cooktop Cleaning" in the General CIeaning section
Brown streaks or specks_ BoHovers are cooked onto surface Use razor blade scraper to remove soil See
"Ceramic-Glass Cooktop Cleaning" in the General Cleaning section,
Areas of discoloration with metallic
sheen,
Mineral deposits from water and food Remove using a ceramic-glass cooktop
cleaning creme Use cookware with dean, dry bottoms
22
FT1
€_
NT_
23

24
®
ELECTRIC SELF-
Use 8LCare Guide
NING RANGE
ESTUFA
Manual del
ELEC_TRICAAUTOLIMPIANTE
usuario
r'rl
Z
u
i
"d,
>.
©
r-
Sears Roebuck and Co,, Hoffman Estates, lL 60179 U,S.A
vcvvw_sears,com
P/N 316000945 (9810)
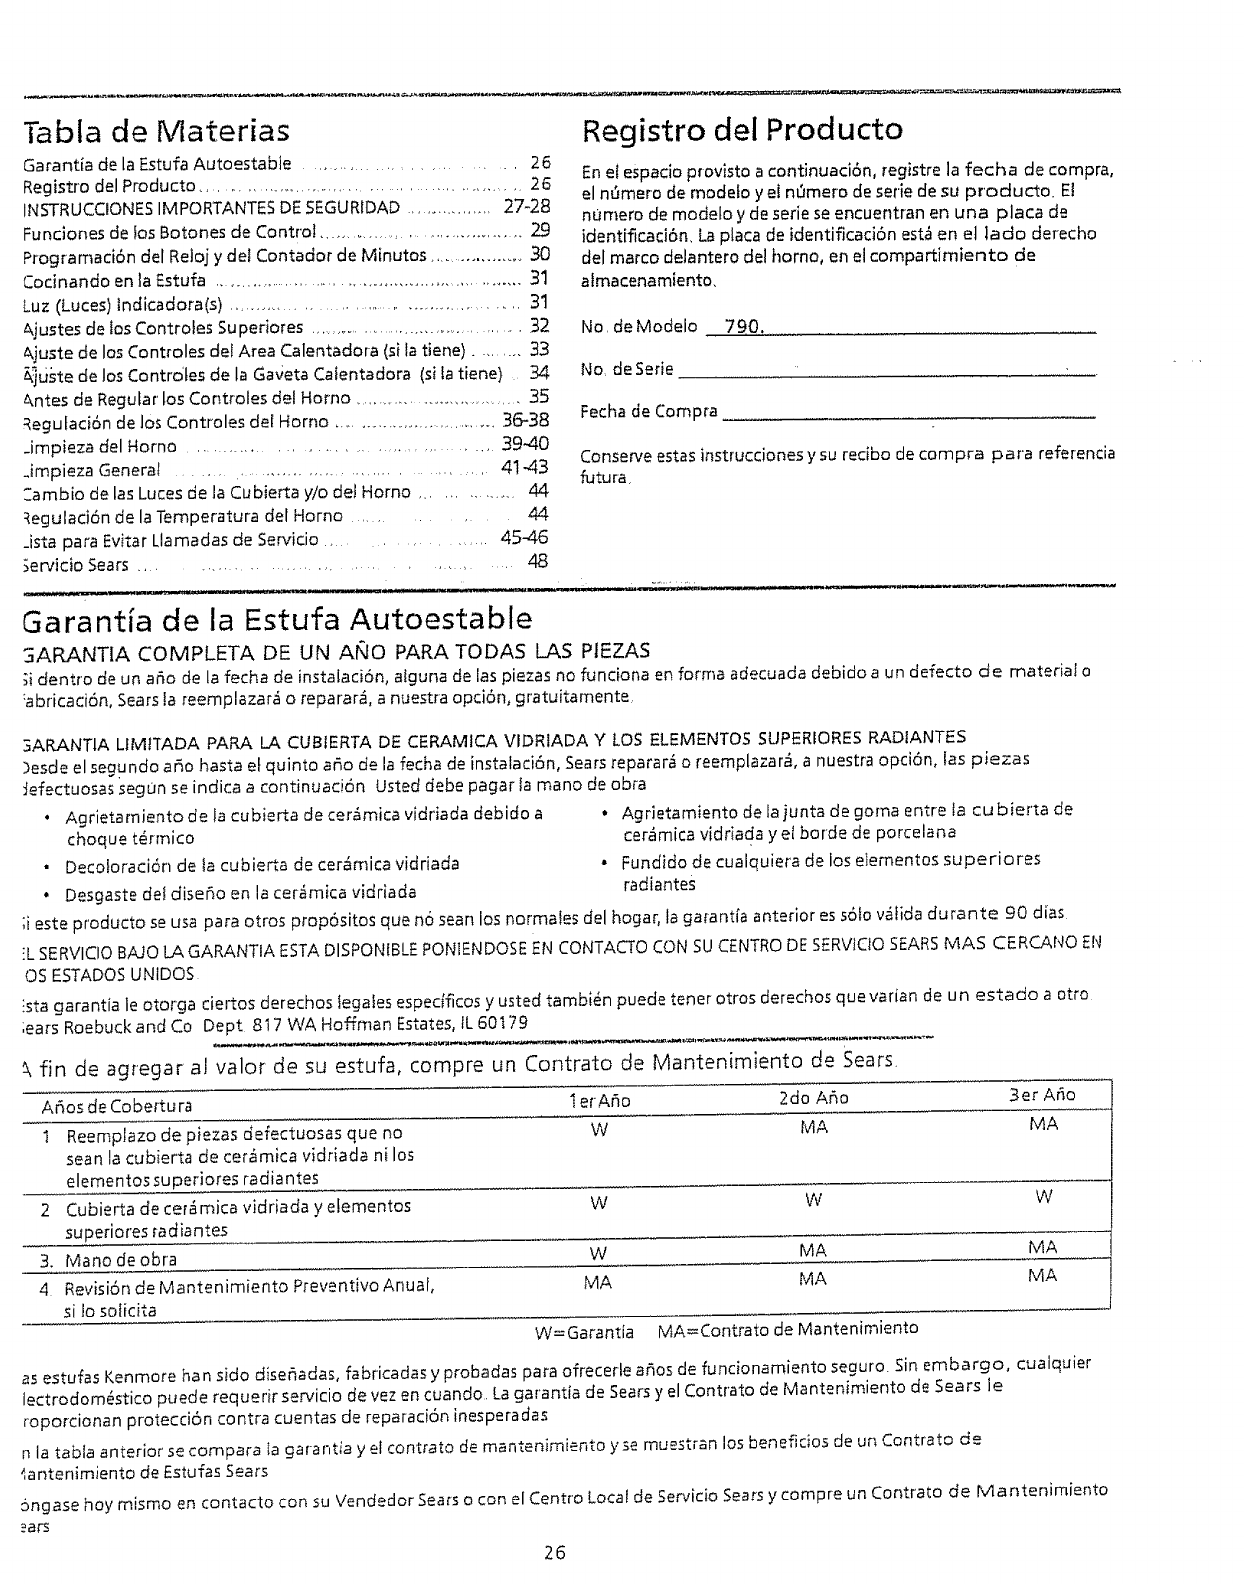
Tabla de Materias
Garantia de la Estufa AutoestabJe .............................. 26
Registro del Producto ............................................................ 26
INSTRUCCIONES IMPORTANTES DE SEGURIDAD .................. 27-28
Funciones de los Botones de Contro! ........................................ 29
Programaci6n del Reloj y del Contador de Minutos ................... 30
Codnando en la Estufa ............................................................. 31
Luz (Lutes)tndicadora(s) ................................................ 31
qustes de los Controfes Superiores .......................................... 32
&juste de los Controles del Area Calentadora (si la tiene) ......... 33
_]uste de los Contro'tes de la Gay;eta CaJentadora (si fatiene) 34
a,ntes de Regular' los Controles del Homo ................................... 35
Regufaci6n de los Controles de[ Homo ................................. 36-38
_impieza del Homo ........................................... 39-40
jmpieza General ....... ................................... 41-43
=ambio de las Luces de la Cubierta y/o del Homo ............... 44
qegulaci6n de la Temperatura del Homo ............ 44
_ista para Evitar Ltamadas de Sen¢icio ............... 45-46
_ervicio Sears ................................................. 48
Registro del Producto
Enel espado pfovisto a continuaci6n, registre la fecha de compra,
el n_mer'o de modefo yel n_mero de serie de su producto. E1
numero de modeto y de sefie se encuentran en una placa de
identificaci6n, La placa de identificaci6n est_ en el ]ado derecho
del marco delantero del horno, en el compartimiento de
almacenamiento.
No. de Modeio 790.
No de Serie
Fecha de Compra
Conserve estas instr'ucciones y su recibo de compra para referenda
futura
Garant[a de la Estufa Autoestable
5ARANTIA COMPLETA DE UN AI_JO PARA TODAS LAS PIEZAS
_identro de un a_o de la fecha de instalaci6n, alguna de las piezas no funciona en forma adecuada debido a un defecto de material o
:abricaci6n, Searsla reemplazar_ o reparar_, a nuestra opci6n, gratuitamente
3ARANTIA LfMtTADA PAPA LA CUEItERTA DE CERAMICA VIDRIADA Y LOS ELEMENTOS SUPERIORES RADIANTES
:)esde el segundo a_o hasta et quinto ar3o de la fecha de instalaci6n, Sears reparar_ o reemplaz.ar=_,a nuestra opci6n, las piezas
Jefectuosas segun se indica a continuaci6n Usted debe pagar la mano de obra
o Agrietamiento de ta cubierta de cer_mica vidriada debido a • Agrietamiento de la iunta de goma entre ta cu bierta de
choque t_rmico cer_mica vidriada y el horde de porcelana
• Deco!oraci6n de la cubierta de cer_mica vidriada • Fundido de cuaiquiera de los elementos superiores
• Desgaste deI disefio en la cer_mica vidriada radiantes
;i este producto se usa para otros prop6sitos que no sean los normales del hogar, la garant[a anterior es s6!o v_ticla durante 90 dias
!L SERVICIO BAJOLA GARANTIA ESTA DISPONIBLE PONIENDOSEEN CONTACTO CON SUCENTRO DE SERVICIOSEARSMAS CERCANO EN
O5 ESTADOSUNIDOS
ista garantia te otorga ciertos derechos Iegafes especificos y usted tambi_n puede tenet otros derechos que varian de un estado a otto
;ears Roebuckand Co Dept 817 WA Hoffman Estates, IL 60179
_,fin de ag_egar al valor de su estufa, compre un Contrato de Mantenimiento de Sears.
Afios de Cobertura t erASo 2do Afio 3er A_o
1 Reemplazo de piezas defectuosas que no W MA MA
sean la cubierta de ceramica vidriada ni los
elementos su periores radia ntes
2 Cubierta de cef_mica vidriada y elementos W W W
superiores radiantes
3. Mano deobra W MA MA
4 Revisi6n de Mantenimiento PreventivoAnual, MA MA MA
si 1osolicita
W=Garantia MA=Contrato de Mantenimiento
as estufas Kenmore han sido disefiadas, fabricadas y probadas para ofrecerle argosde funcionamiento seguro. Sin embargo, cuaiquier
lectrodom_stico puede requerir servicio de vez en cuando. La garantia de Sears y el Contrato de Mantenimiento de Sears ie
roporcionan protecci6n contra cuentas de reparaci6n inesperadas
n la tabla anterior se compara Ia garantia y el contrato de mantenimiento y se muestran los beneficios de un Contrato de
_,antenimiento de Estufas Sears
5ngase hey mismo en contacto con su Vendedor Sears o con el Centro Local de Servicio Sears y compre un Contrato de Mantenimiento
_a_
26
INSTRUCCIONES IMPORTANTES DE SEGURIDAD
Lea todas las instrucciones antes de usar este artefacto,
Guarde estas instrucdones pare referenda futura,
Estemanual contiene touches arises deseguridad importantes, Siempre lea y obedezcaredes los arisesde seguridad
Este es et sfmbofo de alerta sobre seguridad. Le advierte sobre avisos de seguridad que le informan sobre pefigros que pueden causarl_ la
muerte o lesionado austed o a otros o causar dafio at producto.
!
_'z__]_[_ lndica una situaci6n inminentemente peligrosa que, si no se evita puede resultar en una lesi6n grave o mortal.
tndica una situaci6n inminentemente peligrosa que, si no se evita puede resultar en una tesi6n menor omoderada o
solamente d;a_o dei producto.
Todos los arises de seguridad identifican un peligro, te expfican come reducir la posibifidad de sufrir una tesiSn y le indican to que puede
sucedersi no sesiguenlasinstrucciones .Nunca modifique o altere la construcci6n de una estufa
° Todas los estufas pueden volcarse.
° Se pueden causer lesiones,
°{nstale el dispositivo antivuelco
incluido con fa estufa,
°Vea las instrucciones de
instalaci6n°
>ara reducir el riesgo de vuelco de la estufa, se
Jebe asegurar instalando adecuadamente el(los)
soporte(s) antivueico provistos con [a estufa. Para
verfficar si el soporte ha side instalado.
correctamente, verifique visualmente que la pata
niveladora est_ insertada y compietamente
asegurada pore! soporte del dispositivo antivuelco
sacando el panel inferior o ta gaveta de
almacenamiento. Para los modelos con gaveta
calentadora o compartimiento para asar, sujete el
borde trasero superior' de ia estufa y trate
cuidadosamente de inciinarla hacia adeiante.
Consufte las instrucciones de instalaci6n pare
instalar correctamente el(los) sop o#.e(s) antivuetco.
• Retire todas los cintas y tos envoltodos de empaque antes de
user la estufa_ Destruya la caja de cart6n y las botsas de pt_-stico
despu_s de desempacar ta estufa Nunca dejejugar a los nifios con
et material de empaque
, tnstalaci6n correcta--AsegOrese de que su artefacto haya
side correctamente instalado y puesto a tierra en farina
adecuada per un t6cnico calificado de acuerdo con la norton
ANSI/NFPA No. 70 def C6digo El6ctrico National--ultimo
edici6n y con los requisites de los c6dlgos locales I n st a I e
siguiendo sofamente los instrucciones de instalaci6n
proporcionadas en la documentaci6n de esta estufa
Consuite con su distribuidor pare que le recomiende un t_cnico
calificado yun centre de servicio autorizado. Aprenda a desconectar
la energfa et_ctrica de ta estufa en el disyu ntor o en ia caja de fus[bles
en case de emergencia
• Mantenlmiento per el usuario_No repare o reemplace
ninguna pieza de[ artefacto a menos que se recomiende
espedficamente en los manuales Todo otro tipo de
mantenimiento debe ser efectuado per un t#cnico caiificado pare
reducir el riesgo de lesiones corporales o dar_o a Ia estufa
27
quitando las paras niveladoras, paneles, protectores de
cables, torn{lies o soportes antivuetco o cualquiera otra pieza
de la estufa,
Sl se para, se apoya o se sienta en las
puer_as o gavetas de esta estufa puede provocar lesiones
corporates graves.y puede tambi6n da_,a r' Eaestufa. No permita
que los ni_os ttepen o jueguen alrededor de la estufa. E!peso deun
ni6o en una puerto abierta puede vetoer ia estufa causando
quemaduras graves u otro tipo de lesiones
No use el homo o la gaveta ca}entadora
(sila tiene) pare guardar utensitios_
No guarde a_icutos que interesen a los nifios
en los armories que est6n arriba de la estufa o en el protector
trasero, Los nifios que se suban a ia estufa para alcanzar dichos
artlcuios pueden sufrir lesiones graves
Nunca use este artefacto para calentar o
caiefaccionar la habitaci6n.
•Almacenamiento dentro o sobre el artefacto_No se deben l-F]
guarder materiates inflamables en el homo, cerca de los _Gfl
....etementos superiores, en la gaveta de atmacenamiento e en _
la gaveta calentadora (s[ ia tiene). Esto incluye art[cl_tos de
papei, p!_stico y tote, tales come libros de cocina, objetos de
pl_stico y toallas, as[ come llquidos inflamables No almacene Ct
articulos explosives, tales come latas de aerosol sobre fa estufa o t'_
cerca de elta
.No deje a fos nifios solos, No se debe dejar a los ni_os solos
o sin vigilancia en el _rea donde se usa el artefacta Nunca
debe permittrseles que se sienten o se apoyen en ninguna porte de!
artefacto.
,NO TOQUE LOS ELEMENTO5 SUPERIORES, LAS AREAS
CERCANAS A LOS ELEMENTOS, LOS; ELEMENTOS
CALEFACTORES DEL HORNO 0 LAS SUPERFICIES INTERIORES
DEL HORNO Tanto los elementos superiores come los elementes
calefactores de[ homo pueden ester calientes, a 0 n cua ndo su color
sea oscuro, Los _reas cercanas a los elementos su periores pueden
calentarse !o suficiente come para causar quemaduras Durante y
despu6s que use ta estufa, no toque ni deje que la rope u otros
materiales inflamables toquen estas Meas haste q ue no se hayan
enfriado Entre _stas _reas se encuentra la cubie rta, fas superficies
orientadas hacia la cubierta, los orificios de los respiraderos del
homo, los superficies cercanas a estos orificios, la puerto y la
ventanilta del homo.
,Vista ropa adecuada_No use nunca prendas de vestir
holgadas 0 sueltas cuando est_ usando este artefacte No
deje queta ropa u otros materiales infiamables entren en contacto
con los superficies calientes
" No use ague ni harina para apagar un incendio causado par
frituras_Apague el fuego con Ia tapa de una sart_n o bien
utilice bicarbonate de sodio o un extinguido r de espuma o de
un producto quimico seco.
INSTRUCCIONES
• Cuando catiente grasa o aceite, debe vigifar atentamente ta estufa.
La grasa o el aceite se pueden inflamar si se calientan dernasiado.
•Use s61o tomaollas secos_Los tomaollas mojados o h0medos en
superficies calien_:es pueden causar quemaduras 0casionadas per el
vapor, No deje que los tomaoltas toquen los !lamas o fos etementos,
No use toallas u otros matedafes g!_uesos en vez de tomaollas.
• No caiiente envases de alimentos cerradosRLa acumulaci6n de
presi6n puede reventar el envase y ocasionar tesiones_
• Saque ta puerto del hornodet0da estufa que ya no se utilice cuando
la guarde o la descarte,
IMPORTANTE--No trate de usar ta estufa durante una interrupci6n det
suministro el_ctrico, Si se interrumpe fa energia ei_¢trica, apague
siempre la estufa Si la estufa no se apaga, y se restablece el suministro
el_ctrico, la estufa puedecomenzara funcionar nuevamente. El alimento
que se haya dejado desatendido puede prenderse fuego o dafiarse.
1NSTRUCCIONES IMPORTANTES PARA USAR LA
CUBIERTA ...........
• Famitiarfcese con cada uno de los botones que controlan los
etementos superiores. Coloque un utensilio con a[imento en el
e]emento antes de encenderlo y apague el elemento antes de retirar
et utensilio,
• Use utensilios de tamar_o adecuado--Este artefacto est_ equipado
con uno o m_s e_ementos supedores dediferentes tamafios. Seleccione
utensilios que tenga el fondo piano y suficientemente grande para
cubrir la superficie del etemento El use de utensi[ios demasiado
pequefos dejar=_ expuesta a contacto directo parte del elemento
calefactor y se puede quemar ia ropa Debe e×istir una relaci6n
adecuada entre el tamaSo de! utensilio y el tamaffo de la superficiede!
elemento y de tal mode tambi6n se mejorar_ la eficiencia.
• Los mangos de los utensilios deben cotocarse hacia adentro y no
dejartos sobre los elementos contiguos_ Para reducir el riesgo de
quemaduras, incendio de materiales inflamables y denames debido
a c0ntacte accidental cone! utens!fi0, et rpa ngo debe cojocarse hacia
adentro y no sobre los elementos superiores contiguos
• N unca deje tin vigilancia los elementos superiores encendidos en
los ajustes attos_Al hervir se derrama el contenido produdendo
derrames degrasa quese pueden incendiar o bien se puede {undir una
sart_n cuyo contenido se haya consumido
- Revestimientos protectores_No use papel de aiuminio para revestir
la parts inferior de! he rnoo cualquier otra pa rte d eta estufa, Use papel
de aluminio solamente come se recomienda para hornear si se usa para
cubrir los alimentos. Cualquier otto use de revestimientos protectores
o del papel de alu minio pu ede resultar en un riesgo de cheque et6ctrico
o incendio.
. Utensilios de cocina de cer',mica--S6lo dertos tipos devidrio, rid rio/
cer_mica, cer_mica, arcilla u otros utensitios de vidrio resultan
adecuados para usar en ta cubie_a de fa estufa sin que se quiebren
con el cambio repentino detemperatu ra Consulte los recomendaciones
del fabricante para use en ia cubierta de la estufa
PARA CUBIERTAS DE VIDRIO SOLa.MENTE
• No cocine sobre una cubierta que est_ quebrada--Si la cubie_a se
quiebra, le pueden penetrar solucio nes de lira pieza y derrames y crear
un riesgo de cheque el6ctrico P6ngase en contacto con un t_cnico
caiificado inmediatamente
° Limpie con cuidado la cubierta_Si utiliza una esponia homeda o un
pa r_o para limpiar los d erra rues en un _ rea de cocci6n q u e est6 ca liente,
tenga cuidado a fin de evitar una quemadura con el vapor Atgunos
agentes de iimpieza pueden producir vapores perjudiciales si se
aplican en una superficie caliente
IMPORTANTES DE SEGURIDAD
INSTRUCCtONES IMPORTANTES PARA EL use
DEL HORNO
• Abra con cuidado la puerto del homo o ia gaveta calentadora_
Mant_ngase al costado de la estufa cuando abra la puerta de[ berne
catiente. Deje salir el aire callente o el vapor antes de retirar o velvet
a colocar los alimentes en et home.
• Evite fa obstrucci6n de los conductos de ventilaci6n del homo, Los
conductos de ventitad6n de_ homo se encuentran d ebajodel protector
-trasero. No t6que los superficies_6:n esta _rea"_uando el homo es;c_
funcionande, se pueden ocasionar quemaduras g raves. Adem_s no
coloque objetos de pi_stico o termosensibles sobre los orificios de
ventilaci6n del homo o cerca de ellos. Estos obietos pueden derretirse
o incendiarse
, Coiocaci6n de los rejilfas det horno Cotoque los rejitlas del homo en
la posici6n deseada solamente cuando ef homo est_ frto. Si la rejiIla
se debe cambiar cuando el homo est_ caliente, h=Sgalo con sumo
cuidado UsetomaotiasysujeteJa reiilIa con ambas manes para votver
a cofocarta No dejeque los tornaoltas toquen la llama de{ elemento
o el interior def homo Quite todes los utensitios d e la rejilIa antes de
retirarla
• No use la asadera sin el inserto La asadera yel inserto permiten drenar
la grasa y protegerla contra el color del asador_
• No cubra el inserto de la asadera con pope[ de at uminio. La grasa
y el aceite asi expuestos pueden inflamarse.
• Lastemperaturasbajaspuedendar_arelcontroletectr6nico Cuando
use la estufa per pdmera vez o cuando no ta use per un pertodo
prolongado, aseg0rese de que la estufa se haya mantenido a
temperaturas superlores a 32_F (0°C) per Io menos d u rante los 01timas
tres heros antes de conectar ta energia el6ctrica al artefacto.
INSTRUCCIONES IMPORTANTES PARA LA LIMPIEZA
DE SU ESTUFA
. Limpie regularmente la estufa para mantener sin grasa todas los
. piezas que puedan prenderse fuego_ Presteatenci6 n especial al _rea
situada debajo de coda elemente superior No deje que se acumule
g rosa Consulte las instrucciones para la limpieza propo rcionadas per
el fabricante de los campanas
• Aerosoles y agentes de limpieza para estufas_Si ga siempre las
instrucciones de use recomendadas per el fabricante. Tenga presente
que los residues de los agentes de limpleza y aerosoles pueden
inflamarse causando dafio yio lesiones
HORNOS AUTO LIMPIANTES
, Limpie en el ciclo de autolimpieza s61o los piezas del homo indicadas
en este manual del usuario Antes de la autolimpieza del homo, retire
la asadera y todo utensilio o alimentos que est_n guardados en el
homo
" No use agentes de fimpieza para homo Nose debe usar agentes de
limpieza para homo o revestimiento de protecci6n de ning0n tipo en
ninguna pieza del homo o en su vecindad
• Nolimpielajuntade!apue_adethorno Lajuntadetapuertaes
esencial para quequedesetlada en forma correcta Tenga cuidado de
no frotar, da6ar o mover la junta
CONSERVE ESTAS INSTRUCCIONES
28

Funciones de los
Botones de Control
CLEAR [Anular]--Se usa para
anular cualquier fu nci6n
ing resada previa mente, excepto
Ia hora det dfa y eXcontador de
minutos. Oprima CLEAR tpara
terminar de cocinar.
BAKE [Hornear]--Se
usa para ingresar la
tern peratura de
horneado normal.
LEA CUtDADOSAMENTE LAS INSTRUCCIONES ANTES DE USAR EL HORNO.
Para uso satisfactorio de su homo aprenda a utitizar los diversas funciones que se
describen a continuad6n.
FLECHA5 MAS y MENOS--Se usan junto con los botones de
fundones para sefeccionar el tiempo de cacd6n, el tiempo de
parada (cuando se programa un tiempo de parada
automat!co), ta hora dot dfa, et contador de minutes y la
fund6 n aut61impieza,
CLOCK [Reloj}--Se usa
poner la hora del
dfa.
INDICADORAS
DE FUNCION--Se
!lure!nan para indicar
cual es la funci6n que
se est,4 usando
BROIL [Asar a
Parrilla]--Se usa
para seleccionar la
fund6n de asado a
[a parrilla
CLEAN [Limpiar]
Se usa para
seieccionar el cido
de autoiimpieza
:;+,:_bC:;_ :93 :!i _ 5? L,L;3L;
LUZ OVEN (Homo), PREHEAT (Precalentar) y LOCK (Cierre)--La
iuz "OVEN" se iluminar_ coda vez que se enciende el homo para
mantener ta temperatura se_eccionada del homo Laluz
"PREHEAT" se iluminar_ cuando el homo se enciende para
comenzar a hornear o sila temperatura deseada es ajustada a
una temperatura m_s alta queta temperatura real del homo La
luz "LOCK" destetlar_ hasta que se cierre la puerta (o se abre
completamente) cuando se utiliza eI cido de auto_impieza
Permanece iluminada despu6s de que se cierra Ia puerto
E1 horno se puede programar para:
• Hornearenforma normal (Bake)
. Indicar ta duraci6n dei horneado (Bake Time)
, Asar a ta parrilla (Vari Broi!)
• Autoiimpieza (Clean)
TIMER ON!OFF
[Contador
Encendidoi
Apagado]--Se usa
para programar o
cancelar el contador
de minutos El
contadorde
minutos no
c0mienza ni dot!one
ta cocci6n
BAKE TIME [Duraci6n
del horneado]--Se usa
para ingresarla
durad6n clel tiempo
de horneado
STOP TIME [Hora de
parada]--Se usa para
programar la hora de
parada deseada para
elhorneado Se
pue'de usar con BAKE
TIME para programar
un cicto diferido de
horneado.
Para un panel de control silencioso
Cuando se selecdona una funci6n, se oir_ una so,at snnora cada vez que se oprima un bot6n Si Io desea, los controles pueden ser
para funcionamiento silendoso Oprima y mantenga oprimido el bot6n _. Despu_s de 7 segundos, e[ control
I
programados
emitir_ una seSal sonora Esto impedir_ que los controles emitan sefiales sonoras cuando sean oprimidos Para restablecer el sonido,
oprima nuevamente y mantenga oprimido e[ bot6n @ por 7 segundos hasta que escuche una seSal sonora
Nora: El control vo!,ver_ at modo sonoro despu6s de una interrupci6n del sumin+stro e!6ctrico
rT]
L,g
©
r-
Conversi6n de la temperatura:
El control electr6nico del homo est_iprogramado para funcionar en °F (Fahrenheit) cuando es despachado de fclbrica
programar para cualquier temperatura entre 170°F y 550°F (65°C a 287°C)
Para cambiar la temperatura a °C (Celsius) o de °C a °F (el control no debe estar en modo Bake o Clean):
Oprima @. En el indicador visual aparece ....
2 Oprima y mantenga oprimido este bot6n (_ hasta que aparezca "HI" [Alta] en el indicador visual
3 Oprima y mantenga oprimido et bot6n @ hasta que aparezca °Fo °Cen e[ indicador visual
4 Optima el bot6n _ o (_ para cambiar de °Fa °C o de _Ca °F
5 Oprima cuatquiera de los botones de funci6n para volver at modo normal de funcionamiento
El horno se puede
29
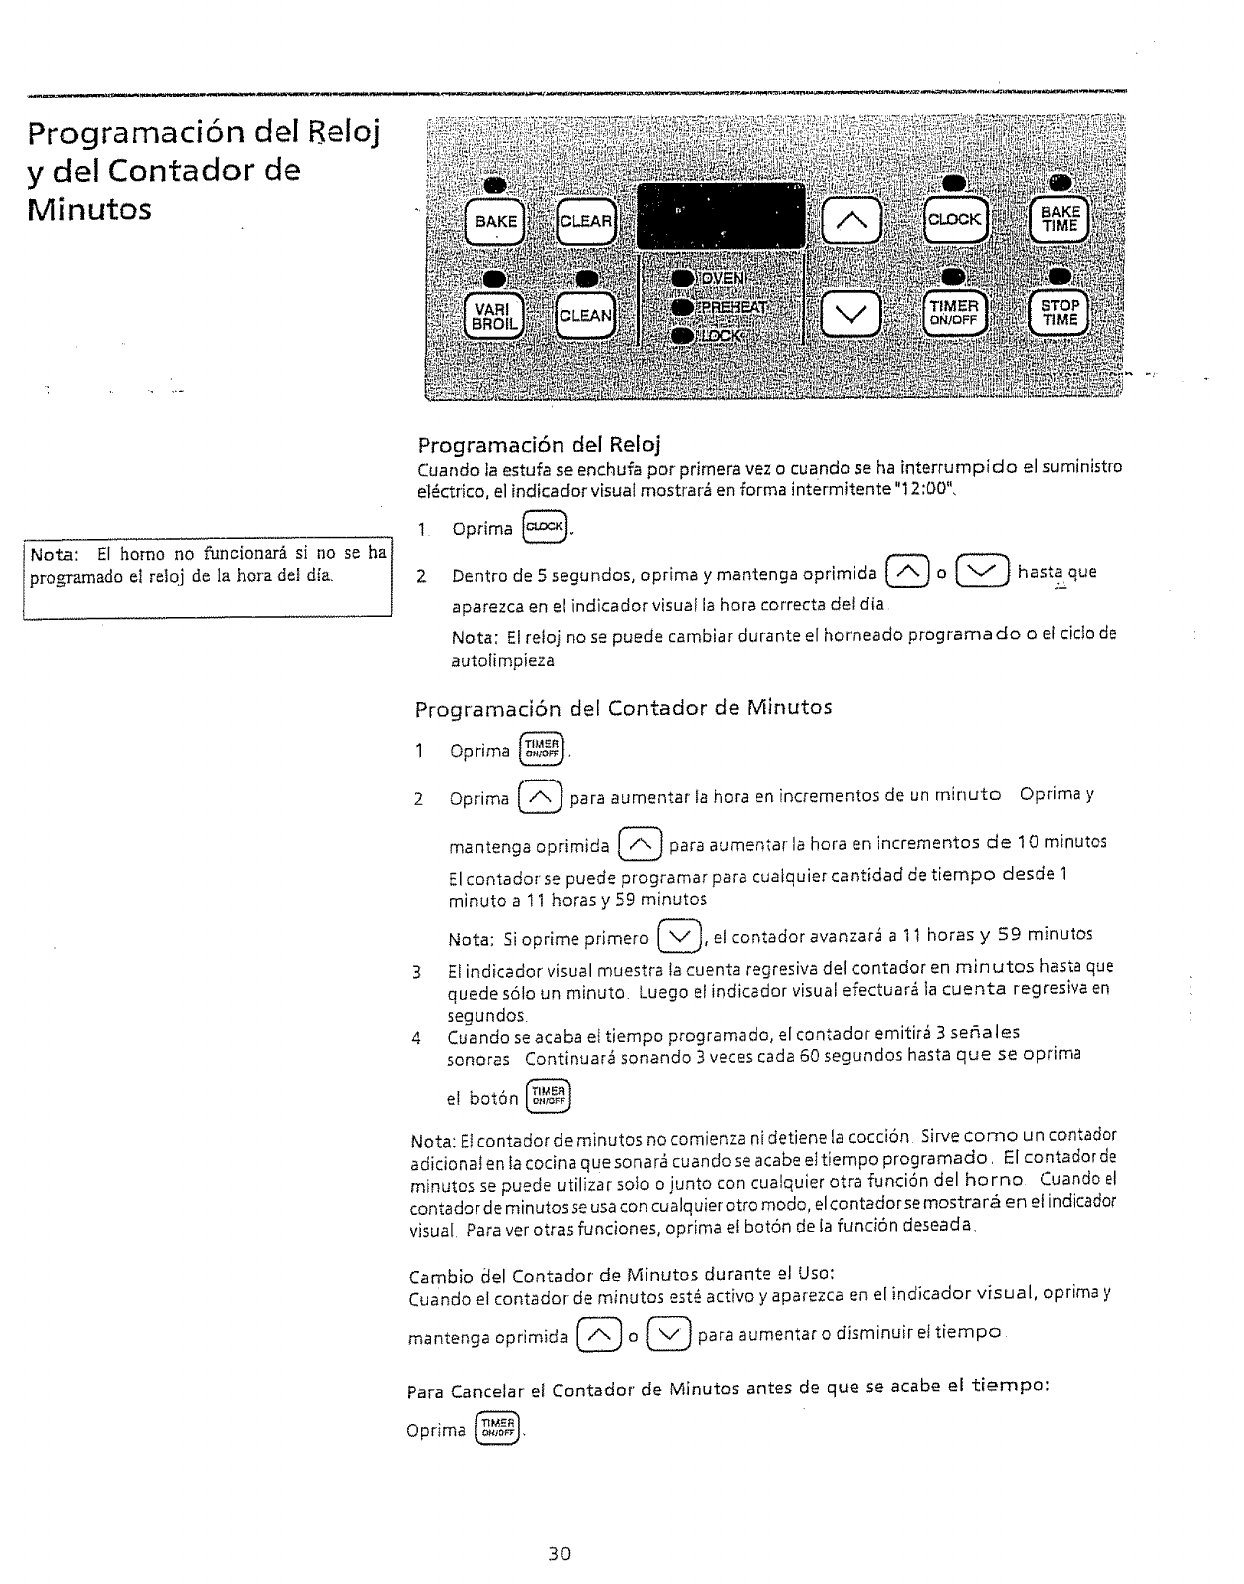
Programaci6n del Reloj
y del Contador de
Minutos
Nora: El homo no funcionar_, si no se ha l
pro:_ramado el r_to] d_ la hera deJ d[a.
Programaci6n del Reloj
Cuanda la estufa se enchufa per primera vez a cuando se ha interrumpido el suministra
et6ctrlco, el indicadar visual mostrar_ en farina intermitente "12:00",
1 Oprima _°
Dentra de5 segundas, oprima ymantenga aprimida (_a (_ hasta qua
2
aparezca en el indicador visua! ia hara tar'recta det dia
Nota: El reioj no se puede cambiar durante el horneado programado o el tide de
autolimpieza
Programad6n del Cantador de Minutes
1 Oprima _,
2 Optima _ para aumentar la hera en incrementos de un minute Oprima y
mantenga oprimida _ para aumentar la hera en incrementos de 10 minutes
El contador se puede programar para cuatquier cantidad de tiempo desde 1
minute a !1 heros y 59 minutes
Nata; Sioprime primate ____, elcontador avanzar_ a 11 horas y 59 minutes
3 El indicador visual muestra la cuenta regresiva del contador en rain utos hasta que
quede s61o un minute. Luego el indicador visual efectuar_ la cuenta regresiva en
segundos.
4 Cuando se acaba et tiempo programado, el contador emitir_ 3 ser_ales
sonoras Continuar_ sonando 3 veces coda 60 segundos hasta que se optima
el bot6n
Nota: Et contador de minutes no comienza ni detiene la cocci6n Sirve come un contador
adicionaI en la cocina qua sonar_ cuando se acabe et tiempo programado, El contador de
minutes se puede utilizar solo o junto con cualquier otra funci6n del homo Cuando el
conta dor de min utos se usacon cualq uier otto mode, elcontador se mostra r_ en el i ndicador
visual Para ver otras funciones, oprima el bot6n de Ia funci6n deseada,
Cambio del Contadar de Minutes durante el Usa:
Cuando el contador de minutes est6 activa y aparezca en el indicador visual, oprima y
mantenga oprimida (_ a (_ para aumentaro disminuird tiempo
Para Cancelar et Contador de Minutes antes de que se acabe el tiempo:
Oprima _,
3O
Cocinando en la Estufa Cubierta de Vidriado Cer_mico
Lacubierta de vidriado cer_mico tiene serpentines calefactores etdctricos u bicados debajo
de la superficie de vidrio. Eldi._er_oen la cublerta deiinea el contomo dot etemento que est_
debajo. Esmuy importante asegurarse de que el di_metro del utensilio coincida con et
di_metro del elemento. E1color es transferido hacia arriba a tray,s de la superficie de la
cubierta hacia ef utensifio 5e deben usar solamente utensilios de fondo piano, Eltipo y
tamafio de los utensilios, el ntlmero de elementos superiores que est_n en uso y el ajuste
de coda uno de olios son factores que afectar_n la canttdad de calor que se esParcir_ a los
_reas que rodean a los elementes superiores Las _reas que rodean a los etementos pueden
caientarse 1osuficiente como para causarquemaduras_
Lacu bierta de la estufa no debe.usarse conio una ta bla de cortaro como su perficie detrabajo
en ia cocina Bise dejan caer objetos pesados o duros sobre la cubierta puede q'uebrarse
Losutensi[ios que tengan fondo &spero pueden rayar lasuperEcie. No se reco mienda cotocar
alimentos directamente sobre la superEde (sin utensilios de cDdnar) pues resultar_ en
cocci6n dispareja y limpieza con mayor dif]cultad
Efementos Superiores Radiantes
Los elementes superiores radiantes son un grupo de serpentines calefa ctores encerrados
dentro de un dispositivo de cer&mica situado debajo de la cubierta de rid rio. La temperatura
det etemente aumenta gradual y uniformemente. A medida que la temperatura va
aumentando, el elemento se ifuminar_ de rojo. Para mantener el ajuste selecdonado, el
elemento pasar=_pot ciclos de encendido y apagado, El elemento catefactor retiene
suficiente cator para propordonar un color uniforme y consistente durante el cido de
apagado. Eldispositivo de cer=_mica aistat_rmicamente alelemento calefa ctor, concentrando
el caior en e! _rea calefactora Para cocci6n eficiente, apague el elem_&nto varios minutos
antes de terminar de cocinar Esto permidr_ que el color residual termine el proceso de
cocci6n La cantidad de color residual depende det tipo yde la calida d d e los utensilios de
cocina, de la cantidad de atimentos que est_ siendo codnada y de la temperatura
seleccionada
Luz (Luces)
Indicadora(s)
Elementos Superiores Radiantes Dobles (si los tiene)
Et etemento superior radiante doble se compone de un serpendn interior y un serpentin
exterior dentro del mismo elemento 5e ha provisto un 5ot6n de controf y un
interruptor oscilante para operar los diversos serpentines. Elelemento m_s pequefio o rTt
serpentin interior tiene una potencia en watts menor y puede usarse pa ra preparar M'i
cantidades m_s pequer3as de alimentos en utensilios m_s pequer_os El elemento m_s
grande o Ia combinaci6n del serpentin interior y exterior, tiene mayor potenda y puede
ser usado para preparar cantidades m_s grandes de alimentos en utensilios m_s
grandes Cuando use el serpendn exterior, funciona tanto el serpent[n interior como el O :
exterior, 1"
Hay dos clases diferentes de tuces de control superiores que se ilumina r_ n en su estufa_
una luz indicadora de los elementos superiores y una fuz indicadora de cafefacci6n
de la cuble_a-
La luz indicadora de los elementos superiores, situada en e! panel de control, se ilumina
cuando se enciende cualquiera de los elementos superiores Una mirada r_pida a la luz
despu_s de haber cocinado es una manera f_cil de asegurarse de que todos los controles
superiores est_n apagados
La luz indicado_'a de calefacci6n de la cubierta, situada debajo de la cubierta de vidrio
o en el panel de control, se encender_ a medida que el _rea de la cubie_a se caliente y
continuarg ifuminada hasta que la cubieda de
se haya enfriado a un niveI moderado
"R1

Ajustes de los
Superiores
Controles
Controtes Dobles de los Etementos
Superiores Radiantes j
Uso de los Elementos Superiores Radiantes
Optima y gire la peritla de control del etemento superior' en cualquier direcci6n al ajuste
deseado Cada etemento superior provee una cantidad constante de ca ior en cada ajuste
Comience a cocinar en un ajuste alto; luego seteccione un ajuste m_s bajo para terminar,
Sise extiende una superficie roja briltante m_s alf_ det borde inferior d el utensifio de ¢orina
significa que el utensilio es demasiado pequefio para el efemento La perilla de control no
necesita estar cotocada en una marca especffica Use iasma rcascomo gu[as y ajuste la periila
de control como sea necesario.
Uso det Control de los Eiementos Radiantes Dobles (atgunos modetos)
Cotoque et interruptor en el tai_aficJ__e_erpen_k_qdeseadd • indica el'serpentin
interior solamente.
(_) indica que ambos serpentines est_n en uso Usted puede cambiar de cuaiquiera
de estos dos ajustes en cualquier momento mientras est_ cocinancio,. Optima y gire la
perilla de control del etemento superior dobfe en cualquier direcci6n al ajuste deseado
NOTA: Los elementos radiantes tienen un limitador que les permite pasar pot un cicfo
'ON' (encendido) y un cicio 'OFF' (apagado), aun cuando est_n en el ajuste 'HI' (Alto)
Esto ayuda a evitar que se dafie la cubierta de vidrio. Elfuncionamiento ciclico en el
ajuste HI es normal y puede ocurrir cuando el utensilio es demasiado..pe_tuer_o.para el
etemento o siet rondo del utensilio no es piano.
Despu_s de apagar un etemento superior radiante, tenga
cuidado de no tocar ninguno de los elementos hasta que hayan tenido
tiempo de ENFRIARSE. Los efementos superiores se pondr_n de un color
oscuro despu_s de que han sido apagados y pueden ocurrir quemaduras si
los elementos se tocan en este momento
No cotoque objetos de pt_stico tales como saleros y
pimenteros, apoyacucharas o envoltorios de pl_stico sobre la estufa cuando la
est_ usando, Estos objetos se pueden derretir o encender Los tomaotlas, las toaltas
o cucharas de madera se pueden prender fuego si se cotocan muy cerca de los
elementos

Ajuste de los Controles
del Area Calentadora
(sila tiene)
Useel _reacalentadara para ma ntener catientes 1
Jlos alimentos cocinados, tales coma: verdu ras, I
Jsalsas,guisos,sopas, estofados, panes, pastetes j
IY ptatos de servir que se pueden usar en el l
[homo.
OFF HI .... ......
MED
WARMER ZONE
@
,a.REACALENTADO RA
Tabla de Ajustes Recomendados para
Atimentos en la Gaveta de Calentar
Tipo de Alimento Aiuste
Panes/Pasteles LO [BAJA]
Guisos al Homo LO [BAJA]
Platos Grandes con
Atimento LO [BAJA]
Huevos LO [BAJA]
Salsas LO IBAJA)
Carnes MED [MEDIANA]
Salsas MED [MEDIANA
Sopas (crema) IVIED[MEDIANA
Estofados MED [MEDIANA
Verduras MED [MEDIANA
•Atimentos Fritos HI [ALTA]
Bebidas Calientes HI [ALTA]
Sopas (tiquidas) Ht [ALTA]
Empteo del Area Catentadora
Elprop6sit0 del _rea calentadora esmantener los alimentos calientes pa ra servidos Antes
de ponerla, la comida debe estar caliente, No se recomienda calentar comida frla en e! _rea
calentadora,
Todos los aiimentos que se colocan en el _rea calentadora se deben cubrir con una tapa o
con papel de afuminio para mantener la calidad. Paraobtener mejores resuftados cuando
caliente pasteles o panes, la cubierta debe tener una abertura para que deie escapar ia
humedad No use pl_stico para cubrir los alimentas, El pl_stico se puede derretir
en la superficie y ser dificil de iimpiar,
Enel ,_reacalentadora use s61ovajilla y utensilios de cocina recomenda dos para usar enel
homo y en la cublerta de la estufa.
AI contrario de los elementos superiores, el _rea ca lento dora no se
pondr_ roja cuando est6 caliente.
Use siempre tomaollas o guantes de cocina cuando retire los
atimentos de ta gaveta cafentadora, ya que los platos o los utensilios pueden estar
calientes
Aiuste de! Control det Area Calentadora
1 Para ajustar el control, oprima y gire la perilla Lostemperaturas son aproximadas
y se ;ban designado coma HI [Atta], MED [Mediana] y LO [Baja]. Sin embargo, el
control puede set ajustado en cualquier posici6n entre HI y LO pa ra diferentes
nivelesde calentamiento
2 Cuando haya terminado, gire el control a la posici6n OFF, El _rea calentadora
permanecer=_ caliente hasta que se apague la luz indicador'a de calentamiento
de Ia cubierta
Selecci6n de la Temperatura
Consulte los ajustes recomendados en la ta6ta a la izquierda Si no figura el alimento que
desea, comience con el ajuste media y regule despu&s coma sea necesa rio La mayorla de
los atimentosse pueden mantener a la temperatura adecuada para servir usando ela]uste
media
Lutes Indicadoras
Laluzindicadora superior est_ situada debajo dei control de[ _rea cafentadora, Seilumina
cuando se ajusta el controi yse mantiene iluminada hasta que et control se apaga Laluz
indicadora de catentamlento de la cubierta, situada debajo de la cu bierta de vidrio, se
encender_ cUando seajuste el control ycontinuar_ iluminada hasta que la cu bierta devidrio
se haya enfriado aun nivel moderado
Control det Area CaIentadora
1
Indicador Superior
Area de Calentar y Servir
r11
L_
Zl
©
t_
Lacubie_a y el panel de control que se muestran aqul son solamente ejemptos 5u
estufa puede tenet un diseSo diferente y caracteristicas diferentes
33
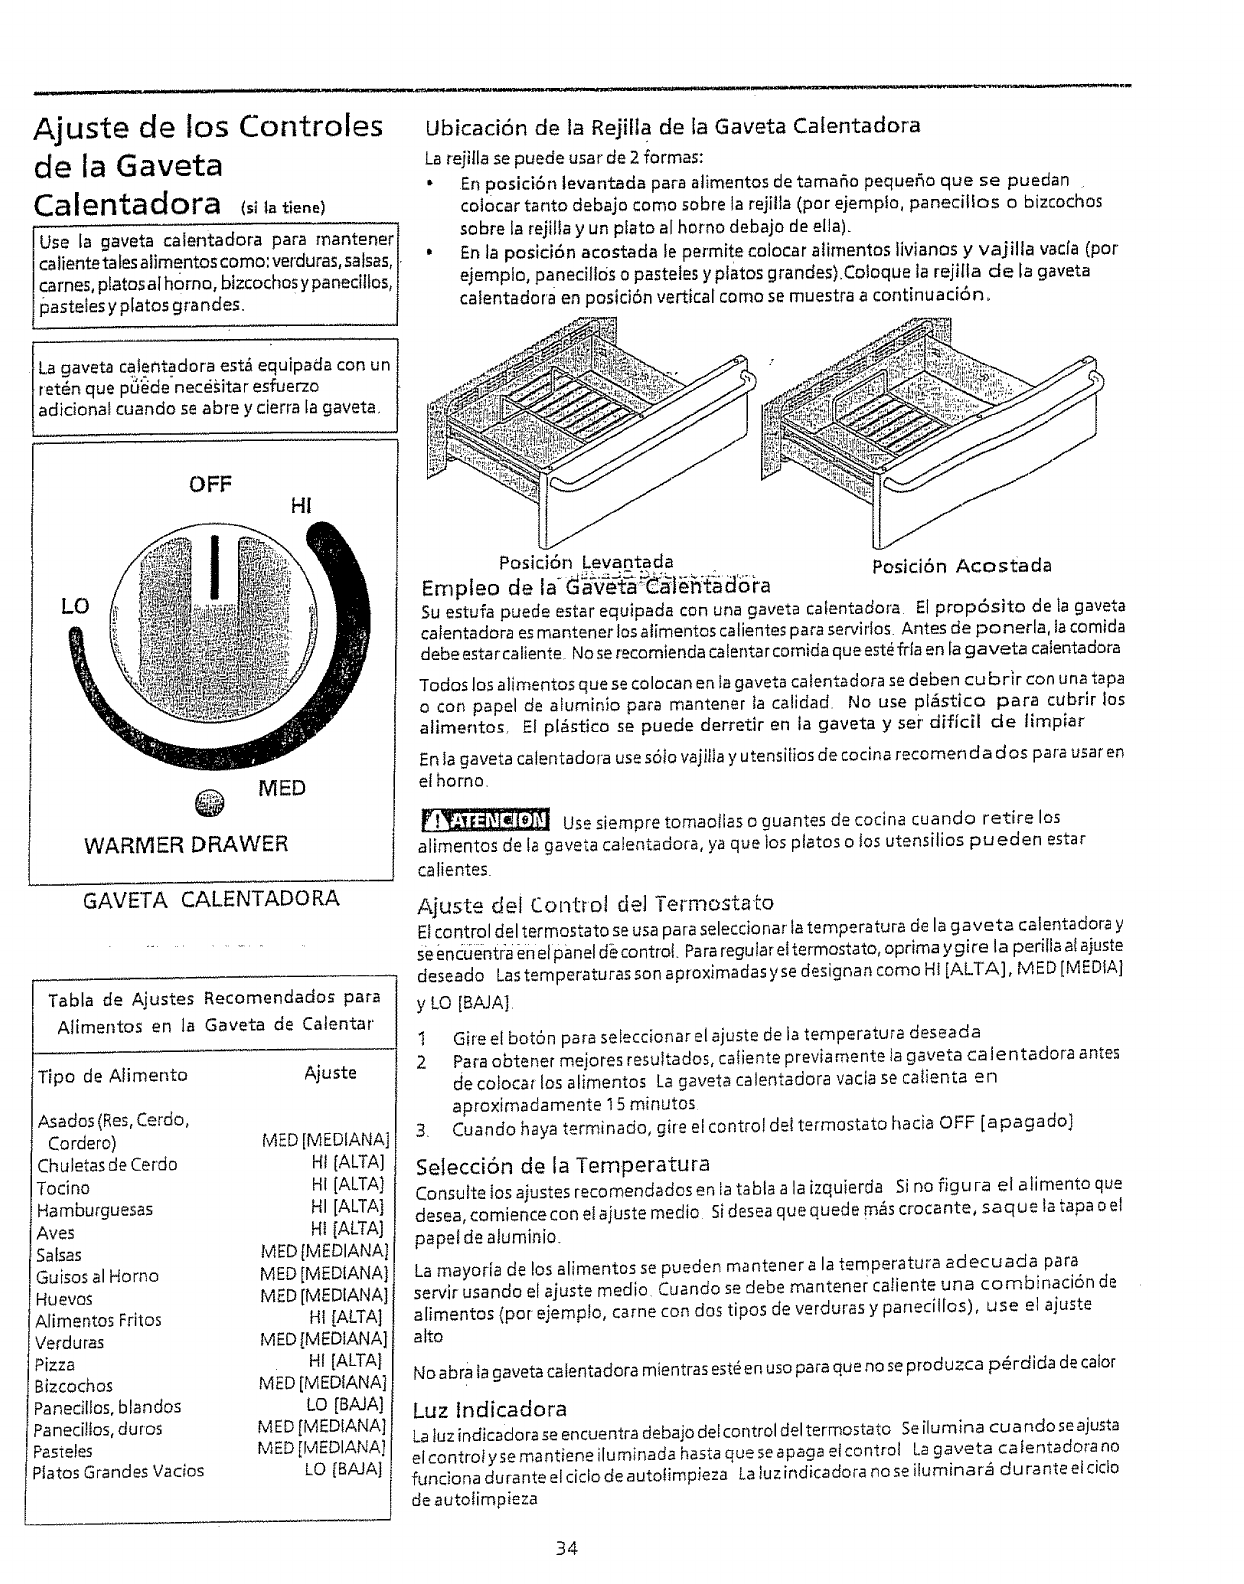
Ajuste de los Controles
de la Gaveta
Calentadora
I Use ta gaveta calentadora para mantener_
caliente tates alimentos coma: verduras, salsas,J-
carnes, piatQsat homo, bizcochosy panecittas, I
Paste °'YPlat°sgr°°dt " j
La gaveta calentadara est_ equipada can un
ret_n que p_'ede"necesita r esfuerzo
adicionaL cuando se abre y cierra la gaveta.
Ubicaci6n de la Rejill a de la Gaveta Calentadora
La re]ifla se puede usar de 2 formas:
• En posici6n levantada para atimentos de tama6a pequer_o qua se puedan
colocar tanto debajo coma sabre la re]ilta (par ejempfo, panedtlos o bizcochos
sabre la rejilla y un plato al homo debajo de ella).
• En la posici6n acastada te permite caiocar atimentos livianos y vajilla vacla (par
ejempio, paned/10s a pasteles y platos grandes),Colaque ia reji[la de la gaveta
calentadara en posici6n vertical coma se muestra a cantinuaci6n_
OFF
HI
MED
WARMER DRAWER
GAVETA CALENTADORA
Tabla de Ajustes Recomendados para
Aflmentos en la Gaveta de Calentar
Tipo de Alimento Aiuste
Asados (Res,Cerdo,
Cordero) MED [MEDIANA]
ChMetas de Cerdo HI [ALTA]
Todno HI [ALTA]
Hamburguesas HI [ALTA]
Aves HI [ALTA]
Salsas IVIEDIMEDIANA
Guisos al Homo MED [MEDIANA
Huevos MED [MEDIANA
Alimentas Fritos Ht [ALTA]
Verduras MED [MEDIANA]
Pizza HI [ALTA]
Bizcochos MED [MEDtANA]
Panecillos, blandos LO [BAJA]
Panecilfos, duros M ED [MEDIANA]
Pasteles M ED[lvtEDIANA]
Platos Grandes Vacios LO [BAJA]
Posici6n Levantada
Ernpleo de la" G_=e_t_C_l_[l:l_aa'6ka Posici6n Acostada
Su estufa puede estar equipada con una gaveta cafentadora. El prop6sito de la gaveta
cafentadara esmantenerlos atimentos calientes para servMas. Antes de ponerla, ia comida
debe estar caliente. Nasa recomienda calentar comida queest_frta en la gaveta caientadora
Todos las alimentos que se colocan en ta gaveta catentadora se deben cu bHr con una tapa
o con papal de aluminio para mantener ta calidad. Na use pi_stico para cubrir los
alimentos, El pl_stica se puede derretlr en la gaveta y sei' dificil de limp/ar
En la gaveta calentadara use s6to vajilla y u tensifios de cocina recomenda dos para usar en
ethorno.
Use siempre tomaafias a guantes de cacina cuando retire los
alimentos de la gaveta calentadora, ya qua los platos o los utensilios pueden estar
calientes.
Ajuste del Control del Termostato
Elcontrol del termostato se usa para seleccionar ia temperatura de la gaveta calentadara y
se encuentra en el panel de control. Pararegular eltermostata, optima y gire la perilla at ajuste
deseado Lastemperaturas son aproximadas yse designan coma HI [ALTA], MED [MEDIAJ
y Lo [BAJA],
1 Gire el bot6n para seleccionar el ajuste de la temperatura deseada
2 Para obtener mejores resultados, catiente previamente Ia gaveta ca lentadora antes
de co}ocat los alimentos La gaveta calentadora vacia se calienta en
aproximadamente 15 minutas
3. Cuando haya terminada, gire el control det termostato hacia OFF [a pagadoj
Selecci6n de la Temperatura
Consulte los aiustes recomendados en la tabla a la izquierda Si no figu ra el alimenta qua
desea, comience con el ajuste media Sidesea que quede m_s crocante, saque la tapa o el
papel de aluminio.
Lamayoria de los alimentos se pueden mantener a la temperatura adecuada para
servir usando el ajuste media Cuando se debe mantener catiente una combinaci6n de
alimentos (par ejempta, came con das tipos de verduras y panecillos), use el ajuste
alto
No abra la gaveta calentadora mientras est6en usa para qua nase prod uzca p_rdida de caior
Luz lndicadora
LaIuz indicadora se encuentra debaio del control del termostato Seilumina cua nda se ajusta
el cantrat yse mantiene ilu minada hasta qua se apaga el control Lagaveta catentadora no
fundona durante el ciclo de autotimpieza Laluz indicadora no se iluminar=_ d u rante elcido
de autalimpieza
34

Antes de Regular los
Controles del Horno
Disposici6n de las Rejillas del Homo
COLOQUE SIEMPRELAS REJILLASCUANDO ELHORNO ESTEFR!O (ANTES DE
ENCENDERLO), Use siempre guantes de cocina cuando use el homo
Orificio de Ventilaci6n del Homo
Elodficio de ventilaci6n det homo se
encuentra debajo del protector trasero,
Cuando el homo est_ encendido, el aire
cafiente sale por los respiraderos. Esta
ventilaci6n e5 necesaria para_:una
circuiaci6n adecuada del affe en e! homo y
para obtener buenos resuitados en el
horneado.
OR[FICIO DEVENTILACION
/
PARA QUITAR Y COLOCAR LA5 REJILLA5
DEL HORNO
Para quitar, tire de !a rejilla hacia adelante
hasta el tope. Levante ta parte delantera de ]a
rejil[a ydeslfcela hada afuera. Para colocar,
inserte la.rejil[a en la5 gufas de tas pa redesdel
homo. Levante ia parte delantera de la rejilla
y deslfcela a su lugar
DISPOSICtON DE L/kS REJILLAS DEL
HORNO EN 5POSICfONES
Para hornear en una rejilla, col6queta en
ias posiciones 3 o 4, Para hornearen dos
rejillas, cotbquelas en las posiciones 2 y 4.
FT1
LI1
>
Z_
©
r-
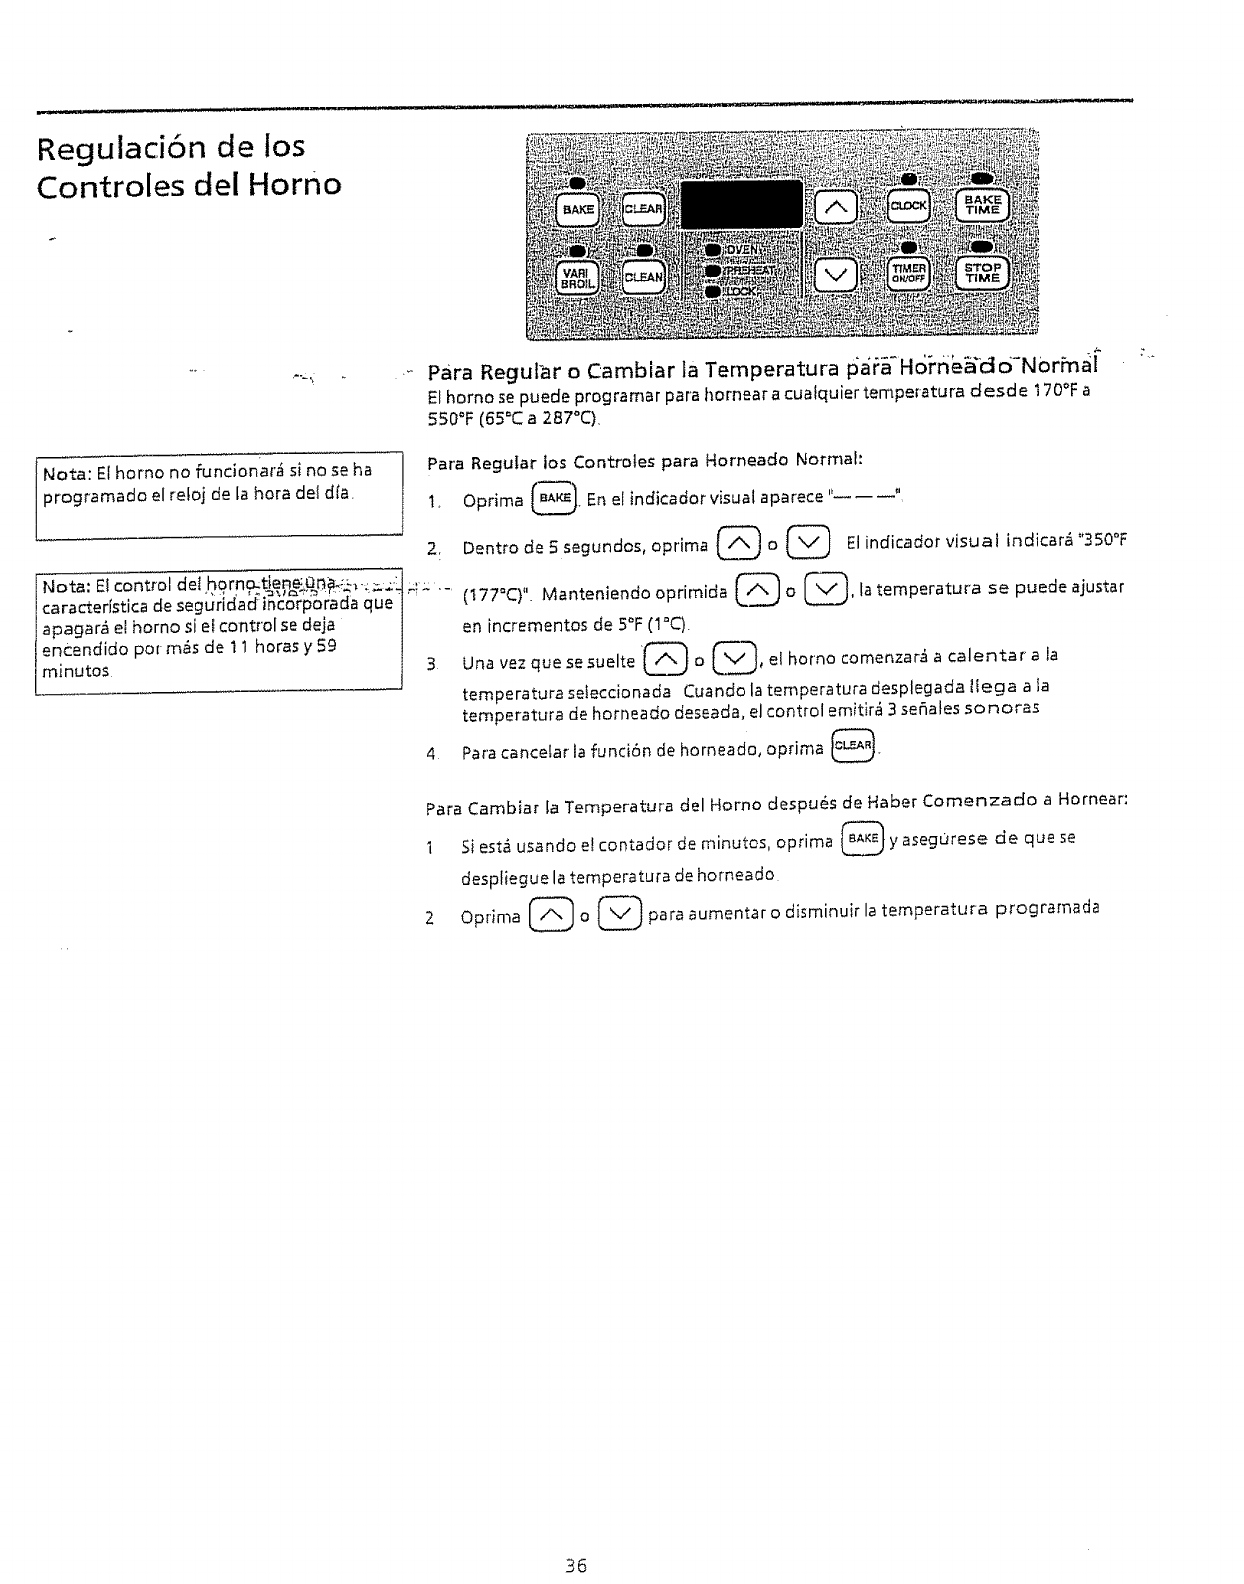
Regulaci6n de los
Controles del Homo
Para Regular o Cambiar la Temperatura [sa_-H6rn&,_'do-Norhaal"
El homo se puede programar para hornear a cuatquier temperatura desde t 70°F a
550_F(65_Ca 287°C),
Nota: EThomo no funcionar_ si no se ha
programado el refoi de la hora del dfa.
Para ReguIar los Controtes para Horneado Normah
1, Oprima _ En el indicador visual aparece'_----
2, Dentro de 5segundos, opdma L__ o L__ El indicador visual indicar_ '350°F
Nora: E! control dei _born_t_ep_,&a_h, .,:= ;-_ =:=._.
caracter[stica desegurid'aariScor#orada que ]' ' (t77°Cy ', Mantenienao oprimida _o _, latemperatura se puede ajustar
apagar_ et homo si el control se deja J en incrementos de 5°F (I_Q.
encendido pot m_s de 11 horas y 59
minutos _ 3 Unavezquesesuelte[___o_ _vL_ ,e,hornocomenzar_acalentarala
ftemperatura seieccionada Cuando la temperatura desplegada tiega a la
temperatura de horneado deseada, el control emitir_ 3 sefiales sonores
4 Para cancelar fa funci6n de horneado, optima _
Para Cambiar laTemperatura del Homo despu6s de Haber Comenzado a Hornear:
15i est_ usando el contador de minutos, oprima _ y asegorese de que se
despliegue la temperatura de horneada
2 Oprima (_ o (_ para aumentar o disminuir la temperatura programada
36

Regulaci6n de los
Controles del Homo
(continuaci6n)
Tenga touche cuidado
cuando use el ¢entador autem_tico Use eJ
contador autom_tico cuando cocine
carnes curadas ocongeladas, asf come la
mayorfa de los frutas y verdures. Los
alimentos que se puedan echar a perder
f_cilmente tales come ta leche, huevos,
pescado, came de reso de ave deben set ........
refrigerados pdmere. Aun cuando han::::: _::
estado refrigerados, no deben dejarse en el
homo par m_s de I hera antes de
comenzar Ia cocci6n yse deben sacar
r4_pidamente una vez qua est_n tistos
Programaci6n del Contador Autom_tico (Funci6n de Horneado
Programado)
Los controle_s BAKE TIME y STOP TIME activan la funci6n Timed Bake [Horneado
Programado]o El contador autom_tico encender_ y apagar& et homo en los horas que
ha seleccionado con antedaridad El homo se puede programar pare que comience
_nmediatamente'yse apague en forma autom_tica o pare que empiece a hornear en
una hera pesterioryse apague autom_ticamente.
Programaci6n de! Home pare Horneado lnmediate y se Apague Autom_ticamente:
I, Asegt)rese de qua el ref6j indique la hera correcta det alia.
2. Cofoque tes alimentos en et horno_
3, Oprima _,
4 Dentro de 5 segundos, oprima _ o (_. El indicador visual mostrar_
"350_F (177°Q" Manteniendo opdmida _ o (_, la temperatura se puede
ajustar en incrementos de 5°F (1°C),
5 Oprima @ El indicadorvisual mastrar_ intermitentemente "O:O0",
6 Oprima (_ o (_ hasta qua aparezca en el indicador visual el tiempo de
horneado deseado
Programaci6n del Homo para Tiempo de Horneado Diferido y Parade Autom_tlca:
tA-seg0rese de que el r_loj indique la hera carrecta deI d[a
2 Coloque los alimentes en el homo
3 Oprima (_
4, Dentro de 5 segundos, oprima _ o [_, El indicador mostrar_ "350°F
(177°C)" Manteniendo oprimida C_o (_, la temperature puede entonces
ser ajustada en incrementos de 5°F (1°C)
5 Optima _ "0:00" destelIar_ en el indicadar
6 Oprima (_ o (_ hasta qua aparezca la cantidad deseada de tiempe de
horneade
7 Optima @ Et tiempo de parada m_s temprano posible aparec_i_ eliel
8
9
indicador
Optima _j o _ haste qua aparezca en el indicador el tiempo de parada
deseado
Una vez que se hen programado los contreles, el control catcula la hera en qua
debe comenzar el horneado a fin de terminar en la hera que usted program6
Despu_s de Programar los Contrefes:
a Et homo se encender_ y comenzar& a calentar ala temperatura de horneado
seleccionada
b La temperature det homo aparecer_ en et indicadorvisual
Expiraci6n del Tiempo de Horneado:
a Aparecer_ "END" {Fin] en el indicador visual y el homo se apagar_
autom_ticamente
b EI control emitir_ 3 sesamessonoras coda 60 segundos hasta qua optima lc_.__
Cambio de Ia Temperatura del Homo o del Tiempo de Homeado despu6s de
Empezado el Horneado:
t. Oprima el bot6n de funcibn que desea cambiar
2 Oprima (_o (_ pare carnbiar e! aiuste
m
©
r-"
37

Regulaci6n de los
Controles del Horno
(continuaci6n)
Par'a asar
t. Coloque ta rejilta del homo cuando e! homo adn este:frfo. Cotoq ue la rejilla seg0n
se sugiere en la tabla siguiente
Laasadera tiene un inserto que permite drenar
fa grasa y protegerla del intense taler del
asador NO use la asadera sin el inserto. NO
cubra el inserto con papel de afuminio, La
grasa expuesta puede incendiarse
Posici6n de la Rejilia desde Arriba Alimento
t Bistecs casi crudos
2 Rebanadas de jam6n, pescado, bistecs a
media asar, hamburguesas y chuletas
3 Aiimentos bien cocides tat come polio y
langosta
2,.
3
Oprima @,
Oprima y mantenga oprimida (_ o (_ haste que aparezca el nivel
deseado para asar en el indicador visual Optima (_ para asar en H1 o la
(_para de los alimentos pueden asar en HI
asar en LO La mayoria se
SeLeccione LO para evitar que se doren o sequen los alimentas que deben quedar
bien cocidos
4 Cotoque el inserto en la asadera, tuego cofoque la comida sabre el inserto NO
use la asadera sin el inserto ni Io cubra con papel de aluminio La grasa expuesta
se puede incendia_
5 Cotoque la asadera sabre fa reiilta del homo. Para asar, abra la puerta del
homo hasta la pasici6n tope de asaro
6 Ase un tado de los alimentos hasta que se doren; d6 vuelta y cocine et otro lado
Sazoneysirva Not.a: Siempretire de la reji!la hasta que tlegue al tope antes de
dar vuelta o sacar los atimentos
7 Cuando se termine de asar, oprima _,
Encase de que se praduzca un incendio en el homo, cierre la puerta
yapagueelhorno Sicontin0aetincendio, useunextinguidor NOarrojeaguao
harina en las llamas; la harina puede explota[
6n Tope
de Asar
38
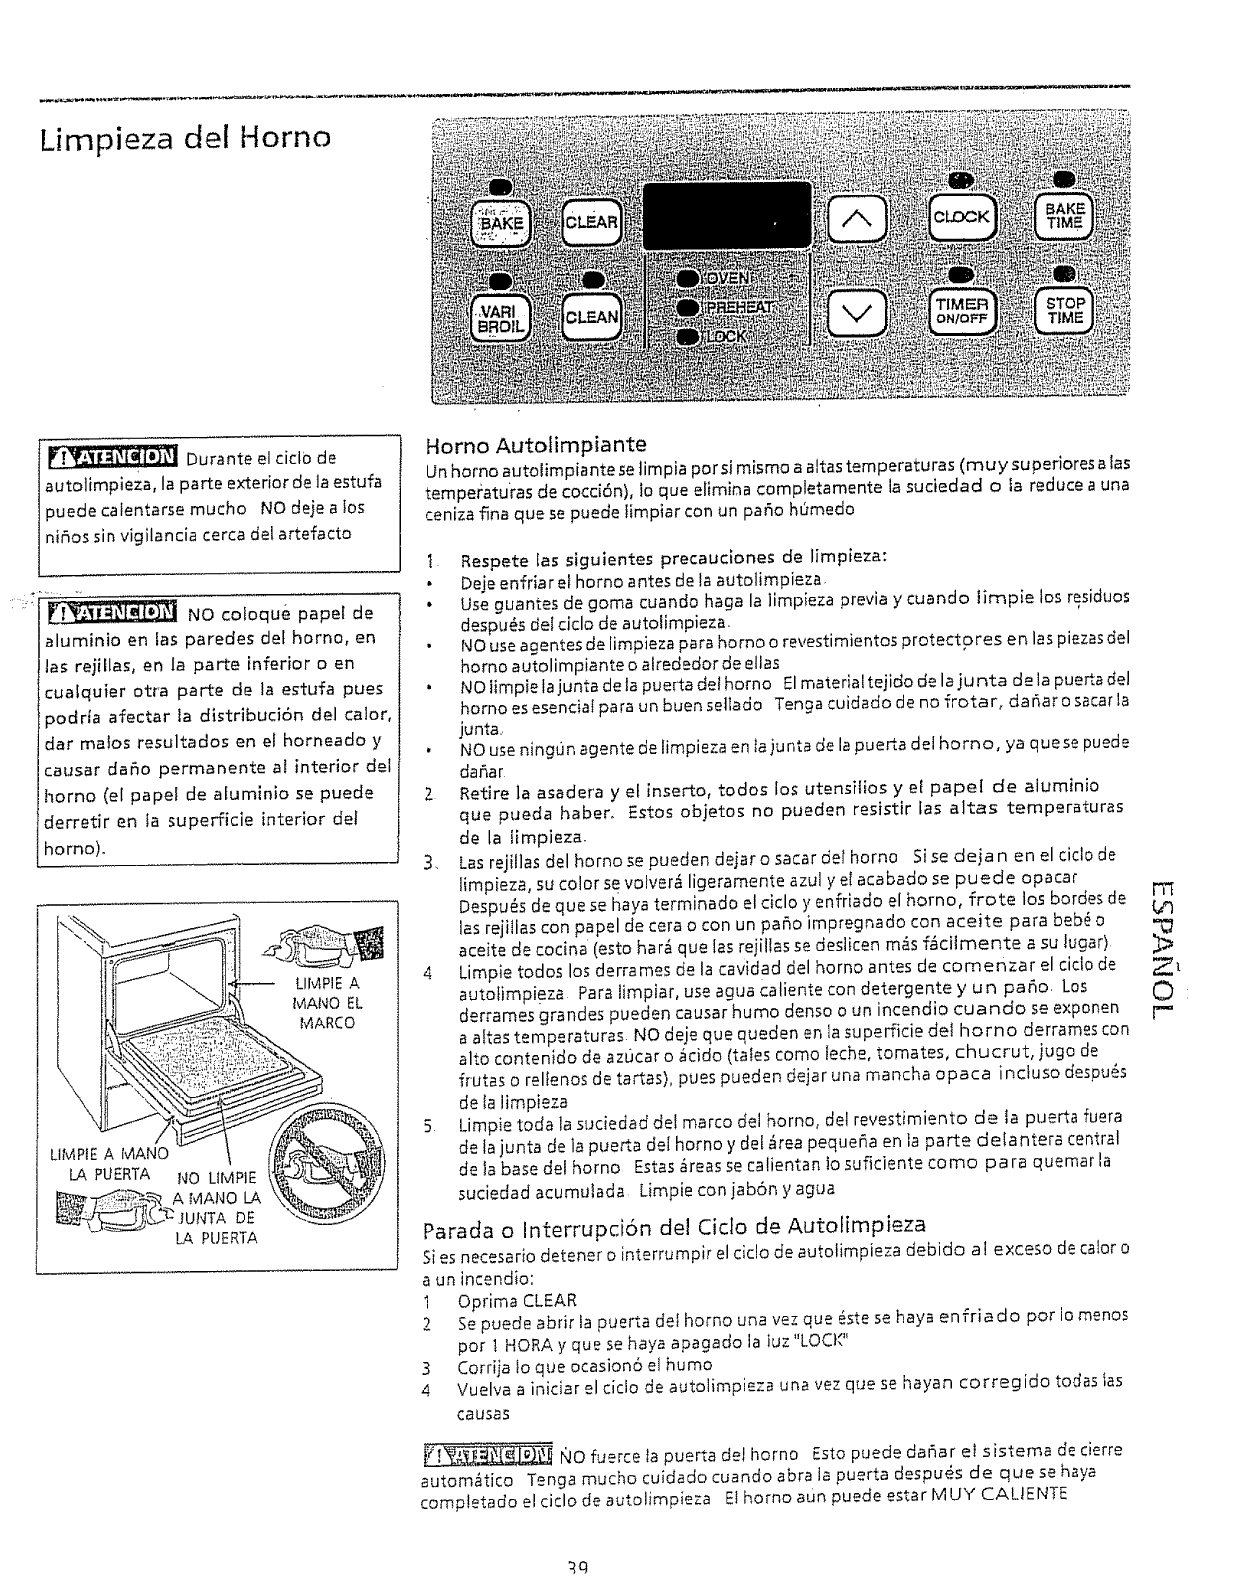
Limpieza del Homo
Durante el cicla de
autotimpleza, la parte exterior de ta estufa
3uede calentarse mucho NO deje a los
niflos sin vigilancia cerca del artefacto
: " _ !_-"_lf=!_t_[°_j_,l_: - NO cotoque papel de
aluminio en fas parecles det homo, en
Jas rejillas, en la porte inferior o en
cuafquier otra porte de la estufa pues
ipodda afectar la distribuddn del color,
dar ma!os resultados en el horneado y
causar dafio permanente at interior de[
horno (el papel de afuminio se puede
derretir en ta superficle interior del
homo), i
LIMPIEA
MANO EL
MARCO
LIMPtEA MANO
LA PUERTA NO LIMPIE
AMANOLA
__I_ .IUNTADE
LA PUERTA
Homo Autolimpiante
Un homo autolimpiante se timpia por si mismo a altos temperaturas (muy superiores alas
temperaturas de cocd6n), lo que elimina completamente la sudedad o la reduce a una
ceniza fina que se puede iimpiar con un patio h0medo
Respete las siguientes precaudones de limpleza:
• Deje enfriar et homo antes de la autolimpieza.
• Use guantes de goma cuando haga la ]impieza previa y cuando iimpie los residuos
despu_s deI ciclo de autolimpieza.
. NO use agentes de limpieza para homo o revestimientos protect ores en los plazas del
homo autolimpiante o alrededor de elias
.NO timpie lajunta de la pue[ta de! homo Elmaterial tejido de la junta de ta pueRa gel
homo es esenciat para un buen sellado Tenga cuidado de no frotar, dafiar o sacar [a
junta,.
• NO use ningun agente de limpieza en taiunta de la pue_a del horno, ya qua se puede
dafiar
2 Retire la asadera y el inserto, todos los utensitlos y el pape[ de aluminlo
quepueda haber, Estosobjetosno pueden resistirlas altos temperaturas
de la timpieza.
3, Lasrejillasdelhornosepuedendejarosacardelhorno Sisedeianeneleid0de
limpieza, su color se votver_ ligeramente azul y el acabado se puede opacar
Despu_s de qua se haya terminado el ddo y enfriado el homo, frote los hordes de
los rejillas con papel de cera o con un patio impregnado con aceite para beb_ o
aceite de cocina (esto har_ qua los rejillas se deslicen m_s f_cilmente a su lugar)
4 Limpie todos los derrames de la cavidad del homo antes de comenzar el cicio de
autotimpieza Para timpiar, use agua caliente con detergente y un patio, Los
derrames grandes pueden causar humo denso o un incendio ¢uando se exponen
a altas temperaturas NO deje qua queden en la superficie det homo derrames con
alto contenido de azucar o _cido (tales como lethe, tomates, chucrut, jugo de
fi"utas o relfenos de tartas), pues pueden dejar una mancha opaca incluso despu_s
de la limpieza
5 Limpie toda la suciedad de! marco gel homo, det revestimiento de ia puerta fuera
de la junta de la puerto del homo y det _rea pequefla en la porte delantera central
de la base del homo Estas_reassecalientanlosuficientecomoparaquemarla
suciedad acumutada Limpie con jab6n y agua
Parada o Interrupci6n del CicIo de Autoiimpieza
Si es necesario detener ointerrumpi_ el cido de autoiimpieza debido al exceso de cabr o
a un incendio:
1 Oprima CLEAR
2 Se puede abrir ta puerta de[ homo una vez qua _ste se haya enfriado por io menos
por ! HORA y qua se haya apagado la iuz "LOCI("
3 Corriia to qua ocasion6 et humo
4 Vuelva a iniciar el cicio de autolimpieza una vez qua se hayan corregido togas fas
causas
i<4Ofuercetapuertadelhomo Estopuededaflaretsistemadecierre
autom_tico Tango mucho cuidado cuando abra la puerta despuds de que se haya
completado el ciclo de autolJmpieza Et homo aun puede astor M UY CAU ENTE
r_
Zl
O
p-
_q
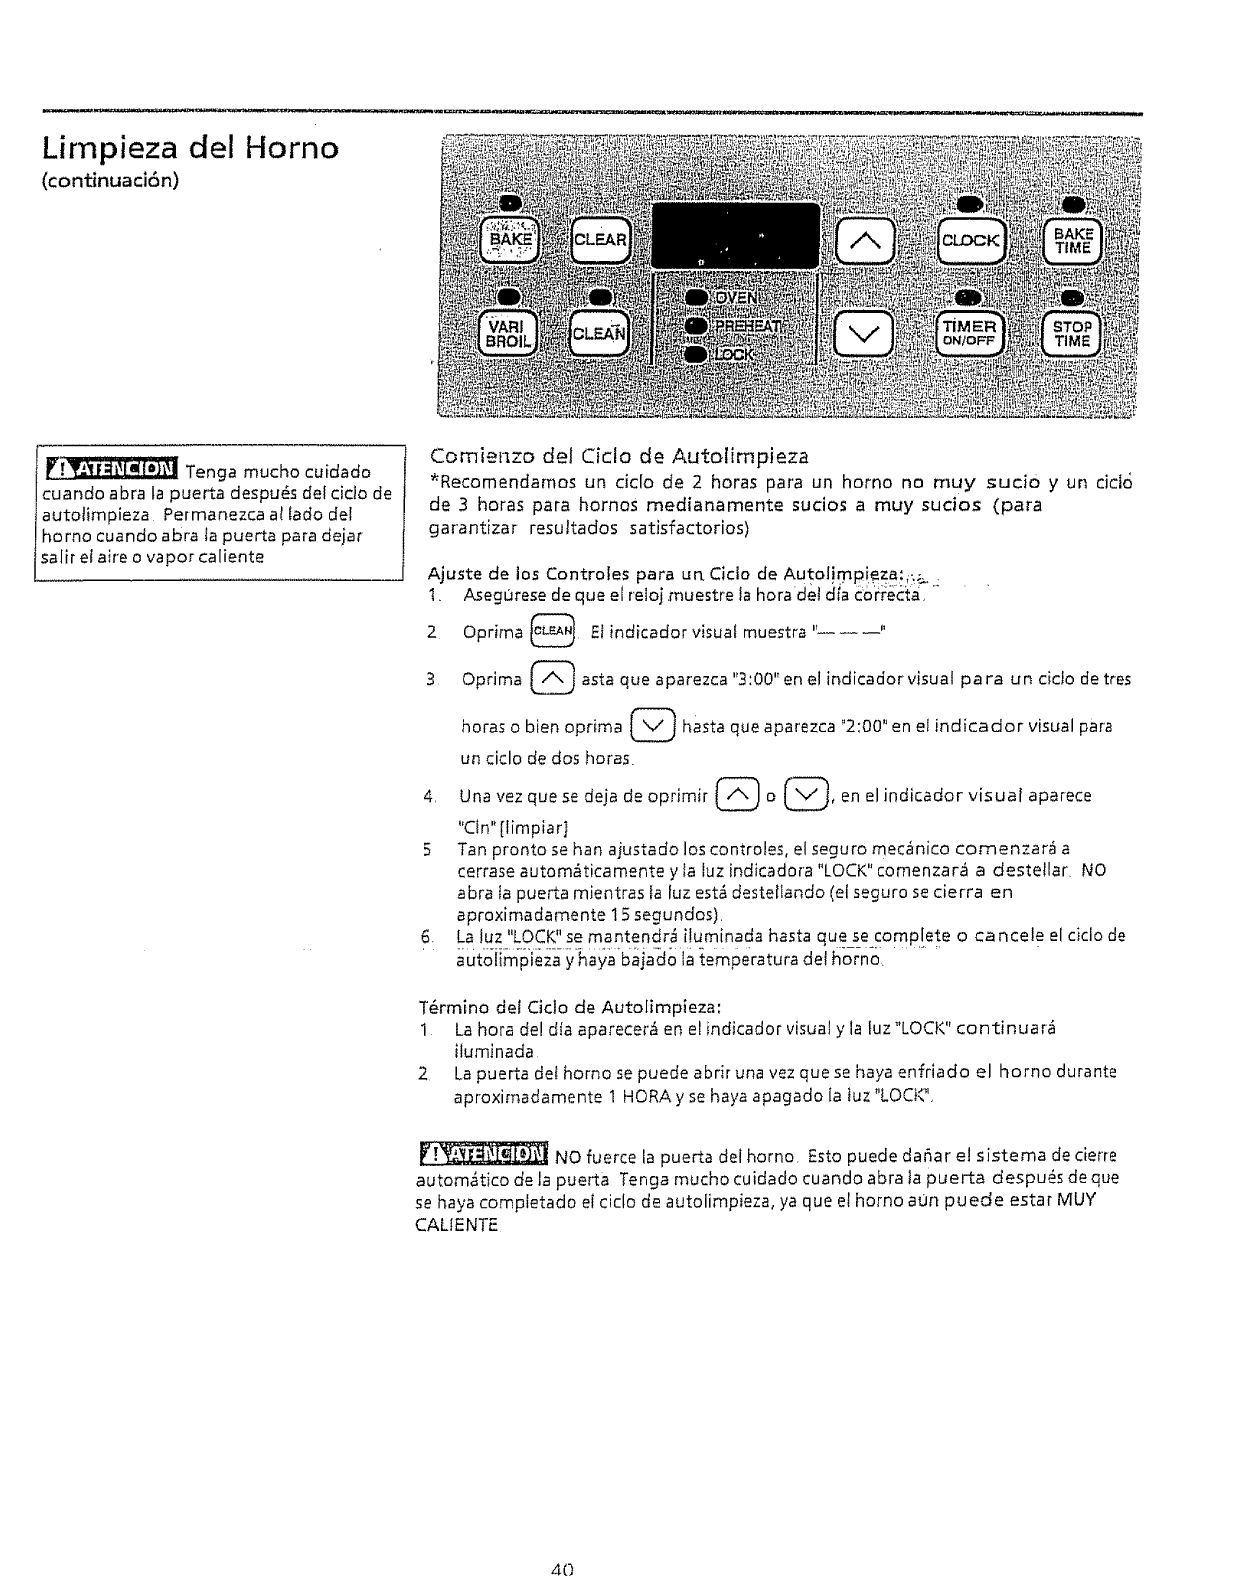
Limpieza del Homo
(continuaci6n)
__ Tonga mucho cuidado
cuando abra la pue_a despu_s del ciclo de
autolimpieza Permanezca a_ Iado def
homo cuando abra la pue_a para dejar
salir el aire o vapor caliente
Comienzo del Ciclo de Autolimpieza
*Recomendamos un ciclo de 2 horas para un homo no muy sucio y un cicio
de 3 horas para homos medianamente sucios a muy sucios (para
garantizar resultados satisfactorios)
Ajuste de los Controles para un Cicto de Autolimpieza: _.;..
t. _egurese de que el reIoj muestre la hora de_dia c6_ec_a_"
2 Optima _ El indicador visual muestra
i
3 Oprima @ asta que aparezca '3:00" en el indicador visual para un cido de tres
horas o bien oprima _ hasta que apar'ezca "2;00" en et indicador visual para
un ciclo de dos horas.
4. Una vez que se deja de oprimir _o _, en elindicador visual aparece
"Cln" [limpiar]
5 Tan pronto se han ajustado los controles, el seguro mec_nico comenzar_ a
cerrase autom_ticamente y la luz indicadora "LOCK" comenzar_ a destetlar_ NO
abra la pueRa mientras la luz est_ destellando (el seguro se cierra en
aproximadamente 15 segundos).
6. La luz "LOCK" se mantendr_ iluminada hasta quese comp.[ete o ca ncele el cicio de
autolimpieza y haya bajado Ia temperatura dei homo
T6rmino del Ciclo de Autolimpleza;
1 La hora de! dia aparecer_ en el indicador visual y la luz "LOCK" continuar_
iluminada
2 La puerta det homo se puede abrir una vez que se haya enfriado el homo durante
aproximadamente 1 HORA y se haya apagado la tuz "LOCK"_
NO fuerce ia pueRa del homo Esto puede da_ar e! sistema de cierre
autom_tico de la pue_ta Tenga mucho cuidado cuando abra la pueRa despu_s de que
se haya completado el ciclo de autolimpieza, ya que et homo aun puede estar MUY
CALtENTE
40

Limpieza General Limpieza de las Distintas Piezas de su Estufa
Antes de limp;at cualquier pieza de la estufa, asegurese de que todos los controles est_n
apagados [OFF] y que la estufa est_ FRIA LIMP!E TODOS LOSDERRAMES Y LA SUCIEDAD
LO ANTES POSIBLE LAS LIMPIEZAS REGULARESDISMINUYEN LA FRECUENCIA DE LAS
LIMPIEZASMAS PROFUNDAS
Come Limp;or
Aluminio (Motduras)y Vinito Use agua caliente jabonosa y un paso. Seque con un par_o fimpio,
Vidrio, Perillas de Control Esma|tadas y
Pl_sticas, Plazas de{ Cuerpo y M01duras
Deco rativas
Para limpieza genera/, u_:eagua-caliente ia bonosa y un par_o Para manchas mJs dif/cifes
zgrasa acumul.ada, aplique detergente lfquido directamente en ta mancha, D_jefo en ta
mancha per 30 a 60 minutes, Eniuague con un paso h6medo y seque: NO use ag_entes
de Jimpieza abrasives en ninguno de estos mater;ales, pues pueden raya r. Para sacar los
periflas de control, gfrelas hasta la posici6n OFF [apagado]; t6mefas firmemente yt{relas
derecho hacia fuera del eje Para volvera colocarlas perillas despu_s de la limpieza, alinee
los Jades pianos de la perilta y del eje; luego inserte la perilla en su bgar
Acero Inoxidable, Creme
_anel de Control, Molduras Decoratlvas
Asadera de Porcetana Esmaltada e
tnserto, Revestimiento de la Puerto, Piezas
del Cuerpo, Gaveta Catentadora (sila
tiene)
Rejillas del Homo
Puerto del
Homo
LA FUE_A
Antes de limpiar el panel de control, coloque todos los controles en la posici6n "OFF"
yquite las per;lies de control Para sacarlas, tire de elias derecho hacia afuera para
sacarlas del eje. Limpie usando agua calientejabonosa y un pa6o Enjuague con agua
timpia y un patio: Cubra:lai_naochas diflciles con una toalla de papel impregnada en
amonlaco durante 30 a 40 minutos Enjuague, Aseg_rese de estrujar e! exceso de
agua del pa6o antes de limpiar el panel; especialmente cuando est_ limpiando
afrededor de los controles El exceso de agua en los controtes o alrededor de elios
puede daSar el artefacto Se recomiendan agentes de timpieza especia tmente
formulados para acero inoxidable, tales come 'Stainless Steel Magic', marca
registrada de Magic American Corp. o productos sire;fares. Siga siempre ias
instrucdones del fabricante Aseg_rese de enjuagar los residues de los agentes de
limpieza, pues se pueden formar manchas azutadas con el calory no se pueden
quitar Para volver a colocar los perillas despu_s de ia limpieza, alinee los tados planes
de fa perilla y de_ ale; iuego inserte ta perffta en su iugar,
Restriegue suavemente con una esponja jabonosa de fregar para sacar fa mayoria de lax
manchas Eniuague con una soluci6n 1:I de agua y amon_aco 5Jes necesado, cubra los
manchas dificiles con una toalla de papel impregnada en amen;ace per 30 a 40 minutes
Enjuague con agua limpia ycon un par_oh_Jmedo y luego frote con una esponja jabonosa
de fregar Enjuagueysequeoc£r_ un paSo
Limpieza General
[i_ NO uselimpiadores j
para la cubierta cuando 6sta est6 caliente
Los vapores pueden ser perjudiciales para
su satud y pueden da6ar quimlcamente ta
superficie de vidriad0 cer_mico,
Antes de limpiar la
cubierta, aseg6rese de que los controles
est_n en la posici6n OFFy que la cubierta
est_ FRIiL
Limpieza de ia Cubierta de Vidriado Cer=irnico
Esesencial limpiar regutarmentey en forma coi_recta lacubierta de vidriado cer._mico, Sino
limp[an los derrames de alimentos, saipicaduras de grasa y las rayaduras de los utensilios
de aluminio, se pueden quemar en la superficie de la cubierta y causar decoioraci6n
permanente.
Limpieza Diaria
Para sucledad normal:
I Deje que se enfr[e la cubierta,
2. Limpie tos derrames ysalpicaduras con una toaila de papel Jimpia. Siempre use toal]as
de papet nuevas y Iimpias cuando fimpiela cubierta de vidriado cer_&mlco_
3. Cotoque unas gotas de atguna crema de limpieza recomendada para ¢ubiertas de
viddado cer_imico en los _ireassucias usando una toaHa limpia y hO meda. Restriegue
con una toal[a de papel seca basra que haya salido toda la crema y la suciedad. La
timpieza frecuente deja una capa protectora de silicona que ayuda a evitar los rayaduras
y abrasiones. Limpie la superficie con la crema de limpieza de la cubierta despu6s de
cada uso
4 Enjuague con otra toatla de papel humeda Seque con una toatta de papel seca
Para
1.
2.
3.
4
5
suciedad dura y quemada:
Deje que se enft'ie fa cubie[¢a
Raspe con cuidado _asuciedad con un raspador con hoja de afeitar. Sostenga la hoja
de afeitar a un ._ngulo de 30° en relaci6n con la cubierta
Saque [asuciedad suelta con una toa_la de papel limpia
Aplique crema de limpieza de cubiertas como se indica para ia suciedad normal
Sitodav[a queda suciedad, repita los pasos anteriores Despu_s que se ha quitado toda
Jasuciedad, pula toda la superficie con la crema de timpieza de cubiertas
Para los derrames azucarados:
Los derrames azucarados pueden causar picaduras en ia superficie de la cubierta Pot !o
tanto, usted debe comenzar a fimpiarlos cuando la cubierta todavia est_ caliente Tenga
cuidado'al seguir los pasos siguientes:
t Apague todos los etementos superiores y saque inmediatamente todos los
utensilios que est_n en Ia cubierta
2 Usando un guante de homo, use un raspador con hoja de afeitar para sacar el derrame
caliente del _rea de cocci6n hacia un _rea m_s fr[a de la cubierta
3 Deje queIa cubierta-se enfrfe:
4 Siga tas instrucdones anteriores para suciedad dura y quemada.
NO use to que se indica a continuacibn en la cubierta de vidriado cer_mico:
• Esponjas de pl_stico, nylon, metaf o de telas abrasivas Pueden raya r la superficie y
hater m_s dificil la iimpieza posteriormente.
• Esponjas, par_oso toallas de secar ptatos Lospelusas o suciedad que deja nen la cubierta
los pa_os o esponjas pueden quemarse y causar decoloraci_n
, Cualquier cosa que pueda derretirse (pl=isticos, papel de aluminio)
• Limpiadores que no sean recomendados para cubiertas de vidriado cer&mico
• CIoro, amonlaco, _cido hidrofluorhidrico, limpiadores quimicos de homos o cuatquie_
otto iimpiador quimico Pueden rayar o descoIorar la cubierta
42
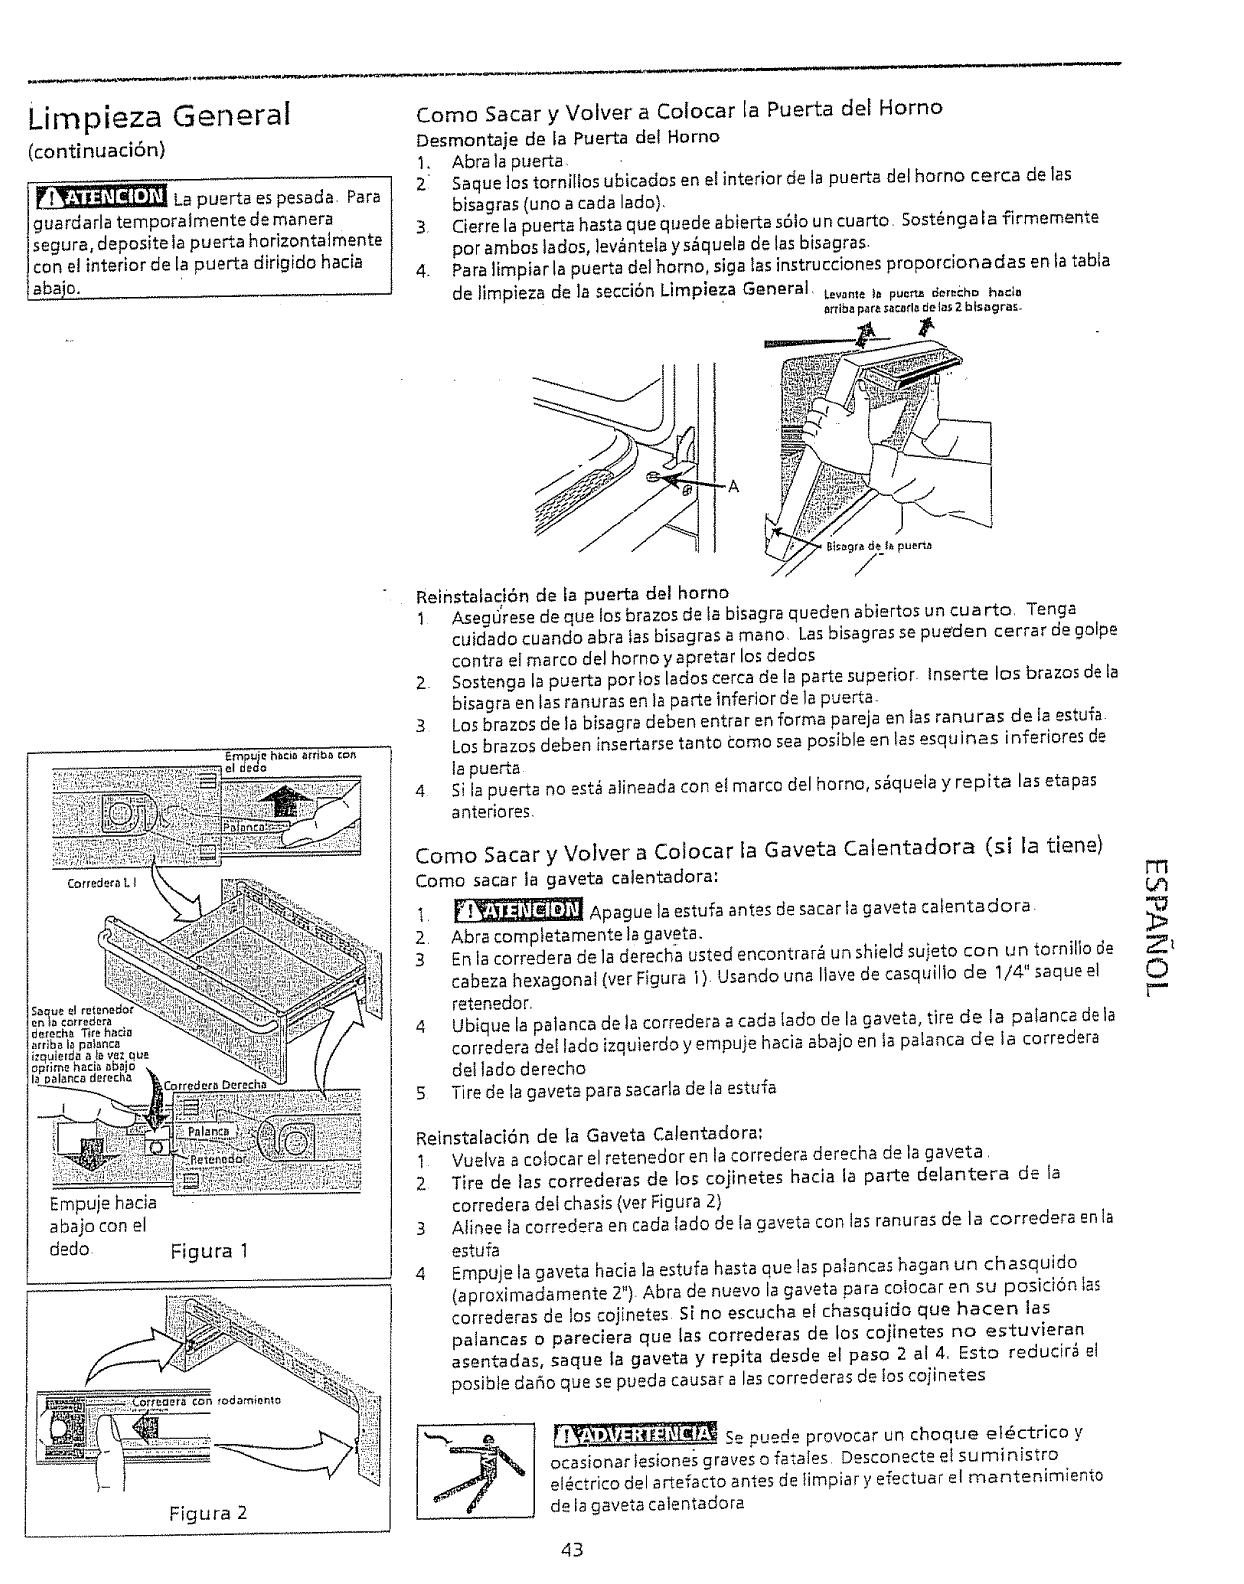
Limpieza General
(continuaci6n)
_ La puerto es pesada Para
guardarla temporafmente de manera
segura, deposite la puerta horizontaJmente
con el interior de la puerto dirigido hacia
abajo.
Como Sacar y Volver a Colocar la Puerta det Homo
Desmontaje de LaPuerto del Homo
1, Abrala puerta,
21 Saque los torniltos ubicados en el interior de la pue_a del homo cerca de las
bisagras (uno a cada lado),
3, Cierre la puerto hasta que quede abierta s61o un cuarto, Sost_nga fa firmemente
por ambos lados, ]ewintela y s_tquela de los bisagras.
4. Para limpiar la puerta del homo, siga Ias instrucciones proporcionadas en ta tabla
de limpieza de la secci6n Limpieza General, L_wntet_ pu_ 6er_'ho hacla
arrlba para sacarla de las 2 btsagras.
-A
Reinstatad6n de fa puerta de/horno
1. Asegt)rese de que los brazos de fa bisagra queden abiertos un cuarto, Tenga
cuidado cuando abra tas bisagras a mano, Las bisagras se pue'den cerrar de goipe
contra el marco del homo y apretar los dedos
2. Sostenga la puerta pot ios lados cerca de la parte superior, lnserte los brazos de ia
bisagra en los ranuras en la porte inferior de la puerta_
3. Los brazos de la bisagra deben entrar en forma pareja en tas ranu ras de Ia estufa.
Los brazos deben insertarse tanto _:omo sea posible en las esquinas inferiores de
la puerto
4Si {a puerto no estci alineada con e( marco del homo, s_quela y repita las etapas
antedores,
Empuje hacia
abajo con el
dedo Figura I
Figura 2
Como Sacar y Volver a Colocar ta Gaveta Calentadora (si la tiene)
Como sacar la gaveta calentadora: I-rl
I. _ Apaguela estufa antes desacarla gaveta cafentadora.
2. Abra comptetamentela gaveta,
3 En la corredera de la derecha usted encontrar_i un shield suieto con un tornilio de Z_
cabeza hexagonal (ver Figura 1). Usando una Iiave de casquilio de 1/4" saque el C)
retenedor_ r"
4 Ubique la patanca de la corredera a coda lado de la gaveta, tire de la patanca deia
corredera deI lado izquierdo y empuje hacia abajo en ia palanca de la corredera
del lado derecho
5 Tire de la gaveta para sacarla de {aestufa
Reinstalad6n de la Gaveta Catentadora:
1 Vuelva a coiocar el retenedor en la corredera derecha de la gaveta,
2 Tire de los correderas de fos cojinetes hacia la parte delantera de ia
corredera det chasis (ver Figura 2)
3 Afinee Ia corredera en carla fado de (a gaveta con los ranuras de la corredera en {a
estufa
4 Empuje la gaveta hacia la estufa hasta que las patancas hogan un chasquido
(aproximadamente 2"). Abra de nuevo la gaveta para colocar en su posid6n tas
correderas de los cojinetes. Si no escucha el chasquido que hacen tas
palancas o pareciera que {as correderas de los coiinetes no estuvieran
asentadas, saque la gaveta y repita desde el paso 2 al 4. Esto reducir_ el
posibte dafio que se pueda causar a las correderas de Ios co]inetes
Se puede provocar un choque et6ctrico y
ocasionar lesiones graves o fatales, Desconecte el su mi nJstro
el_ctrico del artefacto antes de limpiar y efectuar el mantenimiento
de ia gaveta calentadora
43
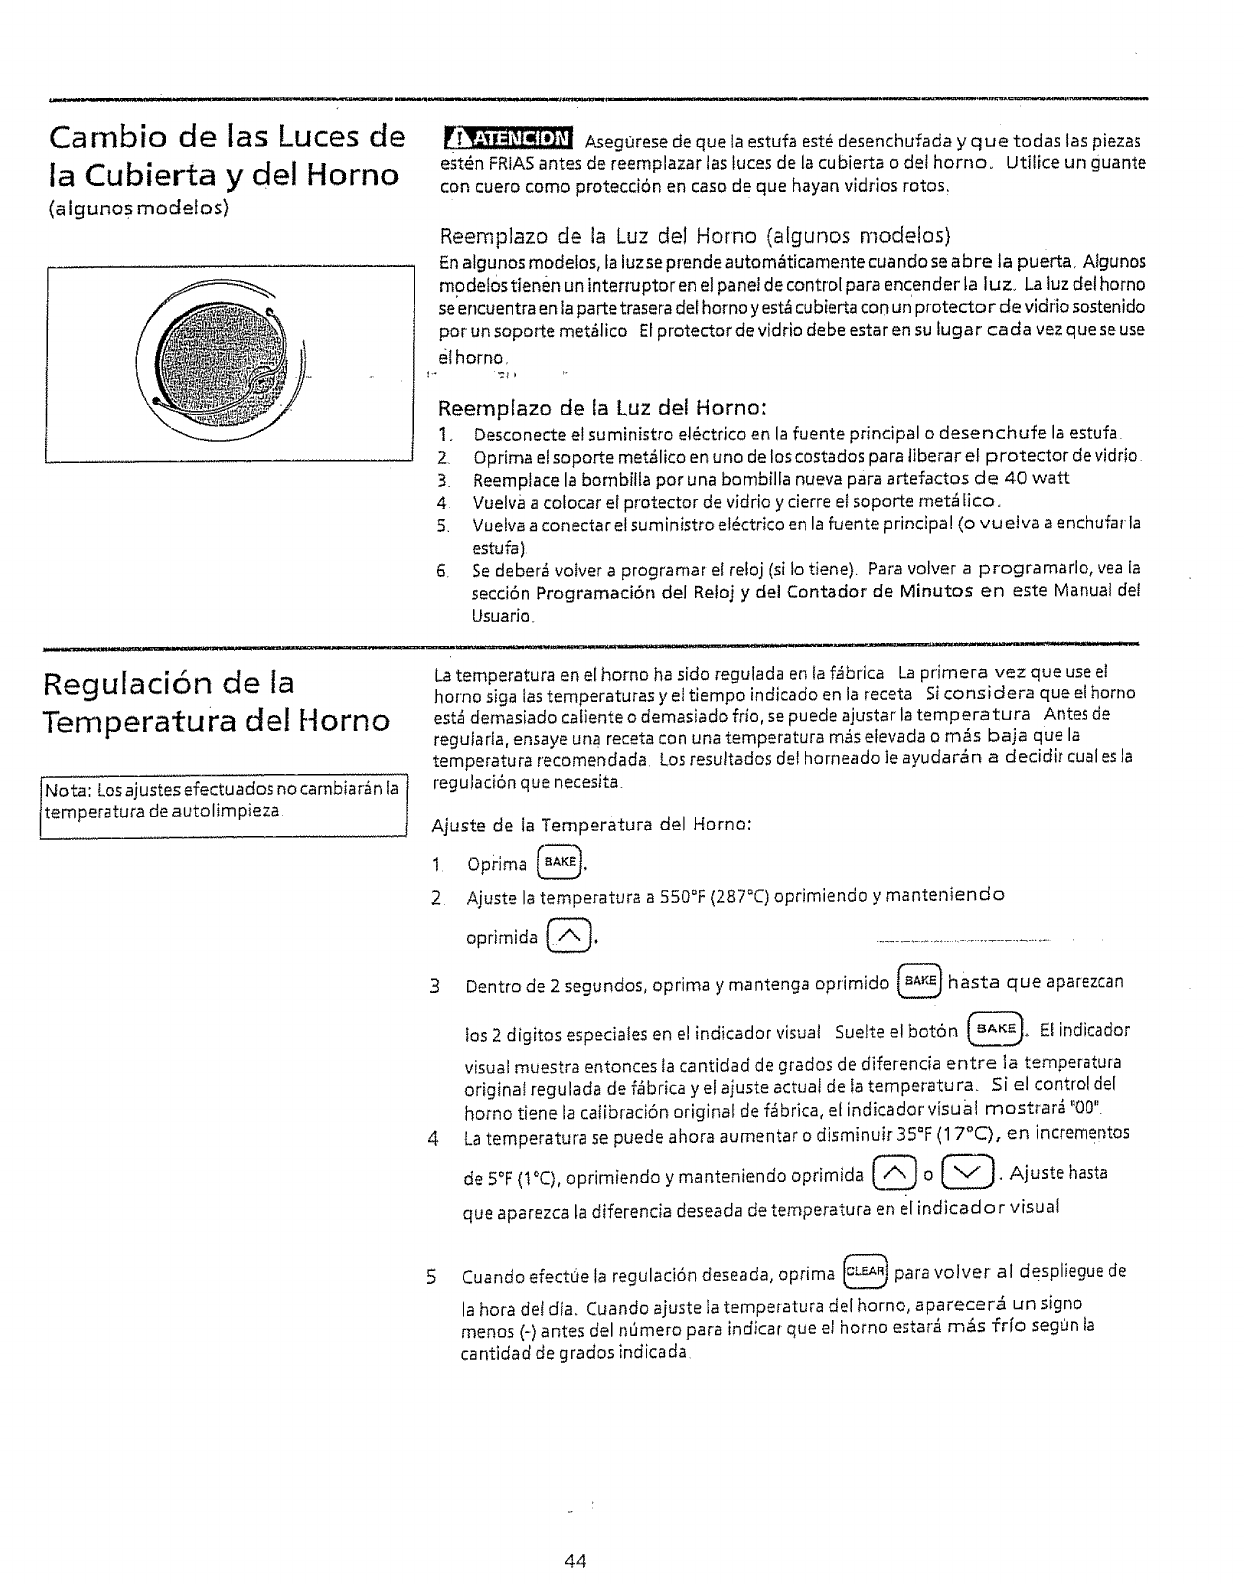
Cambio de las Luces de
la Cubierta y del Homo
(a igunos rnodelos)
• i
AsegOrese de que la estufa est_ desenchufada y que todas las piezas
est_n FRIAS antes de reemplazar tas luces de la cubierta o dei homo. Utilice un guante
con cuero como protecci6n en caso de que hayan vidrios rotos.
Reemplazo de la Luz de! Horno (algunos modelos)
En algunos modetos, la luzse prende autom_ticamente cuando se abre la puerto. Atgunos
modef0s tienen un interrvptor en el panel de control para encender la luz. Laluz det homo
seencuentra en ta parte trasera del homo y est_ cubierta con un protector de vidrio sostenido
pot un soporte met_lico El protector de vidrio debe estar en su [ugar cada vez que se use
el homo,
Reemplazo de la Luz del Homo:
1° Desconecte el suministro el_ctrico en la fuente principal o desenchufe la estufa
2. Optima el soporte met=filicoen uno de los costados para tiberar el protector de vidrio
3. Reemplace la bombifla pot una bombilla nueva para artefactos de 40 watt
4 Vuelva a cofocar er protector de vidrio y cierre el soporte met_ [ico_
5. Vuelva a conectar el suministro el_ctrico en la fuente principal (o vuetva a enchufar la
estufa)
6. Sedeber_ voIver a programar et refoj (si Io tiene). Para volver a programarlo, yea la
secci6n Programaci6n del Reloj y del Contador de Minutos en este Manual del
Usuario.
Regulaci6n de la
Temperatura del Horno
No_i Losajustes efectuados no cambiar_n la
temperatura de autolimpieza |
J
Latemperatura en el homo ha sido regulada en ta f=fibrica La primera vez que use el
homo siga ias temperaturas y el tiempo indicado en ia receta Si considera que el homo
est.4demasiado cafiente o demasiado frio, se puede ajustar la temperatura Antes de
regulafla, ensaye una receta con una temperatura m_s efevada o m_s baja que la
temperatura recomendada Losresuttados det homeado le ayudar_n a decidir cual es la
regulad6n que necesita
Ajuste de ta Temperatura del Homo:
1 Op?ima ___.
2 Ajuste la temperatura a 550°F (287_C) oprimiendo y manteniendo
oprimida (_ ...................................................
3 Dentro de 2 segundos, optima y mantenga oprimido _ hasta que aparezcan
tos 2 digitas especiales en el indicador visual Suelte e! bot6n (_o E[ indicador
visual muestra entonces Ia cantidad de grados de diferencia entre la temperatura
original regulada de f_brica y el ajuste actual de ta temperatura. Si el control del
homo tiene la catibraci6n original de f_brica, e[ indicador visual mostrar_ "00".
4Latemperatura se puede ahora aumentar o disminuir 35°F (17°C), en incrementos
de 5°F (t°C), oprimiendo y manteniendo opfimida (_ o (_. Ajuste hasta
que aparezca la diferencia deseada de temperatura en el indicador visual
Cuando efect0e la regulaci6n deseada, optima _ para voiver al despliegue de
la hora det dia_ Cuando ajuste Ia temper'atura del homo, aparecer_ un signo
menos (-) antes del nfimero para indicat que el homo estar_ m&s fr[o segun ta
cantidad de grados indicada
44
Lista para Evitar
Liamadas de Servicio
Consulte la lists siguiente antes de soffcitarservicio Puede ahorrarle tiempo y dinero La
lists inctuye los incidentes m_s comunes que no son originados por [a fabricaci6n o
materiales defectuasos en este afro facto.
PR-OBLEMA
Este homo est=iequipado con un moderno controlador electr6nico. Entre sus diversas
caracteristicas, induye un sistema de diagn6stico constante de fos drcuitos det homo. El
controlador supervisa constantemente el circuitaje interno, asl como tambi6n diversos
circuitos indispensables del homo pars garantizar quetodos funcionen correctamente, Si
en atgOn momento uno de estes sistemas falls, el controlador detendr=_ inmediatamente
eI funcionamienta, emitiendo una se_alsonora y desptegando el c6digo de error F1 o F3*
en el indicador visual, si Io tiene.
POSIBLE CI'ON _=
Estufa desnivetada. lnstalaci6n deficiente Coloque ta reji!ta del homo en el centro Cotoque u n nivel en ia rejilla
del homo, A]uste las patas niveladoras en la base de fa estufa hosts que la rejilla quede
nivelada.
Aseg_rese de que el piso est_ nivelado y pueda sostener la estufa en farms adecuada
Ltame aun ¢arpintero pars corregir et hundimiento odesniveI del piso.
: ,,i!-_= Armarios de la cocina mat alineados que pueden dar la impresi6n de que la estufa est_
desnivelada. AsegOrese de que los _rmarios est_n derechos y que hays suficiente espacio
tibre entre la base de los armarios y la estufa
Es difidf mover la estufa. La estufa debe Armarios que no est_n derechos o quedaron muy apretados. Lfame aun constructor o
estar accesible en caso de reparad6n, instalador para hacer accesible e! artefacts
LBalfombra interfiere con ef funcionamiento de Is estufa Proporcione espacio suficiente
pars que fa estufa pueda ser tevantada sobre la atfombra
*El control del horns emite una seSa!
sonora y despliega F1 o F3,
El control electr6nico ha detectado una fafla Oprima CANCEL pars despejar et indicador
visual y cancetar ta seSal sonora Vuetva a programar el homo. Sila falla persiste, anote su
m3mero Oprima CANCEL y p6ngase en contacto con un t6cnico autorizado.
El elemento superior' est_ demaslado Ajuste de control incorrecto AsegQrese de que eI control correcto est6 en el eiemento
caliente o no fo suficientemente caliente, superiorque va a ser usado
Elemento superior no calienta, Beemplean utensilios demasiado tivianos o deformados Usesotamente utensitios decocina
que sean de rondo piano, unifo[memente equilibrados de peso mediano o pesados Los
utensitios planosse catientan mejor que los deformados Elmaterial de los utensilios yel peso
del material afectan elcalentamiento. Losutensifios pesados y de peso media no se calientan
uniformente Debido a que los utensilios son iivianos, tos alimentos pueden quemarse
f_cilmente
Noltegaelectricidadataestufa Verifique tospasosbajo"Laestufanofu ncio na par compteto"
en esta Lista pars Evitar Llamadas de Servicio
Ajuste de control incorrecto Asegurese de que e! control correcto est_ en el elemento
superior que va a set usado
La estufa no funciona par completo, Aseg0rese de que el cord6n e!_ctrico o el enchufe est_n conectados
El cableado de servido no est_ completo P6ngase en contacto con su distribuidor, agente
instalador o el t6cnico de sePvicio autorizado
lnterrupci6n de la energ[a el_ctrica Pars estar seguro, revise los lutes de! hogar Lfameal
senvicio t6cnico de su compahla de electricidad local
La tuz de ta cubierta yio de! homo (atgunos ReempIace o apriete la bombilla Ver la secci6n Cambio de los Luces de la Cublerta
modelos) no funciona yio del Homo (algunos modelos) en este Manual del Usuario pars obtener los instrucciones
FT1
GM
Zl
©
r'-
45
Elhornodesprendemuchohumocuandoseasa. El (los) controt(es) no est,(n) ajustado(s) en forma correcta. Siga las instrucciones bajo
Regulaci6n de los Controles del Homo°
Aseg0rese de clue Is puerta est_ abierta en [a posici6 ntope de asar.
La came est_ muy cerca de] e]emento dei asador. Vuelva a acomodar ta reji!la de mode que
quede un espada m_s grondo entre la came y el elemento. Cafiente con anticipaci6n el elemento
de asar para tester,
La came no queda bien preparada Saque ef exceso de g rosa de la came. Ha ga u n torte en _nguto
recto en _osbordes cob grasa pare evitar ef pandeamiento de la came, pore no corte haste Ia parte
magra,
La parri[ta de ta asadera 'est_i cotocada_al roves y (a grasa no est_ goteandoo Siernpl;e coIoque la
parrJ]ta de Ja asadera con 3asnervaduras dirJgidas hacia arriba y los tenures hacia aba_o pare
permitir que la grasa gotee hacia la asadera_
Se ha acumutado grasa en los superficies del homo Es necesario efectuar u na tirnpieza regular
cuando ase en forma frecuente. La grasa acumulada o los salpicaduras de alimentos pueden
¢ausar mucho humo
Horneado def_ciente, Muchas factores pueden afectar los resultados at hornear AsegOrese de que est_ usando ta reji/la
en ta posid6n correcta_ Cologue eI alimento en eI centre del homo ysepare las asaderas para
permitir que circule el aire Deje que eI homo seca(iente a Iatemperatura preseleccionada antes
de cofocar los afimentes en ef homo. Trate de a_ustar [a temperatura o ef tiem po de horneado
rei:omendados en Is receta. Si slente que el horno est_ demasiado caliente o demasiado fr/o,
yea la secc:i6n Regulaci6n de ta Temperatura del Homo en este Manual del Usuarie.
No funciona et title de autotimpieza. El (los) centrol(es} no est#(n) a.iustado(s) en forma corre_a Siga las instrucciones bajo
Regulaci6n de tos Controies de! Homo,
Se interrumpi6 et dclo de autofimpieza Siga los pesos de (a secd6n °Parada o lnterrupci6n del
Cido de Autolimpleza" en Limpieza deI Homo
No saie toda la suciedad del homo despu_s
del cidode fimpieza. No se timpi6 ]a porte inferior delantera, marco deI homo, la porte superior d el homo o los_reas
de ta puerta fuera de la iunta dot homo, Estas 4teas no entran en el cido de a utotimpieza, pore
_e catientan Jo suficiente come pare gut se _uemen Jos residues. Limpie estas _reas antes de
comenzar el cido de autolimpieza Elresidue quemado se puede iimpiar con u n cepilio de nylon
duro yagua o con un restregador de nyfon. Trate de no daSar ia junta del homo
Uamas dentro del horno o humo desdeel orificio Muchos derrames en el homo. Programe el dole deautolimpieza para un periodo de timpieza
de ventiiaci6m m_s large.
Muchos derrames en e{ homo Esto es normal, espedalmente los derrames de tartas o grandes
cantidades de grasa en la porte inferior del homo Umpie los derrames antes de comenzar el
ciclo de autoiimpieza. Si hayltamas 0 un exceso de humo, detenga eI cicfo de a utolimpieza ysigas
las eta pas de la secci6n"Parada o Interrupci6n del Ciclo de Autolimpieza" en fa secci6n Umpieza
de Homo
Rayaduras o abrasiones en Ia supe_icie de la
cubierta. Lospan_iculas_speras tales come tasolo arena entre la cubierta y los utensiEios pueden causer
rayaduras Aseg0rese deque Iasuperfidede lacubierta y Laporte inferior de los utensilios est6n
limpios antes de usarios Los rayaduras pequer_asno afectan la cocci6n y ser_n menos visiMes
con el tiempo
Sehan usado materiales de Iimpiezano recamendados pare cuble_tasde vid riad o cer_mi{:o Ver
"Limpieza de Ia Cubierta de Vidriado Cer_mico" en ta secci6n Limpieza General
Sehen usado utensilios con ta porte inferior _spera Useutensilios decocina de fondos ptanos
y suaves
Marcas Met_licas 5e flan destizado o restregado utensitios de mete( sabre ta superficie de ta cu bierta No destice
utensilios de metal en Jasuperficie d e la cubierta Use una creme de timpieza pare cubiertas de
viddado cer_mico pare quitar tas manchas Vet "Limpieza de la Cubierta de rid riado Cer_mi¢o"
en la secciSn Limpieza Genera!.
Manchas o rayas marrones_ Oerrames hir¢ientes se hen cocinado en la superficie Use un raspador provisto de una hoja de
afeitar pare sacar ta suciedad Ver"Limpieza de la Cubierta de Vidriado Cer_ m ic:o" en la secdSn
Limpieza Genera[,
Areas de decoloraci6n con brillo met_fico Dep6sitos minerales del agua y de los alimentos Saque usando una crem a d e limpieza pare
cubiertas de vidriado cer_mico Use utensifios con ia parle inferior limpia y seca
46

_7
rT_
{
Z_
0
V"
For in-home major brand repair service:
Call 24 hours a day, 7 days a week
1-800-4-MY- H0 M E'_(1-800-469-4663)
Para pedir servicio de reparaci6n a dornicillio- 1-800-676-581 1
In Canada for all your service and parts needs call -1-800-665-4455
Au Canada pour tout le service ou les pi_ces
For the repai,_ orreP!acement parts you need:
Cart 6am - 11 pm CST; 7 days a week
Direct"
1-800-366-PART (1-800-366-7278)
Para ordenar piezas con entrega a domicilio - 1-800-659-7084
For the location of a Sears Parts and Repair Center in your area:
Call 24 hours a day, 7 days a week
1-800-488-1222
Fox" information on purchasing a Sears Maintenance Agreement
or to inquire about an existing Agreement:
Call 9 am - 5 pro, Monday - Saturday
1-800-827-6655
I
H0meCentral!
The ServiceSideof Sears"
