Kenmore 91148365690 User Manual ELECTRIC BUILT IN DOUBLE OVEN Manuals And Guides L0710504
KENMORE Built In Oven, Electric Manual L0710504 KENMORE Built In Oven, Electric Owner's Manual, KENMORE Built In Oven, Electric installation guides
User Manual: Kenmore 91148365690 91148365690 KENMORE ELECTRIC BUILT-IN DOUBLE OVEN - Manuals and Guides View the owners manual for your KENMORE ELECTRIC BUILT-IN DOUBLE OVEN #91148365690. Home:Kitchen Appliance Parts:Kenmore Parts:Kenmore ELECTRIC BUILT-IN DOUBLE OVEN Manual
Open the PDF directly: View PDF ![]() .
.
Page Count: 25
Kenmo '÷
OWNER'S
MANUAL
MODEL NO.
CAUTION:
Read and Follow AI! Safety
Rules and Operating
Instructions Before First
Use of This Product
911. 48365
.Safety instructions
.Features
,Operation
° Care and Cleaning
oProblem Solving
.Easy Adjustment
o Consumer Service
; _ ,,,
Sears, Roebuck and Co., Hoffrnan Estates, BL 60t 79 U.S.A.
229C4020PO74(SR10299)

Range Safety ......................................... 3-4
Broiling .................................. I4
General Rules .................................... 14
Preparing Meats ................................... 14
Oven Rack Position ........................ 14
Features ................................. 5
Oven Centre& CBock &Timer
............................... *.............................. 6-9
Traditional Oven Function ................... 6
Timed Oven Function ......................... 6
Touch Pads ......................................... 6
Control Display ................................... 7
Clock and Kitchen Timer .............. 8
Tones ................................................. 9
F-Codes ......................................... 9
Oven Cooking Tips ............ 10-12
Strong Smefl or Odor .................... 10
No Peeking ...................................... 10
Aluminum Foil .................................... 10
Preheating .............................................. 10
Temperature Sensor ...................... 10
Oven Vent ....................................... 10
Fan .................................................... 11
Moisture ............................................... t 1
Low Temperature Zone .................. 11
Using Delay Start .................................... 11
Bakeware .......................................... 11
Element Cycling ............................ 11
Bakeware Placement .......................... 11
Oven Racks .............................................. 12
Temperature Adjustment ............. t2, 23
Se;FCSeanin_ ..................... 15, 16
Preparing Your Oven .......................... 15
Oven Door Gasket ............................... 15
Door Lock Device .................................. 15
Surface of the Cavity .................... 15
How to Set A Clean Cycle .................... 16
To Stop A Cycle ................................ 16
After The Cycle ................................. 16
To Set A Delayed Cycle ................... 16
Speciag Features ............... 17, 18
12 Hour Shut-Off ............................... 17
Centigrade Selection ........................... 17
12 Flour Clock ................................. 17
Control Lockout ............................. 18
Cook and Hold ................................. I8
Arrow Speed ................................ t8
Control Panel ....................................... 19
Broiler Pan and Grid ............................... 19
Oven Racks ....................................... 19
Oven Interior ............................. :...... 19
Oven Door ............................................ 20
Replacing the Light Bulb ..........................20
Se_ti_g The ContrM .......... 12-13
To Set Bake (upper oven) ............... 13
To Set Time Bake (upper oven) ....... 13
To Set Delay Bake (upper oven) .......... 13
To Set Bake (lower oven) ................ 12
To Set Broil (Iower oven) ................... 12
Before Calling for Service ................. 21, 22
Consumer Service Numbers .............. 24
Warranty
For your cor_venie_ce and future re_ere_ce_ ptease write down your rnoden
a_d serlaU num#_ers in _he sp_ce provided. They _re Boca_ed on the f_on_
frame.
MODEL NUM3ER: SERg/_L t_UME3ER:
2

8AFETF
TO INSURE safety for .yourself, fami!y and
home, please read your Owner's Manual
careful!y, Keep it handy for reference Pay
close attention to the Safety sections.
BE SURE ,your appliance is installed and
grounded by a qualified technician.
TEACH CHILDREN
,Not tOplay with controls or any part of the
appliance
oNot to sit, climb orstandon the oven door
NEVER WEAR loose fitting
clothing when using Four
appliance _
NEVER USE a towe! or
other bulky cloth as a
potholder and make sure the
potholder is dry. Moist
potholders could cause steam burns Keep
dish towels, dish cloths, potholders and other
finens a safe distance away from your
appliance
NEVER USEyour appliance
for warming or heating the
room
BE SURE the oven is securely installed in
a cabinet that is firmly attached to the
house structure,
NEVER STORE items of
interest to children in cabinets
above the appliance,
KEEP THBS book for later use.
NEVER TRY torepair or replace any part of
the appliance unless instructions are given in
this manual_ Atl other work should be done by
a qualified technician
ALWAYS KEEP the appliance area free
from things that will bum° Food, wooden
utensils and grease buildup could catch fire
Plastic utensils could melt and canned foods
could explode Your apptiance should never
be used as a storage area
ALWAYS KEEP your oven clear of things
that will burn (gasoline and other flammable
vapors or liquids).,
ALWAYS KEEP combustible wall
coverings, curtains and other linens a safe
distance from the appliance,
NEVER HEAT unopened food containers.
Pressure buildup can cause the container to
burst and cause injury
NEVER ILEA VE jars or cans of fat or
drippings in or near your appliance
SOME CLEANERS produce noxious fumes
and wet cloths or sponges can cause steam
burns.
3important safety precautions continued

I£vTFOflTAflT SAFETY
PLACE OVEN RACKS in the desired
position while the oven is cool If racks must be
moved while oven is hot, do not let potholder
contact the hot oven element
AFTER BROgLING, always take the broiler
pan and grid out of the oven and clean them
Leftover grease in the broiler pan could catch
fire the next time you use your oven
_L_,_ Y$ USE care when opening the oven
door, Let steam escape before moving foods.
_EVER USE aluminum foil to line the oven
bottom.. Improper use of foil could start a fire,
CLE_P# O_L Y the parts listed in this manual
Follow all cleaning instructions.
g1: THE SELF-CLEANING mode
malfunctions, turn off the controls or
disconnect the power supply. Have serviced
by a qualified technician.
b3EVE_ _U_ move or damage the door
gasket on self-cleaning ovens.
NEVER clean utensils, cookware, removable
parts or broiler pan and grid in the self-clean
cycle
DO NOT _JSE oven cleaners -- No
commercial oven cleaner should be used in or
around any part of the oven
continued
IMPOF_TANT SAFETY NOTNCE!
The Cafifornia Safe Drinking Water and
Toxic Enforcement Act requires the
governor of California to publish alist of
substances known to the state to cause
birth defects or other reproductive harm
and requires businesses to warn
customers of potential exposure to such
substances.
The fiberglass insulation in self-cleaning
ovens will give off avery small amount of
carbon monoxide during the cleaning cycle.
Exposure can be minimized by venting with
an open door or window or using a
ventilation fan or hood.
READ AND
UNDERSTA #D
THN$
Nt F@RMAW@H
NOWZ
Should you ever need it, you will not have
time for reading. Be sure everyone in
your home knows what to do in case of
fire. Never use water on agrease fire; it
will only spread the flames.
OVEN FNRE:
Do not try to move the pan!
1. Close the oven door and turn
controls off
2. tf fire continues, throw baking
soda on the fire, or use a dry
chemical, foam, or halon type
extinguisher
4
OF 27"
o
o
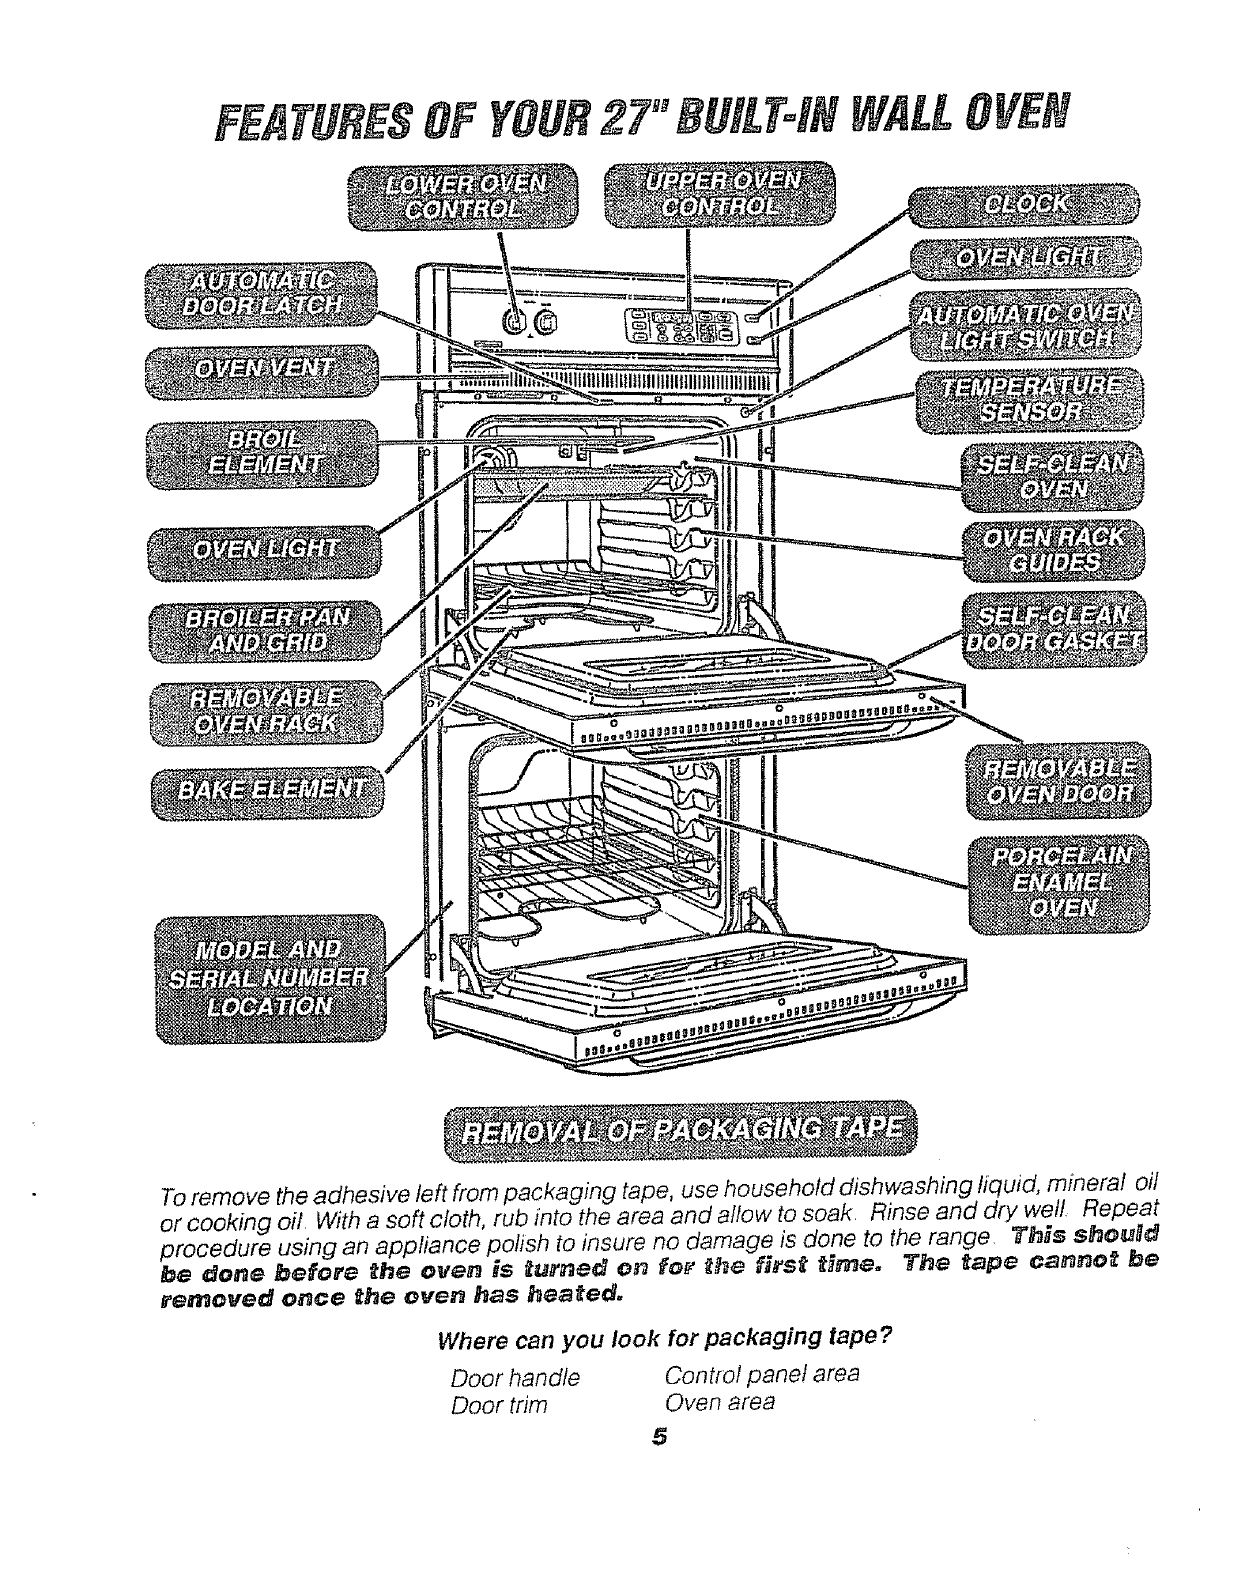
To remove the adhesive left from packaging tape, use household dishwashing liquid, mineral oil
or cooking off With a soft cloth, rub into the area and allow to soak. Rinse and dry well Repeat
procedure using an appliance polish to insure no damage is done to the range, This shouHd
be done before the oven is _urned on for _he first t_rne. The tape cannot be
removed once the oven has hearted.
Where can you look for packaging tape?
Door handle Contfo! panel area
Door trim Oven area
5

@ @@
TEMP HOUR _,11_1
®®
TIMED O_JEH KITCHEI!
Your new upper oven touch pad control will allow .you to set oven functions with ease Below
are the different types of functions and a description of each
HBA_ -- Cook foods in the traditional oven
with a temperature range of 170°Fro 550°F
_OB_, -- Cooks cuts of meat at 550_F hi broil
or 450 °low broil from the direct heat of the
upper element.. Broiling should be done with
the door opened to the broil stop position
CLF, A_$ -- Cleans the inside area of the oven
for you. When the cycle is finished the oven wilf
turn off automatically.
OV_a_3 C@@_I_3@ TV_E-- Choose bake or
clean. Set the amount of time you prefer foods
to cook or the oven to clean and have the oven
turn off automatically.
DEL_ YfE# BAKE O_ CILEAN --Choose
bake or clean. Set the amount of time you
prefer foods to cook or the oven to clean Set
the time of day you prefer the oven to turn on.
When the function is finished the oven wifl turn
off automatically.
@Thesetthe_OURtimeof day,and J!tgINUT"Elengthofpads
HOUR MIa cooking time, length of cleaning
@ @ time'thetime set on the Kitchenthe delayed start timenmer,and
@
TEMP The TEMP pad sets the
temperature used for cooking
The ST"ARTpad must be pressed
to activate any oven function
The OVEN CO0_G _'_M_
pad is used when setting the
length of cooking or time.
The DELAY" START T_ME pad
is used to set the time of day .you
prefer the oven to turn on and
start cooking or cteaning.
The CLeAR/OFF pad is used to
cancel any oven function and the
end of cycle tone° _ _iH #oft
eance_ t_e C_oc_ or _i_c_e_
Timer.
oven control clock and timer continued

,CLOCKand continued
OVENTEMPERATURE
INDICATOR
\
FLASHINGINDICATOR _SE
TOALERTYOUTOSETAfl T
TEMPERATUREORA TIME I
I DELAYSAKE CLEAN
_, 8ROlL\LOCKEDDOOR
OVEflFUNCTION
INDICATOR
INDICATORTOLETYOUKNOW
THEOVENHASTURNEDON
_._=_7_._7 .h_==_'_ FORTHETIMEOFDAY
LOCATION
_ _=_==,e=ez_4_CLOCK,KITCHENTIMER,DELAY
"_ _ql |STARTTIME,OVENCOOKING,OR
CLEAMNGT/ME
STARTCLOCKCLEAN!
COOK',_TOPI/TIMER_,,/
OVENFUNCTION
INDICATOR
The display is an easy reference to use while learning your control Below are descriptions of how
the display works
OVEN TEMPERA TURE HNDNCA TFOR --
This indicator has a multiple purpose
oDispBays tPJe temperature
oDispHays an error code -- "/ERR" - tf
the oven temperature indicator flashes
"ERR", then.you have set an invalid time or
temperature Press the CLEAR/OFF pad
to clear the control and reset your oven
function,
oDisplays Oven Problems --If your
control flashes "F" and a number or letter,
.you have experienced an oven problem.
Please read the section on F.COD/ES in
your manual
ON INDICATOR -- Lights when an oven
function is set.
S/ET iNDiCATORS -- The set indicator will
flash in combination with an oven function or
timed function to let you know you need to set
a time or temperature Example "S/ET" and
"BAKE" will flash to let .you know you need to
set the bake temperature.
TiME INDICATOR -- Displays the time of
day, cooking time, delayed start time,
cleaning time or the time set on the kitchen
timer
Displays areminder coder"PUSH
START" -If the time indicator flashes the
word "PUSH START" then .you need to
press the START pad to activate ,your
setting
OVEN FUNCTION INDICATORS --
Displays which oven function has been set,
when the oven door locks, and ff the function
is delayed
7oven control, clock andtimer continued

CO TROL,CLOCKand con#nued
The clock must be set for the correct time of
day before a delayed oven function can work
properly. The time of day cannot be changed
during a timed oven function, but can be
changed during a bake or broil function_
HOW TO S_T THE (:LOCK
@@
1. Press the CLOCK pad.
2. Press the HOUFJ and/or M_H arrow pads
to set the time.
3. Press the START pad,
_ECALL THE CLOCK
While using ,your oven for cooking, press the
CLOCK pad if you wish to check the time of
da.y The current time of day will show in the
display.
POWER FAII-UF_
If .you have experienced a power failure the
time flashing in the display will be incorrect.
Reset .your Clock..
Any oven cooking function that was in process
will need to be reset
The Kitchen Timer is used to time cooking
processes or other household activities, tt
does not control the oven It can be set for up
to 9 hours and 59 minutes, It will count down
in minutes unti! the last 60seconds is reached,
then the control will beep once. When the
countdown reaches zero the control will beep
3 times followedby one beep every 6 seconds
until the _iTCHEN TIIMER ON/OFF pad is
pressed, The 6 second beep can be
canceled See Tones on the following page,
HOW TO S£T THE TIMER
HOUR MIN
1. Press the KITCHEN TIMF.R ON/OFF
pad
2. Press HOUB and/or MNN arrow pads to
set time
3. Press the START pad
4. When the countdown has reached zero,
press the KI_t'CHEN TKMEFL ON/OFF
pad.
To cancel the timer during the countdown
press the _'IMER OFJ/OFF pad twice
The Timer can be set for time cooking in the
Lower Oven,
8oven control, clock and timer continued

COETRO[,CLOCKand KITCHEN continued
Your new contro! has a series of tones that will
sound at different times, These tones may
sound while you set the control for an oven
function, or at the end of the oven function, It
will also alert,you there may be a problem with
the functions, Below are the types of tones
and a brief description of each
TONES WHILE SETTING THE
CONTROL
When you press a touch pad you will hear a
beep This beep will let you know .you have
placed enough pressure on the pad to
activate it, (The arrow pads do not beep,)
END OF TIMED CYCLE TONE
At the end of a timed cooking function, you wifl
hear 3 short beeps followed by 1 beep every
6 seconds This 6 second beep will continue
to sound until the CLFd_R/OFF pad is pressed
or you may select the special feature to cancel
this 6 second beep from sounding at the end
of future cycles
TO CANCEL THE 6 SECOND BEIEP
1, Press and hold the BAKE and BROgL
pads for 3 seconds, at the same time,
until the display shows "SF',
2. Press the KNTCHEN TIIMER ON/OFF
pad The display will show "CON BEF.P"
(contit_ous beep),
3. Press the KITCHEN TIMER ON/OFF
pad again The display will show"BEEP"
(beep canceled).
4. Press the START pad
If you would like to retum the 6 second beep,
repeat steps above until the display shows
,your choice and press the start pad
ATTEHTiON TONE
This tone wilt sound if you make an error or an
oversight is made while setting an oven
function,
Examples would be:
a. SetfitTg a clean cycle and the oven door is
not properly closed.
b. Setting a function and not pressing START,
c. Pressing an additional function pad
without setting a temperature or time first.
Any of these can be quickly identified by
watching the display
PREHEAT TONE
When ,you set an oven temperature, the oven
automatically starts to heat, When the
temperature inside the oven reaches the
temperature you have set, a tone will sound to
let you know the oven is ready for baking,,
If .you set an oven function and the control
beeps while the display is flashing "F" and a
number "F.,_" or letter "Fi" there may be a
problem with the control or oven, Simply press
the CLE,_R/OFF pad an d wait about an hour
Try setting the function again, If the code
repeats, write down the flashing code and calf
for service Tell the technician what the code
was flashing
9

It is normal to have some odor when using your
oven for the first time. This is caused by the
heating of new parts and insulationr
To help eliminate this odor, ventilate the
room by openSng a w_n_ow er using a
vent hood_
Let the oven preheat thoroughly when recipes
carl for preheating. Preheating is bringing the
temperature up to the temperature .you will be
using during baking. When the oven has
reached the preheat temperature, a tone will
sound. Have foods nearby ready to place in
the oven.
Never cover the
oven bottom or oven
rack with aluminum
foil, Improper use
can cause poor heat
flow, poor baking
results, and may
damage the oven finish.
In the back of
notice a small
tube This is a
heat sensor that
maintains the
temperature of
theoven Never
move or bend
this tube
OVEN TEMPERATURE
SENSOR
The oven vent is tocated just above the door
This area could become very hot during oven
use, The vent is important for proper air
circulation _ev_" block this verso
Opening the door often to check foods wifl
cause heat loss and poor baking results,
t0oven cooking tips continued
OVENCOOKINGTIPS
During any oven opera tion you may hear a fan
noise° This is the intemal cooling fan that
keeps all electrical parts from overheating, It
is not uncommon for this fan to keep running
even after the oven is turned of L
As the oven heats, the change in temperature
inside the oven may cause water droplets to
form on the oven door glass. To prevent this,
open the door momentarily to allow the moist
air out_
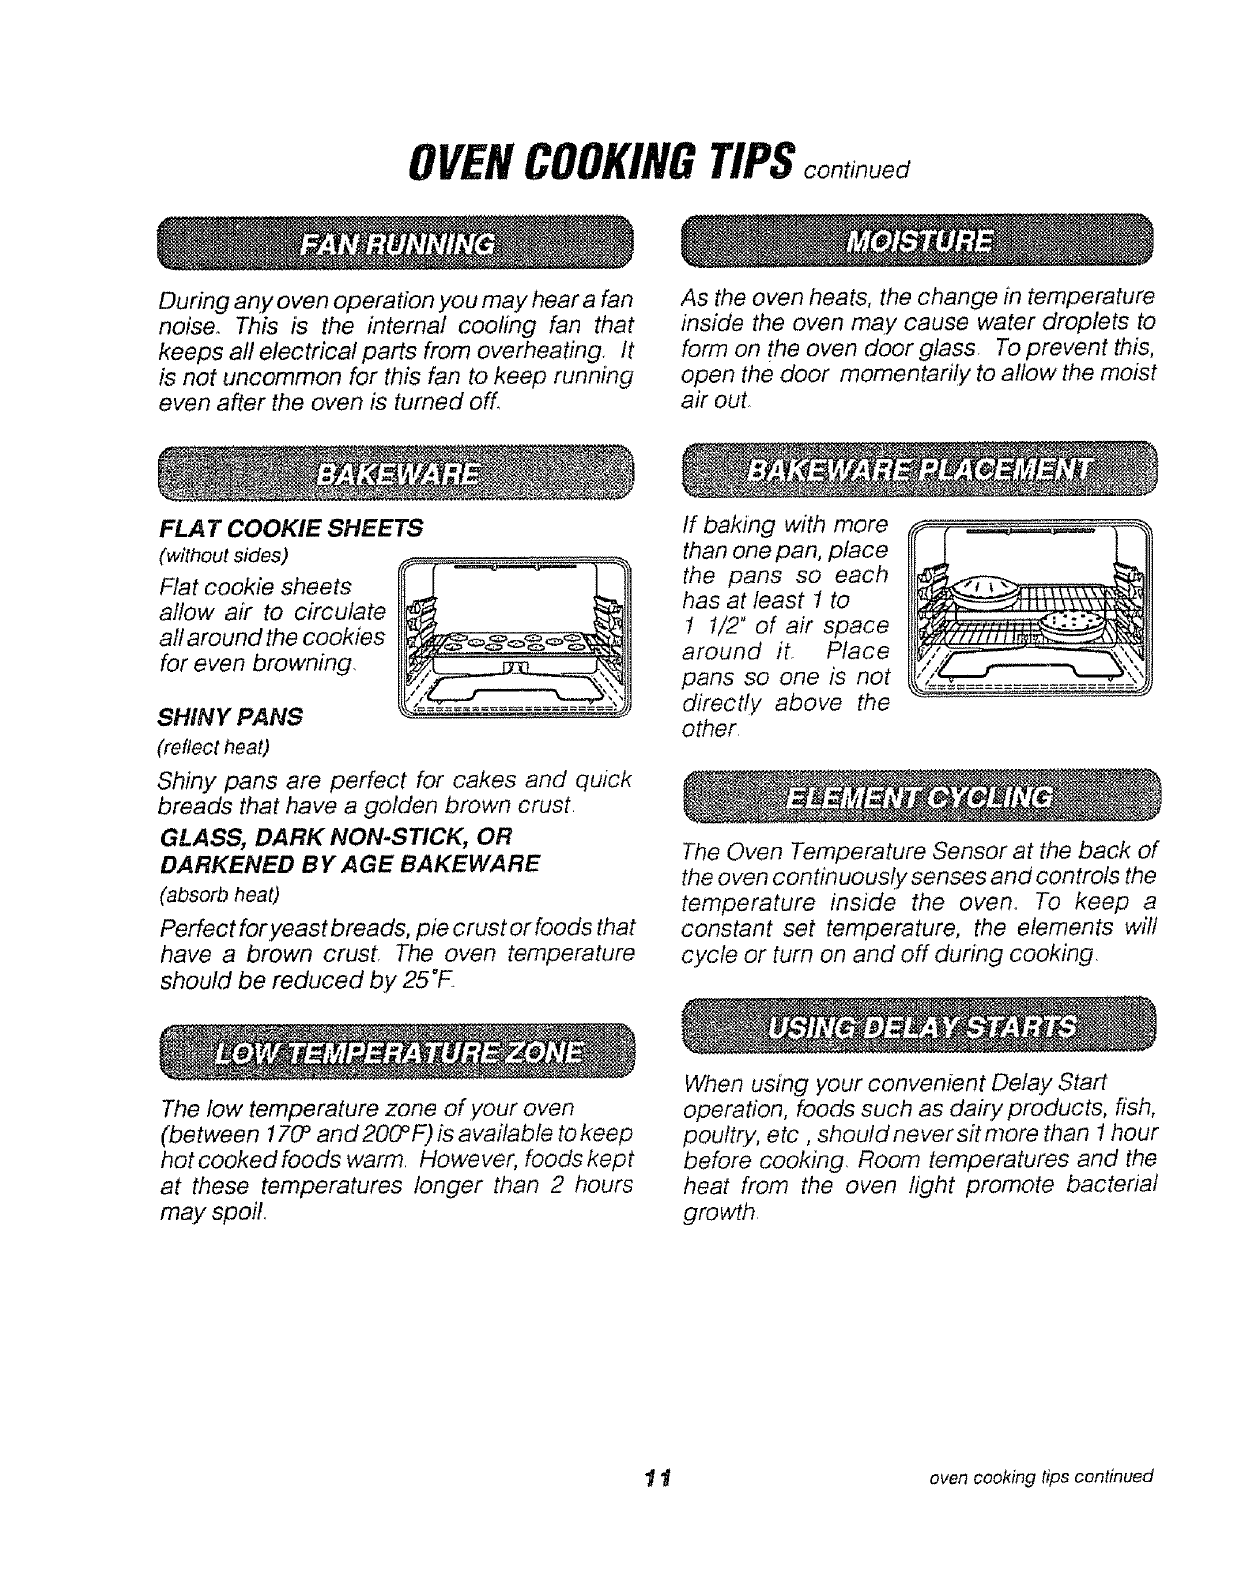
FLA T COOKIE SHEETS
(without sides)
allow air to circulate
all around the cookies
for even browning, /
SHINY PANS
(reflect heat)
Shiny pans are perfect for cakes and quick
breads that have a golden brown crust
GLASS, DARK NON-STICK, OR
DARKENED B Y AGE BAKEWARE
(absorb heat)
Perfect for yeast breads, pie crust orfoods that
have a brown crust, The oven temperature
should be reduced by 25°F
If baking with more
than one pan, place
l
the pans so each
has at least 1 to
1 1/2 ° of air space
around it_ Place
pans so one is not
directly above the
other
_--,(t t t I _ \l\ \ XI',,_V,,
The Oven Temperature Sensor at the back of
the oven continuously senses and controls the
temperature inside the oven, To keep a
constant set temperature, the elements will
cycle or turn on and off during cooking,
The low temperature zone of your oven
(between 170_and 2OO°F) is available to keep
hot cooked foods warm, However, foods kept
at these temperatures longer than 2 hours
may spoil,
When using your convenient Delay Start
operation, foods such as dairy products, fish,
pouftt:yo etc , should never sit more than 1hour
before cooking, Room temperatures and the
heat from the oven light promote bacterial
growth
1 t oven cooking tips continued
OVENCOOKINGTIPScontinued
L0 WER0 VEN
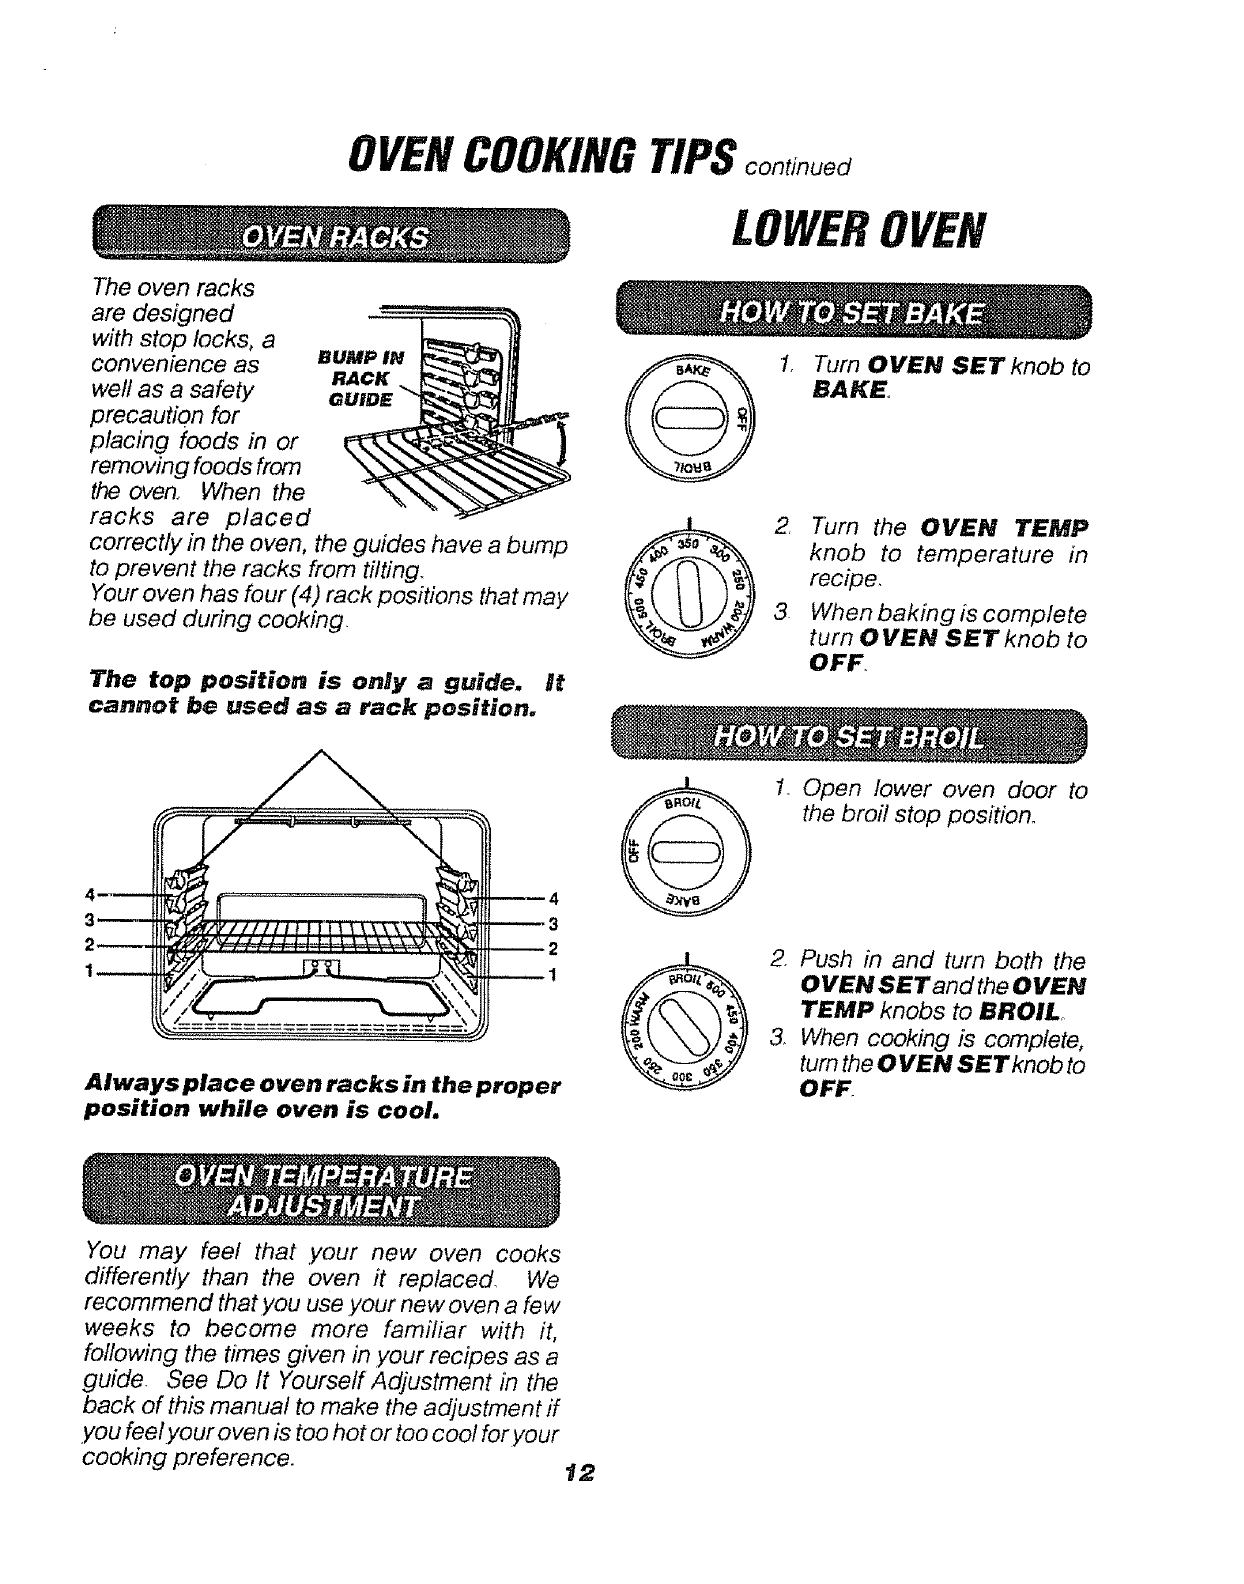
The oven racks
are designed
with stop locks, a
convenience as
welt as a safety
precaution for
placing foods in or
removing foods from
the oven,, When the
racks are placed
correctly in the oven, the guides have a bump
to prevent the racks from tilting.
'Four oven has four (4) rack positions that may
be used during cooking
,. ,o
Turn the OVEN TEMP
2, knob to temperature in
recipe,
3 When baking is complete
turn OVEN SET knob to
OFF.
The top position is only a guide. It
cannot be used as a rack position.
Always place oven racks in the proper
position while oven is cool
You may feel that your new oven cooks
1, Open lower oven door to
the broil stop position.
2 Push in and turn both the
0VEN SETand the OVEN
TEMP knobs to BROILo
3,, When cooking is complete,
turn the OVEN SET knob to
OFF.
differently than the oven it replaced, We
recommend that.you use .your new oven a few
weeks to become more familiar with it,
following the times given in your recipes as a
guide. See Do It Yourseff Adjustment in the
back of this manual to make the adjustment if
.you feel your oven is too hot or too cool for your
cooking preference. 12

BAKING(UPPEROVEN)
@
TEMP
@
t. Press the BAKE pad.
2, Press the Temp UP and/
or DOWN arrow pads to
set the oven temperature
you prefer to use.,
3, Press the START pad.
To set the oven to cook for a specific amount
of time and turn off automatically.
To set the oven to delay the start, cook for a
specific amount of time and turn off
automatically,
(_ 1. Press the BAKE pad.
@
TEMP
@
2. Press the Temp UP and/
or DOWN arrow pads to
set the oven temperature
.you prefer to use
OVEN
COOKING
TIME
3. Press the OVEN
COOKING TIME pad
@
TEMP
@
@@
HOUR MIN
@@
@
t, Press the BAKE pad..
2. Press the Temp UP and/
or DOWN arrow pad to
set the oven temperature
you prefer to use,
3. Press the OVEN
COOKING TIME pad
4, Press the Hour and/or
Minute UP and DOWN
arrow pads to set the
amount of time you prefer
your foods to cook.
_. Press the START pad
@@
HOUR MIN
@@
mPress the Hour and/or
Minute UP and DOWN
arrow pads to set the
amount of time ,you prefer
,your foods to cook,
5. Press the DELAY
START TIME pad
@@
HOUR MIN
@@
6. Press the Hour and/or
Minute UP and DOWN
arrow pads to set the
time of day you prefer
the oven to turn on.
7. Press the START pad.
!3
These oven operations may be used
when roasting.
The oven wile cut chat the end of the
coo_ing time unless the temperature
he_d feature has been activated,

BROILING
Broiling is cooking bY direct
heat from the upper element
The oven door should remain
opened to the broil stop
position during broiling
It is not necessary to preheat
the oven when broiling Use the broiler pan
and grid that came with your range Both are
designed for proper drainage of fat and
liquids
i'" ...,.,,:;,,
Foil must be molded tightly
to the grid and slits cut into
the foil to match those of the
grid. This allows fats and
liquids to drain into the
broiler pan, preventing fire
and excessive smoke.
Always remove the pan
and grid from the oven.
Storing or forgetting a
soiled broiler pan in the
oven is a potential smoke
or fire hazard.
The U_SoDepartment of Agriculture notes that
meat cooked rare is popular, but meat cooked
to on!y 140°F (rare) means that some
poisoning organisms may survive
The closer you place foods to the broil element,
the faster foods brown on the outside yet remain
red to pink in the center
Moving meats away from the element will allow
the meat to cook to the center while browning on
the outside Using this positioning, cook side 1
at least 2 minutes longer than side 2 lf your oven
is connected to 208 volts, ,you may want to use
a higher rack position and/or broil foods longer
The size, weight, thickness, starting
temperature and your preference of the
doneness of the meat will affect broiling This
chart is based on meats at refrigerator
temperature
RACK
POSITION
3
2
oChoose tender cuts of meat at least 3/4"
thick for broiling
•Trim the outer layer of fat, slit the edges to
keep meats from curling
•Always use tongs to turn meats Piercing
meat allows juices to escape
oSalt the first side of meats just before
turning, the second side just before
serving Brush chicken and fish with
butter several times as they broil
oChicken and fish should be placed on
the grid skin side down For fish, lightly
grease the grid to prevent sticking
la. Press the BROIL pad,
(This will automatically
set H! Broil)
lb. While the indicator is flashing
in the display, press the BROIL
pad again if ,you prefer to use
LO Broil,
2. Press the START pad
3. When broiling is finished, press
the CLEAR/OFF pad
t4

SELF-CLEANINGCYCLEFORUPPEROVEN
I. Remove the broiler
pan and grid, oven
racks, utensils and
any foil that may
be in the oven.
2. Soil on the front
frame, 1" inside
the oven, and
outside the door
/
FRONT FRAME
DoorGASKET_ \
""_ DOOR LINER
gasket will need to be cleaned by hand
Clean these areas with hot water, soap-rifled
steel wool pads or cleansers such as Soft
Scrub® to remove any soil, Rinse well with
clean water and dry
3. Wipe up any heavy spiltovers on the oven
bottom
4. Do not ctean the door gasket The fiberglass
material of the oven door gasket cannot
withstand abrasion tt is essential for the
gasket to remain intact, If you notice it
becoming worn, frayed, or displaced on the
door, it should be replaced
The door gasket boo,PANEL GASKET
is designed to
have a 5_6" gap
at the bottom of
the door. DOOR LINER
This allows for
proper air circulation, it is normal for your oven
door to give the appearance of not having a
good seal against the range, This is due to the
gasket The location of the gasket on the oven
door maintains a good seal and prevents any
heat Ioss_
....................... i Ill,,ll"l
Utensils should never be left
in a self-clean cycle.
The oven racks may be
cleaned during the self-clean
cycle, but will lose their
luster and become hard to slide, ff you
choose to leave them in during the cycle,
wiping them down with vegetable oil after
the cycle will help them slide easier.
Always make sure the oven light is off
during the self-clean cycle to prolong the
fife of the bulb.
For the first clean cycle, vent the room
with an opened window or hood vent.
This will prevent the strong odor from
heating new parts.
When the door locks, LOCKED DOOR will
show in the displaF The oven temperature
will need to drop below the locking
temperature before the door can be opened
The word LOCKED DOOR will go out in
the display
• If LOCK DOOR flashes in the display, the
door is not closed completely; simply press
on the door,
Clean on!y as touch up between clean cycles
Use dishwashing liquid, warm water, or soap
filled steel wool pad, Rinse well after cleaning
and dry,
NEVER USE OVEN CLEANERS IN OR
AROUND ANY PART OF THE OVEN.
When cleaning, be sure not to bend or
displace the temperature sensor located
on the back wall of the oven
t5self-clean cycle continued

SELF..CLEANCYCLE
The Clean Cycle is automatically set for 4
hours,,, but you may change this from 3 hours if
oven is lightly soiled up to 5 hours ff ovenis
heavily soiled
@@
HOUR M|N
t. Press the CLEAN pad.
4 hours will show in the
display.
2. if you want to change
the length of clean time
press the Hour and/or
Min UP or DOWN
arrow pad.
3. Press the START pad
Simply press the CLEAR/OFF
pad You wit need to wait for the
oven temperature to drop below the lock
temperature (approx_ 1 hour) before
attempting to open the door. Locked door wit
go out of the display,
After the cycle, you may
HOUR MtN
@@
@@
HOUR M1N
@@
1. Press the CLEAN pad,
Ifyou want to change the
length of clean time press
the Hour and/or Min UP
or DOWN arrow pad.
3. Press the D£_ Y
START TIME pad.
4_ Press the Hour and/or
Minute UP or DOWN
arrowpads to set the time
you prefer the clean
cycle to start.
5. Press the START pad.
notice some white ash in
the oven. Just wipe it up
with a damp cloth or
sponge.
If white spots remain, scrub them with a soap
filled steel wool pad Be sure to rinse
thoroughly. These are usually deposits of salt
that cannot be remove d during the cycle.
Nf for any reason you are no_ satisfied
_ith the cleaning resuUts_ just repea_
_he cycSe°
t6

SETTINGSPECIALFEATURESOF YOURCONTROL
Your new touch pad contro! has additional features that you may choose to use.
After making your selection, ff you want to change a setting follow the steps untit the display shows
.your choice,
The control is automatically set to turn off the
oven after 12 hours baking or 3 hours broifing
should you forget and leave the oven on If you
want to remove this feature:
t. Press and hold, at the same time, the
BAKE and BROIL pads for 3 seconds,
until the display shows SF
2, Press the DELAY START TiME pad
The display shows 12shdn (12 hour shut
off).
Press the DEftlY START TiME pad
again. The display will show no shdm (no
shut off)..
3. Press the START pad.
Your oven control is set for the Fahrenheit
temperature selections. Most recipes are
given using the Fahrenheit scaler You maY
change this to use the Centigrade selection
t. Press and hold, at the same time, the
BAKE and BROIL pads for 3 seconds,
until the display shows SF.
2. (a) Press the BROIL pad The control
display will show the degrees sign and F.
(b) Press the BROi£ pad again. This will
change F(Fahrenheit) to C(Centigrade)
3o Press the START pad
Your control is set to use the 12 hour clock. If
you prefer to use the 24 hour Military Time
clock or black out the display:
t. Press and hold, at the same time, the
BAKE and BROIL pads for 3 seconds,
until the display shows SF.
2, (a) Press the CLOCK pad. The display
shows ll 2hr tf this is your choice press the
START pad
or
(b) Press the CLOCK pad again The
display will show 24hr Example: 5:00 on
the I2 hour clock will read 1700 on the 24
hour clock If this is your choice press the
start padr
or
(c) Press the C//OCK pad again. The
display will showOFF, (Time will not show
in the display) If this is .your choice press
the START pad (The Delay Start Time
feature will not operate..)
1 7 special features continued

SP£CIA[ continued
Your control will allow ,you to lock down the
touch pads so they cannot be activated when
pressed. If you're worried about leaving the
oven unsupervised, activate this feature
t, Press and hold, at the same time, the
BAKE and BROH. pads for 3 seconds,
until the display shows $F,
2o (a) Press the CLF.AN pad The display
shows LOC OFF (lockout off),
(b_ Press the CLEAN pad again The
display will show LOC OH (lockout on),
3. Press the STAR;" pad,
This feature can onSy be se_ when _the
oven is not in use.
When this feature is on the display will show
LOC ff a touch pad is pressed. (This feature
will not affect the Clock, Timer or Oven light
pads.)
This Special Feature will allow you to change
the speed; #1 means the speed of change is
slow and #5 means the speed of change is
fast, To set the speed ,you prefer, follow these
steps,
1. Press and hold, at the same time,
the BAKE and BROIRL pads for 3
seconds, until the display shows SF..
2, Press the UP arrow pad The display
will show you the current set speed
between 1 and 5.
3, Press the UP arrow to increase the speed
up to the number 5
or
Press the DOWN arrow pad to decrease
the speed down to the number 1
4. Press the START pad,
Your new control has a cook and hold
feature for timed cooking only, that keeps
hot cooked foods warm up to 3 hours after
the timed cooking is finished To activate
this feature,.
1. Press and hold, at the same time, the
BAKE and BROIL pads for 3 seconds,
until the display show SF,
2. (a) Press the OVEN COOKING "irIME
pad. The display will show HLd OFF,
(b) Press the OVEN COOKING TiME
pad _gain to activate the feature The
display wilt show HJ-d ON.
:3. Press the START pad.
You will need to set this feature seperately for
each oven.
18

CLEANING
CLEANING MATERIALS TO USE:
*Dishwashing detergent
.Warm water
oSoft cloth
Do not use abrasive cleaners,
Jndustria8 cOeaners_ or bOeac_.
CLEANING MATERIALS TO USE:
oDishwashing detergent
•Warm water _'_______j//
. Soap-filled steel wool pad _//
Commercial oven cleaner
TO CLEAN:
Allow the pan to soak Sprinkle the grid with
dishwashing detergent and cover with a
damp cloth or paper towel and let stand
Scour as needed, Wash, rinse, and dry well.
You may also place both the pan and grid in
the dishwasher.
CLEANING MATERIALS TO USE:
oDishwashing detergent
oSoap-filled steel wool pad
o Warm water
TO CLEAN:
Wash and rinse well.
TO BEMOVE:
Pull the racks out and up to remove.
TO REPLACE:
Set the raised back of the rack on the pair of
rack guides. Push until ,you reach the stop
locks, lift the front of the rack until the back
slides easily under the bump. Push rack into
the oven.
SELF.CLEANING OVEN
CLEANING MATERIALS TO USE:
•Dishwashing detergent
. Soap-filled steel wool pad
oScouring pad
•Warm water
TO CLEAN:
Rinse thoroughly after cleaning Cleaning
inside the oven need only be done as a
touch up between clean cycles
Do nor affempf fo cBean the oven
unHess it is compRe,ely cool Never
use oven cleaner in your oven,
CONVENTIONAL OVEN
CLEANING MATERIALS TO USE:
oDishwashing detergent
,, Oven cleaner
. Soap-filled steel wool pad
,, Warm water
,, Cleansing powder
TO CLEAN:
Cleaning inside the oven after each use will
make clean-up easier For heavy soil, if a
commercial oven cleaner is used follow the
label directions carefully. Do not get any
cleaner on the temperature sensor. Rinse welt
after cleaning
Do not atfernpt to clean the oven
unless if is cornpBetely cooL
t9

REMOVABLEPARTS
BULB
LIVE COLLAR
BULB COVER BAIL WIRE
TO REMOVE:
Open the door to the broil
stop position_ Grasp the
door on each side and lift
up and off the hinges, DO
NOT LIFT THE DOOR
BY THE HANDLE.
TO REMOVE THE COVEn:
t. Disconnect electrical power to the oven at
the main circuit breaker or fuse box,
2. Hold your hand under cover and firm!y
push back the bail wire, until it clears and
releases the bulb cover,
REPHCE ?'HE LIGHT BULE:
Unscrew the fight bulb and replace it with a
40-watt home appliance bulb,
TO R_PLACE COVER:
t. Place the bulb cover into the groove of the
bulb socket,
2. Pull the bail wire forward until it snaps into
the indentation on top of the bulb cover
3. Reconnect the electricat power to the oven.
i ,irl.....................
DO not touch a hot oven light
bulb. Do not touch a bulb with
wet hands or wet cloth.
Never touch the electrically
live collar on the bulb when
removing or replacing the
bulb. Do not remove any
screws,
=,, iii=,, u.... ,=
r- _'
When the door is removed
and the hinge arms are in
the broil stop position, do
not bump into the hinge
arms. They could snap
back and cause injury to
hands and damage the porcelain finish
of the front frame. Cover the hinge arms
with empty paper towel rolls or towels
while working in the oven area.
7"0 REPLACE:
Remove the paper
towel rolls Or towels,
Make sure the hinges
are still in the broil stop
position, Grasp the
door on each side. Lift
the door over each
hinge_ Line the slots at
the bottom of the door
with the hinges Slide
the door down over the
hinges as far as it will
go.
20

CALLINGFORSERVICE
To save ,you time and money, before making a service call, check the list below for any problem
you may feel you have with the performance of your range, If the problem is something you cannot
repair, use the Consumer Service Numbers located at the back of this manual When making
any calls, have the model number, repair parts list, use and care manual and the
date of purchase available.
PROBLEM
rllU, i.... i
The display of your
control is flashing "F"
followed by a number
or letter.
POSSIBLE CA USE
Range malfunction
POSSIBLE SOLUTION
L L ,,
Press the CLEAR/OFF pad. Let the range
cool for Ihour and place the range back into
an oven operation If the problem repeats,
call for service..
Oven will not work; No power to range a. Check the household circuit breaker or
totally inoperative, fuse box
b. Check to make sure the range is plugged
in
u,
Foods do not bake
properly.
f.
g.
a. Oven is not preheated a,
b, Improper rack or pan b,
placement
¢. Oven vent blocked or ¢,
covered.
d, Improper use of foil do
e. Improper temperature e.
setting for utensil
used.
Recipe not followed
Improper oven control
calibration
h. Range and oven rack
not level
Be sure to preheat until the tone sounds
Maintain uniform air space around pans
and utensils See oven cooking section.
Keep vent clear
Racks should not be covered during
baking
Reduce temperature 25 degrees for glass
or dull/darkened pans
f, Check recipe and measurement_
g, Check the temperature adjustment
following this section
h, Check the installation instructions for
leveling
Oven temperature
seems inaccurate.
Temperature
Adjustment See oven cooking section
Oven light
does not work.
a. Light switch is in off
position.
b. Bulb needs replacing
a. Check switch setting,
bCheck or replace light bulb
21 before calling for service continued

CALLINGFORSERVICEcontin .
PROBLEM
,fllll,, i i i1,,,i,ii
POSSIBLE CAUSE POSSIBLE SOLUTION
iiiii ,11 e_,ll ..... [,11,,i,,, IH ........
Foods do not broiB
properly.
iii ,,,_u,
a. Improper rack a.
position,
b. Oven preheated b.
c, Improper use of foil c.
d. Oven door closed d.
during broiling
e. Low voltage (208 volts) e,
f. Improper broiling time f.
i,=u, =,,,,,...... H=r,,=, i= i
Check broil pan placement, see
broiling section,
Do not preheat when broiling,
Check broiling section,
Open door to broil stop position,
Use higher rack position and/or
longer cooking time
Check broiling chart in broiling
section
t; =,t,P :
Oven did .o_
clean or results
were poor.
a. Controls were not set
properly
b. Clean cycle was
interrupted
c. Oven was soiled heavily
a. Check the self-cleaning section of this
manual,
b. The normal clean cycle should last 4
hours,
c. Heavy spillovers should be removed
before the cycle is set You can also
repeat the cycle
Oven smokes, a. Dirty oven
b. Improper use of
aluminum foil
c. Broiler pan containing
grease left in the oven,
a Check for heavy spillover
b. Use of foil not recommended
c. Clean pan and grid after each use
Oven emits odor. a. Oven insulation may
emit odor during the first
few usages,
b. Failure to wipe out
excess soil prior to the
self-clean cycle
a. Put oven through self-clean cycle to
speed up process of odor "wearing offt
b. Wipe excess soil off before beginning
self-clean cycle
Cannot set 350 °
Bake Control set for degrees
Centigrade Mode See setting Special Features Section,
22

"DOtT VfiSRSELf"
You may feel that .your new oven cooks
differently than the oven it replaced. We
recommend that you use.your new oven a few
weeks to become more familiar with it,
following the times given in .your recipes as a
guide.
If you think .your new oven is too hot (burning
foods) or not hot enough (foods are
undercooked) you can adjust the temperature
yourself. The appearance and texture of foods
is a better indicator of oven accuracy than an
inexpensive thermometer, such as those found
in grocery stores, to check the temperature
setting of your new oven. These thermometers
can vary by 20-40 degrees. In addition, the
oven door must be opened to read these
thermometers.. Opening the door wfll change
the temperature of the oven
To decide how much to change the
temperature, set the oven temperature 25
degrees higher (if foods are undercooked) or
25 degrees lower (if foods are burning) than
the temperature in your recipe, then bake. The
results of this "test" should give .you an idea of
how much the temperature should be changed
d_!' Q
COOLER
HOTTER
1_ TurnOV£N SETknob toOFFandremove
the oven temp knob by pulling straight off
2 Look at the back of the knob The arrow
pointing to the center of the upper screw
indicates the original factory setting The
knob can be adjusted up to 50°F hotter or
50°F cooler, in 10°increments.
3. Use a screwdriverto loosen the two screws
about I turn each
ADJUSTMENT
4 Hold the knob handle (A on illustration)
while turning the knob skirt (B on illustration)
in the desired direction. As you tum you
should be able to hear clicks and fee!
notches or teeth. Each click or notch is 10°
You can turn up to 5 clicks or notches in
either direction.
5 When you reach the desired adjustment,
retighten both screws.
Do not force the knob onto the thermostat
stem or .you may damage it,
÷
TEMP
@
71 Press and hold down both
the B,_ KE and BROllL pads
for 3 seconds, until the dis-
play shows SF
2, Press the BAK_ pad. A
factory set 2 digit number will
show in the display,
usually 00.
Hf you thHnk t_e oven is
not ho_ enoughg
3a. Press the UP Temp arrow
pad to increase [+) the
temperature up to +35°F,,
If you think fthe oven is
_oo hot,
3b. Press the DOWN Temp
arrow pad to decrease (.)
the temperature down to
.35°F.
4o Press the START pad.
This increased or decreased temperature
setting will remain in memory until the above
steps are repeated A power failure will not
affect this setting
The Broil and Self-Clean temperatures will not
be affected
23

Forthe repairorreplacementpartsyouneed
delivered directlytoyourhome
Call 7 am - 7 pm, 7 days a week
1°80@o366oPA_T
(1..800°366°7278)
Forin-homemajorbrandrepairservice
Call24 hoursa day,7daysaweek
1 °800o4oREPA_
(1-800.473-7247)
',,[, ',y, ............
Forthe locationof a
SearspartsandRepairCenterinyourarea
Call24 hoursa day,7 daysaweek
li °800°488° _ 2_
ForinformationonpurchasingaSears
MaintenanceAgreementor to inquire
aboutanexistingAgreement
Call9 am - 5 pro,Monday-Saturday
1°800°827°6655
America's Repair Specialists
24

Dear Customer:
Our constant efforts are
directed toward making
sure your new Kenmore
Oven will arrive at your
home In perfect condi-
tion and wli! give you
props,performance. As
part of these efforts, we
feet it is our responsi-
bility to provide you with
this warranty for your
range.
FULL ONIE YEAR WA_.NTY ON THF. FUNCTiONB_'_G OF A_.{L
IPART_ E_CEPT G_-_$_ P._RTS
if, within one year from the date of installation, any part, other than a
glass part, falis to function properly due to a defect in material or
workmanship, Sears wlll repair or replace it, free of charge.
FULL 30-D_Y _,_JARRANTVO_ CLASS PARTS AND FamiSH OF
PORC_L_I];t_1E_,_-L, PAI_hITED OR BRIGHT _,_ETAL FIIN[ISHED
PARTS
1'_,within 30 days from the date of installation, any glass pall or the
finlsh on any porcelain enamel, painted or bright metal part Is defeettw
tn material or workmanship, Sears will reptace the part, free of charge.
FULl. SO.DAY _,_ARR_TY _ _,_CHAH_]C_L ADJUST_T$
For 90 days from the date of installation, Sears wilt provide, free of
charge, any mechanical adjustments necessary for proper operation of
the range, egcept for normal maintenance.
If the range Is subjected to other than private family use, the above
warranty coverage is effective for only 90 days.
WARRANTY SERV,_CE BSAVA_,ELE EY CO_TACT_ING THE _'_EAR-
EST SEARS SERVICE CENTERK_EPARTMEHT I_ THE UH_TED
STATES
This warranty applies only while this product is In use in the Untted States.
This warranty gives you specific legal rig hts, and you may also have other
rights which vary from state to state. SEARS, ROEEUC_ AND CO.
Dept. 817 WA
Hoffman Esf;a_es, |L 60179j)
"We Service What We Sell" ts our assurance to you that you can depend on Sears for service because Sears
service is nationwide.
Your Kenmore Oven has added value when you consider that Sears has aservice unit nee,you staffed by Sears
trained technlcians.., professional technicians specifically trained on Sears appliances, having the parts, tools
and equipment to ensure that we meet our pledge to you _"We Service What We Sell!"
TO FURTHER ADD TO THE VALUE OF YOUR RANGE, BUY ASEARS MA1NTEHAHCE AGREEMENT,
Kenmora Ranges are designed, manufactured and tested for
years of dependable operation. Yet,anymodern appliance may
require service from t line to time. The Sears Warranty plus the
Sears Malntenanee Agreement provides protect ionfrom une_-
pected repair bills and assuresyou of enjoying maximum rang e
efficlency_
Here*s a comparative warranty and Maintenance Agreement
chart showing you the benefits of a Sears Range Maintenance
Agreement,
Yo_ of 0wne_t'_p Cover_loe 1st Ye_ 2t_d ye_ 3rd YO_;'
,.,l.o...°._olo.,oo,.. W MA MA
1
=P_ other them Potclt_dn
Or Gf==_
2 ..oh=,_o.t_u..._n, W iVlA MA
3_ DA¥_
A_e,I Pr_v_n_ve Mait_t_n.
4=€. O_.=. =, yo=r ,aqu_., MA MA MA
CONTACT YOUR SEARS SALESPERSON OR LOCAL SEARS SERVICE
CENTER TODAY AND PURCHASE A SEARS MA_TEHAHCE AGREEMENT.
O ® Am r ica's Appliance
Sold by SF-ARS, ROEBUC_ AND CO., Ho_grnan Es_a_es_ EL 60179
Printed in the United States
