Kenmore 91195575891 User Manual RANGE Manuals And Guides L0901100
KENMORE Free Standing, Electric Manual L0901100 KENMORE Free Standing, Electric Owner's Manual, KENMORE Free Standing, Electric installation guides
User Manual: Kenmore 91195575891 91195575891 KENMORE RANGE - Manuals and Guides View the owners manual for your KENMORE RANGE #91195575891. Home:Kitchen Appliance Parts:Kenmore Parts:Kenmore RANGE Manual
Open the PDF directly: View PDF ![]() .
.
Page Count: 64
OWNER'S MANUAL
SELF°@LEANmN@
FREEoSTANDmN@
RANGE
MODEL HO°
9tt,95575
911.95576
9tto9557g
@A@THOH:
Before using this range,
read this _anuaR and
fogllow aH its Safe_y Ru_es
and Operating
BnstructionSo
oSafety gnstruct_ons
oOperation
Care and Caeaning
oProbgern SoUring
Sears, Roebuck and Co., Hoffman R=sta_es, UL 60179 U,S.Ao
229C4020Pt 49,,2 (SR- 10357)
7"ableof Contents
SELF-CLEANING
flADIANT#:flEESTANDINGflANGE
Range Safety ......................... 3-6
Stability Device ......................... 3
Protecting the Cooktop ............. 7
Removal of Packaging Tape .... 7
Features of Your Range ........... 8
Cooking Zones ......................... 9
Cooking Utensils ...................... 9
Checking Your Cookware ......... 9
Cookware Performance ............ 9
Radiant Coils .......................... 10
Radiant Unit Cycle .................. 10
Control Settings ...................... 10
Dual Cooking Zone ................. 10
Simmer ................................... 11
Home Canning Tips ................ ! 1
Hour/Minute Arrow Pad .......... 12
Display .................................... t2
To Black Out The Display ....... 12
F-Codes .................................. 12
Power On ................................ 12
Automatic Oven Shut-Off ........ 12
Oven Control .......................... 13
Indicator Lights ....................... 13
Disable 12 hour shut-off ......... 13
Oven Light .............................. !3
Clock and Timer ..................... 14
To Set The Clock .................... 14
To Set The Timer .................... 14
To Reset The Timer ................ 14
To Cancel The Timer .............. 14
Oven Cooking Tips ........... 15 -16
Baking With Margarine ........... 15
Baking .................................... 17
Broiling ................................... 18
Self-Cleaning Cycle ........... 19-20
Glass-Ceramic Cooktop
Cleaning ............................ 21-22
General Information ................ 22
Precautions ............................. 22
Control Panel .......................... 22
Broiler Pan and Grid ............... 22
Control Knobs ......................... 23
Oven Light Bulb ...................... 23
Oven Racks ............................ 24
Oven Door .............................. 24
Storage Drawer ...................... 25
Before Calling for
Service ............................... 26-28
Temperature Adjustment ........ 29
Warranty ................................. 31
Consumer Service Numbers ... 32
For your convenience and future reference, pgease write down
your model and seriaJ numbers in the space provided. They are
located on the front frame behind the storage dirawer.
MODE"- HUMBER: SER_A!!. NUMBER:
2
SAVE THESE IIHSTRUCTUOHS
Read aH instructions before using th_s appliance, When using
gas or electr_caU appniances, basic safety precautions shougd
be foHJowed, including the following:
oAll Ranges Can Tip ':::
:
oInjury To Persons :..
Could Result
• Install Anti-tip
Device Packed With
Range
• See Installation :::
Instructions :
TooBs you wHD need:
o Phillips head screwdriver
o 1318" open end or adjustable wrench
1, Remove the bracket from the
prepack located inside the oven.
2, Decide whether the bracket will be
installed on the right or left side of
range location.
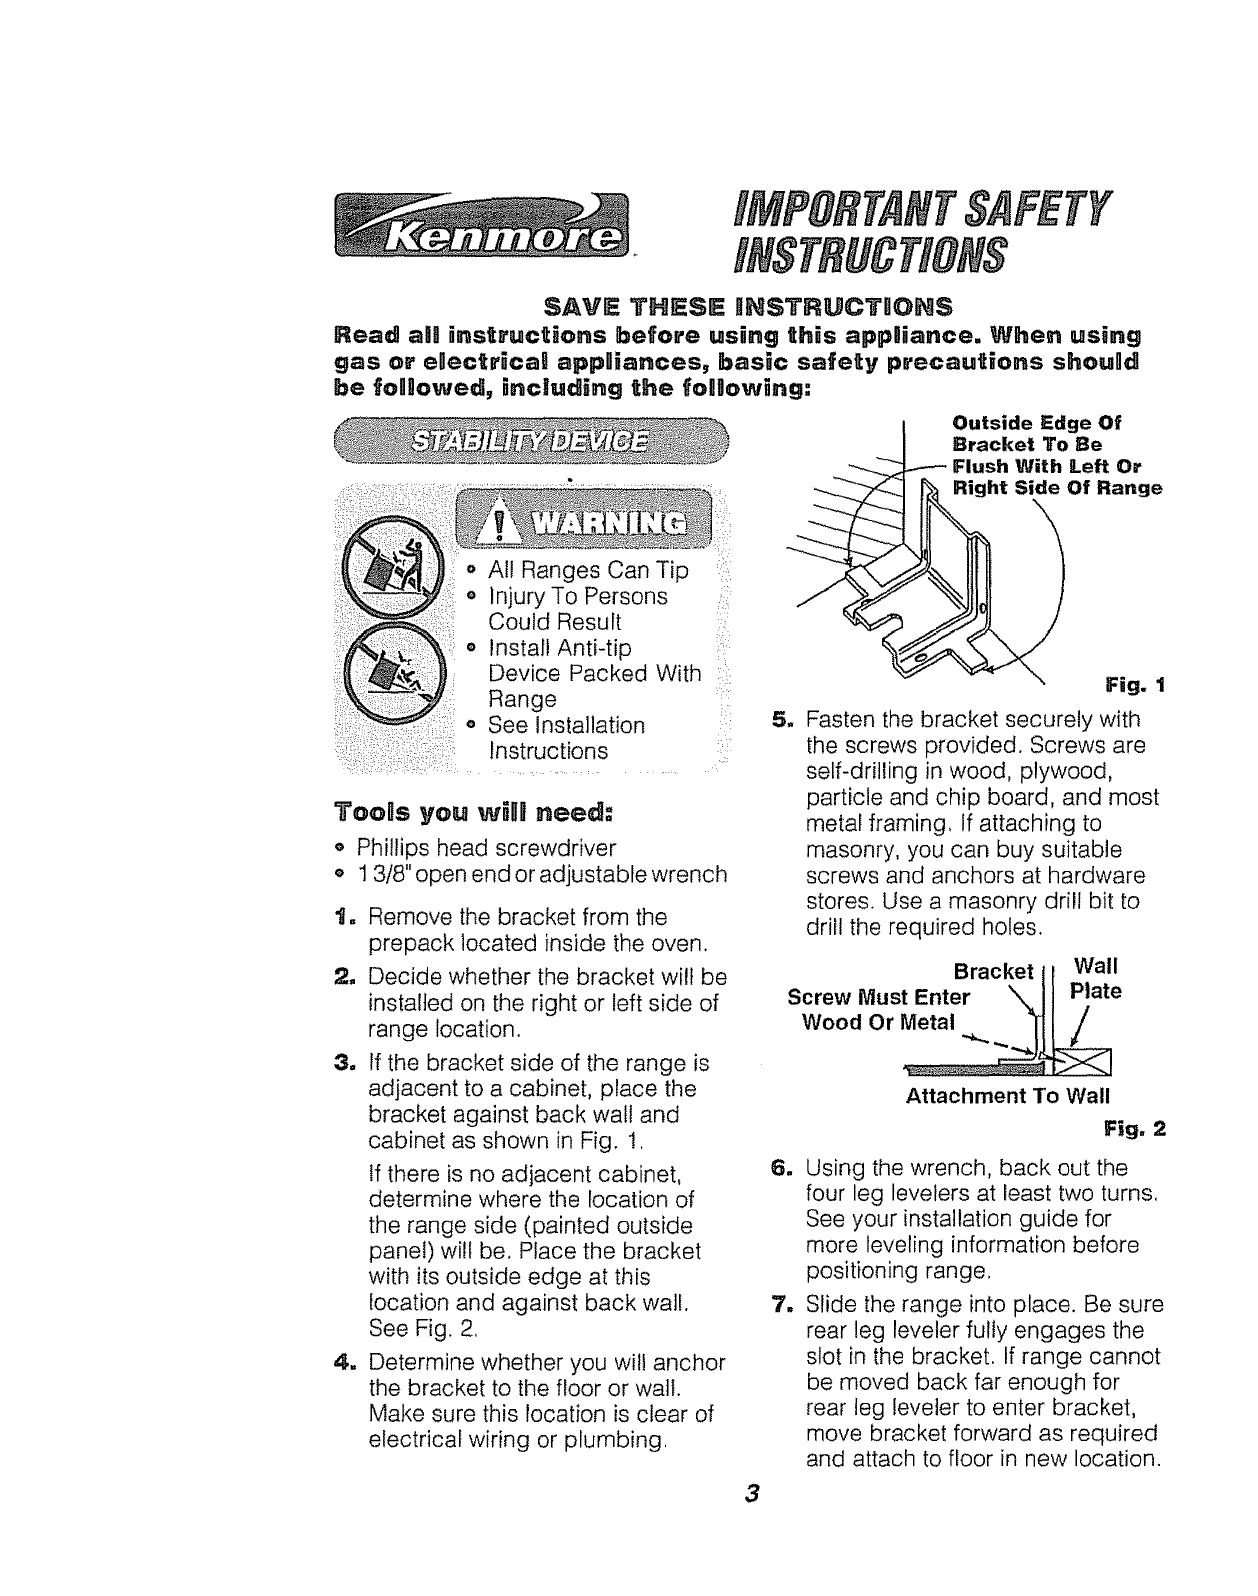
3, tf the bracket side of the range is
adjacent to a cabinet, place the
bracket against back wall and
cabinet as shown in Fig. !.
If there is no adjacent cabinet,
determine where the location of
the range side (painted outside
panel) will be. Place the bracket
with its outside edge at this
location and against back wall.
See Fig. 2.
4, Determine whether you wil! anchor
the bracket to the floor or wall.
Make sure this location is clear of
electrical wiring or plumbing.
Outside Edge Of
Bracket To Be
Flush With Left Or
Right Side Of Range
5_
=
m
Fig. 1
Fasten the bracket securely with
the screws provided. Screws are
self-drilling in wood, plywood,
particle and chip board, and most
metal framing, if attaching to
masonry, you can buy suitable
screws and anchors at hardware
stores. Use a masonry drill bit to
drill the required holes.
Bracket 11 Wall
Screw Must Enter \II Plate
WoodOrMetal _)_
Attachment To Wall
Fig, 2
Using the wrench, back out the
four leg levelers at least two turns,
See your installation guide for
more leveling information before
positioning range.
Slide the range into place. Be sure
rear leg leveler fully engages the
slot in the bracket. If range cannot
be moved back far enough for
rear teg leveler to enter bracket,
move bracket forward as required
and attach to floor in new location.
3
_, _. x ¸ ::_: ::....
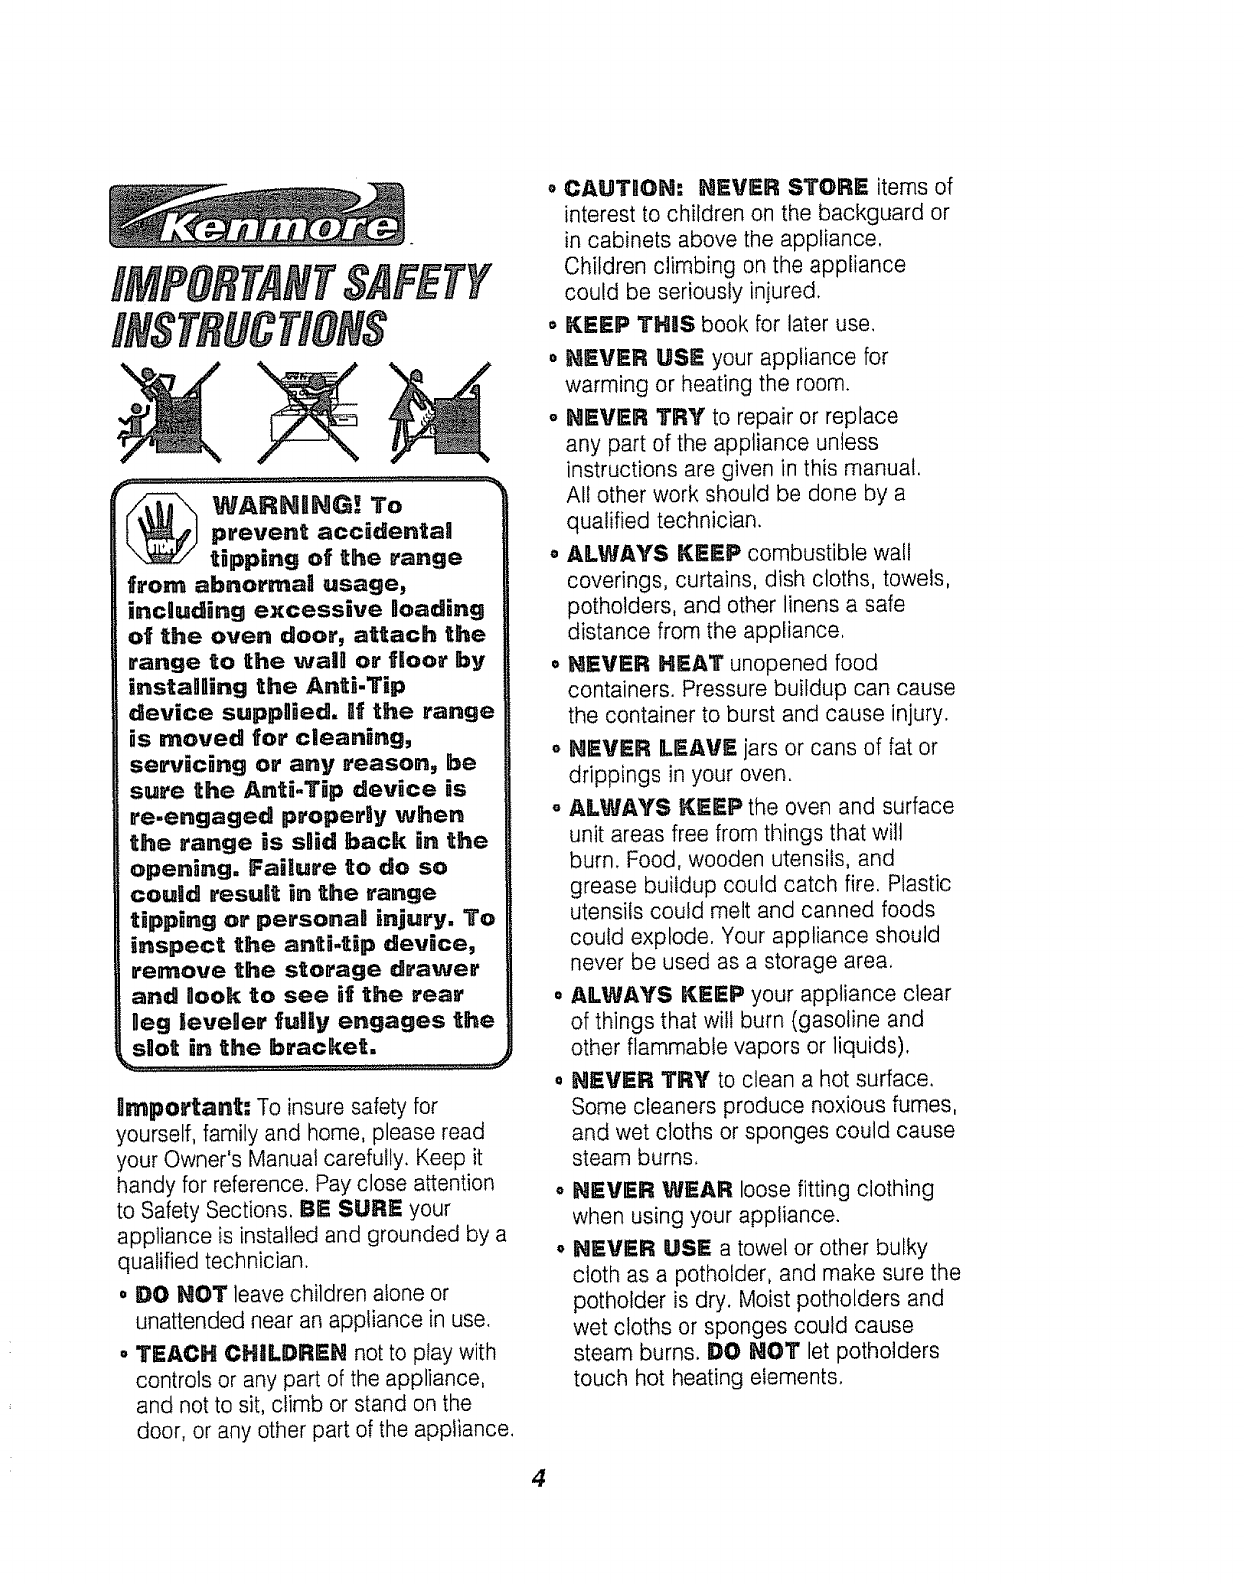
_ARNIING! To
prevent accidenta_
tipping of the range
from abnorrnait usage,
incguding excessive Boading
of the oven door, attach the
range to the wal0 or floor by
instagRing the Anti.Tip
device suppaied. If the range
is moved for cleaning,
servicing or any reason, be
sure the Anti-Tip device is
re-engaged properly when
the range is sgid back in the
opening. Failure to do so
couUd resuRt in the range
tipping or personaB injury. To
inspect the anti-tip device,
remove the storage drawer
and nook to see if the rear
geg leveger _uHy engages the
s,ot in the bracket,
Iirnportant: To insure safety for
yourself, family and home, please read
your Owner's Manual carefully. Keep it
handy for reference. Pay close attention
to Safety Sections. BE SURE your
appliance is installed and grounded by a
qualified technician.
o if}O HOT leave children alone or
unattended near an appliance in use.
°TEACH CHILDREN not to play with
controls or any part of the appliance,
and not to sit, climb or stand on the
door, or any other part of the appliance.
o
°
CAUTgON: NEVER STORE items of
interest to children on the backguard or
in cabinets above the appliance,
Children climbing on the appliance
could be seriously injured.
KEEP THIS book for later use,
NEVER USE your appliance for
warming or heating the room.
oNEVER TRY to repair or replace
any part of the appliance unless
instructions are given in this manual.
All other work should be done by a
qualified technician.
•ALWAYS KEEP combustible wall
coverings, curtains, dish cloths, towels,
potholders, and other linens a safe
distance from the appliance.
o NEVER HEAT unopened food
containers. Pressure buildup can cause
the container to burst and cause injury.
,, NEVER LEAVE jars or cans of fat or
drippings in your oven.
°ALWAYS KEEP the oven and surface
unit areas free from things that will
burn. Food, wooden utensils, and
grease buildup could catch fire. Plastic
utensils could melt and canned foods
could explode. Your appliance should
never be used as a storage area.
°ALWAYS KEEP your appliance clear
of things that will burn (gasoline and
other flammable vapors or liquids).
° NEVER TRY to clean a hot surface,
Some cleaners produce noxious fumes,
and wet cloths or sponges could cause
steam burns.
NEVER WEAR loose fitting clothing
when using your appliance.
NEVER USE a towel or other bulky
cloth as a pothotder, and make sure the
potholder is dry. Moist potholders and
wet cloths or sponges could cause
steam burns. DO NOT let potholders
touch hot heating elements.
4
oDO NOT touch cooktop zones,
surfaces near them, or interior oven
surfaces. These may be hot enough to
cause burns even though they are
dark in color. During and after use, do
not touch or let clothing or flammable
material contact the elements or hot
surfaces until they have had time to
cool. Other surfaces near the oven
vent openings, oven door and
window, and cooktop surfaces may
also be hot enough to cause burns.
oONLY SOME kinds of glass or
ceramic cookware can be used for
cooktop cooking. Make sure the
cookware you choose to use is
designed for cooktop cooking without
breaking due to the sudden
temperature change.
• ALWAYS USE care when touching
cooktop zones. They wilt retain heat
after the range has been turned off.
•HEVER BLOCK the oven air vent
behind the right rear element.
•COOKWARE USED for cooktop
cooking should be flat on the bottom
and large enough to cover the heating
area being used. Undersized utensils
expose the heating element and may
result in direct contact or ignition of
clothing.
o HEVER LEAVE surface units
unattended at high settings. Boilovers
result in smoking or greasy spills
which could catch fire.
HEVER cook on a broken cooktop;
cleaning solutions and spillage could
penetrate it and create the risk of
electrical shock or fire,
oALWAYS TURN utensil handles
inward and away from other surface
units to reduce the risk of burns,
ignition, unintended contact, and
spillage.
°WHEN PREPARING flaming foods
under the vent hood, turn the fan on.
oPLACE OVEH RACKS in the
desired position while the oven is
cool. If racks must be moved while
oven is hot, do not let potholder
contact the hot oven element.
•AFTER BROBUHG, always take
the broiler pan and grid out of the
oven and clean them, Leftover
grease in the broiler pan could catch
fire the next time you use your oven.
• ALWAYS USE care when opening
the oven door. Let hot air and steam
escape before moving foods,
• NEVER USE aluminum foi! to line the
oven bottom, improper use of foil could
start a fire, or electrical shock could
result.
5
,, CLEAH OHLY the parts listed in this
manual. Follow all cleaning
instructions. Be sure to remove broiler
pan and grid before the self-clean
cycle.
o NEVER RUB, move or damage the
door gasket on self-cleaning ranges.
o NEVER TRY to clean utensils,
cookware, removable parts, or broiler
pan and grid in the self*clean cycle.
oDO NOT USE oven cleaners - No
commercial oven cleaner, or protective
coating of any kind, should be used in
or around any part of the oven.
o NEVER force the latch handle open
while oven is hot.
nMPORTANT SAFETY
NOTICE. w
The California Safe Drinking
Water and Toxic Enforcement
Act requires the governor of
Cagifornia to publish a0ist of
substances known to the state
to cause birth defects or other
reproductive harm and re.
quires businesses to warn
their customers of potentiag
exposure to such substances.
The fiberglass insugation in a
seBf.cleaning oven will give off
avery smaU amount of carbon
monoxide during the cleaning
cycle, Exposure can be mini-
mized by venting with an open
door or window oR'using a
ventigation fan or hood.
iMPORTANT: The health of some
birds is extremely sensitive to
the fumes given off during the
self-cleaning cycle of any range.
Move birds tlo another well.
ventilated room.
READ AHD UHDERSTAHD
THRS RHFORMATBOH NOW w.
Be sure everyone in you,' home
knows what to do in case of fire.
Never use water on agrease
fire; it will only spread the
flames,
COOKTOP GRI_a, SE FIRE:
Never pick up aflaming pan,..
1, Turn off the surface elements,
11 Smother the flame with a tightly
fitting lid. Use baking soda or a dry
chemical, foam, or haton type
extinguisher.
OVEN FI1RE:
Do not try to move the pan.w
1. Close the oven door and turn
controls off.
tl If fire continues, carefully open the
door, throw baking soda on the fire,
or use a dry chemical, foam, or
haton type extinguisher,
6
Protectingthe Cooktop
o Do not slide cookware across your
cooktop.
o Do not use a dish towel or sponge
to clean or wipe your cooktop.
o Do not use scouring powders or
plastic, nylon or metal cleaning
pads on your cooktop.
o Do not apply your cooktop cleaning
creme to the cooktop surface if the
surface is hot.
• Read the instruction label on the
cooktop cleaning creme bottle
before attempting to clean the
surface of your cooktop.
o After cleaning the cooktop surface,
be sure to wipe off any residue with
a dry paper towel that may be left
from the cleaning creme.
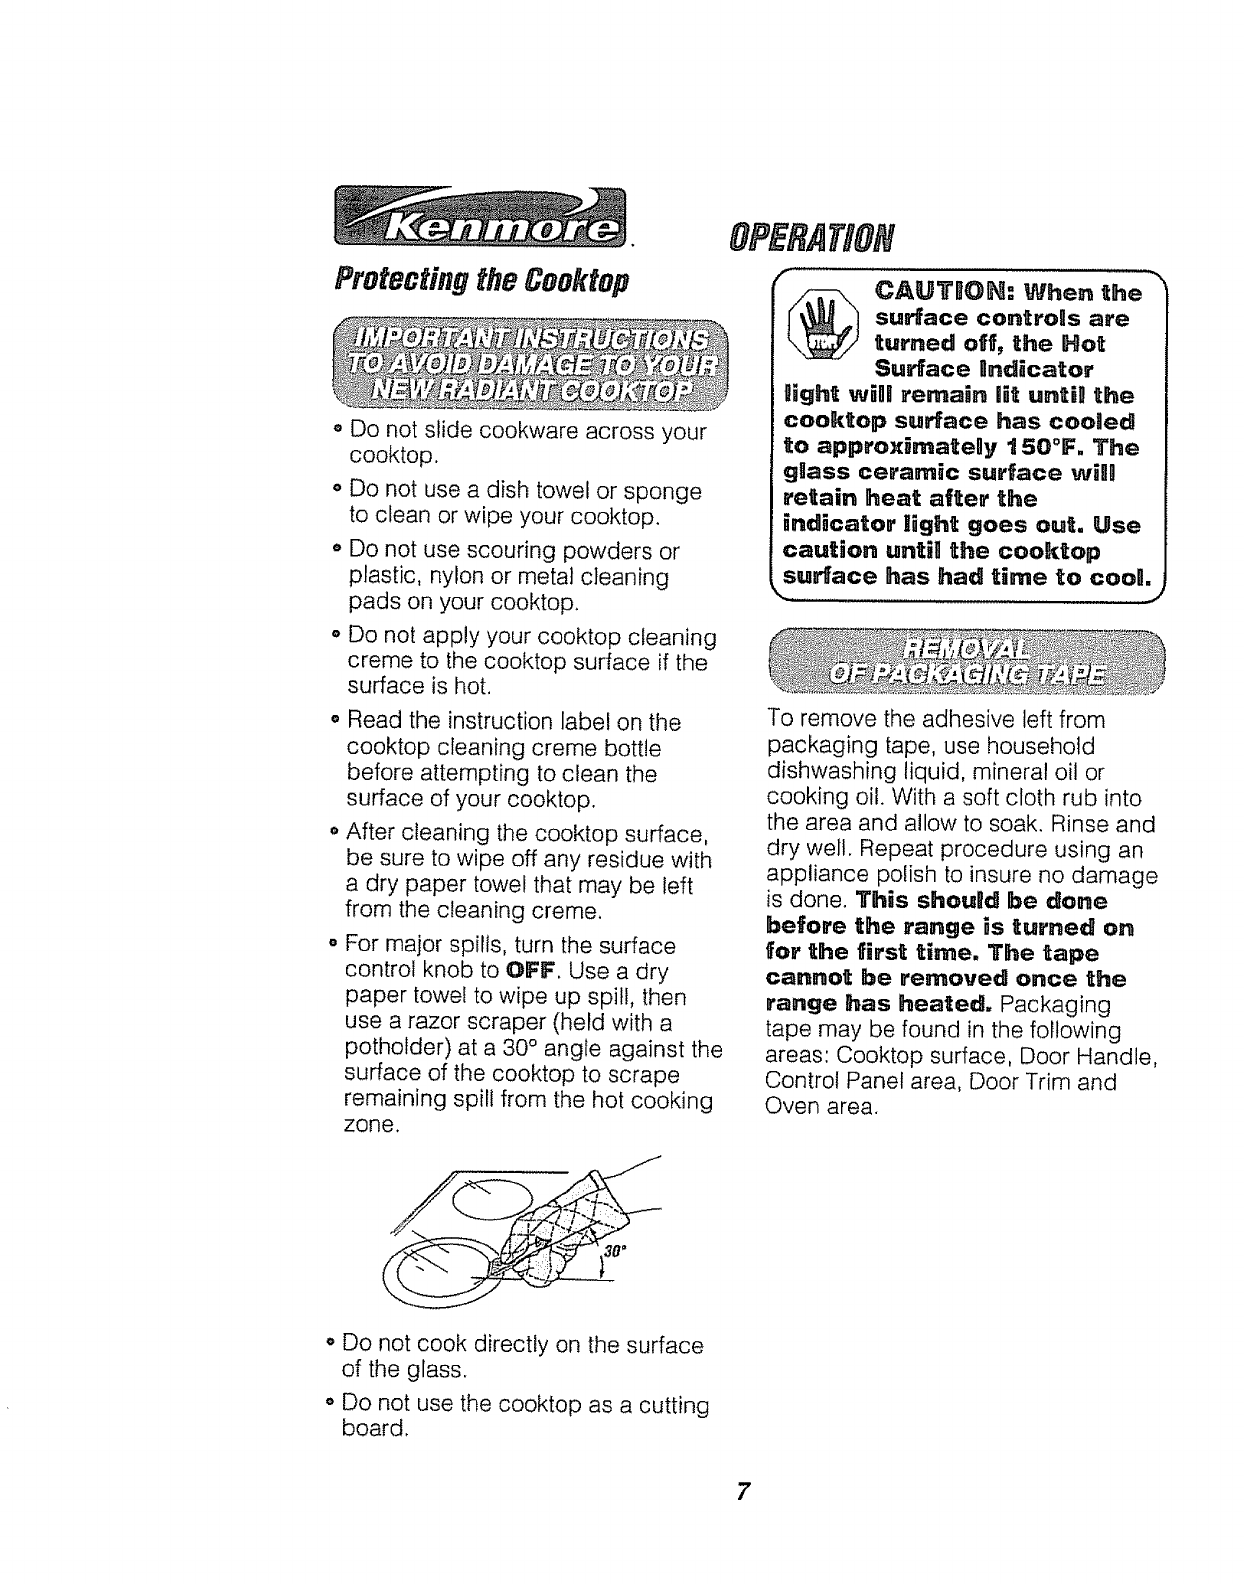
,, For major spills, turn the surface
control knob to OFF. Use a dry
paper towel to wipe up spill, then
use a razor scraper (held with a
potholder) at a 30 ° angle against the
surface of the cooktop to scrape
remaining spill from the hot cooking
zone.
OPERAtiON
_ AUTBOH: When the
surface controlls are
turned off, the Hot
Surface Bndlicator
gight wigi remain lit unt[B the
cooktop surface has cooledl
to approxirnatelly 150°F, The
glass ceramic surface will
retain heat after the
_ndicator llight goes out. Use
caution until] the cooktop
surface has had time to cool,
To remove the adhesive left from
packaging tape, use household
dishwashing liquid, mineral oil or
cooking oil. With a soft cloth rub into
the area and allow to soak. Rinse and
dry well. Repeat procedure using an
appliance polish to insure no damage
is done, This should be done
before the range is turned on
for the first time. The tape
cannot be removed once the
range has heated,, Packaging
tape may be found in the following
areas: Cooktop surface, Door Handle,
Control Panel area, Door Trim and
Oven area.
o Do not cook directly on the surface
of the glass.
o Do not use the cooktop as a cutting
board.
OPERATION
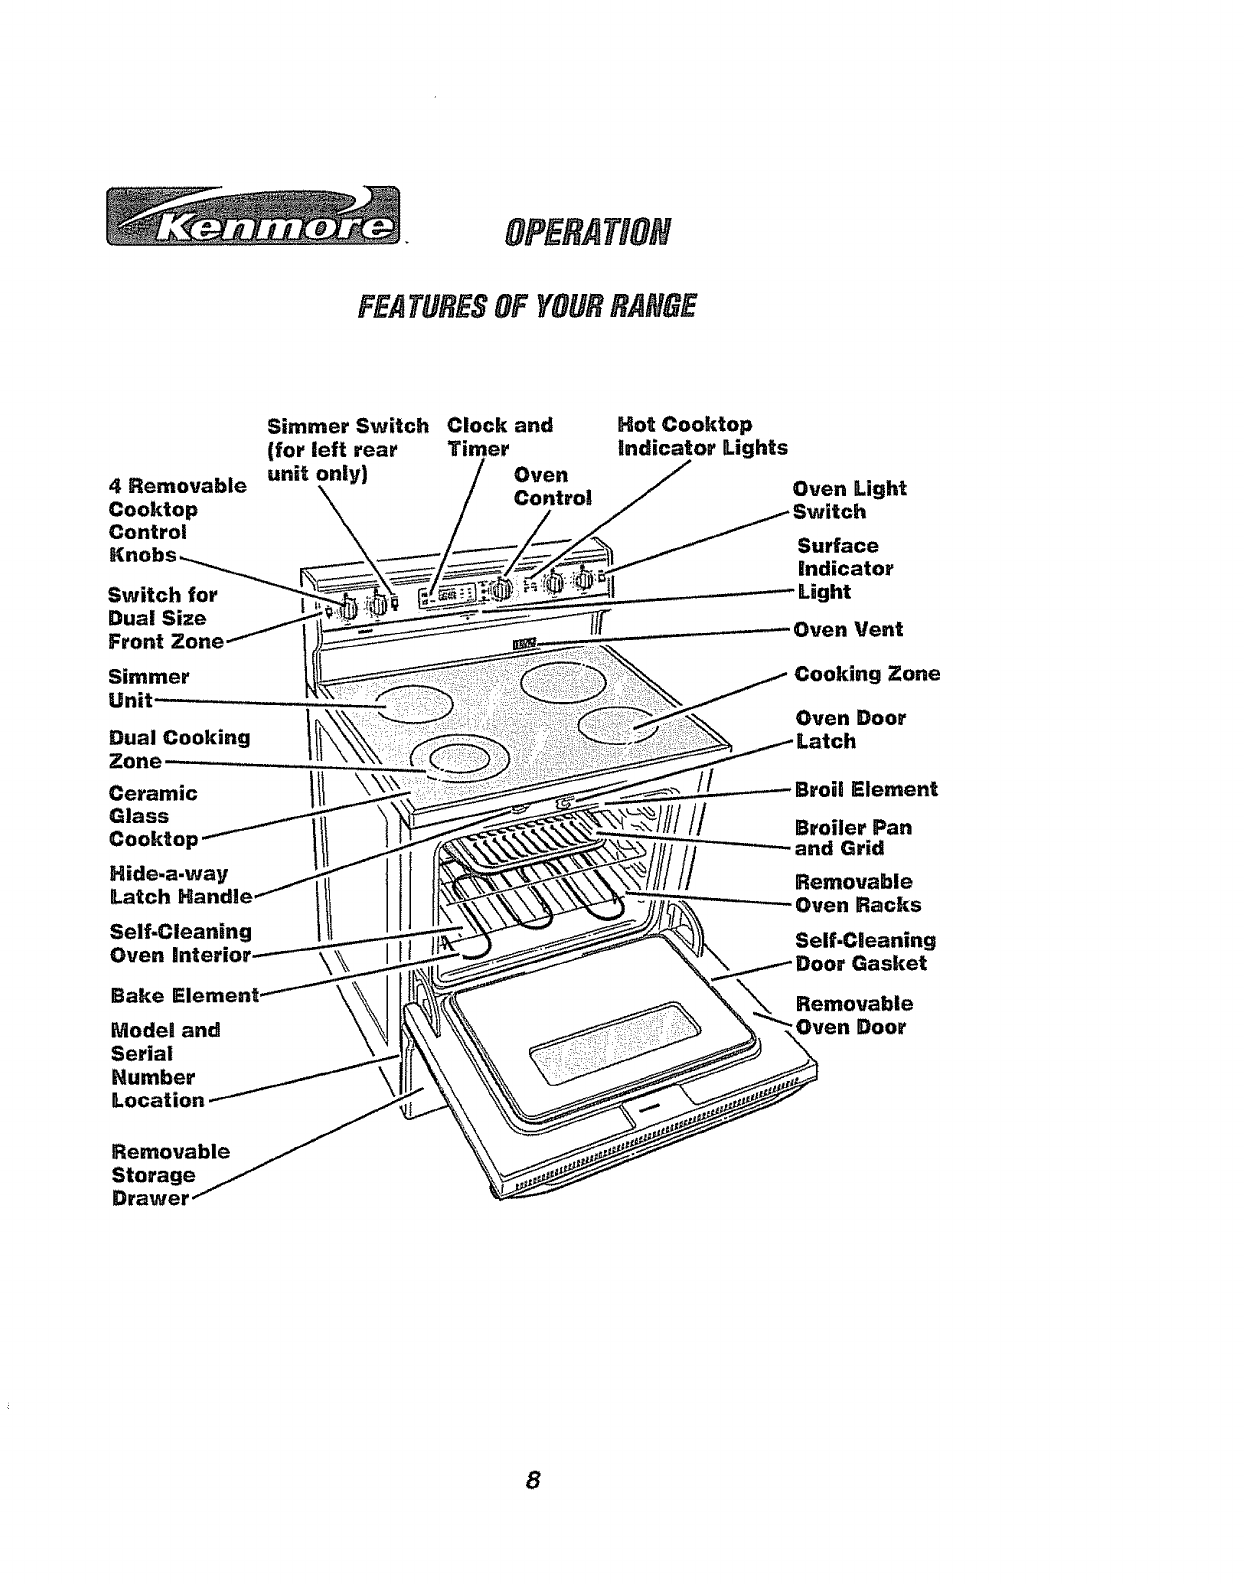
FEATURESOFYOURRANSE
4 Removable
Cooktop
Control
Simmer Switch
(for left rear
unit only)
Switch for
Dual Size
Front Zone,
Simmer
Unit- , ,
Dual Cooking
Zone
Ceramic
Glass
Cooktop
Hide.a.way
Latch
Self-Cleaning
Oven I
Bake
Model and
Serial
Number
Location
Clock and
Timer
Oven
Control
Hot Cooktop
indicator Lights
!/ffl
Oven Light
Surface
indicator
Light
Oven Vent
Cooking Zone
Oven Door
Broil Element
Broiler Pan
and Grid
Removable
Oven Racks
Self-Cleaning
Door Gasket
Removable
Oven Door
Removable
Storage
Drawer
8
OPERATION
RadiantCooktopCooking
Before using your new radiant
cooktop, clean it with the Cooktop
Cleaning Creme ®. This will leave a
protective coating.
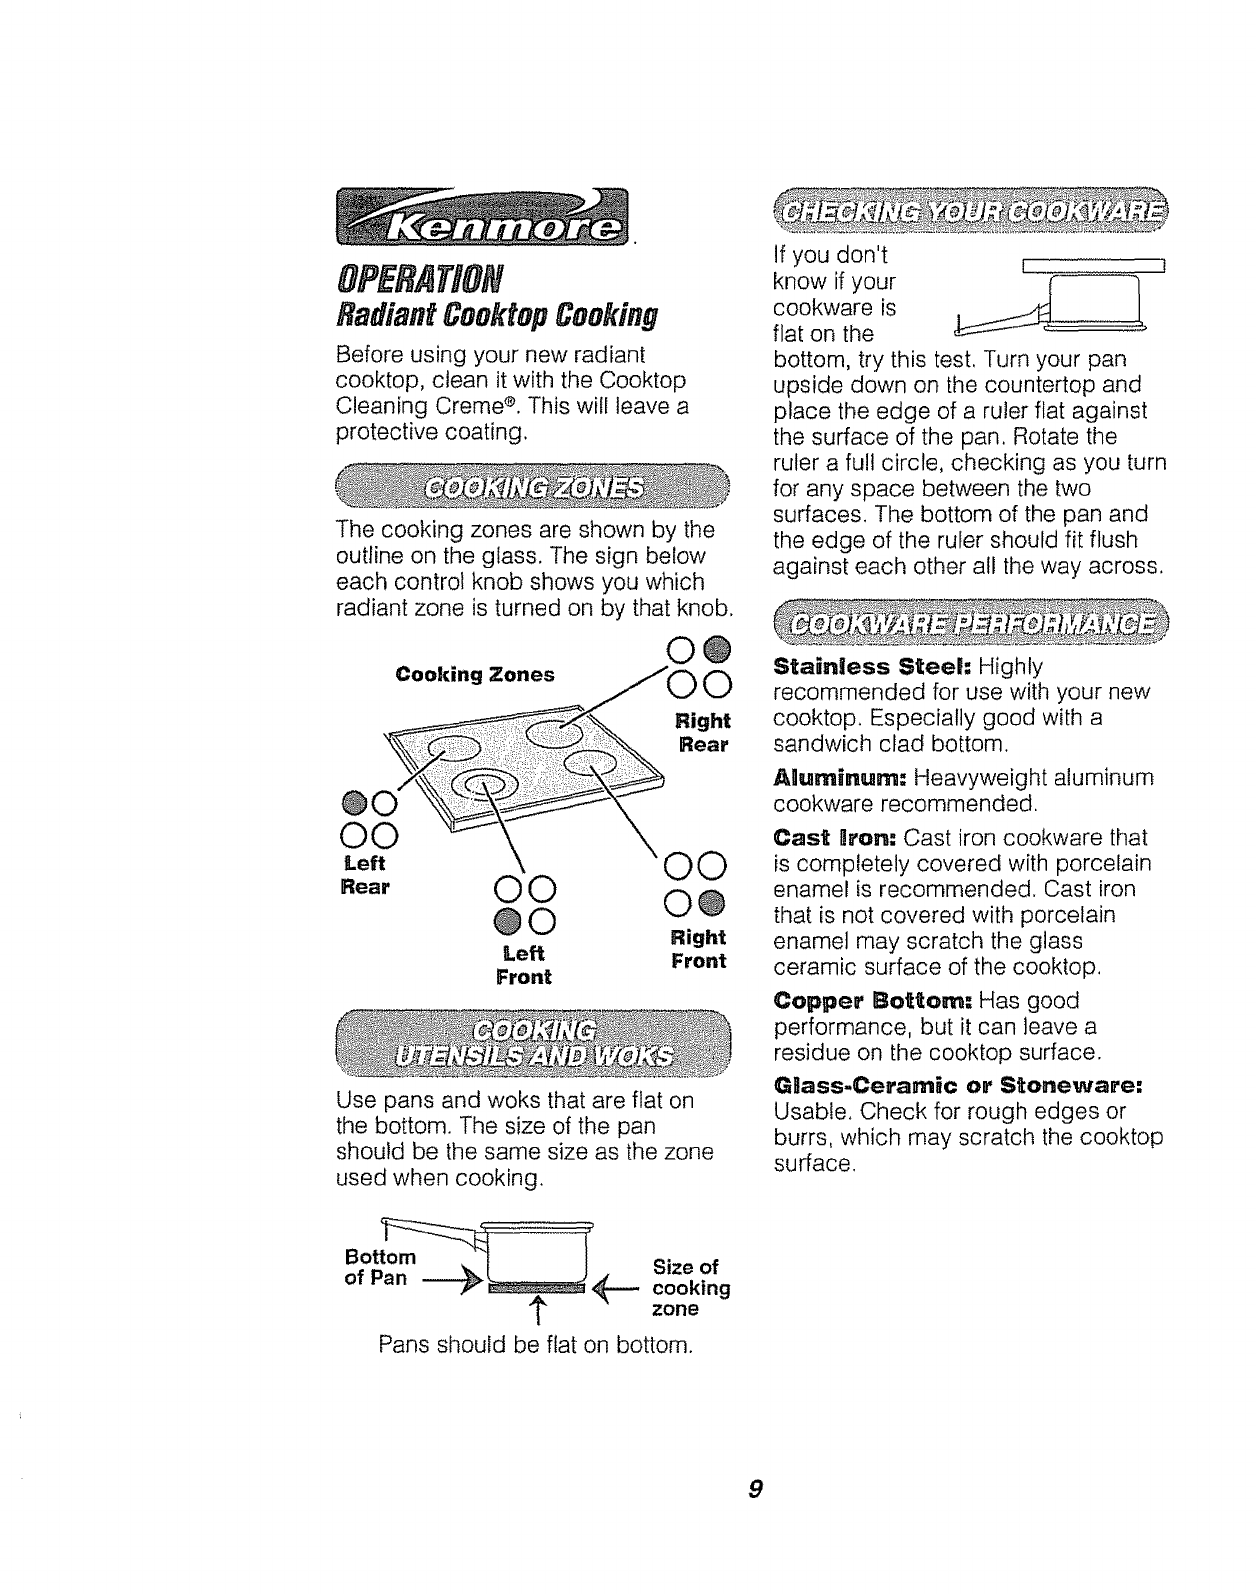
The cooking zones are shown by the
outline on the glass. The sign below
each control knob shows you which
radiant zone is turned on by that knob.
O@
Rear O0 O@
@ 0 Right
Left Front
Front
Use pans and woks that are flat on
the bottom. The size of the pan
should be the same size as the zone
used when cooking.
If you don't (j
know if your _ }
cookware is
flat on the
bottom, try this test, Turn your pan
upside down on the countertop and
place the edge of a ruler flat against
the surface of the pan. Rotate the
ruler a full circle, checking as you turn
for any space between the two
surfaces. The bottom of the pan and
the edge of the ruler should fit flush
against each other all the way across.
Sta_nlless SteeH: Highly
recommended for use with your new
cooktop. Especially good with a
sandwich clad bottom.
Aguminum: Heavyweight aluminum
cookware recommended,
Cast llron: Cast iron cookware that
is completely covered with porcelain
enamel is recommended, Cast iron
that is not covered with porcelain
enamel may scratch the glass
ceramic surface of the cooktop,
Copper Bottom: Has good
performance, but it can leave a
residue on the cooktop surface.
Gllass=Ceramic or Stoneware:
Usable. Check for rough edges or
burrs, which may scratch the cooktop
surface.
Size of
cooking
zone
Pans should be flat on bottom.
9
OPERATION
Radiant CooktopCooking
When the knobs are turned on, coils
beneath the glass radiate heat
through the glass to the cooking
utensil, it will take a few minutes for
the coils to heat; as they do, a red
glow can be seen on the surface of
the cooktop.
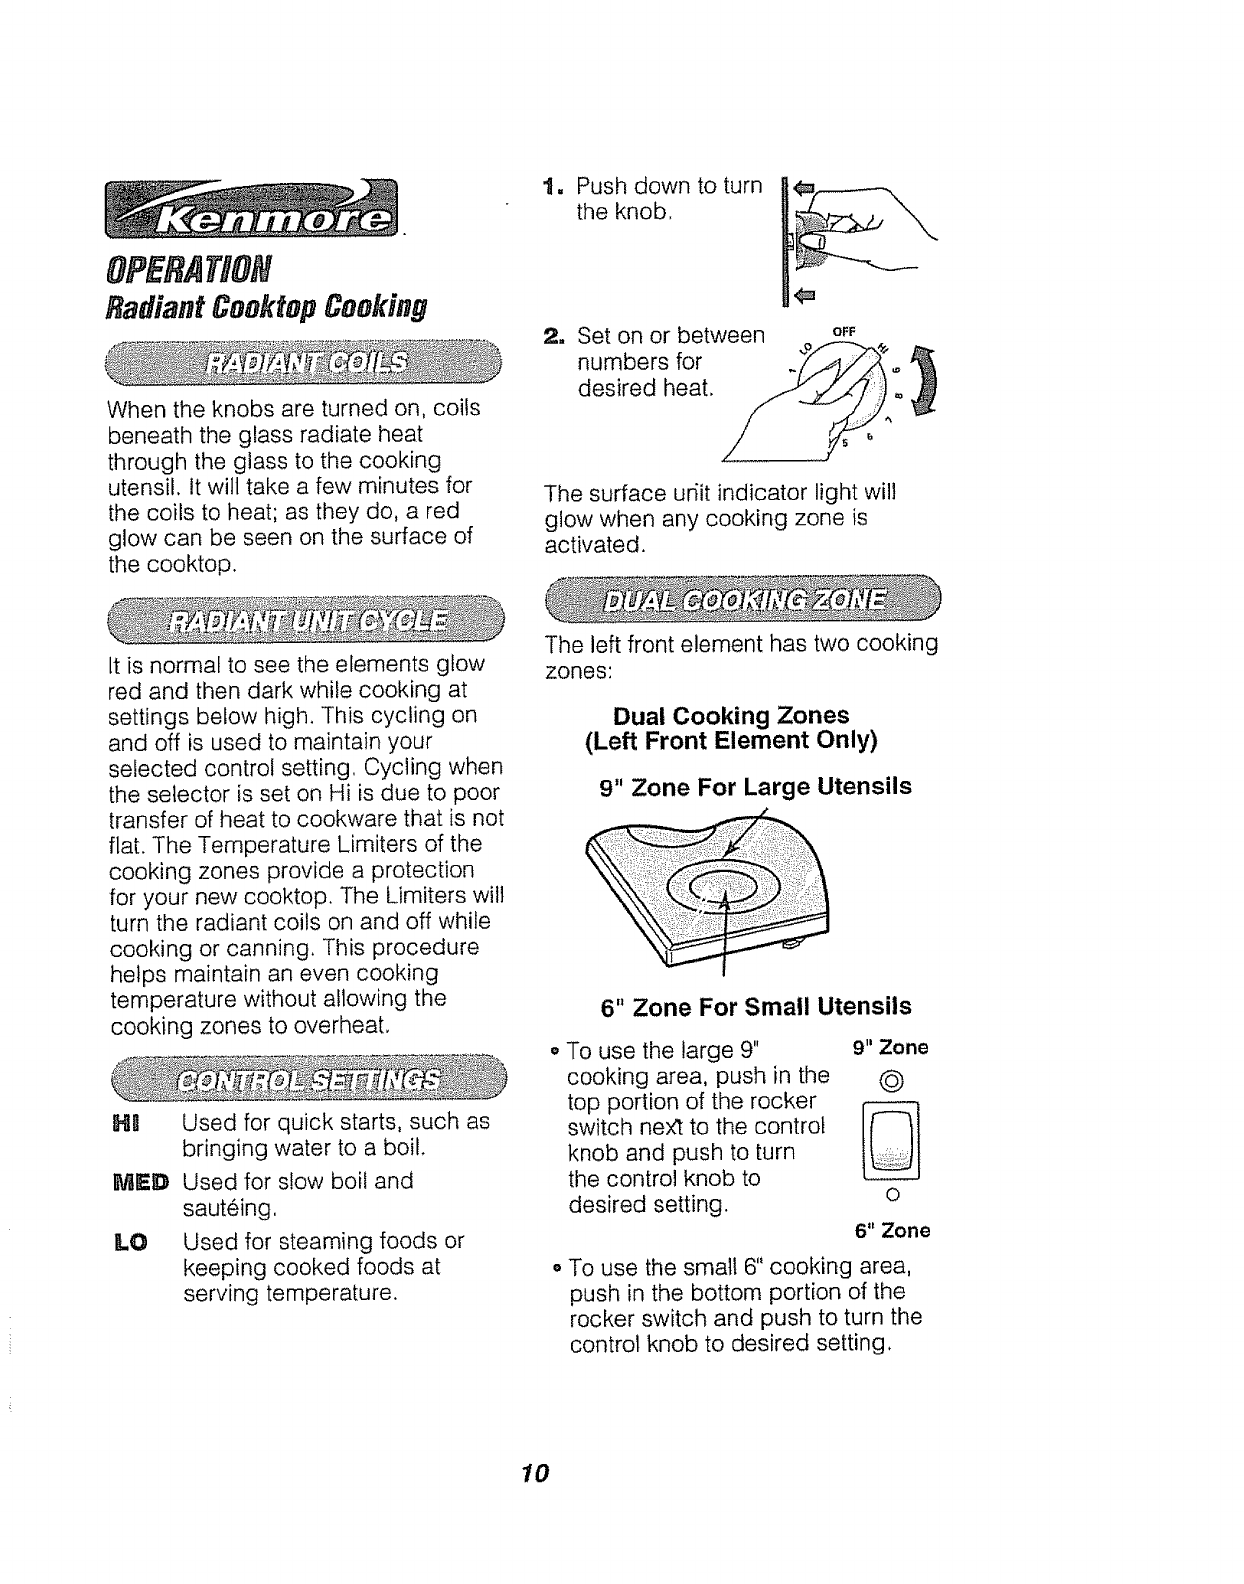
1. Push down to turn
the knob,
uSet on or between o
numbers for .__'_o/_
desired heat. /___
The surface udit indicator light will
glow when any cooking zone is
activated.
It is normal to see the elements glow
red and then dark while cooking at
settings below high. This cycling on
and off is used to maintain your
selected control setting, Cycling when
the selector is set on Hi is due to poor
transfer of heat to cookware that is not
flat. The Temperature Limiters of the
cooking zones provide a protection
for your new cooktop. The Limiters will
turn the radiant coils on and off while
cooking or canning. This procedure
helps maintain an even cooking
temperature without allowing the
cooking zones to overheat.
Hg
MED
LO
Used for quick starts, such as
bringing water to a boil.
Used for slow boil and
sauteing,
Used for steaming foods or
keeping cooked foods at
serving temperature.
The left front element has two cooking
zones:
Dual Cooking Zones
(Left Front Element Only)
9" Zone For Large Utensils
6" Zone For Small Utensils
To use the large 9" 9" Zone
cooking area, push in the Q
top portion of the rocker
switch next to the control
knob and push to turn
the control knob to
desired setting, o
6" Zone
To use the small 6" cooking area,
push in the bottom portion of the
rocker switch and push to turn the
control knob to desired setting,
10
OPEflATION
Radiant CoolrtopCooking
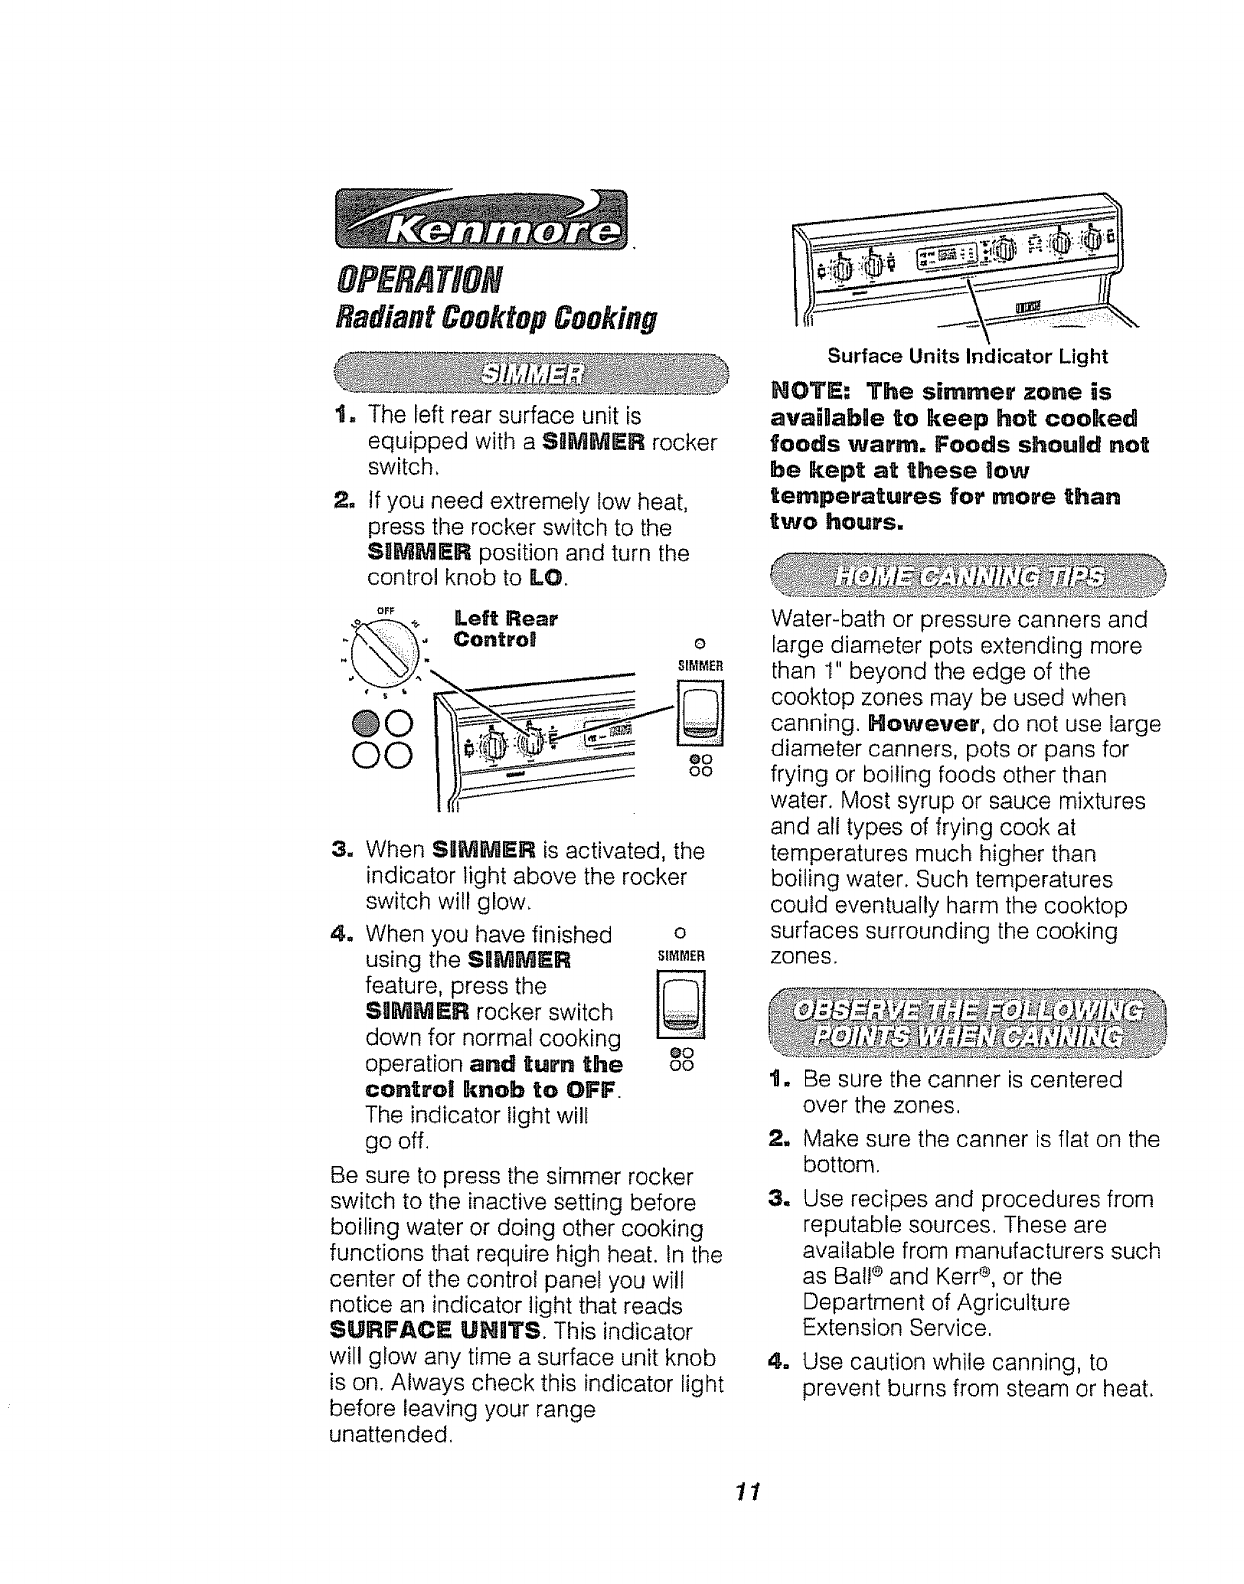
11. The left rear surface unit is
equipped with a SLIMMER rocker
switch,
1t If you need extremely low heat,
press the rocker switch to the
SIIMM_:R position and turn the
control knob to LO.
opl_
N _
NO
©©
0
81MMER
u
a
When SLIMMER is activated, the
indicator light above the rocker
switch will glow.
When you have finished o
using the S_MMER s_ER
feature, press the
SLIMMER rocker switch
down for normal cooking eo
operation and turn the oo
control knob to OFF.
The indicator light will
go off.
Be sure to press the simmer rocker
switch to the inactive setting before
boiling water or doing other cooking
functions that require high heat. In the
center of the control panel you will
notice an indicator light that reads
SURFACE UNFITS. This indicator
will glow any time a surface unit knob
is on. Always check this indicator light
before leaving your range
unattended.
Surface Units Indicator Light
NOTE: The simmer zone is
ava_ablle to keep hot cooked
foods warm. Foods shoulld not
be kept at these low
temperatures for more _han
two hours.
Water-bath or pressure canners and
large diameter pots extending more
than 1" beyond the edge of the
cooktop zones may be used when
canning. However, do not use large
diameter canners, pots or pans for
frying or boiling foods other than
water. Most syrup or sauce mixtures
and all types of frying cook at
temperatures much higher than
boiling water. Such temperatures
could eventually harm the cooktop
surfaces surrounding the cooking
zones.
tit
1t
1I
=
Be sure the canner is centered
over the zones,
Make sure the canner is flat on the
bottom.
Use recipes and procedures from
reputable sources, These are
available from manufacturers such
as Bal!® and Kerr ®, or the
Department of Agriculture
Extension Service.
Use caution while canning, to
prevent burns from steam or heat.
11
OFERAT#ON
OvenControl,Clock, and Timer
f
%%I @
..... FR_'I'B:J "_'00_
OFF
0*4OO''"
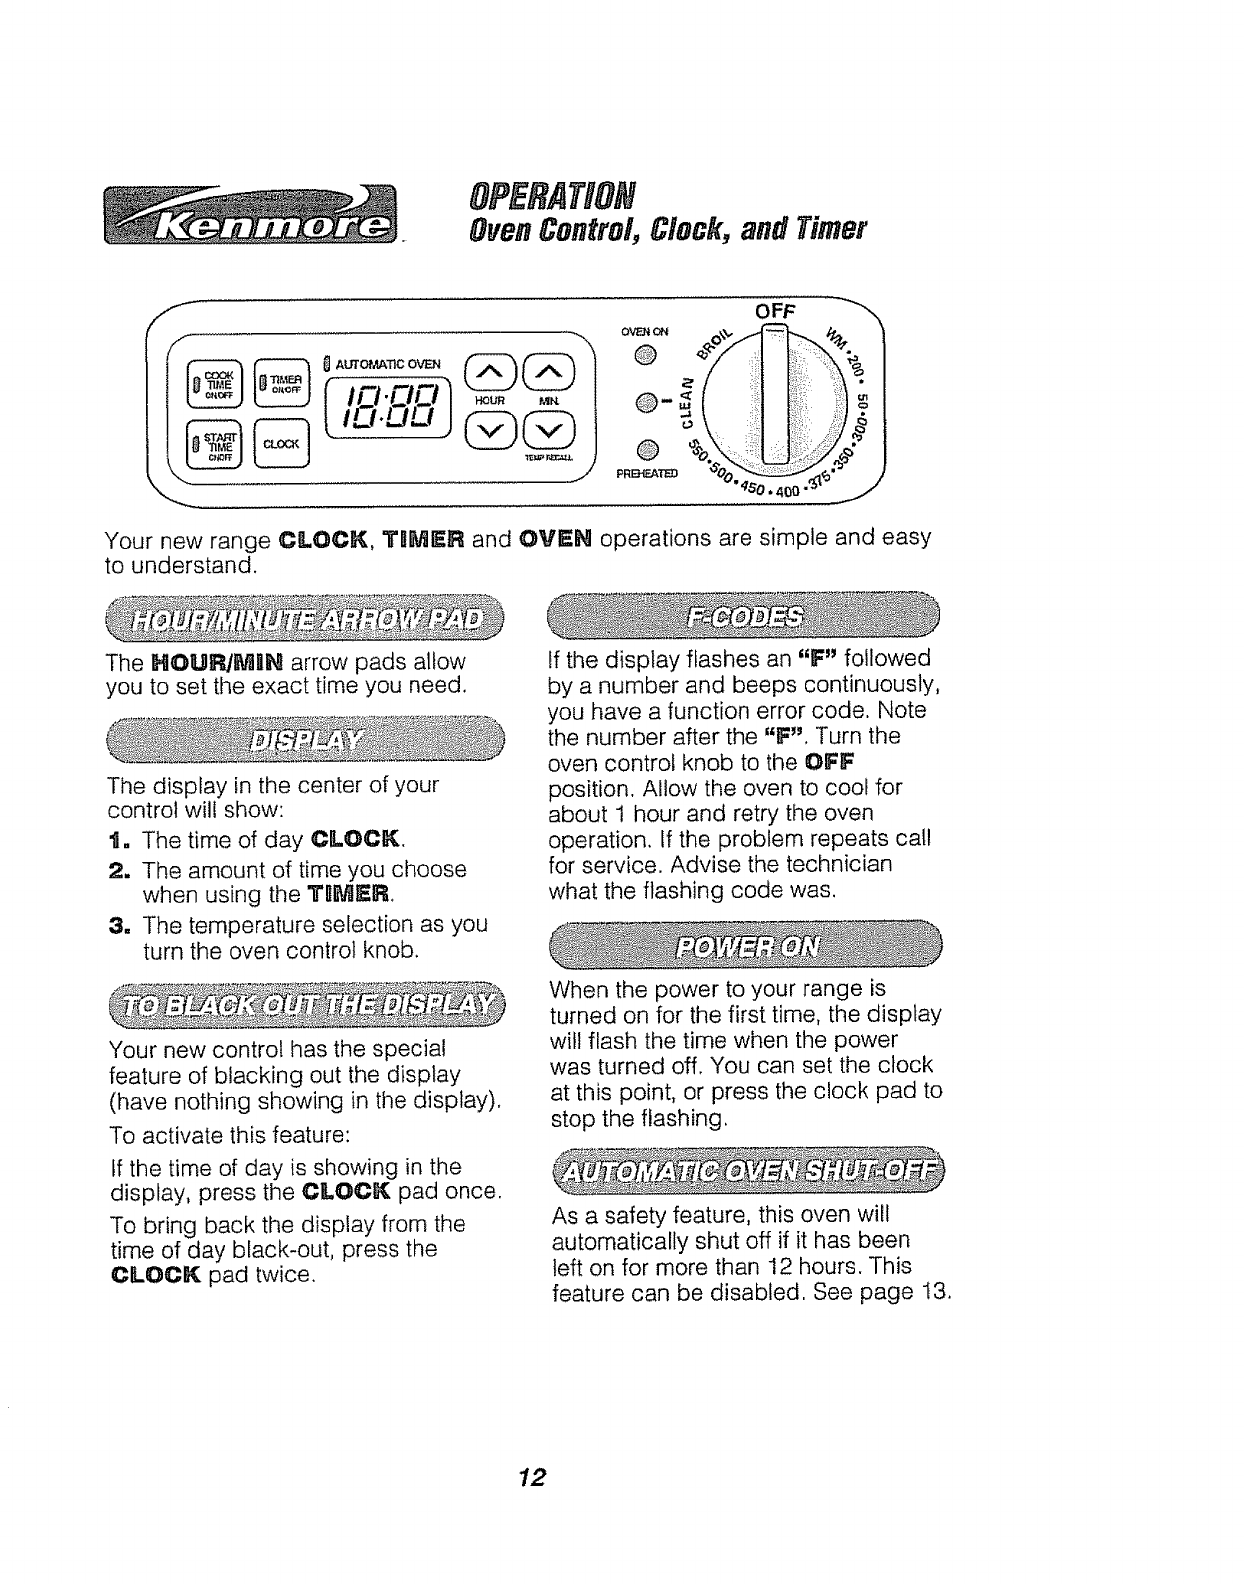
Your new range CLOCK, TRMER and OVEN operations are simple and easy
to understand.
The HOUR/MIH arrow pads allow
you to set the exact time you need.
The display in the center of your
control will show:
t. The time of day CLOCK.
2. The amount of time you choose
when using the TIIMI_R
3. The temperature selection as you
turn the oven control knob.
Your new control has the special
feature of blacking out the display
(have nothing showing in the display).
To activate this feature:
If the time of day is showing in the
display, press the CLOCK pad once.
To bring back the display from the
time of day black-out, press the
CLOCK pad twice.
If the display flashes an "F" followed
by a number and beeps continuously,
you have a function error code. Note
the number after the "F'. Turn the
oven control knob to the OFF
position. Allow the oven to cool for
about 1 hour and retry the oven
operation. If the problem repeats call
for service. Advise the technician
what the flashing code was.
When the power to your range is
turned on for the first time, the display
will flash the time when the power
was turned off, You can set the clock
at this point, or press the clock pad to
stop the flashing.
As a safety feature, this oven wilt
automatically shut off if it has been
left on for more than 12 hours. This
feature can be disabled. See page 13.
12

Your oven control has a selector knob
for setting BAKE, BROIIL, or
CLEAH. Simply turn the knob to the
temperature setting you want to use
or to Broil or Clean,
The PndDcator ""
L,ghts,
Your control has individual indicator
lights that will show you the
operations you have chosen,
As you read through your manual, you
will find what each of these indicators
is used for and how they wil! help you
in understanding your new control.
t. With the control knob in the off
position, press and hold the I_BN
UP and DOWH arrow pad, at the
same time, until "OH" or "OFF"
shows in the display.
2. Holding the MIIH UP and DOWH
arrow pads again, at the same
time, will alternate between 12
hour shut-off on or off,
•PREHEATED Indicator Light-
turns on and stays on when oven
has reached selected bake
temperature.
o OVEN OH Indicator Light -- turns
on and stays on when a Bake, Broil
or Clean function has been chosen.
oCLEAN Indicator Light -- turns on
and stays on for self-clean. If the
CLEAN indicator Light flashes you
should check for one of the
following:
1. The door handle is latched during
a baking function.
2. The door handle is not latched
during a self-clean function.
To prolong the life of your oven light
bulb, follow these helpful tips; always
turn the light off when the oven is not
in use or during a clean cycle. If your
appliance does not have a window in
the door, you will need to open the
door to make sure the oven light is off.
If your oven light is teft on for an
extended period of time, the oven wilt
be warm when the door is opened
due to the heat generated from the
light bulb,
13
OPERATION
Clockand Timer
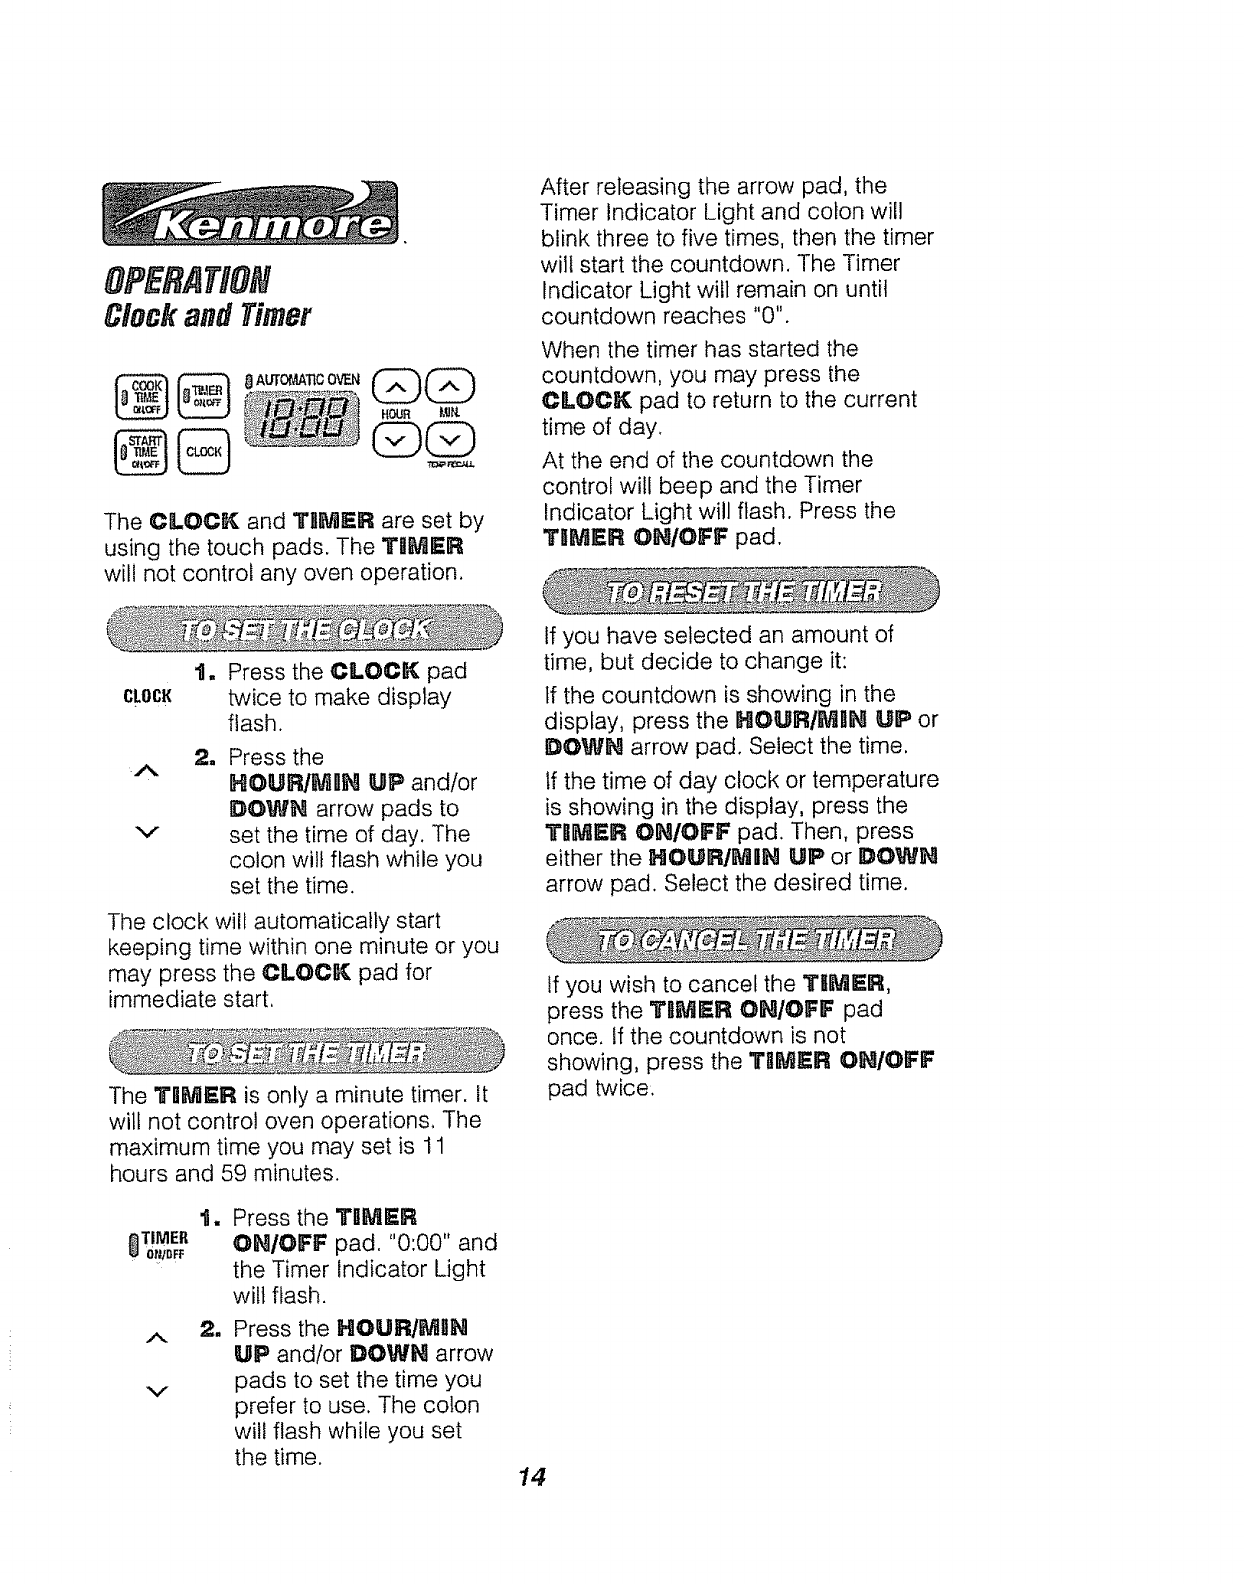
The CLOCK and TIIMER are set by
using the touch pads. The TgMER
w[ti not controt any oven operation.
1. Press the CLOCK pad
After releasing the arrow pad, the
Timer Indicator Light and colon will
blink three to five times, then the timer
will start the countdown. The Timer
Indicator Light will remain on until
countdown reaches "0".
When the timer has started the
countdown, you may press the
CLOCK pad to return to the current
time of day.
At the end of the countdown the
control will beep and the Timer
Indicator Light will flash. Press the
T_MER OH/OFF pad,
CLOCK twice to make display
flash.
%/
aPress the
HOUR/MgN UP and/or
DOWH arrow pads to
set the time of day. The
colon wilt flash while you
set the time.
The clock will automatically start
keeping time within one minute or you
may press the CLOCK pad for
immediate start,
The "IrlIMER is only a minute timer. It
wilt not control oven operations. The
maximum time you may set is 11
hours and 59 minutes.
A
V
It
2_
Press the TtIMER
ON/OFF pad. "0:00" and
the Timer Indicator Light
will flash.
Press the HOUR/_IIIN
UP andlor DOWN arrow
pads to set the time you
prefer to use. The colon
will flash while you set
the time. 14
If you have selected an amount of
time, but decide to change it:
tf the countdown is showing in the
display, press the HOUR/MUlN! UP or
DOWN arrow pad. Select the time,
If the time of day clock or temperature
is showing in the display, press the
TIIMER ON/OFF pad. Then, press
either the HOURIMBN UP or DOWN
arrow pad. Select the desired time.
tf you wish to cancel the TIMER,
press the TRMER ON/OFF pad
once. tf the countdown is not
showing, press the "filMER ON/OFF
pad twice.
OPERAT#ON
OvenCookingTips
Preheating is bringing the oven
temperature up to the temperature
you will be using during baking.
it is normal to have some odor when
using your oven for the first time. To
help eliminate this odor, ventilate
the room by open_ng awindow
or using avent hood.
PMPORTANT: Never cover the oven
bottom or oven rack with aluminum
foil. Improper use can cause poor
heat flow, poor baking results, and
may damage the oven finish. To
prevent staining from spillovers, you
may place a piece of aluminum foil or
cookie sheet below the food which
may spill over.
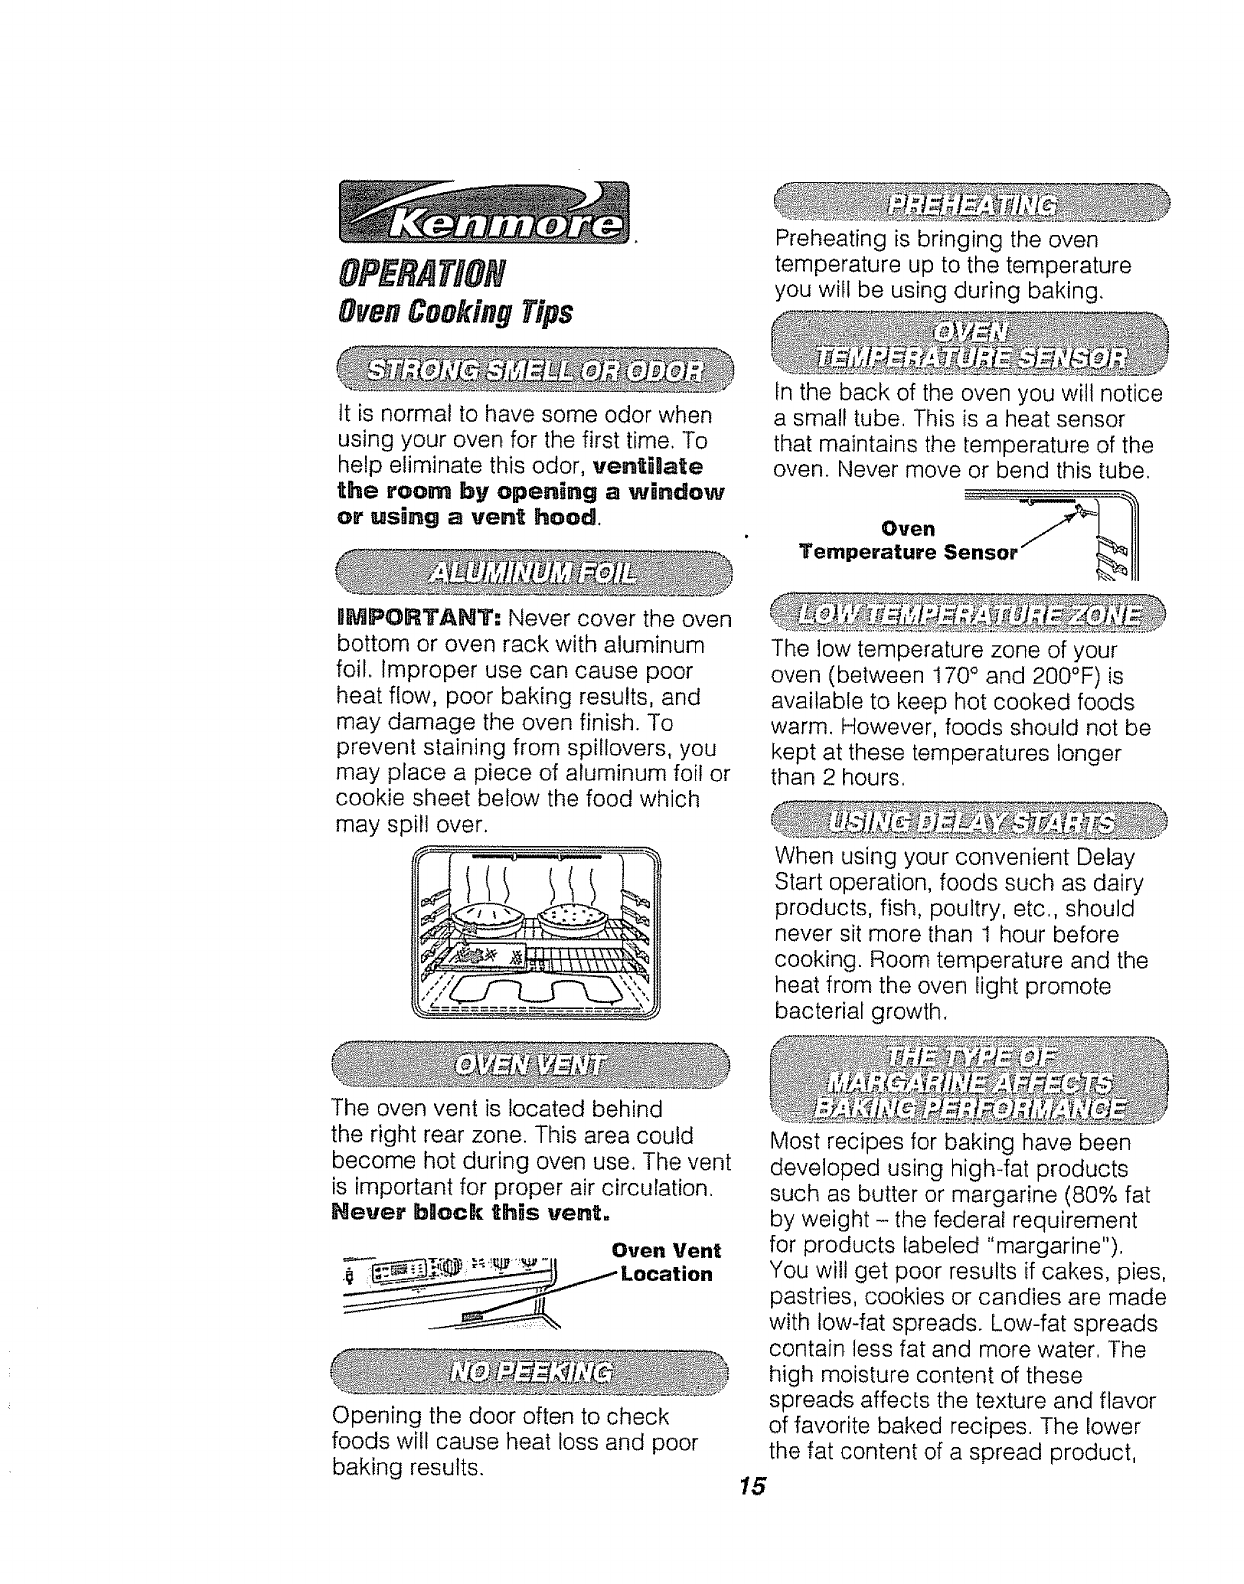
The oven vent is located behind
the right rear zone. This area could
In the back of the oven you wilt notice
a small tube, This is a heat sensor
that maintains the temperature of the
oven. Never move or bend this tube.
Temperature S
The low temperature zone of your
oven (between 170° and 200°F)is
available to keep hot cooked foods
warm. However, foods should not be
kept at these temperatures longer
than 2 hours.
When using your convenient Delay
Start operation, foods such as dairy
products, fish, poultry, etc., should
never sit more than 1 hour before
cooking. Room temperature and the
heat from the oven light promote
bacterial growth.
become hot during oven use. The vent
is important for proper air circulation,
Never b_ock this vent.
Oven Vent
Opening the door often to check
foods will cause heat loss and poor
baking results.
Most recipes for baking have been
developed using high-fat products
such as butter or margarine (80% fat
by weight - the federal requirement
for products labeled "margarine"),
You will get poor results if cakes, pies,
pastries, cookies or candies are made
with low-fat spreads. Low-fat spreads
contain less fat and more water. The
high moisture content of these
spreads affects the texture and flavor
of favorite baked recipes. The lower
the fat content of a spread product,
15
OFERAfi#f
OvenCookingTips
the more noticeable these differences
become. To ensure best results, use
margarine, butter or stick spreads
containing at least 70% vegetable oil.
The Oven Temperature Sensor at the
back of the oven continuously senses
and controls the temperature inside the
oven. To keep a constant set
temperature, the elements will cycle or
turn on and off during cooking.
If baking with more than one pan, place
the pans so each has at least t to 1 1/2"
of air space around it. Place pans so
one is not directly above the other.
GLASS, DARK NON-STgCK OR
DARKENED BY AGE BAKE-WARE,
absorbs heat and can be used for yeast
breads, pie crust or foods that need a
brown crust. The oven temperature,
when using these pans, should be
reduced by 25°F.
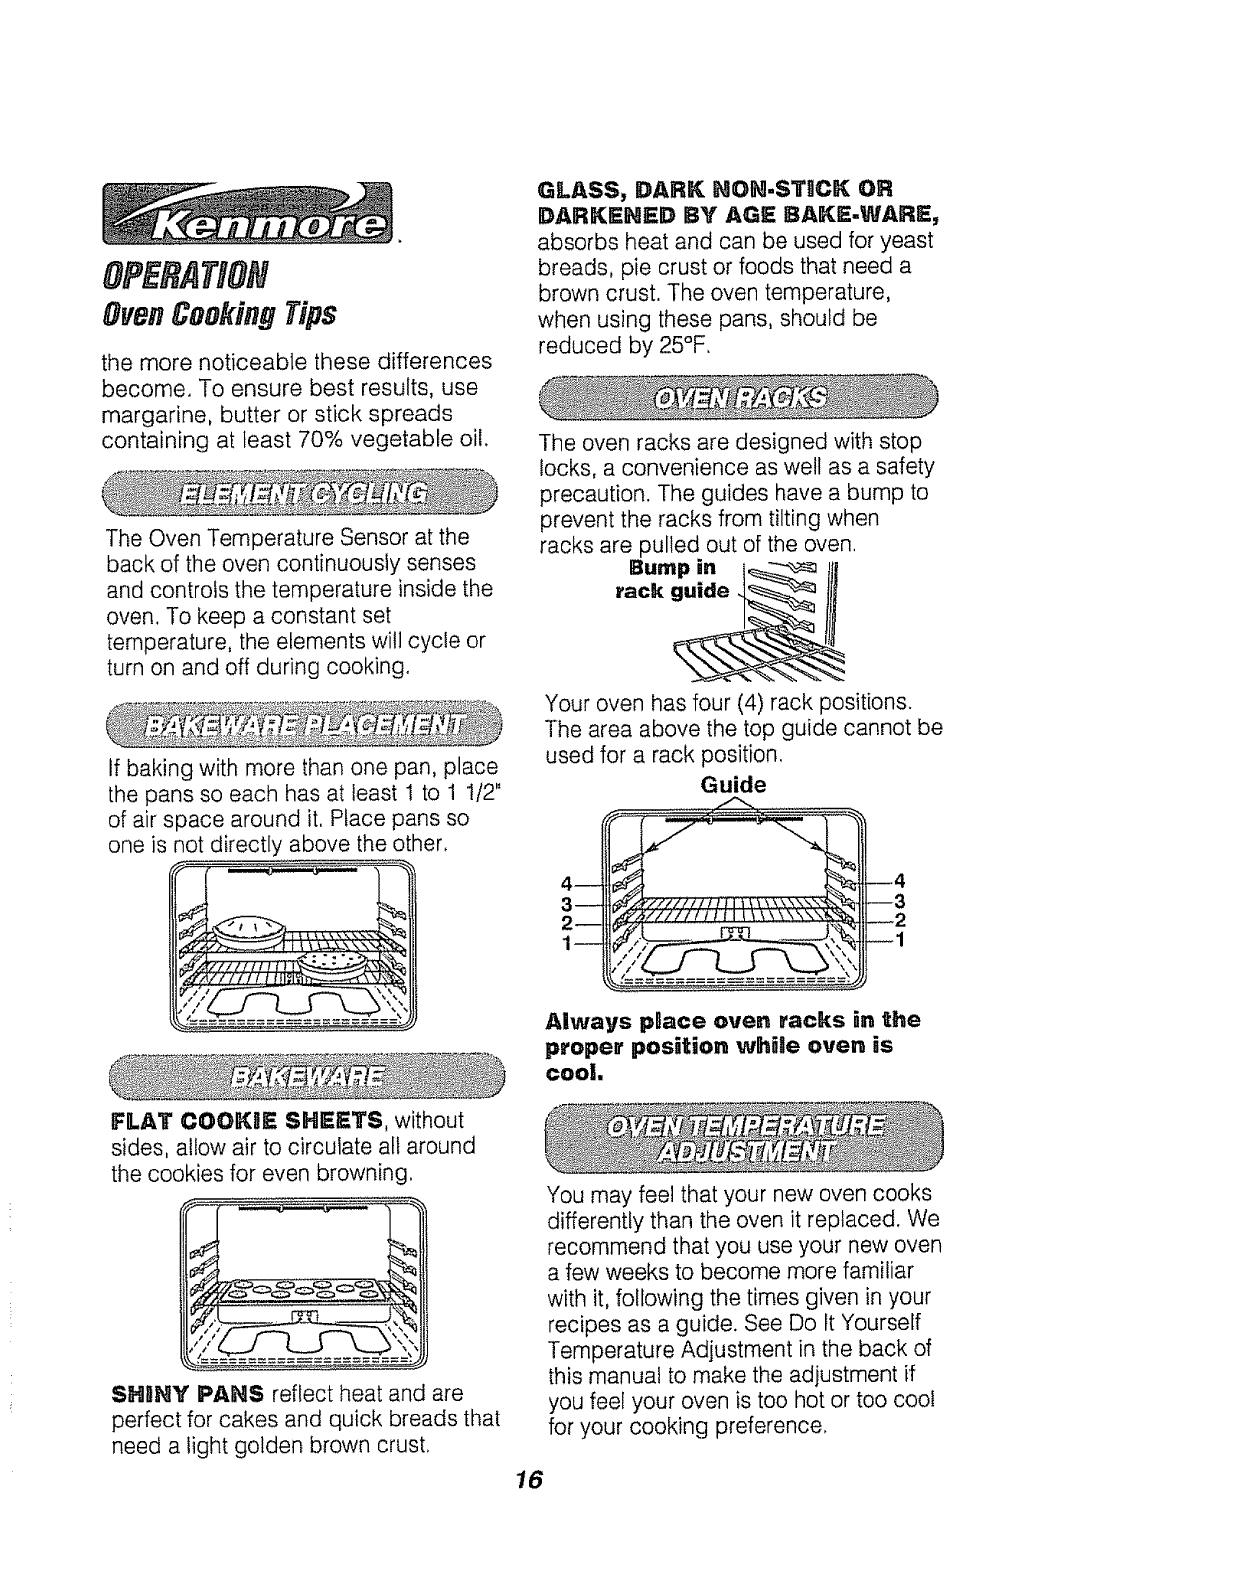
The oven racks are designed with stop
locks, a convenience as well as a safety
precaution. The guides have a bump to
prevent the racks from tilting when
racks are pulled out of the oven.
Your oven has four (4) rack positions.
The area above the top guide cannot be
used for a rack position.
Guide
Always place oven racks in the
proper position while oven is
cool,
FLAT CO(_KSE SHEETS, without
sides, allow air to circulate all around
the cookies for even browning.
oo
1114, ,,',
SHnNY PANS reflect heat and are
perfect for cakes and quick breads that
need a light golden brown crust.
You may feel that your new oven cooks
differently than the oven it replaced. We
recommend that you use your new oven
a few weeks to become more familiar
with it, following the times given in your
recipes as a guide. See Do It Yourself
Temperature Adjustment in the back of
this manual to make the adjustment if
you feel your oven is too hot or too coo!
for your cooking preference.
16
1. Turn the OVSN CONTROL KNOB
to selected temperature from WM to
550°F. As the knob turns, the control
display will show the changing
temperatures. When the display
shows your selected temperature,
release the coritrol knob. The
temperature will remain in the display
for 5 seconds then return to the time
of day. To recall the temperature
display, press the MIIN DOWN
arrow pad.
2. The "OVEN ON" indicator light
will glow.
3, When the oven has reached the
selected temperature, a series of
short tones will sound, and the
"PREHEATED" and "OVEN ON"
indicator lights will glow.
4, The "PREHEATED" and "OVEN
ON" indicator lights will remain on
until baking is complete and the
control knob is turned to the OFF
position.
1. Make sure the correct time of day is
showing in the display.
2, Press the COOK TIME
ONtOFF pad.
3. Press the HOUR/MnN UP and/or
DOWN arrow pads, to set how tong
you want foods to cook.
4. Turn the Oven Control Knob to the
baking temperature you want to use.
The Oven On and Automatic Oven
indicator lights will glow. When the
temperature reaches the temperature
you have selected, the preheated
indicator light will glow.
5. When the set amount of cooktime has
reached zero, a tone will sound and
the "COOK TRME" and "OVEN
OH" indicator lights will blink until
the oven control knob is turned to the
OFF position.
1. Make sure the correct time of day is
showing in the display,
2. Press the COOK. T_ME
OH/OFF pad.
3. Press the HOUR/MgH UP and/or
DOWN arrow pads, to set how long
you want foods to cook.
4, Press the START Tg_E
ONtOFF pad.
5. Press the HOURIMIIN UP and/or
DOWN arrow pads to set the time of
day you want the oven to turn on.
6. Turn the OVEN CONTROL _N08
to the baking temperature you want
to use. The "OVEN ON" indicator
light will blink when the
A_TO_AT_C OVEN times are set,
but a temperature is not selected.
7. The "START TOME" and
"AUTO_ATIC OVEN" indicator
lights will glow.
8. When the start time is reached, the
oven will automatically turn on and
start cooking,
9. When the temperature inside the
oven reaches the selected
temperature, the "PREHEATED"
indicator light wil! glow.
10, When baking is finished the
"CO0_TI_E" and "OVEN ON" in-
dicator lights will blink until the control
knob is turned off.
DOTE: After pressing the Cook Time or
Start Time pads, if you hesitate before
pressing the Hour/Min pads, the display
witl blink 5 times and return to the time of
day, if this happens just press again the
Time pad you were setting to continue.
Cook Time, Clock, Timer, and Start
Time can be recalled by pressing the
desired pad once, Press the HOUR/_g_
UP and/or DOWN arrow pads if a time
change is desired.
17
Broiling is cooking by direct heat
from the upper element. The oven
door should remain open to the broil
stop position during broiling.
The closer you place foods to the
broi! element the faster foods brown
on the outside yet remain red to pink
in the center.
Moving meats away from the element
will allow the meat to cook to the
center while browning on the outside.
Cook side 1 at least 2 minutes longer
than side 2. If your oven is connected
to 208 volts, you may want to use a
higher rack position and/or broil
foods longer.
The size, weight, thickness, starting
temperature and your preference of
the doneness of the meat will affect
broiling. This chart is based on meats
at refrigerator temperature,
tt is not necessary to preheat the
oven when broiling. Use the broiler
pan and grid that came with your
range. Both are designed for proper
drainage of fat and liquids.
af foil _s used _t must
be mollded t_ghUy to
the gr_d and sgits cu_
into _he fo_ll _o match
those of the grid. ThRs
allllows fats and Oiqu_ds to
drain into the broiUer pan,
preventing fire and
excessive smoke=
A_ways remove the pan and
gr_d from the oven.
Storing or forgetting
a soiged broi_er pan
in the oven is a potential
smoke or fire hazard=
........................................... J
The U,S. Department of Agriculture
recommends to cook meat and
poultry thoroughly---meat to at least
an INTERNAL temperature of 160° F
and poultry to at least an INTERNAL
temperature of 180 ° F. Cooking to
these temperatures usually protects
against food-borne illness. 18
FOOD RACK
POSITION
3
Steak 1" thick
Ground beef
patties
1" thick 3 16-18
Pork Chops-
1/2"thick 3 27-29
Fish (fillets) 3 11-13
Chicken (pieces) 2 45-55
TOTAL
TIME (MIN.)
9-11
I. Set the OVEH COHTROL
KHOB to BROIIL
2. The "OVEH ON" indicator light
will glow.
3. When broiling is finished, turn the
OVe:N CONTROL KNOB to the
"OFF" position,
Serf-CleaningCycle
CLEANING
1. Remove the broiler pan and grid,
oven racks, utensils and any foil
that may be in the oven.
2. Soil on the front frame, 1" inside
the oven and outside the door
gasket, will need to be cleaned
by hand.
Front Frame
/PDoor Gasket ___
--'-- Door Liner \
Clean these areas with hot water,
soap-filled steel wool pads or
cleansers such as Soft Scrub ® to
remove any soil. Rinse well with clean
water and dry.
3, Wipe up any heavy spillovers on
the oven bottom.
4. Do not clean the door gasket. The
fiberglass material of the oven
door gasket cannot withstand
abrasion. It is essential for the
gasket to remain intact. If you
notice it becoming worn, frayed or
displaced on the door, it should be
replaced.
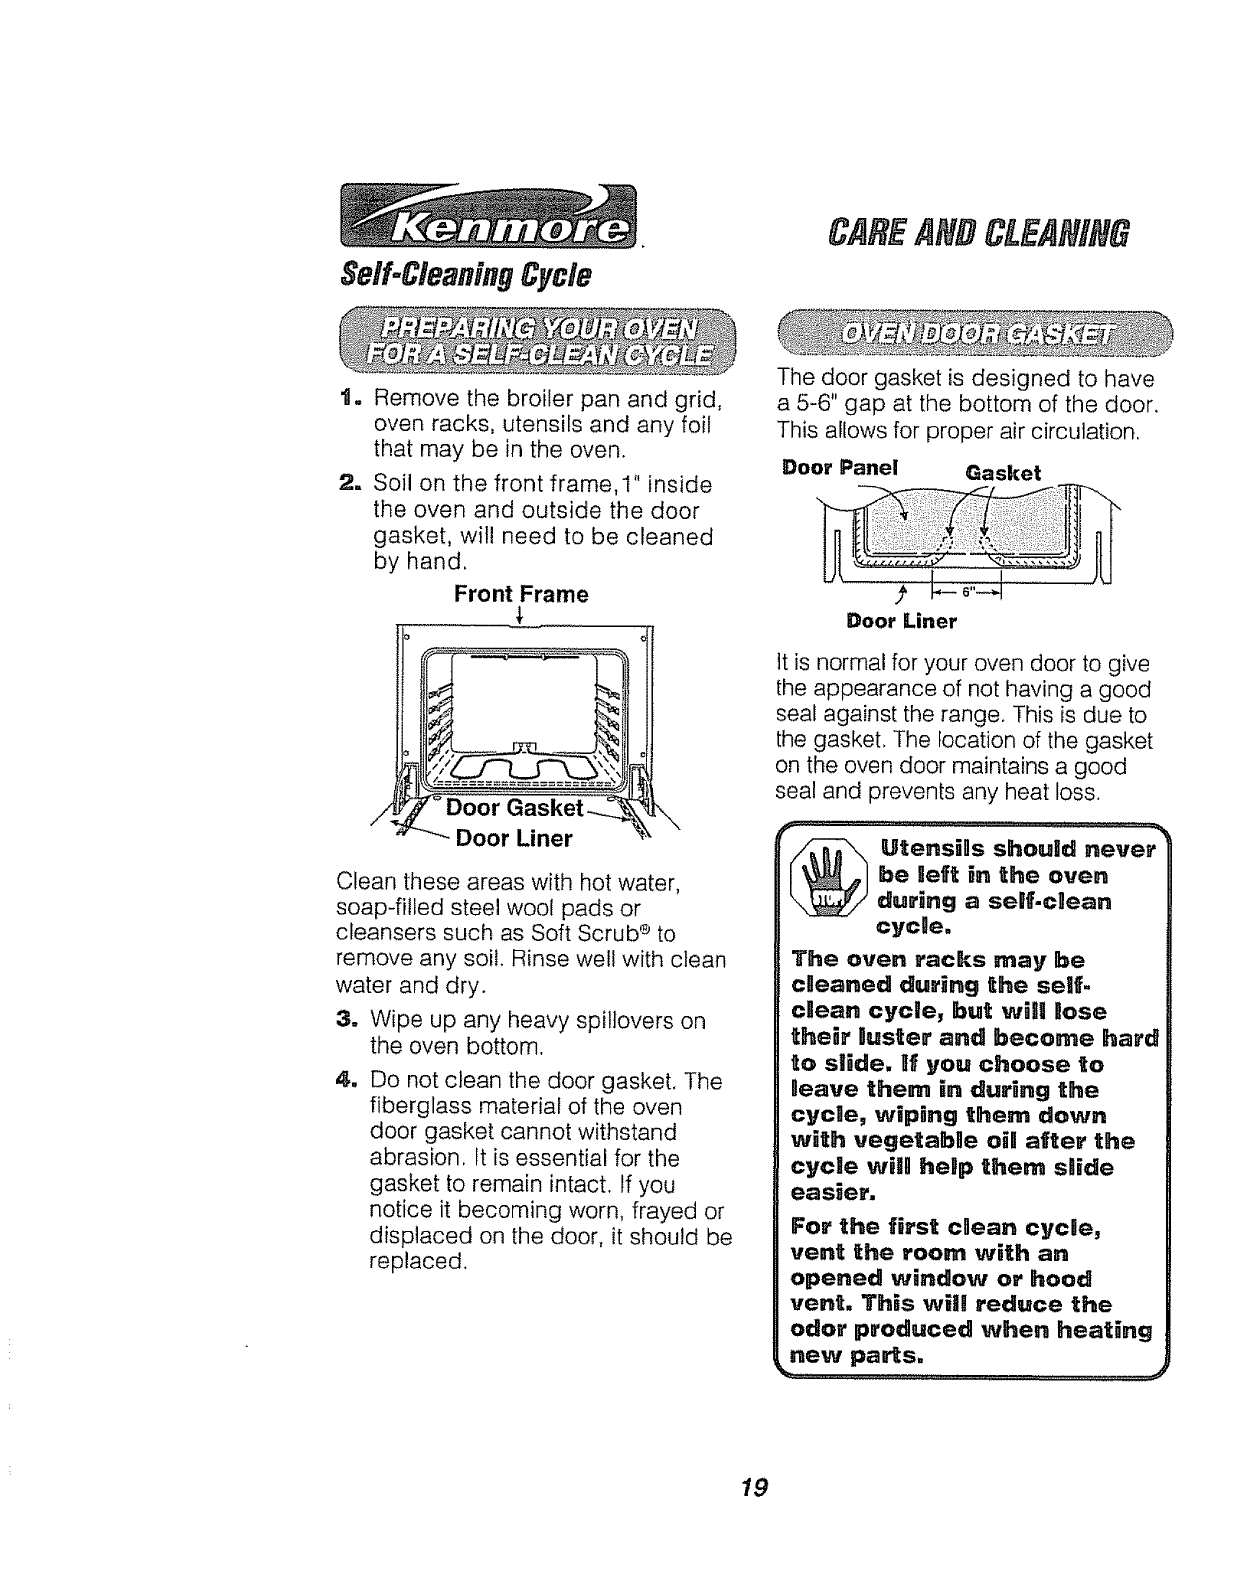
The door gasket is designed to have
a 5-6" gap at the bottom of the door.
This allows for proper air circulation.
Door Panel Gasket
Door Liner
it is normal for your oven door to give
the appearance of not having a good
seal against the range. This is due to
the gasket, The location of the gasket
on the oven door maintains a good
seal and prevents any heat loss.
_ tensills should never
be aeft _n the oven
during a seRf-cBean
cycBeo
The oven racks may be
cgeaned during the self.
cBean cycle, but wHB Bose
their Buster and become hard
to slide. If you choose to
Deave them in during the
cycge, wiping them down
with vegetabge oiB after the
cycle wHII heBp them sBide
easier.
For the first cnean cycDe,
vent the room w_th an
opened window or hood
vent. Th_s wiU reduce the
odor produced when heating
new parts,
19
CAREAft# NIN6
Self-Cleaning Cycle
1, For best results, follow the steps in
PR_=PARUHG YOUR OVEN.
2. Slide the handle to the right. Do not
force the handle.
3, Turn the oven control knob to
"CLEAN". The "CLEAN",
"AUTOMA'IraC OVEN", "COOK
TIIME", and "OVEN OH"
indicator lights will glow.
4, The handle will lock when high
temperatures are reached inside
the oven.
5, The clean cycle lasts 4 hours and
20 minutes. This includes a cool
down time. You may change this
clean time from 3 hours up to 5
hours and 59 minutes by pressing
the HOUR/_ilItN UP and/or
DOWN arrow pads, while the
colon is flashing.
When the clean cycle has started, you
may press the CLOCK pad to return
the display to the time of day. By
pressing the COOK TIME pad you
can return to the remaining clean time.
6, When the cycle is finished, the
"OVEN OH" and "CLEAN"
indicator lights will flash until the
oven control knob is turned to the
off position.
7, When the temperature has cooled,
the door handle will easily slide to
the left.
tm
,1
For best results, follow the steps
in PRI_PARIIHG YOUR OVEN.
Slide the handle to the right. Do
not force the handle.
3, Turn the oven control knob to
"CLEAN". The '_CLEAI_" and
"OVEH ON" indicator lights
will glow.
4, To delay the start of the clean
cycle press the START T_MI_
ON/OFF pad.
5, Press the HOUR/M_H UP and/or
DO_'NH arrow pads to set the time
of day you want the oven to start
cleaning automatically. The
"OVEH OH" indicator light is off
until the start time is reached.
aWhen the cycle is finished the
"OVe:H OH" and "CLe=AH"
indicator lights will flash. Turn the
oven control knob to the off
position and unlock the door.
Turn the oven control knob to the off
position. Wait (approx. 1 hour) before
attempting to open the door. The indi-
cator light will not blink if the cycle is
interrupted.
If any white spots remain, wipe with a
damp cloth or sponge, or scrub them
with a soap-filled steel wool pad and
rinse thoroughly.
2O
CAREAH# NIN6
GlassoCeramicCooktop
Cleaning
Cleaning a glass-ceramic cooktop is
different from cleaning a standard
porcelain cooktop. To maintain and
protect your glass-ceramic cooktop
follow these basic steps,
Use only Cooktop Cleaning Creme ®
on glass-ceramic.
For norma_, _ight so_B
t_ Using a damp paper towel, rub a
few drops of creme onto soiled
area. Wipe until all soil and creme
are removed.
2. Clean surface with creme after
each cooktop use. Frequent
cleaning is essential in preventing
scratches and abrasions.
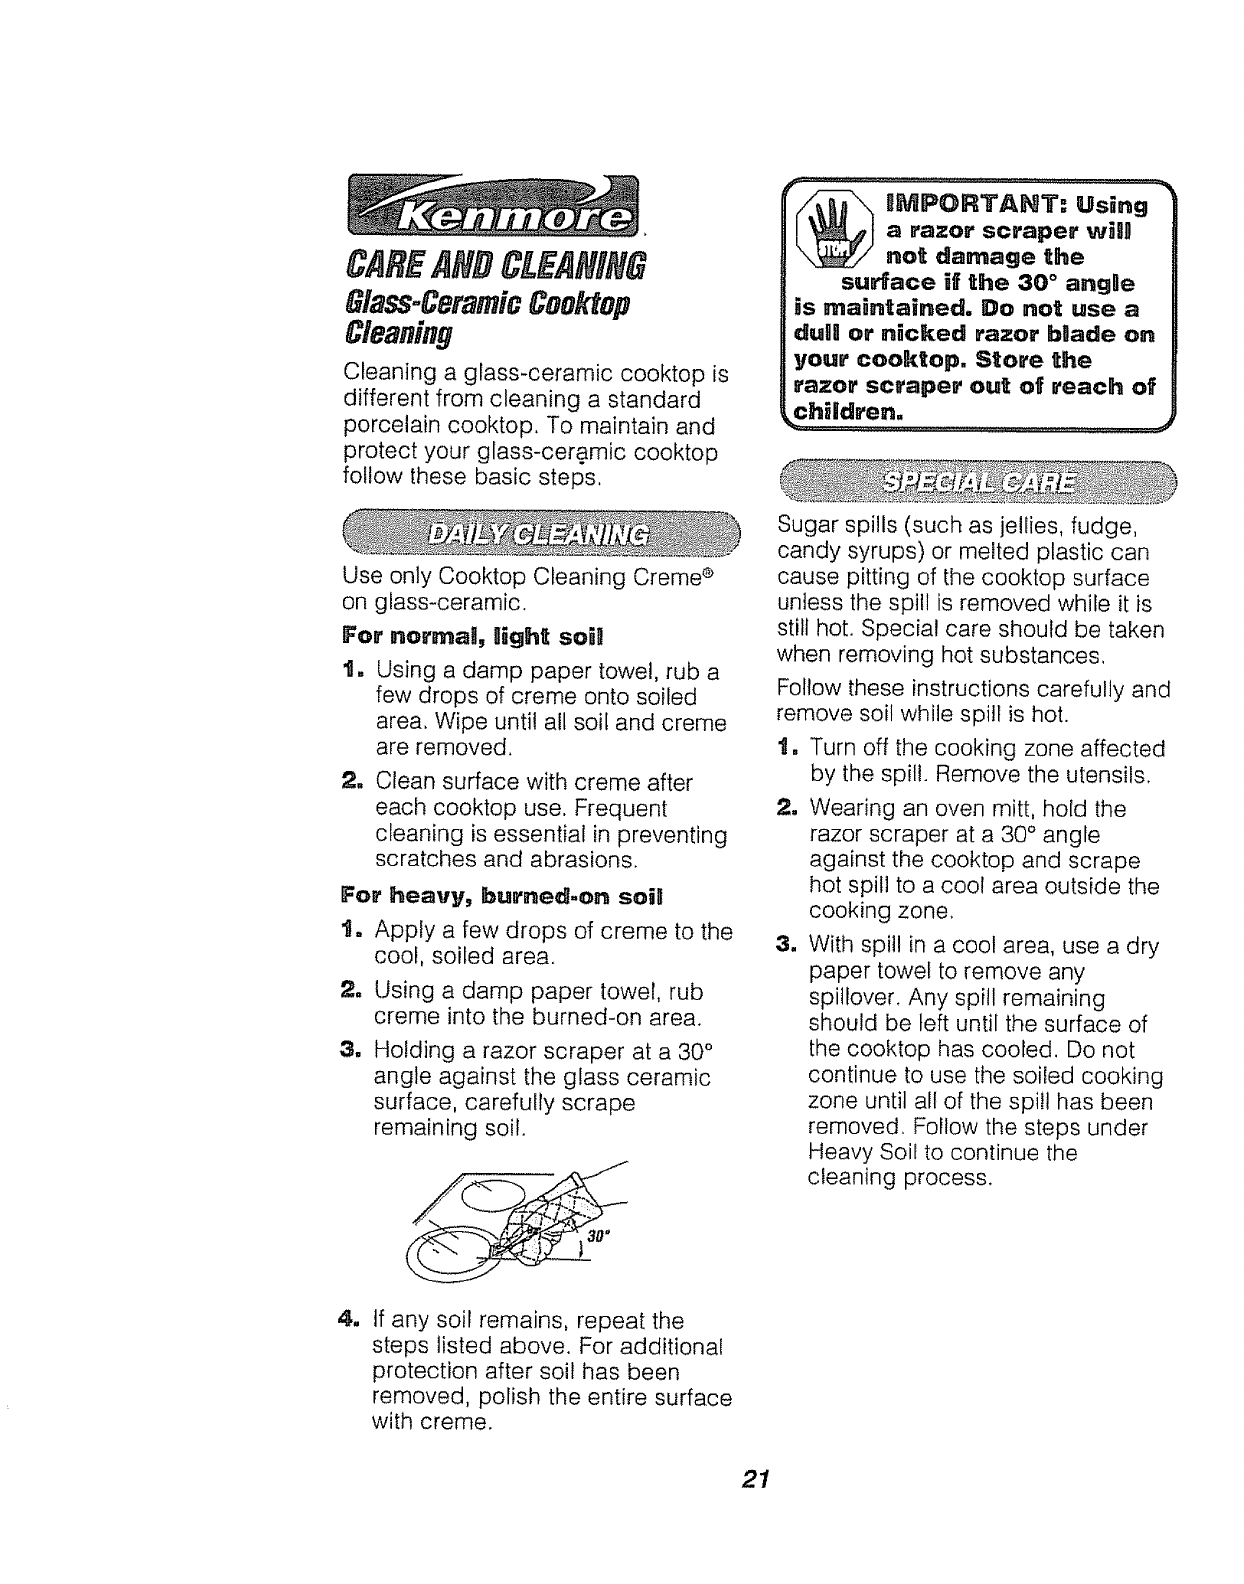
For heavy, burned-on soi_
t. Apply a few drops of creme to the
cool, soiled area.
2. Using a damp paper towel, rub
creme into the burned-on area.
3. Holding a razor scraper at a 30 °
angle against the glass ceramic
surface, carefully scrape
remaining soil.
Sugar spills (such as jellies, fudge,
candy syrups) or melted plastic can
cause pitting of the cooktop surface
unless the spill is removed while it is
still hot. Special care should be taken
when removing hot substances,
Follow these instructions carefully and
remove soil while spill is hot.
1. Turn off the cooking zone affected
by the spill. Remove the utensils.
11
11
Wearing an oven mitt, hold the
razor scraper at a 30 ° angle
against the cooktop and scrape
hot spill to a coo! area outside the
cooking zone.
With spill in a coot area, use a dry
paper towel to remove any
spillover. Any spill remaining
should be left until the surface of
the cooktop has cooled, Do not
continue to use the soiled cooking
zone until all of the spill has been
removed, Follow the steps under
Heavy Soil to continue the
cleaning process.
4. tf any soil remains, repeat the
steps listed above. For additional
protection after soil has been
removed, polish the entire surface
with creme.
21
CAREANBCLEANING
61assoCeramicCooktop
Cleaning
As the Creme cleans, it leaves a
protective coating that helps prevent
buildup of mineral deposits (water
spots) and will make future cleaning
easier. Dishwashing detergent
removes the protective coating and
should not be used.
• Most cleaners contain ammonia,
chemicals and abrasives tllat
o Do not use a dull or nicked razor
blade on your cooktop.
o Do not use abrasive cleaners or
abrasive scouring pads on your
cooktop.
o Plastic mesh pads, such as Dobie ®
may be used.
To order additional Cooktop Cleaning
Creme e, call your nearest Sears
Service Center or Retail Store and ask
for Stock No. 40079.
CLIEANSHG MATERIALS
o Dishwashing detergent
o Warm water
o Soft cloth
Do not use abrasive cReaneFs,
_ndustria! clleaners or blleach.
damage the surface of your cooktop.
Use only the Cooktop Cleaning
Creme ® for proper cleaning and
protection of your glass ceramic
surface.
o If you slide aluminum or copper
bottom cookware across the
surface of the cooktop, they may
leave metal markings which appear
as scratches. Use the razor scraper
and cooktop creme to remove these
marks. Failure to remove this residue
immediately may leave permanent
marks.
o If pots with a thin overlay of
aluminum, copper or enamel boil
dry, bonding with the glass ceramic
surface of the cooktop may occur.
This black discoloration should be
removed immediately or it could
become permanent.
oUse of glass cleaner may leave an
iridescent film on the cooktop.
Cleaning Creme will remove this film.
o Water stains (mineral deposits) are
removable using the creme or full
strength white vinegar.
CLEAN_HG MAT!_RBALS
oDishwashing detergent
o Warm water
o Soap-filled scouring pad
o Commercial oven cleaner
TO CLEAH
Allow the pan to soak. Sprinkle the
grid with dishwashing detergent and
cover with a damp cloth or paper
towel. Rinse and dry well. Scour as
needed. You may also place both the
pan and grid in the dishwasher.
Clean only as touch up between
clean cycles, Use dishwashing
liquid, warm water, or a soap-filled
steel wool pad. Rinse well after
cleaning and dry.
HEVER USE OVEH CLEAHERS
I;H OR AROUND ANY PART OF
THE OVEN,
When cleaning, be sure not to bend
or displace the temperature sensor
22 located on the back wall of the oven.
CLEAHRNG MATERIALS
,, Dishwashing detergent
,, Warm water
,, Soft cloth
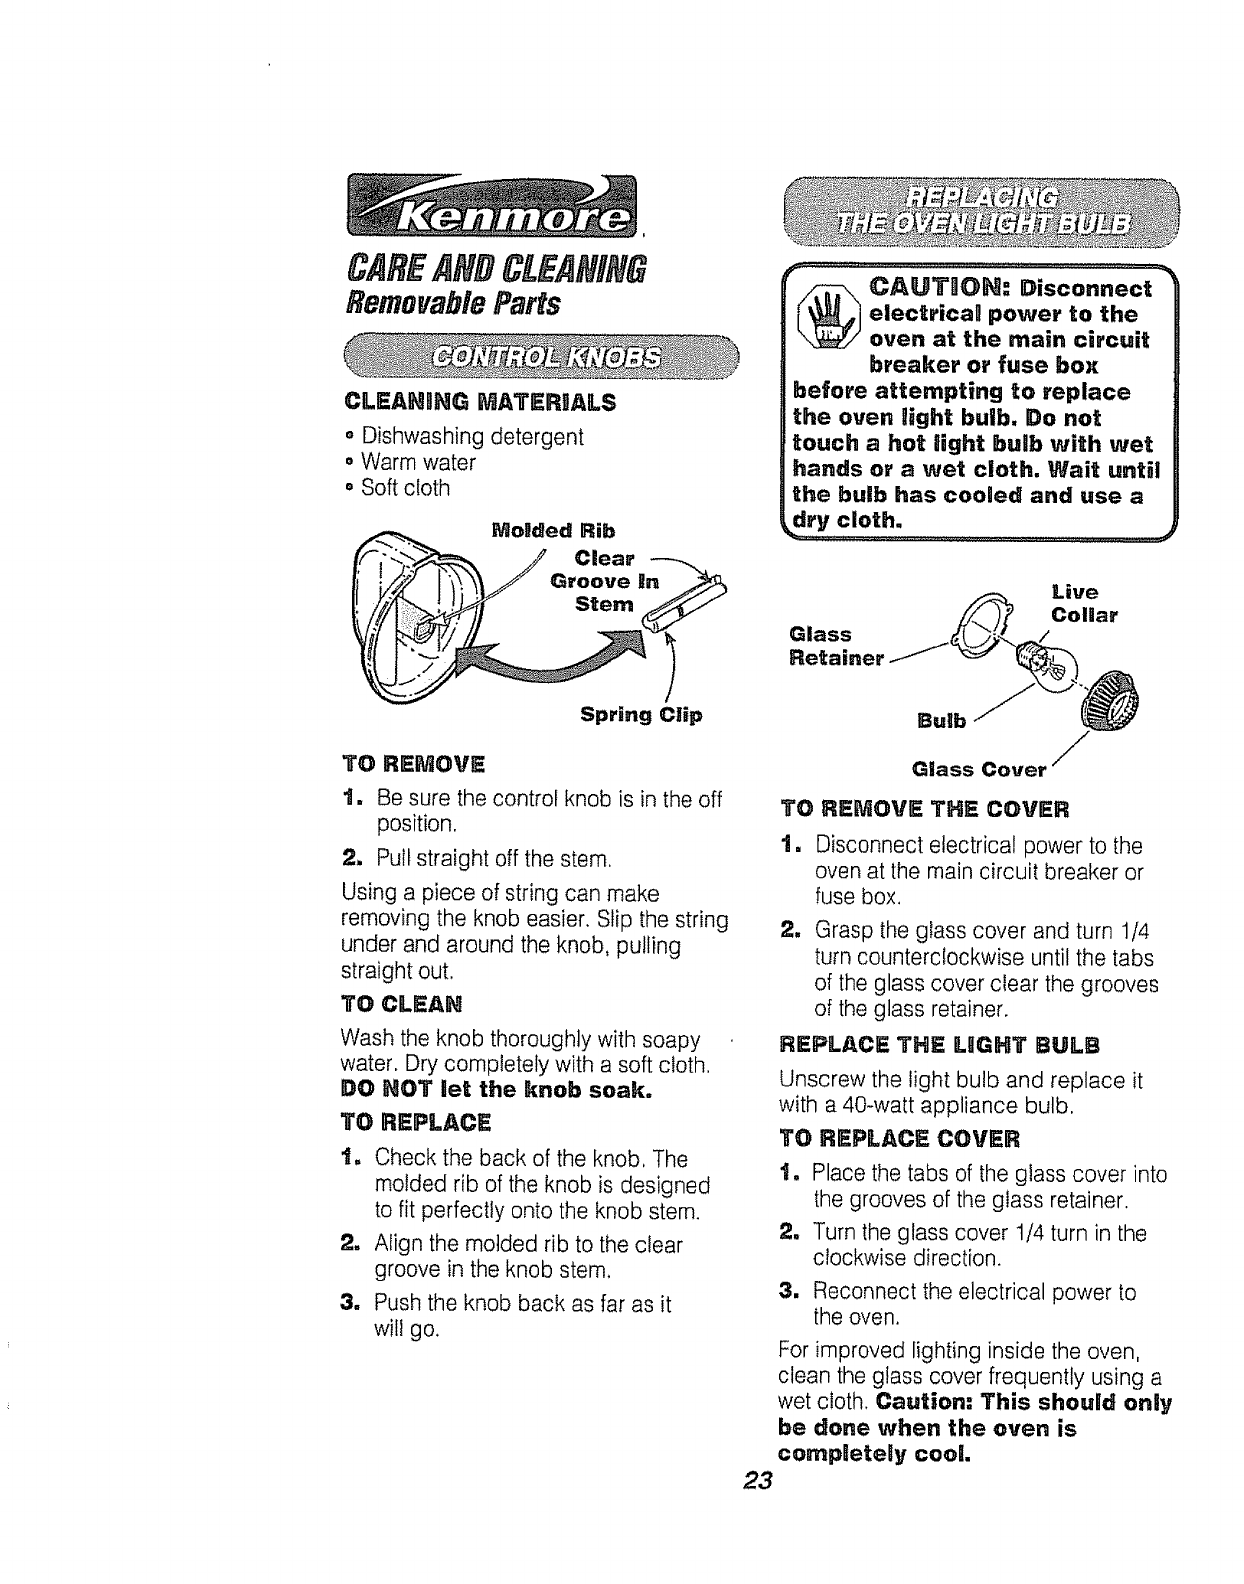
,_ Monded Rib
Clear
Spring Clip
TO REMOVE
t, Be sure the control knob is in the off
position.
2, Pull straight off the stem.
Using a piece of string can make
removing the knob easier. Slip the string
under and around the knob, pulling
straight out.
TO CLEAN
Wash the knob thoroughly with soapy
water. Dry completely with a soft cloth,
DO NOT let the knob soak.
TO REPLACE
IB
.
a
Check the back of the knob. The
molded rib of the knob is designed
to fit perfectly onto the knob stem.
Align the molded rib to the clear
groove in the knob stem.
Push the knob back as far as it
will go.
_AUTMON: Disconnect
electricag power to the
oven at the main circuit
breaker or fuse box
before attempting to replace
the oven i_ght bulb. Do not
touch a hot light bulb with wet
hands or awet cloth, Wait until
the bulb has cooled and use a
dry cloth,
23
Glass
Retainer.
Live
Collar
Bulb j
Glass Cover /
REMOVE THE COVER
Disconnect electrical power to the
oven at the main circuit breaker or
fuse box,
2, Grasp the glass cover and turn 1/4
turn counterclockwise until the tabs
of the glass cover clear the grooves
ol the glass retainer.
REPLACE THE LIIGHT BULB
Unscrew the light bulb and replace it
with a 40-watt appliance bulb.
TO R£PLACE COVI_R
t, Place the tabs of the glass cover into
the grooves of the glass retainer.
2, Turn the glass cover 1/4 turn in the
clockwise direction.
3, Reconnect the electrical power to
the oven.
For improved lighting inside the oven,
clean the glass cover frequently using a
wet cloth. Caution: This should only
be done when the oven is
completely cool.
CAREANDCLEANING
RemovableParts
CLEAHBNG MATERIALS
• Dishwashing detergent
oWarm water
,, Scouring pad or soap-filled steel
wool pad
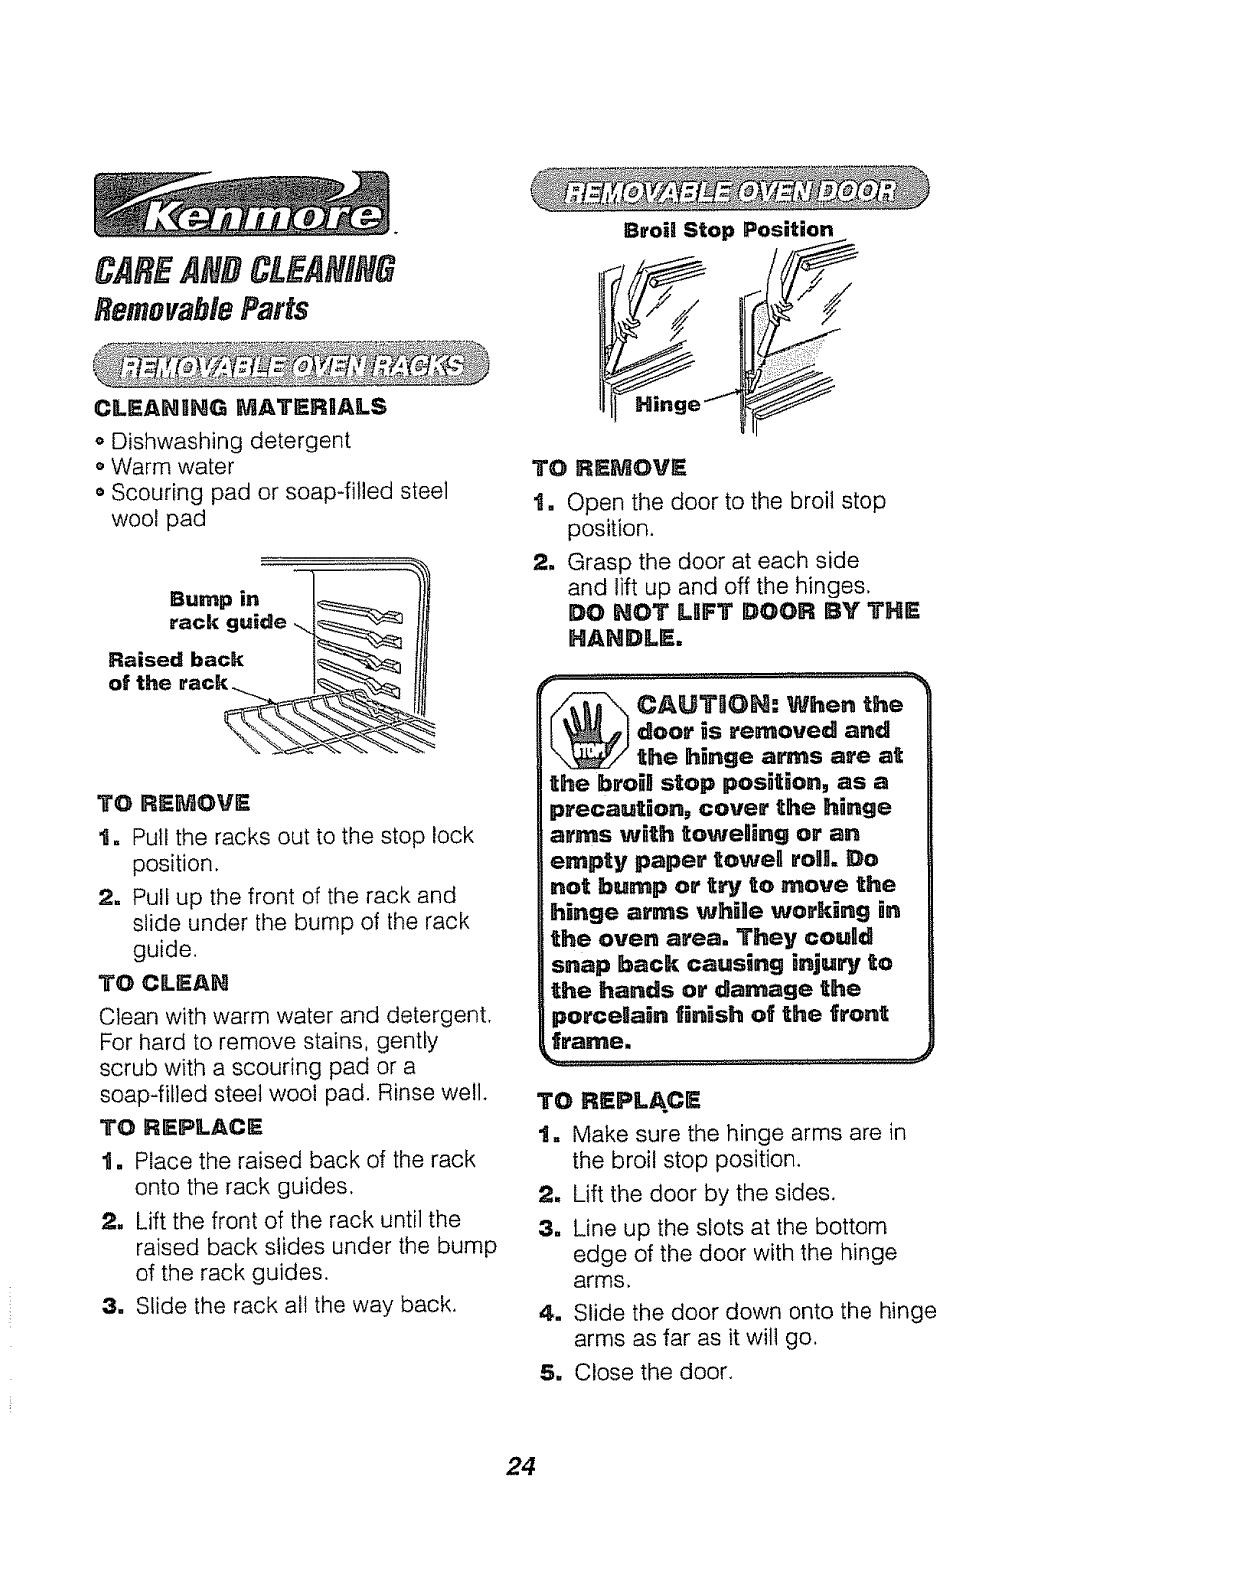
TO REMOVE
t. Pull the racks out to the stop lock
position.
2. Pull up the front of the rack and
slide under the bump of the rack
guide.
TO CLEAN
Clean with warm water and detergent.
For hard to remove stains, gently
scrub with a scouring pad or a
soap-filled steel wool pad. Rinse well.
TO REPLACE
t. Place the raised back of the rack
onto the rack guides.
2. Lift the front of the rack until the
raised back slides under the bump
of the rack guides.
3. Slide the rack all the way back.
Broil Stop Position
TO RSMOVE
1. Open the door to the broil stop
position.
2. Grasp the door at each side
and lift up and off the hinges,
DO NOT LBFT DOOR BY THI_
HANDLE.
_ AUTIiON: When the
door _s removed and
the h_nge arms are at
the broia stop position, as a
precaution, cover the hinge
arms with towelling or an
empty paper towell roll,. Do
not bump or tn_, to move the
hinge arms whiBe working in
the oven area. They coulldl
snap back causing injury to
the hands or damage the
porceUain finish of the front
frame,
.................... ,, o, LL_,,............. L ,.,.J,,
TO REPLAC[_
t. Make sure the hinge arms are in
the broil stop position.
2. Lift the door by the sides.
3. Line up the slots at the bottom
edge of the door with the hinge
arms.
4. Slide the door down onto the hinge
arms as far as it will go,
5. Close the door.
24

CAREANDCLEANING
RemovableParts
TO REPLACE
t. Lift the front of the drawer stop
and lower the stop of the drawer
through the opening of the
base rail.
CLEANIING MATERIALS
oDishwashing detergent
,) Damp cloth
o Warm water
TO REMOVE
1. Pull the drawer out until it stops,
2. Lift the front of the drawer until the
stop guide of the drawer clears the
stop guide on the base rail.
Stop Guide
3. Lift the drawer up and over the
drawer stop,
TO CLEAN
Wipe the inside and outside with
warm soapy water and a damp cloth
or sponge, Do not use harsh abra-
sives or scouring pads on the drawer,
Stop Guide
2, Lower the front of the drawer and
push back the drawer until it
stops.
3. Lift up on the front of the drawer
until the stop guide of the drawer
clears the stop guide of the base
rail, Slide the drawer into place,
_AUTUOH: The drawergives you space for
keeping cookware and
bakeware. Plastics and
flarnmabqe rnateriaUs shouRd
not be kept in this drawer,
Do not overgoad the storage
drawee:. Hf the drawer _s too
heavy, it may sDJp off the
base ra_B when opened.
25
BEFORECALLINGFORSERVICE
To save you time and money, before making a service calf check the list below
for any problem you may feel you have with the performance of your range. If
the problem is something you cannot fix use the Consumer Service Numbers
located at the back of this manual, When making any callls have the
Modeg Ho., Repair Parts _,s_, Use and Care Manuan and the Date
of Purchase ava,iablle.
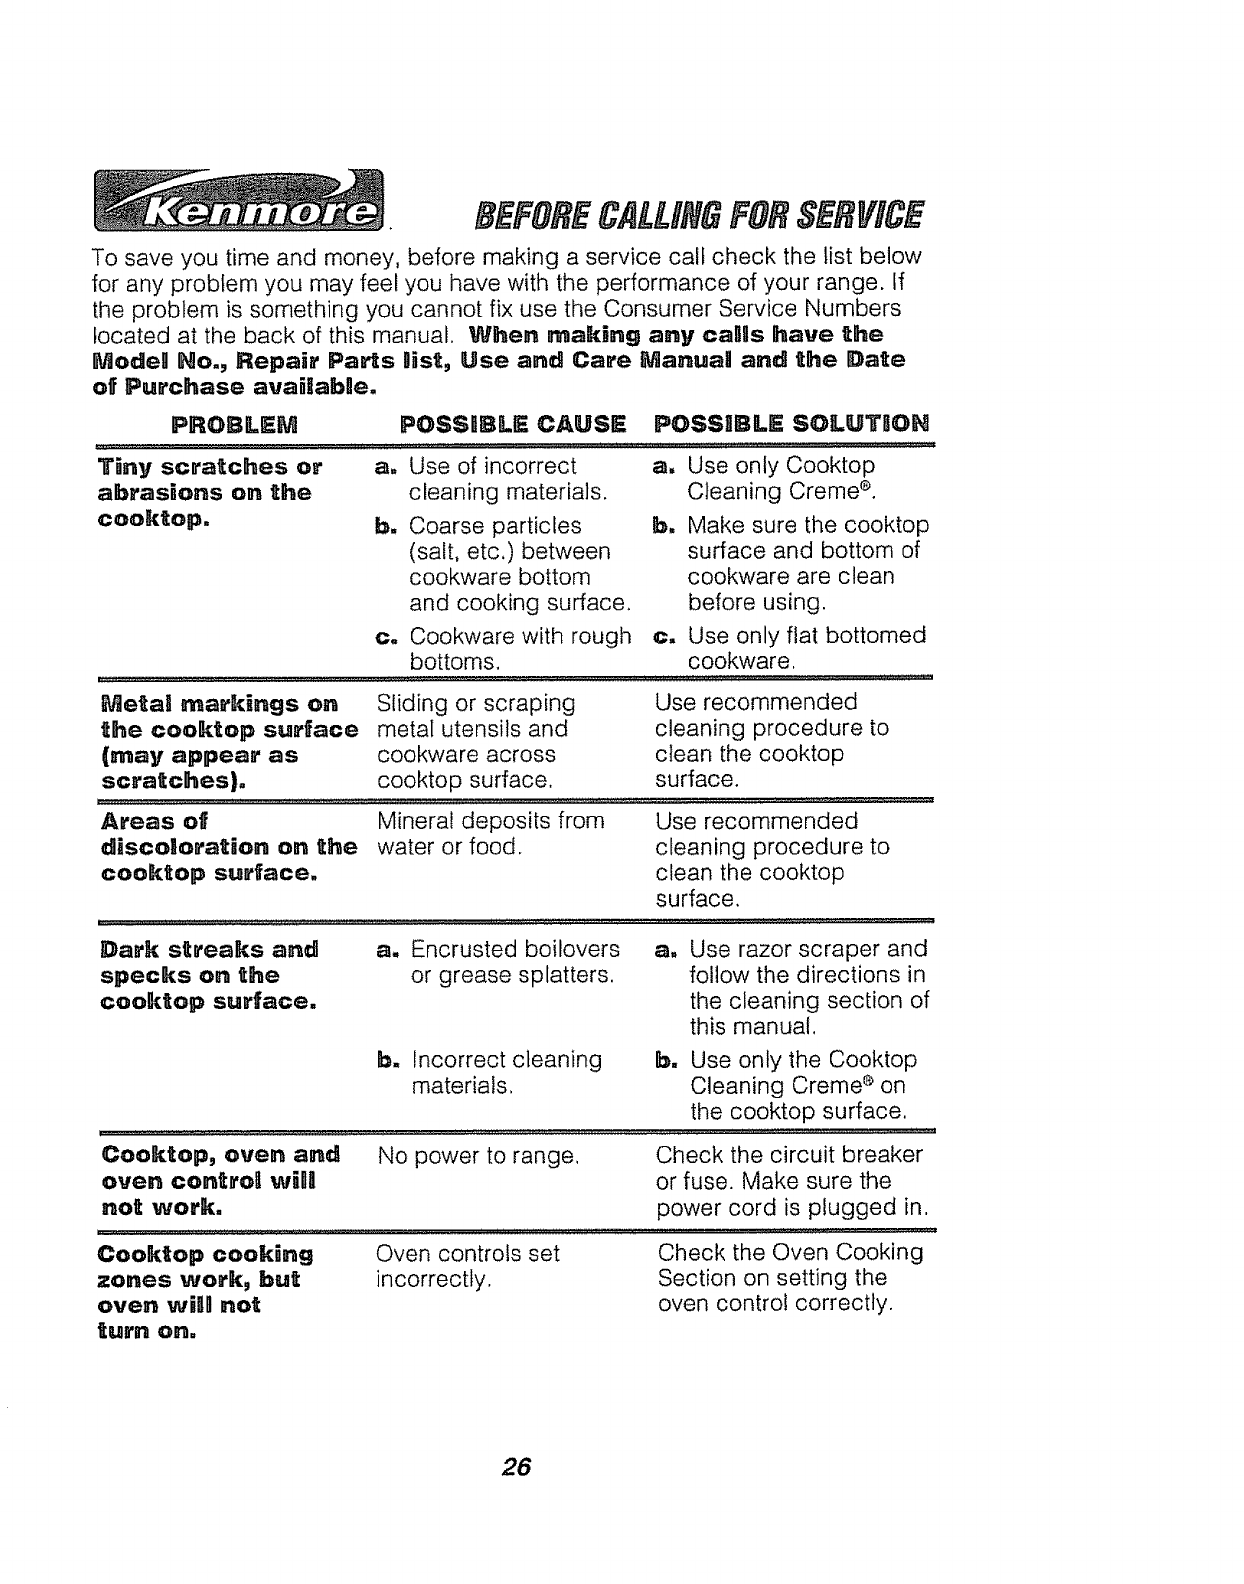
PROBLEM POSSRBLE CAUSE POSSIBLE SOLUTnoH
'_'iny scratches or a' Use of incorrect a. Use only Cooktop
abrasions on the cleaning materials.
cooktop, b. Coarse particles b.
(salt, etc,) between
cookware bottom
and cooking surface.
c. Cookware with rough c.
bottoms.
Metal markings on Sliding or scraping Use recommended
the cooktop surface metal utensils and cleaning procedure to
(may appear as cookware across clean the cooktop
scratches), cooktop surface, surface.
Areas of Mineral deposits from Use recommended
discoloration on the water or food. cleaning procedure to
coektop surface, clean the cooktop
surface.
Dark streaks and a. Encrusted boilovers a. Use razor scraper and
specks on the or grease splatters, follow the directions in
cooktop surface, the cleaning section of
this manual,
Cleaning Creme ®.
Make sure the cooktop
surface and bottom of
cookware are clean
before using,
Use only flat bottomed
cookware,
b. Incorrect cleaning b. Use only the Cooktop
materials, Cleaning Creme _ on
the cooktop surface,
Cooktop, oven and No power to range, Check the circuit breaker
oven controa wBIl or fuse. Make sure the
not work. power cord is plugged in,
Cooktop cooking Oven controls set Check the Oven Cooking
zones work, but incorrectly. Section on setting the
oven will not oven control correctly.
turn on.
26
BEFORECALLINGFORSERVIC
PROBLEM POSSUBLE CAUSE POSSgBLE SOLUTgOH
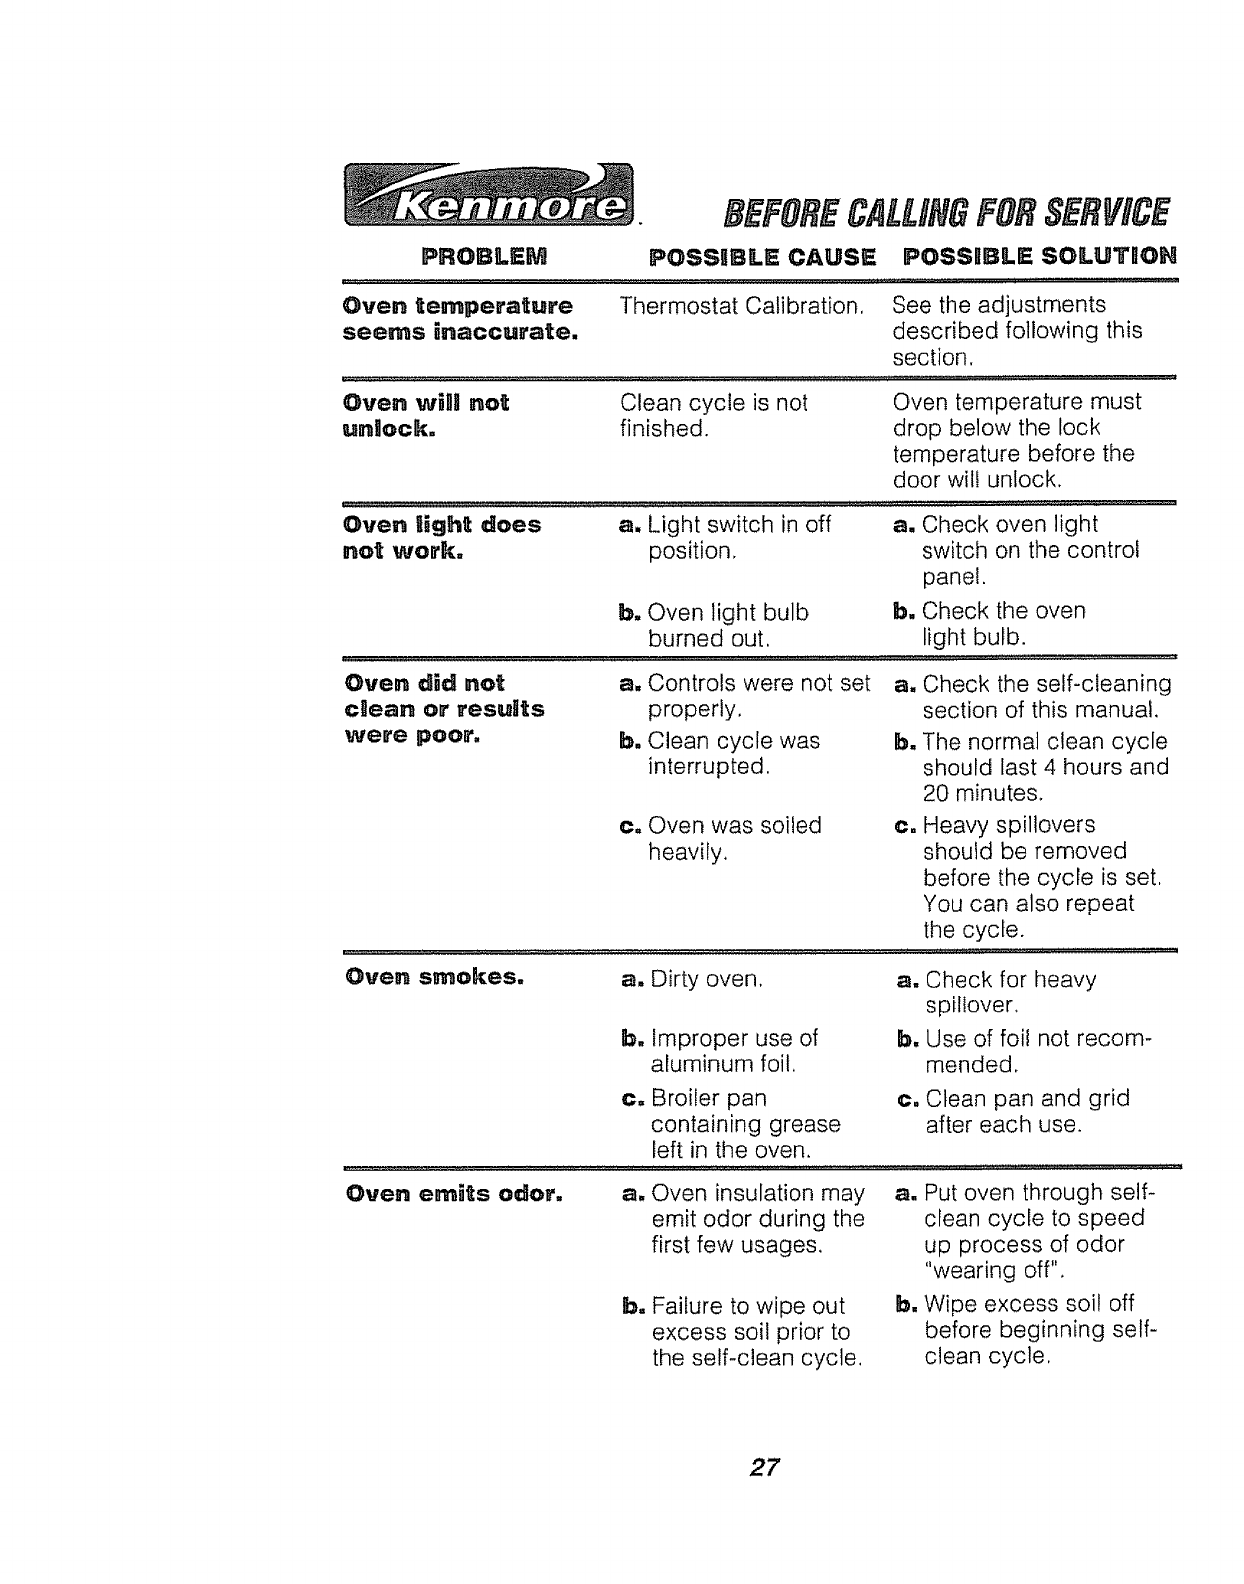
Oven temperature Thermostat Calibration, See the adjustments
seems inaccurate, described following this
section.
Oven wBl not Clean cycle is not Oven temperature must
unllock, finished, drop below the lock
temperature before the
door wil! unlock.
Oven If_ght does a. Light switch in off a. Check oven light
not work, position, switch on the control
panel.
b, Oven light bulb b, Check the oven
burned out. light bulb.
Oven d_d not a.
clean or results
were poor, b.
Ca
Controls were not set a,
properly.
Clean cycle was b,
interrupted.
Check the self-cleaning
section of this manual.
The normal clean cycle
should last 4 hours and
20 minutes.
Oven was soiled
heavily.
Oven smokes, a, Dirty oven. a, Check for
spillover.
b, Improper use of b, Use of foil
aluminum foil. mended.
c, Heavy spillovers
should be removed
before the cycle is set.
You can also repeat
the cycle.
heavy
not recom-
C=
Oven emits odor= a,
b=
Broiler pan
containing grease
left in the oven.
Oven insulation may
emit odor during the
first few usages.
Failure to wipe out
excess soil prior to
the self-clean cycle.
o° Clean pan and grid
after each use.
a. Put oven through self-
clean cycle to speed
up process of odor
"wearing off".
b, Wipe excess soi! off
before beginning self-
clean cycle.
27
BEFORECAI-L/NGFORSERVICE
PROBLEM POSStlBLE CAUSE POSSIBLE SOLUTIlOH
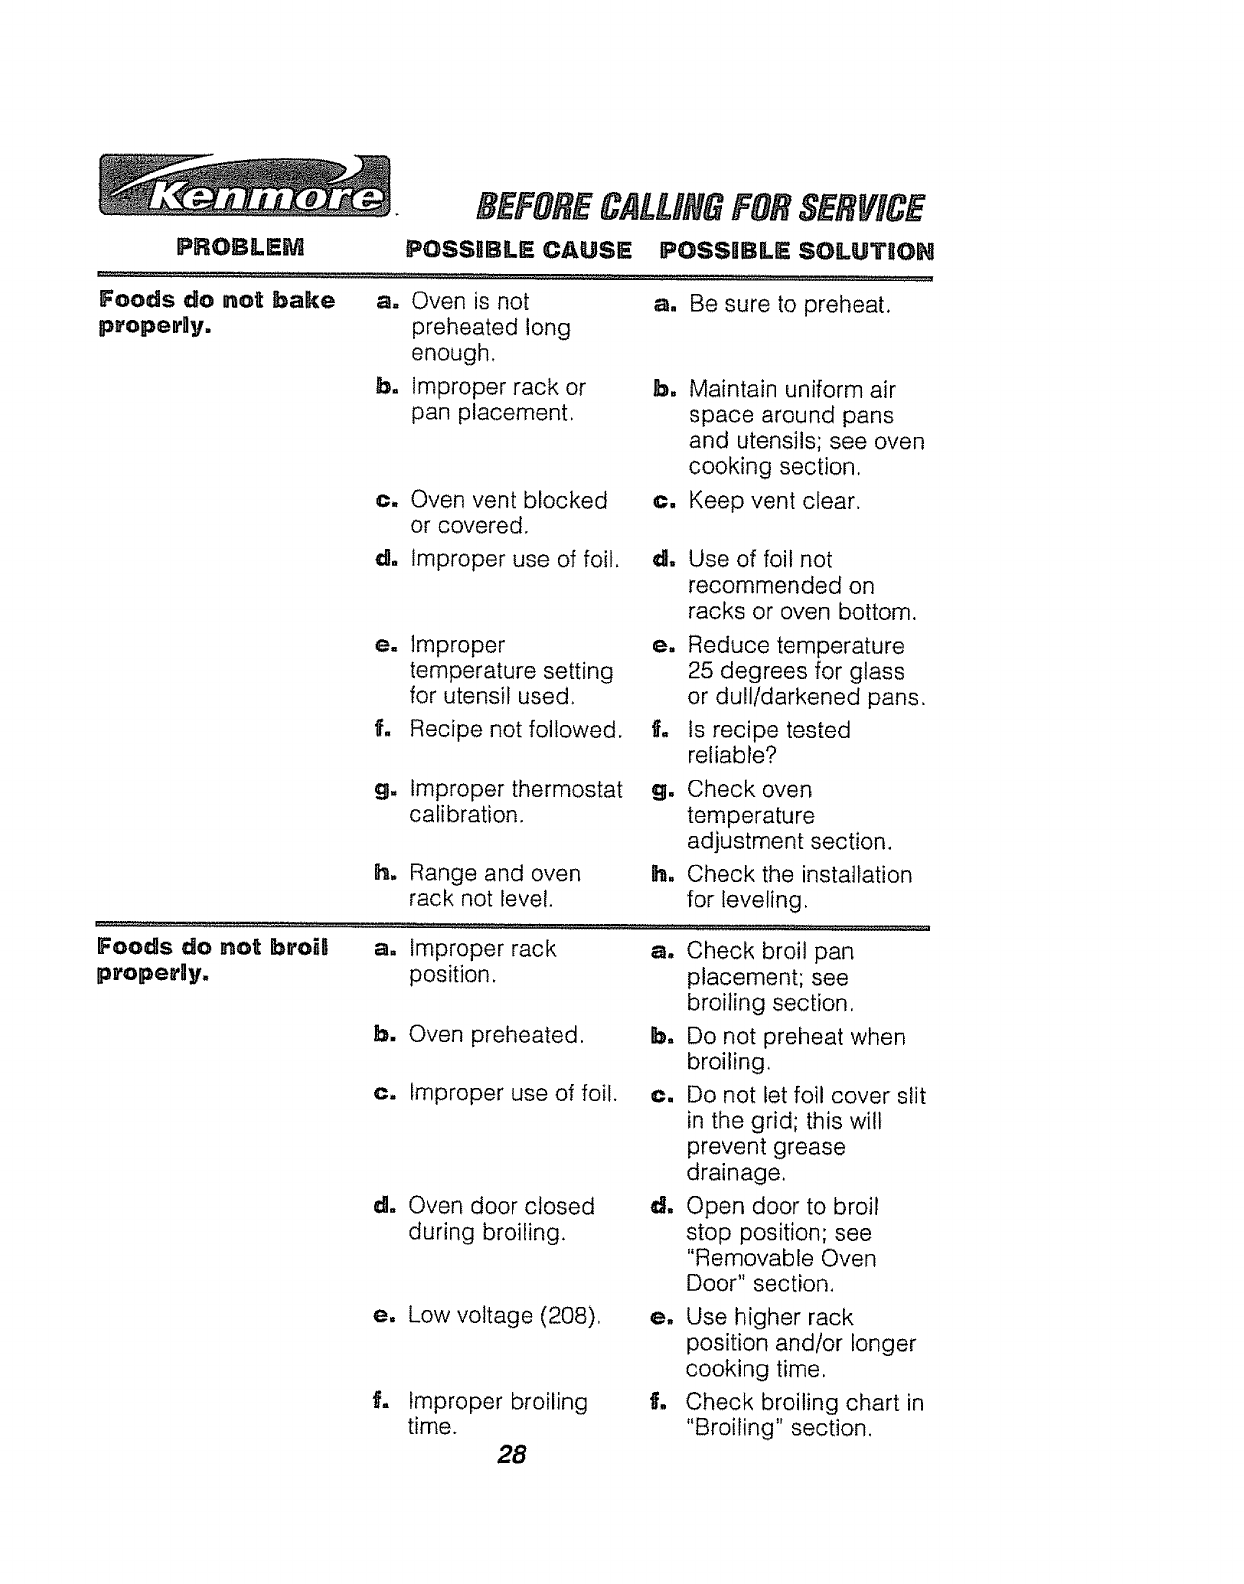
Foods do not bake
properlly.
a. Oven is not
preheated long
enough,
b. Improper rack or
pan placement,
c. Oven vent blocked
or covered.
a. Be sure to preheat,
b. Maintain uniform air
space around pans
and utensils; see oven
cooking section,
c. Keep vent clear,
d. Improper use of foil, d. Use of foil not
recommended on
racks or oven bottom.
e. Improper
temperature setting
for utensil used.
f. Recipe not followed.
e. Reduce temperature
25 degrees for glass
or dull/darkened pans
f. ts recipe tested
reliable?
g. Improper thermostat
calibration.
h. Range and oven
rack not level.
g. Check oven
temperature
adjustment section,
h. Check the installation
for leveling.
Foods do no_ broill a. Improper rack a. Check broil pan
propeFgy,, placement; see
broiling section,
position.
b. Oven preheated,
c. Improper use of foil.
d. Oven door closed
during broiling.
lb. Do not preheat when
broiling.
c. Do not let foil cover slit
in the grid; this will
prevent grease
drainage.
d. Open door to broil
stop position; see
"Removable Oven
Door" section.
e. Low voltage (208),
f. Improper broiling
time.
28
e. Use higher rack
position and/or longer
cooking time,
f. Check broiling chart in
"Broiling" section,
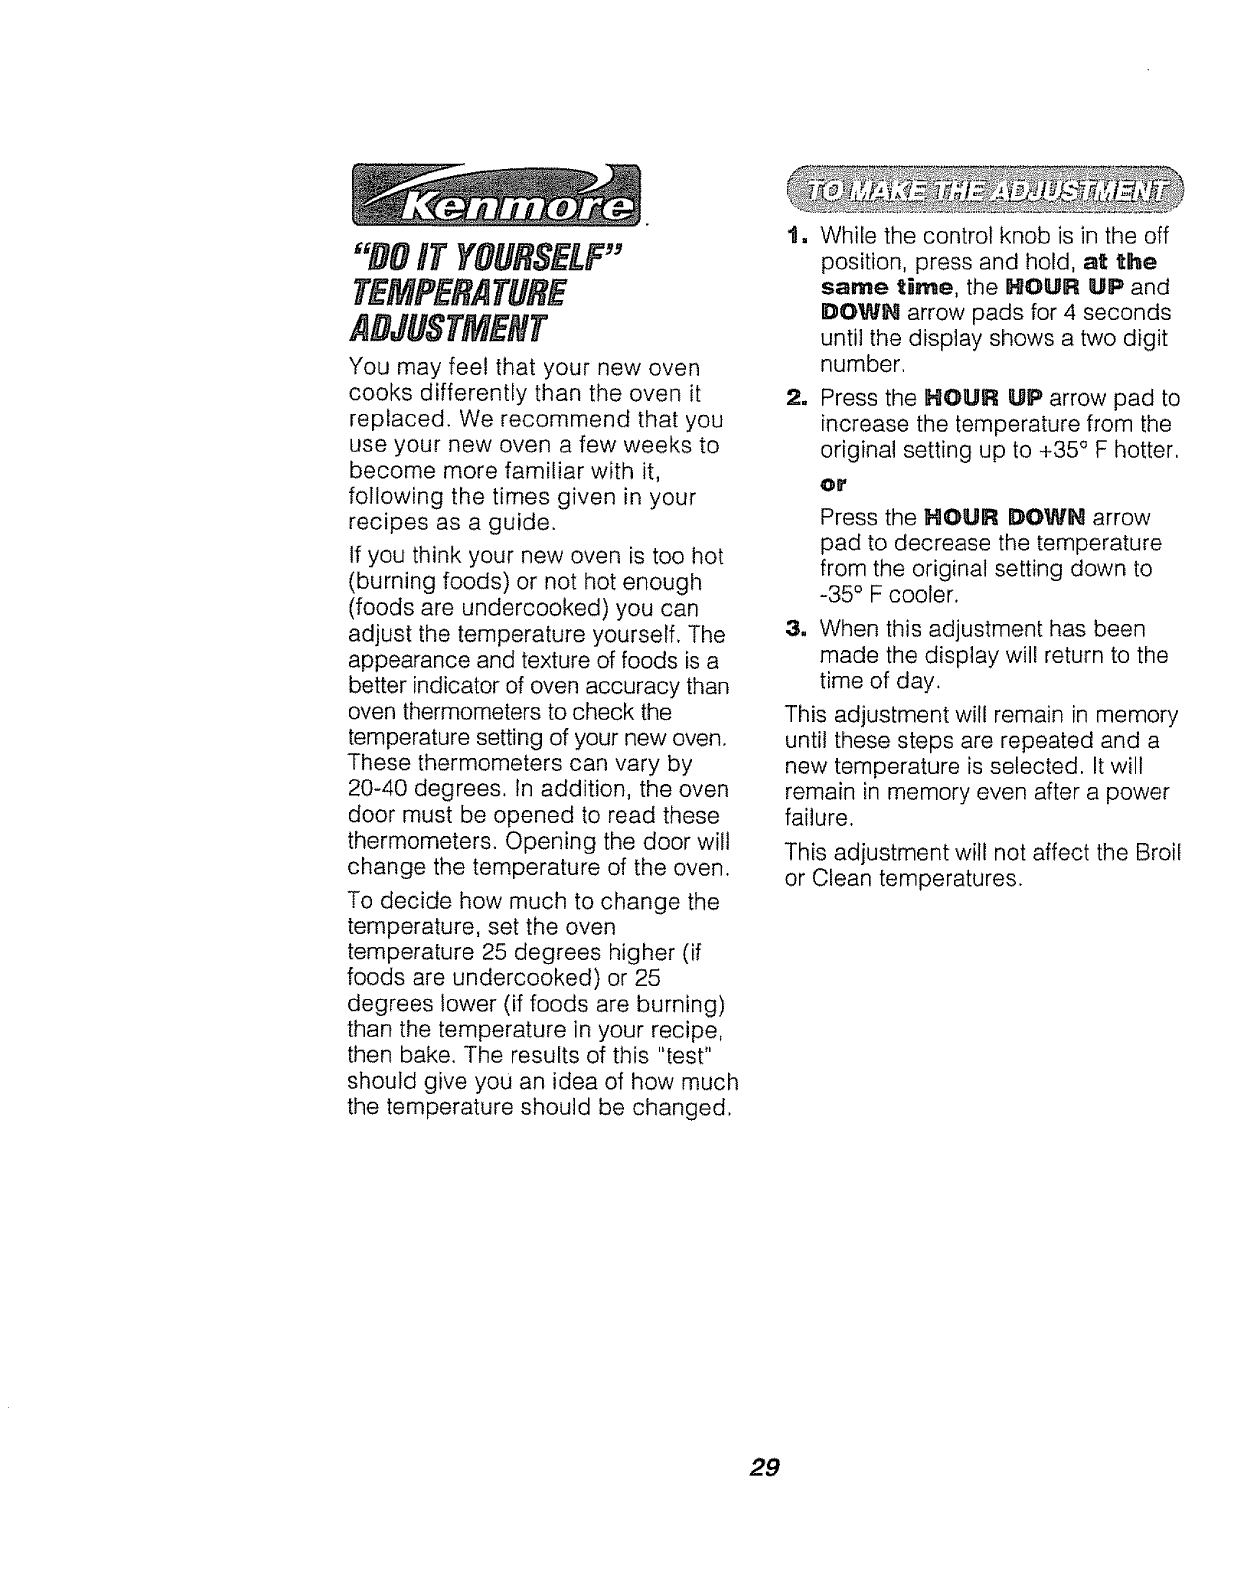
"BQiT YOURSELF"
TEMPERATURE
ADJUSTMENT
You may feel that your new oven
cooks differently than the oven it
replaced. We recommend that you
use your new oven a few weeks to
become more familiar with it,
following the times given in your
recipes as a guide.
If you think your new oven is too hot
(burning foods) or not hot enough
(foods are undercooked) you can
adjust the temperature yourself, The
appearance and texture of foods is a
better indicator of oven accuracy than
oven thermometers to check the
temperature setting of your new oven.
These thermometers can vary by
20-40 degrees, In addition, the oven
door must be opened to read these
thermometers. Opening the door will
change the temperature of the oven.
To decide how much to change the
temperature, set the oven
temperature 25 degrees higher (if
foods are undercooked) or 25
degrees lower (if foods are burning)
than the temperature in your recipe,
then bake. The results of this "test"
should give you an idea of how much
the temperature should be changed.
While the control knob is in the off
position, press and hold, at the
same t_rae, the HOUR UP and
DOWN arrow pads for 4 seconds
until the display shows a two digit
number.
2, Press the HOUR UP arrow pad to
increase the temperature from the
original setting up to +35 ° F hotter,
OF
Press the HOUR DOWH arrow
pad to decrease the temperature
from the original setting down to
-35 ° F cooler.
3. When this adjustment has been
made the display will return to the
time of day.
This adjustment will remain in memory
until these steps are repeated and a
new temperature is selected. It will
remain in memory even after a power
failure.
This adjustment will not affect the Broil
or Clean temperatures.
29

NOTES
30
RADIANTFREEoSTANDIN8
RANGEWARRANTY
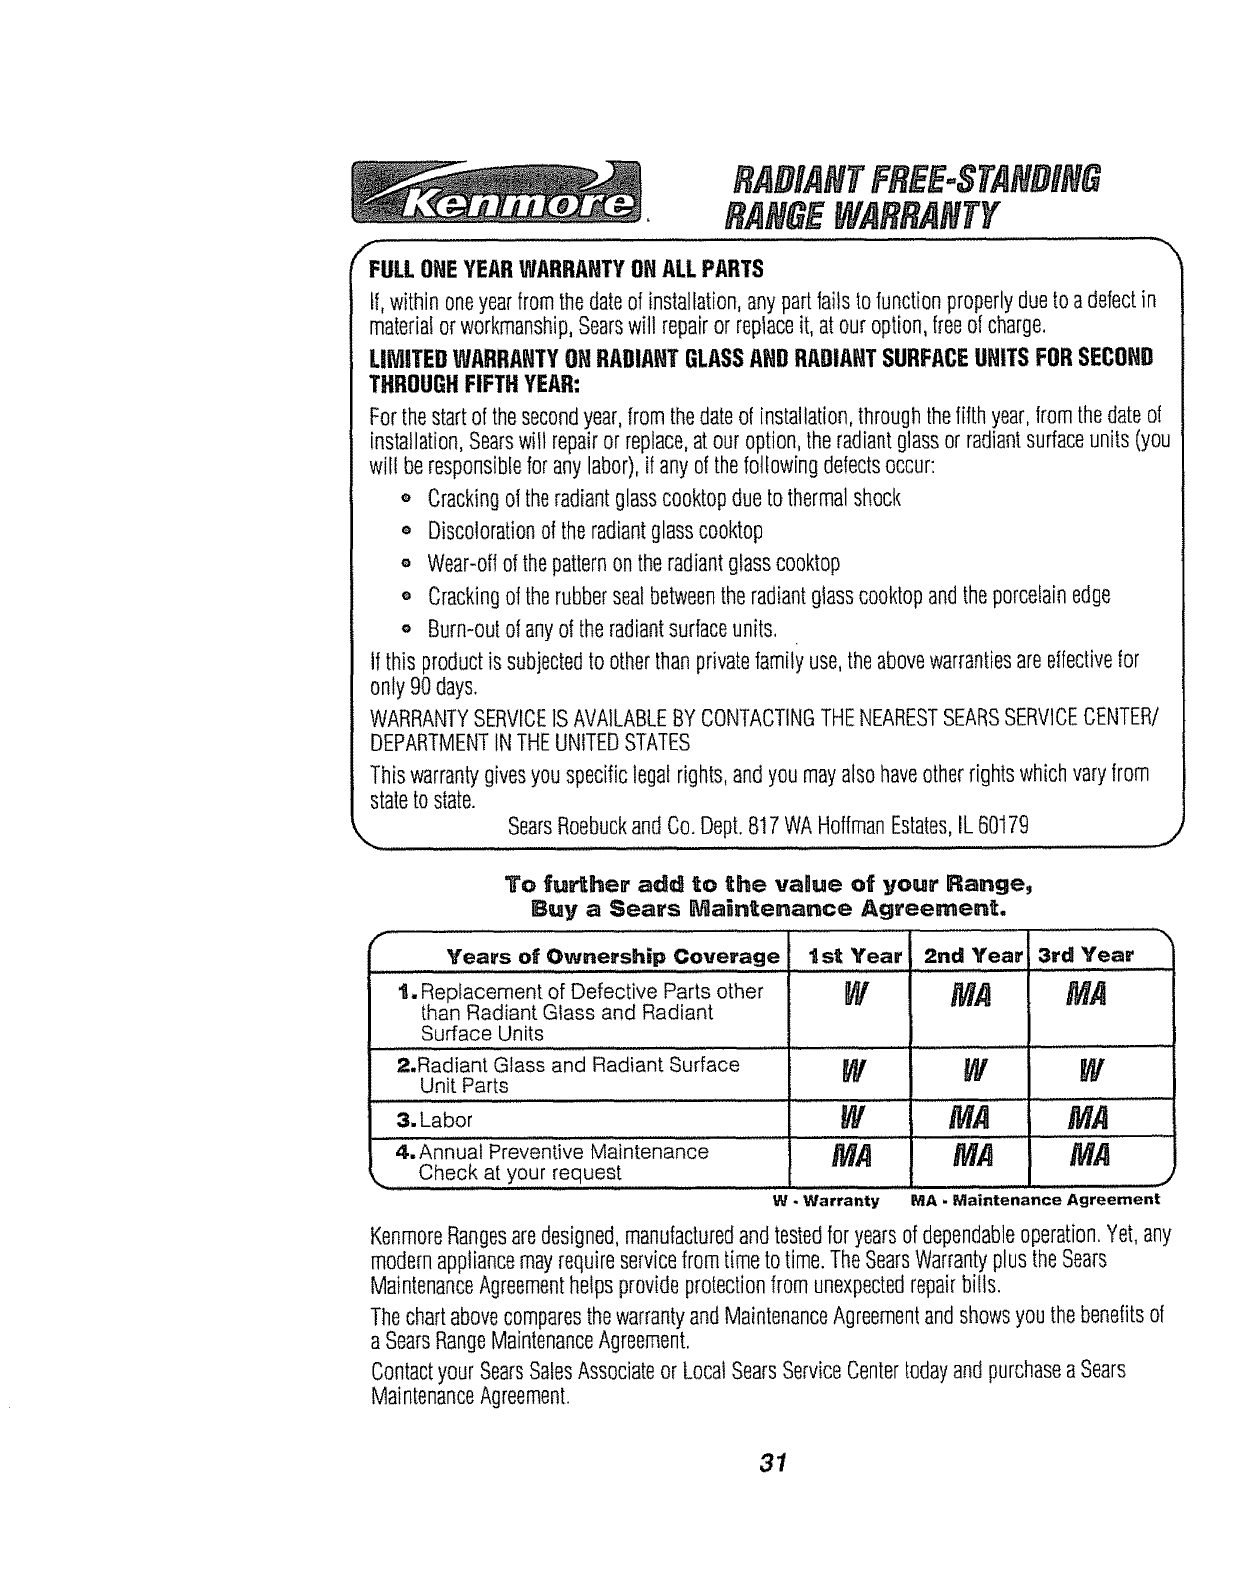
fFULLONEYEARWARRANTYOHALL PARTS
If,within oneyearfromthedateof installation,anypartfailsto functionproperlyduetoa defectin
materialor workmanship,Searswill repairor repiaceit, at our option,freeof charge.
LIMITED WARRANTYOHRADIAHTGLASSAHDRADIAHTSURFACEUHITSFORSECOHD
THROUGHFIFTH YEAR:
Forthe startof thesecondyear,from thedateof installation,throughthefifth year,from thedateof
installation,Searswill repairor replace,at our option,theradiantglassor radiantsurfaceunits (you
will beresponsiblefor any labor),if anyof thefotfowingdefectsoccur:
o Crackingof theradiantglasscooktopdueto thermalshock
o Discolorationof theradiantglasscooktop
o Wear-offof thepatternonthe radiantglasscooktop
o Crackingof therubbersealbetweentheradiantglasscooktopandtheporcelainedge
o Burn-outof anyof theradiantsurfaceunits.
If this productis subjectedto otherthanprivatefamilyuse,theabovewarrantiesareeffectivefor
only 90 days.
WARRANTYSERVICEISAVAILABLEBYCONTACTINGTHENEARESTSEARSSERVICECENTER/
DEPARTMENTINTHEUNITEDSTATES
Thiswarrantygivesyouspecificlegalrights,andyoumayalso haveotherrightswhich varyfrom
stateto state.
,,._ SearsRoebuckandCo.Dept.817WAHoffmanEstates,IL 60179 J
To fu_her add to the vague of your Range,
Buy a Sears Maintenance Agreement.
Years of Ownership Coverage _st Year
1, Replacement of Defective Parts other
than Radiant Glass and Radiant
Surface Units
, ,, ....... ,,, ,,,,,,,........... , , ,,
2.Radiant Glass and Radiant Surface
Unit Parts
3, Labor
' 4.Ann'ual P'i'eventive Maintenance
,...................Check at your request
W
W
W
£vTA
W Warranty
2rid Year 3rd Year
MA
W
MA
MA
MA
W
MA
MA
J
MA - Maintenance Agreement
KenmoreRangesaredesigned,manufacturedandtestedfor yearsof dependableoperation.Yet,any
modernappliancemayrequireservicefrom timeto time.TheSearsWarrantyplus theSears
MaintenanceAgreementhelpsprovideprotectionfrom unexpectedrepairbills.
ThechartabovecomparesthewarrantyandMaintenanceAgreementandshowsyou thebenefitsof
aSearsRangeMaintenanceAgreement.
Contactyour SearsSalesAssociateor LocalSearsServiceCentertodayand purchasea Sears
MaintenanceAgreement.
31
For in-homomajorbrandrepair service:
Call 24 hours a day, 7 days a week
t °SOe°4=MY°MOME°°'
(1-800-469-4663)
Para pedir servicio de reparaciGn a domicHio -
t-800-676-58t t
In Canada for all your service and parts needs call -
Au Canada pour tout le service ou les pi_ces -
t°800.665-4455
For the repairorreplacementparts you need:
Call 7 am-7 prn, 7 days a week
t .SOe=366=PART
(1-800-366-7278)
Para ordenar piezas con entrega a domicilio-
t -800-659-7084
Forthelocationof a
SearsPartsandRepairCenter
in yourarea:
Call 24 hours a day, 7 days a week
t =800=488-1t 222
For informationonpurchasinga Sears
Maintenance Agreement or to inquire
aboutan existingAgreement:
Call 9 am-5 pro, Monday-Saturday
t -800-827=6655
HemeCentrait _''
The Service Side of Sears s*'
32

MANUAL DEL
CONSUM_DOR
ESTUFA ELECTRICA
RADmANTE DE 30"
IN@EPENDIENTE C@I_
MODELO NO.
9tl.95575
91t.95576
9t1_95579
Lea y siga todas ltas
regUas yilas Bnstrucc_ones
para ell funciona_Rento
antes de usar este
producto per pri_era vez.
o Ilnstrucc_ones de
Seguridad
oFuncRc)na_ie_o
oCu_dade y Limpieza
oC6_o ResoUver
Problle_as
Sears, Roebuck _nd Co. Hoff_n Estates, _IL 60t 79 U.S°Ao
229C4020Pt _2 (SR- 10357)
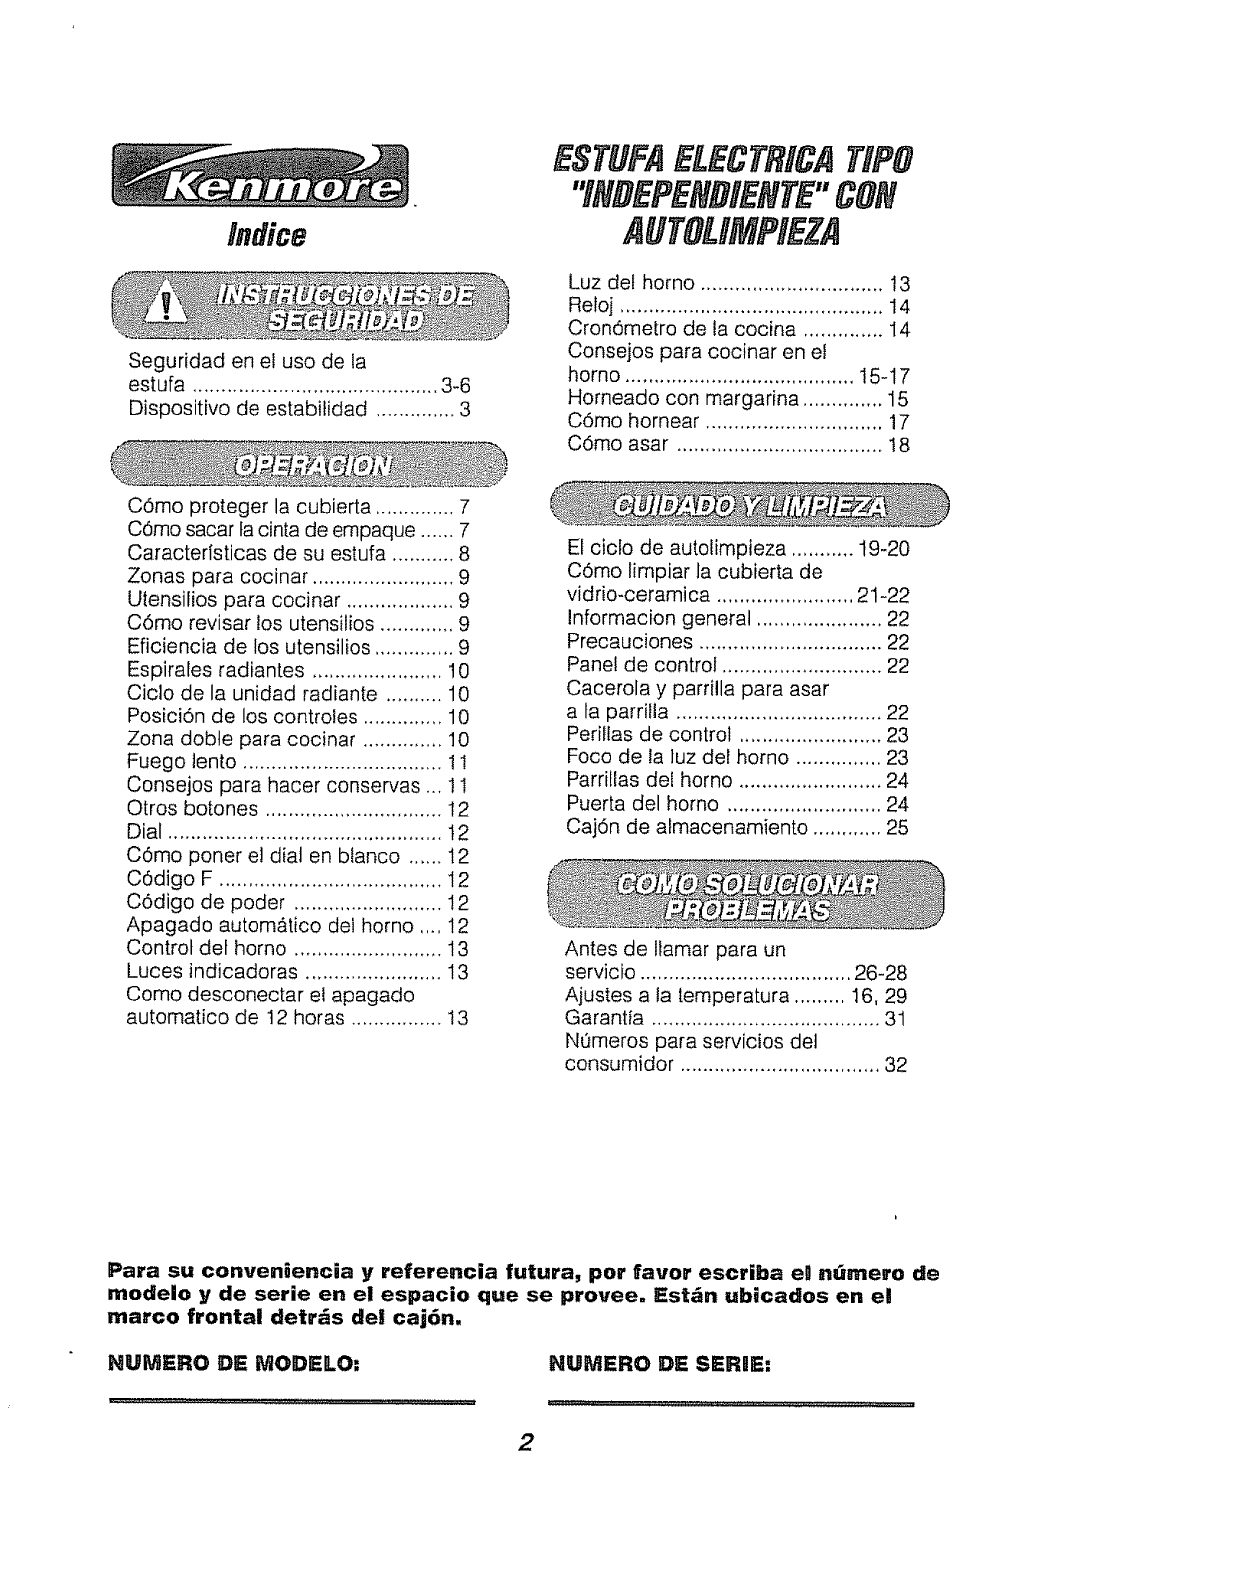
lndice
Seguridad en el uso de la
estufa ........................................... 3-6
Dispositivo de estabitidad .............. 3
ESTUFAELECTRICATIPO
"INBEPENBIENTE"CON
AUTOLiMPIEZA
Luz del homo ................................ 13
Reloj .............................................. 14
Cron6metro de la cocina .............. 14
Consejos para cocinar en el
homo ........................................ 15-17
Homeado con margarina .............. 15
Cdmo hornear ............................... 17
Cdmo asar .................................... 18
C6mo proteger la cubierta .............. 7
COmo sacar fa cinta de empaque ...... 7
Caracteristicas de su estufa ........... 8
Zonas para cocinar ......................... 9
Utensilios para cocinar ................... 9
C6mo revisar los utensilios ............. 9
Eficiencia de los utensilios .............. 9
Espirales radiantes ....................... 10
Ciclo de la unidad radiante .......... 10
Posici6n de los controtes .............. 10
Zona doble para cocinar .............. 10
Fuego lento ................................... 1i
Consejos para hacer conservas ... 1i
Qtros botones ............................... I2
Dial ................................................ t 2
C0mo poner e! dial en blanco ...... 12
COdigo F ....................................... 12
COdigo de poder .......................... 12
Apagado autom_tico del homo .... 12
Control det homo .......................... 13
Luces indicadoras ........................ 13
Como desconectar et apagado
automatico de I2 horas ................ t3
El cicfo de autolimpieza ........... 19-20
COmo limpiar la cubierta de
vidrio-ceramica ........................ 21-22
lnformacion general ...................... 22
Precauciones ................................ 22
Panel de control ............................ 22
Cacerola y parrilla para asar
a ta parrilla .................................... 22
Perillas de control ......................... 23
Foco de la ]uz det homo ............... 23
Parrillas del homo ......................... 24
Puerta del homo ........................... 24
Caj6n de almacenamiento ............ 25
Antes de llamar para un
servicio ..................................... 26-28
Ajustes a la temperatura ......... 16, 29
Garantia ........................................ 31
NOmeros para servicios del
consumidor ................................... 32
Para su conven6encia y referencia futura, pot favor escriba eg n_mero de
modelo y de serie en el espacio que se provee. Est_n ubacados en el
marco frontal detr_s del caj6n,
NUMERO DE MODELO: HUMERO DE SERGE:
2
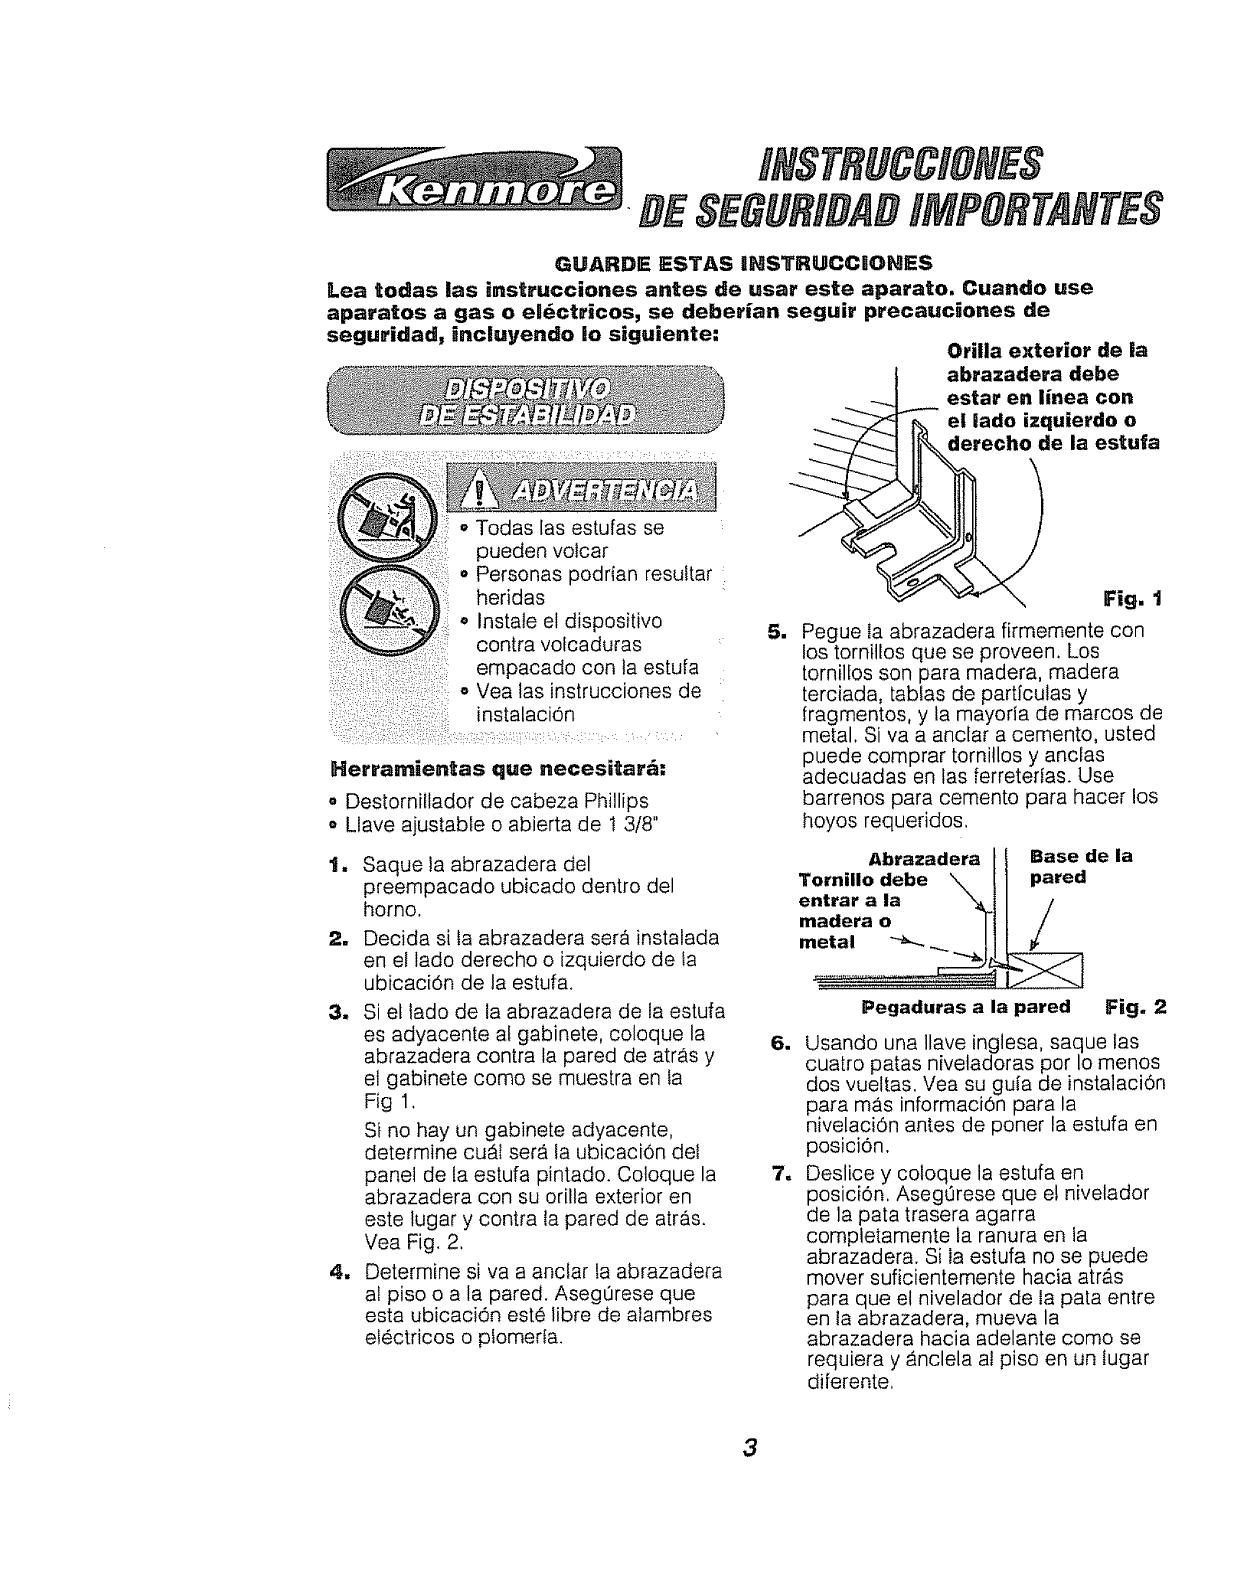
GUARDE ESTAS aNSTRUCCBONES
Lea todas las instrucciones antes de usar este aparato, Cuando use
aparatos agas o ei_ct,'icos, se deberian seguir precauciones de
seguridad, incluyendo lo siguiente: Orilla exterior de ia
abrazadera debe
estar en linea con
el lado izquierdo o
derecho de la estufa
o Todas las estufas se
pueden volcar
o Personas podrian resuftar
heridas
,, Instale el dispositivo
contra volcaduras
: empacado con la estufa
o Vea las instrucciones de
instalaciOn
b::: ::: ::: : :
Herrarnientas que necesitard:
eDestornitlador de cabeza Phillips
o Llave ajustabte o abierta de t 318"
tt
1
Saque la abrazadera del
preempacado ubicado dentro del
horno.
Decida si la abrazadera sera instalada
en et lado derecho o izquierdo de la
ubicaci6n de la estufa.
8, Si el tado de la abrazadera de la estufa
es adyacente a! gabinete, coloque la
abrazadera contra la pared de atras y
el gabinete como se muestra en Ia
Fig 1.
Si no hay un gabinete adyacente,
determine cu_l ser_, la ubicacion del
panel de la estufa pintado. Coloque la
abrazadera con su orilla exterior en
este lugar y contra la pared de arras.
Vea Fig. 2.
4, Determine siva a anctar la abrazadera
al piso o a la pared. AsegOrese que
esta ubicaciOn este libre de aiambres
el_ctricos o plomerta.
1
w
1
Fig. t
Pegue ia abrazadera firmemente con
los tornillos que se proveen. Los
tornilios son para madera, madera
terciada, tablas de partlculas y
fragmentos, y la mayorta de marcos de
metal. Siva a ancfar a cemento, usted
puede comprar tornillos y ancias
adecuadas en las ferreterias. Use
barrenos para cemento para hacer los
hoyos requeridos.
Abrazadera 1
Tornillo debe _, [
entrar ala x_i
madera o /i
Pegaduras a la pared
Base de la
pared
/
Fig. 2
Usando una llave inglesa, saque las
cuatro patas nivetadoras por Io menos
dos vuettas. Vea su gula de instalaciOn
para m_s informaciOn para la
nivelaci6n antes de poner la estufa en
posicion.
Deslice y coloque la estufa en
posiciOn. AsegOrese que e! nivelador
de la pata trasera agarra
completamente la ranura en la
abrazadera. Si la estufa no se puede
mover suficientemente hacia atras
para que el nivelador de ia pata entre
en la abrazadera, mueva la
abrazadera hacia adelante como se
requiera y _nclela at piso en un lugar
diferente.
3

;ADVERTEHCnA!
Para prevenir que 0a
estufa se vuelque
accidentalmente
debido a un uso
anormal, incluyendo una carga
excesiva sobre la puerta,
eng_nchela a la pared o al suelo
instalando el dispositivo contra
uolcaduras que se provee. Si la
estufa se mueue para 0impiarla,
para hacerle servicio o cualquier
raz6n_ asegdrese que el
dispositivo contra volcaduras
sea enganchado nuevamente
cuando la estufa se coloque de
vuelta en la abertura. No hacerio
podria resultar en que la estufa
se vuelque o en heridas
personales, Para inspeccionar e!
dispositivo contra volcaduras,
saque el pane! frontal y mire
para asegurarse que ei nive|ador
de la pata trasero est_ bien
enganchado en la ranura de la
abrazadera.
UMPORTAHTE: Para garantizar su
seguridad, la de su familia y la de su
hogar, por favor tea su Manual del
Consumidor cuidadosamente.
Mantengalo a la mano para referencias,
Ponga mucha atenciOn alas secciones de
seguridad. ASEGURESE que su estufa
sea instalada pot un tecnico especializado
y que haga tierra adecuadamente.
•NO DEJIE a los ninos sin vigilancia
cerca de una estufa que se est_ usando.
oENSENE A LOS NRNOS a no jugar
con los controles o cualquier parte de ta
estufa y no sentarse, subirse o pararse
sobre la puerta de este aparato o de
cualquier otra parte de la estufa.
oPRECAUCROH: NUHCA GUARDE
articulos que sean de interns para los
niNos en el panel trasero o en los
gabinetes sobre la estufa, Los ni_os que
se suban sobre la estufa podrfan
resuftar gravemente heridos.
•GUARDE ESTE tibro para un uso
futuro.
° HUHCA USE su estufa para entibiar o
calentar una habitaci6n.
°NUNCA TRATE de reparar o
reemplazar una parte de la estufa a
menos que Jas instrucciones se den en
este manual. Todo otto trabajo deberfa
set hecho por un tecnico especializado.
,SUEMPRE MANTEHGA los
revestimientos combustibles de tas
paredes, cortinas y otros pa_os a una
distancia prudente de fa estufa.
°NUHCA CALHENTE contenedores de
alimentos cerrados. El aumento de ia
presi6n podda causar que et contenedor
exptote y cause heridas.
o NUNCA DEJE fiascos o latas de
grasa o goteaduras sobre o cerca de la
estufa.
°SJEMPRE tVtANTENGA el _rea de la
estufa despejada de cosas que se
podrian quemar. La acumulaci6n de
comida y grasa y los utensilios de
madera se podrian incendiar. Los
utensilios de plastico se podrlan derretir
y las comidas en conservas poddan
explotar. Su homo nunca se deberia
usar para almacenar cosas.
oSREMPRE MAINITEHGA la estufa
despejada de cosas que se podrian
quemar (gasolina y otros vapores y
liquidos infiamables),
oHUNCA TRATE de limpiar las
superficies calientes. Algunos
limpiadores producen vapores nocivos y
los pa_os y tas esponjas mojadas
podrlan causar quemaduras por vapor.
oNUNCA USE ropa suelta cuando use
la estufa.
•NUNCA USE una toalla u otto paso
abultado como agarradera y aseg0rese
que ]a agarradera est6 seca. Las
agarraderas h0medas y las esponjas
mojadas podrian causar quemaduras
pot vapor. NO PERtVtUTA que las
agarraderas toquen ias zonas para
cocinar cafientes.
4

• INIOTOQUE las superficies para calentar,
tas superficies cerca de elias o las
superficies interiores. Estas podrfan estar
suficientemente calientes para quemar
aunque se vean de color oscuro. Durante y
despu6s del uso, no toque o permit° que ta
ropa o materiales inflamables hagan
contacto con las superficies calientes hast°
que hayan tenido tiempo de enfriarse. Las
otras superficies cerca de las ventanillas de
ventitaciOn del homo, puertas, ventanas y
las superficies para cocinar tambien
podrian estar suficientemente calien[es
para causar quemaduras.
°SOLO CIERTAS cfases de utensilios de
vidrio o cer_mica se pueden usar para
cocinar en la cubierta. AsegQrese que los
utensilios que seleccione estAn diseC_ados
para cocinar sobre fa cubierta sin
quebrarse debido a los sQbitos cambios de
temperatura.
oSItI:MPRI_ TEHGA cuidado cuando
toque los eiementos de ta cubierta.
Retendr&n calor despues de que la estufa
se hay° apagado.
oiItUNCA OIBSTRUYA la ventilaciOn del
homo detr_s el elemento derecho de atr&s.
• LAS OLLAS QUIE SE USEH para
cocinar en la cubierta deberian ser de
fondo piano y lo suficientemente grandes
para cubrir el &tea que se est#,utilizando.
Los utensilios que son demasiado
pequeRos exponen et elemento calentador
y podrla causar un contacto directo o el
incendio de la ropa.
• NUNCA D__,,Jl_Ias unidades de
superficie sin vigilancia a temperaturas
altas. Los derrames podflan resuftar en
humo o en derrames de grasa que se
podrlan incendiar.
oHUNCA COCRNE sobre una cubierta
par° cocinar quebrada. Las soluciones
para la limpieza y los derrames podrian
penetrada y crear un riesgo de corte de
corriente o de incendio.
,SIEMPRE COLOQUE las agarraderas
(manillas) de las oltas hacia adentro y lejos
de las otras unidades de la superficie para
reducir el riesgo de quemaduras,
encendido, un contacto y derrame
accidental.
•CUANDO PREPARE comidas a la llama
debajo de la campana de ventilaciOn,
encienda el ventilador.
oCOLOQUE II.AS PARRILLAS DElL
HORHO en la posiciOn deseada
mientras el homo este frIo. Si las parrillas
se deben mover mientras el homo est#,
caliente, no permita que la agarradera
haga contacto con el quemador catiente
del horno.
°DESPUES DE ASAR A LA
PARRIILLA, siempre saque Ia cacerofa y
la parrilla par° asardel homo y timpielas.
Los sobrados de grasa en ta cacerola
para asar podrian incendiarse la pr6xima
vez que usted use el homo.
•SIEMPRE TENGA cuidado cuando
abra la puerta del homo, Deje que el aire
caliente y el vapor escapen antes de
mover los alimentos.
oNUNCA USE papel de aluminio para
cubrir el rondo del horno. El uso
incorrecto del papel de aluminio podria
empezar un incendio, o podria resultar en
un gotpe de corriente.
5
•LUiViPIE SOLAMEHTE fas partes que se
llstan en este manual. Siga todas las
instrucciones para la limpieza. AsegOrese
de sacar la cacerola y la parritfa para asar
antes det ciclo de autolimpieza.
o NUNCA FRIEGUE, mueva, o dane et
setlo de ta puerta en tas estufas con
autolimpieza.
oNUNCA TRATE de limpiar los utensilios,
ollas, partes removibles o ta cacerola y ta
parrilta para asar en el cicto de
autolimpieza.
oNO USE ]impiadores para hornos - No se
deberta usar ninguna ctase de limpiador
para hornos o cremas protectoras dentro o
alrededor de cualquier parte del homo.
•HUNCA FUERCE la manitla del cerrojo a
la posici6n de abierto mientras el homo
est_ catiente.
;ADVERTENC_A DE
SEGUR_DAD IMPORTAHTE!
California Safe Drinking Water and
Toxic Enforcement Act requiere que
el gobernador de California publique
una lista de substancias que el
estado sepa que producen defectos
de nacimiento u otros da_os
reproducUvos y requiere que los
hombres de negocios adviertan a
sus clientes del contacto potencial
a tales substancias. E! aislante de
libra de vidrio en el homo con
autolimpieza emitir;_ una muy
peque_a cantidad de mon6xido de
_arbono durante el ciclo de
autolimpieza. El contacto se puede
minimizar ventilando con una puerta
o ventana abierta o usando un
ventilador o una campana de
ventilaci6n.
01VtPORTAHTE: La salud de algunos
p_jaros es extremadamente
sensitiva alos vapores producidos
por el ciclo de autolimpieza de
cualquier horno. Ponga los p_jaros
en otra habitaci6n que est_ bien
ventilada.
;LEA Y COMPRENDA
ESTA _NFORi_IACRO_ AHORA!
Asegdrese que todos en su hogar
sepal qu_ hacer en caso de
incendio, Nunca use agua sobre un
incendio de grasa; esto solamente
extender_ tas llamas,
BNCEHDHO DE GRASA EH LA
CUBIERTA:
Hunca levante una oHa en llamas,..
1, Apague los elementos de la superficie.
2. Sofoque la llama con una tapa
apretada, soda para cocinar o con un
extintor qufmico, a espuma o "halon".
FUEGO EN EL HORNO:
;No trate de mover la cacerola!
1, Cierre la puerta del homo y apague
los controles.
), Si et incendio continOa,
cuidadosamente abra la puerta, arroje
soda para cocinar sobre el fuego, o
use un extintor de qufmico seco,
espuma o "ha!on".
6

CGmoProtegerLa Cubierta
ParaCocinar
• No arrastre los utensitios sobre la
cubierta.
• No use una toalla o esponja para platos
para timpiar la cubierta.
• No use polvos para fregar, o lanillas de
plb.stico o de metal sobre ta cubierta.
• No aplique crema para limpiar sobre la
cubierta si la superficie esta caliente.
• Lea tas instrucciones en la etiqueta de la
botella de crema para limpiar la cubierta
antes de tratar de limpiar la superficie
de la cubierta.
o Despues de limpiar fa superficie de la
cubierta, asegQrese de sacar todo et
residuo de la crema que podr[a quedar
con una toalta de pape! seca.
o Para derrames grandes, haga girar ta
perilla de control de la superficie a la
posici6n de APAGADO (OFF), Utilice
una toalfa de papel seca para limpiar el
derrame, luego use uh raspador a hoja
(sujetado con una agarradera) en un
angufo de 30 grados sobre la superficie
de la cubierta para raspar et resto del
derrame de ta zona para cocinar
caliente.
OPERACION
PRECAUCION. Cuando
[ _ A]BOS controles de ia
L_it'/) superficie se apaguen, la
auz Rndicadora de Calor
de la Superficie permanecer_
encendida basra que ia
superficie se haya enfriado hasta
aproxirnadamente 150 grados F,
La superficie de vidrio-cerdmica
retendr_ calor despuds que la luz
indicadora se haya apagado.
Tenga cuidado hasta que la
superfic6e de la cubierta haya
tenido tiempo de enfriarse,
Para sacar el adhesivo que queda de la
cinta de empaque, use un detergente
liquido normal para platos, aceite mineral
o para cocinar. Con un paso suave frote el
area y permita que se remoje. Enjuague y
seque bien, Repita el procedimiento
usando un pulidor para estufas para
asegurarse que et estufa no se dane.
"=sto se deberia hacer antes de
encender la estufa pot primera
vez. La cinta no se puede sacar
una vez que la estufa se haya
calentado. La cinta de empaque se
puede encontrar en las siguientes areas:
superficie de la cubierta, manilla de la
puerta, area del panel de control,
moldura de la puerta, area de! homo.
• No cocine directamente sobre la
superficie del vidrio.
o No use la superficie como tabia para
cortar.
7
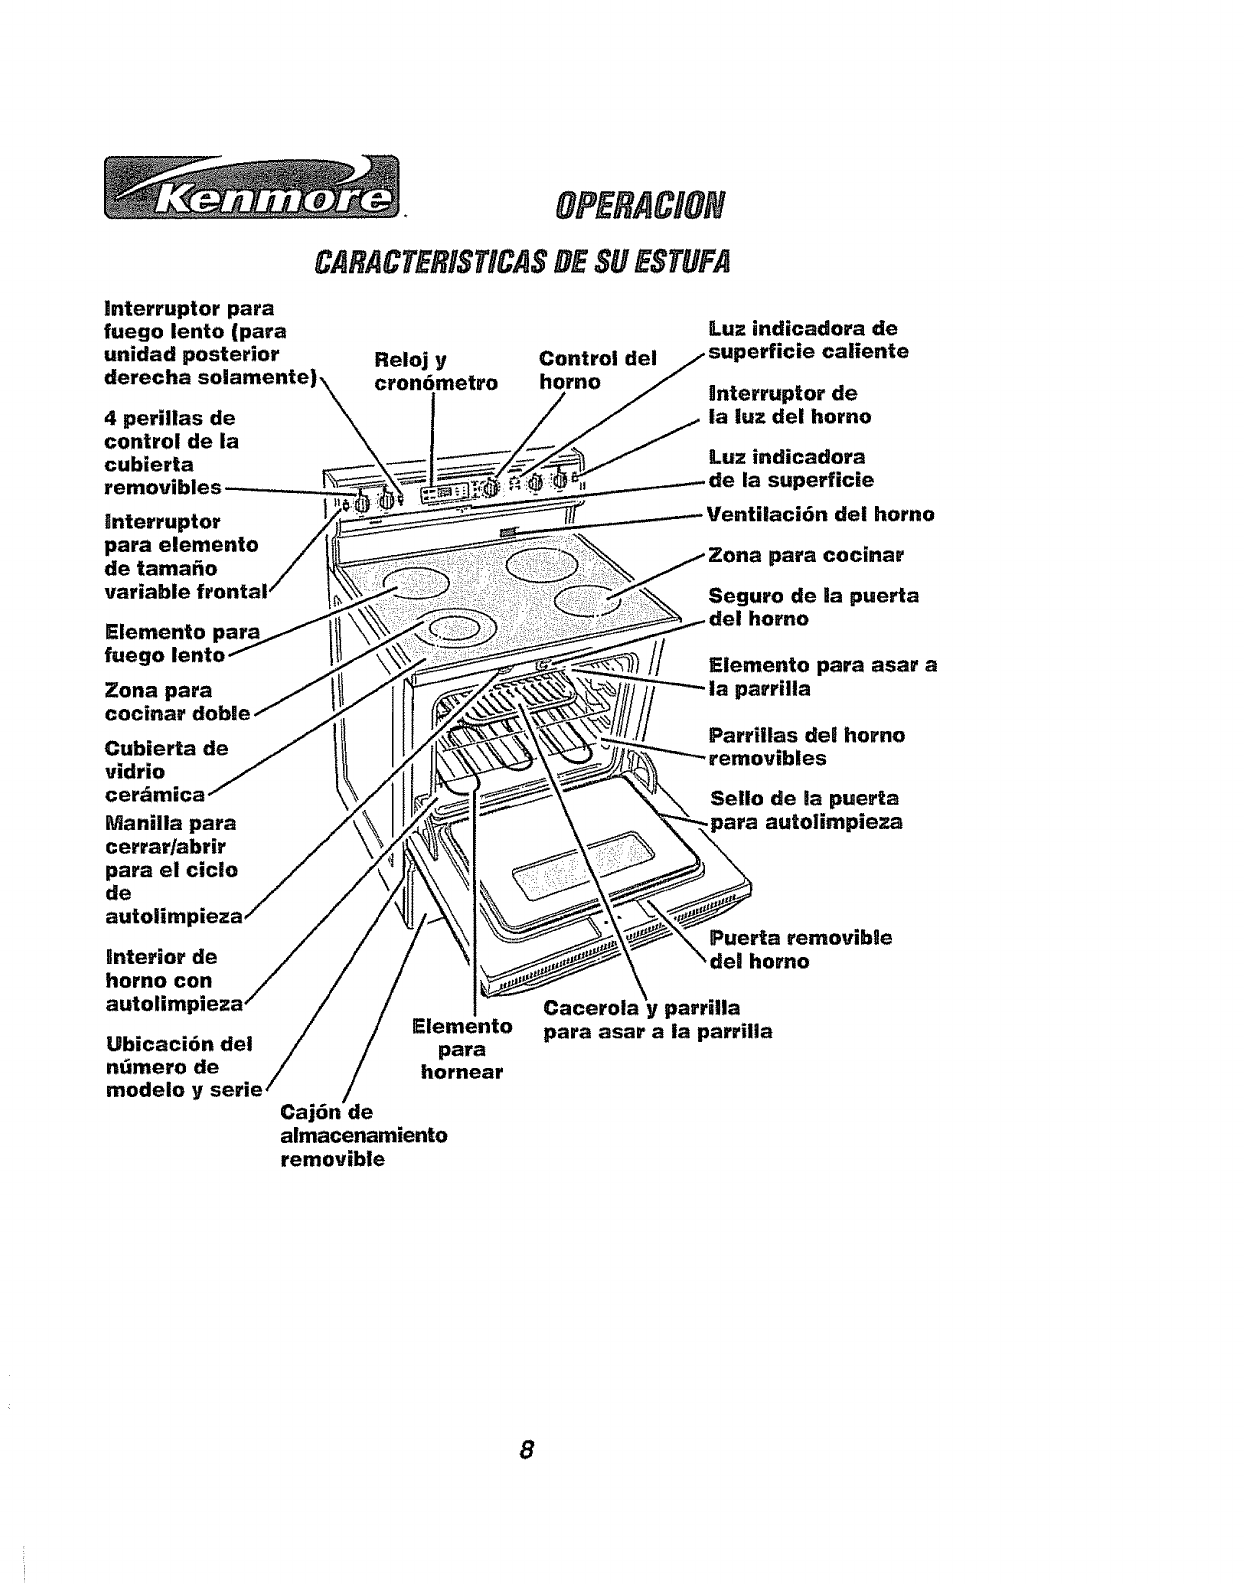
Interruptor para
fuego lento (para
unidad posterior
derecha
4 perillas de
control de la
cubierta
removibles
Jnterruptor
para elemento
de tama_o
variable
Elemento
fuego lento
Zona para
cocinar doble
Cubierta de
vidrio
cerdmica
Maniila para
cerrar/abrir
para el ciclo
de
autoliml
Bnterior de
homo con
autolim
Ubicaci6n del
ntimero de
modelo y serie
OPERACION
CARACTERISTiCASDESUESTUFA
Reloj y Control del
cron6metro homo
Luz indicadora de
lerficie caiiente
Onterruptor de
la luz del homo
Luz indicadora
la superficie
dei horno
para cocinar
Seguro de la puerta
horno
Elemento para asar a
parrilla
Parriilas de! homo
Sello de mapuerta
para autolimpieza
Elemento
para
hornear
Caj6n' Je
almacenamiento
removible
Puerta rernovible
horno
Cacerola y parrilla
para asar a la parrilla
8
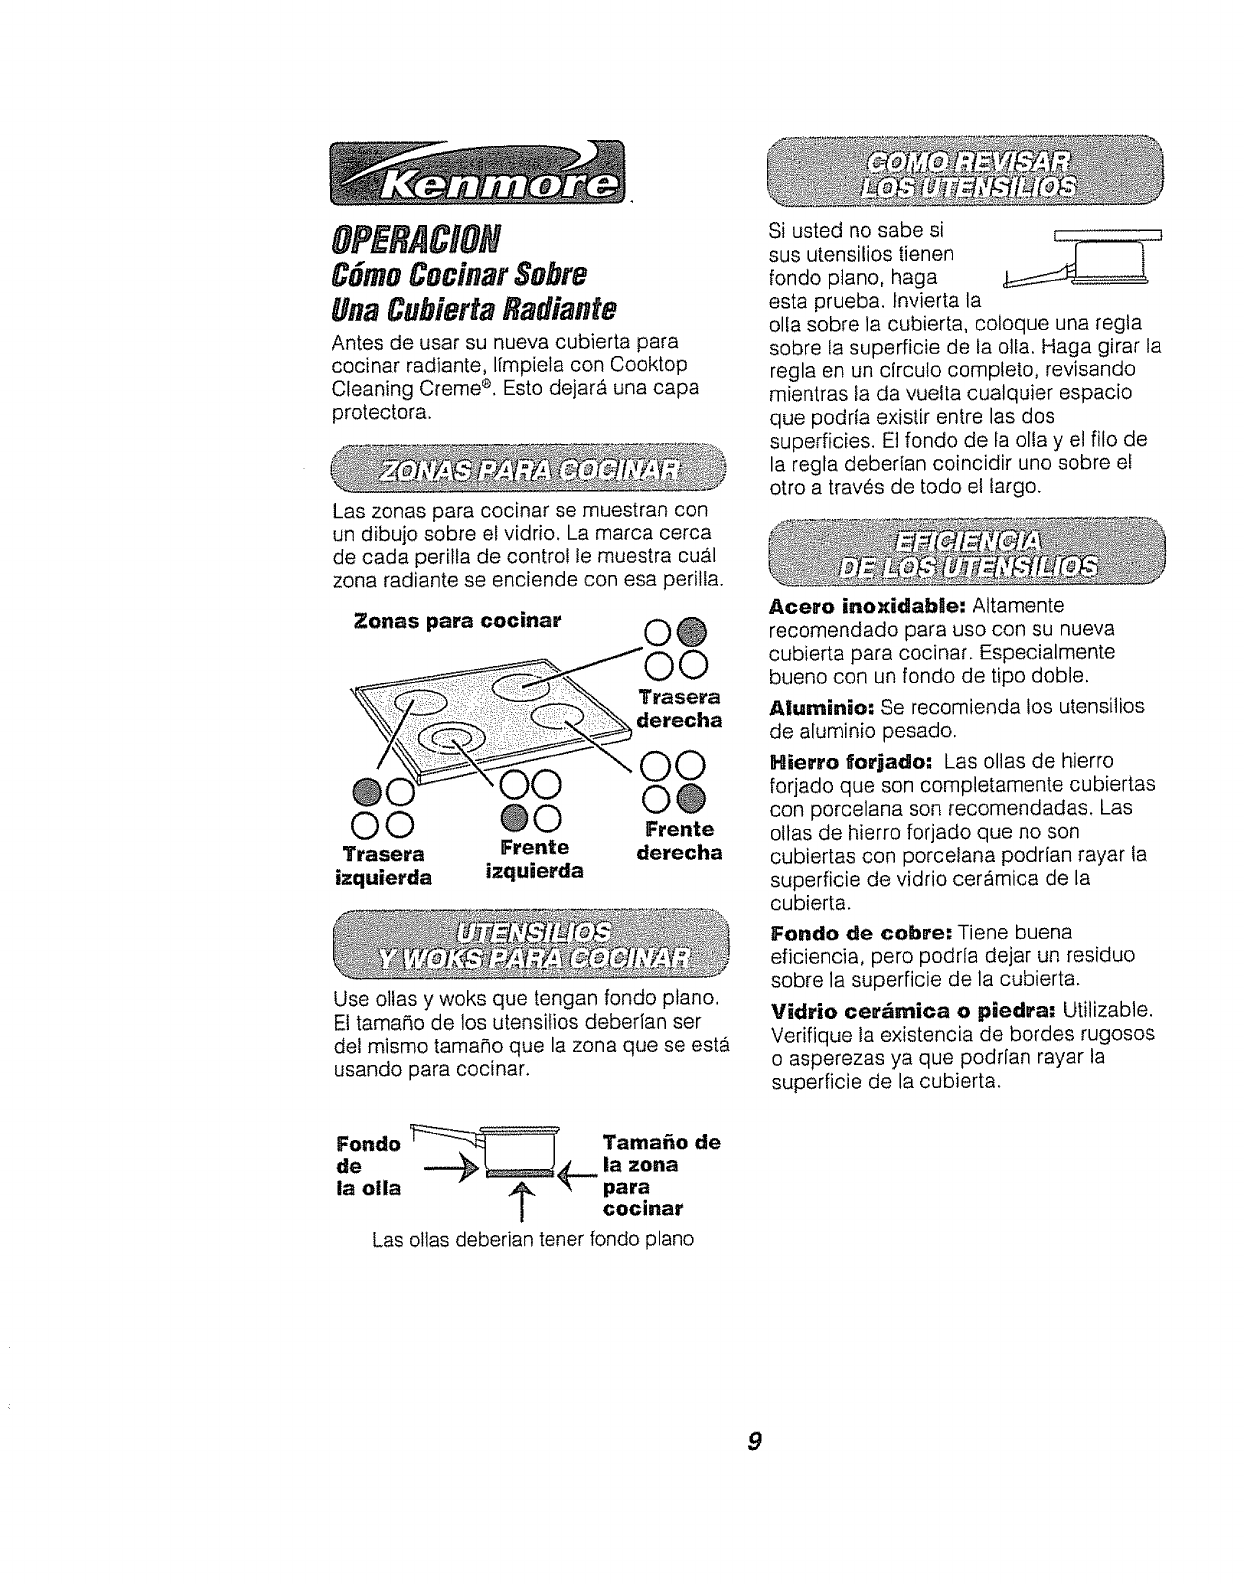
OPERACION
CGmoCocinar$obm
Una Cubierta Radiante
Antes de usar su nueva cubierta para
cocinar radiante, lfmpiela con Cooktop
Cleaning Creme ®. Esto dejar_ una capa
protectora.
Las zonas para cocinar se muestran con
un dibujo sobre e! vidrio. La marca cerca
de cada perilfa de control te muestra cub.l
zona radiante se enciende con esa perilta.
Zonas para cocinar O@
O0
Trasera
derecha
O0 @0
Trasera Frente
izquierda izquierda
O0
O@
Frente
derecha
Use ollas y woks que tengan rondo plane.
El tamaRo de los utensifios debeflan ser
del mismo tama_o que la zona que se esta
usando para cocinar.
Fon do %_ I_.__ Tama_o de
de la zona
la oila para
cocinar
Las ollas deberian tener fondo piano
Si usted no sabe si t
sus utensilios tienen
rondo ptano, haga
esta prueba, fnvierta la
olla sobre la cubierta, coloque una regla
sobre la superficie de la olla, Haga girar la
regla en un circuto completo, revisando
mientras la da vuelta cualquier espacio
que podrla existir entre las dos
superficies. Et rondo de ta olla y el filo de
la regla debedan coincidir uno sobre e!
otto a trav_s de todo el largo.
Acero inoxidabne: Altamente
recomendado para uso con su nueva
cubierta para cocinar. Especialmente
bueno con un fondo de tipo doble.
Alurninie= Se recomienda los utensilios
de aluminio pesado.
Hierro forjado: Las ollas de hierro
forjado que son completamente cubiertas
con porcelana son recomendadas. Las
oltas de hierro forjado que no son
cubiertas con porcelana podrian rayar la
superficie de vidrio cer_mica de la
cubierta.
Fondo de cobre= Tiene buena
eficiencia, pero podrla dejar un residuo
sobre la superficie de la cubierta.
Vidrio cet_mica o piedra: Utilizable.
Verifique la existencia de bordes rugosos
o asperezas ya que poddan rayar la
superficie de la cubierta.
9
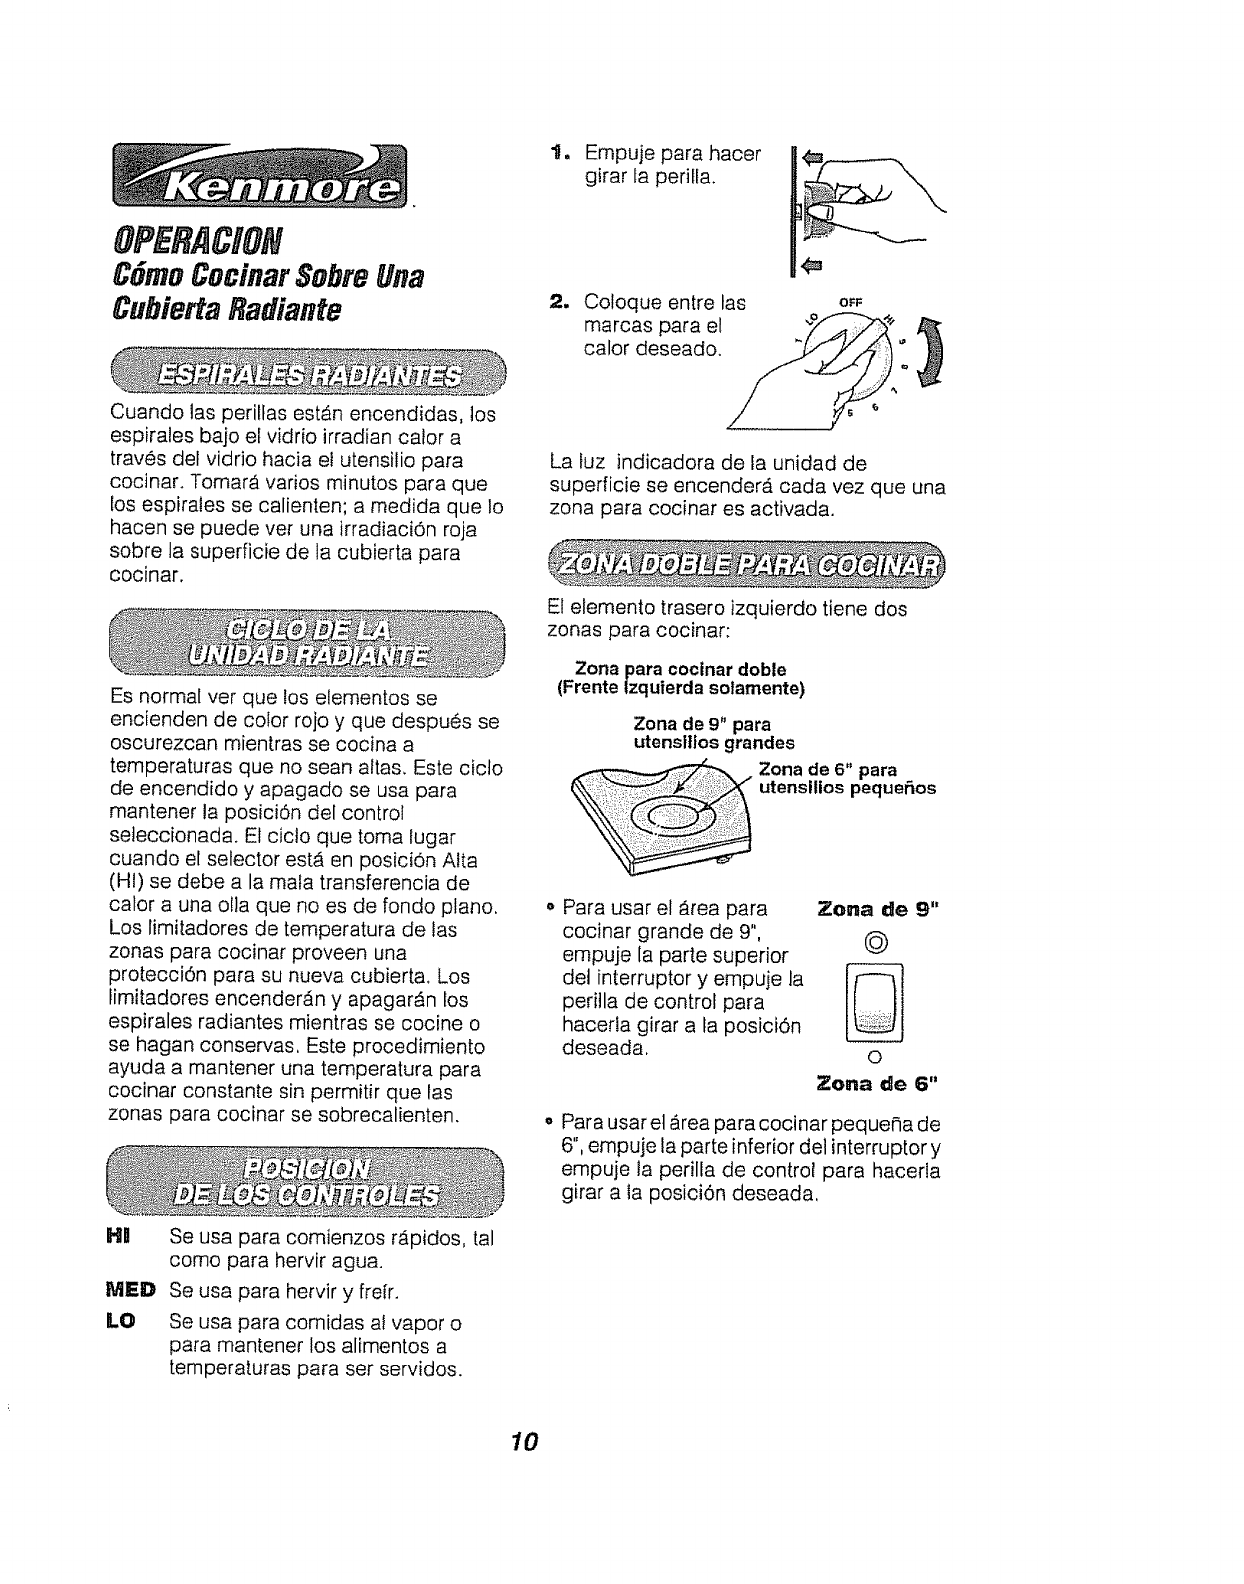
OPERACION
C6moCecinarSobreUna
Cubie#a Radiante
Cuando las peritlas est_n encendidas, los
espirales hajo el vidrio irradian calor a
traves del vidrio hacia el utensilio para
cocinar. Tomar_ varios minutos para que
los espirales se calienten; a medida que 1o
hacen se puede vet una irradiaci6n roja
sobre la superficie de la cubierta para
cocinar.
1t
11
Empuje para hacer
girar fa perilla.
Coloque entre las o_F
marcas para el "__" /_
calor deseado./__, _
La tuz indicadora de la unidad de
superficie se encender_i cada vez que una
zona para cocinar es activada.
Es normal ver que los elementos se
encienden de color rojo y que despues se
oscurezcan mientras se cocina a
temperaturas que no sean altas. Este cicto
de encendido y apagado se usa para
mantener la posici6n del control
seteccionada. El cic!o que toma lugar
cuando el selector estA en posiciOn Atta
(HI) se debe a la mala transferencia de
calor a una olla que no es de rondo piano.
Los limitadores de temperatura de las
zonas para cocinar proveen una
protecciOn para su nueva cubierta. Los
limitadores encender_n y apagar_n los
espirales radiantes mientras se cocine o
se hagan conservas, EsLe procedimiento
ayuda a mantener una temperatura para
cocinar constante sin permitir que tas
zonas para cocinar se sobrecalienten.
H!
MED
LO
Se usa para comienzos r_pidos, tal
como para hervir agua.
Se usa para hervir y freir.
Se usa para comidas af vapor o
para mantener los alimentos a
temperaturas para set servidos.
El elemento trasero izquierdo tiene dos
zonas para cocinar:
Zona para cocinar dobte
(Frente tzqulerda solamente)
Zona de 9" para
utens|tios grandes
Zona de 6" para
utensltios pequer_os
a Para usar el _.rea para
cocinar grande de 9",
empuje la parte superior
det interruptor y empuje la
peritla de control para
hacerla girar a la posici6n
deseada.
Zona de 9"
©
©
Zona de 6"
€,Para usar et area para cocinar pequena de
6", empuje la parte inferior del interruptor y
empuje la perilla de control para hacerla
girar a la posiciOn deseada,
10
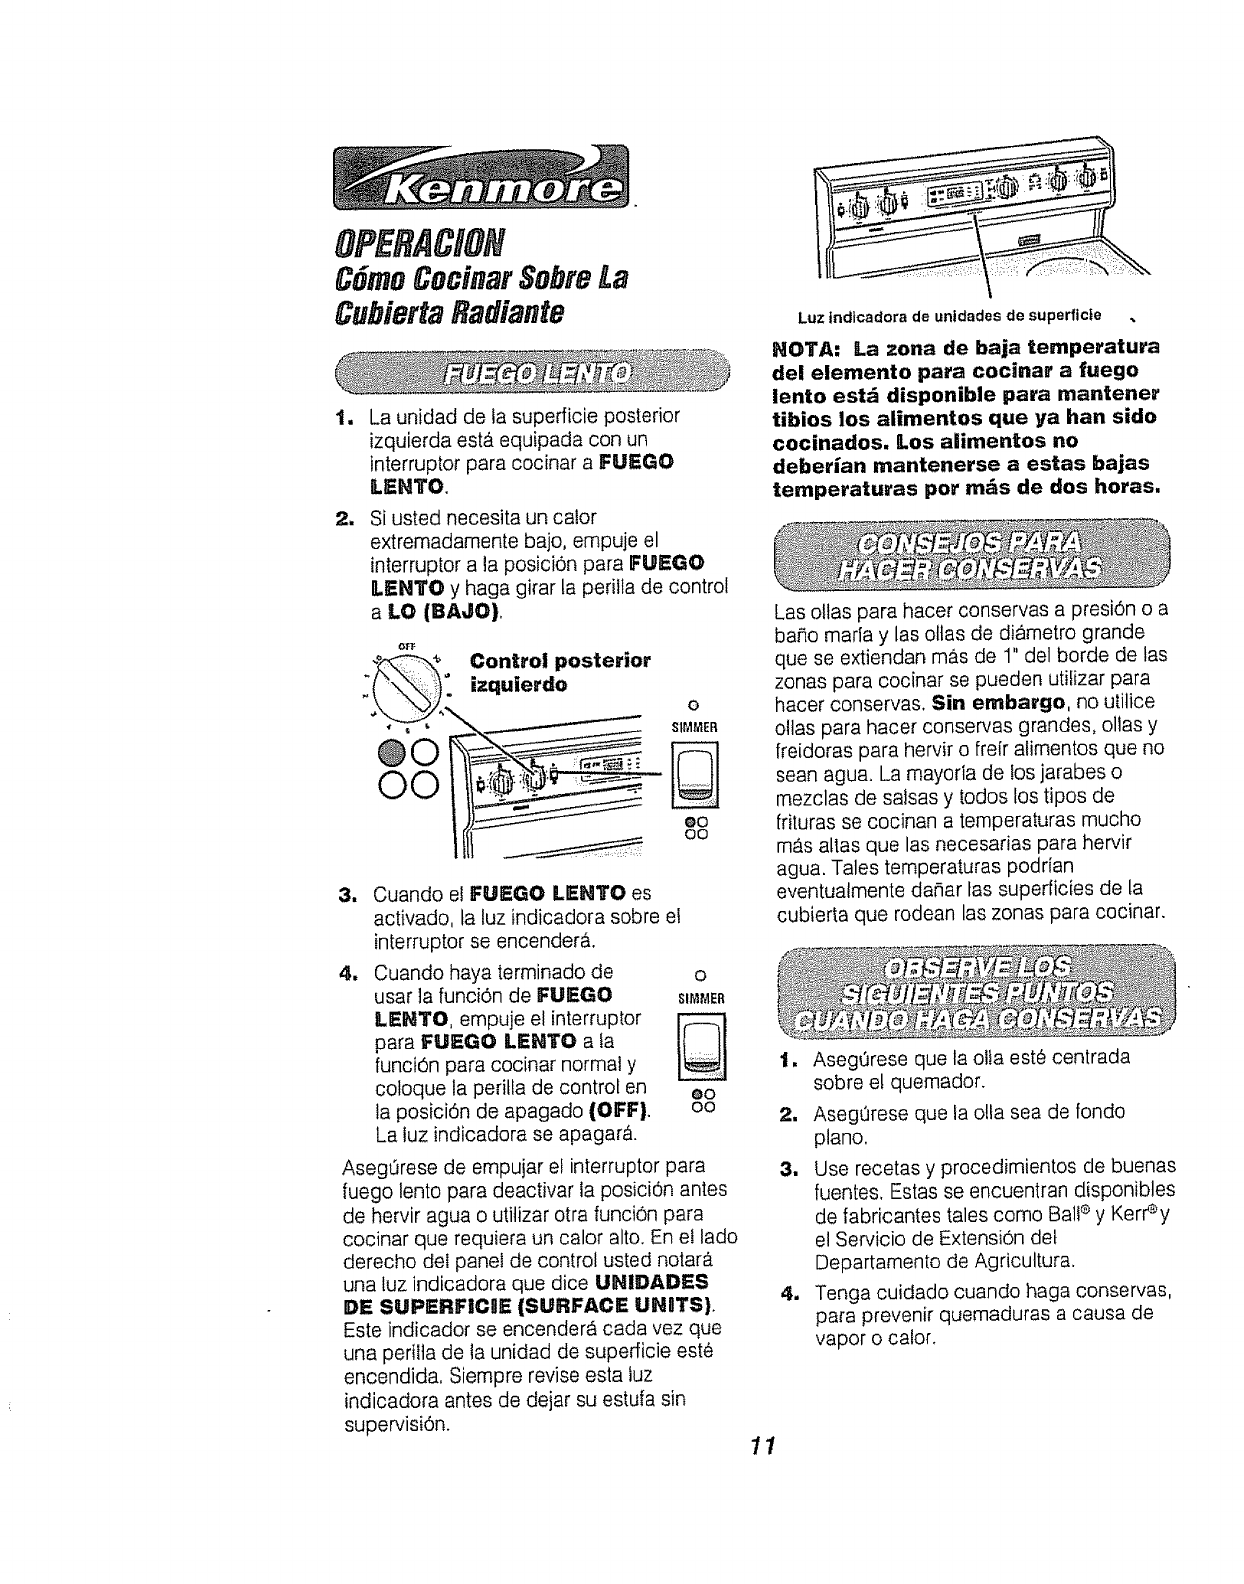
OPERATION
CGmoCocinarSobreLa
Cubierta Radiante
Im
1
La unidad de ta superficie posterior
izquierda est& equipada con un
interruptor para cocinar a FUEG@
LENTO.
Si usted necesita un calor
extremadamente bajo, empuje el
interruptor a la posiciOn para FUEGO
LENTO y haga girar la perilla de control
aLO (eAJO).
o
StMMEP,
oo
oo
3. Cuando el FUEGO LENTO es
activado, la luz indicadora sobre et
interruptor se encender_.
11 Cuando haya terminado de o
usar la funciOn de FUEGO SIMMER
LENTO, empuje el interruptor
para FUEGO LENTO a ta
funciOn para cocinar normal y
coloque la peritla de control en eo
ta posiciOn de apagado (OFF}. oo
La luz indicadora se apagar,_.
AsegL_rese de empujar et interruptor para
fuego lento para deactivar la posici0n antes
de hervir agua o utitizar otra funci0n para
cocinar que requiera un calor alto. En et lado
derecho del panel de control usted notarY.
una luz indicadora que dice UHIDADES
DE SUPERFICRE (SURFACE UNOTS}
Este indicador se encender_ cada vez que
una perilla de ta unidad de superficie este
encendida. Siempre revise esta tuz
indicadora antes de dejar su estufa sin
supervision. 11
Luz indlcadora de unidades de superficte .
NOTA: La zona de baja temperatura
del elemento para cocinar a fuego
lento est_ disponible para rnantener
tibios los alimentos que ya han sido
cocinados. ILos a|imentos no
deberian mantenerse aestas bajas
temperaturas per m_s de dos horas,
Las ottas para hacer conservas a presi0n o a
ba_o maria y las oltas de diametro grande
que se extiendan m_s de 1" del borde de las
zonas para cocinar se pueden utifizar para
hacer conservas. Sin embargo, no ulilice
ollas para hacer conservas grandes, oltas y
freidoras para hervir o frelr atimentos que no
sean agua. La mayoria de los jarabes o
mezclas de satsas y todos los tipos de
[rituras se cocinan a temperaturas mucho
mb,s alias que las necesadas para hervir
agua. Tales ternperaturas podrian
eventualmente daSar las supedicies de la
cubierta que rodean las zonas para cocinar.
2,
3,
4m
AsegOrese que la olta este centrada
sobre e! quemador.
Aseg0rese que la olta sea de rondo
piano.
Use recetas y procedimientos de buenas
fuentes, Estas se encuentran disponibles
de fabricantes tales como Bali® y Kerrey
el Servicio de ExtensiOn det
Departamento de Agricultura.
Tenga cuidado cuando haga conservas,
para prevenir quemaduras a causa de
vapor o calor.
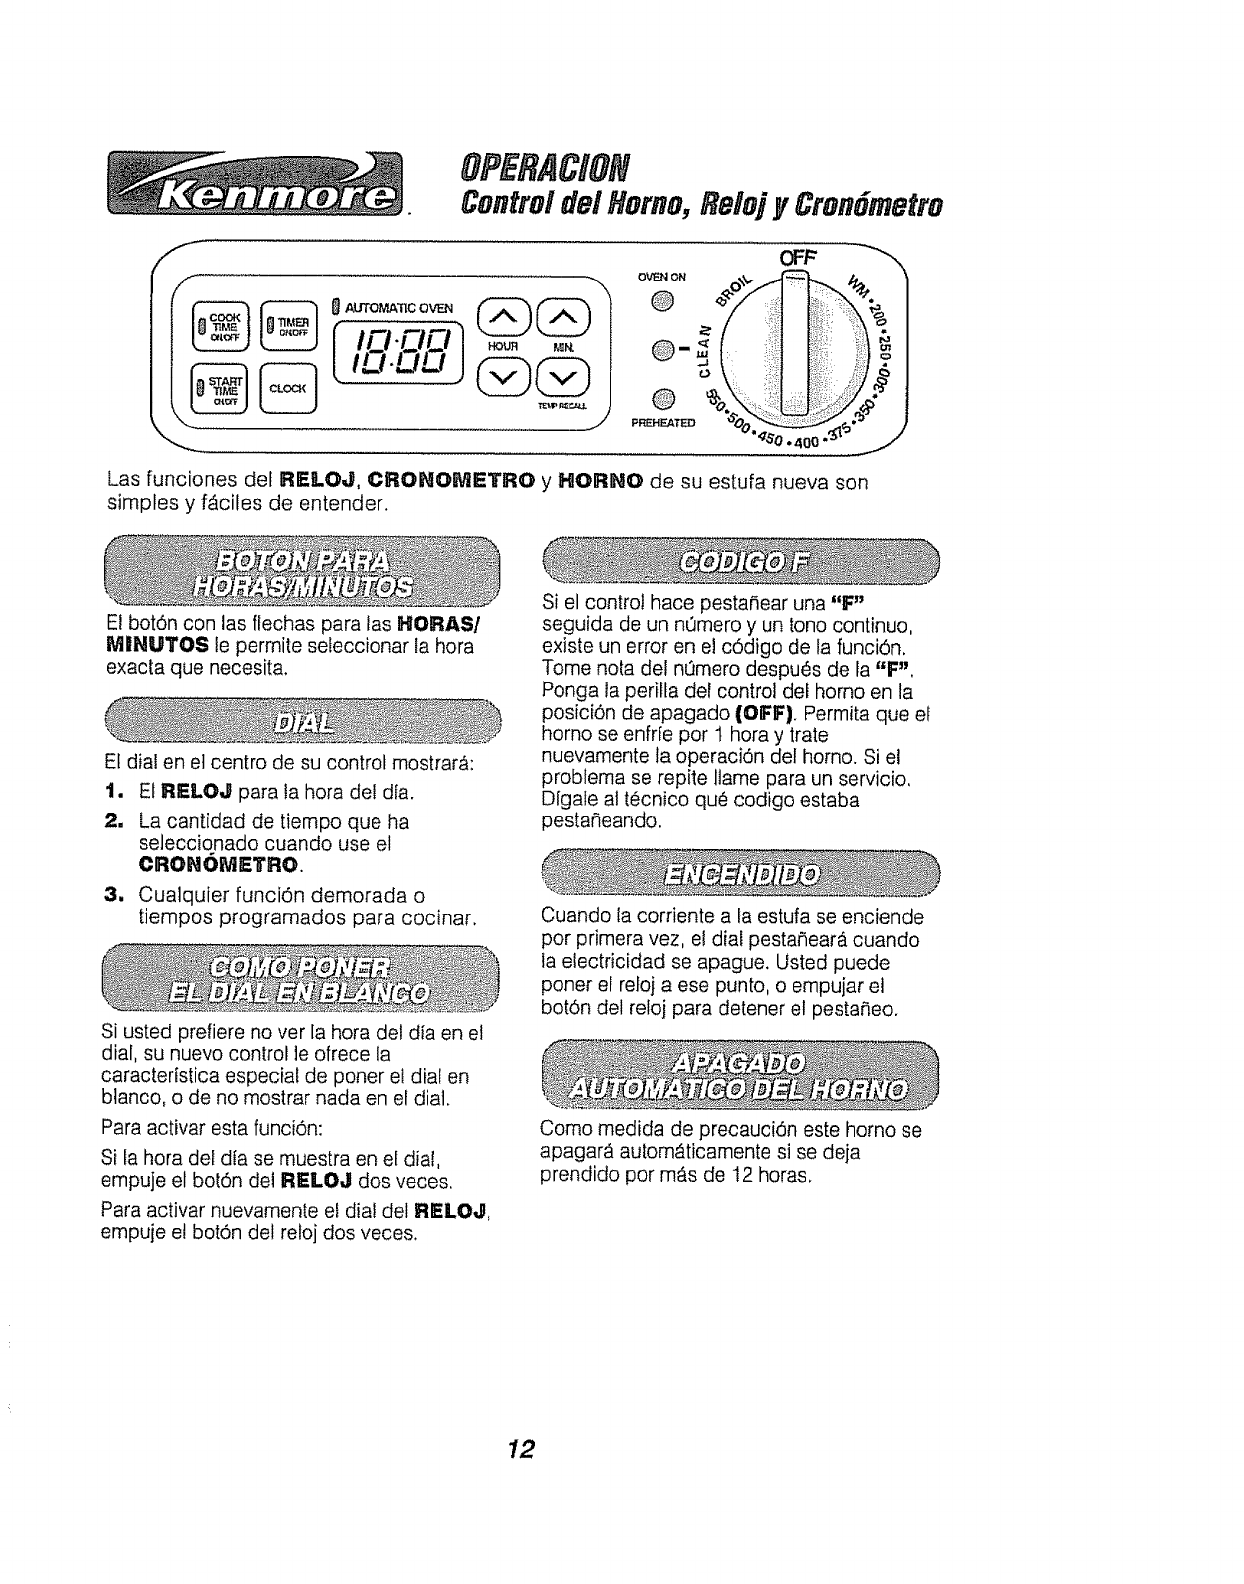
8PERACIO#
Confroidel Homo, RelojyCron#mefro
OFF
::_ ::;: ::_::.4: _: .=
_"o.,_so74oo._ .-
Las funciones def RELOJ, CRONOMETRO yHORHO de su estufa nueva son
simptes y fAciles de entender.
El botOn con las flechas para las HORASI
MINUTOS le permite seteccionar la hora
exacta que necesita.
Et dial en el centro de su control mostrar_:
la
2.
n
El RIELOJ para la hora det dia.
La cant!dad de tiempo que ha
seleccionado cuando use el
CRONOMIETRO.
Cualquier funci6n demorada o
tiempos programados para cocinar.
Si usted prefiere no ver la hora del dia en et
dial, su nuevo control le ofrece la
caracteristica especial de porter e! dial en
blanco, o de no mostrar nada en el dial.
Para act!vat esta funciOn:
Si la hora del dta se muestra en el dial,
empuje el bot6n del RIELOJ dos veces.
Para activar nuevamente et dia! del RIELOJ,
empuje e! botOn del reloj dos veces.
Si el control hace pesta_ear una "F"
seguida de un nOmero y un tono continuo,
existe un error en el c6digo de la funci6n.
Tome nora del nQmero despues de la "F'.
Ponga la periffa del control del homo en la
posiciOn de apagado (OFF}. Permita que el
homo se enfrie port hora y trate
nuevamente fa operaci6n de! homo. Si el
probfema se repite llame para un servicio.
Digafe at tecnico que cod!go estaba
pesta_eando.
Cuando la corriente a la estufa se enciende
por primera vez, et dial pesta_ear_, cuando
ta electric!dad se apague. Usted puede
porter el reloj a ese punto, o empujar et
botOn del reloj para detener et pesta_,eo.
Como medida de precauciSn este homo se
apagar_ autom_ticamente si se deia
prendido por mAs de t2 horas.
12
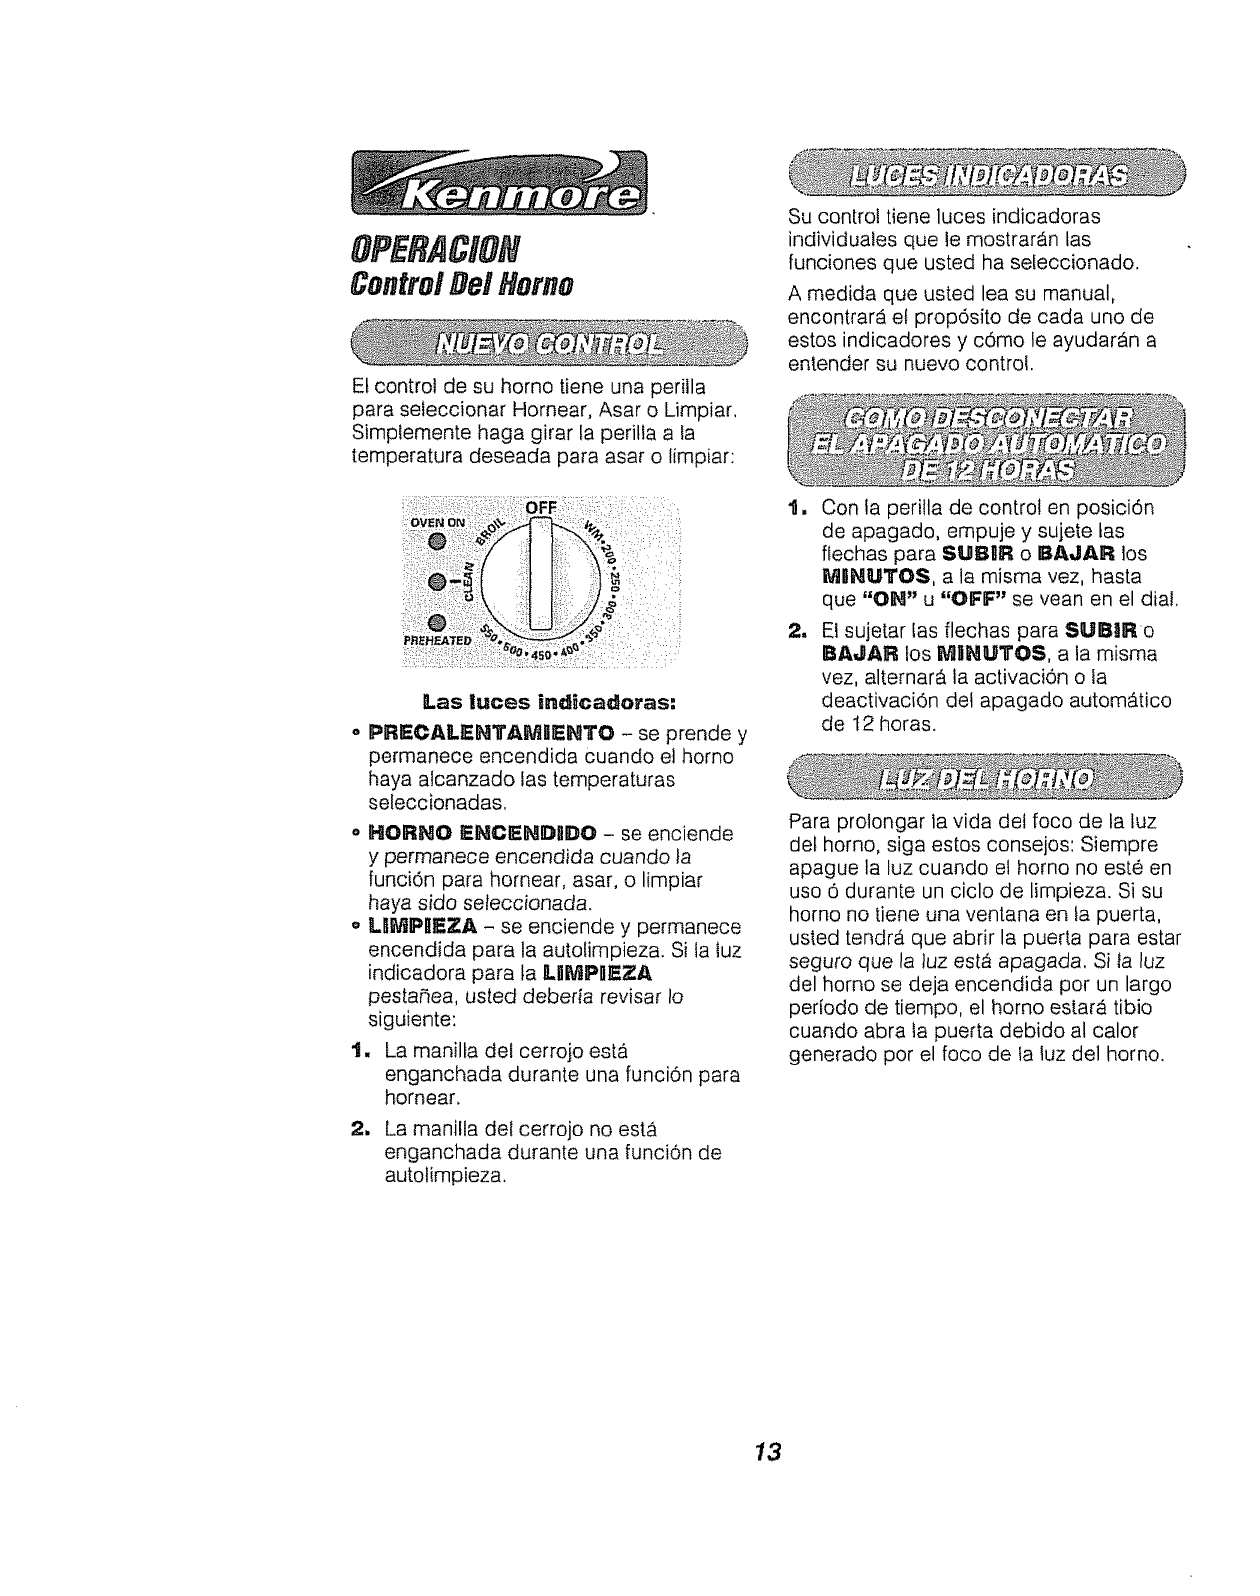
OPERACION
Centre!De! Homo
Et control de su homo tiene una perilla
para sefeccionar Hornear, Asar o Limpiar,
Simplemente haga girar la peritla a la
temperatura deseada para asar o limp!at:
Las lluces ind_cadoras:
oPRECAILEHTAMIIENTO - se prende y
permanece encendida cuando et homo
haya alcanzado las temperaturas
seleccionadas.
,, HORNO EHCI_HDIIDO -se enciende
y permanece encendida cuando ta
funci6n para hornear, asar, o limp!at
haya sido seleccionada.
o L.RMPREZA - se enciende y permanece
encendida para la autolimpieza. Si ia iuz
indicadora para la UMPHI_ZA
pesta_ea, usted deberta revisar Io
siguiente:
t. La manilla del cerrojo esta
enganchada durante una funciOn para
hornear.
2. La mani!la dei cerrojo no esta
enganchada durante una funciOn de
autolimpieza.
Su control tiene luces indicadoras
individuales que le mostrar_n tas
funciones que usted ha seleccionado.
A medida que usted lea su manual,
encontrar_ e! prop6sito de cada uno de
estos indicadores y como le ayudar_n a
entender su nuevo control.
lm
2_
Con la perilla de control en posici6n
de apagado, empuje y sujete tas
flechas para SUBIR o BAJAR los
MIINUTOS, a la misma vez, hasta
que "ON" u "OFF" se vean en el dial.
El sujetar [as flechas para SUB_Ro
BAJAR los MIIHUTOS, a la misma
vez, alternar& la activaciOn o la
deactivaci6n det apagado autom_tico
de t2 horas.
Para protongar la vida del foco de la luz
def homo, siga estos consejos: Siempre
apague la luz cuando et homo no este en
uso 6 durante un ciclo de limpieza. Si su
homo no tiene una ventana en ta puerta,
usted tendra que abrir la puerta para estar
seguro que la/uz esta apagada, Si la luz
del homo se deja encendida por un largo
periodo de tiempo, el homo estate, tibio
cuando abra la puerta debido al calor
generado pot el foco de la iuz del homo.
13
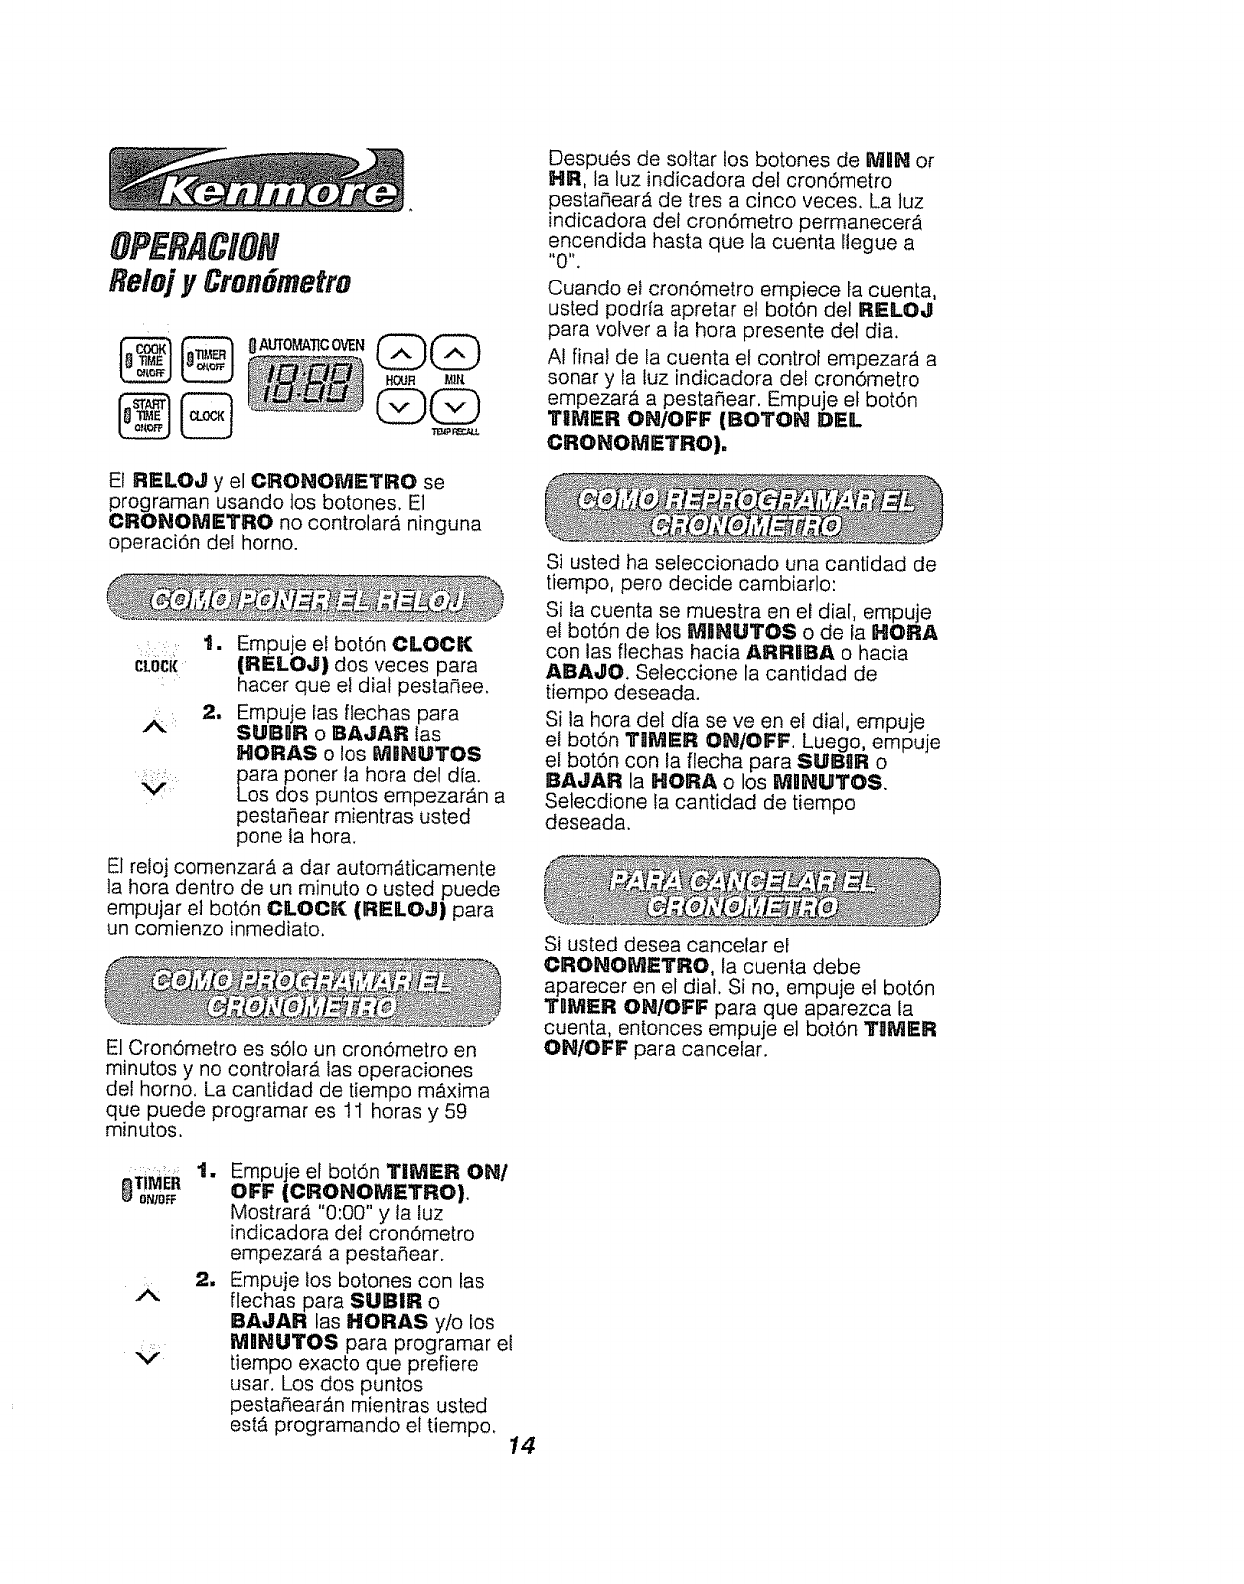
OPERACION
Re/ojy Cron6metro
El RELOJ y el CRONOIVIETRO se
programan usando los botones. E1
CROHOMETRO no controlar_ ninguna
operaci0n del homo.
::t. Empuje e! botOn CLOCK
CLOCi( (RELO,II) dos veces para
hacer que el dial pestaC_ee.
2, Empuje las ffechas para
SU1BgR oBA,JAR las
HORAS o los MIIHUTOS
_:_: para poner la hera del dfa.
Los dos puntos empezar_n a
pestanear mientras usted
pone la hera.
El refoj comenzar_ a dar autom_ticamente
ta hera dentro de un minute o usted puede
empujar el botOn CLOCK (RELOJ) para
un comienzo inrnediato.
El CronOmetro es s0to un cronOmetro en
minutes y no controtar_ tas eperaciones
del homo. La cantidad de tiempo m_.xima
que puede programar es 11 horas y 59
minutes.
DespuOs de soltar los botones de MgH or
HR, la luz indicadora del cronOmetro
pesta_ear_ de tres a cinco veces. La luz
indicadora det cron6metro permanecer_
encendida hasta que la cuenta llegue a
_0 I_"
Cuando et cronOmetro empiece la cuenta,
usted podria apretar el botOn del RELOJ
para volver a ta hera presente det dia.
AI final de la cuenta et control empezar_ a
sonar y la luz indicadora del cronOmetro
empezar_ a pesta_ear. Empuje el botOn
TUlVP=R ON/OFF (BOTON DEL
CRONOMErRO),
Si usted ha seleccionado una cantidad de
tiempo, pero decide cambiar!o:
Si la cuenta se muestra en el dial, empuje
et bot0n de los MIINUTO8 o de la HeRA
con las flechas hacia ARRIIBA o hacia
ABAJO. Seleccione la cantidad de
tiempo deseada.
Si la hera del dia se ve en el dial, empuje
el botOn TIMER OH/OFF. Luego, empuje
el bot0n con la flecha para SUBIIR o
IlIA,JAR la HeRA o los MgHUTOS.
Selecdione la cantidad de tiempo
deseada.
Si usted desea cancelar el
CROHOiVIETRO, la cuenta debe
aparecer en el dial. Si no, empuje el botOn
TI_MER OHIOFF para que aparezca la
cuenta, entonces empuje el botOn T_IMER
OHIOFF para cancelar.
_T1MER
orb/OFF
A2m
Empuje el botOn TIMER OH/
OFF (CROHOMETRO).
Mostrar_ "0:00" y ta tuz
indicadora de! crond_metro
empezar_ a pestaNear.
Empuje los botones con las
flechas para SUBIR o
BAJAR tas HORA$ y/o los
MIIHUTOS para programar el
tiempo exacto que prefiere
usar. Los dos puntos
pesta¢_ear_n mientras usted
est,. programando el tiempo. 14
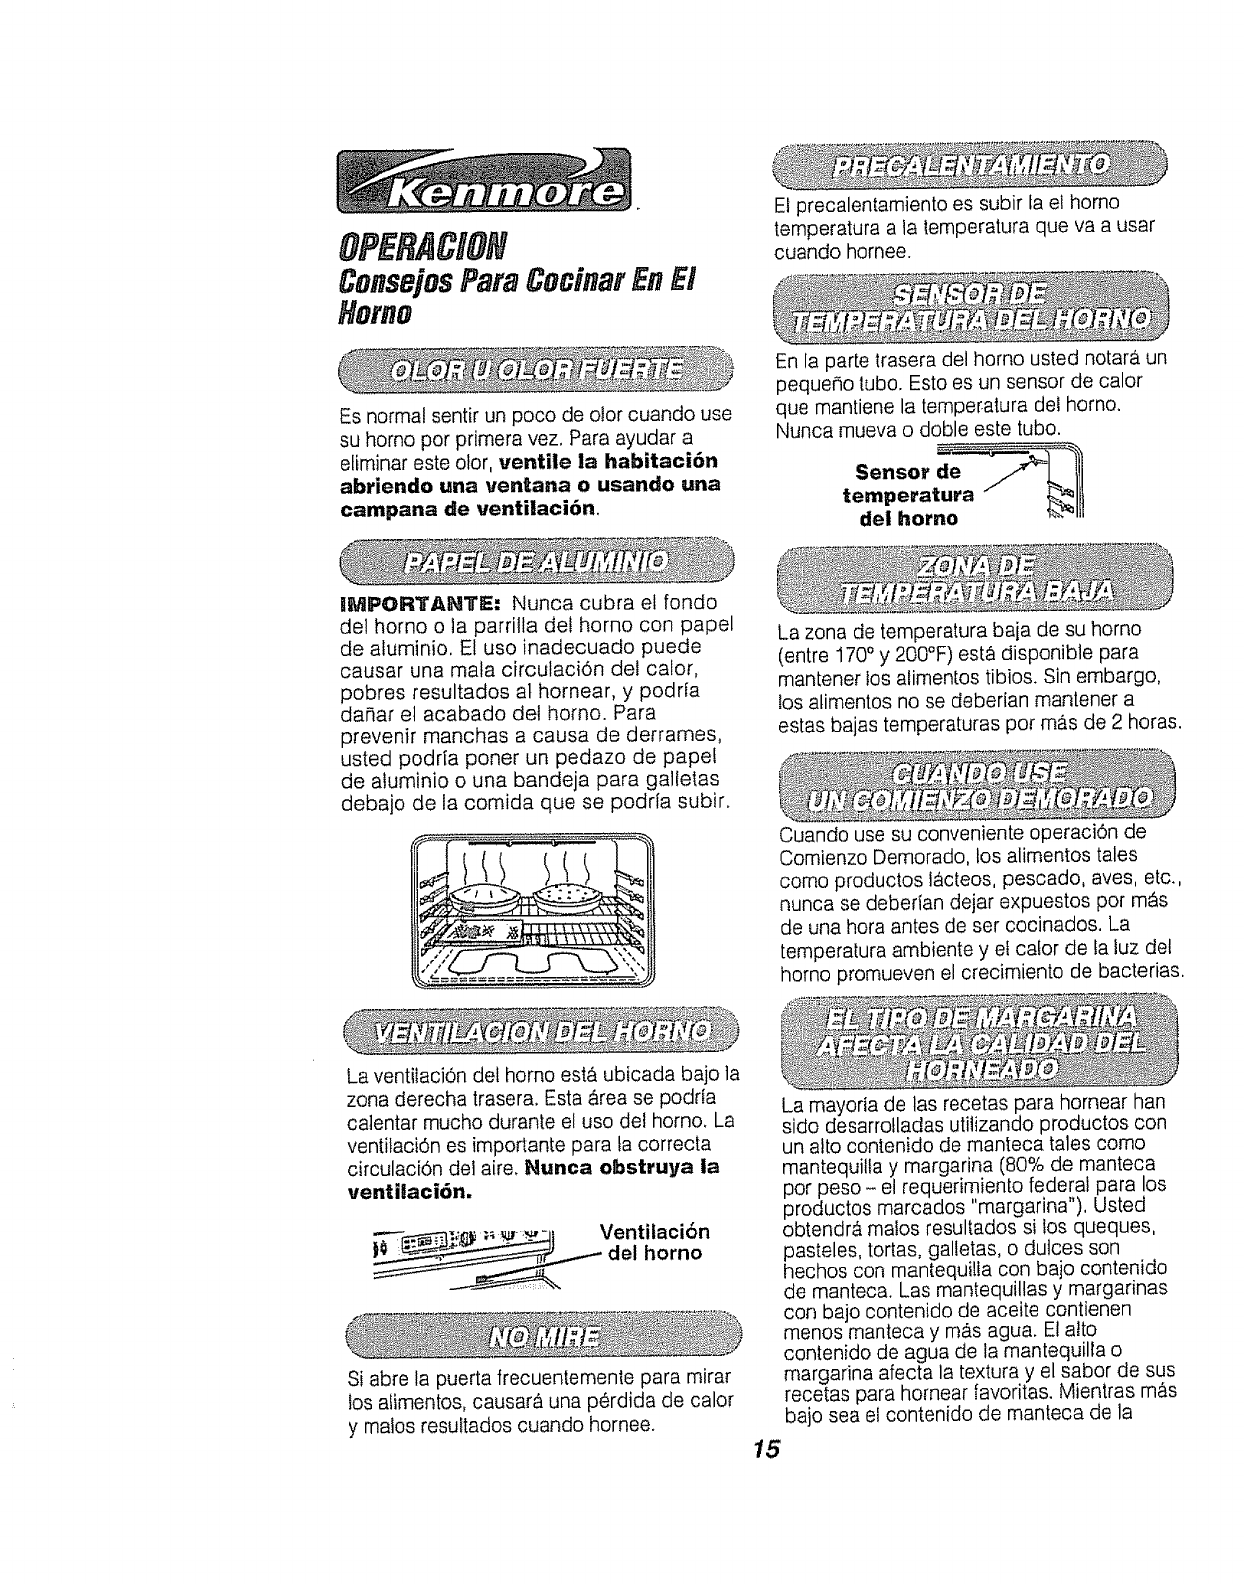
OPERACION
ConsejosPara CocinarEnEl
Homo
Es normal sentir un poco de otor cuando use
su homo por primera vez. Para ayudar a
efiminar este olor, ventile la habitaci6n
abrlendo una ventana o usando una
campana de venti]aci6n.
Et precalen[amiento es subir Ia el homo
temperatura a la temperatura que va a usar
cuando hornee.
En la parle trasera del homo usted notar& un
peque_o [ubo. Esto es un sensor de calor
que mantiene la temperatura del horno.
Nunca mueva o doble este tubo.
Senso, __
temperatura _ llt
del homo _-_ll
liViPORTAHTe=: Nunca cubra el fondo
del homo o la parritla del homo con papel
de atuminio. El uso inadecuado puede
causar una mata circulacidn del calor,
pobres resultados at homear, y podrfa
da_ar et acabado det horno. Para
prevenir manchas a causa de derrames,
usted podria poner un pedazo de papef
de aluminio o una bandeja para galtetas
debajo de la comida que se podda subir.
La zona de temperatura baja de su horno
(entre 1700y 200°F) est,') disponible para
mantener los alimen[os tibios. Sin embargo,
los alimentos no se deberian mantener a
es/as bajas temperaturas pot mas de 2 horas.
Cuando use su conveniente operaciOn de
Comienzo Demorado, los alimentos tales
como productos I&cteos, pescado, ayes, etc.,
nunca se debedan dejar expuestos por m_s
de una hora antes de ser cocinados. La
temperatura ambiente y el cafor de la luz del
homo promueven el crecimiento de bacterias.
La ventilaciOn del homo esta ubicada bajo ta
zona derecha trasera. Esta _.rea se podrfa
calentar mucho durante el uso det homo. La
ventitaci6n es importante para ta correcta
circulaci6n det aire. Nunca obstruya la
ventilaci6n.
Si abre la puerta frecuentemente para mirar
los alimentos, causara una perdida de calor
y matos resultados cuando hornee. 15
La mayoria de las recetas para hornear han
sido desarro!ladas utilizando productos con
un alto contenido de manteca tales como
mantequilla y margarina (80% de manteca
por peso - el requerimiento federal para los
productos marcados "margarina"), Usted
obtendr_, malos resultados si los queques,
pasteles, tortas, galletas, o dutces son
hechos con mantequilla con bajo contenido
de manteca. Las man[equillas y margarinas
con bajo contenido de aceite contienen
menos manteca y mgts agua. El alto
contenido de agua de ia mantequilla o
margarina afecta la textura y el sabor de sus
recetas para homear favoritas. Mientras m_s
bajo sea el contenido de rnanteca de la
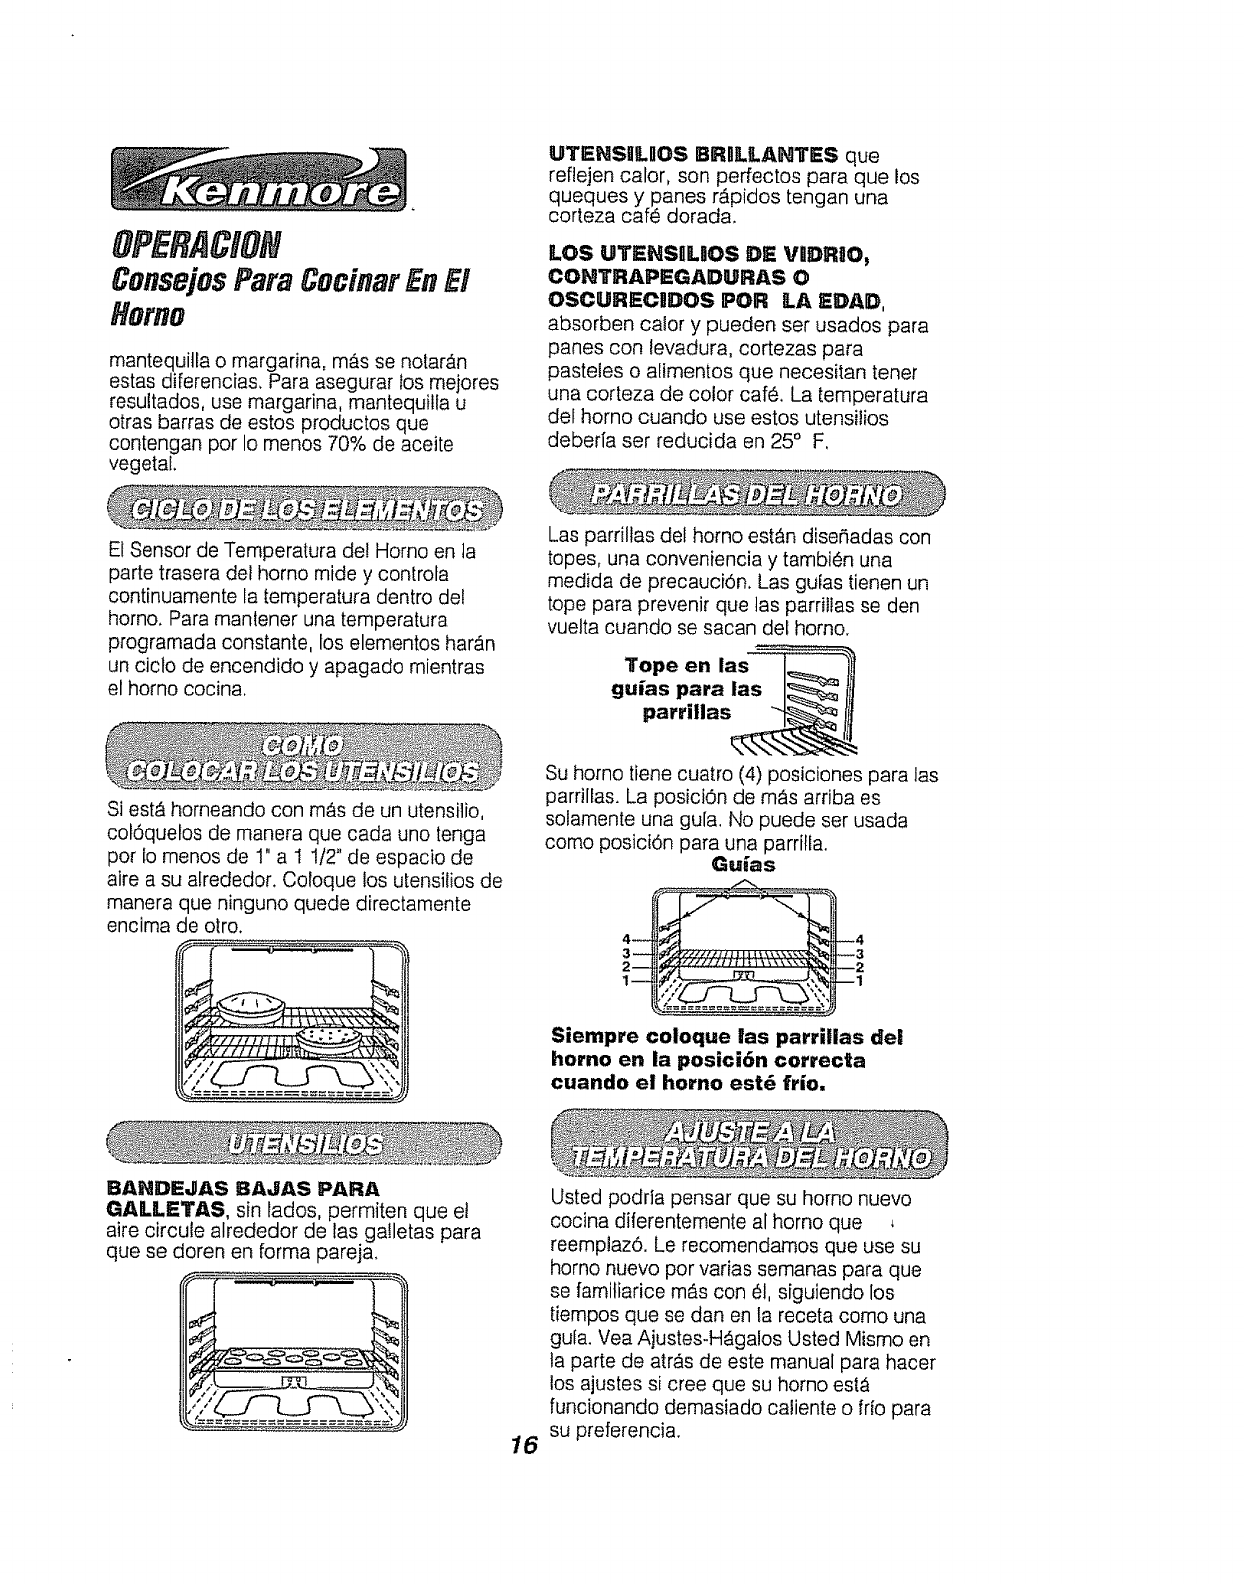
OPERACION
ConsejosPara CocinarEnE.i
Homo
mantequitla o margarina, masse notar_n
estas diferencia& Para asegurar los mejores
resultados, use margarina, mantequifla u
otras barras de estos productos que
contengan por Io menos 70% de aceite
vegetal.
UTEHSIILgOS IBRBLLANTES que
reflejen calor, son perfectos para que los
queques y panes r_pidos tengan una
corteza cafe dorada.
LOS UTEHS0UOS DE VgDRgO,
CONTRAPEGADURAS O
OSCUREC_DOS POR LA EDAD,
absorben cator y pueden ser usados para
panes con levadura, cortezas para
pastetes o alimentos que necesitan tenet
una corteza de color caf& La temperatura
del homo cuando use estos utensilios
debefla ser reducida en 25° F,
El Sensor de Temperatura de! Homo en ta
parte trasera det homo mide y controta
continuamente fa temperatura dentro del
homo. Para mantener una temperatura
programada constante, los elementos har_n
un ciclo de encendido y apagado mientras
el homo cocina.
Las parrillas del homo est&n diserhadas con
topes, una conveniencia y tambien una
medida de precauciOn. Las gufas tienen un
tope para prevenir que las parrilIas se den
vuelta cuando se sacan del homo.
Tope en las
guias para las
parrillas
Si est_ horneando con m_s de un utensilio,
cot6quefos de manera que cada uno tenga
por Io menos de 1" a I 1/2" de espacio de
aire a su alrededor. Coloque los utensilios de
manera que ninguno quede directamente
encima de otro.
Su homo tiene cuatro (4) posiciones para las
parriltas. La posiciOn de m_s arriba es
solamente una gula. No puede ser usada
como posiciOn para una parrilla.
Guias
Siempre coloque las parrillas dei
homo en la posici6n correcta
cuando el homo est_ frio.
BAHDEJAS BAJAS PARA
GALLETAS, sin lados, permiten que et
aire circule alrededor de las galletas para
que se doren en forma pareja.
16
Usted podfla pensar que su homo nuevo
cocina diferentemente alhorno que ,
reemplaz6. Le recomendamos que use su
homo nuevo por varias semanas para que
se familiarice mAs con el, siguiendo los
tiempos que se dan en la receta como una
gufa. Yea Ajustes-HAgalos Usted Mismo en
ta parte de atr_s de este manual para hacer
los ajustes si cree que su homo est_
funcionando demasiado caliente o frio para
su preferencia.

|Cuando se Lerminede hornear, el control
sonar_ y ia luz indicadora de Homo
Autom_tico pesta_ear&n hasta que la
perilta de control def homo se cotoque en
la posiciOn de APAGADO (OFF),
t, De vuetta ta perilla OVEN CONTROL a
la temperatura deseada de tibio WlVi
hasta 550° F. A medida que la peri!ta gira,
el dial def control mostrar_ los cambios de
temperatura. Cuando ei dial muestre la
temperatura que usted seleccion6, suette
la perilla del control. La temperatura
permanecer_, en el diat pot 5 segundos y
luego volver_ a la hora del dia. Para ver
nuevamente el dial de la temperatura,
empuje el botOn con ta flecha hacia abajo.
2, La tuz indicadora HORN@
ENCEHDIDO (OVEN OH) se
encender&
3, Cuando el homo haya alcanzado la
temperatura seleccionada las luces
"PR_'HEATED '' y "OVEN ON" se
encender_n. Ponga la cornida en et
homo.
4, Las luces indicadoras de"PRE-
HEATED" y "OVEN ON"
permanecer_n encendidas hasta que el
horneado haya terminado y ia perilta de
control se haya puesto en ta posici6n de
apagado (OFF).
1, AsegQrese que el reloj este mostrando la
hora correcta del dia.
2, Empuje el bot6n COOK TIME ON/OFF.
3, Empuje los botones con tas fiechas para
SUBImRoBAJAR las HORAS y/o los
MgNUTOS para programar ta cantidad
de tiempo para cocinar.
4, Haga girar la PERJLLA DE CONTROL
DEL HORNO para se]eccionar la
temperatura que desea usar. Cuando la
temperatura dentro del homo llegue a la
temperatura que usted ha seleccionado
la luz de precalentamiento se encender#,.
t, AsegQrese que et reloj este mostrando la
hora correcta del dia.
2, Empuje el botOn COOK TOME OHtOFF.
3, Empuje los botones con las flechas para
SUBIIR oBAJAR [asHORAS y/o los
MliNUTOS para programar la cantidad
de tiempo para cocinar.
4, Empuje el bo[On START TiME
ON/OFF.
5, Empuje los botones con las flechas para
SUBIR o 18AJAR las HORA8 y/o los
MIHUTOS para programar la hora en
que desea que et homo se encienda.
6. Haga girar la PERILLA DE CONTROL
DEL HORHO para seleccionar ta
temperatura que desea usar. La luz
indicadora de homo encendido
pestanear_ cuando los tiempos sean
programados en AUTOMATIC OVEN
(HORNO AUTOMATRCO), pero una
temperatura no es seleccionada.
7, Las luces indicadoras de START TIItYIE
(HORA DE COMBENZO) yAUTO-
IVlATIC OVEN se encender_n.
8, Cuando se Ilegue a la hora de comienzo,
el homo se encendera autom_ticamente
y empezara, a cocinar.
9, Cuando la temperatura dentro def homo
flegue a la temperatura que usted ha
seleccionado la luz de
PRECALENTAMgEHTO se
encender&
tO. Cuando se termine de hornear, el control
sonarS,y la tuz indicadora de Homo
Autom_.tico pestaheara hasta que la pe-
rilla de control del homo se co!oque en la
posici0n de APAGADO (OFF),
NOTA: Despues de empujar los botones
Cook Time o Start Time, si usted vacita antes
de empujar los botones Hour/Minute, el dial
pestaC_earb.3 veces y volver_ a la hora del
dla. Si esto sucede, simplemente empuje et
boron Time que estaba programando
nuevamente para continuar. COOK TIME,
CLOCK, TIMER, o START T!IME se
pueden versi empuje et botOn deseado una
vez. Empuje los botones con las flechas para
SUBnR oBAJAR si desea cambiar una
17cantidad de tiempo.
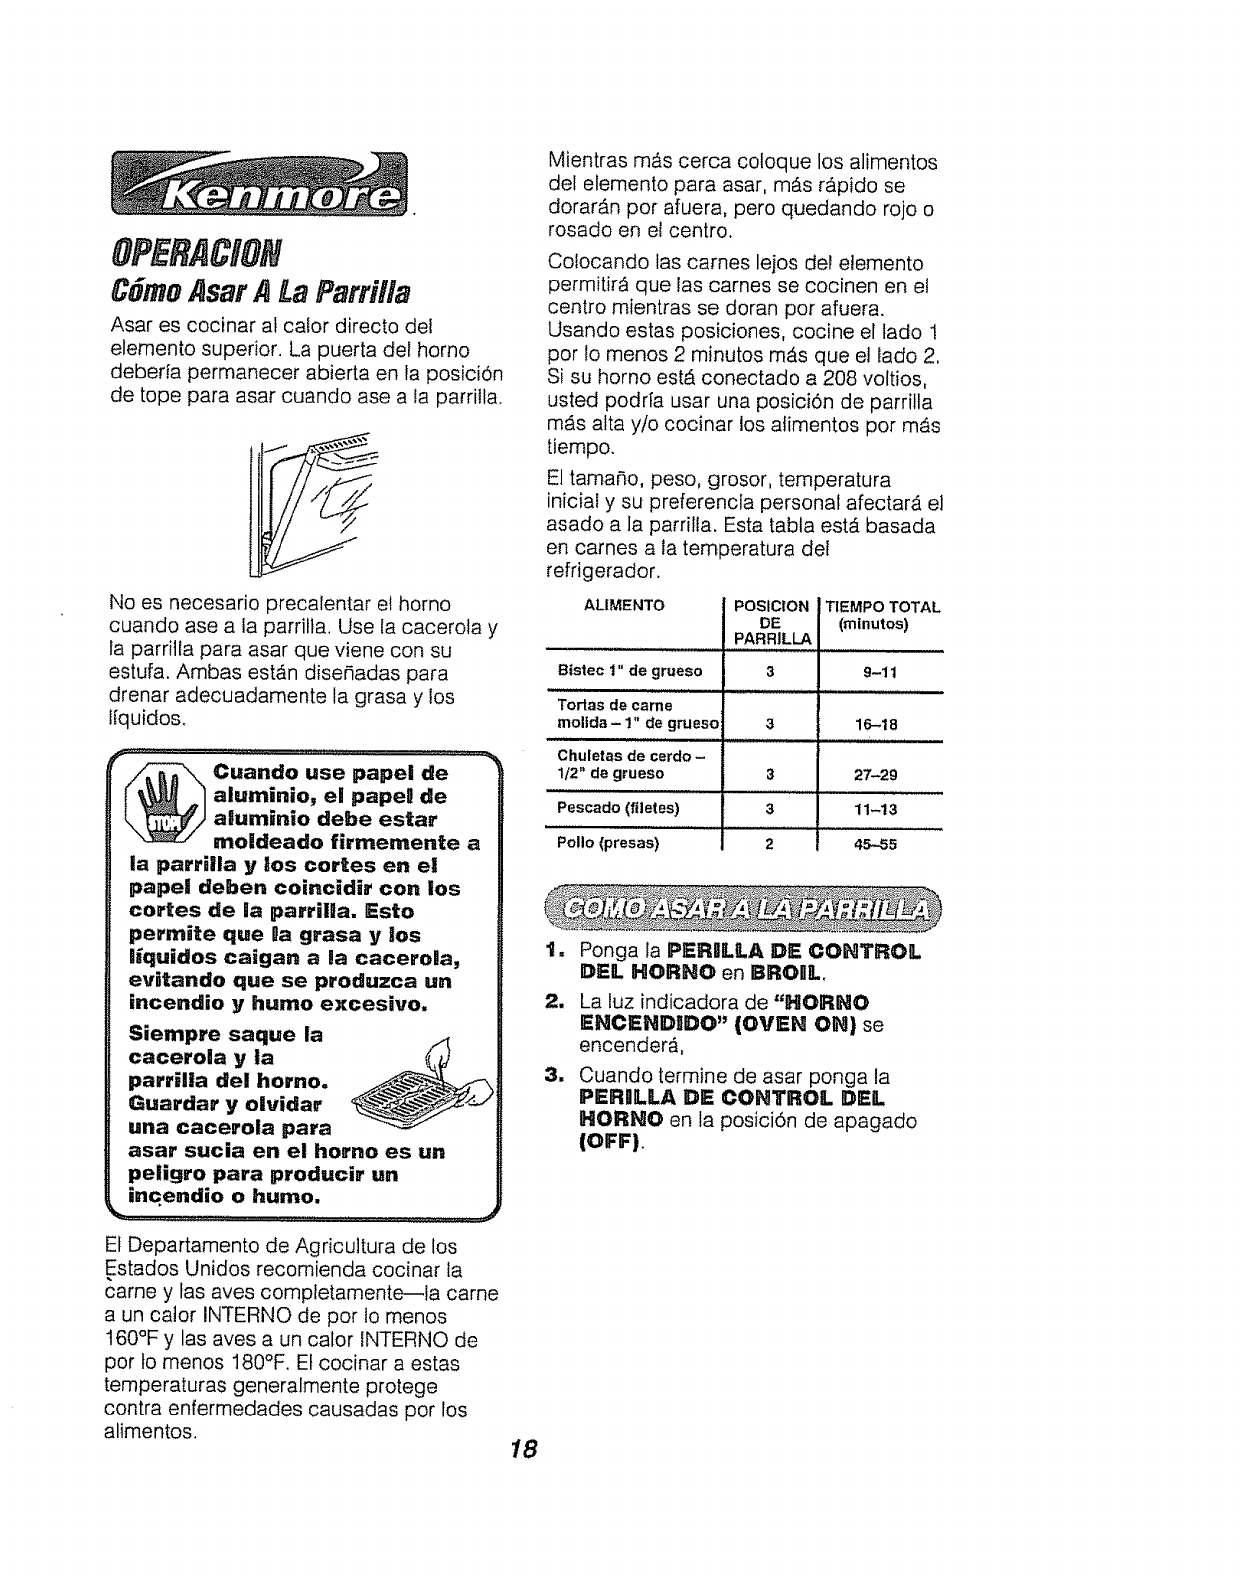
OPERACION
CGmoAsar A La Parrilla
Asar es cocinar al caior directo del
elemento superior. La puerta del homo
debeda permanecer abierta en ta posici6n
de tope para asar cuando ase a la parritla.
No es necesario precalentar el horno
cuando ase a la parrilta. Use la cacerola y
la parritla para asar que viene con su
estufa. Ambas est_n dise_adas para
drenar adecuadamente la grasa y los
l[quidos.
_uando use papei de
aluminio, el pape0 de
aBuminio debe estar
moldeado firmemente a
la parrilla y los cortes en el
papel deben coincidir con los
cortes de la parriila. Esto
permite que 0a grasa y los
liquidos caigan ala cacerola,
ev_tando que se produzca un
incendio y humo excesivo.
Siempre saque la
cacerola y la
parrilla del homo,
Guardar y olvidar
una cacerola para
incendio o humo.
El Departamento de Agricuttura de los
.Estados Unidos recomienda cocinar la
came y fas aves comptetamente--fa came
a un ca!or INTERNO de por to menos
160°F y las aves a un calor INTERNO de
por to menos 180°F. Et cocinar a estas
temperaturas generalmente protege
contra enfermedades causadas pot los
alimentos. 18
Mientras m_s cerca coloque los alimentos
det elemento para asar, m_ts rapido se
dorarAn por afuera, pero quedando rojo o
rosado en el centro.
Co!ocando las cames lejos del etemento
permitir_ que las carnes se cocinen en el
centro mientras se doran pot afuera.
Usando estas posiciones, cocine el lado!
por 1omenos 2 minutos mAsque et lado 2.
Si su horno estA conectado a 208 voltios,
usted podrfa usar una posiciOn de parrilla
mAs alta y/o cocinar los atimentos por mAs
tiempo.
El tama_o, peso, grosor, temperatura
inicial y su preferencia personal afectar_ el
asado a la parrilla. Esta tabta est,. basada
en carnes a la temperatura del
refrigerador.
ALIMENTO POSICION
DE
PARRILLA
Bistec t" de grueso 3
Tortas de came
mollda - 1" de grueso 3
Chuletas de cerdo-
1/2" de grueso 3
Pescado (flletes) 3
Polio (presas) 2
TIEMPO TOTAL
(minutos)
9-11
16-18
27-29
11-13
45-55
2.
B
Ponga la PERgLLA DIE CONTROL
DEL HORHO en BROgL
La luz indicadora de "HORNO
ENCENDIDO" (OVEN ON} se
encender_,
Cuando termine de asar ponga la
PERllLLA DE CONTROL DEL
HORNO en la posici6n de apagado
(OFF).
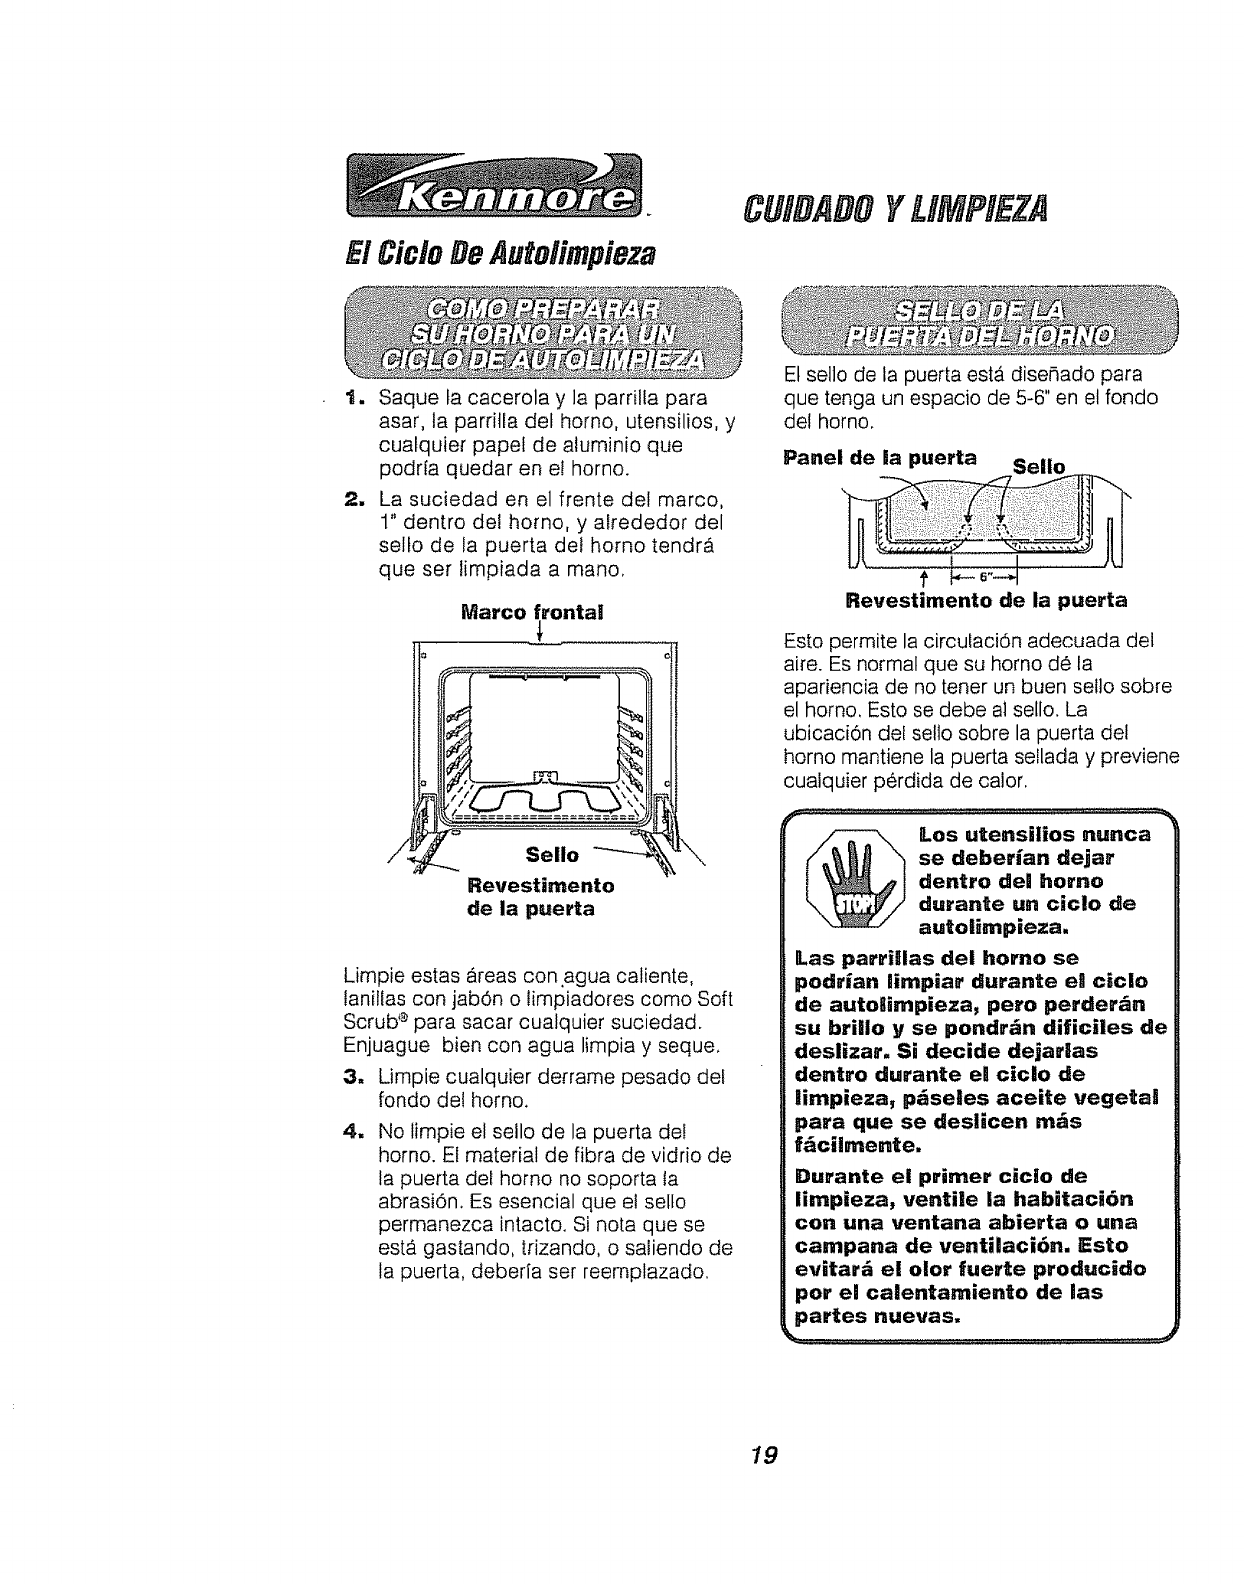
E/Cic/o DeAutolimpieza
CUIDABOYLIMPIEZA
tl
m
Saque la cacerola y la parrilla para
asar, la parritla def homo, utensilios, y
cuatquier papel de aluminio que
podr(a quedar en el horno.
La suciedad en el frente del marco,
1" dentro del homo, y alrededor del
selto de ta puerta deI homo tendra
que set limpiada a mano.
Marco fronta!
Z
Sello
RevesUmento
de la puerta
Limpie estas a.reas con agua caliente,
taniflas con jabOn o fimpiadores como Soft
Scrub '_para sacar cualquier suciedad.
Enjuague bien con agua limpia y seque.
3, Limpie cualquier derrame pesado del
rondo de! horno.
mNo limpie el setlo de la puerta del
horno. El material de fibra de vidrio de
la puerta del homo no soporta la
abrasidn. Es esencial que el selfo
permanezca intacto. Si nora que se
est_ gastando, trizando, o saliendo de
la puerta, deberia ser reemplazado.
Et sello de la puerta estA dise_ado para
que tenga un espacio de 5-6" en e! fondo
del homo.
Panel de ia puerta SeUo
f
Revestimento de la puerta
Esto permite la circulaci6n adecuada del
aire, Es normal que su homo de la
apariencia de no tener un buen seilo sobre
el homo, Esto se debe al se[lo. La
ubicacidn del sello sobre la puerta del
homo mantiene la puerta sellada y previene
cualquier perdida de caior.
Los utensilios nunca
se deberian dejar
dentro dee homo
durante un ciclo de
autolimpieza.
Las parritlas del homo se
podrian iimpiar durante el ciclo
de autoiimpieza, pero perderdn
su brilio y se pondrdn dificiles de
deslizar. Si decide dejarlas
dentro durante el ciclo de
limpieza, p_seles aceite vegetal
paeta que se deslicen rn:_s
fdcilmente.
Durante el primer cicio de
limpieza, ventiie la hab_taci6n
con una ventana abierta o una
campana de ventiiaci6n. Esto
evitar_ el olor fuerte producido
per el calentamiento de las
partes nuevas.
_._ ........................................................................ _,_
19
CUIDABOYUMPIEZA
El Cicle De Autolimpieza
1, Para mejor resultado, siga los pasos
para PREPARAR SU HORNO.
2. Corra fa manifla hacia la derecha. No
{uerce la manilfa.
1De vuelta ta perilla de control a
"CLEAN" (LitMPIEZA). Las luces
indicadoras del CERROJO DE LA
PUERTA (LOCK DOOR) y de
HORNO ENCENDIIDO (OVEN ON)
se encender_n.
4. La manitla se enganchar_ cuando se
tlegue alas altas temperaturas dentro
del hormo,
5, El ciclo de limpieza dura 4 horas y 20
minutos, esto inctuye un periodo de
enfriamiento. Usted puede cambiar esta
cantidad de tiempo para la limpieza
desde 3 horas hasta 5 horas y 59
minutos ernpujando los botones con fas
flechas para SUIBIR oBA,JAR la
HORA y/o los B/IIIHUTOS, mientras los
dos puntos est_n pestaF,eando..
Cuando el cic!o de limpieza haya
aempezado, usted puede empujar el botOn
CLOCK para que el dial muestre la hora del
dia. Si empuja el botOn COOKT0iVJE usted
puede ver el tiempo de limpieza que queda.
6. Cuando e! ciclo de limpieza es
completado, tas luces indicadoras de
"OVEN ON" (HORNO EHCEHD_DO)
y "CLEAN" (LlllVIPIIEZA) pestafiear,_n
hasta que la perilla de control se
cotoque en posici6n de apagado,
7, Cuando la temperautra se haya enfriado,
la manitta se desfizar_ f_citmente hacia
la izquierda.
t. Para mejor resuftado, siga los pasos
para PREPARAR SU HORNO.
2. Corra la manitla hacia la derecha. No
fuerce la manitla.
3. De vuelta la perilla de control a
"CLEAN" (LIIMPIIIEZA). Las luces
indicadoras del "CLEAN" (LItMPgEZA)
y de HORHO ENCENDgDO (OVEN
ON) se encenderan.
4. Para demorar el comienzo de un ciclo de
limpieza, empuje el botOn START
TiME ON/OFF.
5. Empuje el bot6n con la ffecha para
SUBliR o BAJAR la HORA o los
BiIRHUTOS para programar la hora det
dla en que desea que el homo empiece
a limpiarse autom&ticamente, La luz
indicadora "OVEH ON" (HORNO
ENCENDIlDO) estar_ apagada hasta
que se llegue a la hora de cornienzo.
6. Cuando el ciclo termine, las luces
indicadoras de "OVEN ON" y
"CLEAN" pestafiear_n. Coloque la
peritla de control del homo en la
posicidn de apagado y desenganche la
puerta.
Haga girar la perilla de control a ia posici6n
de apagado. Espere (aprox, ! hora) antes
de tratar de abrir la puerta, La luz
indicadora no pestar_ear_ si el ciclo es
interrumpido.
Si quedan manchas btancas, limpielas con
un patio o esponja mojada, o frieguelas con
una lanilfa de acero con jabOn y enjuague
bien.
2O
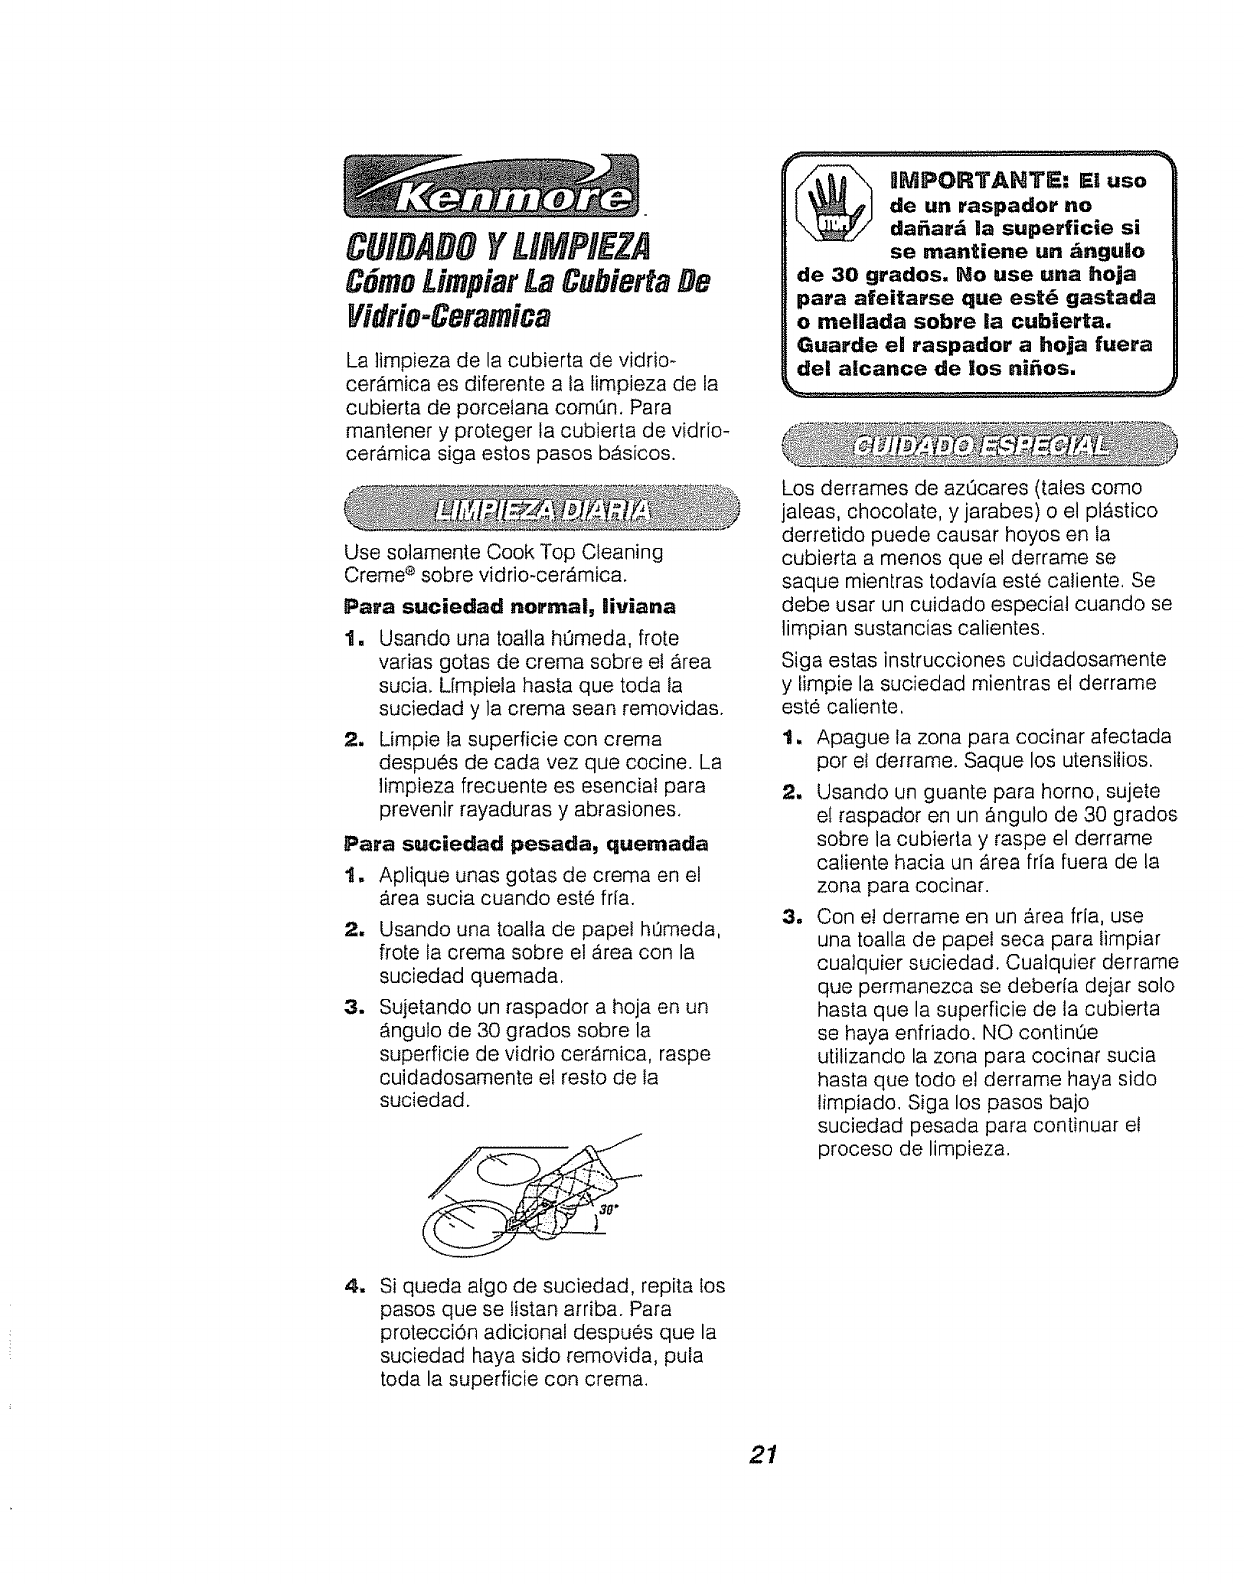
CUIDADOYUMPIEZA
C6moUmpiar La CubiertaDe
Vidrio-Ceramica
La limpieza de la cubierta de vidrio-
cer_mica es diferente a ta limpieza de la
cubierta de porcelana comQn. Para
rnantener y proteger la cubierta de vidrio-
ceramica siga estos pasos b_sicos.
Use solamente Cook Top Cleaning
Creme ®sobre vidrio-cer_mica.
Para suciedad normal, liviana
1. Usando una toalla hOmeda, fro[e
varias gotas de crema sobre el area
sucia. L[mpiela hasta que toda ta
suciedad y la crema sean removidas.
2. Limpie la superficie con crema
despues de cada vez que cocine. La
iimpieza frecuente es esencia! para
prevenir rayaduras y abrasiones.
Para suciedad pesada, quernada
1. Aplique unas gotas de crema en el
Area sucia cuando este fria.
2. Usando una toalla de papel hOmeda,
frote la crema sobre el _rea con la
suciedad quemada.
3. Sujetando un raspador a hoja en un
_ngulo de 30 grados sobre la
superficie de vidrio cer_mica, raspe
cuidadosamente e! resto de la
suciedad.
BMPORTANTE: El uso
de un raspador no
da_ar;_ la superficie si
se rnantiene un ;_nguio
de 30 grados. Ho use una hoja
para afeitarse que est_ gastada
o mellada sobre la cubierta,
Guarde el raspador ahoja fuera
de| alcance de los ni_os.
Los derrames de azQcares (tales como
jaleas, chocolate, y jarabes) o el pl&stico
derretido puede causar hoyos en la
cubierta a menos que e! derrame se
saque mien[ras todavia est6 caliente, Se
debe usar un cuidado especial cuando se
limpian sustancias calientes,
Siga estas instrucciones cuidadosamente
y fimpie la suciedad mientras el derrame
este caliente,
2.
o
Apague la zona para cocinar afectada
por el derrame. Saque los utensilios.
Usando un guante para homo, sujete
el raspador en un _ngulo de 30 grados
sobre la cubierta y raspe el derrame
caliente hacia un _.rea fria fuera de la
zona para cocinar.
Con e! derrame en un area fria, use
una toalla de papel seca para limpiar
cualquier suciedad. Cualquier derrame
que permanezca se deberia dejar solo
hasta que la superficie de la cubierta
se haya enfriado. NO continQe
utitizando la zona para cocinar sucia
hasta que todo e! derrame haya sido
limpiado, Siga los pasos bajo
suciedad pesada para continuar e!
proceso de limpieza.
tl Si queda algo de suciedad, repita los
pasos que se fistan arriba. Para
protecci6n adicional despues que la
suciedad haya sido removida, pula
toda la superficie con crema.
21
CUIBADOYLIMPIEZA
DeLa CubiertaBe Vidrio°
Cer6mica
o No use limpiadores abrasivos o ianillas
abrasivas sobre la cubierta.
• Se puede usar fanillas de pl_stico tal
como Dobie ®.
Para ordenar Cooktop Cleaning Creme ®
adicionat, llame a su Centro de Servicio o
tienda Sears mas cercana, pida et (Stock
No. 40079).
A medida que la crema limpia, deja una
capa protectora que ayuda a prevenir ta
acumulaci6n de dep6sitos minerales
(manchas de agua) y facilita la timpieza
futura. El detergente para lavar platos
elimina la capa protectora y no se deberia.
utilizar.
MATERRALES DE LgMPIEZA
o Detergente liquido para platos
° Agua tibia
o PaSo suave
Ho use aimpadores abras[vos,
limpiadores industriales, o
bRanquedores (cOoro).
La mayorfa de los timpiadores contienen
amonia, quimicos y abrasivos que danan
la superficie de su cubierta. Use
sotamente Cooktop Cleaning Creme ®
para una limpieza adecuada y para ta
protecciOn de la superficie de vidrio
cer_mica.
o Si usted arrastra el rondo de tas ollas de
aluminio o cobre sobre la superficie de
la cubierta, podria dejar marcas de
metal en forma de rayaduras. Use el
raspador y la crema para ta superficie
para sacar estas marcas. Si no saca
este residuo inmediatamente, podrta
producir marcas permanentes,
• Si tas ottas con un enchapado de
aluminio delgado, de cobre o de esmalte
hierven cuando estAn secas, se podrian
fundir con la superficie de la cubierta.
Esta descoloraci6n negra deberia set
sacada inmediatamente o podria ser
permanente.
• El uso de limpiadores de vidrio podrian
dejar una capa irridescente sobre fa
cubierta. La crema para timpiar sacarb.
esta capa.
• Las manchas de agua (depOsitos
minerates) son removibles usando
crema y vinagre blanco a toda fuerz&
° No use un raspador con una hoja
gastada o mellada sobre la cubierta.
MATERHAILES DE UMPHEZA
o Detergente llquido para platos
o Agua tibia
o Lanillas de acero con jabOn
o Limpiador comercial para hornos
COMO UIVIPgAR
Permita que la cacerola se remoje. Ponga
detergente para platos sobre la parrilta y
cubra con un paho o una toalla hQmeda
por un rato. Ffiegue a medida que sea
necesario. Lave, enjuague, y seque bien.
Usted tambien podrIa poner la cacerola y
la parriila en fa lavadora de platos.
Limpie solamente como un toque entre
ciclos de timpieza. Use detergente [iquido,
agua tibia, o lanifla de acero con jabOn.
Enjuague bien despues de limpiar y
seque.
HUHCA USE UMPUADORES DE
HORNOS DEHTRO O ALREDEDOR
DE CUALQUIER PAR'rE DEL
HORNO.
Cuando limpie, aseg0rese de no dobtar o
desplazar et sensor de temperatura
ubicado en la pared trasera de! horno.
22

CUIDADOYLIMPIEZA
PartesRemovibles
MATERIALES DE UMPIEZA
o Detergente para platos
• Agua tibia
• PaSo suave
Canal
moldeado
Gancho
del resorte
COMO SACAR
t, AsegQrese que la perilla este en
posici6n de apagado.
2, Tire derecho hacia afuera del tallo.
Usando un pedazo de cuerda podrla
facilitar el sacado de la perilla. Ponga la
cuerda debajo y alrededor de ta perilla,
y tire derecho hacia afuera.
PARA LIMP_AR
Lave bien la perilia con agua con jabOn.
Seque completamente con un paso suave.
No permita que la perilla se remoje.
PARA COLOCARLA NUEVAMEHTE
t, Mire fa parte trasera de ta perilla.
2. El canal moldeado de la perifla esta
disefiado para quedar perfectamente
ajustado en el tatIo de ta perilla.
3, Coloque el canal moldeado en linea con
la ranura plana en el talto de la perilia.
Empuje la perilta hasta 1om&s atr&s
posible.
_RECAUCRON:
Desconecte el poder
el6ctrico hacia et homo
en la caja del circuito
principa! o en la caja de
los fusibles antes de tratar de
reernplazar el foco de la iuz del
homo, No toque un foco de la
luz caiiente con las manos
mojadas o con un patio ht_medo,
Espere a que ei foco se enfrie y
use un patio seco.
Sujetador
dei vidrio
FOCO j
Collar con
,,tricidad
Cubierta de vidrio
COMO SACAR LA CUBIERTA
11, Desconecte el paso de la electricidad al
horno en el interruptor del circuito
principal o en la caja de los fusibles.
2, Tome la cubierta de vidrio y hb.gala girar
!/4 de vuelta contra el reloj hasta que las
aletillas de la cubierta de vidrio pasen
por sobre las ranuras de! sujetador del
vidrio.
COIVIO REEPLAZAR EL FOCO DE
LA LUZ
Desatornitle el foco de la luz y reemplacelo
con un foco para aparatos etectricos de 40
watts.
PARA REEMPLAZAR LA CUBIERTA
1, Coloque las aletillas de la cubierta de
vidrio en la ranura del sujetador del
vidrio.
2, Haga girar la cubierta de vidrio 1/4 de
vuetta en direcci6n del reloj.
3, Reconecte fa electricidad al horno.
Para mejorar la luz dentro del homo, limpie
la cubierta de vidrio frecuentemente con un
paso majado, Precauci6n: Esto se
deberia hacer solamente cuando el
horno estd completamente frio.
23

CUIBADOYUMPIEZA
PartesRemovibles
MATER_ALES DE LgMPUEZA
o Detergente
o Agua tibia
o Lanas para fregar o lanilta de acero con
jabdn
COMO SACAR
1. Tire tas perrillas hasta ta posici6n de
tope,
2, Levante el frente de la parrilla y
desl[cela bajo el tope de la gufa para
]as parri!las,
PARA LOMPgAR
Limpie con agua tibia y detergente, Para
sacar manchas duras, friegue levemente
con lana para fregar o con una lanitla de
acero con jab6n. Enjuague bien,
PARA COLOCAR NUEVAMENTE
1, Cotoque la parte levantada de atr_.s de
la parrilla sobre las guias,
2. Levante el frente de la parritta hasta
que la parte levantada de atr_s se
deslice pot debajo det tope de las
gutas.
3, Destice la parrilta hasta atrAs.
Posici6n de tope para asar a la parrilla
PARA SACAR
I!
2.
Abra la puerta hasta ta posici6n para
asar a la parritla.
Tome la puerta de cada lado, lev_.ntela
y s_queta de tas bisagras. HO
LEVANTE LA PUERTA DE LA
MAHgLLA.
_RECAUCBON: Cuando
la puerta se saca y gos
brazos de gas bisagras
est_n en 8a posici6n de
tope para asar ala parrilla,
como precauci6n cubra los
brazos die |as bisagras con
toaUas o con un FOlio de toatlas
vacio. No pase a llevar o trate
de mover los brazos de las
bisagras mientras est_
trabajando en e! drea del homo.
Se podrian devolver
violentamente y causarle
heridas en las manos o da_ar ell
acabado de porcelana en el
frente deg marco.
PARA COLOCARLA NUEVAMEHTE
4_
5.
t, AsegOrese que los brazos de las
bisagras estb,nen ta posici6n de tope
para asar a la parfilla.
2, Levante ta puerta de ambos lados,
3, Coioque en linea fas ranuras en la
orilia def fondo del homo con los
brazos de las bisagras.
Destice la puerta hacia abajo sobre los
brazos de las bisagras Io mcfisposible.
Cierre la puerta.
24

CUIDABOYUMPIEZA
PartesRemovibles
COMO COLOCAR HUEVAMENTE
1, Levante el frente del tope del caj6n y
b_jeto a trav6s de la abertura en la
base det riel.
MATERIALES DE UMPIIEZA
o Detergente para platos
o Agua tibia
° Pano hQmedo
COMO SACAR
1. Tire el caj6n hacia afuera hasta que
se detenga,
mLevante el frente del cajOn hasta que
el tope de la guia del cajOn pase por
encima del tope de la gula sobre el riet
de la base.
3. Levante el cajOn por sobre los topes.
PARA LnMPgAR
Limpie pot dentro y fuera del caj0n con
agua tibia con jab6n y un paho o esponja
h0meda. No use abrasivos fuertes o lanas
para fregar sobre et caj6n.
Tope de
la guia
2. Baje el frente del caj6n y empuje el
cajon hacia arras hasta que se
detenga,
3. Levante el frente del caj6n hasta que
el tope de ta guia de[ caj0n pase por
encima de fa guia en el riet de la
base. Deslice et cajOn hacia su lugar.
_RECAUCIOH: IEBcaj6n ie
ofrece espacio para
guardar utensilios para
cocinar y hornear. Los
materiales _nflamables y de
pl_stico no se deberian guardar
en este caj6n. He sobrecargue
el caj6n. Si el caj6n est_
demasiado pesado, se podria
saUr de! tiel de ga base cuando
Jo abra.
25
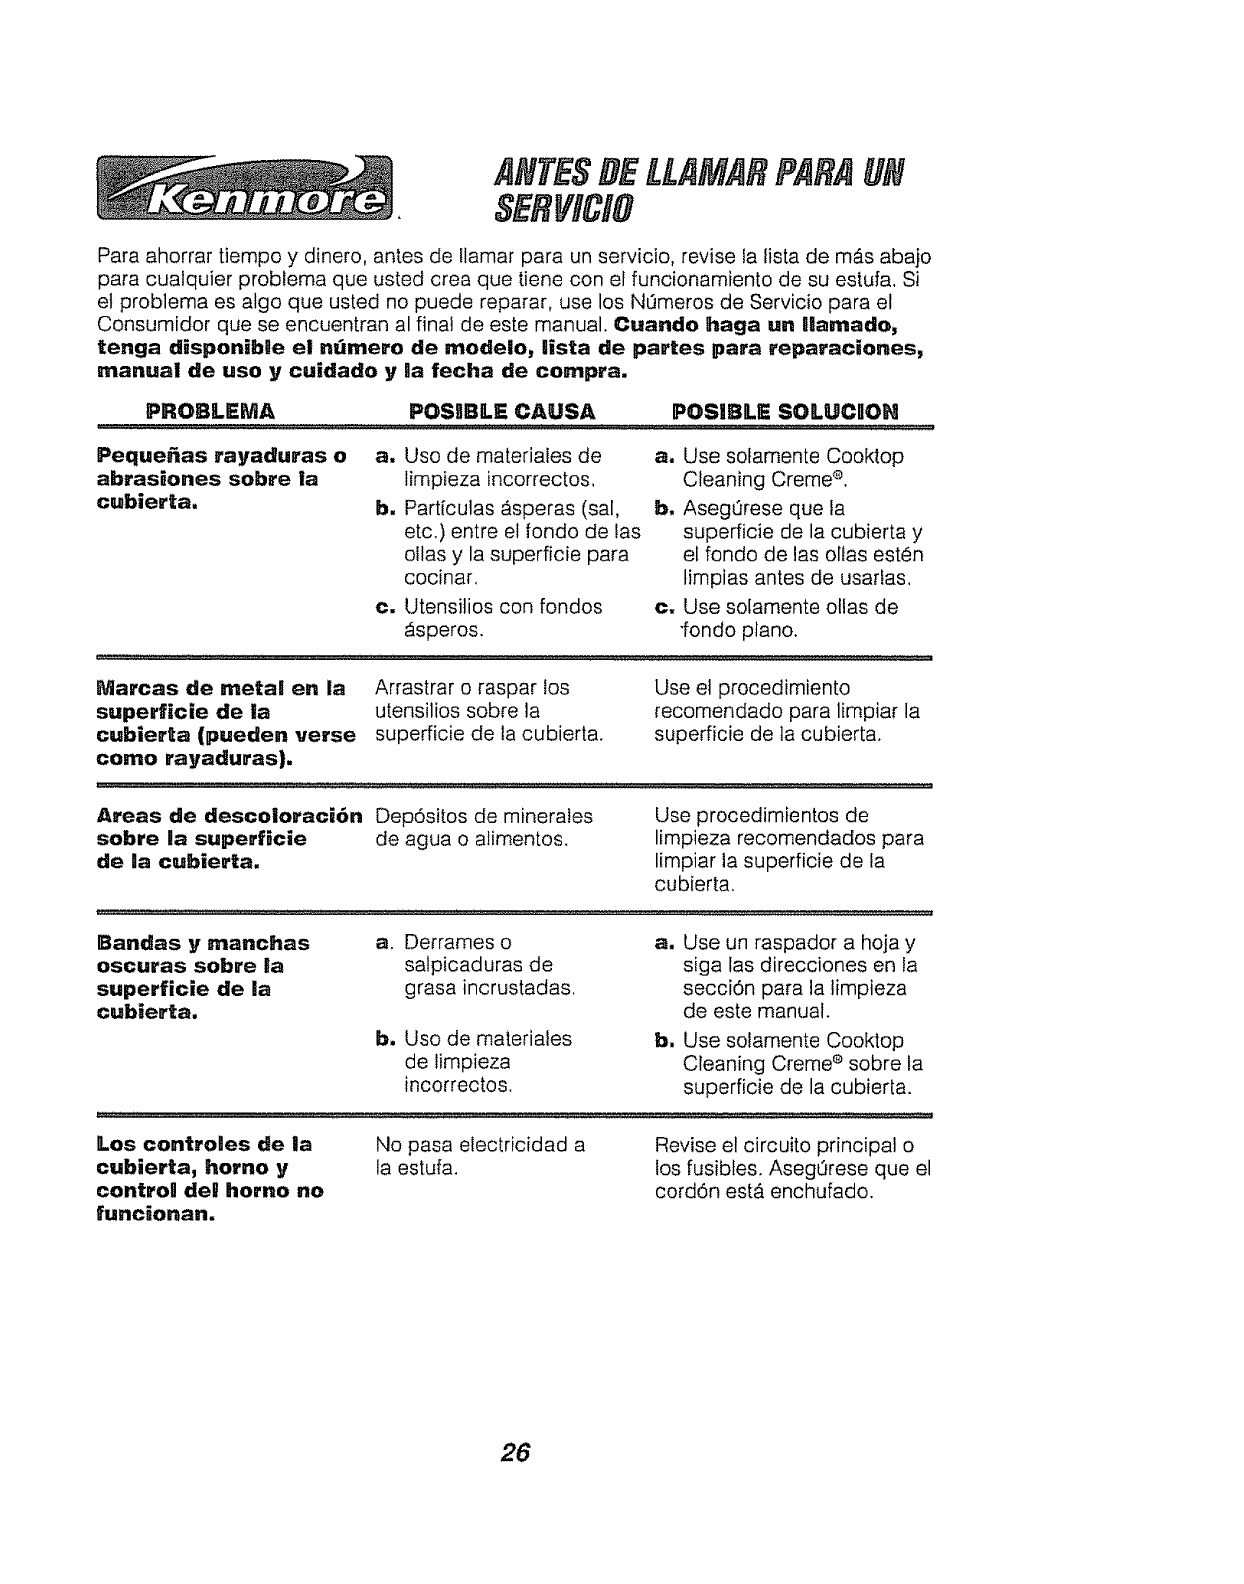
ANTESDELLAMARPARAUN
SERVICiO
Para ahorrar tiempo y dinero, antes de llamar para un servicio, revise ia lista de m_s abajo
para cualquier problema que usted crea que tiene con el funcionamiento de su estufa, Si
el problema es algo que usted no puede reparar, use los NOmeres de Servicio para el
Consumidor que se encuentran al final de este manual. Cuando haga un Ramado,
tenga disponibge el n_mero de modelo, |ista de partes para reparaciones,
manual de uso y cuidado y la fecha de compra.
PROIBLIEMA POSJlBLE CAUSA POS|BLE SOLUCgOH
Pequefias Irayaduras o a. Use de materiales de a. Use solamente Cooktop
abrasiones sobre ia limpieza incorrectos, Cleaning Creme ®.
cubierta, b, Particulas 8.speras (sal, b, AsegOrese que la
etc.) entre el rondo de fas superficie de la cubierta y
otlas y la superficie para el fondo de las ollas esten
cocinar, timpias antes de usarias,
¢. Utensitios con rondos ¢. Use solamente elias de
_speros. "fondo piano.
Marcas de metal en la Arrastrar e raspar los Use et procedimiento
superficie de la utensilios sobre la recomendado para limpiar la
cubietta (pueden verse superficie de ta cubierta, superficie de ta cubierta.
como rayaduras).
:................................................................... o.__; :___ ::: ............ ,,,,:v ,,,,,,,,,
Areas de descoloraci6n Dep6sitos de minerales Use procedimientos de
sobre Ila superf_cie de agua o alimentos, limpieza recomendados para
de la cubierta, limpiar la superficie de la
cubierta,
Bandas y manchas
oscuras sobre la
superficie de la
cubierta.
a. Derrames o
salpicaduras de
grasa incrustadas.
a. Use un raspador a hoja y
siga las direcciones en la
secciOn para la limpieza
de este manual.
b, Uso de materiaies
de limpieza
incorrectos.
b, Use solamente Cooktop
Cleaning Creme e sobre la
superficie de la cubierta.
Los controles de la
cubierta, homo y
control del homo no
funcHonan.
No pasa electricidad a
la estufa. Revise e! circuito principal o
los fusibles. AsegOrese que el
cordon estA enchufado.
26
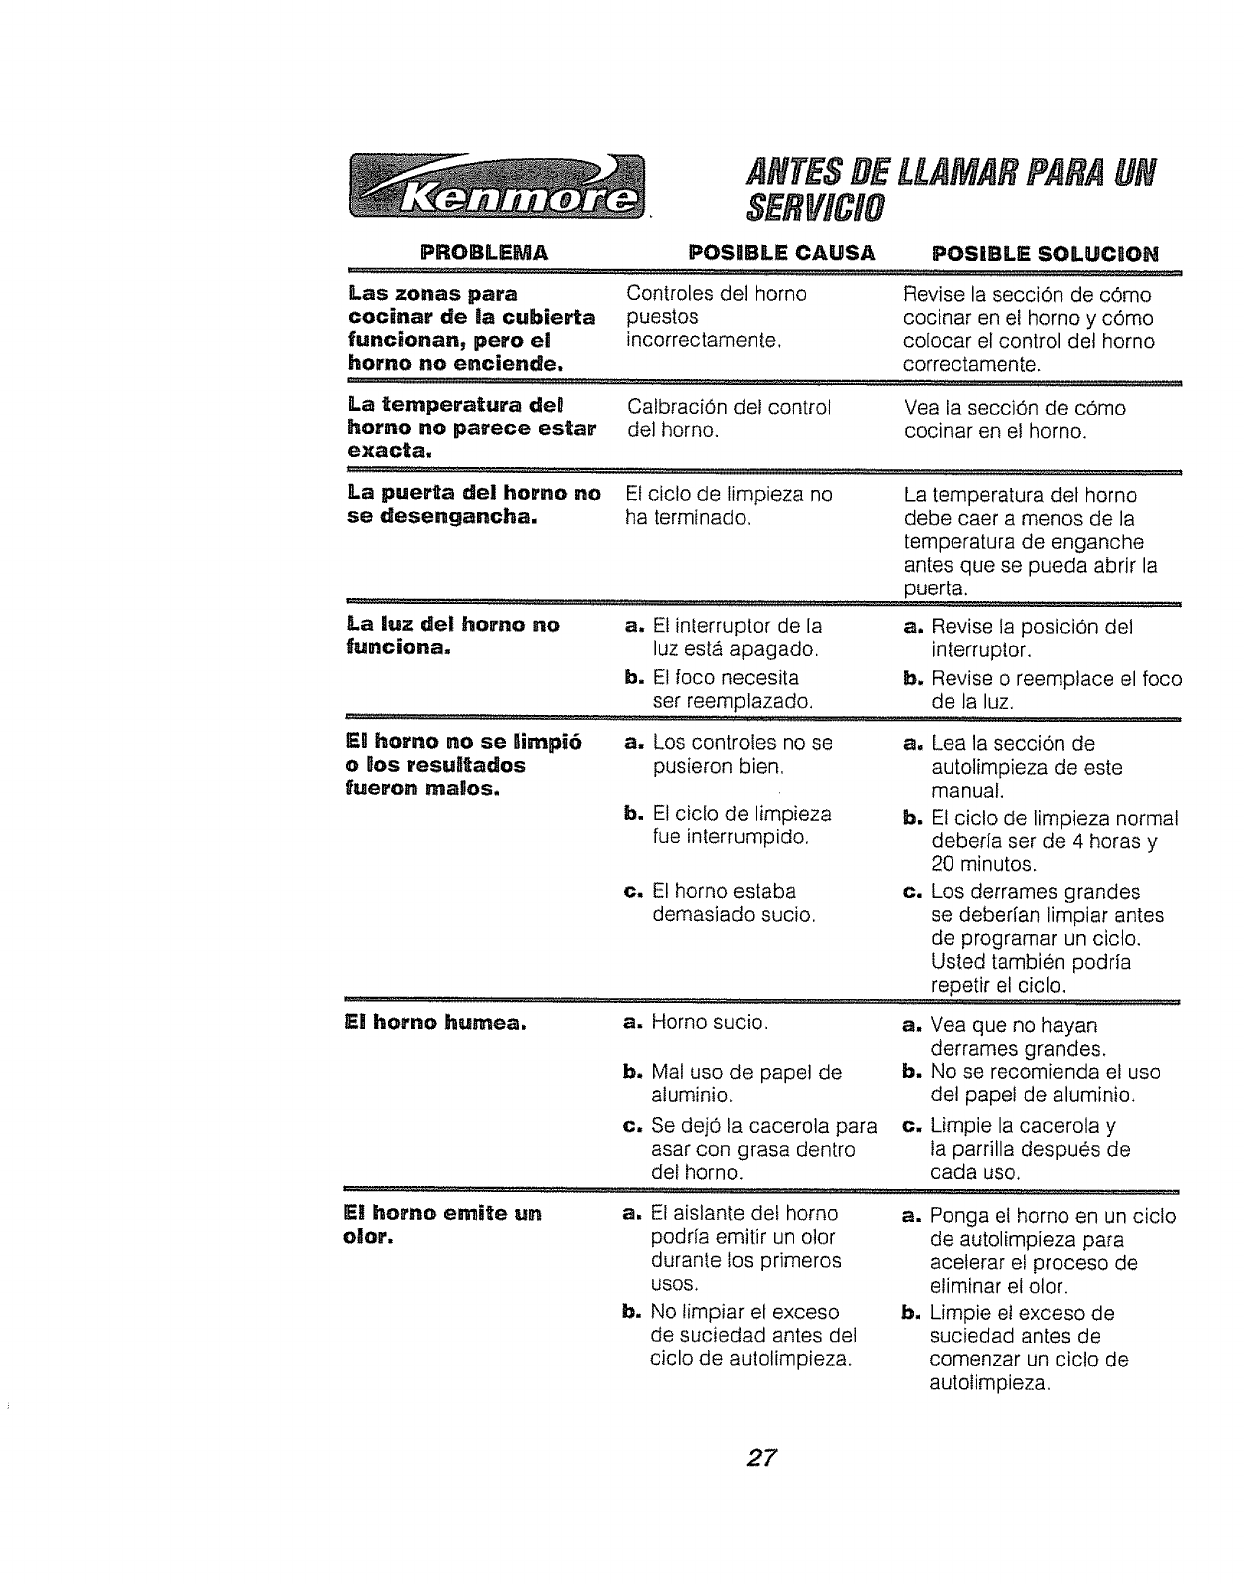
ANTESDELLAMARFARAUN
SERWlClO
PROBLEMA POSgBLE CAUSA POSIBLE SOLUCaOH
Las zonas para Controles del homo Revise la seccidn de cdmo
¢oc[nar de Iia cubierta puestos cocinar en el homo y c6mo
funcionan_ pero el incorrectamente, colocar el control det horno
homo no enciendle, correctamente.
Yea ia secciOn de c6mo
cocinar en el horno.
Calbraci6n del control
del horno.
La temperatura deO
homo no parece es_ar
exacta,
La puertta del homo no
se desengancha.
La luz del homo no a.
funciona.
E! homo no se 6impi6
El ciclo de limpieza no La temperatura det homo
ha terminado, debe caer a menos de la
temperatura de enganche
antes que se pueda abrir la
...........................Eue !a:.....................
bm
a, Revise la posicion del
interruptor.
b, Revise o reernplace el foco
de la luz.
bi
El inLerruptor de la
luz estb. apagado.
El foco necesita
ser reemplazado,
El ciclo de limpieza normal
deberfa ser de 4 horas y
20 minutos.
o gos resuRtados
fueron magos.
a, Los controles no se a, Lea la secci6n de
pusieron bien. autolimpieza de este
manual.
b, El ciclo de limpieza
rue interrumpido,
¢, El homo estaba
demasiado sucio. c. Los derrames grandes
se debedan limpiar antes
de programar un ciclo.
Usted tambien podria
repetir el ciclo.
u , _, ,
E! homo humea. a, Homo sucio.
b, Mal uso de papel de
aluminio.
a, Yea que no hayan
derrames grandes.
b. No se recomienda et uso
del papel de aluminio.
El homo emi!_e un
olor.
c, Se dejO la cacerota para c, Limpie la cacerola y
asar con grasa dentro la parrilla despues de
del horno, cada uso,
a, El aislante det homo a, Ponga e! homo en un ciclo
podria emitir un olor
durante los primeros
USOS,
b. No timpiar el exceso
de suciedad antes det
ciclo de autolimpieza.
bu
de autolimpieza para
aceterar et proceso de
eliminar el olor.
Limpie el exceso de
suciedad antes de
comenzar un cic!o de
autolimpieza,
27
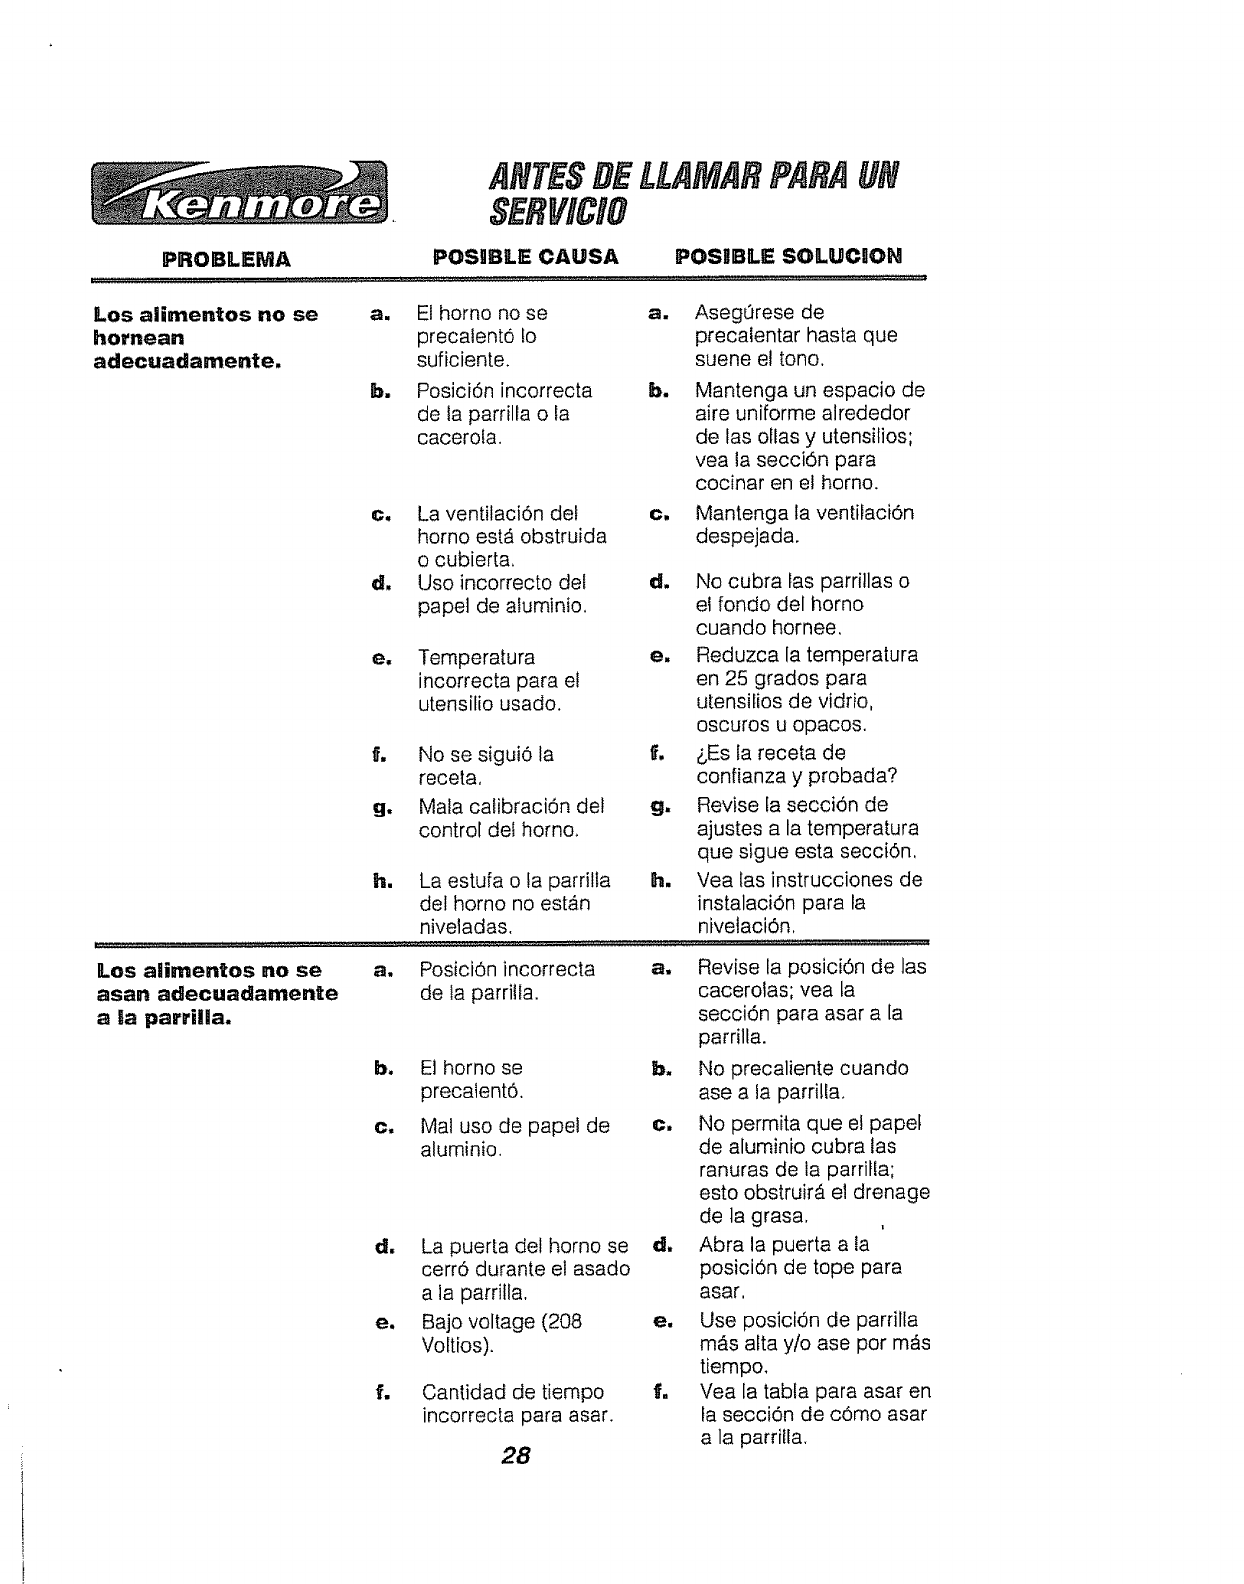
ANTESDELLAMARPARAUN
SERVICIO
PROB1LI_MA POSgBILE CAUSA POSUBILE SOILUCgOH
Los aiienentos no se a. El homo no se a, AsegQrese de
hornean precaiento !o precalentar hasta que
adecuadamente, suficiente, suene el tone,
Los alimentos no se
asa. adecuadamente
a la parriHa.
b. Posici6n incorrecta b.
de la parrilla o la
cacerola.
Mantenga un espacio de
aire uniforme alrededor
de fas ollas y utensilios;
yea la secci6n para
cocinar en el horno.
c, La ventilaci6n del
homo estA obstruida
o cubierta.
d, Usoincorrecto del
papel de aluminio.
eu Temperatura
incorrecta para el
utensilio usado.
f. No se sigui0 la
receta,
g. Mafa catibraci6n det
control del homo.
hw La estufa o la parrilla
del homo no est_n
niveladas,
Clw Mantenga la ventilaci6n
despejada.
d. No cubra las parrillas o
el rondo del homo
cuando hornee,
e. Reduzca latemperatura
en 25 grados para
utensilios de vidrio,
oscuros u opacos.
f. &Es la receta de
confianza y probada?
g. Revise la secci6n de
ajustes a la temperatura
que sigue esta secci6n,
h. Vealas instrucciones de
instalaci6n para la
nivelaci0n,
_w PosiciOn incorrecta
de la parrilla.
as Revise la posici6n de las
cacerolas; vea la
secci6n para asar a [a
parrilla.
b. El homo se
precalentO.
e. Mal uso de papel de
aluminio.
d, La puerl.a del horno se
cerr6 durante el asado
a la parrifla.
e, Bajo voltage (208
Voltios).
fw Cantidad de tiempo
incorrecta para asar.
28
b, No precaliente cuando
ase a la parrilla.
c, No permita que el papef
de aluminio cubra tas
ranuras de la parrifla;
esto obstruir__ el drenage
de la grasa.
d, Abrala puerta ala
posiciOn de tope para
asar.
e, Use posici6n de parrilla
mAs alta y/o ase por m_s
tiempo.
f, Vea la tabla para asar en
fa secci6n de c0mo asar
a la parrilla.
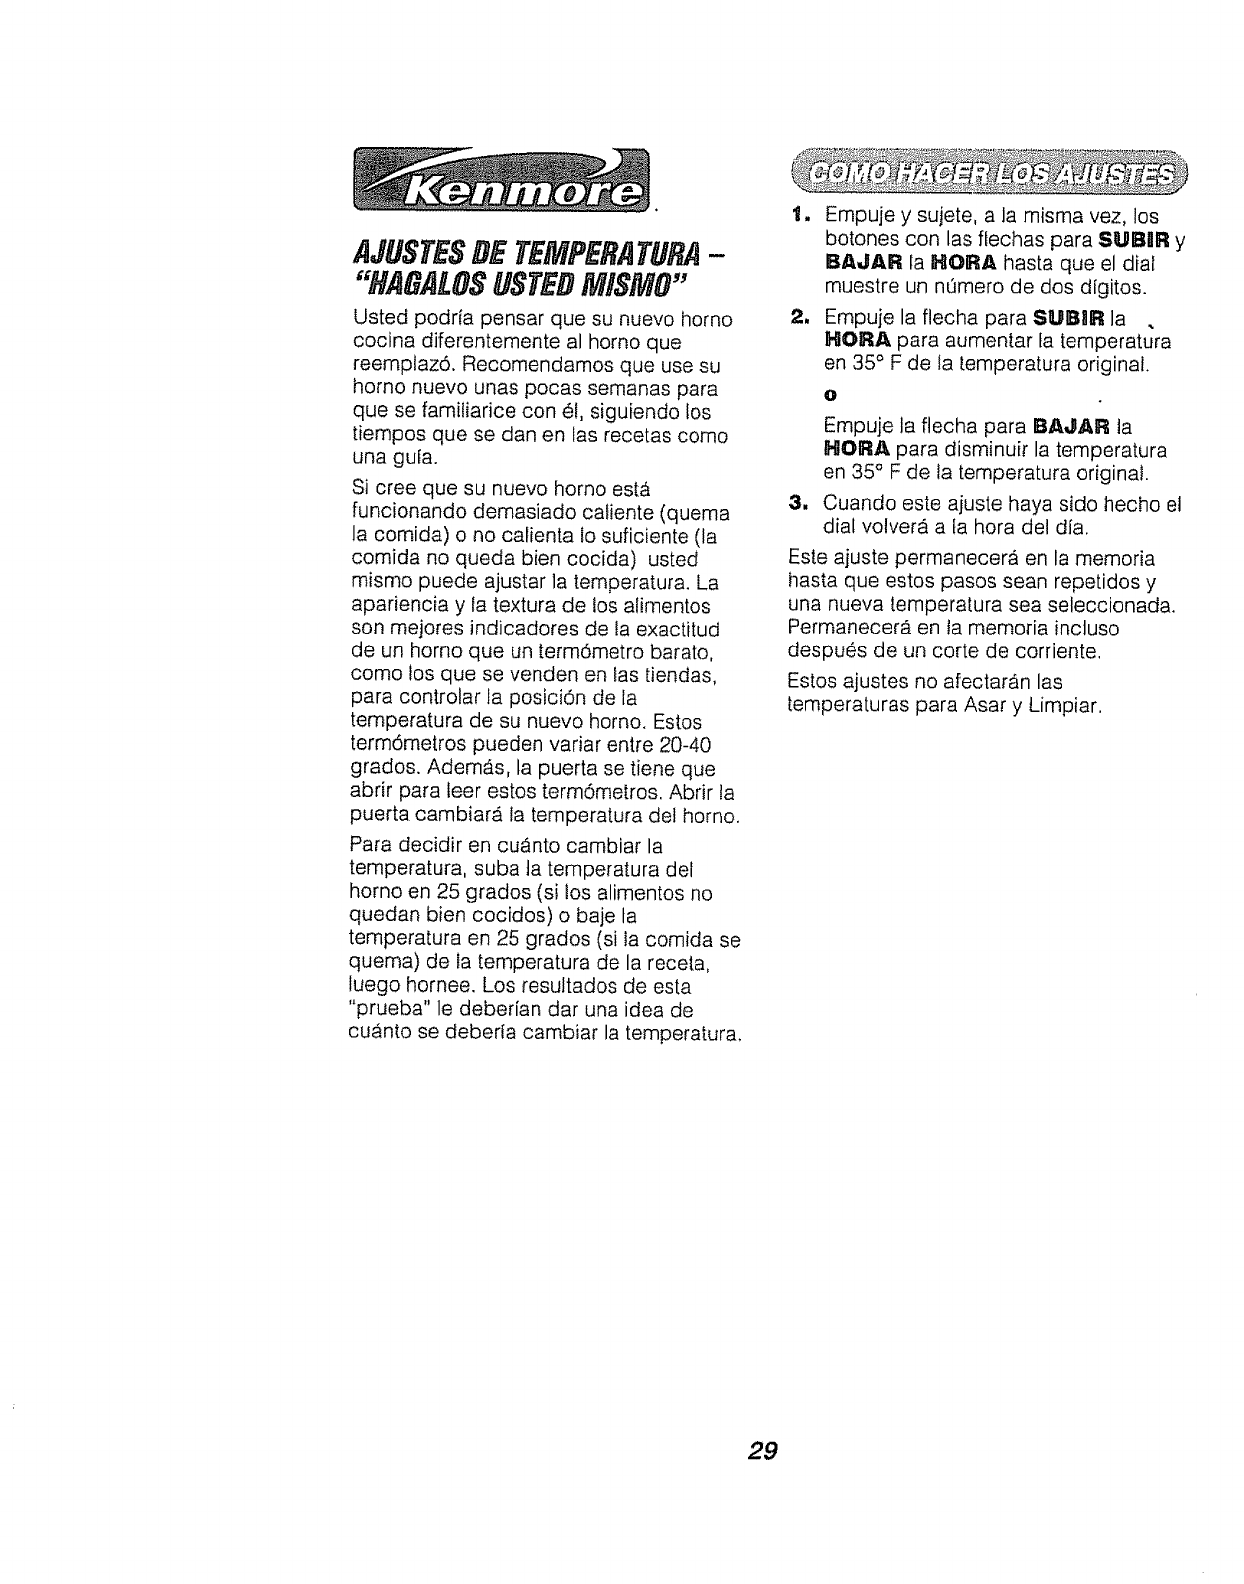
AJUSTESDETEMPERATURA-
"HAGALOSliSTEDMISMO"
Usted podria pensar que su nuevo homo
cocina diferentemente al homo que
reemptaz6. Recomendamos que use su
homo nuevo unas pocas semanas para
que se familiarice con 8!, siguiendo los
tiempos que se dan en las recetas como
una gu[a.
Si cree que su nuevo homo est_
funcionando demasiado caliente (quema
la comida) o no calienta io suficiente (la
comida no queda bien cocida) usted
mismo puede ajustar la temperatura. La
apariencia y la textura de los alimentos
son mejores indicadores de fa exactitud
de un horno que un term6metro barato,
como los que se venden en fas tiendas,
para controlar la posiciOn de fa
temperatura de su nuevo homo. Estos
term6metros pueden variar entre 20-40
grados. Adem_s, la puerta se tiene que
abrir para leer estos term6metros. Abrir ta
puerta cambiar#, la temperatura del homo.
Para decidir en cu_nto cambiar la
temperatura, suba ia temperatura del
homo en 25 grados (si los alimentos no
quedan bien cocidos) o baje la
temperatura en 25 grados (si la comida se
quema) de la temperatura de la receta,
luego hornee. Los resultados de esta
"prueba" le deberian dar una idea de
cuanto se deberfa cambiar la temperatura.
1, Empuje y sujete, a la misma vez, los
botones con las flechas para SUBIIR y
BA,JAR la HORA hasta que el dial
muestre un nQmero de dos dfgitos.
2, Empuje la flecha para SUBIIR la
HORA para aumentar fa temperatura
en 35° F de la temperatura original.
O
11
Empuje la fiecha para 18AJAR ta
HORA para disminuir la temperatura
en 35 ° F de la temperatura original.
Cuando este ajuste haya sido hecho el
dial volvera a fa hora del dia.
Este ajuste permanecer_ en la memoria
hasta que estos pasos sean repetidos y
una nueva temperatura sea seleccionada.
Permanecerb_ en la memoria incluso
despues de un corte de corriente,
Estos ajustes no afectaran las
temperaturas para Asar y Limpiar.
29

NONS
30
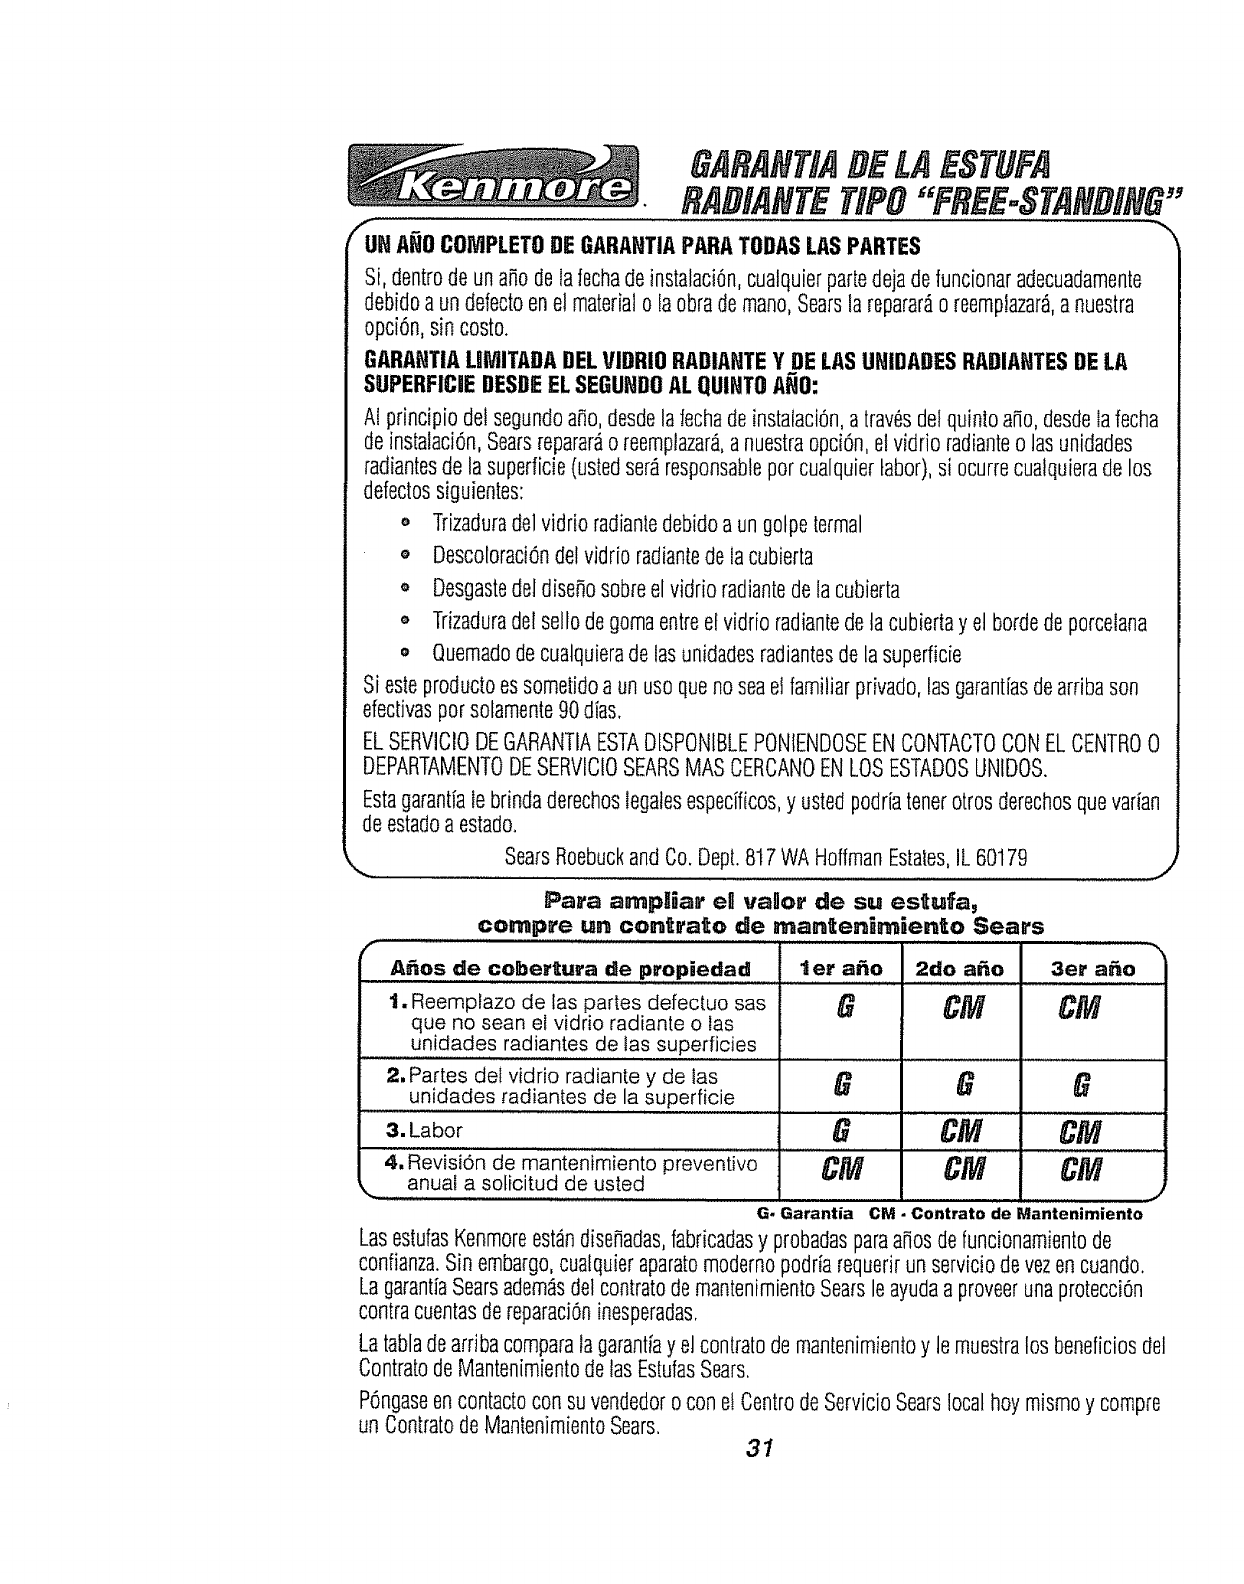
GARANTIADELAESTUFA
RADIAN TIP#"FREE-STANDING"
_H ANOCOMPLETODEGARAHTIAPARATODASLASPARTES
Si, dentrode un anodelafechadeinstalaci6n,cuatquierpartedejadefuncionaradecuadamente
debidoaun defectoenel materialo laobrade mano,Searsla reparardoreemplazar&a nuestra
opci6n,sincosto.
GARANTIALIMITADADELVIDRIO RADIAHfEY DELASUHIDADESRADIAHTESDELA
SUPERFICIEDESDEELSEGUHDOALQUIHTOAHO:
Ai principiodel segundoano,desdelafechade instalaci6n,a travesdel quintoa_o,desdeiafecha
deinstalaci6n,Searsreparardoreemptazar&anuestraopci6n,e!vidrio radianteo lasunidades
radiantesde lasuperficie(ustedser_responsablepor cualquierlabor),si ocurrecualquierade los
defectossiguientes:
o Trizaduradel vidrio radiantedebidoa un gotpetermal
o Descoloraci6ndelvidrio radiantede lacubierta
o Desgastedel disenosobreelvidrio radiantede iacubierta
o Trizaduradel seltodegomaentree!vidrio radiantedela cubiertay el bordede porcelana
• Quemadodecualquierade lasunidadesradiantesde lasuperficie
Si esteproductoessometidoa un uso quenoseaelfamiliarprivado,lasgarantiasdearribason
efedivaspotsofamente90dias.
ELSERVICIODEGARANTIAESTADfSPONIBLEPONIENDOSEENCONTACTOCONELCENTRO0
DEPARTAMENTODESERVICtOSEARSMASCERCANOENLOSESTADOSUNIDOS.
Estagarantiale brindaderechoslegalesespecificos,y ustedpodriatenetotrosderechosquevarian
de estadoaestado.
SearsRoebuckand Co.Dept.8t7 WAHoffmanEstales,IL 60179
Para arnpl;iar ell va_or de su estufa,
compre un contrato de man_enimiento Sears
f
.... A_OS die colbertur a de propiedad ter a_o 2do a_o 3era_ 0 .......
1. Reemplazo de las partes defectuo sas _ C_/_' CM
que no sean el vidrio radiante o las
unidades radiantes de tas superficies
2, Partes del vidrio radiante y de las _ _
......... unidades radiantes de Ia superficie
3.Labor _Cr_ CM
4, Revisi6n de mantenimiento preventivo _'_ _ _j_/_
,,._ anuaf a soticitud ........de usted .J
G- Garantia CM -Contrato de Mantenimiento
LasestufasKenmoreest_ndiseNadas,fabricadasy probadasparaamosdefuncionamientode
confianza.Sin embargo,cuafquieraparatomodernopodriarequerirun serviciode vezen cuando.
LagarantiaSearsademdsdel contratodemantenimientoSearsleayudaa proveerunaprotecci6n
contracuentasdereparaciOninesperadas.
£atabladearfiba comparala garantiay elcontratodemanIenimientoy lemuestralos beneficiosdel
Contratode MantenimientodelasEstufasSears,
P6ngaseencontactocon su vendedoro con e! Centrode ServicioSearslocalhoymismoy compre
un Conlratode MantenimientoSears, 31

Forin-homemajor brandrepair service:
Call 24 hours a day, 7 days a week
t°800°4°MYoMOME
(1-800-469-4663)
Para pedir servicio de reparaciGn a domicilio -
1.800.$76-5811
In Canada for all your service and parts needs call -
Au Canada pour tout le service ou les pi_ces -
1.800.$65.4455
For therepair orrepiacementparts you need:
Call 7 am-7 pro, 7 days a week
t.80e.36e.PART
(1-800-366-7278)
Para ordenar piezas conentrega a domicilio -
1.800.659.7084
Forthelocationofa
Sears Parts andRepairCenter
in yourarea:
Call 24 hours a day, 7 days a week
t -SO0=4SS- t 222
For informationon purchasinga Sears
MaintenanceAgreementor to inquire
about an existing Agreement:
Call9 am-5 pm,Monday-Saturday
t -800-827-6655
He_eCentrall _''
The Service Side of Sears °'`
32
