Kenmore 721 26082 Users Manual
72126082601 72126082601 KENMORE VACUUM - Manuals and Guides LR708133 View the owners manual for your KENMORE VACUUM #72126082601. Home:Vacuums & Floor Care Parts:Kenmore Parts:Kenmore VACUUM Manual
KENMORE Vacuum, Canister Manual LR708133 KENMORE Vacuum, Canister Owner's Manual, KENMORE Vacuum, Canister installation guides
721.26082 LR708133
3828FI2852V to the manual 0262d150-83a4-45b6-a8c6-3279aaa79e9f
2015-01-24
: Kenmore Kenmore-721-26082-Users-Manual-328020 kenmore-721-26082-users-manual-328020 kenmore pdf
Open the PDF directly: View PDF ![]() .
.
Page Count: 24
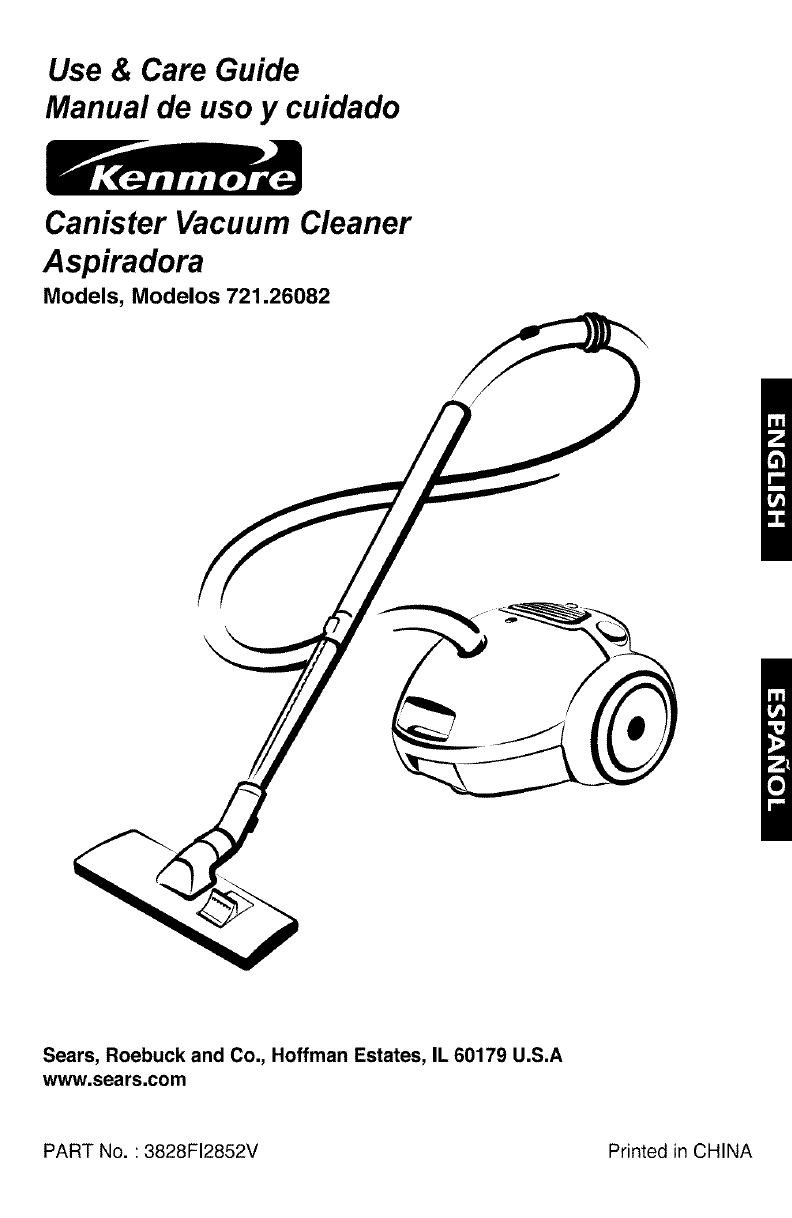
Use & Care Guide
Manual de uso y cuidado
Canister Vacuum Cleaner
Aspiradora
Models, Modelos 721.26082
Sears, Roebuck and Co., Hoffman Estates, IL 60179 U.S.A
www.sears.com
PART No. : 3828FI2852V Printed in CHINA
Before Using Your New Vacuum...................2
Kenmore Vacuum Cleaner Warranty ............2
Important Safety Instructions........................3
Parts and Features .........................................4
Assembly ........................................................5
Use and Care ..................................................6
How Your Vacuum Works................................6
How to Start Your Vacuum ...............................6
Attachments .....................................................7
Attachments Use Chart ....................................7
Vacuuming Tips ................................................ 8
Performance Features ...................................... 8
Cleaning The Dust Bin and Washable Filter ....9
Cleaning Motor Safety Filter ........................... 10
Cleaning Exterior and Attachments ................ 10
Storing Your Vacuum ..................................... t0
Troubleshooting ........................................... 11
Master Protection Agreements ................... 12
Espahol .......................................................... 13
Service ............................................ Back Cover
Please read this guide. It will help you assemble and operate your new Kenmore vacuum in the
safest and most effective way.
For more information about the care and operation, call your nearest Sears store.
Your will need the complete model and serial numbers when requesting information.
Your vacuum's model and serial numbers are located on the Model and Serial Number Plate.
Use the space below to record the model number and serial number of your new Kenmore vacuum.
Model No.
Serial No.
Date of Purchase
Keep this book and your sales check (receipt) in a safe place for future reference.
ONE YEAR FULL WARRANTY ON KENMORE VACUUM CLEANER
When assembled, operated and maintained according to the Use and Care Guide, if this vacuum cleaner
fails due to a defect in material or workmanship within one year from the date of purchase, RETURN IT TO
ANY SEARS STORE OR SEARS PARTS & REPAIR CENTER FOR FREE REPAIR (or replacement if
repair proves impossible).
This warranty is void if this vacuum cleaner is ever used for commercial or rental purposes.
This warranty excludes vacuum bags, belts, light bulbs, and filters, which are expendable parts that can
wear out from normal use before the end of the warranty year.
This warranty covers only defects in material and workmanship. Sears will NOT pay for:
1. An on-site service technician to instruct the user in correct product installation,operation or maintenance.
2. A service technician to clean or maintain this product.
3. Damage to or failure of this product if it is not installed, operated or maintained according to the Installation
Instructions and Use and Care Guide.
4. Damage to or failure of this product resulting from accident, abuse, misuse or use for other than itsintended
purpose.
5. Damage to or failure of this product caused by the use of detergents, cleaners, chemicals or utensils
other than those recommended in the Use and Care Guide.
6. Damage to or failure of parts or systems resulting from unauthorized modifications made to this product.
This warranty applies only while this appliance is used in the United States.
This warranty gives you specific legal rights, and you may also have other rights which vary from state to state.
Sears, Roebuck and Co., Dept. 817WA, Hoffman Estates, IL 60179
-2-
WARNING-Toreducetheriskoffire,electricshock,orinjury:
Your safety is important to us. To reduce the risk of fire, electrical shock, injury to
persons or damage when using your vacuum cleaner, follow basic safety precautions
including the following:
Readthis manualbefore assemblingor using
your vacuumcleaner.
Useyour cleaneronly as describedinthis
manual.Useonly withsuppliedattachments.
To reducethe risk of electrical shock- Do not
useoutdoorsor on wet surfaces.
Disconnect electricalsupply before servicing
or cleaningout brusharea. Failureto do so
couldresult in electricalshock or brush
suddenlystarting.
Always turncleaner off beforeconnectingor
disconnectingthe hose.
Always turncleaner off before unplugging.
Do not unplug by pullingoncord. To unplug,
graspthe plug, notthe cord.
Hold plugwhen rewindingonto cord reel.
Do not allow plugto whip whenrewinding.
Do not use withdamagedcord or plug. If
cleaneris notworking as it should, has been
dropped,damaged, left outdoors,or dropped
intowater, return itto a service center.
Do not pull orcarry by cord,usecordas a
handle,closedooron cord,or pullcord around
sharpedgesor corners.Do notruncleanerover
cord. Keepcord awayfromheatedsurfaces.
Do not leavecleanerwhenpluggedin.Unplug
fromoutletwhennotin useand beforeservicing.
Do not allowto be usedasa toy. Closeattention
_snecessarywhenusedbyor nearchildren.
Do not handle plugor cleanerwith wet hands.
Do not operatethe cleanerwith a punctured
hose. Replaceif cut or worn. Avoidvacuuming
sharpobjects.
Do not usewith any openingblocked; keep
free of dust, lint, hair and anythingthat may
reduceair flow.
Keep hair, looseclothing,fingers, and all parts
of body away fromopenings and movingparts.
Do not use cleanerwithout dust bag and/or
filters in place.
Always changethe dust bag aftervacuuming
carpetcleanersor freshener,powdersandfine
dust.These productsclog the bag, reduce
airflowand cancausethe bagto burst. Failure
to changebag could causepermanentdamage
to the cleaner.
Do nat usethe cleanerto pick upsharp hard
objects,small toys, pins, paper, etc.They may
damagethe cleaneror dust bag.
Donot pickupanythingthatis burningorsmoking,
suchas cigarettes,matches,or hotashes.
Do not usevacuumcleaner
to pick upflammableor combustibleliquids
(gasoline,cleaningfluids, perfumes,etc.),or use
in areaswherethey maybe present.Thefumes
fromthese substancescancreatea fire hazard
orexplosion.
Use extra care whencleaning on stairs. Donot
puton chairs, tables,etc. Keep on floor.
You are responsiblefor makingsurethat your
vacuum cleaneris notused by anyone unable
to operate itproperly.
SAVE THESE INSTRUCTIONS
Proper assembly and safe use of your vacuum cleaner are your responsibilities. Your
cleaner is intended only for household use. Read this Owner's Manual carefully for
important use and safety information. This guide contains safety statements under warning
and caution symbols. Please pay special attention to these boxes and follow any
instructions given. WARNING statements alert you to such hazards as fire, electrical
shock, burns and serious personal injury. CAUTION statements alert you to such hazards as
moderate personal injury and/or property damage.
-3-
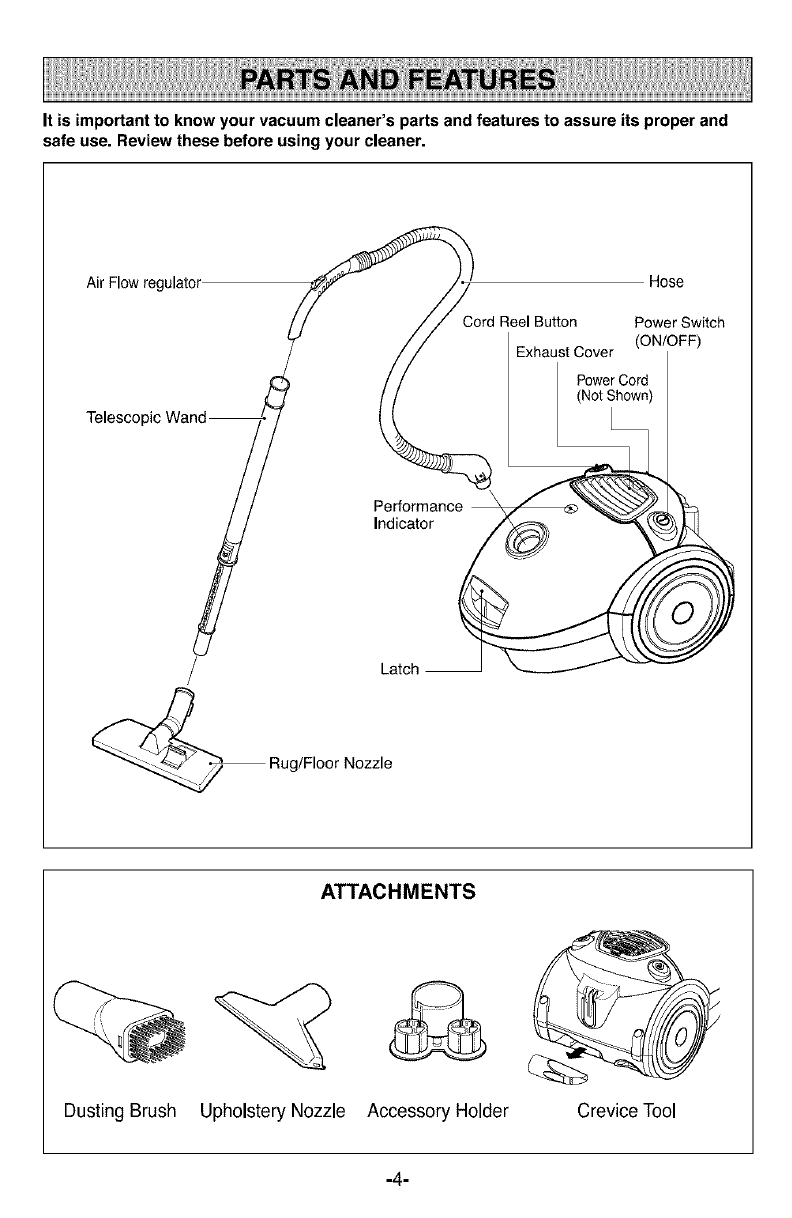
It is importantto know your vacuum cleaner's parts and features to assure its proper and
safe use. Review these before using your cleaner.
Air Flowregulator Hose
Cord Reel Button Power Switch
(ON/OFF)
ExhaustCover
PowerCord
(NotShown)
ATTACHMENTS
Dusting Brush Upholstery Nozzle Accessory Holder Crevice Tool
-4-
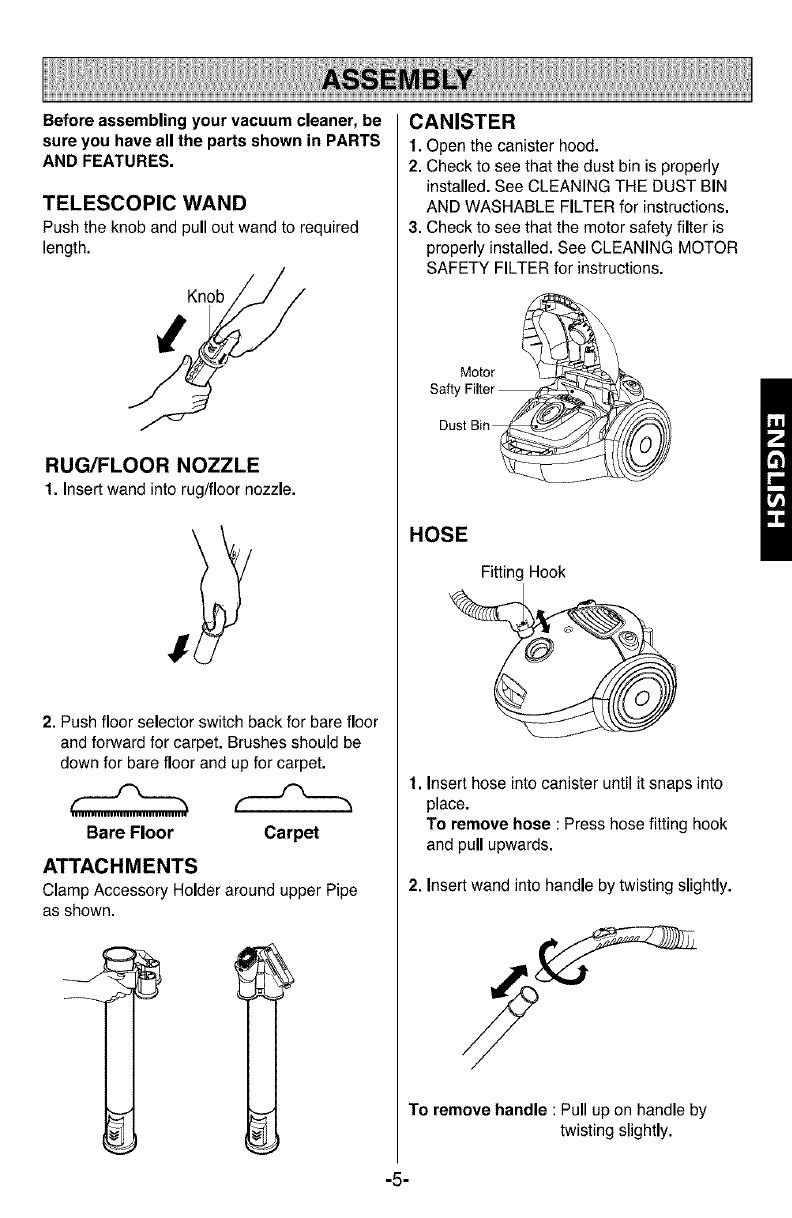
Before assembling your vacuum cleaner, be
sure you have all the parts shown in PARTS
AND FEATURES.
TELESCOPIC WAND
Push the knob and pull out wand to required
length.
Knob
RUG/FLOOR NOZZLE
1. Insertwand intorug/floor nozzle.
2. Push floor selector switch back for bare floor
and forward for carpet. Brushes should be
down for bare floor and up for carpet.
Bare Floor Carpet
ATTACHMENTS
Clamp Accessory Holder around upper Pipe
as shown.
CANISTER
1. Open the canister hood.
2. Check to see that the dust bin is properly
installed. See CLEANING THE DUST BIN
AND WASHABLE FILTER for instructions.
3. Check to see that the motor safety filter is
properly installed. See CLEANING MOTOR
SAFETY FILTER for instructions.
Motor
Safty Filter_\
Dust Bin__
HOSE
Fitting Hook
1. Insert hose into canister until it snaps into
place.
To remove hose : Press hose fitting hook
and pull upwards.
2. Insert wand into handle by twisting slightly.
To remove handle : Pull up on handle by
twisting slightly.
-5-

USE AND CARE
The vacuum cleaner creates suction that
picks up dirt. Rapidly moving air carries _'_ _,
the dirt to the dust bin through the air flow _,,_7 _'>" )/
passages. The dust bin lets the air pass /7" //
through, while it traps the dirt. For best J, _// /_
cleaning results, keep the airflow passage _ ,f_ //
open. Check the starred areas //_ //
occasionally for clogs. Unplug from outlet 9//// //
before checking. _'_// / /
WARNING
PersonalInjuryand ProductDamage Hazard!
• DO NOT plug inif switch is in ON position.
Personalinjury or product damagecould result.
•Thecordmovesrapidlywhenrewinding.
Keepchildrenawayandprovideaclearpathwhen
rewindingthe cordto preventpersonalinjury.
•DO NOT use outletsabovecounters. Damageto
itemsin surroundingarea could occur.
1. Pull out the power cord to the desired length.
When you unwind the cord, you will see a
yellow and a red mark. The red mark is at the
very end of the cord, the yellow mark is 28
inches from the cord end.
NOTE: To reduce the risk of electric shock, this
vacuum cleaner has a polarized plug; one blade is
wider than the other. This plug will fit in a polarized
outlet only one way. If the plug does not fit fully in the
outlet, reverse the plug. If it still does not fit, contact a
qualified electrician to install the proper outlet. Do not
change the plug in any way.
2. Plug the polarized power cord into a 120 Volt
outlet located near the floor.
To rewind: Unplug the cleaner. Hold the plug
while rewinding to prevent damage or injury
from the moving cord. Press on the cord reel
button to rewind the cord.
3. To start, press power Cord Reel
switch. TO stop, Button
press power
switch again. _j_
Power Switch Knob _(_--_rr_ _
-6-
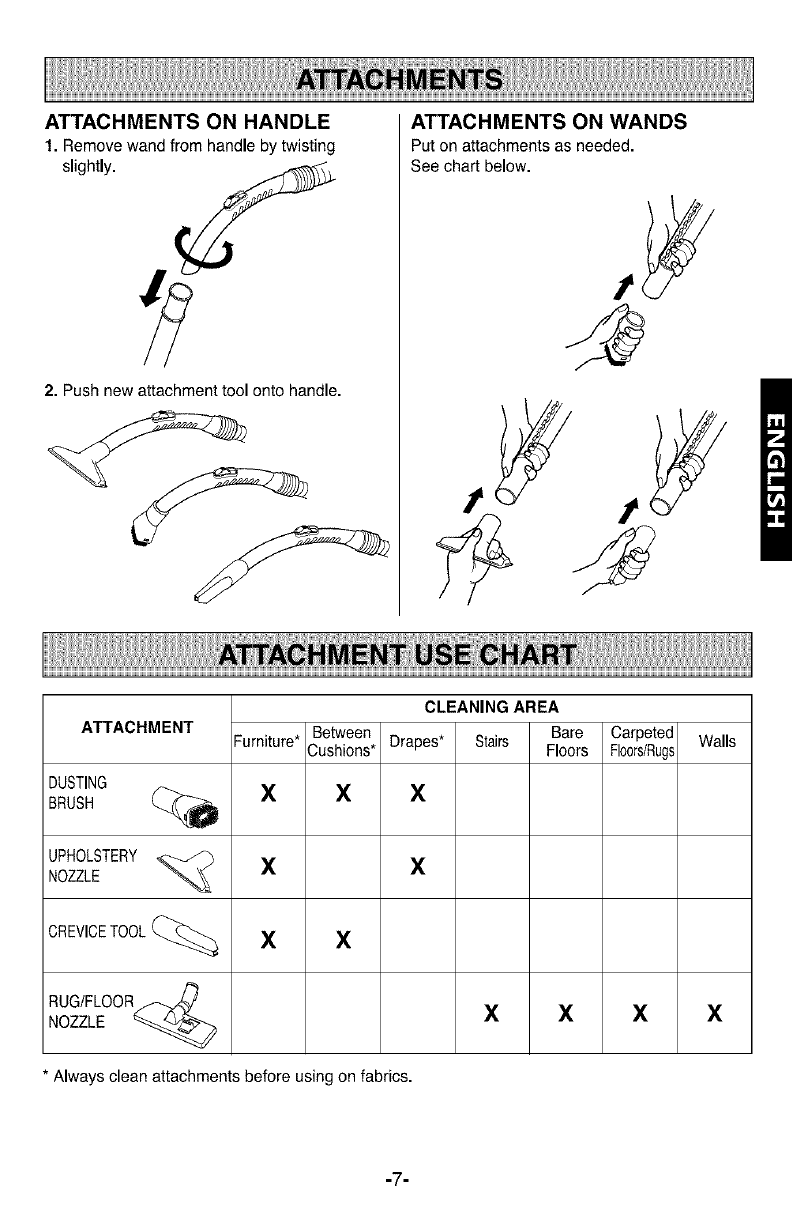
ATTACHMENTS ON HANDLE
1. Remove wand from handle by twisting
slightly.
2. Push new attachment tool onto handle.
ATTACHMENTS ON WANDS
Put on attachments as needed.
See chart below.
CLEANING AREA
Between Drapes* Stairs Bare Carpeted Walls
ATTACHMENT --urniture* 3ushions* Floors Fio0rs/Rugs
DUSTING
BRUSH _ X X X
UPHOLSTERY
NOZZLE X X
CREVICETOOL(_ X X
RUG/FLOOR _./_
NOZZLE _ X X X X
*Always clean attachments before using on fabrics.
-7-
Suggested sweeping pattern
For best cleaning action, the rug/floor nozzle
should be pushed straight away from you and
pulled straight back.
This pattern should be continued across the rug
with slow, gliding motions.
NOTE: Fast, jerky strokes do not provide
complete cleaning.
Carpeted stairs need to be vacuumed
regularly.
For best cleaning results, keep the airflow
passage open. Check occasionally for clogs.
See HOW YOUR VACUUM WORKS section.
Unplug from outlet before checking.
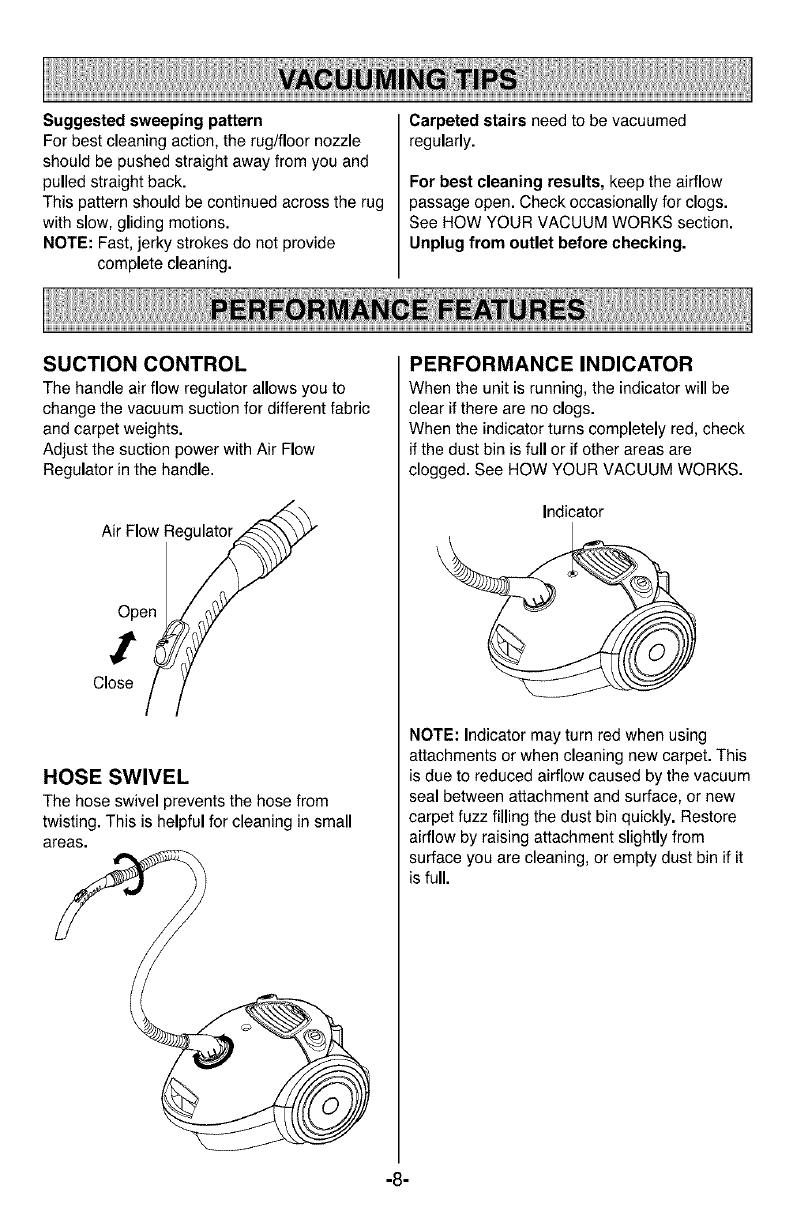
SUCTION CONTROL
The handle air flow regulator allows you to
change the vacuum suction for different fabric
and carpet weights.
Adjust the suction power with Air Flow
Regulator in the handle.
Oos'ef
HOSE SWIVEL
The hose swivel prevents the hose from
twisting. This is helpful for cleaning in small
areas.
PERFORMANCE INDICATOR
When the unit is running, the indicator will be
clear if there are no clogs.
When the indicator turns completely red, check
if the dust bin is full or if other areas are
clogged. See HOW YOUR VACUUM WORKS.
Indicator
NOTE: Indicator may turn red when using
attachments or when cleaning new carpet. This
is due to reduced airflow caused by the vacuum
seal between attachment and surface, or new
carpet fuzz filling the dust bin quickly. Restore
airflow by raising attachment slightly from
surface you are cleaning, or empty dust bin if it
is full.
-8-
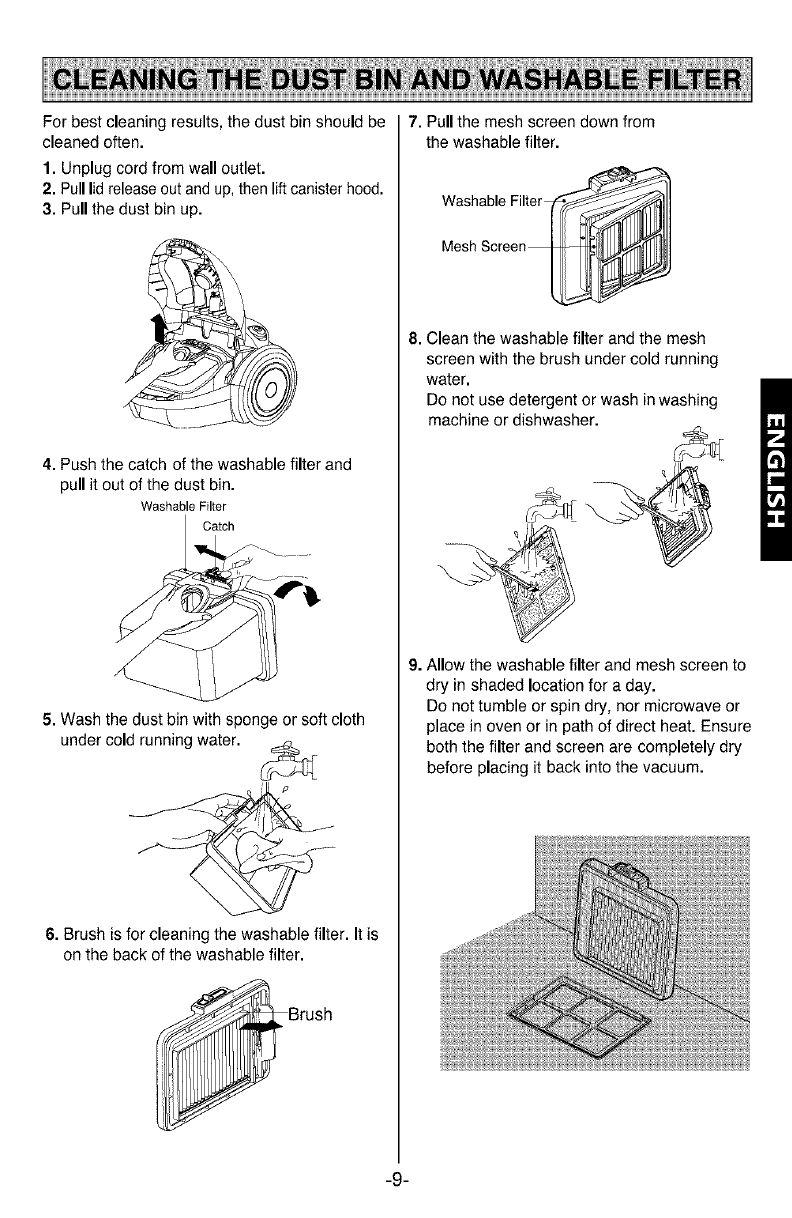
For best cleaning results, the dust bin should be
cleaned often.
1. Unplug cord from wall outlet.
2. Pull lid release out and up, then lift canister hood.
3. Pull the dust bin up.
4. Push the catch of the washable filter and
pull it out of the dust bin.
Washable Filter
Catch
5. Wash the dust bin with sponge or soft cloth
under cold running water.
6. Brush is for cleaning the washable filter. It is
on the back of the washable filter.
7. Pull the mesh screen down from
the washable filter.
Washable Filter
8. Clean the washable filter and the mesh
screen with the brush under cold running
water.
Do not use detergent or wash in washing
machine or dishwasher.
9. Allow the washable filter and mesh screen to
dry in shaded location for a day.
Do not tumble or spin dry, nor microwave or
place in oven or in path of direct heat. Ensure
both the filter and screen are completely dry
before placing it back into the vacuum.
-9-
Y.I I WARNING
Electrical Shock Hazard
Do not operate the cleaner without the
motor safety filter. Be sure the filter is dry
and properly installed to prevent motor
failure and/or electrical shock.
Check motor safety filter occasionally
and clean when dirty.
1. Unplug cord from wall outlet and lift
canister hood.
1. Unplug cord from wall outlet. DO NOT drip
water on cleaner.
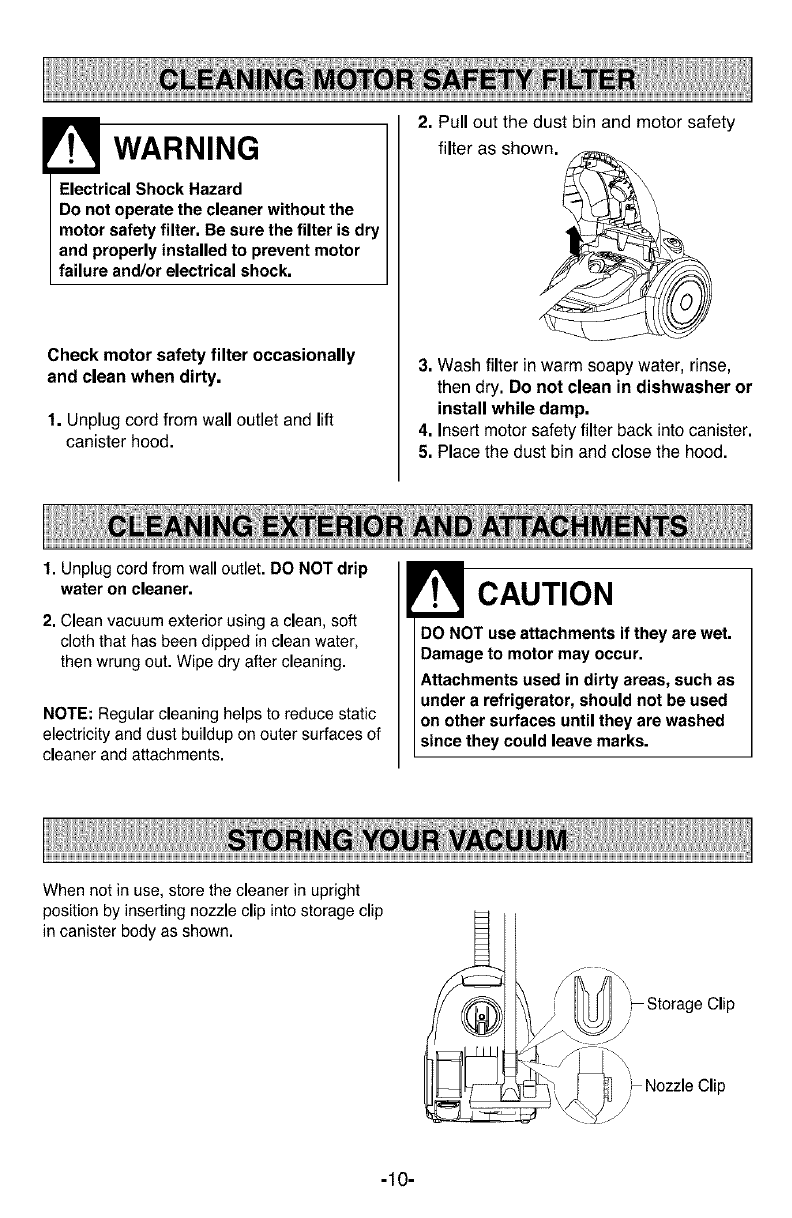
2. Pull out the dust bin and motor safety
filter as shown.
3. Wash filter in warm soapy water, rinse,
then dry. Do not clean in dishwasher or
install while damp,
4. Insert motor safety filter back into canister.
5. Place the dust bin and close the hood.
2. Clean vacuum exterior using a clean, soft
cloth that has been dipped in clean water,
then wrung out. Wipe dry after cleaning.
NOTE: Regular cleaning helps to reduce static
electricity and dust buildup on outer surfaces of
cleaner and attachments.
CAUTION
DO NOT use attachments if they are wet.
Damage to motor may occur.
Attachments used in dirty areas, such as
under a refrigerator, should not be used
on other surfaces untilthey are washed
since they could leave marks.
When not in use, store the cleaner in upright
position by inserting nozzle clip into storage clip
in canister body as shown.
Nozzle Clip
/
-10-
Review this chart to find do-it-yourself solutions for minor performance problems, Any other service
needed should be performed by a Sears or other qualified service representative.
WARNING Electrical Shock Hazard
Disconnect electrical supply before servicing or cleaning the unit.
Failure to do so could result in electrical shock or personal injury.
PROBLEM POSSIBLE CAUSE POSSIBLE SOLUTION
Cleaner won't 1. Unplugged at wall outlet. 1. Plug in firmly, press the power switch.
start. 2. Tripped circuit breaker/blown 2. Reset circuit breaker or replace fuse.
fuse at household service
panel.
Poor job of dirt
pick-up.
Cleaner starts
but cuts off.
Performance
indicator, some
models, is red.
Cleaner picks up
movable rugs, or
nozzle pushes
too hard.
Power cord
won't rewind.
1. Clogged airflow passages.
2. Dirty filter.
3. Hole in hose.
4. Canister hood open.
5. Full dust bin.
1. Hood electrical connections.
2. Tripped overload protector in
canister.
1. Dirty filter.
2. Clogged airflow passage.
3. Full dust bin.
1. Suction too strong.
1. Dirty power cord.
2. Power cord jammed.
1. Clear airflow passages (page 6).
2. Clean filter (page 9).
3. Replace hose.
4. Close and latch hood.
5. Empt dust bin.
1. Check connections (page 6).
2. Clean dust bin, clear airflow blockage
(page 6, 9). Unplug cord from Wall outlet and
wait 20~25 minutes for motor to cool and
automatically reset.
1. Clean filter (page 9).
2. Clear blockage from airflow passage (page 6).
3. Empty dust bin.
1. Adjust Air Flow Regulator (page 8).
1. Clean the power cord.
2. Pull out Power cord and rewind.
-11-
Master Protection Agreements
Congratulations on making a smart purchase.
Your new Kenmoree product isdesigned and
manufactured for years of dependable operation.
But like all products, it may require preventive
maintenance or repair from time to time.
That's when having a Master Protection Agreement
can save you money and aggravation,
Purchase a Master Protection Agreement now and
protect yourself from unexpected hassle and
expense.
The Master Protection Agreement also helps extend
the life of your new product. Here's what's included in
the Agreement:
[] Expert service by our 12,000 professional repair
specialists
[] Unlimited service and no charge for parts and
labor on all covered repairs
[] "No-lemon" guarantee - replacement of your
covered product if four or more product failures
occur within twelve months
[] Product replacement if your covered product
can't be fixed
[] Annual Preventive Maintenance Check at your
request - no extra charge
[] Fast help by phone - phone support from a
Sears technician on products requiring in-home
repair, plus convenient repair scheduling
[] Power surge protection against electrical
damage due to power fluctuations
[] Rental reimbursement if repair of your covered
product takes longer than promised
Once you purchase the Agreement, a simple phone
call is all that it takes for you to schedule service.
You can call anytime day or night, or schedule a
service appointment online.
Sears has over 12,000 professional repair specialists,
who have access to over 4.5 million quality parts and
accessories. That's the kind of professionalism you
can count on to help prolong the life of your new
purchase for years to come. Purchase your Master
Protection Agreement today!
Some limitations and exclusions apply.
For prices and additional information call
1-800-827-6655.
Sears Installation Service
For Sears professional installation of home
appliances, garage door openers, water heaters, and
other major home items, in the U.S.A. call
1-800-4-MY-HOME _
-12-

Antesde Usar Su NuevaAspiradora........... t3
Garantiade la AspiradoraKenmore ............ 13
InstruccionesImportantesde Seguridad.... 14
Partesy Caracteristicas................................15
Montaje...........................................................16
Uso y Mantenimiento....................................17
C6moTrabaja su Aspiradora...........................17
C6mo Empezarla Aspiradora .........................17
Accesorios.......................................................18
Cuadrode Usode Accesorios......................... 18
ConsejosparaAspirar.......................................19
Caracterfsticasde Funcionamiento..................19
Limpiezade la Bolsay Filtro Lavable...............20
Limpiezadel Filtrode Seguridaddel Motor......21
LimpiezaExteriory de Accesorios ..................21
Mantenimientode la Aspiradora .....................21
Resolviendo Preblemas ...............................22
Acuerdos Acerca de la Proteccibn..............23
Servicio .................................PosteriorCubierta
Porfavor leaestaguia. Leayudar&a montaryoperarsunuevaaspiradoraKenmorede unamaneram&s
seguray efectiva.
Paramayorinformaci6nsobreelcuidadoy funcionamiento,Ilamea sutiendaSearsmascercana.
Ustednecesitar_tel modeloyn5merosdeseriecompletosalpedirla informacion.
Elmodeloy nt]merosde seriedesuaspiradoraestanIocalizadosen la Planchadel Modeloy Nt_merodeSerie.
Useel espaciodebajoparaguardarel n0merode modeloy n merodekeseriedesu nuevaaspiradoraKenmore.
No.deModelo
No.deSerie
Fechade Compra
Guardeestelibrey suchequede venta(recibo)en unlugarseguroparaunafuturareferencia.
GARANTiA COMPLETA DE UN ANO PARA ASPIRADORAS KENMORE
Si esta aspiradora falla debido a un defecto en material o mano de obra antes de que pase un afio de su
adquisici6n, y siempre que haya sido montada, operada y se hayan Ilevad9 a cabo tareas de mantenimiento
de acuerdo con las instrucciones de la Gufa de Uso y Cu[dado, PODRA DEVOLVERLA A CUALQUIER
ESTABLECIMIENTO SEARS O CENTRO DE REPARACION Y SUMINISTRO DE PIEZAS SEARS PARA
UNA REPARACION GRATIS (o recambio del aparato si no se pudiese reparar).
Esta garantfa queda anulada si la aspiradora se utilice en instalaciones comerciales o se alquila.
Esta garantfa excluye las bolsas de aspiraci6n, correas, bombillas y filtros. Estas piezas pueden desgastarse
debido a un uso normal antes de que transcurra un aSo de la adquisici6n de la garantfa.
Esta garantia enicamente cubre los defectos que ocurran debido al material o a la mano de obra.
Sears NO se har_ cargo de :
1. los costes en que se incurra al Ilamar a un t6cnico para ensefiar al usuario a utilizar correctamente el producto,
a instalarlo o realizar tareas de mantenimiento.
2. los costes en que se incurran para que un tecnico limpie o realice tareas de mantenimiento en este producto.
3. los daSos o fallos que sufra este producto si no se instala, opera ni se realiza mantenimiento en ella segt_n
se describe en las/nstrucciones de Instalaci6n yen la Guia de Use y Cuidado.
4. los dafios o fallos que sufra este producto y que sean ocasionados por accidentes, abuses, un mal use o un
uso para el cual el aparato no est& indicado.
5. los dafios o fallos que sufra este productoy que sean provocadospor el uso de los detergentes, limpiadores,
productos quimicos o utensilios que no sean los recomendados en la Gufa de Uso y de Cuidado.
6. los dafios o fallos que sufran las piezas o sistemas y que sean el resultado de modificaciones realizadas al
producto.
Esta garantia s61oes aplicable mientras el producto se utilice en los Estados Unidos.
Esta garantia no le ofrece derechos legales especificos, y usted puede tener otros derechos que variaran de
Estado a Estado.
Sears, Roebuck and Co., Dept. 817WA, Hoffman Estates, IL 60179
-13 -
ADVERTENCIA.Pa,areduc,, el riesgodefuego, descargaelectrica,olesion.
Su seguridad es importante para nosotros. Para reducir el riesgo de fuego, descarga
el_ctrica, lesibn a personas o da_os al usar su aspiradora; siga las precauciones de
seguridad b_sicas incluidas a continuacibn:
Leaestemanualantesde montaro usarsuaspiradora.
Usesu aspiradorasolocomesedescribeen este
manual.Usarsoloconlosacoesoriesincluidos.
Parareducirel riesgede unadescargaelOctrica- No la
usealaire Iibree en lassuperficieshOmedas.
DesconecteelsuministroelOctricoantesde repararo
limpiarfuerael Areadel cepiIIo.Si noIo hace podria
producirunadescargaelectricao podrlaempezara
cepillarde repente.
Siempreapaguela aspiradoraantesde conectaro
desconectarla manguera.
Siempreapeguela aspiradoraantesde desenchufar.
Nodesenchufetirandodelcordon.Paradesenehufar,
asirdel enchufe,no delcord6n.
Sostengaelenchufealenrrollarhaciala bobinadel
cordon.
Nodejarenchufadoalenrollarel cord6n.
Nousarsiel cableo el enchufeestandafiados,ni
tampecosiel funcionamientede la aspiradoranoes el
adecuado,siseha caido,si ha recibidoalgt3ngolpe,si
ha permanecidoen el exterioro siha caido alagua,
devuelvalaa uncentrodesetvicio.
Nolajaleni lacarguedelcord6n,nouseel cordon
comeuna as& nocierrela puertacobreel cordon,no
tireel cordonalrededorde hordesafiladoso esquinas.
Noenciendalaaspiradorasobreelcordon.Mantengael
cordonfuerade superficiesacaloradas.
Nodejelaaspiradoraconel enchufepuesto.
Desench_feladeltoma-corrientecuandono lauseylo
antesde reperar.
Nopermitaque seausadacomounjuguete.Una
atenciOnespecialesnecesariacuandolauseal ladoo
cercade losnifios.
Nocojael enchufeo laaspiradoraconlas manes
hC]medas.
Nooperela aspiradoracon lamangueraperforada.
Reempl&celasi est&cortadao gastada.Evitelimpiarcon
laaspiradoraobjetesafilados.
Nola useconcualquiererificiobloqueado;mantengala
librede pelvo,hilachas,peloy/oalgoque puedareducir
elflujoaereo.
Mantengael pelo,ropasuelta,losdedos,y todaslas
partesde cuerpofueradel orificioylas partesmOviles.
Nousela aspiradorasin la belsadelpelvoy/ofiltros.
Siemprecambiela bolsadelpolvodespuesde limpiar
con laaapiradoralimpiadoresdealfombrae
purificadores,talcosy pelvofine.Estesproductos
estorbanla bolsa,reducenlacorrientede aire y pueden
causarque la bolsaserompa.Sinocambiela belsa
podriacausarel dafiopermanentede la aspiradora.
Nousela aspiradorapararecogerobjetosduros
afilados,juguetespequefios,alfileres,pepel,etc.EIIos
puedendafiarlaaspiradorao labolsadel pelvo
No recojaningunacosa quese este quemandoo este
humeando,comecigarros,f6sforos,o cenizascalientes.
Nousela aspiradorapararecogerliquidosinflamableso
combustibles(gasolina,fluidesde limpieza,perfumes,
etc.),ni la useen&reasdende
ellospuedenestarpresentes.Loshumosde estas
substenciaspueden
causar un riesgode fuegoo explesi6n.
Useextremo ¢uidado al limpiaren los escalones.No
pongasillas,mesas,etc.Mantengalaen el suelo.
Uetedes elresponsableperasegurarquesu aspiradora
no seausadapernadieincapazde operarla
propiamente.
GUARDE ESTAS INSTRUCCIONES
Elapropiadomontajey usosegurodesu aspiradoraessu responsabilidad.Su aspiradorasOlofuepensada
parauso del hogar.Leael Manualdel Propietariocuidadosamenteparaelimportanteuso y lasegura
informaciOn.Estaguiacontienelasdeclaracionesdeseguridadbajoadvertenciasy sefialesde precauciOn.
PorfavorpresteespecialatenciOna estoscuadrosy sigacualquierinstrucci6ndada.Lassefialesde
ADVERTENClAtenerencuentael riesgodeineendio,descargaelOctrica,quemadurasy otrosdafios
personalesgraves.
PRECAUClONtenerencuentael riesgodedafiosmoderadosalas personaso lapropiedad.
-14-
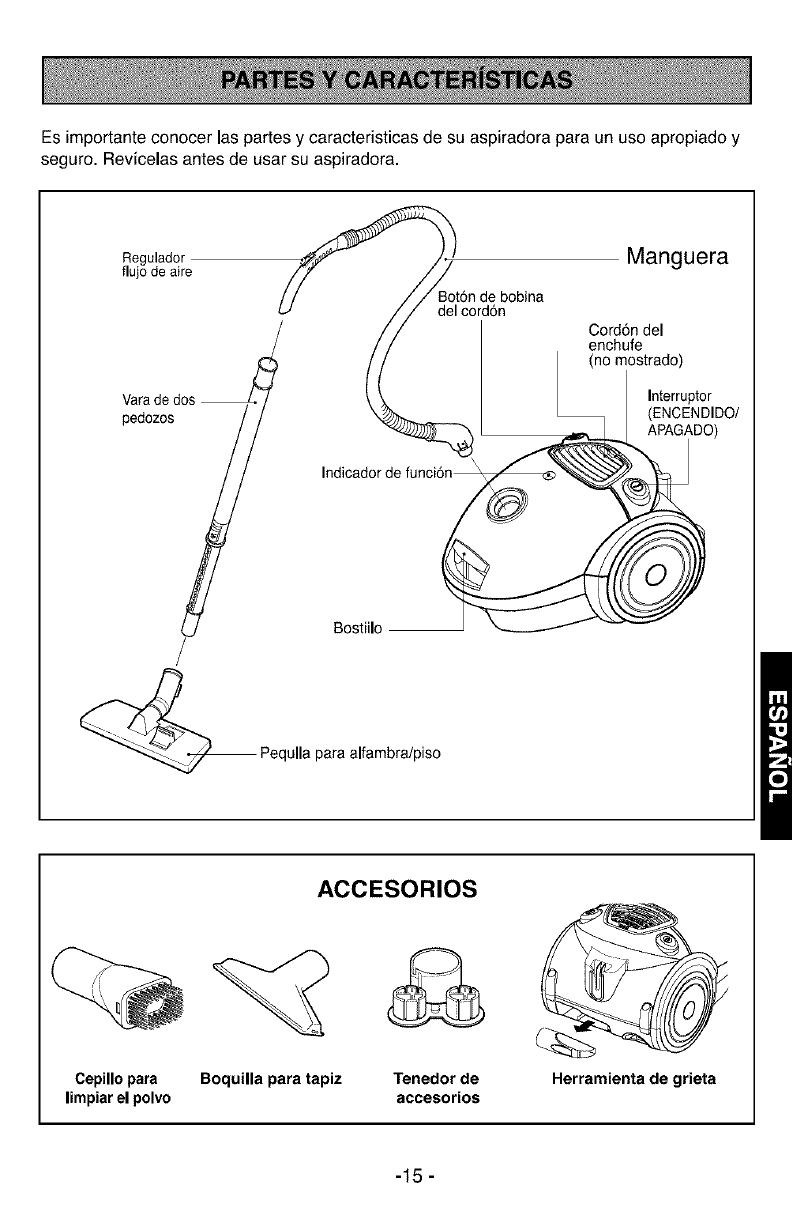
Es importante conocer las partes y caracteristicas de su aspiradora para un uso apropiado y
seguro. Revicelas antes de usar su aspiradora.
Regulador Manguera
flujo de aire
de bobina
del cord6n
Vada Bostiilo
_ Pequlla para alfambra/piso
Cord6n del
enchufe
(no mostrado)
Interruptor
(ENCENDIDO/
APAGADO)
ACCESORIOS
Cepillo para Boquilla para tapiz Tenedor de
limpiar el polvo accesorios Herramienta de grieta
-15 -
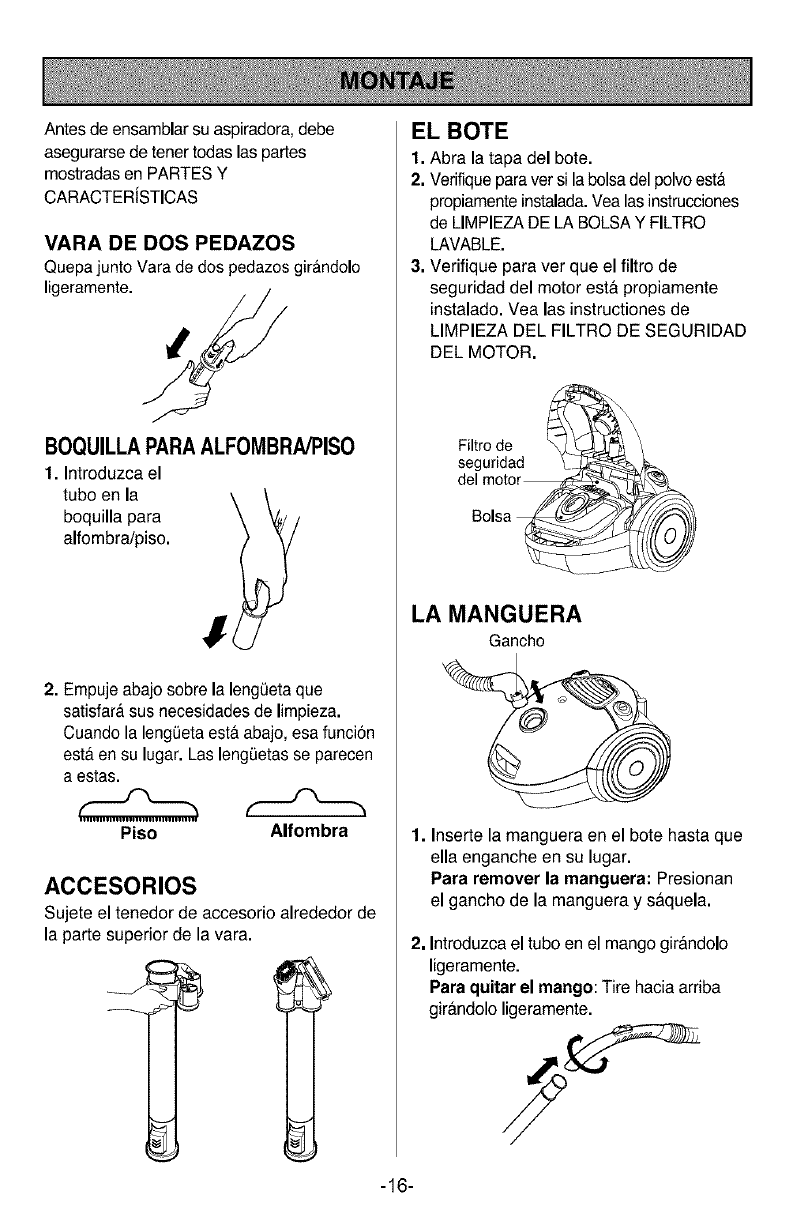
Antes de ensamblar su aspiradora, debe
asegurarse de tener todas las partes
mostradas en PARTES Y
CARACTERiSTICAS
VARA DE DOS PEDAZOS
Quepa junto Vara de dos pedazos girandolo
ligeramente.
BOQUILLAPARAALFOMBRA/PISO
1. Introduzca el
tubo en la !\ \
boquilla para
alfombra/piso.
2. Empuje abajo sobre la lengQetaque
satisfar_tsus necesidades de limpieza.
Cuando la lengQetaest&abajo, esa funciSn
esteren su lugar. Las leng_etas se parecen
a estas.
Piso Alfombra
ACCESORIOS
Sujete el tenedor de accesorio alrededor de
la parte superior de la vara.
EL BOTE
1. Abra la tapa del bote.
2. Verifique paraver si la bolsa del polvo esta
propiamente instalada.Vea las instrucciones
de LIMPIEZADE LA BOLSA Y FILTRO
LAVABLE.
3. Verifique para ver que el filtro de
seguridad del motor est& propiamente
instalado. Vea las instructiones de
LIMPIEZA DEL FILTRO DE SEGURIDAD
DEL MOTOR.
s Q\
del motor_
Bolsa __
LA MANGUERA
Gancho
Inserte la manguera en el bote hasta que
ella enganche en su lugar.
Para remover la manguera: Presionan
el gancho de la manguera y s&quela.
Introduzcael tubo en el mango gir&ndolo
ligeramente.
Para quitar el mango: Tire hacia arriba
gir&ndolo ligeramente.
-16-

USO Y MANTENIMIENTO
La aspiradora genera una succi6n que
recoge la suciedad. R&pidamente el aire en
movimiento se Ileva la suciedad a la bolsa
del polvo a trav_s de los pasajes a_reos,
mientras atrapa la suciedad. Para un meier
resultado de limpieza, mantenga el flujo de
la corriente de aire abierto.
Verifique las a.reas de barras de vez en
cuando per causa de la suciedad.
DesenchOfela antes de verificar.
%
_I_ ADVERTENCIA
Lesionpersonaly riezgodedafiodelProducto
•Noenchufesi elinterruptorest_enla posicion
ON.Podrianocurrirlesionespersonaleso
dafios.
. Elcordbnsemuever_pidamentealenrrollar.
Mantengaa losnioslejosy proporcioneun
caminolibreal enrollarel cord6nparaprevenirla
lesionespersonales.
•Nousetoma-corrientessobrecontadores.
Podrfanocurrirdaiosa losartculosenel _rea
circundante.
1. Saque el cord6n del enchufe a la Iongitud
deseada. AI sacar el cable, ver& una
marca amarilla y una roja. La marca roja
esta en puro extreme del cable, la marca
amarilla esta a 28 pulgadas del extreme
del cable.
NOTA: Parareducirel riesgode descargas
el6ctricas,esta aspiradoratiene un enchufe
polarizado;una hojaes masancha que la otra.
EsteenchufeencajarAen una toma-corriente
polarizada de unasola forma. Siel enchufe no
encaja totalmenteen latoma-corriente,inviertael
enchufe. Si todavia no encaja, avisea un
electricistacalificadoparainstalarel toma-
corrienteapropiado.No cambieel enchufede
maneraalguna.
2. Enchufar el cordon de poder polarizado en
una toma-corriente de 120 Voltios
Iocalizada cerca al suelo.
Para rebobinar: Desenchufelaaspiradora.
Sostengael enchufe mientrasest&
rebobinandoparaprevenirel dafio o lesi6ndel
cord6nen moviento.Presioneel botonde
bobinadel cord6n para enrollarel mismo.
3. Para la puesta en marcha, pulse el
interruptor de encendido. Paradetener el
funcionamiento, pulse de nuevo el bot6n.
Bot6n de bobina
del cordon
Interruptor
(ENCENDIDO/APAGADO)
-17-
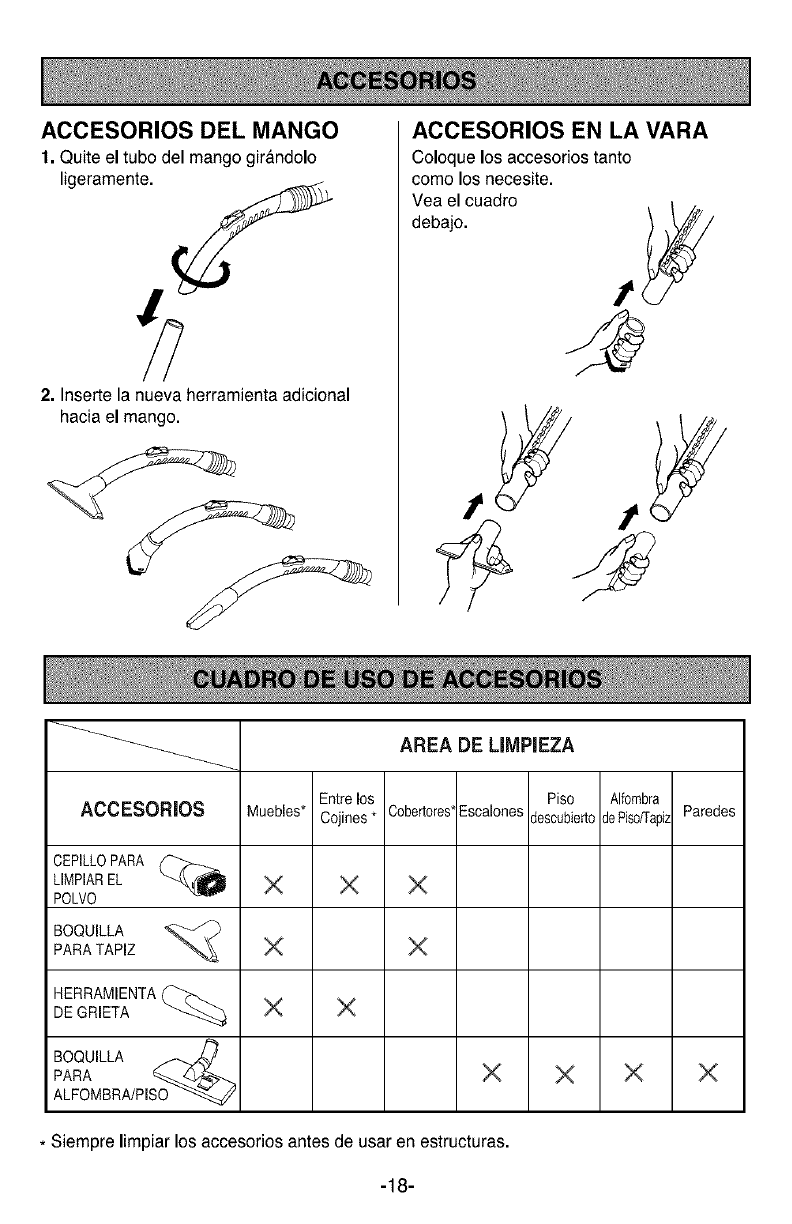
ACCESORIOS DEL MANGO
1. Quite el tubo del mango gir_ndolo
ligeramente.
2. Inserte la nueva herramienta adicional
hacia el mango.
ACCESORIOS EN LA VARA
Coloque los accesorios tanto
como los necesite.
Vea el cuadro
debajo. t
AREA DE UMPIEZA
Entrelos Piso Alfombra
ACCESORIOS Muebles* Cojines* Cobertores'EscalonesdescubiertoJePiso_apizParedes
CEPILLOPARA (_
LIMPIAREL
POLVO
BOQUILLA _PARATAPIZ
HERRAMIENTA(_DEGRETA
BOQUILLA _
PARA ___...Z.._'---._
ALFOMBRA/PISO
. Siempre limpiar los accesorios antes de usar en estructuras.
-18-
Modo de barrer sugerido
Para una mejor acci6n de limpieza, la
Boquilla para alfombra/piso empujar
rectamente fuera de usted y jalar rectamente
atr&s Este modo debe continuarse sobre la
alfombra con movimientos lentos,
deslizandose.
NOTA: Rapidez, golpes rigidos no
proporcionan una limpieza completa.
Escaleras alfombradas necesitan ser
aspiradas regularmente. Para mejores
resultados de limpieza, ponga el interruptoren
MAX.
Para mejores resultados de limpieza,
mantenga el pasaje del flujo de aire abierto.
Controle le vez en cuando si hay estorbos.
Vea la seccion de COMO TRABAJA SU
ASPIRADORA. Desench_fela antes de
verificar.
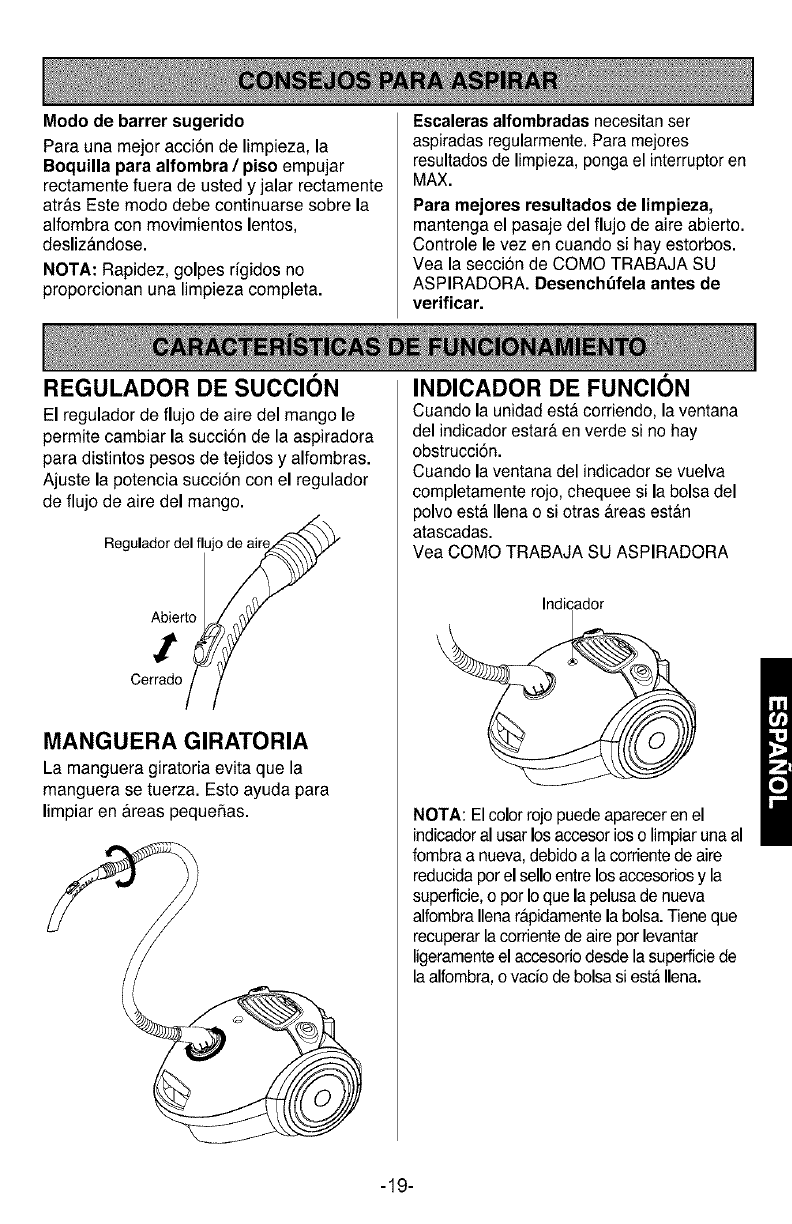
REGULADOR DE SUCClON
El regulador de flujo de aire del mango le
permite cambiar la succi6n de la aspiradora
para distintos pesos de tejidos y alfombras.
Ajuste la potencia succi6n con el regulador
de flujo de aire del mango.
Regulador del flujo de air
Abierto
I
Cerrado
MANGUERA GIRATORIA
La manguera giratoria evita que la
manguera se tuerza. Esto ayuda para
limpiar en a_reaspequeSas.
INDICADOR DE FUNCION
Cuando la unidad esta corriendo, la ventana
del indicador estar_,en verde si no hay
obstrucciSn.
Cuando la ventana del indicador se vuelva
completamente rojo, chequee si la bolsa del
polvo est& Ilena o si otras _treasest&n
atascadas.
Vea COMO TRABAJA SU ASPIRADORA
Indicador
NOTA: Elcolor rojo puedeaparecer en el
indicadoral usar los accesorios o limpiaruna al
fombra a nueva,debido a la corrientede aire
reducida por el sello entre los accesoriosy la
superficie,o por Io que la pelusa de nueva
alfombraIlena r_.pidamentela bolsa. Tiene que
recuperarla corrientede aire por levantar
ligeramenteel accesoriodesde la superficiede
la alfombra,o vacfo de bolsa si est&Ilena.
-19-
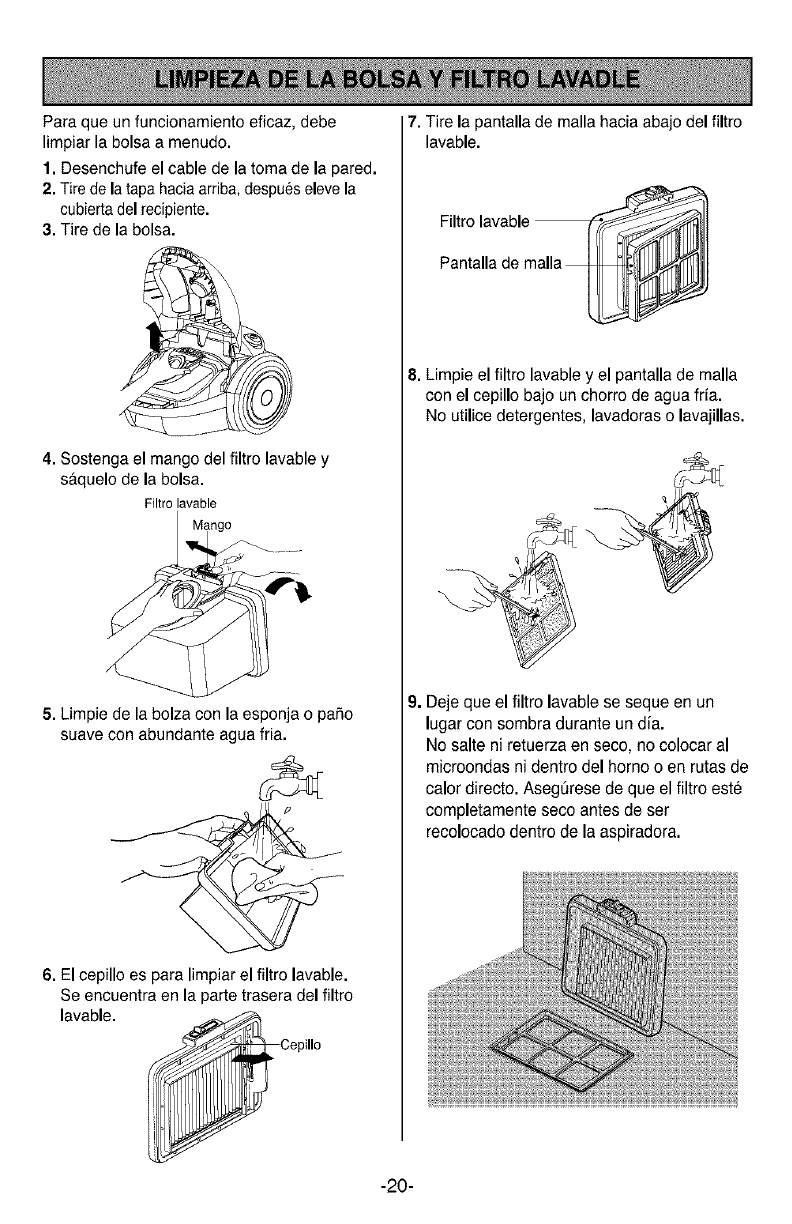
Para que un funcionamiento eficaz, debe
limpiar la bolsa a menudo.
1. Desenchufe el cable de la toma de la pared.
2. Tire de la tapa hacia arriba, despues eleve la
cubierta del recipiente.
3. Tire de la bolsa.
4. Sostenga el mango del filtro lavable y
saquelo de la bolsa.
Filtrolavable
5. Limpie de la bolza con la esponja o pai_o
suave con abundante agua fria.
6. El cepillo es para limpiar el filtro lavable.
Se eneuentra en la parte trasera del filtro
lavable.
Cepillo
7. Tire la pantalla de malla hacia abajo del filtro
lavable.
Filtre
8. Limpie el filtro lavable y el pantalla de malla
con el cepillo bajo un chorro de agua fria.
No utilice detergentes, lavadoras o lavajillas.
9. Deje que el filtro lavable se seque en un
lugar con sombra durante un dia.
No salte ni retuerza en seco, no colocar al
microondas ni dentro del homo o en rutas de
calor directo. Asegt_resede que el filtro est6
completamente seco antes de ser
recolocado dentro de la aspiradora.
-20-
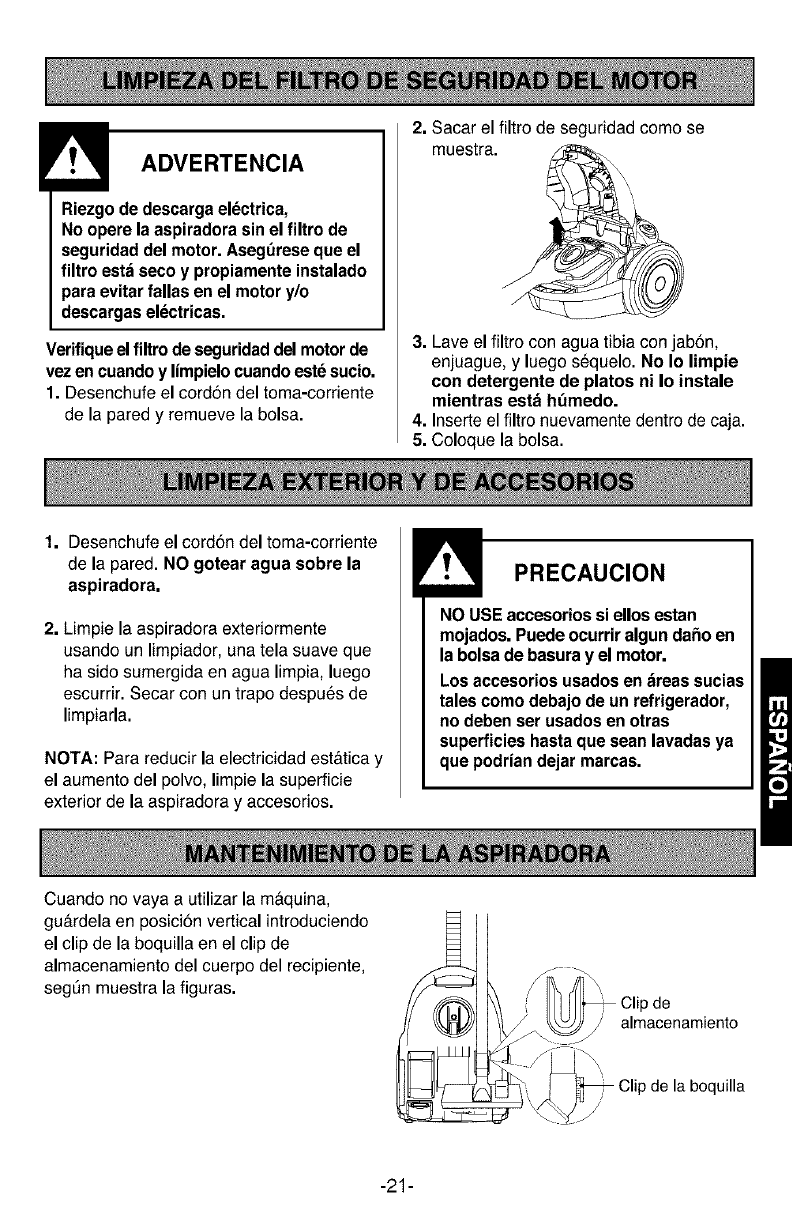
ADVERTENCIA
Riezgo de descarga eldctrica,
No opere la aspiradora sin el filtro de
seguridad del motor. Asegt_reseque el
filtro esta seco y propiamente instalado
para evitar fallas en el motor y/o
descargas electricas.
Verifiqueel flltro de seguridaddel motor de
vez en cuando y limpielocuando este sucio.
1. Desenchufe el cord6n del toma-corriente
de la pared y remueve la bolsa.
2. Sacar el filtro de seguridad como se
muestra.
3. Lave el filtro con agua tibia con jab6n,
enjuague, y luego sequelo. No Io limpie
con detergente de platos ni Io instale
mientras est_ ht_medo.
4. Inserte el filtro nuevamente dentro de caja.
5. Coloque la bolsa.
1. Desenchufe el cord6n del toma-corriente
de la pared. NO gotear agua sobre la
aspiradora.
2. Limpie la aspiradora exteriormente
usando un limpiador, una tela suave que
ha side sumergida en agua limpia, luego
escurrir. Secar con un trapo despues de
limpiarla.
NOTA: Para reducir la electricidad est&tica y
el aumento del polvo, limpie la superficie
exterior de la aspiradora y accesorios.
_I_ PRECAUCION
NO USE accesorios si ellos estan
mojados. Puede ocurrir algun da5o en
la bolsa de basura y el motor.
Los accesorios usados en _reas sucias
tales como debajo de un refrigerador,
no deben ser usados en otras
superficies hasta que sean lavadas ya
que podrian dejar marcas.
Cuando no vaya a utilizar la m&quina,
gu&rdela en posici6n vertical introduciendo
el clip de la boquilla en el clip de
almacenamiento del cuerpo del recipiente,
seglSn muestra la figuras. :)de
J almacenamiento
Clip de la boquilla
-21-
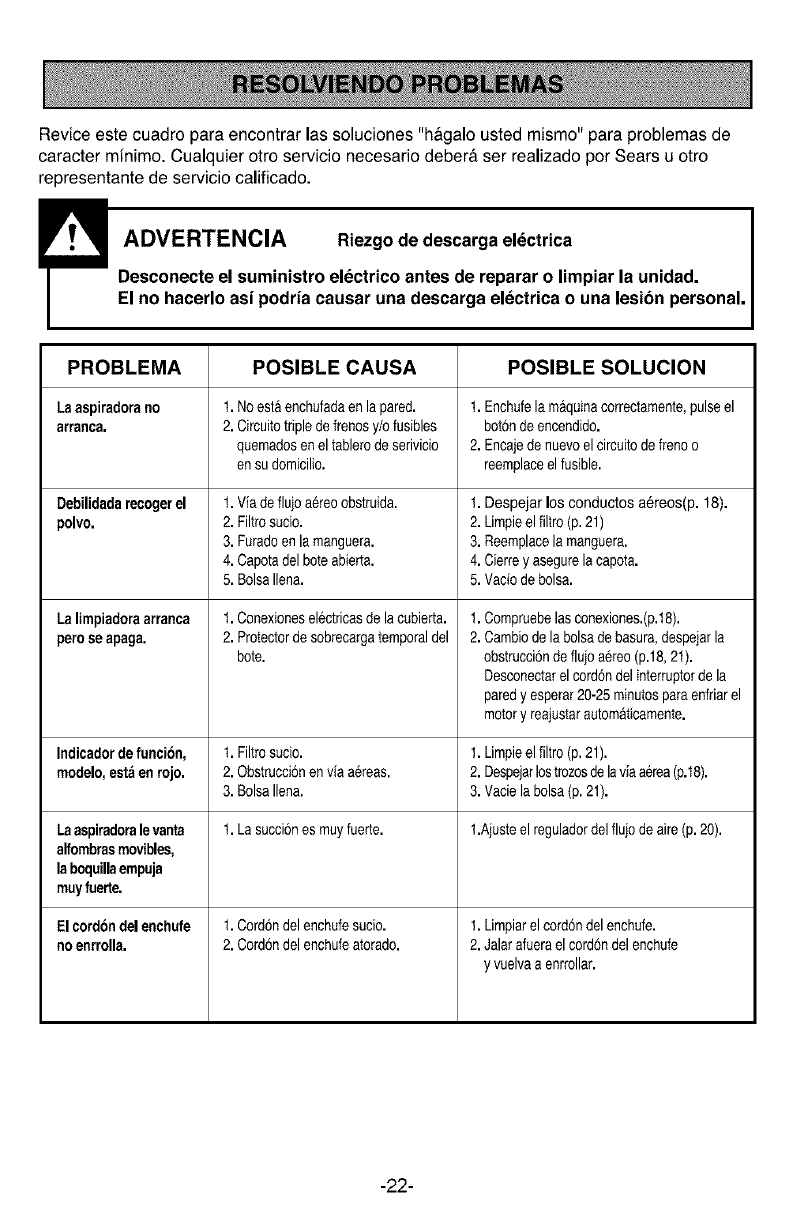
Revice este cuadro para encontrar las soluciones "h&galo usted mismo" para problemas de
caracter minimo. Cualquier otro servicio necesario deber& ser realizado por Sears u otro
representante de servicio calificado.
_ADVERTENCIA Riezgo de descarga el_ctrica
Desconecte el suministro electrico antes de reparar o limpiar la unidad.
El no hacerlo asi podria causar una descarga electrica o una lesibn personal.
PROBLEMA POSIBLE CAUSA POSIBLE SOLUCION
Laaspiradorano t. No estaenchufadaen lapared. 1. Enchufela m&quinacorrectamente,pulseel
arranca. 2. Circuitotriplede frenosy/ofusibles botonde encendido.
quemadosenel tablerode serivicio 2. Encajede nuevoel circuitode freno o
en sudomicilio, reemplaceelfusible.
Debilidadarecoger el t. Viade flujo a6reoobstruida. 1. Despejar los conductos a6reos(p. 18).
polvo. 2. Filtrosucio. 2. Limpieel filtro(p.21)
3. Furadoenla manguera. 3. Reemplacela manguera.
4. Capotadel boteabierta. 4. Cierrey asegurelacapota.
5. BolsaIlena. 5. Vacio debelsa.
La limpiadora arranca
perosoapaga.
Indicadordefuncion,
modelo,est_enrojo.
Laaspiradorale vanta
alfombrasmovibles,
la boquillaempuja
muyluerte.
El cordondelenchufe
no enrrolla.
t. Conexionesel6ctricasde lacubierta.
2. Protectorde sobrecargatemporaldel
bote.
1.Compruebelasconexiones.(p.t8).
2. Cambiode la bolsade basura,despejarla
ebstrucci6nde flujoaereo (p.18,21).
Desconectarel cord6ndelinterruptorde la
paredy esperar20-25minutospara enfriarel
motory reajustarautomaticamente.
t. Filtrosucio. 1.
2. Obstruccbnen via a6reas. 2.
3. BolsaIlena. 3.
1.La succi6nes muyfuerte.
t. Cordondelenchufesucio.
2. Cord6ndelenchufeatorado.
Limpieel filtro(p.21).
Despejarlostrozosde lavia aerea(p.18).
Vacie labolsa(p.21).
1.Aiusteel reguladordelflujo de aire(p.20).
1. Limpiarel cord6ndelenchufe.
2. Jalarafuerael cordondelenchufe
y vuelvaa enrrollar.
-22-
Acuerdos acerca de la proteccion
Le felicitamos por su sabia eleccidn al haber
adquirido este producto.
Este nuevo producto Kenmore¢ ha sido diseflado y
fabricado durante aflos de funcionamiento serio y
form& Pero, al igual que el resto de productos,
necesita un mantenimiento preventivo o realizar
ciertas reparaciones de vez en cuando.
Por eso, con estos Acuerdos acerca de la protecci6n
ahorrara,tiempo y dinero y evitara dafios mayores.
Adquiera estos Acuerdos acerca de la proteccidn y
protejase contra gastos y problemas inesperados.
Los Acuerdos acerca de la proteccidn tambien le
ayudara.na ampliar la duraci6n de este nuevo
producto. En los Acuerdos se incluyen:
[] Servicio experto por ma.sde 12.000 tecnicos de
reparacion profesionales
[] Servicio ilimitado sin costes para las piezas y el
trabajo realizado en todas las reparaciones
cubiertas
[] Garantia anual: sustitucidn del producto cubierto
si se producen cuatro o ma.sfallos en doce meses
[] Sustituci6n del producto si el producto cubierto
no se puede arreglar
[] Mantenimiento preventivo anual siempre que Io
solicite sin costes extra
[] Atenci6n de ayuda al cliente: ayuda telef6nica
por parte de un tecnico de Sears acerca de los
productos que precisen reparaciones caseras,
ademas de una programaci6n sobre reparaciones
[] Protecci6n contra cortes el_ctricos que pueden
provocar daflos electricos debido alas
fluctuaciones de energfa
[] Reembolso si la reparacbn del producto cubierto
tarda mas de Io que se estableci6
Si adquiere estos Acuerdos, solo tendra que hacer
una Ilamada telef6nica para activar este servicio.
Podra Ilamar a cualquier hora del dfa o conseguir una
cita online para el servicio.
En Sears hay mas de 12.000 tecnicos de reparaci6n
profesionales que tienen acceso a unos 4,5 rnillones
de piezas y accesorios de calidad. Este es el tipo de
profesionalidad con la que puede contar para
prolongar la duraci6n de este producto durante aflos.
Adquiera ya su Acuerdo acerca de la protecci6n.
Se aplican algunas limitaciones yexcepciones.
Llame al 1-800-827-6655 si desea obtener mas
informacibn acerca de los precios.
Servicios de Instalacibn Sears
Para solicitar servicios de instalaci6n
profesionales de Sears de electrodomesticos,
mandos de apertura de puertas de garajes,
calentadores de agua y otros aparatos en los
Estados Unidos, puede Ilamar a
1-800-4-MY-HOME ®
-23-
iiiiiii_iiiii_iiiii@iiii_iiiii_iiiii_iii!iiiiiii!ii!_J_...... q!!iii_ii_!_iiiisiiiiiiiii_iiiiiii!!_i
Forrepair- in yourhome- of aHmajorbrandappliances,
lawnandgardenequipment,orheatingandcoolingsystems,
nomatterwho madeit, nomatterwho soldit!
Forthereplacementparts,accessoriesand
owner'smanualsthatyouneedtodo-it-yourself.
ForSearsprofessionalinstallationof homeappliances
anditemslikegaragedooropenersandwaterheaters.
1-800-4-MY-HOME® Anytime, day or night
(1-800-469-4663) (U.S.A. and Canada)
www.sears.com www.aears.ca
Our Home
For repair of carry-in products like vacuums, lawn equipment,
and electronics, call or go on-line for the nearest
Sears Parts and Repair Center.
1-800-488-1222 Anytime, day or night (U.S.A. only)
www.aears.com
iiiiiiiiiiiiiiiiiiiiiiiiiiii_¸¸
!iiiiii_iiiiiiiii,iiiii'i__'
iiiiiiiiiiiiiiiiiiiiiii
iiiiiiiiiiiiiiiiiiiiiii
iiiiiiiiiiiiiiiiiiiiiii
iiiiiiiiiiiiiiiiiiiiiii
iiiiiiiiiiiiiiiiiiiiiii
iiiiiiiiiiiiiiiiiiiiiii
iiiiiiiiiiiiiiiiiiiiiii
iiiiiiiiiiiiiiiiiiiiiii
iiiiiiiiiiiiiiiiiiiiiii
iiiiiiiiiiiiiiiiiiiiiii
iiiiiiiiiiiiiiiiiiiiiii
iiiiiiiiiiiiiiiiiiiiiii
iiiiiiiiiiiiiiiiiiiiiii
i:iBiiiiiiiiii
@B
_ii#iii!!iiiiii!iiii
i@!iiiiiii,
_i@iiiii@iiiii_
i!!iiiiiiiiiiiiii%_
'_i_!iiiiii_!!iiiiiiiiiiiiL
_iiiiiiiiiiiiiiii!!iiiiiB_
Sill!@
!ii
i;!iiiiiiSiiii'
!i@
Top°roh=se=proteotJon°0reement<USA_.......................iiiiiiiiiiiiiiiiiiiii!ii
ormaintenanceagreement(Canada) onaproductservicedbySears: iiiii!!iiiilIBiii
1-800-827-6655 (U.S.A.) 1-800-361 =6665 (Canada) .....
Para pedirservicio de reparacidn Au Canada pour service en francis:
a domicilio, y para ordenar piezas: 1-800-LE-FOYER MC
1-888-SU-HOGAR® (1-800-533-6937)
(1-888-784_427) www.sears.ca
© Sears Brands, LLC
@ Registered Trademark /T_,,_Trademark /sN Service Mark of Sears Brands, LLC
@ Marea Registrada /TM Marca de Fabriea/SM Marca de Servicio de Sears Brands, LLC
_,_cMarque de commerce /MD Marque deposee de Sears Brands, LLC
