Kenwood USA 31241110 Communications Receiver User Manual TH F6A
Kenwood USA Corporation Communications Receiver TH F6A
UserManual.wiki
>
Kenwood USA
>
31241110 User Manual
Instruction Manual
Navigation menu
Upload a User Manual
Namespaces
Wiki Guide
HTML
PDF
Info
Views
User Manual
Discussion / Help
Navigation
![iTHANK YOUTHANK YOUThank you for choosing this KENWOOD TH-F6A/ TH-F7E transceiver. It has been developed by a team ofengineers determined to continue the tradition ofexcellence and innovation in KENWOODtransceivers.First, don’t let the size fool you. This small FMportable transceiver features 144 MHz, 220 MHz(TH-F6A only), and 430/ 440 MHz amateur bandoperation plus another all-mode 100 kHz to 1.2 GHzreceiver (SSB and CW are up to less than 600 MHz).In the meantime, as you learn how to use thistransceiver, you will also find that KENWOOD ispursuing “user friendliness”. For example, each timeyou change the Menu No. in Menu mode, you will seea text message on the display that lets you knowwhat you are configuring.Though user friendly, this transceiver is technicallysophisticated and some features may be new to you.Consider this manual to be a personal tutorial fromthe designers. Allow the manual to guide you throughthe learning process now, then act as a reference inthe coming years.FEATURES• Ultra compact design• 144 MHz, 220 MHz (TH-F6A only), and430/ 440 MHz amateur band FM transceiveroperation• A separate wide band, all-mode receiver, built-in• 400 memory channels plus 23 special functionmemory channels (24 channels for TH-F6A)• Long operation period with a Li-ion battery pack• High output power (up to 5 W operation)• 9600 bps Packet-ready data (Speaker/ Mic.) jack• Built-in VOX functionSUPPLIED ACCESSORIESAfter carefully unpacking the transceiver, identify theitems listed in the table below. We recommend youkeep the box and packing material in case you needto repack the transceiver in the future.yrosseccA rebmuNtraPytitnauQA6F-HT E7F-HT)K( )E( )T(koohtleBXX-3260-92J111annetnAXX-1870-09T )dnab-4( 1––XX-9870-09T )dnab-3( –11partSXX-9330-96J111yrettabnoi-iLXX-9790-90W111regrahCXX-7290-80W1––XX-8290-80W–1–XX-9290-80W––1noitcurtsnI launaMXX-1441-26B )S/E( 111XX-2441-26B )I/F( –1–XX-3441-26B )G/D( –1–ecitoNETT&RXX-7622-95B–11dracytnarraW XX-9640-64B1––XX-0130-64B–11WRITING CONVENTIONS FOLLOWEDThe writing conventions described below havebeen followed to simplify instructions and avoidunnecessary repetition.noitcurtsnI oDottahWsserP ]YEK[]YEK[ ]YEK[ ]YEK[]YEK[ .esaelerdnasserP YEKYEK YEK YEKYEK .sserP ]2YEK[+]1YEK[]2YEK[+]1YEK[ ]2YEK[+]1YEK[ ]2YEK[+]1YEK[]2YEK[+]1YEK[ .dlohdnasserP 1YEK1YEK 1YEK 1YEK1YEK ,nwodsserpneht 2YEK2YEK 2YEK 2YEK2YEK eraerehtfI. dnasserp,syekowtnahterom litnunrutniyekhcaenwoddloh .desserpneebsahyeklanifehtsserP ]1YEK[]1YEK[ ]1YEK[ ]1YEK[]1YEK[ ,]2YEK[]2YEK[ ]2YEK[ ]2YEK[]2YEK[ .sserP 1YEK1YEK 1YEK 1YEK1YEK ,yliratnemomesaeler 1YEK1YEK 1YEK 1YEK1YEK sserpneht, 2YEK2YEK 2YEK 2YEK2YEK .sserP ][+]YEK[][+]YEK[ ][+]YEK[ ][+]YEK[][+]YEK[ .,FFOrewopreviecsnartehthtiW dlohdnasserp YEKYEK YEK YEKYEK hctiwsneht, ybrewopreviecsnartehtNO gnisserp ][][][ ][][.)REWOP(](https://usermanual.wiki/Kenwood-USA/31241110/User-Guide-153116-Page-2.png)

![3YOUR FIRST QSOFIRST QSOAre you ready to give your TH-F6A/ TH-F7E a quicktry? Reading this page should get your voice on theair right away. The instructions below are intendedonly for a quick guide. If you encounter problems orthere is something you would like to know more, readthe detailed explanations given later in this manual.43521678qPresss and hold [ ] (POWER) briefly to switchthe transceiver power ON.• Do not press the switch for more thanapproximately 2 seconds; the transceiver willbe switched OFF.• A high pitched double beep sounds and then“KENWOOD” and “HELLO!!” appearsmomentarily. The various indicators and 2frequencies appear on the LCD.wPress [A/B] to select the frequency band on top.• Each time you press [A/B], the “s” iconmoves, indicating which frequency band iscurrently selected for operation.eTurn the VOL control clockwise to the 11 o’clockposition.rPress [BAND] until you select the amateur radioband you wish to operate.tTurn the Tuning control to select the receivefrequency.• You may further turn the VOL control to adjustthe volume level of the signal.yTo transmit, hold the transceiver approximately5 cm (2 inches) from your mouth.uPress and hold the PTT switch, then speak in yournormal tone of voice.iRelease the PTT switch to receive.oRepeat steps y, u and i to continuecommunication.](https://usermanual.wiki/Kenwood-USA/31241110/User-Guide-153116-Page-6.png)
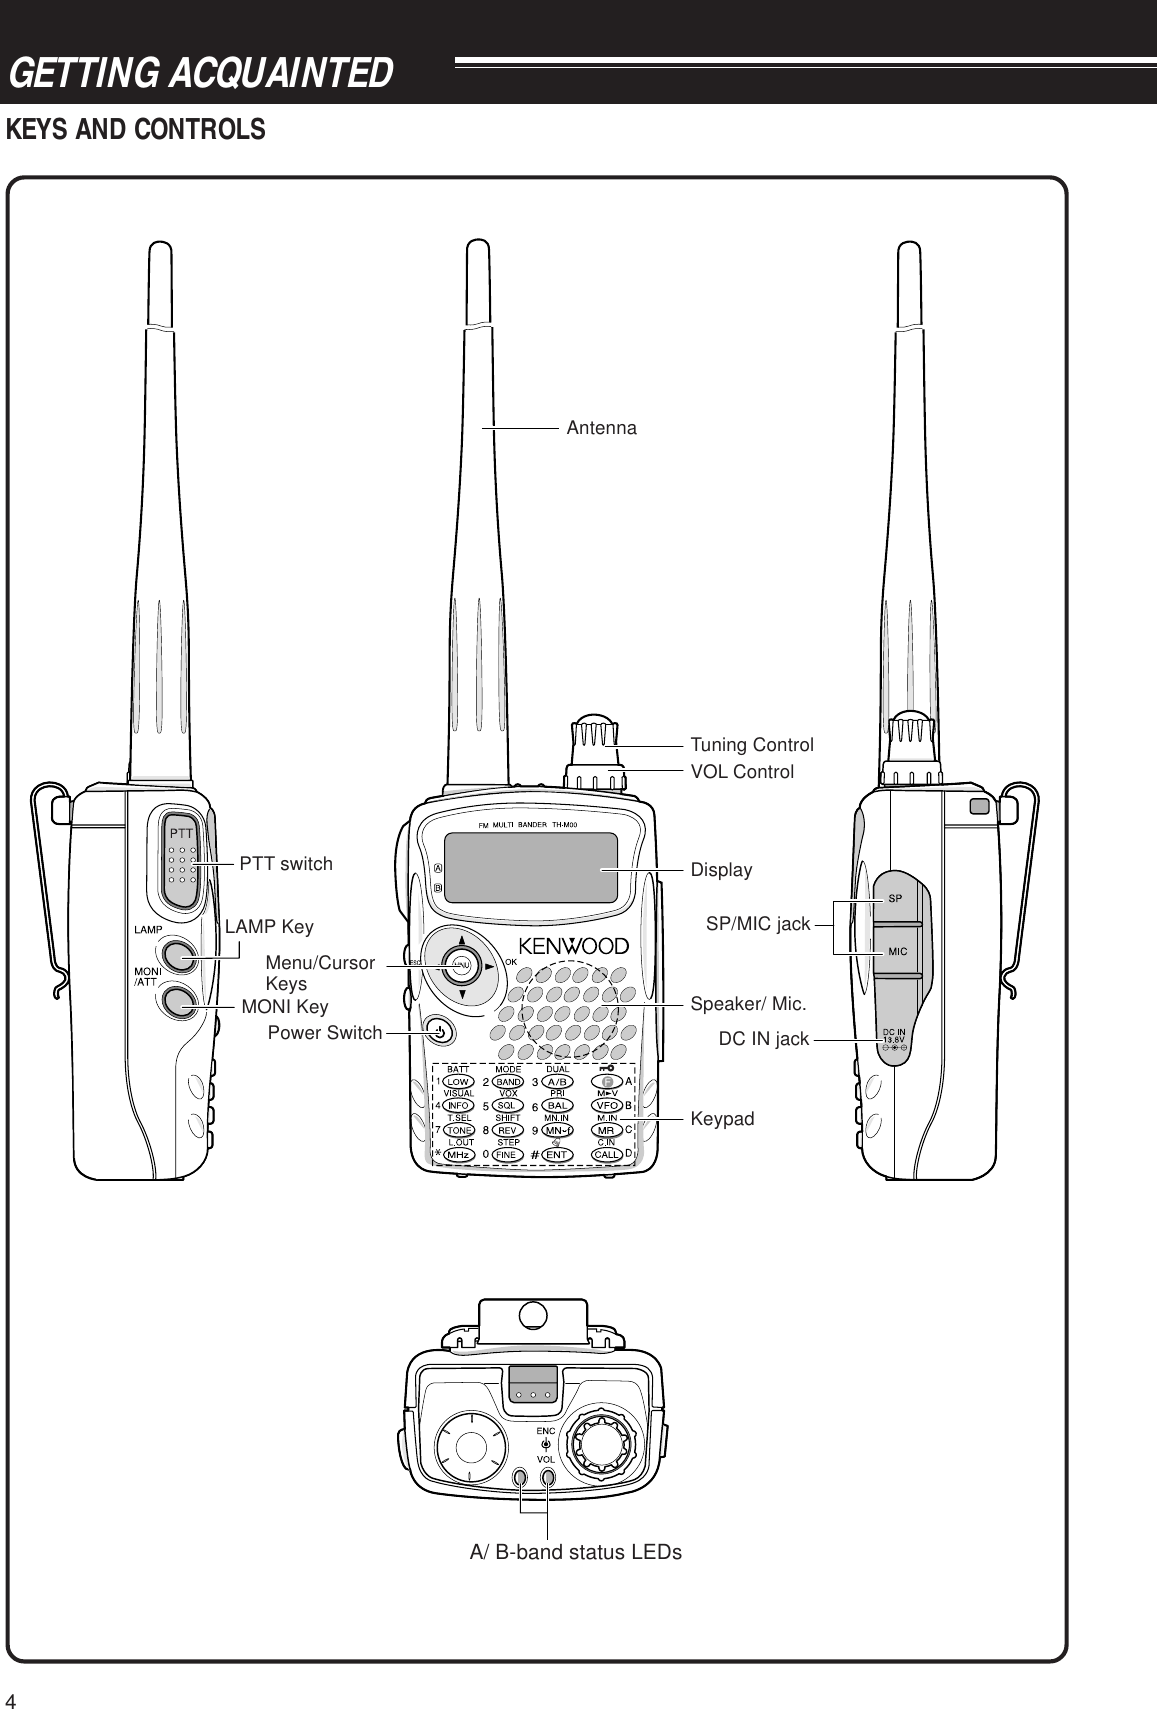
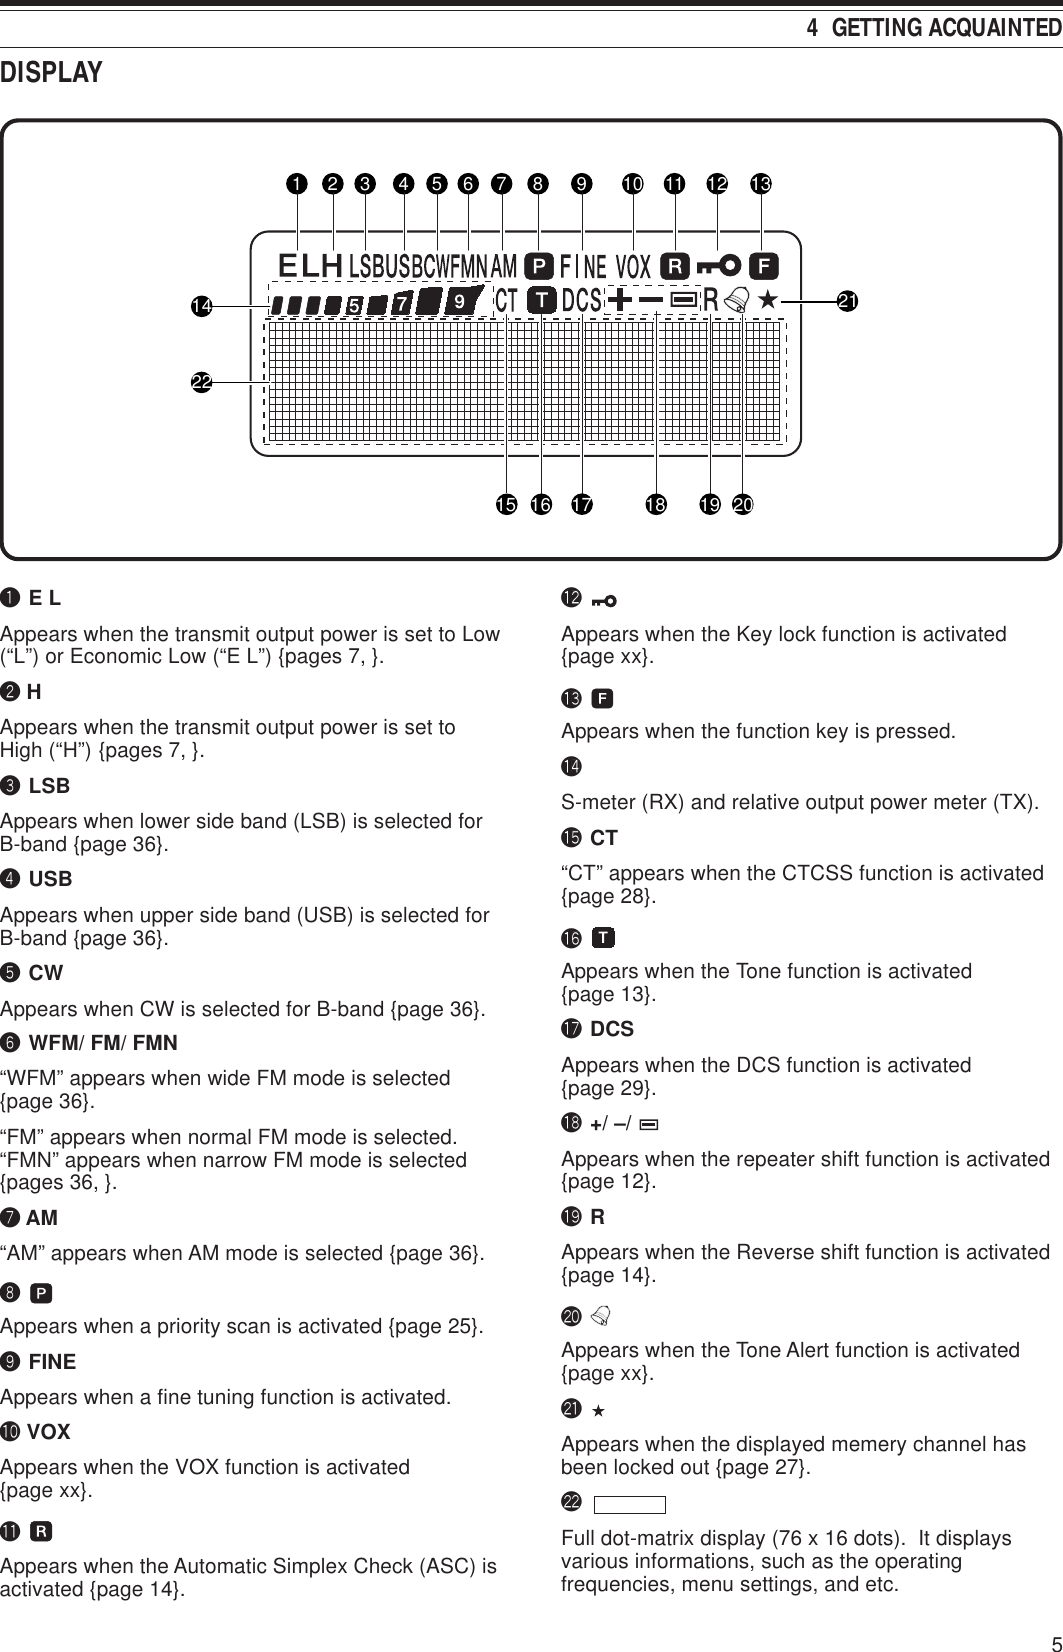
![64 GETTING ACQUAINTEDBASIC OPERATIONSWITCHING POWER ON/ OFF1Press [ ] (POWER) briefly to switch thetransceiver power ON.• Do not press the key for more thanapproximately 2 seconds; the transceiver willbe switched OFF.• Upon power up, a high pitched double beepsounds, followed by the frequencies and otherindicators.2To switch the transceiver OFF, press [ ](POWER) again.• When you turn the transceiver OFF, a lowpitched double beep sounds.ADJUSTING VOLUMETurn the VOL control clockwise to increase the audiooutput level and counterclockwise to decrease theoutput level.• If you are not receiving a signal, press and hold[MONI] to unmute the speaker, then adjust theVOL control to a comfortable audio output level.ADJUSTING SQUELCHThe purpose of the Squelch is to mute the speakerwhen no signals are present. With the squelch levelcorrectly set, you will hear sound only while actuallyreceiving signals. The higher the selected squelchlevel, the stronger the signals must be, to receive.The appropriate squelch level depends on theambient RF noise conditions. You can configureindependent threshold squelch levels for the A-bandand B-band.1Press [SQL].• The current SQL level appears.2Turn the Tuning control or press [ ]/ [ ] to adjustthe level.• Select the level at which the background noiseis just eliminated when no signal is present.• The higher the level, the stronger the signalsmust be, to receive.• 6 different levels can be set (OPEN: unmuted ~|| || || || || || : maximum).3Press [sssss] or [MNU] to store the new settings orpress [ttttt] to cancel without changing the currentsetting.SELECTING A BANDBy default, two frequencies are displayed on theLCD. The frequency on top is called the A-band. Thebottom frequency is called the B-band.Press [A/B] to select the A-band or B-band foroperation. Each time you press [A/B], the “s” iconmoves, indicating which band is currently selected foroperation. Usually, select the A-band to operate theamateur band and select the B-band to receive thevarious broadcasting stations, such as AM, FM, TV(audio only) or another amateur band {page 35}.CURSOR KEYSThis transceiver has a 4-way cursor key with a MENU(“MNU”) key in the center./ keysThe / keys function in the same way as theTuning control. These keys change the frequencies,memory channels, and other selections.Note: You can use the Tuning control in place of the / keys formost of the controls.s/ OK keyPress to move to the next step or complete thesetting in various modes, such as Menu mode,CTCSS frequency selection, and DCS code selection.t/ ESC keyPress to move back or cancel the entry in variousmodes, such as Menu mode, CTCSS frequencyselection, and direct frequency entry.MNU keyPress to enter the Menu mode.In Menu mode, you can select the desired menunumber by turning the Tuning control or pressing[]/ [ ].A-bandB-band](https://usermanual.wiki/Kenwood-USA/31241110/User-Guide-153116-Page-9.png)
![74 GETTING ACQUAINTEDTRANSMITTING1To transmit, hold the transceiver approximately5 cm (2 inches) from your mouth, then press andhold the PTT switch and speak into themicrophone in your normal tone of voice.• The status LED on the top panel lights red andbar-graph meter appears.• If you press [PTT] while you are outside of thetransmission coverage, a high pitched errorbeep sounds.2When you finish speaking, release the PTT switch.Note: If you transmit countinuously for more than 10 mintues, theinternal time-out timer generates a warning beep and the transceiverstops transmitting. In this case, release the PTT switch and let thetransceiver cool down for a while, then press the PTT switch again toresume transmitting {page xx}.■Selecting Output PowerSelecting lower transmission power is the best way toreduce the battery consumption, if communication isstill reliable. You can configure different power levelsfor transmission {page xx}.Press [LOW].• Each time you press [LOW], the indicator cyclesbetween “H” (high), “L” (low), and “EL” (economiclow).Note:◆You can store different output power setting for the A and B-band.When you change the output power, it is reflected to all availableamateur bands for A or B-band.SELECTING A FREQUENCY■VFO modeThis is the basic mode for changing the operatingfrequency. Turn the Tuning control clockwise toincrease the frequency. Turn the Tuning controlcounterclockwise to decrease the frequency. Or,press [ ]/ [ ] to change the frequency.If the desired operating frequency is far away fromthe current frequency, it is quicker to use the MHztuning mode.1Press [MHz].• A MHz digit blinks.2Turn the Tuning control or press [ ]/[ ] to selectthe desired MHz digit.3After selecting the desired MHz digit, press [MHz]to exit the mode and return to normal tuningmode.4You may further adjust the frequency using theTuning control or [ ]/[ ].■Direct Frequency EntryIn addition to turn the Tuning control or press [ ]/[ ],there is another way of selecting the frequency.When the desired frequency is far away from thecurrent frequency, you can directly enter a frequencyfrom the numeric keypad.1Press [VFO].• You must be VFO mode to make the directfrequency entry.2Press [ENT].• “– – – – – – ” appears.3Press the numeric keys ([0] to [9]) to enter yourdesired frequency. [MHz] can be used tocomplete the MHz digits entry.• Pressing [ENT] fills the remaining digits (thedigits you did not enter) with 0 and completesthe entry.• To select 145.000 MHz for example, press [1],[4], [5] then press [ENT] to complete the entry.Example 1 (100 MHz < f < 1000 MHz)To enter 438.320 MHz:Key in Display[ENT] – –– –––[4], [3], [8] 4 3 8. – – –[3], [2], [0] 4 3 8. 3 2 0Note: You do not have to press [MHz] when you are entering 3-digit MHz number.](https://usermanual.wiki/Kenwood-USA/31241110/User-Guide-153116-Page-10.png)
![84 GETTING ACQUAINTEDExample 2To enter 439.000 MHz:Key in Display[ENT] ––– –––[4], [3], [9] 4 3 9. – – –[ENT] 4 3 9. 0 0 0Example 3 ( f > 1000 MHz)To enter 1250.500 MHz (B-band only):Key in Display[ENT] ––– –––[1], [2], [5], [0] 12 5 0. – – –[5] 12 5 0. 5 – –[ENT] 12 5 0. 5 0 0Example 4 (f < 100 MHz)To enter 10.500 MHz (B-band only):Key in Display[ENT] ––– –––[1], [0] 1 0 – – – –[MHz] 1 0. – – –[5] 1 0. 5 – –[ENT] 1 0. 5 0 0 0Note: When pressing the last [ENT], the FINE tuning function isautomatically activated for 10.5000 MHz.Example 5To enter 810 kHz (B-band only):Key in Display[ENT] ––– –––[0] 0 – – – – –[MHz] 0. – – –[8], [1], [0] 0. 8 1 0Note:◆If the entered frequency does not match the current frequencystep size, the frequency is automatically rounded up or down tothe next available frequency.◆When the desired frequency cannot be entered exactly, checkwhether the FINE function is ON or not and confirm thefrequency step size {page xx}.◆Some frequency ranges are blocked, due to governmentregulations. Refer to the specifications for the TX/ RX coverage.◆If you turn the Tuning control or press [ ]/ [ ] while enteringthe frequency, the transceiver clears the entry and recovers theprevious frequency and mode.](https://usermanual.wiki/Kenwood-USA/31241110/User-Guide-153116-Page-11.png)
![9MENU SETUPWHAT IS A MENU?Many functions on this transceiver are selected orconfigured via a software-controlled Menu, ratherthan through the physical controls of the transceiver.Once familiar with the Menu system, you willappreciate the versatility it offers. You can customizethe various timings, settings, and programmingfunctions on this transceiver to meet your needswithout using many controls and switches.MENU ACCESS1Press [MNU].• The Menu No. and setting appear on thedisplay, along with a brief explanation of theMenu No.2Turn the Tuning control or press [ ]/ [ ] to selectyour desired Menu No.• As you change the Menu No., a briefexplanation of each Menu No. appears.3Press [sssss] or [MNU] to configure the parameter ofthe currently selected Menu No.4Turn the Tuning control or press [ ]/ [ ] to selectyour desired parameter.5Press [sssss] or [MNU] to store the setting.Otherwise, press [ttttt] or [PTT] to cancel.MENU FUNCTION LISTSELECTING A MENU LANGUAGEYou can select either English or Japanese (katakana)for the menu description. To switch the language:1Press [MNU].2Turn the Tuning control or press [ ]/ [ ] to selectMenu No. 27.3Turn the Tuning control or press [ ]/ [ ] to selecteither “ENGLISH” or “JAPANESE”.4Press [sssss] or [MNU] to store the setting.Otherwise, press [ttttt] or [PTT] to cancel.• When you select “JAPANESE” in step 3 andpress [sssss] or [MNU], all Menu explanations aredisplayed in Japanese (katakana). To return toEnglish mode, repeat step 1 and 2 {above} toaccess Menu No. 27, then select “EIGO”.Press [sssss] or [MNU] to display the Menu modein English.Note: The menu language selection does not affect any othermodes, such as memory name or DTMF name.yalpsiDehtnOuneM .oNnoitcnuF snoitceleS tluafeD .feR gaPeEMUSERNACS1dohtememusernacS edomdetarepO-emiT:EMIT edomdetarepO-reirraC:REIRRAC edompotsdnakeeS:KEES/REIRRAC/EMIT KEES EMIT72KNILPRG.M2 noitarugifnockniLpuorGyromeM76543210skniLoN42DOHTEMRM3 noitidnocllaceRyromeM /SDNABLLA DNABTNERRUC LLA SDNAB 61OFVGORP4 egnarycneuqerfOFVelbammargorP—eeS ecnerefeR egaPTESFFOOTUA5 noitcnuftesffOretaepeRotuAFFO/NONO31TESFFO6 ycneuqerftesfforetaepeR zHM59.95~00.0 fospetsni zHM50.0eeS ecnerefeR egaP21ELBANEENUT7 syekehtnehwlortnocgninuTehtfoesutimreP dekcolera FFO/NOFFOTIBIHNIXT8 noissimsnartehttibihnIFFO/NOFFOKCAJPS/CIM9 noitcnufkcajPS/CIMehttceleSCP/CNT/PS/CIMPS/CIM](https://usermanual.wiki/Kenwood-USA/31241110/User-Guide-153116-Page-12.png)
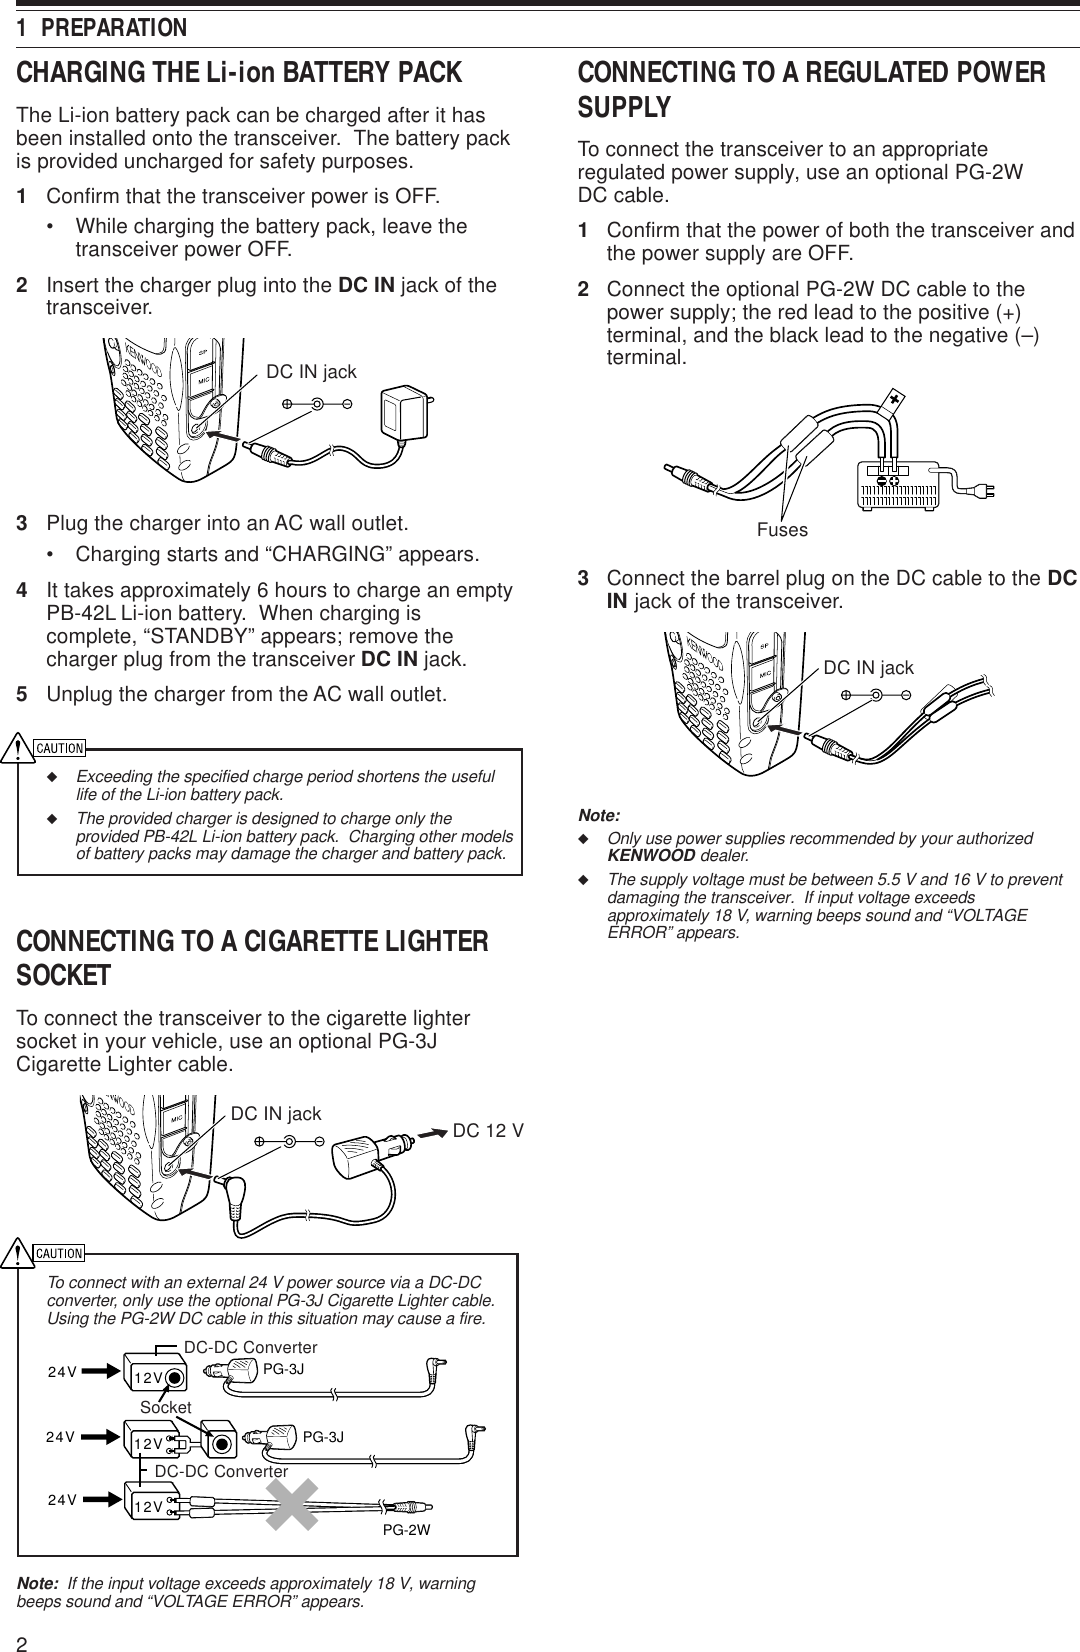
![12OPERATING THROUGH REPEATERSRepeaters, which are often installed and maintainedby radio clubs, are usually located on mountain topsor other elevated locations. Generally they operate athigher ERP (Effective Radiated Power) than a typicalstation. This combination of elevation and high ERPallows communications over much greater distancesthan communications without using repeaters.Most repeaters use a receive and transmit frequencypair with a standard or non-standard offset (odd-split).In addition, some repeaters must receive a tone fromthe transceiver to allow it to access. For details,consult your local repeater reference.Offset Programming FlowIf you store the above data in a memory channel, youneed not reprogram every time. See “MEMORYCHANNELS” {page 15}.PROGRAMMING OFFSETFirst select an amateur radio repeater downlinkfrequency on the A-band or B-band as described in“SELECTING A FREQUENCY” {page 7}.■Selecting Offset DirectionSelect whether the transmit frequency will behigher (+) or lower (–) than the receive frequency.Press [F], [REV] to select the offset direction.• “+” or “–” appears, indicating which offsetdirection is selected.• To program –7.6 MHz offset on the TH-F7E(430 MHz only), repeatedly press [F], [REV]until “ ” appears.If the offset transmit frequency falls outside theallowable range, transmitting is inhibited. Use oneof the following methods to bring the transmitfrequency within the band limits:• Move the receive frequency further inside theband.Note: While using an odd-split memory channel or transmitting,you cannot change the offset direction.■Selecting Offset FrequencyTo access a repeater which requires an odd-splitfrequency pair, change the offset frequency fromthe default which is used by most repeaters. Thedefault offset frequency on the 144 MHz band is600 kHz (All models); the default on the 430/ 440MHz band is 5 MHz (TH-F6A) or 1.6 MHz(TH-F7E); the default on the 220 MHz band is1.6 MHz (TH-F6A).1Press [BAND] to select an amateur radio bandyou want to change the offset frequency.2Press [MNU].3Turn the Tuning control or press [ ]/[ ] toselect Menu No. 6 (OFFSET).4Press [sssss] or [MNU].5Turn the Tuning control or press [ ]/ [ ] toselect the appropriate offset frequency.• The selectable range is from 0.00 MHz to59.95 MHz in steps of 50 kHz.6Press [sssss] or [MNU] to store the setting.TH-F7E Only: If you have selected “ ” for the offset direction,you cannot change the default (–7.6 MHz) offset frequency.Note: After changing the offset frequency, the new offsetfrequency will also be used by Automatic Repeater Offset.TX: 144.725 MHzTX tone: 88.5 HzRX: 145.325 MHz TX: 144.725 MHzTX tone: 88.5 HzRX: 145.325 MHzSelect a band.qwertySelect a receive frequency.Select an offset direction.Select an offset frequency. (Only when programming odd-split repeater frequencies)Activate the Tone function. (If necessary)Select a tone frequency. (If necessary)](https://usermanual.wiki/Kenwood-USA/31241110/User-Guide-153116-Page-15.png)
![135 OPERATING THROUGH REPEATERS■Activating Tone FunctionPress [TONE] to switch the Tone function ON (orOFF).• “T” appears when the Tone function is ON.Note: You cannot use the Tone and CTCSS/ DCS functions atthe same time. Switching the Tone function ON after activatingthe CTCSS deactivates the CTCSS/ DCS function.TH-F7E Only: When you access repeaters that require 1750 Hztones, you need not activate the Tone function. Press [CALL]without pressing the PTT switch to transmit a 1750 Hz tone(default setting).■Selecting a Tone Frequency1While the Tone function is ON, press [F],[TONE].2Turn the Tuning control or press [ ]/ [ ] toselect the desired tone frequency.3Press [sssss] or [MNU] to complete the setting.Available Tone frequencies.oN .qerF )zH( .oN .qerF )zH( .oN .qerF )zH( .oN .qerF )zH(100.76214.79323.141435.602203.96310.001422.641537.012309.17415.301524.151631.812404.47512.701627.651737.522500.77619.011722.261831.922607.97718.411829.761936.332705.28818.811928.371048.142804.58910.321039.971143.052905.88023.721132.681241.452015.19128.131238.291118.49225.631335.302Note: 42 different tones are available for TH-F6A/ TH-F7E.These 42 tones includes 37 EIA standard tones and 5 non-standard tones.TH-F7E only:◆To transmit a 1750 Hz tone, simply press [CALL] withoutpressing the PTT switch (default setting). Release [CALL] toquit transmitting. You can also make the transceiver remainin the transmit mode for 2 seconds after releasing [CALL]; a1750 Hz tone is not continuously transmitted. Access MenuNo. 24 (1750 HOLD) and select “ON”.◆If you desire to assign [CALL] for recalling the Call channelin place of transmitting the 1750 Hz tone, access Menu No.23 (CALL KEY) and select “CALL”.AUTOMATIC REPEATER OFFSETThis function automatically selects an offset direction,according to the frequency that you select on the144 MHz and 220 MHz (TH-F6A only) bands. Thetransceiver is programmed for offset direction asshown below. To obtain an up-to-date band plan forrepeater offset direction, contact your nationalAmateur Radio association.TH-F6A (U.S.A. and Canada)This complies with the standard ARRL band plan.+––– +SSSS144.0 145.5 146.4 147.0 147.6145.1 146.0 146.6 147.4 148.0 MHzS: SimplexTH-F7E (Europe/ Others)SSS: Simplex–144.0 146.0 MHz145.8145.6Note: Automatic Repeater Offset does not function when Reverse isON. However, pressing [REV] after Automatic Repeater Offset hasselected an offset (split) status, exchanges the receive and transmitfrequencies.1Press [MNU].2Turn the Tuning control or press [ ]/ [ ] to selectMenu No. 5 (AUTO OFFSET).3Press [sssss] or [MNU].4Turn the Tuning control or press []/ [ ] switchthe function ON or OFF.5Press [sssss] or [MNU] to store the setting.](https://usermanual.wiki/Kenwood-USA/31241110/User-Guide-153116-Page-16.png)
![5 OPERATING THROUGH REPEATERS14REVERSE FUNCTIONThe reverse function exchanges a separate receiveand transmit frequency. So, while using a repeater,you can manually check the strength of a signal thatyou receive directly from the other station. If thestation’s signal is strong, both stations should moveto a simplex frequency and free up the repeater.To swap the transmit and receive frequencies:Press [REV] to switch the Reverse function ON (orOFF).• “R” appears when the function is ON.AUTOMATIC SIMPLEX CHECK (ASC)While using a repeater, the ASC function periodicallychecks the strength of a signal that you are receivingdirectly from the other station. If the station’s signal isstrong enough to allow direct contact without arepeater, “R” indicator on the display starts blinking.Press [REV] (1 s) to switch the function ON.• “R” appears when the function is ON.• While direct contact is possible, “R” icon blinks.• To quit the function, press [REV] momentarily.Note:◆Pressing the PTT switch causes “R” icon to quit blinking.◆ASC does not function if your transmit and receive frequenciesare the same (simplex operation).◆ASC does not function while scanning.◆Activating ASC while using Reverse switches Reverse OFF.◆If you recall a memory channel or the Call channel that containsa Reverse ON status, ASC is switched OFF.◆ASC causes received audio to be momentarily intermitted every3 seconds.TONE FREQ. ID SCANThis function scans through all tone frequencies toidentify the incoming tone frequency on a receivedsignal. You may use the function to find which tonefrequency is required by accessing your localrepeater.1While the Tone function is ON, press [F], [TONE](1 s) to start the Tone Freq. ID scan.• When the transceiver receives the signal, thescan starts.• To reverse the scan direction, turn the Tuningcontrol or press []/ [ ].• To quit the function, press [PTT] or [ttttt].•When the tone frequency is identified, a beepsounds and the identified frequency appears.2Press [sssss] to program the identified frequency inplace of the current tone frequency.• Press [ttttt] if you do not want to program theidentified frequency.• Press [ ]/ [ ] while the identified frequency isblinking, to resume scanning.Note: Some repeaters do not re-transmit the access tone in thedownlink signal. In this case, check the other station’s uplink signalto detect the repeater access tone.144.725 MHz145.325 MHz144.725 MHzTX: 144.725 MHz TX: 144.725 MHz TX: 144.725 MHz TX: 145.325 MHzRX: 145.325 MHz RX: 145.325 MHz RX: 145.325 MHz RX: 144.725 MHz](https://usermanual.wiki/Kenwood-USA/31241110/User-Guide-153116-Page-17.png)
![15MEMORY CHANNELSIn memory channels, you can store frequencies andrelated data that you often use. Then you need notreprogram those data every time. You can quicklyrecall a programmed channel through simpleoperation. A total of 400 memory channels areavailable for storing the frequencies, modes andother operating conditions of the A and B-bands.SIMPLEX & REPEATER ORODD-SPLIT MEMORY CHANNEL?You can use each memory channel as a simplex &repeater channel or an odd-split channel. Store onlyone frequency to use as a simplex & repeaterchannel or two separate frequencies to use as anodd-split channel. Select either application for eachchannel depending on the operations you have inmind.Simplex & repeater channels allow:• Simplex frequency operation• Repeater operation with a standard offset(if an offset direction is stored)Odd-split channels allow:• Repeater operation with a non-standard offsetNote: Not only can you store data in memory channels, but you canalso overwrite existing data with new data.The data listed below can be stored in each memorychannel:retemaraP &xelpmiS retaepeR tilps-ddOycneuqerfevieceR seY seYycneuqerftimsnarTseYycneuqerfenoTseYseYNOenoTseYseYycneuqerfSSCTCseYseYNOSSCTCseYseYedocSCDseYseYNOSCDseYseYnoitceridtesffOseYA/NycneuqerftesffOseYA/NNOesreveRseYA/NezispetsycneuqerFseYseYtuokcollennahcyromeMseYseYemanlennahcyromeMseYseYNOgninutENIFseYseYnoitcelesedoMseYseYYes: Can be stored in memory.N/A: Cannot be stored in memory.STORING SIMPLEX FREQUENCIES ORSTANDARD REPEATER FREQUENCIES1Press [VFO].2Turn the Tuning control or press [ ]/ [ ] to selectyour desired frequency in the amateur radiobands.• You can also directly enter desired frequencyusing the keypad {page 7}.4If storing a standard repeater frequency, select thefollowing data:• Offset direction {page 12}• Tone function, if necessary {page 13}• CTCSS/ DCS function, if necessary{pages 28, 29}If storing a simplex frequency, you may selectother related data (CTCSS or DCS settings, etc.).5Press [F].• A memory channel number appears and blinks.•“ ” indicates the current channel is empty; “ ”appears if the channel contains data.• Memory channel number “L0”/ “U0” ~ “L9”/ “L9”{page 23}, “I-0” ~ “I-9” {page 20}, and “Pr1” and“Pr2” {page 25} are reserved for otherfunctions. Do not use these memories to storethe TX/ RX data.6Turn the Tuning control or press [ ]/ [ ] to selectthe memory channel in which you want to storethe data.7Press [MR] to store the data to the channel.STORING ODD-SPLIT REPEATER FREQUENCIESSome repeaters use a receive and transmit frequencypair with a non-standard offset. If you store twoseparate frequencies in a memory channel, you canoperate on those repeaters without programming theoffset frequency and direction.1Store the desired receive frequency and relateddata by following the procedure given for simplexor standard repeater frequencies, above.2Turn the Tuning control or press [ ]/ [ ] to selectthe desired transmit frequency.3Press [F], [MR].4Turn the Tuning control or press [ ]/ [ ] to selectthe memory channel you programmed in step 1.5Press [PTT]+[MR].• The transmit frequency is stored in the memorychannel.Note: When you recall an odd-split memory channel, “+” and “–”appear on the display. To confirm the transmit frequency, press[REV].](https://usermanual.wiki/Kenwood-USA/31241110/User-Guide-153116-Page-18.png)
![168 MEMORY CHANNELSRECALLING A MEMORY CHANNELThere are 2 ways of recalling the desired memorychannel.■Using the Tuning control or / keys1Press [MR] to enter Memory Recall mode.• The memory channel used last is recalled.2Turn the Tuning control or press [ ]/ [ ] to selectyour desired memory channel.• You cannot recall an empty memory channel.• To restore VFO mode, press [VFO].Note: If the “CURRENT BAND” is selected for Menu No. 3 (MRMETHOD), only memory channels that have the same band data canbe recalled {see below}.■Using a Numeric keypadYou can also recall a memory channel by entering adesired memory channel number with the keypad.1Select the desired band.2Press [MR] to enter Memory Recall mode.3Press [ENT], then enter the channel number using3 digits.• For example, to recall channel 12, press [ENT],[0], [1], [2].• You can shorten the entry for memory channelsthat are less than 100 by pressing [ENT] afterentering the channel number. For example, torecall memory channel 9, press [ENT], [9],[ENT].Note:◆You cannot recall an empty memory channel. An error beepsounds.◆When you recall an odd-split memory channel, “+” and “–” appearon the display. Press [REV] to display the transmit frequency.◆After recalling a memory channel, you may program data such asTone or CTCSS. These settings, however, are cleared once youselect another channel or the VFO mode. To permanently storethe data, overwrite the channel contents {page 15}.CLEARING A MEMORY CHANNELTo clear an individual memory channel:1Recall the memory channel you want to erase.2Switch the transceiver OFF.3Press [MR]+ [ ].• An erase confirmation message appears.4Press [MR] to erase the channel data.• The contents of the memory channel areerased.• To quit clearing the memory channel, press anykey other than [MR].Note:◆If you clear the information channel data, the data will be set tothe factory default values.◆You can also clear the Priority channel data, and L0/U0 ~ L9/U9data.MEMORY RECALL MODESince the transceiver has more than 400 memorychannels, it sometimes takes time to search for yourdesired memory channel. By default, the transceivercan recall all memory channels when [MR] ispressed, regardless of the current operating band.However, you can configure the transceiver to recallonly the memory channels that have the same bandinformation. For example, when you operate on the144 MHz band in VFO mode, pressing [MR] recallsonly the memory channels that have 144 MHz bandinformation. To change the memory recall mode:1Press [MNU].2Turn the Tuning control or press []/ [ ] to selectMenu No. 3 (MR METHOD).3Press [sssss] or [MNU].4Turn the Tuning control or press []/ [ ] to select“CURRENT BAND”.5Press [sssss] or [MNU] to store the setting.When you press [MR] in VFO mode, only memorychannels that have the same band data are recalled.To return to the default memory recall mode, repeatstep 1 to 5 {above} and select “ALL BANDS” in step4.](https://usermanual.wiki/Kenwood-USA/31241110/User-Guide-153116-Page-19.png)
![178 MEMORY CHANNELSNAMING A MEMORY CHANNELYou can name memory channels using up to 8alphanumeric characters. When you recall a namedmemory channel, its name appears on the display inplace of the stored frequency. Names can be callsigns, repeater names, cities, names of people, etc.1Press [MR] to recall your desired memorychannel.2Press [F], [MN<->f] to enter memory name inputmode.• The entry cursor appears.3Turn the Tuning control or press [ ]/ [ ] to selectthe first character.• You can enter alphanumeric characters plusspecial ASCII characters. Refer to thefollowing table for the available characters.4Press [sssss].• The cursor moves to the next digit.5Repeat steps 3 and 4 to enter up to 8 digits.• Pressing [sssss] after selecting the 8th digitcompletes the programming.• To complete programming after entering lessthan 8 digits, press [sssss] twice.• Press [ttttt] to move the cursor back.• Pressing [F] deletes the character at the cursorposition.You can also use the keypad to enter alphanumericcharacters, in step 3. For example, each press of[2] sets the entry as a, b, c, 2, A, B, C, and then backto a. Press [0] to enter a space or 0.After storing a memory name, pressing [MN<->f]switches the display between the memory name andthe frequency.Note:◆You can also name the DTMF memory channels {page 31} andInformation Channels {page 20} but you cannot name the Callchannel {page 19}.◆You cannot assign a memory name to a channel that does notcontain data.◆You can overwirite stored names by repeating steps 1 to 5.◆The stored name is erased when you clear the memory channeldata.Available characters using the numeric keypadAvailable characters using the Tuning controlFMTD yek sretcarahcelbaliavA1qz1QZ2abc2ABC3def3DEF4ghi4GHI5jkl5JKL6mno6MNO7 p r s 7PRS8 tuv8TUV9wxy9WXY0ecaps0#?! ' .,–/&# ( ) <> ;:"@ABCDEFGH I JKLMNOPQRSTUVWX Y Z [\]^_`abcdefghij k lmnopqrstuvwxyz{ | }~PS!"#$%&’()*+,–./0123456789: ;<=>?@ÀÁÂÃÄÅÆÇÈÉÊËÌÍÎÏ ÑÒÓÔÕÖ ØÙÚÛÜߌàáâãäåæçèéêëìíîïñòóôõöœøùúûü Ÿÿ´yˆS´YˆsAdditional characters for the TH-F7E Available characters](https://usermanual.wiki/Kenwood-USA/31241110/User-Guide-153116-Page-20.png)
![188 MEMORY CHANNELSMEMORY CHANNEL GROUPS400 memory channels have been divided into8 groups of 50. Group 0 contains memory channelnumbers 0 ~ 49, group 1 is 50 ~ 99, group 2 is 100 ~149, and so on. You can categorize each group tostore similar data, same frequency bands or samemodes for ease of use.#puorG lennahcyromeM #puorG lennahcyromeM0puorG94~04puorG942~0021puorG99~055puorG992~0522puorG941~0016puorG943~0033puorG991~0517puorG993~053RECALLING A MEMORY CHANNEL USINGMEMORY GROUP FUNCTIONIt is sometimes a tedious endeavor to scroll through400 memory channels sequencially. However, usinga Group memory recall function, you can access yourdesired memory channel numbers more quickly.1Press [MR] to enter Memory Recall mode.2While pressing and holding [LAMP], turn theTuning control to select a group.• Each click of the Tuning control, the lowestmemory channel number of each group isrecalled. For example, if you have the followingmemory channels that contain data:#puorG atadehtniatnoctahtslennahcyromeM0puorG02015103541puorG05165687892puorG3011113213puorG2516614puorG5puorG0620826puorG5032233335437puorG993Memory channels 0, 50, 103, 152, 260, 305, 399,and then 0 are recalled sequencially whilepressing and holding [LAMP].3Release [LAMP] and turn the Tuning control toselect the desired memory channels within theselected group.Note: If you have configured the Menu No. 3 as “CURRENT BAND”{page 16}, only memory channels that have the same frequencyband are recalled.ERASING MEMORY CHANNELS USING MEMORYGROUP DELETEInstead of erasing each unnecessary channel one byone, you can erase an entire group of memorychannels at once. For example, if you erase group 2memory channels, all the data in memory channels100 ~ 149 are erased.1Press [MR].• Turn the Tuning control or press [ ]/ [ ] toselect a memory channel in the group you wantto erase (for example, memory channelNo. 111, in Group 2).2Press [ ] (POWER) to turn the transceiver OFF.3Press [ ] (POWER) + [MHz].• An erase confirmation message appears.4Press [MR], [sssss] or [MNU] to proceed. Otherwise,press any other key to cancel the erase.MEMORY TRANSFER■Memory \ VFO TransferAfter retrieving frequencies and associated datafrom Memory Recall mode, you can copy the datato the VFO. This function is useful, for example,when the frequency you want to monitor is nearthe frequency stored in a memory channel.1Press [MR], then turn the Tuning control torecall a desired memory channel.2Press [F], [MR] to copy the memory channeldata to the VFO.■Channel \ Channel TransferYou can also copy channel information from onememory channel to another. This function isuseful when storing frequencies and associateddata that you temporarily change in MemoryRecall mode.1Press [MR], then turn the Tuning control torecall a desired memory channel.2Press [F].3Select the memory channel where you wouldlike the data copied, using the Tuning control.4Press [MR].](https://usermanual.wiki/Kenwood-USA/31241110/User-Guide-153116-Page-21.png)
![198 MEMORY CHANNELS993~00lennahC a993~00lennahCycneuqerfevieceR aycneuqerfevieceRycneuqerftimsnarT aycneuqerftimsnarTycneuqerfenoT aycneuqerfenoTnoitceridtfihS anoitceridtfihSycneuqerfSSCTC aycneuqerfSSCTCedocSCD aedocSCDSCD/SSCTC/enoT sutatsFFO/NO aSCD/SSCTC/enoT sutatsFFO/NOnoitceridtesffO anoitceridtesffONOesreveR aNOesreveRezispetsycneuqerF aezispetsycneuqerFlennahcyromeM eman alennahcyromeM emanNOgninutENIF aNOgninutENIFnoitcelesedoM anoitcelesedoMlennahCyromeM FFO/NOtuokcoL alennahCyromeM FFO/NOtuokcoL993~0lennahC a2rP,1rP,9U/9L~0U/0LycneuqerfevieceR aycneuqerfevieceRycneuqerftimsnarT aycneuqerftimsnarTycneuqerfenoT aycneuqerfenoTnoitceridtfihS anoitceridtfihSycneuqerfSSCTC aycneuqerfSSCTCedocSCD aedocSCDSCD/SSCTC/enoT sutatsFFO/NO aSCD/SSCTC/enoT sutatsFFO/NOnoitceridtesffO anoitceridtesffONOesreveR aNOesreveRezispetsycneuqerF aezispetsycneuqerFlennahcyromeM eman alennahcyromeM emanNOgninutENIF aNOgninutENIFnoitcelesedoM anoitcelesedoMlennahCyromeM NOtuokcoL alennahCyromeM FFOtuokcoLThe tables above illustrate how data is transferredbetween memory channels.CALL CHANNELThe Call channel can be recalled instantly nomatter what frequency the transceiver is operatingon. For instance, you may use the Call channel asan emergency channel within your group. In thiscase, the Call scan {page 24} will be useful.The default Call channel frequencies are144.000 MHz for the 144 MHz band, 223.000 MHz for220 MHz band (TH-F6A), 430.000 MHz (TH-F7E)/440.000 MHz (TH-F6A) for the 430/ 440 MHz band.Each Call channel can be reprogrammed either as asimplex or odd-split channel.Note: Unlike memory channels 0 to 399, the Call channel cannot becleared. Clearing the Call channel will set it to the factory defaultvalues.■Recalling the Call Channel1Press [BAND] to select an amateur radio band.2Press [CALL] to recall the Call channel for thatoperating band.• The call channel frequency and “C” appear.• To return to the previous frequency, press[CALL] again.■Reprogramming the Call Channel1Press [BAND] to select your desired amateurradio band.2Select your desired frequency and related data(Tone, CTCSS, DCS, or Shift, etc.).• When you program the Call channel as anodd-split channel, select a receivefrequency first.3Press [F], [CALL].• The selected frequency and related data arestored in the Call channel for the selectedband.To also store a separate transmit frequency,continue with the following steps.4Select the desired transmit frequency.5Press [F].6Press [PTT]+[CALL].• The separate transmit frequency is stored inthe Call channel.Note:◆The transmit frequency must be on the same band as thereceive frequency band.◆Call channel data is shared between the A and B-band.◆Transmit offset status and Reverse status are not stored inan odd-split Call channel.◆To store transceiver configurations other than frequencies,select the configurations in step 3 not step 5.](https://usermanual.wiki/Kenwood-USA/31241110/User-Guide-153116-Page-22.png)
![208 MEMORY CHANNELSINFORMATION CHANNELS10 Information channels are available for storingradio broadcasting service frequencies, such asweather radio stations and community FMbroadcasting stations. For your conveniences,pressing [INFO] instantly recalls the Informationchannel to B-band. Unlike regular memory channels,you cannot store a transmit frequency in anInformation channel. The following frequency data isstored by default.rebmunlennahC emaNyromeM/edoM/ycneuqerFA6F-HT E7F-HT1–I /MF/zHM055.261 REHTAEW)ytpmE(atadoN2–I /MF/zHM004.261 REHTAEW3–I /MF/zHM574.261 REHTAEW4–I /MF/zHM524.261 REHTAEW5–I /MF/zHM054.261 REHTAEW6–I /MF/zHM005.261 REHTAEW7–I /MF/zHM525.261 REHTAEW8–I /MF/zHM056.161 REHTAEW9–I /MF/zHM577.161 REHTAEW0–I /MF/zHM572.361 REHTAEWYou can revise the default channel data, such as thereceiving frequencies, modes, and memory names.■Recalling an Information Channel1Select your desired band.2Press [INFO] to recall the Informationchannels.• “I–n” appears, where “n” is the Informationchannel number from (“0” ~ “9”).• If the B-band is selected for operation, youcan turn the Tuning control or press []/ [ ]to select other Information channels.• To exit the Information channel mode, press[VFO] or [MR].Note: If you press [MN<->f], you can display the receivingfrequency in place of the memory name.■Reprogramming the Information Channel1Press [VFO].2Select a desired frequency and mode.3Press [F].4Turn the Tuning control or press [ ]/ [ ] toselect the memory channel (I–0 to I–9) in whichyou want to store the data.5Press [MR].• A long beep sounds and the Informationchannel data is now revised.](https://usermanual.wiki/Kenwood-USA/31241110/User-Guide-153116-Page-23.png)
![218 MEMORY CHANNELSCHANNEL DISPLAYWhile in this mode, the transceiver displays onlymemory channel numbers (or memory names ifstored) instead of frequencies.1Press [ ] (POWER) + [A/B].• The transceiver displays the memory channelnumber in place of the operating frequencies.2Turn the Tuning control or press [ ]/ [ ] to selectyour desired memory channel number.To recover normal operation, press [ ] (POWER) +[A/B] again.Note:◆To enter Channel Display mode, you must have at least onememory channel that contains the data.◆If the memory channel contains the memory name data, thememory name is displayed in place of the memory channelnumber.](https://usermanual.wiki/Kenwood-USA/31241110/User-Guide-153116-Page-24.png)
![22SCANScan is a useful function for hands-off monitoring ofyour favorite frequencies. By becoming comfortablewith all types of Scan, you will increase your operatingefficiency.This transceiver provides the following types of scans.epyTnacS esopruPlamroN nacSnacSdnaB ehtfodnaberitneehtsnacS detcelesuoyycneuqerfmargorP nacSdeificepsehtsnacS niderotssegnarycneuqerf ~0U/0LslennahcyromeM 9U/9LnacSzHM nihtiwseicneuqerfehtsnacS egnarzHM1ayromeM nacSlennahC-llA nacS ,slennahcyromeMllasnacS 993ot0morfnacSpuorG yromeMdeificepsehtsnacS spuorglennahcllaC nacSOFV dnalennahcllaCehtsnacS ycneuqerfOFVtnerrucehtyromeM lennahC dnalennahcllaCehtsnacS lennahcyromeMdetcelesehtnacSytiroirP ehtnoseitivitcaehtskcehC slennahcytiroirpdeificeps sdnoces6yrevelennahCnoitamrofnI nacS noitamrofnIehtsnacS slennahclausiV *nacSOFVsnacS ±ehtniseicneuqerf5 raenezispetsdemmargorp gnitarepotnerruceht langisehT.ycneuqerf siycneuqerfhcaefohtgnerts hparg-rabanideyalpsidyromeM lennahCslennahcyromeMehtsnacS langisehtsyalpsiddna anilennahchcaefohtgnerts hparg-rab*Visual Scan graphically shows the busy status of frequencies in aspecific range.Note:◆While using CTCSS or DCS, Scan unmutes only for the signalsthat contain the same CTCSS tone or DCS code that youselected.◆Pressing and holding [PTT] causes Scan to stop.◆Starting Scan switches OFF the Automatic Simplex Checker(ASC) {page 14}.NORMAL SCANWhen you are operating the transceiver in VFO mode,3 types of scanning are available: Band Scan,Program Scan, and MHz Scan.BAND SCANThe transceiver scans the entire band of thefrequency you selected. For example, if you areoperating and receiving at 144.525 MHz on theA-band, it scans all the frequencies available for the144 MHz band. (Refer to receiver VFO frequencyrange in the specifications {page xx}). When thecurrent VFO receive frequency is outside of theProgram Scan frequency range {below}, thetransceiver scans the entire frequency rangeavailable for the current VFO.1Press [VFO].2Press [BAND] to select your desired band.3Turn the Tuning control or press [ ]/ [ ] to selectthe frequency outside of the Program Scanfrequency range {below}.4Press [VFO] (1 s) to start the Band Scan.5To stop the Band Scan, press [VFO] or [PTT].Note:◆While scanning, you can change the scan frequency direction byturning the Tuning control or press [ ]/ [ ].◆If you select a frequency within the L0/ U0 ~ L9/ U9 range in step3, the Program Scan {below} starts.◆If you press [MONI], Band Scan temporarily pauses. Release[MONI] to resume scanning.◆The transceiver stops scanning in only the AM and FM modeswhen it detects a signal.◆If the Fine Tuning function is ON, scanning does not stop at thebusy channels.◆If you press any ot the following keys during the scan, thetransceiver exits the Scan: [F], [F] (1 s), [LAMP], [MONI],[SQL], Tuning control, [ ], and [ ]](https://usermanual.wiki/Kenwood-USA/31241110/User-Guide-153116-Page-25.png)
![2314 SCANMHz SCANMHz Scan allows you to scan an entire 1 MHzfrequency range within the current VFO frequency.1Press [VFO].2Turn the Tuning control or press [ ]/ [ ] to selecta frequency in which to perform the MHz Scan. Ifyou want to scan the entire 145 MHz frequency,select any frequency between 145.000 and149.995 MHz (for example, select 145.650 MHz).Scan will operate between 145.000 MHz and145.999 MHz.3Press [MHz] (1 s) to start the MHz Scan.4To stop the MHz Scan, press [MHz] or [PTT].Note:◆If the Fine Tuning function is ON, you cannot perform the MHzScan.◆The transceiver stops scanning in only the AM and FM modeswhen it detects a signal.◆If you press [MONI], MHz Scan temporarily pauses. Release[MONI] to resume scanning.◆If you press any of the following keys during the scan, thetransceiver exits the Scan: [F] (1 s), [LAMP], [MONI], [SQL],Tuning control, [ ], and [ ]◆When the CTCSS or DCS function is activated, the transceiverstops at a busy frequency and decodes the CTCSS tone or DCScode. If the tone or code matches, the transceiver unmutes.Otherwise, it resumes scanning.PROGRAM SCANYou can limit the scanning frequency range. Thereare 10 memory channel pairs (L0/ U0 ~ L9/ U9)available for specifying the start and end frequencies.It monitors the range between the start and endfrequencies that you have stored in memory channelsL0/ U0 to L9/ U9. Before performing the ProgramScan, store the Program Scan frequency range toone of the memory channels L0/ U0 ~ L9/ U9.■Storing Program Scan Frequency Range1Press [VFO].2Press [BAND] to select your desired band.3Turn the Tuning control or press [ ]/ [ ] to selectyour desired start frequency.4Press [F], then turn the Tuning control or press[ ]/ [ ] to select a memory channel from L0 ~ L9.5Press [MR] to store the start frequency in thememory channel.6Turn the Tuning control or press [ ]/ [ ] to selectyour desired end frequency.7Press [F], then Turn the Tuning control or press[ ]/ [ ] to select the corresponding channel fromU0 ~ U9 (you must select the same numeric valueas in step 4).• For example, if you selected L0 in step 4, youmust select U0 in this step.8Press [MR] to store the end frequency in thememory channel.■Performing the Program Scan1Press [VFO].2Turn the Tuning control or press [ ]/ [ ] to selecta frequency within the frequency range of memorychannel L0/ U0 ~ L9/ U9.3Press [VFO] (1 s) to start the Program Scan.4To stop the Program Scan, press [VFO] or [PTT].Note:◆If you press [MONI], Program Scan temporarily pauses. Release[MONI] to resume scanning.◆The transceiver stops scanning only in the AM and FM modeswhen it detects a signal.◆If the Fine Tuning function is ON, the scanning does not stop atthe busy channels.◆If you press any of the following keys during the scan, thetransceiver exits the Scan: [F] (1 s), [LAMP], [MONI], [SQL],Tuning control, [ ], and [ ]](https://usermanual.wiki/Kenwood-USA/31241110/User-Guide-153116-Page-26.png)
![2414 SCANMEMORY SCANMemory Scan monitors all memory channels in whichyou have stored frequencies (All-Channel Scan) oronly a desired group of memory channels (GroupScan).ALL-CHANNEL SCANThe transceiver scans all of the memory channels inwhich you have stored frequencies.1Press [MR] (1 s).• Scan starts from the last memory channelnumber and ascends up through the channelnumbers (default). Turn the Tuning control orpress [ ]/ [ ] to change the scanning direction.• To jump to a desired channel while scanning,quickly turn the Tuning control.2To stop the All-Channel Scan, press [MR] or[PTT].Note:◆If the Fine Tuning function is ON, you cannot perform the All-Channel Scan.◆If you press [MONI], All-Channel Scan temporarily pauses.Release [MONI] to resume scanning.◆The transceiver stops scanning in all modes when it detects thesignal.◆If you press any of the following keys during the scan, thetransceiver exits the Scan: [F] (1 s), [LAMP], [MONI], [SQL],Tuning control, [ ], and [ ]GROUP SCANIn order to easily manage all 400 memory channels,they are divided into 8 groups {page 18}. For thepurpose of Group Scan, you can select a particularmemory group to be scanned, depending on thesituation. Using the Memory Group Link function{below}, you can scan all the linked memory groups.1Press [MR] to enter Memory Scroll mode.2Turn the Tuning control or press [ ]/ [ ] to selecta memory channel in the group you want to scan.For example, if you want to scan the group 0memory channels, recall memory channel 12(group 0 contains memory channels 0 ~ 49).3Press [MHz] (1 s).• The memory channels within the selectedgroup are scanned.• If the group is linked to other groups {below},all the linked groups are also scanned.4To stop the Group Scan, press [MHz] or [PTT].Note:◆If the Fine Tuning function is ON, you cannot perform the GroupScan.◆If you press [MONI], All-Channel Scan temporarily pauses.Release [MONI] to resume scanning.◆The transceiver stops scanning in all modes when it detects asignal.◆If you press any of the following keys during the scan, thetransceiver exits the Scan: [F] (1 s), [LAMP], [MONI], [SQL],Tuning control, [ ], and [ ]■Memory Group LinkAlthough the 400 memory channels are divided into 8groups {page 18}, you may sometimes want to scantwo or more groups. In this case, use the MemoryGroup Link function.1Press [MNU] to enter Menu mode.2Turn the Tuning control or press [ ]/ [ ] to selectMenu No. 2 (M.GRP LINK).3Press [sssss] or [MNU].• The memory group numbers appear.4Move the cursor using [ttttt]/ [sssss], then turn theTuning control or press [ ]/ [ ] to select ordeselect the group to be linked.• Linked groups appear at the bottom of thedisplay (in the example below, groups 0, 1, 3and 5 are linked).5Press [MNU] to store the setting. Otherwise,press [PTT] to cancel.](https://usermanual.wiki/Kenwood-USA/31241110/User-Guide-153116-Page-27.png)
![2514 SCANCALL SCANA Call channel can be stored for each amateur radioband, such as the 144 MHz, 430/ 440 MHz, and 220MHz (TH-F6A only) bands {page 19}. You canmonitor one of these Call channels and the currentoperating frequency alternatively.1Select the frequency (in VFO or Memory Recallmode) you want to monitor.• In VFO mode, press [A/B] to select the A orB-band. Then, turn the Tuning control or press[ ]/ [ ] to select the desired frequency.• In Memory Recall mode, turn the Tuningcontrol or press [ ]/ [ ] to select a memorychannel you want to monitor.2Press [CALL] (1 s) to start the Call Scan.3The Call channel for the band and the selectedVFO frequency or memory channel are monitoredalternatively.4To stop the Call Scan, press [PTT] or [CALL].Note:◆If you press [MONI], Call Scan temporarily pauses. Release[MONI] to resume scanning.◆The transceiver stops scanning in all modes when it detects asignal.◆If you press any of the following keys during the scan, thetransceiver exits the Scan: [F] (1 s), [LAMP], [MONI], [SQL],and the Tuning controlPRIORITY SCANYou may sometimes want to check your favoritefrequency activities while monitoring the A andB-bands. In this case, use the Priority Scan function.It checks the activities of Pr1 and Pr2 channels every6 seconds, alternatively, using the B-band receiver. Ifthe transceiver detects a signal on Pr1 or Pr2, itrecalls the frequency to the B-band receiver.Note: If you do not operate any control or key for 3 seconds after thesignal drops, the transceiver resumes Priority Scan.■Programming Priority channels1Press [VFO].2Turn the Tuning control or press [ ]/ [ ] to selectyour desired priority channel frequency.3Select the mode and selective call functions ifnecessary.4Press [F].• The memory channel number appears.5Turn the Tuning control or press [ ]/ [ ] to select“Pr1”.6Press [MR] to store the data on the prioritychannel.• If you want to store a second priority channel,repeat steps 1 ~ 6 and select “Pr2” in step 5.Note: You can program any frequency available on the B-band as apriority channel.](https://usermanual.wiki/Kenwood-USA/31241110/User-Guide-153116-Page-28.png)
![2614 SCAN■Using Priority Scan1Press [F], [BAL].• “P” appears.• The transceiver checks for a signal on the Pr1and Pr2 channels every 6 seconds,alternatively.• When the transceiver detects a signal on thepriority channel, the B-band frequency changesto the priority channel.• If you do not operate any control or key for 3seconds after the signal drops, the transceiverresumes Priority Scan.2To quit Priority Scan, press [F], [BAL] again.Note:◆The signal being received on the B-band may become intemittentbeuase the Priority Scan uses the B-band receiver to check thepriority channel(s) activities.◆If you press any of the keys below during the scan, thetransceiver exits the scan: [A/B], [LAMP], [MONI], [SQL],[F] (1s), [BAL], and [F] then [BAL]◆When a signal is received on a Priority channel with a CTCSS orDCS code programmed, the Priority channel is recalled even if adifferent selective tone/ code is detected. However, thetransceiver only unmutes if the signal has the same CTCSS toneor DCS code.◆Press and hold [MONI] to pause the Priority Scan when thetransceiver is not displaying a priority channel. Release [MONI]to resume the Priority Scan.INFORMATION CHANNEL SCANInformation channel scan is similar to group scan.However, it scans only Information channels.1Press [INFO].• The last Information channel you used isrecalled.2Press [INFO] (1 s) to start the InformationChannel Scan.3To stop the Information Channel Scan, press[INFO] or [PTT].Note:◆If you press [MONI], Information Channel Scan temporarilypauses. Release [MONI] to resume scanning.◆The transceiver stops scanning in all modes when it detects asignal.◆If you press any of the following keys during the scan, thetransceiver exits the Scan: [F] (1 s), [LAMP], [MONI], [SQL],Tuning control, [ ], and [ ]VISUAL SCANWhile you are receiving, Visual Scan allows you tomonitor frequencies near the current operatingfrequency. Visual Scan graphically displays the busystatus of all frequencies in the selected range. Youwill see a maximum of 7 segments, for eachfrequency (channel) point that represent relative S-meter levels.The Visual Scan monitors ±5 channels (frequencies)by centering on the current channel (frequency). Inthis way, a total of 11 channels’ (frequencies’) signalstrength status are graphically displayed.Note: When you perform the Visual scan on the A-band, thetransceiver can output the audio. However, when you perform theVisual Scan on the B-band, it cannot output the audio.■Using Visual Scan (VFO)1Select your desired band for Visual Scan.2Turn the Tuning control or press [ ]/ [ ] toselect your desired center frequency.• The transceiver scans the 5 upperfrequencies and 5 lower frequencies usingthe current VFO frequency step.3Press [F], [INFO] to start Visual Scan (VFO).• The scanning frequency is displayed on thecurrent operating band and the relativeS-meter level of each frequency appears onthe other band display.• To pause Scan, press and hold [MONI].While the Visual Scan is paused, you canmonitor the paused frequency. Release[MONI] to resume the Visual Scan.4To change the current scanning frequency,Turn the Tuning control or press [ ]/ [ ].• The displayed frequency changes and thecursor moves.5To stop the Visual Scan, press [F], [INFO].Note:◆If you press [MONI], Visual Scan temporarily pauses. Release[MONI] to resume scanning. When it is paused, the centerfrequency bar-graph blinks.◆Although you can perform the Visual Scan on the A or B-band,the B-band cannot output the audio during the scan.◆You can press [PTT] or [CALL] (if 1750 Hz is programmed) totransmit during the scan.◆If the Fine Tuning function is ON, the Visual Scan cancels theFINE function and automatically adjusts the frequency to the nextavailable frequency.](https://usermanual.wiki/Kenwood-USA/31241110/User-Guide-153116-Page-29.png)
![2714 SCAN■Using Visual Scan (Memory Channel)1Press [MR] to enter Memory Recall mode.2Turn the Tuning control or press [ ]/ [ ] toselect your desired center memory channel.3Press [F], [INFO] to start the Visual Scan.4The transceiver start scanning the 5 uppermemory channels and 5 lower memorychannels, by centering the selected memorychannel.• The current scanning memory channelnumber and frequency are displayed on thecurrent operating band. On the other band,the relative S-meter level of each frequencychannel is displayed.• To pause Scan, press [MONI]. While theVisual Scan is paused, you can monitor thepaused frequency. Press [MONI] again toresume the Visual Scan.6To change the current scanning channel, turnthe Tuning control or press [ ]/ [ ].7To stop the Visual Scan, press [F], [INFO].Note:◆If you press [MONI], Visual Scan temporarily pauses. Release[MONI] to resume scanning. When it is paused, the centerfrequency bar-graph blinks.◆Although you can perform the Visual Scan on the A or B-band,the B-band cannot output the audio during the scan.◆You can press [PTT] or [CALL] (if 1750 Hz is programmed) totransmit during the scan.◆If the Fine Tuning function is ON, the Visual Scan cancels theFINE function and automatically adjusts the frequency to the nextavailable frequency.SCAN RESUME METHODThe transceiver stops scanning at the frequency (ormemory channel) where a signal is detected. It thencontinues or stops scanning according to whichresume mode you have selected. You can chooseone of the following modes. The default is Time-operated mode.• Time-Operated mode (default)The transceiver remains on a busy frequency (ormemory channel) for approximately 5 seconds,then continues to scan, even if the signal is stillpresent.• Carrier-Operated modeThe transceiver remains on the busy frequency (ormemory channel) until the signal drops out. Thereis a 2 second delay between signal dropout andscan resumption.• Seek modeThe transceiver moves to a frequency or memorychannel where a signal is present and stops.To change the scan resume method:1Press [MNU].2Turn the Tuning control or press [ ]/ [ ] to selectMenu No. 1 (SCAN RESUME).3Press [sssss] or [MNU].4Turn the Tuning control or press [ ]/ [ ] to select“TIME ” (Time-Operated mode), “CARRIER”(Carrier-Operated mode), or “SEEK” (Seek mode).5Press [sssss] or [MNU] to store the setting.Otherwise, press [ttttt] or [PTT] to cancel.MEMORY CHANNEL LOCKOUTYou can lock out memory channels that you prefernot to monitor during Memory Scan.1Press [MR] to enter Memory Recall mode.2Turn the Tuning control or press [ ]/ [ ] to selectthe memory channel to be locked out.3Press [F], [MHz].•“” appears at the top right of the memorychannel number, indicating the channel islocked out.4To unlock the memory channel, repeat steps 1 ~ 3.•“” disappears.](https://usermanual.wiki/Kenwood-USA/31241110/User-Guide-153116-Page-30.png)
![28SELECTIVE CALLCTCSS and DCSYou may sometimes want to hear calls from onlyspecific persons or groups. In this case, use theselective call function. This transceiver is equippedwith CTCSS (Continuous Tone Coded SquelchSystem) and DCS (Digital Coded Squelch). Theseselective calls allow you to ignore (not hear)unwanted calls from other persons who are using thesame frequency. The transceiver unmutes only whenit receives the signal having the same CTCSS tone orDCS code.Note:◆CTCSS and DCS do not cause your conversation to be private orscrambled. It only relieves you from listening to unwantedconversations.◆CTCSS and DCS function in only FM mode.CTCSS (Continuous Tone Coded SquelchSystem)A CTCSS tone is a sub-audible tone and is selectablefrom among the 42 tone frequencies listed in thetable on the following page. The list includes 37 EIAstandard tones and 5 non-standard tones. You canselect one of the tones to use as a CTCSS tone.USING CTCSS1Press [TONE] until “CT” appears.• Each time you press [TONE], the icon cyclesas follows: “T” (TONE) ➞ “CT” (CTCSS) ➞“DCS” (DCS) ➞ “ ” (OFF) ➞ “T” (TONE).When the CTCSS funtion is ON, you will hear callsonly when the selected CTCSS tone is received. Toanswer the call, press and hold the PTT switch, thenspeak into the microphone.Note:◆You cannot use the CTCSS and Tone/ DCS functionssimultaneously. Switching the CTCSS function ON after havingactivated the Tone/ DCS functions deactivates the Tone/ DCSfunctions.◆If you select a high CTCSS frequency, receiving audio or noisethat contains the same frequency portions may cause CTCSS tofunction incorrectly. To prevent noise from causing this problem,select an appropriate squelch level {page x}.SELECTING A CTCSS FREQUENCY1While in CTCSS mode {above}, press [F],[TONE].• The current CTCSS frequency appears.2Turn the Tuning control or press [ ]/ [ ] to selectyour desired CTCSS frequency.• The selectable CTCSS frequencies are thesame as those for the Tone frequency. Refer tothe table on the following page for the availableCTCSS frequencies.3Press [sssss] or [MNU] to store the new setting.Otherwise, press [ttttt] or [PTT] to cancel.A/BBALTNCMENULISTBCONVFOREVDUPMHzDUALENTCALLMN fMRPOSMSGPOWERESCOKDATAAX.25PROTOCOLSTSTACONCONPACKET9696BCONDUP975STSTACONCONPACKET9696BCONDUP975STSTACONCONPACKET9696BCONDUP975STSTACONCONPACKET9696BCONDUP975](https://usermanual.wiki/Kenwood-USA/31241110/User-Guide-153116-Page-31.png)
 to start the CTCSS Freq. ID Scan function.• To reverse the scan direction, turn the Tuningcontrol or press [ ]/ [ ].• To quit the function, press [ttttt].•When a CTCSS frequency is identified, theidentified frequency appears and blinks.2Press [sssss] or [MNU] to program the identifiedfrequency in place of the current CTCSSfrequency. Otherwise, press [ttttt] if you do notwant to program the identified frequency.• Turn the Tuning control or press [ ]/ [ ] whilethe identified frequency is blinking to resumescanning.Available CTCSS frequencies.oN .qerF )zH( .oN .qerF )zH( .oN .qerF )zH( .oN .qerF )zH(100.76214.79323.141435.602203.96310.001422.641537.012309.17415.301524.151631.812404.47512.701627.651737.522500.77619.011722.261831.922607.97718.411829.761936.332705.28818.811928.371048.142804.58910.321039.971143.052905.88023.721132.681241.452015.19128.131238.291118.49225.631335.302Note:◆Received signals are monitored through the speaker whilescanning is in progress.◆If the CTCSS function is activated for both the A and B-band, thescan speed may be slower.DCS (Digital Coded Squelch)DCS is similar to CTCSS. However, instead of usingan analog signal, it uses a continuous sub-audibledigital wave form that represents a 3-digit octalnumber. You can select a DCS code from among the104 DCS codes listed in the table below.USING DCS1Press [TONE] until “DCS” appears.• Each time you press [TONE], the icon cyclesas follows: “T” (TONE) ➞ “CT” (CTCSS) ➞“DCS” (DCS) ➞ “ ” (OFF) ➞ “T” (TONE).When the DCS function is ON, you will hear calls onlywhen the selected DCS code is received. To answerthe call, press and hold the PTT switch, then speakinto the microphone.Note: You cannot use the DCS funtion and CTCSS/ Tone functionssimultaneously. Switching the DCS function ON after havingactivated the CTCSS/ Tone functions deactivate the CTCSS/ Tonefunctions.SELECTING A DCS CODE1While in DCS mode {above}, press [F], [TONE].• The current DCS code appears.2Turn the Tuning control or press [ ]/ [ ] to selectyour desired DCS code.• The available DCS codes are shown in thefollowing table.3205602315025521333145642161375201704312121622333246644262376202703413223623431343057264371303705415225626432346051363472304702516226621535446152364576304115513421726536443254563405116514424724632546252667406112615426035634542354661502215616421131735546453073505212711525131142645652174501314712525232144646063273Press [sssss] or [MNU] to store the new setting.Otherwise, press [ttttt] or [PTT] to cancel.](https://usermanual.wiki/Kenwood-USA/31241110/User-Guide-153116-Page-32.png)
![7 SELECTIVE CALL30DCS CODE ID SCANThis function scans through all DCS codes to identifythe incoming DCS code on the received signal. Youmay find this useful when you cannot recall the DCScode that the other persons in your group are using.1While in DCS mode, press [TONE] (1 s) to startthe DCS Code ID Scan function.• To reverse the scan direction, turn the Tuningcontrol or press [ ]/ [ ].• To quit the function, press [ttttt].•When a DCS code is identified, the identifiedcode appears and blinks.2Press [sssss] or [MNU] to program the identifiedfrequency in place of the current DCS code.Otherwise, press [ttttt] if you do not want toprogram the identified code.• Turn the Tuning control or press [ ]/ [ ] whilethe identified DCS code is blinking to resumescanning.Note:◆Received signals are monitored through the speaker whilescanning is in progress.◆If the DCS function is activated for both the A and B-band,the scan speed may be slower.](https://usermanual.wiki/Kenwood-USA/31241110/User-Guide-153116-Page-33.png)
![31DTMF FUNCTIONSThe keys on the keypad also function as DTMF keys;the 12 keys found on a push-button telephone plus 4additional keys (A, B, C, D). This transceiver alsoprovides 10 dedicated DTMF memory channels. Youcan store a DTMF number (16 digits max.) with amemory name (8 digits max.) in each of the channelsto recall later for a speed dialingl.Many repeaters in the U.S.A. and Canada offer aservice called Autopatch. You can access the publictelephone network via such a repeater by sendingDTMF tones. For further information, consult yourlocal repeater reference.MANUAL DIALINGManual Dialing requires only two steps to send DTMFtones.1Press and hold the PTT switch to transmit.2While transmitting, press the keys in sequence onthe keypad to send DTMF tones.• The corresponding DTMF tones aretransmitted and monitored through the speaker.■TX HoldThis function makes the transceiver remain intransmit mode for 2 seconds after you releaseeach key. So you can release the PTT switchwhile sending the DTMF tones.1Press [MNU] to enter Menu mode.2Turn the Tuning control or press [ ]/ [ ] toselect the Menu No. 12 (DTMF HOLD).3Turn the Tuning control or press [ ]/ [ ] toselect “ON”.4Press [sssss] or [MNU] to store the setting.Otherwise, press [ttttt] or [PTT] to cancel.AUTOMATIC DIALERIf you use the 10 dedicated memory channels to storeDTMF numbers, you need not remember a long stringof digits.■Storing a DTMF Number in MemoryNote: Audible DTMF tones from other transceivers near you (orfrom your own speaker) may be picked up by your microphone.If so, you may fail to correctly program a DTMF number.1Press [MNU] to enter Menu mode.2Turn the Tuning control or press [ ]/ [ ] toselect the Menu No. 10 (DTMF STORE).3Turn the Tuning control or press [ ]/ [ ] toselect a desired DTMF memory channelnumber from 0 to 9.4Press [sssss] or [MNU].• The display for entering a memory nameappears; the first digit blinks.• To skip naming the channel, press [sssss] or[MNU] again. You can jump to step 8.5Turn the Tuning control or press [ ]/ [ ] toselect a character.• You can enter alphanumeric characters plusspecial ASCII characters.•[MONI] to delete a charactor on the cursor.• You can also use the numeric keypad toenter a character (Special ASCII charactorsare not available).• Press [LAMP]+turning Tuning control tojump to the first charactor of each charactertype in the ASCII table.6Press [sssss] to move the cursor to the next digit.7Repeat steps 5 and 6 to enter up to 8 digits.• Pressing [sssss] after selecting the 8th digitcauses the cursor to move to the start of thenext field.• To complete programming the name lessthan 8 digits, press [sssss] twice.)zH(.qerF 9021 6331 7741 3361796 123A077 456B258 789C149 0D](https://usermanual.wiki/Kenwood-USA/31241110/User-Guide-153116-Page-34.png)
![328 DTMF FUNCTIONS• Each press of [ttttt] causes the cursor tomove backward.8Press the keys in sequence on the keypad toenter a DTMF number with up to 16 digits.• You can also turn the Tuning control orpress [ ]/ [ ] to select the required DTMFnumber for each digit. Select a space if youwant to put a pause.9Press [sssss] or [MNU] to complete theprogramming.You can confirm the stored DTMF number byusing steps 1 to 3.You can also use the keypad to enteralphanumeric characters in step 5. For example,each press of [BAND] switches entry as A, B, C,a, b, c, then 2.■Transmitting a Stored DTMF Number1Press [PTT]+[MNU].2Release only [MNU], then turn the Tuningcontrol or press [ ]/ [ ] to select the desiredDTMF memory channel.3While still holding [PTT], press [sssss] or [MNU]to trasmit the DTMF tones.• The number stored in the channel scrollsacross the display accompanied by DTMFtones from the speaker.• After transmission, the frequency display isrestored.If you need not confirm the memory channelcontents, press [0] to [9] instead of turning theTuning control or pressing [ ]/ [ ] in step 2 toselect a channel number. The stored DTMFnumber will be immediately transmitted. You neednot press [sssss] or [MNU] in step 3.■Adjusting the DTMF tone tranmission speedThis transceiver allows you to configure the DTMFnumber transmission speed between Fast(default) and Slow. If a repeater cannot respondto the fast speed, adjust this parameter.1Press [MNU] to enter Menu mode.2Turn the Tuning control or press [ ]/ [ ] toselect the Menu No. 11 (DTMF SPD).3Press [sssss] or [MNU]4Turn the Tuning control or press [ ]/ [ ] toselect “FAST” (default) or “SLOW”.• The tone duration of FAST is 50 ms andSLOW is 100 ms.5Press [sssss] or [MNU] to store the new setting.■Adjusting the pause durationYou can also change pause duration (a spacedigit) stored in memory channels; the default is500 msec.1Press [MNU] to enter Menu mode.2Turn the Tuning control or press [ ]/ [ ] toselect the Menu No. 13 (DTMF PAUSE).3Press [sssss] or [MNU]4Turn the Tuning control or press [ ]/ [ ] toselect 100/ 250/ 500 (default)/ 750/ 1000/ 1500/2000 msec.5Press [sssss] or [MNU] to store the new setting.DTMF LOCKAssuming you have a transceiver with the optionalspeaker microphone installed and you are carrying itin the holder or bag, you sometimes want to disablethe keypad DTMF transmission to avoid theaccidental DTMF transmission. In this case, turn theDTMF Lock function ON.1Press [MNU] to enter Menu mode.2Turn the Tuning control or press [ ]/ [ ] to selectthe Menu No. 14 (DTMF LOCK).3Press [sssss] or [MNU]4Turn the Tuning control or press [ ]/ [ ] to select“ON”.5Press [sssss] or [MNU] to store the setting.When this function is activated, you cannot transmitDTMF tones using the DTMF keypad (including[MNU]) during the transmission.](https://usermanual.wiki/Kenwood-USA/31241110/User-Guide-153116-Page-35.png)
![35UTILIZING B-BANDABOUT B-BANDUsually you can communicate with other amateurradio stations using A-band frequencies for receivingand transmitting. This transceiver also featuresanother receiver in addition to A-band transceiver.The frequency for the B-band appears the bottompart of the display. Although A-band transceivercovers only 144 MHz/ 220 MHz (TH-F6A only)/ 430/440 MHz amateur radio bands in FM mode, B-bandreceiver can receive from 100 kHz to 470 MHz inSSB, CW, FM, or AM mode. From 470 MHz to1.3 GHz, you can also receive in FM or AM mode.In this way, you can monitor 2 different frequencies atthe same time. This means that you can listen to alocal FM broadcasting station while you aremonitoring your club channel at the same time.If one of A-band amateur radio bands is also selectedfor B-band in FM mode, you can also transmit on theB-band frequency.B-BAND FREQUENCYSince B-band frequency coverage is so wide, thedefault frequency band, mode, and frequency stepsize are preprogrammed as shown below.1Press [A/B] to select B-band.•“s” icon moves, indicating which band iscurrently selected.2Press [BAND] until the desired frequency bandappears.• Each time you press [BAND], the frequencyband cycles from the last band you selected toupper band frequency. When it reaches to 1.2GHz band, it goes back to LW band.3Turn the Tuning control or press [ ]/ [ ] to tune toa desired frequency.Note: You can also select one of the amateur radio band to transmiton the B-band frequency. However, the operating mode must be inFM mode to transmit.■B-band Frequency CoveragednaB ycneuqerF petS edoMdnabMAzHk025~zHk001zHk1MA)A6F-HT(zHM8.1~zHk025 )E7F-HT(zHM17.1~zHk025 zHk01MAFH)A6F-HT(zHM5.3~zHM8.1 )E7F-HT(zHM5.3~17.1zH001 )NOENIF(MAzHM0.4~zHM5.3BSLzHM0.7~zHM0.4MAzHM3.7~zHM0.7BSLzHM1.01~zHM3.7MAzHM51.01~zHM1.01WCzHM0.41~zHM51.01MAzHM53.41~zHM0.41BSUzHM860.81~zHM53.41MAzHM861.81~zHM860.81BSUzHM0.12~zHM861.81MAzHM54.12~zHM0.12BSUzHM98.42~zHM54.12MAzHM99.42~zHM98.42BSUzHM0.82~zHM99.42MAzHM7.92~zHM0.82BSUm6 zHM0.05~zHM7.92zHk52 )A6F-HT( zHk5 )E7F-HT( MFzHM0.45~zHM0.05zHk01dnabMFzHM0.801~zHM0.45zHk001WMFdnabriAzHM0.731~zHM0.801zHk52MAm2zHM0.441~zHM0.731zHk5MFzHM0.641~zHM0.441 5/5.21 zHkzHM0.471~zHM0.641zHk5VTFHVzHM0.612~zHM0.471zHk001WMFzHM0.222~zHM0.612zHk5.21MFm3.1zHM0.532~zHM0.222zHk02 )A6F-HT( zHk5.21 )E7F-HT(zHM0.004~zHM0.532zHk5.21zHM0.034~zHM0.004zHk5.21mc07zHM0.054~zHM0.034zHk52zHM0.074~zHM0.054zHk5.21VTFHUzHM0.608~zHM0.074zHk001WMFmc32zHM0.0031~zHM0.608zHk52MFNote:◆By a default, FINE mode is activated automatically for 1.8 MHz ~29.7 MHz.◆LSB/ USB/ CW mode operation is limited below 600 MHz.◆Cellular band is blocked due to government regulations.](https://usermanual.wiki/Kenwood-USA/31241110/User-Guide-153116-Page-36.png)
![368 ENHANCED COMMUNICATIONSSELECTING A MODE FOR B-BANDWhen using B-band, the following receiving mode isavailable.edomgnivieceR segnarycneuqerfelbaliavABSU/BSLzHk001 ≤zHM074<fWCzHk001 ≤zHM074<fMAzHk001 ≤zHG3.1<fNMF/MFzHM7.92 ≤zHG3.1<fMFWzHM7.92 ≤zHG3.1<f■LSB/ USB/ AM/ FM/ WFMTo select the receiving mode for B-band:1Press [VFO].2Press [A/B] to select B-band.3Press [BAND] and then turn the Tuning control orpress [ ]/ [ ] to select the desired frequency.4Press [MODE] until you select the desiredreceiving mode. The mode icon cyclesFM ➞ WFM ➞ AM ➞ LSB ➞ USB ➞ CW, andthen goes back to FM.Note:◆To select FMN (Narrow FM), access Menu No. 29 and select“ON” {below}.◆LSB, USB, and CW modes can be selected in the frequenciesbelow 470 MHz only.BAR ANTENNAAlthough the supplied wide-band helical antenna isused for receiving B-band frequencies, due to thesize and length limitation, it may not suitable for thelow HF band (below 7 MHz) receiption. Thetransceiver features a built-in bar antenna for thereceiption frequency below 7 MHz. The transceiverautomatically switches to the bar antenna when youselect a frequency below 7 MHz for the B-band.However, you can connect an external antenna to theantenna connector instead.To disable the built-in bar antenna:1Press [MNU].2Turn the Tuning control or press [ ]/ [ ] to selectMenu No. 26 (BAR ANT).3Press [sssss], [MNU].4Turn the Tuning control or press [ ]/ [ ] to select“DISABLE”.FINE TUNING MODEWhen you operate the B-band in LSB, USB, CW, orAM mode, you can turn the FINE Tuning function ON.The Fine Tuning frequency step size can be selectedfrom 50 Hz, 100 Hz (default), or 1000 Hz.■Activating Fine TuningTo activate the FINE Tuning function:1Select a frequency (below 470 MHz) onthe B-band.• Operating mode must be LSB, USB, CW orAM.2Press [FINE].• 100 Hz digits appears.3Turn the Tuning control or press [ ]/ [ ] to tune toa station.Note:◆Fine Tuning functions works only when you operate thefrequency below 470 MHz.◆You cannot activate the Fine Tuning function on the A-band.◆When you change the mode to FM, the frequency will beautomatically adjusted to the next available frequency.◆While in the Fine Tuning mode, you cannot perform VFO stepsize change {page xx}, MHz mode {page xx}, and MHz Scan{page xx}.◆When you perform the Visual Scan {page xx}, InformationChannel Memory recall {page xx}, Information Channel Scan{page xx}, VFO mode {page xx}, Memory channel recall {pagexx}, Call channel recall {page xx}, or direct frequency entry {pagexx}, the transceiver exits the Fine Tuning mode.](https://usermanual.wiki/Kenwood-USA/31241110/User-Guide-153116-Page-37.png)
![378 ENHANCED COMMUNICATIONS■Selecting Fine Tuning Frequency stepYou can select the Fine Tuning frequency step from50 Hz, 100 Hz (default), or 1000 Hz.To select the Fine Tuning frequency step size:1Select a frequency on the B-band.2Press [F], [FINE].• Current frequency step size appears.3Turn the Tuning control or press [ ]/ [ ] to selecta desired frequency step from 50 Hz, 100 Hz(default), or 1000 Hz.4Press [sssss] or [MNU] to store the new setting.Note: The Fine Tuning frequency step size reflects all availablefrequencies for the B-band.](https://usermanual.wiki/Kenwood-USA/31241110/User-Guide-153116-Page-38.png)
![38OPERATOR CONVENIENCESBATTERY SAVERBattery Saver extends the operating time of thetransceiver. It becomes automatically active whenthe squelch is closed and no key is pressed for morethan 10 seconds. To reduce the battery consumption,it shuts the receiver circuit OFF for the programmedtime then momentarily ON to detect the signal. Toprogram the receiver shut-off period for the batterysaver:1Press [MNU].2Turn the Tuning control or press []/ [ ] to selectMenu No. 17 (BAT SAVER).3Press [sssss] or [MNU].4Turn the Tuning control or press []/ [ ] to selectthe receiver shut-off period from OFF, 0.2, 0.4,0.6, 0.8, 1.0 (default), 2.0, 3.0, 4.0, and5.0 seconds.5Press [sssss] or [MNU] to store the setting.Note: Longer period, more you can save the battery consumption.However, more chances of missing the signal.BATTERY REMAININGYou can confirm the remaining Ni-ion battery capacityusing this function. To confirm the Ni-ion batteryremaining capacity:Press [F], [LOW].• Battery remaining indicator appears.: more than 70 %: 40 % ~ 70 %: less than 40 %: needs rechargingNote: When DC IN jack is connected to the DC source (13.8 V DC),“CHARGING” (charging the Ni-ion battery) or “STANDBY” (charginghas completed) appears.BEEP FUNCTIONThe Beep function provides you confirmation of entry,error status, and malfunctions of the transceiver. Werecommend you leave it ON in order to detecterroneous operatins and malfunctions. However, toturn the beep function OFF:1Press [MNU].2Turn the Tuning control or press []/ [ ] to selectMenu No. 19 (KEY BEEP).3Press [sssss] or [MNU].4Turn the Tuning control or press []/ [ ] to select“OFF”.5Press [sssss] or [MNU] to store the setting.APO (Auto Power OFF)The TH-F6A/ TH-F7E switches OFF automatically ifno keys or controls are pressed or adjusted for 30minutes (default). 1 minute before the transceiverswitches OFF, warning beeps are output for a fewseconds and “APO” appears on the display. You canselect the APO time from OFF (disable), 30 (default),and 60 minutes.1Press [MNU].2Turn the Tuning control or press []/ [ ] to selectMenu No. 18 (APO).3Press [sssss] or [MNU].4Turn the Tuning control or press []/ [ ] to selectthe APO time from OFF, 30, or 60 minutes.5Press [sssss] or [MNU] to store the setting.Note:◆The APO function works even if the transceiver is scanning.◆The APO timer starts counting down the timer when no keypresses, no control adjustments, and no command (RS-232Cport) sequences are detected.ATTENUATORThe attenuator function is useful when extremelystrong signals exist nearby your receiving frequency.When these type of signals exist nearby yourreceiving frequency, the receiver gain control may beerroneously controlled and overloaded by the strongsignals, rather than by the target receiving signal. Ifthis happens, the target receiving signal can bemasked and buried by the strong signals. In thiscase, turn the Attenuator function ON. However, as aside effect, the target signal is also attenuated. Youmay have to adjust the VOL control to increase theaudio output level when it is ON.1Press [F], [MONI].• “ATT ON” appears momentarily on the B-banddisplay and the mode indicator blinks while it isON.2To turn the attenuator function OFF, press [F],[MONI] again.• The mode indicator quits blinking when it isOFF.Note:◆When the attenuator function is ON, both A-band and B-band,are attenuated. You cannot set the attenuator functionindependently for each band.◆ATT function is disabled while scanning.](https://usermanual.wiki/Kenwood-USA/31241110/User-Guide-153116-Page-39.png)
![3915 OPERATOR CONVENIENCESThe transceiver generates the following warningbeeps even if the beep function is turned OFF.• DC voltage error {page 2}.• PLL circuit malfunctions.Note: A beep output level is linked the VOL control position.BEAT SHIFTSince the transceiver uses a microprocessor tocontrol various functions of the transceiver, the CPUclock oscillator’s harmonics or image may appear onsome spots of the receiving frequencies. In this case,turn the Beat Shift function ON.1Press [MNU].2Turn the Tuning control or press []/ [ ] to selectMenu No. 25 (BEAT SHIFT).3Press [sssss] or [MNU].4Turn the Tuning control or press []/ [ ] to select“ON”.5Press [sssss] or [MNU] to store the setting.DISPLAY CONTRASTYou can adjust the LCD contrast level from 1(weakest) to 16 (strongest) by accessing Menu No.16 (CONTRAST). A default level is 8.1Press [MNU].2Turn the Tuning control or press []/ [ ] to selectMenu No. 16 (CONTRAST).3Press [sssss] or [MNU].4Turn the Tuning control or press []/ [ ] to adjustthe LCD contrast.• The relative contrast level appears in a bar-graph.5Press [sssss] or [MNU] to store the setting.FREQUENCY STEP SIZEChoosing the correct frequency step size is essentialin order to select your exact receive frequency usingthe Tuning control or pressing []/ [ ]. You canselect your desired frequency step size from:5 kHz, 6.25 kHz, 8.33 kHz (118 MHz band only),9 kHz (AM broadcasting band only) , 10 kHz,12.5 kHz, 15 kHz, 20 kHz, 25 KHz, 30 kHz, 50 kHz,100 kHz.The default step size for the amateur radio bands areas follows.dnaB oidarruetamA dnab A6F-HT E7F-HTdnab-AzHM441zHk5zHk5.21zHM022zHk02—zHM044/034zHk52zHk52dnab-BzHM441zHk5zHk5.21zHM022zHk02zHk5.21zHM044/034zHk52zHk52zHG2.1zHk52zHk52For B-band, refer to the page 35 for the defaultfrequency step size for other frequency bands. Thetransceiver stores the frequency step size parameterfor each band independently. You can also furtherfine tune the frequency in LSB, USB, AM, CW modeson the B-band. Refer to FINE tuning function{page 36}.Note: If you change the frequency step size that does not match thecurrent operating frequency, the transceiver automatically adjust thefrequency that matches new frequency step size.LAMPYou can illuminate the transceiver display by pressing[LAMP]. Approximately 5 seconds after releasing[LAMP], the light goes OFF if no other key ispressed. Pressing any key other than [LAMP] whilethe display is lit, restarts the 5-second timer; pressing[LAMP] turns OFF the light immediately.To keep the light ON continuously, press [F], [LAMP].The light remains ON until you press [F], [LAMP].LOCK FUNCTIONLock function disables the most of keys to preventyou from accidentally activating a function orchanging the current settings.Press [F] (1 s) to toggle Lock function ON or OFF.•“ ” appears when this function is ON.However, the following keys are not locked:[LAMP], [MONI], [SQL], [PTT], [F] (1 s), [ ], and[F] then [LAMP].Note: The Tuning control is also locked. To unlock the Tuningcontrol while the Lock function is ON, turn the Tune Enable functionON.■Tune EnableEven if the Lock function is ON, you sometimes wantto turn the Tuning control to change the frequency.In this case, turn this function ON.1Press [MNU].2Turn the Tuning control or press []/ [ ] to selectMenu No. 7 (TUNE ENABLE).3Press [sssss] or [MNU].4Turn the Tuning control or press []/ [ ] to select“ON”.5Press [sssss] or [MNU] to store the setting.](https://usermanual.wiki/Kenwood-USA/31241110/User-Guide-153116-Page-40.png)
![4015 OPERATOR CONVENIENCESNARROW BAND FM OPERATIONBy a default, if you select FM mode, the transceiveroperates in normal FM deviation (± 25kHz) mode forboth transmission and receiption. However, you canoperates the transceiver in narrow band FM deviation(± 12.5kHz) mode. To operate the narrow band FM:1Press [MNU].2Turn the Tuning control or press []/ [ ] to selectMenu No. 29 (FM NARROW).3Press [sssss] or [MNU].4Turn the Tuning control or press []/ [ ] to select“ON”.5Press [sssss] or [MNU] to store the setting.When the narrow band FM operation is ON,“FMN” appears instead of “FM”.Note: When you select Menu No. xx ON (9600 bps), the A-bandoperating mode returns to normal FM mode temporarilyPOWER-ON MESSAGEYou can change the greeting message when thetransceiver is turned ON.To change the message:1Press [MNU].2Turn the Tuning control or press []/ [ ] to selectMenu No. 15 (PWR-ON MSG).3Press [sssss] or [MNU].• The current message and entry cursorappears.3Turn the Tuning control or press [ ]/ [ ] to selectthe first character.• You can enter alphanumeric characters plusspecial ASCII characters. See the table belowfor available characters.4Press [sssss].• The cursor moves to the next digit.5Repeat steps 3 and 4 to enter up to 8 digits.• Pressing [sssss] after selecting the 8th digitcompletes the programming.• To complete programming after entering lessthan 8 digits, press [sssss] twice.• Press [ttttt] to move a cursor backward.• Pressing [F] deletes a character at the cursorposition.You can also use the keypad to enter alphanumericcharacters in step 3. For example, each press of[2] selects entry as a, b, c, 2, A, B, C, then a. PressMICROPHONE PF KEYS (OPTIONAL)If you have an optional SMC-33 or SMC-34 speakermicrophone, you can access many transceiversettings without using transceiver keys or controls.The 1, 2, and 3 keys located on the top of themicrophone are programmable with the transceiverkey (or key combination) function. The defaultassignment functions are as follows.[1]: A/B[2]: VFO/ MR[3]: CALL (TH-F6A)/ 1750 Hz (TH-F7E)Note:◆Turn the transceiver OFF before connecting the optional speakermicrophone.◆If the LOCK switch on the rear of the microphone is ON, youmust move the switch to OFF position to program the keys.1Press one of the following key combinations to re-program the keys on the speaker microphone.• Press Mic [1]+ [ ] to re-program Mic [1] key• Press Mic [2]+ [ ] to re-program Mic [2] key• Press Mic [3]+ [ ] to re-program Mic [3] key2Press a key or key combination you want toassign to the function key.]YEK[ ]YEK[+]F[PMALVERPMAL1NI.NMINOMf>-<NMTTABTUO.LWOLzHMEDOMPETSDNABENIFLAUDB/AOFVLAUSIVV>MOFNIRMXOVNI.MLQSLLACIRPNI.CLABzH0571LES.TENOTTFIHS1 The light stays ON until you press the key again.MONITORWhen you are receiving while the squelch function isON, weak signals may become intermittent.Or, if the CTCSS or DCS function is ON, you maywant to disable the squelch function temporarily tomonitor the current channel activities.In these cases, use the Monitor function to disablethe squelch function temporarily.To activate the Monitor function:1Press and hold [MONI].• The speaker is unmuted and you can monitorthe signals.2Release [MONI] key to return to normal operation.](https://usermanual.wiki/Kenwood-USA/31241110/User-Guide-153116-Page-41.png)
![4115 OPERATOR CONVENIENCES[0] to select space or 0. Refer to page 17 for theavailable characters and control keys.PROGRAMMABLE VFOIf you want to limit the operating frequencies within acertain range, program the upper and lowerfrequency limits to the program VFO pamameters.For example, if you select 448 MHz for the lower limitand 449 MHz for the upper limit, the tunable rangewill be limited from 448.000 MHz to 449.995 MHz.1Press [A/B] to select A-band.2Press [VFO].2Press [BAND] until you select the desiredamateur radio band to configure theprogrammable VFO frequency range.3Press [MNU].4Turn the Tuning control or press []/ [ ] to selectMenu No. 4.• The current programmable frequency range forthe band appears.5Press [sssss] or [MNU].6Turn the Tuning control or press []/ [ ] to selectthe lower limit frequency in MHz.7Press [sssss] or [MNU] to store the lower limitfrequency.• The cursor moves to right and the upper limitfrequency blinks.8Turn the Tuning control or press []/ [ ] to selectthe upper limit frequency in MHz.7Press [sssss] or [MNU] to store the upper limitfrequency.Note:◆You cannot program the 100 kHz or lower digit.◆The upper limit frequency varies depending on the selectedfrequency step size.SINGLE BAND OPERATIONIf you do not want to use A and B-band receiver at thesame time, you can turn A or B-band receiver OFF.1Press [A/B] to select the band you want tooperate.2Press [F], [A/B].• The frequency of the selected band appears inlarge font and the other band is turned OFF.3To return to normal dual band operation, press [F],[A/B] again.TIME-OUT TIMERThe Time-out Timer limits the time of eachtransmission. The built-in time-out timer in thetransceiver limits each transmission time for amaximum of 10 minutes. It is necessary to protectthe transceiver from the thermal damage. You cannotturn this function OFF.TONE ALERTTone Alert provides an audible alarm when signalsare received on the frequency you are monitoring. Inaddition, it shows the number of hours and minuteselapsed after signals were received. If you use ToneAltert with CTCSS or DCS, it alarms only when areceived CTCSS tone or DCS code matches the toneor code yo selected.1Select your desired frequeny or memory channel.2Press [F], [ENT].• A bell icon appears when Tone Alert function isON.• When a signal is received, an alarm soundsfor 10seconds and the bell icon stars blinking.• Pressing the PTT switch while the bell icon isblinking switches Tone Alert function OFF.• When 99 hours and 59 minutes pass after a signalis received, counting stops.• Each time a new signal is received, the elapsedtime resets to 00:00.Note:◆While Tone Alert is ON, there is no speaker output when a signalis received. To monitor the signal, press and hold [MONI].◆When Tone Alert is ON, APO does not turn the power OFF.◆When Tone Alert is ON, you can use only the following functions.[LAMP], [MONI], [SQL], [A/B], [F] then [LAMP], [F] then [ENT].TX INHIBITYou can inhibit the transmission to preventunauthorized individuals from transmitting, or toeliminate the accidental transmissions while carrying](https://usermanual.wiki/Kenwood-USA/31241110/User-Guide-153116-Page-42.png)
![4215 OPERATOR CONVENIENCESthe transceiver.1Press [MNU].2Turn the Tuning control or press []/ [ ] to selectMenu No. 8 (TX INHIBIT).3Press [sssss] or [MNU].4Turn the Tuning control or press []/ [ ] to select“ON”.5Press [sssss] or [MNU] to store the setting.• “TX INHIBIT!” appears if you press [PTT] whilethe TX Inhibit is ON.TX POWERYou can change the transmission output power bypressing [LOW]. Each time you press [LOW], theicon cycles H ➞ L ➞ EL, and then goes back to H.The output power varies depending on the batterytype and operating voltage. When the transceiveroperates with the power from the DC IN jack at 13.8V DC, it produces the maximum output power. Thetable below is approximate output power when thetransceiver operates with different types of battery orDC power source.tuptuO leveLrewoP yrettaB epyT dnaBrewoPtuptuO ).xorppa(A6F-HT E7F-HTH)hgih(41-TB )V0.6(zHM441W7.1zHM022W0.2A/NzHM044/034W5.2L24-BP )V4.7(zHM441zHM022zHM044/034NICD )V8.31(zHM441zHM022zHM044/034L)wol(41-TB )V0.6(zHM441zHM022zHM044/034L24-BP )V4.7(zHM441zHM022zHM044/034NICD )V8.31(zHM441zHM022zHM044/034LE cimonoce( )wol41-TB )V0.6(zHM441zHM022zHM044/034L24-BP )V4.7(zHM441zHM022zHM044/034NICD )V8.31(zHM441zHM022zHM044/034VOLUME BALANCEWhile you are receiving A and B-bands at the sametime, you may sometimes feel that audio output oneither band is too loud. You can adjust the volumebalance level of the bands.1Press [BAL].• The balance scale and blinking cursor appear.2Turn the Tuning control or press [ ]/ [ ] tochange the volume balance level of the bands.A-band Max Max Max Att MuteB-band Mute Att Max Max MaxMax: Maximum, Mute: Muted, Att: Attenuated3Press [sssss] or [MNU] to store the setting.VOX (VOICE-OPERATED TRANSMIT)VOX eliminates the necessity of manually switchingto the transmit mode each time you want to transmit.The transceiver automatically switches to transmitmode when the VOX circuitry senses that you havebegun speaking into the microphone.When using VOX, develop the habit of pausingbetween thoughts to allow the transceiver to dropback to receive mode briefly. You will then hear ifanybody wants to interrupt, plus you will have a shortperiod to gather your thoughts before speaking again.Your listeners will appreciate your consideration aswell as respect your more articulate conversation.VOX can be switched ON and OFF independently forCW and the other modes, excluding FSK.1Press [F], [SQL].•“VOX” appears.• To exit the VOX mode, press [F], [SQL] again.■Microphone Input LevelTo enjoy the VOX function, take the time toproperly adjust the gain of the VOX circuit. Thislevel controls the capability of the VOX circuit todetect the presence or absence of your voice.1Press [MNU].2Turn the Tuning control or press []/ [ ] toaccess Menu No. 21 (VOX GAIN).3Press [sssss] or [MNU].4Turn the Tuning control or press []/ [ ] toselect the “ON”.5Press [sssss] or [MNU] to store the setting.6While speaking into the microphone using your](https://usermanual.wiki/Kenwood-USA/31241110/User-Guide-153116-Page-43.png)
![4315 OPERATOR CONVENIENCESnormal tone of voice, adjust the setting (defaultis 4) using the Tuning control or press []/ [ ]until the transceiver reliably switches totransmit mode each time you speak.• The selectable gain range is from 0 (leastsensitive) to 9 (most sensitive).• The setting should not allow backgroundnoise to switch the transceiver to transmitmode.Note: The VOX gain level can be adjusted even if VOX isswitched OFF or while you are transmitting.■Delay TimeIf the transceiver returns to receive mode tooquickly after you stop speaking, your final wordmay not be transmitted. To avoid this, select anappropriate delay time that allows all of yourwords to be transmitted without an overly longdelay after you stop speaking.1Press [MNU].2Turn the Tuning control or press []/ [ ] toselect Menu No. 22 (VOX DELAY).3Press [sssss] or [MNU].4Turn the Tuning control or press []/ [ ] toselect the desired delay time from 100/ 200/300/ 500 (default)/ 1000/ 1500/ 3000 ms.5Press [sssss] or [MNU] to store the setting.■VOX on BusyYou can configure the transceiver to enforce theVOX transmission even if the A and/or B-bandreceiver is receiving the signals.1Press [MNU].2Turn the Tuning control or press []/ [ ] toselect Menu No. 20 (VOXonBUSY).3Press [sssss] or [MNU].4Turn the Tuning control or press []/ [ ] toselect “ON”.• To supress the VOX transmission when thetransceiver is receiving the signals, select“OFF”.5Press [sssss] or [MNU] to store the setting.](https://usermanual.wiki/Kenwood-USA/31241110/User-Guide-153116-Page-44.png)
![47WIRELESS REMOTE CONTROL (TH-F6A ONLY)If you also have a KENWOOD multi-band mobiletransceiver, you can control one of its bands bysending DTMF tones from this handy transceiver.You will find this function useful when you want tocontrol your mobile transceiver from a locationoutside your vehicle.Note:◆You can remotely control only the mobile transceivers that haveboth the DTSS and Remote Control functions.◆The FCC rules permit you to send control codes only on the 440MHz band.PREPARATIONLet us assume the 144 MHz band of the mobiletransceiver will be controlled.On the handy transceiver:1Press [PTT]+[VFO]+[ ].• The current secret access code numberappears. The default is 000.2Press a numeric key 0 to 9 to enter a 3-digit secretnumber.• You can also turn the Tuning control or press[ ]/ [ ] to select each digit. Press [sssss] ([ttttt])to move the cursor to the next (previous) digit.3When the cursor on the most right position, press[sssss] to complete the setting.4Select the 440 MHz band.5Select the transmit frequency.6Turn the transceiver power OFF.7Press [PTT]+[MR]+[ ].• The transceiver enters Remote Control mode.“MOBILE CTRL” appears.• To exit Remote control mode, repeat steps 6and 7.On the mobile transceiver:8Program the DTSS code on the UHF band as thesecret number.• Select the same number as you selected instep 2.• For the programming method, refer to theinstruction manual for the mobile transceiver.9Select the receive frequency on the UHF band.• Mate this frequency with the transmit frequencyon the handy transceiver.10 Make the transceiver enter Remote Control mode.• For the method, refer to the instruction manualfor the mobile transceiver.CONTROL OPERATIONWhen in the Remote Control mode, the keys of thetransceiver will function as below. Each time youpress a key, the transceiver will automatically entertransmit mode and send the corresponding commandto the mobile transceiver.1 2 3 ANOVERNOENOTNOSSCTCTNE4 5 6 BFFOVERFFOENOTFFOSSCTCLESENOT7 8 9 CLLACOFVRM)NOPER(0 DNWODWOLPU)FFOPER(1TM-V7A/ TM-D700A: REV ON/ OFFOther mobile transceiver: TONE ALERT ON/ OFF2Switches Repeater function ON/ OFF if the mobiletransceiver support this function.To change the transmit/ receive frequency:[VFO] ➡ [ENT] ➡ [0] ~ [9] (enter the necessarydigits) ➡ [ENT]) or [VFO] ➡ [UP]/ [DOWN]To recall a memory channel:[MR] ➡ [ENT] ➡ [0] ~ [9] (enter the necessary digits)➡ [ENT] or [MR] ➡ [UP]/ [DOWN]To change the tone (or CTCSS) frequency:[TONE SEL] ➡ [0] ~ [9] (enter 2 digits; ex. [0], [5]) ➡[TONE SEL]• Refer to the Tone frequency table on your mobiletransceiver for the Tone number.• Your mobile transceiver may require you to firstactivate the Tone or CTCSS function. It may alsoallow you to program a separate tone and CTCSSfrequency. Check the instruction manual for themobile transceiver.](https://usermanual.wiki/Kenwood-USA/31241110/User-Guide-153116-Page-45.png)