Kenwood Car Stereo System Kdc U7056Bt Users Manual
Kenwood Car Stereo System KDC-U7056DAB 51cb966844d10
2015-01-23
: Kenwood Kenwood-Kenwood-Car-Stereo-System-Kdc-U7056Bt-Users-Manual-263182 kenwood-kenwood-car-stereo-system-kdc-u7056bt-users-manual-263182 kenwood pdf
Open the PDF directly: View PDF ![]() .
.
Page Count: 24

KDC-U7056DAB
KDC-U7056BT
KDC-U7056BTL
CD-RECEIVER
Quick Start Guide
B59-2188-10/01 (M)© 2012 JVC KENWOOD Corporation
B59-2188-10_01_13Stepup_QSG_M_En.indd 1 13/06/04 13:36
2 | Quick Start Guide
Contents Before use
# WARNING
To prevent injuries or a fire, take
the following precautions:
• Stopthecarbeforeoperatingtheunit.
• Topreventashortcircuit,neverputor
leaveanymetallicobjects(suchascoins
ormetaltools)insidetheunit.
! CAUTION
• Adjustthevolumesothatyoucanhear
soundoutsidethecar.Drivingwiththe
volumeadjustedtoatoohighlevelmay
causeanaccident.
• Wipeoffthedirtonthepanelwithadry
siliconorsoftcloth.
Failuretoobservethisprecautionmay
resultindamagetothemonitororunit.
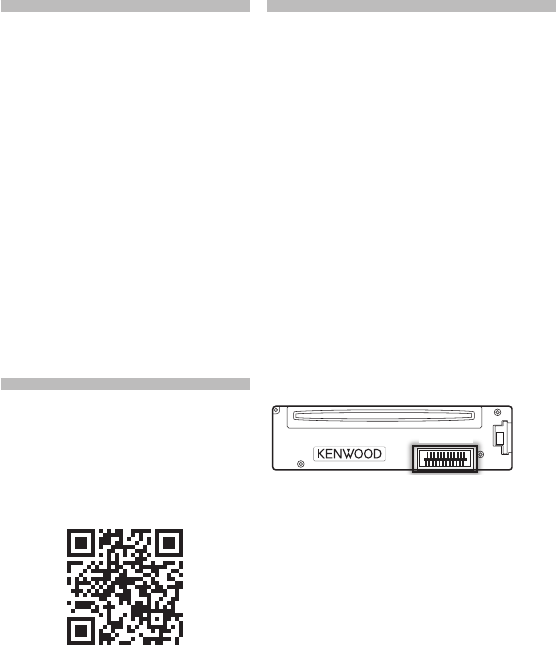
Cleaning the connector
Theunitmaynotfunctionproperlyifthe
connectorbetweentheunitandfaceplate
aredirty.Detachthefaceplateandcleanthe
connectorwithacottonswabgently,being
carefulnottodamagetheconnector.
Connector
Condensation
Whenthecarisair-conditioned,moisture
maycollectonthelaserlens.Thismaycause
discreaderrors.Inthiscase,removethedisc
andwaitforthemoisturetoevaporate.
Notes
• Ifyouexperienceproblemsduring
installation,consultyourKenwooddealer.
• Whenyoupurchaseoptionalaccessories,
checkwithyourKenwooddealertomake
surethattheycanworkwithyourmodel
andinyourarea.
• CharactersthatconformtoISO8859-1
canbedisplayed.
About the Quick Start Guide.......................... 2
Before use .............................................................2
Appendix .............................................................. 4
Preparations .........................................................4
General operations ............................................ 6
Playing music (CD/USB/iPod)......................... 7
Listening to the radio/Digital radio ............. 8
Hands-free phoning .......................................... 9
Before installation ............................................10
Connecting wires to terminals ....................12
3 way speaker system setup ........................14
Installing/Removing the unit .......................16
Installing the Microphone unit ..................17
Installing the Digital radio antenna...........17
Specifications .....................................................21
About the Quick Start
Guide
ThisQuickStartGuidedescribesbasic
functionsofthisunit.
ForfunctionsnotdescribedinthisGuide,
refertotheInstructionManualonthe
followingwebsite:
manual.kenwood.com/edition/im362/
TorefertotheInstructionManual,abrowser
suchasInternetExplorer®7orlater,Firefox®
3.6orlater,Chrome™20orlater,Safari®5.1
orlater,iOSSafari®4.0orlater,orAndroid™
2.2orlaterisrequired.
B59-2188-10_01_13Stepup_QSG_M_En.indd 2 13/06/04 13:36
English | 3
Before use
• Todisplaycharactersinthefollowing
language,additionalsettingisrequired.
KDC-U7056DAB KDC-U7056BT
-Chinese
Referto“Chinese”of<12-5.Initial
settings>.
KDC-U7056BTL
-Arabic
-Persian
-Thai
Referto“TAGLanguage”of<12-5.Initial
settings>.
About the discs used with this unit
• ThisunitcanonlyplaytheCDswith
.
• Thefollowingdiscscannotbeused:
- Adiscthatisnotround
- Adiscwithcoloringontherecording
surfaceoradiscthatisdirty
- Arecordable/rewritablediscthathas
notbeenfinalized(Forthefinalization
process,refertotheinstructionmanual
thatcamewithyourdiscwriting
softwareoryourdiscrecorder.)
- An8cm(3inch)disc(Anattempt
toinsertusinganadaptercancause
malfunction.)
Handling discs
• Donottouchtherecordingsurfaceof
thedisc.
• Donotsticktapeetc.onthedisc,orusea
discwithtapestuckonit.
• Donotuseanyaccessoriesforthedisc.
• Donotuseanysolventstocleandiscs.
Useadrysiliconorsoftcloth.
• Cleanthediscbymovingthecloth
outwardfromthecenterofthedisc.
• Whenremovingadiscfromthisunit,pull
itouthorizontally.
• Ifthecenterholeoroutsiderimofadisc
hasburrs,removethembeforeinserting
adisc.
! CAUTION
• Keepbatteryoutofreachofchildren
andinoriginalpackageuntilreadyto
use.Disposeofusedbatteriespromptly.
Ifswallowed,contactaphysician
immediately.
• Donotleavethebatterynearfireor
underdirectsunlight.Afire,explosion
orexcessiveheatgenerationmayresult.
• Donotsettheremotecontrolinhot
placessuchasonthedashboard.
• TheLithiumbatteryisindangerof
explosionifreplacedincorrectly.
Replaceitonlywiththesameor
equivalenttype.
The illustrations of the display and panel appearing
in this manual are examples used to explain more
clearly how the controls are used. Therefore, what
appears on the display in the illustrations may differ
from what appears on the display on the actual
equipment, and some of the images on the display
may be inapplicable.
How to reset your unit
Iftheunitfailstooperateproperly,pressthe
Resetbutton.Theunitreturnstothefactory
settings.
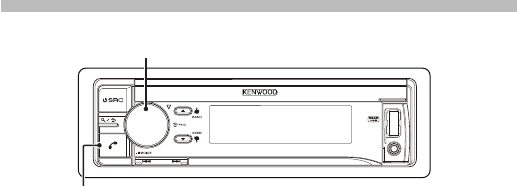
Reset button
B59-2188-10_01_13Stepup_QSG_M_En.indd 3 13/06/04 13:36

4 | Quick Start Guide
Preparations
Before using this unit for the first
time
When this unit is first turned on, the
interactive menu appears for setting the
interface language and demonstration
mode. This menu disappears when no
action is taken for 15 seconds.
KDC-U7056BTL only:
Selecttheinterfacelanguagetodisplay
themenuitemsoftheFunctionsetting,
fromEnglish,Arabic,andPersian.
Turn[Control]knobtoselectthe
language,andthenpress[Control]knob.
KDC-U7056BTL only:
IfyouselectedEnglishinstep1,select
thelanguagetodisplaytheaudiofile
information,fromEnglishandThai.
(ArabicorPersianisautomatically
selectedifyouselectedPersianorArabic
instep1.)
Press[Control]knobwhenthemessage
“TocancelDEMOPressthevolumeknob”
appears.
Turn[Control]knobtoselect“YES”,and
thenpress[Control]knob.
Theinterfacelanguageand
demonstrationmodecanalsobeset
withtheFunctionsetting.Referto<12-
4.Demonstrationmodesetting>in
Instructionmanual
Appendix
About Audio file
• PlayableAudiofiles
AAC-LC(.m4a),MP3(.mp3),WMA(.wma),
WAV(.wav)ofUSBdevice
• Playablediscmedia
CD-R/RW/ROM
• Playablediscfileformats
ISO9660Level1/2,Joliet,Longfilename.
• PlayableUSBdevices
USBmassstorageclass
• PlayableUSBdevicefilesystems
FAT12,FAT16,FAT32
Theonlinemanualabout
audiofilesisputonthesite,
www.kenwood.com/cs/ce/audiofile/.
Models of iPods/iPhones that can
be connected to this unit
Madefor
• iPodtouch(4thgeneration)
• iPodtouch(3rdgeneration)
• iPodtouch(2ndgeneration)
• iPodtouch(1stgeneration)
• iPodclassic
• iPodwithvideo
• iPodnano(6thgeneration)
• iPodnano(5thgeneration)
• iPodnano(4thgeneration)
• iPodnano(3rdgeneration)
• iPodnano(2ndgeneration)
• iPodnano(1stgeneration)
• iPhone4S
• iPhone4
• iPhone3GS
• iPhone3G
• iPhone
Forinformationonthecompatibilitywith
iPod/iPhonesoftware,visitwww.kenwood.
com/cs/ce/ipod/.
B59-2188-10_01_13Stepup_QSG_M_En.indd 4 13/06/04 13:36
English | 5
[1/6]
Preparations
Adjusting the clock
Press[Control]knobtoenterthe
Functionsettingmode.
Theitemcanbeselectedand
determinedasfollows.
”Settings”Á“Clock&Date”Á“Clock
Adjust”
Turn[Control]knobtoselecttheitem,
andpress[Control]knob.
Turn[Control]knobtoadjustthehour,
andthenpress[Control]knob.
Turn[Control]knobtoadjustthe
minute,andthenpress[Control]knob.
Pressandhold[1/6]toexitsthe
Functionsettingmode.
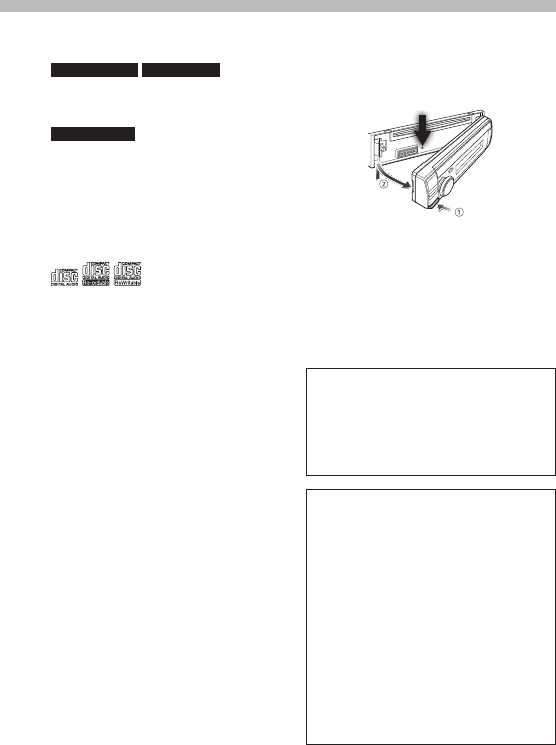
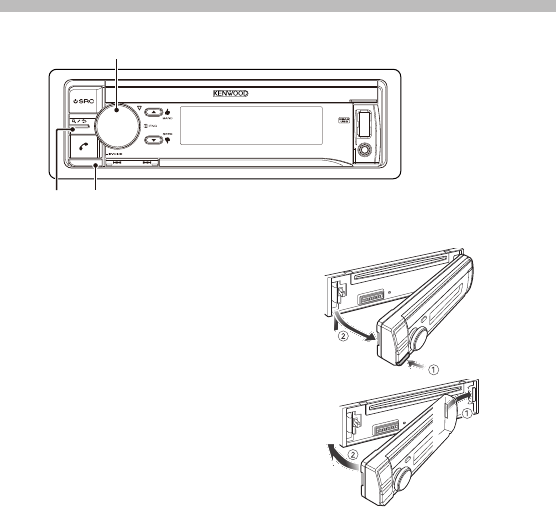
Detaching/ Attaching the faceplate
Pressthe
Releasebutton.
!
• Removethefaceplateatonceafter
pressingtheReleasebutton;otherwiseit
canfalldownduetovibration.
• Thefaceplateisaprecisioncomponentof
theunitandcanbedamagedbyshocks
orjolts.
• Keepthefaceplateinitscasewhile
detached.
• Donotplacethefaceplate(andcase)in
areasexposedtodirectsunlight,excessive
heatorhumidity.Alsoavoidplaceswith
toomuchdustorthepossibilityofwater
splashing.
Release
[Control] knob (Volume knob)
B59-2188-10_01_13Stepup_QSG_M_En.indd 5 13/06/04 13:36

6 | Quick Start Guide
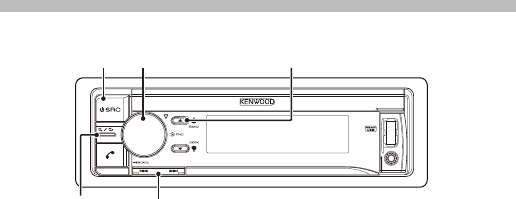
General operations
Power
ToturnthepowerON,press[SRC].
ToturnthepowerOFF,pressandhold
[SRC].
Source selection
Pressing[SRC]repeatedlyswitches
amongsources.
Source Display
Standby “STANDBY”
Digital radio[2] “DIGITAL RADIO”
Tuner “TUNER”
USB device connected to front USB
terminal
“USB (FRONT)”
USB device connected to rear USB
terminal
“USB (REAR)”
iPod connected to front USB terminal[1] “iPod (FRONT)”
iPod connected to rear USB terminal[1] “iPod (REAR)”
Pandora® of iPod connected to front
USB terminal[1][2][3]
“Pandora
(FRONT)”
Pandora of iPod connected to rear USB
terminal[1][2][3]
“Pandora
(REAR)”
Pandora of device connected via
Bluetooth[1][2][3]
“Pandora”
aha™ of iPod connected to front USB
terminal[1]
“aha (FRONT)”
aha™ of iPod connected to rear USB
terminal[1]
“aha (REAR)”
aha™ of device connected via
Bluetooth[1]
“aha”
Bluetooth audio “BT AUDIO”
CD[1] “CD”
Auxiliary Input “AUX”
[1]Thissourcecanbeselectedonlywhenitcan
beplayed.
[2]FunctionofKDC-U7056DAB.
[3]FunctionofKDC-U7056BT.
Volume
Turn[Control]knobtoadjustthesound
volume.
USB terminal
AUSBdeviceoriPodcanbeconnected.
TheCA-U1EX(Max.500mA)orKCA-iP102
(optionalaccessories)isrecommended
toconnectaUSBdeviceoriPod.
Auxiliary input
Aportableaudiodevicecanbe
connectedwithastereomini-plug(3.5
mmø).
[SRC]
Auxiliary input
USB terminal
[Control] knob (Volume knob)
B59-2188-10_01_13Stepup_QSG_M_En.indd 6 13/06/04 13:36

English | 7
CA-U1EX[1]
KCA-iP102[1]
[1/6]
[G]
[E/F] [R/S]
Playing music (CD/USB/iPod)
Playing a disc
OpentheDisc slot coverupward.
InsertadiscintheDisc slot.
Whenitisinserted,thesourceis
switchedautomaticallyandplayback
starts.
ClosetheDisc slot cover.
Playing a USB device/ iPod
ConnectaUSBdeviceoriPodtotheUSB
terminal asshownabove.
Whenitisconnected,thesourceis
switchedautomaticallyandplayback
starts.
YoucanconnecttheiPodorUSBdevice
toeitheroneoftheUSBterminals
providedatthefrontandrearofthisunit.
IfyouconnectittotherearUSBterminal,
the“REARUSB”indicatorstayslit.
[1]optionalaccessories
Selecting an audio file folder
Press[R]or[S].
Selecting a song (track or file)
Press[E]or[F].
Fast-forwarding or fast-
backwarding a song (track or file)
Pressandhold[E]or[F].
Pause and play a song (track or
file)
Pressandhold[1/6].
Music search
You can search for the song you want to
play.
Press[1/6].
Searchforasong.
Operation type Operation
Selecting items Turn [Control] knob.
Determining selection Press [Control] knob.
Returning to previous item Press [1/6].
Tocancelmusicsearchinaudiofilesor
iPod,Pressandhold[1/6].
Ejecting disc
OpentheDisc slot coverupward,and
press[G].
Removing USB device/ iPod
SwitchtoasourceotherthanUSB,
iPod,Pandora,andAhaRadio,andthen
removetheUSBdevice.
DatacontainedintheUSBdevice/iPod
maybedamagedifyouremoveitwhen
itisusedastheactivesource.
USB TerminalREAR USB indicator
Disc slot
Disc slot cover
[Control] knob
B59-2188-10_01_13Stepup_QSG_M_En.indd 7 13/06/04 13:37
8 | Quick Start Guide
Listening to the radio/Digital radio
Selecting a tuner source
Press[SRC]toselect“TUNER”or“DIGITAL
RADIO”(KDC-U7056DABonly).Referto
<Sourceselection>(page6).
Selecting a band (FM or AM)
(Tuner only)
Press[R].
Selecting a station/ service
Press[E]or[F].
Theseekmodecanbechanged.Referto
<9-5.Tunersetting>or<10-1.Listening
totheDigitalRadio>inInstruction
manual
Station preset memory
Press[R]toselectaband.(Tuneronly)
Press[E]or[F]toselectthe
station/serviceyouwanttosaveinthe
stationpresetmemory.
“TUNER”:Press[1/6].
“DIGITALRADIO”:Press[1/6]twice.
Press[1/6]againtoentertheMix
Stationpresetmode.Inthismode,
differentbandsandtunersources(FM,
AM,DigitalRadioetc.)canbesaved
inthesamepresetlayer,whichallows
youtorecalladesiredstationwithout
switchingbetweenbandsand/ortuner
sources.Maximumof6stationscanbe
presetintheMixStationpresetmode.
Turn[Control]knobtoselectpreset
number(FM/DigitalRadio:“1”–“18”,
AM:“1”–“6”),andthenpressandhold
[Control]knob.
Recalling the stations in the
memory
Press[R]toselectaband.(Tuneronly)
Press[1/6].
Turn[Control]knobtoselectapreset
number(FM/DigitalRadio:“1”–“18”,AM:
“1”–“6”),andthenpress[Control]knob.
IntheMixStationpresetmode,band
namesoftunersourcesaredisplayedas
follows:
FM:FMbroadcaststation
AM:AMbroadcaststation
DR:DigitalRadioservice
[SRC]
[
1
/
6
] [
E
/
F
]
[R]
[Control] knob
B59-2188-10_01_13Stepup_QSG_M_En.indd 8 13/06/04 13:37
English | 9
Hands-free phoning
Pairing a Bluetooth device
You can pairing your Bluetooth device in
this unit.
OperatetheBluetoothdevicetorequest
thisunitforconnection.
Thenameofthisunit(“KDC-####”)
appearsontheBluetoothdevice.
“Pressthevolumeknob”appears.
Press[Control]knob.
ConnectiontoyourBluetoothdevice
starts,“PairingSuccess”appearsawhile
later,andthentheprevioussourceis
selected.
Whenregistrationofyourcellphoneis
completed,thephonebookofthecell
phoneisautomaticallydownloaded
tothisunit.(Ifthephonebookhasnot
beendownloadedtothisunit,operate
thecellphonetodownloadit.)
Dialing a number in the phone
book
Dial the phone number in the phone book
of your cell phone.
If the phone book has not been
downloaded to this unit, operate the cell
phone to download it.
Press[Ú].
Turn[Control]knobtoselect“Phone
Book”,andthenpress[Control]knob.
Turn[Control]knobtoselectaname,
andthenpress[Control]knob.
Turn[Control]knobtoselectaphone
number.
Press[Ú].
Answering a phone call
Press[Ú].
Disconnecting a call
Press[Ú].
[Ú]
[Control] knob
B59-2188-10_01_13Stepup_QSG_M_En.indd 9 13/06/04 13:37
10 | Quick Start Guide
# WARNING
• Theunitcanonlybeinstalledinacarwith
a12VDCpowersupply,negativeground.
• Ifyouconnecttheignitionwire(red)
andthebatterywire(yellow)tothecar
chassis(ground),youmaycauseashort
circuit,thatinturnmaystartafire.Always
connectthosewirestothepowersource
runningthroughthefusebox.
! CAUTION
• Usethepowerharnessenclosedwiththis
unitforconnectingpower.Usingapower
harnessenclosedwithothermodelscan
causemalfunction.
• Installthisunitintheconsoleofyour
vehicle.
• Donottouchthemetalpartsofthisunit
duringandshortlyafteruseoftheunit.
Metalpartssuchastheheatsinkand
enclosurebecomehot.
• Mountingandwiringthisproduct
requiresskillsandexperience.Forsafety’s
sake,leavethemountingandwiringwork
toprofessionals.
• Ifyouexperienceanyproblemduring
installation,consultyourKenwooddealer.
• Disconnectthebattery’snegativeterminal
beforeinstallingtheunit.
• Insulateunconnectedwireswithvinyl
tapeorothersimilarmaterials.Toprevent
ashortcircuit,donotremovethecapson
theendsoftheunconnectedwiresand
terminals.
• Besuretogroundthisunittothecar’s
chassisagainaftermounting.
• Ifthefuseblows,firstmakesurethewires
arenottouchingotherpartstocausea
shortcircuit,andthenreplacetheoldfuse
withonewithanewthesamerating.
• Whenconnectingonlytwospeakers,
connecttheconnectorseithertoboth
ofthefrontoutputterminalsortoboth
oftherearoutputterminals(donotmix
frontandrearterminals).Forexample,if
youconnectthe+connectoroftheleft
speakertoafrontoutputterminal,do
notconnectthe - connectortoarear
outputterminal.
• Connectthespeakerwirescorrectlytothe
correspondingterminals.Theunitmay
bedamagedorfailtoworkifyoushare
the - wiresorgroundthemtoanymetal
partinthecar.
• Donotuseyourownscrews.Useonly
thesuppliedscrews.Usingwrongscrews,
coulddamagetheunit.
• Ifyourcar’signitionkeyswitchdoes
nothaveanACCposition,connectthe
ignitionwirestoapowersourcethatcan
beturnedonandoffwiththeignition
key.Ifyouconnecttheignitionwiresto
aconstant-voltagepowersource,aswith
batterywires,thebatterymaydie.
• Iftheconsolehasalid,makesureto
installtheunitsothatthefaceplatewill
nothitthelidwhenitisclosedoropened.
• Aftertheinstallingtheunit,check
whetherthebrakelamps,blinkers,wipers,
etc.onthecarareworkingproperly.
• Mounttheunitsothatthemounting
angleis30°orless.
• Receptionmaybecomepoorifthereare
metalobjectsneartheBluetoothantenna.
Bluetooth antenna unit
Before installation
B59-2188-10_01_13Stepup_QSG_M_En.indd 10 13/06/04 13:37
English | 11
KDC-U7056DAB
• Thisunithasthecoolingfantodecrease
theinternaltemperature.Donotmount
theunitinaplacewherethecooling
fanoftheunitareblocked.Blocking
theseopeningswillinhibitthecooling
oftheinternaltemperatureandresultin
malfunction.
Cooling fan
For Good Reception
Toassuregoodreception,notethe
following:
• Communicatewiththecellphonewithin
theline-of-sightdistanceof10m(30
ft).Thecommunicationrangebecomes
shorterdependingonthesurrounding
environment.Thecommunication
rangealsobecomesshorterwhenthere
isanobstaclebetweenthisunitand
thecellphone.Theabovemaximum
communicationrange(10m)isnot
alwaysassured.
• Abroadcaststationorwalkie-talkie
locatednearbycaninterferewith
communicationduetoatoostrong
signal.
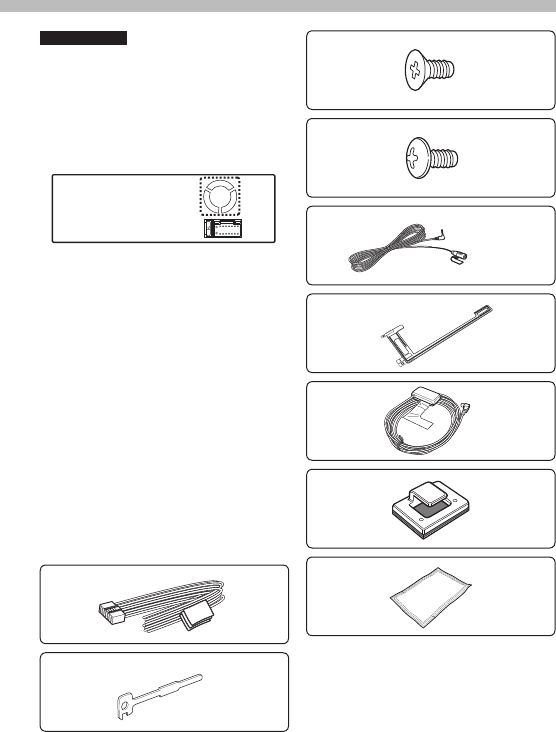
Installation accessories
1
.....1
2
.....2
Before installation
3
.....4
4
.....4
5
.....1 (3m)
6[1]
.....1
7[1]
.....1
8[1]
.....3
9[1]
.....1
[1]KDC-U7056DABonly
B59-2188-10_01_13Stepup_QSG_M_En.indd 11 13/06/04 13:37
P.CONT
ILLUMI
REMOTE CONT
REMOTE INPUT
STEERING WHEEL
ANT.
CONT
MUTE
–
+
FRONTSW REAR
LR
LR
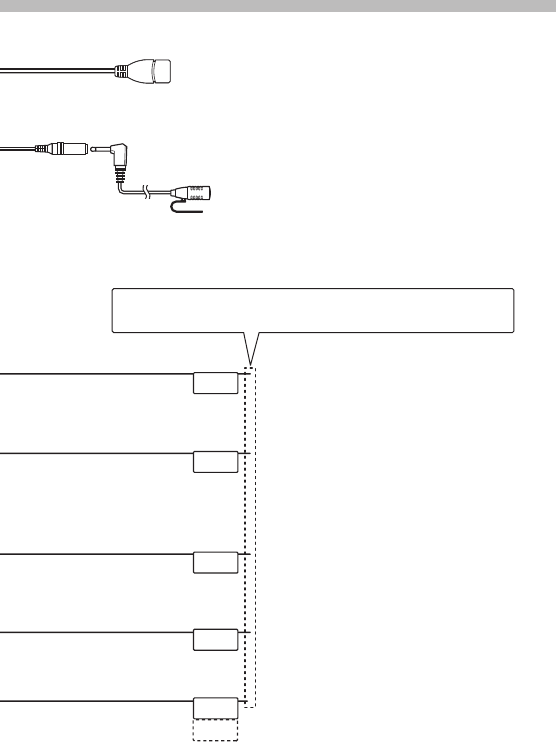
12 | Quick Start Guide
Connecting wires to terminals
FM/AMantennainput
Digitalradioantenna
(Accessory7)
(KDC-U7056DABonly)
KDC-U7056DABonly
Frontoutput
Fuse(10A)
White/Black
Gray/Black
Green/Black
Purple/Black
White
Gray
Green
Purple
Tofrontleftspeaker
Tofrontrightspeaker
Torearrightspeaker
Torearleftspeaker
Subwooferoutput
Rearoutput
Wiringharness
(Accessory1)
Red(Ignitionwire)
Yellow(Batterywire)
Black(Groundwire)·(Tocarchassis)
Ignitionkey
switch
Carfusebox
(Mainfuse)
ACC
Carfuse
box
Battery
<
• SpeakerImpedance:4–8Ω
Microphone(Accessory5)
(KDC-U7056BT/
KDC-U7056BTLonly)
B59-2188-10_01_13Stepup_QSG_M_En.indd 12 13/06/04 13:37
P.CONT
ILLUMI
REMOTE CONT
REMOTE INPUT
STEERING WHEEL
ANT.
CONT
MUTE
–
+
FRONTSW REAR
LR
LR
English | 13
Connecting wires to terminals
USBconnector(0.8m)
ToUSBdevice.
Ifnoconnectionsaremade,donotletthewirecomeoutfrom
thetab.
Blue/White
(Powercontrolwire)
Blue(Antennacontrolwire)
Orange/White
(Dimmercontrolwire)
Whenusingtheoptionalpoweramplifier,connect
thiswiretoitspowercontrolterminal.
Tocarlightcontrolswitch.
Dependingonwhatantennayouareusing,connect
eithertothecontrolterminalofthemotorantenna,
ortothepowerterminalfortheboosteramplifierof
thefilm-typeorshortpoletypeantenna.
(Max.300mA,12V)
Brown(Mutecontrolwire)
Tousethesteeringwheelremotecontrolfeature,
anexclusiveremoteadapter(notsupplied)that
matchesyourcarisrequired.
LightBlue/Yellow
(Steeringremotecontrolwire)
WhenconnectingtotheKenwoodnavigation
system:Refertoyournavigationmanual.
Microphone(Accessory5)
(KDC-U7056DABonly)
USBmaximumpowersupplycurrent
:DC5V=1A
B59-2188-10_01_13Stepup_QSG_M_En.indd 13 13/06/04 13:37
FRONTSW REAR
LR
LR
P.CONT
14 | Quick Start Guide
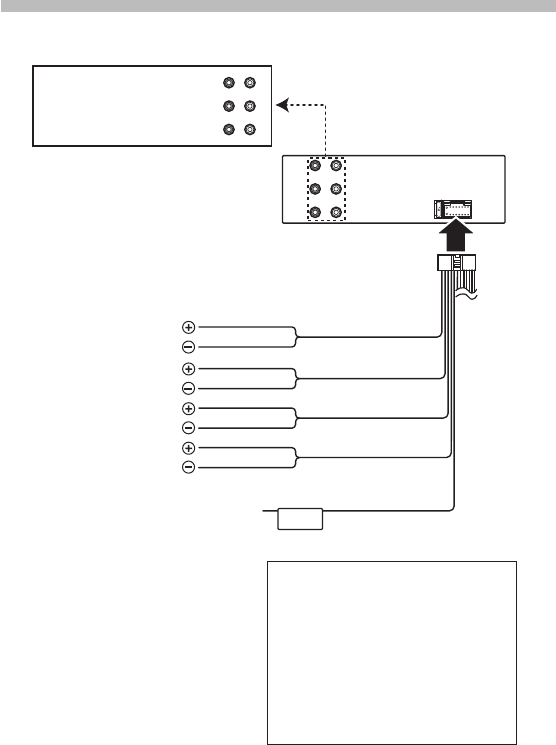
3 way speaker system setup
White/Black
Gray/Black
Green/Black
Purple/Black
White
Gray
Green
Purple
ToMIDRangeleftspeaker
ToMIDRangerightspeaker
TorightTweeter
ToleftTweeter
MidRangeoutput
Wooferoutput
Tweeteroutput
Whenusingtheoptionalpoweramplifier,
connectthiswiretoitspowercontrol
terminal.
⁄ Ifnoconnectionsaremade,donot
letthewirecomeoutfromthetab.
Connect the speaker wires
Wiringharness
(Accessory1)
¤
Selectacrossovermodeaccordingto
howthespeakersareconnected.Refer
to<2-Way/3-WayCrossoverSetting>
(nextpage).
Ifyouselectawrongmode:
• Thespeakerscanbreak.
• Theoutputsoundlevelmaybe
extremelylow.
⁄ Forhowtoconnectspeakerwires
toterminalsotherthanspeaker
terminalsandPreoutterminals,refer
to<Connectingwirestoterminals>
(page12).
Blue/White
(Powercontrolwire)
B59-2188-10_01_13Stepup_QSG_M_En.indd 14 13/06/04 13:37

English | 15
3 way speaker system setup
2-Way/3-Way Crossover Setting
Select a crossover mode 2-way or 3-way
according to how the speakers are
connected.
Pressthe[SRC]toselect“STANDBY”.
Pressingdownthe[S]and[E]sforat
least3seconds,allowsyoutoenterthe
2-way/3-waycrossoversettingmode.
Thecurrentlyselectedcrossovermode
isdisplayed.
Tochangeit,turn[Control]knobto
select“YES”,andthenpress[Control]
knob.
Aconfirmationscreenappears.
Ifyouaresureyouwanttochangethe
crossovermode,turnthe[Control]
knobtoselect“YES”,andthenpressthe
[Control]knob.
Thenewlyselectedcrossovermodeis
displayed,cancelingthe2-way/3-way
crossoversettingmode.
B59-2188-10_01_13Stepup_QSG_M_En.indd 15 13/06/04 13:37
16 | Quick Start Guide
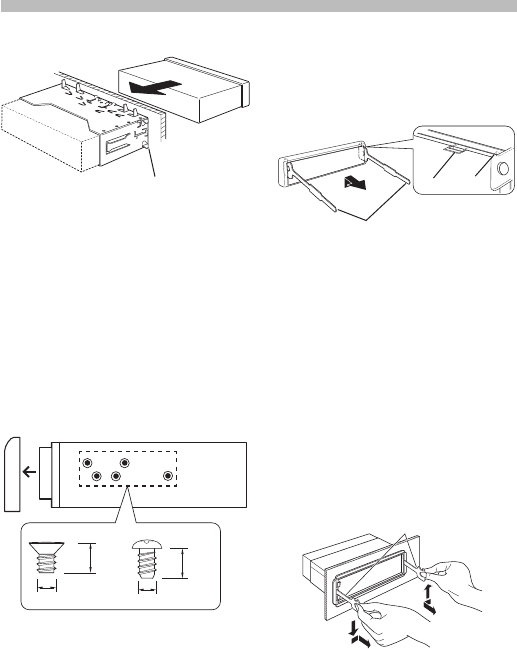
Installing/Removing the unit
Non-Japanese cars
Bend the tabs of the mounting sleeve
with a screwdriver or the like and
attach it in place.
<
• Makesurethattheunitisinstalled
securelyinplace.Iftheunitisunstable,it
maymalfunction(forexample,thesound
mayskip).
Japanese cars
Removethetrimplatewithreferenceto
<Removingthetrimplate>.
Aligntheholesintheunit(twolocations
oneachside)withthevehiclemounting
bracketandsecuretheunitwiththe
accessoryscrews.
8 mm
MAX.
ø5mm ø5mm
8mm
MAX.
34
Removing the trim plate
Engagethecatchpinsontheextraction
key(Accessory2)andreleasethetwo
locksontheupperpartofframe.
Liftupandpulltheframeforwardas
showninthefigure.
Catch
Lock
Accessory2
Whentheupperpartofframeis
removed,removethelowerpartofframe.
<
• Theframecanberemovedfromthe
bottomsideinthesamemanner.
Removing the unit
Removethetrimplatewithreferenceto
<Removingthetrimplate>.
Removethefaceplate.
Insertthetwoextractionkeys
(Accessory2)deeplyintotheslotson
bothsidesasshown.
Lowertheextractionkeytowardthe
bottom,andthenpullouttheunit
halfwaywhilepressingtheextractionkey
towardstheinside.
Accessory2
!
• Becarefultoavoidinjuryfromthecatch
pinsontheextractionkey.
Pulltheunitallthewayoutwithyour
hands,beingcarefulnottodropit.
B59-2188-10_01_13Stepup_QSG_M_En.indd 16 13/06/04 13:37
English | 17
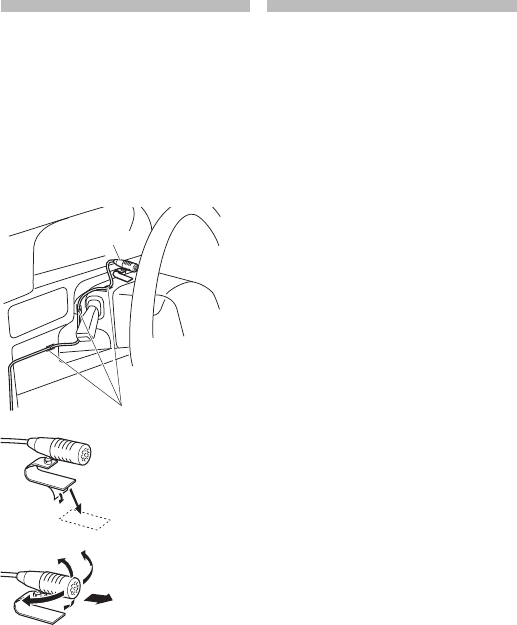
Installing the
Microphone unit
Installing the Digital
radio antenna
! CAUTION
• Thisfilmantennaisexclusivelyforuse
insidethevehicle.
• Donotinstallatthefollowinglocations:
- Whereitmayblockdriver’sview
- Whereitmayobstructoperationof
safetydevicessuchasairbags
- Onmovableglasssurfacesuchasrear
hatch
• Signalstrengthwilldecreaseatthe
followinglocations:
- OnIRreflectingglassorwherecovered
withmirrortypeglassfilm
- Whereitoverlapswithgenuineradio
antenna(pattern)
- Whereitoverlapswithwindowheating
wires
- Atsideofvehicle(e.g.door,front
quarterwindow)
- Onrearwindow
- Whenglassthatblocksradiosignals
(e.g.IRreflectingglass,thermal
insulationglass)isused
- Receptionmaydecreaseduetonoise
whenwindshieldwiper,airconditioner,
ormotoristurnedon.
- Receptionmaydecreasedependingon
thedirectionofthebroadcaststation
withrespecttothevehicle(antenna).
• Besuretochecktheinstallationlocation
offilmantenna(Accessory6)before
installing.Filmantennacannotbe
re-pasted.
• Thoroughlywipeoilanddirtfromthe
pastingsurfacewiththeincludedcleaner
(Accessory9).
• Donotbendordamagethefilmantenna
(Accessory6).
• Warmthepastingsurfacebyturningon
theheaterforexample,beforeapplying.
• Itmaynotbepossibletoinstallonsome
typeofvehicle.
• Checkthecableroutingofthefilm
antenna(Accessory6)andamplifier
(Accessory7)beforepasting.
Checktheinstallationpositionofthe
microphone(Accessory5).
Cleantheinstallationsurface.
Installthemicrophone.
Laythecableuptotheunitwithit
securedatseveralpositionsusingtape
orthelike.
<
• Installthemicrophoneasfaraspossible
fromthecellphone.
Fix the cable with a commercial item of tape.
Accessory5
Remove the separator of
the microphone, and stick
the microphone to the
place shown above.
Adjust the direction of the
microphone to the driver.
KDC-U7056DAB only
B59-2188-10_01_13Stepup_QSG_M_En.indd 17 13/06/04 13:37
18 | Quick Start Guide
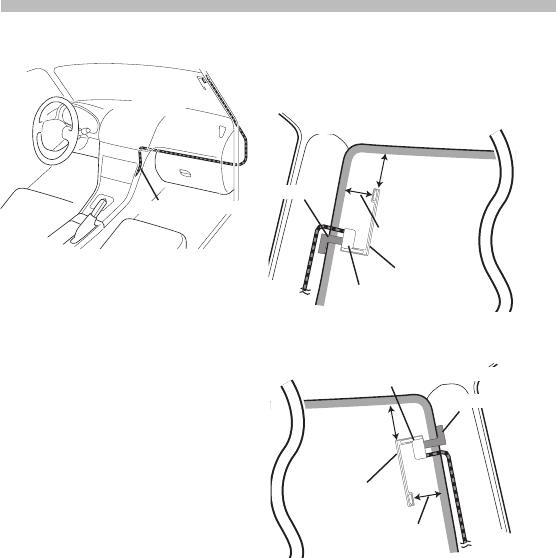
Installing the Digital radio antenna
Installation overview
Antenna cable (3.5 m)
Accessory67
• Theantennashouldbeinstalledonthe
passengersideforsafety.
• Usecordclamper(Accessory8)to
securetheantennatothepillaratseveral
locations.
• Thedirectionoftheantennafilm
(Accessory6)changesdependingon
whetherthefilmantennaisinstalledon
therightsideorleftside.
• Separatetheantennafilm(Accessory6)
fromtheceramicline(blackpart)atthe
topofthefrontglassby150mm.
Also,placeitabout70mminsidethe
ceramiclineatthesideendofthefront
glass.(wheretheearthsheetofthe
amplifiercanbepastedonthemetalpart
ofthefrontpillar)
• Separatefromotherantennasbyatleast
100mm.
• Donotpastetheamplifier(Accessory7)
ontheceramicline(blackpart)around
thefrontglass.Becausethereisnot
enoughadhesion.
Determining the antenna
installation location
• When installing the antenna on the
left side
Accessory7
Accessory6
70 mm*
150 mm
Front pillar
Earth sheet
• When installing the antenna on the
right side
Accessory6
Accessory7
70 mm*
150 mm
Front pillar
Earth sheet
*Wheretheearthsheetofamplifierunit
(Accessory7)canbepastedonthemetal
partofthefrontpillar.
KDC-U7056DAB only
B59-2188-10_01_13Stepup_QSG_M_En.indd 18 13/06/04 13:37
English | 19
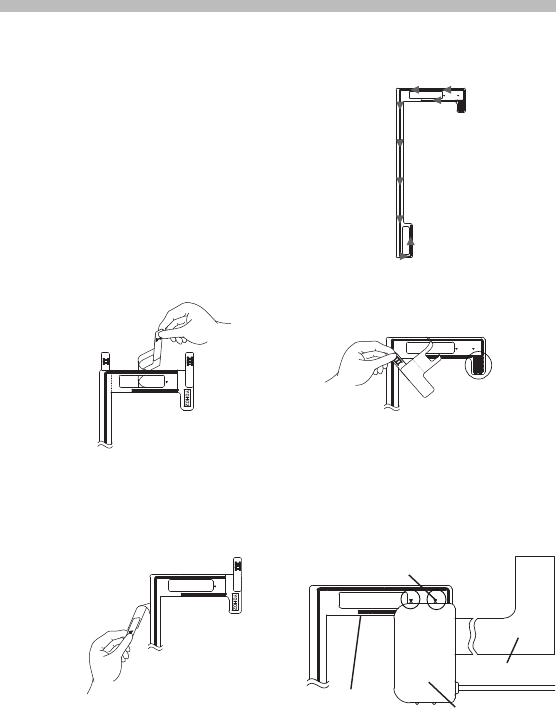
Installing the Digital radio antenna
Antenna Installation
Checktheinstallationlocation.
Cleantheareawhereantennafilm
(Accessory6),amplifierunit(Accessory
7),andearthsheetarepastedwiththe
includedcleaner(Accessory9).
Thecoatingonthemetalsurfaceneed
notberemoved.
• Waituntiltheglasssurfaceis
completelydrybeforepasting.
• Iftheglasssurfaceiscold,suchas
duringwinter,warmitwithdefrosteror
dryer.
Removetheseparator(tagI)ofantenna
filmhorizontallyandpastetheantenna
onthefrontglass.
• Removetheseparatorgently.
• Donottouchthepastingsurface
(adhesiveside)oftheantennafilm.
Removetheseparator(tagII)ofantenna
filmverticallyandpastetheantenna
gentlywhileapplyingpressure.
Afterpasting,rubtheelementinthe
glasssurfaceinthedirectionofthearrow
showninthefiguretobondit.
Removetheapplicationfilm(tagIII).
• Donottouchthefeederterminalof
theelement.Also,donotapplyany
glasscleaner.
Feeder terminal
Matchtheprotrusionoftheamplifier
withthe5ontheantennafilmand
paste.
• Donottouchthefeederterminalor
thepastingsurface(adhesiveside)of
theamplifier.
• When installing the antenna on the
right side
Accessory7
Accessory6
Earth sheet
Match the protrusion with 5
B59-2188-10_01_13Stepup_QSG_M_En.indd 19 13/06/04 13:37
20 | Quick Start Guide
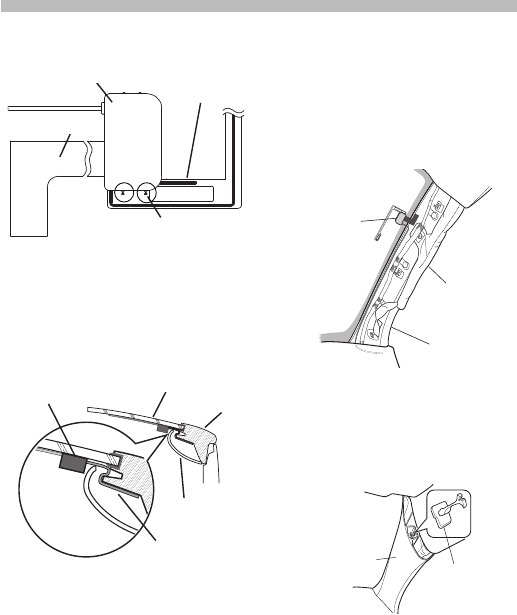
Installing the Digital radio antenna
• When installing the antenna on the
left side
Accessory7
Accessory6
Earth sheet
Match the protrusion with 5
Removethefilmcoveringtheearth
sheetandpastetheearthsheetonthe
metalpartofthevehicle.
Providesufficientleewayfortheearth
sheetsothatitdoesnotinterferewith
theinteriorparts(frontpillarcover).
Alsotakecarethattheinteriorpartsdo
notinterferewiththeamplifier.
Accessory7
Earth sheet
Interior part
Front pillar
Front glass
Wiretheantennacables.
• Usecordclamper(Accessory8)to
securetheantennatothepillarat
severallocations.
<
• Takethefollowingprecautionswhen
passingtheantennacableinsidethefront
pillarwheretheairbagisinstalled.
- Installtheamplifierpartoftheantenna
cableinfrontorabovetheairbagso
thattheantennaandtheairbagdonot
interfere.
Accessory7
Air bag
Front pillar
- Thefrontpillarcoverissecuredwith
aspecialclipwhichmayneedtobe
replacedwhenthefrontpillarcoveris
removed.
Contactyourvehicledealerfordetails
onreplacingthefrontpillarcoverand
availabilityofreplacementparts.
Clip
Interior part
KDC-U7056DAB only
B59-2188-10_01_13Stepup_QSG_M_En.indd 20 13/06/04 13:37

English | 21
Specifications
FM tuner section
Frequencyrange
200kHzstep:87.9MHz–107.9MHz
50kHzstep:87.5MHz–108.0MHz
Usablesensitivity(S/N=26dB)
:7.2dBf(0.63μV/75Ω)
QuietingSensitivity(S/N=46dB)
:15.2dBf(1.6μV/75Ω)
Frequencyresponse(±3dB):30Hz–15kHz
SignaltoNoiseratio(MONO):75dB
Stereoseparation(1kHz):45dB
AM tuner section
Frequencyrange
10kHzstep:530kHz–1700kHz
9kHzstep:531kHz–1611kHz
Usablesensitivity(S/N=20dB):31dBµ(36µV)
DAB tuner section (KDC-U7056DAB)
Frequencyrange
L-BAND:1452.960MHz–1490.624MHz
BANDIII:174.928MHz–239.200MHz
Sensitivity:-100dBm
SignaltoNoiseratio:80dB
AntennaConnectortype:SMB
AntennaOutputVoltage(11–16V):14.4V
AntennaMaximunCurrent:<100mA
CD player section
Laserdiode:GaAlAs
Digitallter(D/A):8TimesOverSampling
D/AConverter:24Bit
Spindlespeed(Audioles):500–200rpm(CLV)
Wow&Flutter:BelowMeasurableLimit
Frequencyresponse(±1dB):10Hz–20kHz
Totalharmonicdistortion(1kHz):0.008%
SignaltoNoiseratio(1kHz):110dB
Dynamicrange:93dB
MP3decode
:CompliantwithMPEG-1/2AudioLayer-3
WMAdecode
:CompliantwithWindowsMediaAudio
AACdecode:AAC-LC“.m4a”les
USB interface
USBStandard:USB1.1/2.0(Fullspeed)
FileSystem:FAT12/16/32
MaximumSupplycurrent:DC5V 1A
Decode:MP3,WMA,AAC,WAV
Audio section
Maximumoutputpower:50Wx4
FullBandwidthPower(atlessthan1%THD)
:22Wx4
Preoutlevel/Load(CD)
KDC-U7056DAB:2500mV/10kΩ
KDC-U7056BT/KDC-U7056BTL:4000mV/10kΩ
Preoutimpedance:≤600Ω
SpeakerImpedance:4–8Ω
Tone:
Band1:62.5Hz±9dB, Band2:100Hz±9dB
Band3:160Hz±9dB, Band4:250Hz±9dB
Band5:400Hz±9dB, Band6:630Hz±9dB
Band7:1kHz±9dB, Band8:1.6kHz±9dB
Band9:2.5kHz±9dB, Band10:4kHz±9dB
Band11:6.3kHz±9dB, Band12:10kHz±9dB
Band13:16kHz±9dB
Bluetooth section
Version:BluetoothVer.2.1+EDRCertied
Frequencyrange:2.402–2.480GHz
OutputPower
:+4dBm(MAX),0dBm(AVE)PowerClass2
MaximumCommunicationrange
:Lineofsightapprox.10m
Proles
:HFP(HandsFreeProle)
:SPP(SerialPortProle)
:PBAP(PhonebookAccessProle)
:OPP(ObjectPushProle)
:A2DP(AdvancedAudioDistributionProle)
:AVRCP(Audio/VideoRemoteControlProle)
Auxiliary input
Frequencyresponse(±3dB):20Hz–20kHz
InputMaximumVoltage:1200mV
InputImpedance:10kΩ
General
Operatingvoltage:14.4V(10.5–16Vallowable)
MaximumCurrentconsumption:10A
InstallationSize(WxHxD):182x53x159mm
Weight:1.3kg
Specifications subject to change without notice.
B59-2188-10_01_13Stepup_QSG_M_En.indd 21 13/06/04 13:37
Requirements Pandora:
RequirementsforlisteningtothePandora
areasfollows:
iPhone or iPod touch
• UseanAppleiPhoneoriPodtouch
runningunderiOS3orlater.
• Searchfor“Pandora”intheAppleiTunes
AppStoretofindandinstallthemost
currentversionofthePandoraapplication
onyourdevice.
• iPhone/iPodtouchconnectedtothisunit
withaKCA-iP102.
Android™ or BlackBerry®
• DownloadthePandoraapplicationto
yoursmartphonefromPandorasiteusing
it’sstandardbrowser.
• Bluetoothmustbebuiltinandthe
followingprofilesmustbesupported.
-SPP(SerialPortProfile)
-A2DP(AdvancedAudioDistribution
Profile)
NOTE
• Intheapplicationonyourdevice,login
andcreateanaccountwithPandora.
(Ifyouarenotalreadyaregistereduser,
anaccountcanalsobecreatedatwww.
pandora.com.)
• InternetconnectionbyLTE,LTE,3G,EDGE,
orWiFi.
• PandoraisavailableonlyintheU.S,
Canada,AustraliaandNewZealand.
• BecausePandoraisathird-partyservice,
thespecificationsaresubjecttochange
withoutpriornotice.Accordingly,
compatibilitymaybeimpairedorsome
oralloftheservicesmaybecome
unavailable.
• SomefunctionsofPandoracannotbe
operatedfromthisunit.
• Forissuesusingtheapplication,please
contactPandoraatpandora-support@
pandora.com
• PANDORA,thePANDORAlogo,andthe
Pandoratradedressaretrademarksor
registeredtrademarksofPandoraMedia,
Inc.,usedwithpermission.
Requirements Aha™:
RequirementsforlisteningtotheAha™are
asfollows:
iPhone or iPod touch
• UseanAppleiPhoneoriPodtouch
runningiOS4orlater.
• Searchfor“aha”intheAppleiTunesApp
Storetofindandinstallthemostcurrent
versionoftheAha™applicationonyour
device.
• iPhone/iPodtouchconnectedtothisunit
withaKCA-iP102.
Android™
• UseAndroidOS2.2orlater.
• DownloadtheAha™applicationtoyour
smartphonefromtheGooglePlay.
• Bluetoothmustbebuiltinandthe
followingprofilesmustbesupported.
-SPP(SerialPortProfile)
-A2DP(AdvancedAudioDistribution
Profile)
NOTE
• Intheapplicationonyourdevice,login
andcreateafreeaccountwithAha.
• InternetconnectionbyLTE,LTE,3G,EDGE,
orWiFi.
• BecauseAha™isathird-partyservice,
thespecificationsaresubjecttochange
withoutpriornotice.Accordingly,
compatibilitymaybeimpairedorsome
oralloftheservicesmaybecome
unavailable.
• SomeAha™functionalitycannotbe
operatedfromthisunit.
• aha,theAhalogo,andtheAhatradedress
aretrademarksorregisteredtrademarks
ofHARMANInternationalIndustries,used
withpermission.
B59-2188-10_01_13Stepup_QSG_M_En.indd 22 13/06/04 13:37

• TheBluetoothwordmarkandlogosare
ownedbytheBluetoothSIG,Inc.andanyuse
ofsuchmarksbyJVCKENWOODCorporation
isunderlicense.Othertrademarksandtrade
namesarethoseoftheirrespectiveowners.
• The“AAC”logoisatrademarkofDolby
Laboratories.
• “MadeforiPod”and“MadeforiPhone”
meanthatanelectronicaccessoryhasbeen
designedtoconnectspecificallytoiPodor
iPhone,respectively,andhasbeencertified
bythedevelopertomeetAppleperformance
standards.Appleisnotresponsibleforthe
operationofthisdeviceoritscompliancewith
safetyandregulatorystandards.Pleasenote
thattheuseofthisaccessorywithiPodor
iPhonemayaffectwirelessperformance.
• iPhone,iPod,iPodclassic,iPodnano,andiPod
toucharetrademarksofAppleInc.,registered
intheU.S.andothercountries.
• iTunesandSafariaretrademarkofAppleInc.
• IOSisatrademarkorregisteredtrademarkof
CiscointheU.S.andothercountriesandis
usedunderlicense.
• Adobe,AcrobatandReaderareeither
registeredtrademarksortrademarksofAdobe
SystemsIncorporatedintheUnitedStates
and/orothercountries.
• AndroidandChromearetrademarkof
GoogleInc.
• BlackBerry®,RIM®,ResearchInMotion®and
relatedtrademarks,namesandlogosarethe
propertyofResearchInMotionLimitedand
areregisteredand/orusedintheU.S.and
countriesaroundtheworld.Usedunder
licensefromResearchInMotionLimited.
• InternetExplorerandWindowsMediaare
registeredtrademarkofMicrosoftCorporation
intheUnitedStatesandothercountries.
• FirefoxisaregisteredtrademarkofMozilla
FoundationintheUnitedStatesandother
countries.
• PANDORA,thePANDORAlogo,andthe
Pandoratradedressaretrademarksor
registeredtrademarksofPandoraMedia,Inc.,
usedwithpermission.
• aha,theAhalogo,andtheAhatradedress
aretrademarksorregisteredtrademarksof
HARMANInternationalIndustries,usedwith
permission.
The marking of products using
lasers (Except for some areas)
CLASS 1
LASER PRODUCT
Thelabelisattachedtothechassis/caseand
saysthatthecomponentuseslaserbeams
thathavebeenclassifiedasClass1.Itmeans
thattheunitisutilizinglaserbeamsthat
areofaweakerclass.Thereisnodangerof
hazardousradiationoutsidetheunit.
TRA
REGISTERED No. : ER0106384/13
DEALER No. : 0016026/08
B59-2188-10_01_13Stepup_QSG_M_En.indd 23 13/06/04 13:37

B59-2188-10_01_13Stepup_QSG_M_En.indd 24 13/06/04 13:37
