Kenwood Car Stereo System Kdc X597 Users Manual 113KDCX597
KDC-X597 to the manual 906096e3-7a03-45ae-b744-e366d2f37281
2015-01-23
: Kenwood Kenwood-Kenwood-Car-Stereo-System-Kdc-X597-Users-Manual-263203 kenwood-kenwood-car-stereo-system-kdc-x597-users-manual-263203 kenwood pdf
Open the PDF directly: View PDF ![]() .
.
Page Count: 24
KENWOOD
KDC-X597
KDC-BTSSSU
KDC-BT355U
CD-RECEIVER
INSTRUCTION
MANUAL
AMPLI-TUNER
LECTEUR
DE
CD
MODE
D'EMPLOI
REPRODUCTOR
DE
DISCOS
COMPACTOS
RECEPTOR
DE
FM/AM
MANUAL
DE
INSTRUCCIONES
JVC KENWOOD Corporation
/IIIJI
Designed for
-lliil
Windows
~-™
Media™
Made for
~
iPod C iPhone works with
PANDOR.A
Take
the
time
to
read
through
this
instrudion
manual.
Familiarity
with
installation and operation procedures
will
help
you
obtain
the
best performance
from
your
new
CO-receiver.
For
your
records
Record
the
serial number, found on the back
of
the
unit, in
the
spaces designated on
the
warranty card, and in
the
space provided below.
Refer
to
the
model and serial
numbers whenever you call
upon
your Kenwood dealer for information or seNice on the product.
Model KDC-X597/
KDC-BTSSSU/
KDC-BT355U
Serial
number
_____
_
US
Residents
Only
Register
Online
~:~:
~'>-:
~~,-~
:- . -
-._-
- - - - '
~
--._-
--_
"--
~
.'
·--~-:
~'.:
;
-_
~~-~~
~-·
~~-:~~:~:~~:~~:~~:~::.~:-~~f;~;~~:~5~~~~f~:::i~~::Ji
©
2012
JVC
KENWOOD
Corporation
GET0858-001
A
(KW/KO)
CONTENTS
2
BEFORE
USE
2
BASICS
3
GETTING
STARTED
4
RADIO
5
CD
I
USB
I
iPod
6
AUX
7
Pandora8
(for
l:~•!il!f.il~/
13•Ita:if.i-i-11))
8
SiriusXM™
(for
13•!il!f.il~/
13nea:if.i-i-11J)
8
BLUETOOTH
8 10
AUDIO
SETTINGS
14
DISPLAY
SETTINGS
15
MORE
INFORMATION
16
TROUBLESHOOTING
17
SPECIFICATIONS
19
INSTALLATION
I
CONNECTION
20
r---------
----
----
---
---------
--
--
--------------
--
-----
------------------
---
1
I
How
to
read this manual !
I •
Operations explained mainly using buttons !
I
on
the faceplate.
I
•
[XX]
indicates the
selected
items.
I
• (-+XX)
indicates
references
are
available
on
I
L the stated
page
n~~~~-
-
-
-
---_j
BEFORE
USE
A
warning
Do
not operate
any
function that
takes
your
attention
away
from
safe
driving.
A
caution
Volume
setting:
• Adjust the volume
so
that
you
can
hear
sounds
outside the
car
to prevent accident.
• Lower the volume before playing digital
sources
to avoid damaging the
speakers
by
the sudden
increase
of
the
output
level.
General:
• Avoid
using
the
USB
device or iPod/iPhone if it might hinder driving
safety.
•
Make
sure
all
important
data
has
been
backed
up.
We
shall
bear
no responsibility for
any
loss
of recorded
data.
•
Never
put or
leave
any
metallic objects
(such
as
coins
or metal tools) inside the unit, to prevent a short circuit.
• If a
disc
error
occurs
due to condensation
on
the
laser
lens,
eject the
disc
and
wait for the moisture to evaporate.
Remote
control
(RC-406):
•
Do
not
leave
the remote control
in
hot
places
such
as
on
the dashboard.
•
The
Lithium battery
is
in
danger
of
explosion if
replaced
incorrectly.
Replace
it only with the
same
or equivalent
type.
•
The
battery
pack
or batteries
shall
not
be
exposed
to
excessive
heat
such
as
sunshine,
fire or the
like.
•
Keep
battery out
of
reach
of
children
and
in
original
package
until
ready
to
use.
Dispose
of
used
batteries
promptly. If swallowed, contact a physician immediately.
CALIFORNIA,
USA
ONLY
This
perchlorate
WARNING
applies only to the product
sold
or distributed
in
California
USA
"Perchlorate
Material-special handling
may
apply,
See
www.dtsc.ca.gov/hazardouswaste/perchlorate."
r-
.v~;i~t;~~
-
~~-;
-
-
----
-
-----
-
------
----
--
-
---
-
--
-
---
--
-
--
-
-----
-------------
-
------
-
------
-
---
-
-
-
-
---
------------
-
---
--
-------
- -
--
-----------
---
--
-
- -
------
-
--
---
-1
i
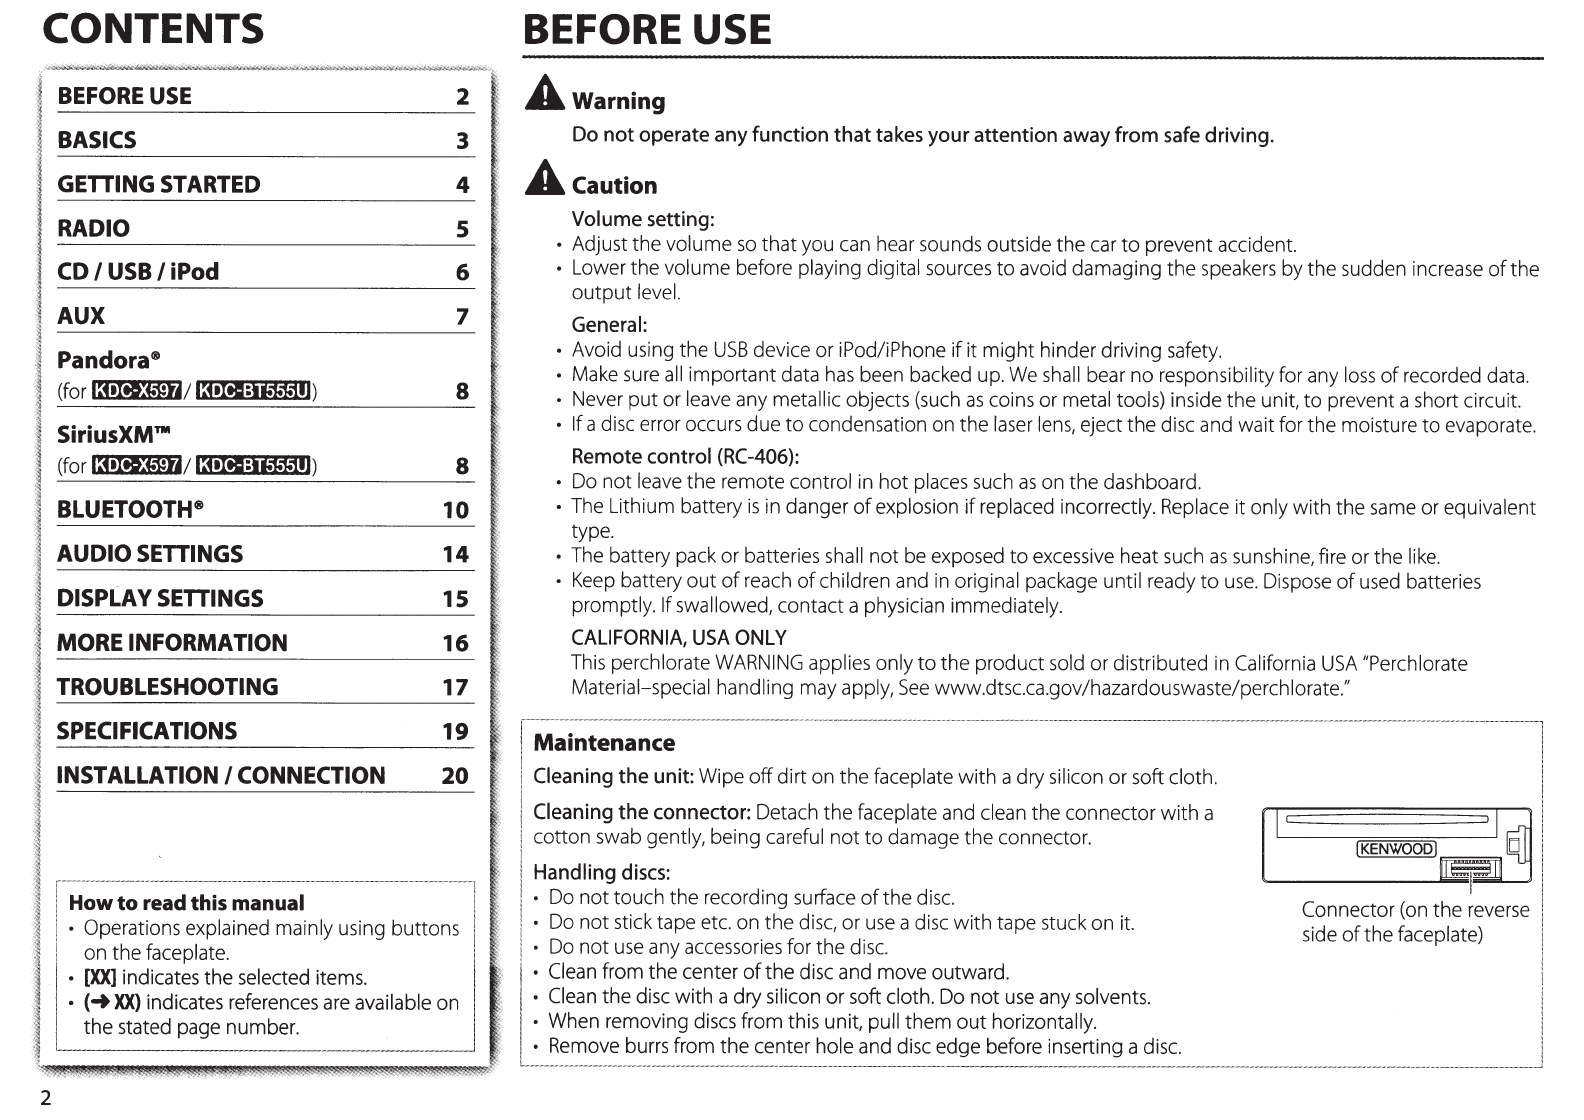
Cleaning
the
unit:
Wipe off dirt
on
the faceplate with a dry silicon or soft cloth.
I
j
Cleaning the connector:
Detach
the faceplate
and
clean
the connector with a I 1
~
I•
1
cotton
swab
gently,
be1ng
careful not to damage the connector.
!KENWOOD
I~
~
o !
j
Handling
discs:
. .
~
i
1 •
Do
not
t~uch
the recordmg
su.rface
of
the
d.1sc.
. . Connector
(on
the
reverse
!
1 •
Do
not
st1ck
tape
etc.
on.
the
d1sc,
or
.use
a
d1sc
w1th
tape
stuck
on
1t.
side
of
the faceplate)
l
1 •
Do
not
use
any
accessones
for the
d1sc.
i
I •
Clean
from the center
of
the
disc
and
move outward. !
I •
Clean
the
disc
with a
dry
silicon or soft cloth.
Do
not
use
any
solvents.
i
I •
When
removing
discs
from this unit, pull them out horizontally. l
I •
Remove
burrs
from the center hole
and
disc
edge before inserting a
disc.
I
L_
______
_
_____
_
___
_
___
_
__
____
__________
_
___________
___________ _
___
__
___
__ _
____
______
__
__
_____
_
________
_ _ _ ___
____________________
___
___
_______
__
_
____
___
____ _
___
__
___
_j

BASICS
Faceplate
Volume
knob
(turn/press)
13~•I=I§r=:=i~=tF=tF=tii=)=I====L=o=a=d
r g s
I
ot
Detach
Detach
button
Turn
on
the power
Adjust the volume
Select a
source
Change the display
information*
Press(!)
SRC.
•
Press
and hold
to
turn
off
the
power.
Turn
the
volume
knob.
Press(!)
SRC
repeatedly.
Press
SCRL
DISP
repeatedly.
How
to
reset
Your preset adjustments
will also be erased.
•
Press
and hold
to
scroll
the
current display information.
*
l:i•II§:iite~ill:
You can also select
to
turn
off
the
display information by pressing
SCRL
DISP
repeatedly.
Remote control (RC-406)
rr~~~~~~::rL
Remote sensor (Do
not
expose
to
bright
sunlight.)
How
to
replace
the
battery
Pull
out
the
insulation sheet
when
using for
the
first time.
CR202s:Q
~3
Press
and hold
SRC
to
turn
off
the power.
(Pressing
SRC
does
not
turn on
the
power.)
Press
VOL/'....
or
VOL "'vi'.
Press
ATT
during playback
to
attenuate
the
sound.
•
Press
again
to
cancel.
Press
SRC
repeatedly.
(
not
available)
!
I
_j
ENGLISH
I
3
GETTING STARTED
4
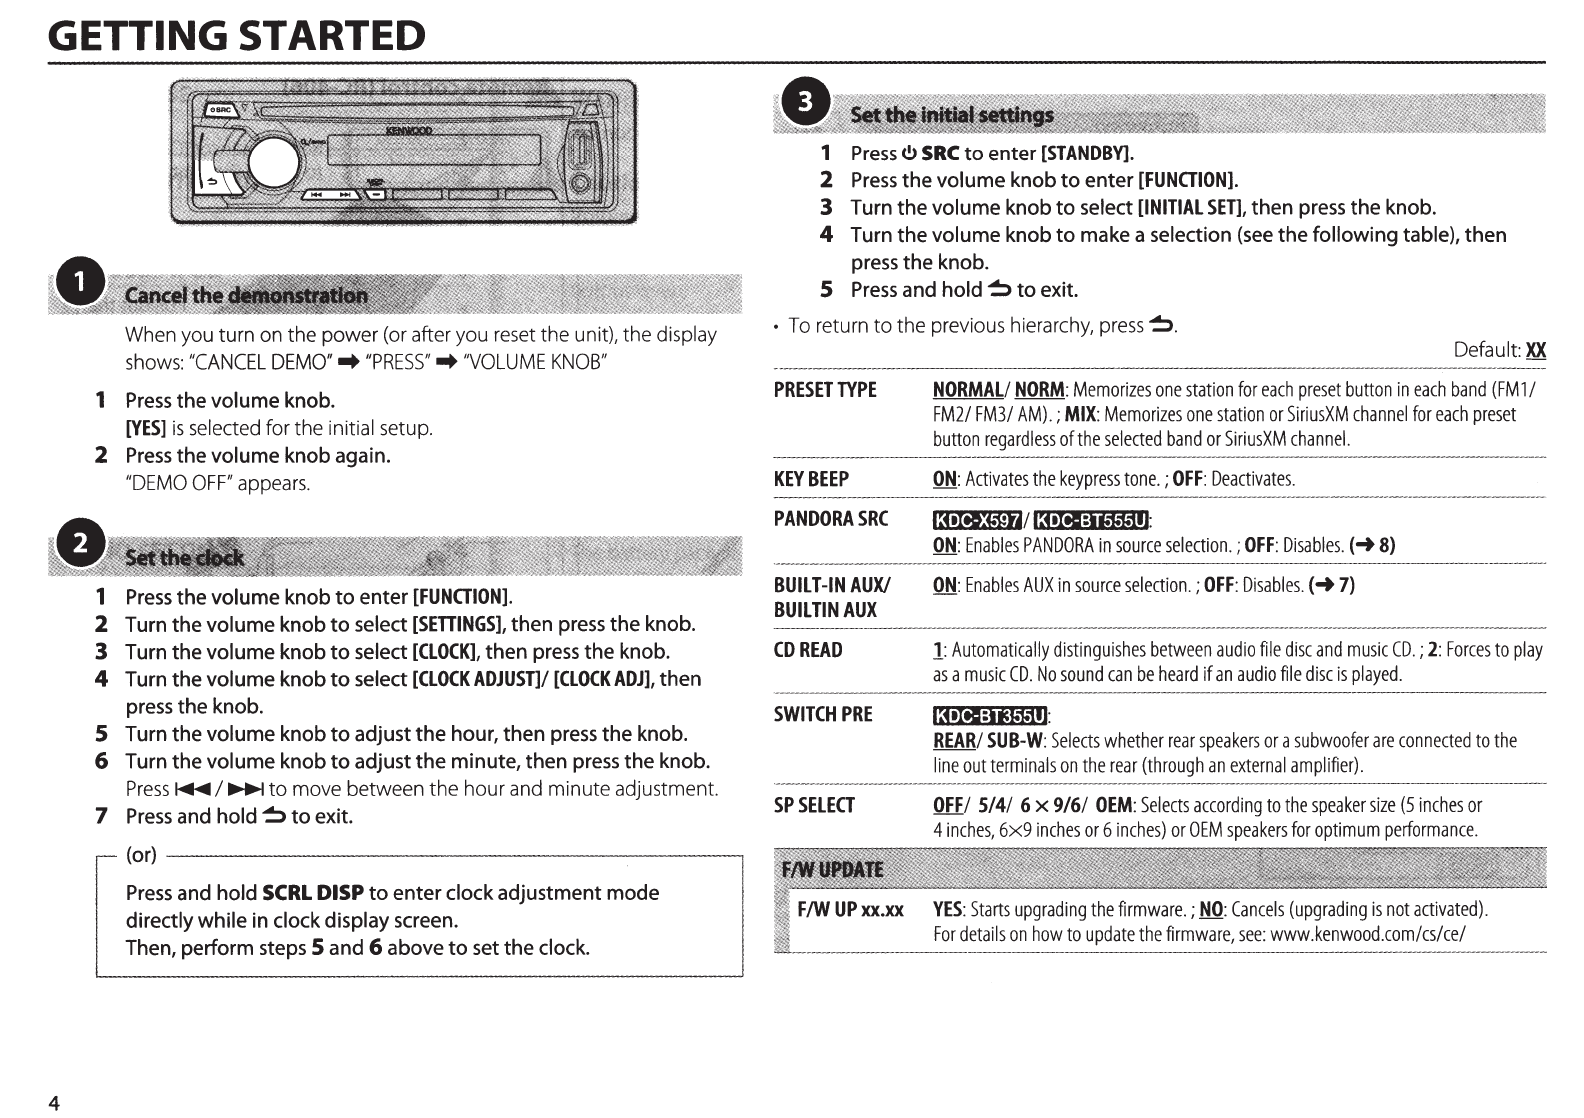
When
you
turn
on
the power
(or
after you
reset
the unit), the display
shows:
//CANCEL
DEMO''
..
//PRESS//
..
'VOLUME
KNOB//
1
Press
the volume knob.
[YES]
is
selected
for the initial
setup.
2
Press
the volume knob again.
//DEMO
OFF//
appears.
1
Press
the
volume knob
to
enter
[FUNOION).
2 Turn the volume knob
to
select
[SETTINGS],
then press the knob.
3 Turn the volume knob
to
select
[CLOCK],
then press
the
knob.
4 Turn the volume knob
to
select
[CLOCK
ADJUST]/
[CLOCK
ADJ],
then
press the knob.
5 Turn the volume knob
to
adjust
the
hour, then press
the
knob.
6 Turn the volume knob
to
adjust
the
minute, then press
the
knob.
Press~
I~
to move between the hour
and
minute adjustment.
7
Press
and hold
~
to
exit.
(or)
------------------------------------------~
Press
and hold
SCRL
DISP
to
enter clock adjustment mode
directly while in clock display screen.
Then, perform steps 5 and 6 above
to
set the clock.
1
Press
t!>
SRC
to
enter
[STANDBY).
2
Press
the
volume knob
to
enter
[FUNOION).
3 Turn
the
volume knob
to
select
[INITIAL
SET),
then press the knob.
4 Turn the volume knob
to
make a selection
(see
the following table), then
press the knob.
5
Press
and
hold~
to
exit.
•
To
return to the previous
hierarchy,
press~.
PRESET
TYPE
KEY
BEEP
PANDORASRC
BUILT
-IN
AUX/
BUILTIN
AUX
CD
READ
SWITCH
PRE
SP
SELECT
Default:
XX
NORMAL/
NORM:
Memorizes
one
station
for
each
preset
button
in
each
band
(FM1/
FM2/ FM3/
AM).;
MIX:
Memorizes
one
station
or
SiriusXM
channel
for
each
preset
button
regardless
of
the
selected
band
or
SiriusXM
channel.
ON:
Activates
the
keypress
tone.
;
OFF:
Deactivates.
13•Iti!Jett4t
•~olii:Jie1e1e11J:
ON:
Enables
PANDORA
in
source
selection.;
OFF:
Disables.(~
8)
ON:
Enables
AUXin
source
selection.;
OFF:
Disables.(~
7)
1:
Automatically
distinguishes
between
audio
file
disc
and
music
CD.;
2:
Forces
to
play
as
a
music
CD.
No
sound
can
be
heard
if
an
audio
file
disc
is
played.
l:i•M:iite1e11l:
REAR/
SUB-W:
Selects
whether
rear
speakers
or
a
subwoofer
are
connected
to
the
line
out
terminals
on
the
rear
(through
an
external
amplifier).
OFF/
5/4/ 6 x 9/6/
OEM:
Selects
according
to
the
speaker
size
(5
inches
or
4
inches,
6x9
inches
or
6
inches)
or
OEM
speakers
for
optimum
performance.
F/W
UP
xx.xx
YES:
Starts
upgrading
the
firmware.;
NO:
Cancels
(upgrading
is
not
activated).
For
details
on
how
to
update
the
firmware,
see:
www.kenwood.com/cs/ce/
RADIO
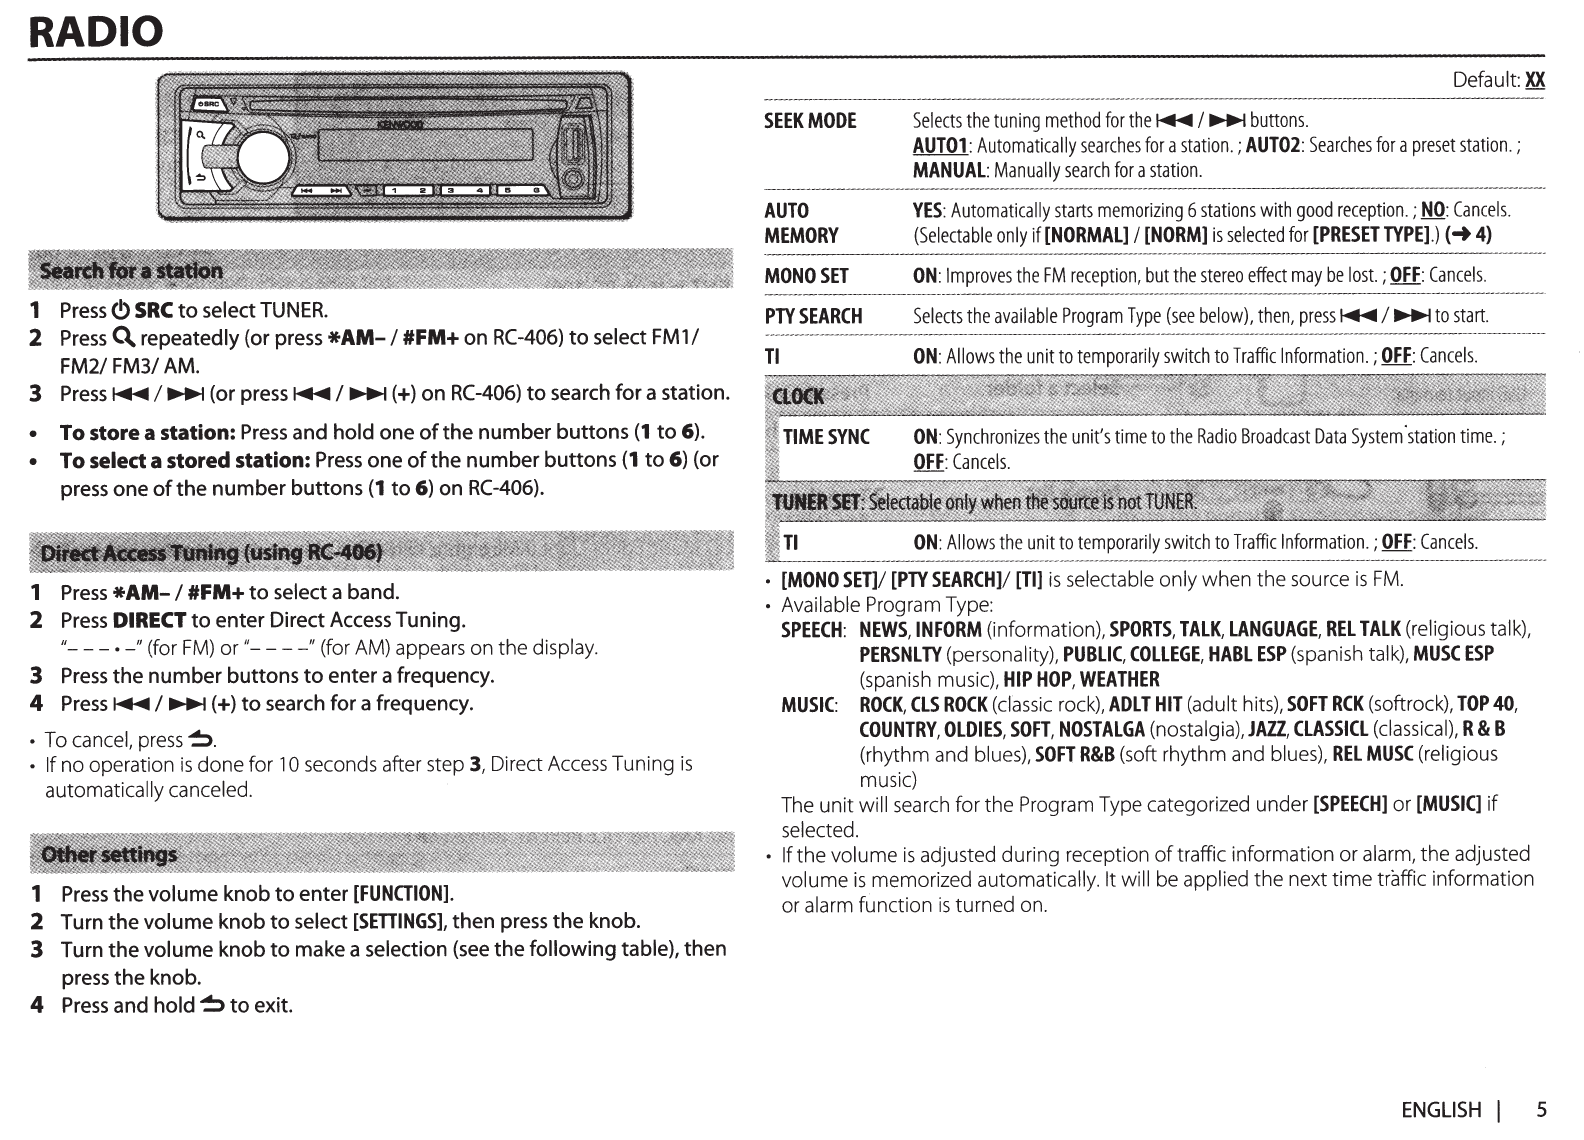
1
Press(!)
SRC
to
select
TUNER.
2
Press
C\
repeatedly (or press
*AM-
I #FM+
on
RC-406)
to
select
FM11
FM21 FM31
AM.
3
Press~
I~
(or
press~
I~(+)
on
RC-406)
to
search
for
a station.
• To
store
a
station:
Press
and hold one
of
the
number
buttons
(1
to
6).
• To
select
a
stored
station:
Press
one
of
the
number
buttons
(1
to
6)
(or
press one
of
the
number
buttons
(1
to
6)
on
RC-406).
1
Press
*AM-
I #FM+
to
select a band.
2
Press
DIRECT
to
enter Direct Access Tuning.
"---.
-
11
(for
FM)
or"----~~
(for AM) appears on the display.
3
Press
the
number
buttons
to
enter a frequency.
4
Press~
I~(+)
to
search
for
a frequency.
• To cancel,
press~.
• If no operation
is
done
for
10
seconds after step
3,
Direct Access Tuning
is
automatically canceled.
1
Press
the
volume
knob
to
enter
[FUNaiON].
2 Turn
the
volume
knob
to
select
[SETTINGS],
then press
the
knob.
3
Turn
the
volume
knob
to
make a selection
(see
the
following
table),
then
press
the
knob.
4
Press
and
hold~
to
exit.
Default
XX
SEEK
MODE
Selects
the
tuning
method
for
the~
I~
buttons.
AUTOl:
Automatically
searches
for
a
station.;
AUT02:
Searches
for
a
preset
station.;
MANUAL:
Manually
search
for
a
station.
AUTO
MEMORY
YES:
Automatically
starts
memorizing
6
stations
with
good
reception.;
NO
:
Cancels
.
(Selectable
only
if
[NORMAL]
I
[NORM]
is
selected
for
[PRESET
TYPE].)(~
4)
MONO
SET
ON:
Improves
the
FM
reception,
but
the
stereo
effect
may
be
lost.;
OFF:
Cancels.
PTYSEARCH
Selects
the
available
Program
Type
(see
below),
then,
press~
I~
to
start.
Tl
ON
:
Allows
the
unit
to
temporarily
switch
to
Traffic
Information.;
OFF:
Cancels.
ON
:
Allows
the
unit
to
temporarily
switch
to
Traffic
Information
.;
OFF
:
Cancels
.
•
[MONO
SET]/
[PTY
SEARCH]/
[TI]
is
selectable only
when
the source
is
FM
.
• Available Program Type:
SPEECH:
NEWS,
INFORM
(information),
SPORTS,
TALK,
LANGUAGE,
REL
TALK
(religious talk),
PERSNLTY
(personality),
PUBLIC,
COLLEGE,
HABL
ESP
(spanish talk),
MUSC
ESP
(spanish music),
HIP
HOP,
WEATHER
MUSIC:
ROCK,
CLS
ROCK
(classic rock),
ADLT
HIT
(adult hits),
SOFT
RCK
(softrock),
TOP
40,
COUNTRY,
OLDIES,
SOFT,
NOSTALGA
(nostalgia),
JAZZ,
CLASSICL
(classical),
R & B
(rhythm and blues),
SOFT
R&B
(soft rhythm and blues),
REL
MUSC
(religious
music)
The
unit
will search for the Program Type categorized under
[SPEECH]
or
[MUSIC]
if
selected.
• If the volume
is
adjusted during reception
of
traffic information
or
alarm,
the
adjusted
volume
is
memorized automatically. It will be applied the next
time
traffic information
or alarm function
is
turned on.
ENGLISH
I
5
CD I
USB
I iPod
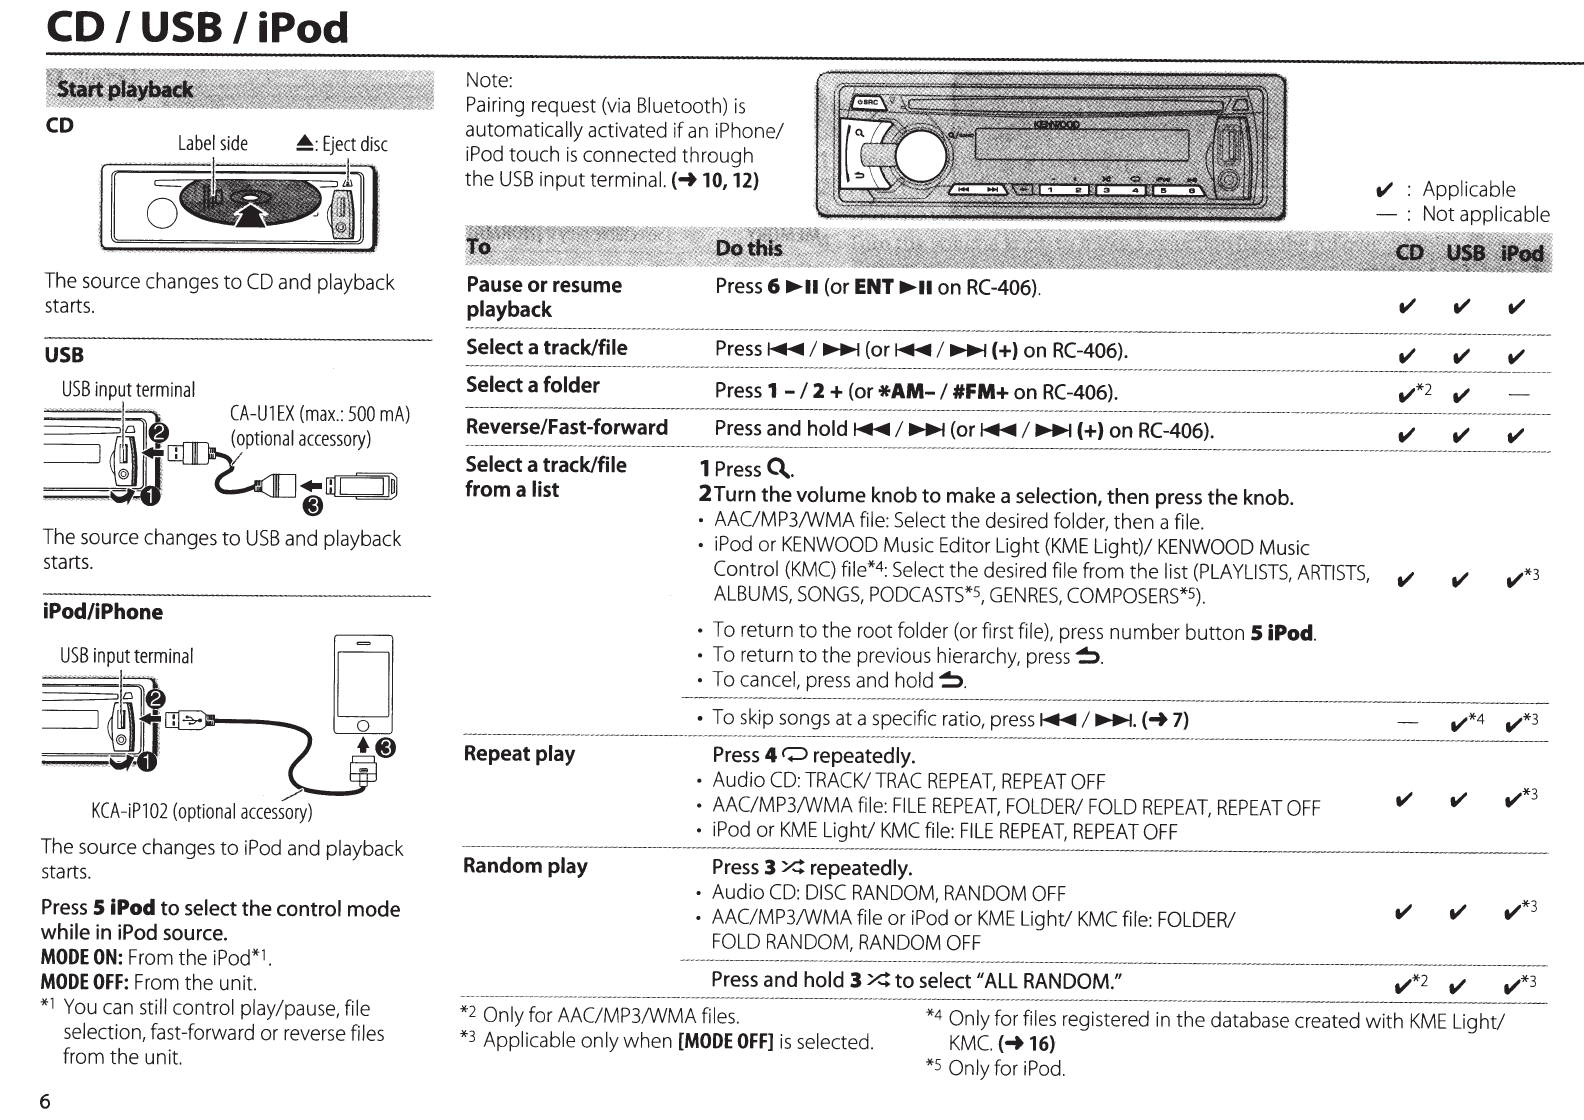
CD
Label
side
~:
Eject
disc
The
source
changes
to
CD
and
playback
starts.
USB
USB
input
terminal
~:}J~;:~:~~::)
The
source
changes
to
USB
and
playback
starts.
iPod/iPhone
USB
input
terminal
..
..
...
....
...
.
..
.
.....
.
~::::::"'\
~~
~
-
~II~~
/
KCA-iP102
(optional
accessory)
The
source
changes
to
iPod
and
playback
starts.
Press
5 iPod to
select
the control mode
while
in
iPod
source.
MODE
ON:
From
the iPod*l.
MODE
OFF:
From
the unit.
*1
You
can
still control play/pause, file
selection, fast-forward or
reverse
files
from the unit.
6
Note:
Pairing
request
(via
Bluetooth)
is
automatically activated if
an
iPhone/
iPod
touch
is
connected through
the
USB
input terminal.
(-t10,
12)
Pause
or resume
playback
Select a track/file
Select a folder
Press
6
~II
(or
ENT
~II
on
RC-406).
Press~
I~
(or~
I~(+)
on
RC-406).
Press
1-
I
2
+(or
*AM-
I
#FM+
on
RC-406).
ttl
:
Applicable
-: Not applicable
ttl
ttl ttl
Reverse/Fast-forward
Press
and
hold~
I~
(or~
I~(+)
on
RC-406).
ttl ttl ttl
-----
---
------
---
--------
---
---
·
---
-----
-----·
---
--
--
----
--
-
--
----
--
---
·
--
----
----
----
-
--
---
---
- -
--
---
----
---
----
- -
--
- -
--
----
----
-
----
---
---
------
---
--
-
--
-----
--
-
--
---
-
---
-
Select a track/file 1
Press
Q..
from a list 2Turn the volume
knob
to
make
a
selection,
then
press
the
knob.
• AAC/MP3/WMA
file:
Select
the
desired
folder, then a file.
•
iPod
or
KENWOOD
Music
Editor Light
(KME
Light)/
KENWOOD
Music
Control
(KMC)
file*4:
Select
the
desired
file from the list
(PLAYLISTS,
ARTISTS,
ttl ttl ttl*3
ALBUMS,
SONGS,
PODCASTS*S,
GENRES,
COMPOSERS*S)
.
•
To
return to the root folder
(or
first
file),
press
number button 5 iPod.
•
To
return to the previous hierarchy,
press~.
•
To
cancel,
press
and
hold~.
•
To
skip
songs
at
a specific
ratio,
press~
I~.
(-t
7)
ttl*4 ttl*3
----
---
-----
----
------
-----
---
-----
-
-
-----
----
----
-
--
----
---
-
--
--·--
--
-
---
----
---
-
--
--------
----
-
-
--
----
----
--
----
-
---
-
-
-
-
---
---
--
-
--
----
--~
-----
--
-
--
--
---
-
-
----
-
-----
-
Repeat play
Press
4 0 repeatedly.
Random play
• Audio
CD:
TRACK/TRAC
REPEAT,
REPEAT
OFF
• AAC/MP3/WMA
file:
FILE
REPEAT,
FOLDER/
FOLD
REPEAT,
REPEAT
OFF
•
iPod
or
KME
Light/
KMC
file:
FILE
REPEAT,
REPEAT
OFF
Press
3
X:
repeatedly.
• Audio
CD:
DISC
RANDOM,
RANDOM
OFF
• AAC/MP3/WMA file or
iPod
or
KME
Light/
KMC
file:
FOLDER/
FOLD
RANDOM,
RANDOM
OFF
Press
and
hold 3
X:
to
select
11
ALL
RANDOM."
*2
Only for AAC/MP3/WMA
files.
*4
Only for
files
registered
in
the
database
created with
KME
Light/
KMC.
(-t16)
*3
Applicable only when
[MODE
OFF]
is
selected.
*S
Only for
iPod.
1
Press
DIRECT.
2
Press
the number buttons
to
enter a track/file
number.
3
Press~
I~(+)
to
search for music.
•
To
cancel,
press~.
• Not
available
if
Random
Play
is
selected.
• Not applicable for
iPod,
KME
Light/
KMC
file.
(-+16)
While listening to
iPod
...
1
Press
C\.
2 Turn the volume knob
to
select a category, then
press the knob.
3
Press
C\
again.
4 Turn the volume knob
to
select the character
to
be searched for.
5
Press
~
I
~
to
move
to
the entry position.
You
can
enter up to three
characters.
6
Press
the volume knob
to
start searching.
7 Turn the volume knob
to
make a selection, then
press the knob.
Repeat
step
7 until the desired item
is
selected.
•
To
search
for a character other than A to Z
and
0 to
9,
enter only"*" .
•
To
return to the previous hierarchy,
press~.
•
To
return to the top menu,
press
number button
5 iPod.
•
To
cancel,
press
and
hold~.
CD I USB I
iPod
AUX
While listening to
iPod
or
KME
Light/
KMC
file
...
1
Press
the volume knob
to
enter
[FUNGION].
2 Turn the volume knob
to
select
[SETTINGS],
then
press the knob.
3 Turn the volume knob
to
select
[SKIP
SEARCH],
then
press
the
knob .
4 Turn the volume knob
to
make a selection, then
press the knob.
O.S%
(default)/ 1%/
S%1
10%:
Sets
the
skip
ratio
when searching for a
song.
(Holding
~I~
skips
songs
at
1
0%
regardless
of
the setting
made.)
5
Press
and
hold~
to
exit.
Muting
upon
the
reception
of
a
phone
call
Connect the
MUTE
wire to your telephone using a
commercial telephone accessory.(-+
21)
When a call comes in, "CALL" appears.
•
The
audio
system
pauses.
•
To
continue listening to the audio
system
during a
call,
press~
SRC.
"CALL"
disappears
and
the audio
system
resumes.
When the call ends, "CALL" disappears.
•
The
audio
system
resumes.
---------------------------------
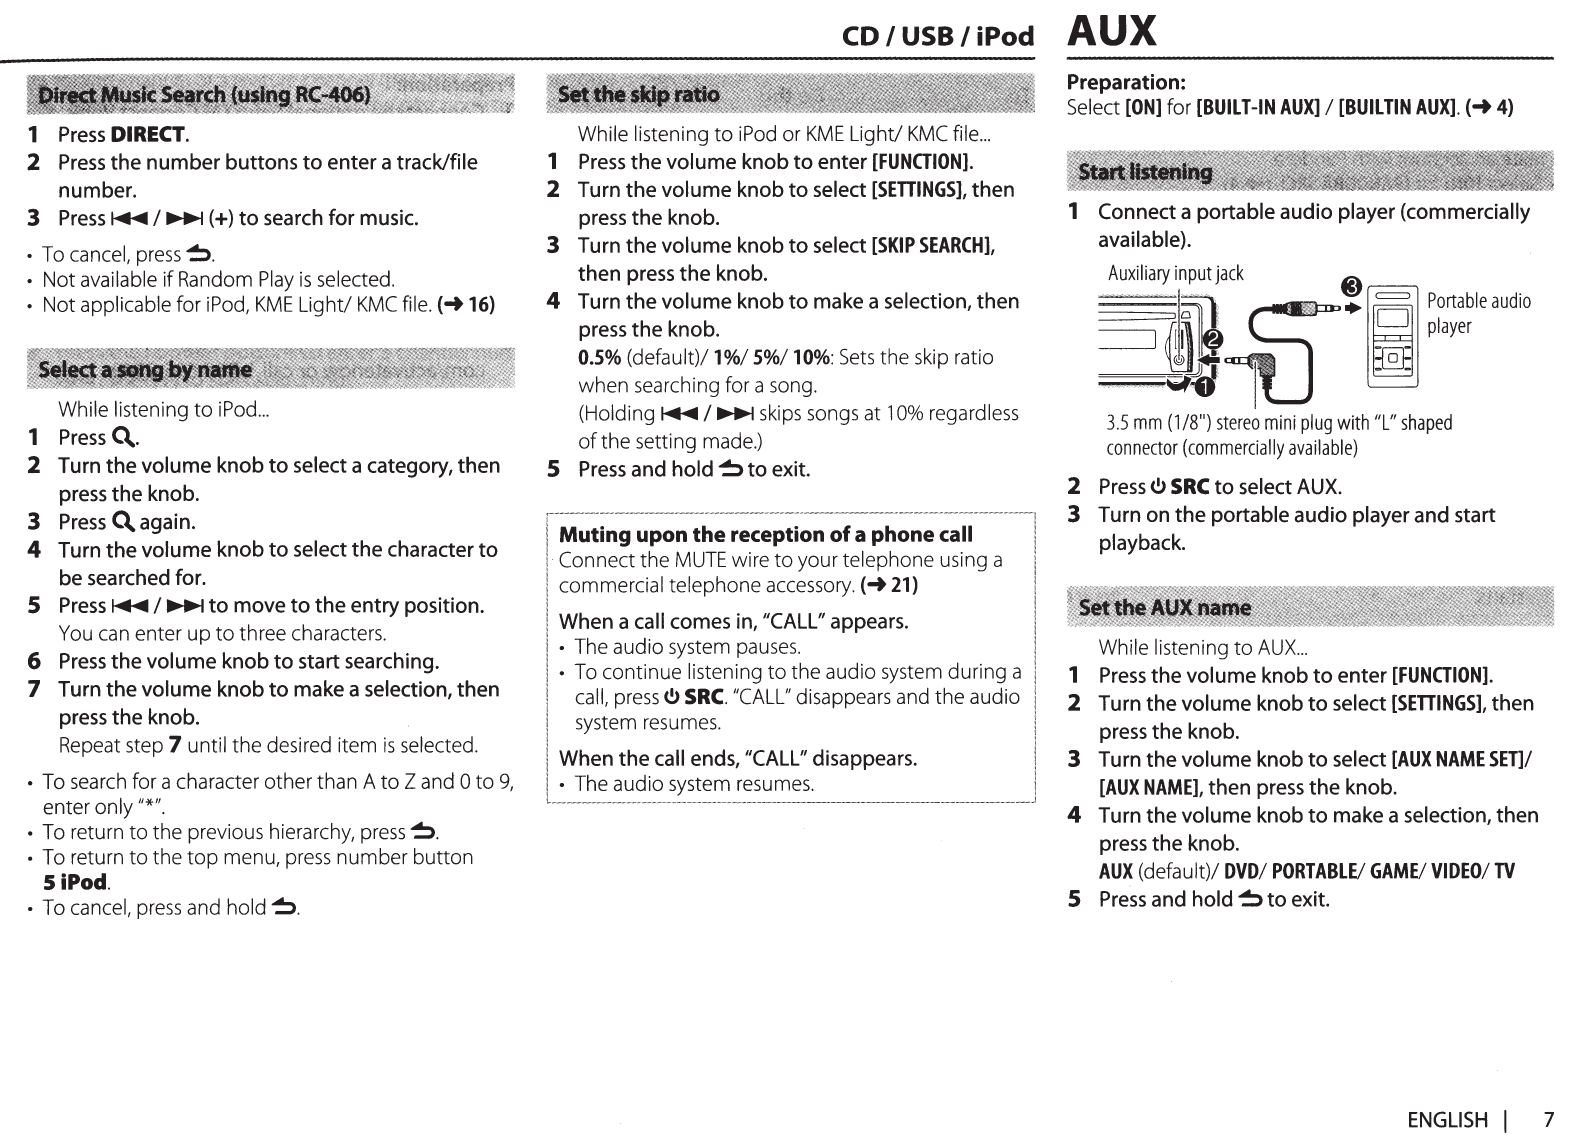
Preparation:
Select
[ON]
for
[BUILT-IN
AUX]
I
[BUILTIN
AUX].
(-+
4)
1 Connect a portable audio player (commercially
available).
~~~IIi~~~
I~~~t
jack
@)
~
i~•[i[
~~~:~leaudio
3.5
mm
(1
/8
11
)
stereo
mini
plug
with
"L"
shaped
connector
(commercially
available)
2
Press~
SRC
to
select
AUX.
3 Turn on the portable audio player and start
playback.
While listening to
AUX
...
1
Press
the volume knob
to
enter
[FUNCTION]
.
2 Turn the volume knob
to
select
[SETTINGS],
then
press
the knob.
3 Turn the volume knob
to
select
[AUX
NAME
SET)/
[AUX
NAME],
then
press
the knob .
4 Turn the volume knob
to
make a selection, then
press
the knob .
AUX
(default)/
DVD/
PORTABLE/
GAME/
VIDEO/
TV
5
Press
and
hold~
to
exit.
ENGLISH
I 7
pan
d
0 fa®
(for
13•Iil$tf4/13•MI:i
..
,.1e11l)
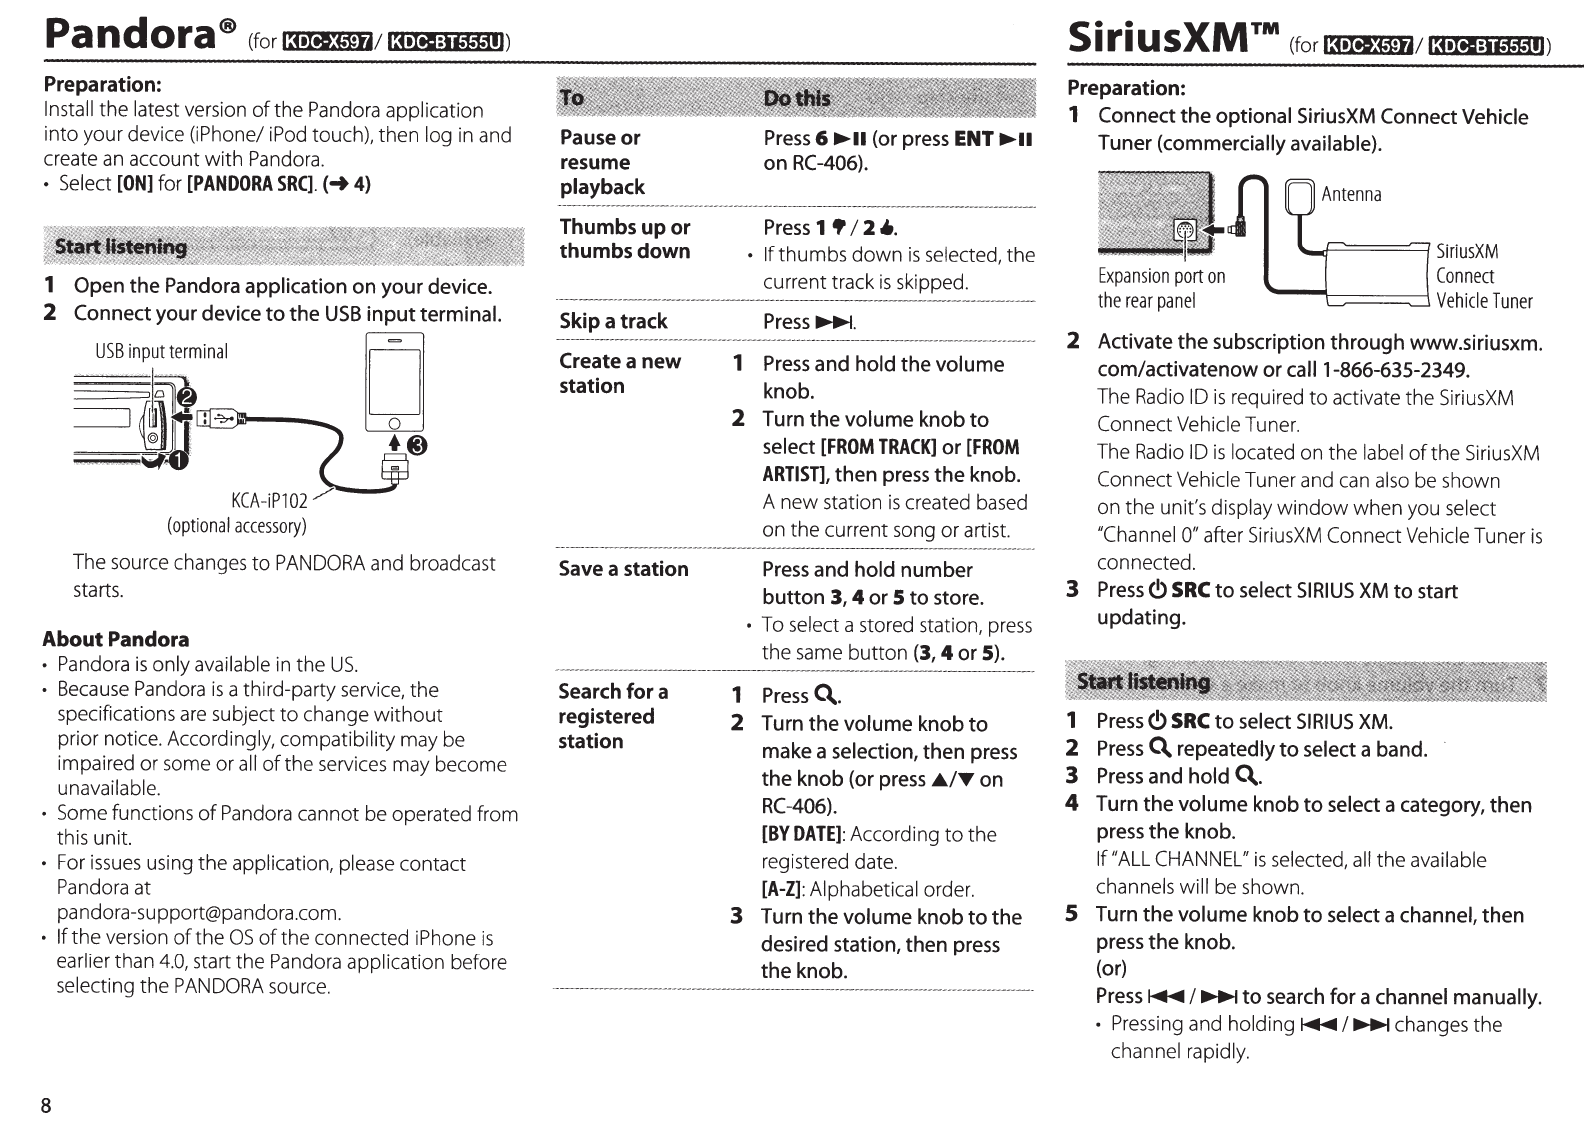
Preparation:
Install the latest version
of
the
Pandora
application
into your device (iPhone/
iPod
touch), then log
in
and
create
an
account with
Pandora
.
• Select
[ON]
for
[PANDORA
SRC].
(-t
4)
1 Open
the
Pandora application on
your
device.
2
Connect your device
to
the
USB
input
terminal.
KCA-iP102
/
(optional
accessory)
D
.@)
The
source changes to
PANDORA
and broadcast
starts.
About
Pandora
•
Pandora
is
only available
in
the
US.
•
Because
Pandora
is
a third-party
service,
the
specifications
are
subject to change without
prior notice. Accordingly, compatibility may
be
impaired or
some
or
all
of
the
services
may become
unavailable.
•
Some
functions
of
Pandora
cannot
be
operated from
this unit.
•
For
issues
using the application,
please
contact
Pandora
at
pa
ndora-su pport@pa ndora.com.
• If
the version
of
the
OS
of
the connected iPhone
is
earlier than
4.0,
start the
Pandora
application before
selecting the
PANDORA
source.
8
Pause or
resume
playback
Thumbs up or
thumbs
down
Skip a track
Create a new
station
Save a station
Search for a
registered
station
Press
6
...,..
..
(or press ENT
...,..
..
on
RC-406).
Press
1
•12
4..
• If
thumbs down
is
selected, the
current track
is
skipped.
1
Press
and hold
the
volume
knob.
2
Turn
the
volume knob
to
select
[FROM
TRACK]
or
[FROM
ARTIST],
then
press
the
knob.
A new station
is
created
based
on the current
song
or artist.
Press
and hold
number
button
3, 4
or
5
to
store.
•
To
select a stored station,
press
the
same
button
(3,
4
or
5).
1
Press
Q..
2 Turn
the
volume knob
to
make a selection,
then
press
the
knob (or press
£./T
on
RC-406).
[BY
DATE]:
According
to
the
registered date.
[A-Z]:
Alphabetical order.
3 Turn
the
volume knob
to
the
desired station, then press
the
knob.
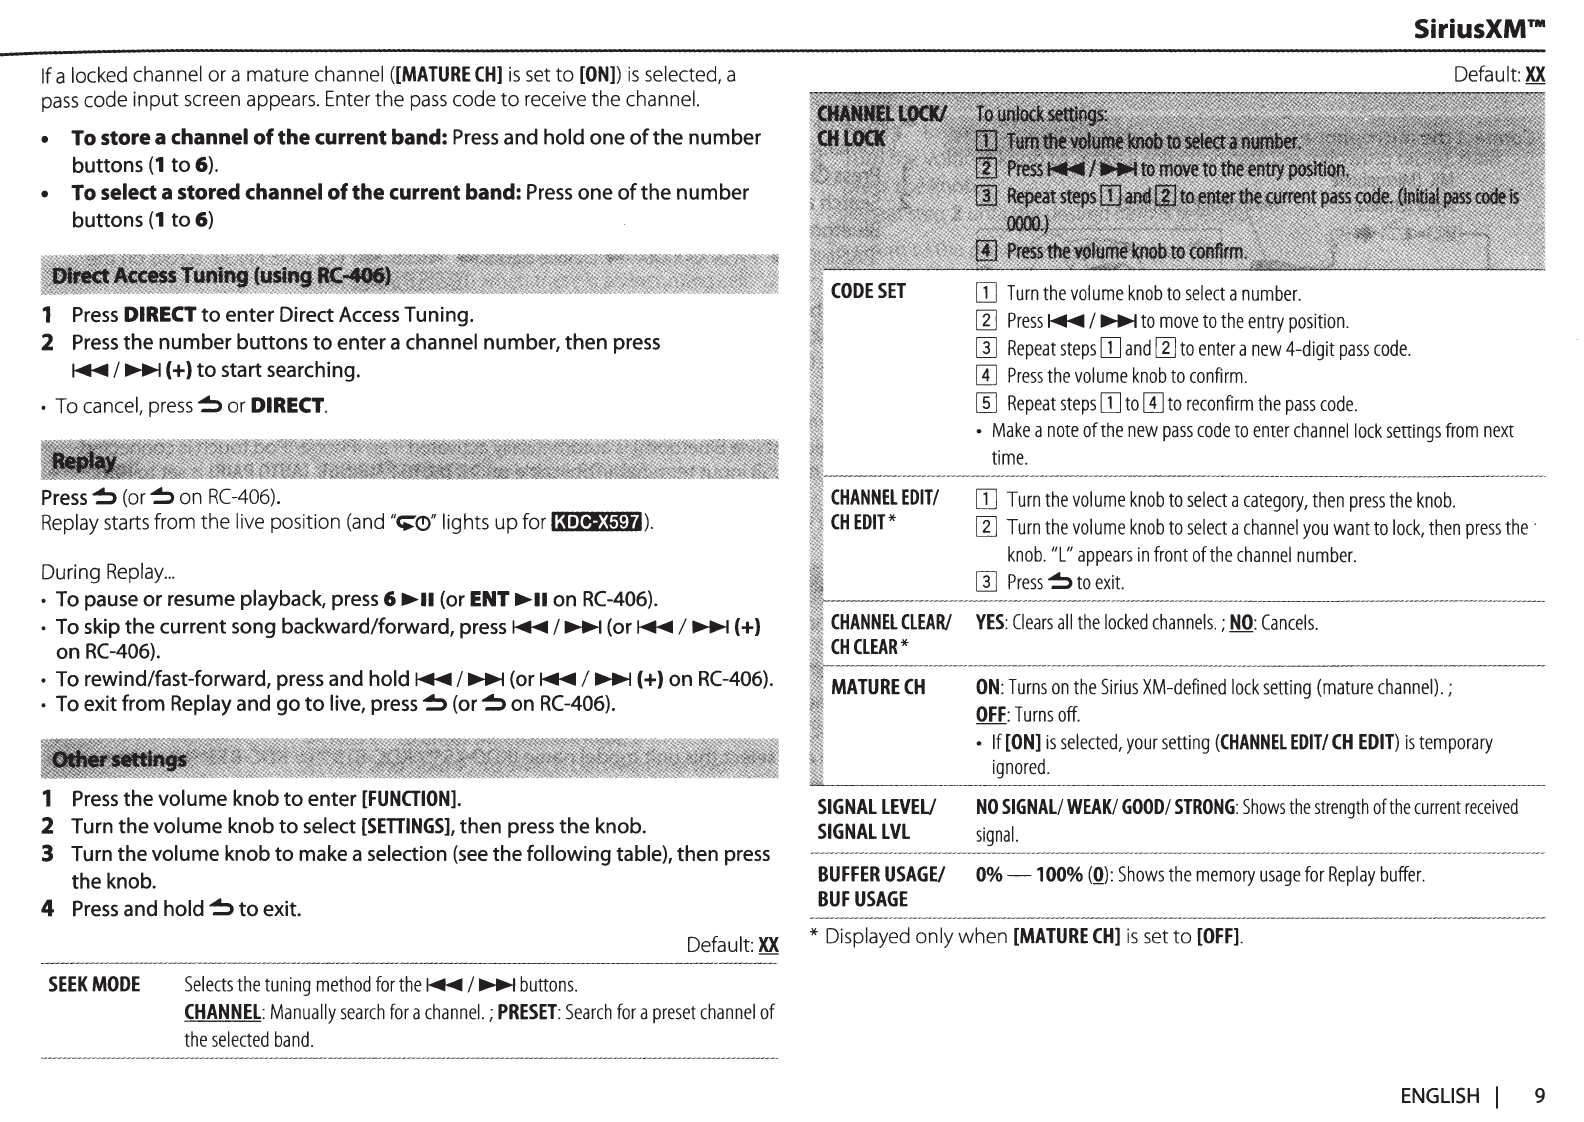
Preparation:
1
Connect
the
optional SiriusXM Connect Vehicle
Tuner (commercially available).
Expansion
port
on
the
rear
panel
L.c=:::=======l
Si
ri
usXM
Connect
~-"'=========1
Vehicle
Tuner
2
Activate
the
subscription
through
www.siriusxm.
com/activatenow
or
call 1-866-635-2349.
The
Radio
ID
is
required to activate the
SiriusXM
Connect Vehicle
Tuner.
The
Radio
ID
is
located on the label
of
the
SiriusXM
Connect Vehicle Tuner
and
can
also
be
shown
on the unit's display window when you select
"Channel
0"
after
SiriusXM
Connect Vehicle Tuner
is
connected.
3
Press
C)
SRC
to
select
SIRIUS
XM
to
start
updating.
1
Press(.!)
SRC
to
select
SIRIUS
XM.
2
Press
Q. repeatedly
to
select a band.
3
Press
and hold
Q..
4
Turn
the
volume
knob
to
select a category,
then
press
the
knob.
If
"ALL
CHANNEL"
is
selected,
all
the available
channels will
be
shown.
5 Turn
the
volume
knob
to
select a channel,
then
press
the
knob.
(or)
Press~
I~
to
search
for
a channel manually.
•
Pressing
and holding
~I~
changes the
channel rapidly.
If a locked channel or a mature channel
([MATURE
CH]
is
set
to
[ON])
is
selected, a
pass
code input
screen
appears.
Enter
the
pass
code to
receive
the channel.
•
To
store a channel
of
the
current band:
Press
and hold one
of
the
number
buttons
(1
to
6).
•
To
select a stored channel of
the
current band:
Press
one
of
the
number
buttons
(1
to
6)
1
Press
DIRECT
to
enter Direct Access Tuning.
2
Press
the
number
buttons
to
enter a channel number, then press
~I~(+)
to
start searching.
•
To
cancel,
press~
or
DIRECT.
Press~
(or~
on
RC-406).
Replay
starts
from the
live
position
(and
"~(!)"
lights up for
13•III!Jetr4).
During
Replay
...
• To pause
or
resume playback, press 6
~II
(or
ENT
~II
on
RC-406).
• To skip the current song backward/forward,
press~
I~
(or~
I~(+)
on
RC-406).
• To rewind/fast-forward, press and
hold~
I~
(or~ I~(+)
on
RC-406).
• To exit from Replay and
go
to
live,
press~
(or~
on
RC-406).
1
Press
the
volume knob
to
enter
[FUNGION].
2 Turn
the
volume knob
to
select
[SETTINGS],
then press
the
knob.
3 Turn the volume knob
to
make a selection
(see
the following table), then
press
the knob.
4
Press
and hold
~
to
exit.
SEEK
MODE
Default
XX
Selects
the
tuning
method
for
the~
I~
buttons.
CHANNEL:
Manually
search
for
a
channel.;
PRESET:
Search
for
a
preset
channel
of
the
selected
band.
CODE
SET
CHANNEL
EDIT/
CH
EDIT*
OJ
Turn
the
volume
knob
to
select
a
number.
[I]
Press
~
I~
to
move
to
the
entry
position.
W
Repeat
steps
OJ
and
W
to
enter
a
new
4-digit
pass
code.
[!]
Press
the
volume
knob
to
confirm.
[[]
Repeat
steps
OJ
to[!]
to
reconfirm
the
pass
code
.
SiriusXM™
Default
XX
•
Make
a
note
of
the
new
pass
code
to
enter
channel
lock
settings
from
next
time.
OJ
Turn
the
volume
knob
to
select
a
category,
then
press
the
knob.
[I]
Turn
the
volume
knob
to
select
a
channel
you
want
to
lock,
then
press
the·
knob.
"L"
appears
in
front
of
the
channel
number.
W
Press
~
to
exit.
CHANNEL
CLEAR/
YES:
Clears
all
the
locked
channels.
;
NO:
Cancels.
CH
CLEAR*
MATURECH
ON:
Turns
on
the
Sirius
XM-defined
lock
setting
(mature
channel).;
OFF:
Turns
off.
•
If
[ON]
is
selected,
your
setting
(CHANNEL
EDIT/
CH
EDIT)
is
temporary
ignored.
SIGNAL
LEVEL/
NO
SIGNAL/
WEAK/
GOOD/
STRONG:
Shows
the
strength
of
the
current
received
SIGNAL
LVL
signal.
------------------------------------------------------------------------------------------------------
BUFFER
USAGE/
0%-100%
(~):Shows
the
memory
usage
for
Replay
buffer.
BUF
USAGE
*
Displayed
only when
[MATURE
CH]
is
set
to [Off].
ENGLISH
I 9
BLUETOOTH®
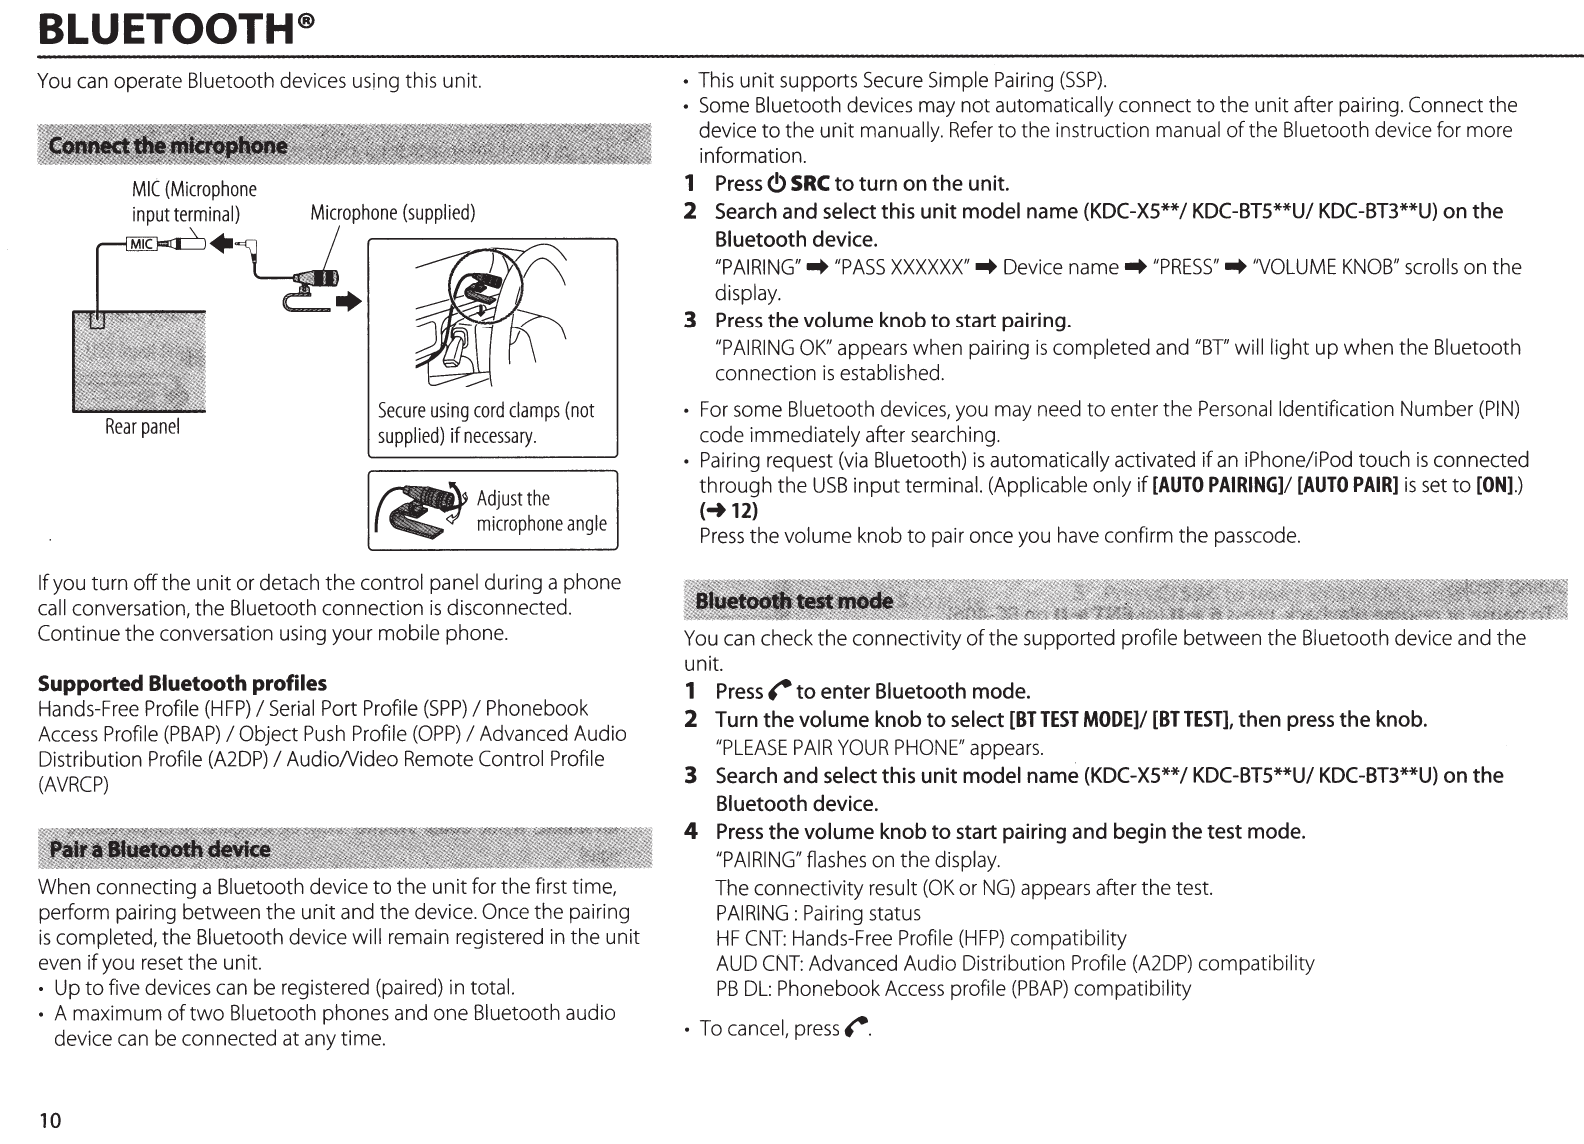
You
can
operate Bluetooth
devices
using
this unit.
MIC
(Microphone
input
term:y:hone
(supplied)
Rear
panel
Secure
using
cord
clamps
(not
supplied)
if
necessary.
Adjust
the
microphone
angle
If
you
turn off the unit or detach the control
panel
during a phone
call
conversation, the Bluetooth connection
is
disconnected.
Continue the conversation
using
your mobile phone.
Supported Bluetooth profiles
Hands-Free
Profile
(HFP)
I
Serial
Port
Profile
(SPP)
I Phonebook
Access
Profile
(PBAP)
I Object
Push
Profile
(OPP)
I Advanced Audio
Distribution
Profile
(A2DP)
I AudioNideo
Remote
Control
Profile
(AVRCP)
When
connecting a Bluetooth device to the unit for the first time,
perform pairing between the unit
and
the
device.
Once
the pairing
is
completed, the Bluetooth device will
remain
registered
in
the unit
even
if
you
reset
the unit.
•
Up
to five
devices
can
be
registered
(paired)
in
total.
• A maximum
of
two Bluetooth phones
and
one Bluetooth audio
device
can
be
connected
at
any
time.
10
•
This
unit supports
Secure
Simple
Pairing
(SSP).
•
Some
Bluetooth
devices
may
not automatically connect to the unit after pairing. Connect the
device to the unit
manually.
Refer
to the instruction
manual
of
the Bluetooth device for more
information.
1
Press
C!>
SRC
to turn
on
the unit.
2
Search
and
select
this
unit model name (KDC-XS**/ KDC-BTS**U/
KDC-BT3**U)
on
the
Bluetooth device.
"PAIRING"-+
"PASS
XXXXXX"
..
Device
name-+
"PRESS"-+
"VOLUME
KNOB"
scrolls
on
the
display.
3
Press
the volume
knob
to
start
pairing.
"PAIRING
OK"
appears
when pairing
is
completed
and
"BT"
will light up when the Bluetooth
connection
is
established.
•
For
some
Bluetooth
devices,
you
may
need
to enter the
Personal
Identification Number
(PIN)
code immediately after
searching.
•
Pairing
request
(via
Bluetooth)
is
automatically activated if
an
iPhone/iPod touch
is
connected
through the
USB
input terminal. (Applicable only if
[AUTO
PAIRING]/
[AUTO
PAIR]
is
set
to
[ON].)
(
...
12)
Press
the volume knob to
pair
once
you
have
confirm the
passcode.
You
can
check the connectivity
of
the supported profile between the Bluetooth device
and
the
unit.
1
Press~
to enter Bluetooth mode.
2
Turn
the volume
knob
to
select
[BT
TEST
MODE]/
[BT
TEST],
then
press
the
knob.
"PLEASE
PAIR
YOUR
PHONE"
appears.
3
Search
and
select
this
unit model name (KDC-XS**/ KDC-BTS**U/
KDC-BT3**U)
on
the
Bluetooth device.
4
Press
the volume
knob
to
start
pairing
and
begin the test mode.
"PAIRING"
flashes
on
the
display.
The
connectivity result
(OK
or
NG)
appears
after the
test.
PAIRING:
Pairing
status
HF
CNT:
Hands-Free
Profile
(HFP)
compatibility
AUD
CNT:
Advanced Audio Distribution
Profile
(A2DP)
compatibility
PB
DL:
Phonebook
Access
profile
(PBAP)
compatibility
•
To
cancel,
press~.
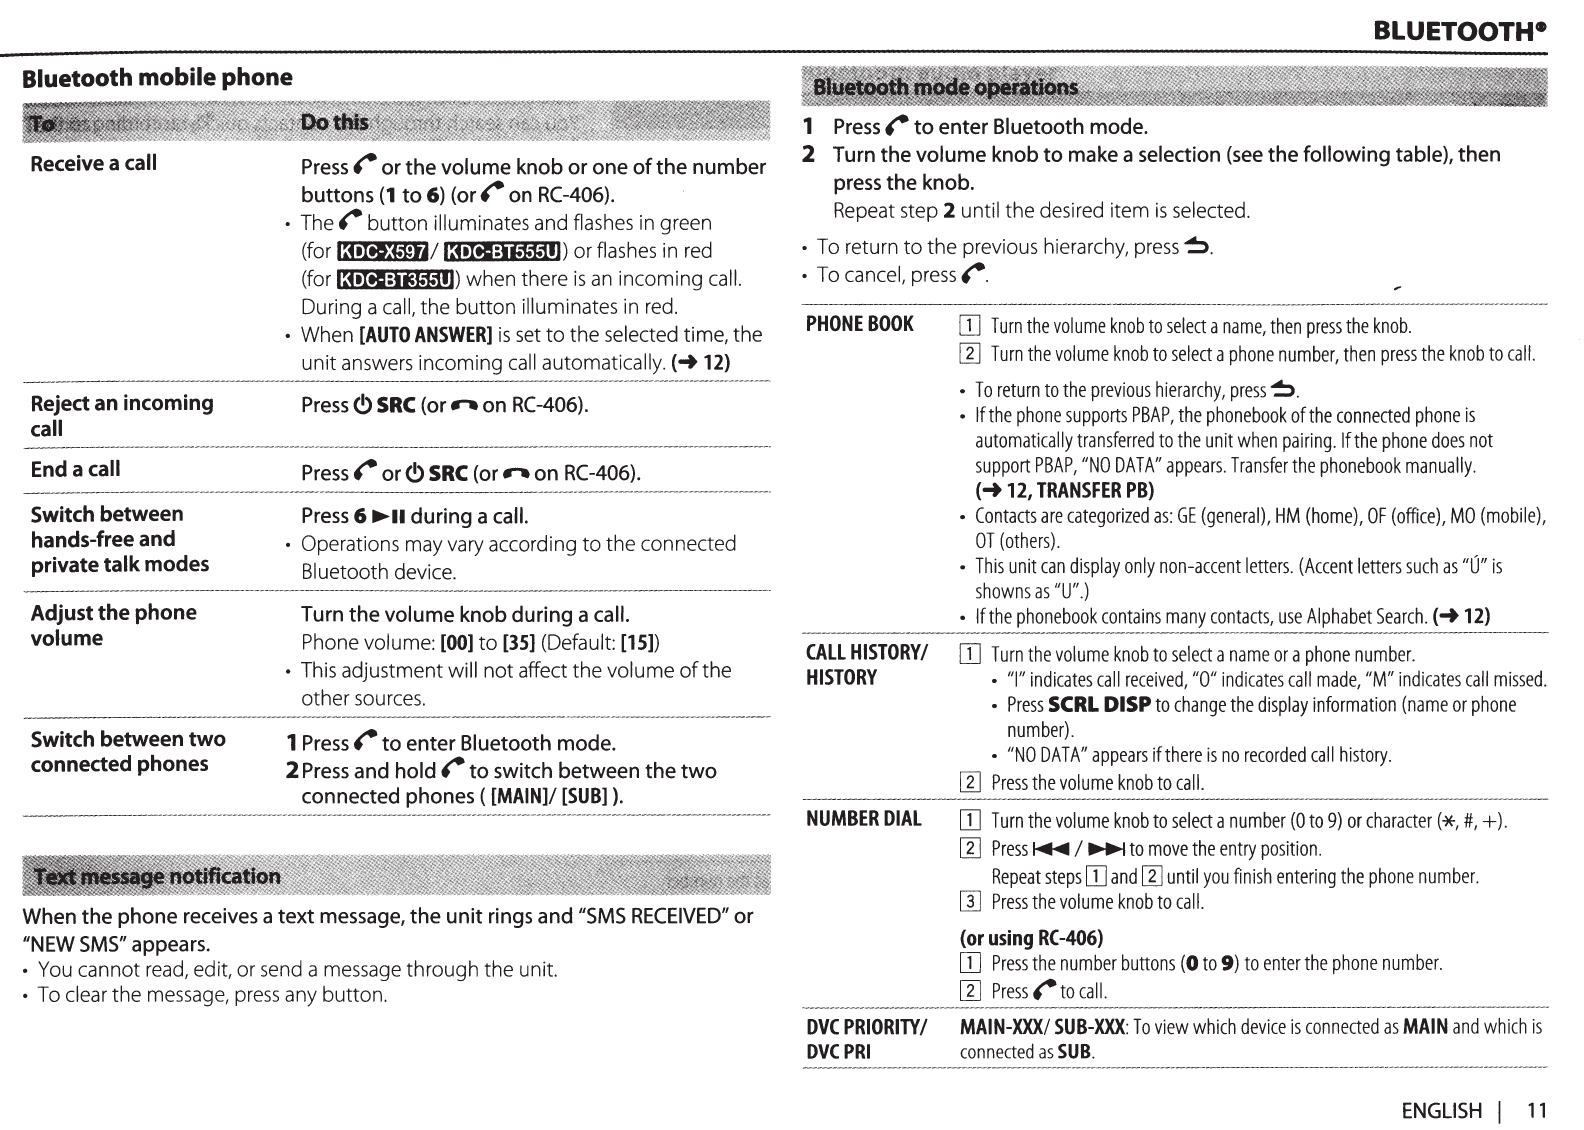
Bluetooth mobile phone
Receive
a
call
Reject
an
incoming
call
End
a
call
Switch
between
hands-free
and
private talk modes
Adjust the phone
volume
Switch
between two
connected phones
Press~
or
the
volume
knob
or
one
of the number
buttons
(1
to
6)
(or~
on
RC-406).
•
The~
button illuminates
and
flashes
in
green
(for
13•11U1W/
l:oXtll:i,..,..,.111)
or
flashes
in
red
(for
13•Itll:ii~.,.11J)
when there
is
an
incoming
call.
During a
call,
the button illuminates
in
red.
•
When
[AUTO
ANSWER]
is
set
to the selected time, the
unit
answers
incoming
call
automatically.(-+
12)
Press~
SRC
(or.--
on
RC-406).
Press~
or~
SRC
(or.--
on
RC-406).
Press
6
..,.II
during
a
call.
• Operations
may
vary
according to the connected
Bluetooth device.
Turn
the
volume
knob
during
a
call.
Phone
volume:
[00]
to
[35]
(Default:
[15])
•
This
adjustment will not affect the volume
of
the
other
sources.
1
Press~
to
enter
Bluetooth
mode.
2
Press
and
hold~
to
switch
between the two
connected
phones
([MAIN]/
[SUB]).
When
the
phone
receives
a text
message,
the unit
rings
and
"SMS
RECEIVED"
or
"NEW
SMS"
appears.
•
You
cannot
read,
edit, or
send
a
message
through the unit.
•
To
clear
the
message,
press
any
button.
BLUETOOTH•
1
Press~
to enter
Bluetooth
mode.
2
Turn
the volume
knob
to
make
a
selection
(see
the following
table),
then
press
the
knob.
Repeat
step
2 until the desired item
is
selected.
•
To
return to the previous hierarchy,
press~.
•
To
cancel,
press~.
PHONE
BOOK
CALL
HISTORY/
HISTORY
NUMBER
DIAL
OJ
Turn
the
volume
knob
to
select
a
name,
then
press
the
knob.
[l]
Turn
the
volume
knob
to
select
a
phone
number,
then
press
the
knob
to
call.
•
To
return
to
the
previous
hierarchy,
press~.
•
If
the
phone
supports
PBAP,
the
phonebook
of
the
connected
phone
is
automatically
transferred
to
the
unit
when
pairing.
lfthe
phone
does
not
support
PBAP,
"NO
DATA"
appears.
Transfer
the
phonebook
manually.
(-+
12,
TRANSFER
PB)
•
Contacts
are
categorized
as:
GE
(general),
HM
(home),
OF
(office),
MO
(mobile),
OT
(others).
•
This
unit
can
display
only
non-accent
letters.
(Accent
letters
such
as
"U"
is
showns
as
"U".)
•
lfthe
phonebook
contains
many
contacts,
use
Alphabet
Search.
(-+12)
OJ
Turn
the
volume
knob
to
select
a
name
or
a
phone
number.
•
"I"
indicates
call
received,
"0"
indicates
call
made,
"M"
indicates
call
missed.
•
Press
SCRL
DISP
to
change
the
display
information
(name
or
phone
number).
•
"NO
DATA"
appears
ifthere
is
no
recorded
call
history.
[l]
Press
the
volume
knob
to
call.
OJ
Turn
the
volume
knob
to
select
a
number
(0
to
9)
or
character(*,#,+).
[l]
Press~
I~
to
move
the
entry
position.
Repeat
steps
OJ
and
[l]
until
you
finish
entering
the
phone
number.
W
Press
the
volume
knob
to
call.
(or
using
RC-406)
OJ
Press
the
number
buttons
(0
to
9)
to
enter
the
phone
number.
[l]
Press~
to
call.
DVC
PRIORITY/
MAIN-XXX/
SUB-XXX:
To
view
which
device
is
connected
as
MAIN
and
which
is
DVC
PRI
connected
as
SUB.
ENGLISH
I
11

BLUETOOTH•
PAIRING
TRANSFER
PB*
DETAILED
SET/
DETAIL
SET
PHONE
SELEO
I
PHONESEL
---
-
-------
-
-----
-----
--
AUDIO
SELEO/
AUDIO
SEL
DEVICE
DELETE/
DVC
DELETE
Default:
XX
Select
the
phone
or
audio
device
to
connect
or
disconnect.
[I]
Turn
the
volume
knob
to
select
a
device
to
delete,
then
press
the
knob.
[I]
Turn
the
volume
knob
to
select
[YES]
or
[NO],
then
press
the
knob.
:
"DL
PB
***"appears
and
transfer
the
phonebook
of
the
connected
phone
to
this
unit
manually.
PIN
CODE
EDIT/
Changes
the
PIN
code
(up
to
8
digits).
PIN
EDIT
[I]
Turn
the
volume
knob
to
select
a
number.
(0000)
[I]
Press~
I~
to
move
the
entry
position.
AUTO
ANSWER
RECONNEa
AUTO
PAIRING/
AUTO
PAIR
Repeat
steps
[I]
and
[I]
until
you
finish
entering
the
PIN
code.
[I]
Press
the
volume
knob
to
confirm.
1 -
99
(8):
The
unit
answers
incoming
calls
automatically
in
the
selected
time.;
OFF:
Cancels
.
ON:
The
unit
automatically
reconnect
when
the
Bluetooth
device
is
within
range.;
OFF
:
Cancels.
ON:
The
unit
automatically
pair
supported
Bluetooth
device
(iPhone/iPod
touch)
when
it
is
connected
through
USB
input
terminal.
Depending
on
the
iOS
version
of
the
connected
iPhone/iPod
touch,
this
function
may
not
work
.;
OFF:
Cancels.
--
- - -
----
-
-----
-
--
-- -
--
--
--
- - -
----
- -- --
--
--
-
---------
-
--
-- -- - - -
--
---
-
--
---
- ·
BT
HF/AUDIO
FRONT:
Ouputs
audio
from
the
front
left
and
right
speakers.;
ALL:
Outputs
audio
from
all
the
speakers.
CALL
BEEP
ON:
The
unit
beeps
when
there
is
an
incoming
call.;
OFF:
Cancels.
-
---
---------
-----
----
-
--
-
--
--
---
--
----
---
----
----
----
-
----
---
----
----
----
---
----
----
--
----
----
----
BT
F/W
UPDATE/
BT
F/W
XX.XX:
YES:
Updates
all
the
Bluetooth
settings
(including
stored
pairing,
BT
UPDATE
phonebook,
and
etc.)
.;
NO:
Cancels.
MICGAIN
-20-
+8
(Q):
The
sensitivity
of
the
microphone
increases
as
the
number
increased.
ECHO
LEVEL
1
-10
(~)
:
Adjust
the
echo
cancellation
delay
time
until
the
least
echo
is
being
heard
during
a
phone
conversation.
* Selectable only
when
the connected
phone
supports
OPP.
12
You can search
through
the
contacts quickly according
to
the
first letter
(A
to
Z),
number
(0
to
9),
or symbol.
• The second alphabet
of
the contact will be searched
if
the
first alphabet does
not
exist.
1
Press~
to enter Bluetooth mode.
2
Turn
the volume knob to
select
[PHONE
BOOK],
then
press
the
knob.
3
Press~
to enter alphabet
search
mode.
The first menu
(ABCDEFGHIJK)
appears. To
go
to
the
other
menu
(LMNOPQRSTUV
or WXYZl
*),press~
I~-
4
Turn
the volume knob to
select
the
desired
first
letter,
then
press
the
knob.
• To search
with
numbers, select
"1
".
• To search
with
symbols, select"*"·
5
Turn
the volume
knob
to
select
a
name,
then
press
the
knob.
6
Turn
the volume knob to
select
a phone number, then
press
the knob to
call.
• To return
to
the
previous hierarchy,
press~-
• Contacts are categorized
as:
GE
(general), HM (home),
OF
(office), MO (mobile),
OT
(others).
• This
unit
can display only non-accent letters. (Accent letters
such
as
"U"
is
shown
as
"U".)
1
Press
and hold
~.
2
Speak
the
name
of
the
contact you
want
to
call
or
the
voice command
to
control
the
phone
functions.
• Supported
Voice
Recognition features
vary
for
each
phone.
Refer
to the instruction
manual
of
the connected phone for details.
•
This
unit
also
supports the intelligent
personal
assistant
function
of
iPhone.
You
can
store
up to 6 contacts.
1
Press~
to
enter Bluetooth mode.
2 Turn
the
volume
knob
to
select
[PHONE
BOOK],
[HISTORY],
or
[NUMBER
DIAL],
then
press
the
knob.
3
Turn
the
volume
knob
to
select a contact
or
enter a
phone
number.
4
Press
and hold one
of
the
number
buttons
(1
to
6).
''STORED"
appears
when the contact
is
stored.
•
To
erase
a contact from the
preset
memory,
select
[NUMBER
DIAL]
in
step
2
and
store
a blank number.
1
Press
~
to
enter Bluetooth mode.
2
Press
one
of
the
number
buttons
(1
to
6).
3
Press~
or
the
volume
knob
to
call.
"NO
MEMORY"
appears
if there
are
no
contacts
stored.
BLUETOOTH•
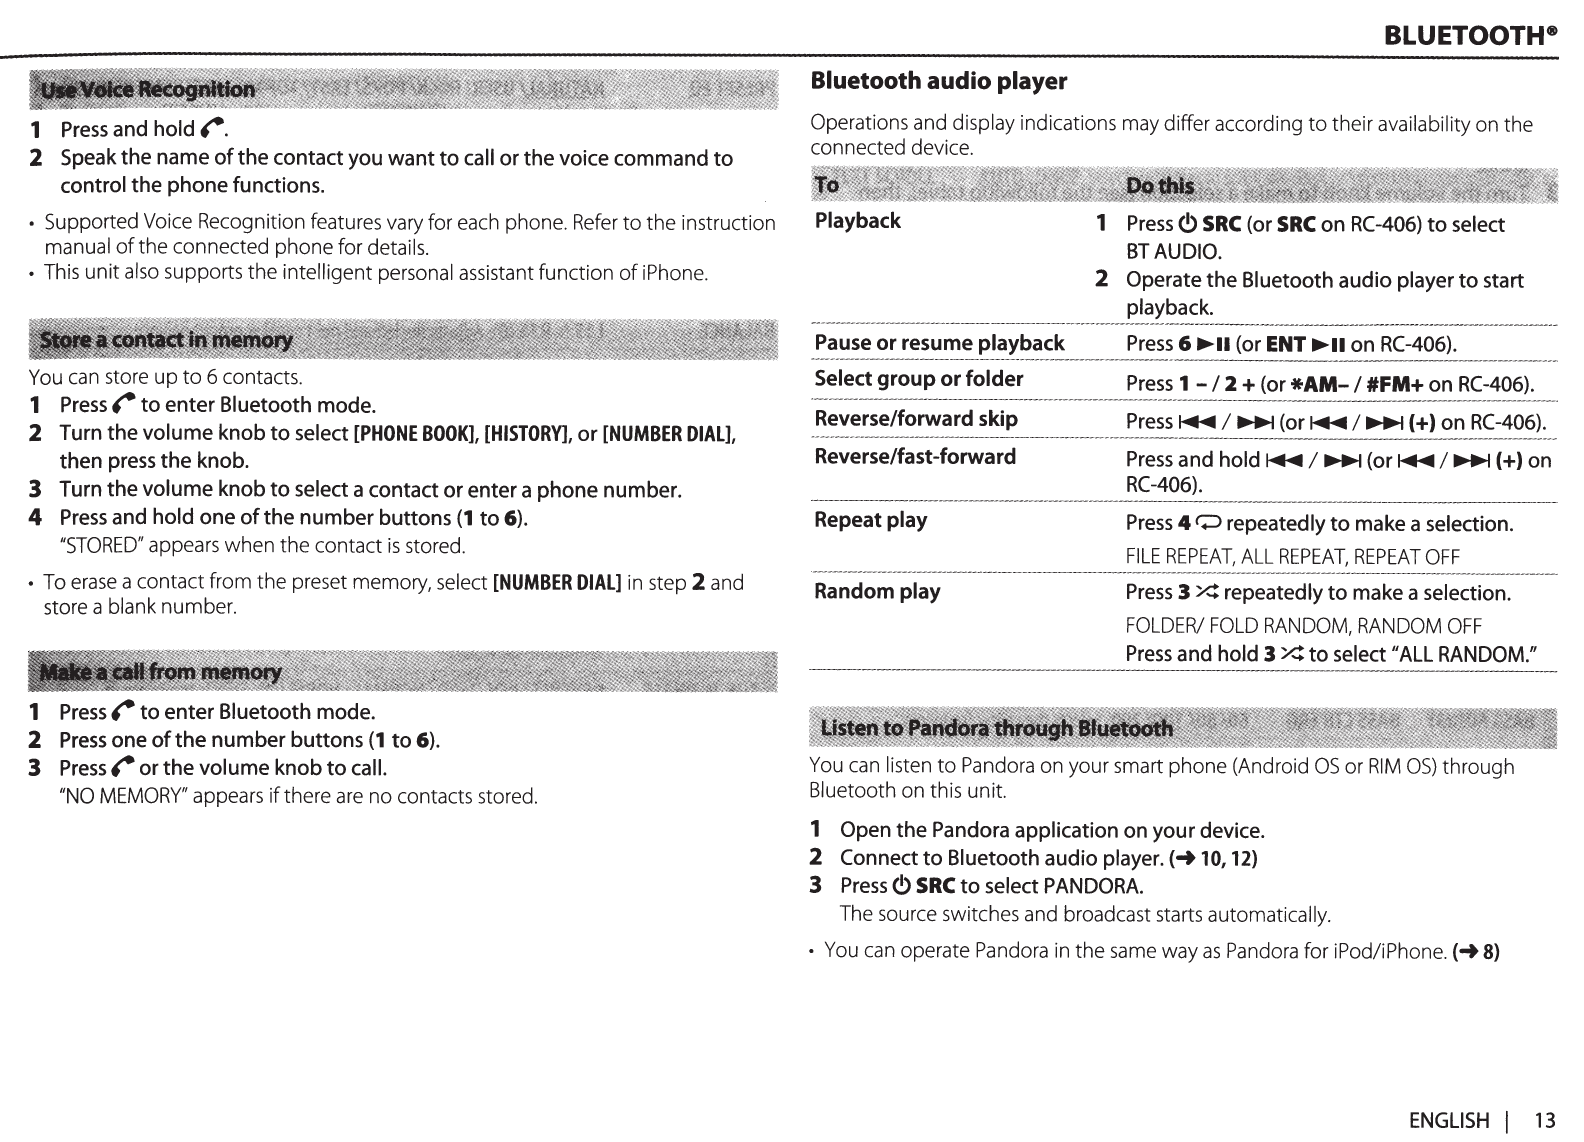
Bluetooth
audio
player
Operations
and
display indications
may
differ according to their availability
on
the
connected
device.
Playback 1
Press
C!>
SRC
(or
SRC
on
RC-406)
to
select
BTAUDIO
.
2
Operate
the
Bluetooth audio player
to
start
playback.
Pause
or
resume
playback
Press
6
...,..
..
(or ENT
...,..
..
on
RC-406).
----------------------------------------------------------------------------------
·
Select
group
or
folder
Press
1-12
+(or
*AM-
1
#FM+
on
RC-406).
~----------------------------------------
-
-------------------------------------
Reverse/forward skip
Press~
I~
(or~
1
~(+)on
RC-406).
Reverse/fast-forward
Repeat
play
Random
play
Press
and
hold~
I~
(or~
I~(+)
on
RC-406).
Press
4 0
repeatedly
to
make a selection.
FILE
REPEAT,
ALL
REPEAT,
REPEAT
OFF
Press
3
X::
repeatedly
to
make a selection.
FOLDER/
FOLD
RANDOM,
RANDOM
OFF
Press
and hold 3
X::
to
select "ALL RANDOM."
You
can
listen to
Pandora
on
your
smart
phone (Android
OS
or
RIM
OS)
through
Bluetooth
on
this unit.
1 Open
the
Pandora application on
your
device.
2
Connect
to
Bluetooth audio player. (-+10, 12)
3
Press
C!>
SRC
to
select
PANDORA.
The
source
switches
and
broadcast
starts
automatically.
•
You
can
operate
Pandora
in
the
same
way
as
Pandora
for iPod/iPhone. (-+
8)
ENGLISH
I
13
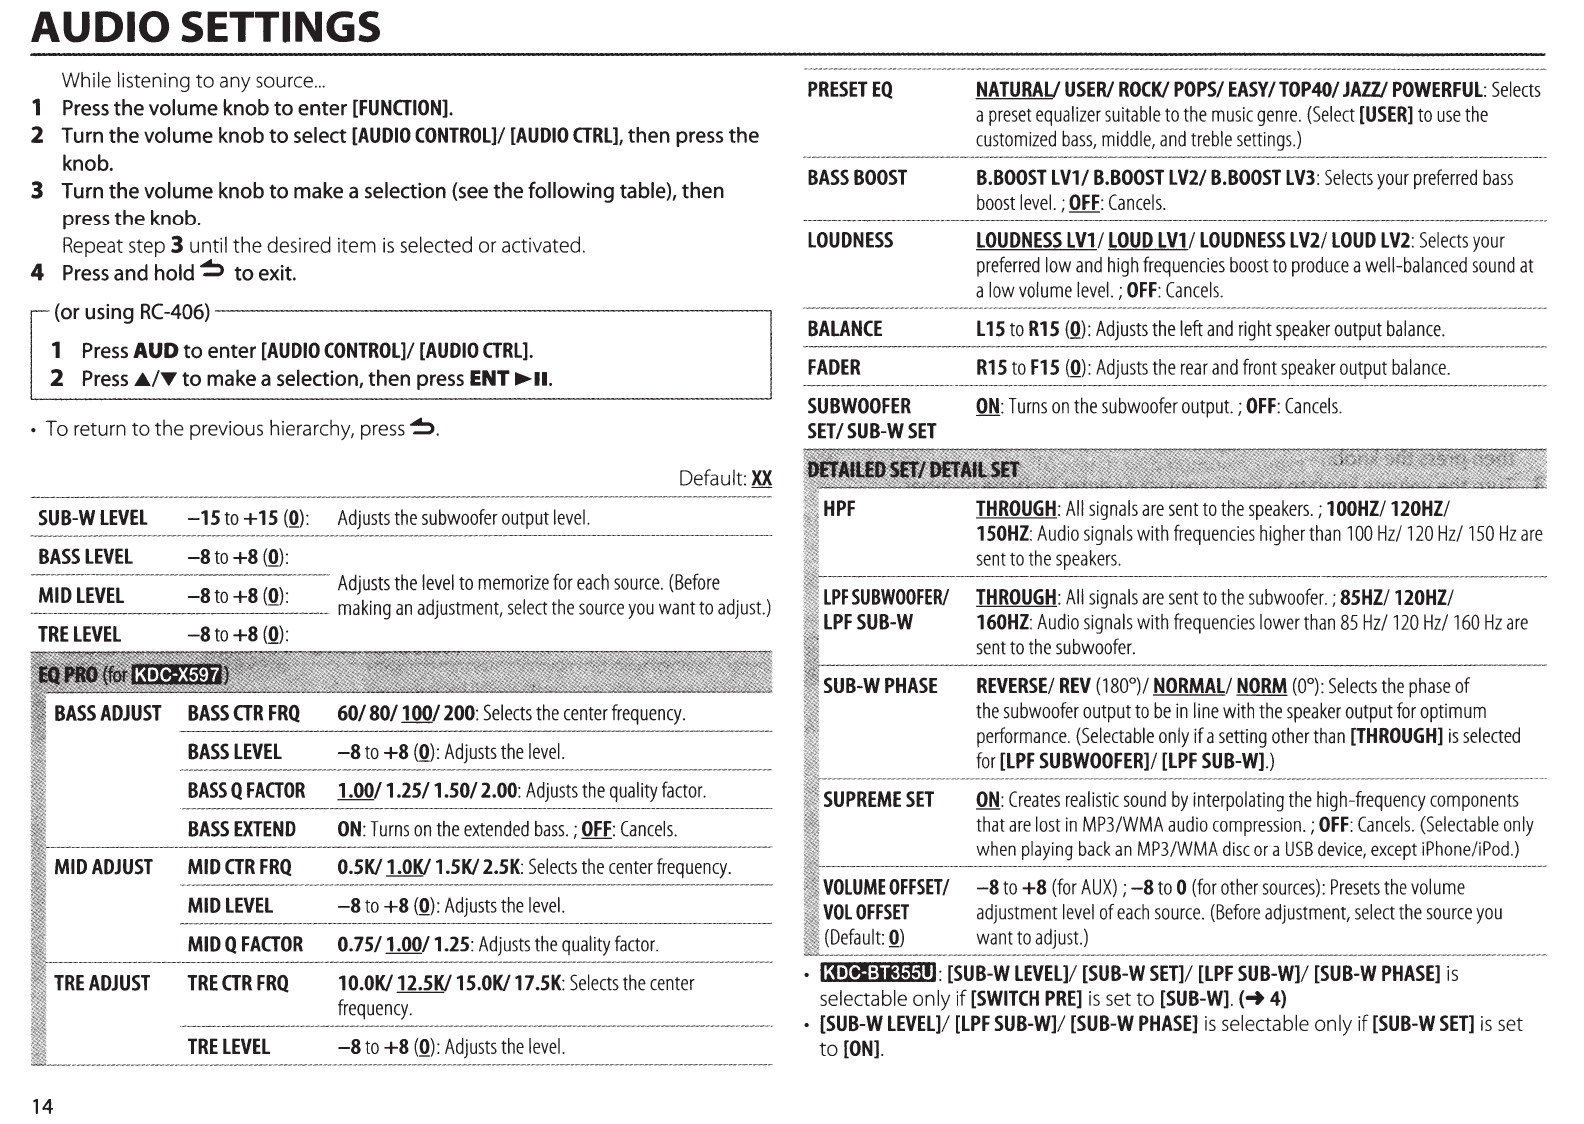
AUDIO
SETTINGS
While listening to
any
source
...
1 Press
the
volume
knob
to
enter
[FUNGION].
2 Turn
the
volume
knob
to
select
[AUDIO
CONTROL]/
[AUDIO
GRL],
then
press
the
knob.
3 Turn
the
volume
knob
to
make a selection (see
the
following
table),
then
press
the
knob.
Repeat
step 3 until the desired item
is
selected or activated.
4 Press
and
hold~
to
exit.
(orusingRC-406)~~~~~~~~~~~~~~~~~~~~
1 Press
AUD
to
enter
[AUDIO
CONTROL]/
[AUDIO
GRL].
2 Press
JJrt../T
to
make a selection,
then
press ENT ........
•
To
return to the previous hierarchy,
press~.
Default:
XX
SUB-W
LEVEL
-15
to+
15
(0):
Adjusts
the
subwoofer
output
level.
BASS
LEVEL
-8
to
+8
(0):
-MIDLEVEL--------=_
8
t~
+B(m:
____
Adju.sts
the
le~el
to
memorize
for
each
source.
(Before
.
-------------------------=-------
makmg
an
adjustment,
select
the
source
you
want
to
adjust.)
TRE
LEVEL
-8
to
+8
(0):
14
BASS
ADJUST
BASS
GR
FRQ
60/80/ 100/200:
Selects
the
center
frequency.
-------------------------------------------~
BASS
LEVEL
-8
to
+8
(0):
Adjusts
the
level.
-------------------------------------------------------------------------
BASS
Q
FACTOR
1.00/1.25/1.50/2.00:
Adjusts
the
quality
factor.
BASS
EXTEND
ON:
Turns
on
the
extended
bass.
;
OFF:
Cancels.
MID
ADJUST
MID
GR
FRQ
0.5K/1.0K/1.5K/2.5K:
Selects
the
center
frequency.
----------------------------------------------------------
MID
LEVEL
-8
to
+8
(0):
Adjusts
the
level.
MID
Q
FAGOR
0.75/1.00/1.25:
Adjusts
the
quality
factor.
TRE
ADJUST
TRE
GR
FRQ
TRE
LEVEL
1 O.OK/12.5K/15.0K/17
.5K:
Selects
the
center
frequency.
-8
to
+8
(0):
Adjusts
the
level.
PRESET
EQ
BASS
BOOST
LOUDNESS
BALANCE
FADER
NATURAU
USER/
ROCK/
POPS/
EASY/TOP40/
JAW
POWERFUL:
Selects
a
preset
equalizer
suitable
to
the
music
genre.
(Select
[USER]
to
use
the
customized
bass,
middle,
and
treble
settings.)
B.BOOST
LV1/
B.BOOST
LV2/
B.BOOST
LV3:
Selects
your
preferred
bass
boost
level.;
OFF:
Cancels.
LOUDNESS
LV1/
LOUD
LV1/
LOUDNESS
LV2/
LOUD
LV2:
Selects
your
preferred
low
and
high
frequencies
boost
to
produce
a
well-balanced
sound
at
a
low
volume
level.;
OFF:
Cancels.
L15
to
R15
(0):
Adjusts
the
left
and
right
speaker
output
balance.
R15
to
F15
(0):
Adjusts
the
rear
and
front
speaker
output
balance.
SUBWOOFER
ON:
Turns
on
the
subwoofer
output.;
OFF:
Cancels.
SET
I
SUB-W
SET
HPF
THROUGH:
All
signals
are
sent
to
the
speakers.;
100HZ/
120HZ/
150HZ:
Audio
signals
with
frequencies
higher
than
100
Hz/
120
Hz/
150Hz
are
sent
to
the
speakers.
LPF
SUBWOOFER/
THROUGH:
All
signals
are
sent
to
the
subwoofer.;
85HZ/
120HZ/
LPF
SUB-W
160HZ:
Audio
signals
with
frequencies
lower
than
85
Hz/
120
Hz/
160
Hz
are
sent
to
the
subwoofer.
SUB-W
PHASE
REVERSE/
REV
(180°)/
NORMAL/
NORM
(0°):
Selects
the
phase
of
the
subwoofer
output
to
be
in
line
with
the
speaker
output
for
optimum
performance.
(Selectable
only
if a
setting
other
than
[THROUGH]
is
selected
for
[LPF
SUBWOOFER]/
[LPF
SUB-W].)
SUPREME
SET
ON:
Creates
realistic
sound
by
interpolating
the
high-frequency
components
that
are
lost
in
MP3/WMA
audio
compression.;
OFF:
Cancels.
(Selectable
only
when
playing
back
an
MP3/WMA
disc
or
a
USB
device,
except
iPhone/iPod.)
VOLUME
OFFSET/
-8
to
+8
(for
AUX);
-8
to
0
(for
other
sources):
Presets
the
volume
VOL
OFFSET
adjustment
level
of
each
source.
(Before
adjustment,
select
the
source
you
(Default:
0)
want
to
adjust.)
•
13•IIJI:iite1;.111:
[SUB-W
LEVEL]/
[SUB-W
SET]/
[LPF
SUB-W]/
[SUB-W
PHASE]
is
selectable only if
[SWITCH
PRE]
is
set
to
[SUB-W].
(~
4)
•
[SUB-W
LEVEL]/
[LPF
SUB-W]/
[SUB-W
PHASE]
is
selectable only if
[SUB-W
SET]
is
set
to
[ON].
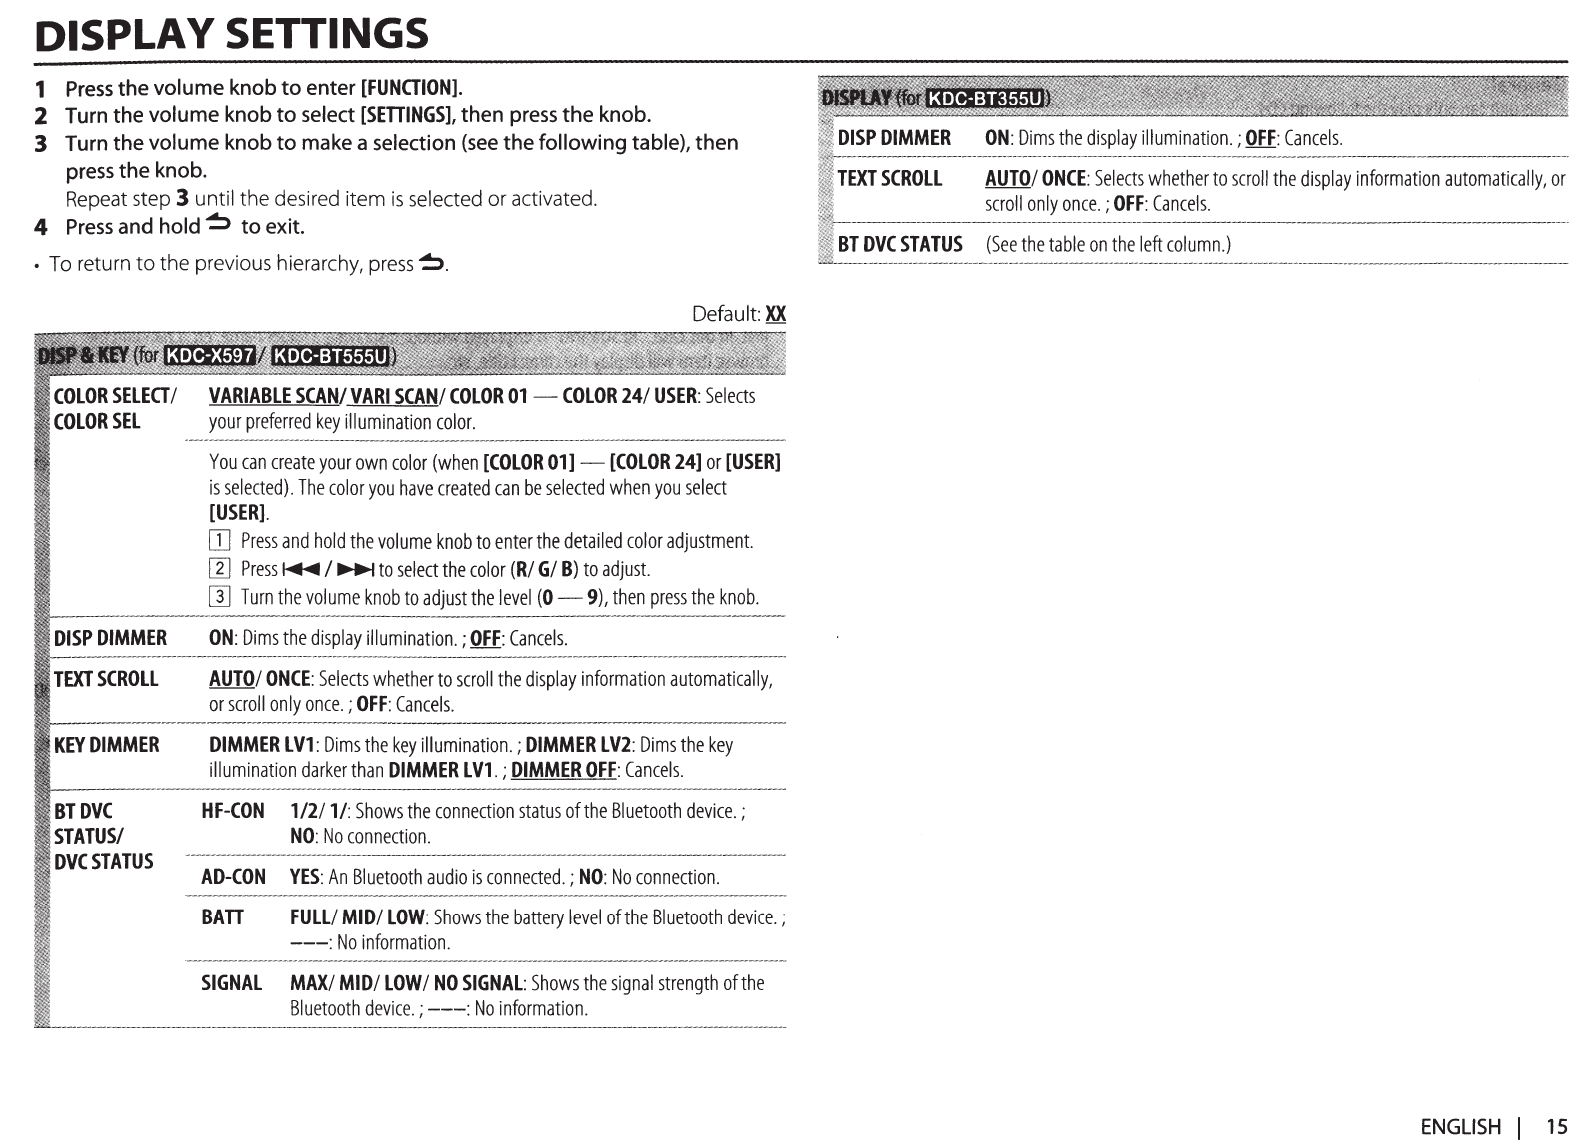
DISPLAY SETTINGS
1
Press
the volume knob
to
enter
[FUNGION].
2 Turn the volume knob to select
[SETTINGS],
then
press
the knob.
3 Turn the volume knob to make a selection
(see
the following table), then
press
the knob.
Repeat step 3 until
the
desired item
is
selected or activated.
4
Press
and
hold~
to
exit.
• To return
to
the
previous hierarchy,
press~.
COLOR
SELEa
I
COLORSEL
DISPDIMMER
TEXT
SCROLL
KEY
DIMMER
BTDVC
STATUS/
DVCSTATUS
Default:
XX
VARIABLE
SCAN/VARISCAN/
COLOR
01
-COLOR 24/
USER:
Selects
your
preferred
key
illumination
color.
You
can
create
your
own
color
(when
[COLOR
01]-
[COLOR
24]
or
[USER]
is
selected).
The
color
you
have
created
can
be
selected
when
you
select
[USER].
[]
Press
and
hold
the
volume
knob
to
enter
the
detailed
color
adjustment.
W
Press
~I~
to
select
the
color
(R/
G/
B)
to
adjust.
[}]
Turn
the
volume
knob
to
adjust
the
level
(0-
9),
then
press
the
knob.
ON:
Dims
the
display
illumination.;
OFF:
Cancels.
AUTO/
ONCE:
Selects
whether
to
scroll
the
display
information
automatically,
or
scroll
only
once.;
OFF:
Cancels.
DIMMER
LV1:
Dims
the
key
illumination.;
DIMMER
LV2:
Dims
the
key
illumination
darker
than
DIMMER
LV1.;
DIMMER
OFF:
Cancels.
HF-CON
1/2/1/:
Shows
the
connection
status
of
the
Bluetooth
device.;
NO:
No
connection.
AD-CON
YES:
An
Bluetooth
audio
is
connected.;
NO:
No
connection.
BATT
FULL/
MID/
LOW:
Shows
the
battery
level
of
the
Bluetooth
device.;
---:
No
information.
SIGNAL
MAX/
MID/
LOW/
NO
SIGNAL:
Shows
the
signal
strength
of
the
Bluetooth
device.;---:
No
information.
DISP
DIMMER
ON:
Dims
the
display
illumination.;
OFF:
Cancels.
TEXT
SCROLL
AUTO/
ONCE:
Selects
whether
to
scroll
the
display
information
automatically,
or
scroll
only
once.;
OFF:
Cancels.
BT
DVC
STATUS
(See
the
table
on
the
left
column.)
ENGLISH
I
15
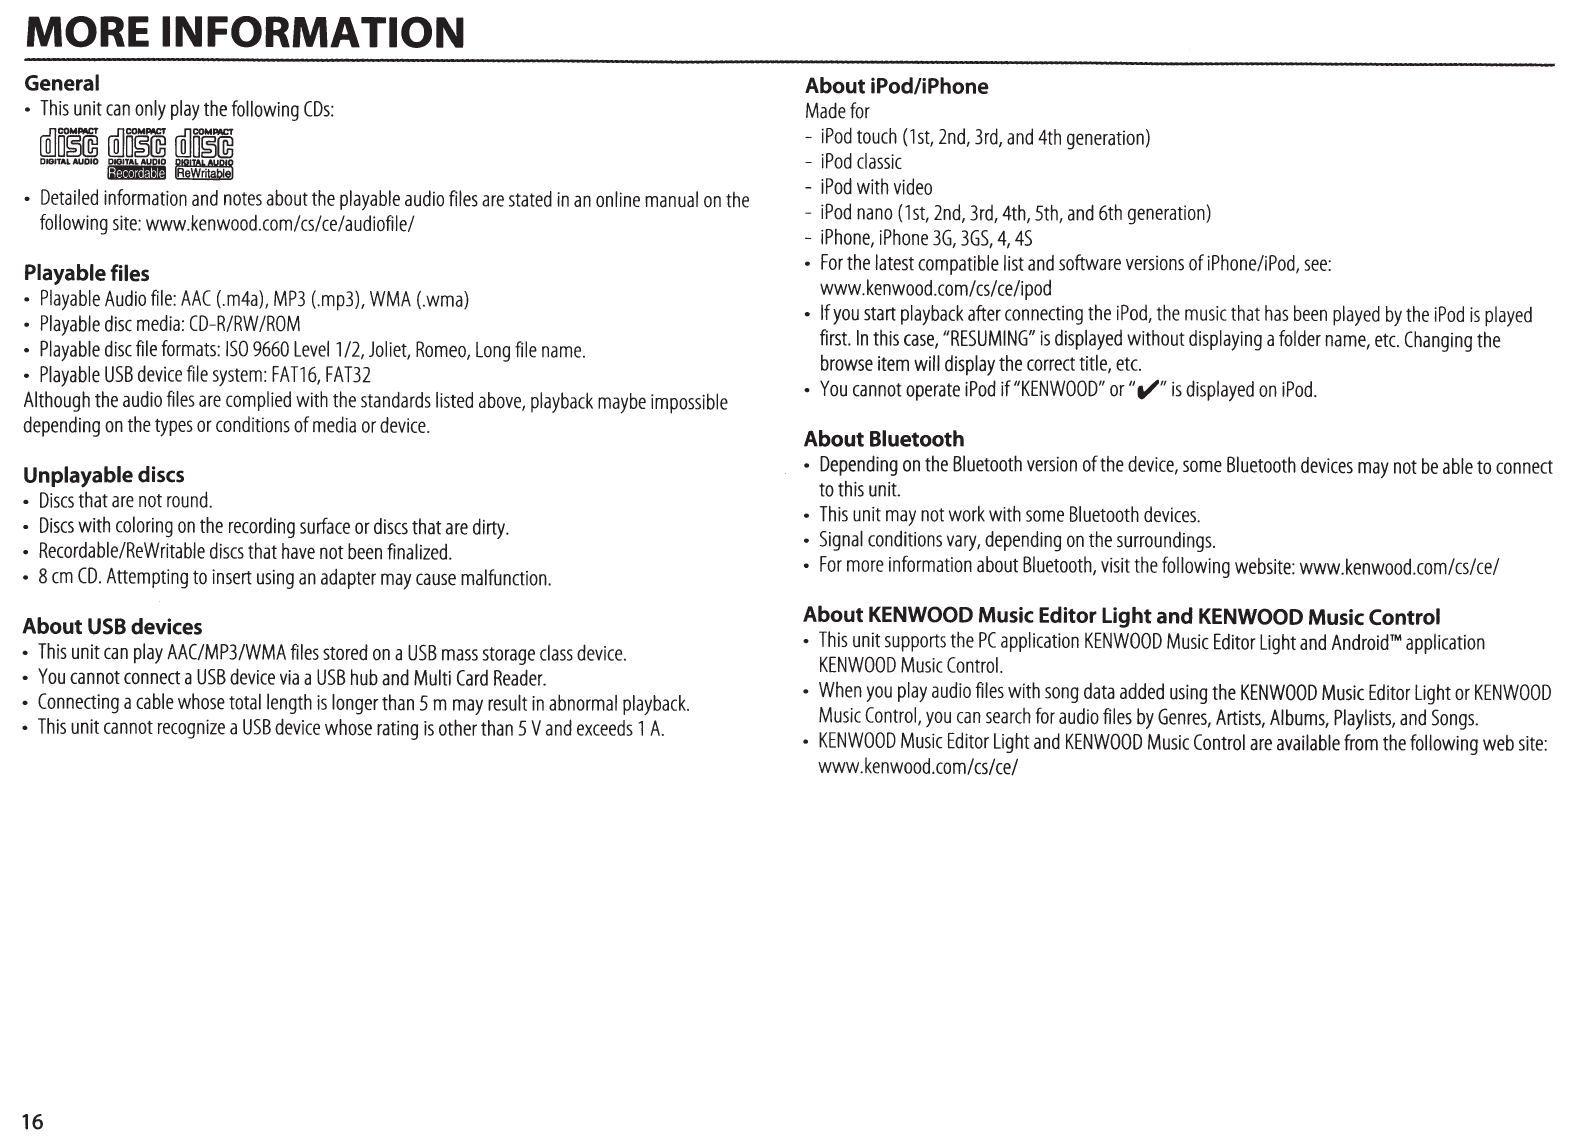
MORE INFORMATION
General
•
This
unit
can
only
play
the
following
CDs:
cOJD§@
cOJo§@
cOJD§@
DIOITALAUDIO
&'ilm
~
·······~
•
Detailed
information
and
notes
about
the
playable
audio
files
are
stated
in
an
online
manual
on
the
following
site:
www.kenwood.com/cs/ce/audiofile/
Playable
files
•
Playable
Audio
file:
AAC
(.m4a),
MP3
(.mp3),
WMA
(.wma)
•
Playable
disc
media:
CD-R/RW
/ROM
•
Playable
disc
file
formats:
ISO
9660
Levell
/2,
Joliet,
Romeo,
Long
file
name.
•
Playable
USB
device
file
system:
FA
T16,
FAT32
Although
the
audio
files
are
complied
with
the
standards
listed
above,
playback
maybe
impossible
depending
on
the
types
or
conditions
of
media
or
device.
Unplayable
discs
•
Discs
that
are
not
round.
•
Discs
with
coloring
on
the
recording
surface
or
discs
that
are
dirty.
•
Recordable/ReWritable
discs
that
have
not
been
finalized.
• 8
em
CD.
Attempting
to
insert
using
an
adapter
may
cause
malfunction.
About
USB
devices
•
This
unit
can
play
AAC/MP3/WMA
files
stored
on
a
USB
mass
storage
class
device.
•
You
cannot
connect
a
USB
device
via
a
USB
hub
and
Multi
Card
Reader.
•
Connecting
a
cable
whose
total
length
is
longer
than
5 m
may
result
in
abnormal
playback.
•
This
unit
cannot
recognize
a
USB
device
whose
rating
is
other
than
5
V
and
exceeds
1
A.
16
About iPod/iPhone
Made
for
-
iPod
touch
(1st,
2nd,
3rd,
and
4th
generation)
-
iPod
classic
-
iPod
with
video
-
iPod
nano
(1st,
2nd,
3rd,
4th,
5th,
and
6th
generation)
-
iPhone,
iPhone
3G,
3GS,
4,
4S
•
For
the
latest
compatible
list
and
software
versions
of
iPhone/iPod,
see:
www.kenwood.com/cs/ce/ipod
• If
you
start
playback
after
connecting
the
iPod,
the
music
that
has
been
played
by
the
iPod
is
played
first.
In
this
case,
"RESUMING"
is
displayed
without
displaying
a
folder
name,
etc.
Changing
the
browse
item
will
display
the
correct
title,
etc.
•
You
cannot
operate
iPod
if"KENWOOD"
or
"t/"
is
displayed
on
iPod.
About Bluetooth
•
Depending
on
the
Bluetooth
version
of
the
device,
some
Bluetooth
devices
may
not
be
able
to
connect
to
this
unit.
•
This
unit
may
not
work
with
some
Bluetooth
devices
.
•
Signal
conditions
vary,
depending
on
the
surroundings
.
•
For
more
information
about
Bluetooth,
visit
the
following
website:
www.kenwood.com/cs/ce/
About
KENWOOD
Music
Editor
Light
and
KENWOOD
Music
Control
•
This
unit
supports
the
PC
application
KENWOOD
Music
Editor
Light
and
Android™
application
KENWOOD
Music
Control.
•
When
you
play
audio
files
with
song
data
added
using
the
KENWOOD
Music
Editor
Light
or
KENWOOD
Music
Control,
you
can
search
for
audio
files
by
Genres,
Artists,
Albums,
Playlists,
and
Songs
.
•
KENWOOD
Music
Editor
Light
and
KENWOOD
Music
Control
are
available
from
the
following
web
site:
www.kenwood.com/cs/ce/
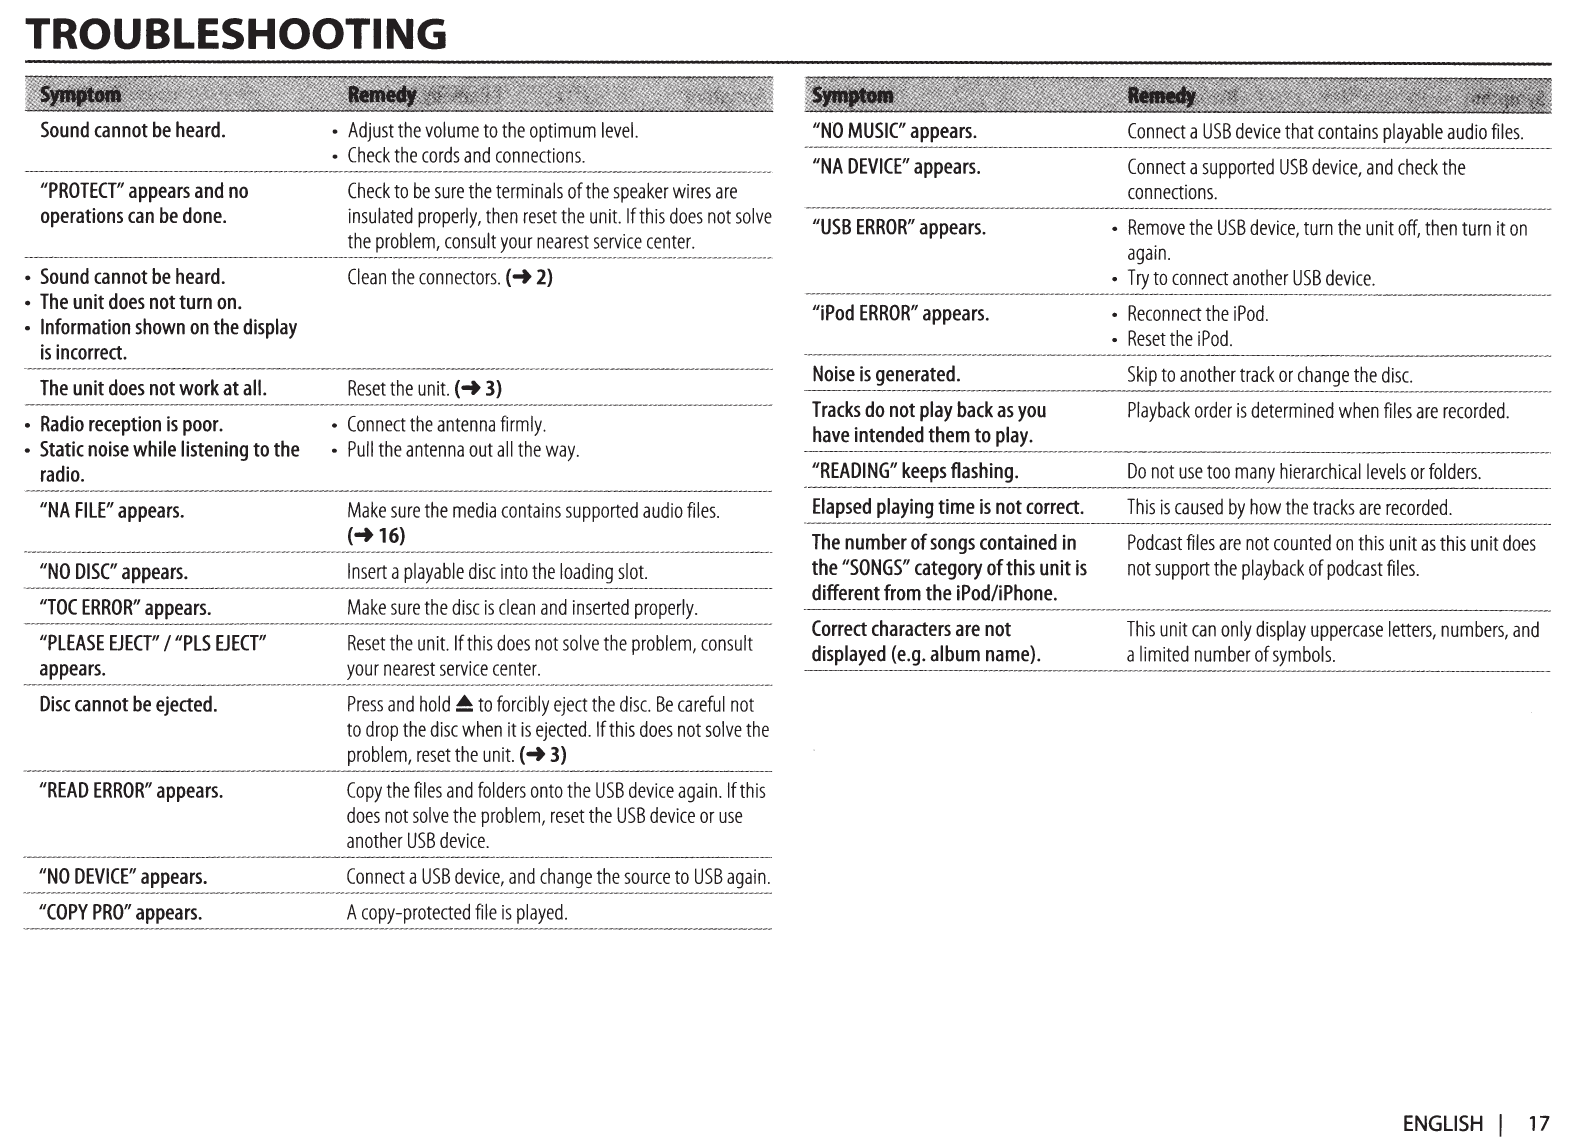
TROUBLESHOOTING
Sound
cannot
be
heard.
"PROTECT"
appears
and
no
operations
can
be
done.
•
Adjust
the
volume
to
the
optimum
level.
•
Check
the
cords
and
connections.
Check
to
be
sure
the
terminals
of
the
speaker
wires
are
insulated
properly,
then
reset
the
unit.
If
this
does
not
solve
the
problem,
consult
your
nearest
service
center.
~--------------------------------------------------------------------------------------------------------------------------------------
•
Sound
cannot
be
heard.
Clean
the
connectors.(~
2}
•
The
unit
does
not
turn
on.
•
Information
shown
on
the
display
is
incorrect.
The
unit
does
not
work
at
all.
•
Radio
reception
is
poor.
•
Static
noise
while
listening
to
the
radio.
"NA
FilE"
appears.
"NO
DISC"
appears.
Reset
the
unit.(~
3}
•
Connect
the
antenna
firmly.
•
Pull
the
antenna
out
all
the
way.
Make
sure
the
media
contains
supported
audio
files.
(~
16}
Insert
a
playable
disc
into
the
loading
slot.
"TOC
ERROR"
appears.
Make
sure
the
disc
is
clean
and
inserted
properly.
-----------------------------------------------------------------------------------------
"PlEASE
EJECT"
I
"PlS
EJECT"
Reset
the
unit.
If
this
does
not
solve
the
problem,
consult
appears.
your
nearest
service
center.
-------------------------------------------------------------------------
·
------------------------------~
Disc
cannot
be
ejected.
Press
and
hold~
to
forcibly
eject
the
disc.
Be
careful
not
to
drop
the
disc
when
it
is
ejected.
If
this
does
not
solve
the
problem,
reset
the
unit.(~
3}
"READERROR"appea~.
Copy
the
files
and
folders
onto
the
USB
device
again.
If
this
does
not
solve
the
problem,
reset
the
USB
device
or
use
another
USB
device.
"NO
DEVICE"
appears.
Connect
a
USB
device,
and
change
the
source
to
USB
again.
-------------------------------------------
-
------------------------------------------------------------~
"COPY
PRO"
appears.
A
copy-protected
file
is
played.
"NO
MUSIC"
appears.
"NA
DEVICE"
appears.
"USBERROR"appea~.
"iPod
ERROR"
appears.
Connect
a
USB
device
that
contains
playable
audio
files.
Connect
a
supported
USB
device,
and
check
the
connections.
•
Remove
the
USB
device,
turn
the
unit
off,
then
turn
it
on
again.
•
Try
to
connect
another
USB
device
.
•
ReconnecttheiPod.
•
Reset
the
iPod.
Noise
is
generated.
Skip
to
another
track
or
change
the
disc.
-------~--------------------------------------------~-----------------------------------~--------
Tracks
do
not
play
back
as
you
Playback
order
is
determined
when
files
are
recorded.
have
intended
them
to
play.
------------------------------------------------------------------------------------------------·
"READING"
keeps
flashing.
Do
not
use
too
many
hierarchical
levels
or
folders.
Elapsed
playing
time
is
not
correct.
This
is
caused
by
how
the
tracks
are
recorded.
--------------------------------------------------------------------------
The
number
of
songs
contained
in
Podcast
files
are
not
counted
on
this
unit
as
this
unit
does
the
/ISONGS"
category
of
this
unit
is
not
support
the
playback
of
pod
cast
files.
different
from
the
iPod/iPhone.
Correct
characters
are
not
displayed
(e.g.
album
name).
This
unit
can
only
display
uppercase
letters,
numbers,
and
a
limited
number
of
symbols.
ENGLISH
I
17
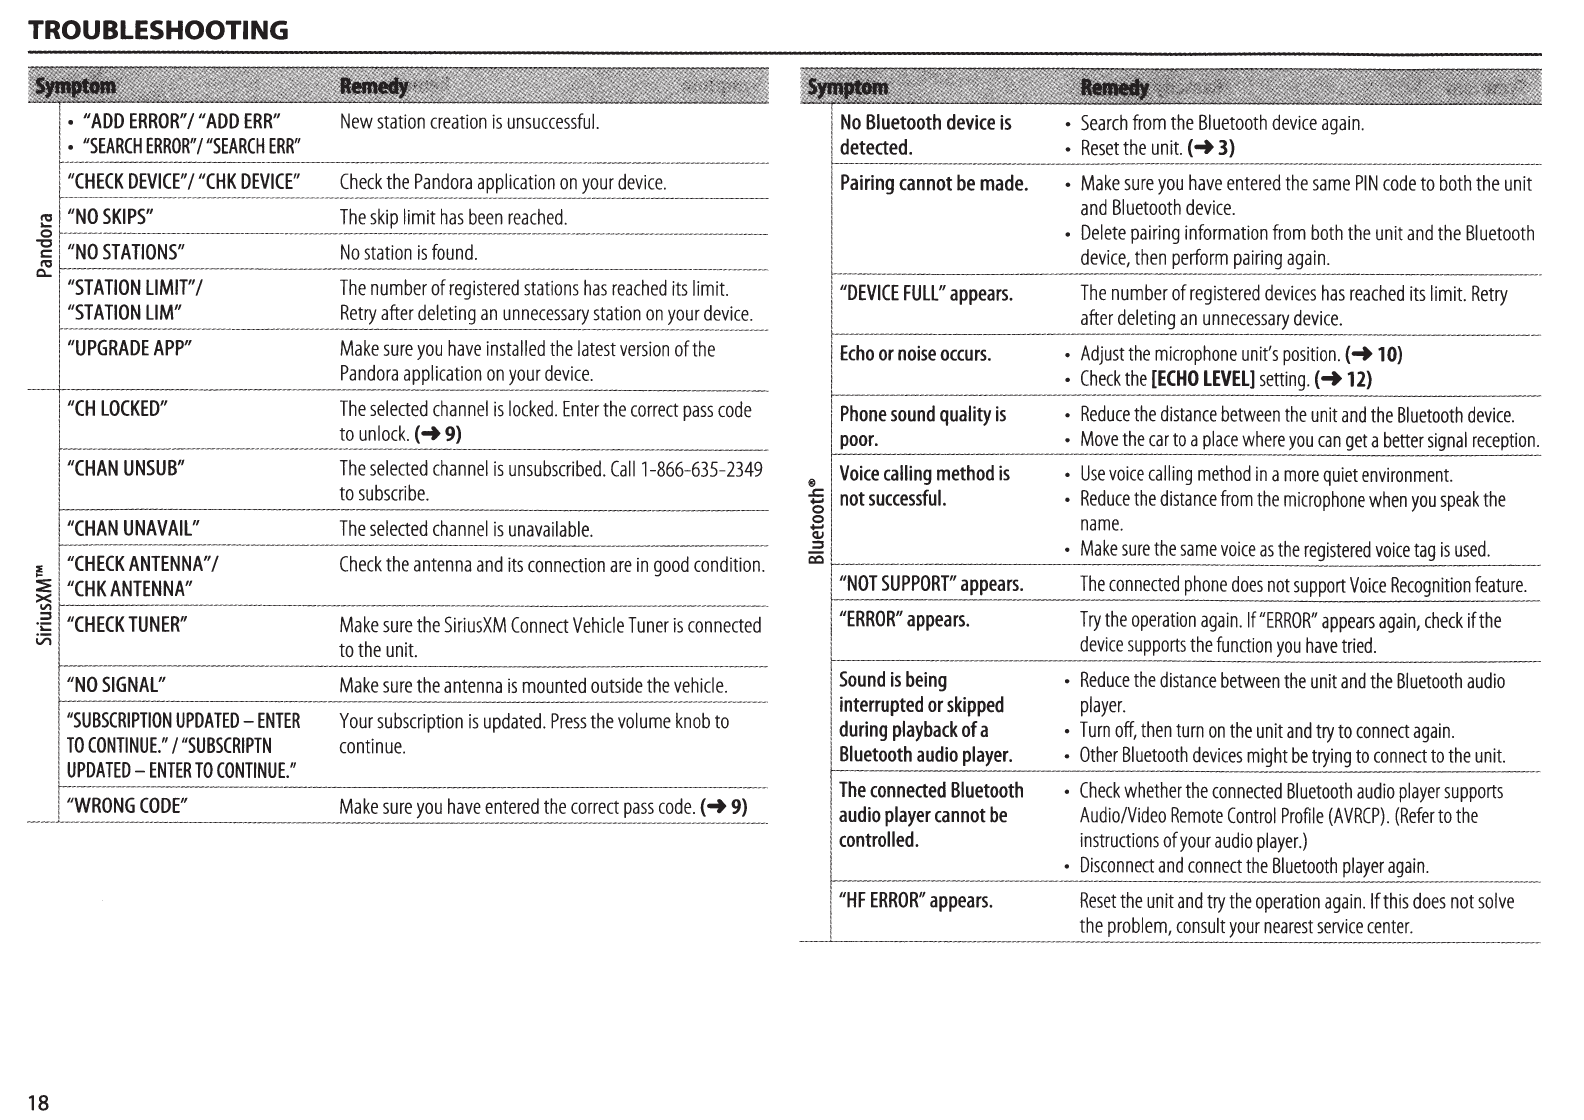
TROUBLESHOOTING
•
II
ADD
ERROR"
I
II
ADD
ERR"
•
"SEARCH
ERROR"
I
"SEARCH
ERR"
"CHECK
DEVICE"
I
"CHK
DEVICE"
"'
"NO
SKIPS"
...
0
""C
"NO
STATIONS"
c:::
"'
0...
"STATION
liMIT"/
"STATION
liM"
"UPGRADE
APP"
"CH
LOCKED"
"CHAN
UNSUB"
"CHAN
UNA
VAIL"
!
"CHECK
ANTENNA"
I
~
"CHK
ANTENNA"
X
V\
::s
"CHECK
TUNER"
.i::
v;
"NO
SIGNAL"
"SUBSCRIPTION
UPDATED-
ENTER
TO
CONTINUE."
I
"SUBSCRIPTN
UPDATED-
ENTER
TO
CONTINUE."
"WRONG
CODE"
18
New
station
creation
is
unsuccessful.
Check
the
Pandora
application
on
your
device.
The
skip
limit
has
been
reached.
No
station
is
found.
The
number
of
registered
stations
has
reached
its
limit.
Retry
after
deleting
an
unnecessary
station
on
your
device.
Make
sure
you
have
installed
the
latest
version
of
the
Pandora
application
on
your
device.
The
selected
channel
is
locked.
Enter
the
correct
pass
code
to
unlock.(-+
9)
The
selected
channel
is
unsubscribed.
Calll-866-635-2349
to
subscribe.
The
selected
channel
is
unavailable.
Check
the
antenna
and
its
connection
are
in
good
condition.
Make
sure
the
SiriusXM
Connect
Vehicle
Tuner
is
connected
to
the
unit.
Make
sure
the
antenna
is
mounted
outside
the
vehicle.
Your
subscription
is
updated.
Press
the
volume
knob
to
continue.
Make
sure
you
have
entered
the
correct
pass
code.(-+
9)
No
Bluetooth
device
is
detected.
Pairing
cannot
be
made.
'"DEVICE
FULL"
appears.
Echo
or
noise
occurs.
•
Search
from
the
Bluetooth
device
again.
•
Reset
the
unit.(-+
3)
•
Make
sure
you
have
entered
the
same
PIN
code
to
both
the
unit
and
Bluetooth
device.
•
Delete
pairing
information
from
both
the
unit
and
the
Bluetooth
device,
then
perform
pairing
again.
The
number
of
registered
devices
has
reached
its
limit.
Retry
after
deleting
an
unnecessary
device.
•
Adjust
the
microphone
unit's
position.(-+
10)
•
Check
the
[ECHO
LEVEL]
setting.(-+
12)
Phone
sound
quality
is
•
Reduce
the
distance
between
the
unit
and
the
Bluetooth
device.
1
poor.
•
Move
the
car
to
a
place
where
you
can
get
a
better
signal
reception.
®
I
Voice
calling
method
is
•
Use
voice
calling
method
in
a
more
quiet
environment.
~
I
not
successful.
•
Reduce
the
distance
from
the
microphone
when
you
speak
the
.S
name.
QJ
::s
•
Make
sure
the
same
voice
as
the
registered
voice
tag
is
used.
~~------------·----------------------------·--·---~~-------~---------
"NOT
SUPPORT"
appears.
I
"ERROR"
appears.
I
Sound
is
being
interrupted
or
skipped
during
playback
of
a
Bluetooth
audio
player.
The
connected
Bluetooth
audio
player
cannot
be
controlled.
"HF
ERROR"
appears.
The
connected
phone
does
not
support
Voice
Recognition
feature.
Try
the
operation
again.
If
"ERROR"
appears
again,
check
if
the
device
supports
the
function
you
have
tried.
•
Reduce
the
distance
between
the
unit
and
the
Bluetooth
audio
player.
•
Turn
off,
then
turn
on
the
unit
and
try
to
connect
again.
•
Other
Bluetooth
devices
might
be
trying
to
connect
to
the
unit.
•
Check
whether
the
connected
Bluetooth
audio
player
supports
Audio/Video
Remote
Control
Profile
(AVRCP).
(Refer
to
the
instructions
of
your
audio
player.)
•
Disconnect
and
connect
the
Bluetooth
player
again.
Reset
the
unit
and
try
the
operation
again.
If
this
does
not
solve
the
problem,
consult
your
nearest
service
center.
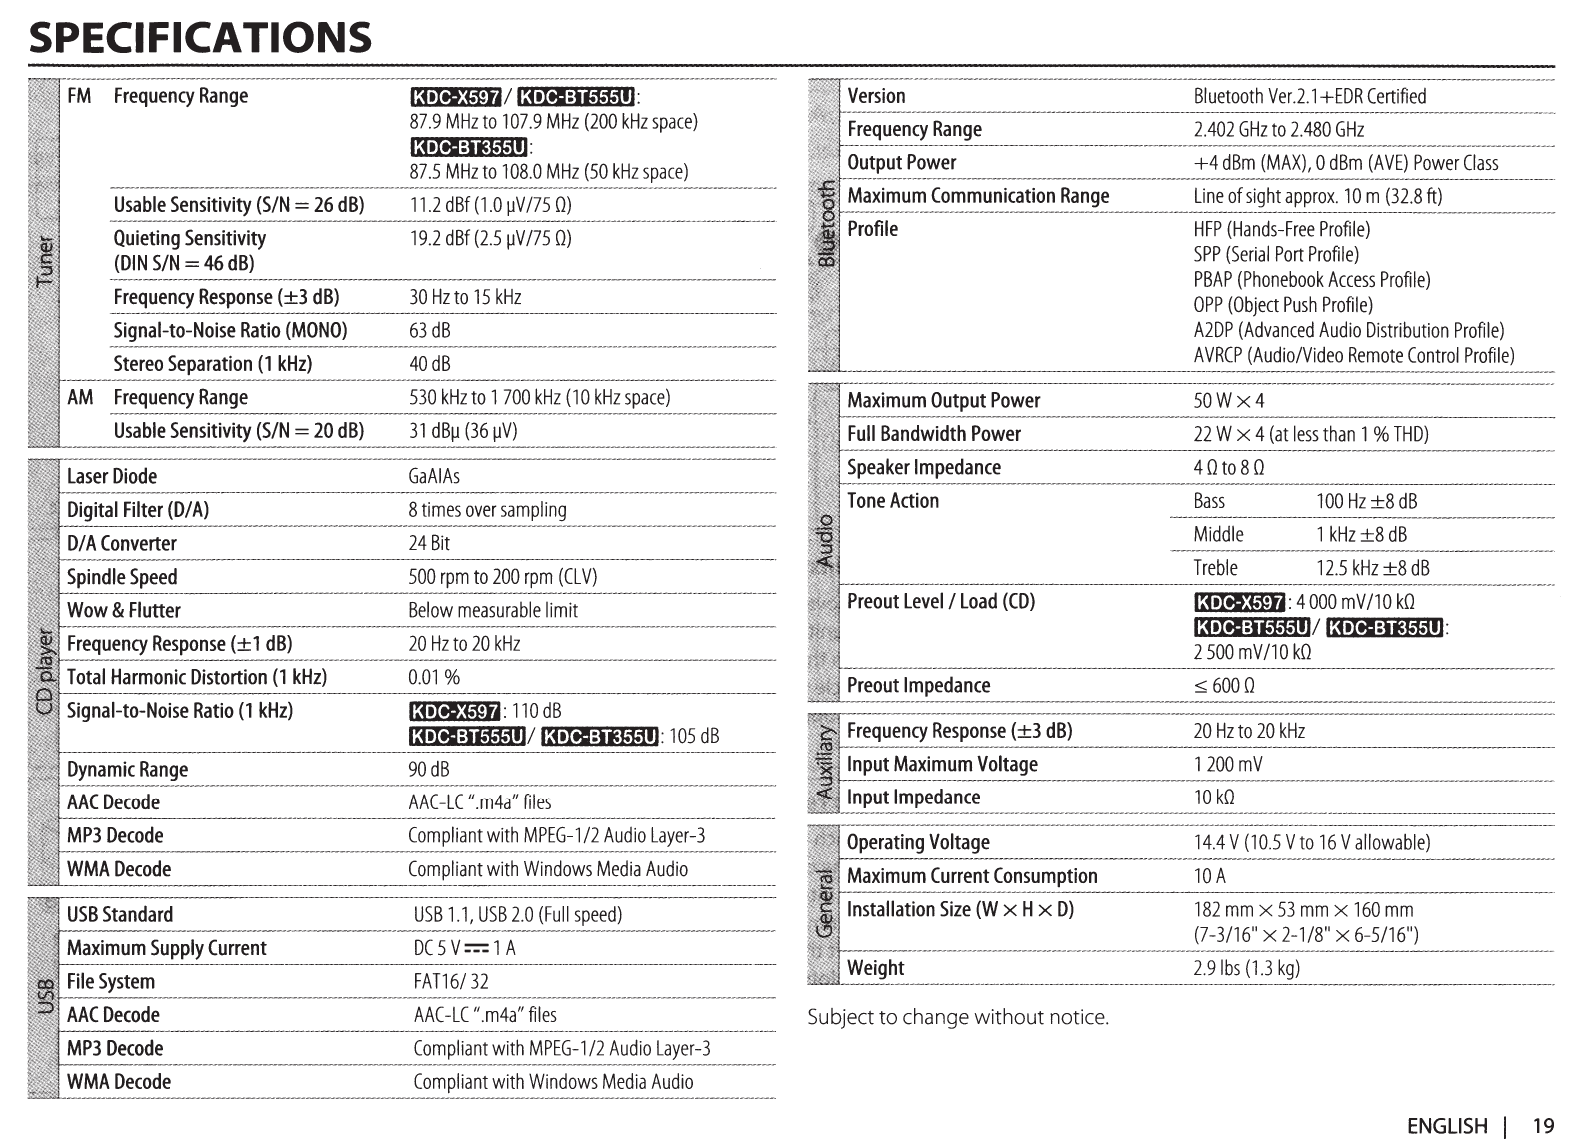
SPECIFICATIONS
FM
Frequency
Range
•:olll$tr4/
13•M=iieie1e11J:
87.9
MHz
to
107.9
MHz
(200kHz
space)
13•M=iite1e11J:
87.5
MHz
to
108.0
MHz
(50
kHz
space)
----------------------------------------------------------------------------------------------------------------
Usable
Sensitivity
(SIN=
26
dB)
11.2
dBf
(1.0
~V
/75
0)
----------------------------------------------------------------------------------·--------------
Quieting
Sensitivity
19.2
dBf
(2.5
~V
/75
0)
(DIN
S/N
=
46
dB)
Frequency
Response
(±3
dB)
30
Hz
to
15
kHz
-----------------------------------------------------------------------------------
Signal-to-Noise
Ratio
(MONO)
63
dB
Stereo
Separation
(1
kHz)
40
dB
AM
Frequency
Range
530
kHz
to
1
700kHz
(10kHz
space)
-------------------------------------------------------------------------
Usable
Sensitivity
(S/N
=
20
dB)
31
dB~
(36
~V)
Laser
Diode
GaAIAs
Digital
Filter
(D/
A)
8
times
over
sampling
D/
A
Converter
24
Bit
Spindle
Speed
500
rpm
to
200
rpm
(CLV)
Wow
&
Flutter
Below
measurable
limit
Frequency
Response
(±
1
dB)
20
Hz
to
20
kHz
Total
Harmonic
Distortion
(1
kHz)
0.01%
Signal-to-Noise
Ratio
(1
kHz)
Dynamic
Range
90
dB
AAC
Decode
AAC
-LC
".m4a"
files
MP3
Decode
Compliant
with
MPEG-1/2
Audio
Layer-3
WMA
Decode
Compliant
with
Windows
Media
Audio
USB
Standard
USB
1.1,
USB
2.0
(Full
speed)
Maximum
Supply
Current
DC
5 V== 1 A
File
System
FAT16/
32
AAC
Decode
AAC
-LC
".m4a"
files
MP3
Decode
Compliant
with
MPEG-1
/2
Audio
Layer-3
WMA
Decode
Compliant
with
Windows
Media
Audio
Version
Frequency
Range
Output
Power
Maximum
Communication
Range
Profile
Maximum
Output
Power
Full
Bandwidth
Power
Speaker
Impedance
Tone
Action
Preout
Level
I
Load
(CD)
Preout
Impedance
Frequency
Response
(±3
dB)
Input
Maximum
Voltage
Input
Impedance
Operating
Voltage
Maximum
Current
Consumption
Installation
Size
(W
x H x
D)
Weight
Subject
to
change
without
notice.
Bluetooth
Ver.2.1
+EDR
Certified
2.402
GHz
to
2.480
GHz
+4
dBm
(MAX),
0
dBm
(AVE)
Power
Class
Line
of
sight
approx.
10
m
(32.8
ft)
HFP
(Hands-Free
Profile)
SPP
(Serial
Port
Profile)
PBAP
(Phonebook
Access
Profile)
OPP
(Object
Push
Profile)
A2DP
(Advanced
Audio
Distribution
Profile)
AVRCP
(Audio/Video
Remote
Control
Profile)
50Wx4
22
W x 4
(at
less
than
1 %
THD)
4 0
to
8 0
Bass
100Hz
±8
dB
Middle
1
kHz
±8
dB
Treble
12.5
kHz
±8
dB
t:oXtA$tH:
4
000
mV/10
kO
l~olte:iie1e1e1IJ/
13•M=iite1e11J:
2
500
mV/10
kO
~
6000
20
Hz
to
20
kHz
1
200
mV
10
kO
14.4
V
(10.5
V
to
16
V
allowable)
10
A
182
mm
x
53
mm
x
160
mm
(7-3/16
11
X
2-1/8
11
X
6-5/16
11
)
2.91bs
(1.3
kg)
ENGLISH
I
19
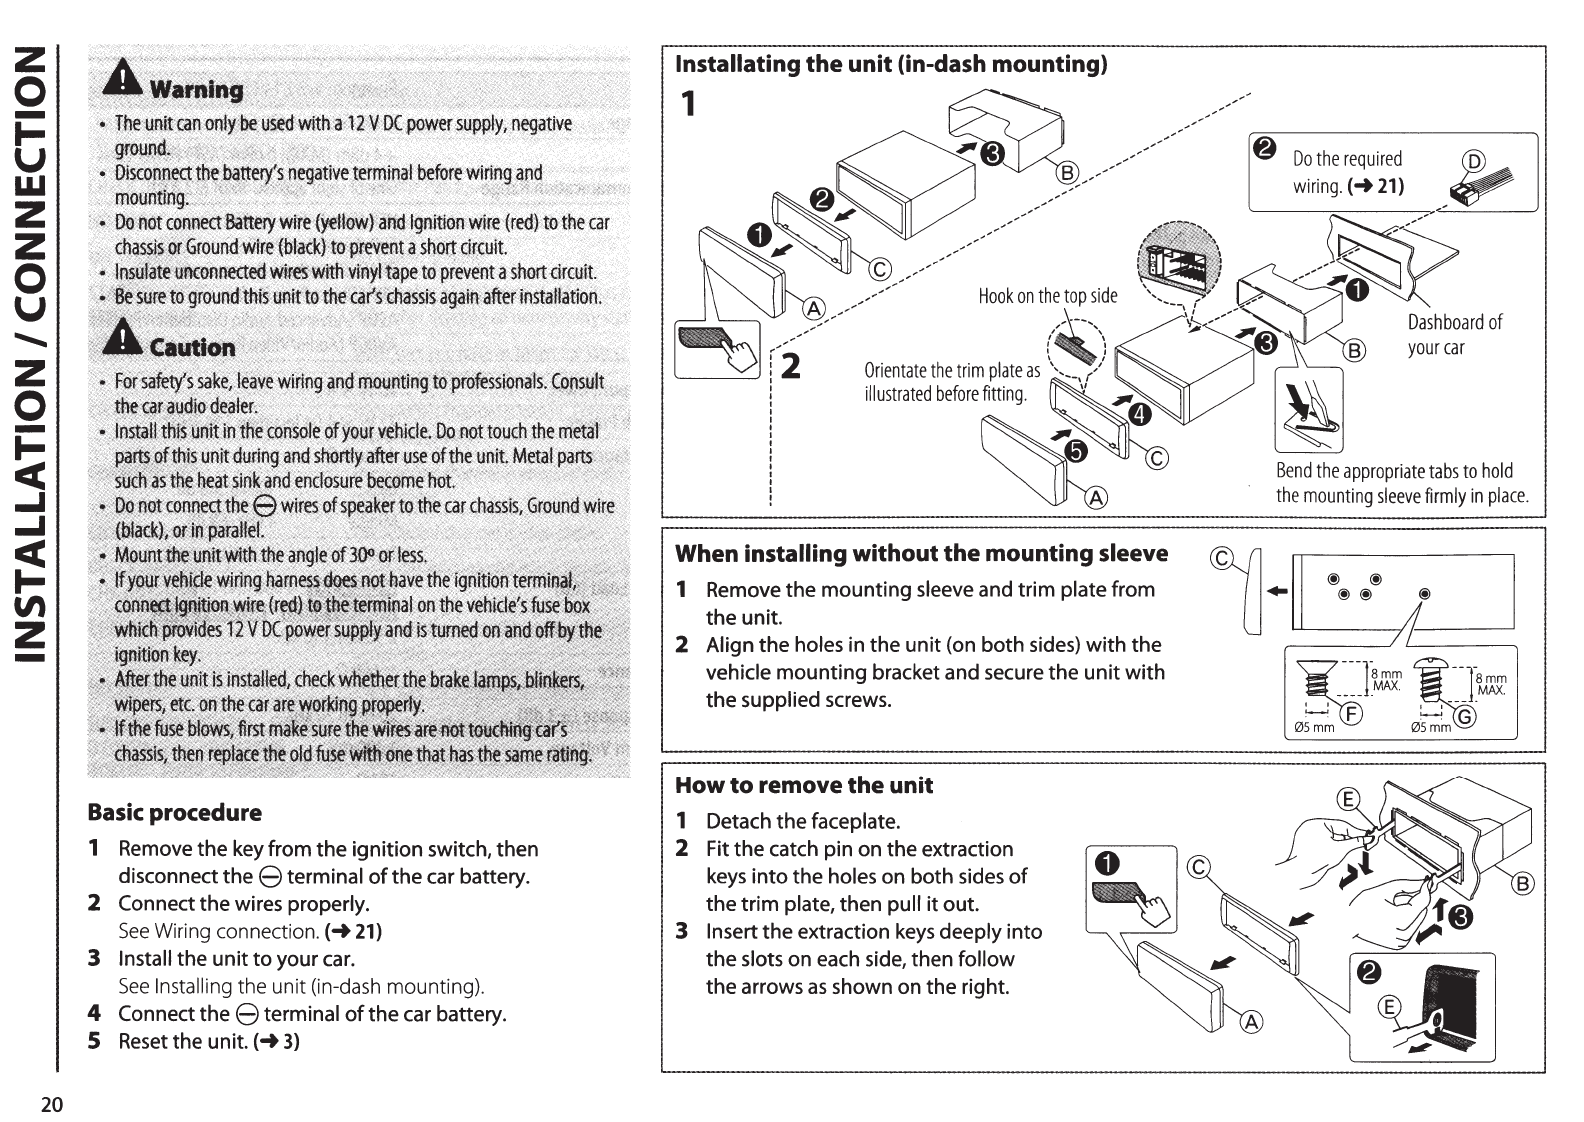
z
0
-
1-
u
w
z
z
0
u
............
z
0
-
I-
cc
....
....
cc
1-
"'
z
-
20
Basic
procedure
1 Remove the key from the ignition switch, then
disconnect
thee
terminal
of
the car battery.
2 Connect the wires properly.
See
Wiring
connection.(~
21)
3 Install the
unit
to
your
car.
See
Installing the unit (in-dash mounting).
4 Connect the 8 terminal
of
the car battery.
5
Reset
the
unit.(~
3)
lnstallating
the
unit (in-dash mounting)
1
When installing without
the
mounting sleeve
1 Remove the mounting sleeve and trim plate from
the unit.
2 Align the holes in the unit (on both
sides)
with
the
vehicle mounting bracket and secure the
unit
with
the supplied screws.
How
to
remove the unit
1 Detach the faceplate.
2 Fit the catch pin on the extraction
keys
into
the holes on both sides
of
the
trim
plate, then pull
it
out.
3 Insert the extraction
keys
deeply into
the slots on each side, then follow
the arrows
as
shown on the right.
Bend
the
appropriate
tabs
to
hold
the
mounting
sleeve
firmly
in
place
.
@ @
@@
@
;/
/I
~T!J
8
mm
----8
mm
_MAX.
__
_l_MAX.
~G
05mm
05mm
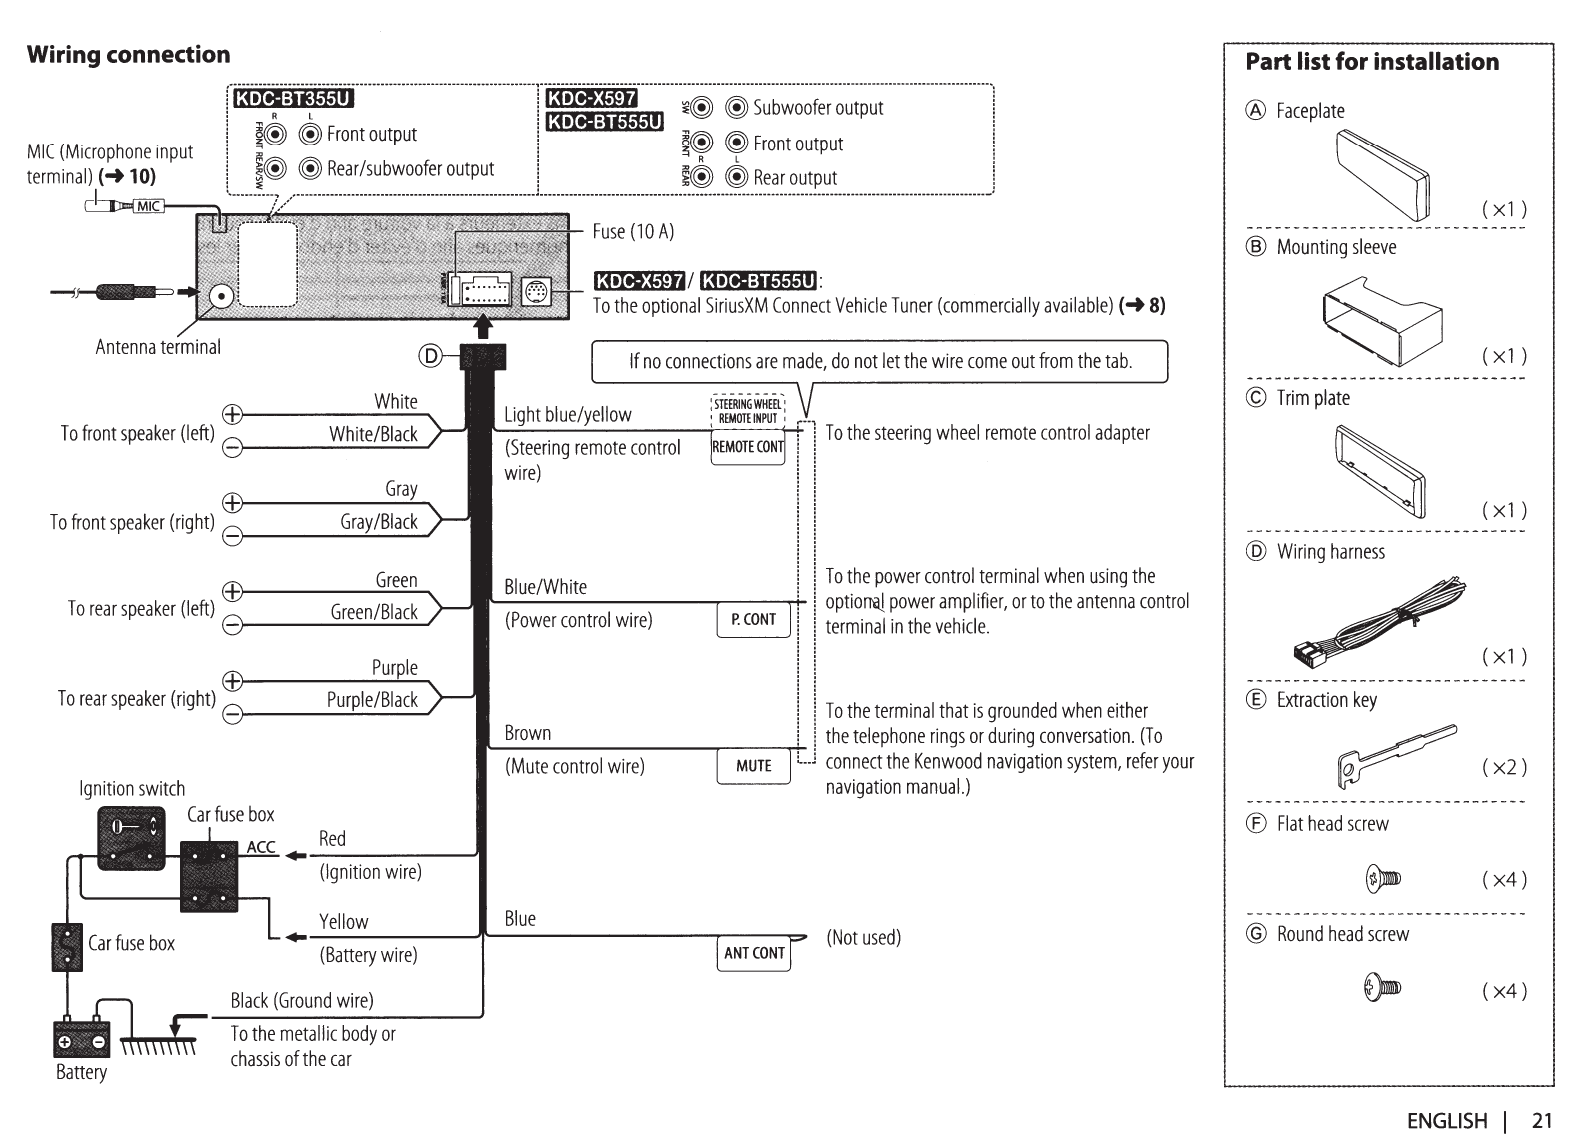
Wiring connection
MIC
(Microphone
input
terminal)
(-+ 10)
Antenna
terminal
To
front
speaker
(left)
To
rear
speaker
(left)
[Ti;f!l:iit:tiif"mmomnonnooooonnmmo•moooTUi~I!J!tiffmnmo;@m(®)os~b~~~f~~-~-~~~-~-~nonoomoommmnn•~
!
jl~
~
! ltottJ:i
..
1e1e11J
.,
1
!
~@
@
Front
output
!
~~
~
Front
output
!
!
~~
~
Rear/subwoofer
output
!
~
@Rear
output
!
'........
..
.....................................................................................................................
~
.................................................................................................................................................................................................................................
-'
White
White/Black
->--------
Green
Green/Black
->--------
Pu
le
Fuse
(10
A)
13•111$1!14/
13•M:i
..
1e1e11J:
To
the
optional
SiriusXM
Connect
Vehicle
Tuner
(commercially
available)
(-+ 8)
If
no
connections
are
made,
do
not
let
the
wire
come
out
from
the
tab.
Light
blue/yellow
(Steering
remote
control
wire)
Blue/White
(Power
control
wire)
To
the
steering
wheel
remote
control
adapter
To
the
power
control
terminal
when
using
the
optiorreJ
power
amplifier,
or
to
the
antenna
control
terminal
in
the
vehicle.
To
rear
speaker
(right)
Purple/Black
-~------~------
To
the
terminal
that
is
grounded
when
either
the
telephone
rings
or
during
conversation.
(To
Ignition
switch
Battery
Car
fuse
box
Red
(Ignition
wire)
Yellow
Brown
(Mute
control
wire)
Blue
:...l
connect
the
Kenwood
navigation
system,
refer
your
navigation
manual.)
.-------------~----------------~----~
(Not
used)
(Battery
wire)
Black
(Ground
wire)
To
the
metallic
body
or
chassis
of
the
car
Part list for installation
®
Faceplate
~
(
x1
)
®
Mounting
sleeve
(
x1
)
©
Trim
plate
(
x1
)
@
Wiring
harness
(
x1
)
®
Extraction
key
(
x2)
®
Flat
head
screw
(
x4)
@
Round
head
screw
(
x4)
ENGLISH
I
21
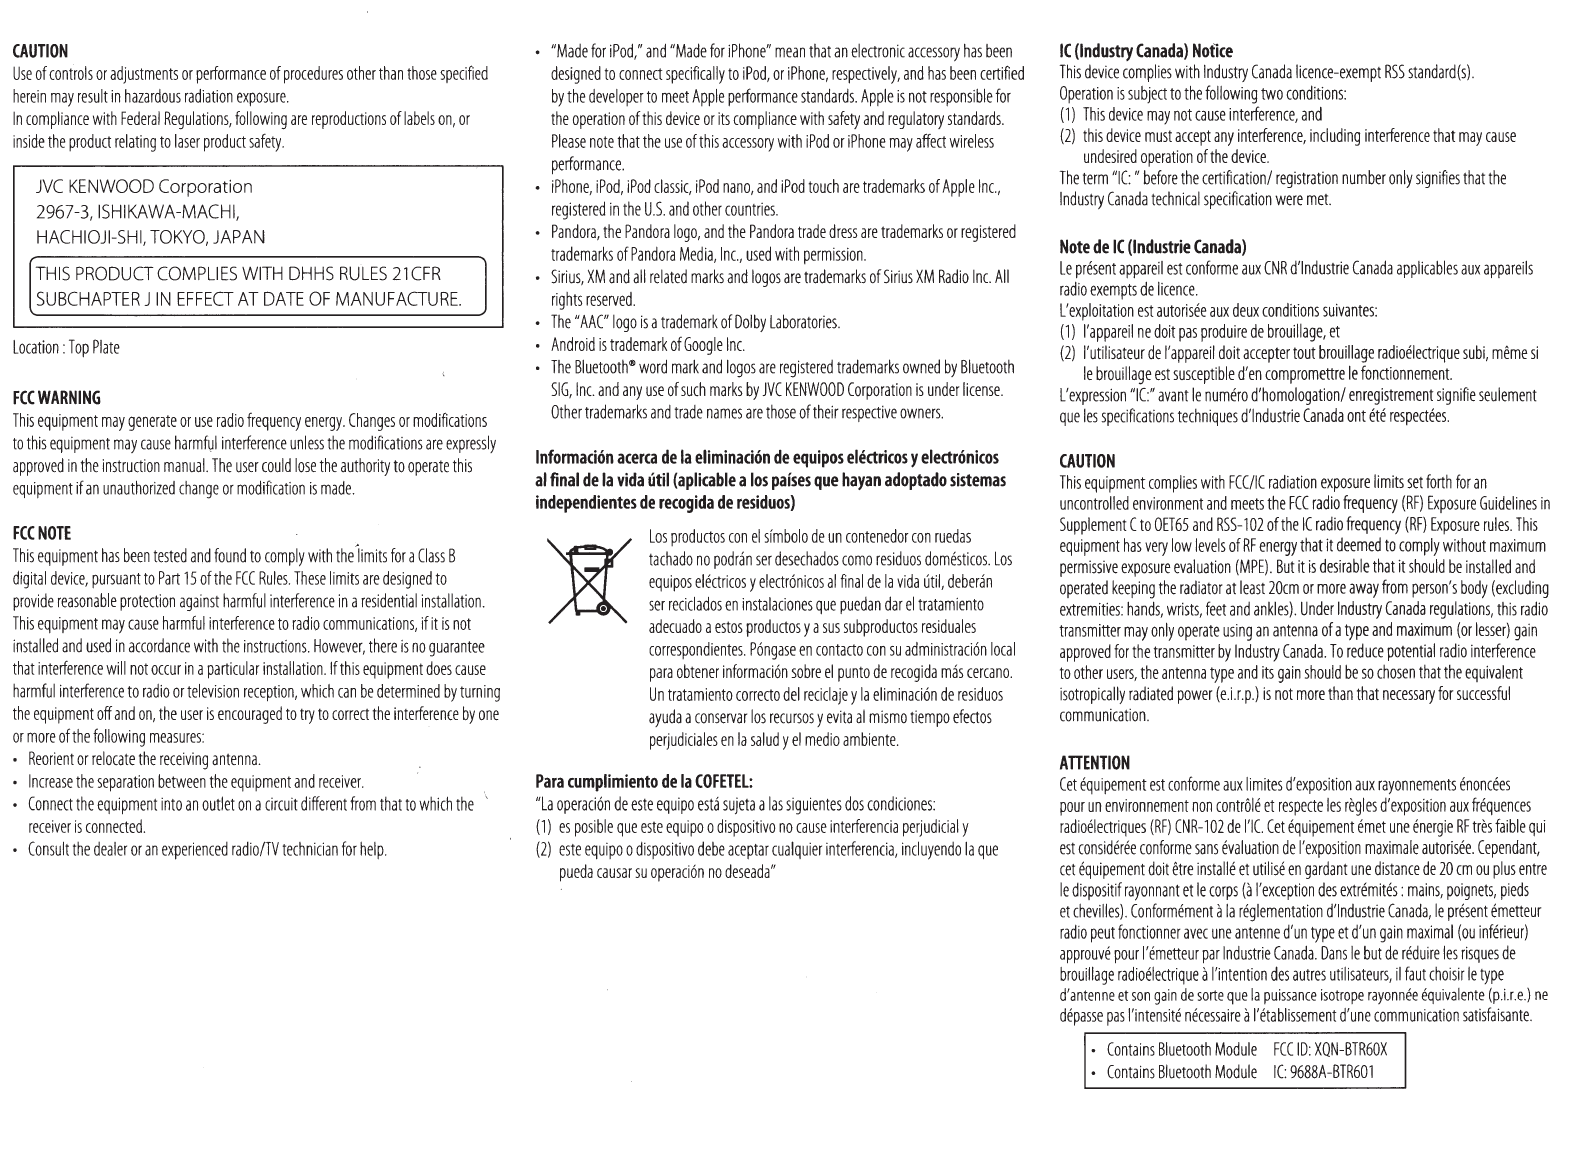
CAUTION
Use
of
controls
or
adjustments
or
performance
of
procedures
other
than
those
specified
herein
may
result
in
hazardous
radiation
exposure.
In
compliance
with
Federal
Regulations,
following
are
reproductions
of
labels
on,
or
inside
the
product
relating
to
laser
product
safety.
JVC
KENWOOD
Corporation
2967-3,
ISHIKAWA-MACHI,
HACHIOJI-SHI,
TOKYO,
JAPAN
THIS
PRODUCT
COMPLIES
WITH
DHHS
RULES
21
CFR
SUBCHAPTER
J
IN
EFFECT
AT
DATE
OF
MANUFAGURE.
Location
:
Top
Plate
FCC
WARNING
This
equipment
may
generate
or
use
radio
frequency
energy.
Changes
or
modifications
to
this
equipment
may
cause
harmfvl
interference
unless
the
modifications
are
expressly
approved
in
the
instruction
manual.
The
user
could
lose
the
authority
to
operate
this
equipment
if
an
unauthorized
change
or
modification
is
made.
FCC
NOTE
This
equipment
has
been
tested
and
found
to
comply
with
thelimits
for
a
Class
B
digital
device,
pursuant
to
Part
15
of
the
FCC
Rules.
These
limits
are
designed
to
provide
reasonable
protection
against
harmful
interference
in
a
residential
installation.
This
equipment
may
cause
harmful
interference
to
radio
communications,
if
it
is
not
installed
and
used
in
accordance
with
the
instructions.
However,
there
is
no
guarantee
that
interference
will
not
occur
in
a
particular
installation.lf
this
equipment
does
cause
harmful
interference
to
radio
or
television
reception,
which
can
be
determined
by
turning
the
equipment
off
and
on,
the
user
is
encouraged
to
try
to
correct
the
interference
by
one
or
more
of
the
following
measures:
•
Reorient
or
relocate
the
receiving
antenna.
•
Increase
the
separation
between
the
equipment
and
receiver.
•
Connect
the
equipment
into
an
outlet
on
a
circuit
different
from
that
to
which
the
'
receiver
is
connected.
•
Consult
the
dealer
or
an
experienced
radio/TV
technician
for
help.
•
"Made
for
iPod,"
and
"Made
for
iPhone"
mean
that
an
electronic
accessory
has
been
designed
to
connect
specifically
to
iPod,
or
iPhone,
respectively,
and
has
been
certified
by
the
developer
to
meet
Apple
performance
standards.
Apple
is
not
responsible
for
the
operation
of
this
device
or
its
compliance
with
safety
and
regulatory
standards.
Please
note
that
the
use
of
this
accessory
with
iPod
or
iPhone
may
affect
wireless
performance.
•
iPhone,
iPod,
iPod
classic,
iPod
nano,
and
iPod
touch
are
trademarks
of
Apple
Inc.,
registered
in
the
U.S.
and
other
countries.
•
Pandora,
the
Pandora
logo,
and
the
Pandora
trade
dress
are
trademarks
or
registered
trademarks
of
Pandora
Media,
Inc.,
used
with
permission.
•
Sirius,
XM
and
all
related
marks
and
logos
are
trademarks
of
Sirius
XM
Radio
Inc.
All
rights
reserved.
•
The"
AAC"
logo
is
a
trademark
of
Dolby
Laboratories.
•
Android
is
trademark
of
Google
Inc.
•
The
Bluetooth®
word
mark
and
logos
are
registered
trademarks
owned
by
Bluetooth
SIG,
Inc.
and
any
use
of
such
marks
by
JVC
KENWOOD
Corporation
is
under
license.
Other
trademarks
and
trade
names
are
those
of
their
respective
owners.
Informacion
acerca
de
Ia
eliminacion
de
equipos
eh!ctricos
y
electronicos
al
final
de
Ia
vida
util
(aplicable
a
los
paises
que
hayan
adoptado
sistemas
independientes
de
recogida
de
residuos)
Los
productos
con
el
slmbolo
de
un
contenedor
con
ruedas
tachado
no
pod
ran
ser
desechados
como
residuos
domesticos.
Los
equipos
electricos
y
electr6nicos
al
final
de
Ia
vida
uti
I,
deberan
ser
reciclados
en
instalaciones
que
puedan
dar
el
tratamiento
adecuado
a
estos
productos
y a
sus
subproductos
residuales
correspondientes.
P6ngase
en
contacto
con
su
administraci6n
local
para
obtener
informacion
sobre
el
punto
de
recogida
mas
cercano.
Un
tratamiento
correcto
del
reciclaje
y
Ia
eliminaci6n
de
residuos
ayuda
a
conservar
los
recursos
y
evita
al
mismo
tiempo
efectos
perjudiciales
en
Ia
salud
y
el
medio
ambiente.
Para
cumplimiento
de
Ia
COFETEL:
"La
operaci6n
de
este
equipo
esta
sujeta
a
las
siguientes
dos
condiciones:
(1)
es
posible
que
este
equipo
o
dispositivo
no
cause
interferencia
perjudicial
y
(2)
este
equipo
o
dispositivo
debe
aceptar
cualquier
interferencia,
incluyendo
Ia
que
pueda
causar
su
operaci6n
no
deseada"
IC
(Industry
Canada)
Notice
This
device
complies
with
Industry
Canada
licence-exempt
RSS
standard(s).
Operation
is
subject
to
the
following
two
conditions:
(1)
This
device
may
not
cause
interference,
and
(2)
this
device
must
accept
any
interference,
including
interference
that
may
cause
undesired
operation
of
the
device.
The
term
"IC:
"before
the
certification/
registration
number
only
signifies
that
the
Industry
Canada
technical
specification
were
met.
Note
de
IC
(lndustrie
Canada)
Le
present
appareil
est
conforme
aux
CNR
d'lndustrie
Canada
applicables
aux
appareils
radio
exempts
de
licence.
L'exploitation
est
autorisee
aux
deux
conditions
suivantes:
(1)
l'appareil
ne
doit
pas
produire
de
brouillage,
et
(2)
l'utilisateur
de
l'appareil
doit
accepter
tout
brouillage
radioelectrique
subi,
meme
si
le
brouillage
est
susceptible
d'en
compromettre
le
fonctionnement.
L'expression
"IC:"
avant
le
numero
d'homologation/
enregistrement
signifie
seulement
que
les
specifications
techniques
d'lndustrie
Canada
ont
ete
respectees.
CAUTION
This
equipment
complies
with
FCC/I(
radiation
exposure
limits
set
forth
for
an
uncontrolled
environment
and
meets
the
FCC
radio
frequency
(RF)
Exposure
Guidelines
in
Supplement
C
to
OET65
and
RSS-102
of
the
IC
radio
frequency
(RF)
Exposure
rules.
This
equipment
has
very
low
levels
of
RF
energy
that
it
deemed
to
comply
without
maximum
permissive
exposure
evaluation
(MPE).
But
it
is
desirable
that
it
should
be
installed
and
operated
keeping
the
radiator
at
least
20cm
or
more
away
from
person's
body
(excluding
extremities:
hands,
wrists,
feet
and
ankles).
Under
Industry
Canada
regulations,
this
radio
transmitter
may
only
operate
using
an
antenna
of
a
type
and
maximum
(or
lesser)
gain
approved
for
the
transmitter
by
Industry
Canada.
To
reduce
potential
radio
interference
to
other
users,
the
antenna
type
and
its
gain
should
be
so
chosen
that
the
equivalent
isotropically
radiated
power
(e.i.r.p.)
is
not
more
than
that
necessary
for
successful
communication.
ATTENTION
Cet
equipement
est
conforme
aux
limites
d'exposition
aux
rayonnements
enoncees
pour
un
environnement
non
contr61e
et
respecte
les
regles
d'
exposition
aux
frequences
radioelectriques
(RF)
CNR-102
de
I'IC.
Cet
equipement
emet
une
energie
RF
tres
faible
qui
est
consideree
conforme
sans
evaluation
de
!'exposition
maxi
male
autorisee.
Cependant,
cet
equipement
doit
etre
installe
et
utilise
en
gardant
une
distance
de
20
em
ou
plus
entre
le
dispositif
rayonnant
et
le
corps
(a
I'
exception
des
extremites:
mains,
poignets,
pieds
et
chevilles).
Conformement
a
Ia
reg
I
em
entation
d'lndustrie
Canada,
le
present
emetteur
radio
peut
fonctionner
avec
une
antenne
d'un
type
et
d'un
gain
maximal
(ou
inferieur)
approuve
pour
l'emetteur
par
lndustrie
Canada.
Dans
le
but
de
reduire
les
risques
de
brouillage
radioelectrique
a
!'intention
des
autres
utilisateurs,
il
faut
choisir
le
type
d'antenne
et
son
gain
de
sorte
que
Ia
puissance
isotrope
rayon
nee
equivalente
(p.i.r.e.)
ne
depasse
pas
l'intensite
necessaire
a
l'etablissement
d'une
communication
satisfaisante.
•
Contains
Bluetooth
Module
FCC
ID:
XQN-BTR60X
•
Contains
Bluetooth
Module
IC:
9688A-BTR601
MILITARY
Units
purchased
through
the
U.S.A.
military
exchange
serv
i
ce
overseas
may
be
serviced
under
warranty
in
the
con
ti
ne
n
tal
U.S.A
..
subject
to
lhe
!allowing
conditions.
1)
The
original
warranty
is
in
effect.
2)
Proof
of
pu
r
chase
is
provided
to
lhe
servicer.
WARRANTY
FOR MILITARY
MARKET
Kenw
o
od
corporation
is
proud
ofthe
quality
and
workmanship
of
its
audio
equipment.
Thi
s
unit
has
been
pro
pe
rly
des
ign
ed,
tested
and
inspected
before
II
wa
s
shipped
to
yo
u.
If
pr
o
perly
installed
and
operated
inaccordance
wilh
inslruct
~
ns
furn
i
sh
ed
,
il
should
give
yoo
an
optimum
reliable
pertormance
.
WARRANTY
PERIOD
This
pr
od
uct
is
warranted
lor
a
period
of
(1)
yea
r
from
lhe
dale
of
the
original
pur
chase.
SCOPE OF WARRANTY
Except
as
speci
fied
below
,
lhis
warranty
covers
all
def
ec
ts
in
materials
and
workmansh
ip
of
the
Kenwood
brand
pr
oduc
ts
During
the
warranty
period,
any
auth
o
rized
Kenwood
Serv
i
ce
Center
in
the
military
market
listed
in
the
back
of
this
war
ra
nty
card
will
provide
you
free-of-charge
bolh
parts
and
l
abor
required
to
correct
any
defect
in
materials
or
wort<mansh
i
p.
The
following
are
not
covered
by
this
warranty.
1.
Vo
l
lago
con
ver
sions.
2.
Periodic
chec
k-upswhichdonotdiscloseanydefect
cove
red
by
the
warranty.
3.
Cabinets
.
grilles.
other
exterior
linishes.
belts
,
tape
heads,
and
other
non-durable
parts
and
accessories
.
4.
Units
onwttich
lhe
serial
number
has
been
effaced
.
mod
ifi
ed
or
removed.
5.
1nstallation
and/or
removal
c
harg
es
.
6.
Damaged
magnetic
tapes.
7.
HO\Jse
call
cllarges
for
any
repairs.
8.
Shipping
or
delivery
charges
to
or
tram
an
autho
r
ized
Kenw
oo
d
Se
rvi
ce
Center.
9.
Th
i
swarradywill
notcoveranyfailurelhal
is
ooa
t
oany
oflhe
following
co
ndilions
in
accordance
with
the
visual
i
nspect
i
on
of
the
aut
hon
zed
Kenwood
Service
Center:
•
Improper
ma
i
ntenance
or
repair
,
including
the
installati
on
ot
parts
or
a
ccessories
lhal
do
not
c
onform
to
the
qua
lity
and
s
pecitication
s
of
lhe
original
parts.
·
Misuse.
abuse.
neglect,
una
u
thor
iz
ed
pr
oduct
modif
i
cati
on
or
failure
to
fo
llow
instruc
t
ion
s
contai
ned
in
the
Owner~
Manual.
•
Accidental
or
intentional
damages
.
•
Repairs
or
attempted
repairs
by
an
unautho
r
ized
age
n
cy
.
(N
I
repairs
must
be
pertormed
at
an
authorized
K
enwo
od
Service
Cen
ter
.)
•
Damages
or
deter
i
orations
caused
during
shipme
nt (Claims
must
be
p
rese
n
ted
to
the
carrier).
·
Damages
or
deteri
o
rati
ons
resulting
from
removal
an
d/
or
repl
aceme
nt
PURCHASER'S RESPONSIBIUTIES
As
the
pur
c
hased
of
a
new
Kenw
oo
d
brand
pr
od
uc
t.
yo
u
ar
e
re
qu
es
t
ed
to
do
lhe
fo
l
lowing
in
order
to
obt
ain
K
enwood
warran
tys
erv
K:e
.
1.
Retainyoorsales
slip
or
olherevidenceof
purchase
fo
r
prov
i
ng
you
r
eligibility
tor
requesting
Kenwood
warr
an
ly
serv
i
ce
.
2.
Make
your
un
it
available
to
an
authorized
Kenwoo
d
Serv
i
ce
Center
in
lhe
military
market
for
inspection
and
ap
p
roved
warranly
service
, or s
hip
your
unit
in
its
orig
i
nal
cart
on
bo
x
or
equivalent.
fu
lly
ins
ured
and
s
hipping
charges
prepa
id
,
to
t
he
auth
or
ized
Kenw
o
od
Se
rv
i
ce
Cente
r.
Dear
Customer,
LIMITATION OF IMPLIED
WARRANTIES
Any
and
all
imp
l
ied
wa
r
ra
nti
es
,
including
warranti
es
of
merchantability
and
fit
ness
fo
r a p
articular
purpose,
shall
be
limited
in
duration
to t
he
len
gt
h of
this
warranty.
EXCLUSION OF CERTAIN
DAMAGES
KENWOOD
's
liabi
li
ty
for
any
de
f
ective
product
is
limited
to
the
repair
or
repl
acement
of
sai
d
produ
c
t.
at
ou
r
po
t
ion
.
and
s
hall
n
ot
ioclu
de
dama
ge
s of any
kind
.
wheth
er
incid
en
ta
l,
c
onsequential
or
o
lherw
i
se
,
expe
ct
to
the
e
xt
ent
prohibited
by
applicable
law
.
KENWOOD AUTHORIZED SERVICE
CENTERS
IN
MIUTARY
MARKET
JAPAN:
Yokota
Kenwood
Rep
,; c/o
Yokota
BX, JAAX
AA
FES-PAC,
APO
San
Francisco 96328
Zama
Kenwood
Rep,
;
C/o
Zama
PX,
JAAX
AA
FE
S-
PAC,
APO
San
Francisco 96343
Misawa
Kenwood Rep,; c/o
Mi
sa
wa B
X,
J
AAX
AAF
ES
-
PAC
,
AP
O
San
Fra
ncisco 96519
Yokosuka
Kenwood
Rep
,; c/o
A-33, Yokosuka
NEX
No.
260-010
FPO
Seattle 98760
Atsugl
Kenwood
Rep,
; c/o
At
sugi N EX No. 26
0-0
20
FP
O Sea
tt
le
98767
lwakuni
Kenwood Rep,;
C/o
Marine Corps Excha
ng
e, Marine Corps
Air Station,
FPO
Seattle 98764
Sasebo
Sa
sebo
NE
X;
Navy
Exc
han
ge 260-040
F.A.
Box 1
15
FPO
Se
att
le 98766
Okinawa
Kenwood
Rep
,; c/o
OWAX, AAFES-P
AC
,
AP
O
San
Francisco
96230
KOREA:
Ken
wo
od Rep,; c/o
KOAX Repair Shop, AAFES-P
AC
DD
-C
amp Market, APO
Sa
n Francisco
96488
GUAM:
Ken
wood Rep,; c/o
Guam
NE
X No. 230-010,
FPO S
an
Fran
cisco 96630
Ke
nwo
od
Rep
,; c/o
GUAX,
AAFES-PAC
, APO
San
Fr
anc
isco
96334
U.S.A.:
Hawaii
Kenwood Factory Service
99-994 lw
aena
St.. Aiea, Hawaii
96701
Alaska
Vista
Radio
TV,
;
861
East
Loop
Road
, Anchorage, Alaska
99501
Ancho
rage
Commerc
ia
l
El
ec
tr
oni
cs
. Inc.;
1450 East 9th Ave., Anch
or
age,
Alaska
99501
In
The
Continental
U.S.A.
For
Nearest
Au
thorized Service Center;
Te
l:
Hl
00-536-9663
Kenwood
Service
U.S.A.
Ken
wo
od Factory Service;
P.
O.
Bo
x 22745,
2201
Ea
st
Dominguez
Stree
t.
Long Beach. California 908
01
-5745
Te
l:
(31
01
639-5300
EUROPE:
Please i
nq
ui
re
at the
mi
litary resale
outlets where you bought your Ke
nw
ood
products, or
KENWOOD
ELECTR
ONI
CS
DE
UTSCHlAND GMBH:
Re
mbr
Ucker-Str.
15,
631
50 Heusenstamm,
Germany
Tel.: 49-06104-69010
Thank
you
for
purchasing this kenwood product.
As
mentioned
in
the
pages
of
this booklet,
our
warranty is only
valid in
the
countries listed.
If
your
country is not listed please contact
your
retailer for information
on
warranty
procedure,
or
write to:
JVC
KENWOOD
Customer Information Center
3-12,
Moriyacho
,
Kanagawa-ku,
Yokohama-shi
,
Kanagawa
221-0022,
Japan
Warranty
Card
Attention:
Identification
du
produit
Modele do aparelho e numero de serie
Model number & serial number
Revendeur & cachet
Nome da loja e carimbo
Dealer & stamp
Date d'achtat
Data da compra
Purchase date
Nom & adres
se
du
cli
en
t
Nome e endereQo do cliente
Name & address of customer
This c
ard
an
d
re
ce
ipt (or in
vo
ic
e)
ar
e ne
ces
sa
ry
to
purch
ase
a
ne
w p
ane
l in
case
of
theft
or damage.
Attention:
Vo
us
aur
ez be
so
in de cette carte et du
re~
u
(ou
de Ia
fa
cture) po
ur
ach
eter un nouv
ea
u
panneau
en
cas
de
vo
l ou d'endommag
em
en
t.
Aten~ao:
Em
c
as
o de
da
no ou perda do
pa
inel frontal, este Certificado de Garantia e a
Nota
Fi
sca
l
de compra ser
ao
requisitados pa
ra
a
a
q
u
i
s
i
~a
o
de um novo pai
ne
l.
~
846-0824-00/
01
(K) (12/07)
U.S.A.
This
warranty
will
be
honored
only
in
the
U.S.A.
KENWOOD LIMITED WARRANTY
FOR
CAR
STEREO
COMPONENTS
HOW LONG IS
THE
WARRANTY
Kenwood
U.S.A.
Corporation
('Kenwood')
warrants
th
is
product
for
a
period
of
one
(1)
year
from
the
date
of
orig
i
nal
purchase.
WHAT
IS
COVERED
AND WHAT IS
NOT
COVERED
Except
as
spec
ified
below.
this
warranty
covers
all
def
ects
in
materialandwmkmansh
ip
in
Kenwood
car
stere
o
co~nents
.
The
following
are
not
covered
by
the
warranty:
1
Any
prod
uct
whk:h
is
not
distributed
in
the
U
.S.A.
by
Kenwood
or
which
is
not
purchased
in
the
U.S.A
f
rom
an
author
i
zed
Kenwood
car
stereo
dealer
or
an
aut
omob
ile
dealer,
un
less
the
product
is
purchased
through
the
U.S.A
Military
Exchange
Service.
2.
Any
product
on
which
the
serial
number
ha
s
been
d
ef
aced.
mcx1ilied
or
removed.
3.
Damage,
deterioration
or
malfunction
resulting
from:
a.
Any
shipment
of
the
product
(claims
must
be
pres
ente
d
to
the
carrier).
b.
Installation
or
removal
of
the
product.
c.
Accident,
eels
of
nature,
misuse,
abuse,
neg~f
.
unauthorized
product
modification
or
fa
i
lure
to
fo
ll
ow
instructioos
supplied
with
the
product.
d.
Re
pai
r
or
attempted
repair
by
anyone
not
auth
or
i
ze
d
by
Kenwood
e. A
ny
other
cause
which
does
not
relate
to
a
prod
uct
defect.
KENWOOD
USA
CORPORATION
WHO IS
PROTECTED
This
warranty
is
enforcea
ble on
ly
by
the
original
purchaser.
WHAT WE WILL
PAY
FOR
We
will
pay
for
a
ll
labor
a
nd
ma
t
erial
expenses
for
covered
items.
Payment
of
shippi
ng c
har
g
es
is
discussed
in
the
n
ext
section
of
this
wa
r
ranty
.
HOW
TO
OBTAIN
WARRANTY
SERVICE
If
your
KENWOOD
product
ever
needs
service:
1.
Take
orship
itto
any
KENWOOD
Authorized
Service
Center
in
the
U.S.A.
along
with
&
comp
lete
description
of
the
problem.
(if
you
are
uncertai
n
as
to
whether
a
Service
Center
is
author
i
zed
,
please
calf
1-
800-K
ENWOOD
fort
he
nearest
Service
Cente
r.
1-80
0-5
36
-9
663).
2.
Although
you
must
pay
any
s
hip
p
ing
charges
if
it
is
necessa
ry
to
ship
the
product
for
warran
ty
servi
ce,
we
will
pay
the
retu
rn
shipping
charges
if
the
r
epa
i
rs
are
covered
by
the
warranty
within
the
Un
ited
States
3.
Wh
enever
your
units
are
take
n or
sent
for
warranty
serv
i
ce
.
you
mu
st
include
a
copy
of t
he
original
dated
sa
les
receipt
as
proof
of
warranty
ccve
r
age.
LIMITATION
OF
IMPLIED
WARRANTIES
ALL
IMPLIED
WARRA
NT
IE
S,
I
NC
LUDING
WARRANTIE
S
OF
MERCHANTABILITY
AND
FITN
ESS
FOR
A
PARTICULAR
PURPOSE,
ARE
LIMITED
IN DU
RA
TION
TO
THE
LENGTH
OF
THIS
WARRANTY.
EXCLUSION
OF
DAMAGES
KEN
WOO
D'S
LIABILITY
FOR
ANY
DEF
EC
TI
VE
PROD
UCT
IS
LIM
IT
ED
TOTHEREPAIRORREPtA
CEM
ENTO
FTH
EP
R
ODUCT
AT
OUR
O
PTION.
KENWOOD
SHALL
NOT BE
LIAB
LE
FOR:
1.
I
NSTA
LLATION
OR
REMO
VAL
CH
ARGES
, D
AMAGE
TO
OT
HER
PROPERTY
CAUSED
BY
AN
Y
DE
FECTS
IN
KEN
WOOD
CAR
STEREO
COMPONEN
T
S,
D
AMAGES
B
AS
ED
UPON
INCONVENIEN
CE, L
OSS
OF
US
E
OF
THE
P
RO
DU
CT:
OR
2.
ANY
O
THER
DAMAG
ES
,
WH
ET
HER
I
NC
IDENTAL,
CO
NSEQUENTIAL
OR
OTHERW
I
SE
.
S
OM
E
ST
ATES
DO
NOT
AL
L
OW
LI
MI
TATI
ONS
ON
HOW
L
ONG
AN
IMPLIED
WARRAN
TY
LA
ST
S
AND
/
OR
DO
NOT
ALLOW
THE
EXCLUSION
OR
LIMI
T
AT
ION OF INCI
DE
NTAL
OR
CO
NSEQUENTIAL
DAMAGES,
SO
T
HE
ABOVE
LI
MIT
ATIONS
AND
EXCL
USIONS
MAY
NOT
APP
LY
TO YOU.
T
hi
s
warra
nty
gives
you
speci
f~
lega
l rig
ht
s, a
nd
you
may
also
ha
ve
oth
er
rights
whic
h
vary
f
rom
sta
te
to
sta
t
e.
lf
a
pro
bl
em
developsdurillgorafierl
heli
mit
edWa
r
ra
n
ty
Per
i
od,
or
if
you
have
any
questions
reg
ard
ing the
oper
ation
of
lhe
pr
od
u
ct
,
yo
u
should
contact
yo
ur
KENW
O
OD
Aut
ho
ri
ze
d
Dealer
or
Au
tho
rized
Service
Ce
nt
er
.
II
the
p
ro
bl
em
or
your
q
uestion
is
not handled
to
your
satisfaction,
plea
se
co
nt
act
ou
r
Cus
tomer
Re
l
at
io
ns
Department
at
the
add
r
ess
li
st
ed
be
low:
KENWOOD
USA
CORPORATION
P.O
Box 22745, 2201 East Dominguez
Street, Long Beach, CA 90801-5745
Tel:
(3101
639-5300
'BRASIL
JVC
KENWOOD
DO
BRASIL
COMERCIO
DE
ELETRONICOS
LTDA
0
fabricante
garante
o
produfo
iden
tificado
na
Nota
Fi
sca
l
de
venda
ao
consumidor
cen
t
ra
qualquer
defeito
de
labrica~
o
ou
de
materia-prima
duran
te o
perfod
o
de
garantia.
Esta
gara
n
lia
;
val
ida
no
ter
r
i16rio
brasileiro
desde
que
o
produto
te
nha
si
do
adquirido
no
Br
asi
l e
disfribui
do
pela
JV
C
KENWOOD
do
Bra
s
il
Comercio
de
E
letrO
ni
cos
Ltda.
PERiODO
DE
GARANTIA
Es
te
produto
e
garantido
pelo
prazo
de
01
(urn)
ano.
inclu
i
ndo
o
perlodo
estabe
l
ecido
per
lei,
a
partir
da
data
de
aquisi!;iio,
comprovada
mediante
a ap
re
senfa!;iio
da
respectiva
Nota
fi
sca
l
de
venda
ao
consu
midor
final.
Eventuais
reparos
realizados
no
produto
dura
nte a
per
i
odo
de
garantia
nao
implicam
na
dilala,a<J
do
seu
prazo.
EXCLUSAO
DA
GARANTIA
(a)
Produtos
com
o
nUmero
de
s
erie
au
ce
rtificado
de
gara
n
tia
ra
su
rados,
ad
ulterado
s
ou
il
egfv
e
is
:
(b)
Defeitos
r
esu
ltantes
de
ac
id
entes
(quedas
,
batidas
e
etc
),
u
so
em
desacordo
como
manual
de
instruC(Ies
, Ill!
utiliza~o.
li
gacao
a
fonte
de
tensa
o d
ifer
en
te
da
especificada
no
Man
ua
l
de
l
ns
truCi)es,
modificacoes
nao
autorizadas:
(c)
Danos
causados
por
agentes
da
natureza
(Ex
:
chuvas
, rai
os.
maresia,
enchentes
e
etc):
(d)
Defeifos
ou
danos
em
decorr~ncia
de
consertos
rea
li
zados
por
pessoas
nao
au
torizadas
:
(e)
Oefeif
os
ou
da
nos
resultanles
do
uso
de
pecas
ou di
spos
i
tivos
n!o
conformes
as
especifica(:ii
es
da
JVC
KENWOOD:
(f)
Danos
ou
defer
i
ora(:iies
ao
s
acabamentos
externos
,
pa
rtes
cosmeticas.
cabos,
ch
ic
o
tes
.
parafusos
de
fixa~o
,
luvas
,
al,..s,
bolsas,
esto
j
os
, a
daptadores.
anlenas
,
fitas,
caOO,..S
gravadoras
.
COs
ou
danos
c
au
sa
do
s
po
r
pil
has
defe
i
fuosas
ou
com
vazamento:
(
g)
Oefeifos
ou
danos
de
vido
ao
tran
s
porte
(reci...,.,O.s
devem
ser
fe
ita
s ju
nto
a
emp
resa
fransportadora):
(h)
Qualquer
oufra
ca
u
sa
que
nao
es
te
ja
retacionada
a
def
ei
tos
de
materia-primae
de
fa
br
i
cacao
:
(i)
Danos
causados
por
tentativa
de
ro
ubo
ou
furt
o:
(j)
Dano
s
causados
por
uso
de
COs
de
rna
qualidade:
(k)
Dan
os
decorrentes
do
desgaste
natural
do
produto
:
(I)
Danoscau
sados
por
mau
uso.
(derramamento
de
t~uidos
e/ou
alimentos,
corrosao
, o
xida\;30
,
exposic3
o a
umidade
ou
situacoes
climAticas
extremas
,
ri
scos
au
quedas).
CONSERTO
EM GARANTIA
E
indi
s
pensavel
a
apresen
t~
o
deste
Cert
ific
a
do
de
Garanlia
dev
id
ame
nt
e p
re
enc
hido
,
acompanhado
da
re
specliva
Nota
Fi
sca
l
de
compra
do
pr
od
uto, d
esde
que
n
!o
ap
resente
rasuras
ou
modifica~Oes
0
cons
umid
or
sorrente
t
erti
dire
it
o a est
es
be
n
effc
i
os
,
quand
o o
pm
duto
fo
r entr
eg
ue dire
tamente
no
balcao
de
urn
Servi
co
Auto
rizad
o
da
JV
C
KENWOOD.
0
QUE
NAO E
COBERTO
PELA
GARANTIA
I
nstalacao
e
remQC3"o
do
produ
lo
,
des
pe
sas
de I
rete,
seguro
e
embalag
em
sao
de r
es
po
n
sabi
I
idade
do
proprietario.
Es
fe
produto!
deslinado
exclusiva
men
fe
ao
uso
domestico.
IMPORT
ANTE:
P
ar
a
qualquer
info"""""
soll
re
se
u equip
amento
JVC
KENWOOD,
ou
p
ara
ob
ter
o
en
der
e
co
do
Ser
vic
o
Autorizad
o
mais
p
r6
xi
mc
,
acesse
o
site
www.kenwo
od
.com
.br,
ou
li
gue
pa
ra a
Centra
l
de
Alendimento
JVC
KENWOOD-
Te
l.
+
55
(11)
3777-6771
corn
os
da
dosaba
i
xo
p
reenchidos
.
JVC
KENWOOD
DO
BRASIL
COMERCIO
DE
ELETRONICOS
LTDA
Tel: (11} 3777-6771
www.kenwood.com.br
No
me
do
cons
u
mido
r:
----------------
Endereco:
_________
CEP:
______
_
Gidade:
__________
Estado:
_____
_
Telefone:
________
_
Data
da
compra:
__
!
__
!
__
Nota
Fiscal:
____
_
CANADA
KENWOOD
WARRANTY
KENW
OO
D ELECT
RO
NIC
S
CANAD
A I
NC.
(h
ere
i
na
fter
ca
ll
ed
'K
ENWO
OD
'),
gives
the
fo
ll
ow
i
ng
wri
tte
n
wa
rr
anty
to the
origi
na
l cust
omer
of
e
ach
new
Kenwo
od
produ
ct
di
st
ribu
te
d
in
Cana
da
by
KENWOO
D
and
purch
ased
f
rom
a deal
er
auth
or
i
zed
by
KENWOO
D.
KENW
OO
D
wa
rr
ants
that
each
new
Ke
nwoo
d p
ro
d
uct
, und
er
no
r
ma
l u
se,
is
fre
e f
rom
any
def
ects
, su
bject
to
the t
er
ms
an
d
co
ndi
ti
ons
se
t fo
rth
be
low.
If
a
defect
sh
ould o
ccu
r
wi
th
in
the
warranty
p
er
iod,
repa
irs
will
be
nnade
f
ree
of
cha
rg
e for
pa
rts
an
d
~
b
our
wh
en
such
de
fect
s
are
de
t
er
mi
ned
by
KE
NW
OOD
or its' autho
ri
ze
d
se
rvice
centres
to
be
a
tt
ri
bu
ta
ble
to
fa
ul
ty
ma
terials or
wo
r
~
ma
ns
hip
at
lirre
of
ma
nu
fa
ct
u
re
. Pl
ease
co
nt
ac
t
KE
NW
OO
D to
confirm
if
a
dea
l
er
or
se
rvi
ce
ce
nt
re
is
aut
ho
rize
d by K
ENWOOD.
WARRANTY
PERIOD
This K
en
w
oo
d p
ro
duct
is
wananl
ed
for
parts
and l
abo
ur f
or
a
per
iod of
on
e (
1)
year
fr
om
t
he
da
te
of
orig
in
al
pu
rch
ase
, l
ease
or
renta
l,
excep
t
for
p
rodu
cts
which
are
u
se
d in a pr
ofess
i
ona
l
or
comm
er
c
ia
l a
pp
lica
tion
,
whi
ch
are
war
ran
ted
f
or
a p
eriod
of nin
ety
(90
) d
ays
for
parts
an
d l
abo
ur
an
d a
re
s
ub
jec
t to
the
t
er
ms and
co
nd
it
ions
of
the
warran
ty
.
WARRANTY EXCLUSIONS
Th
is
wa
rr
a
nty
exc
lu
des
:
(a) P
ro
d
uc
ts
purc
hased
in
a
fo
re
ign
ccun
t
ry
or
p
urc
hased
in
Canad
a a
nd
ta
ken
to
a
forei
gn
cc
unf
ry
(b)
P
roduc
ts
pu
rc
h
as
ed
from
a
de
al
er not auth
or
ized
by
K
EN
WOOD
.
(c) P
ro
du
cts
with
the
ser
ial
num
ber
de
fa
ce
d,
alter
ed
or
mi
ss
i
ng.
(d) P
er
i
od
ic
check-
ups
which
do not di
sc
l
ose
any
defects
cove
re
d
by
this
warranty
.
GARANTIE KENWOOD
KENWOO
D
ELECTR
ONICS
CANADA
I
NC
.
(c
i-
ap
re
s app
elee
"KE
NWOO
D')
, donne
par
ec
r
it
Ia
gara
ntie suivante a l
'acheteu
r
or
ig
i
na
l
de
ch
aq
ue
nouveau
pr
aooit
Ken
w
oo
d di
st
r
ib
ue au
Can
ada
par
K
ENWOO
D
etache
te
a un
concess
io
nna
i
rea
ut
ori
se
p
ar
KE
NWOO
D.
KE
NW
O
OD
ga
ra
n
ti
t.
so
us
r
eserve
des
t
er
mes
et
de
s
co
ndi
ti
ons
enonce
s
ci
-
de
sso
us, que
chaqu
e
no
uveau
p
ro
du
it
Kenw
ood
,
d
ans
des
co
n
dit
io
ns
d'em
ploi
norma
l
es
,
est
exempt
de
tous
de
fa
u
ts
.
Si
l'
un d
efa
ut
se
produ
np
en
dan
t Ia peri
ode
de
garanti
e,
KEN
W
OO
D s'
en
g
age
aassumer
~cc
01
des
pi
eces
d
etec
t
ue
uses
ef
de
Ia
ma
in
-d
'
oe
u
vre
nlcessair
es
po
ur
e
ff
e
ctue
r l
es
r
epa
r
ati
o
ns
pou
rvu
que
de
leis
defauts
s
oo
t a
ttrib
u
ab
l
es
a
des
pieces
defectue
u
ses
em
pl
oye
es
tors
de
Ia
fabri
cati
on du p
ro
duit
Ke
n
wo
od
ou
a Ia
mai
n
-d'oeuvre
tel
qu'
etab
li
pa
r K
ENWOOD
ou
p
ar
l'
un
deses
ce
n
tres
de
serviceaut
ori
ses.
Ap
pel
ez
KENW
O
OD
pour
ve
ri
fi
er
si
un co
ncess
i
onnaire
ou
un
ce
ntre
de
s
erv
i
ce
es
t
a
utor
ise par K
ENW
OO
D
PERIODE
DE
GARANTIE
Les
pieces
el
la
ma
i
n-
d'
oetMe
necessa
ir
es
pour
Ia r
epara
tion
d
es
p
ro
duit
s
Ke
n
wood
sont
garanties
pe
n
da
nt
Ia
pe
ri
ode
d'
un
( 1 )
an
a c
om
pt
er
de
Ia
da
te
d'achat
, de
ba
il ou
de
l
oca
tion
or
i
gina
te,
sa
ul dans les
cas
oU l
es
produits
Kenwoo
d
so
n! empl
oyes
d
ans
un
bu
t p
ro
fess
ionnel
ou
commerc
ial,
oU
Ia
ga
ran
lie
d
es
pi
~ces
et
de
Ia
main-d'
oe
uvre
demeure
en
vig
ueu
r
pe
n
da
nt u
ne
peri
ode
de q
ua
tre
-vi
ng
t-
dix
(
90)
jours
sous
r
!Serve
d
es
t
ermes
ef d
es
co
ndi
tions
de
laga
rantie
.
EXCLUSIONS
DE
GARANTIE
Cette
g
ar
an
tie
ne
couv
re
pas
:
(a
) l
es
pro
du
ils
ac
h
ete
s a
l'
etra
ng"'
ou
ach
e
tes
au
Ca
na
da
et
l
ran
spcrte
sa
l'
etranger:
{b) l
es
pro
duits a
ch
etes
~
un
oon
cess
ion
na
ir
e non a
ut
o
ri
se
par
K
EN
WOO
D:
(c
) l
es
p
ro
dui
ts
do
nlle
numero
de
se
rie manq
ue
, a ete e
fface
ou
m
od
i
fie
;
(d) l
es
servi
ces
d'entretien
p
etiod
iQu
es
qu
i n'indiquent a
uc
un
defa
ul
couvert
par
cene
gara
nli
e:
KENWOOD
ELECTRONICS
CANADA
INC.
(e
)
De
fects
r
es
u
lt
ing
fr
om di
saste
r,
ac
cide
nt
,
abuse
, m
is
use
,
light
ning,
po
we
r su
rg
es
,
negl
ect
or
lack
of
peri
od
ic
ma
int
enance
, unauthori
ze
d
modiliraion
or
failu
re
to
f
oll
ow
i
ns
tru
ct
i
ons
in
th
e o
wne
r's
ma
nua
l.
(I)
Defects
or da
ma
ge
as
a r
esult
ot
r
epairs
pert
o
rme
d
by
a
pers
on or
pa
rty
n
ot
auth
or
ize
d
by
K
ENWOOD.
(g)
De
f
ects
re
su
lt
in
g
fro
m t
he
use
of
parts
or
d
ev
ic
es
t
hat
do
not
conf
orm to
KENWOO
D
speci
fi
cati
o
ns
.
(h)
D
amage
or de
te
ri
o
rati
on
occurr
ing to
any
exter
i
or
fi
nish
es
,
cos
met
ic
parts
.
ta
pe h
eads
.
adaptors,
an
te
n
nas
.
cab
les,
t
apes
, di
scs
or faul
ts
or
damage
ca
used
by
d
et
ec
ti
ve
or
l
eak
ing b
atter
i
es
.
( i)
Def
ects
or
da
mage
o
ccurri
ng dur
illQ
ship
ping
(c
la
i
ms
sh
ou
ld
be
p
resen
t
ed
to
the
sh
i
ppi
ng c
ompany)
.
(j) P
ro
d
uc
t
vo
l
tage
and /
or
li
ne
f
req
uen
cy cc
nv
er
sions.
(k)
P
rod
u
ct
I
ns
ta
lla
tion or
rem
o
val
charges
.
TO
OBTAIN
WARRANTY
SERVICE
Sh
ou
ld yo
ur
Kenw
ood
product
r
eq
ui
re
warranty
se
rv
ice
, deli
ve
r
it
to
an
y auth
or
i
ze
d
KENW
O
OD
se
rvi
ce
ce
nt
re
and
pre
sen
t
t
he
or
igi
na
l
co
py
of
your b
ill
of
sa
le
and
this
wa
rr
an
ty
card
as
pr
ool of
wa
rr
an
ty
, or
send
yo
ur pr
odtJcl
fu
l
ly
insur
ed
an
d
f
re
igh
t
prep
aid
to
the
neares
t a
uthc
ri
zed
KE
NW
O
OD
service
centre
. To a
vo
id
possib
le
sh
i
pp
ing
damage
,
ma
ke su
re
th
e
p
ro
d
uct
is
prop
erl
y
pac
k
ed
. Incl
ude
a
copy
of
yo
ur
ori
gi
n
al
bill
o1
sa
le a
nd
th
is
warranty
ca
rd
as
proo
f of
wa
rr
a
nty
al
on
g
with
yo
ur
name
, h
ome
and
/
or
work
te
lepho
ne
nu
m
ber(
s
),
a c
omp
lete
re
tu
rn
ad
d
ress
an
d a
deta
il
ed
des
cr
ip
ti
on of
the
faul
t
(s
).
P
ro
d
uc
ts
rep
ai
red
wi
th
in
wa
rran
ty
wi
ll
be
returned
freigh
t p
re
pa
id to
des
ti
na
tions w
it
hin
Ca
nada
. T
he
c
us
to
mer
is
res
p
on
sible for a
ll
fre
ig
ht
an
d rela
ted
cos
ts f
or
the
retu
rn
of
pr
od
uct(
s) to
des
tinatio
ns
ou
ts
i
de
Ca
nada
.
(e
) l
es
d
efa
ut
s
causes
pa
r l
es
<Uisast
r
es
,
les
a
cc
i
de
n
ts
, l
es
abus, le
sem
pl
ois in
cor
r
ec
ls,
les
et
la
i
rs
.
les
su
rten
si
on
s de
co
ura
n
t.l
es
m
an
ques
de
so
ins ou d'
ent
r
et
i
ens
p
{lrio
di
qu
es
,
l
es
m
od
ifi
ca
tions
n
on
au
tori~es
ou
les
manq
u
es
de
re
sp
e
ct
du
mo
de
d'e
mpi
OI
:
(f)
les
<Uif
au
ts
ou l
es
do
mrn
a
ges
ca
u
se
s I
ars
de
r
eparat
ions
e
ffec
t
ue
es
par
u
ne
pers
o
nne
ou
pa
r
une
pa
rt
ie n
on
autori
see
pa
r
KE
NWOOD
:
(g
)
~s
d
efa
uts
causes
par
l
'emp
loi
de
pi
l!ces
ou
dedi
spo
sit
ifs
q
ui
ne
se
con
for
ment
pa
s
aux
ex
i
ge
nces
de
K
ENW
OOD
:
(h)
l
es
fi
ni
ti
ons
exte
ri
eu
res
, l
es
pi
l!ces
cos
rretiq
u
es
, l
es
t!tes
de
bandes
, l
es
adap
f
ate
u
rs,
les
an
tennes
, l
es
cabl
es,
l
es
bandes
,
les
d
is
qu
es
end
o
mmag!S
oo
d
epe
ri
s, ni
les
<Ui
f
au
ts ou
do
mm
ages
ca
u
ses
pa
r
des
p
iles
de
f
ecf
u
euses
ou
qui
fu
i
en
t;
(i)
les
d
ef
au
ls
ou domm
ages
qu
i
se
prod
ui
se
nt p
en
da
nt
l'
ex~
it
i
o n
d
es
pr
od
uifs K
enwoo
d (
On
devra
if
deposer
de
te
ll
es
rlcl
ama
fiO
nS
aup
r
es
des
~gn
i
es
de
t
rans
po
rt)
:
(j
) l
es
co
nvers
i
on
s de
tens
ion
et/ou
de
f
req
u
en
ce
du
pr
od
uif:
(k)
l
es
f
ra
is d'in
sta
ll
afio
n
oo
d'enl
!vement
du
prod
ui
t.
COMMENT
OBTENIR
DU
SERVICE
SOUS GARANTIE
Au
cas
oil
un
serv
i
ce
s
ous
ga
r
ant
ie
de
votre
p
ro
duit
Ke
nw
oo
d
s
'
av
~
r
e
necessa
ir
e,
v
eu
i
llez
li
vrer le
prod
uit
~
n
'i
m
porte
quel
cen
t
re
de
serv
i
ce
KENWOO
D
ef
pr
esen
t
er
Ia c
op
ie
or
iginale du
c
ontra!
de
ve
nt
e et
cett
e
carte
de
garan
t
~
en t
ant
que p
reuve
de
garan
tie ou
ve
uillez
fa
i
re
p
arve
n
ir
vo
t
re
prod
uit
assu
re
et
po
rt
pay
;
au
ce
nt
re
de
s
er
vice KE
NWOOD
au
t
or
i
se
le plus
pr
oc
he.
Pou
r
ev
il
er tou
tes
p
oss
ibi
lit
5 de do
mmages
pe
n
da
nt
le
tra
ns
port
, veui
ll
ez
bien em
ba
ller
le
pr
od
ui
l.
Ve
u
il
lez inc
lu
re
une
co
pie du co
ntr
a!
de
ven
te o
ri
gin
al et
ce
tt
e
carte
de
gar
antie
en !
an
t
qu
e pr
eu
ve de ga
ra
ntie au
ssi
bi
en
Que
vot
re n
om
,
n
urreros
de
telep
ho
ne au
pe
s
te
de
t
rava
il
et/o
u au d
om
ic
il
e,
votre
ad
r
esse
et
une
de
sc
r
ip
ti
on
d
et
a
illee
des
deta
u
ts
.
Les
prod
ui
ls
so
us g
ar
ant
ie
r
~pa
r
es
se
ron
t
rel
o
um~
port
pa
ye
a
ux
d
es
ti
na
tio
ns
~
!'i
nt
erieur
du
C
anada
. le
co
n
sommateur
se
ra
resp
o
nsa
ble
de
tous f
ra
is
de
tra
nspo
rt
et
d
'a
u
tre
s f
rai
s qui s
'y
r
ap
po
rt
en
t
po
ur
fa
i
re
exp!d
i
er
l
es
produ
i
ts
a d
es
tin
ati
ons a
f'ext
erieu
rd
u Can
ada
.
ENTIRE
WARRANTY
T
his
warr
anty
co
nst
itu
tes
th
e
en
ti
re
wr
itten
w
arr
a
nty
given
by
KENW
OOD
. No
pers
on,
pa
rty
,
dealer
or
service
ce
nt
re
or t
hei
r
agents
or
e
mp
l
oyees
are
au
tho
ri
zed
to
extend
or
enl
arge
this
warran
ty
on
be
ha
lf of
KE
NW
OOD
by
any
wr
i
tte
n
or
verba
l
stateme
nt
or
a
dvert
i
sement
or
pr
omotion
,
inc
luding
any
extended
warran
ty
p
rogra
m or pl
an
that
may
be
o
ffer
ed
by t
he
deale
r
or
serv
i
ce
ce
ntr
e, unl
ess
appr
OYed
in
wr
it
ing
by
KENWOO
D.
DISCLAIMER
KENW
OOD di
sc
lai
ms
an
y
res
po
ns
ibi
lity
for l
oss
of ti
me
or
u
se
of
the
p
raooct
or
any oth
er
i
nd
ir
ect,
i
nc
i
de
n
ta
l or
ccnseq
ue
nt
ial
da
mage
to ot
her
p
ro
du
cts
or
goods
, in
cc
n
ven
i
ence
or
co
mme
rc
ial
l
oss
.
NOTICE
TO
CONSUMER
T
he
provis
i
oo
s
con
ta
i
ne
d in this w
ri
tte
n
wa
rr
a
nty
ar
e
no
t in
ten<led
to
li
mit,
m
od
i
fy
,
ta
ke
away
,
disc
laim
or
exclude
an
y
wa
rr
an
ti
es
or
r
ilJhts
you may h
ave
wh
i
ch
a
re
se
t
fOfl
h in
an
y app
li
cable
p
rov
i
ncial
or fe
dera
l
law
s
or
legisla
tion
.
IMPORTANT
This
warra
n
ty
ca
rd
by
itself
is
no
t co
ns
idered
by
K
EN
WO
OD
as
a
va
l
id
pr
oo
f of pu
rchase
. When a
pp
ly
ing
for
wa
rranty
rep
airs
,
yo
u m
ust
p
resenlthe
or
igi
na
l
co
py of y
our
bill of
sale
and this
wa
r
ra
n
ty
car
d
as
pr
oo
f
of
warran
ty
,
so
we
r
ecorrrnend
tha
t
they
be
ke
pt
in a
sa
fe pl
ace
, sh
ou
ld th
ey
be
req
uir
ed
in
the
future
.
KENWOOD
ELECTRONICS
CANADA
I
NC.
6070 Kestrel Road, Mississauga,
Ontario, Canada L5T
1S8
Tel
.:
(9051670-7211
Fax: (905) 670-7248
L'ENTIERE
GARANTIE
Cette
gar
ant
ie
re
prese
nt
e
l'
e
ntie
re
ga
r
a
nt
~
donn!e
par
!cr
it
pa
r
KENWOO
D. K
ENWO
OD
ne
se
fi
e
nt
au
cunemen
t
respon
sa
ble
de
tou
tes
exten
si
ons
ni
de
toutes
augmentati
o
ns
de
ceNe
garan
t
~
fa
i
tes
ou
en
t
rep
ri
ses
par
to
u
tes
perso
nn
es
,
part
i
es
,
conc
essio
n
na
ir
es
ou
ce
ntr
es
de
serv
i
ce
au
par
l
eu
rs
ag
en
ts
ou
em
pl
oy!S
au n
om
de
KENWOOD
au
mc
ye
n d'
aff
ir
mati
on
s
verba
l
eso
uecril
es
, d'
anno
nc
es
ou
de
pr
omot
i
on
s, y inclus to
us
pr
og
ram
mes
ou
plans de
ga
ran
fi
e e
ten
d
ue
que
pu
i
ssent
off
rir
les
concessionna
ir
es
ou l
es
cent
r
es
de
se
rv
ice
, a
ma
i
ns
que
KE
NW
OOD
n'
y ail
co
nse
nti
pa
r
ecrit
d'
avance
.
RENONCIATION
K
ENWOOD
r
en
on
ce
a lou
tes
res
po
nsabi
li
t
!S
de
pe
rte
de
temps
,
d'
eflll
loi du pr
od
uit,
de
tou
s
do
mmages
ind
i
reds
au
accessoi
res
causes
a d'aut
res
pro
dui
ts
ou bie
ns,
de
to
us
i
nco
nveni
en
ts
ou
de to
utes
pertes
co
mm
erc
i
al
es
.
AVIS AUX CONSOMMATE
UR
S
L
es
stipula
tions
co
nt
enues
d
ans
Ia pr
esentegarant
ieec
r
il
e n'
onf
pas
po
ur
bu
t
delim
it
er
. de
mo
dif
ier
, de dimin
uer
,
de
re
je
ler
ni
d'
ex
cl
u
re
d'
autres
ga
ra
n
ties
ni d
ro
its
en
onc!S
dans
n'
im
po
rt
e
que
ll
es
lois
ou
l
eg
isl
ati
ons p
rov
i
nc
ta
les
ou
flidlra
l
es
.
IMPORTANT
KENWOOD
ne
co
nside
re
p
as
cene
ga
ra
nt
ie to
ute
seu
le com
me
e
la
n!
une
p
reuve
d'
achat
va
l i
de
. Lo
rs
qu
'o
n d
eman
d
ed
u
se
rv
ice
so
us
gara
n
tie
, i I f
audra
pr
!Senter
Ia
co
pie o
ri
gi
na
te du
cont
ra
!
de
ven
te au
ss
i
b
~
n
q
ue
cane
cane
de
gararlie en
fan
!
qu
e
preuve
de
ga
r
anti
e. On r
eco
mm
a
nd
e de les con
serve
r
dans
un
I
ie
u
sO
r
au
cas
oU
elles
s'
avere
ra
ient
ne
cesai
r
es
~
l'
ave
ni
r.
KENWOOD
ELECTRONICS
CANADA
I
NC.
6070
Kestrel Road, Mississauga,
Ontario, Canada
l5T
1S8
Te
lephone:
(9051
670-7211
Telecopieur: (905} 670-7248
