Kinpo Electronics SP70 SMART-PHONE WITH WLAN, BT, AND GSM/GPRS User Manual USERS MANUAL 2
Kinpo Electronics Inc SMART-PHONE WITH WLAN, BT, AND GSM/GPRS USERS MANUAL 2
Contents
- 1. USERS MANUAL 1
- 2. USERS MANUAL 2
- 3. USERS MANUAL 2
- 4. Users Manual 1 of 2
- 5. Users Manual 2 of 2
- 6. manual 1 of 2
- 7. manual 2 of 2
USERS MANUAL 2

Chapter 9
Internet Explorer
9.1 Using Internet Explorer
9.2 Viewing Mobile Favorites
9.3 Changing Settings
SP70 User Manual 9-2
Internet Explorer
9.1 Using Internet Explorer
You can use Internet Explorer Mobile to view Web pages on your mobile device in two ways:
n downloading pages through synchronization (See Chapter 11.)
n connecting to the Internet (see Chapter 8)
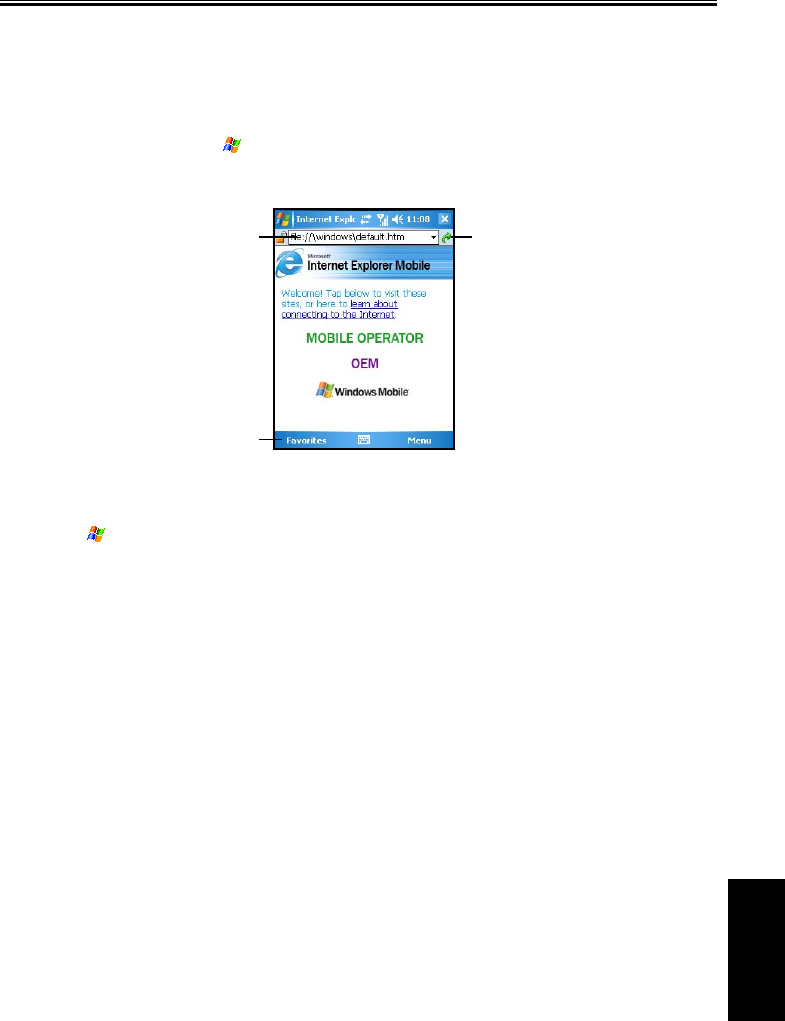
To switch to the program, tap > Internet Explorer Mobile. The Internet Explorer Mobile home page
appears.
Sending a Link via Email
1. Tap > Internet Explorer Mobile.
2. Go to the page you want to send.
3. Tap Menu > Tools > Send Link via E-mail. A new message is created with the page address inserted
in the message body.
9.2 Viewing Favorites
Your Pocket PC Phone has incorporated some of the useful favorites for your use.
On the Internet Explorer screen, tap Favorites to open the favorite list.
If you are using Microsoft Internet Explorer 4 or greater on the desktop computer, you can synchronize
favorite links. If you are using Microsoft Internet Explorer 5 or later versions on the desktop computer, you
can also synchronize mobile favorites. Synchronizing favorite links enable you to have the URLs of your
favorite Web sites at your fingertips. Synchronizing a mobile favorite enables you to view Internet content
on your device while you are disconnected from your Internet service provider and desktop computer.
Favorites are stored in the Mobile Favorites subfolder of Favorites in Internet Explorer on the desktop
computer. This folder will be created when you select the Favorites information type for synchronization in
ActiveSync on your desktop computer. Favorites must be stored in this folder to be synchronized.
Synchronizing a Favorite Link
1. In ActiveSync on your desktop computer, click Tools > Options, and select Favorite. For more
information on using ActiveSync, see ActiveSync Help.
2. In Internet Explorer on your desktop computer, save or move favorite links to the Mobile Favorites
subfolder in the Favorites list. For more information on using Internet Explorer, see Internet Explorer
Help on the desktop computer.
3. Connect your mobile device to your desktop computer. If synchronization does not start automatically,
in ActiveSync on your desktop computer, click Sync.
Favorites
Web address Link to

9-3 SP70 User Manual
Internet Explorer
Synchronizing a Mobile Favorite
1. In ActiveSync on your desktop computer, click Tools > Options, and select Favorite. For more
information on using ActiveSync, see ActiveSync Help.
2. In Internet Explorer 5 or later versions on your desktop computer, browse to the page you want to view
offline.
3. Click Tools > Create Mobile Favorite.
4. To change the link name, enter a new name in the Name box.
5. In the Update box, select a desired update schedule to keep the page in the Mobile Favorites folder up
to date. You can also update content by clicking Tools > Synchronize in Internet Explorer.
6. To save the link in a subfolder of Mobile Favorites, click Create In and select the desired subfolder.
7. Click OK. Internet Explorer will download the latest version of the page.
8.
To download the pages that are linked to the mobile favorite you just created, in Internet Explorer on
the desktop computer, right-click the mobile favorite and then click Properties. On the Download tab,
specify the number of links deep you want to download. To conserve device memory, only go one level
deep.
9. Connect your Pocket PC Phone to the desktop computer. If synchronization between your device and
desktop computer does not start, in ActiveSync on your desktop computer, click Sync.
9.3 Changing Settings
You can tap Menu > View on the main page of Internet Explorer
Mobile to change the display settings.
You can also tap Menu > Tools > Options on the main page of Internet Explorer Mobile to custmize more
settings.
Item Description
General Enables you to change the home page or the displayed language.
Memory Enables you to set the period before clearing the visiting history, and delete
temporary files.
Security Enables you to accept or clear cookies, and send out a warning when visiting
unsecure Web pages.

Chapter 10
Microsoft Pocket Outlook
10.1 Calendar
10.2 Tasks
10.3 Notes
10.4 Messaging (Outlook, SMS, MMS)
10.5 MMS Messages

10-2 SP70 User Manual
Microsoft Pocket
Outlook
10.1 Calendar
Use Calendar to schedule appointments, including meetings and other events. You can check your
appointments in one of several views (Agenda, Day, Week, Month and Year) and set Calendar to remind
you of appointments with a sound or other method. Appointments for the day can be displayed on the
Today screen.
Creating an Appointment
1. Tap > Calendar.
2. Tap Menu > New Appointment.
3. To select a new date from a pop-up calendar, tap the display
date. To enter or select a new time, tap the display time. Enter
other appointment details. You will need to hide the Input panel
to see all available fields.
4. You can assign an appointment to a category so that you can
use these groupings to quickly display only the information you
want.
Tap Categories. Select the categories that you want to assign
the appointment to. To create a new category, tap New, enter the
category name, and then tap Done.
Tap OK to return to the previous screen.
5. Tap Notes. You can add written or typed notes and even
recordings to an appointment. For information on Notes, see
Section 10.3.
6. Tap OK to save the change.
• You can view appointments in one of several views. To change the view mode, tap the
appropriate view icons on the command bar.
• Tap the Down arrow in the Subject and Location fields to quickly select from built-in or
previous entries.
• If you set a reminder for an appointment, the Pocket PC Phone will remind you according to the
settings in Sounds & Notifications.
• To make an appointmnet recurring, tap Occurs and select a pattern from the list. Or, to create a
new pattern, tap Edit pattern, and follow the steps in the wizard.
View Modes
You can view appointments in one of several views (Agenda, Day, Week, and Month).
Agenda View
In Agenda view, upcoming appointments are displayed in bold.
Day View
In Day view, the subject of an appointment is displayed on the right of the appointment’s time.
Week View
Week view displays blue boxes to indicate the dates and time of appointments.
SP70 User Manual 10-3
Microsoft Pocket
Outlook
Month View
Month view displays symbols to indicate the types of appointments you have on a given day. An upward
triangle indicates a morning appointment; a downward triangle indicates an afternoon appointment. If you
have appointments in the morning and afternoon, a solid square is displayed. If you have an all day event
not marked Free, a hollow square is displayed.
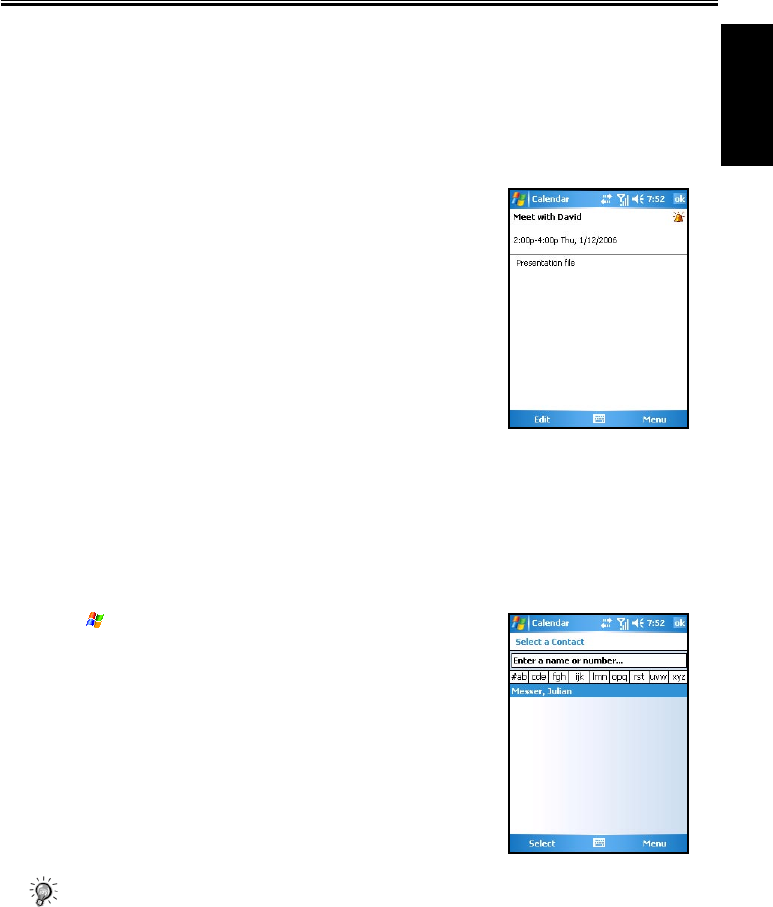
Using the Calendar Summary Screen
When you tap an appointment in Calendar, a summary screen is
displayed. To change the appointment, tap Edit.
Sending Meeting Requests
Use Calendar to schedule meetings with people who use Outlook or Pocket Outlook. When attendees
receive a meeting request, they can accept or decline the meeting. If they accept, the meeting is
automatically added to their schedule. In addition, their response is sent back to you, and your calendar is
updated.
Before you can send a meeting request, you must enter email addresses in Contacts and set up Messaging
to send and receive messages.
1. Tap > Calendar.
2. Tap Menu > New Appointment.
3. Enter the meeting information.
4. Tap Attendees (you will need to hide the input panel to see this
box).
5. Select the contacts you want to invite. Only those contacts with
email addresses will be displayed.
6. Tap OK. Messaging automatically creates a meeting request and
sends it to the attendees the next time you synchronize with your
desktop computer. Any textual notes entered in the Notes tab
(excluding writing or recordings) will be sent also.
• If you are sending the meeting request through a connection to an ISP or the network,
rather than through synchronization with your desktop computer, tap Menu > Options >
Appointments. In Send meeting requests via, tap the service you want to use to send the
meeting request.

10-4 SP70 User Manual
Microsoft Pocket
Outlook
10.2 Tasks
Use Tasks to keep track of things you need to do. A variety of task information can be displayed on the
Today screen.
• To see the start and due date for a task in the task list, tap Tools > Options.
Creating a Task
1. Tap > Programs > Tasks.
2. Tap Menu > New Task.
3. Enter detailed information, such as start and due dates. You will
need to hide the Input panel to see all available fields.
4. You can assign a task to a category so that you can use these
groupings to quickly display only the information you want.
Tap Categories. Select the categories that you want to assign
the appointment to. To create a new category, tap New, enter the
category name, and then tap Done.
Tap OK to return to the previous screen.
5. Tap Notes. You can add written or typed notes and even
recordings to an appointment. For information on Notes, see
Section 10.3.
6. Tap OK to save the change.
• If you set a reminder for a task, the Pocket PC Phone will remind you according to the settings in
Sounds & Notifications.
• To quickly create a task, enter text in the “Tap here to add a new task” field at the top of the
screen. If you don’t see this box, tap Menu > Options > Show Tasks entry bar.
Using the Tasks Summary Screen
The task list displays a list of your tasks. Overdue tasks are
displayed in bold and in red.
If you have a long list of tasks, tap Menu > Sort By and select the
option you want to sort on.
To see more task information, tap the task.To change a task, tap it in
the task list, and then tap Edit.
SP70 User Manual 10-5
Microsoft Pocket
Outlook
10.3 Notes
Notes may help you quickly capture your ideas, notes, and thoughts. You can create a note using written
and typed text, drawings, and recordings. You can also share your notes with others through email, infrared,
and synchronization with your desktop computer.
Creating a Note
1. Tap > Programs > Notes.
2. Tap New.
3. Enter your note information. For information on entering information, see Section 2.11.
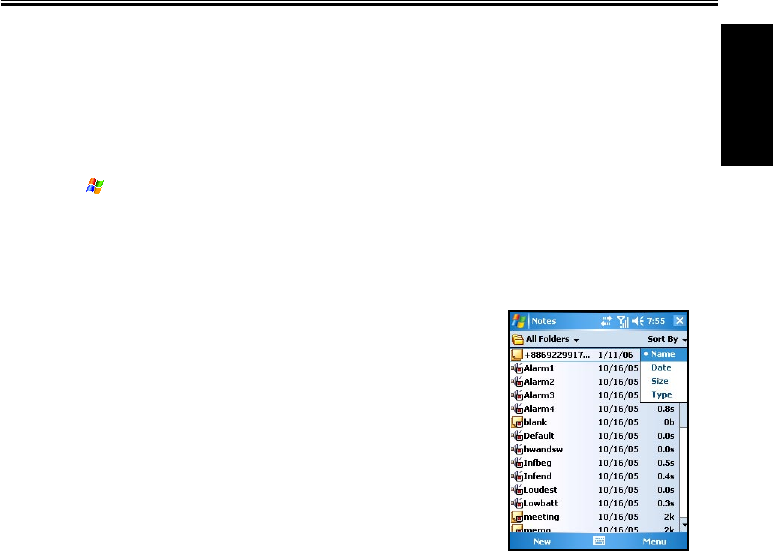
Viewing Notes
The note list displays a list of your notes and recordings. If you have
a long list, tap Sort By and select the option you want to sort on. To
open a note or play a recording, tap it.
10.4 Messaging (Outlook, SMS, MMS)
You can receive Internet email messages, text messages (SMS) and multimedia messages (MMS)
in Messaging. Internet email messages are sent by using an address you receive from your Internet
service provider (ISP) or your employer. SMS and MMS messages are sent and received through your
wireless phone service provider by using a phone number as the message address.
You can send and receive email by synchronizing with your desktop computer, or by connecting to a
Post Office Protocol 3 (POP3) or Internet Message Access Protocol 4 (IMAP4) mail server. You need
to set up an email account for each method that you use except for an Outlook email account, which is
set up by default. The Outlook Email account on your device is used to store messages that you send
and receive through synchronization with a desktop computer. Account names will appear when you
open the folder list (located on the left, under the navigation bar) in the message list view.
With synchronization, messages are synchronized between the device Inbox folder for the Outlook
Email account and the desktop computer Inbox by using ActiveSync and Microsoft Exchange or
Microsoft Outlook. For more information, see the “Synchronizing Outlook Email Messages” section
later in this chapter.
When connecting to a POP3 or IMAP4 server, use a modem to connect to your Internet service
provider (ISP), or a modem or Ethernet card to connect to the local area network that your email server
is connected to. You can also use your phone to connect by using a cellular line connection. For more
information, see Chapter 8.

10-6 SP70 User Manual
Microsoft Pocket
Outlook
Synchronizing Outlook Email Messages
After selecting Inbox for synchronization in ActiveSync, Outlook email messages are synchronized as
part of the general synchronization process.
During synchronization:
n Messages are copied from the Inbox folder on your desktop computer or the Microsoft Exchange
server to the Inbox folder of the Outlook Email account on your device. (Note that you can only
synchronize information directly with an Exchange Server if your company is running Microsoft
Mobile Information Server 2003 or later.) By default, you’ll receive messages from the last three
days only, the first 100 lines of each new message, and file attachments of less than 100 KB in
size.
n Messages in the Outbox folder on your device are transferred to Exchange or Outlook and then
sent from those programs.
n The messages on the two computers are linked. When you delete a message on your device, it’s
deleted from your desktop computer the next time you synchronize.
n Messages in subfolders in other email folders in Outlook are synchronized only if they have been
selected for synchronization in ActiveSync.
• For information on initiating Outlook email synchronization or changing synchronization
settings, see ActiveSync Help on the desktop computer.
• Text messages are not received through synchronization. Instead, they are sent to your device
via your service provider.
Connecting to a Mail Server
Setting up a POP3 or IMAP4 Email Account
1. Tap > Messaging.
2. Tap Menu > Tools > New Account.
3. Enter the email address and then tap Next.
4. The Pocket PC Phone will start the auto configuration. Auto
configuration attempts to connect to your email server and
download necessary settings so that you do not need to enter
them manually. If auto configuration is successful, you may
begin downloading messages from the server.
5. If auto configuration is unsuccessful, tap Next for manual
configuration. Enter the displayed name, the user name and
password provided by your ISP or network administrator. You
can select Save password to avoid having to reenter it later.
6. In the Account type list, tap POP3 or IMAP4. (POP3 is the
most common mail protocol for ISPs.)
In Your name, enter a unique name for the account, such as
Work or Home. This name cannot be changed later.
Then Tap Next.

SP70 User Manual 10-7
Microsoft Pocket
Outlook
7. In Incoming mail, enter the name of your email server.
In Outgoing mail, enter the name of your Simple Mail Transfer
Protocol (SMTP) host.
If you are using a network connection, in Domain, enter your
domain name.
8. Select if you want to download the messages of this account
immediately.
Deleting an Account
1. Tap > Messaging.
2. Tap Menu > Tools > Options.
3. Tap and hold the name of the account, and then tap Delete.
• You can set up several email accounts including your Outlook email account, but you can set up
only one text message account.
• You cannot delete your text message account.
Downloading Messages from the Server
1. In Messaging, tap Accounts > Connect to open a connection to the Internet or your corporate
network, depending on the account. For information on connections, see Chapter 8.
2. The messages on your device and email server are synchronized: new messages are downloaded to
the device Inbox folder, messages in the device Outbox folder are sent, and messages that have been
deleted from the server are removed from the device Inbox.
3. Tap a message in the message list to open it.
4. If you read a message and decide that you need the full copy:
• Tap Edit > Mark for Download while in the message window.
• If you are in the message list, tap and hold the message, and then tap Mark for Download.
5. When finished, tap Accounts > Disconnect.

10-8 SP70 User Manual
Microsoft Pocket
Outlook
• If you selected some items when setting up an email account, then the mail attachments or entire
messages may be downloaded.
• Receiving entire messages consumes storage memory.
• The size column in the message list displays the local size and server size of a message. Even
when a message has been downloaded fully, these numbers may differ, because the size of a
message can vary between the server and the device.
Reading and Responding to Messages
Downloading Messages
The way you download copies of messages depends on how you are receiving messages:
n If you receive email messages through ActiveSync, synchronization will be started.
n If you receive email messages through a remote email server, see the “Downloading Messages from
the Server” section earlier in this chapter.
n Text messages will be automatically received when your phone is turned on. Otherwise, messages will
be held by your service provider until the next time your phone is turned on.
Replying to or Forwarding a Message
1. Tap > Messaging.
2. Tap to open the message.
3. Tap Menu, and then tap Reply, Reply All, or Forward.
4. Enter your response. To quickly add common messages, tap My
Text and tap a desired message.
5. Tap Send.
• Selections in Menu > Tools > Options > Message
determine whether the original text is included.
Receiving Attachments
An attachment sent with an email message or downloaded from the server appears as an icon at the bottom
of the message in its own window pane. Tapping the attachment icon opens the attachment if it has been
fully downloaded. You can mark an attachment for downloading (IMAP4 account only) the next time when
the phone is connected.
If you receive messages through synchronization:
1. Start ActiveSync on your desktop computer.
2. Click File > Mobile Device, and then select your Pocket PC Phone.
3. Click Tools > Options.
4. Select the message account, and then click Settings > Include File Attachments.

SP70 User Manual 10-9
Microsoft Pocket
Outlook
If you receive messages through a remote email server and have an IMAP4 account:
1. Tap > Messaging.
2. Tap Menu > Switch Accounts > IMAP4.
3. Tap Next until you reach Server Information, and then tap Options.
4. Tap Next twice, and then select Get full copy of messages and When getting full copy, get
attachments.
• Embedded images and objects cannot be received as attachments.
• An embedded message can be viewed as an attachment when you are using IMAP4 to receive
email. However, this feature will not work if TNEF is enabled so that you can receive meeting
requests.
Receiving Meeting Requests
If you receive your email messages through ActiveSync, you will automatically receive meeting requests.
If you connect directly to an email server, the server must be running Microsoft Exchange Server 5.5 or
2000 for you to receive meeting requests. If you are running Microsoft Exchange Server 2000, you will
automatically receive meeting requests in your Inbox.
To receive meeting requests on Microsoft Exchange Server 5.5:
n Ask your system administrator to activate Rich Text Format and TNEF support for your account. If
TNEF is enabled, you will not receive messages that are included in other messages as attachments,
and you will not be able to tell if a message has an attachment until you get the full copy. In addition,
download time may be longer.
n While setting up your mail account, select Get file attachments.
After you are set up to receive meeting requests:
1. If you connect directly to an email server and only receive message headers and/or a limited number of
lines per message, tap and hold the message that you think is a meeting request, and then tap Mark for
Download.
2. Open the meeting request.
3. Tap Menu > Accept, Tentative, or Decline. If you want, you can also include a written message with
the response. The response will be sent the next time that you synchronize or connect to your email
server, and your device Calendar will be updated.
Composing and Editing a Message
Composing and Sending a Message
1. Tap > Messaging.
2. In the message list, tap Menu > Switch Accounts, and select the
desired email account.
3. Tap New.
4. Enter the email address or text message address of one or
more recipients, separating them with a semicolon. To access
addresses and phone numbers from Contacts, tap To.
5. Enter your message. To quickly add common messages, tap My
Text and tap a desired message.
6. Tap Send. If you are working offline, the message will be moved
to the Outbox folder and will be sent the next time you connect.

10-10 SP70 User Manual
Microsoft Pocket
Outlook
• If you are sending a text message and want to know whether it was received, before sending
the message, tap Menu > Tools > Options> Text Messages, and select Request delivery
notifications.
Attaching a File to a Message
1. Tap > Messaging.
2. In the message list, tap Menu > Switch Accounts, and select the
desired email account.
3. Tap New.
4. Enter the email address or text message address of one or more
recipients, separate them with a semicolon. To access addresses
and phone numbers from Contacts, tap To.
5. Enter your message. To quickly add common messages, tap My
Text and tap a desired message.
6. Tap Menu > Insert > File.
7. Select the file you want to attach. OLE objects cannot be
attached to Messaging messages. Messaging automatically
converts Pocket Word files that you attach to messages to .doc
format and Pocket Excel files to .xls format.
8. Tap Send. If you are working offline, the message will be moved
to the Outbox folder and will be sent the next time you connect.
Inserting a Recording
1. Tap > Messaging.
2. In the message list, tap Menu > Switch Accounts, and select the
desired email account.
3. Tap New.
4. Enter the email address or text message address of one or more
recipients, separate them with a semicolon. To access addresses
and phone numbers from Contacts, tap To.
5. Enter your message. To quickly add common messages, tap My
Text and tap a desired message.
6. Tap Menu > Insert > Voice Note.
7. Tap the Recording button to start recording, and the Stop button
to stop. The recording will appear as an attachment.
8. Tap Send. If you are working offline, the message will be moved
to the Outbox folder and will be sent the next time you connect.
SP70 User Manual 10-11
Microsoft Pocket
Outlook
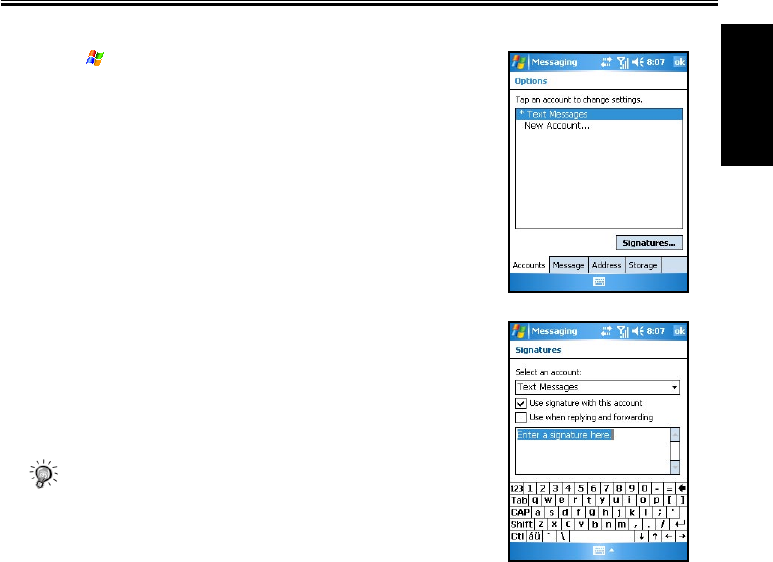
Creating a Signature
1. Tap > Messaging.
2. Tap Menu > Tools > Options.
3. Tap Signatures.
4. Select an account for which you want to create or change a
signature.
5. Select Use signature with this account if the check box is not
selected.
6. Select Use when replying and forwarding if wanted.
7. Enter a signature in the box.
8. Tap OK twice to return to the message list.
• To stop using a signature, clear the Use signature with this
account check box.
• You can use a different signature with each account.
Message Folders
Each email account and text message account has its own folder hierarchy with five default folders:
Inbox, Outbox, Deleted Items, Drafts, and Sent Items. The messages you receive and send through the
mail account are stored in these folders. You can also create additional folders within each hierarchy.
The Deleted Items folder contains messages that have been deleted from the device. The behavior of the
Deleted Items and Sent Items folders depends on the Messaging options you have chosen.
The behavior of the folders you create depends on whether you are using an Outlook email, text message,
POP3, or IMAP4 account.
n If you use an Outlook email account, email messages in the Inbox folder in Outlook will automatically
be synchronized with your device. You can select to synchronize additional folders by designating
them for ActiveSync. The folders you create and the messages you move will then be mirrored on the
server. For example, if you move two messages from the Inbox folder to a folder named Family, and
you have designated Family for synchronization, the server will create a copy of the Family folder and
copies the messages into that folder. You can then read the messages while away from your desktop
computer.
n If you use a text message account, messages will be stored in the Inbox folder.
n If you use a POP3 account and you move email messages to a folder you created, the link will be
broken between the messages on the device and their copies on the mail server. The next time you
connect, the mail server will see that the messages are missing from the device Inbox folder and delete
them from the server. This prevents you from having duplicate copies of a message, but it also means
that you will no longer access messages that you move to folders created from anywhere except the
device.

10-12 SP70 User Manual
Microsoft Pocket
Outlook
n If you use an IMAP4 account, the folders you create and the email messages you move will be
mirrored on the server. Therefore, messages are available anytime while you connect to your mail
server, whether it is from your device or desktop computer. This synchronization of folders occurs
whenever you connect to your mail server, create new folders, or rename/delete folders when
connected.
Managing Folders
For all accounts except Outlook Email, you can access folder options
by tapping Menu > Tools > Manage Folders.
1. Tap > Messaging.
2. Tap Menu > Switch Accounts, and then select the correct
account.
3. Tap Menu > Tools > Manage Folders.
4. Tap and hold the desired folder to:
• Tap New Folder to create a new folder under the folder
that is currently selected.
• Tap a current folder, and then tap Rename to change the
folder name. Default folders, such as Inbox, cannot be
renamed.
• Tap Delete to delete a folder and its contents.
• Tapping Folder Options to set folder synchronization
settings on a per-folder basis by selecting the check box
next to the folder you want to synchronize.
• You must be online to delete or rename an IMAP4 folder.

SP70 User Manual 10-13
Microsoft Pocket
Outlook
10.5 MMS Messages
The MMS program has been incorporated into the Messaging feature of your Pocket PC Phone.
Tap > Messaging > Accounts > MMS to access the MMS folders.
To compose an MMS message:
1. Tap New > Custom.
2. Enter the email address or mobile phone number of one or more
recipients
3. Enter the message subject.
4. Tap the photo insertion area to select a picture or video.
5. Tap the text insertion area to enter text information.
6. Tap the audio insertion area to create an audio file.
7. When it is completed, tap Send.
• You need to subscribe to the GPRS and MMS services with
your service provider and configure your Pocket PC Phone
properly before you can send and receive MMS messages.

Chapter 11
Microsoft ActiveSync
11.1 Installing Microsoft ActiveSync
11.2 Connecting to Your Desktop Computer
11.3 Synchronizing with Your Desktop Computer
11.4 Synchronizing Directly with Exchange Server
11.5 Changing the Synchronization Schedule
11.6 Backup and Restore
11-2 SP70 User Manual
Microsoft
ActiveSync
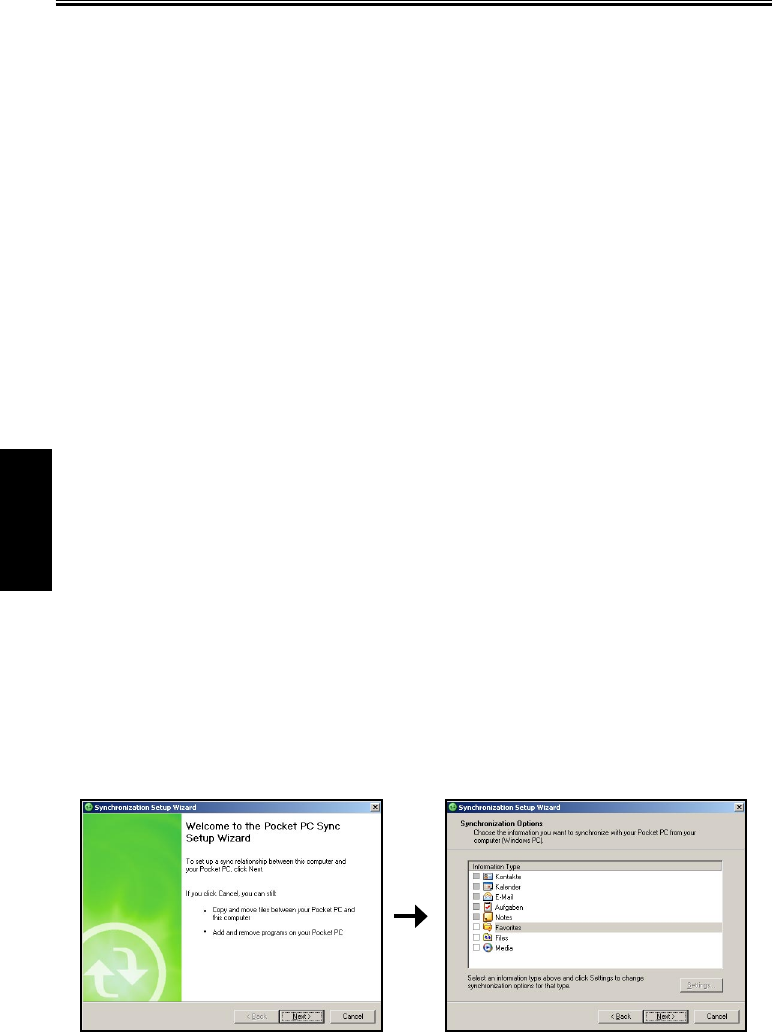
11.1 Installing Microsoft ActiveSync
With Microsoft ActiveSync on both your desktop computer and Pocket PC Phone, you can exchange
information between a desktop computer or server and your Pocket PC Phone. To synchronize your Pocket
PC Phone with your desktop computer, you must install ActiveSync on the desktop computer.
Using ActiveSync, you can:
n Synchronize information between your Pocket PC Phone and desktop computer or server so that you
have the latest information in all locations.
n Change synchronization settings and synchronization schedule.
n Copy files between your Pocket PC Phone and desktop computer.
n Add or remove programs to/from your Pocket PC Phone.
An Microsoft Companion CD is supplied with your Pocket PC Phone. You need to use the CD to install
ActiveSync on the desktop computer before perfoming synchronization.
Follow this procedure:
1. Turn on the desktop computer.
2. Insert the Companion CD into the CD-ROM drive of the desktop computer.
3. On the first screen, click the arrow to enter the main screen and click Start Here.
4. On the next screen, click Next to pop up Get Ready to Synchronize screen.
5. The Microsoft ® ActiveSync® installation wizard appears. Click Next.
6. The License Agreement appears, choose ‘I accept the terms in the license agreement’, and click Next.
7. The Customer Information screen appears, please enter user name and organization, and click Next.
8. The Destination Folder screen appears, click Next.
9. The Ready to Install the Program screen appears, click Install.
10. After the file transfer is completed, the installation is finished. Click Finish.
11. Click Close back to Windows to start ActiveSync.
12. When prompted, connect one end of the USB cable to the converter, and then connect the converter to
the USB port on the bottom of your Pocket PC Phone.
13. Connect the other end of the USB cable to the USB port of the desktop computer.
14. Follow the on-screen instructions to establish a partnership between your Pocket PC Phone and your
desktop computer. Select the types of information for synchronization. After your first synchronization,
the data you have stored on your desktop computer such as Calendar, Contacts and Tasks are copied to
your Pocket PC Phone.
SP70 User Manual 11-3
Microsoft
ActiveSync
• If you do not establish a standard partnership with the desktop computer, then you cannot
perform synchronization between two devices, and you will need to select a desired partnership
every time you connect to the desktop computer.
11.2 Connecting to Your Desktop Computer
You can connect your Pocket PC Phone to a desktop computer in several ways:
n Use the USB cable or an optional cradle.
n Use the IR port in place of using a cable. (For complete instructions on connecting to your desktop
computer by infrared, see the ActiveSync Help on your desktop computer.)
n Use a network or dial-up connection.
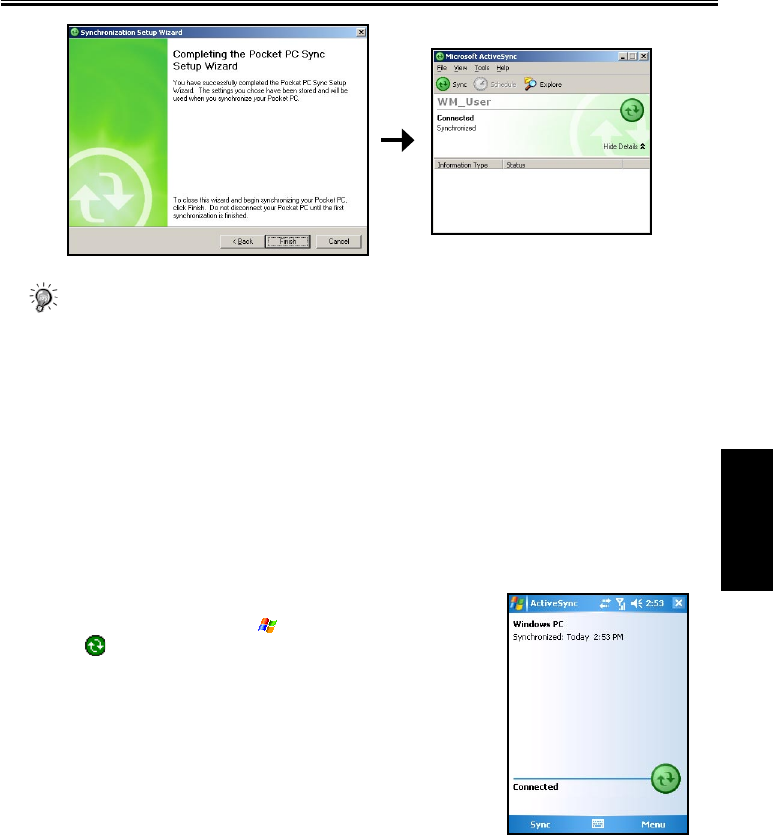
11.3 Synchronizing with Your Desktop Computer
1. Connect your Pocket PC Phone to your desktop computer.
2. On your Pocket PC Phone, tap > Programs > ActiveSync.
3. Tap to start synchronization.

11-4 SP70 User Manual
Microsoft
ActiveSync
11.4 Synchronizing Directly with Exchange Server
1. Make sure that the Pocket PC Phone is not turned on.
2. Connect to the Internet. (See Chapter 8 for more information.)
3. In ActiveSync on the device, tap Menu > Add Server Source.
5. In Server address, enter the name of the server running Exchange Server, and tap Next.
6. Enter your name, password, and domain, and tap Next.
7. Select the check boxes for the types of information items that you want to synchronize with Exchange
Server.
8. To change available synchronization settings, select the type of information and tap Settings.
9. Tap Finish.
10. Make sure that the server is powered on.
11. Connect the Pocket PC Phone to the Internet. (See Chapter 8 for more information.)
11.5 Changing the Synchronization Schedule
1. In ActiveSync on the device, tap Menu > Schedule.
2. Do one or more of the following:
• When you are working or e-mail volume is high, select a shorter interval in the Peak times list.
• When e-mail volume is low, select a longer interval or As items arrive in the Off-peak times list.
• While roaming, tap Use above settings while roaming.
• When you select Send in Messaging on the device, select the Send outgoing items immediately
check box.
11.6 Backup and Restore
Use the USB cable to connect the SP70 to your PC.
The icon appears on the taskbar. Click guest partnership and click Next.
Use the backup/restore function of Active Sync\Tools.
Update your data for backup and then perform the backup procedure.
When the backup procedure is completed, click OK. If you select the restoring function, click Restore.
Click guest partnership and click OK.
Select to execute the restoring program.
When the restoring procedure is completed, click OK to restart the device.
Start the file menu of the device and exit.

Chapter 12
Today Plus
12.1 Programs
12.2 Media Content
12.3 Games
12.4 Phone Records
12.5 Settings

12-2 SP70 User Manual
Today Plus
12.1 Programs
Tap Today Plus on the Today screen and then tap the Programs icon.
Programs provides shortcuts to items in Start\Programs, such as
Word Mobile, Excel Mobile, PowerPoint Mobile, File Explorer,
Tasks, Notes, etc.
12.2 Media Content
Tap Today Plus on the Today screen and then tap the Media Content
icon.
Media Content provides shortcuts to items in the Media Content
folder, such as Music, Album, Media Player, Java, and Wallpaper.
12.3 Games
Tap Today Plus on the Today screen and then tap the Games icon.
Games allows you to select and execute items in the Start\Programs\
Games folder quickly.

SP70 User Manual 12-3
Today Plus
12.4 Phone Records
Tap Today Plus on the Today screen and then tap the Phone Records
icon.
Phone Records provide shortcuts to select options in Missed Call,
Received Call, Dialed Call, SMS, MMS, E-Mail, Call Guard, and
Call Answer.
12.5 Settings
Tap Today Plus on the Today screen and then tap the Settings icon.
Settings provides shortcuts to items in Start\Settings.

Chapter 13
VideoCam
13.1 Using the Camera
13.2 Using the DV
13.3 Changing VideoCam Settings

SP70 User Manual 13-2
VideoCam
13.1 Using the Camera
The Pocket PC Phone is installed with the VideoCam program for you to take pictures.
Taking a Picture
1. Press the Capture key on the side of the Pocket PC Phone, or tap > Programs > VideoCam, to
enter the Camera mode.
2. By default, the screen is displayed in the landscape mode.
You can use one hand to hold the Pocket PC Phone’s bottom for easy operations. Be careful not
to let your fingers cover the camera lens. You can press the Volume/Zoom key to adjust the size of
the image.
3. Frame the subject to be photographed in the viewing window. When it is ready, press the Capture key
on the side of the Pocket PC Phone to capture the picture.
The Pocket PC will preview the picture on the screen shortly. You can:
• Tap to save the picture and continue taking pictures
• Tap to send the picture in an email.
• Tap to delete the picture.
• Tap to switch to MyAlbum.
(You can also press the Left/Right key to switch between the four icons.)
By default, the new picture is stored in the My Device\My Documents\My Album folder on the
Pocket PC Phone in five seconds. The picture is stored in the JPEG format, and its filename starts with
DSC00001 and goes on in the ascending order until the Pocket PC Phone is out of storage space.
4. 6. To view the picture you took, tap to switch to MyAlbum. (See Chapter 14 for information on
MyAlbum.)
Camera mode
Remaining amount
of pictures to take
Standby mode
Picture size
Zoom setting
Switches to DV mode
Closes the program.
Opens or closes the brightness
adjustment bar.
Rotates the screen.
Tool Settings.
Brightness adjustment bar
Selects the picture mode.
Opens MyAlbum.
System time
Battery power

13-3 SP70 User Manual
VideoCam
Taking Continuous Pictures
VideoCam allows you to take continuous pictures. By default, VideoCam takes one single picture. There-
fore, you need to change the setting first.
1. After you start VideoCam, tap on the screen.
2. Tap Camera.
3. In Shooting Mode, select Continuous Shooting and tap OK.
4. Take pictures according to the procedure described in the “Taking a Picture” section earlier in this
chapter.
After the pictures are captured, the screen displays the thumbnail view of these continuous pictures.
The time interval for the continuous pictures is 0.7 second.
• You cannot use the Record key in the Camera mode.
• You cannot use the Camera and DV features at the same time.
13.2 Using the DV
The VideoCam program also allows you to record videos.
1. Press the Capture key on the side of the Pocket PC Phone, or tap > Programs > VideoCam, to
enter the Camera mode.
2. By default, the screen is displayed in the landscape mode.
Tap to switch to the DV mode. You can use one hand to hold the Pocket PC Phone’s bottom for easy
operations. Be careful not to let your fingers cover the camera lens.
3. Frame the subject to be photographed in the viewing window. When it is ready, press the Capture key
on the side of the Pocket PC Phone to start recording. Press the Capture key again to stop recording.
The Pocket PC will preview the first picture of the video on the screen shortly. You can:
• Tap to save the video and continue recording.
• Tap to send the video in an e-mail.
• Tap to delete the video.
• Tap to switch to MyAlbum.
(You can also press the Left/Right key to switch between the four icons.)
By default, the new video is stored in the My Device\My Documents\My Album folder of the Pocket
PC in five seconds. The video is stored in the MPEG4/3GP format, and its filename starts with
DV00001 and goes on in the ascending order until the Pocket PC is out of storage space.
4. To view the video you recorded, tap to switch to MyAlbum. (See Chapter 14 for information on
MyAlbum.)
• The DV mode indicator glows in orange when you using the DV feature.
• If you answer a call in the DV mode, then the video will be saved and VideoCam closed. If you
reject the call, the screen will remain the same.
DV mode
Switches to Camera mode
SP70 User Manual 13-4
VideoCam
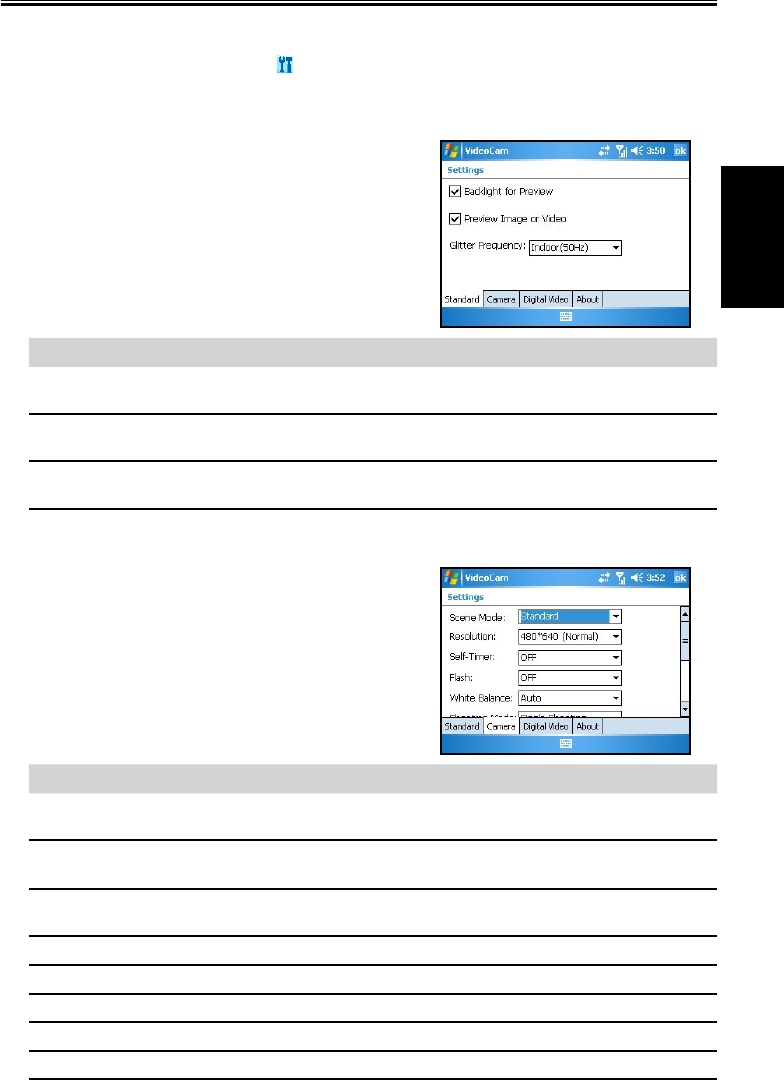
13.3 Changing VideoCam Settings
In the Camera/DV mode, you can tap on the screen to access the setting items.
Standard Settings
On the Setting screen, tap Standard.
Item Description
Backlight for
Preview
Sets whether to turn on the backlight for picture/video preview.
Preview Image or
Video
Sets whether to keep the preview for five seconds before the next shooting.
Glitter Frequency While using VideoCam, please setup Glitter Frequency according to your
environment for improving the preview quality of the VideoCam.
Camera Settings
On the Setting screen, tap Camera.
Item Description
Scene Mode Selects the desired scene mode: Standard, Nightshot, Portrait, Grayscale,
Sepia, or Document.
Resolution
Selects the desired image resolution: 1600*1280, 1280*1024, 640*480 (Normal),
320*240 (Basic), or 176*144 (Compact).
Self-Timer Sets the time lag between releasing the shutter and shooting the picture. The
options are 5 sec, 10 sec or 15 sec.
Flash Turns on or off the flash.
White Balance Changes the setting for white balance.
Shooting Mode Selects the single or continuous shooting.
Filename recount Resets the filename counter, starting from DSC00001.
Folder Selects the storage location for the picture.

13-5 SP70 User Manual
VideoCam
Digital Video Settings
On the Setting screen, tap Digital Video.
Item Description
Scene Mode Selects the desired scene mode: Standard, Nightshot, Grayscale or Sepia.
Resolution
Selects the desired image resolution: Large, High Quality; Large, Long Time;
Small, High Quality; Small, Long Time.
Self-Timer Sets the time lag between releasing the shutter and shooting the picture. The
options are 5 sec, 10 sec or 15 sec.
Format Selects the desired video format: MP4:MPEG4+ACC, MP4:MPEG4+AMR,
3GP:MPEG4+AMR, or 3GP:H.263+AMR.
Silence Shoot Allows you to record only images without sounds.
Filename recount Resets the filename counter, starting from DV00001.
Image size setting Allows you to set the size limit for recorded videos.
Folder Selects the storage location for the videos.

Chapter 14
Using MyAlbum
14.1 Starting MyAlbum
14.2 Opening a Picture or Video
14.3 Editing Pictures
14.4 Using the FaceMagic Feature
14.5 Using Effects
14.6 Sending Files
14.7 View Modes
14-2 SP70 User Manual
Using MyAlbum
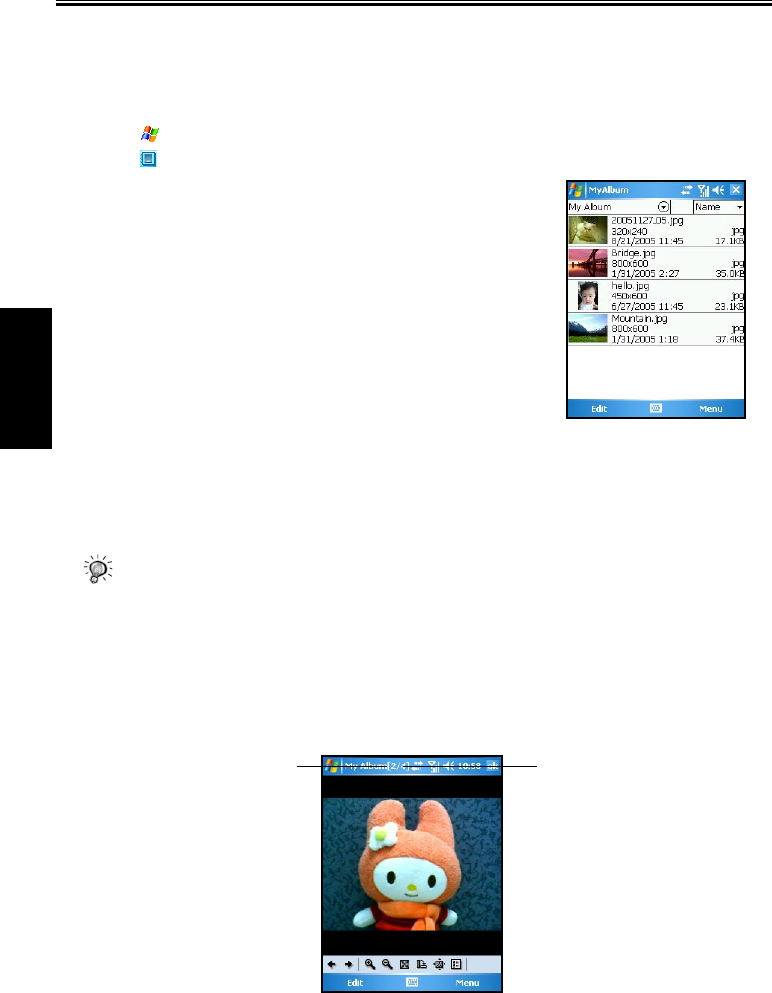
14.1 Starting MyAlbum
The MyAlbum program is very useful for viewing picture and video files. The supported formats include:
.bmp, .png, .jpeg, .gif, .3gp and .mpeg4.
To start MyAlbum, you can:
n Tap > Programs > MyAlbum.
n Tap in the Camera/DV mode.
n Today plus > Media Content > Album.
The startup screen of MyAlbum displays the file list.
The top of the screen displays the name of the current folder (the default setting is the My Device\My Doc-
ument\My Album folder) and the sorting method (the default setting is Name). The middle of the screen
displays the information about the picture: the preview of the pictures on the left; the filename, resolution,
saving time, file format and file size on the right.
• You can tap Edit and Menu on the command bar for advanced features. See the later sections in
the chapter.
14.2 Opening a Picture or Video
To have a closer view of a picture or video, tap the specific thumbnail view in the Report mode of
MyAlbum.
Below is the screen of an opened picture:
Total number of files
Number of current file

SP70 User Manual 14-3
Using MyAlbum
In this mode, you can:
n Tap / or press the Left/Right key to browse for the previous/next file of the current folder.
n Tap / or press the Up/Down key to zoom in/out of the image.
n Tap to zoom the picture to best fit the screen.
n Tap to rotate the picture at 90 degrees.
n Tap to switch to full screen.
n Tap to return to the Report mode.
• You can tap Edit and Menu on the command bar for advanced features. See the later sections in
the chapter.
14.3 Editing Pictures
In the Report mode or opened picture mode, you can tap Edit on the command bar to cut, copy, paste,
rename or delete the selected or opened file. You can also select all files, or save the selected file as a new
file.
14.4 Using the FaceMagic Feature
Tapping Menu > FaceMorph on the command bar allows you
to create special changes on the person’s expression. On the
positioning screen, tap Reset, and follow the screen tips to perform
positioning on the person’s face.
After positioning, tap FaceMagic > Morph (as an example). The
screen displays the expression items and the adjustment bar for you
to customize and create special effects. You can also tap FaceMagic
> Comic or Avatar for more special expression effects.

14-4 SP70 User Manual
Using MyAlbum
14.5 Using Effects
Tap Effect on the command bar to create special effects on the selected or opened picture. The picture with
effects will be saved as a new file with “-1” added to the filename.
Painting
1. Tap Menu > Effect > Painting.
2. You can paint on the picture.
Or, tap to add text on the picture. Tap the screen, and a
editing cursor will appear. You can start to enter the texts and
change the text’s font, font size and color.
3. Press the OK key or tap OK to save the changes as a new file.
Effect
1. Tap Menu > Effect > Effect.
2. Tap the desired effect: Normal ( ), Black/White ( ), Sepia (
), Emboss ( ), Blur ( ) or Mosaic ( ).
3. Press the OK key or tap OK to save the changes as a new file.
Selecting Normal (icon) will not save the picture as a new file.
Frame
1. Tap Menu > Effect > Frame.
2. Tap the desired picture frame from the option bar at the bottom
of the screen. The screen will display the applied picture for
viewing immediately. You can tap the arrows on both sides of the
option bar for more frame options.
3. Press the OK key or tap OK to save the changes as a new file.
SP70 User Manual 14-5
Using MyAlbum
Stamp
1. Tap Menu > Effect > Stamp.
2. Tap the desired stamp from the option bar at the bottom of the
screen. The screen will display the applied picture for viewing
immediately. You can tap the arrows on both sides of the option
bar for more stamp options.
3. Press the OK key or tap OK to save the changes as a new file.
Adjustment
1. Tap Menu > Effect > Adjustment.
2. Tap the list to select the item for adjustment: Brightness,
Contrast, Saturation, Smart Color, Portrait, Landscape and
Document.
3. Adjust the value by tapping and draging on the adjustment bar.
Note
1. Tap Menu > Effect > Note.
2. You can enter note text in the box, or tap the recording button to
create a recording as a note. The added text or recording will be
saved as a stand-alone file.
3. Tap OK to save the note.
4. The note icon ( ) in the list mode indicates that a note has been
added to the picture.

14-6 SP70 User Manual
Using MyAlbum
14.6 Sending Files
Tapping Menu > Send on the command bar allows you to send the file by:
n MMS
Send an MMS message including the selected picture.
n E-Mail
Send an email message including the selected picture.
n Beam File
Use the infrared or bluetooth to beam picture.
14.7 View Modes
MyAlbum provides four view modes for viewing picture and video files.
n Large mode
n Middle mode
n Small mode
n Report mode (default mode)

Chapter 15
More Programs
15.1 Word Mobile
15.2 Excel Mobile
15.3 PowerPoint Mobile
15.4 Windows Media Player
15.5 Pictures & Videos
15.6 MIDlet Manager
15.7 File Explorer
15.8 Calculator
15.9 Pocket MSN
15.10 IE Favorites
15.11 Media Content
15.12 SIM Contacts
15.13 Search
15.14 Games
15.15 Voice Commander
15.16 Profiles
15.17 SmartX

15-2 SP70 User Manual
More Programs
15.1 Word Mobile
You can create and edit documents and templates in Microsoft Word Mobile just as you do in Microsoft
Word on your desktop computer.
Creating a Document
1. Tap > Programs > Word Mobile.
2. Tap New. You’ll see either a blank document or a template.
3. You can enter information by working in different modes, which
you select from the View menu.
4. When you have finished entering the information and tap OK,
the document is automatically saved. Word documents are
usually saved as .psw files, but you can also save them in other
file formats, such as .doc, .rtf or .txt.
Opening an Existing Document
In the document list, tap the document you want to open. If you don’t see the document in the list, make
sure you’ve chosen the correct folder in the folder list (labeled All Folders by default).
You can have only one document open at a time. When you open a second document, the first one is saved
and closed automatically.
• If you’re opening a Word document that was created on a desktop computer, you may want to
select View > Wrap to Window so that you can see the entire document.
15.2 Excel Mobile
You can create and edit workbooks and templates in Microsoft Excel Mobile just as you do in Microsoft
Excel on your desktop computer.
Creating a Workbook
1. Tap > Programs > Excel Mobile.
2. Tap New. You’ll see either a blank workbook or template.
3. You can enter formulas and functions, and then filter data to see
the subset of information.
4. When you have finished entering the information and tap OK,
the document is automatically saved. Excel Mobile workbooks
are usually saved as .pxl files, but you can also save them in .xls
format.
SP70 User Manual 15-3
More Programs
Opening an Existing Workbook
In the workbook list, tap the file you want to open. If you don’t see the workbook in the list, make sure
you’ve chosen the correct folder in the folder list (labeled All Folders by default).
• You can open only one workbook at a time; when you open a second workbook, you will be
asked to save the first.
15.3 PowerPoint Mobile
With PowerPoint Mobile, you can open and view slide show presentations created on your desktop
computer. Whether the presentation is opened from an email message, downloaded from a file share or the
Internet, copied to the Pocket PC Phone via a storage card, or obtained by synchronizing with your desktop
computer, slide shows created in *.ppt and *.pps format with PowerPoint ‘97 and later can be viewed on
your Pocket PC Phone. Note that PowerPoint Mobile is a viewer only.
Tap > Programs > Word Mobile. In the presentation list, tap the
presentation you want to open. If you don’t see the presentation in
the list, make sure you’ve chosen the correct folder in the folder list
(labeled All Folders by default).
15.4 Windows Media Player
Use Microsoft® Windows Media® Player 10 Mobile for Pocket PC Phone to play digital audio and video
files that are stored on your device or on the Web.
By default, Windows Media Player can play Windows Media or MP3 files (including files with the extensions .asf,
.wma, .wmv, .mp3).
Starting Windows Media Player
To start Windows Media Player, tap > Windows
Media.
By default, Windows Media Player displays the Library screen as
the startup screen after the Pocket PC Phone is turned on.

15-4 SP70 User Manual
More Programs
Screens and Menus
Windows Media Player has three primary screens:
n Playback screen
The screen that displays the playback controls (such as Play, Pause, Next, Previous, and Volume), the
album art window, and the video window. You can change the appearance of this screen by choosing a
different skin.
n Now Playing screen
The screen that displays the Now Playing playlist. This special playlist indicates the currently playing
file and any files that are “queued up” to play next.
n Library screen
The screen that lets you quickly find your audio files, video files, and playlists. It contains categories
such as My Music, My Video, My TV, and My Playlists.
At the bottom of each screen is Menu. The commands on this menu change depending upon which screen
you are viewing.
n Playback screen menu
Item Description
Play/Pause Starts or pauses playback.
Repeat Plays the items in the Now Playing playlist repeatedly.
Stop Stops playback.
Full Screen When a video is playing, displays it by using the entire screen.
Library Displays the Library screen so you can choose a file to play.
Open URL Lets you play a file on a network, such as the Internet.
Options Lets you adjust various Windows Media Player options, including net-
work, skin, and hardware button options. (See the “Changing Windows
Media Player Settings” section later in the chapter.)
Properties Displays information about the currently playing file.
About Displays information about Windows Media Player, such as the version
number.
n Now Playing screen menu
Item Description
Library Displays the Library screen so you can choose a file to play.
Move Up Moves the selected item up in the playlist order.
Move Down Moves the selected item down in the playlist order.
Delete from Playlist Deletes the selected item from the playlist.
Clear Now Playing Deletes all items from the Now Playing playlist.
Error Details Displays error information about the selected item (an exclamation mark
appears before the item name if error details are available).
Properties Displays information about the selected file.
SP70 User Manual 15-5
More Programs
n Library screen menu
Item Description
Queue Up Adds the selected item to the end of the current (Now Playing) playlist.
Delete from Library Deletes the selected item from the library.
Update Library Adds new items to the library by searching your device or storage card.
Open File Lets you find and play files that are stored on your device or storage card
but that are not in the library.
Properties Displays information about the selected file.
Libraries
The library contains links to your audio files, video files, and playlists. As in the desktop Player, you will
be allowed to sort your content by criteria such as artist name, album title, genre, or actor.
Unlike the desktop Player, the Pocket PC Phone Player can have multiple libraries. Each library represents
an available storage location. For example, if you store some content in the internal storage location on the
device (known as random access memory or RAM), the My Device library will contain links to those files.
If you also store content on removable storage cards, you will have additional libraries for each of those
cards.
On the Library screen, you can switch between the My Device library and any other libraries that are
available to your device.
By default, Windows Media Player automatically searches the internal storage location of your device for
compatible digital media files. If it finds any, they will be added to the My Device library.
Similarly, when you insert a removable storage card into your device, Windows Media Player automatically
searches it for content and adds it to a Storage Card library.
If the Player does not detect new files that you copy to your device, you can manually update the library by
using the Update Library command.
Updating a Library
In most cases, Windows Media Player automatically updates your libraries as necessary. However, you can
manually update a library to ensure that it has links to any new files that you might have recently copied to
your Pocket PC Phone or a removable storage card.
1. Tap > Windows Media.
2. If you are not already on the Library screen, tap Menu >
Library.
3. On the Library screen, tap the Library arrow (near the top of
the screen), and then tap the library that you want to update (for
example, Storage Card).
4. Tap Menu > Update Library.
5. Tap Search, wait for the files to be added, and then tap Done.
15-6 SP70 User Manual
More Programs
Playback
Playing Items on Your Pocket PC Phone
Use the library to find and play songs, videos, and playlists that are stored on your Pocket PC Phone or
removable storage card.
1. Tap > Windows Media.
2. If you are not already on the Library screen, tap Menu >
Library.
3. On the Library screen, tap the Library arrow (near the top of
the screen), and then tap the library that you want to update (for
example, Storage Card).
4. Tap a category (for example, My Music or My Playlists), tap and
hold the item that you want to play (such as a song, album, or
artist name), and then tap Play or Queue Up.
5. Tap Play to start playing back the selected file.
• To play a file stored on your device but that is not in a library, on the Library screen, tap Menu >
Open File. Tap and hold the item that you want to play (such as a file or a folder), and then tap
Play or Queue Up.
Controls
Item Description
Plays a file.
Pauses a file.
Skips to the beginning of the current file or to the previous file.
Skips to the next file.
Adjusts the playback progress of a selected file.
Increases the volume level.
Decreases the volume level.

SP70 User Manual 15-7
More Programs
Item Description
Turns the sound on or off.
Displays a video by using the entire screen (full screen).
Displays a Web site, such as WindowsMedia.com, where you can find music and
videos to play.
If your device hardware supports it, you can rewind and fast-forward files by
pressing and holding the Left/Right controls.
Playing an Item on a Network
Use the Open URL command to play a song or video that is stored on the Internet or on a network server.
1. Tap > Programs > Windows Media.
2. If you are not on the Playback screen, tap OK to close the current screen and display the Playback
screen.
3. Tap Menu > Open URL.
4. In the URL box, enter a network address. Or, in the History box, tap a URL that you have previously
used.
• To play an item on a network, the phone must be connected to a network. For more information
on creating a remote connection between your portable device and a network, see Chapter 8.
Playlists
A playlist is a list of digital media files that play in a specified order. By using the playlist, you can group
audio and video files together for convenient playback.
For example, in the desktop Player, you can create a playlist of upbeat songs to listen to when you exercise
or a playlist of soothing songs to enjoy during a long flight. When you synchronize with the desktop
version of Windows Media Player 10, your favorite playlists are automatically copied to your Pocket PC
Phone.
Your playlists are available in the library (in the My Playlists category). A temporary playlist, called Now
Playing, is available from the Now Playing menu. It lists the currently playing file, as well as any files that
have been “queued up” to play next.
Synchronization
Use the Sync feature in the desktop version of Windows Media Player 10 to automatically copy your
favorite audio files, video files, and playlists from your desktop Player library to your Pocket PC Phone
Player library every time you connect your Pocket PC Phone to your computer.
For more information on synchronization, see the Windows Media Player Help on the desktop computer.
Copying Files to Your Pocket PC Phone
Use the desktop version of Windows Media Player 10 to synchronize digital media files to your Pocket PC
Phone (instead of dragging a file from a folder on your desktop computer to a folder on your Pocket PC
Phone, for example). Using the desktop Player ensures that licenses are copied with protected files.
For more information on copying files to your Pocket PC Phone, see the Windows Media Player Help on
the desktop computer.

15-8 SP70 User Manual
More Programs
Licenses and Protected Files
Protected files are digital media files that are secured with a license to prevent unauthorized distribution or
playback.
The license specifies how you can use the file. For example, a license can specify how many times you can
play a file. A license can also specify whether you can burn the file to a CD or synchronize (copy) the file
to a portable device.
The terms of the license are specified by the person or company that provided the file. Most people obtain
protected files from online stores, such as MSN Music and Napster.
When copying a protected file from your computer to your Pocket PC Phone, always use the desktop
version of Windows Media Player 10 to synchronize (copy) the file to your Pocket PC Phone. For example,
do not use Windows Explorer to drag and drop files from your computer to your Pocket PC Phone.
For more information on copying files to your Pocket PC Phone, see the Windows Media Player Help on
the desktop computer.
• You can view the protection status for a file by checking its file properties (Menu > Properties).
Changing Windows Media Player Settings
1. Tap > Programs > Windows Media.
2. If you are not on the Playback screen, tap OK to close the
current screen and display the Playback screen.
3. Tap Menu > Options to customize Windows Media Player
settings.
Item Description
Change player appearance Tap Skins. Tap Previous or Next until you find the skin that
you want to use.
Shrink oversized video Tap Audio/Video. Select the Shrink to fit window check
box.
Play video in full screen Tap Audio/Video. In Play video in full screen, select the
desired option.
Change background playback Tap Playback. Select or clear the Pause playback while
using another program check box.
Change how time is displayed Tap Playback. In the Show time as box, select the desired
option.
Change playback after a phone call Tap Playback. Select or clear the Resume playback after a
phone call check box.
Change network connection speed Tap Network. In the Internet Connection Speed box, tap
the speed of your network connection.

SP70 User Manual 15-9
More Programs
Item Description
Change network protocol options Tap Network. In Protocol, select the check box for each
protocol you want to enable.
Change the startup screen Tap Library.
Select the Start Player on Library screen check box to
show the Library screen when you start Windows Media
Player.
Clear the Start Player on Library screen check box to
show the Playback screen when you start Windows Media
Player.
15.5 Pictures & Videos
Use Pictures & Videos to view pictures or videos stored on your device or on a storage card, send pictures or
videos to others, view a slideshow of your pictures, or set a picture as the background on the Today screen.
Viewing Pictures and Videos
1. You can copy pictures or videos from your desktop computer to the My Pictures folder, within the My
Documents folder on your Pocket PC Phone. For more information on copying files from your desktop
computer to your Pocket PC Phone, see ActiveSync Help on your desktop computer.
2. To view pictures or videos in a storage card, insert the card.
3. Tap
>
Programs
>
Pictures & Videos.
4. By default, the program displays thumbnails of the pictures and
videos in the My Pictures folder, within the My Documents
folder on your Pocket PC Phone. To view the pictures and videos
in a storage card, tap the icon. To view pictures and videos on
the Pocket PC Phone, tap the icon.
5. Thumbnails of pictures and videos appear on the screen. You can
tap one of them to view the picture in full screen.
Sending Pictures and Videos
You can send a .jpg picture to others as an email attachment. The picture is resized to approximately 30
KB, making it easier to send over wireless connections.
1. Tap
>
Programs
>
Pictures & Videos.
2. Tap the picture you want to send as an email attachment.
3. Tap Tools
>
Send via Email to create an email message with the picture attached.
Slideshow of Pictures
You can view your pictures as a slideshow on your device. Pictures & Videos will display slides of the
pictures shown in thumbnail view with 5-second intervals between slides.
1. Tap
>
Programs
>
Pictures & Videos.
2. Tap the icon to view pictures as a slideshow.
3. Tap anywhere on the screen to display the Slideshow toolbar, which you can use to pause the
slideshow, rotate the view, and more.
15-10 SP70 User Manual
More Programs
Setting a Picture as Background
1. Tap
>
Programs
>
Pictures & Videos.
2. Tap the picture you want to set as the background.
3. Tap Tools
>
Set as Today Wallpaper.
15.6 Java
Java is a programming environment targeting various applications
running on mobile devices, such as games and useful applets.
Downloading Java applications may be charged or free of charge. For
free Java applications, download them from the Internet or WAP sites.
For charged Java applications, consult your mobile phone service
provider for purchase. To use Java, you need to subscribe to the GPRS
or LAN service from your mobile phone service provider, and make
sure that you have set up the GPRS or WLAN connection on the
Pocket PC Phone.
You can use the Java program to download Java games or
applications. Tap
>
Programs
>
Java.
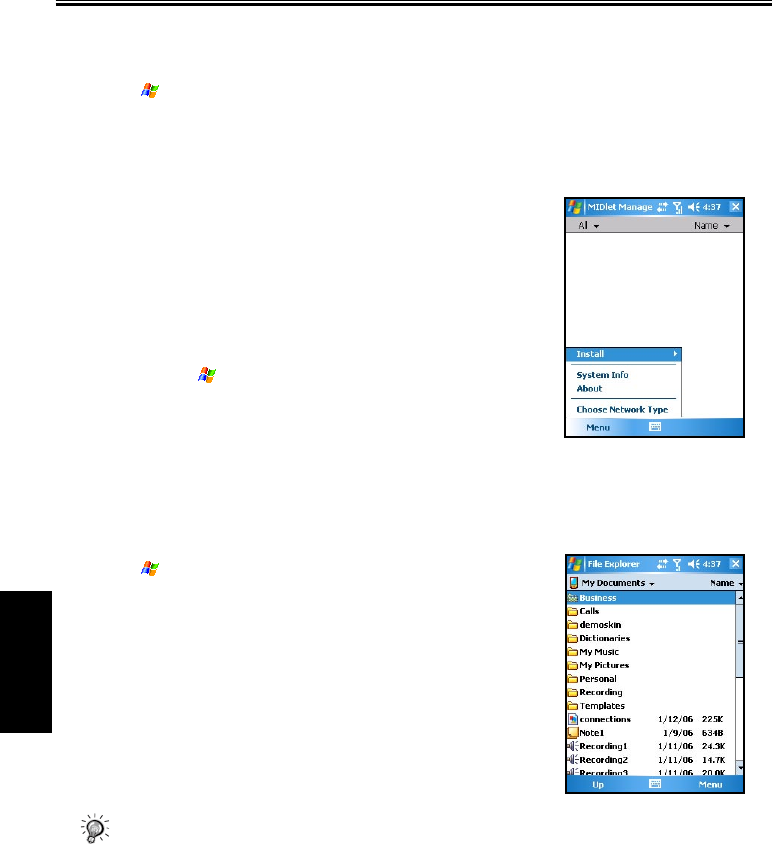
15.7 File Explorer
File Explorer allows you to explore and manage the folders and files stored on the Pocket PC Phone or
storage card.
1. Tap
>
Programs
>
File Explorer.
2. Tap the folder list (labeled My Documents by default) and then
the folder that you want to view.
3. To open an item, tap it.
4. To quickly delete, rename, copy, or move an item, tap and hold.
Then, on the pop-up menu, tap Copy, Delete, or Rename.
• To select multiple items, tap and drag.
SP70 User Manual 15-11
More Programs
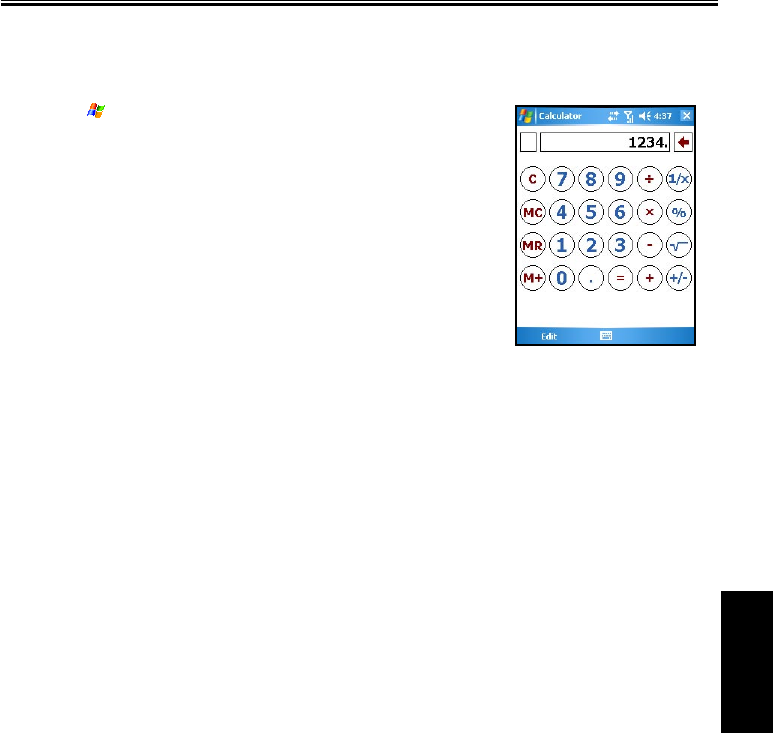
15.8 Calculator
You can use Calculator to perform any of the standard operations for which you would normally use a
handheld calculator.
1. Tap
>
Programs
>
Calculator.
2. Use the Calculator buttons or the input panel to enter numbers
and perform calculations.
• To clear the current calculation or the displayed number, tap
C.
• To clear the last digit entered in a multidigit entry, tap the
arrow to the right of the entry box.
• To clear memory, tap MC.
15.9 Pocket MSN
Pocket MSN on your Pocket PC Phone provides practically instant access to your up-to-date MSN Hotmail
Inbox, your MSN Messenger Contacts list, and options for customizing your Pocket MSN experience.
You need to connect the Pocket PC Phone to the Internet to access the Pocket MSN web site. (See
information in Chapter 8.)
Sign in to Pocket MSN
The sign-in process helps to maintain secure access to your MSN
Hotmail and MSN Messenger accounts.
1. To sign in to Pocket MSN, go to the Today screen, and then tap
Tap here to sign in to Pocket MSN.
2. Type the e-mail address and password you use to sign in to MSN
Mobile.
3. Tap Sign in.
MSN Messenger
MSN Messenger on your mobile device provides the same chat environment as MSN Messenger on your
desktop computer. These features include:
n Seeing who is online.
n Sending and receiving instant messages.
n Having an instant message conversation with a group of contacts.
n Telling contacts that you are unavailable.
n Blocking contacts from seeing your status or sending you messages.
Setting Up an Account
Before you can use MSN Messenger, you must set up the instant messaging account(s) to use. For MSN
Messenger Service, you must have a Microsoft Passport or Hotmail account. For Exchange Instant
Messaging, you must have an Exchange account.
To set up a Microsoft Passport account, go to http://www.passport.com. To set up a Hotmail account, go to
http://www.hotmail.com. To set up an Exchange account, see your network administrator.
15-12 SP70 User Manual
More Programs
1. Create a connection for your
Pocket PC Phone. (See Chapter 8 for
more information.)
2. In MSN Messenger, tap Menu > Options > Messenger.
3. Select Enable MSN Messenger Service. Your sign-in name
and password are established the first time you sign in to Pocket
MSN.
4. Select Enable MSN Messenger Service and/or Enable
Exchange Instant Messaging.
5. If necessary, select which account to sign in to first, under Sign
in using this account first.
Signing In and Out
1. Tap > Programs > MSN Messenger.
2. To sign in, tap anywhere on the screen. Follow the directions on the screen.
3. To sign out, tap Menu > Sign out.
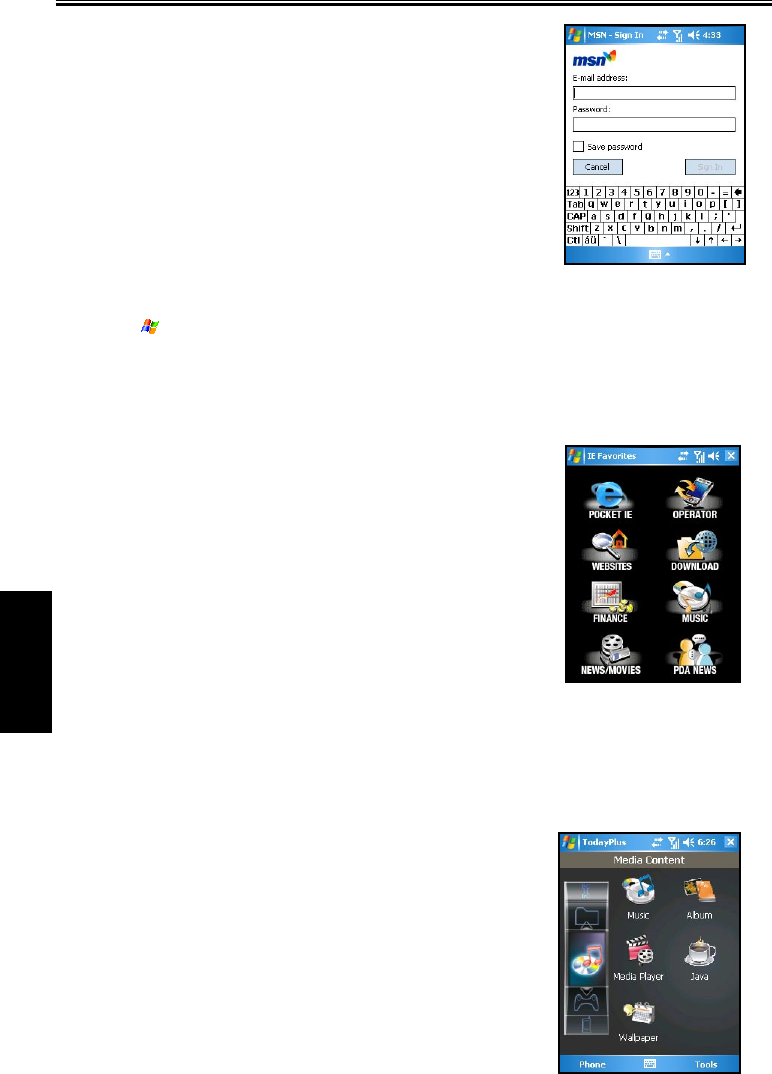
15.10 IE Favorites
Tap Start>Programs>IE Favorites to access the IE Favorites main page.
IE Favorites provides several categories of links for quick access.
n POCKET IE
n WEBSITES
n FINANCE
n NEWS/MOVIES
n OPERATOR
n DOWNLOAD
n MUSIC
n PDA NEWS
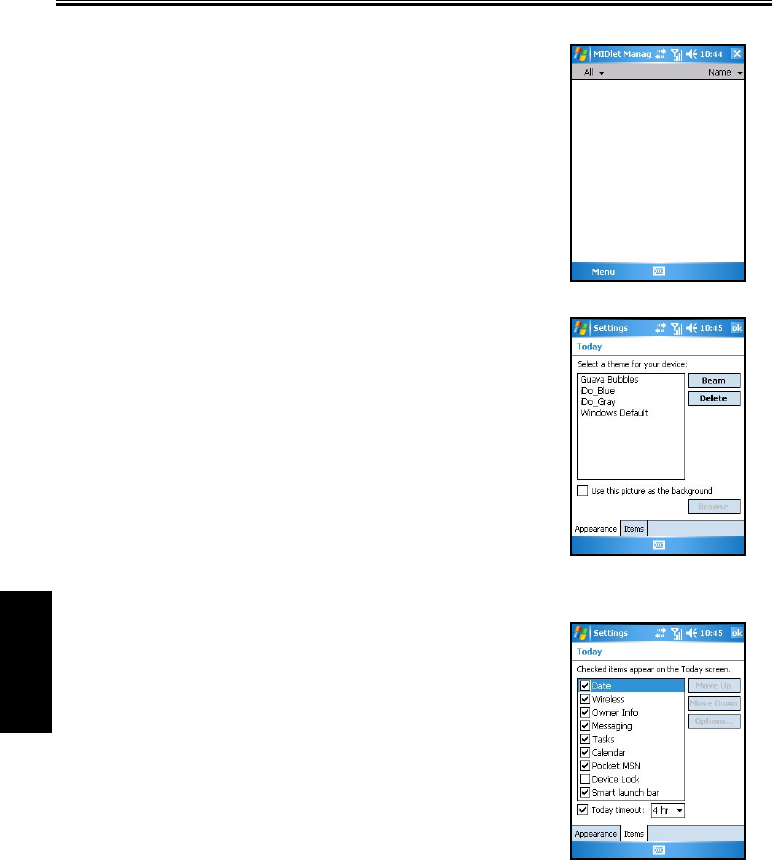
15.11 Media Content
To access Media Content, tap Today Plus on the Today screen, and then tap the Media Content icon. Media
Content includes Music, Album, Media Player, Java and Wallpaper items.
The main page of Media Content is shown to the right.

SP70 User Manual 15-13
More Programs
Media Content Items
Music
On the main page of Media Content, tap Music to quickly access the
contents in the My Device\My Documents\My Music folder.
Tap the desired item for playback. Your Pocket PC Phone will use
Windows Media Player to play the selected item.
For information on Windows Media Player, see Section 15.5.
Album
On the main page of Media Content, tap Album to quickly start
MyAlbum.
For information on MyAlbum, see Chapter 14.
Media Player
On the main page of Media Content, tap Media Player to quickly
start Windows Media Player.
For information on Windows Media Player, see Section 15.5.
15-14 SP70 User Manual
More Programs
Java
On the main page of Media Content, tap Java to quickly start the
Java program.
For information on Java, see Section 15.7.
Wallpaper
On the main page of Media Content, tap Wallpaper to quickly
access the setting items of the Today screen.
n Tap Appearance to change the theme picture of the Today
screen.
n Tap Items to set the items to be diaplayed on the Today
screen. You can also set the time for the Pocket PC Phone
to automatically return to the Today screen after a period of
inactivity (4 hours by default).
For information on Settings, see Chapter 6.
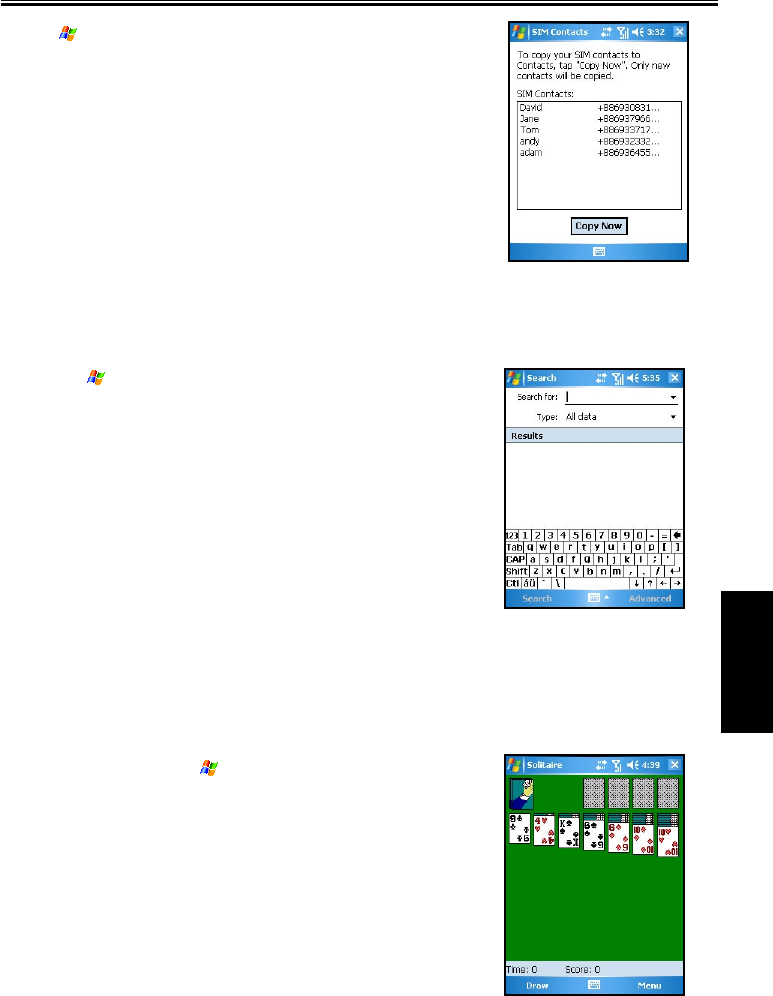
15.12 SIM Contacts
On your Pocket PC Phone, there can be two kinds of independent contact lists. One is stored in the Pocket PC
Phone’s memory by Microsoft Contacts; the other is stored in the SIM card. By default, you can use Contacts
to load the contact information stored in the Pocket PC Phone’s memory (see Chpater 4 for information on
Contacts), and use SIM Contacts to load the contact information stored in the SIM card.
SP70 User Manual 15-15
More Programs
Tap
>
Programs
>
SIM Contacts. When running SIM Contacts
for the first time after turning the Pocket PC Phone on, it may take a
few minutes to load the contact informaion.
After the loading is completed, you can tap Copy Now to copy your
contacts to Contacts.
15.13 Search
The Search feature on your Pocket PC Phone helps you quickly locate information.
1. Tap
>
Programs
>
Search.
2. Enter the text you want to find, and select a data type.
3. Tap Search to start the search.
4. Tap the desired item to open on the result list.
15.14 Games
Solitaire
The object of Solitaire is to use all the cards in the deck to build up the four suit stacks in ascending order,
beginning with the aces.
1. To open Solitaire, tap
>
Programs
>
Games
>
Solitaire.
2. A new game is started. You can also tap Menu > New Game on
the command bar to start a new game.

15-16 SP70 User Manual
More Programs
3. You can:
• To move a card to one of the stacks, drag the card. Build the row stacks in descending order, from
king to two, alternating between red and black cards.
• To display cards in the upper-left stack, tap the stack.
• In the row stacks, turn a card face-up by tapping it. You can move a king to an empty row stack.
• To undo a move, tap Menu > Undo.
Setting solitaire Options
To change the setting options, tap Menu
>
Options.
n Game Rules
• Draw selects one card or three cards for each draw.
• Scoring selects the Standard or Vegas scoring system, or no scoring.
• Time game enables the timing function.
• Display status shows the elasped time and scores of games.
• Keep cumulative score keeps a cumulative score when using the Vegas scoring system.
n Card Back
You can select a desired card back.
Bubble Breaker
To play Bubble Breaker, you need to align similar bubbles in order to form large blocks of bubbles before
bursting them. The more bubbles in the block before they are burst, the greater number of points you will
receive.
1. To open Bubble Breaker, tap
>
Programs
>
Games
>
Bubble Breaker.
2. Tap a bubble that is connected to other similar bubbles. Those
connected bubbles (at least two bubbles) will be highlighted,
and a new bubble will pop up displaying that block’s potential
bubble points.
3. Tap on your selection again in order to burst the bubbles. All
bubbles above your burst block will now fall down.
To take back the last move you have made, tap the icon.
4. To start a new game, tap Games
> New Game.
5. To view the statistics, tap Info
> Statistics.
SP70 User Manual 15-17
More Programs
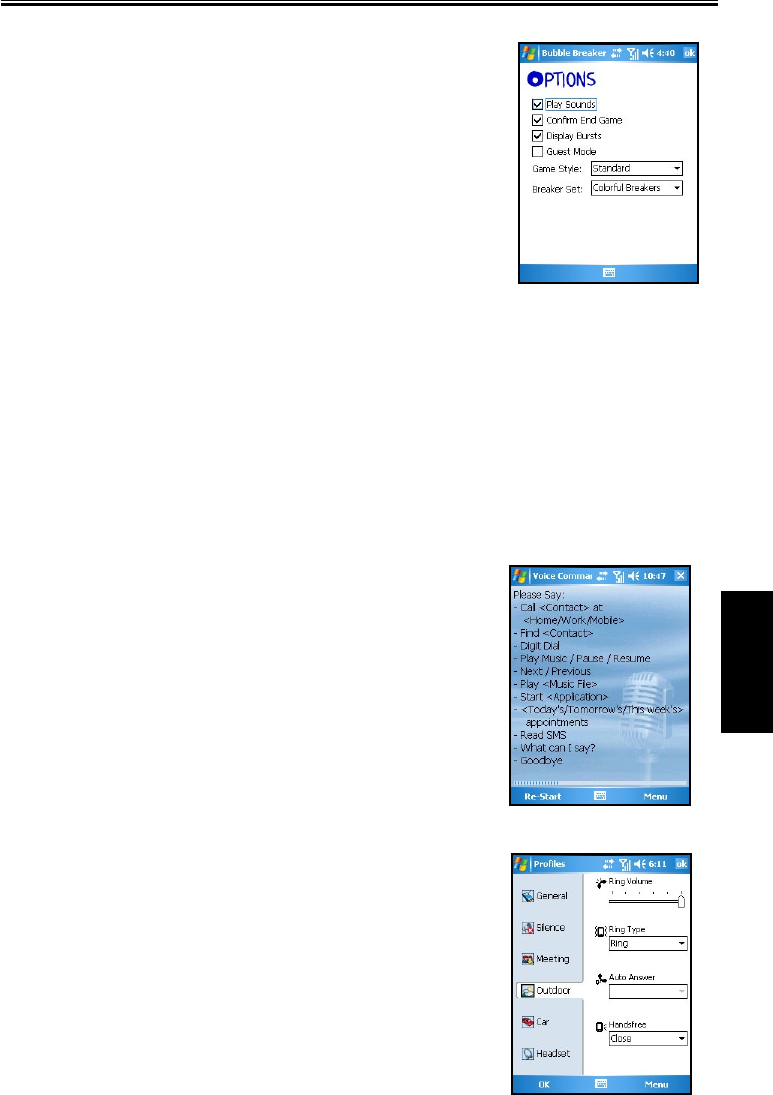
Setting Bubble Breaker Options
To change the setting options, tap Game
> Options.
n Play Sounds sets whether or not you want Bubble Breaker to
make sounds.
n Confirm End Game sets Bubble Breaker to pop up a
confirmation dialog when the “End Game” menu item is
selected.
n Display Burst sets to display the burst of bubbles or not.
n Guest Mode plays the game without affecting the statistics
n Game Style selects one of the following game styles.
• Standard The default mode of play where there is a set
number of bubble that will not increase.
• Continuous In this style, whenever a vertical set of bubbles has been burst and the remaining
bubbles have shifted over to the right, a new randomly selected column of bubbles will pop up on
the left, thereby allowing a game to be played for an extended amount of time.
• Shifter In this style, when a set of bubbles has been burst, all remaining bubbles to the top and
left will shift down and to the right.
• MegaShift This style is a combination of the shifter and continuous styles in that bubbles will
shift down and to the right while empty columns will fill on the left.
n Breaker set changes the color of the bubbles.
15.15 Voice Commander
According to the command instructions, users may activate
applications, dial phone numbers, and inquire contacts or
conferences, etc., by voice commander.
15.16 Proles
Profiles allows you to select a desired ring tone setting that suits your
need.
The available Profiles options include: General, Silence, Meeting,
Outdoor, Car and Headset.

15-18 SP70 User Manual
More Programs
15.17 SmartX
Your Pocket PC Phone has a smart close (SmartX) function to
quickly close running programs.
Tap and hold on the top-right corner of the screen to display the
SmartX menu.
By default, the SmartX menu displays the following items:
n Close closes the current program.
n Minimize minimizes the current program.
n Close All closes all running programs.
n Close Inactive closes inactive programs.
n [program name] displays the running program(s).
n Settings displays the SmartX settings.
By default, the SmartX function is enabled. You can clear the
Enable Smart Close function item to disable the SmartX
function.
You can customize the displayed items on the SmartX menu.
The items for selection include:
• Auto close
• Close All
• Close Inactive
• Running Program
• Rotate screen left (disabled by default)
• Rotate screen right (disabled by default)
• Settings

Chapter 16
Troubleshooting
16.1 Resetting the Pocket PC Phone
16.2 Restoring Factory Defaults
16.3 Power Problems
16.4 Memory Problems
16.5 Screen Problems
16.6 Connection Problems
16.7 Hardware Problems
16.8 Software Problems
16.9 Other Problems

16-2 SP70 User Manual
Troubleshooting
16.1 Resetting the Pocket PC Phone
Occasionally, you may need to reset your Pocket PC Phone when your Pocket PC Phone stops
responding (it appears to be “frozen” or “locked up”).
1. Remove the miniSD card (if installed).
2. Use the stylus to press the Reset button on the rear of your Pocket PC Phone.
16.2 Restoring Factory Defaults
In some cases, you may need to restore your Pocket PC Phone to the factory default state by clearing
the memory of your Pocket PC Phone. For example, you should clear the memory:
n When your Pocket PC Phone cannot be powered on, even if you remove and then re-install the
battery.
n When you forget your password.
n When you want to remove the additional programs that you installed by yourself.
Before clearing the Pocket PC Phone memory and restoring the factory default state, make sure that
you have copied your data to the desktop computer or miniSD card.
• Pressing the Power key, Reset button and Call button at the same time will restore the
factory defaults, and clear the data and programs in the memory.You need to reinstall the
additional programs.
16.3 Power Problems
Problem Solution
The device cannot
be powered on when
using battery power.
The remaining battery power may be too low to run your SP70. Connect the
AC charger to your SP70 and to external AC power. Then, turn on your SP70.
Battery runs out of
power quickly.
You might be using your SP70 in a manner that drains power quickly. Use
SP70 with the AC adaptor.
SP70 keeps showing
the low battery
power messages.
Make sure
SP70
is fully charged. In such cases, backup your data via Activesync,
restore the device to the factory default state (see Section 16.1), and then fully
charge the device. If the problem persists, send your SP70 to the authorized dealer
for inspection.
Battery does not
work correctly.
When the battery fails to charge and discharge, and it is not man-made
damage and still in the warranty period, send it to the authorized dealer for
replacement.

SP70 User Manual 16-3
Troubleshooting
16.4 Memory Problems
Problem Solution
SP70 sends out
warnings of
insufficient memory.
Please perform the following:
n Delete files that you no longer need: tap > Programs > File Explorer.
n Delete programs that you no longer need: tap > Settings > System >
Remove Programs.
n Delete all files and history in Internet Explorer: tap > Programs >
Internet Explorer > Menu > Tools > Options > Memory.
n Stop running programs: tap > Settings > System > Memory >
Running Programs; or tap on the Today screen.
n Save data to a miniSD card.
How to find out the
memory capacity
after resetting?.
Tap > Settings > System > Memory > Main.
16.5 Screen Problems
Problem Solution
Screen is off. n Connect the AC charger to your device and to external AC power.
n Remove the battery and then reinstall it.
Screen responds
slowly.
n The battery power may be low. Connect the AC charger to your device and
to external AC power.
n Probably too many programs are in use. Stop the running programs: tap
> Settings > System > Memory > Running Programs.
Screen is not clear
or is hard to read.
n Turn on the backlight of the display.
n Move to a location with enough light.
Inaccurate response
to stylus taps.
n Realign the touch panel: tap > Settings > System > Screen > Align
Screen.
n If there’s a screen protective film supplied, please apply it firmly and
properly on the screen.
16.6 Connection Problems
Problem Solution
Synchronization
with the desktop
computer fails.
n Make sure that you have installed the correct version of ActiveSync on
your desktop computer. ActiveSync version 4.1 or later is recommended.
n Make sure that the cable connection is correct.
n Disconnect and then re-connect the cable.
n Remove the driver for SP70 and ActiveSync on the desktop computer,
and then reinstall them. Do not connect the cable during ActiveSync
installation.
Using infrared to
beam information
fails.
n Transfer only one file, or no more than 25 contact cards, at a time.
n When using IR, make sure nothing is between the two IR ports.
n Adjust the room lighting or move to another location (some types of light
interfere with beaming).
Network connection
is not working
properly.
n Make sure the network connection settings are correct: tap > Settings
> Connections > Connections.
n Consult the network administrator if the user name and password are
correct.

16-4 SP70 User Manual
Troubleshooting
Problem Solution
Connection to the
desktop computer
automatically
disconnects.
Disconnect the USB cable from the desktop computer, and then re-connect
it. Allow the desktop computer to find SP70 again. If the network is still
automatically disconnected, send SP70 to an authorized dealer for inspection.
If necessary, the dealer will update the firmware of SP70 for you. Make sure
to back up your data first because updating firmeare will restore the factory
default state.
The device cannot
receive various
beamed information
from other devices
via infrared. Only
contact information
and picture
exchange could
work.
Infrared information exchange is mainly for contact information exchange
with other mobile devices. Currently, most traditional mobile phones could
only exchange contact information and group pictures. The resources and
compatibility of information exchange with SP70 is still limited.
However, regarding data sharing and program installation, you can still make
use of the connection to the desktop compouter.
When the wireless
network is
unavailable
n Please make sure the wireless network is enabled.
n Check whether there’s any wireless network available and ensure
messages are transmitted correctly.
When Bluetooth is
not recognized
Please ensure both identification codes are correct.
16.7 Hardware Problems
Problem Solution
What is the CPU
and memory of
SP70?
The CPU of your device is ARM iMX21 350MHz, with memory containing
128MB RAM.
How to clean the
camera lens?
There is an acrylic material protecting the camera lens inside. Therefore, you
only need to clearn the external acrylic material.
What miniSD cards
are compatible with
SP70?
SP70 supports miniSD cards manufactured by SanDisk, KingMAX,
Transcend, A-DaTa, and so on.
The infrared
information
exchange only
applies to contact
information and
picture receipt?
Infrared information exchange is mainly for contact information exchange
with other mobile devices. Currently, most traditional mobile phones could
only exchange contact information and group pictures. The resources and
compatibility of information exchange with SP70 is still limited.
SP70 may often connect to the desktop computer using the USB cable for
data sharing and program installation. Due to the above fact, the USB cable is
supplied as a standard accessory for your use.
SP70 User Manual 16-5
Troubleshooting
16.8 Software Problems
Problem Solution
Is there a limit for
assigning ring tone
groups?
No, there is no such limit on your SP70.
Does SP70 supoport
Java and Bluetooth?
1. Yes, Java (MIDP 2.0) is supported.
2. Yes, the device supports Bluetooth.
How to play back
MPEG files from
desktop computer
on SP70?
To play back MPEG files from the desktop computer, you need to use
Microsoft codecs to transfer them for playback on SP70.
How to use key
words to find a
contact?
Take “John” for example: enter John.
Cannot log in to
MSN Messenger
from SP70?
If your device is not updated since October 15, 2003, you will need to
updated the your device and MSN Messenger. Connect to Microsoft Web site
for updates. After updating, press the Reset button to complete the update
procedure. Then restart SP70 and log in to MSN Messenger.
How to copy MP3
files to SP70?
You can copy files from the desktop computer to your SP70 using Activesync
or Card Reader. See ActivSync Help on the desktop computer.
How to set up the
GPRS configuratoin
on SP70?
Tap > Settings > Connections > GPRS Auto Configuration. Select Auto
Configuration, select your mobile phone service provider, and then tap OK.
Why is it not
working to copy
data and MP3 files
from the supplied
miniSD card to a
newly-purchased
miniSD card?
You cannot copy files between two miniSD cards. Follow this procedure:
1. Format the new card.
2. Install ActiveSync using the supplied CD on the desktop computer.
3. Use ActiveSync to copy files from the supplied miniSD card to the desktop
computer, and then copy those files from the desktop computer to the new
card.
Some MP3 files
cannot play back on
SP70.
Your SP70 supports the standard MP3 format only. You need to purchase an
audio format transfer program to transfer files using non-standard codecs.
SP70 can send but
cannot receive text
messages.
There may be too many text messges stored in SP70. Clear the non using text
messages in SP70 for receiving new text messages.
How does SP70
connect to the
Internet via the
desktop computer?
Connect to the desktop computer using the USB cable. In ActiveSync on
the desktop computer, click File > Connection Settings > This computer
connects to, and change the connection to Internet.
Failure occurs
during program
installation on SP70.
The possible reasons are:
1. There is not enough memory. Delete the programs you no longer need.
2. There are some running programs.

16-6 SP70 User Manual
Troubleshooting
Problem Solution
SP70 cannot switch
to the GSM mode
from the flight
mode.
After switching to the flight mode, wait for 20 seconds to one minute before
switching back to the GSM mode.
Can I save the
text messages and
contact information
to a miniSD card?
Due to the limits of the operating system, you cannot save the text messages
and contact information to a miniSD card.
Why can’t I zoom
in/out and change
brightness when
using the camera
feature?
Please close the VideoCam application, and check if the zoom in/out keys and
navigation keys are working normally.
Note that the zoom in/out function is not available in DV mode.
16.9 Other Problems
Problem Solution
Some peripheral
devices are not
compatible with
SP70.
Your SP70 uses the new Windows Mobile Version 5.0 operating system. The
drivers of some peripheral devices may not support the operating system.
Contact the dealers of the peripheral devices to see if they can provide drivers
supporting the operating system.
The programs
are missing after
removing the
battery.
When you remove the battery for over five minutes or reset SP70, it will
restore the factory default state. All data stored in the memory will be erased.
You are strongly recommended to back up your data regularly.
SP70 is broken, and
I cannot access the
data.
If SP70 is broken and unable to restart, you have to restore it to the factory
default state and all unsaved data will be lost. To protect the data on your
SP70 (including all files, system settings and additional programs), we
strongly recommend you to back up your data regularly.
SP70 retains the
contact information
from the old SIM
card after changing
the SIM card.
SP70 loads the contact information from the SIM card to SP70. When
changing the SIM card, SP70 will compare the contact information of the
new SIM card with the old one, and then remove the old information. Wait for
about two minutes for the comparison and deletion to complete. Otherwise,
the old contact information may not be deleted. In this case, insert another
SIM card into SP70. Turn the Pocet PC Phone on and wait for two minutes
for SP70 to load and update the contact information. Then replace the old
SIM card and wait for two minutes for SP70 to delete old contact information
completely.

Chapter 17
Appendix
17.1 European Declaration of Conformity

17-2 SP70 User Manual
Appendix
17.1 European Declaration of Conformity
Products with the CE marking comply with Radio & Telecommunication Terminal Equipment Direc-
tive (R&TTE) (1995/5/EEC), the Electromagnetic Compatibility Directive (89/336/EEC) and the
Low Voltage Directive (73/23/EEC) issued by the Commission of the European Community.
Compliance with these directives implies conformity to the following European Standards:
n EN 60950 (IEC 60950)
Safety of information technology equipment.
n ETSI EN 301 511
Candidate Harmonized European Standard (Telecommunications series) Global System for
Mobile communications (GSM); Harmonized standard for mobile stations in the GSM 900
and DCS 1800 bands covering essential requirements under article 3.2 of the R&TTE directive
(1999/5/EC).
n ETSI EN 301 489-1
Electronic compatibility and Radio spectrum Matters, ElectroMagnetic Compatibility (Common
technical requirements); Part 1: Common Techinal Requirements.
n ETSI EN 301 489-7
Electro Magnetic Compatibility and Radio spectrum Matters (ERM); Electro Magnetic Compat-
ibility (EMC) standard for radio equipment and services; Part 7: Specific conditions for mobile
and portable radio and ancillary equipment of digital cellular radio telecommunications systems
(GSM and DCS).
n ETSI EN 301 489-17
Electronic compatibility and Radio spectrum Matters, ElectroMagnetic Compatibility (Specific
conditions for Wideband data and HIPERLAN equipment); Part 17: Specific Requirements for
Wideband Data and Hyperlan.
n ETSI EN 300 328
Electronic compatibility and Radio spectrum Matters, Wideband Transmission system; Data
transmission equipment operating in the 2.4GHz ISM band and using spread spectrum modula-
tion techniques.
n GSM11.10
n EN50360, EN50361 for SAR
Specific Absorption Rate (SAR).
According to the testing standards of the Directorate General of Telecommunications (DGT) of the
Ministry of Transportation and Communications (MOTC), this product has passed the following tests:
1. PLMN01 GSM900 and DCS1800 Mobile Equipment Technical Specifications.
2. CN13438 Limits and Methods of Measurement of Radio Interference Characteristics of
Information Technology Equipment.
3. SAR (GPRS:900/1800MHz) (OET65) Specific Absorption Rate (SAR) Test.
4. SAFETY LVD/EN60950 Safety of Information Technology Equipment.
5. RTTE01 2.4GHz Radio-frequency Telecommunications Terminal Equipment Technical
Specifications.
The SAR limit set by the FCC is 1.6W/kg; the highest SAR value for this product is 0.235W/Kg
@10g.
WARNING: To reduce the influences of the radio waves, please use this product carefully and
properly.
This product meets the government’s requirements for exposure to radio waves.

SP70 User Manual 17-3
Appendix
FCC Regulations:
n This device complies with part 15 of the FCC Rules. Operation is subject to the following two condi-
tions: (1) This device may not cause harmful interference, and (2) this device must accept any inter-
ference received, including interference that may cause undesired operation.
n This device has been tested and found to comply with the limits for a Class B digital device, pursu-
ant to Part 15 of the FCC Rules. These limits are designed to provide reasonable protection against
harmful interference in a residential installation. This equipment generates, uses and can radiated
radio frequency energy and, if not installed and used in accordance with the instructions, may cause
harmful interference to radio communications. However, there is no guarantee that interference will
not occur in a particular installation If this equipment does cause harmful interference to radio or
television reception, which can be determined by turning the equipment off and on, the user is encour-
aged to try to correct the interference by one or more of the following measures:
- Reorient or relocate the receiving antenna.
- Increase the separation between the equipment and receiver.
- Connect the equipment into an outlet on a circuit different from that to which the receiver is con-
nected.
- Consult the dealer or an experienced radio/TV technician for help.
Changes or modifications not expressly approved by the party responsible for compliance could void the
user’s authority to operate the equipment.

17-4 SP70 User Manual
Appendix
RF Exposure Information (SAR)
This device meets the government’s requirements for exposure to radio waves. This device is designed
and manufactured not to exceed the emission limits for exposure to radio frequency (RF) energy set by the
Federal Communications Commission of the U.S. Government.
The exposure standard for wireless devices employs a unit of measurement known as the Specific Absorp-
tion Rate, or SAR. The SAR limit set by the FCC is 1.6W/kg. *Tests for SAR are conducted using standard
operating positions accepted by the FCC with the device transmitting at its highest certified power level in
all tested frequency bands. Although the SAR is determined at the highest certified power level, the actual
SAR level of the device while operating can be well below the maximum value. This is because the device
is designed to operate at multiple power levels so as to use only the poser required to reach the network. In
general, the closer you are to a wireless base station antenna, the lower the power output.
The highest SAR value for the device as reported to the FCC when tested for use at the ear is 0.191 W/
kg@1g for PCS Head SAR and when worn on the body, as described in this user guide, is 0.651 W/kg@1g
for PCS Body SAR and 1.33 W/kg@1g for WLAN Body SAR. (Body-worn measurements differ among
device models, depending upon available enhancements and FCC requirements.)
While there may be differences between the SAR levels of various devices and at various positions, they all
meet the government requirement.
The FCC has granted an Equipment Authorization for this device with all reported SAR levels evaluated
as in compliance with the FCC RF exposure guidelines. SAR information on this device is on file with the
FCC and can be found under the Display Grant section of http://www.fcc.gov/oet/fccid after searching on
FCC ID: ESN-SP70.
For body worn operation, this device has been tested and meets the FCC RF exposure guidelines for use with
an accessory that contains no metal and the positions the handset a minimum of 1.5 cm from the body. Use
of other enhancements may not ensure compliance with FCC RF exposure guidelines. If you do no t use a
body-worn accessory and are not holding the device at the ear, position the handset a minimum of 1.5 cm
from your body when the device is switched on.
USERS MANUAL 2

Chapter 9
Internet Explorer
9.1 Using Internet Explorer
9.2 Viewing Mobile Favorites
9.3 Changing Settings

SP70 User Manual 9-2
Internet Explorer
9.1 Using Internet Explorer
You can use Internet Explorer Mobile to view Web pages on your mobile device in two ways:
n downloading pages through synchronization (See Chapter 11.)
n connecting to the Internet (see Chapter 8)
To switch to the program, tap > Internet Explorer Mobile. The Internet Explorer Mobile home page
appears.
Sending a Link via Email
1. Tap > Internet Explorer Mobile.
2. Go to the page you want to send.
3. Tap Menu > Tools > Send Link via E-mail. A new message is created with the page address inserted
in the message body.
9.2 Viewing Favorites
Your Pocket PC Phone has incorporated some of the useful favorites for your use.
On the Internet Explorer screen, tap Favorites to open the favorite list.
If you are using Microsoft Internet Explorer 4 or greater on the desktop computer, you can synchronize
favorite links. If you are using Microsoft Internet Explorer 5 or later versions on the desktop computer, you
can also synchronize mobile favorites. Synchronizing favorite links enable you to have the URLs of your
favorite Web sites at your fingertips. Synchronizing a mobile favorite enables you to view Internet content
on your device while you are disconnected from your Internet service provider and desktop computer.
Favorites are stored in the Mobile Favorites subfolder of Favorites in Internet Explorer on the desktop
computer. This folder will be created when you select the Favorites information type for synchronization in
ActiveSync on your desktop computer. Favorites must be stored in this folder to be synchronized.
Synchronizing a Favorite Link
1. In ActiveSync on your desktop computer, click Tools > Options, and select Favorite. For more
information on using ActiveSync, see ActiveSync Help.
2. In Internet Explorer on your desktop computer, save or move favorite links to the Mobile Favorites
subfolder in the Favorites list. For more information on using Internet Explorer, see Internet Explorer
Help on the desktop computer.
3. Connect your mobile device to your desktop computer. If synchronization does not start automatically,
in ActiveSync on your desktop computer, click Sync.
Favorites
Web address Link to
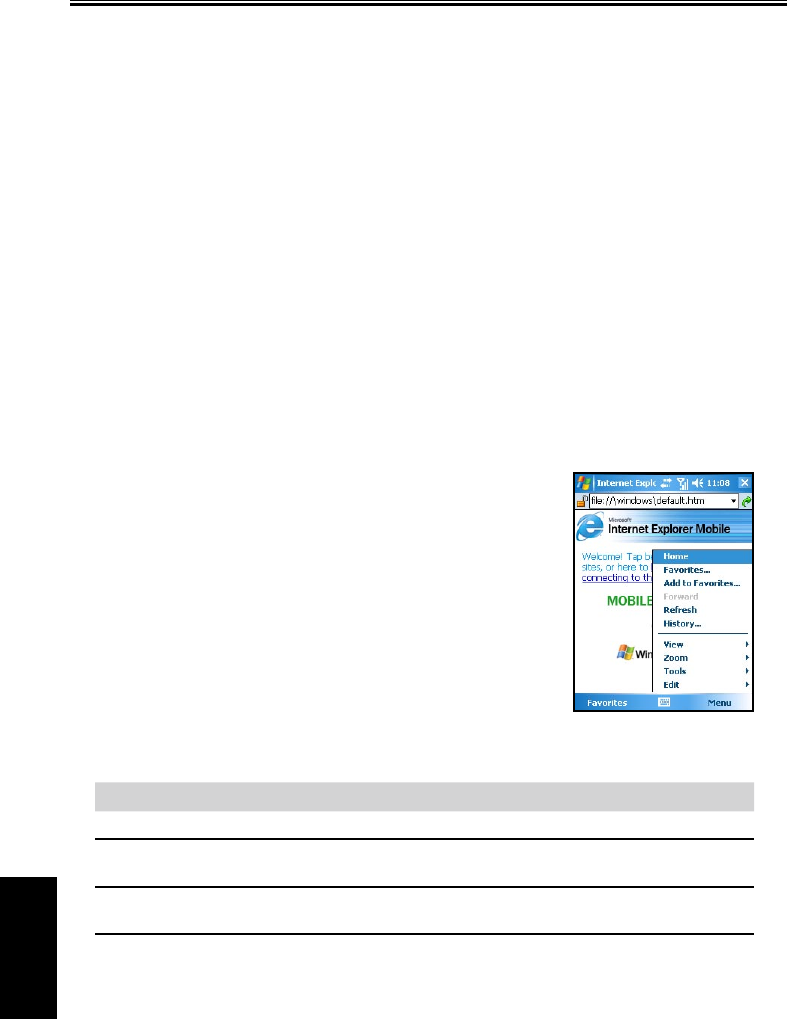
9-3 SP70 User Manual
Internet Explorer
Synchronizing a Mobile Favorite
1. In ActiveSync on your desktop computer, click Tools > Options, and select Favorite. For more
information on using ActiveSync, see ActiveSync Help.
2. In Internet Explorer 5 or later versions on your desktop computer, browse to the page you want to view
offline.
3. Click Tools > Create Mobile Favorite.
4. To change the link name, enter a new name in the Name box.
5. In the Update box, select a desired update schedule to keep the page in the Mobile Favorites folder up
to date. You can also update content by clicking Tools > Synchronize in Internet Explorer.
6. To save the link in a subfolder of Mobile Favorites, click Create In and select the desired subfolder.
7. Click OK. Internet Explorer will download the latest version of the page.
8.
To download the pages that are linked to the mobile favorite you just created, in Internet Explorer on
the desktop computer, right-click the mobile favorite and then click Properties. On the Download tab,
specify the number of links deep you want to download. To conserve device memory, only go one level
deep.
9. Connect your Pocket PC Phone to the desktop computer. If synchronization between your device and
desktop computer does not start, in ActiveSync on your desktop computer, click Sync.
9.3 Changing Settings
You can tap Menu > View on the main page of Internet Explorer
Mobile to change the display settings.
You can also tap Menu > Tools > Options on the main page of Internet Explorer Mobile to custmize more
settings.
Item Description
General Enables you to change the home page or the displayed language.
Memory Enables you to set the period before clearing the visiting history, and delete
temporary files.
Security Enables you to accept or clear cookies, and send out a warning when visiting
unsecure Web pages.

Chapter 10
Microsoft Pocket Outlook
10.1 Calendar
10.2 Tasks
10.3 Notes
10.4 Messaging (Outlook, SMS, MMS)
10.5 MMS Messages

10-2 SP70 User Manual
Microsoft Pocket
Outlook
10.1 Calendar
Use Calendar to schedule appointments, including meetings and other events. You can check your
appointments in one of several views (Agenda, Day, Week, Month and Year) and set Calendar to remind
you of appointments with a sound or other method. Appointments for the day can be displayed on the
Today screen.
Creating an Appointment
1. Tap > Calendar.
2. Tap Menu > New Appointment.
3. To select a new date from a pop-up calendar, tap the display
date. To enter or select a new time, tap the display time. Enter
other appointment details. You will need to hide the Input panel
to see all available fields.
4. You can assign an appointment to a category so that you can
use these groupings to quickly display only the information you
want.
Tap Categories. Select the categories that you want to assign
the appointment to. To create a new category, tap New, enter the
category name, and then tap Done.
Tap OK to return to the previous screen.
5. Tap Notes. You can add written or typed notes and even
recordings to an appointment. For information on Notes, see
Section 10.3.
6. Tap OK to save the change.
• You can view appointments in one of several views. To change the view mode, tap the
appropriate view icons on the command bar.
• Tap the Down arrow in the Subject and Location fields to quickly select from built-in or
previous entries.
• If you set a reminder for an appointment, the Pocket PC Phone will remind you according to the
settings in Sounds & Notifications.
• To make an appointmnet recurring, tap Occurs and select a pattern from the list. Or, to create a
new pattern, tap Edit pattern, and follow the steps in the wizard.
View Modes
You can view appointments in one of several views (Agenda, Day, Week, and Month).
Agenda View
In Agenda view, upcoming appointments are displayed in bold.
Day View
In Day view, the subject of an appointment is displayed on the right of the appointment’s time.
Week View
Week view displays blue boxes to indicate the dates and time of appointments.

SP70 User Manual 10-3
Microsoft Pocket
Outlook
Month View
Month view displays symbols to indicate the types of appointments you have on a given day. An upward
triangle indicates a morning appointment; a downward triangle indicates an afternoon appointment. If you
have appointments in the morning and afternoon, a solid square is displayed. If you have an all day event
not marked Free, a hollow square is displayed.
Using the Calendar Summary Screen
When you tap an appointment in Calendar, a summary screen is
displayed. To change the appointment, tap Edit.
Sending Meeting Requests
Use Calendar to schedule meetings with people who use Outlook or Pocket Outlook. When attendees
receive a meeting request, they can accept or decline the meeting. If they accept, the meeting is
automatically added to their schedule. In addition, their response is sent back to you, and your calendar is
updated.
Before you can send a meeting request, you must enter email addresses in Contacts and set up Messaging
to send and receive messages.
1. Tap > Calendar.
2. Tap Menu > New Appointment.
3. Enter the meeting information.
4. Tap Attendees (you will need to hide the input panel to see this
box).
5. Select the contacts you want to invite. Only those contacts with
email addresses will be displayed.
6. Tap OK. Messaging automatically creates a meeting request and
sends it to the attendees the next time you synchronize with your
desktop computer. Any textual notes entered in the Notes tab
(excluding writing or recordings) will be sent also.
• If you are sending the meeting request through a connection to an ISP or the network,
rather than through synchronization with your desktop computer, tap Menu > Options >
Appointments. In Send meeting requests via, tap the service you want to use to send the
meeting request.
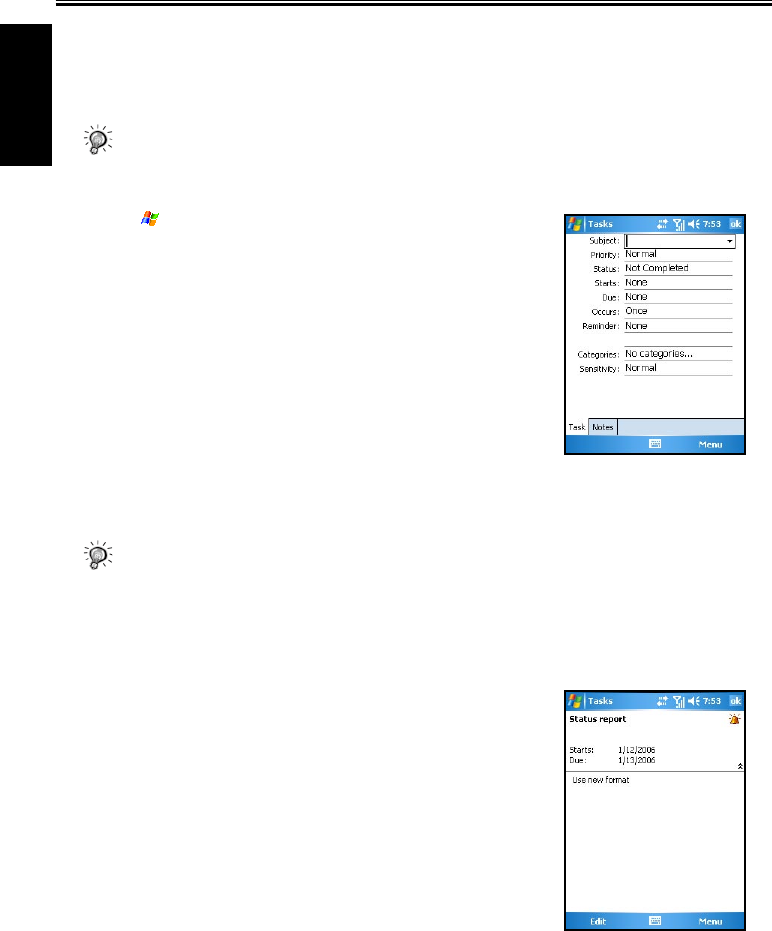
10-4 SP70 User Manual
Microsoft Pocket
Outlook
10.2 Tasks
Use Tasks to keep track of things you need to do. A variety of task information can be displayed on the
Today screen.
• To see the start and due date for a task in the task list, tap Tools > Options.
Creating a Task
1. Tap > Programs > Tasks.
2. Tap Menu > New Task.
3. Enter detailed information, such as start and due dates. You will
need to hide the Input panel to see all available fields.
4. You can assign a task to a category so that you can use these
groupings to quickly display only the information you want.
Tap Categories. Select the categories that you want to assign
the appointment to. To create a new category, tap New, enter the
category name, and then tap Done.
Tap OK to return to the previous screen.
5. Tap Notes. You can add written or typed notes and even
recordings to an appointment. For information on Notes, see
Section 10.3.
6. Tap OK to save the change.
• If you set a reminder for a task, the Pocket PC Phone will remind you according to the settings in
Sounds & Notifications.
• To quickly create a task, enter text in the “Tap here to add a new task” field at the top of the
screen. If you don’t see this box, tap Menu > Options > Show Tasks entry bar.
Using the Tasks Summary Screen
The task list displays a list of your tasks. Overdue tasks are
displayed in bold and in red.
If you have a long list of tasks, tap Menu > Sort By and select the
option you want to sort on.
To see more task information, tap the task.To change a task, tap it in
the task list, and then tap Edit.

SP70 User Manual 10-5
Microsoft Pocket
Outlook
10.3 Notes
Notes may help you quickly capture your ideas, notes, and thoughts. You can create a note using written
and typed text, drawings, and recordings. You can also share your notes with others through email, infrared,
and synchronization with your desktop computer.
Creating a Note
1. Tap > Programs > Notes.
2. Tap New.
3. Enter your note information. For information on entering information, see Section 2.11.
Viewing Notes
The note list displays a list of your notes and recordings. If you have
a long list, tap Sort By and select the option you want to sort on. To
open a note or play a recording, tap it.
10.4 Messaging (Outlook, SMS, MMS)
You can receive Internet email messages, text messages (SMS) and multimedia messages (MMS)
in Messaging. Internet email messages are sent by using an address you receive from your Internet
service provider (ISP) or your employer. SMS and MMS messages are sent and received through your
wireless phone service provider by using a phone number as the message address.
You can send and receive email by synchronizing with your desktop computer, or by connecting to a
Post Office Protocol 3 (POP3) or Internet Message Access Protocol 4 (IMAP4) mail server. You need
to set up an email account for each method that you use except for an Outlook email account, which is
set up by default. The Outlook Email account on your device is used to store messages that you send
and receive through synchronization with a desktop computer. Account names will appear when you
open the folder list (located on the left, under the navigation bar) in the message list view.
With synchronization, messages are synchronized between the device Inbox folder for the Outlook
Email account and the desktop computer Inbox by using ActiveSync and Microsoft Exchange or
Microsoft Outlook. For more information, see the “Synchronizing Outlook Email Messages” section
later in this chapter.
When connecting to a POP3 or IMAP4 server, use a modem to connect to your Internet service
provider (ISP), or a modem or Ethernet card to connect to the local area network that your email server
is connected to. You can also use your phone to connect by using a cellular line connection. For more
information, see Chapter 8.
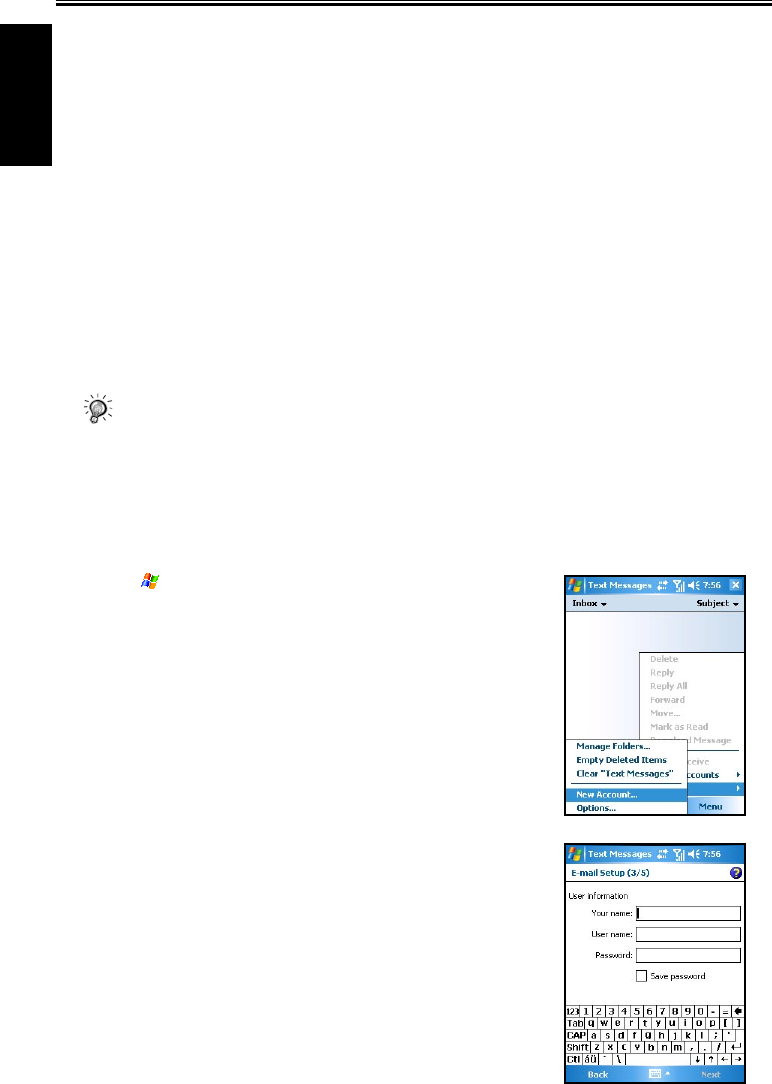
10-6 SP70 User Manual
Microsoft Pocket
Outlook
Synchronizing Outlook Email Messages
After selecting Inbox for synchronization in ActiveSync, Outlook email messages are synchronized as
part of the general synchronization process.
During synchronization:
n Messages are copied from the Inbox folder on your desktop computer or the Microsoft Exchange
server to the Inbox folder of the Outlook Email account on your device. (Note that you can only
synchronize information directly with an Exchange Server if your company is running Microsoft
Mobile Information Server 2003 or later.) By default, you’ll receive messages from the last three
days only, the first 100 lines of each new message, and file attachments of less than 100 KB in
size.
n Messages in the Outbox folder on your device are transferred to Exchange or Outlook and then
sent from those programs.
n The messages on the two computers are linked. When you delete a message on your device, it’s
deleted from your desktop computer the next time you synchronize.
n Messages in subfolders in other email folders in Outlook are synchronized only if they have been
selected for synchronization in ActiveSync.
• For information on initiating Outlook email synchronization or changing synchronization
settings, see ActiveSync Help on the desktop computer.
• Text messages are not received through synchronization. Instead, they are sent to your device
via your service provider.
Connecting to a Mail Server
Setting up a POP3 or IMAP4 Email Account
1. Tap > Messaging.
2. Tap Menu > Tools > New Account.
3. Enter the email address and then tap Next.
4. The Pocket PC Phone will start the auto configuration. Auto
configuration attempts to connect to your email server and
download necessary settings so that you do not need to enter
them manually. If auto configuration is successful, you may
begin downloading messages from the server.
5. If auto configuration is unsuccessful, tap Next for manual
configuration. Enter the displayed name, the user name and
password provided by your ISP or network administrator. You
can select Save password to avoid having to reenter it later.
6. In the Account type list, tap POP3 or IMAP4. (POP3 is the
most common mail protocol for ISPs.)
In Your name, enter a unique name for the account, such as
Work or Home. This name cannot be changed later.
Then Tap Next.
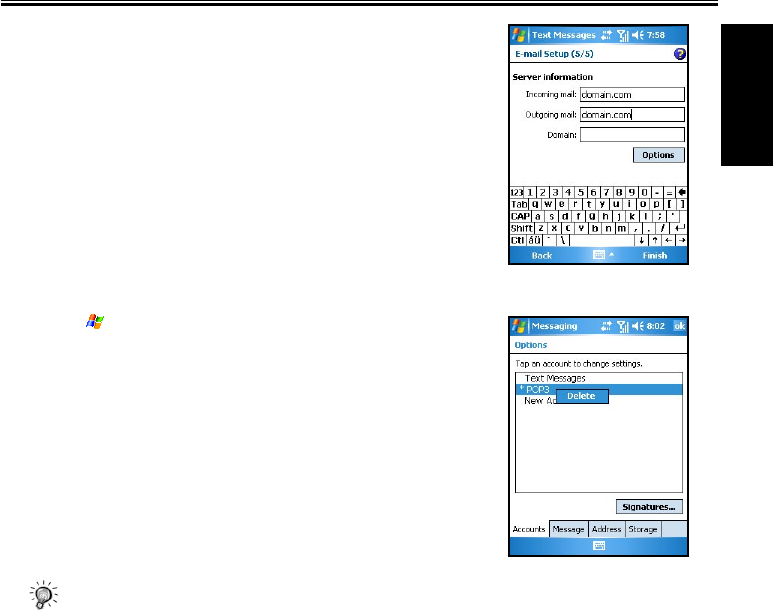
SP70 User Manual 10-7
Microsoft Pocket
Outlook
7. In Incoming mail, enter the name of your email server.
In Outgoing mail, enter the name of your Simple Mail Transfer
Protocol (SMTP) host.
If you are using a network connection, in Domain, enter your
domain name.
8. Select if you want to download the messages of this account
immediately.
Deleting an Account
1. Tap > Messaging.
2. Tap Menu > Tools > Options.
3. Tap and hold the name of the account, and then tap Delete.
• You can set up several email accounts including your Outlook email account, but you can set up
only one text message account.
• You cannot delete your text message account.
Downloading Messages from the Server
1. In Messaging, tap Accounts > Connect to open a connection to the Internet or your corporate
network, depending on the account. For information on connections, see Chapter 8.
2. The messages on your device and email server are synchronized: new messages are downloaded to
the device Inbox folder, messages in the device Outbox folder are sent, and messages that have been
deleted from the server are removed from the device Inbox.
3. Tap a message in the message list to open it.
4. If you read a message and decide that you need the full copy:
• Tap Edit > Mark for Download while in the message window.
• If you are in the message list, tap and hold the message, and then tap Mark for Download.
5. When finished, tap Accounts > Disconnect.
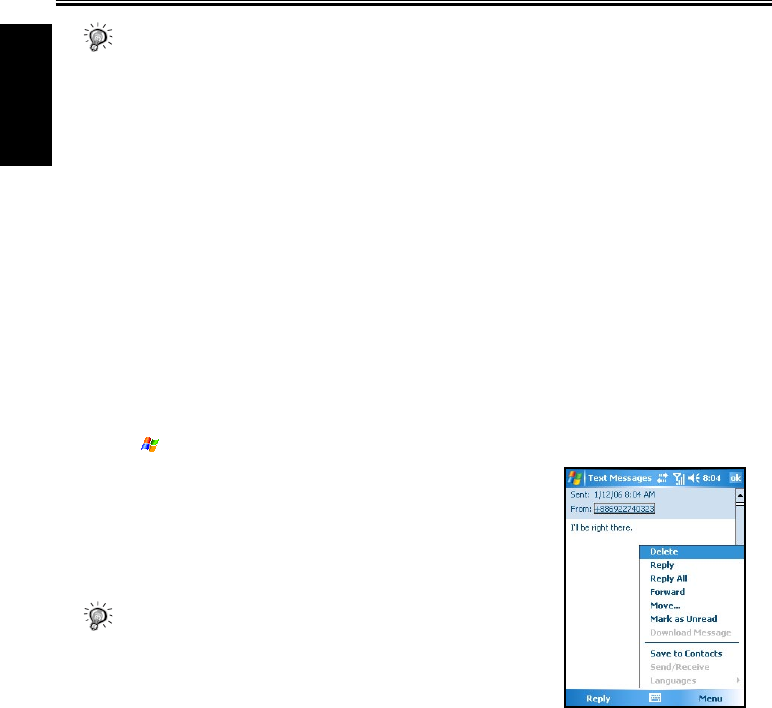
10-8 SP70 User Manual
Microsoft Pocket
Outlook
• If you selected some items when setting up an email account, then the mail attachments or entire
messages may be downloaded.
• Receiving entire messages consumes storage memory.
• The size column in the message list displays the local size and server size of a message. Even
when a message has been downloaded fully, these numbers may differ, because the size of a
message can vary between the server and the device.
Reading and Responding to Messages
Downloading Messages
The way you download copies of messages depends on how you are receiving messages:
n If you receive email messages through ActiveSync, synchronization will be started.
n If you receive email messages through a remote email server, see the “Downloading Messages from
the Server” section earlier in this chapter.
n Text messages will be automatically received when your phone is turned on. Otherwise, messages will
be held by your service provider until the next time your phone is turned on.
Replying to or Forwarding a Message
1. Tap > Messaging.
2. Tap to open the message.
3. Tap Menu, and then tap Reply, Reply All, or Forward.
4. Enter your response. To quickly add common messages, tap My
Text and tap a desired message.
5. Tap Send.
• Selections in Menu > Tools > Options > Message
determine whether the original text is included.
Receiving Attachments
An attachment sent with an email message or downloaded from the server appears as an icon at the bottom
of the message in its own window pane. Tapping the attachment icon opens the attachment if it has been
fully downloaded. You can mark an attachment for downloading (IMAP4 account only) the next time when
the phone is connected.
If you receive messages through synchronization:
1. Start ActiveSync on your desktop computer.
2. Click File > Mobile Device, and then select your Pocket PC Phone.
3. Click Tools > Options.
4. Select the message account, and then click Settings > Include File Attachments.
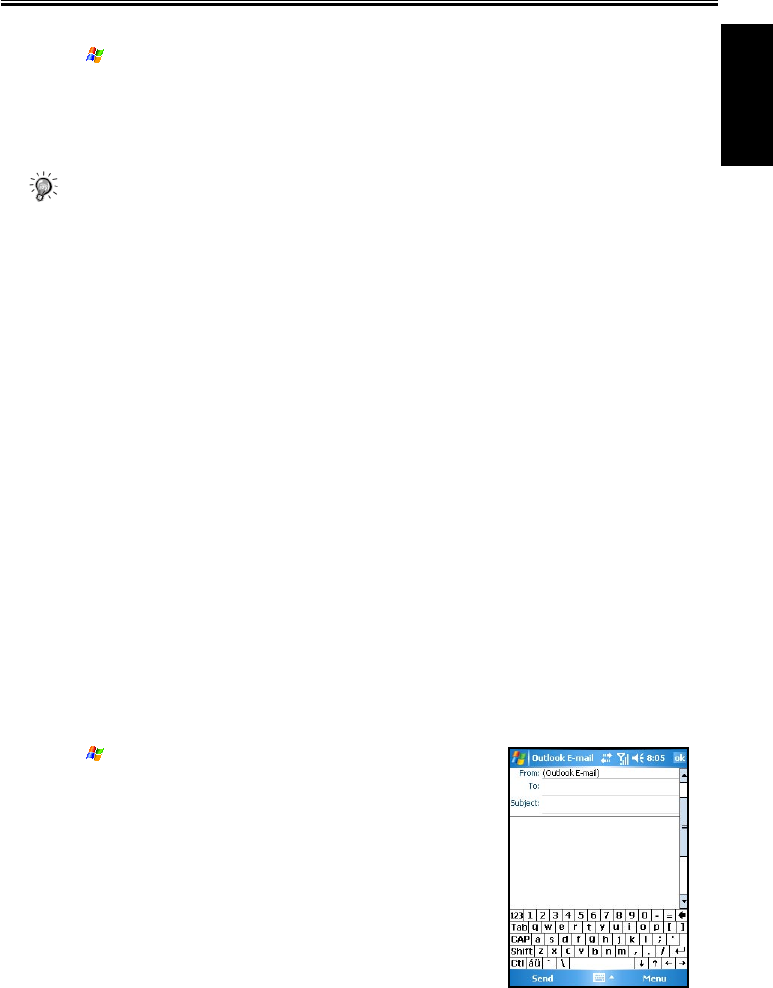
SP70 User Manual 10-9
Microsoft Pocket
Outlook
If you receive messages through a remote email server and have an IMAP4 account:
1. Tap > Messaging.
2. Tap Menu > Switch Accounts > IMAP4.
3. Tap Next until you reach Server Information, and then tap Options.
4. Tap Next twice, and then select Get full copy of messages and When getting full copy, get
attachments.
• Embedded images and objects cannot be received as attachments.
• An embedded message can be viewed as an attachment when you are using IMAP4 to receive
email. However, this feature will not work if TNEF is enabled so that you can receive meeting
requests.
Receiving Meeting Requests
If you receive your email messages through ActiveSync, you will automatically receive meeting requests.
If you connect directly to an email server, the server must be running Microsoft Exchange Server 5.5 or
2000 for you to receive meeting requests. If you are running Microsoft Exchange Server 2000, you will
automatically receive meeting requests in your Inbox.
To receive meeting requests on Microsoft Exchange Server 5.5:
n Ask your system administrator to activate Rich Text Format and TNEF support for your account. If
TNEF is enabled, you will not receive messages that are included in other messages as attachments,
and you will not be able to tell if a message has an attachment until you get the full copy. In addition,
download time may be longer.
n While setting up your mail account, select Get file attachments.
After you are set up to receive meeting requests:
1. If you connect directly to an email server and only receive message headers and/or a limited number of
lines per message, tap and hold the message that you think is a meeting request, and then tap Mark for
Download.
2. Open the meeting request.
3. Tap Menu > Accept, Tentative, or Decline. If you want, you can also include a written message with
the response. The response will be sent the next time that you synchronize or connect to your email
server, and your device Calendar will be updated.
Composing and Editing a Message
Composing and Sending a Message
1. Tap > Messaging.
2. In the message list, tap Menu > Switch Accounts, and select the
desired email account.
3. Tap New.
4. Enter the email address or text message address of one or
more recipients, separating them with a semicolon. To access
addresses and phone numbers from Contacts, tap To.
5. Enter your message. To quickly add common messages, tap My
Text and tap a desired message.
6. Tap Send. If you are working offline, the message will be moved
to the Outbox folder and will be sent the next time you connect.

10-10 SP70 User Manual
Microsoft Pocket
Outlook
• If you are sending a text message and want to know whether it was received, before sending
the message, tap Menu > Tools > Options> Text Messages, and select Request delivery
notifications.
Attaching a File to a Message
1. Tap > Messaging.
2. In the message list, tap Menu > Switch Accounts, and select the
desired email account.
3. Tap New.
4. Enter the email address or text message address of one or more
recipients, separate them with a semicolon. To access addresses
and phone numbers from Contacts, tap To.
5. Enter your message. To quickly add common messages, tap My
Text and tap a desired message.
6. Tap Menu > Insert > File.
7. Select the file you want to attach. OLE objects cannot be
attached to Messaging messages. Messaging automatically
converts Pocket Word files that you attach to messages to .doc
format and Pocket Excel files to .xls format.
8. Tap Send. If you are working offline, the message will be moved
to the Outbox folder and will be sent the next time you connect.
Inserting a Recording
1. Tap > Messaging.
2. In the message list, tap Menu > Switch Accounts, and select the
desired email account.
3. Tap New.
4. Enter the email address or text message address of one or more
recipients, separate them with a semicolon. To access addresses
and phone numbers from Contacts, tap To.
5. Enter your message. To quickly add common messages, tap My
Text and tap a desired message.
6. Tap Menu > Insert > Voice Note.
7. Tap the Recording button to start recording, and the Stop button
to stop. The recording will appear as an attachment.
8. Tap Send. If you are working offline, the message will be moved
to the Outbox folder and will be sent the next time you connect.

SP70 User Manual 10-11
Microsoft Pocket
Outlook
Creating a Signature
1. Tap > Messaging.
2. Tap Menu > Tools > Options.
3. Tap Signatures.
4. Select an account for which you want to create or change a
signature.
5. Select Use signature with this account if the check box is not
selected.
6. Select Use when replying and forwarding if wanted.
7. Enter a signature in the box.
8. Tap OK twice to return to the message list.
• To stop using a signature, clear the Use signature with this
account check box.
• You can use a different signature with each account.
Message Folders
Each email account and text message account has its own folder hierarchy with five default folders:
Inbox, Outbox, Deleted Items, Drafts, and Sent Items. The messages you receive and send through the
mail account are stored in these folders. You can also create additional folders within each hierarchy.
The Deleted Items folder contains messages that have been deleted from the device. The behavior of the
Deleted Items and Sent Items folders depends on the Messaging options you have chosen.
The behavior of the folders you create depends on whether you are using an Outlook email, text message,
POP3, or IMAP4 account.
n If you use an Outlook email account, email messages in the Inbox folder in Outlook will automatically
be synchronized with your device. You can select to synchronize additional folders by designating
them for ActiveSync. The folders you create and the messages you move will then be mirrored on the
server. For example, if you move two messages from the Inbox folder to a folder named Family, and
you have designated Family for synchronization, the server will create a copy of the Family folder and
copies the messages into that folder. You can then read the messages while away from your desktop
computer.
n If you use a text message account, messages will be stored in the Inbox folder.
n If you use a POP3 account and you move email messages to a folder you created, the link will be
broken between the messages on the device and their copies on the mail server. The next time you
connect, the mail server will see that the messages are missing from the device Inbox folder and delete
them from the server. This prevents you from having duplicate copies of a message, but it also means
that you will no longer access messages that you move to folders created from anywhere except the
device.
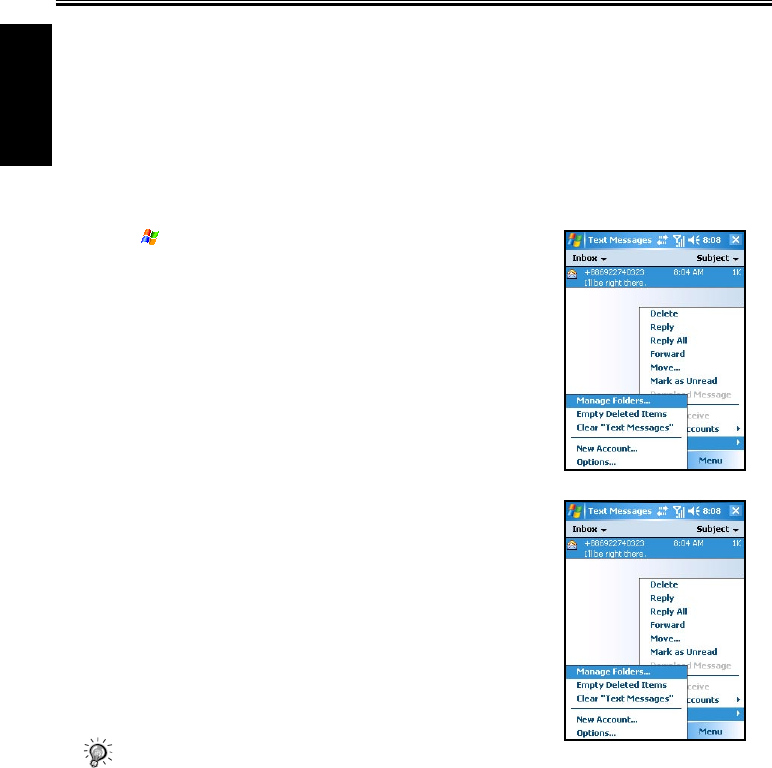
10-12 SP70 User Manual
Microsoft Pocket
Outlook
n If you use an IMAP4 account, the folders you create and the email messages you move will be
mirrored on the server. Therefore, messages are available anytime while you connect to your mail
server, whether it is from your device or desktop computer. This synchronization of folders occurs
whenever you connect to your mail server, create new folders, or rename/delete folders when
connected.
Managing Folders
For all accounts except Outlook Email, you can access folder options
by tapping Menu > Tools > Manage Folders.
1. Tap > Messaging.
2. Tap Menu > Switch Accounts, and then select the correct
account.
3. Tap Menu > Tools > Manage Folders.
4. Tap and hold the desired folder to:
• Tap New Folder to create a new folder under the folder
that is currently selected.
• Tap a current folder, and then tap Rename to change the
folder name. Default folders, such as Inbox, cannot be
renamed.
• Tap Delete to delete a folder and its contents.
• Tapping Folder Options to set folder synchronization
settings on a per-folder basis by selecting the check box
next to the folder you want to synchronize.
• You must be online to delete or rename an IMAP4 folder.
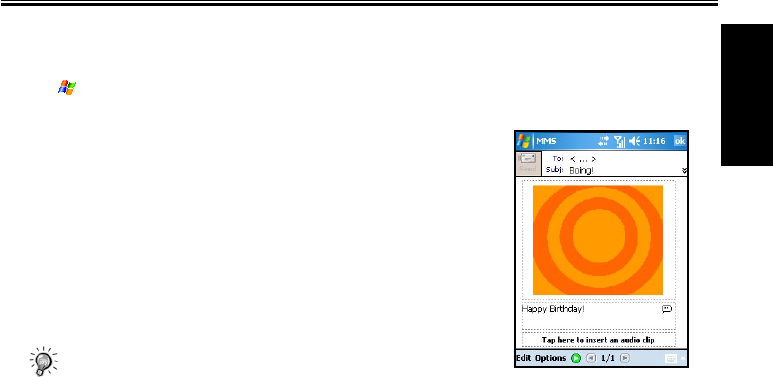
SP70 User Manual 10-13
Microsoft Pocket
Outlook
10.5 MMS Messages
The MMS program has been incorporated into the Messaging feature of your Pocket PC Phone.
Tap > Messaging > Accounts > MMS to access the MMS folders.
To compose an MMS message:
1. Tap New > Custom.
2. Enter the email address or mobile phone number of one or more
recipients
3. Enter the message subject.
4. Tap the photo insertion area to select a picture or video.
5. Tap the text insertion area to enter text information.
6. Tap the audio insertion area to create an audio file.
7. When it is completed, tap Send.
• You need to subscribe to the GPRS and MMS services with
your service provider and configure your Pocket PC Phone
properly before you can send and receive MMS messages.

Chapter 11
Microsoft ActiveSync
11.1 Installing Microsoft ActiveSync
11.2 Connecting to Your Desktop Computer
11.3 Synchronizing with Your Desktop Computer
11.4 Synchronizing Directly with Exchange Server
11.5 Changing the Synchronization Schedule
11.6 Backup and Restore

11-2 SP70 User Manual
Microsoft
ActiveSync
11.1 Installing Microsoft ActiveSync
With Microsoft ActiveSync on both your desktop computer and Pocket PC Phone, you can exchange
information between a desktop computer or server and your Pocket PC Phone. To synchronize your Pocket
PC Phone with your desktop computer, you must install ActiveSync on the desktop computer.
Using ActiveSync, you can:
n Synchronize information between your Pocket PC Phone and desktop computer or server so that you
have the latest information in all locations.
n Change synchronization settings and synchronization schedule.
n Copy files between your Pocket PC Phone and desktop computer.
n Add or remove programs to/from your Pocket PC Phone.
An Microsoft Companion CD is supplied with your Pocket PC Phone. You need to use the CD to install
ActiveSync on the desktop computer before perfoming synchronization.
Follow this procedure:
1. Turn on the desktop computer.
2. Insert the Companion CD into the CD-ROM drive of the desktop computer.
3. On the first screen, click the arrow to enter the main screen and click Start Here.
4. On the next screen, click Next to pop up Get Ready to Synchronize screen.
5. The Microsoft ® ActiveSync® installation wizard appears. Click Next.
6. The License Agreement appears, choose ‘I accept the terms in the license agreement’, and click Next.
7. The Customer Information screen appears, please enter user name and organization, and click Next.
8. The Destination Folder screen appears, click Next.
9. The Ready to Install the Program screen appears, click Install.
10. After the file transfer is completed, the installation is finished. Click Finish.
11. Click Close back to Windows to start ActiveSync.
12. When prompted, connect one end of the USB cable to the converter, and then connect the converter to
the USB port on the bottom of your Pocket PC Phone.
13. Connect the other end of the USB cable to the USB port of the desktop computer.
14. Follow the on-screen instructions to establish a partnership between your Pocket PC Phone and your
desktop computer. Select the types of information for synchronization. After your first synchronization,
the data you have stored on your desktop computer such as Calendar, Contacts and Tasks are copied to
your Pocket PC Phone.

SP70 User Manual 11-3
Microsoft
ActiveSync
• If you do not establish a standard partnership with the desktop computer, then you cannot
perform synchronization between two devices, and you will need to select a desired partnership
every time you connect to the desktop computer.
11.2 Connecting to Your Desktop Computer
You can connect your Pocket PC Phone to a desktop computer in several ways:
n Use the USB cable or an optional cradle.
n Use the IR port in place of using a cable. (For complete instructions on connecting to your desktop
computer by infrared, see the ActiveSync Help on your desktop computer.)
n Use a network or dial-up connection.
11.3 Synchronizing with Your Desktop Computer
1. Connect your Pocket PC Phone to your desktop computer.
2. On your Pocket PC Phone, tap > Programs > ActiveSync.
3. Tap to start synchronization.

11-4 SP70 User Manual
Microsoft
ActiveSync
11.4 Synchronizing Directly with Exchange Server
1. Make sure that the Pocket PC Phone is not turned on.
2. Connect to the Internet. (See Chapter 8 for more information.)
3. In ActiveSync on the device, tap Menu > Add Server Source.
5. In Server address, enter the name of the server running Exchange Server, and tap Next.
6. Enter your name, password, and domain, and tap Next.
7. Select the check boxes for the types of information items that you want to synchronize with Exchange
Server.
8. To change available synchronization settings, select the type of information and tap Settings.
9. Tap Finish.
10. Make sure that the server is powered on.
11. Connect the Pocket PC Phone to the Internet. (See Chapter 8 for more information.)
11.5 Changing the Synchronization Schedule
1. In ActiveSync on the device, tap Menu > Schedule.
2. Do one or more of the following:
• When you are working or e-mail volume is high, select a shorter interval in the Peak times list.
• When e-mail volume is low, select a longer interval or As items arrive in the Off-peak times list.
• While roaming, tap Use above settings while roaming.
• When you select Send in Messaging on the device, select the Send outgoing items immediately
check box.
11.6 Backup and Restore
Use the USB cable to connect the SP70 to your PC.
The icon appears on the taskbar. Click guest partnership and click Next.
Use the backup/restore function of Active Sync\Tools.
Update your data for backup and then perform the backup procedure.
When the backup procedure is completed, click OK. If you select the restoring function, click Restore.
Click guest partnership and click OK.
Select to execute the restoring program.
When the restoring procedure is completed, click OK to restart the device.
Start the file menu of the device and exit.

Chapter 12
Today Plus
12.1 Programs
12.2 Media Content
12.3 Games
12.4 Phone Records
12.5 Settings
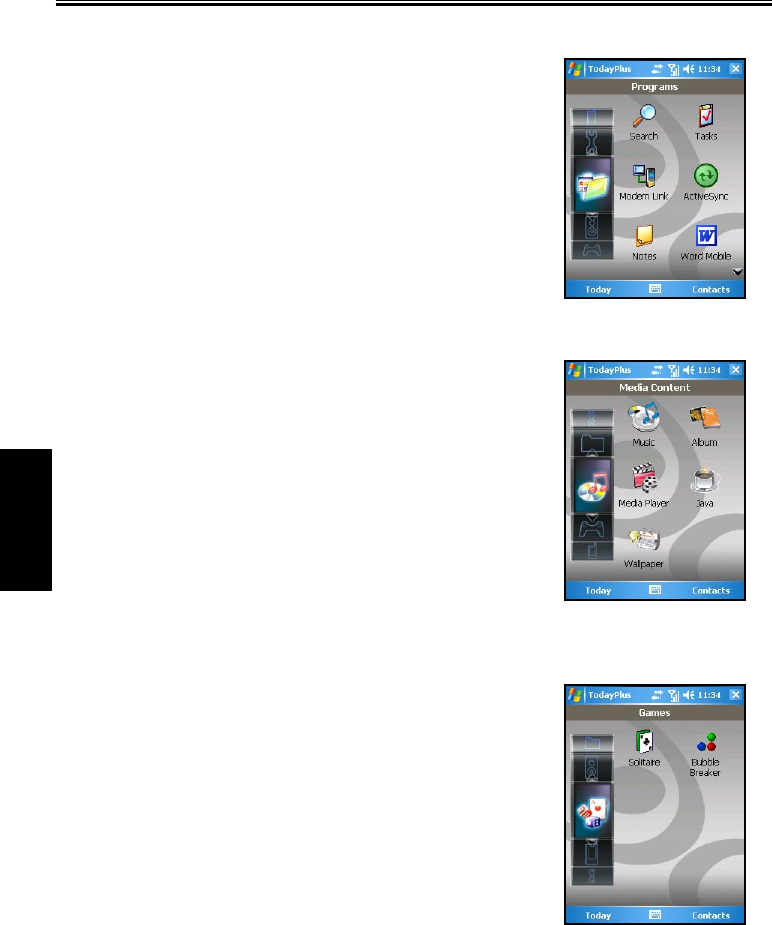
12-2 SP70 User Manual
Today Plus
12.1 Programs
Tap Today Plus on the Today screen and then tap the Programs icon.
Programs provides shortcuts to items in Start\Programs, such as
Word Mobile, Excel Mobile, PowerPoint Mobile, File Explorer,
Tasks, Notes, etc.
12.2 Media Content
Tap Today Plus on the Today screen and then tap the Media Content
icon.
Media Content provides shortcuts to items in the Media Content
folder, such as Music, Album, Media Player, Java, and Wallpaper.
12.3 Games
Tap Today Plus on the Today screen and then tap the Games icon.
Games allows you to select and execute items in the Start\Programs\
Games folder quickly.
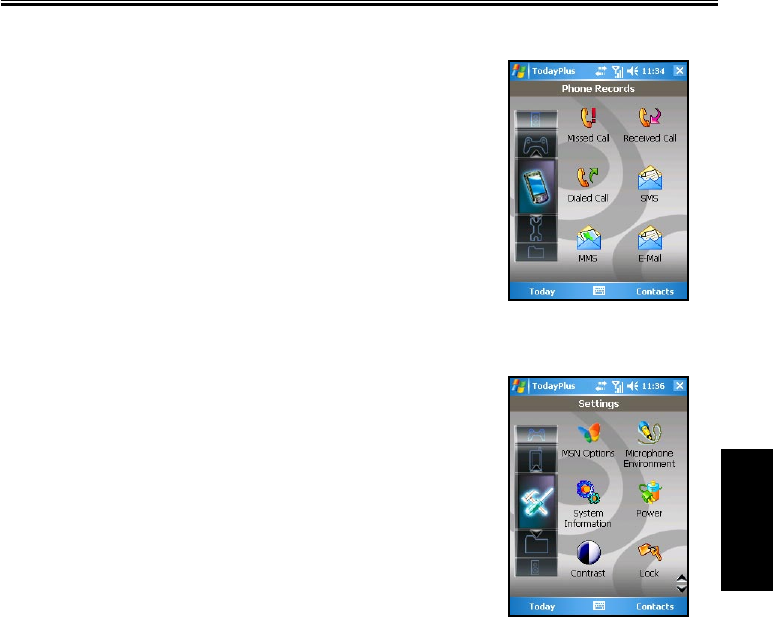
SP70 User Manual 12-3
Today Plus
12.4 Phone Records
Tap Today Plus on the Today screen and then tap the Phone Records
icon.
Phone Records provide shortcuts to select options in Missed Call,
Received Call, Dialed Call, SMS, MMS, E-Mail, Call Guard, and
Call Answer.
12.5 Settings
Tap Today Plus on the Today screen and then tap the Settings icon.
Settings provides shortcuts to items in Start\Settings.

Chapter 13
VideoCam
13.1 Using the Camera
13.2 Using the DV
13.3 Changing VideoCam Settings
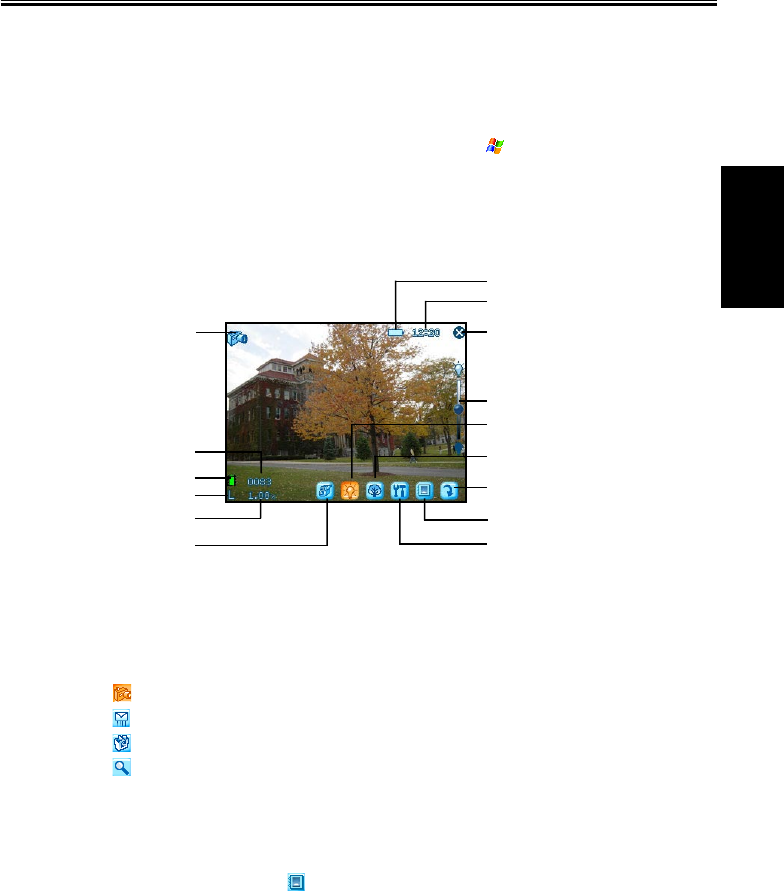
SP70 User Manual 13-2
VideoCam
13.1 Using the Camera
The Pocket PC Phone is installed with the VideoCam program for you to take pictures.
Taking a Picture
1. Press the Capture key on the side of the Pocket PC Phone, or tap > Programs > VideoCam, to
enter the Camera mode.
2. By default, the screen is displayed in the landscape mode.
You can use one hand to hold the Pocket PC Phone’s bottom for easy operations. Be careful not
to let your fingers cover the camera lens. You can press the Volume/Zoom key to adjust the size of
the image.
3. Frame the subject to be photographed in the viewing window. When it is ready, press the Capture key
on the side of the Pocket PC Phone to capture the picture.
The Pocket PC will preview the picture on the screen shortly. You can:
• Tap to save the picture and continue taking pictures
• Tap to send the picture in an email.
• Tap to delete the picture.
• Tap to switch to MyAlbum.
(You can also press the Left/Right key to switch between the four icons.)
By default, the new picture is stored in the My Device\My Documents\My Album folder on the
Pocket PC Phone in five seconds. The picture is stored in the JPEG format, and its filename starts with
DSC00001 and goes on in the ascending order until the Pocket PC Phone is out of storage space.
4. 6. To view the picture you took, tap to switch to MyAlbum. (See Chapter 14 for information on
MyAlbum.)
Camera mode
Remaining amount
of pictures to take
Standby mode
Picture size
Zoom setting
Switches to DV mode
Closes the program.
Opens or closes the brightness
adjustment bar.
Rotates the screen.
Tool Settings.
Brightness adjustment bar
Selects the picture mode.
Opens MyAlbum.
System time
Battery power
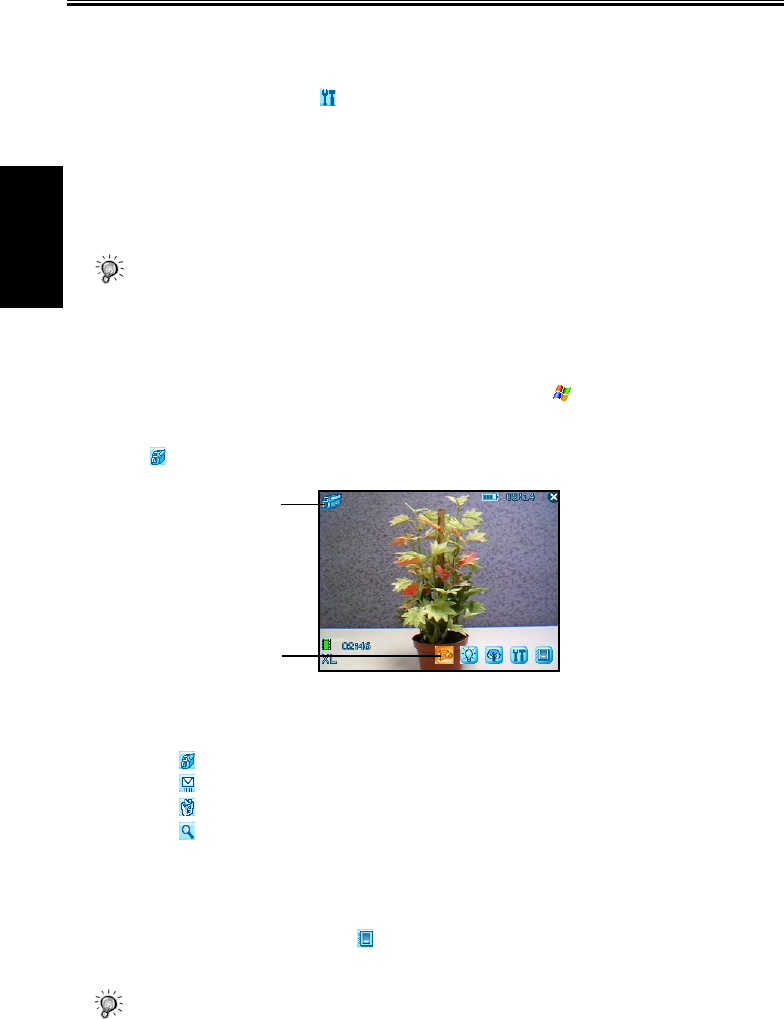
13-3 SP70 User Manual
VideoCam
Taking Continuous Pictures
VideoCam allows you to take continuous pictures. By default, VideoCam takes one single picture. There-
fore, you need to change the setting first.
1. After you start VideoCam, tap on the screen.
2. Tap Camera.
3. In Shooting Mode, select Continuous Shooting and tap OK.
4. Take pictures according to the procedure described in the “Taking a Picture” section earlier in this
chapter.
After the pictures are captured, the screen displays the thumbnail view of these continuous pictures.
The time interval for the continuous pictures is 0.7 second.
• You cannot use the Record key in the Camera mode.
• You cannot use the Camera and DV features at the same time.
13.2 Using the DV
The VideoCam program also allows you to record videos.
1. Press the Capture key on the side of the Pocket PC Phone, or tap > Programs > VideoCam, to
enter the Camera mode.
2. By default, the screen is displayed in the landscape mode.
Tap to switch to the DV mode. You can use one hand to hold the Pocket PC Phone’s bottom for easy
operations. Be careful not to let your fingers cover the camera lens.
3. Frame the subject to be photographed in the viewing window. When it is ready, press the Capture key
on the side of the Pocket PC Phone to start recording. Press the Capture key again to stop recording.
The Pocket PC will preview the first picture of the video on the screen shortly. You can:
• Tap to save the video and continue recording.
• Tap to send the video in an e-mail.
• Tap to delete the video.
• Tap to switch to MyAlbum.
(You can also press the Left/Right key to switch between the four icons.)
By default, the new video is stored in the My Device\My Documents\My Album folder of the Pocket
PC in five seconds. The video is stored in the MPEG4/3GP format, and its filename starts with
DV00001 and goes on in the ascending order until the Pocket PC is out of storage space.
4. To view the video you recorded, tap to switch to MyAlbum. (See Chapter 14 for information on
MyAlbum.)
• The DV mode indicator glows in orange when you using the DV feature.
• If you answer a call in the DV mode, then the video will be saved and VideoCam closed. If you
reject the call, the screen will remain the same.
DV mode
Switches to Camera mode

SP70 User Manual 13-4
VideoCam
13.3 Changing VideoCam Settings
In the Camera/DV mode, you can tap on the screen to access the setting items.
Standard Settings
On the Setting screen, tap Standard.
Item Description
Backlight for
Preview
Sets whether to turn on the backlight for picture/video preview.
Preview Image or
Video
Sets whether to keep the preview for five seconds before the next shooting.
Glitter Frequency While using VideoCam, please setup Glitter Frequency according to your
environment for improving the preview quality of the VideoCam.
Camera Settings
On the Setting screen, tap Camera.
Item Description
Scene Mode Selects the desired scene mode: Standard, Nightshot, Portrait, Grayscale,
Sepia, or Document.
Resolution
Selects the desired image resolution: 1600*1280, 1280*1024, 640*480 (Normal),
320*240 (Basic), or 176*144 (Compact).
Self-Timer Sets the time lag between releasing the shutter and shooting the picture. The
options are 5 sec, 10 sec or 15 sec.
Flash Turns on or off the flash.
White Balance Changes the setting for white balance.
Shooting Mode Selects the single or continuous shooting.
Filename recount Resets the filename counter, starting from DSC00001.
Folder Selects the storage location for the picture.
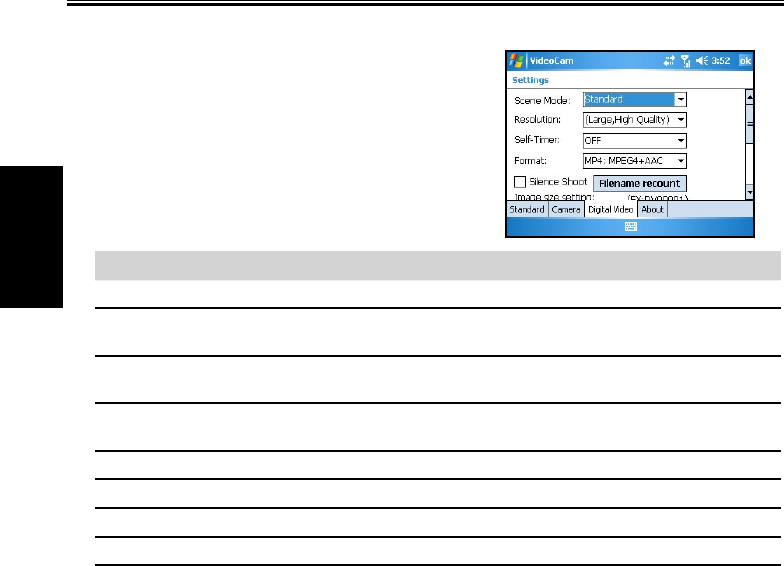
13-5 SP70 User Manual
VideoCam
Digital Video Settings
On the Setting screen, tap Digital Video.
Item Description
Scene Mode Selects the desired scene mode: Standard, Nightshot, Grayscale or Sepia.
Resolution
Selects the desired image resolution: Large, High Quality; Large, Long Time;
Small, High Quality; Small, Long Time.
Self-Timer Sets the time lag between releasing the shutter and shooting the picture. The
options are 5 sec, 10 sec or 15 sec.
Format Selects the desired video format: MP4:MPEG4+ACC, MP4:MPEG4+AMR,
3GP:MPEG4+AMR, or 3GP:H.263+AMR.
Silence Shoot Allows you to record only images without sounds.
Filename recount Resets the filename counter, starting from DV00001.
Image size setting Allows you to set the size limit for recorded videos.
Folder Selects the storage location for the videos.

Chapter 14
Using MyAlbum
14.1 Starting MyAlbum
14.2 Opening a Picture or Video
14.3 Editing Pictures
14.4 Using the FaceMagic Feature
14.5 Using Effects
14.6 Sending Files
14.7 View Modes

14-2 SP70 User Manual
Using MyAlbum
14.1 Starting MyAlbum
The MyAlbum program is very useful for viewing picture and video files. The supported formats include:
.bmp, .png, .jpeg, .gif, .3gp and .mpeg4.
To start MyAlbum, you can:
n Tap > Programs > MyAlbum.
n Tap in the Camera/DV mode.
n Today plus > Media Content > Album.
The startup screen of MyAlbum displays the file list.
The top of the screen displays the name of the current folder (the default setting is the My Device\My Doc-
ument\My Album folder) and the sorting method (the default setting is Name). The middle of the screen
displays the information about the picture: the preview of the pictures on the left; the filename, resolution,
saving time, file format and file size on the right.
• You can tap Edit and Menu on the command bar for advanced features. See the later sections in
the chapter.
14.2 Opening a Picture or Video
To have a closer view of a picture or video, tap the specific thumbnail view in the Report mode of
MyAlbum.
Below is the screen of an opened picture:
Total number of files
Number of current file
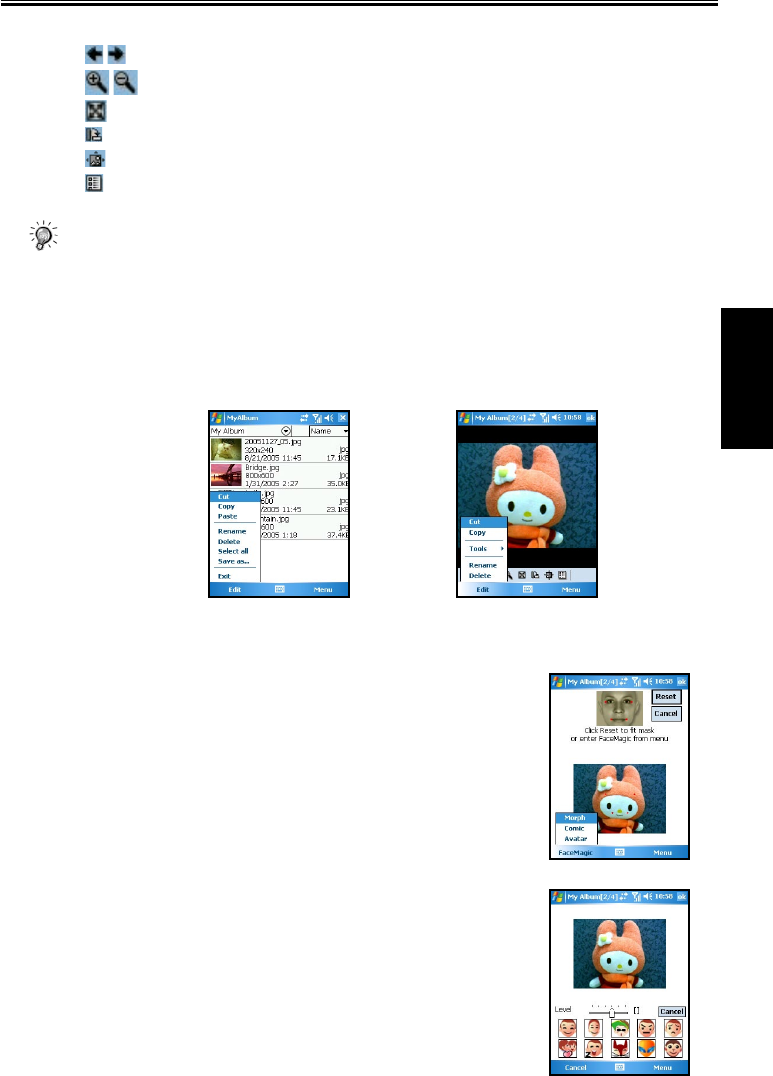
SP70 User Manual 14-3
Using MyAlbum
In this mode, you can:
n Tap / or press the Left/Right key to browse for the previous/next file of the current folder.
n Tap / or press the Up/Down key to zoom in/out of the image.
n Tap to zoom the picture to best fit the screen.
n Tap to rotate the picture at 90 degrees.
n Tap to switch to full screen.
n Tap to return to the Report mode.
• You can tap Edit and Menu on the command bar for advanced features. See the later sections in
the chapter.
14.3 Editing Pictures
In the Report mode or opened picture mode, you can tap Edit on the command bar to cut, copy, paste,
rename or delete the selected or opened file. You can also select all files, or save the selected file as a new
file.
14.4 Using the FaceMagic Feature
Tapping Menu > FaceMorph on the command bar allows you
to create special changes on the person’s expression. On the
positioning screen, tap Reset, and follow the screen tips to perform
positioning on the person’s face.
After positioning, tap FaceMagic > Morph (as an example). The
screen displays the expression items and the adjustment bar for you
to customize and create special effects. You can also tap FaceMagic
> Comic or Avatar for more special expression effects.
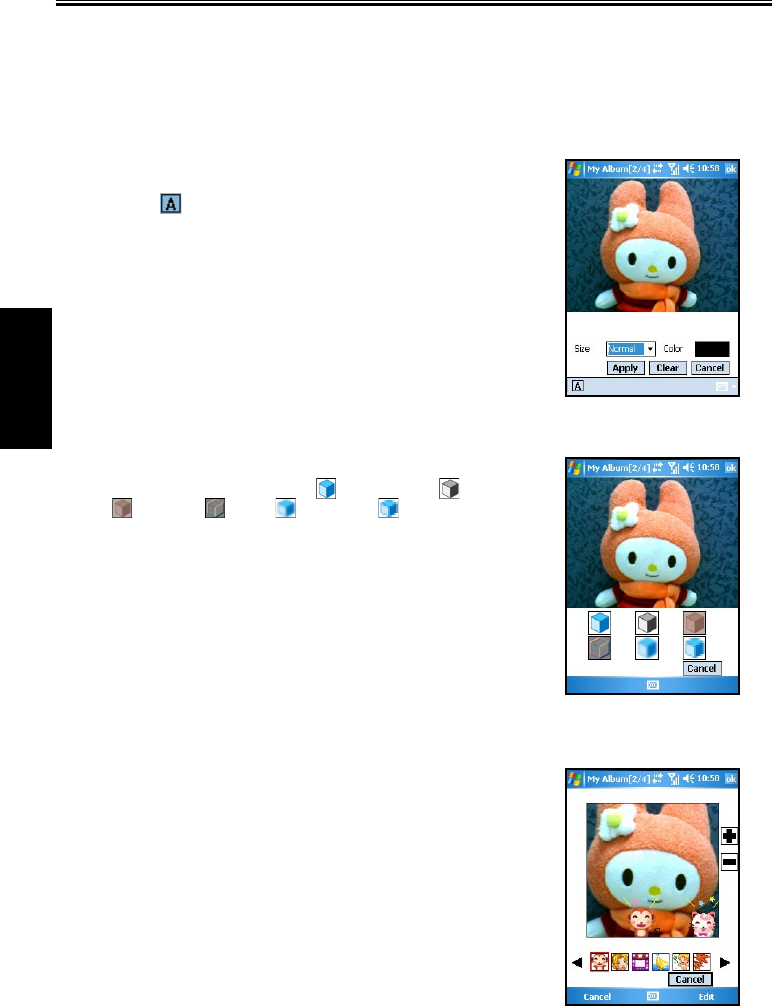
14-4 SP70 User Manual
Using MyAlbum
14.5 Using Effects
Tap Effect on the command bar to create special effects on the selected or opened picture. The picture with
effects will be saved as a new file with “-1” added to the filename.
Painting
1. Tap Menu > Effect > Painting.
2. You can paint on the picture.
Or, tap to add text on the picture. Tap the screen, and a
editing cursor will appear. You can start to enter the texts and
change the text’s font, font size and color.
3. Press the OK key or tap OK to save the changes as a new file.
Effect
1. Tap Menu > Effect > Effect.
2. Tap the desired effect: Normal ( ), Black/White ( ), Sepia (
), Emboss ( ), Blur ( ) or Mosaic ( ).
3. Press the OK key or tap OK to save the changes as a new file.
Selecting Normal (icon) will not save the picture as a new file.
Frame
1. Tap Menu > Effect > Frame.
2. Tap the desired picture frame from the option bar at the bottom
of the screen. The screen will display the applied picture for
viewing immediately. You can tap the arrows on both sides of the
option bar for more frame options.
3. Press the OK key or tap OK to save the changes as a new file.

SP70 User Manual 14-5
Using MyAlbum
Stamp
1. Tap Menu > Effect > Stamp.
2. Tap the desired stamp from the option bar at the bottom of the
screen. The screen will display the applied picture for viewing
immediately. You can tap the arrows on both sides of the option
bar for more stamp options.
3. Press the OK key or tap OK to save the changes as a new file.
Adjustment
1. Tap Menu > Effect > Adjustment.
2. Tap the list to select the item for adjustment: Brightness,
Contrast, Saturation, Smart Color, Portrait, Landscape and
Document.
3. Adjust the value by tapping and draging on the adjustment bar.
Note
1. Tap Menu > Effect > Note.
2. You can enter note text in the box, or tap the recording button to
create a recording as a note. The added text or recording will be
saved as a stand-alone file.
3. Tap OK to save the note.
4. The note icon ( ) in the list mode indicates that a note has been
added to the picture.

14-6 SP70 User Manual
Using MyAlbum
14.6 Sending Files
Tapping Menu > Send on the command bar allows you to send the file by:
n MMS
Send an MMS message including the selected picture.
n E-Mail
Send an email message including the selected picture.
n Beam File
Use the infrared or bluetooth to beam picture.
14.7 View Modes
MyAlbum provides four view modes for viewing picture and video files.
n Large mode
n Middle mode
n Small mode
n Report mode (default mode)

Chapter 15
More Programs
15.1 Word Mobile
15.2 Excel Mobile
15.3 PowerPoint Mobile
15.4 Windows Media Player
15.5 Pictures & Videos
15.6 MIDlet Manager
15.7 File Explorer
15.8 Calculator
15.9 Pocket MSN
15.10 IE Favorites
15.11 Media Content
15.12 SIM Contacts
15.13 Search
15.14 Games
15.15 Voice Commander
15.16 Profiles
15.17 SmartX
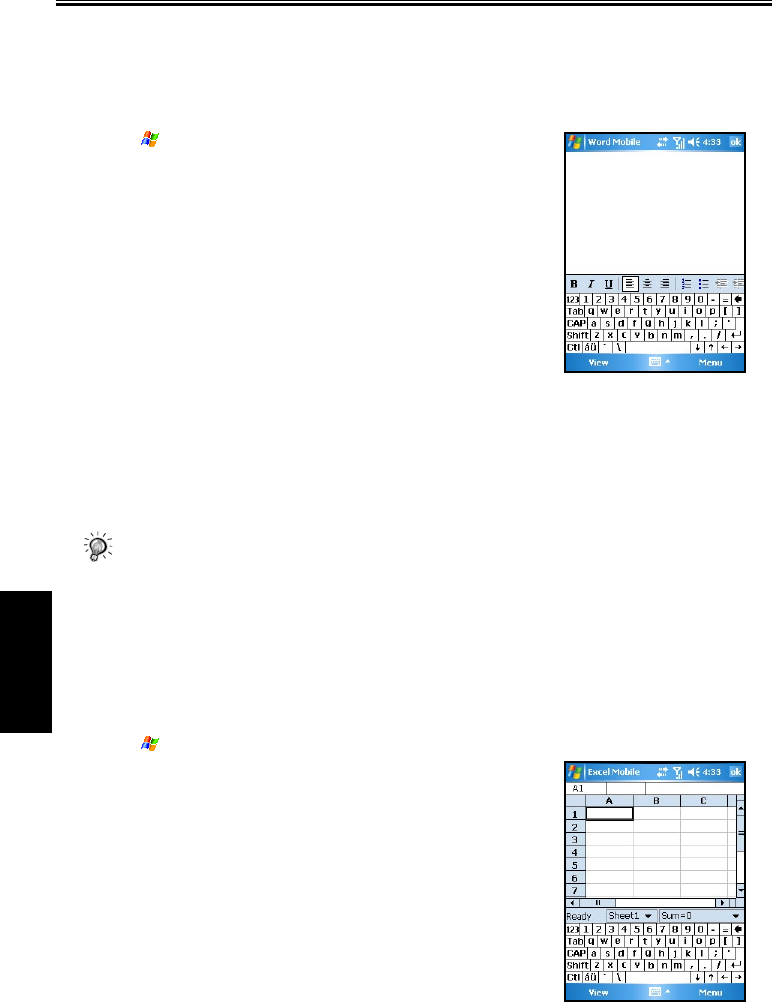
15-2 SP70 User Manual
More Programs
15.1 Word Mobile
You can create and edit documents and templates in Microsoft Word Mobile just as you do in Microsoft
Word on your desktop computer.
Creating a Document
1. Tap > Programs > Word Mobile.
2. Tap New. You’ll see either a blank document or a template.
3. You can enter information by working in different modes, which
you select from the View menu.
4. When you have finished entering the information and tap OK,
the document is automatically saved. Word documents are
usually saved as .psw files, but you can also save them in other
file formats, such as .doc, .rtf or .txt.
Opening an Existing Document
In the document list, tap the document you want to open. If you don’t see the document in the list, make
sure you’ve chosen the correct folder in the folder list (labeled All Folders by default).
You can have only one document open at a time. When you open a second document, the first one is saved
and closed automatically.
• If you’re opening a Word document that was created on a desktop computer, you may want to
select View > Wrap to Window so that you can see the entire document.
15.2 Excel Mobile
You can create and edit workbooks and templates in Microsoft Excel Mobile just as you do in Microsoft
Excel on your desktop computer.
Creating a Workbook
1. Tap > Programs > Excel Mobile.
2. Tap New. You’ll see either a blank workbook or template.
3. You can enter formulas and functions, and then filter data to see
the subset of information.
4. When you have finished entering the information and tap OK,
the document is automatically saved. Excel Mobile workbooks
are usually saved as .pxl files, but you can also save them in .xls
format.

SP70 User Manual 15-3
More Programs
Opening an Existing Workbook
In the workbook list, tap the file you want to open. If you don’t see the workbook in the list, make sure
you’ve chosen the correct folder in the folder list (labeled All Folders by default).
• You can open only one workbook at a time; when you open a second workbook, you will be
asked to save the first.
15.3 PowerPoint Mobile
With PowerPoint Mobile, you can open and view slide show presentations created on your desktop
computer. Whether the presentation is opened from an email message, downloaded from a file share or the
Internet, copied to the Pocket PC Phone via a storage card, or obtained by synchronizing with your desktop
computer, slide shows created in *.ppt and *.pps format with PowerPoint ‘97 and later can be viewed on
your Pocket PC Phone. Note that PowerPoint Mobile is a viewer only.
Tap > Programs > Word Mobile. In the presentation list, tap the
presentation you want to open. If you don’t see the presentation in
the list, make sure you’ve chosen the correct folder in the folder list
(labeled All Folders by default).
15.4 Windows Media Player
Use Microsoft® Windows Media® Player 10 Mobile for Pocket PC Phone to play digital audio and video
files that are stored on your device or on the Web.
By default, Windows Media Player can play Windows Media or MP3 files (including files with the extensions .asf,
.wma, .wmv, .mp3).
Starting Windows Media Player
To start Windows Media Player, tap > Windows
Media.
By default, Windows Media Player displays the Library screen as
the startup screen after the Pocket PC Phone is turned on.

15-4 SP70 User Manual
More Programs
Screens and Menus
Windows Media Player has three primary screens:
n Playback screen
The screen that displays the playback controls (such as Play, Pause, Next, Previous, and Volume), the
album art window, and the video window. You can change the appearance of this screen by choosing a
different skin.
n Now Playing screen
The screen that displays the Now Playing playlist. This special playlist indicates the currently playing
file and any files that are “queued up” to play next.
n Library screen
The screen that lets you quickly find your audio files, video files, and playlists. It contains categories
such as My Music, My Video, My TV, and My Playlists.
At the bottom of each screen is Menu. The commands on this menu change depending upon which screen
you are viewing.
n Playback screen menu
Item Description
Play/Pause Starts or pauses playback.
Repeat Plays the items in the Now Playing playlist repeatedly.
Stop Stops playback.
Full Screen When a video is playing, displays it by using the entire screen.
Library Displays the Library screen so you can choose a file to play.
Open URL Lets you play a file on a network, such as the Internet.
Options Lets you adjust various Windows Media Player options, including net-
work, skin, and hardware button options. (See the “Changing Windows
Media Player Settings” section later in the chapter.)
Properties Displays information about the currently playing file.
About Displays information about Windows Media Player, such as the version
number.
n Now Playing screen menu
Item Description
Library Displays the Library screen so you can choose a file to play.
Move Up Moves the selected item up in the playlist order.
Move Down Moves the selected item down in the playlist order.
Delete from Playlist Deletes the selected item from the playlist.
Clear Now Playing Deletes all items from the Now Playing playlist.
Error Details Displays error information about the selected item (an exclamation mark
appears before the item name if error details are available).
Properties Displays information about the selected file.

SP70 User Manual 15-5
More Programs
n Library screen menu
Item Description
Queue Up Adds the selected item to the end of the current (Now Playing) playlist.
Delete from Library Deletes the selected item from the library.
Update Library Adds new items to the library by searching your device or storage card.
Open File Lets you find and play files that are stored on your device or storage card
but that are not in the library.
Properties Displays information about the selected file.
Libraries
The library contains links to your audio files, video files, and playlists. As in the desktop Player, you will
be allowed to sort your content by criteria such as artist name, album title, genre, or actor.
Unlike the desktop Player, the Pocket PC Phone Player can have multiple libraries. Each library represents
an available storage location. For example, if you store some content in the internal storage location on the
device (known as random access memory or RAM), the My Device library will contain links to those files.
If you also store content on removable storage cards, you will have additional libraries for each of those
cards.
On the Library screen, you can switch between the My Device library and any other libraries that are
available to your device.
By default, Windows Media Player automatically searches the internal storage location of your device for
compatible digital media files. If it finds any, they will be added to the My Device library.
Similarly, when you insert a removable storage card into your device, Windows Media Player automatically
searches it for content and adds it to a Storage Card library.
If the Player does not detect new files that you copy to your device, you can manually update the library by
using the Update Library command.
Updating a Library
In most cases, Windows Media Player automatically updates your libraries as necessary. However, you can
manually update a library to ensure that it has links to any new files that you might have recently copied to
your Pocket PC Phone or a removable storage card.
1. Tap > Windows Media.
2. If you are not already on the Library screen, tap Menu >
Library.
3. On the Library screen, tap the Library arrow (near the top of
the screen), and then tap the library that you want to update (for
example, Storage Card).
4. Tap Menu > Update Library.
5. Tap Search, wait for the files to be added, and then tap Done.

15-6 SP70 User Manual
More Programs
Playback
Playing Items on Your Pocket PC Phone
Use the library to find and play songs, videos, and playlists that are stored on your Pocket PC Phone or
removable storage card.
1. Tap > Windows Media.
2. If you are not already on the Library screen, tap Menu >
Library.
3. On the Library screen, tap the Library arrow (near the top of
the screen), and then tap the library that you want to update (for
example, Storage Card).
4. Tap a category (for example, My Music or My Playlists), tap and
hold the item that you want to play (such as a song, album, or
artist name), and then tap Play or Queue Up.
5. Tap Play to start playing back the selected file.
• To play a file stored on your device but that is not in a library, on the Library screen, tap Menu >
Open File. Tap and hold the item that you want to play (such as a file or a folder), and then tap
Play or Queue Up.
Controls
Item Description
Plays a file.
Pauses a file.
Skips to the beginning of the current file or to the previous file.
Skips to the next file.
Adjusts the playback progress of a selected file.
Increases the volume level.
Decreases the volume level.
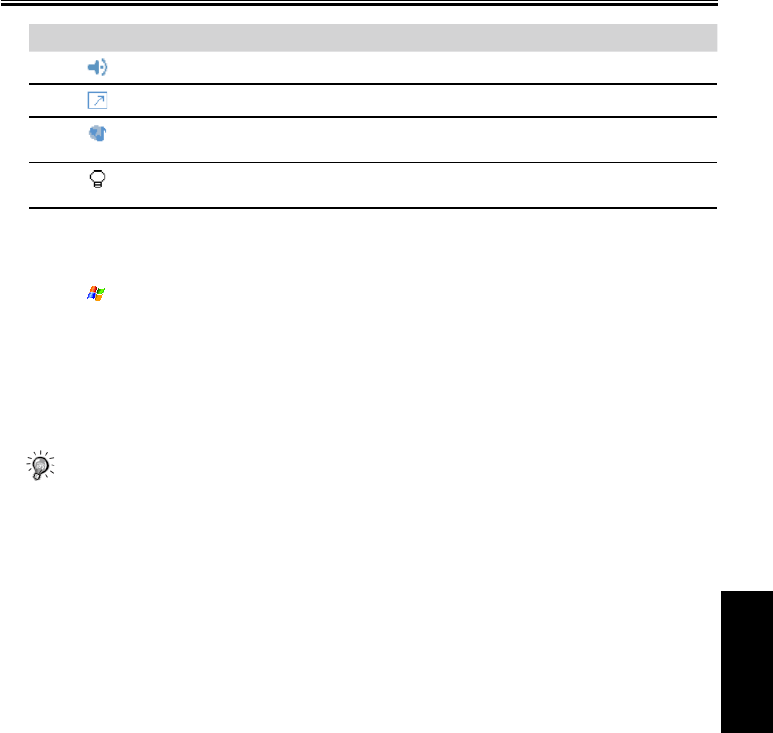
SP70 User Manual 15-7
More Programs
Item Description
Turns the sound on or off.
Displays a video by using the entire screen (full screen).
Displays a Web site, such as WindowsMedia.com, where you can find music and
videos to play.
If your device hardware supports it, you can rewind and fast-forward files by
pressing and holding the Left/Right controls.
Playing an Item on a Network
Use the Open URL command to play a song or video that is stored on the Internet or on a network server.
1. Tap > Programs > Windows Media.
2. If you are not on the Playback screen, tap OK to close the current screen and display the Playback
screen.
3. Tap Menu > Open URL.
4. In the URL box, enter a network address. Or, in the History box, tap a URL that you have previously
used.
• To play an item on a network, the phone must be connected to a network. For more information
on creating a remote connection between your portable device and a network, see Chapter 8.
Playlists
A playlist is a list of digital media files that play in a specified order. By using the playlist, you can group
audio and video files together for convenient playback.
For example, in the desktop Player, you can create a playlist of upbeat songs to listen to when you exercise
or a playlist of soothing songs to enjoy during a long flight. When you synchronize with the desktop
version of Windows Media Player 10, your favorite playlists are automatically copied to your Pocket PC
Phone.
Your playlists are available in the library (in the My Playlists category). A temporary playlist, called Now
Playing, is available from the Now Playing menu. It lists the currently playing file, as well as any files that
have been “queued up” to play next.
Synchronization
Use the Sync feature in the desktop version of Windows Media Player 10 to automatically copy your
favorite audio files, video files, and playlists from your desktop Player library to your Pocket PC Phone
Player library every time you connect your Pocket PC Phone to your computer.
For more information on synchronization, see the Windows Media Player Help on the desktop computer.
Copying Files to Your Pocket PC Phone
Use the desktop version of Windows Media Player 10 to synchronize digital media files to your Pocket PC
Phone (instead of dragging a file from a folder on your desktop computer to a folder on your Pocket PC
Phone, for example). Using the desktop Player ensures that licenses are copied with protected files.
For more information on copying files to your Pocket PC Phone, see the Windows Media Player Help on
the desktop computer.
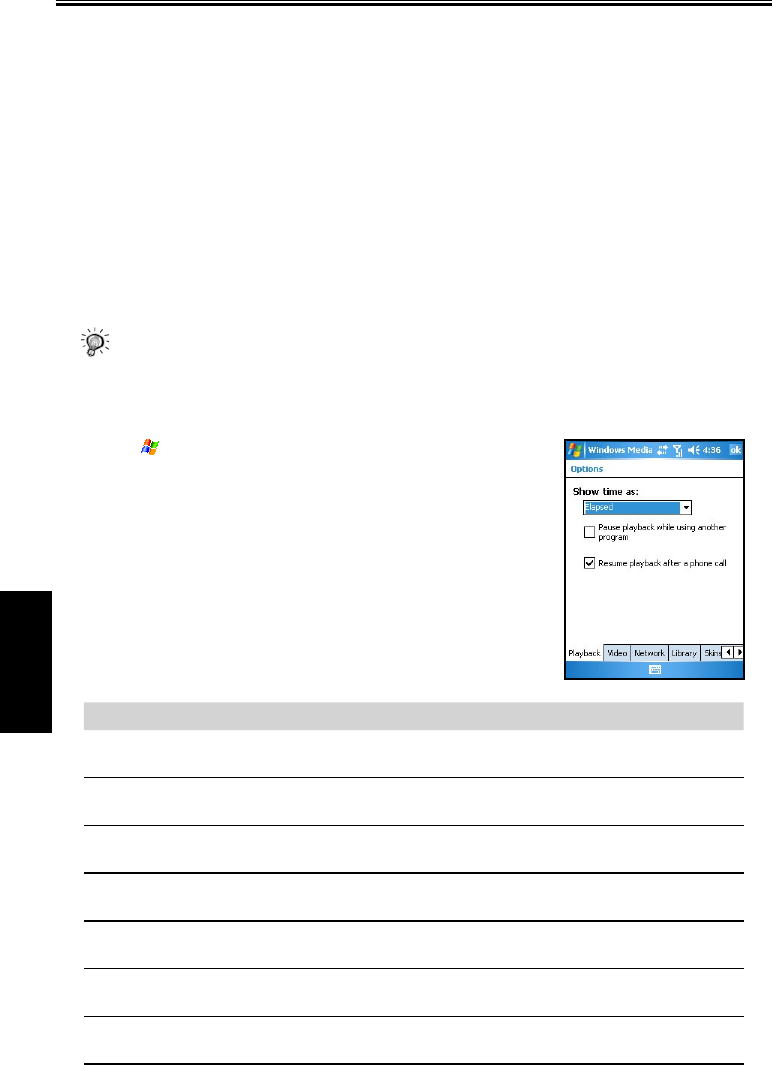
15-8 SP70 User Manual
More Programs
Licenses and Protected Files
Protected files are digital media files that are secured with a license to prevent unauthorized distribution or
playback.
The license specifies how you can use the file. For example, a license can specify how many times you can
play a file. A license can also specify whether you can burn the file to a CD or synchronize (copy) the file
to a portable device.
The terms of the license are specified by the person or company that provided the file. Most people obtain
protected files from online stores, such as MSN Music and Napster.
When copying a protected file from your computer to your Pocket PC Phone, always use the desktop
version of Windows Media Player 10 to synchronize (copy) the file to your Pocket PC Phone. For example,
do not use Windows Explorer to drag and drop files from your computer to your Pocket PC Phone.
For more information on copying files to your Pocket PC Phone, see the Windows Media Player Help on
the desktop computer.
• You can view the protection status for a file by checking its file properties (Menu > Properties).
Changing Windows Media Player Settings
1. Tap > Programs > Windows Media.
2. If you are not on the Playback screen, tap OK to close the
current screen and display the Playback screen.
3. Tap Menu > Options to customize Windows Media Player
settings.
Item Description
Change player appearance Tap Skins. Tap Previous or Next until you find the skin that
you want to use.
Shrink oversized video Tap Audio/Video. Select the Shrink to fit window check
box.
Play video in full screen Tap Audio/Video. In Play video in full screen, select the
desired option.
Change background playback Tap Playback. Select or clear the Pause playback while
using another program check box.
Change how time is displayed Tap Playback. In the Show time as box, select the desired
option.
Change playback after a phone call Tap Playback. Select or clear the Resume playback after a
phone call check box.
Change network connection speed Tap Network. In the Internet Connection Speed box, tap
the speed of your network connection.
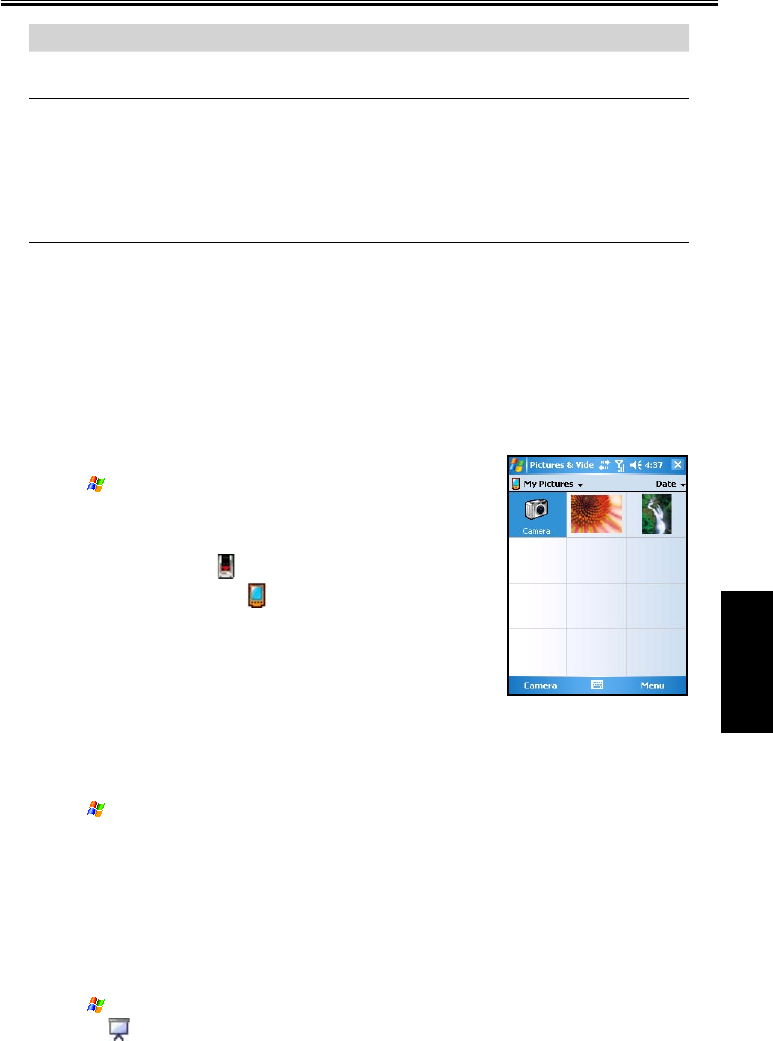
SP70 User Manual 15-9
More Programs
Item Description
Change network protocol options Tap Network. In Protocol, select the check box for each
protocol you want to enable.
Change the startup screen Tap Library.
Select the Start Player on Library screen check box to
show the Library screen when you start Windows Media
Player.
Clear the Start Player on Library screen check box to
show the Playback screen when you start Windows Media
Player.
15.5 Pictures & Videos
Use Pictures & Videos to view pictures or videos stored on your device or on a storage card, send pictures or
videos to others, view a slideshow of your pictures, or set a picture as the background on the Today screen.
Viewing Pictures and Videos
1. You can copy pictures or videos from your desktop computer to the My Pictures folder, within the My
Documents folder on your Pocket PC Phone. For more information on copying files from your desktop
computer to your Pocket PC Phone, see ActiveSync Help on your desktop computer.
2. To view pictures or videos in a storage card, insert the card.
3. Tap
>
Programs
>
Pictures & Videos.
4. By default, the program displays thumbnails of the pictures and
videos in the My Pictures folder, within the My Documents
folder on your Pocket PC Phone. To view the pictures and videos
in a storage card, tap the icon. To view pictures and videos on
the Pocket PC Phone, tap the icon.
5. Thumbnails of pictures and videos appear on the screen. You can
tap one of them to view the picture in full screen.
Sending Pictures and Videos
You can send a .jpg picture to others as an email attachment. The picture is resized to approximately 30
KB, making it easier to send over wireless connections.
1. Tap
>
Programs
>
Pictures & Videos.
2. Tap the picture you want to send as an email attachment.
3. Tap Tools
>
Send via Email to create an email message with the picture attached.
Slideshow of Pictures
You can view your pictures as a slideshow on your device. Pictures & Videos will display slides of the
pictures shown in thumbnail view with 5-second intervals between slides.
1. Tap
>
Programs
>
Pictures & Videos.
2. Tap the icon to view pictures as a slideshow.
3. Tap anywhere on the screen to display the Slideshow toolbar, which you can use to pause the
slideshow, rotate the view, and more.

15-10 SP70 User Manual
More Programs
Setting a Picture as Background
1. Tap
>
Programs
>
Pictures & Videos.
2. Tap the picture you want to set as the background.
3. Tap Tools
>
Set as Today Wallpaper.
15.6 Java
Java is a programming environment targeting various applications
running on mobile devices, such as games and useful applets.
Downloading Java applications may be charged or free of charge. For
free Java applications, download them from the Internet or WAP sites.
For charged Java applications, consult your mobile phone service
provider for purchase. To use Java, you need to subscribe to the GPRS
or LAN service from your mobile phone service provider, and make
sure that you have set up the GPRS or WLAN connection on the
Pocket PC Phone.
You can use the Java program to download Java games or
applications. Tap
>
Programs
>
Java.
15.7 File Explorer
File Explorer allows you to explore and manage the folders and files stored on the Pocket PC Phone or
storage card.
1. Tap
>
Programs
>
File Explorer.
2. Tap the folder list (labeled My Documents by default) and then
the folder that you want to view.
3. To open an item, tap it.
4. To quickly delete, rename, copy, or move an item, tap and hold.
Then, on the pop-up menu, tap Copy, Delete, or Rename.
• To select multiple items, tap and drag.

SP70 User Manual 15-11
More Programs
15.8 Calculator
You can use Calculator to perform any of the standard operations for which you would normally use a
handheld calculator.
1. Tap
>
Programs
>
Calculator.
2. Use the Calculator buttons or the input panel to enter numbers
and perform calculations.
• To clear the current calculation or the displayed number, tap
C.
• To clear the last digit entered in a multidigit entry, tap the
arrow to the right of the entry box.
• To clear memory, tap MC.
15.9 Pocket MSN
Pocket MSN on your Pocket PC Phone provides practically instant access to your up-to-date MSN Hotmail
Inbox, your MSN Messenger Contacts list, and options for customizing your Pocket MSN experience.
You need to connect the Pocket PC Phone to the Internet to access the Pocket MSN web site. (See
information in Chapter 8.)
Sign in to Pocket MSN
The sign-in process helps to maintain secure access to your MSN
Hotmail and MSN Messenger accounts.
1. To sign in to Pocket MSN, go to the Today screen, and then tap
Tap here to sign in to Pocket MSN.
2. Type the e-mail address and password you use to sign in to MSN
Mobile.
3. Tap Sign in.
MSN Messenger
MSN Messenger on your mobile device provides the same chat environment as MSN Messenger on your
desktop computer. These features include:
n Seeing who is online.
n Sending and receiving instant messages.
n Having an instant message conversation with a group of contacts.
n Telling contacts that you are unavailable.
n Blocking contacts from seeing your status or sending you messages.
Setting Up an Account
Before you can use MSN Messenger, you must set up the instant messaging account(s) to use. For MSN
Messenger Service, you must have a Microsoft Passport or Hotmail account. For Exchange Instant
Messaging, you must have an Exchange account.
To set up a Microsoft Passport account, go to http://www.passport.com. To set up a Hotmail account, go to
http://www.hotmail.com. To set up an Exchange account, see your network administrator.

15-12 SP70 User Manual
More Programs
1. Create a connection for your
Pocket PC Phone. (See Chapter 8 for
more information.)
2. In MSN Messenger, tap Menu > Options > Messenger.
3. Select Enable MSN Messenger Service. Your sign-in name
and password are established the first time you sign in to Pocket
MSN.
4. Select Enable MSN Messenger Service and/or Enable
Exchange Instant Messaging.
5. If necessary, select which account to sign in to first, under Sign
in using this account first.
Signing In and Out
1. Tap > Programs > MSN Messenger.
2. To sign in, tap anywhere on the screen. Follow the directions on the screen.
3. To sign out, tap Menu > Sign out.
15.10 IE Favorites
Tap Start>Programs>IE Favorites to access the IE Favorites main page.
IE Favorites provides several categories of links for quick access.
n POCKET IE
n WEBSITES
n FINANCE
n NEWS/MOVIES
n OPERATOR
n DOWNLOAD
n MUSIC
n PDA NEWS
15.11 Media Content
To access Media Content, tap Today Plus on the Today screen, and then tap the Media Content icon. Media
Content includes Music, Album, Media Player, Java and Wallpaper items.
The main page of Media Content is shown to the right.
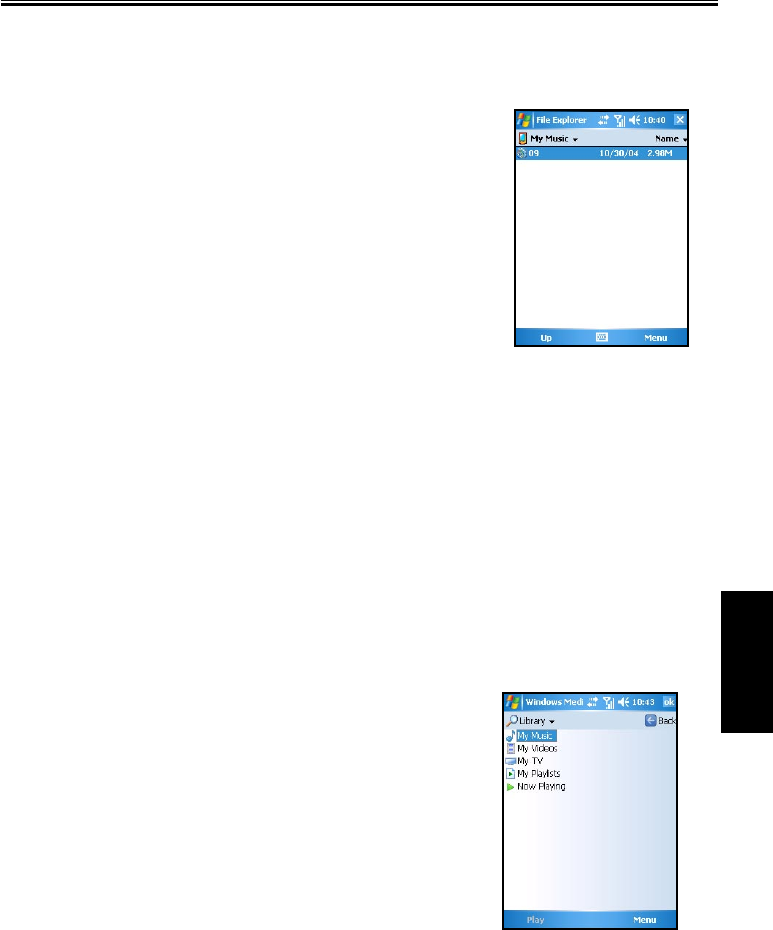
SP70 User Manual 15-13
More Programs
Media Content Items
Music
On the main page of Media Content, tap Music to quickly access the
contents in the My Device\My Documents\My Music folder.
Tap the desired item for playback. Your Pocket PC Phone will use
Windows Media Player to play the selected item.
For information on Windows Media Player, see Section 15.5.
Album
On the main page of Media Content, tap Album to quickly start
MyAlbum.
For information on MyAlbum, see Chapter 14.
Media Player
On the main page of Media Content, tap Media Player to quickly
start Windows Media Player.
For information on Windows Media Player, see Section 15.5.

15-14 SP70 User Manual
More Programs
Java
On the main page of Media Content, tap Java to quickly start the
Java program.
For information on Java, see Section 15.7.
Wallpaper
On the main page of Media Content, tap Wallpaper to quickly
access the setting items of the Today screen.
n Tap Appearance to change the theme picture of the Today
screen.
n Tap Items to set the items to be diaplayed on the Today
screen. You can also set the time for the Pocket PC Phone
to automatically return to the Today screen after a period of
inactivity (4 hours by default).
For information on Settings, see Chapter 6.
15.12 SIM Contacts
On your Pocket PC Phone, there can be two kinds of independent contact lists. One is stored in the Pocket PC
Phone’s memory by Microsoft Contacts; the other is stored in the SIM card. By default, you can use Contacts
to load the contact information stored in the Pocket PC Phone’s memory (see Chpater 4 for information on
Contacts), and use SIM Contacts to load the contact information stored in the SIM card.

SP70 User Manual 15-15
More Programs
Tap
>
Programs
>
SIM Contacts. When running SIM Contacts
for the first time after turning the Pocket PC Phone on, it may take a
few minutes to load the contact informaion.
After the loading is completed, you can tap Copy Now to copy your
contacts to Contacts.
15.13 Search
The Search feature on your Pocket PC Phone helps you quickly locate information.
1. Tap
>
Programs
>
Search.
2. Enter the text you want to find, and select a data type.
3. Tap Search to start the search.
4. Tap the desired item to open on the result list.
15.14 Games
Solitaire
The object of Solitaire is to use all the cards in the deck to build up the four suit stacks in ascending order,
beginning with the aces.
1. To open Solitaire, tap
>
Programs
>
Games
>
Solitaire.
2. A new game is started. You can also tap Menu > New Game on
the command bar to start a new game.

15-16 SP70 User Manual
More Programs
3. You can:
• To move a card to one of the stacks, drag the card. Build the row stacks in descending order, from
king to two, alternating between red and black cards.
• To display cards in the upper-left stack, tap the stack.
• In the row stacks, turn a card face-up by tapping it. You can move a king to an empty row stack.
• To undo a move, tap Menu > Undo.
Setting solitaire Options
To change the setting options, tap Menu
>
Options.
n Game Rules
• Draw selects one card or three cards for each draw.
• Scoring selects the Standard or Vegas scoring system, or no scoring.
• Time game enables the timing function.
• Display status shows the elasped time and scores of games.
• Keep cumulative score keeps a cumulative score when using the Vegas scoring system.
n Card Back
You can select a desired card back.
Bubble Breaker
To play Bubble Breaker, you need to align similar bubbles in order to form large blocks of bubbles before
bursting them. The more bubbles in the block before they are burst, the greater number of points you will
receive.
1. To open Bubble Breaker, tap
>
Programs
>
Games
>
Bubble Breaker.
2. Tap a bubble that is connected to other similar bubbles. Those
connected bubbles (at least two bubbles) will be highlighted,
and a new bubble will pop up displaying that block’s potential
bubble points.
3. Tap on your selection again in order to burst the bubbles. All
bubbles above your burst block will now fall down.
To take back the last move you have made, tap the icon.
4. To start a new game, tap Games
> New Game.
5. To view the statistics, tap Info
> Statistics.

SP70 User Manual 15-17
More Programs
Setting Bubble Breaker Options
To change the setting options, tap Game
> Options.
n Play Sounds sets whether or not you want Bubble Breaker to
make sounds.
n Confirm End Game sets Bubble Breaker to pop up a
confirmation dialog when the “End Game” menu item is
selected.
n Display Burst sets to display the burst of bubbles or not.
n Guest Mode plays the game without affecting the statistics
n Game Style selects one of the following game styles.
• Standard The default mode of play where there is a set
number of bubble that will not increase.
• Continuous In this style, whenever a vertical set of bubbles has been burst and the remaining
bubbles have shifted over to the right, a new randomly selected column of bubbles will pop up on
the left, thereby allowing a game to be played for an extended amount of time.
• Shifter In this style, when a set of bubbles has been burst, all remaining bubbles to the top and
left will shift down and to the right.
• MegaShift This style is a combination of the shifter and continuous styles in that bubbles will
shift down and to the right while empty columns will fill on the left.
n Breaker set changes the color of the bubbles.
15.15 Voice Commander
According to the command instructions, users may activate
applications, dial phone numbers, and inquire contacts or
conferences, etc., by voice commander.
15.16 Proles
Profiles allows you to select a desired ring tone setting that suits your
need.
The available Profiles options include: General, Silence, Meeting,
Outdoor, Car and Headset.
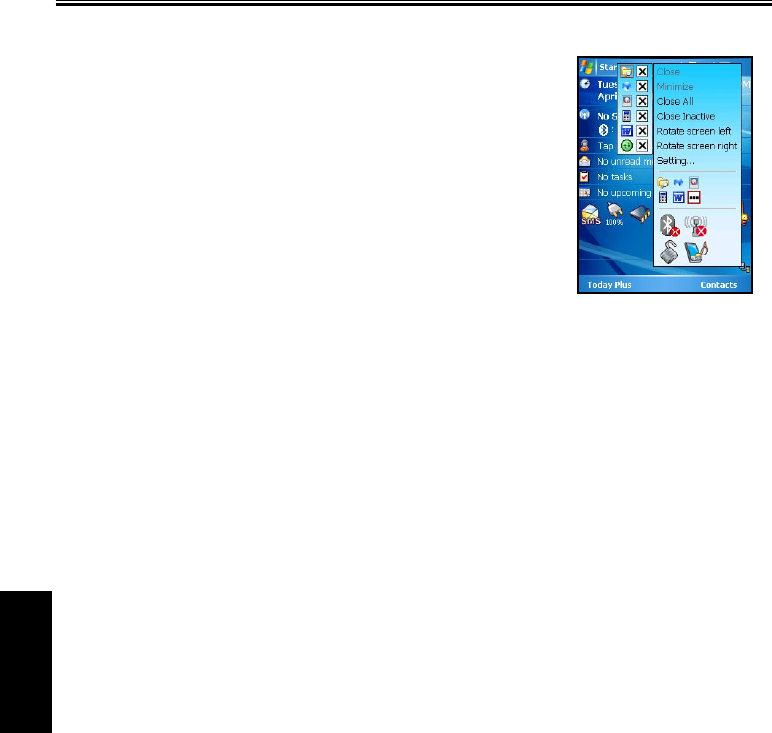
15-18 SP70 User Manual
More Programs
15.17 SmartX
Your Pocket PC Phone has a smart close (SmartX) function to
quickly close running programs.
Tap and hold on the top-right corner of the screen to display the
SmartX menu.
By default, the SmartX menu displays the following items:
n Close closes the current program.
n Minimize minimizes the current program.
n Close All closes all running programs.
n Close Inactive closes inactive programs.
n [program name] displays the running program(s).
n Settings displays the SmartX settings.
By default, the SmartX function is enabled. You can clear the
Enable Smart Close function item to disable the SmartX
function.
You can customize the displayed items on the SmartX menu.
The items for selection include:
• Auto close
• Close All
• Close Inactive
• Running Program
• Rotate screen left (disabled by default)
• Rotate screen right (disabled by default)
• Settings

Chapter 16
Troubleshooting
16.1 Resetting the Pocket PC Phone
16.2 Restoring Factory Defaults
16.3 Power Problems
16.4 Memory Problems
16.5 Screen Problems
16.6 Connection Problems
16.7 Hardware Problems
16.8 Software Problems
16.9 Other Problems

16-2 SP70 User Manual
Troubleshooting
16.1 Resetting the Pocket PC Phone
Occasionally, you may need to reset your Pocket PC Phone when your Pocket PC Phone stops
responding (it appears to be “frozen” or “locked up”).
1. Remove the miniSD card (if installed).
2. Use the stylus to press the Reset button on the rear of your Pocket PC Phone.
16.2 Restoring Factory Defaults
In some cases, you may need to restore your Pocket PC Phone to the factory default state by clearing
the memory of your Pocket PC Phone. For example, you should clear the memory:
n When your Pocket PC Phone cannot be powered on, even if you remove and then re-install the
battery.
n When you forget your password.
n When you want to remove the additional programs that you installed by yourself.
Before clearing the Pocket PC Phone memory and restoring the factory default state, make sure that
you have copied your data to the desktop computer or miniSD card.
• Pressing the Power key, Reset button and Call button at the same time will restore the
factory defaults, and clear the data and programs in the memory.You need to reinstall the
additional programs.
16.3 Power Problems
Problem Solution
The device cannot
be powered on when
using battery power.
The remaining battery power may be too low to run your SP70. Connect the
AC charger to your SP70 and to external AC power. Then, turn on your SP70.
Battery runs out of
power quickly.
You might be using your SP70 in a manner that drains power quickly. Use
SP70 with the AC adaptor.
SP70 keeps showing
the low battery
power messages.
Make sure
SP70
is fully charged. In such cases, backup your data via Activesync,
restore the device to the factory default state (see Section 16.1), and then fully
charge the device. If the problem persists, send your SP70 to the authorized dealer
for inspection.
Battery does not
work correctly.
When the battery fails to charge and discharge, and it is not man-made
damage and still in the warranty period, send it to the authorized dealer for
replacement.
SP70 User Manual 16-3
Troubleshooting
16.4 Memory Problems
Problem Solution
SP70 sends out
warnings of
insufficient memory.
Please perform the following:
n Delete files that you no longer need: tap > Programs > File Explorer.
n Delete programs that you no longer need: tap > Settings > System >
Remove Programs.
n Delete all files and history in Internet Explorer: tap > Programs >
Internet Explorer > Menu > Tools > Options > Memory.
n Stop running programs: tap > Settings > System > Memory >
Running Programs; or tap on the Today screen.
n Save data to a miniSD card.
How to find out the
memory capacity
after resetting?.
Tap > Settings > System > Memory > Main.
16.5 Screen Problems
Problem Solution
Screen is off. n Connect the AC charger to your device and to external AC power.
n Remove the battery and then reinstall it.
Screen responds
slowly.
n The battery power may be low. Connect the AC charger to your device and
to external AC power.
n Probably too many programs are in use. Stop the running programs: tap
> Settings > System > Memory > Running Programs.
Screen is not clear
or is hard to read.
n Turn on the backlight of the display.
n Move to a location with enough light.
Inaccurate response
to stylus taps.
n Realign the touch panel: tap > Settings > System > Screen > Align
Screen.
n If there’s a screen protective film supplied, please apply it firmly and
properly on the screen.
16.6 Connection Problems
Problem Solution
Synchronization
with the desktop
computer fails.
n Make sure that you have installed the correct version of ActiveSync on
your desktop computer. ActiveSync version 4.1 or later is recommended.
n Make sure that the cable connection is correct.
n Disconnect and then re-connect the cable.
n Remove the driver for SP70 and ActiveSync on the desktop computer,
and then reinstall them. Do not connect the cable during ActiveSync
installation.
Using infrared to
beam information
fails.
n Transfer only one file, or no more than 25 contact cards, at a time.
n When using IR, make sure nothing is between the two IR ports.
n Adjust the room lighting or move to another location (some types of light
interfere with beaming).
Network connection
is not working
properly.
n Make sure the network connection settings are correct: tap > Settings
> Connections > Connections.
n Consult the network administrator if the user name and password are
correct.

16-4 SP70 User Manual
Troubleshooting
Problem Solution
Connection to the
desktop computer
automatically
disconnects.
Disconnect the USB cable from the desktop computer, and then re-connect
it. Allow the desktop computer to find SP70 again. If the network is still
automatically disconnected, send SP70 to an authorized dealer for inspection.
If necessary, the dealer will update the firmware of SP70 for you. Make sure
to back up your data first because updating firmeare will restore the factory
default state.
The device cannot
receive various
beamed information
from other devices
via infrared. Only
contact information
and picture
exchange could
work.
Infrared information exchange is mainly for contact information exchange
with other mobile devices. Currently, most traditional mobile phones could
only exchange contact information and group pictures. The resources and
compatibility of information exchange with SP70 is still limited.
However, regarding data sharing and program installation, you can still make
use of the connection to the desktop compouter.
When the wireless
network is
unavailable
n Please make sure the wireless network is enabled.
n Check whether there’s any wireless network available and ensure
messages are transmitted correctly.
When Bluetooth is
not recognized
Please ensure both identification codes are correct.
16.7 Hardware Problems
Problem Solution
What is the CPU
and memory of
SP70?
The CPU of your device is ARM iMX21 350MHz, with memory containing
128MB RAM.
How to clean the
camera lens?
There is an acrylic material protecting the camera lens inside. Therefore, you
only need to clearn the external acrylic material.
What miniSD cards
are compatible with
SP70?
SP70 supports miniSD cards manufactured by SanDisk, KingMAX,
Transcend, A-DaTa, and so on.
The infrared
information
exchange only
applies to contact
information and
picture receipt?
Infrared information exchange is mainly for contact information exchange
with other mobile devices. Currently, most traditional mobile phones could
only exchange contact information and group pictures. The resources and
compatibility of information exchange with SP70 is still limited.
SP70 may often connect to the desktop computer using the USB cable for
data sharing and program installation. Due to the above fact, the USB cable is
supplied as a standard accessory for your use.

SP70 User Manual 16-5
Troubleshooting
16.8 Software Problems
Problem Solution
Is there a limit for
assigning ring tone
groups?
No, there is no such limit on your SP70.
Does SP70 supoport
Java and Bluetooth?
1. Yes, Java (MIDP 2.0) is supported.
2. Yes, the device supports Bluetooth.
How to play back
MPEG files from
desktop computer
on SP70?
To play back MPEG files from the desktop computer, you need to use
Microsoft codecs to transfer them for playback on SP70.
How to use key
words to find a
contact?
Take “John” for example: enter John.
Cannot log in to
MSN Messenger
from SP70?
If your device is not updated since October 15, 2003, you will need to
updated the your device and MSN Messenger. Connect to Microsoft Web site
for updates. After updating, press the Reset button to complete the update
procedure. Then restart SP70 and log in to MSN Messenger.
How to copy MP3
files to SP70?
You can copy files from the desktop computer to your SP70 using Activesync
or Card Reader. See ActivSync Help on the desktop computer.
How to set up the
GPRS configuratoin
on SP70?
Tap > Settings > Connections > GPRS Auto Configuration. Select Auto
Configuration, select your mobile phone service provider, and then tap OK.
Why is it not
working to copy
data and MP3 files
from the supplied
miniSD card to a
newly-purchased
miniSD card?
You cannot copy files between two miniSD cards. Follow this procedure:
1. Format the new card.
2. Install ActiveSync using the supplied CD on the desktop computer.
3. Use ActiveSync to copy files from the supplied miniSD card to the desktop
computer, and then copy those files from the desktop computer to the new
card.
Some MP3 files
cannot play back on
SP70.
Your SP70 supports the standard MP3 format only. You need to purchase an
audio format transfer program to transfer files using non-standard codecs.
SP70 can send but
cannot receive text
messages.
There may be too many text messges stored in SP70. Clear the non using text
messages in SP70 for receiving new text messages.
How does SP70
connect to the
Internet via the
desktop computer?
Connect to the desktop computer using the USB cable. In ActiveSync on
the desktop computer, click File > Connection Settings > This computer
connects to, and change the connection to Internet.
Failure occurs
during program
installation on SP70.
The possible reasons are:
1. There is not enough memory. Delete the programs you no longer need.
2. There are some running programs.

16-6 SP70 User Manual
Troubleshooting
Problem Solution
SP70 cannot switch
to the GSM mode
from the flight
mode.
After switching to the flight mode, wait for 20 seconds to one minute before
switching back to the GSM mode.
Can I save the
text messages and
contact information
to a miniSD card?
Due to the limits of the operating system, you cannot save the text messages
and contact information to a miniSD card.
Why can’t I zoom
in/out and change
brightness when
using the camera
feature?
Please close the VideoCam application, and check if the zoom in/out keys and
navigation keys are working normally.
Note that the zoom in/out function is not available in DV mode.
16.9 Other Problems
Problem Solution
Some peripheral
devices are not
compatible with
SP70.
Your SP70 uses the new Windows Mobile Version 5.0 operating system. The
drivers of some peripheral devices may not support the operating system.
Contact the dealers of the peripheral devices to see if they can provide drivers
supporting the operating system.
The programs
are missing after
removing the
battery.
When you remove the battery for over five minutes or reset SP70, it will
restore the factory default state. All data stored in the memory will be erased.
You are strongly recommended to back up your data regularly.
SP70 is broken, and
I cannot access the
data.
If SP70 is broken and unable to restart, you have to restore it to the factory
default state and all unsaved data will be lost. To protect the data on your
SP70 (including all files, system settings and additional programs), we
strongly recommend you to back up your data regularly.
SP70 retains the
contact information
from the old SIM
card after changing
the SIM card.
SP70 loads the contact information from the SIM card to SP70. When
changing the SIM card, SP70 will compare the contact information of the
new SIM card with the old one, and then remove the old information. Wait for
about two minutes for the comparison and deletion to complete. Otherwise,
the old contact information may not be deleted. In this case, insert another
SIM card into SP70. Turn the Pocet PC Phone on and wait for two minutes
for SP70 to load and update the contact information. Then replace the old
SIM card and wait for two minutes for SP70 to delete old contact information
completely.

Chapter 17
Appendix
17.1 European Declaration of Conformity

17-2 SP70 User Manual
Appendix
17.1 European Declaration of Conformity
Products with the CE marking comply with Radio & Telecommunication Terminal Equipment Direc-
tive (R&TTE) (1995/5/EEC), the Electromagnetic Compatibility Directive (89/336/EEC) and the
Low Voltage Directive (73/23/EEC) issued by the Commission of the European Community.
Compliance with these directives implies conformity to the following European Standards:
n EN 60950 (IEC 60950)
Safety of information technology equipment.
n ETSI EN 301 511
Candidate Harmonized European Standard (Telecommunications series) Global System for
Mobile communications (GSM); Harmonized standard for mobile stations in the GSM 900
and DCS 1800 bands covering essential requirements under article 3.2 of the R&TTE directive
(1999/5/EC).
n ETSI EN 301 489-1
Electronic compatibility and Radio spectrum Matters, ElectroMagnetic Compatibility (Common
technical requirements); Part 1: Common Techinal Requirements.
n ETSI EN 301 489-7
Electro Magnetic Compatibility and Radio spectrum Matters (ERM); Electro Magnetic Compat-
ibility (EMC) standard for radio equipment and services; Part 7: Specific conditions for mobile
and portable radio and ancillary equipment of digital cellular radio telecommunications systems
(GSM and DCS).
n ETSI EN 301 489-17
Electronic compatibility and Radio spectrum Matters, ElectroMagnetic Compatibility (Specific
conditions for Wideband data and HIPERLAN equipment); Part 17: Specific Requirements for
Wideband Data and Hyperlan.
n ETSI EN 300 328
Electronic compatibility and Radio spectrum Matters, Wideband Transmission system; Data
transmission equipment operating in the 2.4GHz ISM band and using spread spectrum modula-
tion techniques.
n GSM11.10
n EN50360, EN50361 for SAR
Specific Absorption Rate (SAR).
According to the testing standards of the Directorate General of Telecommunications (DGT) of the
Ministry of Transportation and Communications (MOTC), this product has passed the following tests:
1. PLMN01 GSM900 and DCS1800 Mobile Equipment Technical Specifications.
2. CN13438 Limits and Methods of Measurement of Radio Interference Characteristics of
Information Technology Equipment.
3. SAR (GPRS:900/1800MHz) (OET65) Specific Absorption Rate (SAR) Test.
4. SAFETY LVD/EN60950 Safety of Information Technology Equipment.
5. RTTE01 2.4GHz Radio-frequency Telecommunications Terminal Equipment Technical
Specifications.
The SAR limit set by the FCC is 1.6W/kg; the highest SAR value for this product is 0.235W/Kg
@10g.
WARNING: To reduce the influences of the radio waves, please use this product carefully and
properly.
This product meets the government’s requirements for exposure to radio waves.

SP70 User Manual 17-3
Appendix
FCC Regulations:
n This device complies with part 15 of the FCC Rules. Operation is subject to the following two condi-
tions: (1) This device may not cause harmful interference, and (2) this device must accept any inter-
ference received, including interference that may cause undesired operation.
n This device has been tested and found to comply with the limits for a Class B digital device, pursu-
ant to Part 15 of the FCC Rules. These limits are designed to provide reasonable protection against
harmful interference in a residential installation. This equipment generates, uses and can radiated
radio frequency energy and, if not installed and used in accordance with the instructions, may cause
harmful interference to radio communications. However, there is no guarantee that interference will
not occur in a particular installation If this equipment does cause harmful interference to radio or
television reception, which can be determined by turning the equipment off and on, the user is encour-
aged to try to correct the interference by one or more of the following measures:
- Reorient or relocate the receiving antenna.
- Increase the separation between the equipment and receiver.
- Connect the equipment into an outlet on a circuit different from that to which the receiver is con-
nected.
- Consult the dealer or an experienced radio/TV technician for help.
Changes or modifications not expressly approved by the party responsible for compliance could void the
user’s authority to operate the equipment.

17-4 SP70 User Manual
Appendix
RF Exposure Information (SAR)
This device meets the government’s requirements for exposure to radio waves. This device is designed
and manufactured not to exceed the emission limits for exposure to radio frequency (RF) energy set by the
Federal Communications Commission of the U.S. Government.
The exposure standard for wireless devices employs a unit of measurement known as the Specific Absorp-
tion Rate, or SAR. The SAR limit set by the FCC is 1.6W/kg. *Tests for SAR are conducted using standard
operating positions accepted by the FCC with the device transmitting at its highest certified power level in
all tested frequency bands. Although the SAR is determined at the highest certified power level, the actual
SAR level of the device while operating can be well below the maximum value. This is because the device
is designed to operate at multiple power levels so as to use only the poser required to reach the network. In
general, the closer you are to a wireless base station antenna, the lower the power output.
The highest SAR value for the device as reported to the FCC when tested for use at the ear is 0.191 W/
kg@1g for PCS Head SAR and when worn on the body, as described in this user guide, is 0.651 W/kg@1g
for PCS Body SAR and 1.33 W/kg@1g for WLAN Body SAR. (Body-worn measurements differ among
device models, depending upon available enhancements and FCC requirements.)
While there may be differences between the SAR levels of various devices and at various positions, they all
meet the government requirement.
The FCC has granted an Equipment Authorization for this device with all reported SAR levels evaluated
as in compliance with the FCC RF exposure guidelines. SAR information on this device is on file with the
FCC and can be found under the Display Grant section of http://www.fcc.gov/oet/fccid after searching on
FCC ID: ESN-SP70.
For body worn operation, this device has been tested and meets the FCC RF exposure guidelines for use with
an accessory that contains no metal and the positions the handset a minimum of 1.5 cm from the body. Use
of other enhancements may not ensure compliance with FCC RF exposure guidelines. If you do no t use a
body-worn accessory and are not holding the device at the ear, position the handset a minimum of 1.5 cm
from your body when the device is switched on.