Kinpo Electronics SP70 SMART- PHONE WITH WLAN, BT, AND GSM/ GPRS User Manual manual 1 of 2
Kinpo Electronics Inc SMART- PHONE WITH WLAN, BT, AND GSM/ GPRS manual 1 of 2
Contents
manual 1 of 2

SP70R Pocket PC Phone
User Manual

i
Precautions
n Use only the AC adapter and battery supplied with the Pocket PC Phone, and keep them away
from high temperature and a humid environment. Using other AC adapters or batteries may cause
malfunction or danger.
n Should the battery becomes deformed, please do not use to avoid danger.
n Removing the battery incorrectly may cause danger.
n Use the battery according to the instructions in the document.
n Recycle used batteries. Dispose of used batteries according to the instructions.
n Do not disassemble the Pocket PC Phone by yourself. Only the authorized service personnel can do
that.
n Keep the Pocket PC Phone and its accessories in a dry place.
n Do not knock, shake, or toss the Pocket PC Phone; otherwise it may cause leakage, overheating, or
fire.
n Do not touch or scratch the screen surface with hard objects.
n Do not use detergent on the screen surface. Use the special clean cloth to clean the screen surface.
n Avoid placing the Pocket PC Phone in a location subject to high humidity, extreme temperature or
heavy dust.
n Keep the Pocket PC Phone away from direct sunlight to avoid leakage, overheating, or fire.
n Heavy weight pressure or dropping of device may cause the damage of panel which is not covered by
the warranty.
This manual is created by professional service people with assistance from the engineering team. Its content is helpful
for rst-time users to understand the operations and details of the Pocket PC Phone. In addition to this manual, a Quick
Start Guide and other documentation are also provided for users of this products. Read these documents carefully and
following the instructions to use this Pocket PC Phone. You will enjoy using it.
This manual does not offer any warranty. The manufacturer is not liable for the printing errors, accuracy of the information
provided and improvement on the Pocket PC Phone. The manual content is subject to change without notice.

ii
Specications
Item Description
Network & Functions GSM 900/1800/1900 MHz, GPRS Class B / Multi-slot Class 10,
Conference Call, Hands Free, Speed Dialing, Phone Recording,
Voice Dialing, Caller ID, Prole...
Display 2.8” 262,144 colors LTPS TFT LCD, 240x320 Pixels
DSC/DV
1.3 Mega Pixels Camera, up to 2.0 Mega Pixels via software
enhancement, pack 8x linear digital zoom in/out, LED Flash,
supports 1600*1280, 1280*1024, 640*480, 320*240, 176*144.
Recording rate up to 30 frames per second
CPU Freescale i.MX21
Operating System Microsoft Windows Mobile 5.0 Pocket PC Phone Edition
Memory 128MB Flash ROM, 64MB SDRAM
Size & Weight 109.4(L) x 55.7(W) x 21.85(H) mm, 142g (With battery)
Battery & Capacity 1300mAh Li-Polymer battery; Talk-time 5 hrs*, Standby 190 hrs
(max.)*
Input Method Stylus/Soft keyboard (supports Block Recognizer/Keyboard/Letter
Recognizer/Transcriber)
Connectivity IrDA, USB, Bluetooth v1.2, WLAN 802.11 b
Expansion Slot miniSD
Ringtone
Supports up to 192 polyphony (Polyphonic, Monophonic, AMR
(Narrow Band .awb), MIDI (rmi, mmf, mid), MP3, WAV, WMA,
AAC, AAC+
Support Java, SMS, MMS, E-mail
Audio Format MP3, WAV, SMAF, MIDI, AMR, AAC, AAC+, WMA, MMF, RMI
Video Format MPEG4, H.263, 3GP, ASF, WMV
Image Format JPEG, PNG, BMP, GIF
*Actual talk-time and standby time vary due to local network condition and usage behavior.
*Acutal specification are in accordance with the device, deviations may occur without notice.

iii
NOTE
Kinpo Electronics, Inc. (herein after referred to as “Kinpo”) is the sole owner of this product, including
its accessories, software and hardware. No imitation, copy, plagiarism or translation is allowed without
Kinpo’s permission.
All brand names, product names, and pictures used in this user manual are trademarks, registered trademarks,
or trade name of their respective holders.
©Copyright 2006 Kinpo Electronics, Inc. All rights reserved. No reproduction is allowed.

iv
Customer Service Information
Congratulations on purchasing SP70R Pocket PC Phone. You will enjoy a whole new experience
using it.
For further information on using SP70R, please contact our customer service center:
e-mail: service@iDo-mobile.com
Website: www.iDo-mobile.com

v
Table of Contents
Precautions .................................................................................................................i
Specifications ............................................................................................................ ii
1 Getting Started .............................................................................. 1-1
1.1 Package Content .......................................................................................... 1-2
1.2 Views of SP70R ........................................................................................... 1-3
1.3 Installing the SIM Card and Battery ............................................................ 1-5
1.4 Charging the Battery.................................................................................... 1-5
1.5 Turning the Pocket PC Phone On and Off................................................... 1-6
Initial Startup ............................................................................................... 1-6
Initializing and Calibrating the Pocket PC Phone ....................................... 1-6
Turning Off .................................................................................................. 1-7
1.6 Expanding the Pocket PC Phone ................................................................. 1-7
Using miniSD Cards .................................................................................... 1-7
2 Basic Operation............................................................................. 2-1
2.1 Using the Stylus........................................................................................... 2-2
2.2 Input Methods .............................................................................................. 2-2
2.3 Using the Navigation Keys .......................................................................... 2-2
2.4 Today Screen ............................................................................................... 2-2
2.5 Volume Adjustment ..................................................................................... 2-3
2.6 Navigation Bar and Command Bar ............................................................. 2-3
2.7 Status Icons .................................................................................................. 2-4
2.8 Using Programs ........................................................................................... 2-4
2.9 Shortcut Menus ............................................................................................ 2-6
2.10 Notifications ................................................................................................ 2-6
2.11 Entering Information ................................................................................... 2-6
Using the Input Panel .................................................................................. 2-7
Writing on the Screen .................................................................................. 2-8
Drawing on the Screen ................................................................................ 2-9
Using My Text ............................................................................................. 2-9
3 Using the Phone Feature .............................................................. 3-1
3.1 Making a Call .............................................................................................. 3-2
Using the On-Screen Phone Keypad ........................................................... 3-2
From Contacts ............................................................................................. 3-2
From Call History ........................................................................................ 3-3
Using Speed Dial ......................................................................................... 3-3
3.2 Answering a Call ......................................................................................... 3-3
3.3 Using the Speakerphone and Muting a Call ................................................ 3-4
Speakerphone .............................................................................................. 3-4
Muting ......................................................................................................... 3-4
3.4 Taking Notes During a Call ......................................................................... 3-5
3.5 Creating a Speed Dial Entry ........................................................................ 3-6

vi
From Phone ................................................................................................. 3-6
From Contacts ............................................................................................. 3-6
3.6 Call History ................................................................................................. 3-7
Changing the Call History View .................................................................. 3-7
Call Timers .................................................................................................. 3-7
3.7 Changing Phone Settings............................................................................. 3-8
Changing the Ring Type .............................................................................. 3-8
Changing the Ring Tone .............................................................................. 3-8
Changing the Keypad Tone ......................................................................... 3-9
Securing Your Phone ................................................................................... 3-9
Changing Phone Service Settings ................................................................ 3-9
Changing Phone Network Settings ............................................................ 3-10
3.8 SIM Contacts ............................................................................................. 3-10
3.9 Turning the Phone On and Off .................................................................. 3-11
4 Contacts ........................................................................................ 4-1
4.1 Creating a Contact ....................................................................................... 4-2
For Microsoft Contacts ................................................................................ 4-2
For SIM Card ............................................................................................... 4-3
4.2 Managing Contacts ...................................................................................... 4-3
Editing a Contact ......................................................................................... 4-3
Deleting a Contact ....................................................................................... 4-3
4.3 View Modes ................................................................................................. 4-4
4.4 Changing List View Settings ....................................................................... 4-4
5 Recording Messages .................................................................... 5-1
5.1 Recording Messages in Notes ..................................................................... 5-2
Creating a Recording ................................................................................... 5-2
Recording Formats ...................................................................................... 5-2
5.2 AMR Recorder ............................................................................................ 5-3
6 Customizing Personal Settings ..................................................... 6-1
6.1 Buttons......................................................................................................... 6-2
6.2 Input ............................................................................................................. 6-2
6.3 Lock ............................................................................................................. 6-3
6.4 Menus .......................................................................................................... 6-3
6.5 MSN Options ............................................................................................... 6-3
6.6 Owner Information ...................................................................................... 6-4
6.7 Phone ........................................................................................................... 6-4
6.8 Sounds & Notifications ............................................................................... 6-4
6.9 Today ........................................................................................................... 6-5
6.10 Today Plus ................................................................................................... 6-5
6.11 Voice Commander ....................................................................................... 6-5
7 Customizing System Settings ....................................................... 7-1
7.1 About ........................................................................................................... 7-2

vii
7.2 Backlight ..................................................................................................... 7-2
7.3 Certificates ................................................................................................... 7-3
7.4 Clock & Alarms ........................................................................................... 7-3
7.5 Error Reporting ............................................................................................ 7-4
7.6 Memory ....................................................................................................... 7-4
7.7 Microphone Environment ............................................................................ 7-5
7.8 Power ........................................................................................................... 7-5
7.9 Regional Settings ......................................................................................... 7-5
7.10 Remove Programs ....................................................................................... 7-6
7.11 Screen .......................................................................................................... 7-6
7.12 System Information ..................................................................................... 7-6
7.13 Wake Up Screen .......................................................................................... 7-8
7.14 SmartX ......................................................................................................... 7-8
7.15 Ring Tone .................................................................................................... 7-8
8 Getting Connected ........................................................................ 8-1
8.1 GPRS Auto Configuration ........................................................................... 8-2
8.2 Beam ............................................................................................................ 8-2
Sending Information .................................................................................... 8-2
Receiving Information ................................................................................. 8-3
8.3 Bluetooth ..................................................................................................... 8-3
Turning on and off Bluetooth ...................................................................... 8-3
Bluetooth Information Exchange ................................................................ 8-3
Bonding with Other Devices ....................................................................... 8-4
8.4 Connections ................................................................................................. 8-4
Connecting to the Internet ........................................................................... 8-5
Connecting to Work ..................................................................................... 8-5
Setting up VPN Server Connections ........................................................... 8-6
Setting up Proxy Server Settings ................................................................. 8-6
8.5 Wireless Manager ........................................................................................ 8-7
Connection to the WLAN Network ............................................................. 8-7
Setting up Proxy Server Settings ................................................................. 8-9
9 Internet Explorer............................................................................ 9-1
9.1 Using Internet Explorer ............................................................................... 9-2
Sending a Link via Email ............................................................................ 9-2
9.2 Viewing Favorites ........................................................................................ 9-2
Synchronizing a Favorite Link .................................................................... 9-2
Synchronizing a Mobile Favorite ................................................................ 9-3
9.3 Changing Settings........................................................................................ 9-3
10 Microsoft Pocket Outlook ............................................................ 10-1
10.1 Calendar ..................................................................................................... 10-2
Creating an Appointment ........................................................................... 10-2
View Modes ............................................................................................... 10-2

viii
Using the Calendar Summary Screen ........................................................ 10-3
Sending Meeting Requests ........................................................................ 10-3
10.2 Tasks .......................................................................................................... 10-4
Creating a Task .......................................................................................... 10-4
Using the Tasks Summary Screen ............................................................. 10-4
10.3 Notes .......................................................................................................... 10-5
Creating a Note .......................................................................................... 10-5
Viewing Notes ........................................................................................... 10-5
10.4 Messaging (Outlook, SMS, MMS)............................................................ 10-5
Synchronizing Outlook Email Messages .................................................. 10-6
Connecting to a Mail Server ...................................................................... 10-6
Downloading Messages from the Server ................................................... 10-7
Reading and Responding to Messages ...................................................... 10-8
Composing and Editing a Message ........................................................... 10-9
Message Folders ...................................................................................... 10-11
10.5 MMS Messages ....................................................................................... 10-13
11 Microsoft ActiveSync ................................................................... 11-1
11.1 Installing Microsoft ActiveSync ................................................................ 11-2
11.2 Connecting to Your Desktop Computer ..................................................... 11-3
11.3 Synchronizing with Your Desktop Computer ............................................ 11-3
11.4 Synchronizing Directly with Exchange Server ......................................... 11-4
11.5 Changing the Synchronization Schedule ................................................... 11-4
11.6 Backup and Restore ................................................................................... 11-4
11.7 PC Setting .................................................................................................. 11-5
12 Today Plus................................................................................... 12-1
12.1 Programs .................................................................................................... 12-2
12.2 Media Content ........................................................................................... 12-2
12.3 Games ........................................................................................................ 12-2
12.4 Phone Records ........................................................................................... 12-3
12.5 Settings ...................................................................................................... 12-3
13 VideoCam ................................................................................... 13-1
13.1 Using the Camera ...................................................................................... 13-2
Taking a Picture ......................................................................................... 13-2
Taking Continuous Pictures ....................................................................... 13-3
13.2 Using the DV ............................................................................................. 13-3
13.3 Changing VideoCam Settings .................................................................... 13-4
Standard Settings ....................................................................................... 13-4
Camera Settings ......................................................................................... 13-4
Digital Video Settings ................................................................................ 13-5
14 Using MyAlbum ........................................................................... 14-1
14.1 Starting MyAlbum ..................................................................................... 14-2
14.2 Opening a Picture or Video ....................................................................... 14-2

ix
14.3 Editing Pictures ......................................................................................... 14-3
14.4 Using the FaceMagic Feature .................................................................... 14-3
14.5 Using Effects ............................................................................................. 14-4
Painting ...................................................................................................... 14-4
Effect ......................................................................................................... 14-4
Frame ......................................................................................................... 14-4
Stamp ......................................................................................................... 14-5
Adjustment ................................................................................................ 14-5
Note ........................................................................................................... 14-5
14.6 Sending Files ............................................................................................. 14-6
14.7 View Modes ............................................................................................... 14-6
15 More Programs ........................................................................... 15-1
15.1 Word Mobile .............................................................................................. 15-2
Creating a Document ................................................................................. 15-2
Opening an Existing Document ................................................................ 15-2
15.2 Excel Mobile ............................................................................................. 15-2
Creating a Workbook ................................................................................. 15-2
Opening an Existing Workbook ................................................................ 15-3
15.3 PowerPoint Mobile .................................................................................... 15-3
15.4 Windows Media Player ............................................................................. 15-3
Starting Windows Media Player ................................................................ 15-3
Screens and Menus .................................................................................... 15-4
Libraries ..................................................................................................... 15-5
Updating a Library .................................................................................... 15-5
Playback .................................................................................................... 15-6
Controls ..................................................................................................... 15-6
Playing an Item on a Network ................................................................... 15-7
Playlists ..................................................................................................... 15-7
Synchronization ......................................................................................... 15-7
Copying Files to Your Pocket PC Phone ................................................... 15-7
Licenses and Protected Files ..................................................................... 15-8
Changing Windows Media Player Settings ............................................... 15-8
15.5 Pictures & Videos ...................................................................................... 15-9
Viewing Pictures and Videos ..................................................................... 15-9
Sending Pictures and Videos ..................................................................... 15-9
Slideshow of Pictures ................................................................................ 15-9
Setting a Picture as Background .............................................................. 15-10
15.6 Java .......................................................................................................... 15-10
15.7 File Explorer ............................................................................................ 15-10
15.8 Calculator ................................................................................................ 15-11
15.9 Pocket MSN ............................................................................................ 15-11
Sign in to Pocket MSN ............................................................................ 15-11
MSN Messenger ...................................................................................... 15-11
15.10 IE Favorites .............................................................................................. 15-12

x
15.11 Media Content ......................................................................................... 15-12
Media Content Items ............................................................................... 15-13
15.12 SIM Contacts ........................................................................................... 15-14
15.13 Search ...................................................................................................... 15-15
15.14 Games ...................................................................................................... 15-15
Solitaire ................................................................................................... 15-15
Bubble Breaker ........................................................................................ 15-16
15.15 Voice Commander ................................................................................... 15-17
15.16 Profiles ..................................................................................................... 15-17
15.17 SmartX ..................................................................................................... 15-18
16 Troubleshooting .......................................................................... 16-1
16.1 Resetting the Pocket PC Phone ................................................................. 16-2
16.2 Restoring Factory Defaults ........................................................................ 16-2
16.3 Power Problems ......................................................................................... 16-2
16.4 Memory Problems ..................................................................................... 16-3
16.5 Screen Problems ........................................................................................ 16-3
16.6 Connection Problems ................................................................................ 16-3
16.7 Hardware Problems ................................................................................... 16-4
16.8 Software Problems .................................................................................... 16-5
16.9 Other Problems .......................................................................................... 16-6
17 Appendix ..................................................................................... 17-1
17.1 European Declaration of Conformity .................................................... 17-2

Chapter 1
Getting Started
1.1 Package Content
1.2 Views of the Pocket PC Phone
1.3 Installing the SIM Card and Battery
1.4 Charging the Battery
1.5 Turning the Pocket PC Phone On and Off
1.6 Expanding the Pocket PC Phone

SP70R User Manual 1-2
Getting Started
1.1 Package Content
Congratulations on purchasing your Pocket PC Phone. Its powerful features and functions help you manage
effectively your most important business and personal information. You can also use the Pocket PC Phone
to make phone calls as well as send or receive emails.
Please verify that you have the items listed below as soon as you unpack your Pocket PC Phone box. If any
item is damaged or missing, notify your dealer immediately.
n SP70R Pocket PC Phone
n Battery
n Stylus (x2)
n USB cable plus USB connector
n AC charger
n Stereo earphone
n Pouch
n Getting Started Disc
n User Manual and Quick Start Guide
1-3 SP70R User Manual
Getting Started
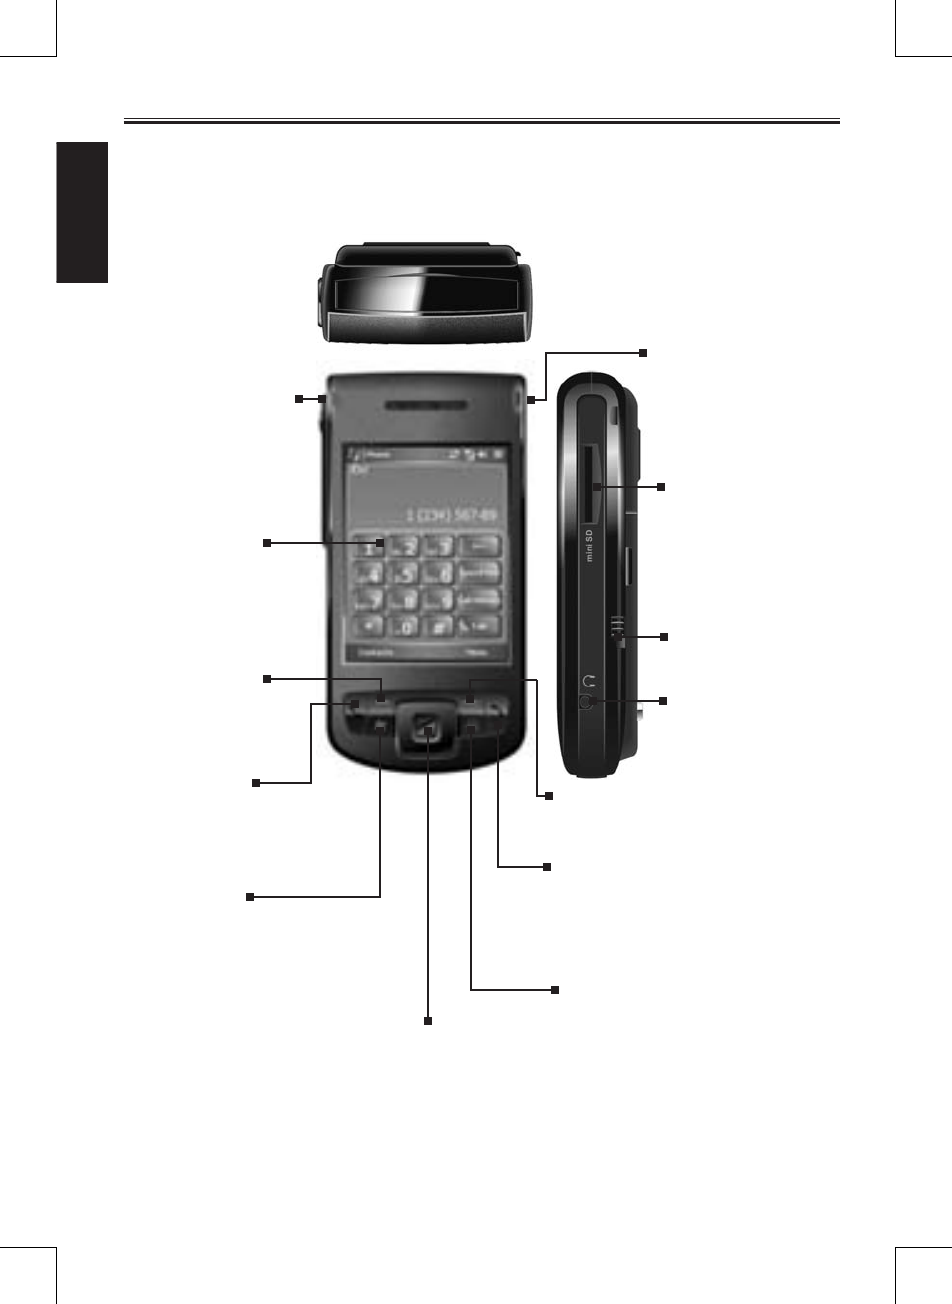
1.2 Views of SP70R
OK Button
Functions as “X” or “OK” located at the
top-right corner of the screen.
Hook Button
Ends or rejects a call by using th key.
Left Soft Key
Press to perform the
command shown
on the bottom-left
corner of the screen.
Navigation Keys
Includes five direction keys for
moving up, down, left or right, and
enter/confirm function.
Call Button
Makes or answers a
phone call.
AC Power Indicator
miniSD Slot
Insert a miniSD card
here.
Battery Switch
Slide the latch to
remove the battery.
Earphone Jack
Right Soft Key
Press to perform the command shown on
the bottom-right corner of the screen.
Start Menu
Button
Displays the Start
menu.
Touch Panel
GSM/Notication
Indicator
Indicates the GSM
signal status and
notifications.
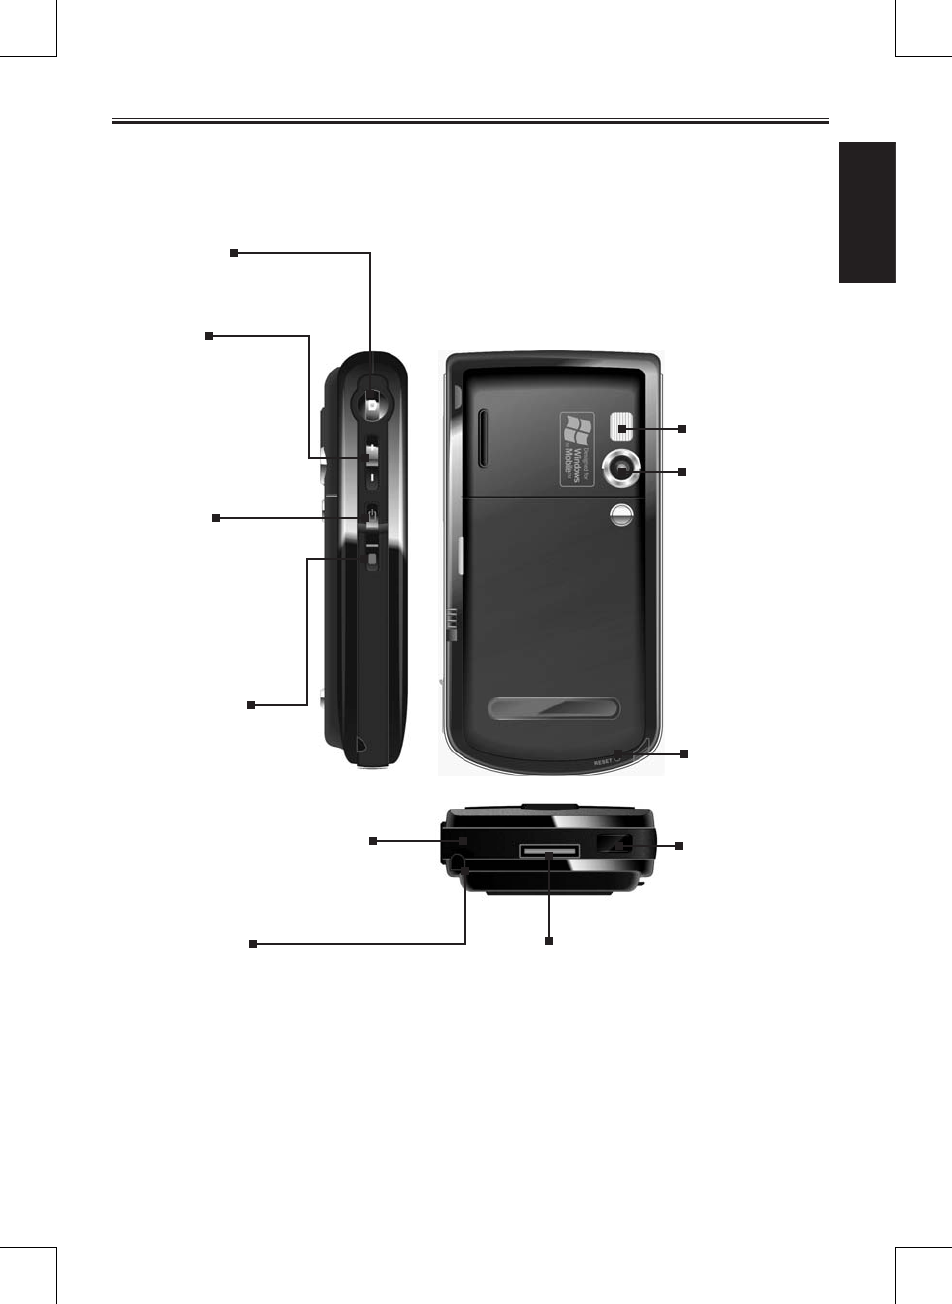
SP70R User Manual 1-4
Getting Started
Camera Lens
Reset Switch
Press to restart the
Pocket PC Phone.
LED Photoash
Capture Key
Press to take pictures or
record videos.
Volume±/
Zoom in/out
Press to adjust the
volume in Standard
mode; or zoom in/out
in Camera mode.
Power Key
Press for 2 seconds
to turn GSM/WLAN
module off; or
press to wake up the
device from suspend/
sleep mode.
Voice Recording
Button
Press to start Notes
options; press
and hold to start
recording, and
release to stop
recording.
Stylus
Allows you to tap,
write or draw on the
touch panel.
USB Port
Connects the AC charger
for charging or USB
cable for data transfer and
synchronization.
IrDA Port
Transfers data with
other devices.
Microphone
Serves as the phone
receiver. It also receives
sound for recording.
1-5 SP70R User Manual
Getting Started
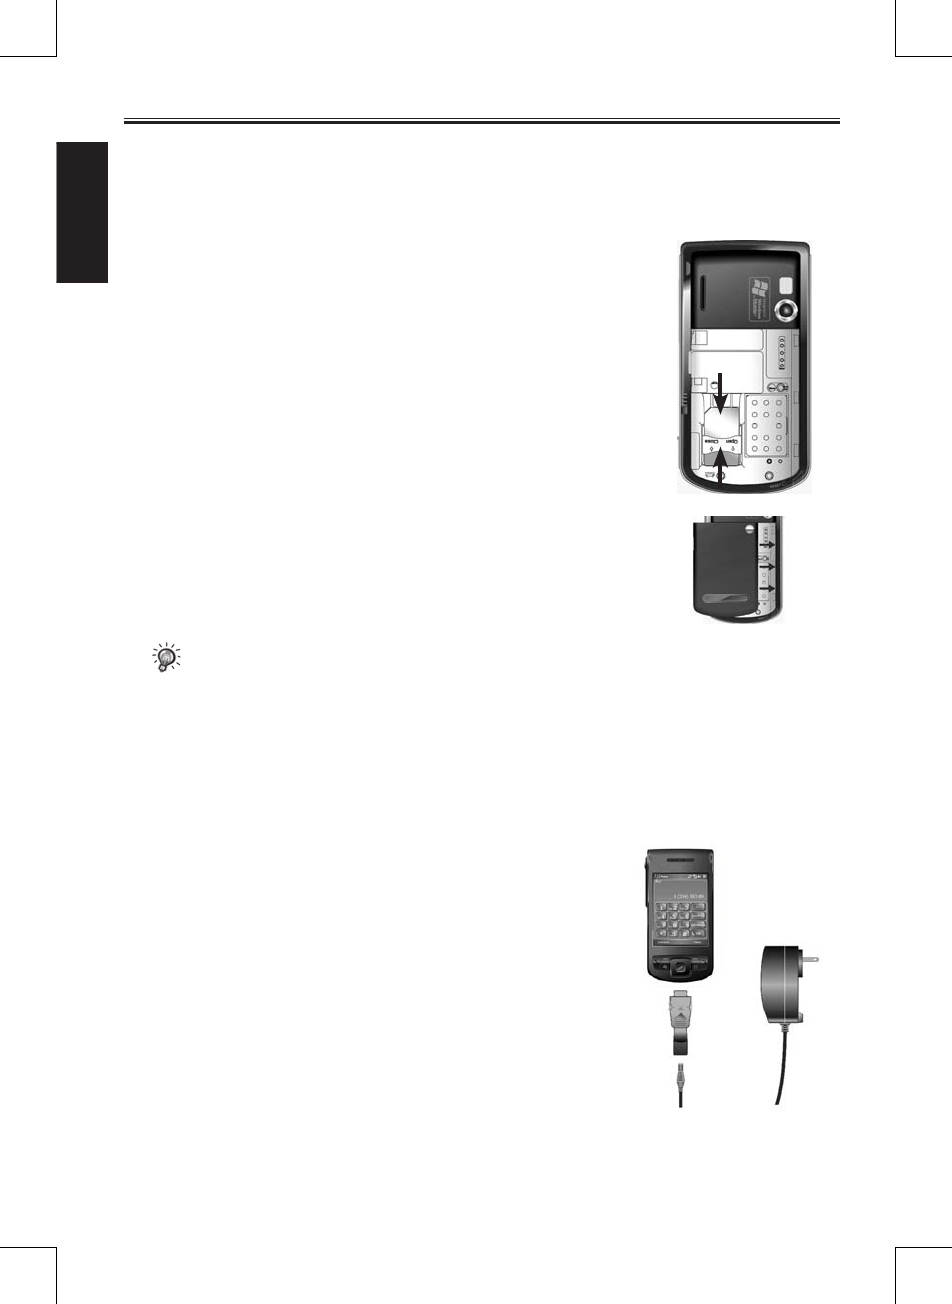
1.3 Installing the SIM Card and Battery
Apply for a Subscriber Identification Module (SIM) card from your mobile phone service provider. The SIM
card contains information of security certifications, and can store your contact data.
The Pocket PC Phone functions are only available when a SIM card is installed securely.
1. Insert the SIM card with the contact area facing inside of
the Pocket PC Phone and the angled corner in the upper-left
position, and then slide the SIM card towards the bottom into the
slot.
2. Press the SIM card and slide the SIM card lock towards top to
secure the SIM card.
3. Insert the three extruding parts on the battery into the holes in
the battery compartment, and then press to close the battery. A
click sound indicates that the battery is locked.
• Insert or remove the SIM card with great care. Do not bend the SIM card or scratch the contact
area.
• Do not disassemble, squeeze, or pierce the battery, or store the battery where the temperature is
over 60°C (140°F), or dispose of used batteries carelessly.
• Replace only with the same or equivalent type recommended by the manufacturer.
• Dispose of used batteries in accordance with local environmental regulations.
1.4 Charging the Battery
1. Connect the DC end of the AC charger to the converter.
2. Connect the coverter to the USB connector on the bottom of the
Pocket PC Phone, and the other end of the AC charger into a
wall outlet.
AC power indicator will light up when SP70R detects battery
charging by the AC Charger or USB. Please check the power
setting of the SP70R for the status of the battery.
SP70R User Manual 1-6
Getting Started
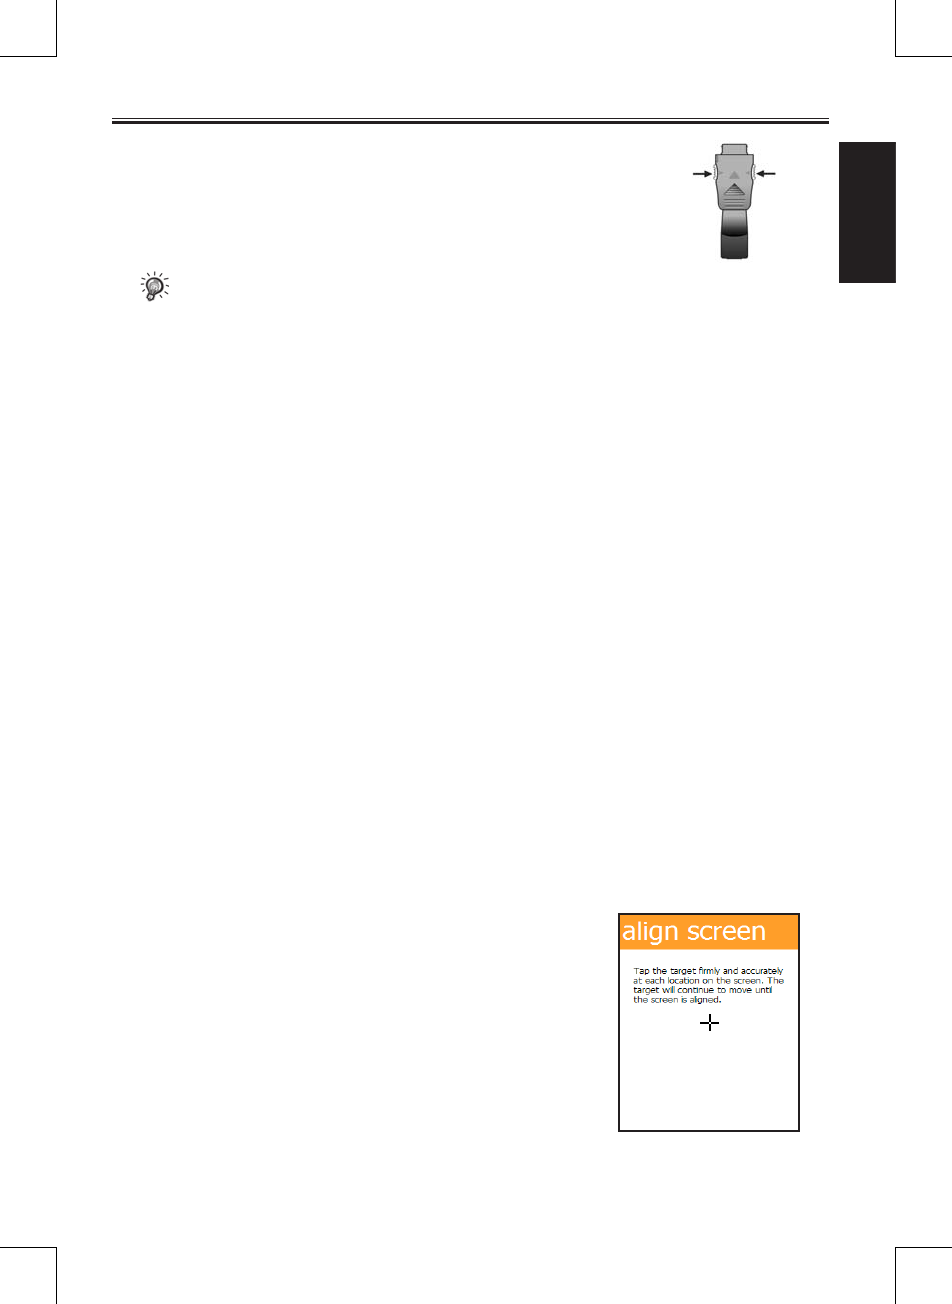
3. After the charging is complete, press on both sides of the
converter to detach it from the Pocket PC Phone.
• Charge the battery fully before turning on the Pocket PC Phone for use. When charging the
battery for the very first time, you should charge it for at least 10 hours.
• Fully charging a discharged battery takes about 2.5 hours. The actual charging time may vary
depending on the using conditions.
• A new battery will reach the optimal performance after several cycles of using and charging.
• Upon a warning of low power, turn off the Pocket PC Phone and recharge the battery at once.
• The estimated operating hours of the battery in different conditions are as follows:
Flight mode operation: 16 hours
Talk time: 5 hours
Standby time: 190 hours
• The actual talk time and standby time vary depending upon local network status and user
behavior.
• Recommend using AC charger instead of USB for accelerated charging time.
1.5 Turning the Pocket PC Phone On and Off
Initial Startup
The Pocket PC Phone automatically performs the initial startup after the installation of the battery.
It will start the initialization/calibration procedure.
1. The backlight of the keypad lights up, accompanied with the
Loading screen.
2. The Windows Mobile screen appears after about 5 seconds.
Initializing and Calibrating the Pocket PC Phone
1. On the Windows Mobile screen, use the stylus to tap the screen
to enter the align screen screen.
2. Follow and tap the “+” positions. Then tap Finish.
3. On the stylus screen, tap Next.
4. On the pop-up menus screen, tap and hold the “9” position.
5. On the pop-up menu that appears, tap Cut.
6. Tap and hold the “11” position on the next screen.
7. On the pop-up menu that appears, tap Paste.
8. You have scheduled an appoinment using pop-up menus
successfully. Tap Next.
9. On the location screen, select your time zone and then tap Next.
10. On the complete screen, tap anywhere on the screen to enter the
Today screen.
1-7 SP70R User Manual
Getting Started
Turning Off
After the initial startup, press the power key to enter the standby mode. To turn off the Pocket PC Phone
(and enter the suspend mode), press and hold the power key for 2 seconds.
• By default, your Pocket PC Phone will automatically suspend after 1 minute (default setting) of
inactivity when operating on battery power. You can change the setting by tapping > Settings
> System > Power > Advanced.
1.6 Expanding the Pocket PC Phone
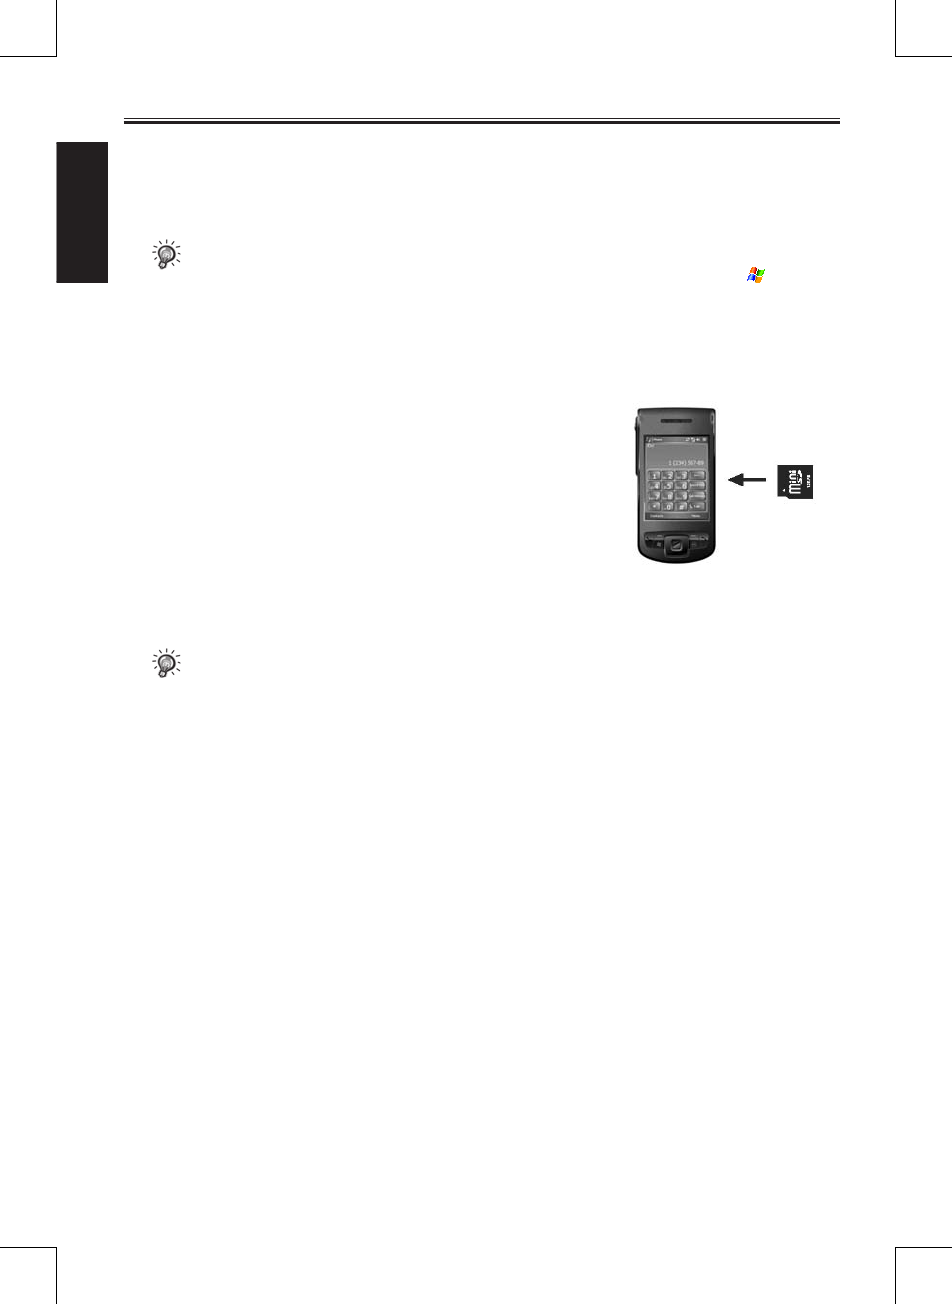
Using miniSD Cards
You can use the miniSD card slot of the Pocket PC Phone to back up
or transfer files and data.
With the label of the miniSD card facing front and its connector
pointing to the slot, insert the card into the slot.
To remove the miniSD card, make sure that no application is accessing the card, slightly push the top edge
of the card to release it and then pull it out of the slot.
• Keep the miniSD card in a well-protected box or bag to avoid dust and humidity when you are
not using it.
• A miniSD card should be formatted before use.
• With File Explorer, you can save data to a miniSD card. For information on using File Explorer,
see section 15.7.

Chapter 2
Basic Operation
2.1 Using the Stylus
2.2 Input Methods
2.3 Using the Navigation Keys
2.4 Today Screen
2.5 Volume Adjustment
2.6 Navigation Bar and Command Bar
2.7 Status Icons
2.8 Using Programs
2.9 Shortcut Menus
2.10 Notifications
2.11 Entering Information
2-2 SP70R User Manual
Basic Operation
2.1 Using the Stylus
The stylus is a tool for you to communicate with your Pocket PC Phone. With the stylus, you can navigate
and select objects on the screen.
The stylus allows you to:
n Tap Touch the screen once with the stylus to open items and select options.
n Drag
Hold the stylus on the screen and drag across the screen to select text and images. Drag in a list to
select multiple items.
n Tap and hold Tap and hold the stylus on an item to see a list of actions available for that item. On the
shortcut menu that appears, tap the action you desire.
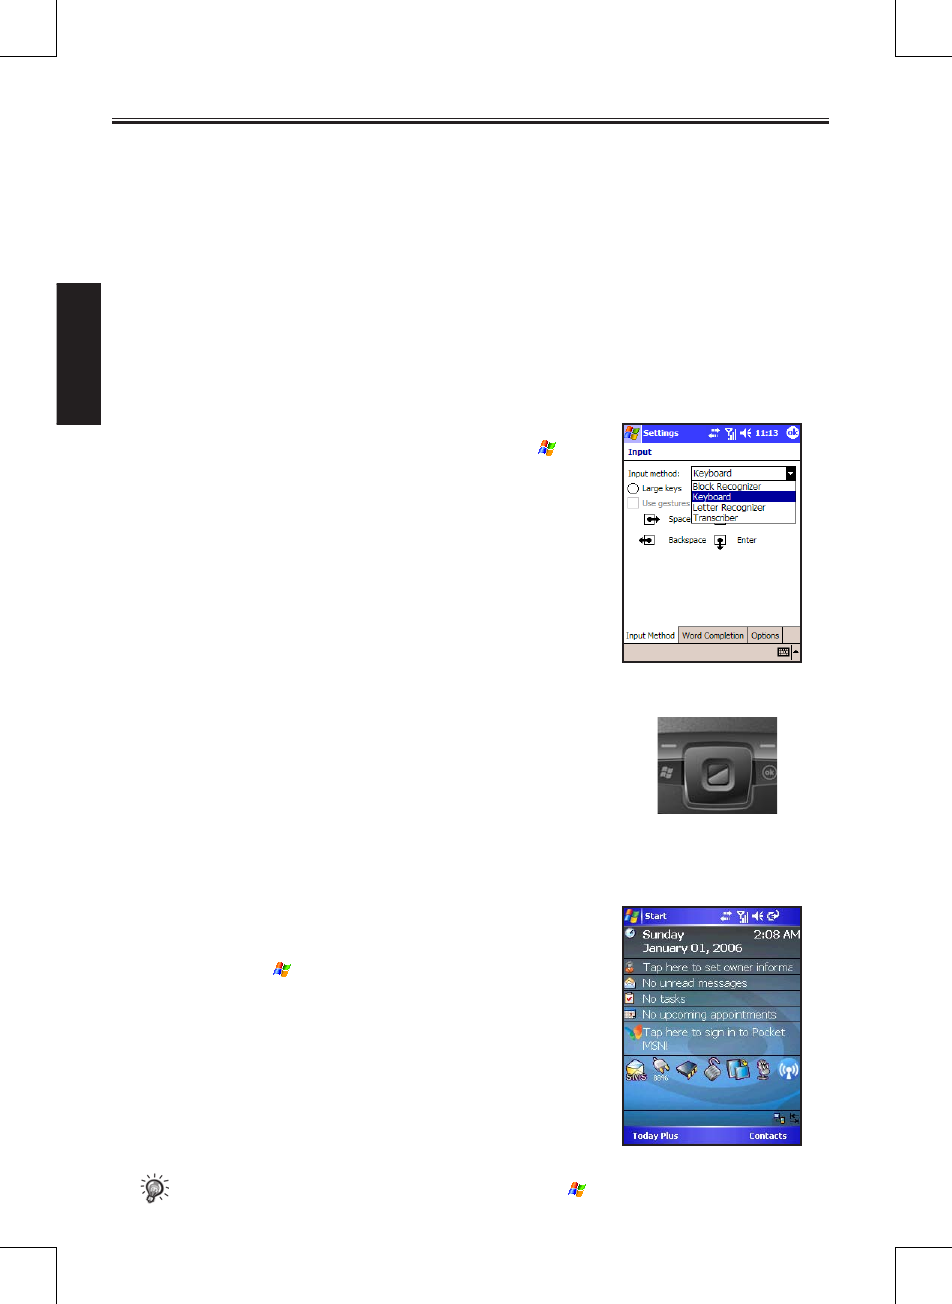
2.2 Input Methods
The Pocket PC Phone provides several input methods for your
selection. (See Section 2.11 for more information.) You can tap
>
Settings
>
Personal
>
Input to select the most desired input method.
This way, you do not need to change the input method every time when
you enter information.
2.3 Using the Navigation Keys
The navigation keys includes five direction keys for moving up,
down, left or right, and enter/confirm function on the screen for
selection.
In a text field, use the navigation keys to move the cursor right or
left, character by character.
At the center of the navigation keys is the OK key for you to activate
the selected item.
2.4 Today Screen
When you turn on your Pocket PC Phone for the first time each day (or
after 4 hours of inactivity), you will see the Today screen. You can also
display it by tapping and then Today.
The Today screen displays important information, such as today’s
appointments and status icons for your device. Tap the information
listed on the Today screen to open the associated program.
You can also tap Today Plus to quickly access more functionalities.
See Chapter 12 for detailed information on Today Plus. Today Plus
allows you to achieve single-hand operation via the navigation keys
and OK button.
• To customize what is displayed on the Today screen, tap > Settings > Personal > Today.
SP70R User Manual 2-3
Basic Operation
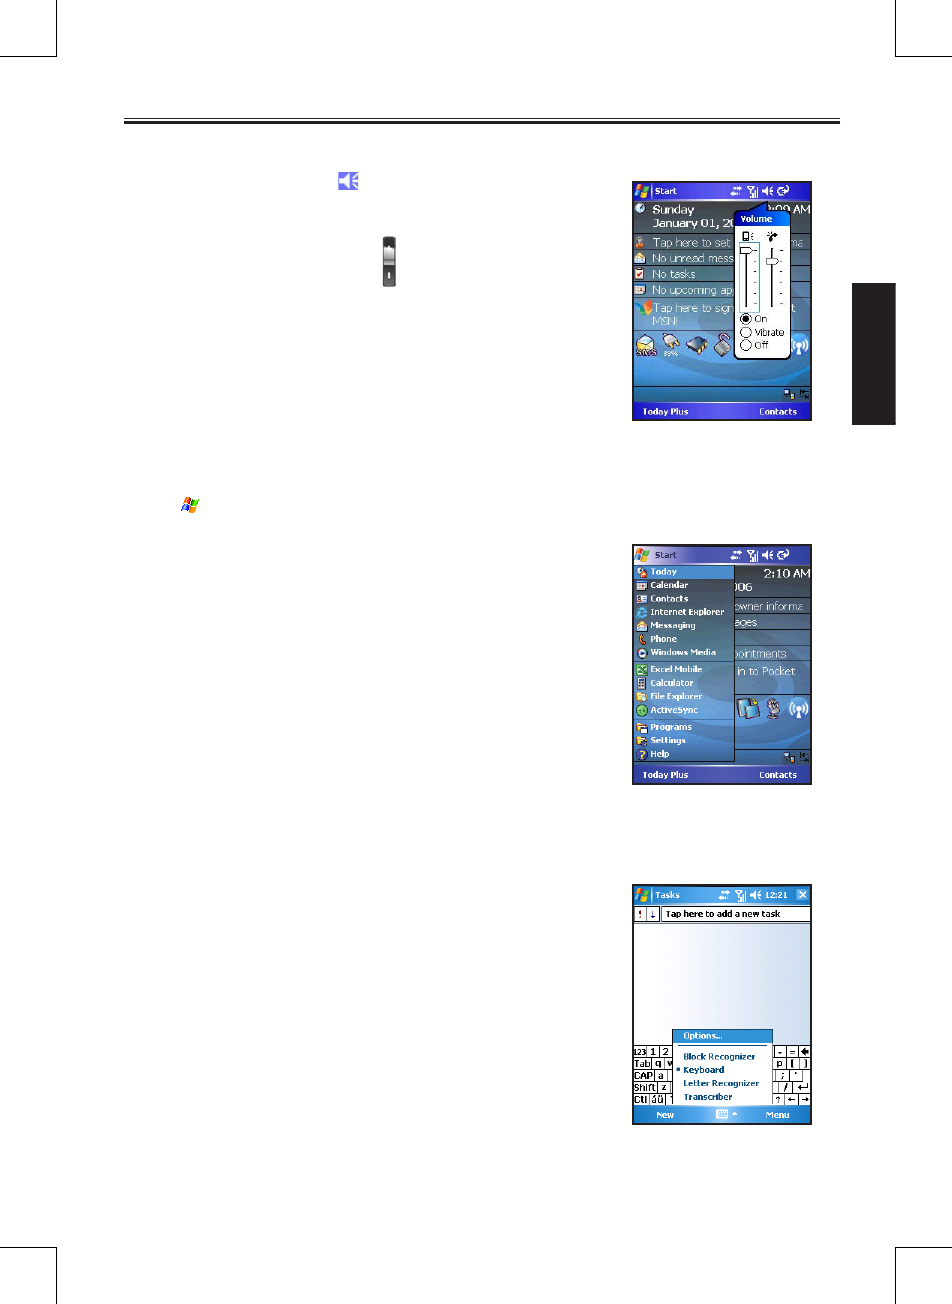
2.5 Volume Adjustment
You can tap the volume icon on the Today screen to adjust the
system volume, such as the sound you hear when you tap on program
names and menu options, and the phone volume.
You can also press the volume keys on the side of the Pocket PC
Phone to easily adjust the volume during a phone call.
2.6 Navigation Bar and Command Bar
The navigation bar, located at the top of the screen, displays the active programs and current time.
Tap
to open the Start menu and select the desired program.
Tap OK (if displayed on the upper-right
corner of the screen) to save the changes you made and exit the current screen.
The navigation bar and Start menu are shown in the figure to the
right.
Use the command bar at the bottom of the screen to perform tasks in programs.
The command bar includes the left and right soft keys, and the input panel button. You can tap the
arrow next to the input panel to select an input method.
The command bar is shown in the figure to the right.
2-4 SP70R User Manual
Basic Operation
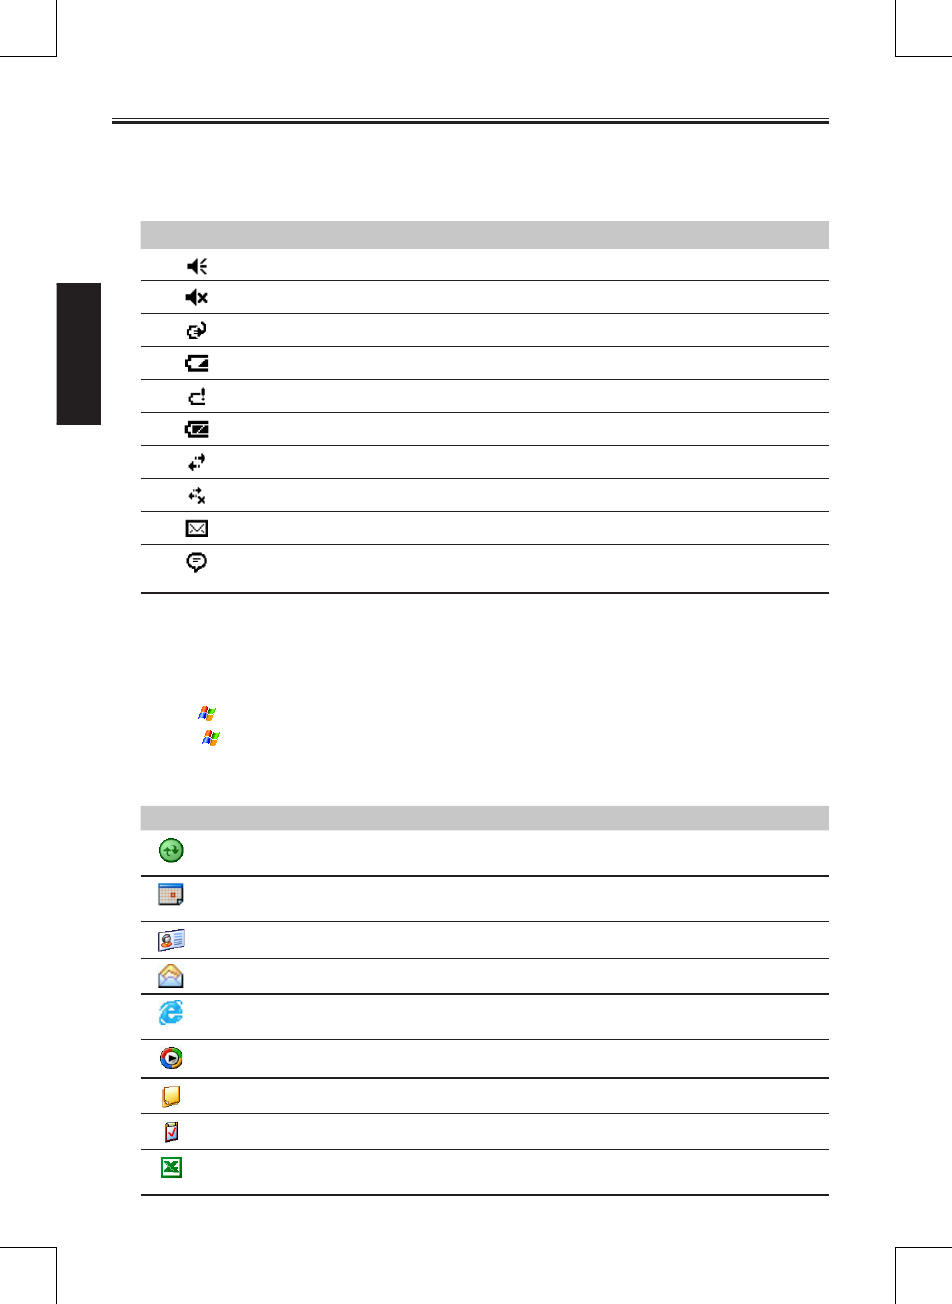
2.7 Status Icons
Status icons are displayed on the navigation bar and command bar of the Today screen. You can tap a status
icon to display the associated control panel or more information related to the item.
Icon Description
The speaker is on.
The speaker is off.
The battery is charging.
The battery power is low.
The battery power is very low.
The battery is fully charged.
The connection is active.
The connection is not active.
One or more email or text messages were received.
There are more icons not displayed due to insufficient display memory. Tap the icon to
view all status icons.
2.8 Using Programs
While using the Pocket PC Phone, you do not need to exit a program to open another or to conserve
memory. The system manages memory automatically. To switch between programs:
n Tap and select the Start menu.
n Tap > Programs to access additional programs. Tap the program icon to launch a program.
n Press the program hot keys on the
Pocket PC Phone to quickly open a program.
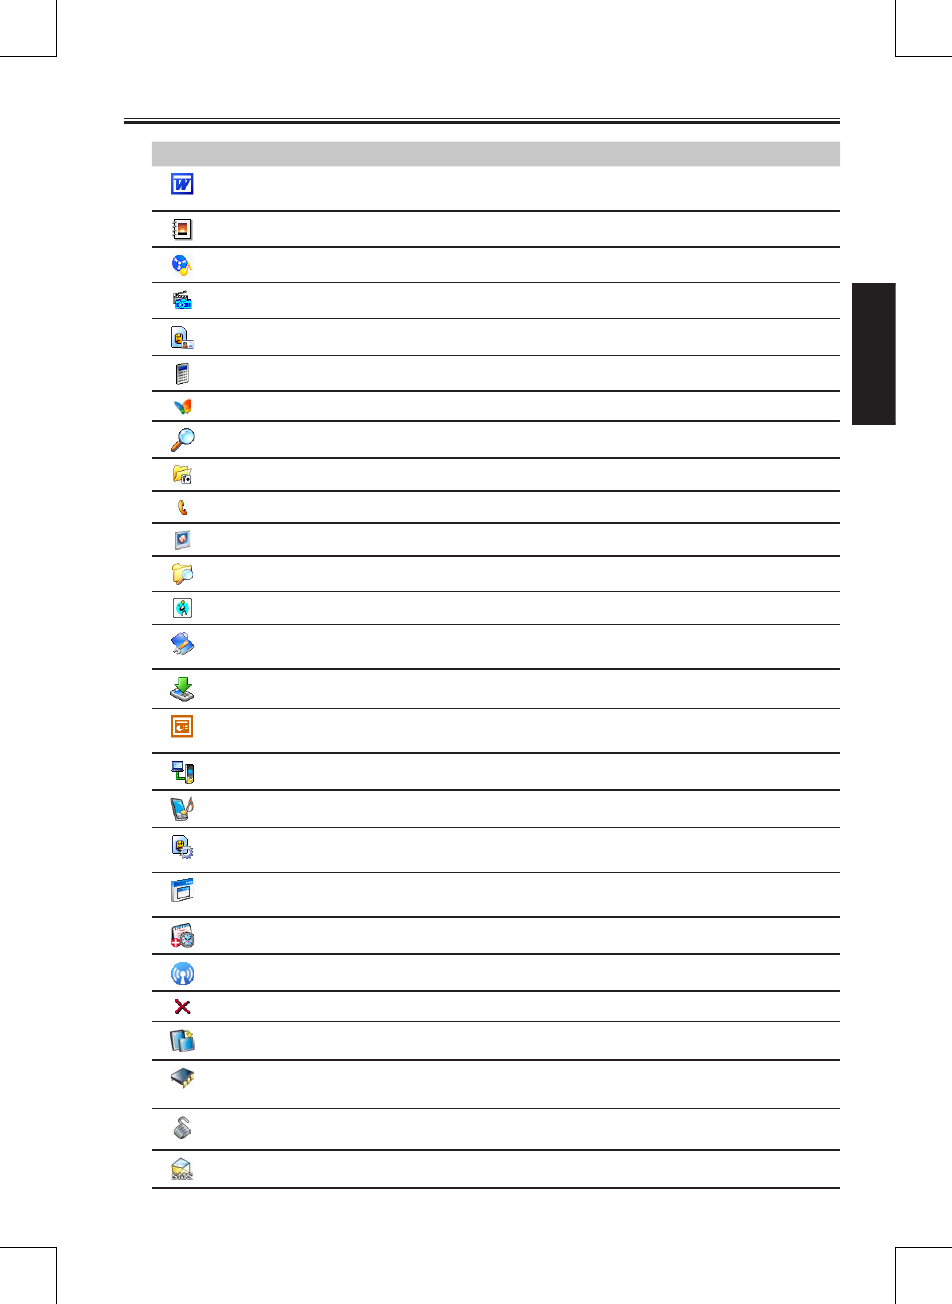
The table below shows the list of the programs and their icons.
Icon Program Description
ActiveSync
Synchronizes information between your Pocket PC Phone and desktop
computer.
Calendar Schedules and keeps track of your appointments and create meeting
requests.
Contacts Creates and displays your address book.
Messaging Sends and receives email, text and multimedia messages.
Internet Explorer Browses web sites and downloads new programs and files from the
Internet.
Windows Media Plays digital audio and video files.
Notes Creates handwritten or typed notes, drawings and recordings.
Tasks Creates and displays your tasks.
Excel Mobile Creates new workbooks, or view and edit Excel workbooks created on
your desktop computer.
SP70R User Manual 2-5
Basic Operation
Icon Program Description
Word Mobile Creates new documents, or view and edit Word documents created on
your desktop computer.
MyAlbum Displays pictures and videos.
AMR Recorder Records sound or voice messages.
VideoCam Takes pictures or records videos.
SIM Contacts Displays the contact information stored in the SIM card.
Calculator Performs basic arithmetic.
Pocket MSN Allows you to register MSN Messenger.
Search Finds files or items on your Pocket PC Phone quickly.
Games Allows you to play games.
Phone Starts the phone program for phone calls and settings.
Pictures & Videos Displays or transfers the pictures and videos on the Pocket PC Phone.
File Explorer Browses and manages files and folders on the Pocket PC Phone.
Java Installs and manages Java programs.
GPRS Auto
Configuration
Performs auto configuration of the GPRS connection on the Pocket PC
Phone.
Download Agent Downloads files for software update.
PowerPoint
Mobile
View PowerPoint files created on your desktop computer.
Modem Link Transforms your SP70R into an external modem.
Profiles Selects a mode for SP70R to notify you of events.
Sim Toolkit Accesses additional services that you have subscribed from your mobile
phone service provider.
Terminal Service
Client
Allows you to use programs on a remote desktop computer.
TodayPlus Accesses more functionalities quickly.
Wireless Manager Selects Phone, Bluetooth, and Wi-Fi settings.
SmartX Performs a smart close function to quickly close running programs.
Rotate Screen Tap to rotate the screen at 90 degrees clockwise.
Memory Tap to quickly enter Settings > System > Memory > Running
Programs to stop the desired program.
Keypad Lock Tap to lock/unlock the keypad.
SMS Message Tap to compose a SMS text message.

2-6 SP70R User Manual
Basic Operation
Icon Program Description
Power Tap to view the remaining battery power.
Voice Commander To launch application via voice commander.
Brightness Tap to adjusts the brightness of the display.
IE Favorites Allows you to use the built-in Web links quickly.
2.9 Shortcut Menus
With shortcut menus, you can quickly choose an action for an item.
For example, you can use the shortcut menu in the contact list to
quickly delete a contact, make a copy of a contact or send an email
message to a contact. The actions in the shortcut menus vary from
program to program. To access a shortcut menu, tap and hold the
stylus on the name of the item that you want to perform the action on.
When the menu appears, lift the stylus and tap the action you want to
perform. Or tap anywhere outside the menu to close the menu without
performing an action.
2.10 Notications
Your Pocket PC Phone reminds you in a variety of ways when
you have something to do. For example, if you have set up an
appointment in Calendar, a task with a due date in Tasks or an alarm
in Clock, you will be notified in any of the following ways:
n A message appears on the screen.
n A warning sound that can remind you.
n The GSM/notification indicator flashes.
You can choose customized reminder types by tapping > Settings
> Personal > Sounds & Notifications.
2.11 Entering Information
Your Pocket PC Phone provides several options for entering new information:
n Use the Input panel to enter typed texts
n Write directly on the screen.
n Draw pictures on the screen.
n Speak into the microphone to record a message.
SP70R User Manual 2-7
Basic Operation
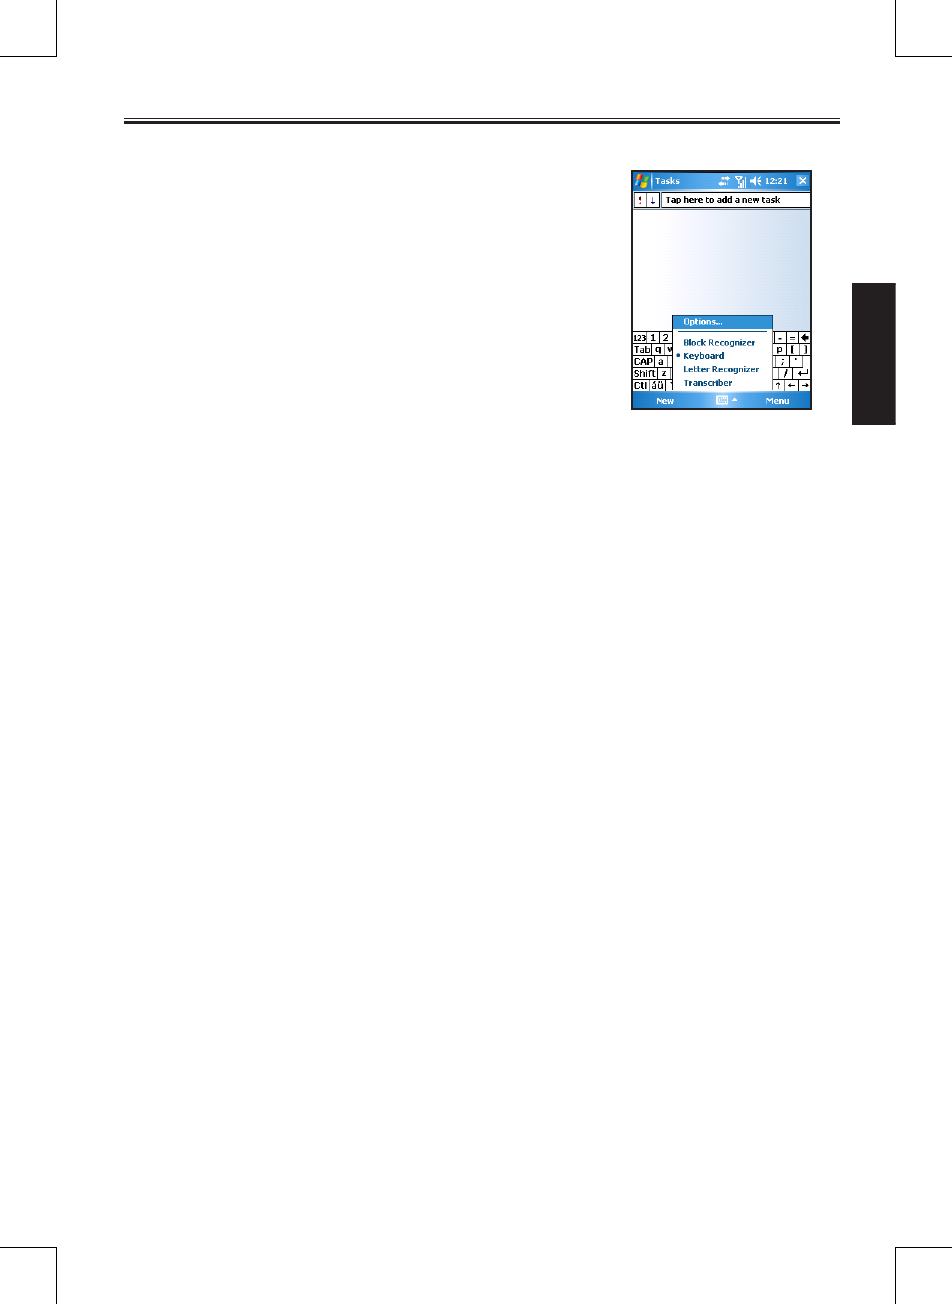
Using the Input Panel
Use the Input panel to enter information in any program on your
Pocket PC Phone. You can either type words by
n using the soft keyboard; or
n writing with your hand.
In any case, the characters appear as typed text on the screen.
To show or hide the Input panel, tap the Input panel button. Tap the
arrow next to the Input panel button to see your choices.
When you use the Input panel, your Pocket PC Phone anticipates the
word you are typing or writing and displays it above the Input panel.
When you tap the displayed word, it is inserted into your text at the
insertion point. The more you use your Pocket PC Phone, the more
words it learns to anticipate.
Block Recognizer
With Block Recognizer, you can use the stylus to input characters using strokes that are similar to the
Palm™ Graffiti® method.
To type with Block Recognizer:
1. Tap the arrow next to the Input panel button and then tap Block Recognizer.
2. Write a letter in the box.
When you write a letter, it is converted to typed text that appears on the screen. For specific instructions
on using Block Recognizer, open Block Recognizer and then tap the question mark next to the writing area.
Letter Recognizer
With Letter Recognizer, you can write letters using the stylus just as you would use a pen on paper.
To type with Letter Recognizer:
1. Tap the arrow next to the Input panel button and then tap Letter Recognizer.
2. Write a letter in the box.
When you write a letter, it is converted to typed text that appears on the screen. For specific instructions
on using Letter Recognizer, open Letter Recognizer and then tap the question mark next to the writing area.
Transcriber
With Transcriber you can write anywhere on the screen using the stylus just as you would on paper. Unlike
Letter Recognizer and Block Recognizer, you can write a sentence or more of information; then, you pause
and let Transcriber change the written characters to typed characters.
To type with Transcriber:
1. Tap the arrow next to the Input panel button then tap Transcriber.
2. Write anywhere on the screen.
For specific instructions on using Transcriber, open Transcriber and then tap the question mark in the lower-
right corner of the screen.

2-8 SP70R User Manual
Basic Operation
Writing on the Screen
In any program that accepts writing—such as the Notes program and the Notes tab in Calendar, Contacts and
Tasks—you can use your stylus to write directly on the screen. Write the way you do on paper. You can edit
and format what you have written and convert the information to text later.
Writing
To write on the screen, tap Menu > Draw to switch to writing mode. This action displays lines on the
screen to help you write.
Editing Your Writing
If you want to edit or format writing, you must first select the writing and then edit it.
1. Tap and hold the stylus next to the text you want to select until the insertion point appears. Without
lifting, drag the stylus across the text you want to select.
2. You can also select text by tapping the Menu > Draw to deselect it and then dragging the stylus across
the screen.
3. Tap and hold the selected words and then tap an editing command (cut, copy or paste) on the shortcut
menu or tap the command on the Menu > Edit menu.
If you accidentally write on the screen, tap Menu > Undo and try again.
Converting Your Writing to Text
1. If you want to convert only certain words, select them before going to the next step.
2.
To convert writing to text, tap
Menu >
Tools
>
Recognize or tap and hold the selected words and then tap
Recognize on the shortcut menu. Your writing is turned into text. If a word is not recognized, it is left as
writing.
If the conversion is incorrect, you can select different words from a list of alternates or return to the
original writing.
1. Tap and hold the incorrect word (tap one word at a time).
2. On the shortcut menu, tap Alternates. A menu with a list of alternate words appears.
3. Tap the word you want to use or tap the writing at the top of the menu to return to the original writing.
Some tips for getting good recognition are listed below:
n Write neatly.
n Write on the lines and draw descenders below the line. Write the cross of the “t” and apostrophes
below the top line so that they are not confused with the word above. Write periods and commas above
the line.
n For better recognition, tap Menu
→
Zoom to increase the zoom level to 300%.
n Write the letters of a word close together and leave big gaps between words.
n Hyphenated words, foreign words that use special characters, such as accents, some punctuation
cannot be converted.
n If you add writing to a word to change it (such as changing a “3” to an “8”) after you attempt to
recognize the word, the writing you add will not be included if you attempt to recognize the writing
again.
SP70R User Manual 2-9
Basic Operation
Drawing on the Screen
You can draw on the screen in the same way that you write on the screen. The difference between writing
and drawing on the screen is how you select items and how they can be edited. For example, selected
drawings can be resized, while writing cannot.
Creating a Drawing
1. To create a drawing, cross three ruled lines on your first stroke. A drawing box appears.
2. Subsequent strokes in or touching the drawing box become part of the drawing. Drawings that do not
cross three ruled lines will be treated as writing.
Editing Your Drawing
If you want to edit or format a drawing, you must select it first.
1. Tap and hold the stylus on the drawing until the selection handle appears. To select multiple drawings,
deselect the Pen button and then drag to select the drawings you want.
2. Tap and hold the selected drawing and then tap an editing command (cut, copy or paste) on the shortcut
menu or tap the command on the Edit menu.
3. To resize a drawing, make sure the Pen button is not selected and then drag a selection handle.
• Not every program supports the drawing mode.
• You may want to change the zoom level so that you can more easily work on or view your
drawing. Tap Menu > Zoom and then choose a zoom level. You can also tap > Settings >
Personal > Input > Options to set the default zoom level.
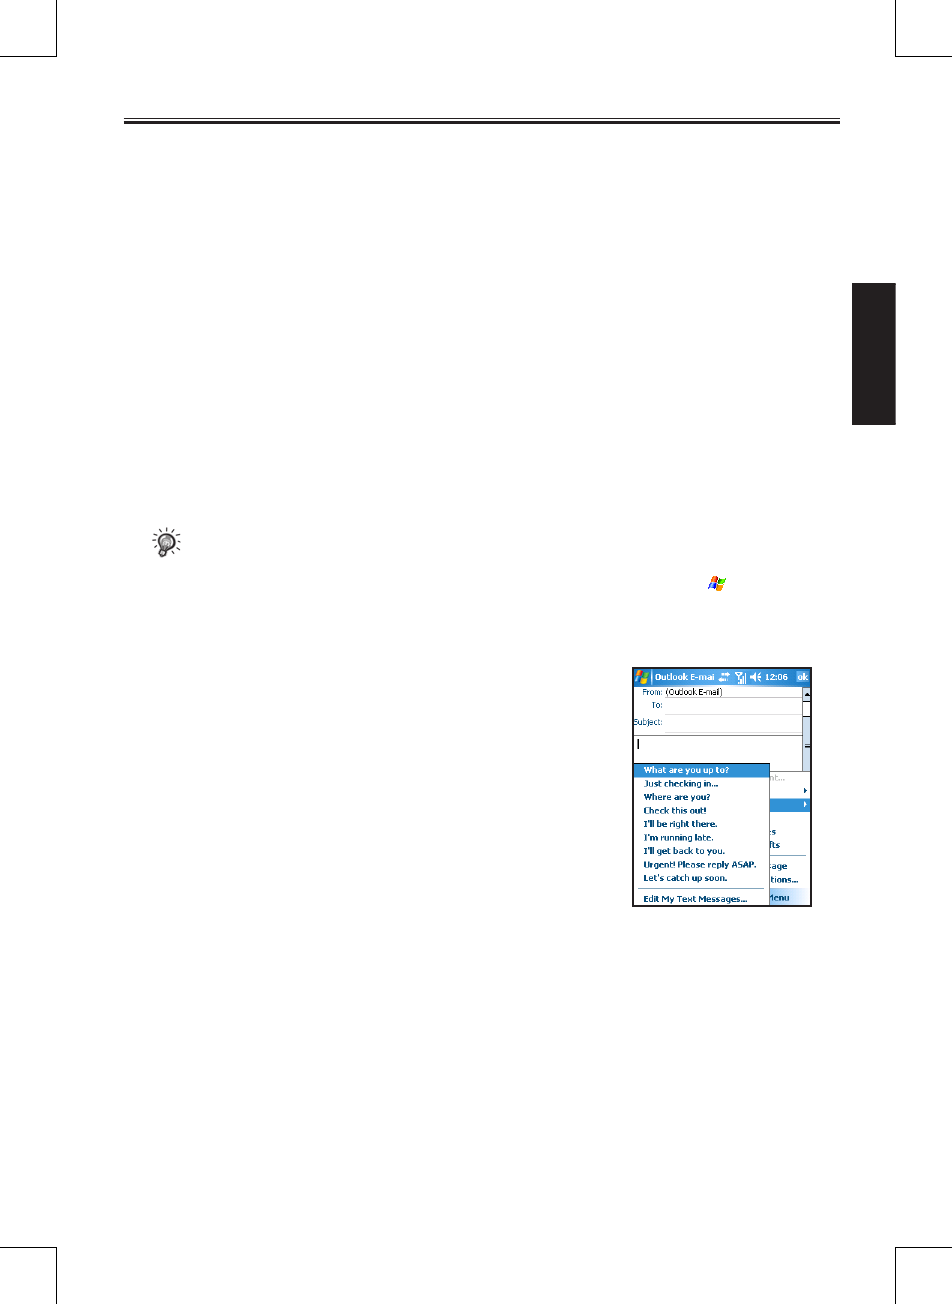
Using My Text
When using Inbox or MSN Messenger, use My Text to quickly insert
preset or frequently used messages into the text entry area. To insert
a message, tap Menu
>
My Text and then tap a message.
To edit a My Text message, tap Tools
>
Edit My Text Messages.
Select the message you wish to edit and make desired changes.

Chapter 3
Using the Phone Feature
3.1 Making a Call
3.2 Answering a Call
3.3 Using the Speakerphone and Muting a Call
3.4 Taking Notes During a Call
3.5 Creating a Speed Dial Entry
3.6 Call History
3.7 Changing Phone Settings
3.8 SIM Contacts
3.9 Turning the Phone On and Off
SP70R User Manual 3-2
Using the Phone
Feature
3.1 Making a Call
The phone mode indicator glows in green when you use the phone feature.
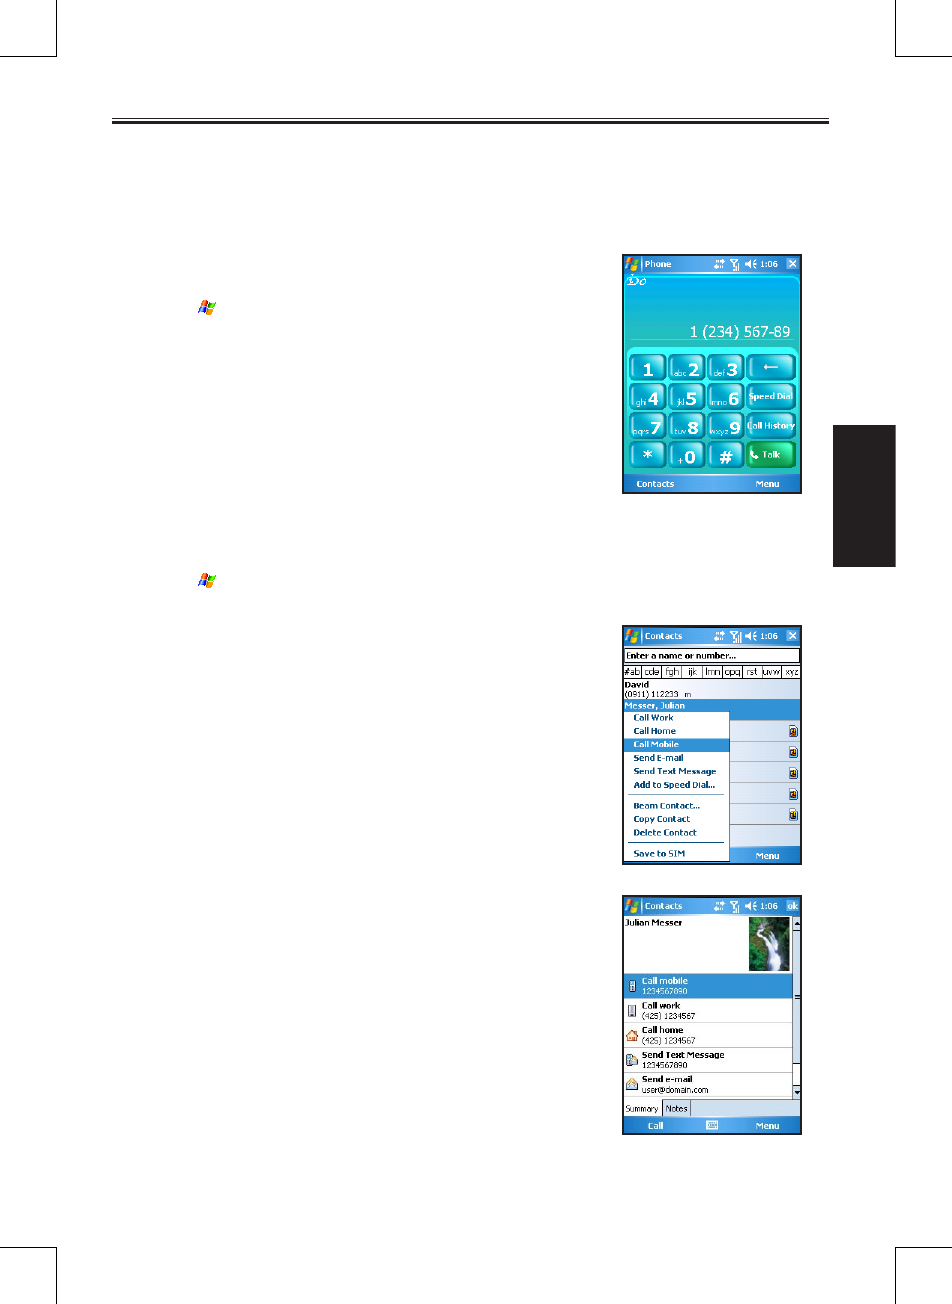
Using the On-Screen Phone Keypad
There are several ways to make a call. The most direct method is by
using the Phone keypad.
1. Tap > Phone, or press the Call button.
2. From the on-screen Phone keypad, tap the number you want to
call.
3. Tap Talk to dial the number.
From Contacts
You can make a call from Contacts without having to look up or manually enter the number.
1. Tap > Contacts, or tap the Contacts soft key.
2. The screen displays your contact list. From here, you can:
2.1 Tap and hold the contact, and then tap Call Work, Call
Home, or Call Mobile.
2.2 Tap to open the contact, and then tap the number you want
to call.
3-3 SP70R User Manual
Using the Phone
Feature
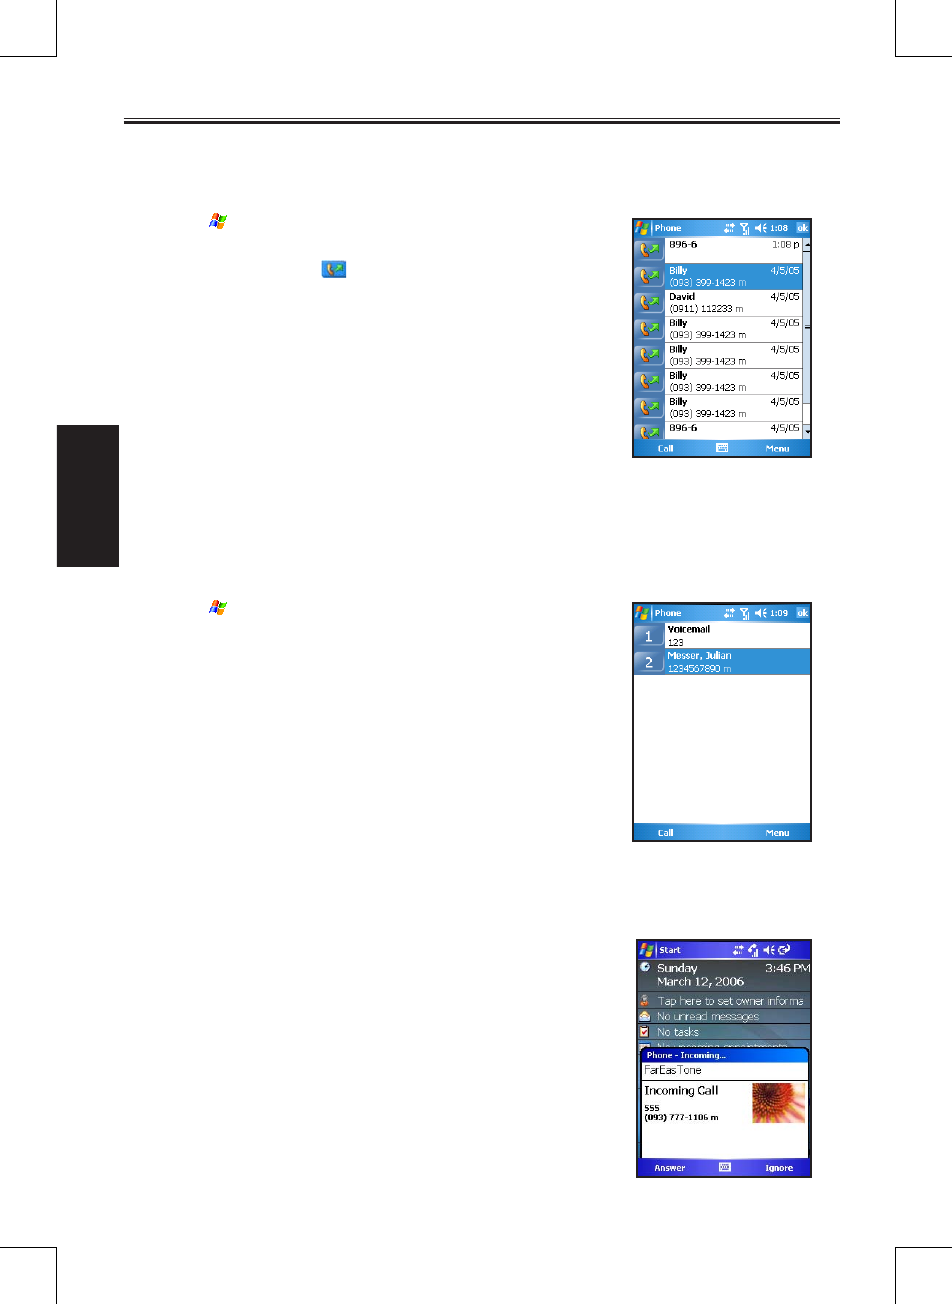
From Call History
Use Call History to quickly call someone you have recently called or
someone who has just called you.
1. Tap > Phone, or press the Call button.
2. From the Phone keypad, tap Call History.
3. Tap the icon (such as ) next to the desired number.
Using Speed Dial
Speed dial numbers enable you to quickly place a call without having
to actually enter the number. Before making a call using speed
dial, you need to create a speed dial entry first. (See Section 3.6 for
information on speed dial.)
1. Tap > Phone, or press the Call button.
2. From the Phone keypad, tap Speed Dial.
3. You can:
• Tap the speed dial location number of the desired contact.
• Tap and hold the speed dial location number assigned to a
contact directly from the Phone keypad.
3.2 Answering a Call
When you receive a phone call, a message will appear, giving you an
option to either answer or ignore the incoming call.
To answer a call, tap Answer or press the Call button.
SP70R User Manual 3-4
Using the Phone
Feature
During a call, you can do the following:
n To end a call, tap End or press the Hook button.
n To hold a call, tap Hold, or press and hold the Call button.
To ignore a call, tap Ignore or press the Hook button.
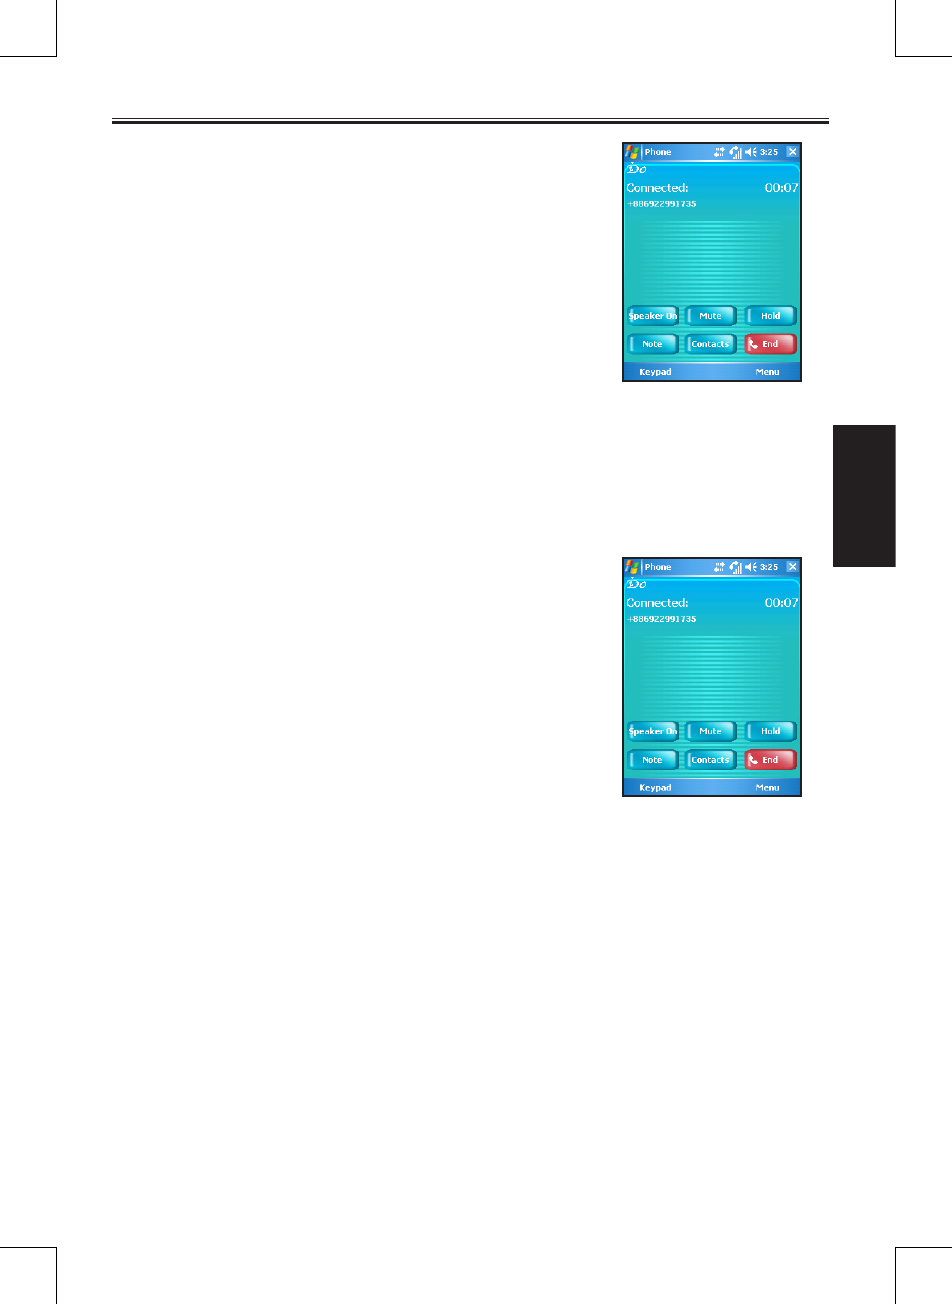
3.3 Using the Speakerphone and Muting a Call
Speakerphone
During a call, you can use the speakerphone function to send out the
other party’s voice through the speaker.
To use the speakerphone function, tap Speaker On. Tap Speaker
Off to disable the speakerphone function.
Muting
During a call, you can mute your microphone so that the person with
whom you are speaking cannot hear you, but you can still hear him
or her. This is useful when, for example, you do not want the other
person to hear a conversation or background noise on your side of
the call.
To mute a call, tap Mute. Tap Unmute to unmute a call.
3-5 SP70R User Manual
Using the Phone
Feature
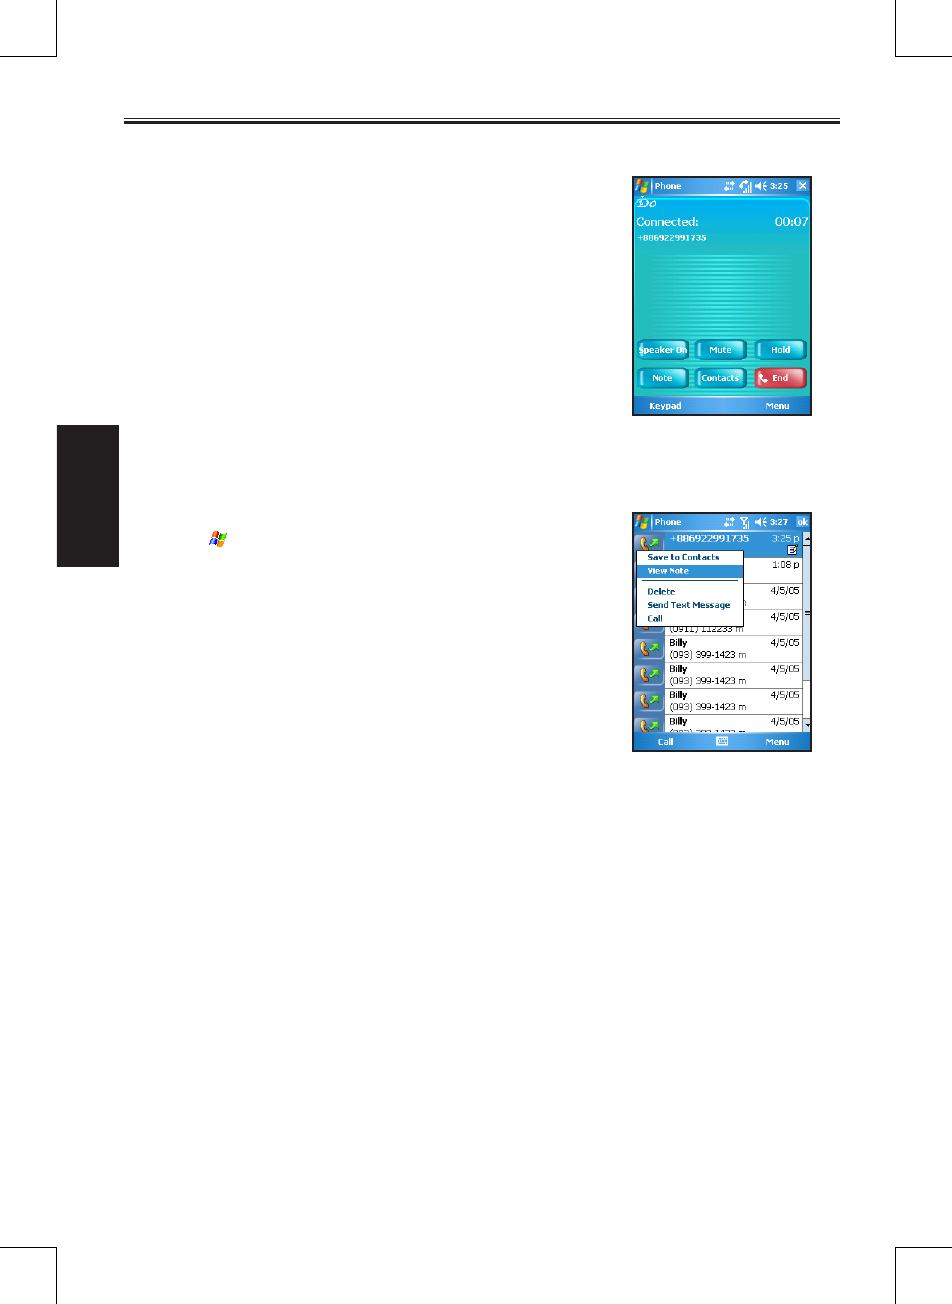
3.4 Taking Notes During a Call
You can take notes on the Pocket PC Phone during a call.
1. During a call, tap Note.
2. Enter your note on the note screen or record a message. When
finished, tap OK.
3. The note will appear on your note list.
To access a note you created during a call:
1. Tap > Phone, or press the Call button.
2. From the Phone keypad, tap Call History.
3. In the Call History list, tap and hold the name or number for the
phone call entry containing the note, and then tap View Note.
SP70R User Manual 3-6
Using the Phone
Feature
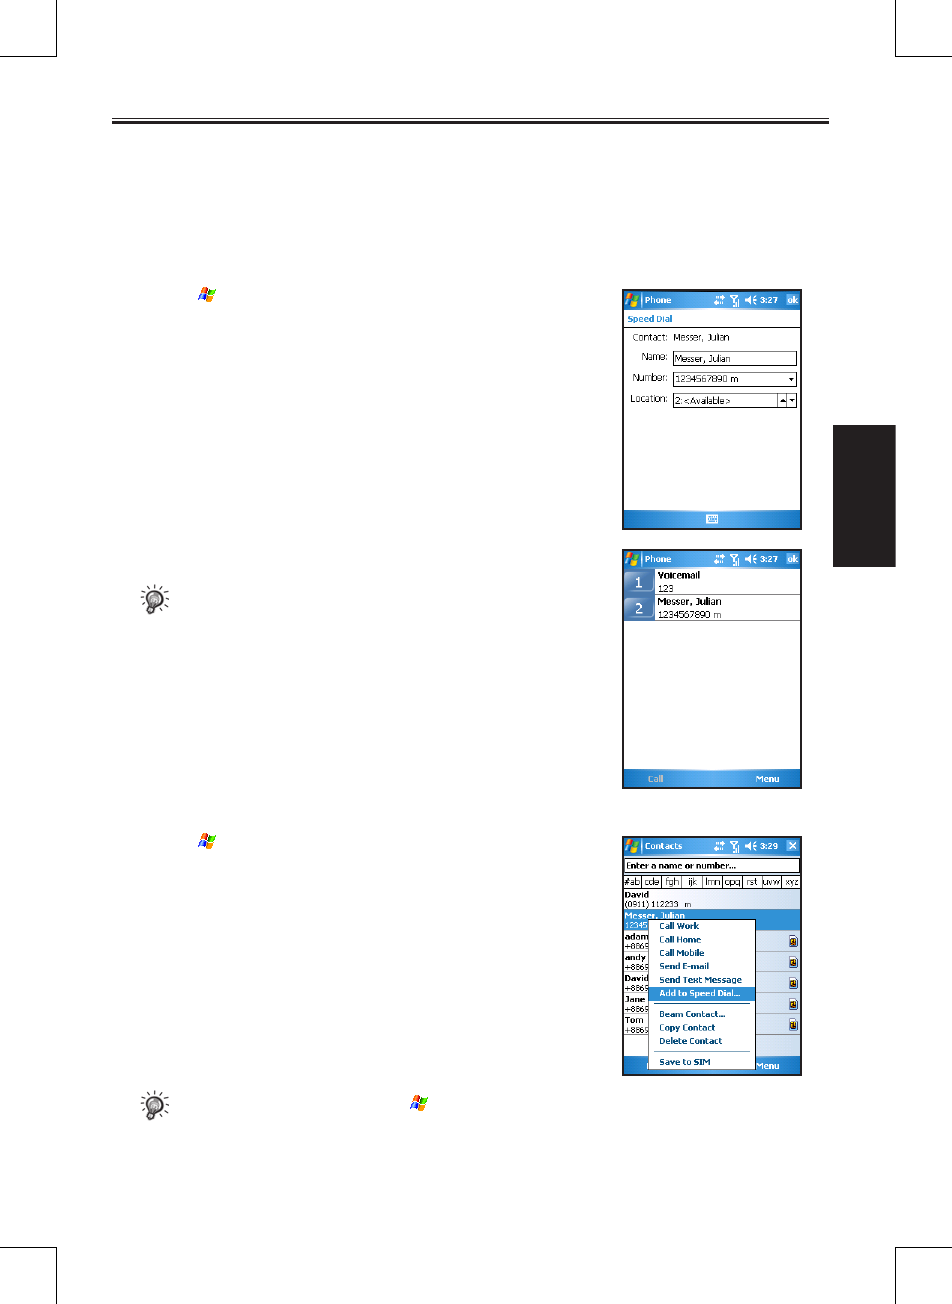
3.5 Creating a Speed Dial Entry
You can create speed dials to call frequently-called numbers with a single tap. Before you can create a
speed dial entry for a phone number, that number must already exist in Contacts.
From Phone
1. Tap > Phone, or press the Call button.
2. From the Phone keypad, tap Speed Dial > Menu > New.
3. Tap the desired contact name and number.
4. In the Location field, tap the Up/Down arrows to select an
available location to assign as the new speed dial entry, and then
tap OK.
5. The new speed dial entry will appear on the speed dial list.
• The first speed dial location is reserved for your voice mail.
From Contacts
1. Tap > Contacts, or tap the Contacts soft key.
2. Tap and hold the contact name, and then tap Add to Speed Dial.
3. In the Location field, tap the Up/Down arrows to select an
available location to assign as the new speed dial entry, and then
tap OK.
• To delete a speed dial entry, tap > Phone > Speed Dial, tap and hold the contact name in the
box to the right of the assigned speed dial number, and then tap Delete.
3-7 SP70R User Manual
Using the Phone
Feature
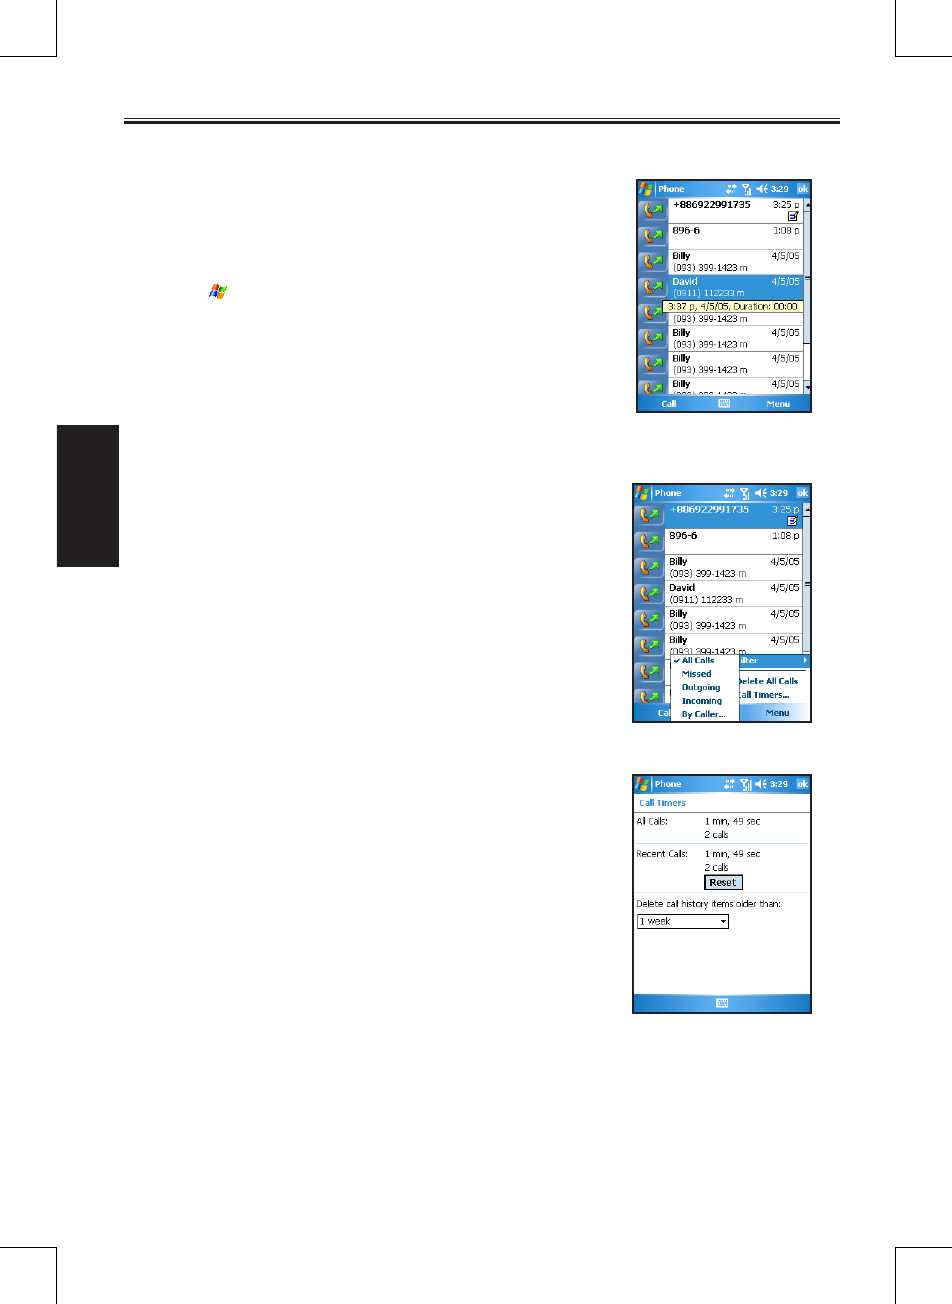
3.6 Call History
Call History provides the time and duration of all incoming,
outgoing, and missed calls, and a summary of total calls. Call
History also provides easy access to any notes taken during a call
(see Section 3.5 for more information).
To view Call History:
1. Tap > Phone, or press the Call button.
2. From the Phone keypad, tap Call History.
3. To quickly see the date, time, and duration of a call, tap the
white area of the call’s entry.
Changing the Call History View
To change the Call History view, tap Menu > Filter, and select a
different view. For example, you can view only missed or incoming
calls, or view calls alphabetically by caller name.
Call Timers
You can tap Menu > Call Timers to view the during and number of
All Calls and Recent Calls.
You can reset the Recent Calls counter by tapping Reset. The All
Calls counter cannot be reset.
You can delete Call History items older than a week, a month, or
a different time period. Tap Menu > Call Timers, and then, under
Delete call history items older than, select a time period.
SP70R User Manual 3-8
Using the Phone
Feature
3.7 Changing Phone Settings
You can customize phone settings, such as the ring type and ring tone to be used for incoming calls,
and the keypad tone to be used when entering phone numbers. You can also protect your phone from
unauthorized use.
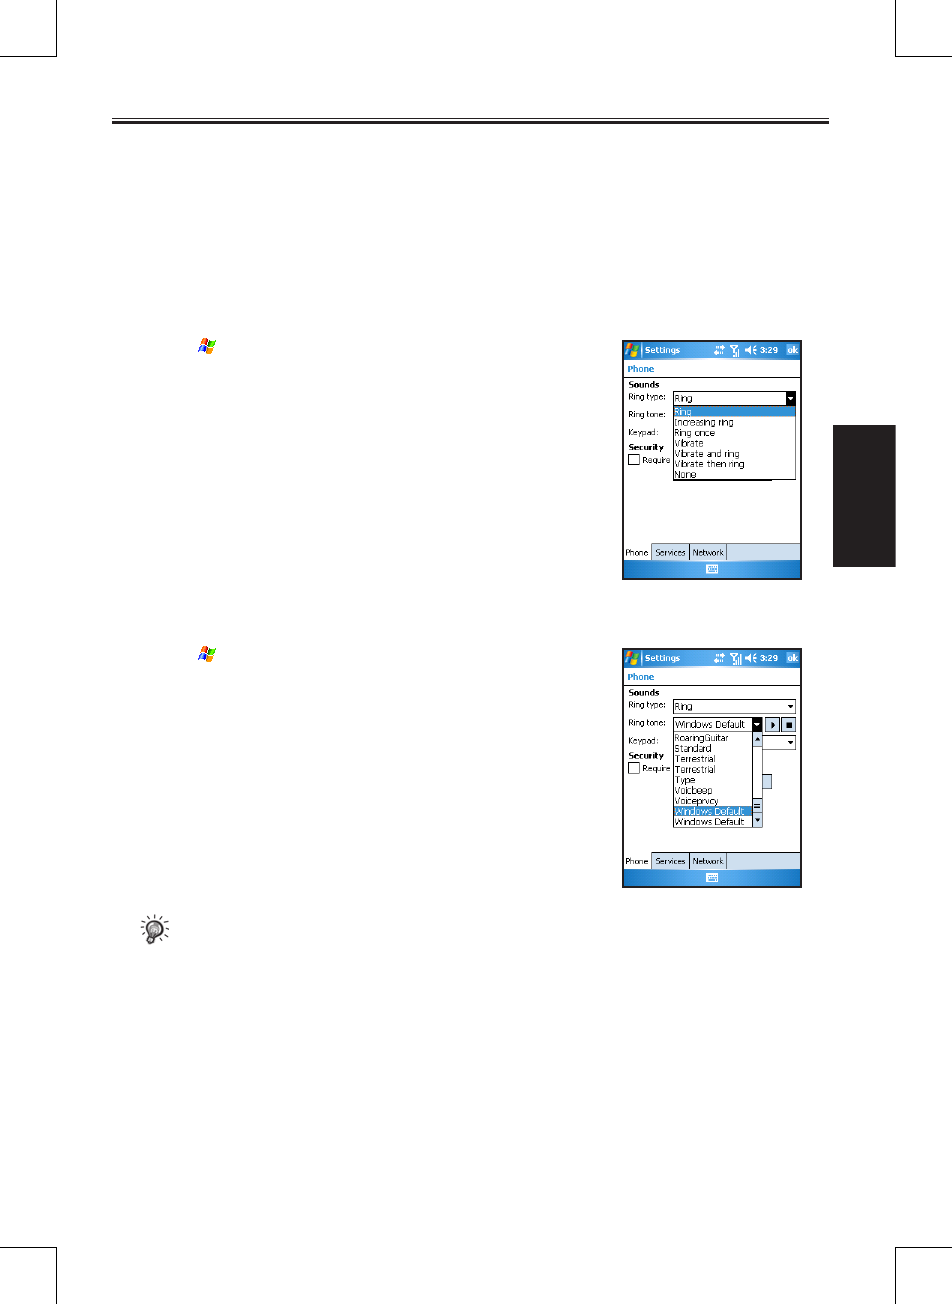
Changing the Ring Type
You can change the way that you are notified of incoming calls. For example, you can choose to be notified
by a ring, a vibration, or a combination of both.
1. Tap > Phone, or press the Call button.
2. From the Phone keypad, tap Menu > Options > Phone.
3. Tap the Ring type list, select the desired option, and tap OK.
Changing the Ring Tone
You can select a different sound to notify you of incoming calls.
1. Tap > Phone, or press the Call button.
2. From the Phone keypad, tap Menu > Options > Phone.
3. Tap the Ring tone list, select the desired option, and tap OK.
• To select .mp3, .wav, .mid or .wma files as your ring tone, first use the ActiveSync on the
desktop computer to copy the files to the \Windows\Rings folder on the Pocket PC Phone. For
information on copying files to the Pocket PC Phone, see the ActiveSync Help on the desktop
computer.
3-9 SP70R User Manual
Using the Phone
Feature
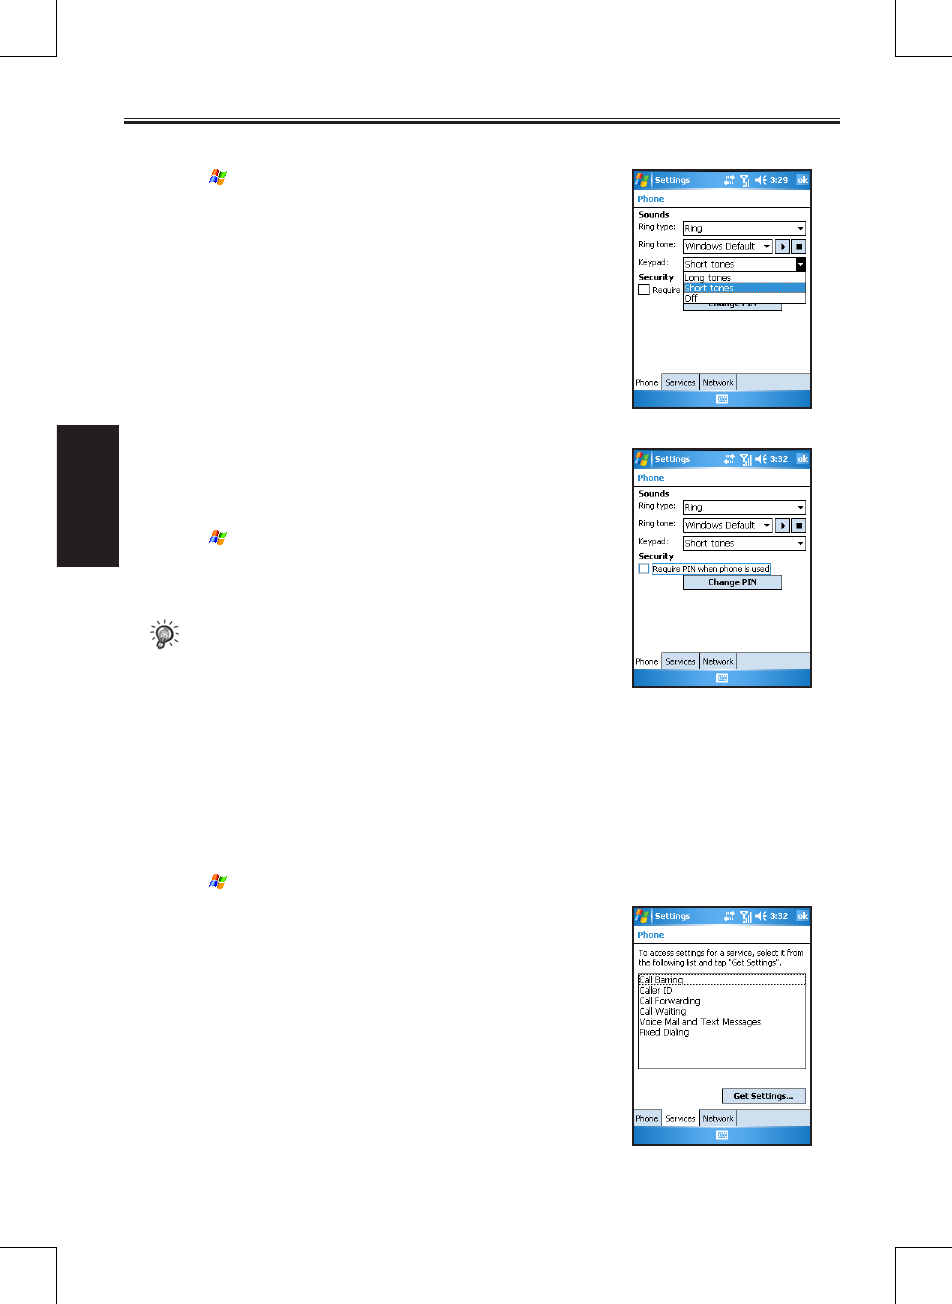
Changing the Keypad Tone
1. Tap > Phone, or press the Call button.
2. From the Phone keypad, tap Menu > Options > Phone.
3. Tap the Keypad list, select the desired option, and tap OK.
Securing Your Phone
You can protect your phone from unauthorized use by assigning a
type of password called a PIN (Personal Identification Number).
Your first PIN will be given to you by your mobile phone service
provider.
1. Tap > Phone, or press the Call button.
2. From the Phone keypad, tap Menu > Options > Services.
3. Select Require PIN when phone is used, and tap OK.
• To change the PIN, tap Change PIN. You need to enter the
old PIN, enter the new PIN, and then re-enter the new PIN
for confirmation.
• Emergency calls can be placed at any time, without
requiring a PIN.
Changing Phone Service Settings
You can access and configure settings for the phone services subscribed from your mobile phone service
provider. For example, you may want to block certain types of incoming and/or outgoing calls, forward
incoming calls to a different phone number based on your situation, be notified of incoming calls when
you’re already in a phone session, or let others know your identity when making calls.
1. Tap > Phone, or press the Call button.
2. From the Phone keypad, tap Menu > Options > Services.
3. Tap a service, and then tap Get Settings.
• Call Barring blocks certain types of incoming and/or
outgoing calls.
• Caller ID lets people to know your identity when calling
them by displaying your caller ID.
• Call Forwarding forwards all incoming calls to a different
number.
• Call Waiting notifies you of incoming calls when you are
already in a phone session.
• Voice Mail or Text Message Phone Number changes the
voice mail or text message phone number.
SP70R User Manual 3-10
Using the Phone
Feature
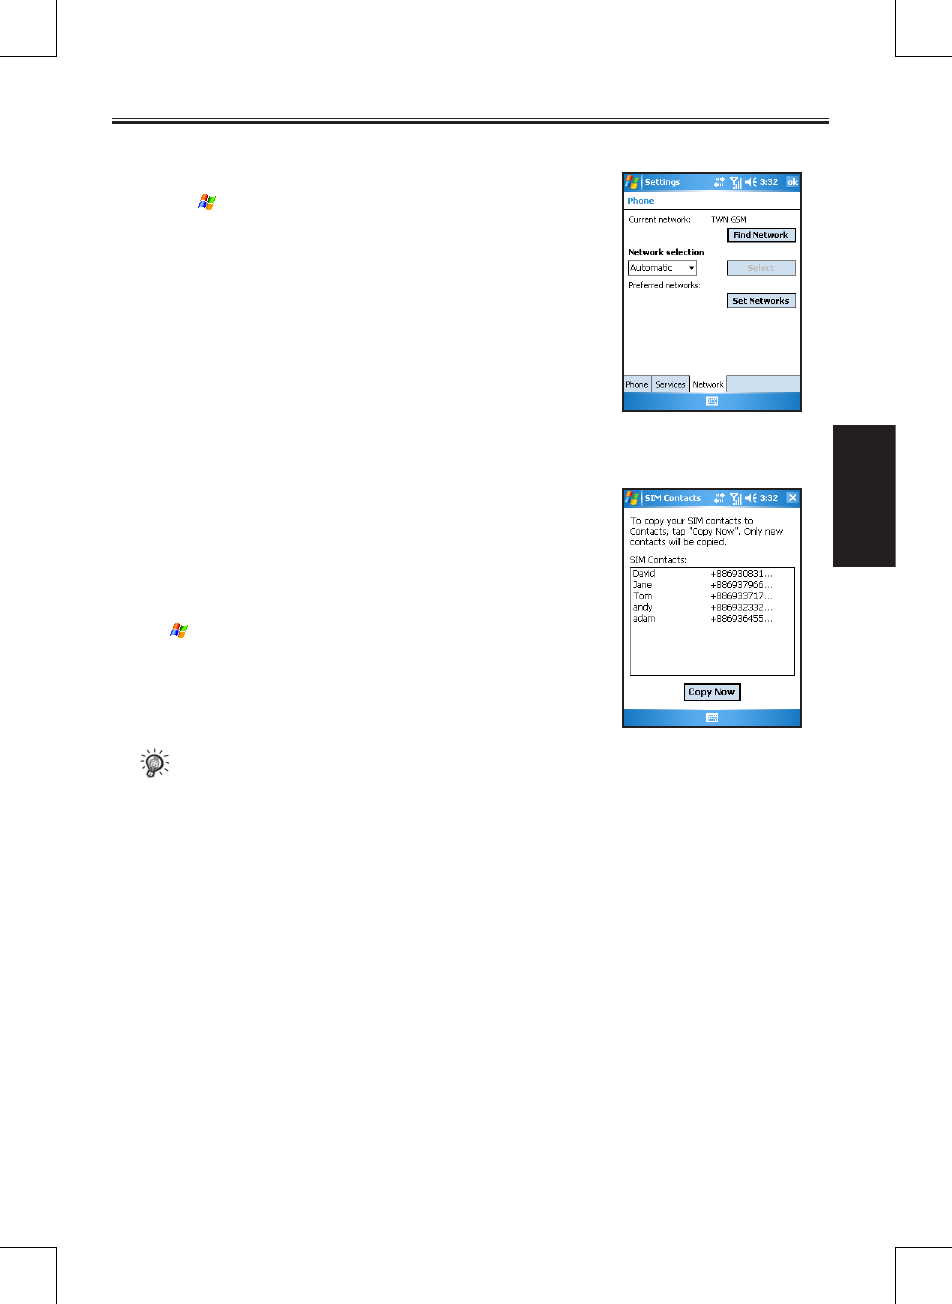
Changing Phone Network Settings
You can view available networks and change their settings.
1. Tap > Phone, or press the Call button.
2. From the Phone keypad, tap Menu > Options > Network.
3. The network your device is currently using will be listed at the
top of the screen. You can specify whether you want to change
networks manually or automatically, and determine the order in
which your phone accesses another network if the current one is
unavailable.
3.8 SIM Contacts
On your Pocket PC Phone, there can be two kinds of independent
contact lists. One is stored in the Pocket PC Phone’s memory by
Microsoft Contacts; the other is stored in the SIM card. By default,
you can use Contacts to load the contact information stored in
the Pocket PC Phone’s memory (see Chapter 4 for information
on Microsoft Contacts), and use SIM Contacts to load the contact
information stored in the SIM card.
Tap > Programs > SIM Contacts. When running SIM Contacts
for the first time after turning the Pocket PC Phone on, it may take a
few minutes to load the contact informaion.
After the loading is completed, you can tap Tools > Select All >
Tools > Copy to Contacts to copy your contacts to Contacts.
• Some Chinese contact info stored in the SIM card may appear in scrambled code while it is
copied to the Pocket PC Phone.
3-11 SP70R User Manual
Using the Phone
Feature
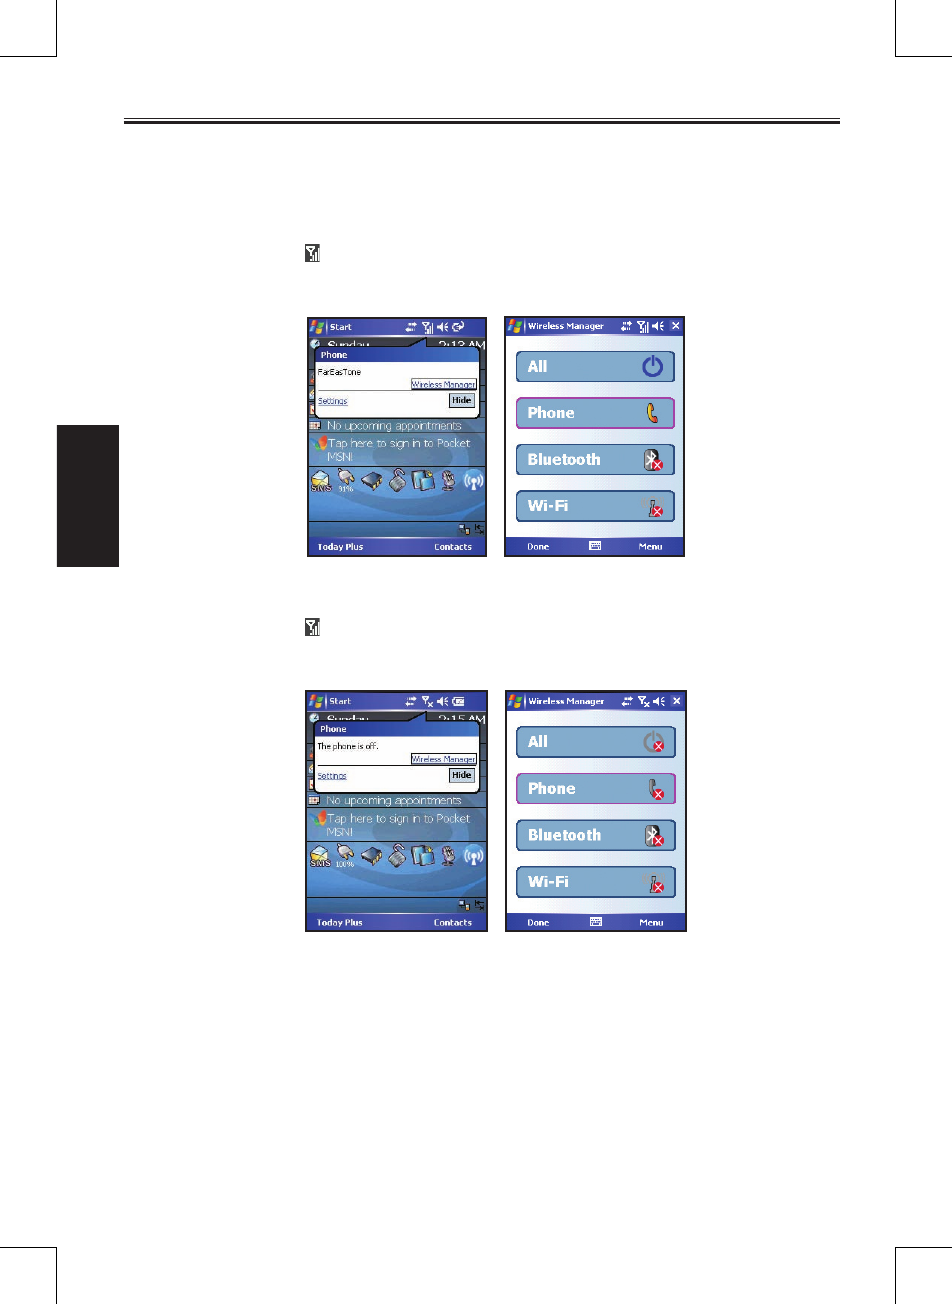
3.9 Turning the Phone On and Off
You can turn your phone on and off while keeping your actual device On. Your phone is off when it is in
flight mode.
Turning the phone off:
1. Tap the signal icon on the navigation bar, and then tap Wireless Manager on the pop-up message.
2. Tap Phone. The phone signal status will show Off.
>
Turning the phone on:
1. Tap the signal icon on the navigation bar, and then tap Wireless Manager on the pop-up message.
2. Tap Phone. The phone signal status will show On.
>

Chapter 4
Contacts
4.1 Creating a New Contact
4.2 Managing Contacts
4.3 View Modes
4.4 Changing List View Settings
4-2 SP70R User Manual
Contacts
4.1 Creating a Contact
Microsoft Contacts maintains a list of your friends and colleagues so that you can easily find the
information you’re looking for, whether you’re at home or on the road. You can enter both personal and
business information.
From Microsoft Contacts, you can create a new contact to store in Microsoft Contacts or on the SIM card.
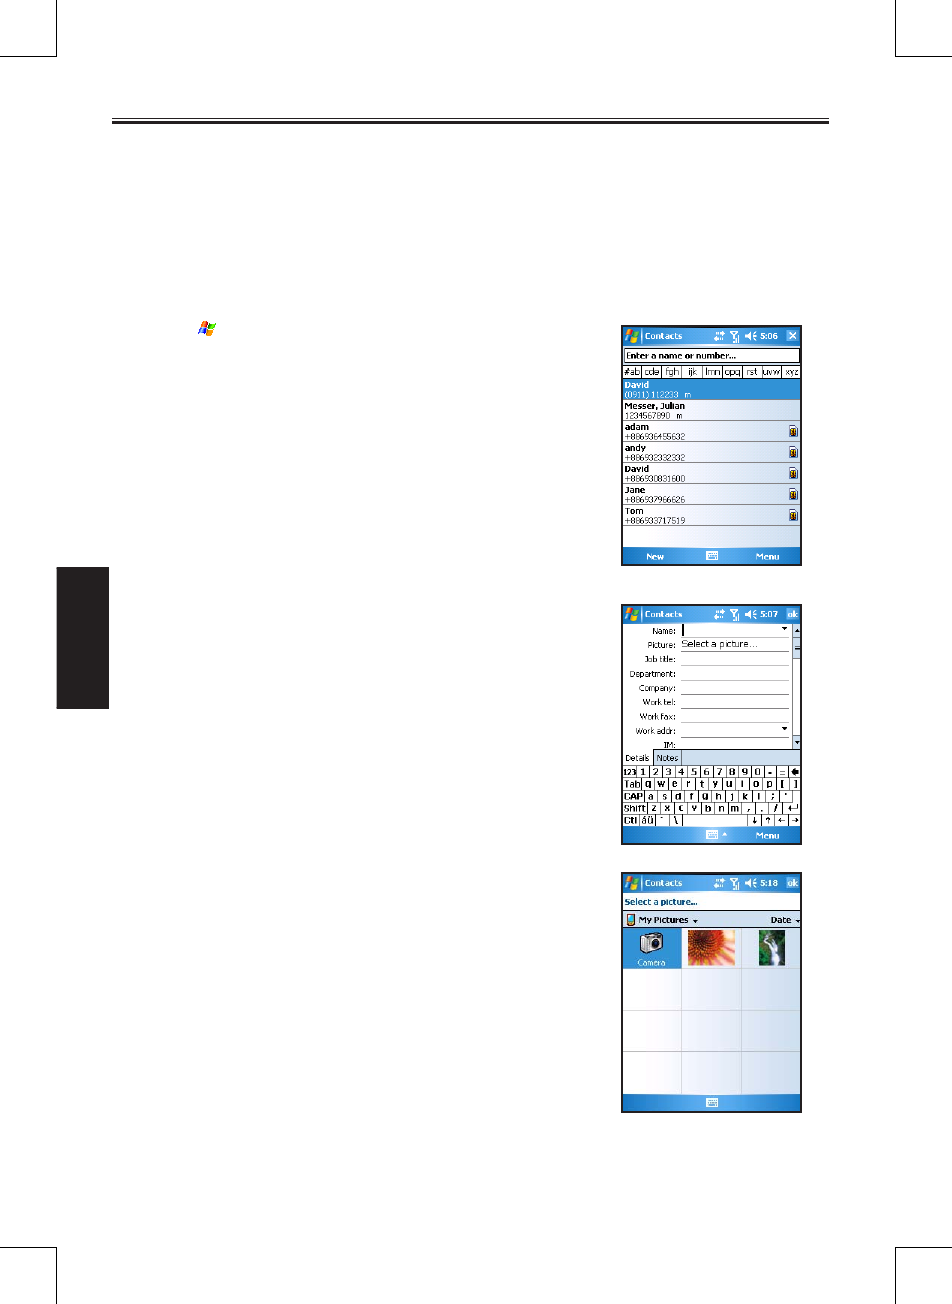
For Microsoft Contacts
1. Tap > Contacts, or tap the Contacts soft key.
2. By default, the screen displays all contacts stored in Contacts.
The bottom of the screen displays the current caller picture
preview of the selected contact, the picture filename and ring
tone file name.
3. To add a new contact, tap New, or Menu > New Contact.
4. Enter the name and other contact information. You will need to
hide the Input panel to see all available fields.
5. To set a caller picture, tap Select a picrure in Picture and
browse for a picture stored on the Pocket PC Phone or miniSD
card (if inserted).
The picture formats supported by the Pocket PC Phone include:
JPEG, PNG, BMP, GIF.
SP70R User Manual 4-3
Contacts
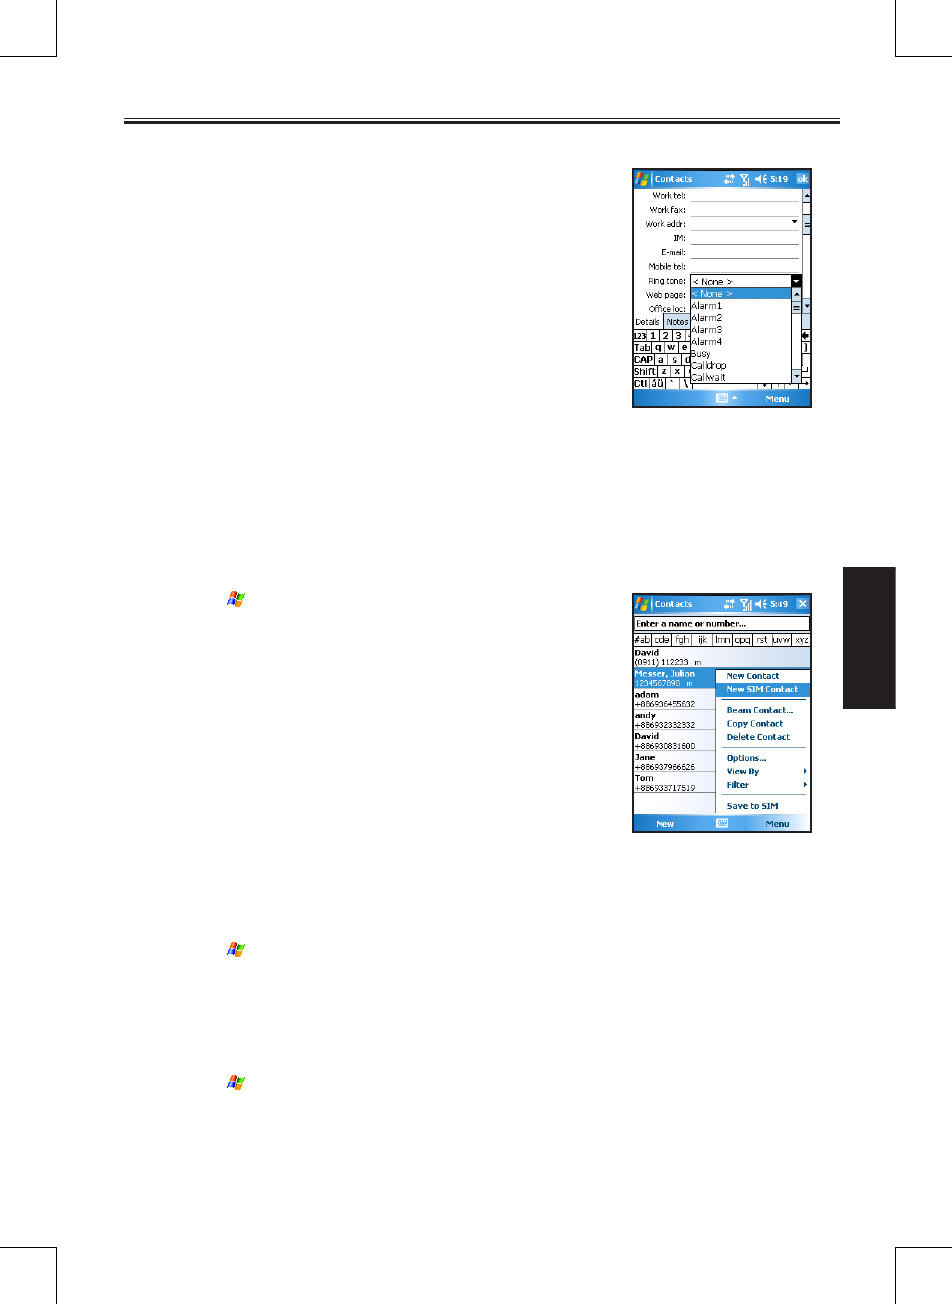
6. To set a caller ring tone, tap Ring tone and browse for a
sound file stored on the Pocket PC Phone or miniSD card
(if inserted).
The sound formats supported by the Pocket PC Phone
include: Polyphonic, Monophonic, MIDI, AMR, WAV,
MP3, WMA, AAC, and AAC+.
5. You can assign a contact to a category so that you can use
these groupings to quickly display only the information
you want.
Tap Categories. Select the categories that you want to
assign the contact to.
To create a new category, tap New, enter the category
name, and then tap Done.
Tap OK to return to the previous screen.
6. Tap Notes. You can add written or typed notes and even recordings to a contact. For information
on Notes, see Section 10.3.
7. Tap OK to return to the contact list. The new contact is added to the list.
For SIM Card
1. Tap > Contacts, or tap the Contacts soft key.
2. To add a new SIM card contact, tap Menu > New SIM
Contact.
3. Enter the name and phone number of the contact, and tap
OK.
SIM contacts appear at the bottom of the contact list in
alphabetical order.
4.2 Managing Contacts
Editing a Contact
1. Tap > Contacts, or tap the Contacts soft key.
2. Tap to open the contact to edit, and tap Menu > Edit.
3. Make the changes and tap OK.
Deleting a Contact
1. Tap > Contacts, or tap the Contacts soft key.
2. Tap to open the contact to delete, and tap Menu > Delete.
3. Tap Yes to confirm.
4-4 SP70R User Manual
Contacts
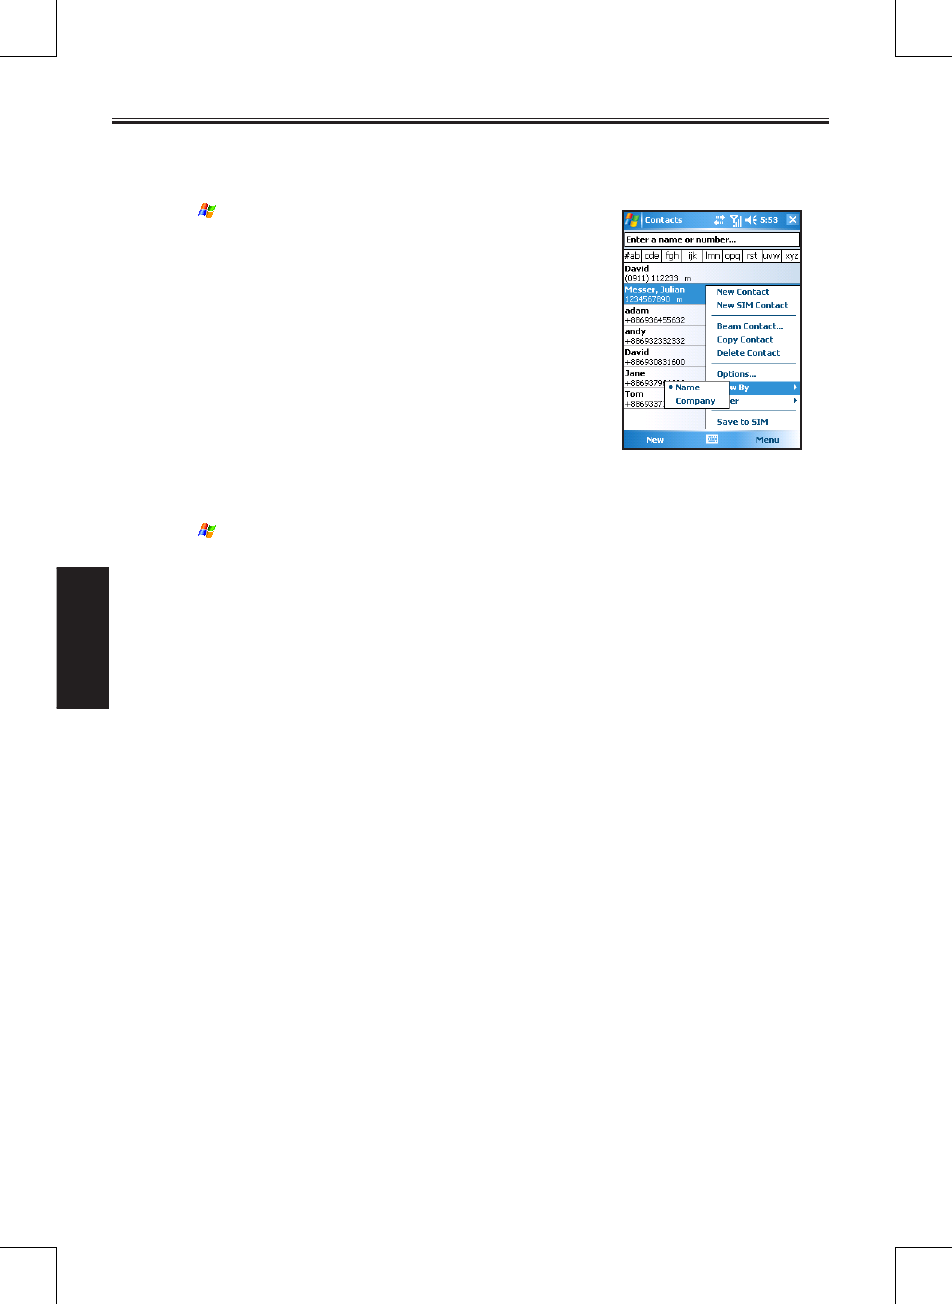
4.3 View Modes
You can display the contact list in Name or Company view.
1. Tap > Contacts, or tap the Contacts soft key.
2. Tap Menu > View By > Name or Company.
In Name view, you can search for a contact by entering a name or
number, or by using the alphabetical index.
In Company view, you can view a list of contacts employed by a
specific company.
4.4 Changing List View Settings
1. Tap > Contacts, or tap the Contacts soft key.
2. Tap Menu > Options.
3. To display a greater number of contacts, select the Show contact names only check box, and clear the
Show alphabetical index check box.

Chapter 5
Recording Messages
5.1 Recording Messages in Notes
5.2 AMR Recorder
5-2 SP70R User Manual
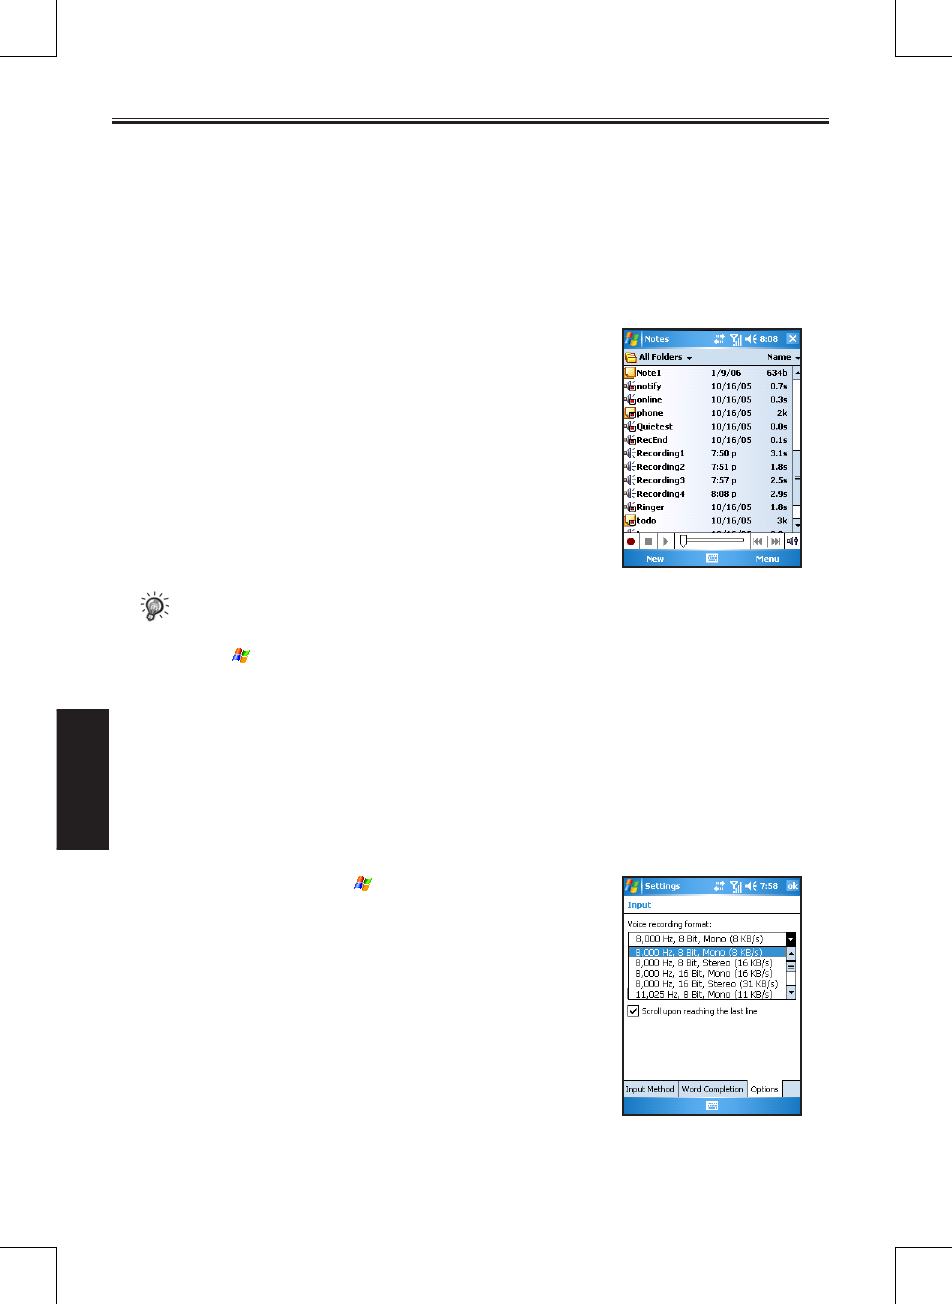
Recording
Messages
5.1 Recording Messages in Notes
In any program where you can write or draw on the screen, you can also quickly capture thoughts,
reminders and phone numbers by recording a message. The recordings will be saved as .wav files in the
\My Documents folder on the Pocket PC Phone.
You can record a message when the Record button appears on the command bar. In Pocket Word, use the
recording function by the View menu.
Creating a Recording
1. Hold your Pocket PC Phone’s microphone near your mouth or
other source of sound.
2. Hold down the Voice Recording button. When you hear the
beep, begin your recording.
3. Keep holding down the Voice Recording button during the
recording.
4. Release the button when you are finished. You will hear two
beeps.
5. The new recording is stored as a stand-alone recording if no note
is open. Tap the recording file to play back.
• The voice recording indicator glows in red when a recording is in process.
• You can use the Record/Playback toolbar for recording and playback.
• Tap > Settings > Personal > Input > Options to select the voice recording format.
Recording Formats
Your Pocket PC Phone supports several formats for voice notes. The formats vary in both the quality of the
recording and the size of the sound file. When selecting a recording format, you should consider the quality
you need as well as how much storage memory the recording will use on your Pocket PC Phone.
Not all recording formats are compatible with other software or computers. If you will share your record-
ings with others or transfer a recording to your desktop computer, be sure to choose a recording format that
is supported by the software used to play recordings on the other computer.
To select a recording format, tap > Settings > Personal > Input
> Options to select a recording format. The list of recording formats
on your Pocket PC Phone indicates the sample rate, whether the
format is stereo or mono and how much storage memory is required
per second of recording. You may need to experiment with different
sample rates and formats to determine which format best suits your
needs.
SP70R User Manual 5-3
Recording
Messages
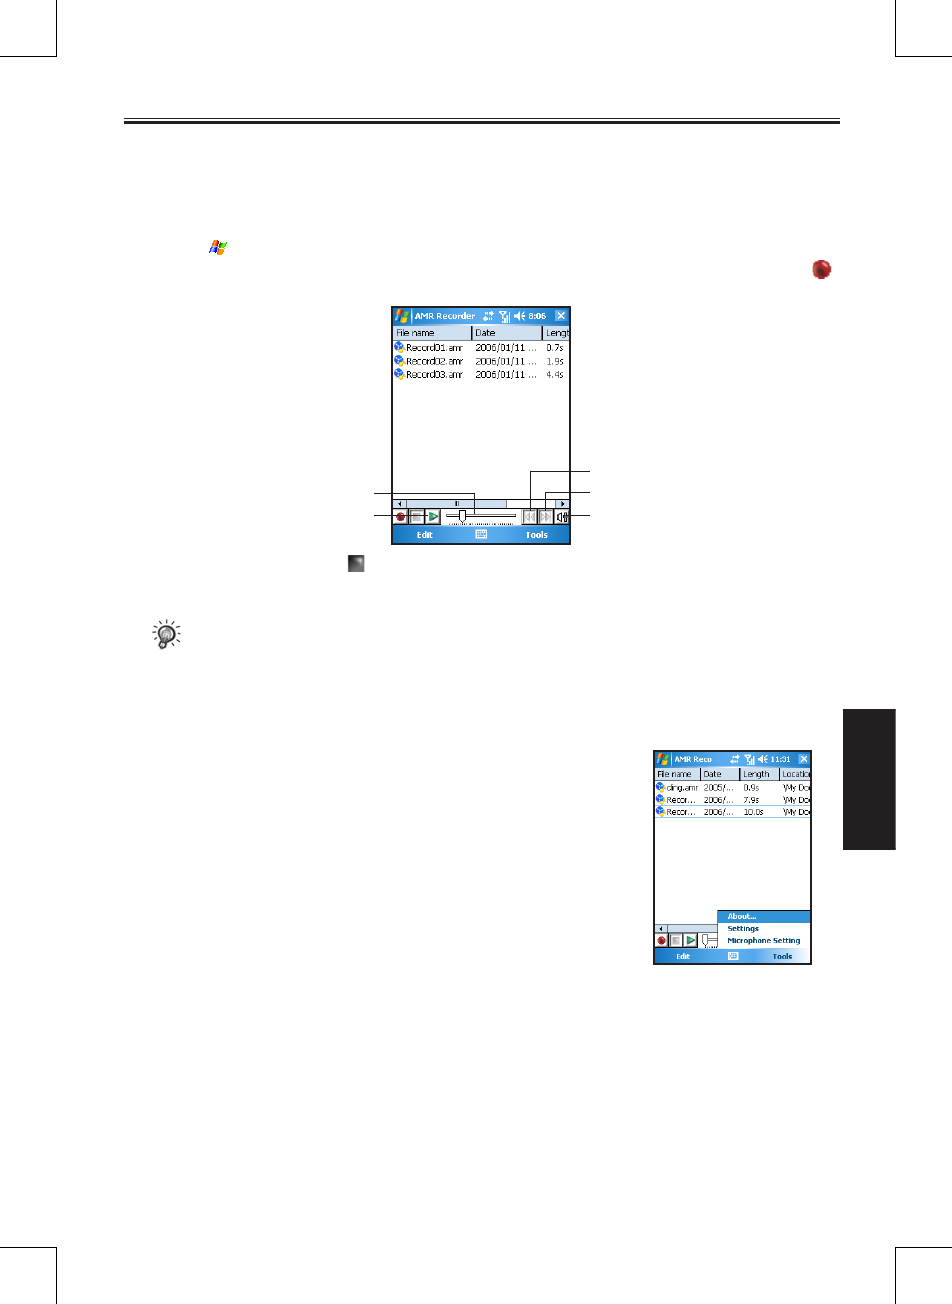
5.2 AMR Recorder
Besides the built-in recording program described in the previous section, you can also use the AMR Recorder
program to record messages. AMR Recorder will save the recordings as AMR files in the My Device\My
Documents\Recording folder on the Pocket PC Phone.
1. Tap > Programs >
AMR
Recorder.
2. Hold your Pocket PC Phone’s microphone near your mouth or other source of sound. Then tap the
icon to start recording.
3. To stop recording, tap the icon. The recording will appear on the list. (To delete a recording, tap and
hold the file on the list, and then tap Delete.)
• The recording indicator glows in red when a recording is in process.
• If the earphone is already connected to the Pocket PC Phone, then the recording will receive
sounds from the speaker on the earphone.
You can change the following settings in Recorder:
n To chnage the storage location of the recording files, tap Tools >
Settings.
n To change the recording quality, tap Tools > Microphone
Setting. When finished, tap OK to save the change.
Fast backward
Recording/
playback progress
Tap to play back Adjusting playback volume
Fast forward

Chapter 6
Customizing Personal Settings
6.1 Buttons
6.2 Input
6.3 Lock
6.4 Menus
6.5 MSN Options
6.6 Owner Information
6.7 Phone
6.8 Sounds & Notifications
6.9 Today
6.10 Today Plus
6.11 Voice Commander
SP70R User Manual 6-2
Customizing
Personal Settings
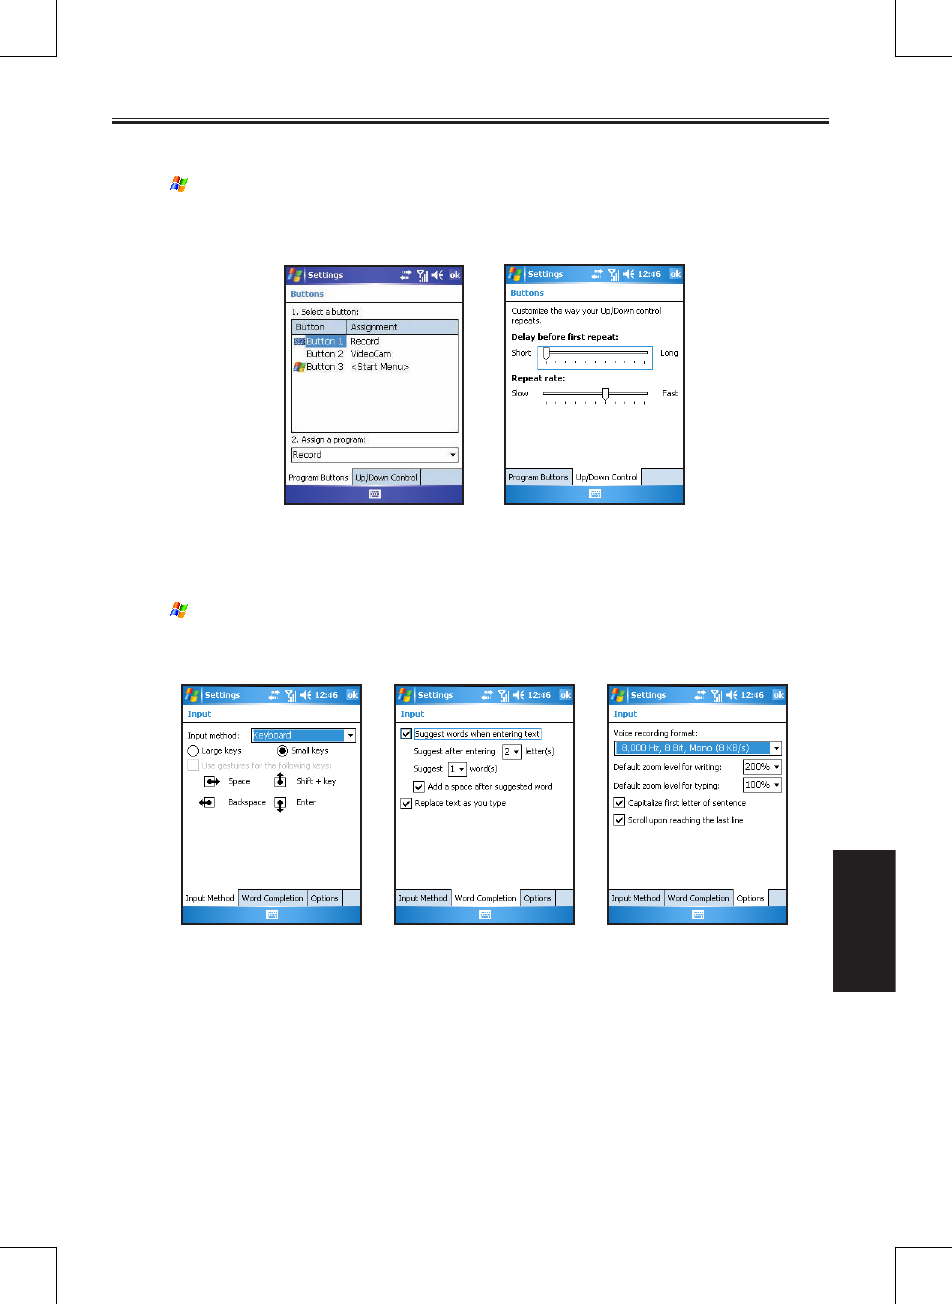
6.1 Buttons
Tap > Settings > Personal > Buttons.
Use this item to assign programs to the hardware buttons and set the repeat rate of the Up/Down direction
keys.
6.2 Input
Tap > Settings > Personal > Input.
This item sets up items related to Block Recognizer, soft keyboard, Letter Recognize, Transcriber input
methods and voice recording format.
6-3 SP70R User Manual
Customizing
Personal Settings
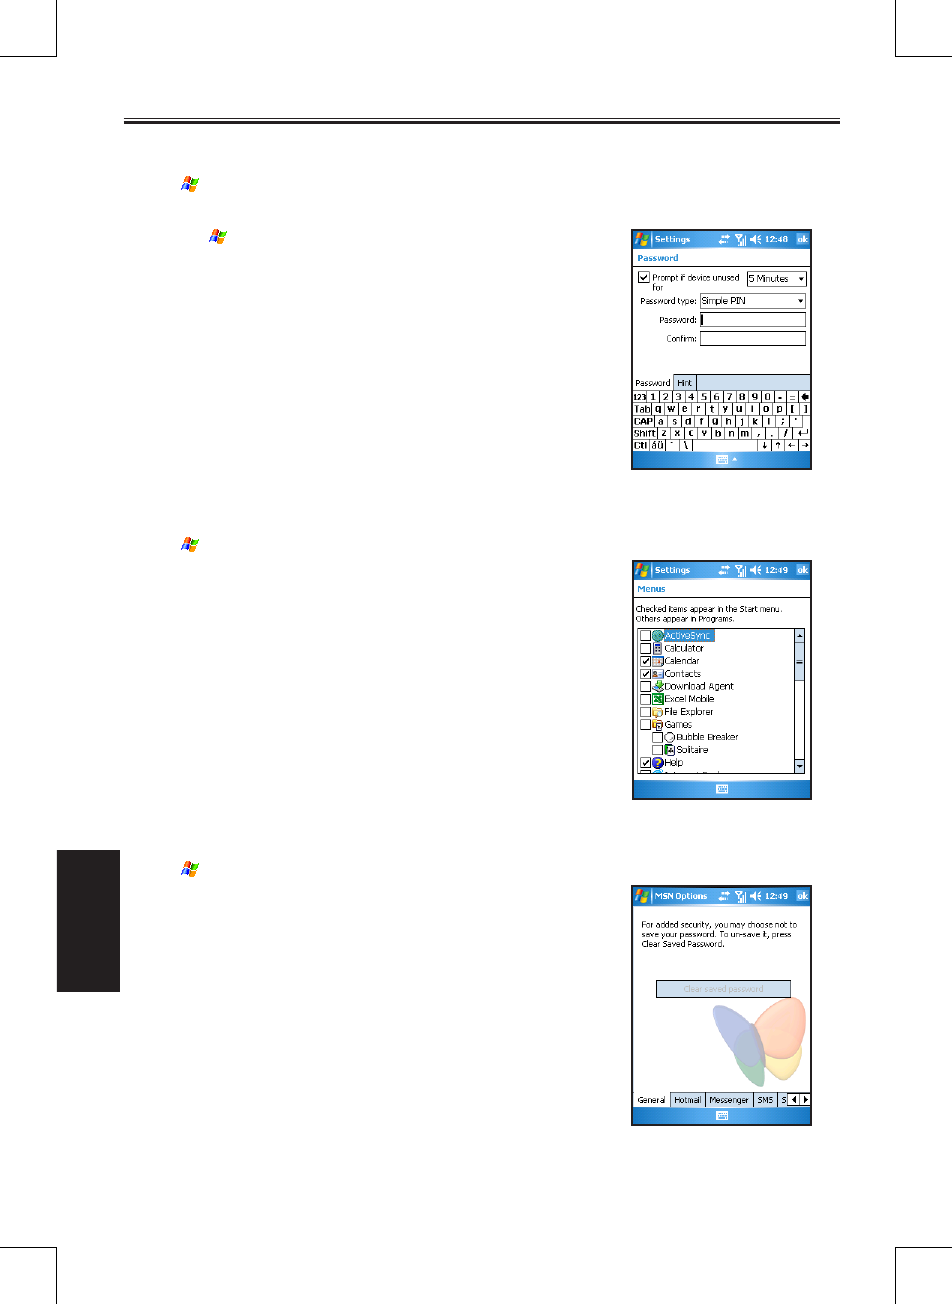
6.3 Lock
Tap > Settings > Personal > Lock.
This item allows you to set a password for security.
1. Tap > Settings > Personal > Password.
2. Check the Prompt if device unused item and select a value to
set the time for the Pocket PC Phone to prompt for password
after idling.
3. Select the type of password you would like to use. You can set a
four-digit password or a long password containing a combination
of at least seven characters, numbers or punctuation.
4. Tap the numbers or characters to set your password.
5. To keep a hint for yourself in case you forget your password, tap
Prompt and enter the prompt for password.
6. Tap OK.
6.4 Menus
Tap > Settings > Personal > Menus.
This item allows you to customize what appears on the Start menu.
On the program list, the selected items will appear on the Start
menu, and the unselected items appear in Programs.
6.5 MSN Options
Tap > Settings > Personal > MSN Options.
Use this item to manage your Pocket MSN settings.
SP70R User Manual 6-4
Customizing
Personal Settings
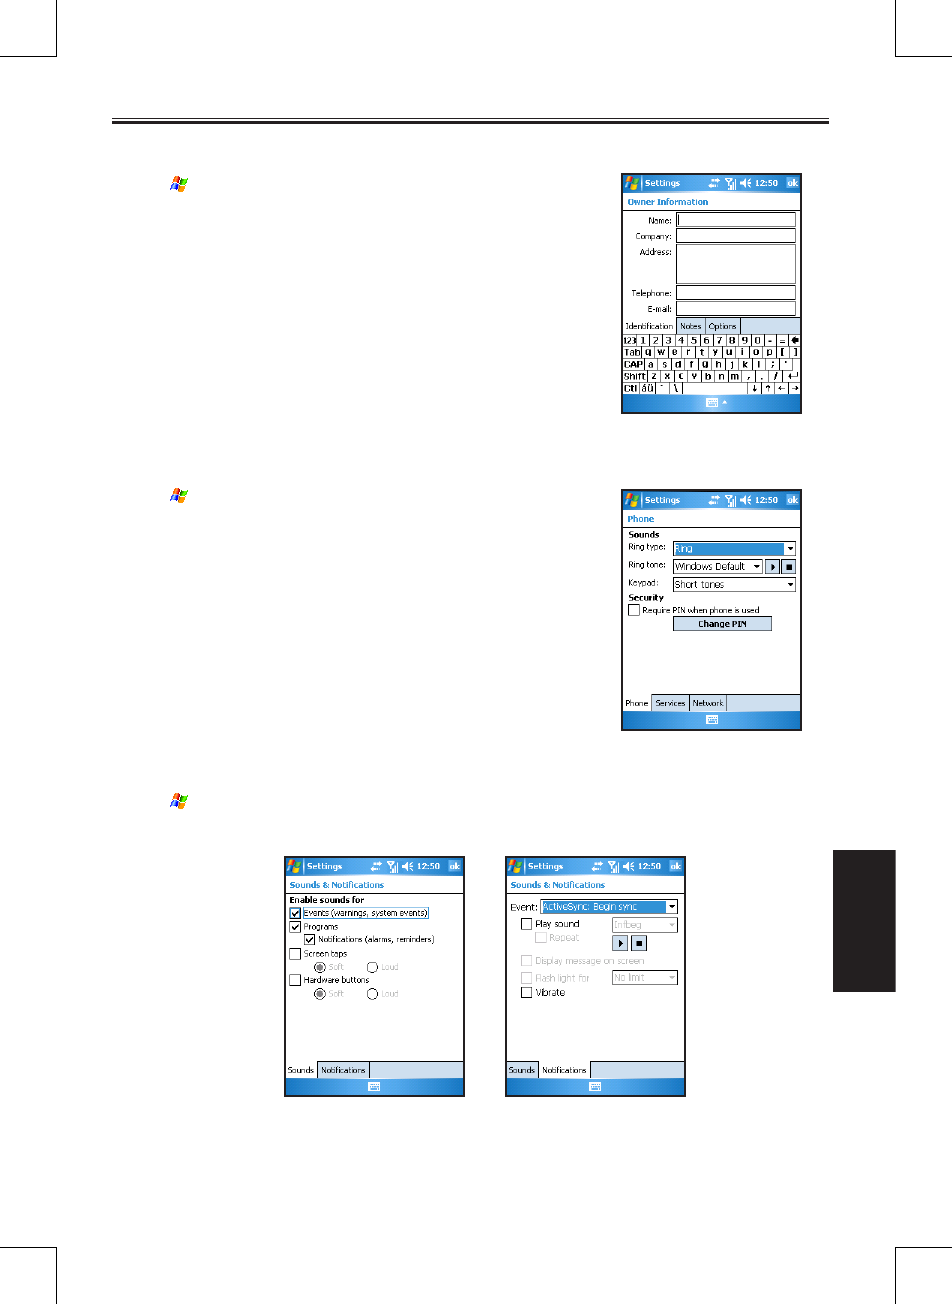
6.6 Owner Information
Tap > Settings > Personal > Owner Information.
Use this item to enter your personal information.
6.7 Phone
Tap > Settings > Personal > Phone.
This item changes the phone-related settings. See Section 3.8 for
detailed information.
6.8 Sounds&Notications
Tap > Settings > Personal > Sounds & Notifications.
This item sets the conditions and types of the sounds, system volume and methods of notifications.
6-5 SP70R User Manual
Customizing
Personal Settings
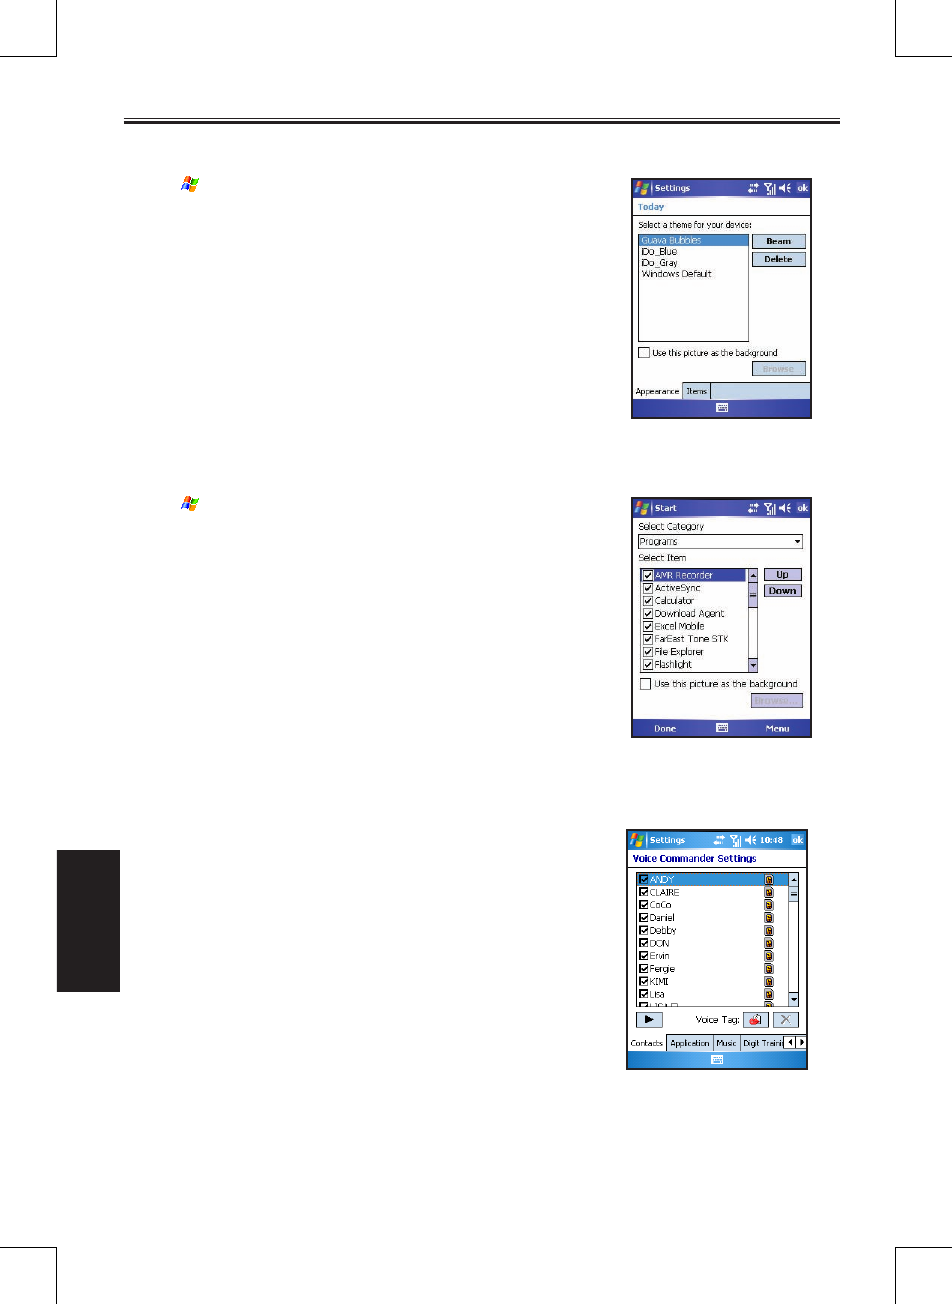
6.9 Today
Tap > Settings > Personal > Today.
Tap Appearance to select a desired theme for the background. You
can also tap Beam to exchange favorite themes with your friends.
Tap Items to select the information you want displayed on the Today
screen. You can also select a period of time (4 hours by default) for
your Pocket PC Phone to automatically return to the Today screen.
6.10 Today Plus
Tap > Settings > System > Today Plus.
Use this item to configure the displayed items in Today Plus. See
Chapter 12 for detailed information on Today Plus.
6.11 Voice Commander
It provides the voice simulation function to help facilitate the identi-
fication such that the user’s specific speech sounds may be identified
easily.
It offers the voice identification/simulation function for operations in
Contacts, Applications, Music, and Digit, etc.

Chapter 7
Customizing System Settings
7.1 About
7.2 Backlight
7.3 Certificates
7.4 Clock & Alarms
7.5 Error Reporting
7.6 Memory
7.7 Microphone Environment
7.8 Power
7.9 Regional Settings
7.10 Remove Programs
7.11 Screen
7.12 System Information
7.13 Wake Up Screen
7.14 SmartX
7.15 Ring Tone
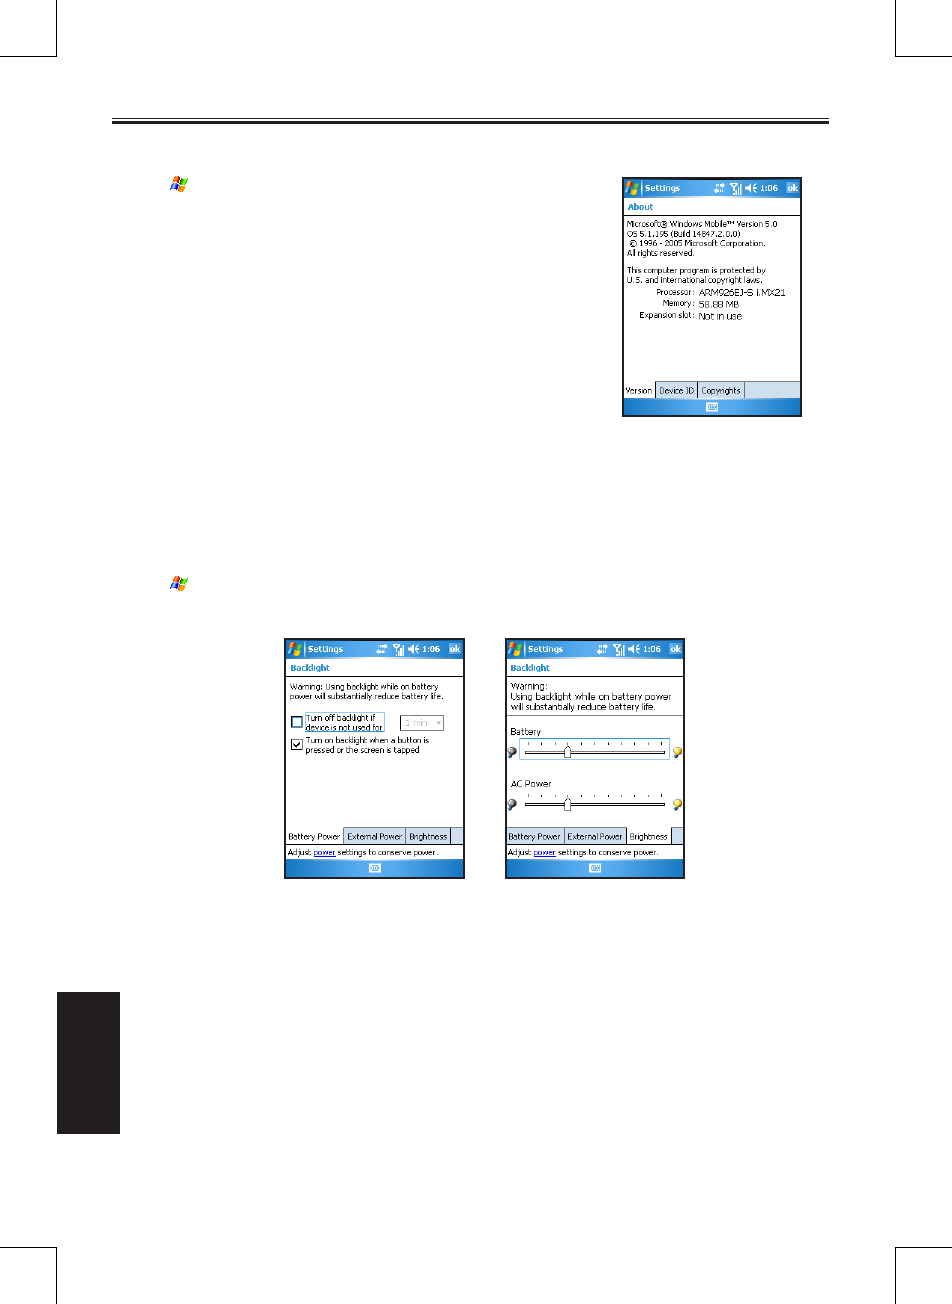
7-2 SP70R User Manual
Customizng
System Settings
7.1 About
Tap > Settings > System > About.
This item shows the hardware information of the Pocket PC
Phone and defines the device name that your Pocket PC Phone
uses for identifying itself to other computers.
7.2 Backlight
Tap > Settings > System > Backlight.
This item adjusts the brightness of the display and sets the automatic turnoff for power saving purposes.

SP70R User Manual 7-3
Customizng
System Settings
7.3 Certicates
Tap > Settings > System > Certificates.
You may add/delete the public key certificates to/from your Pocket PC Phone. These certificates help
establish your identity when you are logging into a secured network, such as a corporate network.
Certificates also help establish the identity of other computers, such as servers, with which you
connect. This helps prevent unauthorized users from accessing your Pocket PC and information.
You can store two types of certificates on your Pocket PC: Personal Certificates that establish your
identity, and Root Certificates that establish the identity of servers with which you connect.
ManagingCerticates
1. Tap > Settings > System > Certificates.
2. The list displays the names of the certificate issuers and
the expiration date.
3. To view more information about a certificate, tap it in the
list.
4. To delete a certificate, tap and hold it in the list and then
tap Delete.
7.4 Clock & Alarms
Tap > Settings > System > Clock & Alarms.
This item allows you to change the date and time and to set
alarms.
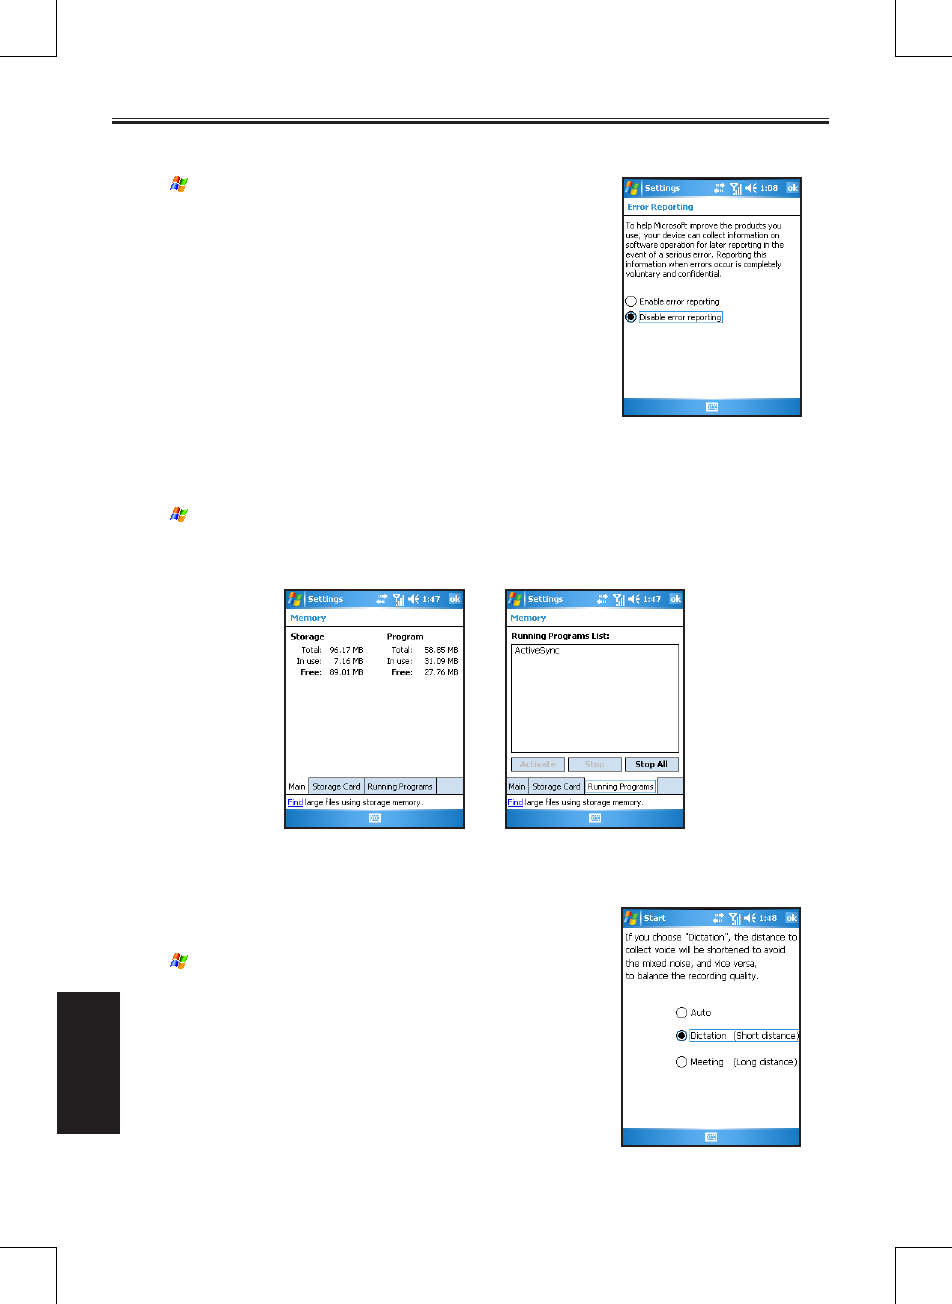
7-4 SP70R User Manual
Customizng
System Settings
7.5 Error Reporting
Tap > Settings > System > Error Reporting.
Use this item to send information needed by technical support
groups to diagnose a program error.
7.6 Memory
Tap > Settings > System > Memory.
This item displays the amount of memory allocated for storage and program memory, as well as the
memory on the storage card (if installed). You can also use this item to manually stop a program.
7.7 Microphone Environment
Tap > Settings > System > Microphone Environment.
This item sets the microphone environment for the recording mode.
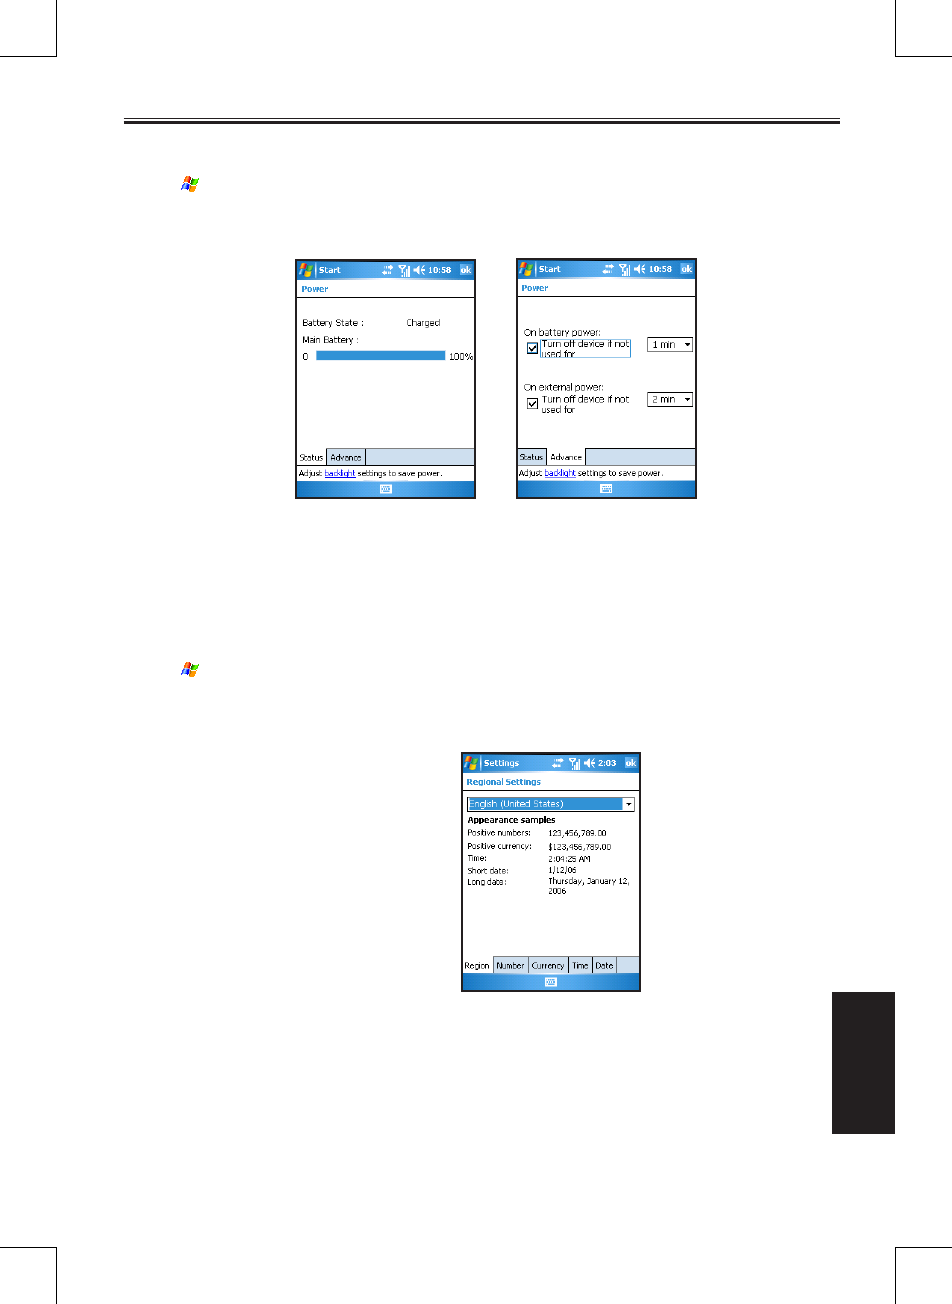
SP70R User Manual 7-5
Customizng
System Settings
7.8 Power
Tap > Settings > System > Power.
This item shows the remaining battery power and sets the time for the Pocket PC Phone to turn off
automatically.
7.9 Regional Settings
Tap > Settings > System > Regional Settings.
This item specifies the region of your location and the formats of the
number, currency, time and date.
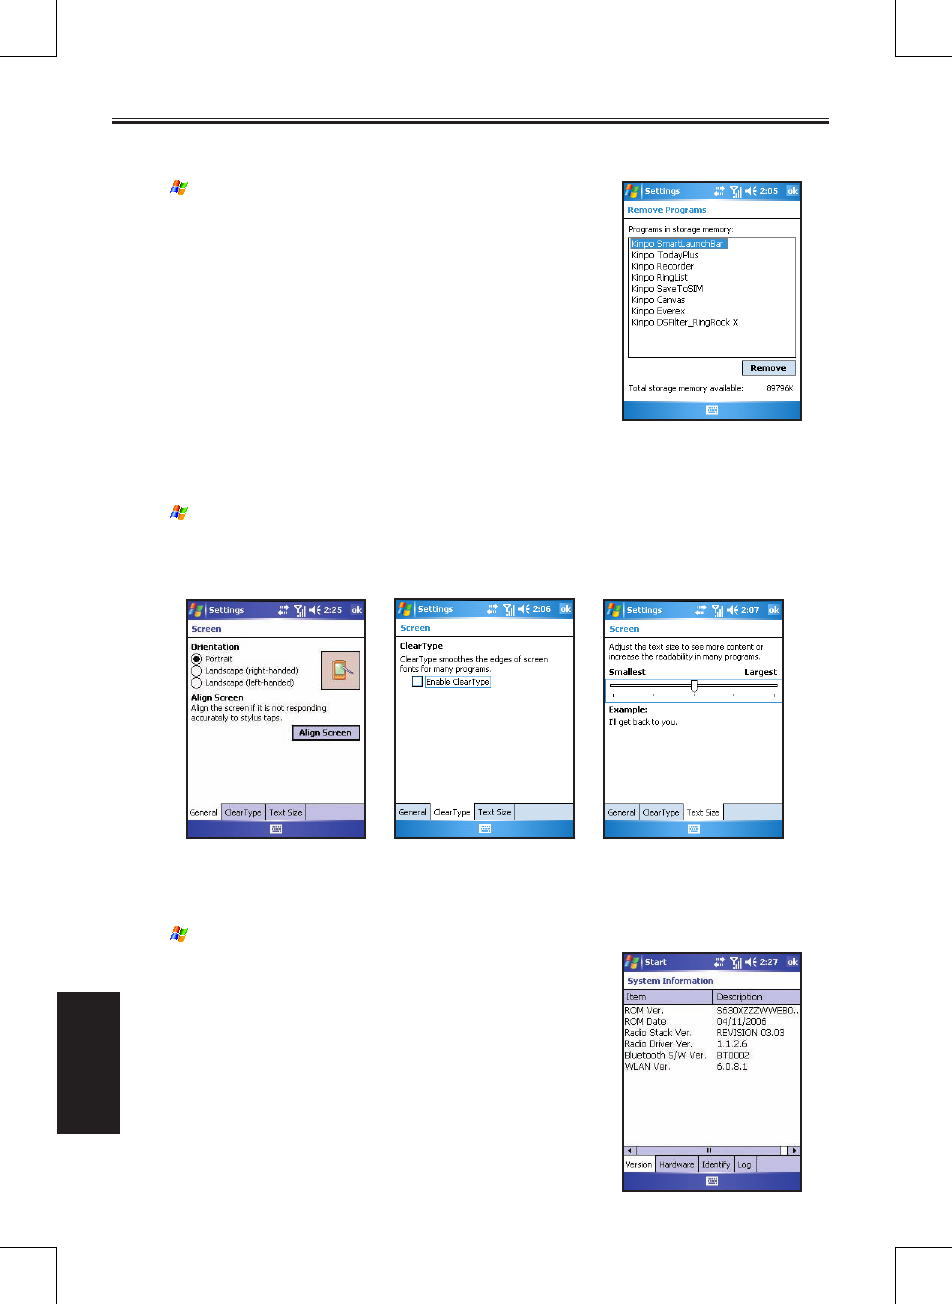
7-6 SP70R User Manual
Customizng
System Settings
7.10 Remove Programs
Tap > Settings > System > Remove Programs.
This item allows you to remove programs you have added
to the memory of your Pocket PC Phone. Tap the desired
program and then tap Remove.
7.11 Screen
Tap > Settings > System > Screen.
This item allows you to adjust the touch screen for accurate screen taps and to enable ClearType feature for
easier reading of text in programs that support ClearType.
7.12 System Information
Tap > Settings > System > System Information.
n Tap Version to view the software version of the Pocket PC
Phone.
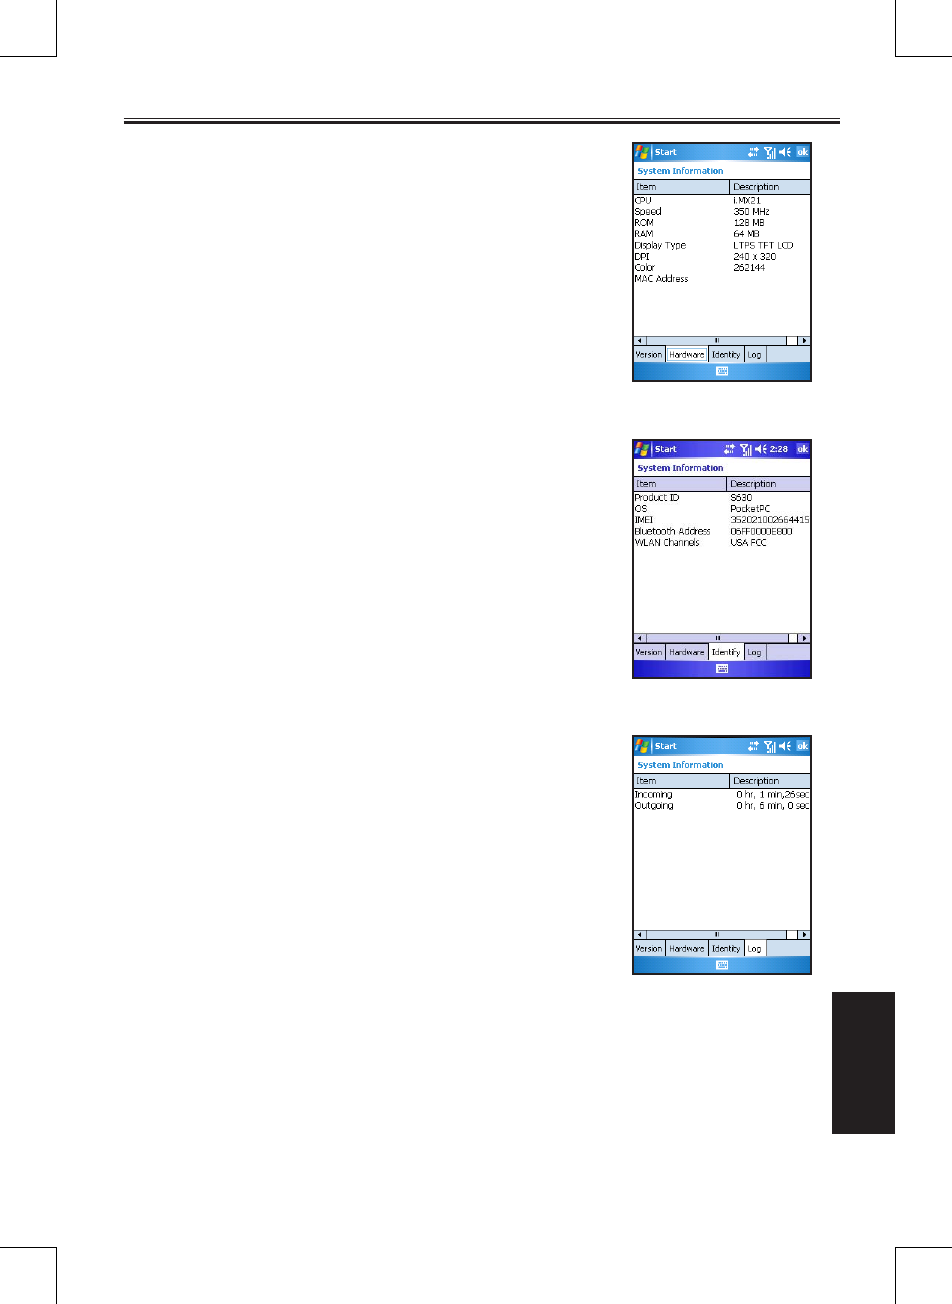
SP70R User Manual 7-7
Customizng
System Settings
n Tap Hardware to view the hardware information of the
Pocket PC Phone.
n Tap Identity to view the model name and operating
system of the Pocket PC Phone.
n Tap Log to view the talk time for incoming and outgoing
phone calls.
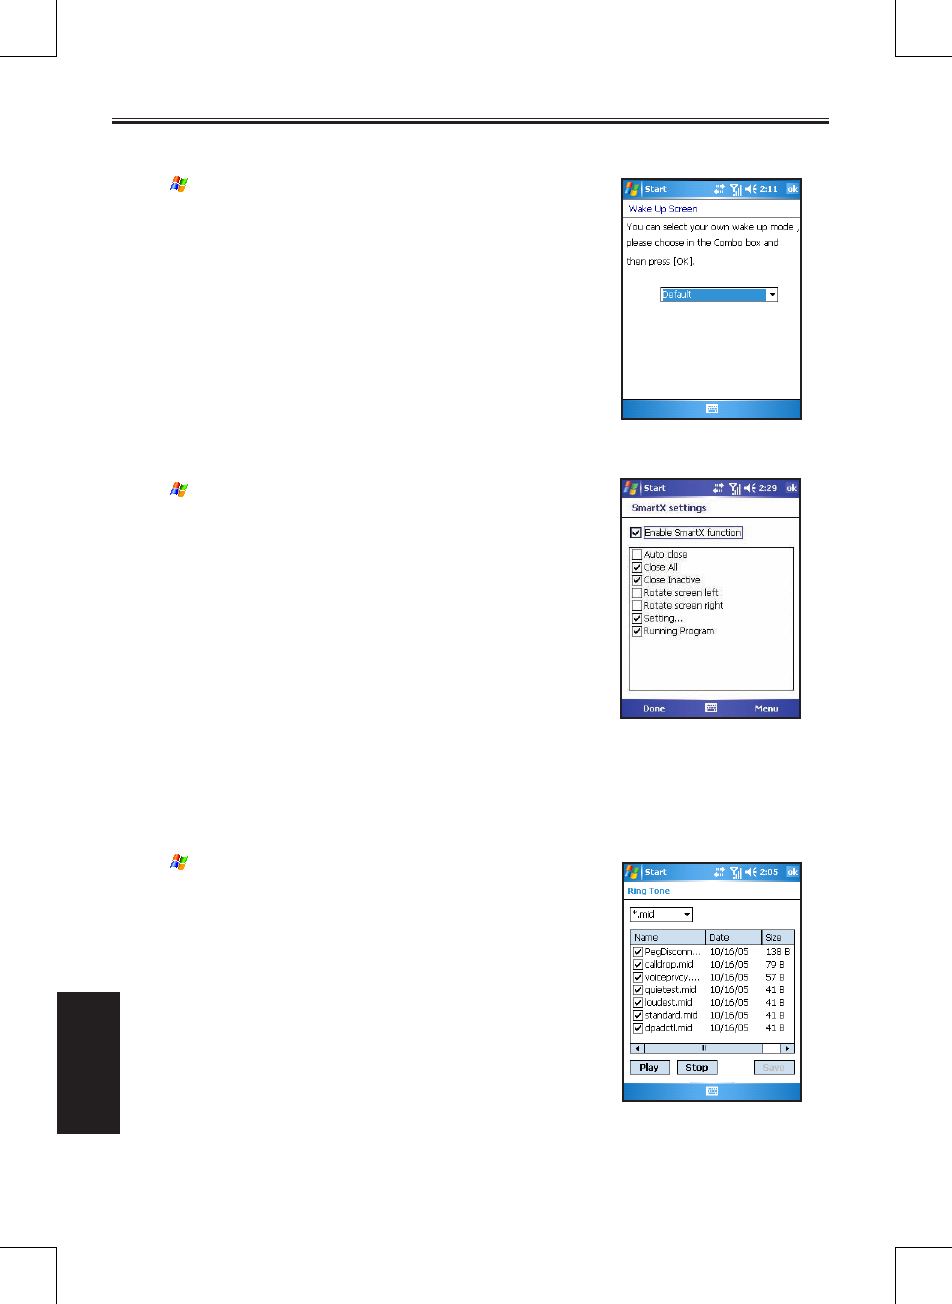
7-8 SP70R User Manual
Customizng
System Settings
7.13 Wake Up Screen
Tap > Settings > System > Wake Up Screen.
Use this item to select the displayed screen when the Pocket
PC Phone wakes up from the standby mode.
7.14 SmartX
Tap > Settings > System > SmartX.
You can customize the displayed items on the SmartX menu.
The items for selection include:
n Auto close closes the current program.
n Close All closes all running programs.
n Close Inactive closes inactive programs.
n Running Program displays the running program(s).
n Rotate screen left (disabled by default) rotates the screen at 90
degrees counterclockwise.
n Rotate screen right (disabled by default) rotates the screen at
90 degrees clockwise.
n Settings displays the SmartX settings.
See Section 15.17 for detailed information on SmartX.
7.15 Ring Tone
Tap > Settings > System > Ring Tone.
This item sets the ring tone file. The screen displays all sound files
stored on the Pocket PC Phone with the format of AMR ( .awb),
MIDI ( .rmi, .mmf, .mid), MP3, WAV, WMA, AAC, and AAC+.

Chapter 8
Getting Connected
8.1 GPRS Auto Configuration
8.2 Beam
8.3 Bluetooth
8.4 Connections
8.5 Wireless Manager
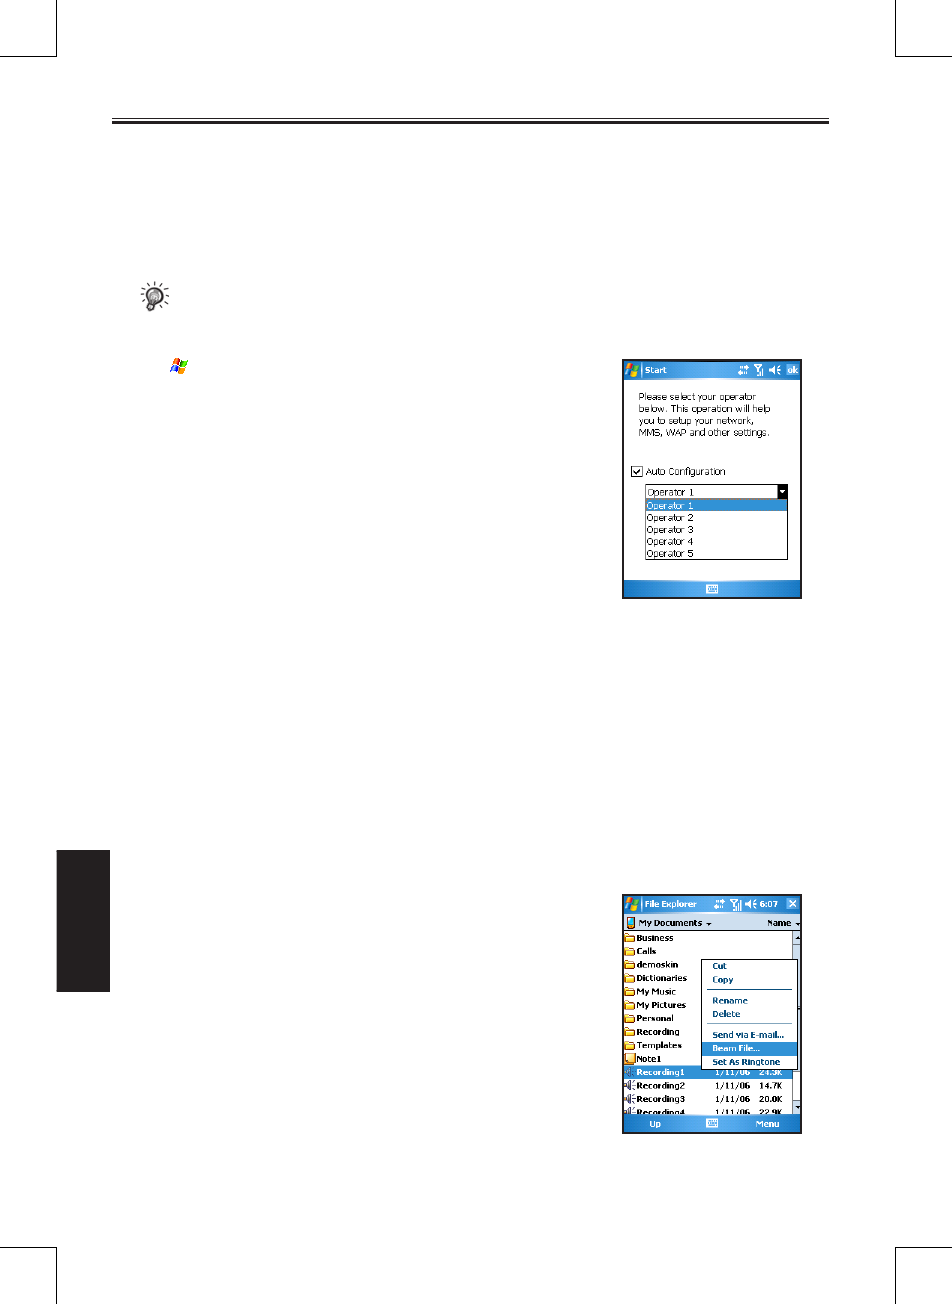
8-2 SP70R User Manual
Getting Connected
8.1 GPRSAutoConguration
GPRS is a high-speed transmission through the mobile phone network, which provides permanent on-line
connection.
When you apply for the GPRS service, your service provider may have already set up a GPRS connection
for you. You can also perform automatic GPRS configuration on your Pocket PC Phone.
• If you have subscribed to the GPRS and MMS services from your mobile phone service provider,
GPRS connection is active, and so is MMS connection.
Tap > Settings > Connections > GPRS Auto Configuration.
Select Auto Configuration, select your mobile phone service
provider, and then tap OK.
8.2 Beam
Use beaming software and hardware, such as infrared (IR), to send and receive information and files
between mobile devices. If an IR port is installed on your desktop computer, you can send and receive
information and files between your device and desktop computer.
When data transmission is not available, please note:
n Transfer only one file, or no more than 25 contact cards, at a time.
n When using IR, make sure nothing is between the two IR ports.
n Adjust the room lighting or move to another location (some types of light interfere with beaming).
Sending Information
1. Switch to the program where you created the item you want to
send and locate the item in the list.
2. Tap and hold the item and tap Beam File on the pop-up menu.
• In Tasks, tap Beam Task.
• In Contacts, tap Beam Contact.
• In Calendar, tap Beam Appointment.
3. Align the IR ports so that they are unobstructed and within a
close range.
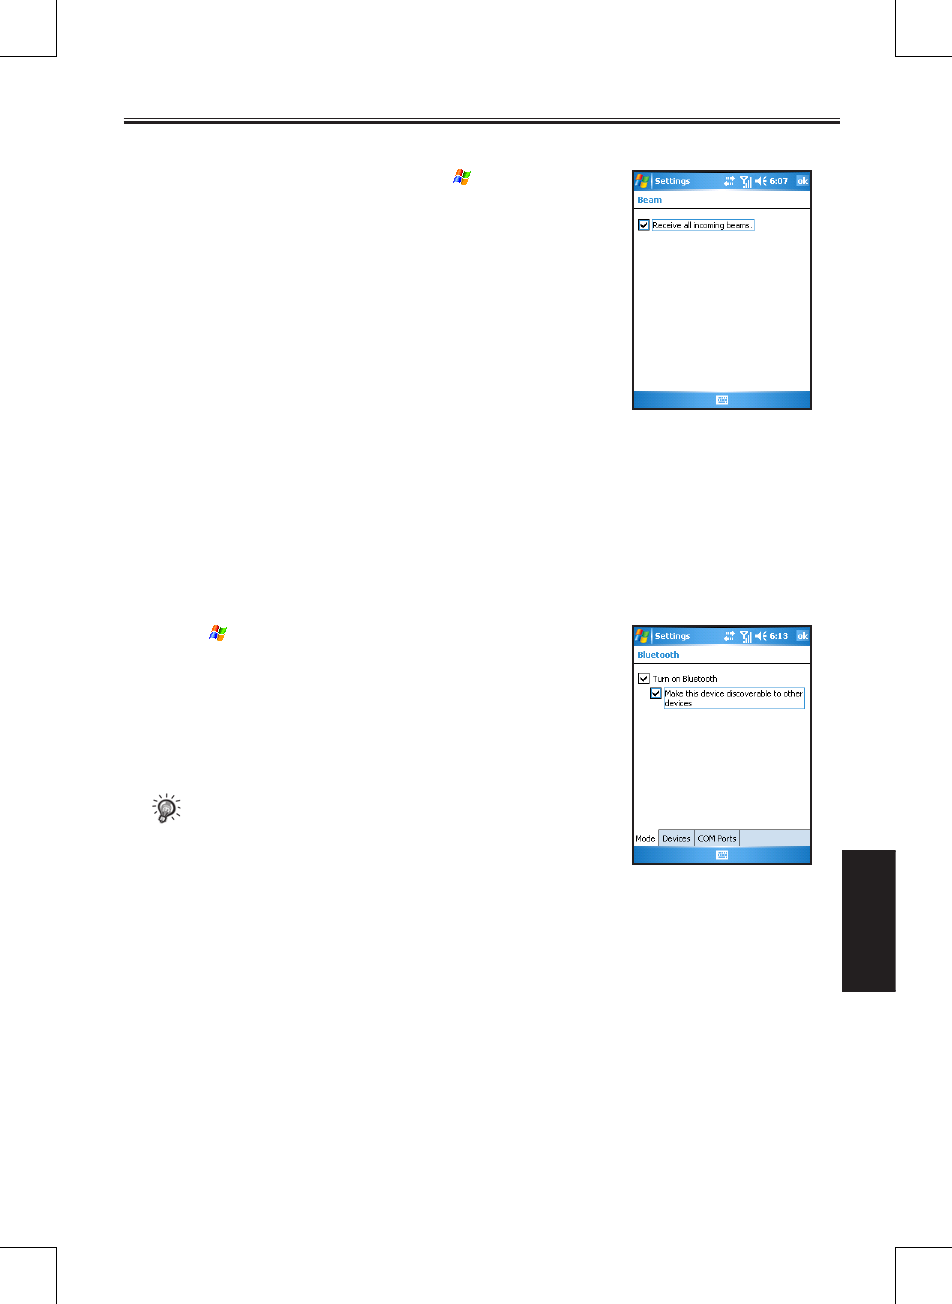
SP70R User Manual 8-3
Getting Connected
Receiving Information
1. Before receiving beamed information, tap > Settings >
Connections > Beam.
2. Select Receive all incoming beams, and tap OK.
3. Align the IR ports so that they are unobstructed and within a
close range.
4. The Pocket PC Phone will search for the other device and
receive information automatically.
8.3 Bluetooth
Bluetooth is a short-range wireless communications technology. Devices with Bluetooth capabilities can
exchange information over a distance of about 10 meters (30 feet) without requiring a physical connection.
You can use Bluetooth in the following ways:
n Beam information, such as files, appointments, tasks, and contact cards, between devices that have
Bluetooth capabilities.
Turning on and off Bluetooth
1. Tap > Settings > Connections > Bluetooth.
2. To turn on Bluetooth, select the Turn on Bluetooth check box.
To make your device discoverable for information exchange,
select the Make this device discoverable to other devices
check box.
To turn off Bluetooth, clear the Turn on Bluetooth check box.
3. Tap OK.
• By default the Bluetooth is turned off. If you turn it on,
and then turn off your device, the Bluetooth also turns off.
When you turn on your device again, the Bluetooth turns
on automatically.
Bluetooth Information Exchange
Beaming Information with Bluetooth
1. Turn on the Bluetooth as described earlier in the “Turning on and off Bluetooth” section.
2. Tap and hold an item to beam, such as an appointment in Calendar, a task in Tasks, a contact card in
Contacts, or a file in File Explorer.
3. Tap Beam [type of item].
4. Your Pocket PC Phone will search for Bluetooth devices within a range of about 10 meters (30 feet) and
display the device names on the screen. Tap the device to which you want to send the beam.

8-4 SP70R User Manual
Getting Connected
Receiving a Bluetooth Beam
1. Tap > Settings > Connections > Beam.
2. Turn on the Bluetooth as described earlier in the “Turning on and off Bluetooth” section.
3. Make sure that the device is powered on, discoverable, and within 10 meters (30 feet) of your device.
4. When prompted to receive an incoming beam, tap Yes.
Bonding with Other Devices
A bond is a relationship that you create between your Pocket PC Phone and another Bluetooth device in
order to help exchange information in a secure manner. Creating a bond involves entering the same PIN
on the two devices you want to bond. Once a bond is created, the devices need only have their Bluetooth
turned on to exchange information; they do not need to be in discoverable mode.
Creating a Bond
1. Make sure that the two devices are placed within 10 meters of one another and that Bluetooth is in
discoverable mode on both devices.
2. Tap > Settings > Connections > Bluetooth > Devices > New Partnership.
3. Your device searches for other Bluetooth devices and displays them in the list.
4. Tap the name of the other device, and then Next.
5. In Passkey, enter a passkey of between 1 and 16 characters and tap Next.
6. Enter the same passkey on the other device.
7. If you want, in Display Name, edit the name of the other device. You may use any name.
8. Tap Finish.
Accepting a Bond
1. Make sure that the two devices are placed within 10 meters of one another and that Bluetooth is in
discoverable mode on both devices.
2. When prompted to bond with the other device, tap Yes.
3. In Passkey, enter a passkey of between 1 and 16 characters and tap Next. You must enter the same
passkey that was entered on the device requested the bond.
4. If you want, in Display Name, edit the name of the other device. You may use any name.
5. Tap Finish. The bond is created. You can now exchange information with the other device.
• Supports Bluetooth earphone, Bluetooth GPS, Bluetooth Keyboard, and other related products.
8.4 Connections
You can set up connections to the Internet and corporate network at work in order to do such activities
as browse the Internet or intranet, send/receive email and instant messages, and synchronize information
using ActiveSync.
Your device has two groups of connection settings:
n My ISP settings are used to connect to the Internet.
n My Work Network settings can be used to connect to any private network, such as a corporate
network you use at work.
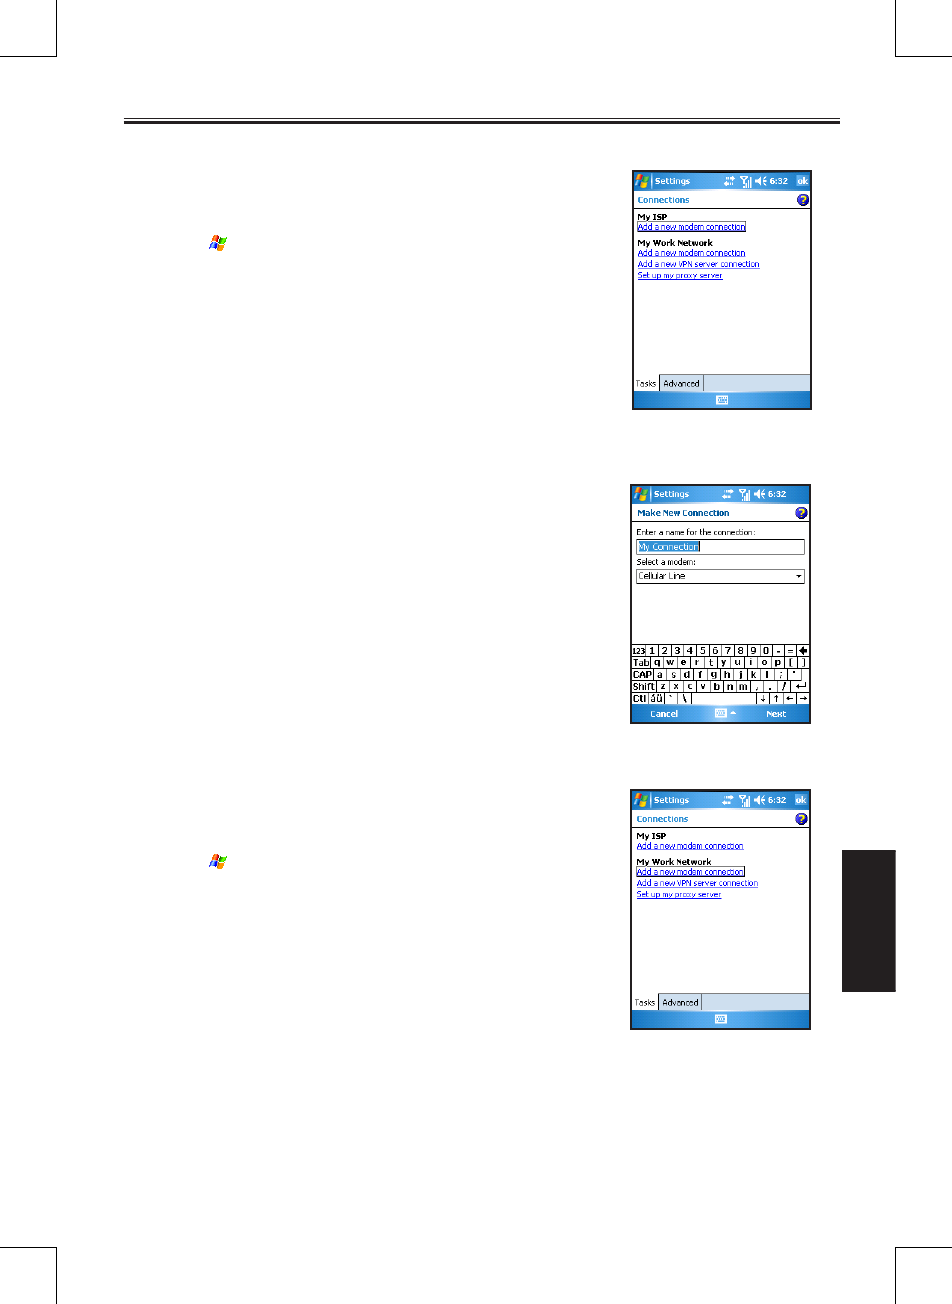
SP70R User Manual 8-5
Getting Connected
Connecting to the Internet
1.
Obtain the following information from your ISP: ISP server
phone number, user name, and password.
2. Tap > Settings > Connections > Connections.
3. In My ISP, tap Add a new modem connection.
4. Enter a name for the connection, such as your company’s name.
In the Select a modem list, tap your modem type.
Tap Next.
5. Enter the phone number. Tap Next.
6. Enter your user name, password, and domain name as provided
by your ISP. If a domain name was not provided, try the
connection without entering a domain name. You need not to
change any advanced settings. Tap Finish.
Connecting to Work
1. Obtain the following information from your network
administrator: server phone number, user name, and password.
2. Tap > Settings > Connections > Connections.
3. In My Work Network, tap Add a new modem connection.
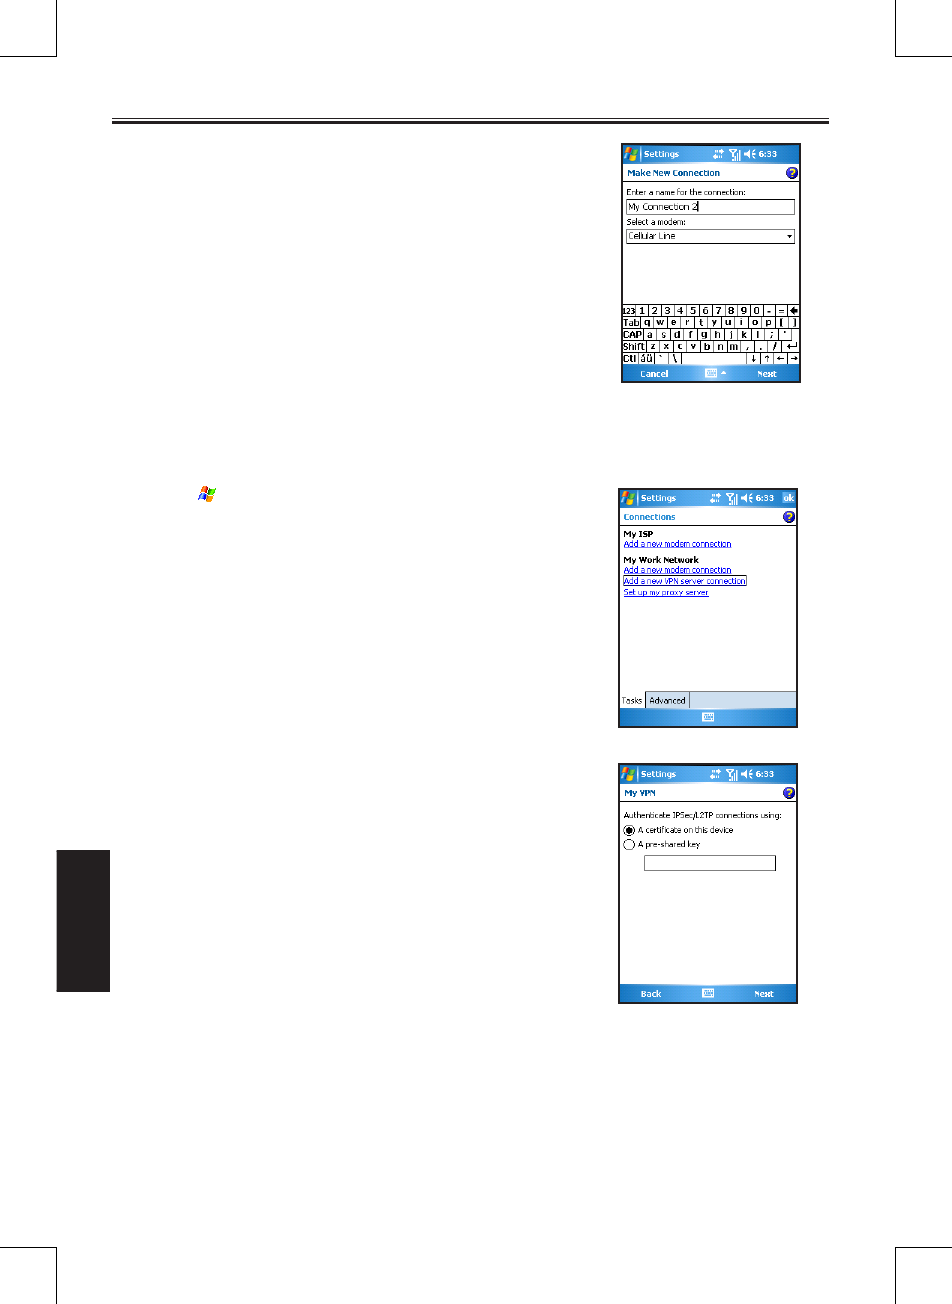
8-6 SP70R User Manual
Getting Connected
4. Enter a name for the connection, such as your company’s name.
In the Select a modem list, tap your modem type.
Tap Next.
5. Enter the phone number. Tap Next.
6. Enter your user name, password, and domain name as provided
by your network administrator. If a domain name was not
provided, try the connection without entering a domain name.
You need not to change any advanced settings. Tap Finish.
Setting up VPN Server Connections
A VPN connection helps you to securely connect to servers, such as a corporate network, via the Internet.
Ask your network administrator for your user name, password, domain name, TCP/IP settings, and host
name or IP address of the VPN server.
1. Tap > Settings > Connections > Connections.
2. In My Work Network, tap Add a new VPN server connection.
3. In Name, enter a name for the connection, such as your
company name.
In Host name/IP, enter the name and IP address of the VPN
server.
Next to VPN type, select the type of authentication to use with
your device: IPSec/L2TP or PPTP. If you aren’t sure which
option to choose, ask your network administrator.
Tap Next.
4. Select the type of authentication. If you select A pre-shared
key, enter the key provided by your network administrator.
Tap Next.
5. Enter your user name, password, and domain name as provided
by your network administrator. If a domain name was not
provided, try the connection without entering a domain name.
You should not need to change any advanced settings. Tap
Finish.
Setting up Proxy Server Settings
If you are connected to your ISP or private network during synchronization, your mobile device should
download proper proxy settings during synchronization from your desktop computer. If these settings are not
on your desktop computer or need to be changed, ask your ISP or network administrator for the proxy server
name, server type, port, type of Socks protocol used, and your user name and password.
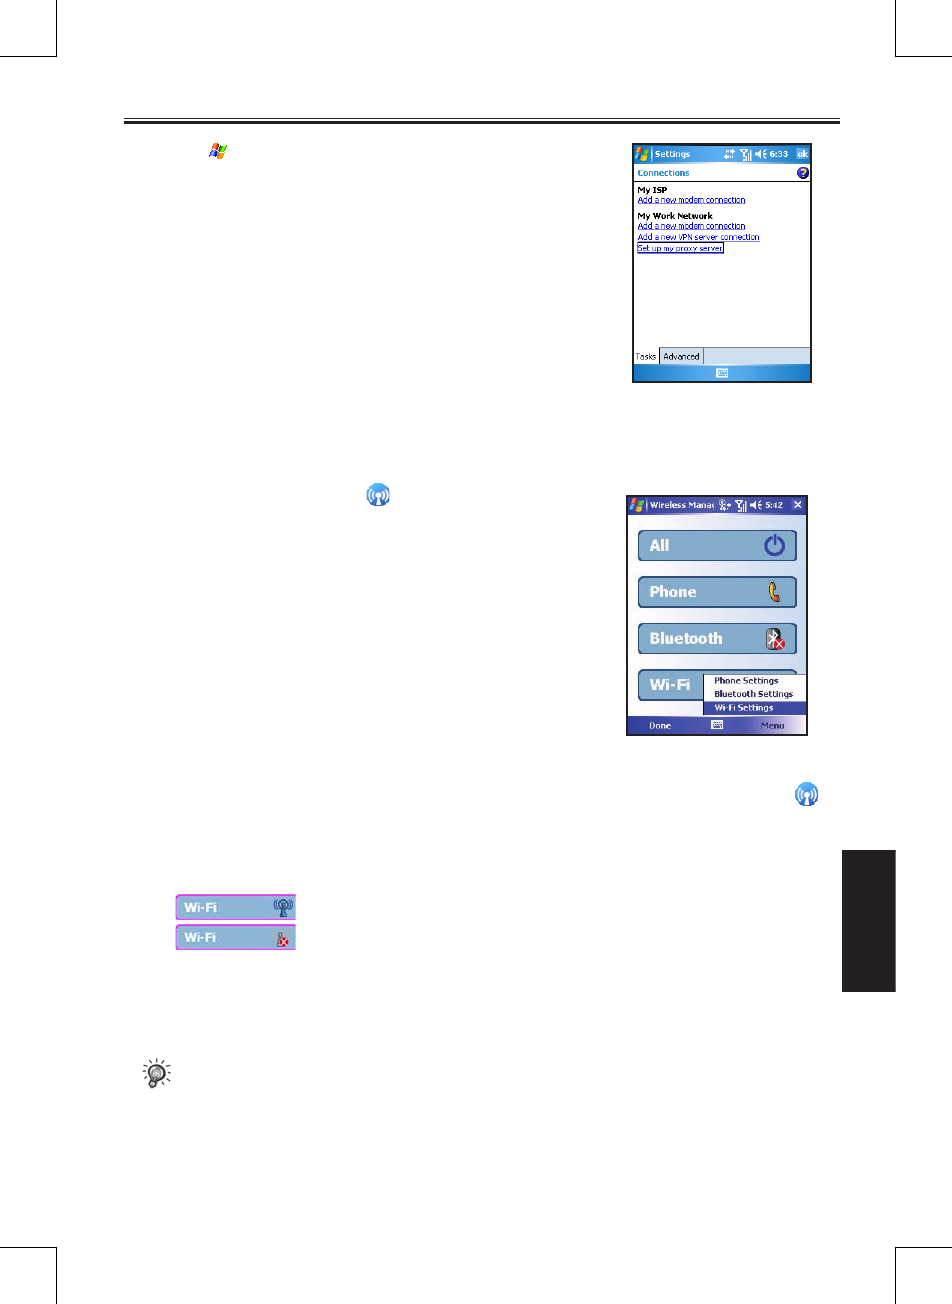
SP70R User Manual 8-7
Getting Connected
1. Tap > Settings > Connections > Connections.
2. In My Work Network, tap Add a new proxy server.
3. Select This network connects to the Internet and This
network uses a proxy server to connect to the Internet. In the
Proxy server box, enter the proxy server name.
4. To change such settings as port number or proxy server type, tap
Advanced and change desired settings.
5. When you are finished, tap OK.
8.5 Wireless Manager
Wireless Manager provides a quick way to control the Bluetooth, Phone, and WLAN settings.
1. On the Today screen, tap the Wireless Manager area.
2. You can do the following:
• To enable or disable the Bluetooth function, tap Bluetooth.
• To change the Bluetooth settings, tap Menu > Bluetooth
Settings.
• To enable or disable the phone , tap Phone.
• To change the Phone settings, tap Menu > Phone Settings.
• To enable or disable the Wi-Fi, tap Wi-Fi.
• To change the Wi-Fi settings, tap Menu > Wi-Fi settings.
Connection to the WLAN Network
1. Tap Start > Settings > Connections > Wireless Manager or Tap the Wireless Manager icon ( ) in
Today’s screen to start the Wireless Manager console.
2. Click the Wi-Fi button to enable/disable wireless networking features. The Wi-Fi icon will indicate the
current wireless network status
: Wi-Fi enabled
: Wi-Fi disabled
3. In the Wireless Manager screen, tap Menu > Wi-Fi Settings for relevant configuration. When the con-
figuration is done, you may connect to WLAN with your mobile phone.
• You may also tap Start > Settings > Connections > Network Cards to access the Wireless LAN
Settings screen.
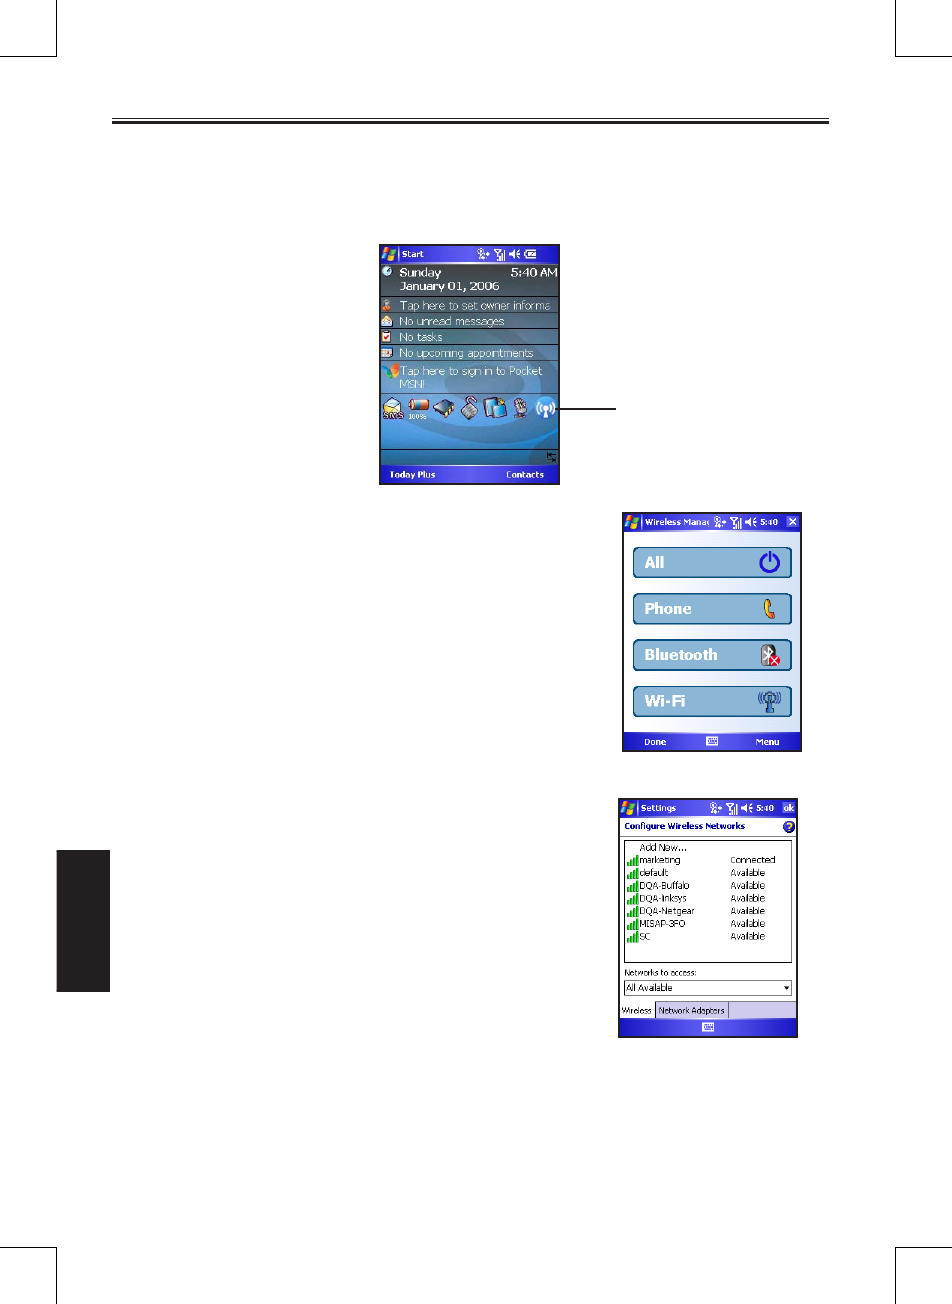
8-8 SP70R User Manual
Getting Connected
Wireless Network Status Detection
Enter Wireless Manager to detect the current wireless network status in the following three screens of the
mobile phone.
• Today Screen. The indicator (the second indicator on the bottom of the device) will light on.
• Wireless Network Screen. The current connection status
and signal intensity of each wireless network channel will
display on the Wireless LAN screen.
• Wireless LAN Settings Screen. Tap Start > Settings >
Connections > Network Cards. The wireless network
available will display in the screen. You may also add a
new wireless network connection.
• And enter Network Adapters to choose your network card
status, Such as The Internet or Work.
Wireless Manager
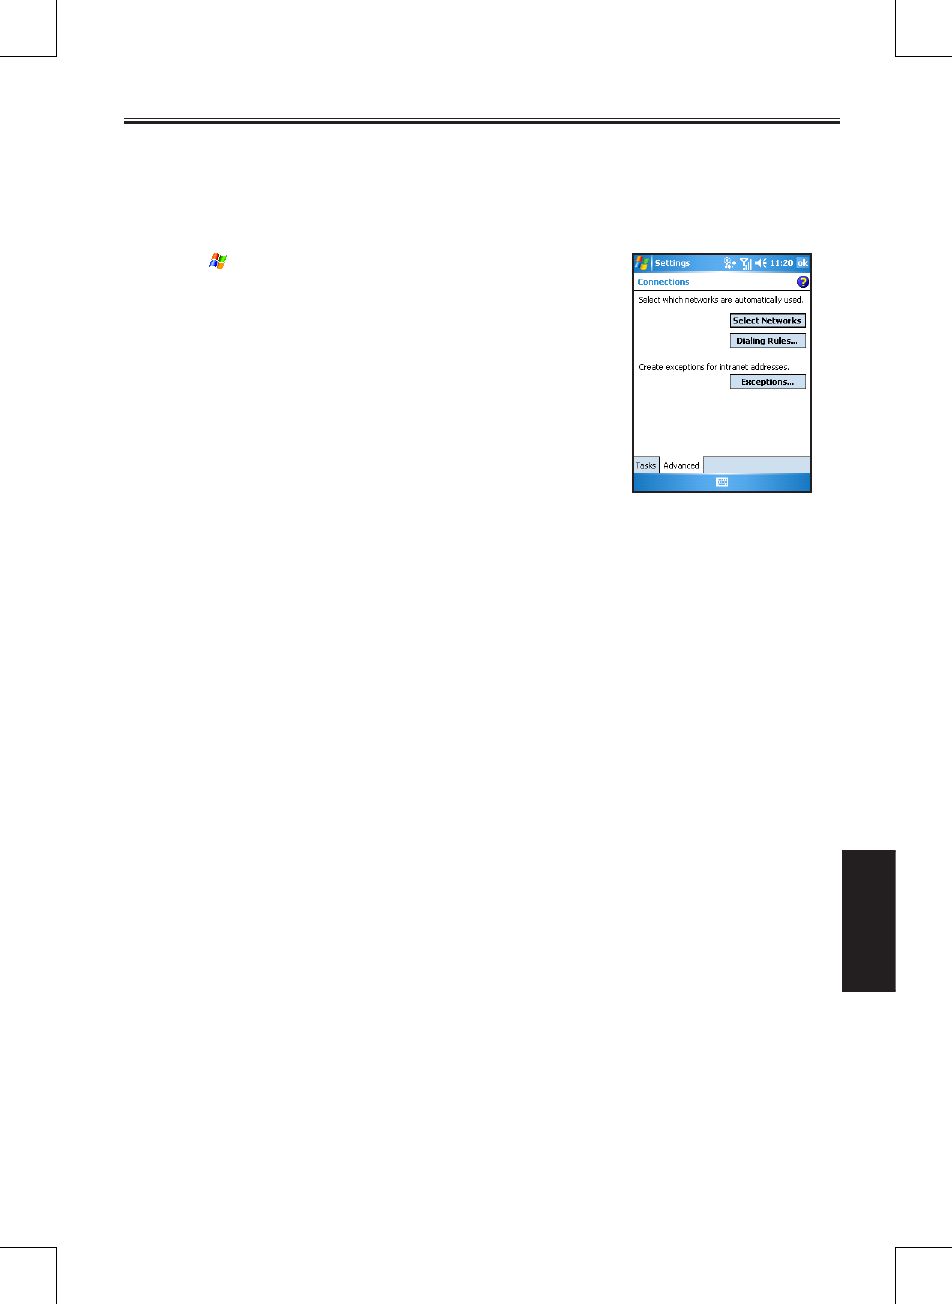
SP70R User Manual 8-9
Getting Connected
Setting up Proxy Server Settings
If you are connected to your ISP or private network during synchronization, your mobile device should
download proper proxy settings during synchronization from your desktop computer. If these settings are not
on your desktop computer or need to be changed, ask your ISP or network administrator for the proxy server
name, server type, port, type of Socks protocol used, and your user name and password.
1. Tap > Settings > Connections > Connections.
2. In My Work Network, tap Add a new proxy server.
3. Select This network connects to the Internet and This
network uses a proxy server to connect to the Internet. In the
Proxy server box, enter the proxy server name.
4. To change such settings as port number or proxy server type, tap
Advanced and change desired settings.
5. When you are finished, tap OK.

Chapter 9
Internet Explorer
9.1 Using Internet Explorer
9.2 Viewing Mobile Favorites
9.3 Changing Settings
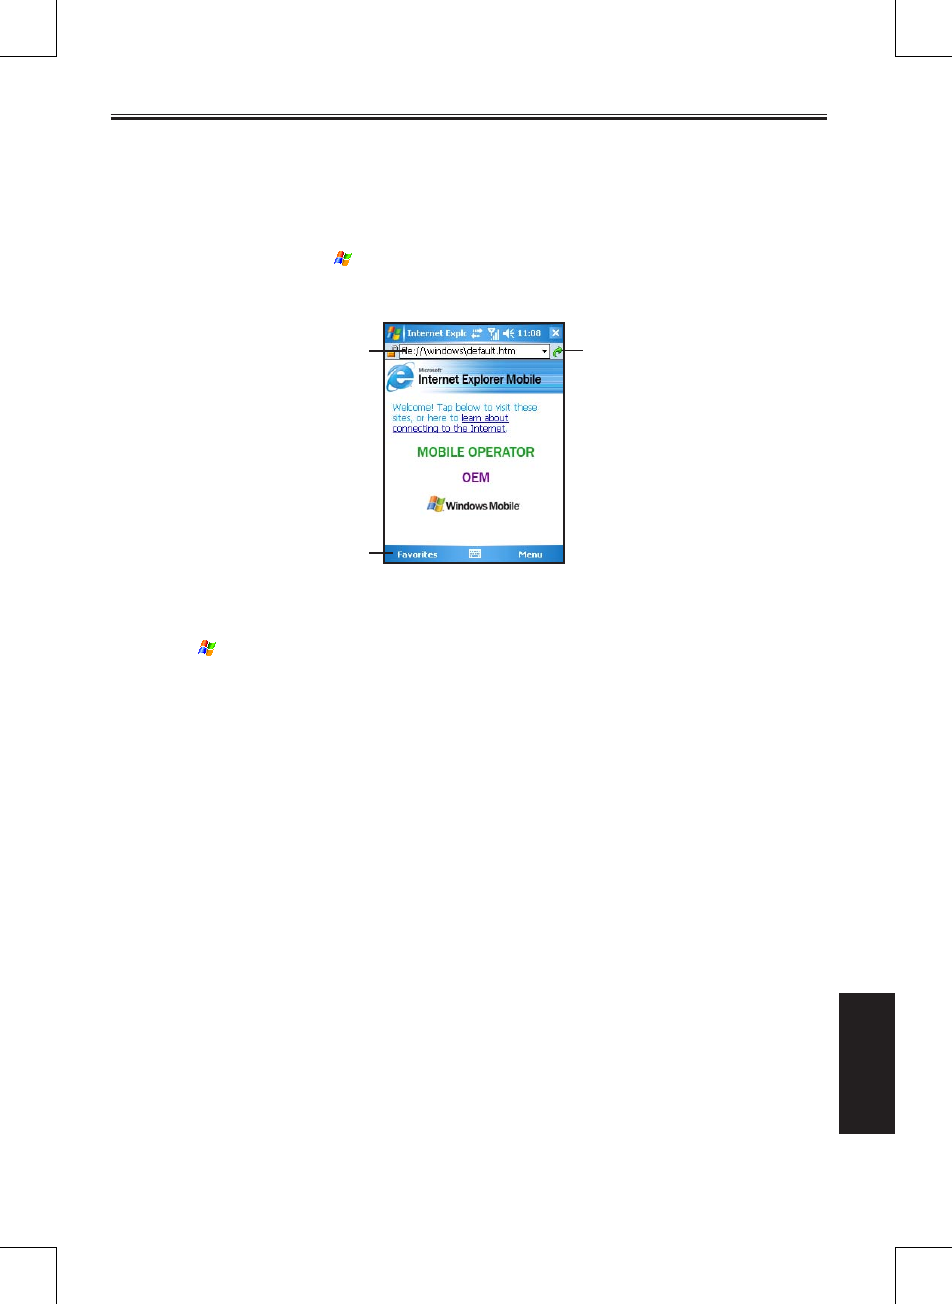
SP70R User Manual 9-2
Internet Explorer
9.1 Using Internet Explorer
You can use Internet Explorer Mobile to view Web pages on your mobile device in two ways:
n downloading pages through synchronization (See Chapter 11.)
n connecting to the Internet (see Chapter 8)
To switch to the program, tap > Internet Explorer Mobile. The Internet Explorer Mobile home page
appears.
Sending a Link via Email
1. Tap > Internet Explorer Mobile.
2. Go to the page you want to send.
3. Tap Menu > Tools > Send Link via E-mail. A new message is created with the page address inserted
in the message body.
9.2 Viewing Favorites
Your Pocket PC Phone has incorporated some of the useful favorites for your use.
On the Internet Explorer screen, tap Favorites to open the favorite list.
If you are using Microsoft Internet Explorer 4 or greater on the desktop computer, you can synchronize
favorite links. If you are using Microsoft Internet Explorer 5 or later versions on the desktop computer, you
can also synchronize mobile favorites. Synchronizing favorite links enable you to have the URLs of your
favorite Web sites at your fingertips. Synchronizing a mobile favorite enables you to view Internet content
on your device while you are disconnected from your Internet service provider and desktop computer.
Favorites are stored in the Mobile Favorites subfolder of Favorites in Internet Explorer on the desktop
computer. This folder will be created when you select the Favorites information type for synchronization in
ActiveSync on your desktop computer. Favorites must be stored in this folder to be synchronized.
Synchronizing a Favorite Link
1. In ActiveSync on your desktop computer, click Tools > Options, and select Favorite. For more
information on using ActiveSync, see ActiveSync Help.
2. In Internet Explorer on your desktop computer, save or move favorite links to the Mobile Favorites
subfolder in the Favorites list. For more information on using Internet Explorer, see Internet Explorer
Help on the desktop computer.
3. Connect your mobile device to your desktop computer. If synchronization does not start automatically,
in ActiveSync on your desktop computer, click Sync.
Favorites
Web address Link to
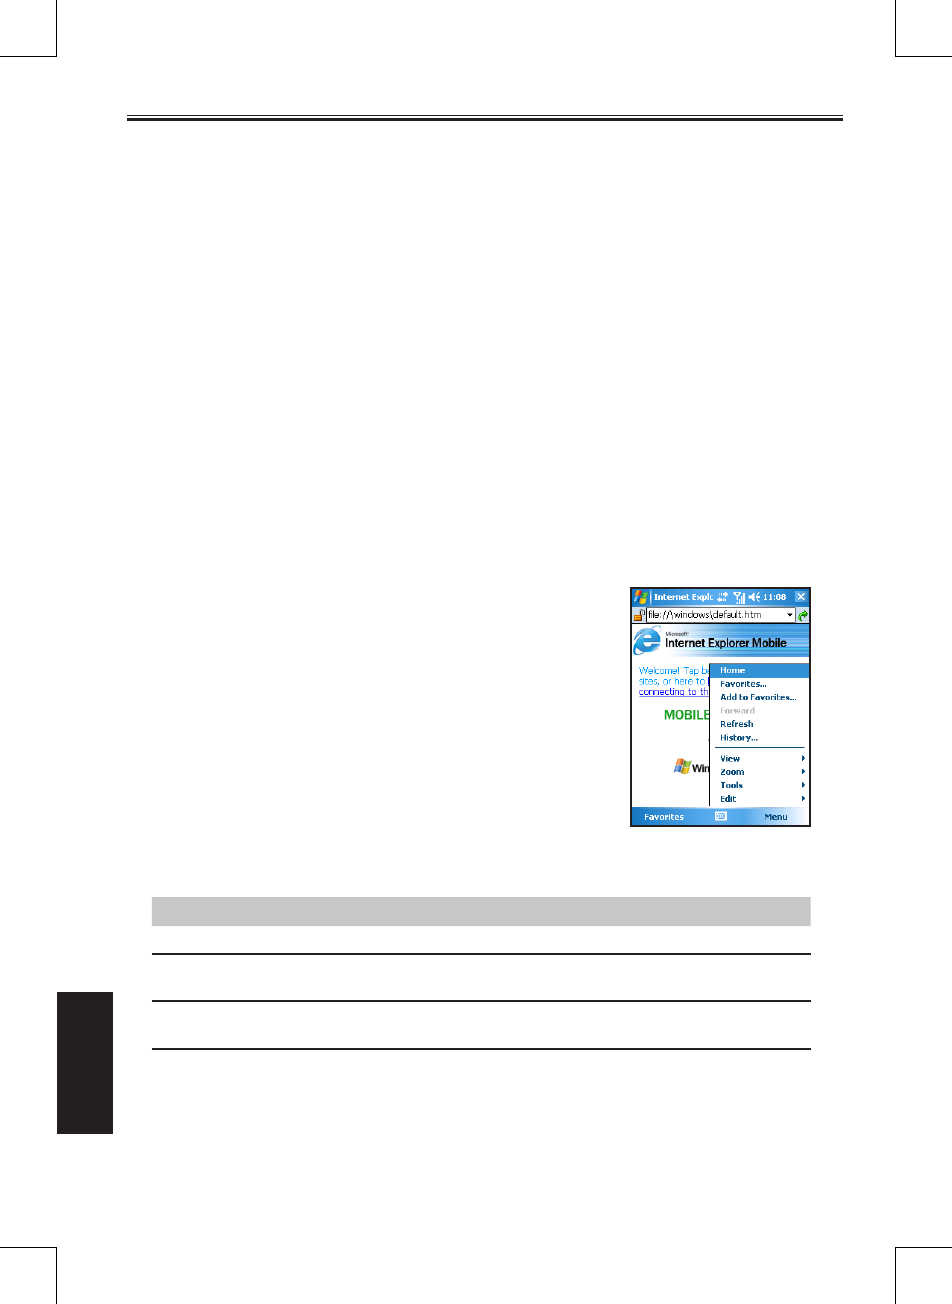
9-3 SP70R User Manual
Internet Explorer
Synchronizing a Mobile Favorite
1. In ActiveSync on your desktop computer, click Tools > Options, and select Favorite. For more
information on using ActiveSync, see ActiveSync Help.
2. In Internet Explorer 5 or later versions on your desktop computer, browse to the page you want to view
offline.
3. Click Tools > Create Mobile Favorite.
4. To change the link name, enter a new name in the Name box.
5. In the Update box, select a desired update schedule to keep the page in the Mobile Favorites folder up
to date. You can also update content by clicking Tools > Synchronize in Internet Explorer.
6. To save the link in a subfolder of Mobile Favorites, click Create In and select the desired subfolder.
7. Click OK. Internet Explorer will download the latest version of the page.
8.
To download the pages that are linked to the mobile favorite you just created, in Internet Explorer on
the desktop computer, right-click the mobile favorite and then click Properties. On the Download tab,
specify the number of links deep you want to download. To conserve device memory, only go one level
deep.
9. Connect your Pocket PC Phone to the desktop computer. If synchronization between your device and
desktop computer does not start, in ActiveSync on your desktop computer, click Sync.
9.3 Changing Settings
You can tap Menu > View on the main page of Internet Explorer
Mobile to change the display settings.
You can also tap Menu > Tools > Options on the main page of Internet Explorer Mobile to custmize more
settings.
Item Description
General Enables you to change the home page or the displayed language.
Memory Enables you to set the period before clearing the visiting history, and delete
temporary files.
Security Enables you to accept or clear cookies, and send out a warning when visiting
unsecure Web pages.

Chapter 10
Microsoft Pocket Outlook
10.1 Calendar
10.2 Tasks
10.3 Notes
10.4 Messaging (Outlook, SMS, MMS)
10.5 MMS Messages
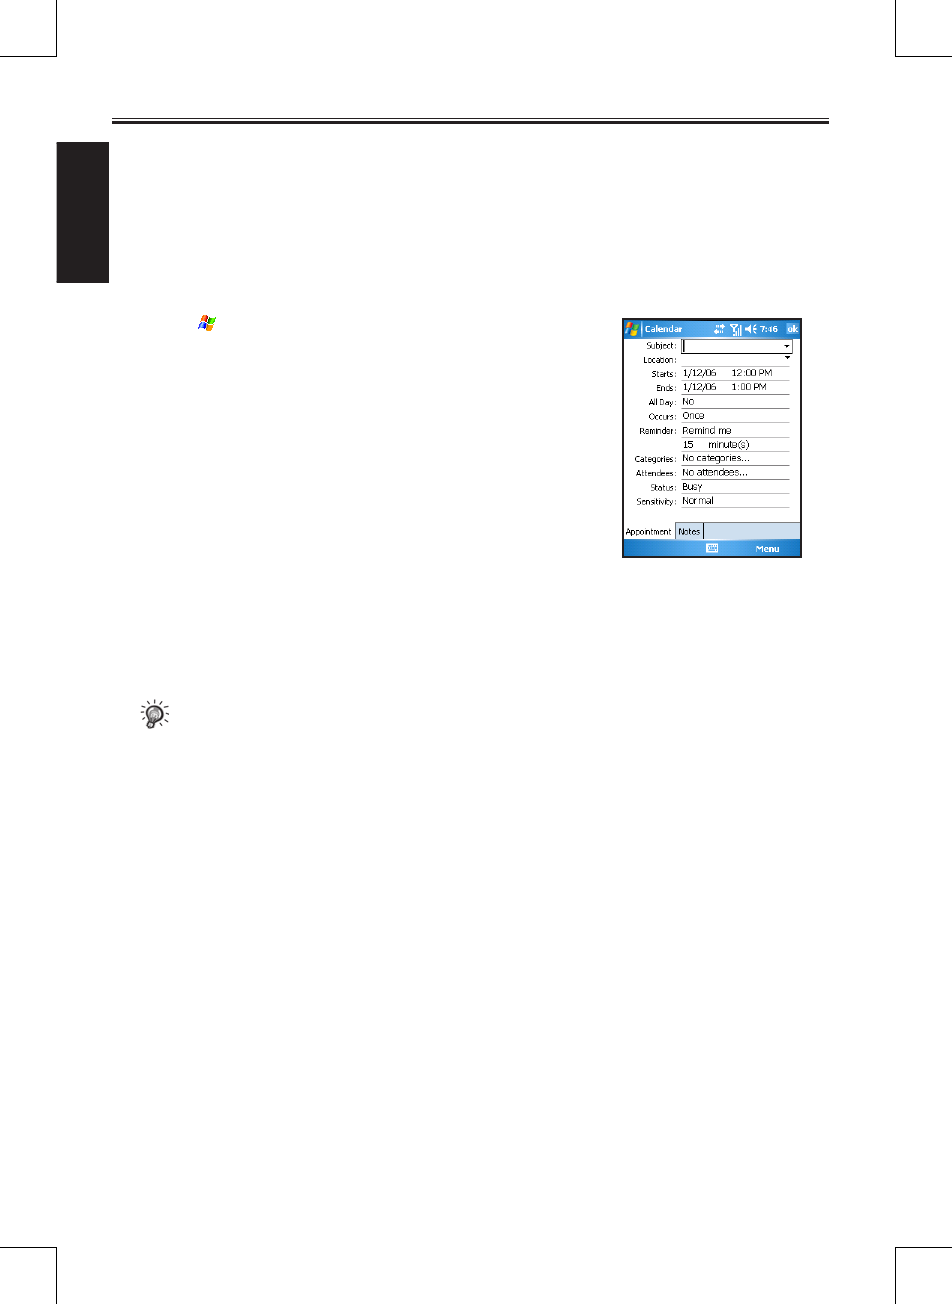
10-2 SP70R User Manual
Microsoft Pocket
Outlook
10.1 Calendar
Use Calendar to schedule appointments, including meetings and other events. You can check your
appointments in one of several views (Agenda, Day, Week, Month and Year) and set Calendar to remind
you of appointments with a sound or other method. Appointments for the day can be displayed on the
Today screen.
Creating an Appointment
1. Tap > Calendar.
2. Tap Menu > New Appointment.
3. To select a new date from a pop-up calendar, tap the display
date. To enter or select a new time, tap the display time. Enter
other appointment details. You will need to hide the Input panel
to see all available fields.
4. You can assign an appointment to a category so that you can
use these groupings to quickly display only the information you
want.
Tap Categories. Select the categories that you want to assign
the appointment to. To create a new category, tap New, enter the
category name, and then tap Done.
Tap OK to return to the previous screen.
5. Tap Notes. You can add written or typed notes and even
recordings to an appointment. For information on Notes, see
Section 10.3.
6. Tap OK to save the change.
• You can view appointments in one of several views. To change the view mode, tap the
appropriate view icons on the command bar.
• Tap the Down arrow in the Subject and Location fields to quickly select from built-in or
previous entries.
• If you set a reminder for an appointment, the Pocket PC Phone will remind you according to the
settings in Sounds & Notifications.
• To make an appointmnet recurring, tap Occurs and select a pattern from the list. Or, to create a
new pattern, tap Edit pattern, and follow the steps in the wizard.
View Modes
You can view appointments in one of several views (Agenda, Day, Week, and Month).
Agenda View
In Agenda view, upcoming appointments are displayed in bold.
Day View
In Day view, the subject of an appointment is displayed on the right of the appointment’s time.
Week View
Week view displays blue boxes to indicate the dates and time of appointments.

SP70R User Manual 10-3
Microsoft Pocket
Outlook
Month View
Month view displays symbols to indicate the types of appointments you have on a given day. An upward
triangle indicates a morning appointment; a downward triangle indicates an afternoon appointment. If you
have appointments in the morning and afternoon, a solid square is displayed. If you have an all day event
not marked Free, a hollow square is displayed.
Using the Calendar Summary Screen
When you tap an appointment in Calendar, a summary screen is
displayed. To change the appointment, tap Edit.
Sending Meeting Requests
Use Calendar to schedule meetings with people who use Outlook or Pocket Outlook. When attendees
receive a meeting request, they can accept or decline the meeting. If they accept, the meeting is
automatically added to their schedule. In addition, their response is sent back to you, and your calendar is
updated.
Before you can send a meeting request, you must enter email addresses in Contacts and set up Messaging
to send and receive messages.
1. Tap > Calendar.
2. Tap Menu > New Appointment.
3. Enter the meeting information.
4. Tap Attendees (you will need to hide the input panel to see this
box).
5. Select the contacts you want to invite. Only those contacts with
email addresses will be displayed.
6. Tap OK. Messaging automatically creates a meeting request and
sends it to the attendees the next time you synchronize with your
desktop computer. Any textual notes entered in the Notes tab
(excluding writing or recordings) will be sent also.
• If you are sending the meeting request through a connection to an ISP or the network,
rather than through synchronization with your desktop computer, tap Menu > Options >
Appointments. In Send meeting requests via, tap the service you want to use to send the
meeting request.
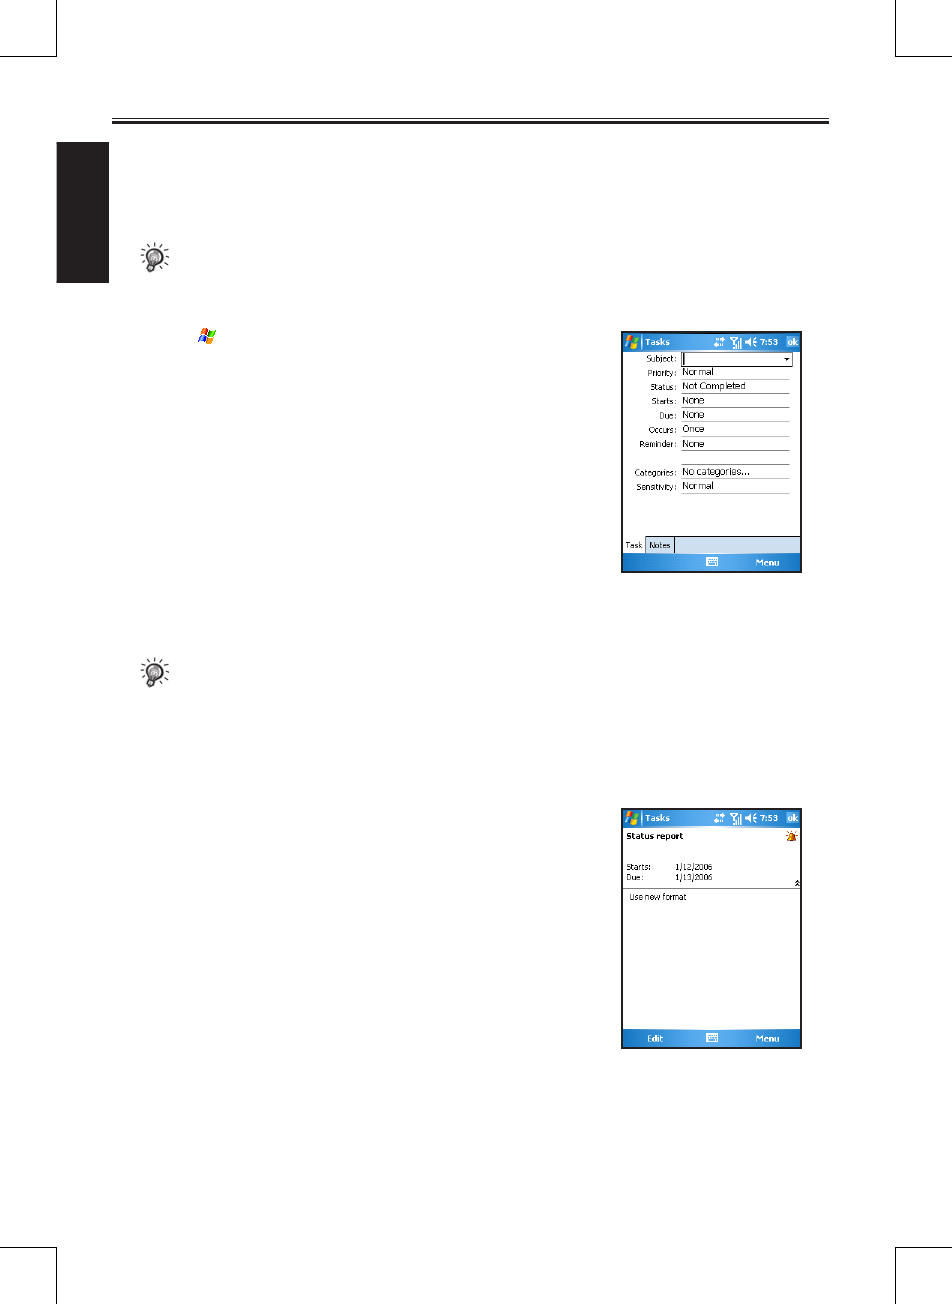
10-4 SP70R User Manual
Microsoft Pocket
Outlook
10.2 Tasks
Use Tasks to keep track of things you need to do. A variety of task information can be displayed on the
Today screen.
• To see the start and due date for a task in the task list, tap Tools > Options.
Creating a Task
1. Tap > Programs > Tasks.
2. Tap Menu > New Task.
3. Enter detailed information, such as start and due dates. You will
need to hide the Input panel to see all available fields.
4. You can assign a task to a category so that you can use these
groupings to quickly display only the information you want.
Tap Categories. Select the categories that you want to assign
the appointment to. To create a new category, tap New, enter the
category name, and then tap Done.
Tap OK to return to the previous screen.
5. Tap Notes. You can add written or typed notes and even
recordings to an appointment. For information on Notes, see
Section 10.3.
6. Tap OK to save the change.
• If you set a reminder for a task, the Pocket PC Phone will remind you according to the settings in
Sounds & Notifications.
• To quickly create a task, enter text in the “Tap here to add a new task” field at the top of the
screen. If you don’t see this box, tap Menu > Options > Show Tasks entry bar.
Using the Tasks Summary Screen
The task list displays a list of your tasks. Overdue tasks are
displayed in bold and in red.
If you have a long list of tasks, tap Menu > Sort By and select the
option you want to sort on.
To see more task information, tap the task.To change a task, tap it in
the task list, and then tap Edit.
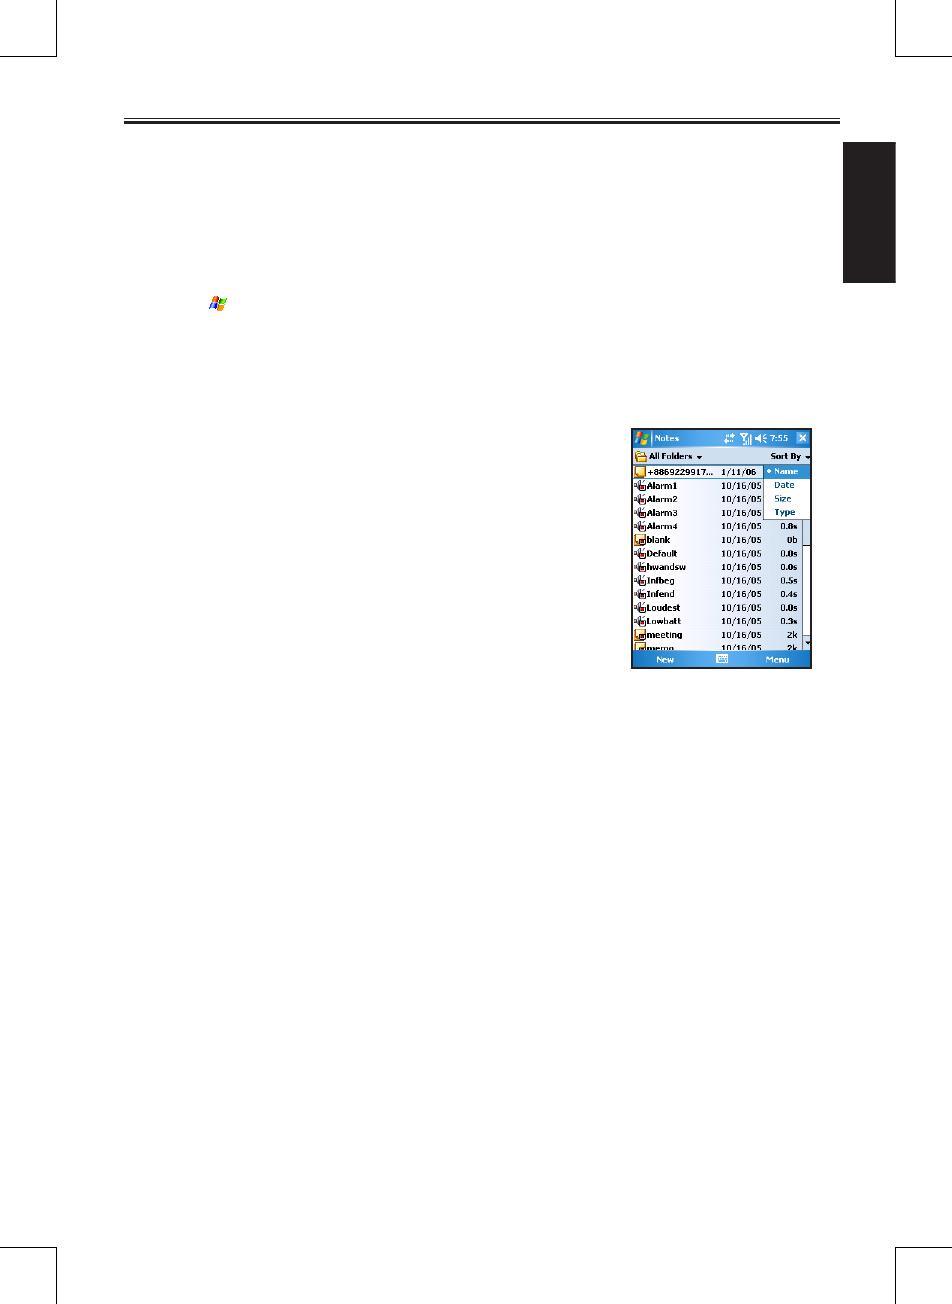
SP70R User Manual 10-5
Microsoft Pocket
Outlook
10.3 Notes
Notes may help you quickly capture your ideas, notes, and thoughts. You can create a note using written
and typed text, drawings, and recordings. You can also share your notes with others through email, infrared,
and synchronization with your desktop computer.
Creating a Note
1. Tap > Programs > Notes.
2. Tap New.
3. Enter your note information. For information on entering information, see Section 2.11.
Viewing Notes
The note list displays a list of your notes and recordings. If you have
a long list, tap Sort By and select the option you want to sort on. To
open a note or play a recording, tap it.
10.4 Messaging (Outlook, SMS, MMS)
You can receive Internet email messages, text messages (SMS) and multimedia messages (MMS)
in Messaging. Internet email messages are sent by using an address you receive from your Internet
service provider (ISP) or your employer. SMS and MMS messages are sent and received through your
wireless phone service provider by using a phone number as the message address.
You can send and receive email by synchronizing with your desktop computer, or by connecting to a
Post Office Protocol 3 (POP3) or Internet Message Access Protocol 4 (IMAP4) mail server. You need
to set up an email account for each method that you use except for an Outlook email account, which is
set up by default. The Outlook Email account on your device is used to store messages that you send
and receive through synchronization with a desktop computer. Account names will appear when you
open the folder list (located on the left, under the navigation bar) in the message list view.
With synchronization, messages are synchronized between the device Inbox folder for the Outlook
Email account and the desktop computer Inbox by using ActiveSync and Microsoft Exchange or
Microsoft Outlook. For more information, see the “Synchronizing Outlook Email Messages” section
later in this chapter.
When connecting to a POP3 or IMAP4 server, use a modem to connect to your Internet service
provider (ISP), or a modem or Ethernet card to connect to the local area network that your email server
is connected to. You can also use your phone to connect by using a cellular line connection. For more
information, see Chapter 8.

10-6 SP70R User Manual
Microsoft Pocket
Outlook
Synchronizing Outlook Email Messages
After selecting Inbox for synchronization in ActiveSync, Outlook email messages are synchronized as
part of the general synchronization process.
During synchronization:
n Messages are copied from the Inbox folder on your desktop computer or the Microsoft Exchange
server to the Inbox folder of the Outlook Email account on your device. (Note that you can only
synchronize information directly with an Exchange Server if your company is running Microsoft
Mobile Information Server 2003 or later.) By default, you’ll receive messages from the last three
days only, the first 100 lines of each new message, and file attachments of less than 100 KB in
size.
n Messages in the Outbox folder on your device are transferred to Exchange or Outlook and then
sent from those programs.
n The messages on the two computers are linked. When you delete a message on your device, it’s
deleted from your desktop computer the next time you synchronize.
n Messages in subfolders in other email folders in Outlook are synchronized only if they have been
selected for synchronization in ActiveSync.
• For information on initiating Outlook email synchronization or changing synchronization
settings, see ActiveSync Help on the desktop computer.
• Text messages are not received through synchronization. Instead, they are sent to your device
via your service provider.
Connecting to a Mail Server
Setting up a POP3 or IMAP4 Email Account
1. Tap > Messaging.
2. Tap Menu > Tools > New Account.
3. Enter the email address and then tap Next.
4. The Pocket PC Phone will start the auto configuration. Auto
configuration attempts to connect to your email server and
download necessary settings so that you do not need to enter
them manually. If auto configuration is successful, you may
begin downloading messages from the server.
5. If auto configuration is unsuccessful, tap Next for manual
configuration. Enter the displayed name, the user name and
password provided by your ISP or network administrator. You
can select Save password to avoid having to reenter it later.
6. In the Account type list, tap POP3 or IMAP4. (POP3 is the
most common mail protocol for ISPs.)
In Your name, enter a unique name for the account, such as
Work or Home. This name cannot be changed later.
Then Tap Next.
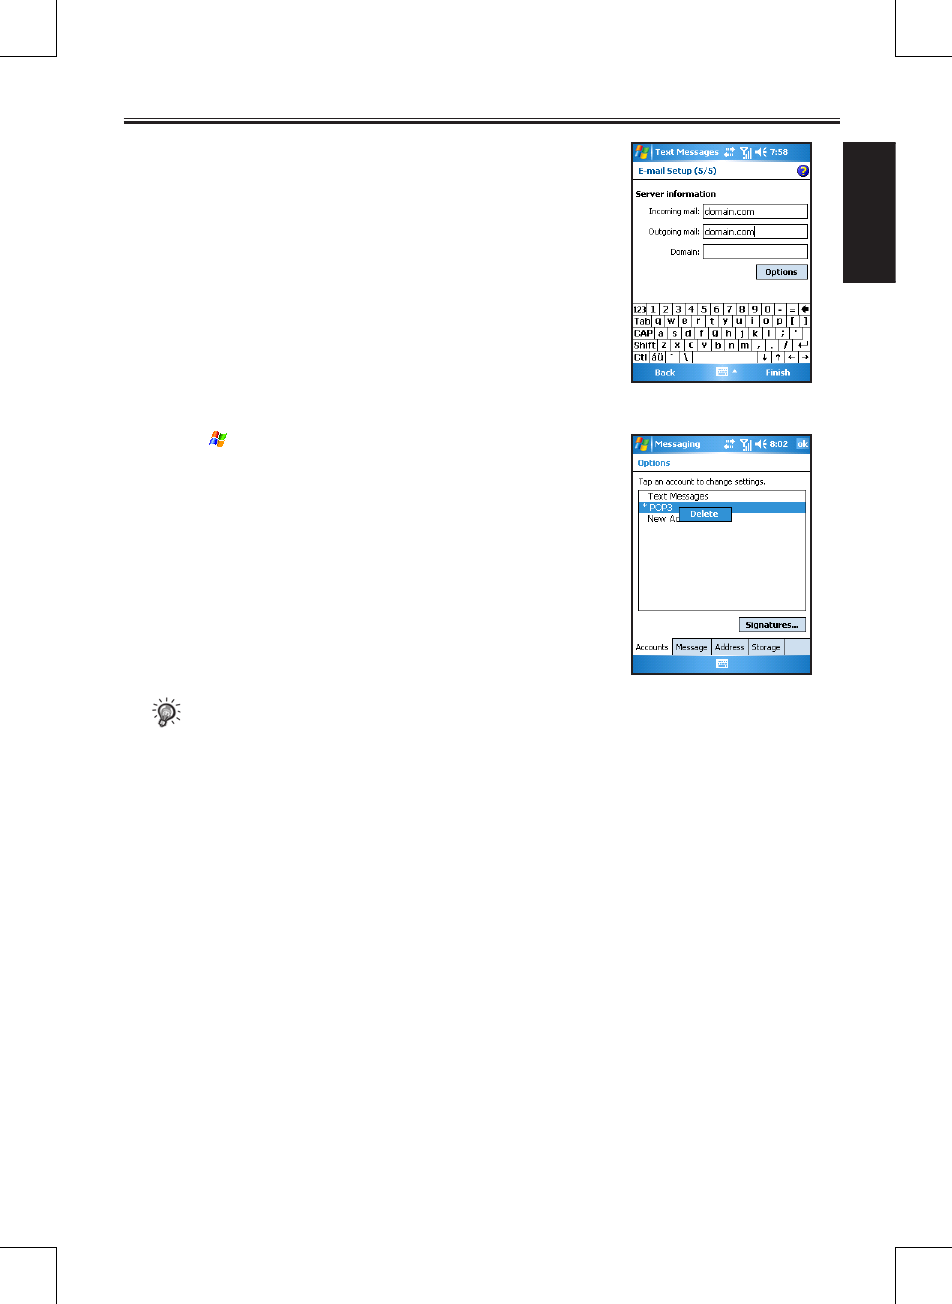
SP70R User Manual 10-7
Microsoft Pocket
Outlook
7. In Incoming mail, enter the name of your email server.
In Outgoing mail, enter the name of your Simple Mail Transfer
Protocol (SMTP) host.
If you are using a network connection, in Domain, enter your
domain name.
8. Select if you want to download the messages of this account
immediately.
Deleting an Account
1. Tap > Messaging.
2. Tap Menu > Tools > Options.
3. Tap and hold the name of the account, and then tap Delete.
• You can set up several email accounts including your Outlook email account, but you can set up
only one text message account.
• You cannot delete your text message account.
Downloading Messages from the Server
1. In Messaging, tap Accounts > Connect to open a connection to the Internet or your corporate
network, depending on the account. For information on connections, see Chapter 8.
2. The messages on your device and email server are synchronized: new messages are downloaded to
the device Inbox folder, messages in the device Outbox folder are sent, and messages that have been
deleted from the server are removed from the device Inbox.
3. Tap a message in the message list to open it.
4. If you read a message and decide that you need the full copy:
• Tap Edit > Mark for Download while in the message window.
• If you are in the message list, tap and hold the message, and then tap Mark for Download.
5. When finished, tap Accounts > Disconnect.
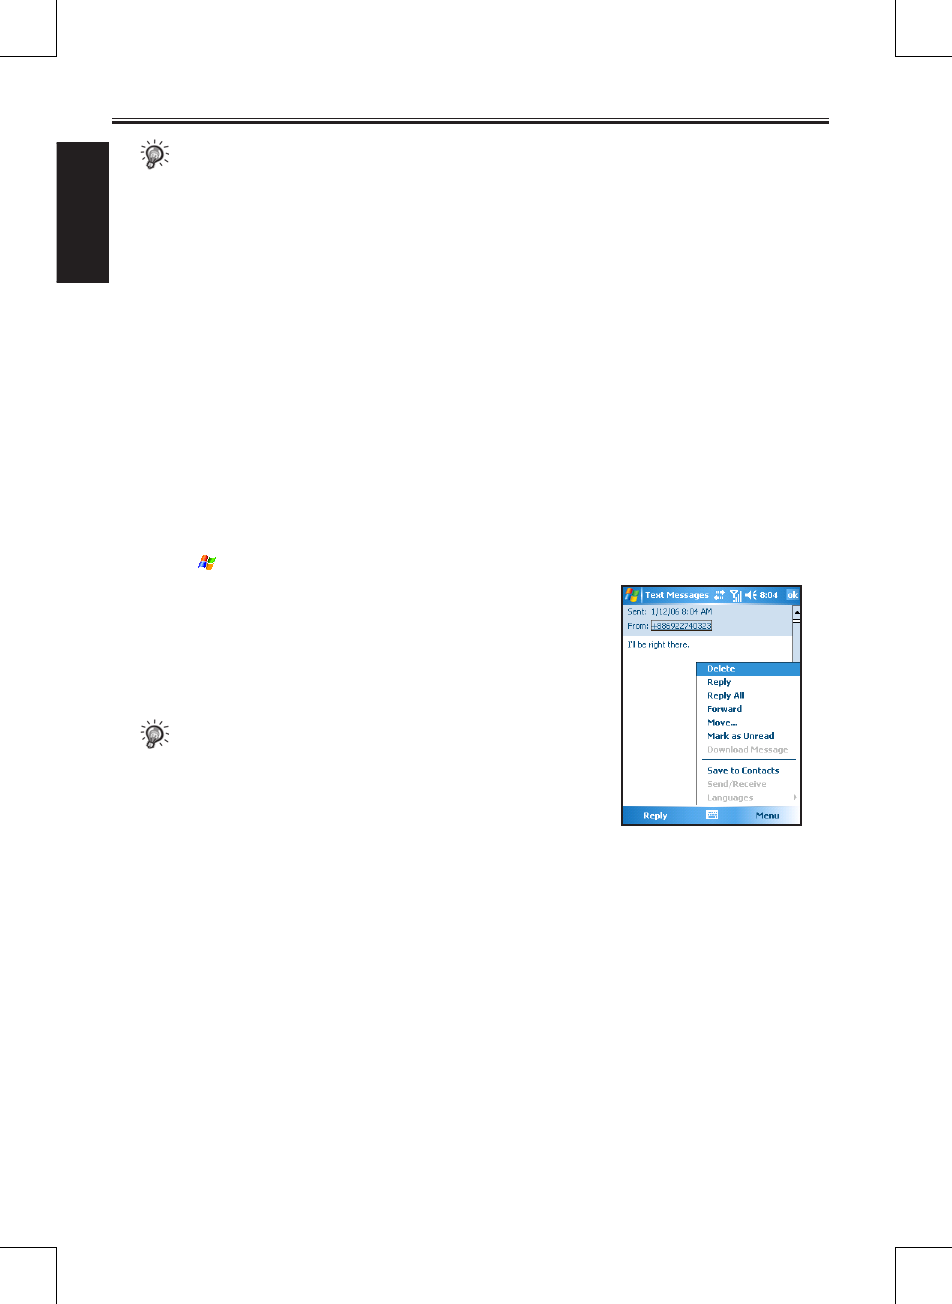
10-8 SP70R User Manual
Microsoft Pocket
Outlook
• If you selected some items when setting up an email account, then the mail attachments or entire
messages may be downloaded.
• Receiving entire messages consumes storage memory.
• The size column in the message list displays the local size and server size of a message. Even
when a message has been downloaded fully, these numbers may differ, because the size of a
message can vary between the server and the device.
Reading and Responding to Messages
Downloading Messages
The way you download copies of messages depends on how you are receiving messages:
n If you receive email messages through ActiveSync, synchronization will be started.
n If you receive email messages through a remote email server, see the “Downloading Messages from
the Server” section earlier in this chapter.
n Text messages will be automatically received when your phone is turned on. Otherwise, messages will
be held by your service provider until the next time your phone is turned on.
Replying to or Forwarding a Message
1. Tap > Messaging.
2. Tap to open the message.
3. Tap Menu, and then tap Reply, Reply All, or Forward.
4. Enter your response. To quickly add common messages, tap My
Text and tap a desired message.
5. Tap Send.
• Selections in Menu > Tools > Options > Message
determine whether the original text is included.
Receiving Attachments
An attachment sent with an email message or downloaded from the server appears as an icon at the bottom
of the message in its own window pane. Tapping the attachment icon opens the attachment if it has been
fully downloaded. You can mark an attachment for downloading (IMAP4 account only) the next time when
the phone is connected.
If you receive messages through synchronization:
1. Start ActiveSync on your desktop computer.
2. Click File > Mobile Device, and then select your Pocket PC Phone.
3. Click Tools > Options.
4. Select the message account, and then click Settings > Include File Attachments.
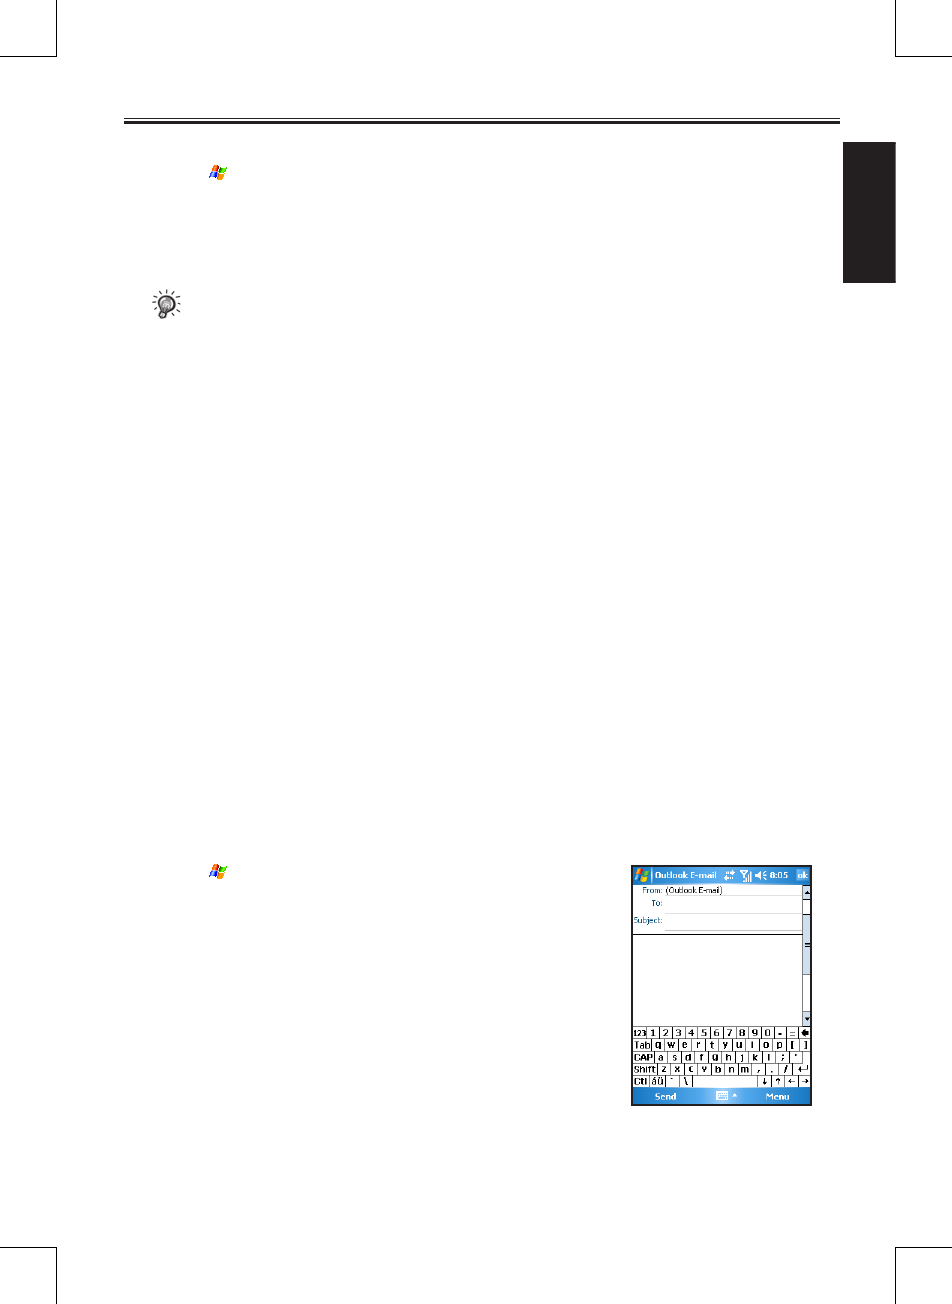
SP70R User Manual 10-9
Microsoft Pocket
Outlook
If you receive messages through a remote email server and have an IMAP4 account:
1. Tap > Messaging.
2. Tap Menu > Switch Accounts > IMAP4.
3. Tap Next until you reach Server Information, and then tap Options.
4. Tap Next twice, and then select Get full copy of messages and When getting full copy, get
attachments.
• Embedded images and objects cannot be received as attachments.
• An embedded message can be viewed as an attachment when you are using IMAP4 to receive
email. However, this feature will not work if TNEF is enabled so that you can receive meeting
requests.
Receiving Meeting Requests
If you receive your email messages through ActiveSync, you will automatically receive meeting requests.
If you connect directly to an email server, the server must be running Microsoft Exchange Server 5.5 or
2000 for you to receive meeting requests. If you are running Microsoft Exchange Server 2000, you will
automatically receive meeting requests in your Inbox.
To receive meeting requests on Microsoft Exchange Server 5.5:
n Ask your system administrator to activate Rich Text Format and TNEF support for your account. If
TNEF is enabled, you will not receive messages that are included in other messages as attachments,
and you will not be able to tell if a message has an attachment until you get the full copy. In addition,
download time may be longer.
n While setting up your mail account, select Get file attachments.
After you are set up to receive meeting requests:
1. If you connect directly to an email server and only receive message headers and/or a limited number of
lines per message, tap and hold the message that you think is a meeting request, and then tap Mark for
Download.
2. Open the meeting request.
3. Tap Menu > Accept, Tentative, or Decline. If you want, you can also include a written message with
the response. The response will be sent the next time that you synchronize or connect to your email
server, and your device Calendar will be updated.
Composing and Editing a Message
Composing and Sending a Message
1. Tap > Messaging.
2. In the message list, tap Menu > Switch Accounts, and select the
desired email account.
3. Tap New.
4. Enter the email address or text message address of one or
more recipients, separating them with a semicolon. To access
addresses and phone numbers from Contacts, tap To.
5. Enter your message. To quickly add common messages, tap My
Text and tap a desired message.
6. Tap Send. If you are working offline, the message will be moved
to the Outbox folder and will be sent the next time you connect.
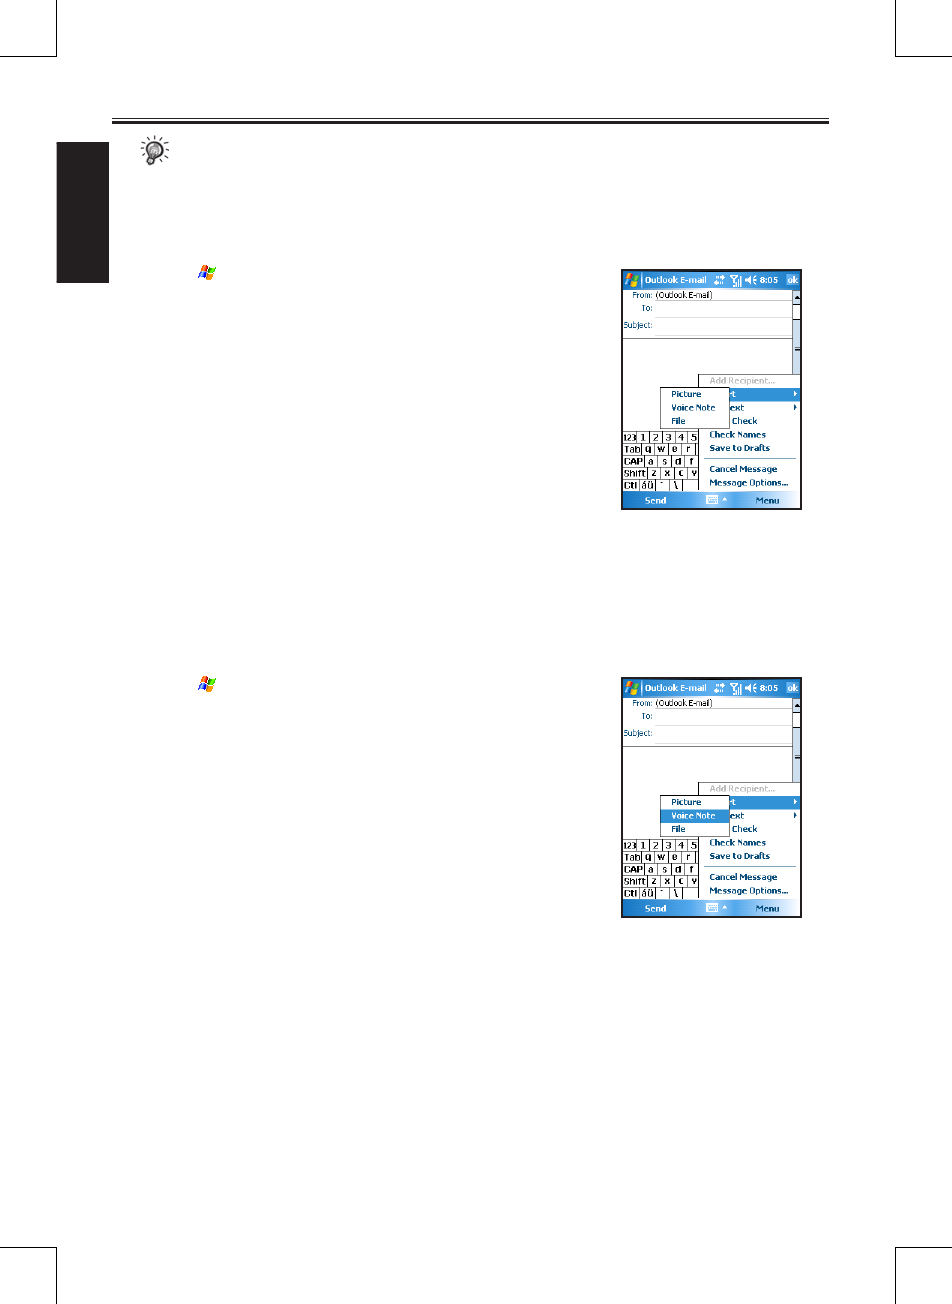
10-10 SP70R User Manual
Microsoft Pocket
Outlook
• If you are sending a text message and want to know whether it was received, before sending
the message, tap Menu > Tools > Options> Text Messages, and select Request delivery
notifications.
Attaching a File to a Message
1. Tap > Messaging.
2. In the message list, tap Menu > Switch Accounts, and select the
desired email account.
3. Tap New.
4. Enter the email address or text message address of one or more
recipients, separate them with a semicolon. To access addresses
and phone numbers from Contacts, tap To.
5. Enter your message. To quickly add common messages, tap My
Text and tap a desired message.
6. Tap Menu > Insert > File.
7. Select the file you want to attach. OLE objects cannot be
attached to Messaging messages. Messaging automatically
converts Pocket Word files that you attach to messages to .doc
format and Pocket Excel files to .xls format.
8. Tap Send. If you are working offline, the message will be moved
to the Outbox folder and will be sent the next time you connect.
Inserting a Recording
1. Tap > Messaging.
2. In the message list, tap Menu > Switch Accounts, and select the
desired email account.
3. Tap New.
4. Enter the email address or text message address of one or more
recipients, separate them with a semicolon. To access addresses
and phone numbers from Contacts, tap To.
5. Enter your message. To quickly add common messages, tap My
Text and tap a desired message.
6. Tap Menu > Insert > Voice Note.
7. Tap the Recording button to start recording, and the Stop button
to stop. The recording will appear as an attachment.
8. Tap Send. If you are working offline, the message will be moved
to the Outbox folder and will be sent the next time you connect.