Kohler KOHLER004 Wireless Bath Media Module User Manual No Job Name
Kohler Co. Wireless Bath Media Module No Job Name
Kohler >
Contents
- 1. user manual
- 2. installers guide
installers guide

JOBNAME: No Job Name PAGE: 1 SESS: 17 OUTPUT: Thu Jul 17 13:54:19 2008
Installation Guide
Bath Media Module
Mproduct numbers are for Mexico (i.e. K-12345M)
Los números de productos seguidos de Mcorresponden a México
(Ej. K-12345M)
Français, page ″Français-1″
Español, página ″Español-1″
K-175
1093174-2-C

JOBNAME: No Job Name PAGE: 2 SESS: 17 OUTPUT: Thu Jul 17 13:54:19 2008
IMPORTANT INSTRUCTIONS
WARNING: When using electrical products, basic precautions should always be followed,
including the following:
DANGER: Risk of electric shock. Connect only to circuits protected by a Ground-Fault
Circuit-Interrupter (GFCI) or Residual Current Device (RCD). Grounding is required. The unit
should be installed and grounded by a qualified service representative.
WARNING: Risk of electric shock. A licensed electrician should route all electrical wiring.
WARNING: Risk of electric shock. Disconnect power before servicing.
WARNING: Risk of injury or property damage. Please read all instructions thoroughly before
beginning installation.
CAUTION: Risk of electric shock or product damage. Make sure the power cord is unplugged
before removing the access covers.
CAUTION: Risk of product damage. The media module is rated to operate in temperatures up to
104°F (40°C). Do not install in any location where the temperature may exceed 104°F (40°C).
NOTICE: Follow all plumbing, electrical, and building codes.
NOTICE: Provide generous, unrestricted service access to the media module. Provide access for
servicing. This access must be located immediately next to the media module. Refer to the roughing in
information.
FCC and IC Compliance
The term ″IC:″before the certification/registration number only signifies that the Industry Canada
technical specifications were met.
Contains:
Kohler Company
Model #: 1070734
IC: 4554A-KOHLER044
FCC ID: N82-KOHLER004
Operation is subject to the following two conditions:
1. This device may not cause interference, and
2. This device must accept any interference, including interference that may cause undesired operation of the
device.
This device complies with Part 15 of the FCC Rules. Operation is subject to the following two conditions:
1. This device may not cause harmful interference, and
2. This device must accept any interference received, including interference that may cause undesired
operation.
NOTE:
Changes or modifications not expressly approved by the party responsible for compliance could void the
user’s authority to operate the equipment.
FCC and IC Radiation Exposure Statement for Mobile Devices
This equipment complies with FCC and IC radiation exposure limits set forth for an uncontrolled
1093174-2-C 2 Kohler Co.

JOBNAME: No Job Name PAGE: 3 SESS: 17 OUTPUT: Thu Jul 17 13:54:19 2008
FCC and IC Compliance (cont.)
environment. This equipment should be installed and operated with a minimum distance of 7-7/8″(20 cm)
between the radiator and your body. The transmitter must not be co-located or operating in conjunction with
any other antenna or transmitter.
Kohler Co. 3 1093174-2-C

JOBNAME: No Job Name PAGE: 4 SESS: 17 OUTPUT: Thu Jul 17 13:54:19 2008
Specifications
Interface
Ambient Temperature Max 125°F (52°C)
Maximum Relative Humidity 100% condensing (External surface only)
Digital Interface Cable Length (supplied
with digital interface) 30 ft (9.14 m)
Media Module
Ambient Temperature Max 104°F (40°C)
Maximum Relative Humidity 95% non-condensing
Electrical Service 100-240 V, 50/60 Hz, 2.0-0.83 A
Media Module 100-240 V, 50/60 Hz, 2.0-0.83 A
Valve Cable Length (supplied) 30 ft (9.14 m)
Line-in Cable Length 5.6 ft (1.71 m)
Ethernet Cable Length 30 ft (9.14 m)
Tools and Materials
Level Pencil Measuring
Tape
Screwdrivers HammerDrill
• 1" Hole Saw
Plus:
1093174-2-C 4 Kohler Co.
JOBNAME: No Job Name PAGE: 5 SESS: 17 OUTPUT: Thu Jul 17 13:54:19 2008
Roughing-In
Before You Begin
Observe all local plumbing, building, and electrical codes.
Read these instructions and determine all required components along with their installation
locations before beginning this installation.
This manual covers horizontal installation under the bath surround. An access panel must be
provided for servicing.
The media module may also be mounted horizontally under the floor joists. If mounting under the
floor, the unit must not be enclosed.
A licensed electrician should install a 15 A 120 V GFCI electrical outlet, within the stud framing, in
close proximity to the media module.
If possible, install the electrical outlet prior to installing the media box.
This media module complies with UL, CSA, and FCC.
To play your personal music files, you must have one of the following music servers on your
personal computer: Microsoft
®
Windows
®
Media Connect, iTunes
®
, RhapsodyTM, Yahoo!,
Musicmatch
®
Jukebox, or Firefly Media Server. For information regarding configuring your music
server, refer to the User Interface User Manual.
For best internet music performance, your computer must have a high speed internet connection.
Kohler Co. reserves the right to make revisions in the design of our products without notice, as
specified in the Price Book.
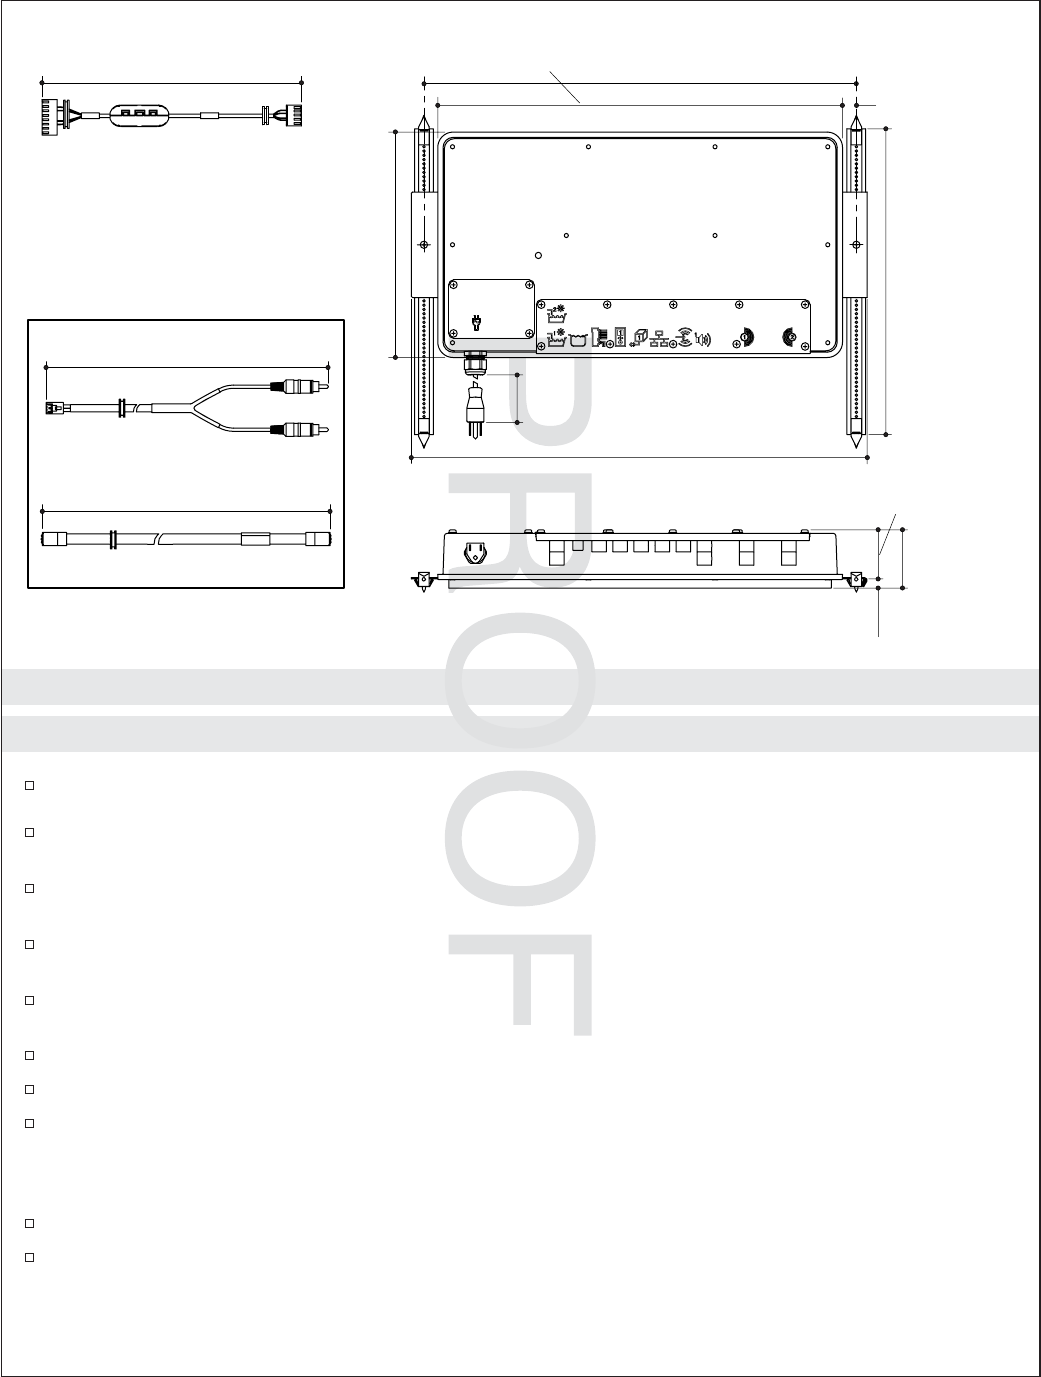
2-3/4"
(7 cm)
7/16"
(1.1 cm)
2-5/16"
(5.9 cm)
21-5/8" (54.9 cm)
20-1/2"
(52.1 cm) 11/16"
(1.7 cm)
19-3/16"
(48.7 cm)
13" (33 cm) to
19" (48.3 cm)
36-1/4"
(92.1 cm)
10-11/16"
(27.1 cm)
30' (9.1 m)
Valve Cable
(Included)
30' (9.1 m)
5' 7" (1.7 m)
Ethernet Cable
Line In Cable
K-10609-D Accessory Cable Kit
Available Separately
Kohler Co. 5 1093174-2-C
JOBNAME: No Job Name PAGE: 6 SESS: 17 OUTPUT: Thu Jul 17 13:54:19 2008
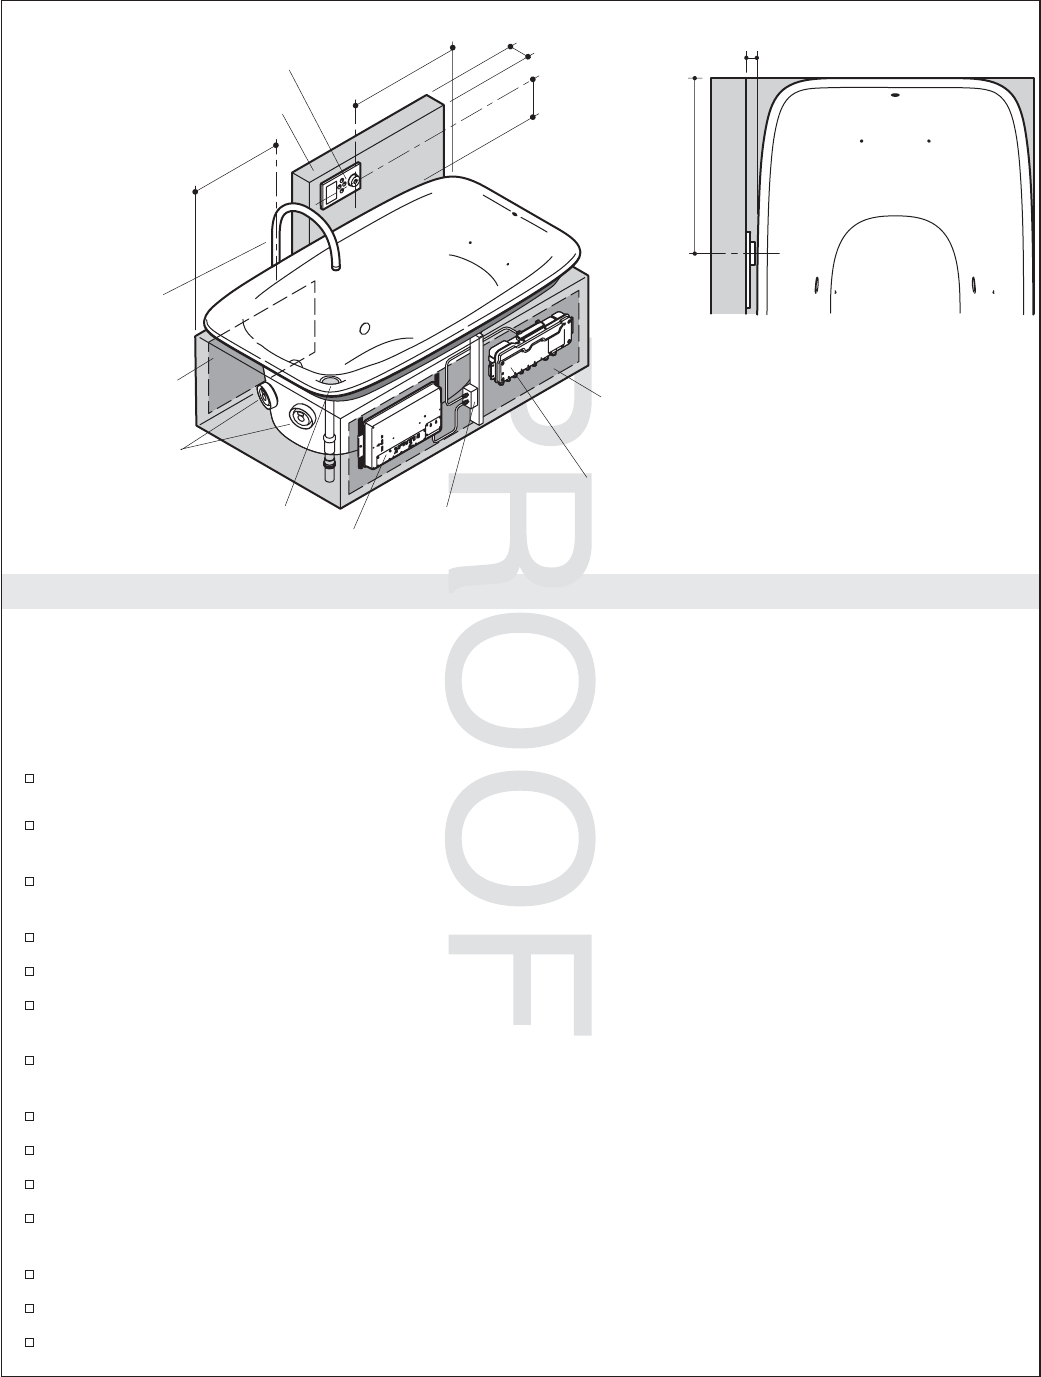
Installation Overview
For best results, follow the recommended installation sequence below. Refer to content in this guide as well
as the Installation Guides packed with each component of your bathing system.
NOTE: Illustration above shows a typical installation with the preferred installation locations for the
digital interface, media module and the digital mixing valve (optional).
Recommended Installation Sequence
Determine the installation location for the media module, and digital mixing valve (if used).
Frame the island for the bath. Provide a properly dimensioned stud pocket for the media module
(required) and the digital mixing valve (optional).
Determine the location for the access panels (required) for servicing the bath transducers, media
module, and digital mixing valve (if used). Plan the island construction accordingly.
Install the island deck. Use the cut-out templates supplied with the bath when preparing the deck.
Frame the false wall for the digital interface.
Route all plumbing to include: supply lines (spout and handshower), drain line, and valve (if
applicable).
Install the electrical outlet(s) in close proximity to the media module and valve (optional)
installation location(s).
Route the Ethernet cable to a router, if applicable.
Route the digital interface cable to the media module.
Finish the false wall.
Install the digital interface and media module. Follow the installation instructions packed with each
product.
Install the bath and drain.
Connect all cables.
Finish the island walls and install the front and rear access panels.
Rear Access
Panel
Overflow Location (LH Shown)
Front Access Panel
24" (61 cm) Min
36" (91.4 cm) Max
3/4" (1.9 cm)
10"
(25.4 cm)
4" (10.2 cm)
Digital Interface
Media Module
34" (86.4 cm)
to Knob
34" (86.4 cm)
to Knob
Outlet
Fill Spout
Digital Mixing Valve
False Wall
Transducers
1093174-2-C 6 Kohler Co.
JOBNAME: No Job Name PAGE: 7 SESS: 17 OUTPUT: Thu Jul 17 13:54:19 2008
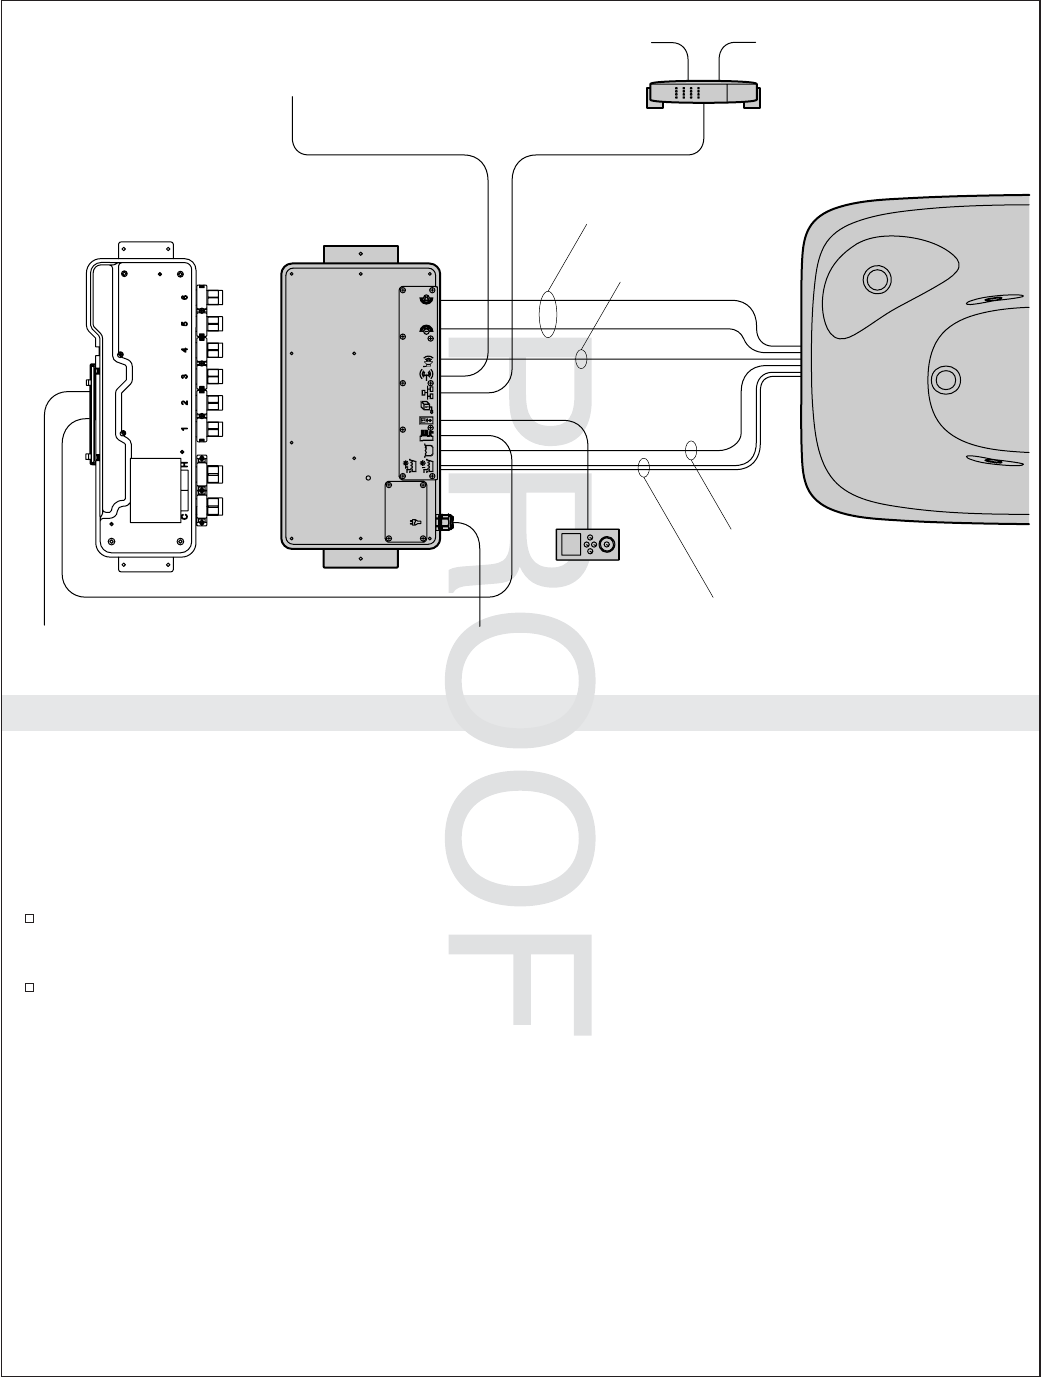
1. Determine Components
The media module controls the digital mixing valve, transducers, ″Smart Fill″level sensor, chroma lighting,
and music via the digital interface.
Cables are available for connecting audio (line in) and Ethernet to the media module.
Note: Wireless Ethernet is an option with the media module. However, a wired Ethernet connection is
recommended.
Determine all required components along with their installation locations before beginning the
media module installation.
Refer to the installation guides packed with each product for specific installation needs.
AC Power
Media Module
Router
Computer Internet
Audio
Source
Ethernet Cable
Line In Cable
AC Power
Below Water
Transducer Cables
Above Water
Transducer Cable
Level Sensor
Cable
Chromatherapy
Lighting Cables
Bath
Digital
Interface
Digital Mixing Valve
(Optional)
Kohler Co. 7 1093174-2-C
JOBNAME: No Job Name PAGE: 8 SESS: 17 OUTPUT: Thu Jul 17 13:54:19 2008
2. Prepare the Site
CAUTION: Risk of product damage. The media module is rated to operate in temperatures up to
104°F (40°C). Do not install in any location where the temperature may exceed 104°F (40°C).
The media module is designed to fit within a 13” (33 cm) to 19” (48.3 cm) wide 2x4 stud cavity. The
cavity should be free of cross bracing and insulation.
Brackets should be positioned 20-1/2″(52.1 cm) apart. Allow enough room to one side of the media
module to accommodate the electrical outlet installation and power cord connection.
Measure 2-5/8″(6.7 cm) to 2-7/8″(7.3 cm) in from the stud face to determine the bracket placement.
Mark the bracket locations with a pencil.
Install a 15 A 120 V GFCI electrical outlet within the stud framing, in close proximity to the media
module.
If used, run the Ethernet cable to the media module installation site.
Outlet
Drip Loop
20-1/2"
(52.1 cm)
13" (33 cm) to
19" (48.3 cm)
Pencil
Media Module
(not installed)
2-5/8" (6.7 cm) to
2-7/8" (7.3 cm)
1093174-2-C 8 Kohler Co.
JOBNAME: No Job Name PAGE: 9 SESS: 17 OUTPUT: Thu Jul 17 13:54:19 2008
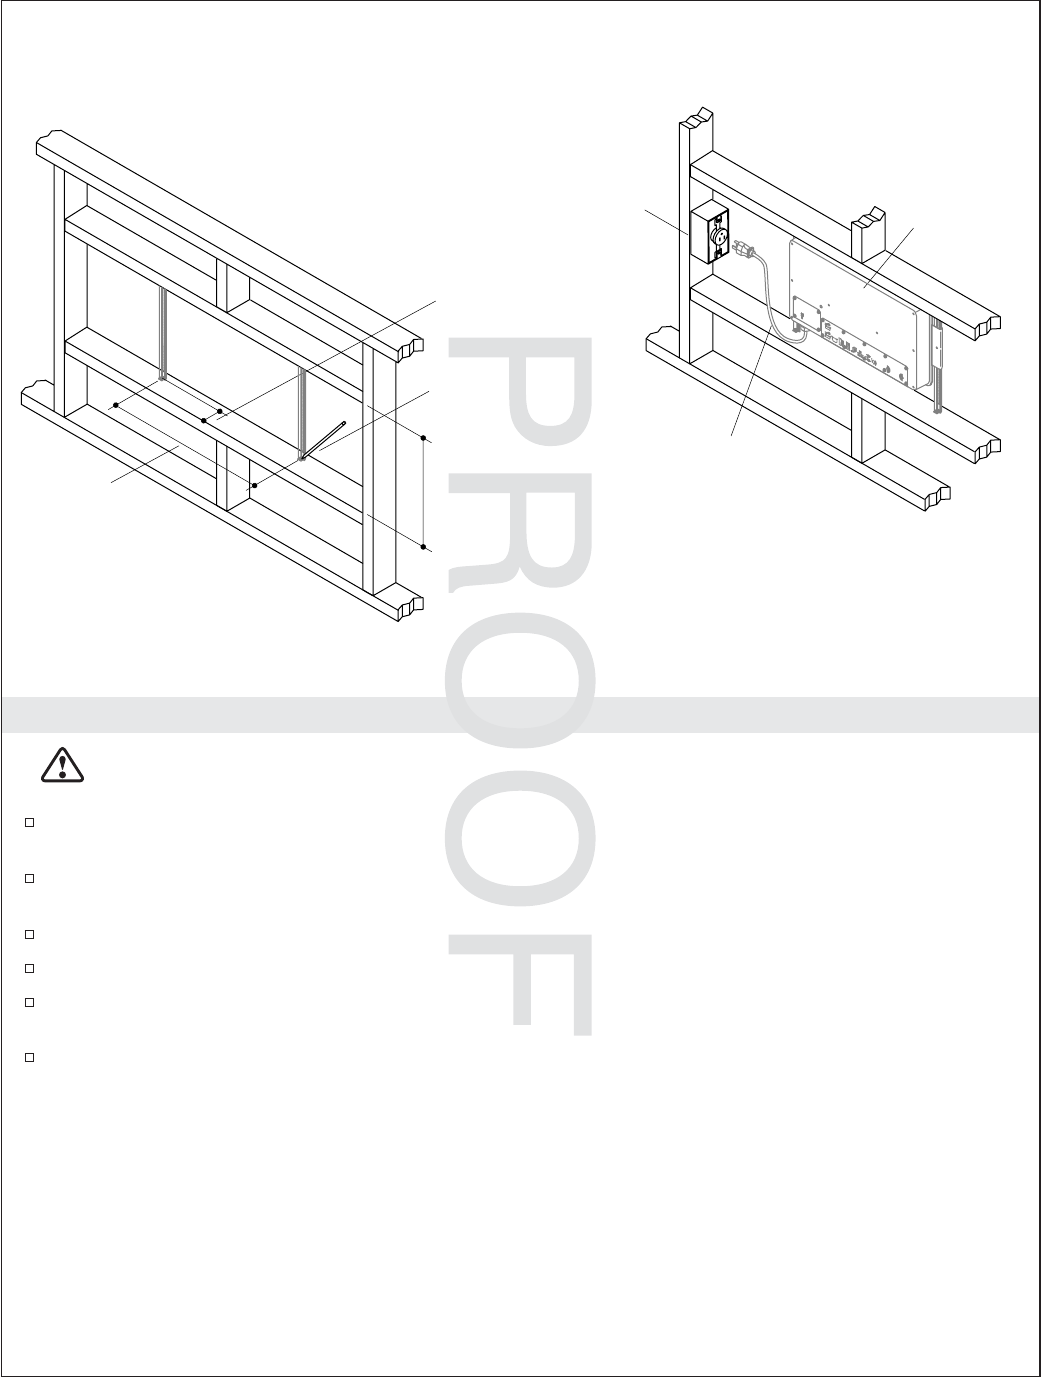
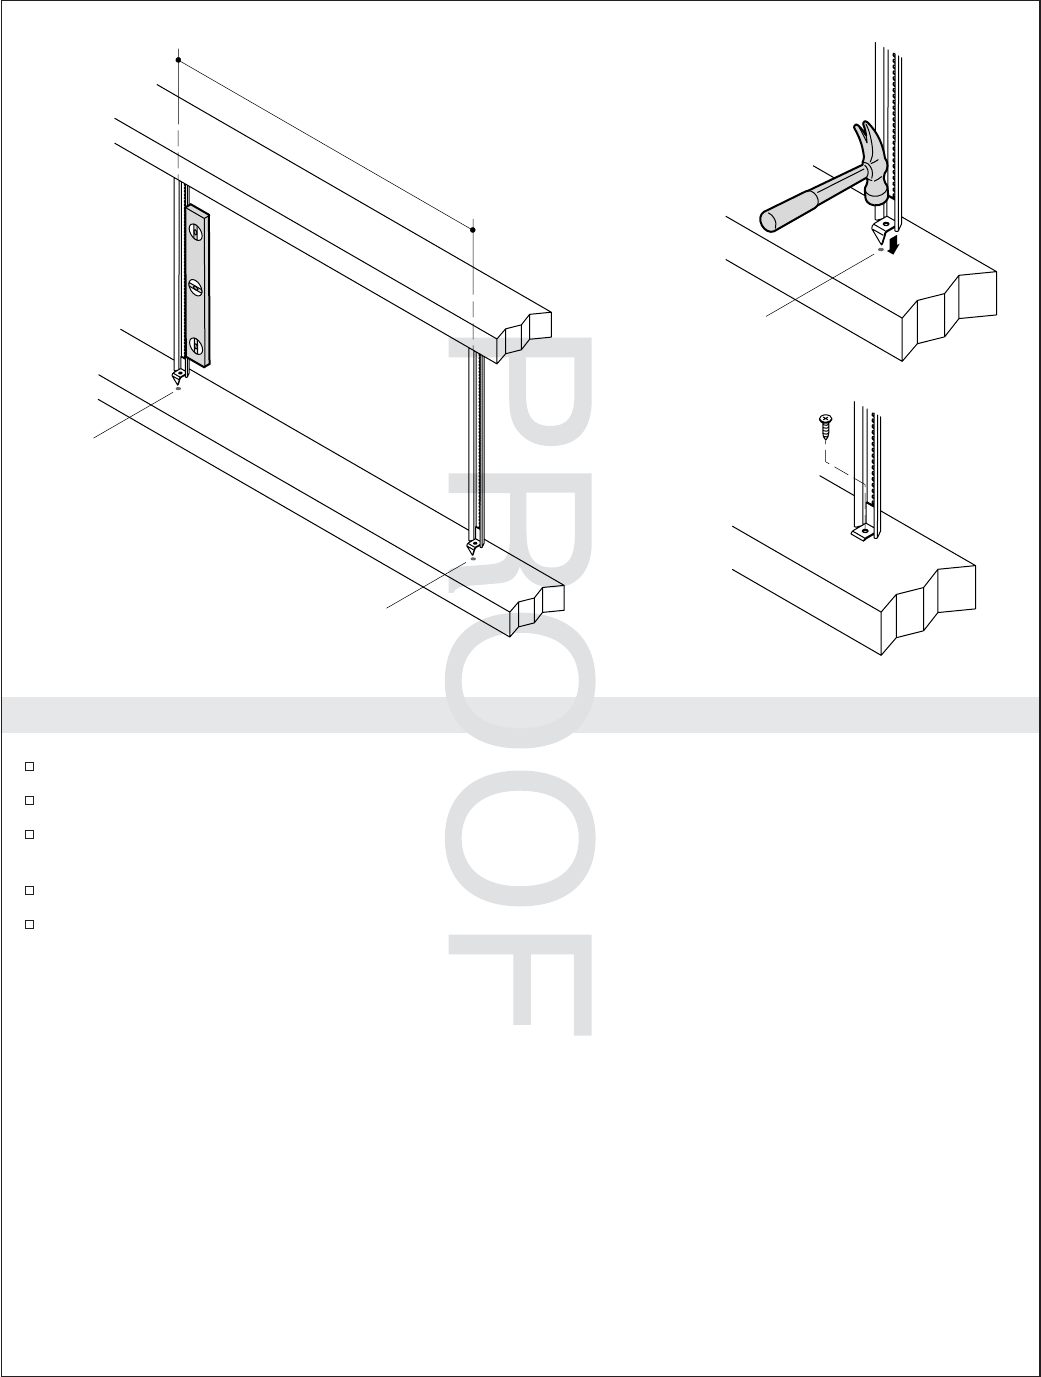
3. Install the Mounting Brackets
Align the point of the bracket with the marked locations on the studs.
Hammer one end of the bracket into the stud until the point is embedded.
Level the bracket horizontally and repeat the steps to secure the other end of the bracket to the
opposite stud.
Secure the ends of the bracket using the supplied screws.
Repeat steps to install the second bracket in the stud cavity.
20-1/2" (52.1 cm)
Align the brackets
with the pencil mark.
Pencil
Mark
Pencil
Mark
Kohler Co. 9 1093174-2-C
JOBNAME: No Job Name PAGE: 10 SESS: 17 OUTPUT: Thu Jul 17 13:54:19 2008
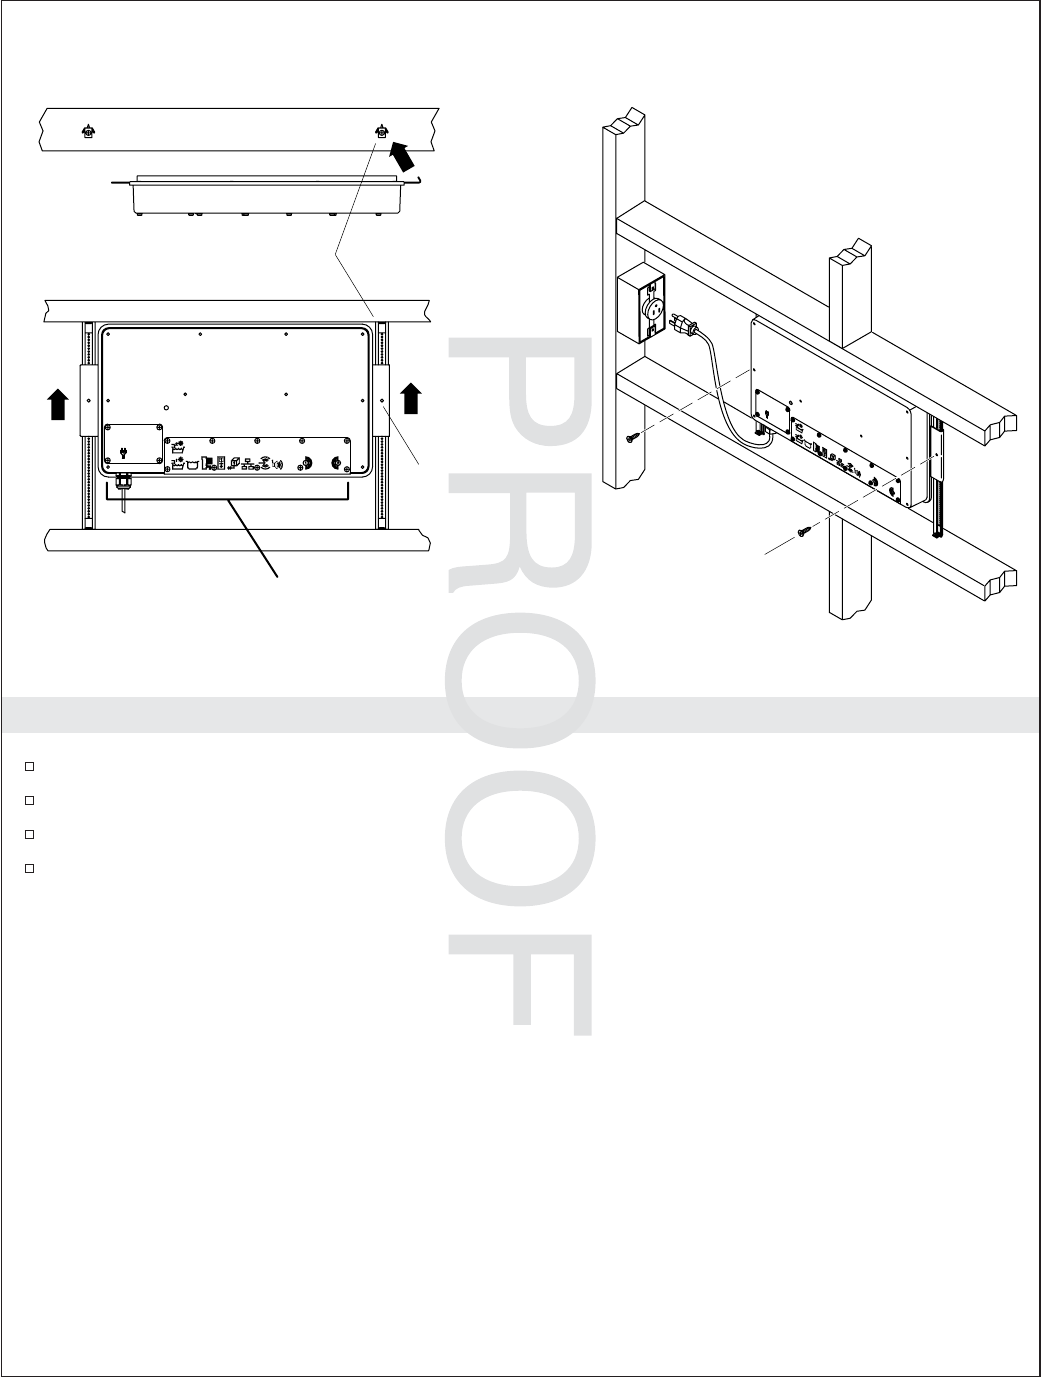
4. Install the Media Module
Orient the media module horizontally with the connection ports facing down.
Hook the end of the media module with the bent flange onto the right bracket.
Slide the media module to the top of the stud cavity to allow access for the cable connections below.
Secure the module to the right and left brackets with the screws.
Cable
Connections
Slide up.
Screw
Right Bracket
Secure
with screw.
1093174-2-C 10 Kohler Co.
JOBNAME: No Job Name PAGE: 11 SESS: 17 OUTPUT: Thu Jul 17 13:54:19 2008
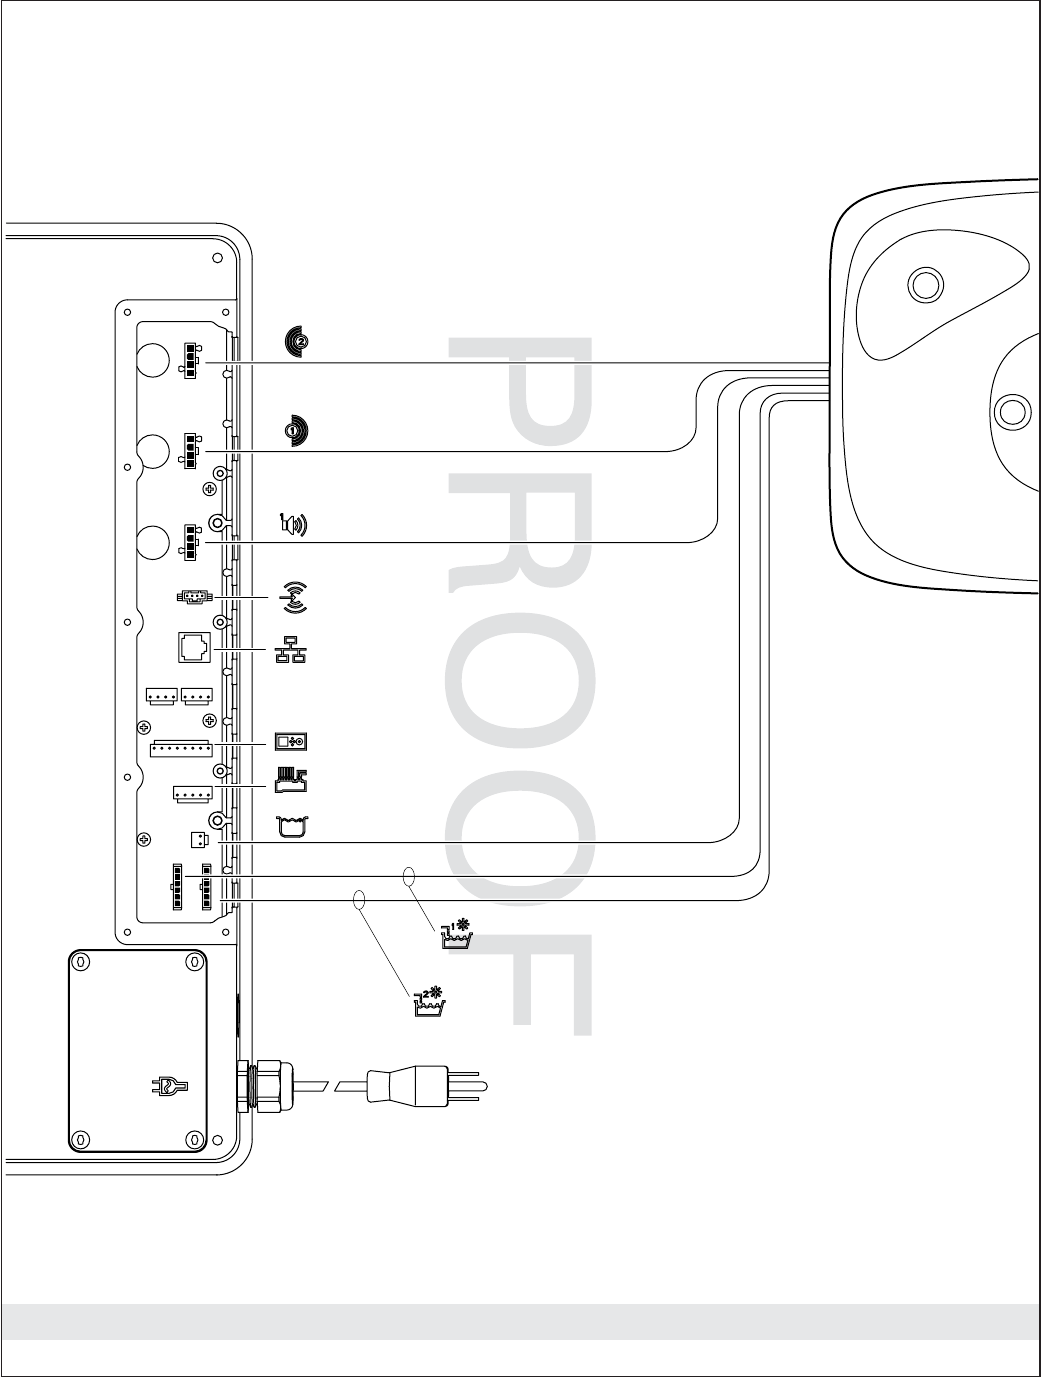
Connection Key
To Ethernet
To Audio Line In
To Digital Interface
To Digital Mixing Valve
Bath
Media Module
Knee/Elbow Transducers, 1057479-B
Elbow Chroma Lights, 1083005-A
Knee Chroma Lights, 1083005-B
Water Level Sensor, 1078002
Back/Feet Transducers, 1057479-A
Above Water Speakers, 1086239
Kohler Co. 11 1093174-2-C

JOBNAME: No Job Name PAGE: 12 SESS: 17 OUTPUT: Thu Jul 17 13:54:19 2008
5. Connect the Components
CAUTION: Risk of electric shock or product damage. Make sure the power cord for the media
module is unplugged or the power supply is turned off before removing the access covers.
Low Voltage Connections – Controls and Components
Note: For wireless applications an Ethernet connection is not needed.
Remove the low voltage access cover.
Remove the grommets in the locations where the cables will be installed. Refer to the ″Connection
Key.″
Gently press each connection until it snaps together.
Slide the cable grommet into the slot with the male end up. Verify the grommet is properly seated.
High Voltage Power Connection – International Installations
IMPORTANT! Use only copper wire for the high voltage connection.
Remove the high voltage access cover.
Remove the power cord.
Secure the power cabling to the media module using the watertight strain relief fitting (provided).
Connect the wire for line, neutral, and ground according to the above illustration. Secure each wire
to the appropriate terminal.
All Connections
Reinstall the access covers. Do not overtighten.
Make sure power cord is
unplugged before
opening access covers.
Grommet
Slide grommet into slot with
male end up.
High Voltage
Access Cover
Low Voltage
Access Cover
Install grommets
flush with media
box.
Indicator Light
Line
Neutral
Ground
Use copper
wire only.
Hard-Wire Option (International)
Male End
1093174-2-C 12 Kohler Co.
JOBNAME: No Job Name PAGE: 13 SESS: 17 OUTPUT: Thu Jul 17 13:54:19 2008
Connect the Components (cont.)
Plug the power cord into the outlet, or for hard-wire options, turn on the power. Verify that the
indicator light turns on and pulses.
Test each component to ensure proper functionality. Refer to the Installation and Homeowner
Guides packed with each of the individual components for additional information.
6. Complete the Installation
Reinstall the access covers. Do not overtighten.
If not already installed, install any additional components at this time according to the installation
instructions packed with the products. For connecting to the media module, refer to the ″Connect
the Components″section.
Plug the power supply into the outlet. Verify that the indicator light turns on and pulses.
Configure your music server and Ethernet. Refer to the Media Module Homeowner’s guide.
7. Installation Checkout
Test each component to ensure proper functionality. Refer to the Installation and Homeowners
Guides packed with each of the individual components for additional information.
Troubleshooting
CAUTION: Risk of personal injury. The valve (if installed) may contain hot water; be careful when
draining any residual water.
IMPORTANT! Turn off the power and water supply to all components before performing any
maintenance.
It is recommended that any valve maintenance should be performed by a Kohler Co. Authorized Service
Representative.
This troubleshooting guide is for general aid only. For service and installation issues or concerns, call
1-800-4-KOHLER.
Interface Troubleshooting Table
Symptoms Probable Cause Recommended Action
1. Digital interface is not lit. A. Media module is not plugged
into the outlet.
A. Plug the media module into the
outlet.
B. Power supply connection to the
media module may be loose or
disconnected.
B. Check power supply connections to
the media module and reconnect if
needed.
C. Interface cable connections may
be loose or disconnected.
C. Check all interface cable
connections, connect if needed.
D. Circuit breaker has been
tripped.
D. Reset the circuit breaker.
E. The media module may require
resetting.
E. Disconnect and reconnect the
power supply from the media
module.
F. If none of the recommended
actions for the above issues
correct the symptom, the media
module or interface requires
servicing.
F. Contact your Kohler Co.
Authorized Service Representative.
2. The interface power
indicator pulses but does
not turn on.
A. Interface cable connections may
be loose or disconnected.
A. Check all interface cable
connections, connect if needed.
Kohler Co. 13 1093174-2-C

JOBNAME: No Job Name PAGE: 14 SESS: 17 OUTPUT: Thu Jul 17 13:54:19 2008
Troubleshooting (cont.)
Interface Troubleshooting Table
Symptoms Probable Cause Recommended Action
B. The media module requires
resetting.
B. Disconnect and reconnect the
media module power supply.
C. If the above recommended
action does not correct the
symptom, the interface or media
module requires servicing.
C. Contact your Kohler Co.
Authorized Service Representative.
3. The interface functions
normally but no water
flows from the spout or
handshower.
A. Inlet/outlet fittings may be
blocked.
A. Check the inlets and outlets for
blockage or debris. Clean the inlet
screens. Refer to the ″Clean the
Inlet Screens″section in the Valve
Homeowners Guide.
B. Outlets are not plumbed
correctly.
B. Reroute plumbing as needed.
C. Hot and cold water supplies are
not turned on.
C. Turn on the water supply to the
valve.
D. The valve or media module
memory may require resetting.
D. Disconnect and reconnect the
power supply from the valve and
media module.
E. System error. E. Check the user interface for an
error code. Refer to the
″Diagnostics″section in the Digital
Interface Homeowners Guide.
F. If none of the recommended
actions for the above issues
correct the symptom, the media
module requires servicing.
F. Contact your Kohler Co.
Authorized Service Representative.
4. Display is difficult to read. A. Contrast is not optimized. A. Adjust contrast in the user interface
setting menu.
B. Brightness is not optimized. B. Adjust the brightness in the user
interface setting menu.
Valve Troubleshooting Table
Symptoms Probable Cause Recommended Action
1. Maximum blend
temperature too hot or
too cold.
A. Incorrect maximum temperature
setting.
A. Refer to the ″Set the Maximum
Temperature″section in the Digital
Interface User Guide.
B. Inlet/outlet fittings may be
blocked.
B. Check the inlets and outlets for
blockage or debris. Clean the inlet
screens. Refer to the ″Clean the
Inlet Screens″section in the Valve
Homeowners Guide.
C. If the above recommended
action does not correct the
symptom, the interface or valve
requires servicing.
C. Contact your Kohler Co.
Authorized Service Representative.
2. Continuous flow. A. System will not switch off. A. Turn off the water and power
supply and contact your Kohler Co.
Authorized Service Representative.
3. Handshower does not
work.
A. Handshower is not enabled. A. Enable the handshower option in
the settings menu. Refer to the
Digital Interface User Guide.
4. Only cold water flows
from the outlets.
A. Hot water supply is either not
turned on or not connected to
the valve inlet.
A. Check the hot water supply is
turned on and connected to the
valve inlet.
1093174-2-C 14 Kohler Co.

JOBNAME: No Job Name PAGE: 15 SESS: 17 OUTPUT: Thu Jul 17 13:54:19 2008
Troubleshooting (cont.)
Valve Troubleshooting Table
Symptoms Probable Cause Recommended Action
B. Hot water inlet is blocked. B. Check the hot water inlet screen for
blockage. Clean or replace the inlet
screen. Refer to the Valve
Homeowners Guide.
C. If none of the recommended
actions for the above issues
correct the symptom, the valve
requires servicing.
C. Contact your Kohler Co.
Authorized Service Representative.
5. Fluctuating or reduced
flow rate. Valve is
functioning properly.
A. Inlet/outlet fittings may be
blocked.
A. Check the inlets and outlets for
blockage or debris. Clean the inlet
screens. Refer to the ″Clean the
Inlet Screens″section in the Valve
Homeowners Guide.
B. Water outlet pressure is low. B. Check that the flow rate is at or
above the minimum rate required.
Refer to ″Specifications″section in
the Valve Homeowners Guide.
C. Fluctuating flow. C. Verify that the dynamic inlet
pressures are within specifications.
Refer to ″Specifications″section in
the Valve Homeowners Guide.
D. If none of the recommended
actions for the above issues
correct the symptom, the valve
requires servicing.
D. Contact your Kohler Co.
Authorized Service Representative.
6. Blend temperature drift or
temperature cycling.
A. Fluctuating water temperature. A. Check the inlet temperature
differentials and verify they are
sufficient. Refer to ″Specifications″
section in the Valve Homeowners
Guide.
B. Hot water supply temperature
fluctuation.
B. Check and make adjustments as
needed.
C. Pressure difference greater than
5 psi (34.5 kPa) between the hot
and cold supply lines.
C. Install pressure regulators to bring
the supplies within 5 psi (34.5 kPa)
of each other.
D. If none of the recommended
actions for the above issues
correct the symptom, the valve
requires servicing.
D. Contact your Kohler Co.
Authorized Service Representative.
7. Water leaking from the
valve.
CAUTION: Risk of
personal injury or
product damage. Turn off
the main power and
water supply.
A. Connections are not secure. A. Check all connections. Make
adjustments as needed.
B. Seals are worn or damaged. B. Order a seal service pack and
replace all seals.
C. Internal leak. C. Unit requires overhaul. Contact
your Kohler Co. authorized service
representative.
8. Hot water only, the valve
shuts down.
A. Hot and cold lines are reversed. A. Switch hot and cold water supply
connections. Verify the hot water
supply is connected to the inlet
marked ″H″and the cold water
supply is connected to the inlet
marked ″C.″
Kohler Co. 15 1093174-2-C

JOBNAME: No Job Name PAGE: 16 SESS: 17 OUTPUT: Thu Jul 17 13:54:19 2008
Troubleshooting (cont.)
Music Troubleshooting Table
Symptoms Probable Cause Recommended Action
1. Bath transducers do not
produce sound.
A. Transducer cables are not
connected properly.
A. Make sure the cables are properly
installed into the Media Module
connections and to the bath
transducers.
2. After playing music
loudly, the music stops
even though a song is
properly selected.
A. Thermal shut down. A. Shut down the system for 1 hour to
allow the unit to cool. Make sure
the area where the unit is installed
does not exceed 104°F (40°C).
3. Library menu is not
available.
A. The Roku agreement was
declined.
A. Enter the settings menu, select
″System,″select ″Music Software,″
select ″Roku Agreement″and select
″YES.″
4. Music server is not
available.
A. Wireless connection out of
range.
A1. Move router closer or install a
wireless access point.
A2. Connect via Ethernet cable.
B. Wireless network is not
configured properly.
B. Enter the settings menu, select
″System,″select ″WiFi Security,″
select ″Network Name,″select
″WEP/WPA Key″and enter the
security key.
C. The network cable is not
connected to the correct
router/switch input.
C. Connect the Media Module to the
router’s/switch’s Ethernet ports.
D. A compatible media server is
not installed/running on your
home computer.
D. Install/open one of the supported
media servers such as Firefly
Media Server, iTunes
®
, Microsoft
®
Windows
®
Media Connect,
RhapsodyTM, Yahoo! or
Musicmatch
®
on your computer
and load your favorite music into
the server’s library.
E. The media server on your home
computer is not configured to
share files.
E. Reference the media server’s help
menu to properly configure file
sharing.
F. The incorrect Wi-Fi region was
selected.
F. Enter the settings menu, select
″System,″select ″Music Software,″
select ″Region″and select the
appropriate geographical region
that matches your Wi-Fi router.
5. I have a wireless network
but my Media Module is
unable to connect to the
network.
A. Ethernet cable is plugged in. A. Unplug the Ethernet cable.
B. Media Module is not within
Wi-Fi range.
B. Make sure the Media Module is
within range of your Wi-Fi
network.
C. A WEP or WPA key was not
entered for your secured
network.
C. Enter the settings menu, select
″System,″select ″WiFi Security,″
select ″Network Name,″select
″WEP/WPA Key″and enter the
security key.
D. The router is not set up for
802.11b.
D. Make sure the access point/router
is configured to allow 802.11b
clients.
1093174-2-C 16 Kohler Co.

JOBNAME: No Job Name PAGE: 17 SESS: 17 OUTPUT: Thu Jul 17 13:54:19 2008
Troubleshooting (cont.)
Music Troubleshooting Table
Symptoms Probable Cause Recommended Action
6. The Media Module cannot
connect to an iTunes
server with firewall
software running.
A. The firewall is not configured
correctly to allow iTunes music
sharing.
A. Make sure your firewall software is
configured to allow iTunes music
sharing. For a Mac: Open System
Preferences. Select the Sharing icon
and click on the firewall tab. Select
the option ″iTunes Music Sharing.″
For a PC: Refer to your
documentation for changing
firewall settings. If running
Windows XP service pack 2, open
″Security Center,″select ″Windows
Firewall,″click on the ″Exceptions″
tab, and check to see that iTunes is
enabled. If not, use ″Add
Programs″to enable it. After these
changes have been made, restart
the Media Module by
disconnecting and reconnecting the
AC power.
7. The Media Module cannot
access the iTunes library.
A. iTunes is not running. A. Make sure the computer containing
your iTunes library is turned on
and iTunes is running.
B. iTunes is not configured for
sharing.
B. In iTunes, be sure to turn on the
″music sharing″option. Go to the
iTunes>Preferences menu or Edit>
Preferences for PC users. In the
dialog box that appears, click the
″Sharing″icon, then check the
option ″Share my music″to enable
sharing on your local network.
C. iTunes is not responding to
commands from the Media
Module.
C. Close and restart iTunes on your
computer.
8. I can see my iTunes
library in the list of
libraries, but when I try to
connect, the connection
fails.
A. iTunes is not configured for
sharing.
A. In iTunes, be sure to turn on the
″music sharing″option. Go to the
iTunes>Preferences menu or Edit>
Preferences for PC users. In the
dialog box that appears, click the
″Sharing″icon, then check the
option ″Share my music″to enable
sharing on your local network.
Kohler Co. 17 1093174-2-C

JOBNAME: No Job Name PAGE: 18 SESS: 17 OUTPUT: Thu Jul 17 13:54:19 2008
Troubleshooting (cont.)
Music Troubleshooting Table
Symptoms Probable Cause Recommended Action
B. No IP address assigned to the
Media Module.
B. The Media Module was not
assigned an IP address via DHCP,
but the PC was. In this situation,
the Media Module is able to see the
library via Rendezvous, but is not
able to connect to the library. Here
is how to check your Media
Module’s address: Enter the
settings menu, select ″System,″
select ″Music,″select ″Roku IP
Address.″If your IP address is of
the form 169.254.xxx.xxx, the Media
Module did not get a
DHCP-assigned address. Check the
configuration of your router to
ensure it is set up to assign DHCP
addresses. Reboot the Media
Module by disconnecting and
reconnecting the AC power.
9. The Media Module can
not access Windows
Media Connect library.
A. Windows Media Connect is not
configured for sharing.
A. Make sure that your computer
containing your music library is
powered ON and Windows Media
Connect is running (icon should be
visible in the task tray). With the
Media Module powered ON and
connected to your network, make
sure that the Media Module is an
authorized device. Launch
Windows Media Connect through
your Control Panel. On the wizard
screen, scroll down the list of
devices. If the Media Module is not
listed, click the ″Add″button at the
bottom of the list. Click on Media
Module, then click ″OK.″It should
show up on the list of authorized
devices. Click ″Done.″Reboot the
Media Module by disconnecting
and reconnecting the AC power.
10. The Media Module can
not access the Musicmatch
library.
A. Musicmatch is not running. A. Make sure the computer containing
your music library is powered ON.
B. Musicmatch is not configured
for sharing.
B. Make sure music sharing is enabled
in Musicmatch. From the main
Musicmatch menu, click on
Options/Settings. Click on the tab
″CD Lookup/Connectivity.″Click
the buttons next to ″Enable music
server″as well as ″Universal Plug
and Play.″Musicmatch does not
need to be running while using the
Media Module; once enabled, the
UPnP server runs in the
background. Reboot the Media
Module by disconnecting and
reconnecting the AC power.
1093174-2-C 18 Kohler Co.

JOBNAME: No Job Name PAGE: 19 SESS: 17 OUTPUT: Thu Jul 17 13:54:19 2008
Troubleshooting (cont.)
Music Troubleshooting Table
Symptoms Probable Cause Recommended Action
11. The Media Module is
connected to my network
via wired ethernet, but is
unable to play Internet
radio and may sometimes
fail to locate, connect to,
or play music from my
music servers.
A. No IP address assigned to the
Media Module.
A. Determine the Media Module’s
address by entering the settings
menu, select ″System,″select
″Music,″select ″Roku IP Address.″
If your IP address is of the form
169.254.xxx.xxx, the Media Module
did not get a DHCP-assigned
address. Check the configuration of
your router to ensure it is set up to
assign DHCP addresses. Reboot the
Media Module by disconnecting
and reconnecting the AC power.
B. Ethernet cable is damaged. B. Replace the Ethernet cable.
12. No sound plays through
the bath transducers.
A. The song is paused. A. Make sure a song is playing. If the
song is paused, press the OK
button to continue playback.
B. The volume is too low. B. Make sure the volume is turned up
high enough for proper enjoyment.
13. Some of my music files
do not display while
browsing.
A. Missing ID3 tag info. A. ID3 data tags may be missing.
Information about your music,
including Song Name, Artist,
Composer, Album, and Genre is
usually created automatically by
the software you used to save your
audio CD files on your computer’s
hard drive. This process creates
data called ″ID3 tags″to describe
each track. If this data is missing
from your music files, they will not
appear when you browse by that
data category. You can edit this
information in music jukebox
software such as iTunes.
14. A music file will not play. A. Unsupported file format. A. Make sure your file is a supported
format: iTunes Music Server: MP3,
AAC, ALAC, AIFF and WAV
Windows Media Player 11 /
Windows Media Connect: MP3,
WMA (including DRM WMA) and
WAV.
15. Songs purchased through
the iTunes music store
will not play.
A. Song is not supported because
of DRM.
A. This is normal. DRM AAC files
(i.e., files purchased on Apple’s
music store) are not supported.
Those files will be detected but will
be skipped during playback.
16. I cannot find playlists that
I saved on my computer.
A. Some playlists may not be
supported.
A. iTunes users: Make sure your
playlist was created in iTunes and
is visible in your iTunes
application. Windows Media
Connect users: Make sure your
playlists are saved in the My
Documents\My Music\My
Playlists or other shared folder.
Musicmatch users: Musicmatch
exports playlists in a manner that is
not supported. Slimserver users:
Make sure your playlist is a
Slimserver-supported playlist
format.
Kohler Co. 19 1093174-2-C

JOBNAME: No Job Name PAGE: 20 SESS: 17 OUTPUT: Thu Jul 17 13:54:19 2008
Troubleshooting (cont.)
Music Troubleshooting Table
Symptoms Probable Cause Recommended Action
17. I am experiencing
undesirable noise or
resonance.
A. Apron is vibrating against the
deck.
A. Verify rubber isolator mounts are
contacting the deck and insulating
the apron from the deck.
B. Transducers resonate with deck. B. Make sure bath is centered in deck
cutout. Transducers should not
contact the framing or deck.
Lights Troubleshooting Table
Symptoms Probable Cause Recommended Action
1. The bath lights do not
turn on.
A. Cable connections are loose or
disconnected.
A. Make sure the cables are properly
connected to the media module.
B. Light cables connected to wrong
media module connectors.
B. Verify cables and connections,
reconnect as needed.
C. Chroma light string damaged. C. Replace chroma light string.
D. Media module is
malfunctioning.
D. Media module may need to be
replaced. Contact your Kohler Co.
Authorized Service Representative.
Media Module Troubleshooting Table
Symptoms Probable Cause Recommended Action
1. System stops working and
the status LED is a solid
red.
A. System failure. A. Reboot the Media Module by
disconnecting the AC power from
the wall outlet. If the status LED
remains a solid red after reboot,
replace the Media Module.
2. System stops working and
the Status LED is a OFF.
A. Power supply failure. A. Reboot the Media Module by
disconnecting the AC power from
the wall outlet. If there is no
change after reboot, replace the
Media Module.
B. Incorrect wiring of the AC
power supply.
B. Verify that the Media Module was
installed per the installation
manual. Make sure AC power is
present at the outlet the Media
Module is plugged into.
3. Music stops playing and I
get a music error.
A. Thermal shutdown. A. Shut down the system for 1 hour to
allow the unit to cool. Make sure
the area where the unit is installed
does not exceed 104°F (40°C).
B. Incorrect speaker load. B. Verify the speaker load is 4 to 8
ohms.
4. Water level sensor does
not detect water.
A. Level sensor cable is damaged. A. Replace the level sensor cable.
B. Level sensor cable is loose or
disconnected.
B. Make sure the cable is properly
connected to the media module.
C. Water is too pure. C. Add bath salts to your bathing
water.
5. No display on the user
interface.
A. The interface cable is damaged. A. Replace the interface cable.
B. The interface cable is not
plugged in.
B. Verify the interface cable is
properly plugged into the interface
at all locations.
C. The interface or Media Module
requires servicing.
C. Contact your Kohler Co.
Authorized Service Representative.
1093174-2-C 20 Kohler Co.

JOBNAME: No Job Name PAGE: 21 SESS: 17 OUTPUT: Thu Jul 17 13:54:19 2008
Troubleshooting (cont.)
Media Module Troubleshooting Table
Symptoms Probable Cause Recommended Action
6. Experiences are not
functioning.
A. SD card is dislodged. A. Contact your Kohler Co.
Authorized Service Representative.
Remote Control Troubleshooting Table
Symptoms Probable Cause Recommended Action
1. Intermittent or erratic
operation.
A. Frequency/channel interference. A. Set RFID, PANID, and channel by
following screen prompts on the
digital interface for the remote.
Then re-sync the remote as
instructed in the Bath Homeowners
Guide.
2. LED on remote does not
blink or constantly blinks.
A. Batteries are low. A. Replace batteries (2 AA).
3. One or more buttons on
remote do not function
and LED does not light
up.
A. Batteries are low. A. Replace batteries (2 AA).
B. Remote program lost. B. Re-sync the remote to the interface.
C. Remote is damaged. C. Replace remote.
4. One or more buttons on
remote do not function
but LED lights up.
A. Digital interface is
malfunctioning.
A. Digital interface may need to be
replaced. Contact your Kohler Co.
Authorized Representative.
Kohler Co. 21 1093174-2-C

JOBNAME: No Job Name PAGE: 1 SESS: 1 OUTPUT: Thu Jul 17 13:54:19 2008
1093174-2-B

JOBNAME: No Job Name PAGE: 2 SESS: 1 OUTPUT: Thu Jul 17 13:54:19 2008
1093174-2-B

JOBNAME: No Job Name PAGE: 1 SESS: 1 OUTPUT: Thu Jul 17 13:54:19 2008
USA: 1-800-4-KOHLER
Canada: 1-800-964-5590
México: 001-877-680-1310
kohler.com
©2008 Kohler Co.
1093174-2-C