Konica Minolta 7 Users Manual 3dsolutions Range7
7 to the manual 708b1c65-4b74-44fc-893f-ca80c84a319a
2014-12-13
: Konica-Minolta Konica-Minolta-7-Users-Manual-124754 konica-minolta-7-users-manual-124754 konica-minolta pdf
Open the PDF directly: View PDF ![]() .
.
Page Count: 8
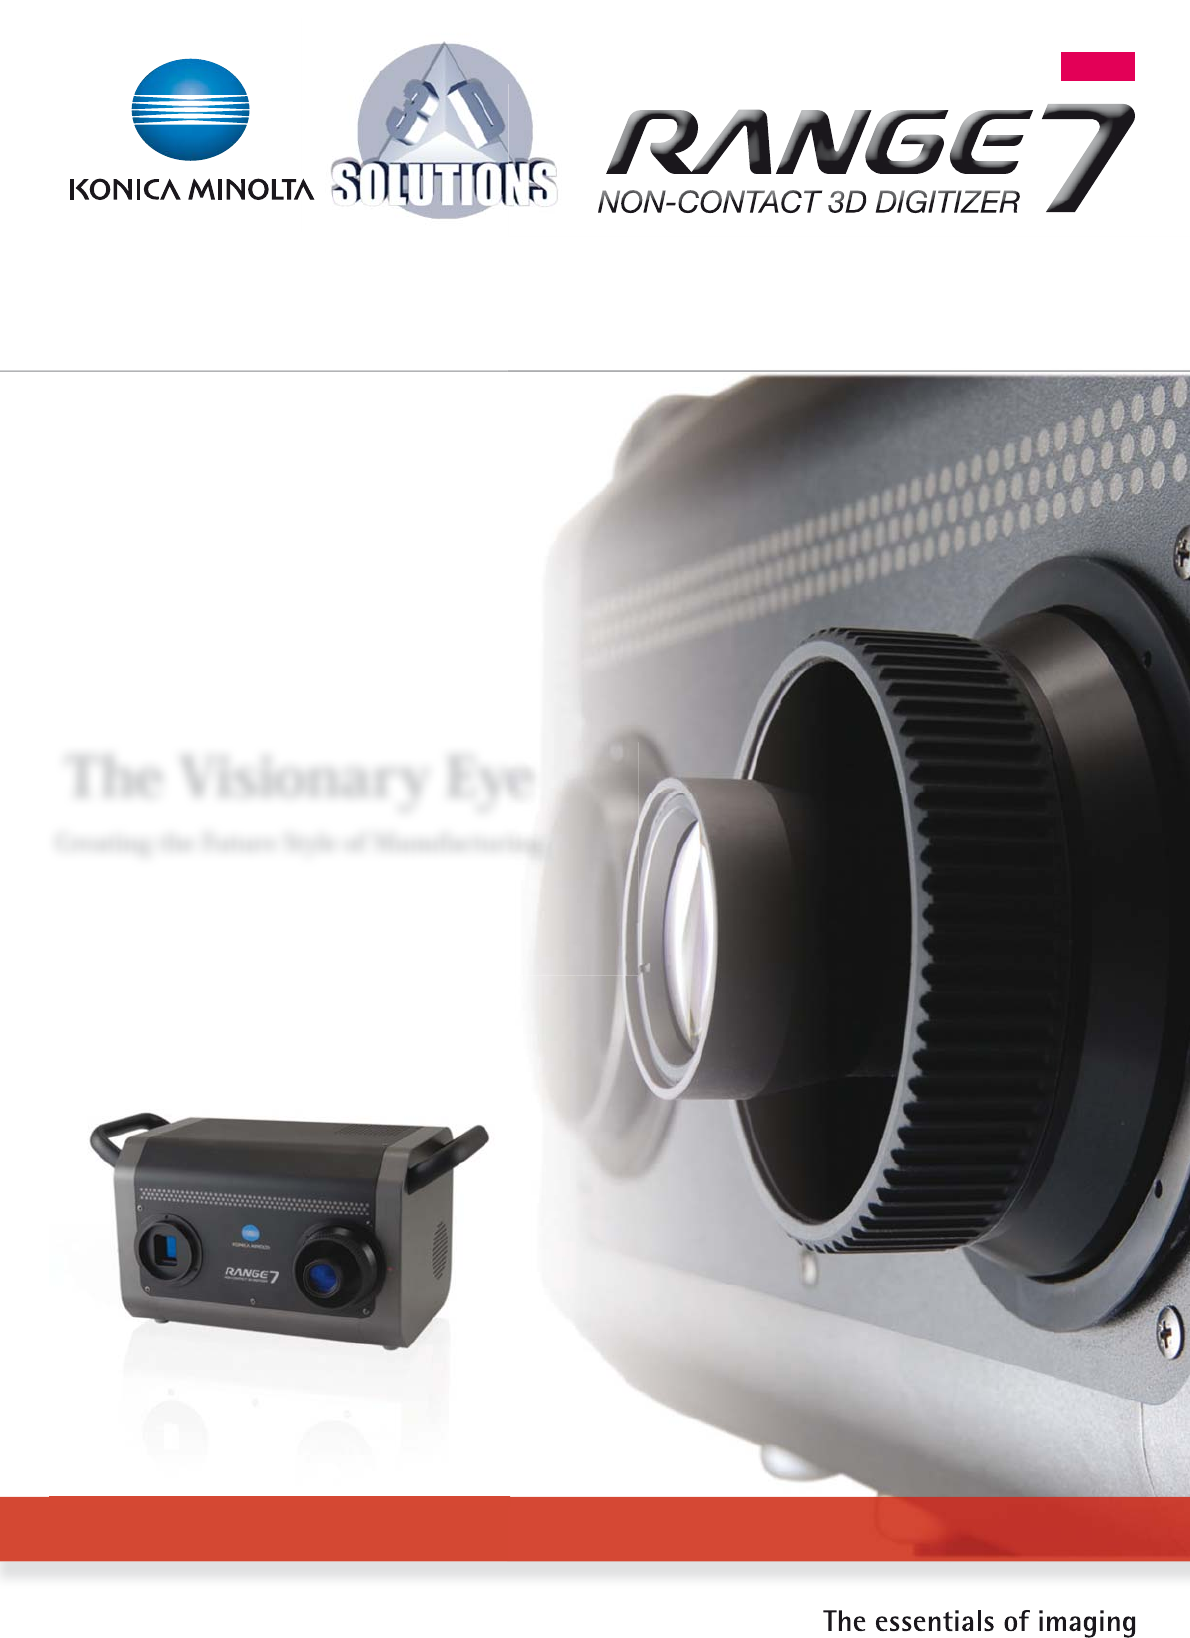
Non-contact 3D digitizer suitable for industrial applications requiring high accuracy and reliability
The Visionary Eye
Creating the Future Style of Manufacturing
NEW
KONICA MINOLTA
Do you make 2D drawings simply to
check your 3D model?
How reliable is your surface profile
evaluation, such as checking of
distortion in a free-form surface?
Is the evaluation of wall thickness or
machining stock inspection for cast
parts sucient?
Do you spend too much time
correcting the dies for press parts?
Are the bosses, ribs and holes of
plastic parts formed in accordance
with the original design?
Is inspection totally dependent on
skilled workers?
Q
■ Principal applications and measurement targets
Quality inspection (conrmation and verication of whether parts are
manufactured to specications) and reverse engineering (quantication
of quality and capability of parts, etc.) from development to
prototyping phases
tCast and other formed materials
tPressed parts
tInjection molded parts
tVarious machined parts
t3FWFSTFFOHJOFFSJOH
t3BQJEQSPUPUZQJOH
t$SFBUJPOPGNBDIJOJOHEBUB
t%JHJUBMNPDLVQ
/PODPOUBDU%EJHJUJ[FS,0/*$".*/0-5"3"/(&DBO
JOTUBOUBOFPVTMZEJHJUJ[FUIFFYUFSOBMQSPGJMFTPGWBSJPVT
industrial parts, including press parts, machined parts, dies,
prototypes, cast parts and injection molded parts, into
%EBUB5IFEJHJUJ[FEQSPGJMFEBUBDBOUIFOCFBDDVSBUFMZ
reproduced on a computer screen. By comparing this
EBUBBHBJOTU%$"%EBUBXJUIPQUJPOBMBQQMJDBUJPO
TPGUXBSFZPVDBORVJDLMZPVUQVUNFBTVSFNFOUSFQPSUTPO
PWFSBMMEFWJBUJPODSPTTTFDUJPOBMEFWJBUJPOXBMMUIJDLOFTT
EJTUSJCVUJPOBOE(%5(FPNFUSJD%JNFOTJPOJOHBOE
5PMFSBODF5IJTBMMPXTJODSFBTFETQFFEBOEJNQSPWFERVBMJUZ
in the manufacturing process.
In addition to measurement for inspection and quality control,
,0/*$".*/0-5"3"/(&PòFSTWBSJPVTBQQMJDBUJPOTJODMVEJOH
KONICA MINOLTA RANGE7 opens up the future possibilities
of non-contact 3D measurement by adding the elements
of increased reliability, improved operability and easier
transportability to Konica Minolta's accumulated optical
technologies and auto-focus function.
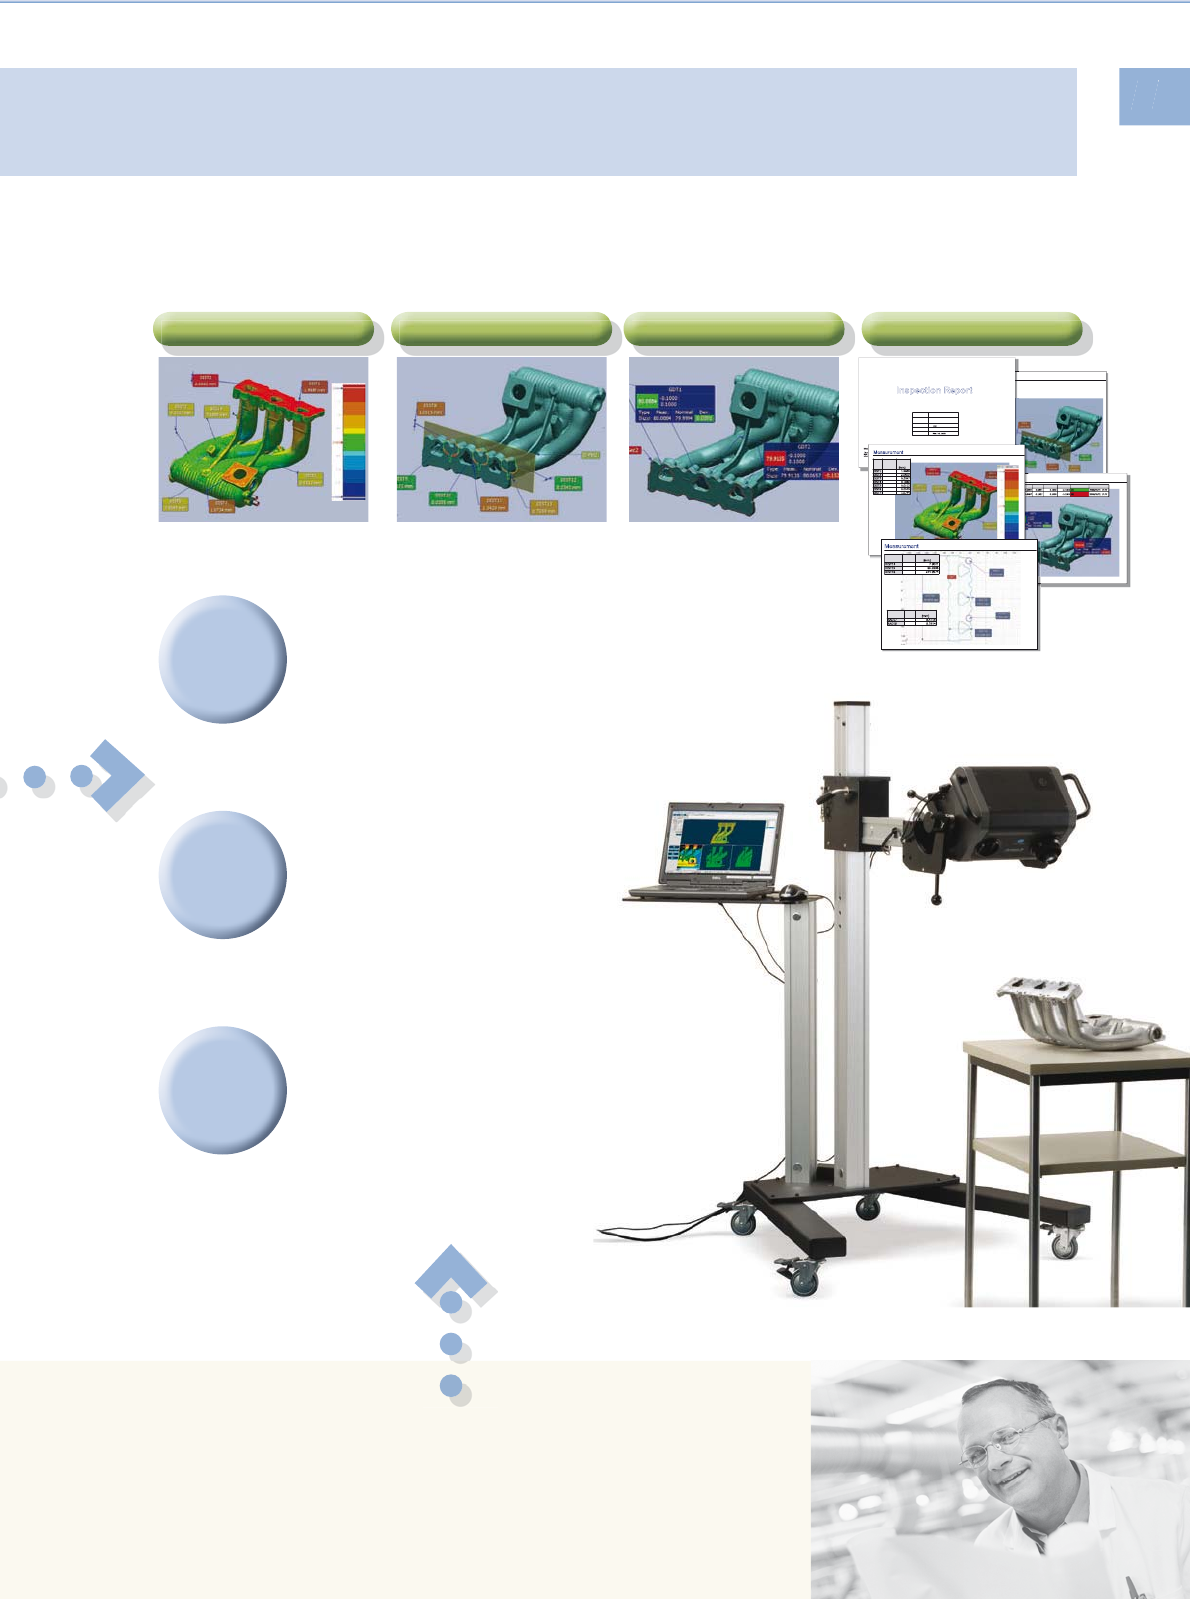
①Contour evaluation ②Cross-section inspection ③
Dimension inspection
(GD&T)
④Report output
Measurement
Total
Number
Average
Upper limit
Lower limit
Difference
Standard
Average
Name Type Measured value
(mm)
Distance
Distance
Distance
Distance
Distance
Distance
GD&T
Name
Standard Difference Upper limit Lower limit
Date/time
Distance
Distance
Inspection Report
a
nd
a
a
Measurement
Name Type Measured
value
Distance
Distance
Distance
Distance
Distance
Distance
Distance
Measurement
Name Type Measured value
Name Type Measured value
Distance
Distance
Distance
radius
radius
∗
Screen shot examples from optional application software.
A
SOLUTION
KONICA MINOLTA RANGE7 will change the process of manufacturing.
1SPCMFNTDBOCFTPMWFECZVTJOH,0/*$".*/0-5"3"/(&
BOE%$"%EBUBXJUIPVUUIFOFFEGPS%ESBXJOHT
Solution 1
$BTUQBSUTDBOCFWJTVBMJ[FEBOERVBOUJöFEGPSUIFFWBMVBUJPOPGXBMM
UIJDLOFTTEJTUSJCVUJPOFOBCMJOHJOTQFDUJPOGPSFYDFTTJWFMZUIJOXBMMT
BOEMBDLPGNBDIJOJOHTUPDL&BSMZGFFECBDLPGUIFSFTVMUTUPUIFEF-
sign and production processes reduces losses in later processes.
Solution 2
#ZWJTVBMJ[JOHUIFTQSJOHCBDLXIJDIPDDVSTEVSJOHGPSN-
JOHUSJBMTJOQSFTTEJFNBLJOHUIFMPDBUJPOBOEBNPVOU
of distortion can be pinpointed precisely, leading to im-
proved accuracy of die correction and reduced correction
cycles.
Solution 3
#ZDSFBUJOH%$"%EBUBPGUIFEJNFOTJPOTBOEUPMFSBODFTGPSJOTQFD-
tion points such as the positions of bosses, ribs and holes of plastic
products in advance, you can automatically create dimension inspec-
UJPOSFQPSUTPO(%5BOBMZTJTFUDSFTVMUJOHJOUIFEFWFMPQNFOUPGB
routine and speeding up the inspection process.
5IFEJSFDUDPNQBSJTPOPG%TDBOEBUBBHBJOTU%$"%EBUBQSPWJEFTWJTVBMBOERVBOUJUBUJWFFWBMVBUJPOPGTVSGBDF
EJTUPSUJPOBOEDSPTTTFDUJPOTPGQBSUFYUFSJPSTFWFOUIPTFXJUINVMUJQMFGSFFGPSNTVSGBDFT#ZEPJOHUIJTZPVDBO
conrm and verify whether parts are manufactured to the design.
KONICA MINOLTA RANGE7 is designed to provide high oper-
ability and reliability. It is a user-friendly 3D digitizer that
provides easy operation with intuitive GUIs, minimization of
erroneous measurements, and always oers high-quality 3D
data regardless of the target shape or surface conditions.
Personal computer
(commercial product)
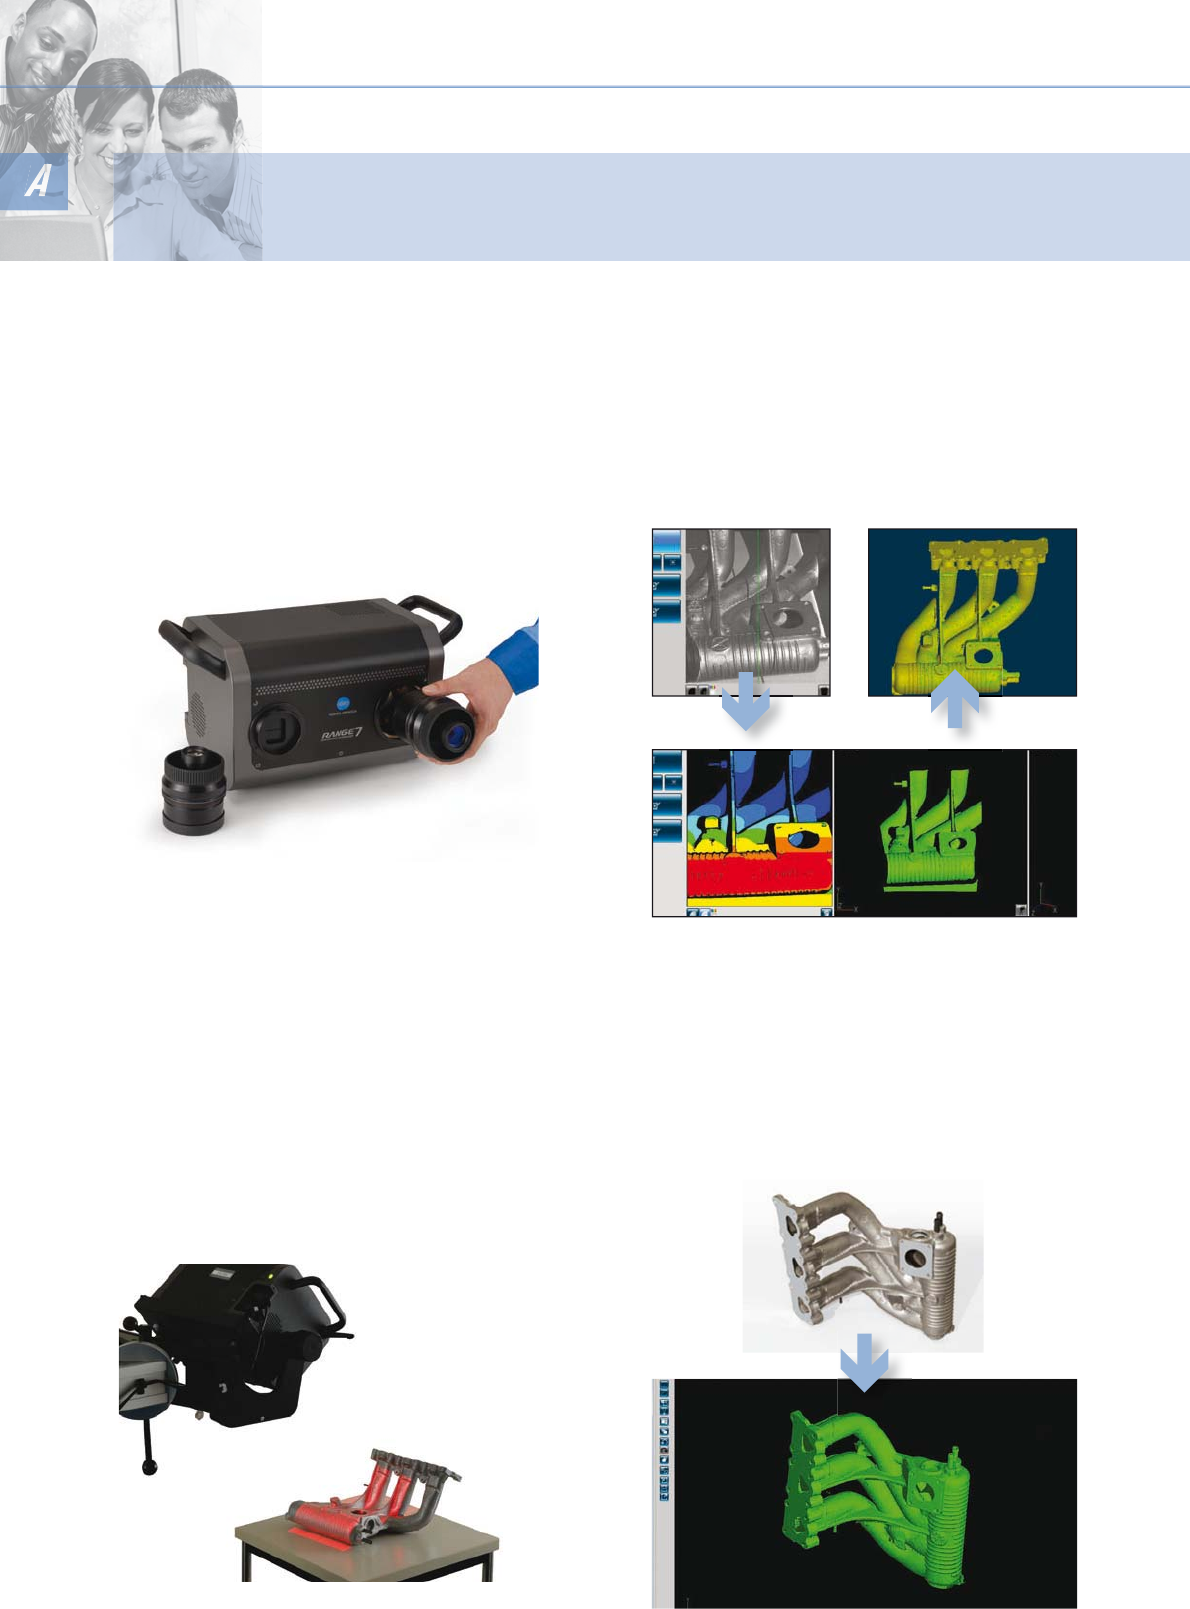
01 Easy-to-carry digitizer with integrated
camera and controller
5IF,0/*$".*/0-5"3"/(&JTBOFX%EJHJUJ[FSTFSJFTGVMM
PG%EJHJUJ[JOHLOPXIPXBDDVNVMBUFEGSPN,POJDB.JOPMUBhT
PWFSZFBSTPGFYQFSJFODF5IFDPNQBDUBOEMJHIUXFJHIU
design integrates the camera and controller in a single body
XFJHIJOHPOMZBQQSPYJNBUFMZLHQSPWJEJOHIJHINPCJMJUZ
PONFBTVSFNFOUTJUFT5IFUXPJOUFSDIBOHFBCMFMFOTFTBMMPX
POFEJHJUJ[FSUPIBOEMFBCSPBENFBTVSFNFOUSBOHF
02 Various focusing functions for quick
capturing of clear 3D data
5IFBVUPGPDVT"'GVODUJPOJNQMFNFOUTGVSUIFSBEWBODFTUIBU
POMZ,POJDB.JOPMUBDPVMEQSPWJEFUPPòFSBNVMUJGPDVTNPEF
which automatically shifts the focus position in two steps to
PCUBJONPSFBDDVSBUFBOETIBSQFS%NFBTVSFNFOUEBUB5IJT
JTFTQFDJBMMZFòFDUJWFGPSNFBTVSFNFOUPGEFFQPCKFDUT5IFBE-
justment of distance and angle of view is also easy by using the
QPJOU"'GVODUJPOXIJDIBEKVTUTUIFGPDVTUPUIFQPJOUTQFDJöFE
CZUIFVTFSBOEUIF'JFMEPG7JFX'07JOEJDBUPSXIJDITIPXT
the current measurement area.
03 The 3D preview function reduces erro-
neous measurements
5IF%QSFWJFXGVODUJPOBMMPXTVTFSTUPQSFEJDUNFBTVSFNFOU
SFTVMUTRVJDLMZ8JUIBQSFTDBOPGPOMZTFDPOETVTFSTDBO
DIFDLGPSNFBTVSFNFOUBSFBEFQUIEFBEBOHMFTTDBOQSPCMFNT
due to surface conditions, etc. beforehand to greatly reduce er-
roneous measurements.
04 Excellent ability to measure glossy sur-
faces, surpassing normal assumptions
regarding optical 3D digitizers
5IFOFXTFOTPSBOEPSJHJOBMNFBTVSFNFOUBMHPSJUINFOTVSF
BXJEFSEZOBNJDSBOHF&WFOHMPTTZPCKFDUTTVDIBTNFUBMMJD
surfaces, can be measured reliably.
INNOVATION
Innovative performance o ered by a next-generation 3D digitizer
'VMMPGWBSJPVTUZQFTPGLOPXIPXUPFOBCMFIJHIRVBMJUZ%EBUBUPCFPCUBJOFERVJDLMZBOEFBTJMZ
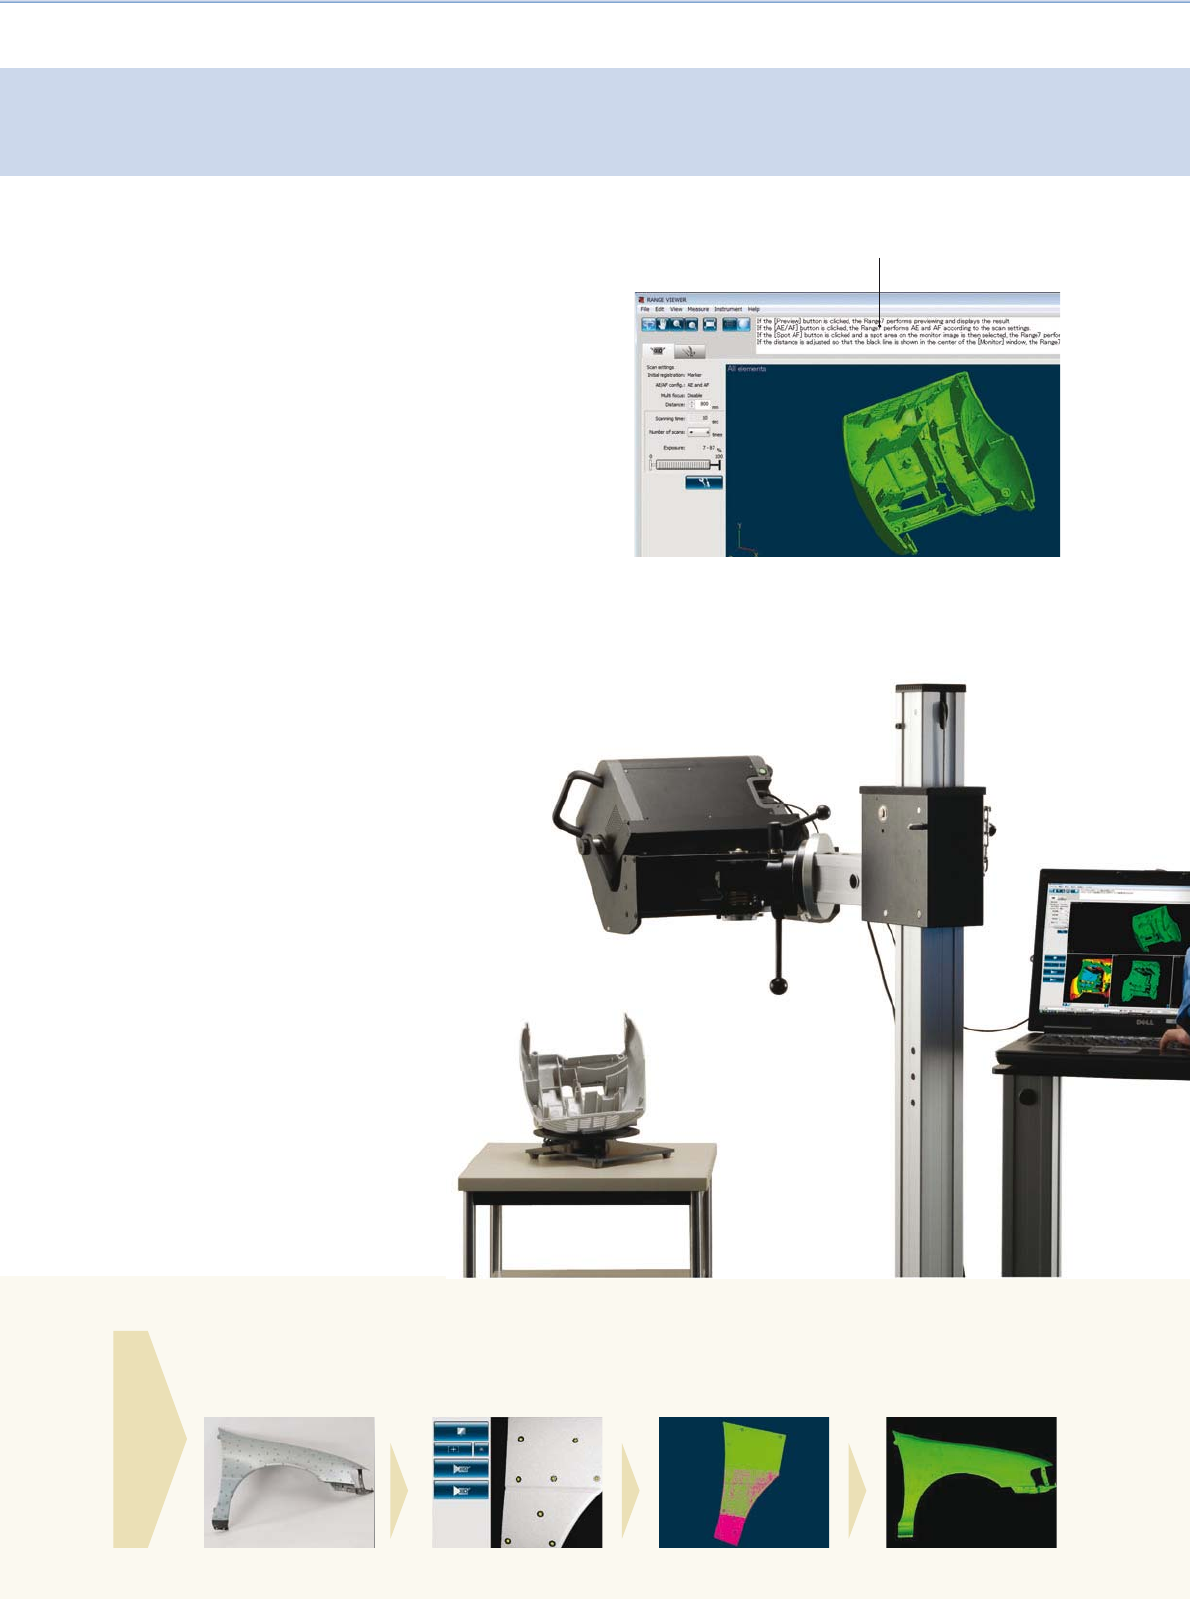
Two types of lenses (TELE, WIDE) are included as standard.
The FOV indicator shows the current measurement area.
Check the focus on the monitor screen. Measurement results
Preview is displayed in 0.4 seconds.
Measurement of the machined surface of a cast part
USABILITY
The newly developed software RANGE VIEWER allows comfortable scanning operations.
5IFTPGUXBSFEFTJHOFETQFDJöDBMMZGPS,0/*$".*/0-5"3"/(&NBLFTUIFQSPDFTT
GSPNTDBOOJOHUPEBUBJOUFHSBUJPORVJDLBOEFBTZ
01 User-friendly software with navigation
messages
3"/(&7*&8&3JTOFXMZEFWFMPQFE%EBUBQSPDFTTJOH
software included as standard. It provides various editing
functions from scanning control of the instrument to align-
NFOUPGNFBTVSFEEBUBBOEEBUBNFSHJOH&BTZUPTFFJDPOT
BOEBøFYJCMF(6*BMMPXTDBOOJOHBOEEBUBFEJUJOHUPCFEPOF
TFBNMFTTMZ5IFOBWJHBUJPONFTTBHFTXIJDITIPXJOTUSVDUJPOT
PSUIFOFYUTUFQBMMPXTCFHJOOFSTUPFBTJMZBOERVJDLMZMFBSO
operation.
02 Supports 64-bit editions of Windows®
Vista to allow large-volume data pro-
cessing
3"/(&7*&8&3TVQQPSUTCJUFEJUJPOTPG8JOEPXT¥7JTUB
enabling large volumes of data to be processed. It does not
require a dedicated computer but can be operated with a
DPNNFSDJBMMZBWBJMBCMFMBQUPQDPNQVUFSLFFQJOHUIFNP-
CJMJUZPGUIF3"/(&JOUBDU*UBMTPBMMPXTRVJDLEBUBUSBOTGFS
to optional application software via IPC (Inter Process Com-
munication) without the need to save les.
∗ For detailed specications, refer to the Operating Environment of RANGE VIEWER in
this catalog.
03 Easy operation and high processing
ability for reduced total operation time
5IFUPUBMPQFSBUJPOUJNFGSPNUIFTFUUJOHPGEJT-
tance and angle of view, through scanning, to data
JOUFHSBUJPOJTBCPVUNJOVUFTUPNFBTVSF,POJDB
.JOPMUBhTTUBOEBSETBNQMFGSPNEJSFDUJPOT)JHI
PQFSBCJMJUZBOEBQSPDFTTJOHBCJMJUZPGBQQSPYJNBUFMZ
1 minute/cycle on average has been achieved.
∗ Measurement using markers (optional accessory).
Other conditions are according to Konica Minolta
Sensing standards.
①"UUBDINBSLFSTTPUIBU
GJWFUPUFONBSLFSTBSF
displayed on the monitor
screen during measure-
ment.
② Perform measurement and
DIFDLUIBUUIFNBSLFSTBSF
displayed on the monitor
screen.
③ Position is aligned ac-
cording to the automatic
recognition of three or
NPSFNBUDIJOHNBSLFSTJO
overlapped images during
measurements.
④3FTVMUT PG UIF NFBTVSF -
ment of the entire target
are obtained by repeating
steps ② and ③.
Measurement procedure with KONICA MINOLTA RANGE7 (measurement using markers)
WORK FLOW
Navigation message
Personal computer
(commercial product)
EF
79
8
10
1
2
3
5
6
4
D
H
AB
G
C
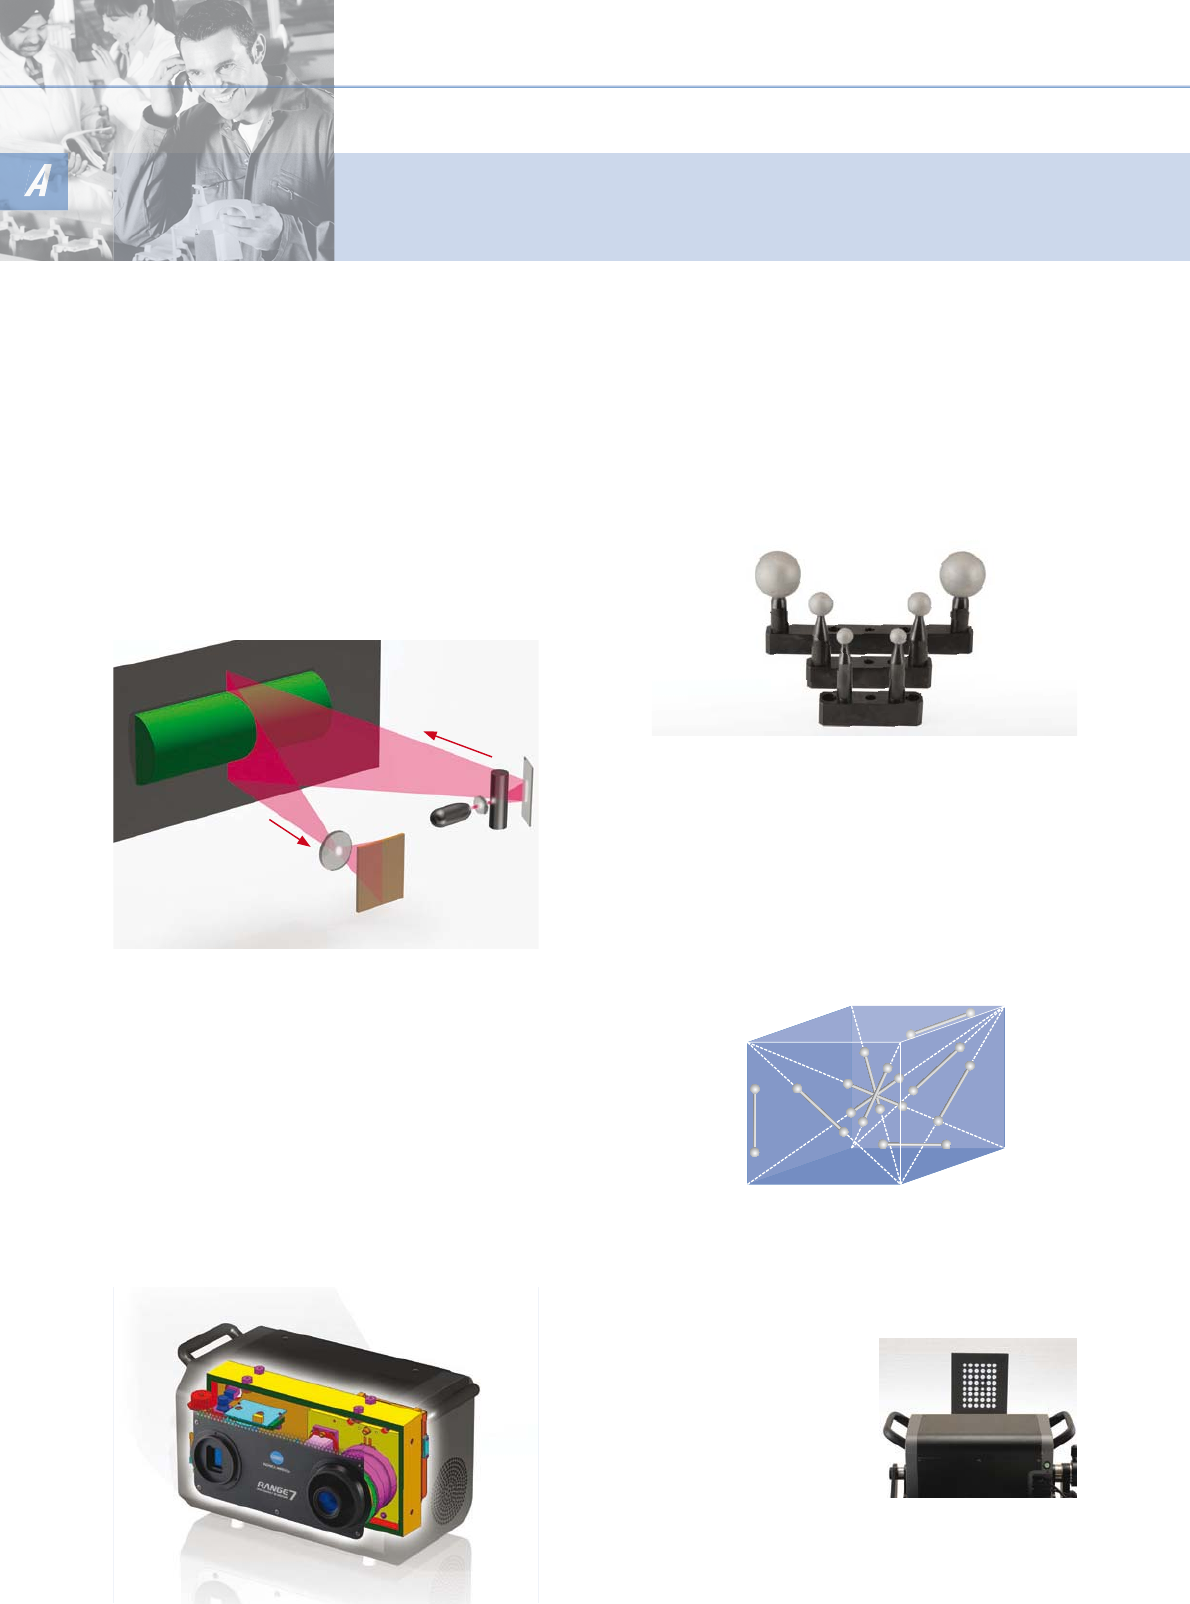
01 Stable scanning with light sectioning
method
,0/*$".*/0-5"3"/(&FNQMPZTUSJBOHVMBUJPOCZUIFMJHIU
TFDUJPOJOHNFUIPEVTJOHB$MBTTTFNJDPOEVDUPSMBTFSUPTXFFQ
UIFUBSHFUXJUIMBTFSMJHIU*OBTMJUUMFBTBQQSPYJNBUFMZTFDPOET
a target is scanned with laser light that has passed through a slit,
BOEUIFSFøFDUFEMJHIUJTSFDFJWFECZUIFNFHBQJYFM$.04
sensor that provides high-resolution information.
5IFJOGPSNBUJPOJTUIFODPOWFSUFEJOUP%EBUBVTJOHUIFEBUBGPS
distance to the target calculated based on the triangulation prin-
DJQMF0OFTDBODBOPCUBJOVQUPBQQSPYJNBUFMZQPJOUT
YQPJOUTPG%DPPSEJOBUFEBUB
02 High reliability with minimized influ-
ence from environment conditions
5IF,0/*$".*/0-5"3"/(&IBTBEPQUFEBOFXPQUJDBMTZT-
tem which adjusts focus based on the signal from the image
QJDLVQEFWJDF*UBMTPIBTBOJOUFHSBUFEJOOFSCBTFQMBUFNBEF
PG$'31DBSCPOöCFSSFJOGPSDFEQMBTUJD"TBSFTVMUUIF,0/*$"
.*/0-5"3"/(&IBTBDIJFWFEBMJHIUXFJHIUCPEZHSFBUSJHJE-
JUZBOEIJHIESJWJOHBDDVSBDZ"UUIFUJNFPGNFBTVSFNFOUUIF
,0/*$".*/0-5"3"/(&QSPWJEFTIJHISFMJBCJMJUZXIFOPQ-
FSBUJOHJOWBSJPVTFOWJSPONFOUTCZNJOJNJ[JOHUIFJOøVFODFPG
instrument tilt, temperature changes, etc.
03 High measurement accuracy based on
strict inspection standards
5IF,0/*$".*/0-5"3"/(&IBTBDIJFWFEIJHINFBTVSF-
ment accuracy*1PGɅN in accuracy evaluation using ball
bars*3BDDPSEJOHUPUIFHVJEFMJOFTJO7%*7%&1BSU
5IFUFTUJOHNFUIPEVUJMJ[JOHCBMMCBSTJTQMBOOFEUPCFJODMVEFE
JOB+BQBOFTF*OEVTUSJBM4UBOEBSETQSPQPTBMSFMBUFEUPUIFUFTU-
ing of optical non-contact coordinate measuring instruments.
,POJDB.JOPMUBQFSGPSNTUFTUJOHCBTFEPO7%*7%&1BSU
VTJOHCBMMCBSTDBMJCSBUFECZUIF/BUJPOBM*OTUJUVUFPG"EWBODFE
*OEVTUSJBM4DJFODFBOE5FDIOPMPHZPG+BQBOGPSBMM,0/*$".*/0-5"
3"/(& VOJUT 8FCVJMEDPOöEFODFCZDMFBSMZJOEJDBUJOHUIFQSPEVDU
accuracy and by conducting strict testing for each unit before shipment.
*1
Accuracy: Measuring instrument accuracy expressed as error limits under the de ned conditions.
*2
Measured with the TELE lens at a distance of 450 mm and ambient temperature of 20±1°C.
Other conditions are according to Konica Minolta Sensing standards.
*3
Ball bar: Equipment for evaluation of accuracy, consisting of a bar that has balls attached at both ends.
*4
VDI/VDE 2634: Optical measurement system testing guidelines issued by Germany in 2002.
Measurement of a ball bar at 10 positions inside a defined space as pre-shipment inspection (conceptual image)
04 On-site calibration for maintaining high
reliability
"DPNQBDUDBMJCSBUJPODIBSU
that can be set up on a table
JTTVQQMJFEBTTUBOEBSE8IFO
calibration is required due
to changes in ambient tem-
perature, all you have to do is
to scan the calibration chart
according to the software
guidance.
5IJTXJMMFOTVSFNFBTVSFNFOUTXJUIUIFTBNFBDDVSBDZBTUIF
time of shipment from the factory.
RELIABLE
Toward new horizons for optical 3D digitizers
5IF,0/*$".*/0-5"3"/(&CPBTUTIJHIBDDVSBDZBOESFMJBCJMJUZ
1PJOUT,POJDB.JOPMUB4FOTJOHDBOOPUDPNQSPNJTFBTBNBOVGBDUVSFSPGNFBTVSJOHJOTUSVNFOUT
Compact calibration chart
(standard accessory)
Ball bars
CMOS sensor
CFRP box structure offering great rigidity and temperature characteristics
Measurement
target
Laser light
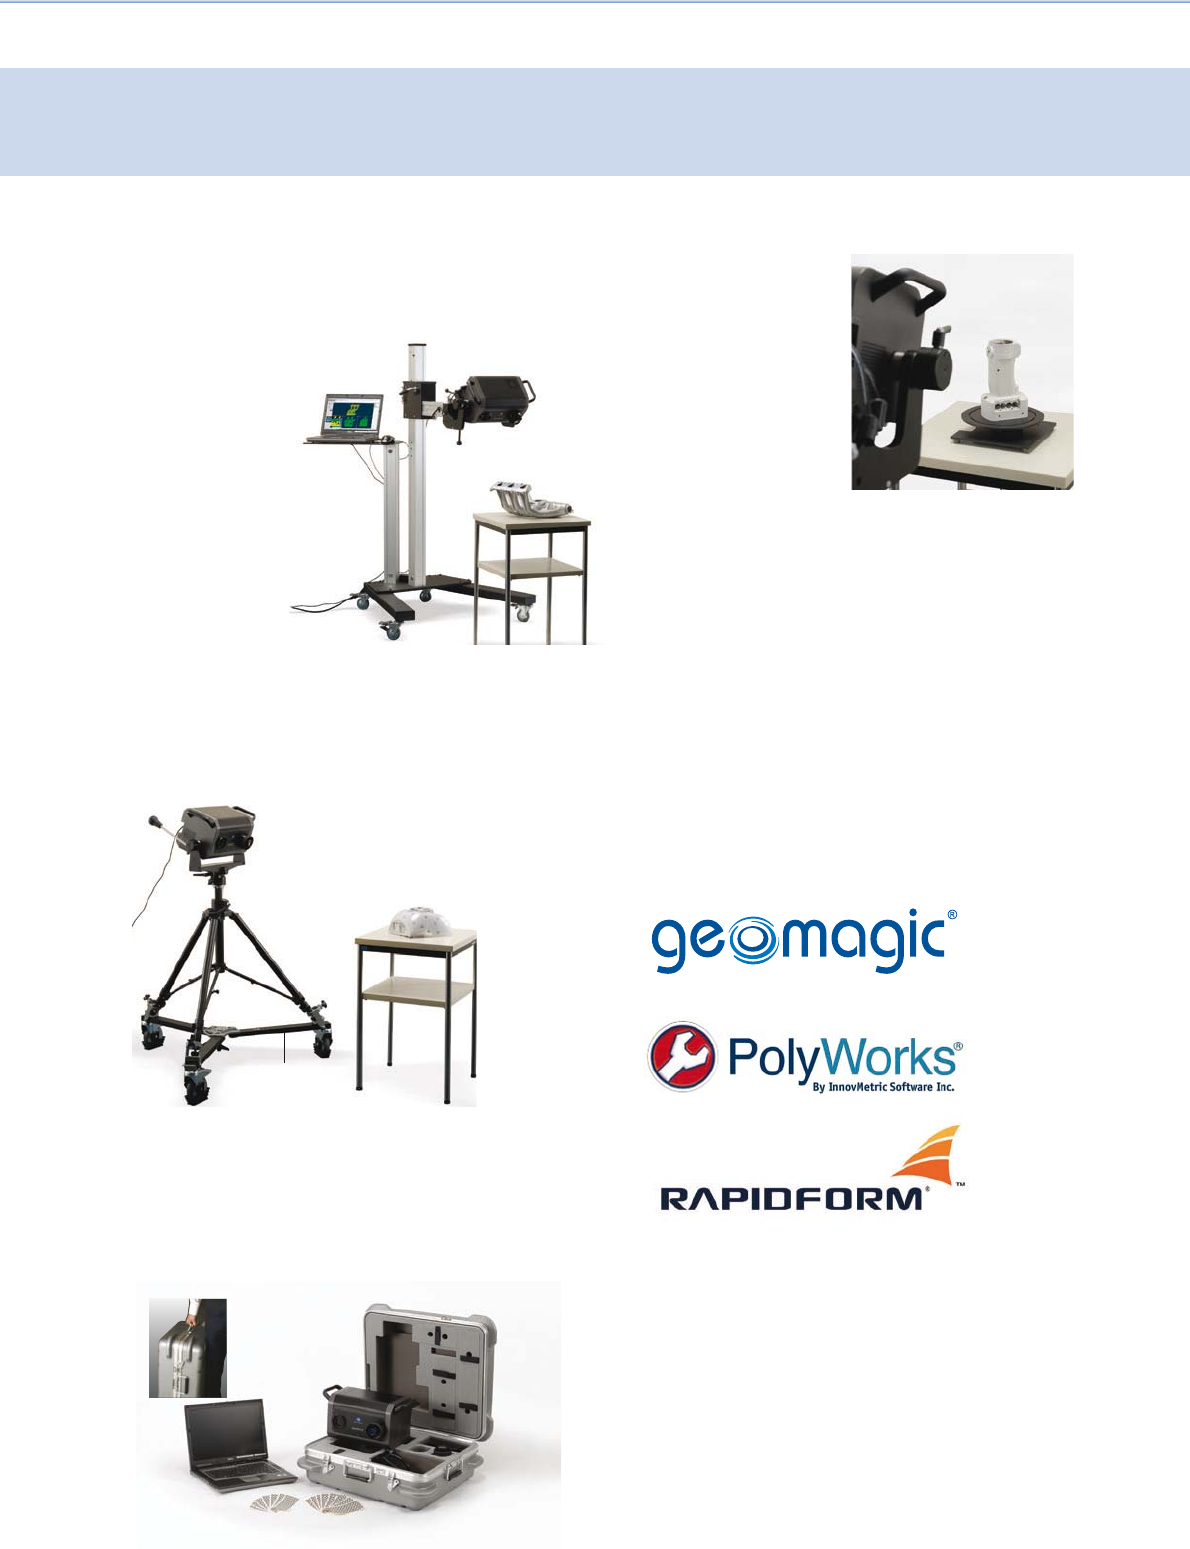
01 Measuring Stand Set with laptop shelf
(optional accessory)
5IFPQUJPOBMNFBTVSJOHTUBOEBMMPXTTUSFTTGSFFXPSLJODBTFT
XIFSFNFBTVSFNFOUSFRVJSFTUIF,0/*$".*/0-5"3"/(&UP
be moved around.
4JODFUIFTUBOEIBTB
shelf on which a lap-
top PC can be placed,
an all-in-one system
can be built to pro-
vide high mobility
within the measure-
ment environment.
02 Tripod Set (optional accessory)
5IFUSJQPEDBOBMTPCFVTFEXJUIBEPMMZPQUJPOBMBDDFTTPSZ
for easy movement.
03 Storage Case (optional accessory)
5IFJOTUSVNFOUMFOTFTDBMJCSBUJPODIBSUBOEDBCMFTDBOCF
stored securely.
04 Rotating Stage Kit (3 kg/20 kg)
(optional accessory)
5IFSPUBUJOHTUBHFLJU
allows automatic posi-
tioning of a target for
measuring from all sides
UISPVHI¡5XPNPE-
els are available depend-
JOHPOUIFMPBELHBOE
LH
05 Optional application software for
reverse engineering, testing, etc.
5PDPNQMJNFOUUIFBEWBODFEGFBUVSFTPGUIF,0/*$".*-
/0-5"3"/(&TDBOOFS,POJDB.JOPMUBPòFSBSBOHFPGUIJSE
QBSUZTPGUXBSFTPMVUJPOT5PHFUIFSXFDBOJEFOUJGZUIFNPTU
FòFDUJWFTPMVUJPOUPNFFUUIFOFFETPGUIFVTFSUPFOTVSFUIFZ
PCUBJONBYJNVNCFOFöUGSPNUIFJSJOWFTUNFOU5IFTPGUXBSF
QBDLBHFTPòFSFECZ,POJDB.JOPMUBJODMVEF
&UD
*OBEEJUJPOUIFEBUBGSPNUIF,0/*$".*/0-5"3"/(&DBO
be output in many standard formats enabling data to be im-
QPSUFEUPUIFNBKPSJUZPG$"%TPGUXBSFQBDLBHFT
VERSATILE
Increased mobility and operability of the compact, lightweight KONICA MINOLTA RANGE7
7BSJPVTBDDFTTPSJFTTQFDJöDBMMZEFTJHOFEGPS,0/*$".*/0-5"3"/(&PòFSøFYJCMFTZTUFNDPOöHVSBUJPO
according to the application and operating environment.
Personal computer
(commercial product)
Dolly (optional accessory)
Personal computer
(commercial product)
©2008 KONICA MINOLTA SENSING,INC. 9242-4892-50 AIEAPK 1
t
Company names and product names used herein are trademarks or registered trademarks of their respective com-
t
panies.
Screens shown are for illustration purpose only.
t
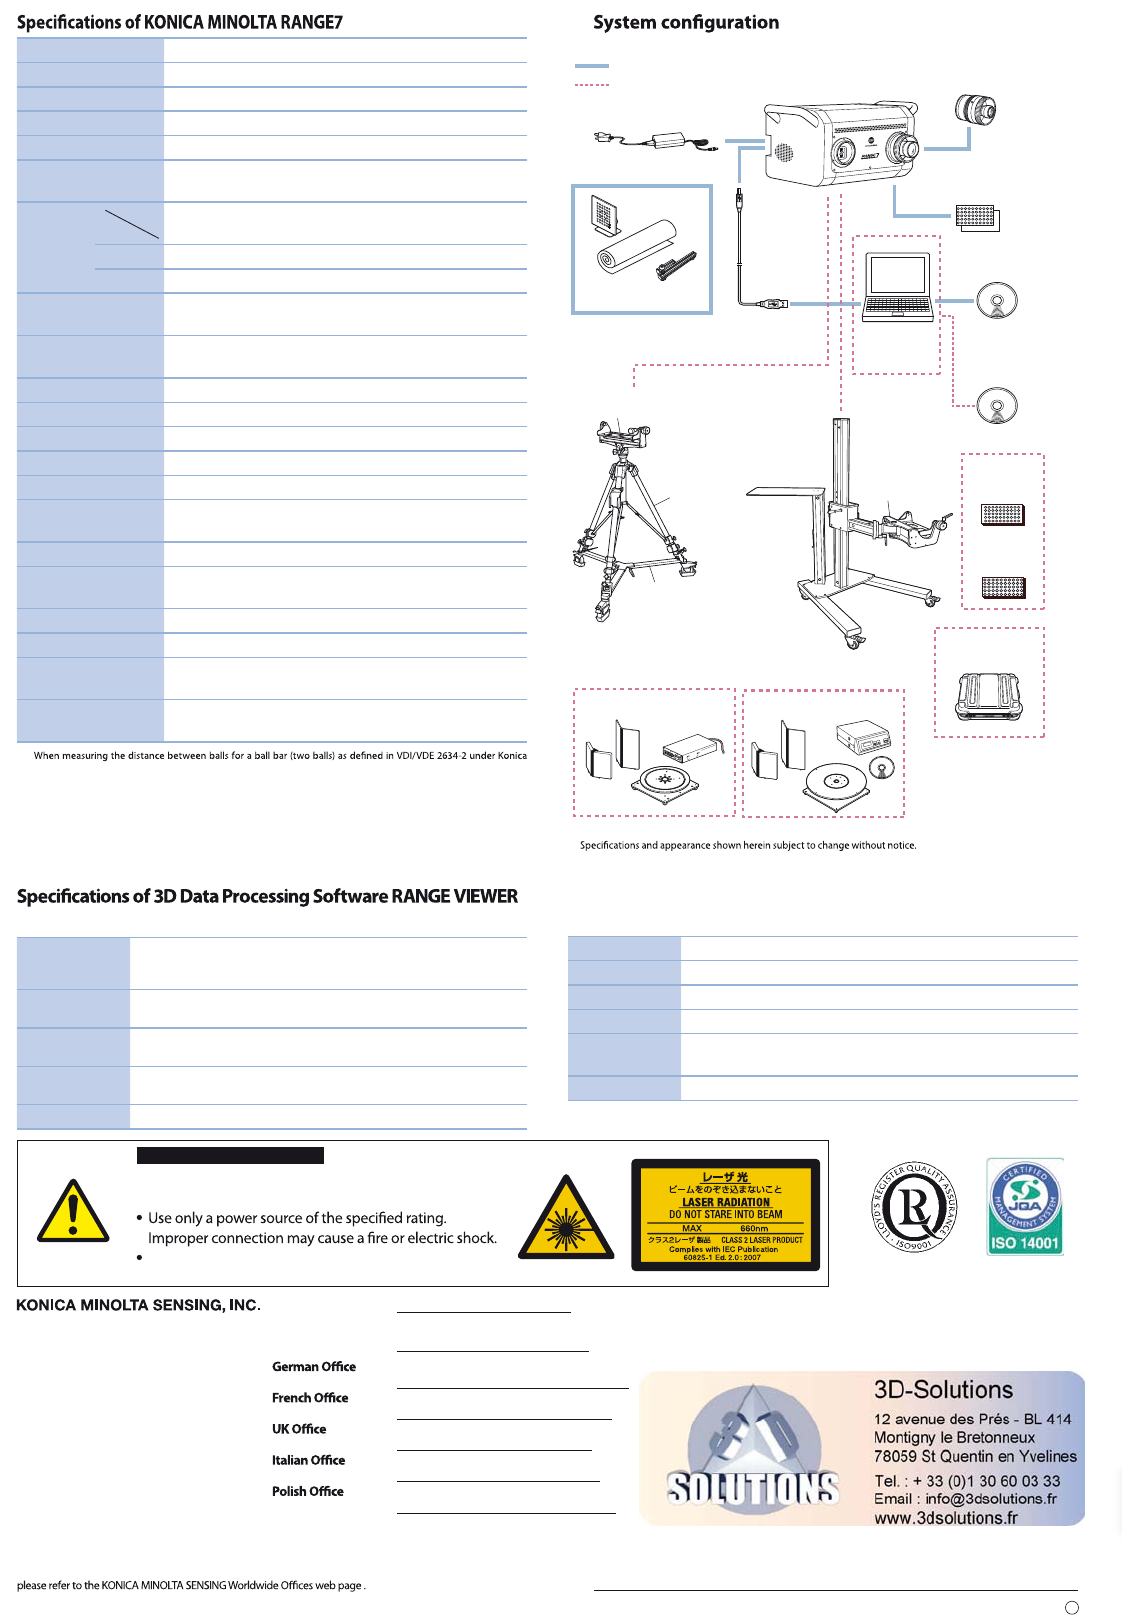
Measuring method Triangulation by light sectioning method
Light source Semiconductor laser, Wavelength: 660 nm
Laser class Class 2 (IEC 60825-1 Edition 2)
Number of pixels taken 1.31 megapixels (1280 x 1024)
Measurement distance 450 to 800 mm
Receiving lens
(interchangeable) TELE, WIDE
Measure-
ment
range
(mm)
TELE
450 mm
TELE
800 mm
WIDE
450 mm
WIDE
800 mm
X × Y 79×99 141×176 150×188 267×334
Z54 97 109 194
XY direction
measurement interval
0.08 0.14 0.16 0.28
Accuracy (Distance
between balls)*1±40μm
Precision (Z, σ)*24μm
Auto-focus Provided
Auto-exposure Provided
Scan time Approx. 2 sec. or more (1 scan)
Preview function Approx. 0.4 sec./scan
Scanning ambient
lighting condition 500 lx or less
Output interface USB 2.0 High Speed
Power Included AC Adapter
Input voltage: 100 to 240 VAC (50/60 Hz), Rating: 1.4 A (at 100 VAC input)
Dimensions 295 (W) x 190 (H) x 200 (D) mm (Excluding grips and lens)
Weight Approx. 6.7 kg
Operating tempera-
ture/humidity range 10 to 40°C; Relative humidity 65% or less (no condensation)
Storage tempera-
ture/humidity range
-10 to 50°C; Relative humidity 85% or less
(at 35°C, no condensation)
*1
Minolta Sensing measurement conditions.
Konica Minolta Sensing measurement conditions: Temperature: 20±1°C; Lens: TELE; Measurement distance: 450
mm; Warm-up: 20 min.; Software used: Konica Minolta processing software; After calibration of the instrument;
Measurement target: Konica Minolta standard target (2 balls); Arrangement of measurement target: Konica Minolta
standard arrangement (10 positions inside measurement space); Uncertainty of standard target not included.
*2 Measurement conditions: Temperature: 20±1°C; Lens: TELE; Measurement distance: 450 mm; Warm-up: 20 min.; Mea-
surement target: Konica Minolta standard planar chart; Software used: Konica Minolta processing software; 1 σ value
*3 Using Konica Minolta processing software
<Major Functions>
Readable data
formats
Readable data formats
Konica Minolta proprietary formats: .rgv (Single-scan data group), .rvm
(more than one piece of data)
Data output STL (binary), ASCII point group
Konica Minolta proprietary formats: .rgv, .rvm
Measurement
functions
Monitor image, Preview, AF/AE, Measurement
Control of rotating stage (Konica Minolta optional accessory)
Editing func-
tions Data alignment, Data merging (integration), Point group deletion
Drawing Point group shading
Interchangeable
Objective Lens
(TELE, WIDE)
KONICA MINOLTA
RANGE7
AC Adapter
USB Cable
(5m) RA-A101
: Europe only (3m)
Marker Sheet Trial Pack
(Sheets T and W, 10 for each)
RANGE VIEWER
Personal
Computer
(commercial product)
Standard accessories
Optional accessories
3D Data Processing Software
Rotating Stage Kit (3 kg) Rotating Stage Kit (20 kg)
Platform Set for Tripod
RA-A151
Measuring Stand Platform Set for
Measuring Stand
RA-A201
Marker Sheet T
RA-A205
(50 markers x 10 sheets)
Marker Sheet W
RA-A206
(50 markers x 10 sheets)
Storage Case
RA-A209
Reverse engineering/
testing software
Calibration Sheet
Calibration Chart
RA-A105
RA-A107
Calibration Base
RA-A106
RA-A104
Dolly
Tripod
<Operating Environment>
OS Windows® Vista 64-bit (x64)
CPU Core2Duo, Xeon or higher
RAM 4 GB or more
Display Graphics display capability of 1280 x 1024 or more
Graphics board
OpenGL compatible board (Konica Minolta veried compatible board recom-
mended)
Interface USB 2.0 port
Distance
Direction
SAFETY PRECAUTIONS
Read all safety and operating instructions before operating
the KONICA MINOLTA RANGE7.
Do not stare into the laser beam.
(MAX. 34mW 660nm , CLASS 2 (IEC) LASER PRODUCT)
34mW
Addresses and telephone/fax numbers are subject to change without notice. For the latest contact information,
Registration No. : YKA 0937154
Registration date : March 3, 1995
Registration No. : JQA-E-80027
Registration date : March 12, 1997
Osaka, Japan EMail : 3dsales@konicaminolta.jp
Konica Minolta Sensing Americas, Inc. New Jersey , U.S.A. Phone: 888-473-2656 (in USA), 201-236-4300 (outside USA)
EMail : vivid3d@se.konicaminolta.us
Konica Minolta Sensing Europe B.V. München, Germany
EMail : info.germany@seu.konicaminolta.eu
Roissy CDG, France
EMail : info.france@seu.konicaminolta.eu
Milton Keynes, United Kingdom
EMail : info.uk@seu.konicaminolta.eu
Milan, Italy
EMail : info.italy@seu.konicaminolta.eu
Wroclaw, Poland
EMail : info.poland@seu.konicaminolta.eu
Konica Minolta (CHINA) Investment Ltd. SE Sales Division Shanghai, China
Konica Minolta Sensing Singapore Pte Ltd. Singapore