Kyocera IUU19AB USB User Terminal of Wireless Internet System User Manual 1 of 2
Kyocera Corporation USB User Terminal of Wireless Internet System 1 of 2
Kyocera >
Contents
- 1. User Manual 1 of 2
- 2. User Manual 2 of 2
User Manual 1 of 2
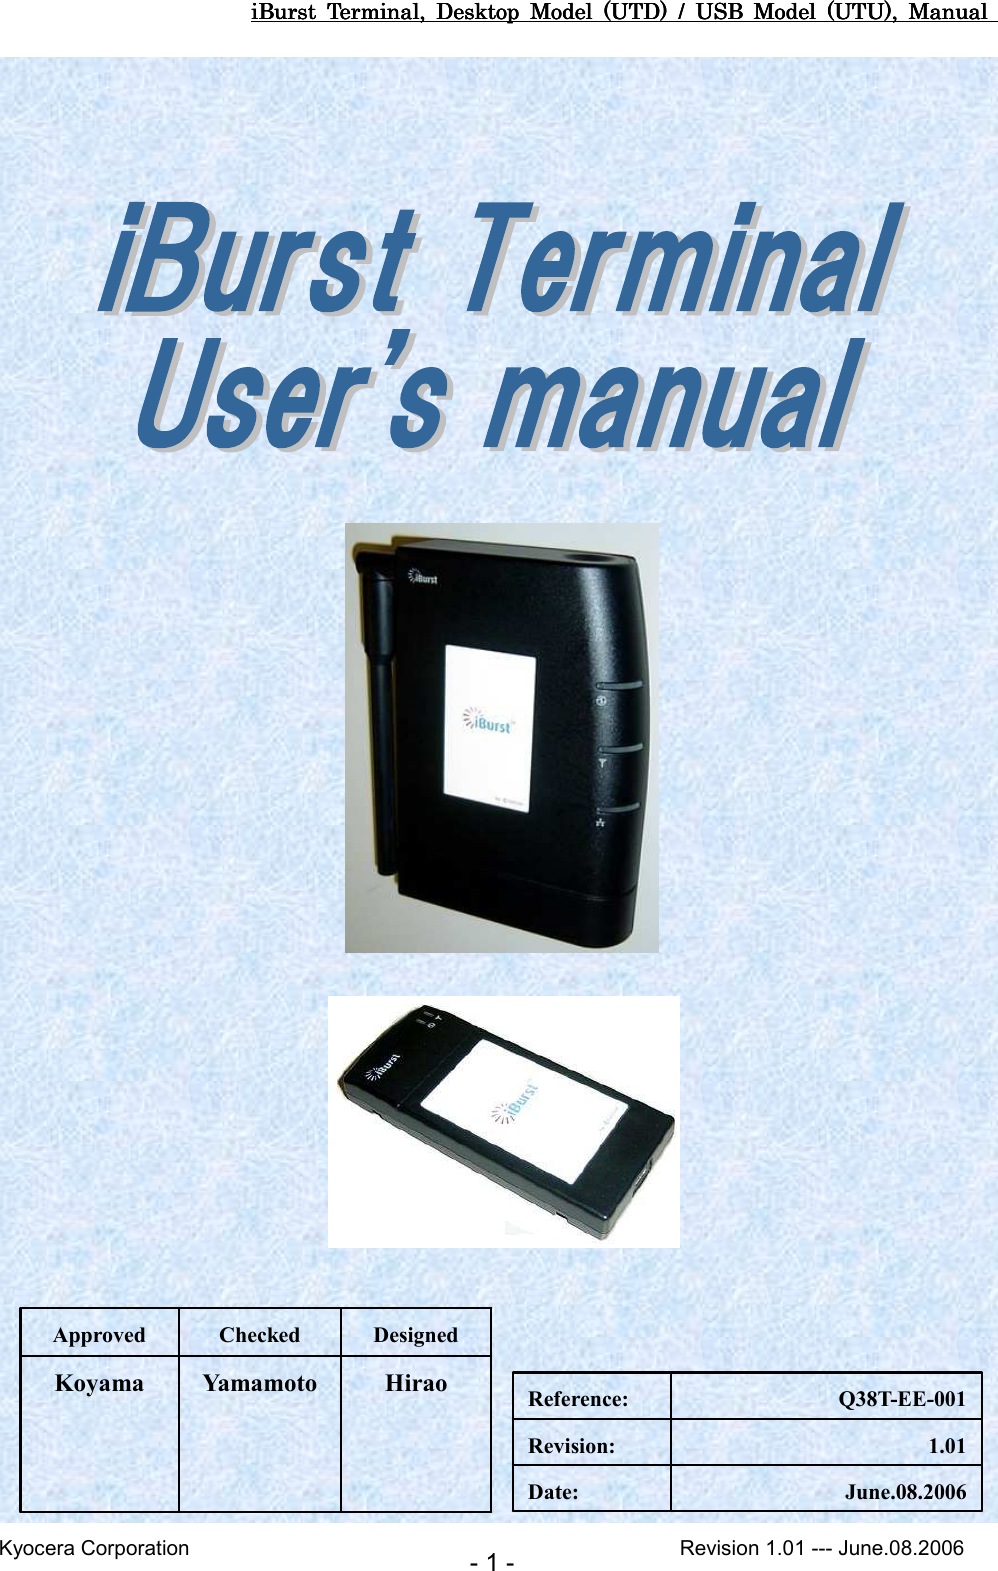
![iBurst Terminal, Desktop Model (UTD) / USB Model (UTU), Manual iBurst Terminal, Desktop Model (UTD) / USB Model (UTU), Manual iBurst Terminal, Desktop Model (UTD) / USB Model (UTU), Manual iBurst Terminal, Desktop Model (UTD) / USB Model (UTU), Manual Kyocera Corporation Revision 1.01 --- June.08.2006 - 14 - iBurst Software InstallatioiBurst Software InstallatioiBurst Software InstallatioiBurst Software Installation n n n This section shows the procedure to install iBurst software on your PC for utilizing iBurst Terminal. The procedure shall be done once before using it. InstallatiInstallatiInstallatiInstallation for Windows XPon for Windows XPon for Windows XPon for Windows XP NOTE: If you are going to connect the iBurst Terminal with your PC only through an Ethernet cable, not through a USB cable, you don’t need to install/uninstall any iBurst software. In such case, you can skip this section and you need only to create a dial-up connection setting described at from page 62. You can see indications of the iBurst Terminal over Ethernet. See page 87 for the method. 1. Make sure to disconnect the iBurst Terminal with your PC. ATTENTION: DonDonDonDon’’’’t connect the iBurst Terminal with your PC through a USB cable until completion of t connect the iBurst Terminal with your PC through a USB cable until completion of t connect the iBurst Terminal with your PC through a USB cable until completion of t connect the iBurst Terminal with your PC through a USB cable until completion of installation.installation.installation.installation. 2. Turn your PC on. 3. Insert the Software Utility CD provided by the network operator into your CD-ROM drive; or execute the appropriate installation software. 4. iBurst Terminal Setup starts. Click the [Next >] button.](https://usermanual.wiki/Kyocera/IUU19AB.User-Manual-1-of-2/User-Guide-706679-Page-14.png)
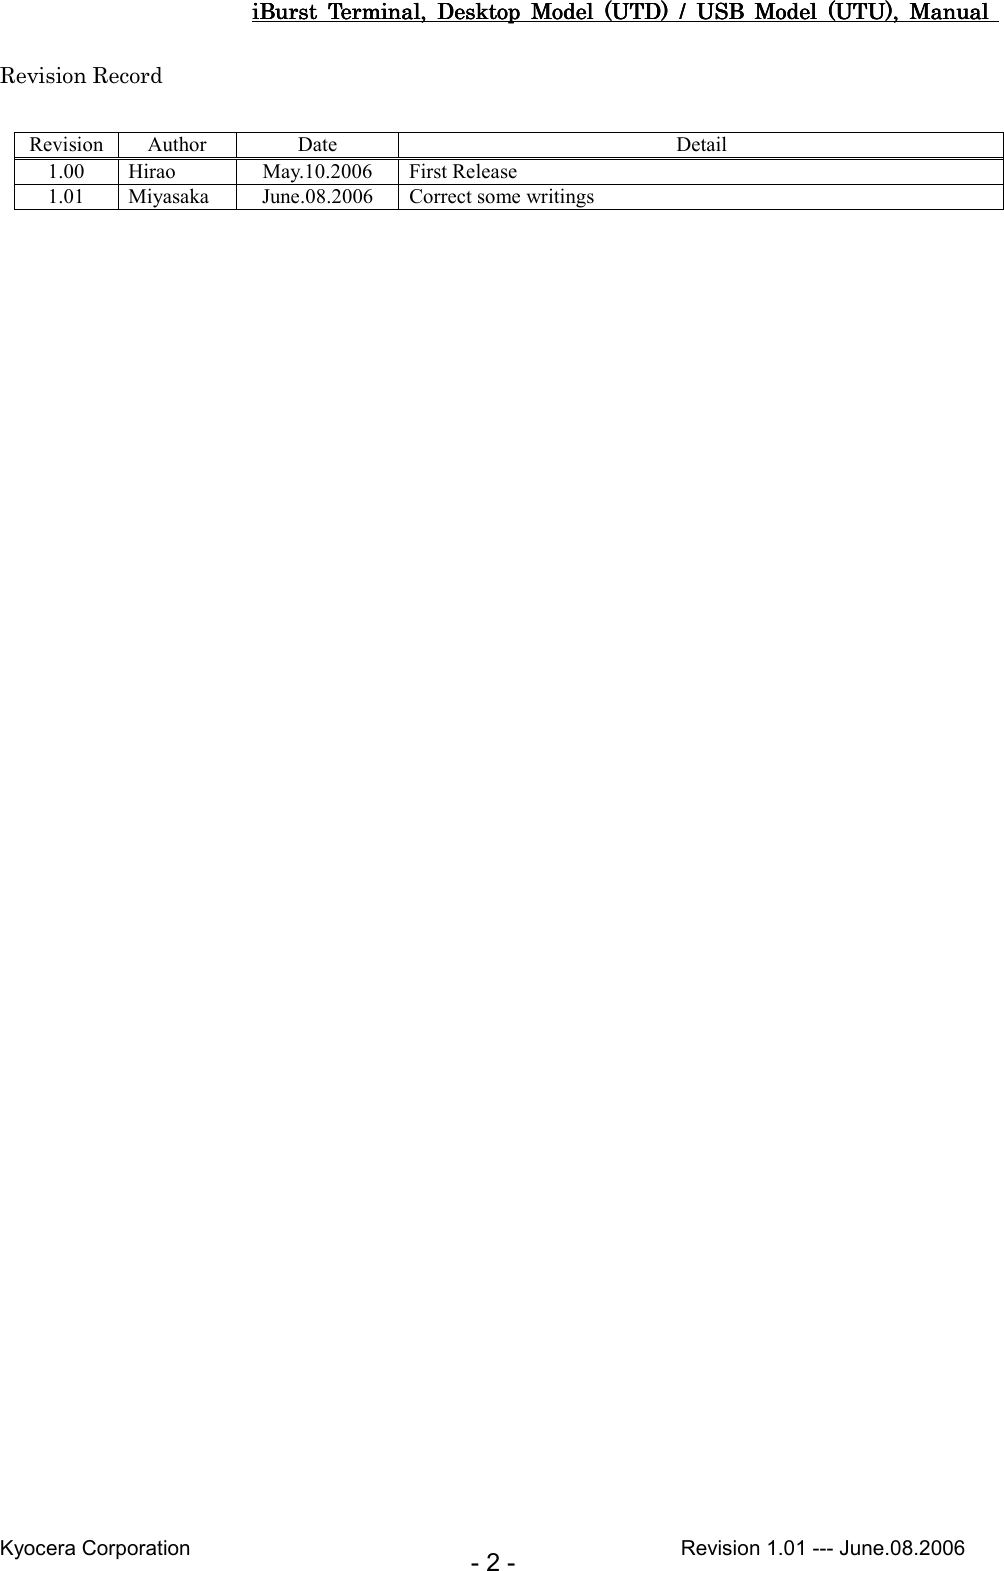
![iBurst Terminal, Desktop Model (UTD) / USB Model (UTU), Manual iBurst Terminal, Desktop Model (UTD) / USB Model (UTU), Manual iBurst Terminal, Desktop Model (UTD) / USB Model (UTU), Manual iBurst Terminal, Desktop Model (UTD) / USB Model (UTU), Manual Kyocera Corporation Revision 1.01 --- June.08.2006 - 15 - 5. Select [I accept the terms the license agreement], click the [Next >] button. 6. Click the [Next >] button after appearing dialog window as shown below. NOTE: To install to a different folder, click [Browse…] and specify another folder. 7. Click the [Next >] button.](https://usermanual.wiki/Kyocera/IUU19AB.User-Manual-1-of-2/User-Guide-706679-Page-15.png)
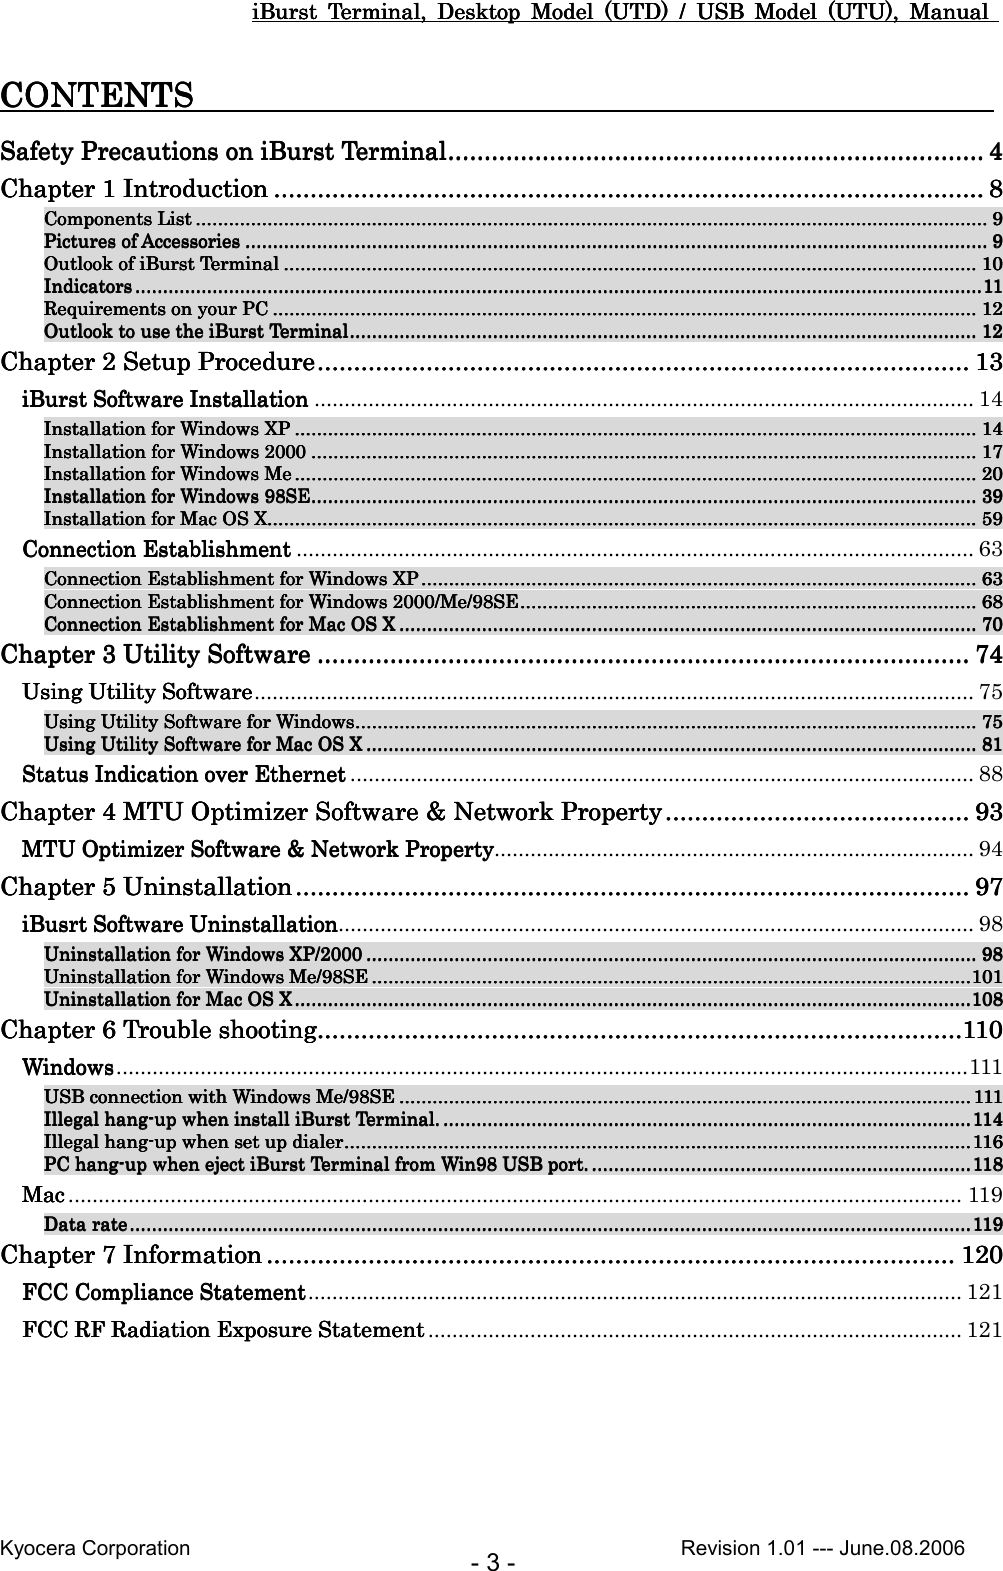
![iBurst Terminal, Desktop Model (UTD) / USB Model (UTU), Manual iBurst Terminal, Desktop Model (UTD) / USB Model (UTU), Manual iBurst Terminal, Desktop Model (UTD) / USB Model (UTU), Manual iBurst Terminal, Desktop Model (UTD) / USB Model (UTU), Manual Kyocera Corporation Revision 1.01 --- June.08.2006 - 16 - 8. The following dialog window will appear, and installation of software begins. 9. When the installing process finishes, the dialog window shown below will appear. Select “Yes, I want to restart my computer now” and click the [Finish] button in the dialog window. 10. After finish of restarting, connect the iBurst Terminal with your PC’s USB port. The iBurst Terminal will be recognized and will be ready to use automatically. NOTE: If the PC request to restart again, click [Yes] to restart the PC. NOTE: To connect to the Internet, refer to page 62.](https://usermanual.wiki/Kyocera/IUU19AB.User-Manual-1-of-2/User-Guide-706679-Page-16.png)
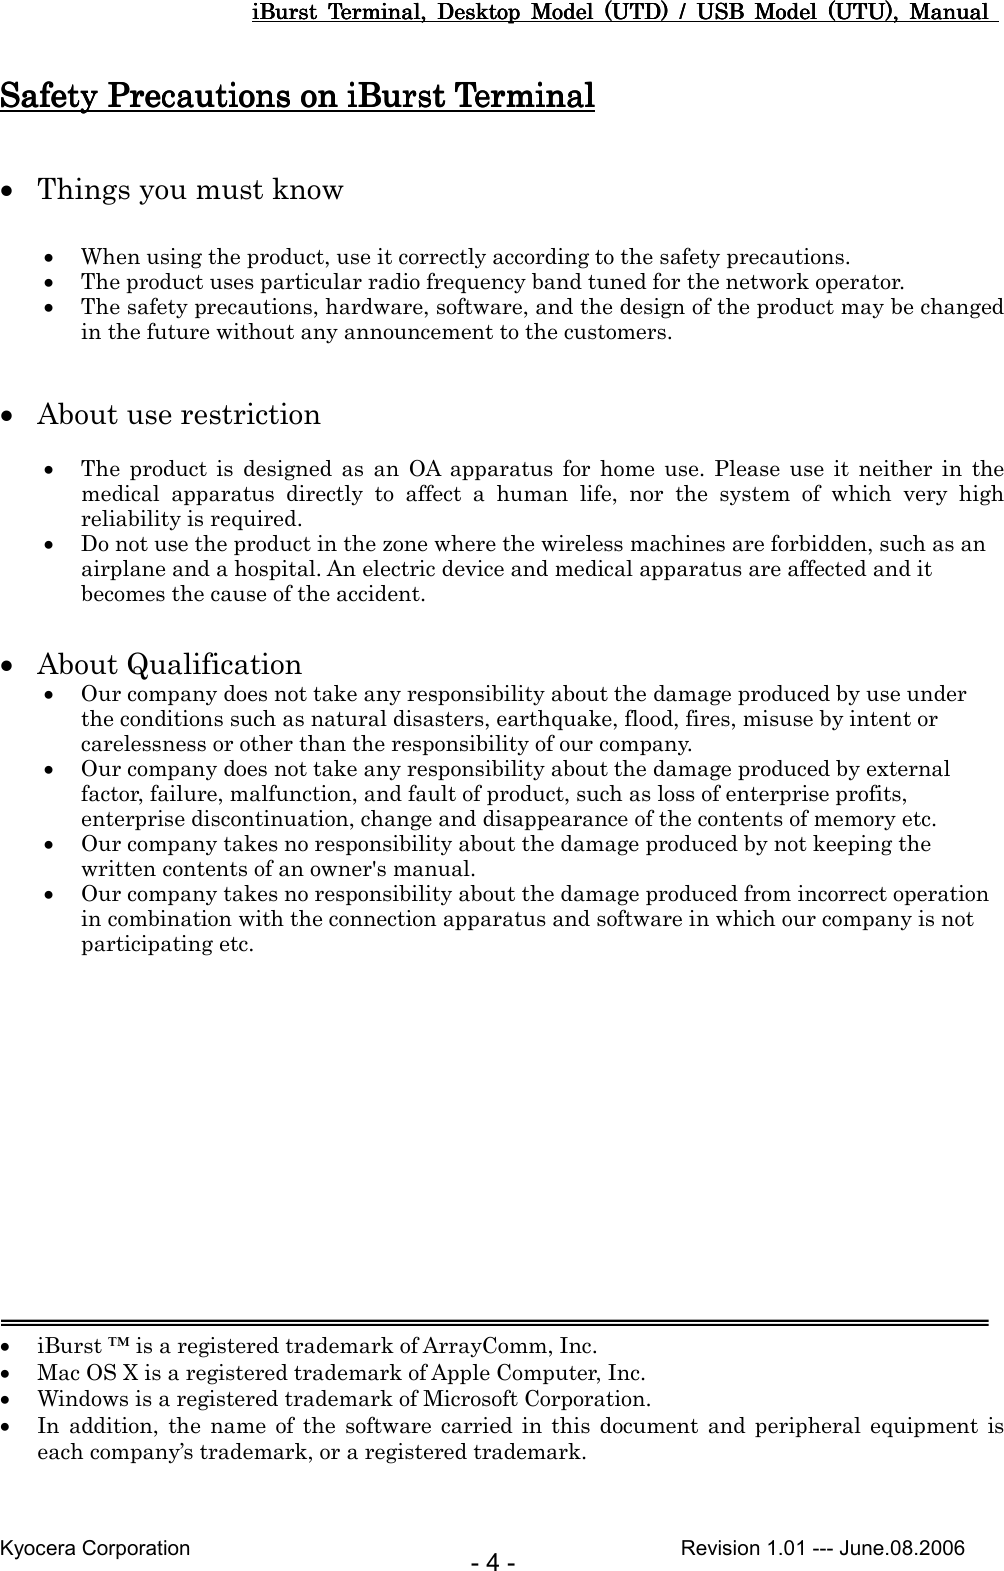
![iBurst Terminal, Desktop Model (UTD) / USB Model (UTU), Manual iBurst Terminal, Desktop Model (UTD) / USB Model (UTU), Manual iBurst Terminal, Desktop Model (UTD) / USB Model (UTU), Manual iBurst Terminal, Desktop Model (UTD) / USB Model (UTU), Manual Kyocera Corporation Revision 1.01 --- June.08.2006 - 17 - Installation for Windows 2000Installation for Windows 2000Installation for Windows 2000Installation for Windows 2000 1. Make sure to disconnect the iBurst Terminal with your PC. ATTENTION: DonDonDonDon’’’’t connect the iBurst Terminal with your PC through a USB cable until completion of t connect the iBurst Terminal with your PC through a USB cable until completion of t connect the iBurst Terminal with your PC through a USB cable until completion of t connect the iBurst Terminal with your PC through a USB cable until completion of installation.installation.installation.installation. 2. Turn your PC on. 3. Insert the Software Utility CD provided by the network operator into your CD-ROM drive; or execute the appropriate installation software. 4. iBurst Terminal Setup starts. Click the [Next >] button. 5. Select [I accept the terms the license agreement], click the [Next >] button.](https://usermanual.wiki/Kyocera/IUU19AB.User-Manual-1-of-2/User-Guide-706679-Page-17.png)
![iBurst Terminal, Desktop Model (UTD) / USB Model (UTU), Manual iBurst Terminal, Desktop Model (UTD) / USB Model (UTU), Manual iBurst Terminal, Desktop Model (UTD) / USB Model (UTU), Manual iBurst Terminal, Desktop Model (UTD) / USB Model (UTU), Manual Kyocera Corporation Revision 1.01 --- June.08.2006 - 18 - 6. Click the [Next >] button after appearing dialog window as shown below. NOTE: To install to a different folder, click [Browse…] and specify another folder. 7. Click the [Next >] button. 8. The following dialog window will appear, and installation of software begins.](https://usermanual.wiki/Kyocera/IUU19AB.User-Manual-1-of-2/User-Guide-706679-Page-18.png)
![iBurst Terminal, Desktop Model (UTD) / USB Model (UTU), Manual iBurst Terminal, Desktop Model (UTD) / USB Model (UTU), Manual iBurst Terminal, Desktop Model (UTD) / USB Model (UTU), Manual iBurst Terminal, Desktop Model (UTD) / USB Model (UTU), Manual Kyocera Corporation Revision 1.01 --- June.08.2006 - 19 - 9. When the installing process finishes, the dialog window shown below will appear. Select [Yes, I want to restart my computer now] and click the [Finish] button in the dialog window. 10. After finish of restarting, connect the iBurst Terminal with your PC’s USB port. The iBurst Terminal will be recognized and will be ready to use automatically. NOTE: If the PC request to restart again, click [Yes] to restart the PC. NOTE: To connect to the Internet, refer to page 67.](https://usermanual.wiki/Kyocera/IUU19AB.User-Manual-1-of-2/User-Guide-706679-Page-19.png)
![iBurst Terminal, Desktop Model (UTD) / USB Model (UTU), Manual iBurst Terminal, Desktop Model (UTD) / USB Model (UTU), Manual iBurst Terminal, Desktop Model (UTD) / USB Model (UTU), Manual iBurst Terminal, Desktop Model (UTD) / USB Model (UTU), Manual Kyocera Corporation Revision 1.01 --- June.08.2006 - 20 - Installation for Windows MInstallation for Windows MInstallation for Windows MInstallation for Windows Me e e e Since tSince tSince tSince the installation disk of he installation disk of he installation disk of he installation disk of Windows MeWindows MeWindows MeWindows Me maymaymaymay b b b be e e e required while required while required while required while driver installation, please driver installation, please driver installation, please driver installation, please prepare prepare prepare prepare the CD or copy the the CD or copy the the CD or copy the the CD or copy the CDCDCDCD intointointointo a hard disk in your PC a hard disk in your PC a hard disk in your PC a hard disk in your PC for it.for it.for it.for it. 1. Make sure to disconnect the iBurst Terminal with your PC. ATTENTION: DonDonDonDon’’’’t connect the iBurst connect the iBurst connect the iBurst connect the iBurst Terminal with your PC through a USB cable until completion of t Terminal with your PC through a USB cable until completion of t Terminal with your PC through a USB cable until completion of t Terminal with your PC through a USB cable until completion of installation.installation.installation.installation. 2. Turn your PC on. 3. Insert the Software Utility CD provided by the network operator into your CD-ROM drive; or execute the appropriate installation software. 4. iBurst Terminal Setup starts. Click the [Next >] button. 5. Select [I accept the terms the license agreement], click the [Next >] button.](https://usermanual.wiki/Kyocera/IUU19AB.User-Manual-1-of-2/User-Guide-706679-Page-20.png)
![iBurst Terminal, Desktop Model (UTD) / USB Model (UTU), Manual iBurst Terminal, Desktop Model (UTD) / USB Model (UTU), Manual iBurst Terminal, Desktop Model (UTD) / USB Model (UTU), Manual iBurst Terminal, Desktop Model (UTD) / USB Model (UTU), Manual Kyocera Corporation Revision 1.01 --- June.08.2006 - 21 - 6. Click the [Next >] button after appearing dialog window as shown below. NOTE: To install to a different folder, click [Browse…] and specify another folder. 7. Click the [Next >] button. 8. The following dialog window will appear, and installation of software begins.](https://usermanual.wiki/Kyocera/IUU19AB.User-Manual-1-of-2/User-Guide-706679-Page-21.png)
![iBurst Terminal, Desktop Model (UTD) / USB Model (UTU), Manual iBurst Terminal, Desktop Model (UTD) / USB Model (UTU), Manual iBurst Terminal, Desktop Model (UTD) / USB Model (UTU), Manual iBurst Terminal, Desktop Model (UTD) / USB Model (UTU), Manual Kyocera Corporation Revision 1.01 --- June.08.2006 - 22 - 9. Click the [Finish] button. 10. Click the [OK] button. NOTE: Refer to the 1st article in chapter 6, if you face such symptom described in the attention message. NOTE: If you are going to connect the iBurst Terminal with your PC only through an Ethernet cable, not through a USB cable, you can skip from hear to step 18 and continue from step 19 in this section. You can see indications of the iBurst Terminal over Ethernet. See page 87 for the method. 11. Connect the iBurst Terminal with your PC through a USB cable. Windows will detect the iBurst Terminal as a new hardware so that [Add New Hardware Wizard] will begin.](https://usermanual.wiki/Kyocera/IUU19AB.User-Manual-1-of-2/User-Guide-706679-Page-22.png)
![iBurst Terminal, Desktop Model (UTD) / USB Model (UTU), Manual iBurst Terminal, Desktop Model (UTD) / USB Model (UTU), Manual iBurst Terminal, Desktop Model (UTD) / USB Model (UTU), Manual iBurst Terminal, Desktop Model (UTD) / USB Model (UTU), Manual Kyocera Corporation Revision 1.01 --- June.08.2006 - 23 - 12. Select [Specify the location of the driver (Advanced)] and click the [Next >] button in the dialog window. 13. Select [Search for the best driver for your device.(Recommended)], then check [Specify a location] and click the [Browse] button. 14. Select [C:\Program Files\iBurst Terminal\bin], and click the [OK] button.](https://usermanual.wiki/Kyocera/IUU19AB.User-Manual-1-of-2/User-Guide-706679-Page-23.png)
![iBurst Terminal, Desktop Model (UTD) / USB Model (UTU), Manual iBurst Terminal, Desktop Model (UTD) / USB Model (UTU), Manual iBurst Terminal, Desktop Model (UTD) / USB Model (UTU), Manual iBurst Terminal, Desktop Model (UTD) / USB Model (UTU), Manual Kyocera Corporation Revision 1.01 --- June.08.2006 - 24 - 15. Click the [Next >] button. 16. Confirm that the device name [iBurst Terminal] is displayed in the dialog window, then click the [Next >] button. 17. Click the [Finish] button.](https://usermanual.wiki/Kyocera/IUU19AB.User-Manual-1-of-2/User-Guide-706679-Page-24.png)
![iBurst Terminal, Desktop Model (UTD) / USB Model (UTU), Manual iBurst Terminal, Desktop Model (UTD) / USB Model (UTU), Manual iBurst Terminal, Desktop Model (UTD) / USB Model (UTU), Manual iBurst Terminal, Desktop Model (UTD) / USB Model (UTU), Manual Kyocera Corporation Revision 1.01 --- June.08.2006 - 25 - 18. The dialog window shown below will appear, click the [Yes] button, and restart your PC. NOTE: If the PC doesn’t shutdown itself, try to press Alt+Ctrl+Del keys several times. 19. Click the [Start] -> [Settings] -> [Control Panel] to open Control Panel as shown below, and then double click [Add New Hardware]. 20. Click the [Next >] button.](https://usermanual.wiki/Kyocera/IUU19AB.User-Manual-1-of-2/User-Guide-706679-Page-25.png)
![iBurst Terminal, Desktop Model (UTD) / USB Model (UTU), Manual iBurst Terminal, Desktop Model (UTD) / USB Model (UTU), Manual iBurst Terminal, Desktop Model (UTD) / USB Model (UTU), Manual iBurst Terminal, Desktop Model (UTD) / USB Model (UTU), Manual Kyocera Corporation Revision 1.01 --- June.08.2006 - 26 - 21. Click the [Next >] button. NOTE: If the dialog window shown below appears, select [No, the device isn’t in the list] and click the [Next >] button. 22. Select [No, I want to select the hardware from a list], and click the [Next >] button.](https://usermanual.wiki/Kyocera/IUU19AB.User-Manual-1-of-2/User-Guide-706679-Page-26.png)
![iBurst Terminal, Desktop Model (UTD) / USB Model (UTU), Manual iBurst Terminal, Desktop Model (UTD) / USB Model (UTU), Manual iBurst Terminal, Desktop Model (UTD) / USB Model (UTU), Manual iBurst Terminal, Desktop Model (UTD) / USB Model (UTU), Manual Kyocera Corporation Revision 1.01 --- June.08.2006 - 27 - 23. Select [Ports (COM & LPT)], and click the [Next >] button. 24. Click the [Have Disk..] button. 25. Click the [Browse...] button.](https://usermanual.wiki/Kyocera/IUU19AB.User-Manual-1-of-2/User-Guide-706679-Page-27.png)
![iBurst Terminal, Desktop Model (UTD) / USB Model (UTU), Manual iBurst Terminal, Desktop Model (UTD) / USB Model (UTU), Manual iBurst Terminal, Desktop Model (UTD) / USB Model (UTU), Manual iBurst Terminal, Desktop Model (UTD) / USB Model (UTU), Manual Kyocera Corporation Revision 1.01 --- June.08.2006 - 28 - 26. Select [C:\Program Files\iBurst Terminal\bin], and click the [OK] button. NOTE: You don’t have to select a file name. Windows will find an appropriate file automatically. 27. Click the [OK] button. 28. Select [iBurst Terminal Virtual COM Port], and click the [Next >] button.](https://usermanual.wiki/Kyocera/IUU19AB.User-Manual-1-of-2/User-Guide-706679-Page-28.png)
![iBurst Terminal, Desktop Model (UTD) / USB Model (UTU), Manual iBurst Terminal, Desktop Model (UTD) / USB Model (UTU), Manual iBurst Terminal, Desktop Model (UTD) / USB Model (UTU), Manual iBurst Terminal, Desktop Model (UTD) / USB Model (UTU), Manual Kyocera Corporation Revision 1.01 --- June.08.2006 - 29 - 29. Click the [Next >] button. 30. Click the [Finish] button. 31. The dialog window shown below will appear, click the [Yes] button to SHUTDOWNSHUTDOWNSHUTDOWNSHUTDOWN your PC. NOTE: If the PC doesn’t shutdown itself, try to press Alt+Ctrl+Del keys several times. 32. Turn your PC on again.](https://usermanual.wiki/Kyocera/IUU19AB.User-Manual-1-of-2/User-Guide-706679-Page-29.png)
![iBurst Terminal, Desktop Model (UTD) / USB Model (UTU), Manual iBurst Terminal, Desktop Model (UTD) / USB Model (UTU), Manual iBurst Terminal, Desktop Model (UTD) / USB Model (UTU), Manual iBurst Terminal, Desktop Model (UTD) / USB Model (UTU), Manual Kyocera Corporation Revision 1.01 --- June.08.2006 - 30 - 33. Click the [Start] -> [Settings] -> [Control Panel] to open Control Panel as shown below, and then double click [Modems]. NOTE: If the dialog window as shown below appears, click the [Add] button.](https://usermanual.wiki/Kyocera/IUU19AB.User-Manual-1-of-2/User-Guide-706679-Page-30.png)
![iBurst Terminal, Desktop Model (UTD) / USB Model (UTU), Manual iBurst Terminal, Desktop Model (UTD) / USB Model (UTU), Manual iBurst Terminal, Desktop Model (UTD) / USB Model (UTU), Manual iBurst Terminal, Desktop Model (UTD) / USB Model (UTU), Manual Kyocera Corporation Revision 1.01 --- June.08.2006 - 31 - 34. Check [Don’t detect my modem; I will select it from a list], and click the [Next >] button. 35. Click the [Have Disk..] button. 36. Click the [Browse…] button.](https://usermanual.wiki/Kyocera/IUU19AB.User-Manual-1-of-2/User-Guide-706679-Page-31.png)
![iBurst Terminal, Desktop Model (UTD) / USB Model (UTU), Manual iBurst Terminal, Desktop Model (UTD) / USB Model (UTU), Manual iBurst Terminal, Desktop Model (UTD) / USB Model (UTU), Manual iBurst Terminal, Desktop Model (UTD) / USB Model (UTU), Manual Kyocera Corporation Revision 1.01 --- June.08.2006 - 32 - 37. Select [C:\Program Files\iBurst Terminal\bin],and click the [OK] button. NOTE: You don’t have to select a file name. Windows will find an appropriate file automatically. 38. Click the [OK] button. 39. Select [iBurst Terminal Virtual MODEM], and click the [Next >] button.](https://usermanual.wiki/Kyocera/IUU19AB.User-Manual-1-of-2/User-Guide-706679-Page-32.png)
![iBurst Terminal, Desktop Model (UTD) / USB Model (UTU), Manual iBurst Terminal, Desktop Model (UTD) / USB Model (UTU), Manual iBurst Terminal, Desktop Model (UTD) / USB Model (UTU), Manual iBurst Terminal, Desktop Model (UTD) / USB Model (UTU), Manual Kyocera Corporation Revision 1.01 --- June.08.2006 - 33 - 40. Select [iBurst Terminal Virtual COM Port (COM X)], and click the [Next >] button. NOTE: The ‘X’ in “COM X” above is a COM port number assigned automatically. NOTE: If the dialog window as shown below appears, type a dummy number in “What are (or city) code are you in now ?” and then click the [Next >] button. 41. Click the [Finish] button.](https://usermanual.wiki/Kyocera/IUU19AB.User-Manual-1-of-2/User-Guide-706679-Page-33.png)
![iBurst Terminal, Desktop Model (UTD) / USB Model (UTU), Manual iBurst Terminal, Desktop Model (UTD) / USB Model (UTU), Manual iBurst Terminal, Desktop Model (UTD) / USB Model (UTU), Manual iBurst Terminal, Desktop Model (UTD) / USB Model (UTU), Manual Kyocera Corporation Revision 1.01 --- June.08.2006 - 34 - 42. Click the [OK] button. 43. Click the [Start] -> [Settings] -> [Control Panel] to open Control Panel as shown below, and then double click [Network].](https://usermanual.wiki/Kyocera/IUU19AB.User-Manual-1-of-2/User-Guide-706679-Page-34.png)
![iBurst Terminal, Desktop Model (UTD) / USB Model (UTU), Manual iBurst Terminal, Desktop Model (UTD) / USB Model (UTU), Manual iBurst Terminal, Desktop Model (UTD) / USB Model (UTU), Manual iBurst Terminal, Desktop Model (UTD) / USB Model (UTU), Manual Kyocera Corporation Revision 1.01 --- June.08.2006 - 35 - 44. Click the [Add…] button on [Configuration] tab. 45. Select [Protocol] and click the [Add…] button. 46. Click the [Have Disk…] button.](https://usermanual.wiki/Kyocera/IUU19AB.User-Manual-1-of-2/User-Guide-706679-Page-35.png)
![iBurst Terminal, Desktop Model (UTD) / USB Model (UTU), Manual iBurst Terminal, Desktop Model (UTD) / USB Model (UTU), Manual iBurst Terminal, Desktop Model (UTD) / USB Model (UTU), Manual iBurst Terminal, Desktop Model (UTD) / USB Model (UTU), Manual Kyocera Corporation Revision 1.01 --- June.08.2006 - 36 - 47. Click the [Browse…] button. 48. Select [C:\Program Files\iBurst Terminal\bin], and click the [OK] button. NOTE: You don’t have to select a file name. Windows will find an appropriate file automatically. 49. Click the [OK] button.](https://usermanual.wiki/Kyocera/IUU19AB.User-Manual-1-of-2/User-Guide-706679-Page-36.png)
![iBurst Terminal, Desktop Model (UTD) / USB Model (UTU), Manual iBurst Terminal, Desktop Model (UTD) / USB Model (UTU), Manual iBurst Terminal, Desktop Model (UTD) / USB Model (UTU), Manual iBurst Terminal, Desktop Model (UTD) / USB Model (UTU), Manual Kyocera Corporation Revision 1.01 --- June.08.2006 - 37 - 50. Select [NDIS(PPPoE) Usermode I/O Protocol for iBurst Terminal], click the [OK] button. NOTE: If the same dialog at step 46 is popped up again, cancel once and repeat from step 44. 51. Click the [OK] button. NOTE: For USB connection with iBurst Terminal, “NDIS(PPPoE) User mode I/O Protocol for iBurst Terminal -> iBurst Terminal” must be added automatically. For Ethernet connection with iBurst Terminal, “NDIS(PPPoE) User mode I/O Protocol for iBurst Terminal -> The name of the Ethernet Network Interface Card or Port” shall be added automatically.](https://usermanual.wiki/Kyocera/IUU19AB.User-Manual-1-of-2/User-Guide-706679-Page-37.png)
![iBurst Terminal, Desktop Model (UTD) / USB Model (UTU), Manual iBurst Terminal, Desktop Model (UTD) / USB Model (UTU), Manual iBurst Terminal, Desktop Model (UTD) / USB Model (UTU), Manual iBurst Terminal, Desktop Model (UTD) / USB Model (UTU), Manual Kyocera Corporation Revision 1.01 --- June.08.2006 - 38 - 52. The dialog window shown below will appear, click the [Yes] button, and restart your PC. NOTE: If the PC doesn’t shutdown itself, try to press Alt+Ctrl+Del keys several times. NOTE: To connect to the Internet, refer to page 67.](https://usermanual.wiki/Kyocera/IUU19AB.User-Manual-1-of-2/User-Guide-706679-Page-38.png)
![iBurst Terminal, Desktop Model (UTD) / USB Model (UTU), Manual iBurst Terminal, Desktop Model (UTD) / USB Model (UTU), Manual iBurst Terminal, Desktop Model (UTD) / USB Model (UTU), Manual iBurst Terminal, Desktop Model (UTD) / USB Model (UTU), Manual Kyocera Corporation Revision 1.01 --- June.08.2006 - 39 - Installation for Windows 98SEInstallation for Windows 98SEInstallation for Windows 98SEInstallation for Windows 98SE Since tSince tSince tSince the installation disk of WINDOWS 98SE he installation disk of WINDOWS 98SE he installation disk of WINDOWS 98SE he installation disk of WINDOWS 98SE may may may may bbbbe e e e required while required while required while required while driver installation, please driver installation, please driver installation, please driver installation, please prepare prepare prepare prepare the CD or copy the the CD or copy the the CD or copy the the CD or copy the CDCDCDCD into into into into a hard disk in your PC a hard disk in your PC a hard disk in your PC a hard disk in your PC for it.for it.for it.for it. 1. Make sure to disconnect the iBurst Terminal with your PC. ATTENTION: DonDonDonDon’’’’t connect the iBurst Terminal with your PC through a USB cable until completion of t connect the iBurst Terminal with your PC through a USB cable until completion of t connect the iBurst Terminal with your PC through a USB cable until completion of t connect the iBurst Terminal with your PC through a USB cable until completion of installation.installation.installation.installation. 2. Turn your PC on. 3. Insert the Software Utility CD provided by the network operator into your CD-ROM drive; or execute the appropriate installation software. 4. iBurst Terminal Setup starts. Click the [Next >] button. 5. Select [I accept the terms the license agreement], click the [Next >] button.](https://usermanual.wiki/Kyocera/IUU19AB.User-Manual-1-of-2/User-Guide-706679-Page-39.png)
![iBurst Terminal, Desktop Model (UTD) / USB Model (UTU), Manual iBurst Terminal, Desktop Model (UTD) / USB Model (UTU), Manual iBurst Terminal, Desktop Model (UTD) / USB Model (UTU), Manual iBurst Terminal, Desktop Model (UTD) / USB Model (UTU), Manual Kyocera Corporation Revision 1.01 --- June.08.2006 - 40 - 6. Click the [Next >] button after appearing dialog window as shown below. NOTE: To install to a different folder, click [Browse…] and specify another folder. 7. Click the [Next >] button. 8. The following dialog window will appear, and installation of software begins.](https://usermanual.wiki/Kyocera/IUU19AB.User-Manual-1-of-2/User-Guide-706679-Page-40.png)
![iBurst Terminal, Desktop Model (UTD) / USB Model (UTU), Manual iBurst Terminal, Desktop Model (UTD) / USB Model (UTU), Manual iBurst Terminal, Desktop Model (UTD) / USB Model (UTU), Manual iBurst Terminal, Desktop Model (UTD) / USB Model (UTU), Manual Kyocera Corporation Revision 1.01 --- June.08.2006 - 41 - 9. Click the [Finish] button. 10. Click the [OK] button. NOTE: Refer to the 1st article in chapter 6, if you face such symptom described in the attention message. NOTE: If you are going to connect the iBurst Terminal with your PC only through an Ethernet cable, not through a USB cable, you can skip from hear to step 19 and continue from step 20 in this section. You can see indications of the iBurst Terminal over Ethernet. See page 87 for the method. 11. Connect the iBurst Terminal with your PC through a USB cable. Windows will detect the iBurst Terminal as a new hardware so that [Add New Hardware Wizard] will begin.](https://usermanual.wiki/Kyocera/IUU19AB.User-Manual-1-of-2/User-Guide-706679-Page-41.png)
![iBurst Terminal, Desktop Model (UTD) / USB Model (UTU), Manual iBurst Terminal, Desktop Model (UTD) / USB Model (UTU), Manual iBurst Terminal, Desktop Model (UTD) / USB Model (UTU), Manual iBurst Terminal, Desktop Model (UTD) / USB Model (UTU), Manual Kyocera Corporation Revision 1.01 --- June.08.2006 - 42 - 12. Click the [Next >] button in the dialog window. 13. Select [Search for the best driver for your device.(Recommended)], and then check the [Next >] button. 14. Check [Specify a location] and click the [Browse] button.](https://usermanual.wiki/Kyocera/IUU19AB.User-Manual-1-of-2/User-Guide-706679-Page-42.png)
![iBurst Terminal, Desktop Model (UTD) / USB Model (UTU), Manual iBurst Terminal, Desktop Model (UTD) / USB Model (UTU), Manual iBurst Terminal, Desktop Model (UTD) / USB Model (UTU), Manual iBurst Terminal, Desktop Model (UTD) / USB Model (UTU), Manual Kyocera Corporation Revision 1.01 --- June.08.2006 - 43 - 15. Select [C:\Program Files\iBurst Terminal\bin], and click the [OK] button. 16. Click the [Next >] button. 17. Confirm that the device name [iBurst Terminal] is displayed in the dialog window, then click the [Next >] button.](https://usermanual.wiki/Kyocera/IUU19AB.User-Manual-1-of-2/User-Guide-706679-Page-43.png)
![iBurst Terminal, Desktop Model (UTD) / USB Model (UTU), Manual iBurst Terminal, Desktop Model (UTD) / USB Model (UTU), Manual iBurst Terminal, Desktop Model (UTD) / USB Model (UTU), Manual iBurst Terminal, Desktop Model (UTD) / USB Model (UTU), Manual Kyocera Corporation Revision 1.01 --- June.08.2006 - 44 - NOTE: If the dialog window as shown below appears, insert [Windows 98SE CD-ROM] into the CD-ROM drive and click the [OK] button. NOTE: If the dialog window as shown below appears, insert [Windows 98SE CD-ROM] into your PC and enter the directory of your [Windows 98SE CD-ROM], click the [OK] button. “xxxxxxxx“ in the picture below is a file name that can not be found. 18. Click the [Finish] button. 19. The dialog window shown below will appear, click the [Yes] button, and restart your PC. NOTE: If the PC doesn’t shutdown itself, try to press Alt+Ctrl+Del keys several times.](https://usermanual.wiki/Kyocera/IUU19AB.User-Manual-1-of-2/User-Guide-706679-Page-44.png)
![iBurst Terminal, Desktop Model (UTD) / USB Model (UTU), Manual iBurst Terminal, Desktop Model (UTD) / USB Model (UTU), Manual iBurst Terminal, Desktop Model (UTD) / USB Model (UTU), Manual iBurst Terminal, Desktop Model (UTD) / USB Model (UTU), Manual Kyocera Corporation Revision 1.01 --- June.08.2006 - 45 - 20. Click the [Start] -> [Settings] -> [Control Panel] to open Control Panel as shown below, and then double click [Add New Hardware]. 21. Click the [Next >] button. 22. Click the [Next >] button.](https://usermanual.wiki/Kyocera/IUU19AB.User-Manual-1-of-2/User-Guide-706679-Page-45.png)
![iBurst Terminal, Desktop Model (UTD) / USB Model (UTU), Manual iBurst Terminal, Desktop Model (UTD) / USB Model (UTU), Manual iBurst Terminal, Desktop Model (UTD) / USB Model (UTU), Manual iBurst Terminal, Desktop Model (UTD) / USB Model (UTU), Manual Kyocera Corporation Revision 1.01 --- June.08.2006 - 46 - NOTE: If the dialog window as shown below appears, select [No, the device isn’t in the list] and click the [Next >] button. 23. Select [No, I want to select the hardware from a list.], and click the [Next >] button. 24. Select [Ports (COM & LPT]], and click the [Next >] button.](https://usermanual.wiki/Kyocera/IUU19AB.User-Manual-1-of-2/User-Guide-706679-Page-46.png)
![iBurst Terminal, Desktop Model (UTD) / USB Model (UTU), Manual iBurst Terminal, Desktop Model (UTD) / USB Model (UTU), Manual iBurst Terminal, Desktop Model (UTD) / USB Model (UTU), Manual iBurst Terminal, Desktop Model (UTD) / USB Model (UTU), Manual Kyocera Corporation Revision 1.01 --- June.08.2006 - 47 - 25. Click the [Have Disk..] button. 26. Click the [Browse…] button. 27. Select [C:\Program Files\iBurst Terminal\bin], and click the [OK] button. NOTE: You don’t have to select a file name. Windows will find an appropriate file automatically.](https://usermanual.wiki/Kyocera/IUU19AB.User-Manual-1-of-2/User-Guide-706679-Page-47.png)
![iBurst Terminal, Desktop Model (UTD) / USB Model (UTU), Manual iBurst Terminal, Desktop Model (UTD) / USB Model (UTU), Manual iBurst Terminal, Desktop Model (UTD) / USB Model (UTU), Manual iBurst Terminal, Desktop Model (UTD) / USB Model (UTU), Manual Kyocera Corporation Revision 1.01 --- June.08.2006 - 48 - 28. Click the [OK] button. 29. Select [iBurst Terminal Virtual COM Port], and click the [Next >] button. 30. Click the [Next >] button.](https://usermanual.wiki/Kyocera/IUU19AB.User-Manual-1-of-2/User-Guide-706679-Page-48.png)
![iBurst Terminal, Desktop Model (UTD) / USB Model (UTU), Manual iBurst Terminal, Desktop Model (UTD) / USB Model (UTU), Manual iBurst Terminal, Desktop Model (UTD) / USB Model (UTU), Manual iBurst Terminal, Desktop Model (UTD) / USB Model (UTU), Manual Kyocera Corporation Revision 1.01 --- June.08.2006 - 49 - NOTE: If the dialog window as shown below appears, insert [Windows 98SE CD-ROM] into the CD-ROM drive and click the [OK] button. NOTE: If the dialog window as shown below appears, insert [Windows 98SE CD-ROM] into your PC and enter the directory of your [Windows 98SE CD-ROM],click the [OK] button. “xxxxxxxx“ in the picture below is a file name that can not be found. 31. Click the [Finish] button. 32. The dialog window shown below will appear, click the [Yes] button to SHUTDOWNSHUTDOWNSHUTDOWNSHUTDOWN your PC. NOTE: If the PC doesn’t shutdown itself, try to press Alt+Ctrl+Del keys several times.](https://usermanual.wiki/Kyocera/IUU19AB.User-Manual-1-of-2/User-Guide-706679-Page-49.png)
![iBurst Terminal, Desktop Model (UTD) / USB Model (UTU), Manual iBurst Terminal, Desktop Model (UTD) / USB Model (UTU), Manual iBurst Terminal, Desktop Model (UTD) / USB Model (UTU), Manual iBurst Terminal, Desktop Model (UTD) / USB Model (UTU), Manual Kyocera Corporation Revision 1.01 --- June.08.2006 - 50 - 33. Turn your PC on again. 34. Click the [Start] -> [Settings] -> [Control Panel] to open Control Panel as shown below, and then double click [Modems]. NOTE: If the dialog window as shown below appears, click the [Add] button.](https://usermanual.wiki/Kyocera/IUU19AB.User-Manual-1-of-2/User-Guide-706679-Page-50.png)
![iBurst Terminal, Desktop Model (UTD) / USB Model (UTU), Manual iBurst Terminal, Desktop Model (UTD) / USB Model (UTU), Manual iBurst Terminal, Desktop Model (UTD) / USB Model (UTU), Manual iBurst Terminal, Desktop Model (UTD) / USB Model (UTU), Manual Kyocera Corporation Revision 1.01 --- June.08.2006 - 51 - 35. Select [Other], and click the [Next >] button. 36. Check [Don’t detect my modem, I will select it from a list] and click the [Next >] button. 37. Click the [Have Disk…] button.](https://usermanual.wiki/Kyocera/IUU19AB.User-Manual-1-of-2/User-Guide-706679-Page-51.png)
![iBurst Terminal, Desktop Model (UTD) / USB Model (UTU), Manual iBurst Terminal, Desktop Model (UTD) / USB Model (UTU), Manual iBurst Terminal, Desktop Model (UTD) / USB Model (UTU), Manual iBurst Terminal, Desktop Model (UTD) / USB Model (UTU), Manual Kyocera Corporation Revision 1.01 --- June.08.2006 - 52 - 38. Click the [Browse…] button. 39. Select [C:\Program Files\iBurst Terminal\bin], and click the [OK] button. NOTE: You don’t have to select a file name. Windows will find an appropriate file automatically. 40. Click the [OK] button. 41. Select [iBurst Terminal Virtual MODEM], and click the [Next >] button.](https://usermanual.wiki/Kyocera/IUU19AB.User-Manual-1-of-2/User-Guide-706679-Page-52.png)
![iBurst Terminal, Desktop Model (UTD) / USB Model (UTU), Manual iBurst Terminal, Desktop Model (UTD) / USB Model (UTU), Manual iBurst Terminal, Desktop Model (UTD) / USB Model (UTU), Manual iBurst Terminal, Desktop Model (UTD) / USB Model (UTU), Manual Kyocera Corporation Revision 1.01 --- June.08.2006 - 53 - 42. Select [iBurst Terminal Virtual COM Port (COM X)], and click the [Next >] button. NOTE: The ‘X’ in “COM X” above is a COM port number assigned automatically. NOTE: If the dialog window as shown below appears, type a dummy number in “What are (or city) code are you in now ?” and then click the [Next >] button. 43. Click the [Finish] button.](https://usermanual.wiki/Kyocera/IUU19AB.User-Manual-1-of-2/User-Guide-706679-Page-53.png)
![iBurst Terminal, Desktop Model (UTD) / USB Model (UTU), Manual iBurst Terminal, Desktop Model (UTD) / USB Model (UTU), Manual iBurst Terminal, Desktop Model (UTD) / USB Model (UTU), Manual iBurst Terminal, Desktop Model (UTD) / USB Model (UTU), Manual Kyocera Corporation Revision 1.01 --- June.08.2006 - 54 - 44. Click the [OK] button. 45. Click the [Start] -> [Settings] -> [Control Panel] to open Control Panel as shown below, and then double click [Network].](https://usermanual.wiki/Kyocera/IUU19AB.User-Manual-1-of-2/User-Guide-706679-Page-54.png)
![iBurst Terminal, Desktop Model (UTD) / USB Model (UTU), Manual iBurst Terminal, Desktop Model (UTD) / USB Model (UTU), Manual iBurst Terminal, Desktop Model (UTD) / USB Model (UTU), Manual iBurst Terminal, Desktop Model (UTD) / USB Model (UTU), Manual Kyocera Corporation Revision 1.01 --- June.08.2006 - 55 - 46. Click the [Add] button on [Configuration] tab. 47. Select [Protocol] and click the [Add…] button. 48. Click the [Have Disk…] button.](https://usermanual.wiki/Kyocera/IUU19AB.User-Manual-1-of-2/User-Guide-706679-Page-55.png)
![iBurst Terminal, Desktop Model (UTD) / USB Model (UTU), Manual iBurst Terminal, Desktop Model (UTD) / USB Model (UTU), Manual iBurst Terminal, Desktop Model (UTD) / USB Model (UTU), Manual iBurst Terminal, Desktop Model (UTD) / USB Model (UTU), Manual Kyocera Corporation Revision 1.01 --- June.08.2006 - 56 - 49. Click the [Browse…] button. 50. Select [C:\Program Files\iBurst Terminal\bin], and click the [OK] button. NOTE: You don’t have to select a file name. Windows will find an appropriate file automatically. 51. Click the [OK] button.](https://usermanual.wiki/Kyocera/IUU19AB.User-Manual-1-of-2/User-Guide-706679-Page-56.png)
![iBurst Terminal, Desktop Model (UTD) / USB Model (UTU), Manual iBurst Terminal, Desktop Model (UTD) / USB Model (UTU), Manual iBurst Terminal, Desktop Model (UTD) / USB Model (UTU), Manual iBurst Terminal, Desktop Model (UTD) / USB Model (UTU), Manual Kyocera Corporation Revision 1.01 --- June.08.2006 - 57 - 52. Select [NDIS(PPPoE) Usermode I/O Protocol for iBurst Terminal], click the [OK] button. NOTE: If the same dialog at step 47 is popped up again, cancel once and repeat from step 45. 53. Click the [OK] button. NOTE: For USB connection with iBurst Terminal, “NDIS(PPPoE) User mode I/O Protocol for iBurst Terminal -> iBurst Terminal” must be added in this stage. For Ethernet connection with iBurst Terminal, “NDIS(PPPoE) User mode I/O Protocol for iBurst Terminal -> The name of the Ethernet Network Interface Card or Port” shall be added in this stage.](https://usermanual.wiki/Kyocera/IUU19AB.User-Manual-1-of-2/User-Guide-706679-Page-57.png)
![iBurst Terminal, Desktop Model (UTD) / USB Model (UTU), Manual iBurst Terminal, Desktop Model (UTD) / USB Model (UTU), Manual iBurst Terminal, Desktop Model (UTD) / USB Model (UTU), Manual iBurst Terminal, Desktop Model (UTD) / USB Model (UTU), Manual Kyocera Corporation Revision 1.01 --- June.08.2006 - 58 - NOTE: If the dialog window as shown below appears, insert [Windows 98SE CD-ROM] into the CD-ROM drive and click the [OK] button. NOTE: If the dialog window as shown below appears, insert [Windows 98SE CD-ROM] into your PC and enter the directory of your [Windows 98SE CD-ROM],click the [OK] button. “xxxxxxxx“ in the picture below is a file name that can not be found. 54. The dialog window shown below will appear, click the [Yes] button, and shut down your PC, then turn on your PC again. NOTE: If the PC doesn’t shutdown itself, try to press Alt+Ctrl+Del keys several times. NOTE: To connect to the Internet, refer to page 67.](https://usermanual.wiki/Kyocera/IUU19AB.User-Manual-1-of-2/User-Guide-706679-Page-58.png)
![iBurst Terminal, Desktop Model (UTD) / USB Model (UTU), Manual iBurst Terminal, Desktop Model (UTD) / USB Model (UTU), Manual iBurst Terminal, Desktop Model (UTD) / USB Model (UTU), Manual iBurst Terminal, Desktop Model (UTD) / USB Model (UTU), Manual Kyocera Corporation Revision 1.01 --- June.08.2006 - 60 - 4. In case of version 10.3 or later, the confirmation message shown below will appear. Click [Continue] button. 5. In case of version 10.2 or older, “Authenticate” dialog will appear. Enter an administrator name and password, and then click the [OK] button. 6. Click the [Continue] button.](https://usermanual.wiki/Kyocera/IUU19AB.User-Manual-1-of-2/User-Guide-706679-Page-60.png)