Kyocera IUU19AB USB User Terminal of Wireless Internet System User Manual 2 of 2
Kyocera Corporation USB User Terminal of Wireless Internet System 2 of 2
Kyocera >
Contents
- 1. User Manual 1 of 2
- 2. User Manual 2 of 2
User Manual 2 of 2
iBurst Terminal, Desktop Model (UTD) / USB Model (UTU), Manual
iBurst Terminal, Desktop Model (UTD) / USB Model (UTU), Manual iBurst Terminal, Desktop Model (UTD) / USB Model (UTU), Manual
iBurst Terminal, Desktop Model (UTD) / USB Model (UTU), Manual
Kyocera Corporation Revision 1.01 --- June.08.2006
- 61 -
7. Click the [Continue] button.
8. The following dialog will appear, click the [Agree] button.
9. Select a destination disk, and then click the [Continue] button.
iBurst Terminal, Desktop Model (UTD) / USB Model (UTU), Manual
iBurst Terminal, Desktop Model (UTD) / USB Model (UTU), Manual iBurst Terminal, Desktop Model (UTD) / USB Model (UTU), Manual
iBurst Terminal, Desktop Model (UTD) / USB Model (UTU), Manual
Kyocera Corporation Revision 1.01 --- June.08.2006
- 62 -
10. Click the [Install] button after appearing dialog window as shown below.
NOTE: In case of version 10.4, Authentication dialog will appear at here.
11. Click the [Continue installation] button.
12. When finish installing, the dialog shown below will appear. Click the [Restart] button.
NOTE: To connect to the Internet, refer to page 69.
iBurst Terminal, Desktop Model (UTD) / USB Model (UTU), Manual
iBurst Terminal, Desktop Model (UTD) / USB Model (UTU), Manual iBurst Terminal, Desktop Model (UTD) / USB Model (UTU), Manual
iBurst Terminal, Desktop Model (UTD) / USB Model (UTU), Manual
Kyocera Corporation Revision 1.01 --- June.08.2006
- 63 -
Connection Establishment
Connection EstablishmentConnection Establishment
Connection Establishment
Connection Establishment for Windows XP
Connection Establishment for Windows XPConnection Establishment for Windows XP
Connection Establishment for Windows XP
1. Make sure to connect the iBurst Terminal with your PC via USB cable or Ethernet cable.
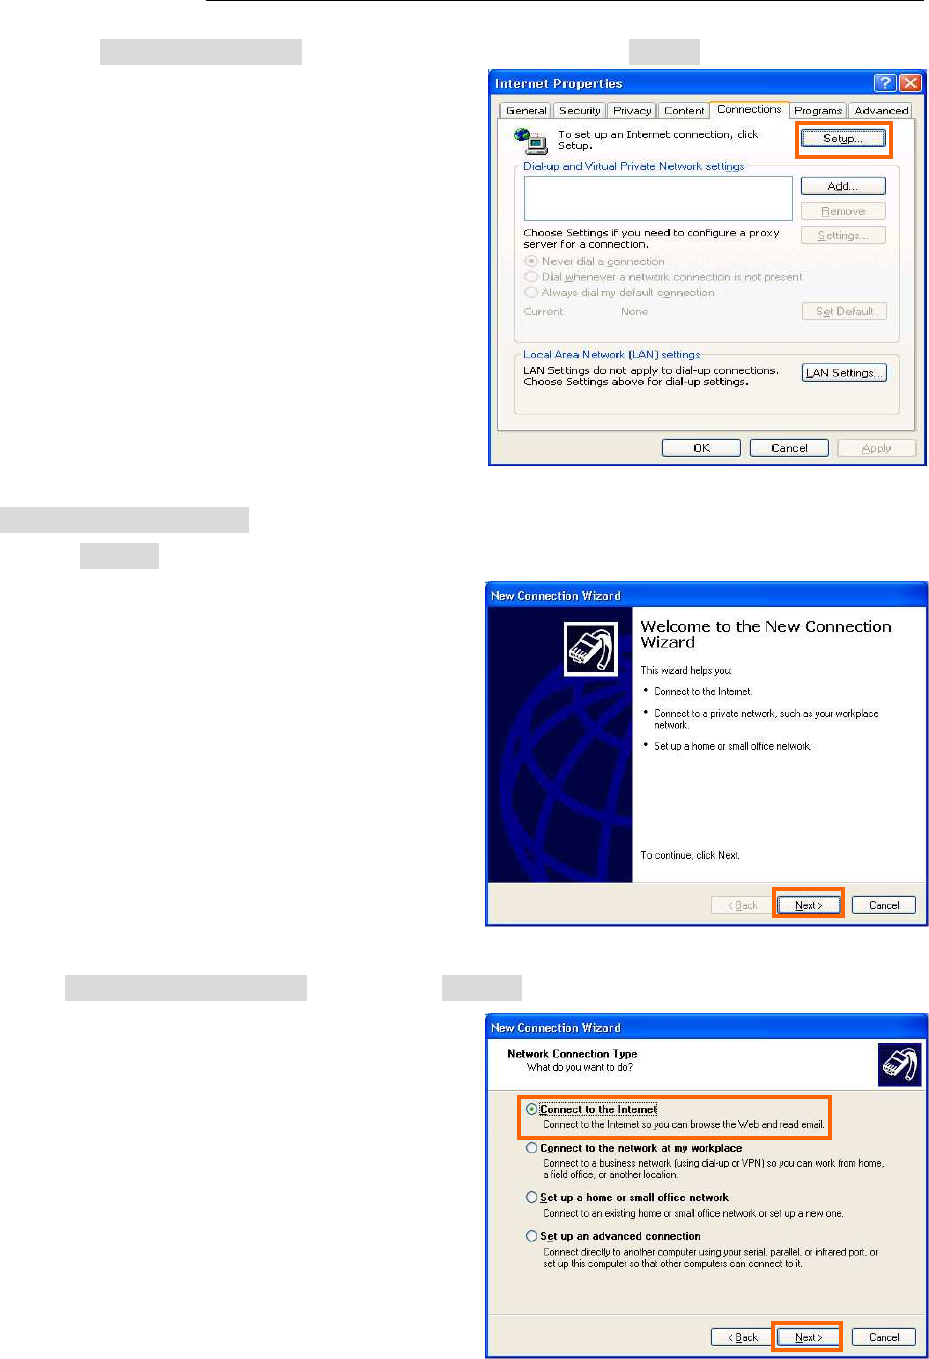
2. Click the [Start] button, followed by selecting [Control Panel] as shown below.
3. Click [Network and Internet Connections] in the [Control Panel] display.
4. Next, click [Set up or Change your Internet connection].
iBurst Terminal, Desktop Model (UTD) / USB Model (UTU), Manual
iBurst Terminal, Desktop Model (UTD) / USB Model (UTU), Manual iBurst Terminal, Desktop Model (UTD) / USB Model (UTU), Manual
iBurst Terminal, Desktop Model (UTD) / USB Model (UTU), Manual
Kyocera Corporation Revision 1.01 --- June.08.2006
- 64 -
5. When the [Internet Properties] dialog window appears, click the [Setup] button.
6. [New Connection Wizard] will begin and the dialog window as shown below will appear.
Click the [Next >] button in the dialog window.
7. Select [Connect to the Internet] and click the [Next >] button.
iBurst Terminal, Desktop Model (UTD) / USB Model (UTU), Manual
iBurst Terminal, Desktop Model (UTD) / USB Model (UTU), Manual iBurst Terminal, Desktop Model (UTD) / USB Model (UTU), Manual
iBurst Terminal, Desktop Model (UTD) / USB Model (UTU), Manual
Kyocera Corporation Revision 1.01 --- June.08.2006
- 65 -
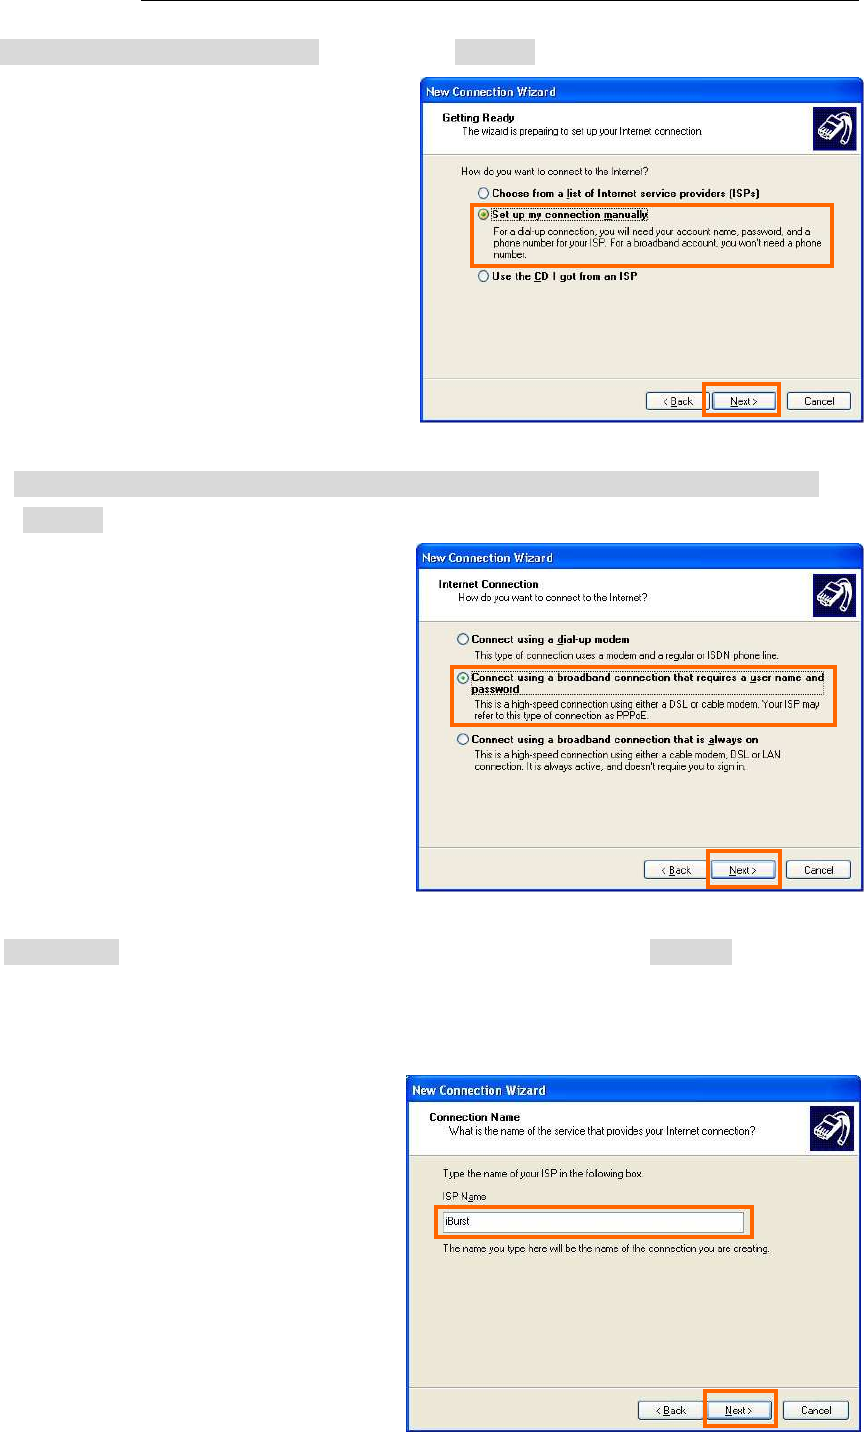
8. Select [Set up my connection manually] and click the [Next >] button.
9. Select [Connect using a broadband connection that requires a user name and password] and
click the [Next >] button.
10. Fill in [ISP Name] edit box with an ISP Name, followed by clicking the [Next >] button. Note
that any ISP name is acceptable.
ISP Name is “iBurst” for example.
iBurst Terminal, Desktop Model (UTD) / USB Model (UTU), Manual
iBurst Terminal, Desktop Model (UTD) / USB Model (UTU), Manual iBurst Terminal, Desktop Model (UTD) / USB Model (UTU), Manual
iBurst Terminal, Desktop Model (UTD) / USB Model (UTU), Manual
Kyocera Corporation Revision 1.01 --- June.08.2006
- 66 -
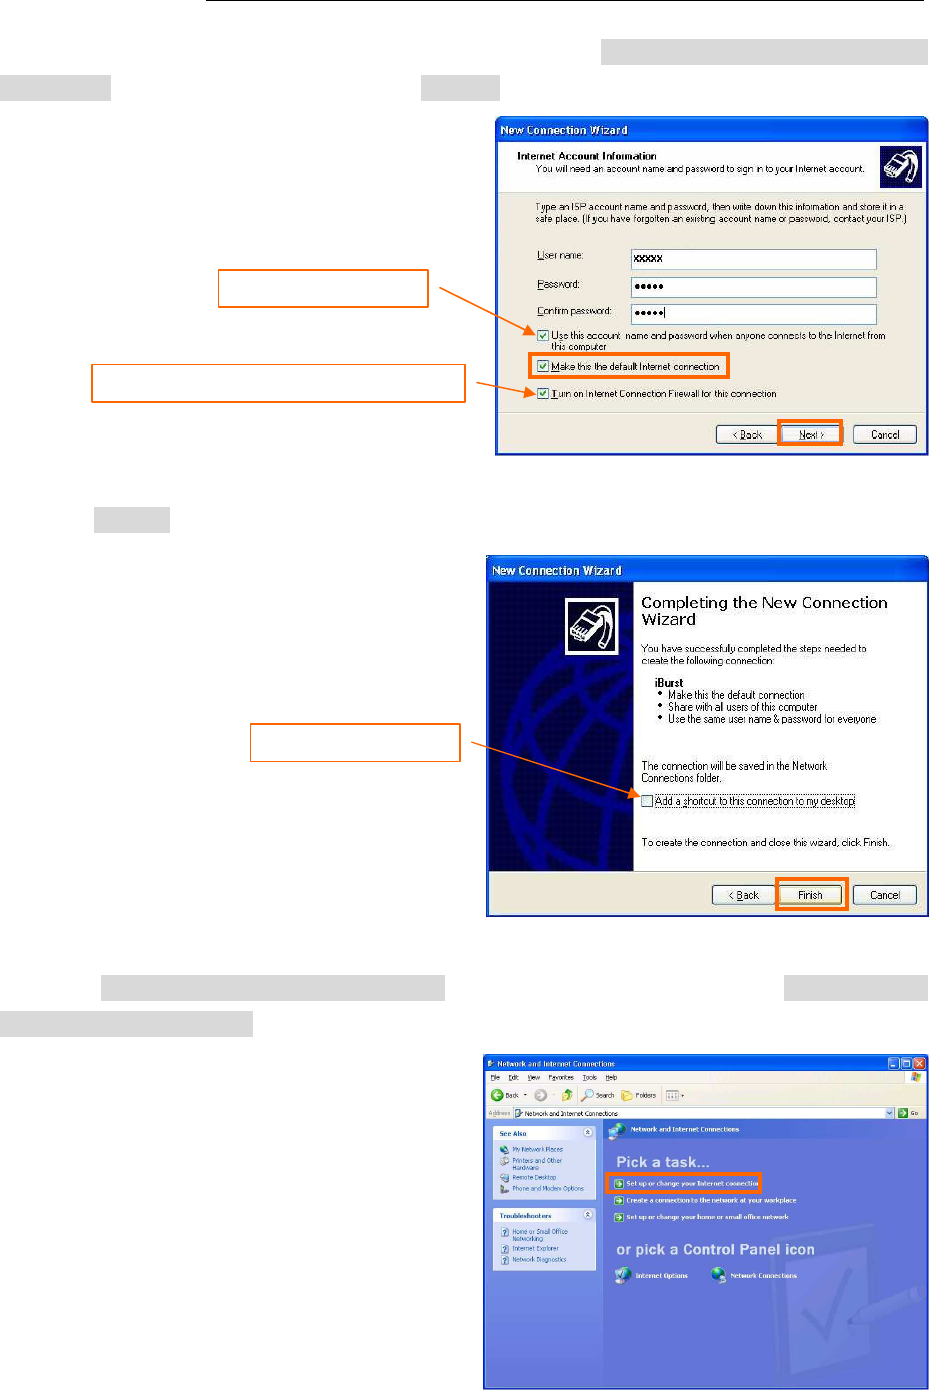
11. Enter user name and password and make sure that the [Make this the default Internet
connection] check box is checked. Click the [Next >] button.
12. Click the [Finish] button.
13. When the [Network and Internet Connection] window pane appears again, click [Set up change
your Internet Connection].
Check it if you want.
Nothing in case SP2 of Windows XP.
Check it if you want.

iBurst Terminal, Desktop Model (UTD) / USB Model (UTU), Manual
iBurst Terminal, Desktop Model (UTD) / USB Model (UTU), Manual iBurst Terminal, Desktop Model (UTD) / USB Model (UTU), Manual
iBurst Terminal, Desktop Model (UTD) / USB Model (UTU), Manual
Kyocera Corporation Revision 1.01 --- June.08.2006
- 67 -
14. When the [Internet Properties] dialog window appears and the [Connections] pane is displayed,
confirm the connection name and make sure that the [Always dial my default connection] radio
button is checked, followed by clicking the [Apply] button. Then, click the [OK] button to close
the dialog window.
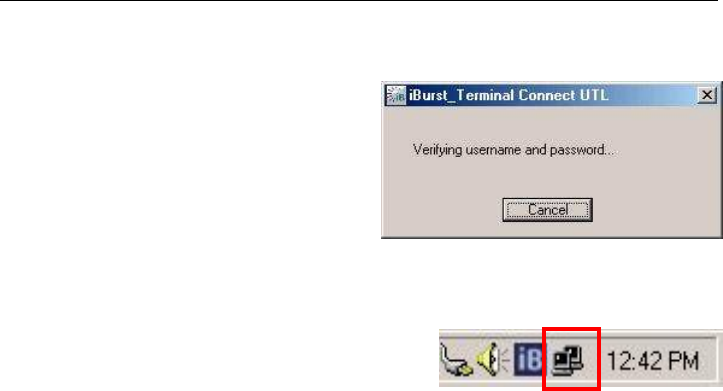
15. At this point, the connection configuration is completed. When you open Internet Explorer, the
[Dial-up Connection] dialog window as shown below will appear. Click the [Connect] button to
connect to the network.
16. When the connection establishment process is complete, a message indicating completion of the
connection will appear at the task tray as shown below.
Select “Always dial ...”.
The ISP name specified at
step 10 above must be the
default connection.
NOTE:
If you don’t choose “Always dial my default
connection” at step 14 above, you have to
open this dial-up connection dialog
manually every when you want to connect to
the Internet.
iBurst (Default)
iBurst

iBurst Terminal, Desktop Model (UTD) / USB Model (UTU), Manual
iBurst Terminal, Desktop Model (UTD) / USB Model (UTU), Manual iBurst Terminal, Desktop Model (UTD) / USB Model (UTU), Manual
iBurst Terminal, Desktop Model (UTD) / USB Model (UTU), Manual
Kyocera Corporation Revision 1.01 --- June.08.2006
- 68 -
Connection Establishment for Windows 2000/Me/98SE
Connection Establishment for Windows 2000/Me/98SEConnection Establishment for Windows 2000/Me/98SE
Connection Establishment for Windows 2000/Me/98SE
NOTE: You have to execute the procedure in this section every when you want to connect to the
Internet.
1. Make sure to connect the iBurst Terminal with your PC via USB cable or Ethernet cable..
2. Double click the shortcut icon on the PC desktop; or click [Start] -> [Programs] -> [iBurst
Terminal] -> [iBurst_Terminal Connect UTL]
3. Enter user name and password and click the [Connect] button.
NOTE: ‘Cancel’ to close the dialog.
‘Property’ to open properties of the dial-up connection for iBurst Terminal.
“
iBurst Terminal
”
shall be selected.
Check it if you want.
In case of UBS connection:
“
Ethernet A
daptor
Name
”
shall be selec
ted.
In case of Ethernet connec
tion:
iBurst Terminal, Desktop Model (UTD) / USB Model (UTU), Manual
iBurst Terminal, Desktop Model (UTD) / USB Model (UTU), Manual iBurst Terminal, Desktop Model (UTD) / USB Model (UTU), Manual
iBurst Terminal, Desktop Model (UTD) / USB Model (UTU), Manual
Kyocera Corporation Revision 1.01 --- June.08.2006
- 69 -
4. While connecting to network, the following connection status window is displayed.
5. When logging on successfully, a network connection icon will be displayed at the task tray.
iBurst Terminal, Desktop Model (UTD) / USB Model (UTU), Manual
iBurst Terminal, Desktop Model (UTD) / USB Model (UTU), Manual iBurst Terminal, Desktop Model (UTD) / USB Model (UTU), Manual
iBurst Terminal, Desktop Model (UTD) / USB Model (UTU), Manual
Kyocera Corporation Revision 1.01 --- June.08.2006
- 70 -
Connection Establishment for Mac OS X
Connection Establishment for Mac OS XConnection Establishment for Mac OS X
Connection Establishment for Mac OS X
1. Make sure to connect the iBurst Terminal with your PC via USB cable or Ethernet cable.
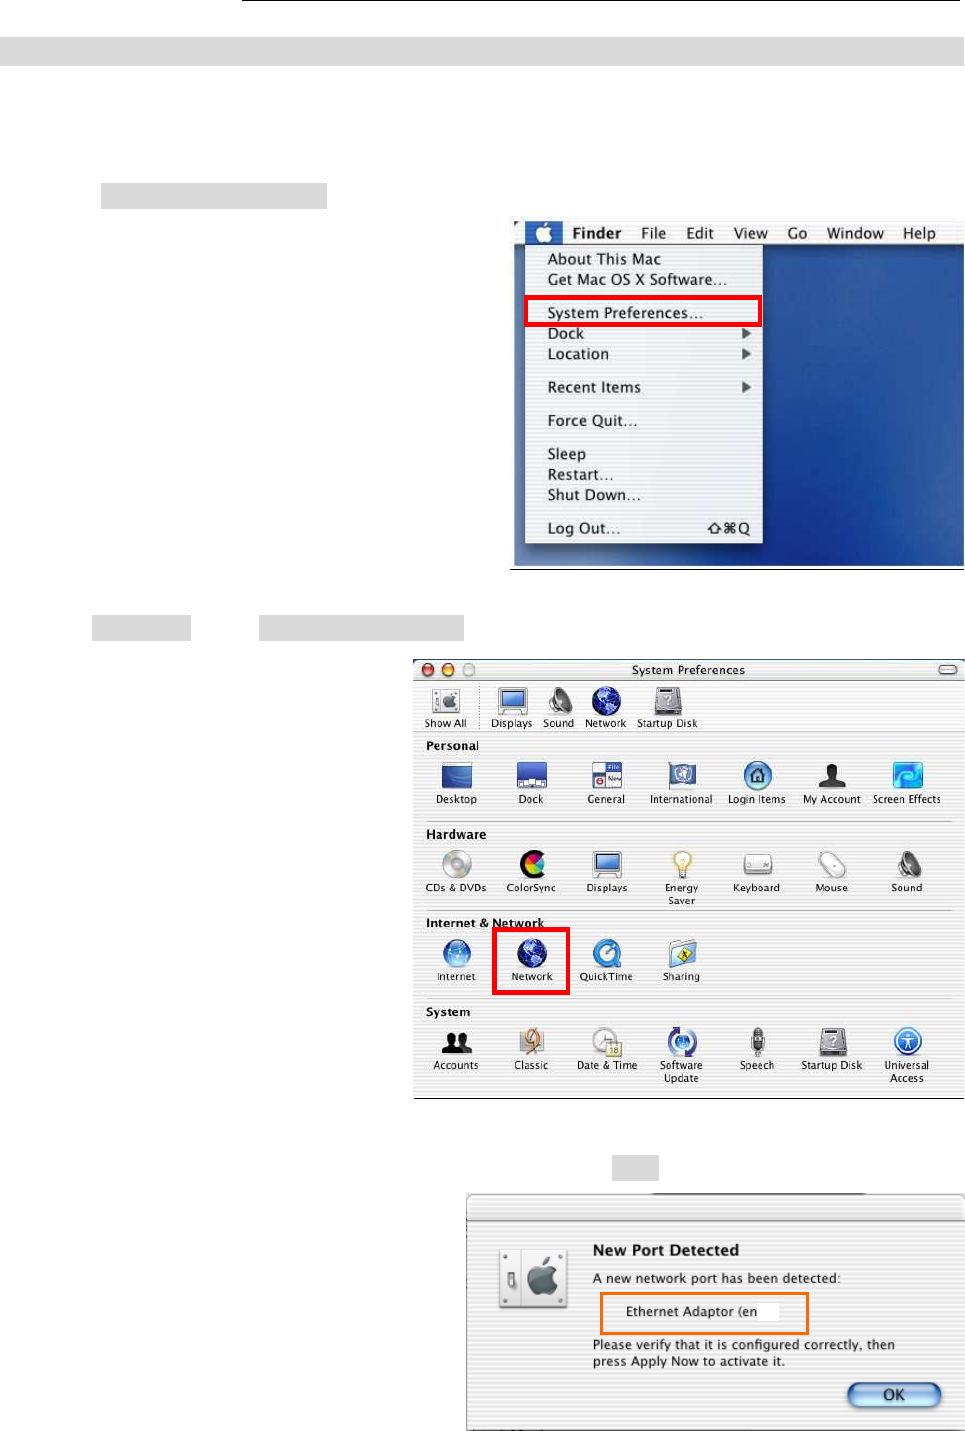
2. Select [System Preferences…] on the Apple menu.
3. Click [Network] in the [System Preferences] window.
4. After the 1st connection with the iBurst Terminal via USB cable, you will find the pop-up
shown below. Take note the name of the new port. Click [OK].
X
)

iBurst Terminal, Desktop Model (UTD) / USB Model (UTU), Manual
iBurst Terminal, Desktop Model (UTD) / USB Model (UTU), Manual iBurst Terminal, Desktop Model (UTD) / USB Model (UTU), Manual
iBurst Terminal, Desktop Model (UTD) / USB Model (UTU), Manual
Kyocera Corporation Revision 1.01 --- June.08.2006
- 71 -
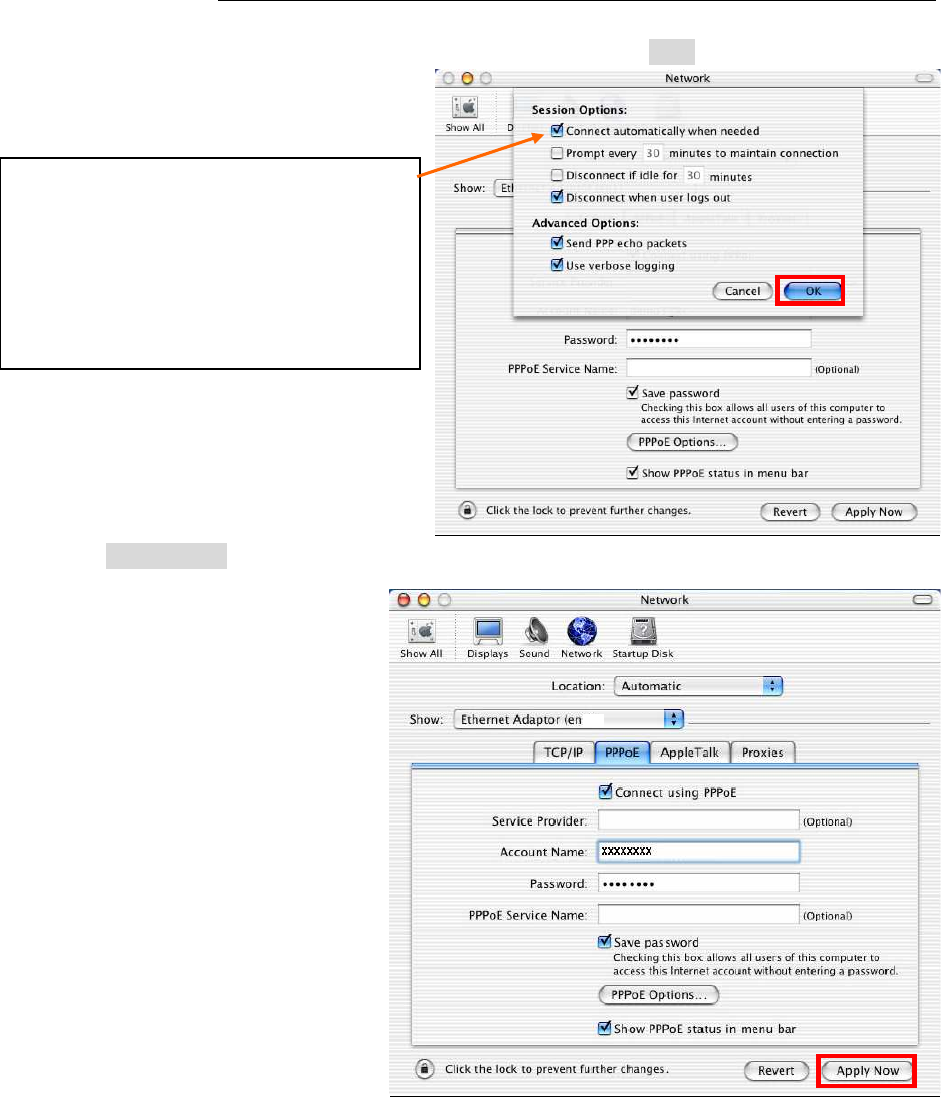
5. Click on the drop down menu of the [Show]; and
Select [Ethernet Adaptor (en X)] indicated in the previous step in case of USB connection; or
Select appropriate “Ethernet” interface in case of Ethernet connection, “Built-in Ethernet” for
example.
NOTE: The ‘X’ in the “en X” is the port number and it shall be the biggest one among
them when 1st connection.
Additionally, set as follows.
• Select the [PPPoE] tab.
• Check [Connect using PPPoE].
• Enter [Account Name] provided by the network operator.
• Enter [Password] provided by the network operator.
• Check [Save password] If you require the computer to remember your password.
• Check [Show PPPoE status in menu bar].
NOTE: If uncheck this option, you cannot see the icon described in the step 9.
• And then, click [PPPoE Options…]
X
)
iBurst Terminal, Desktop Model (UTD) / USB Model (UTU), Manual
iBurst Terminal, Desktop Model (UTD) / USB Model (UTU), Manual iBurst Terminal, Desktop Model (UTD) / USB Model (UTU), Manual
iBurst Terminal, Desktop Model (UTD) / USB Model (UTU), Manual
Kyocera Corporation Revision 1.01 --- June.08.2006
- 72 -
6. On the PPPoE Options dialog, set everything as follows and click [OK].
7. Click the [Apply Now] button.
8. At this point, the connection configuration is completed. When you open any internet
application software, e.g. a web browser, the internet connectivity will be activated
automatically.
NOTE:
If you don’t enable “Connect
automatically when needed”, you have
to make a PPPoE connection following
the procedure described in the next
page every when you want to connect to
the Internet.
X
)
iBurst Terminal, Desktop Model (UTD) / USB Model (UTU), Manual
iBurst Terminal, Desktop Model (UTD) / USB Model (UTU), Manual iBurst Terminal, Desktop Model (UTD) / USB Model (UTU), Manual
iBurst Terminal, Desktop Model (UTD) / USB Model (UTU), Manual
Kyocera Corporation Revision 1.01 --- June.08.2006
- 73 -
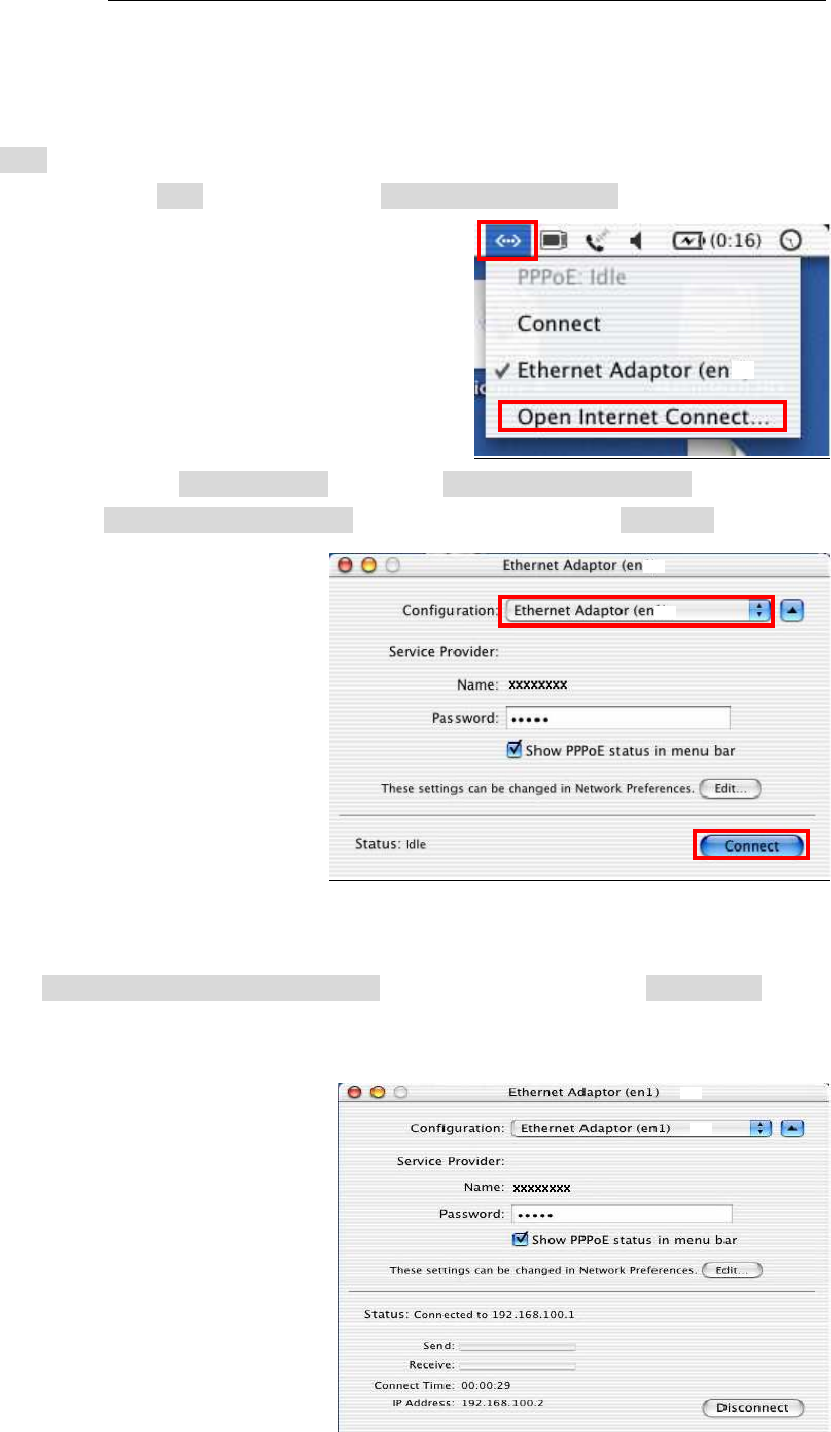
NOTE: To check the internet connectivity only in case of using a USB cable, follow the steps
below.
9. Click the <---> icon at the top right of screen, and select the Ethernet Adapter you choose in
step 5. In addition, click <---> again and choose [Open Internet Connect]
10. Click on drop down menu of [Configuration], and select [Ethernet Adaptor (en X)].
The configuration of [Ethernet Adaptor (en X)] will be displayed, click the [Connect] button.
NOTE: In case of version 10.4, dialog layout is different and you can find the adapter by
expanding icon array, clicking “>>”, at the top of the dialog.
11.
When
the box [Show PPPoE status in menu bar] is checked, PPPoE Status [Connected]
will be
displayed after having finished connection. However, Ethernet Adaptor display will little differ by
OS Version.
X
)
X
)
X
)
X
)
X
)

iBurst Terminal, Desktop Model (UTD) / USB Model (UTU), Manual
iBurst Terminal, Desktop Model (UTD) / USB Model (UTU), Manual iBurst Terminal, Desktop Model (UTD) / USB Model (UTU), Manual
iBurst Terminal, Desktop Model (UTD) / USB Model (UTU), Manual
Kyocera Corporation Revision 1.01 --- June.08.2006
- 74 -
Chapter 3 Utility Software
Chapter 3 Utility SoftwareChapter 3 Utility Software
Chapter 3 Utility Software
This chapter describes the features and usage of the
This chapter describes the features and usage of the This chapter describes the features and usage of the
This chapter describes the features and usage of the
Utility Software
Utility Software Utility Software
Utility Software for iBurst Terminal.
for iBurst Terminal.for iBurst Terminal.
for iBurst Terminal.
iBurst Terminal, Desktop Model (UTD) / USB Model (UTU), Manual
iBurst Terminal, Desktop Model (UTD) / USB Model (UTU), Manual iBurst Terminal, Desktop Model (UTD) / USB Model (UTU), Manual
iBurst Terminal, Desktop Model (UTD) / USB Model (UTU), Manual
Kyocera Corporation Revision 1.01 --- June.08.2006
- 75 -
Using Utility Software
Using Utility Software Using Utility Software
Using Utility Software
Using Utility Software for Wi
Using Utility Software for WiUsing Utility Software for Wi
Using Utility Software for Windows
ndows ndows
ndows
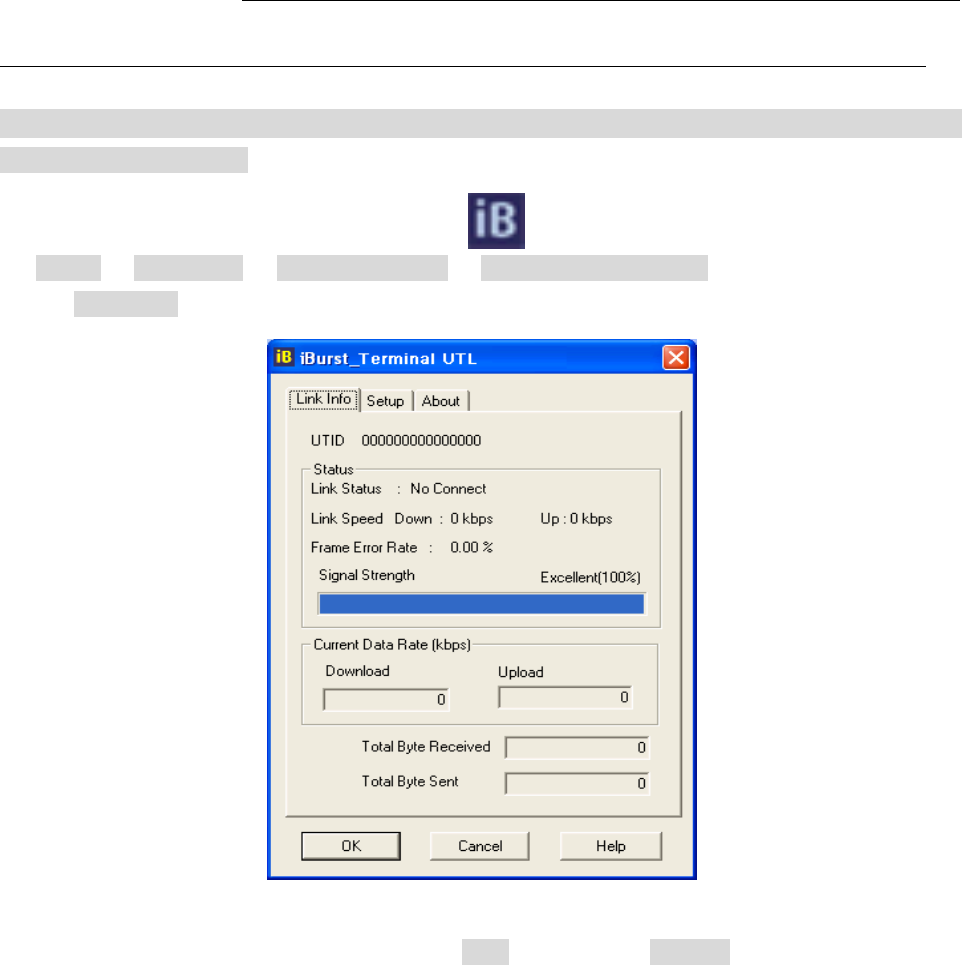
To open the utility dialog.
1. To open the utility dialog, click the icon on the computer’s task tray; or click
[Start] -> [Programs] -> [iBurst Terminal] -> [iBurst_Terminal UTL]. When the dialog opens,
the [Link Info] pane will be displayed as shown below.
2. To close the utility dialog window, click the [OK] button or the [Cancel] button or the ‘X’ button
at upper-right corner of the dialog window.
iBurst Terminal, Desktop Model (UTD) / USB Model (UTU), Manual
iBurst Terminal, Desktop Model (UTD) / USB Model (UTU), Manual iBurst Terminal, Desktop Model (UTD) / USB Model (UTU), Manual
iBurst Terminal, Desktop Model (UTD) / USB Model (UTU), Manual
Kyocera Corporation Revision 1.01 --- June.08.2006
- 76 -
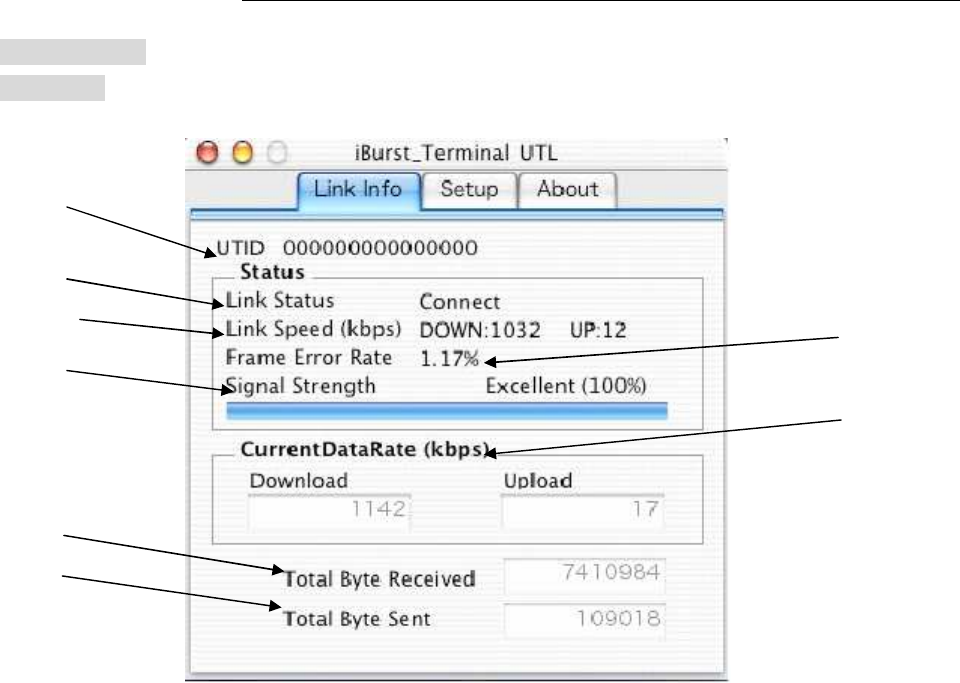
Link Info Pane
[Link Info] pane indicates several communication status about iBurst Terminal.
The following descriptions are about each item on the pane.
(1) UTID
UTIDUTID
UTID
UTID is an identifier assigned to the iBurst Terminal. This will be used for maintenance
support.
(2) Link Status
Link StatusLink Status
Link Status
This indicates current link status between the iBurst Terminal and the access point.
Connect
ConnectConnect
Connect
:
::
:
The link is connected.
No Connect
No ConnectNo Connect
No Connect
: The iBurst Terminal is connected with your PC but the link is not
connected.
No iBurst Terminal
No iBurst TerminalNo iBurst Terminal
No iBurst Terminal
:
::
:
There is no iBurst Terminal connected with your PC.
(3) Link Speed
Link SpeedLink Speed
Link Speed
This indicates current bandwidth allocated automatically between the iBurst Terminal
and a radio base station.
(4) Frame Error Rate
Frame Error RateFrame Error Rate
Frame Error Rate
This indicates current Frame Error Rate on the downlink air.
(1)
(2)
(3)
(4)
(5)
(6)
(7)
(8)

iBurst Terminal, Desktop Model (UTD) / USB Model (UTU), Manual
iBurst Terminal, Desktop Model (UTD) / USB Model (UTU), Manual iBurst Terminal, Desktop Model (UTD) / USB Model (UTU), Manual
iBurst Terminal, Desktop Model (UTD) / USB Model (UTU), Manual
Kyocera Corporation Revision 1.01 --- June.08.2006
- 77 -
(5) Signal Strength
Signal StrengthSignal Strength
Signal Strength
This indicates current signal strength of the received radio signal. The signal bar
indicates the level visually in percentage and the status words are categorized according
to the percent level as follows.
No Signal :
No Signal :No Signal :
No Signal :
0%
Poor :
Poor :Poor :
Poor :
In the range of 1 to 24%
Fair
FairFair
Fair :
: :
:
In the range of 25 to 49%
Good
GoodGood
Good : In the range of 50 to 74%
Excellent
ExcellentExcellent
Excellent :
: :
:
In the range of 75 to 100%
(6) Current Data Rate
Current Data RateCurrent Data Rate
Current Data Rate
This indicates current throughputs on both directions.
(7) Total Byte Received
Total Byte ReceivedTotal Byte Received
Total Byte Received
Total Byte Received indicates the total number of bytes received from the access point
since the communication link is established.
(8) Total Byte Sent
Total Byte SentTotal Byte Sent
Total Byte Sent
Total Byte Sent indicates the total number of bytes transmitted to the access point since
the communication link is established.
iBurst Terminal, Desktop Model (UTD) / USB Model (UTU), Manual
iBurst Terminal, Desktop Model (UTD) / USB Model (UTU), Manual iBurst Terminal, Desktop Model (UTD) / USB Model (UTU), Manual
iBurst Terminal, Desktop Model (UTD) / USB Model (UTU), Manual
Kyocera Corporation Revision 1.01 --- June.08.2006
- 78 -
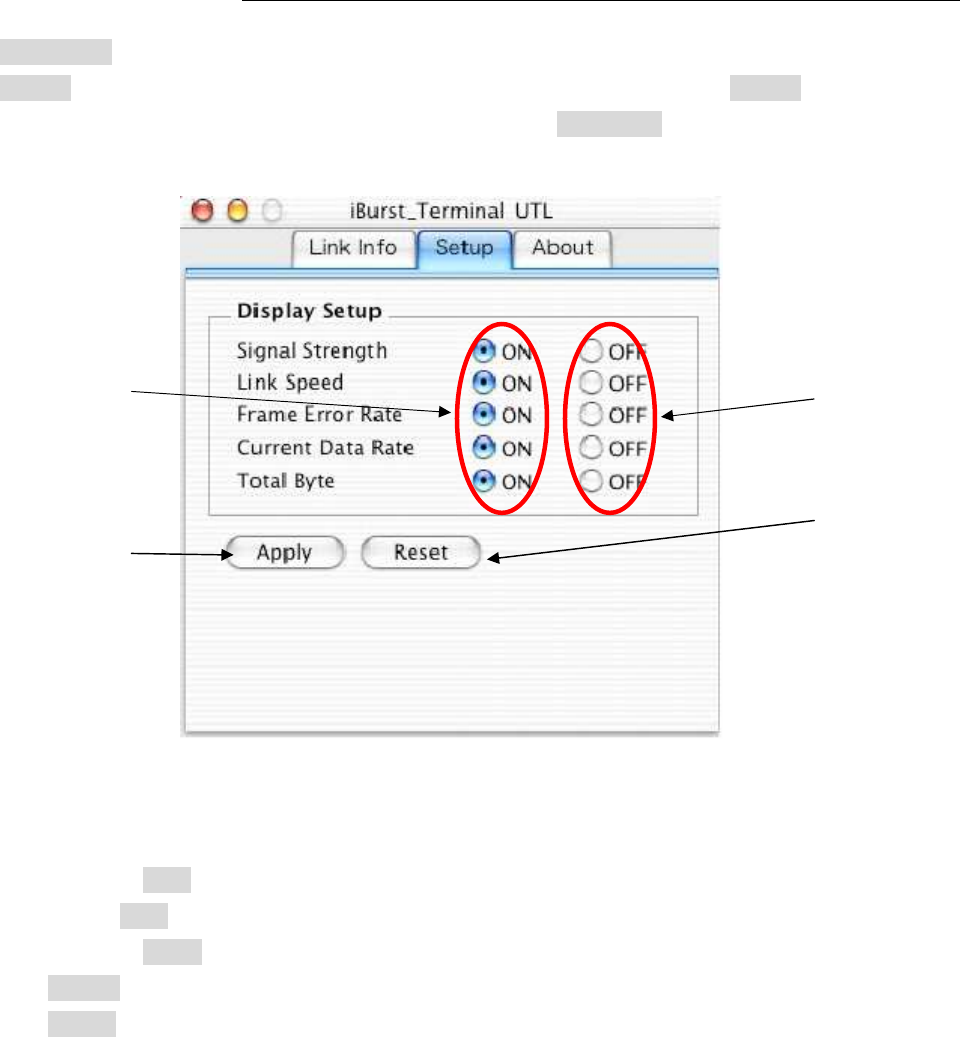
Setup Pane
[Setup] pane can be displayed in the main dialog window by clicking the [Setup] tab. This pane
controls enabling/disabling to show each indicator on the [Link Info] pane.
The following descriptions are about each item on the pane.
(1) Selecting [ON] enables the corresponding indicator on the Link Info pane.
All are [ON] as the default.
(2) Selecting [OFF] disables the corresponding indicator on the Link Info pane.
(3) [Apply] button activates every setting above.
(4) [Reset] button enables and activates all settings above.
(5) [OK] button activates every setting above and close the dialog.
(6) [Cancel] button closes the dialog without activation of the settings.
(1)
(2)
(3)
(4)
(5)
(6)
iBurst Terminal, Desktop Model (UTD) / USB Model (UTU), Manual
iBurst Terminal, Desktop Model (UTD) / USB Model (UTU), Manual iBurst Terminal, Desktop Model (UTD) / USB Model (UTU), Manual
iBurst Terminal, Desktop Model (UTD) / USB Model (UTU), Manual
Kyocera Corporation Revision 1.01 --- June.08.2006
- 79 -
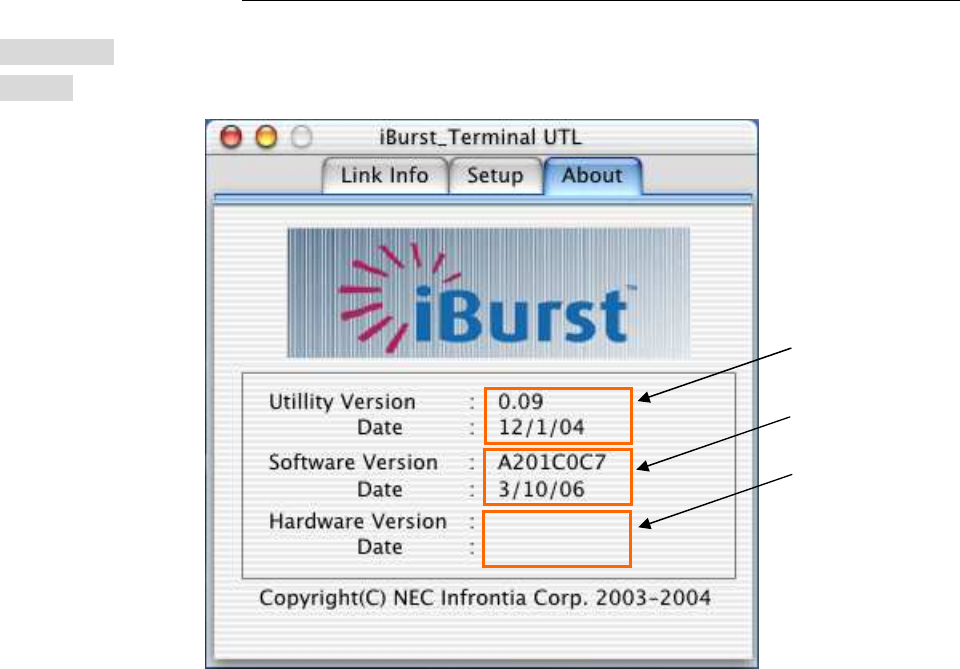
About Pane
[About] pane shows the version information about software, hardware and copyrights.
The following descriptions are about each item on the pane.
(1) This shows the version number and the build date of this Utility Software.
(2) This shows the firmware version and the build date of the iBurst Terminal.
(3) This shows the hardware version and the manufactured date of the iBurst Terminal.
(1)
(2)
(3)
iBurst Terminal, Desktop Model (UTD) / USB Model (UTU), Manual
iBurst Terminal, Desktop Model (UTD) / USB Model (UTU), Manual iBurst Terminal, Desktop Model (UTD) / USB Model (UTU), Manual
iBurst Terminal, Desktop Model (UTD) / USB Model (UTU), Manual
Kyocera Corporation Revision 1.01 --- June.08.2006
- 80 -
Icon Display in task tray
When the Utility Software for iBurst Terminal is running, an icon of the Utility Software will be
displayed in the task tray of the computer monitor according to communication status of the iBurst
Terminal.
The table below shows icons with status descriptions.
Pointing on the iBurst icon on the task tray, a baloon indicates
Link Status, Total Byte Received,
Link Status, Total Byte Received, Link Status, Total Byte Received,
Link Status, Total Byte Received,
Total Byte Sent
Total Byte SentTotal Byte Sent
Total Byte Sent
and
Signal Strength
Signal StrengthSignal Strength
Signal Strength as shown below, but depending on the settings on the [Setup]
pane.
Icon
IconIcon
Icon
Status of
Status ofStatus of
Status of iBurst Terminal
iBurst Terminal iBurst Terminal
iBurst Terminal
iBurst Terminal is not connected with your PC.
There is no transmission nor reception on iBurst Terminal.
iBurst Terminal is transmitting data.
iBurst Terminal is receiving data.
iBurst Terminal is both transmitting and receiving data.
iBurst Terminal, Desktop Model (UTD) / USB Model (UTU), Manual
iBurst Terminal, Desktop Model (UTD) / USB Model (UTU), Manual iBurst Terminal, Desktop Model (UTD) / USB Model (UTU), Manual
iBurst Terminal, Desktop Model (UTD) / USB Model (UTU), Manual
Kyocera Corporation Revision 1.01 --- June.08.2006
- 81 -
Using
Using Using
Using Utility Software for Mac OS
Utility Software for Mac OS Utility Software for Mac OS
Utility Software for Mac OS X
X X
X
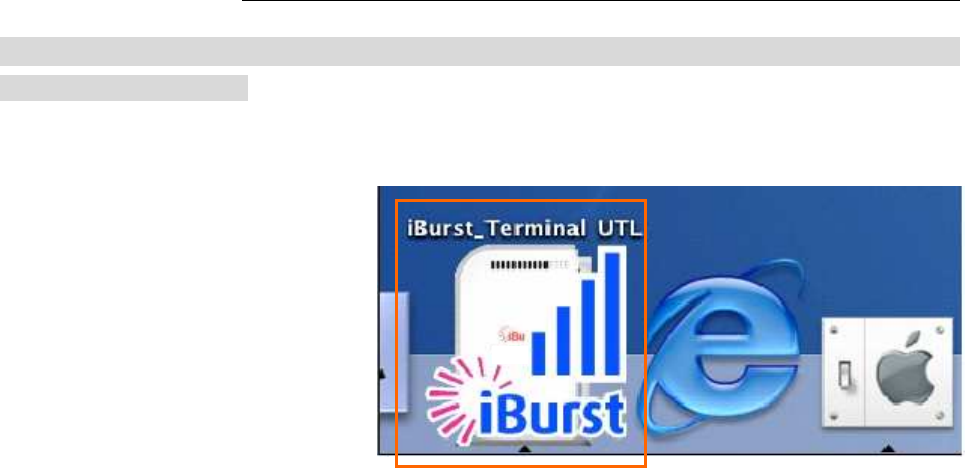
To open the utility dialog.
1. Click the iBurst Terminal UTL icon on the Dock.
2. The iBurst_Terminal UTL dialog appears as shown in next page.
iBurst Terminal, Desktop Model (UTD) / USB Model (UTU), Manual
iBurst Terminal, Desktop Model (UTD) / USB Model (UTU), Manual iBurst Terminal, Desktop Model (UTD) / USB Model (UTU), Manual
iBurst Terminal, Desktop Model (UTD) / USB Model (UTU), Manual
Kyocera Corporation Revision 1.01 --- June.08.2006
- 82 -
Link Info Pane
[Link Info] pane indicates several communication statuses about iBurst Terminal.
The following descriptions are about each item on the pane.
(1) UTID
UTIDUTID
UTID
UTID is an identifier assigned to the iBurst Terminal. This will be used for maintenance
support.
(2) Link Status
Link StatusLink Status
Link Status
This indicates current link status between the iBurst Terminal and the access point.
Connect :
Connect :Connect :
Connect :
The link is connected.
No Connect
No Connect No Connect
No Connect : The iBurst Terminal is connected with your PC but the link is not
connected.
No iBurst Term
No iBurst TermNo iBurst Term
No iBurst Terminal :
inal :inal :
inal :
There is no iBurst Terminal connected with your PC.
(3) Link Speed
Link SpeedLink Speed
Link Speed
This indicates current bandwidth allocated automatically between the iBurst Terminal
and a radio base station.
(4) Frame Error Rate
Frame Error RateFrame Error Rate
Frame Error Rate
This indicates current Frame Error Rate on the downlink air.
(1)
(2)
(3) (4)
(5)
(6)
(7)
(8)

iBurst Terminal, Desktop Model (UTD) / USB Model (UTU), Manual
iBurst Terminal, Desktop Model (UTD) / USB Model (UTU), Manual iBurst Terminal, Desktop Model (UTD) / USB Model (UTU), Manual
iBurst Terminal, Desktop Model (UTD) / USB Model (UTU), Manual
Kyocera Corporation Revision 1.01 --- June.08.2006
- 83 -
(5) Signal Strength
Signal StrengthSignal Strength
Signal Strength
This indicates current signal strength of the received radio signal. The signal bar
indicates the level visually in percentage and the status words are categorized according
to the percent level as follows.
No Signal :
No Signal :No Signal :
No Signal :
0%
Poor :
Poor :Poor :
Poor :
In the range of 1 to 24%
Fair :
Fair :Fair :
Fair :
In the range of 25 to 49%
Good
GoodGood
Good : In the range of 50 to 74%
Excellent :
Excellent :Excellent :
Excellent :
In the range of 75 to 100%
(6) Current Data Rate
Current Data RateCurrent Data Rate
Current Data Rate
This indicates current throughputs on both directions.
(7) Total Byte Received
Total Byte ReceivedTotal Byte Received
Total Byte Received
Total Byte Received indicates the total number of bytes received from the access point
since the communication link is established.
(8) Total Byte Sent
Total Byte SentTotal Byte Sent
Total Byte Sent
Total Byte Sent indicates the total number of bytes transmitted to the access point since
the communication link is established.
iBurst Terminal, Desktop Model (UTD) / USB Model (UTU), Manual
iBurst Terminal, Desktop Model (UTD) / USB Model (UTU), Manual iBurst Terminal, Desktop Model (UTD) / USB Model (UTU), Manual
iBurst Terminal, Desktop Model (UTD) / USB Model (UTU), Manual
Kyocera Corporation Revision 1.01 --- June.08.2006
- 84 -
Setup Pane
[Setup] pane can be displayed in the main dialog window by clicking the [Setup] tab. This pane
controls enabling/disabling to show each indicator on the [Link Info] pane.
The following descriptions are about each item on the pane.
(1) Selecting [ON] enables the corresponding indicator on the Link Info pane.
All are [ON] as the default.
(2) Selecting [OFF] disables the corresponding indicator on the Link Info pane.
(3) [Apply] button activates every setting above.
(4) [Reset] button enables and activates all settings above.
(1) (2)
(3)
(4)
iBurst Terminal, Desktop Model (UTD) / USB Model (UTU), Manual
iBurst Terminal, Desktop Model (UTD) / USB Model (UTU), Manual iBurst Terminal, Desktop Model (UTD) / USB Model (UTU), Manual
iBurst Terminal, Desktop Model (UTD) / USB Model (UTU), Manual
Kyocera Corporation Revision 1.01 --- June.08.2006
- 85 -
About Pane
[About] pane shows the version information about software, hardware and copyrights.
The following descriptions are about each item on the pane.
(1) This shows the version number and the build date of this Utility Software.
(2) This shows the firmware version and the build date of the iBurst Terminal.
(3) This shows the hardware version and the manufactured date of the iBurst Terminal.
1.0
3/24/06
(1)
(2)
(3)
iBurst Terminal, Desktop Model (UTD) / USB Model (UTU), Manual
iBurst Terminal, Desktop Model (UTD) / USB Model (UTU), Manual iBurst Terminal, Desktop Model (UTD) / USB Model (UTU), Manual
iBurst Terminal, Desktop Model (UTD) / USB Model (UTU), Manual
Kyocera Corporation Revision 1.01 --- June.08.2006
- 86 -
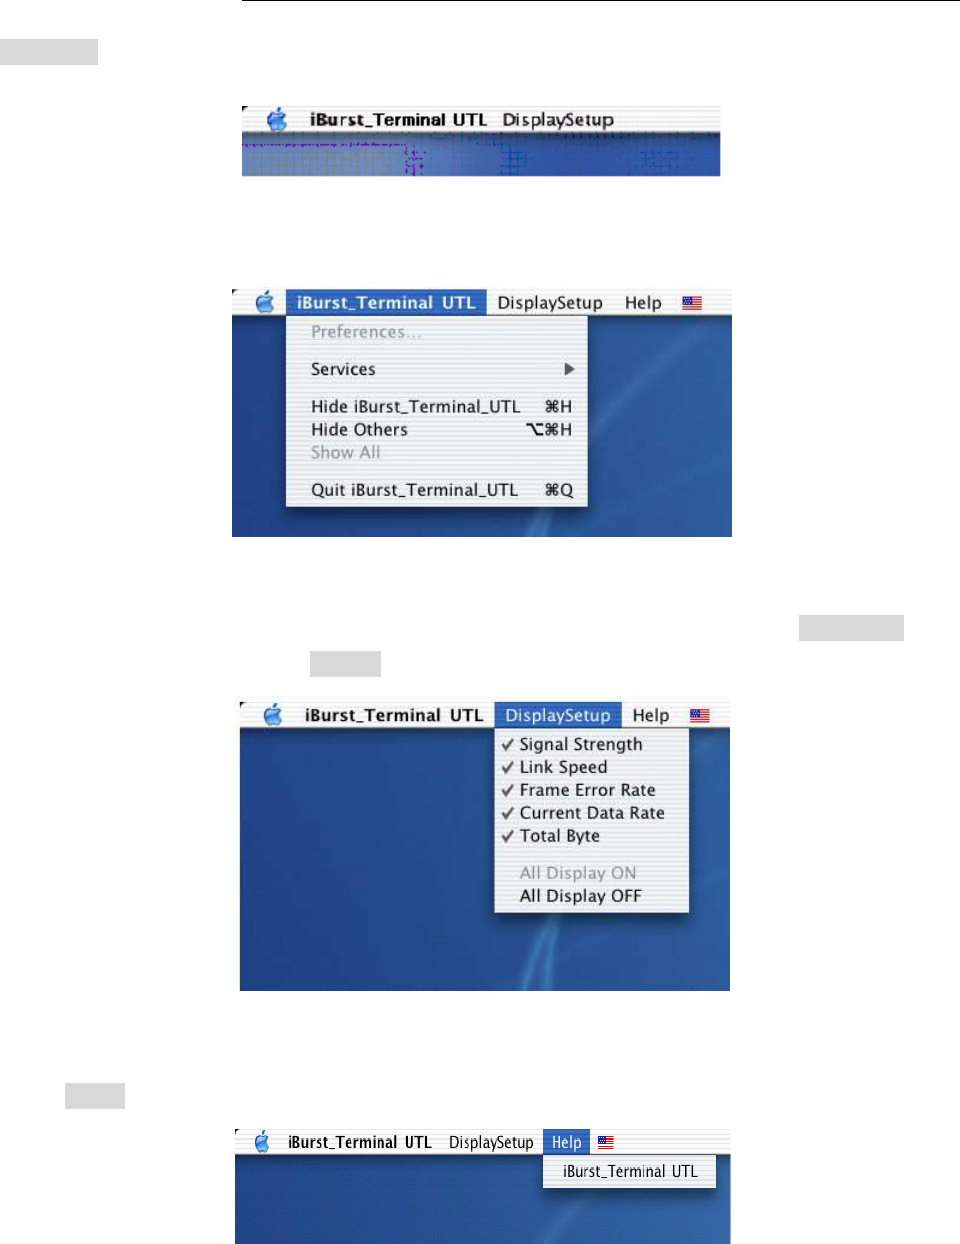
Menu Bar
It will be displayed while the iBurst Terminal utility is active.
(1) iBurst_Terminal UTL menu
The menu is used to quit the iBurst Terminal utility or to perform other operations.
(2) DisplaySetup menu
The menu is used to control enabling/disabling to show each indication on the [Link Info] pane.
The function is the same as the [Setup] pane of the dialog.
(3) Help menu
The [Help] window will appear when help menu is selected.

iBurst Terminal, Desktop Model (UTD) / USB Model (UTU), Manual
iBurst Terminal, Desktop Model (UTD) / USB Model (UTU), Manual iBurst Terminal, Desktop Model (UTD) / USB Model (UTU), Manual
iBurst Terminal, Desktop Model (UTD) / USB Model (UTU), Manual
Kyocera Corporation Revision 1.01 --- June.08.2006
- 87 -
Icon Display on the Dock
When the Utility Software for iBurst Terminal is running, an icon of the Utility Software will be
displayed in the task tray of the computer monitor according to communication status of the iBurst
Terminal.
The table below shows icons with status descriptions.
Icon
IconIcon
Icon
Activities on iBurst Terminal
Activities on iBurst TerminalActivities on iBurst Terminal
Activities on iBurst Terminal
iBurst Terminal is not connected with your PC.
iBurst Terminal is connected with your PC, but No Signal received.
iBurst Terminal is connected with your PC,and Signal Strength is Poor.
iBurst Terminal is connected with your PC,and Signal Strength is Fair.
iBurst Terminal is connected with your PC,and Signal Strength is Good.
iBurst Terminal is connected with your PC,and Signal Strength is
Excellent.

iBurst Terminal, Desktop Model (UTD) / USB Model (UTU), Manual
iBurst Terminal, Desktop Model (UTD) / USB Model (UTU), Manual iBurst Terminal, Desktop Model (UTD) / USB Model (UTU), Manual
iBurst Terminal, Desktop Model (UTD) / USB Model (UTU), Manual
Kyocera Corporation Revision 1.01 --- June.08.2006
- 88 -
Status Indication over Ethernet
Status Indication over Ethernet Status Indication over Ethernet
Status Indication over Ethernet
Introduction
In case that you want to make an IP connectivity through Ethernet, not through USB, you can see
statuses of iBurst Terminal on a web browser instead of iBurst Utility software. In this case, you
need to follow the steps described in this section.
Attention
Since the Ethernet port of an iBurst Terminal has a fixed IP address, 192.168.250.55 as default, it
is strongly recommended to isolate both the iBurst Terminal and your PC from a live Ethernet
network in order to avoid any network trouble.
Information
You can use a straight, not cross, cable to connect between the iBurst Terminal and your PC, it
means that the Ethernet port of an iBurst Terminal has a interface like as a HUB.
Procedure
1. To enable communication with the iBurst Terminal, you have to change IP address of your PC.
<In case Windows XP>
1) Click “Start” -> “Control Panel” to open that.
2) Click “Network and Internet Connections” to open that.
3) Click “Network Connections” to open that.
4) Double click the name of the Ethernet port you want to use which should be listed at “LAN
or High-Speed Internet”.
5) “Local Area Connection Status” dialog will appear. On “General” tab in the dialog, click
“Properties”.
6) “Local Area Connection Properties” dialog will appear. On “General” tab in the dialog, select
“Internet Protocol (TCP/IP)” and click “Properties” button. “Internet Protocol (TCP/IP)
Properties” dialog will appear.
7) On “General” tab in the dialog, select “Use the following IP address:” and specify IP address
and Subnet Mask according to network plan. In case of connecting directly between the
iBurst Terminal and your PC, the settings shown below are recommended as an example.
IP address: 192.168.250.1
Subnet mask: 255.255.255.0
Default gateway: (blank)
8) Click “OK” to close the TCP/IP properties.
9) Click “OK” to close the connection properties.
10) Close “Network Connections” window.

iBurst Terminal, Desktop Model (UTD) / USB Model (UTU), Manual
iBurst Terminal, Desktop Model (UTD) / USB Model (UTU), Manual iBurst Terminal, Desktop Model (UTD) / USB Model (UTU), Manual
iBurst Terminal, Desktop Model (UTD) / USB Model (UTU), Manual
Kyocera Corporation Revision 1.01 --- June.08.2006
- 89 -
<In case Windows 2000>
1) Click “Start” -> “Settings” -> “Control Panel” to open that.
2) Double click “Network and Dial-up Connections” to open that.
3) Double click the connection of the Ethernet port you want to use. In general case, the
name should be “Local Area Connection”. A properties dialog will appear.
4) On “General” tab in the dialog, select “Internet Protocol (TCP/IP)” and click “Properties”
button. “Internet Protocol (TCP/IP) Properties” dialog will appear.
5) On “General” tab in the dialog, select “Use the following IP address:” and specify IP address
and Subnet Mask according to your network plan. In case of connecting directly between
the iBurst Terminal and your PC, the settings shown below are recommended as an
example.
IP address: 192.168.250.1
Subnet mask: 255.255.255.0
Default gateway: (blank)
6) Click “OK” to close the TCP/IP properties.
7) Click “OK” to close the Ethernet Connection properties.
8) Close “Network and Dial-up Connections” window.
<In case Windows Me/98SE>
1) Click “Start” -> “Settings” -> “Control Panel” to open that.
2) Double click “Network” to open that.
3) On “Configuration” tab in the dialog, select “TCP/IP -> [the name of the network
adapter/card]” and click “Properties” button. “TCP/IP Properties” dialog will appear.
4) On “IP Address” tab in the dialog, select “Specify an IP address:” and specify IP address and
Subnet Mask according to your network plan. In case of connecting directly between the
iBurst Terminal and your PC, the settings shown below are recommended as an example.
IP address: 192.168.250.1
Subnet mask: 255.255.255.0
Default gateway: (blank)
5) Click “OK” to close the TCP/IP properties.
6) Click “OK” to close “Network” dialog.

iBurst Terminal, Desktop Model (UTD) / USB Model (UTU), Manual
iBurst Terminal, Desktop Model (UTD) / USB Model (UTU), Manual iBurst Terminal, Desktop Model (UTD) / USB Model (UTU), Manual
iBurst Terminal, Desktop Model (UTD) / USB Model (UTU), Manual
Kyocera Corporation Revision 1.01 --- June.08.2006
- 90 -
<In case Mac OS X>
1) Click “System Preferences” on the dock or click the APPLE icon on the top menu and click
“System Preferences…” to open that.
2) Click “Network” icon to open that.
3) At the pull-down menu of “Show:”, select the Ethernet port you want to use. In general
case, the name should be “Built-in Ethernet”.
4) Select “PPPoE” tab on the dialog and disable “Connect using PPPoE”.
5) Select “TCP/IP” tab on the dialog.
6) At the pull-down menu of “Configure:”, select “Manually”.
7) Specify IP address and Subnet Mask according to your network plan. In case of
connecting directly between the iBurst Terminal and your PC, the settings shown below are
recommended as an example.
IP address: 192.168.250.1
Subnet mask: 255.255.255.0
Router: (blank)
8) Click “Apply Now” button.
9) Close “Network” window.
2. Open a web browser, e.g. Internet Explorer.
3. Specify a URL as follows.
http://192.168.250.55/
NOTE: Even though you change IP address of the iBurst Terminal, the iBurst Terminal
hold the default IP address. So, the default IP address cannot be used for the
other equipment in the network connected. The URL will jump automatically to
the IP address you changed.
4. Now, you are seeing information in the iBurst Terminal. The structure of the information
pages is as follows.
IP Address Setting
Jump Link Information
Link Information
Configuration
Help
Help
iBurst Terminal, Desktop Model (UTD) / USB Model (UTU), Manual
iBurst Terminal, Desktop Model (UTD) / USB Model (UTU), Manual iBurst Terminal, Desktop Model (UTD) / USB Model (UTU), Manual
iBurst Terminal, Desktop Model (UTD) / USB Model (UTU), Manual
Kyocera Corporation Revision 1.01 --- June.08.2006
- 91 -
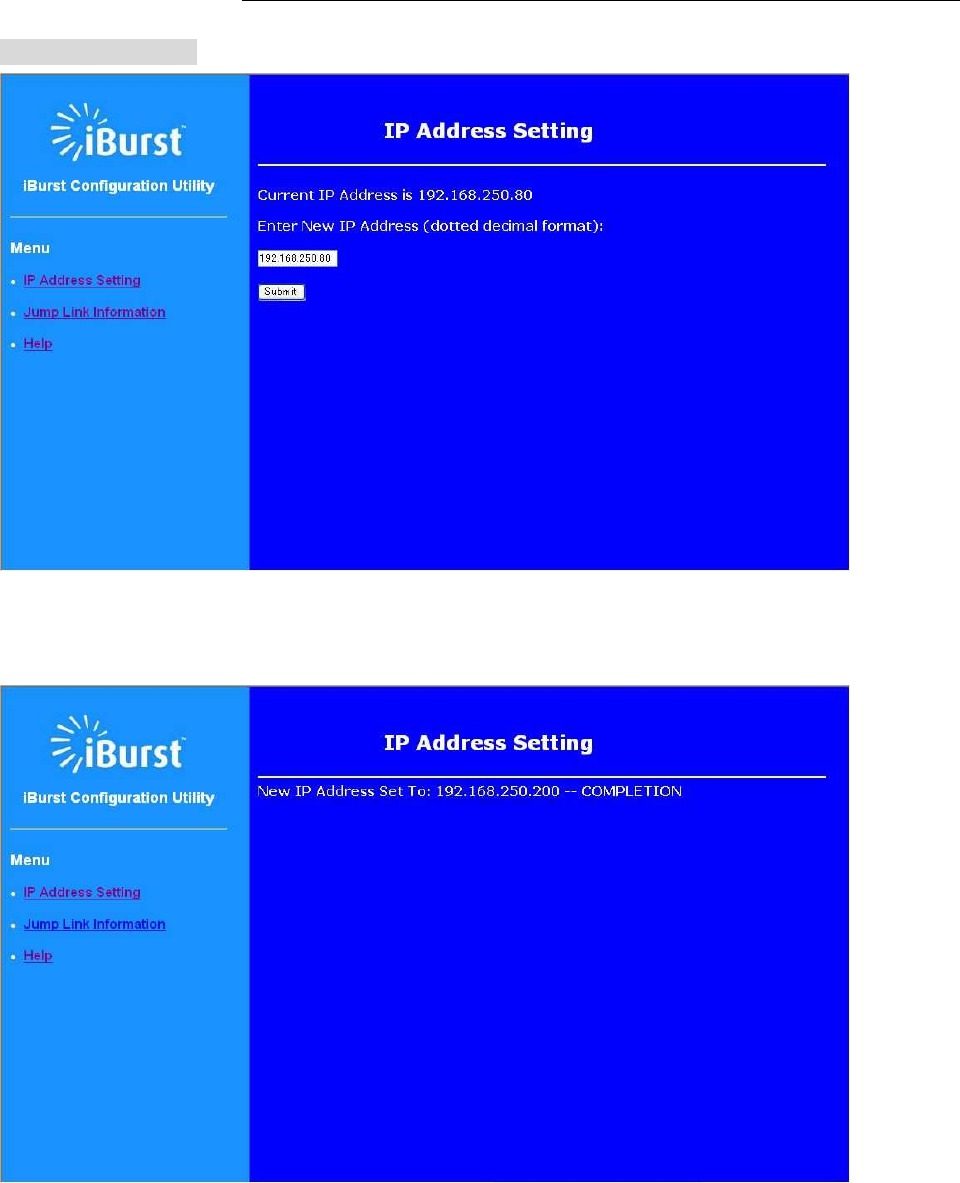
[IP Address Setting]
This page shows current IP address of the iBurst Terminal. You can change the IP address on
this page. To change it, type new IP address and click “Submit” button. The page shown below
will be shown.
iBurst Terminal, Desktop Model (UTD) / USB Model (UTU), Manual
iBurst Terminal, Desktop Model (UTD) / USB Model (UTU), Manual iBurst Terminal, Desktop Model (UTD) / USB Model (UTU), Manual
iBurst Terminal, Desktop Model (UTD) / USB Model (UTU), Manual
Kyocera Corporation Revision 1.01 --- June.08.2006
- 92 -
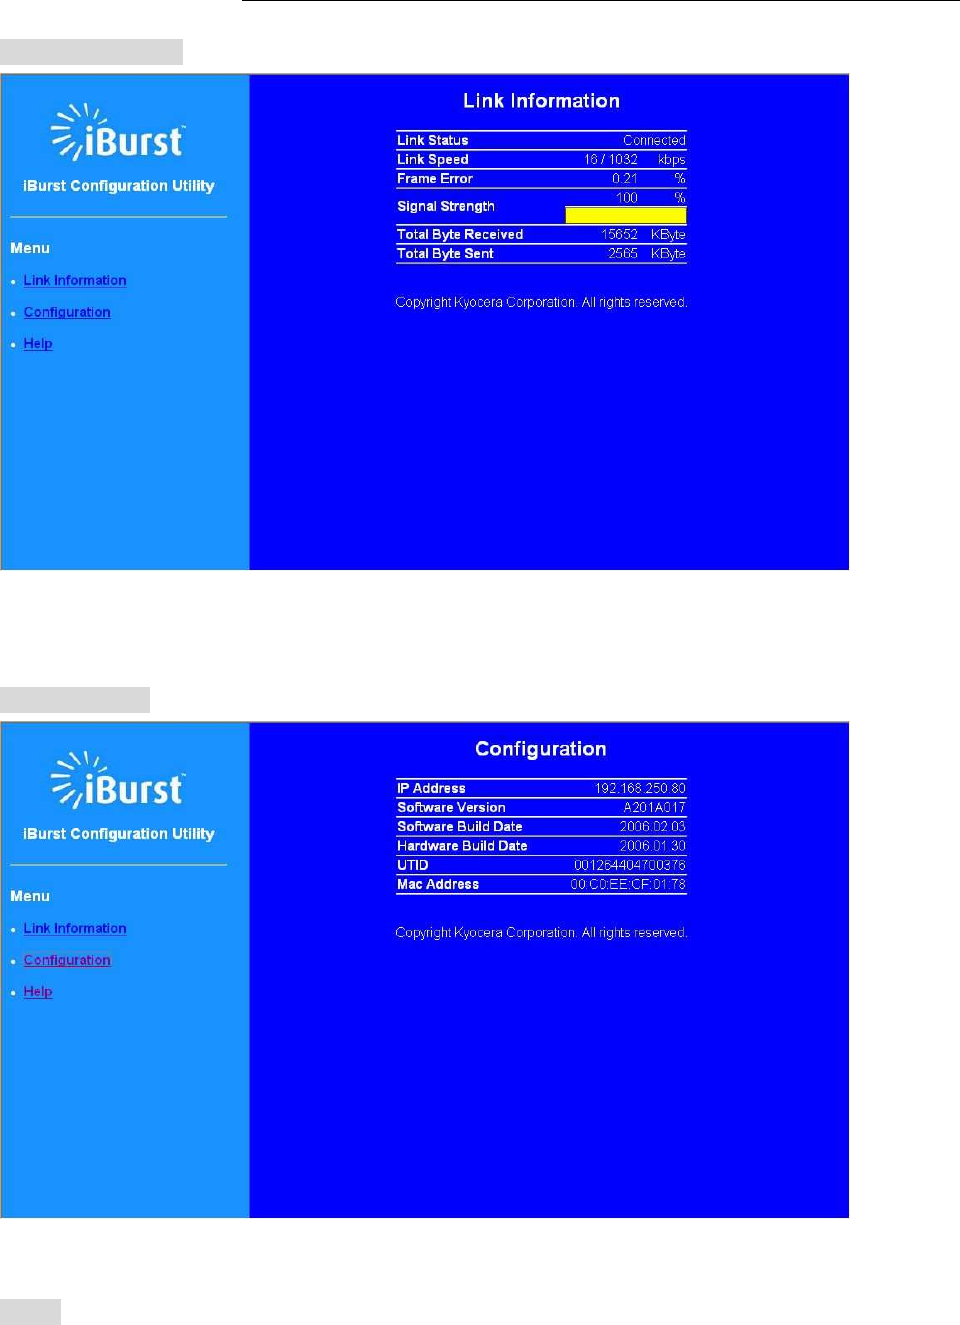
[Link Information]
This page indicates similar information described in page 75 of iBurst Terminal utility software.
** All information will be updated every 5 seconds.
[Configuration]
This page indicates similar information described in page 78 of iBurst Terminal utility software.
[Help]
This navigates you to see the web pages.

iBurst Terminal, Desktop Model (UTD) / USB Model (UTU), Manual
iBurst Terminal, Desktop Model (UTD) / USB Model (UTU), Manual iBurst Terminal, Desktop Model (UTD) / USB Model (UTU), Manual
iBurst Terminal, Desktop Model (UTD) / USB Model (UTU), Manual
Kyocera Corporation Revision 1.01 --- June.08.2006
- 93 -
Chapte
ChapteChapte
Chapter 4 MTU Optimizer Software & Network
r 4 MTU Optimizer Software & Network r 4 MTU Optimizer Software & Network
r 4 MTU Optimizer Software & Network P
PP
Property
ropertyroperty
roperty
This chapter describes the features and usage of the MTU
This chapter describes the features and usage of the MTU This chapter describes the features and usage of the MTU
This chapter describes the features and usage of the MTU
Optimizer Software
Optimizer SoftwareOptimizer Software
Optimizer Software
for iBurst Terminal.
for iBurst Terminal.for iBurst Terminal.
for iBurst Terminal.
iBurst Terminal, Desktop Model (UTD) / USB Model (UTU), Manual
iBurst Terminal, Desktop Model (UTD) / USB Model (UTU), Manual iBurst Terminal, Desktop Model (UTD) / USB Model (UTU), Manual
iBurst Terminal, Desktop Model (UTD) / USB Model (UTU), Manual
Kyocera Corporation Revision 1.01 --- June.08.2006
- 94 -
MTU Optimizer Software & Network Property
MTU Optimizer Software & Network Property MTU Optimizer Software & Network Property
MTU Optimizer Software & Network Property
MTU optimizer software measures the optimized packet size between your PC and a HOST. It is
recommended to tune MTU size in order to avoid any throughput problem. This function is a part
of Kyocera PPPoE dialer and it is available on Windows 98SE, ME and 2000.
NOTE: You need to make a Internet connection through the iBurst Terminal prior to
start this procedure.
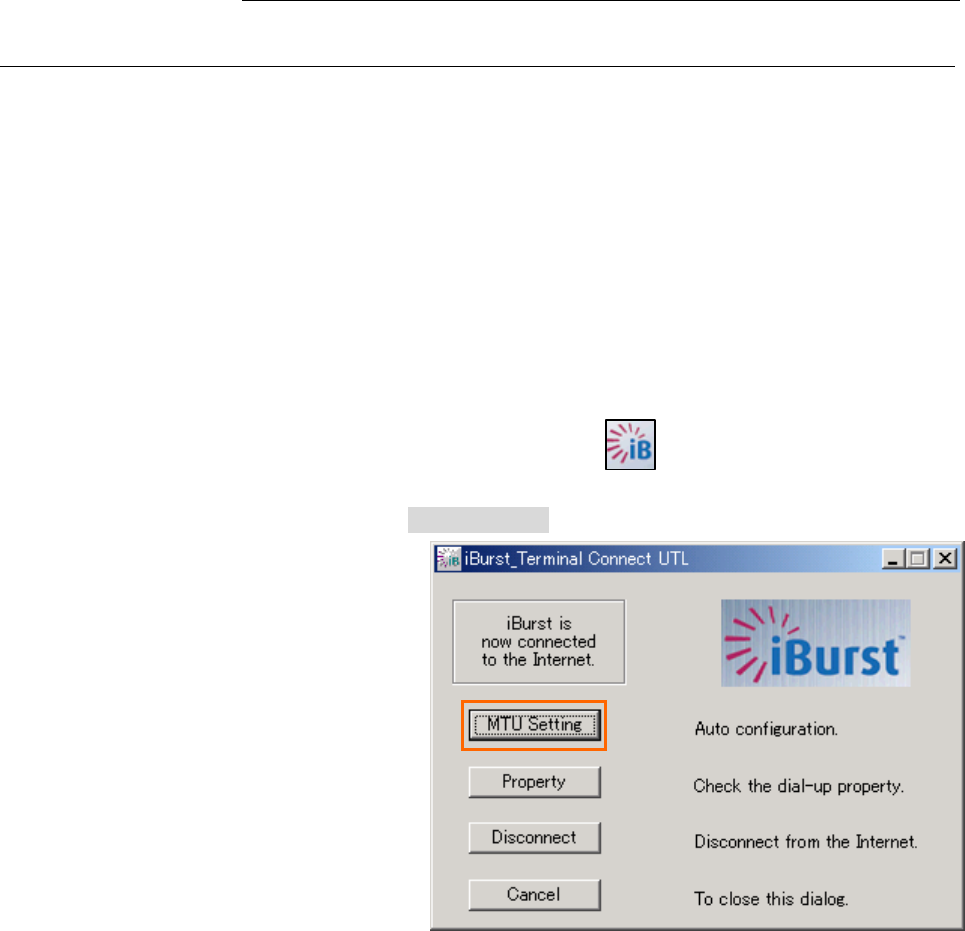
1. While your PC is being connected to the Internet through the iBurst Terminal, double click the
iBurst connection utility icon.
2. When the dialog will appear, click the [MTU Setting] button.
NOTE: ‘Property’ to open properties of the dial-up connection for iBurst Terminal.
‘Disconnect’ to disconnect from the Internet.
‘Cancel’ to close the dialog.
iBurst Terminal, Desktop Model (UTD) / USB Model (UTU), Manual
iBurst Terminal, Desktop Model (UTD) / USB Model (UTU), Manual iBurst Terminal, Desktop Model (UTD) / USB Model (UTU), Manual
iBurst Terminal, Desktop Model (UTD) / USB Model (UTU), Manual
Kyocera Corporation Revision 1.01 --- June.08.2006
- 95 -
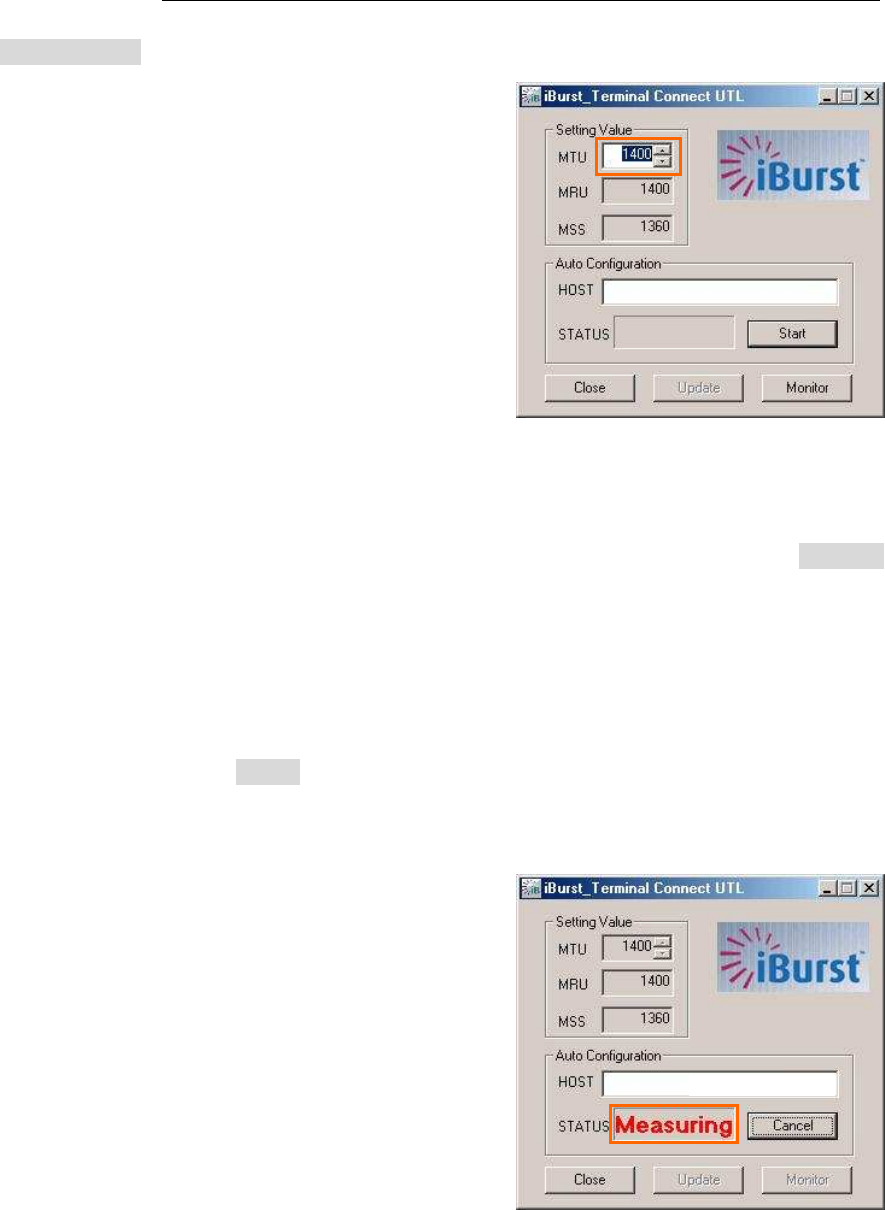
3. The [MTU Setting] dialog is as follows.
4. There are 2 methods to decide MTU size, i.e. manually or automatically.
5. If you want to change MTU size manually, type a value in the MTU field and click the [Update]
button. Your PC may request to restart it.
6. If you want to optimize MTU size automatically,
A) type a target URL or an IP address of the HOST, which will be notified by the network
operator, and click the [Start] button.
B) The optimizer starts measuring and every value will be varied automatically.
NOTE: ‘Cancel’ to stop measuring.
XXX.XXX.XXX.XXX
iBurst Terminal, Desktop Model (UTD) / USB Model (UTU), Manual
iBurst Terminal, Desktop Model (UTD) / USB Model (UTU), Manual iBurst Terminal, Desktop Model (UTD) / USB Model (UTU), Manual
iBurst Terminal, Desktop Model (UTD) / USB Model (UTU), Manual
Kyocera Corporation Revision 1.01 --- June.08.2006
- 96 -
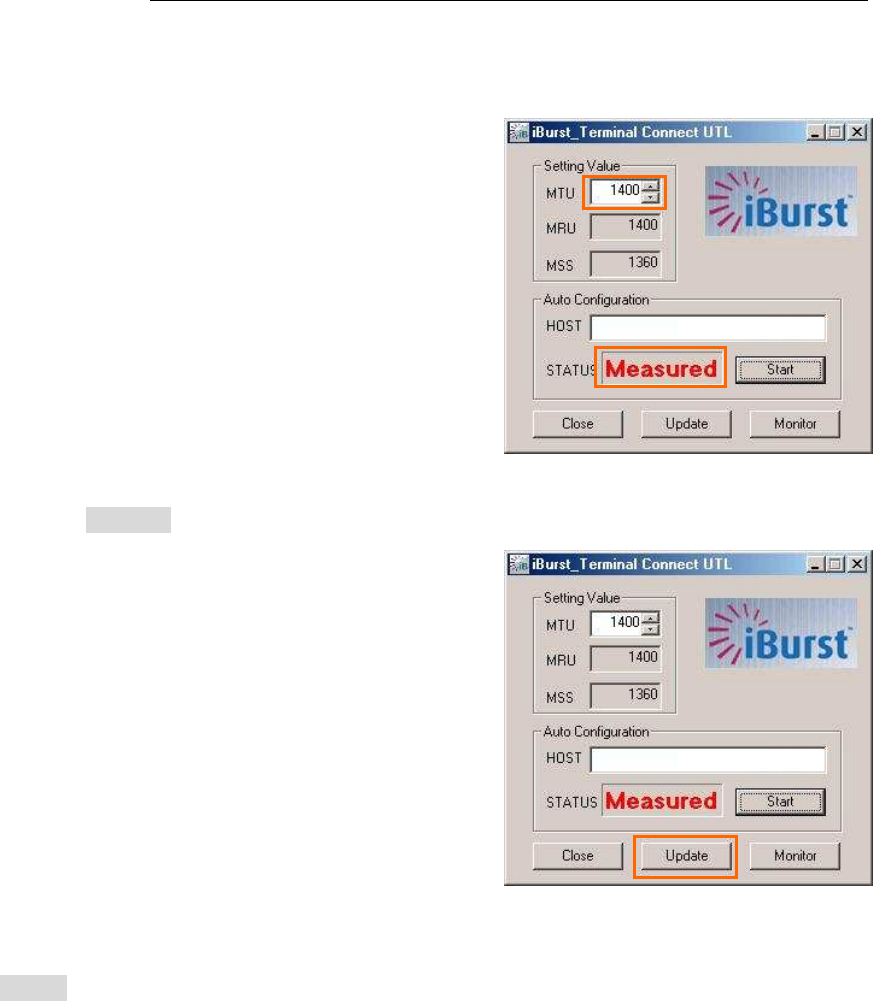
C) The optimizer will finish automatically with a result of the optimized MTU size in the
MTU field.
D) Click the [Update] button to memorize into your PC. Your PC may request to restart it.
NOTE: ‘Monitor’ to revoke the result and show the current memorized MTU size.
7. Click [Close] to close the dialog.
8. If you updated, you need to restart your PC to take effect.
XXX.XXX.XXX.XXX
XXX.XXX.XXX.XXX

iBurst Terminal, Desktop Model (UTD) / USB Model (UTU), Manual
iBurst Terminal, Desktop Model (UTD) / USB Model (UTU), Manual iBurst Terminal, Desktop Model (UTD) / USB Model (UTU), Manual
iBurst Terminal, Desktop Model (UTD) / USB Model (UTU), Manual
Kyocera Corporation Revision 1.01 --- June.08.2006
- 97 -
Chapter 5 Uninstallation
Chapter 5 UninstallationChapter 5 Uninstallation
Chapter 5 Uninstallation
This chapter describes how to uninstall
This chapter describes how to uninstall This chapter describes how to uninstall
This chapter describes how to uninstall iBurst software
iBurst softwareiBurst software
iBurst software.
..
.
iBurst Terminal, Desktop Model (UTD) / USB Model (UTU), Manual
iBurst Terminal, Desktop Model (UTD) / USB Model (UTU), Manual iBurst Terminal, Desktop Model (UTD) / USB Model (UTU), Manual
iBurst Terminal, Desktop Model (UTD) / USB Model (UTU), Manual
Kyocera Corporation Revision 1.01 --- June.08.2006
- 98 -
iBusrt Software Uninstallatio
iBusrt Software UninstallatioiBusrt Software Uninstallatio
iBusrt Software Uninstallation
n n
n
Uninstallation for Windows XP/200
Uninstallation for Windows XP/200Uninstallation for Windows XP/200
Uninstallation for Windows XP/2000
0 0
0
NOTE: All screen copies in this section are examples on Windows XP.
1. Close all programs that are currently running.
2. Disconnect the iBurst Terminal with your PC.
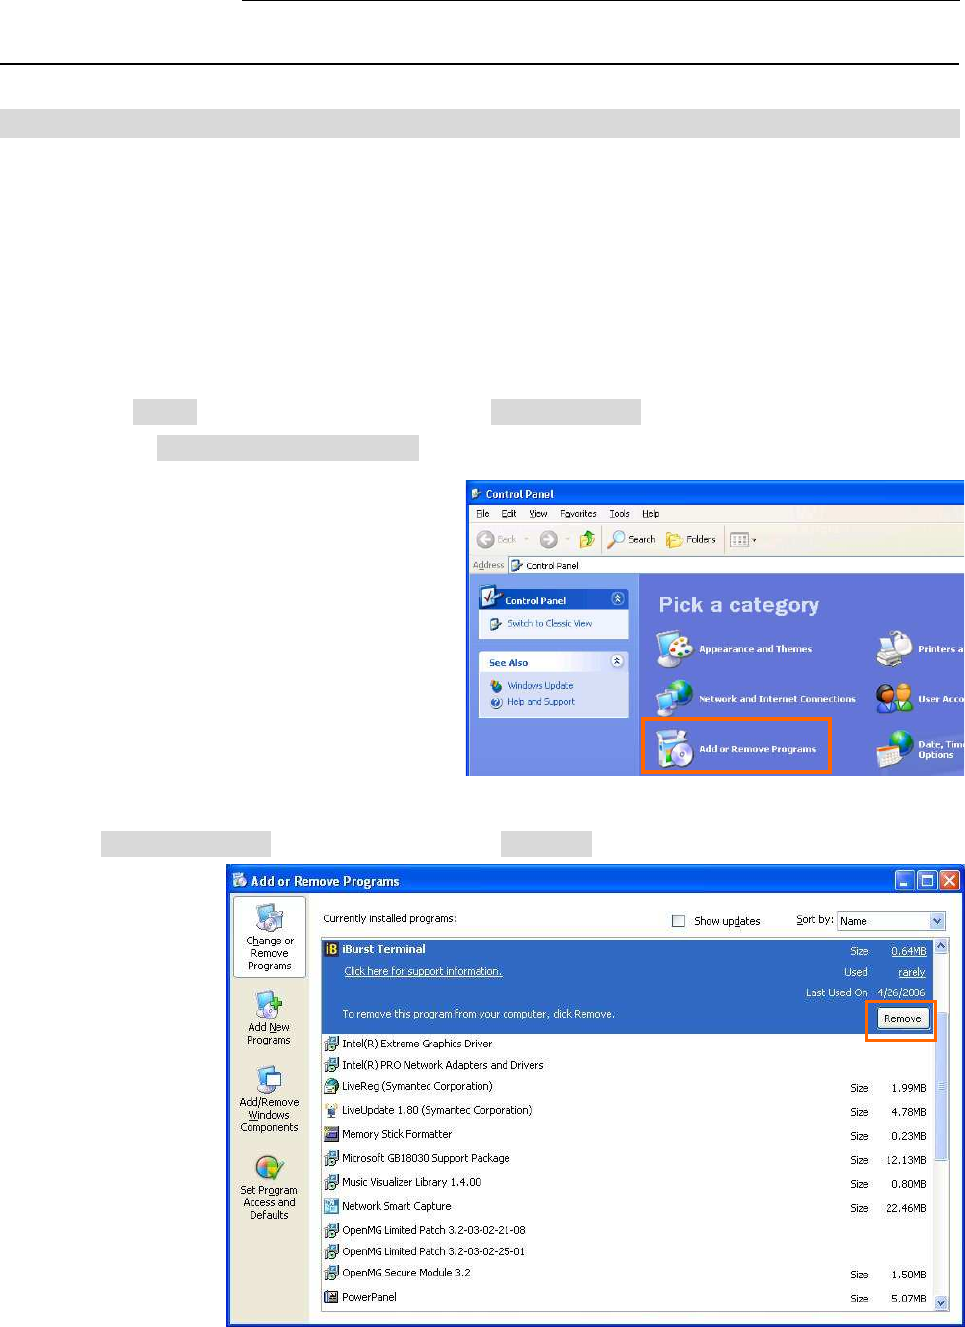
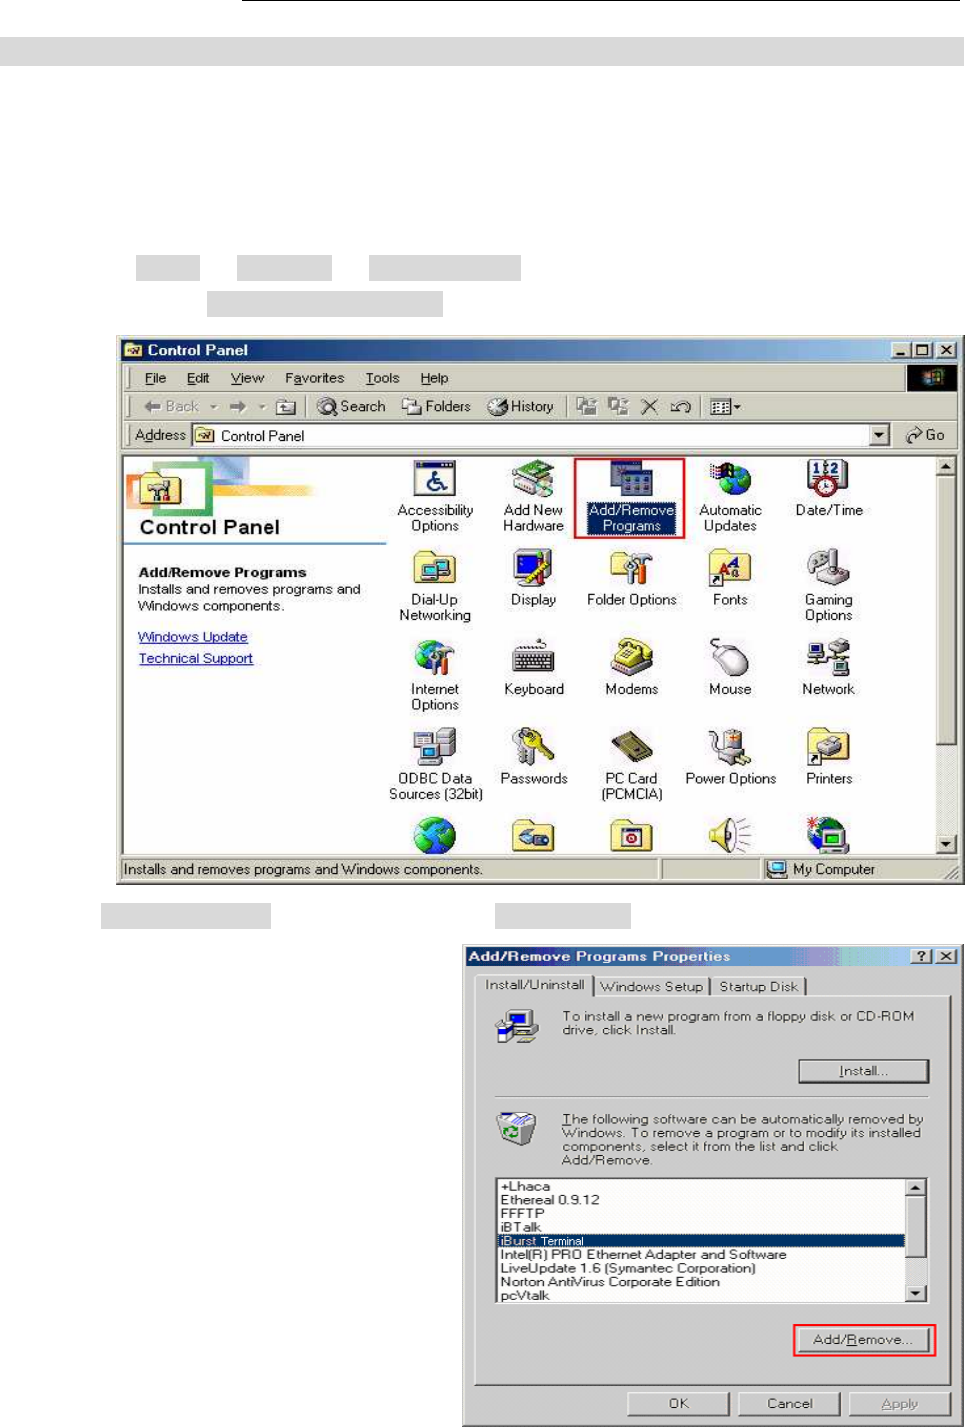
3. Click the [Start] button, followed by selecting [Control Panel] to open Control Panel, and then
double click [Add or Remove Programs].
4. Select [iBurst Terminal] software, and click the [Remove] button.
iBurst Terminal, Desktop Model (UTD) / USB Model (UTU), Manual
iBurst Terminal, Desktop Model (UTD) / USB Model (UTU), Manual iBurst Terminal, Desktop Model (UTD) / USB Model (UTU), Manual
iBurst Terminal, Desktop Model (UTD) / USB Model (UTU), Manual
Kyocera Corporation Revision 1.01 --- June.08.2006
- 99 -
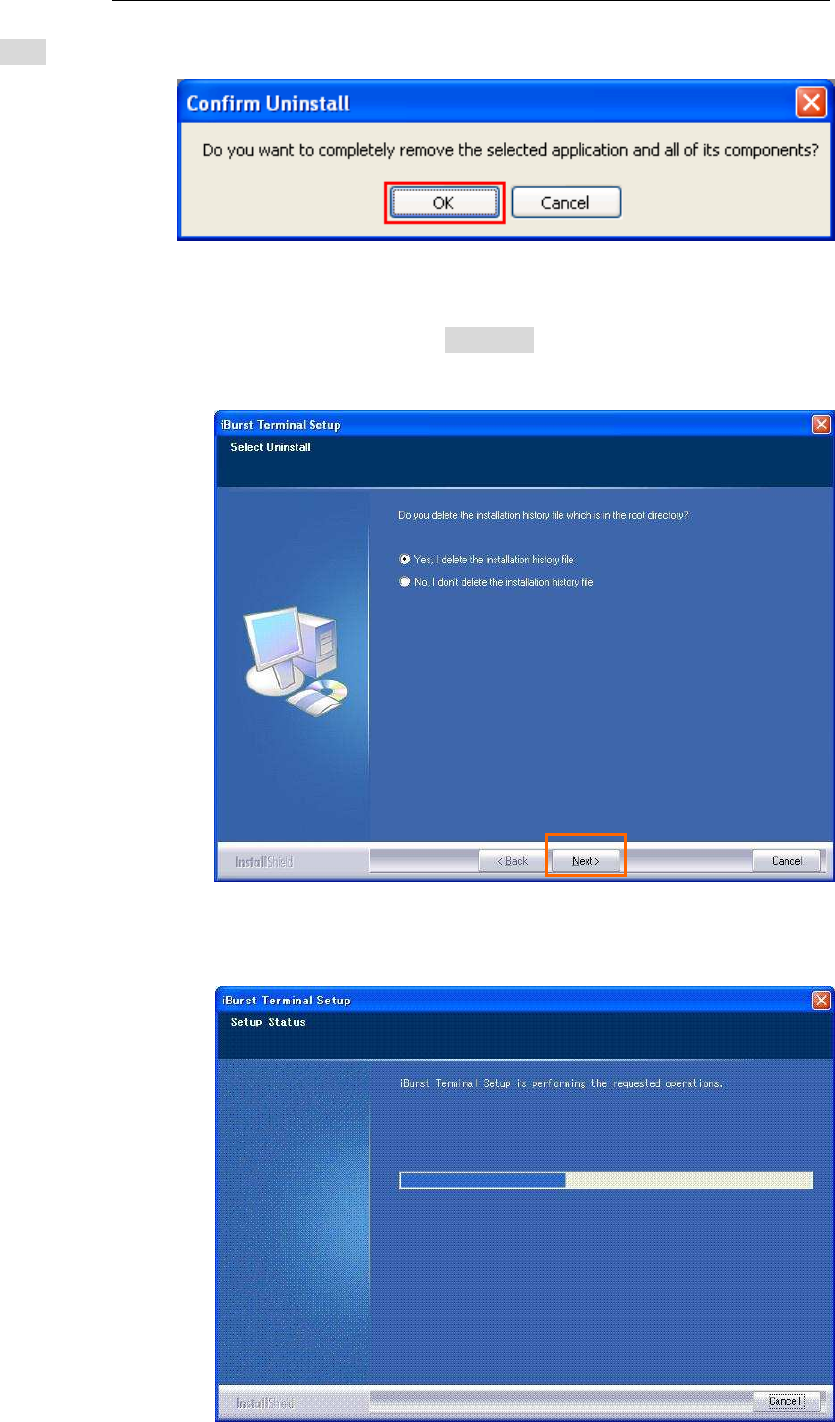
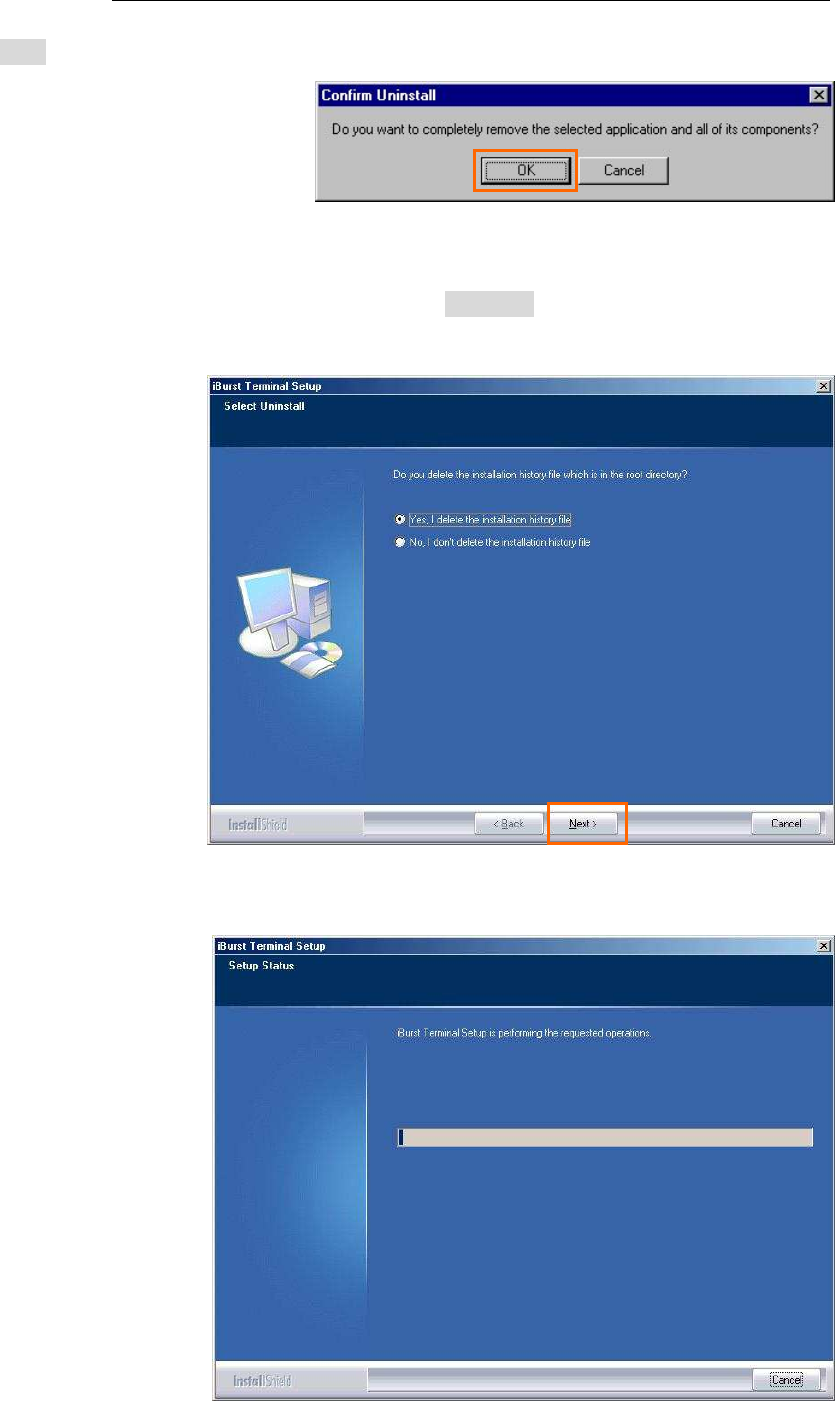
5. Click the [OK] button after appearing dialog window as shown below.
6. The following dialog window will appear, and select to delete or not to delete installation
history files before uninstallation, then click the [Next >] button. Selecting “Yes” is
recommended.
7. The following dialog window will appear, and uninstallation of software begins.
iBurst Terminal, Desktop Model (UTD) / USB Model (UTU), Manual
iBurst Terminal, Desktop Model (UTD) / USB Model (UTU), Manual iBurst Terminal, Desktop Model (UTD) / USB Model (UTU), Manual
iBurst Terminal, Desktop Model (UTD) / USB Model (UTU), Manual
Kyocera Corporation Revision 1.01 --- June.08.2006
- 100 -
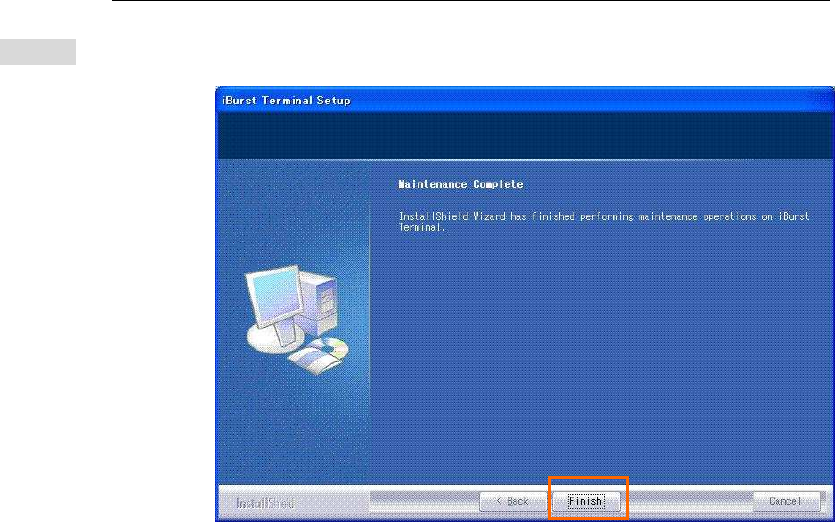
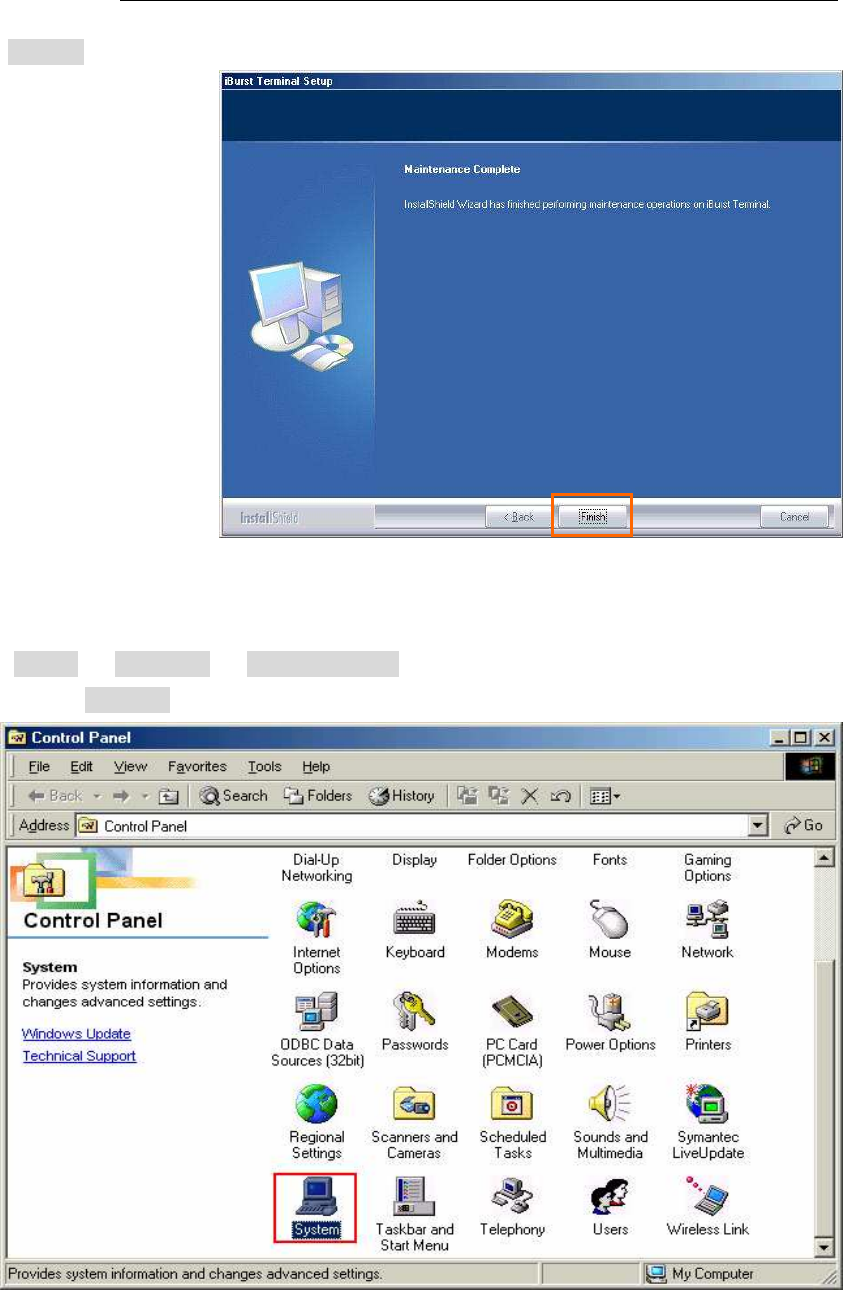
8. Click the [Finish] button after appearing dialog window as shown below.
iBurst Terminal, Desktop Model (UTD) / USB Model (UTU), Manual
iBurst Terminal, Desktop Model (UTD) / USB Model (UTU), Manual iBurst Terminal, Desktop Model (UTD) / USB Model (UTU), Manual
iBurst Terminal, Desktop Model (UTD) / USB Model (UTU), Manual
Kyocera Corporation Revision 1.01 --- June.08.2006
- 101 -
Uninstallation for Windows Me/98S
Uninstallation for Windows Me/98SUninstallation for Windows Me/98S
Uninstallation for Windows Me/98SE
E E
E
1. Close all programs that are currently running.
2. Disconnect the iBurst Terminal with your PC.
3. Click the [Start] -> [Settings] -> [Control Panel] to open Control Panel as shown below, and
then double click [Add/Remove Programs].
4. Select [iBurst Terminal] software,and click the [Add/Remove] button.
iBurst Terminal, Desktop Model (UTD) / USB Model (UTU), Manual
iBurst Terminal, Desktop Model (UTD) / USB Model (UTU), Manual iBurst Terminal, Desktop Model (UTD) / USB Model (UTU), Manual
iBurst Terminal, Desktop Model (UTD) / USB Model (UTU), Manual
Kyocera Corporation Revision 1.01 --- June.08.2006
- 102 -
5. Click the [OK] button when appearing the message as shown below.
6. The following dialog window will appear, and select to delete or not to delete installation
history files before uninstallation, then click the [Next >] button. Selecting “Yes” is
recommended.
7. The following dialog window will appear, and uninstallation of software begins.
iBurst Terminal, Desktop Model (UTD) / USB Model (UTU), Manual
iBurst Terminal, Desktop Model (UTD) / USB Model (UTU), Manual iBurst Terminal, Desktop Model (UTD) / USB Model (UTU), Manual
iBurst Terminal, Desktop Model (UTD) / USB Model (UTU), Manual
Kyocera Corporation Revision 1.01 --- June.08.2006
- 103 -
8. Click the [Finish] button after appearing dialog window as shown below.
NOTE: In case that the uninstaller shows a selection of restarting your PC, it is
recommended to restart it.
9. Click the [Start] -> [Settings] -> [Control Panel] to open Control Panel as shown below, and
then double click [System].
iBurst Terminal, Desktop Model (UTD) / USB Model (UTU), Manual
iBurst Terminal, Desktop Model (UTD) / USB Model (UTU), Manual iBurst Terminal, Desktop Model (UTD) / USB Model (UTU), Manual
iBurst Terminal, Desktop Model (UTD) / USB Model (UTU), Manual
Kyocera Corporation Revision 1.01 --- June.08.2006
- 104 -
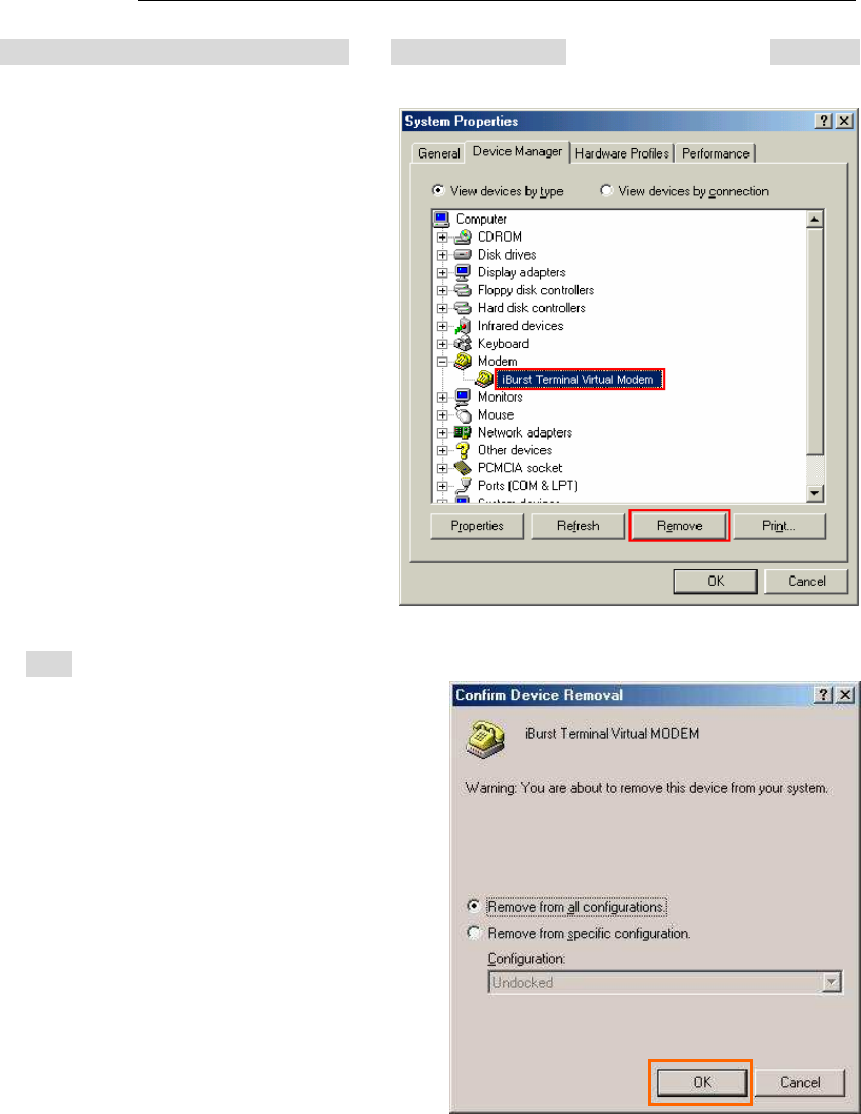
10. Select [iBurst Terminal Virtual MODEM] on [Device Manager] tab, then click the [Remove]
button.
11. Click the [OK] button.
NOTE: In case Windows 98 SE, no selection is on the dialog.
iBurst Terminal, Desktop Model (UTD) / USB Model (UTU), Manual
iBurst Terminal, Desktop Model (UTD) / USB Model (UTU), Manual iBurst Terminal, Desktop Model (UTD) / USB Model (UTU), Manual
iBurst Terminal, Desktop Model (UTD) / USB Model (UTU), Manual
Kyocera Corporation Revision 1.01 --- June.08.2006
- 105 -
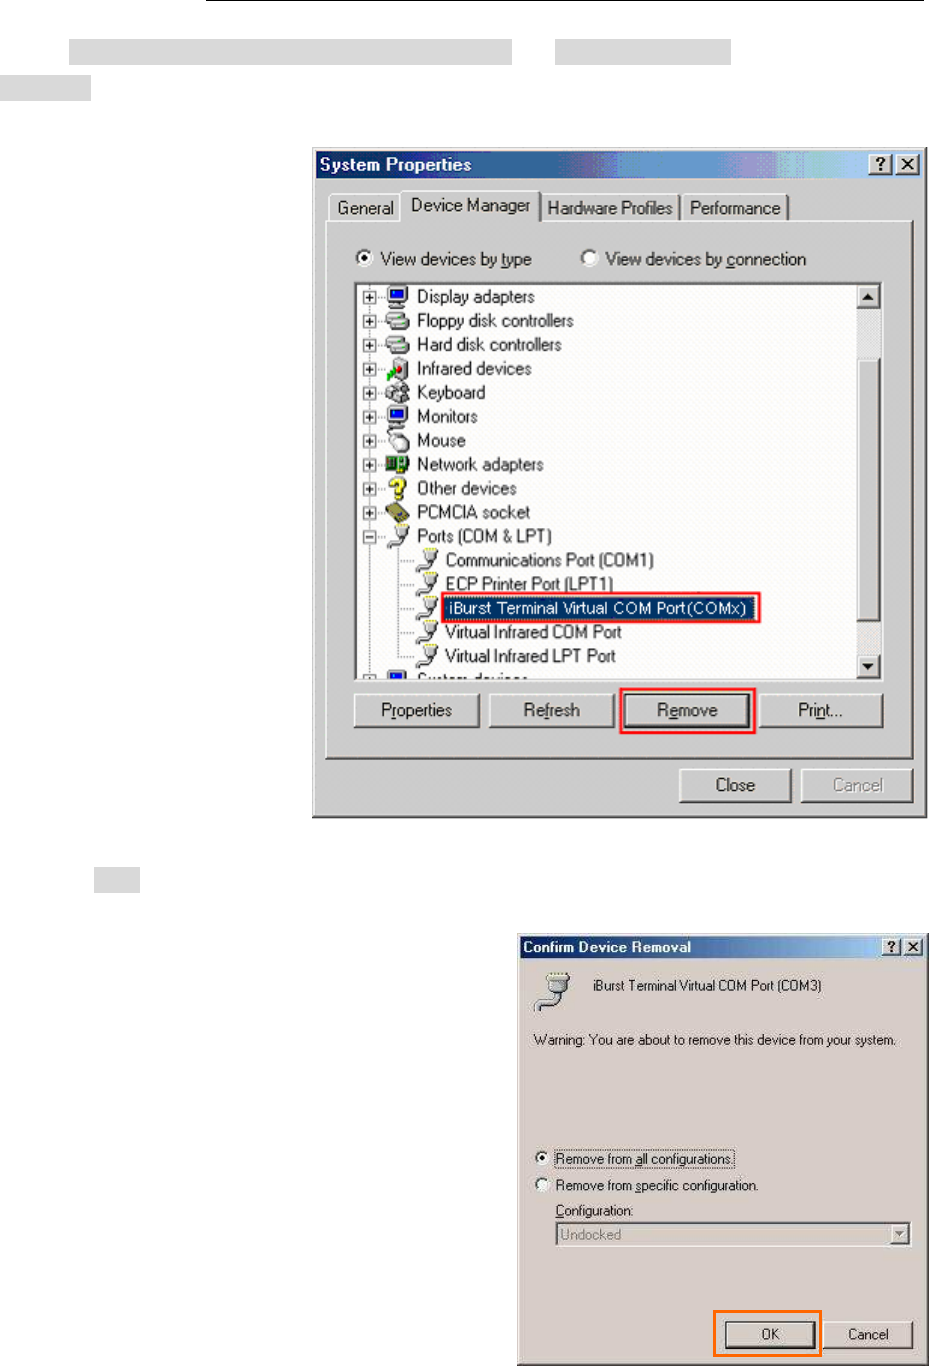
12. Select [iBurst Terminal Virtual COM Port(COMx)] on [Device Manager] tab, then click the
[Remove] button.
NOTE: The ‘X’ in “COM x” above is a COM port number assigned automatically.
13. Click the [OK] button.
NOTE: “COM3” in the picture below is an example.
NOTE: In case Windows 98 SE, no selection is on the dialog.
iBurst Terminal, Desktop Model (UTD) / USB Model (UTU), Manual
iBurst Terminal, Desktop Model (UTD) / USB Model (UTU), Manual iBurst Terminal, Desktop Model (UTD) / USB Model (UTU), Manual
iBurst Terminal, Desktop Model (UTD) / USB Model (UTU), Manual
Kyocera Corporation Revision 1.01 --- June.08.2006
- 106 -
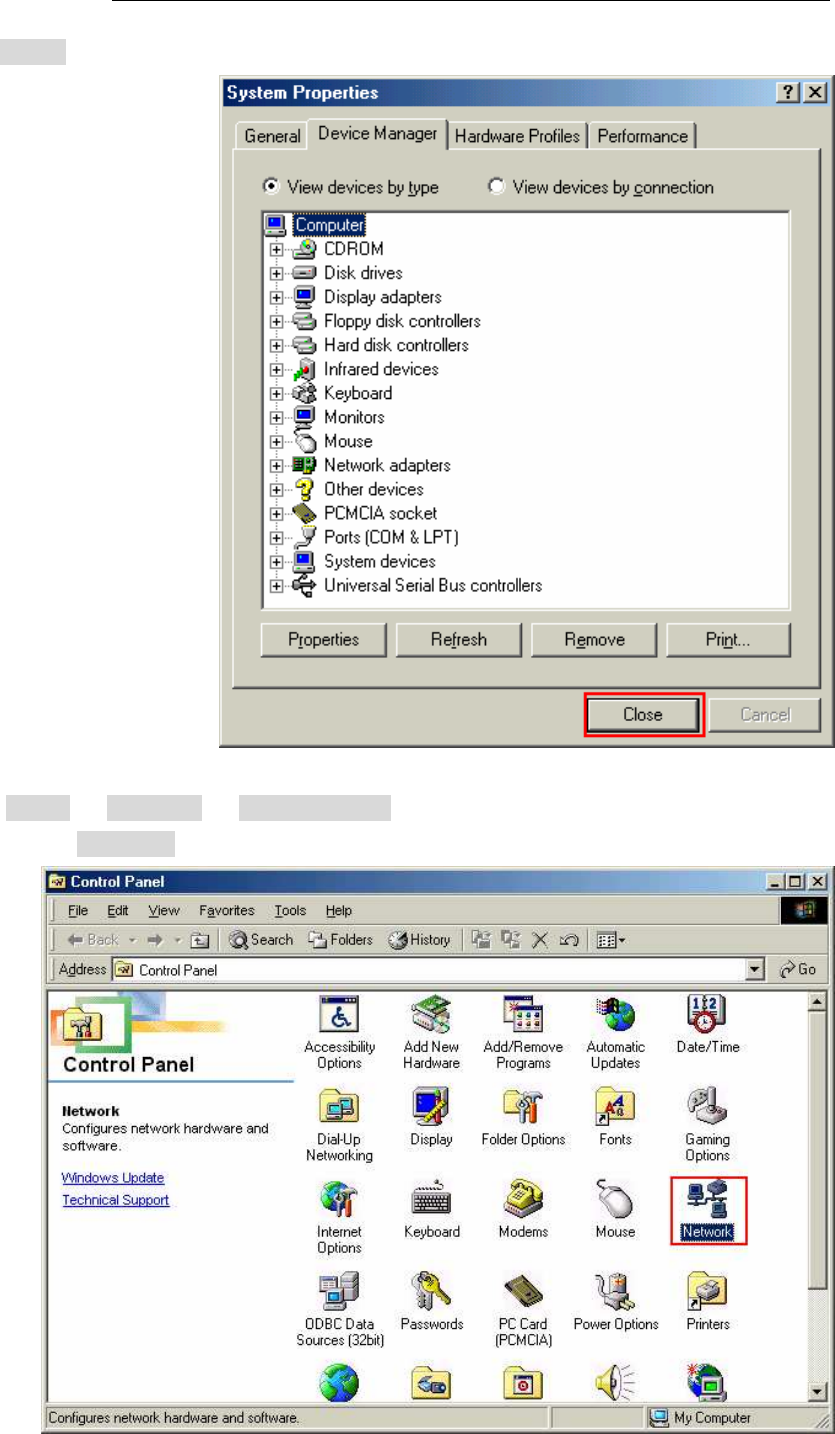
14. Click the [Close] button.
15. Click the [Start] -> [Settings] -> [Control Panel] to open Control Panel as shown below, and
then double click [Network].
iBurst Terminal, Desktop Model (UTD) / USB Model (UTU), Manual
iBurst Terminal, Desktop Model (UTD) / USB Model (UTU), Manual iBurst Terminal, Desktop Model (UTD) / USB Model (UTU), Manual
iBurst Terminal, Desktop Model (UTD) / USB Model (UTU), Manual
Kyocera Corporation Revision 1.01 --- June.08.2006
- 107 -
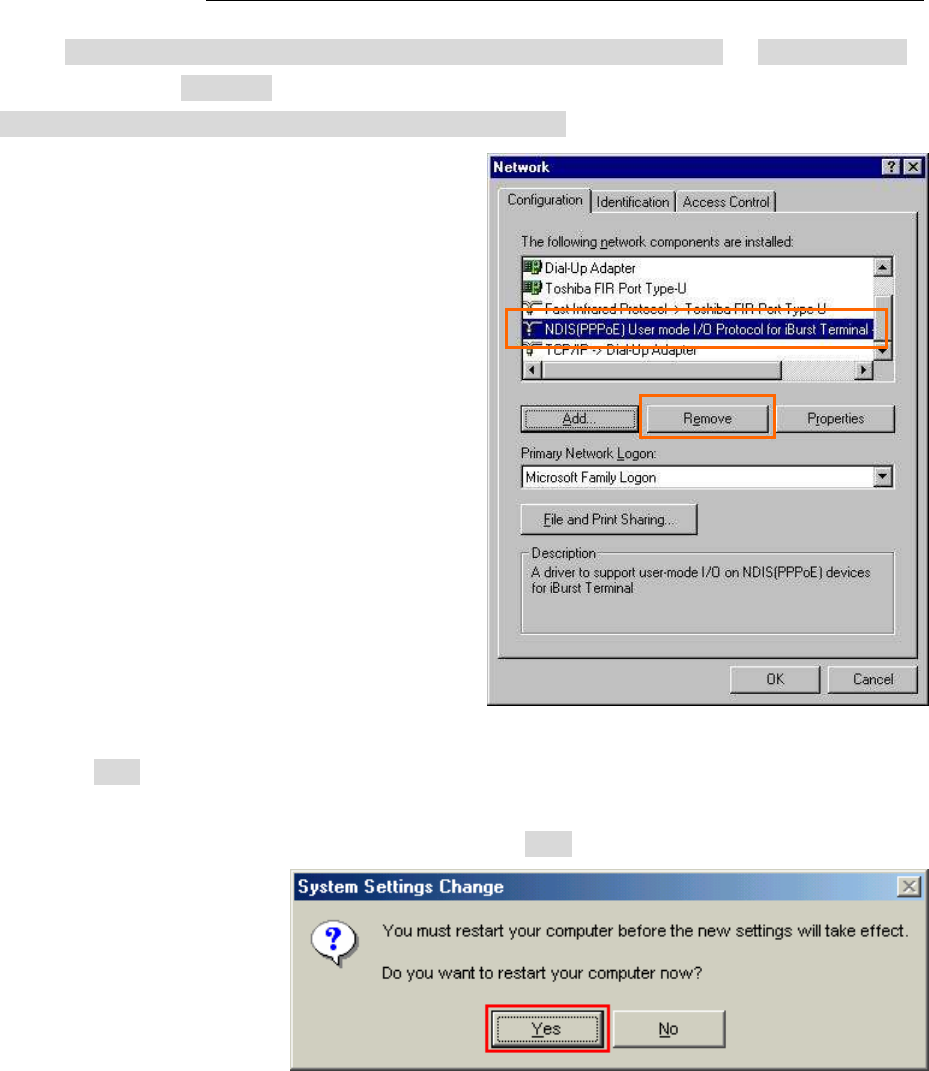
16. Select [NDIS(PPPoE)Usermode I/O Protocol for iBurst Terminal-> xxxxxx] on [Configuration]
tab, then click the [Remove] button.(Repeat the above steps if the other
[NDIS(PPPoE)Usermode I/O Protocol for iBurst Terminal] components are installed.)
17. Click the [OK] button to close Network dialog.
18. The dialog window shown below will appear, click the [Yes] button, and restart your PC.
NOTE: If the PC doesn’t shutdown itself, try to press Alt+Ctrl+Del keys several times.
iBurst Terminal, Desktop Model (UTD) / USB Model (UTU), Manual
iBurst Terminal, Desktop Model (UTD) / USB Model (UTU), Manual iBurst Terminal, Desktop Model (UTD) / USB Model (UTU), Manual
iBurst Terminal, Desktop Model (UTD) / USB Model (UTU), Manual
Kyocera Corporation Revision 1.01 --- June.08.2006
- 108 -
Uninstallation for Mac OS
Uninstallation for Mac OS Uninstallation for Mac OS
Uninstallation for Mac OS X
X X
X
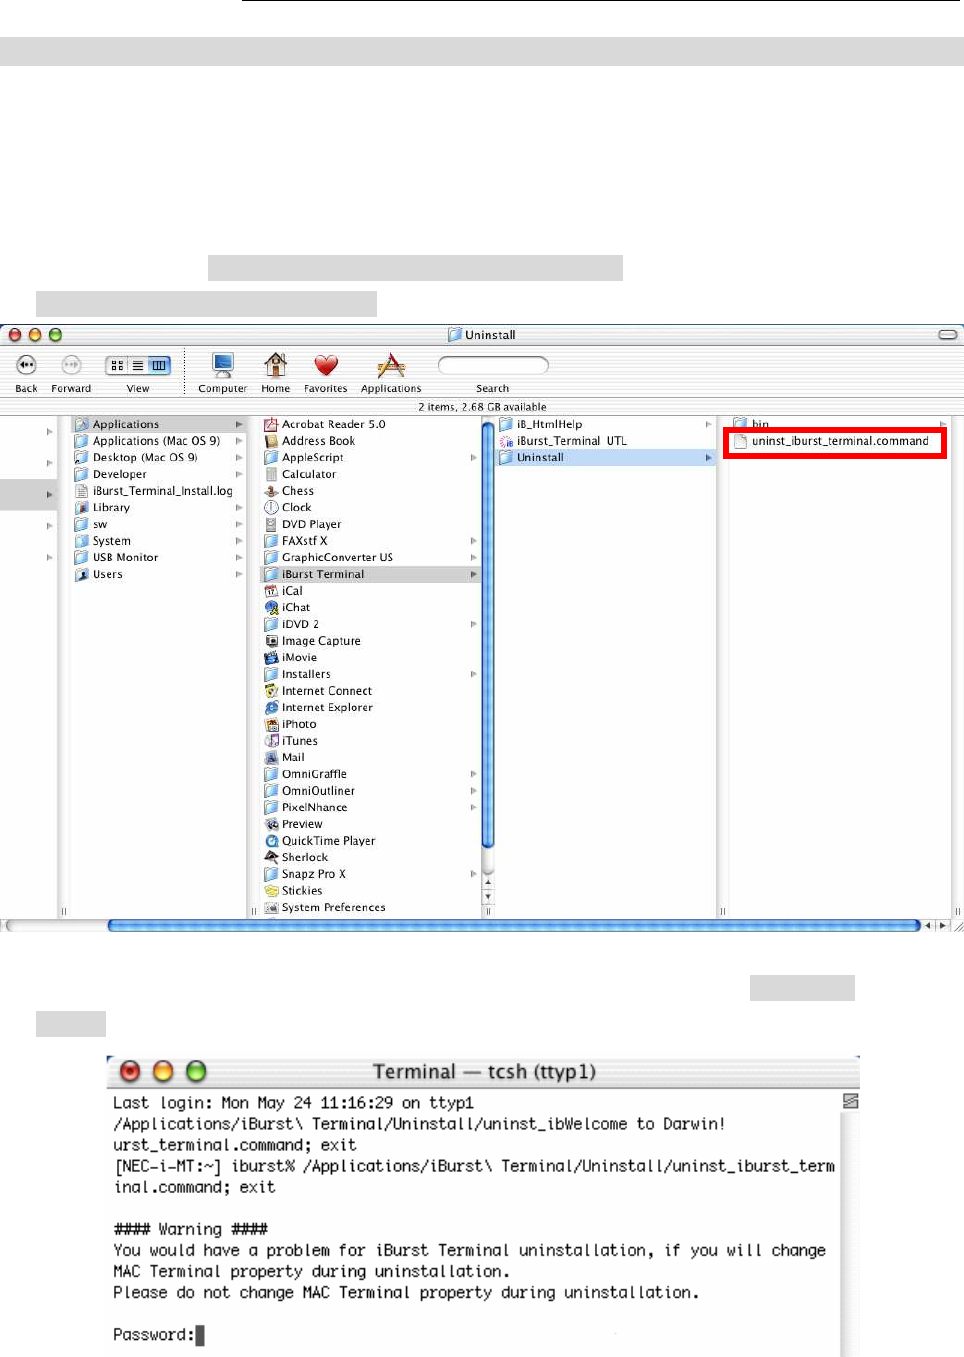
1. Close all programs that are currently running.
2. Disconnect the iBurst Terminal with your PC.
3. Open the folder [Applications\iBurst Terminal\Uninstall], then double click the script file
[uninst_iburst_terminal.command].
4. The terminal window shown below will appear, Type administrator’s [password] and press
[Enter] key.
iBurst Terminal, Desktop Model (UTD) / USB Model (UTU), Manual
iBurst Terminal, Desktop Model (UTD) / USB Model (UTU), Manual iBurst Terminal, Desktop Model (UTD) / USB Model (UTU), Manual
iBurst Terminal, Desktop Model (UTD) / USB Model (UTU), Manual
Kyocera Corporation Revision 1.01 --- June.08.2006
- 109 -
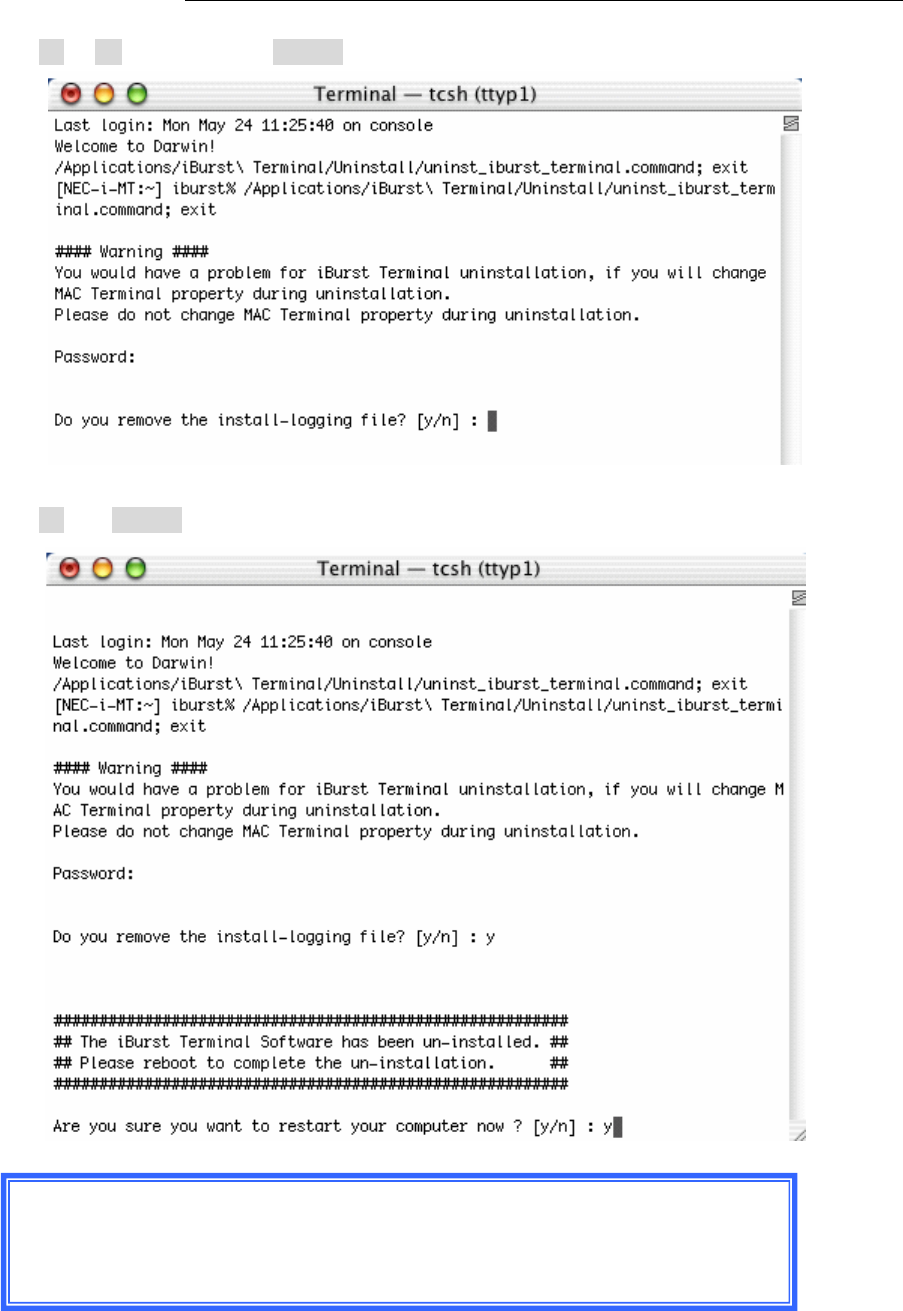
5. Press [y] or [n] key, and Press [Enter] key.
6. Press [y] and [Enter] key to restart your computer.
ATTENTION
:
::
:
Don’t change any properties of MAC Terminal while
uninstallation. Otherwise you would have a problem on uninstalling of
iBurst Terminal software.

iBurst Terminal, Desktop Model (UTD) / USB Model (UTU), Manual
iBurst Terminal, Desktop Model (UTD) / USB Model (UTU), Manual iBurst Terminal, Desktop Model (UTD) / USB Model (UTU), Manual
iBurst Terminal, Desktop Model (UTD) / USB Model (UTU), Manual
Kyocera Corporation Revision 1.01 --- June.08.2006
- 110 -
Chapter 6 Trouble shooting
Chapter 6 Trouble shootingChapter 6 Trouble shooting
Chapter 6 Trouble shooting
This chapter describes how to solve the trouble
This chapter describes how to solve the troubleThis chapter describes how to solve the trouble
This chapter describes how to solve the trouble
when you use
when you use when you use
when you use iBurst.
iBurst.iBurst.
iBurst.
iBurst Terminal, Desktop Model (UTD) / USB Model (UTU), Manual
iBurst Terminal, Desktop Model (UTD) / USB Model (UTU), Manual iBurst Terminal, Desktop Model (UTD) / USB Model (UTU), Manual
iBurst Terminal, Desktop Model (UTD) / USB Model (UTU), Manual
Kyocera Corporation Revision 1.01 --- June.08.2006
- 111 -
Windows
WindowsWindows
Windows
USB connection with Windows Me
USB connection with Windows MeUSB connection with Windows Me
USB connection with Windows Me/98SE
/98SE/98SE
/98SE
Windows
Windows Windows
Windows Me
MeMe
Me/98SE
/98SE/98SE
/98SE may
may may
may n
nn
need a couple seconds or maximal
eed a couple seconds or maximaleed a couple seconds or maximal
eed a couple seconds or maximally
lyly
ly 1 minute to detect iBurst Terminal
1 minute to detect iBurst Terminal 1 minute to detect iBurst Terminal
1 minute to detect iBurst Terminal
through USB connection.
through USB connection.through USB connection.
through USB connection. If you
If you If you
If you find this phenomenon, you can avoid it by following procedure.
find this phenomenon, you can avoid it by following procedure.find this phenomenon, you can avoid it by following procedure.
find this phenomenon, you can avoid it by following procedure.
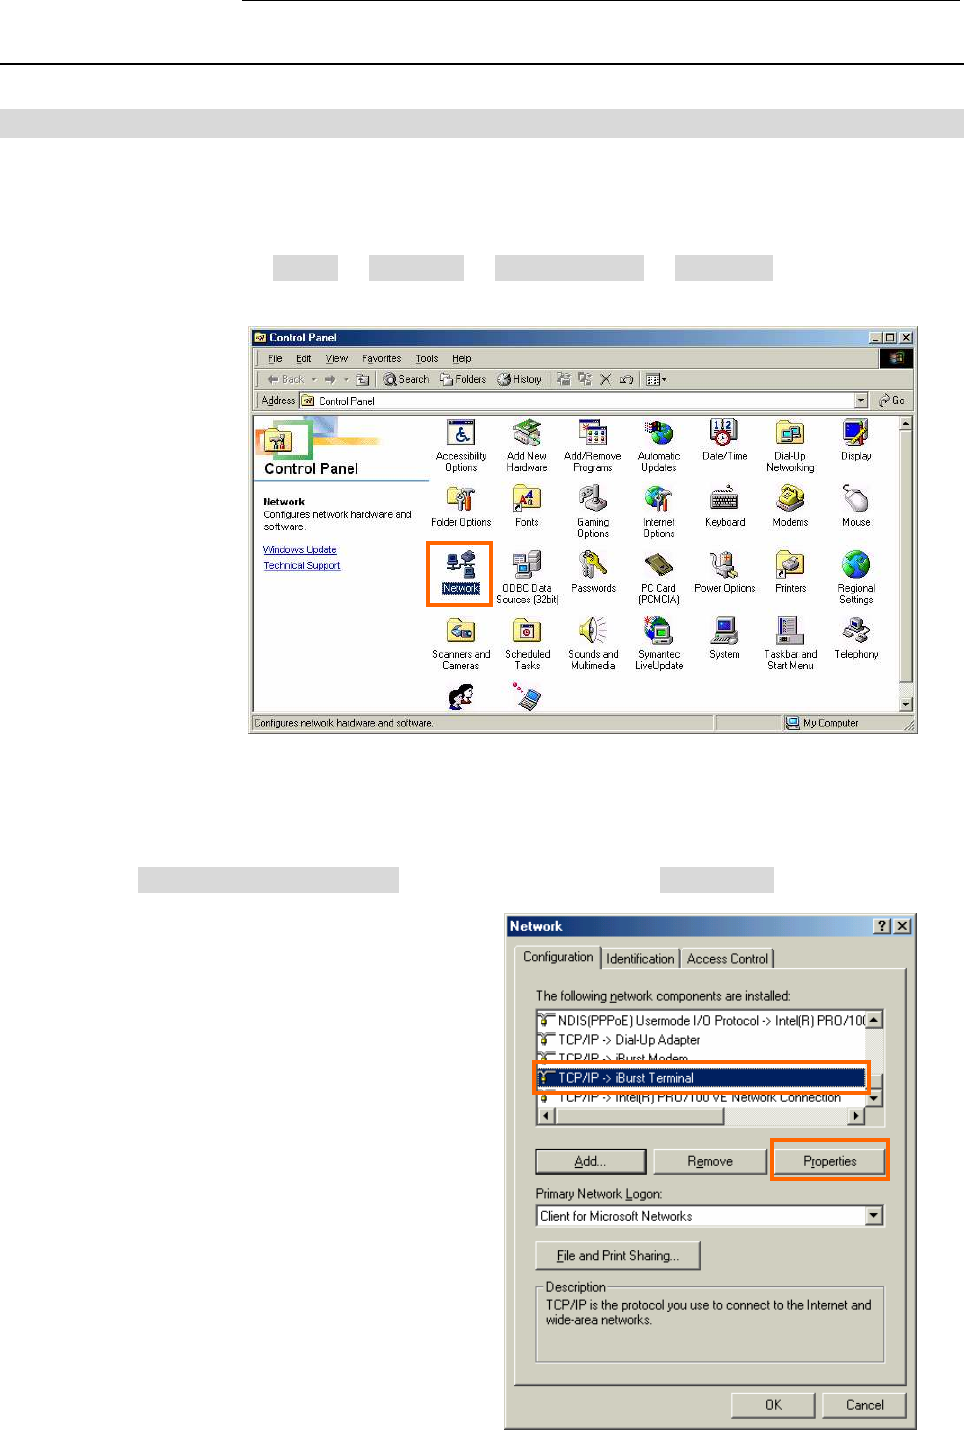
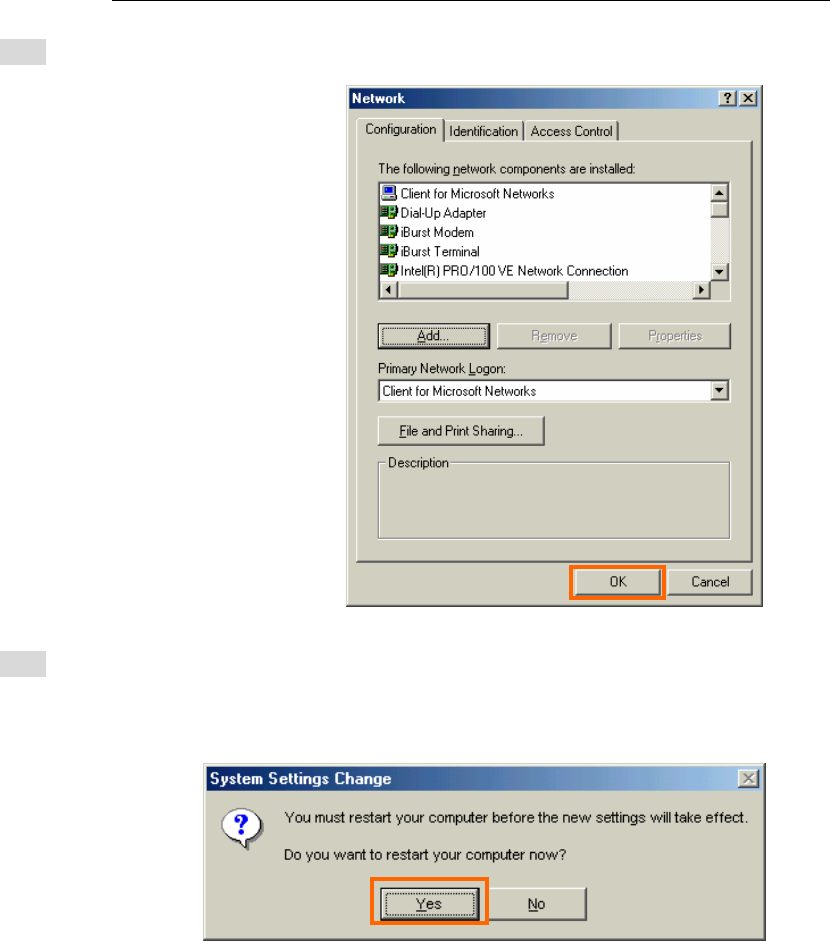
1. Open Network property [Start] -> [Settings] -> [Control Panel] -> [Network].
2. Select the [TCP/IP->iBurst Terminal] component, then click the [Properties] button.
iBurst Terminal, Desktop Model (UTD) / USB Model (UTU), Manual
iBurst Terminal, Desktop Model (UTD) / USB Model (UTU), Manual iBurst Terminal, Desktop Model (UTD) / USB Model (UTU), Manual
iBurst Terminal, Desktop Model (UTD) / USB Model (UTU), Manual
Kyocera Corporation Revision 1.01 --- June.08.2006
- 112 -
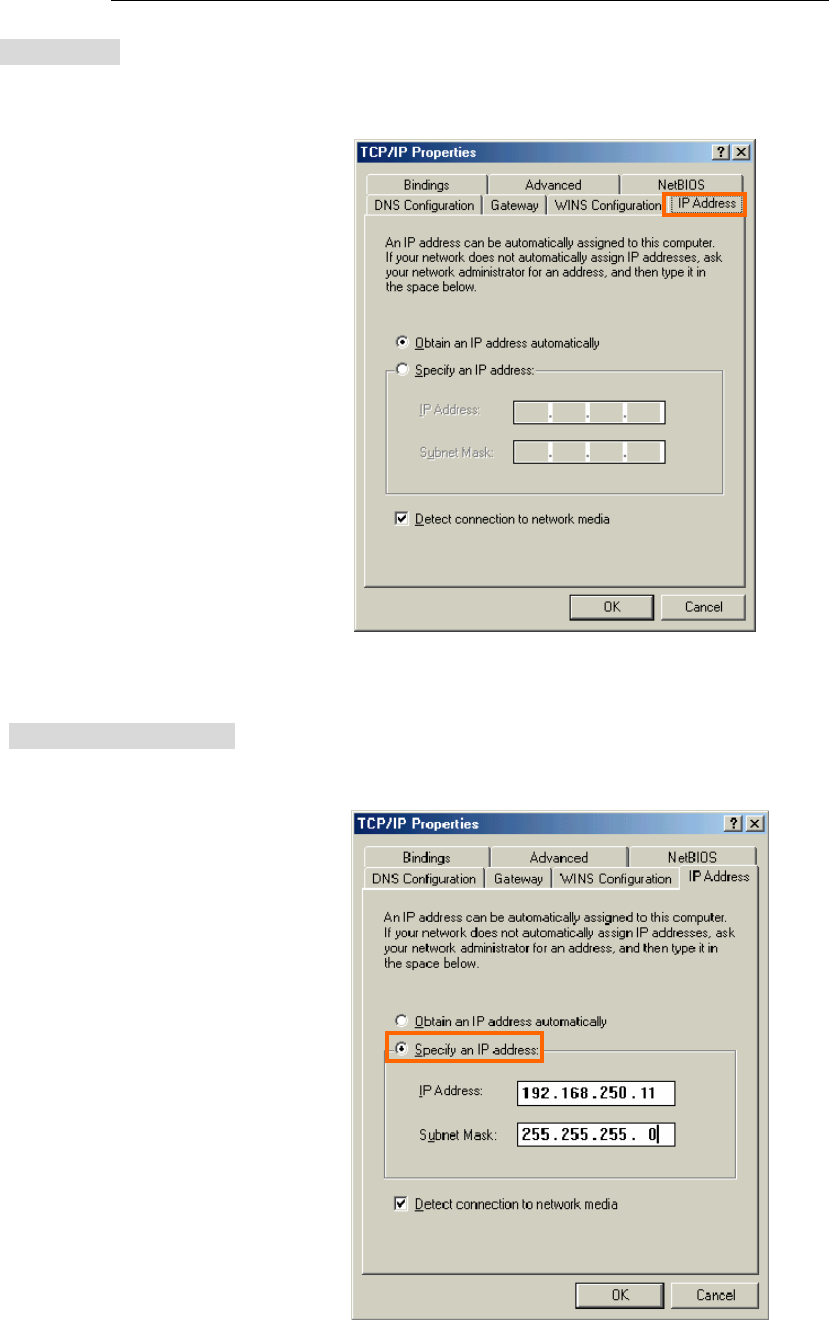
3. Open the [IP Address] tab.
4. Select the [Specify an IP address] then type a private IP address (for example: 192.168.250.11)
and type 255.255.255.0 on Subnet Mask.
iBurst Terminal, Desktop Model (UTD) / USB Model (UTU), Manual
iBurst Terminal, Desktop Model (UTD) / USB Model (UTU), Manual iBurst Terminal, Desktop Model (UTD) / USB Model (UTU), Manual
iBurst Terminal, Desktop Model (UTD) / USB Model (UTU), Manual
Kyocera Corporation Revision 1.01 --- June.08.2006
- 113 -
5. Click the [OK] button.
6. Click the [Yes] button, and restart your PC.
iBurst Terminal, Desktop Model (UTD) / USB Model (UTU), Manual
iBurst Terminal, Desktop Model (UTD) / USB Model (UTU), Manual iBurst Terminal, Desktop Model (UTD) / USB Model (UTU), Manual
iBurst Terminal, Desktop Model (UTD) / USB Model (UTU), Manual
Kyocera Corporation Revision 1.01 --- June.08.2006
- 114 -
Illegal hang
Illegal hangIllegal hang
Illegal hang-
--
-up when install iBurst Terminal.
up when install iBurst Terminal.up when install iBurst Terminal.
up when install iBurst Terminal.
Windows 98SE may need a couple minutes to shutdown itself,
Windows 98SE may need a couple minutes to shutdown itself,Windows 98SE may need a couple minutes to shutdown itself,
Windows 98SE may need a couple minutes to shutdown itself,
o
oo
or may hang
r may hangr may hang
r may hang-
--
-up in worst case after
up in worst case after up in worst case after
up in worst case after
iBurst Terminal device driver
iBurst Terminal device driveriBurst Terminal device driver
iBurst Terminal device driver installation.
installation. installation.
installation.
This case is from Windows OS and competition with other devices.
This case is from Windows OS and competition with other devices.This case is from Windows OS and competition with other devices.
This case is from Windows OS and competition with other devices.
The following
The followingThe following
The following
gives you the procedure to fix this problem.
gives you the procedure to fix this problem.gives you the procedure to fix this problem.
gives you the procedure to fix this problem.
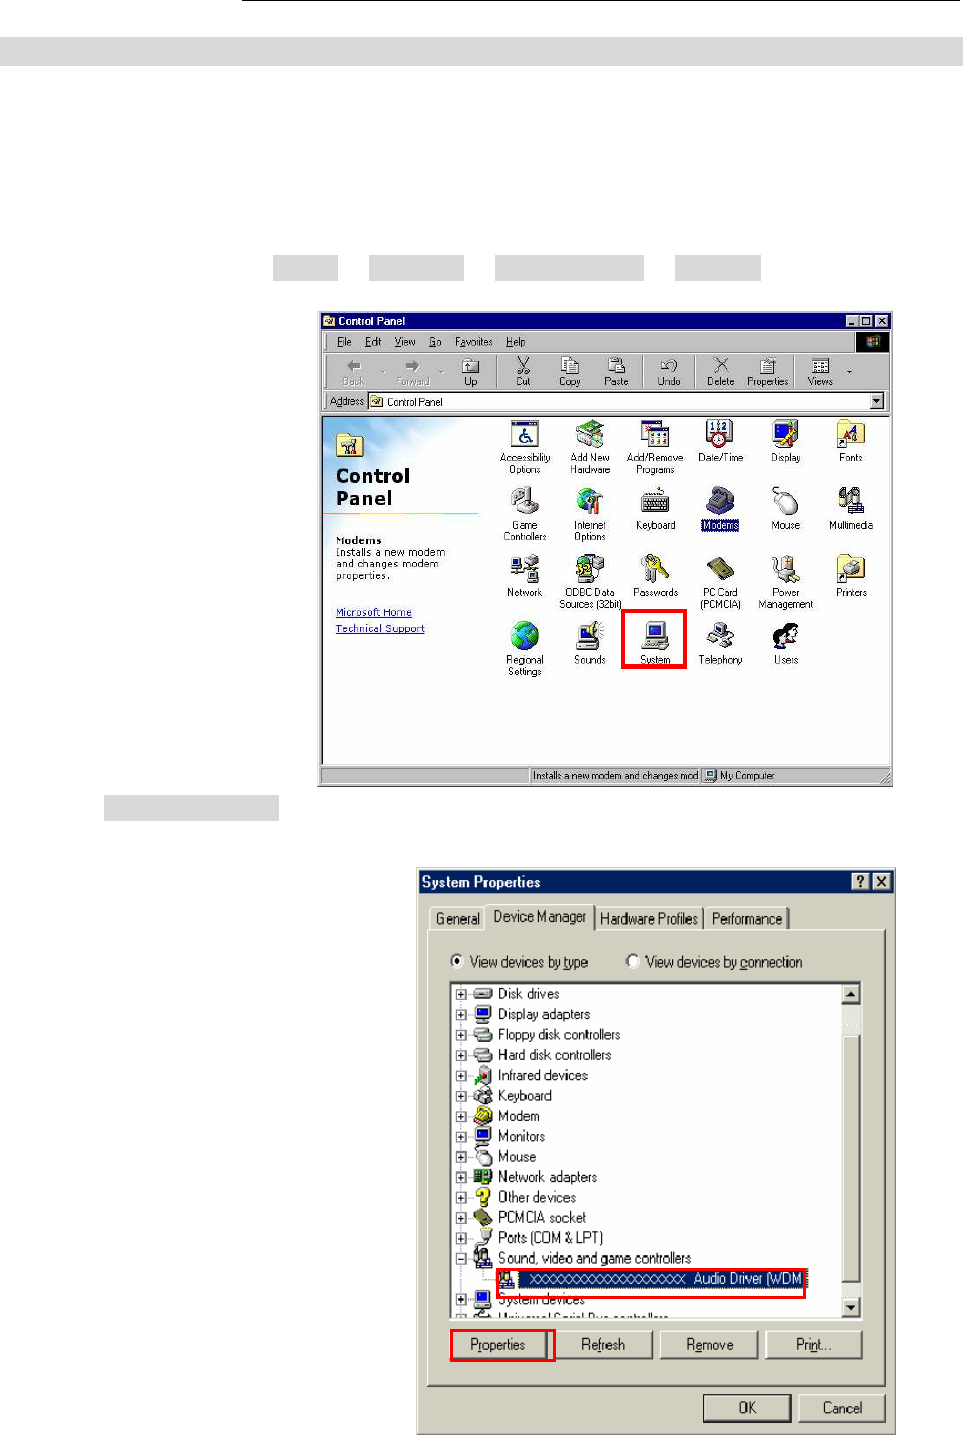
1. Open Network property [Start] -> [Settings] -> [Control Panel] -> [System].
2. Select [Device Manager] tab. Disable sound card device and other which will not effect for
Windows performance, i.e. network card and modem.
iBurst Terminal, Desktop Model (UTD) / USB Model (UTU), Manual
iBurst Terminal, Desktop Model (UTD) / USB Model (UTU), Manual iBurst Terminal, Desktop Model (UTD) / USB Model (UTU), Manual
iBurst Terminal, Desktop Model (UTD) / USB Model (UTU), Manual
Kyocera Corporation Revision 1.01 --- June.08.2006
- 115 -
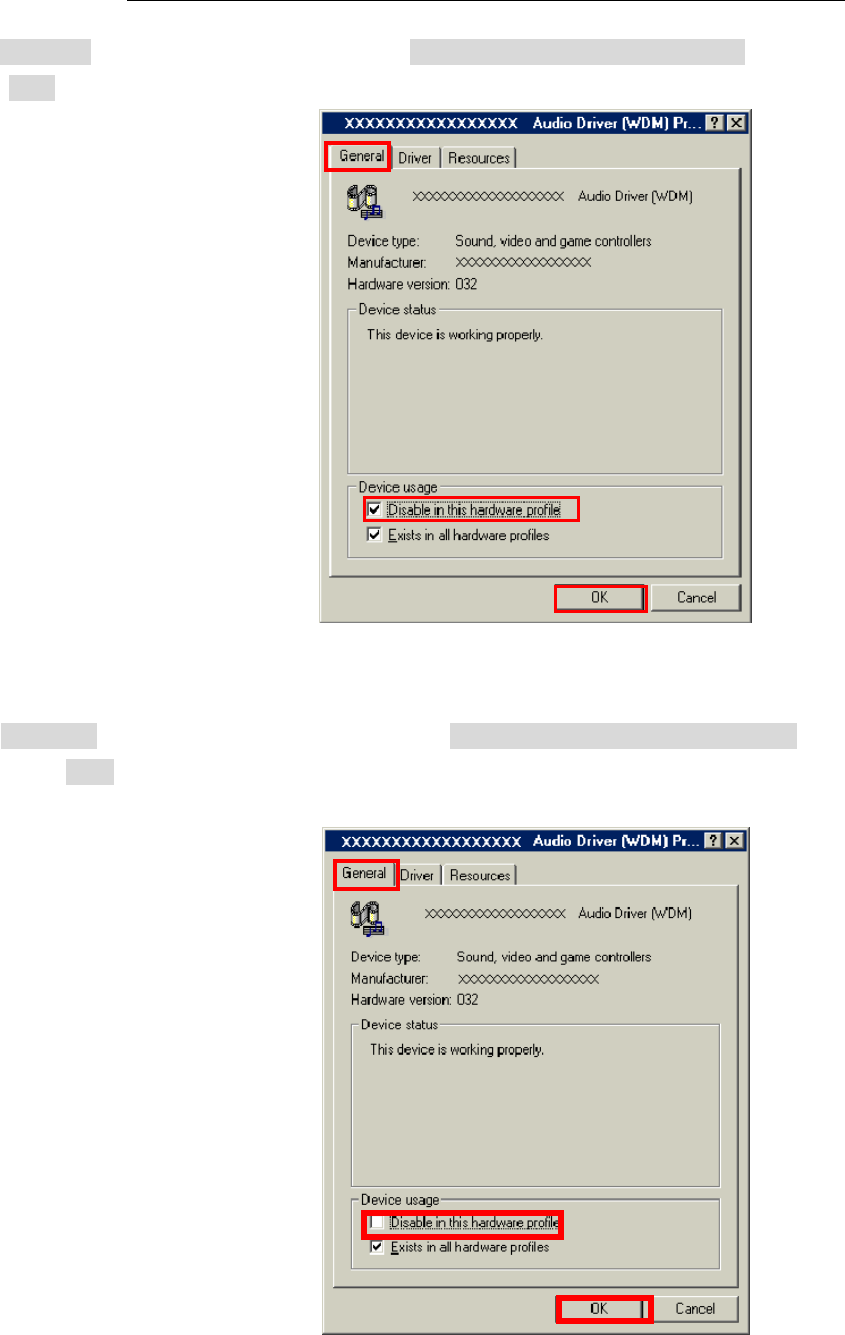
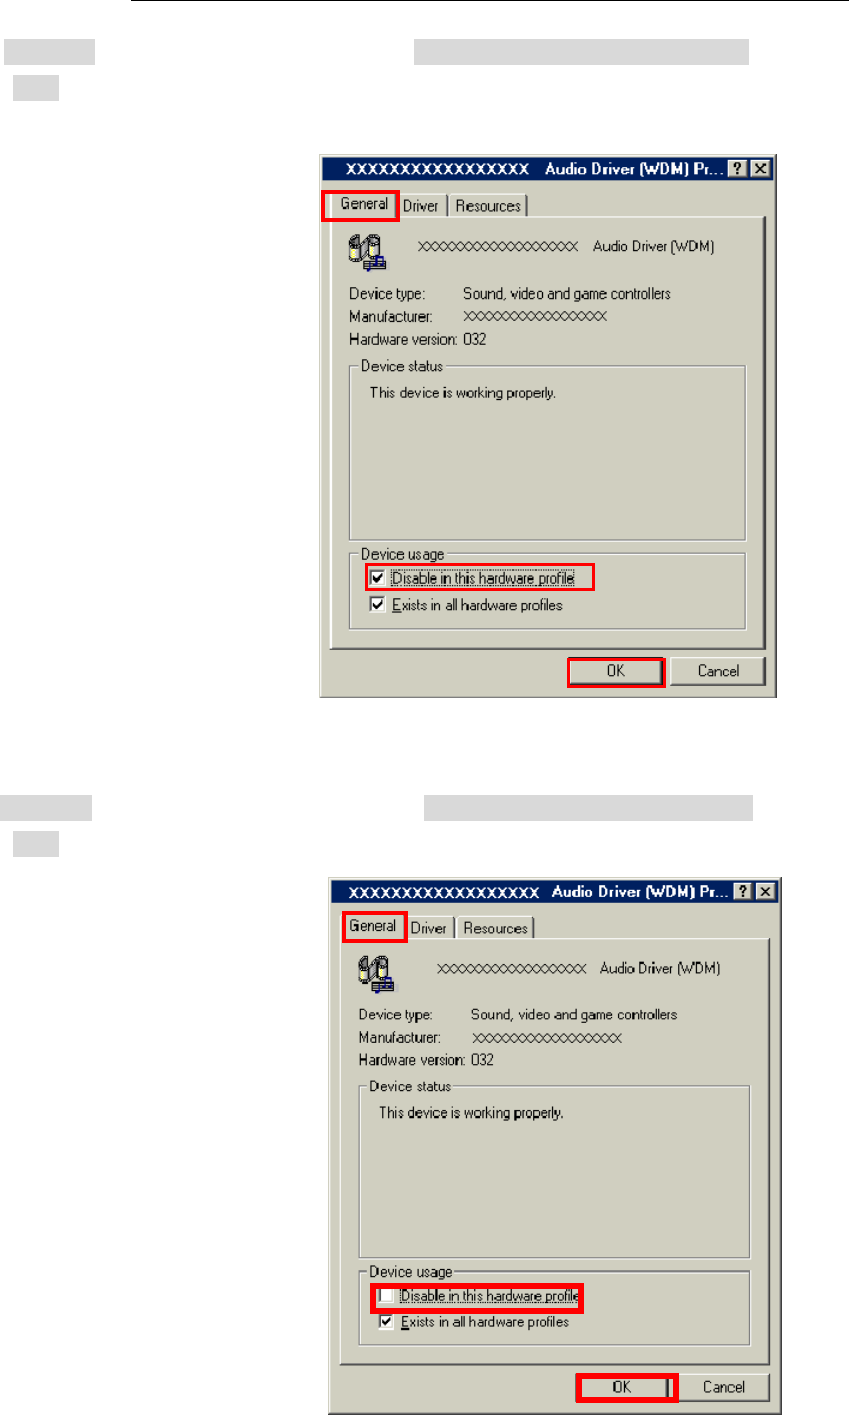
3. On the [General] tab, check the box labeled the [Disable in this hardware profile], and then
click the [OK] button.
4.
Connect iBurst Terminal to USB port.
5.
On the [General] tab, uncheck the box labeled the [Disable in this hardware profile], and
then click the [OK] button.
iBurst Terminal, Desktop Model (UTD) / USB Model (UTU), Manual
iBurst Terminal, Desktop Model (UTD) / USB Model (UTU), Manual iBurst Terminal, Desktop Model (UTD) / USB Model (UTU), Manual
iBurst Terminal, Desktop Model (UTD) / USB Model (UTU), Manual
Kyocera Corporation Revision 1.01 --- June.08.2006
- 116 -
Illegal hang
Illegal hangIllegal hang
Illegal hang-
--
-up when set up
up when set up up when set up
up when set up dialer
dialerdialer
dialer
Windows 98SE may need a couple minutes to shutdown itself, or may hang
Windows 98SE may need a couple minutes to shutdown itself, or may hangWindows 98SE may need a couple minutes to shutdown itself, or may hang
Windows 98SE may need a couple minutes to shutdown itself, or may hang-
--
-up in worst case after
up in worst case after up in worst case after
up in worst case after
iBurst Terminal Virtual COM Port driver installation.
iBurst Terminal Virtual COM Port driver installation.iBurst Terminal Virtual COM Port driver installation.
iBurst Terminal Virtual COM Port driver installation.
This case is from Windows OS and competition with other devices.
This case is from Windows OS and competition with other devices.This case is from Windows OS and competition with other devices.
This case is from Windows OS and competition with other devices.
The following gives you th
The following gives you thThe following gives you th
The following gives you the
ee
e
procedure
procedureprocedure
procedure
to fix this problem
to fix this problemto fix this problem
to fix this problem.
..
.
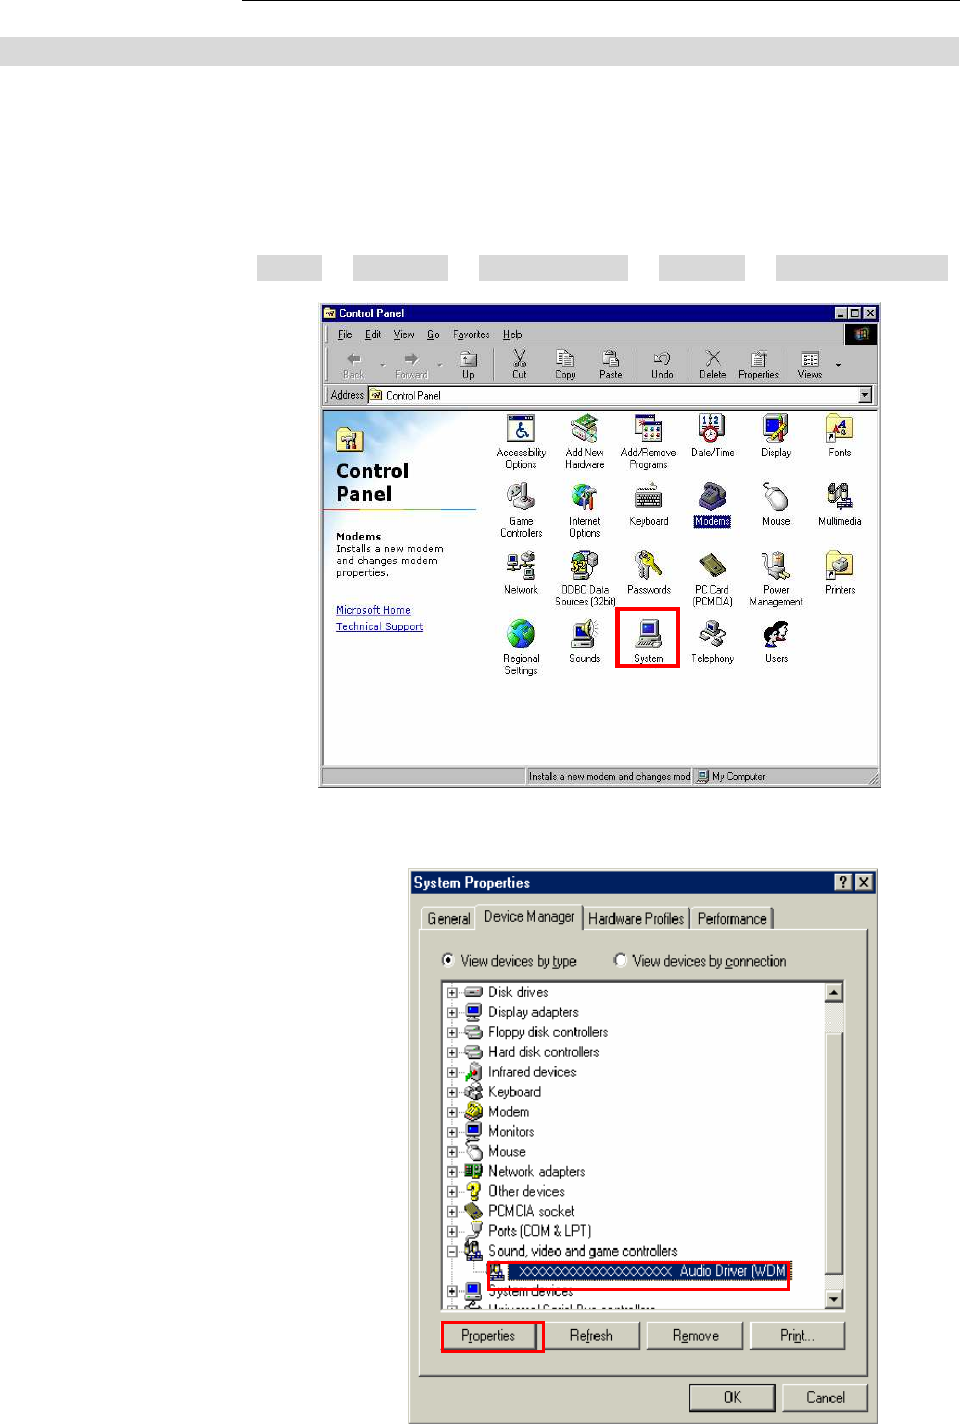
1. Open Device Manager [Start] -> [Settings] -> [Control Panel] -> [System] -> [Device Manager].
2. Disable sound card device and other which will not effect for Windows performance, ie network
card and modem.
iBurst Terminal, Desktop Model (UTD) / USB Model (UTU), Manual
iBurst Terminal, Desktop Model (UTD) / USB Model (UTU), Manual iBurst Terminal, Desktop Model (UTD) / USB Model (UTU), Manual
iBurst Terminal, Desktop Model (UTD) / USB Model (UTU), Manual
Kyocera Corporation Revision 1.01 --- June.08.2006
- 117 -
3. On the [General] tab, check the box labeled the [Disable in this hardware profile], and then
click the [OK] button.
4. Re-install iBurst Terminal Virtual COM Port driver according to installation procedure,
chapter 2 "Installation for Windows 98SE" step 20.
5. On the [General] tab, uncheck the box labeled the [Disable in this hardware profile], and then
click the [OK] button.

iBurst Terminal, Desktop Model (UTD) / USB Model (UTU), Manual
iBurst Terminal, Desktop Model (UTD) / USB Model (UTU), Manual iBurst Terminal, Desktop Model (UTD) / USB Model (UTU), Manual
iBurst Terminal, Desktop Model (UTD) / USB Model (UTU), Manual
Kyocera Corporation Revision 1.01 --- June.08.2006
- 118 -
PC hang
PC hangPC hang
PC hang-
--
-up when eject iBurst Terminal from Win98 USB port.
up when eject iBurst Terminal from Win98 USB port.up when eject iBurst Terminal from Win98 USB port.
up when eject iBurst Terminal from Win98 USB port.
Windows 98SE
Windows 98SE Windows 98SE
Windows 98SE basically does not support hot plug
basically does not support hot plugbasically does not support hot plug
basically does not support hot plug-
--
-out for USB interface.
out for USB interface.out for USB interface.
out for USB interface.
You might find a problem that your PC hang
You might find a problem that your PC hangYou might find a problem that your PC hang
You might find a problem that your PC hang-
--
-up itself when you eject iBurst Terminal from USB
up itself when you eject iBurst Terminal from USB up itself when you eject iBurst Terminal from USB
up itself when you eject iBurst Terminal from USB
port during PC running.
port during PC running.port during PC running.
port during PC running.
In this case, please don’
In this case, please don’In this case, please don’
In this case, please don’t eject iBurst Terminal from USB port during PC running
t eject iBurst Terminal from USB port during PC runningt eject iBurst Terminal from USB port during PC running
t eject iBurst Terminal from USB port during PC running.
..
.
You should eject iBurst Terminal from USB port after you shutdown your PC.
You should eject iBurst Terminal from USB port after you shutdown your PC.You should eject iBurst Terminal from USB port after you shutdown your PC.
You should eject iBurst Terminal from USB port after you shutdown your PC.

iBurst Terminal, Desktop Model (UTD) / USB Model (UTU), Manual
iBurst Terminal, Desktop Model (UTD) / USB Model (UTU), Manual iBurst Terminal, Desktop Model (UTD) / USB Model (UTU), Manual
iBurst Terminal, Desktop Model (UTD) / USB Model (UTU), Manual
Kyocera Corporation Revision 1.01 --- June.08.2006
- 119 -
Mac
Mac Mac
Mac
Data rate
Data rate Data rate
Data rate
iBurst Terminal would not perform maximum data rate when it connects with Mac PC.
This is obviously caused by Mac OS.
And typical data rate connecting with Mac is 800Kbps at downlink and 240Kbps at uplink.

iBurst Terminal, Desktop Model (UTD) / USB Model (UTU), Manual
iBurst Terminal, Desktop Model (UTD) / USB Model (UTU), Manual iBurst Terminal, Desktop Model (UTD) / USB Model (UTU), Manual
iBurst Terminal, Desktop Model (UTD) / USB Model (UTU), Manual
Kyocera Corporation Revision 1.01 --- June.08.2006
- 120 -
Chapter
Chapter Chapter
Chapter 7
77
7 In
In In
Information
formationformation
formation