Kyocera KWC-7135 7135 Trimode Cellular Phone with PDA User Manual T3 UGnew
Kyocera Communications, Inc 7135 Trimode Cellular Phone with PDA T3 UGnew
Kyocera >
Contents
- 1. T3 users guide part b
- 2. users manual
- 3. user manual part 1
- 4. user manual part 2
user manual part 1
Cover
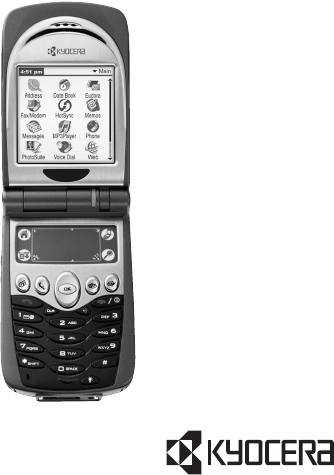
KYOCERA 7135 SMARTPHONE
USER’S GUIDE
hvl`bo^=tfobibpp=`lomK
NMPMM=`~ãéìë=mçáåí=aêáîÉ
p~å=aáÉÖçI=`~äáÑçêåá~=VONON=rKpK^K
sáëáí=ìë=~í=ïïïKâóçÅÉê~JïáêÉäÉëëKÅçã
cçê=~ÅÅÉëëçêáÉëI=îáëáí=ïïïKâóçÅÉê~JïáêÉäÉëëKÅçãLëíçêÉ
UOJ_TVOSJPbkI=oÉîK=MMN
User Guide
for the 7135 smartphone
by Kyocera
c``Lf`=kçíáÅÉ
qÜáë=ÇÉîáÅÉ=ÅçãéäáÉë=ïáíÜ=é~êí=NR=çÑ=íÜÉ=c``=êìäÉëK=léÉê~íáçå=áë=ëìÄàÉÅí=íç=íÜÉ=ÑçääçïáåÖ=íïç=
ÅçåÇáíáçåëW=ENF=qÜáë=ÇÉîáÅÉ=ã~ó=åçí=Å~ìëÉ=Ü~êãÑìä=áåíÉêÑÉêÉåÅÉI=~åÇ=EOF=íÜáë=ÇÉîáÅÉ=ãìëí=
~ÅÅÉéí=~åó=áåíÉêÑÉêÉåÅÉ=êÉÅÉáîÉÇI=áåÅäìÇáåÖ=áåíÉêÑÉêÉåÅÉ=íÜ~í=ã~ó=Å~ìëÉ=ìåÇÉëáêÉÇ=
çéÉê~íáçåK=
qÜÉ=ÉñéçëìêÉ=ëí~åÇ~êÇ=Ñçê=ïáêÉäÉëë=ãçÄáäÉ=éÜçåÉë=Éãéäçóë=~=ìåáí=çÑ=ãÉ~ëìêÉãÉåí=âåçïå=
~ë=íÜÉ=péÉÅáÑáÅ=^Äëçêéíáçå=o~íÉI=çê=p^oK=qÜÉ=p^o=äáãáí=ëÉí=Äó=íÜÉ=c``=áë=NKSt~ííë=éÉê=
âáäçÖê~ã=EtLâÖFK=qÉëíë=Ñçê=p^o=~êÉ=ÅçåÇìÅíÉÇ=ìëáåÖ=ëí~åÇ~êÇ=çéÉê~íáåÖ=éçëáíáçåë=ëéÉÅáÑáÉÇ=
Äó=íÜÉ=c``=ïáíÜ=íÜÉ=éÜçåÉ=íê~åëãáííáåÖ=~í=áíë=ÜáÖÜÉëí=ÅÉêíáÑáÉÇ=éçïÉê=äÉîÉä=áå=~ää=íÉëíÉÇ=
ÑêÉèìÉåÅó=Ä~åÇëK=^äíÜçìÖÜ=íÜÉ=p^o=áë=ÇÉíÉêãáåÉÇ=~í=íÜÉ=ÜáÖÜÉëí=ÅÉêíáÑáÉÇ=éçïÉê=äÉîÉäI=íÜÉ=
~Åíì~ä=p^o=äÉîÉä=çÑ=íÜÉ=éÜçåÉ=ïÜáäÉ=çéÉê~íáåÖ=Å~å=ÄÉ=ïÉää=ÄÉäçï=íÜÉ=ã~ñáãìã=î~äìÉK=qÜáë=
áë=ÄÉÅ~ìëÉ=íÜÉ=éÜçåÉ=áë=ÇÉëáÖåÉÇ=íç=çéÉê~íÉ=~í=ãìäíáéäÉ=éçïÉê=äÉîÉäë=ëç=~ë=íç=ìëÉ=çåäó=íÜÉ=
éçïÉê=êÉèìáêÉÇ=íç=êÉ~ÅÜ=íÜÉ=åÉíïçêâK=få=ÖÉåÉê~äI=íÜÉ=ÅäçëÉê=óçì=~êÉ=íç=~=ïáêÉäÉëë=Ä~ëÉ=
ëí~íáçå=~åíÉåå~I=íÜÉ=äçïÉê=íÜÉ=éçïÉê=çìíéìíK=
_ÉÑçêÉ=~=éÜçåÉ=ãçÇÉä=áë=~î~áä~ÄäÉ=Ñçê=ë~äÉ=íç=íÜÉ=éìÄäáÅI=áí=ãìëí=ÄÉ=íÉëíÉÇ=~åÇ=ÅÉêíáÑáÉÇ=íç=
íÜÉ=c``=íÜ~í=áí=ÇçÉë=åçí=ÉñÅÉÉÇ=íÜÉ=äáãáí=Éëí~ÄäáëÜÉÇ=Äó=íÜÉ=ÖçîÉêåãÉåíJ~ÇçéíÉÇ=
êÉèìáêÉãÉåí=Ñçê=ë~ÑÉ=ÉñéçëìêÉK=qÜÉ=íÉëíë=~êÉ=éÉêÑçêãÉÇ=áå=éçëáíáçåë=~åÇ=äçÅ~íáçåë=EÉKÖKI=~í=
íÜÉ=É~ê=~åÇ=ïçêå=çå=íÜÉ=ÄçÇóF=~ë=êÉèìáêÉÇ=Äó=íÜÉ=c``=Ñçê=É~ÅÜ=ãçÇÉäK=qÜÉ=ÜáÖÜÉëí=p^o=
î~äìÉ=Ñçê=íÜáë=ãçÇÉä=éÜçåÉ=ïÜÉå=íÉëíÉÇ=Ñçê=ìëÉ=~í=íÜÉ=É~ê=áë=MKUV=tLâÖ=~åÇ=ïÜÉå=ïçêå=çå=
íÜÉ=ÄçÇó=~í=íÜÉ=ï~áëí=áë=MKPQ=tLâÖK=E_çÇóJïçêå=ãÉ~ëìêÉãÉåíë=ÇáÑÑÉê=~ãçåÖ=éÜçåÉ=ãçÇÉäëI=
ÇÉéÉåÇáåÖ=ìéçå=~î~áä~ÄäÉ=~ÅÅÉëëçêáÉë=~åÇ=c``=êÉèìáêÉãÉåíëFK=tÜáäÉ=íÜÉêÉ=ã~ó=ÄÉ=
ÇáÑÑÉêÉåÅÉë=ÄÉíïÉÉå=íÜÉ=p^o=äÉîÉäë=çÑ=î~êáçìë=éÜçåÉë=~åÇ=~í=î~êáçìë=éçëáíáçåëI=íÜÉó=~ää=
ãÉÉí=íÜÉ=ÖçîÉêåãÉåí=êÉèìáêÉãÉåí=Ñçê=ë~ÑÉ=ÉñéçëìêÉK=
t~êåáåÖ
rëÉ=çåäó=hóçÅÉê~=táêÉäÉëë=`çêéK=~ééêçîÉÇ=~ÅÅÉëëçêáÉë=ïáíÜ=hóçÅÉê~=táêÉäÉëë=`çêéK=
éÜçåÉëK=rëÉ=çÑ=~åó=ìå~ìíÜçêáòÉÇ=~ÅÅÉëëçêáÉë=ã~ó=ÄÉ=Ç~åÖÉêçìë=~åÇ=ïáää=áåî~äáÇ~íÉ=íÜÉ=
éÜçåÉ=ï~êê~åíó=áÑ=ë~áÇ=~ÅÅÉëëçêáÉë=Å~ìëÉ=Ç~ã~ÖÉ=çê=~=ÇÉÑÉÅí=íç=íÜÉ=éÜçåÉK
qç=Åçãéäó=ïáíÜ=c``=ê~Çá~íáçå=ÉñéçëìêÉ=êÉèìáêÉãÉåíëI=ìëÉ=çÑ=íÜáë=ÇÉîáÅÉ=Ñçê=ÄçÇóJïçêå=
çéÉê~íáçå~ä=ÅçåÑáÖìê~íáçåë=áë=äáãáíÉÇ=íç=~ÅÅÉëëçêáÉë=íÉëíÉÇ=~åÇ=~ééêçîÉÇ=Äó=hóçÅÉê~=
táêÉäÉëë=`çêéK=líÜÉê=~ÅÅÉëëçêáÉë=ìëÉÇ=ïáíÜ=íÜáë=ÇÉîáÅÉ=Ñçê=ÄçÇóJïçêå=çéÉê~íáçåë=ãìëí=åçí=
Åçåí~áå=~åó=ãÉí~ääáÅ=ÅçãéçåÉåíë=~åÇ=ãìëí=éêçîáÇÉ=~í=äÉ~ëí=OOKTRãã=ëÉé~ê~íáçå=Çáëí~åÅÉ=

áåÅäìÇáåÖ=íÜÉ=~åíÉåå~=~åÇ=íÜÉ=ìëÉêÛë=ÄçÇóK=líÜÉê=ÄÉäíJÅäáéëI=ÜçäëíÉêë=çê=ëáãáä~ê=~ÅÅÉëëçêáÉë=
íÜ~í=Ü~îÉ=åçí=ÄÉÉå=íÉëíÉÇ=Ñçê=ÄçÇóJïçêå=p^o=ã~ó=åçí=Åçãéäó=ïáíÜ=c``=oc=ÉñéçëìêÉ=äáãáí=
~åÇ=ëÜçìäÇ=ÄÉ=~îçáÇÉÇK
`~ìíáçå
qÜÉ=ìëÉê=áë=Å~ìíáçåÉÇ=íÜ~í=ÅÜ~åÖÉë=çê=ãçÇáÑáÅ~íáçåë=åçí=ÉñéêÉëëäó=~ééêçîÉÇ=Äó=íÜÉ=é~êíó=
êÉëéçåëáÄäÉ=Ñçê=Åçãéäá~åÅÉ=ÅçìäÇ=îçáÇ=íÜÉ=ï~êê~åíó=~åÇ=ìëÉêÛë=~ìíÜçêáíó=íç=çéÉê~íÉ=íÜÉ=
ÉèìáéãÉåíK
mÜçåÉ=ë~ÑÉíó
o~Çáç=ÑêÉèìÉåÅó=EocF=ÉåÉêÖó
vçìê=hóçÅÉê~=TNPR=ëã~êíéÜçåÉ=áë=~=ê~Çáç=íê~åëãáííÉê=~åÇ=êÉÅÉáîÉêK=tÜÉå=áí=áë=çåI=áí=êÉÅÉáîÉë=
~åÇ=~äëç=ëÉåÇë=çìí=oc=ÉåÉêÖóK=vçìê=ëÉêîáÅÉ=éêçîáÇÉêÛë=éÜçåÉ=åÉíïçêâ=Åçåíêçäë=íÜÉ=éçïÉê=
äÉîÉä=çÑ=íÜÉ=oc=ëáÖå~äK=qÜáë=éçïÉê=äÉîÉä=Å~å=ê~åÖÉ=Ñêçã=MKMMS=ï~ííë=íç=MKS=ï~ííëK
qÜÉêÉ=~êÉ=ëáíì~íáçåë=áå=ïÜáÅÜ=ïáêÉäÉëë=éÜçåÉë=ãìëí=ÄÉ=íìêåÉÇ=çÑÑ=Ñçê=êÉ~ëçåë=çÑ=ë~ÑÉíóK=vçì=
Å~å=èìáÅâäó=íìêå=çÑÑ=íÜÉ=hóçÅÉê~=TNPR=ëã~êíéÜçåÉ=ëáãéäó=Äó=ÜçäÇáåÖ=Ççïå= =Ñçê=~=
ÑÉï=ëÉÅçåÇëK
bñéçëìêÉ=íç=oc=ÉåÉêÖó
få=^ìÖìëí=NVVSI=íÜÉ=rKpK=cÉÇÉê~ä=`çããìåáÅ~íáçåë=`çããáëëáçå=Ec``F=~ÇçéíÉÇ=oc=ÉñéçëìêÉ=
ÖìáÇÉäáåÉë=ïáíÜ=ë~ÑÉíó=äÉîÉäë=Ñçê=Ü~åÇJÜÉäÇ=ïáêÉäÉëë=éÜçåÉëK=qÜÉëÉ=ÖìáÇÉäáåÉë=~êÉ=
ÅçåëáëíÉåí=ïáíÜ=íÜÉ=ë~ÑÉíó=ëí~åÇ~êÇë=éêÉîáçìëäó=ëÉí=Äó=ÄçíÜ=rKpK=~åÇ=áåíÉêå~íáçå~ä=
ëí~åÇ~êÇë=ÄçÇáÉë=áå=íÜÉ=ÑçääçïáåÖ=êÉéçêíëW
√^kpf=`VRKN=E^ãÉêáÅ~å=k~íáçå~ä=pí~åÇ~êÇë=fåëíáíìíÉI=NVVOF
√k`om=oÉéçêí=US=Ek~íáçå~ä=`çìåÅáä=çå=o~Çá~íáçå=mêçíÉÅíáçå=~åÇ=jÉ~ëìêÉãÉåíëI=NVUSF
√f`kfom=EfåíÉêå~íáçå~ä=`çããáëëáçå=çå=kçåJfçåáòáåÖ=o~Çá~íáçå=mêçíÉÅíáçåI=NVVSF
jÉÇáÅ~ä=ÇÉîáÅÉë
m~ÅÉã~âÉêëÔfÑ=óçìê=éçêí~ÄäÉ=ïáêÉäÉëë=éÜçåÉ=áë=íçç=ÅäçëÉ=íç=~=é~ÅÉã~âÉêI=íÜÉ=éÜçåÉÛë=oc=
ÉåÉêÖó=ã~ó=áåíÉêÑÉêÉ=ïáíÜ=íÜÉ=é~ÅÉã~âÉêÛë=çéÉê~íáçåK=qÜÉ=eÉ~äíÜ=fåÇìëíêó=j~åìÑ~ÅíìêÉêë=
^ëëçÅá~íáçå=~åÇ=íÜÉ=ïáêÉäÉëë=íÉÅÜåçäçÖó=êÉëÉ~êÅÜ=Åçããìåáíó=êÉÅçããÉåÇ=íÜ~í=óçì=Ñçääçï=
íÜÉëÉ=ÖìáÇÉäáåÉë=íç=ãáåáãáòÉ=íÜÉ=éçíÉåíá~ä=Ñçê=áåíÉêÑÉêÉåÅÉK
√ ^äï~óë=âÉÉé=íÜÉ=éÜçåÉ=~í=äÉ~ëí=ëáñ=áåÅÜÉë=ENR=ÅÉåíáãÉíÉêëF=~ï~ó=Ñêçã=óçìê=é~ÅÉã~âÉê=
ïÜÉå=íÜÉ=éÜçåÉ=áë=íìêåÉÇ=çåK=
√ aç=åçí=Å~êêó=óçìê=éÜçåÉ=åÉ~ê=óçìê=ÜÉ~êíK
√ rëÉ=íÜÉ=É~ê=çééçëáíÉ=íÜÉ=é~ÅÉã~âÉêK
√ fÑ=óçì=Ü~îÉ=~åó=êÉ~ëçå=íç=ëìëéÉÅí=íÜ~í=áåíÉêÑÉêÉåÅÉ=áë=í~âáåÖ=éä~ÅÉI=íìêå=çÑÑ=óçìê=éÜçåÉ=
áããÉÇá~íÉäóK
eÉ~êáåÖ=~áÇëÔpçãÉ=ÇáÖáí~ä=ïáêÉäÉëë=éÜçåÉë=ã~ó=áåíÉêÑÉêÉ=ïáíÜ=ÜÉ~êáåÖ=~áÇëK=få=íÜÉ=ÉîÉåí=
çÑ=ëìÅÜ=áåíÉêÑÉêÉåÅÉI=óçì=ã~ó=ï~åí=íç=Åçåëìäí=óçìê=ëÉêîáÅÉ=éêçîáÇÉê=çê=Å~ää=íÜÉ=ÅìëíçãÉê=
ëÉêîáÅÉ=äáåÉ=íç=ÇáëÅìëë=~äíÉêå~íáîÉëK
líÜÉê=ãÉÇáÅ~ä=ÇÉîáÅÉëÔfÑ=óçì=ìëÉ=~åó=çíÜÉê=éÉêëçå~ä=ãÉÇáÅ~ä=ÇÉîáÅÉI=Åçåëìäí=íÜÉ=
ã~åìÑ~ÅíìêÉê=çÑ=íÜÉ=ÇÉîáÅÉ=íç=ÇÉíÉêãáåÉ=áÑ=áí=áë=~ÇÉèì~íÉäó=ëÜáÉäÇÉÇ=Ñêçã=ÉñíÉêå~ä=oc=
ÉåÉêÖóK=vçìê=éÜóëáÅá~å=ã~ó=ÄÉ=~ÄäÉ=íç=ÜÉäé=óçì=çÄí~áå=íÜáë=áåÑçêã~íáçåK=
få=ÜÉ~äíÜ=Å~êÉ=Ñ~ÅáäáíáÉëÔqìêå=óçìê=éÜçåÉ=çÑÑ=áå=ÜÉ~äíÜ=Å~êÉ=Ñ~ÅáäáíáÉë=ïÜÉå=áåëíêìÅíÉÇK=
eçëéáí~äë=~åÇ=ÜÉ~äíÜ=Å~êÉ=Ñ~ÅáäáíáÉë=ã~ó=ÄÉ=ìëáåÖ=ÉèìáéãÉåí=íÜ~í=áë=ëÉåëáíáîÉ=íç=ÉñíÉêå~ä=oc=
ÉåÉêÖóK
^îçáÇáåÖ=éçíÉåíá~ääó=ìåë~ÑÉ=~êÉ~ë
mçëíÉÇ=Ñ~ÅáäáíáÉëÔqìêå=óçìê=éÜçåÉ=çÑÑ=áå=~åó=Ñ~Åáäáíó=ïÜÉå=éçëíÉÇ=åçíáÅÉë=êÉèìáêÉ=óçì=íç=
Çç=ëçK
^áêÅê~ÑíÔc``=êÉÖìä~íáçåë=éêçÜáÄáí=ìëáåÖ=óçìê=éÜçåÉ=çå=~=éä~åÉ=íÜ~í=áë=áå=íÜÉ=~áêK=qìêå=óçìê=
éÜçåÉ=çÑÑ=ÄÉÑçêÉ=Äç~êÇáåÖ=~áêÅê~ÑíK
sÉÜáÅäÉëÔoc=ëáÖå~äë=ã~ó=~ÑÑÉÅí=áãéêçéÉêäó=áåëí~ääÉÇ=çê=áå~ÇÉèì~íÉäó=ëÜáÉäÇÉÇ=ÉäÉÅíêçåáÅ=
ëóëíÉãë=áå=ãçíçê=îÉÜáÅäÉëK=`ÜÉÅâ=ïáíÜ=íÜÉ=ã~åìÑ~ÅíìêÉê=çê=áíë=êÉéêÉëÉåí~íáîÉ=êÉÖ~êÇáåÖ=
óçìê=îÉÜáÅäÉK=vçì=ëÜçìäÇ=~äëç=Åçåëìäí=íÜÉ=ã~åìÑ~ÅíìêÉê=çÑ=~åó=ÉèìáéãÉåí=íÜ~í=Ü~ë=ÄÉÉå=
~ÇÇÉÇ=íç=óçìê=îÉÜáÅäÉK
_ä~ëíáåÖ=~êÉ~ëÔqç=~îçáÇ=áåíÉêÑÉêáåÖ=ïáíÜ=Ää~ëíáåÖ=çéÉê~íáçåëI=íìêå=óçìê=éÜçåÉ=çÑÑ=ïÜÉå=
óçì=~êÉ=áå=~=Ää~ëíáåÖ=~êÉ~=çê=áå=~êÉ~ë=éçëíÉÇ=qìêå=çÑÑ=íïçJï~ó=ê~ÇáçKÒ=lÄÉó=~ää=ëáÖåë=~åÇ=
áåëíêìÅíáçåëK
mçíÉåíá~ääó=ÉñéäçëáîÉ=~íãçëéÜÉêÉëÔqìêå=óçìê=éÜçåÉ=çÑÑ=ïÜÉå=óçì=~êÉ=áå=~åó=~êÉ~=ïáíÜ=~=
éçíÉåíá~ääó=ÉñéäçëáîÉ=~íãçëéÜÉêÉK=lÄÉó=~ää=ëáÖåë=~åÇ=áåëíêìÅíáçåëK=pé~êâë=áå=ëìÅÜ=~êÉ~ë=
ÅçìäÇ=Å~ìëÉ=~å=Éñéäçëáçå=çê=ÑáêÉ=êÉëìäíáåÖ=áå=ÄçÇáäó=áåàìêó=çê=ÉîÉå=ÇÉ~íÜK=^êÉ~ë=ïáíÜ=
éçíÉåíá~ääó=ÉñéäçëáîÉ=~íãçëéÜÉêÉë=~êÉ=çÑíÉåI=Äìí=åçí=~äï~óëI=ÅäÉ~êäó=ã~êâÉÇK=qÜÉó=áåÅäìÇÉ
√ cìÉäáåÖ=~êÉ~ë=ëìÅÜ=~ë=Ö~ë=ëí~íáçåë
√ _Éäçï=ÇÉÅâ=çå=Äç~íë
√ qê~åëÑÉê=çê=ëíçê~ÖÉ=Ñ~ÅáäáíáÉë=Ñçê=ÑìÉä=çê=ÅÜÉãáÅ~äë
√ sÉÜáÅäÉë=ìëáåÖ=äáèìÉÑáÉÇ=éÉíêçäÉìã=Ö~ëI=ëìÅÜ=~ë=éêçé~åÉ=çê=Äìí~åÉ
√ ^êÉ~ë=ïÜÉêÉ=íÜÉ=~áê=Åçåí~áåë=ÅÜÉãáÅ~äë=çê=é~êíáÅäÉë=ëìÅÜ=~ë=Öê~áåI=ÇìëíI=çê=ãÉí~ä=
éçïÇÉêë
√ ^åó=çíÜÉê=~êÉ~=ïÜÉêÉ=óçì=ïçìäÇ=åçêã~ääó=ÄÉ=~ÇîáëÉÇ=íç=íìêå=çÑÑ=óçìê=îÉÜáÅäÉ=ÉåÖáåÉ
^áê=Ä~Öë
fÑ=óçì=Ü~îÉ=~å=~áê=Ä~ÖI=al=klq=éä~ÅÉ=áåëí~ääÉÇ=çê=éçêí~ÄäÉ=éÜçåÉ=ÉèìáéãÉåí=çê=çíÜÉê=
çÄàÉÅíë=çîÉê=íÜÉ=~áê=Ä~Ö=çê=áå=íÜÉ=~áê=Ä~Ö=ÇÉéäçóãÉåí=~êÉ~K=^áê=Ä~Öë=áåÑä~íÉ=ïáíÜ=ÖêÉ~í=ÑçêÅÉK=
fÑ=ÉèìáéãÉåí=áë=åçí=éêçéÉêäó=áåëí~ääÉÇI=óçì=~åÇ=óçìê=é~ëëÉåÖÉêë=êáëâ=ëÉêáçìë=áåàìêóK
^ÅÅÉëëçêáÉë
^ÅÅÉëëçêáÉë=Ñçê=óçìê=éÜçåÉ=ã~ó=áåÅäìÇÉ=~=éçêí~ÄäÉ=âÉóÄç~êÇI=ëíÉêÉç=ÜÉ~ÇëÉíI=éçêí~ÄäÉ=
Ü~åÇëJÑêÉÉ=Å~ê=âáíI=Å~ê=éçïÉê=~Ç~éíÉêI=rp_=Å~ÄäÉI=äÉ~íÜÉê=éçìÅÜI=äÉ~íÜÉê=Å~ëÉI=~åÇ=ãçêÉK
qç=éìêÅÜ~ëÉ=~ÅÅÉëëçêáÉëI=îáëáí=ïïïKâóçÅÉê~JïáêÉäÉëëKÅçãLëíçêÉK=vçì=ã~ó=~äëç=Å~ää=
EUMMF=PQVJQNUU=ErKpK^K=~åÇ=`~å~Ç~F=çê=EURUF=UUOJNQNMK

hóçÅÉê~=áë=~=êÉÖáëíÉêÉÇ=íê~ÇÉã~êâ=çÑ=hóçÅÉê~=`çêéçê~íáçåK=n`m=áë=~=íê~ÇÉã~êâ=çÑ=hóçÅÉê~=
táêÉäÉëë=`çêéK=dê~ÑÑáíá=~åÇ=eçípóåÅ=~êÉ=êÉÖáëíÉêÉÇ=íê~ÇÉã~êâë=~åÇ=m~äã=~åÇ=íÜÉ=m~äã=
`çãéìíáåÖ=éä~íÑçêã=äçÖç=~êÉ=íê~ÇÉã~êâë=çÑ=m~äãI=fåÅKI=P`çã=`çêéçê~íáçåI=çê=áíë=
ëìÄëáÇá~êáÉëK=bìÇçê~=áë=~=êÉÖáëíÉêÉÇ=íê~ÇÉã~êâ=çÑ=íÜÉ=råáîÉêëáíó=çÑ=fääáåçáë=_ç~êÇ=çÑ=
qêìëíÉÉëI=äáÅÉåëÉÇ=íç=nr^i`ljj=fåÅçêéçê~íÉÇK=^ééäÉ=~åÇ=j~ÅáåíçëÜ=~êÉ=êÉÖáëíÉêÉÇ=
íê~ÇÉã~êâë=çÑ=^ééäÉ=`çãéìíÉêI=fåÅK=bìÇçê~=fåíÉêåÉí=pìáíÉ»=EbfpF=áë=~=íê~ÇÉã~êâ=çÑ=
nì~äÅçãã=fåÅçêéçê~íÉÇK=líÜÉê=éêçÇìÅí=~åÇ=Äê~åÇ=å~ãÉë=ã~ó=ÄÉ=íê~ÇÉã~êâë=çê=êÉÖáëíÉêÉÇ=
íê~ÇÉã~êâë=çÑ=íÜÉáê=êÉëéÉÅíáîÉ=çïåÉêëK
`çéóêáÖÜí=«=OMMP=hóçÅÉê~=táêÉäÉëë=`çêéK=^ää=êáÖÜíë=êÉëÉêîÉÇK=mêáåíÉÇ=áå=íÜÉ=råáíÉÇ=pí~íÉë=
çÑ=^ãÉêáÅ~K
oáåÖÉê=qçåÉë=`çéóêáÖÜí=«=OMMMJOMMP=hóçÅÉê~=táêÉäÉëë=`çêéK
mçêíáçåë=çÑ=íÜáë=ÇçÅìãÉåí=~êÉ=`çéóêáÖÜí=«=NVVU=P`çã=`çêéçê~íáçå=çê=áíë=ëìÄëáÇá~êáÉëK=
oÉéêáåíÉÇ=ïáíÜ=éÉêãáëëáçåK
UOJ_TVOSJPbkI=oÉîK=MMN
`çåíÉåíë îáá
`çåíÉåíë
tÉäÅçãÉ==K=K=K=K=K=K=K=K=K=K=K=K=K=K=K=K=K=K=K=K=K=K=K=K=K=K=K=K=K=K=K=K=K=K=K=K=K=K=K=K=K=K=K=K=K=K=K=K=K=K=K=K=K=K=N
fÑ=óçì=~äêÉ~Çó=ìëÉ=~=m~äã=Ü~åÇÜÉäÇ= K=K=K=K=K=K=K=K=K=K=K=K=K=K=K=K=K=K=K=K=K=K=K=K=K=K=K=K=K=K=K=O
tÜ~í=íç=Çç=Ñáêëí= K=K=K=K=K=K=K=K=K=K=K=K=K=K=K=K=K=K=K=K=K=K=K=K=K=K=K=K=K=K=K=K=K=K=K=K=K=K=K=K=K=K=K=K=K=K=K=K=K=P
To install the battery . . . . . . . . . . . . . . . . . . . . . . . . . . . . . . . . . . . . . . . . . . . . 3
To connect the cable for synchronizing and charging the battery . . . . . . . . . . 3
To recharge the battery . . . . . . . . . . . . . . . . . . . . . . . . . . . . . . . . . . . . . . . . . . 5
To charge a battery in the cradle’s rear pocket . . . . . . . . . . . . . . . . . . . . . . . 6
Turning your phone on for the first time . . . . . . . . . . . . . . . . . . . . . . . . . . . . . 7
fåíêçÇìÅáåÖ=íÜÉ=hóçÅÉê~=TNPR=ëã~êíéÜçåÉ==K=K=K=K=K=K=K=K=K=K=K=K=K=K=K=K=K=K=K=K=K=K=K=K=K=U
Getting to know the function keys . . . . . . . . . . . . . . . . . . . . . . . . . . . . . . . . . . 8
Turning the phone on and off . . . . . . . . . . . . . . . . . . . . . . . . . . . . . . . . . . . . 10
Features . . . . . . . . . . . . . . . . . . . . . . . . . . . . . . . . . . . . . . . . . . . . . . . . . . . . 10
Checking phone status . . . . . . . . . . . . . . . . . . . . . . . . . . . . . . . . . . . . . . . . . 11
Checking LED status . . . . . . . . . . . . . . . . . . . . . . . . . . . . . . . . . . . . . . . . . . . 12
Using the screen . . . . . . . . . . . . . . . . . . . . . . . . . . . . . . . . . . . . . . . . . . . . . . 12
j~âáåÖ=~åÇ=êÉÅÉáîáåÖ=Å~ääë= K=K=K=K=K=K=K=K=K=K=K=K=K=K=K=K=K=K=K=K=K=K=K=K=K=K=K=K=K=K=K=K=K=K=K=K=K=NP
To dial a call on the keypad . . . . . . . . . . . . . . . . . . . . . . . . . . . . . . . . . . . . . 13
To make a call from the Address Book . . . . . . . . . . . . . . . . . . . . . . . . . . . . . 13
To find a contact using the keypad . . . . . . . . . . . . . . . . . . . . . . . . . . . . . . . . 13
To make a call from the recent calls list . . . . . . . . . . . . . . . . . . . . . . . . . . . . 14
To make a call using speed dial . . . . . . . . . . . . . . . . . . . . . . . . . . . . . . . . . . 14
îááá hóçÅÉê~=TNPR=rëÉê=dìáÇÉ
To use the headset during a call . . . . . . . . . . . . . . . . . . . . . . . . . . . . . . . . . . 15
Receiving calls . . . . . . . . . . . . . . . . . . . . . . . . . . . . . . . . . . . . . . . . . . . . . . . 15
To call emergency numbers . . . . . . . . . . . . . . . . . . . . . . . . . . . . . . . . . . . . . 15
oÉÅÉáîáåÖ=~åÇ=ëÉåÇáåÖ=ãÉëë~ÖÉë=K=K=K=K=K=K=K=K=K=K=K=K=K=K=K=K=K=K=K=K=K=K=K=K=K=K=K=K=K=K=K=K NS
Receiving a message . . . . . . . . . . . . . . . . . . . . . . . . . . . . . . . . . . . . . . . . . . . 16
Sending a message . . . . . . . . . . . . . . . . . . . . . . . . . . . . . . . . . . . . . . . . . . . . 17
rëáåÖ=j~áå=jÉåì=fíÉãë==K=K=K=K=K=K=K=K=K=K=K=K=K=K=K=K=K=K=K=K=K=K=K=K=K=K=K=K=K=K=K=K=K=K=K=K=K=K=K=K OM
To check your own phone number . . . . . . . . . . . . . . . . . . . . . . . . . . . . . . . . 20
båíÉêáåÖ=áåÑçêã~íáçå= =K=K=K=K=K=K=K=K=K=K=K=K=K=K=K=K=K=K=K=K=K=K=K=K=K=K=K=K=K=K=K=K=K=K=K=K=K=K=K=K=K=K=K ON
To use the on-screen keyboard . . . . . . . . . . . . . . . . . . . . . . . . . . . . . . . . . . . 21
To write with the stylus . . . . . . . . . . . . . . . . . . . . . . . . . . . . . . . . . . . . . . . . 21
Basic Graffiti characters . . . . . . . . . . . . . . . . . . . . . . . . . . . . . . . . . . . . . . . . 22
rëáåÖ=íÜÉ=^ÇÇêÉëë=_ççâ==K=K=K=K=K=K=K=K=K=K=K=K=K=K=K=K=K=K=K=K=K=K=K=K=K=K=K=K=K=K=K=K=K=K=K=K=K=K=K=K OP
rëáåÖ=`~ää=eáëíçêó=K=K=K=K=K=K=K=K=K=K=K=K=K=K=K=K=K=K=K=K=K=K=K=K=K=K=K=K=K=K=K=K=K=K=K=K=K=K=K=K=K=K=K=K=K=K OQ
rëáåÖ=íÜÉ=a~íÉ=_ççâ== K=K=K=K=K=K=K=K=K=K=K=K=K=K=K=K=K=K=K=K=K=K=K=K=K=K=K=K=K=K=K=K=K=K=K=K=K=K=K=K=K=K=K OR
rëáåÖ=jÉãçë=== =K=K=K=K=K=K=K=K=K=K=K=K=K=K=K=K=K=K=K=K=K=K=K=K=K=K=K=K=K=K=K=K=K=K=K=K=K=K=K=K=K=K=K=K=K=K=K=K OR
oÉÅÉáîáåÖ=îçáÅÉ=ãÉëë~ÖÉë=~åÇ=îçáÅÉ=ã~áä= K=K=K=K=K=K=K=K=K=K=K=K=K=K=K=K=K=K=K=K=K=K=K=K OT
To check messages and voice mail . . . . . . . . . . . . . . . . . . . . . . . . . . . . . . . . 27
rëáåÖ=péÉÉÇ=aá~ä==K=K=K=K=K=K=K=K=K=K=K=K=K=K=K=K=K=K=K=K=K=K=K=K=K=K=K=K=K=K=K=K=K=K=K=K=K=K=K=K=K=K=K=K=K=K OU
To add numbers to your Speed Dial list . . . . . . . . . . . . . . . . . . . . . . . . . . . . 28
To make a call using Speed Dial . . . . . . . . . . . . . . . . . . . . . . . . . . . . . . . . . 29
rëáåÖ=ma^=^ééäáÅ~íáçåë==K=K=K=K=K=K=K=K=K=K=K=K=K=K=K=K=K=K=K=K=K=K=K=K=K=K=K=K=K=K=K=K=K=K=K=K=K=K=K=K PM
`çåíÉåíë áñ
rëáåÖ=íÜÉ=hóçÅÉê~=jmP=mä~óÉê==K=K=K=K=K=K=K=K=K=K=K=K=K=K=K=K=K=K=K=K=K=K=K=K=K=K=K=K=K=K=K=K=K=K=PN
Transferring audio files from your computer to your phone . . . . . . . . . . . . . 31
Using your JukeBox . . . . . . . . . . . . . . . . . . . . . . . . . . . . . . . . . . . . . . . . . . . 33
Managing your playlist . . . . . . . . . . . . . . . . . . . . . . . . . . . . . . . . . . . . . . . . . 34
rëáåÖ=cáäÉj~å~ÖÉê= =K=K=K=K=K=K=K=K=K=K=K=K=K=K=K=K=K=K=K=K=K=K=K=K=K=K=K=K=K=K=K=K=K=K=K=K=K=K=K=K=K=K=K=K=PR
To use FileManager . . . . . . . . . . . . . . . . . . . . . . . . . . . . . . . . . . . . . . . . . . . 36
rëáåÖ=mÜçíçpìáíÉ==K=K=K=K=K=K=K=K=K=K=K=K=K=K=K=K=K=K=K=K=K=K=K=K=K=K=K=K=K=K=K=K=K=K=K=K=K=K=K=K=K=K=K=K=K=K=PU
rëáåÖ=bfp=tÉÄ= =K=K=K=K=K=K=K=K=K=K=K=K=K=K=K=K=K=K=K=K=K=K=K=K=K=K=K=K=K=K=K=K=K=K=K=K=K=K=K=K=K=K=K=K=K=K=K=K=PV
rëáåÖ=bã~áä=^ééäáÅ~íáçåë= K=K=K=K=K=K=K=K=K=K=K=K=K=K=K=K=K=K=K=K=K=K=K=K=K=K=K=K=K=K=K=K=K=K=K=K=K=K=K=QN
Eudora Email . . . . . . . . . . . . . . . . . . . . . . . . . . . . . . . . . . . . . . . . . . . . . . . . 41
Palm Mail . . . . . . . . . . . . . . . . . . . . . . . . . . . . . . . . . . . . . . . . . . . . . . . . . . . 41
Other Applications . . . . . . . . . . . . . . . . . . . . . . . . . . . . . . . . . . . . . . . . . . . . 42
rëáåÖ=íÜÉ=qç=aç=iáëí=K=K=K=K=K=K=K=K=K=K=K=K=K=K=K=K=K=K=K=K=K=K=K=K=K=K=K=K=K=K=K=K=K=K=K=K=K=K=K=K=K=K=K=K=QO
rëáåÖ=sçáÅÉ=cÉ~íìêÉë= =K=K=K=K=K=K=K=K=K=K=K=K=K=K=K=K=K=K=K=K=K=K=K=K=K=K=K=K=K=K=K=K=K=K=K=K=K=K=K=K=K=K=QP
To voice train the phone . . . . . . . . . . . . . . . . . . . . . . . . . . . . . . . . . . . . . . . . 43
To make a call using voice commands . . . . . . . . . . . . . . . . . . . . . . . . . . . . . 43
To record and play back voice memos . . . . . . . . . . . . . . . . . . . . . . . . . . . . . 44
To customize your smartphone for voice answer and voice wakeup . . . . . . . 45
^ÇàìëíáåÖ=ëçìåÇë==K=K=K=K=K=K=K=K=K=K=K=K=K=K=K=K=K=K=K=K=K=K=K=K=K=K=K=K=K=K=K=K=K=K=K=K=K=K=K=K=K=K=K=K=K=K=QR
To adjust the speaker volume . . . . . . . . . . . . . . . . . . . . . . . . . . . . . . . . . . . . 45
To select a ringer sound and adjust ringer volume . . . . . . . . . . . . . . . . . . . 45
To silence the ringer . . . . . . . . . . . . . . . . . . . . . . . . . . . . . . . . . . . . . . . . . . . 46
To adjust PDA sounds . . . . . . . . . . . . . . . . . . . . . . . . . . . . . . . . . . . . . . . . . . 46
ñ hóçÅÉê~=TNPR=rëÉê=dìáÇÉ
To adjust phone sounds . . . . . . . . . . . . . . . . . . . . . . . . . . . . . . . . . . . . . . . . 47
pÉííáåÖ=ìé=éêÉÑÉêÉåÅÉë==K=K=K=K=K=K=K=K=K=K=K=K=K=K=K=K=K=K=K=K=K=K=K=K=K=K=K=K=K=K=K=K=K=K=K=K=K=K=K=K=K QU
To set PDA preferences . . . . . . . . . . . . . . . . . . . . . . . . . . . . . . . . . . . . . . . . . 48
To set phone preferences . . . . . . . . . . . . . . . . . . . . . . . . . . . . . . . . . . . . . . . 51
pÉííáåÖ=ìé=åÉíïçêâ=ÅçååÉÅíáçåë= K=K=K=K=K=K=K=K=K=K=K=K=K=K=K=K=K=K=K=K=K=K=K=K=K=K=K=K=K=K=K=K=K RR
To set up Network Preferences . . . . . . . . . . . . . . . . . . . . . . . . . . . . . . . . . . . 55
rëáåÖ=c~ñLjçÇÉã= =K=K=K=K=K=K=K=K=K=K=K=K=K=K=K=K=K=K=K=K=K=K=K=K=K=K=K=K=K=K=K=K=K=K=K=K=K=K=K=K=K=K=K=K=K RS
To set up Fax/Modem . . . . . . . . . . . . . . . . . . . . . . . . . . . . . . . . . . . . . . . . . . 57
To use Fax/Modem . . . . . . . . . . . . . . . . . . . . . . . . . . . . . . . . . . . . . . . . . . . . 57
_É~ãáåÖ=áåÑçêã~íáçå= K=K=K=K=K=K=K=K=K=K=K=K=K=K=K=K=K=K=K=K=K=K=K=K=K=K=K=K=K=K=K=K=K=K=K=K=K=K=K=K=K=K=K RU
To beam information . . . . . . . . . . . . . . . . . . . . . . . . . . . . . . . . . . . . . . . . . . 58
oÉëÉííáåÖ=íÜÉ=éÜçåÉ= K=K=K=K=K=K=K=K=K=K=K=K=K=K=K=K=K=K=K=K=K=K=K=K=K=K=K=K=K=K=K=K=K=K=K=K=K=K=K=K=K=K=K=K RV
To perform a soft reset . . . . . . . . . . . . . . . . . . . . . . . . . . . . . . . . . . . . . . . . . 59
To perform a hard reset . . . . . . . . . . . . . . . . . . . . . . . . . . . . . . . . . . . . . . . . 60
póåÅÜêçåáòáåÖ=óçìê=éÜçåÉ=ïáíÜ=~=ÅçãéìíÉê= K=K=K=K=K=K=K=K=K=K=K=K=K=K=K=K=K=K=K=K=K=K=K SN
To install the Desktop software . . . . . . . . . . . . . . . . . . . . . . . . . . . . . . . . . . . 61
To perform your first synchronization . . . . . . . . . . . . . . . . . . . . . . . . . . . . . . 62
mÜçåÉ=Å~êÉ=K=K=K=K=K=K=K=K=K=K=K=K=K=K=K=K=K=K=K=K=K=K=K=K=K=K=K=K=K=K=K=K=K=K=K=K=K=K=K=K=K=K=K=K=K=K=K=K=K=K=K=K SP
Phone . . . . . . . . . . . . . . . . . . . . . . . . . . . . . . . . . . . . . . . . . . . . . . . . . . . . . . 63
Antenna . . . . . . . . . . . . . . . . . . . . . . . . . . . . . . . . . . . . . . . . . . . . . . . . . . . . 64
Battery . . . . . . . . . . . . . . . . . . . . . . . . . . . . . . . . . . . . . . . . . . . . . . . . . . . . . 65
Where to find help . . . . . . . . . . . . . . . . . . . . . . . . . . . . . . . . . . . . . . . . . . . . 68
fåÇÉñ= K=K=K=K=K=K=K=K=K=K=K=K=K=K=K=K=K=K=K=K=K=K=K=K=K=K=K=K=K=K=K=K=K=K=K=K=K=K=K=K=K=K=K=K=K=K=K=K=K=K=K=K=K=K=K=K=K SV

tÉäÅçãÉ N
tÉäÅçãÉ
Your Kyocera 7135 smartphone gives you the integrated features of a CDMA digital
telephone and a Palm handheld Personal Digital Assistant (PDA) with a color display in
one device. With your Kyocera 7135 smartphone, you can download and view pictures,
play games, and listen to music. To learn about your new phone, refer to the following
resources:
rëÉê=dìáÇÉÔThis guide takes you on a quick tour of the phone’s major features.
oÉÑÉêÉåÅÉ=dìáÇÉÔFor detailed information, insert the CD-ROM in your computer and
open the oÉÑÉêÉåÅÉ=dìáÇÉ=or visit Kyocera Wireless Corp. at=
ïïïKâóçÅÉê~ëã~êíéÜçåÉKÅçãK
`aJoljÔOn the CD-ROM, you’ll find the Kyocera 7135 desktop (to install it, see the
Reference Guide on the CD-ROM). You’ll also find third-party software and user guides
for sending email, browsing the Internet, using Web clipping services, using FileManager,
and using your MP3 player. For help with these applications, contact their source. For
example, if you need help with Eudora®, go to the Eudora Web site (www.eudora.com).
tÉÄ=ëáíÉÔYou can download the latest versions of all phone documentation at
ïïïKâóçÅÉê~ëã~êíéÜçåÉKÅçãK
fãéçêí~åíW=_ÉÑçêÉ=ìëáåÖ=óçìê=éÜçåÉI=ÄÉÅçãÉ=Ñ~ãáäá~ê=ïáíÜ=íÜÉ=éÜçåÉ=Å~êÉ=çå=é~ÖÉ=SP=
~åÇ=ë~ÑÉíó=ÅçåëáÇÉê~íáçåë=ëí~êíáåÖ=çå=é~ÖÉ=áááK

O hóçÅÉê~=TNPR=rëÉê=dìáÇÉ
fÑ=óçì=~äêÉ~Çó=ìëÉ=~=m~äã=Ü~åÇÜÉäÇ
If you already use a Palm handheld, you’ll find the Kyocera 7135 smartphone very
familiar. Many Palm applications are the same; some have been enhanced to integrate
with the telephone’s features.
fÅçåëÔMost icons and buttons are identical to those on your Palm handheld. Only a few
icons have changed. The Calculator icon has been replaced with the Dialer icon .
Tap this icon to open the phone application. You’ll find the Calculator on the PDA
applications screen. Also, the Messages and Web browser buttons have changed.
m~äã=aÉëâíçéÔYou do not need to reinstall the Palm Desktop from the CD-ROM.
However, if you are going to connect your Kyocera 7135 smartphone to your computer
using a Universal Serial Bus (USB) connection, you must install the Palm Desktop from
the CD-ROM.
qê~åëÑÉêêáåÖ=Ç~í~ÔYou can transfer the data from your existing Palm device to your
new Kyocera 7135 smartphone. Before you do so, be sure to read the oÉÑÉêÉåÅÉ=dìáÇÉ=
on the enclosed CD-ROM=for several recommended methods.
t~êåáåÖ>=aç=åçí=ëáãéäó=ëóåÅÜêçåáòÉ=óçìê=åÉï=éÜçåÉ=íç=Åçéó=íÜÉ=Ç~í~K=pçãÉ=
áãéçêí~åí=ëÉííáåÖë=çå=íÜÉ=éÜçåÉ=ïáää=ÄÉ=ÅÜ~åÖÉÇ=áÑ=óçì=Çç=ëçK=^ÇÇáíáçå~ääóI=ëáåÅÉ=ÉîÉêó=
m~äã=Ü~åÇÜÉäÇ=ÇÉîáÅÉ=ãìëí=Ü~îÉ=~=ìåáèìÉ=å~ãÉI=ëÉêáçìë=ëóåÅÜêçåáò~íáçå=éêçÄäÉãë=
ã~ó=çÅÅìê=áÑ=óçì=ëóåÅÜêçåáòÉ=íïç=m~äã=ÇÉîáÅÉë=ïáíÜ=íÜÉ=ë~ãÉ=ìëÉê=å~ãÉK=
tÜ~í=íç=Çç=Ñáêëí P
tÜ~í=íç=Çç=Ñáêëí=
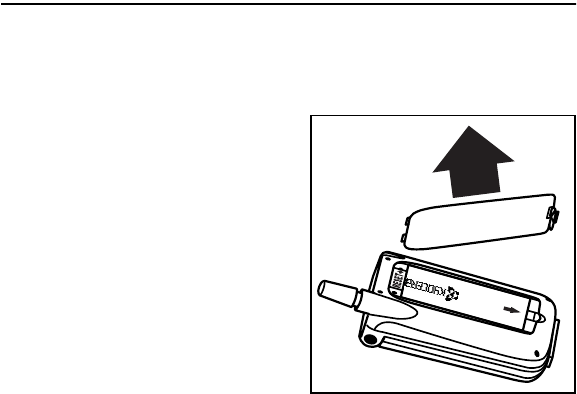
qç=áåëí~ää=íÜÉ=Ä~ííÉêó
The battery for your new phone is delivered partially charged. Before using the phone for
the first time, you must install and fully charge the battery.
NK With the phone turned off, use the stylus or
your finger to open the battery
compartment on the lower back of the
phone. Lift off the battery compartment
cover.
OK Slide the battery into the compartment with
the Kyocera label facing up toward you and
the arrow pointing toward the bottom of
the phone. The end of the battery with
three copper-colored depressions goes
toward the bottom of the phone.
PK Apply gentle pressure until the battery
snaps into place. Then replace the battery
cover by inserting the top of the battery cover first. Apply gentle pressure to the bottom
of the battery cover to snap it closed.
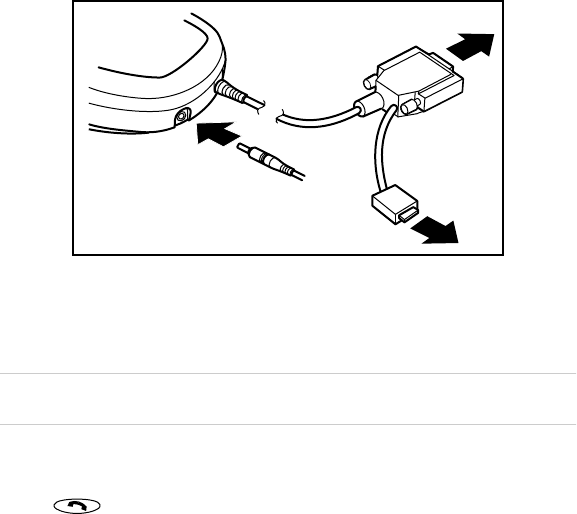
qç=ÅçååÉÅí=íÜÉ=Å~ÄäÉ=Ñçê=ëóåÅÜêçåáòáåÖ=~åÇ=ÅÜ~êÖáåÖ=íÜÉ=Ä~ííÉêó
There are two types of cables for your Kyocera 7135 smartphone: A data cable for
downloading data and a power cable for charging the phone.
Q hóçÅÉê~=TNPR=rëÉê=dìáÇÉ
NK Insert the small round plug of the power cable (~) into the base of the sync cradle.
Plug the other end of the power cable into a wall outlet.
OK To connect the data cable to your computer, first turn off the computer.
PK Plug the data cable from the phone (Ä) into a serial communications (COM) port or
universal serial bus (USB) port on your computer. The cable requires a dedicated
port; it cannot share a port with an internal modem or other device.
kçíÉW=qÜÉ=Ç~í~=Å~ÄäÉ=Ü~ë=ÄçíÜ=~=ëÉêá~ä=~åÇ=rp_=ÅçååÉÅíçêK=låäó=~íí~ÅÜ=çåÉ=ÅçååÉÅíçêK=
`ÜççëÉ=íÜÉ=íóéÉ=íÜ~í=áë=~ééêçéêá~íÉ=Ñçê=óçìê=ÅçãéìíÉêK
QK Turn on the computer.
RK Place the phone in the cradle and flip open (so the screen is visible).
SK Tap to access the phone screen.
(a)
(b) serial
(b) USB
What to do first 5
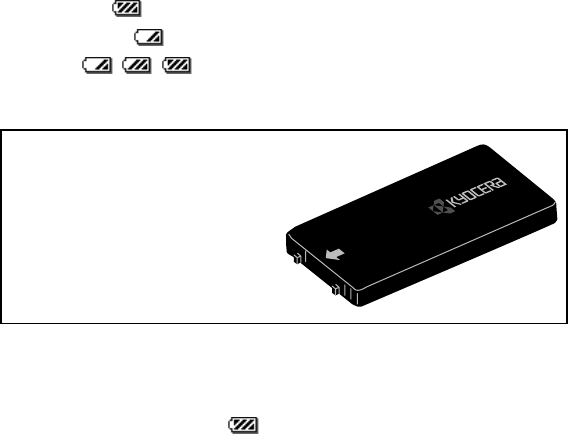
The battery icon in the upper-right corner of the phone screen tells you whether the
phone is:
•Fully charged . All black bars are displayed.
•Partially charged . Fewer black bars are displayed, indicating partial charge.
•Charging . The battery icon is animated and scrolls, indicating the
battery is charging.
To recharge the battery
You can safely recharge your phone’s battery at any time. Place your phone in the cradle
to begin charging or simply plug the power cable into the round port on the phone’s base
to charge directly. The battery icon in the upper-right corner of the phone screen
tells you when the battery is fully charged. The battery will not overcharge, so you can
leave the phone connected as long as you like.
IMPORTANT: Charge the battery
completely before first use.
If the battery is totally drained, it may take
2-3 hours to charge the first time. After
the first time, it is not necessary to
recharge the battery fully; you can use the
phone with a partial charge.

S hóçÅÉê~=TNPR=rëÉê=dìáÇÉ
qç=ÅÜ~êÖÉ=~=Ä~ííÉêó=áå=íÜÉ=Åê~ÇäÉÛë=êÉ~ê=éçÅâÉí=
Your smartphone’s sync cradle has a rear pocket that lets you charge a second battery.
This way you have a fresh battery ready when you don’t have time to recharge your
smartphone.
Your primary battery (the one in your phone) can also be charged in the rear pocket, but
there’s no need to do this. That battery can stay in your phone’s battery compartment and
be charged when the phone is placed in the cradle. If you do remove the primary battery
from the phone and charge it in the rear pocket, remember that your smartphone must
be in the cradle for it to operate. In fact, your smartphone should be kept connected to a
power source whenever the battery is removed, since extended time without power can
lead to data loss.
A charge indicator light shows the status of a battery charging in the rear pocket. This light
is on the cradle’s right side, behind the HotSync button.
•No light - no battery in pocket (pocket empty)
•Red light - battery charging
•Red light (blinking) - battery not charging. Check for error in placement of battery
in pocket, cables to cradle, power source, etc.
•Green light - battery fully charged
kçíÉW=qÜÉ=ÅÜ~êÖÉ=áåÇáÅ~íçê=äáÖÜí=ÇçÉë=åçí=áåÇáÅ~íÉ=íÜÉ=ÅÜ~êÖÉ=äÉîÉä=çÑ=íÜÉ=Ä~ííÉêó=
áåëáÇÉ=óçìê=ëã~êíéÜçåÉK=fí=çåäó=áåÇáÅ~íÉë=íÜÉ=ÅÜ~êÖÉ=äÉîÉä=çÑ=íÜÉ=Ä~ííÉêó=áå=íÜÉ=Åê~ÇäÉÛë=
êÉ~ê=éçÅâÉíK
tÜ~í=íç=Çç=Ñáêëí T
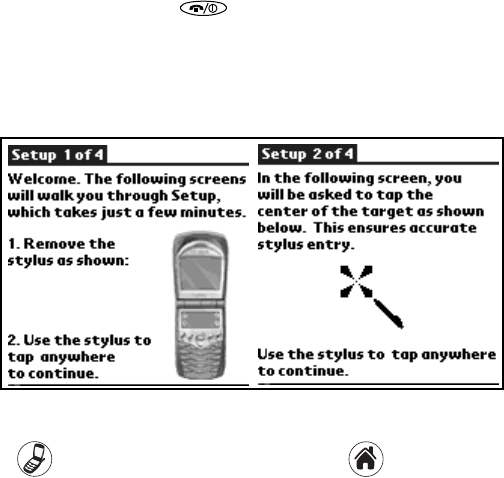
qìêåáåÖ=óçìê=éÜçåÉ=çå=Ñçê=íÜÉ=Ñáêëí=íáãÉ
NK Open the flip. Press and hold for a few seconds. The message “Powering on”
appears on the screen.
OK Follow the Setup procedures to calibrate the screen and Graffiti writing area. If the
Setup screens do not appear, see Calibrating the screen on page 12. The first 2 of 4
screens are shown here.
PK After calibrating the screens, tap açåÉ to exit Setup.
QK Tap to view the phone application screen or tap to see the PDA
application screen.
U hóçÅÉê~=TNPR=rëÉê=dìáÇÉ
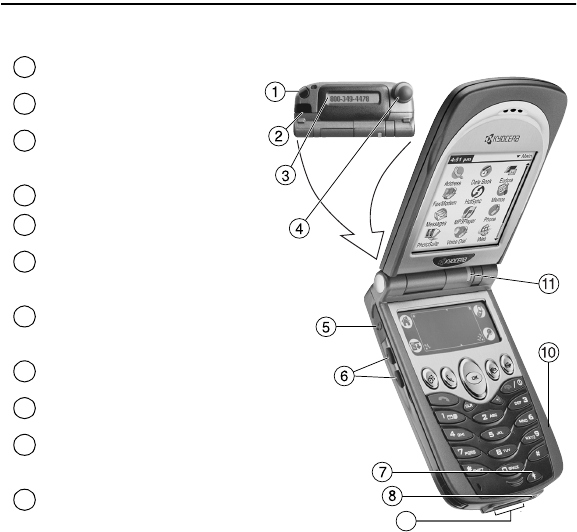
fåíêçÇìÅáåÖ=íÜÉ=hóçÅÉê~=TNPR=ëã~êíéÜçåÉ
dÉííáåÖ=íç=âåçï=íÜÉ=ÑìåÅíáçå=âÉóë
píóäìë - Hold it like a pen to write on
the screen.
fåÑê~êÉÇ=mçêí - Point at other
devices for beaming data.
bñíÉêå~ä=i`aL`~ääÉê=fa - View
caller information without opening
the phone.
^åíÉåå~ - Extend during calls.
eÉ~ÇëÉí=g~Åâ - Pug the headset
cable in here.
sçäìãÉ=ré=~åÇ=açïå - Press
these buttons to increase or decrease
phone volume.
_~ÅâäáÖÜí=_ìííçå - Press to turn the
phone screen on and off. Press and
hold to turn backlight on and off.
mçïÉê=éçêí - Plug the power cable
in here to recharge battery.
a~í~=éçêíLjmP=éçêí - Plug the data
cable in here to load data and MP3s.
bñé~åëáçå=ëäçí - Insert a MMC or
SD card here to expand available
memory on your smartphone.
iba (light-emitting diode)
Green = Home area
Amber = Roaming
Red = No signal
N
9
O
P
Q
R
S
T
U
V
NM
NN

fåíêçÇìÅáåÖ=íÜÉ=hóçÅÉê~=TNPR=ëã~êíéÜçåÉ V
PDA key shows the applications screen of the PDA.
Dialer key shows the main screen of the phone.
Dropdown menu key allows you to perform selected functions in the application you are
currently using.
Find key allows you to search all files and applications on your smartphone for selected text.
Date book key opens the date book to schedule appointments and view entries by hour, day,
or month.
Address book key opens the address book where contacts names, phone numbers, email
addresses, and other information is stored.
Messages key opens your Messages In-box to view text messages and access voice mail.
Web key opens the EIS Web application to browse the Internet. View HTML Web pages with
images, with support for downloads, Javascript, and SSL.
Navigator key scrolls through lists and menus. Press the navigator key up or down to
highlight an item. Press the center of the key to select the item.
Send/Talk key starts or answers a call.
Clear key erases the last character entered while using the keypad or an application.
Speakerphone key turns the speakerphone on and off.
End/Power key turns on and turns off the phone, ends a call, or returns to the home screen.
Shift key changes the text mode in text entry.
NM hóçÅÉê~=TNPR=rëÉê=dìáÇÉ
kçíÉW=qÜÉ=a~íÉ=ÄççâI=^ÇÇêÉëë=ÄççâI=ãÉëë~ÖÉëI=~åÇ=tÉÄ=âÉóë=Å~å=ÄÉ=ÅìëíçãáòÉÇ=íç=
êÉéêÉëÉåí=~åó=ÑìåÅíáçåK=pÉÉ=`ìëíçãáòáåÖÒ=çå=é~ÖÉ RMK
qìêåáåÖ=íÜÉ=éÜçåÉ=çå=~åÇ=çÑÑ
To turn your phone on or off, press and hold for a few seconds until “Powering
On” or “Powering Off” appears on the screen. The Kyocera 7135 smartphone is designed
to conserve battery power. When you are not actively using it, the screen “goes to sleep.”
If you aren’t sure whether the phone is on, open the flip and press .
cÉ~íìêÉë
When you open the flip of your phone, the PDA “wakes up.” It displays the last application
you used or the phone’s main menu screen if the phone is on and the phone application
is selected. If the PDA screen is displayed, and you aren’t sure whether the phone is on,
press . If the message “Phone is OFF” appears and you would like to turn the
phone on, press and hold for a few seconds.
When you are not using the phone or PDA applications, the screen goes blank after a few
minutes to save power. To activate the screen, press any key, press the backlight key, or
close and open the flip.
Space key enters a space during text entry.
Backlight button turns the phone screen and PDA on and off. Press and hold the backlight
button to turn the backlight on and off. You can still see the screen. A quick press of the
backlight turns the PDA off until you press any key.
fåíêçÇìÅáåÖ=íÜÉ=hóçÅÉê~=TNPR=ëã~êíéÜçåÉ NN
You may disable the power-save feature by tapping on your PDA applications screen.
Tap in the upper-right corner of the screen and use your stylus to select dÉåÉê~äK
Tap next to lÑÑ=^ÑíÉê and select kÉîÉê=ïÜÉå=çéÉåK See “Setting up Preferences” in
the reference guide on your CD-ROM.
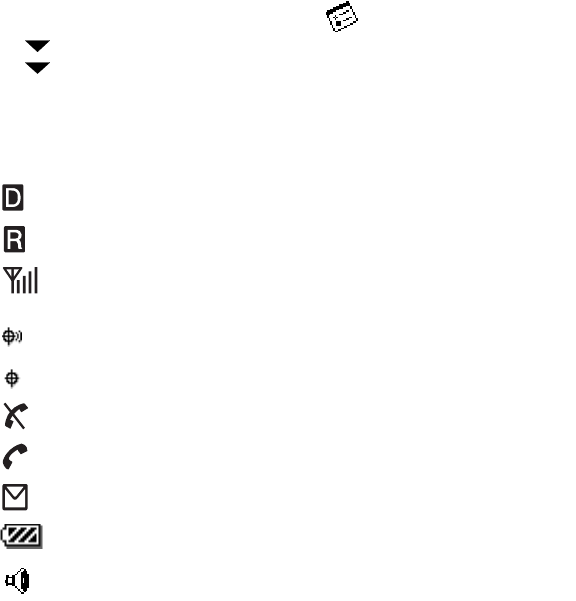
`ÜÉÅâáåÖ=éÜçåÉ=ëí~íìë
The phone screen shows the following information when the phone is on.
The phone is operating in CDMA digital mode. If this icon isn’t present, the phone is either
in analog mode or there is no service.
The phone is outside of its home area (roaming).
This icon shows the current signal strength. The more lines you see, the stronger the signal.
When this icon appears, you can make and receive calls. If the signal strength is very low, you
may not be able to complete a call.
Geographic Positioning System is enabled to share your location with emergency services as
well as your service provider.
Geographic Positioning System shares your location with emergency services only.
The phone is not receiving a signal. You cannot make or receive calls. Wait a little longer or
move to an open area.
A call is in progress.
You have a text message, voice mail, or page.
This=icon=shows how much power remains in the battery. The more black bars you see, the
greater the charge.
The speakerphone is enabled.

NO hóçÅÉê~=TNPR=rëÉê=dìáÇÉ
`ÜÉÅâáåÖ=iba=ëí~íìë
The LED indicates the following states:
•dêÉÉåÔHome. The phone is in its home area. The light flashes when a call is
received, and it remains green during a call.
•^ãÄÉêÔRoaming. The phone is in roaming mode. The light flashes when a call is
received, and it remains amber during a call.
•oÉÇÔNo signal available. The phone is searching for a signal.
rëáåÖ=íÜÉ=ëÅêÉÉå
The screen is touch-sensitive when you are using the PDA. Use the stylus to open
applications and make selections when you are using the PDA. When you are using the
phone application, the screen is not touch-sensitive. You must use the navigator key to
make selections from menus and lists.
`~äáÄê~íáåÖ=íÜÉ=ëÅêÉÉåÔIf the screen is unresponsive, follow these steps.
NK Open the flip. With the stylus, tap .
OK Tap the Prefs PDA icon.
PK Tap in the upper-right corner of the screen. From the picklist, tap aáÖáíáòÉêK=
Follow the instructions on the screen.
When calibration is complete, tap to go to another application.
pÉÉ=`Ü~éíÉê=NI=fåíêçÇìÅáåÖ=íÜÉ=hóçÅÉê~=TNPR=ëã~êíéÜçåÉIÒ=áå=íÜÉ=oÉÑÉêÉåÅÉ=dìáÇÉ=çå=
íÜÉ=`aJoljK
j~âáåÖ=~åÇ=êÉÅÉáîáåÖ=Å~ääë NP
j~âáåÖ=~åÇ=êÉÅÉáîáåÖ=Å~ääë
qç=Çá~ä=~=Å~ää=çå=íÜÉ=âÉóé~Ç
NK Extend the antenna. Check the signal strength icon .
OK Press the keys to enter the phone number. Then press .
If you make a mistake, press to remove the last digit you pressed. Hold
down to clear all digits.
PK To end your call, press .
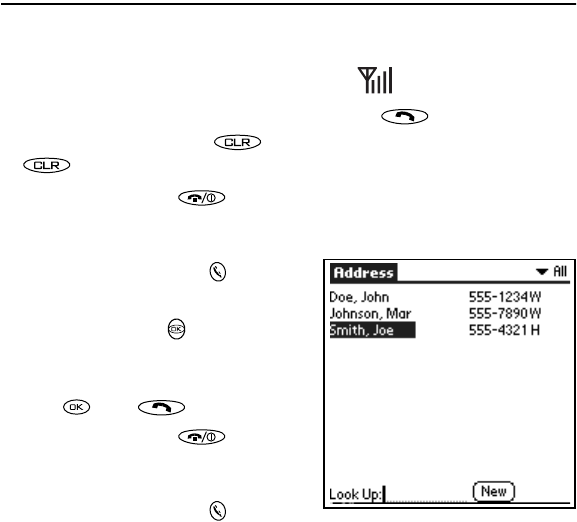
qç=ã~âÉ=~=Å~ää=Ñêçã=íÜÉ=^ÇÇêÉëë=_ççâ=
NK Press the Address Book key to open the
Address List.
OK Use the navigator key to scroll up or
down to select the contact you would like to
call.
PK Press , then .
QK To end your call, press .
qç=ÑáåÇ=~=Åçåí~Åí=ìëáåÖ=íÜÉ=âÉóé~Ç
NK Press the Address Book key .
OK Using the keypad, press the first letter of the name you are searching for. For example,
the 2 key is equivalent to A, B, or C. If you press the 2 key once, the letter A appears
NQ hóçÅÉê~=TNPR=rëÉê=dìáÇÉ
in the Find window. If you press the 2 key twice, the letter B appears. Press keys
rapidly.
Wait a moment. The cursor moves one position to the right.
PK Press the key for the second letter of the name you are searching for. Enter as many
letters as you wish.
QK Your phone will find all entries beginning with the letters you have selected. Use the
navigator key to scroll up or down to highlight an entry.
RK Press to make your selection. If there are multiple numbers for a person, use the
navigator key to highlight the one you want to call.
SK Press .
TK To end your call, press .
qç=ã~âÉ=~=Å~ää=Ñêçã=íÜÉ=êÉÅÉåí=Å~ääë=äáëí
NK From the main phone menu, highlight oÉÅÉåí=`~ääë and press .
OK Use the navigator key to scroll up or down to select the phone number/contact you
wish to call and press .
qç=ã~âÉ=~=Å~ää=ìëáåÖ=ëéÉÉÇ=Çá~ä
After you have assigned a speed dial location to a contact, press and hold the number on
your keypad until you see the contact’s name appear on your screen.
For information on setting up Speed Dial, see rëáåÖ=péÉÉÇ=aá~ä on page page 28 in this
user guide.

j~âáåÖ=~åÇ=êÉÅÉáîáåÖ=Å~ääë NR
qç=ìëÉ=íÜÉ=ÜÉ~ÇëÉí=ÇìêáåÖ=~=Å~ää
NK Plug the headset into your Kyocera 7135 smartphone headset jack. See “Introducing
the Kyocera 7135 smartphone” on page 8.
OK Press the button on the headset to answer or end a call.
oÉÅÉáîáåÖ=Å~ääë
qç=~åëïÉê=~=Å~ää=
NK Open the flip.
OK Press .
PK To end your call, press .
kçíÉW=qç=~ìíçã~íáÅ~ääó=~åëïÉê=~=Å~ää=ïÜÉå=çéÉåáåÖ=íÜÉ=Ñäáé=çå=óçìê=éÜçåÉI=ìëÉ=óçìê=
ëíóäìë=íç=í~é=íÜÉ=mêÉÑë=ma^= K=få=íÜÉ=ìééÉêJêáÖÜí=ÅçêåÉêI=ëÉäÉÅí=cäáé=pÉííáåÖëK=rëÉ=
óçìê=ëíóäìë=íç=ÅÜÉÅâ=íÜÉ=Äçñ=åÉñí=íç=^åëïÉê=Å~ääK
qç=Å~ää=ÉãÉêÖÉåÅó=åìãÄÉêë
You can place calls to 911 even if your phone is locked or your account is restricted.
Countries outside the USA may have an emergency number different than 911. If so,
substitute that number for 911.
j~âáåÖ=~åÇ=êÉÅÉáîáåÖ=Å~ääë=~ÑíÉê=Çá~äáåÖ=VNN
Anytime you make a 911 call, your phone goes into emergency mode. This enables the
emergency service exclusive access to your phone so they can call you back if necessary.
To make or receive regular calls after dialing 911, you must exit this mode.
NS hóçÅÉê~=TNPR=rëÉê=dìáÇÉ
When you have completed the 911 call, press
to select bñáíK Then press again to
confirm your choice. The phone returns to
standby mode (the home screen shown here)
and you are ready to make and receive calls.
cçê=ãçêÉ=ÇÉí~áäÉÇ=áåÑçêã~íáçåI=Åçåëìäí=íÜÉ=
oÉÑÉêÉåÅÉ=dìáÇÉ=çå=íÜÉ=ÉåÅäçëÉÇ=`aJoljK
oÉÅÉáîáåÖ=~åÇ=ëÉåÇáåÖ=ãÉëë~ÖÉë
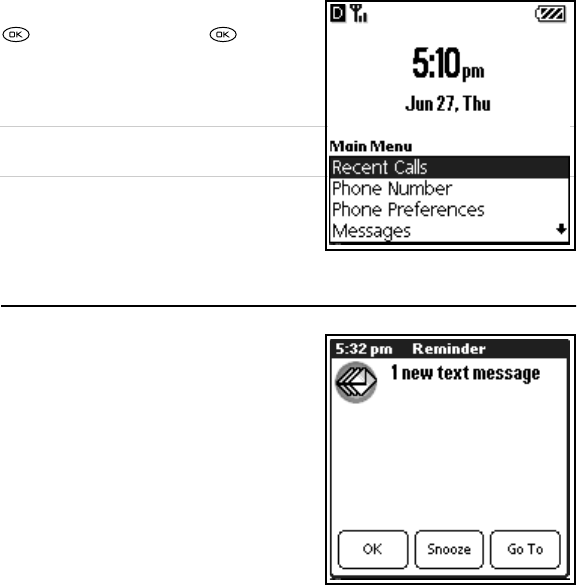
oÉÅÉáîáåÖ=~=ãÉëë~ÖÉ
When a message is received, your Kyocera 7135
smartphone will notify you.
NK Tap dç=qç to view the message.
OK After viewing your message, tap açåÉ to exit
your message, p~îÉ to save the message in
your Saved folder, or bê~ëÉ to erase the
message.

oÉÅÉáîáåÖ=~åÇ=ëÉåÇáåÖ=ãÉëë~ÖÉë NT
The ^Åíáçå menu offers several choices, including:
oÉéäóÔThe lìíÖçáåÖ=jÉëë~ÖÉ screen is
displayed with the address of the sender inserted
in the qçW=field. Enter your message text and tap
pÉåÇK
cçêï~êÇÔThe lìíÖçáåÖ=jÉëë~ÖÉ screen is
displayed with the message text in the jÉëë~ÖÉ
field.
bê~ëÉÔErases the message.
p~îÉÔSaves the message to the Saved folder.
pÉåÇÉêÔDisplays sender information if
available.
_äçÅâÔBlocks incoming messages from the
sender.
pÉåÇáåÖ=~=ãÉëë~ÖÉ
cêçã=íÜÉ=mÜçåÉ=^ééäáÅ~íáçå=ëÅêÉÉå
Use the navigator key to scroll down to highlight jÉëë~ÖÉëK=Then, press .
Continue with Step 3 on next page.
NU hóçÅÉê~=TNPR=rëÉê=dìáÇÉ
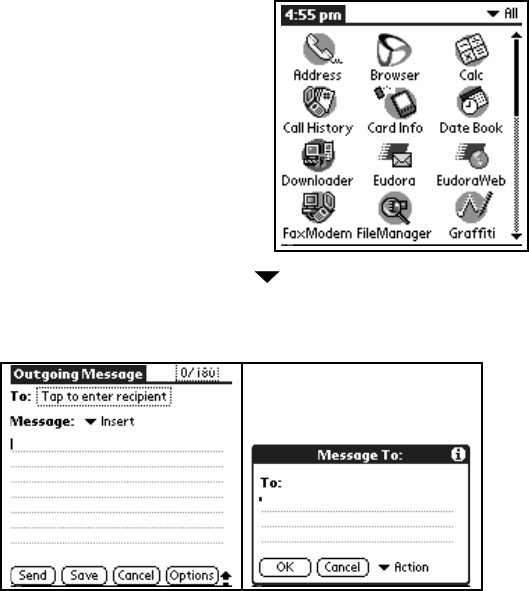
cêçã=íÜÉ=ma^=^ééäáÅ~íáçåë=ëÅêÉÉå
NK Using the stylus, scroll down and tap
jÉëë~ÖÉëK
OK At the Messages screen, tap kÉïK
PK Using the stylus, tap the q~é=íç=ÉåíÉê=
êÉÅáéáÉåí box. Enter the phone number or
email address of the person to whom you are
sending the message.
You can retrieve a number or email address
in several ways. Two are shown here. Tap
máÅâ=Ñêçã=~=oÉÅÉåí=iáëí=to view recipients
you have recently sent a message to or tap next to ^Åíáçå=to view your address
book or save an addressK After you have entered the recipient’s phone number or
email address, use your stylus to tap lhK
oÉÅÉáîáåÖ=~åÇ=ëÉåÇáåÖ=ãÉëë~ÖÉë NV
QK Use the Graffiti® writing area to rapidly enter text and symbols. See “Entering
information” on page 21 for information on forming letters and numbers using your
stylus and using the keyboards.
RK After you have prepared your message, tap pÉåÇK
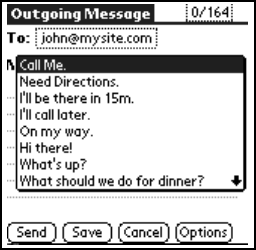
pÉåÇáåÖ=~=éêÉÑçêã~ííÉÇ=íÉñí=ãÉëë~ÖÉ
NK Using your stylus, tap fåëÉêí=at the
lìíÖçáåÖ=jÉëë~ÖÉ Screen.
OK Select a preformatted message by tapping on
it. Then, tap=pÉåÇK
pÉåÇÔSends the message immediately and
saves it in your Text Out-Box.
p~îÉÔSaves the message to your Saved folder.
`~åÅÉäÔReturns to the Out-Box.
léíáçåëÔAllows you to customize your
outgoing message.
`~ääÄ~Åâ=kìãÄÉêÔAdds a callback number to the message.
oÉèìÉëí=oÉÅÉáéíÔIndicates when the message has been received.
mêáçêáíóÔMarks the message Normal or Urgent.
pÅÜÉÇìäÉ=a~íÉÔSchedules date of delivery of the message.
pÅÜÉÇìäÉ=qáãÉÔSchedules time of delivery of the message.
OM hóçÅÉê~=TNPR=rëÉê=dìáÇÉ
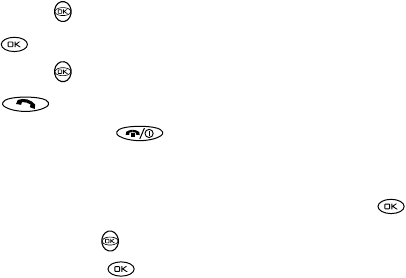
rëáåÖ=j~áå=jÉåì=fíÉãë
NK From the phone application screen, the menu you see depends on whether you are on
a call or not.
If you are not making a call, you see the following options:
If you are making a call, you see the following options:
OK Use the navigator key to scroll up and down to highlight the option you want.
Press .
PK To exit an option or move up one menu level, press .
qç=ÅÜÉÅâ=óçìê=çïå=éÜçåÉ=åìãÄÉê=
NK From the phone application screen, use the navigator key to scroll down and
select mÜçåÉ=kìãÄÉêK Your number appears on the screen.
OK To return to the Main Menu, press .
kçíÉW=vçìê=hóçÅÉê~=TNPR=ïáää=~ìíçã~íáÅ~ääó=êÉíìêå=íç=íÜÉ=j~áå=jÉåì=ïáíÜáå=NR=ëÉÅçåÇëK
oÉÅÉåí=`~ääë See your recent incoming, outgoing, and missed calls
mÜçåÉ=kìãÄÉê Check your phone number
mÜçåÉ=mêÉÑÉêÉåÅÉë Customize your phone’s preferences
jÉëë~ÖÉë Check your voice mail and text messages
^ÇÇêÉëë=_ççâ View your Address Book, add a new contact, view Speed Dial list, or view Voice Dial list
bñáí=mÜçåÉ Return to the PDA Applications screen
jìíÉ=çê=råãìíÉ Mute the sound so the caller cannot hear you
mÜçåÉ=kìãÄÉê Check your phone number and status
båíÉêáåÖ=áåÑçêã~íáçå ON
båíÉêáåÖ=áåÑçêã~íáçå
qç=ìëÉ=íÜÉ=çåJëÅêÉÉå=âÉóÄç~êÇ=
Use the Graffiti writing area to quickly enter text for messages, memos, and other
applications. To enter information using Graffiti, you must be in one of the PDA
applications. When you are ready to enter text:
NK Tap ~ÄÅ=or NOP to open the letters or numbers keyboard.
OK Tap the characters of the keyboard in the screen. When you have finished, tap açåÉ
to close the keyboard.
qç=ïêáíÉ=ïáíÜ=íÜÉ=ëíóäìë=
NK Use the left side of the Graffiti writing area for letters and the right side for numbers.
OK Draw the shape as it appears in the table, starting at the dot. (Don’t draw the dot itself.)
PK Lift the stylus at the end of the stroke. The letter appears at the insertion point. Begin
the stroke for the next character.
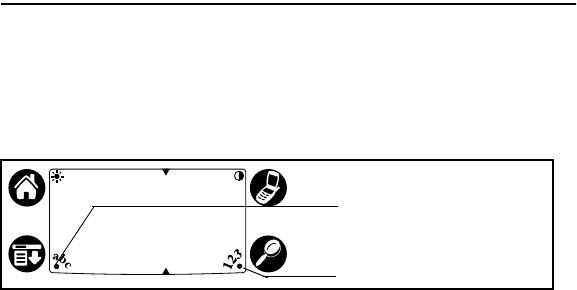
Tap here for the numbers keyboard
Tap here for the letters keyboard
Graffiti Writing Area
OO hóçÅÉê~=TNPR=rëÉê=dìáÇÉ
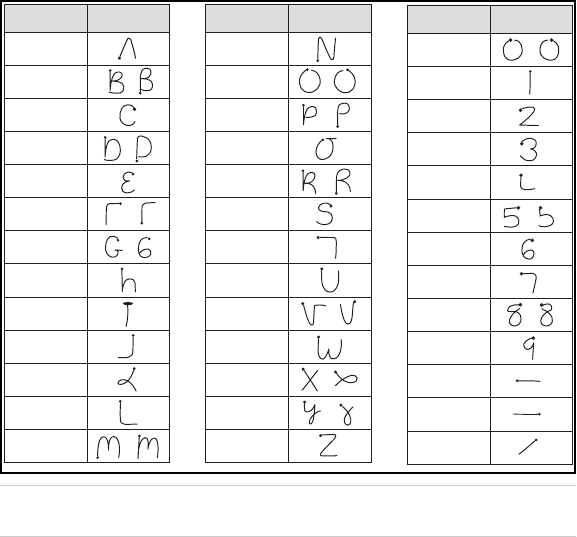
_~ëáÅ=dê~ÑÑáíá=ÅÜ~ê~ÅíÉêë
kçíÉW=vçìê=éÜçåÉ=~ìíçã~íáÅ~ääó=ë~îÉë=óçìê=ïçêâ=ïÜÉå=óçì=ÅÜ~åÖÉ=Ñêçã=çåÉ=
~ééäáÅ~íáçå=íç=~åçíÜÉêI=ëç=óçì=ÇçåÛí=åÉÉÇ=íç=ïçêêó=~Äçìí=äçëáåÖ=áåÑçêã~íáçåK
To enter... Draw To enter... Draw
A
B
C
D
E
F
G
H
I
J
K
L
M
N
O
P
Q
R
S
T
U
V
W
X
Y
Z
0
1
2
3
4
5
6
7
8
9
Space
Next Line
Back Space
To enter... Draw
rëáåÖ=íÜÉ=^ÇÇêÉëë=_ççâ OP
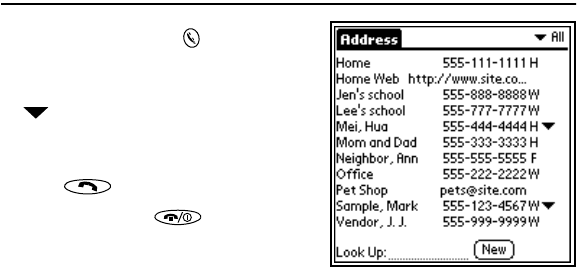
rëáåÖ=íÜÉ=^ÇÇêÉëë=_ççâ=
NK Press the Address Book key.
OK To place a call, tap the number (not the
name). If there is more than one number, tap
and select the number you want to call.
That number is moved into the Address list.
Tap to select it.
PK Press to place the call.
QK To end the call, tap .
RK To edit information, tap the person’s name
(not the phone number) and make your
modifications.
SK To add a new entry, tap kÉïK
TK Use your stylus to enter as much or as little information as you like for your contact.
To enter information in a new line, tap on the line.
– Place an entry in a category, such as _ìëáåÉëë or mÉêëçå~äI or make an entry
private by tapping aÉí~áäëK=Use your stylus to make selections.=
– Attach a note to a contact by tapping kçíÉ with your stylus. Enter your text and tap
açåÉK
UK When you have entered all information for a contact, tap açåÉK
OQ hóçÅÉê~=TNPR=rëÉê=dìáÇÉ
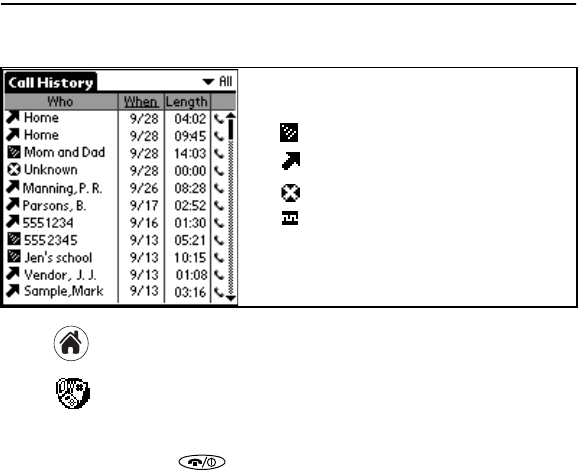
rëáåÖ=`~ää=eáëíçêó
Call History records the last 99 incoming, outgoing, and missed calls.
NK Tap to view the PDA Applications screen.
OK Tap to open Call History.
PK To place a call, tap the phone icon to the right of the number you want to call.
QK To end your call, press .
The icons show the call type:
Incoming
Outgoing
Missed
Data (for example, a call to a Web site)
rëáåÖ=íÜÉ=a~íÉ=_ççâ OR
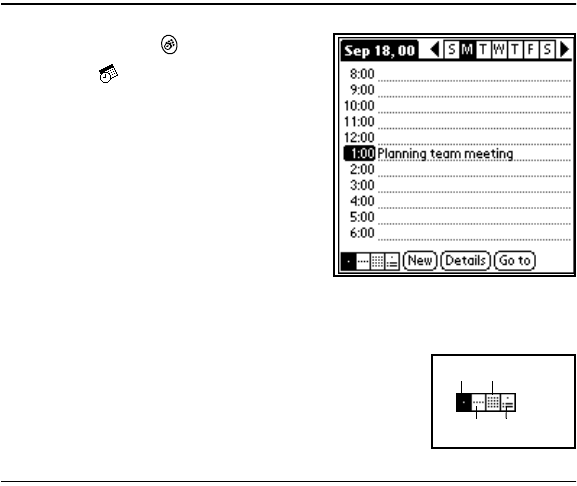
rëáåÖ=íÜÉ=a~íÉ=_ççâ=
NK Press the Date Book key or tap the Date
Book icon on the screen.
OK Tap the time line when an event will begin.
PK Enter information about the event.
QK If your event is longer or shorter than one
hour, tap the time of the event to open the Set
Time dialog.
RK If your event is exactly one hour long, skip to
step 7.
SK Tap the correct hour and minute in the time
columns on the right side of the dialog to set the Start Time.
TK Tap the End Time box. Tap the hour and minute in the time columns.
UK Tap lh when you have finished.
VK To see different views of your schedule, tap the icons in the
lower-left corner.
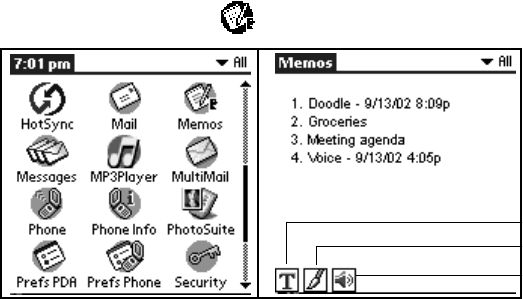
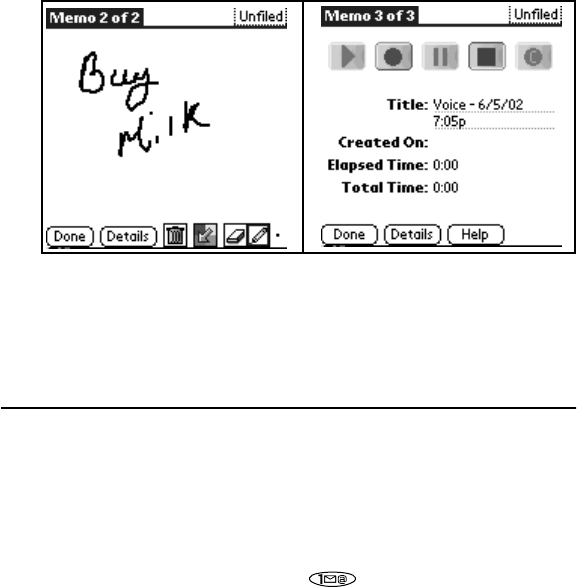
rëáåÖ=jÉãçë==
You can use your Kyocera 7135 smartphone to create several types of memos. A memo
can contain up to 4,000 characters; the number of memos you can store depends on how
much free memory you have.
Week Daily To Do
Day Month
OS hóçÅÉê~=TNPR=rëÉê=dìáÇÉ
NK From the Applications screen, tap to open Memos.
OK Select the type of memo you would like to create from the three options located on the
bottom-right corner of the screen.
–qÉñíK Use the stylus to write your message in the Graffiti writing area. When you
have finished, tap açåÉK
–aççÇäÉK Use your stylus to write directly on your phone’s screen. Tap açåÉK=Your=
doodle is saved with the date and time it was created.
–sçáÅÉK Tap on the Voice Memo icon. Use your stylus to tap on the individual mä~óI=
oÉÅçêÇI=píçéI=m~ìëÉI=and=`äÉ~ê=icons.
Text
Doodle
Voice
oÉÅÉáîáåÖ=îçáÅÉ=ãÉëë~ÖÉë=~åÇ=îçáÅÉ=ã~áä OT
PK Tap any existing memo to open it or tap kÉï to create a new memo.
QK Enter the memo text using Graffiti or the on-screen keyboard.
RK When you have finished, tap açåÉK
oÉÅÉáîáåÖ=îçáÅÉ=ãÉëë~ÖÉë=~åÇ=îçáÅÉ=ã~áä
When you receive a page or voice mail message, the LED on the top of the phone will tell
you that you have missed a call. When you open the flip, you will be notified of the new
message. Select lh=to acknowledge the message. Select påççòÉ to see or hear the
message later. Select dç=qç to view the message or dial voice mail.
qç=ÅÜÉÅâ=ãÉëë~ÖÉë=~åÇ=îçáÅÉ=ã~áä=
NK To dial your voice mail, press and hold the key.
OU hóçÅÉê~=TNPR=rëÉê=dìáÇÉ
OK To check new text or filed messages, use the navigator key to select jÉëë~ÖÉë
from the phone screen or press the messages button. See “Getting to know the function
keys” on page 8.
PK Press .
QK Use the navigator key to select the message you want to check. Then press .
rëáåÖ=péÉÉÇ=aá~ä
You can designate up to 99 phone numbers from your Address Book to be on your Speed
Dial list. You can then call these phone numbers just by pressing the one- or two-digit
Speed Dial number (1 through 99). Because Speed Dial is linked to the Address Book,
when you change a phone number in the Address Book, it is automatically updated in the
Speed Dial list.
qç=~ÇÇ=åìãÄÉêë=íç=óçìê=péÉÉÇ=aá~ä=äáëí
NK Tap to view the PDA applications screen.
OK Use the navigator key or tap the scroll bar to move through applications. On the
PDA screen, tap to open Speed Dial.
PK Tap on an empty speed dial location, then tap ^ÇÇK=
kçíÉW=péÉÉÇ=aá~ä=@N=Ü~ë=ÄÉÉå=~ëëáÖåÉÇ=íç=îçáÅÉ=ã~áäK=vçì=Å~ååçí=ãçîÉI=~ÇÇI=çê=ÇÉäÉíÉ=
íÜáë=ÉåíêóK
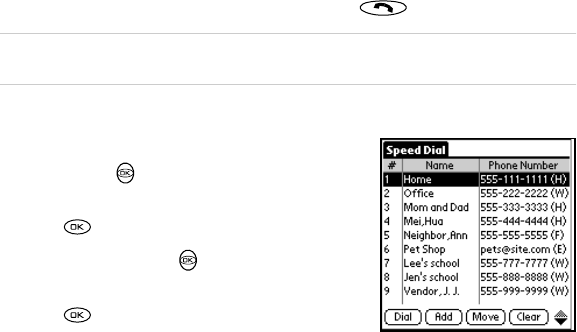
rëáåÖ=péÉÉÇ=aá~ä OV
You are asked if you want to look up the phone number in your Address Book or create
a new entry. If the contact is not in your Address Book, tap=kÉï=båíêó=and follow the
on-screen instructions. If the contact is listed in your Address Book, proceed with step 4.
QK Tap iççâìéK
RK Tap the entry you want to add to the Speed Dial list. Then tap ^ÇÇK=If the entry has more
than one phone number, select the one you want to use. The entry is added to the next
available Speed Dial number.
qç=ã~âÉ=~=Å~ää=ìëáåÖ=péÉÉÇ=aá~ä==
fÑ=óçì=âåçï=íÜÉ=péÉÉÇ=aá~ä=åìãÄÉê
Press the Speed Dial number on the keypad and press .
kçíÉW=mêÉëë=íÜÉ=péÉÉÇ=aá~ä=åìãÄÉê=çå=íÜÉ=âÉóé~Ç=~åÇ=ÜçäÇ=Ççïå=íÜÉ=Ñáå~ä=ÇáÖáí=Ñçê=~=
ÑÉï=ëÉÅçåÇë=íç=éä~ÅÉ=íÜÉ=Å~ääK=
fÑ=óçì=åÉÉÇ=íç=äççâ=ìé=íÜÉ=péÉÉÇ=aá~ä=åìãÄÉê
NK From the phone application screen, press the
navigator key up or down to highlight ^ÇÇêÉëë=
_ççâK
OK Press .
PK Press the navigator key up or down to select
sáÉï=péÉÉÇ=aá~ä=iáëíK
QK Press .
PM hóçÅÉê~=TNPR=rëÉê=dìáÇÉ
RK Tap the selected speed dial number and press .
SK To end your call, press .
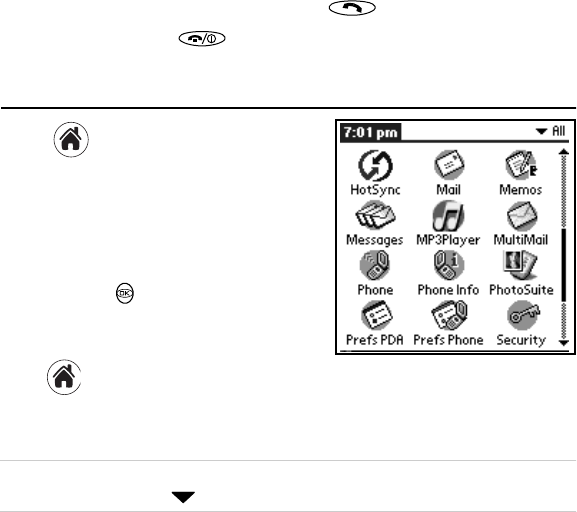
rëáåÖ=ma^=^ééäáÅ~íáçåë=
NK Tap to view the PDA Applications
screen.
OK Tap the icon for the application you want to
launch. If the icon doesn’t appear on the
screen, tap the scroll bar on the right side of
the screen to scroll down or press the
navigator key down to see more
applications.
PK To change from one application to another,
tap and select the new application.
QK To open the a~íÉ=_ççâI=^ÇÇêÉëë=_ççâI=jÉëë~ÖÉëI=or=tÉÄI=press the appropriate
key below the Graffiti screen. See “Getting to know the function keys” on page 8.
kçíÉW=qÜÉ=~ééäáÅ~íáçåë=çå=óçìê=ma^=~êÉ=éä~ÅÉÇ=áå=Å~íÉÖçêáÉëK=få=íÜÉ=ìééÉêJêáÖÜí=
ÅçêåÉê=çÑ=íÜÉ=ëÅêÉÉåI=í~é= =íç=îáÉï=íÜÉ=Å~íÉÖçêáÉë=äáëíÉÇK=
rëáåÖ=íÜÉ=hóçÅÉê~=jmP=mä~óÉê PN
rëáåÖ=íÜÉ=hóçÅÉê~=jmP=mä~óÉê
The Kyocera MP3 Player allows you to play audio files on your Kyocera 7135 smartphone. You
will need Kyocera Loader Windows application for transferring audio files from your computer
to your phone, and a secure digital card or a multimedia card (card sold separately.)
To listen to your MP3 player through the Kyocera
headset (sold separately), you simply plug the
headset into the phone’s headset jack. See
“Introducing the Kyocera 7135 smartphone” on
page 8.
The Kyocera MP3 Player contains three main
functions:
•JukeBox
•PlayList
•Downloader
_~ëáÅ=áåëíêìÅíáçåë=~êÉ=éêçîáÇÉÇ=ÜÉêÉK=cçê=ÇÉí~áäÉÇ=áåÑçêã~íáçå=çå=íÜÉëÉ=ÑÉ~íìêÉë=~åÇ=
çíÜÉêëI=Åçåëìäí=íÜÉ=jmP=ìëÉê=ÖìáÇÉ=áåÅäìÇÉÇ=çå=íÜÉ=`aJoljK
qê~åëÑÉêêáåÖ=~ìÇáç=ÑáäÉë=Ñêçã=óçìê=ÅçãéìíÉê=íç=óçìê=éÜçåÉ
NK Insert a secure digital card or a multimedia card (MMC) into the expansion slot on
your phone.
OK On the PDA Applications screen, tap the Downloader icon.
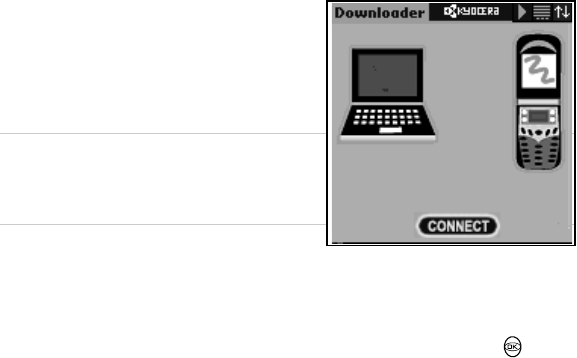
PO hóçÅÉê~=TNPR=rëÉê=dìáÇÉ
PK Place your Kyocera 7135 smartphone in the
cradle.
QK Launch the Kyocera Loader Windows
Application.
RK Press the Connect button.
kçíÉW=qç=îÉêáÑó=íÜ~í=óçì=~êÉ=ÅçååÉÅíÉÇI=äççâ=~í=
íÜÉ=ÄçííçãJäÉÑí=ÅçêåÉê=çÑ=íÜÉ=hóçÅÉê~=
açïåäç~ÇÉê=~ééäáÅ~íáçå=çå=óçìê=ÅçãéìíÉêÛë=
ÇÉëâíçéK=
SK Download the MP3 audio file that you wish to
transfer to your Kyocera 7135 smartphone by dragging and dropping from the upper
Explorer-style region to the lower pane. Copy and Paste may also be used.
TK Once you have added all of the files you wish to transfer to your Kyocera 7135, set the
order the songs are to be played on the phone by using the navigator key .
UK When you are ready to transfer your files to your Kyocera 7135 smartphone, click the
`çéó=qç=aÉîáÅÉ=button. Once transfer is complete, listen to your songs by tapping on
the MP3 Player icon and following the instructions.
rëáåÖ=íÜÉ=hóçÅÉê~=jmP=mä~óÉê PP
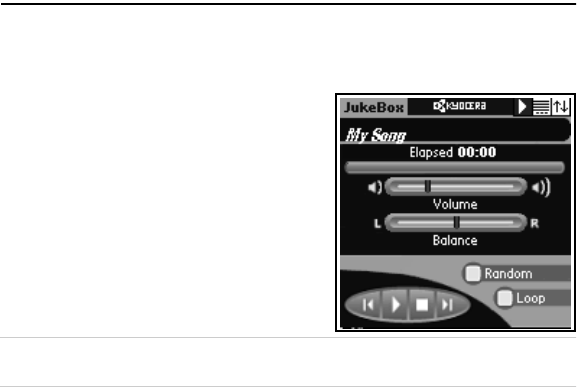
rëáåÖ=óçìê=gìâÉ_çñ
The JukeBox screen controls the MP3 Player.
•pçåÖ=qáíäÉÔShows the current song’s title.
•bä~éëÉÇLoÉã~áåáåÖÔShows how much
time has elapsed for the current song. Tap on
the number field to show the remaining time
of the current song.
•pçåÖ=mêçÖêÉëë=_~êÔShows the progress of
the current song.
•sçäìãÉÔSets the volume.
•_~ä~åÅÉÔSets the headphone balance.
•o~åÇçãÔIf checked, songs in the PlayList
will play in random order.
•iççéÔIf checked, the player will play all songs in the list. When the player reaches
the end of the PlayList, it will restart at the beginning.
•Player Control Buttons:
–mêÉîáçìë=pçåÖLoÉïáåÇÔTap within the first three seconds of a song to return
to the previous song on the playlist. Tap after the first three seconds have elapsed
to start the current song from the beginning.
–mä~óLm~ìëÉÔTap the play button to play the current song. While the song is
playing, the button changes to a pause button. Tap the m~ìëÉ button to stop the
song or mute the volume.
–píçéÔStops the player.
–kÉñí=pçåÖÔPress Next Song to advance to the next song in the PlayList.

PQ hóçÅÉê~=TNPR=rëÉê=dìáÇÉ
j~å~ÖáåÖ=óçìê=éä~óäáëí
The PlayList screen lists all of the MP3 songs on
your media card. You can activate or deactivate
songs and view additional song information.
cçê=ãçêÉ=ÇÉí~áäÉÇ=áåÑçêã~íáçåI=ëÉÉ=íÜÉ=jmP=
mä~óÉê=ìëÉê=ÖìáÇÉ=çå=íÜÉ=`aJoljK
bÇáí=jÉåì
•pÉäÉÅí=^ääÔActivates all songs in the
PlayList.
•pÉäÉÅí=kçåÉÔDeactivates all songs in the
PlayList.
Items on this screen include:
•qçí~ä=mä~ó=qáãÉÔShows the total play duration of the current songs.
•^ÅíáîÉ=`ÜÉÅâÄçñÔIf checked, the song is included in the PlayList. If not checked,
the song is skipped when the playList is played.
•pçåÖ=qáíäÉÔShows the title of the song.
•mä~óáåÖ=fåÇáÅ~íçêÔThe playing indicator will flash on the right side of the currently
playing song.
•pçåÖ=fåÑçÔDisplays song information for the selected song.
•aÉäÉíÉÔPermanently deletes a song from your media card.
•mä~óÉê=`çåíêçä=_ìííçåëÔSee “Using your JukeBox” on page 33.

rëáåÖ=cáäÉj~å~ÖÉê PR
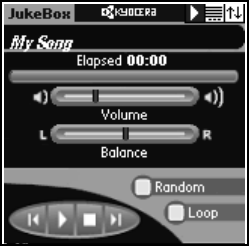
qç=~Çàìëí=îçäìãÉI=Ä~ä~åÅÉI=íêÉÄäÉI=~åÇ=Ä~ëë=
NK With your stylus, tap gìâÉÄçñ in the upper-left corner of the screen.
OK Tap pçìåÇK
PK Adjust settings for sçäìãÉI=_~ä~åÅÉI=qêÉÄäÉI=and=_~ëë by tapping on the horizontal
bar for each category.
QK When you have finished adjusting your settings, tap=açåÉK
rëáåÖ=cáäÉj~å~ÖÉê
FileManager will allow you to manage the files on your expansion card the same way that
you manage your files on your computer.
•View the lists of databases on your phone.
•Copy or move files from your phone to the expansion card.
•Copy or move files from the expansion card to your phone.
•Delete files and folders from the expansion card.
•Create new folders for the expansion card.
•Rename files and folders on the expansion card.

PS hóçÅÉê~=TNPR=rëÉê=dìáÇÉ
qç=ìëÉ=cáäÉj~å~ÖÉê
NK Tap to view the applications on the
PDA screen.
OK Tap to open FileManager. Use your
stylus to select items on the FileManager
screen.
`çéóáåÖ=Ç~í~=Ñêçã=óçìê=ëã~êíéÜçåÉ=íç=
óçìê=Éñé~åëáçå=Å~êÇ
NK Insert an expansion card into your phone’s
expansion slot.
OK Use your stylus to tap the FileManager icon. In the upper-right corner of the screen,
tap to select fåíÉêå~ä=if `~êÇ is displayed.
PK Select the database you would like to copy by tapping it with your stylus. To deselect
an item, tap it once more.
QK Tap `lmvK
RK FileManager prompts you to verify that you intend to copy the selected items. Tap
`lmv again to proceed.
kçíÉW=fÑ=óçì=í~é=jlsb=áåëíÉ~Ç=çÑ=`lmvI=cáäÉj~å~ÖÉê=ïáää=ÇÉäÉíÉ=íÜÉ=ÑáäÉ=Ñêçã=íÜÉ=
çêáÖáå~ä=äçÅ~íáçåK=rëÉ=jlsb=ïáíÜ=Å~ìíáçåK

rëáåÖ=cáäÉj~å~ÖÉê PT
`çéóáåÖ=Ç~í~=Ñêçã=íÜÉ=Éñé~åëáçå=Å~êÇ=íç=íÜÉ=ëã~êíéÜçåÉ
NK Insert an expansion card into your phone’s expansion slot.
OK Use your stylus to tap the FileManager icon. In the upper-right corner of the screen,
tap to select `~êÇ=if fåíÉêå~ä=is displayed.
PK Select the database you would like to copy by tapping it with your stylus. To deselect
an item, tap it once more.
QK Tap `lmvK
RK FileManager prompts you to verify that you intend to copy the selected items. Tap
`lmv=again to proceed.
kçíÉW=fÑ=óçì=í~é=jlsb=áåëíÉ~Ç=çÑ=`lmvI=cáäÉj~å~ÖÉê=ïáää=ÇÉäÉíÉ=íÜÉ=ÑáäÉ=Ñêçã=íÜÉ=
çêáÖáå~ä=äçÅ~íáçåK=rëÉ=jlsb=ïáíÜ=Å~ìíáçåK
`êÉ~íáåÖ=åÉï=ÑçäÇÉêë=çå=íÜÉ=Éñé~åëáçå=Å~êÇ
NK Insert an expansion card into your phone’s expansion slot.
OK Use your stylus to tap the FileManager icon. In the upper-right corner of the screen,
tap to select `~êÇK
PK Navigate to the folder in which you would like to create a new subfolder.
QK Tap the cáäÉj~å~ÖÉê menu bar and select kÉï=cçäÇÉêK
RK FileManager will prompt you to enter a name for the new folder. Enter a name and tap=
lhK

PU hóçÅÉê~=TNPR=rëÉê=dìáÇÉ
oÉå~ãáåÖ=ÑáäÉë=~åÇ=ÑçäÇÉêë=çå=íÜÉ=Éñé~åëáçå=Å~êÇ
NK Insert an expansion card into your phone’s expansion slot.
OK Use your stylus to tap the FileManager icon. In the upper-right corner, tap to
select `~êÇ=if=fåíÉêå~ä is displayed.
PK Navigate to the folder or file you would like to rename.
QK Tap the cáäÉj~å~ÖÉê menu bar at the top of the screen and select oÉå~ãÉKKKKK
FileManager will prompt you to enter a new name for the new folder. Enter a name and
tap=lhK
For detailed information on using FileManager, consult the Reference Guide on the
CD-ROM.
rëáåÖ=mÜçíçpìáíÉ
MGI PhotoSuite Mobile Edition for your Kyocera 7135 smartphone is an easy to use
program that allows you to transfer photos and videos from your computer to your
Kyocera 7135 smartphone for viewing. MGI PhotoSuite Mobile Edition consists of two
parts:
•The PhotoSuite Mobile Organizer allows you to view and edit your photos and videos
and organize them into albums before transferring them to the your Kyocera 7135
smartphone.
•The PhotoSuite Mobile Album allows you to view your photos and videos either
individually, as thumbnails or as a slide show on your Kyocera 7135 smartphone.
Supported photo file formats include BMP, PNG, GIF, TIF, and JPG, in 3-character
extensions (i.e., TIFF and JPEG extensions are not recognized).
rëáåÖ=bfp=tÉÄ PV
Supported video file formats include AVI, MOV, QT, ASF, and WMV. MOV and QT file types
require Apple QuickTime 4 to be installed. ASF and WMV video files require DirectX 8 to
be installed.
kçíÉW=cçê=áåëíêìÅíáçåë=çå=ìëáåÖ=mÜçíçpìáíÉI=ëÉÉ=íÜÉ=ìëÉê=ÖìáÇÉ=äçÅ~íÉÇ=áå=íÜÉ=rëÉê=
dìáÇÉë=äáÄê~êó=çå=íÜÉ=`aJoljK
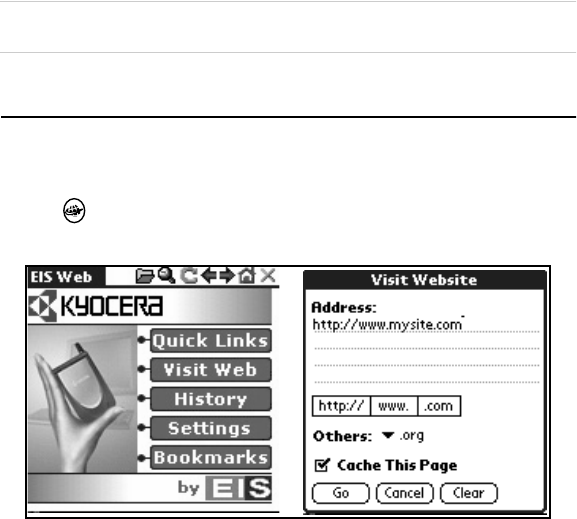
rëáåÖ=bfp=tÉÄ
The Kyocera 7135 smartphone offers the EIS Browser for your Internet connection. To
launch the EIS Browser:
NK Press on the keypad to open EIS Web.
OK Tap sáëáí=tÉÄK EIS Web connects you to the Internet.
QM hóçÅÉê~=TNPR=rëÉê=dìáÇÉ
Menus are accessed by tapping on the home screen. The four main menus are:
•nìáÅâ=iáåâëÔTakes you to a list of Palm-friendly websites related to travel, sports,
finance, shopping, entertainment, news, and internet searching.
•sáëáí=tÉÄÔUse your stylus to enter a specific Web address. Tap ÜííéWLLI=ïïïKI=or=
KÅçã=to rapidly enter prefixes and suffixes.
•eáëíçêóÔSee Web sites you have previously visited. You can visit a previous Web site
or delete an entry.
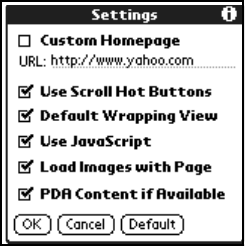
•pÉííáåÖëÔCustomize your homepage, use
scroll hot buttons, select a default wrapping
view, use Javascript, load images with a page,
and view PDA content if available.
•_ççâã~êâëÔKeep a list of your favorite Web
addresses.
You can also access menus by tapping the blue EIS
Web tab in the upper-left corner of the browser
homepage or by tapping the menu icon in the
lower-left corner of the screen. The three menus
are:
•k~îáÖ~íÉÔGo to a specific Web address
(Visit Website), return to the homepage, go forward or backward, refresh the screen,
and connect or disconnect from the Internet.
•oÉÅçêÇëÔAdd, delete, or edit bookmarks; zoom in for better viewing; view or delete
Web addresses stored in your history; or delete all files. Tap the oÉÅçêÇë tab and make
your selection from the list.
•léíáçåëÔCustomize your browser settings, proxy settings, and network preferences.
See the eÉäé feature for quick reference.

rëáåÖ=bã~áä=^ééäáÅ~íáçåë QN
kçíÉW=cçê=ÇÉí~áäÉÇ=áåëíêìÅíáçåë=çå=íÜÉ=ìëÉ=çÑ=íÜÉ=bfp=_êçïëÉêI=ëÉÉ=íÜÉ=ìëÉê=ÖìáÇÉ=çå=
íÜÉ=`aJoljK
rëáåÖ=bã~áä=^ééäáÅ~íáçåë
bìÇçê~=bã~áä
With Eudora Email, you can write messages and send them with custom stationery and
signatures. You can forward, redirect, or reply to messages. You can set up mailboxes and
folders. You can sort messages, set up alerts, and send automatic replies. All your favorite
addresses can be stored in your personal address book. More Eudora features and
functions are described later in this guide.
kçíÉW=bìÇçê~=bã~áä=~åÇ=m~äã=j~áä=Eóçìê=ëã~êíéÜçåÉDë=ëí~åÇ~êÇ=Éã~áä=~ééäáÅ~íáçåëF=
Çç=åçí=ëìééçêí=Éã~áä=~íí~ÅÜãÉåíë=ëìÅÜ=~ë=~íí~ÅÜÉÇ=íÉñí=ÑáäÉë=~åÇ=Öê~éÜáÅëK=qÜáêÇ=é~êíó=
Éã~áä=ëçÑíï~êÉ=Å~å=ÄÉ=éìêÅÜ~ëÉÇ=áÑ=óçì=êÉèìáêÉ=íÜáë=Å~é~ÄáäáíóK=`ÜÉÅâ=ïáíÜ=óçìê=
ëÉêîáÅÉ=êÉéêÉëÉåí~íáîÉ=Ñçê=ÇÉí~áäëK
For complete information on Eudora Email, see the Eudora User Guide available on your
Kyocera Smartphone CD-ROM. You can also find Eudora’s website at
ïïïKbìÇçê~KÅçãK
m~äã=j~áä
Palm Mail allows you to create emails. You can prepare messages with customized fonts
and signatures to be sent later.
QO hóçÅÉê~=TNPR=rëÉê=dìáÇÉ
kçíÉW=m~äã=j~áä=áë=~=ëçÑíï~êÉ=íÜ~í=~ääçïë=óçì=íç=ÅêÉ~íÉ=Éã~áäëK=vçì=Å~ååçí=ëÉåÇ=
Éã~áäë=ìëáåÖ=m~äã=j~áäK
líÜÉê=^ééäáÅ~íáçåë
Other email applications are available. See the CD-ROM that came in your phone package
to download other email applications and user guides.
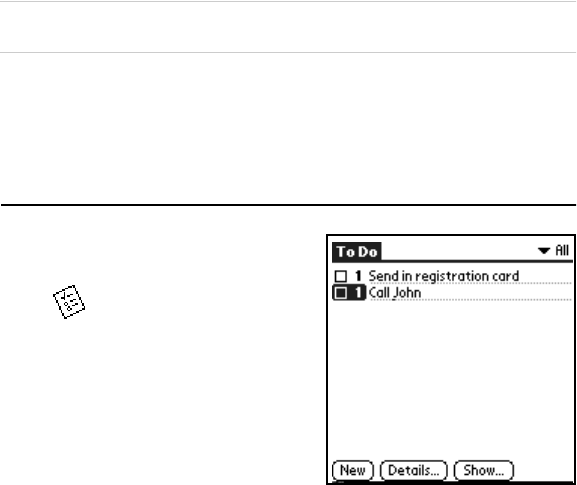
rëáåÖ=íÜÉ=qç=aç=iáëí
Use the To Do List to keep track of things you
need to accomplish.
NK Tap to open your To Do list.
OK Tap kÉï=to add an item to the list.
PK Enter the text for the item. The text can be
longer than one line.
QK Tap aÉí~áäë to set a priority, put the item in
a category, assign a due date, or mark the
item as private. You can also attach a note to
it.
RK Tap pÜçï=to set your preferences for displaying the To Do List. For example, you can
sort items by priority, due date, or category.