Kyocera KWC-7135 7135 Trimode Cellular Phone with PDA User Manual T3 UGnew
Kyocera Communications, Inc 7135 Trimode Cellular Phone with PDA T3 UGnew
Kyocera >
Contents
- 1. T3 users guide part b
- 2. users manual
- 3. user manual part 1
- 4. user manual part 2
user manual part 2
rëáåÖ=sçáÅÉ=cÉ~íìêÉë QP
SK Tap açåÉ when you have finished.
pÉÉ=`Ü~éíÉê=NRI=qç=aç=iáëíIÒ=áå=íÜÉ=oÉÑÉêÉåÅÉ=dìáÇÉ=çå=íÜÉ=`aJoljK
rëáåÖ=sçáÅÉ=cÉ~íìêÉë
qç=îçáÅÉ=íê~áå=íÜÉ=éÜçåÉ
NK Tap to view the applications on the PDA screen.
OK Tap to open Voice Dial. If Voice Book doesn’t appear in the upper-right corner,
tap and select it.
PK Tap kÉïK A list of all the names in your Address Book appears.
QK Select a person and tap ^ÇÇK If there is more than one phone number, select the one
you want to use and tap ^ÇÇK
RK When you hear “Speak a name,” speak the name. Repeat the name when you are
instructed to do so.
qç=ã~âÉ=~=Å~ää=ìëáåÖ=îçáÅÉ=Åçãã~åÇë==
NK Press .
OK When you hear “Speak a name” and a beep, speak the name of the person you want
to call.
QQ hóçÅÉê~=TNPR=rëÉê=dìáÇÉ
qç=êÉÅçêÇ=~åÇ=éä~ó=Ä~Åâ=îçáÅÉ=ãÉãçë=
You can record up to 10 minutes of voice memos on your phone. There is a 2-minute
maximum length for each memo recorded.
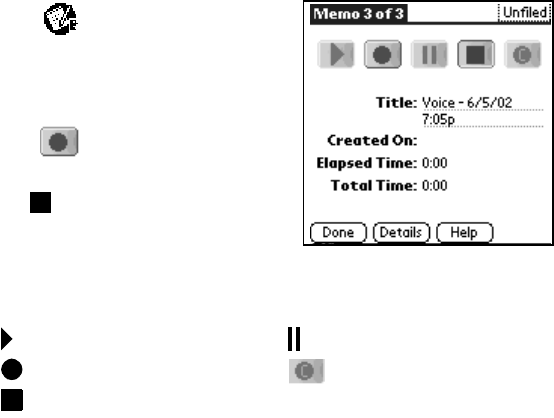
NK Select to open Memos.
OK In the bottom-left corner of the screen,
tap the voice icon. See “Using Memos” on
page 25.
PK Press . When you hear “Please record
at the tone” and a beep, record your memo.
QK Tap to stop recording the memo.
RK To replay a memo, select the memo from the
memo list by tapping it with your stylus.
SK Select the memo you want to replay.
TK Use your stylus to select any of the options on the screen.
Play Pause
Record, Resume, or Append Clear
Stop

^ÇàìëíáåÖ=ëçìåÇë QR
qç=ÅìëíçãáòÉ=óçìê=ëã~êíéÜçåÉ=Ñçê=îçáÅÉ=~åëïÉê=~åÇ=îçáÅÉ=
ï~âÉìé
You can customize your phone to answer a call by voice command and wake up from
sleep mode by voice command. To set your phone for voice answer and/or voice wakeup,
follow these procedures.
NK From the PDA screen, tap with your stylus to open mêÉÑë=mÜçåÉK=
OK In the upper-right corner of the screen, use your stylus to tap .
PK Use your stylus to select sçáÅÉ=aá~äáåÖK
QK With your stylus, tap the checkboxes next to sçáÅÉ=^åëïÉê=and sçáÅÉ=t~âÉìéK
^ÇàìëíáåÖ=ëçìåÇë=
qç=~Çàìëí=íÜÉ=ëéÉ~âÉê=îçäìãÉ=
Press the volume up and volume down buttons on the side
of the Kyocera 7135.
qç=ëÉäÉÅí=~=êáåÖÉê=ëçìåÇ=~åÇ=~Çàìëí=êáåÖÉê=
îçäìãÉ=
NK Tap to view the applications on the PDA.
OK Scroll down and tap to open mêÉÑë=mÜçåÉK
Volume up and
down buttons
QS hóçÅÉê~=TNPR=rëÉê=dìáÇÉ
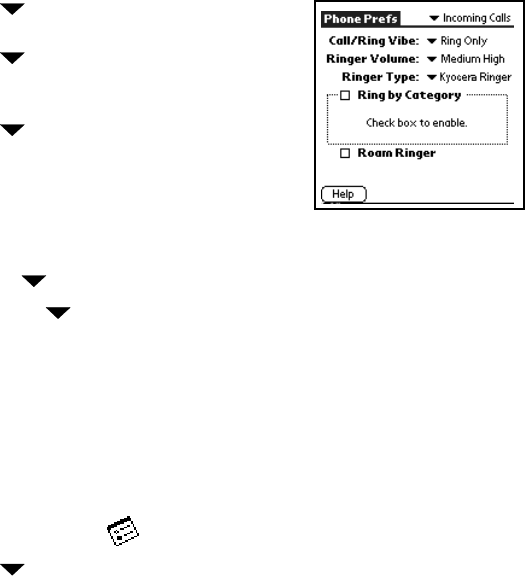
PK Tap in the upper-right corner and select
fåÅçãáåÖ=`~ääëK
QK Tap beside oáåÖÉê=sçäìãÉK=Select a volume
level between Low and High. If you want the ringer
volume to increase with each ring, select bëÅ~ä~íÉK
RK Tap beside=oáåÖÉê=qóéÉ=to select a ringer
sound. When you select a sound, you hear a sample
of it.
SK To select different ringer sounds for different
categories of calls, do the following:
~K Put a check mark in the oáåÖ=Äó=`~íÉÖçêó check box.
ÄK Tap under `~íÉÖçêóK Select a category of calls.
ÅK Tap the under oáåÖÉêK=Select the sound for that category of calls.
ÇK Repeat steps b–c for each category you want to set up.
TK When you have finished, tap açåÉK
qç=ëáäÉåÅÉ=íÜÉ=êáåÖÉê=
Press the volume up and volume down buttons on the side of the Kyocera 7135
smartphone.
qç=~Çàìëí=ma^=ëçìåÇë=
NK With your stylus, tap to open Prefs PDA.
OK Tap in the upper-right corner of the screen and select dÉåÉê~äK=

^ÇàìëíáåÖ=ëçìåÇë QT
PK Tap next to=póëíÉã=pçìåÇI=^ä~êã=pçìåÇI=and=d~ãÉ=pçìåÇ to adjust volume
settings.
kçíÉW=póëíÉã=pçìåÇ=Åçåíêçäë=íÜÉ=îçäìãÉ=çÑ=ÄÉÉéë=óçì=ÜÉ~ê=ïÜÉå=í~ééáåÖ=áÅçåë=~åÇ=
éÉêÑçêãáåÖ=ÖÉåÉê~ä=ÑìåÅíáçåë=çå=óçìê=ma^K=^ä~êã=pçìåÇë=~êÉ=ëçìåÇë=íÜ~í=óçì=ÜÉ~ê=áÑ=
óçì=Ü~îÉ=éêçÖê~ããÉÇ=êÉãáåÇÉêë=çê=~äÉêíë=Ñçê=óçìê=ëã~êíéÜçåÉK=d~ãÉ=pçìåÇ=Åçåíêçäë=
íÜÉ=îçäìãÉ=çÑ=ÄÉÉéë=~åÇ=çíÜÉê=ëçìåÇ=ÉÑÑÉÅíë=ïÜÉå=óçì=~êÉ=éä~óáåÖ=~=Ö~ãÉ=çå=óçìê=
éÜçåÉK
qç=~Çàìëí=éÜçåÉ=ëçìåÇë=
NK With your stylus, tap to open mêÉÑë=mÜçåÉK=
OK Tap in the upper-right area of the screen and select `~ää=sçäìãÉK=
PK Tap next to ^ìíç=sçäìãÉI=b~êéáÉÅÉI=e~åÇëJcêÉÉ=`~ê=háíI=eÉ~ÇëÉíI and
péÉ~âÉêéÜçåÉ to adjust volume settings for these accessories and features.
Your phone can be customized to play a sound when opening and closing the flip. To
select sounds, perform the following steps.
QK Tap in the upper-right area of the screen and select cäáé=pÉííáåÖëK
RK Tap next to mä~ó=ëçìåÇ=under=tÜÉå=léÉåáåÖ=cäáé and make your selection.
SK Tap next to=mä~ó=ëçìåÇ=under tÜÉå=`äçëáåÖ=cäáé and make your selection.
Your phone can be customized to use sounds to alert you when you miss a call, enter
a roaming area or lose service. To customize your phone alerts, perform the following
steps.
TK Tap in the upper-right area of the screen and select mÜçåÉ=^äÉêíëK
QU hóçÅÉê~=TNPR=rëÉê=dìáÇÉ
UK Tap next to páäÉåÅÉ=^ää and make your selection.
VK Select conditions under which you would like your phone to alert you by using your
stylus to tap the checkboxes.
pÉííáåÖ=ìé=éêÉÑÉêÉåÅÉë=
Using the preferences screens, you can turn on many features such as Auto Answer,
One-Touch Dialing, and infrared beaming. You can also make adjustments to sound,
power usage, and other settings. For information on adjusting sound settings, see
^ÇàìëíáåÖ=pçìåÇë=in this user guide.=
There are two types of preferences for your Kyocera 7135: phone preferences and PDA
preferences. This section explains how to adjust a few of the preferences for your phone
and preferences for your PDA. For more information, see the 7135 Reference Guide.
qç=ëÉí=ma^=éêÉÑÉêÉåÅÉë
pÉííáåÖ=ÖÉåÉê~ä=éêÉÑÉêÉåÅÉë
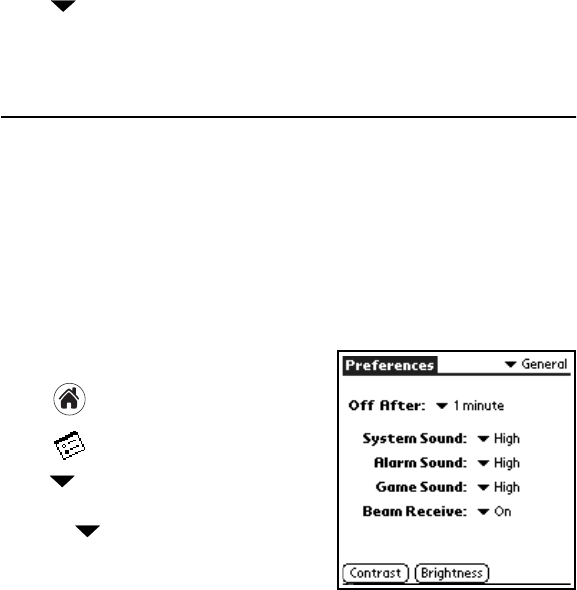
NK Tap to view the PDA screen.
OK Tap to open mêÉÑë=ma^K
PK Tap pick list in the upper-right corner and
select dÉåÉê~äK
QK Tap the next to lÑÑ=^ÑíÉêW to select the
length of time you would like the PDA to wait
before going into sleep mode.
pÉííáåÖ=ìé=éêÉÑÉêÉåÅÉë QV
RK Tap each next to póëíÉã=pçìåÇI=^ä~êã=pçìåÇI and=d~ãÉ=pçìåÇ=to select a
volume level for these features.
kçíÉW=póëíÉã=pçìåÇ=Åçåíêçäë=íÜÉ=îçäìãÉ=çÑ=ÄÉÉéë=óçì=ÜÉ~ê=ïÜÉå=í~ééáåÖ=áÅçåë=~åÇ=
éÉêÑçêãáåÖ=ÖÉåÉê~ä=ÑìåÅíáçåë=çå=óçìê=ma^K=^ä~êã=pçìåÇë=~êÉ=ëçìåÇë=íÜ~í=óçì=ÜÉ~ê=áÑ=óçì=
Ü~îÉ=éêçÖê~ããÉÇ=êÉãáåÇÉêë=çê=~äÉêíë=Ñçê=óçìê=ëã~êíéÜçåÉK=d~ãÉ=pçìåÇ=Åçåíêçäë=íÜÉ=
îçäìãÉ=çÑ=ÄÉÉéë=~åÇ=çíÜÉê=ëçìåÇ=ÉÑÑÉÅíë=ïÜÉå=óçì=~êÉ=éä~óáåÖ=~=Ö~ãÉ=çå=óçìê=éÜçåÉK
SK To receive beamed data from other Palm-compatible devices, make sure that _É~ã=
oÉÅÉáîÉ=is set to=låK
TK Tap `çåíê~ëí to adjust the contrast level of the screen.
UK Tap _êáÖÜíåÉëë to adjust the brightness level of the screen.
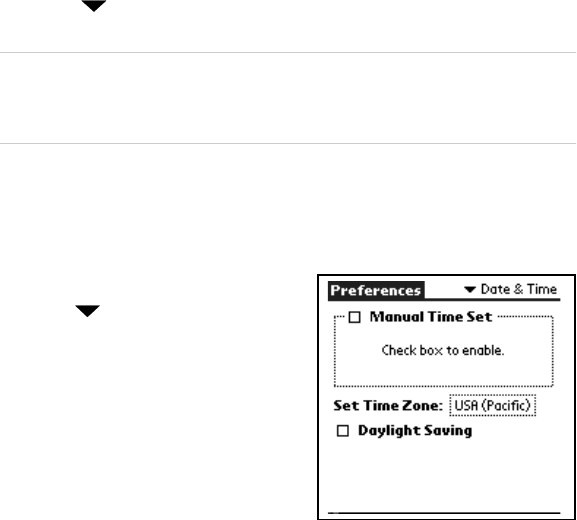
pÉííáåÖ=Ç~íÉ=C=íáãÉ
NK Tap the in the upper-right corner of
the screen and tap a~íÉ=C=qáãÉ with your
stylus.
OK The date and time on your phone are
automatically set. Tap the box next to
j~åì~ä=qáãÉ=pÉí to adjust these settings
yourself.
RM hóçÅÉê~=TNPR=rëÉê=dìáÇÉ
kçíÉW=a~óäáÖÜí=p~îáåÖë=íáãÉ=áë=~ìíçã~íáÅ~ääó=ìéÇ~íÉÇ=ïÜÉå=j~åì~ä=qáãÉ=pÉí=áë=
ìåÅÜÉÅâÉÇK=fÑ=j~åì~ä=qáãÉ=pÉí=áë=ÅÜÉÅâÉÇI=óçìê=éÜçåÉ=éêçîáÇÉë=áåÑçêã~íáçå=çå=
Å~äÅìä~íáåÖ=íÜÉ=ÅçêêÉÅí=íáãÉK
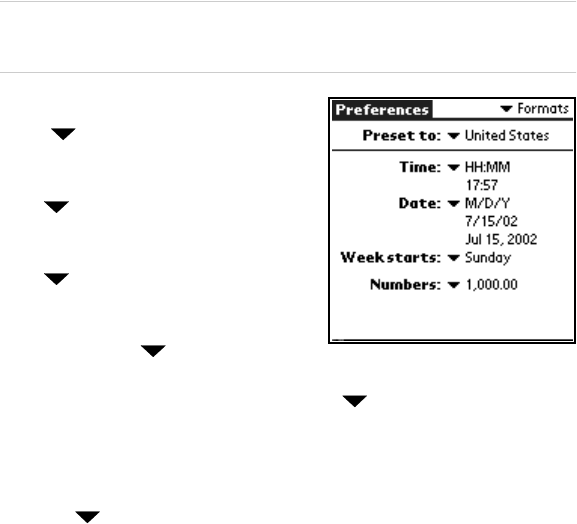
`Ü~åÖáåÖ=cçêã~íë
•Tap in the upper-right corner of the
screen then tap cçêã~íë with your stylus.
– To adjust the way time is displayed, tap
next to qáãÉW=and make your
selection.
– To adjust the way the date is displayed, tap
next to a~íÉW and make your
selection.
– To change the day you would like the week
to start on, tap next to tÉÉâ=ëí~êíëW
and make your selection.
– To adjust the way numbers are displayed, tap next to kìãÄÉêëW and make
your selection.
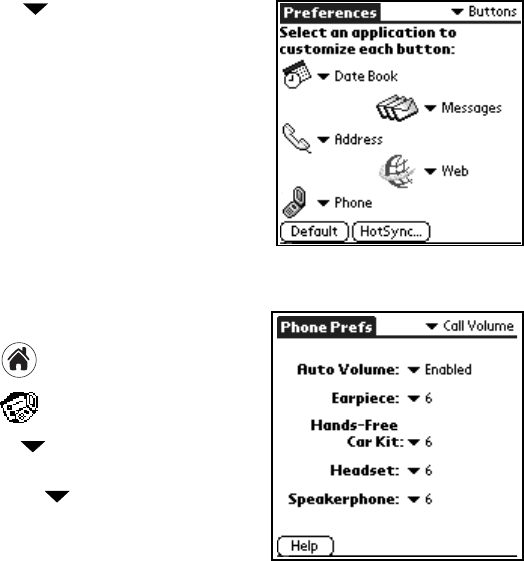
`ìëíçãáòáåÖ=
To customize the buttons above your phone’s keypad, perform the following steps.
NK Tap the in the upper-right corner of the screen and tap _ìííçåë.
pÉííáåÖ=ìé=éêÉÑÉêÉåÅÉë RN
OK Tap the next to a~íÉ=_ççâI=^ÇÇêÉëëI=
mÜçåÉI=jÉëë~ÖÉëI=and tÉÄ to assign an
application to each button. Use your stylus to
make your selection.
qç=ëÉí=éÜçåÉ=éêÉÑÉêÉåÅÉë==
^ÇàìëíáåÖ=Å~ää=îçäìãÉ
NK Tap to view the PDA screen.
OK Tap to open mêÉÑë=mÜçåÉK=
– Tap pick list in the upper-right
corner and select=`~ää=sçäìãÉK
– Tap the beside ^ìíç=sçäìãÉ=to
automatically adjust earpiece volume and
microphone sensitivity during a call,
depending on ambient noise levels.
RO hóçÅÉê~=TNPR=rëÉê=dìáÇÉ
– Tap each next to b~êéáÉÅÉI=e~åÇëJcêÉÉ=`~ê=háíI=eÉ~ÇëÉíI and=
péÉ~âÉêéÜçåÉ to adjust the volumes for these items.
kçíÉW=qç=~Çàìëí=íÜÉ=îçäìãÉë=cçê=íÜÉ=e~åÇëJcêÉÉ=`~ê=háíI=eÉ~ÇëÉíI=íÜÉ=~ÅÅÉëëçêáÉë=
ãìëí=ÄÉ=~íí~ÅÜÉÇ=íç=óçìê=éÜçåÉK
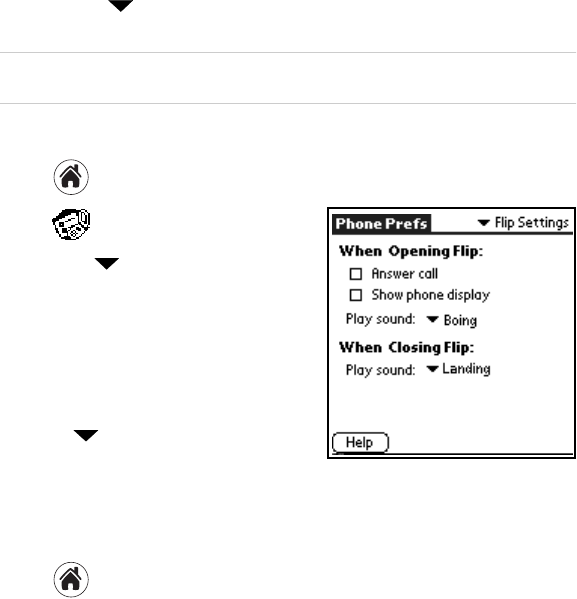
^ÇàìëíáåÖ=Ñäáé=ëÉííáåÖë
NK Tap to view the PDA screen.
OK Tap to open mêÉÑë=mÜçåÉK
– Tap the in the upper-right corner and
select cäáé=pÉííáåÖë with your stylus.
– Tap the box next to=^åëïÉê=Å~ää=answer
incoming calls by opening the flip.
– Tap the box next to=pÜçï=éÜçåÉ=Çáëéä~ó
to show the phone’s status when opening
the flip.
– Tap next to
mä~ó=ëçìåÇ to select
and play unique sounds when opening
and closing the flip of your phone. When
you select a sound, your phone will demonstrate that sound.
^ÇàìëíáåÖ=ëÉííáåÖë=Ñçê=áåÅçãáåÖ=Å~ääë
NK Tap to view the PDA screen.

pÉííáåÖ=ìé=éêÉÑÉêÉåÅÉë RP
OK Tap to open mêÉÑë=mÜçåÉK
PK Tap in the upper-right corner and select
fåÅçãáåÖ=`~ääëK
– Tap beside `~ääLoáåÖ=sáÄÉ=and select
from three options:=oáåÖ=låäóI=sáÄê~íÉ=
låäóI=or=sáÄê~íÉ=íÜÉå=oáåÖK
–Tap by oáåÖÉê=sçäìãÉ=to select from
the options listed. Your phone will
demonstrate the selected volume.
– Tap next to=oáåÖÉê=qóéÉ to select from
a variety of ringer tones. When you select a
Ringer Type, your phone will demonstrate
that ringer.
– Tap the box next to oáåÖ=Äó=`~íÉÖçêó to set different rings for your contacts.
– Tap the box next to oç~ã=oáåÖÉê=to activate a unique ringer indicating that your
phone is located in a roam area.
pÉííáåÖ=éÜçåÉ=~äÉêíë
NK Tap to view the PDA screen.
OK Tap to open mêÉÑë=mÜçåÉK

RQ hóçÅÉê~=TNPR=rëÉê=dìáÇÉ
PK Tap in the upper-right corner and select
mÜçåÉ=^äÉêíëK
QK Tap the beside páäÉåÅÉ=^ää=to select
between=kçêã~ä=pçìåÇëI=sáÄê~íÉ=låäóI=or=
iáÖÜíë=låäóK=
RK Tap to check the box next to each condition
after ^äÉêí=tÜÉåW=and your phone will emit a
single beep each time a selected condition
occurs.
kçíÉW=tÜÉå=sáÄê~íÉ=låäó=çê=iáÖÜíë=låäó=áë=
ëÉäÉÅíÉÇI=áåÅçãáåÖ=Å~ääë=~åÇ=~äÉêíë=ïáää=Å~ìëÉ=íÜÉ=éÜçåÉ=íç=îáÄê~íÉ=çê=äáÖÜí=ìé=áåëíÉ~Ç=
çÑ=ëçìåÇáåÖK=vçìê=jmP=éä~óÉê=~äëç=ïáää=åçí=éä~óK
pÉííáåÖ=íÜÉ=dmp=äçÅ~íçê
The GPS locator allows you to share your location information with network services
other than emergency services, (such as 911), in markets where service has been
implemented. Sharing your location allows the network to detect your position, which
permits your service provider to offer you additional services.
kçíÉW=qÜáë=ÑÉ~íìêÉ=ïçêâë=çåäó=ïÜÉå=óçì=~êÉ=áå=ÇáÖáí~ä=ãçÇÉK
qç=ëÉíW=
NK From the PDA screen, tap the mêÉÑë=mÜçåÉ=icon.
OK Tap in the upper-right corner of the screen and tap mÜçåÉ=pÉêîáÅÉK
pÉííáåÖ=ìé=åÉíïçêâ=ÅçååÉÅíáçåë RR
PK Tap to select=VNN=låäó=or=içÅ~íáçå=låK
– 911 Only (default) is set up to share your position information only with
emergency services when you dial 911.
– Location On is set up to share your position information with your service
provider’s network, along with emergency services.
For information on emergency calls, see “To call emergency numbers” on page 15.
pÉííáåÖ=ìé=åÉíïçêâ=ÅçååÉÅíáçåë
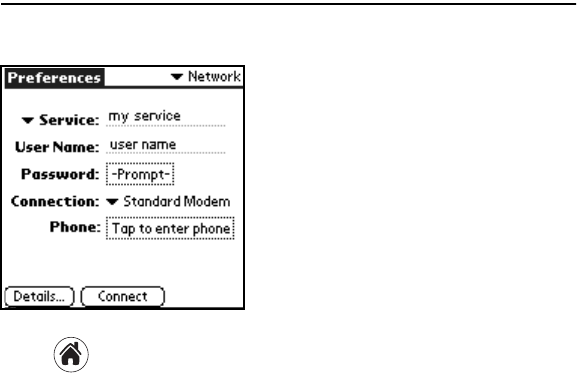
qç=ëÉí=ìé=kÉíïçêâ=mêÉÑÉêÉåÅÉë
Your phone is capable of connecting wirelessly to
multiple network services, depending on your
service plan and your carrier’s data coverage.
The connection setting is preselected for optimal
speed and ease of use; however, if you want an
alternate connection, you can choose from one of
the other preprogrammed choices.
To change your network connection settings,
follow these procedures.
NKInstall your desired data application from the
CD-ROM.
OK Tap to view the PDA Applications screen.

RS hóçÅÉê~=TNPR=rëÉê=dìáÇÉ
PK Tap to open mêÉÑë=ma^=on your PDA Applications screen.
QK Use your stylus to tap in the upper-right corner. Select kÉíïçêâK
RK Tap next to pÉêîáÅÉ and select a service option.
kçíÉW=rëÉ=Å~ìíáçå=ïÜÉå=ãçÇáÑóáåÖ=óçìê=ÉñáëíáåÖ=ëÉííáåÖëK=vçì=ÅçìäÇ=áãé~áê=óçìê=
éÜçåÉÛë=~Äáäáíó=íç=ÅçååÉÅí=íç=~=åÉíïçêâK=`çåëìäí=íÜÉ=rëÉê=dìáÇÉ=äáÄê~êó=Ñçê=ÇÉí~áäÉÇ=
áåëíêìÅíáçåë=çå=ìëáåÖ=Ç~í~=~ééäáÅ~íáçåëK
rëáåÖ=c~ñLjçÇÉã
You can use the built-in wireless modem in your Kyocera 7135 smartphone just like a standard
external modem to your desktop computer or laptop. You can also use it to send or receive
faxes from the computer. Notice, however, that you cannot make or receive voice calls or use
any other applications while the modem is in Data/Fax mode. Incoming phone calls will be
redirected to voice mail. Opening any other application terminates the modem call.
rëáåÖ=c~ñLjçÇÉã RT
qç=ëÉí=ìé=c~ñLjçÇÉã=
NK Tap to view the PDA screen.
OK Tap to open Data/Fax mode.
PK Tap=pÉííáåÖëK=These settings identify the serial
communications settings between your
computer and the Kyocera 7135 smartphone.
QK Match your computer’s settings to these values.
You can change these settings if necessary.
Refer to your computer user guide if
necessary.
RK Tap açåÉK
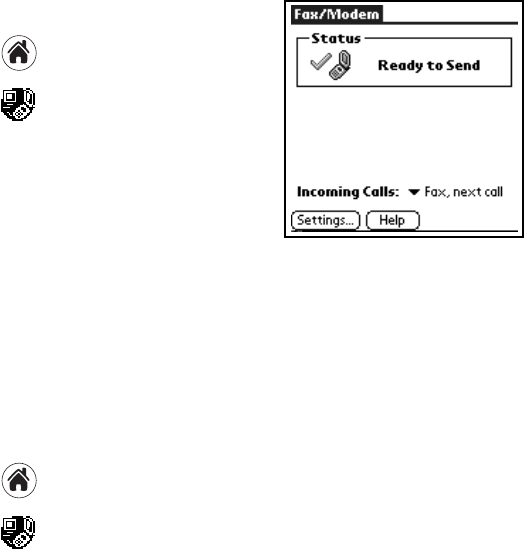
qç=ìëÉ=c~ñLjçÇÉã==
NK Connect the phone to the cable. If the cable is attached to the port you use for data
synchronization, turn off HotSync on your computer. If you are using a data cable on
a different port than the one you use for synchronization, it is not necessary to turn off
HotSync.
OK Tap to view the Applications screen.
PK Tap to open Fax/Modem mode.
You see status information beginning with “Initializing Modem” and continuing to
“Ready to Send.”
RU hóçÅÉê~=TNPR=rëÉê=dìáÇÉ
QK Tap the beside fåÅçãáåÖ=`~ääë and select an option:
These settings allow you to control phone functions while the phone is in Fax/Modem
mode. These settings do not affect outgoing data/fax operations.
RK From the computer, make the connection you want to initiate.
SK To end the data or fax call, tap båÇ or tap and select a different application.
_É~ãáåÖ=áåÑçêã~íáçå
Using the phone’s infrared (IrDA) port, you can “beam” information such as addresses,
memos, applications, or appointments to other Palm-compatible devices with infrared
ports. To receive beamed information, the beam receive feature must be turned on. See
step 6 on page 49.
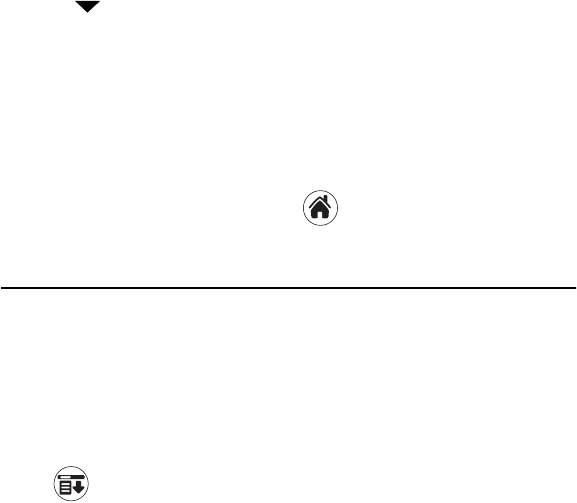
qç=ÄÉ~ã=áåÑçêã~íáçå==
NK Locate the entry you want to beam.
OK Tap to open the menus. From the Record menu, tap _É~ãK
PK Align your smartphone’s infrared port with that of the receiving device, as shown in
diagram. For best results, the devices should be approximately 5–30 centimeters
(2–12 inches) apart, and the path between them must be clear of obstacles.
•Voice •Fax, until off
•Fax, next call •Data, until off
•Data, next call
oÉëÉííáåÖ=íÜÉ=éÜçåÉ RV
QK Wait for the Status message to indicate that the transfer is complete.
oÉëÉííáåÖ=íÜÉ=éÜçåÉ
If the phone does not respond to taps or key presses, you may need to perform a reset.
There are two types of resets—soft resets and hard resets. In a soft reset, all records and entries
are saved. få=~=Ü~êÇ=êÉëÉíI=~ää=êÉÅçêÇë=~åÇ=ÉåíêáÉë=~êÉ=Éê~ëÉÇK If you must do a hard
reset, you can restore any data that you previously synchronized using a HotSync operation.
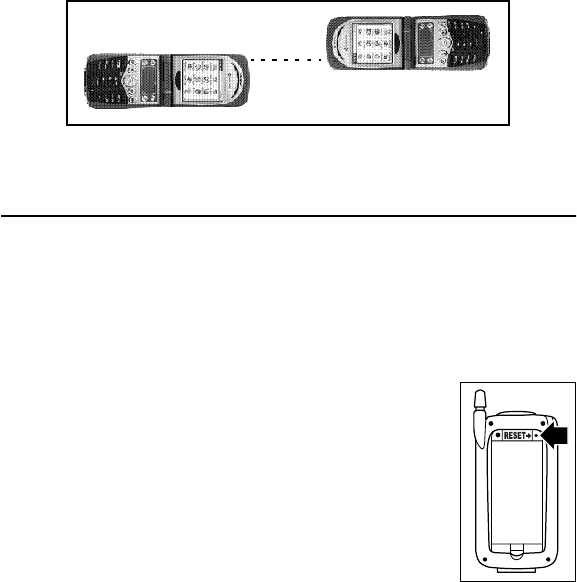
qç=éÉêÑçêã=~=ëçÑí=êÉëÉí==
NK Turn the Kyocera 7135 smartphone over. Open the battery door
on the back of the phone.
OK Press the reset button with the stylus.
PK Replace the battery door. Turn the phone back over and verify that
it has restarted.
SM hóçÅÉê~=TNPR=rëÉê=dìáÇÉ
qç=éÉêÑçêã=~=Ü~êÇ=êÉëÉí==
fjmloq^kqW=tÜÉå=óçì=Çç=~=Ü~êÇ=êÉëÉíI=~ää=ÉåíêáÉë=ëíçêÉÇ=áå=íÜÉ=éÜçåÉ=~êÉ=
Éê~ëÉÇK=vçì=Å~å=êÉëíçêÉ=éêÉîáçìëäó=ëóåÅÜêçåáòÉÇ=Ç~í~=ìëáåÖ=~=eçípóåÅ=çéÉê~íáçåK=
mÉêÑçêã=~=Ü~êÇ=êÉëÉí=çåäó=~ë=~=ä~ëí=êÉëçêí=áÑ=~=ëçÑí=êÉëÉí=Ü~ë=åçí=ëçäîÉÇ=íÜÉ=éêçÄäÉã=çê=
óçì=~êÉ=áåëíêìÅíÉÇ=íç=Çç=ëç=Äó=íÜÉ=hóçÅÉê~=`ìëíçãÉê=`~êÉ=`ÉåíÉêK
NK With the flip open, turn the Kyocera 7135 smartphone over. Open the battery door on the
back of the phone.
OK Press and hold down the backlight button on the keypad of the phone. Keep holding
down the backlight button as you use the stylus to press the reset pin on the right side of
the battery. Wait a moment and release only the reset pin.
PK When the Palm logo appears, release the backlight key. The following message appears:
QK Press the key below the screen to complete the hard reset and delete your data.
Press any other key to cancel the hard reset and keep your data.
bê~ëÉ=~ää=Ç~í~\
vbp=J=ìéÒ=Äìííçå
kl=J=~åó=çíÜÉê=Äìííçå

póåÅÜêçåáòáåÖ=óçìê=éÜçåÉ=ïáíÜ=~=ÅçãéìíÉê SN
póåÅÜêçåáòáåÖ=óçìê=éÜçåÉ=ïáíÜ=~=ÅçãéìíÉê
To synchronize your phone with your computer, install the Kyocera 7135 desktop
software on the computer. You’ll find it on the CD-ROM in your phone package. For
detailed instructions, see the Reference Guide on the CD-ROM.
kçíÉW=mêÉîáçìë=m~äãqj=çïåÉêëI=ÄÉÑçêÉ=óçì=ëóåÅÜêçåáòÉ=óçìê=éÜçåÉI=êÉãçîÉ=íÜÉ=
p~îÉÇ|mêÉÑÉêÉåÅÉëKéêÅ=ÑáäÉ=Ñêçã=íÜÉ=m~äã=_~Åâìé=ÑçäÇÉêK=vçì=Çç=åçí=åÉÉÇ=íç=êÉãçîÉ=
íÜáë=ÑáäÉ=ÄÉÑçêÉ=ëóåÅÜêçåáòáåÖ=áÑ=óçì=ÅÜççëÉ=íç=ÖáîÉ=óçìê=åÉï=éÜçåÉ=~=ìëÉê=å~ãÉ=íÜ~í=
áë=ÇáÑÑÉêÉåí=Ñêçã=óçìê=çêáÖáå~ä=m~äãI=çê=áÑ=óçì=~êÉ=åçí=~=éêÉîáçìë=m~äã=ìëÉêK=
fÑ=óçì=Ü~îÉ=~=ëÉêá~ä=ÅçååÉÅíáçåW=fÑ=óçì=~äêÉ~Çó=ìëÉ=~=m~äã=ÇÉîáÅÉ=~åÇ=Ü~îÉ=áåëí~ääÉÇ=
íÜÉ=m~äã=aÉëâíçé=ëçÑíï~êÉ=çå=óçìê=ÅçãéìíÉêI=áí=áë=åçí=åÉÅÉëë~êó=íç=áåëí~ää=áí=~Ö~áåK=
m~äã=aÉëâíçé=ëçÑíï~êÉ=çå=óçìê=ÅçãéìíÉêI=áåëí~ää=íÜÉ=rp_=ÇêáîÉêë=äçÅ~íÉÇ=çå=íÜÉ=
ÉåÅäçëÉÇ=`aJoljK=pÉÉ=é~ÖÉ=Q=Ñçê=Éñ~ãéäÉë=çÑ=ëÉêá~ä=~åÇ=rp_=ÅçååÉÅíáçåëK
qç=áåëí~ää=íÜÉ=aÉëâíçé=ëçÑíï~êÉ
Do not simply copy the Desktop software to your hard drive. The installer decompresses the
files and puts them in their proper places. Before you begin, exit all programs and
disconnect the phone from the cable.
NK Insert the Kyocera 7135 Desktop CD-ROM into the computer’s CD-ROM drive.
OK If the introduction screen does not appear, open the Start menu and choose oìåK=Type
the letter of your CD-ROM drive, followed by a colon, a backslash, and the word ä~ìåÅÜK=
For example, E:\launch.
PK Click=fåëí~ää=m~äã=aÉëâíçéK Follow the instructions on the screen.

SO hóçÅÉê~=TNPR=rëÉê=dìáÇÉ
qç=éÉêÑçêã=óçìê=Ñáêëí=ëóåÅÜêçåáò~íáçå==
fjmloq^kqW=fÑ=óçì=~êÉ=~=m~äã=ìëÉêI=ëÉÉ=qê~åëÑÉêêáåÖ=áåÑçêã~íáçå=ÄÉíïÉÉå=m~äã=
ÇÉîáÅÉëÒ=áå=`Ü~éíÉê=Q=çÑ=íÜÉ=oÉÑÉêÉåÅÉ=dìáÇÉ=ÄÉÑçêÉ=óçì=ëóåÅÜêçåáòÉ=óçìê=éÜçåÉK
NK On your computer, double-click the Kyocera 7135 Desktop icon (or select hóçÅÉê~=
TNPR=aÉëâíçé from the Start menu).
OK Click in the Windows system tray. In the menu, make sure içÅ~ä=pÉêá~ä=or içÅ~ä=
rp_ is checked. Then click=pÉíìéK
PK In the Setup window, click the içÅ~ä tab. In the Serial Port field, select the port where
you connected the cable. Click lhK
QK Connect the phone to the cable or place it in the sync cradle.
kçíÉW=aç=åçí=êÉãçîÉ=íÜÉ=éÜçåÉ=Ñêçã=íÜÉ=Å~ÄäÉ=ÇìêáåÖ=ëóåÅÜêçåáò~íáçåK=aç=åçí=íìêå=íÜÉ=
éÜçåÉ=çå=çê=çÑÑ=ÇìêáåÖ=ëóåÅÜêçåáò~íáçåK
RK Tap the sync button on the phone screen. During your first synchronization, a message
asks for your user name.
SK On the computer, enter a user name. Click lhK=
kçíÉW=bîÉêó=m~äã=ÇÉîáÅÉ=ãìëí=Ü~îÉ=~=ìåáèìÉ=å~ãÉK=mêçÄäÉãë=ã~ó=çÅÅìê=áÑ=óçì=
ëóåÅÜêçåáòÉ=ãçêÉ=íÜ~å=çåÉ=ÇÉîáÅÉ=ïáíÜ=íÜÉ=ë~ãÉ=å~ãÉK=vçì=ã~ó=ëóåÅÜêçåáòÉ=óçìê=
åÉï=éÜçåÉ=íç=~å=ÉñáëíáåÖ=ìëÉê=å~ãÉ=Ñêçã=~=éêÉîáçìë=m~äãJÅçãé~íáÄäÉ=ÇÉîáÅÉK=
eçïÉîÉêI=vçì=ãìëí=êÉãçîÉ=íÜÉ=p~îÉÇ|mêÉÑÉêÉåÅÉë=ÑáäÉ=~ë=ÇÉëÅêáÄÉÇ=áå=íÜÉ=åçíÉ=~í=íÜÉ=
ÄÉÖáååáåÖ=çÑ=íÜáë=ëÉÅíáçåK

mÜçåÉ=Å~êÉ SP
mÜçåÉ=Å~êÉ=
Follow these guidelines to optimize the performance of your phone.
mÜçåÉ
Do not let unauthorized personnel install or service your phone or accessories.
Faulty installation or service may be dangerous and will invalidate your warranty.
Only use approved accessories. Use of any unauthorized accessories may be
dangerous and will invalidate your phone warranty if the accessories cause damage
or a defect to the phone. See “The phone’s electronic serial number (ESN). This
number is in the battery compartment underneath the battery. You must remove the
battery to see it.” on page 68.
Keep the phone dry. If the phone gets wet, turn the power off immediately. Let it dry
before you use it again. In general, treat the Kyocera 7135 smartphone as you would
a pocket calculator or other small electronic instrument.
To avoid scratching the screen, always use the stylus or other plastic-tipped pen
intended for a touch-sensitive screen. Never use a pen, pencil, or other sharp object
on the surface of the screen.
Treat the phone gently. The touch-sensitive screen contains a glass element. Do not
drop the phone or subject it to any strong impact. Do not carry your Kyocera 7135
smartphone in your back pocket. If you sit on it, the glass may break.
SQ hóçÅÉê~=TNPR=rëÉê=dìáÇÉ
Protect the Kyocera 7135 smartphone from temperature extremes. Do not leave it
on the dashboard of a car on a hot day, and keep it away from heaters and other
heat sources. Store it out of direct sunlight.
Do not store or use the phone in any location that is extremely dusty, damp, or wet.
Use a soft dry cloth to clean the screen.
Avoid using suntan lotion around the phone. Chemicals in suntan lotions can
damage your phone.
^åíÉåå~=
Follow these guidelines to get the best reception.
Fully extend the antenna when you place or receive a call.
Do not touch the antenna while you are on a call. Do not bend or twist the antenna.
When using the headset, keep the headset wire away from the antenna.
When using the phone to connect to the Internet or send and receive email, make
sure the extended antenna is at least 20 centimeters (8 inches) away from other
people and is pointed away from them.
mÜçåÉ=Å~êÉ SR
_~ííÉêó
Your Kyocera 7135 smartphone has a rechargeable lithium ion battery. To charge the
battery, place your phone in the cradle (charging begins unless the battery is already fully
charged). You can also plug the power cable into the round port on the phone’s base to
charge directly. The battery will not overcharge, so you can leave the phone connected as
long as you like.
If you have an extra battery, use the sync cradle’s rear pocket for charging. You can
charge your smartphone and the extra battery simultaneously on the cradle.
`~ìíáçå
Always turn the phone off before removing the battery.
Do not disassemble or short-circuit the battery.
Keep the metal contacts at the base of the battery clean.
If you have not used a battery for more than a month, recharge it before using it.
Do not charge any battery if the temperature is below 32ºF (0ºC) or above 122ºF
(50ºC).
Do not store any battery in hot areas for long periods of time. Use these guidelines:
under 1 month: -4º to 140ºF (-20º to 60ºC)
over 1 month: -4ºF to 113ºF (-20º to 45ºC)
Never dispose of any battery in or near a fire. It could explode.

SS hóçÅÉê~=TNPR=rëÉê=dìáÇÉ
qáéë=Ñçê=áãéêçîáåÖ=Ä~ííÉêó=éÉêÑçêã~åÅÉ
Select a shorter ^ìíç=lÑÑ time on the Power screen under=mêÉÑë=mÜçåÉK=This
feature puts the screen to sleep at a preselected time.
Minimize use of the backlight. Note that during phone calls, the backlight
automatically dims 50% to conserve power. You can turn the backlight off
completely (by pressing ) anytime during a call.
Minimize use of the loudspeaker.
Remove headset when not in use.
If you don’t plan to make or receive calls, you can use the Palm applications without
turning on the phone.
Completely charge the battery before prolonged use.
oÉéä~ÅáåÖ=íÜÉ=Ä~ííÉêó
If the battery becomes low, an alert appears on the screen. Before you replace the
battery, synchronize the phone with your computer to back up the data. This helps
prevent accidental data loss.
If the phone does not turn on when you press , recharge the battery
immediately.
Before replacing the battery, turn the phone off. Never remove the battery while the
phone is on. To verify that the phone is off, use your stylus to tap . The words
“Phone is OFF” appear on the screen.
mÜçåÉ=Å~êÉ ST
Only remove the battery to replace it with another battery. Don’t leave the battery out
of the phone. For example, if your battery becomes drained while you are traveling
and you don’t have a second battery or a cable to recharge it, it is better to leave the
drained battery in the phone than to remove it.
If the battery drains completely, the phone no longer operates. However, there is
enough residual energy in the battery to store your clock settings and data for about
two days.
A built-in backup battery maintains the clock settings and data for an additional 45
minutes after the residual energy in the battery is depleted or if the battery is
removed. Use this time to replace the drained battery with a charged one.
If you leave a drained battery in the phone for more than three days, you can lose
all of the stored data. If this happens, recharge the battery and perform a soft reset
on the phone. Then synchronize the phone to your computer to restore the data.
If the battery is fully charged and the phone is turned off, your clock settings and
data will be stored for about two months.
With the phone off, when you remove the battery and reinsert it, the Kyocera 7135
smartphone does a soft reset. No information is deleted in a soft reset; all records
and entries are retained.
After you have replaced the battery, always check the clock settings.
SU hóçÅÉê~=TNPR=rëÉê=dìáÇÉ
tÜÉêÉ=íç=ÑáåÇ=ÜÉäé
vçìê=ëÉêîáÅÉ=éêçîáÇÉêÔFor questions about your phone and phone service, contact
your service provider. Your service provider’s customer support department can answer
questions about your phone, phone bill, call coverage area, and features such as call
forwarding or voice mail.
vçìê=éÜçåÉ=ÇçÅìãÉåí~íáçåÔIf you have questions about the phone, refer to this guide
or the oÉÑÉêÉåÅÉ=dìáÇÉ (on the CD-ROM in your phone package). To view or download
the most current versions of these guides, visit us at=
ïïïKâóçÅÉê~JïáêÉäÉëëKÅçãK
hóçÅÉê~=íÉÅÜåáÅ~ä=ëìééçêíÔIf you have additional questions, contact the Kyocera
Wireless Corp. Customer Care Center.
•tÉÄ=ëáíÉW=www.kyocerasmartphone.com
Before requesting support, please try to reproduce and isolate the problem. Have the
following information available.
•The name of your service provider
•The actual error message or problem you are experiencing
•The steps you take to reproduce the problem
•The phone’s electronic serial number (ESN). This number is in the battery
compartment underneath the battery. You must remove the battery to see it.

fåÇÉñ SV
fåÇÉñ
kìãÉêáÅë
VNNI=55
^
~ÅÅÉëëçêáÉëI=v
~ÇÇáåÖ
å~ãÉ=íç=sçáÅÉ=aá~äI=
43
^ÇÇêÉëë=_ççâ
Å~ääáåÖ=ÑêçãI=13
ìëáåÖI=23
~áê=Ä~ÖëI=v
~áêÅê~Ñí=ë~ÑÉíóI=iv
^ä~êãI=49
~åëïÉêáåÖ=Å~ääëI=15
~åíÉåå~I=64
^ééäáÅ~íáçåë=i~ìåÅÜÉêI=30
~ééäáÅ~íáçåëI=çéÉåáåÖI=30
^ìíç=sçäìãÉI=47
_
Ä~ííÉêóI=65
ÅÜ~êÖÉ=áÅçåI=5I=11
ÅÜ~êÖÉ=áåÇáÅ~íçê=çå=
Åê~ÇäÉI=6
ÅÜ~êÖáåÖ=áå=êÉ~ê=
éçÅâÉíI=6
ÉñíÉåÇáåÖ=Ä~ííÉêó=
äáÑÉI=65I=66
áãéêçîáåÖ=éÉêÑçêJ
ã~åÅÉI=66
áåëí~ääáåÖ=~åÇ=ÅÜ~êÖJ
áåÖI=3
äçï=Ä~ííÉêó=ëáÖå~äI=12
êÉãçîáåÖI=67
êÉéä~ÅáåÖI=66
ÄÉ~ãáåÖI=58
ëÉåÇáåÖ=Ç~í~I=58
íìêåáåÖ=çå=ÄÉ~ã=êÉJ
ÅÉáîÉI=49
_äçÅâI=17
ÄêáÖÜíåÉëëI=49
ëÉííáåÖI=49
`
Å~äáÄê~íáåÖ=íÜÉ=ëÅêÉÉåëI=7
`~ää=eáëíçêóI=24
Å~ää=áå=éêçÖêÉëë=áÅçåI=11
Å~ääI=j~âáåÖ=~åÇ=
oÉÅÉáîáåÖI=13
Å~ääë
Ñêçã=^ÇÇêÉëë=_ççâI=
13
Ñêçã=aá~äÉêI=29
Ñêçã=âÉóé~ÇI=13
ÜáëíçêóI=24
êÉÅÉáîáåÖI=15
îáÉïáåÖ=êÉÅÉåí=Å~ääëI=
20
Å~êÉ=~åÇ=ë~ÑÉíóI=63
`aj^
ÇáÖáí~ä=ãçÇÉI=11
ÅÜ~êÖáåÖ=íÜÉ=Ä~ííÉêóI=3
Åçåí~ÅíI=ÑáåÇ=ìëáåÖ=íÜÉ=
âÉóé~ÇI=13
Åçåíê~ëíI=49
ëÉííáåÖI=49
`çéóáåÖ=Ç~í~I=36
Åê~ÇäÉI=6
`êÉ~íáåÖ=åÉï=ÑçäÇÉêëI=37
a
a~íÉI=50
a~íÉ=_ççâI=25
ÇÉëâíçé=ëçÑíï~êÉ
áåëí~ääI=61
Çá~äáåÖ
âÉóé~ÇI=13
péÉÉÇ=aá~äI=29
sçáÅÉ=aá~äI=43
TM hóçÅÉê~=TNPR=rëÉê=dìáÇÉ
Çá~äáåÖ=VNNI=15
ÇáÖáí~ä=ãçÇÉI=11
aççÇäÉI=26
açïåäç~ÇÉêI=31
ÇêáîáåÖ=ë~ÑÉíóI=iv
b
b~êéáÉÅÉI=47
bã~áäI=41
ÉãÉêÖÉåÅó=åìãÄÉêëI=15
ÉåíÉêáåÖ=íÉñíI=21
ÉåîÉäçéÉ=áÅçåI=11
c
c~ñLjçÇÉãI=56
cáäÉj~å~ÖÉêI=1I=36
Ñäáé=ëÉííáåÖëI=52
cçêã~íë
ÅÜ~åÖáåÖI=50
d
d~ãÉI=49
dê~ÑÑáíáI=21I=22
Ä~ëáÅ=ÅÜ~ê~ÅíÉêëI=22
e
e~åÇëJcêÉÉ=`~ê=háíI=47
Ü~êÇ=êÉëÉíI=60
eÉ~ÇëÉíI=47
ÜÉ~êáåÖ=~áÇI=ìëáåÖ=éÜçåÉ=
ïáíÜI=iv
ÜÉäéI=68
ÜçãÉ=~êÉ~=áåÇáÅ~íçêI=12
eçípóåÅ
Ñáêëí=íáãÉI=62
áåëí~ääáåÖ=aÉëâíçé=
ëçÑíï~êÉI=61
f
áåëí~ää=Ä~ííÉêóI=3
áåëí~ääáåÖ=m~äã=aÉëâíçéI=
61
g
gìâÉ_çñI=31
h
âÉóëI=10
hóçÅÉê~=TNPR=aÉëâíçéI=62
hóçÅÉê~=TNPR=ÇÉëâíçé
áåëí~ää=áíI=1
i
ibaI=12
iba=ëí~íìëI=12
j
ã~âáåÖ=Å~ääë
Ñêçã=^ÇÇêÉëë=_ççâI=
13
Ñêçã=aá~äÉêI=29
Ñêçã=âÉóé~ÇI=13
Ñêçã=péÉÉÇ=aá~äI=28I=
29
Ñêçã=sçáÅÉ=aá~äI=43
ãÉÇáÅ~ä=ÇÉîáÅÉëI=éÜçåÉ=
åÉ~êI=iv
ãÉãç
jÉãç=m~ÇI=25
jÉëë~ÖÉI=çìíÖçáåÖI=17
ãÉëë~ÖÉI=êÉÅÉáîáåÖI=16
jÉëë~ÖÉI=ëÉåÇáåÖI=17
ãÉëë~ÖÉëI=27
ÅÜÉÅâáåÖI=20
ÉåîÉäçéÉ=áÅçåI=11
ãçÇÉëI=11
jmP=mä~óÉêI=31
ãìíÉ=éÜçåÉ=ÇìêáåÖ=Å~ääI=20
k
åÉíïçêâ=ÅçååÉÅíáçåëI=55
åÉíïçêâ=éêÉÑÉêÉåÅÉëI=55
åç=ëáÖå~ä=áåÇáÅ~íçêI=11I=12
åìãÄÉêI=çïå=éÜçåÉ=
åìãÄÉêI=20
l
çå=Å~ää=áÅçåI=11
çåJëÅêÉÉå=âÉóÄç~êÇI=21
çïå=éÜçåÉ=åìãÄÉêI=20
m
é~ÖÉëI=ëÉÉ=ãÉëë~ÖÉë
m~äã=aÉëâíçéI=61
fåÇÉñ TN
ma^=~ééäáÅ~íáçåëI=30
ma^=ëçìåÇëI=46
éÜçåÉ
ÅÜÉÅâáåÖ=çïå=åìãJ
ÄÉêI=20
Ñäáé=ëÉííáåÖëI=52
éêÉÑÉêÉåÅÉëI=51
mÜçåÉ=^äÉêíëI=47
éÜçåÉ=Å~êÉI=63
éÜçåÉ=åìãÄÉêI=20
éÜçåÉ=ëÉêîáÅÉI=54
éÜçåÉ=ëçìåÇëI=47
éÜçåÉ=ëí~íìëI=11
mÜçíçpìáíÉI=38
mä~óiáëíI=31
éçêí
ëÉêá~äI=4
ìåáîÉêë~ä=ëÉêá~ä=Äìë=
Erp_FI=4
mçïÉêáåÖI=10
éçïÉêáåÖ=éÜçåÉ=çå=~åÇ=
çÑÑI=10
éêÉÑÉêÉåÅÉëI=48
mêáçêáíóI=19
o
ê~Çáç=ÑêÉèìÉåÅó=ÉåÉêÖóI=iii
oÉÅÉáîáåÖ=~åÇ=pÉåÇáåÖ=
jÉëë~ÖÉëI=16
êÉÅÉáîáåÖ=Å~ääëI=15
êÉÅÉåí=Å~ääëI=14I=20
êÉÅÜ~êÖÉ=íÜÉ=Ä~ííÉêóI=5
êÉãçîáåÖ=Ä~ííÉêóI=66
oÉå~ãáåÖ=ÑáäÉë=~åÇ=
ÑçäÇÉêëI=38
oÉèìÉëí=oÉÅÉáéíI=19
êÉëÉííáåÖI=59
êÉëÉííáåÖ=éÜçåÉI=59I=67
oc=ÉåÉêÖó
ÉñéçëìêÉI=iii
ìåë~ÑÉ=~êÉ~ëI=iv
êáåÖÉê
êáåÖ=Äó=Å~íÉÖçêóI=46
ëÉäÉÅíáåÖI=45I=46
ëÉííáåÖ=íç=îáÄê~íÉI=53
îçäìãÉI=46
êáåÖÉê=íóéÉI=46
îáÄê~íÉI=53
êáåÖÉê=îçäìãÉI=46
~ÇàìëíI=45
êç~ãáåÖ=áåÇáÅ~íçêI=11I=12
p
ë~ÑÉíó
é~ÅÉã~âÉêI=iv
oc=ÉåÉêÖóI=iii
ìåë~ÑÉ=~êÉ~ëI=iv
ëÅêÉÉå
ÄêáÖÜíåÉëëI=49
Å~êÉ=çÑI=63
Åçåíê~ëíI=49
Åçåíê~ëí=~åÇ=ÄêáÖÜíJ
åÉëëI=49
áÅçåëI=11
ëÉêá~ä=ÅçããìåáÅ~íáçåëI=4
ëÉêîáÅÉ=~êÉ~I=êç~ãáåÖI=11
pÉííáåÖëI=40
ëáÖå~ä=ëíêÉåÖíÜI=11
páäÉåÅÉ=^ääI=48
ëçÑí=êÉëÉíI=59I=67
ëçìåÇ
~ÇàìëíáåÖ=êáåÖÉêI=45I=
46
êáåÖ=Äó=Å~íÉÖçêóI=46
ëÉäÉÅíáåÖ=êáåÖÉêI=45
ëéÉ~âÉê=îçäìãÉI=45
ëéÉ~âÉêI=~ÇàìëíáåÖ=
îçäìãÉI=45
péÉ~âÉêéÜçåÉI=47
péÉÉÇ=aá~ä
~ÇÇáåÖ=åìãÄÉêëI=28
äççâáåÖ=ìé=åìãÄÉêëI=
29
ã~âáåÖ=Å~ääëI=29
ìëáåÖI=14
ëíóäìëI=21
ëóåÅ=Åê~ÇäÉI=6
ëóåÅÜêçåáòáåÖI=61
ëóåÅÜêçåáòáåÖ=éÜçåÉ=íç=
ÅçãéìíÉêI=61
póëíÉã=pçìåÇI=49
TO hóçÅÉê~=TNPR=rëÉê=dìáÇÉ
q
í~äâ=íáãÉ
Ä~ííÉêó=ÅÜ~êÖÉ=áÅçåI=
11
qÉñíI=26
qÉñí=jÉëë~ÖÉI=
éêÉÑçêã~ííÉÇI=19
qáãÉI=50
qç=aç=iáëíI=42
íìêåáåÖ=éÜçåÉ=çå=~åÇ=çÑÑI=
10
r
råáîÉêë~ä=pÉêá~ä=_ìë
ÅçååÉÅíáçåI=2
ìåáîÉêë~ä=ëÉêá~ä=Äìë=Erp_FI=
4
ìåãìíÉ=éÜçåÉ=ÇìêáåÖ=Å~ääI=
20
ìåë~ÑÉ=~êÉ~ëI=iv
s
îáÄê~íÉ=ëÉííáåÖ=Ñçê=êáåÖÉêI=
53
sçáÅÉI=26
îçáÅÉ=~åëïÉêI=45
îçáÅÉ=Åçãã~åÇëI=43
sçáÅÉ=aá~äI=43
sçáÅÉ=cÉ~íìêÉëI=43
îçáÅÉ=ã~áä
áåÇáÅ~íçêI=11
sçáÅÉ=jÉãçI=26
îçáÅÉ=ï~âÉìéI=45
îçäìãÉ
~ÇàìëíáåÖ=ëéÉ~âÉêI=
45
ëÉííáåÖ=êáåÖÉêI=45I=46
t
tÉÄI=30I=39