Kyocera KWC-K3801 Dual Band CDMA Mobile Phone with Bluetooth User Manual 82 N0247 1EN
Kyocera Communications, Inc Dual Band CDMA Mobile Phone with Bluetooth 82 N0247 1EN
UserManual.wiki
>
Kyocera
>
KWC-K3801 User Manual
>
Users Manual
Contents
1.
Users Manual
2.
Manual
Users Manual
Navigation menu
Upload a User Manual
Namespaces
Wiki Guide
HTML
PDF
Info
Views
User Manual
Discussion / Help
Navigation


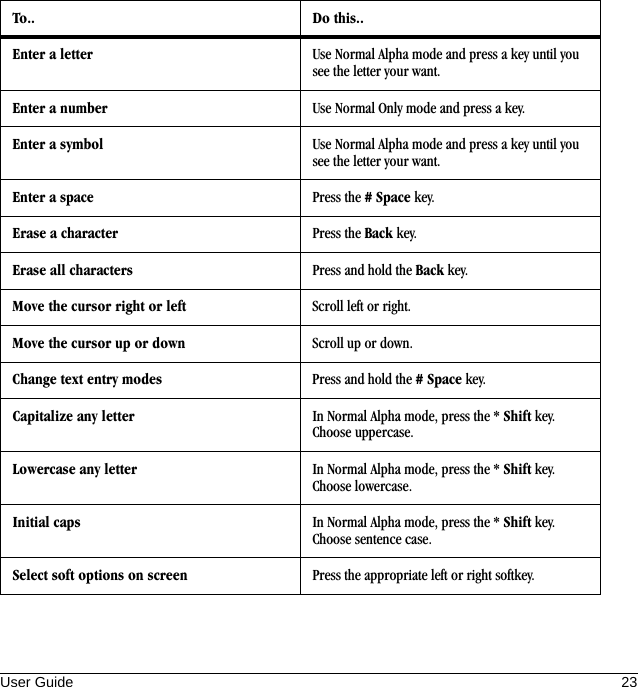
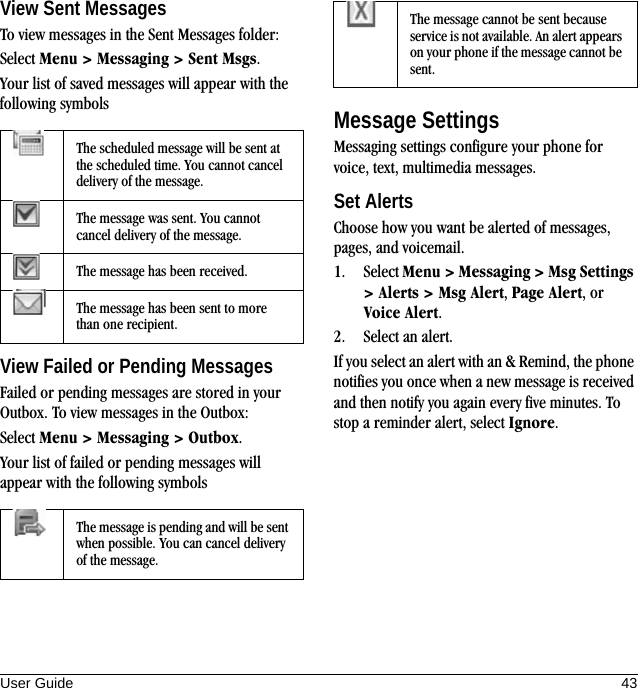
![22 Text Entry Quick Referencecommon words and guesses at the word you are trying to spell.1. For each letter of the word you want, press the key once. For example, to enter the word “any” press the 2 > 6 > 9 keys.2. If the word doesn’t match what you want, press 0 Next key to look at other word matches.3. When you see the word you want, press the # Space key.Enter SymbolsWhile entering text in Normal Alpha mode, you can enter symbols by pressing the 1 key until you see the symbol you want. Using this method, you have access to the following symbols:.. @ ? ! - , & : ‘ ]To access the full set of symbols:1. From the text entry screen select Options > Add Symbol.2. Scroll up or down to view the list of symbols.3. Press the number key corresponding to the symbol to enter it.Change ModesSometimes you need to change modes. For example, to enter numbers in an email address while in Normal Alpha mode, you must change to numbers only mode, enter the numbers, and then change back to Normal Alpha mode to complete the address.To change text entry modes:• Press and hold * Shift key until the icon for the mode you want appears at the top of the screen.• You can also select Options then select a different mode.Note: You can change the default text entry mode when creating a text message. For more information, see “Set Default Text” on page 45.Change CapitalizationYou can change capitalization at any time while entering text.Press the * Shift key to choose upper or lower case while in Normal Alpha mode.Text Entry Quick ReferenceThis table gives instructions for entering letters, numbers, and symbols. For more information, see “Text Entry Modes” on page 21.](https://usermanual.wiki/Kyocera/KWC-K3801.Users-Manual/User-Guide-993023-Page-22.png)