Kyocera KWC-KPC650 CDMA Dual-Band PCMCIA Card User Manual
Kyocera Communications, Inc CDMA Dual-Band PCMCIA Card
UserManual.wiki
>
Kyocera
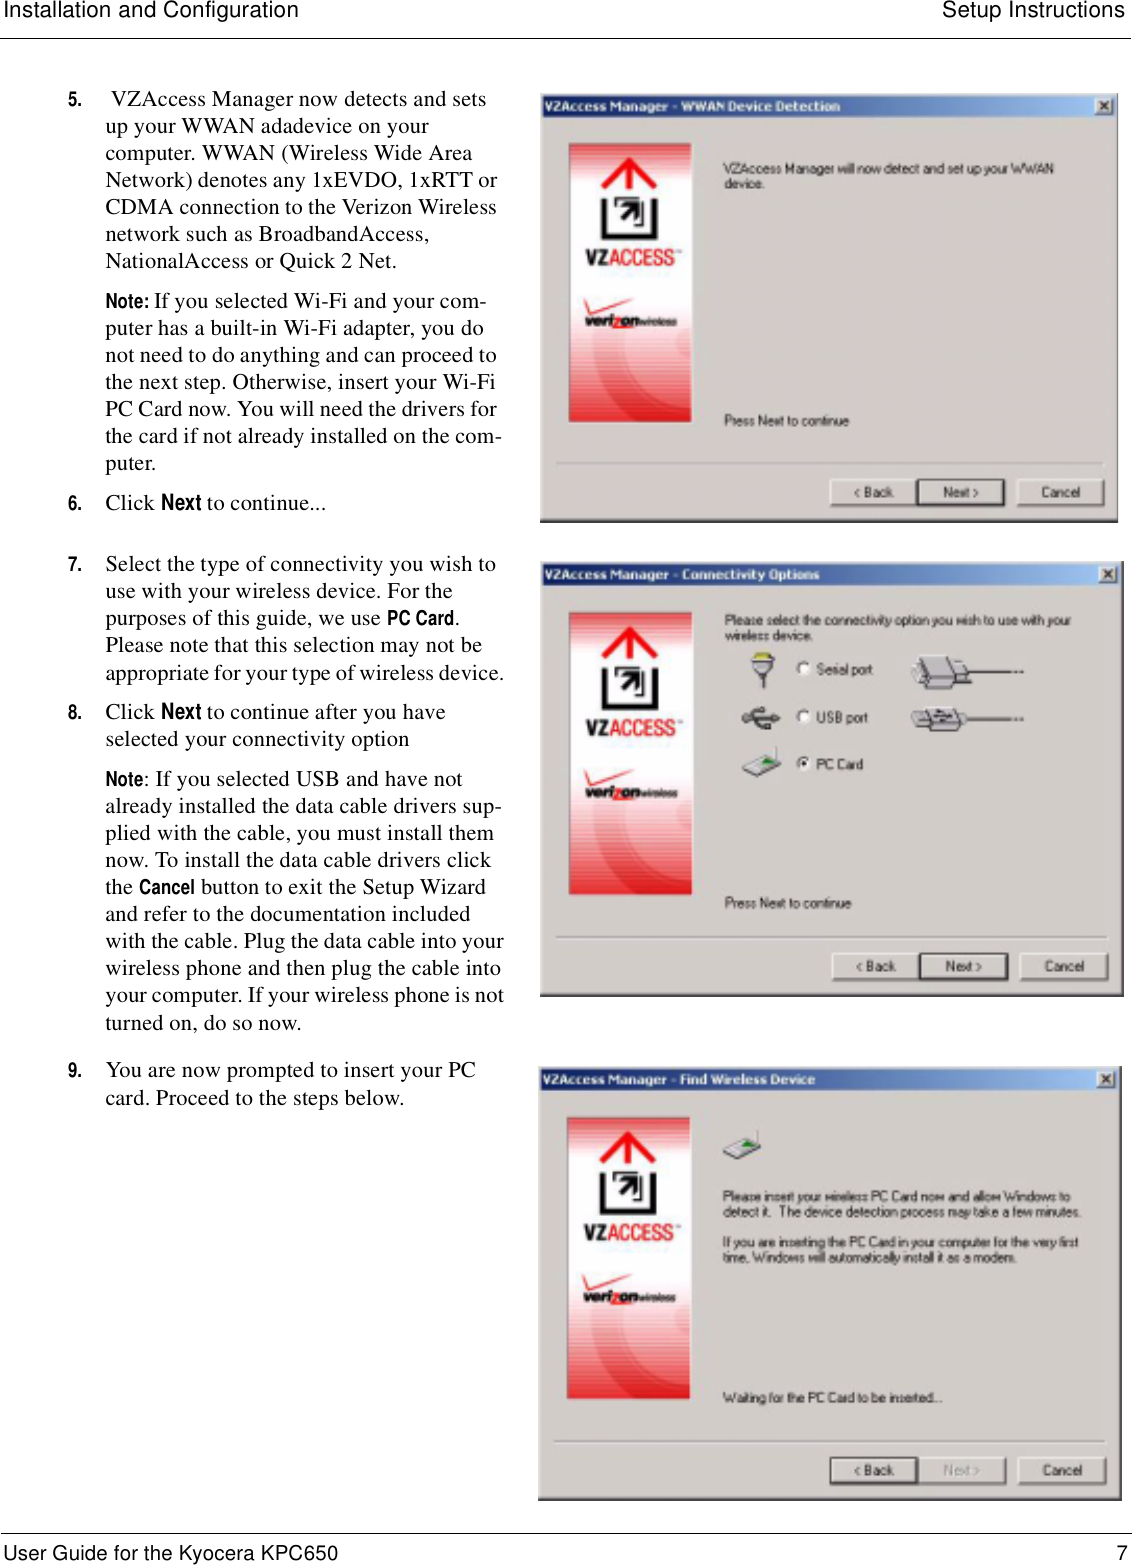
>
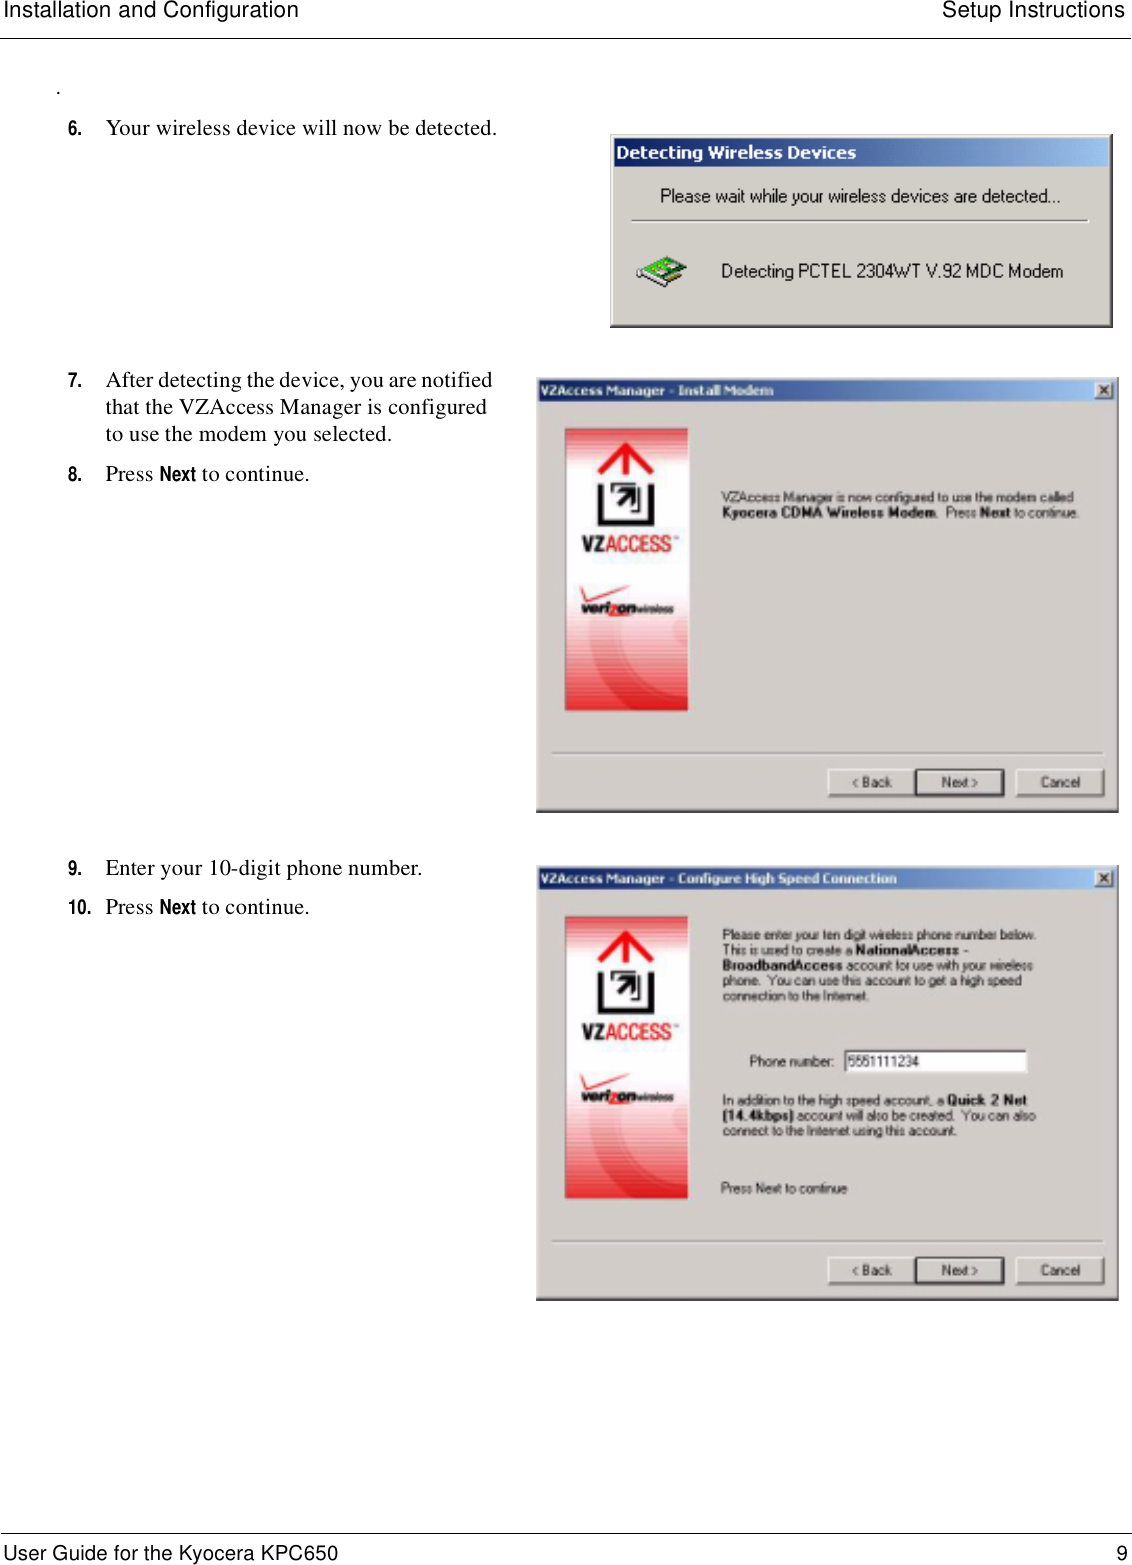
KWC KPC650 User Manual
User Manual
Navigation menu
Upload a User Manual
Namespaces
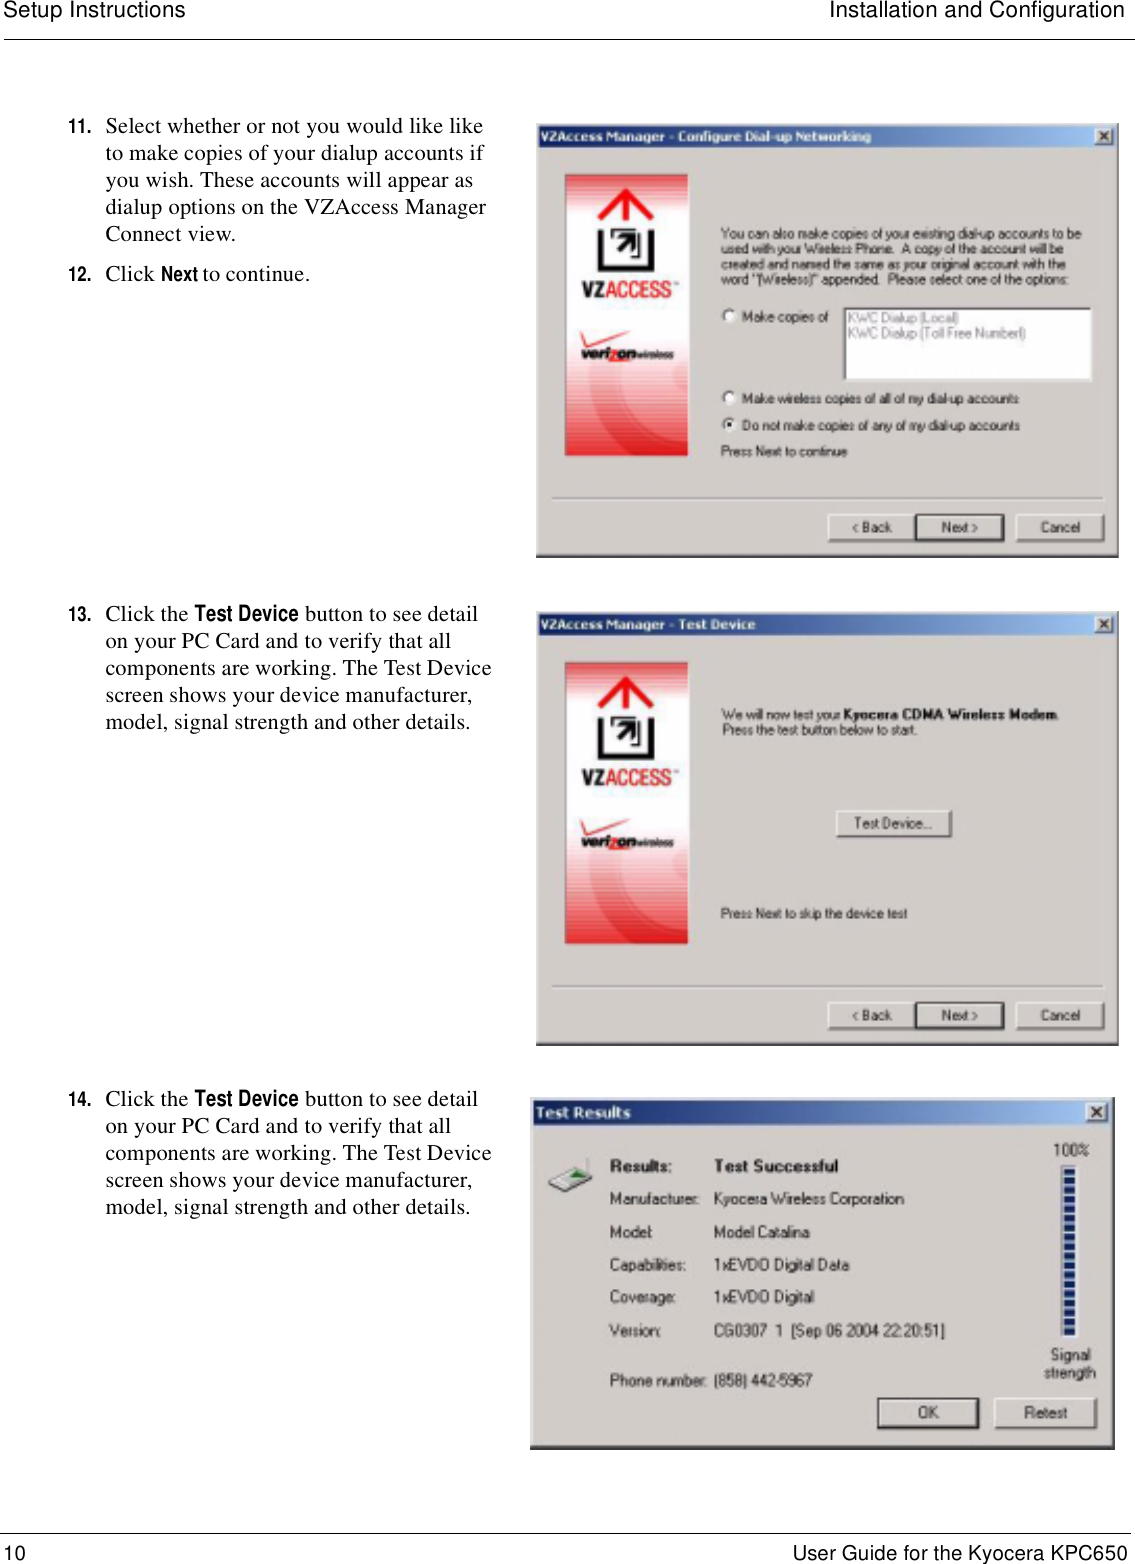
Wiki Guide
HTML
PDF
Info
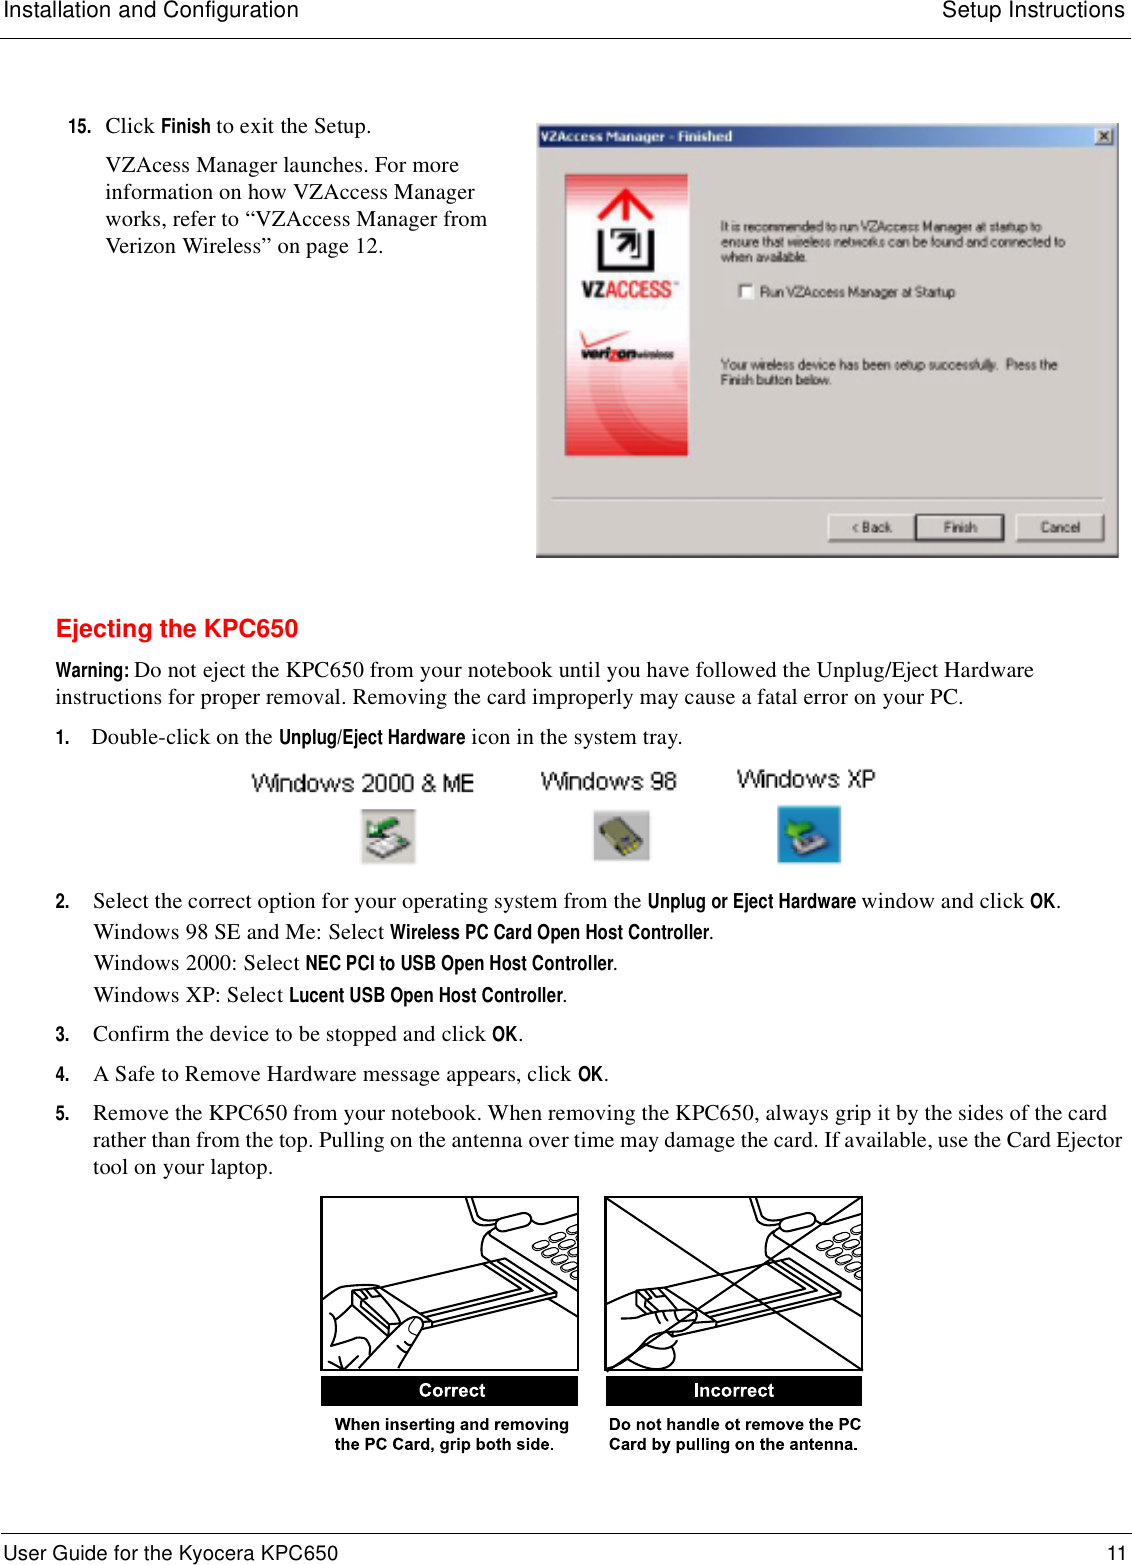
Views
User Manual
Discussion / Help
Navigation
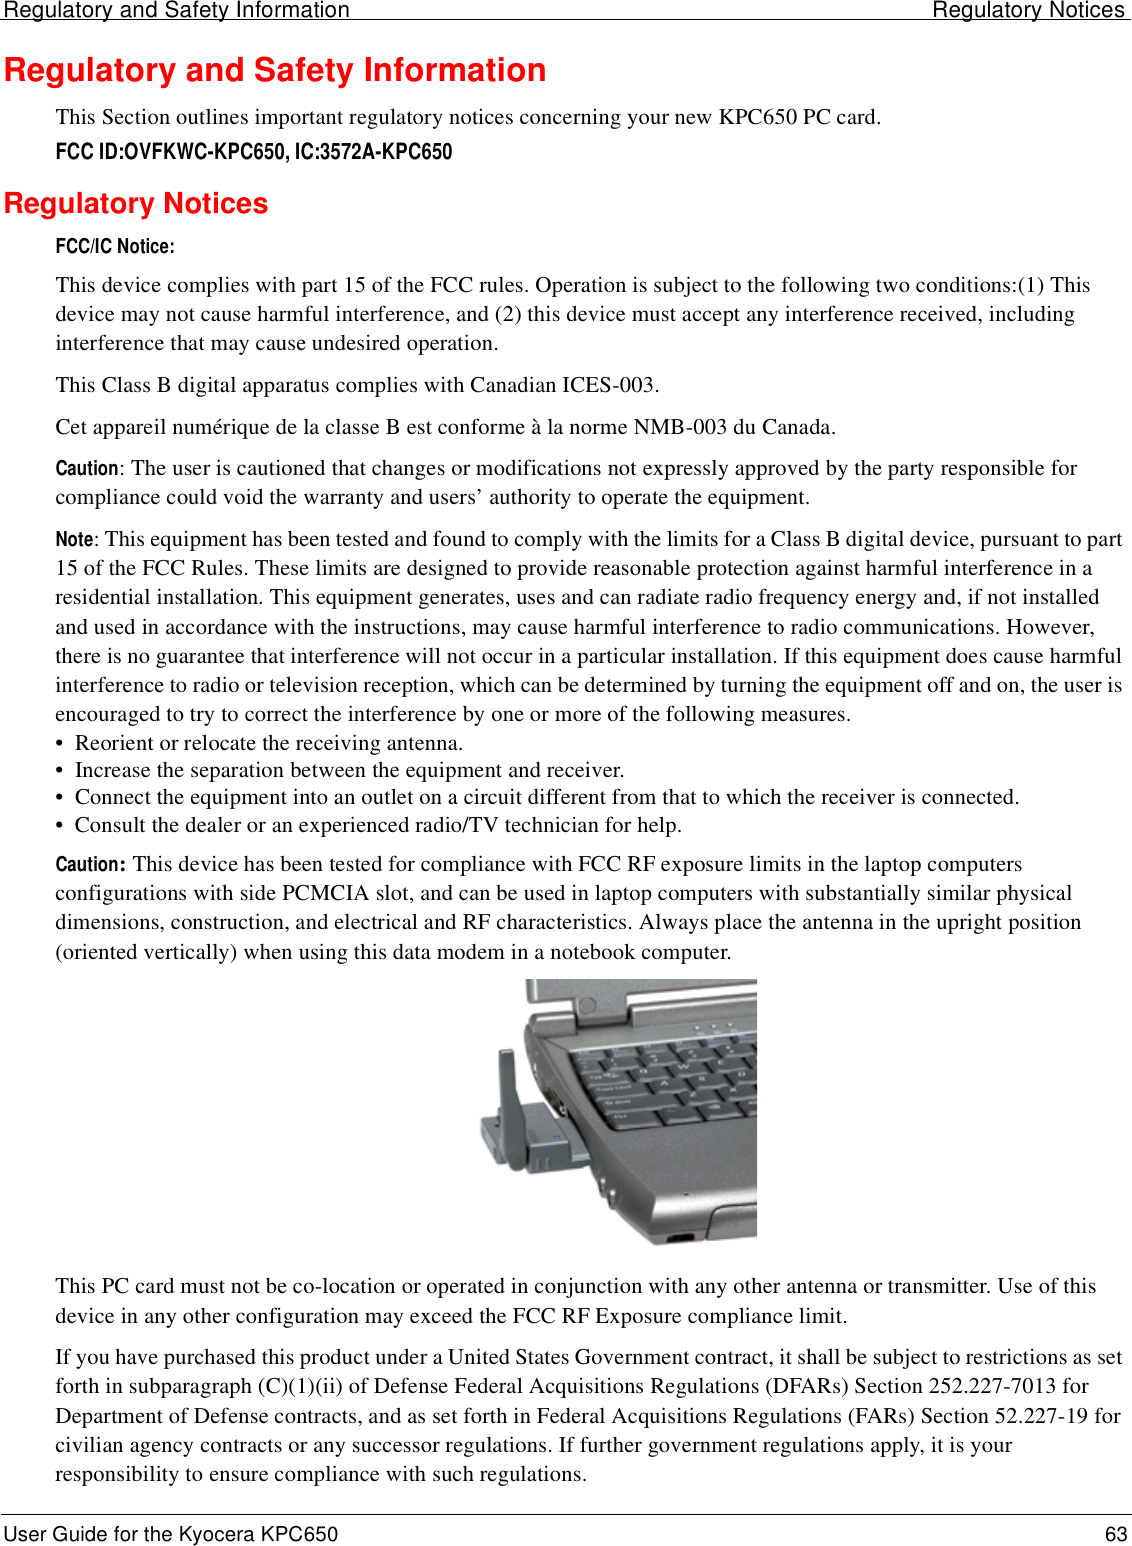
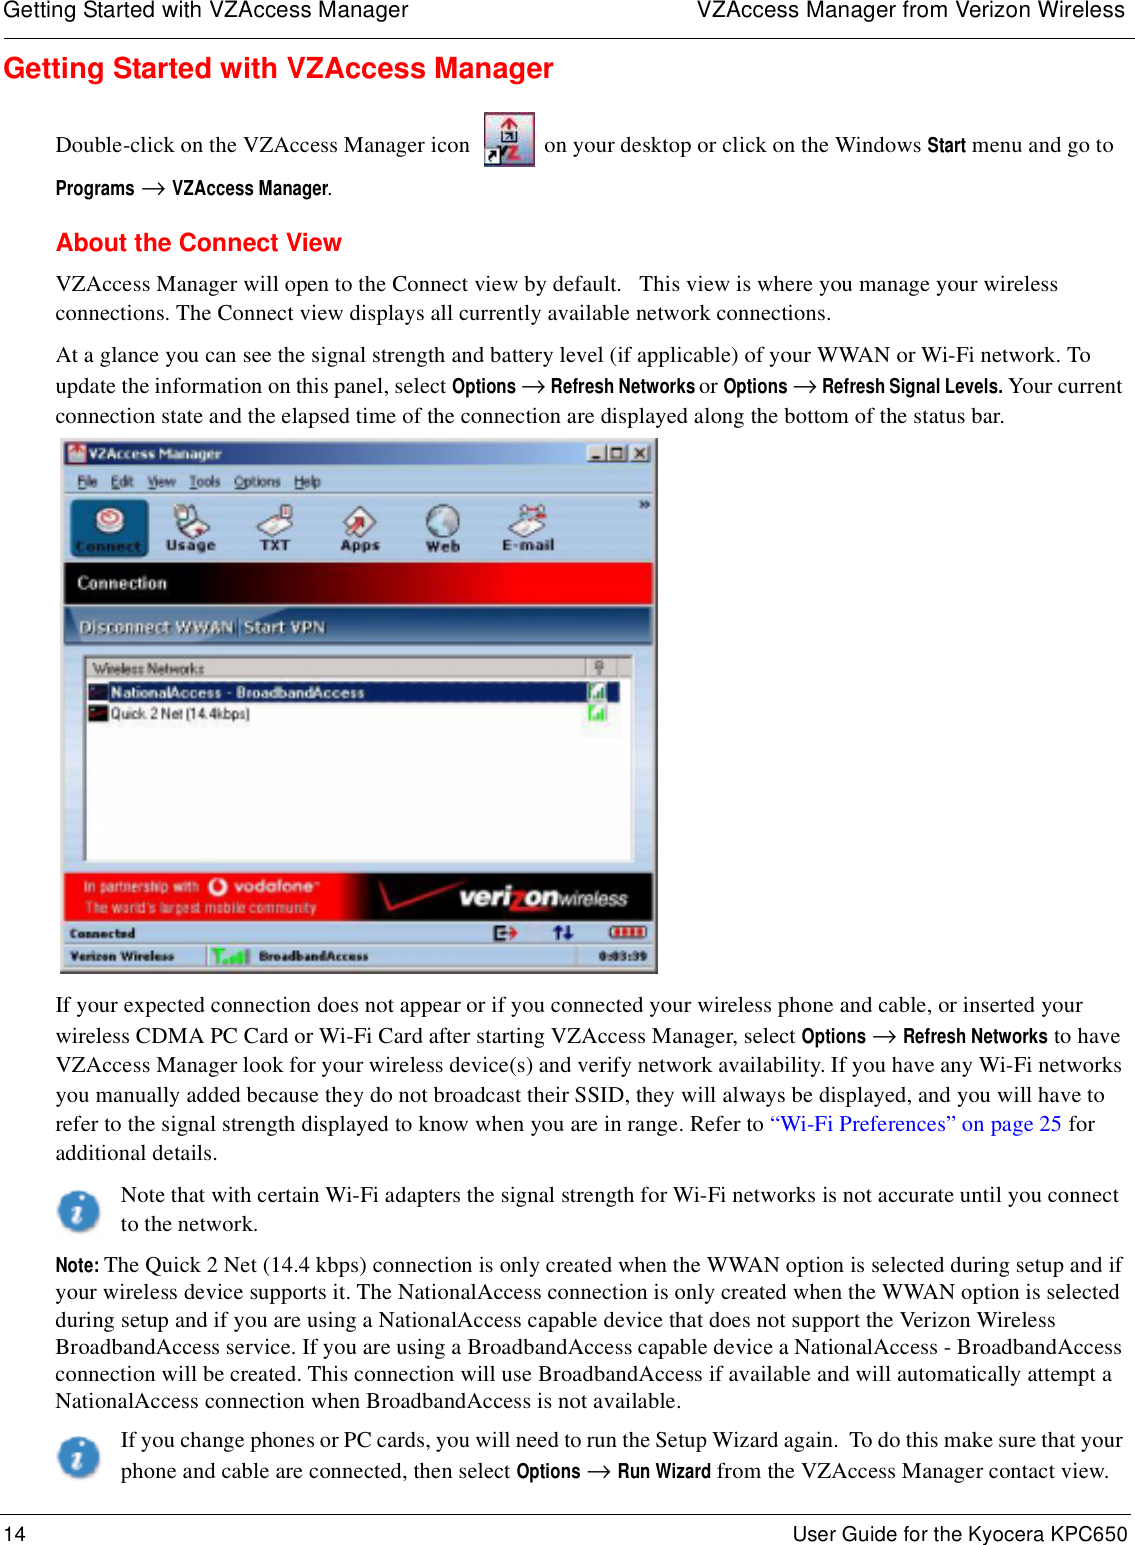
![About your Kyocera KPC650 PC Card KPC650 PC Card Introduction2 User Guide for the Kyocera KPC650About your Kyocera KPC650 PC CardThe KPC650 is a dual-band 1X EVDO PC card modem designed to fit into a Type II PCMCIA card slot available on most notebook PCs. This uniquely designed card allows you to connect to the Internet, send and receive email efficiently, connect to your company’s network, and maximize productivity when away from the office. Note that the KPC supports SMS, but does not support voice services.Power ManagementThe KPC650 is designed to take advantage of the power management and system overhead benefits offered by the standard 32-bit CardBus electrical interface that minimizes power consumption.Other Features and Benefits• A Type II PCMCIA format supporting the CardBus I/O interface• Supports North American PCS (1900 MHz) and Cellular (800 MHz) bands• Based on the QUALCOMM MSM6500 chipset• Supports 3G network technologies• Optimized data rates of up to 2 Mbps in receive mode and up to 144 kbps in transmit mode• Equipped with all necessary host software and drivers for various operating systems• Works at lower battery voltage and operates at a greater speed than standard PC Card interface.• Verizon Wireless BroadbandAccess compatible (download speeds 2.4 Mb/sec max, 300−500 kbps typical)• Verizon Wireless NationalAccess compatible (40−60 kbps)• VZ Access Manager compatible• Memory (FLASH/RAM): 128/64 MB• 32-bit Cardbus interface• Integrated dual band main antenna and a dial-band chip-based diversity antenna• Supports external accessory antenna for enhanced diversity performance• LED service indicator• Supports 2-way Short Message Service (SMS)• External accessory antenna for enhanced performanceStorage• When not in use, fold the antenna down and store in a compartment where the card can be protected from being crushed or broken.• Store your KPC650 in a dry and clean place. Storage temperature: −30° to 65°C [86° to 149°F]. • Do not apply adhesive labels to the KPC650. This may cause the card to jam inside the PC Card slot of your notebook PC.• The antenna extends freely. Do not force or hyper-extend the antenna. This may cause it to break.• The KPC650 easily fits into the PC Card slot. Forcing the KPC650 into the PC Card slot may cause considerable damage.• Protect your card from liquids, dust and excessive heat.](https://usermanual.wiki/Kyocera/KWC-KPC650/User-Guide-474271-Page-6.png)


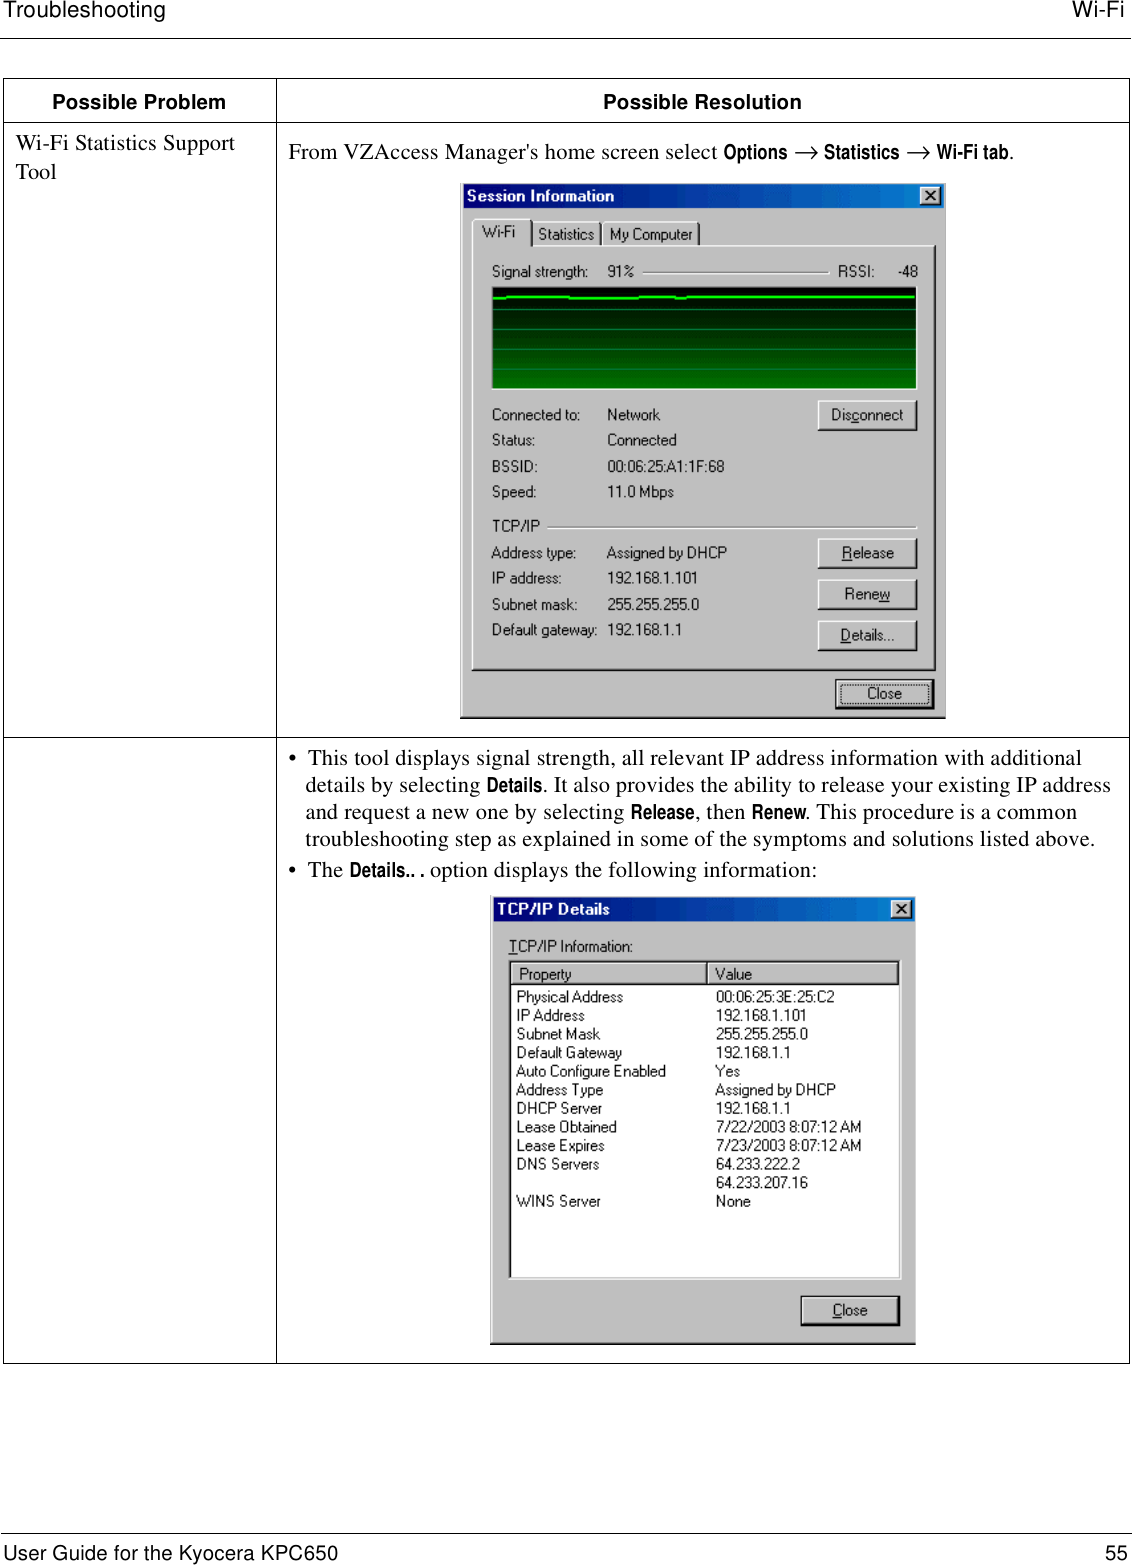
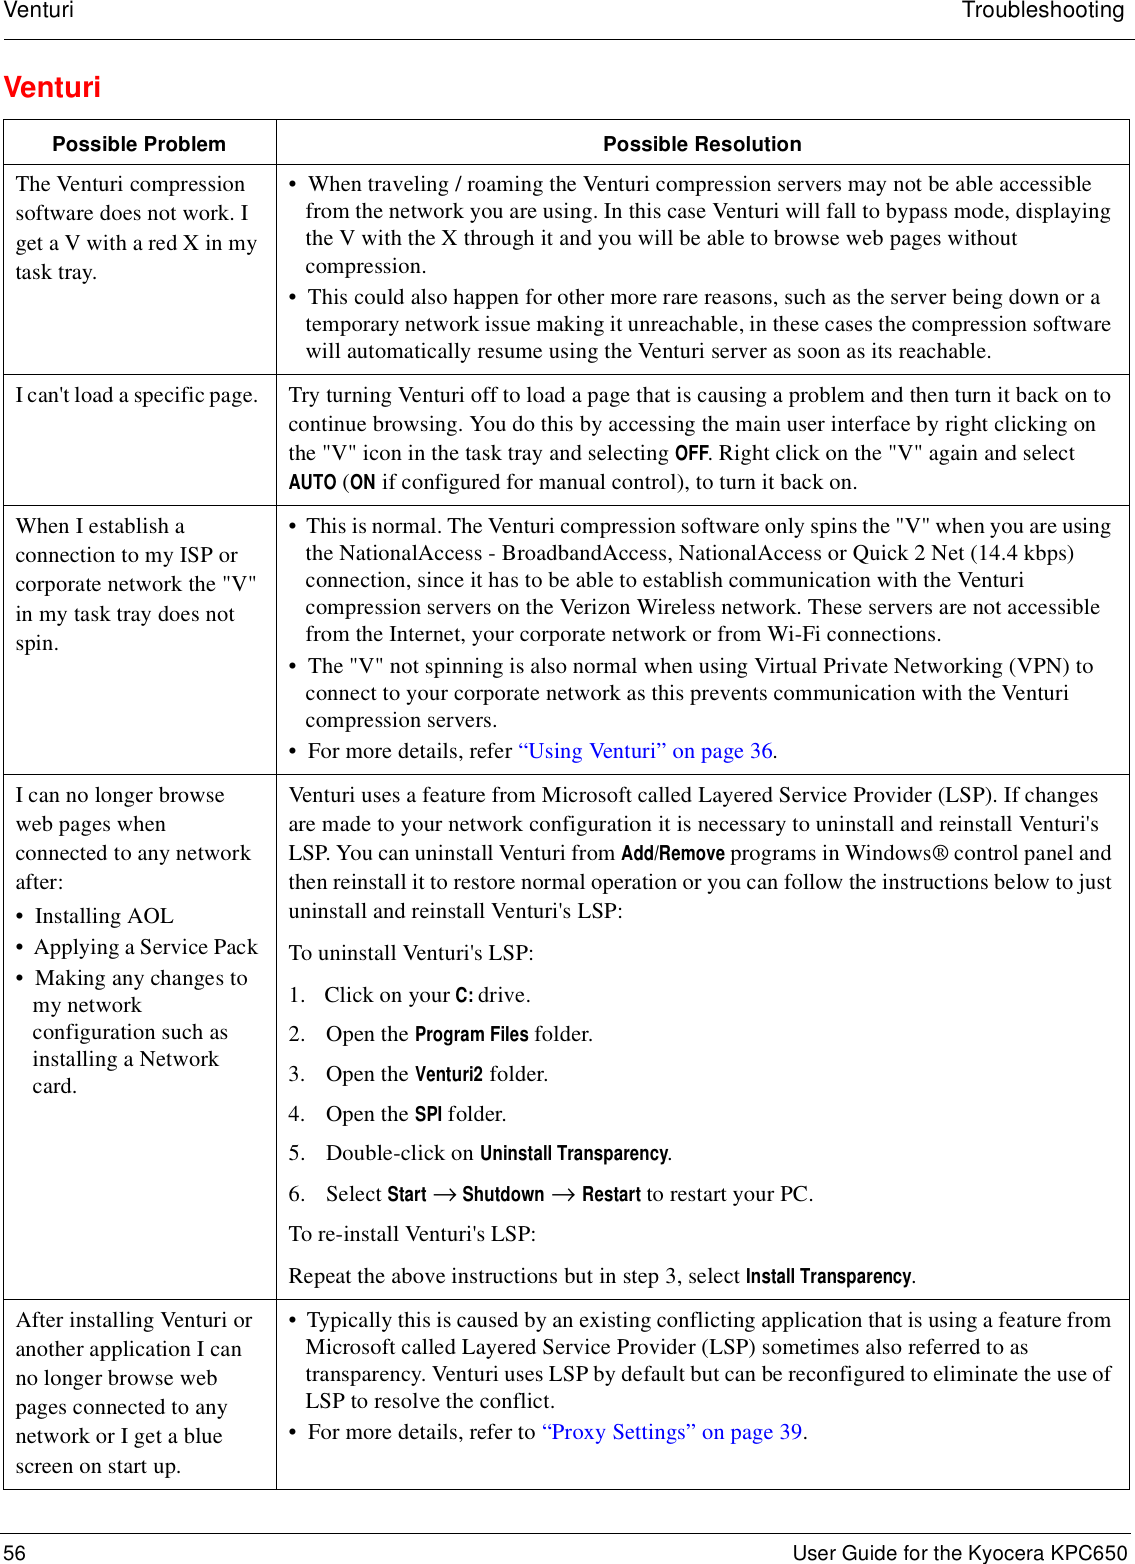
![Settings in other Applications Venturi Compression Software40 User Guide for the Kyocera KPC650If your company uses proxy settings they will appear here.3. If you are only using Wi-Fi connections without VPN and you want to access the Internet directly, uncheck the first three options to turn proxy settings off. If using VPN and if the settings are present leave them as they are. To restore the settings, navigate back to this screen and recheck any boxes you had unchecked. If using a WWAN device, the NationalAccess - BroadbandAccess, NationalAccess and Quick 2 Net (14.4 kbps) connections from within VZAccess Manager have no proxy settings associated with them by default. This means you can access the Internet directly using these connections but if you connect via VPN and your company requires proxy settings, you will not be able to access the Internet when connected via VPN. Performance is better if you drop your VPN connection when you want to access the Internet directly, but you can record all the settings on this screen and on the screen that appears when you select the Advanced button, then enter these settings in the properties for your WWAN connections (NationalAccess - BroadbandAccess, NationalAccess, Quick 2 Net [14.4 kbps]). Note: You can have proxy settings automatically turned off when you connect using Wi-Fi connections , refer to “Wi-Fi Preferences” on page 25.4. If you need to enter proxy settings for the NationalAccess - BroadbandAccess, NationalAccess or Quick 2 Net (14.4 kbps) connection that is used by VZAccess Manager, you would select the connection from the Connections tab in the previous step and select Settings. The exact names of the connections used by VZAccess Manager are](https://usermanual.wiki/Kyocera/KWC-KPC650/User-Guide-474271-Page-44.png)