Kyocera KWC-KPC650 CDMA Dual-Band PCMCIA Card User Manual
Kyocera Communications, Inc CDMA Dual-Band PCMCIA Card
Kyocera >
User Manual
DRAFT COPY-X2
Verizon Wireless
VZAccessSM Manager User Guide
for the
Kyocera KPC650 PC Card
Trademarks and Service Marks
Verizon Wireless is a trademark of Verizon Trademark Services LLC, and the other trademarks, logos, and service
marks (collectively the "Trademarks") used in this help file are the property of Verizon Wireless or their respective
owners. Nothing contained in this help file should be construed as granting by implication, estoppel, or otherwise,
a license or right of use of Verizon Wireless or any other Trademark displayed in this help file without the written
permission of Verizon Wireless or its respective owner.
VZAccessSM is a service mark of Verizon Wireless
Quick 2 NetSM is a service mark of Verizon Wireless.
VenturiTM is a trademark of Venturi Wireless.
QuickLink® is a registered trademark of Smith Micro Software, Inc.
Microsoft®, Hotmail, MSN®, ActiveSync®, Outlook®, Outlook Express® and Windows® are either registered
trademarks or trademarks of Microsoft® Corporation in the United States and/or other countries.
Netscape and the Netscape N and Ship's Wheel logos are registered trademarks of Netscape Communications Cor-
poration in the U.S. and other countries.
AOL® is a registered trademark of America Online, Inc.
Aironet®, Cisco®, Cisco Systems® are registered trademarks of Cisco Systems, Inc. and/or its affiliates in the
U.S. and certain other countries.
HotSync® is a registered trademark of Palm, Inc.
Kyocera® is a registered trademark of Kyocera Corporation.
The names of actual companies and products mentioned in this user guide may be the trademarks of their respec-
tive owners.
Copyright 2004 Verizon Wireless. All rights reserved.
Copyright 2004, Kyocera Wireless Corp. All rights reserved
82-M8831-1, Rev X2

User Guide for the Kyocera KPC650 iii
Table of Contents
KPC650 PC Card Introduction ...............................................................................................................................................1
Checklist .......................................................................................................................................................................................... 1
About this guide ...............................................................................................................................................................................1
About your Kyocera KPC650 PC Card ............................................................................................................................................ 2
Power Management ................................................................................................................................................................. 2
Other Features and Benefits .................................................................................................................................................... 2
Storage ..................................................................................................................................................................................... 2
Installation and Configuration ..............................................................................................................................................3
Notebook PC Installation Precautions .............................................................................................................................................3
System Requirements ......................................................................................................................................................................3
Setup Instructions ............................................................................................................................................................................ 3
Step 1: Install PC Card Drivers ................................................................................................................................................. 3
Step 2: Install VZAccess Manager ........................................................................................................................................... 4
Step 3: Run the VZAccess Manager Setup Wizard .................................................................................................................. 6
Step 4: Install Your KPC650 PC Card. ..................................................................................................................................... 8
Ejecting the KPC650 .............................................................................................................................................................. 11
VZAccess Manager from Verizon Wireless ........................................................................................................................12
Supported Services ........................................................................................................................................................................ 12
NationalAccess and BroadbandAccess defined ..................................................................................................................... 12
VZAccess Manager Tools .............................................................................................................................................................. 13
WWAN (Wireless Wide Area Network, 1xEV-DO/1xRTT/CDMA) Features ...........................................................................13
Wi-Fi Features ........................................................................................................................................................................ 13
Other Features ....................................................................................................................................................................... 13
Getting Started with VZAccess Manager ....................................................................................................................................... 14
About the Connect View ......................................................................................................................................................... 14
Connecting ............................................................................................................................................................................. 15
Warning Messages ................................................................................................................................................................. 17
Setting Dial Up Connections ................................................................................................................................................... 18
VZAccess Manager Settings .......................................................................................................................................................... 19
General Preferences .............................................................................................................................................................. 19
WWAN Preferences ............................................................................................................................................................... 22
Wi-Fi Preferences ................................................................................................................................................................... 25
Additional VZAccess Manager Features ........................................................................................................................................ 30
The Status Bar ........................................................................................................................................................................ 30
The Toolbar Buttons ............................................................................................................................................................... 31
Minimizing the Interface .......................................................................................................................................................... 32
The Tools Menu ...................................................................................................................................................................... 32
The Options Menu .................................................................................................................................................................. 32
The Help Menu ....................................................................................................................................................................... 33
Text messaging .............................................................................................................................................................................. 33

iv User Guide for the Kyocera KPC650
Sending a text message ......................................................................................................................................................... 34
Setting TXT preferences ......................................................................................................................................................... 35
Venturi Compression Software ...........................................................................................................................................36
Supported Protocols ......................................................................................................................................................................36
Using Venturi .................................................................................................................................................................................36
Venturi Icons ........................................................................................................................................................................... 36
Venturi Options ....................................................................................................................................................................... 37
Using Venturi .......................................................................................................................................................................... 37
Downloading Venturi .............................................................................................................................................................. 38
Settings in other Applications ......................................................................................................................................................... 38
Sync Applications ................................................................................................................................................................... 38
Proxy Settings ........................................................................................................................................................................ 39
Instructions for AOL Users ..................................................................................................................................................... 42
Using E-mail with VZAccess ................................................................................................................................................... 47
Troubleshooting ...................................................................................................................................................................50
WWAN (CDMA/1xRTT/1xEVDO) ................................................................................................................................................... 50
Wi-Fi ............................................................................................................................................................................................... 53
Venturi ............................................................................................................................................................................................ 56
Glossary ................................................................................................................................................................................59
Kyocera Wireless Consumer Liminted Warranty ..............................................................................................................61
Regulatory and Safety Information .....................................................................................................................................63
Regulatory Notices ......................................................................................................................................................................... 63
Safety Information .......................................................................................................................................................................... 64

KPC650 PC Card Introduction Checklist
User Guide for the Kyocera KPC650 1
KPC650 PC Card Introduction
Congratulations and thank you for purchasing the Kyocera KPC650 PC Card. The KPC650 is a dual-band 1X EVDO
PC card that enables you to communicate wirelessly from your laptop at high speeds. Using the Kyocera KPC650
together with Verizon Wireless’ Broadband Access and NationalAccess provides you with a nationwide, mobile
wireless data solution that gives you the coverage and speed you need.
Broadband Access is Verizon’s premier data service, offering you one of the fastest, fully mobile wireless Internet
data solutions available today. This ultra-high-speed wireless service provides you with typical speeds of 500 kbps
with bursts up to 2.4 Mbps.
NationalAccess is the name for Verizon’s national wireless Internet service. This 3rd generation data service, also
referred to as 1XRTT, or 1X, enables you to access the Internet, email and attachments, as well as business
applications at speeds bursting up to 144 kbps. The average speed is 40−60 kbps.
Note: Before using the KPC650, please be sure you review the ”Safety Information” on page 64.
Checklist
The following items are included in your kit:
• The KPC650 Wireless PC Card Modem
• Quick Reference Guide
• KWC installation CD, which contains the software and the user guide
• Verizon Welcome CD, which contains pertinent Verizon Wireless information, along with an interactive user guide.
About this guide
This user guide contains all the information you need to properly install and use your KPC650. Before you can begin
using the KPC650, it is essential that you follow the proper instructions for installation. You must first load the
software provided on the CD-ROM included in the kit before you insert the KPC650 into your notebook PC. This
initial setup process takes just a few minutes and you’ll soon be on your way to wireless freedom. An overview of the
steps detailed in the ”Setup Instructions” on page 3 follow:
• Load the drivers and software, located on the Installation CD and follow the setup instructions.
• Insert the KPC650 into your notebook’s PC Card slot when prompted.
• Activate your account when prompted by the Activation Wizard.
• Connect to the Verizon Wireless NationalAccess/BroadbandAccess network.
About your Kyocera KPC650 PC Card KPC650 PC Card Introduction
2 User Guide for the Kyocera KPC650
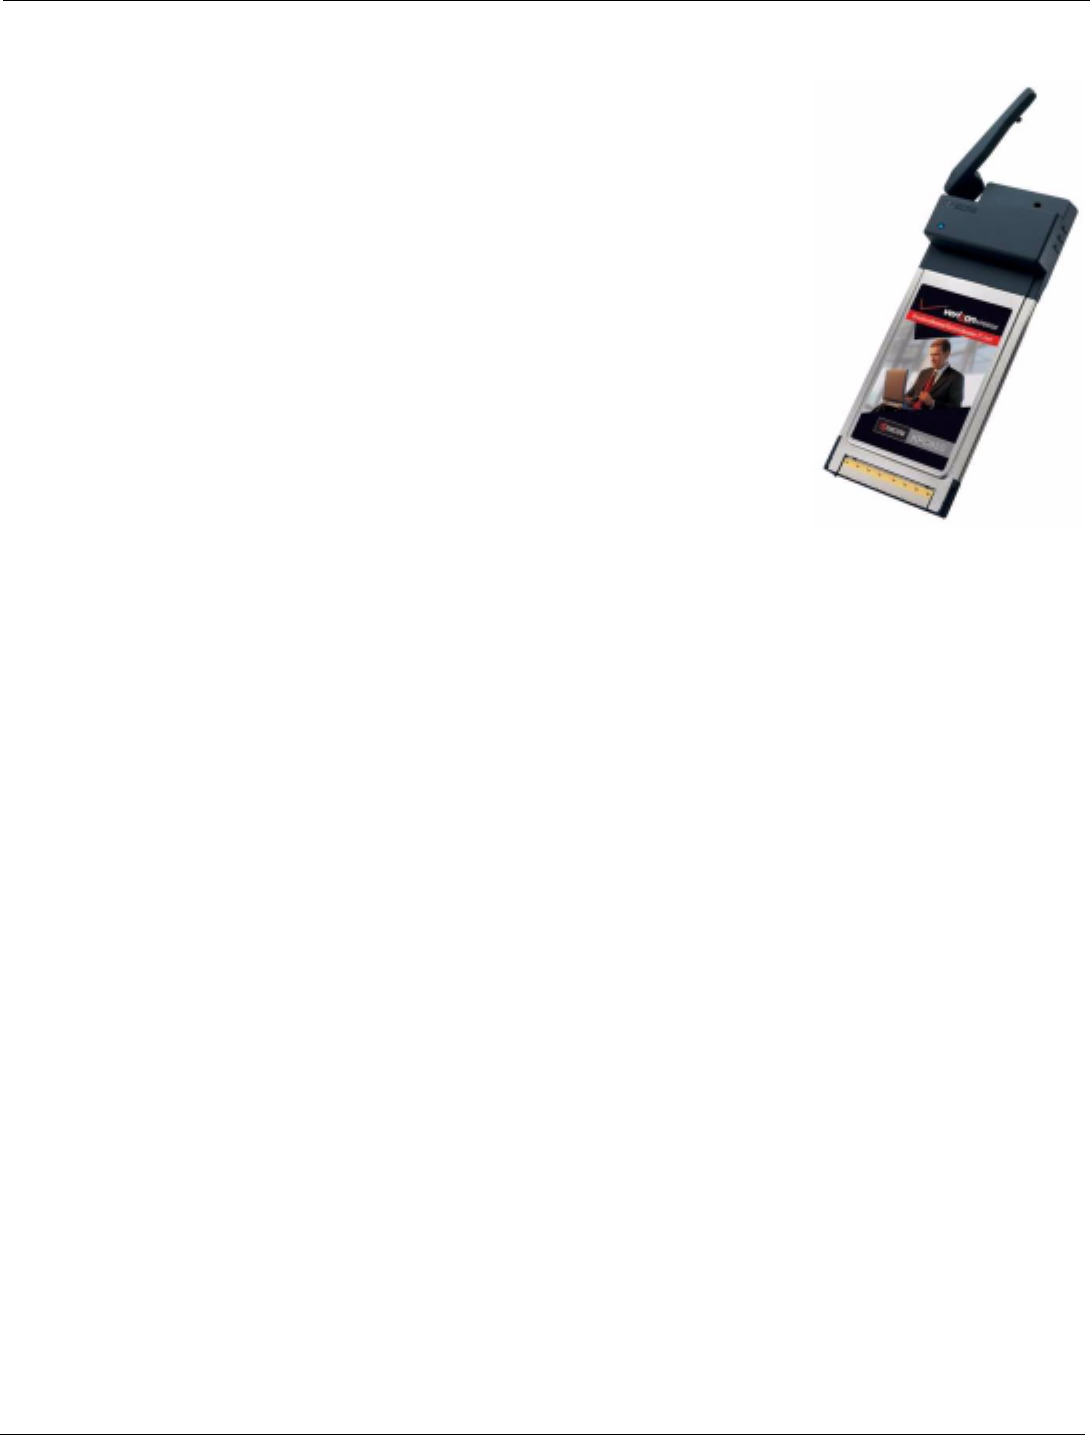
About your Kyocera KPC650 PC Card
The KPC650 is a dual-band 1X EVDO PC card modem designed to fit into a Type II
PCMCIA card slot available on most notebook PCs. This uniquely designed card
allows you to connect to the Internet, send and receive email efficiently, connect to
your company’s network, and maximize productivity when away from the office.
Note that the KPC supports SMS, but does not support voice services.
Power Management
The KPC650 is designed to take advantage of the power management and system
overhead benefits offered by the standard 32-bit CardBus electrical interface that
minimizes power consumption.
Other Features and Benefits
• A Type II PCMCIA format supporting the CardBus I/O interface
• Supports North American PCS (1900 MHz) and Cellular (800 MHz) bands
• Based on the QUALCOMM MSM6500 chipset
• Supports 3G network technologies
• Optimized data rates of up to 2 Mbps in receive mode and up to 144 kbps in transmit mode
• Equipped with all necessary host software and drivers for various operating systems
• Works at lower battery voltage and operates at a greater speed than standard PC Card interface.
• Verizon Wireless BroadbandAccess compatible (download speeds 2.4 Mb/sec max, 300−500 kbps typical)
• Verizon Wireless NationalAccess compatible (40−60 kbps)
• VZ Access Manager compatible
• Memory (FLASH/RAM): 128/64 MB
• 32-bit Cardbus interface
• Integrated dual band main antenna and a dial-band chip-based diversity antenna
• Supports external accessory antenna for enhanced diversity performance
• LED service indicator
• Supports 2-way Short Message Service (SMS)
• External accessory antenna for enhanced performance
Storage
• When not in use, fold the antenna down and store in a compartment where the card can be protected from being
crushed or broken.
• Store your KPC650 in a dry and clean place. Storage temperature: −30° to 65°C [86° to 149°F].
• Do not apply adhesive labels to the KPC650. This may cause the card to jam inside the PC Card slot of your
notebook PC.
• The antenna extends freely. Do not force or hyper-extend the antenna. This may cause it to break.
• The KPC650 easily fits into the PC Card slot. Forcing the KPC650 into the PC Card slot may cause considerable
damage.
• Protect your card from liquids, dust and excessive heat.

Installation and Configuration Notebook PC Installation Precautions
User Guide for the Kyocera KPC650 3
Installation and Configuration
Notebook PC Installation Precautions
Warning: DO NOT insert the KPC650 PC card before you install the software onto your notebook PC. Once you install
the software, and drivers you will be prompted to insert the KPC650 into the Type II PC Card slot
Once the card is inserted, do not physically remove the KPC650 from the PC Card slot until you have
completed the Unplug/Eject process. Removing the card improperly may cause a fatal error to your PC.
System Requirements
Your KPC650 functions in notebook PCs with these Windows® operating systems:
Windows® 98 SE: Note that you may need the original Microsoft Windows 98 installation CD.
Windows® Me
Windows® XP
Windows® 2000
To install the KPC650 and the software, these minimum system resources are required:
Card slots: Type II PC Card slot (CardBus)
Disk Drive: CD-ROM
Memory: 32 MB
Disk Space: 14 MB
Processor: Pentium 166 MHz or higher
Dial Up Networking: DUN bound to TCP/IP
For VZW Access Manager, you also need
Optional Wi-Fi adapter for Wi-Fi access
Internet browser software for Internet access or the software used by your company for network access
Verizon Wireless wireless data service
Setup Instructions
Important: VZAccess Manager software must be installed before you insert the KPC650 PC Card in to the
computer for the first time. Only after the software has been installed can Windows successfully detect and
configure the PC Card.
Step 1: Install PC Card Drivers
1. Insert the Installation CD into your notebook PC’s CD-ROM drive. If set up does not automatically start, click the
Start button on the taskbar and choose Run. Type D:\Start (where D is the letter of your CD-ROM drive) and click
OK.
2. Select Install KP650 Drivers option install the drivers onto your computer.
Important: Do not insert the PC Card until Step 4.
Setup Instructions Installation and Configuration
4 User Guide for the Kyocera KPC650
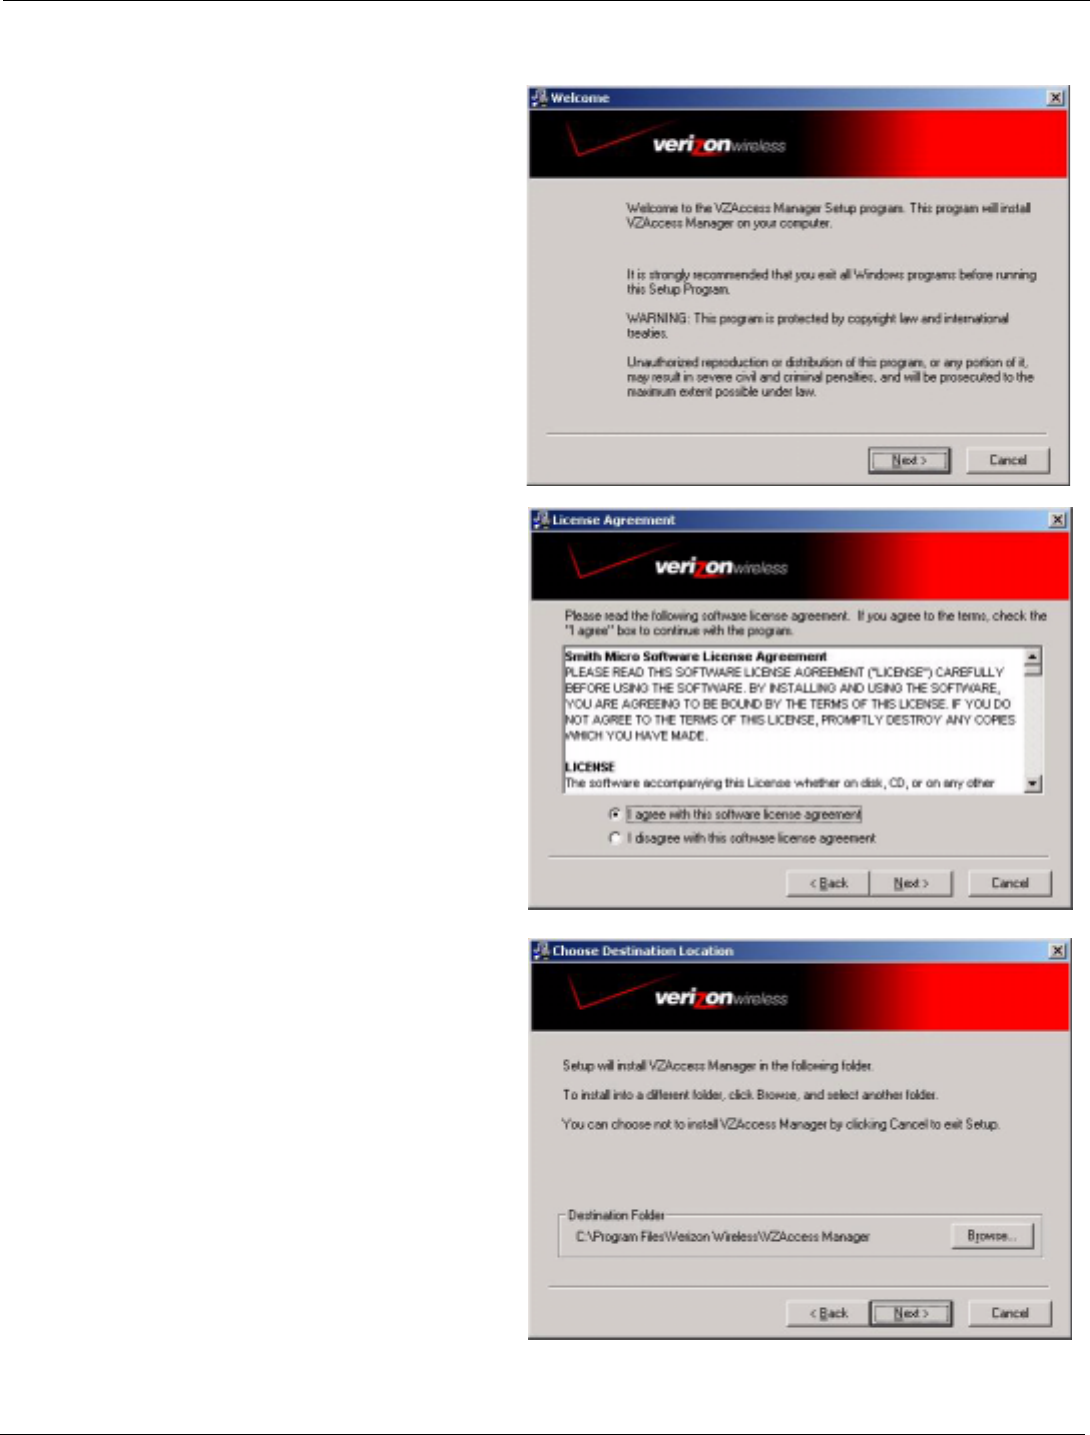
Step 2: Install VZAccess Manager
1. From the CD-ROM, choose Install VZAccess
Manager to begin the installation process.
The VZAccess Manager installation
program opens. Click Next.
2. The VZAccess Manager License Agreement
appears. To install and use this product you
must agree with the terms of the VZAccess
Manager License Agreement. Select I agree
with this software license agreement.
Click Next to continue.
3. Choose a destination folder for your files, or
use the default location.
4. Click Next to continue.
Installation and Configuration Setup Instructions
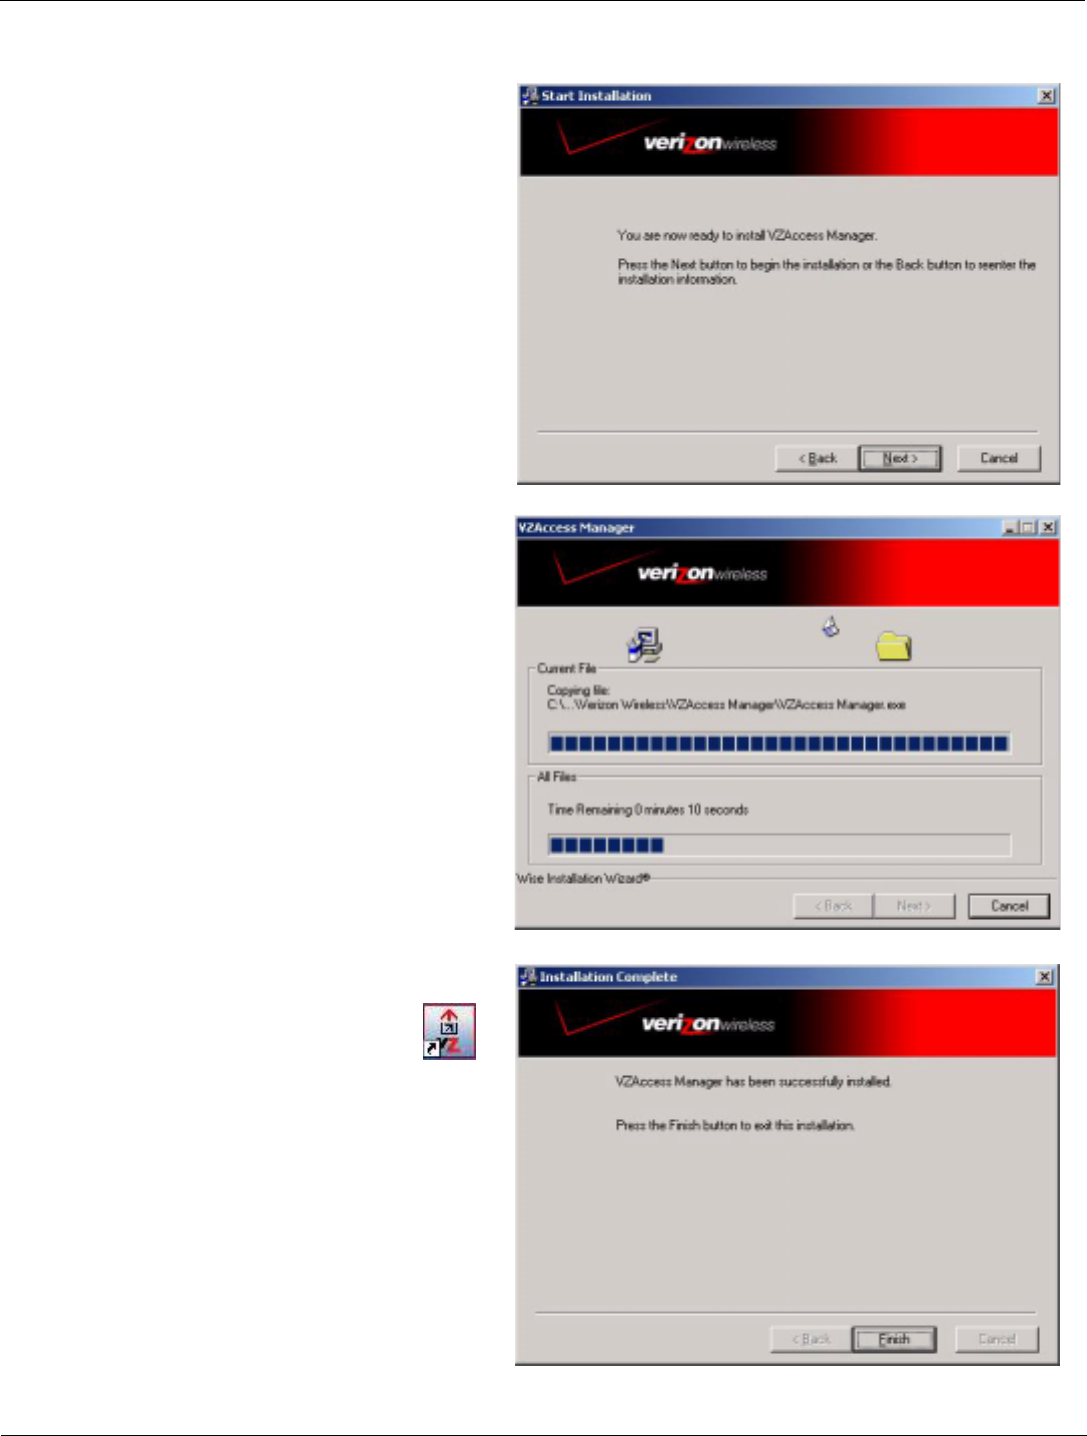
User Guide for the Kyocera KPC650 5
5. Click Next to begin installing VZAccess
Manager components onto your computer.
6. During this step the VZAccess Manager
components product are being installed
onto your computer. Installed files will be
placed within the destination folder
specified in Step 3 above.
7. Installation is now complete. Click Finish.
The setup program will automati-
cally create a VZAccess Manager
shortcut on your desktop.
Proceed to the continued instructions on
page 6.
Setup Instructions Installation and Configuration
6 User Guide for the Kyocera KPC650
Step 3: Run the VZAccess Manager Setup Wizard
After you have successfully completed the installation process of VZAccess Manager, you are ready to install the
VZAccess Manager program. The steps in the Setup Wizard are critical to the proper operation of VZAccess Manager
when using your WWAN or Wi-Fi device to connect to the Internet wirelessly.
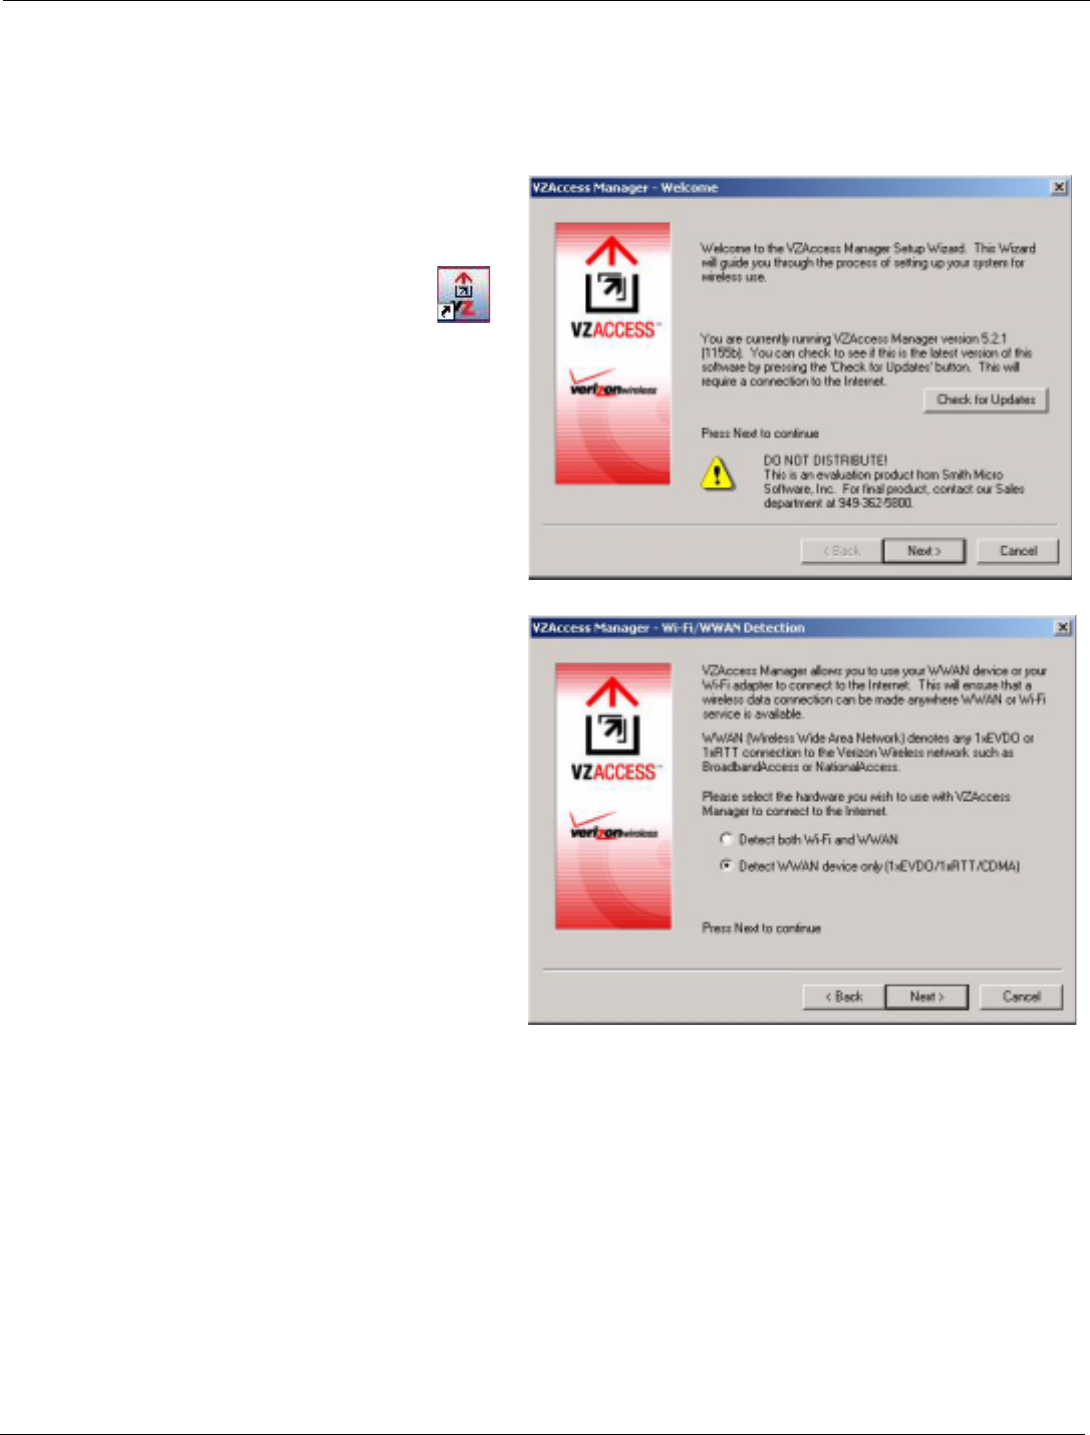
1. The VZAccess Manager software setup
automatically launch when you complete
initial setup.
If setup did not automatically ini-
tiate, double-click on the
VZAccess Manager icon to begin
the installation process, if t.
2. Click Next at the Welcome screen to
continue the installation process.
3. Specify the type of wireless device that you
intend to use with VZAccess Manager by
selecting either
Detect both Wi-Fi and WWAN
or
Detect WWAN device only (1xEV-DO/1xRTT/
CDMA).
For the purposes of this guide, Detect
WWAN device only (1xEV-DO/1xRTT/
CDMA).. Please note that your experience
may be different if you use a different
selection.
4. Click Next to continue.
Installation and Configuration Setup Instructions
User Guide for the Kyocera KPC650 7
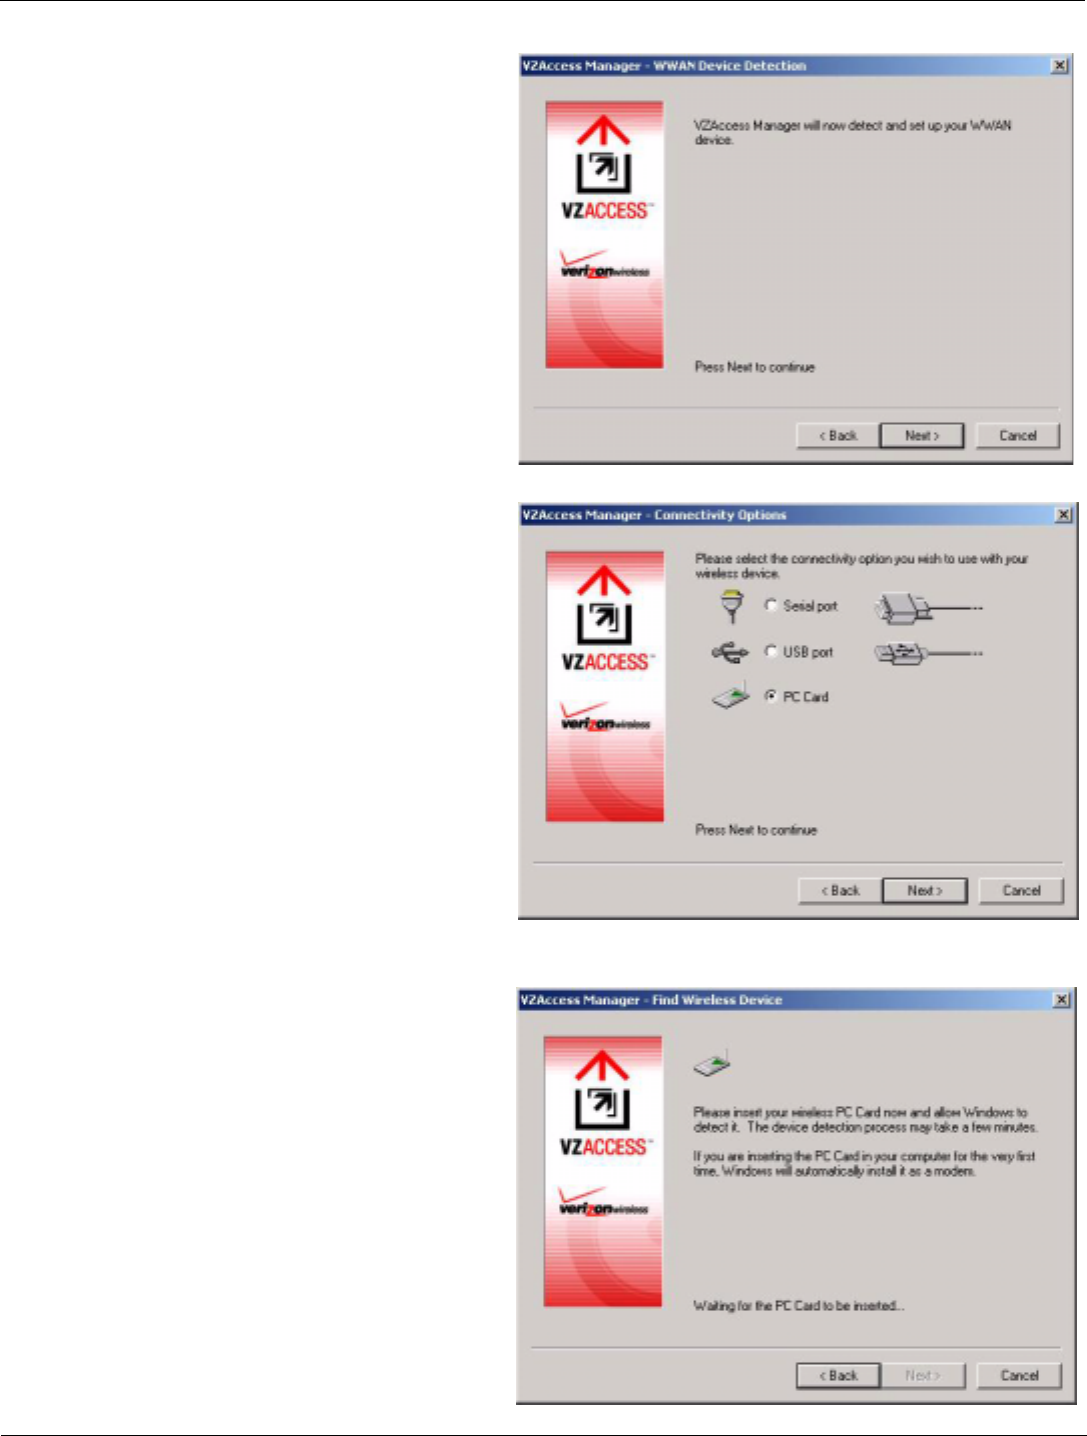
5. VZAccess Manager now detects and sets
up your WWAN adadevice on your
computer. WWAN (Wireless Wide Area
Network) denotes any 1xEVDO, 1xRTT or
CDMA connection to the Verizon Wireless
network such as BroadbandAccess,
NationalAccess or Quick 2 Net.
Note: If you selected Wi-Fi and your com-
puter has a built-in Wi-Fi adapter, you do
not need to do anything and can proceed to
the next step. Otherwise, insert your Wi-Fi
PC Card now. You will need the drivers for
the card if not already installed on the com-
puter.
6. Click Next to continue...
7. Select the type of connectivity you wish to
use with your wireless device. For the
purposes of this guide, we use PC Card.
Please note that this selection may not be
appropriate for your type of wireless device.
8. Click Next to continue after you have
selected your connectivity option
Note: If you selected USB and have not
already installed the data cable drivers sup-
plied with the cable, you must install them
now. To install the data cable drivers click
the Cancel button to exit the Setup Wizard
and refer to the documentation included
with the cable. Plug the data cable into your
wireless phone and then plug the cable into
your computer. If your wireless phone is not
turned on, do so now.
9. You are now prompted to insert your PC
card. Proceed to the steps below.
Setup Instructions Installation and Configuration
8 User Guide for the Kyocera KPC650
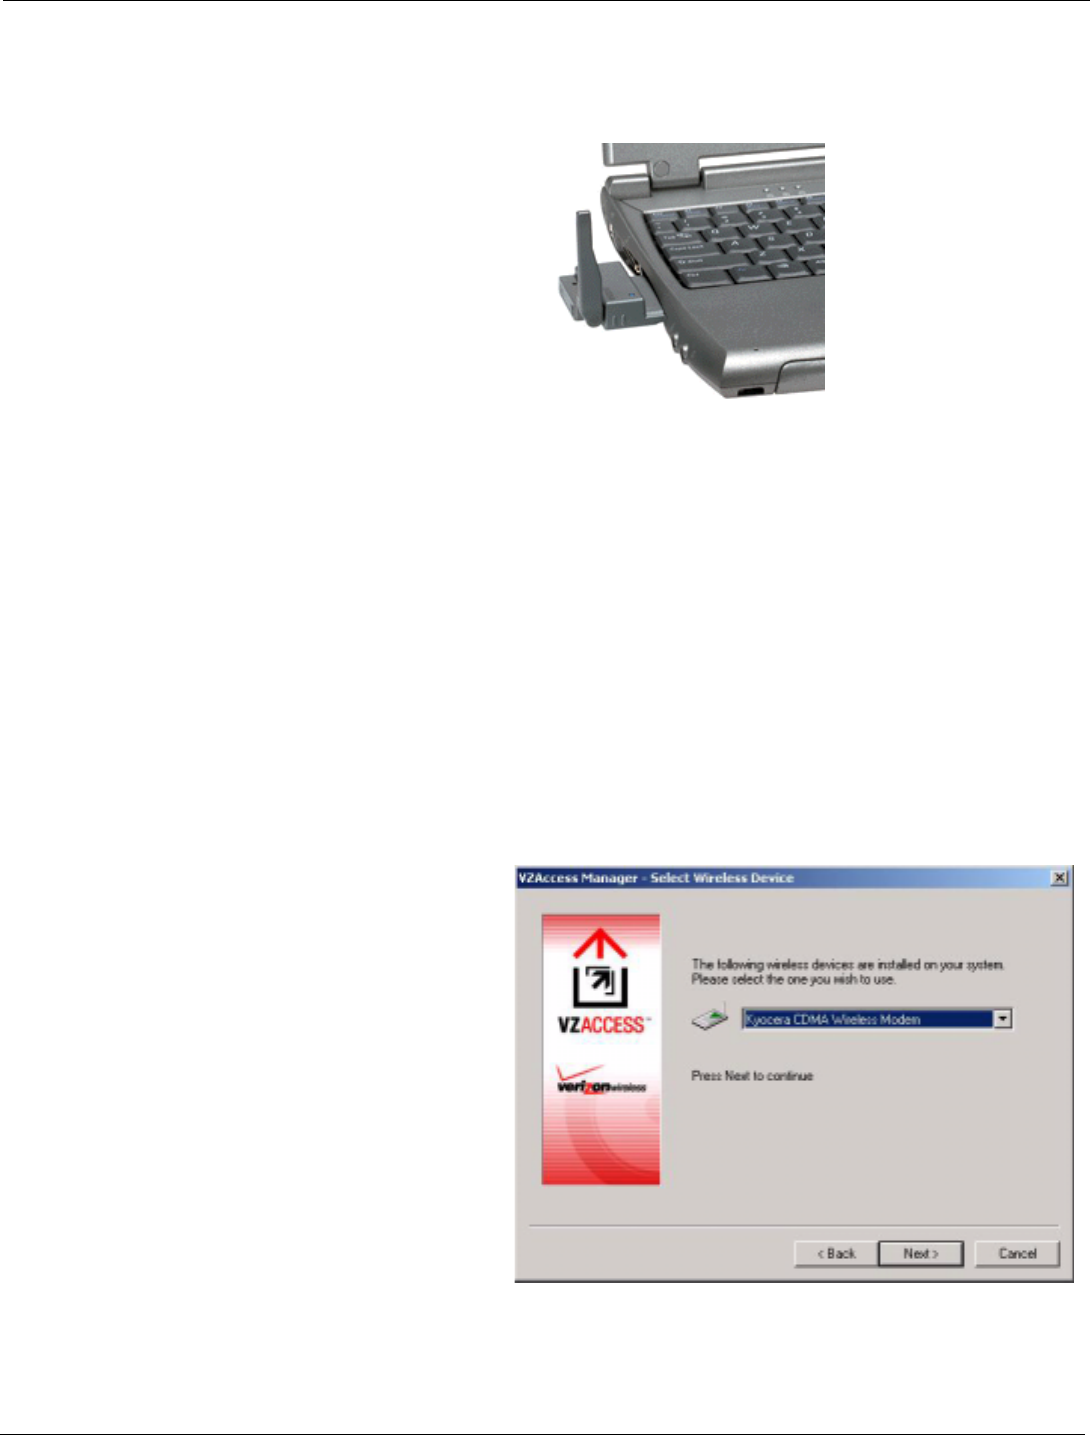
Step 4: Install Your KPC650 PC Card.
1. Remove the installation CD from your CD-ROM drive.
2. Insert the KPC650 into your notebook’s
PC Card Slot with the label facing up.
Raise the antenna so that it is fully
extended and pointed up at a 90° angle.
Use in any other configuration may exceed
FCC RF exposure limits.
3. When you insert the PC card, the Found New Hardware wizard appears and installs the drivers placed on your
computer system in the last set of steps.
Windows 98 SE/2000/Me ONLY: Once you have inserted the card properly, your Windows operating system notifies
you that new hardware has been detected. Please wait a moment for the Found New Hardware function to com-
plete the automated tasks. Multiple windows similar to the Found New Hardware window briefly appear and close
automatically. Once complete you are prompted to begin Activation.
Windows XP ONLY: Once you have inserted the card properly, your Windows operating system notifies you that
new hardware has been detected. Please wait momentarily for the “Found New Hardware” function to com-
plete the automated tasks. Multiple Tool Tips similar to the “Found New Hardware” function will appear
briefly in the system tray and will close automatically. Once complete you will be prompted to begin Activa-
tion (step 4).
Note: You may hear a short beep each time the KPC650 is inserted and removed from your notebook PC. This
is normal. It is an audible notification from your notebook PC communicating that it recognizes new hardware
Click Next to continue.
4. Select the wireless device you are using
with VZAccess Manager.
5. Click Next to continue.
Installation and Configuration Setup Instructions
User Guide for the Kyocera KPC650 9
.
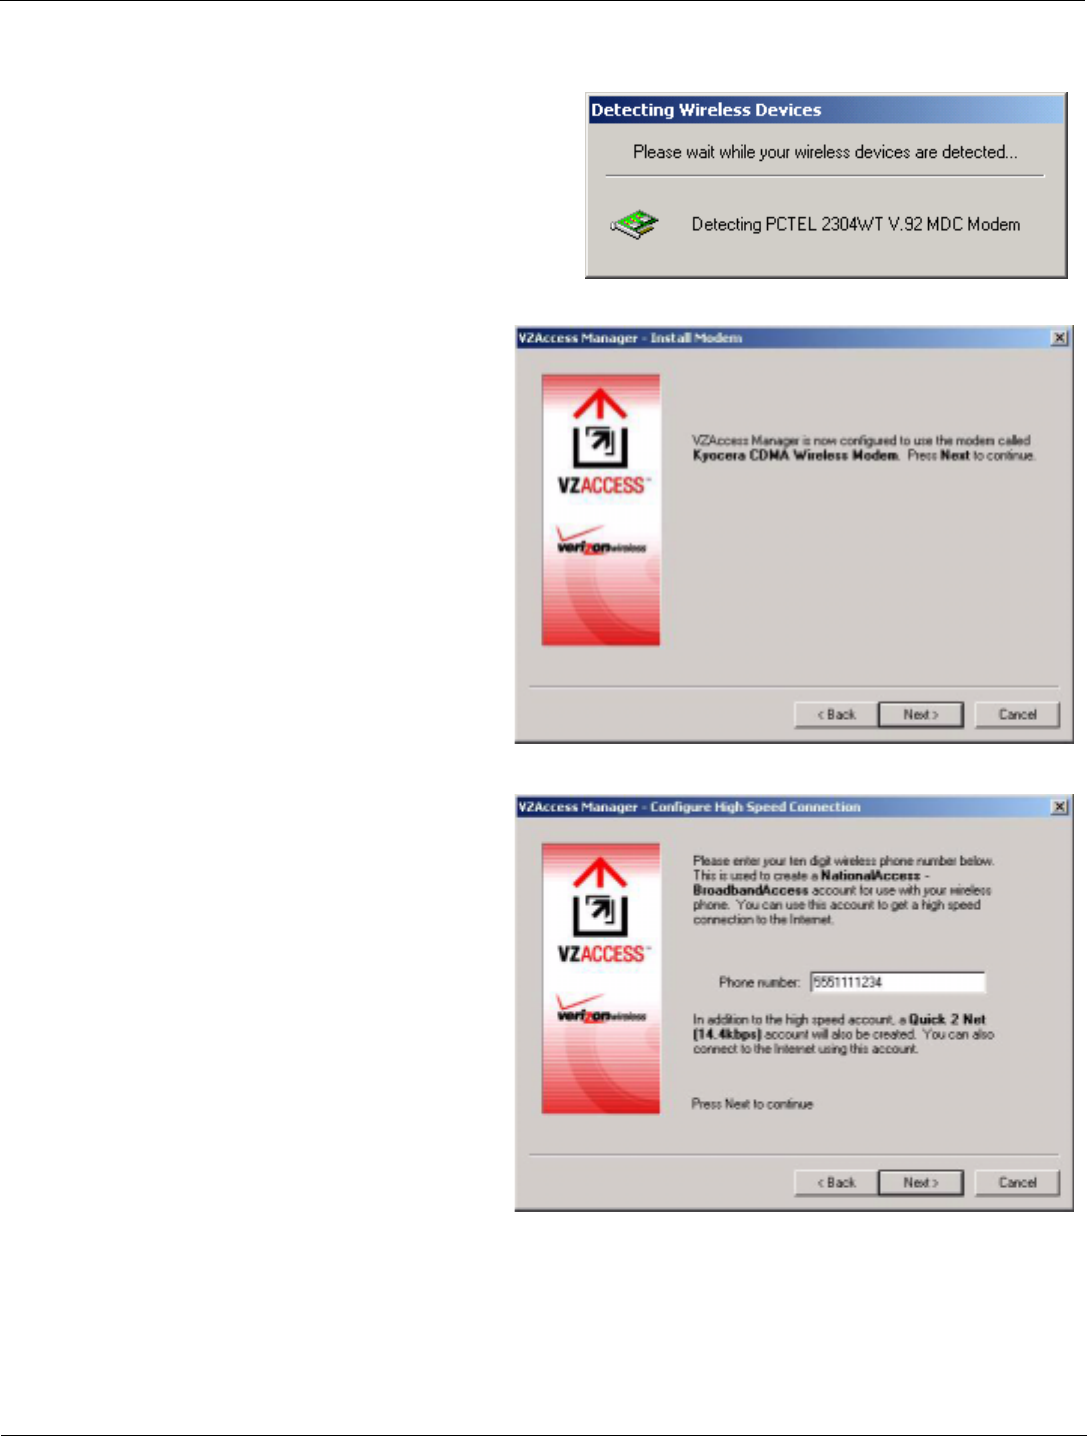
6. Your wireless device will now be detected.
7. After detecting the device, you are notified
that the VZAccess Manager is configured
to use the modem you selected.
8. Press Next to continue.
9. Enter your 10-digit phone number.
10. Press Next to continue.
Setup Instructions Installation and Configuration
10 User Guide for the Kyocera KPC650
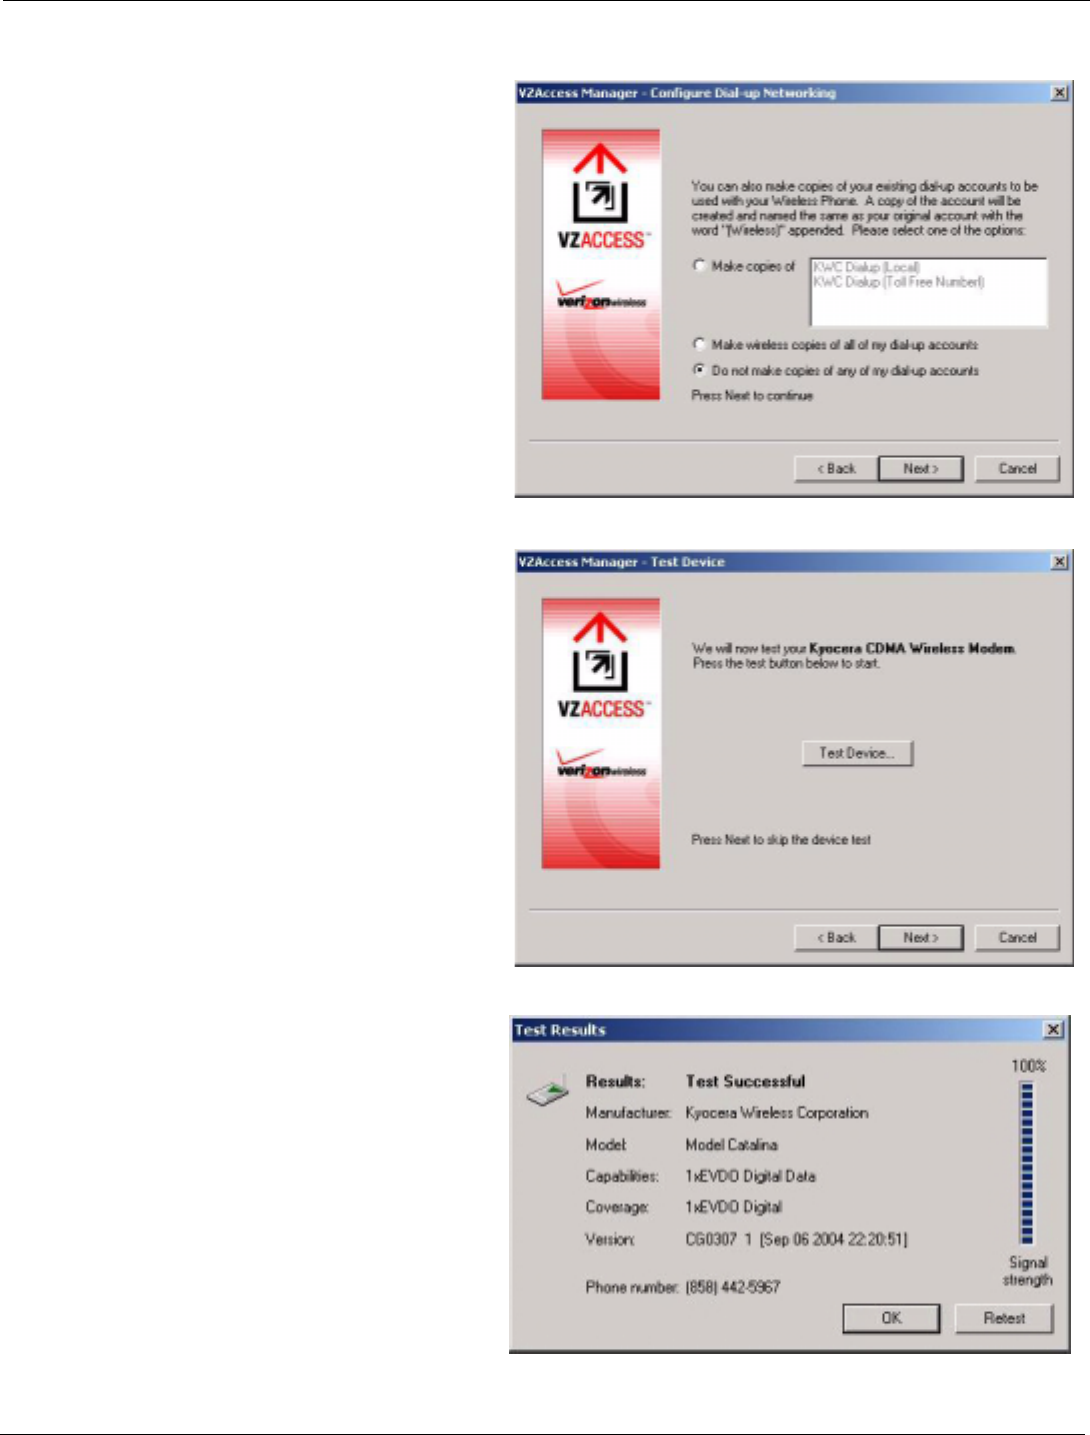
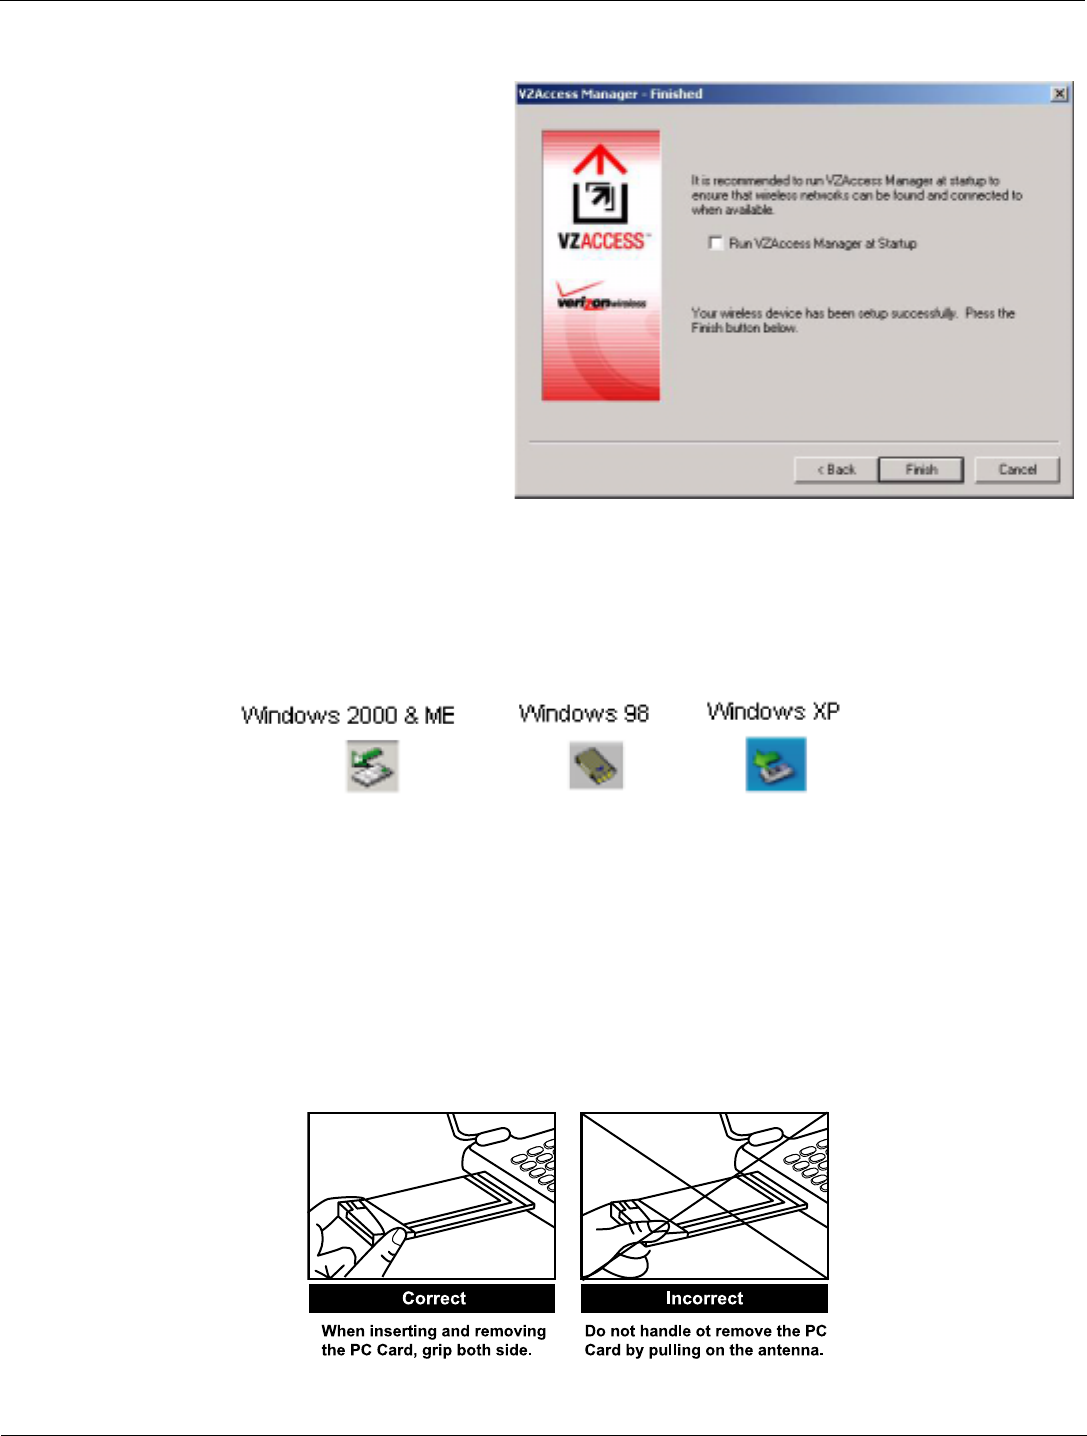
11. Select whether or not you would like like
to make copies of your dialup accounts if
you wish. These accounts will appear as
dialup options on the VZAccess Manager
Connect view.
12. Click Next to continue.
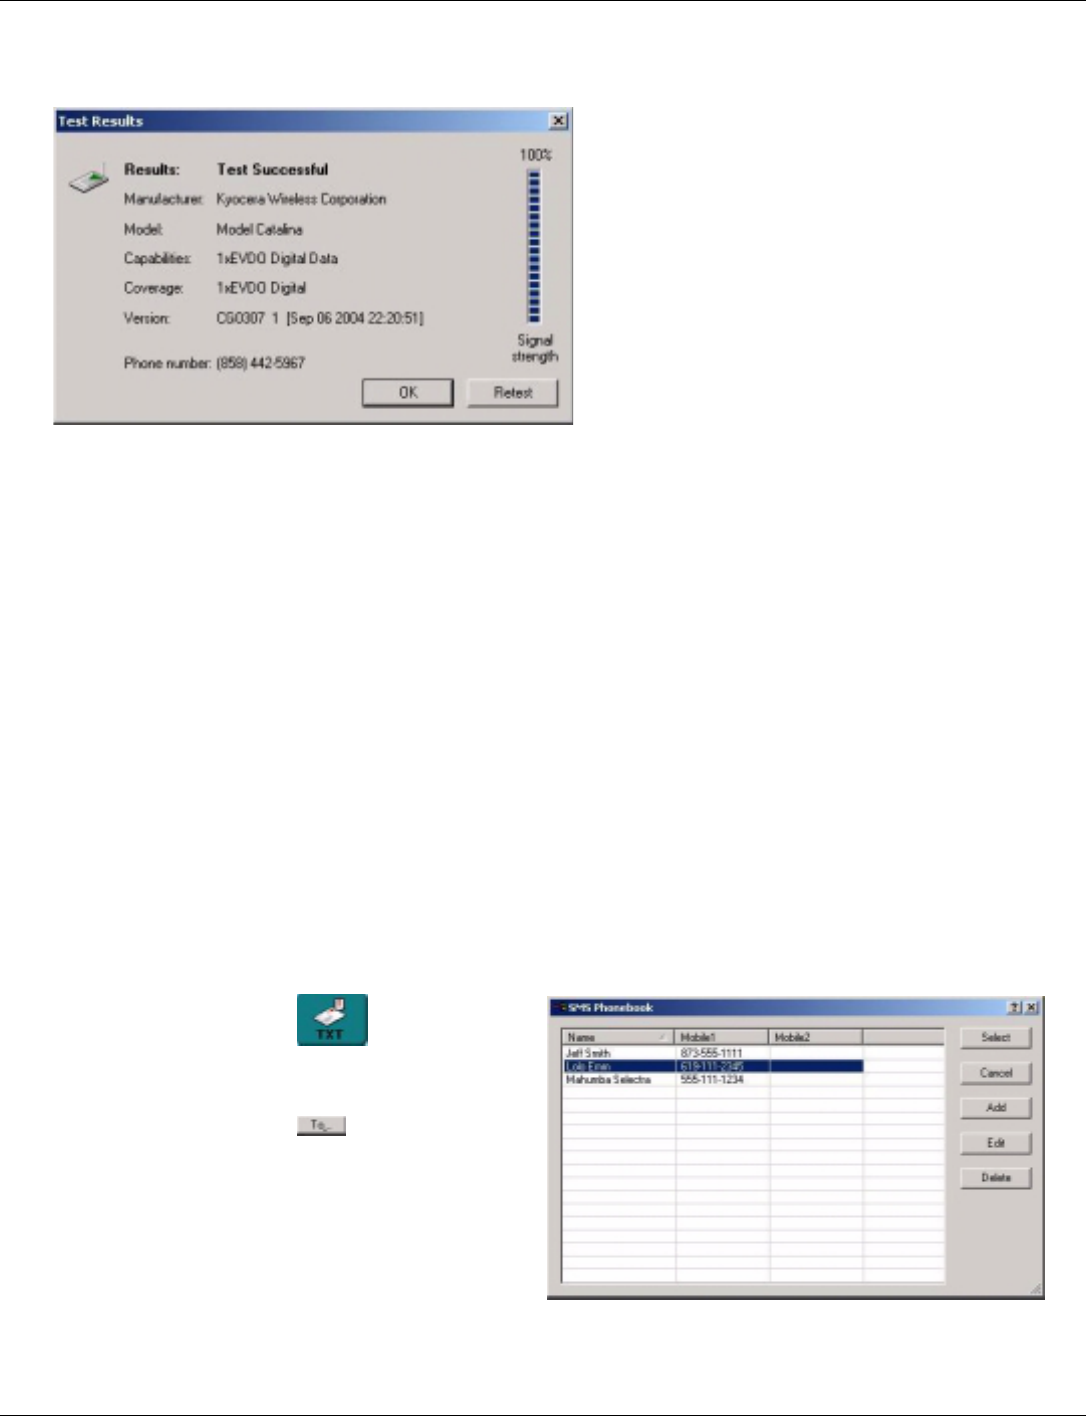
13. Click the Test Device button to see detail
on your PC Card and to verify that all
components are working. The Test Device
screen shows your device manufacturer,
model, signal strength and other details.
14. Click the Test Device button to see detail
on your PC Card and to verify that all
components are working. The Test Device
screen shows your device manufacturer,
model, signal strength and other details.
Installation and Configuration Setup Instructions
User Guide for the Kyocera KPC650 11
Ejecting the KPC650
Warning: Do not eject the KPC650 from your notebook until you have followed the Unplug/Eject Hardware
instructions for proper removal. Removing the card improperly may cause a fatal error on your PC.
1. Double-click on the Unplug/Eject Hardware icon in the system tray.
2. Select the correct option for your operating system from the Unplug or Eject Hardware window and click OK.
Windows 98 SE and Me: Select Wireless PC Card Open Host Controller.
Windows 2000: Select NEC PCI to USB Open Host Controller.
Windows XP: Select Lucent USB Open Host Controller.
3. Confirm the device to be stopped and click OK.
4. A Safe to Remove Hardware message appears, click OK.
5. Remove the KPC650 from your notebook. When removing the KPC650, always grip it by the sides of the card
rather than from the top. Pulling on the antenna over time may damage the card. If available, use the Card Ejector
tool on your laptop.
15. Click Finish to exit the Setup.
VZAcess Manager launches. For more
information on how VZAccess Manager
works, refer to “VZAccess Manager from
Verizon Wireless” on page 12.

Supported Services VZAccess Manager from Verizon Wireless
12 User Guide for the Kyocera KPC650
VZAccess Manager from Verizon Wireless
Welcome to the Verizon Wireless VZAccess Manager. The VZAccess Manager provides a one-touch connection to
the wireless Internet. It has built-in support for WWAN and Wi-Fi devices to give you the flexibility you need while
you are mobile to connect your laptop to the Internet wirelessly.
Supported Services
VZAccess Manager supports the following services from Verizon Wireless:
• Quick 2 NetSM (14.4 kbps): Requires a CDMA data-capable phone and Mobile Office Kit or IS95A-capable PC Card.
This connection operates at 14.4 kbps and provides a connection to the Internet. Additional per-minute changes
apply.
• Dial-Up-Data Service: Requires a CDMA data-capable phone and Mobile Office Kit or IS95A-capable PC Card. This
allows you to use your wireless device to dial into your corporate network, or other services you normally dial into,
over a regular phone line. This connection operates at 14.4 kbps. Additional per-minute changes apply.
• NationalAccess: Requires a NationalAccess-capable wireless phone and Mobile Office Kit or NationalAccess PC
Card. NationalAccess delivers typical speeds of 40 to 60 kbps, bursting up to 144 kbps (speed claim based on our
network tests with 101 Kilobyte FTP data files). Actual throughput speed and coverage vary.. This service requires
subscription to a NationalAccess plan. Additional information is available at
www.verizonwireless.com/b2c/mobileoptions/nationalaccess/index.jsp.
• BroadbandAccess: Requires a BroadbandAccess-capable PC Card and provides a wireless broadband connection to
the Internet. Verizon Wireless BroadbandAccess is one of the fastest, fully mobile wireless Internet data solutions
available. Quickly download complex files and view email attachments at broadband-like speeds (typical speeds of
300−500 kbps, capable of reaching speeds up to 2 Mbps). Today this subscription service is available in the
Washington, D.C., San Diego and Las Vegas areas.
Visit www.verizonwireless.com/b2c/mobileoptions/broadband/index.jsp for service availability and additional
details. Note: Present BroadbandAccess Equipment devices also support NationalAccess, but do not support Quick 2
Net or Dial-Up-Data Service.
You do not need a separate Internet service provider (ISP) to access the Internet when using Quick 2 Net,
NationalAccess, or BroadbandAccess.
NationalAccess and BroadbandAccess defined
The KPC650 operates on Verizon Wireless NationalAccess and BroadbandAccess technologies that leverage a
wireless cellular network called Code Division Multiple Access (CDMA). CDMA is a digital spread-spectrum
wireless technology that offers reliable, high-speed bi-directional throughput at speeds ranging from 144 kbps or 2
Mbps for email, corporate databases, and all the services of the Internet. The high-performance KPC650, designed to
leverage CDMA 1xEVDO and 1xRTT network technologies, enables you to both send and receive data/email at
maximum network rates.
Often times when using a dial-up connection, a network busy signal appears. That's because there are bottlenecks
slowing down the network. With the spread spectrum technology of CDMA these frustrating bottlenecks are
eliminated. In fact, CDMA technology allows a network to handle more calls than competing digital technologies.
BroadbandAccess is Verizon Wireless' premier data service, offering one of the fastest, fully mobile wireless Internet
data solutions available today. This ultra-high-speed wireless service, provides users with typical speeds of 300−500
kbps with bursts up to 2 Mbps. BroadbandAccess is also known as CDMA 1xEVDO, a 3G (third generation)
technology. NationalAccess is the name for Verizon Wireless' national wireless Internet service. This is also known as
CDMA 1xRTT, another variant of 3G technology, and delivers bi-directional peak packet data speeds of up to 144
kbps. Together, Verizon Wireless NationalAccess/BroadbandAccess offers a national mobile wireless data solution.

VZAccess Manager from Verizon Wireless VZAccess Manager Tools
User Guide for the Kyocera KPC650 13
Maximum possible speed varies upon location and availability. Visit the Verizon Wireless website for up-to-date
coverage information: www.verizonwireless.com.
What about privacy?
The secure CDMA network is designed with digital coding that is recognized only by the base station and
unintelligible to eavesdroppers.
VZAccess Manager Tools
Today's online world offers more services everyday and Verizon Wireless gives you the tools you need to take
advantage of the best in connectivity solutions. With VZAccess Manager, enjoy the freedom and convenience of
wireless Internet connectivity from your notebook computer!
WWAN (Wireless Wide Area Network, 1xEV-DO/1xRTT/CDMA) Features
• Configures your PC to use your wireless phone and cable or wireless CDMA PC Card as a modem.
• Creates a Quick 2 Net (14.4 kbps) connection if supported by your device.
• Creates a NationalAccess connection if using a NationalAccess capable wireless phone and cable or PC Card,
which does not support BroadbandAccess.
• Creates a NationalAccess - BroadbandAccess connection if using a BroadbandAccess capable device. This
connection will automatically fall back and attempt connecting via NationalAccess if the BroadbandAccess service
is unavailable.
• Copy utility to create wireless copies of your dial-up connections, if supported by your device.
• Controls the Venturi compression software when using your NationalAccess - BroadbandAccess, National Access,
or Quick 2 Net (14.4 kbps) connections.
• Signal strength and battery level display for most wireless phones.
• Test function for WWAN device.
Wi-Fi Features
• Configures Wi-Fi Adapter to work with VZAccess Manager.
• Displays Wi-Fi connections and signal strength when in a Wi-Fi coverage area. Supports connecting to Wi-Fi
networks such as ones used at home or work.
• Supports built-in Wi-Fi adapters or PC cards.
WWAN capable device is required to use the WWAN features. Individual WWAN features are also device
dependent as described in the WWAN section above.
Other Features
• Launch all of your dial-up networking connections, if desired.
• Launch your browser, e-mail client, VPN or a program of your choice upon connection.
• Lo connections used, duration and bytes sent and received.
• TXT messaging
• For more information about VZAccess Manager features, refer to “Additional VZAccess Manager Features” on
page 30.
Getting Started with VZAccess Manager VZAccess Manager from Verizon Wireless
14 User Guide for the Kyocera KPC650
Getting Started with VZAccess Manager
Double-click on the VZAccess Manager icon on your desktop or click on the Windows Start menu and go to
Programs → VZAccess Manager.
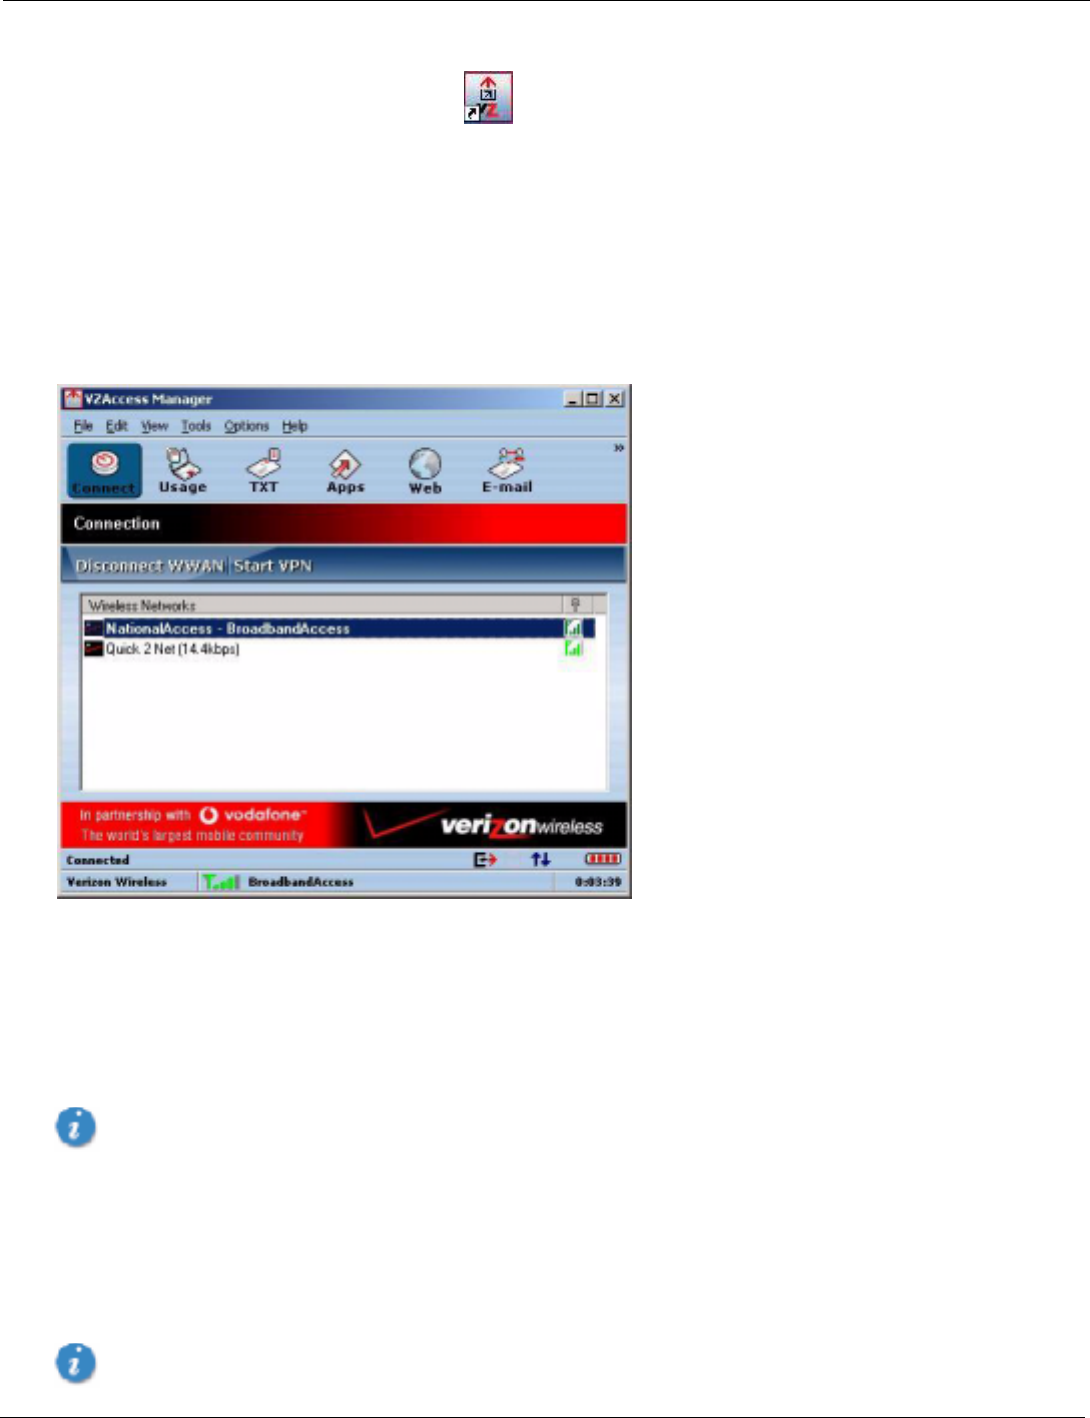
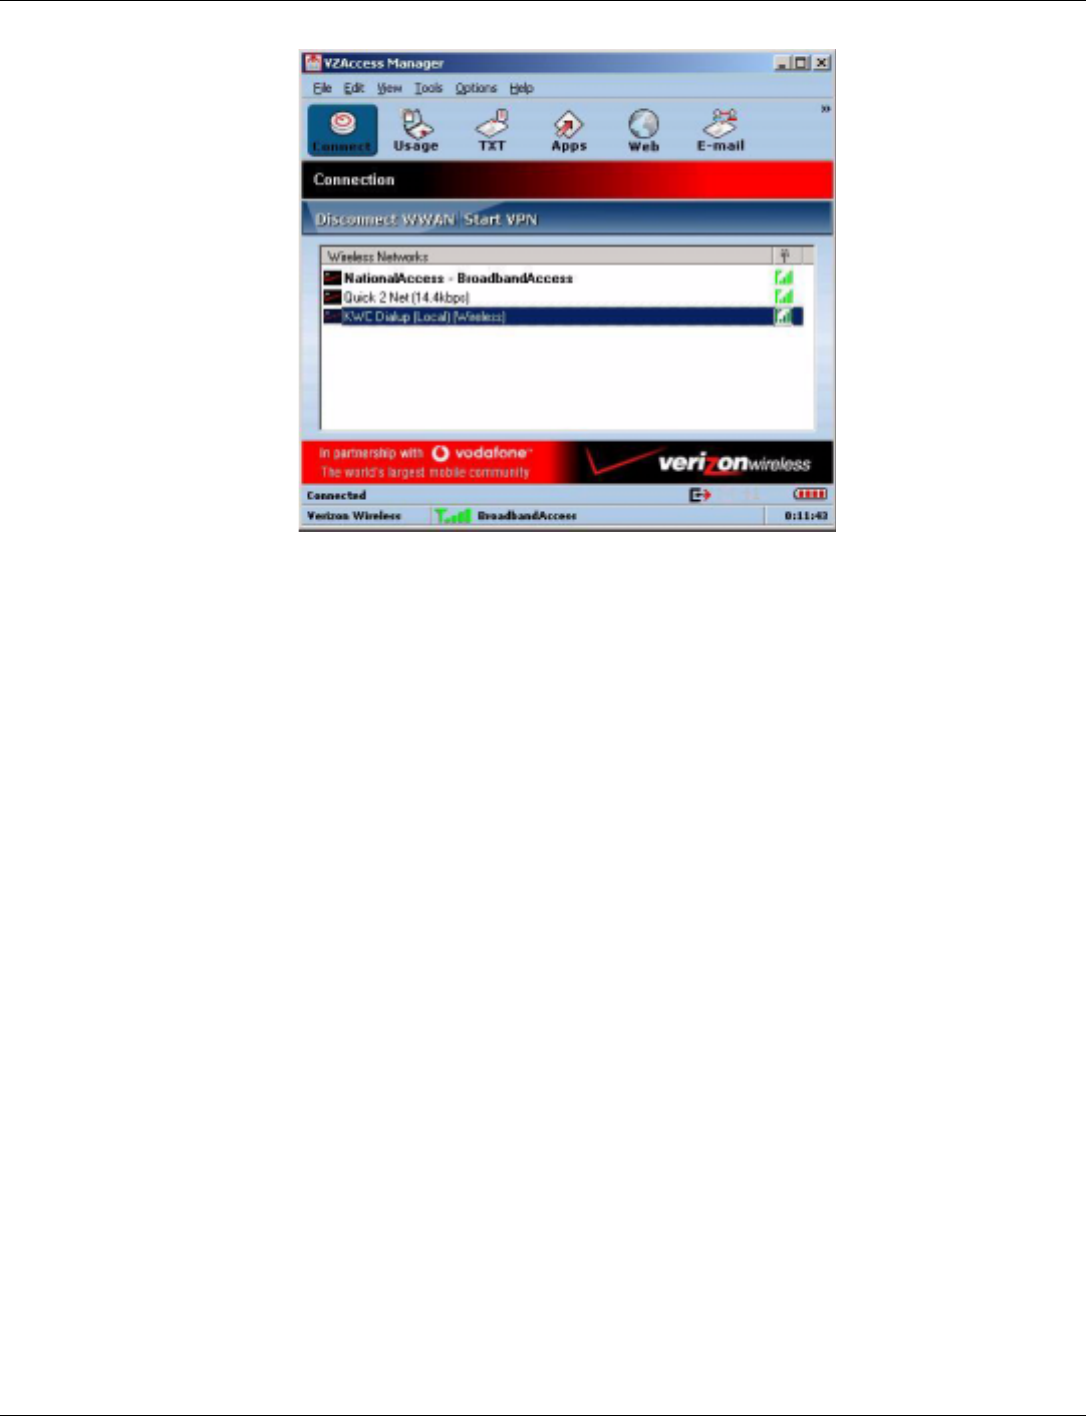
About the Connect View
VZAccess Manager will open to the Connect view by default. This view is where you manage your wireless
connections. The Connect view displays all currently available network connections.
At a glance you can see the signal strength and battery level (if applicable) of your WWAN or Wi-Fi network. To
update the information on this panel, select Options → Refresh Networks or Options → Refresh Signal Levels. Your current
connection state and the elapsed time of the connection are displayed along the bottom of the status bar.
If your expected connection does not appear or if you connected your wireless phone and cable, or inserted your
wireless CDMA PC Card or Wi-Fi Card after starting VZAccess Manager, select Options → Refresh Networks to have
VZAccess Manager look for your wireless device(s) and verify network availability. If you have any Wi-Fi networks
you manually added because they do not broadcast their SSID, they will always be displayed, and you will have to
refer to the signal strength displayed to know when you are in range. Refer to “Wi-Fi Preferences” on page 25 for
additional details.
Note that with certain Wi-Fi adapters the signal strength for Wi-Fi networks is not accurate until you connect
to the network.
Note: The Quick 2 Net (14.4 kbps) connection is only created when the WWAN option is selected during setup and if
your wireless device supports it. The NationalAccess connection is only created when the WWAN option is selected
during setup and if you are using a NationalAccess capable device that does not support the Verizon Wireless
BroadbandAccess service. If you are using a BroadbandAccess capable device a NationalAccess - BroadbandAccess
connection will be created. This connection will use BroadbandAccess if available and will automatically attempt a
NationalAccess connection when BroadbandAccess is not available.
If you change phones or PC cards, you will need to run the Setup Wizard again. To do this make sure that your
phone and cable are connected, then select Options → Run Wizard from the VZAccess Manager contact view.
VZAccess Manager from Verizon Wireless Getting Started with VZAccess Manager
User Guide for the Kyocera KPC650 15
Connecting
Once your Wi-Fi or WWAN device is properly configured, connecting to the Internet is as simple as selecting the
network connection type shown in the list and clicking the Connect button. Note that the Connect button immediately
above the list changes to Connect WWAN or Connect Wi-Fi as appropriate based on the current selection in the
networks list.
1. Select one of the following connections: NationalAccess, NationalAccess - BroadbandAccess, or Quick 2 Net (14.4kbps).
2. Click the Connect WWAN button when it becomes enabled.
Once connected, the Connect WWAN button changes to Disconnect WWAN. Simply click this to end your current
connection. To connect to any other network shown, select it, and then select Connect.
Status Bar
Information regarding your current network connection can be seen in the status bar along the bottom of the
VZAccess Manager interface.
Note: If you are using a WWAN (1xEV-DO/1xRTT/CDMA) device that supports the Verizon Wireless Dial-Up-Data
service and you made wireless copies of your dial-up accounts, they will also appear. If you are in the presence of a
private Wi-Fi network (such as one at work or at home) it will also appear if you selected the Wi-Fi option during
setup. If the number of connections exceeds what can be displayed, a vertical scroll bar will appear to the right of the
connections. Scroll down to see them all.
The first time you connect with the NationalAccess - BroadbandAccess, NationalAccess, or
Quick 2 Net (14.4 kbps) connections, or a private Wi-Fi connection, a connectivity warning message appears.
These messages will appear each time you connect, unless you suppress them. For more information, refer to
“Warning Messages” on page 17.
Status information appears the bottom of the VZAccess Manager window. When not connected, the status text in the
lower left corner will display "Not connected" for the currently selected network. The timer will display "00:00:00".
Once connected, the status text will display "Connected" and the elapsed timer will begin to run. When a connection
is active, its name will appear as bold text.
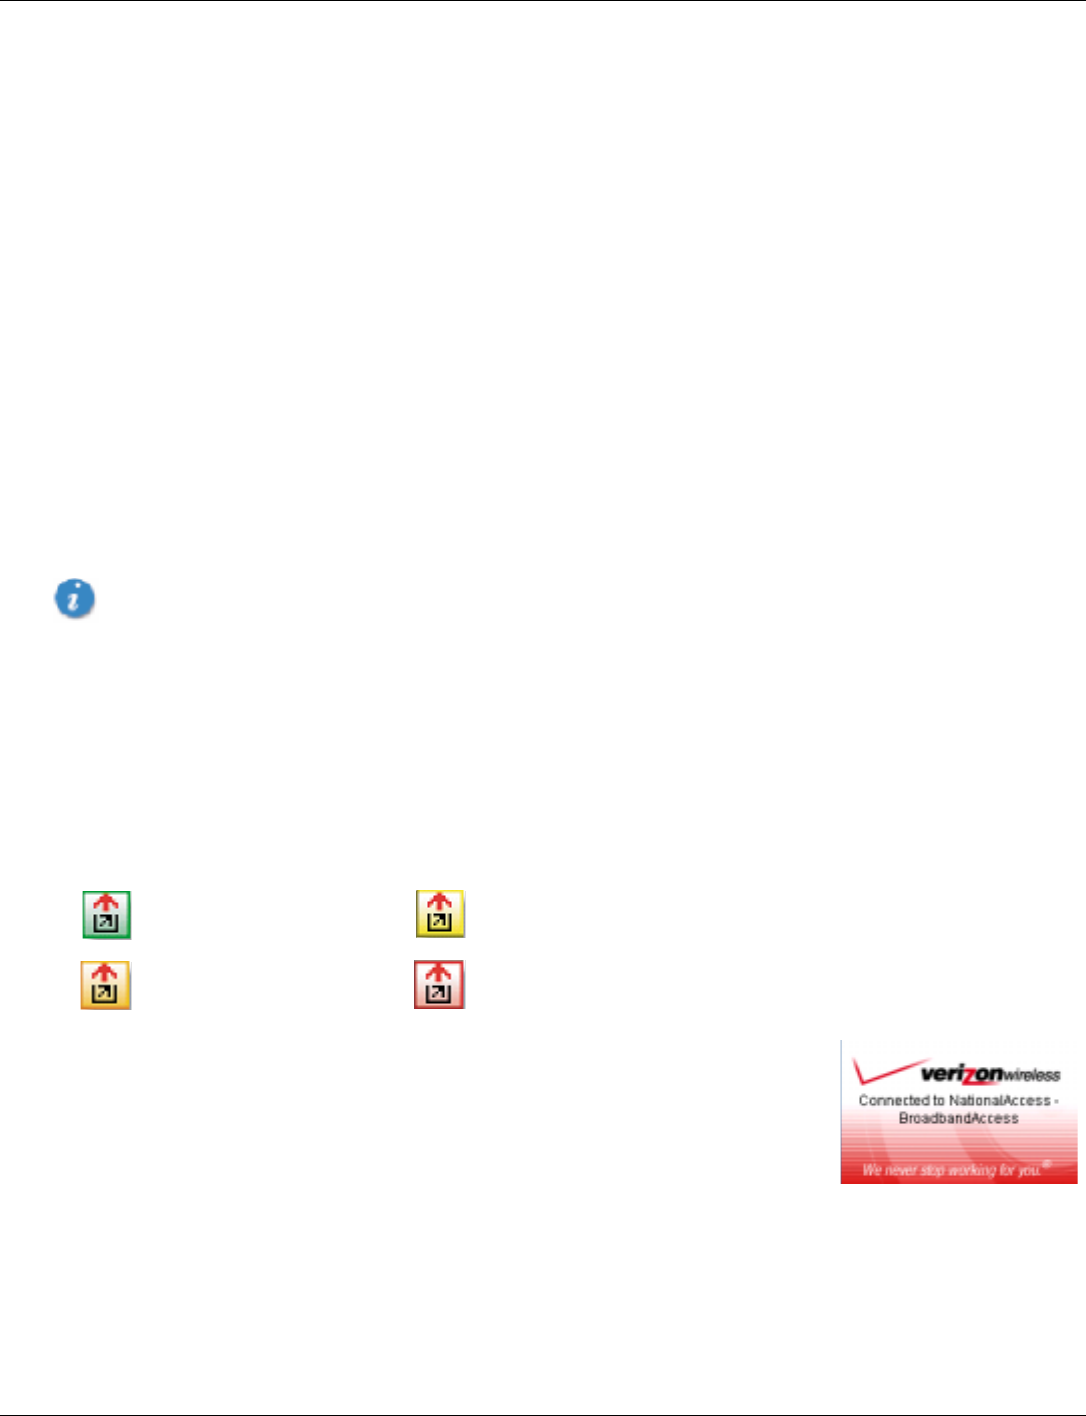
The status is also reflected in the Task Tray icon. Right-clicking on the tray icon provides various options and double-
clicking on it will always show the application. Placing your cursor on it will display the current connection status.
When you connect and disconnect from VZAccess Manager an alert window slides out
of the task tray showing the status from networks.
The pop up status can be turned off, by selecting Tools → Preferences → Options tab, and
unchecking Show popup status windows by tray.
Based on your preferences, your browser or e-mail or VPN program can be launched
automatically, or you can launch whatever software you want to use. You can also determine if all connections show
in the drop down list or only your wireless ones, see “VZAccess Manager Settings” on page 19.
Note: Always use VZAccess Manager when connecting via the NationalAccess - BroadbandAccess, NationalAccess,
or Quick 2 Net (14.4 kbps) connection. This will ensure that the Venturi compression software is enabled and the
wireless device is configured properly before connecting. Refer to “Using Venturi” on page 36 for more information
on how Venturi works.
Connected Connecting
Idle - Not Connected Disconnecting
Getting Started with VZAccess Manager VZAccess Manager from Verizon Wireless
16 User Guide for the Kyocera KPC650
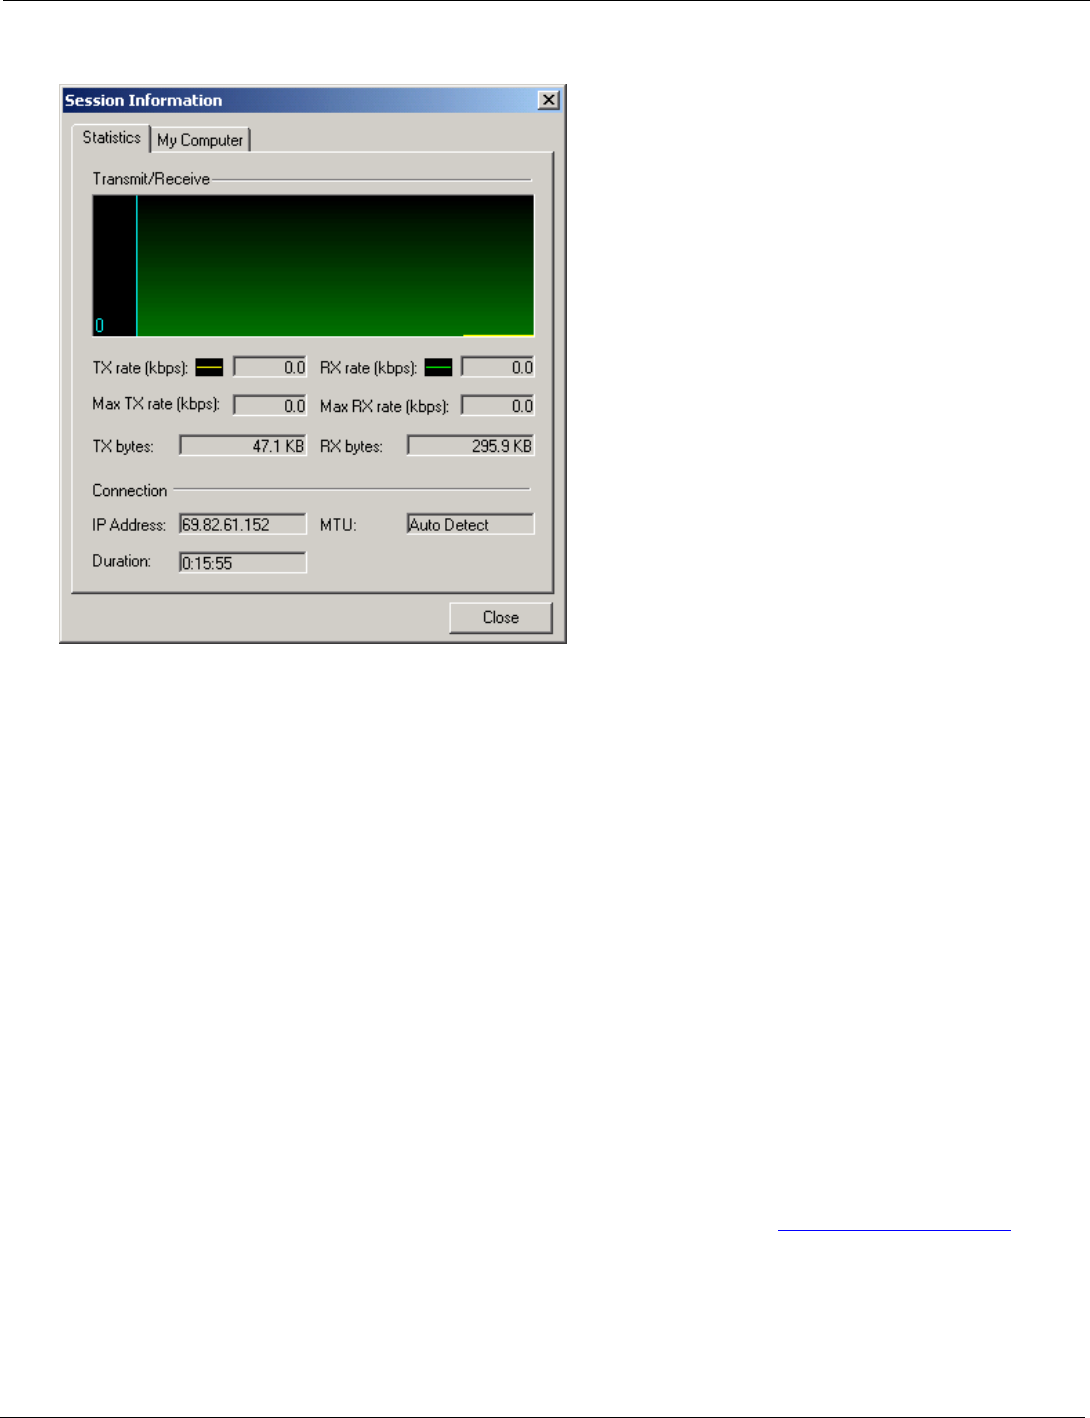
At any time during your connection you can check your current connection speed and throughput stats in the
Statistics tab of the Session Information window. To see this window, select Options → Statistics.
The Session Information window also contains a My Computer tab and a Wi-Fi tab if applicable. The My Computer
tab contains detailed information about your computer. This information is helpful when troubleshooting a problem.
Additional information when using the Quick 2 Net (14.4 kbps) connection:
When using the Quick 2 Net (14.4 kbps) connection, VZAccess Manager enables the Venturi compression software
to roughly double your performance. For additional details refer to “Using Venturi” on page 36.
Additional information when using the NationalAccess connection:
By default VZAccess Manager enables the Venturi compression software for the BroadbandAccess and
NationalAccess connections.
If you are using the NationalAccess - BroadbandAccess or NationalAccess connection and the call fails when you try
to connect, with VZAccess Manager returning to its idle state, you should try to connect again. If you are still having
trouble, try the Quick 2 Net (14.4 kbps) connection, if your device supports it. If you feel you may have incorrectly
entered your wireless telephone number during initial setup, select Options → Run Wizard.
Dormancy:
NationalAccess and BroadbandAccess data sessions become dormant if you are not sending or receiving any data. As
soon as you resume sending or receiving data, the data session will return to an active state.
Depending on your device and your NationalAccess or BroadbandAccess plan, your data session may disconnect
during a dormant state. See your Verizon Calling Plan brochure for details or visit www.verizonwireless.com. If this
happens select Disconnect, and then connect again.
While dormant your wireless phone/device may be able to receive a voice call. If you leave your wireless phone
connected to your PC, after you finish your voice call you may be able to resume your data session as you normally
would.

VZAccess Manager from Verizon Wireless Getting Started with VZAccess Manager
User Guide for the Kyocera KPC650 17
Warning Messages
NationalAccess
The first time you connect via the NationalAccess connection, the following warning message appears:
Select Do not show this warning again to suppress the message. Otherwise, each time you connect via the
NationalAccess connection this message will appear.
NationalAccess - BroadbandAccess
The first time you connect via the NationalAccess - BroadbandAccess connection, the following warning message
appears:
Select Do not show this warning again to suppress the message. Otherwise, each time you connect via the
NationalAccess - BroadbandAccess connection this message will appear.
Quick 2 Net (14.4 kbps)
The first time you connect via the Quick 2 Net (14.4 kbps) connection, the following warning message appears:
Select Do not show this warning again to suppress the message. Otherwise, each time you connect via the
Quick 2 Net (14.4 kbps) connection this message will appear.
Dial-Up
The first time you connect via a wireless Dial-Up connection, the following warning message appears:
Select Do not show this warning again to suppress the message. Otherwise, each time you connect via the
Dial-Up connection this message will appear.
ATTENTION
You are about to establish a NationalAccess (1xRTT)
connection. Charges apply in accordance with your
subscription to Verizon Wireless' NationalAccess.
To see our current pricing for NationalAccess, please visit
http://www.verizonwireless.com/b2c/mobileoptions
ATTENTION
You are about to establish a BroadbandAccess or
NationalAccess connection. Charges apply in accordance
with your subscription to Verizon Wireless'
NationalAccess/BroadbandAccess.
To see our current pricing for BroadbandAccess, please
visit http://www.verizonwireless.com/b2c/mobileoptions.
ATTENTION
Quick 2 Net(sm) may be charged differently than
NationalAccess sessions.
Please check your Calling Plan for details.
ATTENTION
Dial Up connections may be charged differently than
NationalAccess sessions.
Please check your Calling Plan for details.
Getting Started with VZAccess Manager VZAccess Manager from Verizon Wireless
18 User Guide for the Kyocera KPC650
Wi-Fi
The first time you connect to a Wi-Fi network, the following warning appears
In most cases connecting to a private Wi-Fi network is a simple process and you can use VZAccess Manager instead
of the Wi-Fi client you would normally use. If you have any problems doing this try the recommendations in the
section on Wi-Fi Troubleshooting.
Setting Dial Up Connections
This section is only applicable if you are using a WWAN Device that supports Dial-Up connections (a wireless phone
and cable or a PC card).
You can make wireless copies of existing dial up accounts on your system. This will enable those accounts and allow
you to connect to them wirelessly.
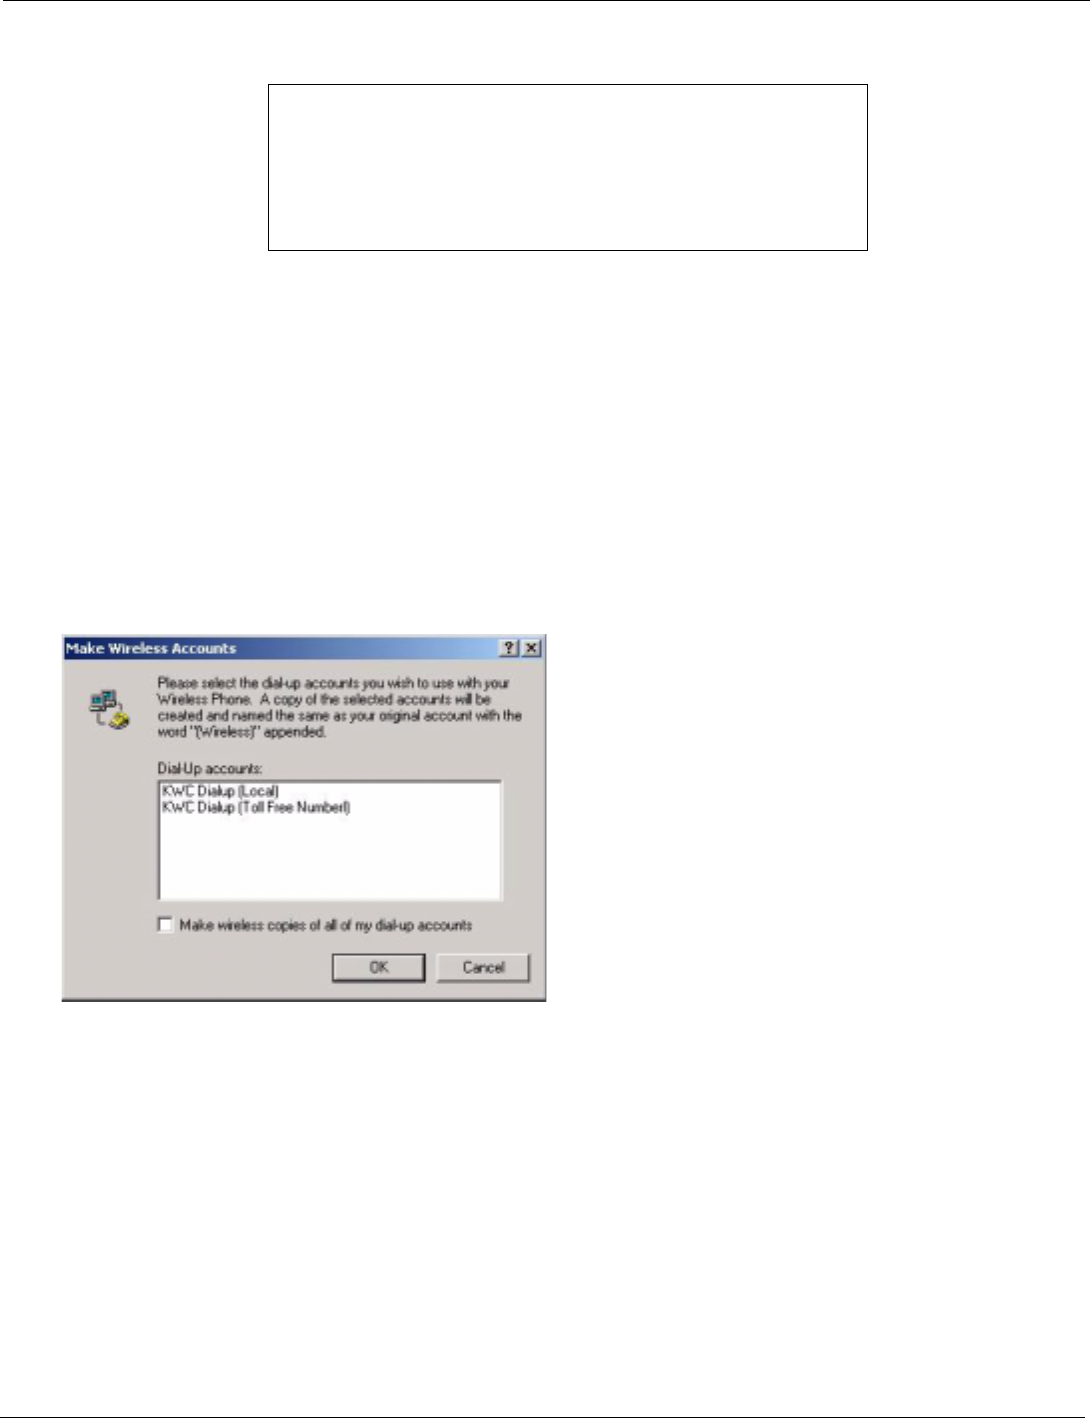
To launch the copy utility, select Tools → Dial-up Accounts → Copy.
Click on the connection or connection(s) you want to copy and click OK.
The new connection will have a suffix of "(Wireless)" and will be set to use your wireless phone as the modem. If the
utility is unable to automatically recognize your existing area code and number, the existing number will be
displayed, and you will be prompted to enter the area code and number. The utility configures the new wireless
connections to always dial 11 digits, so that they will work locally and also in other digital data coverage areas. If it is
determined that the connection might benefit by further optimization, an additional connection with a "(Wireless
Optimized)" suffix, will also be created. This connection may connect faster. If you have trouble with the "(Wireless
Optimized)" connection, you can delete it from your dial-up networking folder and use the "(Wireless)" connection.
You are about to establish a connection to a Wi-Fi network.
Verizon Wireless does not support problems associated with
Wi-Fi networks.
Verizon Wireless Customer Care will not be able to assist you.
Please see the Help file for details.
VZAccess Manager from Verizon Wireless VZAccess Manager Settings
User Guide for the Kyocera KPC650 19
Note: Some applications, such as AOL and JUNO, have Dial-Up Networking connections that can't be used directly
from VZAccess Manager or Dial-Up Networking. Copies of these connections will not work with your wireless
phone, since the original connections do not work by themselves. In most cases the original connections or the
software can be configured to use your wireless phone or CDMA PC Card as a modem. For the easiest way to
configure AOL to work with your wireless phone, refer to “Configuring AOL Version 9” on page 43.
To delete connections:
Windows 95, 98, or ME: Select Tools → Dial-up Accounts → Edit. To delete a connection, click on it to select it, and press
the delete key.
Windows 2000 and XP: Select Tools → Control Panels → Network and Dial-up Connections. Right-click on the desired
connection and select Delete.
VZAccess Manager Settings
General Preferences
This section covers the preferences that are common to both WWAN and Wi-Fi. Preferences that are unique to
WWAN and Wi-Fi are discussed in “WWAN Preferences” on page 22 and “Wi-Fi Preferences” on page 25.
VZAccess Manager Settings VZAccess Manager from Verizon Wireless
20 User Guide for the Kyocera KPC650
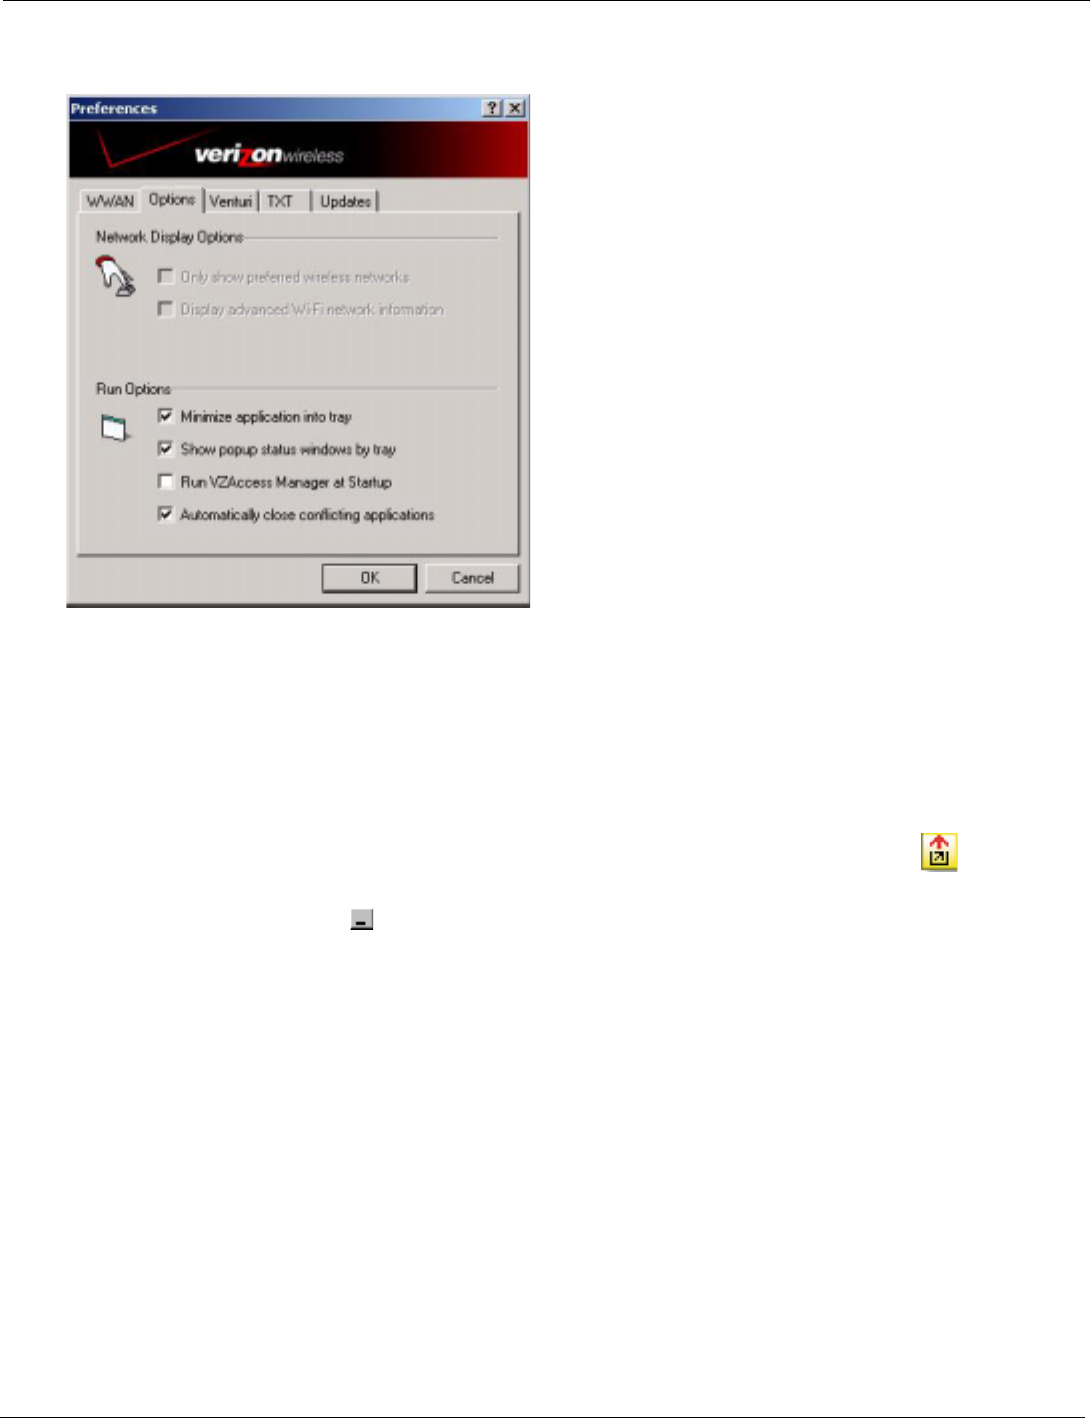
Options Tab
On the VZAccess Manager Home screen, select Tools → Preferences → Options tab.
Only show preferred wireless networks: This only applies to Wi-Fi networks. If checked, at startup, only networks in your
Preferred list on the Wi-Fi tab are displayed (networks you have connected to in the past) otherwise, all detected
networks are displayed.
Display advanced Wi-Fi network information: This only applies to Wi-Fi networks. If checked, additional information will
be displayed for Wi-Fi networks such as the channel, MAC address and type of security.
Minimize Application into tray: With this option selected, when you minimize VZAccess Manager, instead of taking up
space in your taskbar, it will just disappear. You can get it back by double-clicking on the tray icon , alternatively
you can right-click in the icon and select Show Application. You can minimize the main window of VZAccess Manager
by selecting the minimize icon ( ) in the upper-right corner of the main window.
Show popup status windows by tray: Enables status notification in a pop up window above the task bar that displays for a
few seconds whenever connection status changes.
Run VZAccess Manager at Startup: Selecting this option adds VZAccess Manager to the Windows Startup group,
unchecking it removes VZAccess Manager from the startup group.
Automatically close conflicting applications: With this option selected, VZAccess Manager will automatically close any
application it recognizes that is known to prevent it from working correctly. For example, it may close the client
software that was supplied with your Wi-Fi card, if it's known to conflict with VZAccess Manager controlling your
Wi-Fi card.
For Wi-Fi, Passwords, and VPN options, refer “Wi-Fi Preferences” on page 25.
For WWAN options and Venturi options see “WWAN Preferences” on page 22.
VZAccess Manager from Verizon Wireless VZAccess Manager Settings
User Guide for the Kyocera KPC650 21
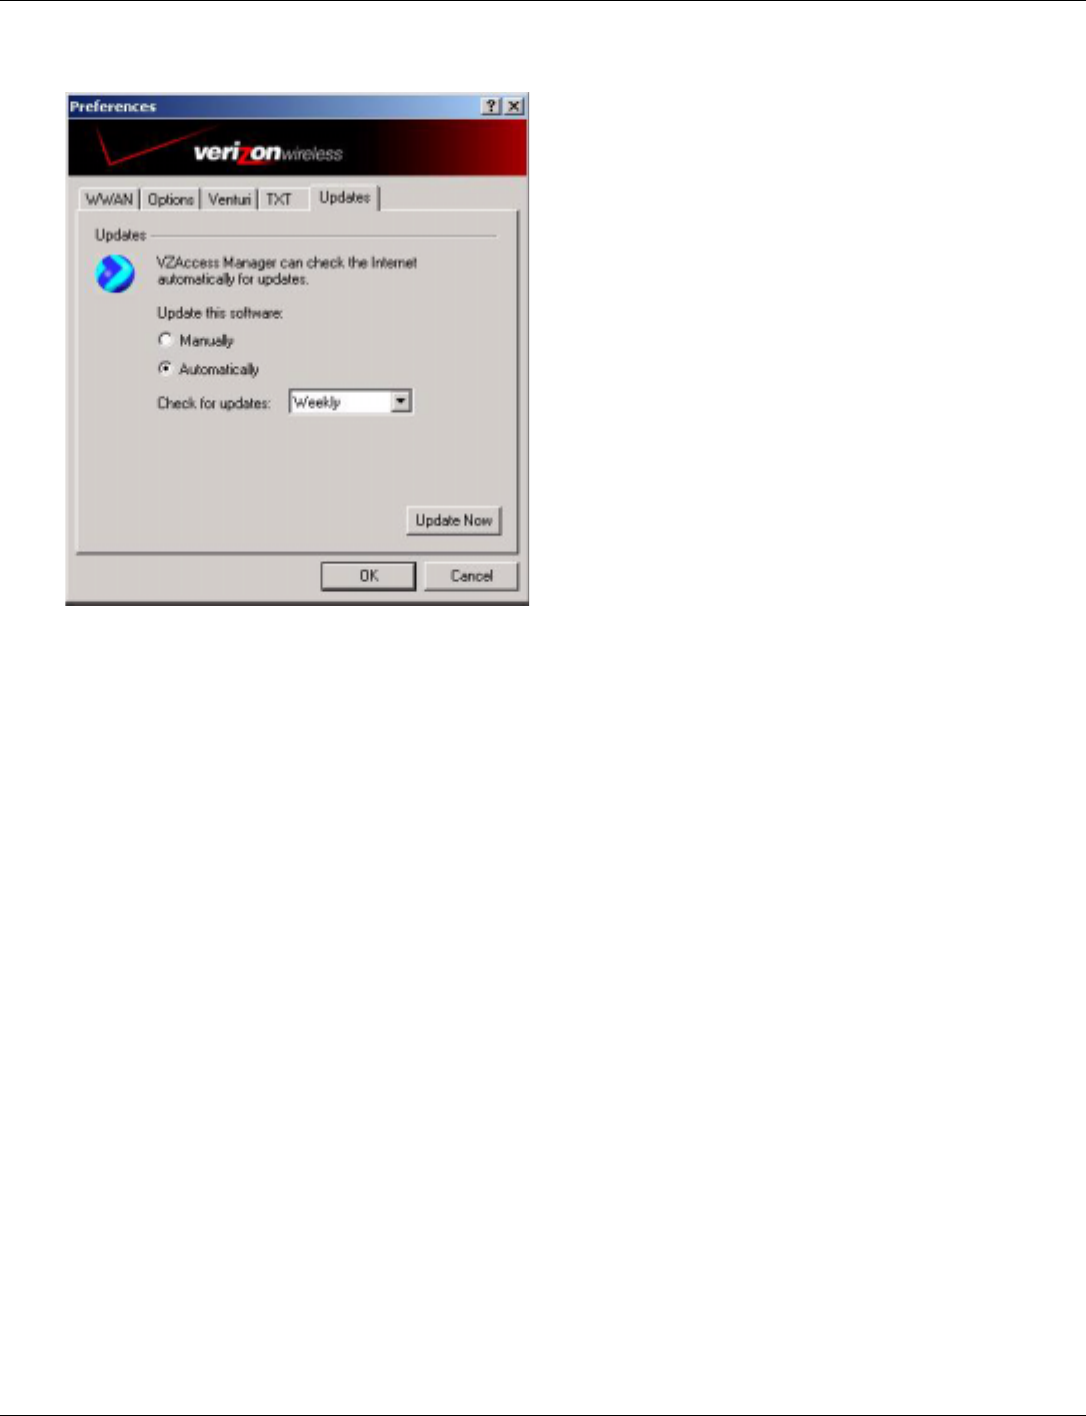
Updates Tab
On the VZAccess Manager connect view, select Tools → Preferences → Updates tab.
This feature allows VZAccess Manager to automatically check for software updates. If an update is available, you
will be notified of its size and approximate download times if using NationalAccess, BroadbandAccess, Quick 2 Net
or any Wi-Fi connection.
You will be given the choice to download or cancel. If you select download, you will be presented with a display that
shows the progress as the update is downloading with the option to cancel if desired. You do not need to download the
updates wirelessly; you can use any connection to the Internet. Note: If you download the updates wirelessly, normal
usage charges apply.
You can allow the software to check automatically for updates, daily, weekly (default), or monthly. It only checks
when the application is running and when it detects that you are connected and able to access to the Internet. If
desired, you can select Manually and the software will only check for updates when you select Update Now, or you when
you select, from VZAccess Manager's connect view Help, Check for Updates.
VZAccess Manager Settings VZAccess Manager from Verizon Wireless
22 User Guide for the Kyocera KPC650
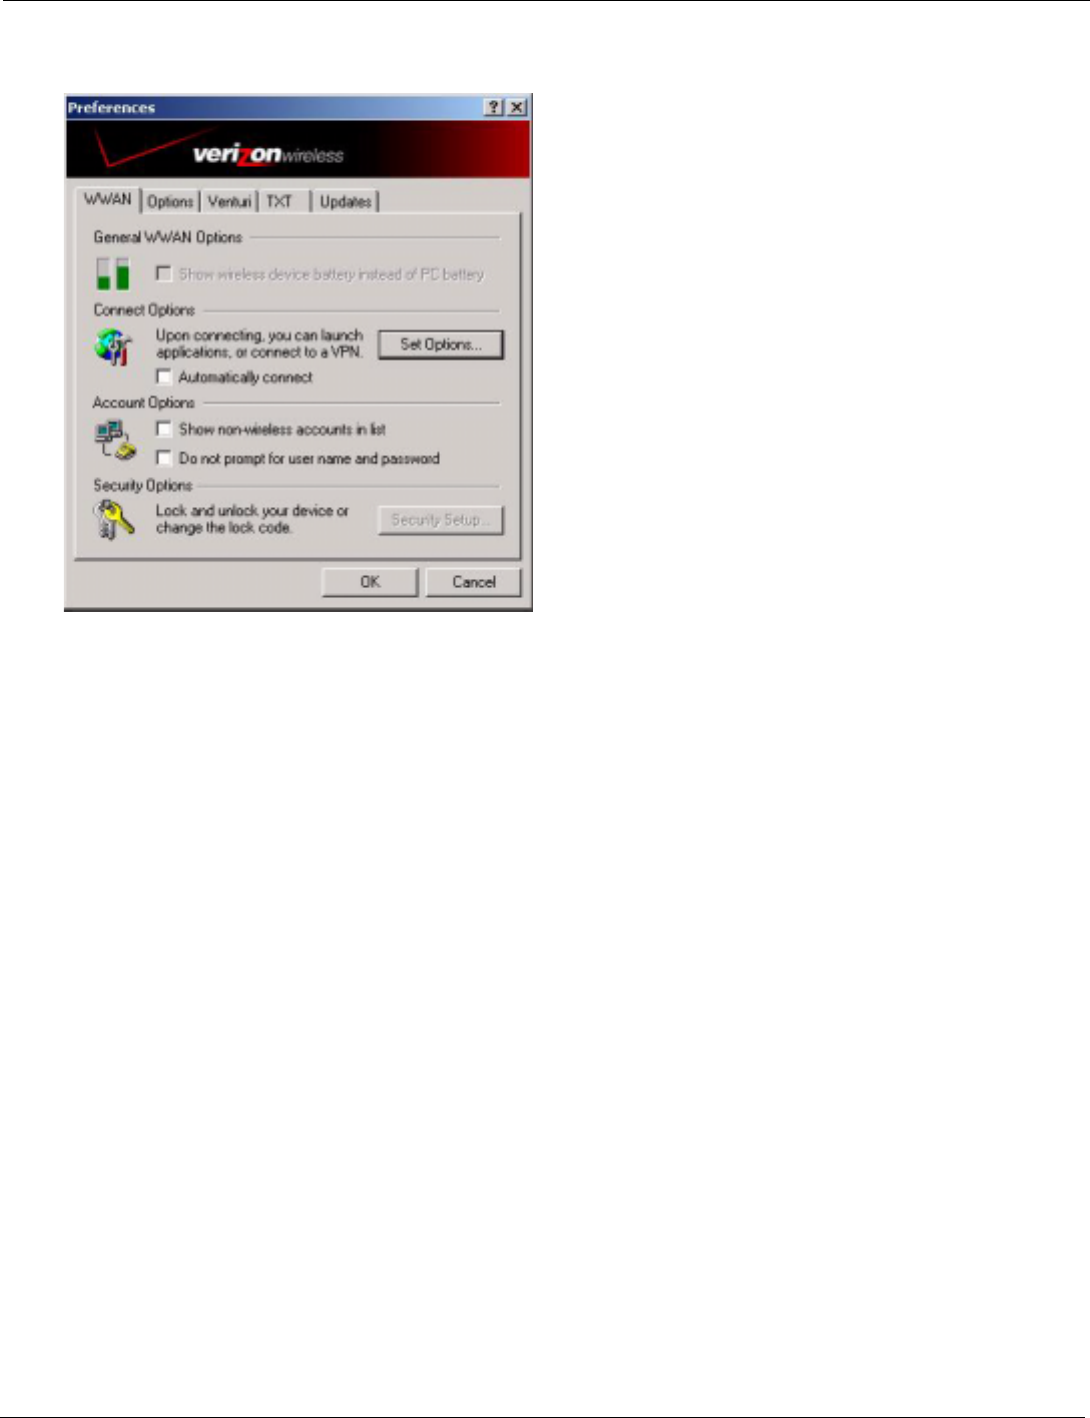
WWAN Preferences
From the VZAccess Manager home screen, select Tools → Preferences → WWAN tab.
Show wireless device battery instead of PC battery: If you only selected to detect and install Wi-Fi when installing
VZAccess Manager, VZAccess Manager will display the PC's battery status in its main window. If you are using a
WWAN device and this option is selected, the battery level of your WWAN device is displayed when your device is
connected and detected by VZAccess Manager, as well as when you connect and disconnect using your WWAN
device. Battery status cannot be updated while you are connected. You can refresh the status when you are not
connected, by selecting Tools → Refresh Signal Levels from VZAccess Manager's main window. Some phones fail to
accurately report their battery level to VZAccess Manager and some WWAN devices such as PC cards do not use
batteries, so you can use this option to display the PC's battery instead.
Set Options. . . : This is used to set various connect options. See “Connect Tab” on page 23 and “VPN Tab” on page 24.
Show non-wireless accounts in list: If you select this option all of your dial up accounts will show up in VZAccess
Manager's list of accounts, allowing you to use VZAccess Manager to launch them instead of Dial-Up Networking.
With this option unchecked, the only connections that are displayed in VZAccess Manager's list of accounts are the
Verizon Wireless NationalAccess - BroadbandAccess, NationalAccess or Quick 2 Net (14.4 kbps) connection,
(depending on your wireless phone/device capabilities) and any wireless connections you have created, manually or
with the Copy Accounts Wizard. If VZAccess Manager is also configured for Wi-Fi, these connections are also
displayed when in coverage of the hot spot.
Do not prompt for user name and password: If you are only using the Verizon Wireless NationalAccess -
BroadbandAccess, NationalAccess or Quick 2 Net (14.4 kbps) connection, this setting has no effect. If you created
Wireless connections to dial into other networks or have existing connections you are going to launch using
VZAccess Manager, checking this option will skip the screen that normally asks for your user name and password.
For this to work you will have had to connect previously, successfully saving your user name and password.
VZAccess Manager from Verizon Wireless VZAccess Manager Settings
User Guide for the Kyocera KPC650 23
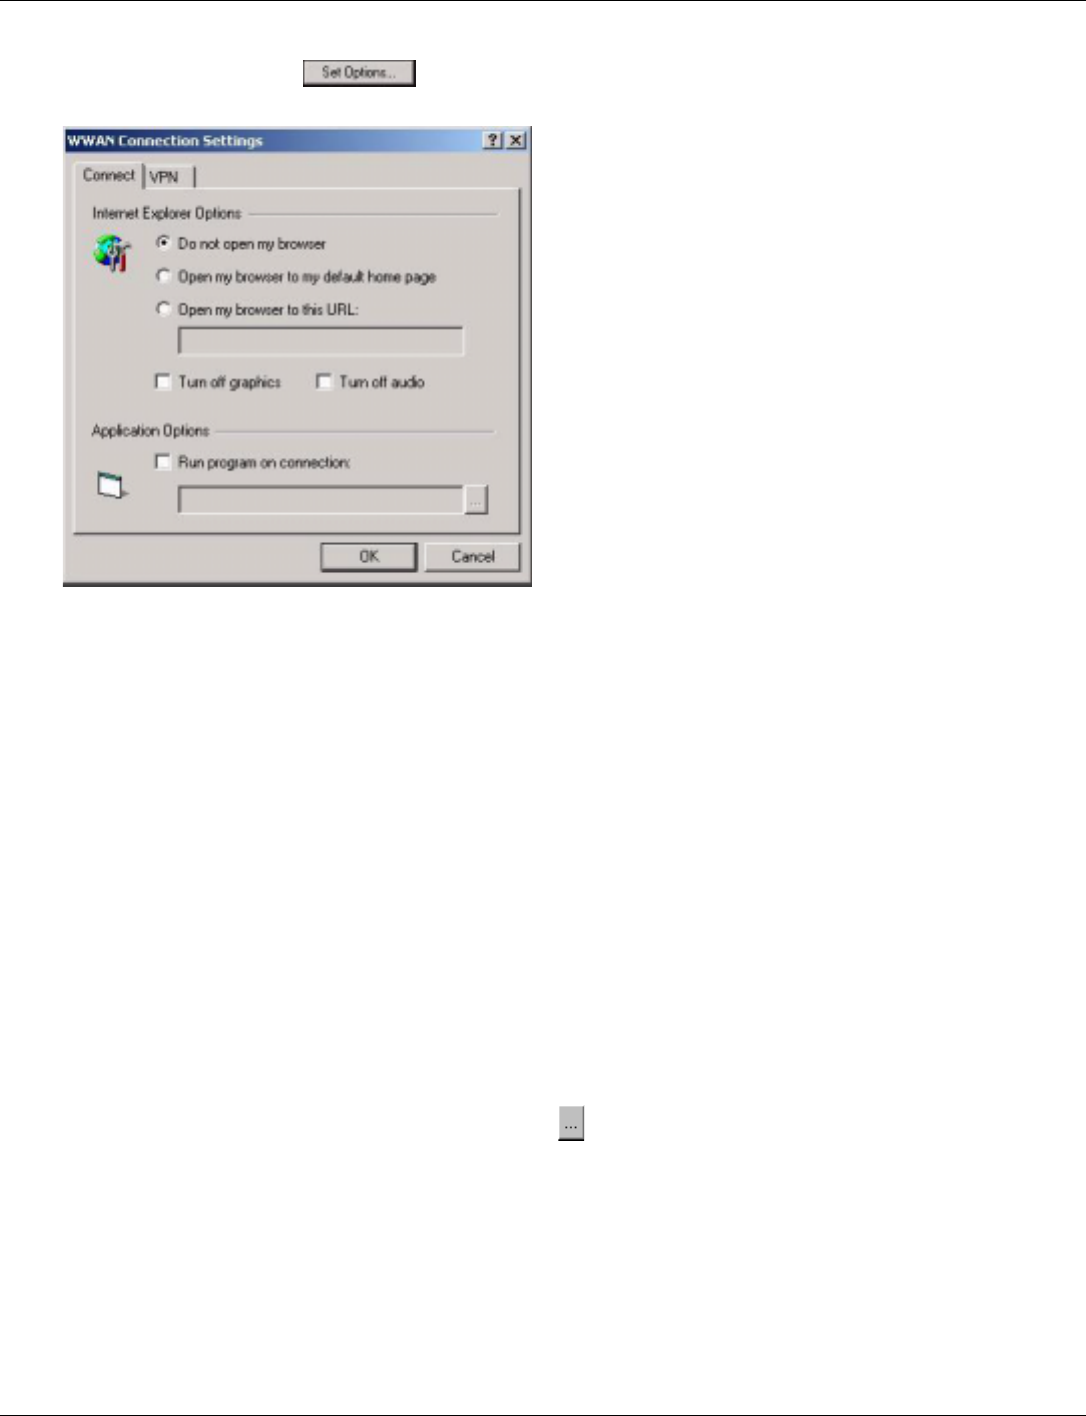
Connect Tab
When you select Set Options from the WWAN Preferences screen (Tools → Preferences→ WWAN tab →
Set Options → Connect tab.), the following options appear .
Do not open my browser: With this option selected, when you connect to a WWAN network, VZAccess Manager will
not automatically launch your default web browser.
Open my browser to my default home page: With this option selected, when you connect to a WWAN network
(NationalAccess - BroadbandAccess, NationalAccess or Quick 2 Net), VZAccess Manager automatically launches
your default web browser and your home page loads.
Open my browser to this URL: With this option selected, when you connect to a WWAN network (NationalAccess -
BroadbandAccess, NationalAccess or Quick 2 Net), VZAccess Manager automatically launches your default web
browser but does it in such a way that the URL you specify will load instead of your home page.
Turn off graphics: When selected, this turns off graphics in Internet Explorer.
Turn off audio: When selected, this turns off audio in Internet Explorer.
With these options off, web pages load faster but you have to right-click and select show picture to view any pictures.
With the added performance of the Venturi compression software when using the Verizon Wireless NationalAccess -
BroadbandAccess, NationalAccess or Quick 2 Net (14.4 kbps) connection, most users prefer to see graphics and have
audio support, so the default setting for both options is unchecked.
Run program on connection: This allows you to automatically run a program when you use VZAccess Manager to
connect to a WWAN network. Select the browse button, , to browse to the desired application you want to run
when you connect to a WWAN network using VZAccess Manager. The application will run for all WWAN
connections made from VZAccess Manager.
VZAccess Manager Settings VZAccess Manager from Verizon Wireless
24 User Guide for the Kyocera KPC650
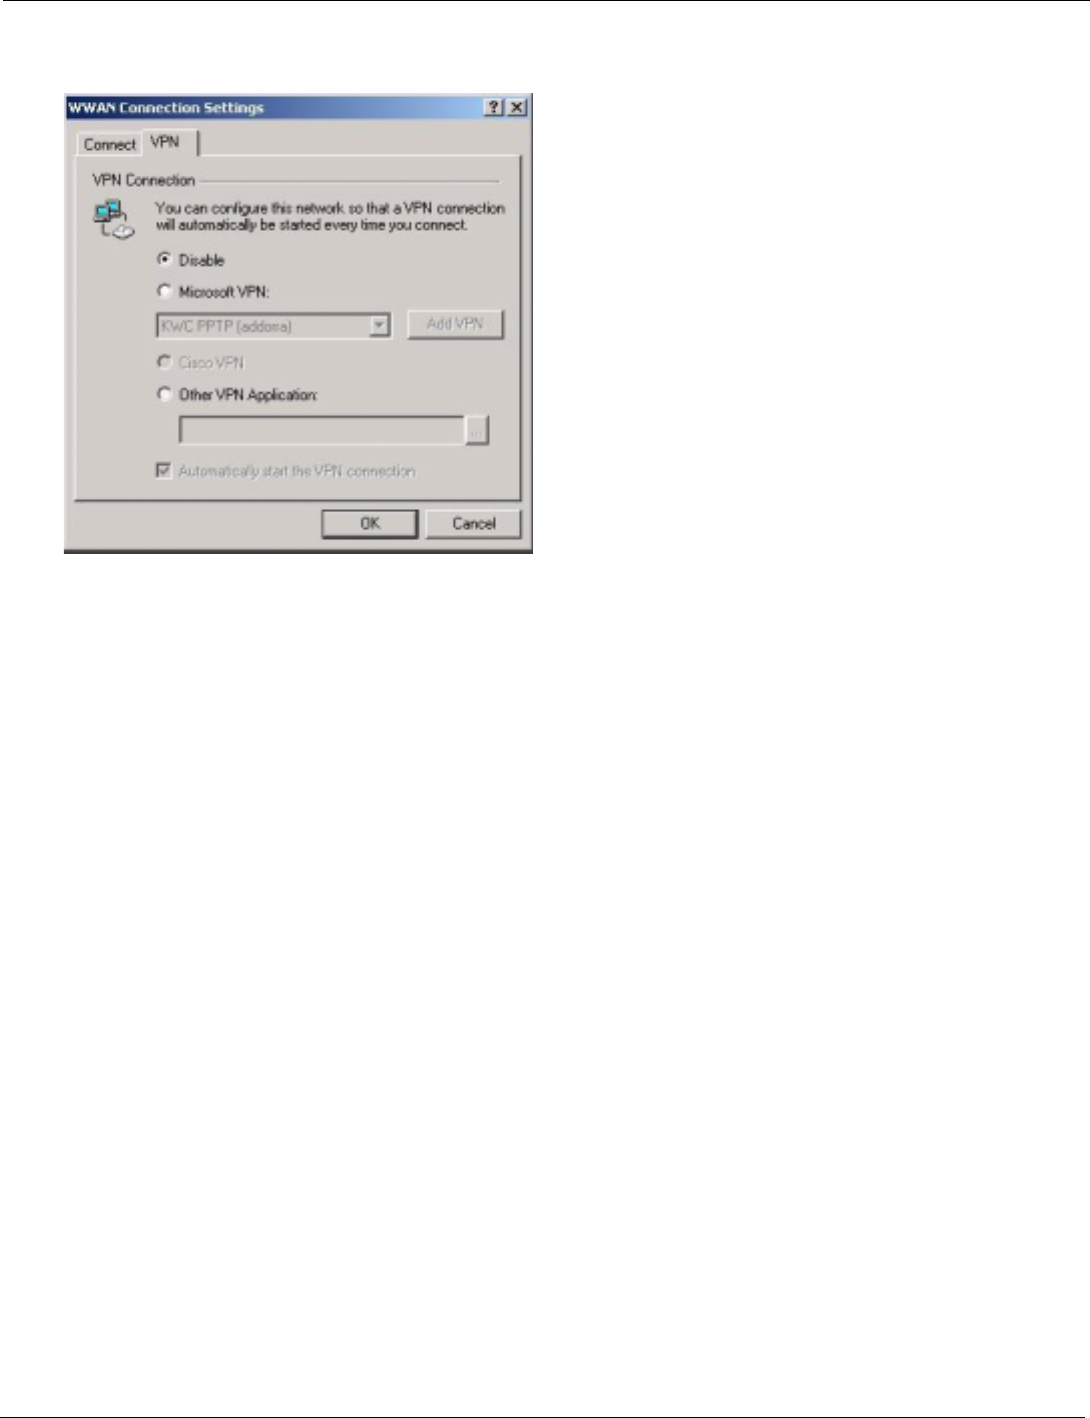
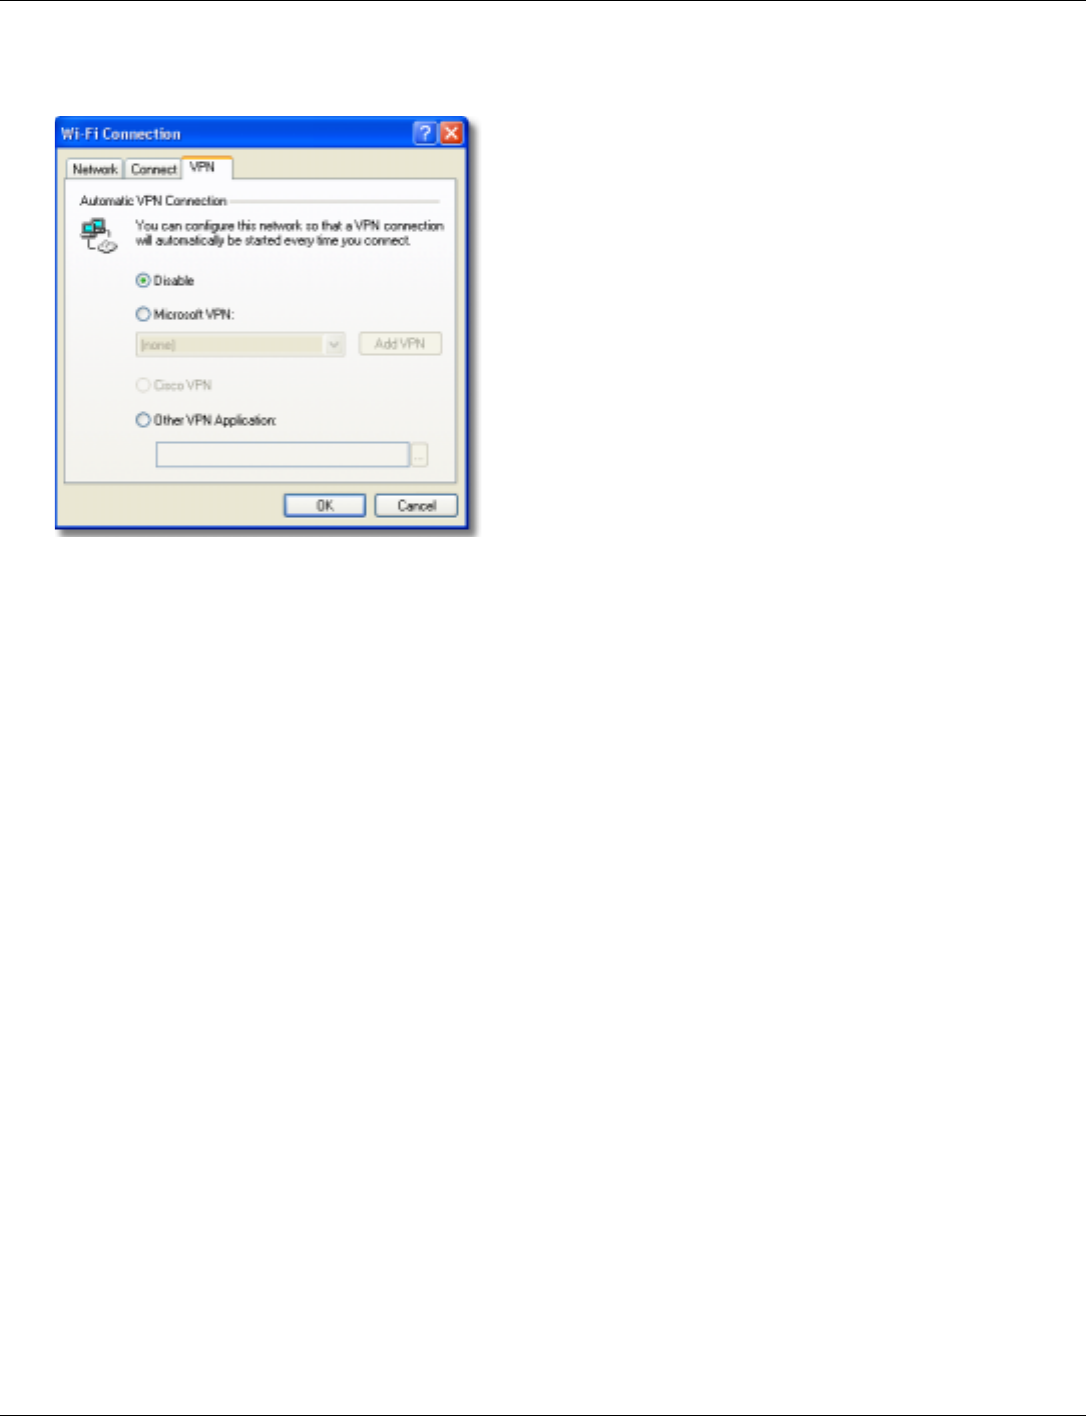
VPN Tab
The following options exist on the VPN tab (Tools → Preferences→ WWAN tab → Set Options → VPN tab):
Disable: When you connect to a WWAN network, VZAccess Manager will not automatically launch your VPN client.
Microsoft VPN: If the network you are connecting to supports using Microsoft's VPN, you can select this option and
select the VPN connection you normally use from the drop down list. You can also use the Add VPN to create a
Microsoft VPN connection. When you use VZAccess Manager to connect to a WWAN network, it will automatically
launch your VPN connection.
Cisco VPN: If Cisco VPN software is installed, you can select this option to cause VZAccess Manager to automatically
launch your Cisco VPN software when you connect to a WWAN network using VZAccess Manager.
Other VPN Application: This allows you to automatically runany VPN program when you use VZAccess Manager to
connect to a WWAN network. Check the Other VPN Application radial button and then click on the browse button to
locate the desired VPN application you want to run when you connect to a WWAN network using VZAccess
Manager. The VPN application will run for all WWAN connections made from VZAccess Manager. If you have a
shortcut you normally use to launch your VPN application you may want to right-click on it and select properties to
see where the program is located and how it's named.
VZAccess Manager from Verizon Wireless VZAccess Manager Settings
User Guide for the Kyocera KPC650 25
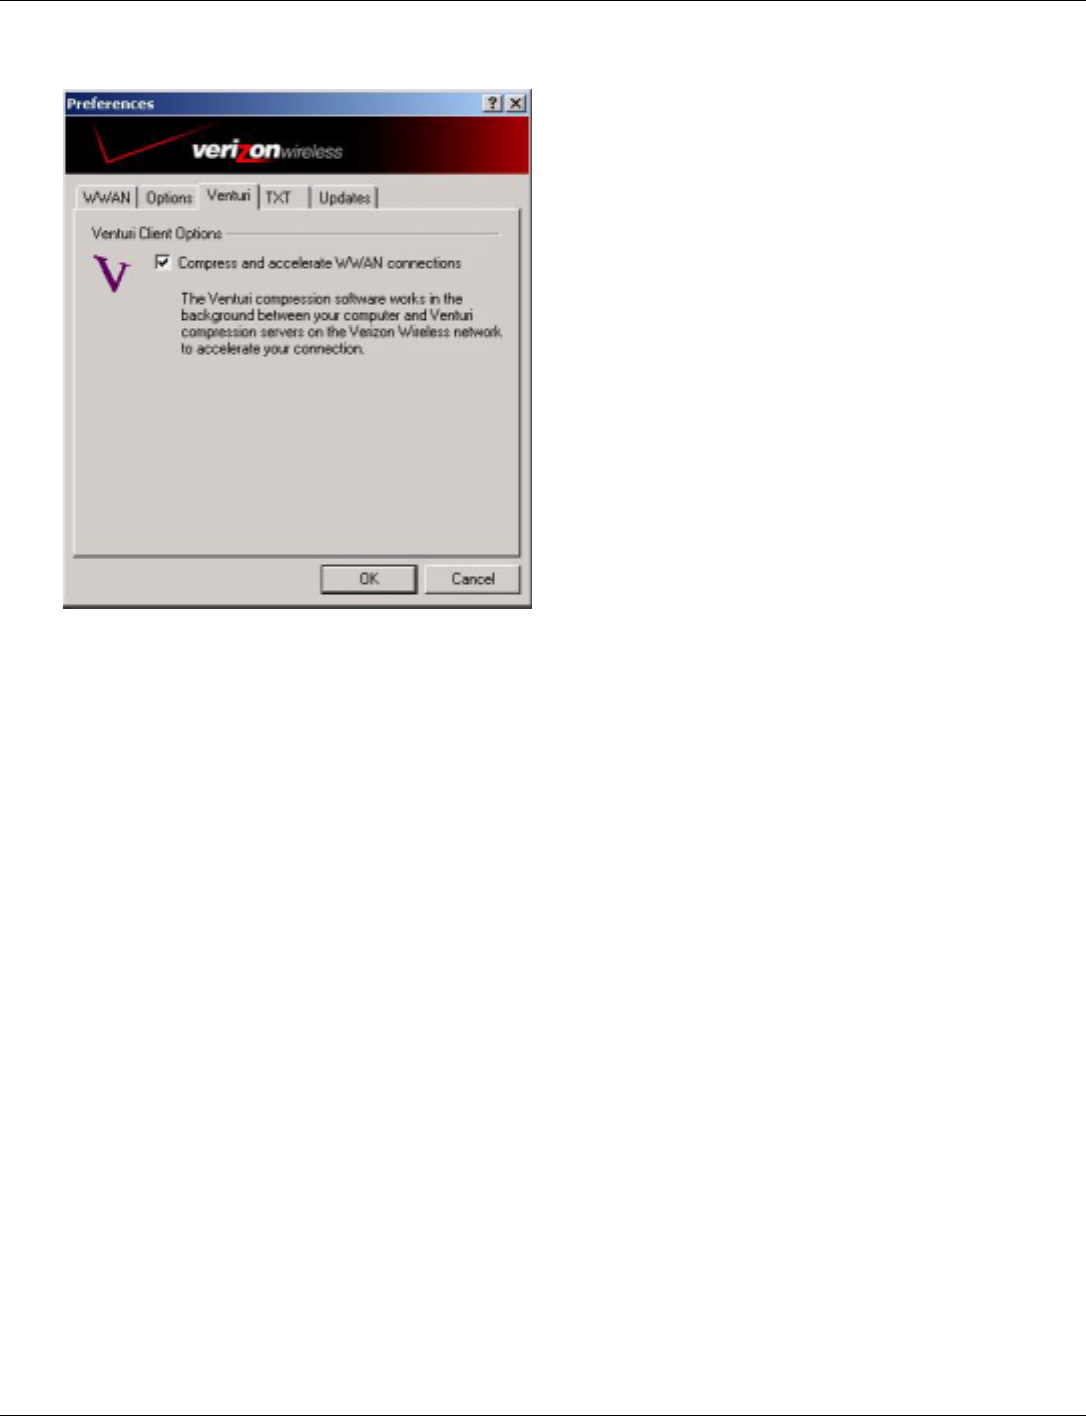
Venturi Tab
The last WWAN specific option is the Venturi tab (Tools → Preferences → Venturi tab):
The Venturi compression software works in the background between your computer and Venturi compression servers
on the Verizon Wireless network to improve your performance when using the NationalAccess - BroadbandAccess,
NationalAccess or Quick 2 Net (14.4 kbps) connection. This option is selected by default and allows VZAccess
Manager to automatically turn the Venturi compression software on when you use VZAccess Manager to connect via
BroadbandAccess, NationalAccess or Quick 2 Net, and off when you disconnect.
Unselecting "Compress and accelerate WWAN connections" will cause VZAccess Manager to no longer toggle the
Venturi compression software on and off when using BroadbandAccess, NationalAccess or Quick 2 Net. The
recommendation is to leave this option selected because it helps in most cases. There are some rare situations where
you may get better performance by turning the compression software off, so the option is available. You can also
control the compression client through its user interface. For additional details see the section on Venturi Instructions.
Wi-Fi Preferences
The following options are available if you selected "detect Wi-Fi" device during setup. If you have added a Wi-Fi
device after having installed VZAccess Manager, you can select Options → Run Wizard to run the setup wizard again.
If you connect your Wi-Fi device after VZAccess Manager has been started and you are in coverage of a Wi-Fi
network, selecting Options → Refresh Networks will cause VZAccess Manager to recognize your Wi-Fi device (and
WWAN if connected) and scan for available networks.
VZAccess Manager Settings VZAccess Manager from Verizon Wireless
26 User Guide for the Kyocera KPC650
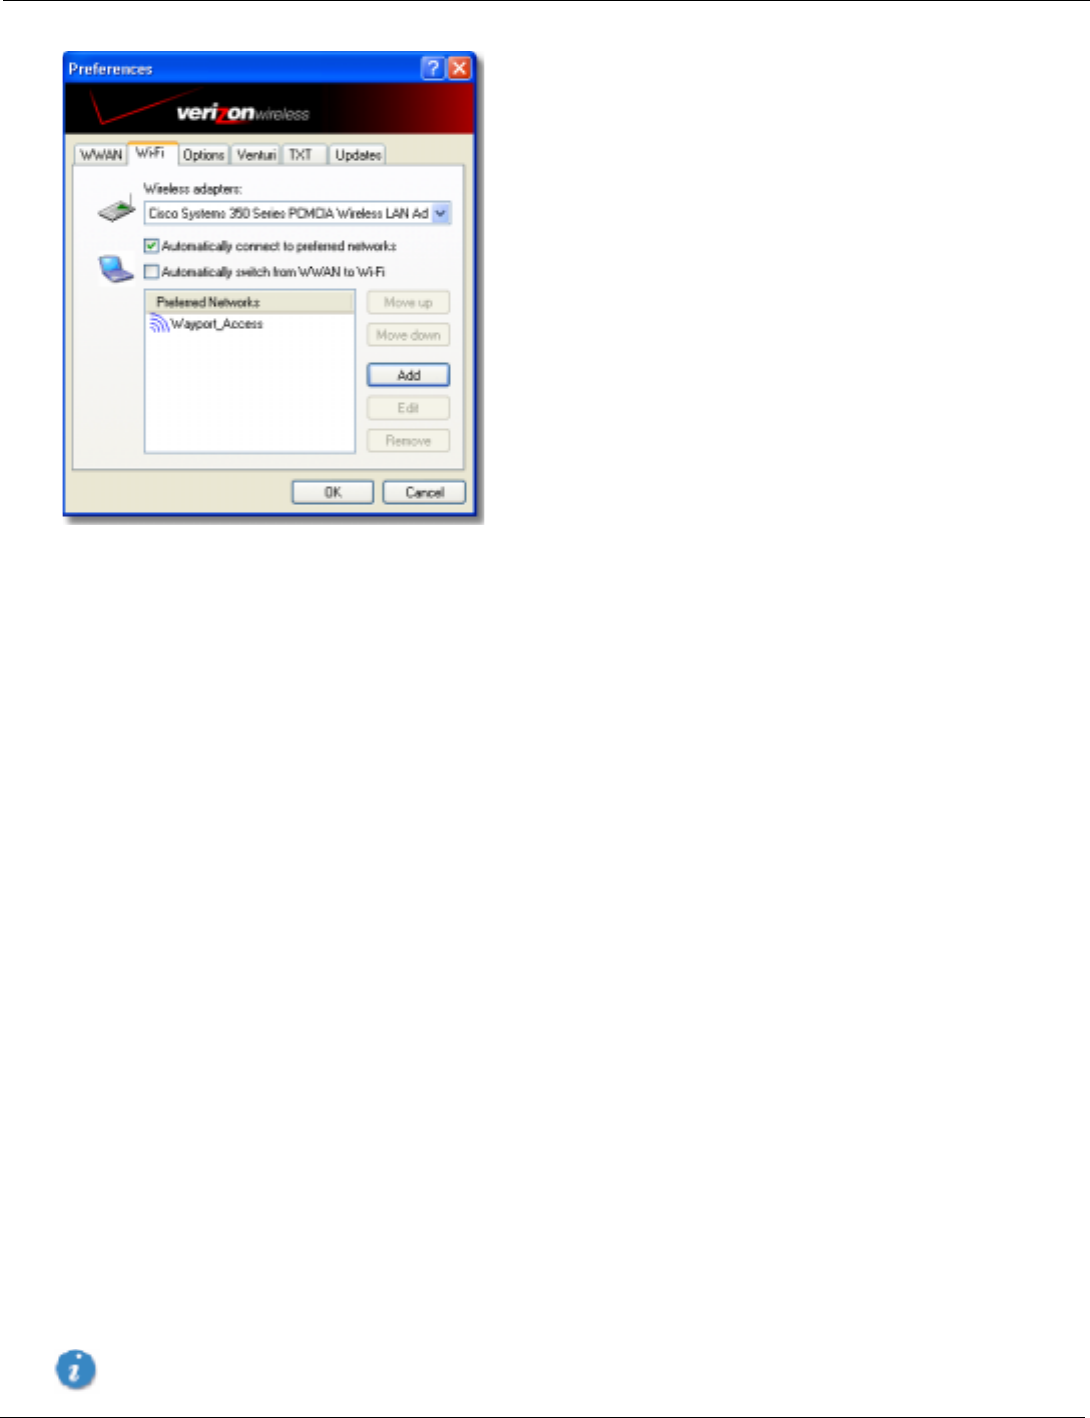
Select Tools → Preferences → Wi-Fi tab.
Wireless adapters: In the rare case you have more than one Wi-Fi adapter, you can select the Wi-Fi adapter you are
using. If your adapter does not appear, try upgrading to the latest available drivers from the Wi-Fi device
manufacturer.
Automatically connect to preferred networks: Allows you to have VZAccess Manager automatically connect to your
preferred Wi-Fi networks when they are detected.
Automatically switch from WWAN to Wi-Fi: Requires that Automatically connect to preferred networks is selected. When you
select this option to automatically switch from WWAN to Wi-Fi
VZAccess Manager will disconnect your WWAN connection (NationalAccess - BroadbandAccess, NationalAccess,
or Quick 2 Net (14.4 kbps)) and automatically connects via Wi-Fi when a preferred Wi-Fi network is detected.
WWAN connections are only relevant if using a 1XRTT/CDMA wireless phone and cable or an 1XEVDO/1XRTT/
CDMA PC card.
Preferred Networks: When you connect to or add Wi-Fi networks they appear in this list. If using the Automatically
connect feature VZAccess Manager attempts to connect to the networks in the order they appear in this list.
Move Up: Changes the priority of the Wi-Fi networks you have added or connected to in the past. This option is only
available when you have two or more Wi-Fi networks in the Preferred list.
Move Down: Changes the priority of non Verizon Wireless Wi-Fi networks you have added or connected to in the past.
This option is only available when you have two or more Wi-Fi networks in the Preferred list.
Add: Used to manually add Wi-Fi network. If you select "Add" you will have to enter the network's name and indicate
if it is password protected. The only time you would need to use the "Add" feature would be if the Access Point
providing the Wi-Fi coverage does not broadcast its network name (SSID). The easiest way to add a network that
broadcasts its network name, is to select the Wi-Fi network connection when it appears, and then select Connect. If it
is password protected you will be prompted to enter your WEP (Wired Equivalent Privacy) key.
Note: If you manually add a Wi-Fi network, when VZAccess Manager finds it, its signal strength is displayed to the
right of the network name when you are within coverage of that network. If you incorrectly entered the name, the
signal strength will never indicate any signal.
With certain Wi-Fi adapters the signal strength for Wi-Fi networks is not accurate until you connect to the
network.
VZAccess Manager from Verizon Wireless VZAccess Manager Settings
User Guide for the Kyocera KPC650 27
Edit: If you select a connection in the Preferred Network list, the Edit button will become active. Pressing it will
provide you with three additional tabs: Network, Connect, and VPN. These are discussed below.
Remove: Removes any other Wi-Fi networks you have added or connected to in the past. Just select the network, then
select Remove.
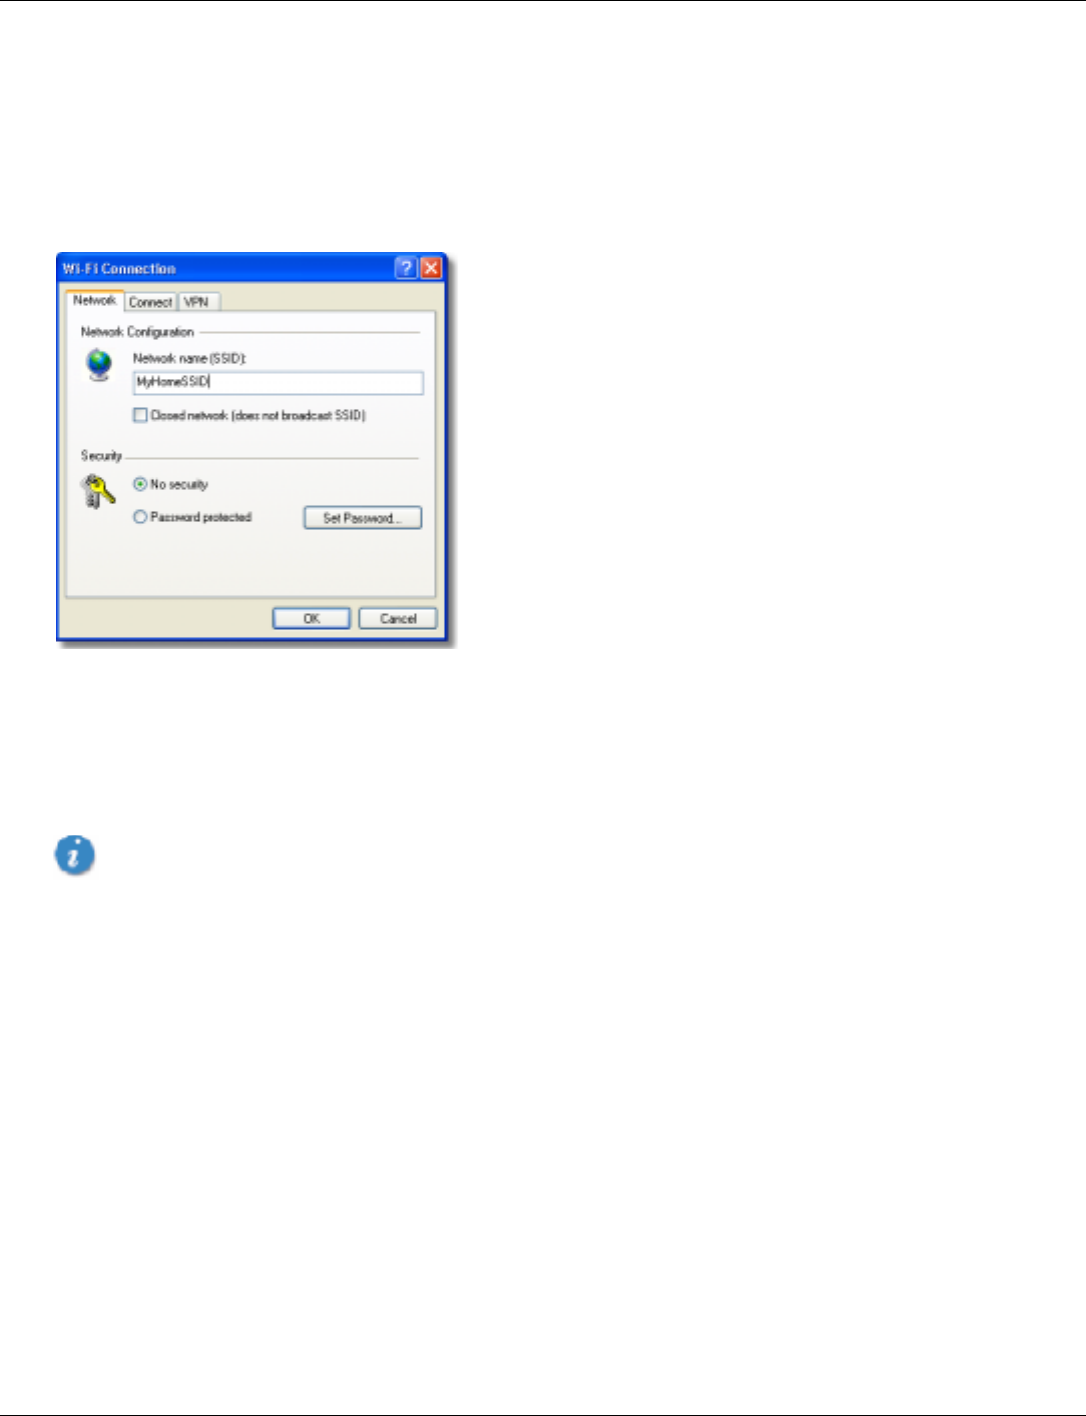
Network Tab
From the Wi-Fi tab above (Tools → Preferences → Wi-Fi tab), select a network listed under Preferred Networks then
select the Edit button, or if you select the Add button, one of the following options will be displayed:
The following options exist on the Network tab:
Network Name: On the Network tab, for private networks you can edit or enter the Network name and specify if it is a
closed network. Note: The name has to match the network to work. If the network broadcasts its SSID, instead of
manually adding it, select the Wi-Fi network connection when it appears, and then select Connect. If it is password
protected you will be prompted to enter your WEP (Wired Equivalent Privacy) key.
The name has to match the network to work. Note that this name is case sensitive when entering it
Set Password: This option allows you to modify, delete or enter your Wi-Fi WEP keys for a private Wi-Fi network..
VZAccess Manager Settings VZAccess Manager from Verizon Wireless
28 User Guide for the Kyocera KPC650
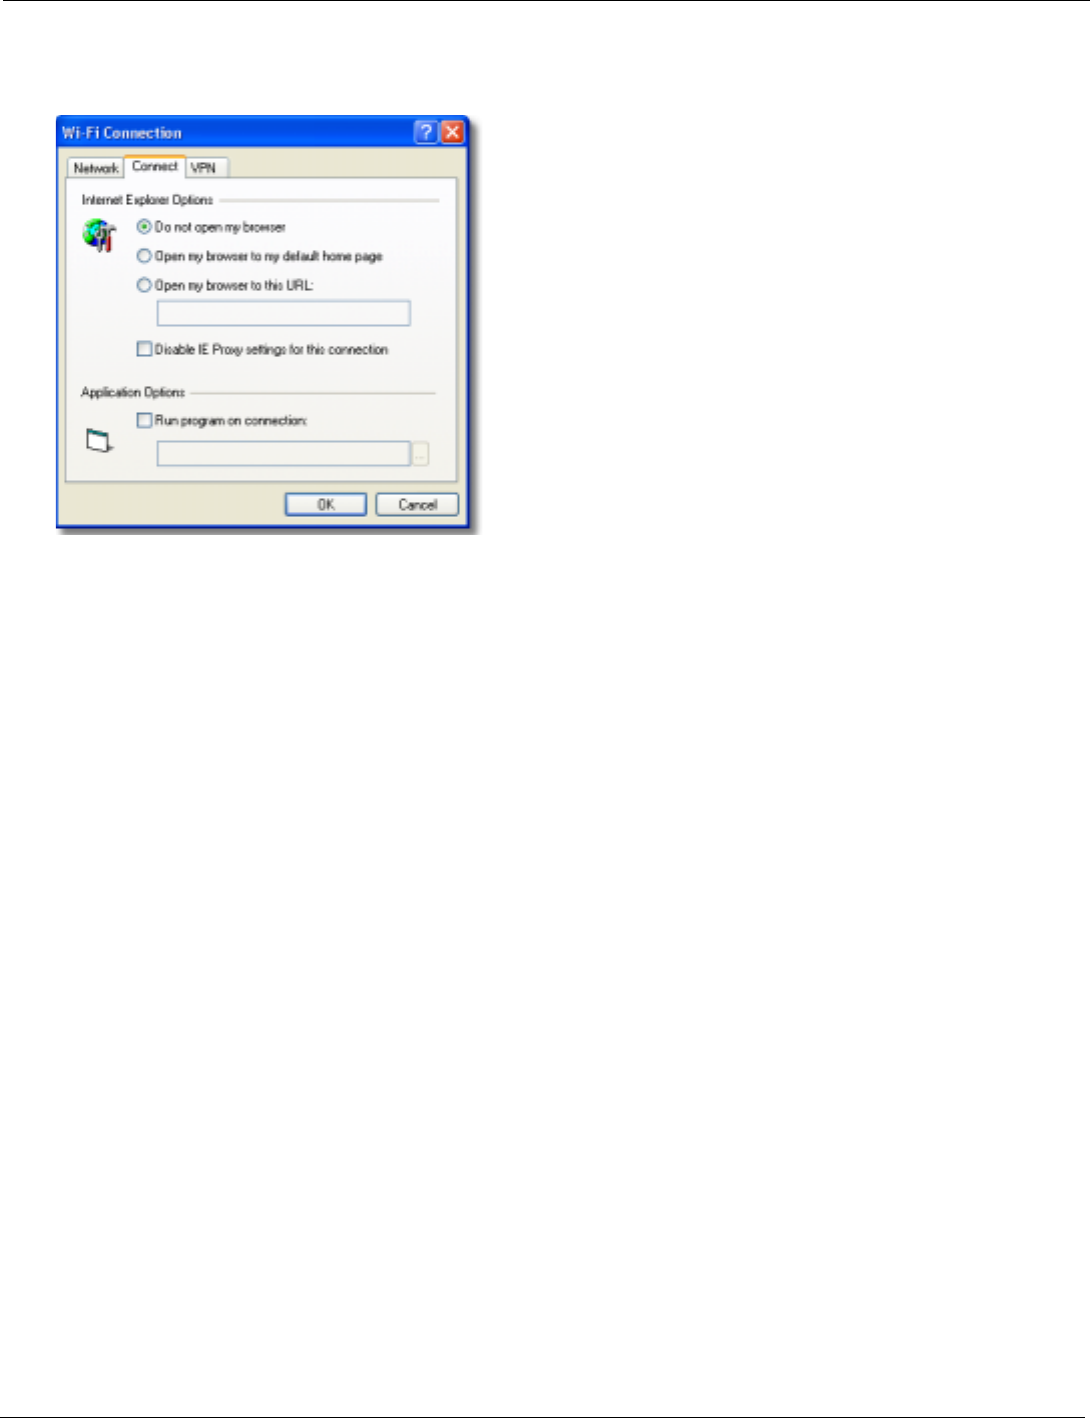
Connect Tab
The following options exist on the Connect tab (Tools → Preferences → Wi-Fi tab → Add or a network in the Preferred
Network list → Edit → Connect tab.):
Do not open my browser: With this option selected, when you connect to a Wi-Fi network, VZAccess Manager will not
automatically launch your web browser.
Open my browser to my default home page: With this option selected, when you connect to a Wi-Fi network VZAccess
Manager will automatically launch your web browser and your default home page will load.
Open my browser to this URL: With this option selected, when you connect to a Wi-Fi network, VZAccess Manager will
automatically launch your web browser but do it in such a way that the URL you specify will load instead of your
home page.
Disable IE Proxy settings for this connection: This option provides an automatic method to turn off proxy settings when
connecting to a Wi-Fi network. This would typically be used if you normally use proxy settings at work to access the
Internet and you wanted to access the Internet directly via Wi-Fi without using VPN (Virtual Private Networking)
software.
Run program on connection: This allows automatically running a program when you use VZAccess Manager to connect
to a Wi-Fi network. Select the browse button to browse to the desired application you want to run when you connect
to a Wi-Fi network using VZAccess Manager. The application will run for all Wi-Fi connections made from
VZAccess Manager.
VZAccess Manager from Verizon Wireless VZAccess Manager Settings
User Guide for the Kyocera KPC650 29
VPN Tab
The following options exist on the VPN tab (Tools → Preferences → Wi-Fi tab → Add or a network in the Preferred
Network list → Edit → VPN tab):
Disable: When you connect to a Wi-Fi network, VZAccess Manager will not automatically launch your VPN client.
Microsoft VPN: If the network you are connecting to supports using Microsoft's VPN, you can select this option and
select the VPN connection you normally use from the drop down list. You can also use the Add VPN to create a
Microsoft VPN connection. When you use VZAccess Manager to connect to the Wi-Fi network you added or edited,
it will automatically launch your VPN connection.
Cisco VPN: If Cisco VPN software is installed, you can select this option to cause VZAccess Manager to automatically
launch your Cisco VPN software when you connect to the Wi-Fi network you added or edited, using VZAccess
Manager.
Other VPN Application: This allows you to automatically run any VPN program when you use VZAccess Manager to
connect to the Wi-Fi network you added or edited. Select the browse button to browse to the desired VPN application
you want to run when you connect to the Wi-Fi network you added or edited, using VZAccess Manager. If you have a
shortcut you normally use to launch your VPN application you may want to right click on it and select properties to
see where the program is located and how it's named.
Options Tab
The last tab in Preferences that has Wi-Fi specific settings is the Options tab (Tools → Preferences → Options):
Only show preferred wireless networks at start up: This only applies to Wi-Fi networks. If checked, at startup, only
networks in your Preferred list on the Wi-Fi tab are displayed (networks you have connected to in the past) otherwise,
all detected networks are displayed. You also have the option in the main screen of VZAccess Manager of selecting
"Show All Networks" when only preferred networks are displayed and you have the option to select "Show
Preferred" networks when VZAccess Manager is set to show all detected networks.
Display advanced Wi-Fi network information: This only applies to Wi-Fi networks. If checked, additional information will
be displayed for Wi-Fi networks such as the channel, MAC address and type of security.
The rest of the features on this tab are explained in “General Preferences” on page 19.
Additional VZAccess Manager Features VZAccess Manager from Verizon Wireless
30 User Guide for the Kyocera KPC650
Additional VZAccess Manager Features
In addition to the basic features mentioned in previous sections, VZAccess Manager has the additional features listed
below.
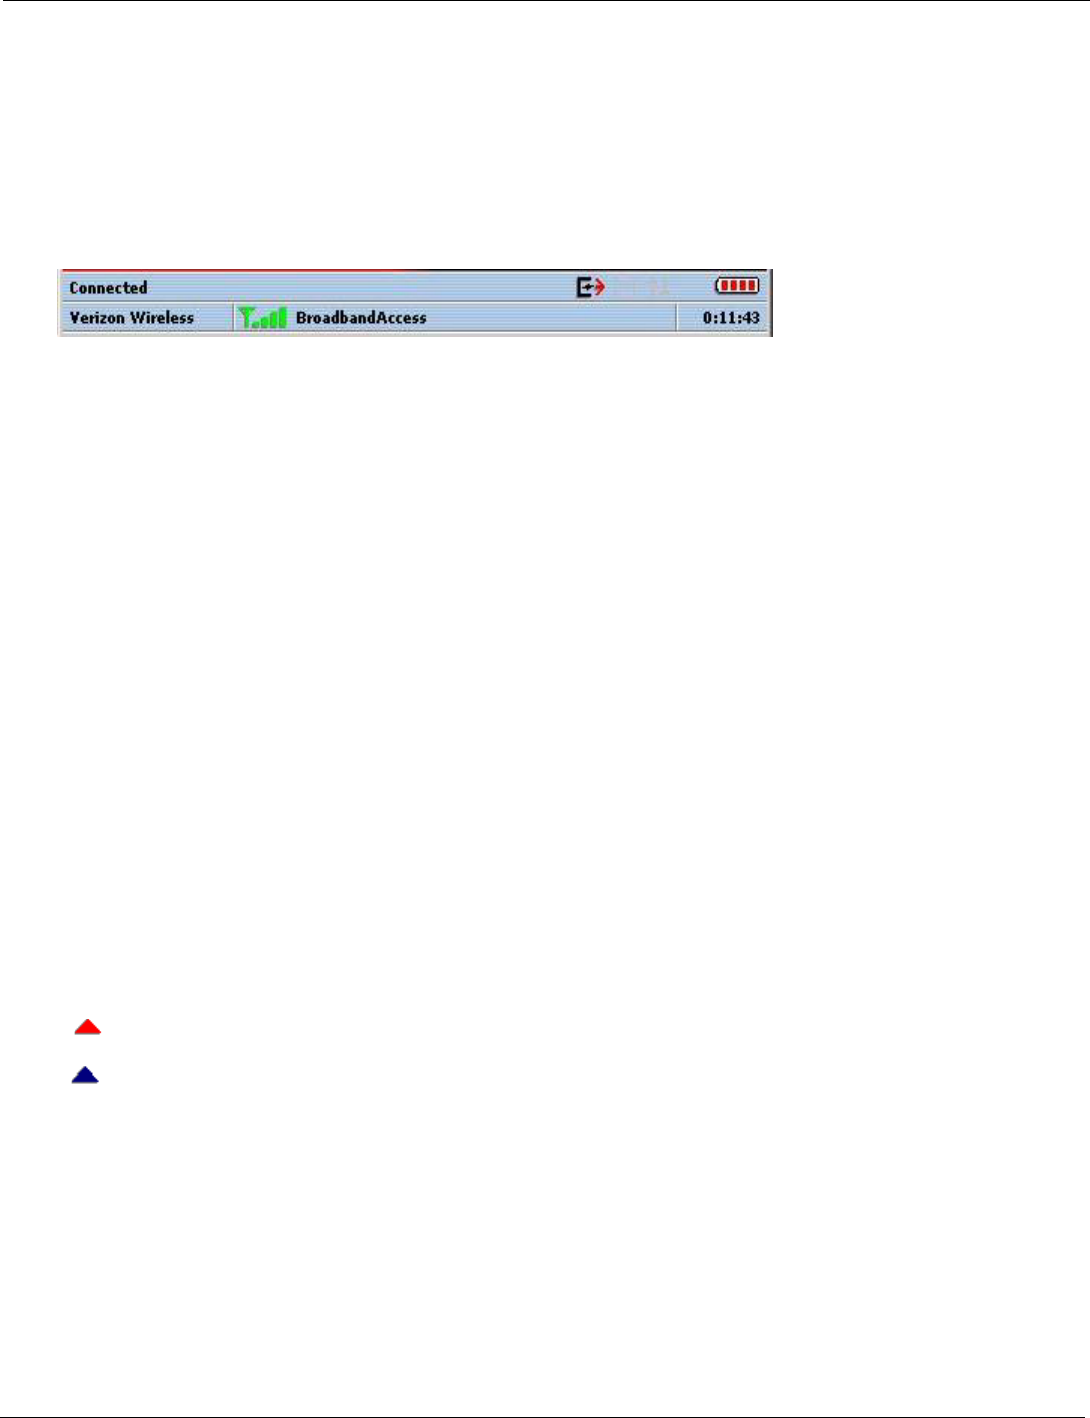
The Status Bar
The details of your current connection can be seen in the status bar at the bottom of the VZAccess Manager interface.
This status bar is always visible when the interface is fully expanded. For information on minimizing the VZAccess
Manager interface, refer to “Minimizing the Interface” on page 32.
Connection Status: The text on the top left portion of the status bar above "Verizon Wireless" reflects your current state.
During an active connection, this text changes to Connected. If you are not connected, Not Connected displays.
WWAN PC Card Status Area:
The text that reads Verizon Wireless can change to the following:
Device not inserted - Your WWAN PC Card is removed from the laptop.
Device not activated - Your PC Card needs to be activated.
Coverage: For PC cards, an icon will display if you are in NationalAccess or BroadbandAccess coverage. Hover the
mouse to see the tool tip showing the name of the current network.
New TXT: If your device supports TXT messaging, an icon appears on the status bar to show that you have a new TXT
message waiting. Double-click on the icon to jump to the TXT view to see the message.
Throughput: The amount of data that you have sent and received since the current network connection was initiated
can be seen by holding the mouse over the green up and down arrows on the right side of the status bar.
Battery Level: The current battery level of your mobile phone can be seen on the right side of the status bar.
Elapsed Time: The amount of time that has elapsed since the current network connection was initiated is tracked on the
lower right side of the status bar.
Roaming Status: VZAccess Manager displays Roaming status for PC Cards. These icons will show on status bar in
these scenarios:
Icon Status
Roaming
Extended Network
No icon displayed Home Network
VZAccess Manager from Verizon Wireless Additional VZAccess Manager Features
User Guide for the Kyocera KPC650 31
The Toolbar Buttons
Connect: Displays all of your available wireless connections and networks.
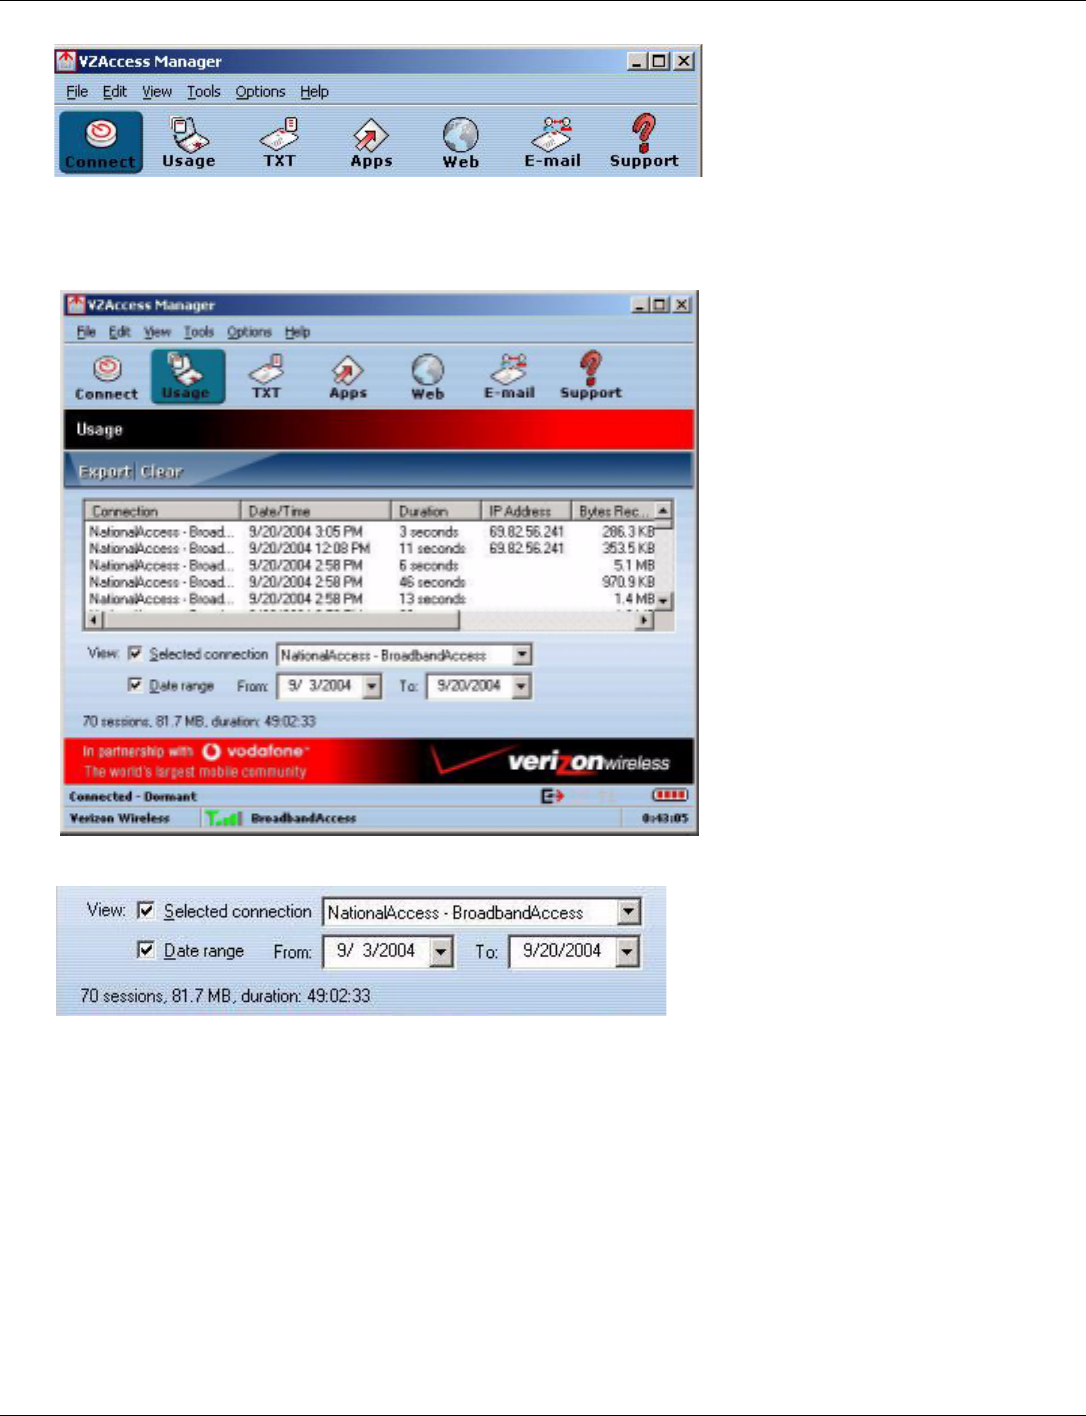
Usage: Provides a concise session log of your network activity. Click on a column heading to sort the log. This
window also displays the total number of sessions as well as the total time connected.
The information displayed in the Usage log can be customized using the controls that appear just below the list.
To view only the connection history of a specific network type, check the Selected connection checkbox and select the
desired type from the drop-down list. To view only the connections made during a specific interval, check the Date
range checkbox and specify the date in the From: and To: fields.
To export this log as a CSV file, click the Export button that is just above the log. To clear the log, press the Clear
button. Note that clearing the log cannot be undone.
Apps: Add applications here that you want easy access to while connected to the wireless Internet. VZAccess
Manager will pre-load into this view links to Verizon Wireless web sites, and any Microsoft Office applications you
have loaded on your computer.
TXT: The TXT button allows you to send short text messages to any other wireless device that supports SMS. Note
that this button is only available when using a wireless device that supports SMS.
Web: Launches the default web browser on your computer.
Additional VZAccess Manager Features VZAccess Manager from Verizon Wireless
32 User Guide for the Kyocera KPC650
Email: Launches the default email application on your computer.
Support: Displays a variety of help options available to you. Click this button to find assistance with a problem, to
explore the full range of VZW products and services, or to contact Verizon Wireless.
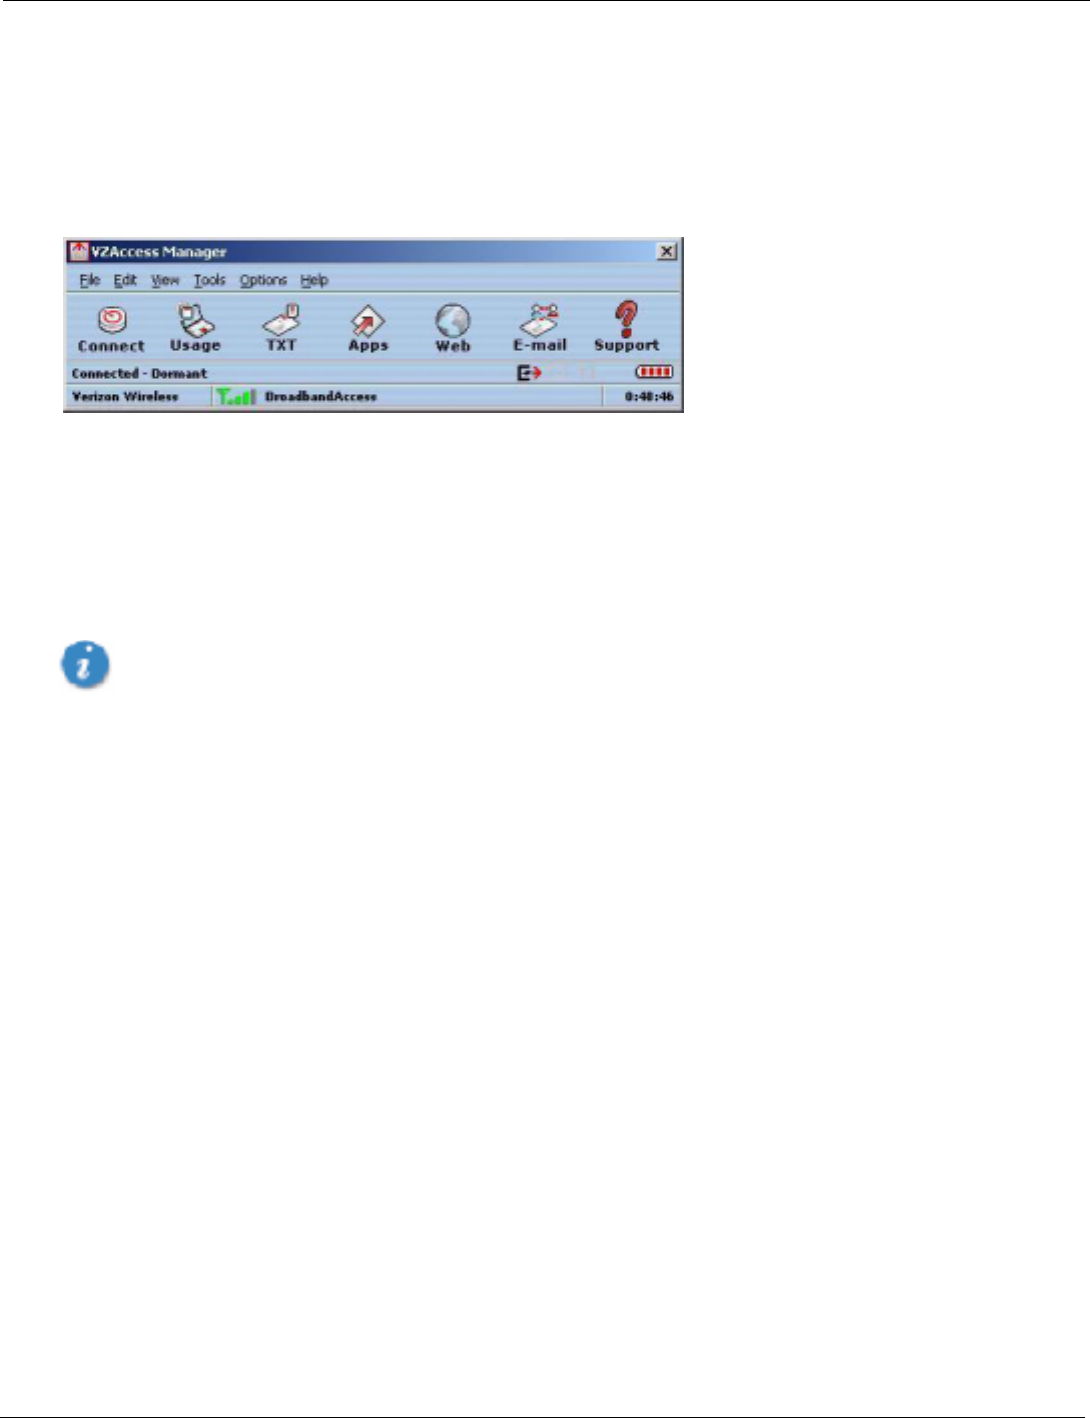
Minimizing the Interface
The VZAccess Manager interface can be minimized to take up as little screen real estate as possible. To minimize the
interface, select View → Minimum.
To return the VZAccess Manager interface to the normal size, select View → Minimum again.
The Tools Menu
Preferences: Allows you to set preferences for WWAN, WiFi, Options, Venturi and updates.
Control Panels: Access to your systems Modem, Network and Dial-Up Connections, and Internet control panels. You can also
see all control panels by selecting All.
The following options are only applicable if using a WWAN device (Wireless Phone and cable or 1xRTT/
CDMA PC card) that supports dial-up accounts
Dial-Up Accounts: Add, edit, or copy wireless dial-up accounts.
• Add Wireless: This is used to create a wireless dial-up connection from scratch.
• Add Other: This is used to create a regular dial-up connection from scratch.
• Edit: This is used to edit properties of any dial-up connection.
• Copy: See section on Using Dial-Up Connections.
The Options Menu
Refresh Networks: This causes VZAccess Manager to verify devices connected and to scan for available Networks. Use
this feature if you connected your equipment after launching VZAccess Manager. Pressing the F6 function key can
also access this option.
Refresh Signal Levels: This causes VZAccess Manager to query signal levels and update its display. This will also
update the battery display for your WWAN device if it is not in an active data session. Signal levels are automatically
refreshed when you launch VZAccess Manager, connect or disconnect. Pressing the F5 function key can also access
this option.
Statistics: If you selected to detect and install Wi-Fi during installation, there will be a Wi-Fi statistics tab with
additional information and tools that are helpful in the event any troubleshooting of the connection is required. You
can view key statistics including bandwidth and your IP address information, release your IP address, renew your IP
address. If you selected to detect and install a WWAN device during installation, there will be a Statistics tab that will
show data speeds during a session when using the WWAN device. Quick 2 Net is capable of data speeds bursting up
to 14.4 Kbps. NationalAccess delivers typical speeds of 40 to 60 kbps, bursting up to 144 kbps. BroadbandAccess
provides broadband-like speeds (up to 1.54 Mbps). There is also a My Computer tab; this tab has key information
about your computer that may be helpful in troubleshooting any problems that may occur. It also has the option of
being e-mailed to Verizon Wireless Technical Support.
VZAccess Manager from Verizon Wireless Text messaging
User Guide for the Kyocera KPC650 33
Test WWAN Device: Retrieve and display detailed information about your WWAN device (Wireless phone and cable or
1xEV-DO/1xRTT/CDMA PC Card) such as manufacturer, model, version, etc. Also, see the current battery (not with
PC cards) and signal strengths. This information can be valuable when troubleshooting a problem.
Run Wizard: Runs the Setup Wizard again. Useful if you need to reconfigure VZAccess Manager to use a new mobile
handset or PC Card.
The Help Menu
Contents: Launches this help file. You can also access this help file from your installation CD.
Check for Updates: Can be used with any connection to the Internet to check for software updates for VZAccess
Manager. Note: If downloading an update wirelessly, normal usage charges apply. “Updates Tab” on page 21.
Device Support Page: Takes you to the Verizon Wireless device support page that contains information about wireless
devices, useful tips and hardware manuals.
E-mail Verizon Wireless Support: This option will attempt to launch your mail client with the default address to e-mail
Verizon Wireless Support.
About VZAccess Manager: Displays the software version.
Text messaging
Your Kyocera KPC650 is short message service (SMS) capable. Before sending messages, you must have the mobile
numbers of your contacts set up your SMS phonebook. To do this:.
1. Click the TXT button on the
VZAccess Manager home screen to open the
TXT Messaging window
2. Click on the To button located toward the
bottom part of the window. The SMS
Phonebook screen appears.
3. Click Add. The Phonebook Entry screen opens
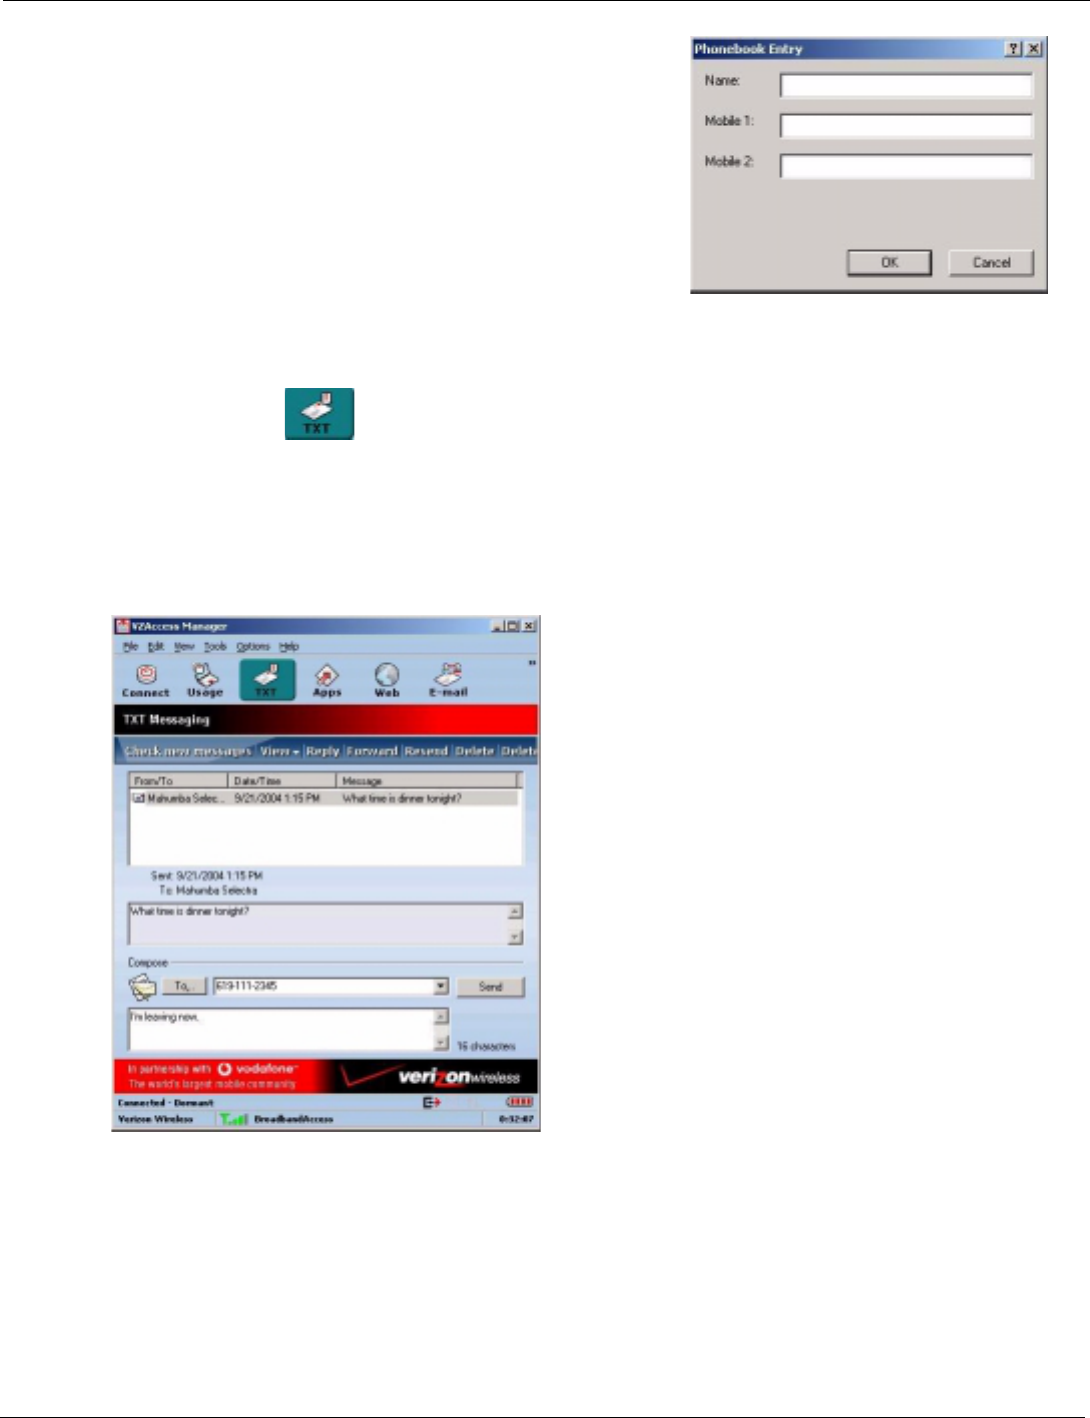
Text messaging VZAccess Manager from Verizon Wireless
34 User Guide for the Kyocera KPC650
Sending a text message
1. Click the TXT button on the VZAccess Manager home screen to open the TXT Messaging window..
2. Click on the To: button, highlight the contact you want to send a message to, and click Select.The address is laced
in the To: text field.
3. Type your message in the Compose text field.
4. Click the Send button. A message alerts you that VZAccess Manager is attempting to send the message. Shortly
after you will receive a confirmation that the message has been sent or that the attempt failed.
Options within TXT Messaging
Check new messages: Click on this text to update message that have been sent to you.
View: Check to see Received Messages, Sent Messages, or All messages in the display window at the top of the
screen.
Reply: Reply to any messages you have received. Select the message to which you want to reply, click Reply, and type
your text. Click Send.
Forward: Send an existing message to another address. Highlight the message, click Forward, Click the To button and
choose the recipient. Click Send.
4. Enter the name and phone number(s) of your
contact and click OK.
5. Repeat for each contact you want to add.
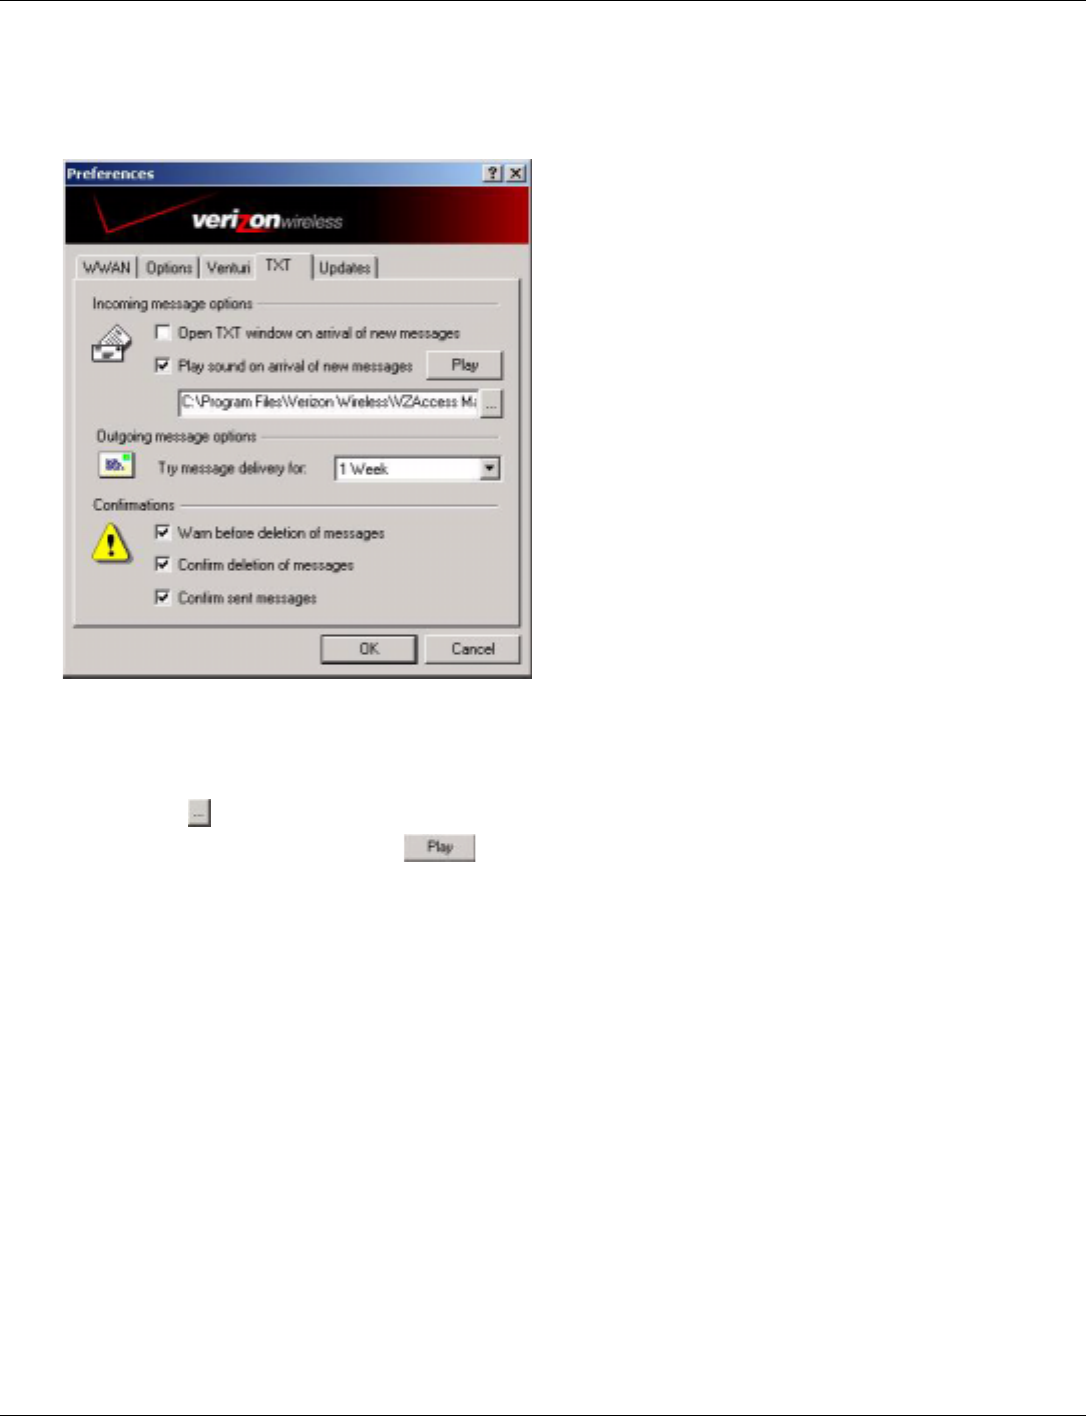
VZAccess Manager from Verizon Wireless Text messaging
User Guide for the Kyocera KPC650 35
Resend: Resend the message to the original recipient.
Delete: Delete messages from your inbox. Highlight the message, click Delete. A warning will confirm that you want to
delete the message. Select Yes.
Setting TXT preferences
Open TXT Window on arrival of new messages: Allows you to set how text messages are delivered. Placing a checkmark in
this box will cause open a new window when a TXT message arrives for you.
Play sound on arrival of new messages: Checking this box allows you to set sounds for incoming messages. Use the
Browse button to search for your sound files. Click on the sound file you want to set. Confirm you set the sound
you wanted by clicking the Play button .
Try message delivery for: Set the timeframe for which how long you want to attempt to send messages if they are
undeliverable. Use the dropdown to set 1 Hour, 6 Hours, 24 Hours, 72 Hours, or 1 Week.
Warn before deletion of messages: Place a checkmark in this box if you want a warning before messages are deleted.
Confirm deletion of messages: Place a checkmark in this box to receive confirmation when messages are deleted.
Confirm sent messages: Place a checkmark in this box to receive confirmation of when messages have been sent.

Supported Protocols Venturi Compression Software
36 User Guide for the Kyocera KPC650
Venturi Compression Software
Venturi, on average, roughly doubles your web browsing performance when connecting to the Internet when using a
WWAN device (Wireless phone and cable or 1xEV-DO/1XRTT/CDMA PC Card) and the NationalAccess -
BroadbandAccess, NationalAccess or Quick 2 Net (14.4 kbps) connection. Performance can vary due to many
factors.
Here's how it works
The Venturi client intercepts your request from your web browser and passes it to a Venturi compression server on the
Verizon Wireless Network. The server gets your web content, reduces the quality of the graphics, to reduce their size,
and compresses the text that makes up the rest of the web page. The now compressed page, smaller in size, is sent to
the client. The client decompresses the page and passes it to your browser. Performance is improved since less
information has to be sent for you to get your web page.
Supported Protocols
• HTTP (used for web pages)
• HTTPS (used for secure web pages). Note: Due to encryption secure web pages are not compressed, but Venturi still
improves HTTPS performance.
• FTP (used when accessing Internet file servers)
• POP3 (used to access some e-mail servers)
• IMAP (used to access some e-mail servers)
• SMTP (used for e-mail, send mail servers)
• Telnet and Secure Shell (used for terminal applications accessing other computers)
Note: Although Venturi supports these protocols, you may not be able to access certain servers if they are not accessi-
ble via any connection to the Internet. For example, many Internet Service Providers (ISPs) only allow access to their
send mail servers when you are connected to the Internet through them. They do this to minimize fraudulent use of
their send mail servers. An alternative is to use the Verizon Wireless Send Mail Server or to use web based e-mail,
such as Microsoft's Hotmail (http://www.hotmail.com). For more details, see section on Using E-mail with Mobile
Office.
Using Venturi
Venturi Icons
The Venturi compression software loads automatically at startup. A “V” icon is available in your system tray. This
icon indicates the following states:
A purple "V" indicates that Venturi is idle and on.
A spinning “V” indicates Venturi is processing requests.
A “V” with a red X indicates that either the Venturi compression software is off or in bypass mode. If
the client is on and enters bypass mode, this is an indication that the client was unsuccessful
communicating with the Venturi server. In the rare case of this happening, Venturi will automatically
resume working as soon as it's able to reach the server. While in bypass mode you will still be able to
access web pages, but Venturi compression will not occur.

Venturi Compression Software Using Venturi
User Guide for the Kyocera KPC650 37
Venturi Options
If you right click on the Venturi task tray icon the following menu appears.
About Venturi: Displays the version of the client.
Speed/Image Selection: Select the quality of graphics you want Venturi to provide by clicking on one of the four car
images. It's a trade-off between speed and image quality. With any of these settings, you can always force a web page
to load with uncompressed images by doing a forced refresh. If using Internet Explorer this is accomplished by
holding down the Ctrl key + Alt key + the Shift key and then clicking on the refresh icon. If using Netscape, hold down
the shift key and click on the "Reload" icon.
OFF and AUTO: Allows you to switch the client between AUTO and OFF (or ON and OFF, if configured for manual mode).
If you are using Virtual Private Networking (VPN) or are connected wirelessly to a private network or Internet
Service Provider where the Verizon Wireless Venturi servers are not reachable, you may want to turn Venturi off so
you don't have to wait for it to determine that no server is available and switch into its bypass mode. Also, in the rare
case you have an issue accessing a particular site, you can also temporarily turn Venturi off. Remember to turn it back
on when you want to use it.
The BroadbandAccess / NationalAccess / Quick 2 Net version of Venturi is configured by default to use Auto mode.
This means that it loads, turns off , and expects an external program to turn it on when you connect wirelessly
and turn it off when you disconnect. The VZAccess Manager software performs these functions.
Default Venturi Server: Displays the address for the Venturi compression servers on the Verizon Wireless Network, this
is set to expressnet.myvzw.com. By default this value cannot be changed but may be used for troubleshooting when
working with Verizon Wireless support.
Exit: Closes Venturi.
Using Venturi
Make sure that Venturi is set to AUTO (or ON if configured for manual mode), connect to the Internet by double-
clicking on NationalAccess - BroadbandAccess, NationalAccess, or Quick 2 Net (14.4kbps) from VZAccess Manager. Once
connected, start browsing web pages.

Settings in other Applications Venturi Compression Software
38 User Guide for the Kyocera KPC650
Additional Tips:
If you have trouble loading a page or signing onto a site you can temporarily turn Venturi off as follows:
1. Click Stop in your browser to stop any data being processed by Venturi. The "V" should stop spinning. If it does
not, exit your browser.
2. Right-click on in the task tray to bring up the user interface.
3. Click on OFF.
4. Click on Refresh or Reload in your browser, to reload the page. If you had to exit your browser in step 1, launch it
and navigate to your desired page. (It should also appear in your browser's history.)
5. To turn Venturi back on, simply right-click on in the task tray and click on AUTO (or ON if configured for
manual mode).
Note: If your browser fails to stop passing data to Venturi and will not stop spinning to allow you to toggle Venturi
off, exit your browser, toggle Venturi off, and then launch your browser again.
If you ever have a web page where a graphic fails to load, try right-clicking where the graphic should have loaded and
select Show Picture or View Image, and just that image will be requested and load.
Downloading Venturi
The VZAccess Manager should come with the latest version of Venturi, but you can check the following web site for
updates to this software: www.venturiwireless.com/support.html.
For troubleshooting tips on using Venturi, see the Online help.
Settings in other Applications
This section describes special settings that might be required to use Personal Digital Assistants (PDAs) over the
Verizon Wireless wireless network.
Sync Applications
Palm Incorporated's HotSync® and Microsoft Corporation's ActiveSync® are used for PDAs. These programs
synchronize files between a laptop or desktop PC and the PDA, and may conflict with your WWAN device. If you
have any problems using your WWAN device, try turning these programs off as explained below:
To turn HotSync On and Off: Right-click on the HotSync icon in your task tray to bring up HotSync options. Click on
Local Serial and Local USB to remove the check marks. This disables HotSync. If HotSync was causing a conflict your
WWAN device should now work. Repeat this process to recheck Local Serial and Local USB to re-enable HotSync. If
you are using an early version of HotSync, you may not be able to uncheck the Local options without first checking
Modem or Network. If this is the case, you can always select Exit to close HotSync and launch it from the Start menu
the next time you need it.
To turn Windows CE Services On and Off: For the original Windows CE services: Right-click on the Windows CE
Services icon in your task tray and select/deselect Enable Serial Connection. Make sure it is unchecked for Mobile
Office and checked when you want to sync your Windows CE based PDA.
For Microsoft ActiveSync: Right-click on the ActiveSync icon in your task tray and select Connection Settings.
Select/deselect Allow serial cable or infrared connection to this COM port: and Allow USB connection with this desktop computer.
Make sure they are unchecked if you are having trouble connecting with your WWAN device and restore them to their
original settings when syncing your PDA. Click OK when finished.

Venturi Compression Software Settings in other Applications
User Guide for the Kyocera KPC650 39
Proxy Settings
Most corporations go through a proxy server to access the Internet via the corporate network. If you wish to access
the internet directly through the Verizon Wireless BroadbandAccess, NationalAccess, or Quick 2 Net (14.4 kbps)
connection, proxy settings must be turned off. If you are connecting to your corporation's network using VPN and
your corporation uses proxies, then you would need the correct proxy settings to be able to access the Internet. For
exact details on the proxy settings needed when accessing your corporate network, contact your corporate network
technical support department.
Performance, when accessing the Internet directly, is improved because you eliminate any overhead of the VPN
client. Also for the NationalAccess - BroadbandAccess, NationalAccess, and Quick 2 Net (14.4 kbps) connection, if
the Venturi compression software is installed, it also increases performance when you are accessing the Internet
directly. When using a VPN client, it creates a secure connection to your corporate network and prevents accessing
the Venturi compression servers on the Verizon Wireless network, so Venturi is of no value when you are using VPN.
For additional details on Venturi, refer to “Using Venturi” on page 36.
Proxy settings if using Internet Explorer (version 5 and newer)
If you are using proxy settings, when connected to a corporate network via your Network adapter, they will be entered
under LAN settings. These settings apply to devices that appear to windows as Network adapters, which include
Wi-Fi adapters as well as your Network adapter. You can access the LAN Settings by doing the following:
1. In Internet Explorer, select Tools → Internet Options.
2. Then select the Connections Tab then LAN Settings.

Settings in other Applications Venturi Compression Software
40 User Guide for the Kyocera KPC650
If your company uses proxy settings they will appear here.
3. If you are only using Wi-Fi connections without VPN and you want to access the Internet directly, uncheck the
first three options to turn proxy settings off. If using VPN and if the settings are present leave them as they are. To
restore the settings, navigate back to this screen and recheck any boxes you had unchecked. If using a WWAN
device, the NationalAccess - BroadbandAccess, NationalAccess and Quick 2 Net (14.4 kbps) connections from
within VZAccess Manager have no proxy settings associated with them by default. This means you can access
the Internet directly using these connections but if you connect via VPN and your company requires proxy
settings, you will not be able to access the Internet when connected via VPN. Performance is better if you drop
your VPN connection when you want to access the Internet directly, but you can record all the settings on this
screen and on the screen that appears when you select the Advanced button, then enter these settings in the
properties for your WWAN connections (NationalAccess - BroadbandAccess, NationalAccess, Quick 2 Net [14.4
kbps]).
Note: You can have proxy settings automatically turned off when you connect using Wi-Fi connections , refer to
“Wi-Fi Preferences” on page 25.
4. If you need to enter proxy settings for the NationalAccess - BroadbandAccess, NationalAccess or Quick 2 Net
(14.4 kbps) connection that is used by VZAccess Manager, you would select the connection from the Connections
tab in the previous step and select Settings. The exact names of the connections used by VZAccess Manager are
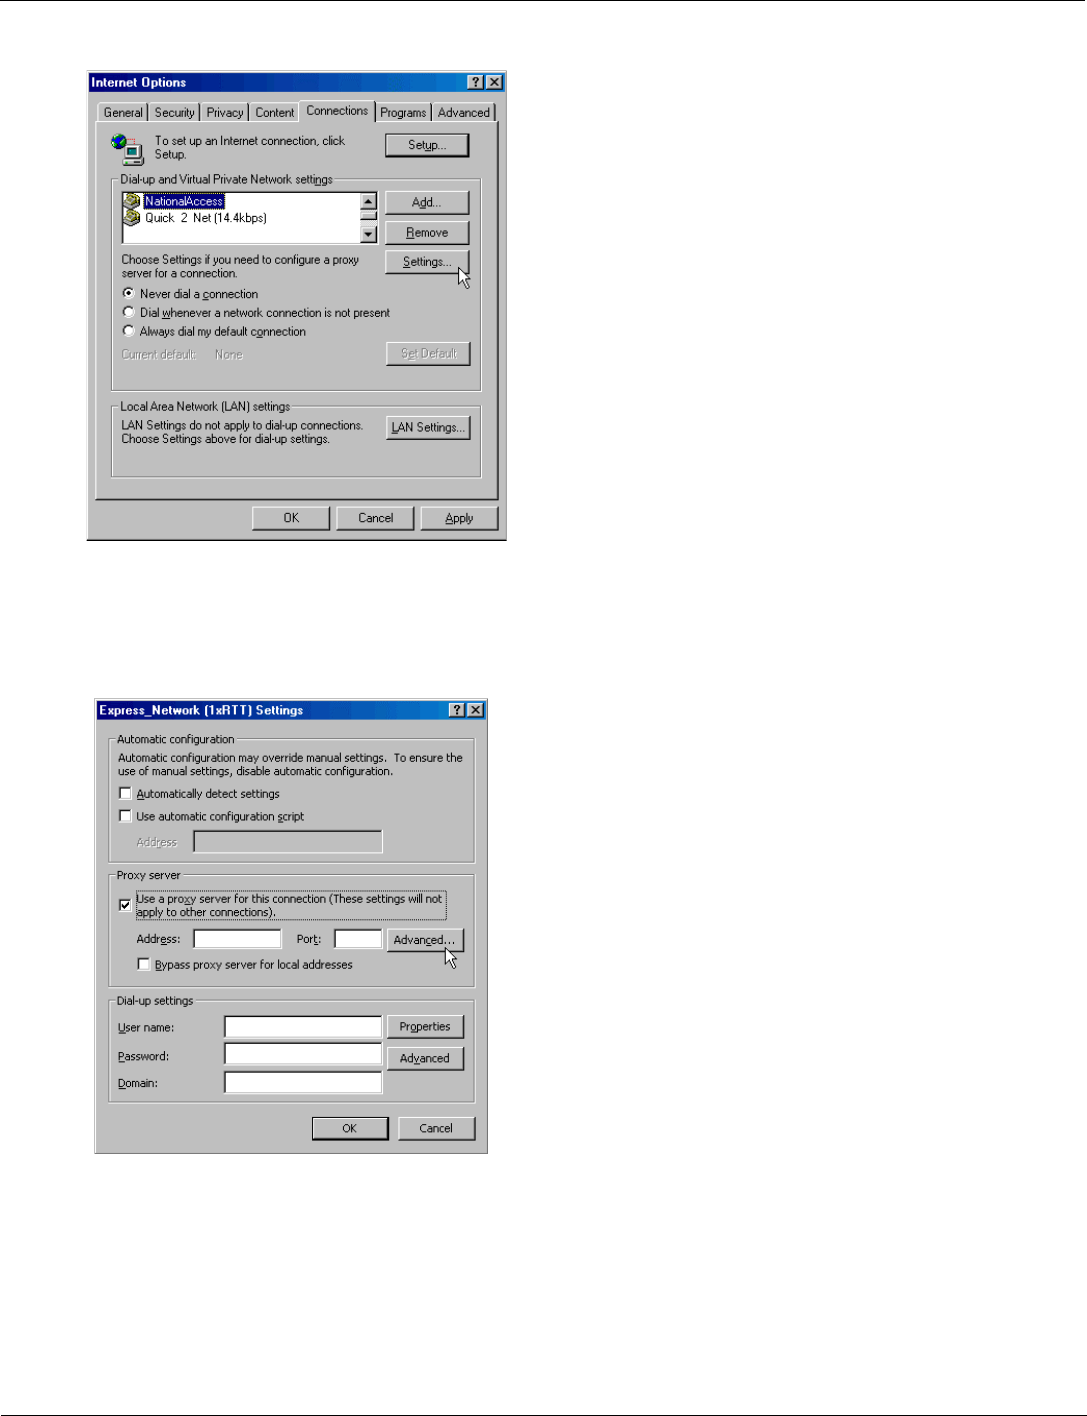
Venturi Compression Software Settings in other Applications
User Guide for the Kyocera KPC650 41
NationalAccess - BroadbandAccess, NationalAccess, and Quick 2 Net (14.4kbps). (If you need to navigate to this
tab, from Internet Explorer's main screen, select Tools → Internet Options → Connections tab.)
5. The settings are displayed, you can now enter the same proxy settings you recorded in Step 3, if you want to use
VPN and your proxy settings with these connections. If necessary also enter the information recorded from the
screen that appears after selecting the Advanced button. To disable proxy settings for these connections, uncheck
the Use proxy server. . . box. Proxy settings must be disabled to access the Internet directly when using these
connections without VPN.
Proxy Settings if using Internet Explorer 4.x:
In Internet Explorer 4.x, proxy settings are global and have to be turned off when accessing the Internet directly
through the Verizon Wireless BroadbandAccess, NationalAccess, or Quick 2 Net (14.4 kbps) connection and back on
if required by your company when using their network to access the Internet or when using VPN.
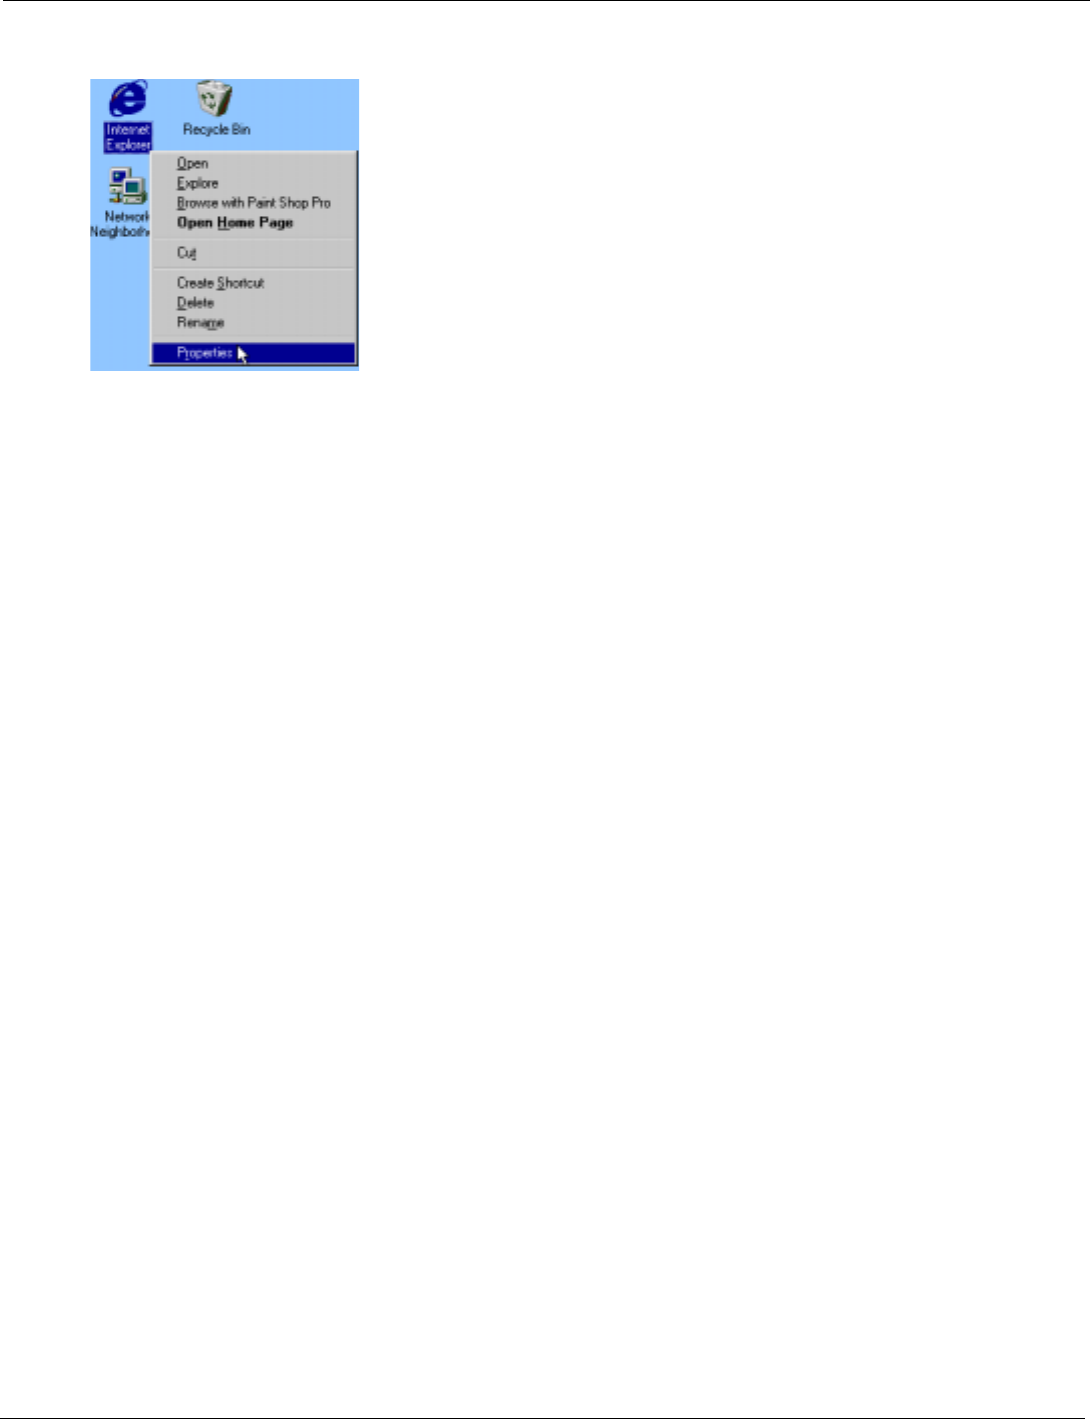
Settings in other Applications Venturi Compression Software
42 User Guide for the Kyocera KPC650
1. Right-click on the Internet Explorer icon and select Properties (or if Internet Explorer is already open go to
Tools → Internet Options...).
2. Click on the Connection tab. Uncheck the box labeled Access the Internet using a proxy server then click OK or Apply.
You may now access the Internet through the Verizon Wireless BroadbandAccess, NationalAccess, or Quick 2
Net (14.4 kbps) connection.
When you wish to access the Internet through your corporate network proxy server, you must repeat these steps,
checking the box labeled Access the Internet using a proxy server.
If your proxy setting is incorrect for the connection you are using, you will get an error whenever you try to go to
any site.
Proxy Settings if using Netscape Navigator 4.0 and higher:
In Netscape Navigator 4.0 and higher, proxy settings are global and have to be turned off when accessing the Internet
directly through the Verizon Wireless BroadbandAccess, NationalAccess, or Quick 2 Net (14.4 kbps) connection and
back on if required by your company when using their network to access the Internet or when using VPN.
1. From within your browser, go to Edit → Preferences.
2. Click on the + beside Advanced then Proxies. Next select Direct connection to the Internet and click OK. You may now
access the Internet through the Verizon Wireless BroadbandAccess, NationalAccess, or Quick 2 Net (14.4 Kbps)
connection.
Reminder: When you wish to access the Internet through your corporate network proxy server, you must repeat these
steps, select Manual proxy configuration and click OK. If your proxy setting is incorrect for the connection you are using,
you will get an error whenever you try to go to any site.
Instructions for AOL Users
AOL supports using other connections to the Internet, so it can be used with the Verizon Wireless BroadbandAccess,
NationalAccess or Quick 2 Net (14.4 kbps) connection.
Note: If you installed AOL after installing the Verizon Wireless Mobile Office Software or if you upgraded to a new
version of AOL and are having trouble accessing web pages. Refer to “Troubleshooting” on page 50 to resolve the
issue.
For instructions on how to configure AOL versions 8.0 or earlier, refer to the 0nline help located under the Help menu
on the VZAccess Manager connect view.
AOL Version 9
AOL supports using other connections to the Internet, so it can be used with the Verizon Wireless BroadbandAccess,
NationalAccess or Quick 2 Net (14.4 kbps) connection.
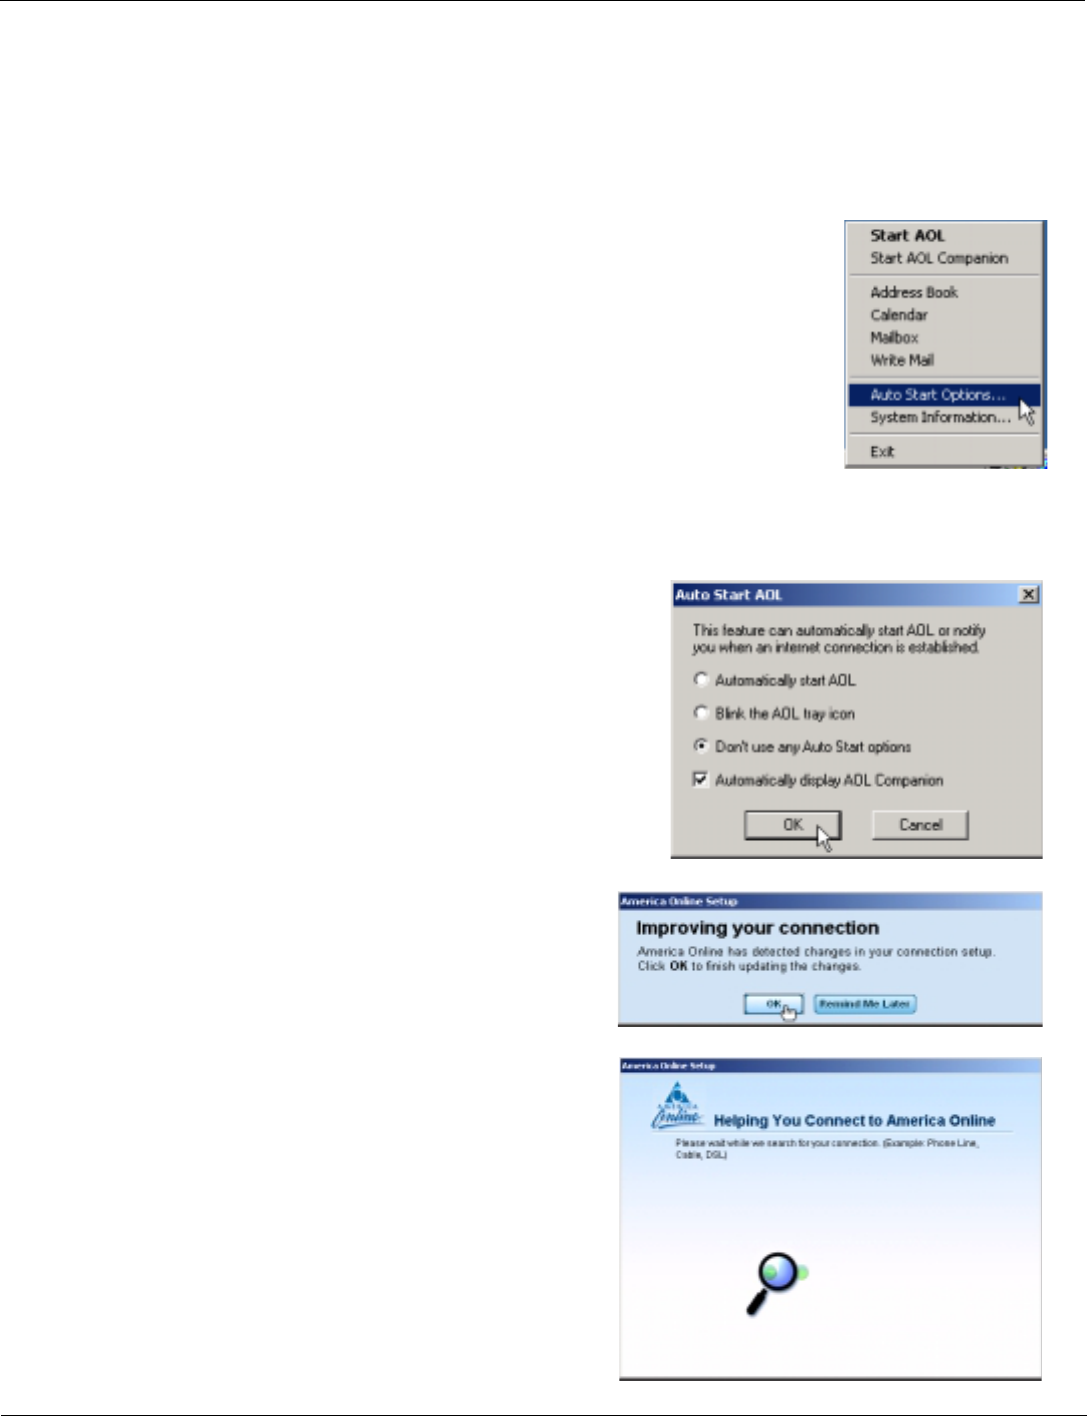
Venturi Compression Software Settings in other Applications
User Guide for the Kyocera KPC650 43
Note: If you installed AOL after installing the Verizon Wireless Mobile Office Software or if you upgraded to a new
version of AOL and are having trouble accessing web pages, click here to see how to resolve this issue in our trouble-
shooting section.
When using the AOL interface, Venturi is unable to compress your Internet traffic, however, Venturi compression will
occur if you launch and use your web browser.
Configuring AOL Version 9
1. Right-click on the AOL icon in your task
tray, and then click on Auto Start Options..
2. Select Don't use any Auto Start options, and then click
OK. (We have found it to be more reliable to manually
launch AOL, rather than to use the Auto Start options.
3. The first time you run AOL (version 9), after setting
your wireless device up as a modem, you may get the
following screen; select OK to proceed. If you do not
get this screen go to Step
4. AOL will attempt to detect how it might be able to
connect
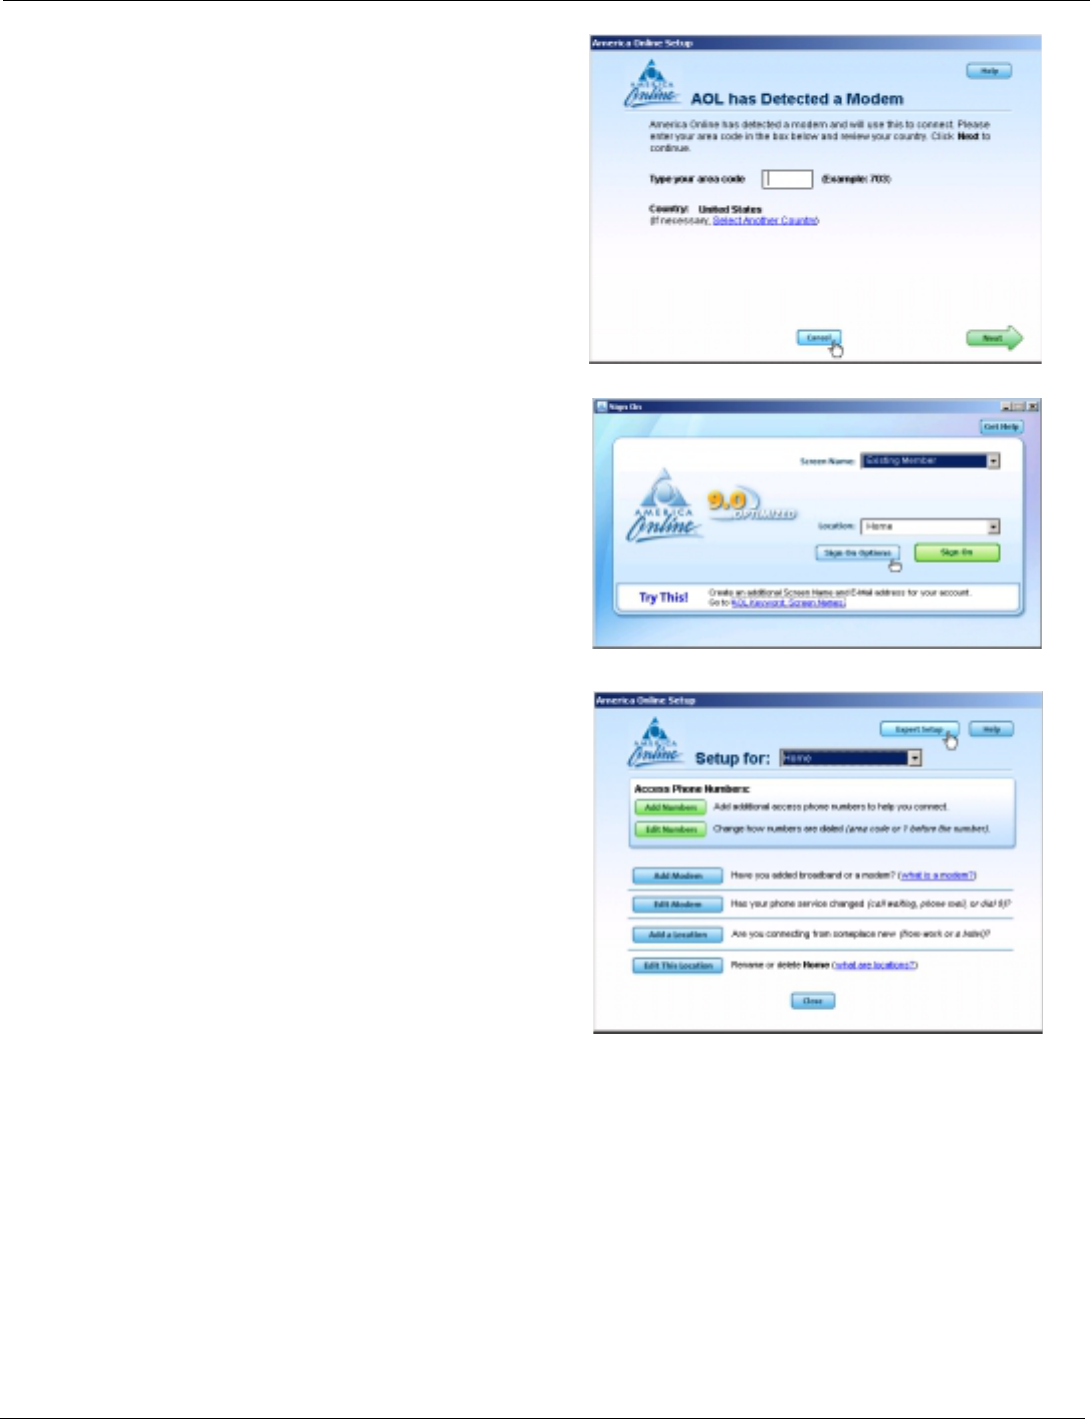
Settings in other Applications Venturi Compression Software
44 User Guide for the Kyocera KPC650
5. Once AOL detects a way to connect, select Cancel.
6. From the sign on screen select Sign On Options.
7. Select Expert Setup.
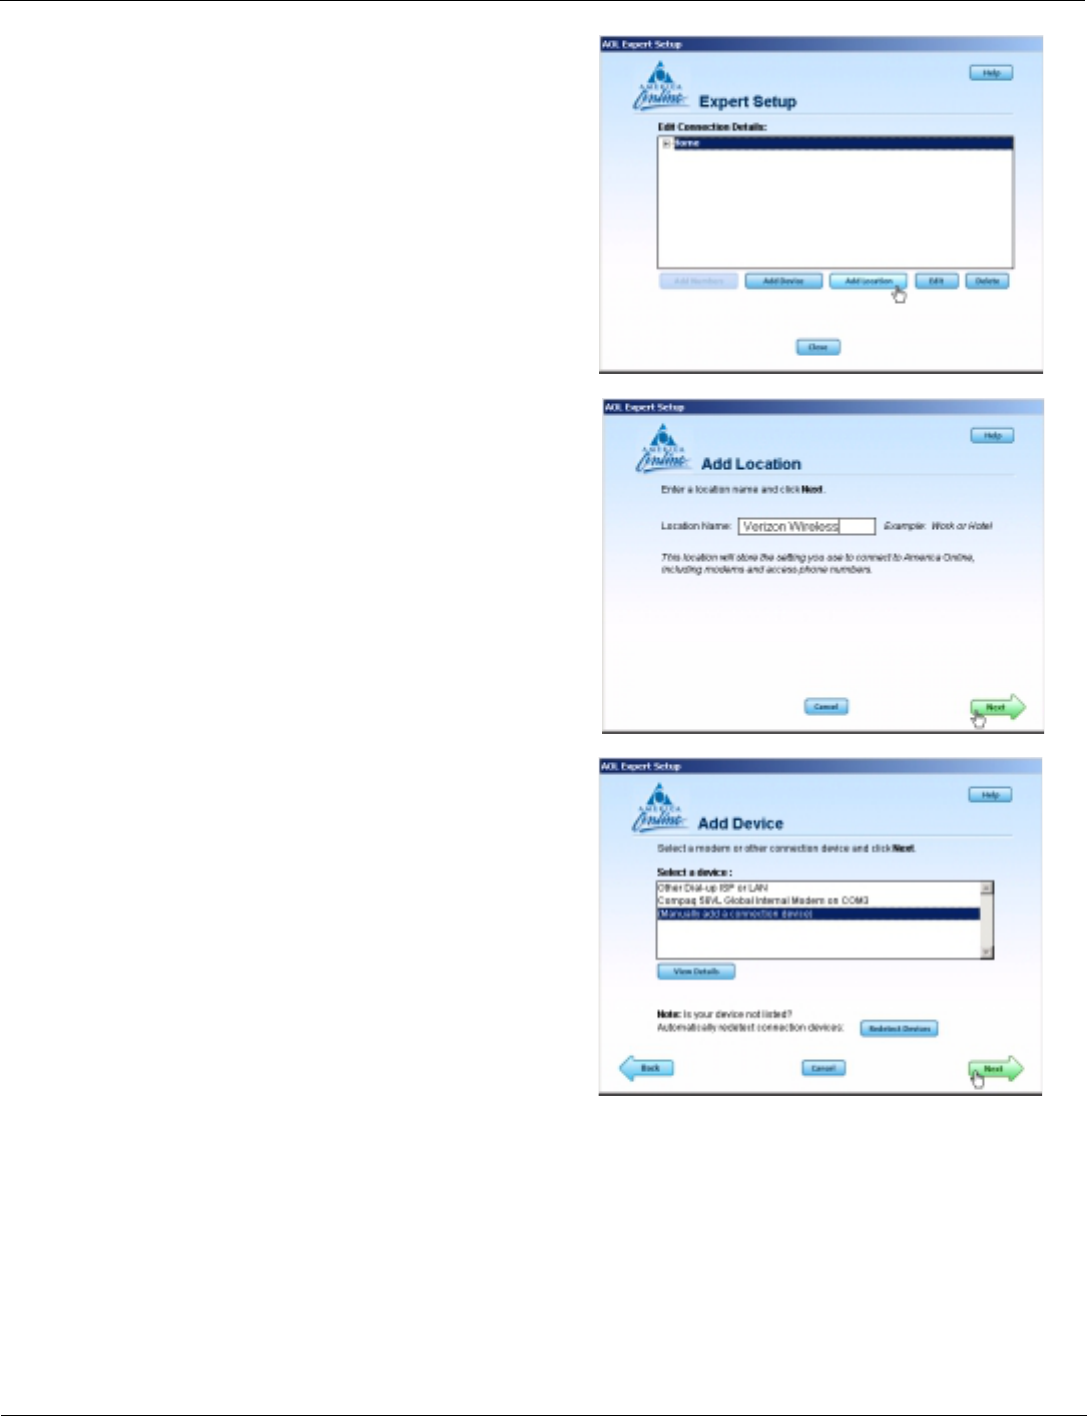
Venturi Compression Software Settings in other Applications
User Guide for the Kyocera KPC650 45
8. Select Add Location.
9. For the location name enter Verizon Wireless and then
select Next
10. ..Select Other Dial-up ISP or LAN, then select Next and go
to Step 10. If this option is not available, select
Manually add a connection device and then select Next.
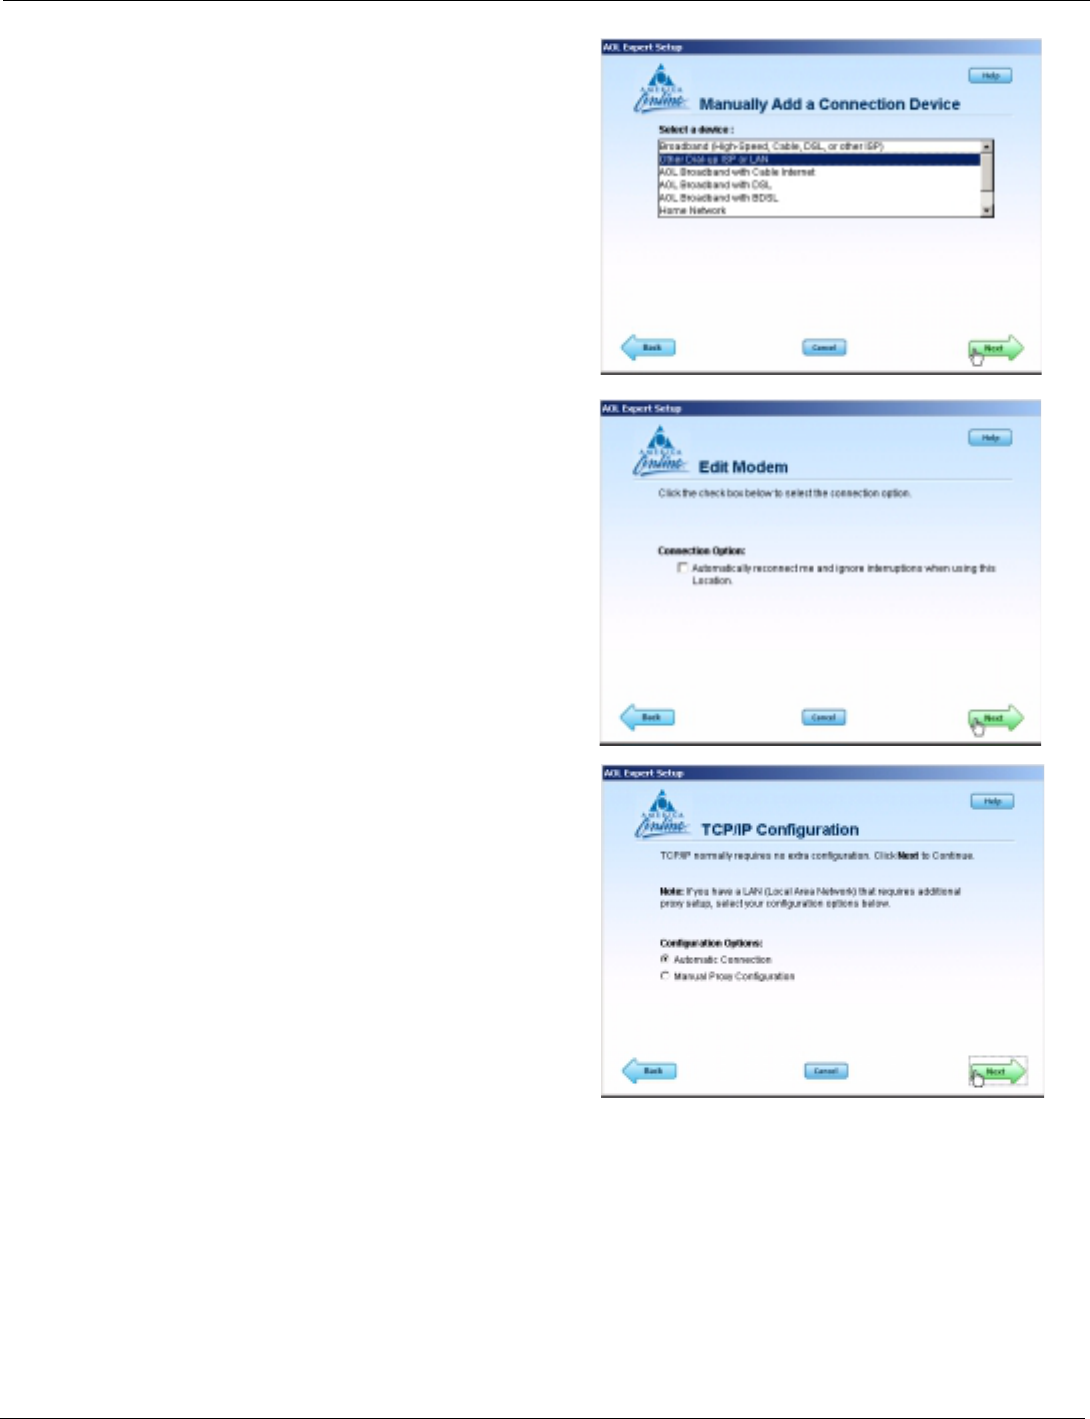
Settings in other Applications Venturi Compression Software
46 User Guide for the Kyocera KPC650
11. Select Other Dial-up ISP or LAN then select Next.
12. Select Next.
13. Select Next.
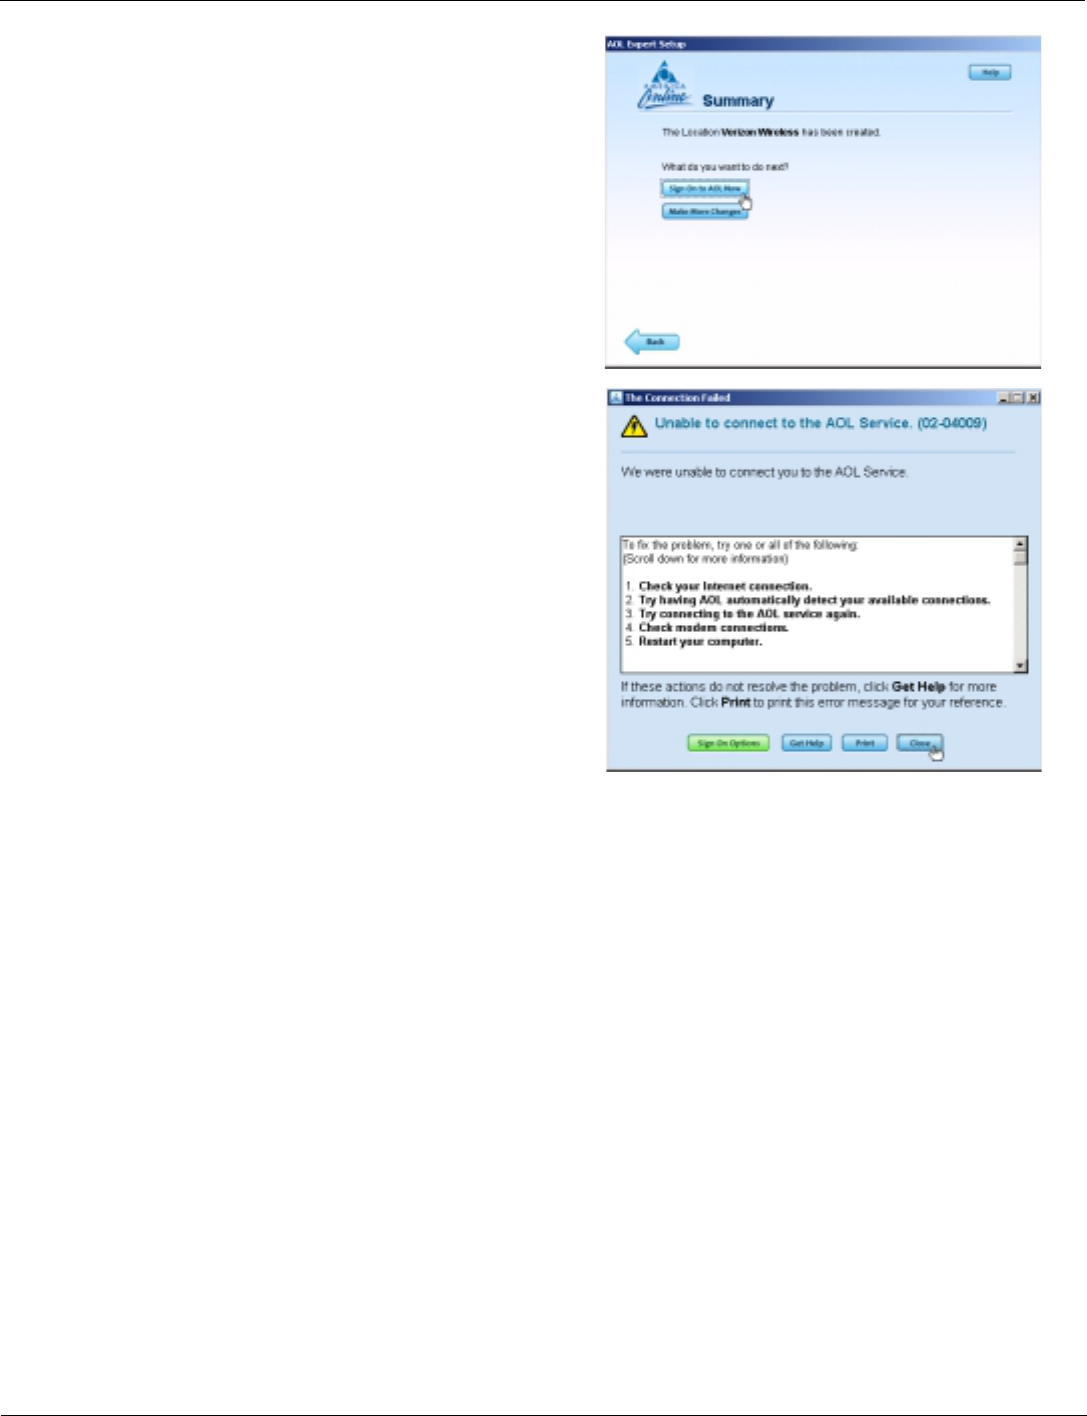
Venturi Compression Software Settings in other Applications
User Guide for the Kyocera KPC650 47
Using AOL Version 9 with your Mobile Office Connections
To use AOL with the Verizon Wireless BroadbandAccess, NationalAccess or Quick 2 Net (14.4 kbps) connection,
select the desired connection from VZAccess Manager's main window and select Connect.
Once connected, launch AOL. From your sign on screen, select Verizon Wireless for the location and sign on. Note: You
can set VZAccess Manager to automatically launch AOL when you get connected. See “Wi-Fi Preferences” on
page 25 and “WWAN Preferences” on page 22. Check the box to Run program on connection:, then click the browse
button to locate and select aol.exe, which should be located in your "C" drive in an America On Line folder, under the
Program Files folder).
Note: If you normally use a landline modem rather than connecting wirelessly, just remember to change the location
back to the one you normally use. Then change it back to Verizon Wireless when you use the Verizon Wireless Broad-
bandAccess, NationalAccess, or Quick 2 Net (14.4 kbps) connection.
Reminder: To disconnect the Verizon Wireless BroadbandAccess, NationalAccess or Quick 2 Net (14.4 kbps)
connection, click on the Disconnect button in VZAccess Manager. (Signing off AOL will not end the call.)
Using E-mail with VZAccess
POP3 E-mail
You can use the Verizon Wireless BroadbandAccess, NationalAccess, or Quick 2 Net (14.4 kbps) connection to
access your POP3 e-mail account if your e-mail provider allows access through other providers (many do). If your
provider restricts access to their outgoing mail server you will get an error message if you are attempting to send mail.
14. Even though AOL reports the location has been
created, you must click on Sign On to AOL Now to save
the changes. Since you are not actually connected to
the Internet, AOL will not actually be able to sign on,
but it will save your changes.
15. Select Close when you get the following error
message. This completes configuring AOL to work
with any connection to the Internet, including
BroadbandAccess, NationalAccess and Quick 2 Net
(14.4 kbps)
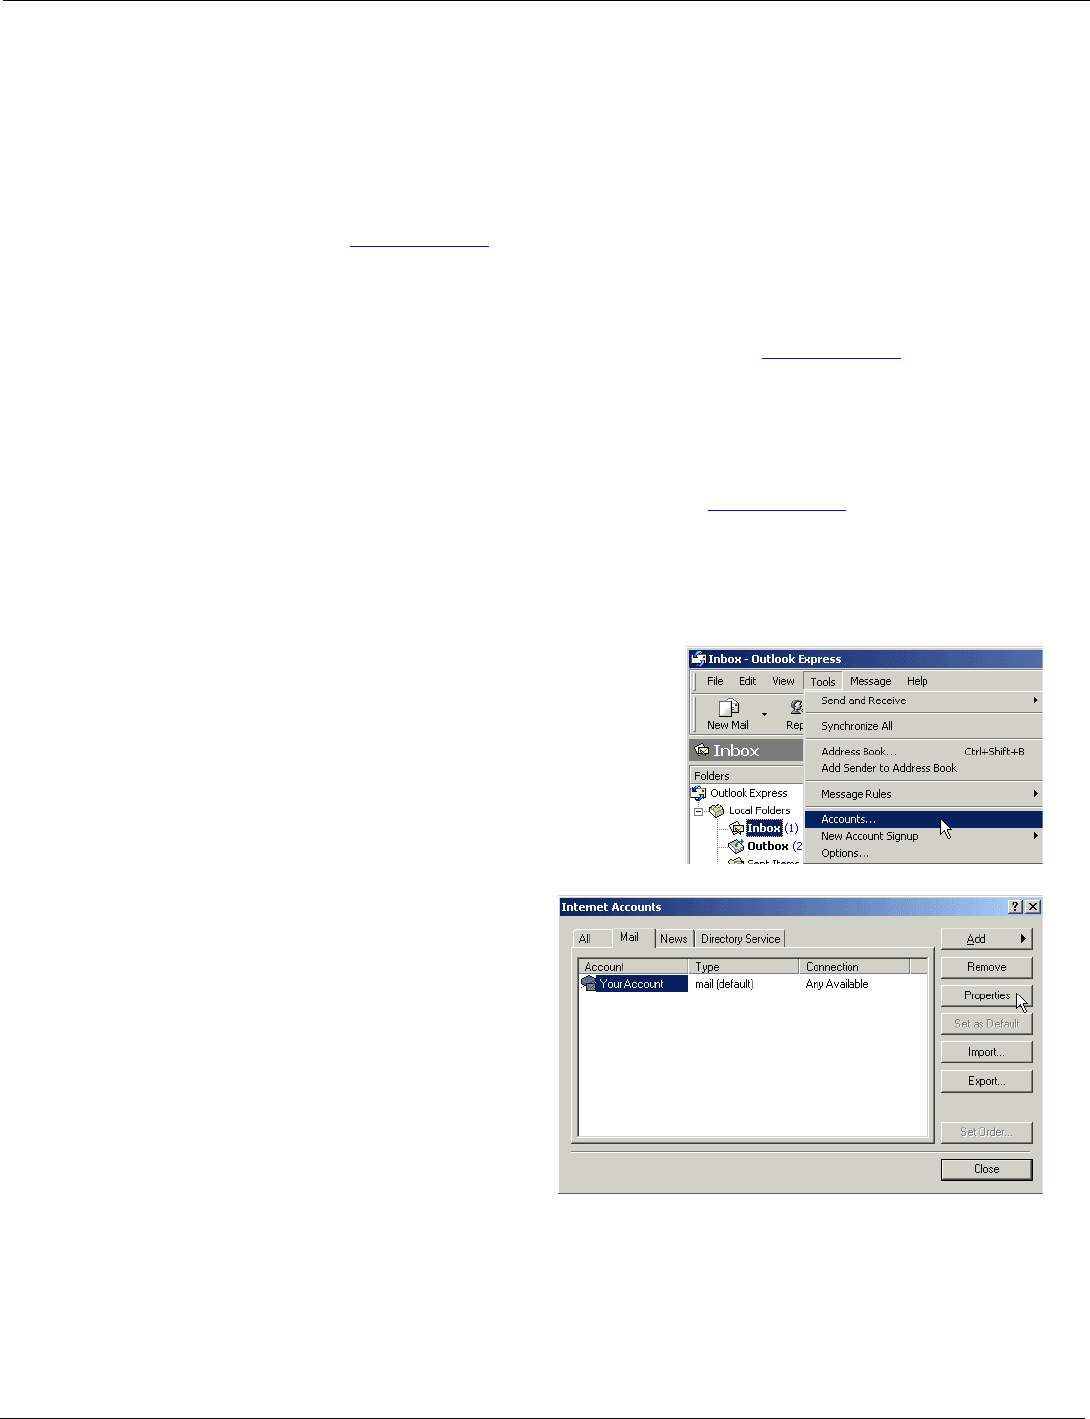
Settings in other Applications Venturi Compression Software
48 User Guide for the Kyocera KPC650
Most mail servers are not accessible from various connections to the Internet. You usually have to be connected to the
e-mail providers’ network to access their mail server and most e-mail providers require authentication (a user name
and password). Without these measures, anyone can use a mail server to send massive amounts of unwanted junk e-
mail. If you are having trouble sending e-mail (which includes replying and forwarding), and you are getting an error
message, then your mail server cannot be accessed from the Verizon Wireless network.
For customers in this situation, Verizon Wireless has made available a mail server that you can use in place of the one
you normally use. All that is required is that you have a TXT messaging-capable Verizon Wireless phone or device
and TXT messaging service, visit www.vtext.com and establish a profile there by selecting Join Up and completing the
form. You will be asked to enter your 10-digit mobile number. A TXT message will be sent to your handset or device
and will be used to establish your password. The Kyocera KPC650 PC card can receive TXT messages. Most Verizon
Wireless phones are TXT messaging capable. If your PC card is not capable of receiving TXT messages but your
Verizon Wireless cell phone is , you can use your phone to establish a profile on www.vtext.com as described above.
To use the Verizon Wireless Send Mail Server, you will edit your existing Mail account settings and change the
outgoing mail server you are currently using. In place of your existing Send Mail Server, enter smtp.vzwmail.net, select
My server requires authentication and using the 10-digit mobile number you used to establish your profile on
www.vtext.com, enter the 10-digit mobile number@vzwmail.net (i.e. 6145551212@vzwmail.net) for the Send Mail
Server user name. For the password, use the password you established for www.vtext.com. You will also be able to
use this server when connected to the Internet from various providers eliminating the need to change this setting when
you switch from being connected to the Internet through Verizon Wireless and by various other means. If you need to
know where these settings normally are in your e-mail client, check with your e-mail provider. For your convenience
the settings for Outlook Express® are as follows:
1. Select Tools → Accounts.
2. Select your default account, then Properties.
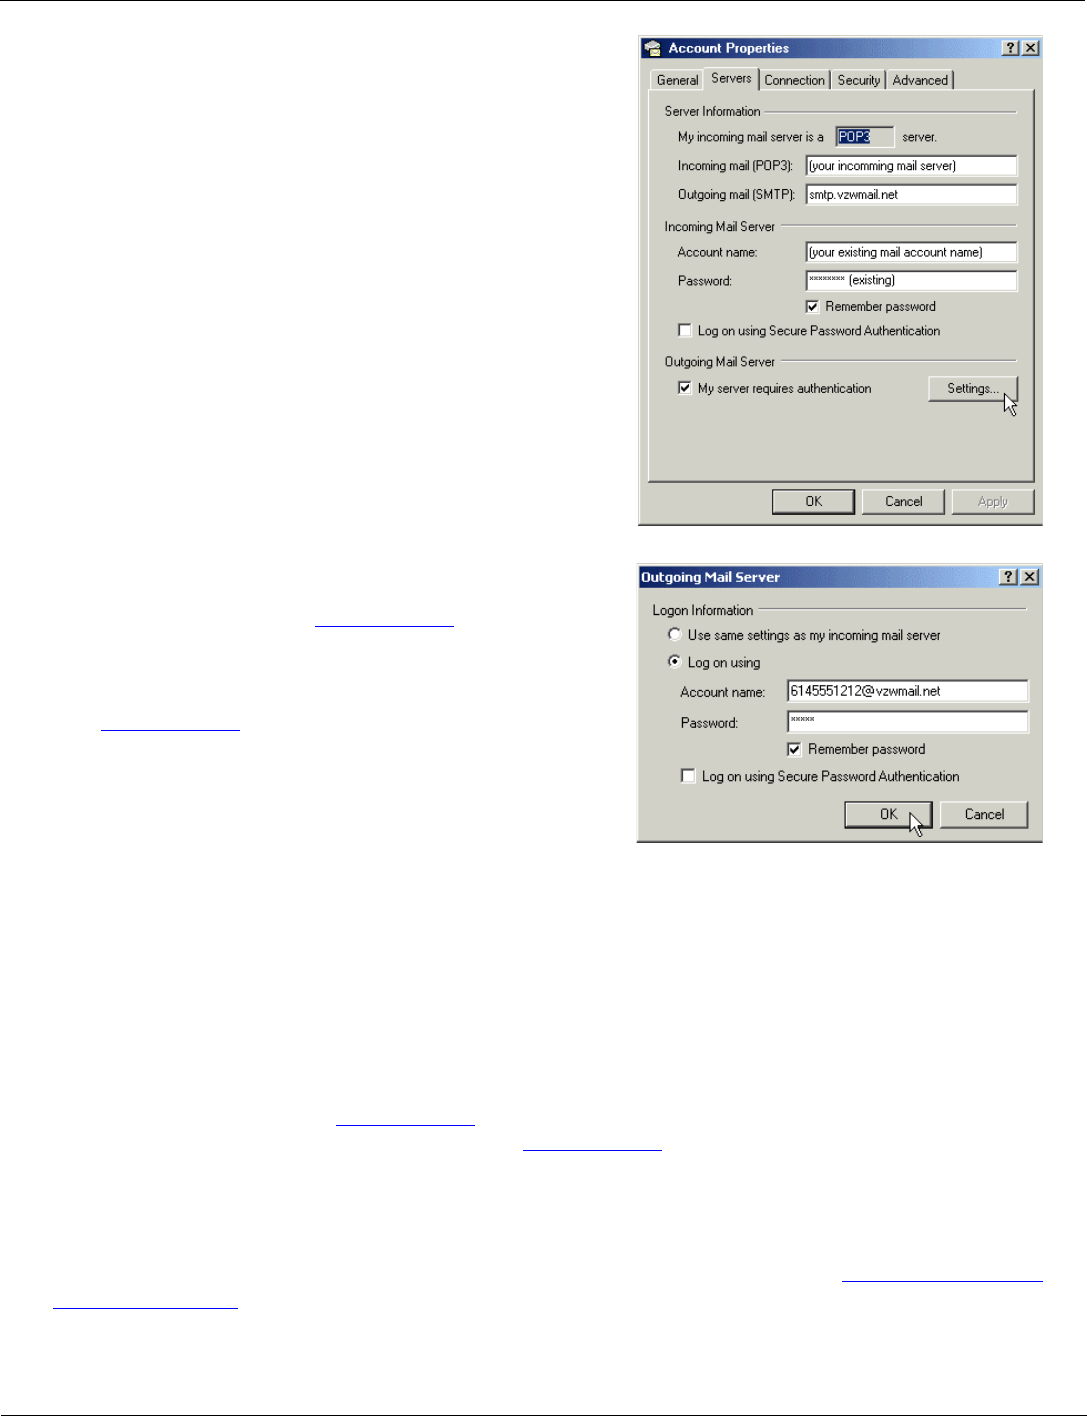
Venturi Compression Software Settings in other Applications
User Guide for the Kyocera KPC650 49
Additional important notes about the Verizon Wireless Send Mail Server
• There is no monthly charge for this service.
• Message Limits are 2 MB Message Size, 100 Recipients per message.
• Customers that are identified as using this server to generate SPAM messages (what most would consider
unsolicited junk e-mail) will be denied access to this server (e-mail messages will not be sent).
• If you are using an e-mail client other than Outlook® or Outlook Express® and it fails to work with the Verizon
Wireless Send Mail server, it may not support authentication correctly. If it works and your e-mail client does not,
check to see if any updates are available for your e-mail client.
Note: Credentials established on www.vtext.com may take up two hours before they will work on the
smtp.vzwmail.net server. If your credentials work on www.vtext.com but not on the smtp.vzwmail.net server, try
again after two hours.
Web Based E-mail
If you currently do not have e-mail software, or if you do not have a text messaging-capable Verizon Wireless device
or phone, you can sign up for web-based e-mail at any of the popular portal sites, such as http://www.yahoo.com, or
http://www.msn.com. You may also search for other e-mail providers from any of these pages.
3. Select the Servers tab. In the Outgoing mail
(SMTP): field enter smtp.vzwmail.net. In the
"Outgoing Mail Server" section at the bottom,
select My server requires authentication, then select
Settings.
4. Select Log on using
Account Name: Using the 10-digit number used to
establish your profile at www.vtext.com, create
number@vzwmail.net
(6145551212@vzwmail.net)
Password: Enter the password you established on
www.vtext.com.
Select Remember password.
Click OK → Apply → OK → Close to return to the
Outlook Express® main screen.

WWAN (CDMA/1xRTT/1xEVDO) Troubleshooting
50 User Guide for the Kyocera KPC650
Troubleshooting
WWAN (CDMA/1xRTT/1xEVDO)
Possible Problem Possible Resolution
When I installed VZAccess
Manager, it was not able to
find the WWAN device
(wireless phone and cable or
1xEV-DO/1XRTT/CDMA
PC card).
• If using a wireless phone and cable make sure it is powered ON and securely
connected.
• If using a wireless phone and cable, try powering it OFF, then ON again.
• If using a WWAN (1xEV-DO/1XRTT/CDMA) PC card, try removing it and
reinserting it.
• Identify any software that uses the serial port on your computer or other USB devices
(such as Microsoft Windows CE services, ActiveSync and Palm HotSync) and exit all
of these programs. See Turning Sync Applications On and Off.
• Make sure that the auto-answer feature of any fax software you are using is disabled.
• Check with your computer manufacturer to verify your serial port or USB port is
enabled and properly configured.
• If using a USB cable be sure to follow the documentation supplied with it to get it
installed as a serial port or USB modem, before installing the VZAccess Manager
software. If you have done this, also try disconnecting the USB cable from the PC and
the wireless phone, then reconnect it and try again.
• If you are using a NationalAccess capable wireless phone and cable, verify the serial
port speed setting on the phone is set to 19,200 or 115,200. If your serial port supports
115,200 or 230,400, VZAccess Manager will automatically set the phone to the best
speed setting. See your wireless phone's manual for instructions on how to do this. If
your wireless phone does not have a speed setting, power it OFF, then ON again.
I get connected, but I can't get
to any web sites.
• If you are using VPN (Virtual Private Networking) you may require proxy settings on
the BroadbandAccess, NationalAccess and Quick 2 Net (14.4 kbps) connections if
you wish to access the Internet when connected to a corporate network through VPN.
To see if this is the case disconnect from your VPN and see if you can access the
Internet directly. For additional information see “Proxy Settings” on page 39.
• If you are using a PC provided by your employer it's possible they might be using
Microsoft's Winsock Proxy or a similar program that enforces Proxy settings without
having to enter any proxy settings in your web browser. If this is the case, you will
only be able to access the Internet when using VPN. To access the Internet directly
you will have to disable the Winsock Proxy. Usually these applications have an icon
in Control Panel that allows turning them on and off. Check with your Network
Administrator if you think this might be the case.
• An application may be causing a conflict with the Venturi compression software. If
you just installed an application temporarily uninstall it and see if normal operation
returns.
I can't load a specific page. • Try turning Venturi off to load a page that is causing a problem and then turn it back
on to continue browsing. Right-click on the V icon in the task tray and OFF to turn
Venturi off, click it again to return it to AUTO (ON if configured for manual control).
I can receive e-mail but
cannot send e-mail using my
e-mail program.
Some Internet Service Providers require that you be connected through them to access
their mail server to send e-mail. See section on E-mail Options.

Troubleshooting WWAN (CDMA/1xRTT/1xEVDO)
User Guide for the Kyocera KPC650 51
My computer, during
installation or normal use:
1. Locks up or crashes when
attempting to dial.
2. Mouse does not work
properly when I try to use
my Mobile Office wire-
less phone or device.
• Refer to your computer manual for help in managing your serial COM ports and USB
ports, to resolve potential resource conflicts.
• Exit any applications that may use serial ports or USB ports, that might be causing a
conflict and try again.
• Remove any PC card (PCMCIA) modems in your computer while using your
wireless phone and cable or 1xEV-DO/1XRTT/CDMA PC card, and try again
My connection fails
immediately, or I get a "Call
Failed" message on the
display of the wireless phone.
• If using a wireless phone and cable, check the battery strength indicator on the
display of your wireless phone. Low power may cause loss of signal.
• Raise the antenna on your wireless phone, and verify that there is a "D" on the display
to indicate digital coverage. If you are not within the digital coverage area, wait until
you are back in Verizon Wireless digital coverage to place your call. Try to connect
again.
• Try powering the wireless phone OFF, then ON again. If using a PC card you can
remove it and reinsert it. Then try to establish your session again.
My connection fails, and I am
getting a "Signal Faded"
message on the display of my
wireless phone.
• Raise the antenna on your PC card and your wireless phone and verify that there is a
"D" on the display to indicate digital coverage. If you are not within the digital
coverage area, wait until you are back in the Verizon Wireless digital coverage area to
place your call.
• Try to establish your session again.
My communication software
shows that I am connected,
but my wireless phone does
not.
• Depending on your device and your NationalAccess or BroadbandAccess plan, your
data session may disconnect during a dormant state. See your Calling Plan brochure
for details. Select disconnect, then connect again
• Your call may have been disconnected due to a network anomaly. Disconnect and try
to establish your session again.
• If you are unable to establish a session using the NationalAccess - BroadbandAccess
or the NationalAccess connection, try the Quick 2 Net (14.4 kbps) connection.
Note: Quick 2 Net and Dial Up connections may be charged differently than
NationalAccess or BroadbandAccess sessions. Please check your Calling Plan brochure
for details.
I get disconnected while
using Mobile Office, or while
dialed in to my corporate
network.
• Raise the antenna on your wireless phone, and verify that there is a "D" on the display
to indicate digital coverage. If you are not within the digital coverage area, wait until
you are back in the Verizon Wireless digital coverage area to place your call.
• Check the battery strength indicator on the display of your wireless phone. Low
power may cause loss of signal.
• Try to establish your session again.
• Make sure the data cable between your wireless phone and your computer is securely
connected to both devices.
• Your corporate network or Internet service provider may have disconnected you. If
the problem persists, contact your Internet service provider or corporate network
administrator for support.
• Check your application software setup to see if it has an inactivity timeout. Increase
the timeout to match your needs.
Possible Problem Possible Resolution

WWAN (CDMA/1xRTT/1xEVDO) Troubleshooting
52 User Guide for the Kyocera KPC650
When I launch VZAccess
Manager:
1. my wireless phone pow-
ers off.
2. the levels reported for
Battery or Signal level
are incorrect.
• Some wireless phones do not support the commands used to determine the battery
and signal levels. If the display of the phone differs with what is displayed in
VZAccess Manager use the information displayed on the phone.
• You can set VZAccess Manager to display the PC's battery level instead of the battery
level of the wireless device. This will resolve the powering off issue if it is occurring.
See WWAN Specific Settings.
• Also keep in mind the battery levels in VZAccess Manager cannot update when the
wireless phone is in use. The default setting is to query the wireless phone when the
program starts, right before you establish a session and when you disconnect. So the
levels are a snapshot; they do not constantly update. You can refresh the levels when
you are not in a session by selecting Options → Refresh Networks from VZAccess
Manager's home screen.
I get There is no dial tone while
trying to connect, using my
wireless phone or it seems as
if the wireless phone is not
being recognized at all.
• Try powering the wireless phone OFF, then ON again. If using a PC card you can
remove it and reinsert it. Then try to establish your session again.
• Raise the antenna on your wireless phone, and verify that there is a "D" on the display
to indicate digital coverage. If you are not within the digital coverage area, wait until
you are back in the Verizon Wireless digital coverage area to place your call.
Note: There is a known issue with some Kyocera 2035s, which will cause this symptom
if you receive or miss a call then connect the wireless phone to your PC and attempt to
use your Quick 2 Net (14.4 kbps) connection. Powering the wireless phone OFF and
then back ON will reset the phone, allowing you to use it. If you take the wireless phone
in for service, the phone's software can be upgraded to the latest version to resolve this
issue.
• If you are using a NationalAccess capable wireless phone and cable, verify the serial
port speed setting on the phone is set to 19,200 or 115,200. If your serial port supports
115,200 or 230,400, VZAccess Manager will automatically set the phone to the best
speed setting. See your wireless phone's manual for instructions on how to do this. If
your wireless phone does not have a speed setting, power it OFF, then ON again.
• If using a USB cable, be sure you connected it to the same port it was connected to
when you configured VZAccess Manager. You can reset the USB drivers by
unplugging and reconnecting the USB cable. If necessary, from VZAccess Manager's
main screen you can select Options → Run Wizard to run the setup wizard again to
redetect and configure the phone.
Venturi stopped working after
I installed software provided
by my service manufacturer.
• The Venturi compression software is configured to be turned on and off by the
VZAccess Manager when using the NationalAccess - BroadbandAccess,
NationalAccess, or Quick 2 Net (14.4 kbps) connection. Verizon Wireless only
supports VZAccess Manager and does not support application software that may be
provided by the device manufacturer.
Every time I try to establish a
NationalAccess -
BroadbandAccess or
NationalAccess connection, it
fails.
• Most likely, you are outside of NationalAccess and BroadbandAccess coverage. If
this is the case, you can try the Quick 2 Net (14.4 kbps) connection.
• If you feel you may have incorrectly entered your wireless telephone number during
initial setup, from the menu bar select Options → Run Wizard. After the wizard
finishes, try connecting again.
Possible Problem Possible Resolution

Troubleshooting Wi-Fi
User Guide for the Kyocera KPC650 53
Wi-Fi
After installing Venturi or
another application I can no
longer browse web pages
connected to any network or I
get a blue screen on start up.
• Typically this is caused by an existing conflicting application that is using a feature
from Microsoft called Layered Service Provider (LSP) sometimes also referred to as
transparency. Venturi uses LSP by default but can be reconfigured to eliminate the use
of LSP to resolve the conflict. Click here for detailed instructions on how to do this.
Possible Problem Possible Resolution
Possible Problem Possible Resolution
When installing VZAccess
Manager, it was not able to
find the Wi-Fi device.
• Verify that the client that came with the Wi-Fi device can talk to it. If it can't, contact the
Wi-Fi device manufacturer for assistance getting it to work with the client it comes with.
Then try VZAccess Manager again.
• Check with the Wi-Fi device manufacturer to see if newer drivers are available. If they
are, download and install them.
• If using a Wi-Fi PC card, try removing it and reinserting it.
• On Windows 2000 and XP, this can happen if you do not have administrative rights.
Check with your IT department, if you have one, to see if they limited your user rights. If
they have, you will need their assistance to run the setup wizard with administrative
rights. You can access the setup wizard from VZAccess Manager's main screen by
selecting Options → Run Wizard.
When installing VZAccess
Manager, a dialog
appeared stating that a
feature in the Cisco®
Aironet® Client needed to
be enabled.
• A simple configuration change is required to the Cisco® Aironet® Client to allow
VZAccess Manager to work properly. Select Start → Programs → Cisco Systems →
Aironet Client Utility (ACU) → Select Profile → Use Another Application to Configure My Wireless
Settings → Apply.
When installing VZAccess
Manager, a dialog
appeared stating You will
need to upgrade your Wi-Fi
card drivers before running
this program.
• Check with the Wi-Fi device manufacturer to see if newer drivers are available. If they
are download and install them.
I'm unable to connect
using Wi-Fi.
• A low signal can cause this. Try moving within the Wi-Fi hot spot to improve your signal
and try connecting again.
• This can happen when your computer fails to successfully obtain an IP address. Try
performing a release and renew by selecting the following from VZAccess Manager's
home screen: Options → Statistics → Wi-Fi tab. The Address type should show Assigned
by DHCP. If it shows Automatic Private Address you have not been assigned an IP
address from the Wi-Fi network. Select Release, then Renew.
• Try selecting Disconnect and then connect again.

Wi-Fi Troubleshooting
54 User Guide for the Kyocera KPC650
I get connected, but I can't
get to any web sites.
• If you are using VPN (Virtual Private Networking) you may require proxy settings to
access the Internet when Wi-Fi connections. To see if this is the case disconnect from
your VPN and see if you can access the Internet directly. Also if you are not using VPN
and you have proxy settings set, they will prevent you from accessing web pages. For
additional information see Turning Proxy Settings On and Off.
• If you are using a PC provided by your employer, it's possible they might be using
Microsoft's Winsock Proxy or a similar program that enforces Proxy settings without
having to enter any proxy settings in your web browser. If this is the case you would only
be able to access the Internet when using VPN. To access the internet directly you would
have to disable the Winsock Proxy. Usually these applications have an icon in Control
Panel that allows turning them on and off. Check with your Network Administrator if
you think this might be the case.
• An application may be causing a conflict with the Venturi compression software. If you
just installed an application temporarily uninstall it and see if normal operation returns.
Venturi is not used for the Wi-Fi connections but a conflicting application might prevent
access to web pages.
I can receive e-mail but
cannot send e-mail using
my e-mail program.
• Some Internet Service Providers require that you be connected through them to access
their mail server to send e-mail. See section on E-mail Options.
I connected OK,
everything was working,
then everything stopped
working.
• A low signal can cause this. Try moving within the Wi-Fi hot spot to improve your signal
and try connecting again.
• If necessary, try disconnecting and reconnecting.
My connection was lost. • A low signal can cause this. Try moving within the Wi-Fi hot spot to improve your signal
and try connecting again
I can't get VZAccess
Manager to work with my
private Wi-Fi Network.
• First verify that the client that came with the Wi-Fi device works with your private
network. If it doesn't, contact your Wi-Fi device provider and or the device provider of
your network equipment.
• In the section on Wi-Fi specific settings there are options to manually add a Wi-Fi
network if it does not broadcast its Network ID (SSID) which would prevent it from
appearing in VZAccess Manager. There is also an option to enter/edit your WEP
(Wireless Equivalent Privacy) password if your network requires one. If it was
incorrectly entered, it could prevent you from connecting.
• The issue may be related to using WEP security and your specific Wi-Fi adapter. You
may want to temporarily test your network without WEP to determine if this is the case.
If it works without WEP and fails using WEP, please e-mail Verizon Wireless Tech
support with your computer and Wi-Fi device info by doing the following: From
VZAccess Manager's main screen select Options → Statistics → My Computer → E-mail
Technical Support. Please also include in the body of the e-mail your computer brand,
model and any Wi-Fi device information you have - built in device or PC card, brand and
model. We will pass this information on to Smith Micro for consideration in a future
version. Use the client that came with your device if you have this issue. Also please be
aware that Verizon Wireless does not support problems associated with Wi-Fi networks.
Customer Care will not be able to assist you.
Possible Problem Possible Resolution
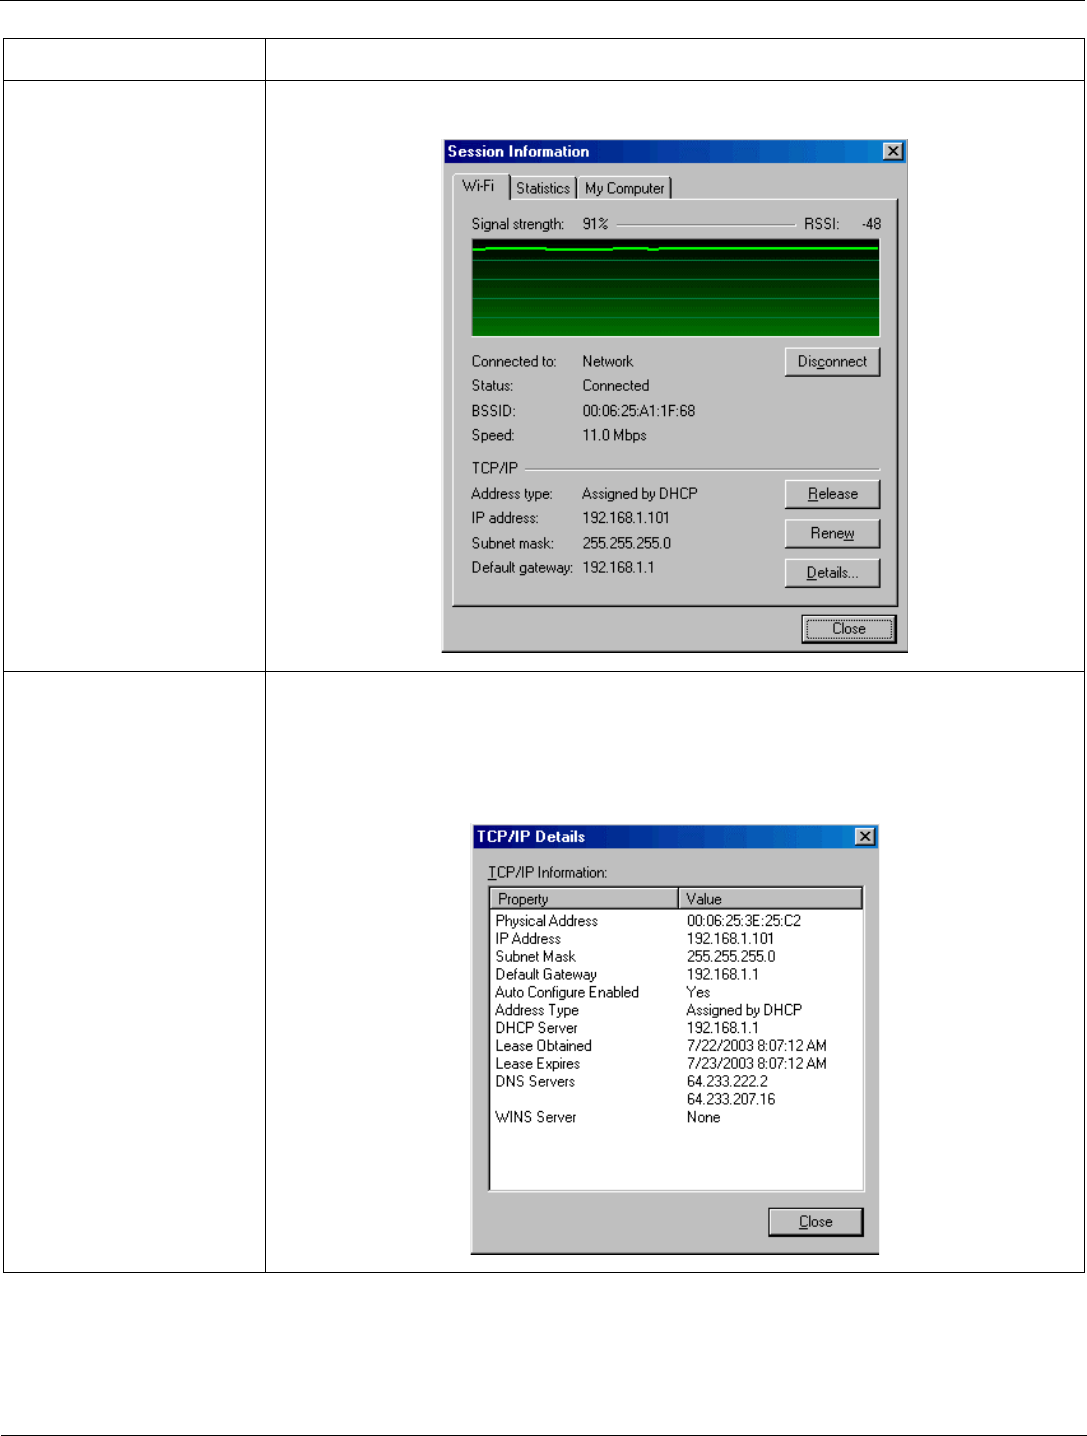
Troubleshooting Wi-Fi
User Guide for the Kyocera KPC650 55
Wi-Fi Statistics Support
Tool From VZAccess Manager's home screen select Options → Statistics → Wi-Fi tab.
• This tool displays signal strength, all relevant IP address information with additional
details by selecting Details. It also provides the ability to release your existing IP address
and request a new one by selecting Release, then Renew. This procedure is a common
troubleshooting step as explained in some of the symptoms and solutions listed above.
• The Details.. . option displays the following information:
Possible Problem Possible Resolution

Venturi Troubleshooting
56 User Guide for the Kyocera KPC650
Venturi
Possible Problem Possible Resolution
The Venturi compression
software does not work. I
get a V with a red X in my
task tray.
• When traveling / roaming the Venturi compression servers may not be able accessible
from the network you are using. In this case Venturi will fall to bypass mode, displaying
the V with the X through it and you will be able to browse web pages without
compression.
• This could also happen for other more rare reasons, such as the server being down or a
temporary network issue making it unreachable, in these cases the compression software
will automatically resume using the Venturi server as soon as its reachable.
I can't load a specific page. Try turning Venturi off to load a page that is causing a problem and then turn it back on to
continue browsing. You do this by accessing the main user interface by right clicking on
the "V" icon in the task tray and selecting OFF. Right click on the "V" again and select
AUTO (ON if configured for manual control), to turn it back on.
When I establish a
connection to my ISP or
corporate network the "V"
in my task tray does not
spin.
• This is normal. The Venturi compression software only spins the "V" when you are using
the NationalAccess - BroadbandAccess, NationalAccess or Quick 2 Net (14.4 kbps)
connection, since it has to be able to establish communication with the Venturi
compression servers on the Verizon Wireless network. These servers are not accessible
from the Internet, your corporate network or from Wi-Fi connections.
• The "V" not spinning is also normal when using Virtual Private Networking (VPN) to
connect to your corporate network as this prevents communication with the Venturi
compression servers.
• For more details, refer “Using Venturi” on page 36.
I can no longer browse
web pages when
connected to any network
after:
• Installing AOL
• Applying a Service Pack
• Making any changes to
my network
configuration such as
installing a Network
card.
Venturi uses a feature from Microsoft called Layered Service Provider (LSP). If changes
are made to your network configuration it is necessary to uninstall and reinstall Venturi's
LSP. You can uninstall Venturi from Add/Remove programs in Windows® control panel and
then reinstall it to restore normal operation or you can follow the instructions below to just
uninstall and reinstall Venturi's LSP:
To uninstall Venturi's LSP:
1. Click on your C: drive.
2. Open the Program Files folder.
3. Open the Venturi2 folder.
4. Open the SPI folder.
5. Double-click on Uninstall Transparency.
6. Select Start → Shutdown → Restart to restart your PC.
To re-install Venturi's LSP:
Repeat the above instructions but in step 3, select Install Transparency.
After installing Venturi or
another application I can
no longer browse web
pages connected to any
network or I get a blue
screen on start up.
• Typically this is caused by an existing conflicting application that is using a feature from
Microsoft called Layered Service Provider (LSP) sometimes also referred to as
transparency. Venturi uses LSP by default but can be reconfigured to eliminate the use of
LSP to resolve the conflict.
• For more details, refer to “Proxy Settings” on page 39.

Troubleshooting Venturi
User Guide for the Kyocera KPC650 57
When trying to use
Venturi, I can't browse web
pages wirelessly.
Uninstall Venturi:
1. Select Start → Programs → Venturi 2 → Uninstall Venturi Client 2.3.
2. Select Start → Shutdown → Restart to restart your PC.
3. Verify you can browse web pages wirelessly, if not, and this is a corporate PC - look
for a Winsock Proxy icon in Windows Control Panel or check with your network
administrator to see if your company is using Winsock Proxy software on your PC. If
this is the case, it must be turned off to access the Internet directly when connecting via
the Verizon Wireless BroadbandAccess, NationalAccess or Quick 2 Net (14.4 kbps)
connection.
4. If you can browse wirelessly with Venturi removed, there is probably a conflicting
application on the PC using Microsoft's Layered Service Provider (LSP) technology.
You can reinstall Venturi and then reconfigure it to eliminate the use of LSP to resolve
the conflict. For more details see section on Explicit Proxy Settings on how to do this.
I can't get Venturi to
coexist with other
applications I use.
• This is vary rare but you also have the option of using the Venturi compression servers
for improved web browsing in a clientless mode, eliminating the need to install the
Venturi compression software on your PC.
I use a personal firewall
and I am not sure what
settings are required to
allow Venturi to work.
• VentC.exe should be granted permission to listen for data from the localhost and to send/
receive data to the internet. VentC.exe listens on the following ports:TCP 8000, 8001,
9875 and UDP 8008. It connects to the Venturi server on UDP port 29301.
• Ventcfg.exe should be granted permission to listen for data from the localhost and to
send/receive data to the localhost. Ventcfg.exe listens on UDP port 8007. It
communicates with VentC.exe on TCP port 9875.
• With most personal firewalls controlling Internet access, you will only need to select yes,
always, when prompted to allow VentC.exe to connect to the Internet.
I changed my performance
settings, but some pages
do not appear to match my
new settings.
This can be caused by pages you may have in your browser's cache. Try clearing your
cache by following the instructions below:
For Internet Explorer versions 5.0, 5.5, 6.0:
1. Open Internet Explorer.
2. Select Tools → Internet Options.
3. Select the General tab.
4. In the Temporary Internet file area, select Delete Files, then select OK.
For Netscape versions 4.7, 6.0, 7.0:
1. Open Netscape
2. Select Edit → Preferences.
3. Select Advanced on the left, then select Cache.
4. Select the Clear Disk Cache button and the Clear Memory Cache button.
5. Select OK.
Note: For any single page, you could do a forced refresh as described below instead of
clearing the entire cache. This will refresh the page without it loading from the cache.
Possible Problem Possible Resolution

Venturi Troubleshooting
58 User Guide for the Kyocera KPC650
Graphics on a page were
compressed to the point I
can't make them out.
Other than changing the performance settings, how can I reload just one page with
uncompressed graphics?
You can always force a web page to load with uncompressed images by doing a forced
refresh:
· If using Internet Explorer this is accomplished by holding down the "Ctrl" key + "Alt"
key + the "Shift" key and then clicking on the refresh icon.
· If using Netscape, hold down the shift key and click on the "Reload" icon.
I need additional help, or
my problem is not listed.
Where can I find
additional help?
Visit www.venturiwireless.com/support.html
Contact Verizon Wireless:
• Wireless Data Technical Support 1-866-788-9387
• Billing & Customer Service 1-800-256-4646
Possible Problem Possible Resolution

Glossary
User Guide for the Kyocera KPC650 59
Glossary
Term Definition
1xRTT Short for single carrier (1x) Radio Transmission Technology. A high-speed wireless technology based
on the CDMA platform. 1xRTT has the capability of providing broadband-like speeds of up to 144
Kbps. 1xRTT is also referred to as CDMA2000.
1xEVDO Part of a family of CDMA2000 1x digital wireless standards. 1xEVDO is a 3G standard. EVDO
stands for EVolution, Data-Only. 1xEVDO is based on a technology initially known as HDR (High
Data Rate) or HRPD (High Rate Packet Data), developed by QUALCOMM. The international
standard is known as IS-856. 1xEVDO has the capability of providing broadband-like speeds of
average speeds of 300−600 kbps.
Access Point An interface between a Wi-Fi network and a wired network.
bps Bits per second – rate of data flow.
Broadband High-capacity high-speed, transmission channel with a wider bandwidth than conventional copper
telephone lines. Broadband channels can carry video, voice, and data simultaneously.
COM Port Defines a serial/RS-232 port within the Windows environment. May be physical or virtual.
Dial-Up
Connection A switched network connection established by a computer using an analog data modem over ordinary
copper telephone lines.
Dormancy A network state that occurs when no data has been transmitted or received after a given amount of
time. A network connection may disconnect during a dormant state.
Firewall A hardware or software boundary that protects a network or single PC from unwanted outside traffic.
HTTP Hypertext Transfer Protocol
ISP Internet Service Provider
IP Internet Protocol. The mechanism by which packets are routed between computers on a network.
Kilobyte 1024 bytes
Kbps Kilobits per second – rate of data flow
LSP Layered Service Provider – a Microsoft feature
LAN Local Area Network. A data network confined to limited area with moderate to high data rates. Does
not use common carrier circuits, although may have gateways or bridges to other public or private
networks.
Mbps Megabits per second
PC Personal computer
PC Card A card having physical and electrical characteristics specified by PCMCIA providing extra
functionality when inserted into a mobile PC. Typical examples are modems and network cards. A PC
card type refers to the thickness of the card.
PC Card Slot A physical slot on a mobile computer, usually located on the side of the machine, which accepts
standard sized PC cards to enhance the functionality of the machine.

Glossary
60 User Guide for the Kyocera KPC650
PCMCIA Personal Computer Memory Card International Association. Defines specifications used for PC
cards. www.pcmcia.org
PDA Personal Digital Assistant. A handheld device used for organization, notes, address books, etc.
POP3 Post Office Protocol v3. A standard transport protocol used send and receive email.
Proxy A firewall mechanism that replaces the IP address of a host on the internal (protected) network with
its own IP address for all traffic passing through it.
Serial
Connection A network connection established by a serial device such as a modem. Serial communication between
your PC and modem or other serial devices adhere to the RS-232 standard.
SMS Short Messaging Service. Short text messages of generally no more than 140-160 characters sent and
received by wireless devices.
SSID Service Set Identifier. An SSID is also referred to as a Network Name because it is a name that
identifies a Wi-Fi network. Most access points broadcast their SSID.
Sync To compare and synchronize two or more sources of data.
TCP/IP Transmission Control Protocol / Internet Protocol
URL Uniform Resource Locator
USB Universal Serial Bus. A connection type for computer peripherals such as a printer, mobile phone, etc.
VPN Virtual Private Network. A way to communicate through a dedicated server securely to a corporate
network over the Internet.
WAN Wide Area Network. A network which uses common carrier-provided lines. Contrasts with LAN.
WEP Wired Equivalent Privacy. A security protocol for wireless local area networks (WLANs) defined in
the 802.11b standard. WEP is designed to provide the same level of security as that of a wired LAN.
Wi-Fi Wireless Fidelity. A generic term used to describe any type of 802.11 (a, b, g) network.
WWAN Wireless Wide Area Network
WWAN Device Wireless Phone and cable or 1xEVDO/1xRTT/CDMA PC card.
WWW World Wide Web
Term Definition

Kyocera Wireless Consumer Liminted Warranty
User Guide for the Kyocera KPC650 61
Kyocera Wireless Consumer Liminted Warranty
Kyocera Wireless Corp. (“KYOCERA”) offers you a limited warranty that the enclosed product or products (the
“Product”) will be free from defects in material and workmanship for a period that expires one year from the date of
sale of the Product to you, provided that you are the original end-user purchaser of the Product and provided that your
purchase was made from an authorized supplier. Transfer or resale of a Product will automatically terminate warranty
coverage with respect to that Product. This limited warranty is not transferable to any third party, including but not
limited to any subsequent purchaser or owner of the Product.
KYOCERA shall, at its sole and absolute discretion, either repair or replace a Product (which unit may use
refurbished parts of similar quality and functionality) if found by KYOCERA to be defective in material or
workmanship, or if KYOCERA determines that it is unable to repair or replace such Product, KYOCERA shall
refund the purchase price for such Product, provided that the subject Product (i) is returned, with transportation
prepaid, to a KYOCERA authorized service center within the one year warranty period, and (ii) is accompanied by a
proof of purchase in the form of a bill of sale or receipted invoice which evidences that the subject Product is within
the one year warranty period (“Proof of Purchase”). After the one year warranty period, you must pay all shipping,
parts and labor charges.
This limited warranty does not cover and is void with respect to the following: (i) any Product which has been
improperly installed, repaired, maintained or modified; (ii) any Product which has been subjected to misuse
(including any Product used in conjunction with hardware electrically or mechanically incompatible or used with
accessories not approved by KYOCERA), abuse, accident, physical damage, abnormal operation, improper handling,
neglect, exposure to fire, water or excessive moisture or dampness or extreme changes in climate or temperature; (iii)
any Product operated outside published maximum ratings; (iv) cosmetic damage; (v) any Product on which warranty
stickers or Product serial numbers have been removed, altered, or rendered illegible; (vi) cost of installation, removal
or reinstallation; (vii) signal reception problems (unless caused by defects in material and workmanship); (viii)
damage the result of fire, flood, acts of God or other acts which are not the fault of KYOCERA and which the Product
is not specified to tolerate, including damage caused by mishandling, shipping and blown fuses; (ix) consumables
(such as fuses);
or (x) any Product which has been opened, repaired, modified or altered by anyone other than KYOCERA or a
KYOCERA authorized service center.
USE ONLY KYOCERA APPROVED ACCESSORIES WITH KYOCERA PHONES. USE OF ANY
UNAUTHORIZED ACCESSORIES MAY BE DANGEROUS AND WILL INVALIDATE THE PHONE
WARRANTY IF SAID ACCESSORIES CAUSE DAMAGE OR A DEFECT TO THE PHONE.
KYOCERA SPECIFICALLY DISCLAIMS LIABILITY FOR ANY AND ALL DIRECT, INDIRECT, SPECIAL,
GENERAL, PUNITIVE, EXEMPLARY, AGGRAVATED, INCIDENTAL OR CONSEQUENTIAL DAMAGES,
EVEN IF ADVISED OF THE POSSIBILITY THEREOF, WHETHER FORESEEABLE OR UNFORESEEABLE
OF ANY KIND WHATSOEVER, INCLUDING BUT NOT LIMITED TO LOSS OF PROFITS, UNANTICIPATED
BENEFITS OR REVENUE, ANTICIPATED PROFITS ARISING OUT OF USE OF OR INABILITY TO USE
ANY PRODUCT (FOR EXAMPLE, WASTED AIRTIME CHARGES DUE TO THE MALFUNCTION OF A
PRODUCT) OR CONTRIBUTION OR INDEMNITY IN RESPECT OF ANY CLAIM RELATED TO A
PRODUCT.
REPAIR OR REPLACEMENT OF A DEFECTIVE PRODUCT OR REFUND OF THE PURCHASE PRICE
RELATING TO A DEFECTIVE PRODUCT, AS PROVIDED UNDER THIS WARRANTY, ARE YOUR SOLE
AND EXCLUSIVE REMEDIES FOR BREACH OF THE LIMITED WARRANTY, AND SUBJECT TO THIS
WARRANTY, THE PRODUCTS ARE APPROVED AND ACCEPTED BY YOU “AS IS”. KYOCERA MAKES
NO OTHER WARRANTIES, REPRESENTATIONS OR CONDITIONS OF ANY KIND, ORAL OR VERBAL,
EXPRESS OR IMPLIED, STATUTORY OR OTHERWISE, WITH RESPECT TO THE PRODUCTS, INCLUDING
BUT NOT LIMITED TO ANY IMPLIED WARRANTY OR CONDITION OF MERCHANTABILITY OR

Kyocera Wireless Consumer Liminted Warranty
62 User Guide for the Kyocera KPC650
FITNESS FOR A PARTICULAR PURPOSE OR AGAINST INFRINGEMENT OR ANY IMPLIED WARRANTY
OR CONDITION ARISING OUT OF TRADE USAGE OR OUT OF A COURSE OF DEALING OR COURSE OF
PERFORMANCE. NO DEALER, DISTRIBUTOR, AGENT OR EMPLOYEE IS AUTHORIZED TO MAKE ANY
MODIFICATION OR ADDITION TO THIS WARRANTY.
Some jurisdictions do not allow the exclusion or limitation of incidental or consequential damages, or allow
limitations on how long an implied warranty lasts, so the above limitations or exclusions may not apply to you.
This limited warranty gives you specific legal rights, and you may also have other rights which vary from jurisdiction
to jurisdiction.
For warranty service information, please call the following telephone number from anywhere in the continental
United States and Canada: 1-800-349-4478 or 858-882-1401; or contact KYOCERA at the following address: 10300
Campus Point Drive, San Diego, California, 92121-1582, USA, Attention: Technical Support.
DO NOT RETURN YOUR PRODUCTS TO THE ABOVE ADDRESS. Please call or write for the location of the
Kyocera Wireless Corp. authorized service center nearest you and for procedures for obtaining warranty service.
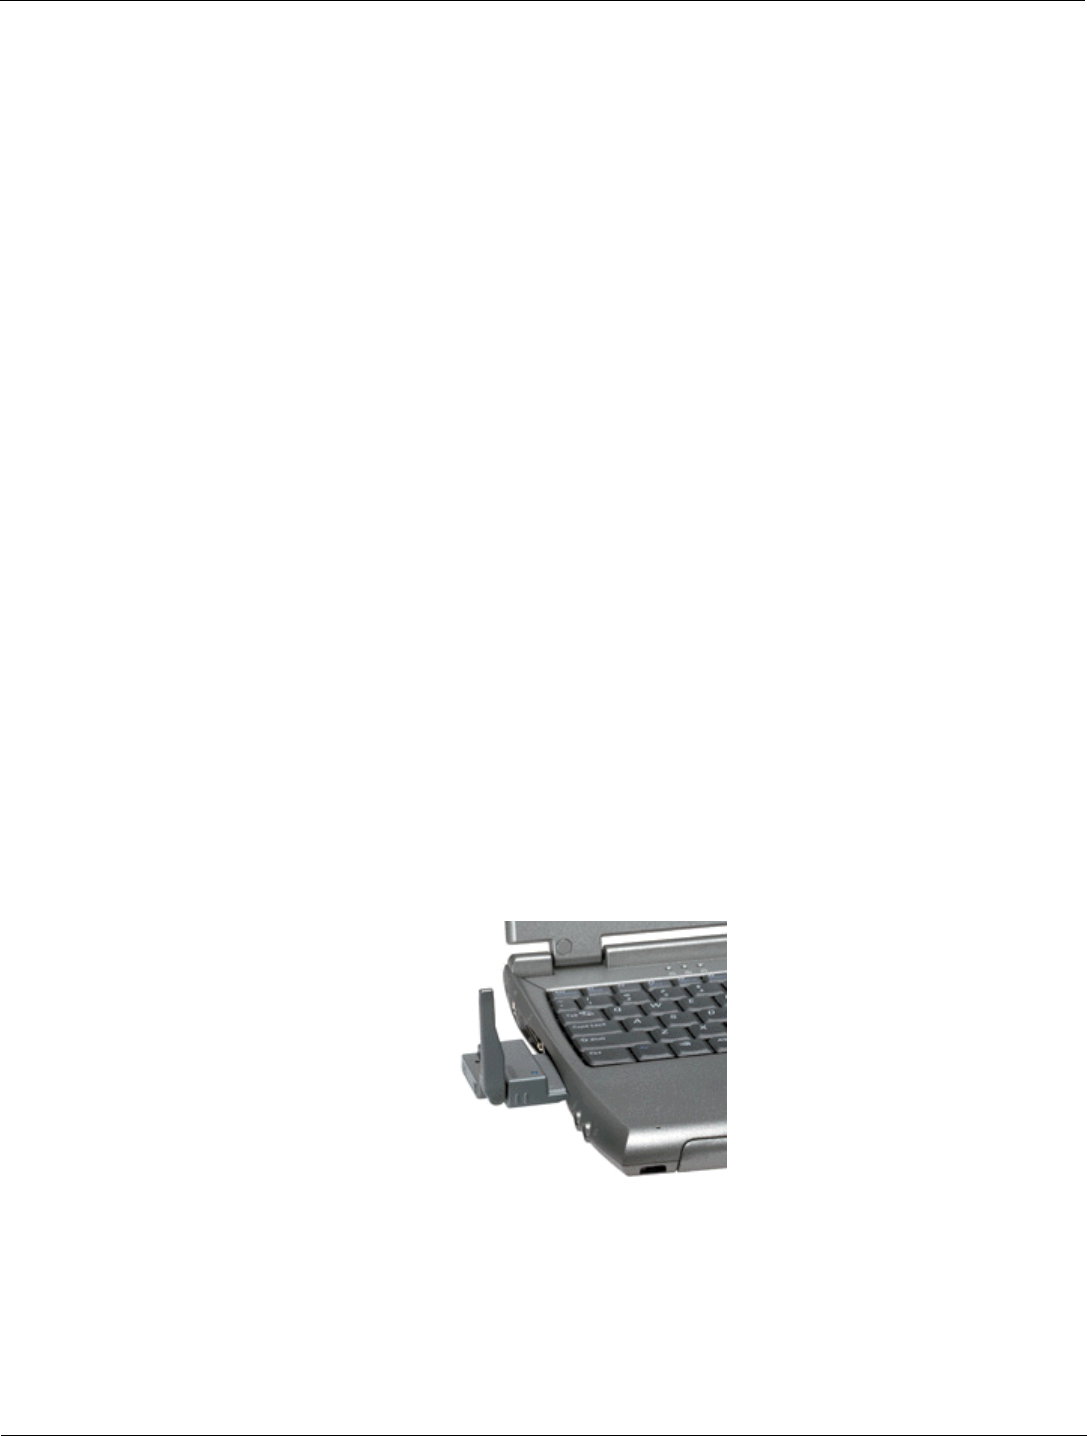
Regulatory and Safety Information Regulatory Notices
User Guide for the Kyocera KPC650 63
Regulatory and Safety Information
This Section outlines important regulatory notices concerning your new KPC650 PC card.
FCC ID:OVFKWC-KPC650, IC:3572A-KPC650
Regulatory Notices
FCC/IC Notice:
This device complies with part 15 of the FCC rules. Operation is subject to the following two conditions:(1) This
device may not cause harmful interference, and (2) this device must accept any interference received, including
interference that may cause undesired operation.
This Class B digital apparatus complies with Canadian ICES-003.
Cet appareil numérique de la classe B est conforme à la norme NMB-003 du Canada.
Caution: The user is cautioned that changes or modifications not expressly approved by the party responsible for
compliance could void the warranty and users’ authority to operate the equipment.
Note: This equipment has been tested and found to comply with the limits for a Class B digital device, pursuant to part
15 of the FCC Rules. These limits are designed to provide reasonable protection against harmful interference in a
residential installation. This equipment generates, uses and can radiate radio frequency energy and, if not installed
and used in accordance with the instructions, may cause harmful interference to radio communications. However,
there is no guarantee that interference will not occur in a particular installation. If this equipment does cause harmful
interference to radio or television reception, which can be determined by turning the equipment off and on, the user is
encouraged to try to correct the interference by one or more of the following measures.
• Reorient or relocate the receiving antenna.
• Increase the separation between the equipment and receiver.
• Connect the equipment into an outlet on a circuit different from that to which the receiver is connected.
• Consult the dealer or an experienced radio/TV technician for help.
Caution: This device has been tested for compliance with FCC RF exposure limits in the laptop computers
configurations with side PCMCIA slot, and can be used in laptop computers with substantially similar physical
dimensions, construction, and electrical and RF characteristics. Always place the antenna in the upright position
(oriented vertically) when using this data modem in a notebook computer.
This PC card must not be co-location or operated in conjunction with any other antenna or transmitter. Use of this
device in any other configuration may exceed the FCC RF Exposure compliance limit.
If you have purchased this product under a United States Government contract, it shall be subject to restrictions as set
forth in subparagraph (C)(1)(ii) of Defense Federal Acquisitions Regulations (DFARs) Section 252.227-7013 for
Department of Defense contracts, and as set forth in Federal Acquisitions Regulations (FARs) Section 52.227-19 for
civilian agency contracts or any successor regulations. If further government regulations apply, it is your
responsibility to ensure compliance with such regulations.

Safety Information Regulatory and Safety Information
64 User Guide for the Kyocera KPC650
Safety Information
This section outlines important liability and safety guidelines concerning your new PC card.
Important Notice
Because of the nature of wireless communications, transmission and reception of data can never be guaranteed. Data
may be delayed, corrupted (i.e., have errors) or totally be lost. Although significant delays or losses of data are rare
when wireless devices such as the PC Card-Model KPC650 CDMA modem are used in a normal manner with a well
constructed network, they should not be used in situations where failure to transmit or receive data could result in
damage of any kind to the user or another party, including but not limited to personal injury, death or loss of personal
property. No responsibility for damages of any kind resulting from delays or errors in data transmitted or received
using the PC Card-Model KPC650 CDMA modem, or for failure of the PC Card-Model KPC650 to transmit or
receive such data.
Safety and Hazards
Blasting Areas and HospitalsDo not operate the PC Card-Model KPC650 in areas where blasting is in progress, where
explosive atmospheres may be present, near medical equipment, life support equipment, or any equipment which may
be susceptible to any form of radio.
Aircraft FCC regulations prohibit using your KPC650 on a plane that is in the air. Do not operate the PC card in any
aircraft whether the aircraft is on the ground or in flight. In aircraft, the PC card must be powered off. When operating
it can transmit signals that could interfere with various onboard systems.
VehiclesRF signals may affect improperly installed or inadequately shielded electronic systems in motor vehicles.
Check with the manufacturer of the device to determine if it is adequately shielded from external RF energy
Air bagsIf your vehicle has an air bag, DO NOT place installed or portable equipment or other objects over the air
bag or in the air bag deployment area. If equipment is not properly installed, you and your passengers risk serious
injury.
Medical devices
PacemakersWarning to pacemaker wearers: PC card, when in the ‘on’ position, may interfere with pacemakers. The
PC card should be kept at least 15 cm (6 inches) away from the pacemaker to reduce risk. If you have any reason to
suspect that interference is taking place, turn off your phone immediately. Contact your cardiologist for more
information.
Other medical devicesIf you use any other personal medical device, consult the manufacturer of the device to
determine if it is adequately shielded from external RF energy. Your physician may be able to help you obtain this
information.
In health care facilitiesTurn your PC card off in health care facilities when instructed. Hospitals and health care
facilities may be using equipment that is sensitive to external RF energy.
Posted facilitiesTurn your PC card off in any facility when posted notices require you to do so.
Potentially explosive atmospheresTurn off your PC card when you are in any area with a potentially explosive
atmosphere. Obey all signs and instructions. Sparks in such areas could cause an explosion or fire, resulting in bodily
injury or death. Areas with a potentially explosive atmosphere are often, but not always, clearly marked. They
include:
• fueling areas such as gas stations
• below deck on boats
• transfer or storage facilities for fuel or chemicals
• vehicles using liquefied petroleum gas, such as propane or butane
• areas where the air contains chemicals or particles such as grain, dust, or metal powders
• any other area where you would normally be advised to turn off your vehicle engine