Kyocera KWC-KX9D Single Band Single Mode Cellular Phone User Manual ACE Kx9D VMU EN
Kyocera Communications, Inc Single Band Single Mode Cellular Phone ACE Kx9D VMU EN
UserManual.wiki
>
Kyocera
>
KWC KX9D User Manual
Users Manual
Navigation menu
Upload a User Manual
Namespaces
Wiki Guide
HTML
PDF
Info
Views
User Manual
Discussion / Help
Navigation
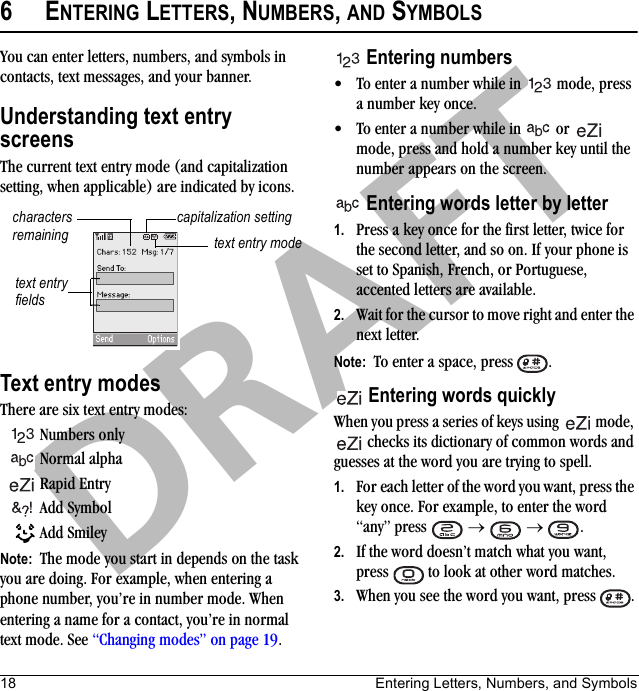
![iiDRAFTAlthough the SAR is determined at the highest certified power level, the actual SAR level of the phone while operating can be well below the maximum value. This is because the phone is designed to operate at multiple power levels so as to use only the power required to reach the network. In general, the closer you are to a wireless base station antenna, the lower the power output.Before a phone model is available for sale to the public, it must be tested and certified to the FCC that it does not exceed the limit established by the government-adopted requirement for safe exposure. The tests are performed in positions and locations (e.g., at the ear and worn on the body) as required by the FCC for each model. The body-worn SAR values were obtained by using Kyocera Wireless Corp. [KWC] supplied and approved universal pouch CV90-61344-02.Body-worn measurements differ among phone models, depending upon availability of accessories and FCC requirements. While there may be differences between the SAR levels of various phones and at various positions, they all meet the government requirement for safe exposure.The FCC has granted an Equipment Authorization for this model phone with all reported SAR levels evaluated as in compliance with the FCC RF emission guidelines. SAR information on this model phone is on file with the FCC and can be found under the Display Grant section http://www.fcc.gov/oet/fccid after searching on the FCC ID: OVFKWC-KX9D.Additional information on SAR can be found on the Cellular Telecommunications and Internet Association (CTIA) web-site at http://www.wow-com.com.* In the United States and Canada, the SAR limit for mobile phones used by the public is 1.6 watts/kg (W/kg) averaged over one gram of tissue. The standard incorporates a substantial margin of safety to give additional protection for the public and to account for any variations in measurements.](https://usermanual.wiki/Kyocera/KWC-KX9D/User-Guide-656016-Page-3.png)