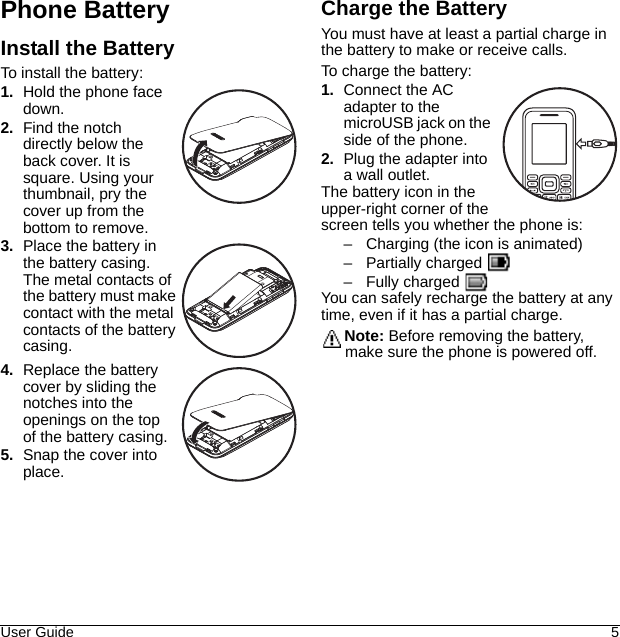
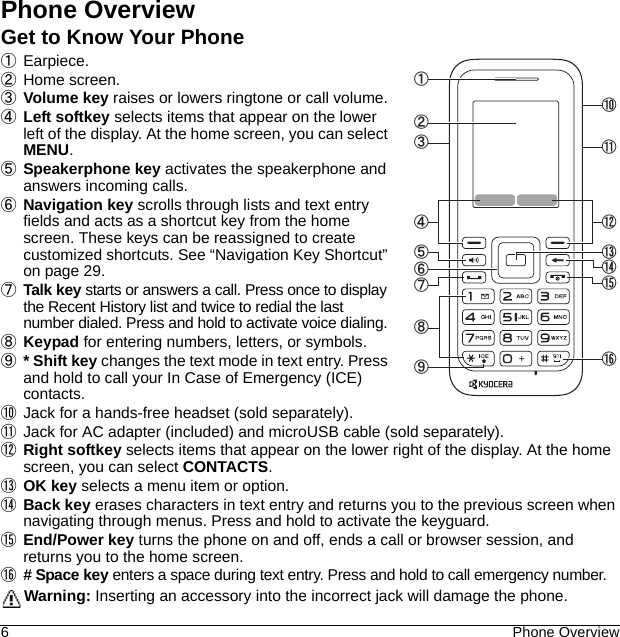
Kyocera S1360 Single Band CDMA Mobile Phone with Bluetooth User Manual S1360 en

Kyocera Corporation Single Band CDMA Mobile Phone with Bluetooth S1360 en

Contents

user manual part 1

S1360User Guide
2Table of Contents1 Get Started. . . . . . . . . . . . . . . . . . 4Phone Accessories . . . . . . . . . . . . . . .  4Program Your Phone. . . . . . . . . . . . . .  4Phone Battery . . . . . . . . . . . . . . . . . . .  5Phone Overview  . . . . . . . . . . . . . . . . .  6Main Menu. . . . . . . . . . . . . . . . . . . . . .  8Guide Conventions  . . . . . . . . . . . . . . .  92 Call Features . . . . . . . . . . . . . . . 10Power Phone Up . . . . . . . . . . . . . . . .  10Make Phone Calls . . . . . . . . . . . . . . .  10Answer Phone Calls  . . . . . . . . . . . . .  11End Phone Calls . . . . . . . . . . . . . . . .  11In-call Options . . . . . . . . . . . . . . . . . .  11Volume Control . . . . . . . . . . . . . . . . .  11Use Speed Dialing. . . . . . . . . . . . . . .  12Use Plus (+) Code Dialing . . . . . . . . .  12Missed Call Notification . . . . . . . . . . .  12Emergency Services . . . . . . . . . . . . .  123 Text Entry  . . . . . . . . . . . . . . . . . 13Text Entry Modes  . . . . . . . . . . . . . . .  13Text Entry Quick Reference  . . . . . . .  154 My Stuff . . . . . . . . . . . . . . . . . . . 16My Stuff Menu . . . . . . . . . . . . . . . . . .  16Ringtones  . . . . . . . . . . . . . . . . . . . . .  16Graphic . . . . . . . . . . . . . . . . . . . . . . .  16Ringback Tones. . . . . . . . . . . . . . . . .  165 My Account . . . . . . . . . . . . . . . . 17Check your Account Balance  . . . . . .  17Top-Up your Account. . . . . . . . . . . . .  17For More Information . . . . . . . . . . . . .  186 Settings . . . . . . . . . . . . . . . . . . . 19Settings Menu . . . . . . . . . . . . . . . . . .  19Display. . . . . . . . . . . . . . . . . . . . . . . .  20Volume. . . . . . . . . . . . . . . . . . . . . . . .  21Ringtones. . . . . . . . . . . . . . . . . . . . . .  21Keyguard . . . . . . . . . . . . . . . . . . . . . .  22Text Entry  . . . . . . . . . . . . . . . . . . . . .  22Phone Info . . . . . . . . . . . . . . . . . . . . .  23Lock Phone . . . . . . . . . . . . . . . . . . . .  23Reset/Delete . . . . . . . . . . . . . . . . . . .  24Others Settings  . . . . . . . . . . . . . . . . .  247 Contacts . . . . . . . . . . . . . . . . . . . 30Access Contacts  . . . . . . . . . . . . . . . .  30Add Contacts . . . . . . . . . . . . . . . . . . .  30Use Contacts . . . . . . . . . . . . . . . . . . .  31Customize Contacts. . . . . . . . . . . . . .  32Contact Groups . . . . . . . . . . . . . . . . .  33Speed Dial List. . . . . . . . . . . . . . . . . .  33Dial Services . . . . . . . . . . . . . . . . . . .  33ICE Contacts . . . . . . . . . . . . . . . . . . .  348 Messaging  . . . . . . . . . . . . . . . . . 35Messaging Menu . . . . . . . . . . . . . . . .  35Use Voicemail . . . . . . . . . . . . . . . . . .  35Send Messages. . . . . . . . . . . . . . . . .  36Threaded Messaging. . . . . . . . . . . . .  36Message Settings  . . . . . . . . . . . . . . .  37Simple Data Exchange  . . . . . . . . . . .  399 Tools . . . . . . . . . . . . . . . . . . . . . . 40Tools Menu . . . . . . . . . . . . . . . . . . . .  40Alarm . . . . . . . . . . . . . . . . . . . . . . . . .  41Calendar  . . . . . . . . . . . . . . . . . . . . . .  41Bluetooth . . . . . . . . . . . . . . . . . . . . . .  43Use Calculator . . . . . . . . . . . . . . . . . .  44Countdown. . . . . . . . . . . . . . . . . . . . .  44Use Stopwatch. . . . . . . . . . . . . . . . . .  45World clock  . . . . . . . . . . . . . . . . . . . .  45
User Guide 3Notepad. . . . . . . . . . . . . . . . . . . . . . . .45Voice Services  . . . . . . . . . . . . . . . . . .4610 Call History . . . . . . . . . . . . . . . . 48Work with Call History. . . . . . . . . . . . .48Call History Icons  . . . . . . . . . . . . . . . .4811 Web  . . . . . . . . . . . . . . . . . . . . . . 49Surf the Web. . . . . . . . . . . . . . . . . . . .49Search the Web  . . . . . . . . . . . . . . . . .4912 Get Help . . . . . . . . . . . . . . . . . . . 50Customer Support. . . . . . . . . . . . . . . .50Qualified Service. . . . . . . . . . . . . . . . .50Phone Accessories . . . . . . . . . . . . . . .50Become a Product Evaluator  . . . . . . .50Important Safety Information . . . . . 51General Precautions . . . . . . . . . . . . . .51Maintaining Safe Use of and Access to Your Phone . . . . . . . . . . . . . . . . . . . . .51Using Your Phone With a Hearing Aid Device. . . . . . . . . . . . . . . . . . . . . . . . .53Caring for the Battery . . . . . . . . . . . . .54Radio Frequency (RF) Energy  . . . . . . 55Owner’s Record  . . . . . . . . . . . . . . . . .57Manufacturer’s Warranty . . . . . . . . 58End User License Agreement  . . . . 60Index. . . . . . . . . . . . . . . . . . . . . . . . . 63
4Phone Accessories1 Get StartedPhone AccessoriesProgram Your Phone1. Turn your phone on by pressing the red power button ( ). Your phone will automatically attempt Hands-Free Activation.2. Follow the onscreen instructions to complete the activation process.– If an error occurs,  select ACTIVATE (left softkey) to override auto-activation and start the manual activation wizard. Complete the activation process by following the on-screen prompts.3. After you have completed the activation wizard, make a phone call to confirm your activation.Tip: Do not press   while the phone is being activated. Pressing   cancels the activation process. To shop for accessories for your phone, visit or kyocera.superiorcommunications.com.Before you start using your phone, you will need to perform a few simple steps to set it up on the network:Note: If you are having any difficulty with activation, contact Customer Care at 1-888-321-5880 for assistance.
User Guide 5Phone BatteryInstall the BatteryTo install the battery:1. Hold the phone face down.2. Find the notch directly below the back cover. It is square. Using your thumbnail, pry the cover up from the bottom to remove.3. Place the battery in the battery casing. The metal contacts of the battery must make contact with the metal contacts of the battery casing.4. Replace the battery cover by sliding the notches into the openings on the top of the battery casing.5. Snap the cover into place.Charge the BatteryYou must have at least a partial charge in the battery to make or receive calls.To charge the battery:1. Connect the AC adapter to the microUSB jack on the side of the phone.2. Plug the adapter into a wall outlet.The battery icon in the upper-right corner of the screen tells you whether the phone is:– Charging (the icon is animated)– Partially charged – Fully charged You can safely recharge the battery at any time, even if it has a partial charge.Note: Before removing the battery, make sure the phone is powered off.
6Phone OverviewPhone OverviewGet to Know Your Phone①Earpiece.②Home screen.③Volume key raises or lowers ringtone or call volume.④Left softkey selects items that appear on the lower left of the display. At the home screen, you can select MENU.⑤Speakerphone key activates the speakerphone and answers incoming calls.⑥Navigation key scrolls through lists and text entry fields and acts as a shortcut key from the home screen. These keys can be reassigned to create customized shortcuts. See “Navigation Key Shortcut” on page 29.⑦Talk key starts or answers a call. Press once to display the Recent History list and twice to redial the last number dialed. Press and hold to activate voice dialing.⑧Keypad for entering numbers, letters, or symbols.⑨* Shift key changes the text mode in text entry. Press and hold to call your In Case of Emergency (ICE) contacts.⑩Jack for a hands-free headset (sold separately).⑪Jack for AC adapter (included) and microUSB cable (sold separately).⑫Right softkey selects items that appear on the lower right of the display. At the home screen, you can select CONTACTS.⑬OK key selects a menu item or option. ⑭Back key erases characters in text entry and returns you to the previous screen when navigating through menus. Press and hold to activate the keyguard.⑮End/Power key turns the phone on and off, ends a call or browser session, and returns you to the home screen.⑯# Space key enters a space during text entry. Press and hold to call emergency number.Warning: Inserting an accessory into the incorrect jack will damage the phone.ձպջռվստրղճմյշոչն
User Guide 7Screen IconsThese icons may appear on your phone’s screen.Your phone’s current signal strength. (More bars = stronger signal.) Your phone cannot find a usable signal. Data service is available. When active, the icon is animated. Data service is currently dormant. Data service is currently unavailable. You have one or more missed voice calls. You have event notifications. You have one or more new messages waiting. You have one or more new voicemail messages waiting. You have one or more new urgent messages waiting. You have different kinds of alerts waiting. You have different kinds of alerts (including urgent messages) waiting. Your phone’s Bluetooth feature is enabled. Your phone is connected to a Bluetooth device. Your phone is visible to other Bluetooth devices. Your phone is connected to or communicating with a Bluetooth device via Hands-free Profile (HFP). Your phone’s current battery charge level. (The icon to the left shows the battery is fully charged.) The volume level is set to between 1 and 8 and vibrate is turned on. 1 Beep and vibrate are set. Your phone’s ringtone is turned off. A beep sounds when you receive an incoming call, a message, etc. Your phone’s sound is turned off. Your phone’s location feature is on and available for location-based. Your phone’s location feature is off. Your location is available only for 911. Your phone is connected to a TTY device. An alarm or countdown is set. Your phone’s HAC (hearing aid compatibility) setting is enabled. Your phone is in airplane mode.
8Main MenuMain MenuAt the home screen, press   (OK key) to access the main menu. Home Screen > Level 1 >  Level 2OK key  My Stuff  Access these options: Ringtones, Graphics, and Ringback Tones.  My Account Access account information and Top-Up your account. Settings Access these options: Display, Volume, Ringtones, Keyguard, Text Entry, Phone Info, Lock Phone, Reset/Delete, and Others. Contacts  Access your Contacts list.  Missed Alerts  Access your missed call alerts.  Messaging  Access these options: Voicemail, Send Message, and Messages. Tools Access these options: Activate This Device, Alarm, Calendar, Bluetooth, Update Phone, Voice Services, Calculator, Countdown, Stopwatch, World Clock, and Notepad. Call History  Access your recent call history.  Web  Browse the web.
User Guide 9Guide ConventionsIn this guide, the following conventions are used when describing phone features.Navigate Through the MenusSelect means to press the Left softkey, Right softkey or OK key to select an item seen on the display. For example, “Select MENU” tells you to physically press the left softkey to choose MENU from the display.Press means to press a phone key. For example, “Press   to make a phone call” tells you to physically press the Talk key on your phone.Scroll means to use the Navigation key to move though a list on the display. For example, “Scroll through your contacts list to choose a contact” means to physically press the Navigation key up or down to scroll through the list on the display.> (greater than symbol) tells you to select an option from a menu or list. For example, “Select MENU > Settings” means to:1. Press the left softkey to select MENU.2. Scroll to the Settings option.3. Press  (OK key) to select Settings.Back Up Within a MenuPress   to go to the previous menu.Press   to return to standby mode.
10 Power Phone Up2 Call FeaturesThis section describes the basic features related to calls.Power Phone UpTo turn your phone on, press   and wait until the phone display lights up.To turn your phone off, press and hold  for two seconds until you see the powering-down animation on the home screen.Make Phone CallsMake sure you are in an area where a signal can be received. Look for the signal strength icon on the home screen. The more bars, the stronger the signal. If there are no bars, move to where the signal strength is better.When the phone has been idle for a time, it changes to power save mode. Press any key to return to normal operating mode.There are several ways you can make a phone call.Call Using a Number1. Enter a phone number.2. Press .Call Using a Contact1. From standby mode, select CONTACTS.2. Highlight a contact and press  .Call Using Voice RecognitionYou can use voice recognition to call a contact from your contact list or to dial a phone number. For more information, see “Voice Recognition Settings” on page 25.Redial a Number1. Press   to open your call history.2. Highlight a phone number or contact and press  .Note: To redial the last number called, received, or missed, press   twice.
User Guide 11Answer Phone CallsWhen a call comes in, the phone rings, vibrates, or lights up. The phone number of the caller also appears if it is not restricted. If the number is stored in your contacts list, the contact’s name appears. There are several ways you can answer a phone call.Answer Using EarpiecePress .Answer Using SpeakerphonePress .End Phone CallsPress .In-call Options Selecting OPTIONS during a call displays a list of available in-call features. To select an option, highlight the option and press . Transfer Audio to switch the call to a Bluetooth device (if applicable).Save to save the current call‘s phone number in your Contacts. Contact Details to display information about the caller stored in your Contacts (if applicable). Main Menu to display the phone‘s main menu. Contacts to display your Contacts list. Voice Memo to record the other party’s voice. Phone Info to display information about your phone.Volume ControlAdjust Volume during a CallPress the Volume key up or down to adjust the earpiece volume during a call. Use the SpeakerphoneYour phone has a built-in speakerphone.To turn on the speakerphone, press  . The speakerphone icon appears on the home screen when the speakerphone is on.To turn off the speakerphone, press  again.Note: If you press   during an incoming call, you will answer the call.Silence an Incoming CallTo silence the phone without answering the call, press   or press the Volume key up or down.To silence the phone and answer the call, press   or press the Volume key up or down and then press .
12 Use Speed DialingUse Speed DialingSpeed dialing allows you to assign a one- or two-digit shortcut to a contact. Before you can use speed dialing you must save a phone number as a contact and assign a speed dial location to it. See “Assign Speed Dials to Contacts” on page 32. To call a contact that has a speed dial location:1. Enter the one- or two-digit speed dial location.2. Press .Use Plus (+) Code DialingWhen placing international calls, use Plus Code Dialing to automatically enter the international access code for your location (for example, 011 for international calls made from the U.S.). 1. Press and hold   to display "+" on your phone screen. 2. Enter the country code and phone number, and then press  . (The phone automatically prepends the access code for international dialing, followed by the country code and phone number.) Missed Call NotificationWhen an incoming call is not answered, your screen displays the Missed Call log. Press   to dial the phone number. To display a Missed Alerts entry from the home screen:1. Select Missed Alerts from the main menu. 2. Highlight the entry you wish to view and press .Emergency ServicesCall Emergency ServiceYou can call an emergency number even if your phone is locked or your account is restricted. When you call, your phone enters emergency mode. This enables the emergency service exclusive access to your phone to call you back, if necessary. To make or receive regular calls after dialing the number, you must exit this mode.To dial an emergency number:Press and hold   and select OK.-or-Press    .Exit Emergency ServicesWhen you have completed the emergency call:Press   and then press  .Note: To determine who has access to your location, see “Location” on page 28.
User Guide 133 Text EntryText Entry ModesYou can enter letters, numbers, and symbols whenever you are prompted to enter text.1. From a screen where you can enter text, select OPTIONS to change the text mode. (If you are in the message entry screen, select OPTIONS > Text Mode.) 2. Select one of the following options: –Abc to enter characters by using the alphabet mode. See Abc Mode. –T9Word to enter text using a predictive text system that reduces the number of key presses required while entering a word. –123 to enter numeric characters. –Symbols to enter symbols. – Smileys to enter smile icons. –Emoticons to enter “emoticons” (if applicable).–Paste List to paste copied or cut text (if applicable). –Web Shortcuts to enter Web shortcuts (for example, www., http://, or .com). –Text Options to display the text entry options menu (if applicable). See “Text Entry” on page 22.Enter Numbers with Number KeypadFrom the text entry field, select OPTIONS > 123 to enter a number when you press a key once. The 123 icon indicates you are in numeric input mode.Enter Letters with Number KeypadFrom the text entry field, select OPTIONS > Abc to enter letters. You can enter text in the following ways:To enter a letter, press a key once for the first letter, twice of the second letter, and so on. If your phone is set to Spanish, accented letters are available. Wait for the cursor to move right and enter the next character. Press   to enter a space.To change case mode, press  .To enter a number, press and hold a number key until the number appears on the screen.Tip: The Abc/ABC/abc icon on the bottom right corner of the screen indicates you are in Abc input mode.
14 Text Entry ModesRapid Entry (T9) with Number KeypadFrom the text entry field, select OPTIONS > T9Word to check words you are trying to spell against a dictionary of common words. You can enter text in the following ways:To enter words, press a key once. For example, to enter the word “any” press the 2 > 6 > 9 keys. If the word doesn’t match what you want, scroll up or down to look at other word matches. When you see the word you want, press  .To change case mode, press  .To enter a number, press and hold a number key until the number appears on the screen.Tip: The T9Word/T9WORD/T9word icon on the bottom right corner of the screen indicates you are in T9 input mode.Enter Symbols with Number KeypadWhile entering text in Abc mode, you can enter symbols by pressing   until you see the symbol you want.To access the full set of symbols:1. From the text entry field, select OPTIONS > Symbols.2. Scroll up or down to view the list of symbols.3. Highlight your desired symbol and press  to enter it.
User Guide 15Text Entry Quick ReferenceThis table gives instructions for entering text.To.. Do this..Enter a letter Use Abc or T9Word mode and press a key until you see the letter your want.Enter a number Use 123 mode and press a key.Enter a symbol Use Symbols mode and highlight a smiley you want and press  .Enter a smiley Use Smileys mode and highlight a smiley you want and press  .Enter a emoticon Use Emoticons mode and highlight a emoticon you want and press  .Enter a web shortcut Use Web Shortcut mode and highlight a word you want and press  .Enter a space Press .Erase a character Press .Erase all characters Press and hold  .Move the cursor right or left Scroll left or right.Move the cursor up or down Scroll up or down.Change case mode Press .Capitalize any letter In Abc or T9Word mode, press  . Choose uppercase (ABC or T9WORD).Lowercase any letter In Abc or T9Word mode, press  . Choose lowercase (abc or T9word).Initial caps In Abc or T9Word mode, press  . Choose sentence case (Abc or T9Word).Select options on the bottom of the screen Press the appropriate left or right softkey.
16 My Stuff Menu4My StuffThis section describes how your phone can retrieve and playback media files and other downloads.My Stuff MenuSelect My Stuff from the main menu to access the following functions:RingtonesDownload a RingtoneBefore downloading, make sure you have enough money in your cash balance; otherwise you can Top-Up your account.1. From Ringtones, select Get New and search for a ringtone.2. Follow the prompts to purchase and download the selected ringtone.Assign a Ringtone1. From Ringtones, select a ringtone.2. Select Assign and choose how you want to assign the ringtone.GraphicAssign a Graphic1. From Graphics, select a graphic.2. Select Assign and choose how you want to assign the graphic.Ringback TonesLevel 1 > Level 2 >  Level 3My Stuff Ringtones Displays your ringtones and the Get New option.Graphics Displays your graphics.Ringback Tones Launch application to purchase Ringback Tone.Ringtones stores your downloaded ringtones.You can download ringtones to your phone from your phone. Charges apply.Select Ringback Tones to purchase ringback tones for your account. For more information about your account, go to.
User Guide 175 My AccountNote: You cannot make calls, receive calls, or access any other phone functions while you are accessing your account information. All incoming calls are automatically sent to your voicemail.Check your Account BalanceTop-Up your AccountTop-Up with a Top-Up Card1. From the main menu, select My Account.2. Scroll down to the Top-Up link and press .3. Enter your Account PIN and select DONE.4. Scroll down to select Login and press .5. Enter your Top-Up card’s PIN number and press  .You can manage your account directly from your phone. The basic tasks are summarized in this chapter. For more information about your account, go to.You can check your account status by selecting My Account from the main menu.Your account information appears. When your account is low or empty, you receive a notification to Top-Up.Note: Additional charges may apply for multiple balance checks in one day. Visit  for more details.Top-Up is how you add money to yours account. You can Top-Up your  account right from your phone. First, buy a Top-Up card from one of the thousands of retailers that carry them or register your debit card, credit card, or PayPal account at.Note: You cannot register a debit or credit card from your phone, and must register online first before you can Top-Up with this method via the phone. When your balance is low, you can Top-Up your account from your phone.
18 For More Information6. Scroll down to select Top-Up Now and press .7. You are now Topped-Up. Press   to exit.Top-Up with a Debit Card, Credit Card, or PayPal Account1. From the main menu, select My Account.2. Scroll down to the Top-Up link and press .3. Enter your Account PIN and select DONE.4. Scroll down to select Login and press .5. Scroll down to select either Credit Card or PayPal and press  .6. Enter the amount you want to Top-Up and press  . You can Top-Up in amounts of $20, $30, $50, or $90.7. Scroll down to select Top-Up Now and press .8. You are now Topped-Up. Press   to exit.For More InformationNote:  You  can  also  Top-Up  over  the Web.For more information about your account.
User Guide 196 SettingsSettings MenuSelect Settings from the main menu to access the following functions:Level 1 > Level 2 >  Level 3SettingsDisplayAccess these options: Graphic, Brightness, Backlight, Notification, Picture ID, Power Save Mode, Keypad Light, Clock/Calendar, and Greeting.Volume Access these options: Incoming Ringtone, Playback Volume, Power Up/Down, and Key Beeps.Ringtones Access these options: Incoming Calls, Voicemail, Messages, Calendar, and Power Up/Down.Keyguard Access these options: On or Off.Text EntryAccess these options: Word Complete, Next Word Complete, Phrase Complete, Word Scan, Word Choice List, Input Language, My Words, and Help.Phone Info Access these options: My Phone#, Memory Status, Icon Glossary, Version,  Advanced, My Account, and UL Environment Certification.Lock Phone Access these options: Lock Now, Change Lock Code, and Lock Code Hint.Reset/Delete Access these options: Reset Settings, Reset Phone, Delete Stuff, and Change Lock Code.Others Access these option: Accessibility, Airplane Mode, Alerts, Call Setup, Data Settings, Headset Mode, Language, Location, and Navigation Keys.
20 DisplayDisplayAdjusting your phone’s display settings not only helps you see what you want, they can also help increase battery life.Set GraphicsFrom Graphics, select a graphic on the home screen.Set Main Menu ViewFrom the home screen, select MENU. Select one of the following:GRID VIEW displays icons of each menu item, with its name at the bottom of the screen.LIST VIEW displays a list of all menu items.Set Brightness1. From Brightness, scroll to change the brightness level.2. Select a brightness level.BacklightYou can adjust Backlight to maximize brightness or maximize battery life.Set Backlight Dim Duration1. From Backlight, select Backlight Dim.2. Select Always Bright, Always Dim, or a preset length of time to elapse before the screen backlight dims.Set Backlight Off Duration1. From Backlight, select Backlight Off.2. Select a preset length of time to elapse before the screen and keypad backlights turn off.Set the Notification Pop-upThis option allows you to enable or disable notification pop-up when you receive a new notification (except for incoming call and alarm) while an application is running.From Notification, select Enable Pop-up or Disable Pop-up.Set a Picture IDYou can select Picture IDs for your contacts, unsaved numbers, private or unknown numbers.1. From Picture ID, select Contact, Unsaved Numbers, or Private / Unknown. (If you select Contact, select an entry.)2. Scroll up or down to select a picture ID option and select an image to assign.
User Guide 21Set Power Save ModeThis feature helps conserve your battery power by automatically adjusting the backlight and keypad setting of your phone.1. From Power Save Mode, select On.2. Read the message and select CONTINUE.Set Keypad LightFrom Keypad Light, select On.Set the Clock/CalendarFrom Clock Calendar, select a clock/calendar display option.Set a Custom GreetingYou can display your own custom greeting in standby mode.1. From Greeting, select Custom.2. Enter a custom greeting.3. Select DONE to save your greeting.VolumeAdjust your phone‘s volume settings to suit your needs and your environment.Adjust Volume1. From Volume, select Incoming Ringtone, Playback Volume, Power Up/Down, or Key Beeps.– If you select Power Up/Down, select On or Off.– If you select Key Beeps, select Tone Volume or Tone Type.2. Scroll up or down to select a volume level.Tip: You can adjust the ringtone volume in standby mode (or the earpiece volume during a call) by using the volume key.RingtonesYou can assign a ringtone or vibration pattern to incoming calls, messages, etc. and also enable audio guidance.Select Ringtones for Incoming Calls and Messages1. From Ringtones, select Incoming Calls or Messages.2. Select Contacts, Unsaved Numbers, or Private / Unknown.
22 Keyguard– If you select Contacts, select All Contacts, or select One Contact to select an entry.)3. Scroll up or down to select a ringtone option and select a ringtone.Select Ringtones for Voicemail, Calendar, and Power Up/Down1. From Ringtones, select Voicemail, Calendar, or Power Up/Down.2. Select Contacts, Unsaved Numbers, or Private / Unknown.3. Scroll up or down to select a ringtone option and select a ringtone.KeyguardUse Keyguard to lock the keypad immediately to automatically lock the keypad after a period of inactivity to prevent accidental key presses.Enable KeyguardFrom Keyguard, select On.-or-From the home screen, press and hold .Unlock KeyguardFrom the home screen, press   and then press   to unlock the keypad.Text EntryYou can configure settings for text entry. From Text Entry, select one of the following:Word Complete to suggest possible words based on letters you have entered.Next Word Complete to automatically display the word that may follow the current text input.Phrase Complete to set the phone to predict possible phrases after one word with a space is entered.Word Scan to allow the predictive text input system to recognize words by searching Contacts.Word Choice List to select whether to display the word choice list.Input Language to select the language to enter (English or Spanish).My Words to edit or delete custom words you have added to the predictive text database.Select Text to select text for copying, cutting or adding (if applicable).Delete All to delete all text (if applicable).Help to view the T9 instructions.
User Guide 23Phone InfoView Phone NumberSelect My Phone# to view your phone’s phone number, MSID, and other information.Check your Phone MemorySelect Memory Status to check the memory usage of your phone.View Phone IconsSelect Icon Glossary to view the icons used in your phone.View Version InformationSelect Version to check your phone’s software and hardware information.View Advanced InformationSelect Advanced to view your phone’s advanced information.My AccountSelect My Account to manage your account.Lock PhoneThe Lock Phone settings menus let you set phone security, lock code, and more.Set Lock PhoneWhen your phone is locked, you can only make calls to 911 or ICE Contact.1. From Lock Phone, enter your four- digit lock code.2. Select Lock Now.Unlock the Phone1. From the home screen, select UNLOCK.2. Enter your four-digit lock code.Change Lock Code1. From Lock Phone, enter your four- digit lock code.2. Select Change Lock Code.3. Enter a new four-digit code.4. Re-enter your new lock code. (You will be prompted to create a lock code hint to help you remember your new lock code.)5. Select YES to create a lock code hint or NO to return to the previous menu.
24 Reset/DeleteReset/DeleteDelete Phone ContentYou can quickly and easily delete all the content that you have created or stored in your phone.1. From Reset/Delete, enter your four- digit lock code.2. Select Delete Stuff.3. Select one of the following:–Messages to delete all messages.–Call Logs to delete all call history from the phone.–Browser Cookies and Cache to delete all Web cookies and all Web cache memory saved in the phone.–Downloaded Content to delete all data downloaded to your phone.return to the previous menu–Contacts to delete all of your Contacts including speed dial numbers saved in your Contacts.–Voice Memo to delete all voice data and call memos saved in the phone.–All Stuff to delete all user-added data.4. Read the message and select DELETE.Reset Your Phone and Phone ContentThis option lets you clear different types of personal information stored on your phone, reset your phone to factory settings, or both.1. From Reset/Delete, enter your four- digit lock code.2. Select one of the following:–Reset Settings to restore all the factory defaults, including ringtone types and display settings. Contacts, Call History, Calendar, and Messaging are not affected.–Reset Phone to reset all settings and erase all data on your phone.3. Read the message and select RESET SETTINGS or RESET PHONE.Others SettingsYou can customize additional settings on your phone such as accessibility, airplane mode, alerts settings, Call Setup options, data settings, headset mode, display language, location mode, and Navigation Key shortcut.Accessibility SettingsThe Accessibility menu lets you enable and manage accessibility-related features.Voice GuideVoice Guide allows you to hear voice prompts and spoken numbers or key names as you press a key, and also to hear menus and options, Contacts names, email addresses, URLs, etc., as you select each item onscreen. (The default setting is Off.)1. From Voice Services, select Voice Guide.2. Select On or Off.
User Guide 25Voice Recognition SettingsYou can control the settings associated with voice recognition. See “Voice Recognition” on page 46 for more information.From Voice Services, select Voice Recognition.To change the voice recognition confirmation:1. From Voice Recognition, select Confirmation.2. Select one of the following:–Automatic to ask for confirmation only when the system is not sure what you said.–Always Confirm to always ask for confirmation.–Never Confirm to never ask for confirmation.To adapt the system to your voice:1. From Voice Recognition, select Adaptation > Adapt Voice.2. Select START and repeat each word, phrase, or telephone number you hear.To reset the adaptation:1. From Voice Recognition, select Adaptation > Adapt Voice.2. Select Reset Voice > YES.To change the audio mode:1. From Voice Recognition, select Audio Modes.2. Select one of the following:–Expert Mode to sound a beep only.–Prompt Mode to prompt for required information.–Readout Mode to prompt for required information and to read the text displayed on the main screen.To change the dialing region:1. From Voice Recognition, select Dialing Region.2. Select one of the following:–North America to recognize only numbers valid in North America.–Other to recognize any number regardless of location.To display the software version:From Voice Recognition, select About.Connect to TTY DeviceYou can connect the phone to a teletype (TTY) device for the hearing impaired. (TTY device sold separately.)Note: Enable TTY only when using the phone with a TTY device.1. Connect the TTY device to your phone.2. From Accessibility, select TTY.3. Select OK to clear the notification.4. Select one of the following:–TTY Off to disable TTY.–TTY VCO to enable TTY mode in Voice Carry Over mode.–TTY HCO to enable TTY mode in Hearing Carry Over mode.–TTY Full to enable all TTY settings.
26 Others SettingsVibrate TypeYou can select vibration patterns for incoming calls, messages, alarms, and scheduled events.1. From Accessibility, select Vibrate Type.2. Select Incoming Calls, Voicemail, Messages, or Alarm/Calendar.3. Select a vibration pattern.Connect to Hearing Aid DeviceWith a hearing aid device (sold separately) connected, you can enable the hearing aid feature.1. Connect the hearing aid device to your phone.2. From Accessibility, select Hearing Aid.3. Select OK to clear the notification.4. Select On.Airplane ModeAirplane Mode allows you to use many of your phone’s features, such as games and voice memos, when you are on an airplane or in any other area where making or receiving calls or data is prohibited. When you set your phone to Airplane Mode, it cannot send or receive any calls or access online information.1. From Airplane Mode, select OK to clear the notification.2. Select one of the following:–On to activate Airplane Mode. Airplane Mode will be deactivated when you turn the phone off.–Off to deactivate Airplane Mode.–On Power-up to activate Airplane Mode each time you turn the phone on.Tip: While in Airplane Mode, your phone’s screen will display the airplane mode icon  .AlertsYou can change the alert settings according to your needs.Alerts NotificationSet your phone to alert you with an audible tone when you change service areas, once a minute during a voice call, or when a call has been connected.1. From Alerts, select Beep Each Minute, Out of Service, or Connect.2. Select On or Off.Voicemail or Message AlertsYou can set how often your phone alerts you when there is a new voicemail or message notification.1. From Alerts, select Repeated Tone > Voicemail or Messages.2. Select Single Tone (once only) or Repeated Tone (once every minute).
User Guide 27Persistent AlertsYou can set the type of Alert you would like to receive.1. From Alerts, select Persistent Alerts.2. Select Audible Tone or Vibrate.3. Select On or Off.Call Setup OptionsYou can configure various call-related settings.Abbreviated DialingAbbreviated Dialing is similar to speed dialing. You can use either of the following abbreviated dialing features:Contacts Match - Retrieve any number saved in your Contacts by entering four or more digits of any part of the number.Prepend - Prepend the first five or six digits (for example, the area code and prefix) to any four or five digits youTo activate the Prepend feature:1. From Call Setup, select Abbrev. Dial.2. Select Prepend > On.3. Enter a five- or six-digit number and select OK.To place a call using Abbreviated Dialing:1. Enter the four or more digits of any part of a Contacts entry’s phone number to use the Contacts Match feature.-or-Enter the last four or five digits of the number to use the Prepend feature.2. Press   to call the displayed number.Call Answer ModeYou can select how to answer incoming calls on your phone.1. From Call Setup, select Call Answer.2. Select Talk Key or Any Key.Auto-Answer ModeSet your phone to automatically pick up incoming calls. Remember, your phone will answer calls in auto-answer mode even if you are not present.1. From Call Setup, select Auto-Answer.2. Select one of the following:–Hands-free to answer calls automatically when the phone is connected to an optional headset or hands-free device.–Speakerphone to answer calls automatically in speakerphone mode.3. Select the time you would like your phone to wait before answering.Data SettingsAlthough your phone‘s data services are turned off by default, you may enable them at any time.To enable data services:1. From Data Settings, select Data > On.2. Read the message and select YES.To disable data services:1. From Data Settings, select Data > Off.2. Read the disclaimer and select DISABLE.
28 Others SettingsNet GuardThe Net Guard helps you avoid accidental connections when you connect to the Web.To enable or disable Net Guard:1. From Data Settings, select Net Guard.2. Select On or Off.Note: When enabled, Net Guard appears only once as long as you have not turned the phone off and on.Update Data ProfileIf you choose to change your user name and select a new one online, or make any changes to your services, you must then update the profile on your phone.From Data Settings, select Update Data Profile. (To cancel, press  before completing the update.)Headset ModeYou can set the sound output destination of incoming ringtone on your phone. From Headset Mode, select one of the following:Normal to play the ringtone for incoming calls through both the headset and the speaker.Headset Only to play the ringtone for incoming calls only through the headset.LanguageYou can choose to display your phone’s onscreen menus in English or in Spanish. From Language, select a language.LocationBefore using any of the location-based services, you must turn on your phone‘s location feature.To enable your phone‘s location feature:1. From Location, select On/Off.2. Select OK to clear the notification.3. Select On.Tip: When the Location feature is on, your phone’s home screen will display the   icon. When Location is turned off, your phone will display the   icon.To send the GPS log to other devices:1. From Location, select NMEA Output.2. Select USB.Note: Turning Location on will allow the network to detect your position using GPS technology, making some applications and services easier to use. Turning Location off will disable the GPS location function for all purposes except 911, but will not hide your general location based on the cell site serving your call. No application or service may use your location without your request or permission. GPS-enhanced 911 is not available in all areas.
User Guide 29Navigation Key ShortcutYou can use the navigation keys as shortcuts to access specific menu items directly from standby mode. You can reassign the default shortcuts to the menu items you choose.1. From Navigation Keys, select the navigation key you wish to reassign.2. Scroll up or down to highlight a function.3. Select ASSIGN to save. (For options with submenu levels, such as Settings, you can assign submenu options by navigating to the desired option.)
30 Access Contacts7 ContactsUse Contacts to store information about a person or company.Access ContactsAccess Contacts List1. From the home screen, select CONTACTS.-or-Select Contacts from the main menu.2. Enter the first letter of your desired contact and scroll to highlight it.3. Do one of the following:– Press   to call the contact.– Press   to view the contact’s details.–Select Add New… to create a new contact.–Select OPTIONS to access more functions.View Contact Details1. From the home screen, select CONTACTS.2. Select a contact to show the details.Add ContactsAdd Contacts from Home Screen1. From the home screen, enter a phone number to save.2. Select OPTIONS > Save.3. Select New Entry or Existing Entry.4. If you chose New Entry, select a number type, and then enter the new entry name.-or-If you chose Existing Entry, select an entry to which you want to save the number, and then highlight a number type and press  .5. When done, select DONE.
User Guide 31Add Contacts from Contacts Menu1. From the Contacts list, select Add New... > New Contact.2. Enter a name for the contact. Scroll down to the next field when done.3. Enter a primary number for the contact and select a number type for the entry.4. Enter additional phone numbers, email addresses, and other contact details.(Scroll up or down to move through the contact fields.)5. When done, select DONE.Add a Code or ExtensionWhen saving the phone number of an automated service, you may include a pause for dialing an extension.1. From the home screen, enter a phone number.2. Select OPTIONS and a type of pause:–Hard Pause causes the phone to wait until you select SEND TONES while making the call.–2-Sec. Pause causes the phone to stop dialing for two seconds.3. Enter the remaining numbers and select OPTIONS > Save.4. Complete the contact information and select DONE.Use ContactsCall Contacts1. From the Contacts list, highlight a contact.2. Press   to dial the entry’s default phone number.-or-To dial another number from the same entry, select an entry to display the contact details screen, highlight a number and then press  .Send a Text Message to Contacts1. From the Contacts list, select a contact.2. At the contact details screen, highlight a number or email address.3. Select SEND MESSAGE.4. Complete your text message and select SEND.Send a Contact1. From the Contacts list, select a contact.2. Select OPTIONS > SEND CONTACT to send to a Bluetooth-enabled device.3. Complete the appropriate task to send the contact information.
32 Customize ContactsCustomize ContactsEdit Contact Details1. From the Contacts list, highlight a contact.2. Select OPTIONS > Edit Contact.3. Enter additional phone numbers, email addresses, and other contact details.(Scroll up or down to move through the contact fields.)4. When done, select DONE.Assign Number Types1. From the Contacts list, select a contact.2. At the contact details screen, select OPTIONS > Edit.3. Highlight the number and select OPTIONS > Set # Type.4. Select a number type. The appropriate icon appears next to the number in your contacts list.5. Select DONE.Assign Ringtones to Contacts1. From the Contacts list, select a contact.2. At the contact details screen, select Set Ringtones.3. Select Incoming Calls or Message > Change.4. Select ringtone from the list. (Scroll to select a ringtone.)Assign Pictures to Contacts1. From the Contacts list, select a contact.2. At the contact details screen, scroll up to select  .3. Select Choose Photo.4. Select a picture from the list. (Scroll to select a picture.)Add a Prefix to Phone NumbersUse Prepend to add a prefix, such as an area code, to a phone number:1. From the Contacts list, select a contact.2. At the contact details screen, highlight a number.3. Select OPTIONS > Prepend to enter the prefix at the beginning of the number.Assign Speed Dials to Contacts1. From the Contacts list, select a contact.2. At the contact details screen, highlight a number.3. Select OPTIONS > Set Speed Dial.4. Select a location from the list to assign the speed dial number.
User Guide 33Delete Contacts1. From the Contacts list, select a contact.2. Select OPTIONS > Delete Contact > DELETE.Note: You cannot recover deleted information.Contact GroupsYou can assign your contacts to groups.Create a New Group1. From the Contacts list, select Add New... > New Group.2. Read the message and select START.3. Select contacts from the list provided. A checkmark appears next to each selection. (You can also remove checkmarks.)4. When finished, select CONTINUE.5. Enter a name for the group and select SAVE.Remove Contacts from Groups1. From the Contacts list, highlight a group.2. Select OPTIONS > Edit Group.3. Highlight a member and select OPTIONS > Remove from Group > YES.4. Repeat step 3 to remove additional members.5. When finished, select SAVE.Delete a Group1. From the Contacts list, highlight a group.2. Select OPTIONS > Delete Group > DELETE.Speed Dial ListAssign Speed Dial Numbers1. From the Contacts list, select OPTIONS > Settings > Speed Numbers.2. Highlight an unassigned number (marked as empty) and select ASSIGN.3. At the contacts list, select a contact.Clear Speed Dial Numbers1. From the Contacts list, select OPTIONS > Settings > Speed Numbers.2. Highlight an assigned number and select OPTIONS > Remove.Dial ServicesYour Contacts list is preprogrammed with contact numbers for various services.1. From the Contacts list, select OPTIONS > Settings > Services.2. Select a service and press  .
34 ICE ContactsICE ContactsYour phone is equipped with a key that displays the ICE (In Case of Emergency) contacts, which could be very helpful in case of emergency.Add an ICE Contact1. From the Contacts list, select OPTIONS > Settings > ICE > ICE Contacts.2. Highlight Add to ICE Contacts under “Call” or “Text” field and select ASSIGN.3. Select the entry to register as ICE contact.Call an ICE Contact1. From the home screen, press and hold .2. Read the message and select OK.Replace or Remove an ICE Contact1. From the Contacts list, select OPTIONS > Settings > ICE > ICE Contacts.2. Highlight an entry and select OPTIONS.3. Select Replace to select another contact.Select a new contact from the displayed list.– or –Select Remove > YES to remove the selected contact.Emergency MessageTo send an emergency message:1. From the Contacts list, select OPTIONS > Settings > ICE.2. Select SEND TEXT > OK.Note: When Location settings is turned off, it will be automatically turned on.To enter or edit the emergency message:1. From the Contacts list, select OPTIONS > Settings > ICE.2. Select Emergency Message > EDIT.3. Enter or edit the message and select DONE.ICE Information1. From the Contacts list, select OPTIONS > Settings > ICE.2. Select My Information > EDIT.3. Enter or edit the necessary information and select DONE.
User Guide 358 MessagingUse Messaging to send, receive, and erase messages from your phone.Messaging MenuSelect Messaging from the main menu to access the following functions:Use VoicemailSet Up your VoicemailYou should set up your Voicemail and personal greeting as soon as your phone is activated. Always use a password to protect against unauthorized access.1. Press and hold  .2. Follow the voice prompts to create your password and record your name and greeting.Note: It is strongly recommended that you set a voicemail password. Without a password, anyone who has access to your phone can access your messages.Check your VoicemailWhen you receive a voicemail message, a notification with a voicemail message icon  appears at the top of your screen.1. At the voicemail notification, press  .2. Enter your voicemail password if prompted.3. Follow the voice prompts to listen to and manage your voicemail messages.Retrieve Your Voicemail MessagesYou can review your messages directly from your wireless phone or from any other touch-tone phone.From your wireless phone:Press and hold  .Level 1 > Level 2 >  Level 3Messaging Voicemail  Access these options: Call Voicemail and Voicemail Details. Send Message  Compose a text message.Messages  Shows a list of threads.

Navigation menu