Kyocera SCP-6750 Cellular/ PCS CDMA Phone with Bluetooth User Manual Sprint UG 7b
Kyocera Corporation Cellular/ PCS CDMA Phone with Bluetooth Sprint UG 7b
UserManual.wiki
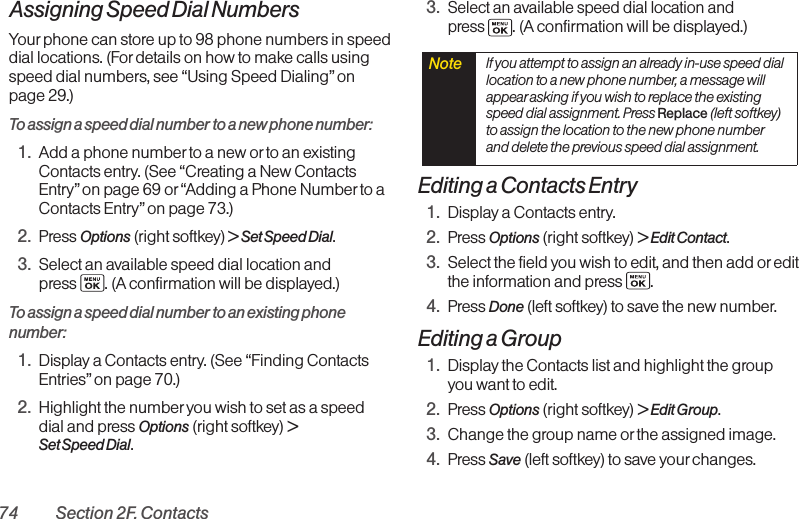
>
Kyocera
>
SCP 6750 User Manual
Users Manual
Navigation menu
Upload a User Manual
Namespaces
Wiki Guide
HTML
PDF
Info
Views
User Manual
Discussion / Help
Navigation


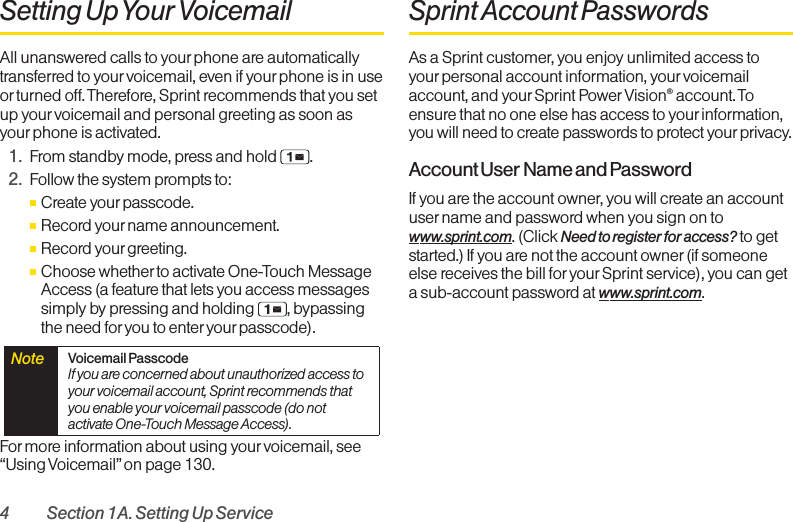
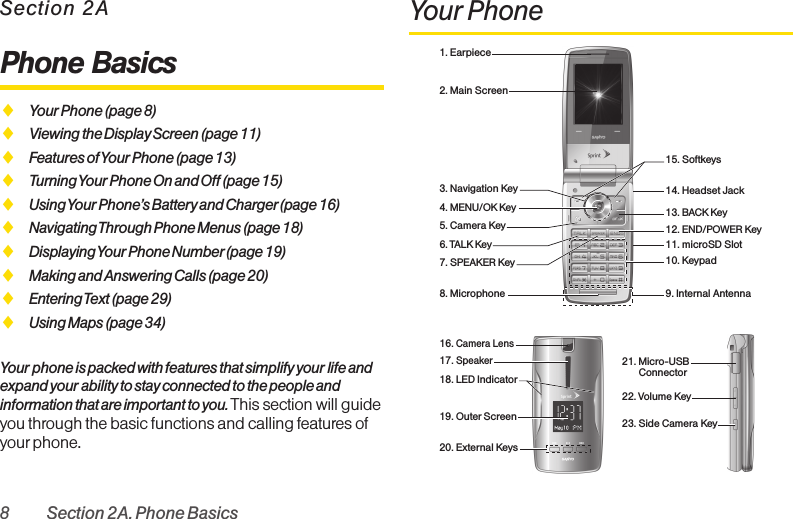
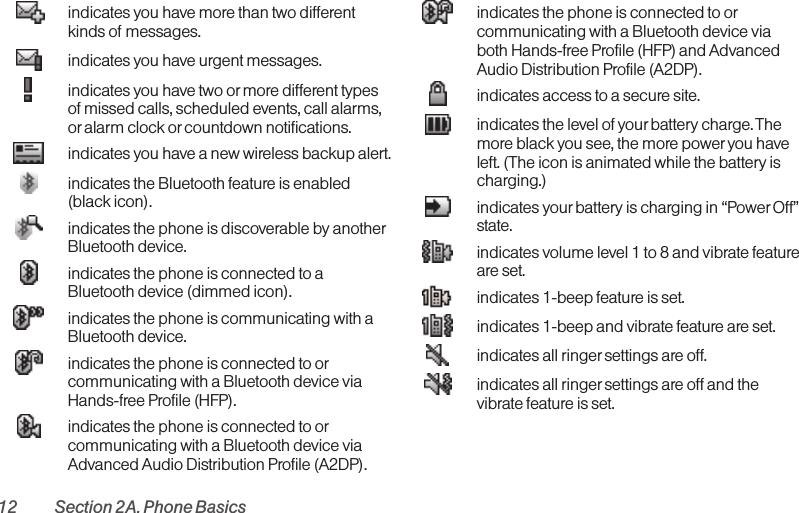

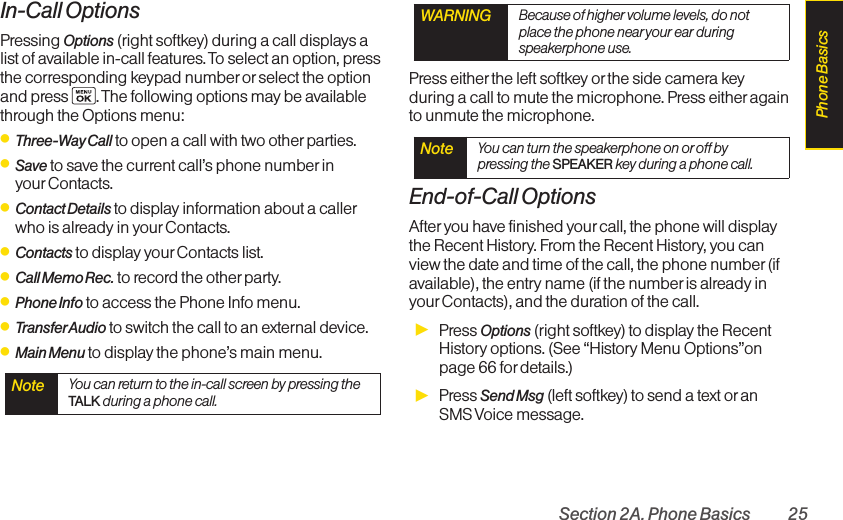
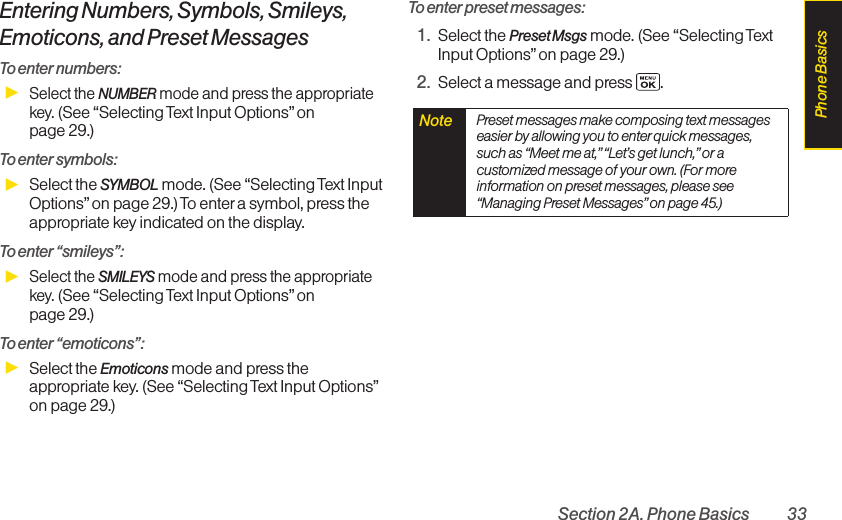
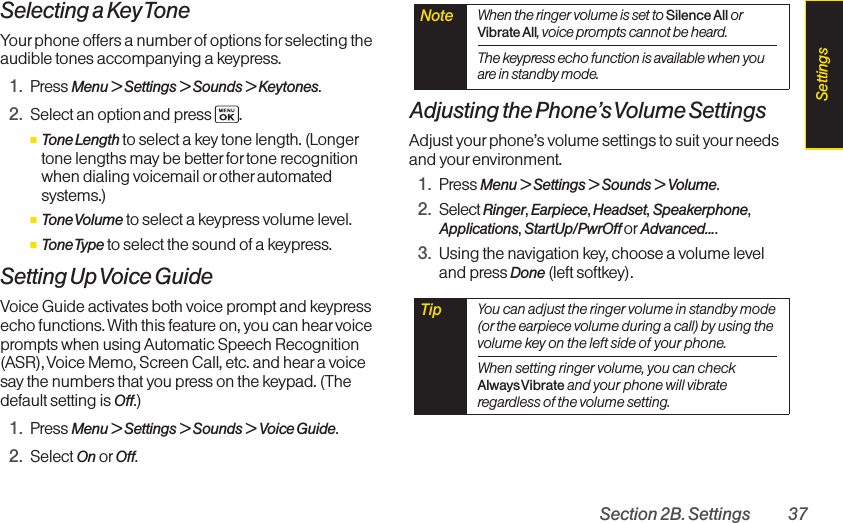

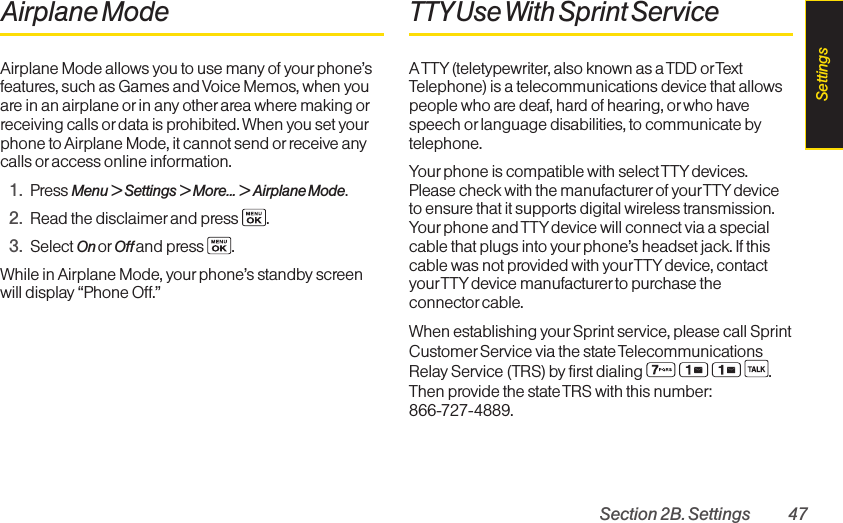
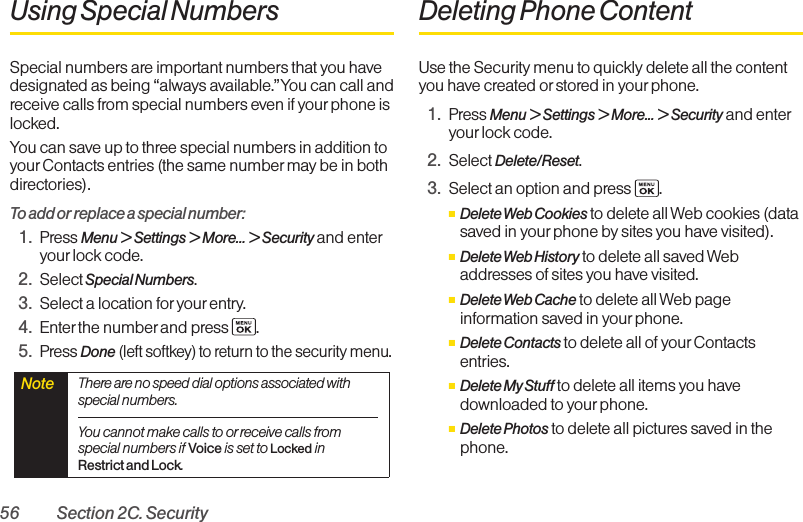
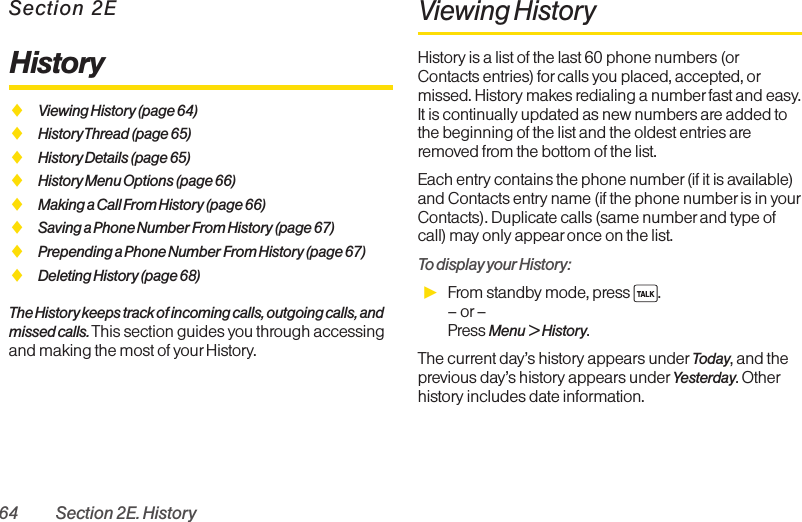
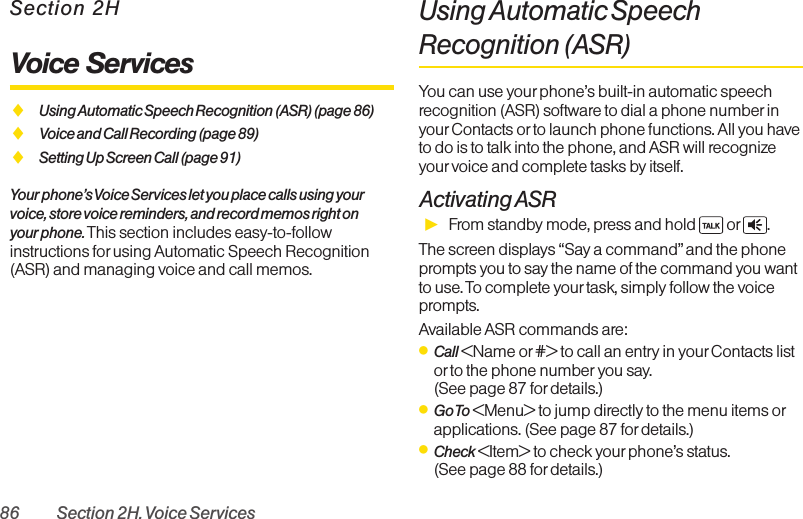
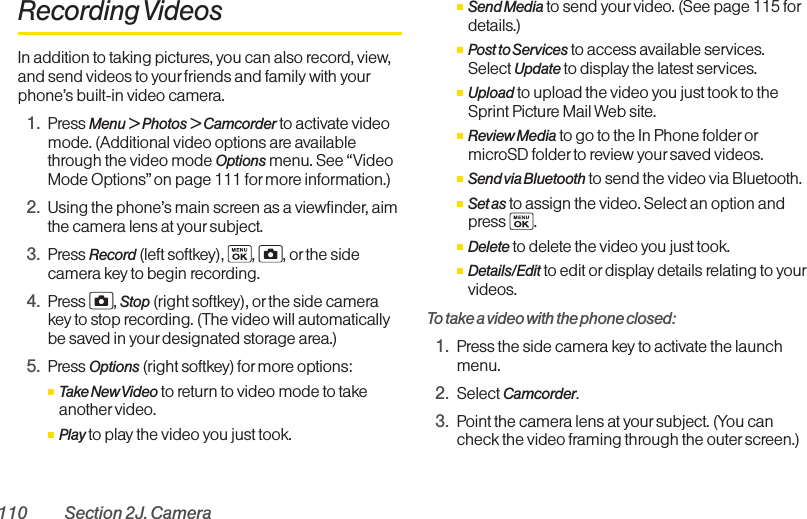
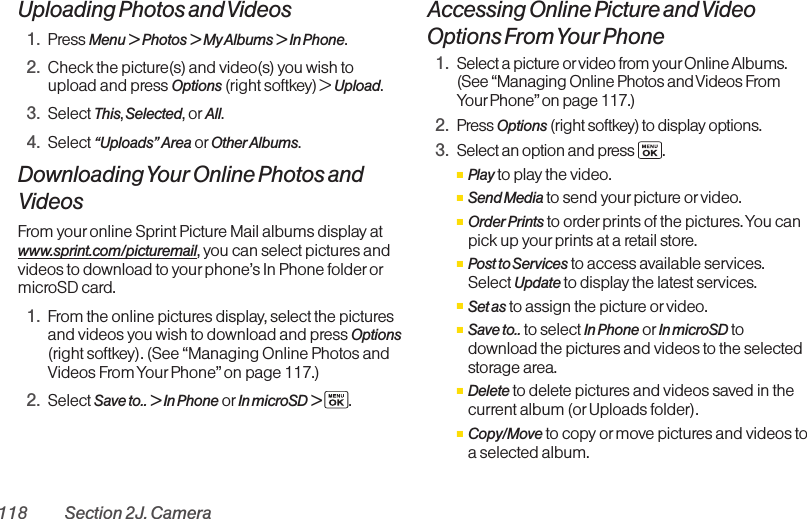
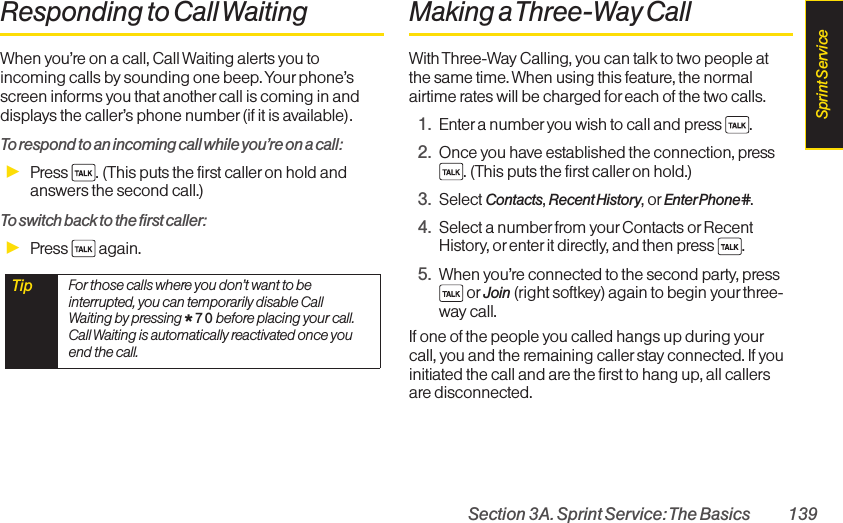
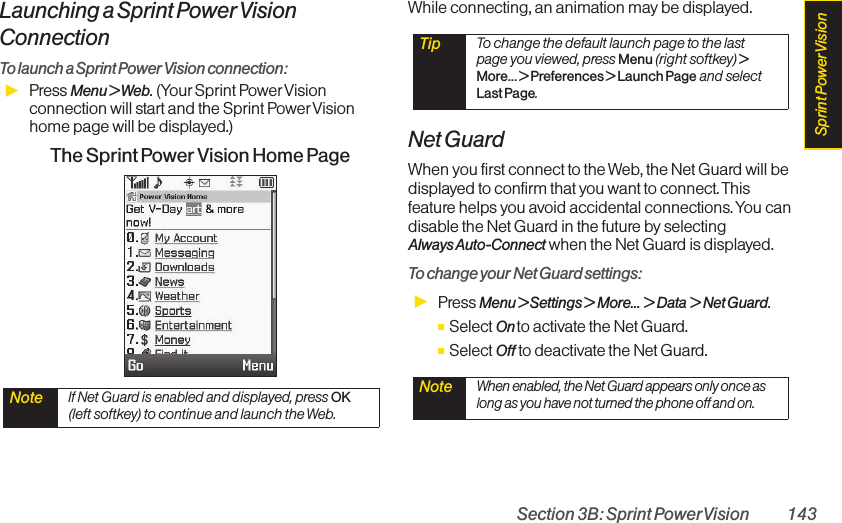
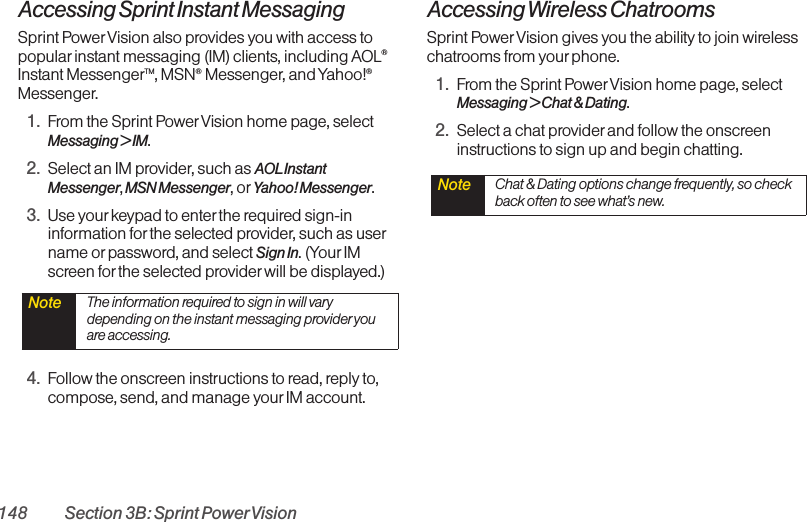
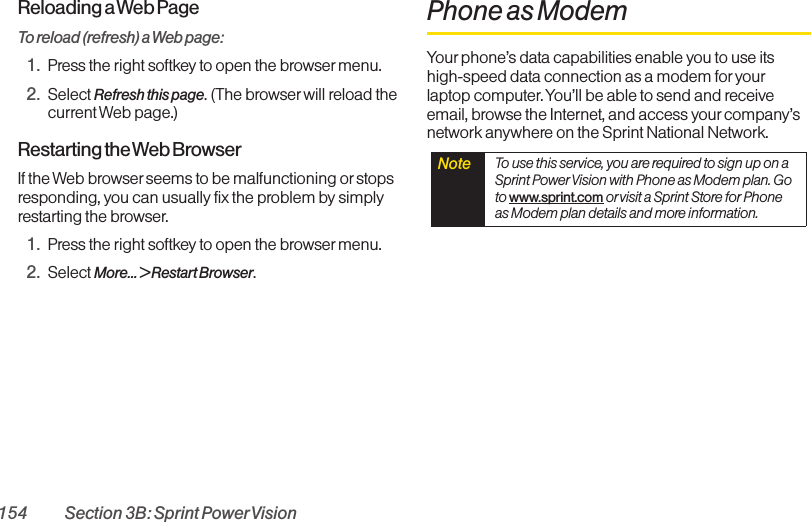
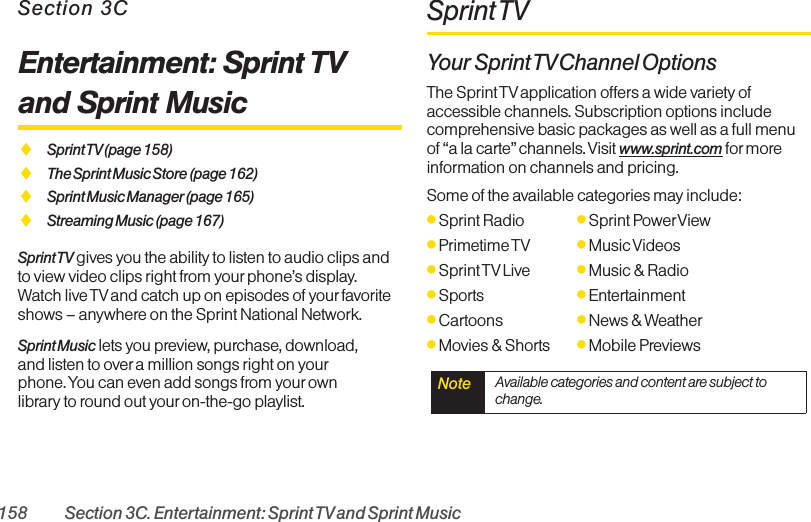
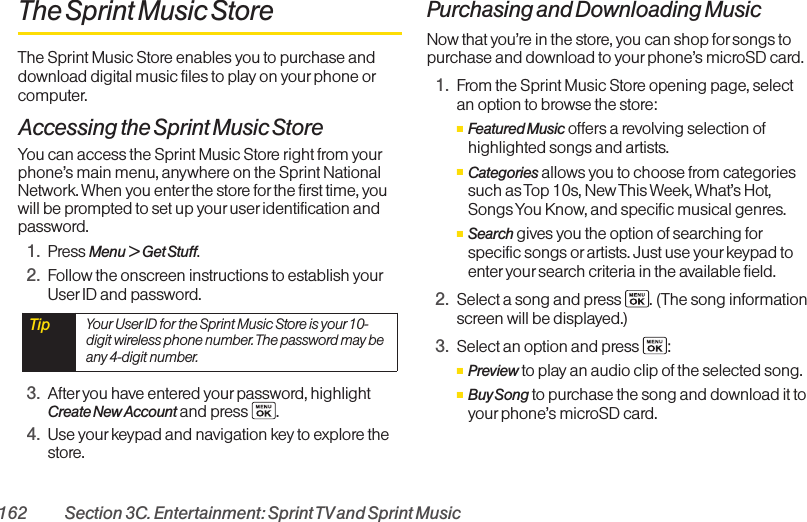
![Section 2B. Settings 45Adding a Customized SignatureAdd a customized signature to each message you send.1. Press Menu > Settings > Messages > Signature.2. Press , and then select On.(If you do not wish toattach a signature to your outgoing messages, select Off.)3. Enter a signature and press OK (left softkey). (See“Entering Text”on page 29.)Managing Preset MessagesYour phone is loaded with 20 preset messages to helpmakesending text messages easier. Customize ordelete these messages, such as “Where are you?,”“Let’sget lunch,”and “Meet me at” to suit your needs, or addyourown messages to the list.To edit or delete a preset message:1. Press Menu > Settings > Messages > Preset Msgs.(The list of preset messages will be displayed.)2. Toedit or delete a message, select it and pressOptions (right softkey). 3. Select Edit,edit the message (see “Entering Text” onpage 29), and press .–or–Select Delete > Yes (left softkey) to delete themessage. (You can also reset all messages byselecting Reset All Msgs > Yes [left softkey].)To change the language of the preset message:1. Press Menu > Settings > Messages > Preset Msgs.2. Press Options (right softkey) > Select Lang.3. Select English or Spanish.Setting Drafts AlertWith this feature, when you try to send an SMS Textmessage, you are reminded if there are unsentmessages in the Drafts folder.1. Press Menu >Settings > Messages > Drafts Alert.2. Select On or Off.Settings](https://usermanual.wiki/Kyocera/SCP-6750/User-Guide-973074-Page-59.png)
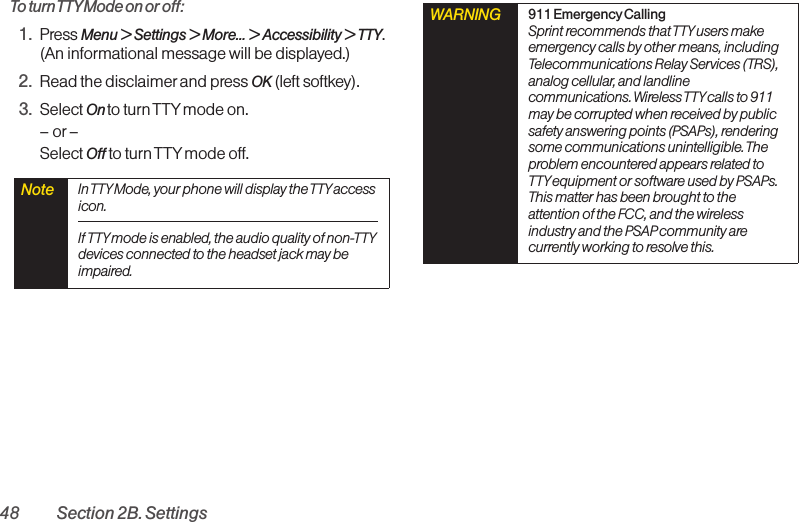

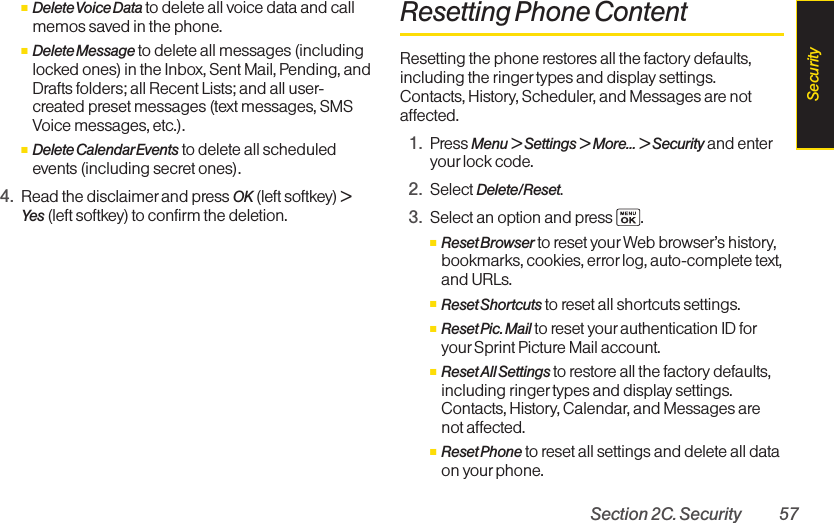
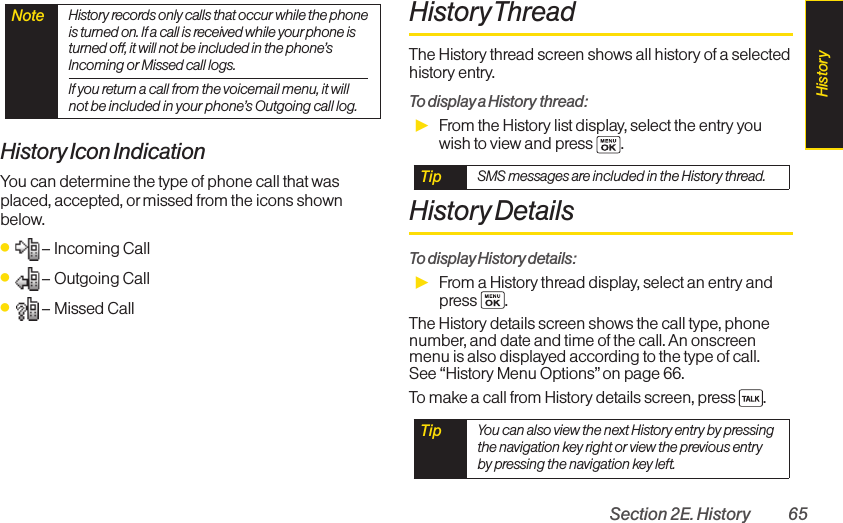


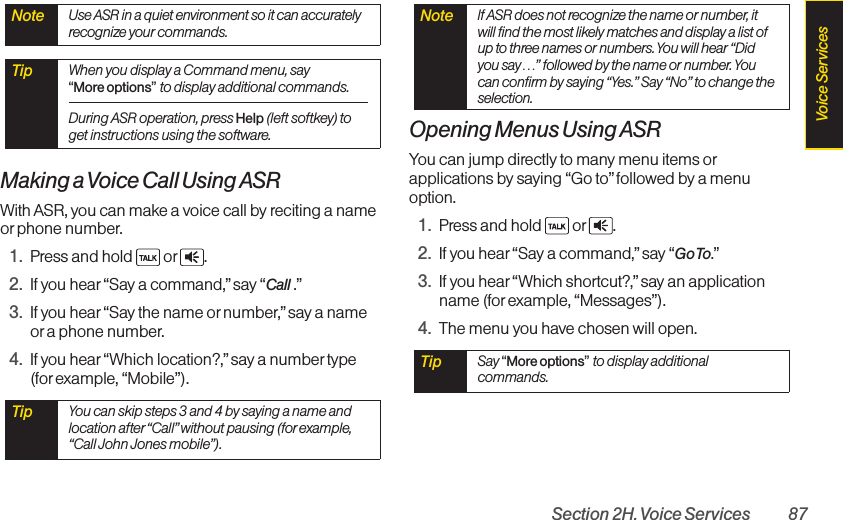
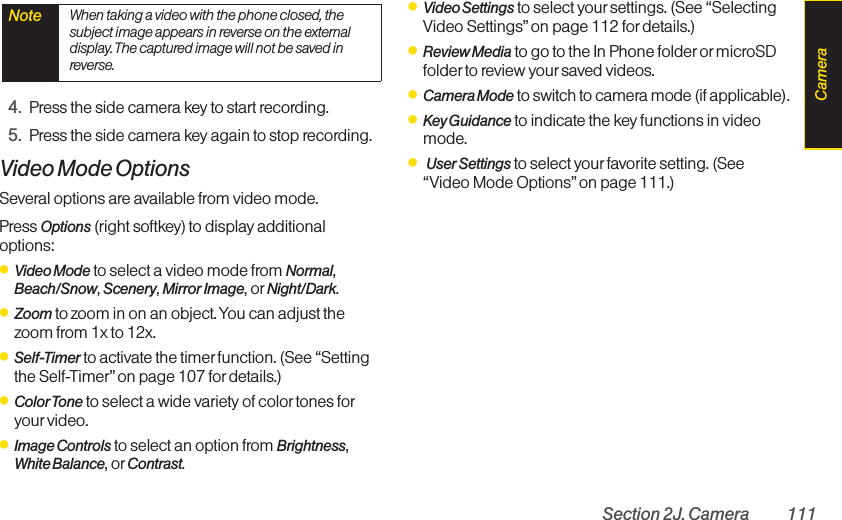
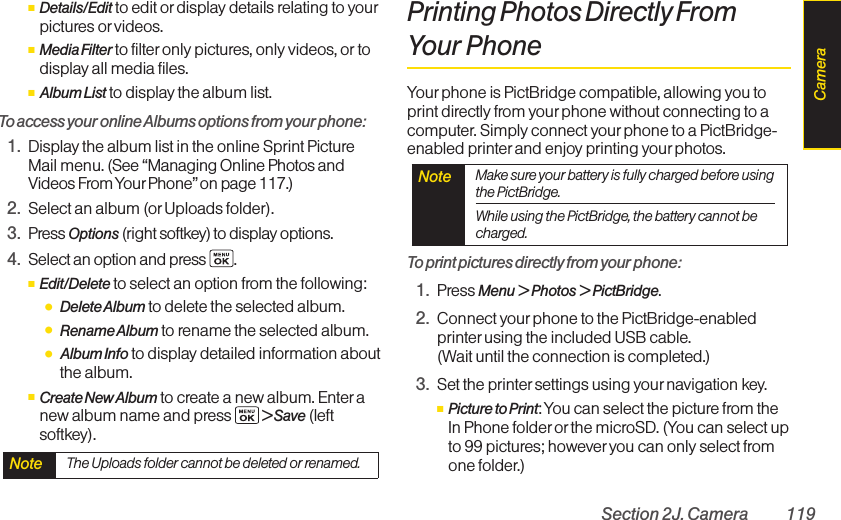
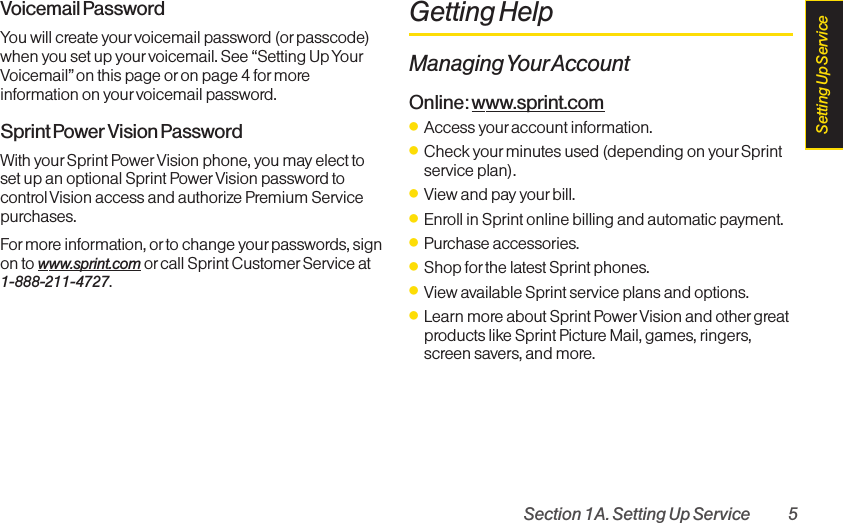
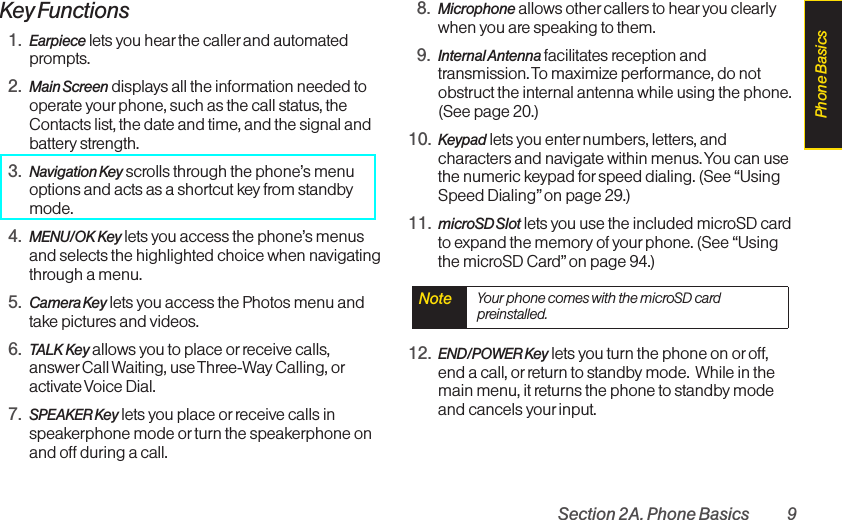
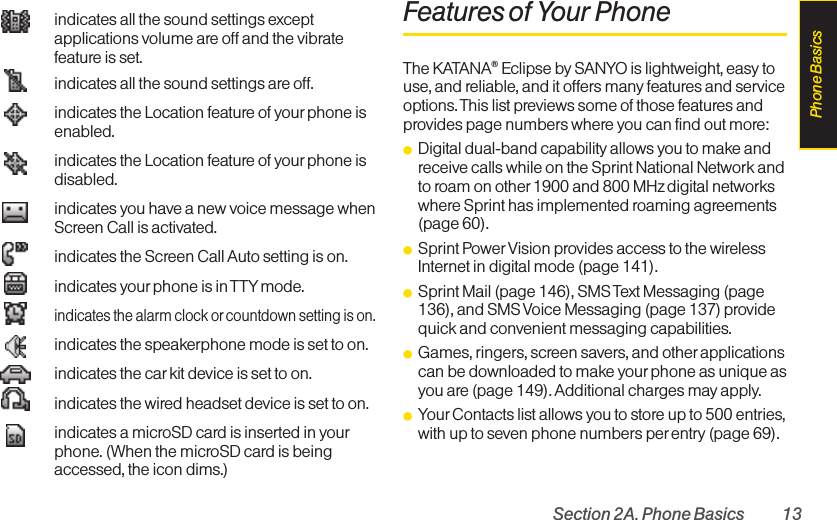
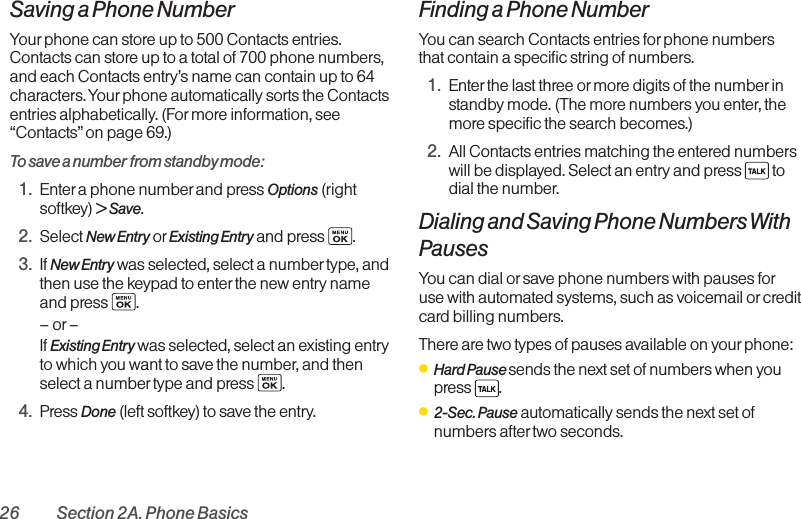
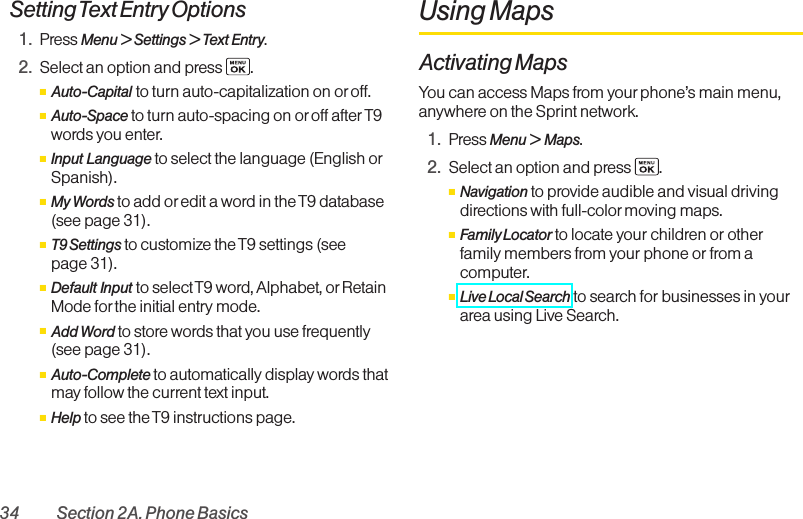
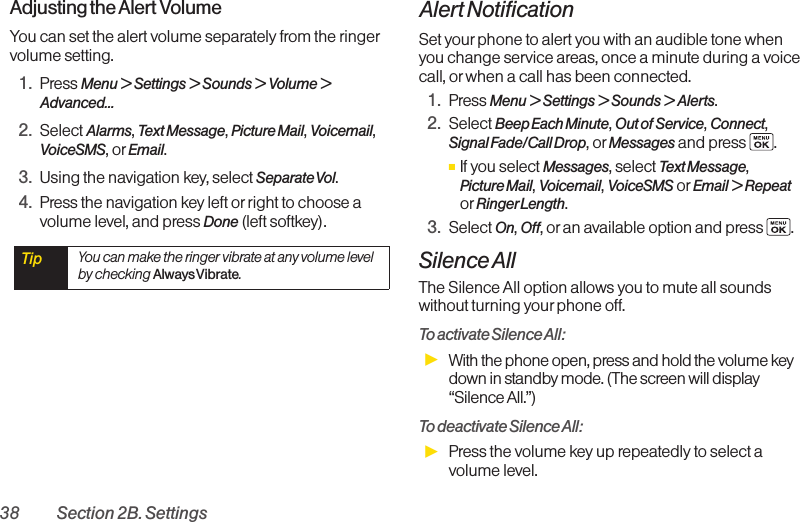
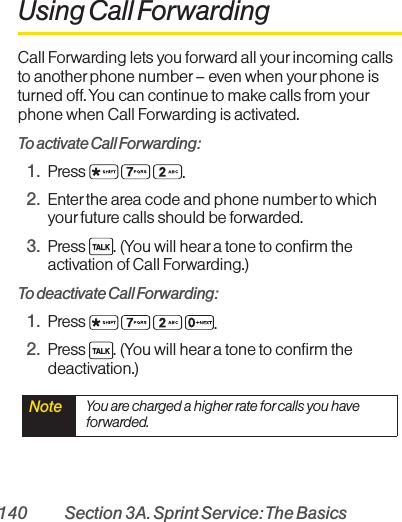
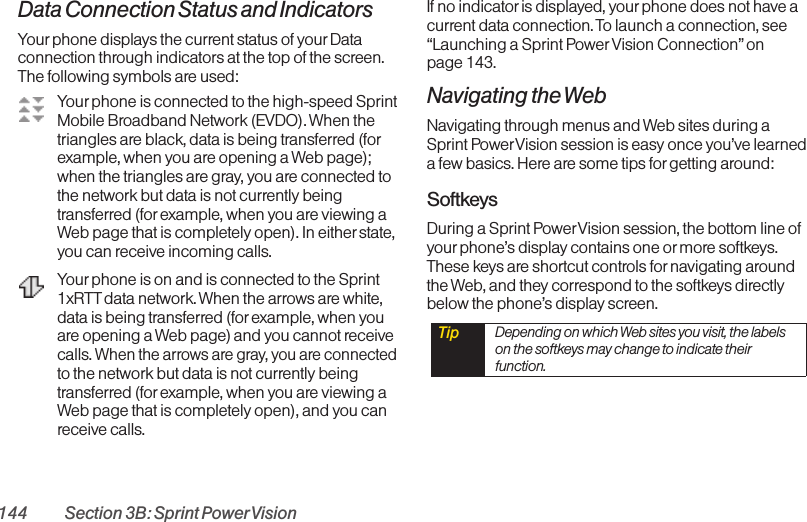
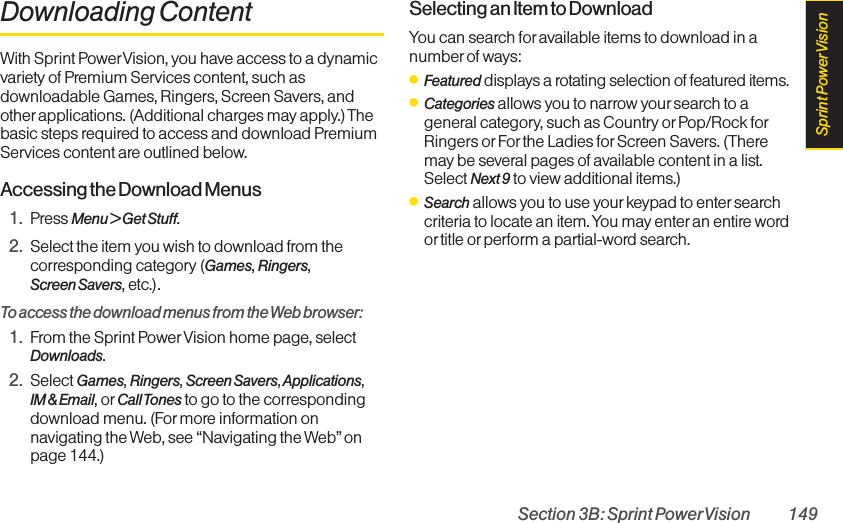
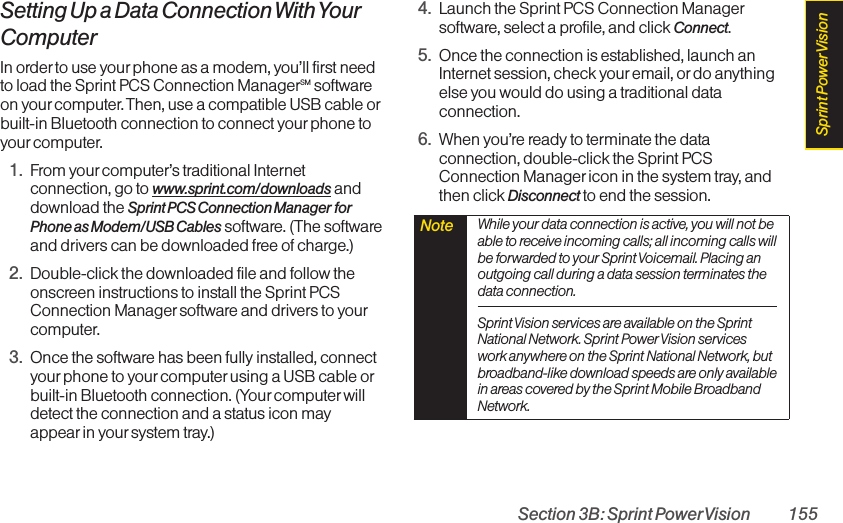
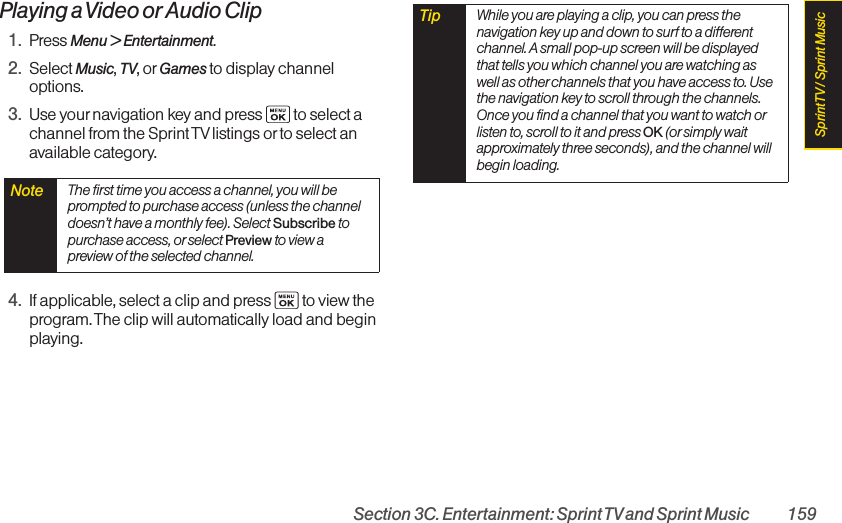
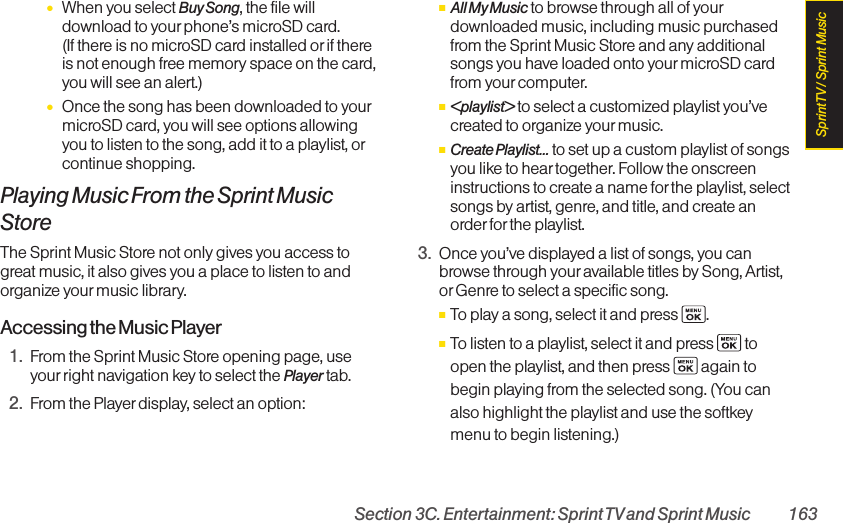
![120 Section 2J. CameraⅢLayout: You can select the print mode from Default Printer, Standard Print, Index Print, orDPOF Print. (If you have selected DPOF Print, pressYes [left softkey] to print. To set up the DPOF Print,see “Setting Up the Digital Print OrderFormat”onpage 101.)ⅢNum. of Copies: You can set the number of copies(1-10). (You cannot specify numberof copieswhen Index Print is selected.)ⅢPrint Size: You can set the print size from DefaultPrinter, 4x6, 5x7, 8x10, or Letter. (Print sizes mayvary according to the type of printer you have.)ⅢDate Stamp: You can imprint the date on yourpictures. Select Yes or No. (Date stamping may notbe available depending on the type of printer youhave.)4. When you have finished selecting the printersettings, select Print.5. When printing is finished, press .6. Press Yes (left softkey). Follow the instructions on thedisplay to unplug the USB cable from the phone.PictBridgeErrorMessages From time to time you may encounterprinting problems. Any printererrormessages will be displayed on your phone,informing you of the specific problemsencountered. Please refer to the user’s guidethat came with your printer for descriptions,explanations, and possible resolutions forany error messages.Note While you are connected to the printer, yourphone’s screen will display “Phone Off.” You cannotmake or receive calls during this time.Note You may not be able to print pictures that youcannot display on your phone.](https://usermanual.wiki/Kyocera/SCP-6750/User-Guide-973074-Page-134.png)
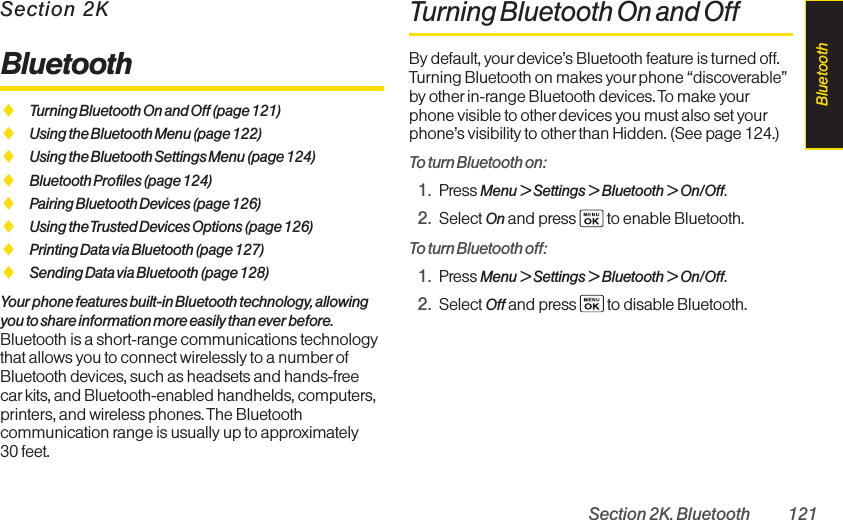


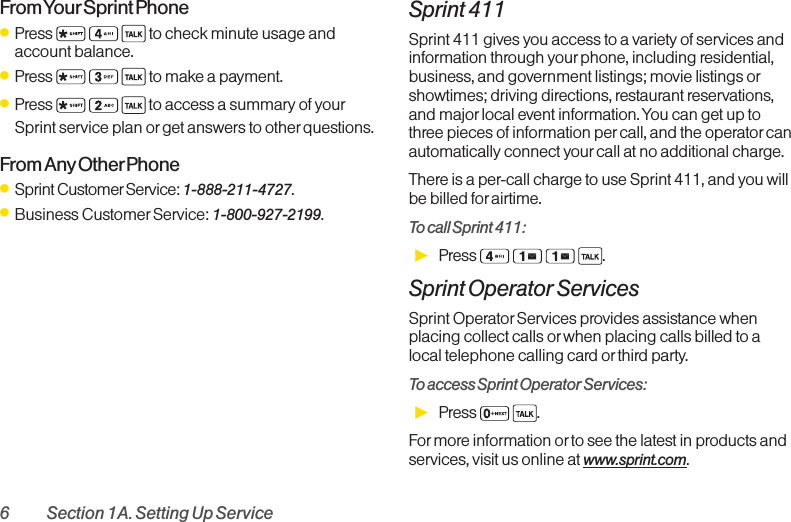
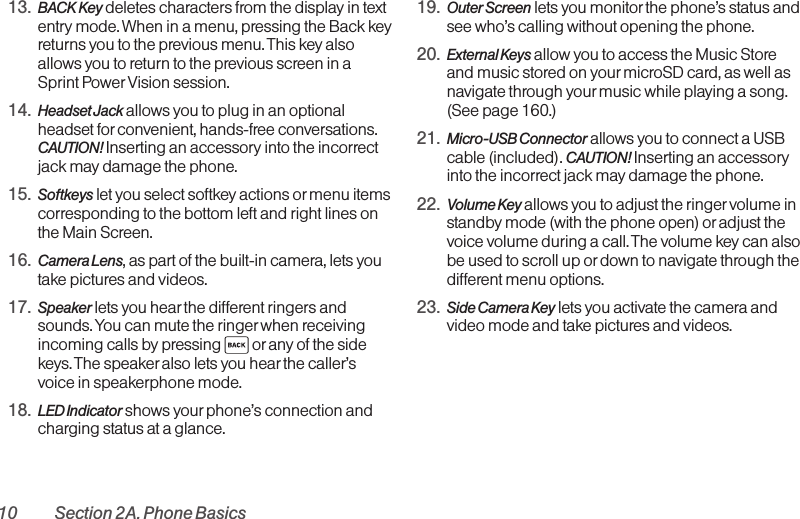
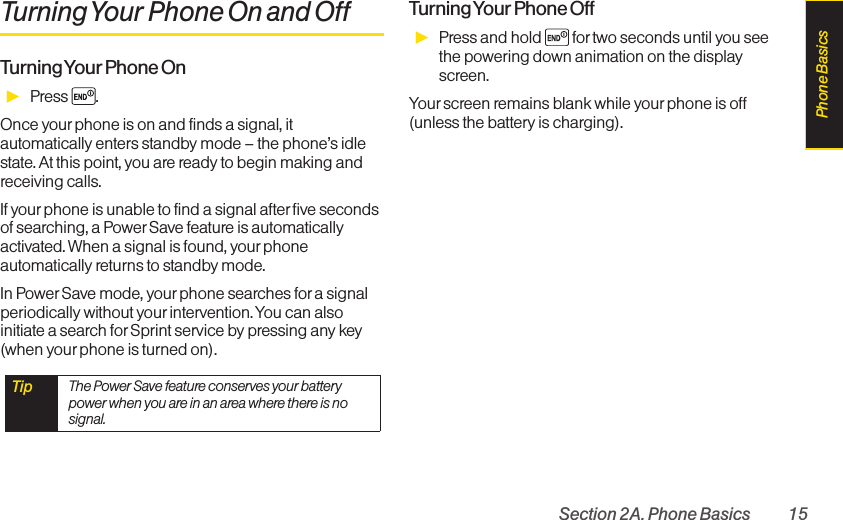
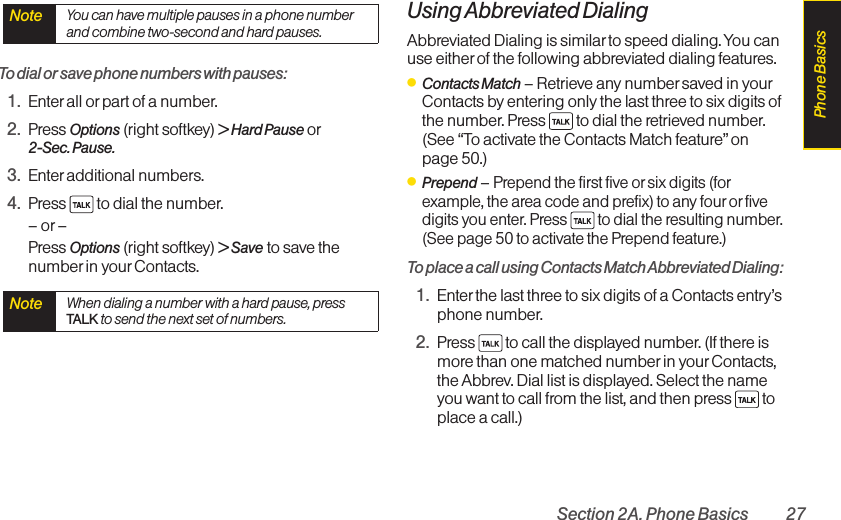
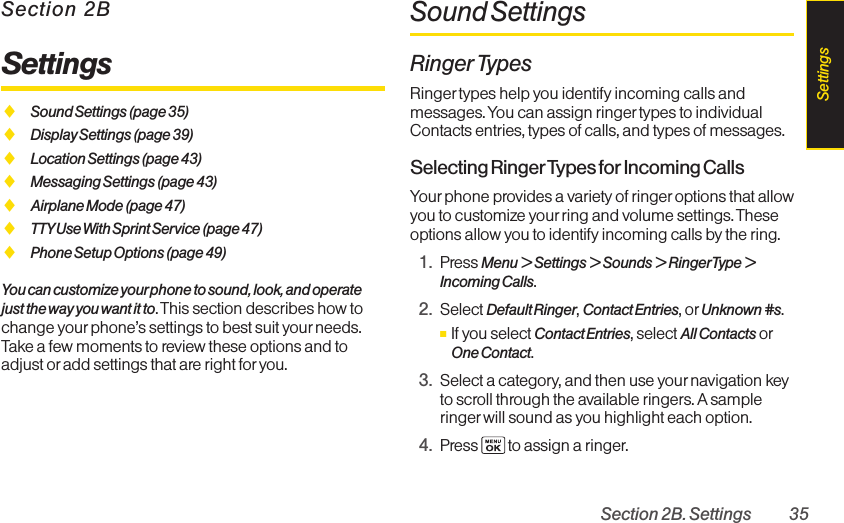
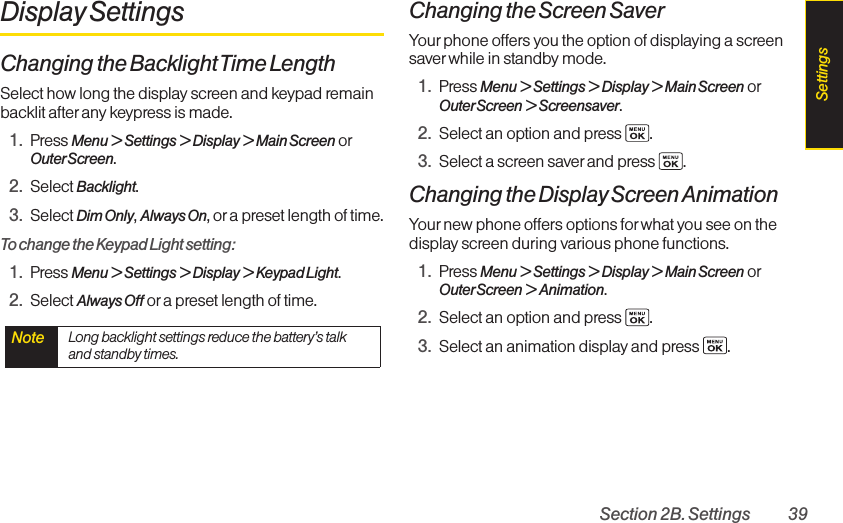
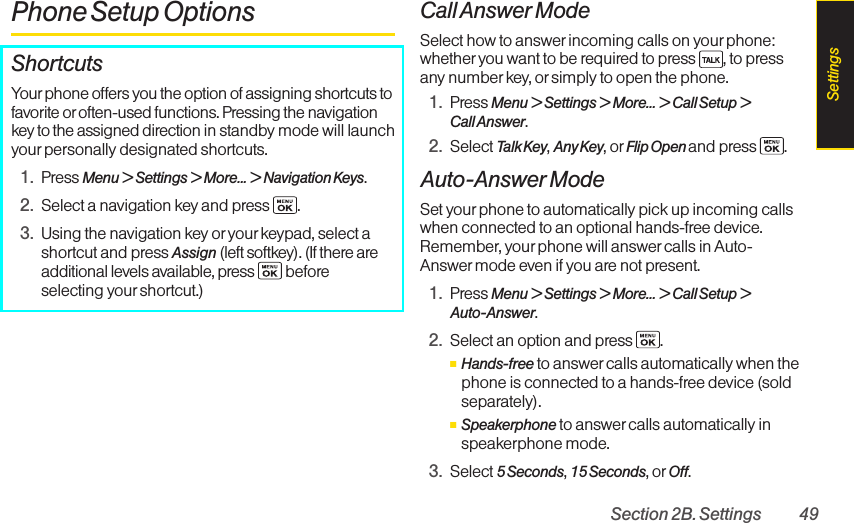
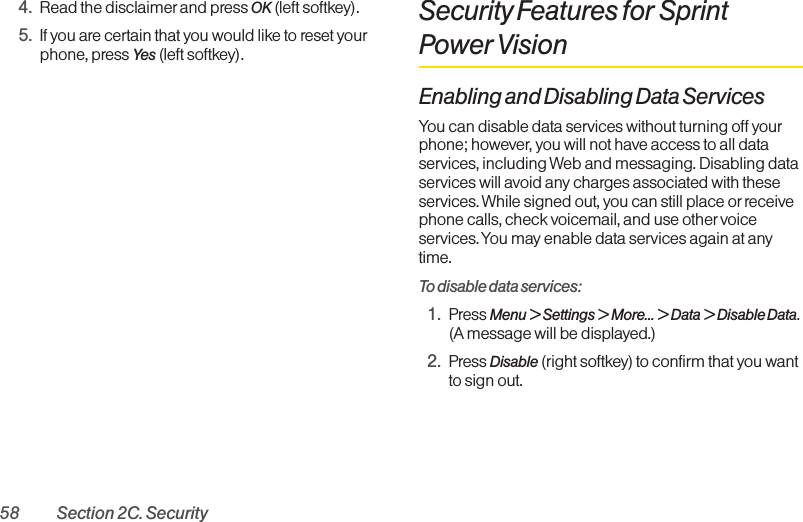
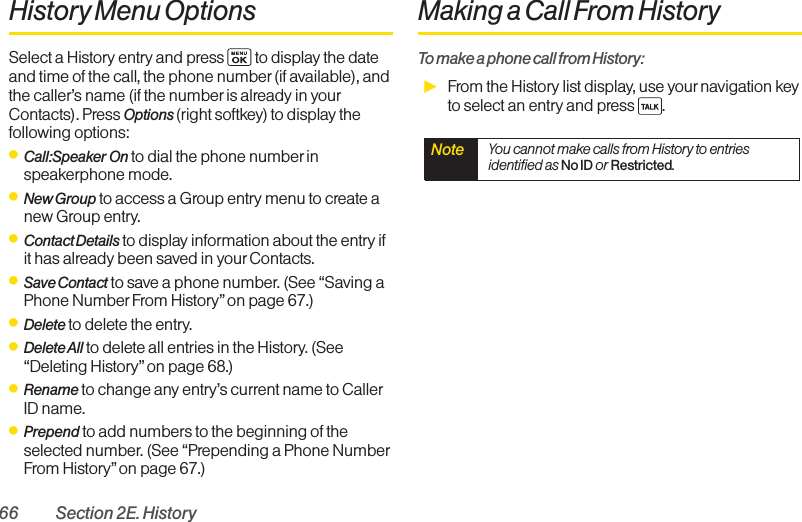
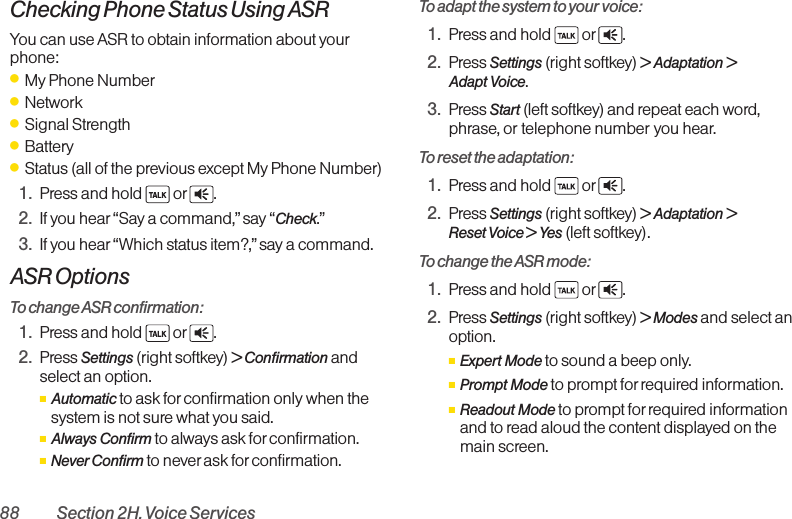
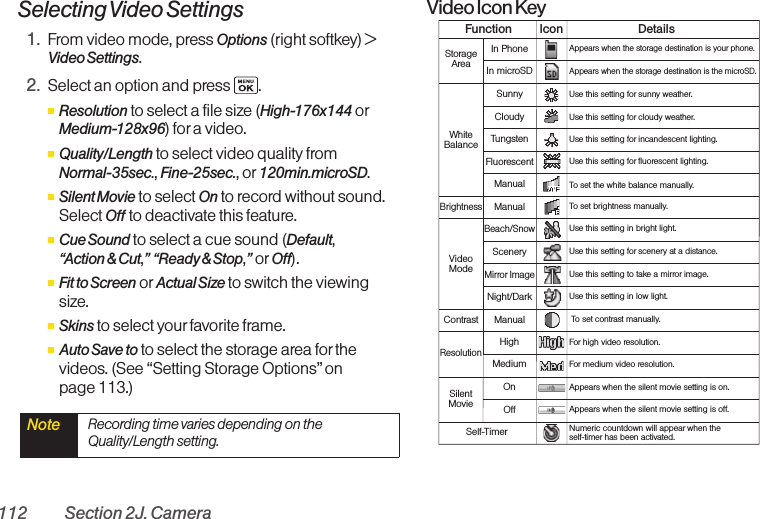
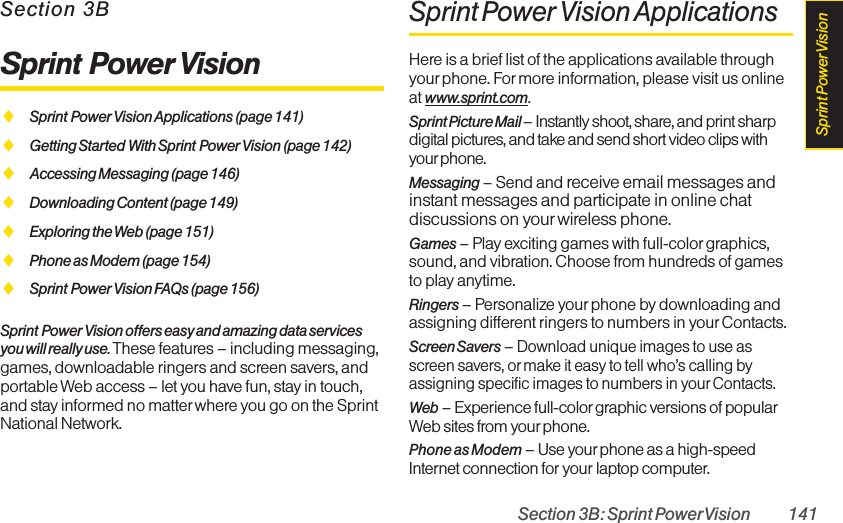
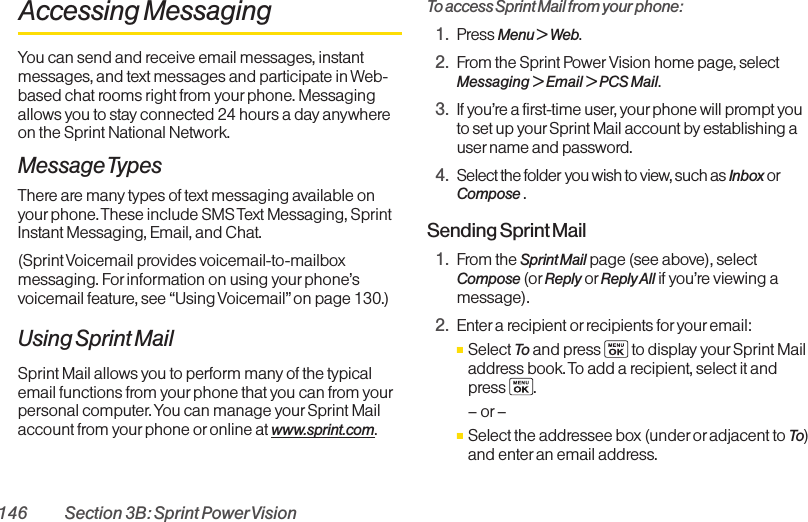
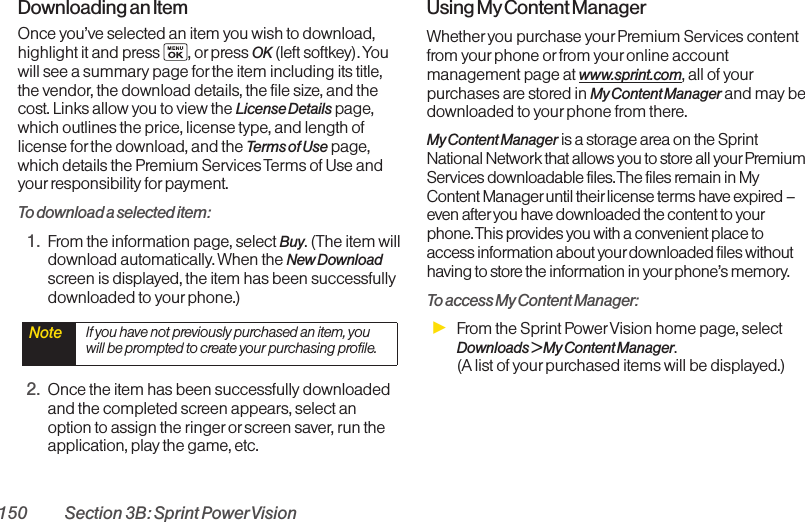
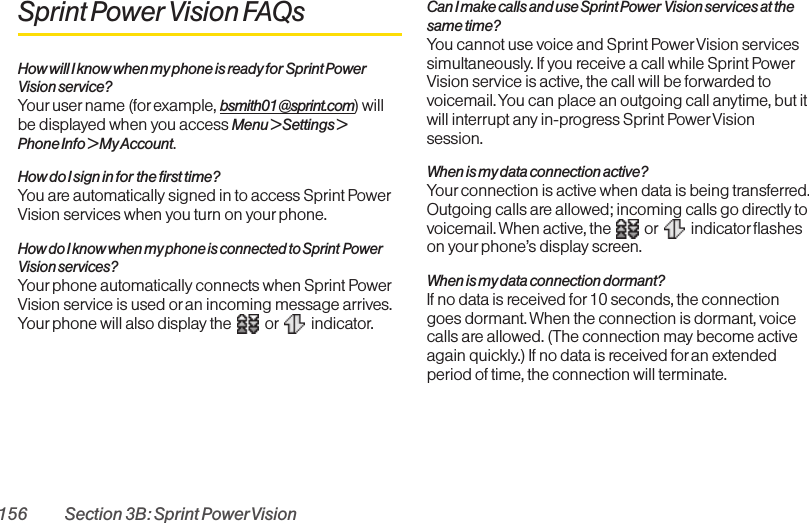
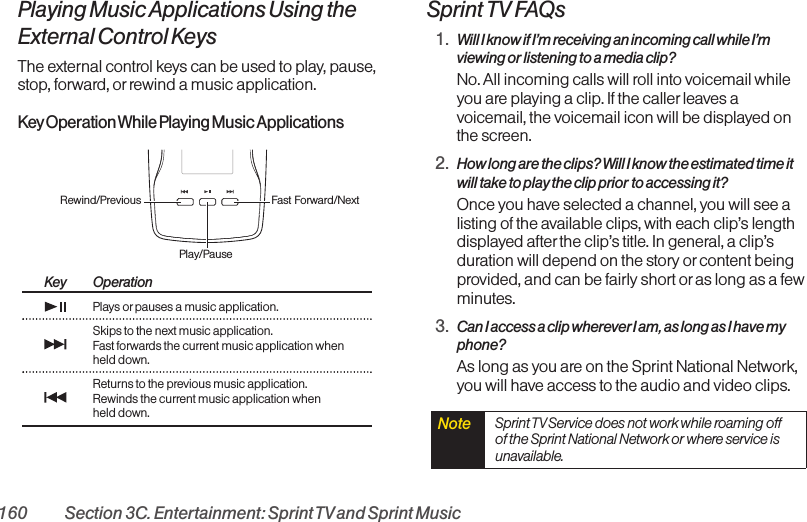
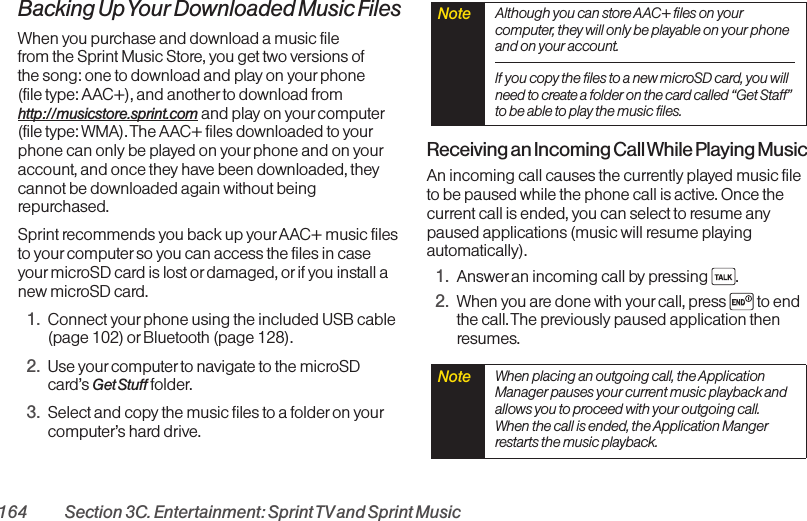
![Section 3A. Sprint Service: The Basics 137To reply to an SMS Text message:1.While the message is open, pressReply(left softkey).–or–Highlight the message in the Inbox, and pressOptions (right softkey) > Reply With > Text Message.2. Follow the steps 3-5 of “Composing SMS TextMessages” on the previous page.Using Preset MessagesPreset messages make sending text messages to yourfriends, family, and co-workers easierthan ever.1. Press Menu > Settings > Messages > Preset Msgs.2. Highlight a message you wish to send and pressOptions (right softkey) >Send Text.3. Follow steps 2-5 in “Composing SMS TextMessages” on the previous page.Using SMS Voice MessagingIn addition to SMS Text Messaging, your phone isenabled with SMS Voice Messaging. With SMS VoiceMessaging, you can send a voice message to otherSMS-enabled phones or to working email addresseswithout making a phone call. Just record a messageand send it directly to the recipient’s phone messaginginbox.Playing an SMS Voice Message1. Press Menu > Messages > VoiceSMS.2. Select a message and press to play. (To displaythe message options, press Options [right softkey].)Composing SMS Voice Messages1. Press Menu > Messages > Send Message > VoiceSMSand select the entry method you prefer:ⅢGo to Contacts to select a recipient from yourContacts. (Qualifying Contacts entries mustcontain a wireless phone number oran emailaddress.)ⅢMultiple (left softkey) to select multiple recipients.Tip If you have two ormore notifications, the MissedAlert list will appear. Select a message in the list andpress View (left softkey) to view the message.Sprint Service](https://usermanual.wiki/Kyocera/SCP-6750/User-Guide-973074-Page-151.png)

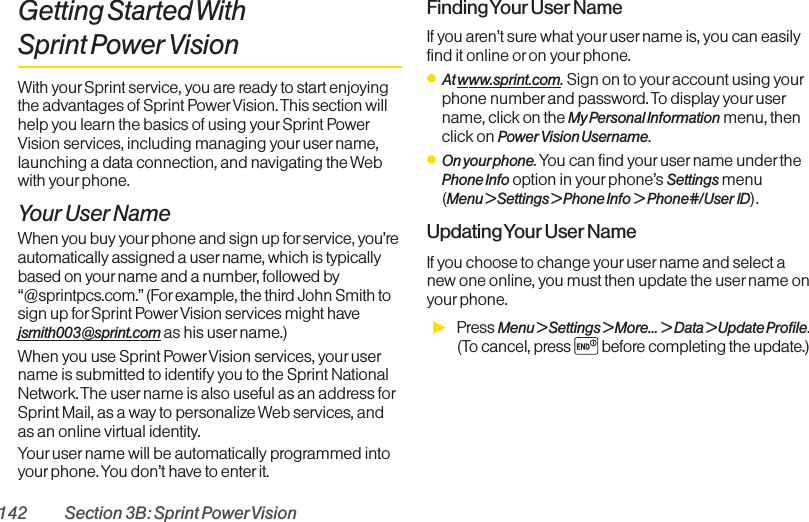
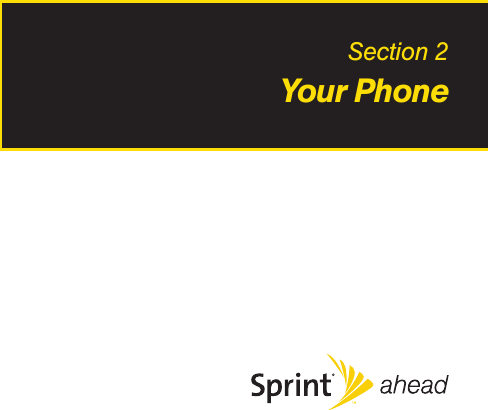
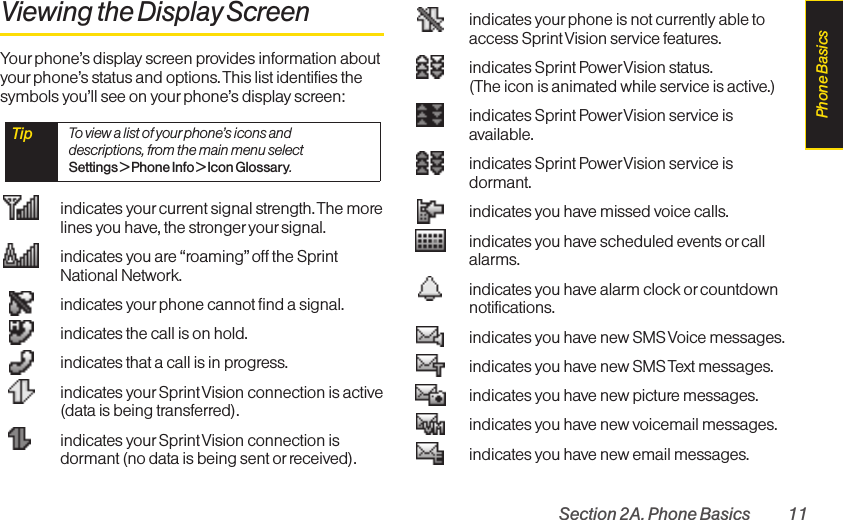
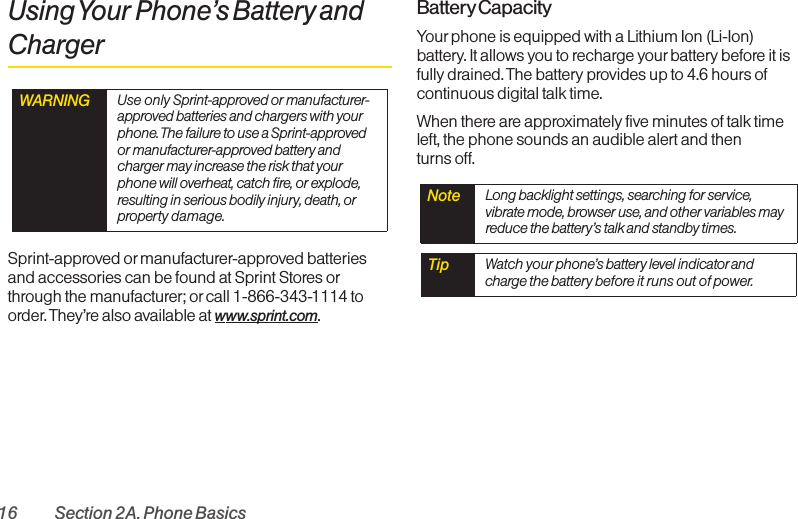
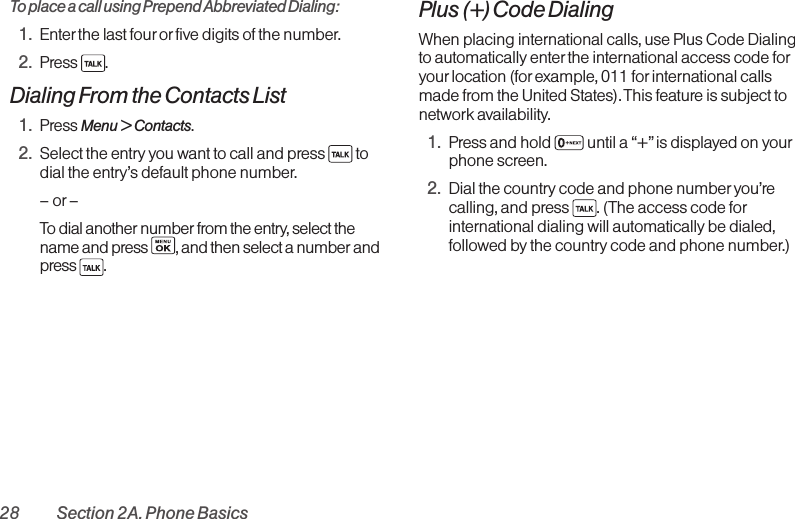
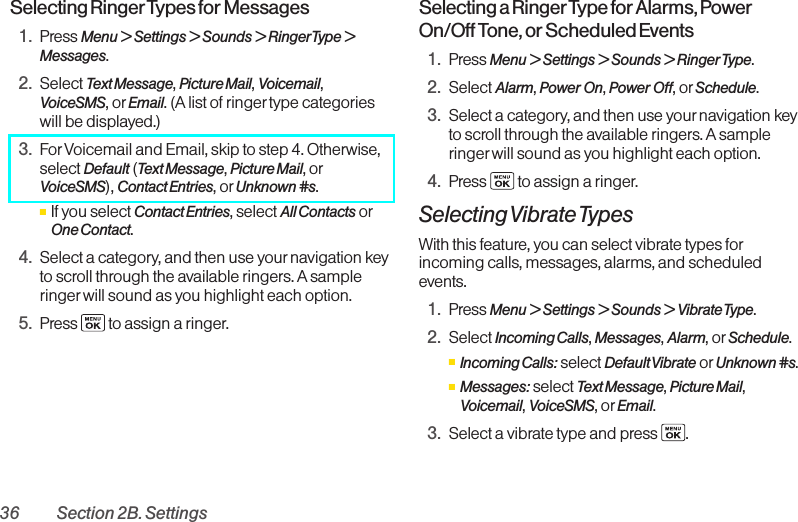
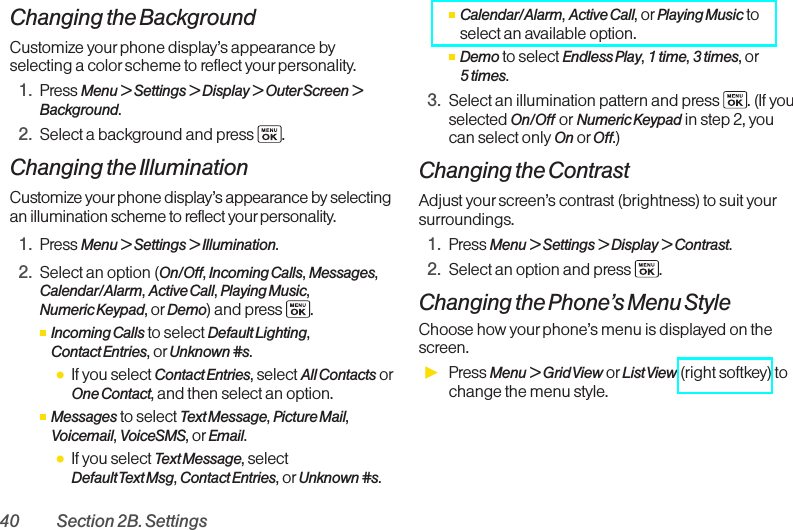
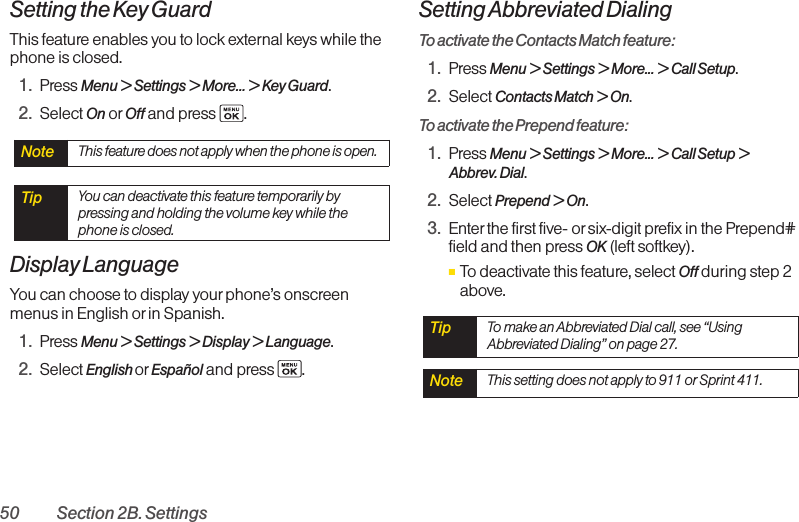
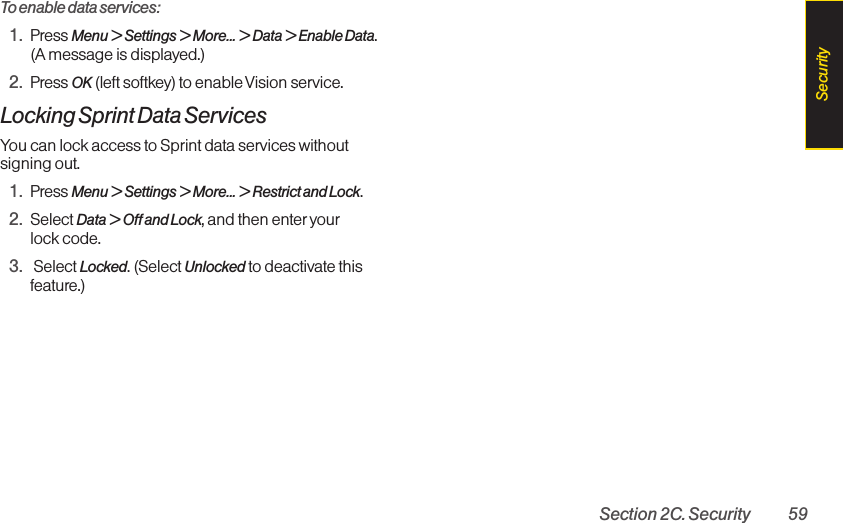
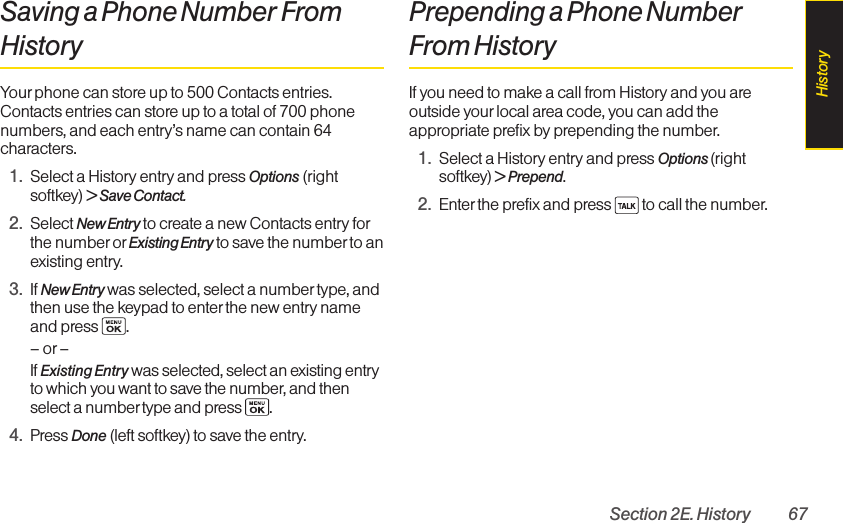
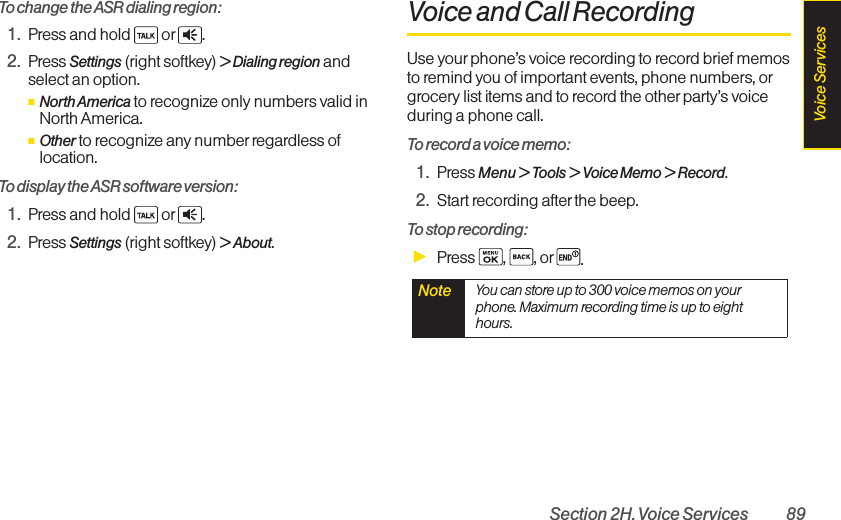
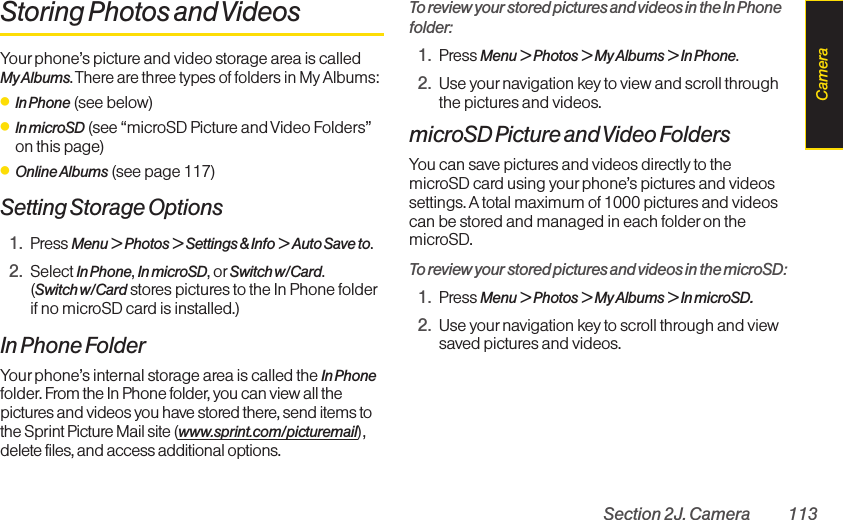
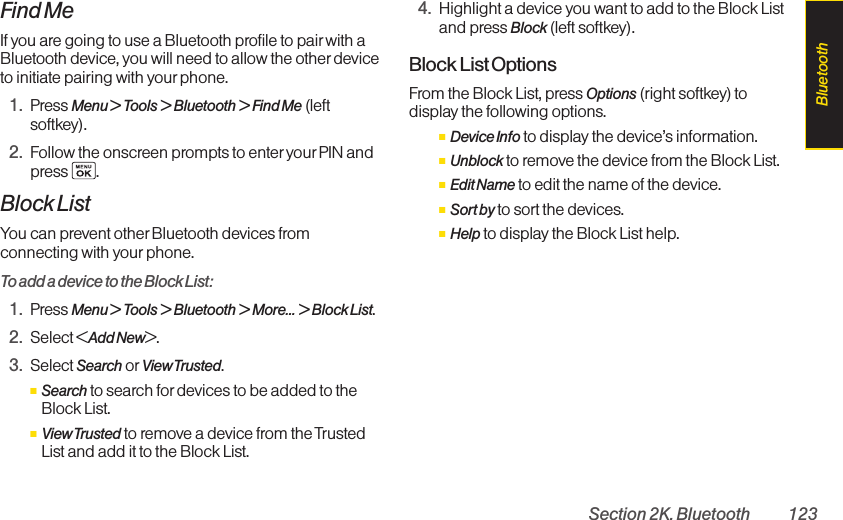
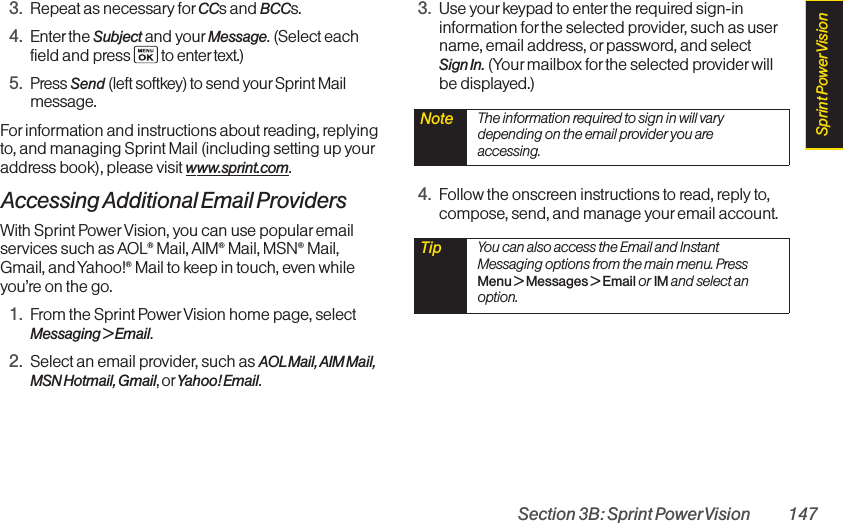
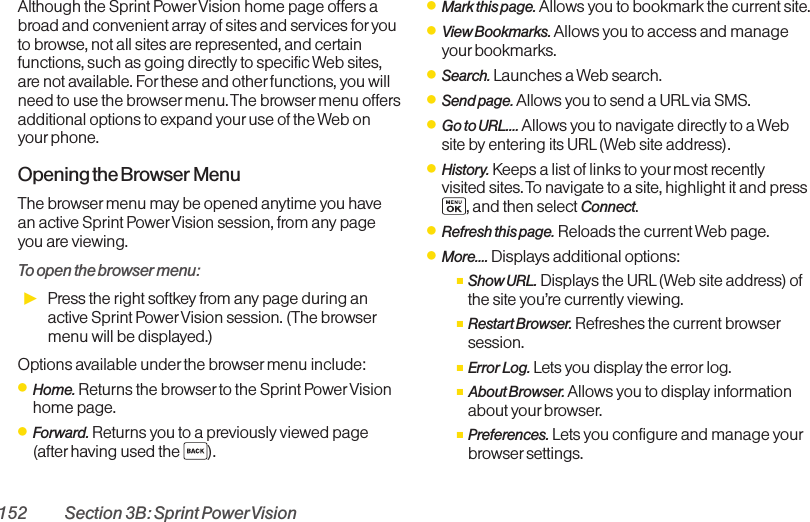
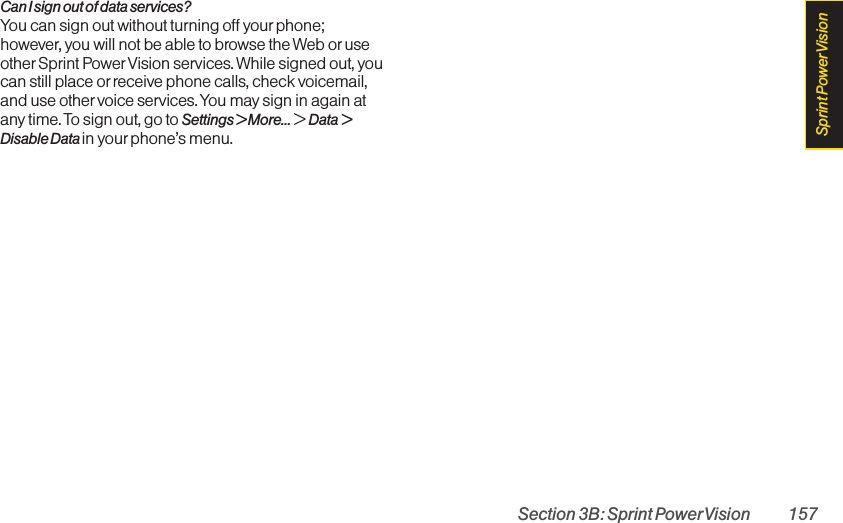
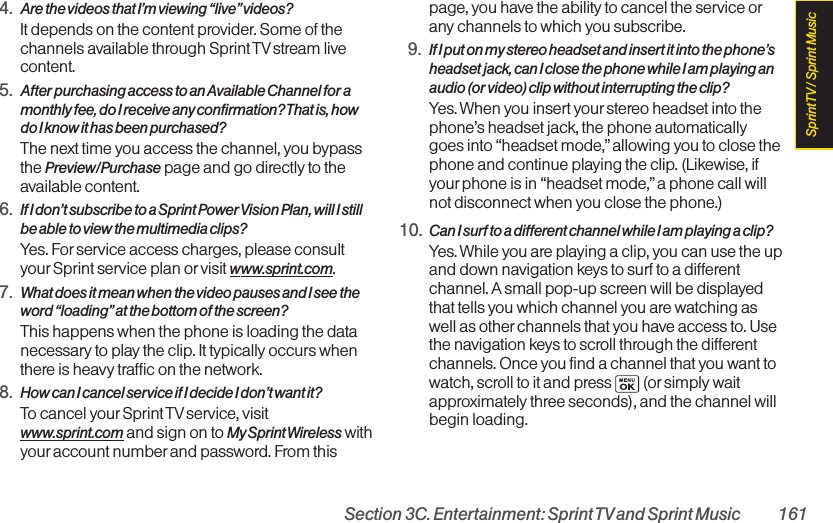
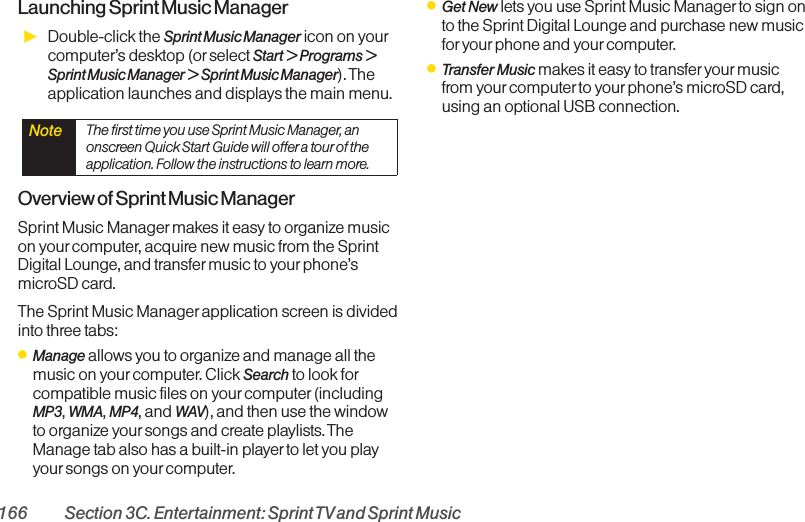
![Section 3B: Sprint PowerVision 145To use softkeys:ᮣPress a softkey. (If an additional pop-up menu isdisplayed when you press the softkey, select menuitems using your keypad [if they’re numbered], or byhighlighting the option and pressing .)ScrollingAs with other parts of your phone’s menu, you’ll have toscroll up and down to see everything on some Web sites.To scroll line by line through Web sites:ᮣPress the navigation key up and down.To scroll page by page through Web sites:ᮣPress the volume buttons on the side of the phone.SelectingOnce you’ve learned how to use softkeys and scroll, youcan start navigating the Web.To select onscreen items:ᮣUse the navigationkey to highlight an item, and thenpress the left softkey (or press ).Links, which are displayed as underlined text, allow youto jump to Web pages, select special functions, orevenplace phone calls. To select links:ᮣHighlight the link and press the appropriate softkey. Going BackTo go back one page:ᮣPress the key on your phone. Going HomeTo return to the home page from any other page:ᮣPress and hold .–or –Press the Menu icon (right softkey) > Home .Note The BACK key is also used for deleting text (like aBACKSPACE key) when you are entering text.Tip You’ll find that the left softkey is used primarily forselecting items. This softkey is often labeled “OK.”If the items on a page are numbered, you can useyour keypad (number keys) to select an item.Sprint PowerVision](https://usermanual.wiki/Kyocera/SCP-6750/User-Guide-973074-Page-159.png)
![Section 3B: Sprint PowerVision 151To download purchased content from My ContentManager:1. From the My Content Manager display (see theprevious page), highlight the item you wish todownload, and press . (The information page forthe selected item will be displayed.)2. Select Download and press . (The item willdownload automatically. When the New Downloadscreen is displayed, the item has been successfullydownloaded to yourphone.)3. Once the item has been successfully downloadedand the completed screen appears, select anoption to assign the ringer orscreen saver, run theapplication, play the game, etc.For complete information and instructions ondownloading Games, Ringers, Screen Savers,Applications, IM & Email, and Call Tones, visit the DigitalLounge at www.sprint.com.Exploring the WebWith Web access on your phone, you can browse full-color graphic versions of yourfavorite Web sites, makingit easier than ever to stay informed while on the go.Follow sports scores, breaking news, and weather, andshop on yourphone anywhere on the Sprint NationalNetwork.In addition to the features already covered in this section,the Sprint PowerVision home page offers access tothese colorful, graphically rich Web categories,including News, Weather, Entertainment, Sports, Money,Travel, Shopping, and Tools, as well as usefulmanagement options including My Account and Search.Many sites are available under more than one menu –choose the one that’s most convenient for you.Using the Browser MenuNavigating the Web from your phone using the SprintPowerVision home page is easy once you get the hangof it. Fordetails on how to navigate the Web, select menuitems, and more, see “Navigating the Web”on page 144.Tip You can also access My Content Manager throughthe phone’s main menu. Press Menu > MyStuff >[Games,Ringers,Screen Savers,Applications orIM & Email] > My Content Manager. The browser willopen and take you to the corresponding content.Sprint PowerVision](https://usermanual.wiki/Kyocera/SCP-6750/User-Guide-973074-Page-165.png)

![Section 3C. Entertainment: Sprint TVand Sprint Music 165If the phone is running more than one simultaneousapplication (such as Music Store, Application [from MyStuff], and Games), the user interface can begin to slowdown and result in music or sound interruptions.ⅢTo solve this type of issue, it is best to close downall other applications (Menu > My Stuff > Options >My Content Manager) before initiating a newapplication. Also, in some situations, the camera orcamcorder mayhave limited functionality or become unavailable. Forexample, if you were currently playing music (via theMusic Store), orplaying a game in the background, andthen wanted take a photo, the phone may prompt youwith a “CPU Low, Kill the Application” dialog. Thisindicates that the current phone resources are stretchedand one of the current applications should beterminated before continuing. Refer to the procedureabove to exit eithera specific application or all currentapplications, and then launch the camera orcamcorderagain.Sprint Music ManagerThe Sprint Music Manager application is a program youcan download to yourcomputer to help you organize,manage, and play all your music. You can also use theSprint Music Manager to copy your compatible musicfiles right from yourcomputer to your phone’s microSDcard (using the adapter oran optional USB connection),including purchases you make from the Sprint DigitalLounge.Getting Sprint Music Manager1. On yourcomputer, go to www.sprint.com/downloadsand download the Sprint Music Manager application. 2. Follow the onscreen instructions to install andlaunch the application, including accepting thelicense agreement and rebooting your computer, ifnecessary.Sprint TV / Sprint Music](https://usermanual.wiki/Kyocera/SCP-6750/User-Guide-973074-Page-179.png)
![Section 3C. Entertainment: Sprint TVand Sprint Music 167Streaming MusicIn addition to the Sprint Music Store, Sprint PowerVisionoffers a variety of musical options through the Musiccategory in the Sprint TV menu, including SIRIUS Music,Music Choice, VH1, and many others. Choose fromrock, pop, hip-hop, and R&B, and access exclusivevideo clips, music industry news, performances, andinterviews with yourfavorite artists.1. Press Menu > Entertainment > Music or TV >[selection].2. Select Preview to see and hear a preview of yourselected channel (if available).–or–Select Subscribe to purchase a monthlysubscription to yourselected channel.Once you have purchased access to a music orradiochannel, you can select from a variety of stations to listento yourfavorite music or get caught up on what’s new inmusic.Sprint TV / Sprint Music](https://usermanual.wiki/Kyocera/SCP-6750/User-Guide-973074-Page-181.png)