LG Electronics USA 15LW1T Wireless Transmit Unit Compatible with 802.11b/g User Manual 3828TUL297C sunny
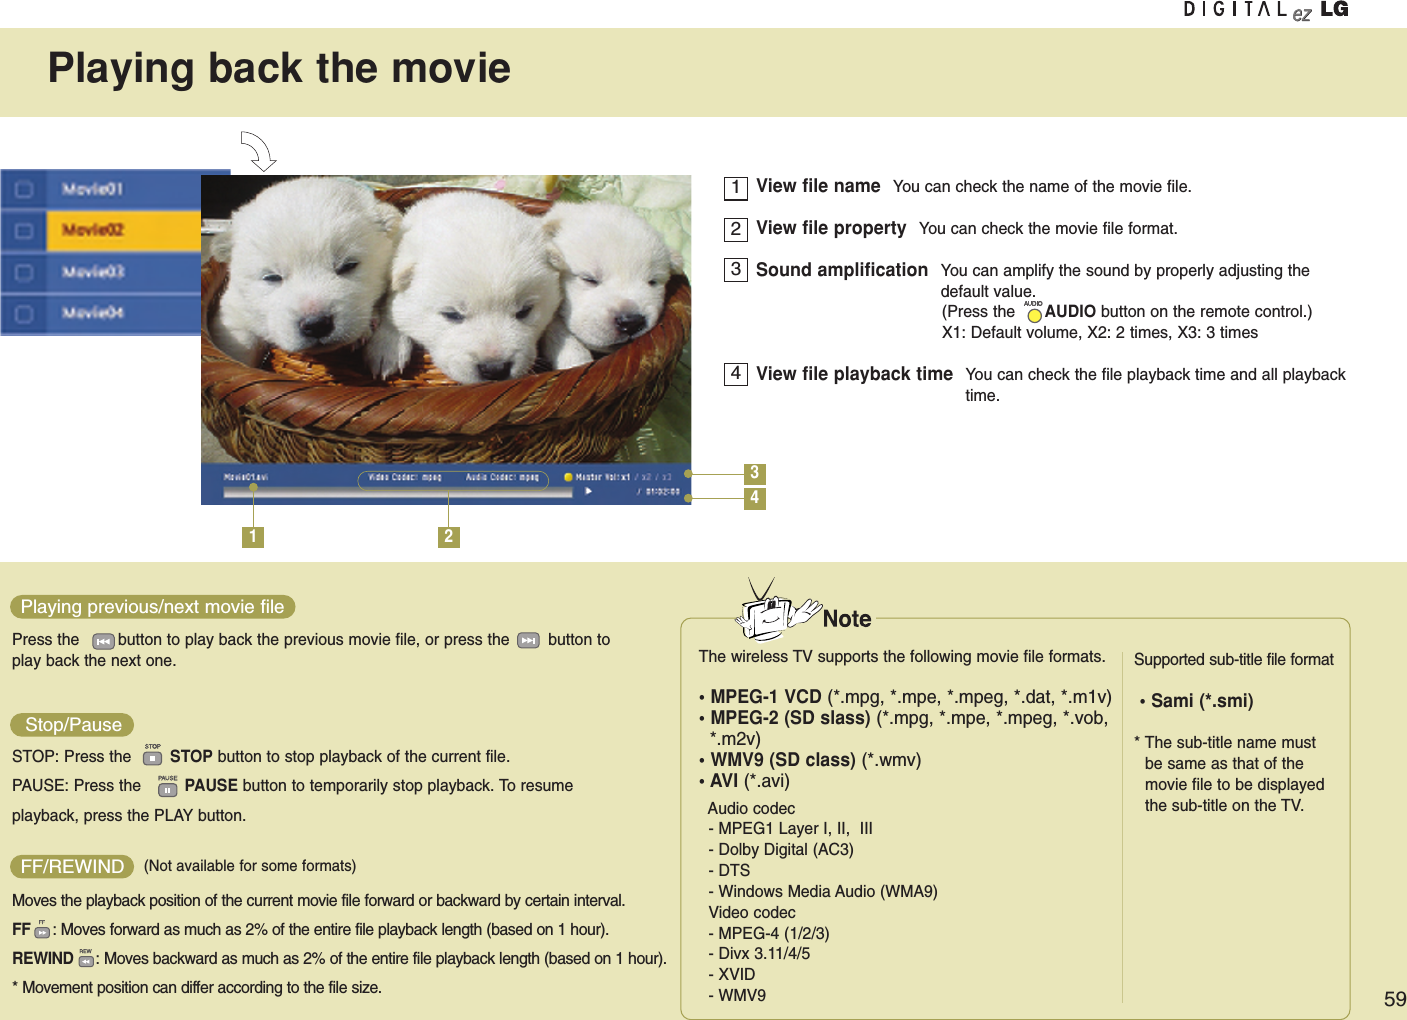
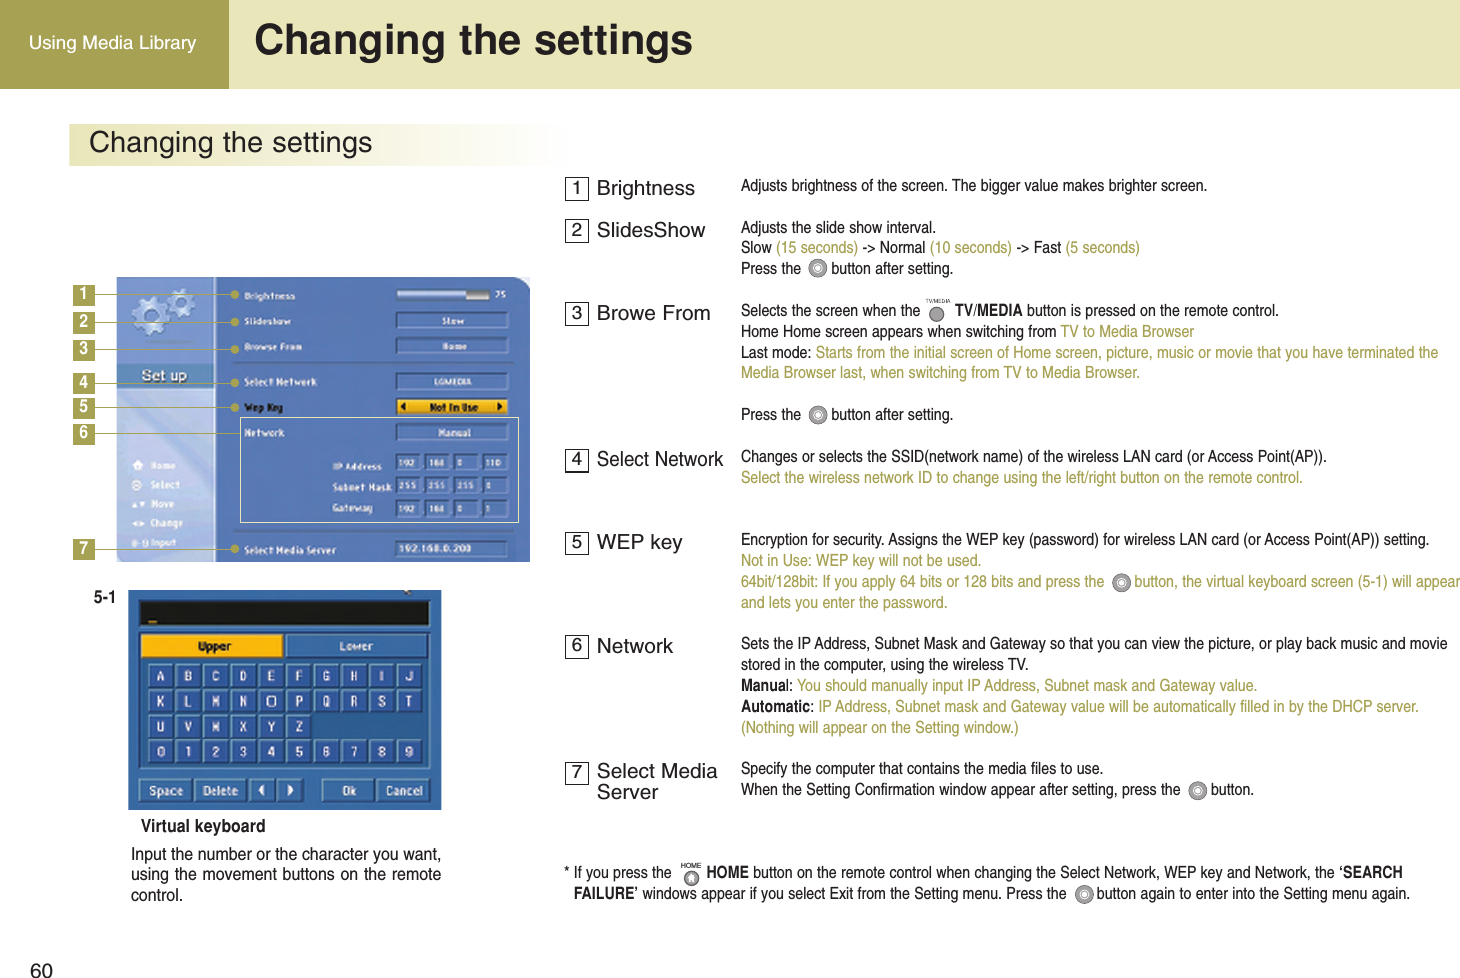
LG Electronics USA Wireless Transmit Unit Compatible with 802.11b/g 3828TUL297C sunny
Contents
- 1. Users Manual 1
- 2. Users Manual 2
Users Manual 2
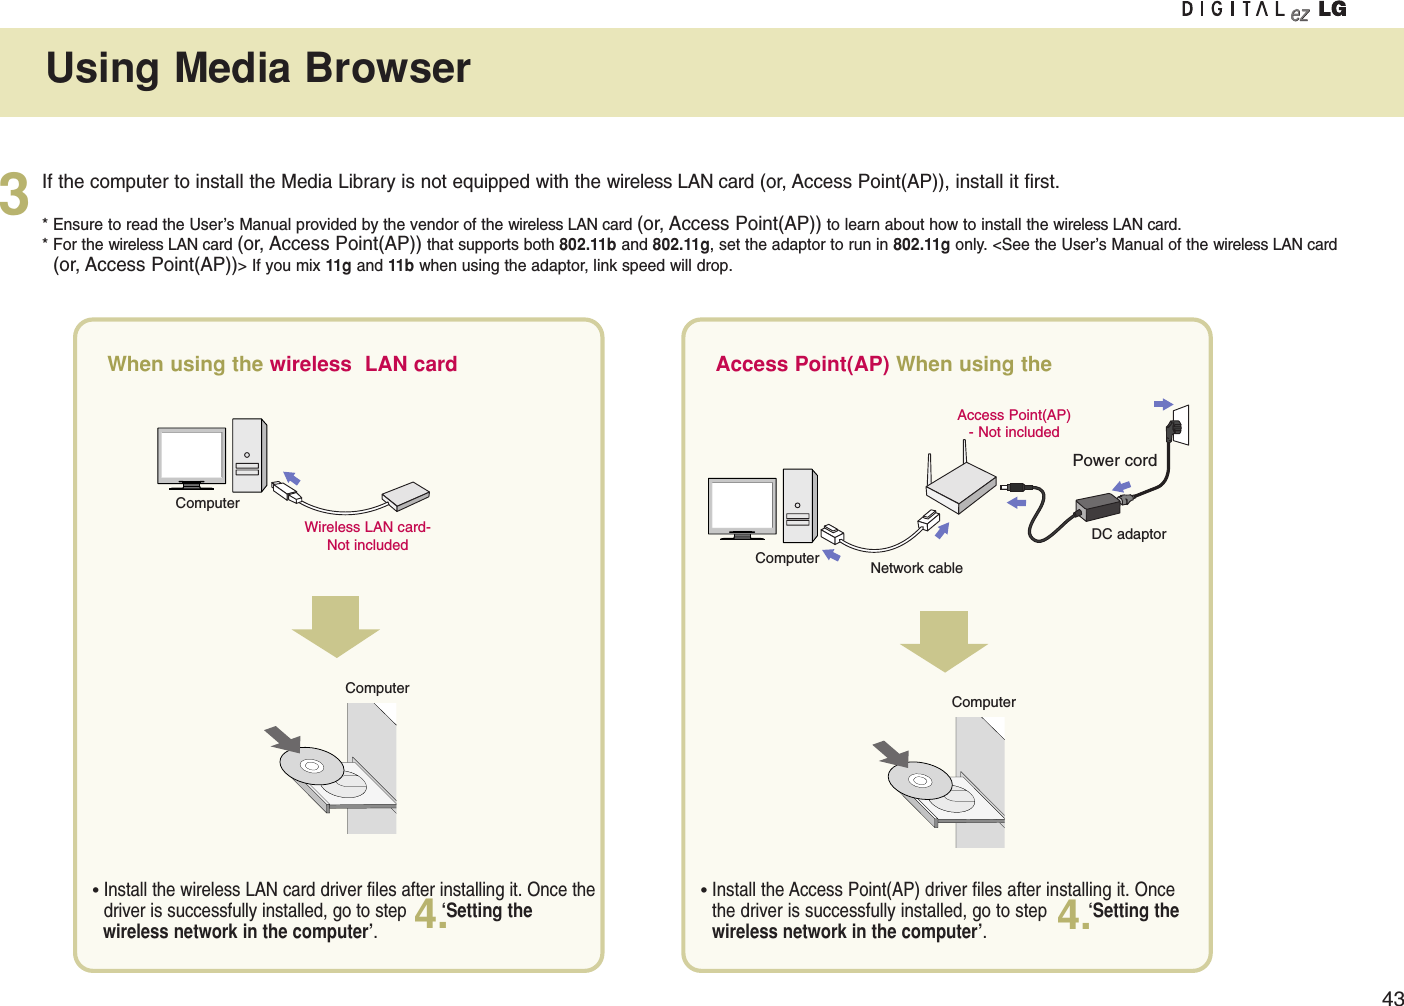
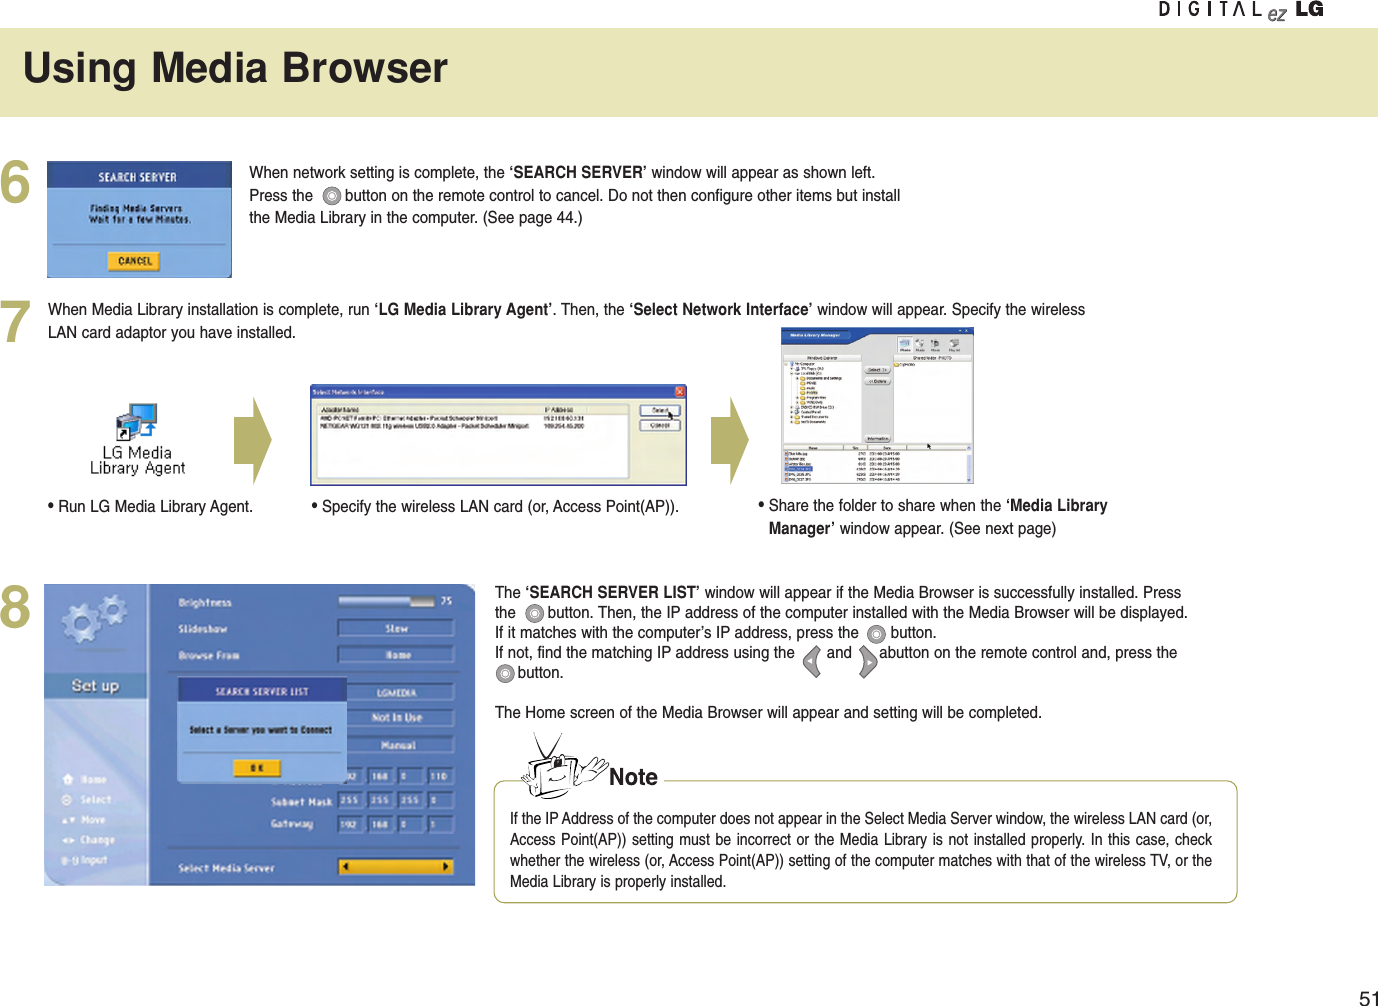
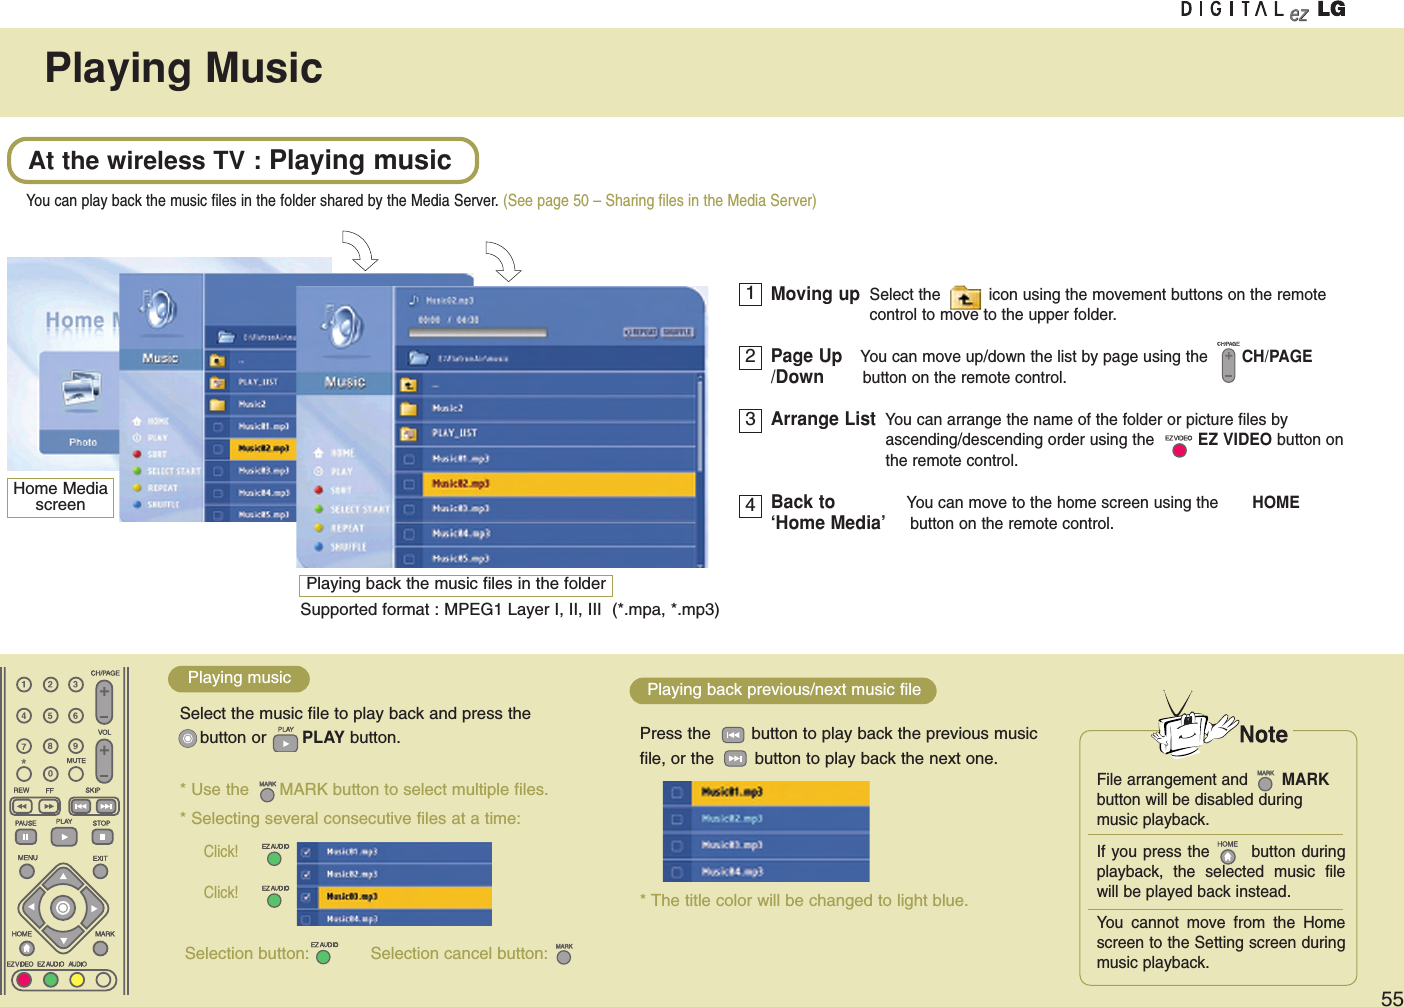
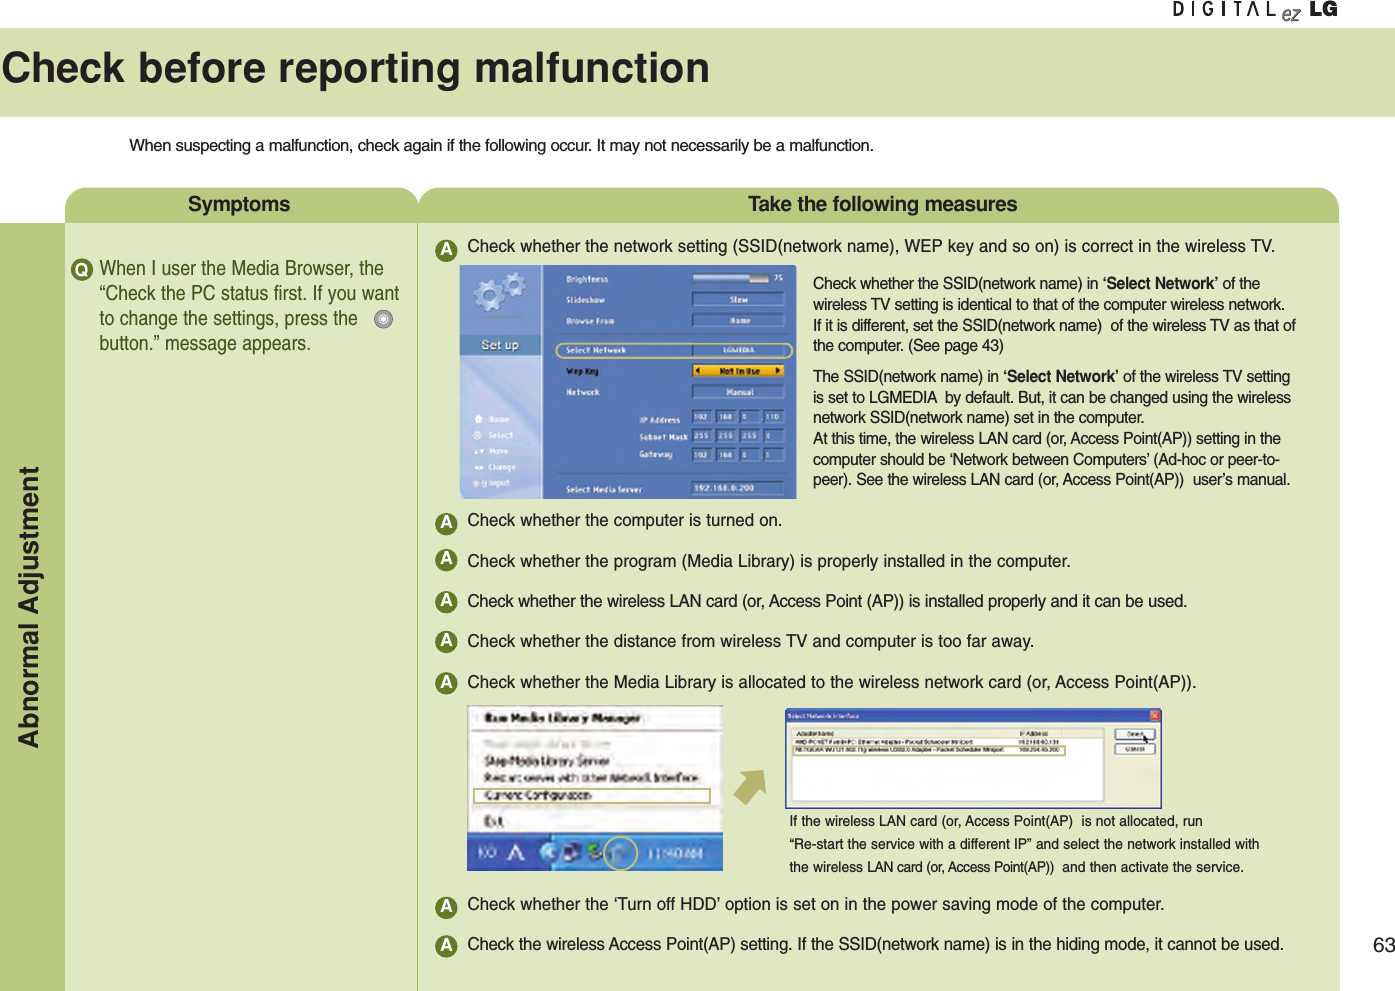
![42Using Media Browser Using Media BrowserSetting the wireless networkYou should configure your computer network and install the Media Library program first to view or play back the picture, music or the movie in your computer using the Media Browserfunction of the wireless TV.If your computer is not installed with the wireless LAN card, it is possible to purchase this product.You should purchase the wireless LAN card (or Access Point(AP)) separately 802.11g adaptor (or 802.11g Access Point(AP)) that complies with Wi-Fi. You cannot use the 802.11a wireless LAN card (or, 802.11a Access Point(AP)) for this wireless TV.We recommend that you use the USB type adaptor that is easy to configure, or the wireless LAN card that runs in 802.11g only.Setting method 11Connect the power to the wireless TV.Wireless TV DC power adaptor2Turn on the wireless TV.Switch to the ‘Media Browser’by pressing TV/MEDIA button.'SEARCH FINDING' or 'SEARCH FAILURE' windowwill appear on the TV screen as shown in the figure.Do not click the [OK] on the screen but take the follow-ing steps.Upper side of the wireless TV Remote control Remote controlororPower cordIf you use the wireless LAN card for the first time, take the steps described in the ‘Setting method 2’.Setting method 1Setting method 1There are two methods for setting the wireless network.If you’re familiar with wireless LAN card setting, take the steps described in the ‘Setting method 2’.](https://usermanual.wiki/LG-Electronics-USA/15LW1T.Users-Manual-2/User-Guide-504128-Page-1.png)
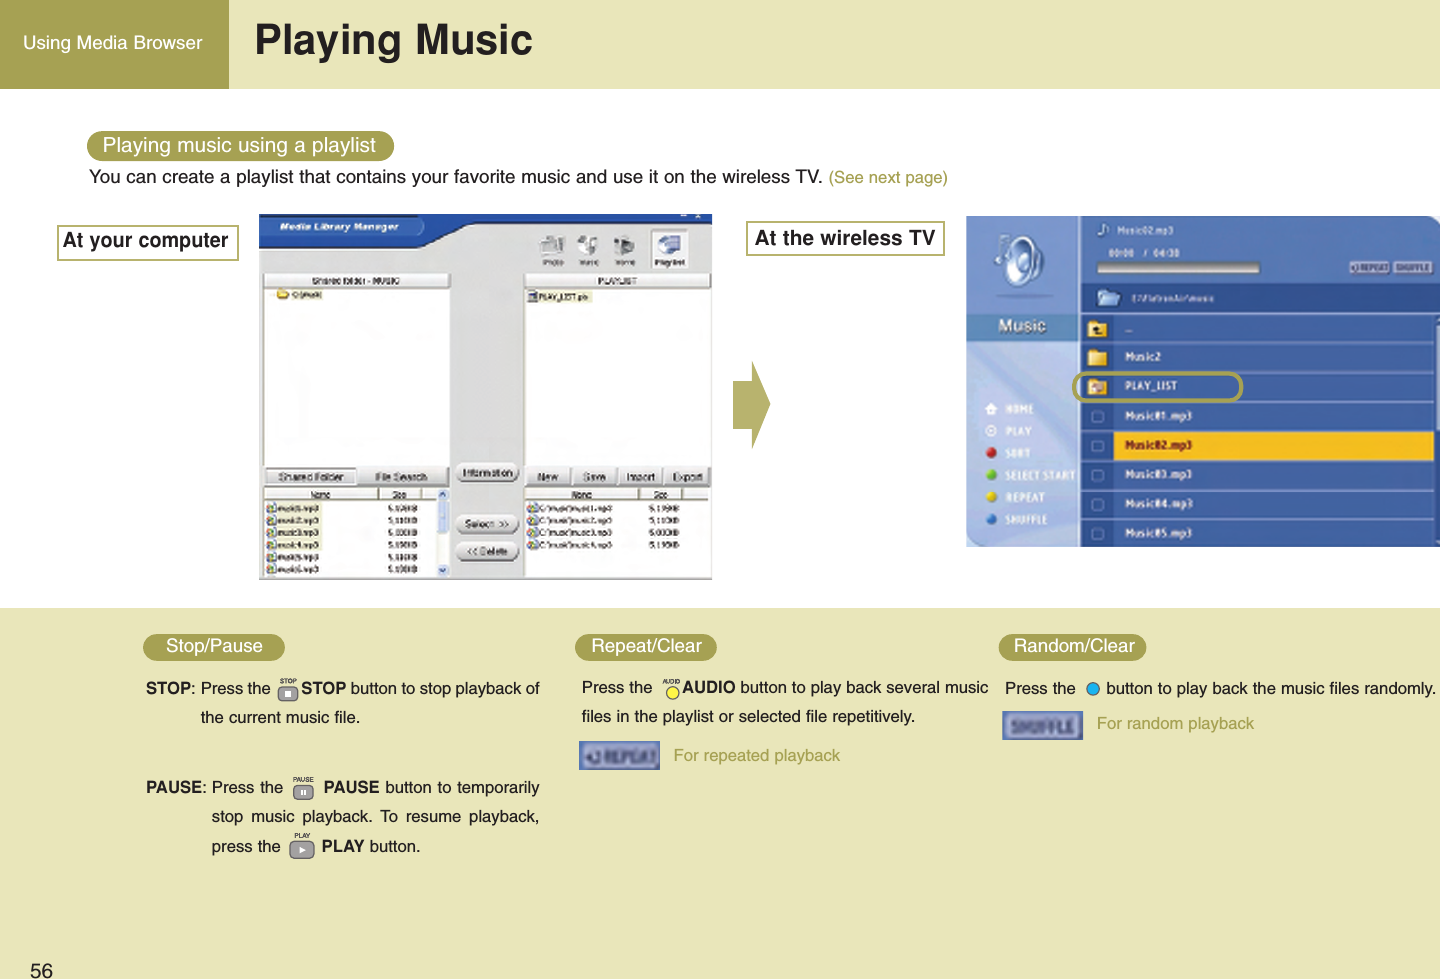
![45Using Media BrowserSet only when you use the Access Point (AP).Take the following setting steps when Access Point(AP) setting is complete.orThe setting screen will appear.* Your wireless TV IP Address may be different from the one describedin this manual.Press the [OK] in the 'SEARCH FINDING' or 'SEARCH FAILURE' window on the TV screen, using the remote control button.Move to ‘Select Network’field using the and button on the remotecontrol.Find the SSID(network name) you have set in the computer using the andbutton on the remote control, and press the button. e.g., LGMEDIAuIf you select the ‘Obtain an IP address automatically’option, select ‘Automatic’.If you select automatic network setting, the IP Address, Subnet mask and Gatewaywill not appear in the wireless TV. (No setting is required.)uIf you select the ‘Use the following IP address’option, select ‘Manual’and set thefourth column of the IP Address different from the Access Point(AP)and the computer. If you set the same address, it will not run.e.g., Wireless TV: 192.198.0.110, Access Point: 192.168.0.1, Computer: 192.168.0.200Subnet Mask: Set the same value with the Access Point(AP). e.g., 255. 255. 255. 0 Gateway: Input the IP address set in the Access Point(AP). e.g., 192.168.0.1 Press the button on the remote control.When the Network Setting Confirmation window appears,press the button on the remote control.When the Find Media Server window appears as shownleft, insert the Media Library Installation CD into the computer.](https://usermanual.wiki/LG-Electronics-USA/15LW1T.Users-Manual-2/User-Guide-504128-Page-4.png)
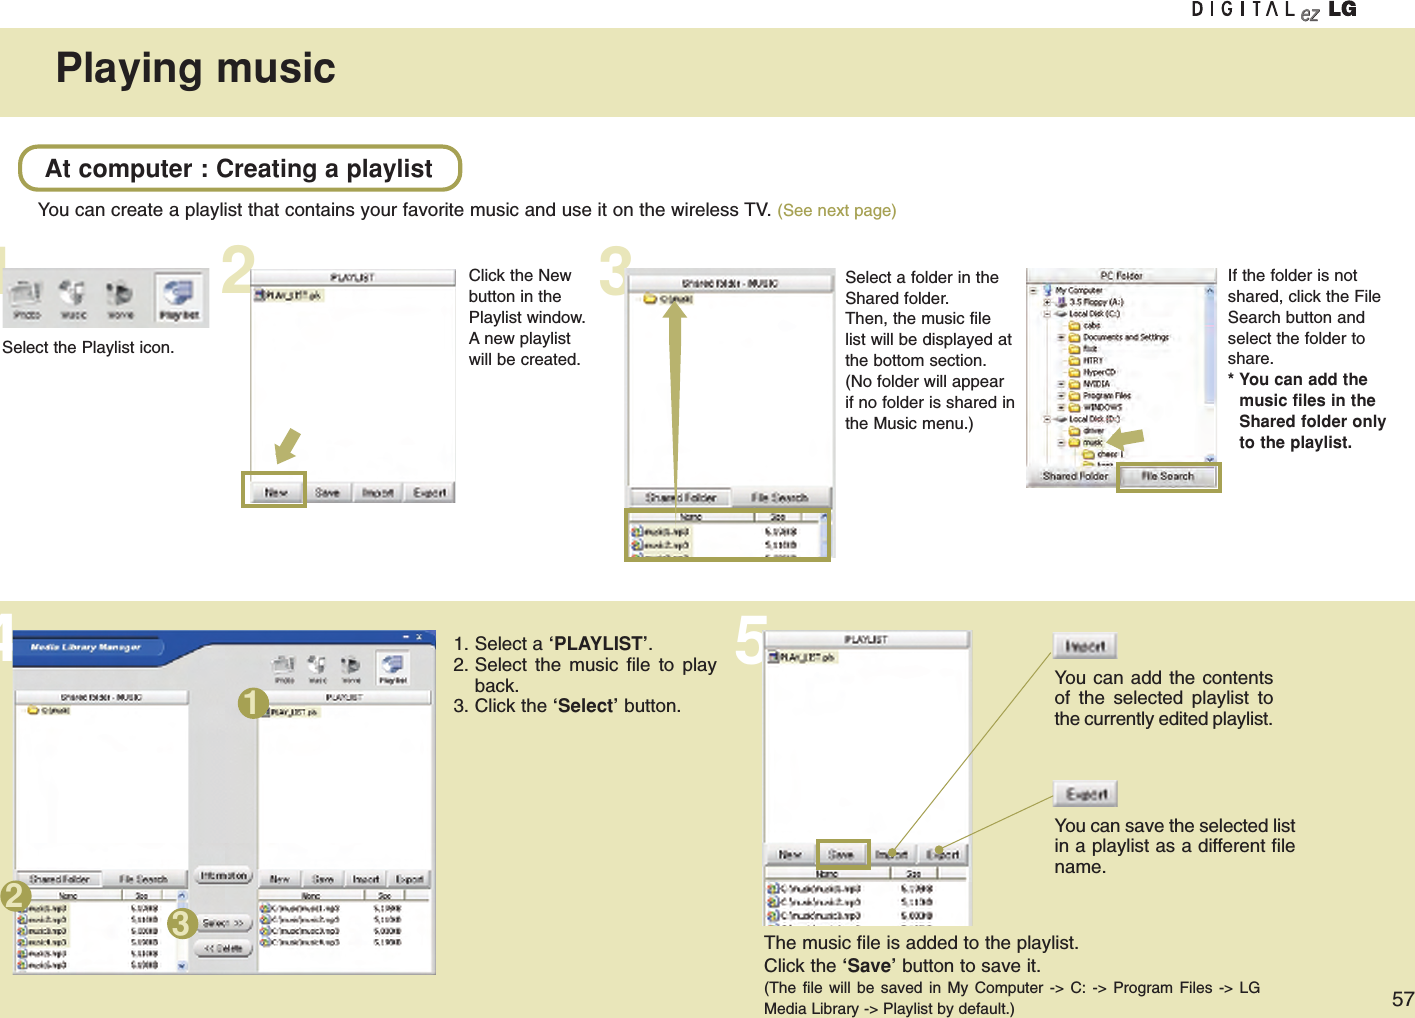
![46Using Media Browser Using Media BrowserOnce the ‘Media Library’program is installed in your computer, you can view the picture or play back music or movie by connecting the wireless TV to the Media Browser.You should install the program first to use the Media Browser in the wireless TV.56 7Computer• Insert the installation CD into the CD-ROM drive. Wait until the installation message appears.• When the Install Media Library window appears,select the language (English/Korean) and clickthe [OK].• If the installation window does not appear automatically, double click the ‘setup.exe’file inthe CD manually.• When installation is ready to proceed, click the [Next] button.Windows 98Windows 98SEWindows MEWindows 2000Windows XP* Wireless LAN card should have the Access Point(AP) or NIC (Network Interface Card) that supports802.11g.* Wireless LAN card should comply with Wi-Fi.OS CPU RAM Hard Disk USBPentium III600MHz orfaster128Mb ormore1Gb or more USB 2.0 support * Wireless LAN card should have the Access Point(AP) or NIC (Network InterfaceCard) that supports 802.11g.* Wireless LAN card should comply with Wi-Fi.Windows XPOS CPU RAM Hard Disk USBPentium IV1.5GHz orfaster128Mb ormore 40Gb or more USB 2.0 supportAt your computer : Installing the ‘Media Library’Server in you computerMinimum PC requirement for installation Recommended PC specification](https://usermanual.wiki/LG-Electronics-USA/15LW1T.Users-Manual-2/User-Guide-504128-Page-5.png)
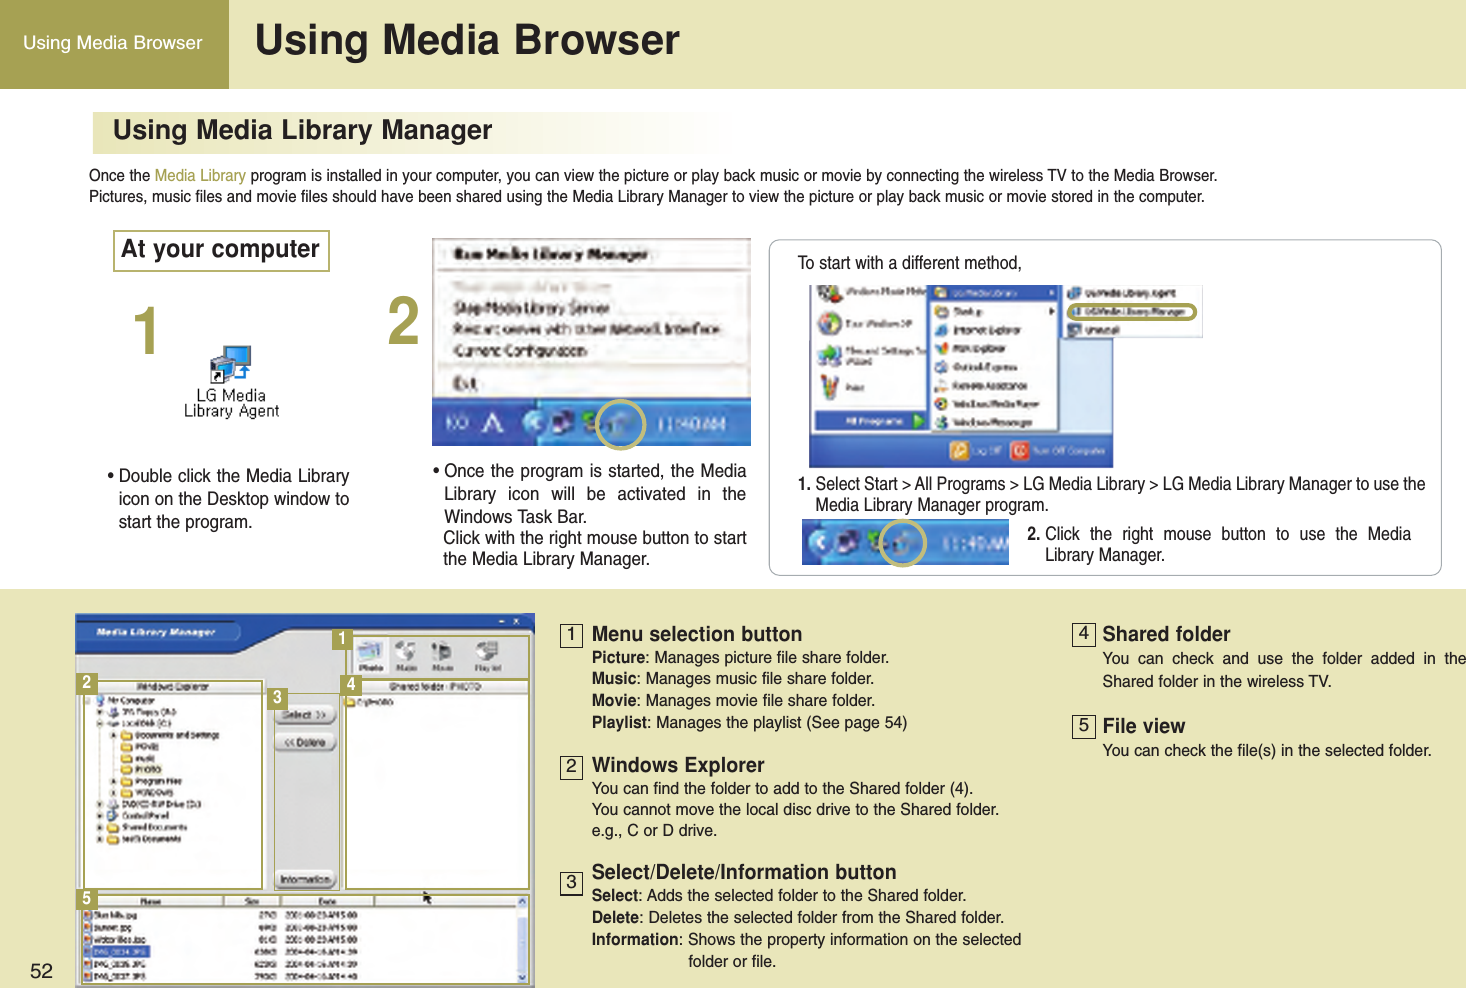
![47Using Media Browser•Create a folder to install the Media Library.•Click the [Next] to create the ‘LG Media Library’folderunder the ‘C:\Program Files’folder automatically.•When the question windowappears, click the [Yes] to runthe Media Library.• When you run the Media Library, the SelectNetwork Interface window will appear. Select thewireless network adaptor you have installed andclick the [Select].When the ‘Media Library Manager’windowappears, share the folder you want. (See page 50)When the program is successfully installed, the initial screen of ‘Home Media’will appear on thewireless TV.• The program icon will appear on the WindowsTask Bar.•If you want to install the program atother folder, click the [Browse] andspecify the folder.•Installation of the Media Library is complete.•Click the [Finish] to complete installation.Deleting the Media Library program8109Select Click1. Select Start > All Programs > LG Media Library > Uninstallto uninstall the Media Library.* When system rebooting selection message appears,select the option you want and click the [Finish].2. You can also delete the Media Library program by selecting My Computer > Control Panel > All or RemovePrograms.](https://usermanual.wiki/LG-Electronics-USA/15LW1T.Users-Manual-2/User-Guide-504128-Page-6.png)
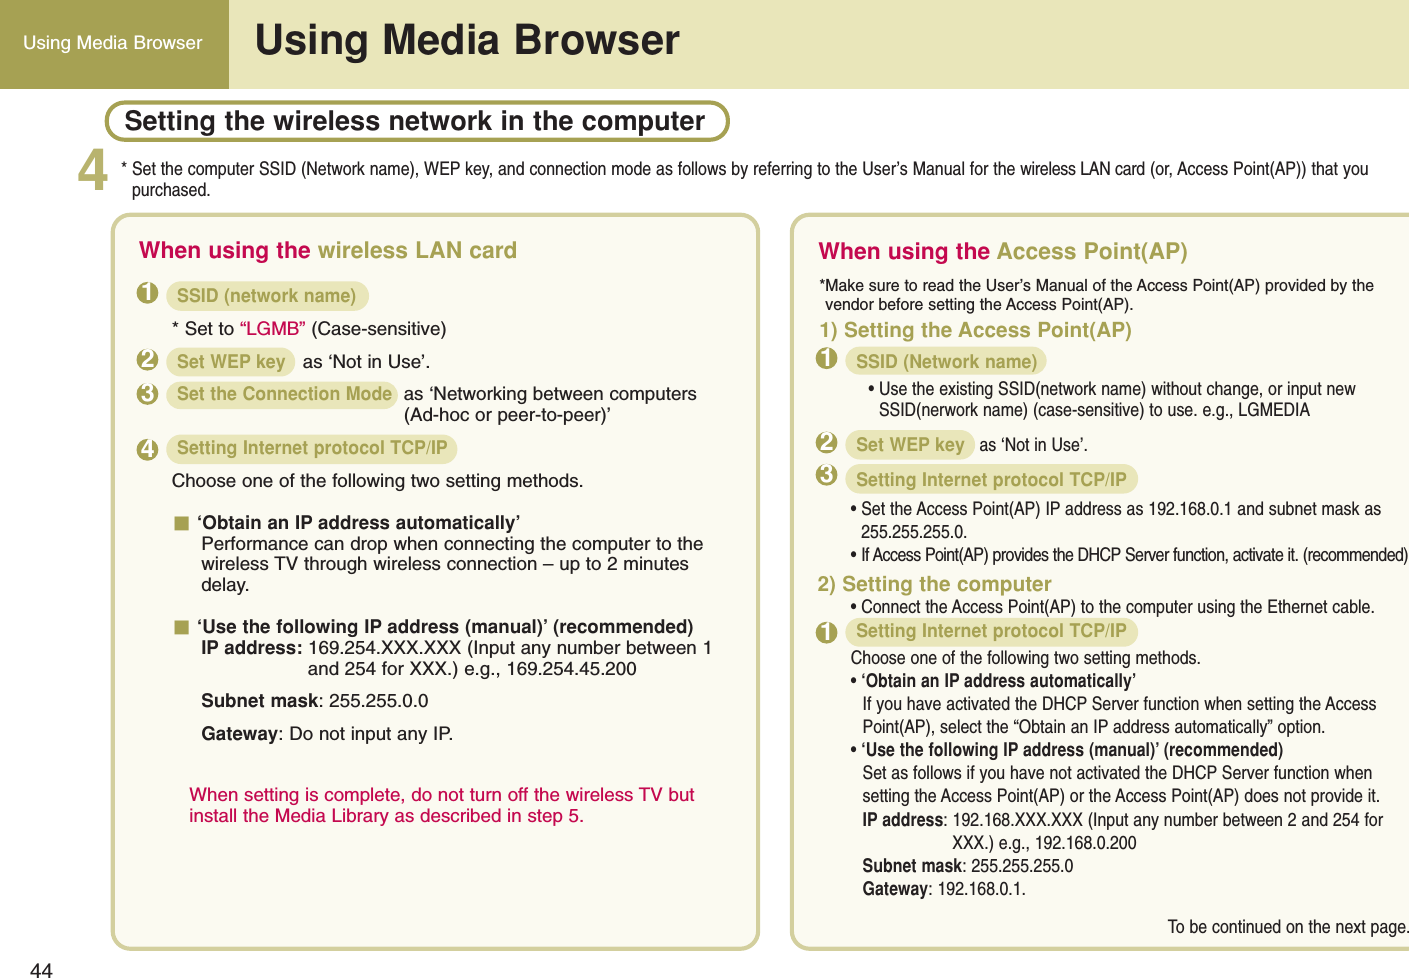
![49Using Media Browser123If you’re familiar with wireless LAN card setting, configure the wireless network of the computer and the wirelessTV by referring to the following section.Connect the power of the wireless TV.Wireless TVDC power adaptorPower cordTurn on the wireless TV.Upper side of the wireless TVRemote controlSwitch to the ‘Media Browser’pressing TV/MEDIA button.Remote controlorThe 'SEARCH FINDING' or 'SEARCH FAILURE' windowwill appear on the TV screen as shown in the figure. Press the [OK] using the remote control button.The Setting window will appear. The setting details are as follows.1. SSID (network name): LGMEDIA2. WEP key: Not In Use 3. Operation mode: ad-hoc 4. Internet Protocol TCP/IP: Obtain an IP address automatically To change the settings, take the following steps.(For your reference, the computer should have been turned on, and the wireless LAN card(or, the Access Point(AP)) also should havebeen configured in advance in the computer.)Move to ‘Select Network’using the and button on the remote control.Select the SSID (network name) set in the computer or the Access Point(AP) using the and button on the remote control.Press the button on the remote control when setting is complete.orSetting method 2](https://usermanual.wiki/LG-Electronics-USA/15LW1T.Users-Manual-2/User-Guide-504128-Page-8.png)
![50Using Media Browser Using Media Browser345Move to WEP key using the and key on the remote control.If you have set the WEK key in the computer (or, the Access Point(AP)), you should set the same WEP key in the wireless TV.(If not, you don’t have to set the WEP key in the wireless TV.)Select ‘64 bits’if the WEP key is 5 or 10 digit long. Or, select ‘128 bits’if it is 13 or 26 digits. Then, press the button on theremote control.Input the WEP key when the virtual keyboard appears.Press the [OK] on the virtual keyboard using the remote control button when setting is completed. For your reference,WEP key setting can slow down performance.Move to the Network section using the and button on the remote control.Select whether you want to set the IP Address automatically or manually.Select ‘Automatic’if you select the ‘Obtain an IP address automatically’option for IP Address setting in the computer.Otherwise (manual setting), input IP Address, Subnet Mask and Gateway using the number buttons on the remote control.Set the fourth column of the IP Address different from the computer. If you set the same address, it will not rune.g., Computer: 192.168.0.200, wireless TV: 192.168.0.110Press the button on the remote control.Press the button on the remote control when the Network Setting Confirmation Window appears.Virtual keyboardInput the number or the character you want by pressingthe buttons on the remote control.](https://usermanual.wiki/LG-Electronics-USA/15LW1T.Users-Manual-2/User-Guide-504128-Page-9.png)
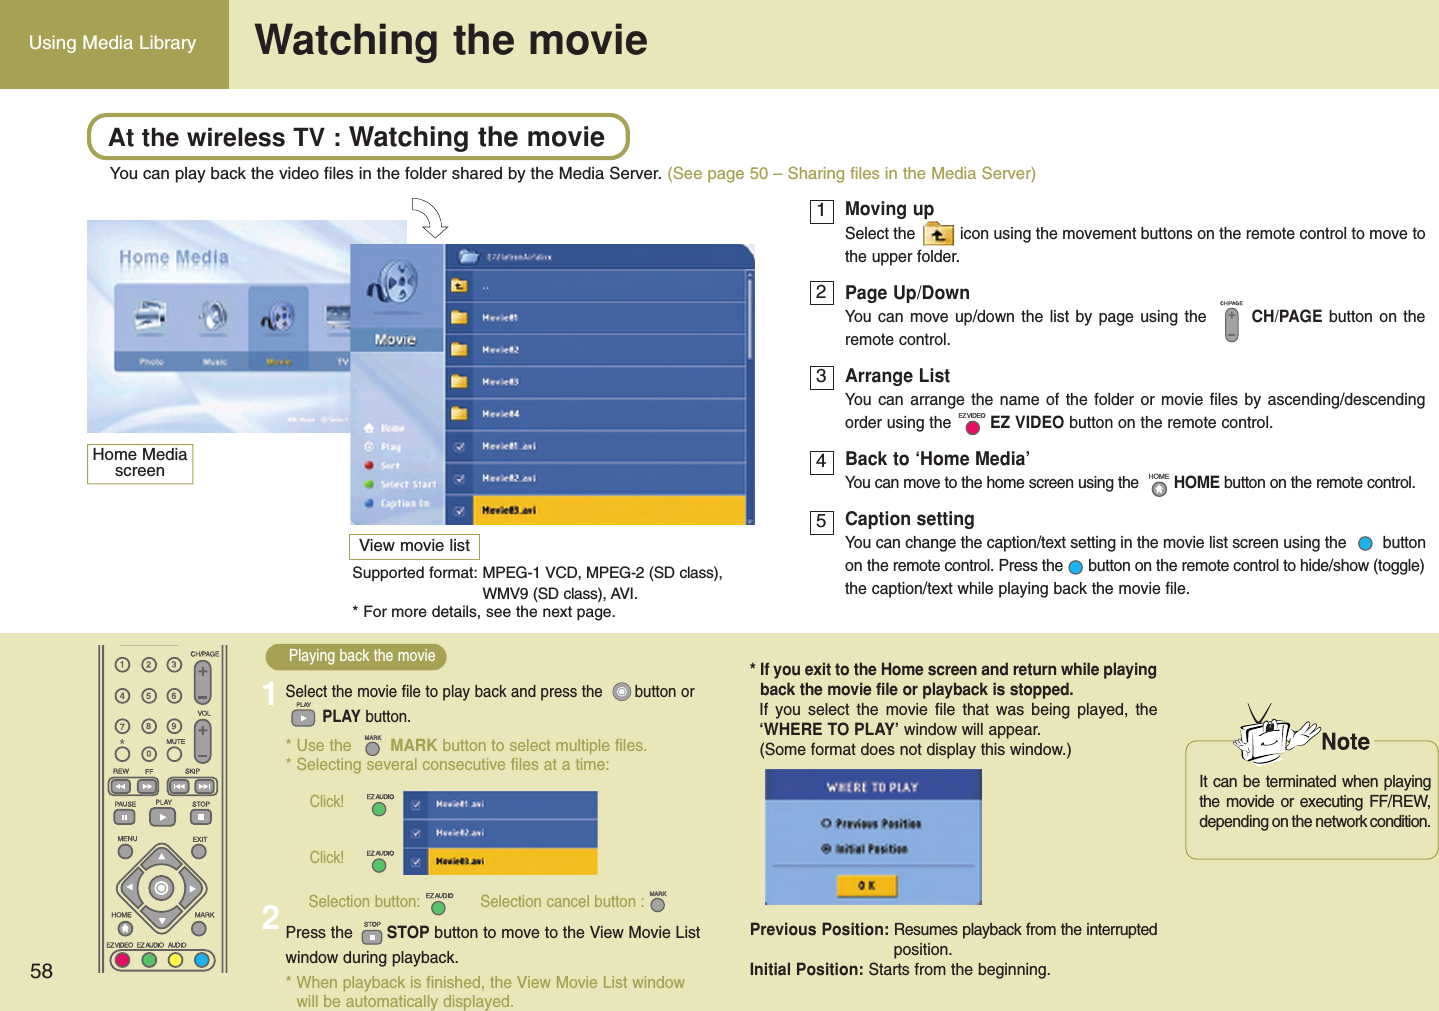
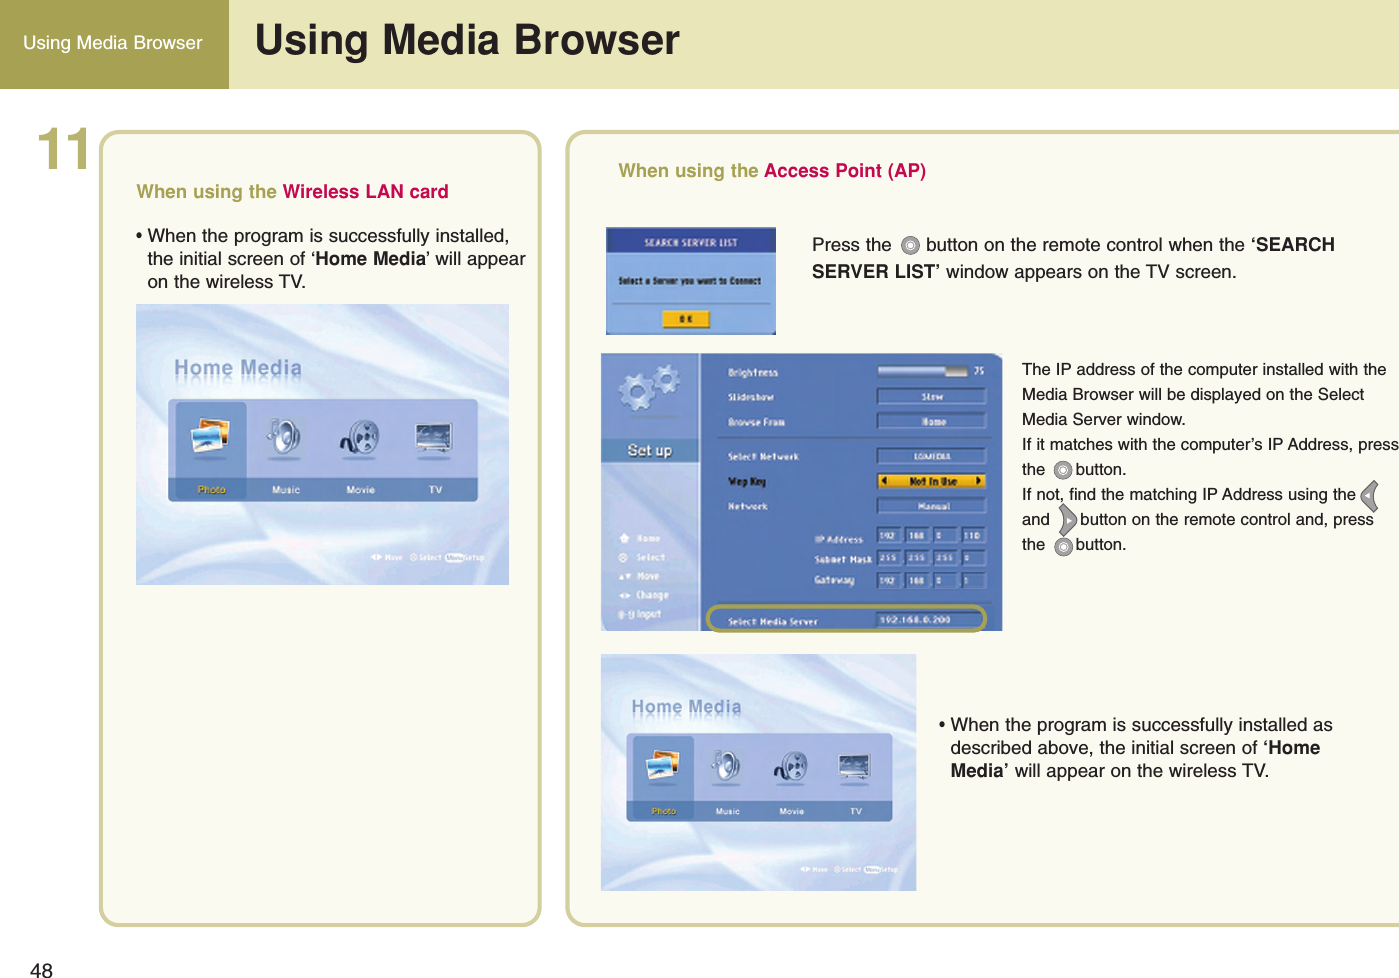
![64Note Check before reporting malfunctionCheck again if the following phenomenon occurs, which you presume that it is malfunction. It may not be malfunction indeed.Symptoms Take the following measuresTV screen display is interrupted fromtime to time, or not displayed properly.Check whether the power of the transmission unit is turned on.First, check whether the power LED in the transmission unit flashes in red color. Then, move the location of thetransmission unit to the center of the house or the position where you watch the TV most frequently.Check whether the distance from wireless TV and computer is too far away.Reception sensitivity differs according to the direction of the wireless TV and wireless transmission unit. Turn the front side of the wireless transmission unit towards the wireless TV.Reception sensitivity of the wireless TV also depends on the direction. Find the optimal direction and location inside the house and install the wireless TV.Do not attach the wireless transmission unit on the bookshelf or the wall to extend the wireless network coverage.If the TV is turned on properly but not the TV broadcasting, check TV antenna connection and set the channel usingthe [Ez Scan] function. (See page 27.)Q AAAAAAAWireless transmission unitFrontAbnormal Adjustment](https://usermanual.wiki/LG-Electronics-USA/15LW1T.Users-Manual-2/User-Guide-504128-Page-23.png)