LG Electronics USA 15LW1T Wireless Transmit Unit Compatible with 802.11b/g User Manual 3828TUL297C sunny
LG Electronics USA Wireless Transmit Unit Compatible with 802.11b/g 3828TUL297C sunny
Contents
- 1. Users Manual 1
- 2. Users Manual 2
Users Manual 2
42
Using Media Browser Using Media Browser
Setting the wireless network
You should configure your computer network and install the Media Library program first to view or play back the picture, music or the movie in your computer using the Media Browser
function of the wireless TV.
If your computer is not installed with the wireless LAN card, it is possible to purchase this product.
You should purchase the wireless LAN card (or Access Point(AP)) separately 802.11g adaptor (or 802.11g Access Point(AP)) that complies with Wi-Fi.
You cannot use the 802.11a wireless LAN card (or, 802.11a Access Point(AP)) for this wireless TV.
We recommend that you use the USB type adaptor that is easy to configure, or the wireless LAN card that runs in 802.11g only.
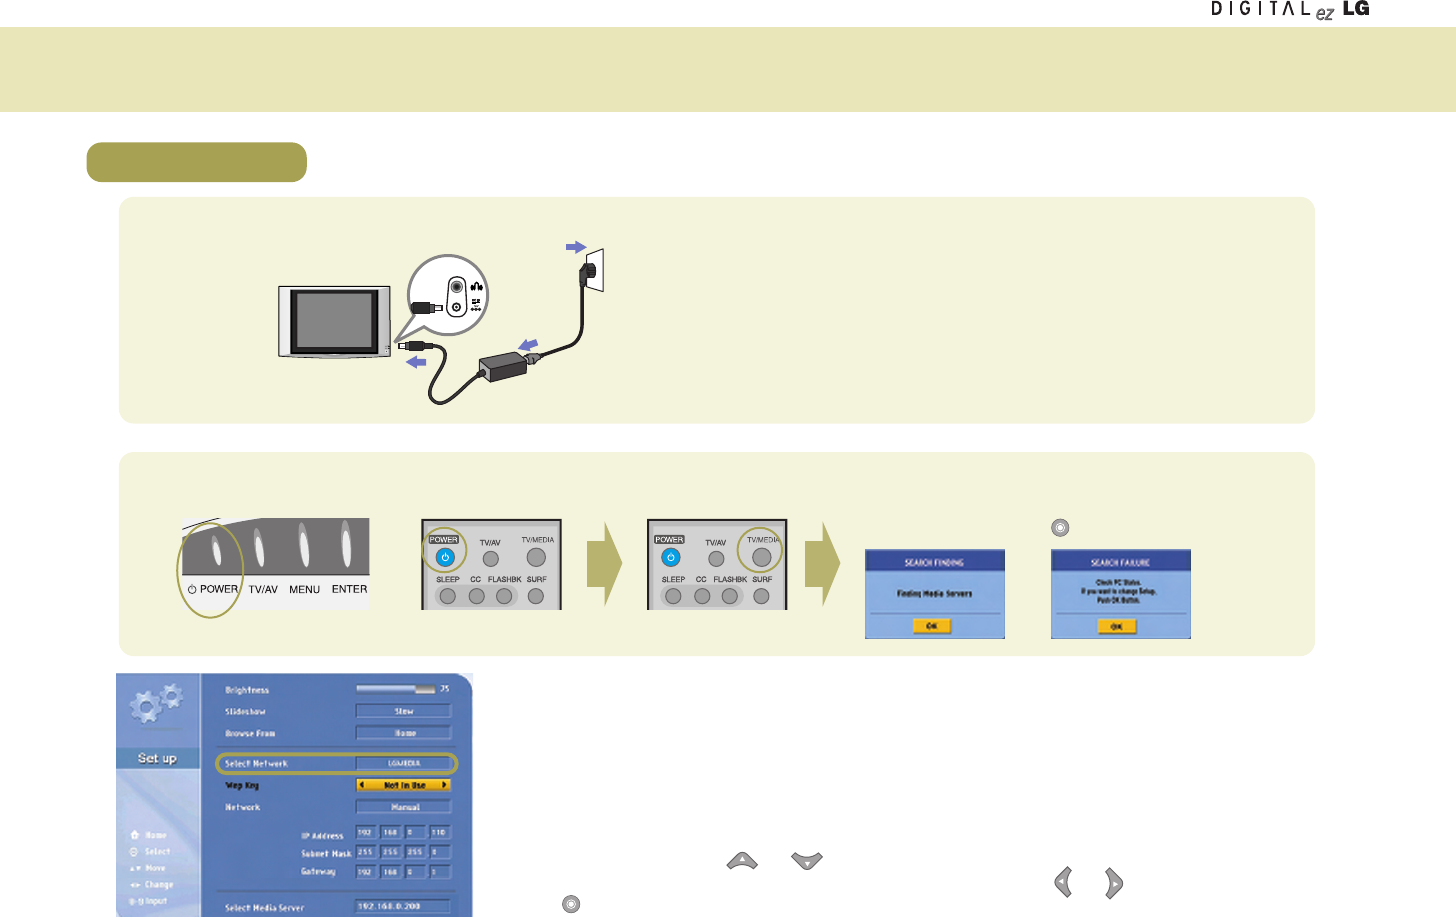
Setting method 1
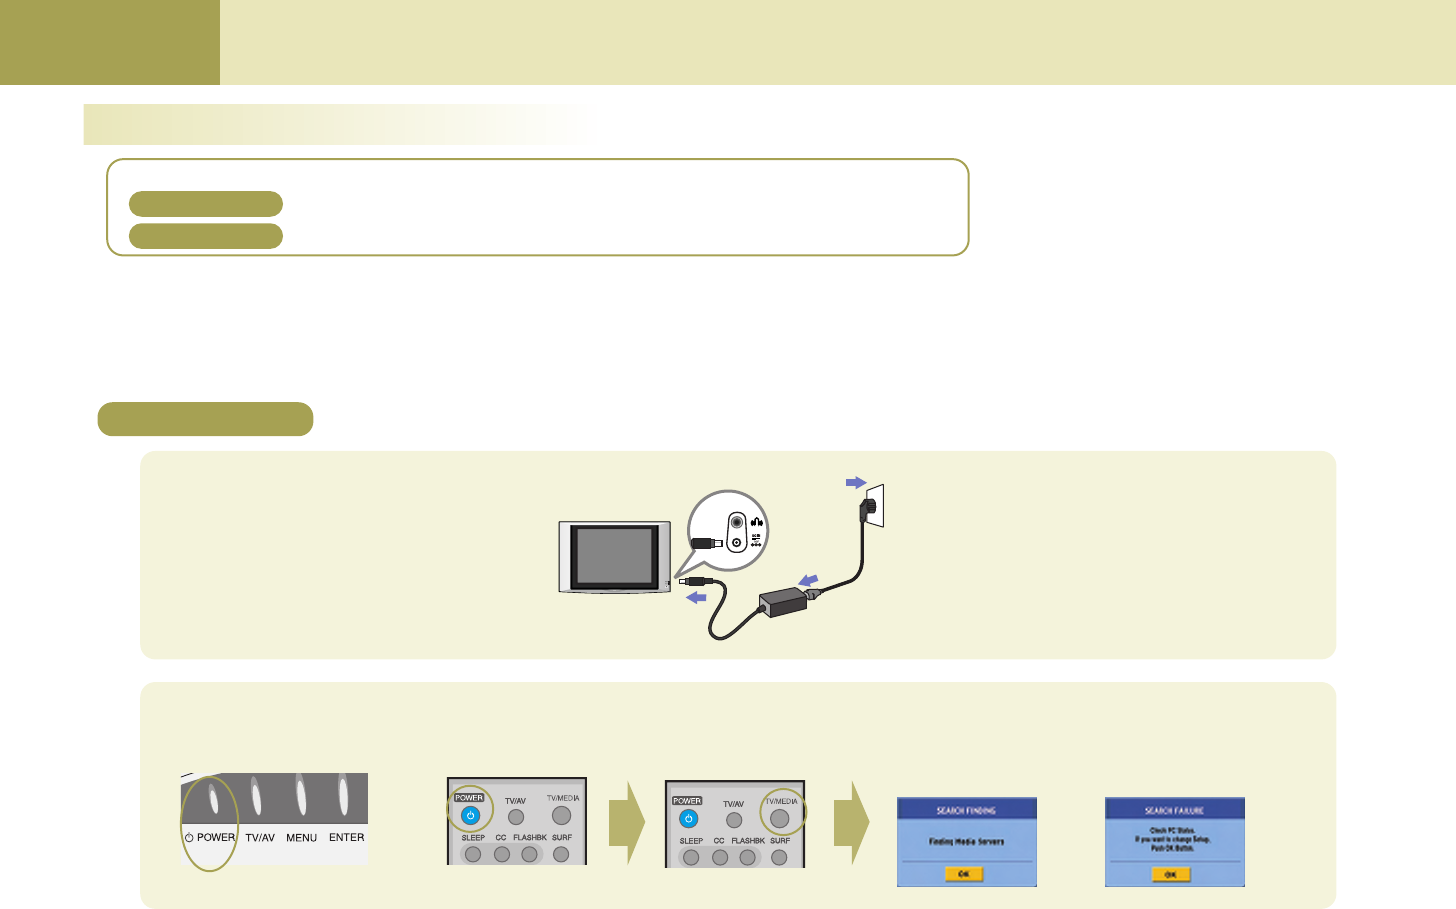
1Connect the power to the wireless TV.
Wireless TV DC power adaptor
2Turn on the wireless TV.
Switch to the ‘Media Browser’
by pressing TV/MEDIA button.
'SEARCH FINDING' or 'SEARCH FAILURE' window
will appear on the TV screen as shown in the figure.
Do not click the [OK] on the screen but take the follow-
ing steps.
Upper side of the wireless TV Remote control Remote control
or
or
Power cord
If you use the wireless LAN card for the first time, take the steps described in the ‘Setting method 2’.
Setting method 1
Setting method 1
There are two methods for setting the wireless network.
If you’re familiar with wireless LAN card setting, take the steps described in the ‘Setting method 2’.
43
Using Media Browser
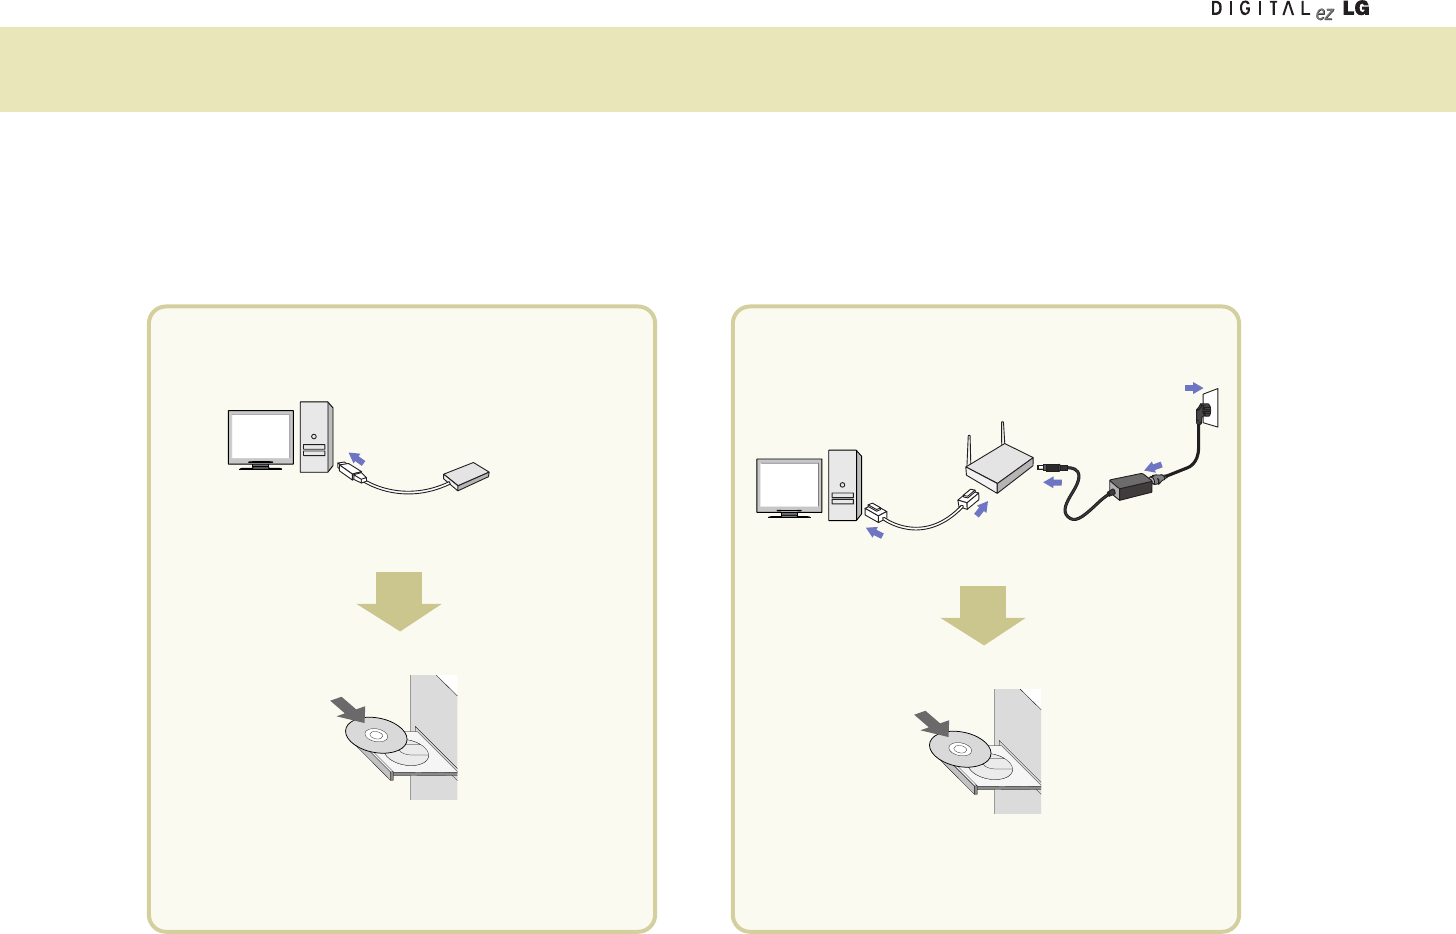
If the computer to install the Media Library is not equipped with the wireless LAN card (or, Access Point(AP)), install it first.
* Ensure to read the User’s Manual provided by the vendor of the wireless LAN card
(or, Access Point(AP))
to learn about how to install the wireless LAN card.
* For the wireless LAN card
(or, Access Point(AP))
that supports both 802.11b and 802.11g, set the adaptor to run in 802.11g only. <See the User’s Manual of the wireless LAN card
(or, Access Point(AP))
> If you mix 11g and 11b when using the adaptor, link speed will drop.
3
When using the wireless LAN card
Wireless LAN card-
Not included
Computer
•
Install the wireless LAN card driver files after installing it. Once the
driver is successfully installed, go to step ‘Setting the
wireless network in the computer’.
Computer
Access Point(AP) When using the
Network cable
DC adaptor
Computer
•
Install the Access Point(AP) driver files after installing it. Once
the driver is successfully installed, go to step ‘Setting the
wireless network in the computer’.
Computer
Access Point(AP)
- Not included
4. 4.
Power cord

44
Using Media Browser Using Media Browser
* Set the computer SSID (Network name), WEP key, and connection mode as follows by referring to the User’s Manual for the wireless LAN card (or, Access Point(AP)) that you
purchased.
4
When using the wireless LAN card
When setting is complete, do not turn off the wireless TV but
install the Media Library as described in step 5.
SSID (network name)
* Set to “LGMB”(Case-sensitive)
Set WEP key
as ‘Not in Use’.
Set the Connection Mode
as ‘Networking between computers
(Ad-hoc or peer-to-peer)’
Setting Internet protocol TCP/IP
Choose one of the following two setting methods.
u‘Obtain an IP address automatically’
Performance can drop when connecting the computer to the
wireless TV through wireless connection – up to 2 minutes
delay.
u‘Use the following IP address (manual)’(recommended)
IP address: 169.254.XXX.XXX (Input any number between 1
and 254 for XXX.) e.g., 169.254.45.200
Subnet mask: 255.255.0.0
Gateway: Do not input any IP.
1
2
3
4
When using the Access Point(AP)
1) Setting the Access Point(AP)
SSID (Network name)
• Use the existing SSID(network name) without change, or input new
SSID(nerwork name) (case-sensitive) to use. e.g., LGMEDIA
Set WEP key
as ‘Not in Use’.
Setting Internet protocol TCP/IP
• Set the Access Point(AP) IP address as 192.168.0.1 and subnet mask as
255.255.255.0.
• If Access Point(AP) provides the DHCP Server function, activate it. (recommended)
• Connect the Access Point(AP) to the computer using the Ethernet cable.
Setting Internet protocol TCP/IP
Choose one of the following two setting methods.
• ‘Obtain an IP address automatically’
If you have activated the DHCP Server function when setting the Access
Point(AP), select the “Obtain an IP address automatically” option.
• ‘Use the following IP address (manual)’(recommended)
Set as follows if you have not activated the DHCP Server function when
setting the Access Point(AP) or the Access Point(AP) does not provide it.
IP address: 192.168.XXX.XXX (Input any number between 2 and 254 for
XXX.) e.g., 192.168.0.200
Subnet mask: 255.255.255.0
Gateway: 192.168.0.1.
To be continued on the next page.
1
2
3
1
*Make sure to read the User’s Manual of the Access Point(AP) provided by the
vendor before setting the Access Point(AP).
2) Setting the computer
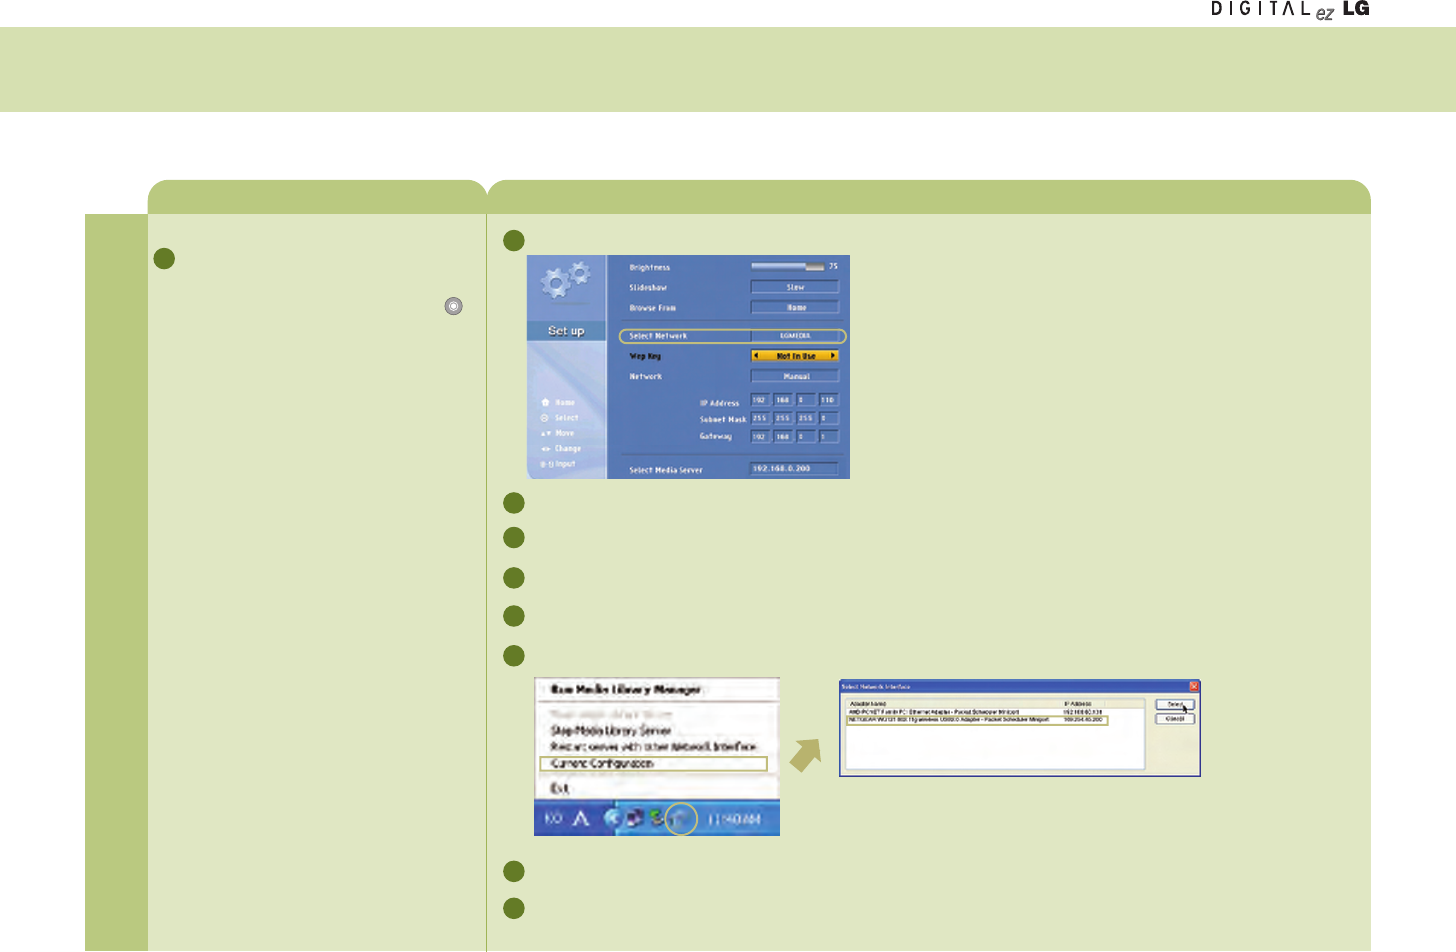
Setting the wireless network in the computer

45
Using Media Browser
Set only when you use the Access Point (AP).
Take the following setting steps when Access Point(AP) setting is complete.
or
The setting screen will appear.
* Your wireless TV IP Address may be different from the one described
in this manual.
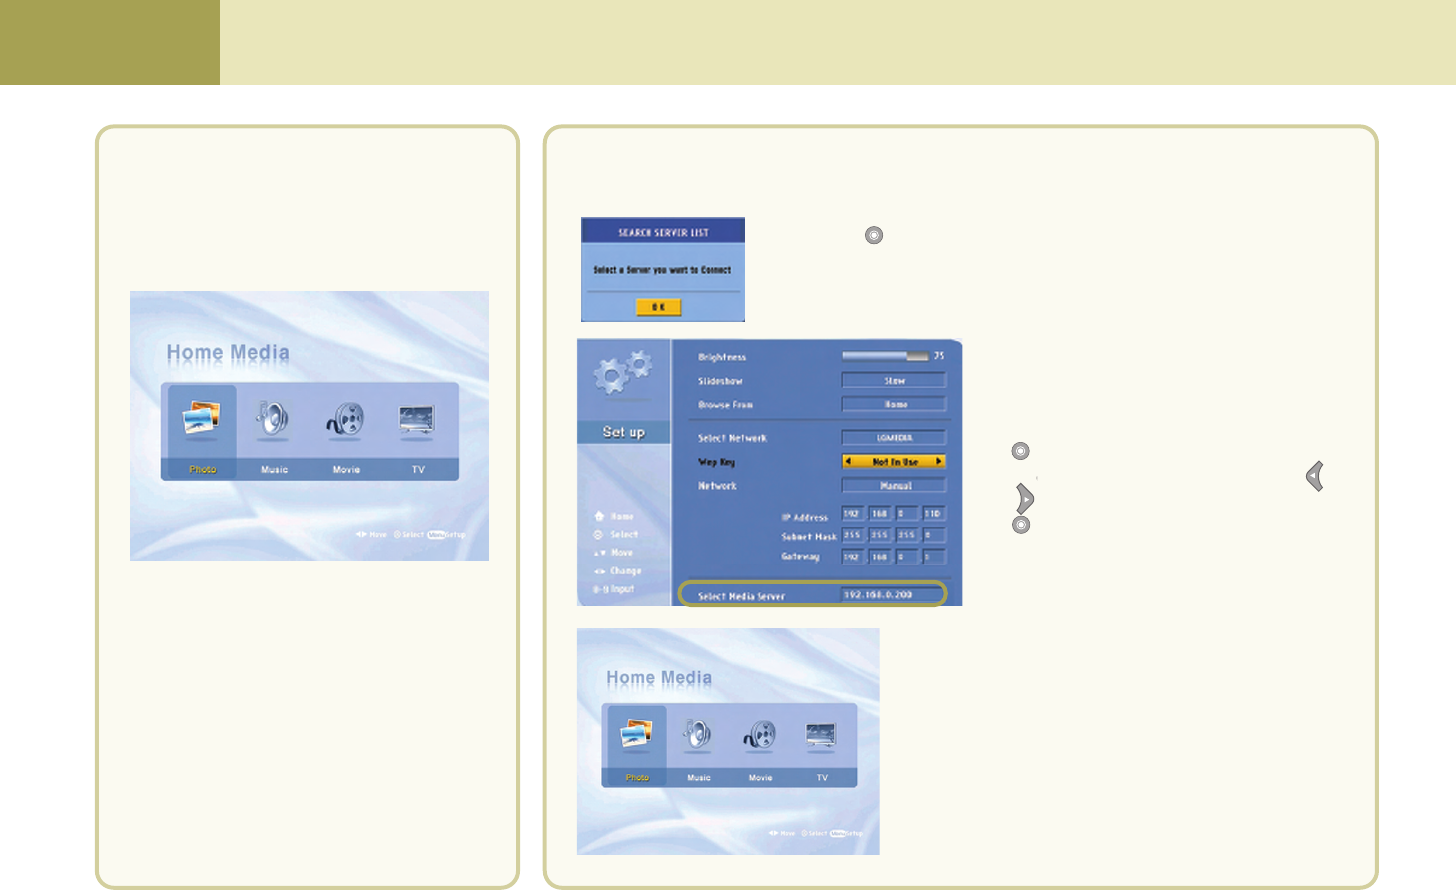
Press the [OK] in the 'SEARCH FINDING' or 'SEARCH FAILURE' window on the TV screen, using the remote control button.
Move to ‘Select Network’field using the and button on the remote
control.
Find the SSID(network name) you have set in the computer using the and
button on the remote control, and press the button. e.g., LGMEDIA
u
If you select the ‘Obtain an IP address automatically’option, select ‘Automatic’.
If you select automatic network setting, the IP Address, Subnet mask and Gateway
will not appear in the wireless TV. (No setting is required.)
u
If you select the ‘Use the following IP address’option, select ‘Manual’and set the
fourth column of the IP Address different from the Access Point
(AP)
and the
computer. If you set the same address, it will not run.
e.g., Wireless TV: 192.198.0.110, Access Point: 192.168.0.1, Computer: 192.168.0.200
Subnet Mask: Set the same value with the Access Point
(AP)
. e.g., 255. 255. 255. 0
Gateway: Input the IP address set in the Access Point
(AP)
. e.g., 192.168.0.1
Press the button on the remote control.
When the Network Setting Confirmation window appears,
press the button on the remote control.
When the Find Media Server window appears as shown
left, insert the Media Library Installation CD into the
computer.
46
Using Media Browser Using Media Browser
Once the ‘Media Library’program is installed in your computer, you can view the picture or play back music or movie by connecting the wireless TV to the Media Browser.
You should install the program first to use the Media Browser in the wireless TV.
56 7
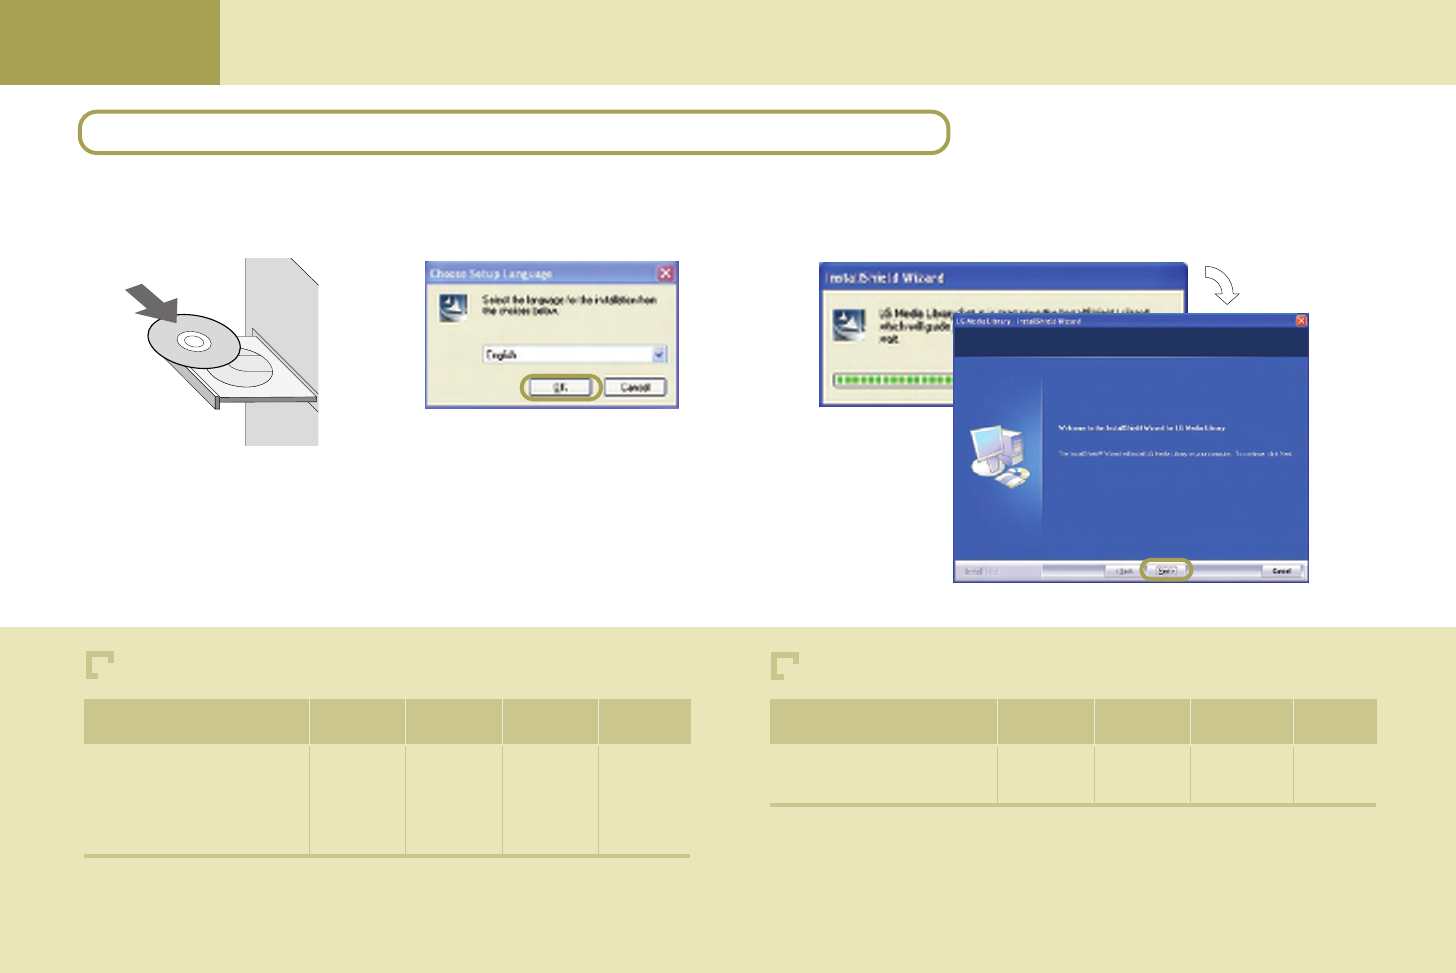
Computer
• Insert the installation CD into the
CD-ROM drive. Wait until the
installation message appears.
• When the Install Media Library window appears,
select the language (English/Korean) and click
the [OK].
• If the installation window does not appear
automatically, double click the ‘setup.exe’file in
the CD manually.
• When installation is ready to proceed, click the [Next] button.
Windows 98
Windows 98SE
Windows ME
Windows 2000
Windows XP
* Wireless LAN card should have the Access Point(AP) or NIC (Network Interface Card) that supports
802.11g.
* Wireless LAN card should comply with Wi-Fi.
OS CPU RAM Hard Disk USB
Pentium III
600MHz or
faster
128Mb or
more
1Gb or more USB 2.0
support * Wireless LAN card should have the Access Point(AP) or NIC (Network Interface
Card) that supports 802.11g.
* Wireless LAN card should comply with Wi-Fi.
Windows XP
OS CPU RAM Hard Disk USB
Pentium IV
1.5GHz or
faster
128Mb or
more 40Gb or more USB 2.0
support
At your computer : Installing the ‘Media Library’Server in you computer
Minimum PC requirement for installation Recommended PC specification
47
Using Media Browser
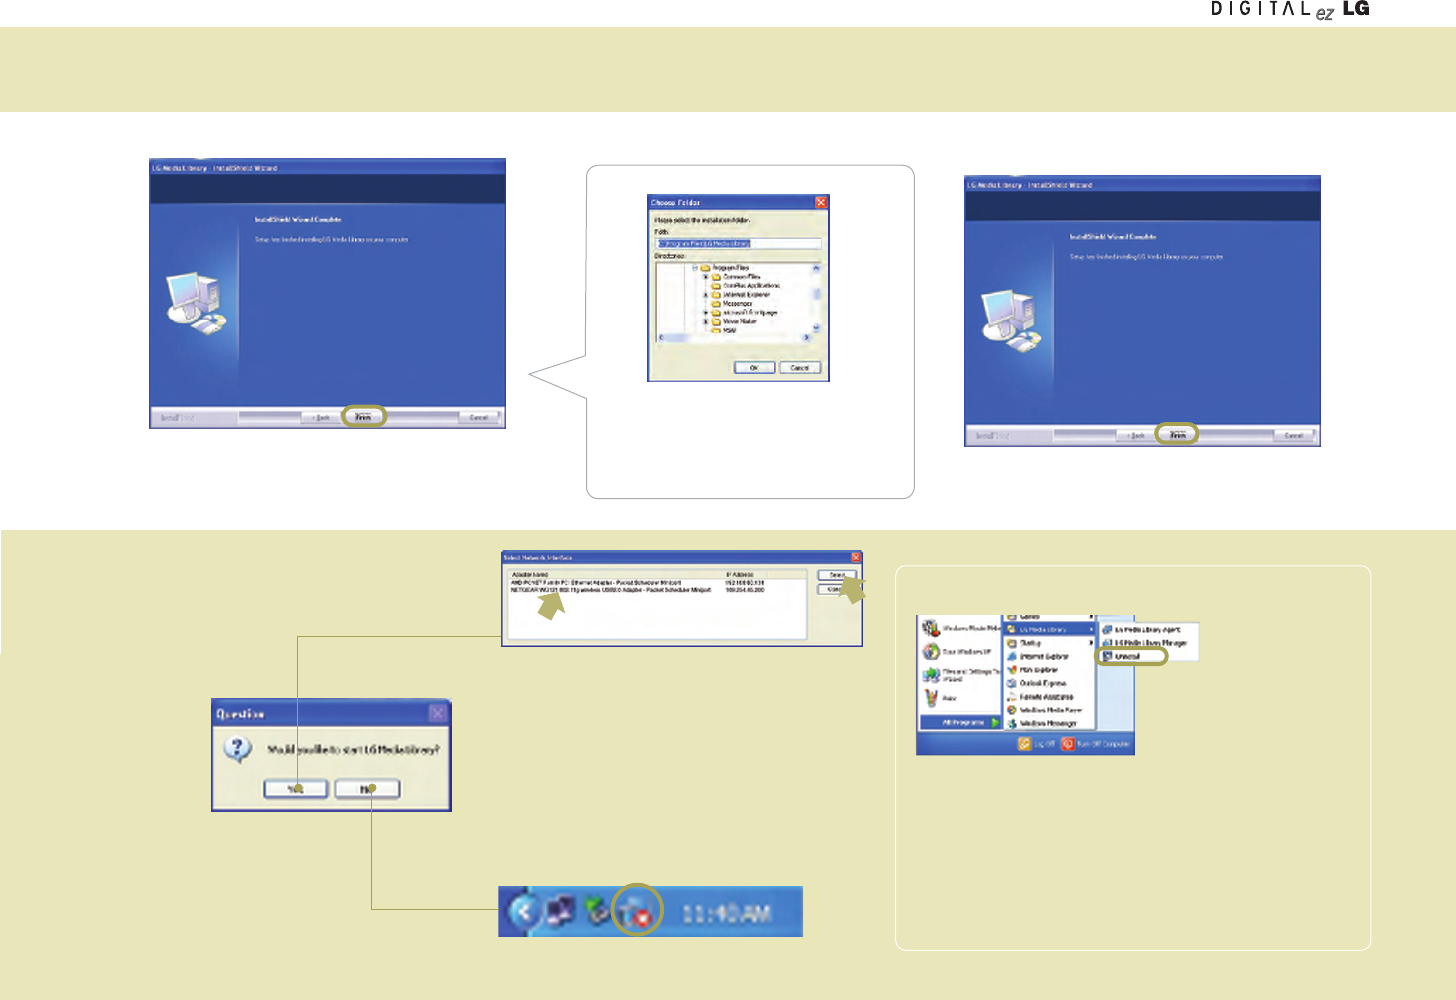
•
Create a folder to install the Media Library.
•
Click the [Next] to create the ‘LG Media Library’folder
under the ‘C:\Program Files’folder automatically.
•
When the question window
appears, click the [Yes] to run
the Media Library.
• When you run the Media Library, the Select
Network Interface window will appear. Select the
wireless network adaptor you have installed and
click the [Select].
When the ‘Media Library Manager’window
appears, share the folder you want. (See page 50)
When the program is successfully installed, the
initial screen of ‘Home Media’will appear on the
wireless TV.
•
The program icon will appear on the Windows
Task Bar.
•
If you want to install the program at
other folder, click the [Browse] and
specify the folder.
•
Installation of the Media Library is complete.
•
Click the [Finish] to complete installation.
Deleting the Media Library program
8
10
9
Select Click
1. Select Start > All Programs > LG Media Library > Uninstall
to uninstall the Media Library.
* When system rebooting selection message appears,
select the option you want and click the [Finish].
2. You can also delete the Media Library program by
selecting My Computer > Control Panel > All or Remove
Programs.
48
Using Media Browser Using Media Browser
11
When using the Wireless LAN card
When using the Access Point (AP)
•
When the program is successfully installed,
the initial screen of ‘Home Media’will appear
on the wireless TV.
Press the button on the remote control when the ‘SEARCH
SERVER LIST’window appears on the TV screen.
•
When the program is successfully installed as
described above, the initial screen of ‘Home
Media’will appear on the wireless TV.
The IP address of the computer installed with the
Media Browser will be displayed on the Select
Media Server window.
If it matches with the computer’s IP Address, press
the button.
If not, find the matching IP Address using the
and button on the remote control and, press
the button.
49
Using Media Browser
1
2
3
If you’re familiar with wireless LAN card setting, configure the wireless network of the computer and the wireless
TV by referring to the following section.
Connect the power of the wireless TV.
Wireless TV
DC power adaptor
Power cord
Turn on the wireless TV.
Upper side of the wireless TV
Remote control
Switch to the ‘Media Browser’
pressing TV/MEDIA button.
Remote control
or
The 'SEARCH FINDING' or 'SEARCH FAILURE' window
will appear on the TV screen as shown in the figure.
Press the [OK] using the remote control button.
The Setting window will appear. The setting details are as follows.
1. SSID (network name): LGMEDIA
2. WEP key: Not In Use
3. Operation mode: ad-hoc
4. Internet Protocol TCP/IP: Obtain an IP address automatically
To change the settings, take the following steps.
(For your reference, the computer should have been turned on, and the wireless LAN card(or, the Access Point(AP)) also should have
been configured in advance in the computer.)
Move to ‘Select Network’using the and button on the remote control.
Select the SSID (network name) set in the computer or the Access Point(AP) using the and button on the remote control.
Press the button on the remote control when setting is complete.
or
Setting method 2
50
Using Media Browser Using Media Browser
3
4
5
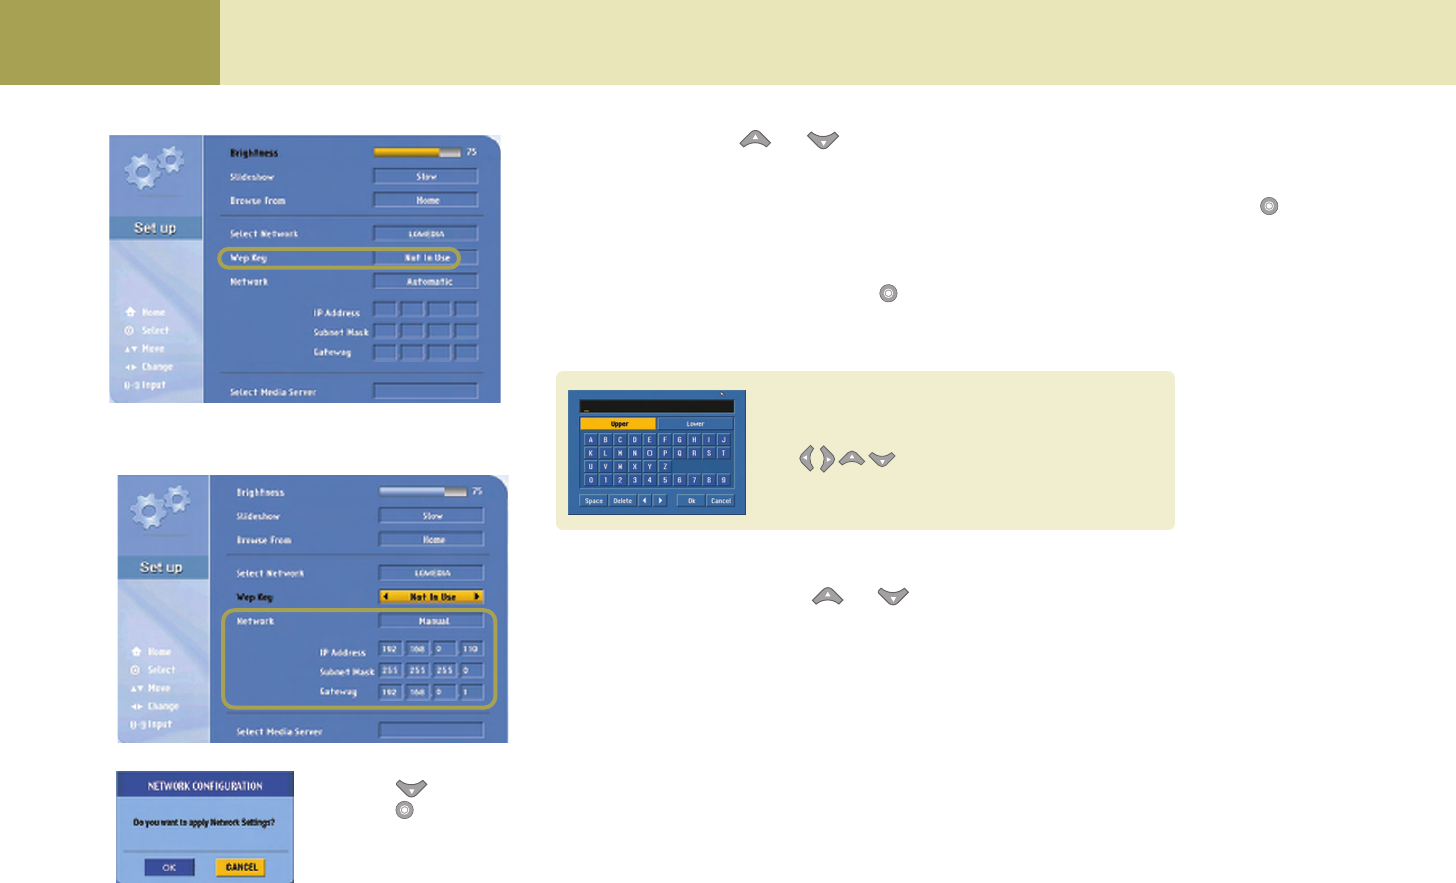
Move to WEP key using the and key on the remote control.
If you have set the WEK key in the computer (or, the Access Point(AP)), you should set the same WEP key in the wireless TV.
(If not, you don’t have to set the WEP key in the wireless TV.)
Select ‘64 bits’if the WEP key is 5 or 10 digit long. Or, select ‘128 bits’if it is 13 or 26 digits. Then, press the button on the
remote control.
Input the WEP key when the virtual keyboard appears.
Press the [OK] on the virtual keyboard using the remote control button when setting is completed. For your reference,
WEP key setting can slow down performance.
Move to the Network section using the and button on the remote control.
Select whether you want to set the IP Address automatically or manually.
Select ‘Automatic’if you select the ‘Obtain an IP address automatically’option for IP Address setting in the computer.
Otherwise (manual setting), input IP Address, Subnet Mask and Gateway using the number buttons on the remote control.
Set the fourth column of the IP Address different from the computer. If you set the same address, it will not run
e.g., Computer: 192.168.0.200, wireless TV: 192.168.0.110
Press the button on the remote control.
Press the button on the remote control when the Network Setting Confirmation Window appears.
Virtual keyboard
Input the number or the character you want by pressing
the buttons on the remote control.
51
6
7
8
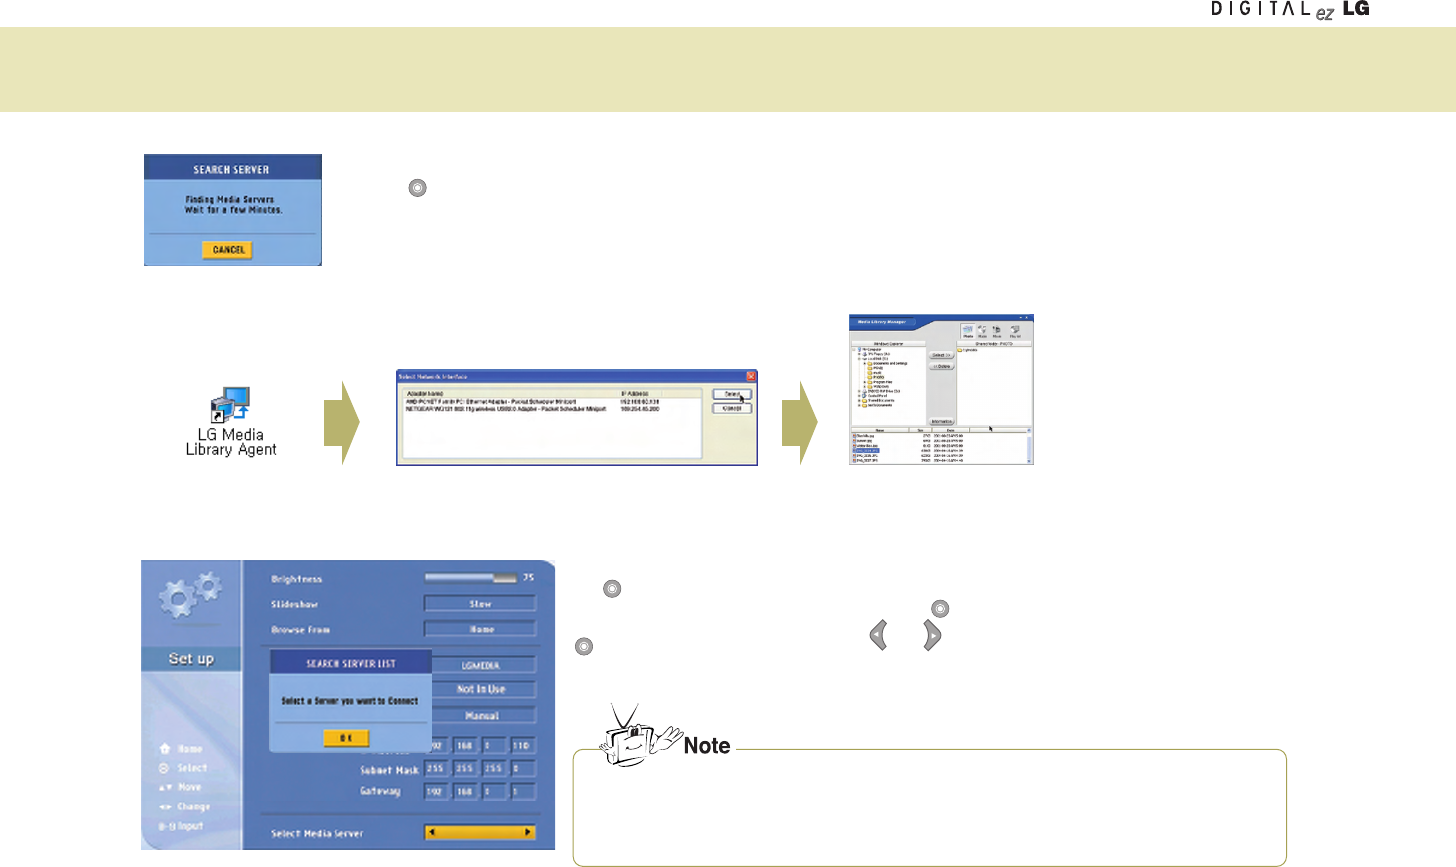
When network setting is complete, the ‘SEARCH SERVER’window will appear as shown left.
Press the button on the remote control to cancel. Do not then configure other items but install
the Media Library in the computer. (See page 44.)
The ‘SEARCH SERVER LIST’window will appear if the Media Browser is successfully installed. Press
the button. Then, the IP address of the computer installed with the Media Browser will be displayed.
If it matches with the computer’s IP address, press the button.
If not, find the matching IP address using the and abutton on the remote control and, press the
button.
The Home screen of the Media Browser will appear and setting will be completed.
When Media Library installation is complete, run ‘LG Media Library Agent’. Then, the ‘Select Network Interface’window will appear. Specify the wireless
LAN card adaptor you have installed.
•
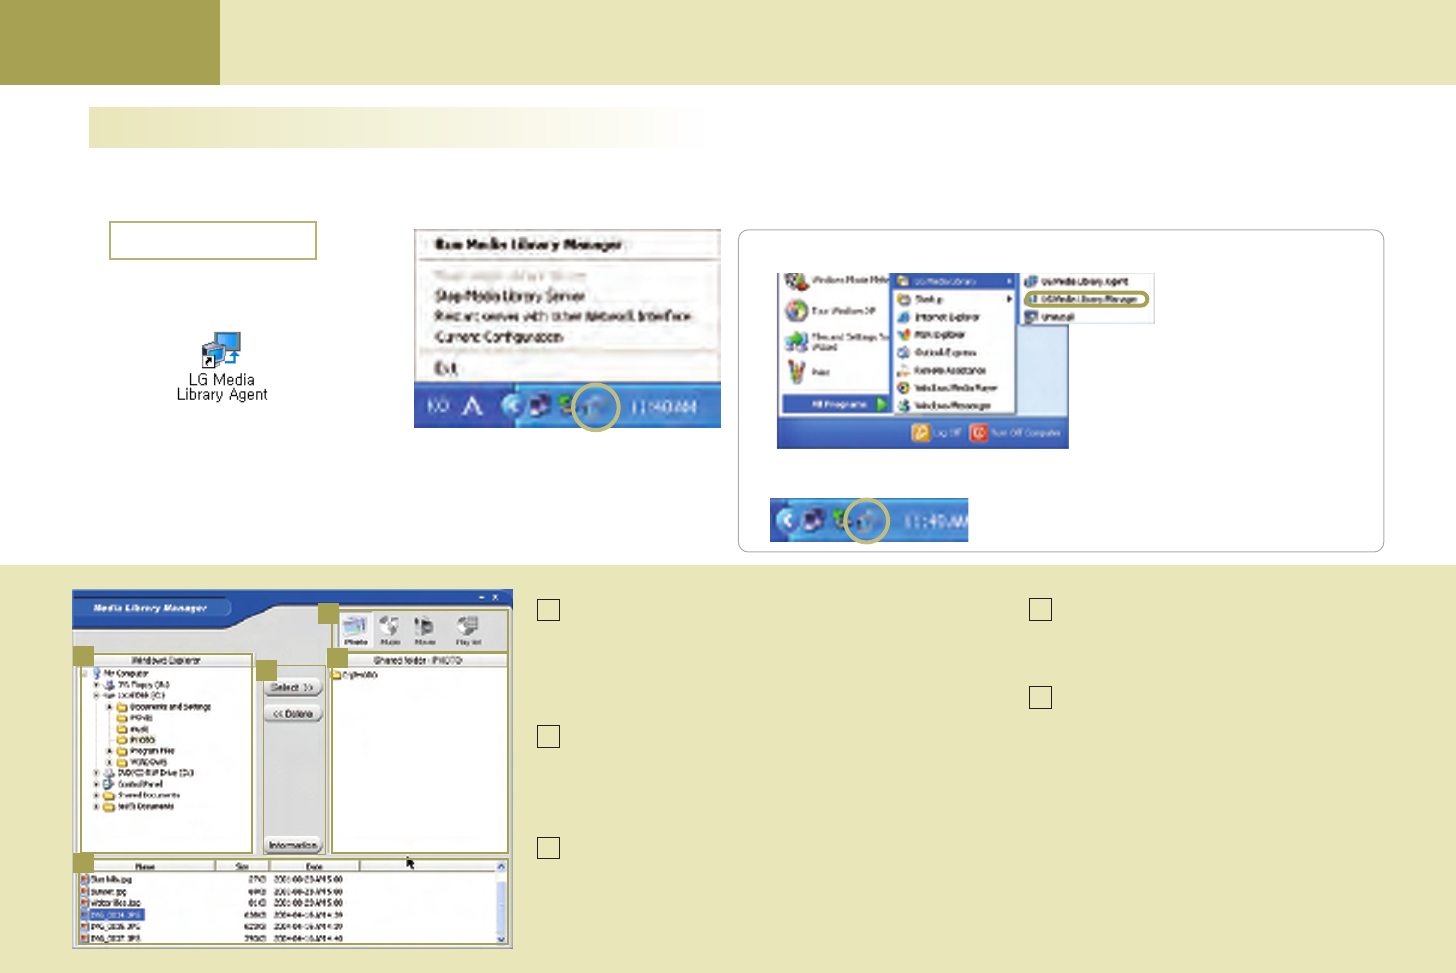
Run LG Media Library Agent.
•
Specify the wireless LAN card (or, Access Point(AP)).
•
Share the folder to share when the ‘Media Library
Manager’window appear. (See next page)
Using Media Browser
If the IP Address of the computer does not appear in the Select Media Server window, the wireless LAN card (or,
Access Point(AP)) setting must be incorrect or the Media Library is not installed properly. In this case, check
whether the wireless (or, Access Point(AP)) setting of the computer matches with that of the wireless TV, or the
Media Library is properly installed.
52
Using Media Browser Using Media Browser
Using Media Library Manager
Once the Media Library program is installed in your computer, you can view the picture or play back music or movie by connecting the wireless TV to the Media Browser.
Pictures, music files and movie files should have been shared using the Media Library Manager to view the picture or play back music or movie stored in the computer.
1
• Double click the Media Library
icon on the Desktop window to
start the program.
To start with a different method,
1. Select Start > All Programs > LG Media Library > LG Media Library Manager to use the
Media Library Manager program.
2. Click the right mouse button to use the Media
Library Manager.
• Once the program is started, the Media
Library icon will be activated in the
Windows Task Bar.
Click with the right mouse button to start
the Media Library Manager.
2
2
5
3
1
4
Menu selection button
Picture: Manages picture file share folder.
Music: Manages music file share folder.
Movie: Manages movie file share folder.
Playlist: Manages the playlist (See page 54)
Windows Explorer
You can find the folder to add to the Shared folder (4).
You cannot move the local disc drive to the Shared folder.
e.g., C or D drive.
Select/Delete/Information button
Select: Adds the selected folder to the Shared folder.
Delete: Deletes the selected folder from the Shared folder.
Information: Shows the property information on the selected
folder or file.
Shared folder
You can check and use the folder added in the
Shared folder in the wireless TV.
File view
You can check the file(s) in the selected folder.
1
2
3
4
5
At your computer
53
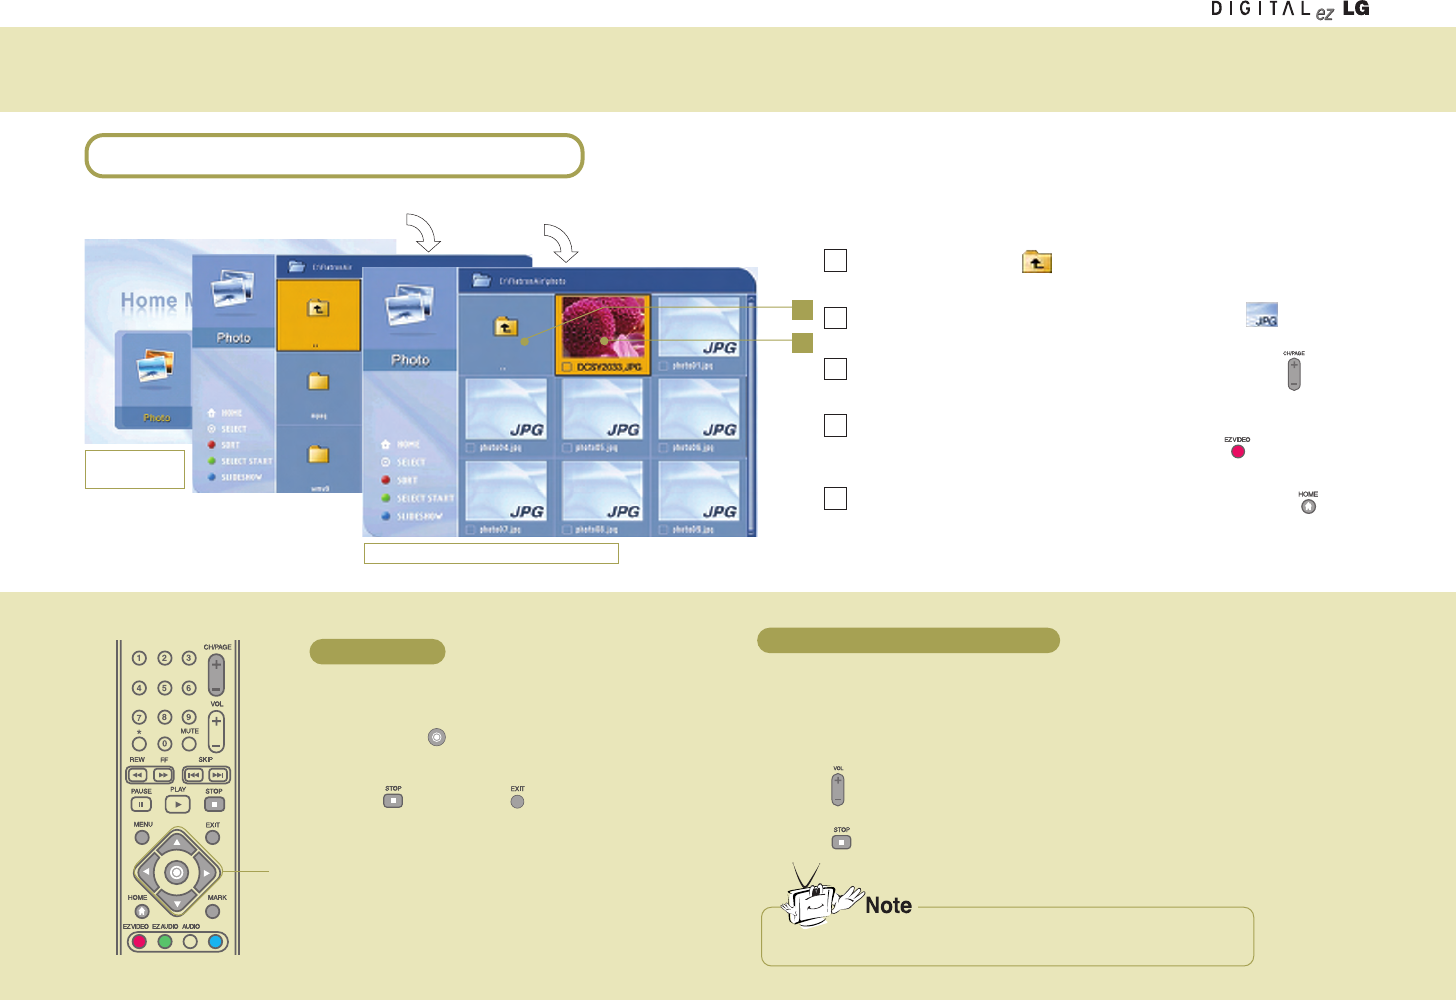
Viewing the Picture
You can view the images or the pictures in the folder shared by the Media Server. (See page 50 – Sharing files in the Media Server)
1
2
Moving up Select the icon using the movement buttons on the remote
control to move to the upper folder.
Preview You can preview the pictures in the folder. The image will
appear if the picture does not contain the preview information.
Page Up You can move up/down the list by page using the CH/PAGE
/Down button on the remote control.
Arrange List You can arrange the name of the folder or picture files by
ascending/descending order using the EZ VIDEO button
on the remote control.
Back to You can move to the home screen using the HOME
‘Home Media’button on the remote control.
1
2
3
4
5
Home Media
screen
Viewings the images in the folder
Supported format
Select the image to view using the movement buttons on the
remote control.
Selection button:
Press the STOP button or EXIT button to move back to
the picture list.
Movement buttons
Play back the music file.
(See page 53.)
Move to the ‘Picture’menu and view the picture after returning to the ‘Home Media’screen.
(You can adjust the sound volume at any menu – ‘Music’menu, ‘Home Media’or ‘Picture’menu,
using the VOL button.)
To stop music playback, return to the ‘Home Media’and move to the ‘Music’menu.
Press the STOP button to stop music playback.
File arrangement will be disabled during music playback.
Viewing the picture Viewing the picture while listening to the music
1
2
1
2
3
At the wireless TV : Viewing the Picture
54
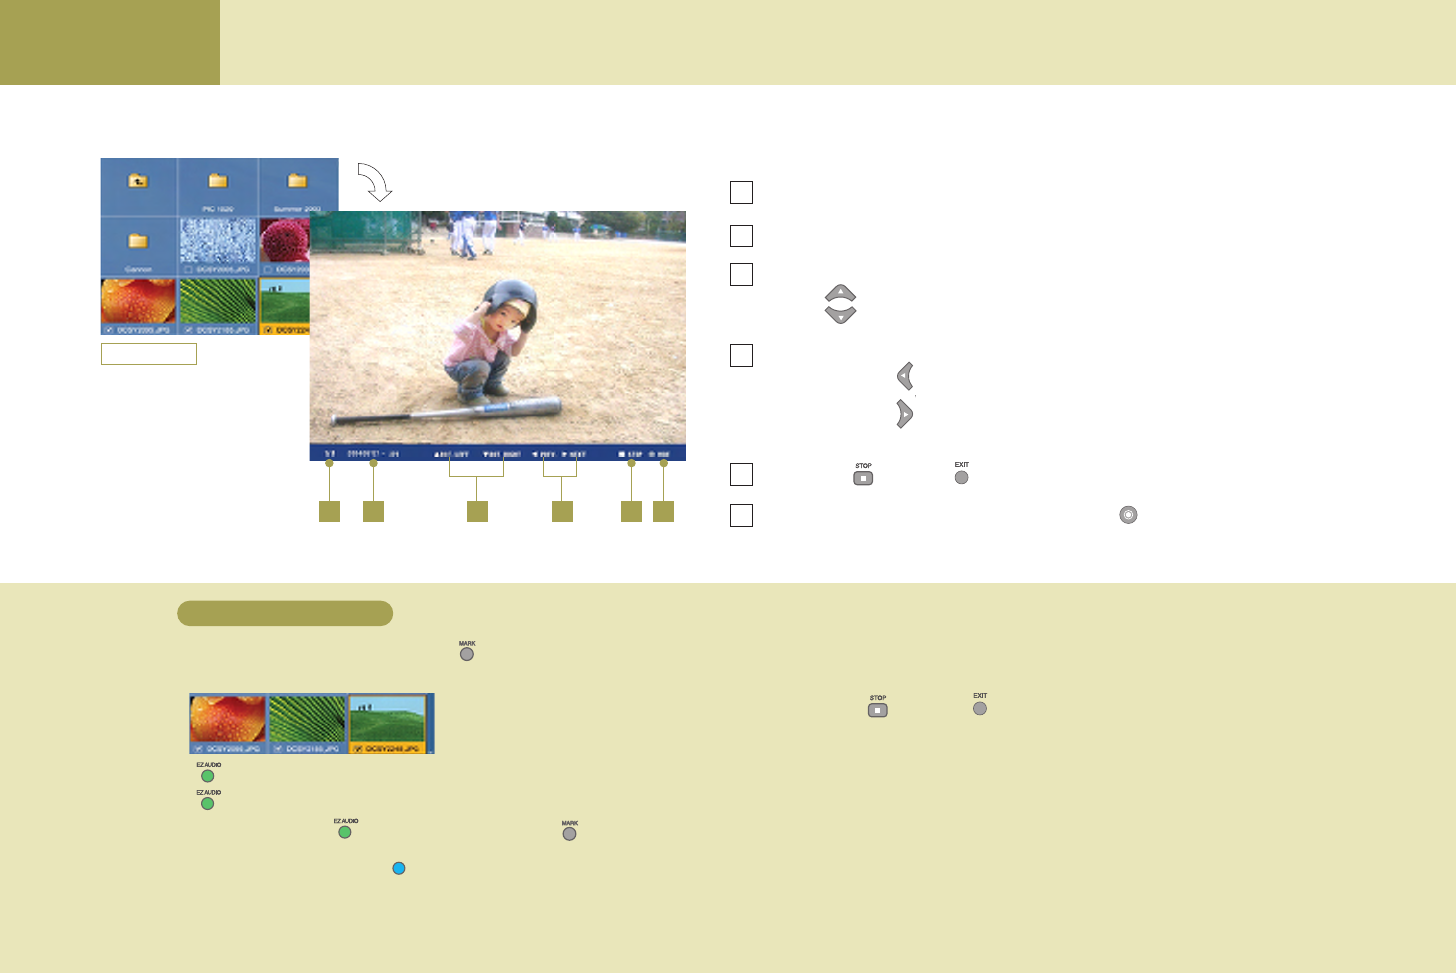
Using Media Browser Viewing Pictures
Viewing the slide show
1
View page You can display current page as well as all pages. (Current page/All pages)
View file name You can check the file name of the picture.
Rotate You can rotate the selected picture for viewing.
button on the remote control: Shows the previous picture.
button on the remote control: Shows the next picture.
View previous / You can display the picture previous/next to the current picture.
next picture Remote Control button: Displays the picture previous to the currently
selected picture.
Remote Control button: Displays the picture next to the currently
selected picture.
Stop Use STOP or EXIT button to return to the View Picture List screen.
Hide Hides the status bar at the bottom. Select the button repetitively to show the status
bar again.
Select the image to view using the MARK button.
* To select consecutive files at a time.
Click at the beginning of the selected pictures!
Click at the end of the selected pictures!
Press the Start Slide Show button.
* If you press this button when no picture is selected, all files
will be included in a slide show.
Selection button: Selection cancel button:
The selected files will be displayed as a slide show with the preset speed.
(Use the Setting menu to change slide show speed! See page 58.)
Press the STOP or EXIT button to stop playing a slide show.
* If you don’t press the STOP button, the slide show will continue repeatedly.
1
2
3
4
5
6
Picture list
2 53 4 6
13
4
2
55
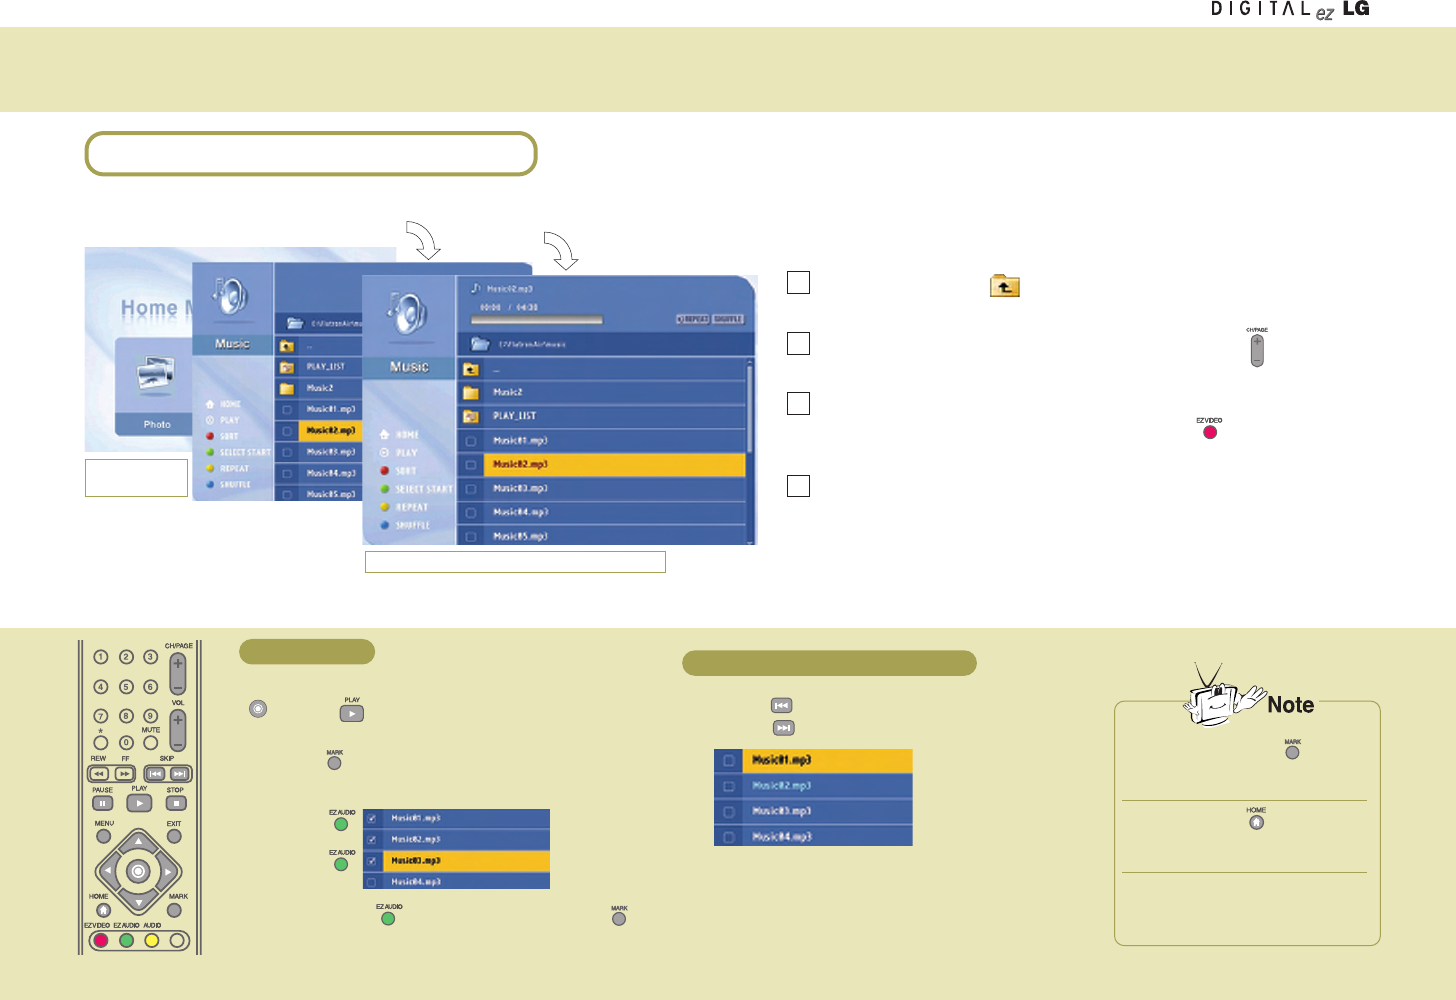
Playing Music
Select the music file to play back and press the
button or PLAY button.
* Use the MARK button to select multiple files.
* Selecting several consecutive files at a time:
Selection button: Selection cancel button:
Press the button to play back the previous music
file, or the button to play back the next one.
* The title color will be changed to light blue.
Click!
Click!
Playing music Playing back previous/next music file
You can play back the music files in the folder shared by the Media Server. (See page 50 – Sharing files in the Media Server)
Moving up Select the icon using the movement buttons on the remote
control to move to the upper folder.
Page Up You can move up/down the list by page using the CH/PAGE
/Down button on the remote control.
Arrange List You can arrange the name of the folder or picture files by
ascending/descending order using the EZ VIDEO button on
the remote control.
Back to You can move to the home screen using the HOME
‘Home Media’button on the remote control.
1
2
3
4
Playing back the music files in the folder
Supported format : MPEG1 Layer I, II, III (*.mpa, *.mp3)
Home Media
screen
File arrangement and MARK
button will be disabled during
music playback.
If you press the button during
playback, the selected music file
will be played back instead.
You cannot move from the Home
screen to the Setting screen during
music playback.
At the wireless TV : Playing music
56
Using Media Browser Playing Music
Playing music using a playlist
You can create a playlist that contains your favorite music and use it on the wireless TV. (See next page)
Stop/Pause
STOP: Press the STOP button to stop playback of
the current music file.
PAUSE: Press the PAUSE button to temporarily
stop music playback. To resume playback,
press the PLAY button.
Repeat/Clear
Press the AUDIO button to play back several music
files in the playlist or selected file repetitively.
For repeated playback
Random/Clear
Press the button to play back the music files randomly.
For random playback
At the wireless TV
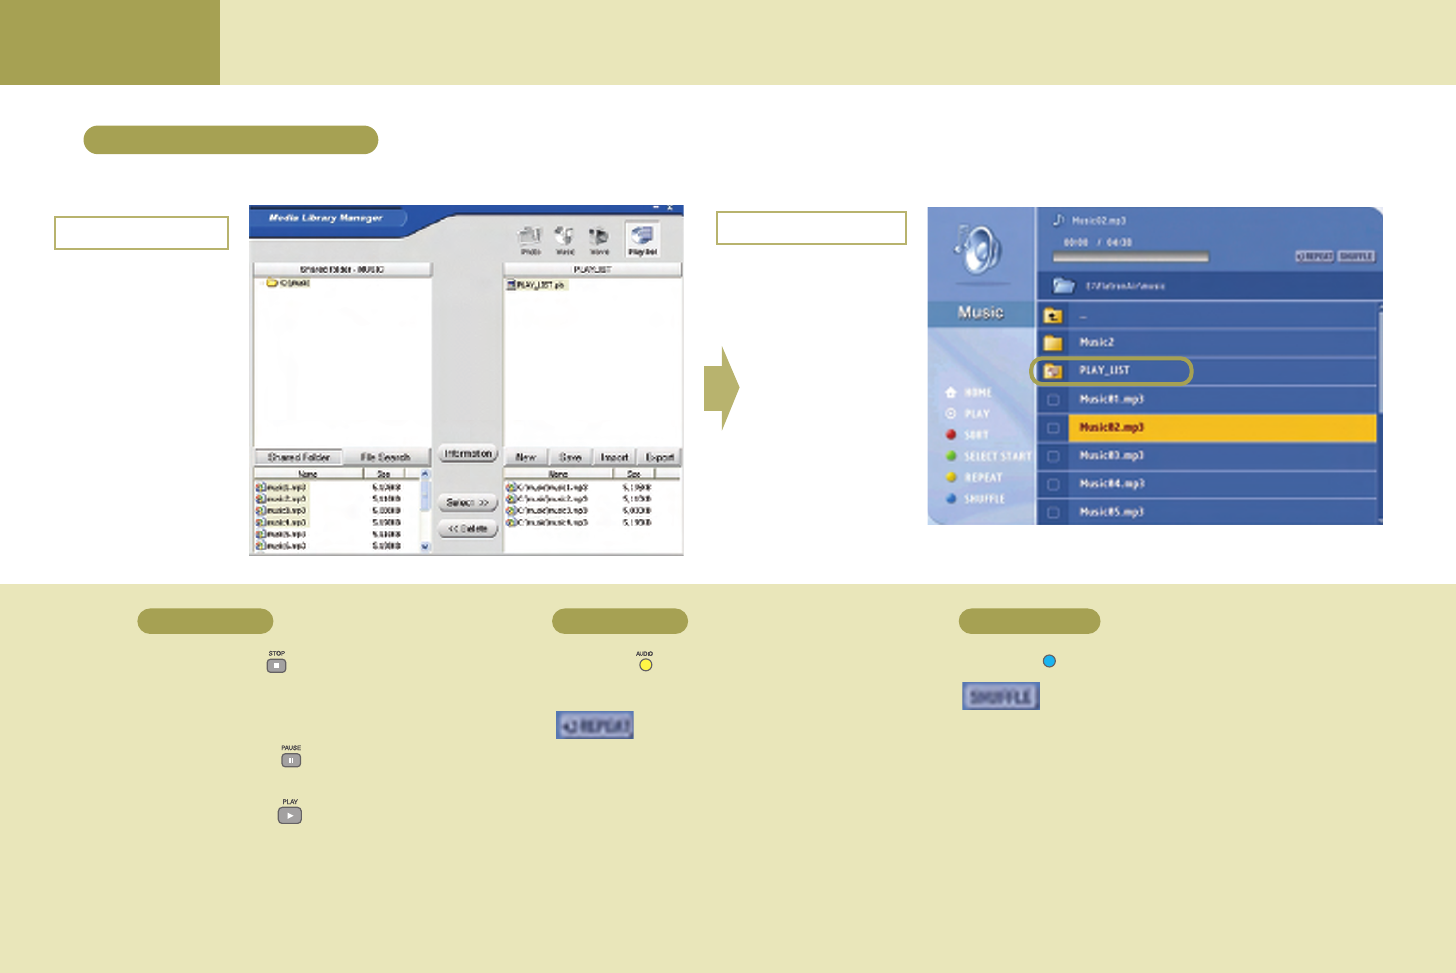
At your computer
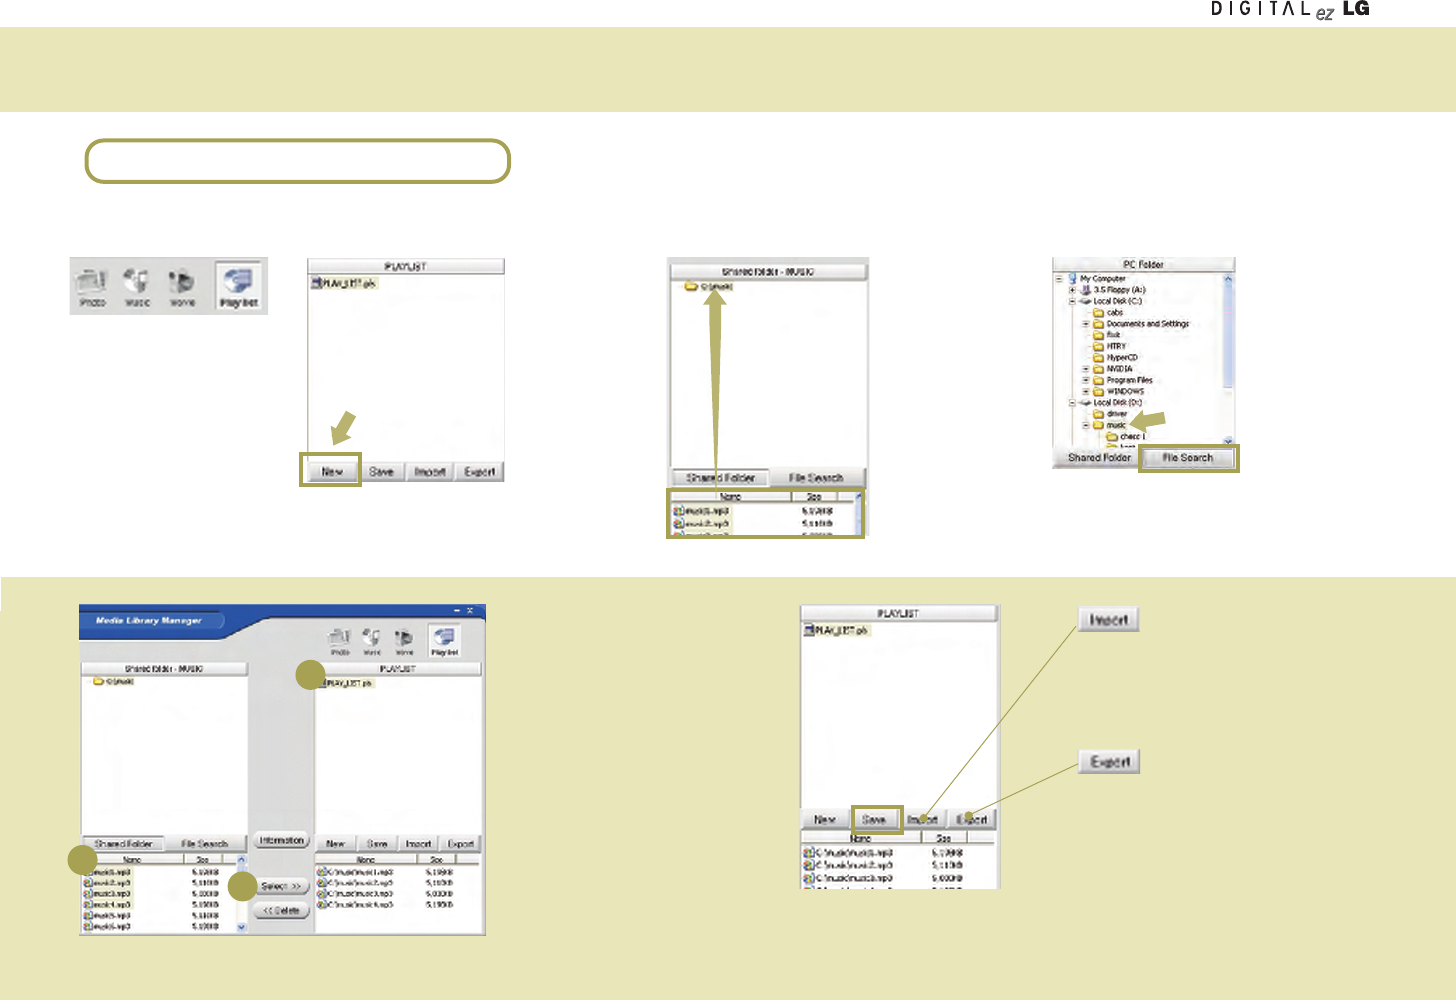
1
57
Playing music
You can create a playlist that contains your favorite music and use it on the wireless TV. (See next page)
Select the Playlist icon.
Click the New
button in the
Playlist window.
A new playlist
will be created.
1. Select a ‘PLAYLIST’.
2. Select the music file to play
back.
3. Click the ‘Select’button.
The music file is added to the playlist.
Click the ‘Save’button to save it.
(The file will be saved in My Computer -> C: -> Program Files -> LG
Media Library -> Playlist by default.)
You can add the contents
of the selected playlist to
the currently edited playlist.
Select a folder in the
Shared folder.
Then, the music file
list will be displayed at
the bottom section.
(No folder will appear
if no folder is shared in
the Music menu.)
If the folder is not
shared, click the File
Search button and
select the folder to
share.
* You can add the
music files in the
Shared folder only
to the playlist.
23
45
You can save the selected list
in a playlist as a different file
name.
1
23
At computer : Creating a playlist
58
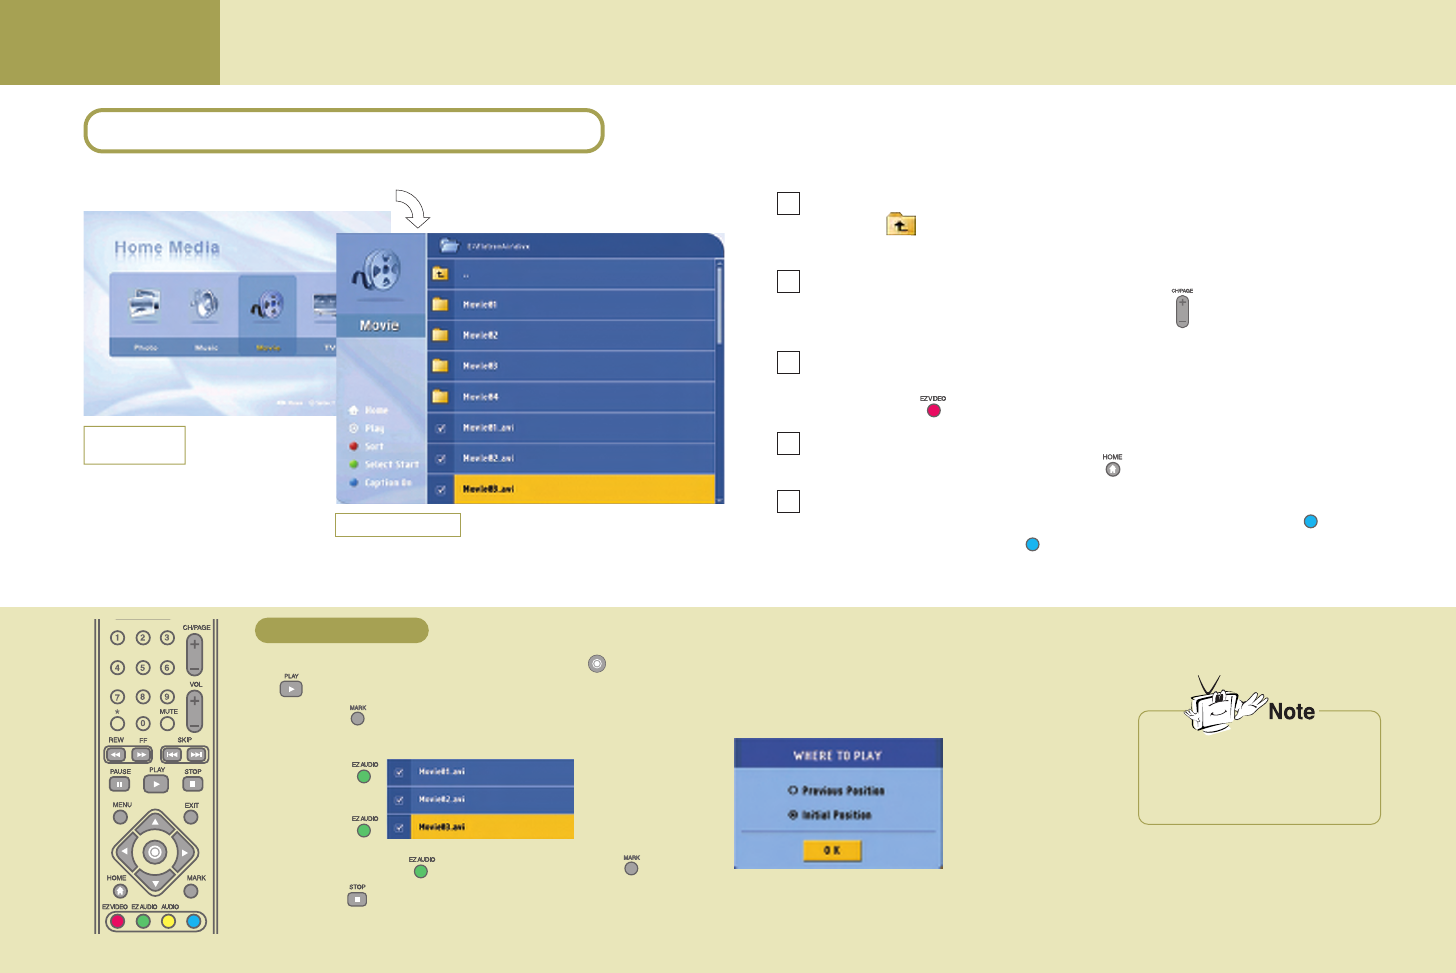
Using Media Library Watching the movie
Select the movie file to play back and press the button or
PLAY button.
* Use the MARK button to select multiple files.
* Selecting several consecutive files at a time:
Selection button: Selection cancel button :
Press the STOP button to move to the View Movie List
window during playback.
* When playback is finished, the View Movie List window
will be automatically displayed.
* If you exit to the Home screen and return while playing
back the movie file or playback is stopped.
If you select the movie file that was being played, the
‘WHERE TO PLAY’window will appear.
(Some format does not display this window.)
Previous Position: Resumes playback from the interrupted
position.
Initial Position: Starts from the beginning.
Click!
Click!
Playing back the movie
You can play back the video files in the folder shared by the Media Server. (See page 50 – Sharing files in the Media Server)
Moving up
Select the icon using the movement buttons on the remote control to move to
the upper folder.
Page Up/Down
You can move up/down the list by page using the CH/PAGE button on the
remote control.
Arrange List
You can arrange the name of the folder or movie files by ascending/descending
order using the EZ VIDEO button on the remote control.
Back to ‘Home Media’
You can move to the home screen using the HOME button on the remote control.
Caption setting
You can change the caption/text setting in the movie list screen using the button
on the remote control. Press the button on the remote control to hide/show (toggle)
the caption/text while playing back the movie file.
1
2
3
4
5
View movie list
Supported format: MPEG-1 VCD, MPEG-2 (SD class),
WMV9 (SD class), AVI.
* For more details, see the next page.
1
2
Home Media
screen
It can be terminated when playing
the movide or executing FF/REW,
depending on the network condition.
At the wireless TV : Watching the movie
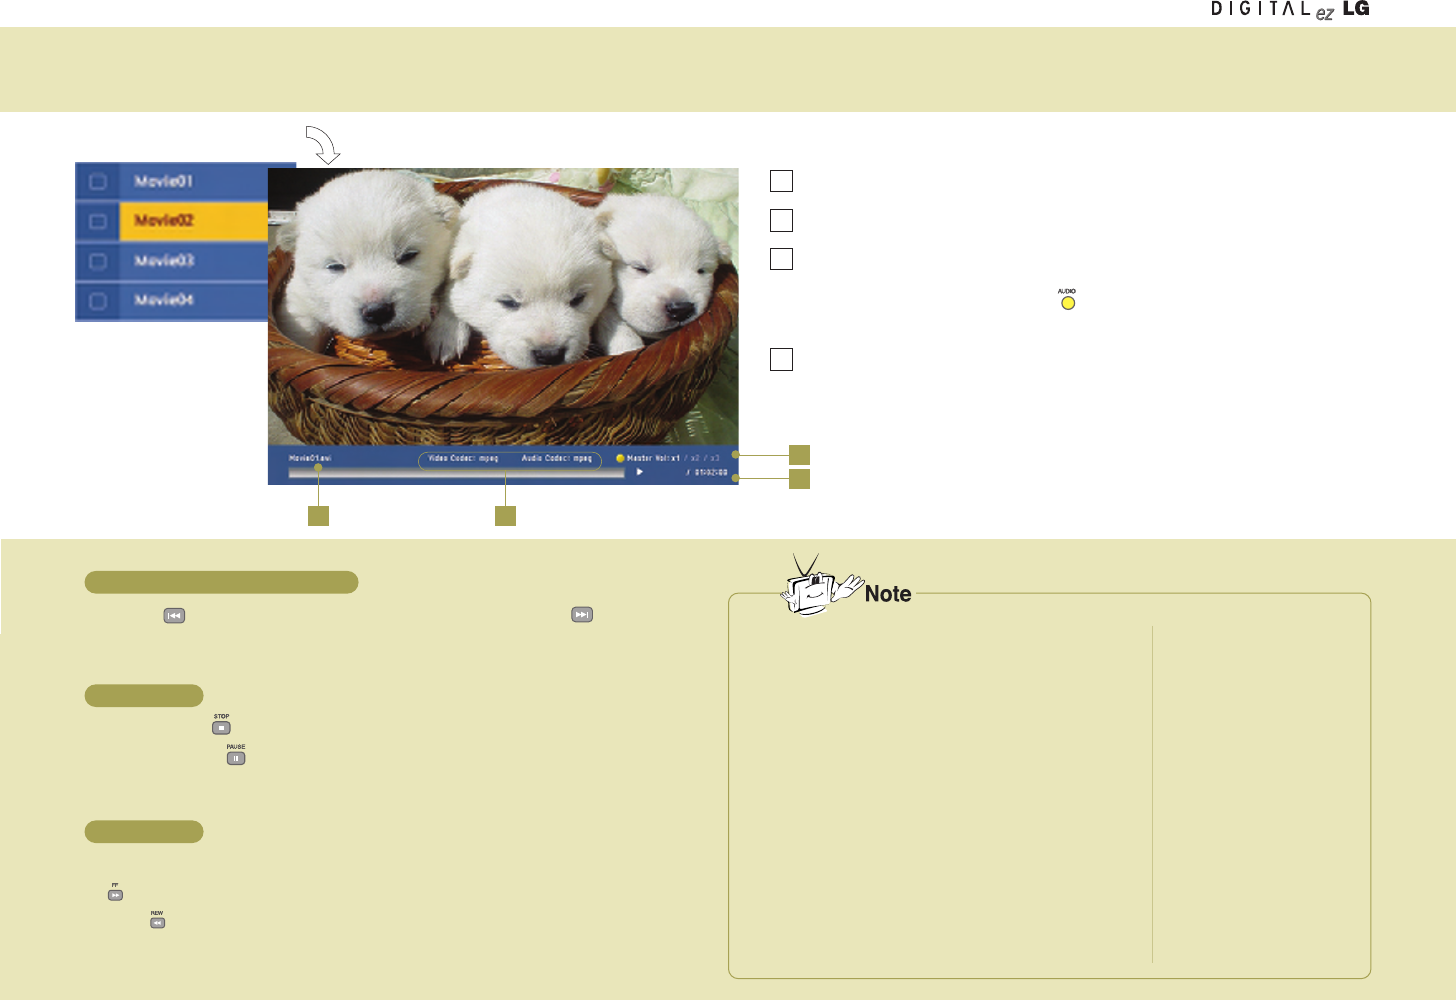
59
Playing back the movie
Playing previous/next movie file
Stop/Pause
FF/REWIND
1 2
3
4
View file name You can check the name of the movie file.
View file property You can check the movie file format.
Sound amplification You can amplify the sound by properly adjusting the
default value.
(Press the AUDIO button on the remote control.)
X1: Default volume, X2: 2 times, X3: 3 times
View file playback time You can check the file playback time and all playback
time.
Press the button to play back the previous movie file, or press the button to
play back the next one.
STOP: Press the STOP button to stop playback of the current file.
PAUSE: Press the PAUSE button to temporarily stop playback. To resume
playback, press the PLAY button.
Moves the playback position of the current movie file forward or backward by certain interval.
FF : Moves forward as much as 2% of the entire file playback length (based on 1 hour).
REWIND : Moves backward as much as 2% of the entire file playback length (based on 1 hour).
* Movement position can differ according to the file size.
(Not available for some formats)
1
2
3
4
The wireless TV supports the following movie file formats.
• MPEG-1 VCD (*.mpg, *.mpe, *.mpeg, *.dat, *.m1v)
• MPEG-2 (SD slass) (*.mpg, *.mpe, *.mpeg, *.vob,
*.m2v)
• WMV9 (SD class) (*.wmv)
• AVI (*.avi)
Audio codec
- MPEG1 Layer I, II, III
- Dolby Digital (AC3)
- DTS
- Windows Media Audio (WMA9)
Video codec
- MPEG-4 (1/2/3)
- Divx 3.11/4/5
- XVID
- WMV9
Supported sub-title file format
• Sami (*.smi)
* The sub-title name must
be same as that of the
movie file to be displayed
the sub-title on the TV.
60
Using Media Library Changing the settings
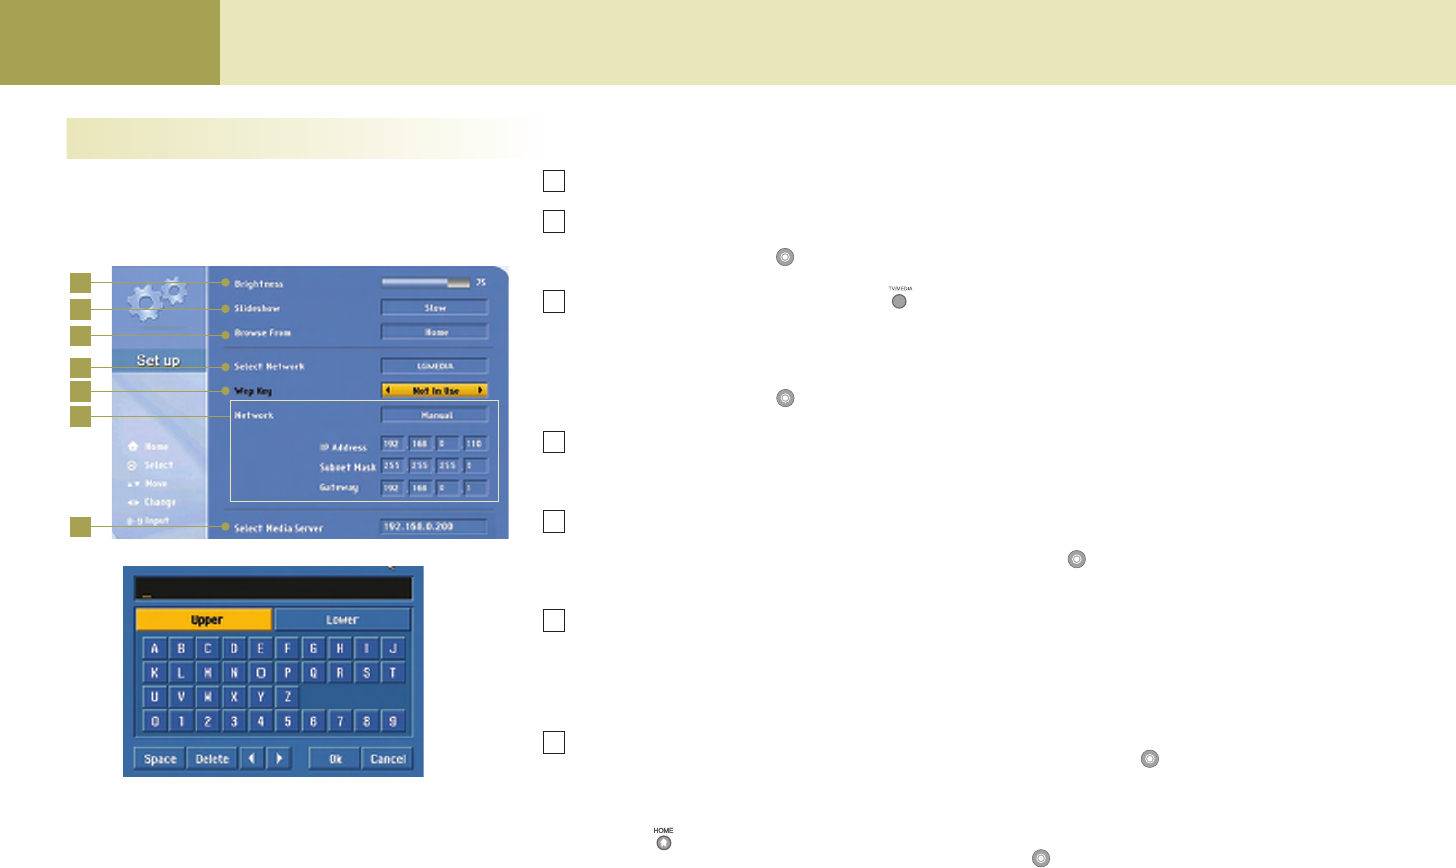
Changing the settings
Brightness
SlidesShow
Browe From
Select Network
WEP key
Network
Select Media
Server
Adjusts brightness of the screen. The bigger value makes brighter screen.
Adjusts the slide show interval.
Slow (15 seconds) -> Normal (10 seconds) -> Fast (5 seconds)
Press the button after setting.
Selects the screen when the TV/MEDIA button is pressed on the remote control.
Home Home screen appears when switching from TV to Media Browser
Last mode: Starts from the initial screen of Home screen, picture, music or movie that you have terminated the
Media Browser last, when switching from TV to Media Browser.
Press the button after setting.
Changes or selects the SSID(network name) of the wireless LAN card (or Access Point(AP)).
Select the wireless network ID to change using the left/right button on the remote control.
Encryption for security. Assigns the WEP key (password) for wireless LAN card (or Access Point(AP)) setting.
Not in Use: WEP key will not be used.
64bit/128bit: If you apply 64 bits or 128 bits and press the button, the virtual keyboard screen (5-1) will appear
and lets you enter the password.
Sets the IP Address, Subnet Mask and Gateway so that you can view the picture, or play back music and movie
stored in the computer, using the wireless TV.
Manual: You should manually input IP Address, Subnet mask and Gateway value.
Automatic: IP Address, Subnet mask and Gateway value will be automatically filled in by the DHCP server.
(Nothing will appear on the Setting window.)
Specify the computer that contains the media files to use.
When the Setting Confirmation window appear after setting, press the button.
* If you press the HOME button on the remote control when changing the Select Network, WEP key and Network, the ‘SEARCH
FAILURE’windows appear if you select Exit from the Setting menu. Press the button again to enter into the Setting menu again.
1
2
3
4
5
6
7
1
2
3
4
7
5-1
Virtual keyboard
Input the number or the character you want,
using the movement buttons on the remote
control.
5
6
61
When suspecting a malfunction, check again if the following occur. It may not necessarily be a malfunction.
Note Check before reporting malfunction
Abnormal Adjustment
Symptoms
Screen appears a little late after turn-
ing the wireless TV on.
Screen appears but no sound is
heard.
Remote control does not work.
Vertical and horizontal lines as well as
net pattern appear on the screen
instantly, and the screen shakes.
Sreen of all channels or the specific
channel is overlapped or the line
Color set all channels or the specific
channel is not displayed.
A strange sound is heard from the
wireless TV.
This phenomenon occurs because of image elimination processing to hide the image noise on the screen when
the power is turned on. It is not amalfunction.
The screen may appear a little late depending on the network status.
Check the program of other broadcasting service provider.
Press the Volume Up button among Volume Up/Down button.
Check whether there is any obstacle between remote control and wireless TV.
Check whether the battery is inserted with correct polarity.
The battery can be used up. Replace two batteries with new one. (Page 18)
Stop using the cordless phone, hair dryer or electric drilling machine since it can be caused by strong electro-
magnetic interference from a high-frequency electric device or other TV.
Adjust the direction. i.e., Re-orient the antenna to the broadcasting station.
Check the program of other broadcasting service provider.
Select the color and adjust it using the Volume Up button. (Page 30)
“Snapping sound” before and after watching TV originates from surrounding environment change because of the
characteristics of the plastic products. It is not a malfunction.
Take the following measures
Q
A
A
A
A
A
A
A
A
A
A
A
A
Q
Q
Q
Q
Q
Q

Note Check before reporting malfunction
When suspecting a malfunction, check again if the following occur. It may not necessarily be a malfunction.
Symptoms
Nothing appears on the screen.
No sound is heard.
The screen becomes darker when I
separate a DC adapter while the bat-
tery is mounted.
The screen blinks when setting the
screen automatically.
Check whether the battery or the DC adaptor is connected.
If you find that the battery power LED flashes in yellow color when you press the power button, the remaining
battery amount is insufficient. Connect the DC adaptor in this case.
Screen brightness is automatically adjusted for power saving. If the DC adaptor is connected, the previous set-
ting will be restored.
Take the following measures
Q A
A
A
A
A
A
A
A
Screen brightness is adjusted twice at the time of automatic screen adjustment. It is not a malfunction.
A
Adjust the volume.
Check whether the ‘Mute’function is set in the Volume setting menu.
If no sound is heard from the headset, check whether the headset jack is properly connected to the wireless TV.
If the headset is equipped with the volume control function, sound balance setting in the wireless TV may not
work properly.
When listening to the music from the wireless TV through the computer, music playback can be interrupted from
time to time depending on the wireless network environment.
Q
Q
Q
62
Abnormal Adjustment
63
Check before reporting malfunction
When suspecting a malfunction, check again if the following occur. It may not necessarily be a malfunction.
Symptoms Take the following measures
When I user the Media Browser, the
“Check the PC status first. If you want
to change the settings, press the
button.” message appears.
Check whether the network setting (SSID(network name), WEP key and so on) is correct in the wireless TV.
Check whether the computer is turned on.
Check whether the program (Media Library) is properly installed in the computer.
Check whether the wireless LAN card (or, Access Point (AP)) is installed properly and it can be used.
Check whether the distance from wireless TV and computer is too far away.
Check whether the Media Library is allocated to the wireless network card (or, Access Point(AP)).
Check whether the ‘Turn off HDD’option is set on in the power saving mode of the computer.
Check the wireless Access Point(AP) setting. If the SSID(network name) is in the hiding mode, it cannot be used.
Q
A
A
A
A
A
A
A
A
Check whether the SSID(network name) in ‘Select Network’of the
wireless TV setting is identical to that of the computer wireless network.
If it is different, set the SSID(network name) of the wireless TV as that of
the computer. (See page 43)
The SSID(network name) in ‘Select Network’of the wireless TV setting
is set to LGMEDIA by default. But, it can be changed using the wireless
network SSID(network name) set in the computer.
At this time, the wireless LAN card (or, Access Point(AP)) setting in the
computer should be ‘Network between Computers’(Ad-hoc or peer-to-
peer). See the wireless LAN card (or, Access Point(AP)) user’s manual.
If the wireless LAN card (or, Access Point(AP) is not allocated, run
“Re-start the service with a different IP” and select the network installed with
the wireless LAN card (or, Access Point(AP)) and then activate the service.
Abnormal Adjustment

64
Note Check before reporting malfunction
Check again if the following phenomenon occurs, which you presume that it is malfunction. It may not be malfunction indeed.
Symptoms Take the following measures
TV screen display is interrupted from
time to time, or not displayed properly.
Check whether the power of the transmission unit is turned on.
First, check whether the power LED in the transmission unit flashes in red color. Then, move the location of the
transmission unit to the center of the house or the position where you watch the TV most frequently.
Check whether the distance from wireless TV and computer is too far away.
Reception sensitivity differs according to the direction of the wireless TV and wireless
transmission unit. Turn the front side of the wireless transmission unit towards the wireless TV.
Reception sensitivity of the wireless TV also depends on the direction. Find the optimal
direction and location inside the house and install the wireless TV.
Do not attach the wireless transmission unit on the bookshelf or the wall to extend the wireless
network coverage.
If the TV is turned on properly but not the TV broadcasting, check TV antenna connection and set the channel using
the [Ez Scan] function. (See page 27.)
Q A
A
A
A
A
A
A
Wireless transmission unit
Front
Abnormal Adjustment
65
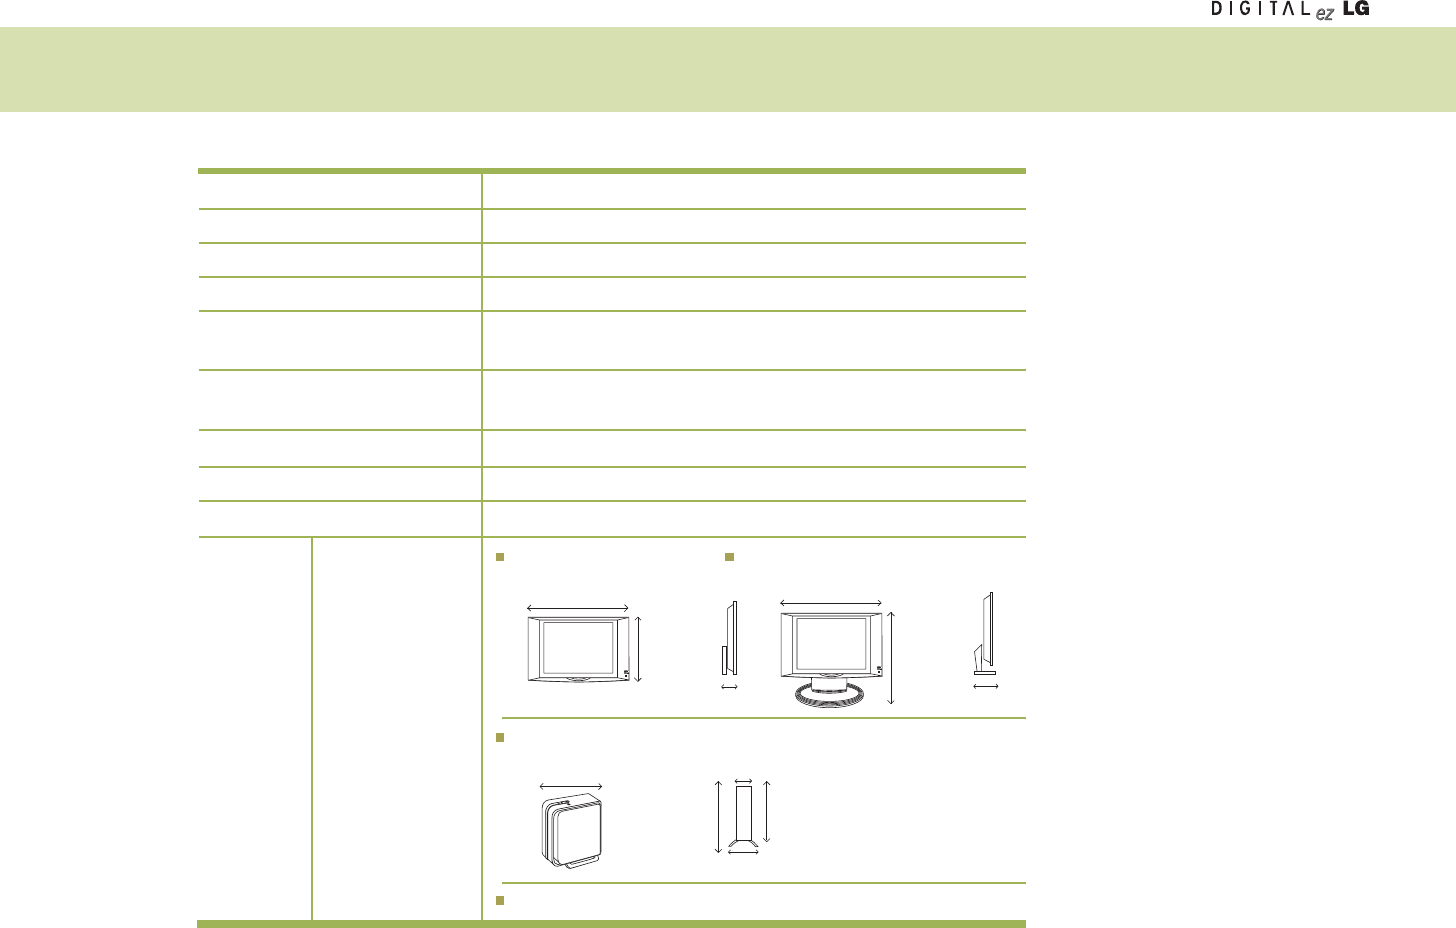
The product specification is subject to change without notice for product improvement.
Product Specification
Display Device
Television Standard
Receiving Channel
Input Connector
Power
Power Consumption
External Antenna Impedance
Sound Output
External Port
Dimension
Size
(Width x Length x Height)
Weight
(excluding package)
Wireless TV (4.0 Kg)
Wireless Transmission Unit (1.6 Kg)
15 LCD Panel
NTSC
VHF 2~13 channels, UHF 14~69 channels, CATV 01~125 channels
S-Video, Video, TV
Wireless TV: DC 16V 3.0A
Wireless Transmission Unit: DC 16V 1.0A
Wireless TV: 40W
Wireless Transmission Unit: 15W
75Ω
1.5W+1.5W
See page 23.
Battery: 0.4 Kg
Wireless TV (4.0 Kg) + Mounting type stand (1.0 Kg)
454 mm 454 mm
380 mm
201 mm
57 mm
303 mm
245 mm 56 mm
110 mm
228 mm
243 mm

Printed in Korea
P/NO: 3828TUL297C(0412-REV00)