LG Electronics USA 26LD352CUA LCD TV / MONITOR (Model:26LD352C-UA) User Manual
LG Electronics USA LCD TV / MONITOR (Model:26LD352C-UA)
UserManual.wiki
>
LG Electronics USA
>
26LD352CUA User Manual
>
Users Manual-1
Contents
1.
Users Manual-1
2.
Users Manual-2
Users Manual-1
Navigation menu
Upload a User Manual
Namespaces
Wiki Guide
HTML
PDF
Info
Views
User Manual
Discussion / Help
Navigation
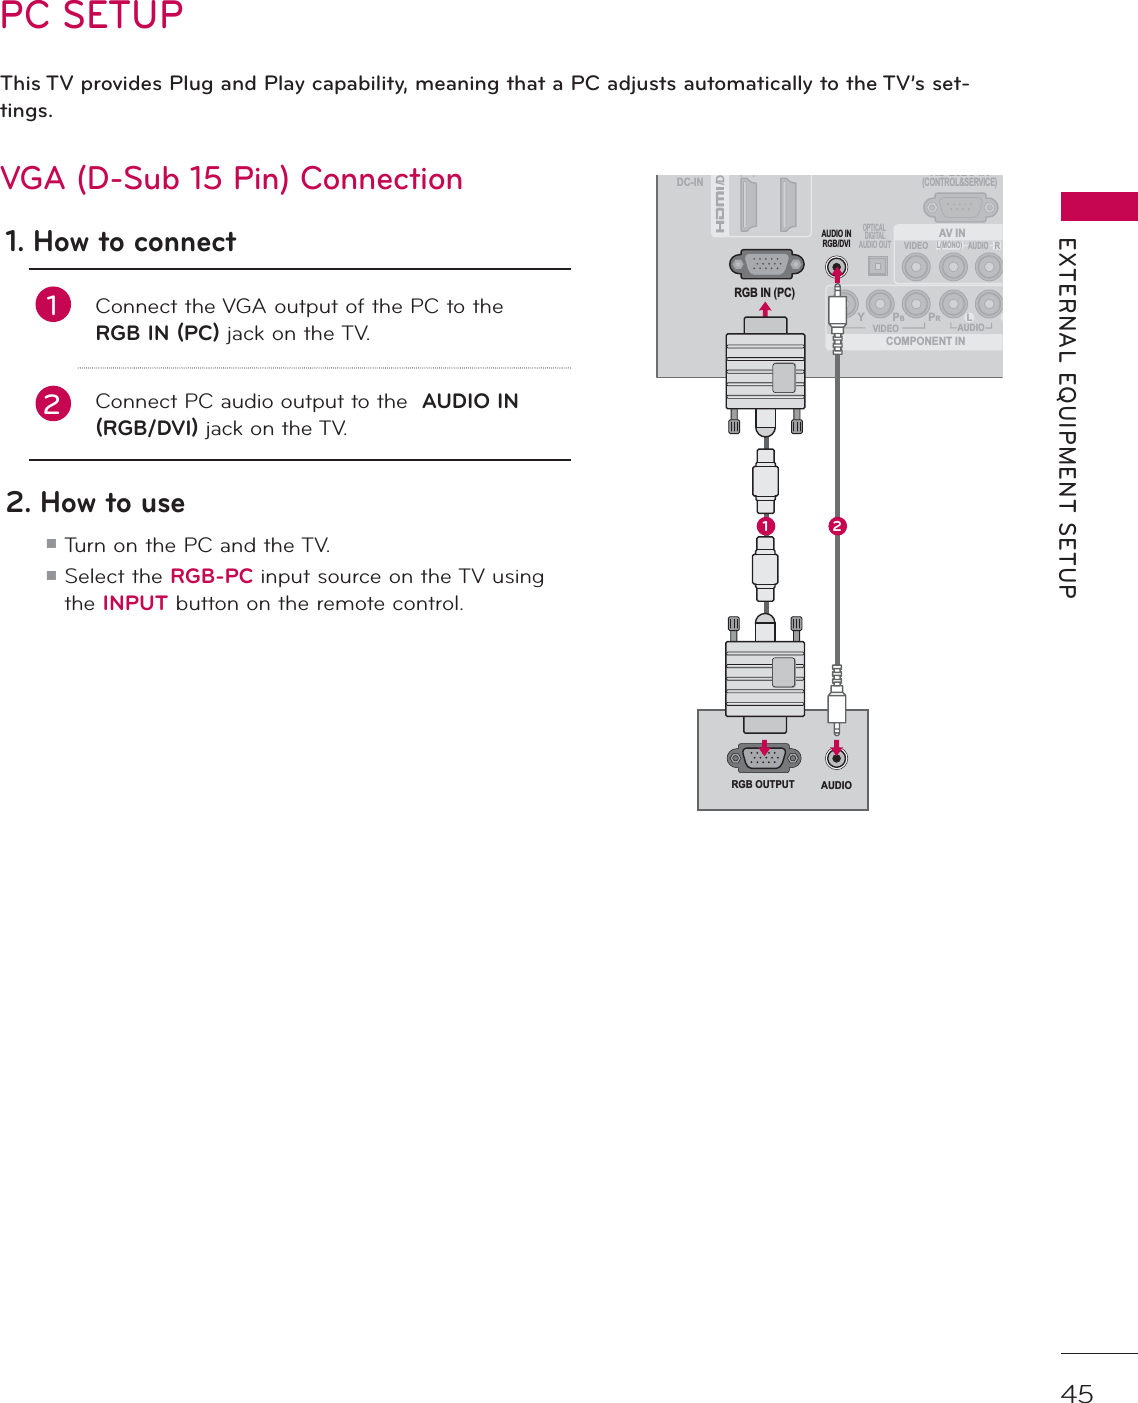
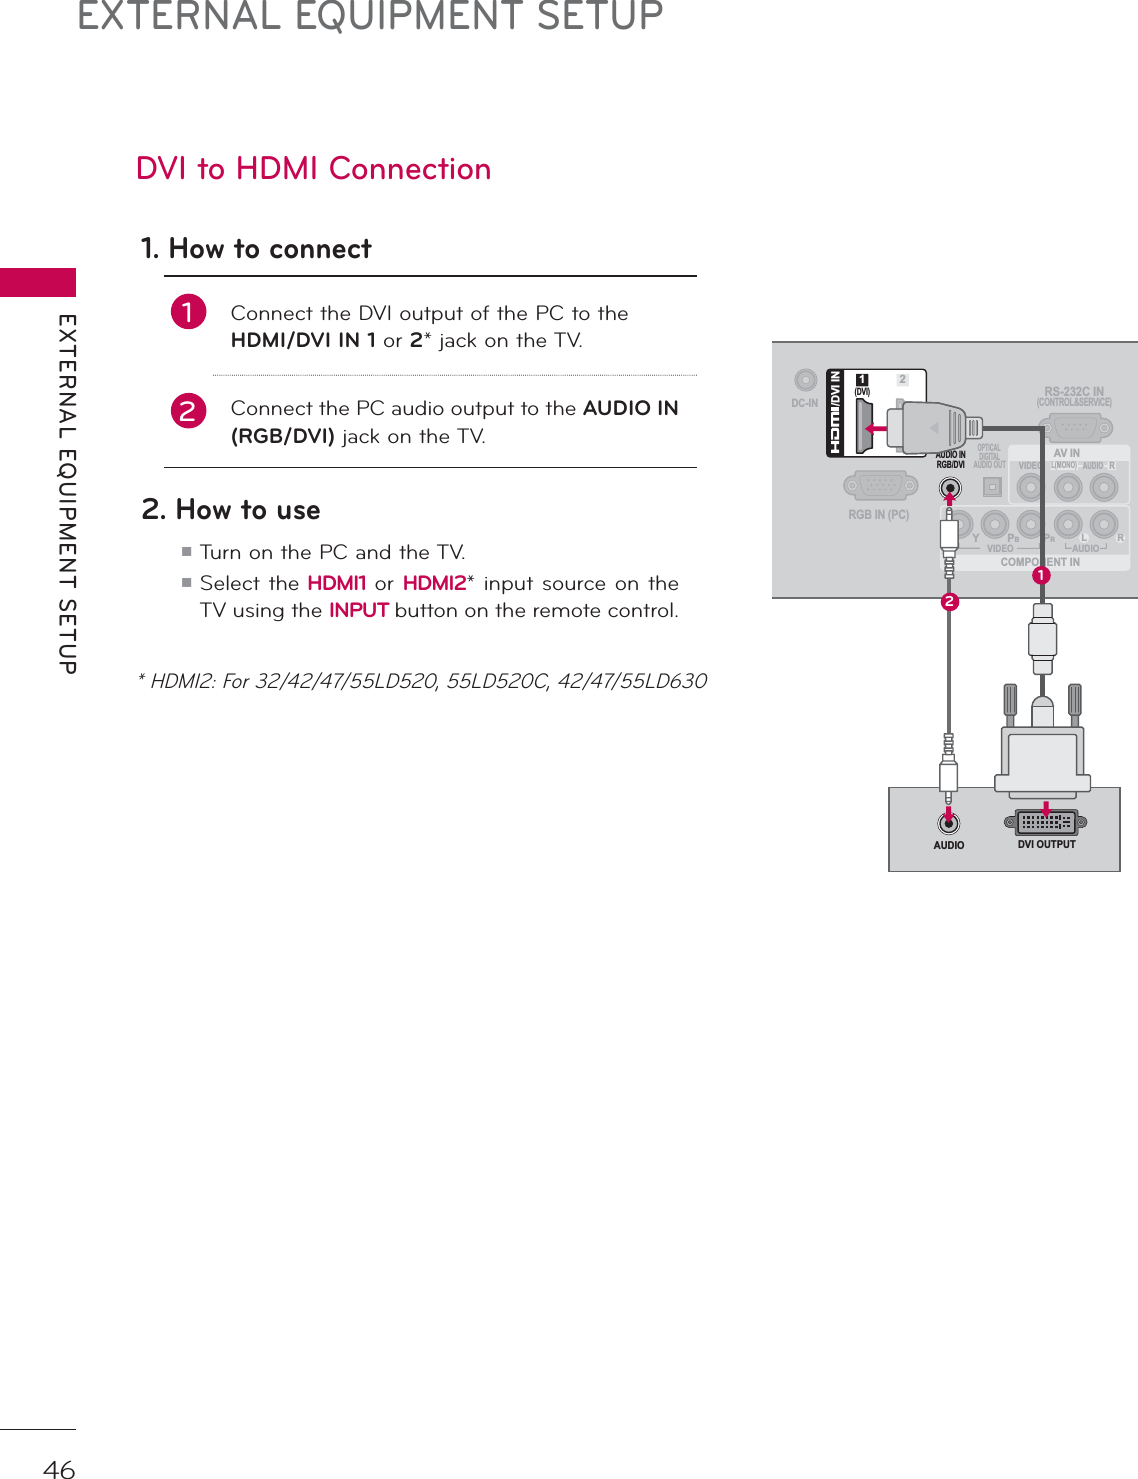
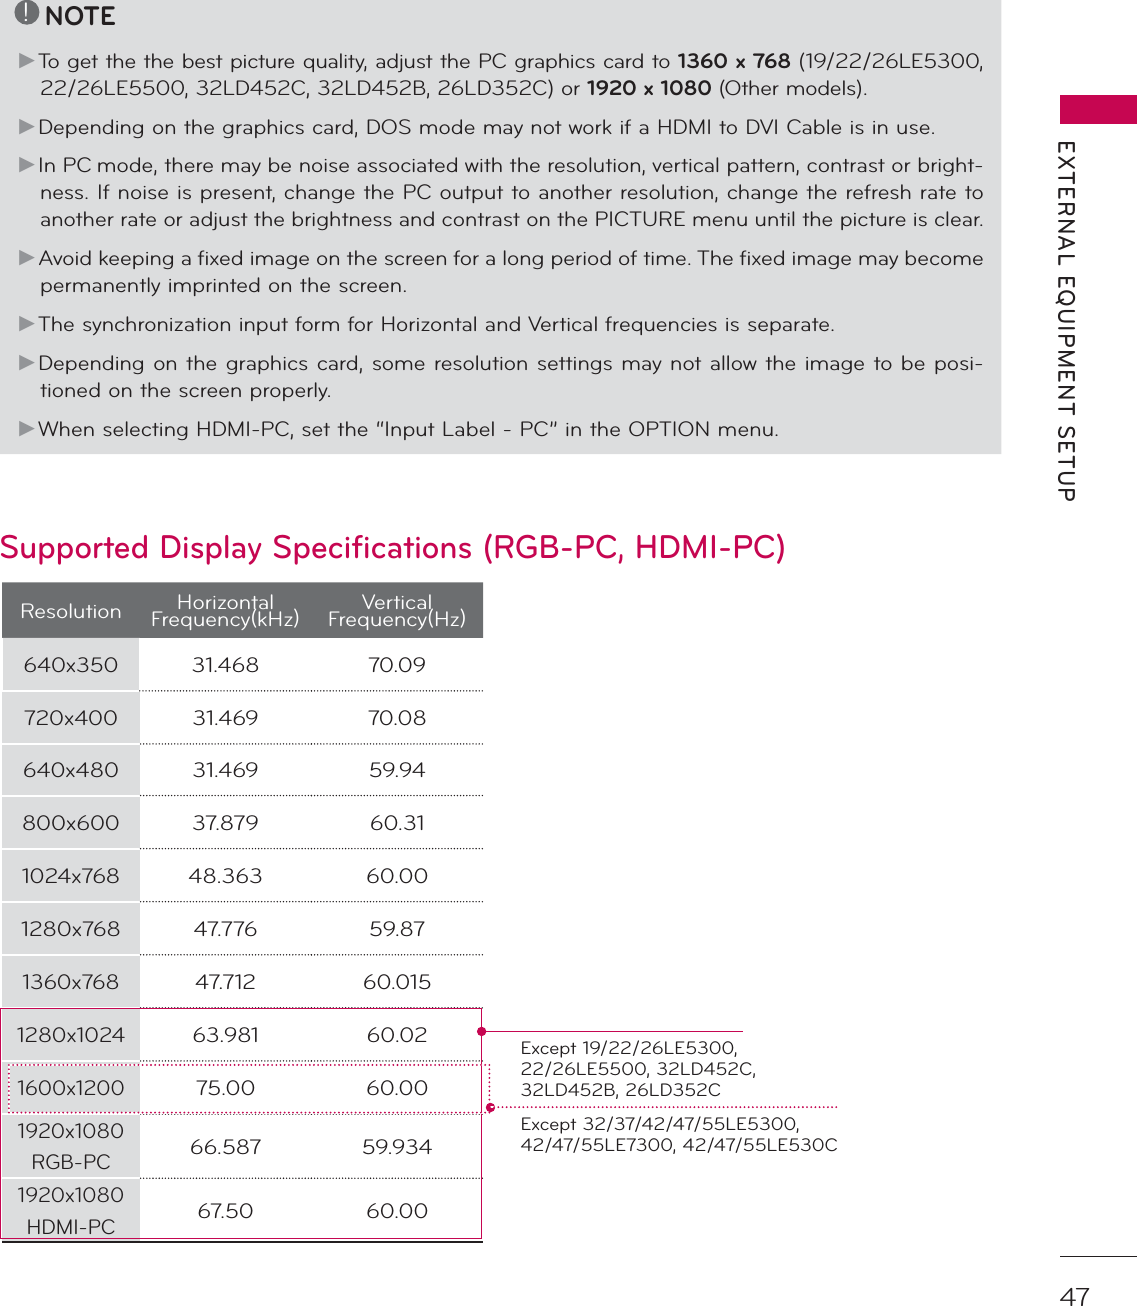
![EXTERNAL EQUIPMENT SETUPEXTERNAL EQUIPMENT SETUP48Screen Setup for PC modeYou can choose the resolution in RGB-PC mode.The Position, Phase, and Size can also be adjusted.You can choose this option only when the PC resolution is set to 1024X768, 1280X768 or 1360X768.Selecting Resolution1MENUSelect PICTURE.2ENTERSelect Screen (RGB-PC).3ENTERSelect Resolution.4ENTERSelect the desired resolution.5ENTER3,&785( ᯒ0RYHᯙ(QWHU ؒ%ULJKWQHVV ؒ6KDUSQHVV ؒ&RORU ؒ7LQW ؒ&RORU7HPS ؒ$GYDQFHG&RQWURO ؒ3LFWXUH5HVHWؒ 6FUHHQ5*%3&5*:&ᯙᯰᯡ[۳[۳[$XWR&RQILJ5HVROXWLRQ3RVLWLRQ6L]H3KDVH5HVHW6&5((1ᯒ0RYHᰙ3UHY](https://usermanual.wiki/LG-Electronics-USA/26LD352CUA.Users-Manual-1/User-Guide-1450141-Page-18.png)
![49EXTERNAL EQUIPMENT SETUPAutomatically adjusts picture position and minimizes image instability. After adjustment, if the image is still not correct, try using the manual settings or a different resolution or refresh rate on the PC.Auto Configure1MENUSelect PICTURE.2ENTERSelect Screen (RGB-PC).3ENTERSelect Auto Config..4ENTERSelect Yes.5ENTERStart Auto Configuration.ᯫ If the position of the image is still not correct, try Auto adjustment again.ᯫ If picture needs to be adjusted again after Auto adjustment in RGB-PC, you can adjust the Position, Size or Phase.3,&785( ᯒ0RYHᯙ(QWHU ؒ%ULJKWQHVV ؒ6KDUSQHVV ؒ&RORU ؒ7LQW ؒ&RORU7HPS ؒ$GYDQFHG&RQWURO ؒ3LFWXUH5HVHWؒ 6FUHHQ5*%3&5*:&ᯙᯰ$XWR&RQILJ5HVROXWLRQ3RVLWLRQ6L]H3KDVH5HVHW$XWR&RQILJ<HV 1R6&5((1ᯒ0RYHᰙ3UHY](https://usermanual.wiki/LG-Electronics-USA/26LD352CUA.Users-Manual-1/User-Guide-1450141-Page-19.png)
![EXTERNAL EQUIPMENT SETUPEXTERNAL EQUIPMENT SETUP50If the picture is not clear after auto adjustment or if text is shaking, adjust the picture phase manually.This feature operates only in RGB-PC mode.Adjustment for screen Position, Size, and Phase1MENUSelect PICTURE.2ENTERSelect Screen (RGB-PC).3ENTERSelect Position, Size, or Phase.4ENTERMake appropriate adjustments.5ENTERᯫ Position: This function is to adjust picture to left/right and up/down as you prefer. ᯫ Size: This function is to minimize any vertical bars or stripes visible on the screen background. And the horizon-tal screen size will also change.ᯫ Phase: This function allows you to remove any horizontal noise and clear or sharpen the image of char-acters.3,&785( ᯒ0RYHᯙ(QWHU ؒ%ULJKWQHVV ؒ6KDUSQHVV ؒ&RORU ؒ7LQW ؒ&RORU7HPS ؒ$GYDQFHG&RQWURO ؒ3LFWXUH5HVHWؒ 6FUHHQ5*%3&5*:&ᯙᯰ$XWR&RQILJ5HVROXWLRQ3RVLWLRQ6L]H3KDVH5HVHWۻ܁۽ۿ6&5((1ᯒ0RYHᰙ3UHY](https://usermanual.wiki/LG-Electronics-USA/26LD352CUA.Users-Manual-1/User-Guide-1450141-Page-20.png)
![51EXTERNAL EQUIPMENT SETUPReturns Position, Size, and Phase to the default initial settings.This feature operates only in RGB-PC mode.Screen Reset (Reset to original initial values)1MENUSelect PICTURE.2ENTERSelect Screen (RGB-PC).3ENTERSelect Reset.4ENTERSelect Yes.5ENTERStart Reset.3,&785( ᯒ0RYHᯙ(QWHU ؒ%ULJKWQHVV ؒ6KDUSQHVV ؒ&RORU ؒ7LQW ؒ&RORU7HPS ؒ$GYDQFHG&RQWURO ؒ3LFWXUH5HVHWؒ 6FUHHQ5*%3&5*:&ᯙᯰ$XWR&RQILJ3RVLWLRQ5HVROXWLRQ6L]H3KDVH5HVHW7R6HW<HV 1R6&5((1ᯒ0RYHᰙ3UHY](https://usermanual.wiki/LG-Electronics-USA/26LD352CUA.Users-Manual-1/User-Guide-1450141-Page-21.png)
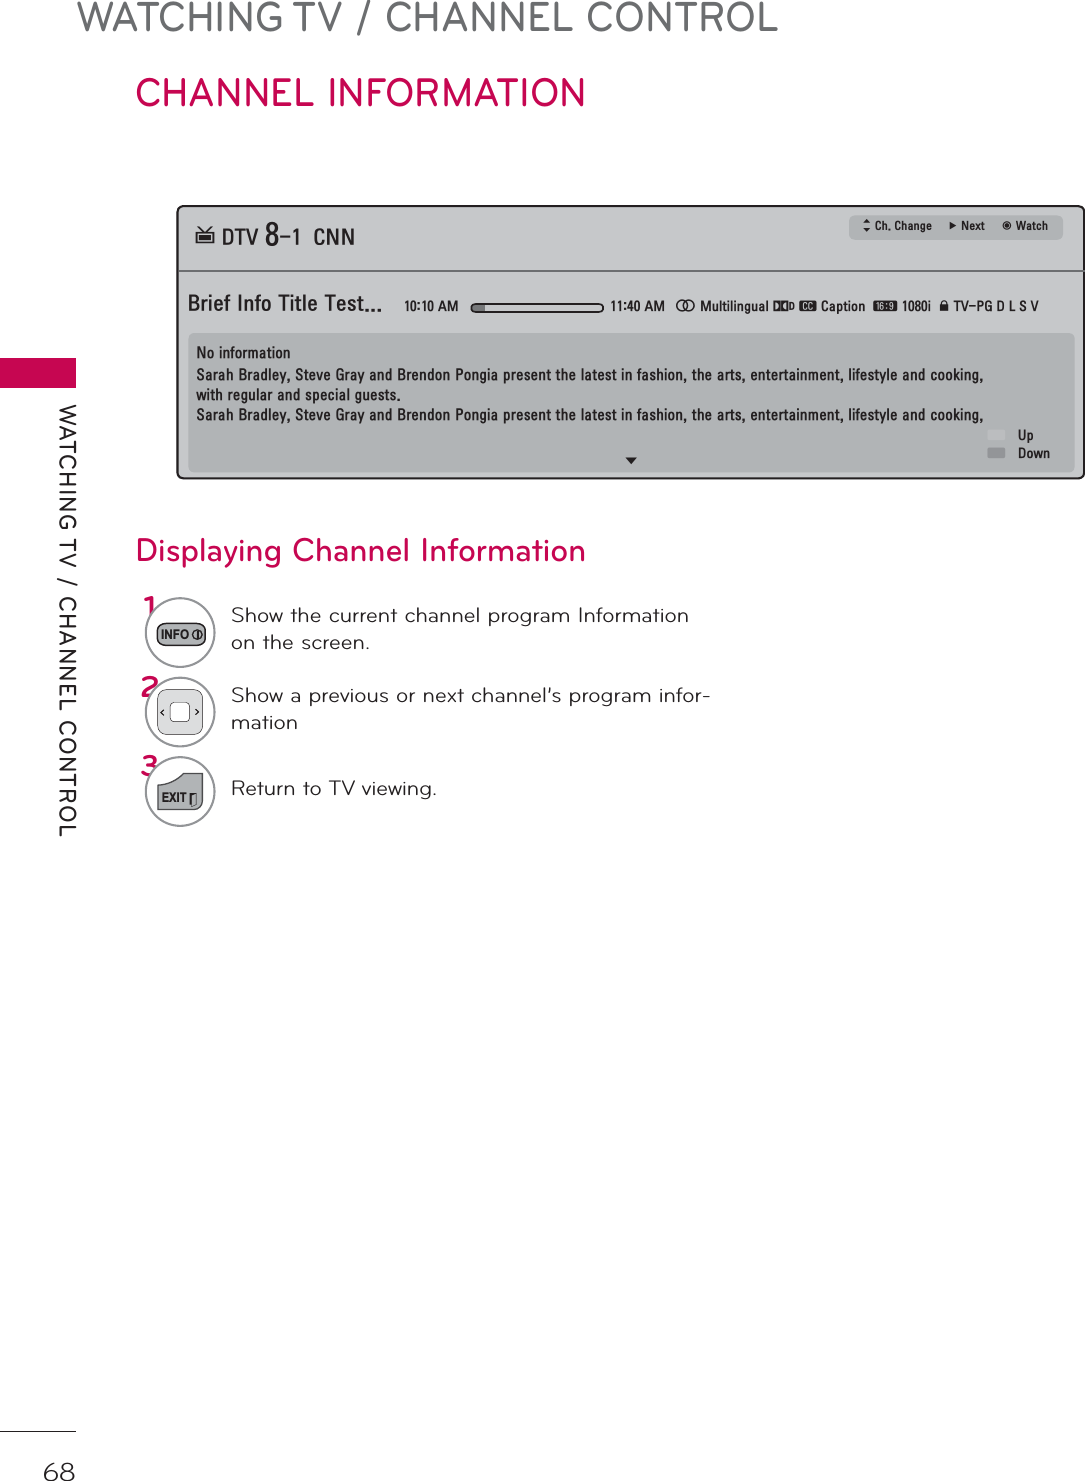
![57WATCHING TV / CHANNEL CONTROLON-SCREEN MENUS SELECTIONYour TV's OSD (On Screen Display) may differ slightly from that shown in this manual.1MENUDisplay each menu.2ENTERSelect a menu item.3ENTERAccept the current selection.4EXITReturn to TV viewing.&+$11(/237,213,&785($8',2 7,0(/2&.3,&785( ᯒ0RYHᯙ(QWHUؒ $VSHFW5DWLR ؒ 3LFWXUH:L]DUGؒ ᰚ(QHUJ\6DYLQJ 2IIؒ 3LFWXUH0RGH 6WDQGDUG ؒ%DFNOLJKW ؒ&RQWUDVW ؒ%ULJKWQHVV ؒ6KDUSQHVV7,0( ᯒ0RYHᯙ(QWHUؒ &ORFNؒ 2II7LPH 2IIؒ 2Q7,PH 2IIؒ 6OHHS7LPHU 2IIؒ $XWR2II 2Q/2&. ᯒ0RYHᯙ(QWHUؒ 6HW3DVVZRUGؒ /RFN6\VWHP 2Q ؒ%ORFN&KDQQHO ؒ0RYLH5DWLQJ ؒ795DWLQJ&KLOGUHQ ؒ795DWLQJ*HQHUDO ؒ'RZQORDGDEOH5DWLQJ ؒ ,QSXW%ORFN237,21 ᯒ0RYHᯙ(QWHUؒ /DQJXDJHؒ &DSWLRQ 2IIؒ 3RZHU,QGLFDWRUؒ ,QLWLDO6HWWLQJؒ 6HW,' ؒ 0RGH6HWWLQJ +RPH8VH$8',2 ᯒ0RYHᯙ(QWHUؒ $XWR9ROXPH 2IIؒ &OHDU9RLFH,, 2IIᰕؒ %DODQFH ؒ 6RXQG0RGH 6WDQGDUG ؒ,QILQLWH6RXQG2II ؒ7UHEOH ؒ%DVV ؒ5HVHW/5&+$11(/ ᯒ0RYHᯙ(QWHUؒ $XWR7XQLQJؒ 0DQXDO7XQLQJؒ &KDQQHO(GLWؒ 6HW3DVVZRUGؒ /RFN6\VWHP 2Q ؒ%ORFN&KDQQHO ؒ795DWLQJ(QJOLVK ؒ795DWLQJ)UHQFK ؒ'RZQORDGDEOH5DWLQJ ؒ,QSXW%ORFNؒ .H\/RFN 2IIFor USAFor CanadaFor 37/42/47LD450C, 55LD520C, 42/4755LE530C, 32/37/42/47LD452C, 32/42/47LD452B, 26LD352C](https://usermanual.wiki/LG-Electronics-USA/26LD352CUA.Users-Manual-1/User-Guide-1450141-Page-27.png)
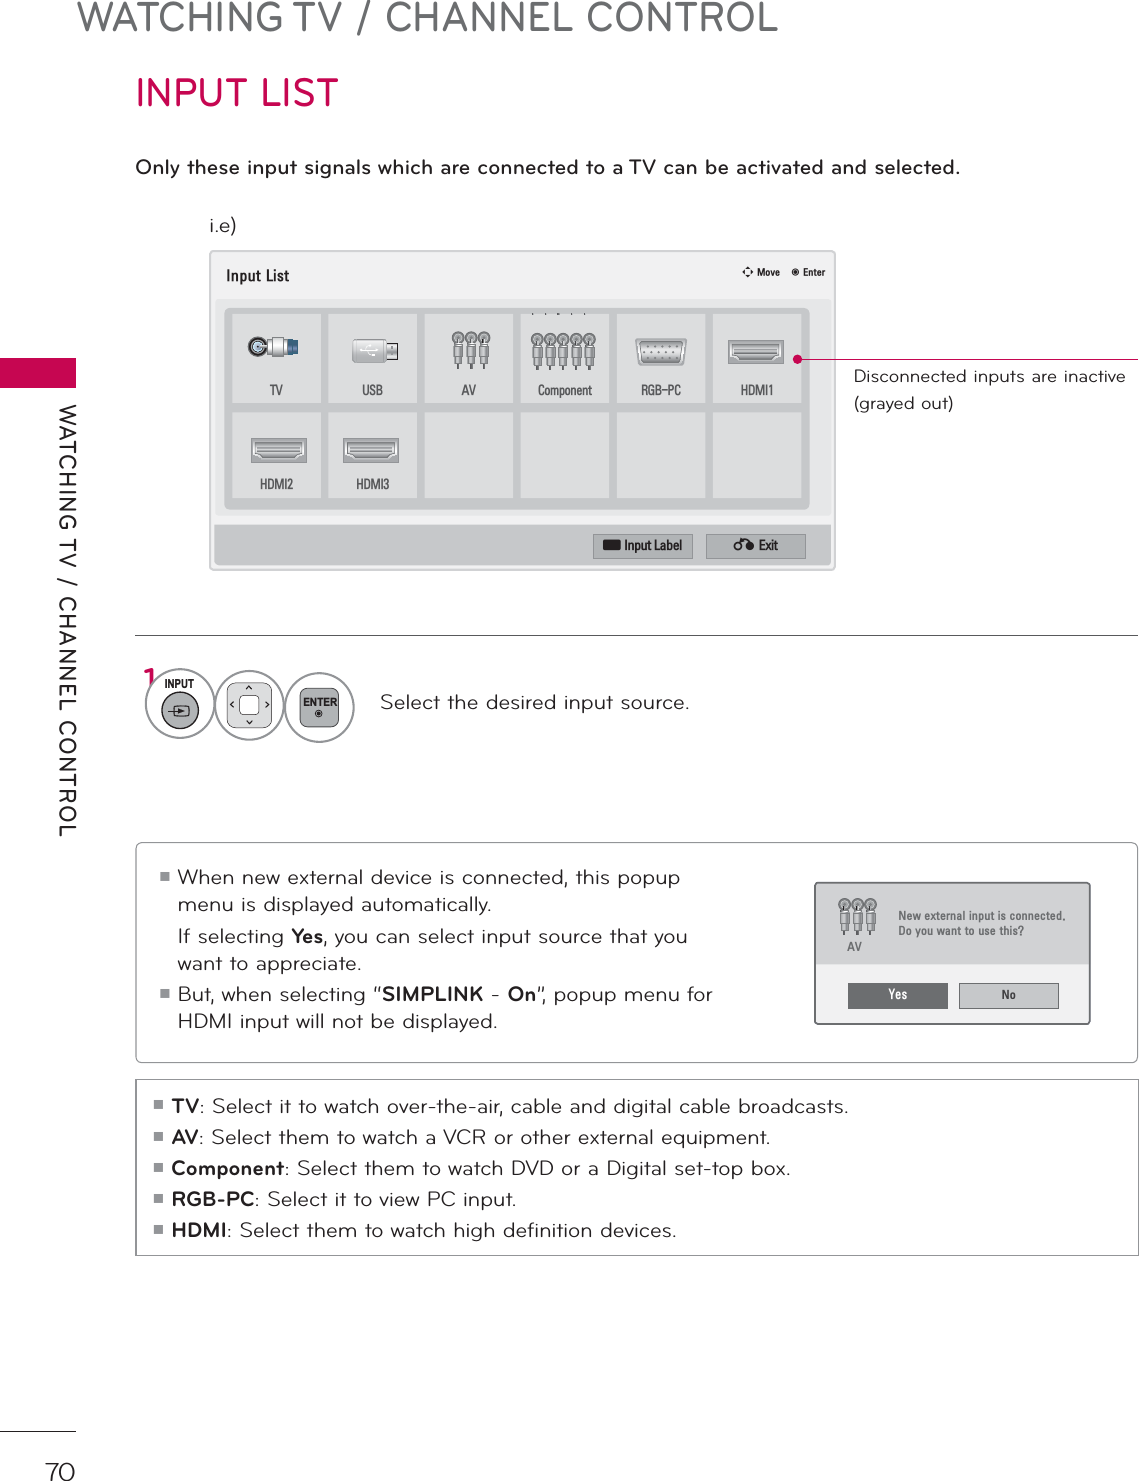
![WATCHING TV / CHANNEL CONTROLWATCHING TV / CHANNEL CONTROL58,13870<0(',$,QSXW/LVW ᯒ0RYH ᯙ(QWHU79 86% $9 &RPSRQHQW 5*%3& +'0,+'0, +'0,ᯕ,QSXW/DEHO ᰙ([LWi.e)0<0(',$3KRWR/LVW 0XVLF/LVW([WUD&RQWHQWV(]6LJQ79For 32/37/42/47LD452CExcept 32/42/47LD420, 32/37/42/47LD450, 37/42/47LD450C, 32/42/47/55LD520, 55LD520C, 42/47/55LE530C, 42/47LD451C, 32/37/42/47LD452C, 32/42/47LD452B, 26LD352CFor 32/42/47LD452B0RYLH/LVW](https://usermanual.wiki/LG-Electronics-USA/26LD352CUA.Users-Manual-1/User-Guide-1450141-Page-28.png)

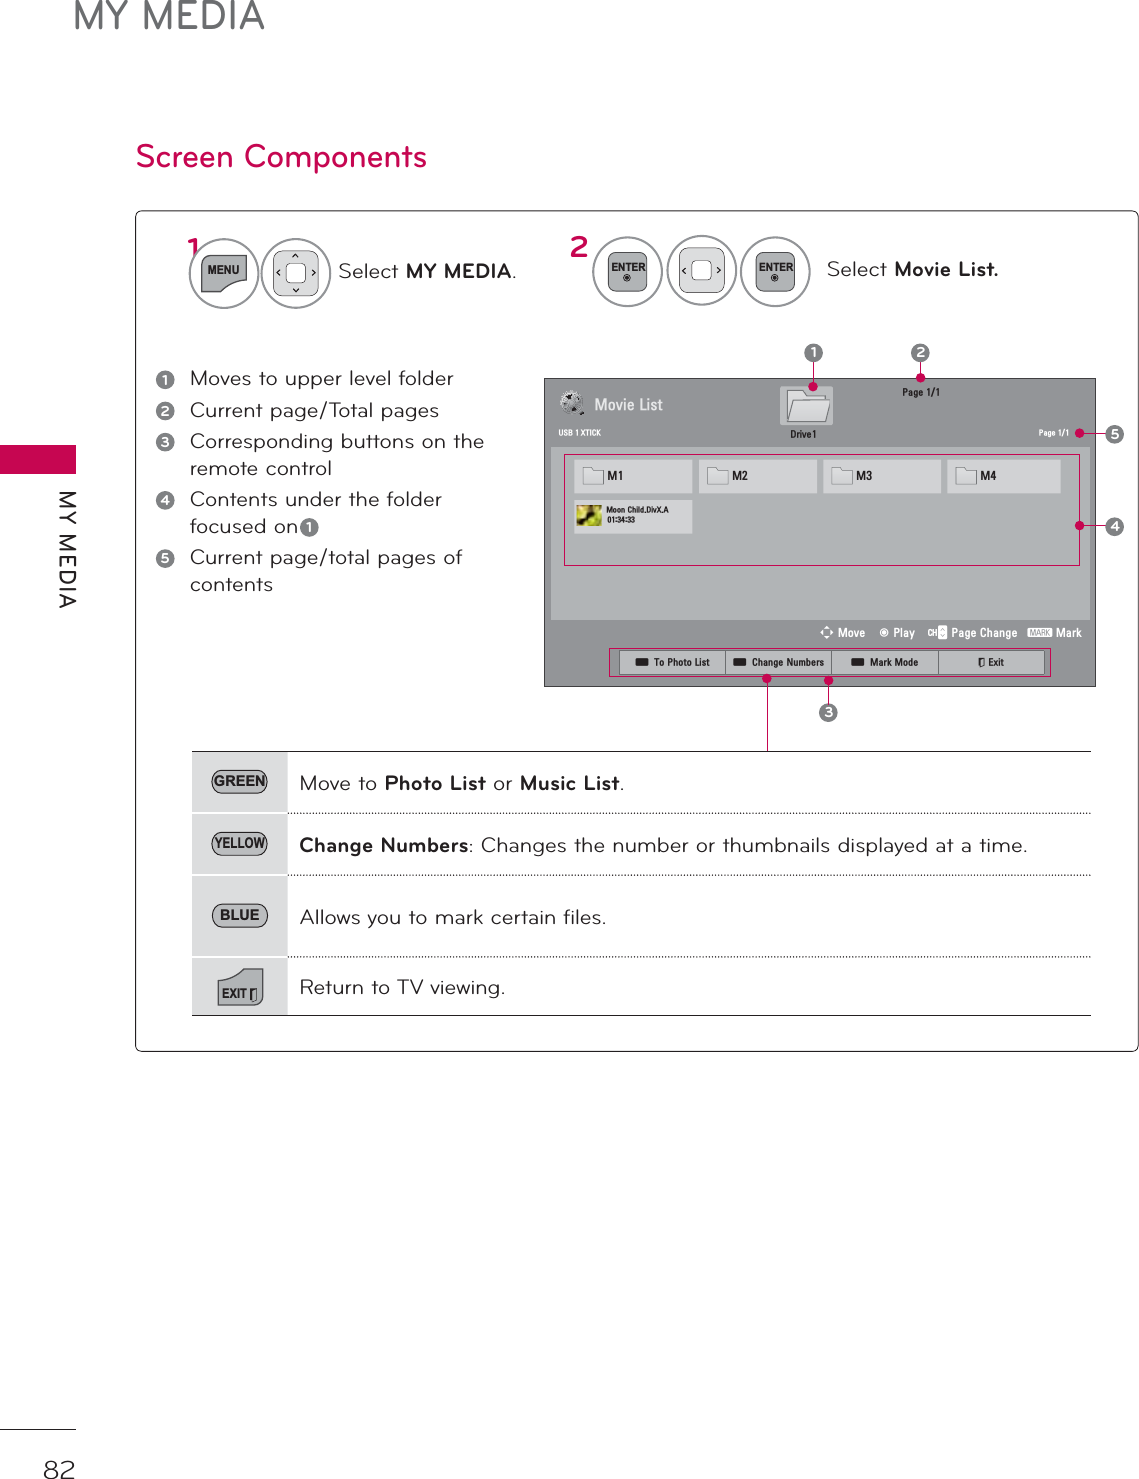
![79MY MEDIAENTRY MODEThe My Media menu will open automatically when you insert a USB drive. My Media can also be accessed by choosing My Media in the user menu.On USB device, you can not add a new folder or delete the existing folder.When removing the USB deviceSelect the USB Device menu before removing the USB device.ᯫ This TV can view JPG image files, HD DivX files or play MP3 audio files.1Q.MENUSelect USB Device.2ENTERSelect Eject.1MENUSelect MY MEDIA.2ENTERSelect EzSign TV, Movie List, Photo List or Music List or Extra Contents.3ENTER0<0(',$3KRWR/LVW 0XVLF/LVW([WUD&RQWHQWV(]6LJQ79For 32/37/42/47LD452CExcept 32/42/47LD420, 32/37/42/47LD450, 37/42/47LD450C, 32/42/47/55LD520, 55LD520C, 42/47/55LE530C, 42/47LD451C, 32/37/42/47LD452C, 32/42/47LD452B, 26LD352CFor 32/42/47LD452B0RYLH/LVW](https://usermanual.wiki/LG-Electronics-USA/26LD352CUA.Users-Manual-1/User-Guide-1450141-Page-49.png)
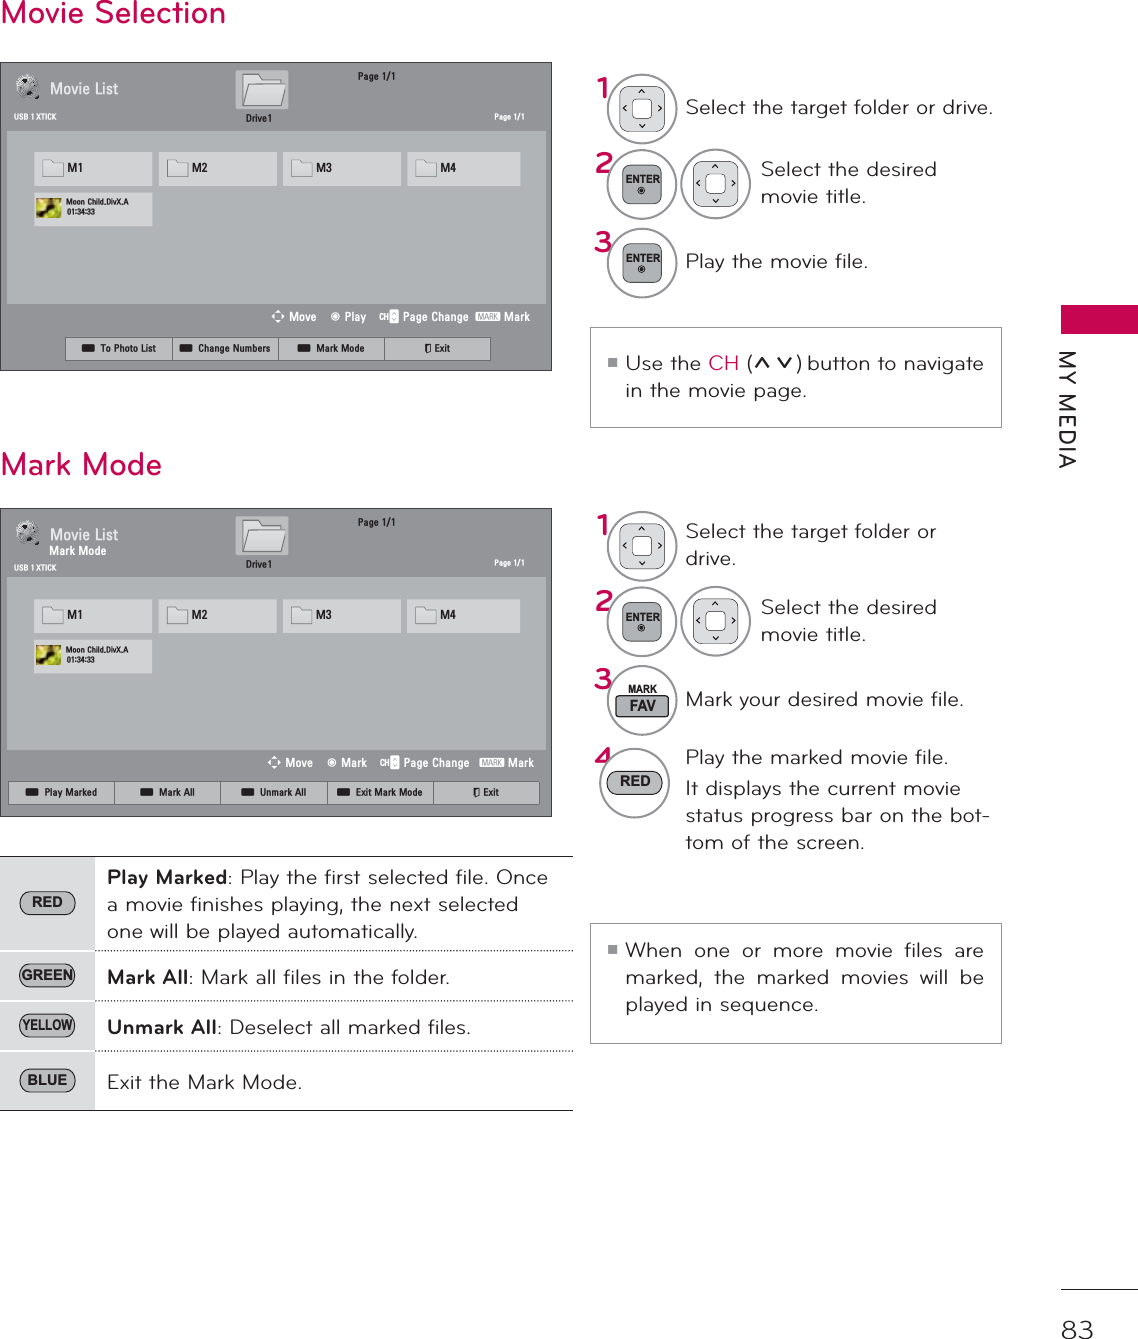
![85MY MEDIASet Video Play Menu Options6HW9LGHR3OD\3LFWXUH6L]H ܁)XOO ۽$XGLR/DQJXDJH ܁۽6XEWLWOH ܁2Q ۽ؒ/DQJXDJH ܁8QNQRZ ۽ؒ&RGH3DJH ܁'HIDXOW ۽ؒ6\QF ܁۽ؒ3RVLWLRQ ܁۽ؒ6L]H ܁1RUPDO ۽5HSHDW ܁2II ۽ᰙ3UHYLRXVSubtitle Language Group Supported LanguageLatin1 English, Spanish, FrenchKorean English, Koreanᯫ Picture Size: Selects your desired picture format for videos.ᯫ Audio Language: Changes the Language Group of the audio for video files.ᯫ Subtitle Language: The subtitles can be turned on or off. If there are two or more subtitles, you can select one of them.ᯫ Language: Activated for SMI subtitles and can select the language within the subtitle.ᯫ Code Page: Subtitle font selection. When set to default, same font as general menu will be used.ᯫ Sync: When the video is not synchro-nized with the captions, it can be adjusted by 0.5 second.ᯫ Position: Move the location of the subtitles.ᯫ Size: Changes the subtitle font size.ᯫ Repeat: Turn on/off repeat function of movie playback. When turned on, the file within the folder will be played back repeatedly.1Select Picture Size, Audio Language, Subtitle, or Repeat.2Make appropriate adjustments.Code Page](https://usermanual.wiki/LG-Electronics-USA/26LD352CUA.Users-Manual-1/User-Guide-1450141-Page-55.png)


![MY MEDIAMY MEDIA98EZSIGN TV- For 32/42/47LD452BSelect MY MEDIA.1MENUSelect EzSign TV.0<0(',$3KRWR/LVW 0XVLF/LVW(]6LJQ792ENTER3ENTERSelect TV memory or USB.&ORVH&RS\WR79PHPRU\3OD\3OD\+RZGR\RXZDQWWRSOD\WKH(]6LJQ79&RQWHQW"79PHPRU\√ 86%or&ORVH3OD\ 'HOHWH(]6LJQ79FRQWHQWH[LVWV+RZGR\RXZDQWWRPDQDJHWKLVFRQWHQW"86%√ 79PHPRU\The EzSign TV function allows you to play and manage high-quality ad content that you create quickly and easily using the EzSign TV Editor.ᯫ For more information of using, refer to the EzSign TV Editor S/W & Manual.3OD\ Plays EzSign TV content in the memory.'HOHWHDeletes EzSign TV content from the memory. (Your TV restarts after the content is deleted.)&ORVH Closes the EzSign TV menu window.TV memoryUSB&RS\WR79PHPRU\3OD\Copies a file from the USB memory to the EzSign TV memory and plays it.(Once the file has been copied, it can be played even when it is removed from the USB memory.)3OD\Plays a file directly from the USB memory without copying it to the EzSign TV memory.&ORVH Closes the EzSign TV menu window.ᯫ The highlighted tab with the "√" sym-bol indicates the location of the file currently being played!NOTEŹ While loading EzSign TV content, your TV may function slower than normal.Ź It is recommended that you copy files to the TV memory before playing them, as playing directly from the USB memory for an extended period of time may cause the device to over-heat.4ENTER](https://usermanual.wiki/LG-Electronics-USA/26LD352CUA.Users-Manual-1/User-Guide-1450141-Page-68.png)

![PICTURE CONTROLPICTURE CONTROL100PICTURE SIZE (ASPECT RATIO) CONTROLPICTURE CONTROLThis feature lets you choose the way an analog picture with a 4:3 aspect ratio is displayed on your TV. You can select a different aspect ratio depending on input source (analog broadcasting, digital broad-casting, aux).1MENUSelect PICTURE.2ENTERSelect Aspect Ratio. 3ENTERSelect the desired picture format.ᯫ You can also adjust Aspect Ratio in the Q.MENU.ᯫ Press the RATIO button repeatedly to select the desired picture format. =RRP &LQHPD=RRP1Q.MENUSelect Aspect Ratio.2ENTERSelect Zoom or Cinema Zoom. 3ENTERAdjust proportion of Zoom or Cinema Zoom. The Cinema Zoom adjustment range is 1-16.4ENTERMove the image on the screen.When adjusting Zoom or Cinema Zoom in Q.MENUᯐ0RYHᯑ=RRPᯙ(QWHU ᯐ0RYHᯑ=RRPᯙ(QWHU3,&785( 3,&785(ᯒ0RYHᯙ(QWHU ᯒ0RYHᯙ(QWHUؒ $VSHFW5DWLR ؒ 3LFWXUH:L]DUGؒ ᰚ(QHUJ\6DYLQJ 2IIؒ 3LFWXUH0RGH 6WDQGDUG ؒ%DFNOLJKW ؒ&RQWUDVW ؒ%ULJKWQHVV ؒ6KDUSQHVVؒ $VSHFW5DWLR ؒ 3LFWXUH:L]DUGؒ ᰚ(QHUJ\6DYLQJ 2IIؒ 3LFWXUH0RGH 6WDQGDUG ؒ%DFNOLJKW ؒ&RQWUDVW ؒ%ULJKWQHVV ؒ6KDUSQHVVᯱᯙᯡ۳-XVW6FDQ۳6HW%\3URJUDP۳۳=RRP۳&LQHPD=RRPᯱᯙ4RETURNor Return to the previous menu.EXITReturn to TV viewing.BACK](https://usermanual.wiki/LG-Electronics-USA/26LD352CUA.Users-Manual-1/User-Guide-1450141-Page-70.png)
![PICTURE CONTROLPICTURE CONTROL102PICTURE WIZARD3LFWXUH:L]DUG:LWK3LFWXUH:L]DUG\RXFDQDGMXVWWKHSLFWXUHTXDOLW\RIWKHRULJLQDOLPDJHᰦThis feature lets you adjust the picture quality of the original image. Use this to calibrate the screen quality by adjusting the Black and White Level etc. You can calibrate the screen quality by easily follow-ing each step. When you adjust the image to Low, Recommended or High, you can see the example of the changes you made.1MENUSelect PICTURE.2ENTERENTERSelect Picture Wizard.3ENTERAdjust Picture Wizard.4ENTERAdjust Standard/Preferred.5ENTERAdjust Black Level.6ENTERAdjust White Level.7ENTERAdjust Tint.ᰙ3UHYLRXV ᯙ1H[W%ODFN/HYHO6HWWKHVFUHHQDERYHLGHQWLFDOWRWKH5HFRPPHQGHGVDPSOHEHORZؒ%ULJKWQHVV /RZ +LJK5HFRPPHQGHGᰙ3UHYLRXV ᯙ1H[W܁۽:KLWH/HYHO6HWWKHVFUHHQDERYHLGHQWLFDOWRWKH5HFRPPHQGHGVDPSOHEHORZؒ&RQWUDVW /RZ +LJK5HFRPPHQGHGᰙ3UHYLRXV ᯙ1H[W܁۽ؒ6WDQGDUG3UHIHUUHGᰙ3UHYLRXV ᯙ1H[W6WDQGDUG 3UHIHUUHG3LFWXUH:L]DUG܁6WDQGDUG۽7LQW6HWWKHVFUHHQDERYHLGHQWLFDOWRWKH5HFRPPHQGHGVDPSOHEHORZ/RZ +LJK5HFRPPHQGHGؒ7LQW ᰙ3UHYLRXV ᯙ1H[W܁۽5*3,&785( ᯒ0RYHᯙ(QWHUᯐᯙؒ $VSHFW5DWLR ؒ 3LFWXUH:L]DUGؒ ᰚ(QHUJ\6DYLQJ 2IIؒ 3LFWXUH0RGH 6WDQGDUG ؒ%DFNOLJKW ؒ&RQWUDVW ؒ%ULJKWQHVV ؒ6KDUSQHVVᯫ If you select Preferred, OSD (On Screen Display) differ from that shown in this manual.](https://usermanual.wiki/LG-Electronics-USA/26LD352CUA.Users-Manual-1/User-Guide-1450141-Page-72.png)
![PICTURE CONTROL1039ENTERAdjust Horizontal Sharpness.10ENTERAdjust Vertical Sharpness.11ENTERAdjust Backlight.8ENTERAdjust Color.12FAVMARKSelect input source to apply the settings.13ENTERSave.14ENTERFinish the Picture Wizard.ᯫ If you stop the Picture Wizard before the final step, the changes will not be saved to the TV. ᯫ Once the Picture Wizard sets the picture quality, Energy Saving is changed to Offautomatically.ᯫ To reset changes made by Picture Wizard, operate Picture Reset when Picture Mode is on Expert1.&RORU6HWWKHVFUHHQDERYHLGHQWLFDOWRWKH5HFRPPHQGHGVDPSOHEHORZؒ&RORU /RZ +LJK5HFRPPHQGHGᰙ3UHYLRXV ᯙ1H[W܁۽+RUL]RQWDO6KDUSQHVV6HWWKHVFUHHQDERYHLGHQWLFDOWRWKH5HFRPPHQGHGVDPSOHEHORZؒ+6KDUSQHVV /RZ +LJK5HFRPPHQGHGᰙ3UHYLRXV ᯙ1H[W܁۽9HUWLFDO6KDUSQHVV6HWWKHVFUHHQDERYHLGHQWLFDOWRWKH5HFRPPHQGHGVDPSOHEHORZؒ96KDUSQHVV /RZ +LJK5HFRPPHQGHGᰙ3UHYLRXV ᯙ1H[W܁۽&RPSOHWH6HOHFWDQLQSXWVWRDSSO\WKHVHWWLQJVᯡ'79۳79۳$9۳$9۳&RPSRQHQW۳&RPSRQHQW۳5*%3&ᯡ+'0,ᯡ+'0,ᯡ+'0,ᯡ+'0,:DUQLQJ7KHSLFWXUHTXDOLW\PD\YDU\DFFRUGLQJWRWKHGLIIHUHQWW\SHVRIVLJQDODQGLQSXWVᰙ3UHYLRXV ᯙ&RQILUPᯐ0RYH᱅0DUNi.e)&ORVH7KHFXUUHQWDGMXVWPHQWYDOXHLVVDYHGWR([SHUWL%DFNOLJKW6HWWKH%DFNOLJKWWR\RXU%ULJKWQHVVSUHIHUHQFHؒ%DFNOLJKW 'DUN %ULJKW5HFRPPHQGHGᰙ3UHYLRXV ᯙ1H[W܁۽](https://usermanual.wiki/LG-Electronics-USA/26LD352CUA.Users-Manual-1/User-Guide-1450141-Page-73.png)
![PICTURE CONTROLPICTURE CONTROL104ᰚENERGY SAVINGIt reduces the TV’s power consumption by lowering the backlight level.You can increase the brightness of your screen by adjusting the Energy Saving level or by adjusting the Picture Mode.1MENUSelect PICTURE.2ENTERSelect ᰚ Energy Saving. 3ENTERSelect Off, Minimum,Medium, Maximum, or Screen Off.ᯫ When selecting Screen off, the screen will turn off after 3 seconds. ᯫ If you adjust “Energy Saving- Maximum”, Backlight feature will not work.ᯫ Press the ENERGY SAVING button repeatedly to select the appropriate Energy Saving setup.3,&785( 3,&785(ᯒ0RYHᯙ(QWHU ᯒ0RYHᯙ(QWHUᯐᯙؒ $VSHFW5DWLR ؒ 3LFWXUH:L]DUGؒ ᰚ(QHUJ\6DYLQJ 2IIؒ 3LFWXUH0RGH 6WDQGDUG ؒ%DFNOLJKW ؒ&RQWUDVW ؒ%ULJKWQHVV ؒ6KDUSQHVVؒ $VSHFW5DWLR ؒ 3LFWXUH:L]DUGؒ ᰚ(QHUJ\6DYLQJ 2IIؒ 3LFWXUH0RGH 6WDQGDUG ؒ%DFNOLJKW ؒ&RQWUDVW ؒ%ULJKWQHVV ؒ6KDUSQHVVi.e) ۳$XWRᯡ2II۳0LQLPXP۳0HGLXP۳0D[LPXP۳6FUHHQ2IIᯐᯙ4RETURNor Return to the previous menu.EXITReturn to TV viewing.BACK](https://usermanual.wiki/LG-Electronics-USA/26LD352CUA.Users-Manual-1/User-Guide-1450141-Page-74.png)
![PICTURE CONTROL105PRESET PICTURE SETTINGS (PICTURE MODE)There are factory presets for picture settings available in the user menus. You can use a preset, change each setting manually.1MENUSelect PICTURE.2ENTERSelect Picture Mode. 3ENTERSelect Vivid,Standard,Cinema,Sport, or Game.ᯫ Vivid, Standard, Cinema, Sport, and Game Settings are preset for the opti-mum picture quality at the factory.ᯫ Vivid: This is the mode to maximize the effect of the video in the retail store. Strengthen the contrast, bright-ness, color and sharpness for vivid picture.ᯫ Standard: This is the mode to realize optimum viewing condition for the general user.ᯫ Cinema: This mode optimizes video for watching movies.ᯫ Sport: This is the video mode to emphasize dynamic video and pri-mary color (e.g, white, uniform, grass, sky blue etc.) by realizing the optimal screen for sports.ᯫ Game: This is the mode to realize fast response speed in a fast gaming screen.ᯫ Expert: This is the mode to adjust the video in detail for video quality expert and general user.ᯫ You can also adjust Picture Mode in the Q.MENU. ᯫ When selecting Intelligent Sensor,Energy Saving is changed to Auto auto-matically.ᯫ When selecting Intelligent Sensor, it changes Backlight, contrast, bright-ness, sharpness, color and tint auto-matically.ᯫ Intelligent Sensor: The most suitable picture is automatically adjusted according to the surrounding condi-tions.3,&785( 3,&785(ᯒ0RYHᯙ(QWHU ᯒ0RYHᯙ(QWHUؒ $VSHFW5DWLR ؒ 3LFWXUH:L]DUGؒ ᰚ(QHUJ\6DYLQJ 2IIؒ 3LFWXUH0RGH 6WDQGDUG ᯙ ؒ%DFNOLJKW ؒ&RQWUDVW ؒ%ULJKWQHVV ؒ6KDUSQHVVᯐᯙؒ $VSHFW5DWLR ؒ 3LFWXUH:L]DUGؒ ᰚ(QHUJ\6DYLQJ 2IIؒ 3LFWXUH0RGH 6WDQGDUG ؒ%DFNOLJKW ؒ&RQWUDVW ؒ%ULJKWQHVV ؒ6KDUSQHVV۳,QWHOOLJHQW6HQVRU۳9LYLGᯡ6WDQGDUG۳&LQHPD۳6SRUW۳*DPH۳ᰛ([SHUW۳ᰛ([SHUWᯐᯙDepending on models4RETURNor Return to the previous menu.EXITReturn to TV viewing.BACK](https://usermanual.wiki/LG-Electronics-USA/26LD352CUA.Users-Manual-1/User-Guide-1450141-Page-75.png)
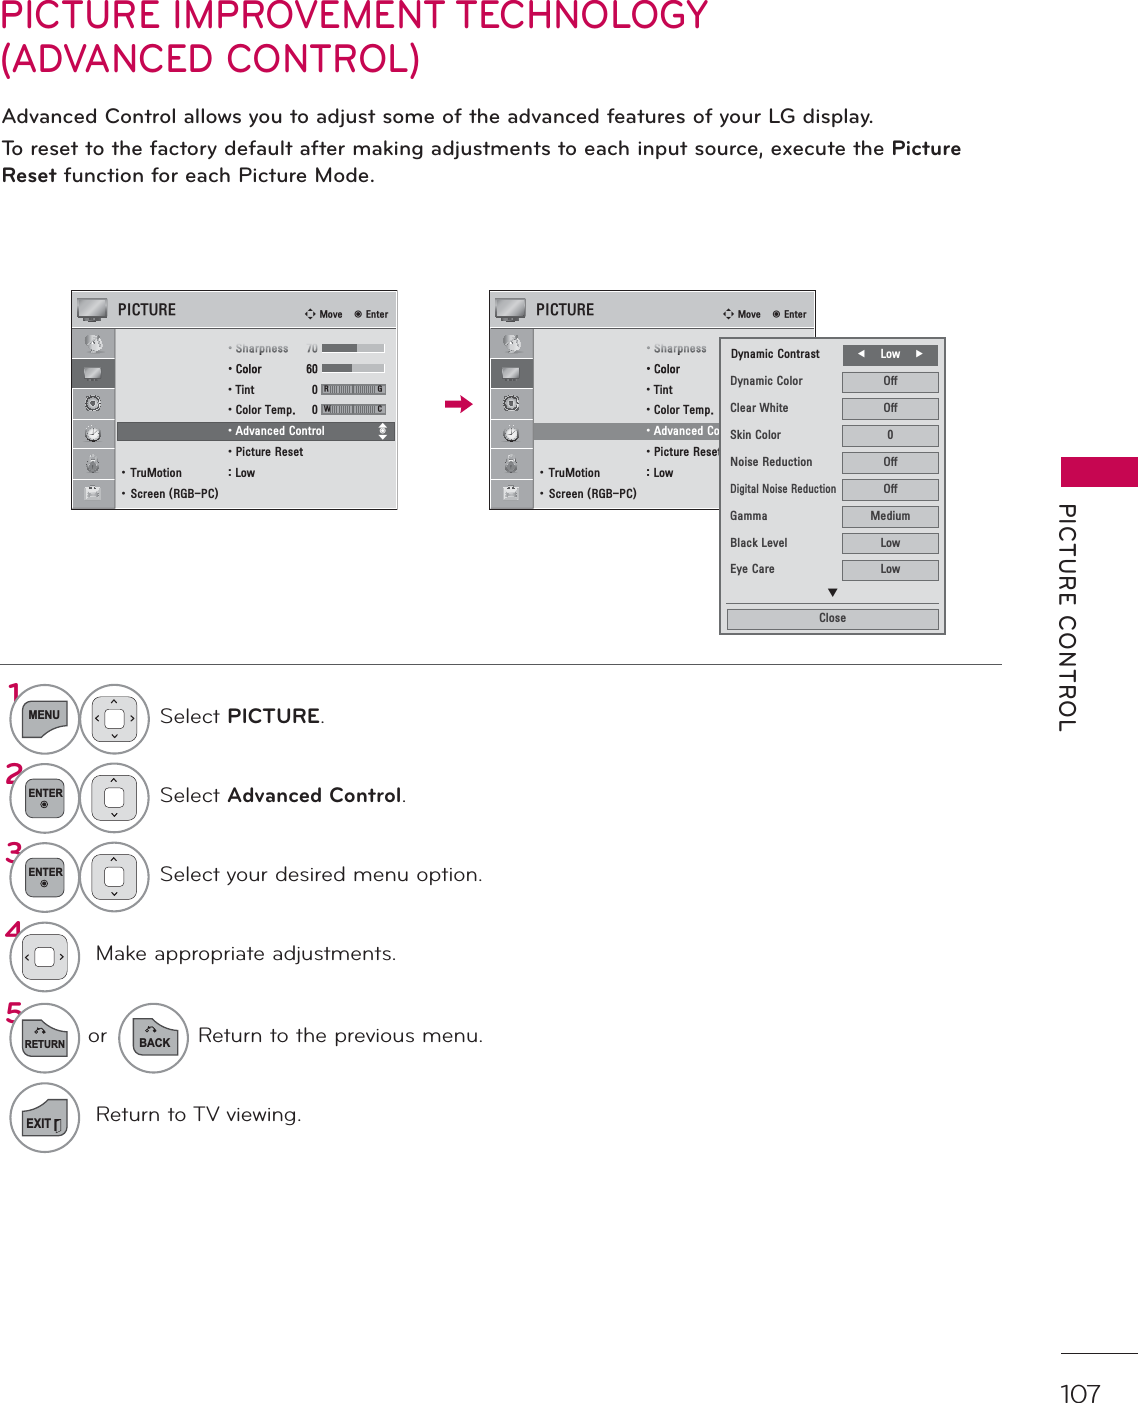
![PICTURE CONTROLPICTURE CONTROL106MANUAL PICTURE ADJUSTMENT - USER MODEAdjust the picture appearance to suit your preference and viewing situations.1MENUSelect PICTURE.2ENTERSelect Picture Mode. 3ENTERSelect Vivid, Standard, Cinema, Sport, or Game.4ENTERSelect Backlight, Contrast, Brightness, Sharpness, Color, Tint, Color Temp., or Advanced Control.5ENTERMake appropriate adjustments.ᯫ Backlight: This function adjusts the brightness of the backlight behind the LCD screen. Adjusting the back-light is recommended when setting the brightness of the TV. When decreasing the backlight, the bright-ness of the black becomes darker without any loss in video signal and the power consumption is reduced.ᯫ Contrast: Increase or decrease the gradient of the video signal. You may use Contrast when the bright part of the picture is saturated.ᯫ Brightness: Adjusts the base level of the signal in the picture. You may use Brightness when the dark part of the picture is saturated.ᯫ Sharpness: Adjusts the level of crisp-ness in the edges between the light and dark areas of the picture. The lower the level, the softer the image.ᯫ Color: Adjusts intensity of all colors.ᯫ Tint: Adjusts the balance between red and green levels.ᯫ Color Temp.: Set to warm to enhance hotter colors such as red, or set to cool to enhance cooler colors such as blue.ؒ%DFNOLJKW ᯙ(QWHUᯰ܁۽ᯱ3,&785( ᯒ0RYHᯙ(QWHUᯐᯙؒ $VSHFW5DWLR ؒ 3LFWXUH:L]DUGؒ ᰚ(QHUJ\6DYLQJ 2IIؒ 3LFWXUH0RGH 6WDQGDUG ؒ%DFNOLJKW ؒ&RQWUDVW ؒ%ULJKWQHVV ؒ6KDUSQHVV6RETURNor Return to the previous menu.EXITReturn to TV viewing.BACK](https://usermanual.wiki/LG-Electronics-USA/26LD352CUA.Users-Manual-1/User-Guide-1450141-Page-76.png)
![PICTURE CONTROLPICTURE CONTROL108EXPERT PICTURE CONTROLᰛExpert1 and ᰛExpert2 provide even more advanced picture settings for users. Typical used by professionals for calibrating the TV.1MENUSelect PICTURE.2ENTERSelect Picture Mode.3ENTERSelect ᰛExpert1 or ᰛExpert2.4ENTERSelect Expert Control.5ENTERSelect your desired menu option.6Make appropriate adjustments.3,&785( ᯒ0RYHᯙ(QWHUؒ $VSHFW5DWLR ؒ 3LFWXUH:L]DUGؒ ᰚ(QHUJ\6DYLQJ 2IIؒ 3LFWXUH0RGH ([SHUW ᯙ ؒ%DFNOLJKW ؒ&RQWUDVW ؒ%ULJKWQHVV ؒ+6KDUSQHVV۳9LYLG۳6WDQGDUG۳&LQHPD۳6SRUW۳*DPHᯡᰛ([SHUW۳ᰛ([SHUWᯐᯙ3,&785( ᯒ0RYHᯙ(QWHU ؒ+6KDUSQHVV ؒ96KDUSQHVV ؒ&RORU ؒ7LQW ؒ([SHUW&RQWURO ؒ3LFWXUH5HVHWؒ 7UX0RWLRQ /RZؒ 6FUHHQ5*%3&5*'\QDPLF&RQWUDVW ܁2II۽1RLVH5HGXFWLRQ 2II'LJLWDO1RLVH5HGXFWLRQ2II%ODFN/HYHO /RZ5HDO&LQHPD2Q&RORU*DPXW :LGH(GJH(QKDQFHU +LJK[Y<FF $XWR([SHUW3DWWHUQ 2IIᯝ&ORVH7RETURNor Return to the previous menu.EXITReturn to TV viewing.BACK](https://usermanual.wiki/LG-Electronics-USA/26LD352CUA.Users-Manual-1/User-Guide-1450141-Page-78.png)