LG Electronics USA 26LK330UB LCD TV Monitor User Manual G User s manual
LG Electronics USA LCD TV Monitor G User s manual
UserManual.wiki
>
LG Electronics USA
>
26LK330UB User Manual
Users Manual
Navigation menu
Upload a User Manual
Namespaces
Wiki Guide
HTML
PDF
Info
Views
User Manual
Discussion / Help
Navigation

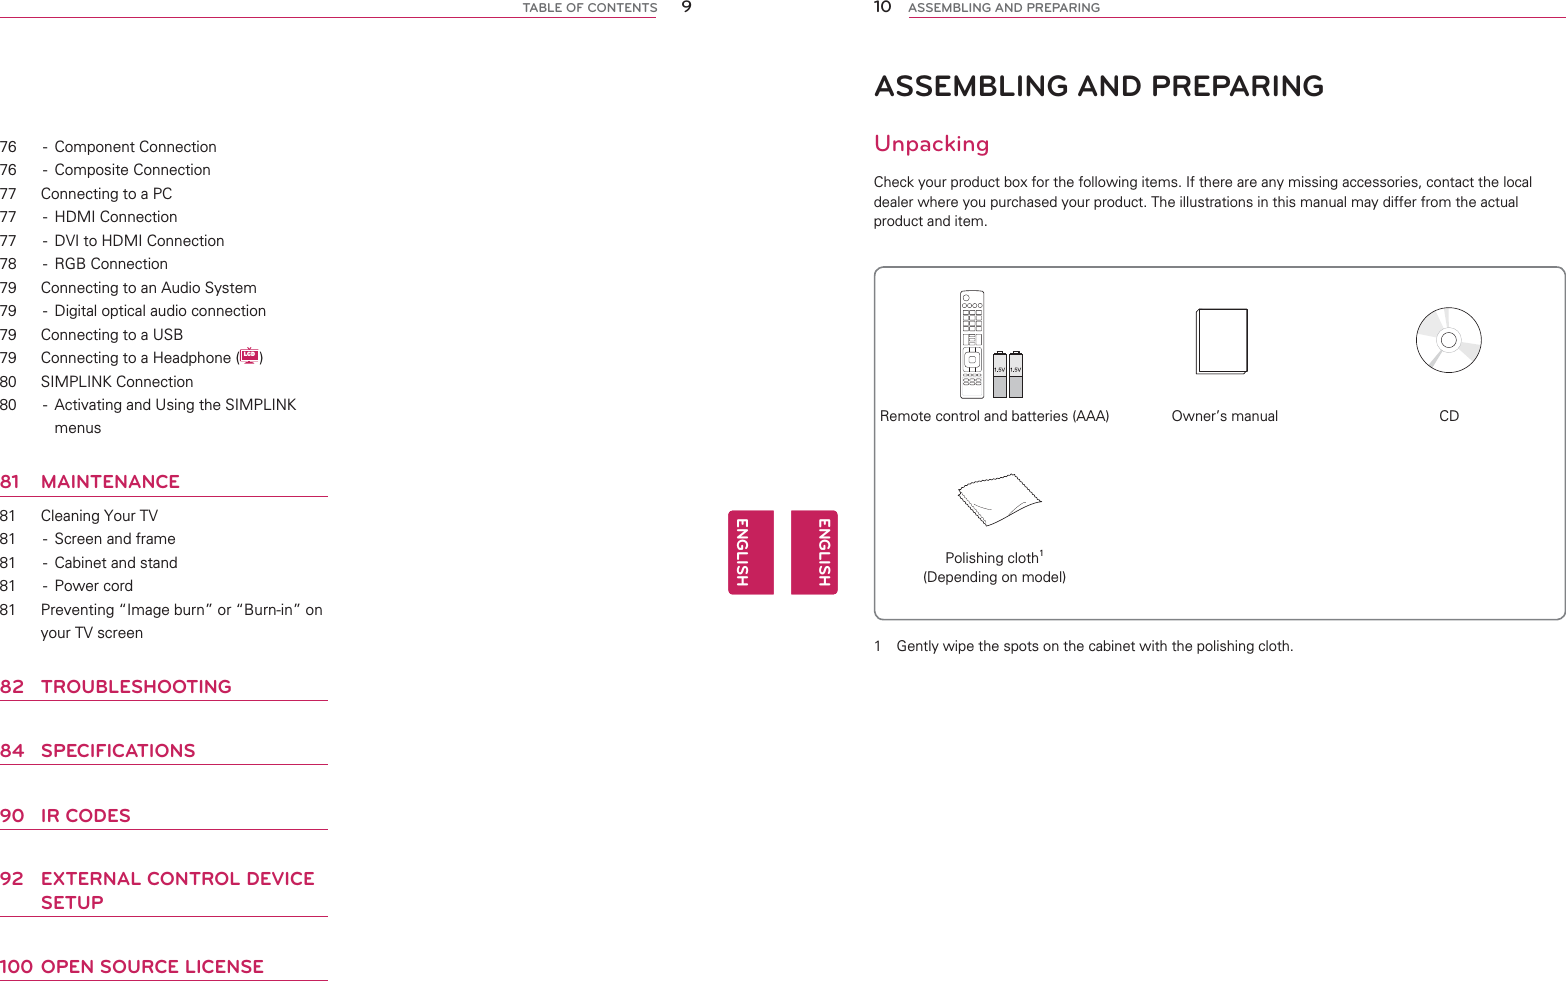
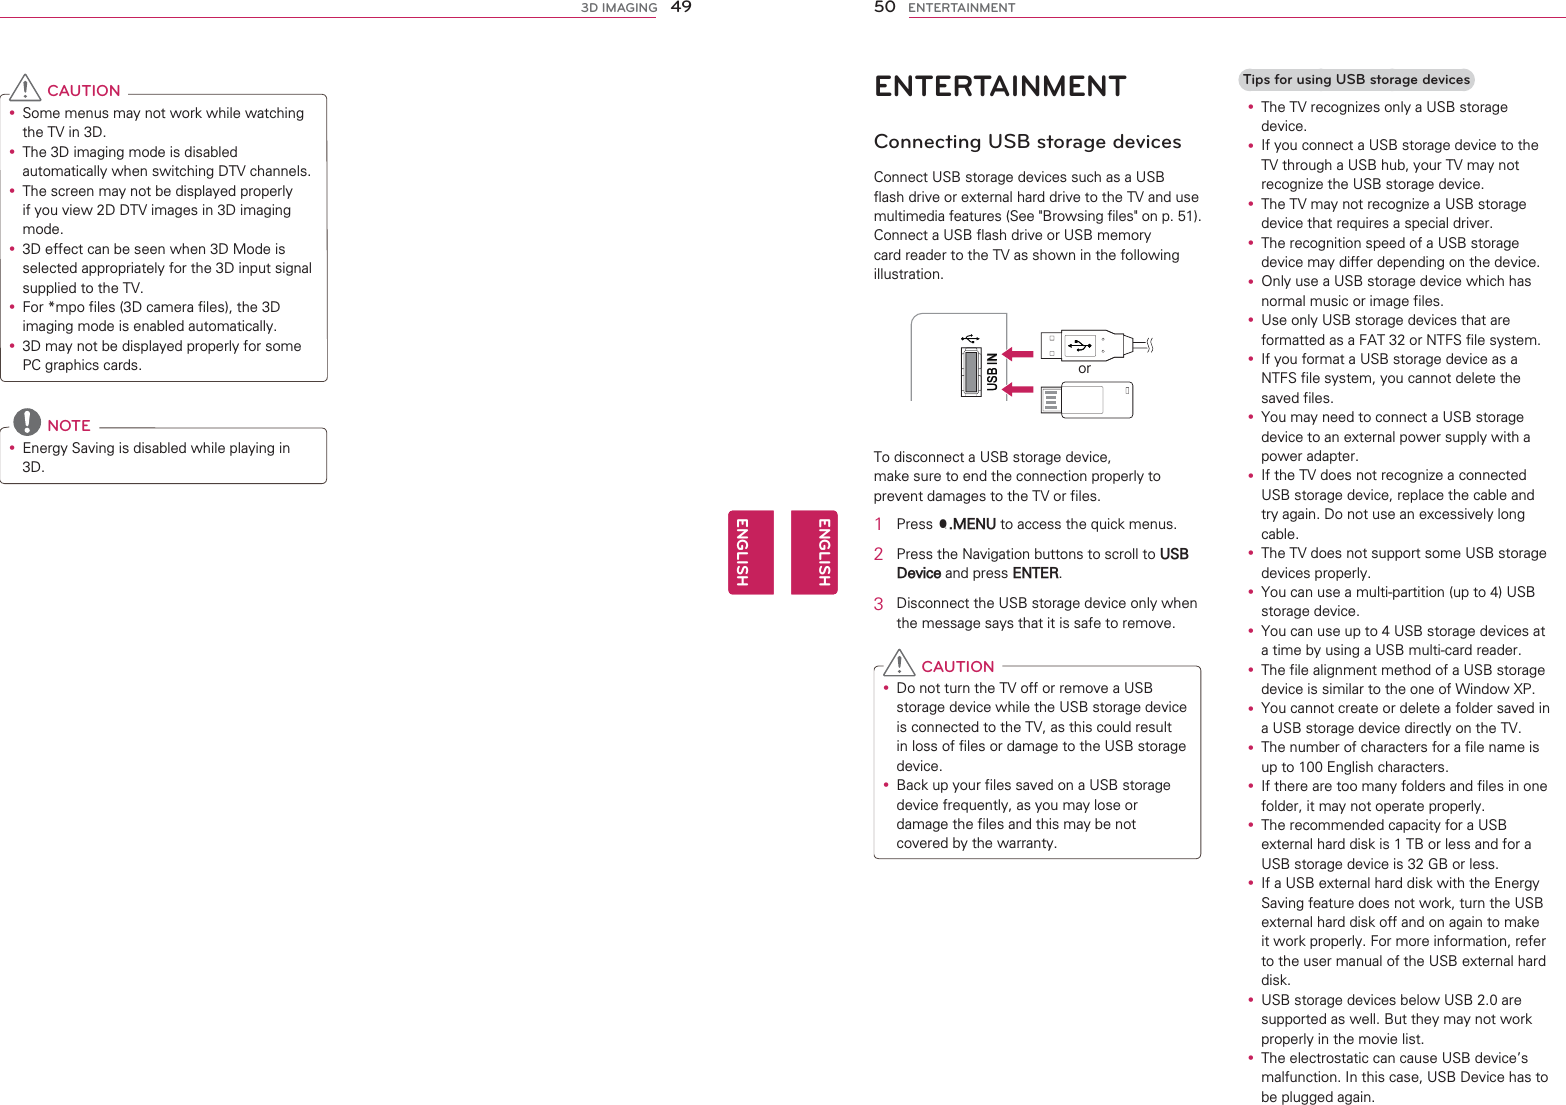
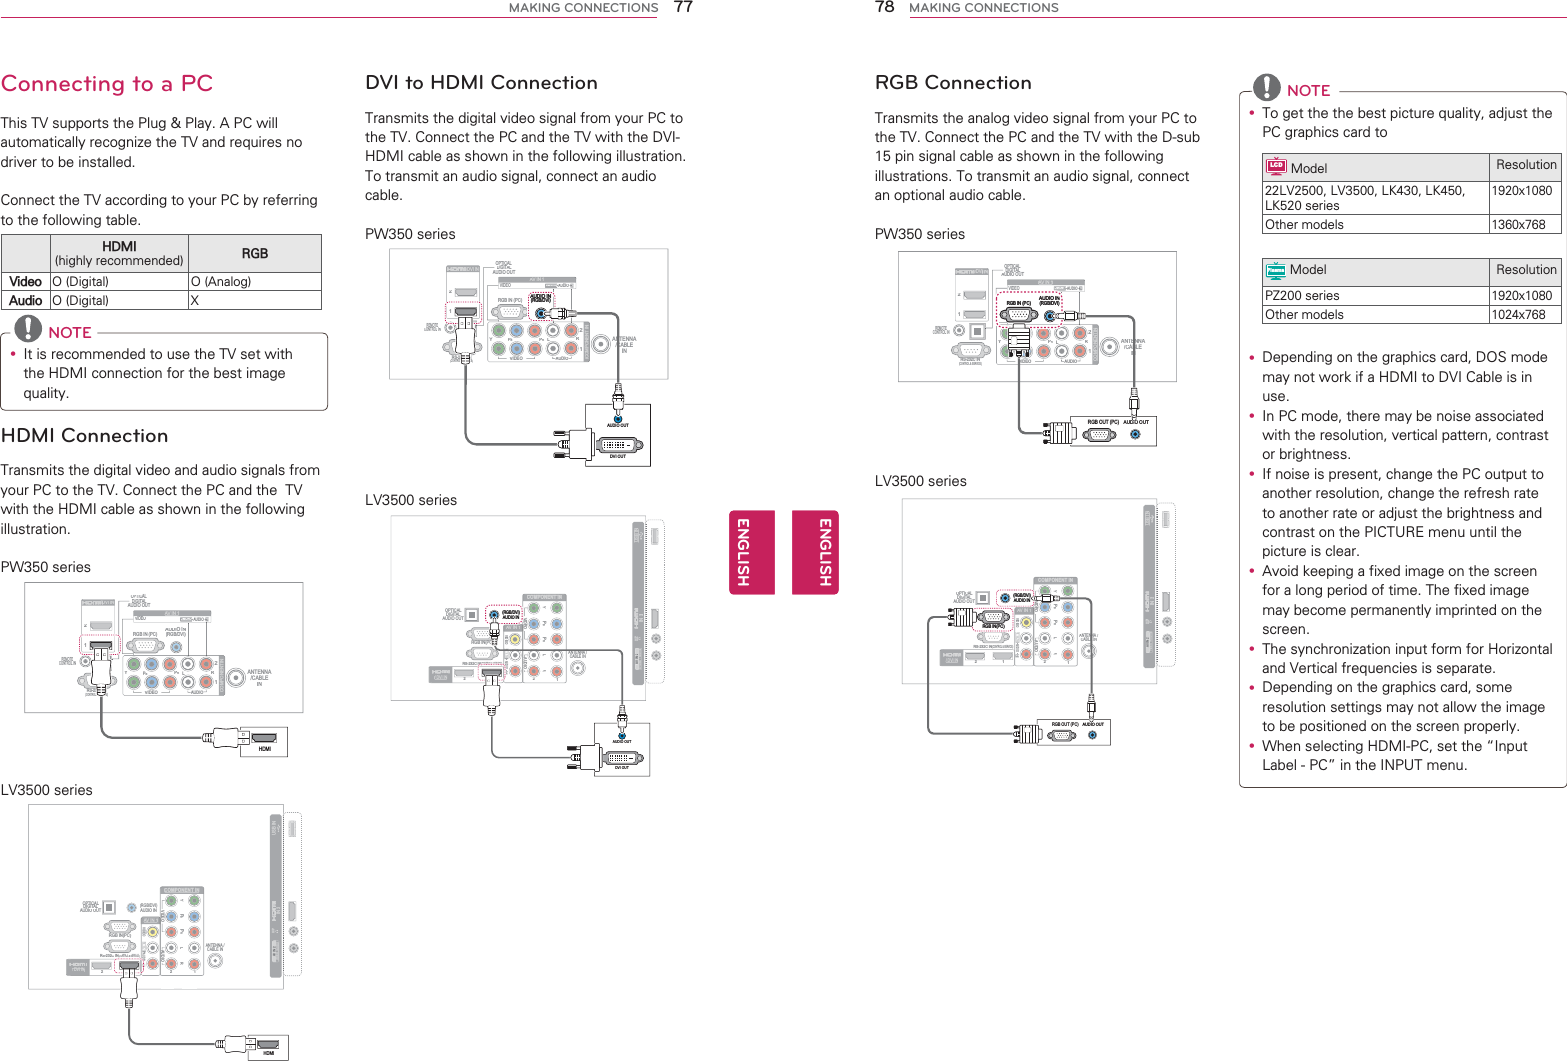
![13ENGENGLISHASSEMBLING AND PREPARING NOTEy The items supplied with your product may vary depending on the model.y Product specifications or contents of this manual may be changed without prior notice due to upgrade of product functions.y ( Plasma ) How to use the ferrite core1 Use the ferrite core to reduce the electromagnetic interference in the PC audio cable. Wind the PC audio cable on the ferrite core thrice. Place the ferrite core close to the TV.[to an External device]10 mm (+/-5 mm)[to the TV] 2 Use the ferrite core to reduce the electromagnetic interference in the power cable. Wind the power cable on the ferrite core once. Place the ferrite core close to the TV.[to a wall plug] [to the TV] 3 Use the ferrite core to reduce the electromagnetic interference in the power cable. Wind the power cable on the ferrite core once. Place the ferrite core close to the TV and a wall plug.[to a wall plug] [to the TV] - If there is one ferrite core, follow as shown in Figure 1.- If there are two ferrite cores, follow as shown in Figures 1 and 2.- If there are three ferrite cores, follow as shown in Figures 1 and 3.y ( LCD ) For an optimal connection, HDMI cables and USB devices should have bezels less than 10 mm (0.39 inches) thick and 18 mm (0.7 inches) width.BAAB*A 10 mm (0.39 inches)*B 18 mm (0.7 inches)[Cross Section of Ferrite Core][Figure 1][Cross Section of Ferrite Core][Figure 2][Cross Section of Ferrite Core][Figure 3]14ENGENGLISHASSEMBLING AND PREPARINGOptional ExtrasOptional extras can be changed or modified for quality improvement without any notification.Contact your dealer for buying these items.This device only works with compatible LG LED LCD TV, LCD TV, or Plasma TV.3D Glasses(AG-S230, AG-S250, AG-S270)D-sub 15 pin signal cable11 When using the VGA (D-sub 15 pin signal cable) PC connection, use the shielded signal interface cable with a ferrite core to maintain standards compliance for the product.](https://usermanual.wiki/LG-Electronics-USA/26LK330UB/User-Guide-1401394-Page-8.png)


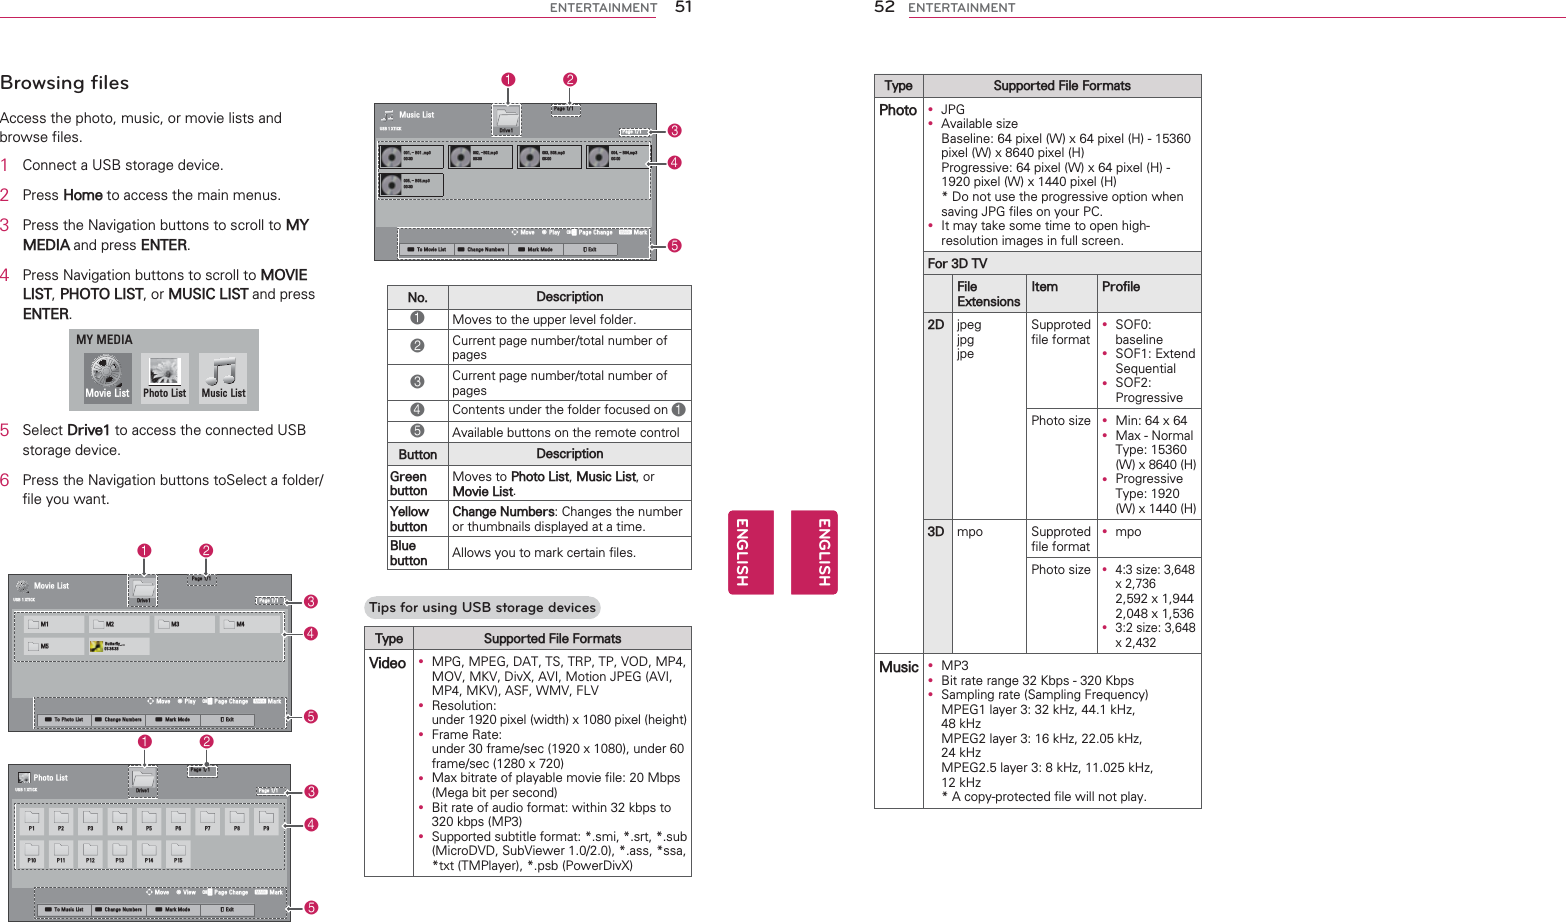
![47ENGENGLISH3D IMAGING NOTEy To watch the TV in 3D, you must put on your 3D glasses. For best results, you should wear LG Brand 3D glasses. The 3D imaging may not display properly when using another brand of 3D glasses. Please see the 3D glasses manual for instructions on how to use the 3D glasses.y After powering on the TV, a few seconds may be needed for your TV to calibrate. y It may take a moment for you to see the 3D imaging if you look away from the TV and then revert your eyes back to the 3D program.y The TV may flicker slightly if the 3D imaging is displayed under 3 wavelength fluorescent light (50 Hz - 60 Hz) or magnetic fluorescent lamp (50Hz - 60 Hz). In such instances, it is recommended to turn the lights off.y If there is an obstacle between the TV and the 3D glasses, the 3D imaging may not display properly.y Do not use the TV in close proximity to other electronic and RF equipments.y In Analog TV, 3D Imaging does not work.y When watching 2D images, it is recommended to take off the 3D glasses. If you watch 2D images with the 3D glasses on, you may see distorted images.When using 3D Glasses CAUTIONy 3D glasses are sold separately. Refer to the 3D glasses manual for operating instructions.y Do not use the 3D glasses to replace your corrective glasses, sunglasses or protective goggles.y Do not store the 3D glasses in hot or cold locations.y Do not drop objects onto the 3D glasses. Do not drop or bend the glasses.y Since the lenses of the 3D glasses are easily scratched, make sure to clean only with a soft cloth. Shake off any dust before using the cloth since the glasses are easily scratched.3D Imaging Viewing RangeTV size, viewing angle & other circumstances may change the viewing distance and the angle of view.Viewing Distance Viewing Angle2 m - 10 m (6.5 ft - 32.8 ft)120 ° (When the viewing distance is 2 m (6.5 ft))48ENGENGLISH3D IMAGING Viewing 3D ImagingView 3D mode for 3D images1 Play the 3D video or select 3D channel. (2D to 3D mode is available with all contents.)2 Press 3D and select same type in your displayed picture on the screen. (Select type on "3D Video" tab.) 3D Video 2D Video NOTEy Turn on the 3D mode automatically for HDMI input playing the 3D blueray titles.3 Press ENTER on displayed information window.(QWHU &DQFHOPower on your 3D glasses and put them on. Sit 2 meters from TV to enjoy the best 3D view.ᯕ'6HWWLQJ4 To turn off the 3D mode, press 3D and select ENTER.(QWHU &DQFHOTurn off 3D Mode.ᯕ'6HWWLQJ'PRGHView 2D mode for 3D images1 Play the 3D video or select 3D channel.2 Press 3D and select same type in your displayed picture on the screen. (Select type on "2D Video" tab.) 3D Video 2D Video3 To turn off the 2D mode, press 3D and select ENTER.(QWHU &DQFHOTurn off 2D Mode.'YLGHR Using 3D quick menu option1 Press 3D SETTING.2 Use the following options while viewing 3D imaging. '6HWWLQJ(QWHU (QG'YLGHR'3LFWXUH6L]H ܁-XVW6FDQ ۽''HSWK ܁۽'9LHZSRLQW ܁۽'3LFWXUH%DODQFH ܁2II ۽'3LFWXUH&RUUHFWLRQ ܁/HIW5LJKW ۽Button Description3D Picture SizeCuts off the outer edges of the picture and stretch it to fit the full screen in 3D mode.3D DepthAdjusts the distance between the object and the background in the picture to enhance the 3D effect in 2D to 3D mode.3D ViewpointBrings the picture (including both the object and background images) to the front or back to enhance the 3D effect in 3D mode.3D PictureBalanceAdjusts the color and brightness difference between the right and left sides of the picture in 3D mode.3D PictureCorrectionChanges the order of images in the right and left sides of the picture in 3D mode.](https://usermanual.wiki/LG-Electronics-USA/26LK330UB/User-Guide-1401394-Page-25.png)
![63ENGENGLISHCUSTOMIZING SETTINGSPICTURE Settings1 Press Home to access the main menus.2 Press the Navigation buttons to scroll to CHANNEL and press ENTER.3 Press the Navigation buttons to scroll to the setting or option you want and press ENTER.- To return to the previous level, press BACK.4 When you are finished, press EXIT. The available picture settings are described in the following.Setting DescriptionAspect Ratio Changes the image size to view images at its optimal size (See p.42).Picture Wizard Adjusts the image quality and calibrates the screen.The customized options will be saved as Expert1 in the Picture Mode. NOTEy If you use Picture Wizard, the Energy saving feature will turn off automatically.y To reset changes made by Picture Wizard, operate Picture Reset when Picture Mode is on Expert1.Energy Saving Reduces the power consumption by adjusting the screen brightness. NOTEy When selecting Auto or Maximum, Backlight will not work.OptionAuto ( LCD ) The backlight is adjusted automatically corresponding to the surroundings when selecting Auto using the Intelligent sensor feature.Intelligent sensor ( Plasma )The most suitable picture is automatically adjusted according to the surrounding conditions.Off Select if this feature is not necessary.Minimum/Medium/MaximumSelects the brightness level.Screen off The screen turns off in 3 seconds.Pressing any button of the remote control will turn on the screen again.3,&785( ᯒ0RYHᯙ(QWHUؒ $VSHFW5DWLR ؒ 3LFWXUH:L]DUGؒ ᰚ(QHUJ\6DYLQJ 2IIؒ 3LFWXUH0RGH 6WDQGDUG ؒ%DFNOLJKW ؒ&RQWUDVW ؒ%ULJKWQHVV ؒ6KDUSQHVV ؒ&RORU ؒ7LQW ؒ&RORU7HPS ؒ$GYDQFHG&RQWURO ؒ3LFWXUH5HVHWؒ 7UX0RWLRQ /RZؒ 6FUHHQ5*%3&5*:&64ENGENGLISHCUSTOMIZING SETTINGSSetting DescriptionPicture Mode Selects one of the preset image or customizes options in each mode for the best TV screen performance. You are also able to customize advanced options of each mode.The available preset picture modes vary depending on the TV.ModeIntelligent Sensor ( LCD )Sets the TV to adjust the image settings, such as contrast, brightness, sharpness, color, or tint, automatically corresponding to the surrounding environments.Vivid Adjusts the video image for the retail environment by enhancing the contrast, brightness, color, and sharpness.Standard Adjusts the image for the normal environment.APS ( Plasma ) Maximizes video images reducing power consumption without hurting picture quality. Cinema Optimizes the video image for a cinematic look to enjoy movies as if you are in a movie theater.Sport Optimizes video images for high and dynamic actions by emphasizing primary colors such as white, grass, or sky blue.Game Optimizes the video image for a fast gaming screen such as PCs or games.Expert Adjusts the detailed video image settings for video experts as well as general viewers. NOTEy If you select Intelligent Senesor, the option of the Energy saving feature will switch to Auto automatically ( LCD ).TruMotion(Depending on model)Advance video technology that provides clearer, smoother images, even during fast action scenes creating a more stable structure for a crisper picture.TruMotion works with all inputs except PC mode.If you enable “TruMotion”, noise may appear on the screen. If this occurs, set “TruMotion” to “Off”.If you select "Picture Mode-Game", set "TruMotion" to "Off".OptionHigh Provides smoother picture movement.Low Provides smooth picture movement. Use this setting for standard use.Off Turn off TruMotion operation.UserDe-JudderAdjusts noise of the screen.De-Blur Adjusts after-image of the screen.SCREEN (RGB-PC) Customizes the PC display options.OptionResolution Selects a proper resolution when your PC uses 1024 X 768, 1280 X 768, or 1360 X 768 resolution.Auto Configure Sets the TV to optimize the options automatically for the TV display.Position Locates the image at the proper position.Size Adjusts the image size.Phase Eliminates horizontal streaking.Reset Restores the options to the default setting.](https://usermanual.wiki/LG-Electronics-USA/26LK330UB/User-Guide-1401394-Page-33.png)


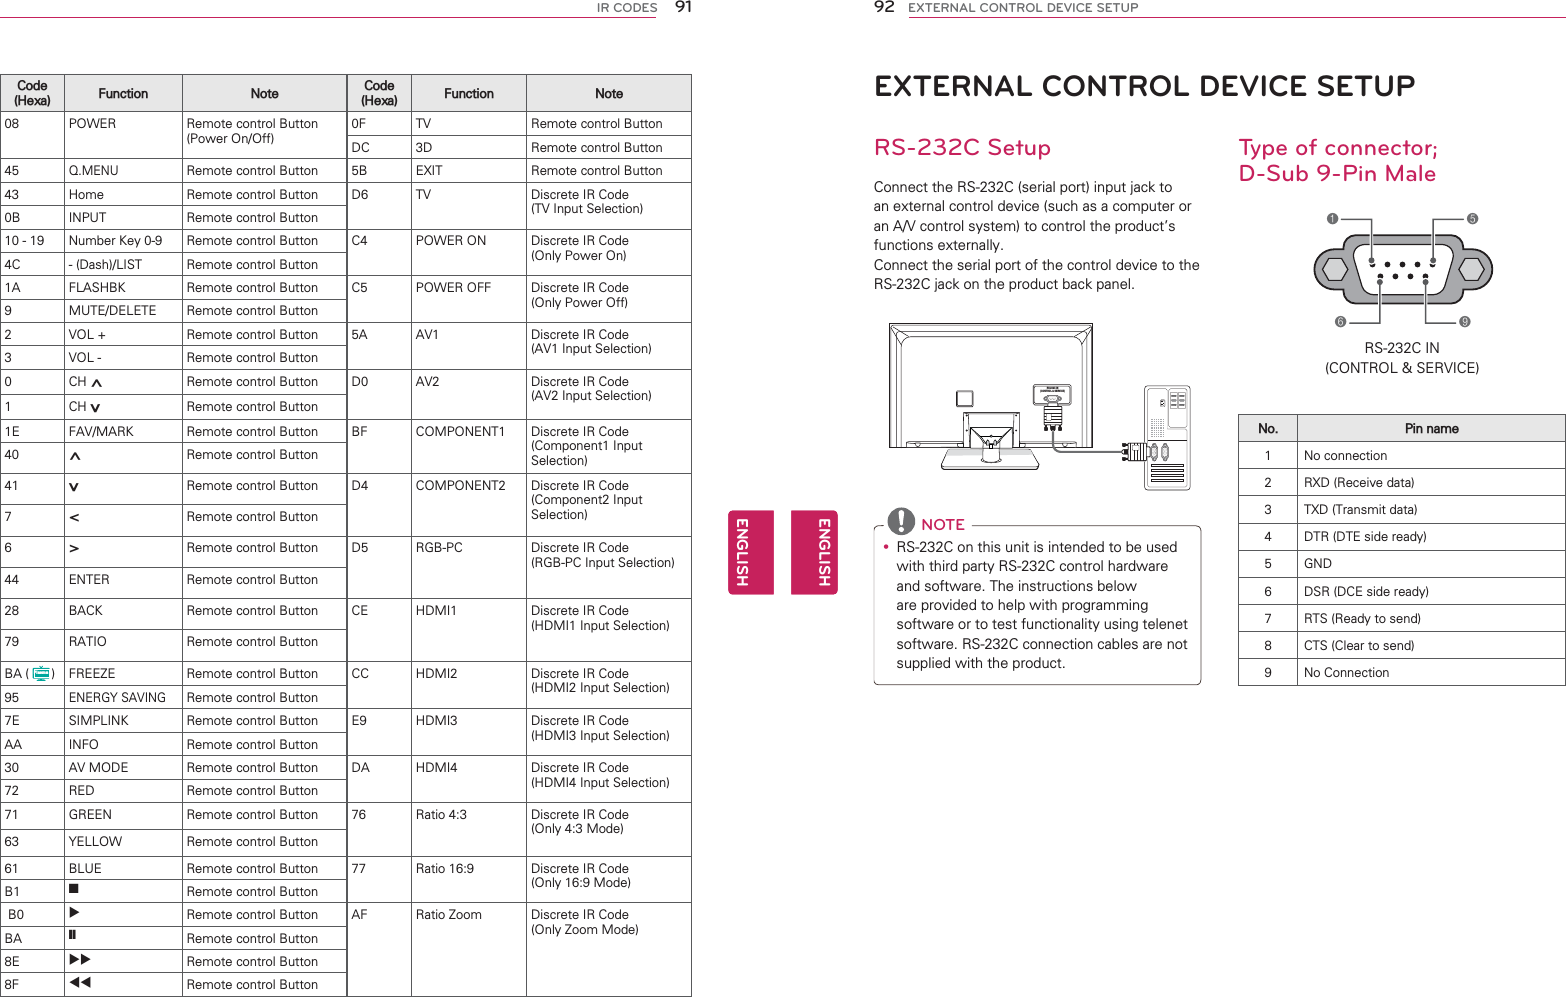
![95ENGENGLISHEXTERNAL CONTROL DEVICE SETUPTransmission / Receiving protocolTransmission[Command1][Command2][ ][Set ID][ ][Data][Cr][Command 1] : First command to control the set.(j, k, m or x)[Command 2] : Second command to control the set.[Set ID] : You can adjust the set ID to choose desired set ID number in Option menu. Adjustment range is 1~ 99. When selecting Set ID ‘0’, every connected the set is controlled. Set ID is indicated as decimal (1~ 99) on menu and as Hexa decimal (0x0~ 0x63) on transmission /receiving protocol.[DATA] : To transmit the command data. Transmit the ‘FF’ data to read status of command.[Cr] : Carriage Return ASCII code ‘0x0D’[ ] : ASCII code ‘space (0x20)’* In this model, set will not send the status during the standby mode.OK Acknowledgement[Command2][ ][Set ID][ ][OK][Data][x]The set transmits ACK (acknowledgement) based on this format when receiving normal data. At this time, if the data is data read mode, it indicates present status data. If the data is data write mode, it returns the data of the PC computer.* In this model, set will not send the status during the standby mode.* Data Format[Command 2] : Use as command.[Set ID] : Use the small character, if set ID is 10, it will send the ‘0’, ‘a’.[DATA] : Use the small character, if data is 0 x ab, it will send the ‘a’, ‘b’.[OK] : Use the large character.Error Acknowledgement[Command2][ ][Set ID][ ][NG][Data][x]The set transmits ACK (acknowledgement) based on this format when receiving abnormal data from non-viable functions or communication errors.Data1: Illegal CodeData2: Not supported functionData3: Wait more time* In this model, set will not send the status during the standby mode.* Data Format[Command 2] : Use as command.[Set ID] : Use the small character, if set ID is 10, it will send the ‘0’, ‘a’.[DATA] : Use the small character, if data is 0 x ab, it will send the ‘a’, ‘b’.[NG] : Use the large character96ENGENGLISHEXTERNAL CONTROL DEVICE SETUP01. Power (Command: k a)To control Power On/Off of the set.Transmission [k][a][ ][Set ID][ ][Data][Cr]Data 00: Power Off Data 01: Power OnAcknowledgement [a][ ][Set ID][ ][OK/NG][Data][x]* In a like manner, if other functions transmit ‘FF’ data based on this format, Acknowledgement data feedback presents status about each function.* Note: In this model, set will send the Acknowledge after power on processing completion. There might be a time delay between command and acknowledge.02. Input Select (Command: x b)To select input source for set.Transmission [x][b][ ][Set ID][ ][Data][Cr]Data 00: DTV (Antenna) Data 01: DTV (Cable)Data 10: Analog (Antenna) Data 11: Analog (Cable)Data 20: AV or AV1 Data 21: AV2Data 40: Component or Component1Data 41: Component2 Data 60: RGB-PC Data 90: HDMI1Data 91: HDMI2 Data 92: HDMI3Data 93: HDMI4Acknowledgement [b][ ][Set ID][ ][OK/NG][Data][x]* Use the feature depending on your model.03. Aspect Ratio (Command: k c)To adjust the screen format.Transmission [k][c][ ][Set ID][ ][Data][Cr]Data 01: 4:3 Data: 09: Just scanData 02: 16:9 Data: 10: Cinema Zoom 1Data 04: Zoom …Data 06: Set by program Data 1F: Cinema Zoom16Acknowledgement [c][ ][Set ID][ ][OK/NG][Data][x]04. Screen Mute (Command: k d)To select screen mute on/off.Transmission [k][d][ ][Set ID][ ][Data][Cr]Data 00: Screen mute off (Picture on), Video-out Mute offData 01: Screen mute on (Picture off)Data 10: Video-out Mute onAcknowledgement [d][ ][Set ID][ ][OK/NG][Data][x]* In case of Video-out Mute on only, TV will display On Screen Display (OSD). But, in case of screen mute on, TV will not display On Screen Display (OSD).05. Volume Mute (Command: k e)To control volume mute on/off.You can also adjust mute using the MUTE button onremote control.Transmission [k][e][ ][Set ID][ ][Data][Cr]Data 00: Volume mute on (Volume off)Data 01: Volume mute off (Volume on)Acknowledgement [e][ ][Set ID][ ][OK/NG][Data][x]06. Volume Control (Command: k f)To adjust volume.You can also adjust volume with the volume buttons on remote control.Transmission [k][f][ ][Set ID][ ][Data][Cr]Data Min: 00 ~ Max: 64 (*transmit by Hexadecimal code)*Refer to “Real data mapping”.Acknowledgement [f][ ][Set ID][ ][OK/NG][Data][x]07. Contrast (Command: k g)To adjust screen contrast.You can also adjust contrast in the PICTURE menu.Transmission [k][g][ ][Set ID][ ][Data][Cr]Data Min: 00 ~ Max: 64 (*transmit by Hexadecimal code)*Refer to “Real data mapping”.Acknowledgement [g][ ][Set ID][ ][OK/NG][Data][x]08. Brightness (Command: k h)To adjust screen brightness.You can also adjust brightness in the PICTURE menu.Transmission [k][h][ ][Set ID][ ][Data][Cr]Data Min: 00 ~ Max: 64 (*transmit by Hexadecimal code)*Refer to “Real data mapping”.Acknowledgement [h][ ][Set ID][ ][OK/NG][Data][x]09. Color (Command: k i)To adjust screen color.You can also adjust color in the PICTURE menu.Transmission [k][i][ ][Set ID][ ][Data][Cr]Data Min: 00 ~ Max: 64 (*transmit by Hexadecimal code)*Refer to “Real data mapping”.Acknowledgement [i][ ][Set ID][ ][OK/NG][Data][x]10. Tint (Command: k j)To adjust screen tint.You can also adjust tint in the PICTURE menu.Transmission [k][j][ ][Set ID][ ][Data][Cr]Data Red: 00 ~ Green: 64 (*transmit by Hexadecimal code)*Refer to “Real data mapping”.Acknowledgement [ j ][ ][Set ID][ ][OK/NG][Data][x]11. Sharpness (Command: k k)To adjust screen sharpness.You can also adjust sharpness in the PICTURE menu.Transmission [k][k][ ][Set ID][ ][Data][Cr]Data Min: 00 ~ Max: 64 (*transmit by Hexadecimal code)*Refer to “Real data mapping”.Acknowledgement [k][ ][Set ID][ ][OK/NG][Data][x]](https://usermanual.wiki/LG-Electronics-USA/26LK330UB/User-Guide-1401394-Page-49.png)
![97ENGENGLISHEXTERNAL CONTROL DEVICE SETUP12. OSD Select (Command: k l)To select OSD (On Screen Display) on/off.Transmission [k][l][ ][Set ID][ ][Data][Cr]Data 00: OSD off Data 01: OSD onAcknowledgement [l][ ][Set ID][ ][OK/NG][Data][x]13. Remote Control Lock Mode (Command: k m)To lock the remote control and the front panel controls on the set.Transmission [k][m][ ][Set ID][ ][Data][Cr]Data 00: Lock off Data 01: Lock onAcknowledgement [m][ ][Set ID][ ][OK/NG][Data][x]If you’re not using the remote control and front panelcontrols on the Monitor set, use this mode. When main power is on/off, remote control lock is released.If Key Lock is on in the standby mode, TV will not turn on by POWER button of remote control and on the TV.14. Treble (Command: k r)To adjust treble.You can also adjust treble in the AUDIO menu.Transmission [k][r][ ][Set ID][ ][Data][Cr]Data Min: 00 ~ Max: 64 (*transmit by Hexadecimal code)*Refer to “Real data mapping”.Acknowledgement [r][ ][Set ID][ ][OK/NG][Data][x]15. Bass (Command: k s)To adjust bass.You can also adjust bass in the AUDIO menu.Transmission [k][s][ ][Set ID][ ][Data][Cr]Data Min: 00 ~ Max: 64 (*transmit by Hexadecimal code)*Refer to “Real data mapping”.Acknowledgement [s][ ][Set ID][ ][OK/NG][Data][x]16. Balance (Command: k t)To adjust balance.You can also adjust balance in the AUDIO menu.Transmission [k][t][ ][Set ID][ ][Data][Cr]Data Min: 00 ~ Max: 64 (*transmit by Hexadecimal code)*Refer to “Real data mapping”.Acknowledgement [t][ ][Set ID][ ][OK/NG][Data][x]17. 3D (Command: x t) (For 3D TV)To change 3D mode for TV.Transmission [x][t][ ][Set ID][ ][Data01][ ][Data02][ ][Data03][ ][Data04][Cr]Data1 00: 3D 01: 2D 02: 3D to 2D 03: 2D to 3DData2 00: Top and Bottom 01: Side by Side 02: Check Board 03: Frame SequentialData3 00: Right to Left 01: Left to RightData4 3D Depth: Min : 00 ~ Max : 14(*transmit by Hexadecimal code)* If TV doesn’t support ‘2D to 3D covert’ this value has no meaning.Acknowledgement [t][ ][OK][Data01][Data02][Data03][Data04][x][t][ ][NG][Data01][x]18. Color Temperature (Command: x u)To adjust color temperature.You can also adjust color temperature in the PICTURE menu.Transmission [x][u][ ][Set ID][ ][Data][Cr]Data Min: 00 ~ Max: 64 (*transmit by Hexadecimal code)*Refer to “Real data mapping”. Acknowledgement [u][ ][Set ID][ ][OK/NG][Data][x] 19. Extended 3D (Command: x v) (For 3D TV)To change 3D option for TV.Transmission [x][v][ ][Set ID][ ][Data01][ ][Data02][Cr]Data1: 3D option 00: 3D Picture Correction 01: 3D Depth (2D to 3D Only) 02: 3D Viewpoint 03: 3D Picture Size 04: 3D Picture Balance 05: 3D OptimizationData2: It has own range for each 3D option determined by Data1.1) When Data1 is 00 00: Right to Left 01: Left to Right2) When Data1 is 01, 02Data Min: 00 ~ Max: 14 (*transmit by Hexadecimal code)3) When Data1 is 03 00: Just Scan 01: 16:94) When Data1 is 04 00: Off 01: On5) When Data1 is 05Data Min: 00 ~ Max: 02 (*transmit by Hexadecimal code)Acknowledgement [v][ ][OK][Data1][Data2][x][v][ ][NG][Data1][x]* Use the feature depending on your model.98ENGENGLISHEXTERNAL CONTROL DEVICE SETUP20. ISM Method (Command: j p) ( Plasma )To avoid having a fixed image remain on screen.Transmission [j][p][ ][Set ID][ ][Data][Cr]Data 02: Orbiter 04: White Wash 08: Normal 20: Color WashAcknowledgement [p][ ][Set ID][ ][OK/NG][Data][x]21. Energy Saving (Command: j q)To control the energy saving function.Transmission [ j ][q][ ][Set ID][ ][Data][Cr]Data 00: off 01: Minimum 02: Medium 03: Maximum 04: Auto/Intelligent sensor (depending on model) 05: Screen offAcknowledgement [q][ ][Set ID][ ][OK/NG][Data][x]22. Auto Configuration (Command: j u)To adjust picture position and minimize image shaking automatically. Auto configuration only works in RGB-PC mode.Transmission [ j ][u][ ][Set ID][ ][Data][Cr]Data 01: To setAcknowledgement [u][ ][Set ID][ ][OK/NG][Data][x]23. Channel Tuning (Command: m a)To tune channel to following physical/major/minor number.Transmission [m][a][ ][Set ID][ ][Data00][ ][Data01][ ][Data02][ ][Data03][ ][Data04][ ][Data05][Cr]Digital channels have a Physical, Major, and Minor channel number. The Physical number is the actual digital channel number, the Major is the number that the channel should be mapped to, and the Minor is the sub-channel. Since the ATSC tuner automatically maps the channel to the Major number, the Physical number is not required when sending a command.Data 00: Physical Channel NumberNTSC air: 02~45, NTSC cable: 01, 0E~7DATSC air: 01~45, ATSC cable: 01~87Data 01 & 02: Major Channel NumberData 01: High byte Data 02: Low byteTwo bytes are available for the Major and Minor, normally only the second byte is used.Data 03 & 04: Minor Channel NumberNot needed for NTSC.The table above lists the binary code which must be converted to Hexadecimal before sending. For example:The binary code to tune the sub source to an NTSC cable channel is “1000 0001”, which translates to “81” in Hex.* 7th bit : For which source do you want to change the channel.* 6th bit: Use a two part or one part channel. Most cases just use 0 since it’s ignored when using NTSC.* 5th bit: Use 0 with NTSC since it can only use the physical channel number. Normally use 1 for ATSC since most times it doesn’t matter what the physical number is. * 4th bit: Set to 0.* 3-0 bits: Choose signal type.* Tune Command Examples:1. Tune to the analog (NTSC) cable channel 35.Data 00 = Physical of 35 = 23Data 01 & 02 = No Major = 00 00Data 03 & 04 = No Minor = 00 00Data 05 = 0000 0001 in binary = 01Total = ma 00 23 00 00 00 00 012. Tune to the digital (ATSC) local channel 30-3.Data 00 = Don’t know Physical = 00Data 01 & 02 = Major is 30 = 00 1EData 03 & 04 = Minor is 3 = 00 03Data 05 = 0010 0010 in binary = 22Total = ma 00 00 00 1E 00 03 2224. Channel Add/Del (Command: m b)To add and delete the channels.Transmission [m][b][ ][Set ID][ ][Data][Cr]Data 00: Channel Delete Data 01: Channel AddAcknowledgement [b][ ][Set ID][ ][OK/NG][Data][x]25. Key (Command: m c)To send IR remote key code.Transmission [m][c][ ][Set ID][ ][Data][Cr]Acknowledgement [c][ ][Set ID][ ][OK/NG][Data][x]When TV is in the standby mode, TV will turn on by POWER button of remote control only.26. Backlight (Command: m g) ( LCD )To adjust screen backlight.Transmission [m][g][ ][Set ID][ ][Data][Cr]Data Min:00 ~ Max:64 (*transmit by Hexadecimal code)*Refer to “Real data mapping”.Acknowledgement [g][ ][Set ID][ ][OK/NG][Data][x]](https://usermanual.wiki/LG-Electronics-USA/26LK330UB/User-Guide-1401394-Page-50.png)
![103ENGENGLISHOPEN SOURCE LICENSEThe source code for a work means the preferred form of the work for making modifications to it. For an executable work, complete source code means all the source code for all modules it contains, plus any associated interface definition files, plus the scripts used to control compilation and installation of the executable. However, as a special exception, the source code distributed need not include anything that is normally distributed (in either source or binary form) with the major components (compiler, kernel, and so on) of the operating system on which the executable runs, unless that component itself accompanies the executable.If distribution of executable or object code is made by offering access to copy from a designated place, then offering equivalent access to copy the source code from the same place counts as distribution of the source code, even though third parties are not compelled to copy the source along with the object code.4. You may not copy, modify, sublicense, or distribute the Program except as expressly provided under this License. Any attempt otherwise to copy, modify, sublicense or distribute the Program is void, and will automatically terminate your rights under this License. However, parties who have received copies, or rights, from you under this License will not have their licenses terminated so long as such parties remain in full compliance.5. You are not required to accept this License, since you have not signed it. However, nothing else grants you permission to modify or distribute the Program or its derivative works. These actions are prohibited by law if you do not accept this License. Therefore, by modifying or distributing the Program (or any work based on the Program), you indicate your acceptance of this License to do so, and all its terms and conditions for copying, distributing or modifying the Program or works based on it.6. Each time you redistribute the Program (or any work based on the Program), the recipient automatically receives a license from the original licensor to copy, distribute or modify the Program subject to these terms and conditions. You may not impose any further restrictions on the recipients’ exercise of the rights granted herein. You are not responsible for enforcing compliance by third parties to this License.7. If, as a consequence of a court judgment or allegation of patent infringement or for any other reason (not limited to patent issues), conditions are imposed on you (whether by court order, agreement or otherwise) that contradict the conditions of this License, they do not excuse you from the conditions of this License. If you cannot distribute so as to satisfy simultaneously your obligations under this License and any other pertinent obligations, then as a consequence you may not distribute the Program at all. For example, if a patent license would not permit royalty-free redistribution of the Program by all those who receive copies directly or indirectly through you, then the only way you could satisfy both it and this License would be to refrain entirely from distribution of the Program.If any portion of this section is held invalid or unenforceable under any particular circumstance, the balance of the section is intended to apply and the section as a whole is intended to apply in other circumstances.It is not the purpose of this section to induce you to infringe any patents or other property right claims or to contest validity of any such claims; this section has the sole purpose of protecting the integrity of the free software distribution system, which is implemented by public license practices. Many people have made generous contributions to the wide range of software distributed through that system in reliance on consistent application of that system; it is up to the author/donor to decide if he or she is willing to distribute software through any other system and a licensee cannot impose that choice.This section is intended to make thoroughly clear what is believed to be a consequence of the rest of this License.8. If the distribution and/or use of the Program is restricted in certain countries either by patents or by copyrighted inter-faces, the original copyright holder who places the Program under this License may add an explicit geographical distribu-tion limitation excluding those countries, so that distribution is permitted only in or among countries not thus excluded. In such case, this License incorporates the limitation as if written in the body of this License.9. The Free Software Foundation may publish revised and/or new versions of the General Public License from time to time. Such new versions will be similar in spirit to the present version, but may differ in detail to address new problems or concerns.Each version is given a distinguishing version number. If the Program specifies a version number of this License which 104ENGENGLISHOPEN SOURCE LICENSEapplies to it and “any later version”, you have the option of following the terms and conditions either of that version or of any later version published by the Free Software Foundation. If the Program does not specify a version number of this License, you may choose any version ever published by the Free Software Foundation.10. If you wish to incorporate parts of the Program into other free programs whose distribution conditions are different, write to the author to ask for permission. For software which is copyrighted by the Free Software Foundation, write to the Free Software Foundation; we sometimes make exceptions for this. Our decision will be guided by the two goals of preserving the free status of all derivatives of our free software and of promoting the sharing and reuse of software generally.NO WARRANTY11. BECAUSE THE PROGRAM IS LICENSED FREE OF CHARGE, THERE IS NO WARRANTY FOR THE PROGRAM, TO THE EXTENT PERMITTED BY APPLICABLE LAW. EXCEPT WHEN OTHERWISE STATED IN WRITING THE COPYRIGHT HOLDERS AND/OR OTHER PARTIES PROVIDE THE PROGRAM “AS IS” WITHOUT WARRANTY OF ANY KIND, EITHER EXPRESSED OR IMPLIED, INCLUDING, BUT NOT LIMITED TO, THE IMPLIED WARRANTIES OF MERCHANTABILITY AND FITNESS FOR A PARTICULAR PURPOSE. THE ENTIRE RISK AS TO THE QUALITY AND PERFORMANCE OF THE PROGRAM IS WITH YOU. SHOULD THE PROGRAM PROVE DEFECTIVE, YOU ASSUME THE COST OF ALL NECESSARY SERVICING, REPAIR OR CORRECTION.12. IN NO EVENT UNLESS REQUIRED BY APPLICABLE LAW OR AGREED TO IN WRITING WILL ANY COPYRIGHT HOLDER, OR ANY OTHER PARTY WHO MAY MODIFY AND/OR REDISTRIBUTE THE PROGRAM AS PERMITTED ABOVE, BE LIABLE TO YOU FOR DAMAGES, INCLUDING ANY GENERAL, SPECIAL, INCIDENTAL OR CONSEQUENTIAL DAMAGES ARISING OUT OF THE USE OR INABILITY TO USE THE PROGRAM (INCLUDING BUT NOT LIMITED TO LOSS OF DATA OR DATA BEING RENDERED INACCURATE OR LOSSES SUSTAINED BY YOU OR THIRD PARTIES OR A FAILURE OF THE PROGRAM TO OPERATE WITH ANY OTHER PROGRAMS), EVEN IF SUCH HOLDER OR OTHER PARTY HAS BEEN ADVISED OF THE POSSIBILITY OF SUCH DAMAGES.END OF TERMS AND CONDITIONSGNU Lesser General Public LicenseVersion 2.1, February 1999Copyright (C) 1991, 1999 Free Software Foundation, Inc. 59 Temple Place, Suite 330, Boston, MA 02111-1307 USA Everyone is permitted to copy and distribute verbatim copies of this license document, but changing it is not allowed.[This is the first released version of the Lesser GPL. It also counts as the successor of the GNU Library Public License, version 2, hence the version number 2.1.]PreambleThe licenses for most software are designed to take away your freedom to share and change it. By contrast, the GNU General Public Licenses are intended to guarantee your freedom to share and change free software--to make sure the software is free for all its users. This license, the Lesser General Public License, applies to some specially designated software packages--typically libraries--of the Free Software Foundation and other authors who decide to use it. You can use it too, but we suggest you first think carefully about whether this license or the ordinary General Public License is the better strategy to use in any particular case, based on the explanations below. When we speak of free software, we are referring to freedom of use, not price. Our General Public Licenses are designed to make sure that you have the freedom to distribute copies of free software (and charge for this service if you wish); that you receive source code or can get it if you want it; that you can change the software and use pieces of it in new free programs; and that you are informed that you can do these things.To protect your rights, we need to make restrictions that forbid distributors to deny you these rights or to ask you to](https://usermanual.wiki/LG-Electronics-USA/26LK330UB/User-Guide-1401394-Page-53.png)
![115ENGENGLISHOPEN SOURCE LICENSEPROVE DEFECTIVE IN ANY RESPECT, YOU (NOT THE INITIAL DEVELOPER OR ANY OTHER CONTRIBUTOR) ASSUME THE COST OF ANY NECESSARY SERVICING, REPAIR OR CORRECTION. THIS DISCLAIMER OF WARRANTY CONSTITUTES AN ESSENTIAL PART OF THIS LICENSE. NO USE OF ANY COVERED CODE IS AUTHORIZED HEREUNDER EXCEPT UNDER THIS DISCLAIMER.8. TERMINATION.8.1. This License and the rights granted hereunder will terminate automatically if You fail to comply with terms herein and failto cure such breach within 30 days of becoming aware of the breach. All sublicenses to the Covered Code which are properly granted shall survive any termination of this License. Provisions which, by their nature, must remain in effect beyond the termination of this License shall survive.8.2. If You initiate litigation by asserting a patent infringement claim (excluding declatory judgment actions) against Initial Developer or a Contributor (the Initial Developer or Contributor against whom You file such action is referred to as “Participant”) alleging that:(a) such Participant’s Contributor Version directly or indirectly infringes any patent, then any and all rights granted by such Participant to You under Sections 2.1 and/or 2.2 of this License shall, upon 60 days notice from Participant terminate prospectively, unless if within 60 days after receipt of notice You either: (i) agree in writing to pay Participant a mutually agreeable reasonable royalty for Your past and future use of Modifications made by such Participant, or (ii) withdraw Your litigation claim with respect to the Contributor Version against such Participant. If within 60 days of notice, a reasonable royalty and payment arrangement are not mutually agreed upon in writing by the parties or the litigation claim is not withdrawn, the rights granted by Participant to You under Sections 2.1 and/or 2.2 automatically terminate at the expiration of the 60 day notice period specified above.(b) any software, hardware, or device, other than such Participant’s Contributor Version, directly or indirectly infringes any patent, then any rights granted to You by such Participant under Sections 2.1(b) and 2.2(b) are revoked effective as of the date You first made, used, sold, distributed, or had made, Modifications made by that Participant.8.3. If You assert a patent infringement claim against Participant alleging that such Participant’s Contributor Version directly or indirectly infringes any patent where such claim is resolved (such as by license or settlement) prior to the ini-tiation of patent infringement litigation, then the reasonable value of the licenses granted by such Participant under Sections 2.1 or 2.2 shall be taken into account in determining the amount or value of any payment or license. 8.4. In the event of termination under Sections 8.1 or 8.2 above, all end user license agreements (excluding distributors and resell-ers) which have been validly granted by You or any distributor hereunder prior to termination shall survive termination. 9. LIMITATION OF LIABILITY.UNDER NO CIRCUMSTANCES AND UNDER NO LEGAL THEORY, WHETHER TORT (INCLUDING NEGLIGENCE), CONTRACT, OR OTHERWISE, SHALL YOU, THE INITIAL DEVELOPER, ANY OTHER CONTRIBUTOR, OR ANY DISTRIBUTOR OF COVERED CODE, OR ANY SUPPLIER OF ANY OF SUCH PARTIES, BE LIABLE TO ANY PERSON FOR ANY INDIRECT, SPECIAL, INCIDENTAL, OR CONSEQUENTIAL DAMAGES OF ANY CHARACTER INCLUDING, WITHOUT LIMITATION, DAMAGES FOR LOSS OF GOODWILL, WORK STOPPAGE, COMPUTER FAILURE OR MALFUNCTION, OR ANY AND ALL OTHER COMMERCIAL DAMAGES OR LOSSES, EVEN IF SUCH PARTY SHALL HAVE BEEN INFORMED OF THE POSSIBILITY OF SUCH DAMAGES. THIS LIMITATION OF LIABILITY SHALL NOT APPLY TO LIABILITY FOR DEATH OR PERSONAL INJURY RESULTING FROM SUCH PARTY’S NEGLIGENCE TO THE EXTENT APPLICABLE LAW PROHIBITS SUCH LIMITATION. SOME JURISDICTIONS DO NOT ALLOW THE EXCLUSION OR LIMITATION OF INCIDENTAL OR CONSEQUENTIAL DAMAGES, SO THIS EXCLUSION AND LIMITATION MAY NOT APPLY TO YOU.10. U.S. GOVERNMENT END USERS.The Covered Code is a ‘’commercial item,’’ as that term is defined in 48 C.F.R. 2.101 (Oct. 1995), consisting of ‘’com-mercial computer software’’ and ‘’commercial computer software documentation,’’ as such terms are used in 48 C.F.R. 12.212 (Sept. 1995). Consistent with 48 C.F.R. 12.212 and 48 C.F.R. 227.7202-1 through 227.7202-4 (June 1995), all U.S. Government End Users acquire Covered Code with only those rights set forth herein.116ENGENGLISHOPEN SOURCE LICENSE11. MISCELLANEOUS.This License represents the complete agreement concerning subject matter hereof. If any provision of this License is held to be unenforceable, such provision shall be reformed only to the extent necessary to make it enforceable. This License shall be governed by California law provisions (except to the extent applicable law, if any, provides otherwise), excluding its conflict-of-law provisions. With respect to disputes in which at least one party is a citizen of, or an entity chartered or registered to do business in the United States of America, any litigation relating to this License shall be subject to the jurisdiction of the Federal Courts of the Northern District of California, with venue lying in Santa Clara County, California, with the losing party responsible for costs, including without limitation, court costs and reasonable attorneys’ fees and expenses. The application of the United Nations Convention on Contracts for the International Sale of Goods is expressly excluded. Any law or regulation which provides that the language of a contract shall be construed against the drafter shall not apply to this License.12. RESPONSIBILITY FOR CLAIMS.As between Initial Developer and the Contributors, each party is responsible for claims and damages arising, directly or indirectly, out of its utilization of rights under this License and You agree to work with Initial Developer and Contributors to distribute such responsibility on an equitable basis. Nothing herein is intended or shall be deemed to constitute any admission of liability.13. MULTIPLE-LICENSED CODE.Initial Developer may designate portions of the Covered Code as Multiple-Licensed. Multiple-Licensed means that the Initial Developer permits you to utilize portions of the Covered Code under Your choice of the MPL or the alternative licenses, if any, specified by the Initial Developer in the file described in Exhibit A.EXHIBIT A -Mozilla Public License.``The contents of this file are subject to the Mozilla Public License Version 1.1 (the “License”); you may not use this file except in compliance with the License. You may obtain a copy of the License at http://www.mozilla.org/MPL/ Software distributed under the License is distributed on an “AS IS” basis, WITHOUT WARRANTY OF ANY KIND, either express or implied. See the License for the specific language governing rights and limitations under the License.The Original Code is ______________________________________.The Initial Developer of the Original Code is ________________________.Portions created by ______________________ are Copyright (C) _____________________________.All Rights Reserved.Contributor(s): ______________________________________.Alternatively, the contents of this file may be used under the termsof the _____ license (the [___] License), in which case the provisions of [______] License are applicable instead of those above.If you wish to allow use of your version of this file only under the terms of the [____] License and not to allow others to use your version of this file under the MPL, indicate your decision bydeleting the provisions above and replace them with the notice andother provisions required by the [___] License. If you do not delete the provisions above, a recipient may use your version of this file under either the MPL or the [___] License.”[NOTE: The text of this Exhibit A may differ slightly from the text of the notices in the Source Code files of the Original Code. You should use the text of this Exhibit A rather than the text found in the Original Code Source Code for Your Modifications.]](https://usermanual.wiki/LG-Electronics-USA/26LK330UB/User-Guide-1401394-Page-59.png)
![117ENGENGLISHOPEN SOURCE LICENSEOpenSSL LicenseCopyright (c) 1998-2008 The OpenSSL Project. All rights reserved. Redistribution and use in source and binary forms, with or without modification, are permitted provided that the following conditions are met:1. Redistributions of source code must retain the above copyright notice, this list of conditions and the following dis-claimer.2. Redistributions in binary form must reproduce the above copyright notice, this list of conditions and the following disclaimer in the documentation and/or other materials provided with the distribution.3. All advertising materials mentioning features or use of this software must display the following acknowledgment: “This product includes software developed by the OpenSSL Project for use in the OpenSSL Toolkit. (http://www.opens-sl.org/)”4. The names “OpenSSL Toolkit” and “OpenSSL Project” must not be used to endorse or promote products derived from this software without prior written permission. For written permission, please contact openssl-core@openssl.org.5. Products derived from this software may not be called “OpenSSL” nor may “OpenSSL” appear in their names without prior written permission of the OpenSSL Project.6. Redistributions of any form whatsoever must retain the following acknowledgment:“This product includes software developed by the OpenSSL Project for use in the OpenSSL Toolkit (http://www.openssl.org/)”THIS SOFTWARE IS PROVIDED BY THE OpenSSL PROJECT ``AS IS’’ AND ANY EXPRESSED OR IMPLIED WARRANTIES, INCLUDING, BUT NOT LIMITED TO, THE IMPLIED WARRANTIES OF MERCHANTABILITY AND FITNESS FOR A PARTICULAR PURPOSE ARE DISCLAIMED. IN NO EVENT SHALL THE OpenSSL PROJECT OR ITS CONTRIBUTORS BE LIABLE FOR ANY DIRECT, INDIRECT, INCIDENTAL, SPECIAL, EXEMPLARY, OR CONSEQUENTIAL DAMAGES (INCLUDING, BUT NOT LIMITED TO, PROCUREMENT OF SUBSTITUTE GOODS OR SERVICES; LOSS OF USE, DATA, OR PROFITS; OR BUSINESS INTERRUPTION) HOWEVER CAUSED AND ON ANY THEORY OF LIABILITY, WHETHER IN CONTRACT, STRICT LIABILITY, OR TORT (INCLUDING NEGLIGENCE OR OTHERWISE) ARISING IN ANY WAY OUT OF THE USE OF THIS SOFTWARE, EVEN IF ADVISED OF THE POSSIBILITY OF SUCH DAMAGE. This product includes cryptographic software written by Eric Young (eay@cryptsoft.com). This product includes software written by Tim Hudson (tjh@cryptsoft.com).Original SSLeay LicenseCopyright (C) 1995-1998 Eric Young (eay@cryptsoft.com) All rights reserved.This package is an SSL implementation written by Eric Young (eay@cryptsoft.com).The implementation was written so as to conform with Netscapes SSL.This library is free for commercial and non-commercial use as long as the following conditions are aheared to. The fol-lowing conditions apply to all code found in this distribution, be it the RC4, RSA, lhash, DES, etc., code; not just the SSL code. The SSL documentation included with this distribution is covered by the same copyright terms except that the holder is Tim Hudson (tjh@cryptsoft.com). Copyright remains Eric Young’s, and as such any Copyright notices in the code are not to be removed. If this package is used in a product, Eric Young should be given attribution as the author of the parts of the library used. This can be in the form of a textual message at program startup or in documentation (online or textual) provided with the package. Redistribution and use in source and binary forms, with or without modification, are permitted provided that the following conditions are met:1. Redistributions of source code must retain the copyright notice, this list of conditions and the following disclaimer.2. Redistributions in binary form must reproduce the above copyright notice, this list of conditions and the following disclaimer in the documentation and/or other materials provided with the distribution.118ENGENGLISHOPEN SOURCE LICENSE3. All advertising materials mentioning features or use of this software must display the following acknowledgement:“This product includes cryptographic software written by Eric Young (eay@cryptsoft.com)”The word ‘cryptographic’ can be left out if the rouines from the library being used are not cryptographic related :-).4. If you include any Windows specific code (or a derivative thereof) from the apps directory (application code) you must include an acknowledgement:“This product includes software written by Tim Hudson (tjh@cryptsoft.com)” THIS SOFTWARE IS PROVIDED BY ERIC YOUNG ``AS IS’’ AND ANY EXPRESS OR IMPLIED WARRANTIES, INCLUDING, BUT NOT LIMITED TO, THE IMPLIED WARRANTIES OF MERCHANTABILITY AND FITNESS FOR A PARTICULAR PURPOSE ARE DISCLAIMED. IN NO EVENT SHALL THE AUTHOR OR CONTRIBUTORS BE LIABLE FOR ANY DIRECT, INDIRECT, INCIDENTAL, SPECIAL, EXEMPLARY, OR CONSEQUENTIAL DAMAGES (INCLUDING, BUT NOT LIMITED TO, PROCUREMENT OF SUBSTITUTE GOODS OR SERVICES; LOSS OF USE, DATA, OR PROFITS; OR BUSINESS INTERRUPTION) HOWEVER CAUSED AND ON ANY THEORY OF LIABILITY, WHETHER IN CONTRACT, STRICT LIABILITY, OR TORT (INCLUDING NEGLIGENCE OR OTHERWISE) ARISING IN ANY WAY OUT OF THE USE OF THIS SOFTWARE, EVEN IF ADVISED OF THE POSSIBILITY OF SUCH DAMAGE. The licence and distribution terms for any publically available version or derivative of this code cannot be changed. i.e. this code cannot simply be copied and put under another distribution licence [including the GNU Public Licence.]MIT license- libcurlCopyright (c) 1996 - 2010, Daniel Stenberg, <daniel@haxx.se>.All rights reserved. Permission to use, copy, modify, and distribute this software for any purpose with or without fee is hereby granted, provided that the above copyright notice and this permission notice appear in all copies. THE SOFTWARE IS PROVIDED “AS IS”, WITHOUT WARRANTY OF ANY KIND, EXPRESS OR IMPLIED, INCLUDING BUT NOT LIMITED TO THE WARRANTIES OF MERCHANTABILITY, FITNESS FOR A PARTICULAR PURPOSE AND NONINFRINGEMENT OF THIRD PARTY RIGHTS. IN NO EVENT SHALL THE AUTHORS OR COPYRIGHT HOLDERS BE LIABLE FOR ANY CLAIM, DAMAGES OR OTHER LIABILITY, WHETHER IN AN ACTION OF CONTRACT, TORT OR OTHERWISE, ARISING FROM, OUT OF OR IN CONNECTION WITH THE SOFTWARE OR THE USE OR OTHER DEALINGS IN THE SOFTWARE. Except as contained in this notice, the name of a copyright holder shall not be used in advertising or otherwise to promote the sale, use or other dealings in this Software without prior written authorization of the copyright holder.- ncurses Copyright (c) 1998 Free Software Foundation, Inc. Permission is hereby granted, free of charge, to any person obtaining a copy of this software and associated documen-tation files (the “Software”), to deal in the Software without restriction, including without limitation the rights to use, copy, modify, merge, publish, distribute, distribute with modifications, sublicense, and/or sell copies of the Software, and to permit persons to whom the Software is furnished to do so, subject to the following conditions: The above copyright notice and this permission notice shall be included in all copies or substantial portions of the Software. THE SOFTWARE IS PROVIDED “AS IS”, WITHOUT WARRANTY OF ANY KIND, EXPRESS OR IMPLIED, INCLUDING BUT NOT LIMITED TO THE WARRANTIES OF MERCHANTABILITY, FITNESS FOR A PARTICULAR PURPOSE AND NONINFRINGEMENT. IN NO EVENT SHALL THE ABOVE COPYRIGHT HOLDERS BE LIABLE FOR ANY CLAIM, DAMAGES OR OTHER LIABILITY, WHETHER IN AN ACTION OF CONTRACT, TORT OR OTHERWISE, ARISING FROM, OUT OF OR IN CONNECTION WITH THE SOFTWARE OR HE USE OR OTHER DEALINGS IN THE SOFTWARE.](https://usermanual.wiki/LG-Electronics-USA/26LK330UB/User-Guide-1401394-Page-60.png)