LG Electronics USA 42PC3RVUJ Plasma Display Panel User Manual 577Fen 1
LG Electronics USA Plasma Display Panel 577Fen 1
UserManual.wiki
>
LG Electronics USA
>
42PC3RVUJ User Manual
User Manual
Navigation menu
Upload a User Manual
Namespaces
Wiki Guide
HTML
PDF
Info
Views
User Manual
Discussion / Help
Navigation


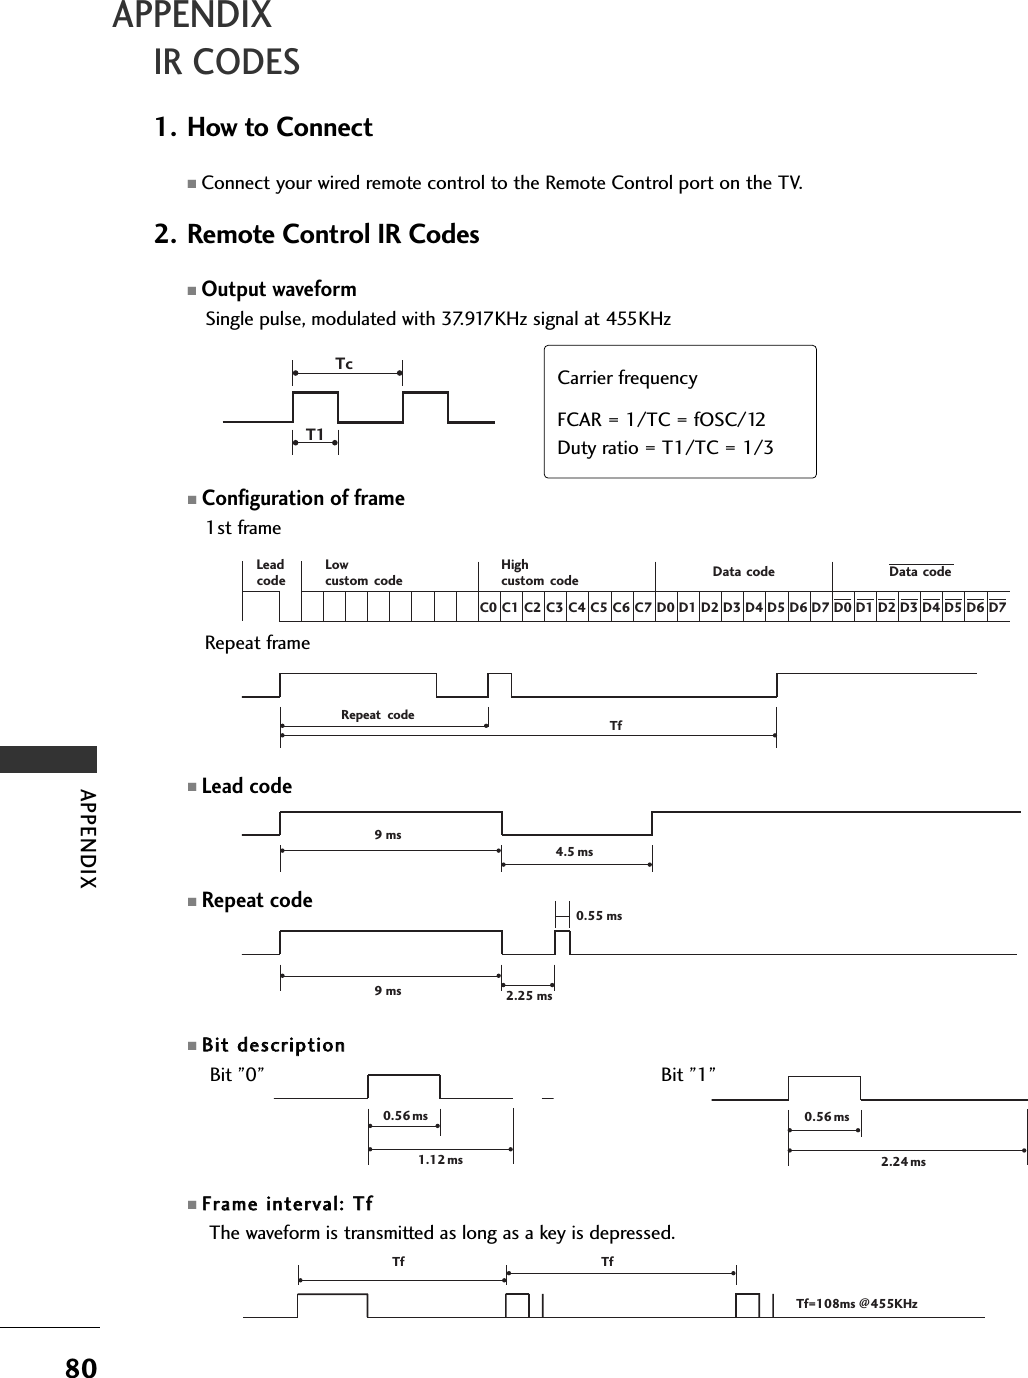
![5CONTENTTV MENUSSccrreeeenn MMeennuu OOppttiioonnssAuto Configure (RGB [PC] mode only) . . . . . . . . . . . .58Manual Configure . . . . . . . . . . . . . . . . . . . . . . . . . . . . . . . . . . . . . . . .59Setting the Picture Format . . . . . . . . . . . . . . . . . . . . . . . . . . . .60Selecting Wide VGA/XGA mode . . . . . . . . . . . . . . . . . . .61Initializing (Reset to original factory settings) . . . . . . . . . . . . . . . .62APPENDIXExternal Control Device Setup . . . . . . . . . . . . . . . . . . . . . . . . . . .63IR Codes . . . . . . . . . . . . . . . . . . . . . . . . . . . . . . . . . . . . . . . . . . . . . . . . . . . . . . .70Remote control IR codes . . . . . . . . . . . . . . . . . . . . . . . . . . . . . . . . . .71Programming the Remote . . . . . . . . . . . . . . . . . . . . . . . . . . . . . . . . .72Programming code . . . . . . . . . . . . . . . . . . . . . . . . . . . . . . . . . . . . .72-73Troubleshooting Checklist . . . . . . . . . . . . . . . . . . . . . . . . . . . .74-75Maintenance . . . . . . . . . . . . . . . . . . . . . . . . . . . . . . . . . . . . . . . . . . . . . . . . . .76Product Specifications . . . . . . . . . . . . . . . . . . . . . . . . . . . . . . . .77-78](https://usermanual.wiki/LG-Electronics-USA/42PC3RVUJ/User-Guide-657892-Page-6.png)


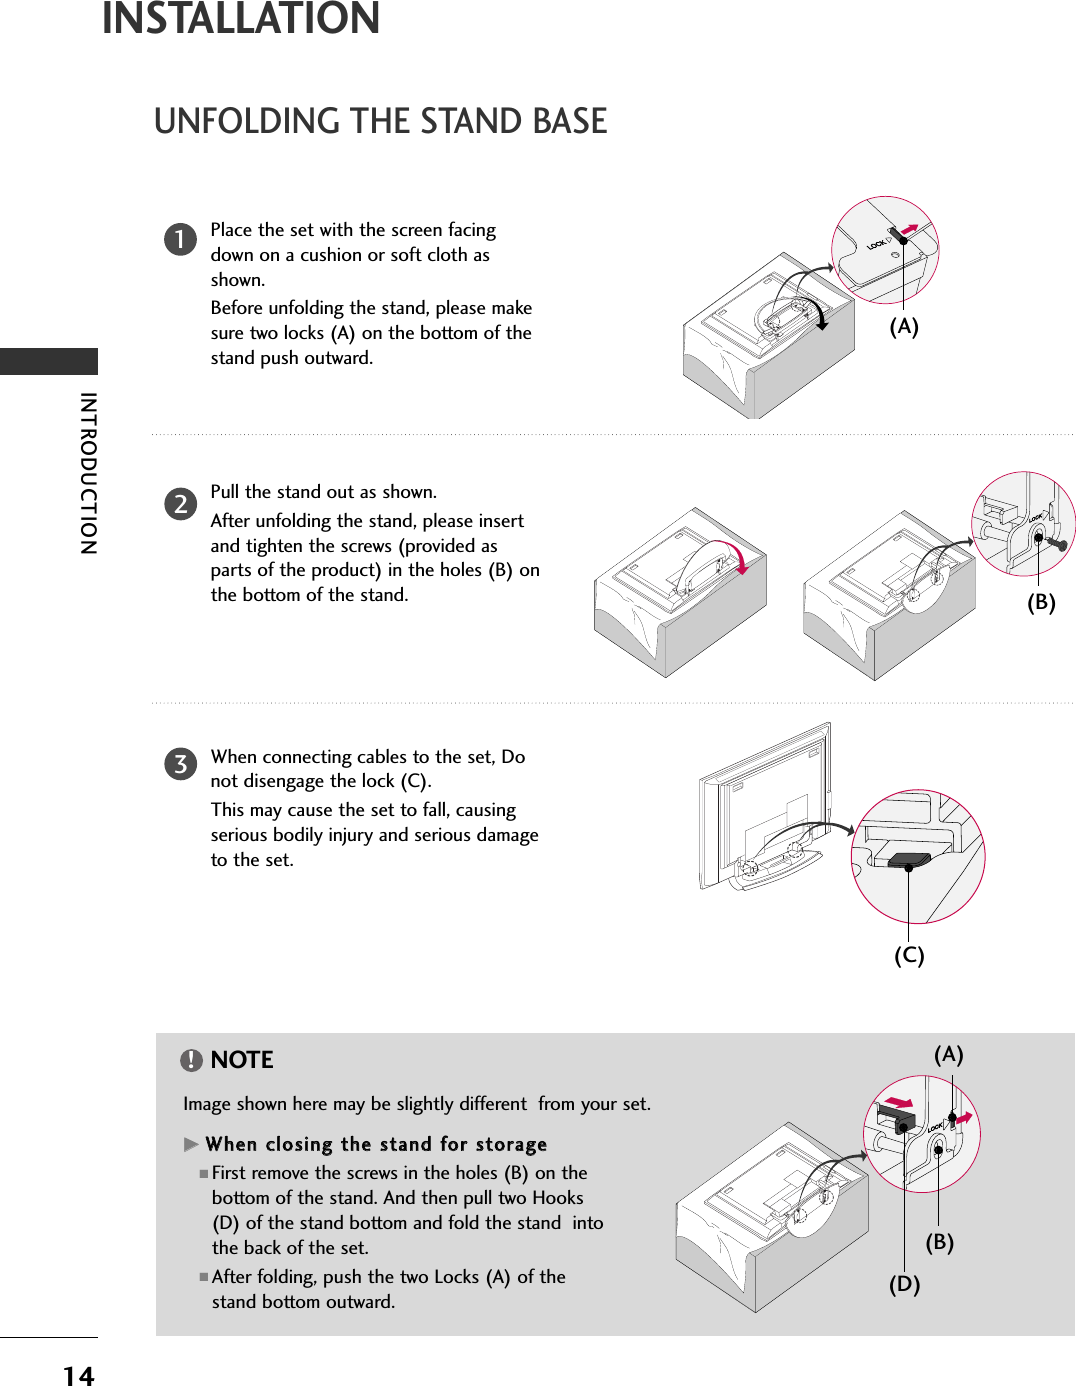

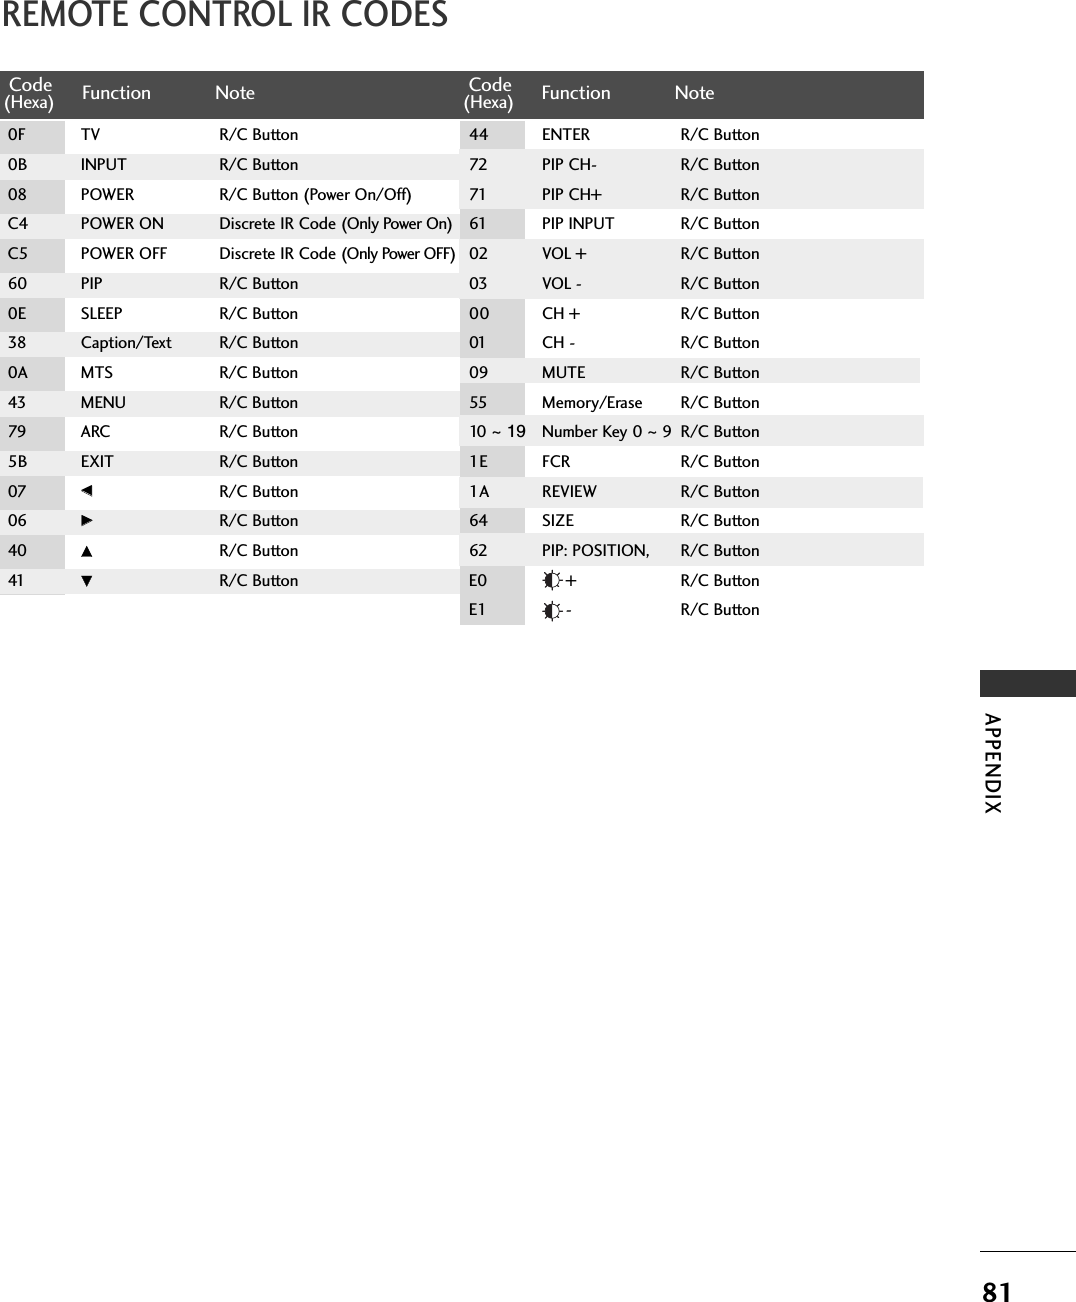
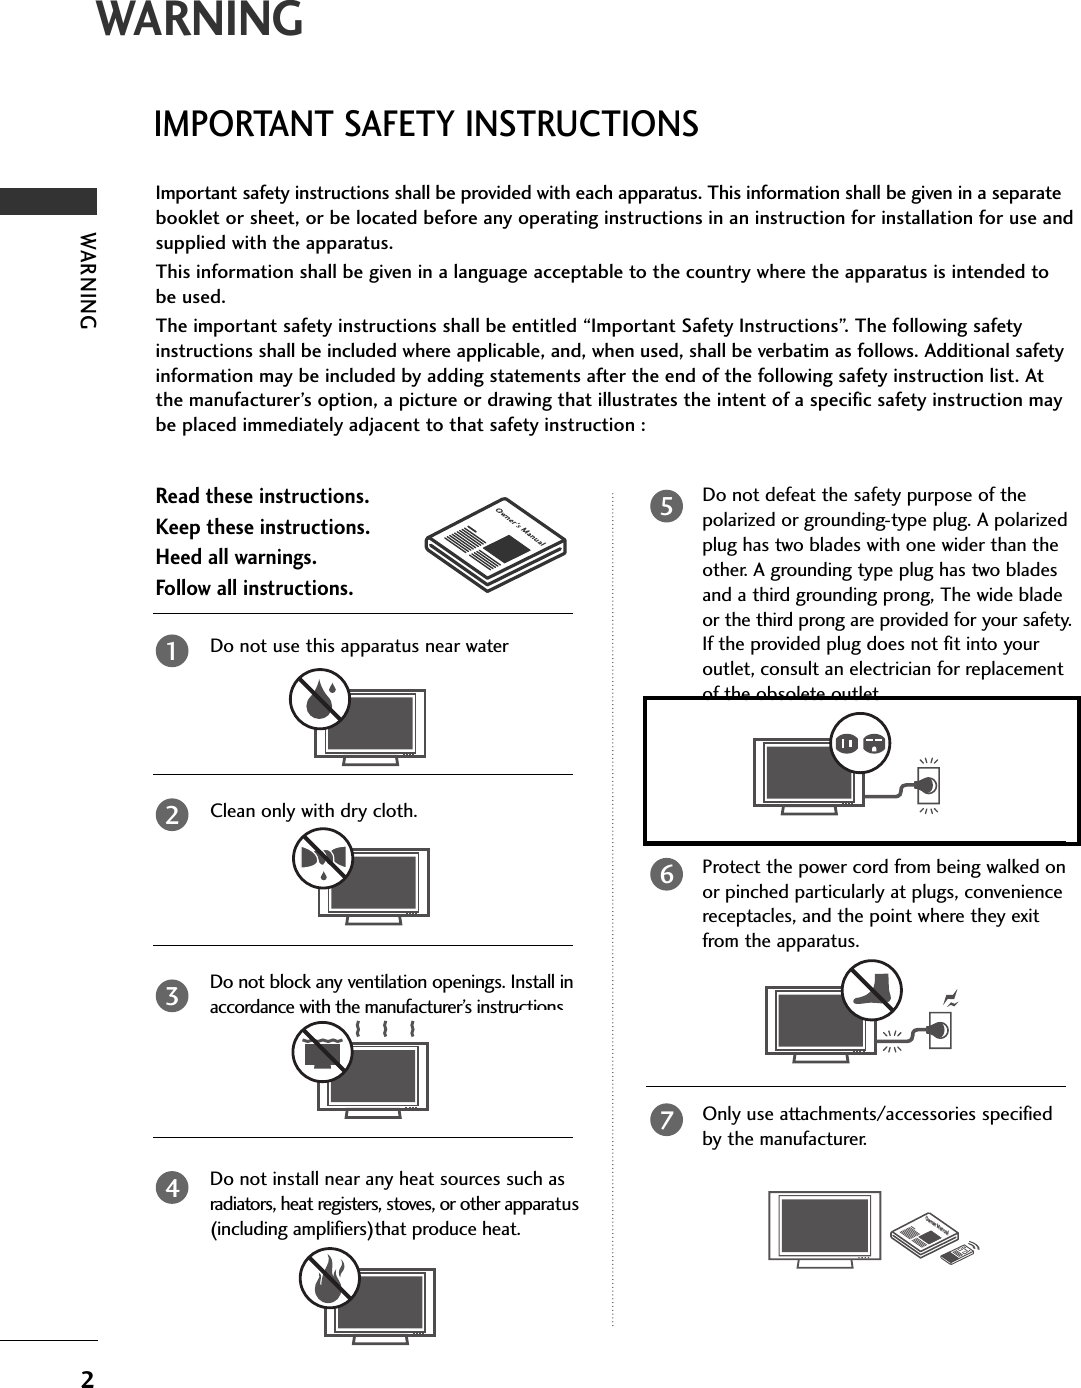
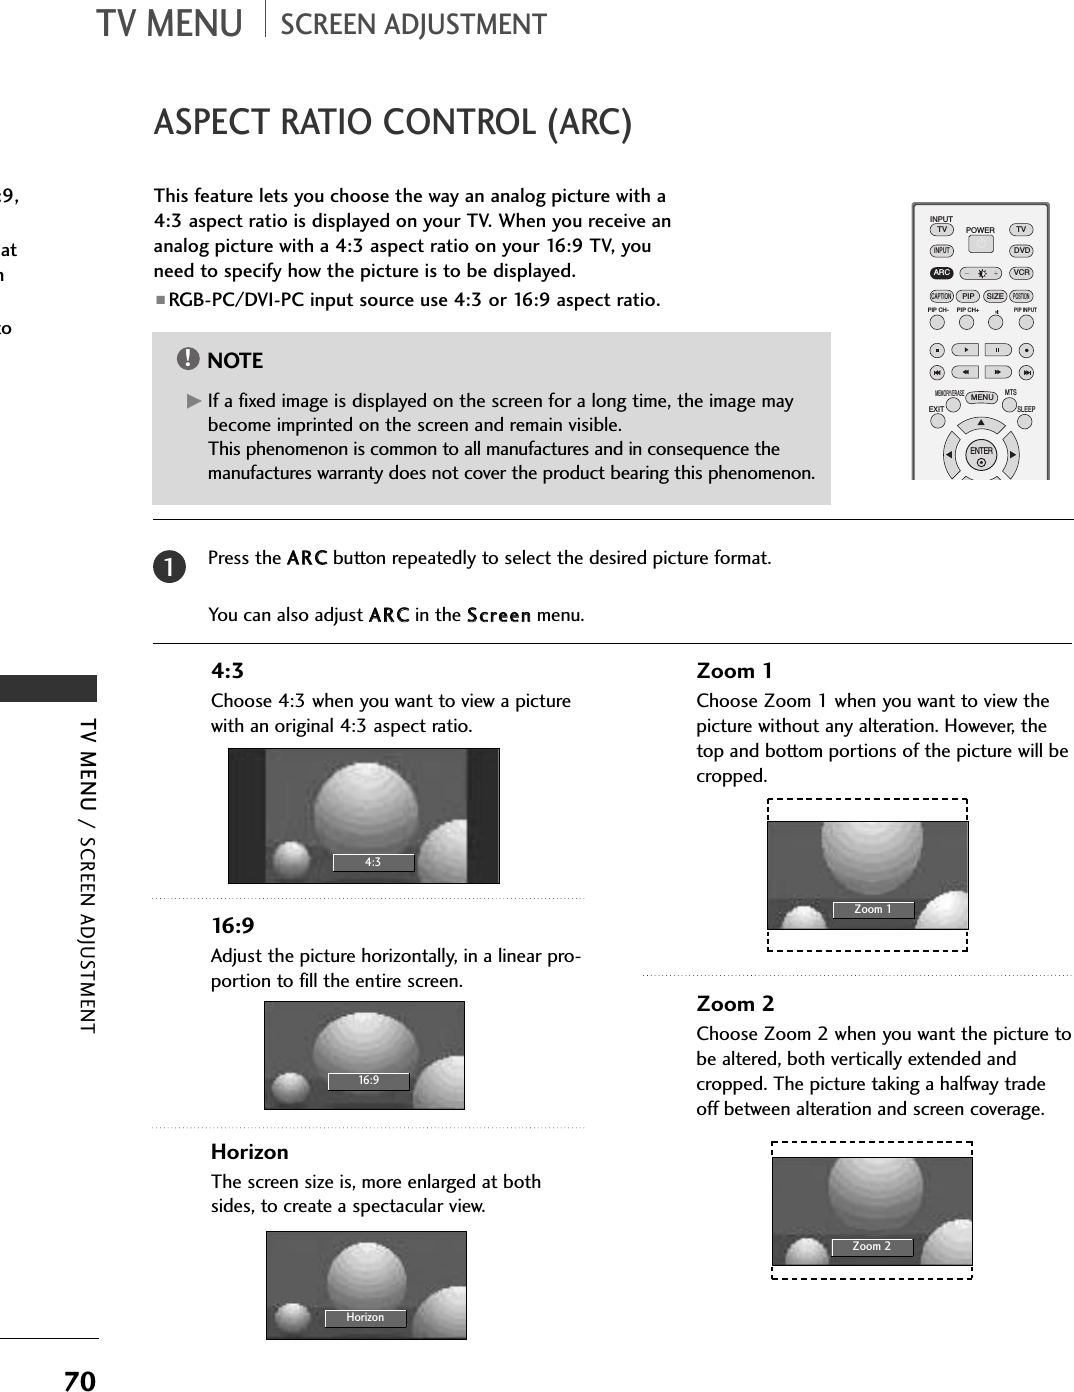
![28CONNECTIONS & SETUPCONNECTIONS & SETUPHorizontal Vertical Frequency(KHz) Frequency(Hz)31.5 70.831.5 70.831.5 59.937.9 60.348.4 60.047.8 59.947.7 59.847.7 59.8Resolution 640x350720x400640x480800x6001024 x 768128 0 x 76 8136 0 x 76 81366 x 768Supported Display Resolution (RGB[PC] mode)(26/32LC2R)Supported Display Resolution (RGB[PC] mode)(42PC1RV)Horizontal Vertical Frequency(KHz) Frequency(Hz)31.5 70.831.5 70.831.5 59.931.5 60.031.5 60.037.9 60.348.4 60.0Resolution 640x350720x400640x480848x480852x480800x6001024 x 768](https://usermanual.wiki/LG-Electronics-USA/42PC3RVUJ/User-Guide-657892-Page-29.png)

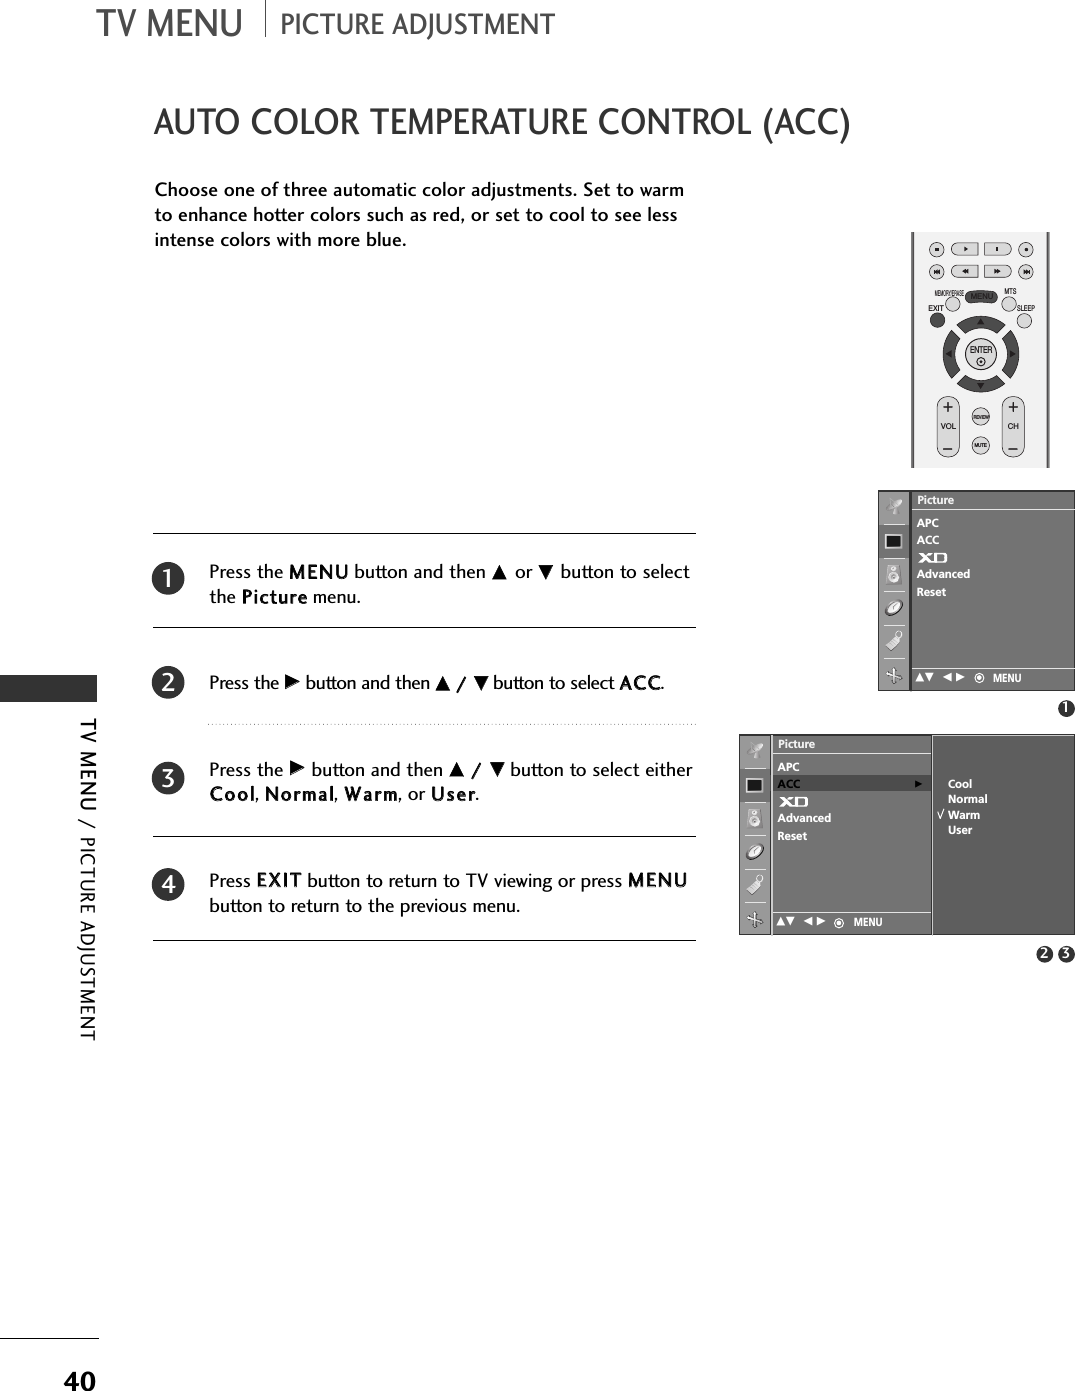

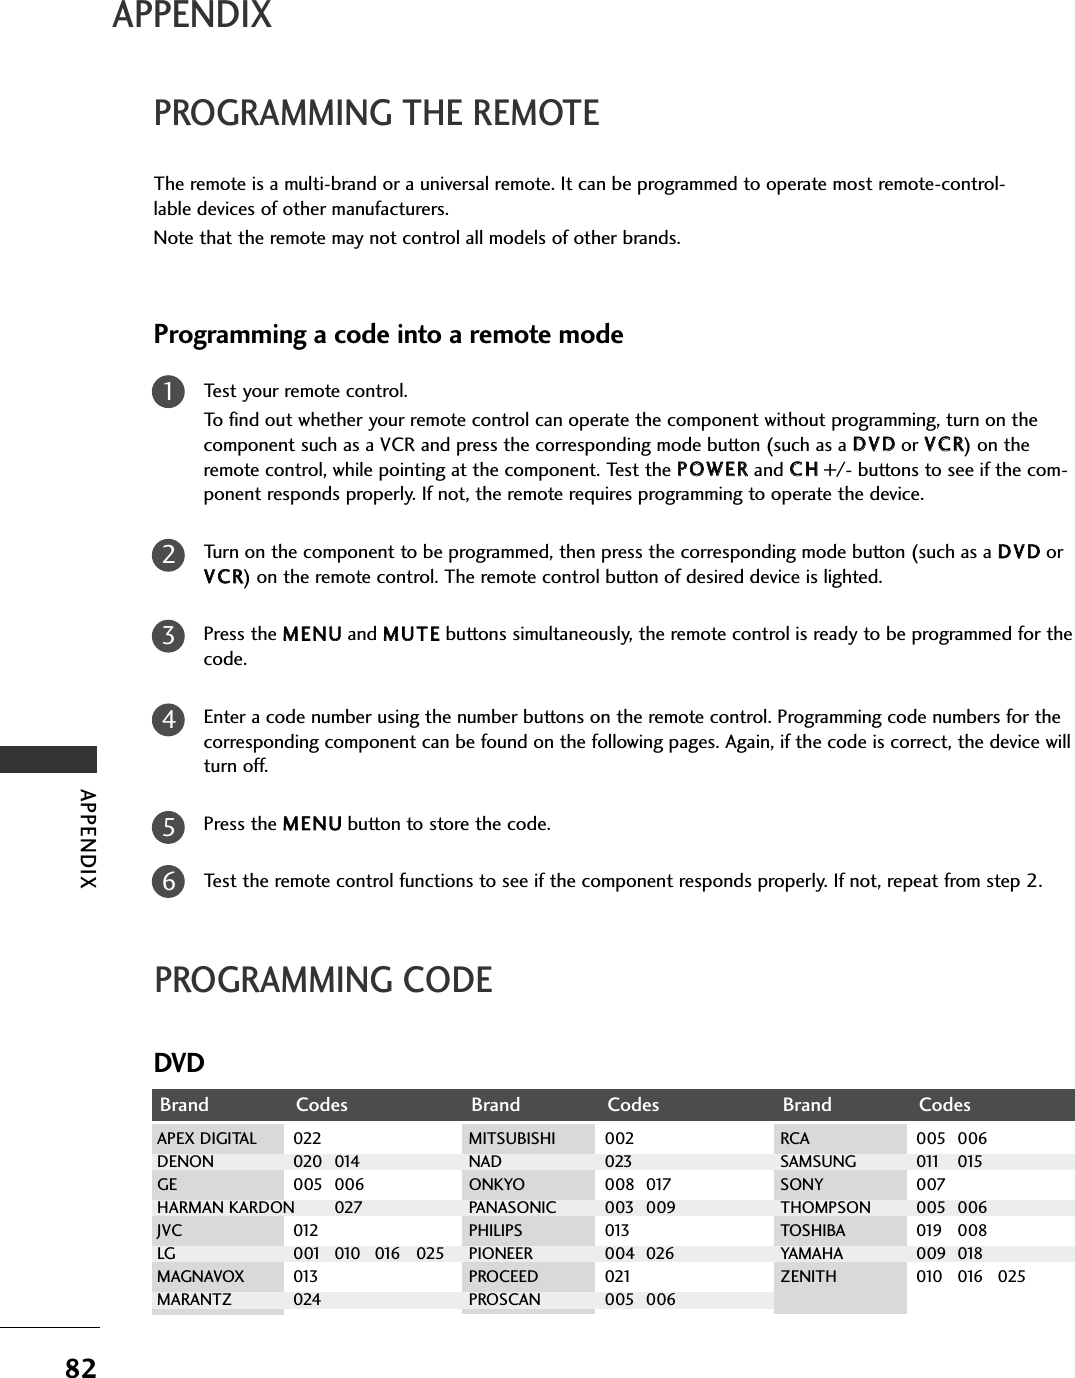
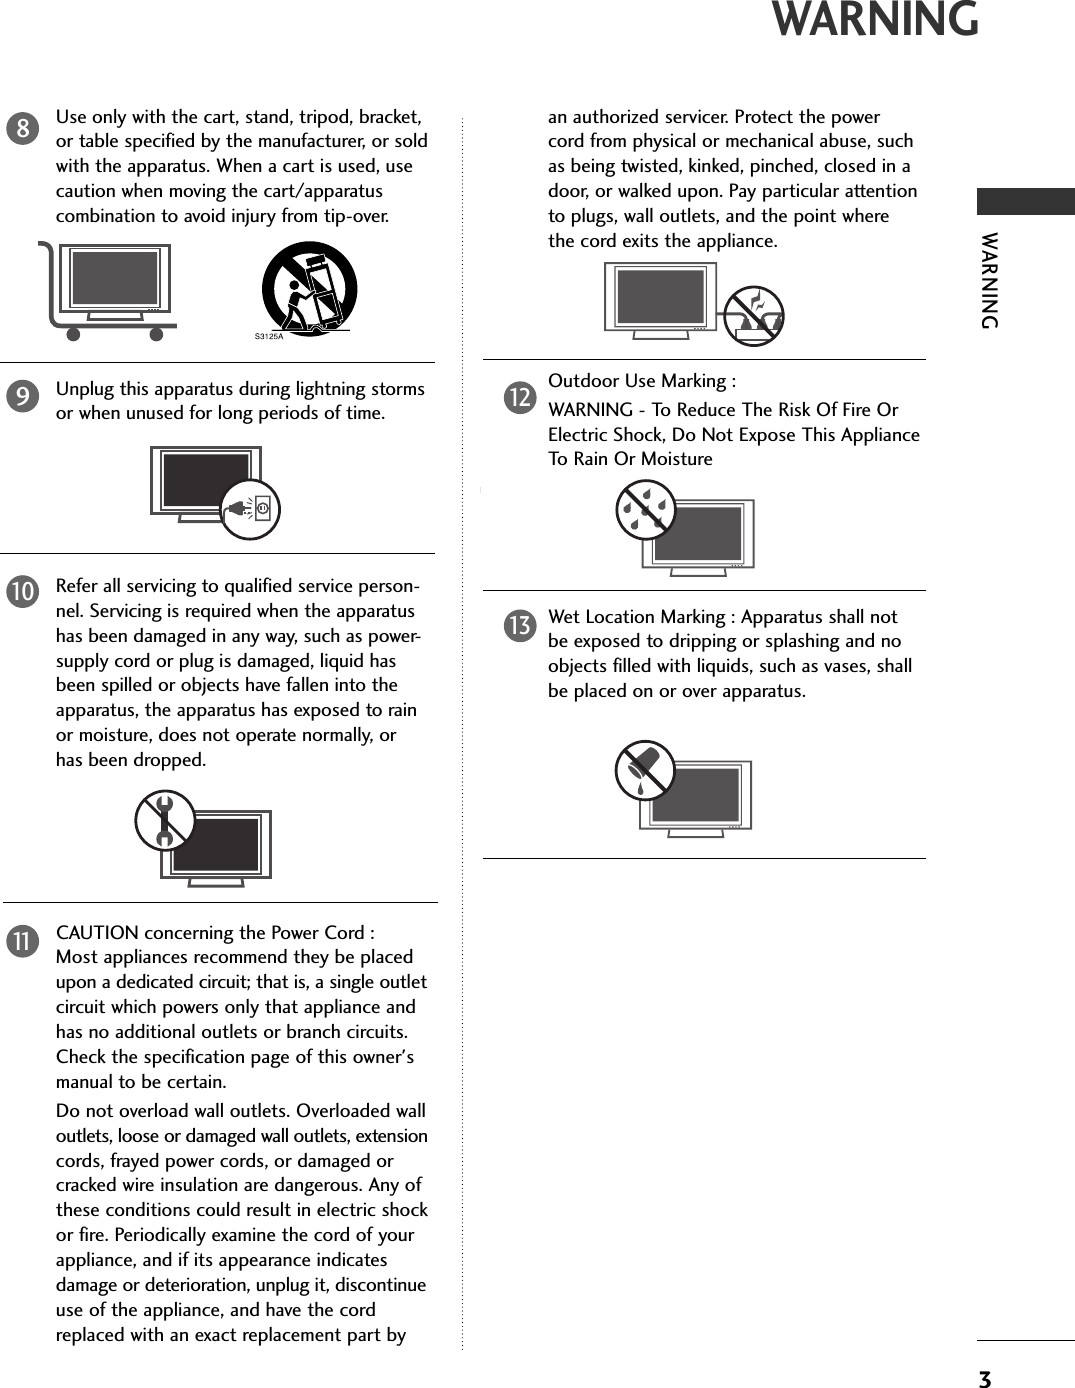
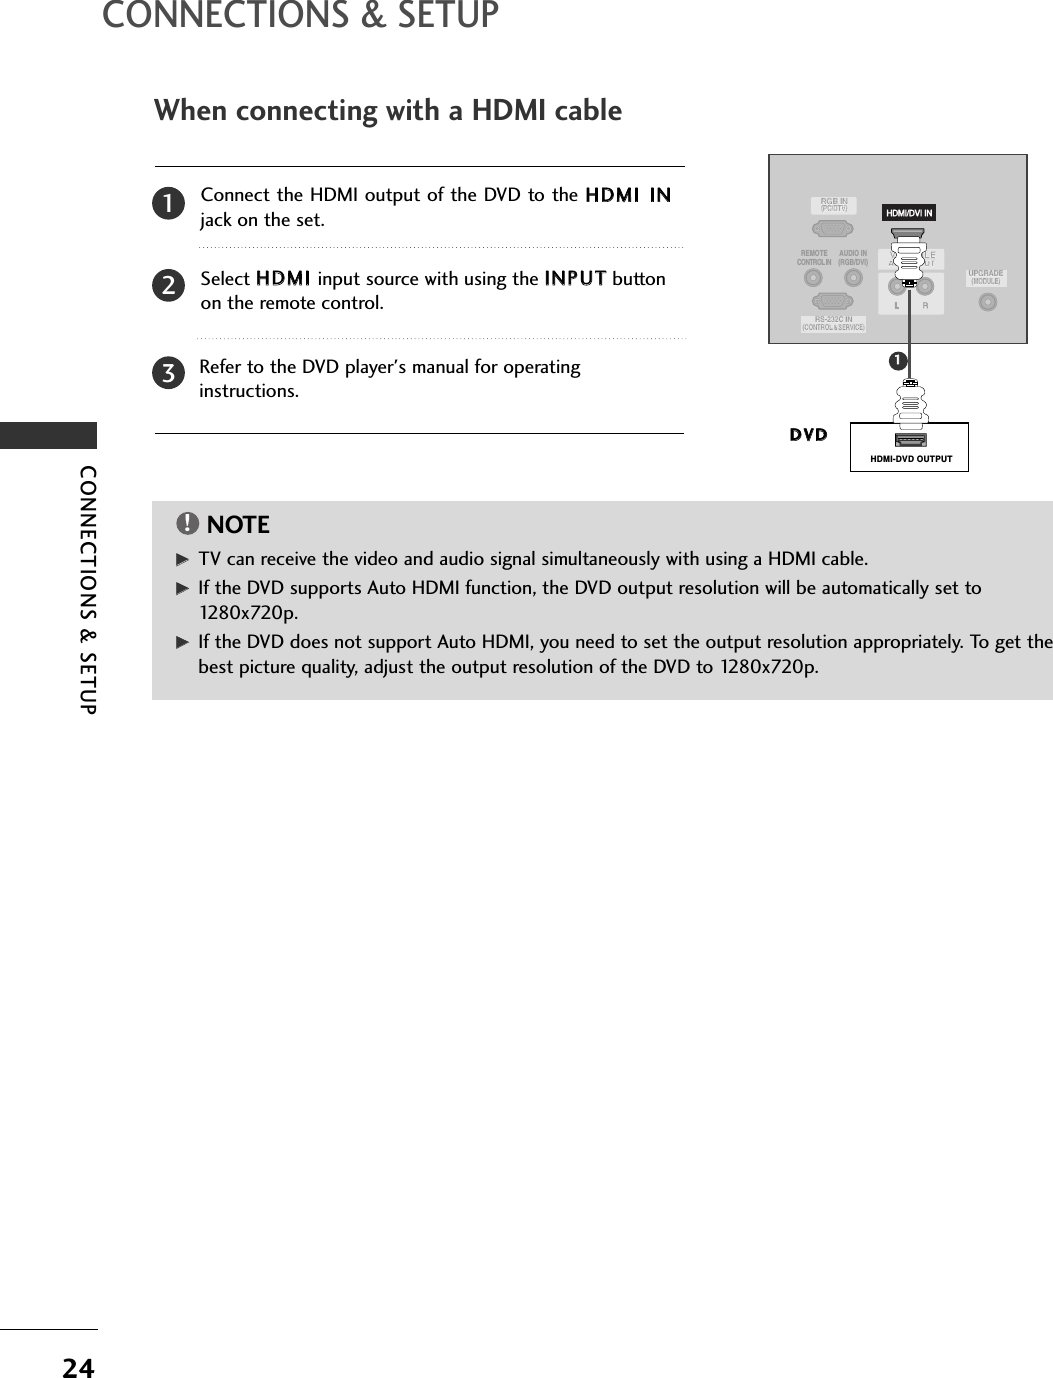
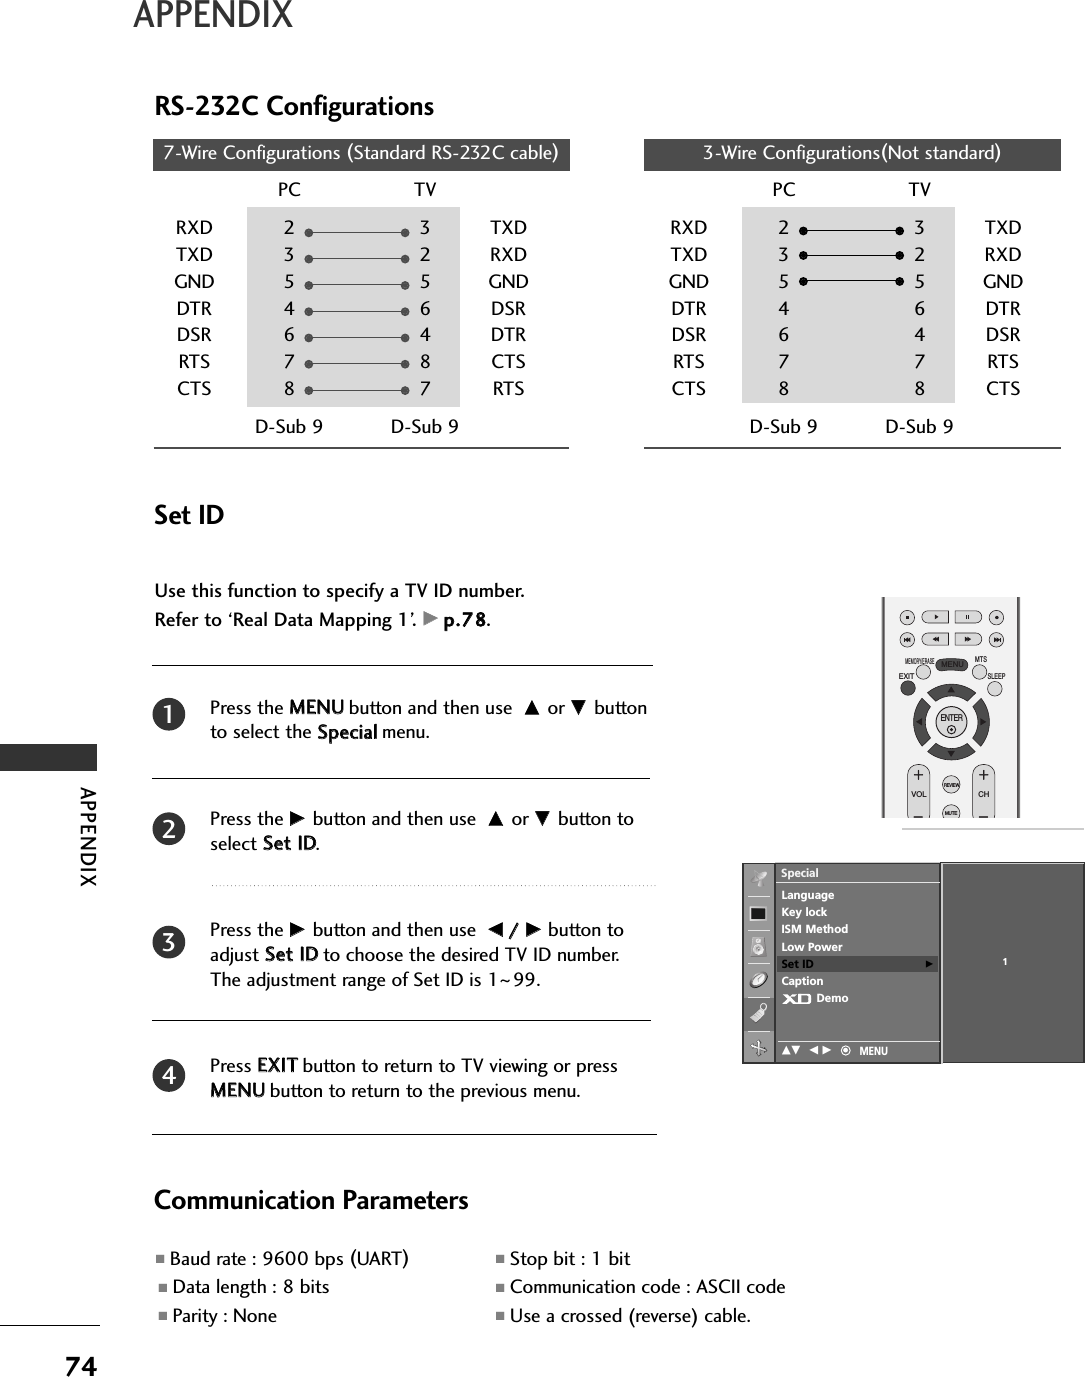
![TV MENU / SPECIAL FEATURES61XD DEMOUse it to see the difference between XD Demo on and XDDemo off.It’s not available to use this function in RGB[PC] mode.Press the MMEENNUUbutton and then use DD or EE button toselect the SSppeecciiaall menu.Press the GG button and then use DD or EE button to selectXXDD DDeemmoo. Press the GGbutton to begin XXDD DDeemmoo.To stop XD Demo, press the MMEENNUU button. 1234• XD DemoXD™Off XD™OnExitMenu12 3SpecialDE F G MENUTo startLanguageKey lockISM MethodLow PowerSet IDCaption/TextParentalDemo GPIP PR- PIP PR+PIP INPUTEXITVOLMUTECHSLEEPMENU123456789ENTER REVIEWMEMORY/ERASEMTSLanguageKey lockISM MethodLow PowerSet IDCaption/TextParentalDemoSpecialDE F G MENU](https://usermanual.wiki/LG-Electronics-USA/42PC3RVUJ/User-Guide-657892-Page-62.png)

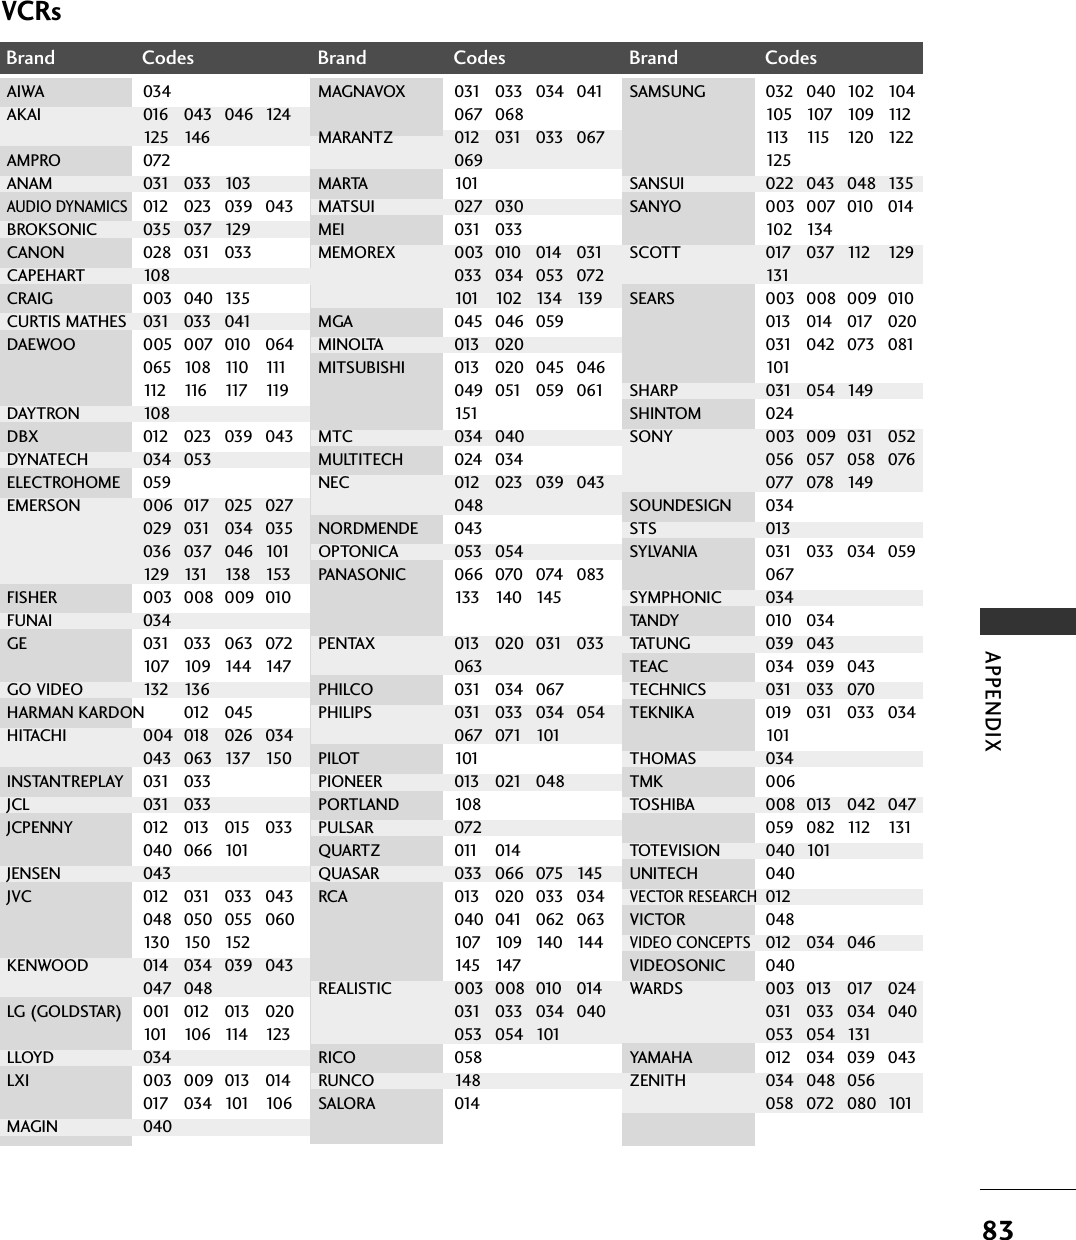
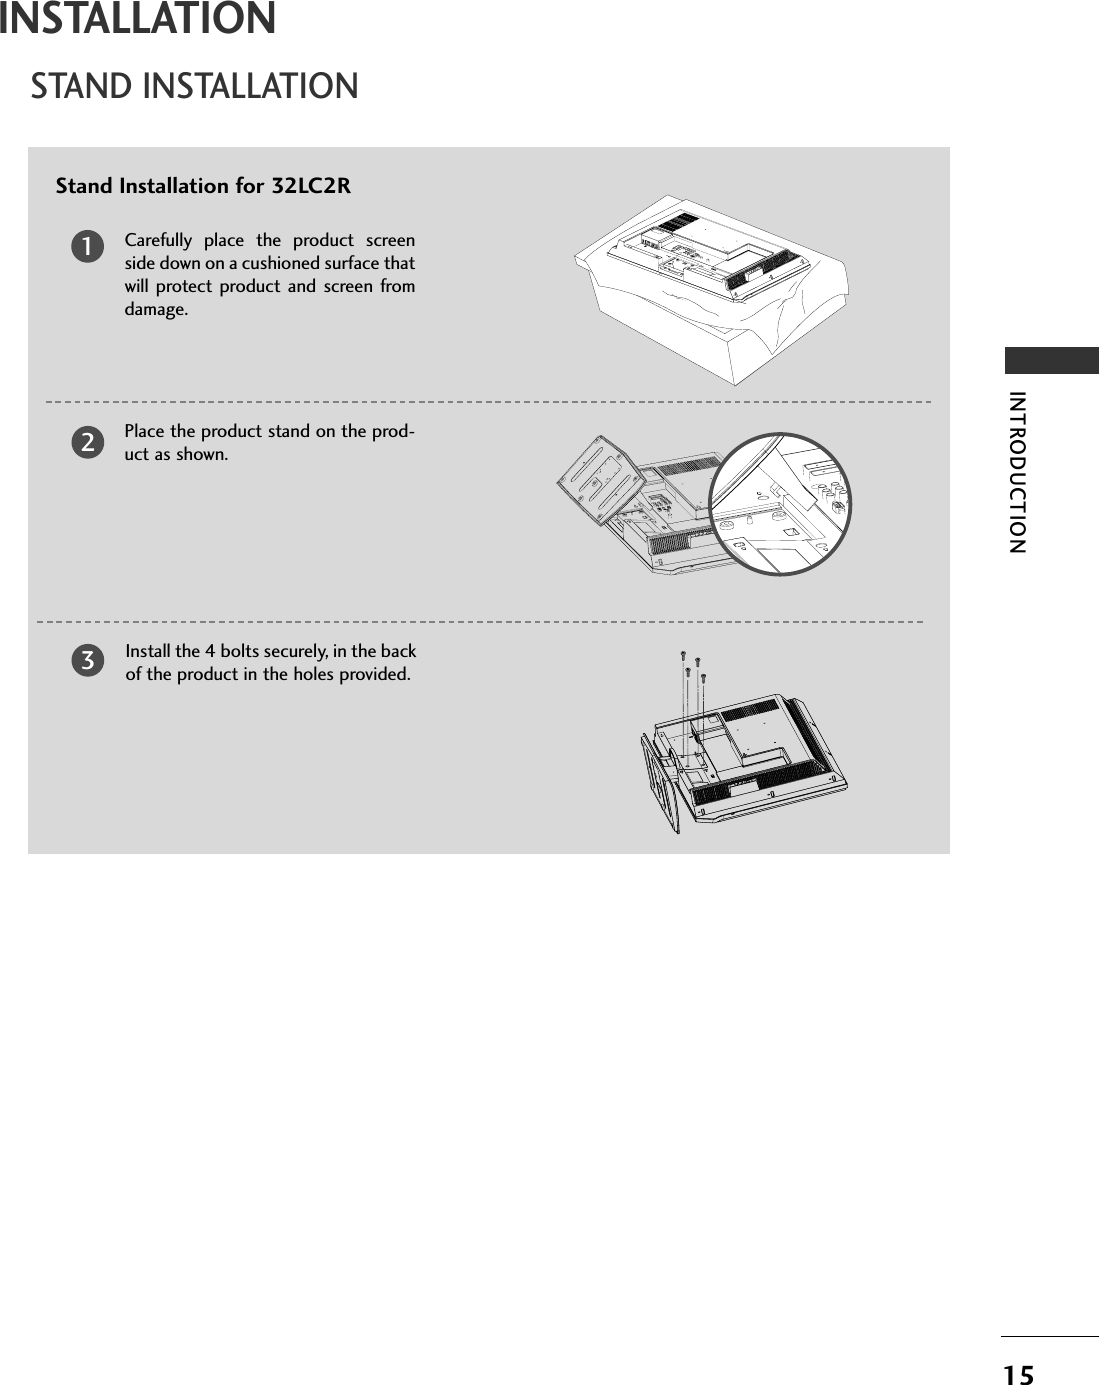
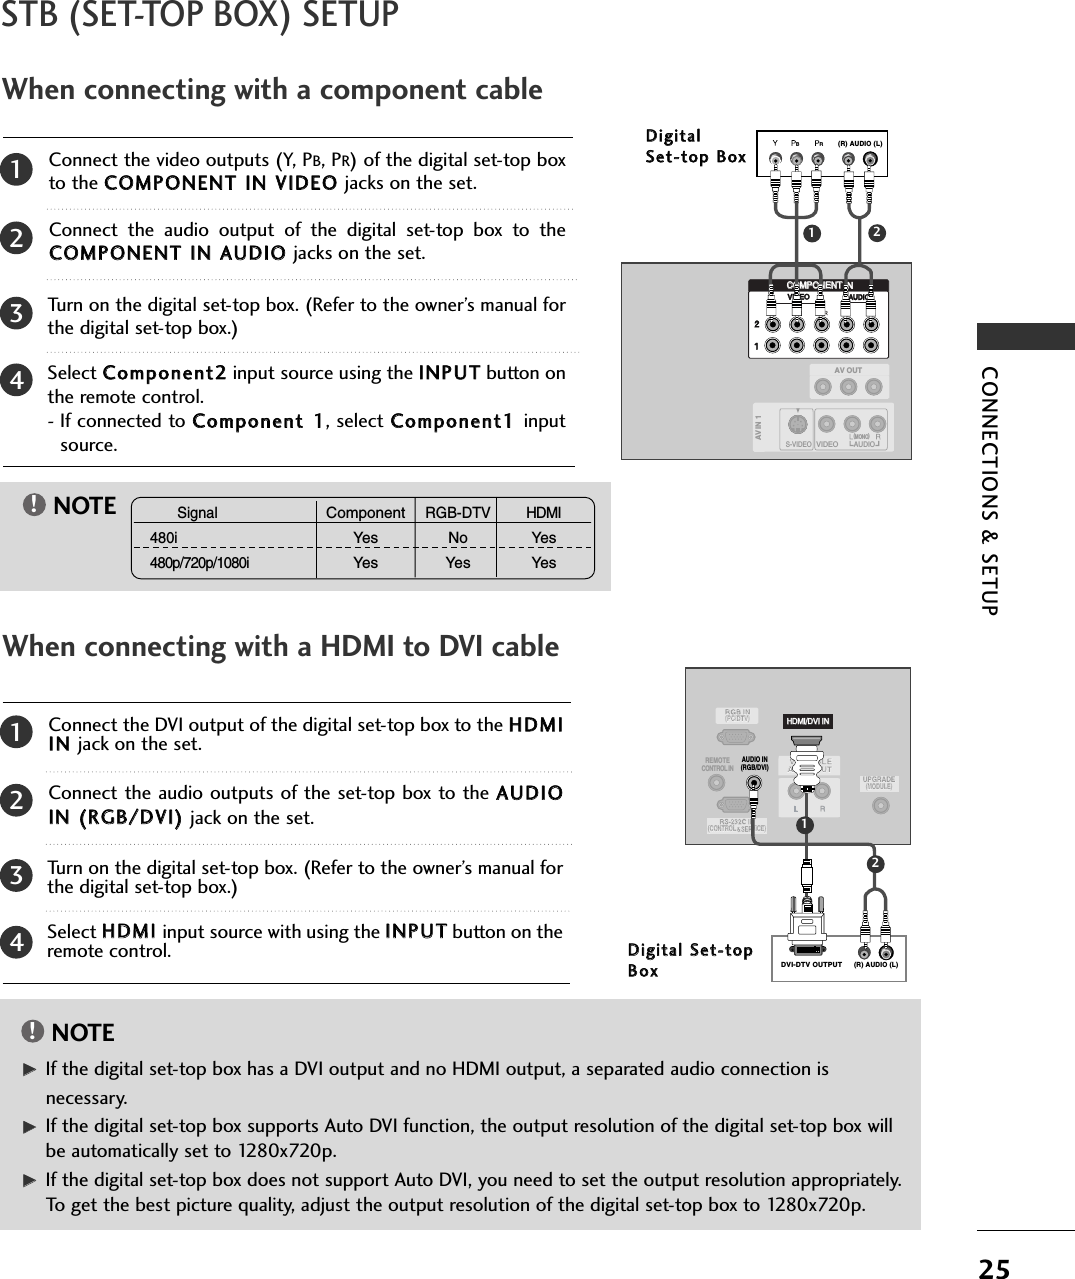
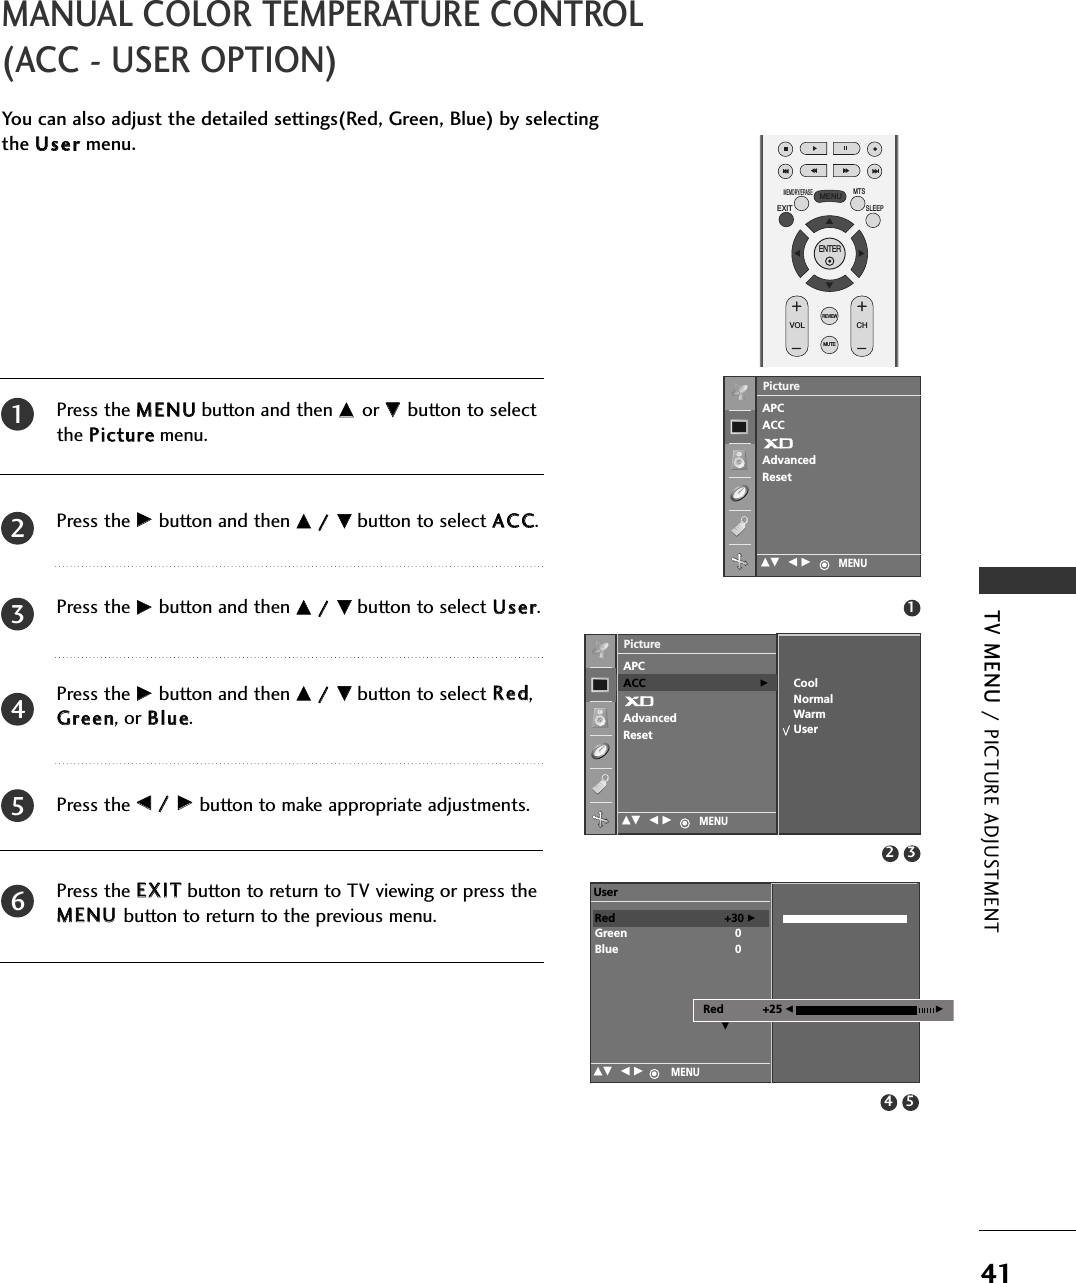
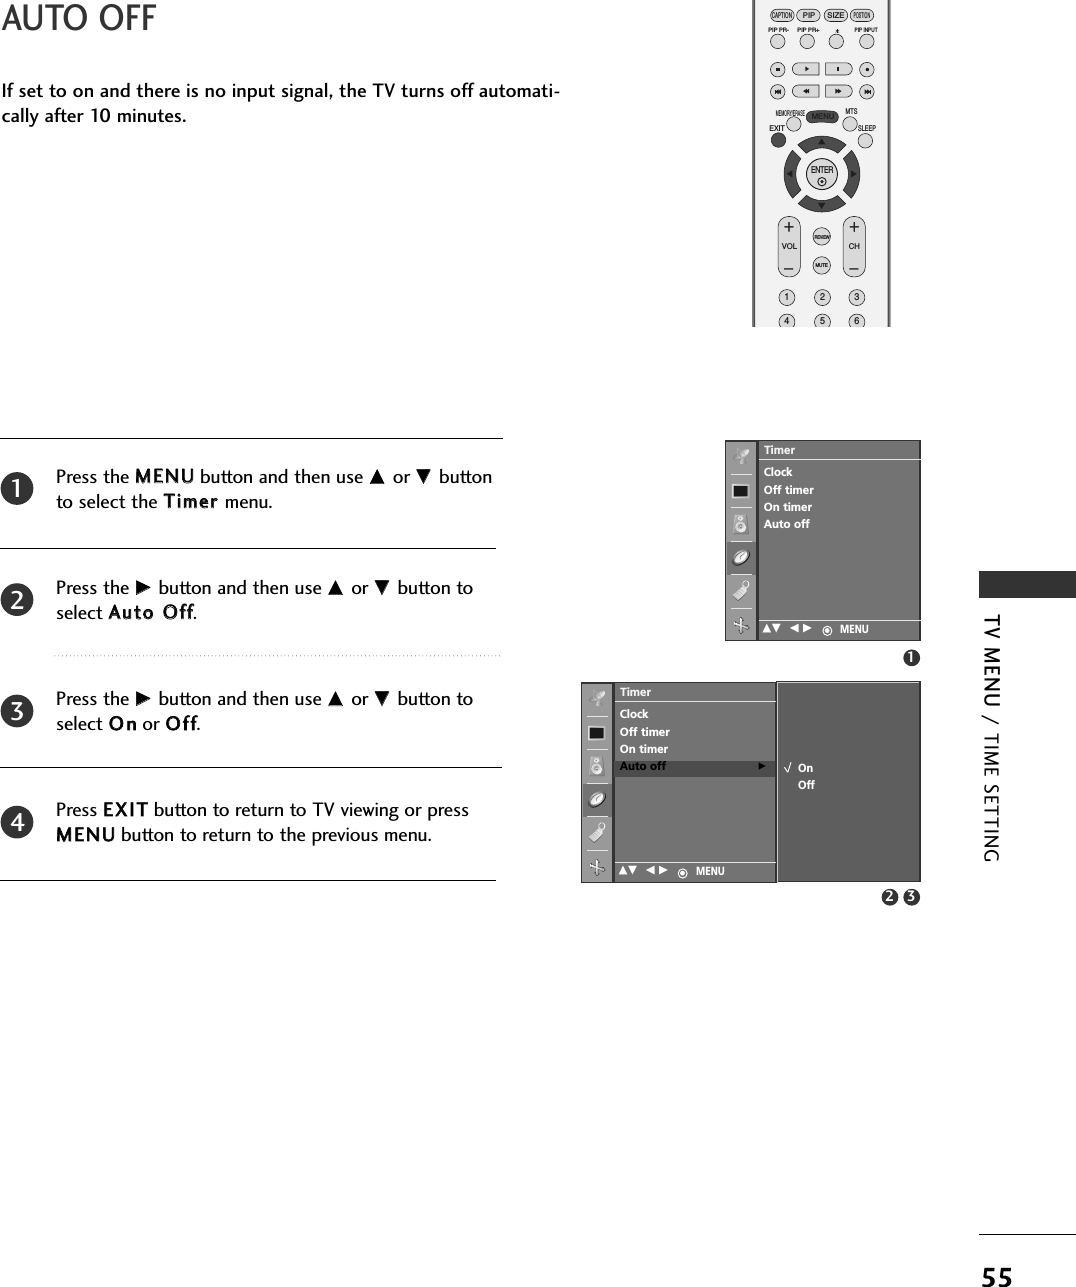
![68TV MENU / SCREEN ADJUSTMENTSCREEN ADJUSTMENTAUTO CONFIGURE (RGB [PC] MODE ONLY)TV MENUPress the MMEENNUUbutton and then use DD or EE button toselect the SSccrreeeenn menu.Press the GG button and then use DD or EE button to selectAAuuttoo ccoonnffiigg... Press the GG button to start AAuuttoo ccoonnffiigg...■When AAuuttoo ccoonnffiigg.. has finished, OOKKwill be shown onscreen.■If the position of the image is still not correct, try Autoadjustment again.If picture needs to be adjusted more after Auto adjustmentin RGB (PC), you can adjust the MMaannuuaall ccoonnffiigg...Press the EEXXIITTbutton to return to TV viewing or press the MMEENNUU button to return to the previous menu.PIP PR- PIP PR+PIP INPUTEXITVOLMUTECHSLEEPMENU123456789ENTER REVIEWMEMORY/ERASEMTSAutomatically adjusts picture position and minimizes imageshaking.Although the image is still not correct, your set is functioningproperly but needs further adjustment.AAuuttoo ccoonnffiigguurreeThis function is for the automatic adjustment of the screen posi-tion, clock, and phase. The displayed image will unstable for a fewseconds while the auto configuration is in progress.1234512 3Auto config.Manual config.VGA ModeARCResetScreenDE F G MENUScreenDE F G MENUTo setAuto config. GManual config.VGA ModeARCReset](https://usermanual.wiki/LG-Electronics-USA/42PC3RVUJ/User-Guide-657892-Page-69.png)
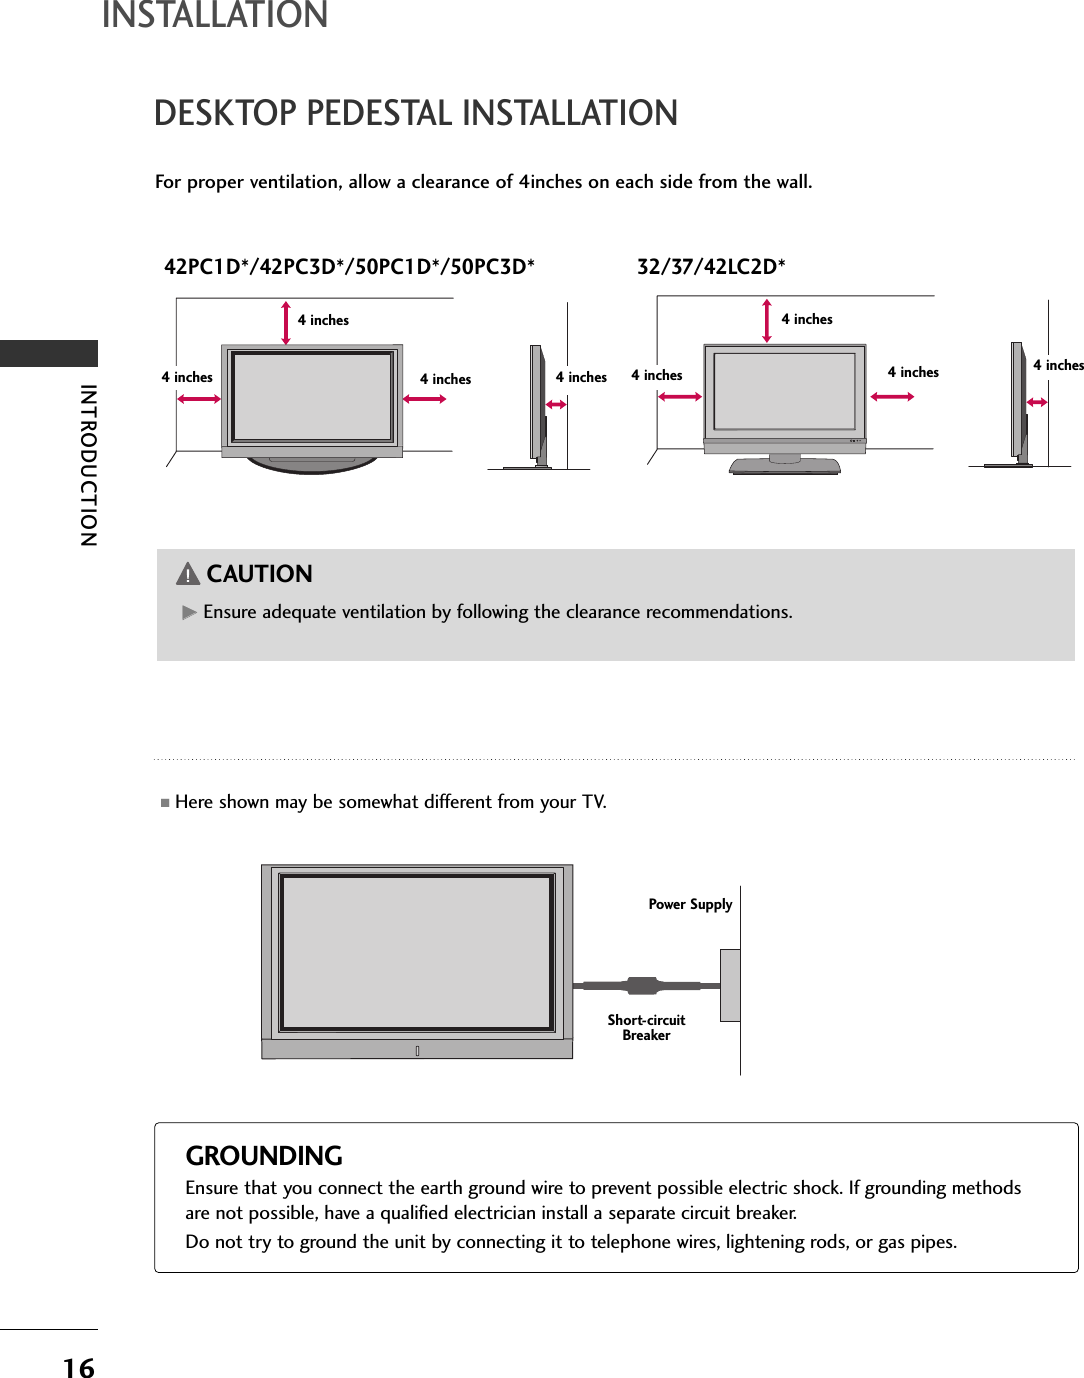
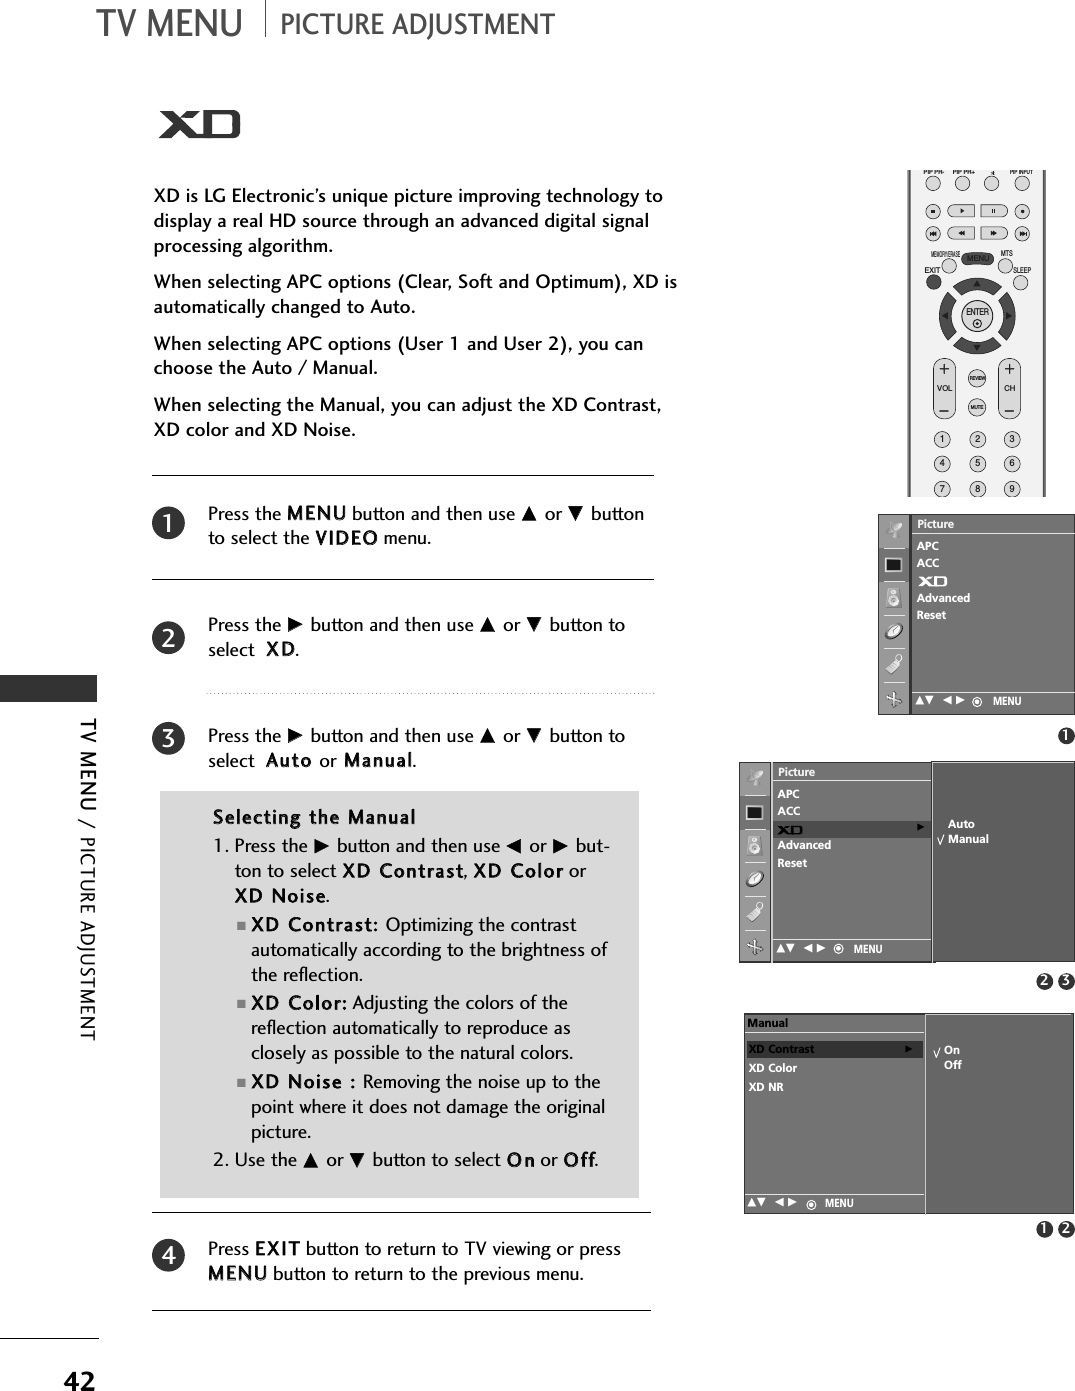
![TV MENU / SCREEN ADJUSTMENT69MANUAL CONFIGUREIf the picture isn’t clear after auto adjustment and especiallyif characters are still trembling, adjust the picture phasemanually.This function works in the following mode : RGB[PC],RGB[DTV], COMPONENT (480p/720p/1080i), HDMI(480p/720p/1080i).It’s not available to use Phase, Clock function in RGB[DTV],COMPONENT (480p/720p/1080i), HDMI(480p/720p/1080i).Press the MMEENNUUbutton and then use DD or EE button toselect the SSccrreeeenn menu.Press the GG button and then use DD or EE button to selectMMaannuuaall ccoonnffiigg... Press the GG button and then use DD or EE button to selectPPhhaassee, CClloocckk, HH--ppoossiittiioonnor VV--ppoossiittiioonn.■PPhhaasseeThis function allows you to remove any horizontal noiseand clear or sharpen the image of characters.■CClloocckkThis function is to minimize any vertical bars or stripesvisible on the screen background. And the horizontalscreen size will also change.■HH--ppoossiittiioonn/ VV--ppoossiittiioonnThis function is to adjust picture to left/right andup/down as you prefer.Press the FF// GGbutton to make appropriate adjustments.Press the EEXXIITTbutton to return to TV viewing or press the MMEENNUU button to return to the previous menu.PIP PR- PIP PR+PIP INPUTEXITVOLMUTECHSLEEPMENU123456789ENTER REVIEWMEMORY/ERASEMTS1234512 3 4Auto config.Manual config.VGA ModeARCResetScreenDE F G MENUScreenAuto config.Manual config. GVGA ModeARCResetPhase 50Clock + 10H-Position 0V-Position 0DE F G MENU](https://usermanual.wiki/LG-Electronics-USA/42PC3RVUJ/User-Guide-657892-Page-70.png)
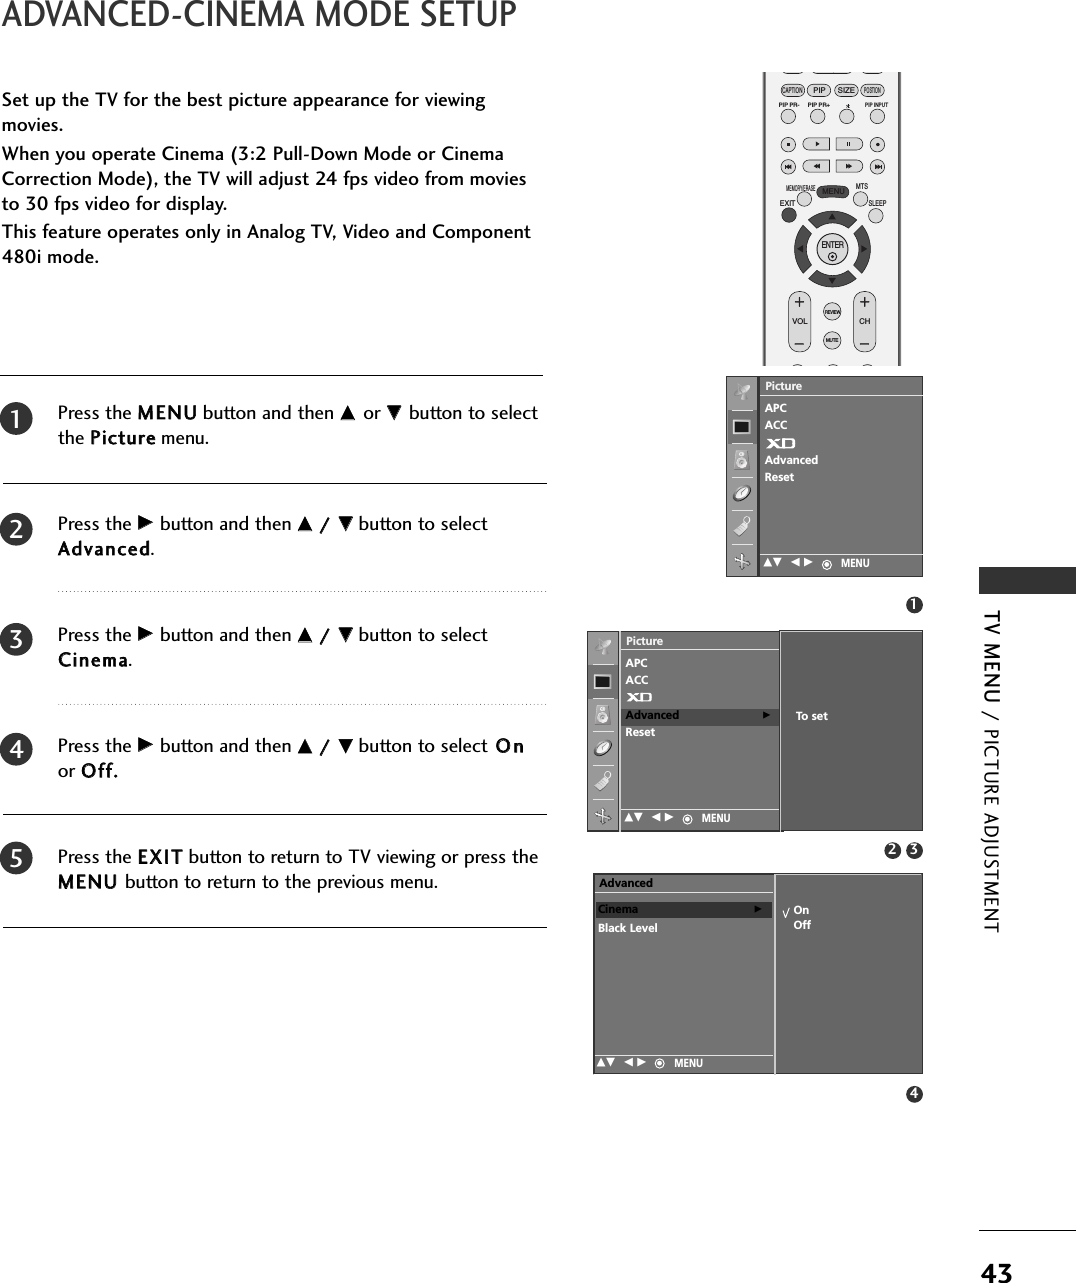
![TV MENU / SCREEN ADJUSTMENT71SELECTING WIDE VGA/XGA MODETo see a normal picture, match the resolution of RGB mode andselection of VGA/XGA mode.This function works in the following mode: RGB[PC] mode.VGA Mode: 42PC1RVXGA Mode: 26/32LC2REXITVOLMUTECHSLEEPMENUENTER REVIEWMEMORY/ERASEMTS12 3Auto config.Manual config.VGA modeARCResetScreenDE F G MENUScreenDE F G MENU640x480848x480852x480Auto config.Manual config.VGA mode GARC ResetPress the MMEENNUUbutton and then use DD or EE buttonto select the SSccrreeeenn menu.Press the GG button and then use DD or EE button toselect VVGGAA mmooddee(or XXGGAA mmooddee). Press the GG button and then use DD or EE button toselect the desired VGA/XGA resolution.Press EEXXIITTbutton to return to TV viewing or pressMMEENNUUbutton to return to the previous menu.2341](https://usermanual.wiki/LG-Electronics-USA/42PC3RVUJ/User-Guide-657892-Page-72.png)
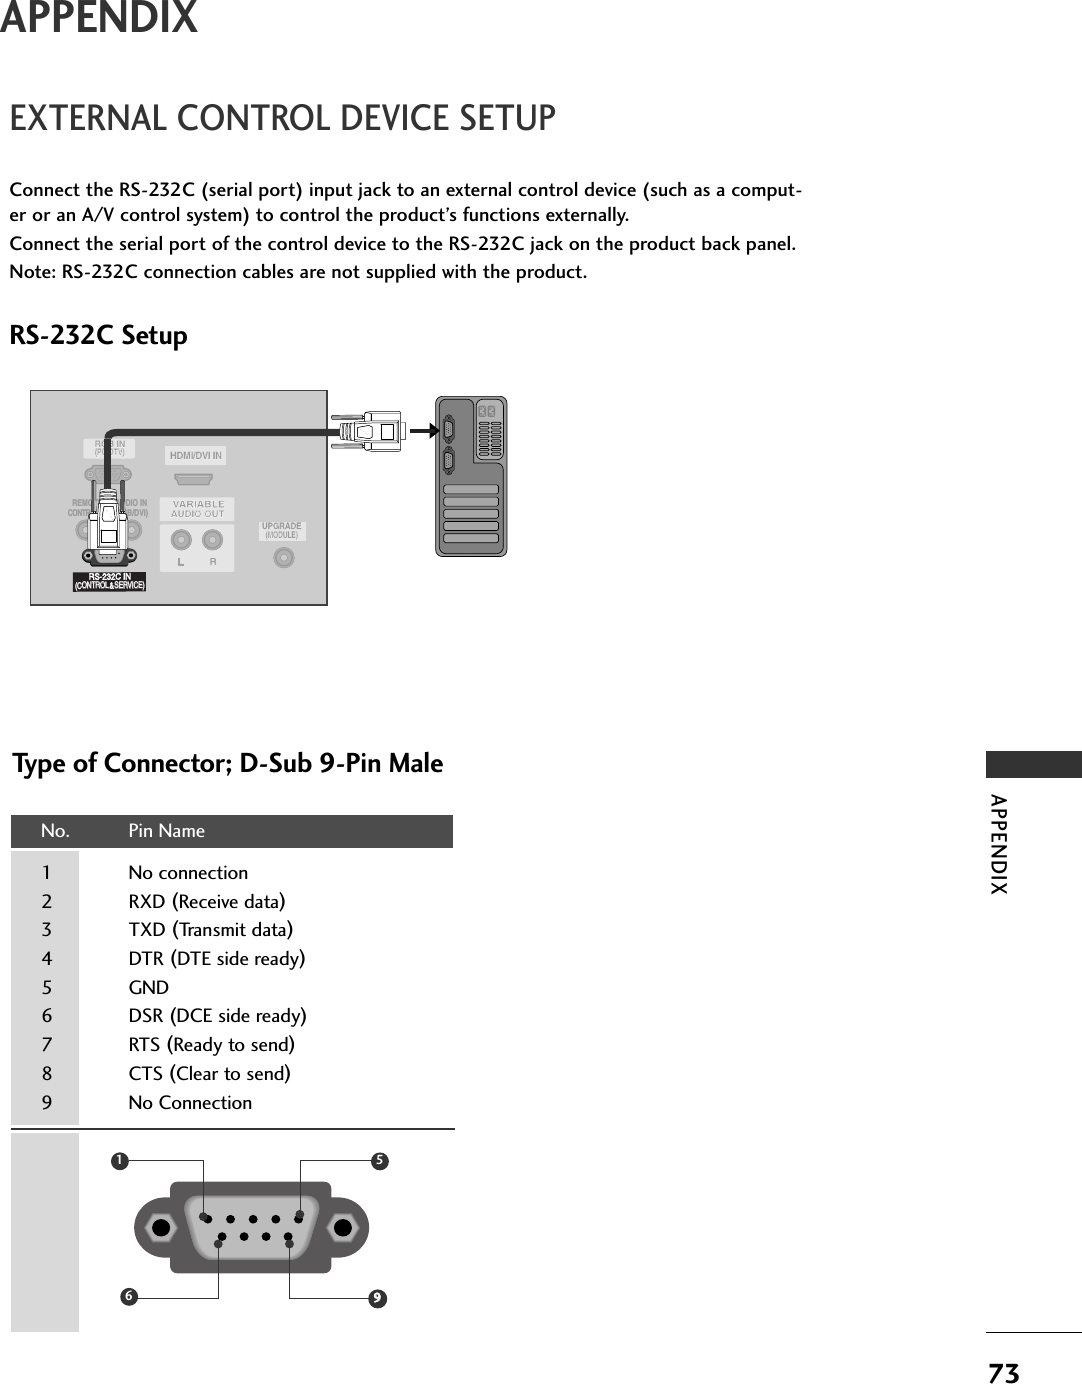
![APPENDIX75Transmission / Receiving ProtocolCommand Reference ListTTrraannssmmiissssiioonn[Command 1] : First command to control the set.(j,k,mor x)[Command 2] : Second command to control the set.[Set ID] : You can adjust the set ID to choose desired TV IDnumber in Setup menu. Adjustment range is 1~99.When selecting Set ID ‘0’, every connected the TVis controlled. Set ID is indicated as decimal (1~99)on menu and as Hexa decimal (0x0~ 0x63)on transmission/receiving protocol.[DATA] : To transmit command data.Transmit ‘FF’ data to read status of command.[Cr] : Carriage ReturnASCII code ‘0x0D’[ ] : ASCII code ‘space (0x20)’OOKK AAcckknnoowwlleeddggeemmeennttThe TV transmits ACK (acknowledgement) based on this for-mat when receiving normal data. At this time, if the data isdata read mode, it indicates present status data. If the data isdata write mode, it returns the data of the PC computer.EErrrroorr AAcckknnoowwlleeddggeemmeennttThe TV transmits ACK (acknowledgement) based on this for-mat when receiving abnormal data from non-viable functionsor communication errors.Data1: Illegal CodeData2: Not supported functionData3: Wait more time[[CCoommmmaanndd11]][[CCoommmmaanndd22]][[ ]][[SSeett IIDD]][[ ]][[DDaattaa]][[CCrr]][[CCoommmmaanndd22]][[ ]][[SSeett IIDD]][[ ]][[OOKK]][[DDaattaa]][[xx]][[CCoommmmaanndd22]][[ ]][[SSeett IIDD]][[ ]][[NNGG]][[DDaattaa]][[xx]]CCOOMMMMAANNDD11CCOOMMMMAANNDD22DATA(Hexadecimal)CCOOMMMMAANNDD11CCOOMMMMAANNDD2216. Color Temperature k u 0 ~317. Red Adjustment k v 0 ~3C (or 50)18. Green Adjustment k w 0 ~3C (or 50)19. Blue Adjustment k $ 0 ~3C (or 50)20.Abnormal Status (option)k z FF21. ISM Method (option)j p 0 ~322. Low Power (option)jq0 ~123.Orbiter Time Setting (option)jr1 ~FE24.Orbiter Pixel Setting (option)js1 ~325. Auto Configure j u 126.Tune Commandm a *27. Key m c Key Code28. Input select (Main) x b *29. Input select (PIP) x y *30. Channel Add/Del m b 0 ~1DATA(Hexadecimal)01. Power k a 0 ~102. Aspect Ratio k c *03. Screen Mute k d 0 ~104. Volume Mute k e 0 ~105. Volume Control k f 0 ~6406. Contrast k g 0 ~6407. Brightness k h 0 ~6408. Color k i 0 ~6409. Tint k j 0 ~6410. Sharpness k k 0 ~6411. OSD Select k l 0 ~112. Remote Control 0 ~1lock mode13. PIP/DW k n 0 ~214. PIP Position k q 0 ~315. Balance k t 0 ~64k m](https://usermanual.wiki/LG-Electronics-USA/42PC3RVUJ/User-Guide-657892-Page-76.png)
![76APPENDIXAPPENDIX0011..PPoowweerr ((CCoommmmaanndd22::aa))To control Power On/Off of the TV.Data 0 : Power Off Data 1 : Power OnTransmission [k][a][ ][Set ID][ ][Data][Cr]Acknowledgement [a][ ][Set ID][ ][OK][Data][x]To show Power On/Off.Transmission [k][a][ ][Set ID][ ][FF][Cr]* In a like manner, if other functions transmit ‘FF’data based on this format, Acknowledgement datafeedback presents status about each function.* To change the Power on input the transmissionmore than twice.Acknowledgement [a][ ][Set ID][ ][OK][Data][x]0022.. AAssppeecctt RRaattiioo ((CCoommmmaanndd22::cc)) ((MMaaiinn ppiiccttuurree ssiizzee))To adjust the screen format. (Main picture format)You can also adjust the screen format using the ARC(Aspect Ratio Control) button on remote control orin the SCREEN menu.Date 1: Normal screen (4:3)Date 2: Wide screen (16:9)Date 3: HorizonDate 4: Full screen (Zoom1)Date 5: Full screen (Zoom2)Transmission [k][c][ ][Set ID][ ][Data][Cr]Acknowledgement [c][ ][Set ID][ ][OK][Data][x]* Using the RGB-PC or Component input, you selecteither 16:9 or 4:3 screen aspect ratio.0033..SSccrreeeenn MMuuttee ((CCoommmmaanndd22::dd))To select screen mute on/off.Data 0 : Screen mute off (Picture on)Data 1 : Screen mute on (Picture off)Transmission [k][d][ ][Set ID][ ][Data][Cr]Acknowledgement [d][ ][Set ID][ ][OK][Data][x]0044.. VVoolluummee MMuuttee ((CCoommmmaanndd22::ee))To control volume mute on/off.You can also adjust mute using the MUTE button on remote control.Data 0 : Volume mute off (Volume on)Data 1 : Volume mute on (Volume off)Transmission [k][e][ ][Set ID][ ][Data][Cr]Acknowledgement [e][ ][Set ID][ ][OK][Data][x]0055..VVoolluummee CCoonnttrrooll ((CCoommmmaanndd22::ff))To adjust volume.You can also adjust volume with the volume buttonson remote control.Data Min : 0 ~Max : 64Refer to ‘Real data mapping 1 ’. See page 78.Transmission [k][f][ ][Set ID][ ][Data][Cr]Acknowledgement [f][ ][Set ID][ ][OK][Data][x]0066.. CCoonnttrraasstt ((CCoommmmaanndd22::gg))To adjust screen contrast. You can also adjust contrast in the PICTURE menu.Data Min : 0 ~Max : 64Refer to ‘Real data mapping 1’. See page 78.Transmission [k][g][ ][Set ID][ ][Data][Cr]Acknowledgement [g][ ][Set ID][ ][OK][Data][x]0077..BBrriigghhttnneessss ((CCoommmmaanndd22::hh))To adjust screen brightness.You can also adjust brightness in the PICTURE menu.Data Min : 0 ~Max : 64Refer to ‘Real data mapping 1’. See page 78.Transmission [k][h][ ][Set ID][ ][Data][Cr]Acknowledgement [h][ ][Set ID][ ][OK][Data][x]0088.. CCoolloorr ((CCoommmmaanndd22::ii))To adjust the screen color.You can also adjust color in the PICTURE menu.Data Min : 0 ~Max : 64Refer to ‘Real data mapping 1’. See page 78.Transmission [k][i][ ][Set ID][ ][Data][Cr]Acknowledgement [i][ ][Set ID][ ][OK][Data][x]0099.. TTiinntt ((CCoommmmaanndd22::jj))To adjust the screen tint.You can also adjust tint in the PICTURE menu.Data Red : 0 ~Green : 64Refer to ‘Real data mapping 1’. See page 78.Transmission [k][j][ ][Set ID][ ][Data][Cr]Acknowledgement [j][ ][Set ID][ ][OK][Data][x]](https://usermanual.wiki/LG-Electronics-USA/42PC3RVUJ/User-Guide-657892-Page-77.png)
![APPENDIX771111.. OOSSDD SSeelleecctt ((CCoommmmaanndd22::ll))To select OSD (On Screen Display) on/off when con-trolling remotely.Data 0: OSD offData 1: OSD onTransmission [k][l][ ][Set ID][ ][Data][Cr]Acknowledgement [l][ ][Set ID][ ][OK][Data][x]1122.. RReemmoottee CCoonnttrrooll LLoocckk MMooddee ((CCoommmmaanndd22::mm))To lock the remote control and the front panel controls on the set.Data 0: Lock off Data 1: Lock onIf you’re not using the remote control and front panelcontrols on the TV, use this mode. When main poweris on/off, remote control lock is released.Transmission [k][m][ ][Set ID][ ][Data][Cr]Acknowledgement [m][ ][Set ID][ ][OK][Data][x]1133.. PPIIPP // DDWW ((CCoommmmaanndd22::nn))To control the PIP (Picture In picture)/DW.You can also control the PIP/DW using the PIP but-ton on the remote control or in the PIP/DW menu.Data 0:PIP/DW off Data 1: PIPData2: DW1 (option) Data3: DW2Data5: POP (option)Transmission [k][n][ ][Set ID][ ][Data][Cr]Acknowledgement [n][ ][Set ID][ ][OK][Data][x]1144.. PPIIPP PPoossiittiioonn ((CCoommmmaanndd22::qq))To select sub picture position for PIP.You can also adjust the sub picture position using POSITION button on the remote control or in thePIP/DW menu.Data 0: Right down on screenData 1: Left down on screenData 2: Left up on screenData 3: Right up on screenTransmission [k][q][ ][Set ID][ ][Data][Cr]Acknowledgement [q][ ][Set ID][ ][OK][Data][x]1155.. BBaallaannccee ((CCoommmmaanndd22::tt))To adjust balance.You can also adjust balance in the SOUND menu.Data Min: 0 ~Max: 64Refer to ‘Real data mapping 1’. See page 78.Transmission [k][t][ ][Set ID][ ][Data][Cr]Acknowledgement [t][ ][Set ID][ ][OK][Data][x]1100.. SShhaarrppnneessss ((CCoommmmaanndd22::kk))To adjust the screen sharpness.You can also adjust sharpness in the PICTURE menu.Data Min: 0 ~Max: 64Refer to ‘Real data mapping 1’. See page 78.Transmission [k][k][ ][Set ID][ ][Data][Cr]Acknowledgement [k][ ][Set ID][ ][OK][Data][x]1166.. CCoolloorr TTeemmppeerraattuurree ((CCoommmmaanndd22::uu))To adjust color temperature.You can also adjust ACC in the PICTURE menu.Data 0: Cool 1: Normal 2: Warm 3: UserTransmission [k][u][ ][Set ID][ ][Data][Cr]Acknowledgement [u][ ][Set ID][ ][OK][Data][x]1177.. RReedd AAddjjuussttmmeenntt ((CCoommmmaanndd22::vv))To adjust red in color temperature.Data Min: 0 ~Max: 3C (or 50)Refer to ‘Real data mapping 2’. See page 78.Transmission [k][v][ ][Set ID][ ][Data][Cr]Acknowledgement [v][ ][Set ID][ ][OK][Data][x]1188..GGrreeeenn AAddjjuussttmmeenntt ((CCoommmmaanndd22::ww))To adjust red in color temperature.Data Min: 0 ~Max: 3C (or 50)Refer to ‘Real data mapping 2’. See page 78.Transmission [k][w][ ][Set ID][ ][Data][Cr]Acknowledgement [w][ ][Set ID][ ][OK][Data][x]1199..BBlluuee AAddjjuussttmmeenntt ((CCoommmmaanndd22::$$))To adjust red in color temperature.Data Min: 0 ~Max: 3C (or 50)Refer to ‘Real data mapping 2’. See page 78.Transmission [k][$][ ][Set ID][ ][Data][Cr]Acknowledgement [$][ ][Set ID][ ][OK][Data][x]](https://usermanual.wiki/LG-Electronics-USA/42PC3RVUJ/User-Guide-657892-Page-78.png)
![78APPENDIXAPPENDIX2200.. AAbbnnoorrmmaall SSttaattee ((CCoommmmaanndd22::zz))To recognize an abnormal state. (This feature is notavailable for all models.)Data FF: ReadData 0: Normal (Power on and signal exist)Data 1: No signal (Power on)Data 2: Turn the TV off by remote controlData 3: Turn the TV off by sleep time functionData 4: Turn the TV off by RS-232C functionData 5: 5V downData 6: AC downData 7: Turn the TV off by Fan Alarm function (option)Data 8: Turn the TV off by Off time functionData 9: Turn the TV off by Auto sleep function* This function is “read only”.Transmission [k][z][ ][Set ID][ ][FF][ ][Cr]Acknowledgement [z][ ][Set ID][ ][OK][Data][x]2211.. IISSMM MMeetthhoodd ((CCoommmmaanndd11::jj,, CCoommmmaanndd22::pp))To control the ISM method. You can also adjust ISM Method in SPECIAL menu. (This feature is not avail-able for all models.)Data 0: Normal Mode Data 1: White WashData2: Orbiter Data3: InversionTransmission [j][p][ ][Set ID][ ][Data][Cr]Acknowledgement [p][ ][Set ID][ ][OK][Data][x]2222.. LLooww PPoowweerr ((CCoommmmaanndd11::jj,, CCoommmmaanndd22::qq))To reduce the power consumption of the monitor. You can also adjust Low Power in SPECIAL menu. (This feature is not available for all models.)Data 0: Off Data 1: OnTransmission [j][q][ ][Set ID][ ][Data][ ][Cr]Acknowledgement [q][ ][Set ID][ ][OK][Data][x]2233.. OOrrbbiitteerr TTiimmee SSeettttiinngg ((CCoommmmaanndd11::jj,, CCoommmmaanndd22::rr))To adjust orbiter operation time term. (This feature isnot available for all models.)Data Min: 1 ~Max: FERefer to ‘Real data mapping 1’.Transmission [j][r][ ][Set ID][ ][Data][ ][Cr]Acknowledgement [r][ ][Set ID][ ][OK][Data][x]2244 .. OOrrbbiitteerr PPiixxeell SSeettttiinngg ((CCoommmmaanndd11::jj,, CCoommmmaanndd22::ss))To adjust pixel number in orbiter function. (This feature is not available for all models.)Data Min: 1 ~Max: 3Refer to ‘Real data mapping 1’.Transmission [j][s][ ][Set ID][ ][Data][Cr]Acknowledgement [s][ ][Set ID][ ][OK][Data][x]2255 .. AAuuttoo CCoonnffiigguurree ((CCoommmmaanndd11::jj,, CCoommmmaanndd22::uu))To adjust picture position and minimize image shaking automatically. It works only in RGB (PC) mode.Data 1: To setTransmission [j][u][ ][Set ID][ ][Data][Cr]Acknowledgement [u][ ][Set ID][ ][OK][Data][x]2266 .. TTuunnee CCoommmmaanndd ((CCoommmmaanndd11::mm,, CCoommmmaanndd22::aa))Tune channel to following physical number.Data 0: Air: 02 ~45, CATV: 01, 0E ~87Refer to ‘Real data mapping 1’. Data 1: Don’t careData 2: Don’t careData 3: Don’t careData 4: Don’t careData 5: 0 : Main[Air] 80 : Sub[Air] (option)1 : Main[Cable] 81 : Sub [Cable]Transmission [m][a][ ][Set ID][ ][Data0][ ][Data1][ ][Data2][ ][Data3][ ][Data4][ ][Data5][ ][Cr]Acknowledgement [a][ ][Set ID][ ][OK][Data0][x]** RReeaall ddaattaa mmaappppiinngg 110 : Step 0A : Step 10 (Set ID 10)F : Step 15 (Set ID 15)10 : Step 16 (Set ID 16)64 : Step 1006E : Step 11073 : Step 11574 : Step 116C7: Step 199FE : Step 254FF : Step 255** RReeaall ddaattaa mmaappppiinngg 220:-301:-292:-281E : 03A : +283B : +293C : +30Data Min: 0 ~Max: 87](https://usermanual.wiki/LG-Electronics-USA/42PC3RVUJ/User-Guide-657892-Page-79.png)
![APPENDIX79MSB LSB0 0 0 0 0 0 0 0External Input Data0001Analog0010Video0100Component0101 RGB-DTV0110RGB-PC1001HDMI (option)External Input Input NumberInput Number Data0000 Input10001Input2Acknowledgement [b][ ][Set ID][ ][OK][Data][x]MSB LSB0 0 0 0 0 0 0 0External Input Data0001Analog0010VideoExternal Input Input NumberAcknowledgement [y][ ][Set ID][ ][OK][Data][x]2277.. KKeeyy ((CCoommmmaanndd11::mm,, CCoommmmaanndd22::cc))To send IR remote key code.Data: Key code - Refer to page 81.Transmission [m][c][ ][Set ID][ ][Data][Cr]Acknowledgement [c][ ][Set ID][ ][OK][Data][x]3300.. CChhaannnneell AAdddd//DDeell ((CCoommmmaanndd11::mm,, CCoommmmaanndd22::bb))To add and delete the programme.Data 0: DeleteData 1: AddTransmission [m][b][ ][Set ID][ ][Data][Cr]Acknowledgement [b][ ][Set ID][ ][OK][Data][x]2288.. IInnppuutt sseelleecctt ((CCoommmmaanndd11::xx,, CCoommmmaanndd22::bb))((MMaaiinn PPiiccttuurree IInnppuutt))To select input source for TV.Data: StructureTransmission [x][b][ ][Set ID][ ][Data][Cr]2299.. IInnppuutt sseelleecctt ((CCoommmmaanndd11::xx,, CCoommmmaanndd22::yy))To adjust input source for sub picture in PIP mode.Data: StructureTransmission [x][y][ ][Set ID][ ][Data][Cr]Input Number Data0000 Input10001Input2](https://usermanual.wiki/LG-Electronics-USA/42PC3RVUJ/User-Guide-657892-Page-80.png)