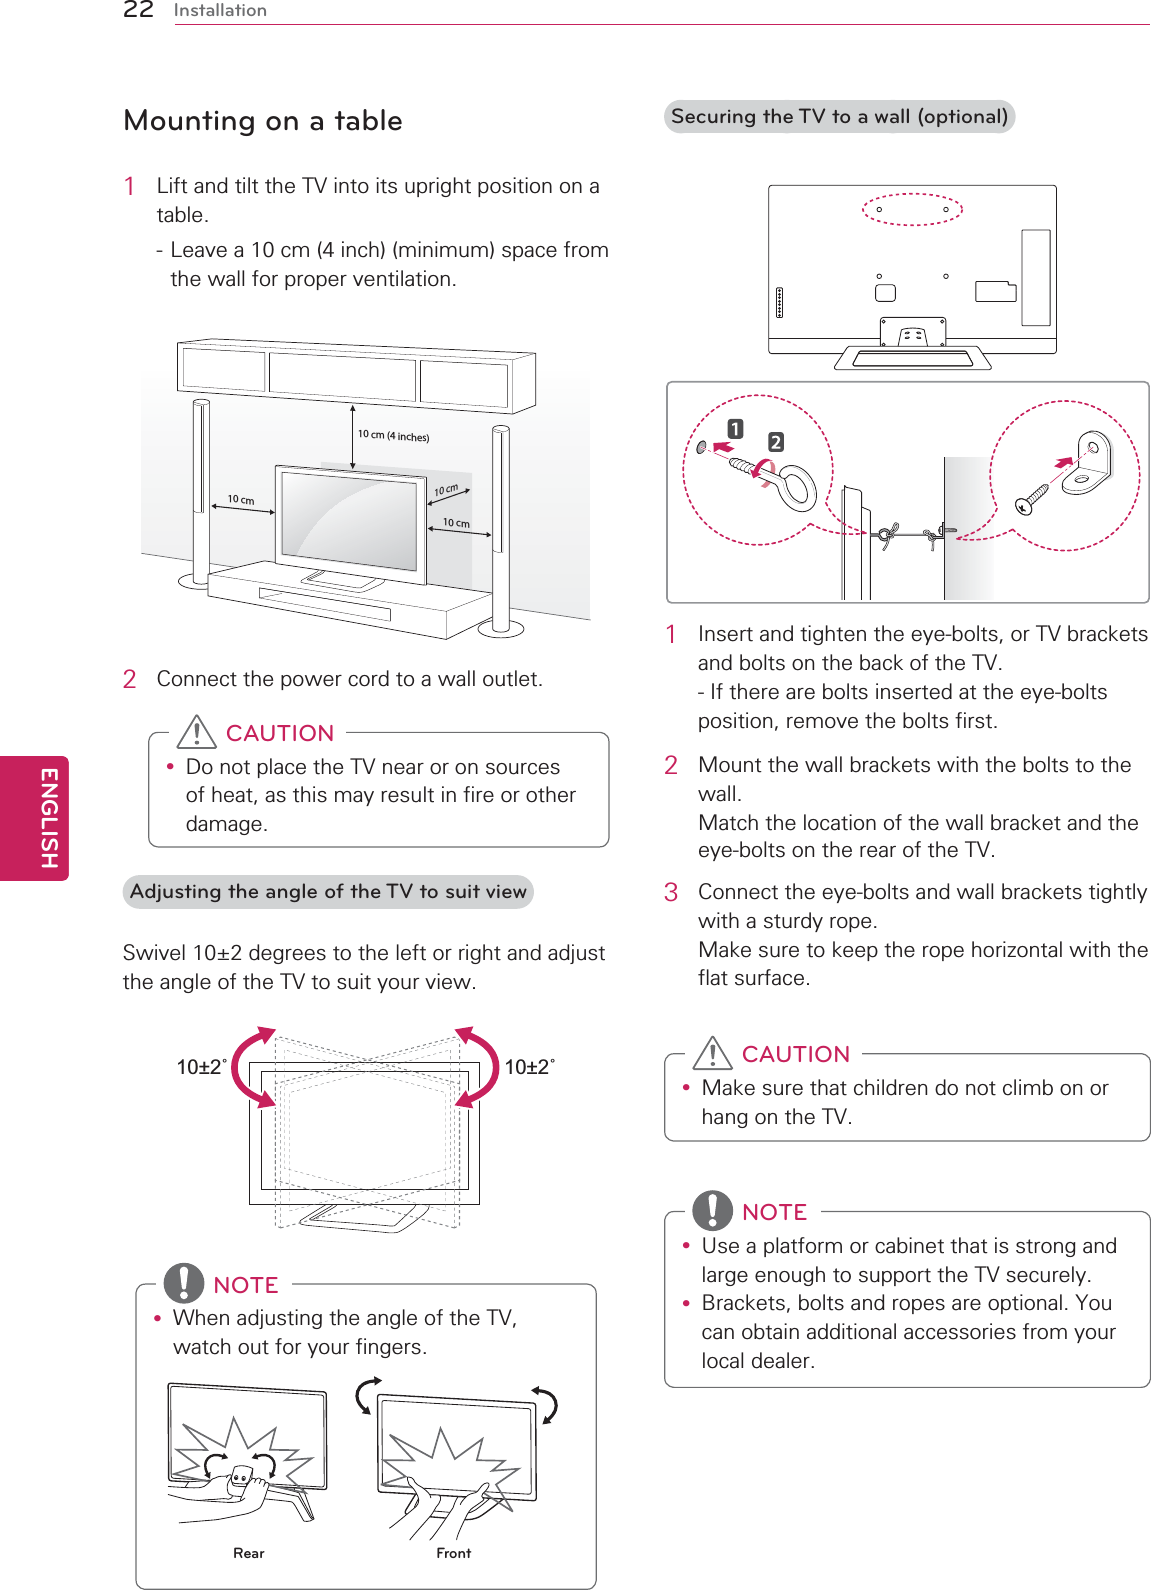
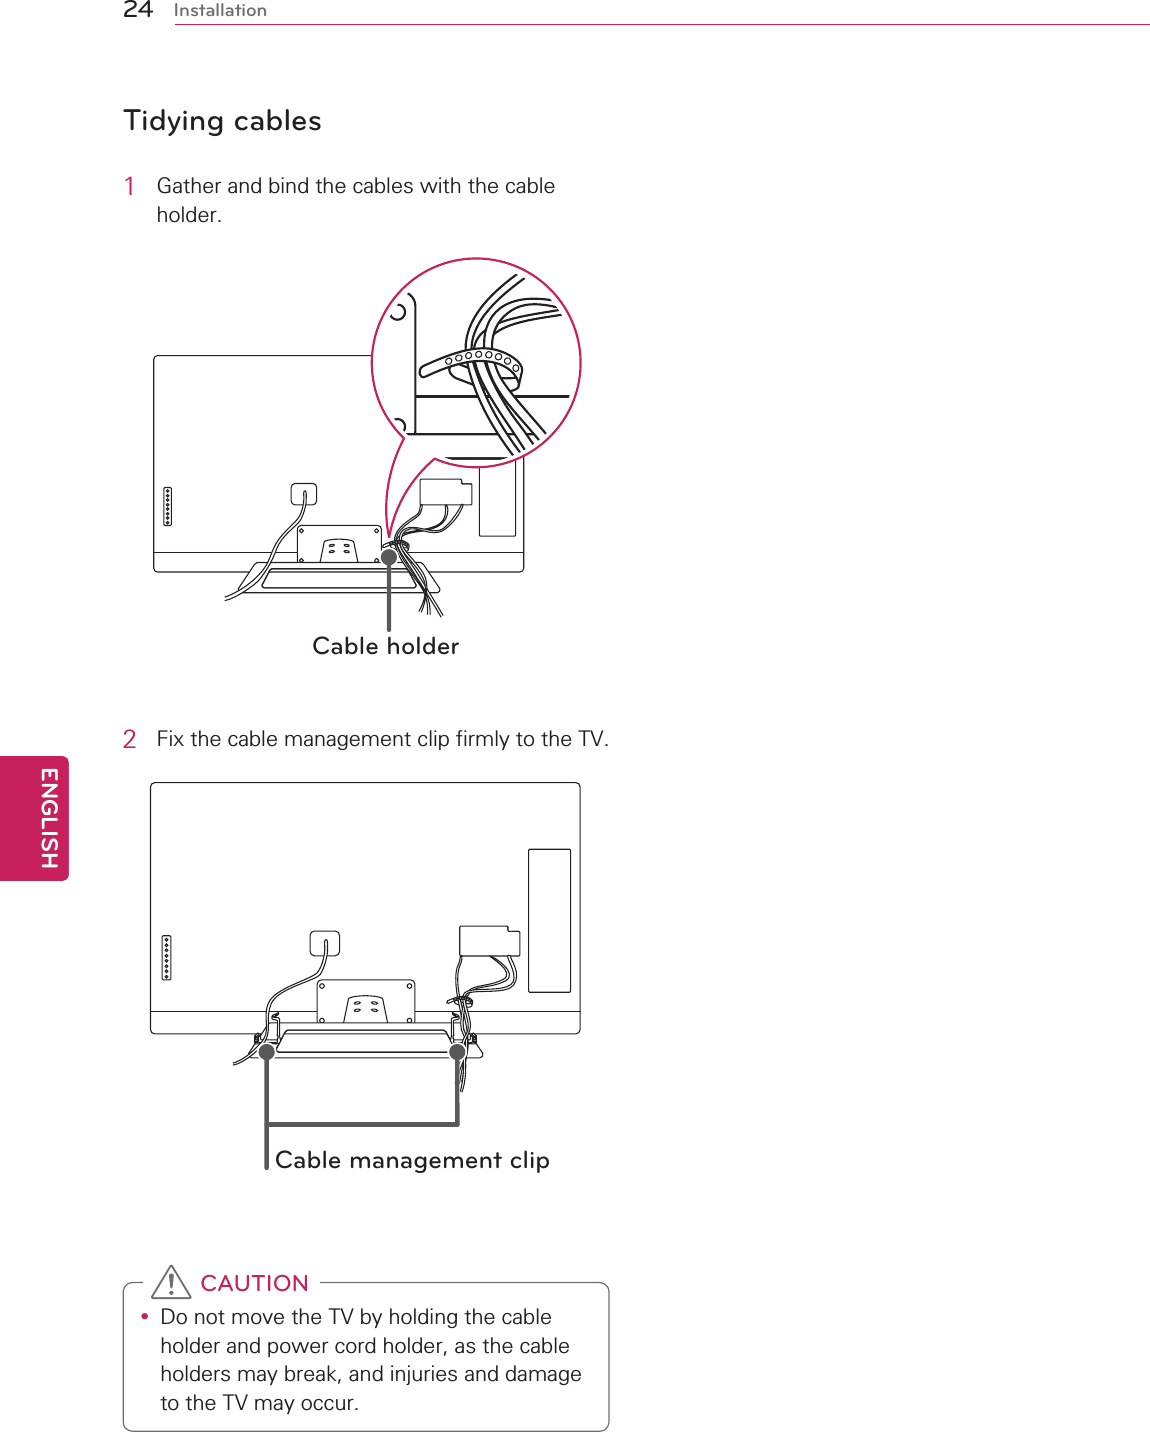
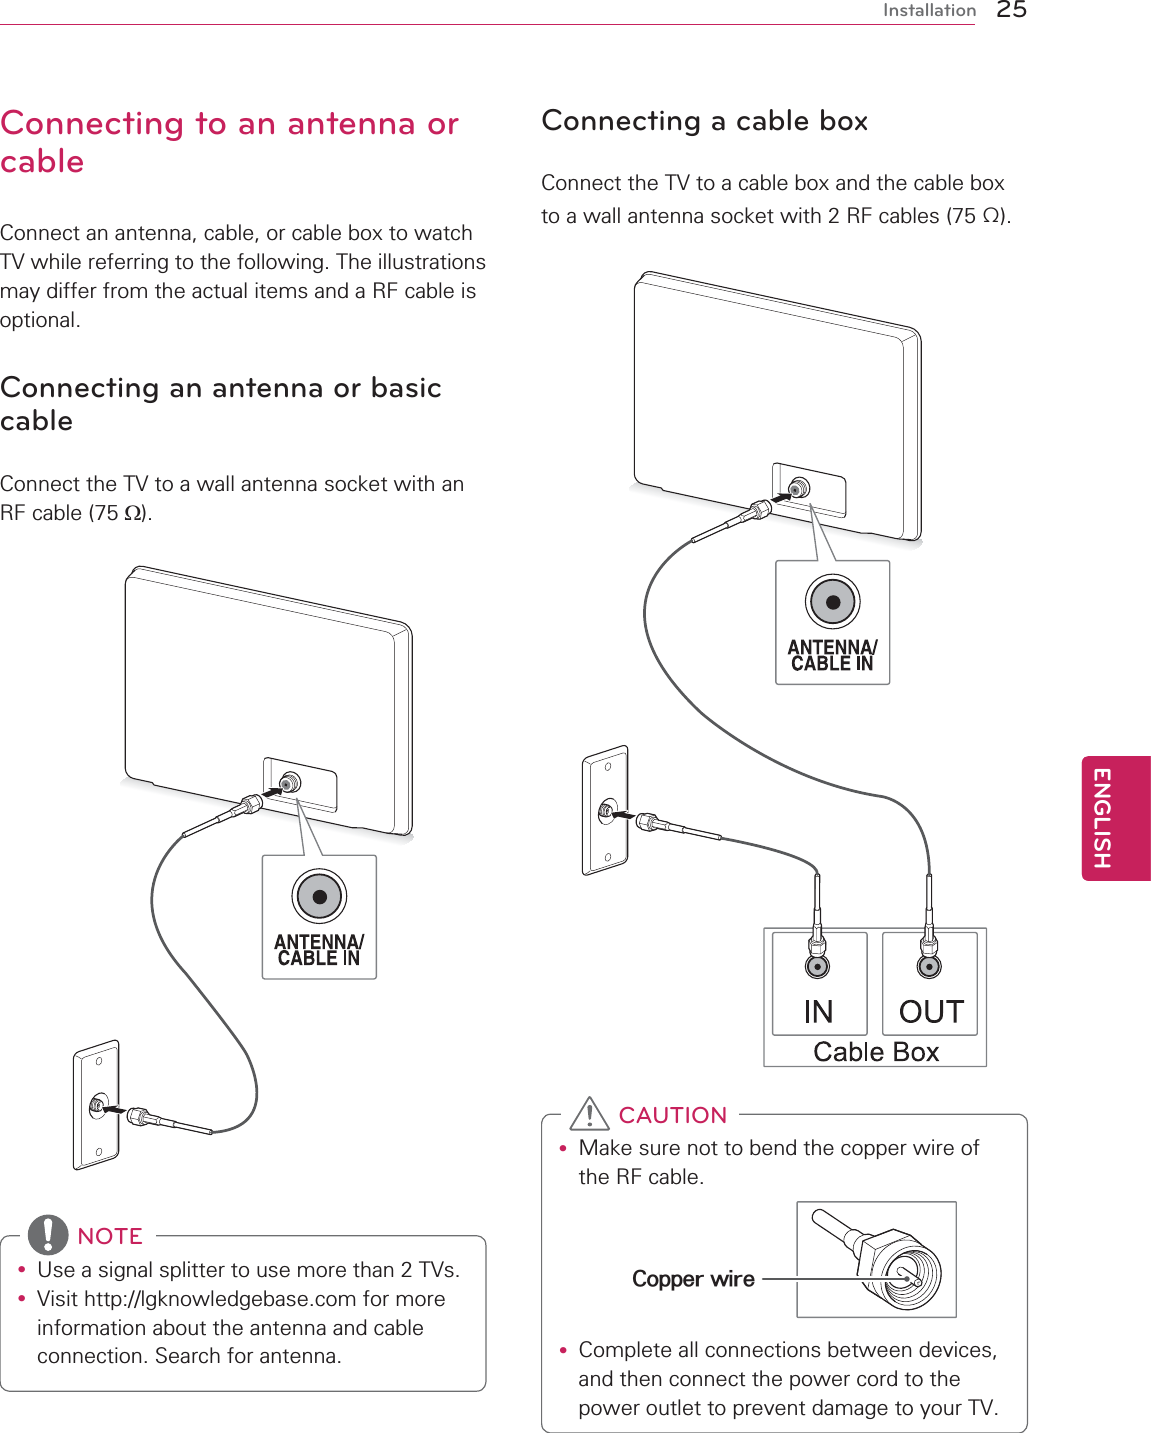
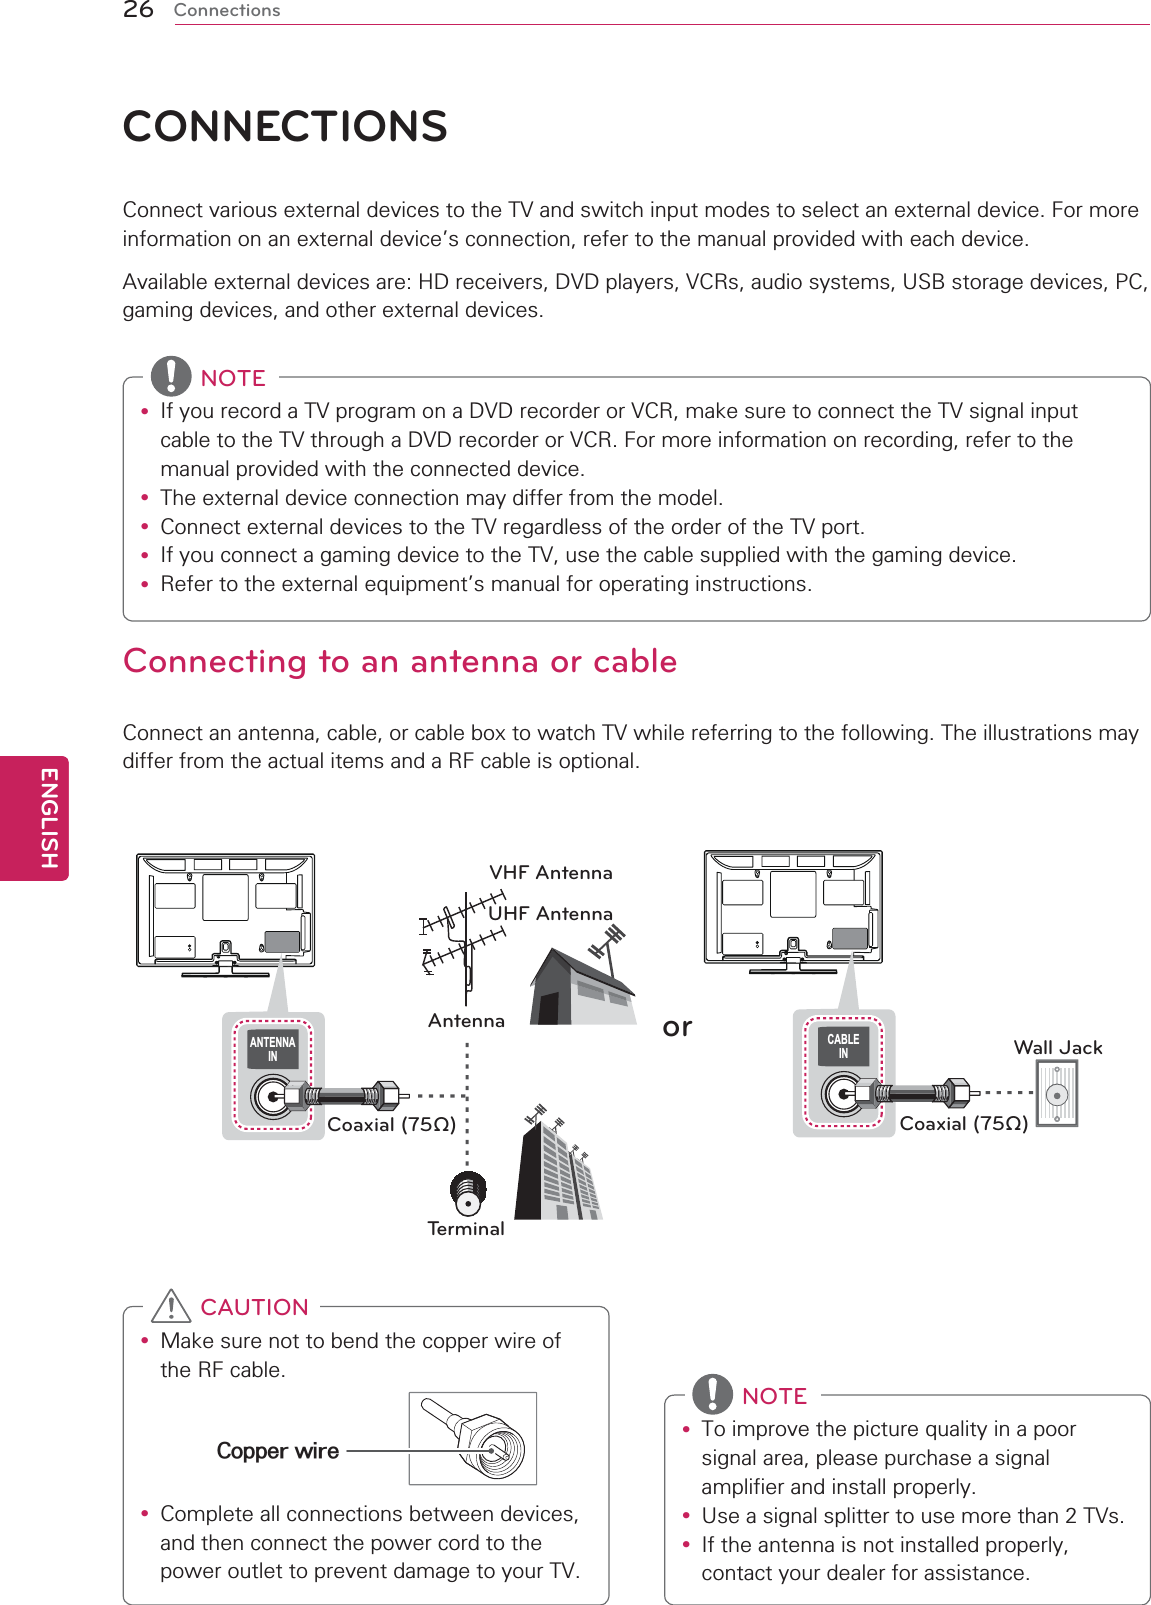
LG Electronics USA 47LMG620UG LED LCD TV Monitor User Manual EMISSION TEST REPORT
LG Electronics USA LED LCD TV Monitor EMISSION TEST REPORT
UserManual.wiki
>
LG Electronics USA
>
47LMG620UG User Manual
Users Manual
Navigation menu
Upload a User Manual
Namespaces
Wiki Guide
HTML
PDF
Info
Views
User Manual
Discussion / Help
Navigation


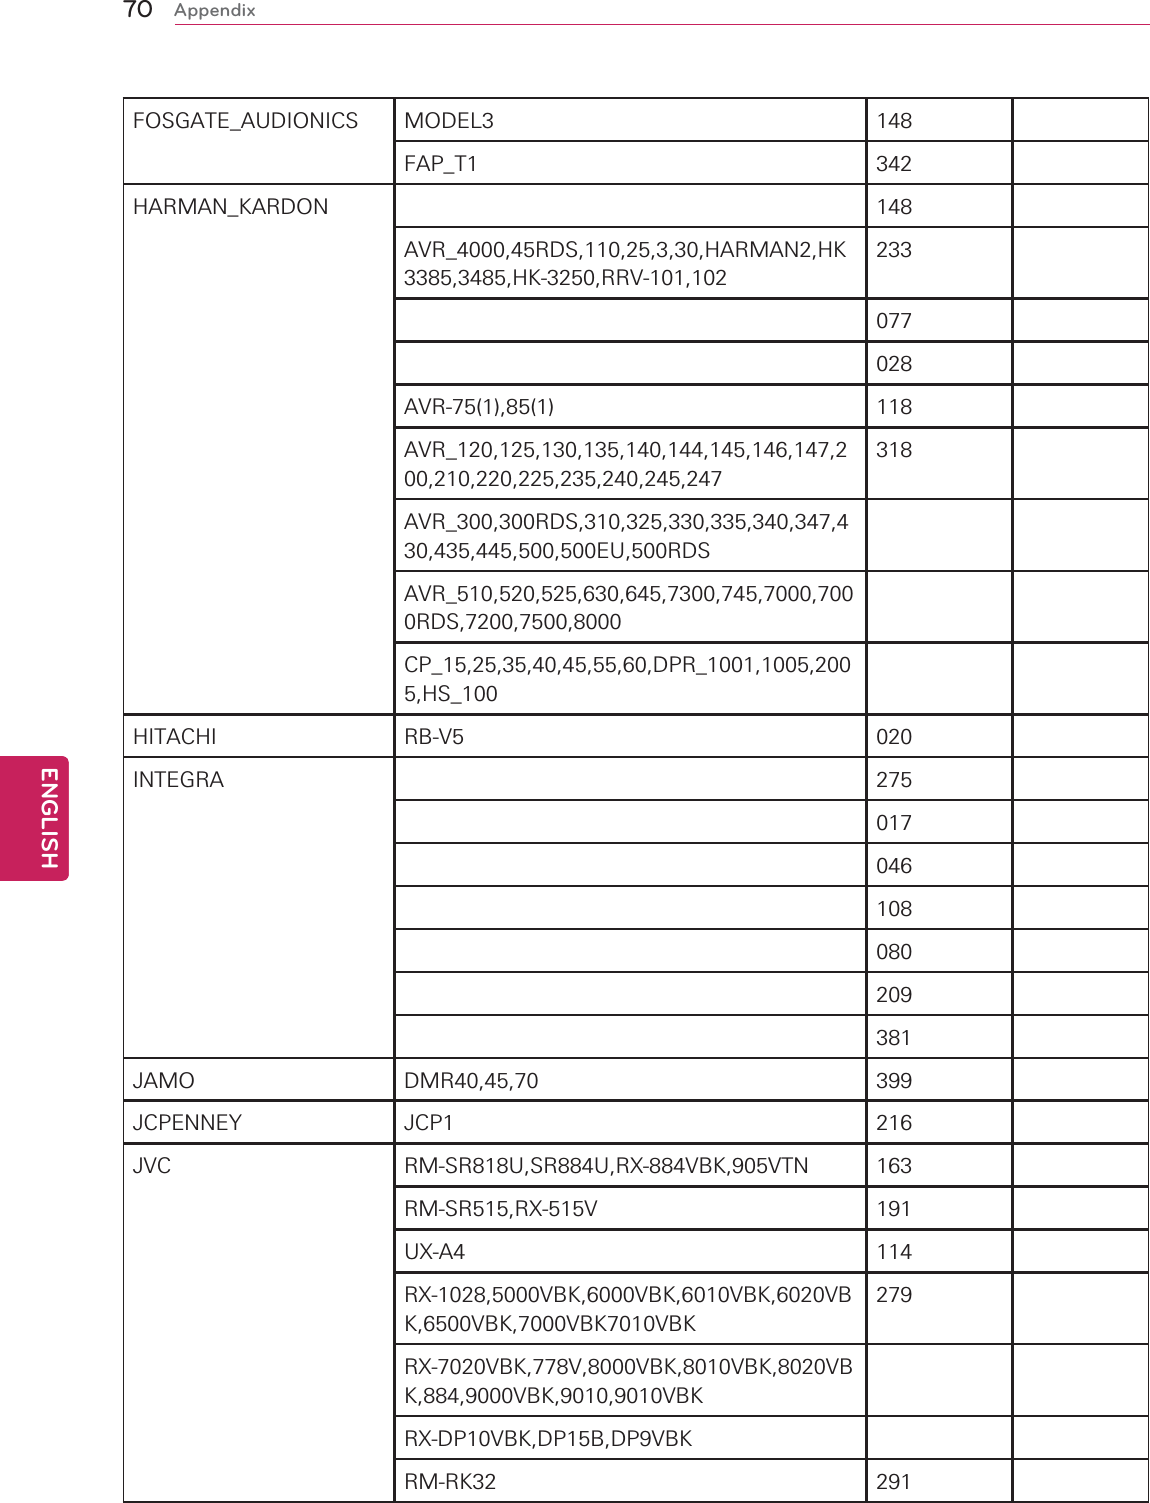
![67ENGENGLISHAppendixIR Code listAUDIOManufacturer & Brand Supported models Code_NumberADCOM GSA-700,GSP-560 082GFP-710,715,750,Pre-502 092GTP-450,502,506,550,600,740,830225GFB-800,GTP-500_II,RC-800 161269GFR-700,700HD,GTP-870HD,880 356AIWA 018RC-T770F 104RC-TN4000EX 202CX-NDV526,NSX-990,999,AV90,AVF99,V90 203RC-T500EX,TN270EX,TN330,TN5200EXU,XR-DV526,H330MDAV-DV75U,RC-8AR03 213RC-T800F 211RC-T779 188AKAI RC-A905 189ANTHEM AVM_2MAIN 335AVM_20MAIN,30MAIN,40MAIN,50MAIN,50VMAIN337STATEMENT_D1MAIN,D2MAINARAGON STAGE_ONE1 687ARCAM ALPGA_10DAVE,AMP-AV50,CR-30,TunerA8 141AR32,65,70,75,80,90,AVR100,C30,31,P1,P35,P90,P90/3077AV8,9[ZONE1-SYS16]AVP700[ZONE1,2-SYS16]AVR250[ZONE1,2-SYS16]AVR280[ZONE1,2-SYS16]AVR300,350[ZONE1,2-SYS16]](https://usermanual.wiki/LG-Electronics-USA/47LMG620UG/User-Guide-1613113-Page-68.png)
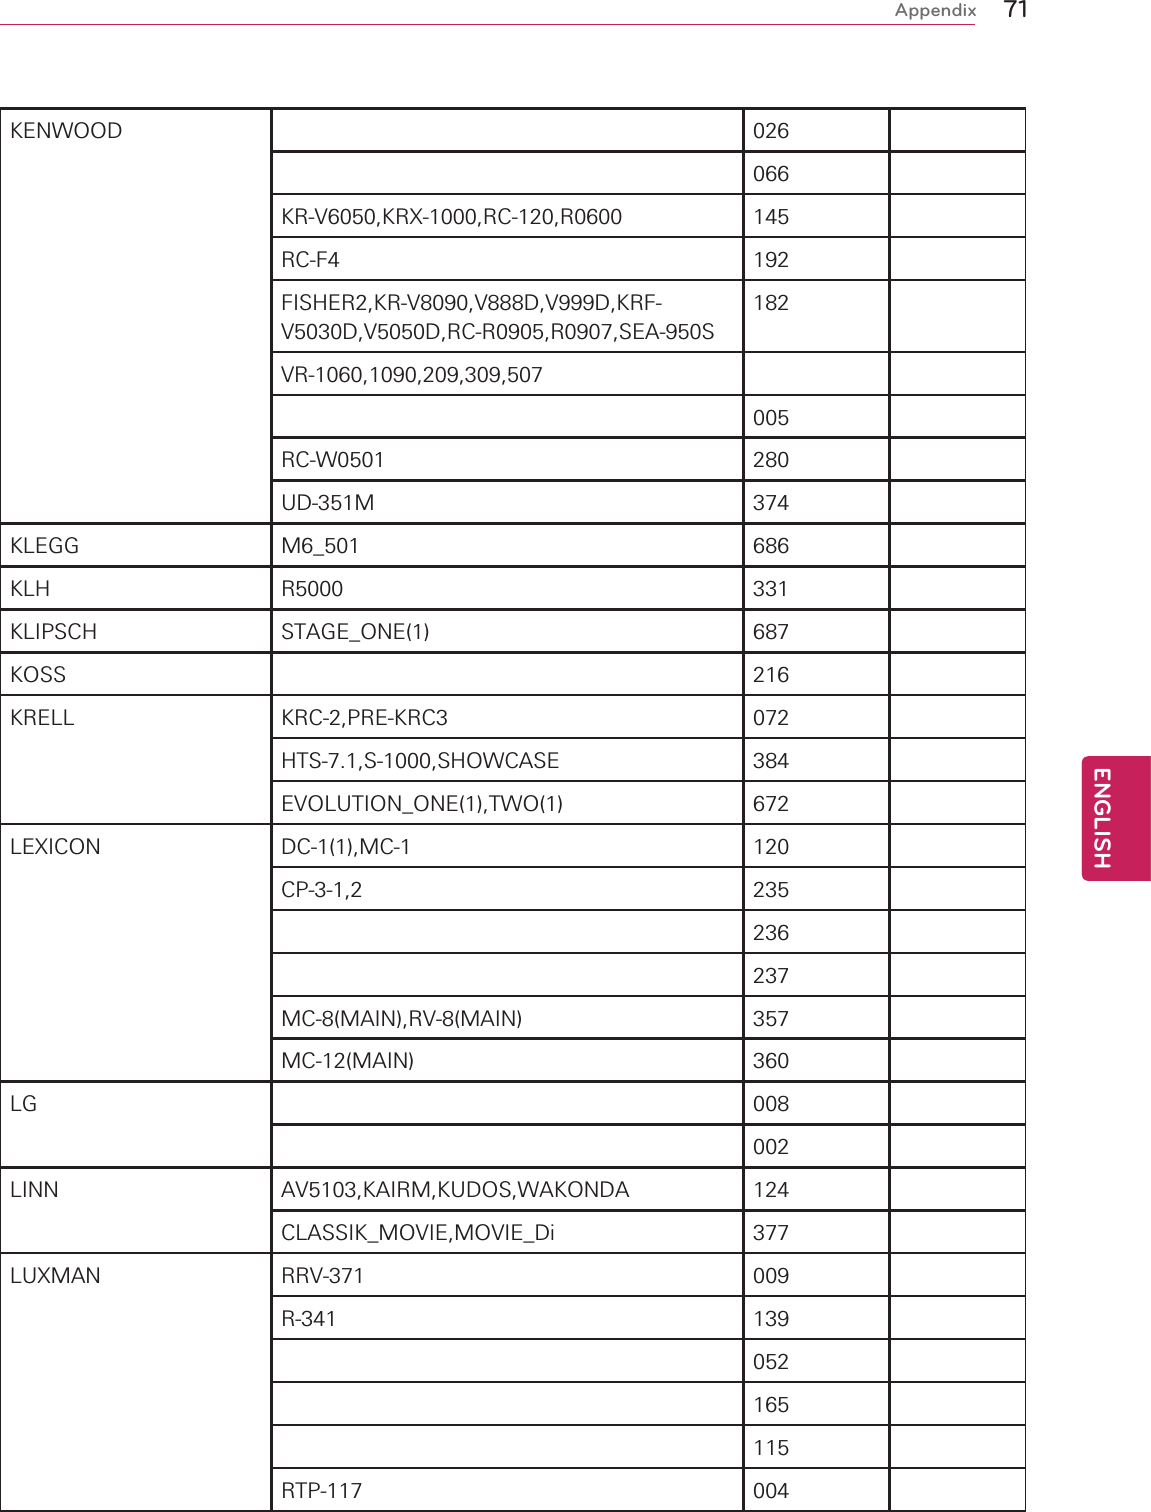
![68ENGENGLISHAppendixATLANTIC_TECHNOLOGYP-2000 342AUDIO_FILE 071B_&_K 3090,4090,HT_Products(1),REF-20,30,ST1400-II096AVP1000,1030,2000,2030,3000,3090,4000,4090AVR101,202,305,307,317,505,505_S2,507,507_S2,515,517Reference10,20,20+,21,30,31,50,50_S2,51AVP1000,1030,2000,2030,3000,3090,4000,4090[ZONE_B]097AVR101,202,305,307,317,505,505_S2,507,507_S2,515,517[ZONE_B]Audio_Products(2),PT3,5[ZONE_B]Reference10,20,20+,21,30,31,50,50_S2,51,5_S2[ZONE_B]BOSE RC-SC-6 070ACOUSTIC_WAVE 224BOSTON_ACOUSTICS AVP-7,AVR-7120 447CAMBRIGE_AUDIO AZUR_640R 684CARVER RH-DD51(2) 006 077PRE-CT-26V,RH-20(1),RH-88B(1) 492RH-20(2),RH-88B(2) 028061071CM-1090,CT-17,6,HR-722,752,875,RH-17,75,TX-8,8R201214226185RH-DD51(1) 013CR-27V,RH-27v 284CARY_AUDIO_DESIGN CINEMA6 378CITATION 5.0,500(5.0AV) 148CLARION 026](https://usermanual.wiki/LG-Electronics-USA/47LMG620UG/User-Guide-1613113-Page-69.png)
![69ENGENGLISHAppendixDENON RC-136 109215T-270,380RD,TU-1500RD 230RC-122 234DRA-295,395,685 330270LII,AMP-AVC-A1,A10SE,CA1,KVAC-A10SE,POA-5200,TU-580RD,S10340AVC-A10,A1D,A1SE,A1SRAVR-1083,1507,1800,1802,2400,2800,2803,3802DRA-297,37,397,697CI,697CIHD[MAIN] 679AVR-1609,1610,1709,1909,1910,2309CI,2809CI,4810,589,689,789,889,989[SIRIUS]569774DIGITAL_PROJECTION TITAN_1080p 660DVICO TVIX_HD_M-4000,4100,5000,5100,6500A,7000A570TVIX_HD_PVR_M-4010,TVIX_HD_TUNER_T-430,431TVIX_PVR_M-4110,4130,5010,5110,5130ELAN HDR-2000 057290ENLIGHTENED_AUDIO 099098ESCIENT DVDM-100[ID#1],FIREBALL_AVX-211,331,552[ID#1]451FIREBALL_DVDM_FB1,FIREBALL_E-120,2,40[ID#1],FIREBALL_E2_FB1FIREBALL_FP-1[ID#1],FIREBALL_MP-100,150,200[ID#1]FIREBALL_MX-111,311,531,752[ID#1],FIREBALL_SE-80,SE-D1,ZP-1[ID#1]VISION_VC-1[R1],VISION_VS-100,600[R1]FISHER REM-380 214182FLEXTRONICS CINEMA8 378](https://usermanual.wiki/LG-Electronics-USA/47LMG620UG/User-Guide-1613113-Page-70.png)
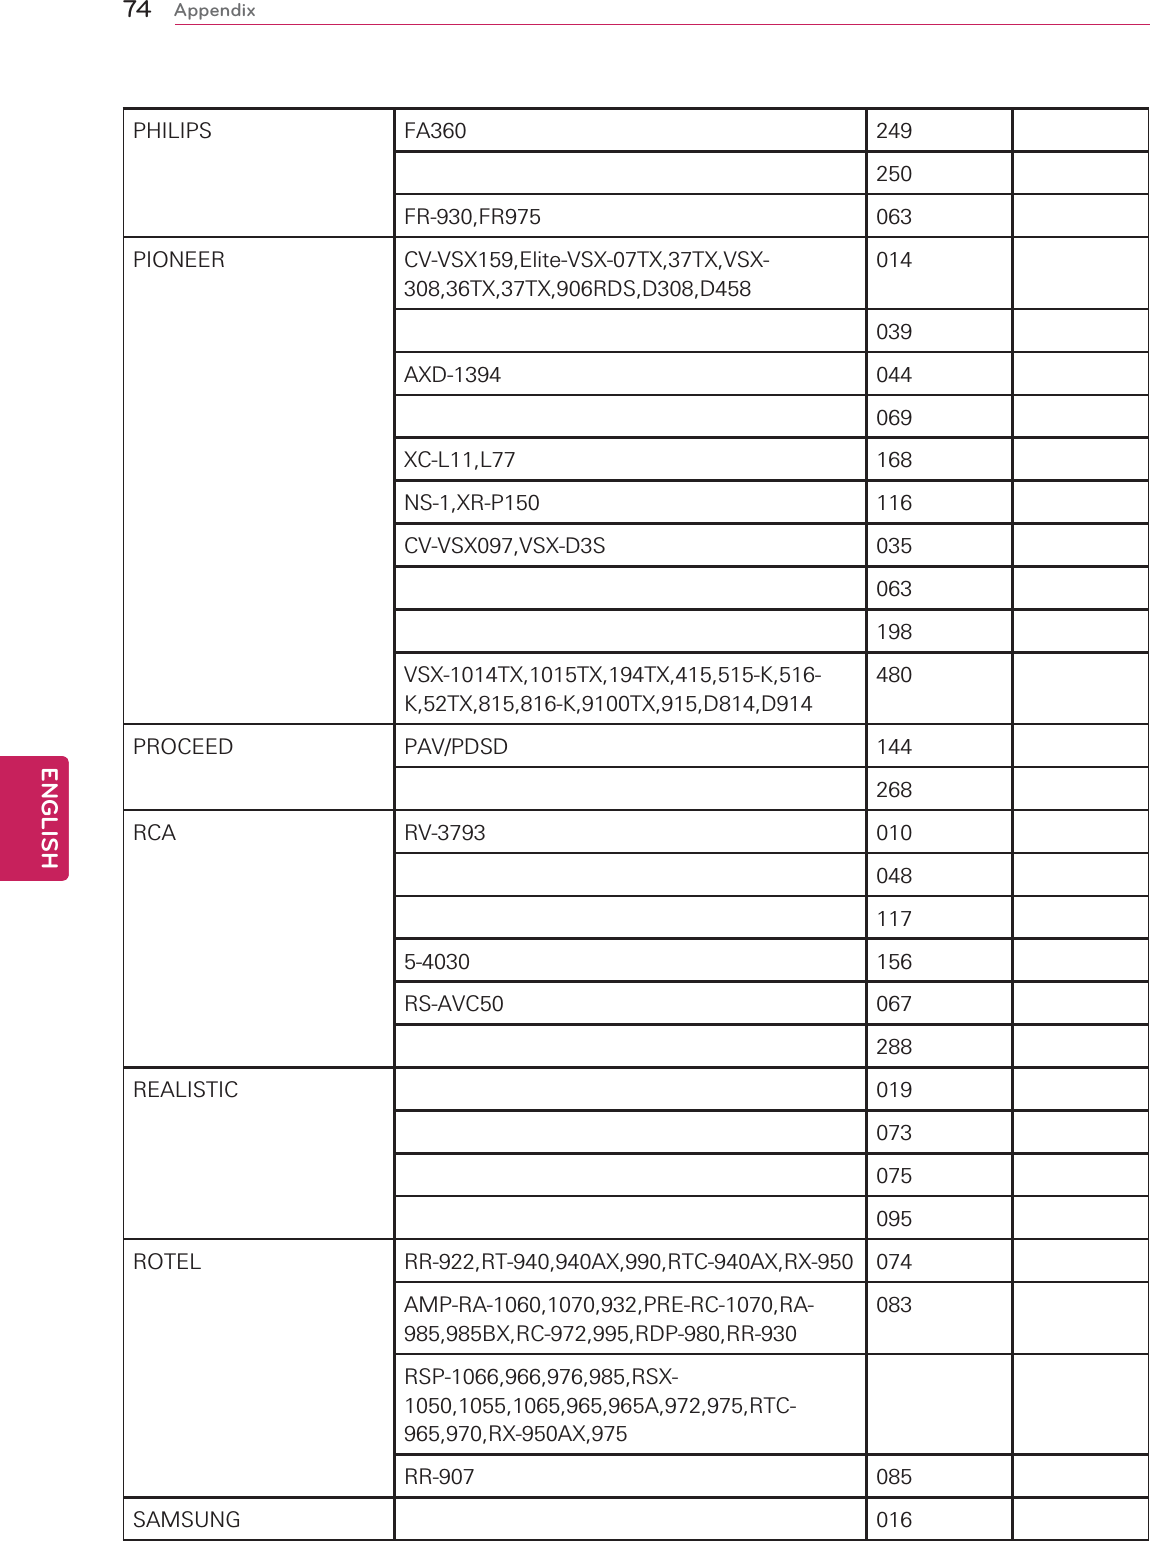
![72ENGENGLISHAppendixMAGNAVOX 086164152077MARANTZ D-870,RC-2000,RC-600-AV,RC-73SR 006AV-500 028031040RC-4000-SR 063185186RC-1132 265289SR6300,6400,7400,8400 492SR5005[MAIN] 712719MCINTOSH C100,15,38,39,41,42,712,CR12,MHT100,MX-132,MX118,PRE-Tune-MX-130238HR35 286C1000,2300,500 311MERIDIAN 500SERIES,501,501V,502,504,507,551,561,562V3,565_PRE-AMP,568,558,PRE-565,TunePRE-504100601_PRE-AMP 012200SERIES 013G_SERIES,G01,02,51,61,68,91 628MITSUBISHI 242M-VR400,600 204MONDIAL AMPHITHEATER1 15728K 158ACT-3 042DIA-150 043RH-11 081112MYRYAD MDP500 077](https://usermanual.wiki/LG-Electronics-USA/47LMG620UG/User-Guide-1613113-Page-73.png)
![73ENGENGLISHAppendixNAD 450,AMP-C340 186705,C422,Tuner-C-420 113NAKAMICHI AV-1RC,2 040RE-1RC,2RC,3RC,RECEIVER2 244245RM-1m 172AV-10,1s,8,RE-10 183287NEC AR-300 176NILES A4.6CI,ZR-4630,-8630AV 403ONKYO TX-DS575,DS575X,DS676,DS757X,DS777 275RC-199M 017DTR-7.1,TS-DS676B,TS-SV828THX 046108TX-DS747[TUNER],DS838[TUNER],DS939[TUNER]080RC-313S 209381OPTIMUS 026041OUTLAW MODEL950 342PANASONIC 032RAK-SC509W 195219177292SC-HT820V[AMP&DVD] 626PARASOUND R-1,U/RC-1500 129R-2,U/RC-1500 130AVC-1800,R-15,R-15ADVANCED,U/RC-1500 132AVC-2500U 261294295C1/C2 333T3 334](https://usermanual.wiki/LG-Electronics-USA/47LMG620UG/User-Guide-1613113-Page-74.png)
![76ENGENGLISHAppendixSONY DDS8943,8949,HT-5500,5500D,550D,DDW750,HTD-D840,DW840,DW8401001STR-DE685,DE695,DE697,DE698,DE885,DE895,DE897,DE985,DE995,DG600,DR898,K840,K840PRM-S102,S241,S441,U421,U54,U541,ST-D905,STR-DB1070,TA-D905018RM-E7(2),RM-P341,P351,P501,U241,TA-V909 247STR-D1011,D1015,D611,D965,DA50ES,DE325,DE345,DE525,DE545,DE715,DE835RM-P1 248STR-DB925,DB930 166RM-E800,EP9,SDP-EP9ES 101RM-PP402 184RM-J55 218RM-SG9AV 271STR-DA2400ES[MAIN],DA3300ES[MAIN],DA3400ES[MAIN],DA4300ES[MAIN],DA4400ES[MAIN]560STR-DA5300ES[MAIN],DA5400ES[MAIN],DA6400ES[MAIN]CAV-CVS12ES[ALL_ZONES] 612SOUNDESIGN 036SUNFIRE Theater_Grand_III,IV(ZONE1) 344Theater_Grand_III,IV(ZONE2) 345182TEAC 005019049040AG-D9100,D9260,UR-407 212RC-660 217](https://usermanual.wiki/LG-Electronics-USA/47LMG620UG/User-Guide-1613113-Page-77.png)
![78ENGENGLISHAppendixYAMAHA 026DSP-A990,VP37310 253AX-596,DSP-A5,RX-V396RDS,VM70290,VP49730,VR09410,VS71360,90590169RS-AVC50,AVX100 067AVS700,VID5400 173AX-380,892,DSP-A505A,A592,A595,A595A,AX620,HTR-5150,5250,5280,5460,5490205R-V1103,V1105,V902,RAV-110,130,150,RS-7,TX-350,492RDS,590,592RDS,670RDS,950RX-3000,V1000,V1200,V2090,V2092,V2095,V2200,V3000,V495,V495RDS,V592,V595A,V595RDSRX-V596,V596RDS,V620RDS,V690,V692,V793,V795,V795A,V800,V992,V995264SYS4 232RAV7 089RAV6 274HTR-6040,RX-V361[MAIN-ID1],RX-V461[MAIN-ID1]715YHT-280[MAIN],YHT-580[MAIN],YHT-680[MAIN],YHT-685[MAIN],YHT-780[MAIN]RX-397,497,RX-797[MAIN] 717YSP-1100[STANDARD] 644695RX-V1065[MAIN],RX-V2065[MAIN],RX-V465[MAIN],RX-V565[MAIN],RX-V665[MAIN],RX-V765[MAIN]738RX-A1000[MAIN],RX-A2000[MAIN],RX-A700[MAIN],RX-A800[MAIN],RX-V667[MAIN]756ZENITH Z712B 143210](https://usermanual.wiki/LG-Electronics-USA/47LMG620UG/User-Guide-1613113-Page-79.png)
![80ENGENGLISHAppendixMOTOROLA DCH70,100,200,3200,3416,6200,6416002DCT700,2500,3080,3400,6200,6208,6400,6412,6416DCX3200,3400QIP2500,2708,6200,6416,7100,7216RG3000 112OCAPMODELS 120BELGACOM IPP430MC 171CABLEVISION 001CE-LABS HD100QA 164DIGEO 2056-MSX 153DIGITAL_STREAMDCS1000 180DUNE SMARTB1,BE,D1,H1,HE,ME 184MINI,ULTRA 185DSTV DSTV[PVR1] 182DSTV[PVR2] 183EVOLUTION -FTAX0-01 158FOXTEL DIGITAL,IQ,IQ2 172GENERAL -INSTRUMENT005DL4,DQNV/DRX 103DPBB,DPV/DP/DQNDRZSTARGATE 1043000RHAMLIN 049CR6000,6600 050CR6800,CR-83 055HITACHI 055103HOMECAST NC3000C01 176](https://usermanual.wiki/LG-Electronics-USA/47LMG620UG/User-Guide-1613113-Page-81.png)


![102ENGENGLISHAppendixManufacturer & Brand Supported models Code_NumberDIRECTV HR20,21 819DSTV DSTV[D] 786DSTV[A] 787DSTV[B] 788DSTV[C] 789HUGHES GXCEBOT 817HDVR2SD-DVR120,DVR40HUMAX 817ICREALTIME FLEX16,4,8 784MAX16,4,8MOXI HD_DVR_MR-1500T3 782PHILIPS TIVO1 790DSR6000R,7000,704,708 817RCA DVD490RE 809REPLAYNETWORKS REPLAY1 001RTV5040,5060,5080,5160,5504,5508,5516,5532SONY RM-Y809 804SAT-T60,W60SVR-2000 805TOSHIBA 817DVR](https://usermanual.wiki/LG-Electronics-USA/47LMG620UG/User-Guide-1613113-Page-103.png)
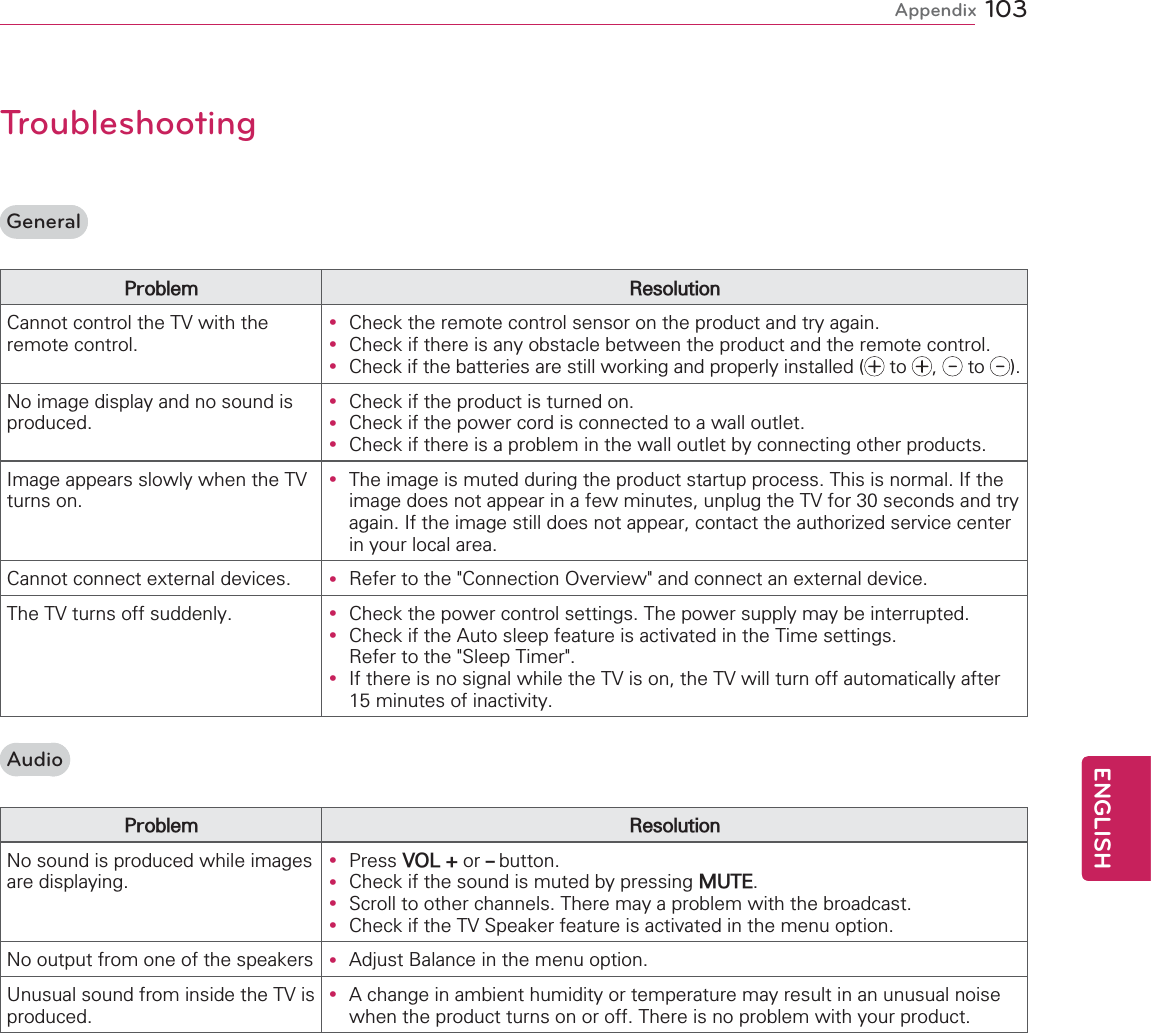
![105ENGENGLISHAppendixPentouchProblem ResolutionThe touch pen does not work. y Check that you used the remote control to enter Pentouch mode.y Check that the Pentouch dongle is connected to the computer and the red LED is on.y Press the ᬋ(POWER) button on the touch pen to check that it is powered on.y Check that the touch pen is paired for use. (The touch pen is correctly paired if the red LED is on once when you press the Home button on the touch pen.)y Set the computer screen to display only on the TV.The TV screen doesn’t look normal when using Pentouch.y Check that the computer is correctly connected to the TV.y Check that you are using the optimal resolution.y Set the aspect ratio on the TV to Just Scan.The touch pen is touched on wrong positions.y Set the computer screen to display only on the TV.y If the point you touch on the TV screen using the touch pen and the point indicated as touched on the computer screen do not match when the computer and the TV are connected by a PC signal (RGB) cable, use the TV remote control to select [SETTINGS] ĺ [Picture] ĺ [Screen] (RGB-PC), then select [Auto Config.] to adjust the screen.The touch pen movement is not smooth.y Check whether the computer and the TV are too far from each other. Check whether there are too many obstructions between the computer and the TV.y Check whether many other applications are running on the computer. (Please avoid running other applications while using the Pentouch program.)](https://usermanual.wiki/LG-Electronics-USA/47LMG620UG/User-Guide-1613113-Page-106.png)