LG Electronics USA 50PW350UA PLASMA MONITOR User Manual
LG Electronics USA PLASMA MONITOR
UserManual.wiki
>
LG Electronics USA
>
50PW350UA User Manual
User manual
Navigation menu
Upload a User Manual
Namespaces
Wiki Guide
HTML
PDF
Info
Views
User Manual
Discussion / Help
Navigation


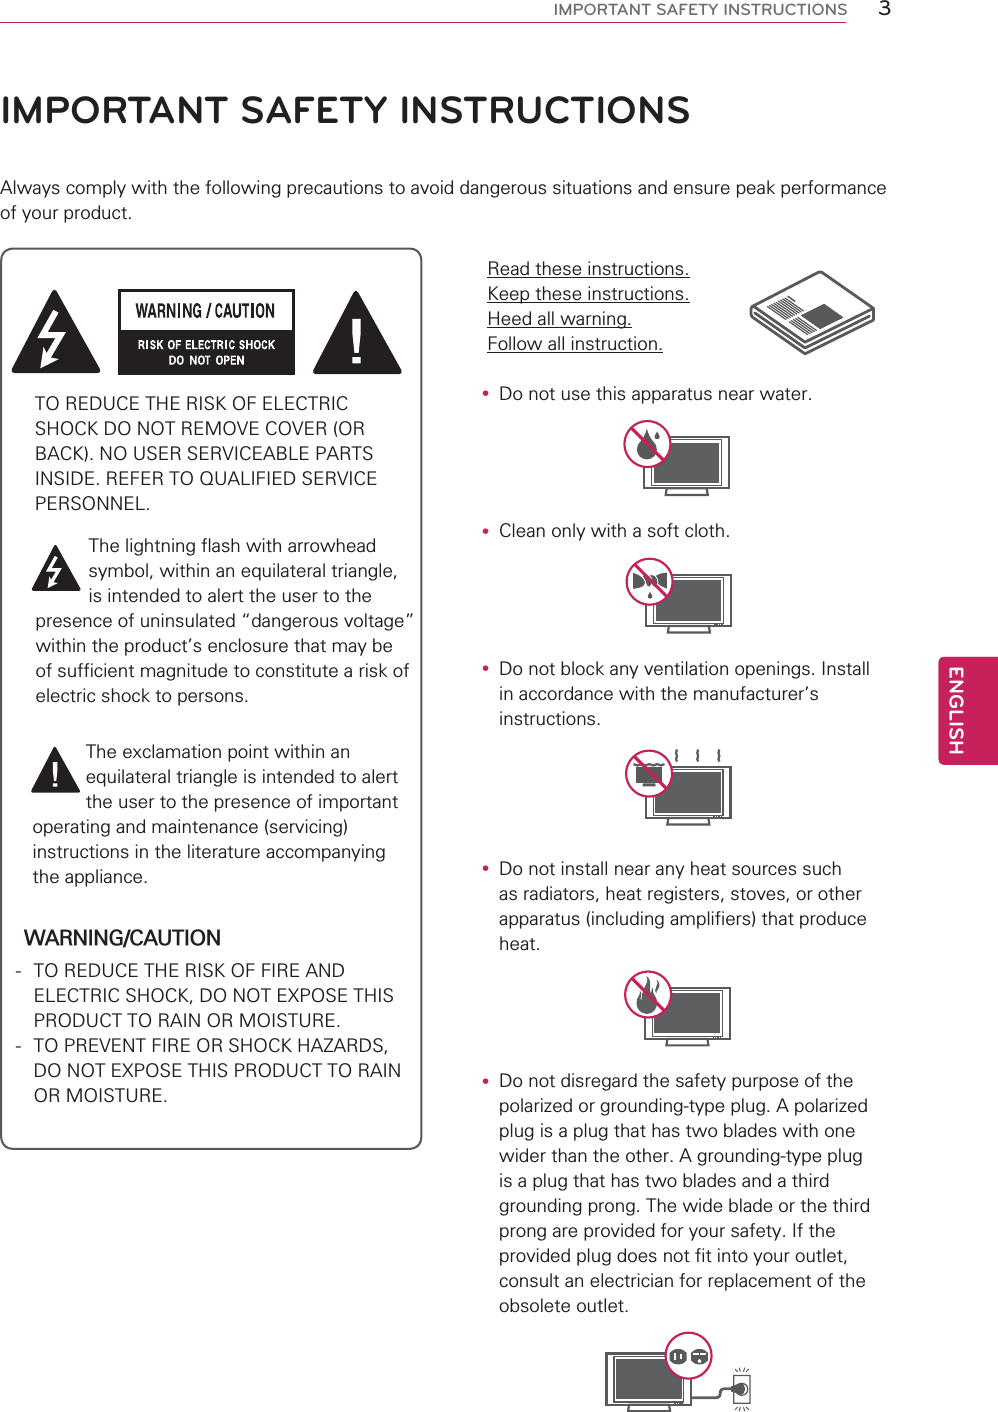


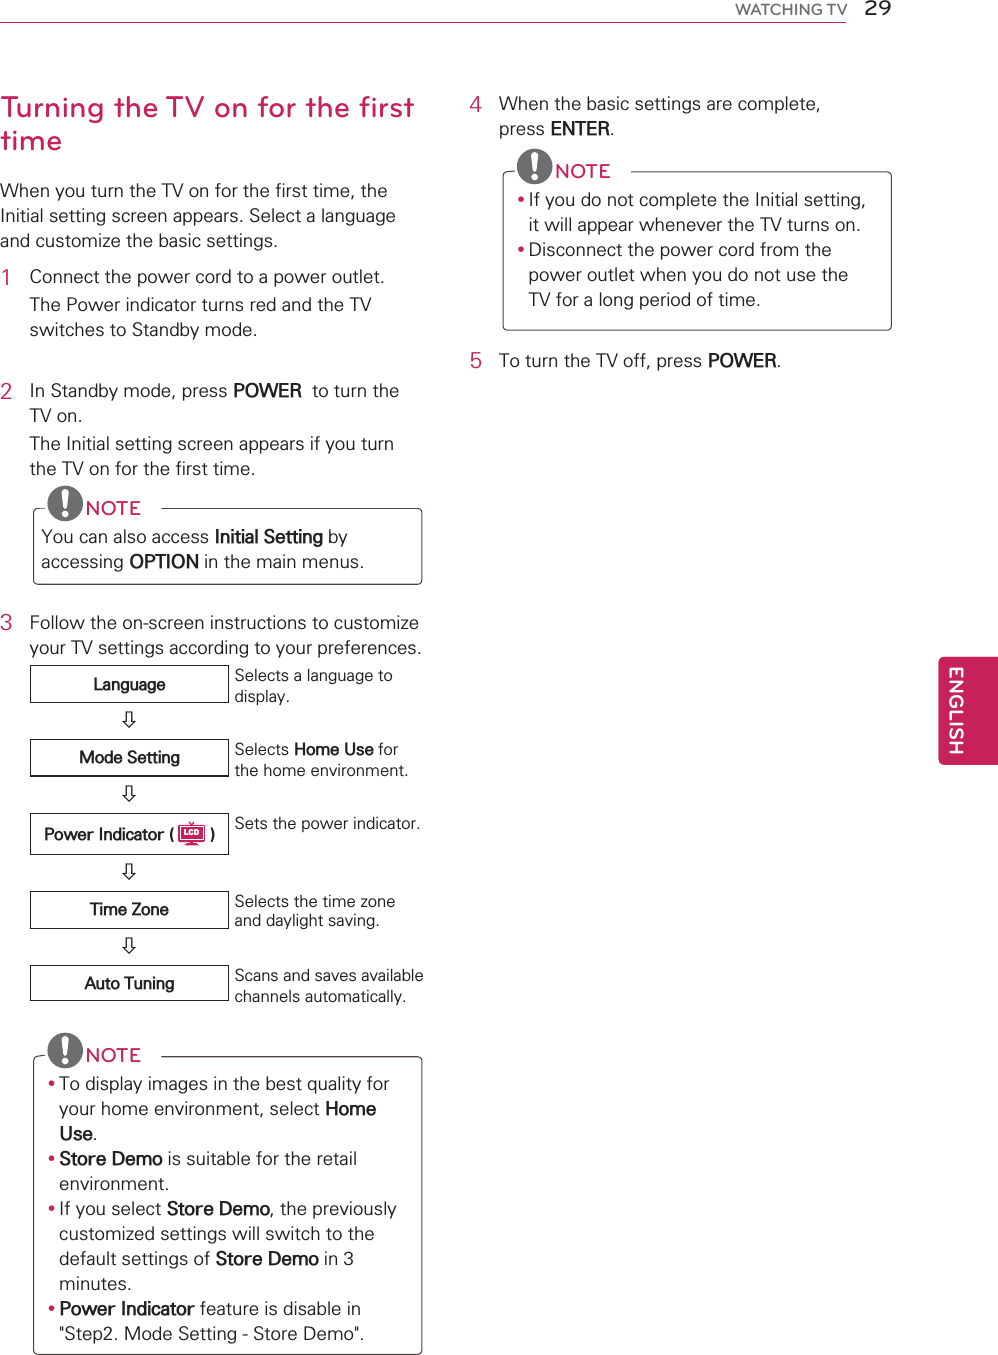


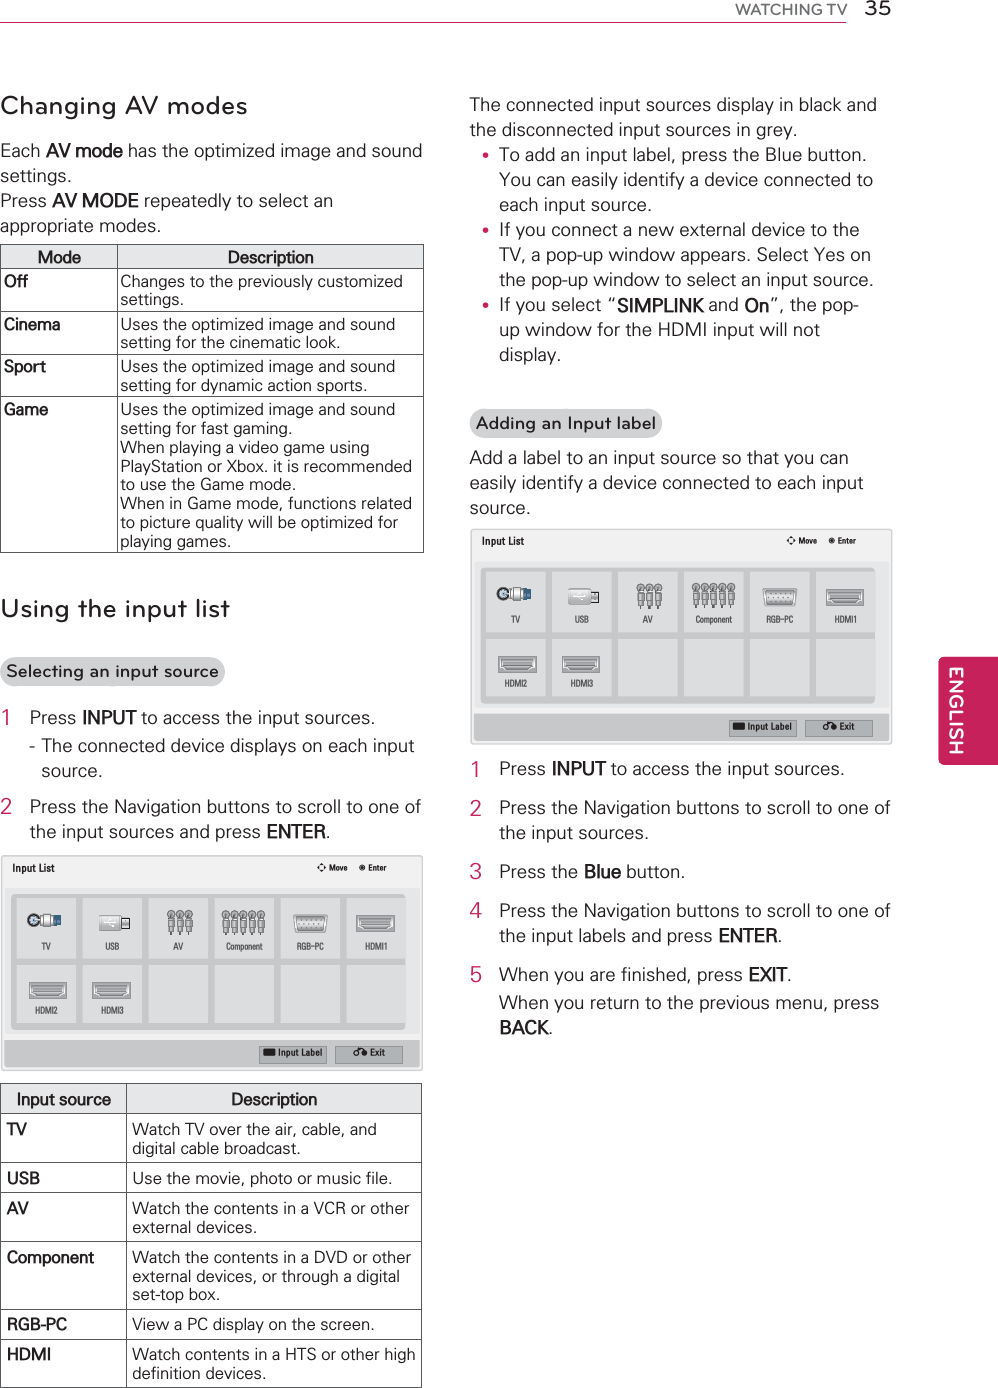
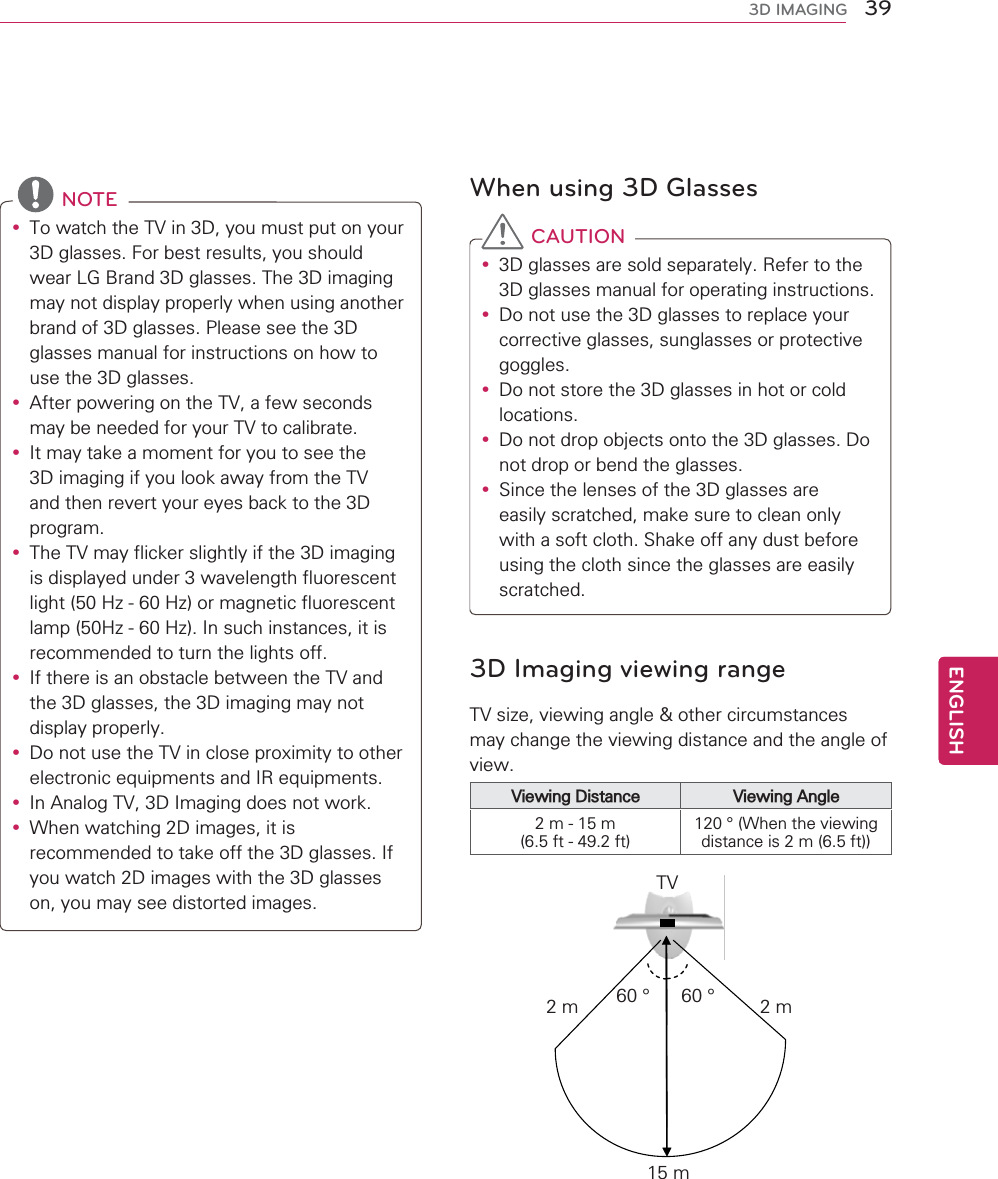
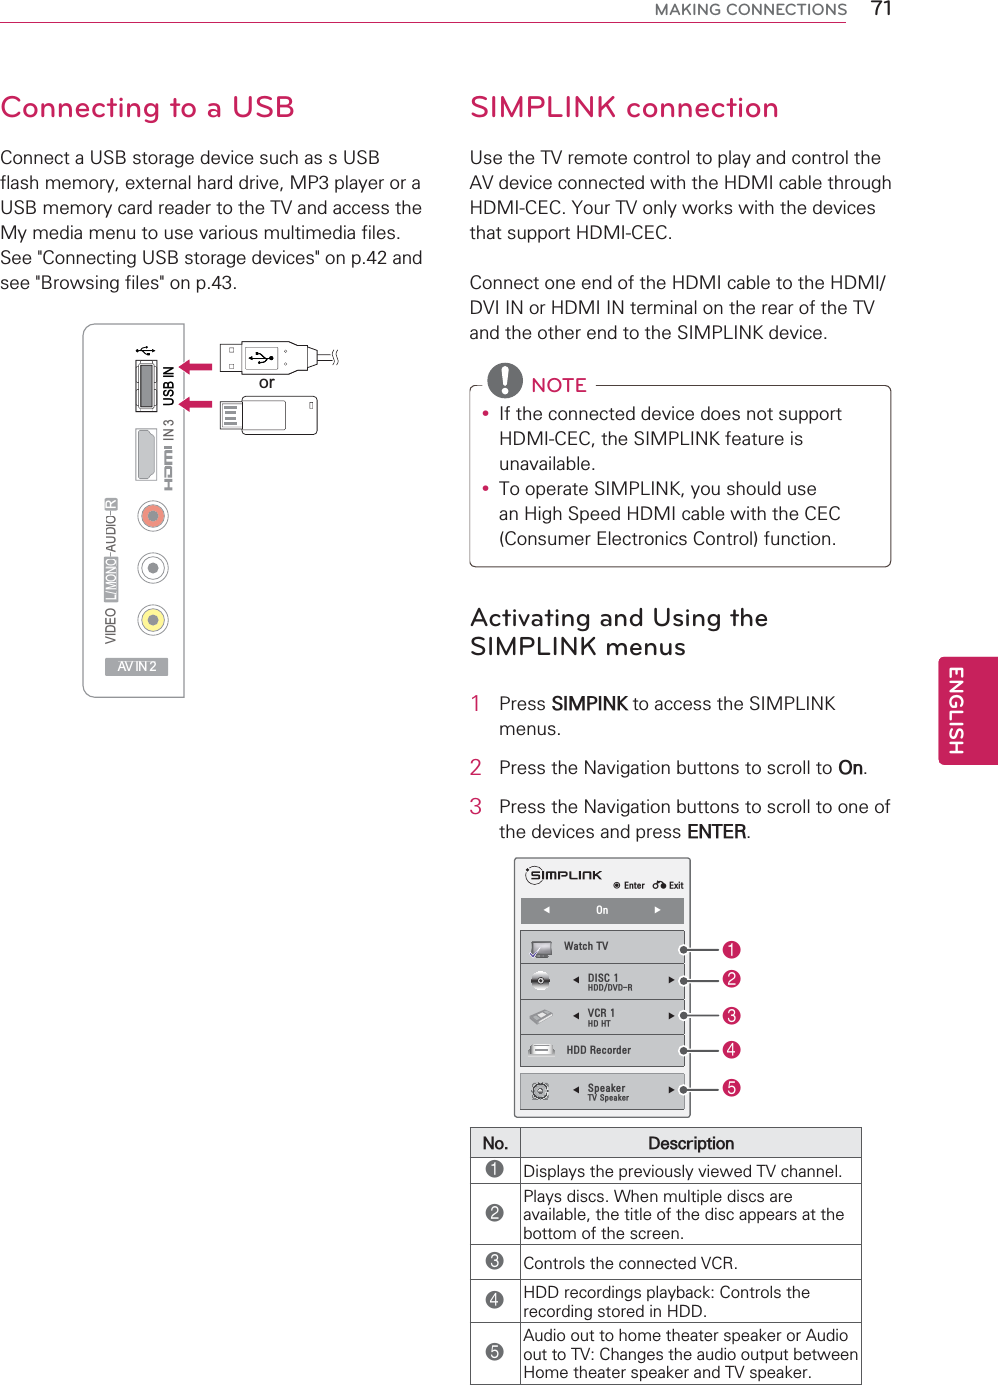
![40ENGENGLISH3D IMAGINGViewing 3D Imaging1Play the video produced in 3D.2Press 3D.3Press the Navigation buttons to scroll the 3Dvideo or 2D video and press ENTER.4Press the Navigation buttons to scroll the shape and press ENTER.Mode Description2D » 3D Changed from 2D imaging to 3D imaging.Top & BottomSide by SideChecker BoardFrameSequential5Wear the 3D glasses.6Press the Navigation buttons to scroll the Enter and press ENTER. (QWHU &DQFHOPower on your 3D glasses and put them on. Sit 2 meters from TV to enjoy the best 3D view.ᯕ'6HWWLQJ7Press 3D button to Turn off 3D mode or Turnoff 2D mode. (QWHU &DQFHOTurn off 3D mode.ᯕ'6HWWLQJ'9LGHR(QWHU &DQFHOTurn off 2D mode.'9LGHRUsing 3D quick menu option1Press 3D SETTING.2Use the following options while viewing 3D imaging.'6HWWLQJ(QWHU (QG'YLGHR'3LFWXUH6L]H ܁-XVW6FDQ ۽'(IIHFWV ܁۽'9LHZRLQW ܁۽'3LFWXUH%DODQFH ܁2II ۽'3LFWXUH&ROOHFWLRQ ܁/HIW5LJKW ۽+Button Description'3LFWXUH6L]H'PRGH㯗㜣㰈㛈㵟㼃㋇㎇⾃㶟ⶃ⚻⋧㸋䊺䱚ほ㵃䱛⤇䭞⢛⢬'(IIHFWV'WR'PRGH㯗㜣㰈㛈㵟㈷⋄⌃ㅃ䊺∋㵟≷⾻⾃㹷㸏䭞㯳㶌䊺∗㵋➙㯳㼃⢛⢬'9LHZSRLQW'PRGH㯗㜣㈷⋄⌃ㅃ䊺㵟⍳㎋㯍㵻㰈㛈㵋䱚ほ㵟㭥Ⱇ⢛⪫䃃㵃㳇㿈㯳㶌䊺∗㵋➙㯳㼃⢛⢬'3LFWXUH%DODQFH'PRGH㯗㜣/HIW㱇5LJKW㵻ㇿ㿇㵟㈤㛐⫸㵻䈮㵻⚟⢛⋄㲷㵻⾃㶗⧠㵃㋻㸜䭞⢛⢬'3LFWXUH&ROOHFWLRQ'PRGH㯗㜣/HIW㱇5LJKW㵻ㇿ㿇㵟㠣㜣⾃㈛▿㮻㼃⢛⢬CAUTIONySome menus may not work while watching the TV in 3D.yThe 3D imaging mode is disabled automatically when switching DTV channels.yThe screen may not be displayed properly if you view 2D DTV images in 3D imaging mode.y3D effect can be seen when 3D Mode is selected appropriately for the 3D input signal supplied to the TV.yFor *mpo files (3D camera files), the 3D imaging mode is enabled automatically. yTo enable the 3D imaging mode, you can also press the ENTER button on the Magic Motion remote control.](https://usermanual.wiki/LG-Electronics-USA/50PW350UA/User-Guide-1374239-Page-40.png)
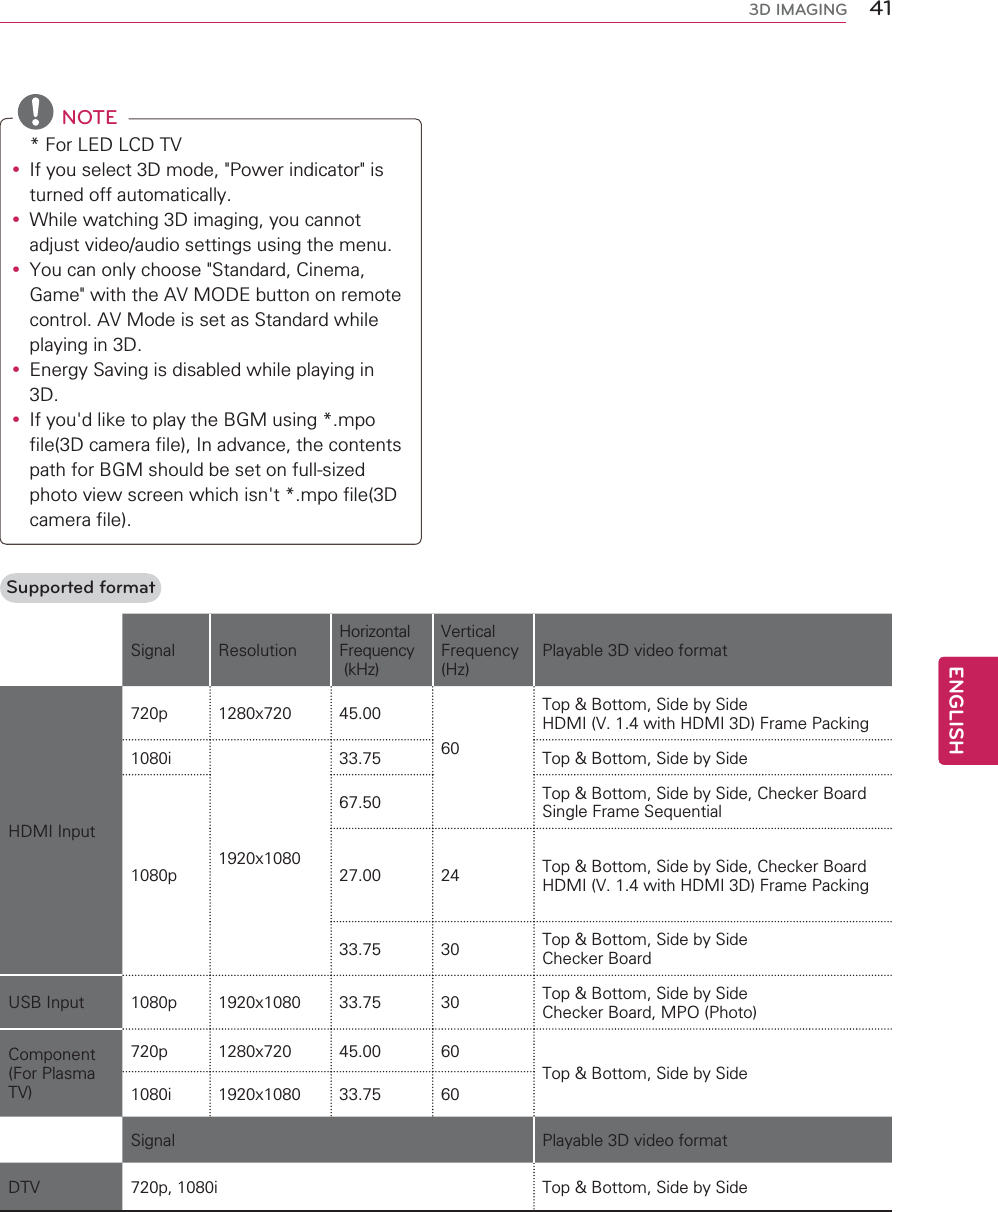


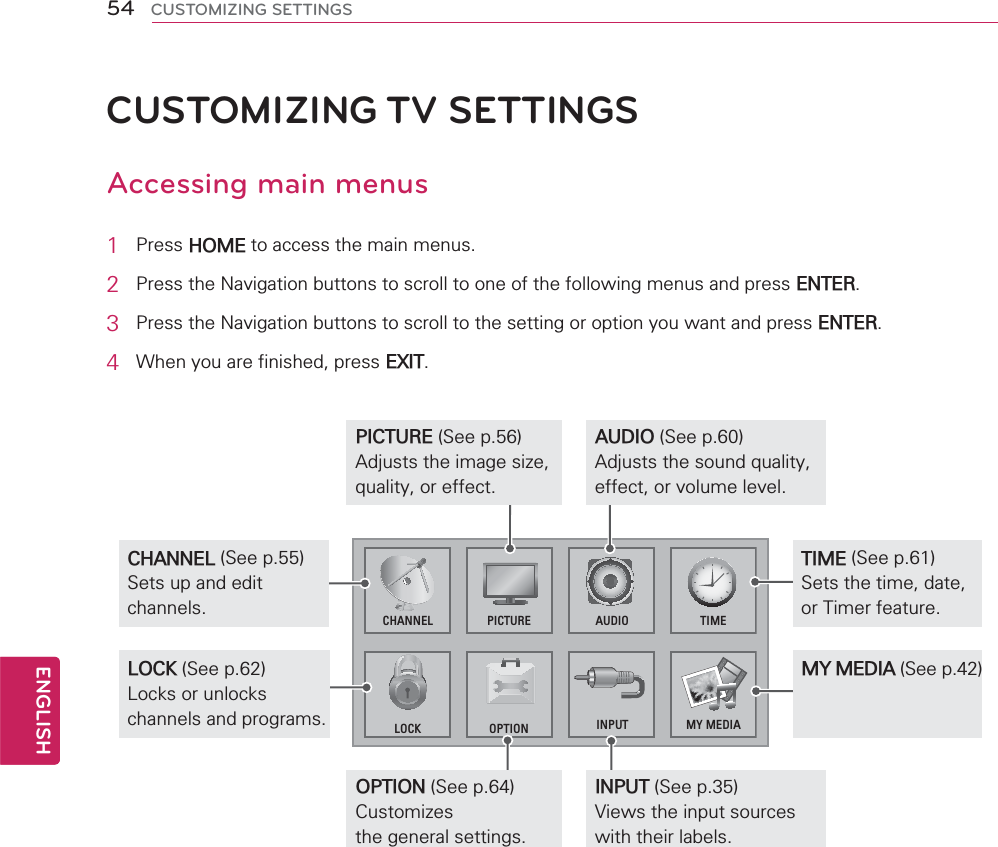
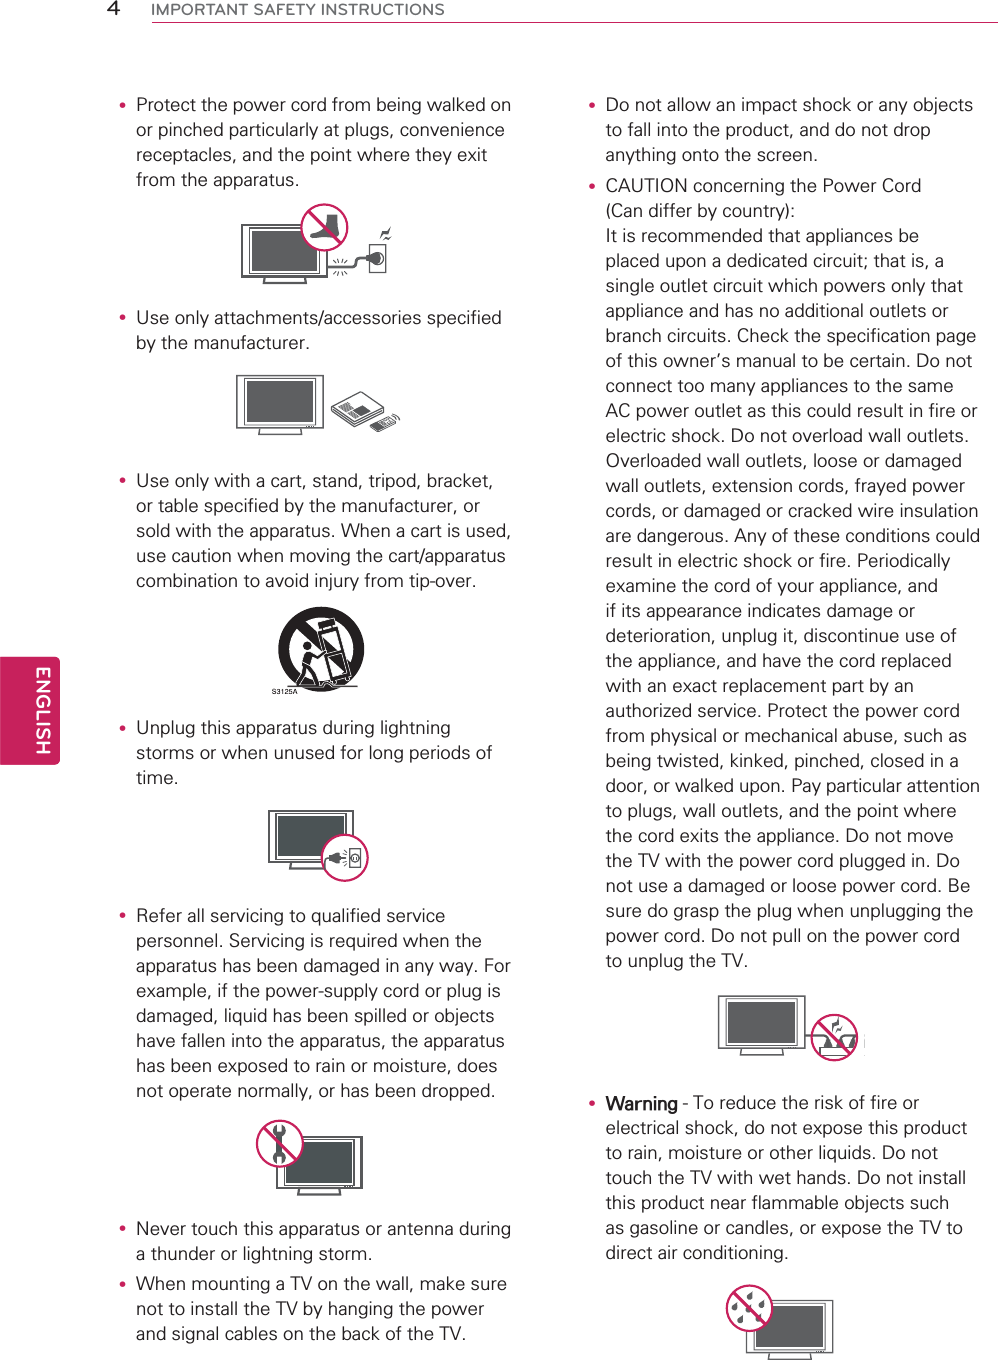
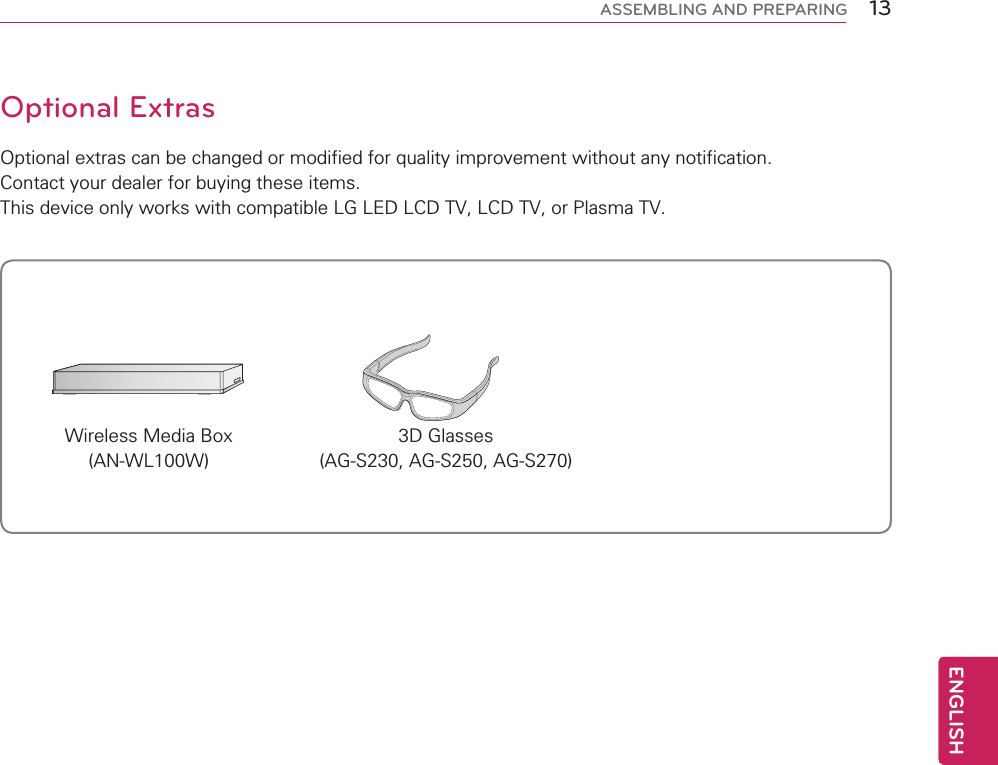
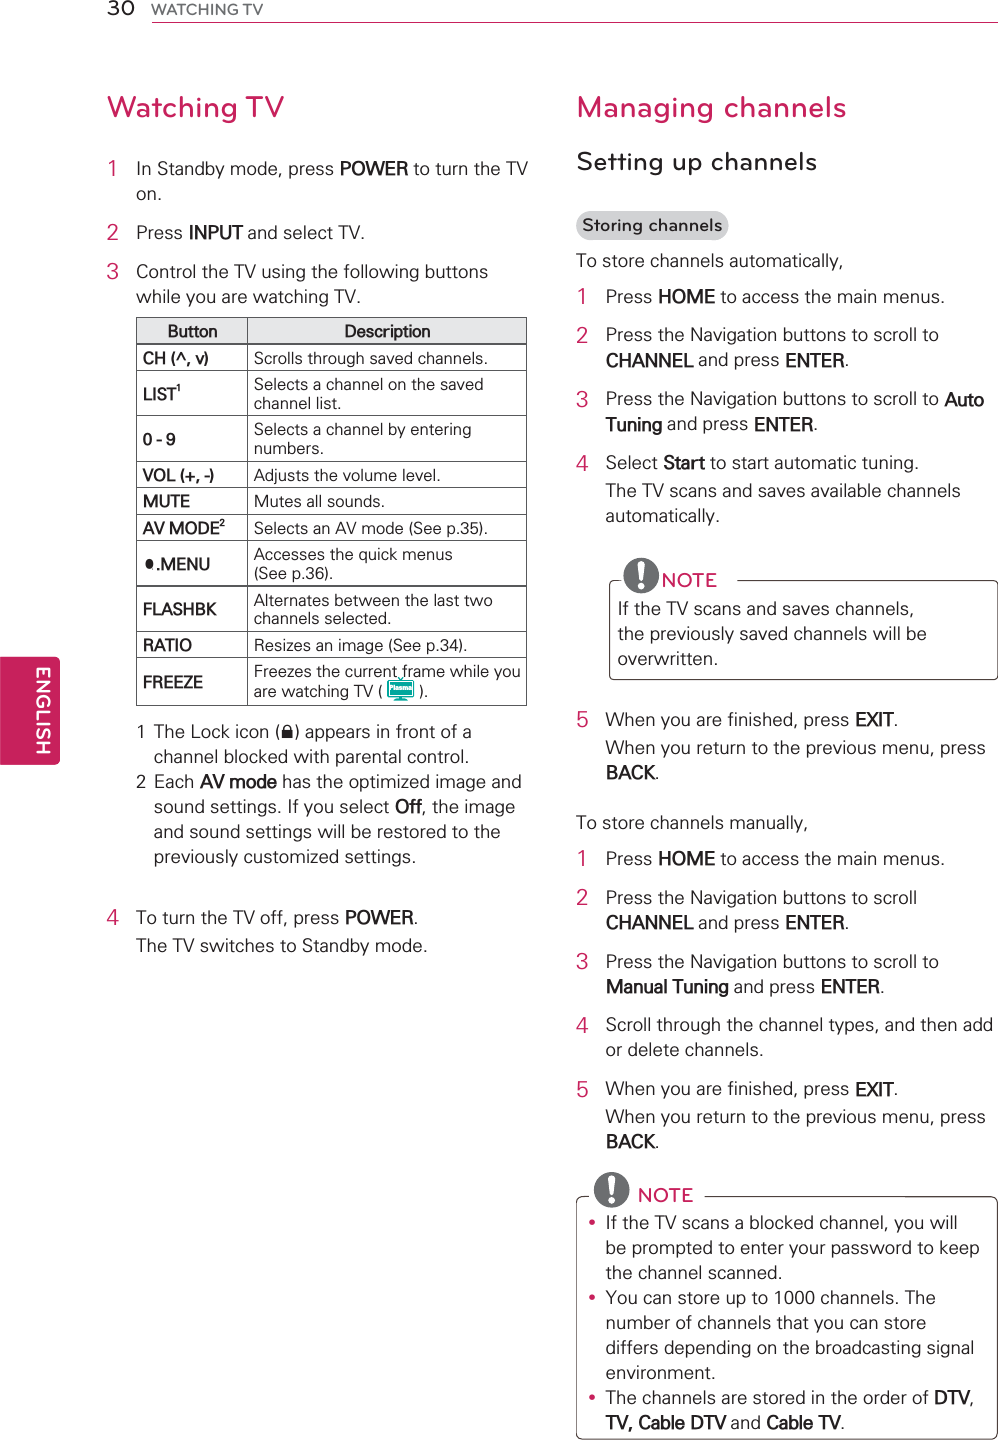
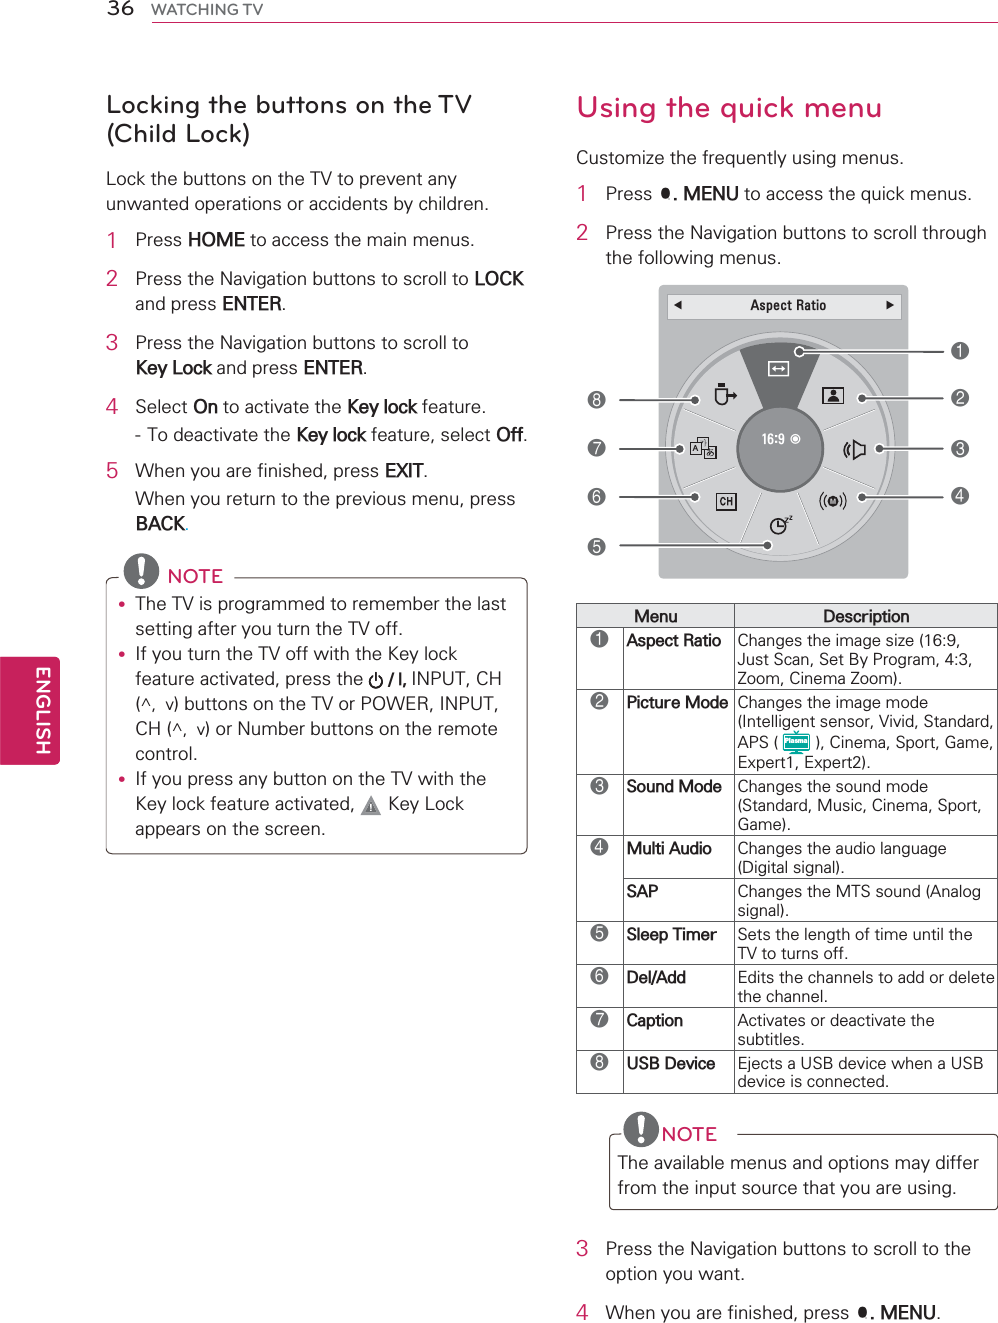
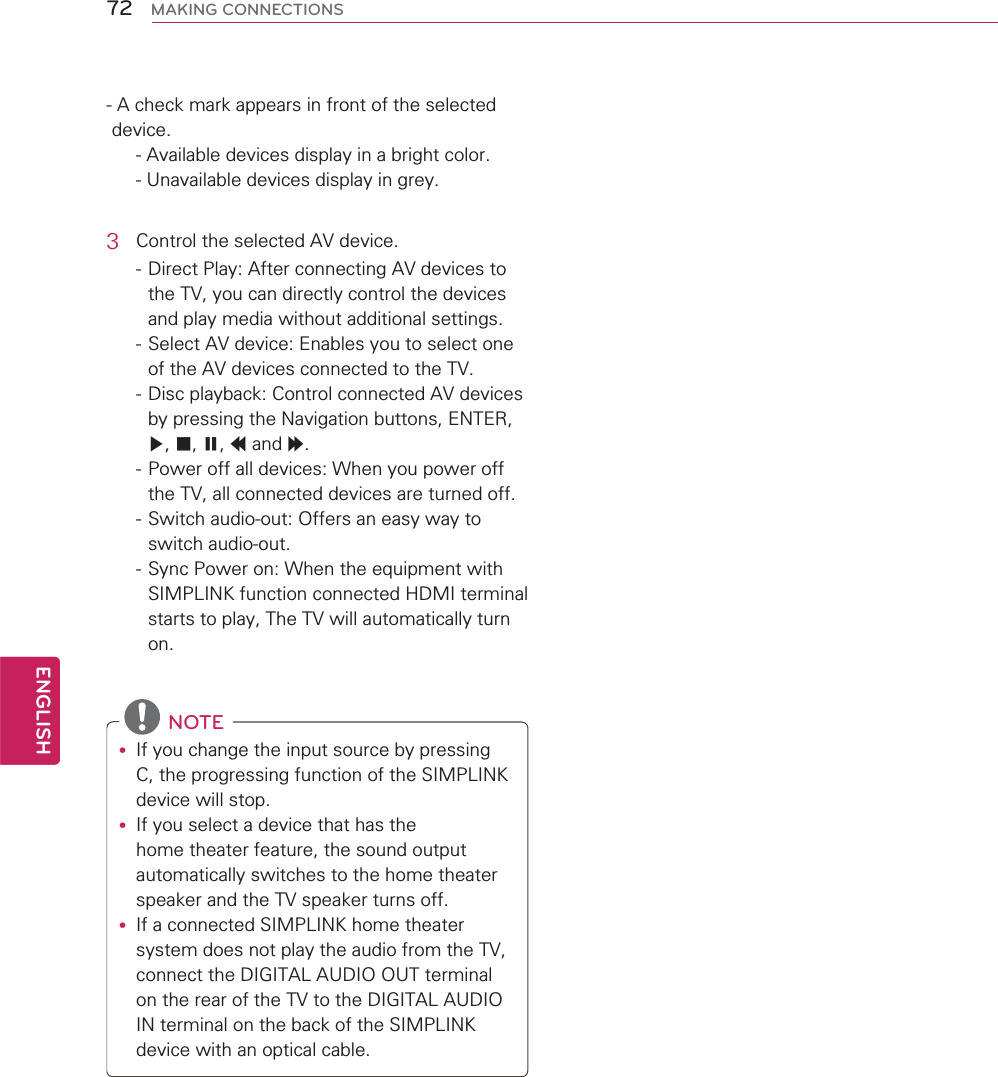
![56ENGENGLISHCUSTOMIZING SETTINGSPICTURE settings1Press HOME to access the main menus.2Press the Navigation buttons to scroll to CHANNEL and press ENTER.3Press the Navigation buttons to scroll to the setting or option you want and press ENTER.- To return to the previous level, press BACK.4When you are finished, press EXIT.The available picture settings are described in the following.Setting DescriptionAspect Ratio Changes the image size to view images at its optimal size (See p.34).Picture Wizard Adjusts the image quality and calibrates the screen by following the on-screen instructions. The customized options will be saved as Expert1 in the Picture Mode.NOTEyIf you use Picture Wizard, the Energy saving feature will turn off automatically.yTo reset changes made by Picture Wizard, operate Picture Reset when Picture Mode is on Expert1.Energy Saving Reduces the power consumption by adjusting the screen brightness.NOTEWhen selecting Auto or Maximum,Backlight will not work.OptionAuto ( LCD ) The backlight is adjusted automatically corresponding to the surroundings when selecting Auto using the Intelligent sensor feature.Intelligent sensor (Plasma )The most suitable picture is automatically adjusted according to the surrounding conditions.Off Energy Saving is not used.Minimum/Medium/MaximumSelects the brightness level.Screen off The screen turns off in 3 seconds.3,&785( ᯒ0RYHᯙ(QWHUؒ $VSHFW5DWLR ؒ 3LFWXUH:L]DUGؒ ᰚ(QHUJ\6DYLQJ 2IIؒ 3LFWXUH0RGH 6WDQGDUG ؒ%DFNOLJKW ؒ&RQWUDVW ؒ%ULJKWQHVV ؒ6KDUSQHVV ؒ&RORU ؒ7LQW ؒ&RORU7HPS ؒ$GYDQFHG&RQWURO ؒ3LFWXUH5HVHWؒ 7UX0RWLRQ /RZؒ 6FUHHQ5*%3&R*:&](https://usermanual.wiki/LG-Electronics-USA/50PW350UA/User-Guide-1374239-Page-56.png)
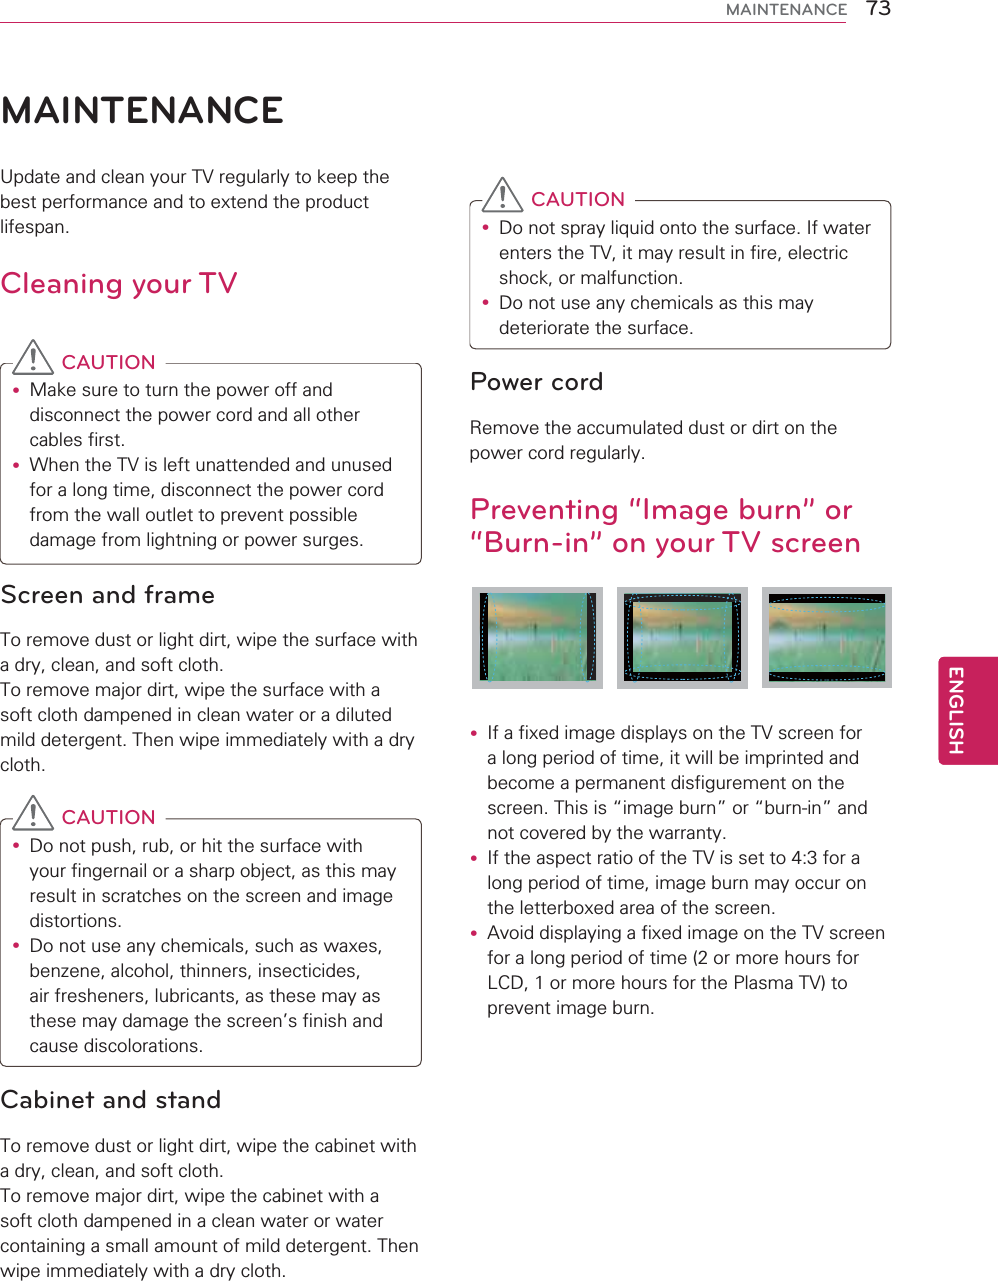
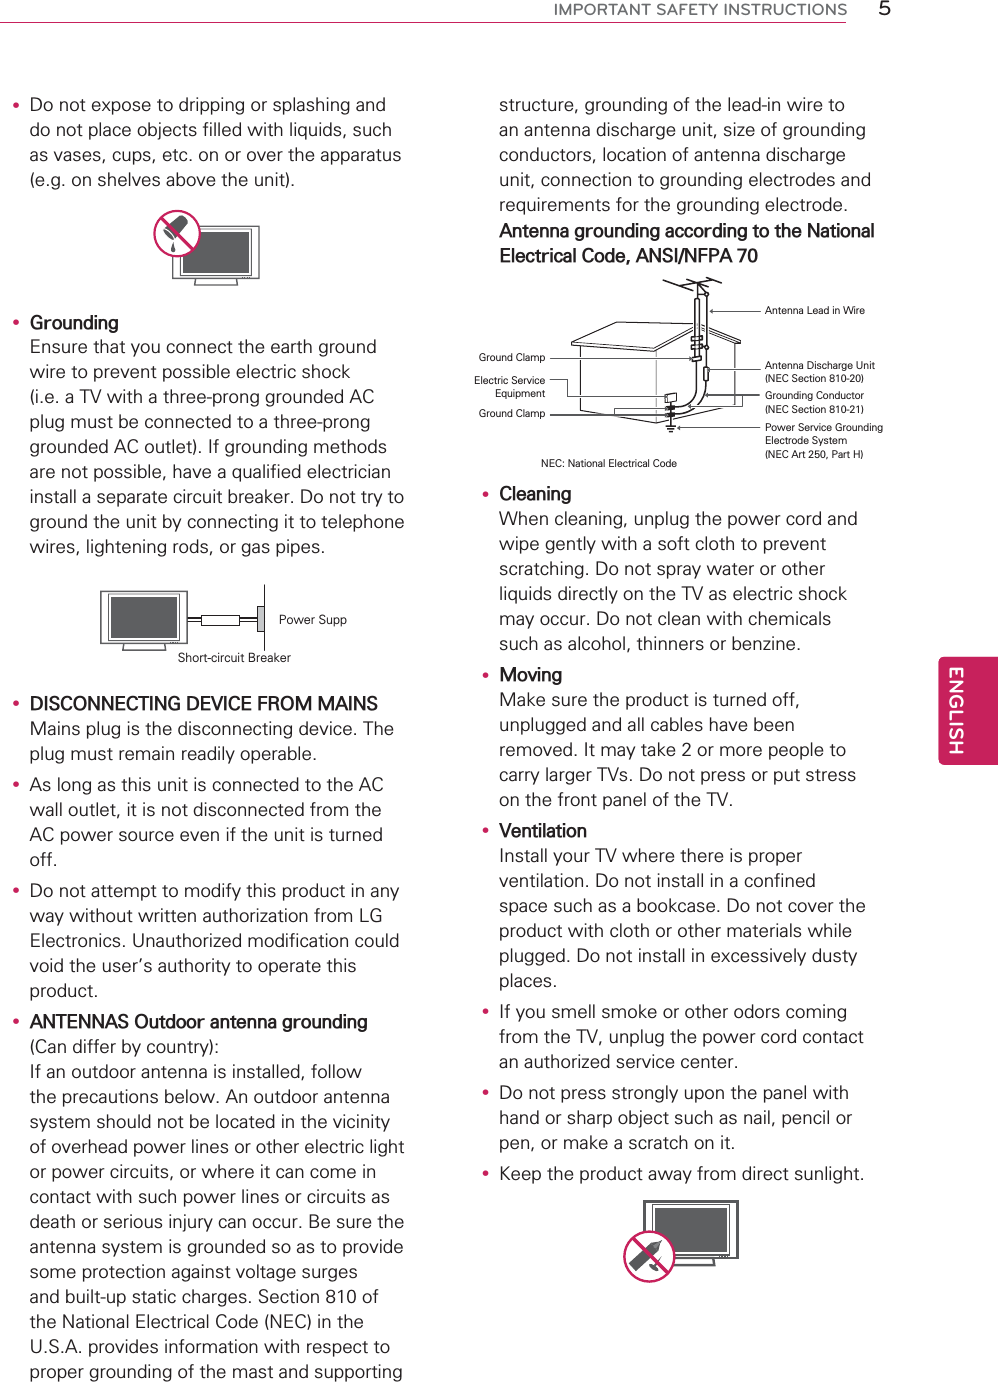
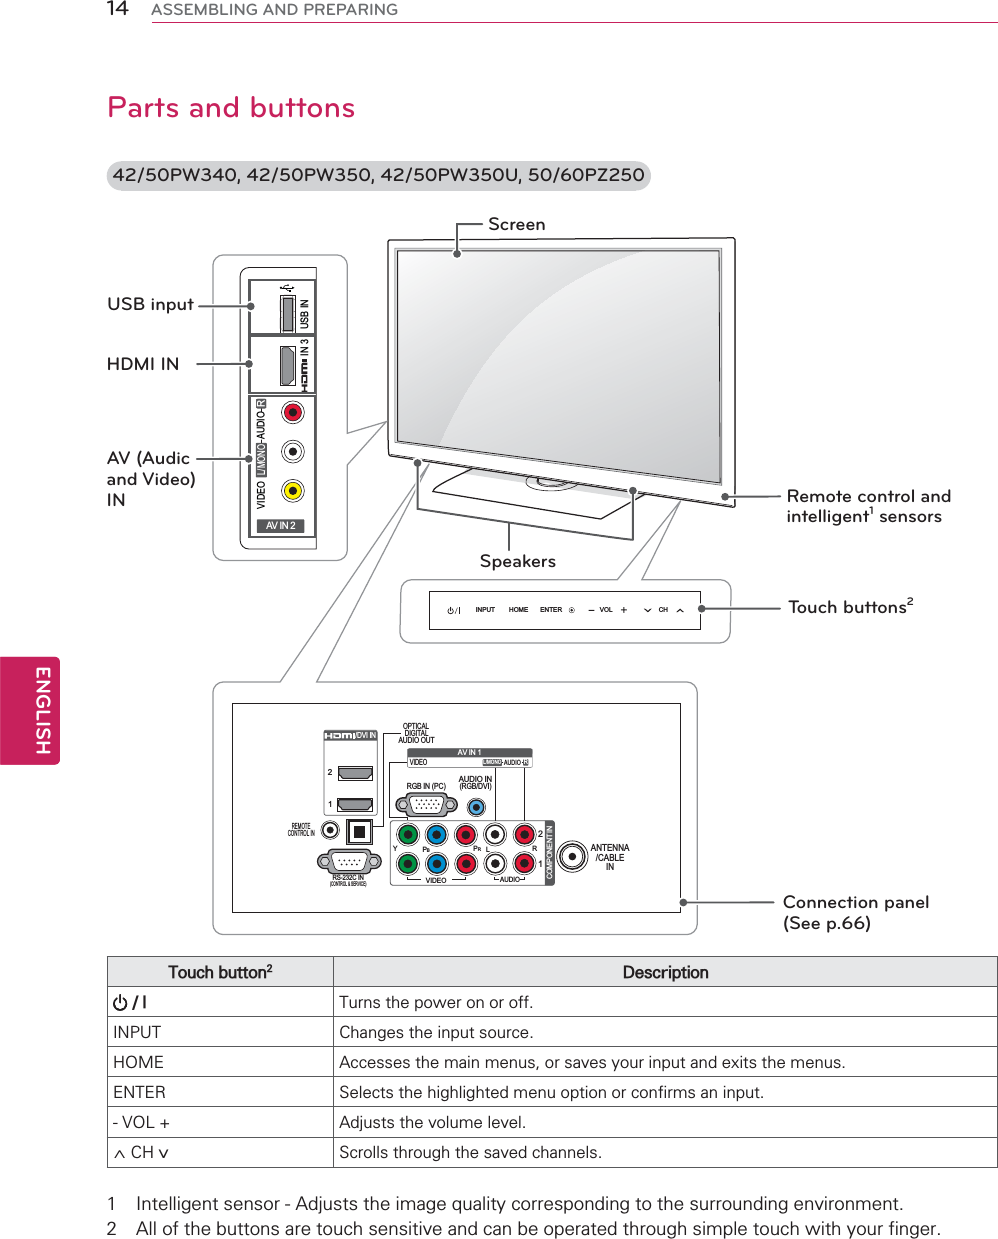
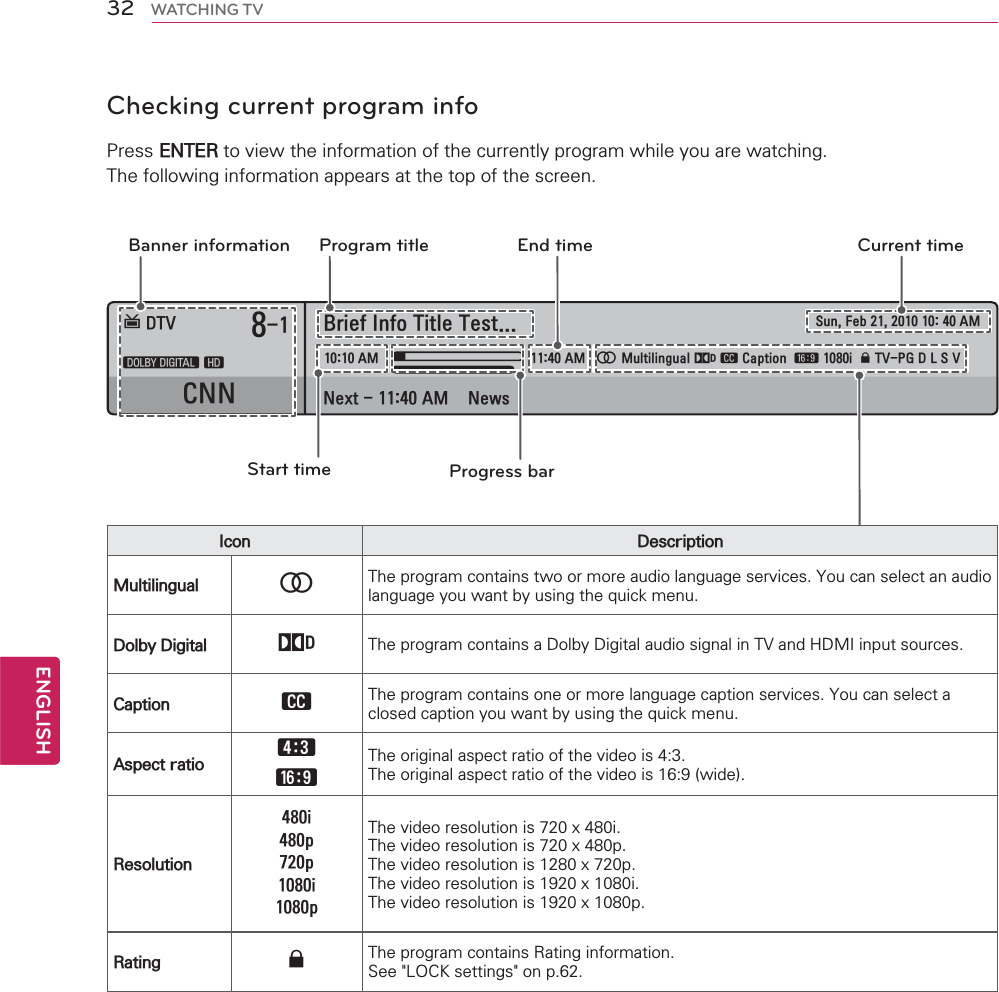
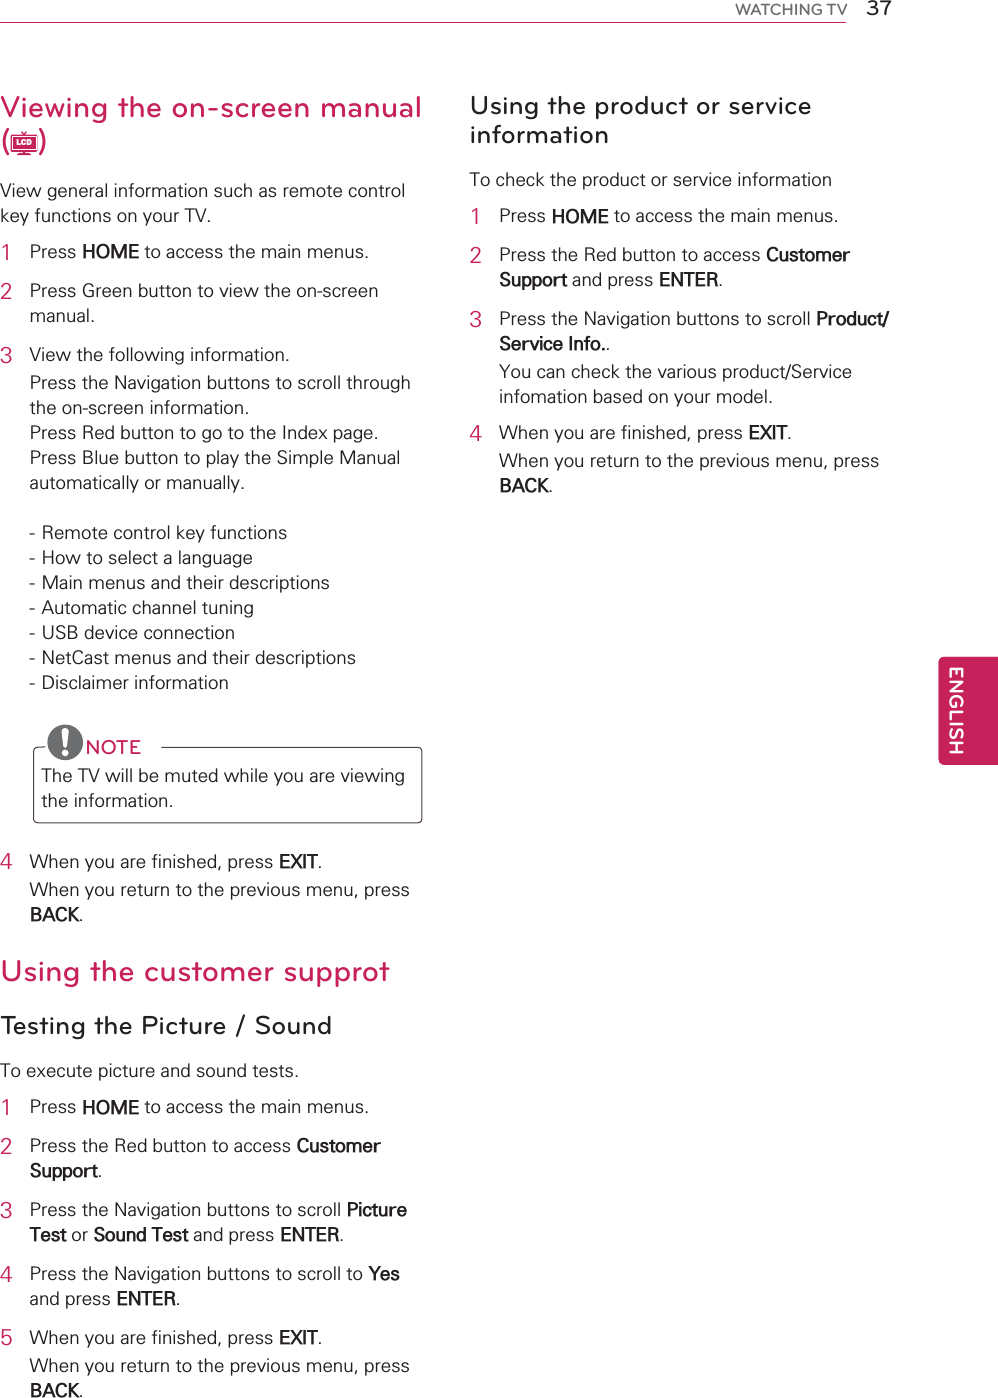
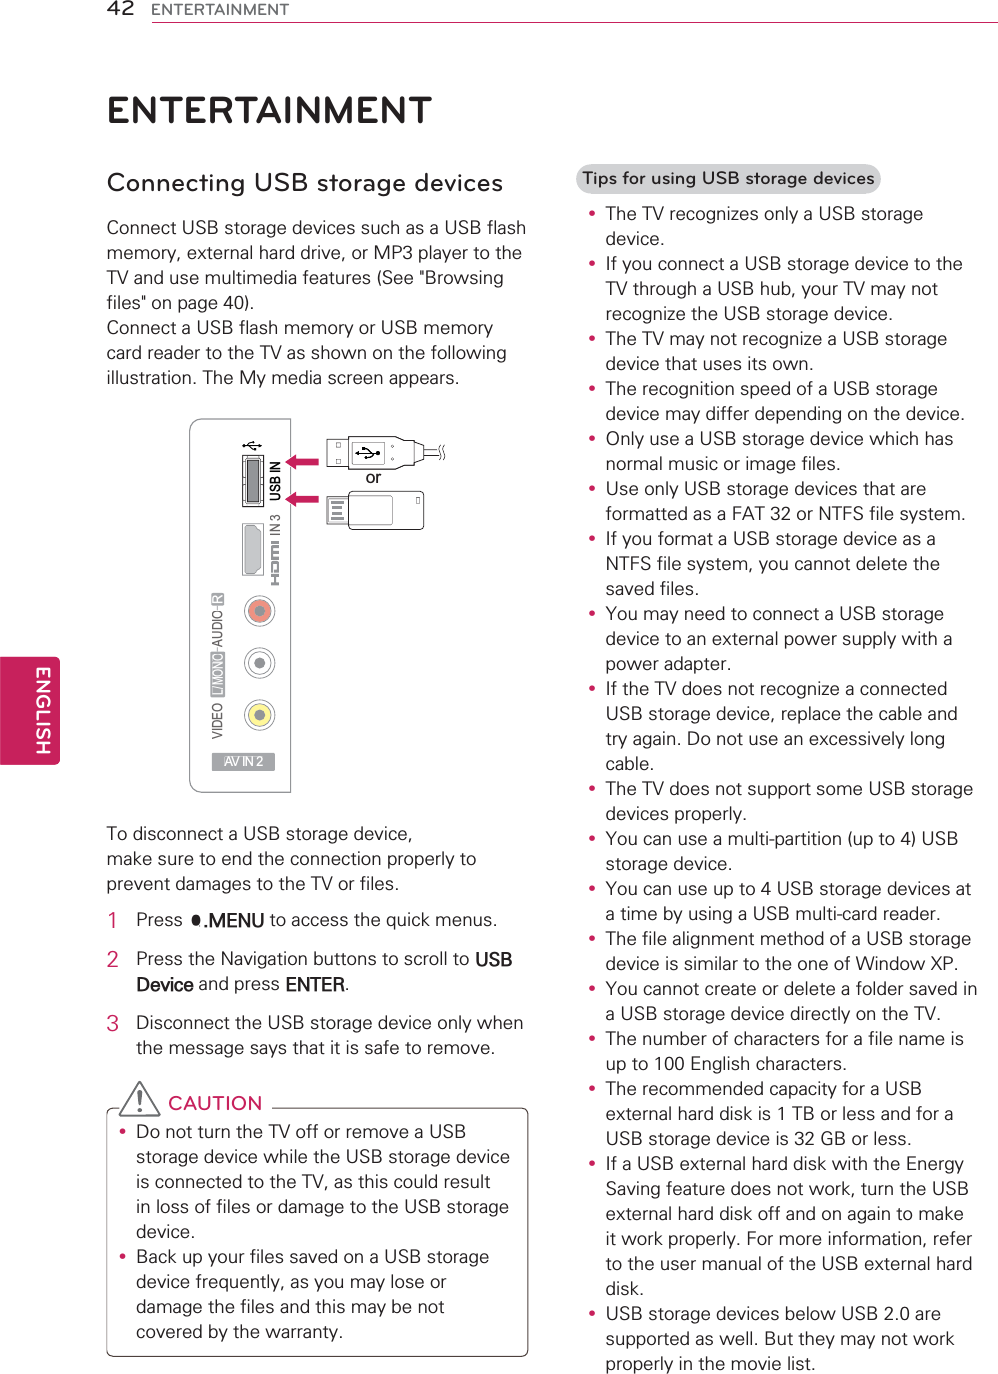
![86ENGENGLISHEXTERNAL CONTROL DEVICE SETUPTransmission / Receiving protocolTransmission[Command1][Command2][ ][Set ID][ ][Data][Cr][Command 1] : First command to control the set.(j, k, m or x)[Command 2] : Second command to control the set.[Set ID] :You can adjust the set ID to choose desired set ID number in Option menu. Adjustment range is 1~ 99. When selecting Set ID ‘0’, every connected the set is controlled. Set ID is indicated as decimal (1~ 99) on menu and as Hexa decimal (0x0~ 0x63) on transmission /receiving protocol.[DATA] : To transmit the command data.Transmit the ‘FF’ data to read status of command.[Cr] : Carriage ReturnASCII code ‘0x0D’[ ] : ASCII code ‘space (0x20)’* In this model, set will not send the status during the standby mode.OK Acknowledgement[Command2][ ][Set ID][ ][OK][Data][x]The set transmits ACK (acknowledgement) based on this format when receiving normal data. At this time, if the data is data read mode, it indicates present status data. If the data is data write mode, it returns the data of the PC computer.* In this model, set will not send the status during the standby mode.* Data Format[Command 2] : Use as command.[Set ID] : Use the small character, if set ID is 10, it will send the ‘0’, ‘a’.[DATA] : Use the small character, if data is 0 x ab, it will send the ‘a’, ‘b’.[OK] : Use the large character.Error Acknowledgement[Command2][ ][Set ID][ ][NG][Data][x]The set transmits ACK (acknowledgement) based on this format when receiving abnormal data from non-viable functions or communication errors.Data1: Illegal CodeData2: Not supported functionData3: Wait more time* In this model, set will not send the status during the standby mode.* Data Format[Command 2] : Use as command.[Set ID] : Use the small character, if set ID is 10, it will send the ‘0’, ‘a’.[DATA] : Use the small character, if data is 0 x ab, it will send the ‘a’, ‘b’.[NG] : Use the large character](https://usermanual.wiki/LG-Electronics-USA/50PW350UA/User-Guide-1374239-Page-86.png)
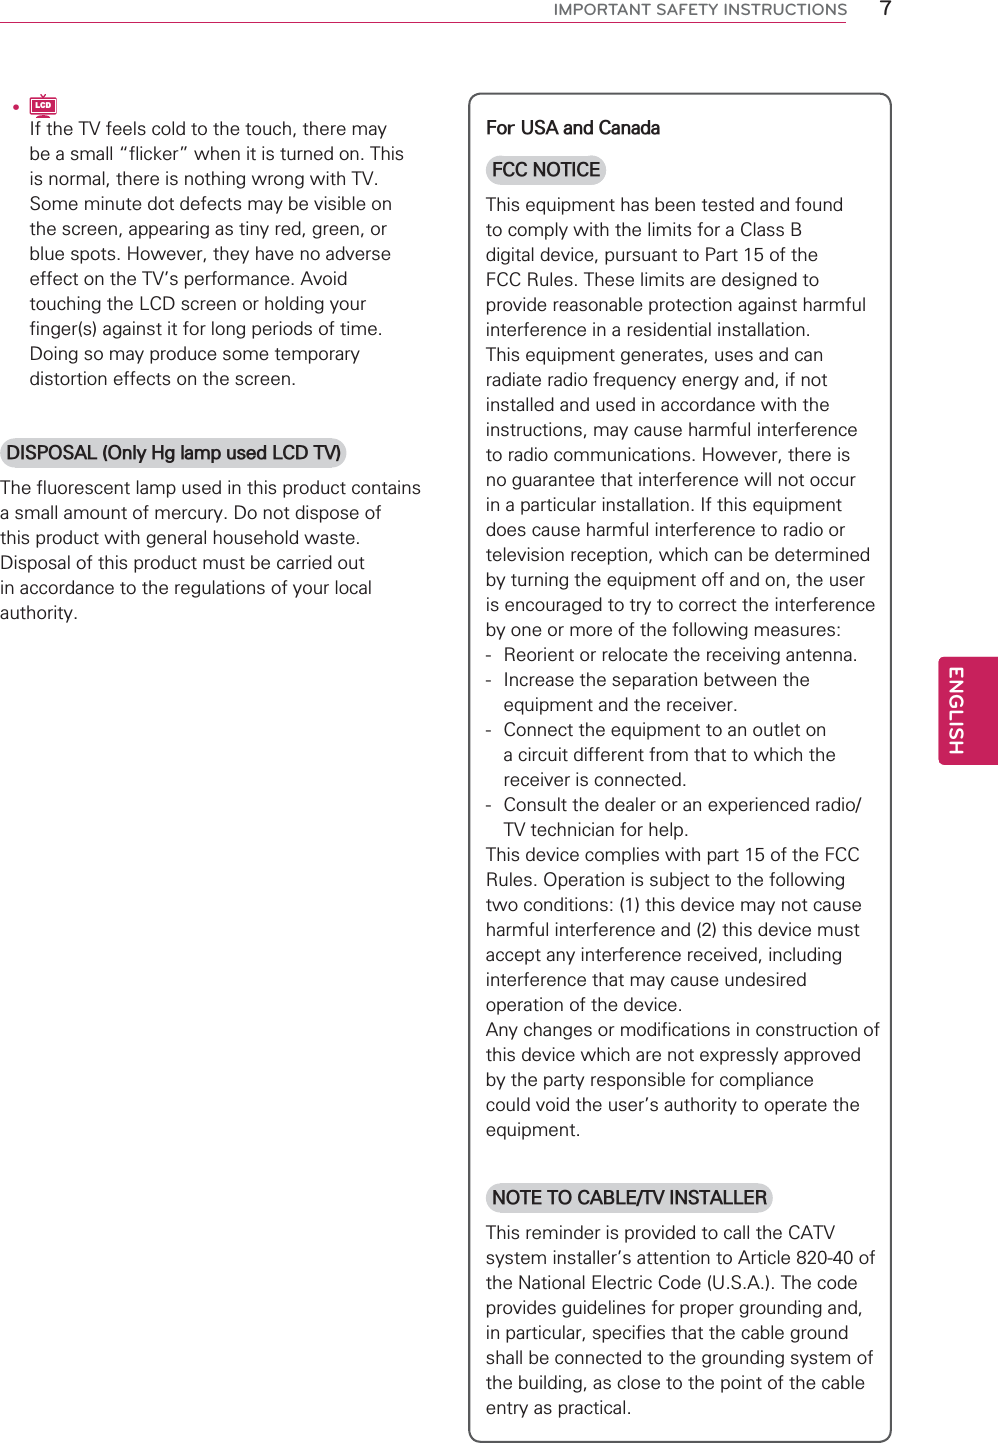
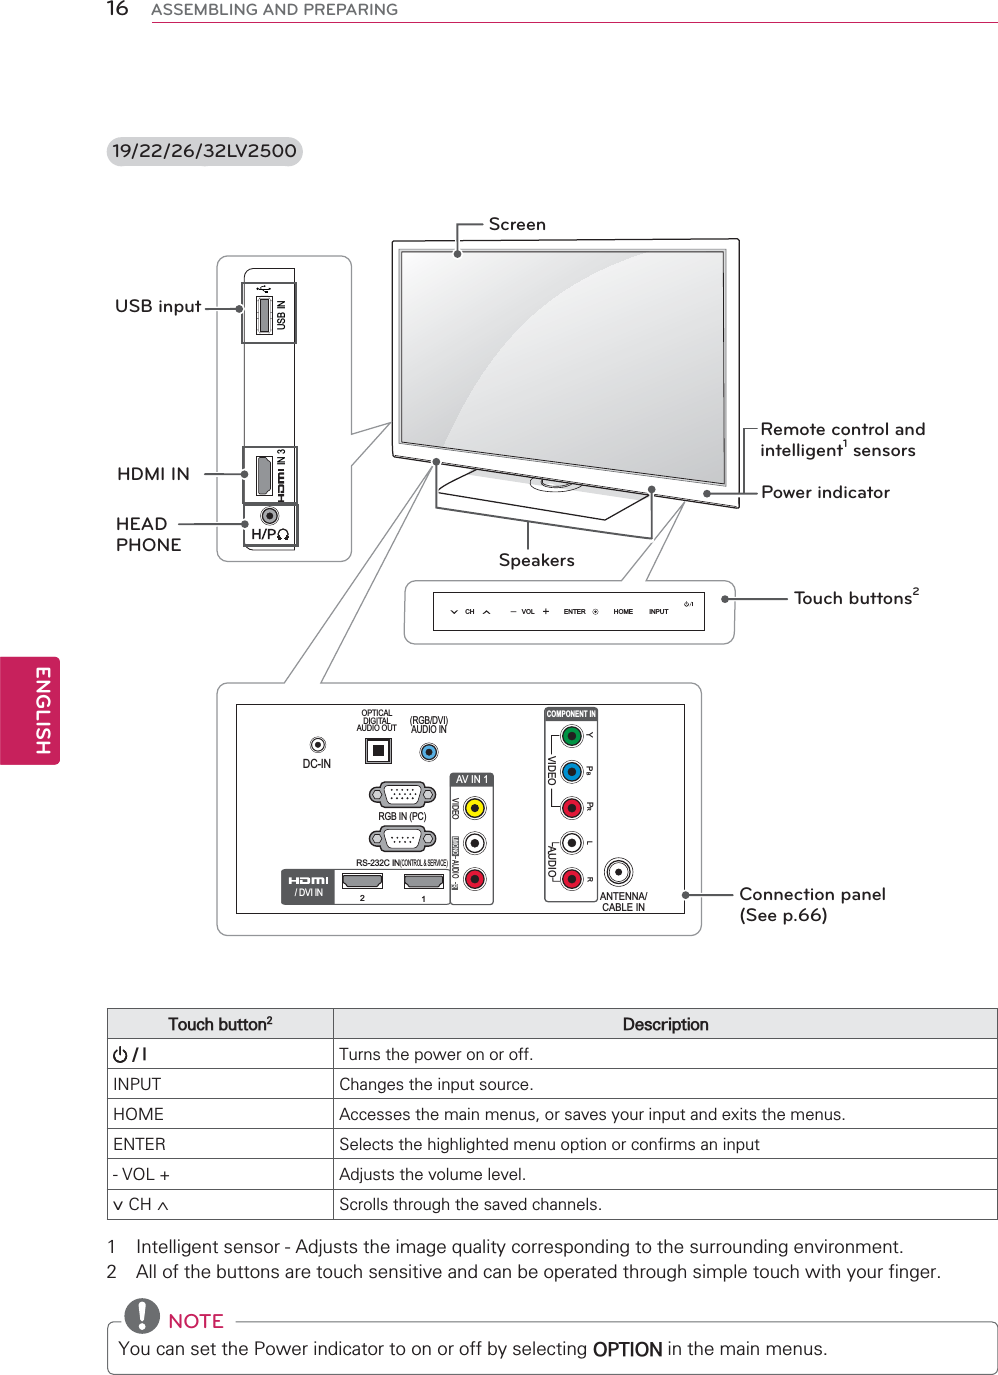
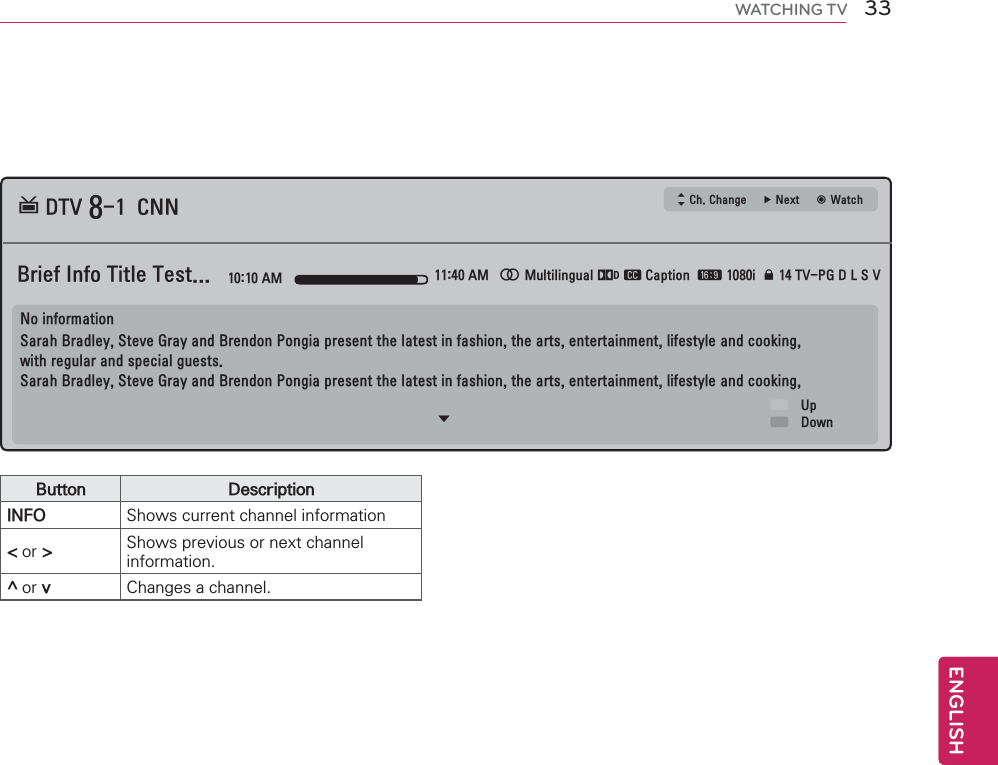
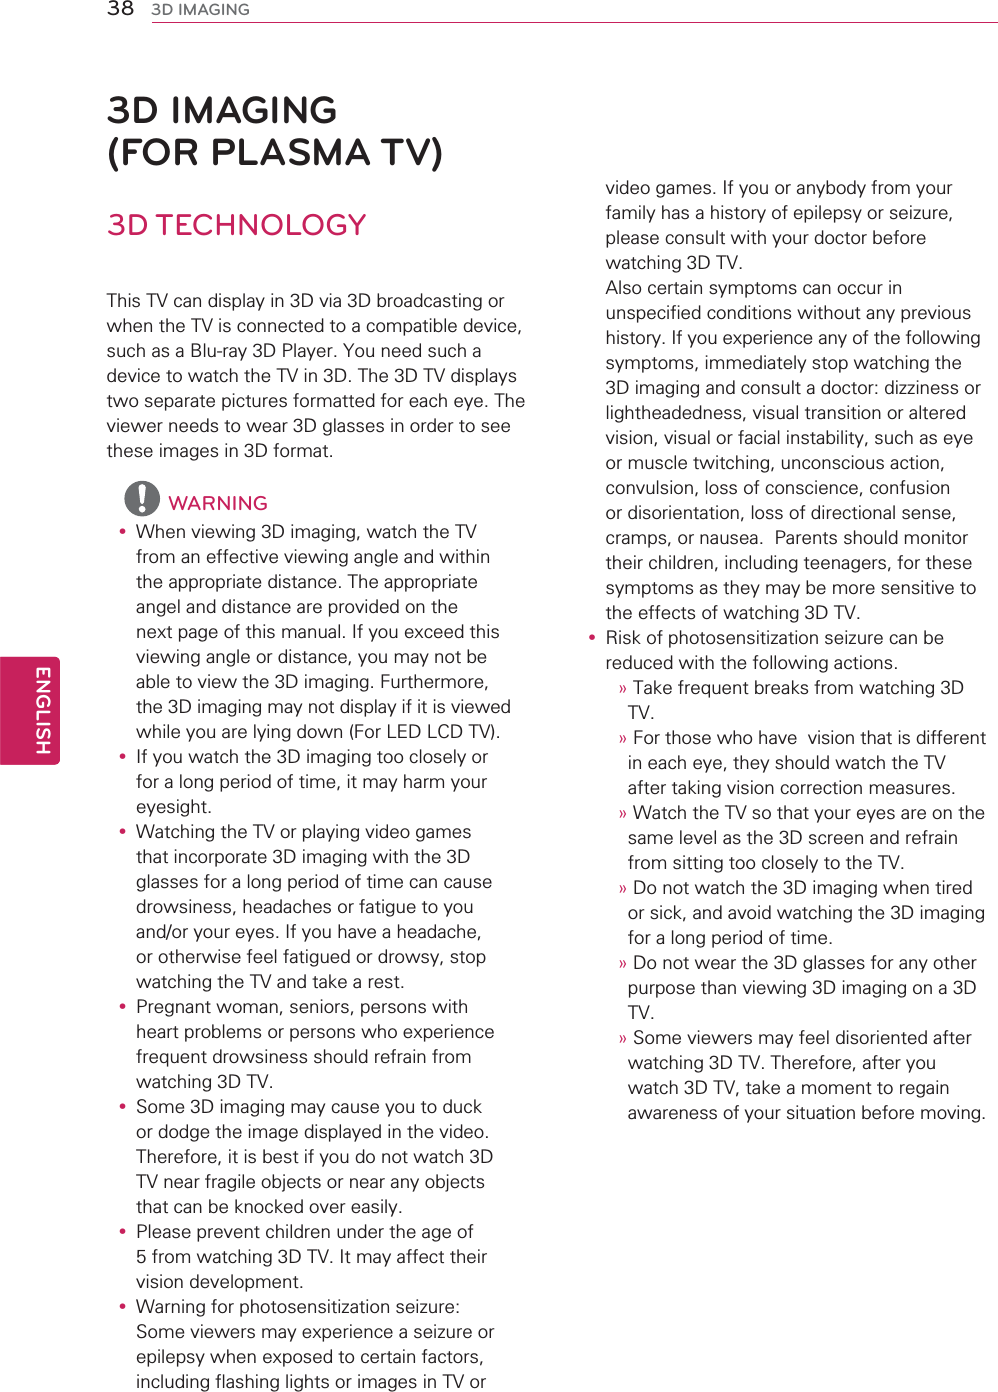
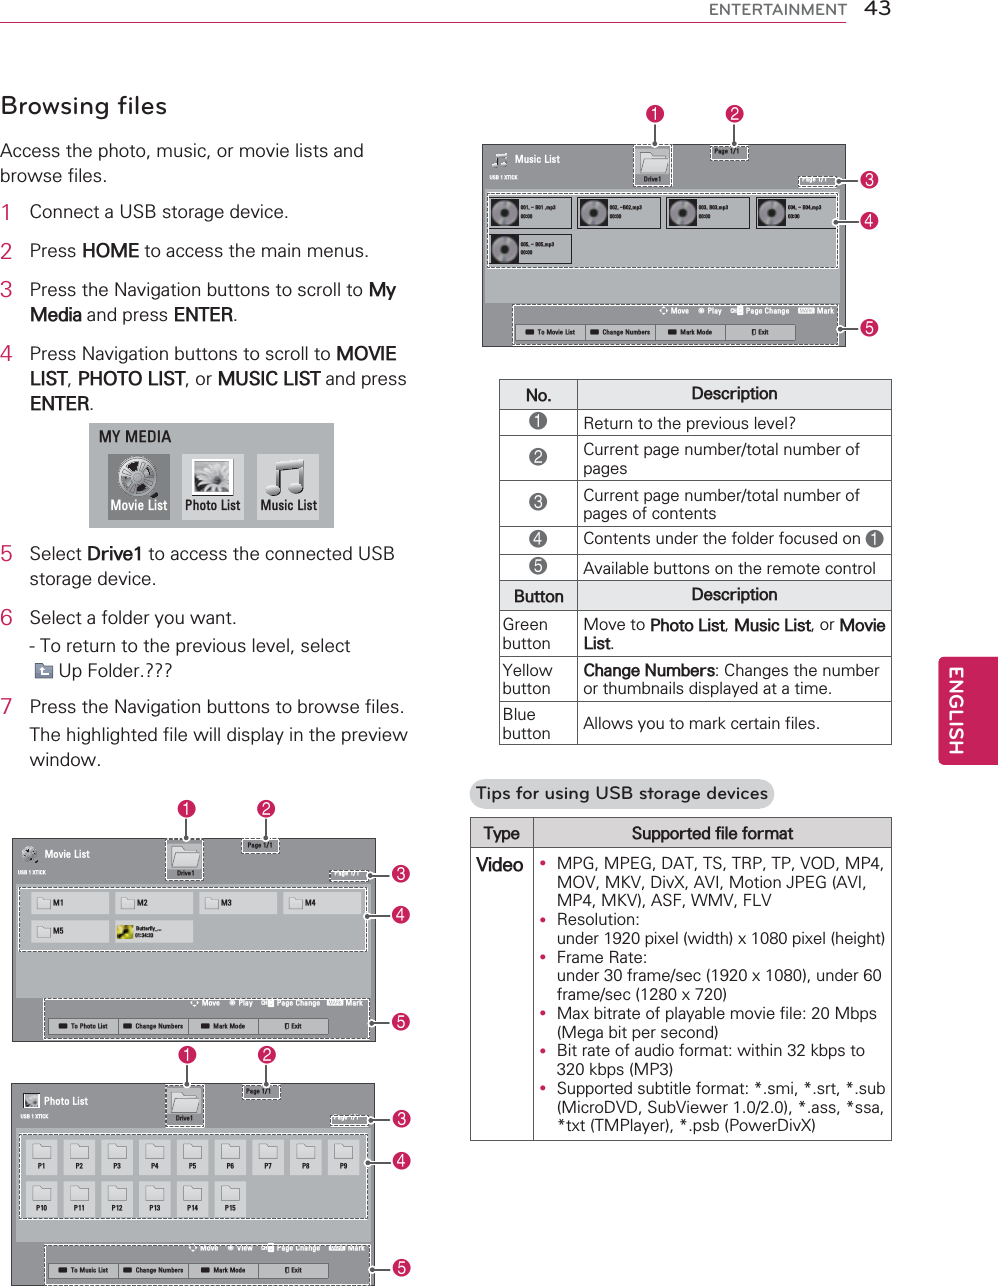
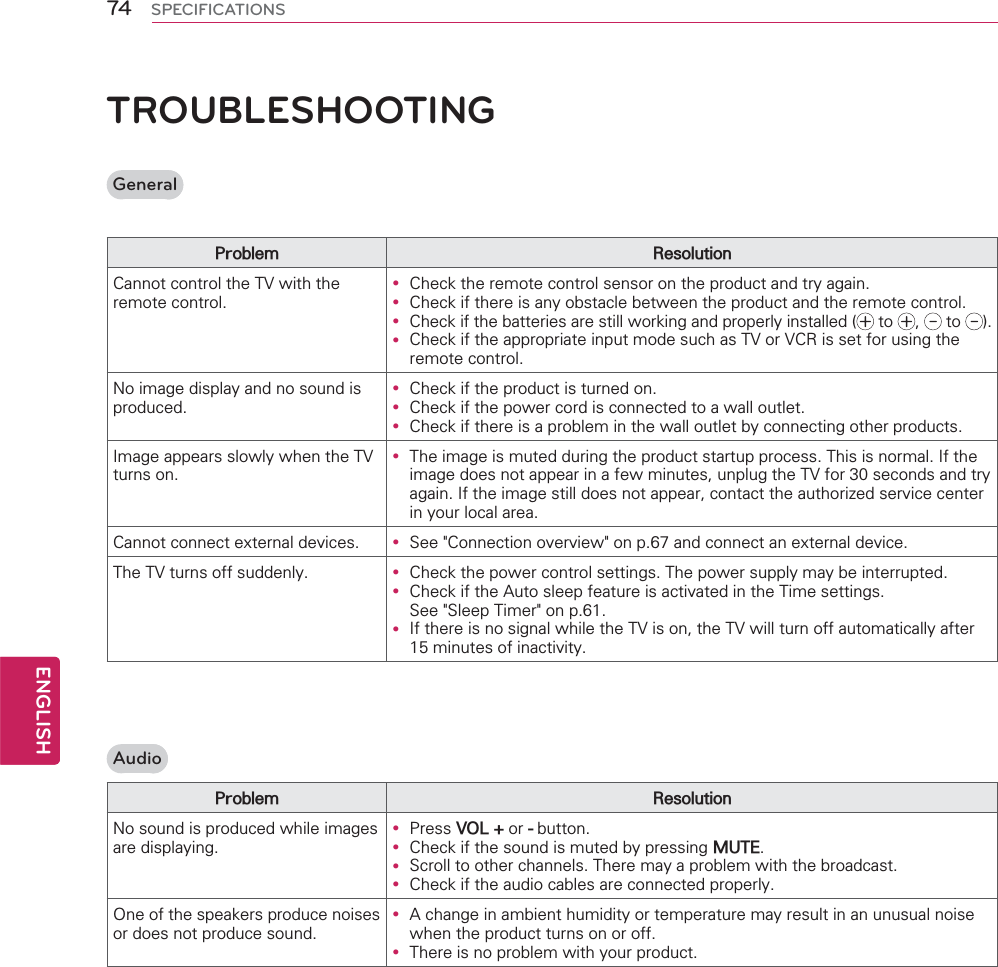
![87ENGENGLISHEXTERNAL CONTROL DEVICE SETUP01. Power (Command: k a)To control Power On/Off of the set.Transmission [k][a][ ][Set ID][ ][Data][Cr]Data 00: Power Off Data 01: Power OnAcknowledgement [a][ ][Set ID][ ][OK/NG][Data][x]* In a like manner, if other functions transmit ‘FF’ data based on this format, Acknowledgement data feedback presents status about each function.* Note: In this model, set will send the Acknowledge after power on processing completion.There might be a time delay between command and acknowledge.02. Input Select (Command: x b)To select input source for set.Transmission [x][b][ ][Set ID][ ][Data][Cr]Data 00: DTV (Antenna) Data 01: DTV (Cable)Data 10: Analog (Antenna)Data 11: Analog (Cable)Data 20: AV or AV1 Data 21: AV2Data 40: Component or Component1Data 41: Component2 Data 60: RGB-PC Data 90: HDMI1Data 91: HDMI2 Data 92: HDMI3Data 93: HDMI4Acknowledgement [b][ ][Set ID][ ][OK/NG][Data][x]* Use the feature depending on your model.03. Aspect Ratio (Command: k c)To adjust the screen format.Transmission [k][c][ ][Set ID][ ][Data][Cr]Data 01: 4:3 Data: 09: Just scanData 02: 16:9 Data: 10: Cinema Zoom 1Data 04: Zoom…Data 06: Set by program Data 1F: Cinema Zoom16Acknowledgement [c][ ][Set ID][ ][OK/NG][Data][x]04. Screen Mute (Command: k d)To select screen mute on/off.Transmission [k][d][ ][Set ID][ ][Data][Cr]Data 00: Screen mute off (Picture on), Video-out Mute offData 01: Screen mute on (Picture off)Data 10: Video-out Mute onAcknowledgement [d][ ][Set ID][ ][OK/NG][Data][x]* In case of Video-out Mute on only, TV will display On Screen Display (OSD). But, in case of screen mute on, TV will not display On Screen Display (OSD).05. Volume Mute (Command: k e)To control volume mute on/off.You can also adjust mute using the MUTE button onremote control.Transmission [k][e][ ][Set ID][ ][Data][Cr]Data 00: Volume mute on (Volume off)Data 01: Volume mute off (Volume on)Acknowledgement [e][ ][Set ID][ ][OK/NG][Data][x]06. Volume Control (Command: k f)To adjust volume.You can also adjust volume with the volume buttons on remote control.Transmission [k][f][ ][Set ID][ ][Data][Cr]Data Min: 00 ~ Max: 64 (*transmit by Hexadecimal code)*Refer to “Real data mapping”.Acknowledgement [f][ ][Set ID][ ][OK/NG][Data][x]07. Contrast (Command: k g)To adjust screen contrast.You can also adjust contrast in the PICTURE menu.Transmission [k][g][ ][Set ID][ ][Data][Cr]Data Min: 00 ~ Max: 64 (*transmit by Hexadecimal code)*Refer to “Real data mapping”.Acknowledgement [g][ ][Set ID][ ][OK/NG][Data][x]08. Brightness (Command: k h)To adjust screen brightness.You can also adjust brightness in the PICTURE menu.Transmission [k][h][ ][Set ID][ ][Data][Cr]Data Min: 00 ~ Max: 64 (*transmit by Hexadecimal code)*Refer to “Real data mapping”.Acknowledgement [h][ ][Set ID][ ][OK/NG][Data][x]09. Color (Command: k i)To adjust screen color.You can also adjust color in the PICTURE menu.Transmission [k][i][ ][Set ID][ ][Data][Cr]Data Min: 00 ~ Max: 64 (*transmit by Hexadecimal code)*Refer to “Real data mapping”.Acknowledgement [i][ ][Set ID][ ][OK/NG][Data][x]10. Tint (Command: k j)To adjust screen tint.You can also adjust tint in the PICTURE menu.Transmission [k][j][ ][Set ID][ ][Data][Cr]Data Red: 00 ~ Green: 64 (*transmit by Hexadecimal code)*Refer to “Real data mapping”.Acknowledgement [ j ][ ][Set ID][ ][OK/NG][Data][x]11. Sharpness (Command: k k)To adjust screen sharpness.You can also adjust sharpness in the PICTURE menu.Transmission [k][k][ ][Set ID][ ][Data][Cr]Data Min: 00 ~ Max: 64 (*transmit by Hexadecimal code)*Refer to “Real data mapping”.Acknowledgement [k][ ][Set ID][ ][OK/NG][Data][x]](https://usermanual.wiki/LG-Electronics-USA/50PW350UA/User-Guide-1374239-Page-87.png)
![88ENGENGLISHEXTERNAL CONTROL DEVICE SETUP12. OSD Select (Command: k l)To select OSD (On Screen Display) on/off.Transmission [k][l][ ][Set ID][ ][Data][Cr]Data 00: OSD off Data 01: OSD onAcknowledgement [l][ ][Set ID][ ][OK/NG][Data][x]13. Remote Control Lock Mode (Command: k m)To lock the remote control and the front panel controls on the set.Transmission [k][m][ ][Set ID][ ][Data][Cr]Data 00: Lock off Data 01: Lock onAcknowledgement [m][ ][Set ID][ ][OK/NG][Data][x]If you’re not using the remote control and front panelcontrols on the Monitor set, use this mode. When main power is on/off, remote control lock is released.If Key Lock is on in the standby mode, TV will not turn on by POWER button of remote control and on the TV.14. Treble (Command: k r)To adjust treble.You can also adjust treble in the AUDIO menu.Transmission [k][r][ ][Set ID][ ][Data][Cr]Data Min: 00 ~ Max: 64 (*transmit by Hexadecimal code)*Refer to “Real data mapping”.Acknowledgement [r][ ][Set ID][ ][OK/NG][Data][x]15. Bass (Command: k s)To adjust bass.You can also adjust bass in the AUDIO menu.Transmission [k][s][ ][Set ID][ ][Data][Cr]Data Min: 00 ~ Max: 64 (*transmit by Hexadecimal code)*Refer to “Real data mapping”.Acknowledgement [s][ ][Set ID][ ][OK/NG][Data][x]16. Balance (Command: k t)To adjust balance.You can also adjust balance in the AUDIO menu.Transmission [k][t][ ][Set ID][ ][Data][Cr]Data Min: 00 ~ Max: 64 (*transmit by Hexadecimal code)*Refer to “Real data mapping”.Acknowledgement [t][ ][Set ID][ ][OK/NG][Data][x]17. Color Temperature (Command: x u)To adjust color temperature.You can also adjust color temperature in the PICTURE menu.Transmission [x][u][ ][Set ID][ ][Data][Cr]Data Min: 00 ~ Max: 64 (*transmit by Hexadecimal code)*Refer to “Real data mapping”. Acknowledgement [u][ ][Set ID][ ][OK/NG][Data][x]18. ISM Method (Command: j p) (Plasma)To avoid having a fixed image remain on screen.Transmission [j][p][ ][Set ID][ ][Data][Cr]Data 02: Orbiter 04: White Wash 08: Normal 20: Color WashAcknowledgement [p][ ][Set ID][ ][OK/NG][Data][x]19. Energy Saving (Command: j q)To control the energy saving function.Transmission [ j ][q][ ][Set ID][ ][Data][Cr]Data 00: off 01: Minimum 02: Medium 03: Maximum 04: Auto (depending on model) 05: Screen offAcknowledgement [q][ ][Set ID][ ][OK/NG][Data][x]20. Auto Configuration (Command: j u)To adjust picture position and minimize image shaking automatically. Auto configuration only works in RGB-PC mode.Transmission [ j ][u][ ][Set ID][ ][Data][Cr]Data 01: To setAcknowledgement [u][ ][Set ID][ ][OK/NG][Data][x]21. Channel Tuning (Command: m a)To tune channel to following physical/major/minor number.Transmission [m][a][ ][Set ID][ ][Data00][ ][Data01][ ][Data02][ ][Data03][ ][Data04][ ][Data05][Cr]Digital channels have a Physical, Major, and Minor channel number. The Physical number is the actual digital channel number, the Major is the number that the channel should be mapped to, and the Minor is the sub-channel. Since the ATSC tuner automatically maps the channel to the Major number, the Physical number is not required when sending a command.Data 00: Physical Channel NumberNTSC air: 02~45, NTSC cable: 01, 0E~7DATSC air: 01~45, ATSC cable: 01~87Data 01 & 02: Major Channel NumberData 01: High byte Data 02: Low byteTwo bytes are available for the Major and Minor, normally only the second byte is used.Data 03 & 04: Minor Channel NumberNot needed for NTSC.The table above lists the binary code which must be converted to Hexadecimal before sending. For example:](https://usermanual.wiki/LG-Electronics-USA/50PW350UA/User-Guide-1374239-Page-88.png)
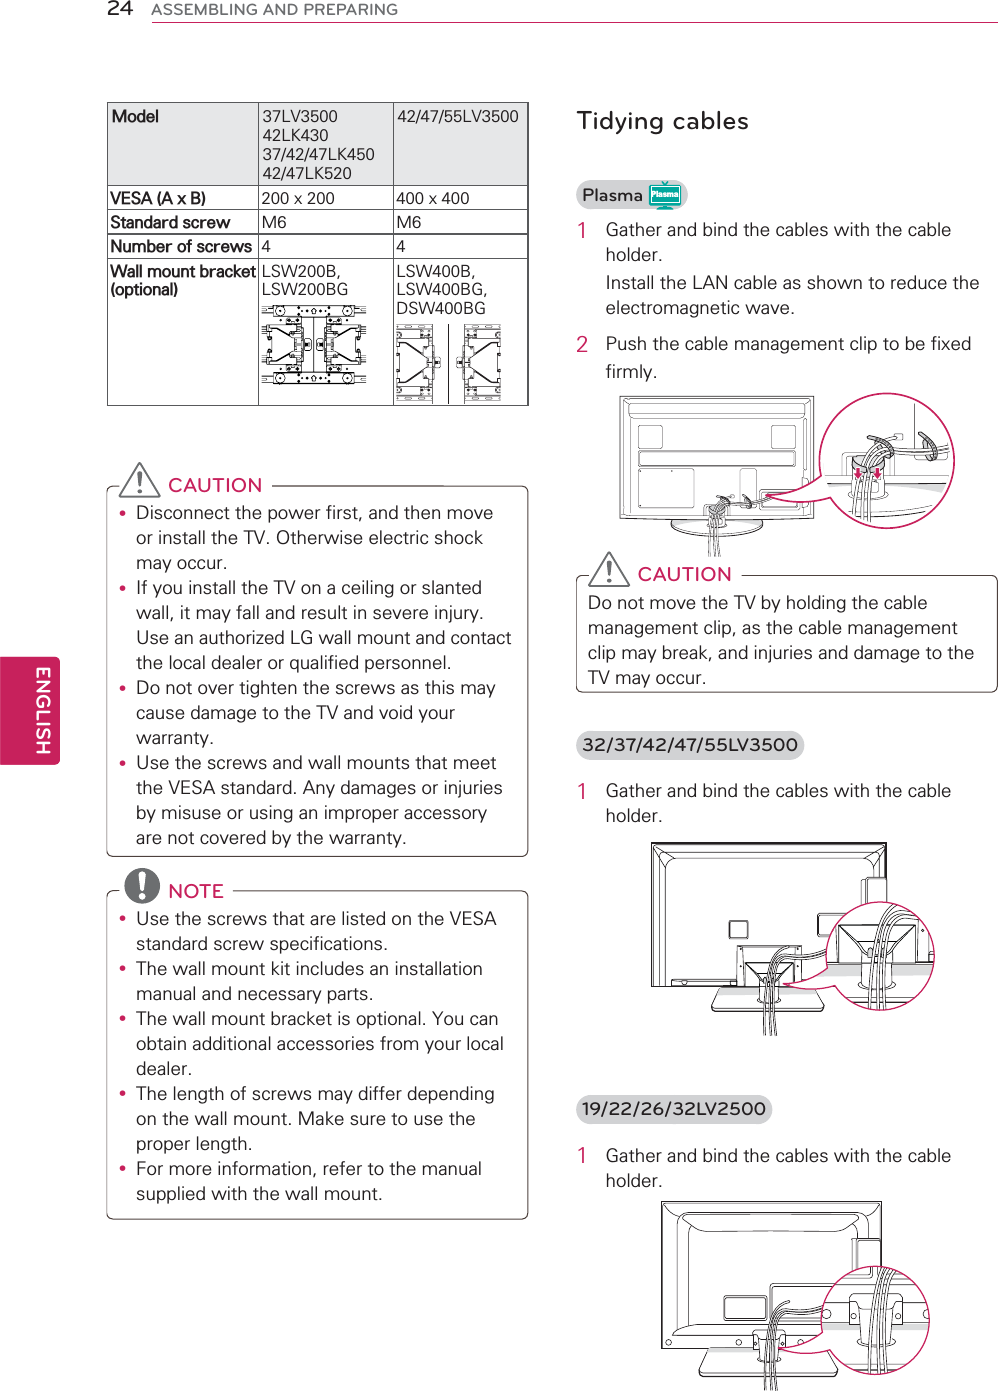
![89ENGENGLISHEXTERNAL CONTROL DEVICE SETUPThe binary code to tune the sub source to an NTSC cable channel is “1000 0001”, which translates to “81” in Hex.* 7th bit : For which source do you want to change the channel.* 6th bit: Use a two part or one part channel. Most cases just use 0 since it’s ignored when using NTSC.* 5th bit: Use 0 with NTSC since it can only use the physical channel number. Normally use 1 for ATSC since most times it doesn’t matter what the physical number is. * 4th bit: Set to 0.* 3-0 bits: Choose signal type.* Tune Command Examples:1. Tune to the analog (NTSC) cable channel 35.Data 00 = Physical of 35 = 23Data 01 & 02 = No Major = 00 00Data 03 & 04 = No Minor = 00 00Data 05 = 0000 0001 in binary = 01Total = ma 00 23 00 00 00 00 012. Tune to the digital (ATSC) local channel 30-3.Data 00 = Don’t know Physical = 00Data 01 & 02 = Major is 30 = 00 1EData 03 & 04 = Minor is 3 = 00 03Data 05 = 0010 0010 in binary = 22Total = ma 00 00 00 1E 00 03 2222. Channel Add/Del (Command: m b)To add and delete the channels.Transmission [m][b][ ][Set ID][ ][Data][Cr]Data 00: Channel Delete Data 01: Channel AddAcknowledgement [b][ ][Set ID][ ][OK/NG][Data][x]23. Key (Command: m c)To send IR remote key code.Transmission [m][c][ ][Set ID][ ][Data][Cr]See page 101.Acknowledgement [c][ ][Set ID][ ][OK/NG][Data][x]When TV is in the standby mode, TV will turn on by POWER button of remote control only.24. Backlight (Command: m g) ( LCD )To adjust screen backlight.Transmission [m][g][ ][Set ID][ ][Data][Cr]Data Min:00 ~ Max:64 (*transmit by Hexadecimal code)*Refer to “Real data mapping”.Acknowledgement [g][ ][Set ID][ ][OK/NG][Data][x]7Main/SubPicture 6Two/OnePartChannel5UsingPhysicalChannel4Reserved 3210 Step0 Main 0 Two 0 Use x 0 0 0 0 NTSC Air1 Sub 1 One 1 No Use x 0 0 0 1 NTSC Cablex 0 0 1 0 ATSC Airx 0 0 1 1 ATSC Cable_stdx 0 1 0 0 ATSC Cable_hrcx 0 1 0 1 ATSC Cable_ircx 0 1 1 0 ATSC cable_autox 0 1 1 1 Reservedx x x x x ...x 1 1 1 1 Reserved](https://usermanual.wiki/LG-Electronics-USA/50PW350UA/User-Guide-1374239-Page-89.png)