LG Electronics USA 55LN5790UI LED TV Monitor User Manual 2
LG Electronics USA LED TV Monitor Users Manual 2
Contents
- 1. Users Manual 1
- 2. Users Manual 2
- 3. Users Manual 3
- 4. User Manual
Users Manual 2
ENGLISH
11
ASSEMBLING AND PREPARING
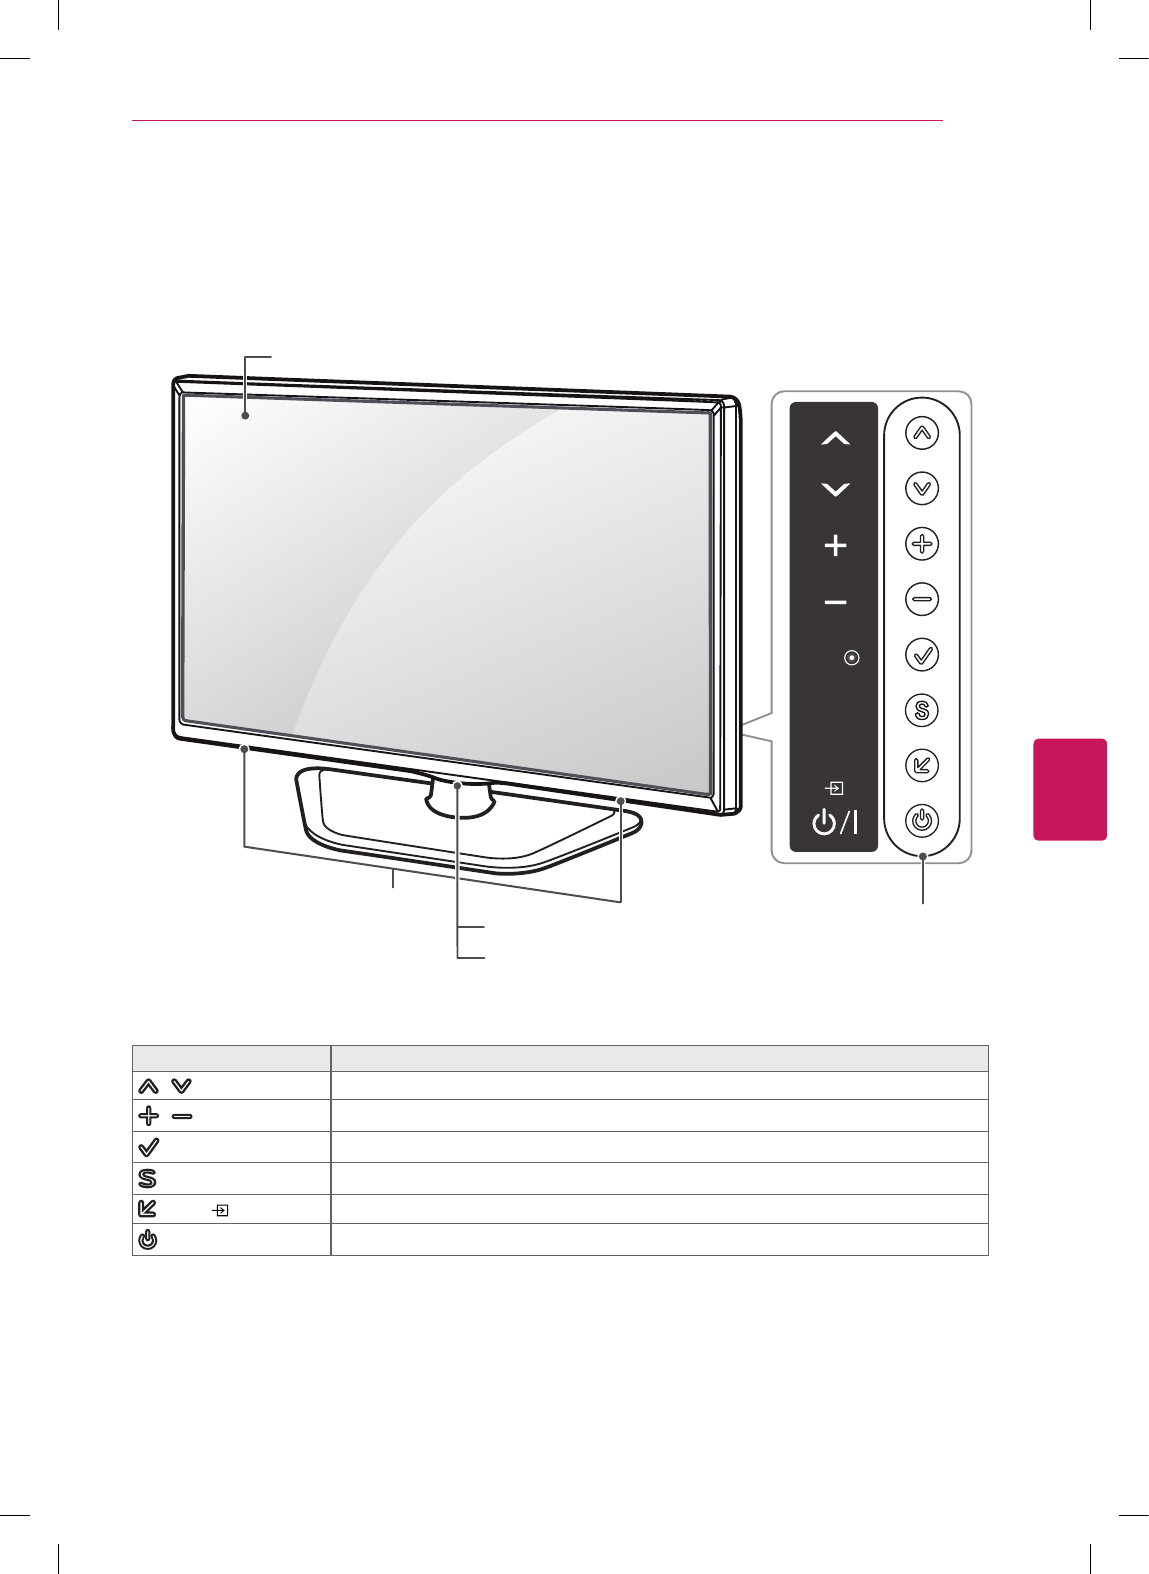
Parts and Buttons
Button Description
/ (^ / v) Scrolls through the saved channels.
/ (+ / -) Adjusts the volume level.
(OK ⊙)Selects the highlighted menu option or confirms an input.
(SETTINGS) Accesses the main menus, or saves your input and exits the menus.
(INPUT ) Changes the input source.
(ꔰ / I) Turns the power on or off.
1 Intelligent sensor - Adjusts the image quality and brightness based on the surrounding environment.
SETTINGS
INPUT
OK
COMPONENT IN / AV IN
VIDEO/
ANTENNA
IN /
CABLE IN
PBPR
Y
IN 1
R
AUDIO
L/MONO
OPTICAL
DIGITAL
AUDIO OUT
Buttons
Screen
Speakers
Remote control Sensor and
Intelligent Sensor1
Power Indicator
ENGLISH
12 ASSEMBLING AND PREPARING
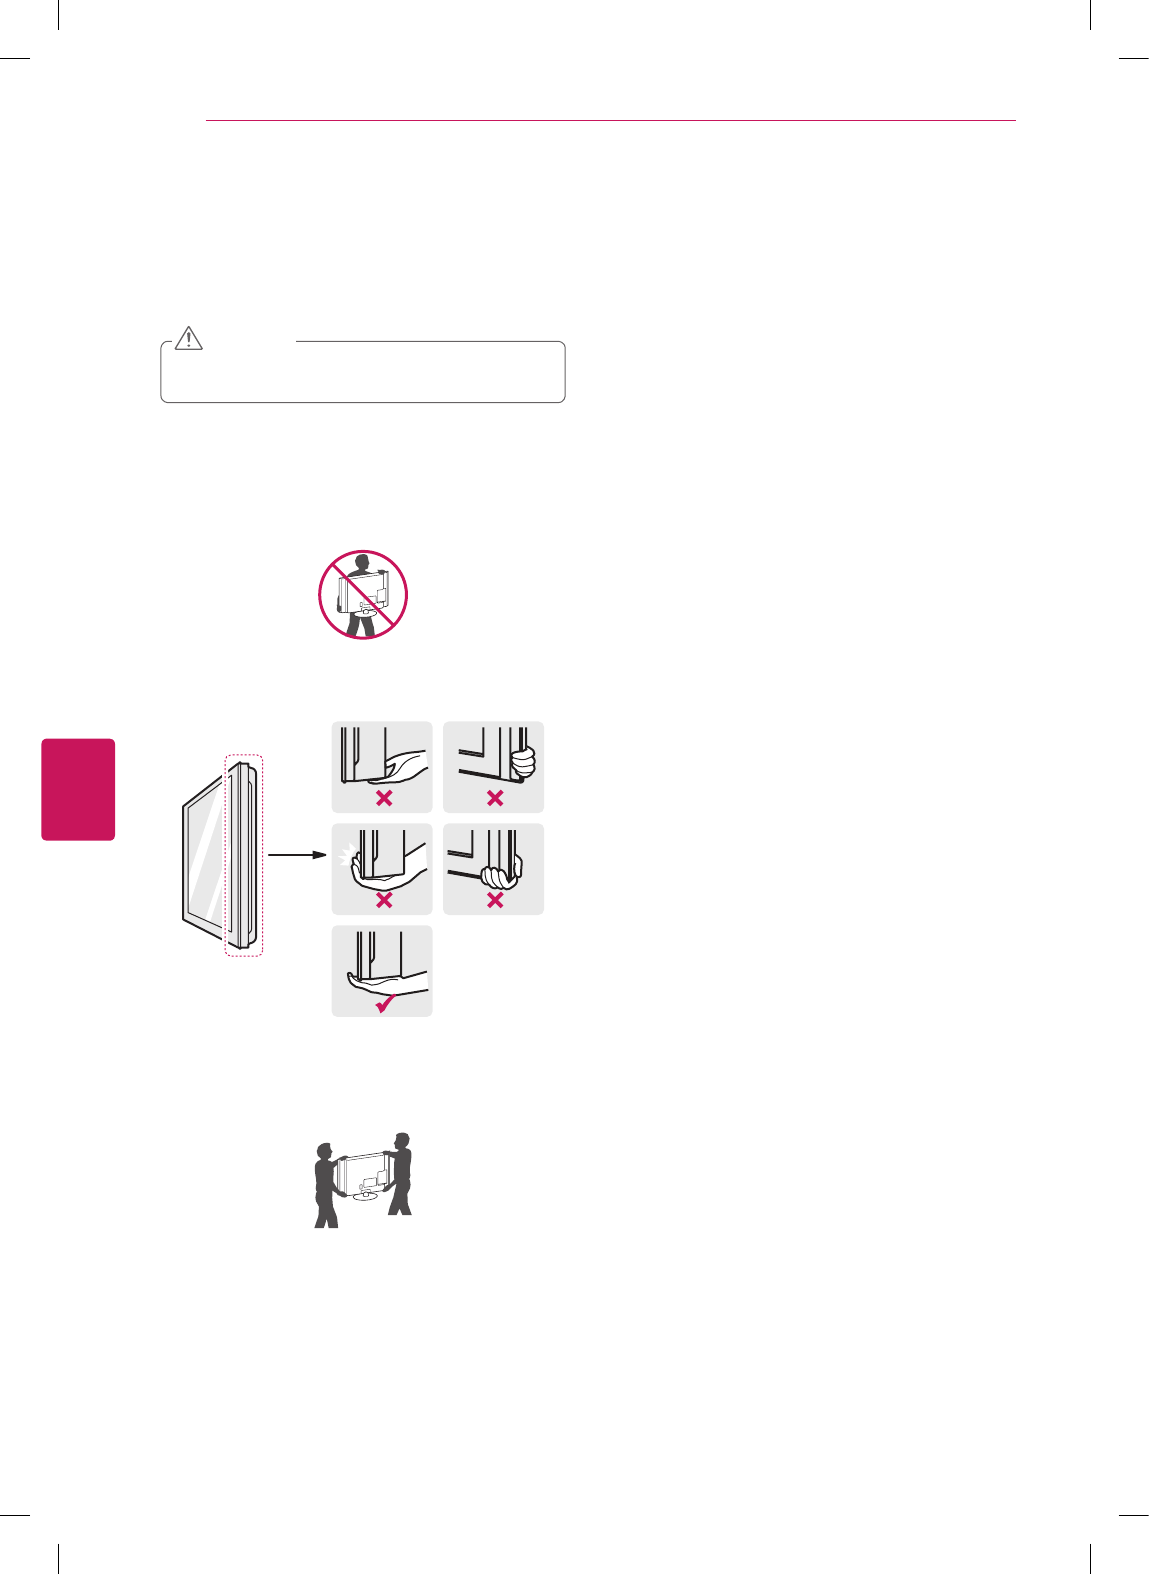
Lifting and moving the TV
When moving or lifting the TV, read the following to
prevent the TV from being scratched or damaged and for
safe transportation regardless of its type and size.
Avoid touching the screen at all times, as this may
result in damage to the screen.
CAUTION
It is recommended to move the TV in the box or
packing material that the TV originally came in.
Before moving or lifting the TV, disconnect the
power cord and all cables.
When holding the TV, the screen should face away
from you to avoid damage.
Hold the top and bottom of the TV frame firmly.
Make sure not to hold the transparent part, speaker,
or speaker grill area.
When transporting a large TV, there should be at
least 2 people.
When transporting the TV by hand, hold the TV as
shown in the following illustration.
When transporting the TV, do not expose the TV to
jolts or excessive vibration.
When transporting the TV, keep the TV upright,
never turn the TV on its side or tilt towards the left
or right.
ENGLISH
13
ASSEMBLING AND PREPARING
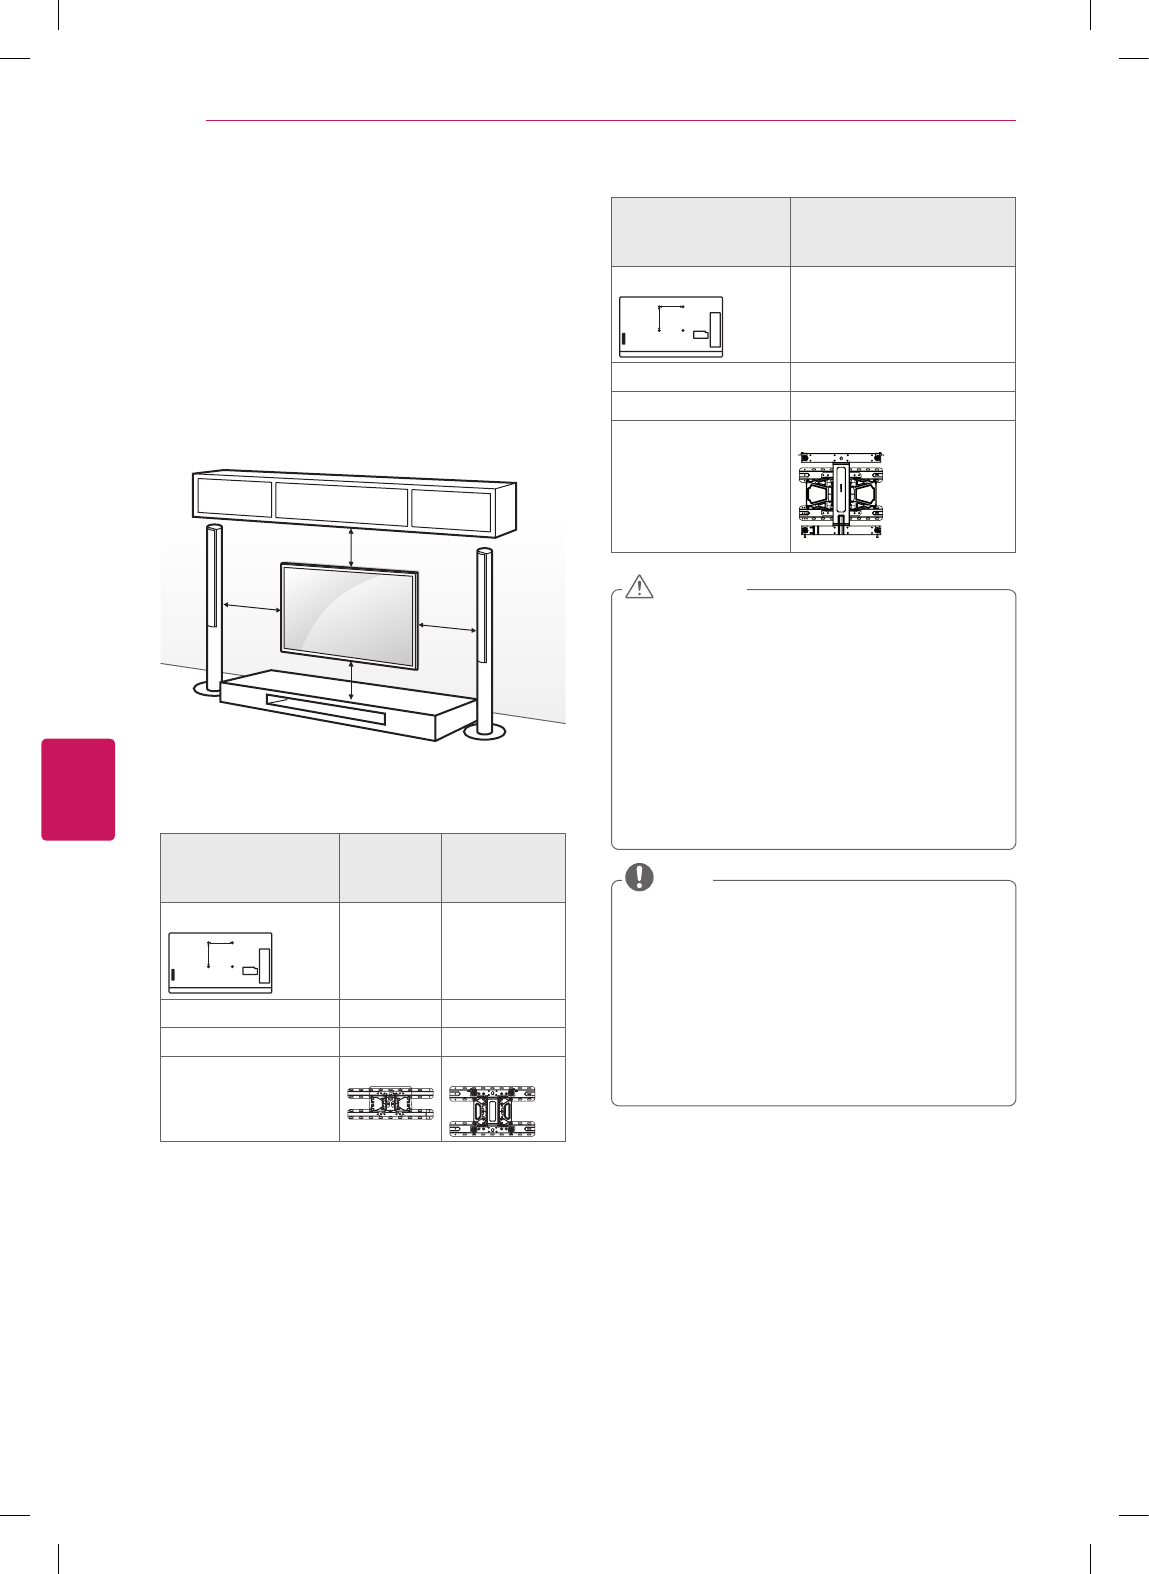
Setting up the TV
The TV can be mounted to a wall or the stand can be attached if the TV will be positioned on an entertainment center or
stand.
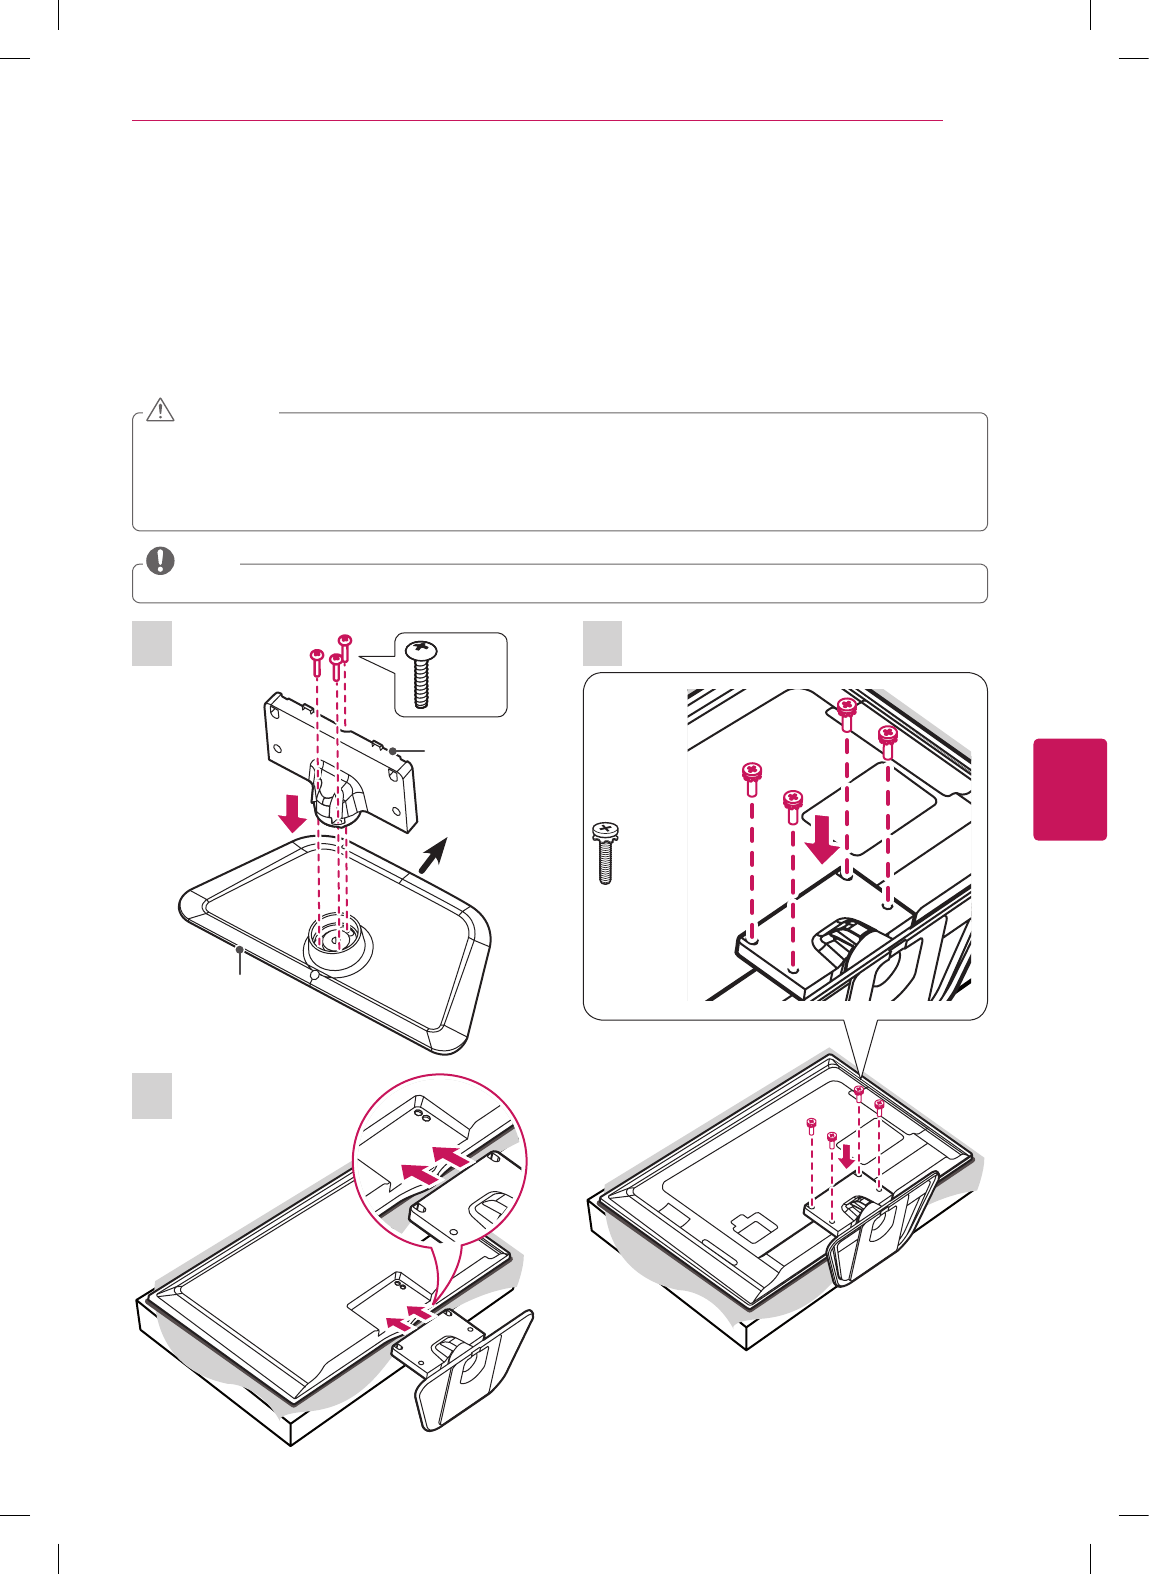
Attaching the stand
If you are not mounting the TV to a wall, use the following instructions to attach the stand.
When attaching the stand to the TV set, place the screen facing down on a cushioned table or flat surface to
protect the screen from scratches.
Make sure that the screws are fastened tightly. (If they are not fastened securely enough, the TV may tilt forward
after being installed.)
Do not tighten the screws with too much force; otherwise they may be damaged and come loose later.
CAUTION
Remove the stand before installing the TV on a wall mount by performing the stand attachment in reverse.
NOTE
3
Stand Body
Stand Base
Front
1
3 EA
P5 x 25
4 EA
M4 x 14
2
ENGLISH
14 ASSEMBLING AND PREPARING
Mounting on a table
1 Lift and tilt the TV into its upright position on a table.
- Leave a 10 cm (4 inch) (minimum) space from
the wall for proper ventilation.
10 cm
10 cm
10 cm
10 cm
(4 inches)
2 Connect the power cord to a wall outlet.
Do not place the TV near or on sources of heat, as
this may result in fire or other damage.
CAUTION
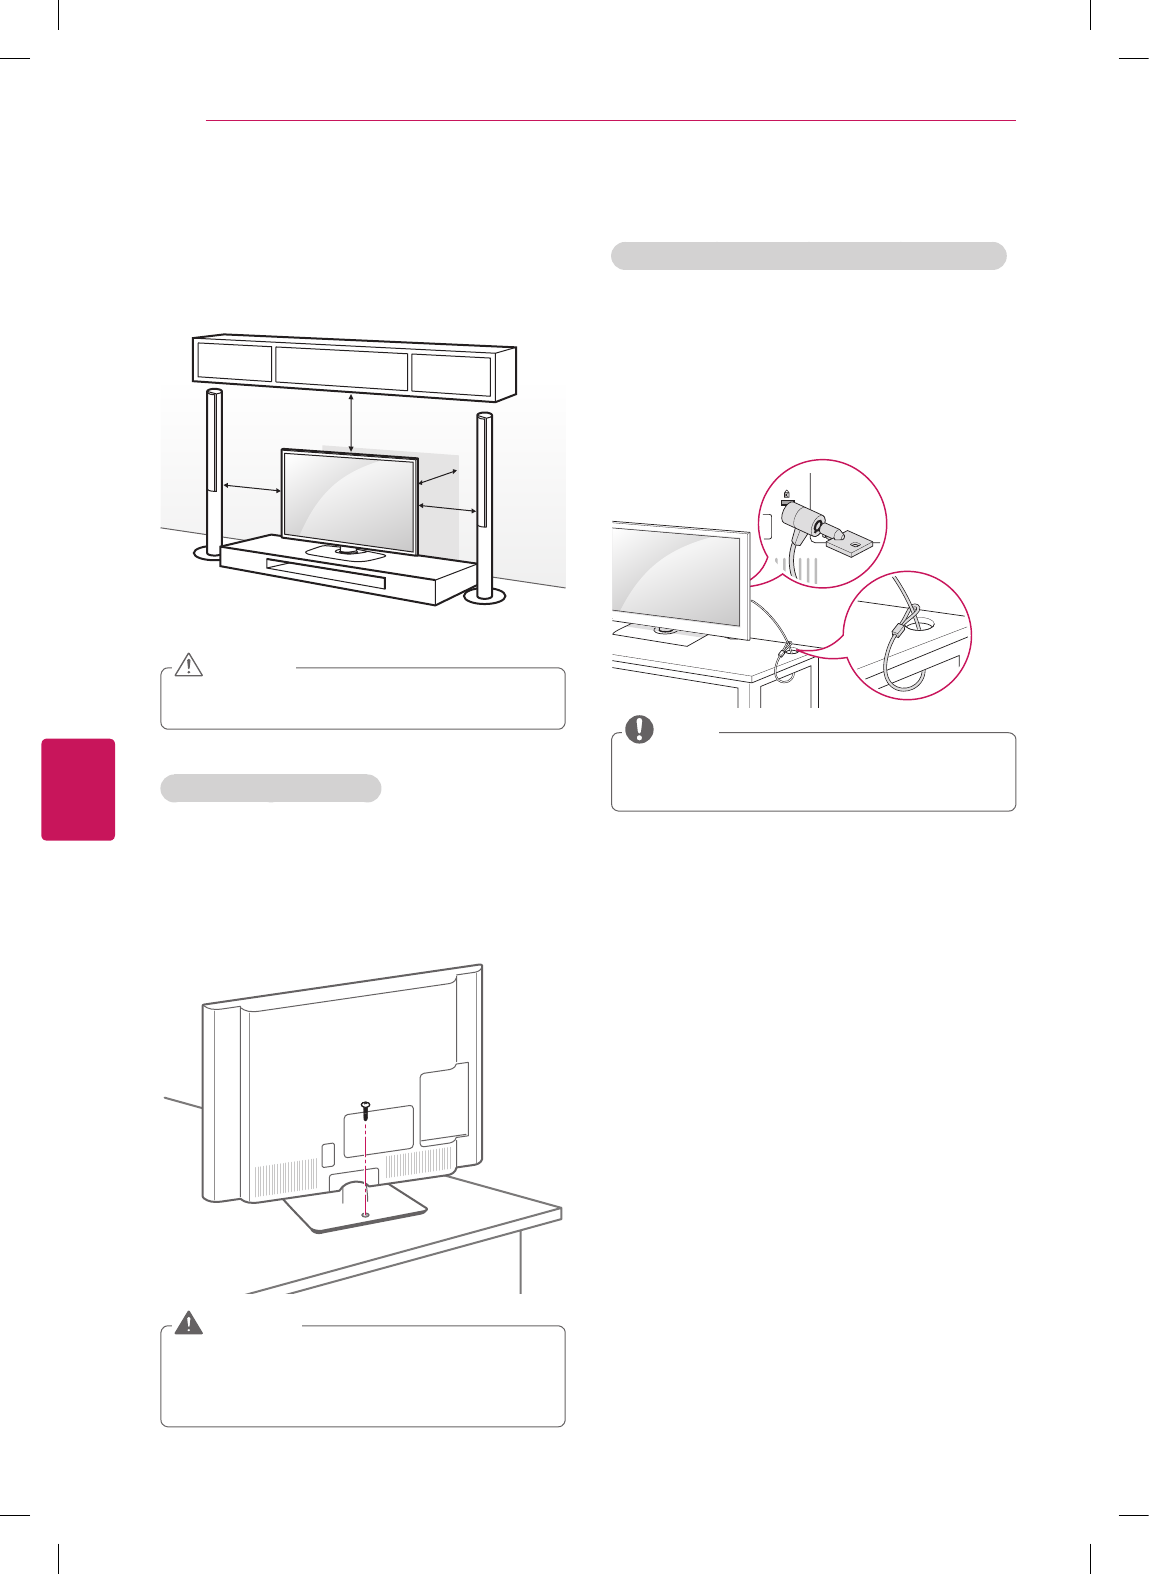
Securing the TV to a table
(For 32/39/42/47/50/60LN5700, 32LN570B,
32/39/42/47/50/60LN5750, 47LN5790)
Fix the TV to a table to prevent from tilting forward,
damage, and potential injury.
Mount the TV on a table, and then insert and tighten the
supplied screw on the rear of the stand.
To prevent TV from falling over, the TV should be
securely attached to the floor/wall per installation
instructions. Tipping, shaking, or rocking the TV
may cause injury.
WARNING
Using the Kensington security system (optional)
(Depending on model)
The Kensington security system connector is located at
the rear of the TV.
For more information of installation and using, refer
to the manual provided with the Kensington security
system or visit http://www.kensington.com.
Connect the Kensington security system cable between
the TV and a table.
The Kensington security system is optional. You
can obtain additional accessories from your local
dealer.
NOTE

ENGLISH
15
ASSEMBLING AND PREPARING
Securing the TV to a wall (optional)
(Depending on model)
1 Insert and tighten the eye-bolts, or TV brackets and
bolts on the back of the TV.
- If there are bolts inserted at the eye-bolts position,
remove the bolts first.
2 Mount the wall brackets with the bolts to the wall.
Match the location of the wall bracket and the eye-
bolts on the rear of the TV.
3 Connect the eye-bolts and wall brackets tightly with
a sturdy rope.
Make sure to keep the rope horizontal with the flat
surface.
Make sure that children do not climb on or hang on
the TV.
CAUTION
Use a platform or cabinet that is strong and large
enough to support the TV securely.
Brackets, bolts and ropes are optional. You can
obtain additional accessories from your local dealer.
NOTE
Tidying cables
1 Gather and bind the cables with the cable holder on
the back of the TV.
Cable holder
Do not move the TV by holding the cable holder,
as the cable holders may break, and injuries and
damage to the TV may occur.
CAUTION
ENGLISH
16 ASSEMBLING AND PREPARING
Mounting on a wall
An optional wall mount can be used with your LG
Television. Consult with your local dealer for a wall
mount that supports the VESA standard used by your
TV model. Carefully attach the wall mount bracket at the
rear of the TV. Install the wall mount bracket on a solid
wall perpendicular to the floor. If you are attaching the
TV to other building materials, please contact qualified
personnel to install the wall mount. Detailed instructions
will be included with the wall mount. We recommend
that you use an LG brand wall mount.
10 cm
10 cm
10 cm
10 cm
(4 inches)
Make sure to use screws and wall mounts that meet the
VESA standard. Standard dimensions for the wall mount
kits are described in the following table.
Model 32LN5700
32LN570B
32LN5750
39/42LN5700
39/42LN5750
VESA (A x B)
A
B
200 x 100 200 x 200
Standard screw M4 M6
Number of screws 4 4
Wall mount bracket
(optional)
LSW130B LSW230B
Model 47/50/55/60LN5700
47/50/55/60LN5750
47/55LN5790
VESA (A x B)
A
B
400 x 400
Standard screw M6
Number of screws 4
Wall mount bracket
(optional)
LSW430B
Disconnect the power before moving or installing
the TV. Otherwise electric shock may occur.
If you install the TV on a ceiling or slanted wall, it
may fall and result in severe injury.
Use an authorized LG wall mount and contact the
local dealer or qualified personnel.
Do not over tighten the screws as this may cause
damage to the TV and void your warranty.
Use the screws and wall mounts that meet the
VESA standard. Any damages or injuries by misuse
or using an improper accessory are not covered by
the warranty.
CAUTION
Use the screws that are listed in the VESA
standard screw specifications.
The wall mount kit includes an installation manual
and necessary parts.
The wall mount bracket is optional. You can obtain
additional accessories from your local dealer.
The length of screws may differ depending on the
wall mount. Make sure to use the proper length.
For more information, refer to the manual supplied
with the wall mount.
NOTE

ENGLISH
17
MAKING CONNECTIONS
MAKING CONNECTIONS
This section uses illustrations of the LN5790 series.
You can connect various external devices to the TV. Supported external devices are: HD receivers, DVD players, VCRs,
audio systems, USB storage devices, PC, gaming devices, and other external devices. For more information on external
device’s connection, refer to the manual provided with each device.
If you record a TV program on a DVD recorder or VCR, make sure to connect the TV signal input cable to the
TV through a DVD recorder or VCR. For more information of recording, refer to the manual provided with the
connected device.
The external device connections shown may differ slightly from illustrations in this manual.
Connect external devices to the TV regardless of the order of the TV port.
If you connect a gaming device to the TV, use the cable supplied with the gaming device.
Refer to the external equipment’s manual for operating instructions.
NOTE
Connecting to an antenna or cable
Connect an antenna, cable, or cable box to watch TV while referring to the following. The illustrations may differ from
the actual items and a RF cable is optional.
Make sure not to bend the copper wire of the RF
cable.
Copper wire
Complete all connections between devices, and
then connect the power cord to the power outlet
to prevent damage to your TV.
CAUTION
Use a signal splitter to use more than 2 TVs.
Visit ‘http://lgknowledgebase.com’ for more
information about the antenna and cable
connection. Search for antenna.
DTV Audio Supported Codec: MPEG, Dolby Digital.
NOTE
ANTENNA/
CABLE IN
ANTENNA/
CABLE IN
Antenna
VHF Antenna
UHF Antenna
Coaxial (75Ω)
Terminal
(*Not Provided)

ENGLISH
18 MAKING CONNECTIONS
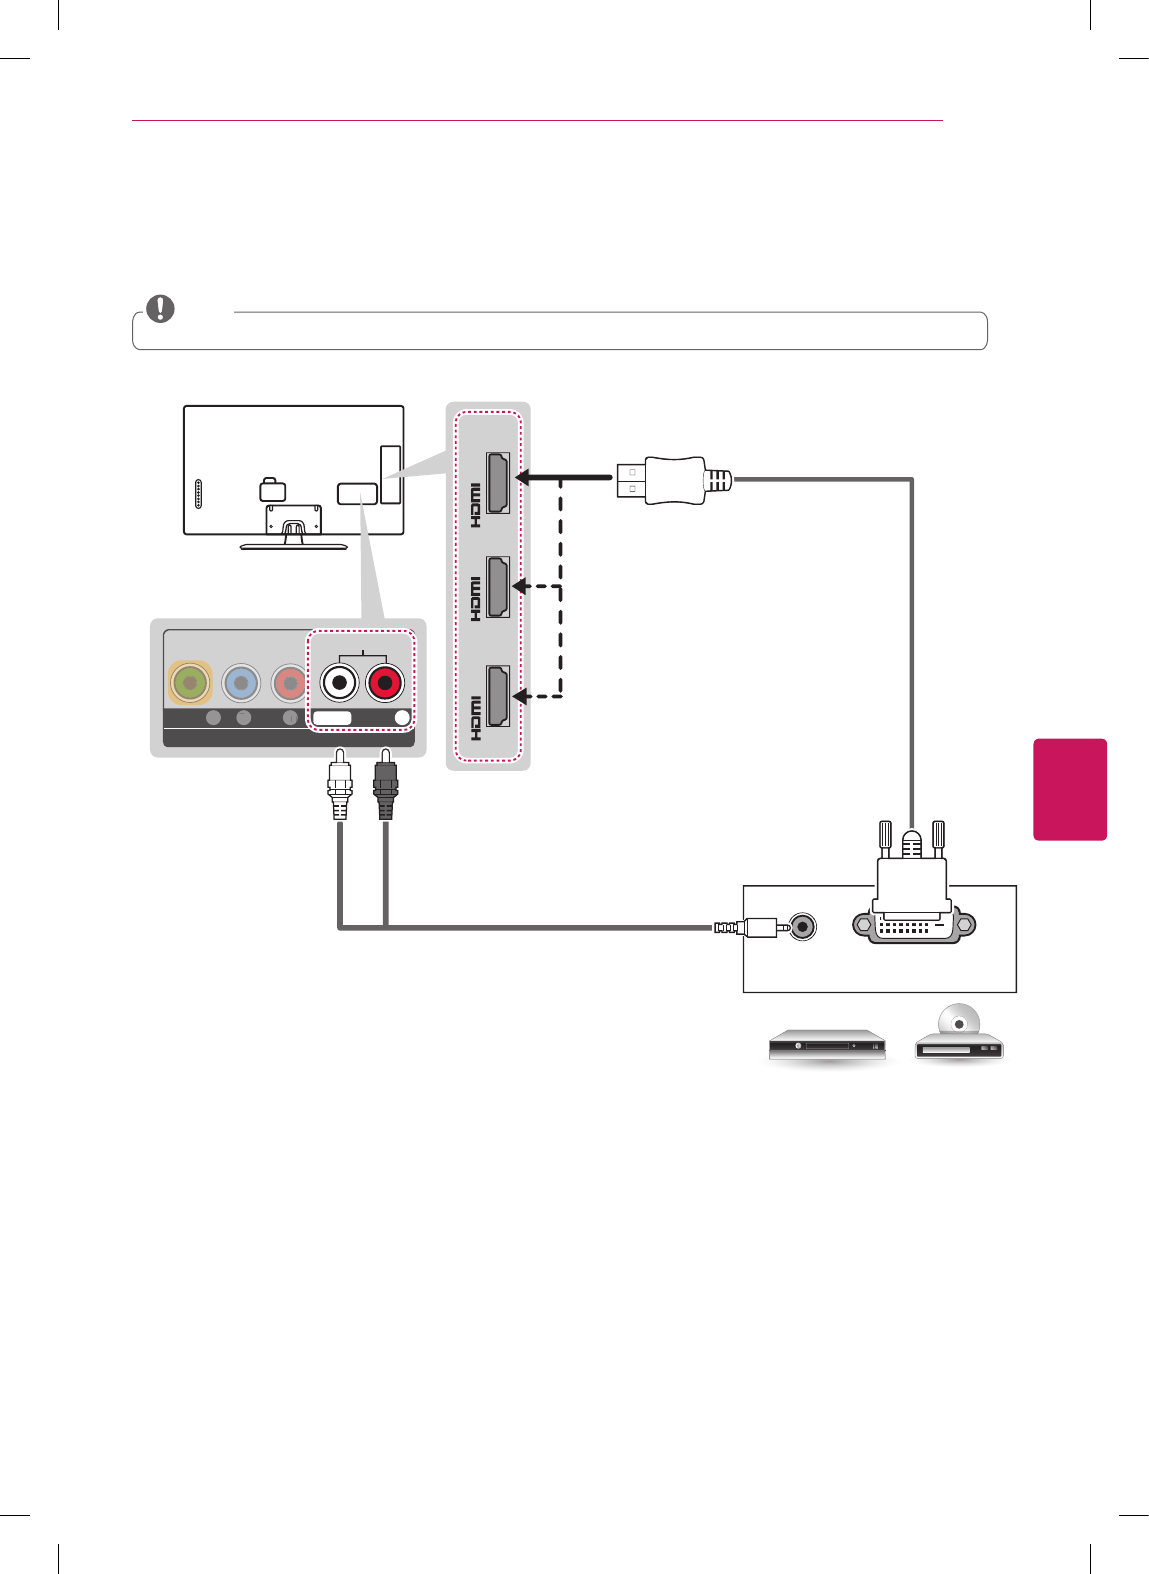
Connecting to a HD receiver, DVD Player, or VCR
Connect a HD receiver, DVD Player, or VCR to the TV and select an appropriate input mode.
HDMI Connection
HDMI is the best way to connect a device.
Transmits the digital video and audio signals from an external device to the TV. Connect the external device and the TV
with the HDMI cable as shown in the following illustration.
Use the latest High Speed HDMI™ Cable that supports CEC (Customer Electronics Control) function.
High Speed HDMI™ Cables are tested to carry an HD signal up to 1080p and higher.
HDMI Audio Supported Format: Dolby Digital, PCM (Up to 192 KHz, 32k/44.1k/48k/88k/96k/176k/192k), DTS.
NOTE
IN
1
(ARC)
IN
3
(MHL)
IN
2
HDMI
DVD / Blu-Ray / HD Cable Box / HD STB
Choose any HDMI input port to connect.
It does not matter which port you use.
(*Not Provided)
ENGLISH
19
MAKING CONNECTIONS
DVI to HDMI Connection
Transmits the digital video signal from an external device to the TV. Connect the external device and the TV with the
DVI-HDMI cable as shown in the following illustration. To transmit an audio signal, connect an audio cable.
When using the HDMI/DVI cable, Single link is only supported.
NOTE
IN
1
(ARC)
IN
3
(MHL)
IN
2
PC-AUDIO IN
COMPONENT IN / AV IN
P
B
P
R
V
IDE
O
/
Y
L/MONO AUDIO R
AUDIO OUT DVI OUT
(*Not Provided)
(*Not Provided)
DVD / Blu-Ray / HD Cable Box
WHITE
RED
ENGLISH
20 MAKING CONNECTIONS
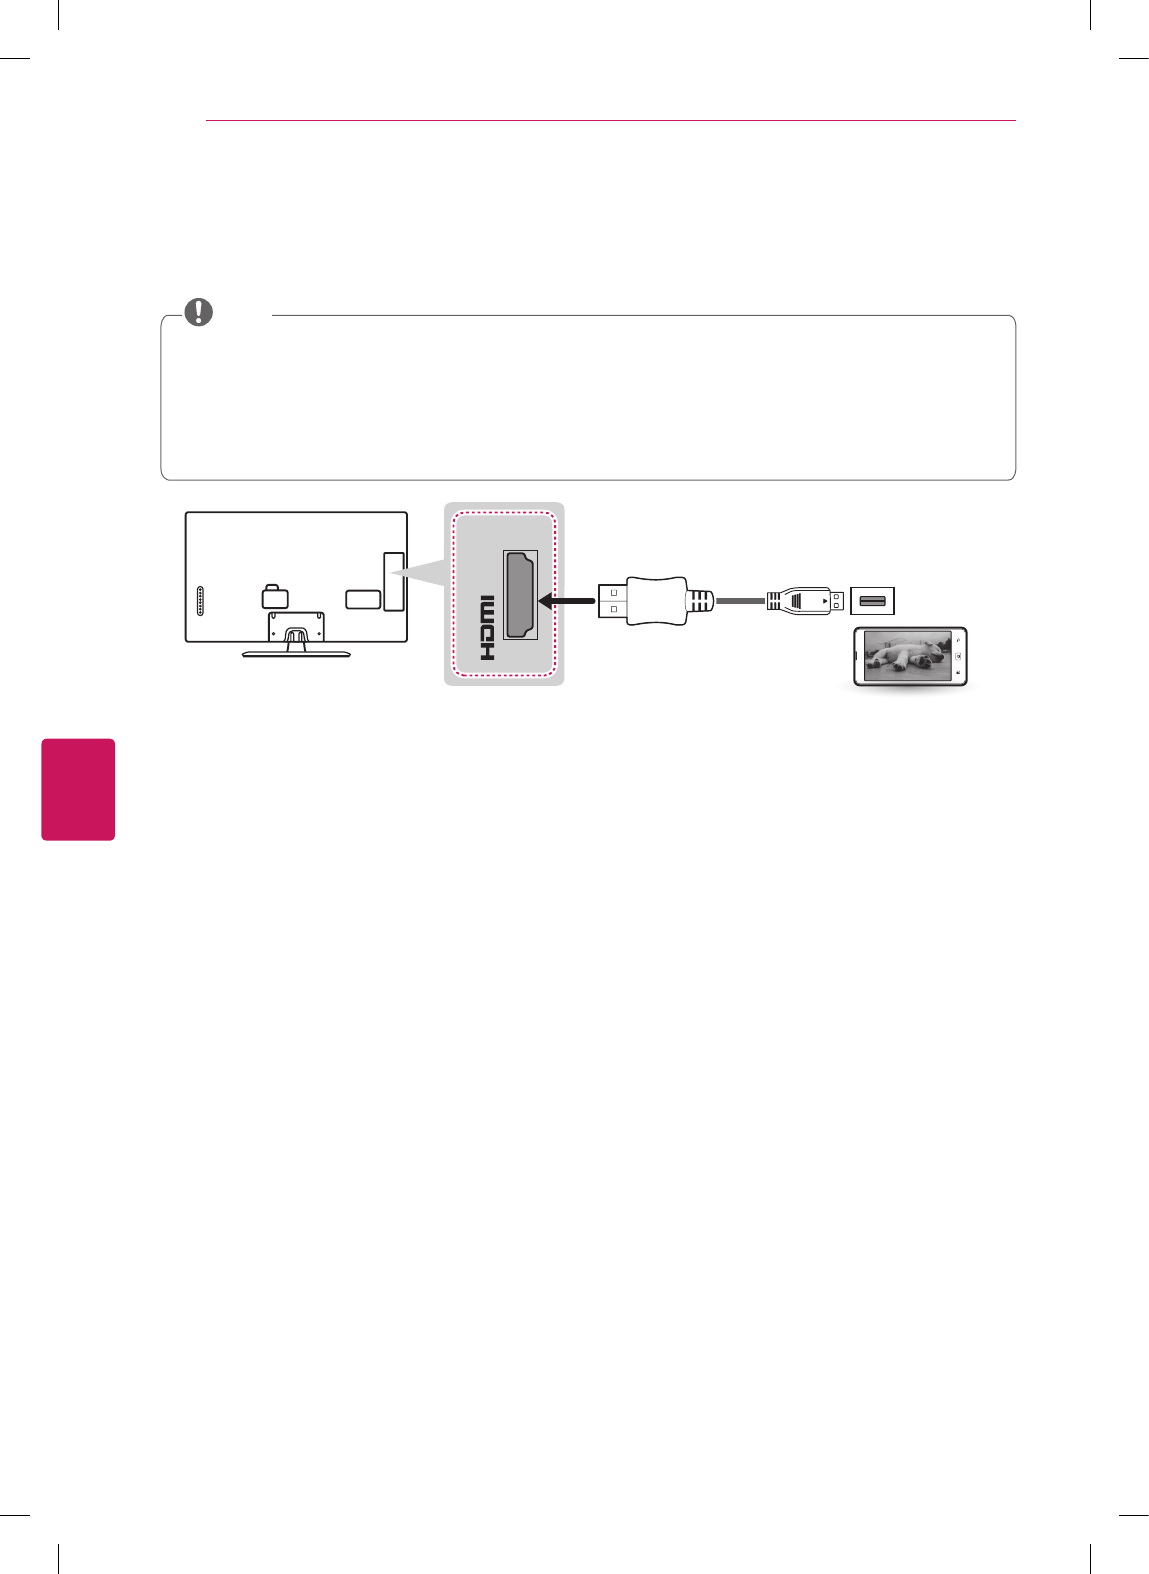
Connecting to a mobile phone
Mobile High-definition Link (MHL) is an interface for transmitting digital audiovisual signals from mobile phones to
television sets.
Connect the mobile phone to the HDMI IN 3 (MHL) port to view the phone screen on the TV.
This only works for the MHL-enabled phone.
With some MHL supporting mobile phones, you can use the TV remote to control the phone.
An MHL passive cable is needed to connect the TV and a mobile phone.
Remove the MHL cable from the TV when:
- the MHL function is disabled.
- your mobile device is fully charged in standby mode.
NOTE
IN
3
(MHL)
(*Not Provided)
MHL Cable
Mobile phone
ENGLISH
21
MAKING CONNECTIONS
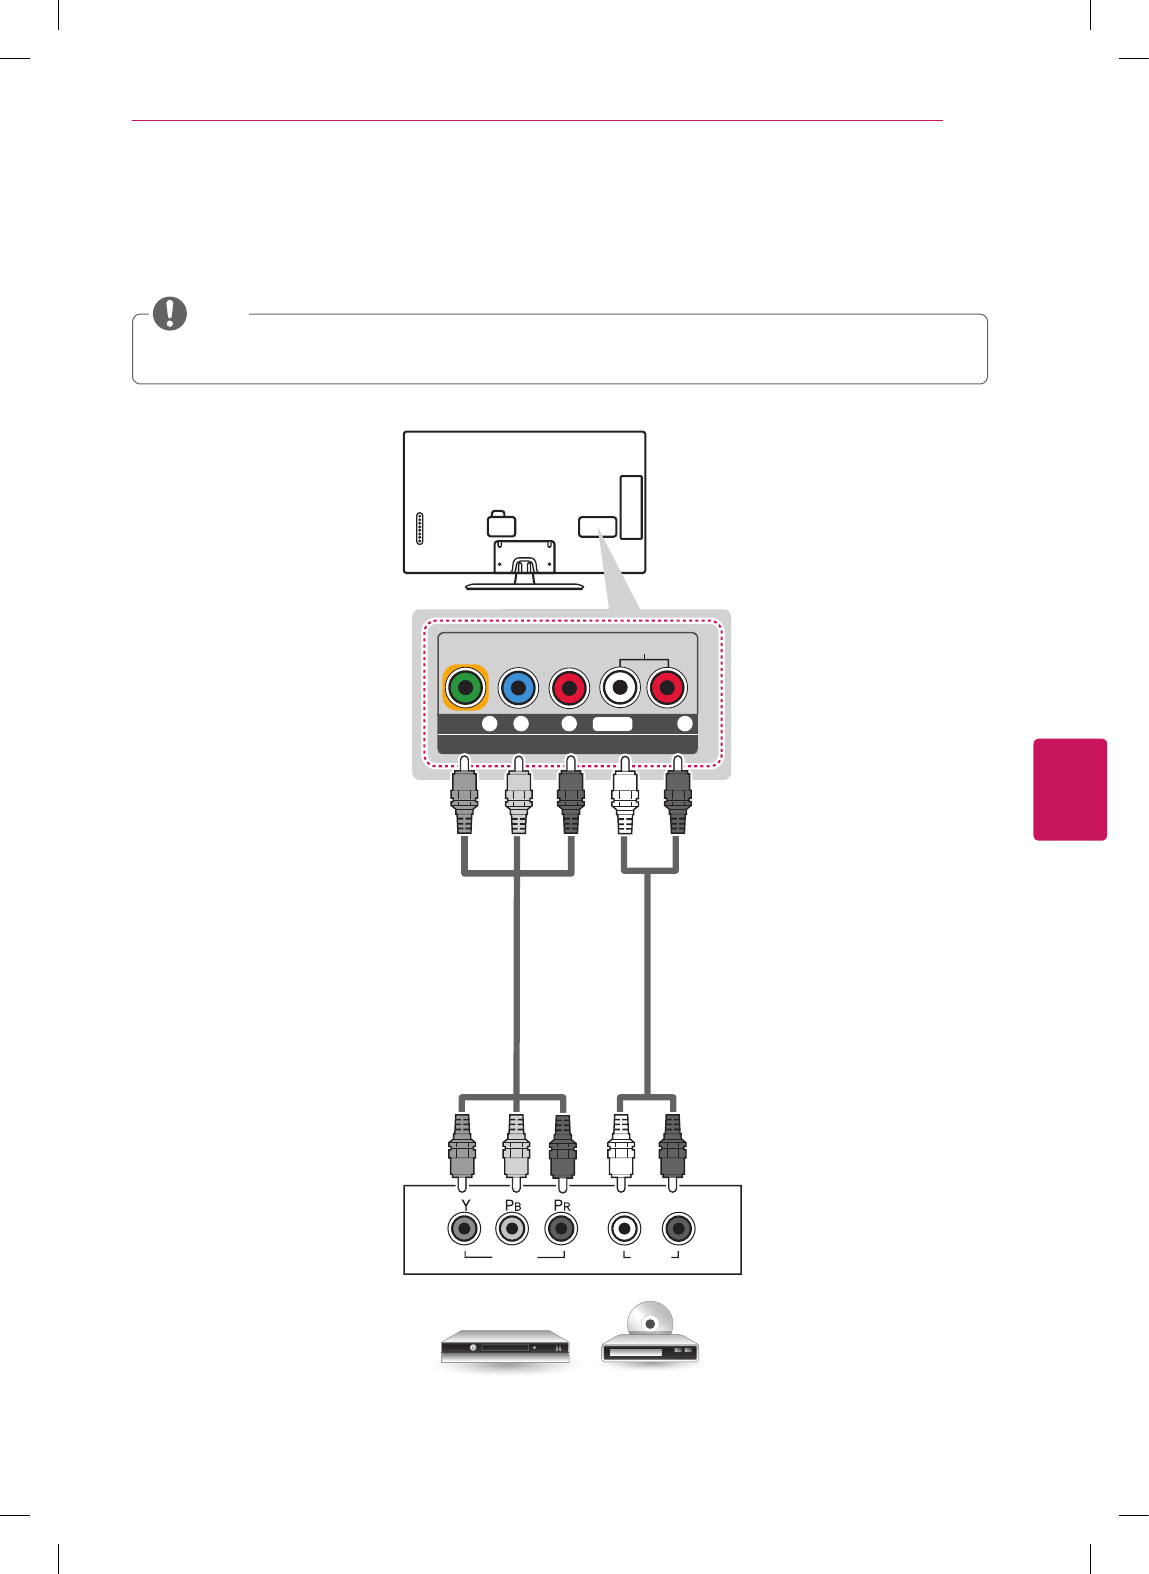
Component Connection
Transmits analog video and audio signals from an external device to the TV. Connect the external device and the TV with
a component cable as shown in the following illustration.
If cables are installed incorrectly, it could cause the image to display in black and white or with distorted color.
Check to ensure the cables are matched with the corresponding color connection.
NOTE
PC-AUDIO IN
COMPONENT IN / AV IN
P
B
PR
VIDEO
/ Y
L/MONO AUDIO R
AUDIO
VIDEO
L R
(*Not Provided)
(*Not Provided)
DVD / Blu-Ray / HD Cable Box
GREEN GREEN
BLUE BLUE
RED RED
RED RED
WHITE WHITE