LG Electronics USA 70UW340C LED TV Receiver User Manual
LG Electronics USA LED TV Receiver
UserManual.wiki
>
LG Electronics USA
>
70UW340C User Manual
User Manual
Navigation menu
Upload a User Manual
Namespaces
Wiki Guide
HTML
PDF
Info
Views
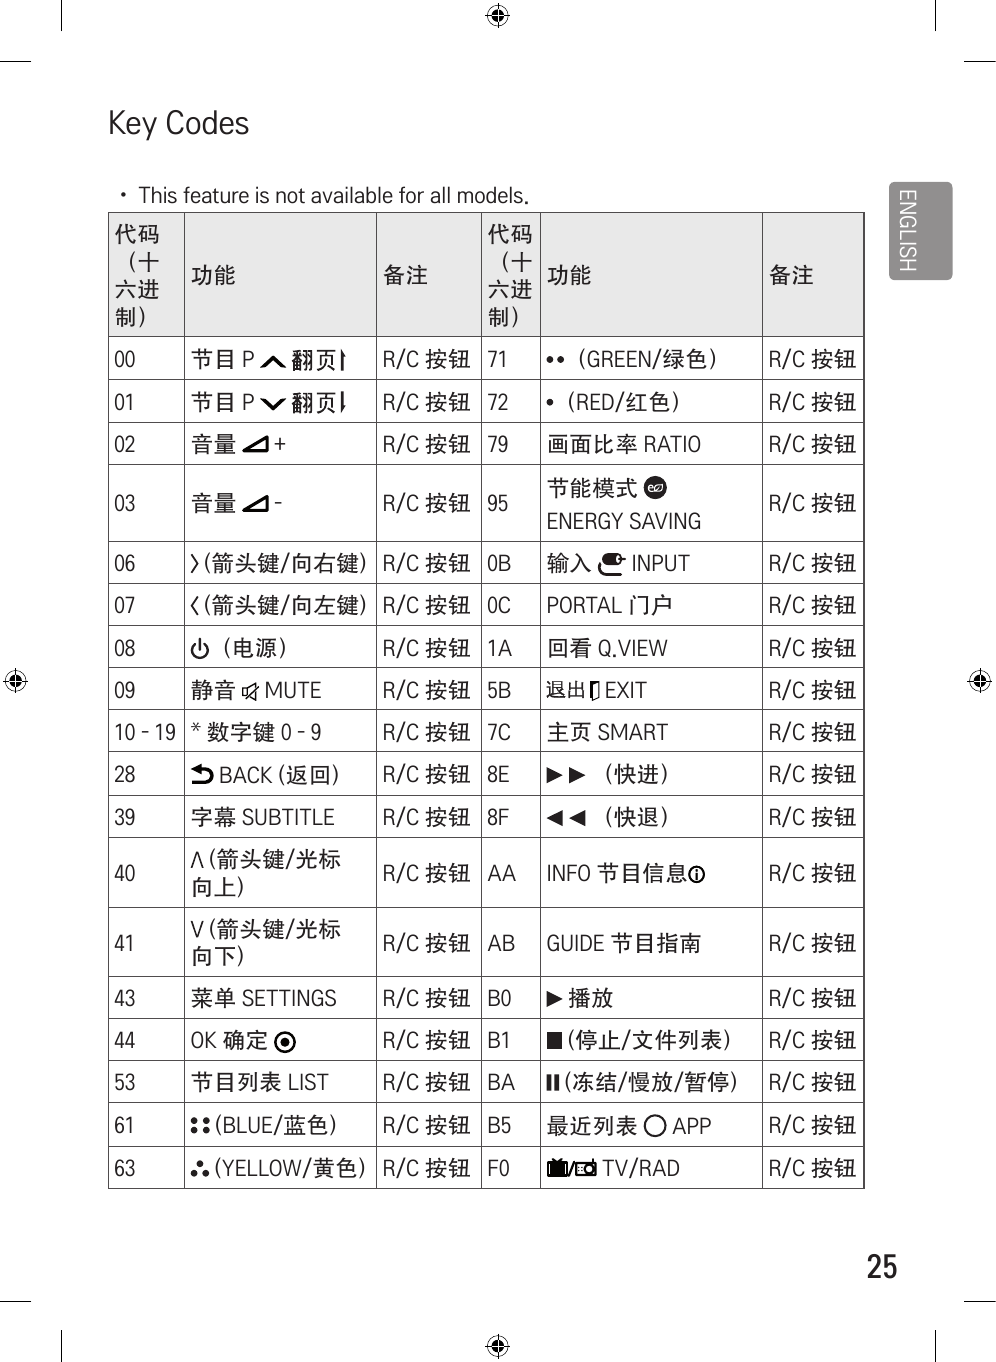
User Manual
Discussion / Help
Navigation
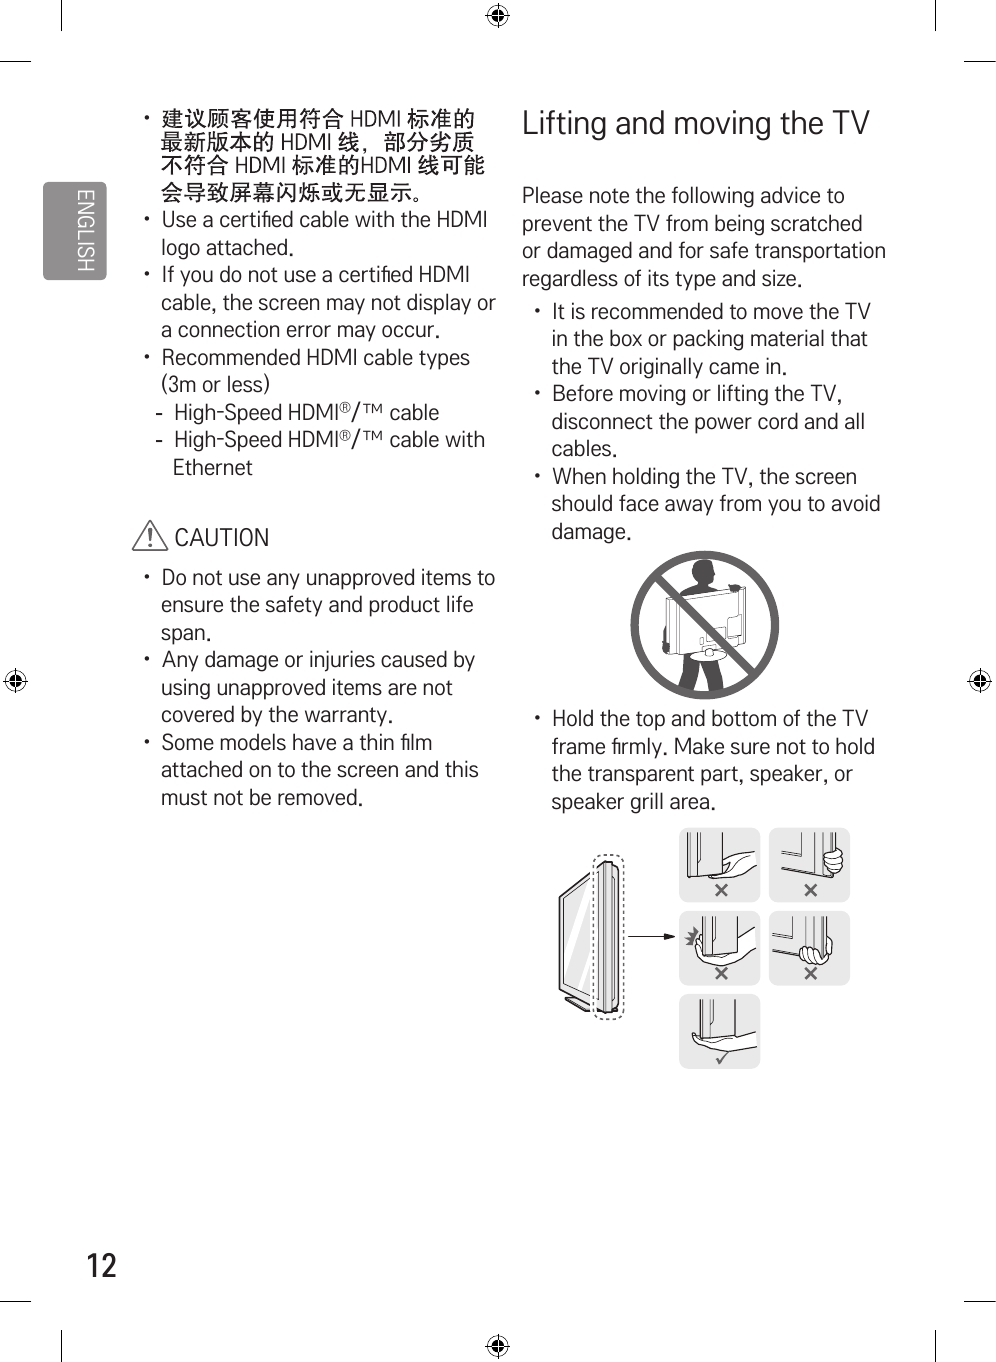


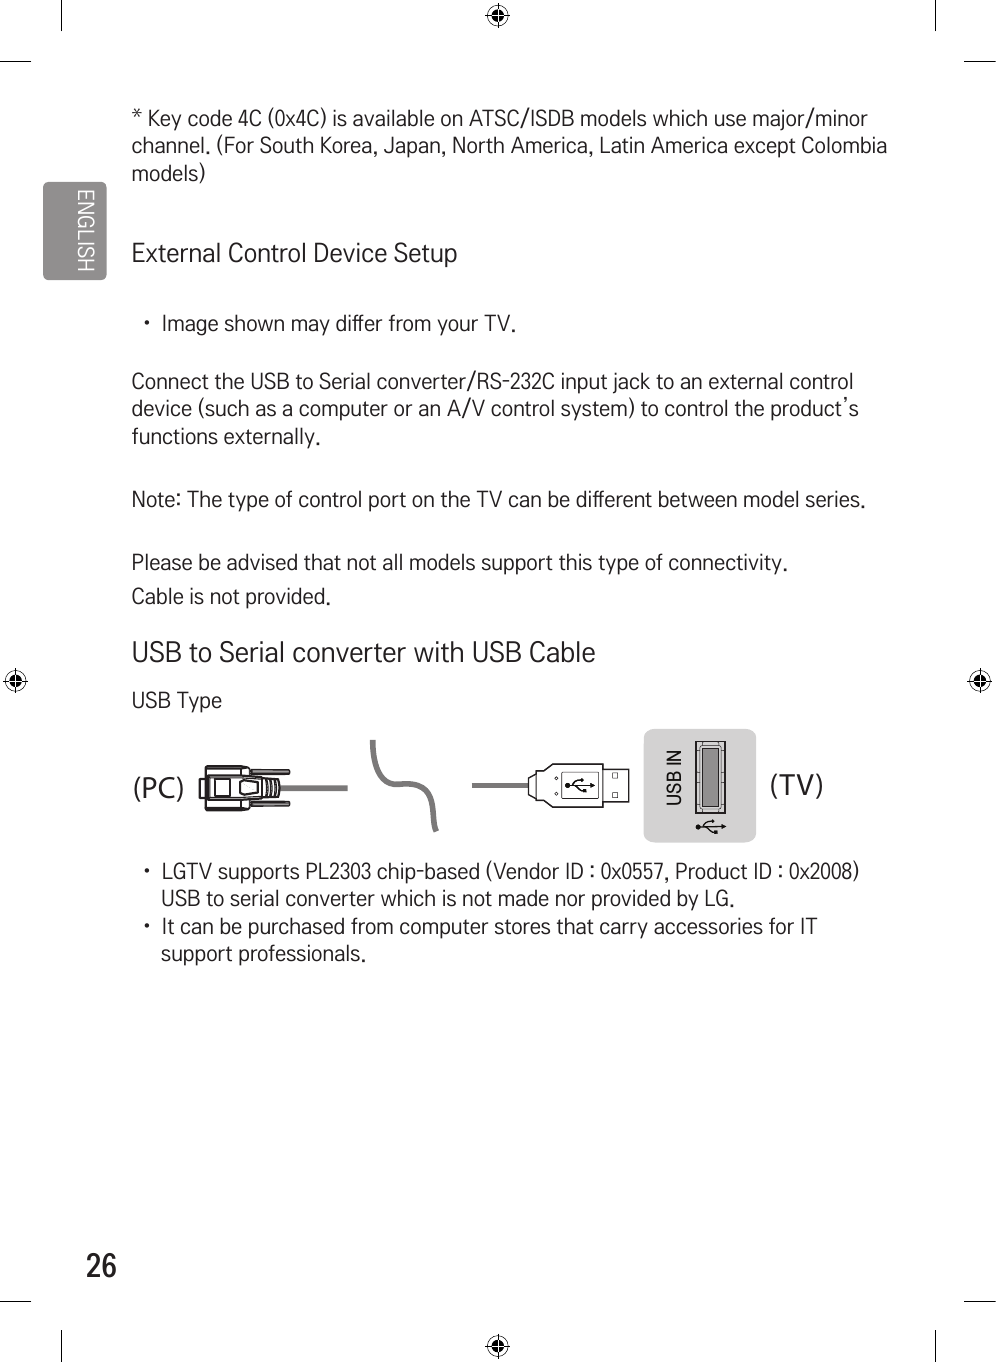
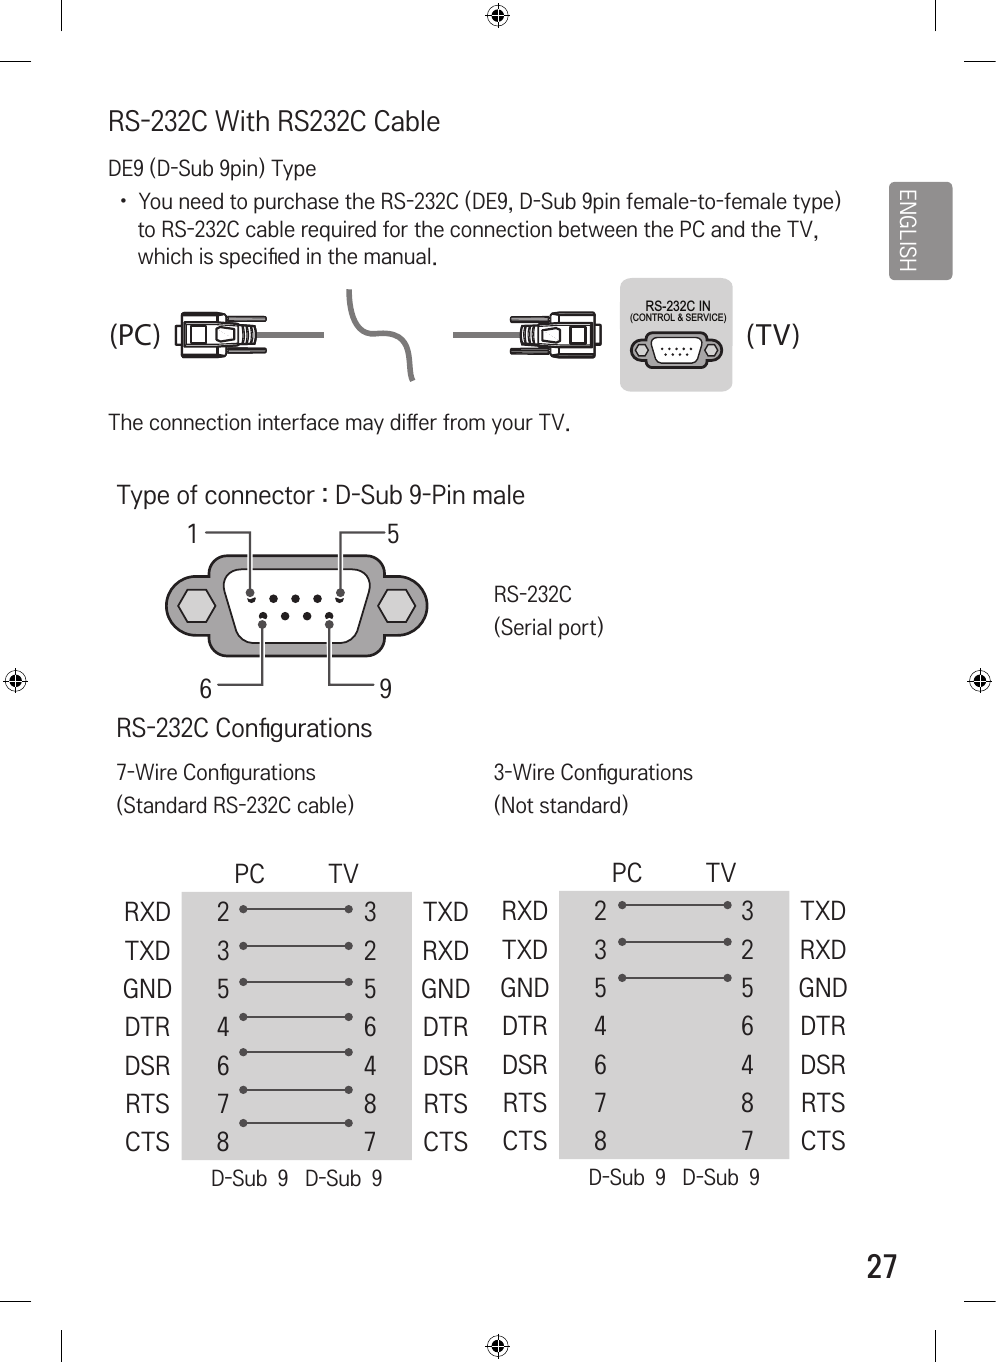
![ENGLISH30* Note : During playing or recording media, all commands except Power (ka) and Key (mc) are not executed and treated as NG. With RS232C cable, TV can communicate “ka command” in power-on or power-off status. but with USB-to-Serial converter cable, the command works only if TV is on.Transmission / Receiving ProtocolTransmission[Command1][Command2][ ][Set ID][ ][Data][Cr][Command 1] : First command to control the TV. (j, k, m or x)[Command 2] : Second command to control the TV.[Set ID] : You can adjust the [Set ID] to choose desired monitor ID number in option menu. Adjustment range in TV is 1 to 99. If [Set ID] value is selected to ‘0’, every connected set can be controlled. * [Set ID] is indicated as decimal (1 to 99) on menu and as Hexadecimal (0x00 to 0x63) on transmission/receiving protocol.[DATA] : To transmit command data (hexadecimal). Transmit ‘FF’ data to read status of command.[Cr] : Carriage Return - ASCII code ‘0x0D’[ ] : Space – ASCII code ‘0x20’OK Acknowledgement[Command2][ ][Set ID][ ][OK][Data][x]* The set transmits ACK (acknowledgement) based on this format when receiv-ing normal data. At this time, if the data is data read mode, it indicates pres-ent status data. If the data is data write mode, it returns the data of the PC computer.](https://usermanual.wiki/LG-Electronics-USA/70UW340C/User-Guide-3174485-Page-30.png)
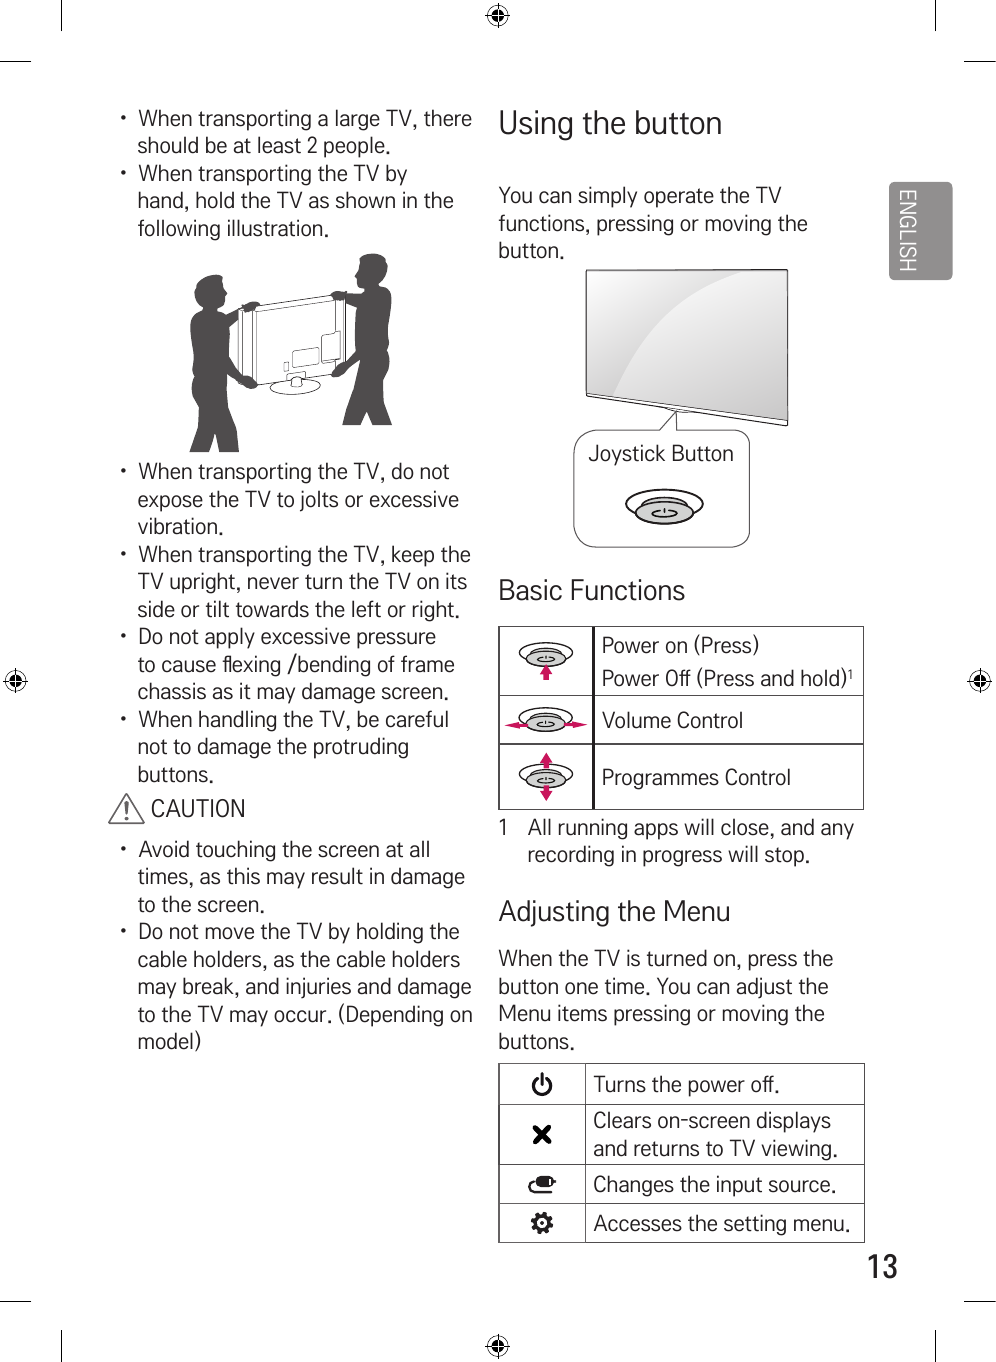
![ENGLISH31Error Acknowledgement[Command2][ ][Set ID][ ][NG][Data][x]* The set transmits ACK (acknowledgement) based on this format when receiv-ing abnormal data from non-viable functions or communication errors.Data 00: Illegal CodeReal data mapping (Hexadecimal : Decimal)* When you enter the [data] in hexadecimal, refer to following conversion table.* Channel Tune (ma) Command uses two-byte hexadecimal value([data]) to select channel number.00 : Step 0 32 : Step 50 (Set ID 50) FE : Step 25401 : Step 1 (Set ID 1) 33 : Step 51 (Set ID 51) FF : Step 255... ... ...0A : Step 10 (Set ID 10) 63 : Step 99 (Set ID 99) 01 00 : Step 256... ... ...0F : Step 15 (Set ID 15) C7 : Step 199 27 0E : Step 999810 : Step 16 (Set ID 16) C8 : Step 200 27 0F : Step 9999... ... ...](https://usermanual.wiki/LG-Electronics-USA/70UW340C/User-Guide-3174485-Page-31.png)
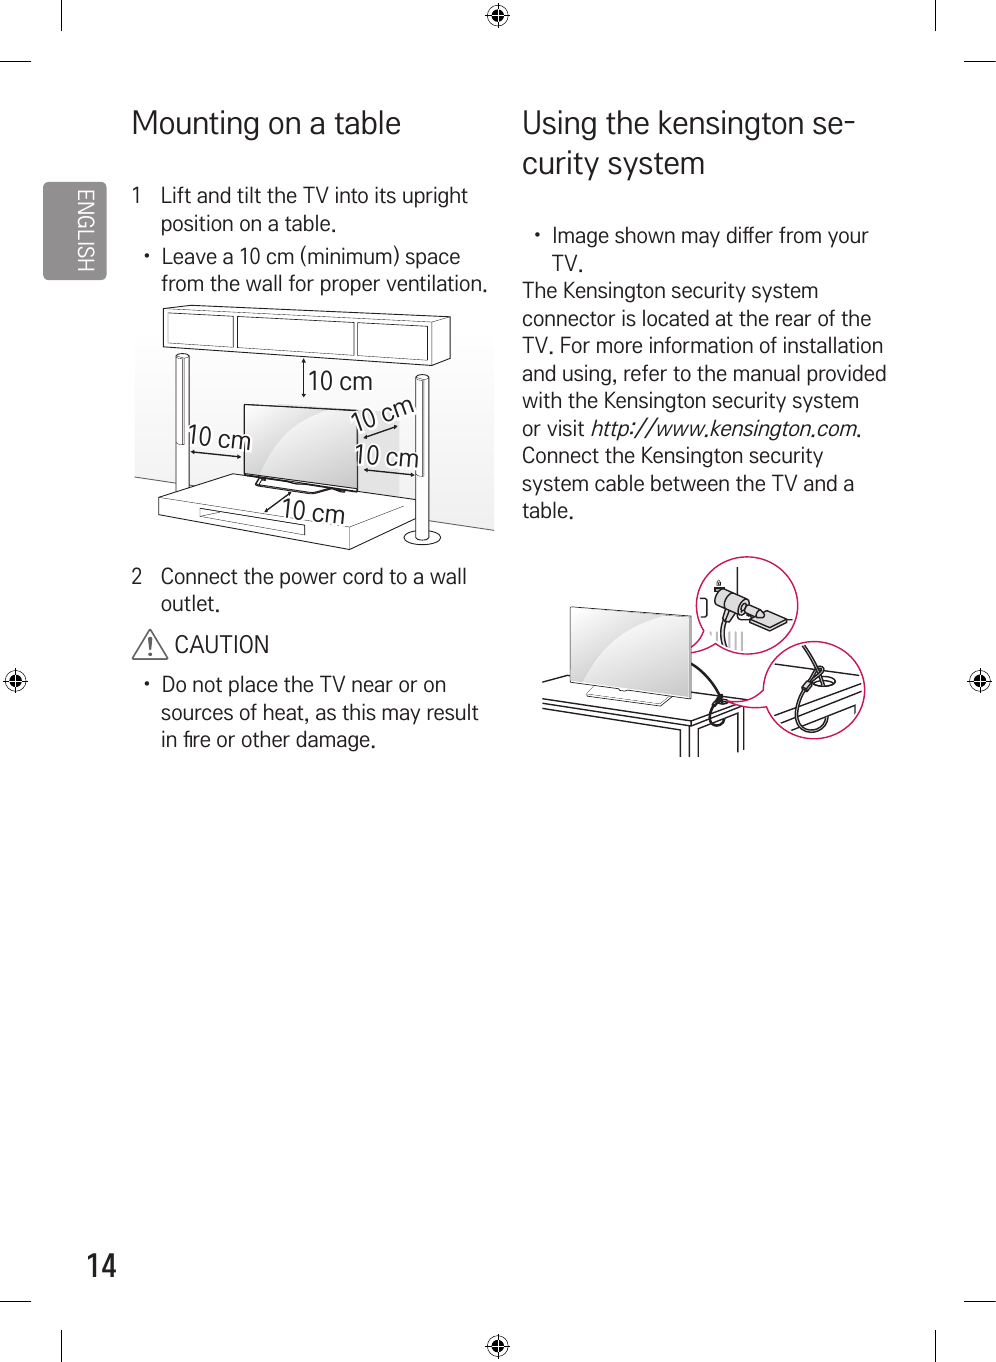
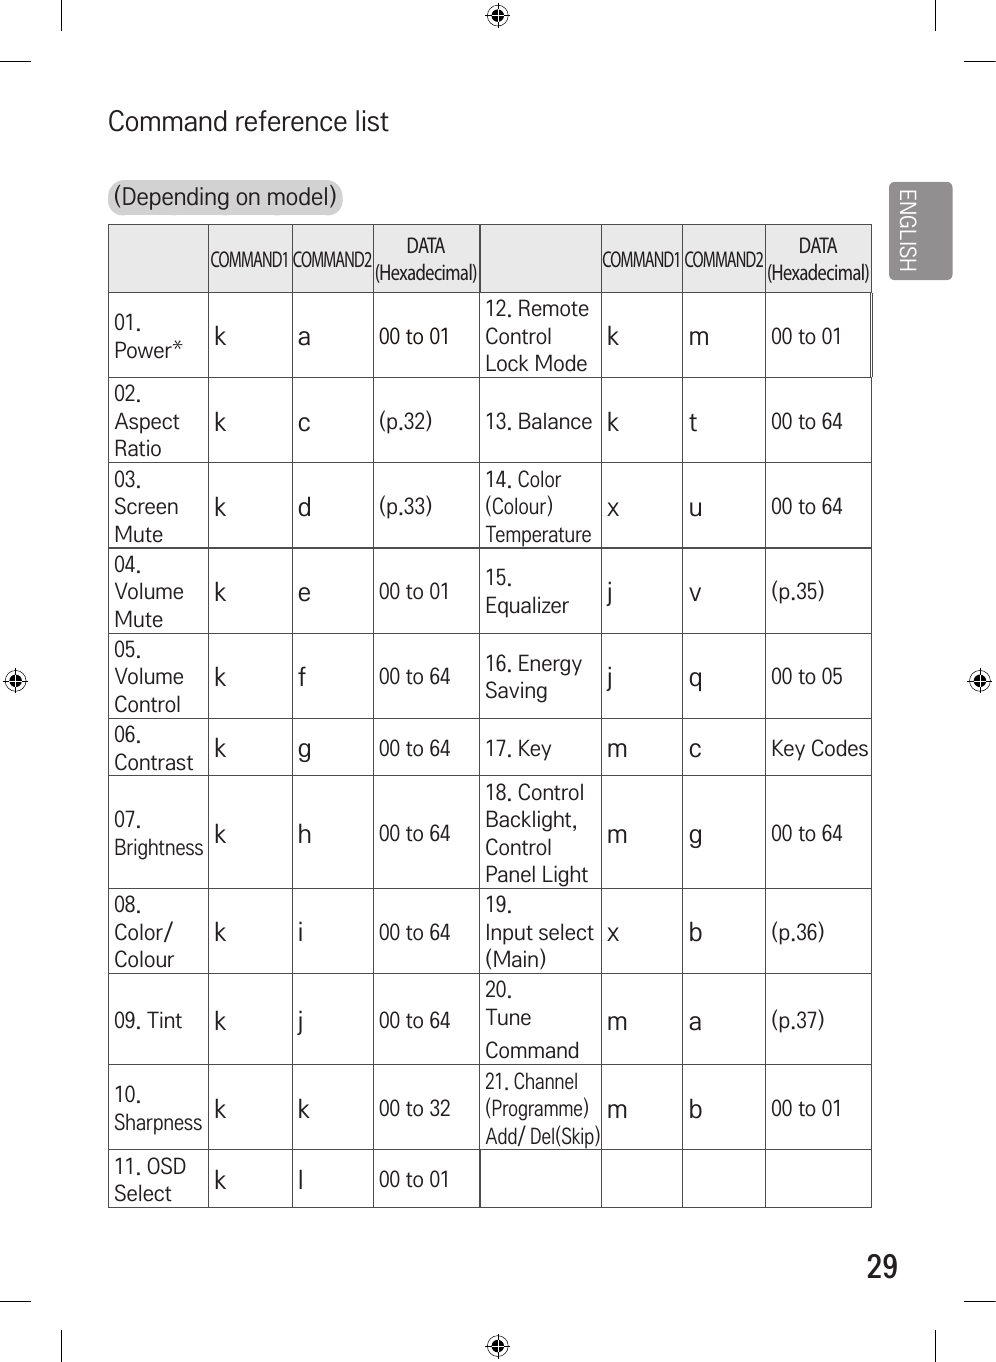
![ENGLISH3201. Power (Command: k a) ►To control Power *On or O of the set.Transmission[k][a][ ][Set ID][ ][Data][Cr]Data 00 : Power O 01 : *Power OnAck [a][ ][Set ID][ ][OK/NG][Data][x] ►To Show TV is Power On or *OTransmission [k][a][ ][Set ID][ ][FF][Cr]Ack [a][ ][Set ID][ ][OK][Data][x]* Similarly, if other functions transmit ‘FF’ data based on this format, Ac-knowledgement feedback presents status about each function.02. Aspect Ratio (Command: k c) (Main Picture Size) ►To adjust the screen format. (Main picture format) You can also adjust the screen format using the Aspect Ratio in the PICTURE menu.Transmission [k][c][ ][Set ID][ ][Data][Cr]Data 01 : Normal screen (4:3) (Just Scan O) 02 : Wide screen (16:9) (Just Scan O) 09 : Just Scan 06 : Original (Just Scan o)Ack [c][ ][Set ID][ ][OK/NG][Data][x]* Using the PC input, you select either 16:9 or 4:3 screen aspect ratio.* Commands may work differently depending on model and signal.](https://usermanual.wiki/LG-Electronics-USA/70UW340C/User-Guide-3174485-Page-32.png)
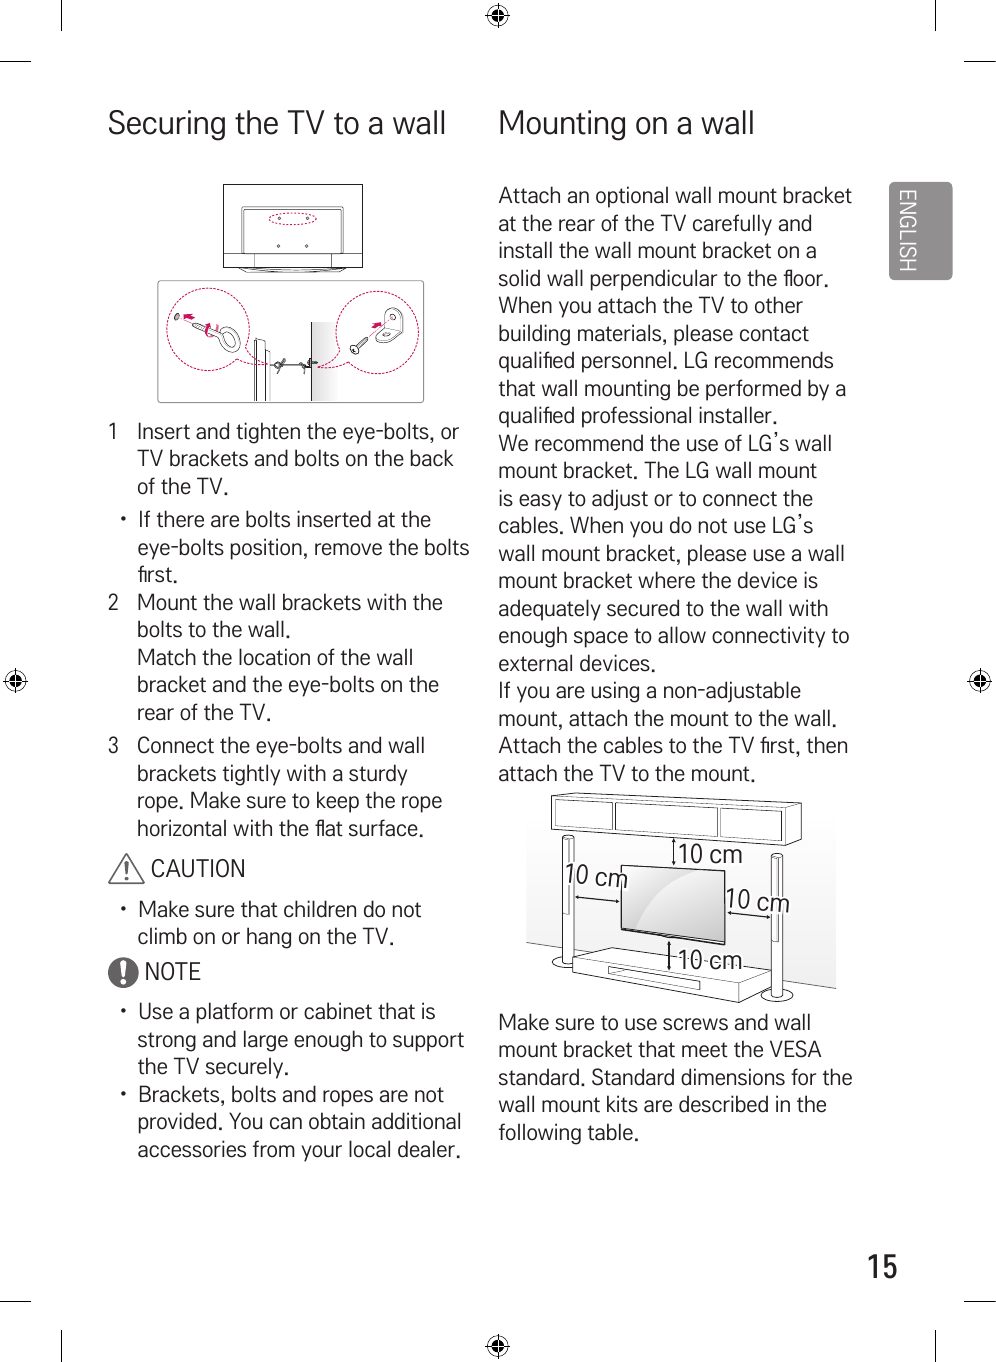
![ENGLISH3303. Screen Mute (Command: k d) ►To select screen mute on/o.Transmission [k][d][ ][Set ID][ ][Data][Cr]Data 00 : Screen mute o (Picture on) Video mute o 01 : Screen mute on (Picture o) 10 : Video mute onAck [d][ ][Set ID][ ][OK/NG][Data][x]* In case of video mute on only, TV will display On Screen Display(OSD). But, in case of Screen mute on, TV will not display OSD.04. Volume Mute (Command: k e) ►To control volume mute on/o. You can also adjust mute using the MUTE button on remote control.Transmission [k][e][ ][Set ID][ ][Data][Cr]Data 00 : Volume mute on (Volume o) 01 : Volume mute o (Volume on)Ack [e][ ][Set ID][ ][OK/NG][Data][x]05. Volume Control (Command: k f) ►To adjust volume. You can also adjust volume with the volume buttons on remote control.Transmission [k][f][ ][Set ID][ ][Data][Cr]Data Min : 00 to Max : 64Ack [f][ ][Set ID][ ][OK/NG][Data][x]06. Contrast (Command: k g) ►To adjust screen contrast. You can also adjust contrast in the PICTURE menu.Transmission [k][g][ ][Set ID][ ][Data][Cr]Data Min : 00 to Max : 64Ack [g][ ][Set ID][ ][OK/NG][Data][x]07. Brightness (Command: k h) ►To adjust screen brightness. You can also adjust brightness in the PICTURE menu.Transmission [k][h][ ][Set ID][ ][Data][Cr]Data Min : 00 to Max : 64Ack [h][ ][Set ID][ ][OK/NG][Data][x]](https://usermanual.wiki/LG-Electronics-USA/70UW340C/User-Guide-3174485-Page-33.png)
![ENGLISH3408. Color/Colour (Command: k i) ►To adjust the screen Color(Colour). You can also adjust colour in the PICTURE menu.Transmission [k][i][ ][Set ID][ ][Data][Cr]Data Min : 00 to Max : 64Ack [i][ ][Set ID][ ][OK/NG][Data][x]09. Tint (Command: k j) ►To adjust the screen tint. You can also adjust tint in the PIC-TURE menu.Transmission [k][j][ ][Set ID][ ][Data][Cr]Data Red : 00 to Green : 64Ack [j][ ][Set ID][ ][OK/NG][Data][x]10. Sharpness (Command: k k) ►To adjust the screen sharpness. You can also adjust sharpness in the PICTURE menu.Transmission [k][k][ ][Set ID][ ][Data][Cr]Data Min : 00 to Max : 32Ack [k][ ][Set ID][ ][OK/NG][Data][x]11. OSD Select (Command: k l) ►To select OSD (On Screen Display) on/o when controlling remotely.Transmission [k][l][ ][Set ID][ ][Data][Cr]Data 00 : OSD o 01 : OSD onAck [l][ ][Set ID][ ][OK/NG][Data][x]12. Remote control lock mode (Com-mand: k m) ►To lock the front panel controls on the monitor and remote control.Transmission [k][m][ ][Set ID][ ][Data][Cr]Data 00 : Lock o 01 : Lock onAck [m][ ][Set ID][ ][OK/NG][Data][x]* If you are not using the remote con-trol, use this mode. When main power is o & on (plug-o and plug-in, after 20 - 30 seconds), external control lock is released.* In the standby mode (DC o by o timer or ‘ka’, ‘mc’ command), and if key lock is on, TV will not turn on by power on key of IR & Local Key.](https://usermanual.wiki/LG-Electronics-USA/70UW340C/User-Guide-3174485-Page-34.png)
![ENGLISH3513. Balance (Command: k t) ►To adjust balance. You can also adjust balance in the AUDIO menu.Transmission [k][t][ ][Set ID][ ][Data][Cr]Data Min : 00 to Max : 64Ack [t][ ][Set ID][ ][OK/NG][Data][x]14. Color(Colour) Temperature (Com-mand: x u) ►To adjust colour temperature. You can also adjust Color(Colour) Tem-perature in the PICTURE menu.Transmission [x][u][ ][Set ID][ ][Data][Cr]Data Min : 00 to Max : 64Ack [u][ ][Set ID][ ][OK/NG][Data][x]15. Equalizer (Command : j v) ►Adjust EQ of the set.Transmission [j][v][ ][Set ID][ ][Data][Cr]0 0 0 0 0 0 0 0MSBFrequency DataLSB765Frequ- ency4 3 2 1 0Step0 0 01st Band0 0 0 0 00(de- cimal)0012nd Band0 0 0 0 11(de- cimal)0103rd Band... ... ... ... ......0 1 14th Band1 0 0 1 119(de- cimal)1 0 05th Band1 0 1 0 120(de- cimal)Ack [v][ ][Set ID][ ][OK/NG][Data][x]* It depends on model, and can adjust when sound mode is EQ adjustable value.](https://usermanual.wiki/LG-Electronics-USA/70UW340C/User-Guide-3174485-Page-35.png)
![ENGLISH3616. Energy Saving (Command: j q) ►To reduce the power consumption of the TV. You can also adjust Energy Saving in PICTURE menu.Transmission [j][q][ ][Set ID][ ][Data][Cr]Data 00 : O 01 : Minimum 02 : Medium 03 : Maximum 04 : Auto (For LCD TV / LED TV) / Intelligent sensor (For PDP TV) 05 : Screen o* (Depending on model)Ack [q][ ][Set ID][ ][OK/NG][Data][x]17. Key (Command: m c) ►To send IR remote key code.Transmission [m][c][ ][Set ID][ ][Data][Cr]Data Key code -p.25Ack [c][ ][Set ID][ ][OK/NG][Data][x]18. Control Backlight, Control Panel Light (Command: m g)For LCD TV / LED TV ►To control the backlight.Transmission [m][g][ ][Set ID][ ][Data][Cr]Data Min : 00 to Max : 64Ack [g][ ][Set ID][ ][OK/NG][Data][x]19. Input select (Command: x b) (Main Picture Input) ►To select input source for main picture.Transmission [x][b][ ][Set ID][ ][Data][Cr]Data 00 : DTV 02 : Satellite DTV ISDB-BS (Japan) 03 : ISDB-CS1 (Japan) 04 : ISDB-CS2 (Japan) 11 : CATV01 : CADTV10 : ATV 20 : AV or AV1 21 : AV2 40 : Component1 60 : RGB41 : Component2 90 : HDMI1 92 : HDMI391 : HDMI293 : HDMI4Ack [b][ ][Set ID][ ][OK/NG][Data][x]* This function depends on model and signal.](https://usermanual.wiki/LG-Electronics-USA/70UW340C/User-Guide-3174485-Page-36.png)
![ENGLISH3720. Tune Command (Command: m a)* This command may work dierently depending on model and signal.• For Europe, Mid-East, Colombia, Asia except South Korea and Japan Model ►Select channel to following physical number.Transmission [m][a][ ][Set ID][ ][Data 00][ ][Data 01][ ][Data 02][Cr]* Analog Antenna/Cable[Data 00][Data 01] Channel DataData 00 : High byte channel dataData 01 : Low byte channel data - 00 00 ~ 00 C7 (Decimal : 0 ~ 199)Data 02 : Input Source (Analog) - 00 : Antenna TV (ATV) - 80 : Cable TV (CATV)* Digital Antenna/Cable/Satellite[Data 00][Data 01]: Channel DataData 00 : High Channel dataData 01 : Low Channel data - 00 00 ~ 27 0F (Decimal: 0 ~ 9999)Data 02 : Input Source (Digital) - 10 : Antenna TV (DTV) - 20 : Antenna Radio (Radio) - 40 : Satellite TV (SDTV) - 50 : Satellite Radio (S-Radio) - 90 : Cable TV (CADTV) - a0 : Cable Radio (CA-Radio)* Tune Command Examples:1. Tune to the Analog antenna (PAL) Channel 10. Set ID = All = 00 Data 00 & 01 = Channel Data is 10 = 00 0a Data 02 = Analog Antenna TV = 00 Result = ma 00 00 0a 002. Tune to the digital antenna (DVB-T) Channel 01. Set ID = All = 00 Data 00 & 01 = Channel Data is 1 = 00 01 Data 02 = Digital Antenna TV = 10 Result = ma 00 00 01 103. Tune to the satellite (DVB-S) Channel 1000. Set ID = All = 00 Data 00 & 01 = Channel Data is 1000 = 03 E8 Data 02 = Digital Satellite TV = 40 Result = ma 00 03 E8 40Ack [a][ ][Set ID][ ][OK][Data 00][Data 01][Data 02][x][a][ ][Set ID] [ ][NG][Data 00][x]](https://usermanual.wiki/LG-Electronics-USA/70UW340C/User-Guide-3174485-Page-37.png)
![ENGLISH38• For South Korea, North/Latin America except Colombia Model ►To tune channel to following physi-cal/major/minor number.Transmission [m][a][ ][0][ ][Data00][ ][Data01][ ][Data02][ ][Data03][ ][Data04][ ][Data05][Cr]Digital channels have a Physical, Major, and Minor channel number. The Physical number is the actual digital channel number, the Major is the num-ber that the channel should be mapped to, and the Minor is the sub-channel. Since the ATSC tuner automatically maps the channel from the Major / Minor number, the Physical number is not required when sending a command in Digital.* Analog Antenna/CableData 00 : Physical Channel Number - Antenna (ATV) : 02~45 (Decimal: 2 ~ 69) - Cable (CATV) : 01, 0E~7D (Decimal : 1, 14~125)[Data 01 ~ 04]: Major/Minor Channel NumberData 01 & 02: xx (Don’t care)Data 03 & 04: xx (Don’t care)Data 05: Input Source (Analog) - 00 : Antenna TV (ATV) - 01 : Cable TV (CATV)* Digital Antenna/CableData 00 : xx (Don’t care)[Data 01][Data 02]: Major Channel NumberData 01 : High byte Channel DataData 02 : Low byte Channel Data - 00 01 ~ 27 0F (Decimal: 1 ~ 9999)[Data 03][Data 04]: Minor Channel NumberData 03 : High byte Channel DataData 04 : Low byte Channel DataData 05 : Input Source (Digital) - 02 : Antenna TV (DTV) – Use Physi-cal Channel Number - 06 : Cable TV (CADTV) – Use Physi-cal Channel Number - 22 : Antenna TV (DTV) – Don’t Use Physical Channel Number - 26 : Cable TV (CADTV) - Don’t Use Physical Channel Number - 46 : Cable TV (CADTV) – Use Physi-cal/Major Channel Number Only (One Part Channel) - 66 : Cable TV (CADTV) – Use Major Channel Number Only (One Part Chan-nel)Two bytes are available for each major and minor channel data, but usually the low byte is used alone (high byte is 0).](https://usermanual.wiki/LG-Electronics-USA/70UW340C/User-Guide-3174485-Page-38.png)
![ENGLISH39* Tune Command Examples:1. Tune to the Analog cable (NTSC) channel 35. Set ID = All = 00 Data 00 = Channel Data is 35 = 23 Data 01 & 02 = No Major = 00 00 Data 03 & 04 = No Minor = 00 00 Data 05 = Analog Cable TV = 01 Total = ma 00 23 00 00 00 00 012. Tune to the digital antenna (ATSC) channel 30-3. Set ID = All = 00 Data 00 = Don’t know Physical = 00 Data 01 & 02 = Major is 30 = 00 1E Data 03 & 04 = Minor is 3 = 00 03 Data 05 = Digital Antenna TV = 22 Total = ma 00 00 00 1E 00 03 22Ack [a][ ][Set ID][ ][OK][Data 00][Data 01][Data 02][Data 03][Data 04][Data 05][x][a][ ][Set ID][ ] [NG][Data 00][x]• For Japan Model ►To tune channel to following physi-cal/major/minor number.Transmission [m][a][ ][0][ ][Data00][ ][Data01][ ][Data02][ ] [Data03][ ][Data04][ ][Data05][Cr]* Digital Antenna/SatelliteData 00 : xx (Don’t care)[Data 01][Data 02]: Major Channel NumberData 01 : High byte Channel DataData 02 : Low byte Channel Data - 00 01 ~ 27 0F (Decimal: 1 ~ 9999)[Data 03][Data 04]: Minor/Branch Channel Number (Don’t care in Sat-ellite)Data 03 : High byte Channel DataData 04 : Low byte Channel DataData 05 : Input Source (Digital/Satellite for Japan) - 02 : Antenna TV (DTV) - 07 : BS (Broadcasting Satellite) - 08 : CS1 (Communication Satellite 1) - 09 : CS2 (Communication Satellite 2)](https://usermanual.wiki/LG-Electronics-USA/70UW340C/User-Guide-3174485-Page-39.png)
![ENGLISH40* Tune Command Examples:1 Tune to the digital antenna (ISDB-T) channel 17-1. Set ID = All = 00 Data 00 = Don’t know Physical = 00 Data 01 & 02 = Major is 17 = 00 11 Data 03 & 04 = Minor/Branch is 1 = 00 01 Data 05 = Digital Antenna TV = 02 Total = ma 00 00 00 11 00 01 022. Tune to the BS (ISDB-BS) channel 30. Set ID = All = 00 Data 00 = Don’t know Physical = 00 Data 01 & 02 = Major is 30 = 00 1E Data 03 & 04 = Don’t Care = 00 00 Data 05 = Digital BS TV = 07 Total = ma 00 00 00 1E 00 00 07* This feature is varied based on the model.Ack [a][ ][Set ID][ ][OK][Data 00][Data 01][Data 02][Data 03][Data 04][Data 05][x][a][ ][Set ID][ ] [NG][Data 00][x]21. Channel(Programme) Add/Del(Skip) (Command: m b) ►To skip current channel(programme) for next time.Transmission [m][b][ ][Set ID][ ][Data][Cr]Data 00 : Del(ATSC,ISDB)/Skip(DVB)01 : AddAck [b][ ][Set ID][ ][OK/NG][Data][x]Set the saved channel status to del(ATSC, ISDB)/ skip(DVB) or add.](https://usermanual.wiki/LG-Electronics-USA/70UW340C/User-Guide-3174485-Page-40.png)