LG Electronics USA 9QK-HW904PA Wireless DVD Receiver User Manual HW994SJ AHP BUSAJJK
LG Electronics USA Wireless DVD Receiver HW994SJ AHP BUSAJJK
UserManual.wiki
>
LG Electronics USA
>
9QK-HW904PA User Manual
>
User Manual
Contents
1.
User Manual HW964TZ Rev 02
2.
User Manual HW904PA Rev 02
3.
User Manual
User Manual
Navigation menu
Upload a User Manual
Namespaces
Wiki Guide
HTML
PDF
Info
Views
User Manual
Discussion / Help
Navigation
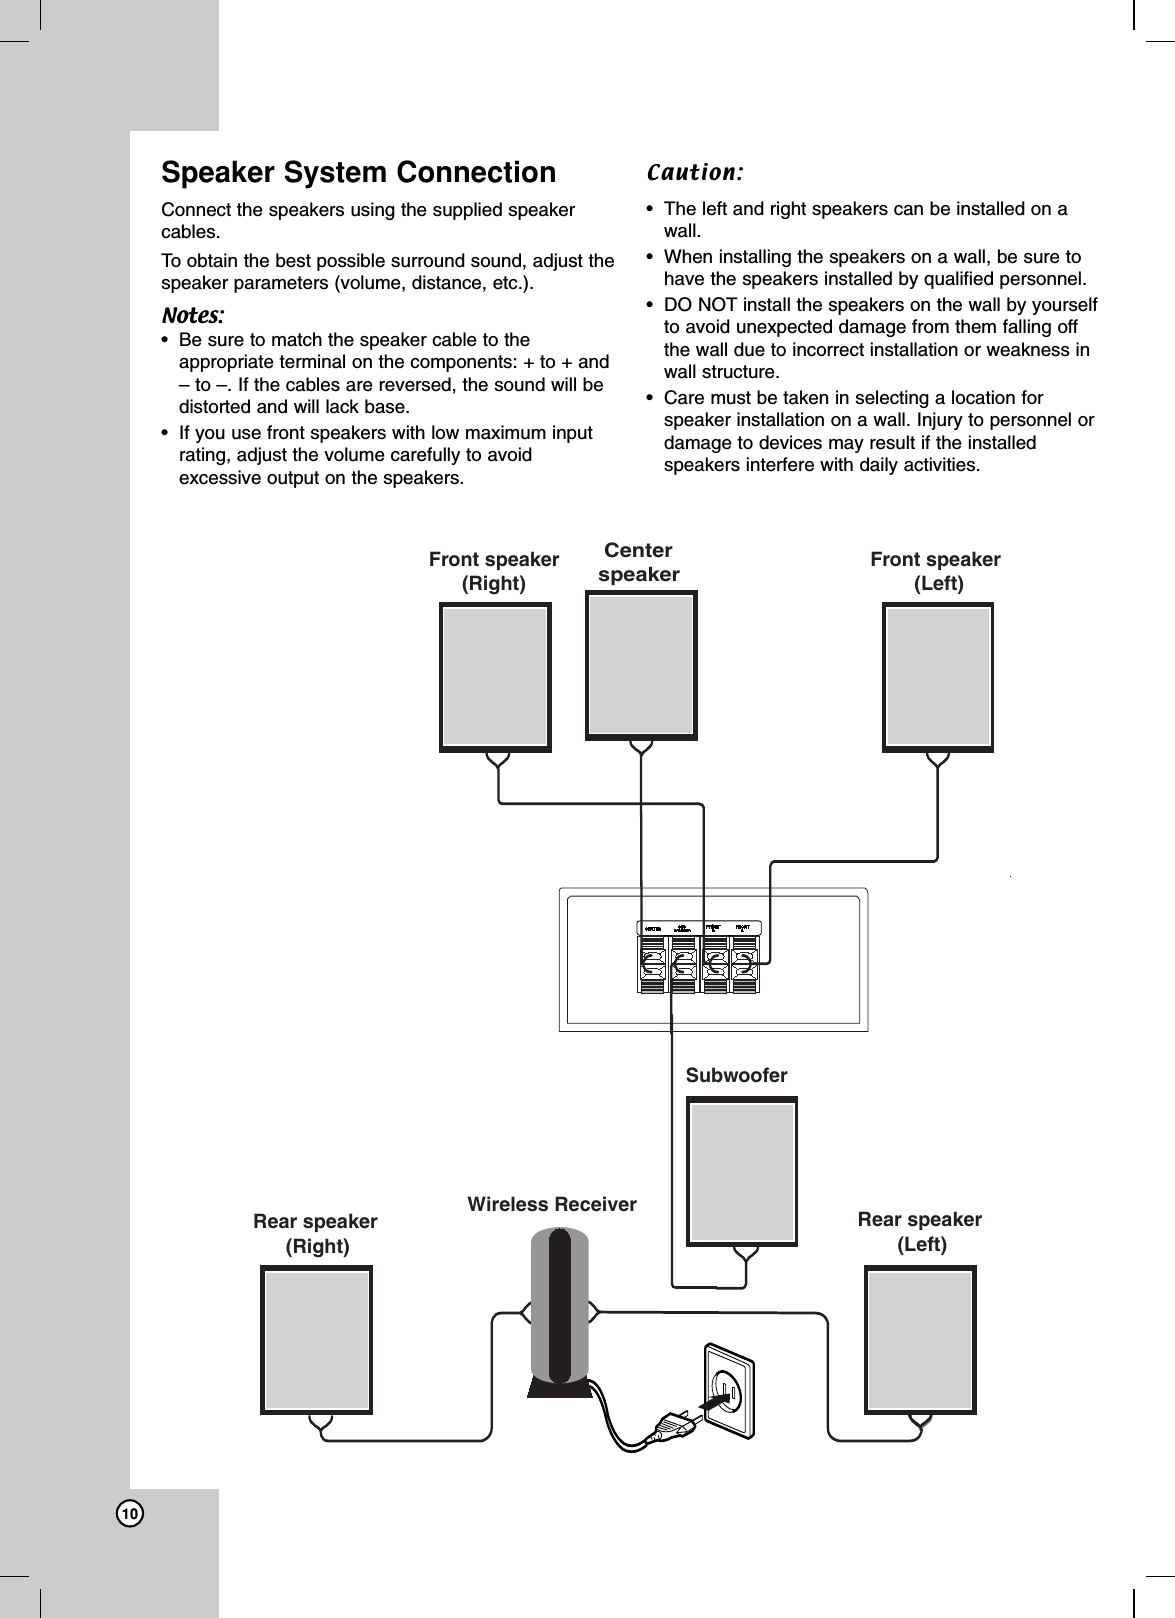
![TH-G51JConsists of XV-THG51, SP-THG51F, SP-THG61C, SP-THG50W and RX-THG51DVD DIGITAL THEATER SYSTEMINSTRUCTIONSFor Customer Use:Enter below the Model No. andSerial No. which are located onthe rear of cabinet. Retain thisinformation for future reference.Model No.Serial No.LVT2054-001A[J]HW994SJ-AHP_BUSAJJKTUNING TUNINGiPod is a trademark of Apple Inc., registered in the U.S. and other countries.](https://usermanual.wiki/LG-Electronics-USA/9QK-HW904PA.User-Manual/User-Guide-1094350-Page-1.png)

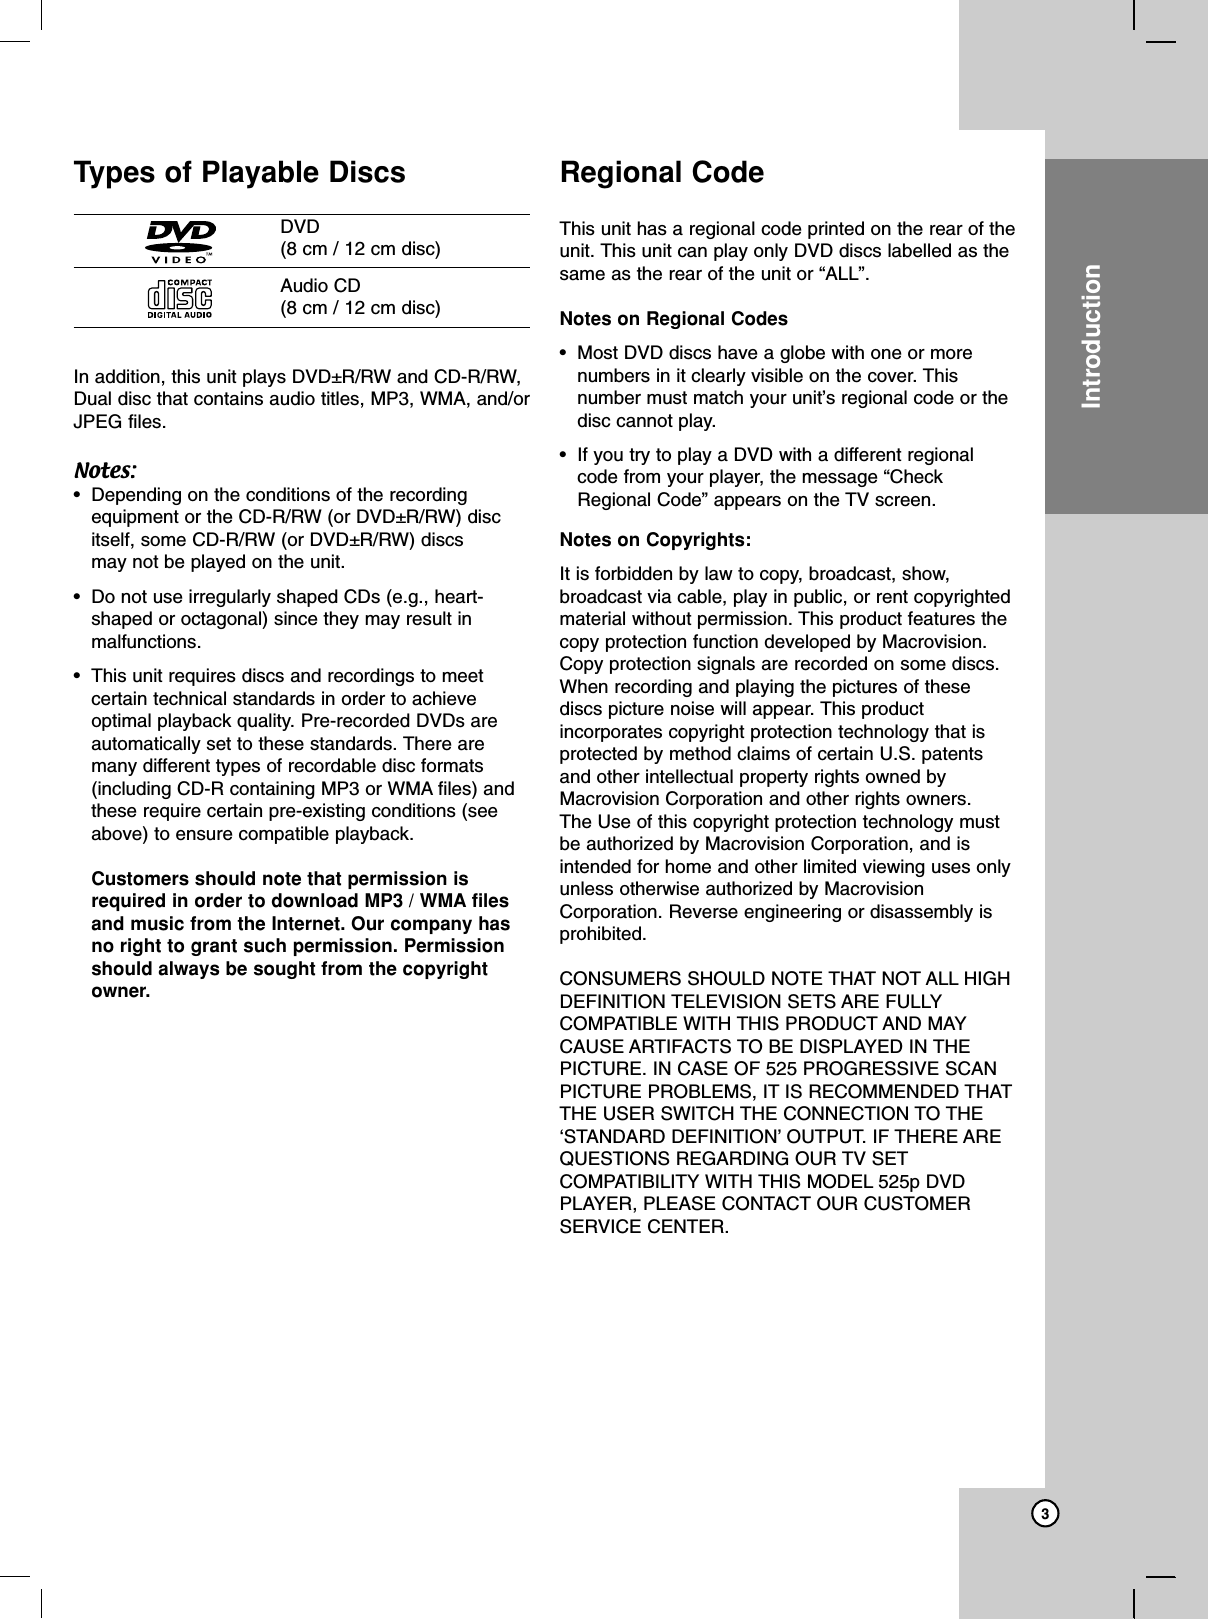
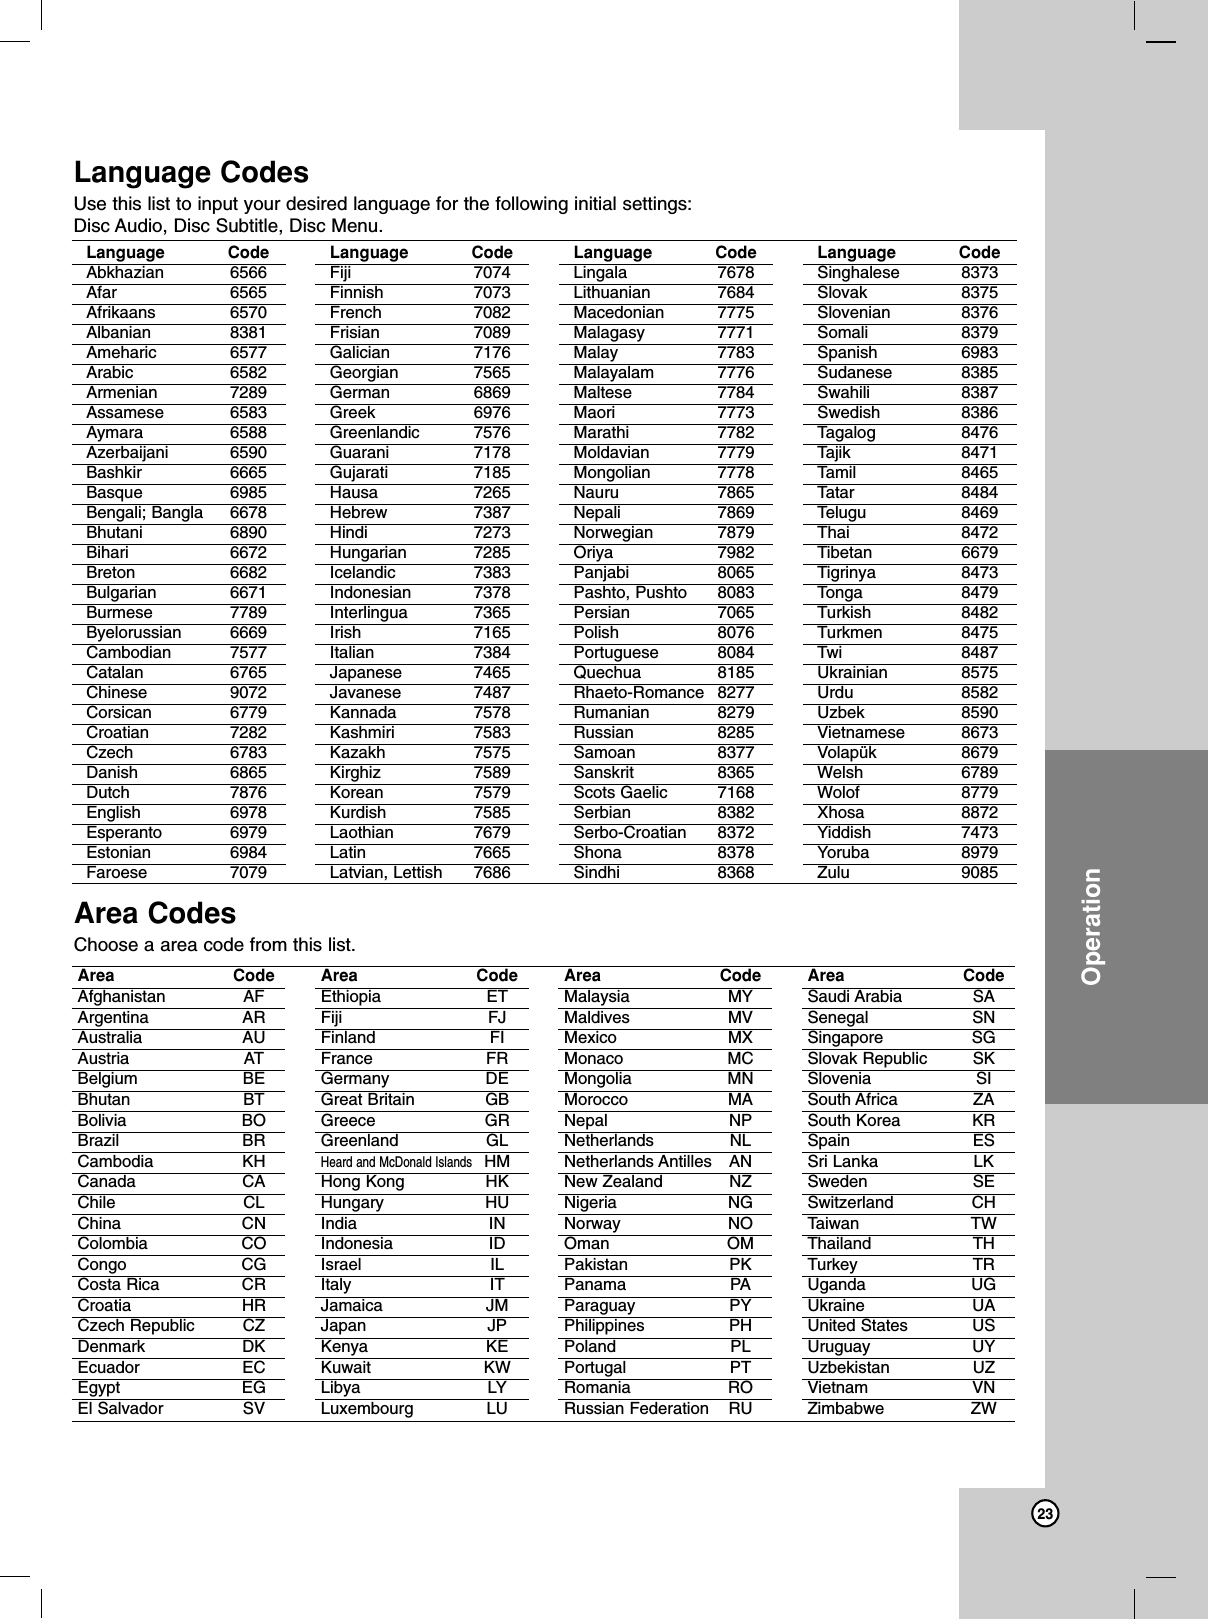
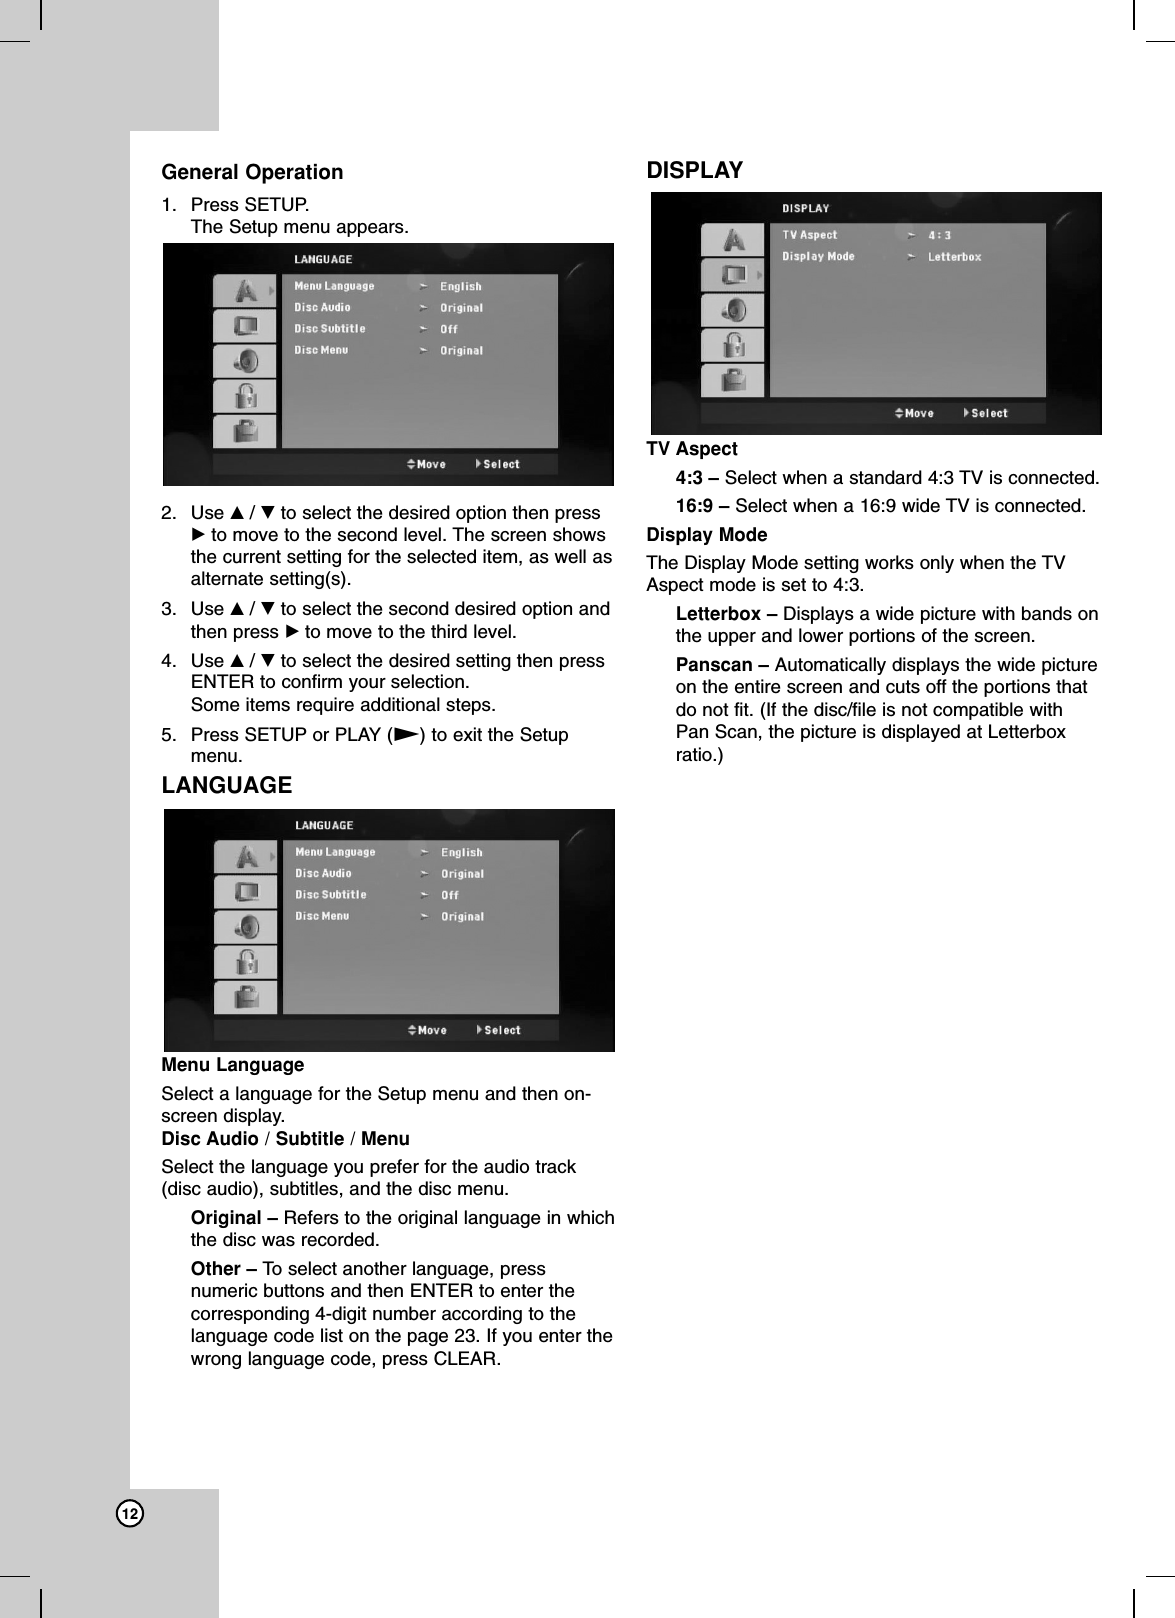
![Operation Reference Introduction11Installation and SetupDisplaying Disc Information on-screenYou can display various information about the discloaded on-screen. 1. Press DISPLAY to show various playbackinformation.The displayed items differ depending on the disctype or playing status. 2. You can select an item by pressing v/ Vandchange or select the setting by pressing b/ B.Title – Current title number/ total number oftitles.Chapter – Current chapter number/total numberof chapters. Time – Elapsed playing time. Audio – Selected audio language or channel. Subtitle – Selected subtitle. Angle – Selected angle/total number of angles. Sound – Selected sound mode. Note:If any button is not pressed for a few seconds, the on-screen display disappears.Initial SettingsBy using the Setup menu, you can make variousadjustments to items such as picture and sound. You can also set a language for the subtitles and theSetup menu, among other things. For details on eachSetup menu item, see pages 11 to 14.OSD Initial language settings:When the POWER is turned on for the first time, theunit need to set the menu language. Follow thedescriptions below after the display connections. AfterOSD Initial language setting, to set Area code (seepage 14)1. Press POWER to turn the unit on. The languagesetup menu will appear on the screen.2. Use b/ B/ v/ Vto select a language then pressENTER. The confirm menu will appear.3. Use b/ Bto select the [Enter] then press ENTERto finish the language setup.To display and exit the Menu:Press SETUP to display the menu. A second press ofSETUP will take you back to initial screen.To go to the next level: Press Bon the remote control. To go back to the previous level:Press bon the remote control.](https://usermanual.wiki/LG-Electronics-USA/9QK-HW904PA.User-Manual/User-Guide-1094350-Page-15.png)
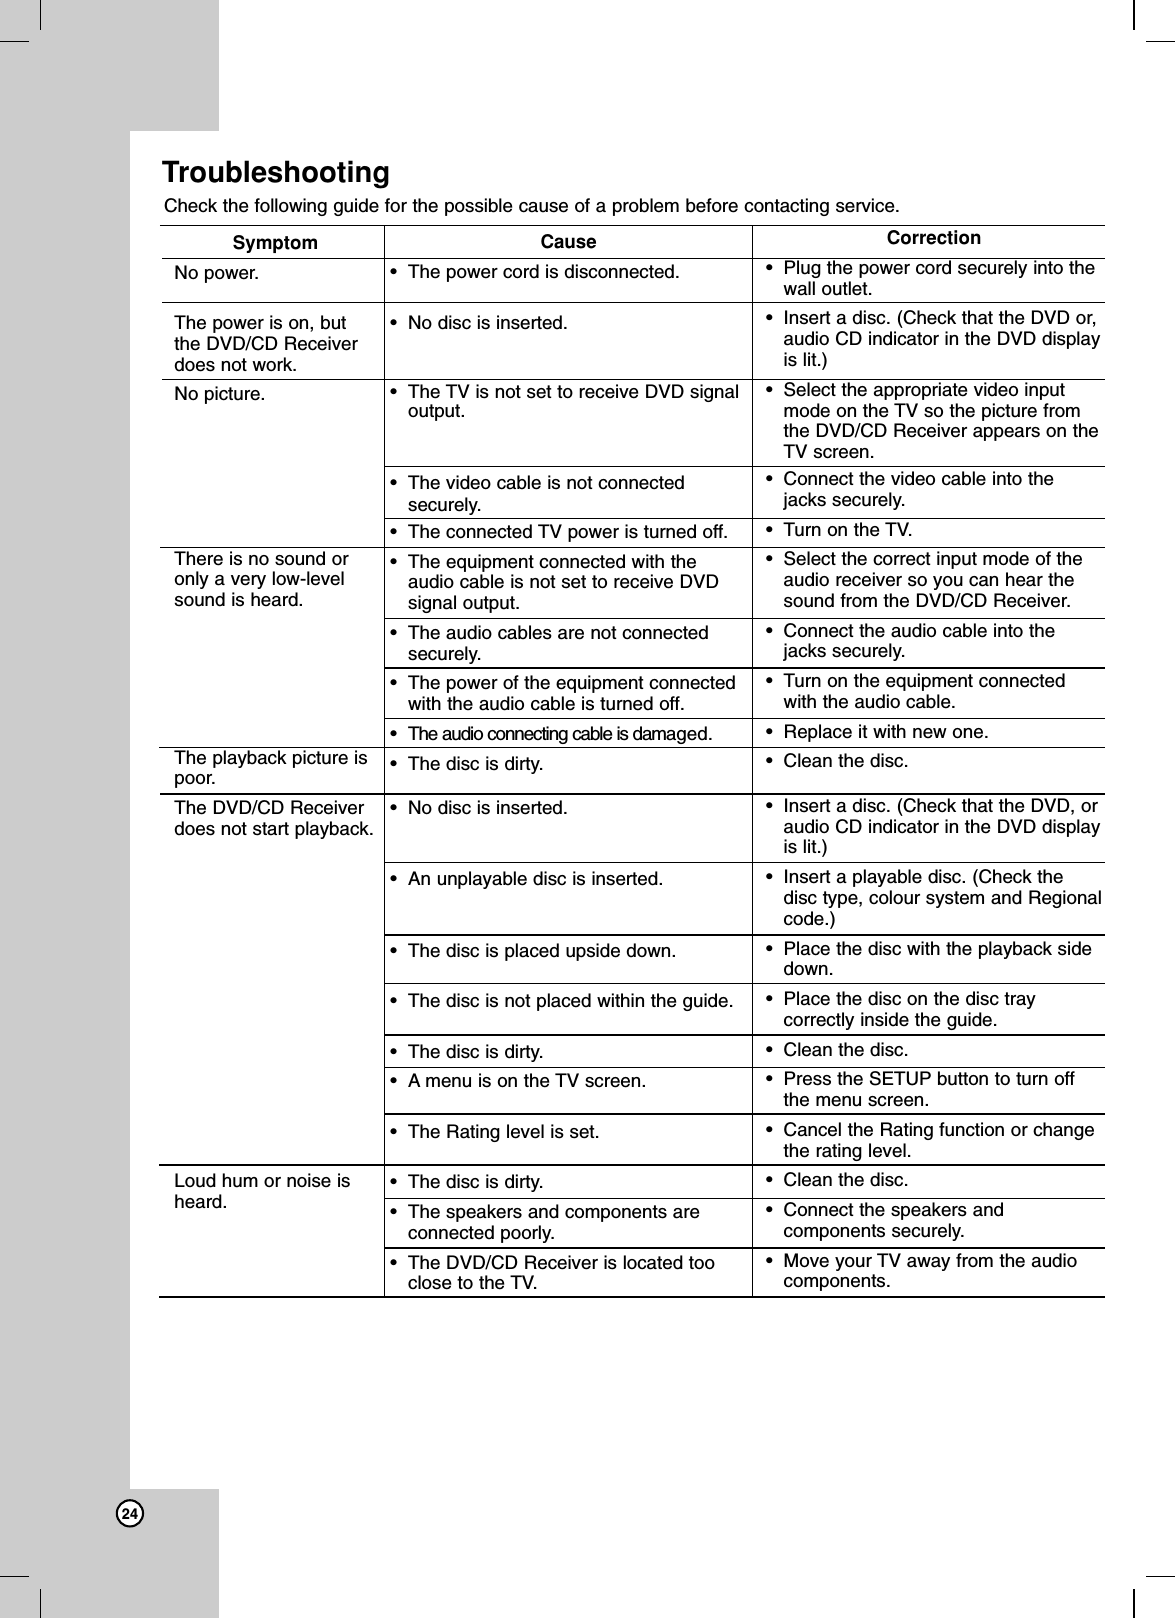
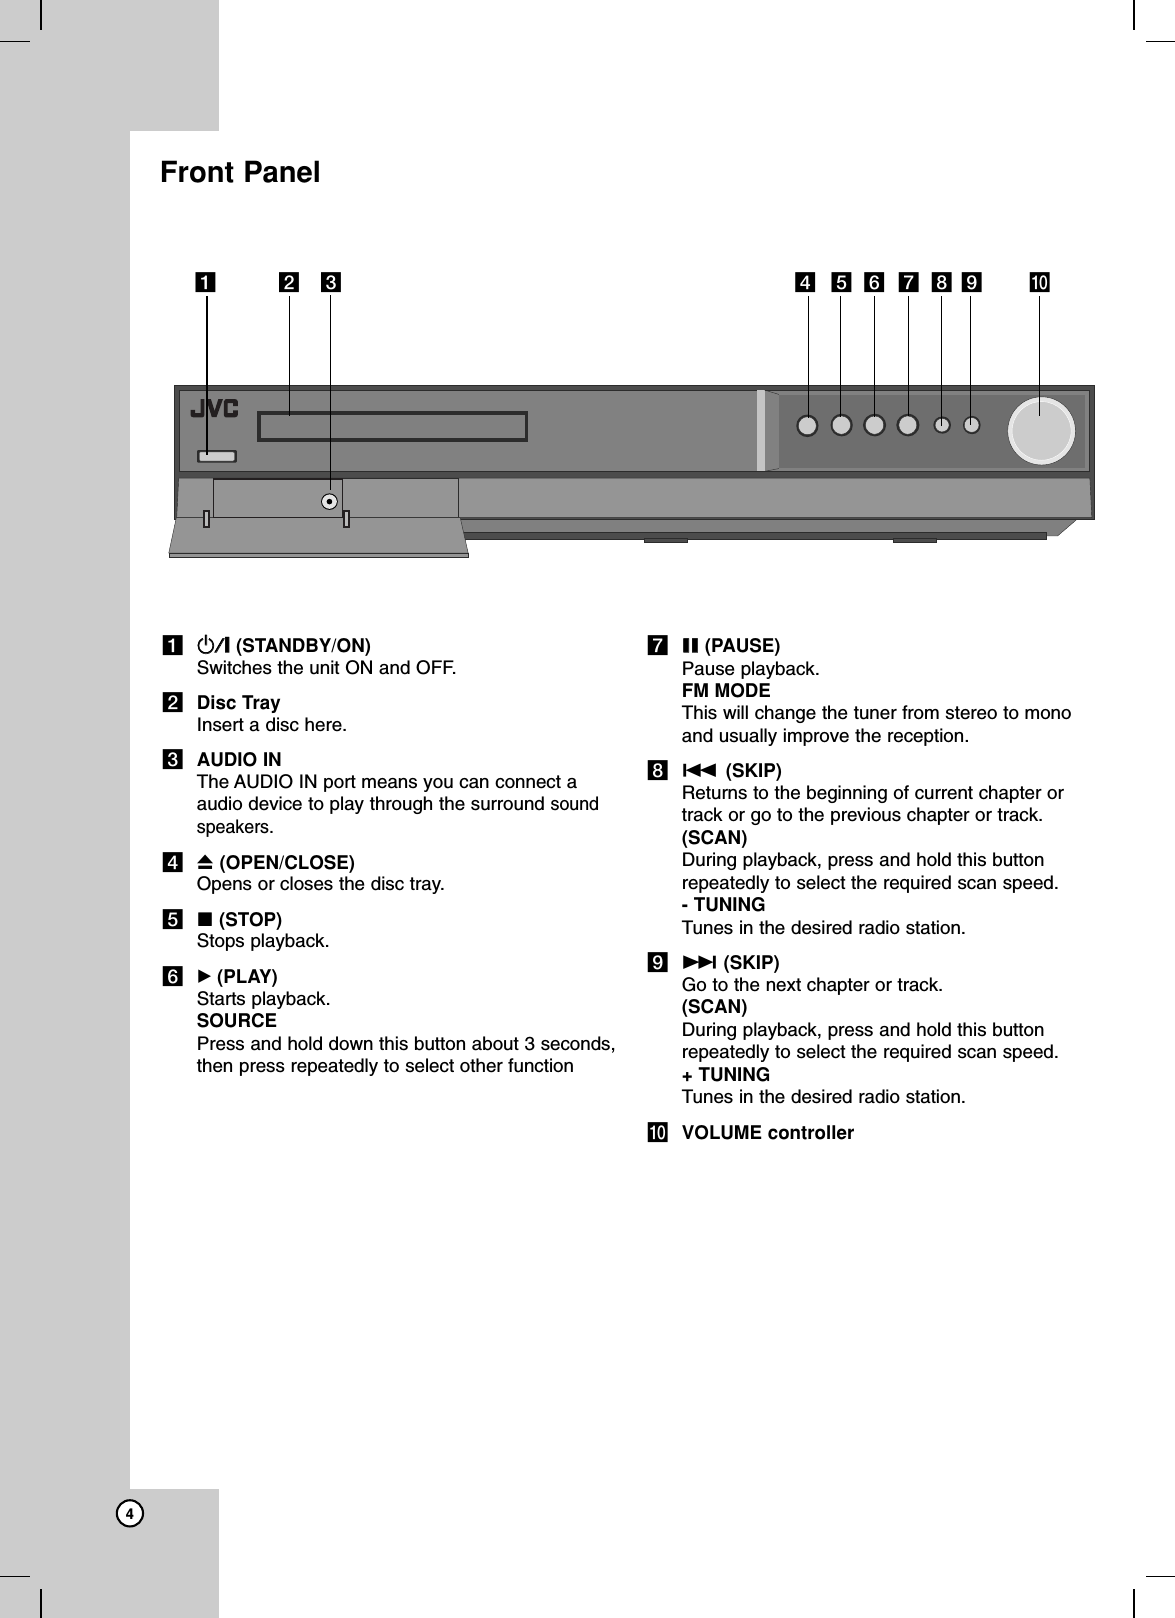
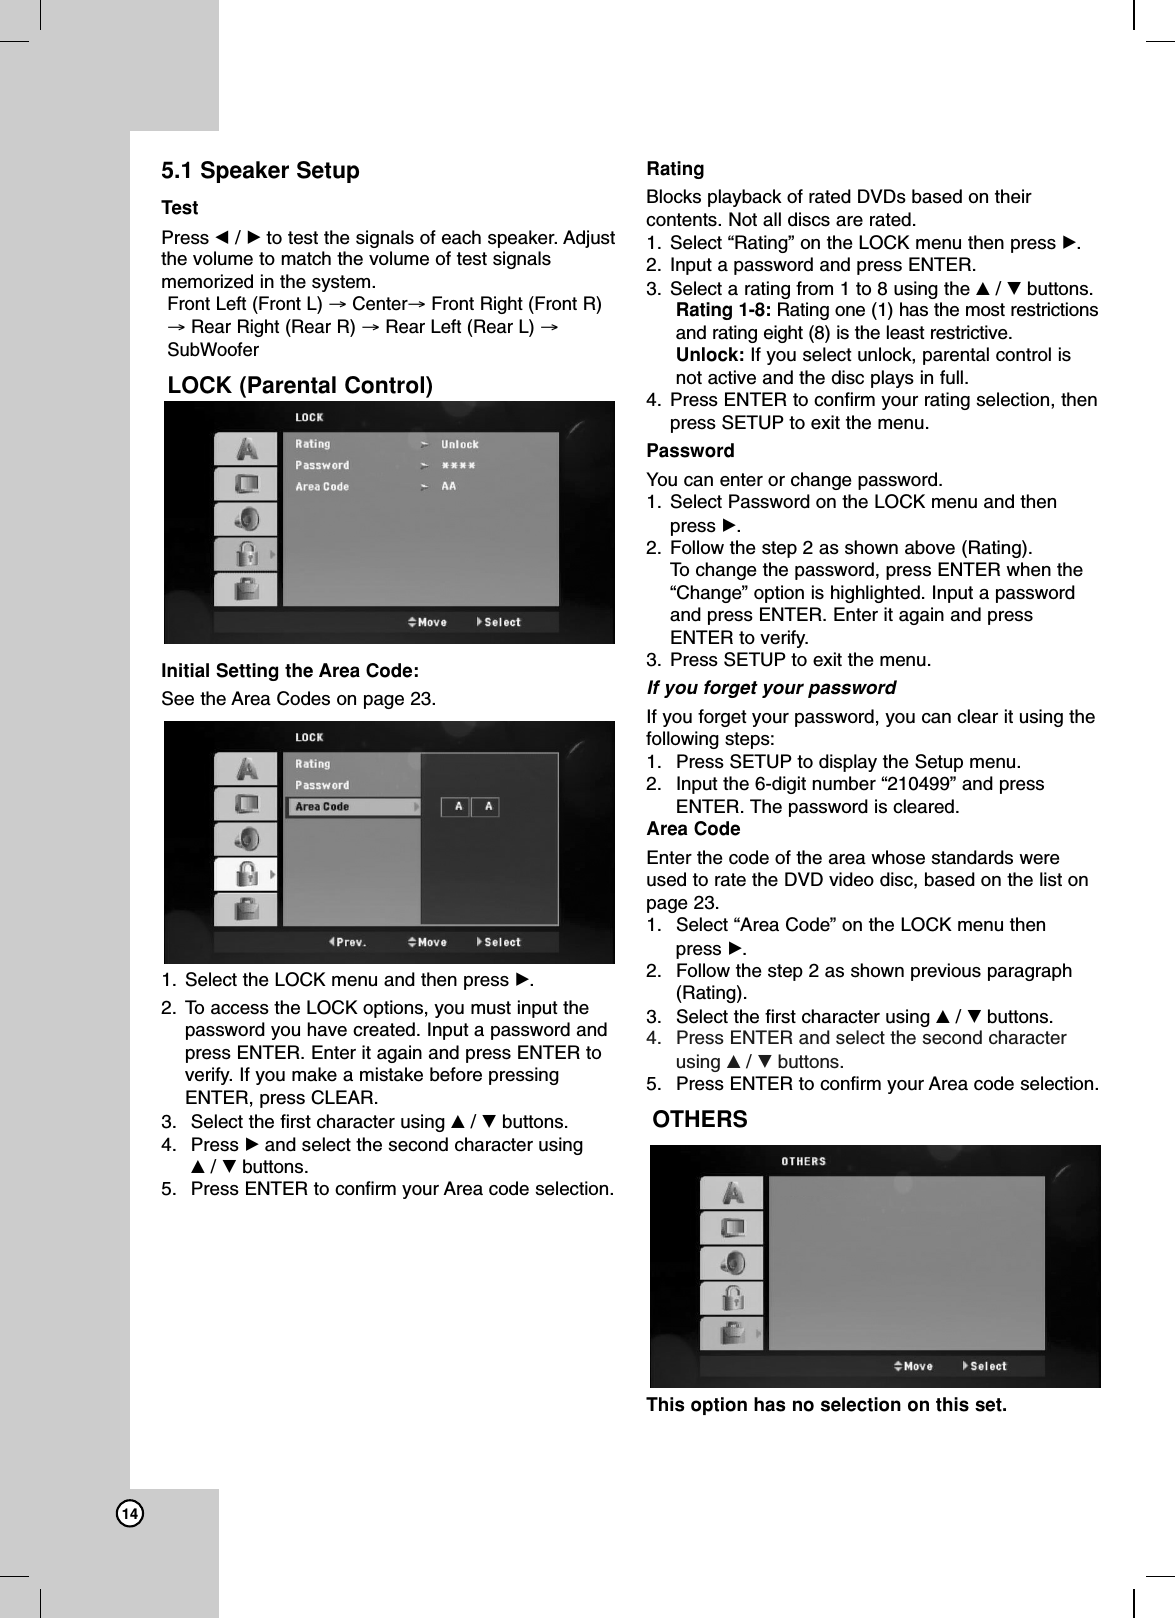
![Operation Reference Introduction13Installation and SetupAUDIOEach DVD disc has a variety of audio output options.Set the player’s AUDIO options according to the typeof audio system you use. Dynamic Range Control (DRC)With the DVD*1format, you can hear a program’ssoundtrack in the most accurate and realisticpresentation, thanks to digital audio technology.However, you may wish to compress the dynamicrange of the audio output (the difference between theloudest sounds and the quietest ones). Then, you maylisten to a movie at a lower volume without losingclarity of sound. Set DRC to On for this effect.*1: Dolby Digital onlyVocalSet Vocal to On only when a multi-channel karaokeDVD is playing. The karaoke channels on the disc willmix into normal stereo sound.HD AV Sync When using Digital TV. Sometimes AV signal could not be transmittedsimultaneously because of later transmission of videosignal compared to audio signal. Because it takes some time to convert analogue videosignal to digital one in the Digital TV. And It means that you may not enjoy picture on thescreen and sound from speaker at the same timeeven though it is one scene.In the HD AV Sync menu, you could adjust delay timeto audio signal for simultaneous AV signaltransmissionDelay time could be set up with 10msec unit. (0 ~ 300ms)Delay time is different according to each TV Brand.So you need to adjust optimal delay time complyingwith your TV.5.1 Speaker SetupMake the following settings for the built-in 5.1 channelsurround decoder.1. Press ENTER, and the 5.1 Speaker Setup menuappears.2. Use b/Bto select the desired speaker.3. Adjust options using v/V/b/Bbuttons.4. Press ENTER to confirm your selection. Returns tothe previous menu.Speaker selectionSelect a speaker that you want to adjust. [Frontspeaker (Front L), Front speaker (Front R), CenterSpeaker (Center), Subwoofer (SubWoofer), Rearspeaker (Rear L), Rear speaker (Rear R)]Note:Certain speaker settings are prohibited by the DolbyDigital licensing agreement.SizeSince the speaker settings are fixed, you cannotchange the settings.VolumePress b/Bto adjust the output level of the selectedspeaker. (-5dB ~ 5dB)DistanceAfter you connected speakers to your DVD Receiver,set the Distance between the speakers and yourlistening point if the distance of Center or Rearspeakers is bigger than the distance of Frontspeakers. This allows the sound from each speaker toreach the listener at the same time. Press b/Bto adjust the Distance of the selectedspeaker. This distance is equivalent to a difference ofthe distance between Center or Rear speaker andFront speakers.Note:You can’t adjust Front/Woofer speakers.The distance of Front speaker is considered to be thestandard.](https://usermanual.wiki/LG-Electronics-USA/9QK-HW904PA.User-Manual/User-Guide-1094350-Page-17.png)

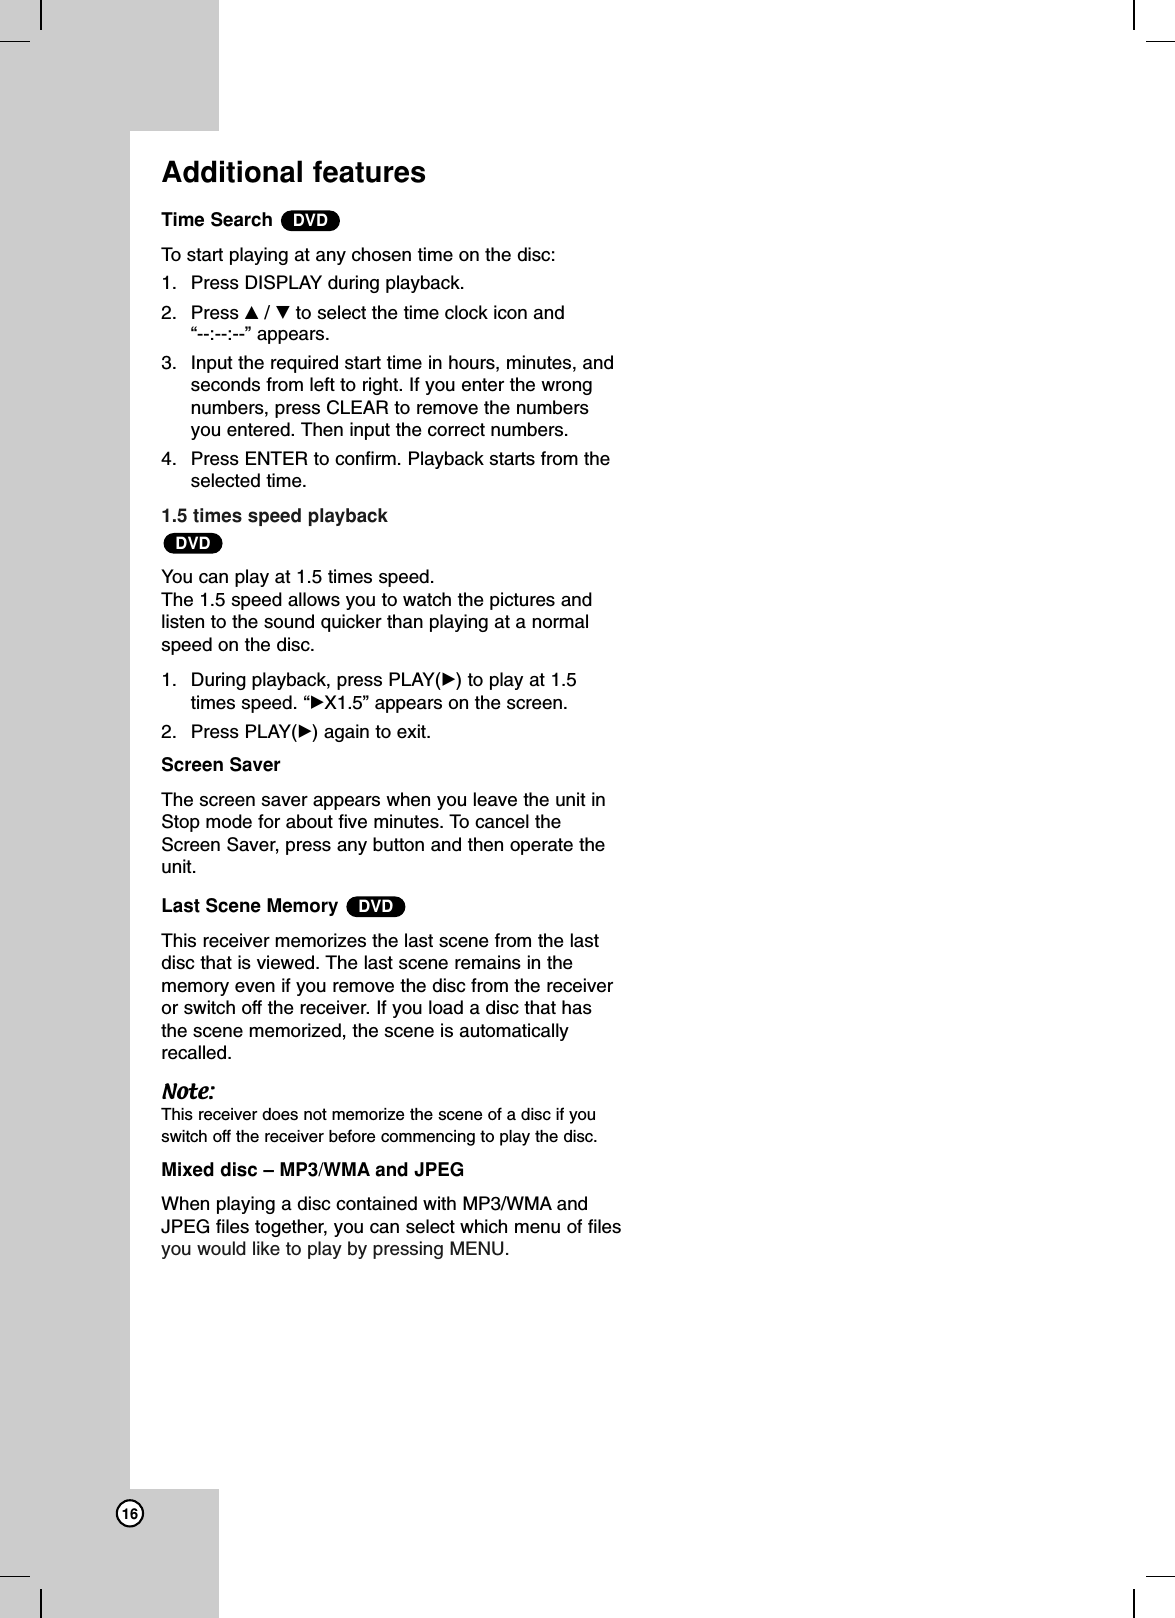
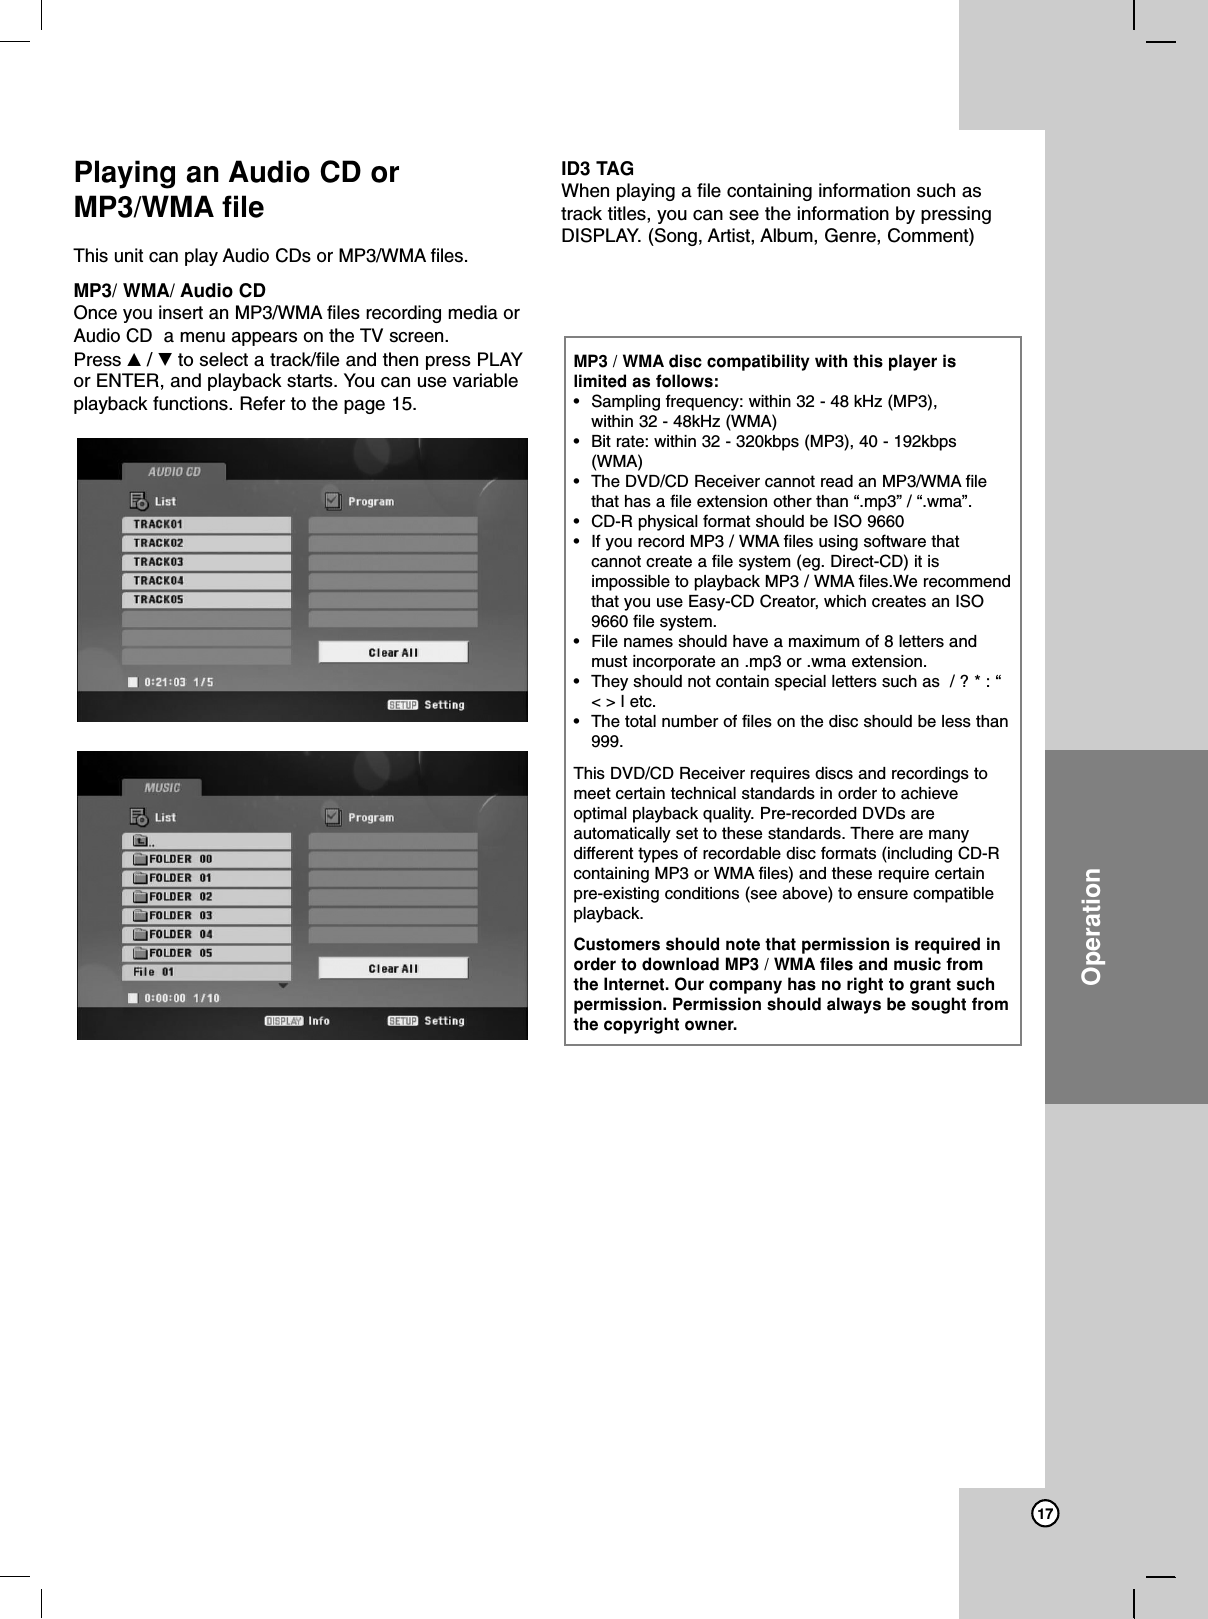
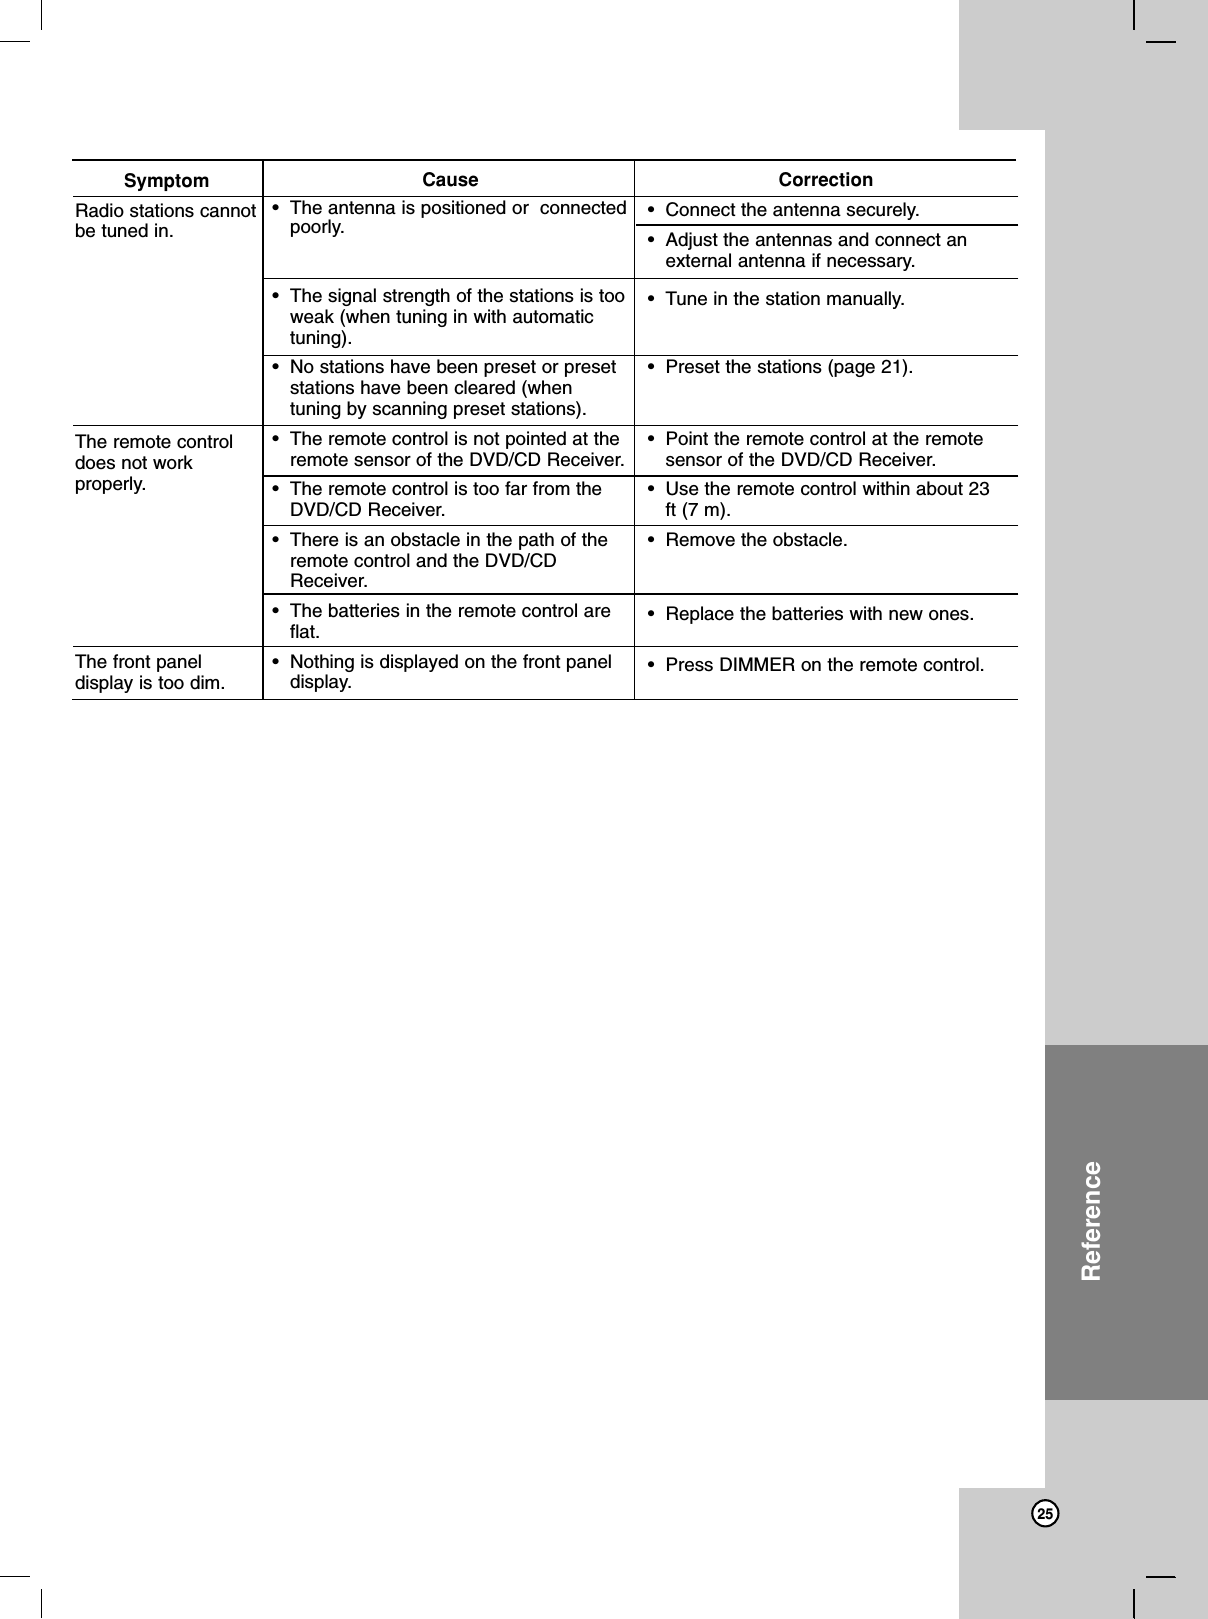
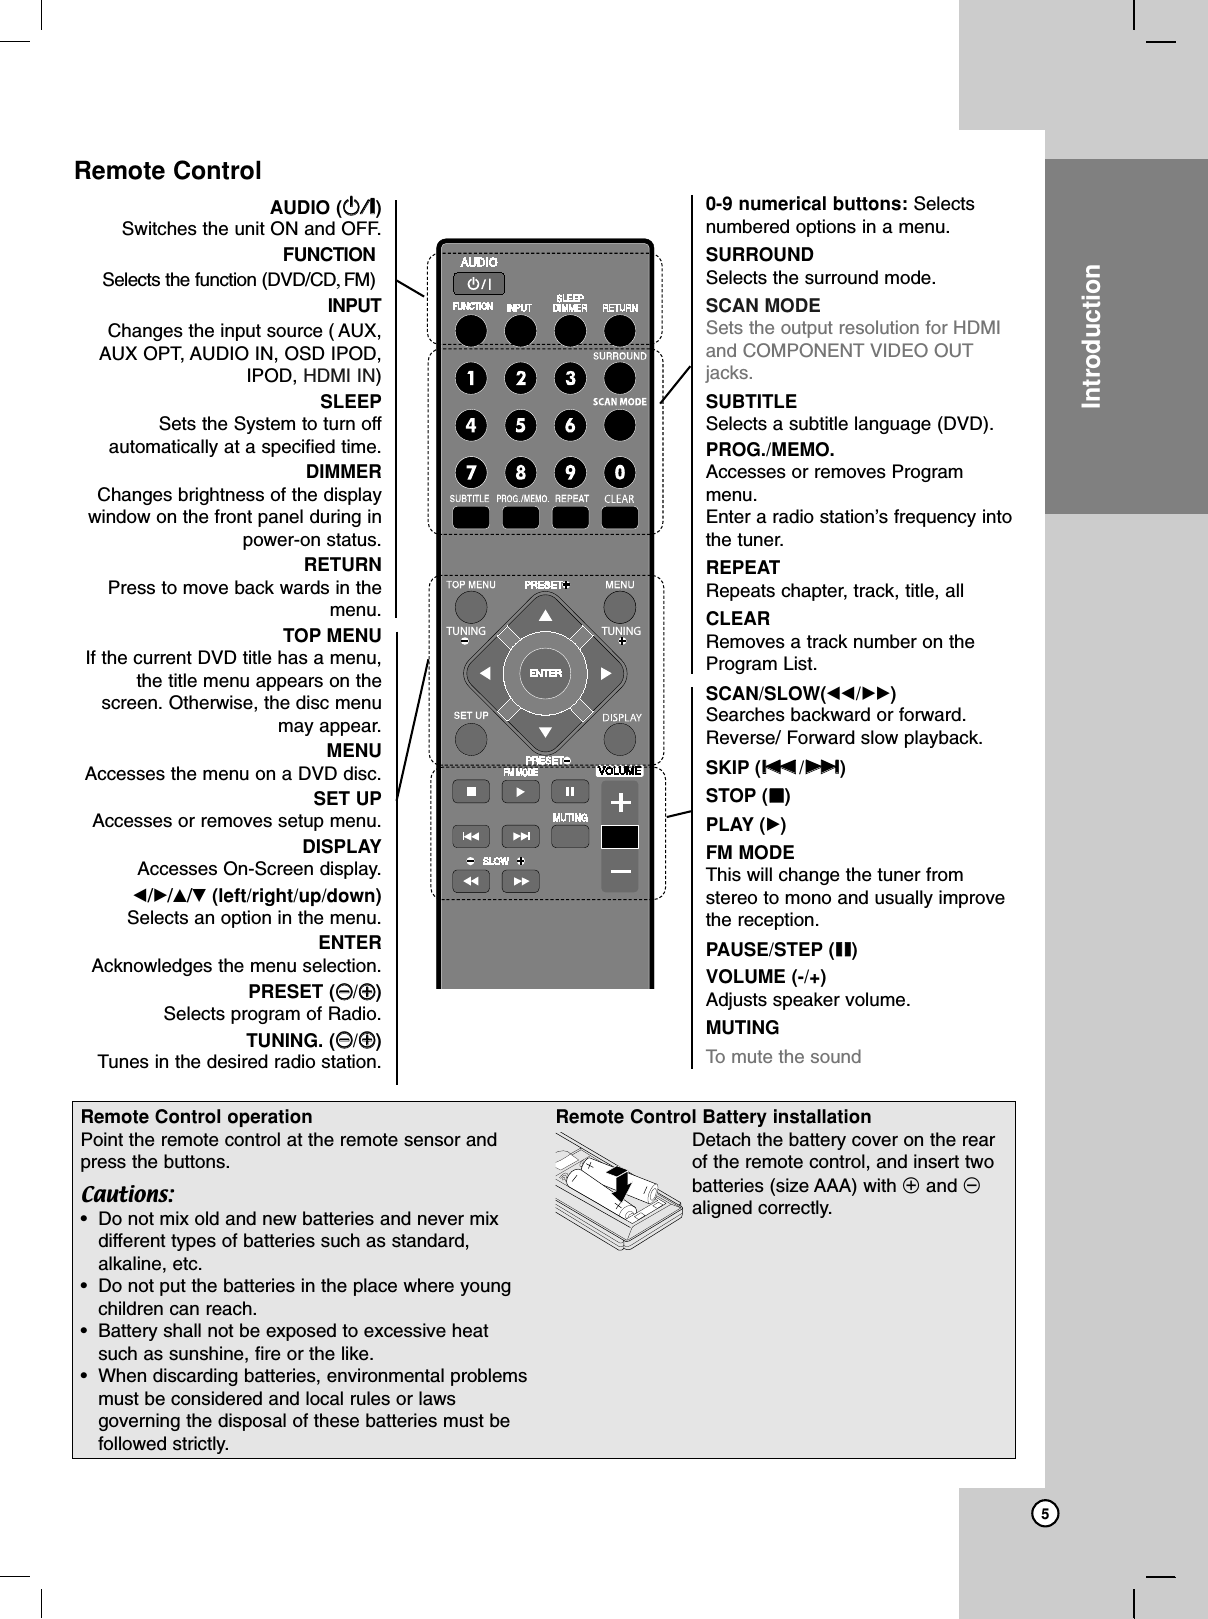
![18Programmed Playback The program function enables you to store yourFavourite tracks from any disc in the receiver memory.Aprogram can contain 30 tracks.1. Insert a disc.Audio CD and MP3/WMA Discs: 2. To add a music(s) on the program list, press PROG/MEMO to enter the program edit mode (mark appears on the menu). 3. Select a desired music on the [List] by using the v/Vthen press ENTER to add the music to theprogram list. 4. Select music from the program list then pressENTER to start programmed playback. Repeat Programmed Tracks 1. Press REPEAT when playing a disc. The repeaticon appears.2. Press REPEAT to select a desired repeat mode.• Track: repeats the current track• All: repeats all the tracks on programmed list.• Random: The current title, chapter or track will beplayed back randomly on programmedlist.• Off (No display): does not play repeatedly.Erasing a Track from “Program” List 1. Use v/Vto select the track that you wish toerase from the Program list.2. Press CLEAR in program edit mode.Erasing the Complete Program List Use v/Vto select [Clear All] then press ENTER inprogram edit mode.Note:The programs are also cleared when the disc is removed,the unit is switched to power off or the function is switched toothers.E](https://usermanual.wiki/LG-Electronics-USA/9QK-HW904PA.User-Manual/User-Guide-1094350-Page-22.png)
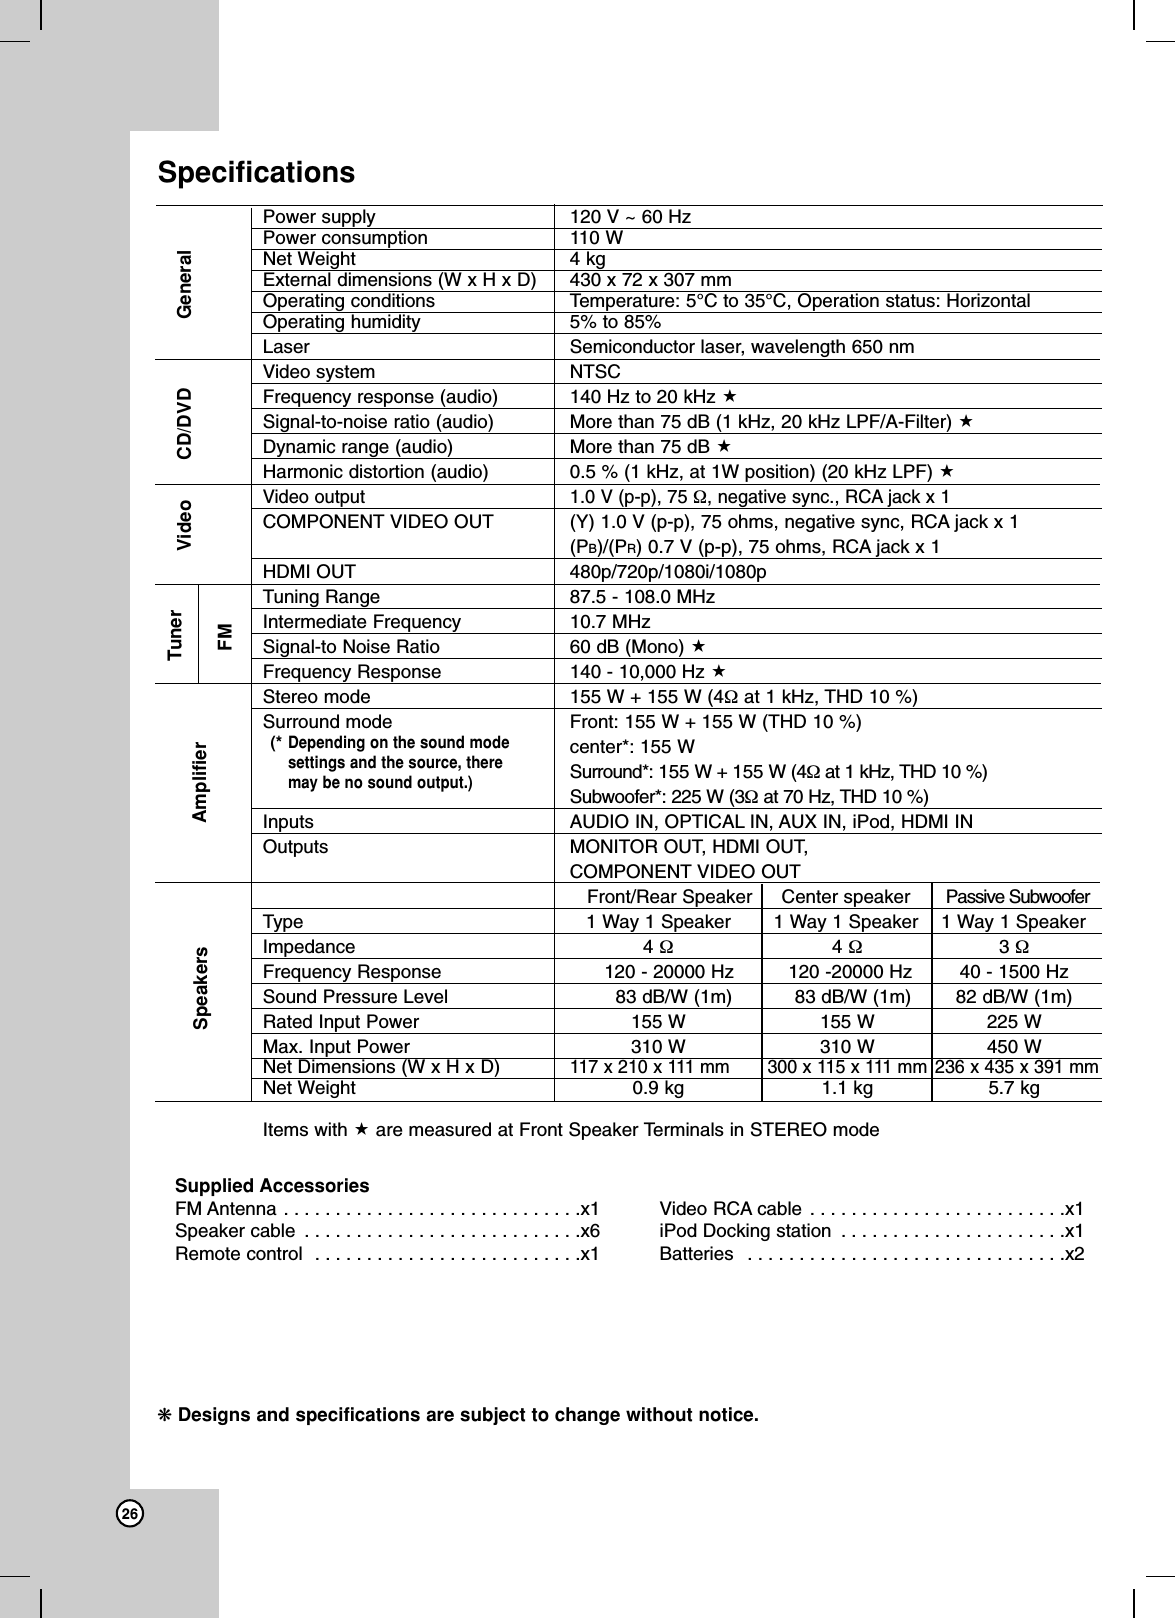
![20Using iPodFor detial refer to iPod guide.iPod mode: You can operate your iPod by using thesupplied remote control and directly control on youriPod.OSD iPod mode: You can operate your iPod bycontrolling OSD menu on the TV screen with suppliedremote control. The controls on your iPod are notoperational in the OSD iPod mode.General operation1. Connect the iPod and the unit with iPod dockingstation. Refer to the page 7.2. Turn the unit on.Your iPod is automatically turned on.3. Press INPUT on the remote control to enter theiPod mode.The iPod menu appears on the TV screen.The initial screen of iPod menu is the OSD iPodmode.4. Use v/Vand ENTER on the Remote Control todisplay the list of menu.5. Press ENTER to play.General features Pauseing playbackPress PAUSE/STEP (X) or PLAY (B) to pauseplayback. Press PAUSE/STEP (X) or PLAY (B) tocontinue playback.Skipping to the next/previous filePress SKIP (>) to move to the next file.Press SKIP (.) to return to the beginning of thecurrent file. Press SKIP (.) twice briefly to step back to theprevious file.Fast forward or fast reverseAudio files: During playback, press and hold SCAN(mor M) and then release at a point you want.Video files: During playback, press SCAN (morM). Press PLAY (B) continue play at normal speed.Playing repeatedlyPress REPEAT repeatedly to select an item to berepeated. The current file will be played backrepeatedly. To return to normal playback, pressREPEAT repeatedly. (On video files, this function isnot available.)iPod message“Please, check your iPod” - If the power of youriPod is insufficient or the iPod is misconnected orunknown device. Reset the iPod if the iPod is notoperating normally (Refer tohttp://www.apple.com/support/)“If you connect to the [VIDEO OUT] terminal onthis unit and switch TV input mode, you can enjoyvideo playback.” - When you connect the unit and TVto COMPONENT VIDEO OUT or HDMI OUT, connectthe unit and TV to VIDEO OUT.Compatible iPod•When the unit is connected with dock connectormay result in malfunctions•Compatibility with your iPod may vary depending onthe type of your iPod. •Depending on your iPod’s software version, it maynot be possible to control your iPod from the unit.We recommend installing the latest softwareversion.Notes:•Interference may happen depending on iPod devices.•The video files are outputted only when you connectthe unit to VIDEO OUT.•Connect the end on the cable with the marked “V“facing downwards to rear on the unit.•Be careful not to put iPod dock strongly into the unitwhen connecting or disconnecting it. But the cablemay be damaged.•JVC is not responsible for any loss of data on aniPod when used with this system.•This system can receive analog sound from thefollowing iPod models- iPod touch- iPod classic- iPod 5th generation- iPod 4th generation- iPod nano (1st/2nd/3nd generation)- iPod mini (1st/2nd generation)•If content on the iPod is not played back correctly,update your iPod software to the latest version. Fordetails about updating the iPod, check the Appleweb site <http://www.apple.com>.•Adjust the volume to a moderate level before youconnect your iPod and this unit.](https://usermanual.wiki/LG-Electronics-USA/9QK-HW904PA.User-Manual/User-Guide-1094350-Page-24.png)
![22Sleep Timer SettingYou can set the DVD/CD Receiver to turn offautomatically at a specified time.1. Press SLEEP to set the desired sleep time.The SLEEP indicator and the sleep time appears in thedisplay window.2. Each time you press SLEEP the settingchanges in the following order.SLEEP 180 →150 →120→90 →80 →70 →60→50 →40 →30 →20 →10 →OFF (No display)Note:You can check the remaining time before the DVD/CDReceiver turns off.Press SLEEP. The remaining time appears in the display window.DimmerThis function will change the brightness of the displaywindow on the front panel during in power-on status. Press the DIMMER repeatedly.MutingPress MUTING to mute your unit. You can mute your unit in order, for example, toanswer the telephone, the “MUTING” indicator flashesin the display window. Note:This muting doesn’t affect the audio output to HDMI; itonly mutes the output of speakers connected to theunit.Setting the disc ejection lockYou can lock the disc tray to prevent the disc formbeing ejected.When the main unit is turned off, hold down the STOPkey at the front panel for 5 seconds If you attempt to open the disc tray by pressingOPEN/CLOSE key, the disc tray does not open and“LOCKED” appears in the display window.To cancel the disc ejection lock, hold down the STOPkey at the front panel for 5 seconds again when themain unit is turned off.“UNLOCKED” is displayed in the display window.Note:Before the main unit is turned off, DVD/CD functionshould be selected.Enjoying audio form an externalsourceYou can enjoy audio form an external source throughyour unit.Press INPUT repeatedly to select the desired inputsource. - AUX, AUX OPT, AUDIO IN, OSD IPOD,IPOD, HDMI INSetting the surround modeThis system has a number of pre-set surround soundfields. You can select a desired sound mode by usingSOURROUND. You can change the SOURROUNDusing b/Barrow key while the SOURROUNDinformation is displayed on.The displayed items for the Equalizer may be differentdepending on sound sources and effects.[[PLII MOVIE/ PLII MUSIC/ PLII MTRX(matrix)] Dolby Pro LogicII enables you to play stereo source on 5.1-channel.[Bypass] You can enjoy the sound without equalizer effect.Notes:•In some of surround modes, some speakers maybeno sound or low sound, it depends on the mode ofsurround and the source of audio, it is not defective.•You may need resetting the surround mode, afterswitch the input, sometimes even after the soundtrack changed.](https://usermanual.wiki/LG-Electronics-USA/9QK-HW904PA.User-Manual/User-Guide-1094350-Page-26.png)