LG Electronics USA 9QK-HW904PA Wireless DVD Receiver User Manual HW964 event
LG Electronics USA Wireless DVD Receiver HW964 event
UserManual.wiki
>
LG Electronics USA
>
9QK-HW904PA User Manual
>
User Manual HW964TZ Rev 02
Contents
1.
User Manual HW964TZ Rev 02
2.
User Manual HW904PA Rev 02
3.
User Manual
User Manual HW964TZ Rev 02
Navigation menu
Upload a User Manual
Namespaces
Wiki Guide
HTML
PDF
Info
Views
User Manual
Discussion / Help
Navigation
![Hooking up the unitResolution SettingYou can change the resolution for component video and HDMI output. Press RESOLUTION repeatedly to select the desired resolution - 480i (or 576i),480p (or 576p), 720p, 1080i, 1080p The resolution may not be selected depending on the connection or TV.•For 720p and 1080i resolution on the component video output, only non-copy protected discs can be played back. If the disc is copy protected, it willbe displayed at the 576p(480p) resolution.•Depending on your TV, some of the resolution settings may result in thepicture disappearing or an abnormal picture appearing. In this case, pressRESOLUTION repeatedly until the picture re-appears.You can set 1080p video resolution to enjoy Full HD picture quality. (FullHD up-scaling)Available resolution according to connection[HDMI OUT] : 1080p, 1080i, 720p, 480p (or 576p) and 480i (576i)[COMPONENT VIDEO OUT] : 1080i, 720p, 480p (or 576p) and 480i (or 576i)[VIDEO OUT] : 480i (or 576i)[SCART] : 576iNotes on HDMI Out connection•If your TV does not accept your resolution setting, abnormal picture appearson the screen.(“TV do not support” will appears in screen)Please read owner’s manual for TV, and then set the resolution that your TVcan accept. •Depending on your TV, some of the resolution settings may result in thepicture disappearing or an abnormal picture appearing. In this case, pressRESOLUTION repeatedly unit the picture re-appears.•Changing the resolution when the unit is connected with HDMI connectormay result in malfunctions. To solve the problem, turn off the unit and thenturn it on again.•When you connect a HDMI or DVI compatible device make sure of thefollowing :-Try switching off the HDMI/ DVI device and this unit. Next, switch on theHDMI/DVI device and leave it for around 30 seconds, then switch on thisunit.-The connected device’s video input is set correctly for this unit.-The connected device is compatible with 720X576i(480i), 720X576p(480p),1280X720p, 1920X1080i or 1920X1080p video input.-The 1080p, 720p and 576p(480p) resolutions are the progressive scanapplied resolution.•Not all HDCP-compatible DVI devices will work with this unit.-The picture will not be displayed properly with non-HDCP device.Enjoying audio from an external source and selecting the functionYou can enjoy audio from an external source through your unit. And You canselect the function.Press FUNCTION repeatedly to select the desired input source and thefunction (AUX, AUX OPT, TV-AUDIO, HDMI IN, PORTABLE, OSD IPOD, IPOD,USB, DVD/CD, FM, AM).8HDMI Out connection (C)Connect the HDMI OUTPUT jackon the unit to the HDMI input jackon a HDMI compatible TV using aHDMI cable.HW964_event 12/6/08 10:58 AM Page 8](https://usermanual.wiki/LG-Electronics-USA/9QK-HW904PA.User-Manual-HW964TZ-Rev-02/User-Guide-1049404-Page-8.png)
![11Adjusting the settings - more you can doAdjusting the language settingsMenu Language – Select a language for the Setup menu and on-screen display. Disc Audio/ Disc Subtitle/ Disc Menu – Select a language for the Disc Audio/Disc Subtitle/ Disc Menu. [Original] : Refers to the original language in which the disc was recorded.[Others] : To select another language, press number buttons then ENTER toenter the corresponding 4-digit number according to the language code list inthe reference chapter (see page 22). If you make a mistake before pressingENTER, press CLEAR.[OFF] (for Disc Subtitle) : Turn off Subtitle.Adjusting the general settingsON REMOTE1Display setup menu : SETUP2Select a desired option on the first level : UU uu3Move to the second level : ii4Select a desired option on the second level : UU uu5Move to the third level : ii6Change the setting : UU uu, ENTEROSD Initial language settings - Optional1Turn the power on :The language list appears POWER2Select the language : UU uu II ii3Press : ENTER4To confirm press : II iiand ENTERDuring the first use of this unit, the initial language setup menuappears on your TV screen. You must complete initial languageselection before using the unit. English will be selected as the initiallanguage.ON REMOTEInitial Setting the Area Code - Optional1Display setup menu : SETUP2Select LOCK menu on the first level: UU uu3Move to second level : The activated Area Code appears on the second level. : ii4Move to the third level : ii5Enter a new password : numerical buttons(0-9) and ENTER6Recheck the entered new password : numerical buttons(0-9) and ENTER7Select a code for a geographic area : After select, Rating and Password will be UU uu IIandactivated. (page 22) ENTER 8To confirm what you press :Make sure to finish setting the Area Code before leaving the setup menu if you cannot set the rating and Password ENTERWhen you use this unit for the first time, you have to set the AreaCode as shown below.ON REMOTEHW964_event 12/6/08 10:58 AM Page 11](https://usermanual.wiki/LG-Electronics-USA/9QK-HW904PA.User-Manual-HW964TZ-Rev-02/User-Guide-1049404-Page-11.png)
![12Adjusting the display settingsTV Aspect – Select which screen aspect to use based on the shape of your TVscreen. [4:3] : Select when a standard 4:3 TV is connected.[16:9] : Select when a 16:9 wide TV is connected.Display Mode – If you selected 4:3, you’ll need to define how you would likewidescreen programs and films to be displayed on your TV screen. [Letterbox] : This displays a widescreen picture with black bands at the topand bottom of the screen.[Panscan] : This fills the entire 4:3 screen, cropping the picture as necessary.TV Output Select – Select an option according to the TV connection type.[RGB] : When your TV is connected with the SCART jack.[YPbPr] : When your TV is connected with the COMPONENT/ PROGRESSIVE SCAN jacks on the unit.- If you change TV Output Select to RGB from YPbPr on the setup menu especially when connecting the unit in the way of component videoconnection, the screen turns black. In that case, connect the video cable toMONITOR jack and select YPbPr on the setup menu again.Adjusting the audio settingsDRC (Dynamic Range Control) – Make the sound clear when the volume isturned down (Dolby Digital only). Set to [On] for this effect.Vocal – Select [On] to mix karaoke channels into normal stereo.This function is effective for multi-channel karaoke DVDs only.HD AV Sync - Sometimes Digital TV encounters a delay between picture andsound. If this happens you can compensate by setting a delay on the sound sothat it effectively ‘waits’ for the picture to arrive: this is called HD AV Sync. Use UU uu (on the remote control) to scroll up and down through the delay amount,which you can set at anything between 0 and 300m sec. Semi Karaoke – When a chapter/ title/ track is fully finished, this functionshows the score in the screen with a fanfare sound. Available discs for the Semi Karaoke function: DVD discs/ DVD Karaoke Discs [On] : When you finished singing a score will appear on the screen.[Off] : Fanfare and score do not appears on the screen.- This function operate on the DVD/CD mode. - The Semi Karaoke function is available only when a microphone is connected. - In case that a fanfare or score appears when a chapter of a movie file ischanged during playback, set the Semi Karaoke to “Off” at the setup menuor disconnect the microphone.5.1 Speaker SetupON REMOTE1Open the settings menu: SETUP2Select to the audio icon: UU uu 3Select right to enter the audio menu, then select 5.1 Speaker Setup: ii UU uuENTER4Select the speaker you want to adjust: II ii5Select a option and change the settings: UU uu II ii6Set the output level (volume) of a speaker:from -5dB to +5dB.The speaker size setting are fixed, so you cannot change the setting. II ii7If you connect speakers to your unit, setting the Distance lets the speakers to know how far the sound has to travel to reach your set listening point. This allows the sound from each speaker to reach the listener at the same time. II ii8Test the signals of each speaker:Adjust the volume to your taste according to these signals. II ii9Save your settings and exit the Setup menu: RETURNHW964_event 12/6/08 10:58 AM Page 12](https://usermanual.wiki/LG-Electronics-USA/9QK-HW904PA.User-Manual-HW964TZ-Rev-02/User-Guide-1049404-Page-12.png)
![13Adjusting the lock settingsTo access the lock options, you must enter the 4-digit password. If you have notyet entered a password you are prompted to do so. Enter a 4-digit passwordthen press ENTER. Enter it again then press ENTER to verify. If you make amistake while entering number, press CLEAR then correct it.If you forget your password you can reset it. First, remove the disc in the unit.Press SETUP to display the Setup menu. Input ‘210499’ and press ENTER. Thepassword has now been cleared. Rating – Select a rating level. The lower the level, the stricter the rating. Select[Unlock] to deactivate the rating.Password – Sets or changes the password for lock settings. [New] : Enter a new 4-digit password using the numerical buttons then pressENTER. Enter the password again to confirm.[Change] : Enter the new password twice after entering the currentpassword.Area Code – Select a code for a geographic area as the playback rating level.This determines which area’s standards are used to rate DVDs controlled by theparental lock. See the Area Codes on page 22.Adjusting the others settingsDivX(R) VOD – We provide you with the DivX®VOD (Video On Demand) registration code that allows you to rent and purchase videos using the DivX®VOD service. For more information, visit www.divx.com/vod.Press ENTER when [DivX(R) VOD] is highlighted and you can view the registration code of the unit.Karaoke Registration - You can check the 8byte karaoke registration code todownload karaoke music file on the website.For more information, visit www.karaoke.ru.Press ENTER when [Select] icon is highlighted and you can view the registration code of the unit.- You can burn the download karaoke files into disc to use in internet karaokemode.SSR (Real Time Score) - This function will be shown the Score to real time bychecking interval and beat during sing a song in the karaoke mode only.Select the [On] : Score bar shows 31 level while checking the interval andbeat.Select the [Off] : Score bar are not display on the screen.- This function is not supported the Semi karaoke mode.Enjoying a pre-programmed sound fieldThe system has a number of pre-set surround sound fields. You can select adesired sound mode by using SPECIAL EQ/ NIGHT.The displayed items for the Equalizer may be different depending on soundsources and effects.NATURAL You can enjoy comfortable and natural sound.Local Regionally optimized sound effect.(DANGDUT/ ARABIC/ Specialization PERSIAN/ INDIA/ REGUETON/ SALSA/ SAMBA)equalizerAUTO EQ Realizes the sound equalizer that is the most similar to the genre of which is included in the MP3 ID3 tag of song files.ROCK This program lends an enthusiastic atmosphere to thePOP sound, giving you the feeling you are at an actual rockJAZZ pop, jazz or classic concert.CLASSICMP3 OPT This function is optimized for compressible MP3 file. It improves the bass sound.BASS B Reinforce the treble, bass and surround sound effect.Virtual You can enjoy more virtual surround sound.NORMAL(OFF) You can enjoy the sound without equalizer effect.PLII MOVIE Dolby Pro Logic II enables you to play stereo source on PLII MUSIC 5.1-channel.PLII MTRX(matrix)CLEAR VOICE This program make Voice sound clear, improving thequality of voice sound.GAME EQ You can enjoy more virtual sound while playing videogames.NIGHT MODE The night mode is to improve listenalbe at lower volumes.ON DISPLAY DescriptionHW964_event 12/6/08 10:58 AM Page 13](https://usermanual.wiki/LG-Electronics-USA/9QK-HW904PA.User-Manual-HW964TZ-Rev-02/User-Guide-1049404-Page-13.png)

![16Creating your own program You can play the contents of a disc in the order you want by arranging the orderof the musics on the disc. To add a music(s) on the program list, press PROG/MEMO to enter the program edit mode ( mark appears on the menu). Select a desired music on the [List] by using the UU uuthen press ENTER to addthe music to the program list. Select music from the program list then pressENTER to start programmed playback. To clear a music from the program list,select the music you want to clear by using the UU uuthen press CLEAR inprogram edit mode. To clear all music from the program list, select [Clear All]then press ENTER in program edit mode. The program is cleared when the discis removed or the unit is turned off.Displaying file information (ID3 TAG ) While playing an MP3/ WMA file containing file information, you can display the information by pressing DISPLAY repeatedly.MP3/ WMA music file requirementMP3/ WMA disc compatibility with this player is limited as follows :•Sampling frequency : within 8 - 48 kHz (MP3), within 22.05 - 48kHz (WMA)•Bit rate : within 8 - 320kbps (MP3), 32 - 256kbps (WMA)•Support Version : v2, v7, v8, v9•File extensions : “.mp3”/ “.wma”•CD-ROM file format : ISO9660•We recommend that you use Easy-CD Creator, which creates an ISO 9660file system.VOCAL FADERYou can enjoy the function as karaoke, by reducing singer vocal of music in thevarious source. (MP3/ WMA/ CD/ DTS/ Dolby Digital/ etc.) Press the VOCALFADER, and “FADE ON” will appear in display window.To cancel it, press VOCAL FADE again.- This function is available to use only when a microphone is connected.- The quality of the VOCAL FADER may be different depending on the recording conditions of music files. - It is not available on the MONO mode.Viewing photo files - more you can doViewing photo files as a slide showUse UU uu II iito highlight ( ) icon then press ENTER to start slide Show.You can change slide show speed using II iiwhen ( ) icon is highlighted.Skipping to the next/ previous photoPress SKIP (.or >) or II iito view the previous/ next photo.Rotating a photoUse UU uuto rotate the photo in full screen counterclockwise or clockwise whileviewing a photo in full screen.Pausing a slide showPress PAUSE/STEP (X) to pause a slide show. Press PLAY (B)orPAUSE/STEP (X) to continue the slide show.Listening to music during slide showYou can listen to music during slide show, if the disc contain music and photofiles together. Use UU uu II iito highlight ( ) icon then press ENTER to startslide show. This function is available only in disc.Photo file requirementJPEG disc compatibility with this player is limited as follows :•Normal JPEG - Max pixel in width : 8902 pixel/ Progressive JPEG - Max pixelin width : 1609 pixel•Maximum files : Under 999.•Some discs may not operate due to a different recording format or the condition of disc.•File extensions: “.jpg”WMAMP3EWMAMP3ACD Viewing photo filesON REMOTE1Insert a disc on unit : ZZ OPEN/CLOSE2Select a DVD/CD : FUNCTION3Select a photo file : UU uu4Display the selected file in full screen : ENTER5To return to the menu : xxSTOPHW964_event 12/6/08 10:58 AM Page 16](https://usermanual.wiki/LG-Electronics-USA/9QK-HW904PA.User-Manual-HW964TZ-Rev-02/User-Guide-1049404-Page-16.png)
![20Playing the iPod - more you can doPauseing playbackPress PAUSE/STEP (XX)or PLAY (BB)to pause playback. Press PAUSE/STEP(XX)or PLAY (BB)to continue playback.Skipping to the next/previous filePress SKIP (>>)to move to the next file.Press SKIP (..)to return to the beginning of the current file. Press SKIP (..)twice briefly to step back to the previous file.Fast forward or fast reverseAudio files: During playback, press and hold SCAN (mmor MM)and thenrelease at a point you want.Video files: During playback, press SCAN (mmor MM). Press PLAY (BB)continue play at normal speed.Playing repeatedlyPress MODE repeatedly to select an item to be repeated. The current file willbe played back repeatedly. To return to normal playback, press MODErepeatedly. (On video files, this function is not available.)iPod message “Please, check your iPod” - If the power of your iPod is insufficient or theiPod is misconnected or unknown device. Reset the iPod if the iPod is notoperating normally (Refer to http://www.apple.com/support/)“If you connect to the [VIDEO OUT] terminal on this unit and switch TVinput mode, you can enjoy video playback.” - When you connect the unitand TV to COMPONENT VIDEO OUT or HDMI OUT, connect the unit and TVto VIDEO OUT.Compatible iPod•When the unit is connected with dock connector may result in malfunctions•Compatibility with your iPod may vary depending on the type of your iPod. •Depending on your iPod’s software version, it may not be possible to controlyour iPod from the unit. We recommend installing the latest software version.When you use iPod, look out for the following•Interference may happen depending on iPod devices.•Connect the end on the cable with the marked “V“ facing downwards to rearon the unit.•The video files are outputted only when you connect the unit to VIDEO OUT.OSD iPod modePlaying the iPod1Connect the iPod dock on the rear of the unit.: -2Connect your iPod to the dock.: -3Turn the power on: POWER4Select the iPod or OSD iPod function: FUNCTION5Select the menu: UU uuand ENTERIf you want to move backwards in the menu, press MENU6Select a file: UU uu7Start the file playing: BPLAY or ENTER8To stop the file playing: xxSTOP9Before disconnecting the iPod, change to any other function by pressing: FUNCTION10 Remove the iPod:-For detial refer to iPod guide.iPod mode: You can operate your iPod by using the supplied remotecontrol and directly control on your iPod.OSD iPod mode: You can operate your iPod by controlling OSD menuon the TV screen with supplied remote control. The controls on your iPodare not operational in the OSD iPod mode.ON REMOTEHW964_event 12/6/08 10:58 AM Page 20](https://usermanual.wiki/LG-Electronics-USA/9QK-HW904PA.User-Manual-HW964TZ-Rev-02/User-Guide-1049404-Page-20.png)
![24About the Symbol Display“ ” may appear on your TV display during operation and indicates that thefunction explained in this owner’s manual is not available on that specific DVDvideo disc.Regional CodesThis unit has a regional code printed on the rear of the unit. This unit can playonly DVD discs labeled same as the rear of the unit or “ALL”.•Most DVD discs have a globe with one or more numbers in it clearly visibleon the cover. This number must match your unit’s regional code or the disccannot play. •If you try to play a DVD with a different regional code from your player, themessage “Check Regional Code” appears on the TV screen.CopyrightsIt is forbidden by law to copy, broadcast, show, broadcast via cable, play inpublic, or rent copyrighted material without permission. This product featuresthe copy protection function developed by Macrovision. Copy protection signalsare recorded on some discs. When recording and playing the pictures of thesediscs picture noise will appear. This product incorporates copyright protectiontechnology that is protected by U.S. patents and other intellectual propertyrights. Use of this copyright protection technology must be authorized byMacrovision, and is intended for home and other limited viewing uses onlyunless otherwise authorized by Macrovision. Reverse engineering ordisassembly is prohibited.CONSUMERS SHOULD NOTE THAT NOT ALL HIGH DEFINITIONTELEVISION SETS ARE FULLY COMPATIBLE WITH THIS PRODUCT ANDMAY CAUSE ARTIFACTS TO BE DISPLAYED IN THE PICTURE. IN CASE OF525 OR 625 PROGRESSIVE SCAN PICTURE PROBLEMS, IT ISRECOMMENDED THAT THE USER SWITCH THE CONNECTION TO THE‘STANDARD DEFINITION’ OUTPUT. IF THERE ARE QUESTIONSREGARDING OUR TV SET COMPATIBILITY WITH THIS MODEL 525p AND625p UNIT, PLEASE CONTACT OUR CUSTOMER SERVICE CENTER.You have to set the disc format option to [Mastered] in order to make the discscompatible with the LG players when formatting rewritable discs. When settingthe option to Live File System, you cannot use it on LG players.(Mastered/ Live File System : Disc format system for Windows Vista) Types of Playable DiscsDVD-VIDEO : Discs such as movies that can be purchased or rented.DVD-R : Video mode and finalized onlyDVD-RW : Video mode and finalized onlyDVD VR format that have been finalized can not be played in this unitDVD+R : Video mode only Supports the double layer disc alsoDVD+RW : Video mode onlyAudio CD :Music CDs or CD-R/ CD-RW in music CD format that can be purchased.This unit plays DVD±R/ RW and CD-R/ RW that contains audio titles,DivX, MP3,WMA and/ or JPEG files. Some DVD±RW/ DVD±R or CD-RW/ CD-R cannot be played on this unit due to the recording qualityor physical condition of the disc, or the characteristics of the recordingdevice and authoring software. LogoType“Dolby”, “Pro Logic”, and the double-D symbol are trademarks of DolbyLaboratories.Manufactured under license from Dolby Laboratories.Manufactured under license under U.S. Patent #’s: 5,451,942; 5,956,674;5,974,380; 5,978,762; 6,487,535 & other U.S. and worldwide patents issued &pending. DTS and DTS Digital Surround are registered trademarks and theDTS logos and Symbol are trademarks of DTS, Inc. © 1996-2007 DTS, Inc. AllRights Reserved.HDMI, the HDMI logo and High-Definition Multimedia Interface aretrademarks or registered trademarks of HDMI licensing LLC.HW964_event 12/6/08 10:58 AM Page 24](https://usermanual.wiki/LG-Electronics-USA/9QK-HW904PA.User-Manual-HW964TZ-Rev-02/User-Guide-1049404-Page-24.png)
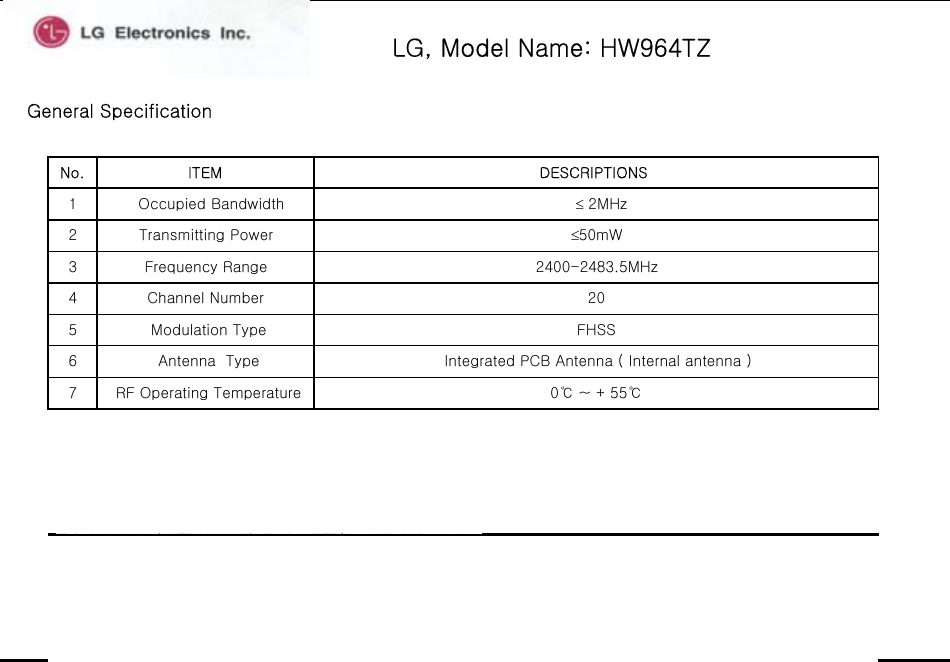
![25GeneralPower supply Refer to main label.Power consumption Refer to main label.Net Weight 3.7 kgExternal dimensions (W x H x D) 430 x 303 x 73 mmOperating conditions Temperature 5°C to 35°C,Operation status: HorizontalOperating humidity 5% to 85%Laser Semiconductor laser,wavelength 650 nmTuner FM/AM [MW]FM Tuning Range 87.5 - 108.0 MHzFM Intermediate Frequency128 kHzAM Tuning Range 522 - 1,620 kHz, 520 - 1,710 kHz or 522 - 1,710kHzAM Intermediate Frequency 45 kHzAmplifierStereo mode 155 W + 155 W (4Ωat 1 kHz, THD 10 %)Surround mode Front 155 W + 155 W (THD 10 %) Center* 155 WSurround* 155 W + 155 W (4Ωat 1 kHz, THD 10 %)Subwoofer* 225 W (3Ωat 30 Hz, THD 10 %)Speakers (HT964TZ)Front/Rear Center PassiveSpeaker speaker SubwooferType 2 Way 3 Speaker 2 Way 3 Speaker 1Way1SpeakerImpedance 4 Ω4 Ω3 ΩRated Input Power 155 W 155W 225 WMax. Input Power 310 W 310 W 450 WNet Dimensions (W x H x D) 290 x 1150 x 114 mm 350 x 105 x 93 mm 216 x 405 x 360 mmNet Weight 3.86 kg 1.5 kg 7.1 kgDesigns and specifications are subject to change withoutprior notice.Specifications SpecificationsSpeakers (HT964PZ)Front RearSpeaker speakerType 2 Way 3 Speaker 1 Way 1 SpeakerImpedance 4 Ω4 ΩRated Input Power 155 W 155 WMax. Input Power 310 W 310 WNet Dimensions (W x H x D) 290 x 1150 x 114 mm 96 x 240 x 108 mmNet Weight 3.86 kg 0.8 kgCenter PassiveSpeaker SubwooferType 2 Way 3 Speaker 1Way1SpeakerImpedance 4 Ω3 ΩRated Input Power 155 W 225 WMax. Input Power 310 W 450 WNet Dimensions (W x H x D) 350 x 105 x 93 mm 216 x 405 x 360 mmNet Weight 1.5 kg 7.1 kgWireless ReceiverPower requirements Refer to main labelPower consumption Refer to main labelExternal dimensions (WxHxD) 64x213.6x252.3 mmNet Weight 1.2 kgReception Output 2.4 GHzHW964_event 12/6/08 10:58 AM Page 25](https://usermanual.wiki/LG-Electronics-USA/9QK-HW904PA.User-Manual-HW964TZ-Rev-02/User-Guide-1049404-Page-25.png)