LG Electronics USA 9QK-LGX11 Notebook PC User Manual XENIA ENG PDF
LG Electronics USA Notebook PC XENIA ENG PDF
UserManual.wiki
>
LG Electronics USA
>
9QK-LGX11 User Manual
>
Users Manual 1
Contents
1.
Users Manual 1
2.
Users Manual 2
3.
Users manual 1
4.
Users manual 2
5.
Users Manual 2
Users Manual 1
Navigation menu
Upload a User Manual
Namespaces
Wiki Guide
HTML
PDF
Info
Views
User Manual
Discussion / Help
Navigation


![Notebook PC Tour 312-2. Operation Status Lamps1. Power Lamp:-Blinking: System Standby-On: The system is running on the AC power or battery.-Off: The system is turned off or in Hibernates.2. AC Power and Battery Status Lamp-Orange: The battery is being charged.-Orange/Green Blinking: Charged more than 90%-Off: The AC adapter is not connected and the battery is being discharged.-Green: The AC adapter is connected and the battery is not in charging stage, or the battery is fully charged.-Green Blinking: The battery is charged less than 10%-Red Blinking: In faulty state-If you try to turn on the system that has entered the Hibernates mode or been turned off after a low-battery alarm, the system will not be turnedon but the lamp will blink three times. 3. Hard Disk Drive Lamp-The lamp is turned on when the HDD is running.Do not turn off the power forcibly while the hard disk drive lamp is on. Otherwise, the data may get impaired.4. Num Lock lamp-When the Num Lock lamp is turned on, you can enter numbers (0~9) using the embedded numeric keys. If you press [Fn]+ [Num Lk] again, the Num Lock lamp is turned off and you can enter text characters.5. Caps Lock lamp-Caps Lock lamp is on when the it is active. When this lamp is on, you can type uppercase letters without holding Shift key.6. Wireless LAN lamp-Off: Wireless LAN is not in use. -Blinking (short interval): Wireless LAN/Bluetooth is connected and data are being transmitted.](https://usermanual.wiki/LG-Electronics-USA/9QK-LGX11.Users-Manual-1/User-Guide-1093516-Page-32.png)


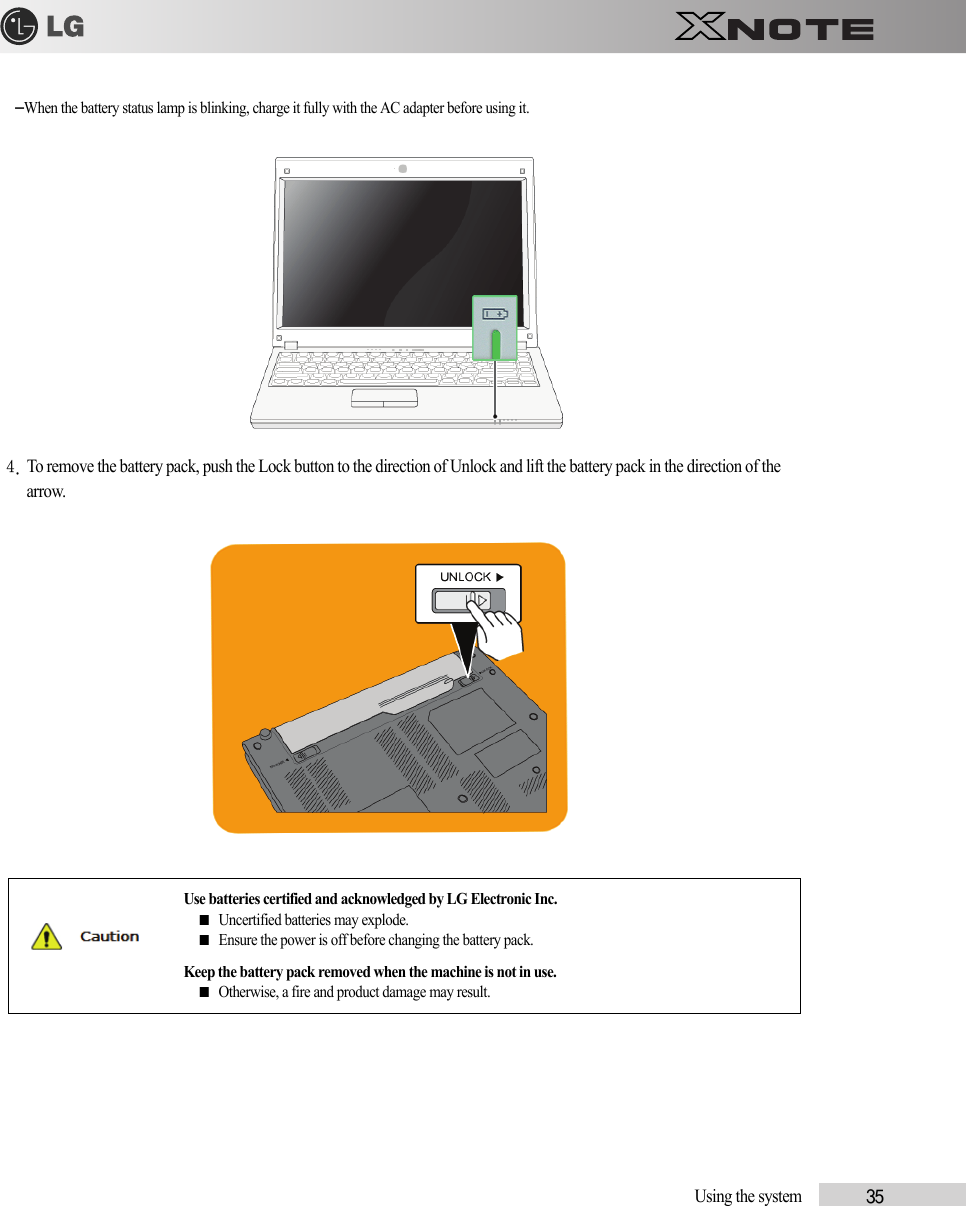
![34 Using the system3-1. Running on BatteryNotebook PC runs on AC power or battery. This section describes the procedure that the user should take initially for a newsystem. The provided AC adapter can be used on voltage between 100V and 240V.Charge the new battery with the AC adapter before use.Refer to [Charging Battery with AC Adapter] in User's Guide.1. Turn the machine over to see the battery pack chamber and equip the pack.-Insert the battery pack into the chamber as shown in the following figure and push it in the direction of the arrow until you hear a clickingsound.2. Open the machine and turn the power on.3. Check the battery state.](https://usermanual.wiki/LG-Electronics-USA/9QK-LGX11.Users-Manual-1/User-Guide-1093516-Page-35.png)
![38 Using the system3-3. Registering WindowsEnsure that the AC adapter is connected or the battery is charged before turning on the machine.Refer to the below directions to turn on/off the machine.▶Turning On1. Open the machine and adjust the panel.2. Press Power button and self-diagnosis begins. After self-diagnosis, Windows XP home screen appears.3. Registering the User with Windows XP Home Edition/Professional-In the initial use, after turning on the system the user is required to register himself with Windows XP. For user registration process, refer tothe following. (The process may differ by system model type, but that difference does not affect the system use.)▶Registering the User with Windows XP Home Edition/ProfessionalIn the initial use, after turning on the system the user is required to register himself with Windows XP.For user registration process, refer to the following. (The process may differ by system model type, but that difference doesnot affect the system use.)1. When the [Welcome to Microsoft Windows] screen appears, click Next.](https://usermanual.wiki/LG-Electronics-USA/9QK-LGX11.Users-Manual-1/User-Guide-1093516-Page-39.png)
![Using the system 392. When [End User License Agreement] appears, read it carefully, select Yes, I accept. (Y) and click Next.3. The [Please specify a computer name.] screen appears. Fill in Computer Name (C) and Computer Description (O) fields and click Skip button to continue.To set up the Internet, click Next and continue.](https://usermanual.wiki/LG-Electronics-USA/9QK-LGX11.Users-Manual-1/User-Guide-1093516-Page-40.png)
![40 Using the system4. When the [Register with Microsoft?] screen appears, select No, not at this time. (N) and click Next.5. When the [Help protect your PC.] screen appears, select "Help protect my PC by turning on Automatic Update now" and click Next.](https://usermanual.wiki/LG-Electronics-USA/9QK-LGX11.Users-Manual-1/User-Guide-1093516-Page-41.png)
![Using the system 416. When the [Type the user name] screen appears, enter your User Name (Y) and click Next.7. When the [Thank you] screen appears, click Finish (F). Now, you have completed the installation process.](https://usermanual.wiki/LG-Electronics-USA/9QK-LGX11.Users-Manual-1/User-Guide-1093516-Page-42.png)
![42 Using the system▶System Termination1. To turn off the computer, close all applications and on the Windows XP home screen click Start and Tur ni n g Off Computer.2. When the [Shutdown Computer] screen appears, click Shutdown.3. The computer turns off automatically4. Close the computer.](https://usermanual.wiki/LG-Electronics-USA/9QK-LGX11.Users-Manual-1/User-Guide-1093516-Page-43.png)
![Using the system 43Do not turn off the power forcibly while the hard disk drive lamp is on.■The data may get damaged.■Occasionally the system on Windows may not be shut down automatically. When thishappens, press Power button for five seconds or longer to forcibly shut down. However,this is an emergency measure and it may cause system errors. It is recommended to clickthe Start button and select [Turn off Computer] menu to shut down the computer. ■Abnormal turning-off of the computer may damage data stored in the hard disk. When the programsuddenly stops, press the Ctrl + Alt + Delete keys to terminate the program through WindowsTask Manager or restart the system. If the some Windows program files have been damageddue to an abnormal shutdown, reinstall damaged programs. LG Electronics is not responsible for dataloss caused by your mistakes and negligence.](https://usermanual.wiki/LG-Electronics-USA/9QK-LGX11.Users-Manual-1/User-Guide-1093516-Page-44.png)
![Using the system 513-6. Scanning Computer VirusesComputer viruses are programs that penetrate other programs and files. Computer viruses infect other files throughreplication, leaving the infected files and programs damaged and unusable. The Notebook PC comes with a vaccine programcalled Norton AntiVirus. You can use Norton AntiVirus and LiveUpdate free of charge for 90 days.The displayed image can be modified without prior notice.Norton AntiVirus can also be installed using LG Intelligent Update CD.▶Installing and Registering Norton AntiVirus1. Complete Windows XP User Registration and turn on the machine.2. Double-click the [Install Norton AntiVirus] icon on the desktop.Norton AntiVirus can also be installed using LG Intelligent Update CD.3. When the Norton AntiVirus license agreement screen appears, read the agreement and click [I Agree].](https://usermanual.wiki/LG-Electronics-USA/9QK-LGX11.Users-Manual-1/User-Guide-1093516-Page-52.png)
![52 Using the system4. When the Norton AntiVirus installation screen appears, select the destination folder to intall the program and click [Next].When the Microsoft Windows installer update window appears, install the update. (You need to be connected to theInternet to install Microsoft Windows installer.)5. The installation program starts to install Norton Antivius.](https://usermanual.wiki/LG-Electronics-USA/9QK-LGX11.Users-Manual-1/User-Guide-1093516-Page-53.png)
![Using the system 536. When the installation of Norton AntiVirus is finished as below, click [Next].7. When the following screen appears, select [Continue with my 90 day Subscription] and click [Next].8. When the following screen appears, click [Finish] to complete the installation.If the system is connected to the Internet, the user registration screen may appear. If you want to register the program, fill in the form as](https://usermanual.wiki/LG-Electronics-USA/9QK-LGX11.Users-Manual-1/User-Guide-1093516-Page-54.png)
![54 Using the systeminstructed on the screen and click [Next]. If you don't want to register, click [Skip].▶Updating Norton AntiVirusA modem or LAN card must be installed in the computer to update Norton Antivirus. Update is availableonly through the Internet. 1. Click Start on the taskbar and select All Programs > Norton AntiVirus > LiveUpdate.2. LiveUpdate downloads and installs the update automatically.](https://usermanual.wiki/LG-Electronics-USA/9QK-LGX11.Users-Manual-1/User-Guide-1093516-Page-55.png)
![Using the system 553. When the update is complete, click [Restart] to reboot the system.▶Scanning Viruses with Norton AntiVirus1. Double-click the Norton AntiVirus icon on the desktop, or click [Start] > All Programs > Norton AntiVirus > Norton AntiVirus.2. In the Norton AntiVirus tab, click [Task & S cans] > [Run a Scan], select the scan method, and start the scan. 3. Scan is performed and the result is displayed.](https://usermanual.wiki/LG-Electronics-USA/9QK-LGX11.Users-Manual-1/User-Guide-1093516-Page-56.png)
![56 Using the systemIf the system is infected with a virus, the Repair window is displayed. Follow the instructions on the screen to repair the infected files.4. When the scan is complete, click [Finish] to exit the program.](https://usermanual.wiki/LG-Electronics-USA/9QK-LGX11.Users-Manual-1/User-Guide-1093516-Page-57.png)

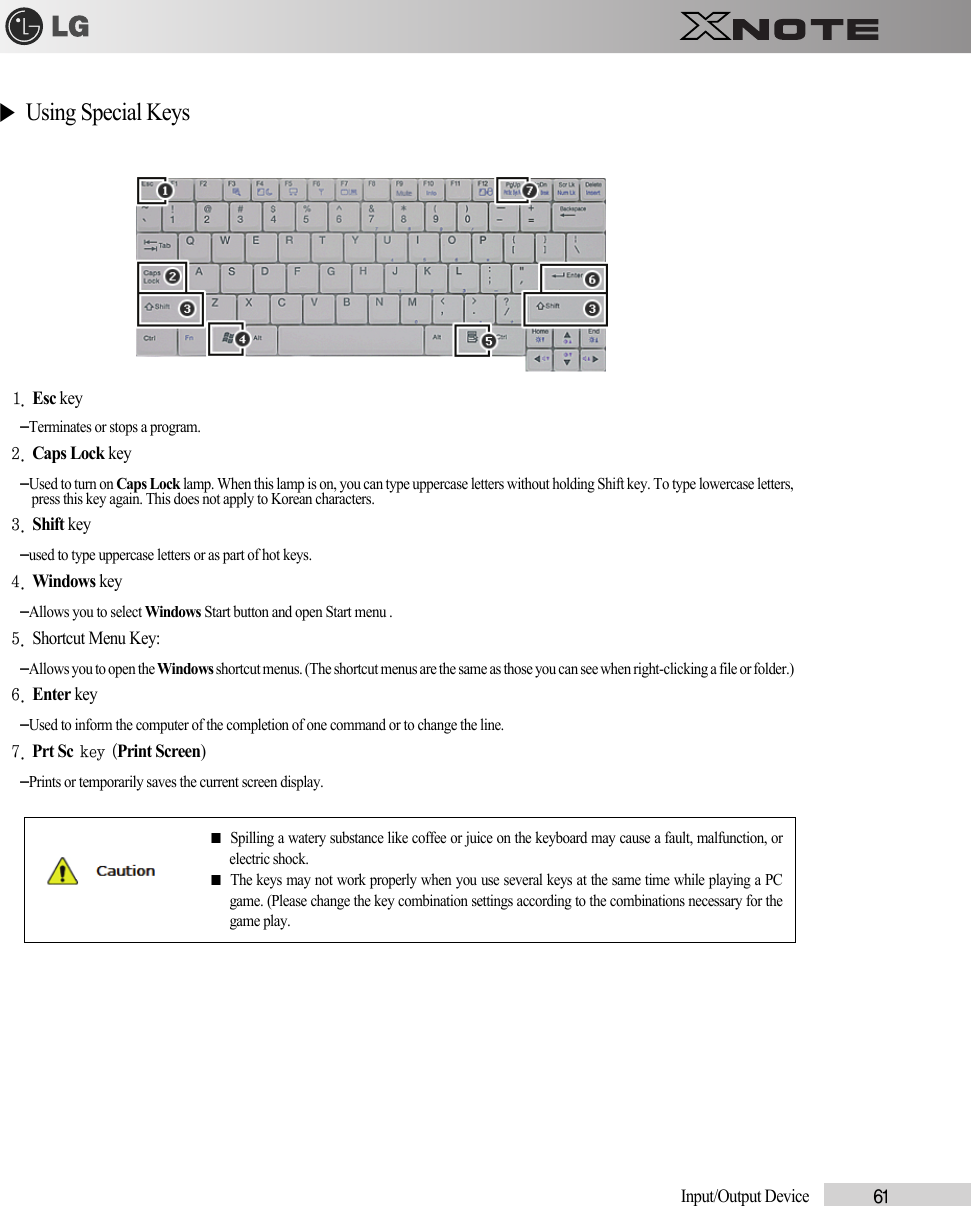
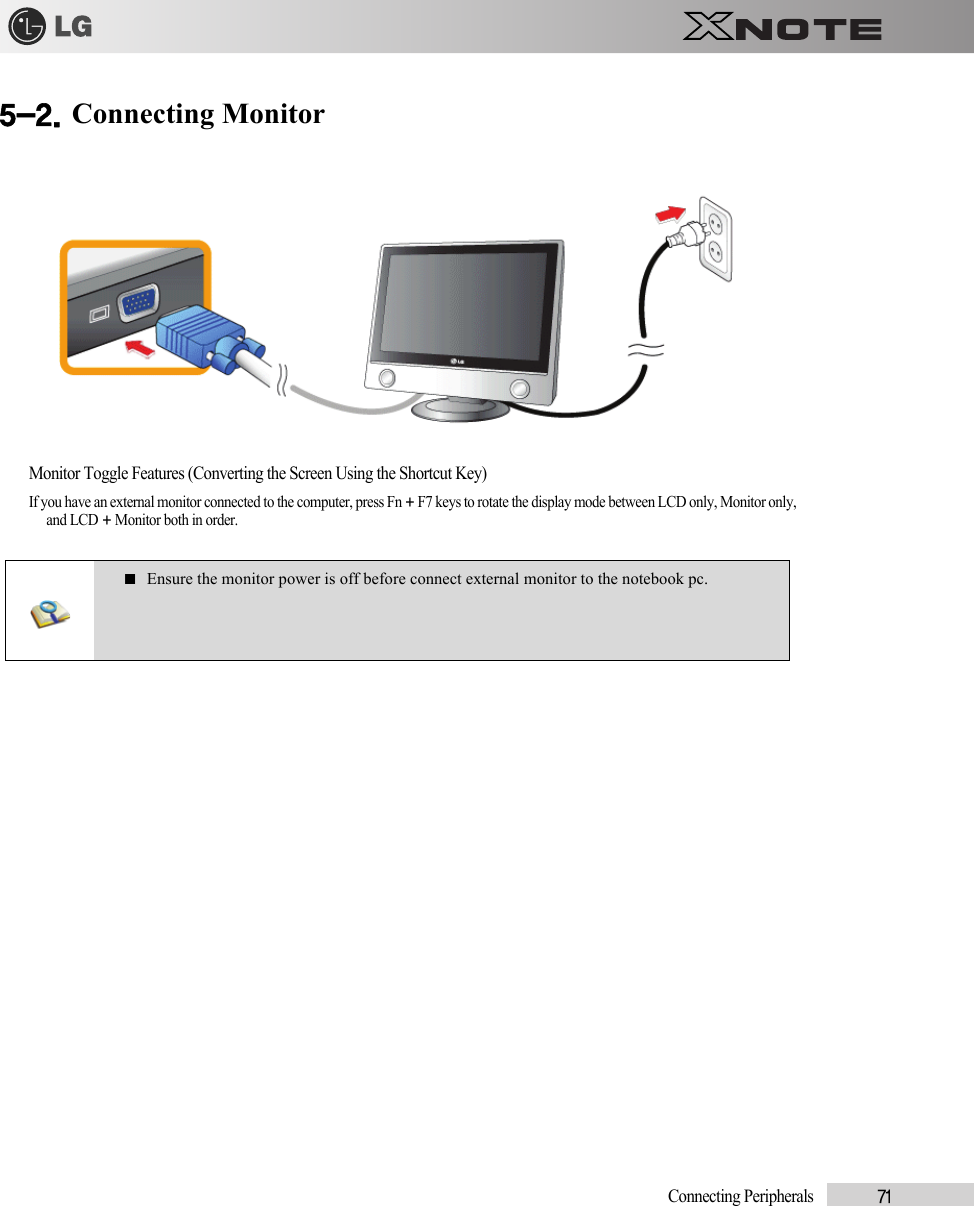
![Input/Output Device 63Fn + F3Magnifying hot keys. Fn + F4Executes the mode defined in the Windows Power Save Mode. (Example: Standby, Hiber-nate)Fn + F5When the user presses Fn + F5 keys, the touchpad mode alternates between TouchpadDisable and Touchpad Enable. (Initialization takes 1 ~ 2 seconds. It is recommended to useafter the initialization.)Fn + F6Turns the wireless devices (incl. Wireless LAN and Bluetooth) on and off (Bluetooth is optional,and so it may not be installed in some models.)Fn + F7 Monitor toggle. If you have an external monitor connected to the computer, press Fn + F7 keysto rotate the display mode between LCD only, Monitor only, and LCD + Monitor bothin order.Fn + F9 Mute (Sound ON / Sound OFF)Fn + Increases LCD brightness, which can have eight different levels.Fn + Decreases LCD brightness, which can have eight different levels.Fn + Turns down the volume.Fn + Turns up the volume.Fn + F10 System Information. Displays summarized system information.Fn + F12Hibernates (When OSD is installed)Fn + Num LkWhen the Num Lock lamp is turned on, you can enter numbers (0~9) using the em-bedded numeric keys. If you press [Fn] + [Num Lk] again, the Num Lock lamp is turnedoff and you can enter text characters.](https://usermanual.wiki/LG-Electronics-USA/9QK-LGX11.Users-Manual-1/User-Guide-1093516-Page-64.png)

![66 Input/Output Device▶Click-free DraggingWhen activated, this feature allows you to drag an icon without pressing and holding the left button. Do the following to activate the click-free dragging feature. If it has been done, pressing the left button for an extensive timereplaces pressing and constant holding so that you can drag without holding the left button.1. Click [Mouse Properties] icon in Notification Area.2. Select Activate click-free dragging (T) and click [Setup] button to adjust the time span for which you should press the left button to execute the feature.▶ScrollingThe touch pad supports the scrolling feature.To scroll vertically or horizontally, glide your finger along the right or bottom edge. Now the screen follows your fingermovements if there is a scroll bar on either edge.](https://usermanual.wiki/LG-Electronics-USA/9QK-LGX11.Users-Manual-1/User-Guide-1093516-Page-67.png)


![72 Connecting Peripherals5-3. Using BluetoothBluetooth establishes wireless connection between the MS Windows user and the various Bluetooth-enabled digital devices such as camera, cell phone, headset, printer, GPS receiver, etc. Bluetooth is optional, and so it may not be installed in some models.The images and contents of Using Bluetooth may differ depending on the MS-Windows version. For more information, refer to the Help of the Bluetooth setup program. ▶Searching for and Using Bluetooth Device1. Double-click the "My Bluetooth neighborhood" icon in the desktop or the icon on the right side of the task bar to run the Bluetooth Setup program.2. When the following [Add New Connection wizard] appears, select [Fast Mode] and click [Next].3. The following screen appears after searching for all Bluetooth devices. Select the device you want to use and click [Next].](https://usermanual.wiki/LG-Electronics-USA/9QK-LGX11.Users-Manual-1/User-Guide-1093516-Page-73.png)
![Connecting Peripherals 734. When the following [Bluetooth Manager-Bluetooth Security] window appears, enter the password for the Bluetooth device.For a password, you can use the password provided by the Bluetooth device manufacturer or you can set it yourself. 5. When you added and connected the Bluetooth device, the corresponding icon and device name is displayed in the Bluetooth Setup program as follows:](https://usermanual.wiki/LG-Electronics-USA/9QK-LGX11.Users-Manual-1/User-Guide-1093516-Page-74.png)


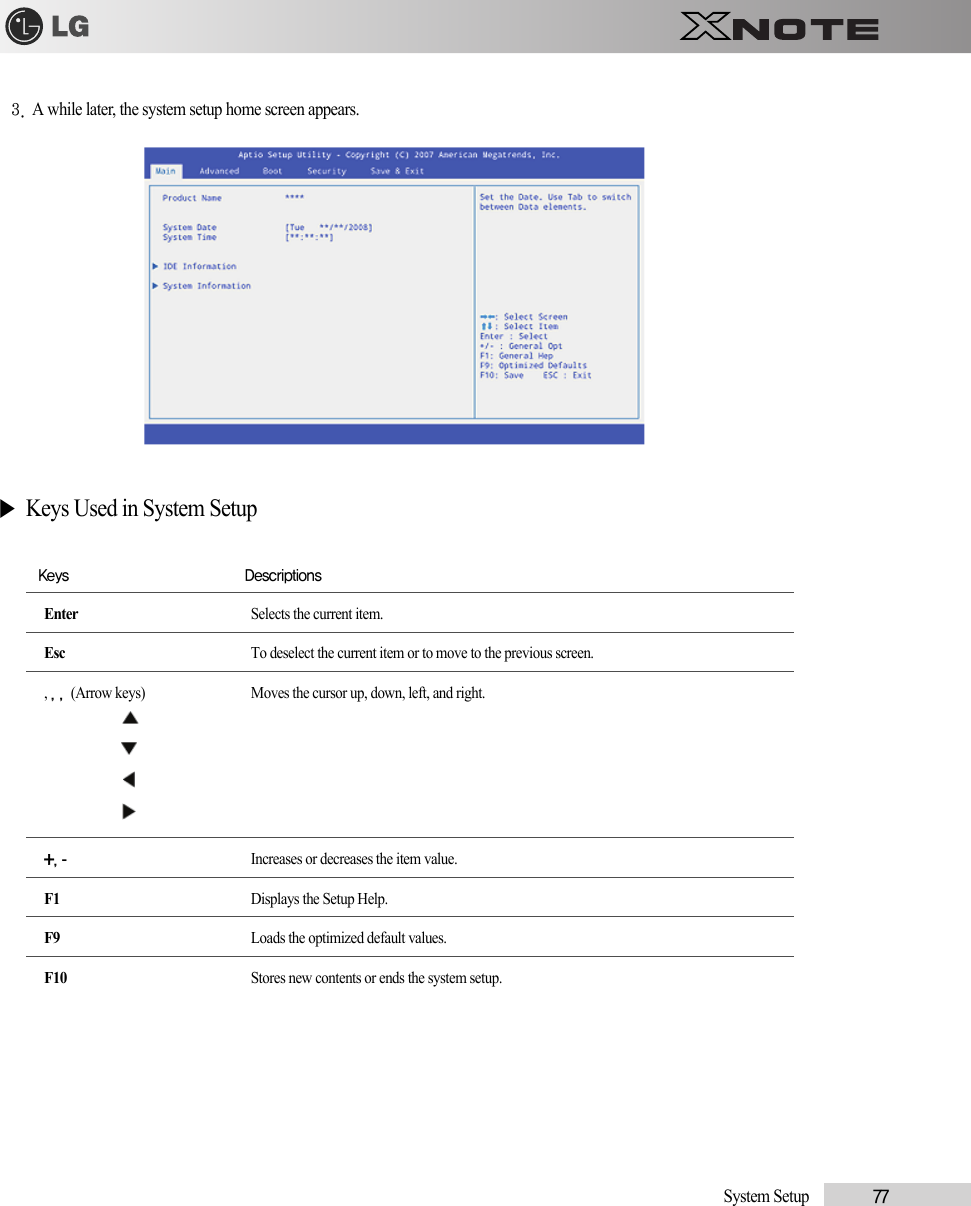
![76 System Setup6-1. Starting System SetupSystem setup means storing the hardware configuration information of the computer in the CMOS RAM. Through systemsetup, the computer retrieves various information including current date and time, memory capacity, and H/D capacity andtype.You setup the system when you set passwords, change the booting order, and add new peripheral devices to the machine.Items displayed on the Setup screen may differ by model type and spec.■ Refer to [Setting the Password].■ Refer to [Changing or Deleting the Password].■ Refer to [Restore the Default Settings].1. Turn on the notebook PC.2. Press F2 key while the "Press F2 for System Utilities" appears on the bottom of the LG logo screen.■A faulty system setup may cause an error during system operation. Therefore, be careful whenchanging the System Setup. Do not change the setup unless it is necessary.■For performance improvement, the CMOS setup menu configuration and default settings may bechanged and become different from the images in User Manual.](https://usermanual.wiki/LG-Electronics-USA/9QK-LGX11.Users-Manual-1/User-Guide-1093516-Page-77.png)