LG Electronics USA 9QK-LGX11 Notebook PC User Manual XENIA ENG PDF
LG Electronics USA Notebook PC XENIA ENG PDF
UserManual.wiki
>
LG Electronics USA
>
9QK-LGX11 User Manual
>
Users manual 2
Contents
1.
Users Manual 1
2.
Users Manual 2
3.
Users manual 1
4.
Users manual 2
5.
Users Manual 2
Users manual 2
Navigation menu
Upload a User Manual
Namespaces
Wiki Guide
HTML
PDF
Info
Views
User Manual
Discussion / Help
Navigation
![System Setup 796-2. Setting the PasswordThis process is to set a password so that other people cannot use the notebook PC or change the settings.The user can set a password while booting the system or setting up the system.▶Supervisor passwordThe password prevents unauthorized people from accessing the notebook PC. By default, no password.is set for the machine.In case an unauthorized person changes the CMOS setup while the notebook PC is on, a password will be set and the userwill be denied from the access to the system.1. After opening the system setup screen, use the arrow keys to move to Security. 2. When the following screen appears, select Supervisor Password with the arrow keys and press [Enter]. 3. When the following message appears, input the password and press [Enter]. The password must not exceed 6 characters of letter (A~Z), number (0~9) or their combination.■Without the registered password, if any, access to the system will be denied. Write down and keep thepassword in a safe place.](https://usermanual.wiki/LG-Electronics-USA/9QK-LGX11.Users-manual-2/User-Guide-1093828-Page-1.png)
![80 System Setup4. When the password confirmation message appears, enter the password again and press [Enter]. 5. To save the changes in system setup, press [F10].6. When the following message appears, select [Yes] and press [Enter]. The notebook PC will restart.▶User PasswordThe password set in the User Password menu is lower than that set in the Supervisor Password menu, andso the user can use the User Password only after setting a password in the Supervisor Password menu.1. After opening the system setup screen, use the arrow keys to move to Security. 2. When the following screen appears, select the User Password item with the arrow keys and press [Enter]. ■Supervisor Password has the privilege to set all the entries in CMOS Setup. It isrecommended to use User Password if people other than you use the system.](https://usermanual.wiki/LG-Electronics-USA/9QK-LGX11.Users-manual-2/User-Guide-1093828-Page-2.png)
![System Setup 813. When the following message appears, input the password and press [Enter]. The password must not exceed 6 characters of letter (A~Z), number (0~9) or their combination.4. When the following message appears, press [Enter]. 5. To save the changes in system setup, press [F10].6. When the following message appears, select [Yes] and press [Enter]. The notebook PC will restart.▶Password CheckPassword on boot feature protects the system by requesting the Set Supervisor Password or Set User Password during boot up.1. After opening the system setup screen, use the arrow keys to move to Security. ■User Password allows limited access to the entries in the CMOS Setup menucompared to Supervisor Password.](https://usermanual.wiki/LG-Electronics-USA/9QK-LGX11.Users-manual-2/User-Guide-1093828-Page-3.png)
![82 System Setup2. Select Password Check and press [Enter].3. When the following screen appears, select [Always] and press [Enter].4. To save the changes in system setup, press [F10].5. When the following message appears, select [Yes] and press [Enter]. The notebook PC will restart.■You may also press the [Shift] + [+] keys to toggle between [Setup] and [Always].](https://usermanual.wiki/LG-Electronics-USA/9QK-LGX11.Users-manual-2/User-Guide-1093828-Page-4.png)
![System Setup 836-3. Changing or Deleting the PasswordYou can delete or change the password only after inputting the current password.▶Changing the Password1. Select [Security] > [Supervior Password] or [User Password], press [Enter], and enter the password.2. Change the password in the same way as setting one.▶Deleting the Password1. Select [Security] > [Supervior Password] or [User Password], press [Enter], and enter the password.2. When the following screen appears, press [Enter].3. When the following screen appears, press [Enter].4. The password is deleted.](https://usermanual.wiki/LG-Electronics-USA/9QK-LGX11.Users-manual-2/User-Guide-1093828-Page-5.png)
![84 System Setup6-4. Restore the Default SettingsIf you have changed the system setup by mistake, you can restore the default settings.1. After opening the system setup screen, use the arrow keys to move to [Save & Exit].2. Use the arrow keys to select [Load Setup Defaults], and press [Enter].3. When the following message appears, select [Yes] and press the [Enter] key. The settings will be reset to their original defaults.4. To save the changes in system setup, press [F10].5. When the following message appears, select [Yes] and press [Enter]. The notebook PC will restart.■You may also press [F9] to use Optimized Defaults.](https://usermanual.wiki/LG-Electronics-USA/9QK-LGX11.Users-manual-2/User-Guide-1093828-Page-6.png)
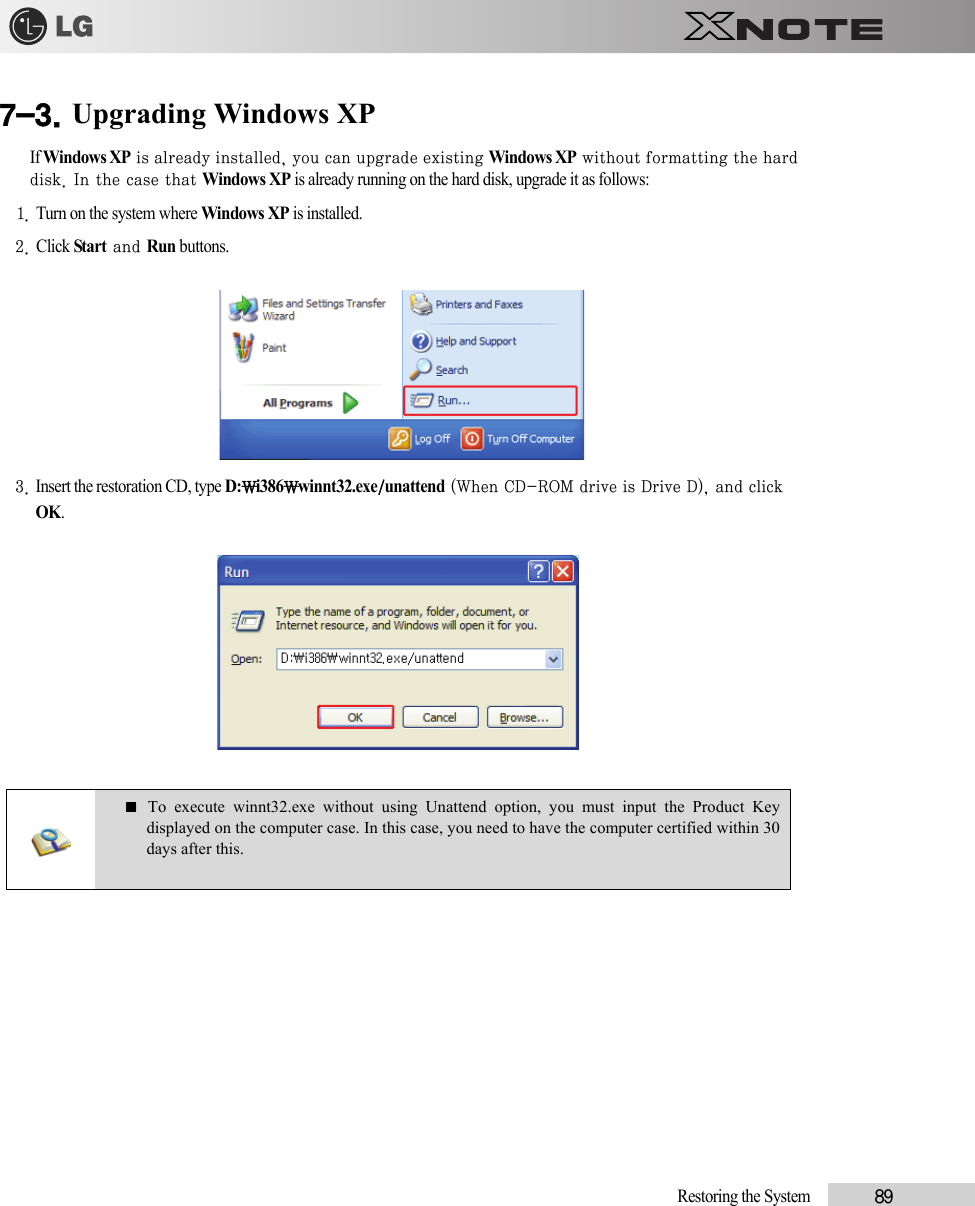
![86 Restoring the System7-1. Restoring the System Using Restoration CDTo restore the hard disk, you need to back up necessary software and data files in advance. After completing Windowsinstallation, you need to register User Properties with Windows just as you do to the new system.1. Make backup copies of important data on the computer.2. Insert the restoration CD in the CD-ROM drive and reboot. When the [Press any key to boot from CD...] message appears, press Enter.3. Follow the instructions on the screen to install MS-Windows.4. After completing Windows installation, remove the CD and reboot the system. When the following screen appears, register User Properties according to the instructions on the screen.-To install Windows XP Media Center 2005 edition, you need to install DOTNETFX and Roll Up on OS CD No. 2 first.Media Center 2005 may not be provided depending on the model.5. When Windows has been installed, install necessary drivers and other applications with the provided LG Intelligent Update CD.](https://usermanual.wiki/LG-Electronics-USA/9QK-LGX11.Users-manual-2/User-Guide-1093828-Page-8.png)